Hair Trends
20 Mother of the Bride Hairstyle Ideas for 2026
Your daughter is getting married, and everyone is going to be looking at you during the ceremony. The mother of the bride hairstyle you choose needs to feel like you — elevated, polished, and completely at ease. This isn't the moment for a last-minute ponytail or the same style you wear to brunch.
We gathered 20 mother of the bride hairstyles that actually deliver on the day. Some are classic updos built to last through tears, speeches, and hours of dancing. Others are softer half-up styles if you want romance without full formality. There are braids, waves, chignons, and polished bobs with accessories that elevate the whole look. Whatever your hair length, texture, or the wedding's dress code, there is something here you will want to book a trial for.
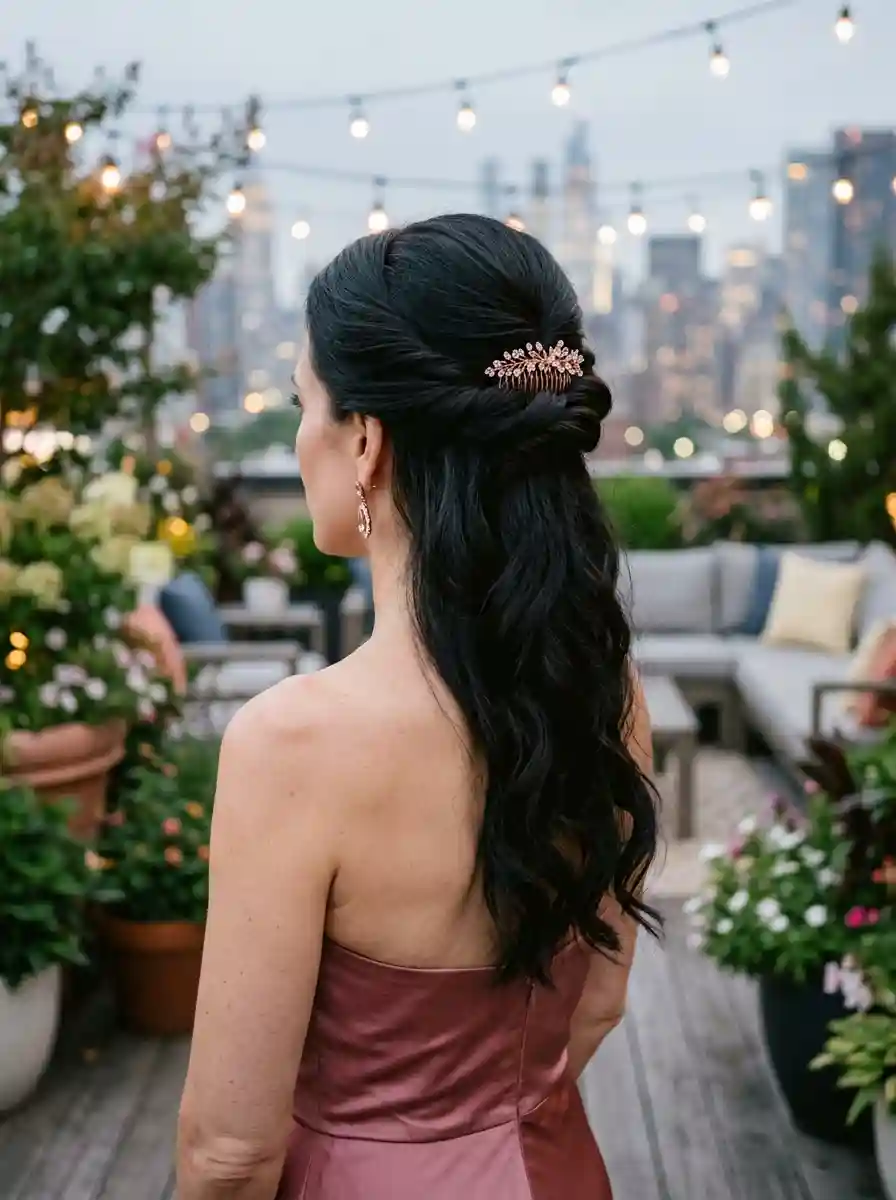
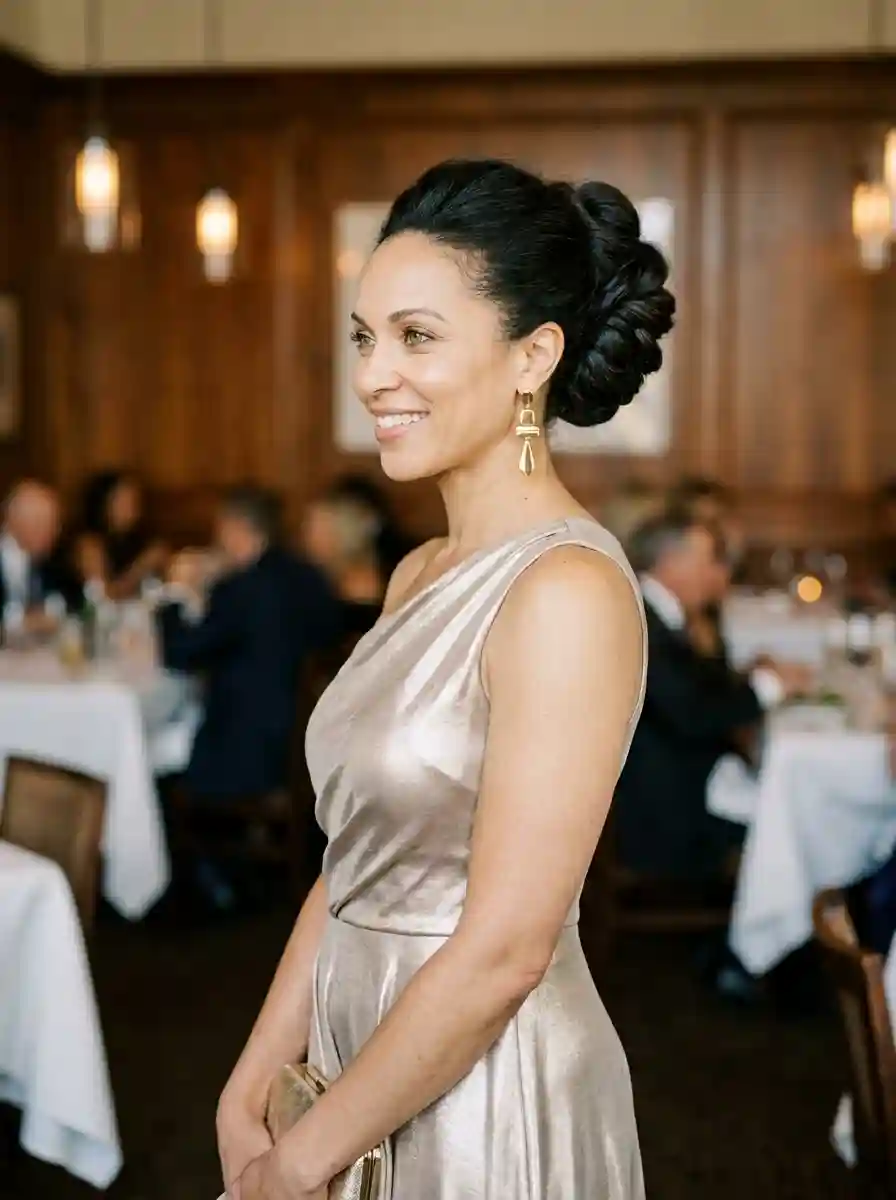
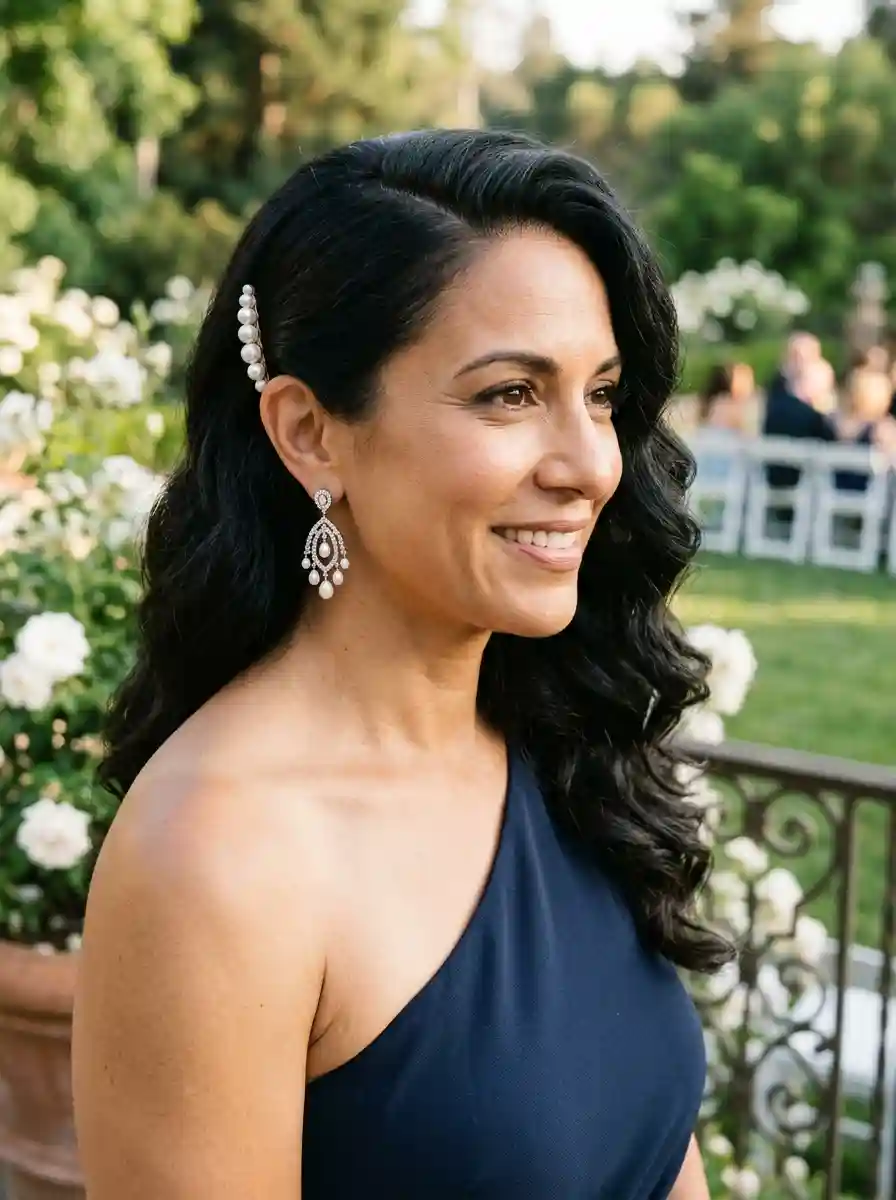
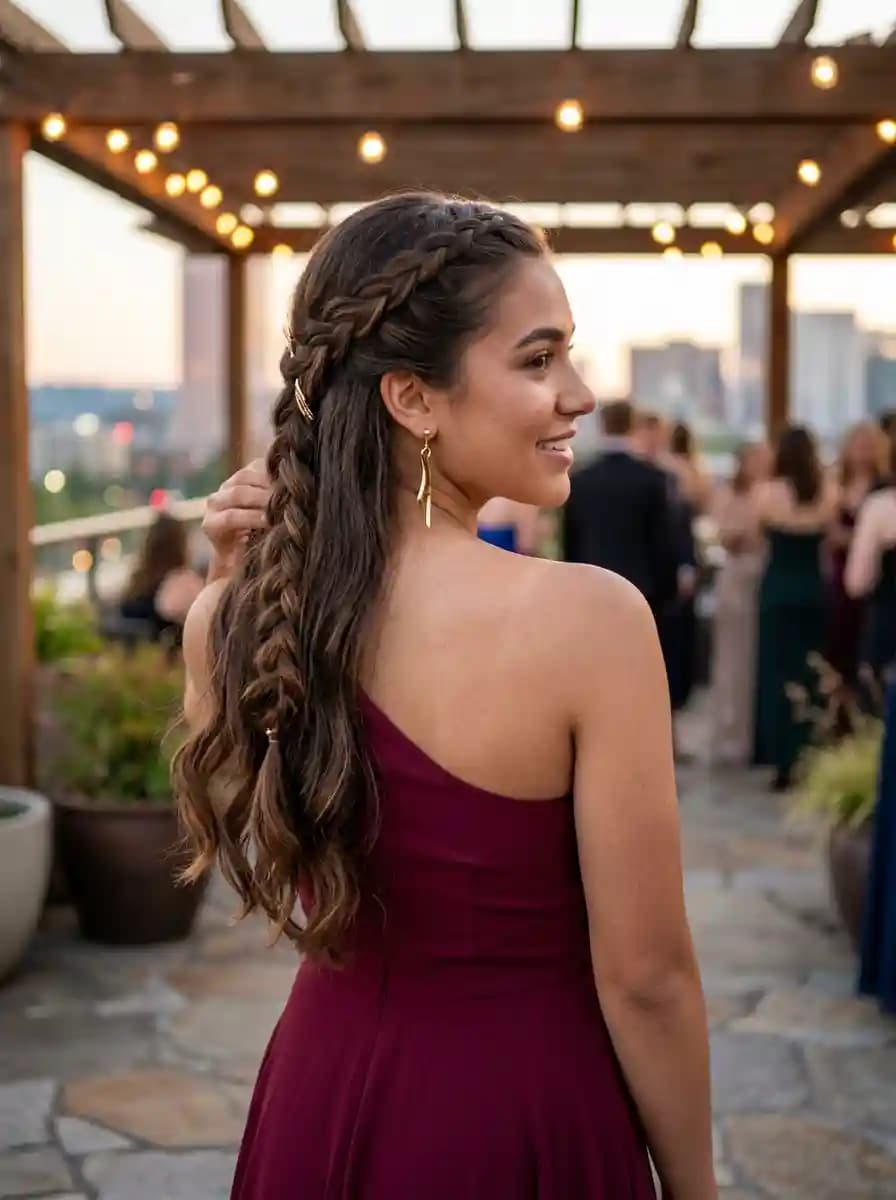
1.Deep Side-Swept Curls with Elegant Waves
The overview: Deep brunette hair with a deep side part, swept to one side. Voluminous, defined waves cascade from the temples past the shoulder. The lighter side of the part is smoothed back behind the ear, revealing the earring. The finish is glossy and polished, with each wave ridge catching light.
Why this look is popular: The deep side part is one of the most universally flattering framing techniques because it softens the face and draws the eye upward. Side-swept waves create a dramatic silhouette that photographs beautifully from every angle. On brunette hair, the glossy wave pattern creates visible dimension that reads as luxurious in both natural and reception lighting.
Where this look is suitable: Black-tie evening ceremonies, ballroom receptions, any formal setting where you want red-carpet glamour. The one-shoulder sweep pairs perfectly with strapless or asymmetric necklines.
Step by step:
- Smooth the foundation. Apply a heat protectant and a smoothing cream, then blow-dry hair straight with a paddle brush for a sleek base.
- Create a deep side part. Use a rat-tail comb for precision. The part should align with the arch of your eyebrow on the deeper side.
- Curl in sections. Using a 1.5-inch curling wand, wrap 1-inch sections away from the face. Pin each curl to the scalp and let it cool completely before releasing.
- Brush into waves. Once all curls are cool, brush through with a boar bristle brush to merge them into continuous waves. Use your fingers to redefine the ridge pattern.
- Sweep and pin the lighter side.Smooth the hair on the shallower side of the part behind the ear. Mist with hairspray and secure with a discreet bobby pin if needed.
- Set with gloss. Mist with strong-hold hairspray and a light shine spray for that glossy, red-carpet finish.
Tips and tricks: Let each curl cool completely before brushing — this is the difference between waves that last all night and waves that fall flat by the ceremony. If your hair struggles to hold curl, apply a mousse with polymer hold before drying.

26 Stunning Summer Braided Hairstyles for Women 2026 ☀️💇♀️
2.Effortless Chignon with Wispy Tendrils
The overview: Honey blonde hair gathered into a loose, textured chignon at the nape. The twist is soft and the bun has visible texture — not slicked or rigid. Soft wispy tendrils fall around the temples, ears, and nape. It is polished enough for a formal ceremony but relaxed enough that you will still want to wear it at the end of the night.
Why this look is popular: The low chignon is a classic for a reason — it elongates the neck, works with every neckline, and keeps hair off your face during the ceremony. The wispy tendrils are what prevent it from looking like a ballet bun. Honey blonde tones add warmth and glow, making the style feel soft rather than severe.
Where this look is suitable: Daytime garden ceremonies, outdoor receptions, any setting where you want elegant without feeling overdone. The loose tendrils catch the breeze naturally, which reads beautifully in candid photos.
Step by step:
- Prep with texture. Apply a sea salt spray or texturizing mist to damp hair and rough-dry for grip. Second-day hair works best for this style.
- Leave out tendrils. Before gathering, separate 1-inch sections on each side of the face and a few at the nape. Set these aside.
- Gather low. Pull the remaining hair to the nape. Do not brush it smooth — you want some texture in the gathered section.
- Twist and pin. Twist the gathered hair loosely and wrap into a chignon shape. Pin with bobby pins that match your honey blonde tone, tucking them underneath.
- Shape the tendrils. Use a 1-inch curling wand to add a gentle bend to the loose pieces. They should curve softly around the face.
- Set softly. Mist with flexible-hold hairspray. The chignon should stay in place, but the tendrils should still move naturally.
Tips and tricks: Second-day hair has the grip this style needs — freshly washed hair is often too slippery. If your hair is fine, backcomb the crown slightly before gathering for added volume. The tendrils should look natural, not sculpted; a slight bend is more flattering than a defined ringlet.
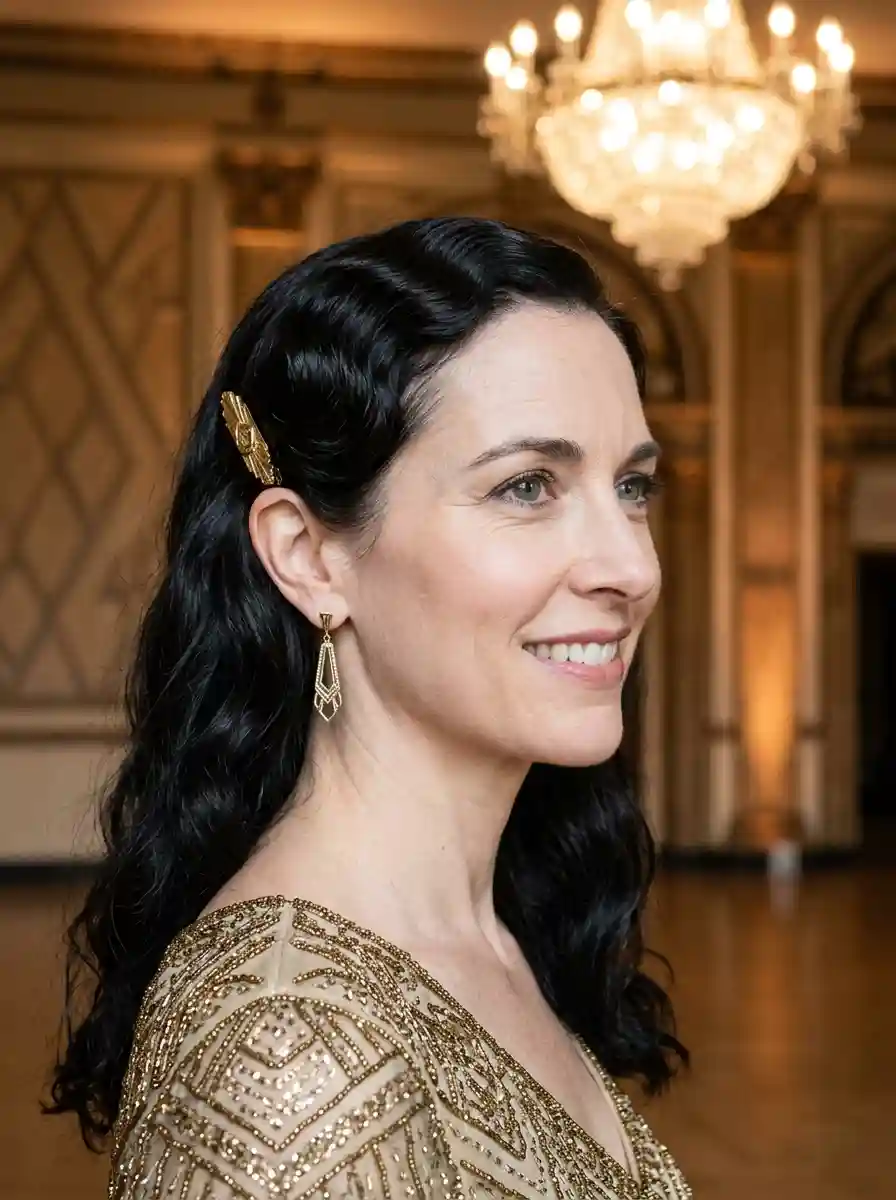
3.Elegant Low Chignon with a Golden Pin
The overview: Silver and grey hair twisted into a compact, polished chignon that sits precisely at the nape. A single gold pin with a subtle decorative detail is inserted at the side, catching light without competing with the hair. The finish is sleek and intentional — every strand is accounted for. The silver tone is luminous against the warm gold accent, creating a contrast that is both understated and striking.
Why this look is popular: A sleek low chignon on silver or grey hair communicates quiet confidence. The polished finish draws attention to the face and the quality of the cut. A single gold pin is a restrained accessory choice that reads as intentional — it says you know exactly what you are doing. The warm-cool contrast between silver hair and gold metal is visually dynamic.
Where this look is suitable: Formal evening ceremonies, classic ballroom receptions, any occasion where refined elegance is the goal. The clean silhouette pairs beautifully with structured gowns, high necklines, and statement jewelry.
Step by step:
- Prep for smoothness. Apply a smoothing serum to damp hair and blow-dry straight with a boar bristle brush. Silver hair benefits from extra conditioning for shine.
- Gather precisely. Pull all hair to the nape and secure with a strong elastic. The position should be exactly where your neck meets your skull.
- Twist tightly. Twist the ponytail with tension and wrap it into a compact bun. Tuck the ends underneath and pin with matching bobby pins.
- Smooth the surface. Use a fine-tooth comb and a dab of styling cream to smooth any flyaways on the crown and around the chignon.
- Insert the gold pin. Place the gold pin at the side of the chignon at a slight upward angle so the decorative detail is visible.
- Set with hold. Mist with strong-hold hairspray. The style should remain intact through the entire event.
Tips and tricks: Silver hair can sometimes appear dry or dull — use a purple shampoo weekly to maintain brightness and apply a lightweight hair oil before styling for extra sheen. The gold pin should be proportional to the chignon; a pin that is too small disappears, one too large overwhelms. This style photographs cleanly from every angle, which matters during formal portraits.

30 Stunning Vacation Nail Ideas for Your Next Getaway in 2026 💅
4.Elegant Twisted Half-Up with Romantic Waves
The overview: Warm brown and caramel hair with soft, loose waves through the mid-lengths and ends. The front sections are twisted back from both sides and pinned at the crown. A small barrette sits where the twists meet. Face-framing pieces are left loose around the temples.
Why this look is popular: The twisted half-up is one of the most requested formal styles because it flatters virtually every face shape and hair texture. The twist creates structure while the waves keep the look romantic rather than rigid. Balayage or dimensional color enhances the style by making each twist and wave ridge visible and distinct.
Where this look is suitable: Garden ceremonies, vineyard weddings, spring and summer events where the setting is romantic. The half-up format transitions seamlessly from outdoor ceremony to indoor reception without needing touch-ups.
Step by step:
- Create waves. Use a 1.25-inch curling wand on 1-inch sections, alternating curl direction for a natural look. Let curls cool completely.
- Break up the curls. Run your fingers through the curls to separate them into softer waves. Do not use a brush.
- Section the front. Take 2-inch sections from each temple, leaving a few wispy pieces out in front.
- Twist each section. Twist each section away from the face, keeping moderate tension. The twist should be visible but not tight.
- Pin at the crown. Bring both twists to the back of the head and pin them where they meet. Cross two bobby pins for extra security.
- Add the barrette and set. Clip the barrette over the pinned section. Mist with flexible-hold hairspray.
Tips and tricks: Backcomb the crown lightly before twisting for added volume at the top of the head. The twists do not need to be perfectly symmetrical — slight variation looks more natural and modern. If your hair is heavily layered, use a light styling cream on the twist sections to keep shorter pieces from escaping.
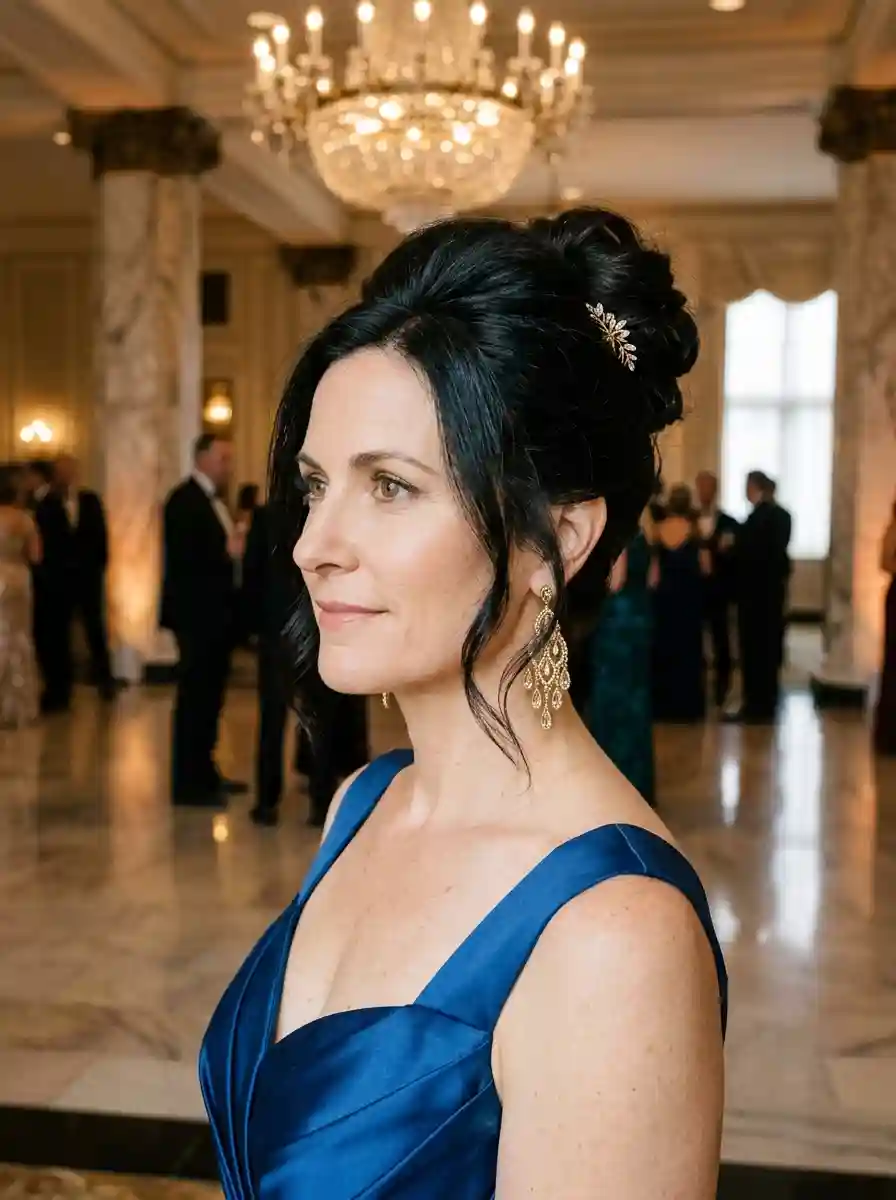
5.Elegant Twisted Updo for a Chic Mother of the Bride
The overview: Ash blonde and silver hair twisted into a sculpted updo sitting high at the crown. The twist spirals continuously with no visible pins or elastics. Soft wispy pieces frame the temples and nape. The surface is smooth and the spiral lines are clean and defined.
Why this look is popular: A sculpted twist updo creates height and drama without relying on accessories or complicated techniques. The clean spiral is architectural and intentional. Ash blonde and silver hair show the twist pattern more clearly than darker shades, making the technique itself the decoration. The wispy face-framing pieces keep it from reading as severe.
Where this look is suitable: Formal evening events, ballroom receptions, ceremonies with a black-tie dress code. The height of the updo creates a striking silhouette that pairs well with off-the-shoulder, strapless, and V-neck gowns.
Step by step:
- Prep for grip. Apply a volumizing mousse to damp hair and blow-dry with a round brush for lift at the roots.
- Backcomb for height. Tease the crown section lightly to create the base volume for the updo's height.
- Gather at the crown. Pull all hair to the high crown position and secure with a strong elastic. Leave wispy pieces out at the temples and nape.
- Twist and wrap. Twist the ponytail tightly and wrap it around the base in a continuous spiral. Tuck the end underneath.
- Pin invisibly. Use bobby pins that match your ash blonde or silver tone, inserting them under the twist so they disappear.
- Smooth and set. Use a fine-tooth comb and light styling cream to smooth the surface. Mist with strong-hold hairspray.
Tips and tricks: The key to a clean spiral twist is even tension — keep the twist tight but consistent as you wrap. Use a boar bristle brush to smooth the crown before gathering; any bumps or ridges will be visible in the final updo. A shine spray on silver hair enhances the metallic quality of the color and makes the twist lines gleam.
32 Stunning Summer Wedding Hairstyles for Brides ☀️💍
6.Elegant Twisted Updo with Loose Curls
The overview: Warm blonde hair twisted into a structured updo sitting at mid-height on the back of the head. Loose, defined curls frame the crown and cascade at the nape. Small pearl or crystal pins are scattered through the twist section. The updo has visible twist texture while the curls remain separate and defined.
Why this look is popular: Combining structure and softness in one style gives you the best of both worlds — the updo stays secure while the loose curls add movement and romance. The loose curls at the crown soften the hairline and prevent the updo from looking matronly. Warm blonde is a highly photogenic color that reflects light beautifully in both natural and indoor settings.
Where this look is suitable: Romantic garden weddings, vineyard ceremonies, any venue where you want a balance of formal and relaxed. The incorporated curls make this style feel less strict than a traditional updo.
Step by step:
- Curl first. Using a 1.25-inch curling wand, create defined curls on all hair. Pin each curl to the scalp and allow to cool completely.
- Section for the updo. Separate the hair you want in the twist from the curls you want to remain loose. The crown and nape sections will stay out.
- Twist the main section. Gather the remaining hair at mid-height and twist into a structured updo shape. Pin securely with matching bobby pins.
- Release and position curls. Gently unpin the curls at the crown and nape. Arrange them around the twist so they frame it naturally.
- Add pins. Scatter pearl or crystal pins through the twist section. Focus on areas where the twist creates natural pockets.
- Set with flexible spray. Mist with medium-hold hairspray to keep the twist secure while allowing the loose curls to maintain movement.
Tips and tricks: Pre-curling all hair before building the updo ensures the loose curls match the twist texture. If your curls tend to drop, use a setting lotion before curling and let each curl cool pinned in place for at least ten minutes. Pearl pins in warm blonde create a soft contrast — avoid silver or crystal if your blonde is warm-toned.
7.Chic Fishtail Braid with Golden Accents
The overview: Bronde and honey-blonde hair in a fishtail braid starting at the crown and falling over one shoulder. The braid is pancaked wide for visibility. Thin gold threads or small gold rings are woven into the braid at irregular intervals. The braid is loose and textured, not tight or severe.
Why this look is popular: The fishtail braid looks more complex than a standard three-strand braid, which makes it feel special and event-appropriate. Pancaking (pulling the braid loops wide) creates volume and makes the pattern more readable from a distance. Golden accents woven through the braid add points of light and tie into warm jewelry tones. Bronde hair provides dimension that makes each fishtail cross visible.
Where this look is suitable: Bohemian or rustic-chic weddings, outdoor ceremonies, vineyard or barn venues. The golden accents add a formal touch that elevates the braid beyond everyday wear.
Step by step:
- Prep with texture. Apply a texturizing spray to give the hair grip. Fishtail braids hold better on hair with texture.
- Create a deep side part. Sweep all hair to one side. The braid will fall over the dominant shoulder.
- Fishtail braid. Divide the hair into two sections. Take a small piece from the outside of section one and cross it to section two. Repeat on the other side. Continue down the length.
- Secure and pancake. Secure the end with a clear elastic. Gently pull the outer loops of the braid to widen it until the fishtail pattern is clearly visible.
- Weave in golden accents. Thread thin gold threads through the braid loops or attach small gold rings to individual sections. Distribute them evenly.
- Set with flexible spray. Mist with medium-hold hairspray to keep the braid intact without making it stiff.
Tips and tricks: Keep the fishtail sections small and even for the most consistent pattern. Pancake the braid more than you think you need — the volume reads beautifully in photos. If using gold rings, choose lightweight ones that won't pull on the hair. Secure them by threading a small strand through the ring and pinning it in place.

33 Trendy Polka Dot Nail Ideas for 2026 💅
8.Elegant Braided Half-Up with Loose Waves
The overview: Ash blonde and silver hair with a Dutch braid starting at one temple, crossing the crown, and ending behind the opposite ear. The remaining hair flows down in soft, voluminous waves. The braid is raised and visible, creating a crown-like effect. The waves are loose and natural.
Why this look is popular: The Dutch braid crown is a classic style that works across generations — it looks appropriate on a mother of the bride without reading as dated. The braid creates a natural frame for the face, drawing attention to your features. Ash blonde and silver hair makes the braid pattern pop beautifully, and the loose waves underneath add modern softness.
Where this look is suitable: Outdoor garden ceremonies, daytime weddings, any setting where you want a polished but relaxed appearance. The braid keeps hair tidy during the ceremony while the waves allow for movement during the reception.
Step by step:
- Create waves first. Use a large-barrel curling iron on 1.5-inch sections. Let curls cool completely, then brush through gently with a wide-tooth comb.
- Start the Dutch braid. Take a 2.5-inch section at one temple. Divide into three and begin a Dutch braid, crossing the outer strands under the middle strand.
- Braid across the crown. Continue braiding along the hairline, adding small sections as you go. Keep the braid close to the scalp for a clean crown effect.
- Tuck and pin. Once you reach the opposite ear, finish the braid and tuck the end behind the ear. Pin discreetly with bobby pins that match your hair color.
- Fluff the waves. Gently shake out the waves with your fingers. Pull a few pieces forward to frame the face.
- Set it. Mist with flexible-hold hairspray to maintain the braid and keep the waves soft.
Tips and tricks: Braid with slightly damp hair for better control and a smoother result. Keep the braid tension consistent — uneven tension creates visible lumps. If your hair is layered, use a small amount of styling cream to smooth shorter pieces into the braid. The waves underneath do not need to be perfect; the braid is the focal point.
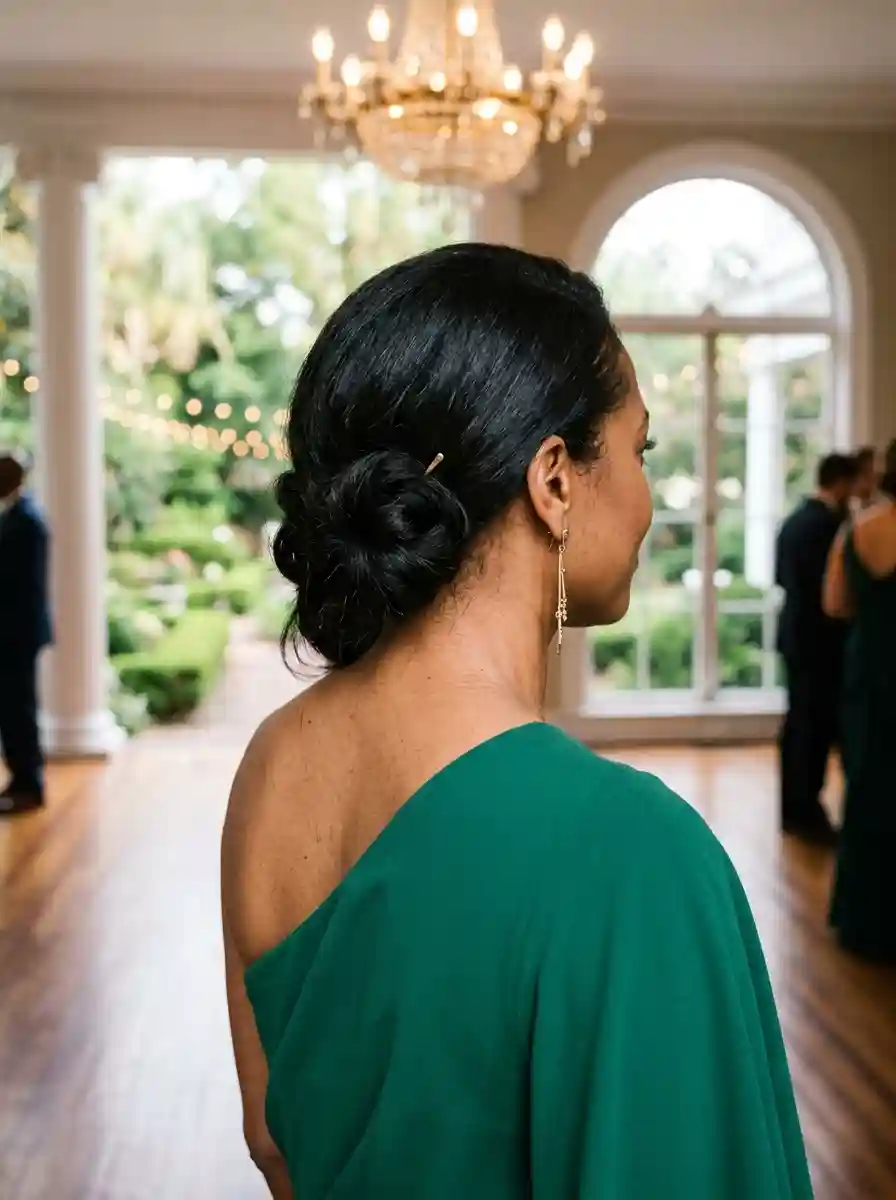
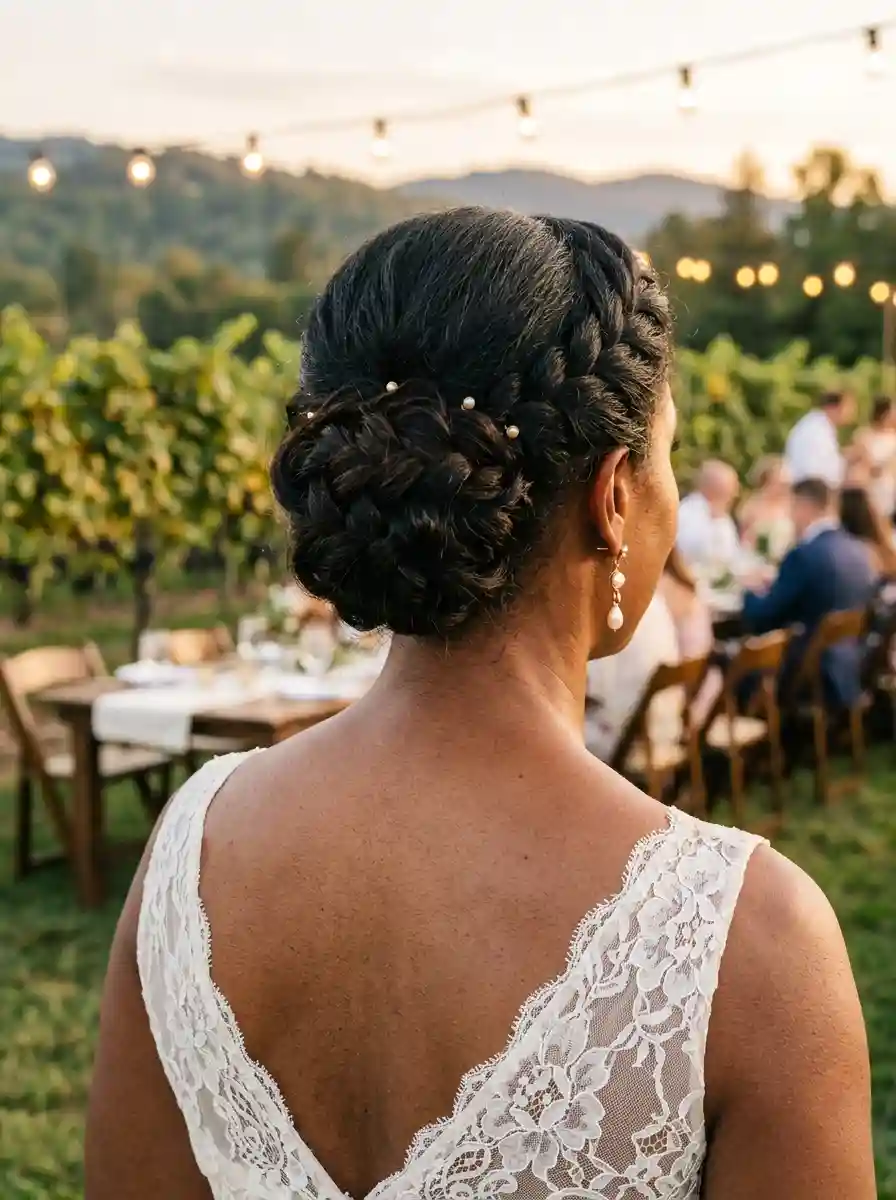
9.Braided Crown Updo with a Chic Low Bun
The overview: Golden brown and caramel hair with two Dutch braids starting at each temple, wrapping around the crown, and meeting at the nape. The braids gather into a smooth low bun. A small decorative pin or pearl cluster accents the bun. The braids are visible and defined, creating a crown-like frame around the face.
Why this look is popular: The braided crown with a low bun combines two classic techniques into one cohesive style. The braids create visual interest and keep hair off the face, while the low bun provides a polished finish that photographs beautifully from behind. This is a popular choice for mothers of the bride because it is secure enough to last through a full day of events.
Where this look is suitable: Formal evening ceremonies, church weddings, traditional settings where a refined updo is appropriate. The dual braid detail adds enough interest for guests seated behind you during the ceremony.
Step by step:
- Prep with grip. Apply a texturizing spray to damp hair and blow-dry. The braids need texture to hold their shape.
- Start the first braid. Take a 2-inch section at the right temple. Dutch braid along the hairline toward the nape, adding hair as you go.
- Repeat on the left. Create a matching Dutch braid from the left temple, also working toward the nape.
- Combine at the nape. Once both braids reach the nape, gather them with the remaining loose hair into a low ponytail. Secure with a strong elastic.
- Form the bun. Twist the ponytail and wrap it into a smooth, compact bun. Pin underneath with matching bobby pins.
- Add accent and set. Place a decorative pin or pearl cluster at the side of the bun. Mist with strong-hold hairspray.
Tips and tricks: Keep both braids at the same tension for symmetry. Work in front of a mirror or have a stylist handle the second braid to ensure even placement. If your hair is shorter, the braids do not need to reach the nape — stop them behind the ears and let the remaining hair form the bun. Backcomb the crown slightly before braiding for added volume.

21 Stunning Concert Hairstyles for Women 2026 🎶✨
10.Effortless Chignon with Face-Framing Tendrils
The overview: Warm caramel blonde hair gathered into a low textured chignon at the nape. Deliberate face-framing tendrils curve around the cheeks and jawline on both sides. The chignon has soft visible texture and is not slick or tight. The tendrils are shaped with a slight inward curve that follows the jaw.
Why this look is popular: Face-framing tendrils are universally flattering because they soften the hairline and can be customized to any face shape. The low chignon is comfortable and secure, making it practical for a long day of events. Caramel blonde is a warm, approachable color that photographs beautifully and works across seasons.
Where this look is suitable: Daytime ceremonies, casual-elegant weddings, garden or vineyard settings. The soft tendrils make this style feel approachable and warm rather than overly formal.
Step by step:
- Prep for texture. Apply a volumizing mousse and texturizing spray to damp hair. Blow-dry with a diffuser or rough-dry for natural body.
- Section the tendrils. Before gathering, separate 1-inch sections on each side of the face. These should start at the temple and extend to just below the jaw.
- Gather and twist. Pull remaining hair to the nape. Twist loosely into a chignon, leaving visible texture. Pin with matching bobby pins.
- Shape the tendrils. Use a 1-inch curling wand to add a gentle inward curve to the tendrils. They should follow the line of the jaw.
- Adjust placement. Position the tendrils so they frame the face naturally — not stuck to the cheek, but with a slight separation.
- Set softly. Mist with flexible-hold hairspray. The tendrils should move naturally but hold their shape.
Tips and tricks: The tendrils should hit at the most flattering point on your face — typically at the cheekbone or jawline. Experiment with length before the event. Use a light pomade on the tendrils to define them without stickiness. Second-day hair holds this style better than freshly washed hair, which can be too slippery for the textured chignon.
11.Sleek High Ponytail with Sparkle Accent
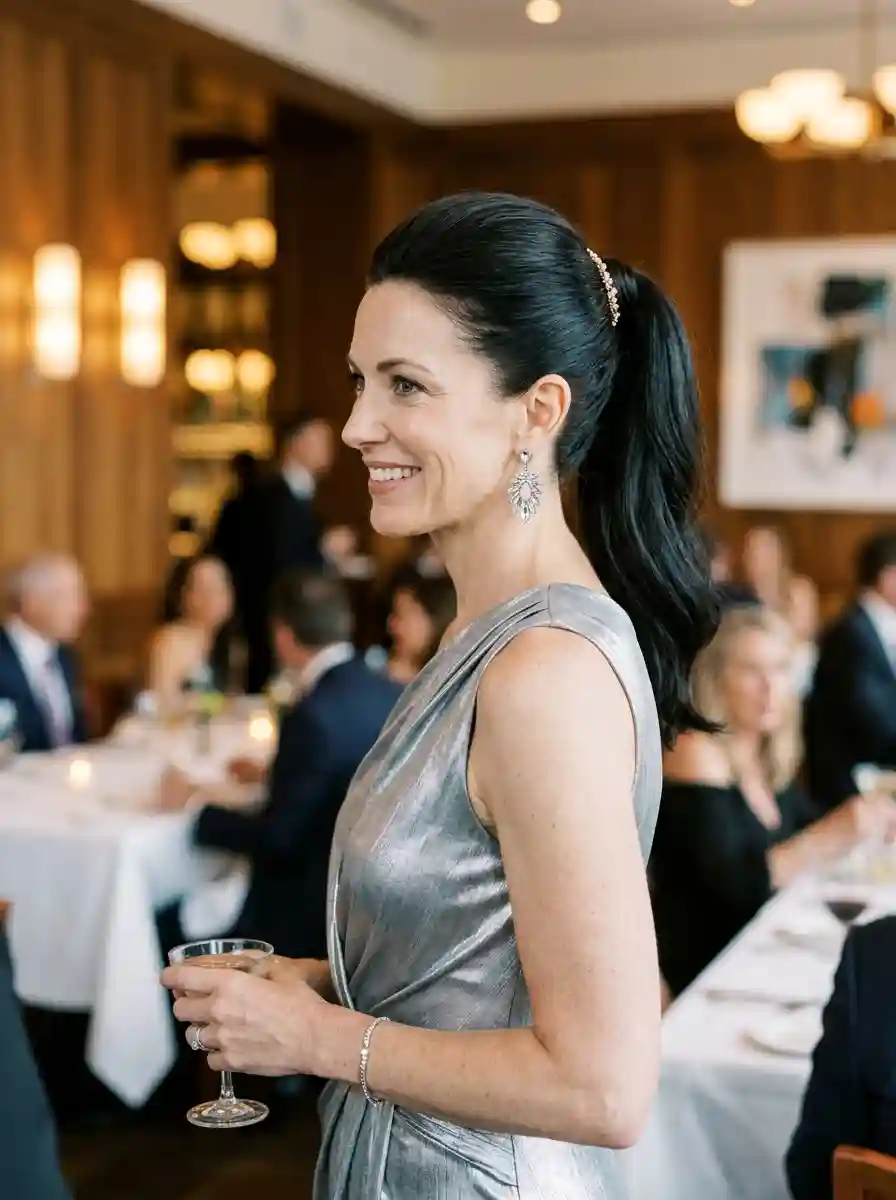
The overview: Brunette hair smoothed into a sleek high ponytail at the crown. The surface is polished with zero flyaways. A crystal or rhinestone barrette wraps around the base of the ponytail. A few soft face-framing pieces are left out at the temples. The ponytail falls straight or with a slight bend at the ends.
Why this look is popular: A sleek high ponytail is surprisingly formal when executed with precision — the key is the smooth surface and the elevated placement. The crystal barrette adds a bridal-level accessory that makes the style feel intentional rather than thrown together. Brunette hair provides a rich base that makes crystal or rhinestone accents pop with high contrast.
Where this look is suitable: Modern minimalist weddings, city venues, evening ceremonies with a contemporary dress code. The clean lines pair beautifully with architectural gowns and statement jewelry.
Step by step:
- Smooth the base. Apply a smoothing serum to damp hair and blow-dry straight with a paddle brush. The crown must be completely smooth.
- Section the face-framing pieces.Leave small sections at the temples. These will soften the look.
- Gather high. Pull all remaining hair to the high crown position. Use a fine-tooth comb to smooth the surface as you gather. Secure with a strong elastic.
- Smooth any bumps. Use a boar bristle brush and a dab of styling cream to smooth any bumps or flyaways on the crown.
- Add the barrette. Clip or wrap the crystal barrette around the elastic base. Ensure it sits securely and evenly.
- Set with strong hold. Mist with strong-hold hairspray. The ponytail should remain sleek and intact through the entire event.
Tips and tricks: Use a boar bristle brush to smooth the crown — it distributes natural oils and eliminates frizz without creating static. A light shine spray after setting adds a glossy finish that photographs beautifully. If your hair is fine, backcomb the ponytail section before securing to add volume to the tail.
27 Stunning June Nail Ideas for 2026 💅
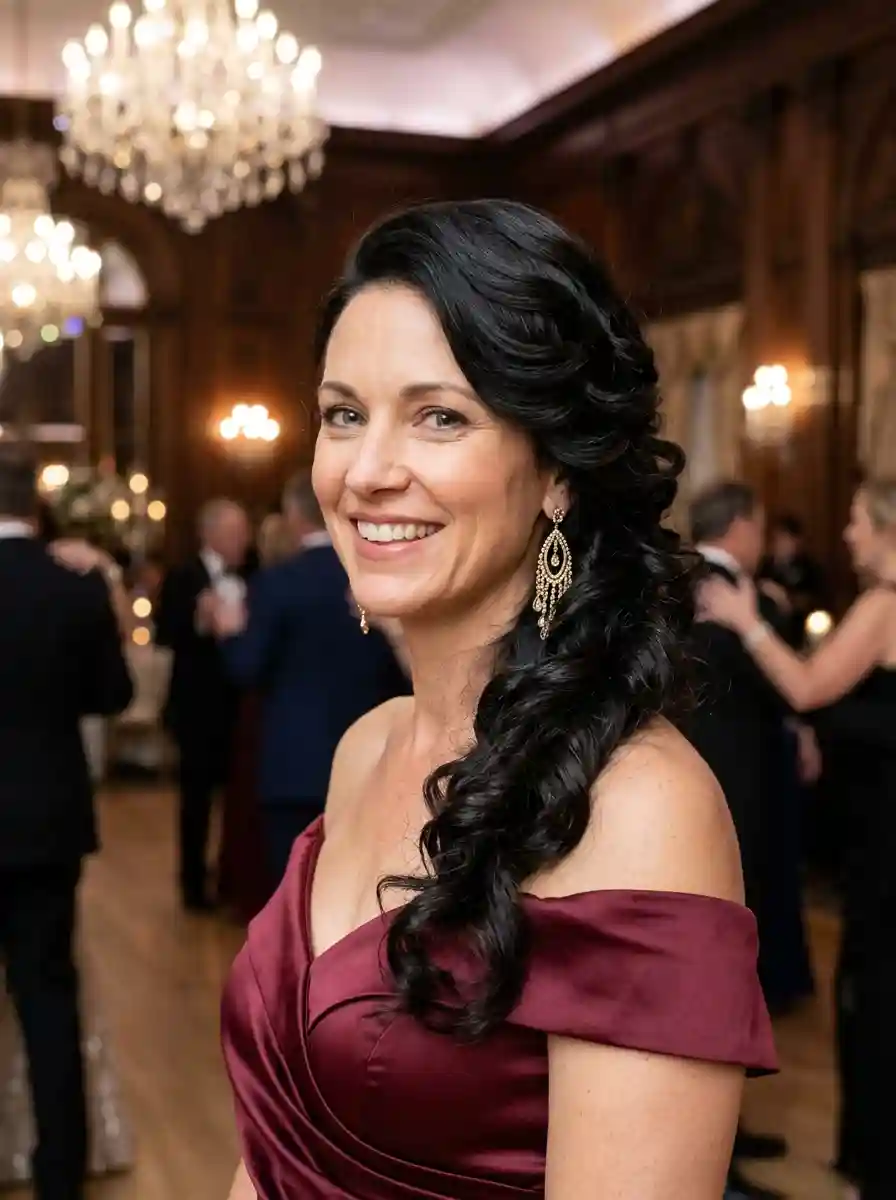
12.Retro Hollywood Glam Waves with Art Deco Flair
The overview: Deep brunette hair with a dramatic deep side part, styled into structured Hollywood waves that cascade to one side. The waves are glossy and defined, with each ridge catching light. A gold Art Deco hair comb with geometric detailing sits at the temple on the deeper side of the part. This is old Hollywood glamour updated for 2026 — the waves are defined but not stiff, the comb is vintage but not costumey.
Why this look is popular: Hollywood waves are one of the most flattering formal styles because they create a dramatic silhouette and frame the face beautifully. The deep side part adds asymmetry that is more visually interesting than a center part. An Art Deco comb adds a touch of vintage glamour that feels intentional and curated. On brunette hair, the glossy waves create visible ridges that catch light in ribbons.
Where this look is suitable: Black-tie galas, formal evening ceremonies, weddings with a vintage or Art Deco theme. Pair with a floor-length gown and pearl or diamond jewelry for a complete old-Hollywood look.
Step by step:
- Smooth the base. Apply a smoothing cream and blow-dry hair straight with a paddle brush. No texture or volume is needed — smoothness is key.
- Create a deep side part. Use a rat-tail comb for a sharp, precise line. The deeper the part, the more dramatic the wave pattern.
- Wave with a large barrel. Use a 1.5-inch curling iron, wrapping sections away from the face. Pin each curl to the scalp in a coiled shape and let cool completely.
- Brush into S-curves. Once completely cool, brush through with a soft bristle brush. The curls should merge into a continuous wave pattern.
- Sculpt and clip. Use your fingers and a tail comb to define each wave ridge. Clip each ridge in place for 10 minutes to set the pattern.
- Add the comb and set. Slide the Art Deco comb into the hair at the temple. Mist with strong-hold hairspray and a light shine spray.
Tips and tricks: The key to authentic Hollywood waves is patience — let each curl cool completely before brushing. Use a shine spray for that classic glossy finish. The Art Deco comb should sit at an angle that shows the full design. If your hair resists holding a wave, apply a setting lotion before curling.
13.Soft Wavy Low Bun with Delicate Pins
The overview: Light brown and honey-blonde hair in loose waves, gathered into a low textured bun at the nape. Small pearl or crystal pins are scattered across the surface of the bun at irregular intervals. The bun has visible wave texture and is not smooth or tight.
Why this look is popular: A wavy low bun has more visual interest than a smooth bun because the wave texture creates natural shadows and highlights. The delicate pins add points of sparkle without overwhelming the style. Light brown and honey-blonde dimensional color enhances every wave and makes the bun look fuller and more textured.
Where this look is suitable: Outdoor garden ceremonies, daytime weddings, any setting where you want a romantic and approachable look. The soft waves make this style feel less formal than a sleek bun.
Step by step:
- Create waves. Use a 1.25-inch curling wand on 1-inch sections, alternating curl direction. Let curls cool, then run fingers through to soften.
- Gather loosely at the nape. Pull the wavy hair to the nape. Do not brush or smooth — the wave texture is what makes this style work.
- Twist into a loose bun. Twist the gathered hair and wrap it into a bun shape. Keep it loose — the bun should have visible wave texture and soft edges.
- Pin to secure. Use bobby pins that match your hair color to secure the bun. Do not over-pin — the bun should still have some softness and movement.
- Add delicate pins. Scatter small pearl or crystal pins across the surface of the bun. Odd numbers look more natural than even.
- Set with light spray. Mist with flexible-hold hairspray. The bun should stay in place but the texture should remain soft.
Tips and tricks: This style is forgiving — the looser the bun, the better it looks. If a section falls out of place, tuck it back in loosely rather than tightening the whole thing. Use pins with pearl or crystal tops that complement your jewelry. For extra volume in the bun, backcomb the hair lightly before gathering.
30 Stunning Mother of the Groom Hairstyle Ideas for 2026 💍✨
14.Deep Side Part Waves with Pearl Accent
The overview: Silver and grey hair with a deep side part, swept to one side in soft, voluminous waves. The waves are polished and defined, cascading past the shoulder. A single pearl hairclip or cluster pin sits at the temple on the deeper side of the part. The waves are polished but not rigid — they move naturally while maintaining their shape. The silver tone is luminous and the pearl accent picks up a warm glow in natural light.
Why this look is popular: Silver and grey hair is one of the most striking colors for formal events because of its natural luminosity. The deep side part adds drama and asymmetry, while soft waves provide movement and softness. A single pearl accent is an elegant, restrained choice that complements silver tones beautifully without overwhelming them.
Where this look is suitable: Evening ceremonies, formal receptions, any occasion where you want to look sophisticated and radiant. The silver and pearl combination is particularly striking under candlelight or chandelier lighting.
Step by step:
- Prep for smoothness. Apply a smoothing serum to damp hair and blow-dry with a round brush for volume at the roots and smoothness through the lengths.
- Create a deep side part. Use a rat-tail comb for a precise line. The deeper side should align with the arch of your eyebrow.
- Curl for waves. Using a 1.5-inch curling wand, wrap 1-inch sections away from the face. Pin each curl and let cool completely.
- Brush into soft waves. Once cool, brush through with a boar bristle brush to soften the curls into flowing waves.
- Place the pearl accent. Position the pearl clip at the temple on the deep side. It should sit where the hair sweeps back.
- Set with flexible hold. Mist with medium-hold hairspray. Use a light shine spray for extra gloss on silver hair.
Tips and tricks: Silver hair benefits from a purple shampoo used weekly to maintain its bright tone and prevent yellowing. A shine spray formulated for grey or silver hair enhances natural luminosity. The pearl accent should be proportional to the section it decorates — a single large pearl clip often reads more elegantly than multiple small pins.
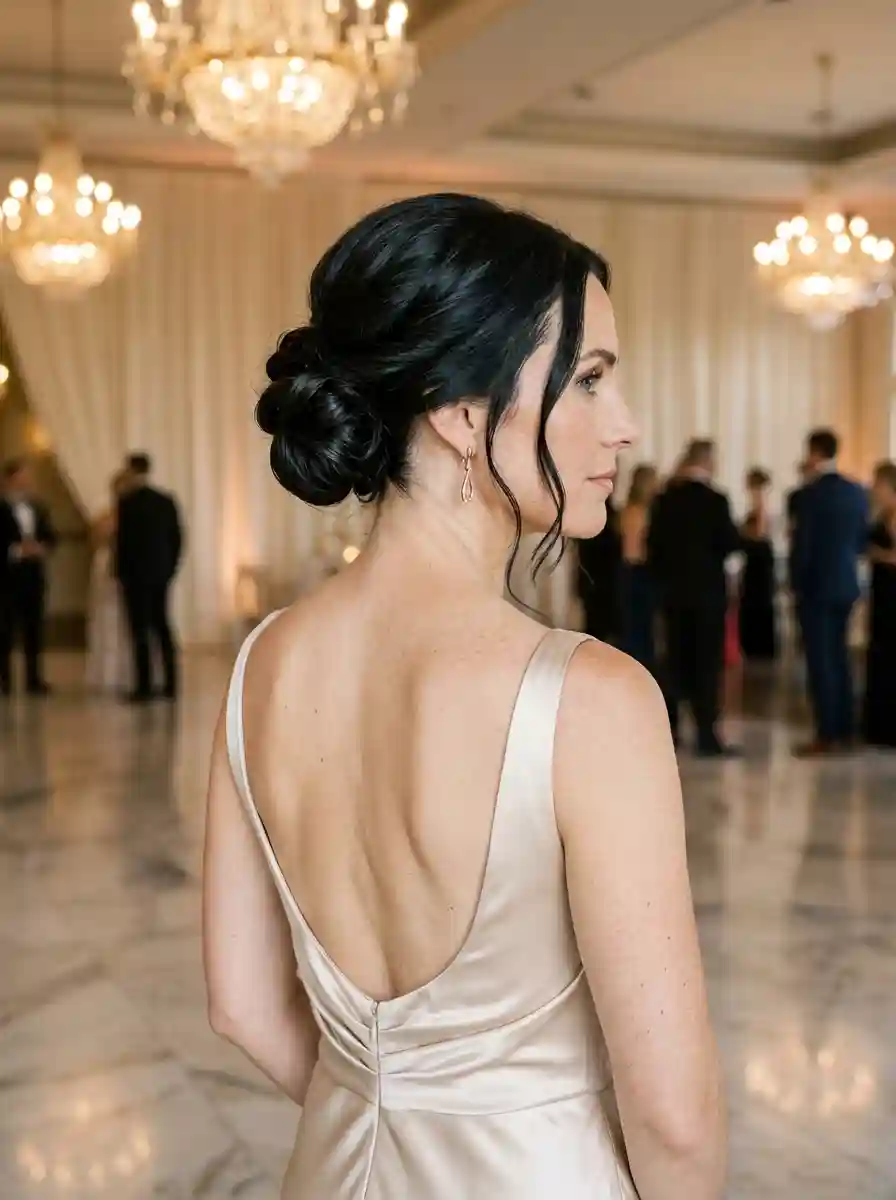
15.Elegant Chignon with Wispy Tendrils
The overview: Light ash blonde hair twisted into a polished, compact chignon at mid-height on the back of the head. Soft wispy tendrils frame the face, curving around the temples and ears. The chignon is smooth and tight, while the tendrils are delicate and soft. The contrast between structure and softness is intentional.
Why this look is popular: The polished chignon with wispy tendrils is a favorite for mothers of the bride because it reads as formal without being severe. The tendrils soften the hairline and can be customized to flatter any face shape. Ash blonde is a sophisticated color that photographs cleanly and works well with both silver and gold accessories.
Where this look is suitable: Classic ballroom receptions, formal evening ceremonies, church weddings. The clean silhouette pairs beautifully with high necklines, boatnecks, and structured gowns.
Step by step:
- Smooth the foundation. Apply a lightweight smoothing cream and blow-dry straight with a paddle brush. The chignon needs a sleek base.
- Section the tendrils. Before gathering, separate thin 0.5-inch sections on each side of the face, just at the temples. Set aside.
- Gather mid-height. Pull the remaining hair to the middle of the back of the head. Secure with an elastic.
- Form the chignon. Twist the ponytail tightly and wrap it into a compact, smooth bun. Pin with matching bobby pins, tucking them underneath.
- Shape the tendrils. Use a flat iron on low heat to give the tendrils a slight bend. They should curve gently around the face.
- Set it. Mist the chignon with strong-hold hairspray. Use a light mist on the tendrils to keep them in place without stiffness.
Tips and tricks: The tendrils should be wispy rather than substantial — thin sections that barely touch the skin. Too much hair in the tendrils competes with the chignon. If your ash blonde tone leans cool, a silver-toned hairspray or shine mist enhances the color. For extra hold on the chignon, cross bobby pins in an X-pattern underneath.

35 Fun Birthday Nail Designs for 2026 🎂
16.Braided Updo with Pearl Accents
The overview: Warm blonde hair braided into multiple sections, then woven and pinned into a textured updo at the back of the head. Pearl pins are scattered throughout the braids at irregular intervals. The braids create visible dimension and pattern within the updo. Some soft pieces are left loose around the face.
Why this look is popular: A braided updo is more visually complex than a smooth bun, which makes it feel special and event-worthy. Multiple braids woven together create natural texture and dimension that photographs beautifully from every angle. Pearl accents add a bridal-level elegance that ties into classic mother of the bride jewelry.
Where this look is suitable: Formal evening ceremonies, candlelit receptions, weddings with a romantic or classic aesthetic. The braided detail is particularly striking in venues with dramatic lighting where shadows emphasize the texture.
Step by step:
- Prep for braid hold. Apply a texturizing spray and light mousse to damp hair. Blow-dry with a diffuser for volume and grip.
- Divide into sections. Partition the hair into three to four sections. Leave small face-framing pieces out.
- Braid each section. Create three-strand braids on each section. Keep them loose — tight braids will not weave together as naturally. Secure ends with clear elastics.
- Pin into an updo. Arrange the braids at the back of the head, folding and tucking them to create a cohesive sculptural shape. Pin with matching bobby pins.
- Add pearl pins. Scatter pearl pins throughout the braided sections, focusing on areas where the braids create natural pockets.
- Set with flexible hold. Mist with medium-hold hairspray. Gently pull at the braids slightly for added volume before the spray dries.
Tips and tricks: Do not braid too tightly — loose braids create more volume and texture when pinned into the updo. Use bobby pins that match your warm blonde tone so they disappear into the style. The pearl pins should be distributed unevenly; symmetrical placement looks more deliberate and less organic.
17.Twisted Braids with Loose Waves
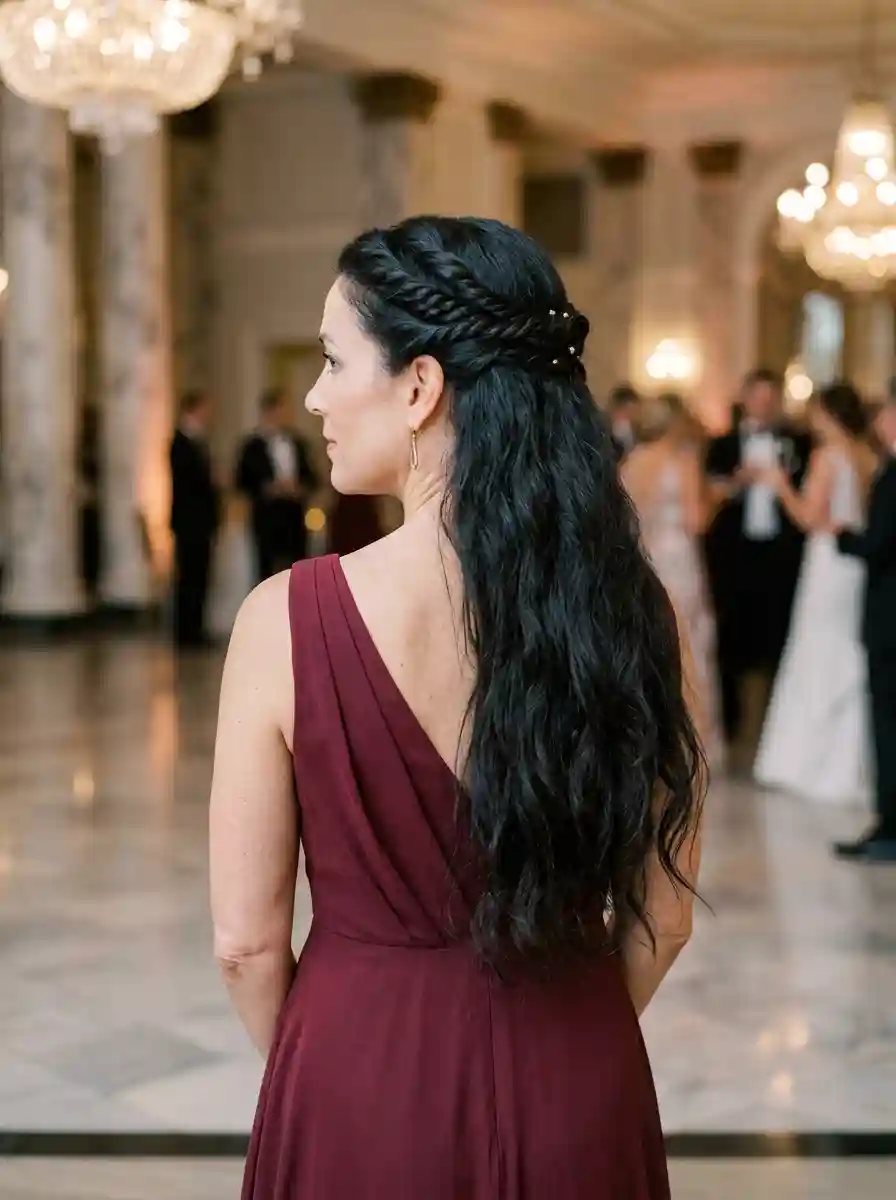
The overview: Bronde hair with two twisted braids starting at the temples and meeting at the back of the crown. The twists are defined and smooth. From the meeting point, the hair falls in loose, voluminous waves. The twists create a clean line from the face, while the waves provide softness and movement below.
Why this look is popular: Twisted braids are faster and easier to execute than traditional braids, but they create a similar visual impact. The combination of structured twists at the crown with loose waves below is visually dynamic — it draws the eye up and then follows the hair down. Bronde (brown-blonde blend) is one of the most flattering color options because it bridges warm and cool tones.
Where this look is suitable: Romantic garden ceremonies, outdoor receptions, any setting where you want a balance of modern and romantic. The twists keep hair off your face during the ceremony, and the waves provide movement for dancing.
Step by step:
- Create loose waves. Using a 1.25-inch curling wand, wave all hair in 1-inch sections. Brush through gently with a wide-tooth comb.
- Section the front. Take 2-inch sections from each temple. These will become the twisted braids.
- Twist each section. Twist each section away from the face, keeping moderate tension. The twist should be smooth and defined.
- Meet at the back. Bring both twists to the back of the head. Pin them where they meet with crossed bobby pins.
- Blend into waves. Allow the remaining length of the twists to fall into the loose waves. No additional pinning is needed below the meeting point.
- Set with flexible spray. Mist with medium-hold hairspray to keep the twists defined while the waves remain soft.
Tips and tricks: The twisted braids should be tighter at the temple and gradually loosen as they approach the meeting point — this creates a natural transition into the waves. Use a light pomade on the twist sections for extra definition and shine. The meeting point should sit slightly below the crown for the most flattering proportion.
20 Stunning Half Up Half Down Hairstyles for Prom Night 2026 💃✨
18.Elegant Braided Crown with Soft Waves
The overview: Warm honey and caramel blonde hair with a Dutch braid wrapping around the crown. The braid sits close to the scalp, creating a raised halo effect. The remaining hair flows down in soft, voluminous waves. The braid is defined and visible, while the waves are loose and romantic.
Why this look is popular: The braided crown is one of the most photogenic formal styles because it creates a natural frame for the face and keeps hair off your features during the ceremony. The soft waves underneath add movement and prevent the style from feeling too severe. Honey and caramel blonde tones catch light beautifully, making the braid pattern pop in photographs.
Where this look is suitable: Vineyard ceremonies, outdoor garden weddings, any setting with natural light. The crown braid keeps hair off your face during the ceremony, while the waves give you movement for the reception.
Step by step:
- Wave the hair first. Use a large-barrel curling iron on 1.5-inch sections. Let curls cool completely, then brush through gently.
- Start the Dutch braid. Take a 2.5-inch section at one temple. Divide into three and begin a Dutch braid, crossing strands under.
- Braid around the crown. Continue the braid along the hairline, adding small sections as you go. Work your way around to the opposite side.
- Secure the end. Pin the end of the braid behind the opposite ear, tucking it under the loose waves. Use bobby pins that match your hair color.
- Adjust the waves. Shake out the waves gently with your fingers. Pull a few pieces forward to frame the face.
- Set it. Mist with flexible-hold hairspray to keep the braid defined and the waves soft and natural.
Tips and tricks: Keep consistent tension as you braid around the crown — uneven tension creates visible lumps. If your hair is layered, use a small amount of styling cream to smooth shorter pieces into the braid. The braid should sit flat against the head, not raised too high. For a softer finish, pancake the braid gently after securing.
19.Twisted Half-Up with Loose Waves
The overview: Warm caramel and golden blonde hair with the front sections twisted back from both sides and pinned at the crown with a small crystal or gold barrette. The remaining hair falls in soft, loose waves past the shoulders. The twists are subtle and the waves are natural and relaxed.
Why this look is popular: The twisted half-up is one of the easiest styles to execute and one of the most universally flattering. The twists keep hair off the face while the waves provide movement and softness. The crystal or gold barrette adds a touch of elegance without requiring a full updo. Warm golden blonde is a universally flattering color that glows in natural and reception lighting.
Where this look is suitable: Daytime garden weddings, semi-formal ceremonies, any setting where you want to look polished without going full formal. The relaxed waves make this style comfortable for a long day of events.
Step by step:
- Create waves. Use a 1.25-inch curling wand on 1-inch sections, alternating curl direction. Let curls cool, then run fingers through to soften.
- Section the front. Take 2-inch sections from each temple. Leave a few face-framing pieces out.
- Twist each section. Twist each section away from the face. Keep the twist relaxed — not too tight.
- Pin at the crown. Bring both twists to the back and pin where they meet. Use crossed bobby pins for security.
- Add the barrette. Clip the barrette over the pinned section. Position it so it sits evenly.
- Set with flexible spray. Mist with medium-hold hairspray to keep the twists in place while the waves remain soft.
Tips and tricks: The twists should be tight enough to hold their shape but not so tight that they pull at the temples. Backcomb the crown slightly before twisting for added lift. The barrette should be proportional to the twist section — too large overwhelms, too small gets lost. For a more formal version, replace the barrette with a crystal or pearl pin.
35 Cute & Trendy Short Summer Nails for 2026 ☀️
20.Classic Inward Curl Bob
The overview: A chin-length blunt bob with a deep side part. The ends are curled inward to create a smooth, curved silhouette that follows the jawline. The finish is glossy and polished with no flyaways. No accessories — the cut and curl are the statement. The warm brunette or caramel tone adds richness that makes the glossy finish pop. This is the hairstyle equivalent of a perfectly tailored blazer.
Why this look is popular: A classic inward curl bob is one of the most confident style choices you can make. It communicates refinement without effort. The chin-length cut highlights the jawline and neck, and the inward curl creates a soft frame for the face. This style photographs cleanly and works beautifully with statement earrings. It is also low-maintenance — once set, it stays in place without constant adjustment.
Where this look is suitable: Modern minimalist venues, city ceremonies, daytime weddings, any setting where clean lines and understated elegance are the dress code. Pairs beautifully with structured necklines, collared dresses, and statement earrings.
Step by step:
- Wash and condition. Use a smoothing shampoo and lightweight conditioner. Avoid heavy products that weigh down the bob.
- Blow-dry with a round brush. Dry section by section, pulling the hair straight and rolling the ends under with the brush. The brush size determines the curl curve — a medium round brush creates a natural inward roll.
- Set the inward curl. Using a flat iron, work through each section and turn the iron under at the ends. Hold for a few seconds to set the curve.
- Create a deep side part. Use a rat-tail comb for a sharp, precise line. The deeper the part, the more dramatic the look.
- Refine the shape. Use a fine-tooth comb and a light smoothing cream to eliminate any flyaways. The finish should be immaculate.
- Finish with shine. Apply a light shine spray or serum to the ends for a glossy finish. Avoid the roots to prevent flatness.
Tips and tricks: Get the bob trimmed one to two weeks before the event so the lines are sharp but the cut has settled. A heat protectant spray is essential before flat-ironing. For fine hair, a light volumizing mousse at the roots before blow-drying prevents the bob from looking flat. Pearl or diamond stud earrings are the perfect accessory — they complement the clean lines without competing.
The Comfort-First Factor
Wedding days are emotional marathons. You will be hugging, crying, dancing, and probably forgetting to eat. The last thing you need is a hairstyle that requires constant adjusting or starts hurting by hour three. That is why the biggest shift in 2026 mother-of-the-bride styling is prioritizing comfort without sacrificing elegance.
Low chignons, soft half-up styles, and loose waves dominate because they stay put without pulling or pinching. The key is using the right products: a light-hold hairspray that will not make your hair crunchy, a smoothing serum that tames flyaways without weighing hair down, and accessories that clip securely without snagging. A medium-hold flexible hairspray like L'Oréal Elnett gives you staying power without stiffness.
The test? Do a trial run of your hairstyle at least two weeks before the wedding. Wear it for a full afternoon to see how it feels after hours of wear. If you are reaching for pins by hour four, it is not the right style for the big day.
The Photo-Ready Secret
What looks amazing in the mirror does not always translate to photos. The biggest mistake mothers of the bride make is choosing a style that is too flat or too busy — both of which can disappear or distract in professional wedding photos. The secret to photo-ready hair is dimension and movement.
Styles with soft waves, textured braids, or subtle accessories catch light from every angle, creating depth that makes you look radiant in every shot. Avoid overly sleek styles that can look flat in photos, and skip accessories that are too small to register on camera. A pearl pin that looks prominent in your hand can vanish entirely in a group shot.
The photographer tip? Ask your photographer about the venue lighting beforehand. For outdoor ceremonies, styles with natural texture photograph best in golden hour light. For indoor venues, styles with subtle shine or metallic accents catch artificial lighting beautifully.