Nail Trends
The Summer 2026 Edit: 35 Majorly Chic Short Nail Ideas You Need to Screenshot
As temperatures rise and iced coffee becomes a daily routine, the overall aesthetic naturally shifts. Heavy sweaters get packed away, SPF becomes a priority, and long, high-maintenance nail extensions are often the first to go. This season, a fresh, effortlessly chic short manicure is a clean, modern alternative.
There is no need for long acrylics to pull off standout nail art. In fact, keeping nails neat and short is a practical yet stylish choice. Whether typing out out-of-office emails, packing for a weekend trip, or simply going about daily tasks, short nails offer ease and convenience. From vibrant neons and nostalgic fruit prints to delicate, 'your-nails-but-better' glazes, this selection highlights the top short nail designs to consider. These ideas are perfect to save for your next nail appointment or DIY session.
The Micro Rule: Why Small Art Works Better on Short Nails
The most common complaint I hear about short nails is the feeling that there is not enough surface area for interesting art. But here is the truth: the problem is not the size of the nail — it is the size of the art. When you try to squeeze a full-coverage floral pattern onto a short nail, the design gets compressed and reads as cluttered. When you scale the art down to match the nail, it looks intentional, bespoke, and honestly more expensive.
This is why "micro motifs" are having a moment in 2026. Tiny polka dots, slim French tips, miniature fruit decals, single-stroke florals — these designs work because of the small canvas, not despite it. Look at "Sweet Strawberry Patch" in this list. The strawberries are small enough that three fit comfortably on a short nail without crowding. Or "Citrus Squeeze French Tips" — the thin line does not eat up visual space the way a thick tip would. The scale is proportionate, so the nail reads as balanced rather than cramped.
The practical takeaway: when you have short nails, think smaller, not simpler. A tiny hand-painted detail reads as luxurious. A large decal that gets cut off at the cuticle reads as a mistake.
In This Guide
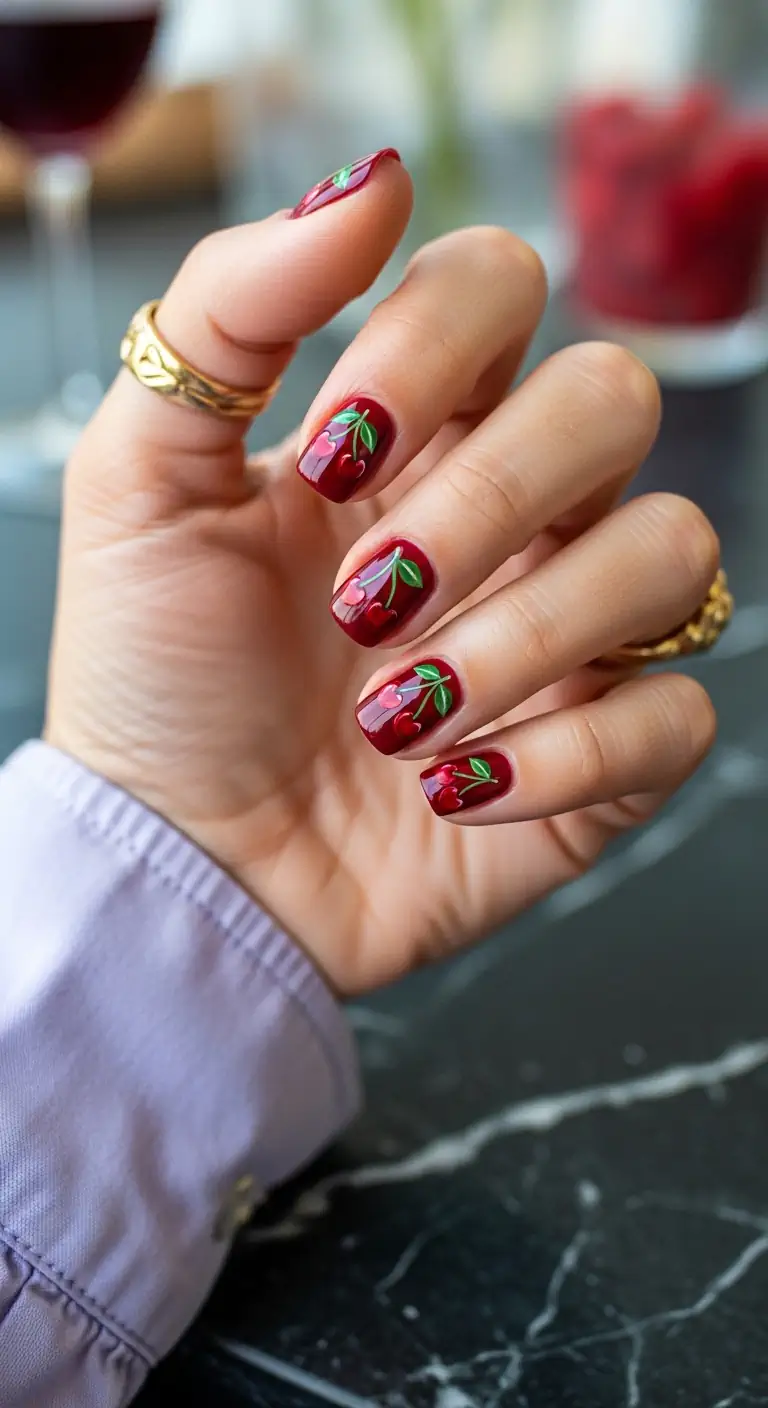
1.Glossy Cherry Bomb Shorties
Deep burgundy nails with hand-painted cherry art—juicy, dark, and unexpectedly perfect for summer.
Overview:
Dark red in summer feels like a rebellion against the pastel-or-nothing crowd, and that is precisely why it works. This deep burgundy base is rich enough to feel autumnal on its own, but the hand-painted cherry illustrations with their bright green leaves pull the whole thing into sunny, playful territory. The contrast between the wine-dark background and the almost cartoonish fruit art is what gives this set its edge.
Soft square shaping keeps everything grounded—a stiletto or coffin shape would push this into costume territory, but the short, gently rounded edges make it feel like something you could genuinely wear to dinner or a weekend market. The glossy finish amplifies the juiciness of both the base color and the cherry motifs, catching light in a way that makes the nail look almost wet.
One practical note: deep reds like this are notorious for staining the nail plate. A solid ridge-filling base coat is non-negotiable here, especially if you plan to switch to a lighter shade afterward. OPI's Nail Envy works well as a protective barrier, and the extra minute of prep saves you from a week of yellow-tinged nails.
Design Breakdown:
The success of this design hinges on the contrast between the moody base and the lively fruit art layered on top.
Base Color: A deep, opaque burgundy or oxblood red. Needs to be highly pigmented—two coats maximum for full coverage without looking thick or lumpy.
Nail Shape: Short soft square. The gently rounded corners prevent the dark color from reading too harsh or aggressive.
Design Element: Hand-painted cherry pairs using bright red for the fruit bodies and a crisp grass green for the stems and leaves. Some cherries sit alone, others appear in connected pairs.
Finish: Ultra-glossy top coat. The reflective surface makes the cherries look dimensional and the base color appear deeper.
Get The Look at Home:
Dotting tools make the cherry shapes nearly foolproof, even if you have shaky hands.
- Prep and base coat: Apply a ridge-filling base coat to protect against staining. This step matters more with dark colors than with any other shade family.
- Burgundy foundation: Paint two smooth coats of your deep burgundy polish, letting each coat dry fully between applications.
- Form the cherries: Load a medium dotting tool in bright red polish. Place two dots side by side, slightly overlapping, to create each cherry body. Repeat on whichever nails you want the pattern—leaving a few solid burgundy keeps the design from overwhelming the hand.
- Stems and leaves: Using a fine liner brush and bright green polish, draw thin curved lines extending upward from each cherry, meeting at a point. Flick a tiny leaf shape off one side of the stem junction.
- Seal it in: Apply two coats of high-shine top coat, making sure to cap the free edge so the dark color does not chip at the tips.
30 Stunning Summer Hair Trends for 2026 ☀️🌊
2.Minty Fresh Daisy Field
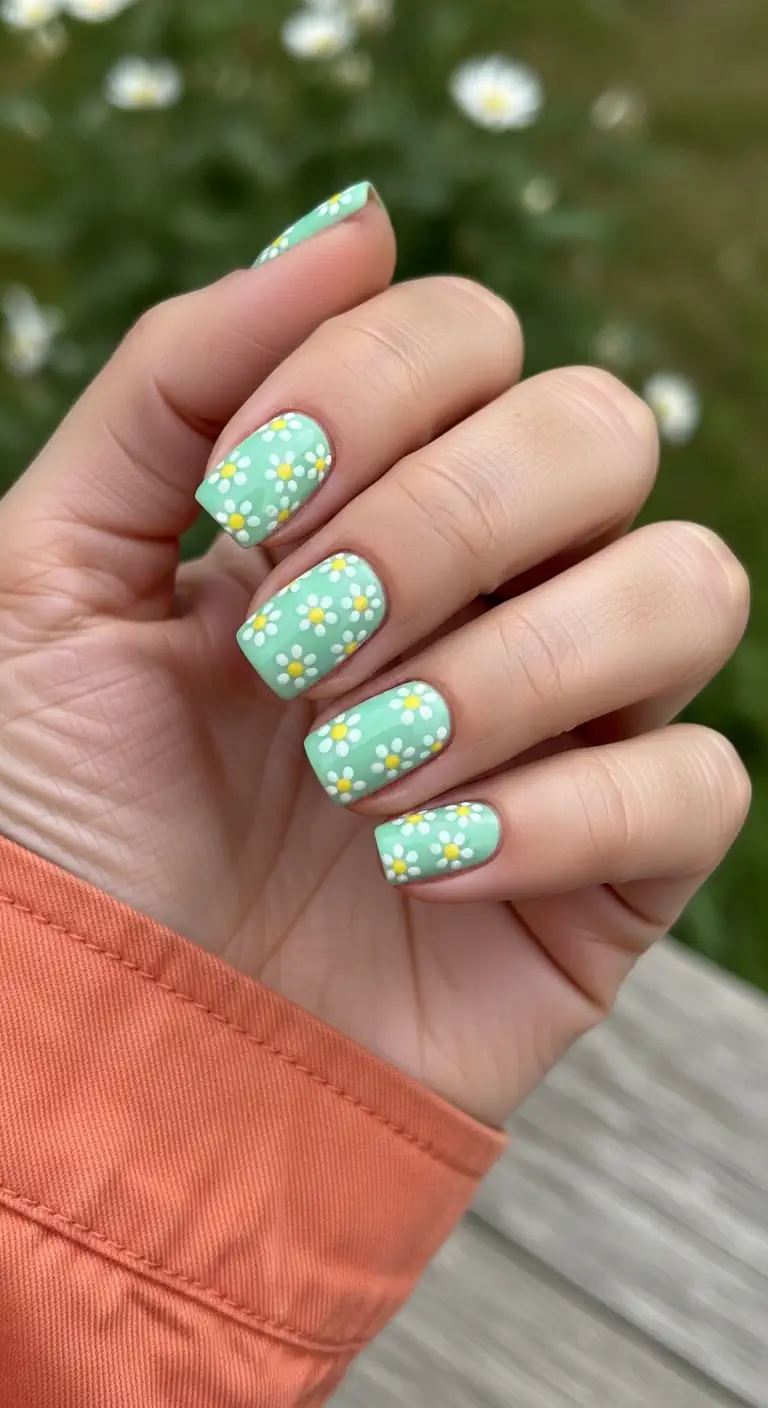
Pastel mint green loaded with cheerful white daisies—nostalgic, fresh, and impossibly easy to love.
Overview:
What happens when you take the softest pastel green and scatter it with tiny daisies? You get the nail equivalent of a meadow in June— the kind of image that makes you want to cancel plans and sit in a park instead. This mint shade hits that sweet spot between cool and warm, reading fresh without veering into icy territory. The white daisy petals with their sunny yellow centers add a hand-drawn, almost vintage quality that never stops being charming.
Short nails are genuinely the best canvas for this type of scattered floral. On longer nails, covering the entire surface with tiny flowers can quickly look busy or costumey. Here, the compact proportions keep the pattern feeling intentional and light. The soft square shape also helps—the slightly rounded corners echo the curves of the petals without competing for attention.
Design Breakdown:
A pastel base with simple dot-based florals is one of the most forgiving combinations in nail art.
Base Color: A creamy, fully opaque pastel mint green. Sheer pastels tend to streak, so look for formulas labeled "cream" rather than "jelly." Essie's Mint Candy Apple is a reliable reference point.
Nail Shape: Short soft square. The structured shape provides a clean backdrop that prevents the floral pattern from looking too whimsical.
Design Element: Classic five-petal white daisies with warm yellow centers, scattered randomly across all nails. Keeping the flowers small and staggered prevents the pattern from feeling grid-like or rigid.
Finish: Glossy top coat that seals the slightly raised dot texture for a smooth, glass-like surface.
Get The Look at Home:
If you can make a dot with a bobby pin, you can make a daisy. This is one of the most beginner-friendly nail art designs out there.
- Smooth base: Gently buff any ridges and apply a smoothing base coat. Pastels highlight surface imperfections more than darker shades.
- Mint application: Apply two even coats of pastel mint polish. Let the second coat dry completely before touching it with a dotting tool, or the white will drag through the green.
- Petal dots: Dip a medium dotting tool (or the rounded end of a bobby pin) into opaque white polish. Place five dots in a tight circle to form each flower. Add partial flowers at the nail edges for a natural, scattered look.
- Center dots: Wait two minutes for the white to set. Then use a smaller dotting tool to place a single yellow dot in the middle of each white circle. The waiting period prevents the yellow from bleeding into the white.
- Top coat: Float the top coat gently over the surface so the brush does not catch the raised dots and smear them.
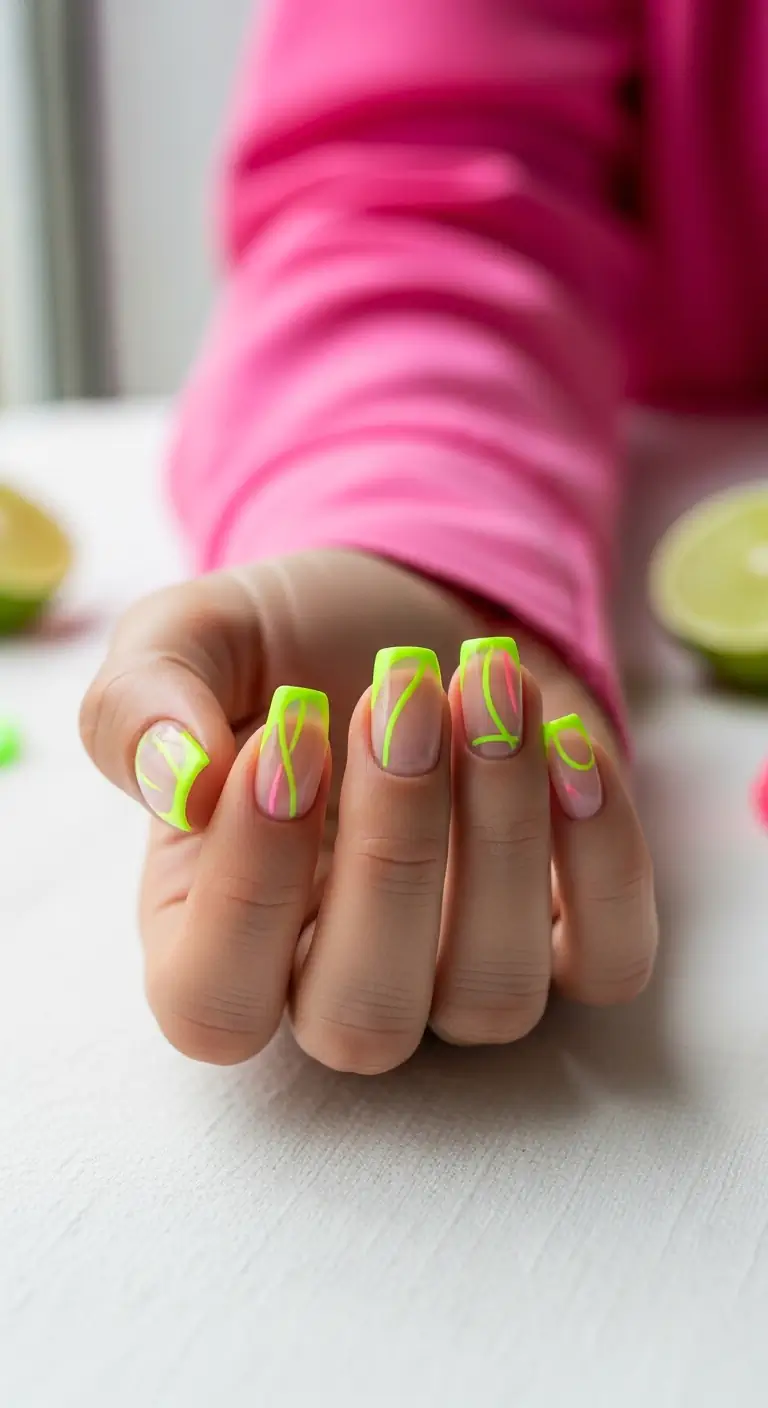
3.Y2K Hot Pink Starburst
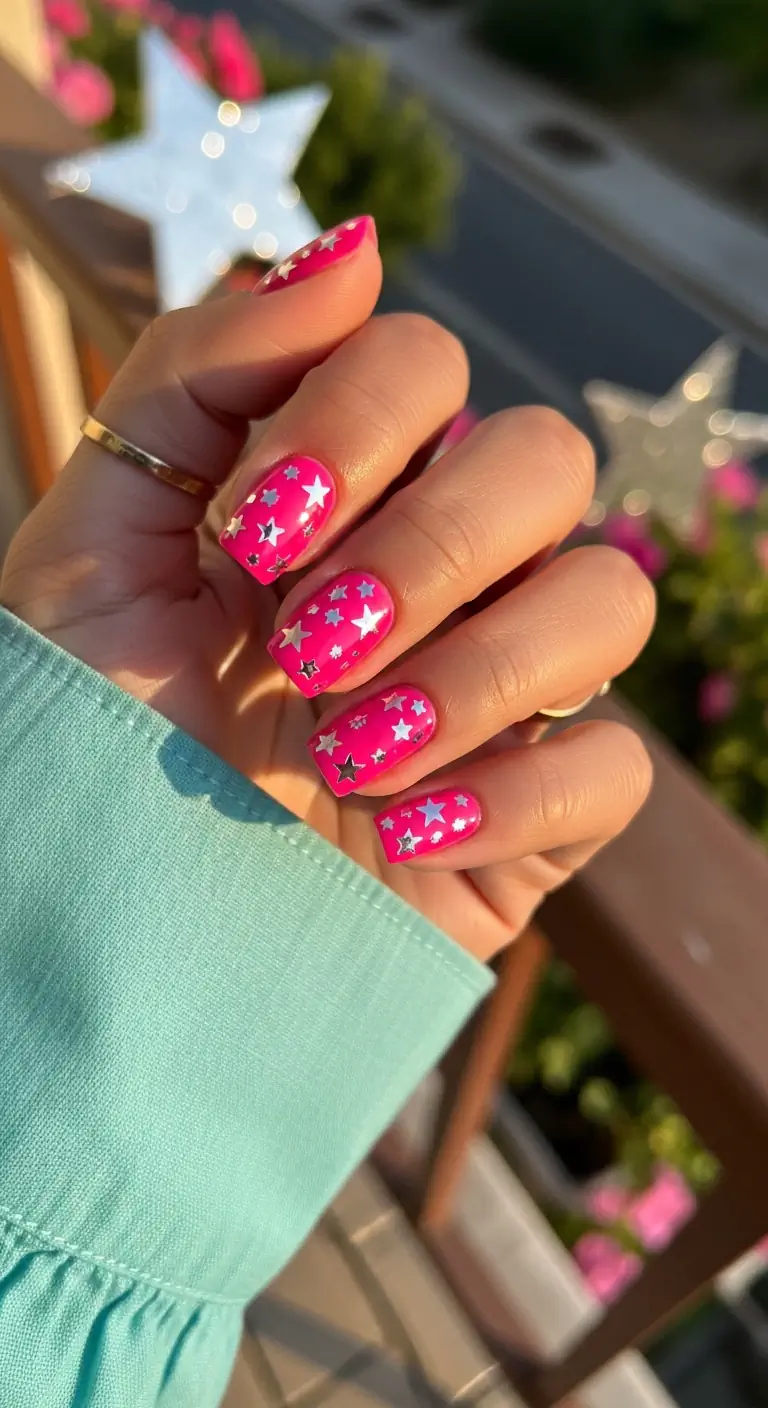
Eye-watering fuchsia nails scattered with holographic silver stars—maximum impact, minimum effort.
Overview:
There is a reason hot pink refuses to leave the summer rotation: it works. Throw metallic silver stars into the equation and you have something that feels specifically engineered for outdoor concerts, rooftop bars, and anywhere the lighting hits at golden hour. The holographic quality of the star decals is what elevates this beyond a basic neon mani—they catch light in multiple colors simultaneously, creating tiny prismatic explosions across the nail surface.
Decals deserve more respect than they get in the nail art world. Hand-painted stars are beautiful, sure, but they require precision that most people do not have at home. Star stickers eliminate the skill barrier entirely and produce a cleaner, more uniform result. The trick is placement: scattering them at random angles rather than aligning them in rows keeps the energy chaotic and fun rather than predictable.
Fair warning: neons like this tend to dry matte and slightly chalky on their own. Without a thick glossy top coat, the fuchsia looks flat. With it, the color becomes electric and the holographic stars gain that wet, reflective quality that photographs so well.
Design Breakdown:
Neon pink plus metallic silver is a high-contrast pairing that thrives on boldness.
Base Color: A true neon magenta or fuchsia. Neons typically require a white base coat underneath to reach full opacity without three or four layers.
Nail Shape: Short-medium soft square. The slightly longer length gives more surface area for the star placement without sacrificing practicality.
Design Element: Silver holographic star decals in mixed sizes—tiny and medium stars scattered randomly across the nails. The varying sizes create visual depth.
Finish: Thick glossy top coat applied in two layers to fully encapsulate the decals and prevent edges from lifting.
Get The Look at Home:
Decals are the great equalizer—this looks like a salon job but takes about twenty minutes at home.
- White undercoat: Apply one coat of opaque white polish and let it dry. This is the neon secret—the white base makes the fuchsia glow instead of looking patchy.
- Neon layers: Paint two coats of your hot pink neon over the white, letting each coat dry fully. Neons are notoriously streaky; the white base reduces this significantly.
- Tacky surface: Wait until the pink polish is almost completely dry but still slightly tacky. This gives the decals something to adhere to without sliding around.
- Star placement: Using tweezers, lift individual star decals and press them onto the nail at random angles. Vary the sizes and spacing—some nails might get three stars, others just one.
- Encapsulation: Apply one generous coat of top coat, let it dry, then apply a second. This buries the decal edges so they do not catch on fabric or hair.

28 Cute & Sporty Baseball Game Nail Ideas for 2026 ⚾
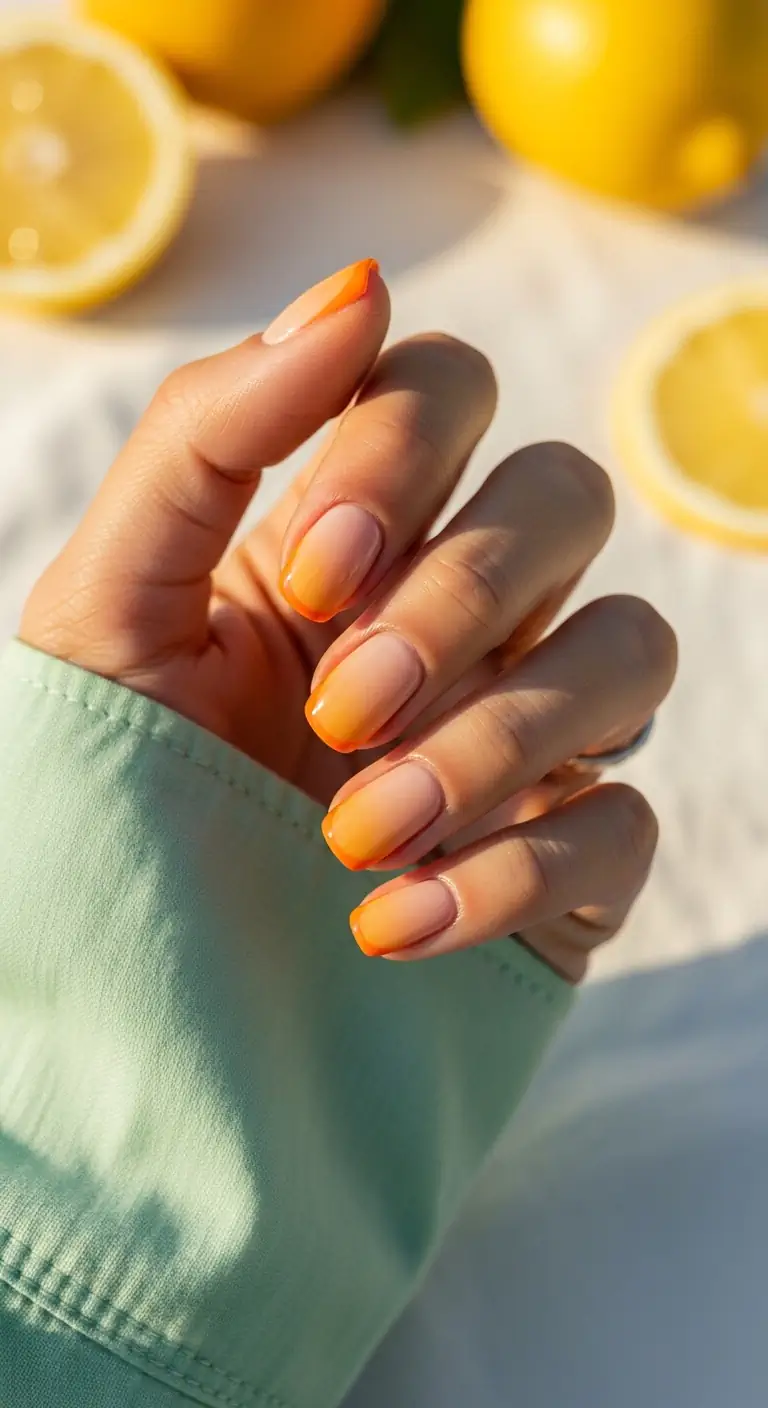
4.Squeezed Citrus Spritz
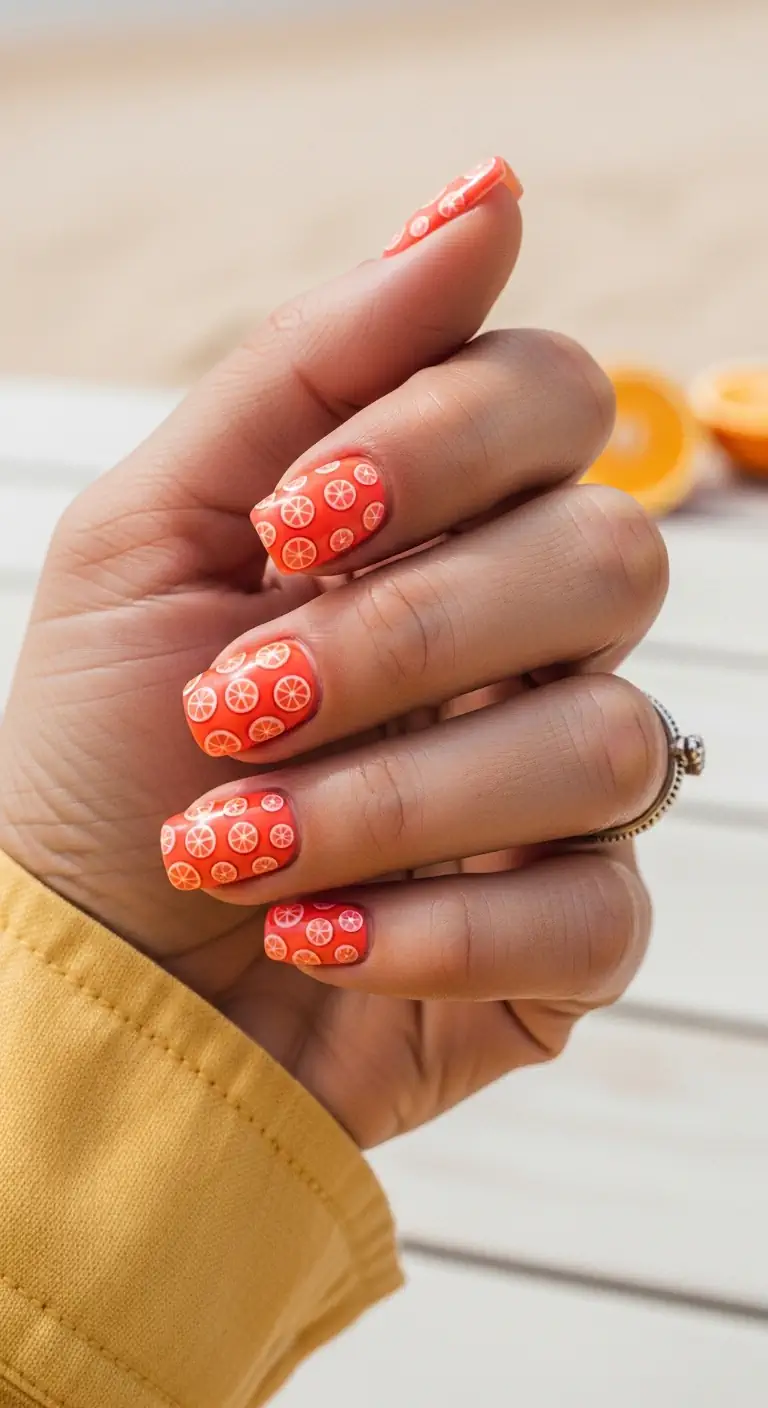
Bright coral-orange with hand-painted citrus slice details—like a spritz for your fingertips.
Overview:
Orange is having a genuine moment, and designs like this explain exactly why. The coral-leaning shade reads warm and vibrant without the eye-searing quality of a true neon, making it flattering on a wider range of skin tones. The white citrus slice motifs layered on top create a monochromatic story that feels cohesive rather than cluttered—the white linework defines the fruit segments without introducing competing colors.
What makes this design work on short nails is the scale. The citrus motifs are kept small and concentrated, letting the bold base color breathe around them. On longer nails, covering the entire surface with this pattern could overwhelm the hand, but the compact soft square shape keeps everything proportional.
Design Breakdown:
A saturated warm base with white illustrative detail creates visual depth through contrast alone.
Base Color: A bright, opaque coral-orange cream. This shade sits between true orange and salmon, giving it enough warmth to pop against summer tanned skin.
Nail Shape: Short soft square. The gentle rounding at the corners mirrors the curved lines of the citrus segments.
Design Element: White citrus slice motifs—half-circles and full rounds detailed with thin lines to represent fruit segments. The white-on-orange approach keeps the pattern graphic rather than literal.
Finish: High-gloss top coat to unify the slightly raised white linework with the base color into a smooth surface.
Get The Look at Home:
A stamping plate makes this fast, but freehand works if you take your time with a fine detail brush.
- Orange base: Apply two coats of your coral-orange polish. Full opacity is important here—the white art needs a solid background to stand out against.
- Outline the slices: Using a thin liner brush and opaque white polish, draw small circles or half-circles on the nails. These represent the cross-section of citrus fruit.
- Add segment lines: Still using white, draw three to five thin lines radiating from the center of each circle to the edge, like spokes on a wheel. These mimic the internal segments of an orange.
- Clean up: Dip an angled brush in acetone and run it along the cuticle line and sidewalls to remove any white polish that migrated during painting.
- Gloss seal: Apply a generous top coat to smooth out the texture difference between the white lines and the orange base.
5.Ocean Wave Retro Swirls
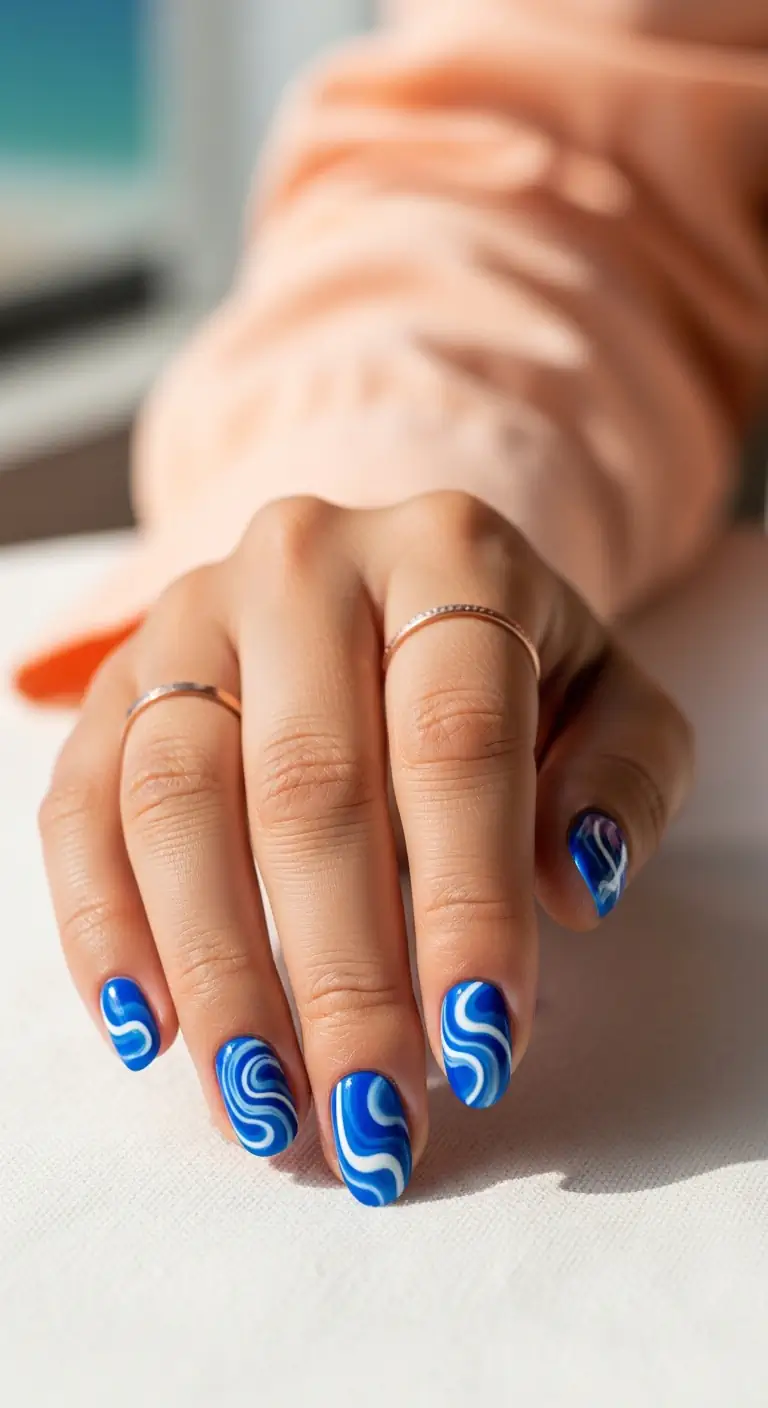
Deep cobalt blue with retro white swirl lines that look like waves crashing in slow motion.
Overview:
Cobalt blue has a depth that lighter sky and baby blues simply cannot match—it reads rich, saturated, and almost electric in direct sunlight. Adding white retro swirl lines transforms it from a solid color manicure into something with movement and rhythm. The swirls do not need to be symmetrical or precise. In fact, the slight irregularity of hand-drawn curves is what gives this design its organic, water-like quality.
The short-medium length works well here because it provides enough nail surface for the swirl pattern to read clearly without the design getting lost. Soft square shaping keeps the overall effect modern rather than retro—the rounded corners soften what could otherwise look like a 1970s wallpaper print.
One thing to watch for with deep blues: they can look almost black in dim lighting. If you want the cobalt to stay vibrant, a glossy top coat is essential—matte finishes tend to flatten dark blues and remove their dimensional quality.
Design Breakdown:
Fluid linework over a saturated base creates the illusion of movement across a static surface.
Base Color: A bold, opaque cobalt blue. Not navy, not royal— cobalt sits right in that electric mid-range that photographs vividly.
Nail Shape: Short-medium soft square. The extra width of the square provides room for the swirl pattern to develop its curves.
Design Element: Thick and thin white wavy lines drawn in flowing S-curves across the nail. The variation in line weight creates depth—thicker lines recede, thinner lines advance.
Finish: Glossy top coat. Essential for maintaining the vibrancy of the cobalt and preventing it from reading flat.
Get The Look at Home:
Confidence matters more than precision here—wobbly lines actually look more like real water than perfectly smooth ones.
- Cobalt base: Apply two coats of your deep blue polish and let it dry completely. The base must be hard before the white lines go on, or the brush will drag through it.
- Load a striper: Use a long, thin striping brush. Load it generously with white polish so you can complete a full swirl without stopping to re-dip.
- Draw the swirls: Place the brush near the cuticle and pull it downward in fluid, S-shaped curves. Vary the width by adjusting pressure—press harder for thick sections, lighten for thin ones.
- Let it set: Give the white lines a full five minutes to dry before touching the nail. White polish smears easily over dark colors.
- Top coat: Apply a thick layer of glossy top coat, floating the brush gently to avoid disturbing the white lines underneath.

30+ Chic Pool Party Hairstyles for Summer 2026 🌊👙
6.Lavender Gold Pinstripe
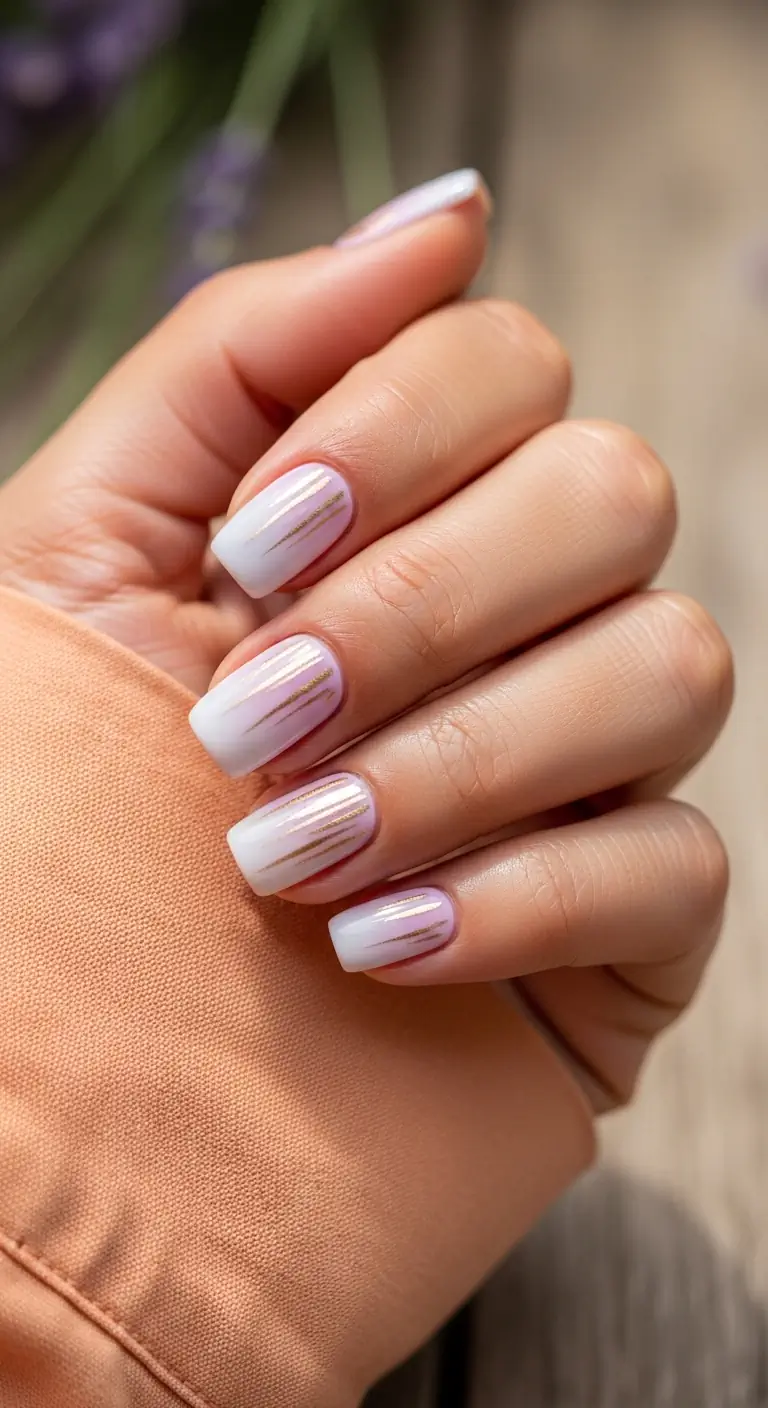
Milky lavender nails with delicate gold pinstripes—quiet luxury distilled into three thin lines.
Overview:
There is a particular kind of elegance that comes from doing less, not more. A milky white-lavender base—soft enough to read as a neutral, cool enough to avoid looking flat—serves as the backdrop for two or three thin horizontal gold metallic stripes that run across each nail. The stripes do all the talking. They catch light in a way that whispers rather than shouts, which is exactly the point.
Horizontal pinstripes on short squoval nails create a visual width that makes narrow nail beds appear more balanced. The gold reads as warm against the cool lavender undertone, creating a tension that keeps the design from feeling precious. This is minimalism with just enough edge to hold your attention.
Design Breakdown:
Metallic striping over a translucent base is the quiet-luxury playbook— the design communicates sophistication through restraint.
Base Color: A milky, semi-sheer white with a lavender or cool-pink undertone. Essie "Ballet Slippers" with a drop of purple mixed in, or Zoya "Genesis," captures this cloudy translucency.
Nail Shape: Short squoval. The straight edges provide natural guidelines for horizontal stripe placement.
Design Element: Two to three thin, perfectly horizontal gold metallic stripes running across the width of each nail, evenly spaced and uniform in width.
Finish: Glossy top coat to seal the metallic stripes and add depth to the shimmer base.
Get The Look at Home:
Gold striping tape produces perfectly straight, uniform lines that are nearly impossible to achieve freehand.
- Shimmer base: Apply two to three thin coats of your milky lavender polish. Let it dry completely—the surface must be hard before applying tape.
- Place the stripes: Cut thin pieces of gold metallic striping tape and lay them horizontally across the nail at even intervals. Press firmly, especially near the edges, to prevent lifting.
- Trim the edges: Use cuticle scissors to trim the tape ends exactly at the nail edge. Tape that hangs over the free edge will peel within hours.
- Secure with top coat: Apply one coat of top coat, let it dry, then apply a second. The double layer locks the tape edges down and prevents catching.
7.Watermelon Sugar Bites
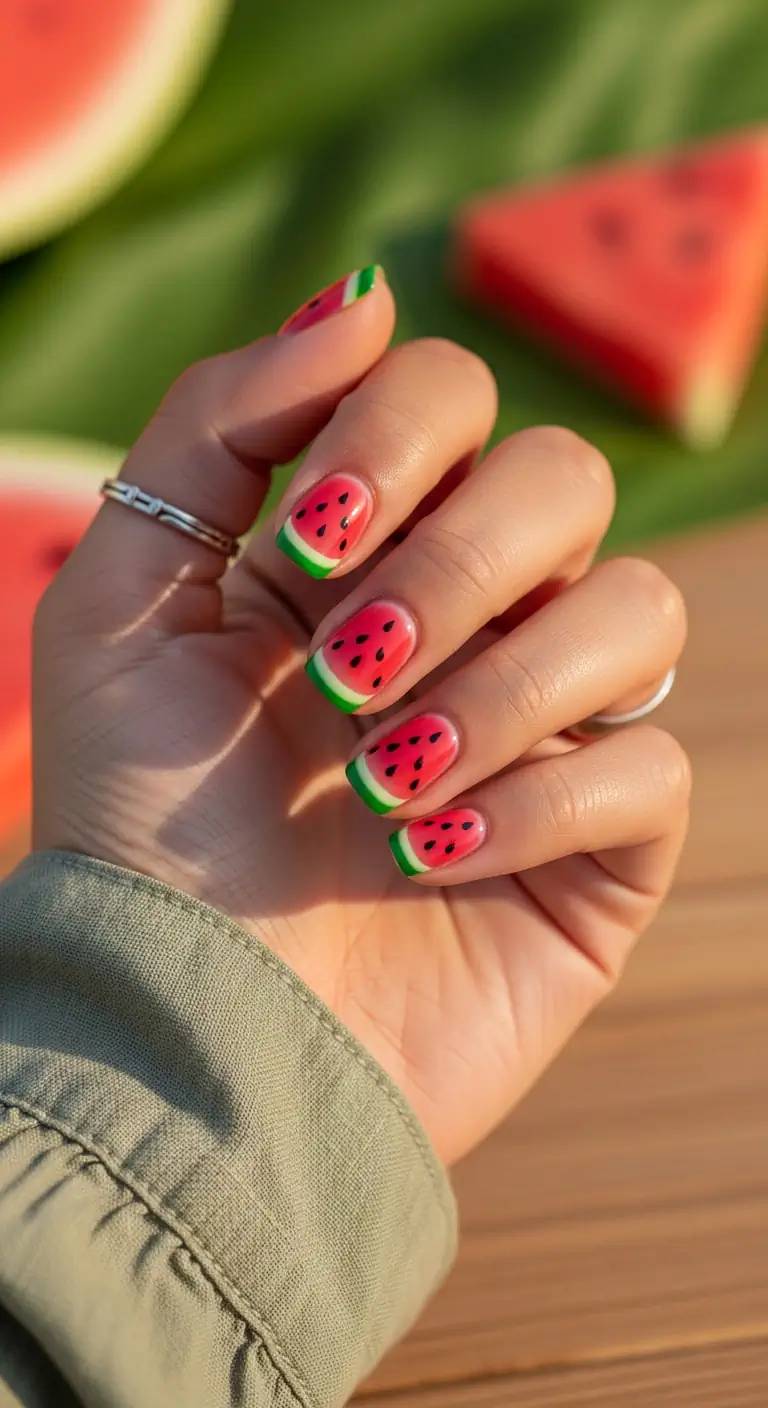
A pink-coral base with green French tips and tiny seed dots—watermelon, deconstructed and reimagined.
Overview:
The French tip renaissance shows no signs of slowing, and this watermelon variation is one of the more inventive takes on the format. Rather than the expected white smile line, a bright green band across the free edge mimics the rind of a watermelon. The pink-coral base reads as the fruit's flesh, and scattered black seed dots complete the illusion without making it feel like a literal fruit sticker.
Short soft square nails are the ideal shape for this design. The flat free edge provides a clean canvas for the green "rind," and the compact length keeps the fruit theme playful rather than overwrought. The glossy finish is what sells the watermelon comparison—it gives the pink base a juicy, fresh-cut quality.
A word on the green tip: this works best with a true grass green rather than a lime or olive. The brightness is what creates the watermelon association. Olive or muted greens would shift the design into abstract territory, which is fine, but not the goal here.
Design Breakdown:
A three-color design that uses the French tip format to tell a visual story.
Base Color: A juicy pink-coral. Not hot pink, not red—this shade captures the exact color of watermelon flesh.
Nail Shape: Short soft square. The flat tip is essential for creating a clean, straight green band that reads as a rind.
Design Element: A bright green French tip with a thin white line separating it from the pink base (the "pith"), plus scattered black seed dots near the cuticle area.
Finish: Glossy top coat for that fresh-cut fruit quality.
Get The Look at Home:
Three polish colors and a dotting tool—this is a straightforward design that reads more complex than it actually is.
- Pink base: Apply two coats of your pink-coral polish and let it dry thoroughly.
- Green rind: Using a thin brush or French tip guide, paint a straight green band across the free edge of each nail, about two to three millimeters wide.
- White pith: With a fine detailer brush and white polish, draw a thin line directly above where the green meets the pink. This subtle border sells the watermelon anatomy.
- Seed dots: Use a tiny dotting tool or toothpick dipped in black polish to place small teardrop-shaped dots scattered across the pink area, concentrated near the cuticles.
- Top coat: Seal everything with a generous glossy top coat to level out the texture of the raised dots and green band.

30 Stunning Beach Nail Ideas for the Best Vacation in 2026 🌊
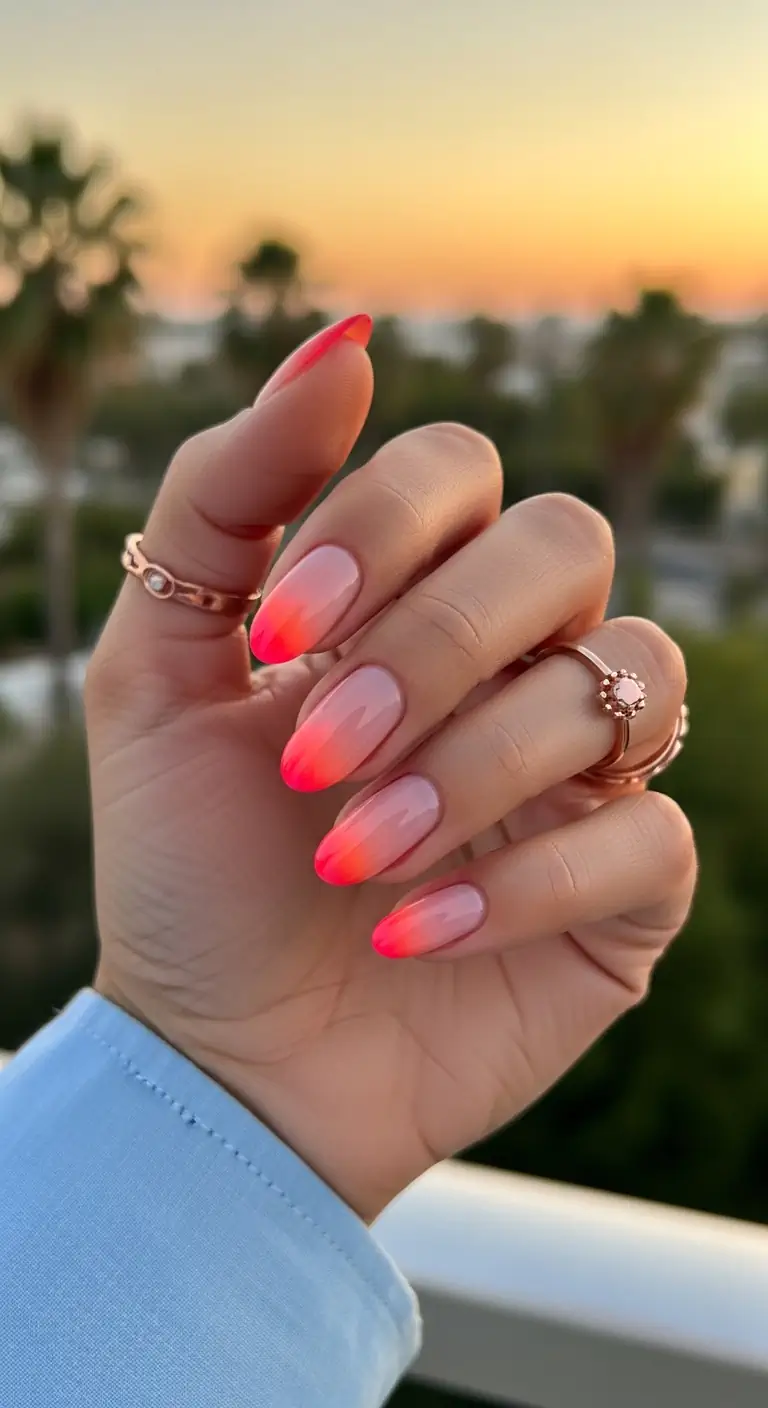
8.Tropical Sunset Ombre French
A sheer nude-to-neon coral gradient that looks like the last five minutes before sunset over the ocean.
Overview:
Ombre gradients are one of those techniques that look deceptively simple in photos but require genuine patience to execute well. This particular version—a seamless melt from sheer nude at the cuticle to a hot coral-neon pink at the tips—works because the color transition is concentrated at the free edge rather than spanning the entire nail. The result looks airbrushed and intentional rather than patchy.
The medium-long almond shape provides enough surface area for the gradient to develop gradually. A shorter nail would compress the transition zone, making the ombre look abrupt instead of diffused. The almond taper also elongates the fingers visually, which amplifies the sunset metaphor—everything pulls downward toward a glowing horizon line.
Design Breakdown:
A seamless two-color gradient relies on the sponge technique to blend the transition zone.
Base Color: A sheer, translucent nude-pink that closely matches the natural nail bed color. This creates the "fade from nothing" effect at the cuticle.
Nail Shape: Medium-long almond. The extended length and tapered tip give the gradient room to develop its full range.
Design Element: A concentrated ombre at the tips blending from the nude base into a vivid coral-neon pink. The transition zone should be roughly one-third of the total nail length.
Finish: Glossy top coat applied thick enough to smooth out any texture left by the sponge application.
Get The Look at Home:
A makeup sponge is the standard tool for this technique, but the key is building opacity gradually rather than loading too much polish at once.
- Nude foundation: Apply one coat of your sheer nude polish over the entire nail to establish an even, natural base tone.
- Prep the sponge: Paint a stripe of nude and a stripe of neon coral-pink side by side on a wedge makeup sponge. The colors should touch but not overlap.
- Dab the tips: Press the sponge onto the nail tip, rolling gently from side to side. Reload the sponge and repeat five to six times, gradually moving the sponge slightly higher each pass to build the gradient.
- Clean the skin: Sponging deposits polish on the surrounding skin. Use a cleanup brush dipped in acetone to wipe the edges while the polish is still slightly wet.
- Smooth and seal: Apply two coats of glossy top coat. The second coat is important—it fills the porous texture left by the sponge and creates a truly seamless gradient.
9.Summer Havana Tortoiseshell
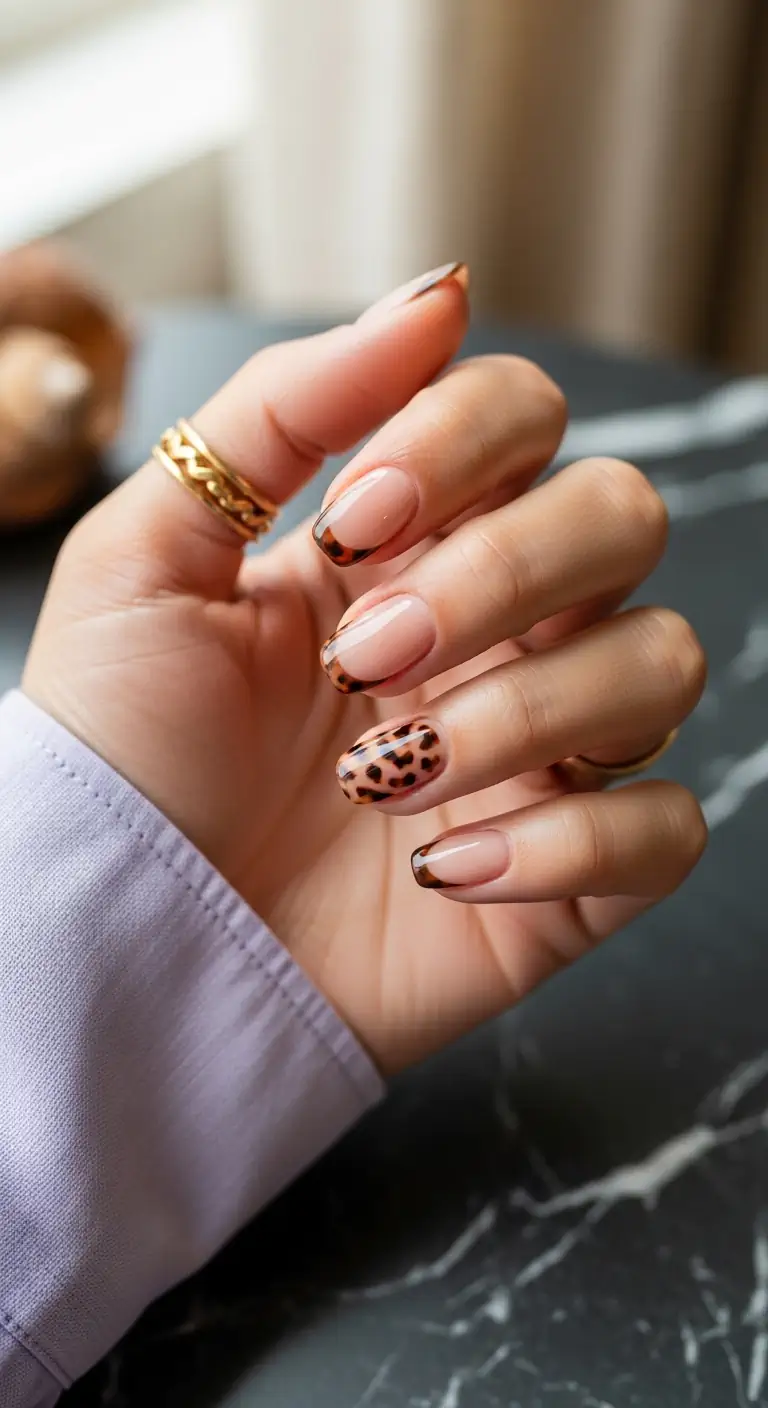
Sheer nude nails with tortoiseshell French tips and one statement accent nail—classic meets vacation.
Overview:
Tortoiseshell usually reads autumnal—warm amber tones, deep brown mottling, chunky knit energy. But pairing it with a sheer, barely- there nude base and limiting the pattern to French tips completely recontextualizes it for warm weather. The negative space of the nude nail bed keeps everything light and breathable, while the tortoiseshell tips add richness and visual weight exactly where you want it.
The single fully tortoiseshell accent nail on the ring finger is a smart design choice. It anchors the set, giving the eye a focal point without committing every nail to the pattern. On short squoval nails, this balance between restraint and statement reads as sophisticated rather than busy.
Getting realistic tortoiseshell depth requires layering sheer (jelly) polishes, not opaque ones. Opaque browns layered on top of each other look muddy and flat. The translucency of jelly formulas is what creates that characteristic amber glow where the layers overlap.
Design Breakdown:
Layered translucent polishes create the dimensional depth that makes tortoiseshell look realistic rather than painted-on.
Base Color: A sheer, glossy nude for the non-accent nails. The transparency lets the natural nail show through, creating a "barely there" backdrop.
Nail Shape: Short squoval. The wider surface area accommodates both the French tip application and the full accent nail pattern.
Design Element: Layered tortoiseshell pattern using amber, sheer brown, and dark brown or black splotches. Applied as French tips on four fingers and a full-nail design on the ring finger.
Finish: Ultra-glossy top coat to bring out the amber depth between the layered jelly polishes.
Get The Look at Home:
Jelly (sheer) polishes are mandatory for this look—opaque formulas will not produce the right translucent depth.
- Nude base: Apply one coat of sheer nude to all nails. On the ring finger, skip the nude and apply a sheer amber-yellow jelly polish as the base instead.
- Tortoiseshell tips: On the non-accent nails, paint the free edge with the same amber jelly polish, creating a French tip about two to three millimeters wide.
- Layer one: While the amber is still wet, drop irregular blobs of a sheer brown polish onto the tortoiseshell areas. Let them spread and bloom slightly before moving on.
- Layer two: Once the first layer dries, add another thin coat of amber jelly over the top. This traps the brown spots underneath and creates the characteristic tortoiseshell depth.
- Dark accents: Finally, add a few smaller, more concentrated dots of dark brown or black polish to the lightest areas of the pattern for contrast.
- Glass finish: Seal with a thick, glossy top coat to amplify the layered transparency of the jelly polishes.

26 Stunning Summer Braided Hairstyles for Women 2026 ☀️💇♀️
10.Coral Chrome Accent
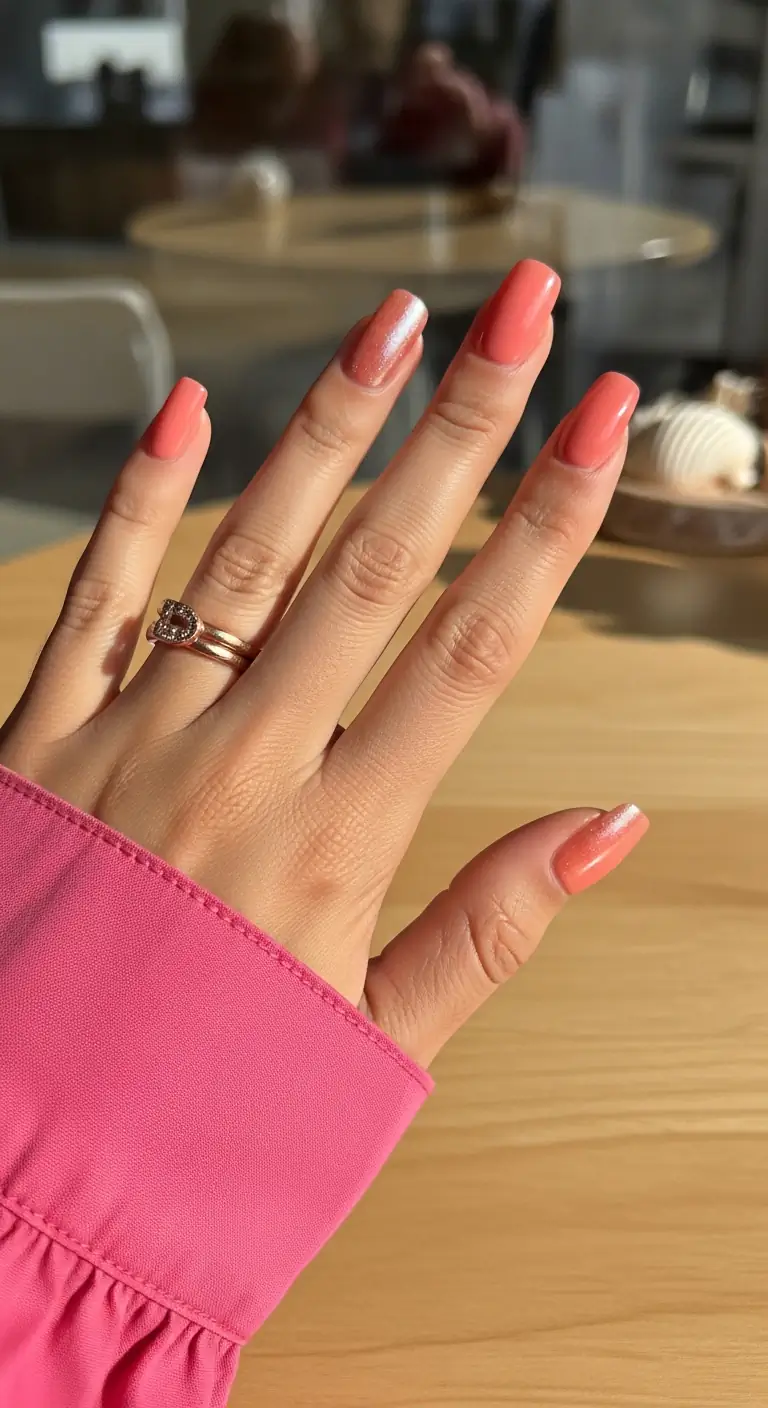
Coral-salmon nails with a single pearl-chrome accent—when one nail does all the talking.
Overview:
Most of the nails in this set are straightforward: a solid coral- salmon pink, creamy and warm, the kind of shade that flatters every skin tone and photographs well in any lighting. But the ring finger breaks the pattern with a white-silver pearl chrome finish that shifts between cool and warm depending on the angle. It is a small disruption that changes the entire energy of the set.
The accent nail concept works here because the chrome is tonally close to the coral. A silver chrome on a navy base would read as costume-y. Here, the pearl finish shares the warmth of the coral, so the transition feels like a natural extension rather than a jarring contrast. Short-medium squoval nails keep the overall effect polished and wearable.
Design Breakdown:
A single accent nail rewrites the rules of a solid-color manicure through finish variation rather than pattern or color.
Base Color: A creamy, opaque coral or salmon pink. Needs to be fully pigmented in two coats without appearing thick.
Nail Shape: Short-medium squoval. The structured shape keeps the solid coral clean and lets the accent nail stand out.
Design Element: Solid coral on four nails. The ring finger receives a white-silver pearl chrome powder buffed over the same coral base, creating a pearlescent shimmer that catches light.
Finish: High-gloss top coat on all nails. The chrome accent gets an extra coat to lock the powder in place.
Get The Look at Home:
Chrome powder is the fastest way to transform a single nail from solid cream to iridescent shimmer.
- Coral base: Apply two coats of coral-salmon polish to all nails and let them dry fully.
- Prep the accent nail: On the ring finger only, apply a no-wipe gel top coat and cure it. The surface must be smooth and non-tacky for the chrome to adhere.
- Buff the chrome: Using a silicone tool or eyeshadow sponge, rub white-silver pearl chrome powder firmly over the cured top coat. The surface transforms from cream to iridescent within seconds.
- Dust and seal: Brush away excess powder, then apply a final glossy top coat to all nails to lock the chrome in place and add depth to the coral.
11.Vintage Rose Gold Flake
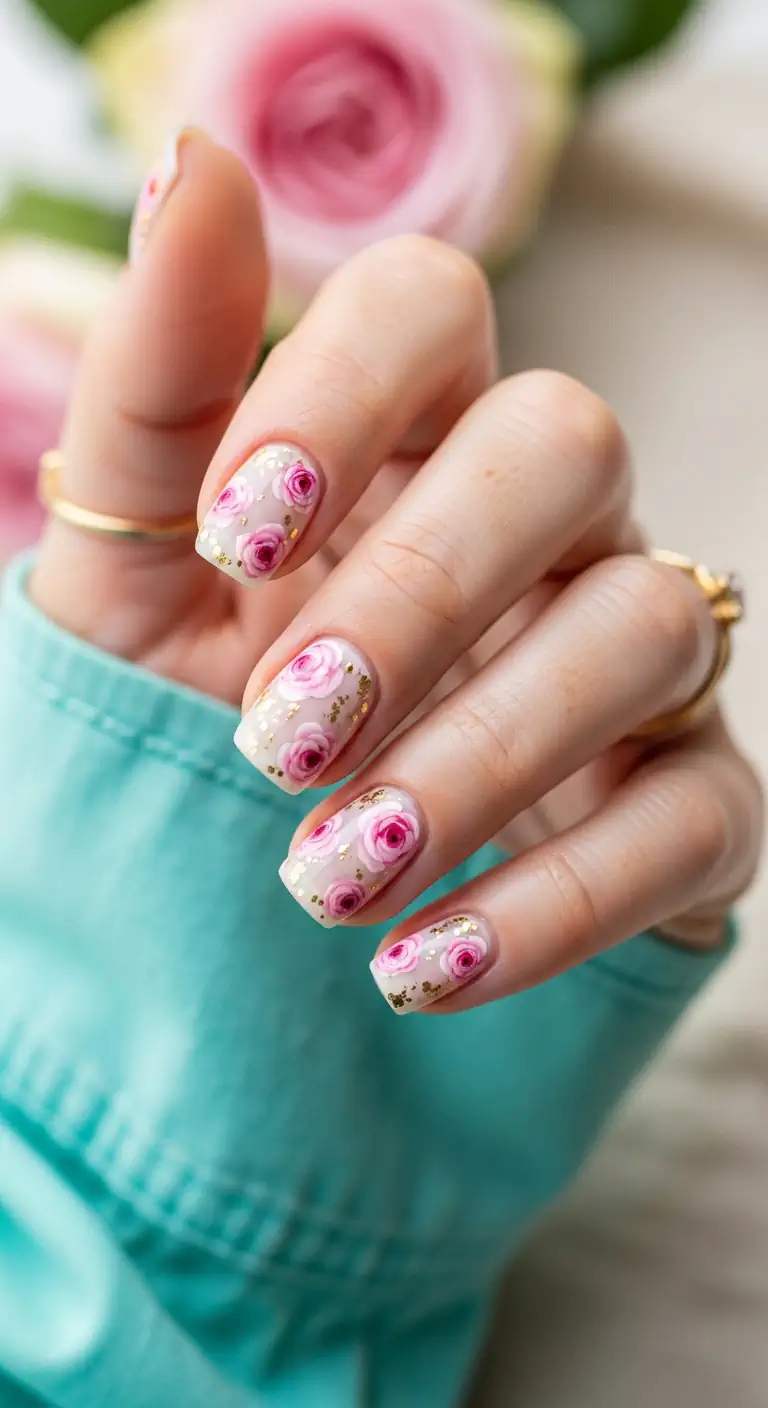
Milky white nails with hand-painted pink roses and gold foil flecks—romantic without being precious.
Overview:
A milky white or cream base with hand-painted pink rose blossoms and scattered gold foil flecks sounds like it could tip into grandmotherly territory fast. It does not, and the reason is the looseness of the execution. The roses are painted in a loose, almost watercolor style—petals that bleed slightly at the edges rather than sitting inside crisp outlines. This painterly approach prevents the florals from reading as decals or stickers, which matters when the goal is artistry rather than decoration.
Gold foil flecks scattered around the roses add a textural contrast that catches light differently than the glossy top coat does. The foil reflects in sharp, angular flashes while the polish surface produces a smooth, even glow. This interplay between the organic florals and the geometric metallic accents is what keeps the design from veering into purely cottagecore territory.
Design Breakdown:
The combination of hand-painted florals and metallic foil requires careful layering to maintain visual clarity.
Base Color: A sheer, milky white or translucent cream. This shade blurs the natural nail bed while maintaining transparency— two coats maximum to avoid looking opaque.
Nail Shape: Short squoval. The structured shape provides a clean frame for the organic, flowing floral art.
Design Element: Hand-painted pink rose blossoms in a loose, layered style, positioned asymmetrically across the nails. Gold foil flecks placed around and between the flowers to catch light.
Finish: High-gloss top coat applied thick enough to encapsulate the foil texture and create a smooth surface.
Get The Look at Home:
Nail stickers are a perfectly valid shortcut if freehand painting feels intimidating—the final effect is remarkably similar.
- Milky base: Apply two thin coats of sheer white or soft cream polish. Let each coat dry fully before the next.
- Paint the roses: Using a detail brush and light pink polish, paint loose, overlapping petal shapes in clusters. Do not aim for botanical accuracy—abstract, blurred edges look more artistic.
- Add depth to the flowers: While the pink is still slightly tacky, dab a slightly darker rose shade into the center of each cluster to create dimension.
- Foil placement: Using a dotting tool dipped in a tiny bit of clear polish, pick up small pieces of gold foil and press them into the gaps between the roses and near the cuticle area.
- Encapsulate: Apply a thick, self-leveling top coat to seal the foil and florals into a smooth, unified surface. A second coat may be needed over the foil areas.

35 Fun Birthday Nail Designs for 2026 🎂
12.Neon Lime Abstract French
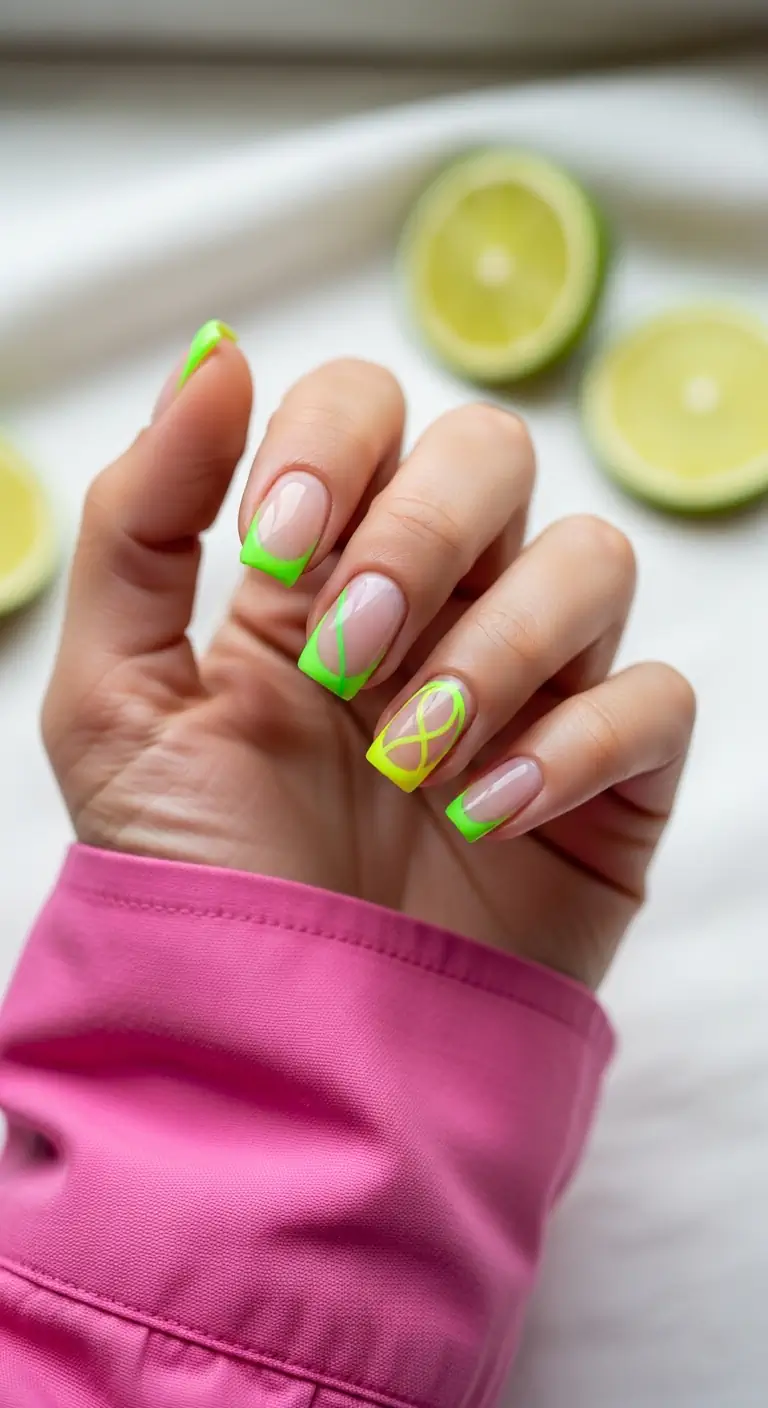
Sky blue with a crisp white geometric grid—architectural, cool, and completely matte.
Overview:
Nothing about this design whispers. Neon lime-green French tips on a sheer nude base are already loud, but the addition of abstract swirling neon line art across the nail bed pushes the energy level higher. The swirls loop and intersect with each other, creating a kinetic, almost psychedelic effect that reads as controlled chaos. The bare nude base beneath all that neon is the key—it provides negative space that prevents the bright green from becoming visually exhausting.
The short squoval shape works here because it provides a clean, geometric framework for the organic neon swirls. The contrast between the structured nail shape and the loose, free-form line art creates a tension that keeps the design interesting. Coffins or almonds would soften that edge and push the design into different territory.
Design Breakdown:
Negative space is essential to this design—without the bare nail showing through, the neon would be overwhelming.
Base Color: A sheer, transparent nude that lets the natural nail bed show through completely. This is the negative space that balances the neon.
Nail Shape: Short squoval. The straight edges provide a geometric contrast to the loose, swirling neon lines.
Design Element: Neon lime-green French tips combined with abstract swirling line art that loops and crosses over the bare nail bed. The lines vary in thickness.
Finish: Glossy top coat to bring the neon to life and protect the line work.
Get The Look at Home:
A white undercoat beneath the neon makes the lime-green glow instead of looking streaky—a trick that changes everything.
- Nude canvas: Apply a sheer, self-leveling nude polish or builder gel to perfect the nail while maintaining transparency.
- Neon French tips: Use a white undercoat on the tips first (neons pop better over white), then trace over with neon lime green for full opacity.
- Swirl lines: Load a long, fine striping brush with neon green polish. Starting from the cuticle or sidewall, pull the brush across the nail in fluid, looping arcs that intersect with each other.
- Vary the pressure: Press harder for thick sections and lighten for thin ones—this variation creates visual movement in the swirls.
- Gloss seal: Apply a thick top coat. Neons dry matte and can look flat without the glossy finish to activate their vibrancy.
13.Sky Blue Geometric Grid

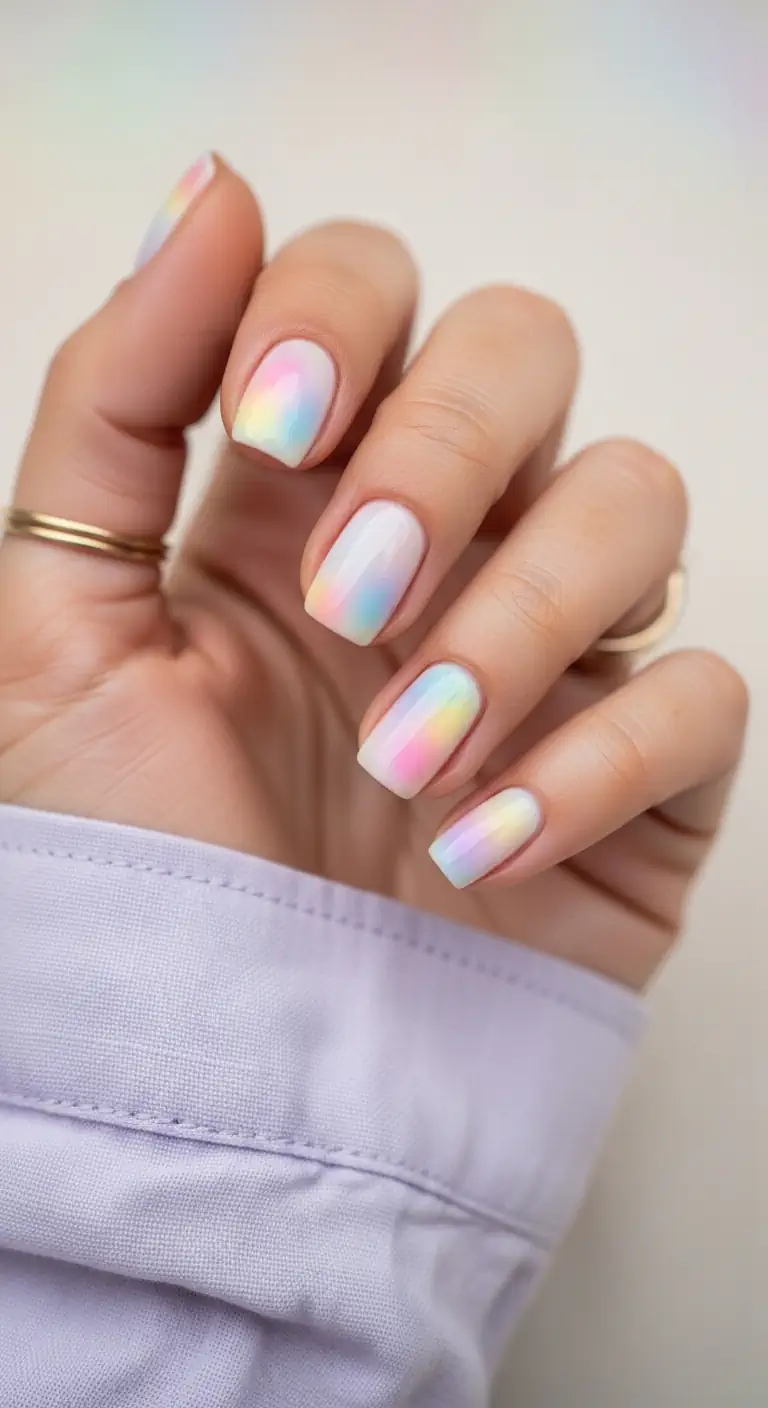
Milky white nails with a diffused pastel rainbow aura in the center—ethereal, iridescent, and soft.
Overview:
What you actually get is a cool, architectural sky blue with white geometric linework and a deliberately matte finish. The matte texture is the defining feature here. Where glossy top coats amplify color and create depth, matte finishes flatten the surface and push the design toward a graphic, almost textile-like quality. The sky blue becomes more of a printed pattern than a painted nail.
The white grid lines—intersecting X-shapes and diamond patterns— look like they belong on a ceramic tile or a piece of woven fabric. On short squoval nails, the geometric structure feels balanced: the straight edges of the nail shape echo the straight lines of the grid, creating a cohesive, intentional look.
Design Breakdown:
A matte finish changes how color behaves—it reduces vibrancy but increases the graphic impact of line work.
Base Color: An opaque, clean sky blue. Not pastel, not navy—this is a true mid-tone blue that reads cheerful and cool simultaneously.
Nail Shape: Short squoval. The straight sidewalls and flat tip provide natural guidelines for geometric patterns.
Design Element: White ultra-thin lines forming intersecting X-shapes and diamond grid patterns across the nails. The lines are uniform in width, creating a structured, architectural feel.
Finish: Matte top coat. This is a deliberate choice—glossy would make this look like a completely different design.
Get The Look at Home:
Striping tape is the most reliable tool for perfectly straight geometric lines—freehand rarely produces results this clean.
- Sky blue base: Apply two solid coats of your sky blue polish and let them dry completely. The base must be hard before applying tape, or the tape will pull up the color.
- Tape the grid: Cut thin pieces of nail striping tape and lay them diagonally across the nail in one direction, then crossing in the opposite direction to form X-shapes and diamonds.
- Paint the lines: Using white polish and a fine detail brush, paint along the edges of the tape to create the white grid lines. The tape acts as a ruler.
- Remove tape: Peel the tape off while the white polish is still wet using tweezers. This ensures the lines stay razor-sharp rather than pulling at the edges.
- Matte top coat: Apply a matte top coat over the entire design. The transformation from glossy to matte happens within seconds and completely changes the character of the design.
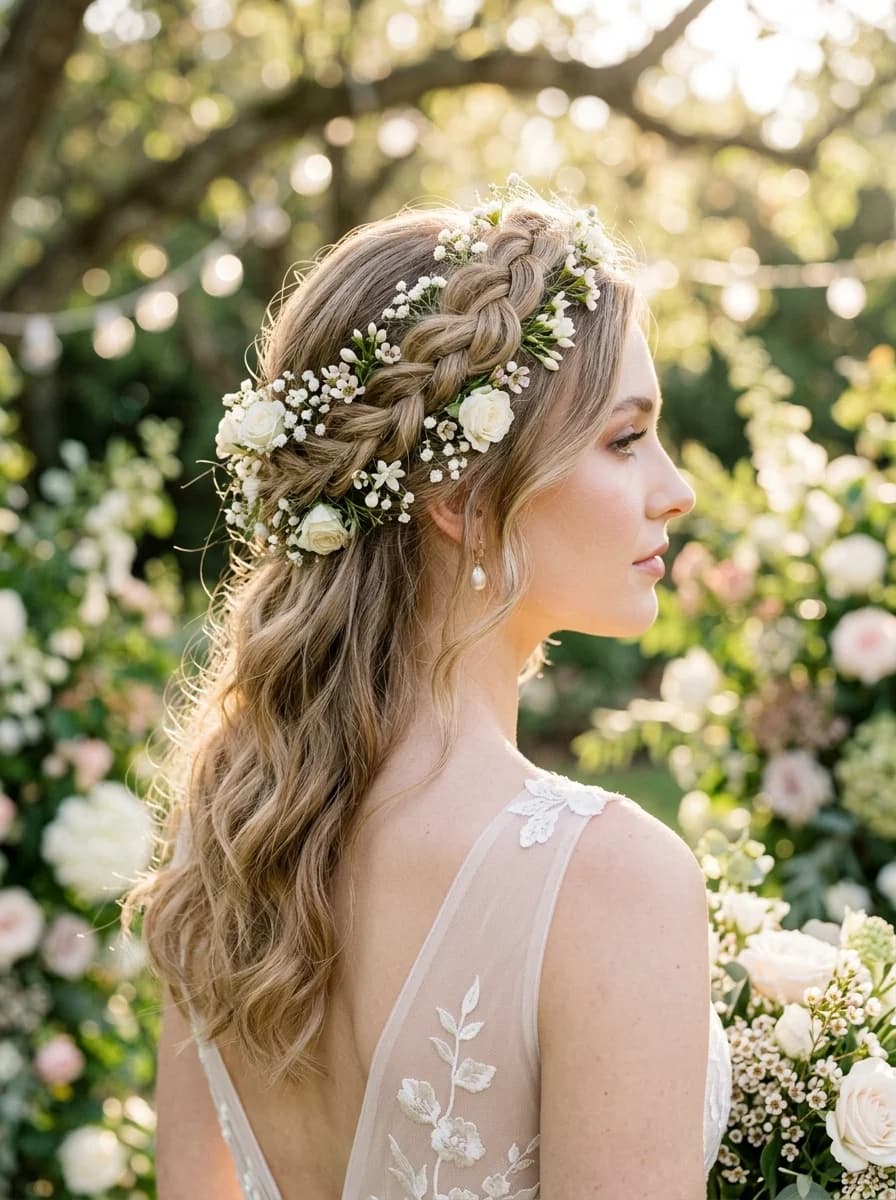
32 Stunning Summer Wedding Hairstyles for Brides ☀️💍
14.Pastel Rainbow Aura
Soft lilac nails with watercolor cherry blossoms that look like they were painted by a gentle breeze.
Overview:
Another title-misdirection moment: despite the geometric grid name, this design is all about softness. A milky white translucent base hosts a diffused pastel rainbow aura that radiates from the center of each nail, blending seamlessly into the white at the edges. The effect looks airbrushed or digitally rendered, but it is achieved through careful layering of sheer pastel polishes or, more commonly, eyeshadow pigments buffed directly onto a tacky base.
The iridescent sheen that sits on top of the gradient adds a second dimension—the nails catch light in shifting rainbow flashes that change depending on the viewing angle. This is not a chrome powder finish; it is more of a pearlescent overlay that lets the pastel colors beneath show through while adding a prismatic top layer.
Design Breakdown:
The soft, diffused quality of this design depends entirely on blending technique rather than precise linework.
Base Color: A sheer, milky white or translucent ivory. Two thin coats create a cloudy, diffused backdrop without full opacity.
Nail Shape: Short squoval with softened corners. The rounded edges complement the soft, blended quality of the aura.
Design Element: A radial gradient in the nail center blending sheer pastel pink, baby blue, and soft lemon yellow into one another and fading outward into the white base.
Finish: Glossy top coat with an iridescent or pearl sheen layered on top, creating a prismatic overlay effect.
Get The Look at Home:
The eyeshadow powder technique produces a more seamless blend than layering polish, and the tools are probably already in your makeup drawer.
- Milky base: Apply two coats of sheer white polish and let it dry fully. A slightly tacky surface helps the powder adhere.
- Grab an eyeshadow palette: Choose matte pastel shades— pink, blue, and yellow work best. A small, fluffy eyeshadow brush is the application tool.
- Buff the aura: Pick up pastel pink powder on the brush and gently tap it into the center of the nail. Without cleaning the brush, pick up blue and buff it next to the pink, letting the edges overlap. Repeat with yellow.
- Blend the edges: Use a clean, dry brush to soften the outer edges of the colored area, feathering it into the white base for a diffused look.
- Top coat reveal: Float a glossy top coat over the nail. The liquid instantly transforms the powdery eyeshadow into a vibrant, seamless gradient. Add an iridescent top coat for the final prismatic layer.
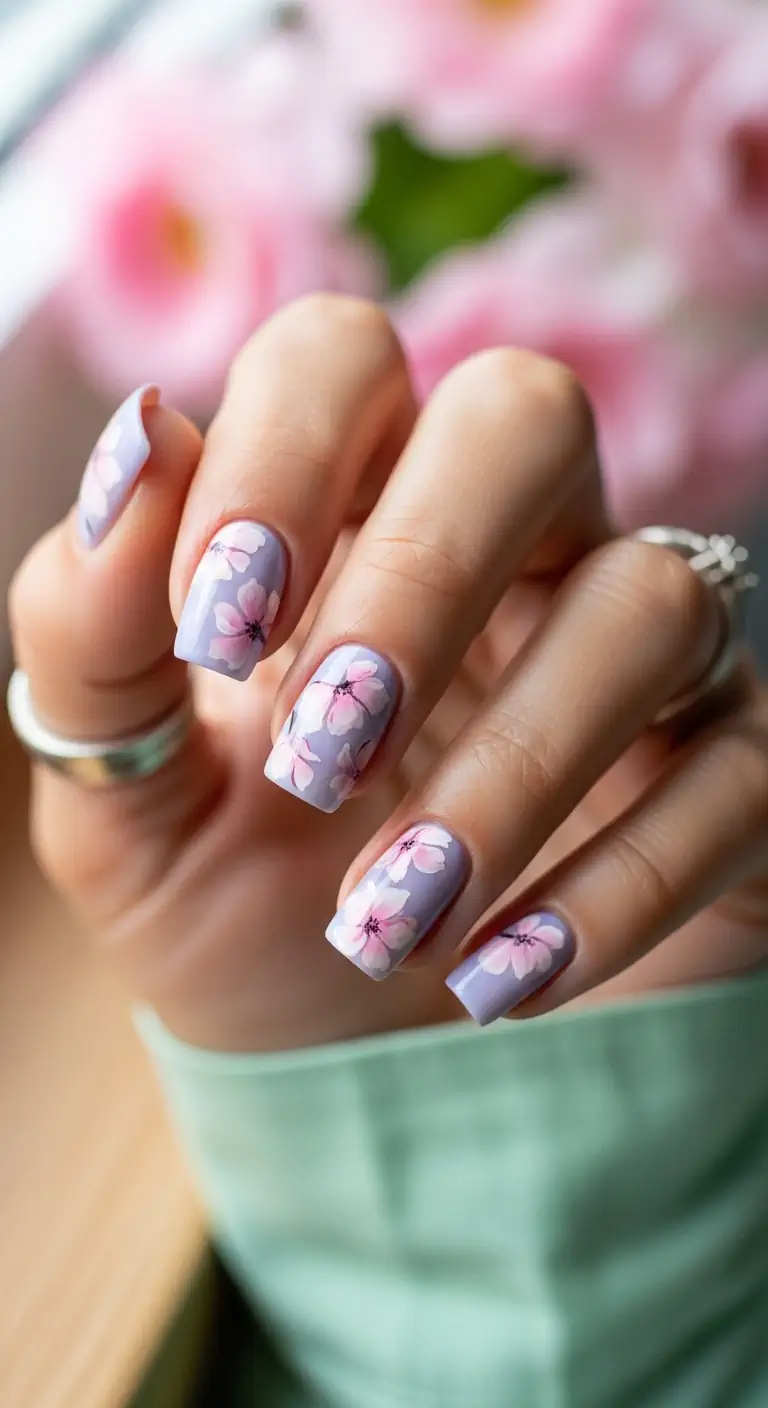
15.Lilac Watercolor Blossoms
Baby blue nails with intricate white boho lace mandala detail on accent fingers—handcrafted, bohemian energy.
Overview:
A soft lilac-lavender base adorned with white and pink cherry blossom watercolor florals. The watercolor technique is what makes this design remarkable—the petals are not painted with crisp, defined edges. Instead, they bleed and feather into the lavender base, creating a stained, translucent effect that looks like a watercolor painting on wet paper.
Cherry blossoms are one of those motifs that walk a fine line between elegant and overdone. The watercolor approach resolves this entirely—the softness of the technique prevents the flowers from reading as literal or kitschy. On short squoval nails, the contained canvas forces the blossoms to stay small and abstract, which enhances the painterly quality.
Design Breakdown:
The watercolor effect depends on diluting polish to create sheer, flowing layers rather than opaque, defined shapes.
Base Color: A creamy, opaque lilac or lavender. This cool- toned pastel provides a calming backdrop that the warm pink petals contrast against.
Nail Shape: Short squoval. The structured shape acts as a clean frame for the organic, fluid artwork.
Design Element: Translucent pink cherry blossom petals with soft, bleeding edges, finished with tiny darker pink or black dots at the center for definition.
Finish: Glossy top coat to bring out the depth of the watercolor layers and add dimension to the sheer petal shapes.
Get The Look at Home:
Acetone is the secret ingredient here—it thins polish into a transparent wash that behaves like actual watercolor paint.
- Lilac foundation: Paint all nails with two coats of your lavender polish. Let it dry completely before moving to the next step.
- Create a matte surface: Apply a matte top coat over the lavender. Watercolor techniques work much better on a matte, slightly textured surface because the diluted polish grips rather than sliding.
- Mix the watercolor: Place a drop of bright pink polish on a piece of tin foil. Dip a brush in pure acetone and mix it into the pink to create a watery, transparent wash.
- Paint the petals: Dab the watery pink mixture onto the nail in rough petal shapes. The acetone evaporates quickly, leaving a stained, translucent effect. Layer multiple petals for depth.
- Center details: Use a tiny dotting tool with dark brown or black polish to place a few dots where the petals meet, then seal with a glossy top coat to restore the depth.

34 Cutest Butter Yellow Nail Designs for 2026 🧈
16.Hot Coral Sunset Ombre
A sheer nude-to-neon coral gradient that looks like the last five minutes before sunset over the ocean.
Overview:
Ombre gradients are one of those techniques that look deceptively simple in photos but require genuine patience to execute well. This particular version—a seamless melt from sheer nude at the cuticle to a hot coral-neon pink at the tips—works because the color transition is concentrated at the free edge rather than spanning the entire nail. The result looks airbrushed and intentional rather than patchy.
The medium-long almond shape provides enough surface area for the gradient to develop gradually. A shorter nail would compress the transition zone, making the ombre look abrupt instead of diffused. The almond taper also elongates the fingers visually, which amplifies the sunset metaphor—everything pulls downward toward a glowing horizon line.
Design Breakdown:
A seamless two-color gradient relies on the sponge technique to blend the transition zone.
Base Color: A sheer, translucent nude-pink that closely matches the natural nail bed color. This creates the "fade from nothing" effect at the cuticle.
Nail Shape: Medium-long almond. The extended length and tapered tip give the gradient room to develop its full range.
Design Element: A concentrated ombre at the tips blending from the nude base into a vivid coral-neon pink. The transition zone should be roughly one-third of the total nail length.
Finish: Glossy top coat applied thick enough to smooth out any texture left by the sponge application.
Get The Look at Home:
A makeup sponge is the standard tool for this technique, but the key is building opacity gradually rather than loading too much polish at once.
- Nude foundation: Apply one coat of your sheer nude polish over the entire nail to establish an even, natural base tone.
- Prep the sponge: Paint a stripe of nude and a stripe of neon coral-pink side by side on a wedge makeup sponge. The colors should touch but not overlap.
- Dab the tips: Press the sponge onto the nail tip, rolling gently from side to side. Reload the sponge and repeat five to six times, gradually moving the sponge slightly higher each pass to build the gradient.
- Clean the skin: Sponging deposits polish on the surrounding skin. Use a cleanup brush dipped in acetone to wipe the edges while the polish is still slightly wet.
- Smooth and seal: Apply two coats of glossy top coat. The second coat is important—it fills the porous texture left by the sponge and creates a truly seamless gradient.
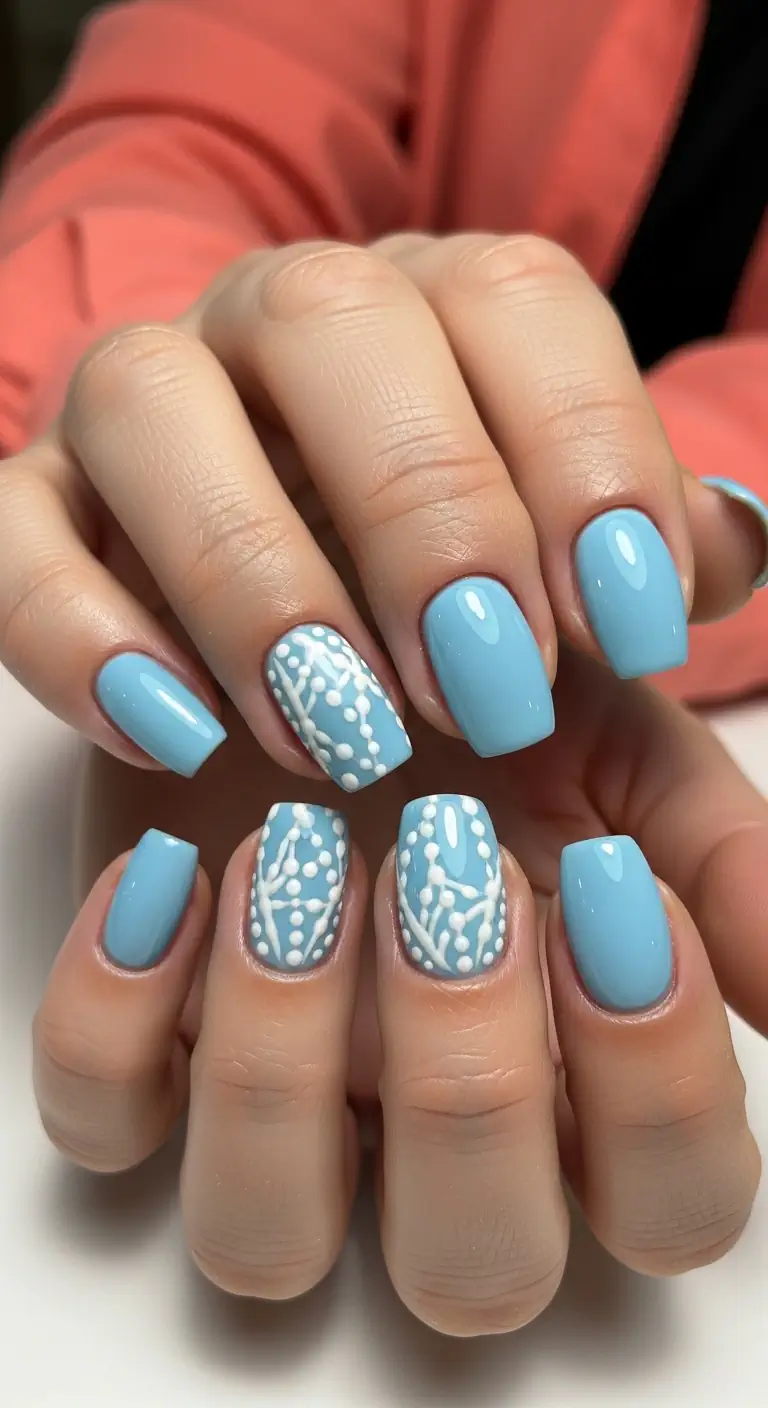
17.Baby Blue Boho Lace
Clear nude nails with layered teal and aqua wave bands—ocean-inspired without being literal about it.
Overview:
A cool baby blue with white boho lace mandala patterns concentrated on the ring and middle fingers. This is a design that rewards close inspection—from a distance, the white lace reads as a general textured pattern, but up close, the intricate dot work and curved lines reveal themselves as a deliberate, almost henna-like mandala.
Concentrating the heavy art on just two accent fingers is a practical choice that also looks better. Covering all five nails with this level of detail would be exhausting both to create and to wear. The solid baby blue on the remaining nails lets the lace fingers function as statement pieces without the overall effect becoming overwhelming.
The lace pattern has a slightly raised texture from the layered dot work, which means a thick top coat is necessary to smooth the surface. Without it, the design catches on fabric and hair—a real practical downside to this level of detail.
Design Breakdown:
High-contrast white on blue creates the sharp definition needed for intricate lace patterns to read clearly.
Base Color: A clean, opaque baby blue or powder blue. The cool undertone makes the warm white of the lace pattern pop.
Nail Shape: Short squoval. The wider nail bed of the squoval provides more surface area for the mandala detail.
Design Element: White dot-and-line lace mandala pattern concentrated on the ring and middle fingers. The pattern features curved framework lines embellished with descending dot rows and scalloped edges.
Finish: Thick glossy top coat, applied in two layers to encapsulate the raised dot texture.
Get The Look at Home:
The descending-dot technique—where dots naturally shrink as the polish runs off the tool—creates a tapered lace effect with almost no skill required.
- Blue base: Apply two coats of baby blue polish to all nails. Let them dry fully so the dotting tool does not dent the surface.
- Framework lines: On the accent nails, use a fine detail brush and white polish to draw the main structural curves—a central diamond shape or intersecting arcs that define the mandala layout.
- Dot the scallops: Load a medium dotting tool with white polish and place dots along the framework lines to create a scalloped, lace-like border.
- Descending dots: Use a smaller dotting tool. Load it once, then dab in a line moving outward from the design. As the polish depletes, the dots naturally shrink, creating a tapered fringe.
- Seal the texture: Apply two generous coats of top coat to smooth out the raised dot work and prevent it from snagging.

25 Stunning Summer Vacation Hairstyles for 2026 ☀️🌊
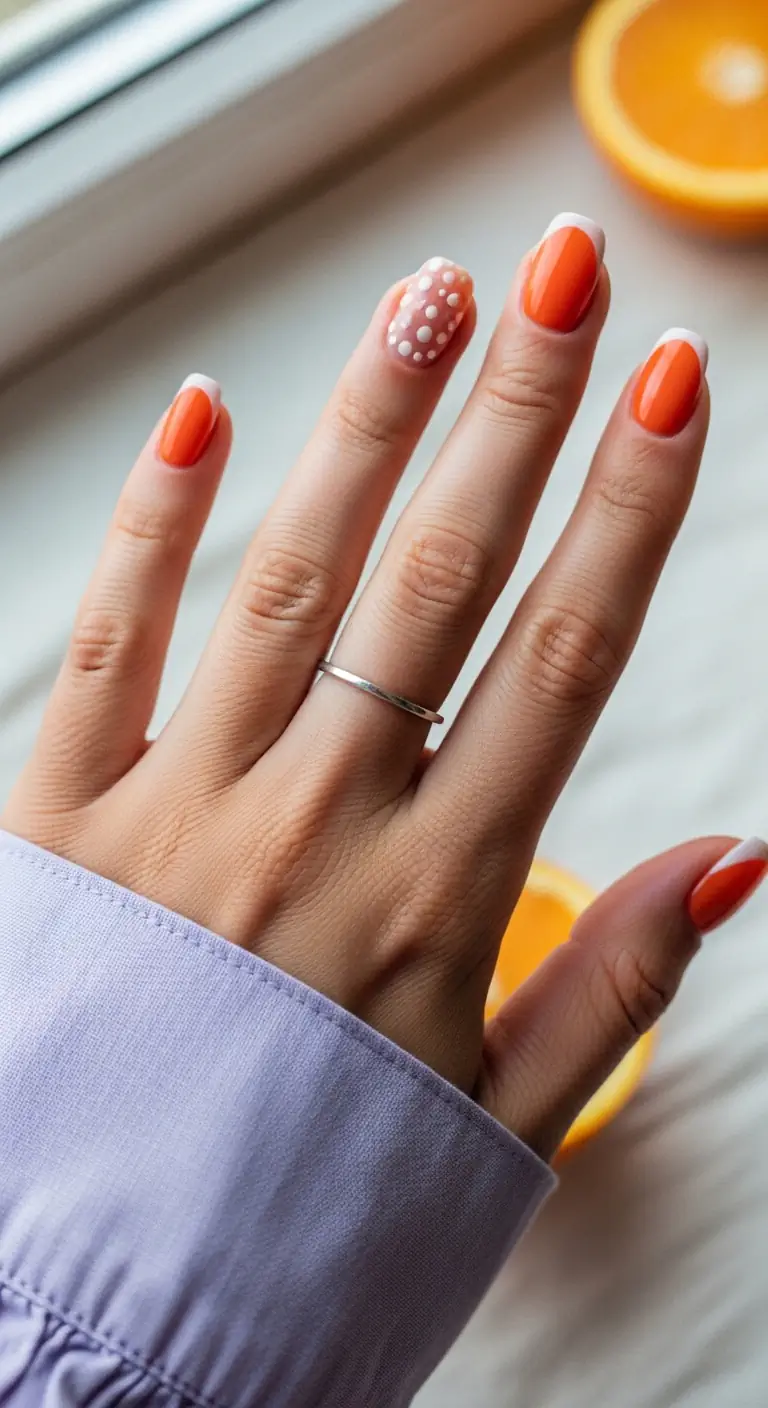
18.Tangerine French Glaze
Sheer nude nails with bright tangerine French tips—clean, zesty, and effortlessly summer-ready.
Overview:
The most effective French tip variations are the ones that keep the formula simple: sheer base, bold tip, clean line. This design delivers exactly that—a translucent pink nude base that lets the natural nail show through, paired with vivid orange tips that read as a burst of citrus color. The ring finger breaks the pattern with white polka dots scattered across a sheer base, adding a playful accent that elevates the entire set.
Short squoval nails are the ideal shape for a colored French tip. The flat free edge provides a clean, straight line for the orange to follow, and the squared-off corners prevent the design from looking too soft or rounded. The polka dot accent nail adds visual interest without overwhelming the clean simplicity of the French tips on the remaining nails.
Design Breakdown:
A colored French tip with a single accent nail creates a balanced design that feels intentional rather than busy.
Base Color: A sheer, translucent pink or nude that blurs nail imperfections while maintaining a "your nails but better" transparency.
Nail Shape: Short squoval. The flat tip provides a clean canvas for the French smile line.
Design Element: A medium-width French tip in bright orange on four nails. The ring finger features white polka dots scattered across the sheer nude base for a playful accent.
Finish: High-gloss top coat to smooth the transition between the sheer base and the opaque tip.
Get The Look at Home:
A silicone stamper hack produces a perfect French smile line in seconds without any freehand painting required.
- Sheer base: Apply two coats of your sheerest nude or pink polish. Let it dry fully—the next step depends on the surface being hard.
- Stamper method: Paint a stripe of orange polish directly onto a silicone nail stamper pad. Press the tip of your nail into the painted stamper at a 45-degree angle—the polish will transfer onto the tip in a perfect French curve.
- Polka dot accent: On the ring finger, use a medium dotting tool dipped in opaque white polish to place scattered dots across the sheer nude base. Vary the spacing for a playful, organic feel.
- Clean the line: Dip a small angled brush in acetone to sharpen the smile line and remove any orange polish that migrated onto the skin.
- Top coat: Seal the design with a generous glossy top coat to smooth the ridge between the sheer base and the painted tip.
19.Tropical Ocean Waves
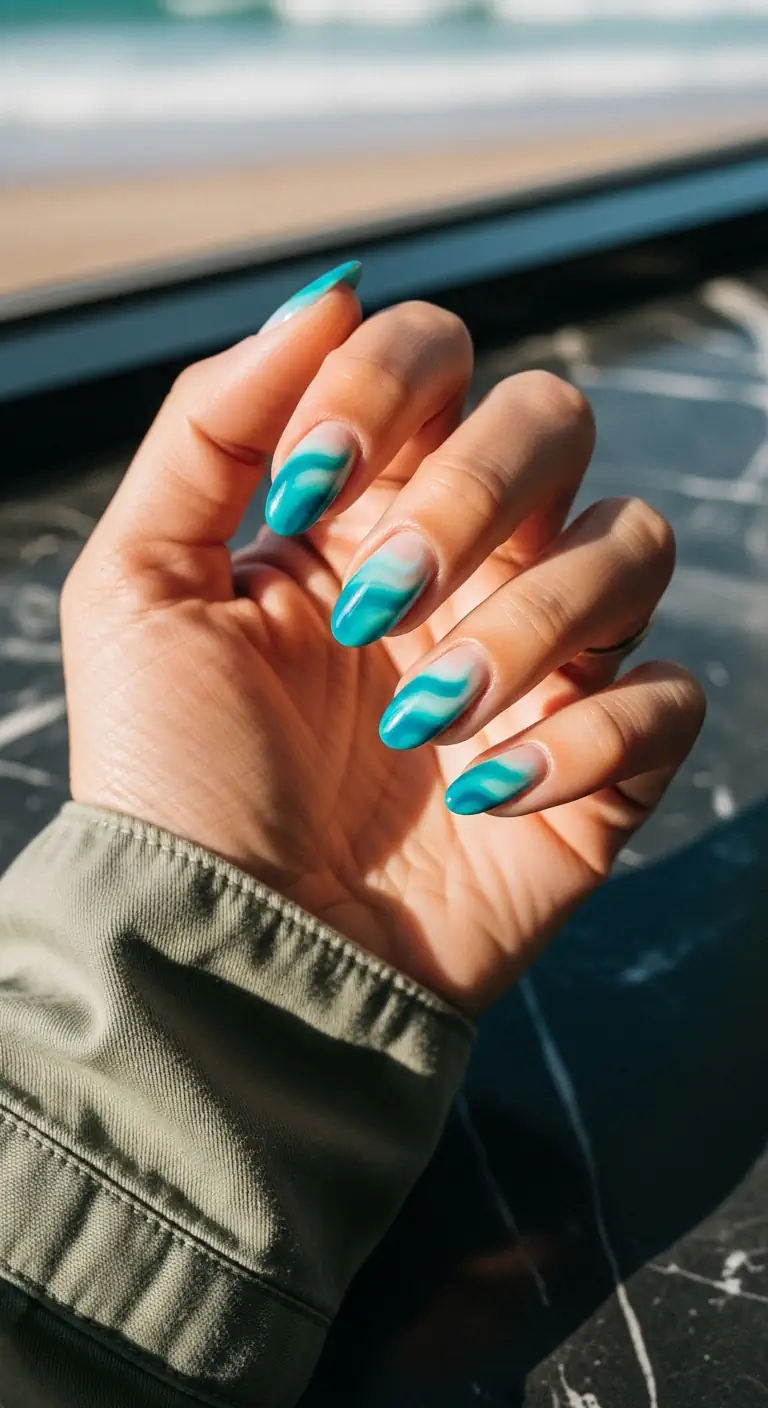
Clear nude nails with layered teal and aqua wave bands—ocean-inspired without being literal about it.
Overview:
Not every ocean-themed nail design needs seashells and starfish. This set takes the aquatic reference in a more abstract direction: medium almond nails with a clear or nude base and bands of teal and aqua blue flowing across them in wave-like patterns. The negative space of the nude base is what makes this design breathe. The blue bands—rendered in two distinct tones, a deeper teal and a brighter aqua—look like currents of water moving across the nail surface.
The wave bands are not structured or geometric. They flow with a natural, organic quality that suggests water in motion rather than a painted pattern. This loose, fluid approach works particularly well on the almond shape, where the tapered tip enhances the sense of movement. The glossy finish adds a wet-look quality that reinforces the aquatic theme without being heavy-handed about it.
Design Breakdown:
Two tones of blue over a nude base create depth through color variation rather than texture or pattern.
Base Color: A sheer, natural nude or clear base coat. The transparency of the nail bed is a design element, not a shortcut.
Nail Shape: Medium almond. The elongated, tapered shape complements the flowing, wave-like bands.
Design Element: Horizontal or slightly diagonal wave bands in two shades—deep teal and bright aqua blue—layered across the nude base. The bands vary in width and spacing.
Finish: Glossy top coat that gives the blue bands a wet, lacquered appearance.
Get The Look at Home:
Loading multiple colors onto a single brush stroke creates the blended, water-like effect without precise color placement.
- Nude base: Apply a sheer nude or clear base coat and let it dry. The base should look clean and healthy—it is the backdrop for everything.
- First wave: Using a flat brush loaded with teal polish, paint a horizontal band across the nail about one-third of the way up from the cuticle. Let the edges stay slightly irregular— do not try to make them perfectly straight.
- Second wave: Clean the brush and load it with bright aqua. Paint a second band above the teal, leaving a small gap of nude showing between them.
- Blend the edges: While both colors are still slightly wet, use a clean, dry brush to gently blur the top edge of each band, creating a softer transition.
- Top coat: Apply a glossy top coat to seal the bands and create a unified, wet-look surface.

31 Patriotic Fourth of July Nail Ideas for 2026 🇺🇸
20.Rose Quartz Pearl Glaze
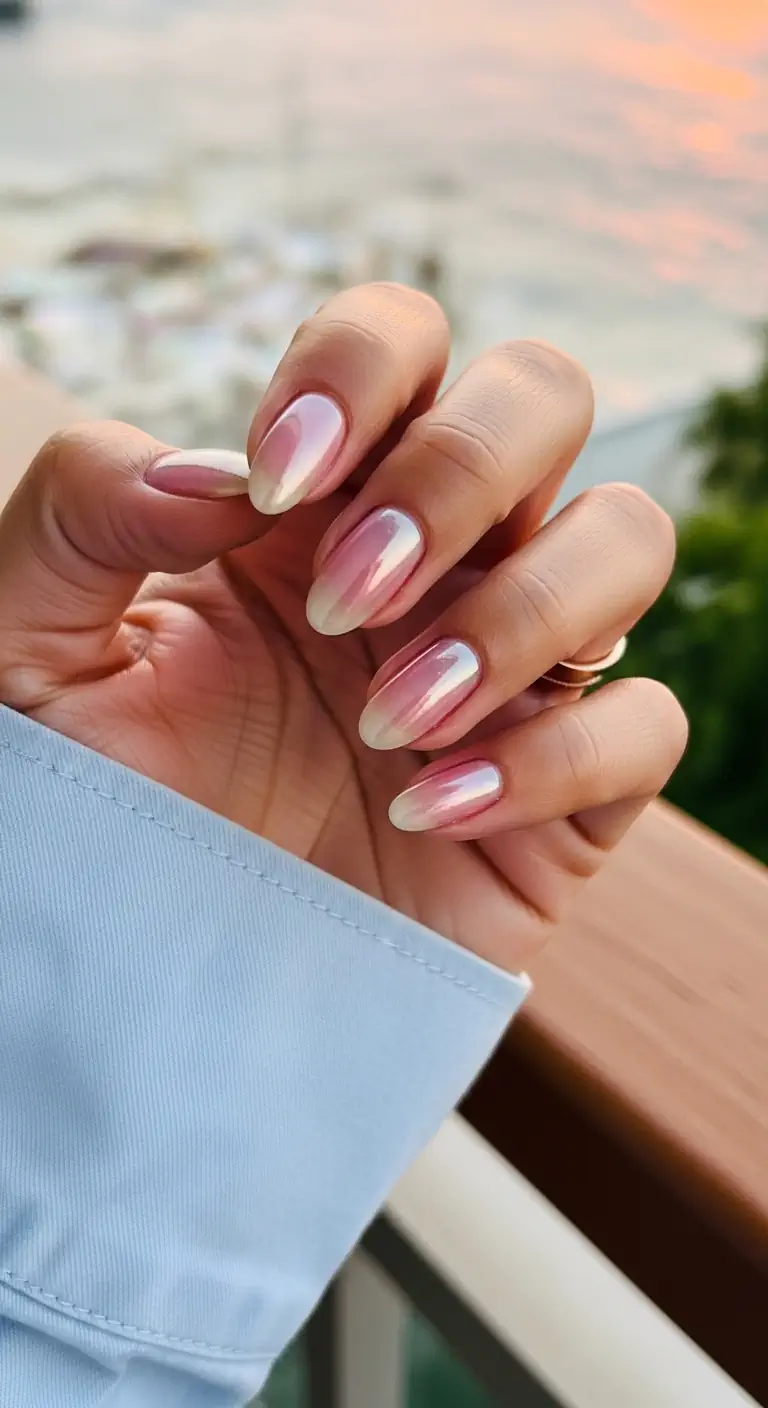
Pink-to-white ombre with a pearl chrome glaze—soft, luminous, and impossibly smooth.
Overview:
The title tells you exactly what this is: rose quartz rendered in nail form. A pink-to-white ombre gradient covers the entire nail, with the transition concentrated near the tips where the white is most opaque. The pearl chrome glaze layered on top transforms what would already be a beautiful gradient into something that catches and scatters light with every movement—less "nail polish" and more "gemstone."
The short-medium almond shape is the right call for this type of subtle design. The curved surface of the almond distributes the pearl finish evenly, avoiding the flat, patchy look that can happen on sharper square shapes. The tapered tip also elongates the fingers, which amplifies the ethereal quality of the rose quartz effect.
Design Breakdown:
A subtle gradient with a chrome overlay—the design relies on light interaction rather than bold color or pattern.
Base Color: A sheer, translucent pink that transitions to milky white. This can be achieved with two different polishes sponged together, or with a single ombré-effect polish.
Nail Shape: Short-medium almond. The rounded surface maximizes the pearl chrome's light-catching quality.
Design Element: A seamless pink-to-white ombre covering the full nail, with a white-pearl or iridescent chrome powder buffed over the entire surface.
Finish: Pearl chrome glaze sealed with a glossy top coat. The chrome provides the finish; the top coat protects it.
Get The Look at Home:
Chrome powder is what transforms this from a simple gradient into something that looks genuinely expensive.
- Pink base: Apply two coats of your sheer pink polish to the entire nail and let it dry.
- White tip gradient: Paint milky white polish onto a makeup sponge and dab it onto the nail tips, gradually building opacity toward the free edge. The white should blend softly into the pink rather than creating a hard line.
- Chrome application: Apply a no-wipe top coat (for gel) or a water-based top coat (for regular polish) and let it reach a tacky state. Rub pearl chrome powder over the entire surface using a silicone tool or eyeshadow sponge.
- Dust and seal: Brush away excess chrome powder from the cuticles and skin, then apply a final glossy top coat to lock the finish in place.
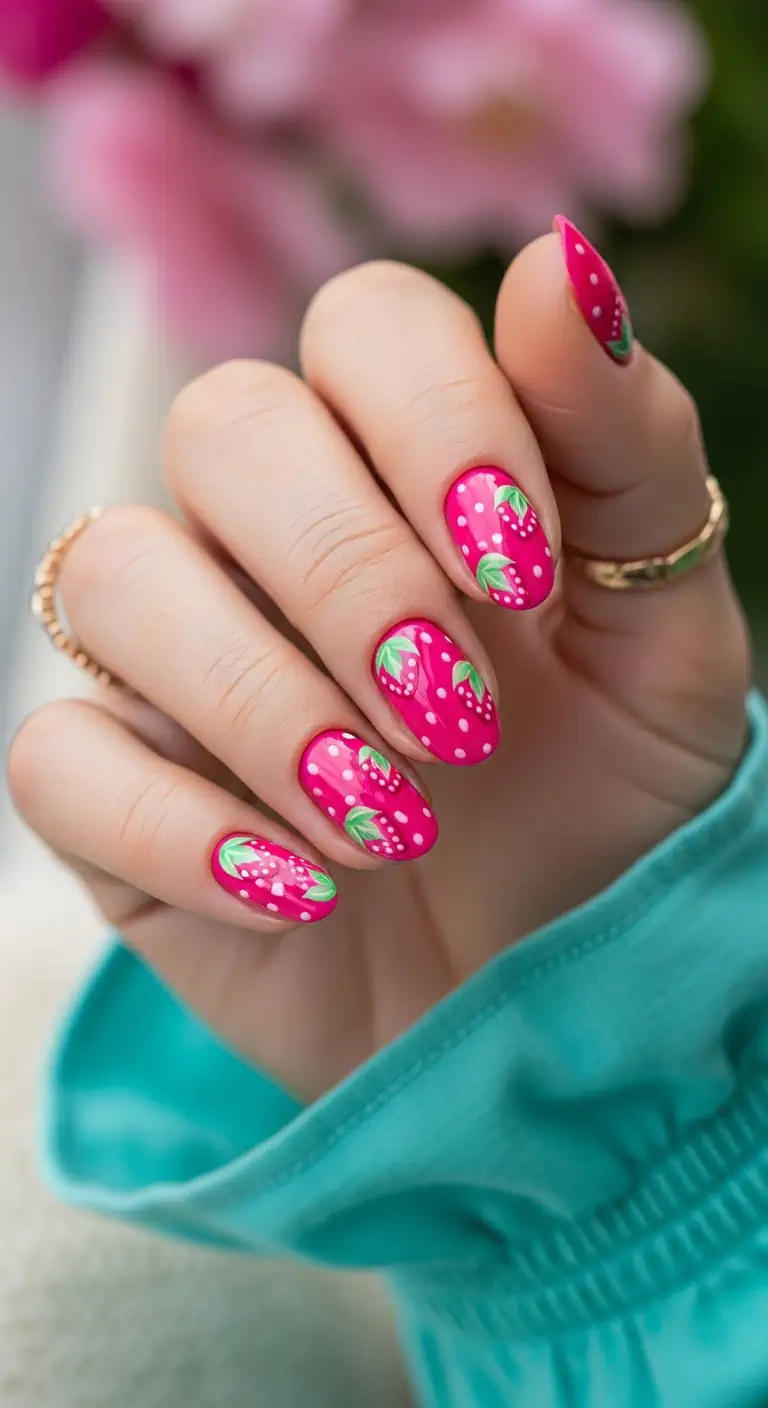
21.Sweet Strawberry Patch
Sage green nails with coral-red hibiscus blooms—an earthy-tropical combination that should not work but absolutely does.
Overview:
Hot pink and strawberries are a match that feels almost too obvious in retrospect. The bright magenta base reads bold and unapologetic on its own, but the addition of hand-painted strawberry motifs— complete with white seed dots and tiny green leaf tops—transforms the set into something that feels like summer distilled into nail form. The strawberries are painted with enough detail to be immediately recognizable without crossing into realistic territory.
The short oval shape complements the rounded strawberry forms perfectly. The organic curves of the fruit motifs echo the soft silhouette of the nail, creating a visual harmony that keeps the design feeling cohesive rather than chaotic. The glossy finish is essential here—it gives the pink base a juicy, saturated quality that reinforces the strawberry theme.
Design Breakdown:
A saturated pink base with simple fruit motifs creates a design that is both bold and charming.
Base Color: A bright, opaque hot pink or magenta. This should be a cream finish without shimmer—the fruit art needs a solid, saturated backdrop.
Nail Shape: Short oval. The rounded shape mirrors the organic curves of the strawberry motifs.
Design Element: Hand-painted strawberry shapes using a slightly lighter pink or red for the fruit body, white dots for seeds, and bright green for the leafy tops. The strawberries are scattered across the nails in varying sizes.
Finish: Glossy top coat to enhance the vibrancy of the pink and give the strawberries a juicy, fresh-picked quality.
Get The Look at Home:
A dotting tool handles the seed details perfectly—this is a beginner-friendly design that looks more complex than it actually is.
- Pink base: Apply two coats of your hot pink or magenta polish. Let it dry completely before adding the fruit art.
- Strawberry shapes: Using a detail brush and a slightly lighter pink or red polish, paint rounded triangular strawberry shapes scattered across the nails. Keep them varying in size and angle for a natural look.
- Seed dots: Load a small dotting tool with opaque white polish and place tiny dots across each strawberry body to represent seeds. Space them evenly for a clean, graphic effect.
- Leaf tops: Using a fine liner brush and bright green polish, paint small V-shaped leaf clusters at the top of each strawberry. Two or three tiny strokes per berry are enough.
- Glossy seal: Apply a generous top coat to smooth out the texture of the painted details and give the entire design a juicy, high-shine finish.

21 Hot Summer Buns Hairstyle Ideas for 2026 ☀️🔥
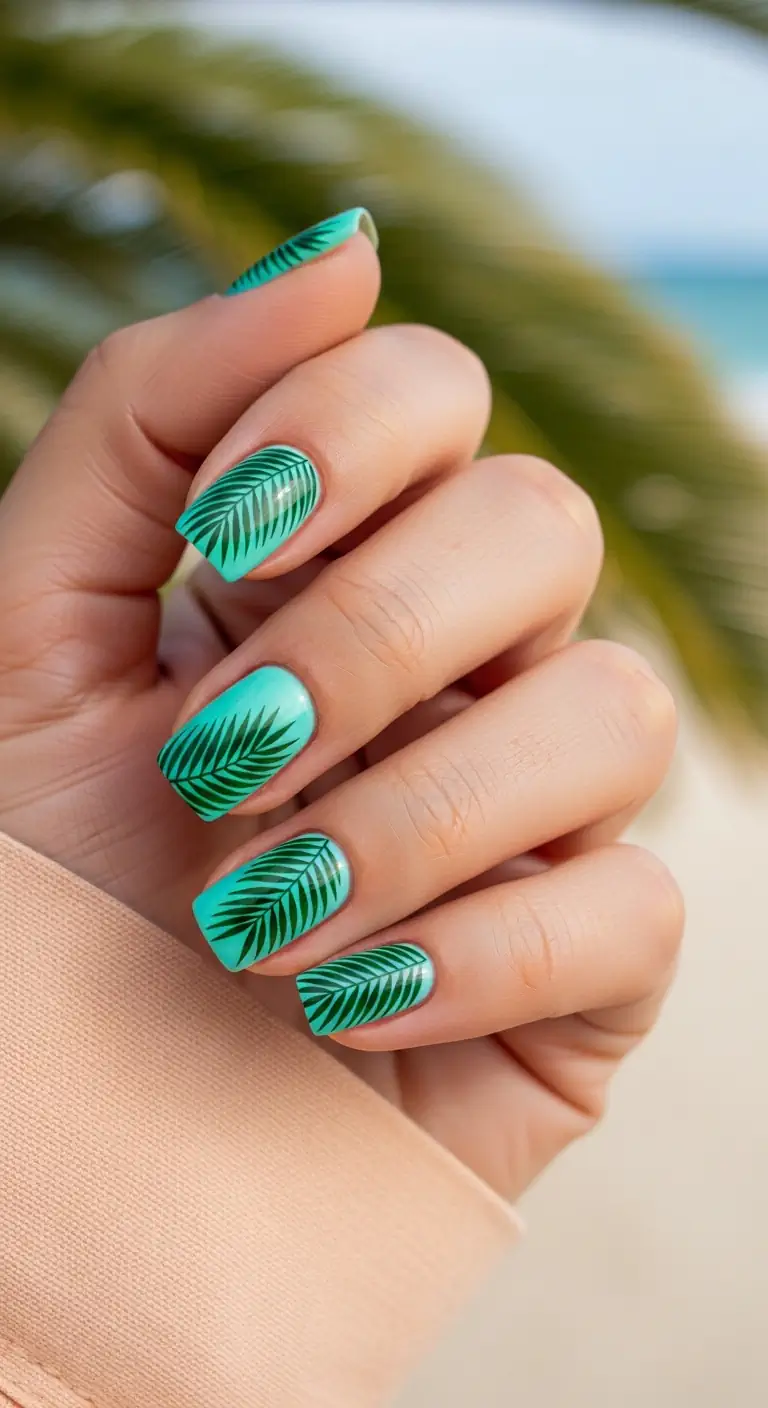
22.Resort Palm Fronds
Aqua turquoise nails with dark green palm frond silhouettes—tropical, saturated, and vacation-ready.
Overview:
Bright aqua turquoise as a base color is already a statement— saturated, electric, the kind of shade that makes you feel like you are standing ankle-deep in Caribbean water. Adding dark green palm frond silhouettes on top pushes the tropical energy higher without making the design feel busy. The contrast between the vivid blue and the deep forest green of the palm leaves creates a layered depth that reads like looking through clear water at vegetation below the surface.
The palm fronds are rendered as silhouettes rather than detailed botanical illustrations—dark shapes against a bright background rather than green leaves with visible veins and texture. This simplified approach keeps the design graphic and modern. On short square nails, the contained canvas forces the fronds to stay compact, which enhances the silhouette effect.
Design Breakdown:
Two shades of blue-green create a monochromatic depth that reads as lush and layered.
Base Color: A bright, opaque aqua turquoise. This shade leans more blue than green, creating a pool-water effect.
Nail Shape: Short square. The clean, structured shape provides a modern frame for the organic palm frond shapes.
Design Element: Dark green palm frond silhouettes originating from the cuticle or sidewall of the nail, fanning outward in simplified, leaf-like shapes. The fronds are solid dark green without internal detail.
Finish: Glossy top coat to maintain the wet, tropical quality of the aqua base.
Get The Look at Home:
Stamping plates with tropical leaf designs eliminate the need for freehand painting and produce cleaner, more uniform silhouettes.
- Aqua foundation: Apply two coats of bright aqua polish and let them dry completely.
- Stamping method: Use a tropical-themed stamping plate. Apply dark green stamping polish to the palm leaf design, scrape the excess, pick it up with a stamper, and roll it onto the nail at an angle.
- Freehand alternative: Use a thin striping brush and dark green polish. Draw one curved central spine, then flick quick, tapered strokes outward on both sides to create the frond shape.
- Placement: Start the fronds from the corners or cuticle area of the nail so they fan outward naturally rather than floating in the center.
- Top coat: Float a glossy top coat over the design to avoid dragging the green polish across the aqua base.
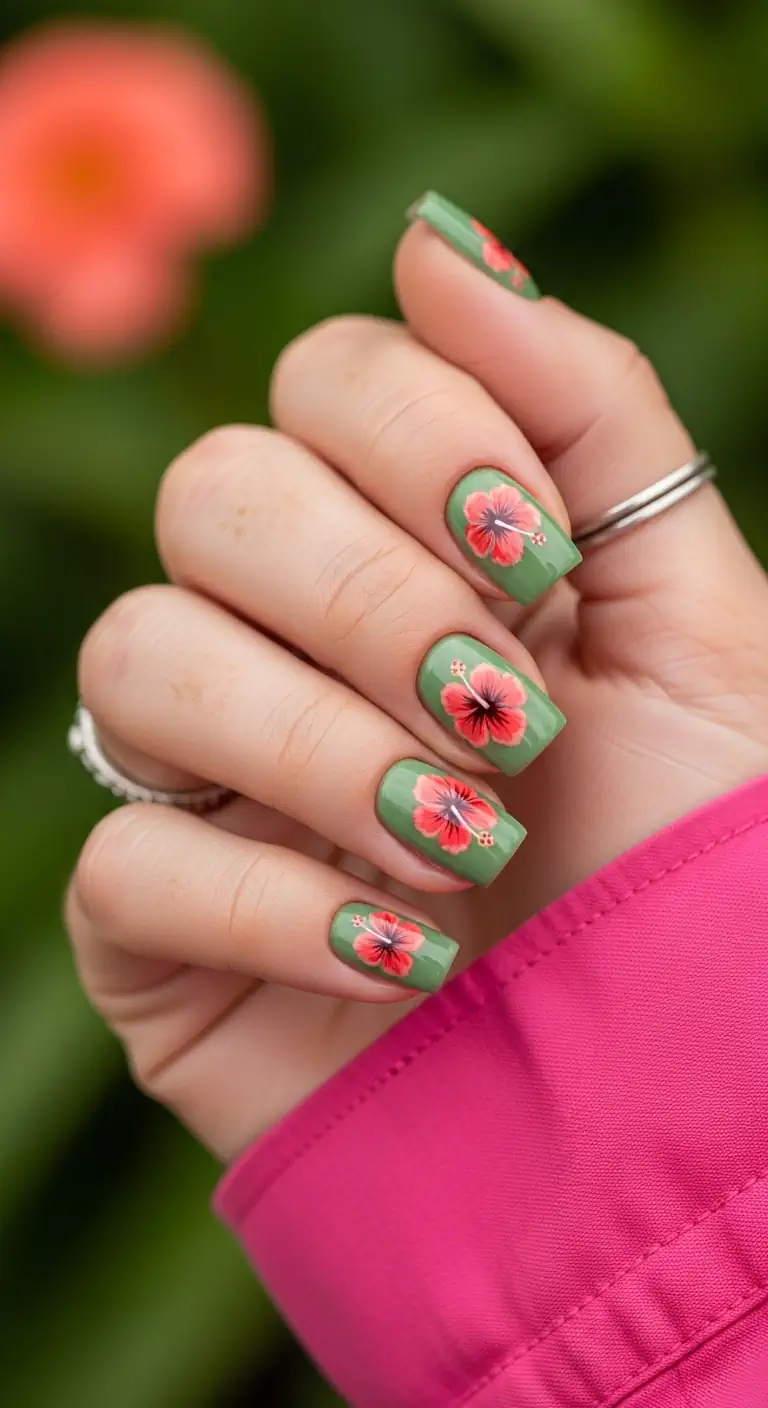
23.Matcha Hibiscus Bloom
Sage green nails with coral-red hibiscus blooms—an earthy-tropical combination that should not work but absolutely does.
Overview:
Earthy green and tropical flowers are an unlikely pairing, yet this set makes a convincing case for both. The muted sage or olive green base reads calm, grounded, and almost autumnal—until the coral-red hibiscus flowers appear on top, instantly pulling the design into summer territory. The hibiscus blooms are painted with enough detail to be recognizable (you can see the petals, the dark center, and the prominent stamen) without being so literal that they look like botanical illustrations.
This combination works because the green functions as a neutral. Sage and olive tones sit alongside beige, tan, and brown in the color-temperature range, which means they pair with almost anything— including bright, saturated florals. The hibiscus becomes the focal point while the green background provides a resting place for the eye.
Design Breakdown:
The success of this design relies on the earthy base grounding the vibrant floral art without competing for attention.
Base Color: A muted sage, olive, or matcha green. This should be a cream finish without shimmer—matte or metallic would change the entire character.
Nail Shape: Short square. The clean, structured shape keeps the organic hibiscus flowers from looking too wild or uncontrolled.
Design Element: Hand-painted coral-red hibiscus flowers featuring layered petals, a dark burgundy center, and a prominent stamen detail. Positioned asymmetrically across the nails.
Finish: Glossy top coat to bring out the vibrancy of the coral against the muted green.
Get The Look at Home:
Layering two or three shades of red and pink within each flower creates depth that a single color cannot achieve.
- Green base: Apply two coats of your sage or olive green polish. Let it dry fully.
- Petal shapes: Using a detail brush and coral-pink polish, paint five slightly ruffled petal shapes in a loose circle. The petals should overlap slightly at their bases.
- Center depth: While the pink is still slightly wet, dab a darker cherry red or burgundy into the center of the flower. Let it bleed outward into the pink naturally.
- Stamen detail: Once dry, use a very fine brush to paint a thin, curved line extending from the center using white or light pink. Add tiny yellow dots at the end to represent pollen.
- Seal the art: Apply a thick glossy top coat, floating the brush to avoid dragging the painted petals.

27 Stunning Graduation Day Nail Ideas for 2026 🎓
24.Electric Abstract Tips
Neon lime-green French tips with abstract swirling line art on a bare nude base—loud, graphic, and unapologetically fun.
Overview:
Nothing about this design whispers. Neon lime-green French tips on a sheer nude base are already loud, but the addition of abstract swirling neon line art across the nail bed pushes the energy level higher. The swirls loop and intersect with each other, creating a kinetic, almost psychedelic effect that reads as controlled chaos. The bare nude base beneath all that neon is the key—it provides negative space that prevents the bright green from becoming visually exhausting.
The short squoval shape works here because it provides a clean, geometric framework for the organic neon swirls. The contrast between the structured nail shape and the loose, free-form line art creates a tension that keeps the design interesting. Coffins or almonds would soften that edge and push the design into different territory.
Design Breakdown:
Negative space is essential to this design—without the bare nail showing through, the neon would be overwhelming.
Base Color: A sheer, transparent nude that lets the natural nail bed show through completely. This is the negative space that balances the neon.
Nail Shape: Short squoval. The straight edges provide a geometric contrast to the loose, swirling neon lines.
Design Element: Neon lime-green French tips combined with abstract swirling line art that loops and crosses over the bare nail bed. The lines vary in thickness.
Finish: Glossy top coat to bring the neon to life and protect the line work.
Get The Look at Home:
A white undercoat beneath the neon makes the lime-green glow instead of looking streaky—a trick that changes everything.
- Nude canvas: Apply a sheer, self-leveling nude polish or builder gel to perfect the nail while maintaining transparency.
- Neon French tips: Use a white undercoat on the tips first (neons pop better over white), then trace over with neon lime green for full opacity.
- Swirl lines: Load a long, fine striping brush with neon green polish. Starting from the cuticle or sidewall, pull the brush across the nail in fluid, looping arcs that intersect with each other.
- Vary the pressure: Press harder for thick sections and lighten for thin ones—this variation creates visual movement in the swirls.
- Gloss seal: Apply a thick top coat. Neons dry matte and can look flat without the glossy finish to activate their vibrancy.
25.Vanilla Girl Shimmer
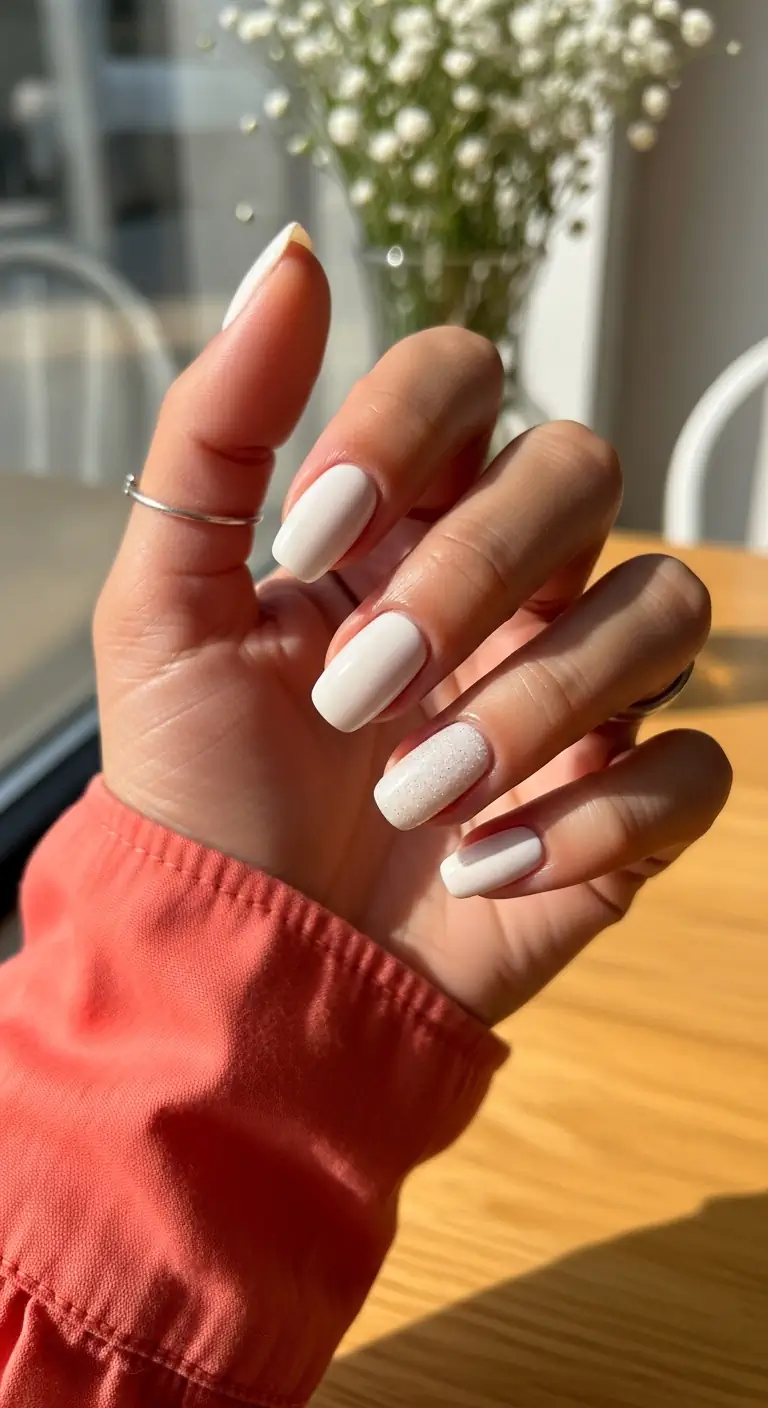
Creamy ivory nails with a single glittering silver accent—the definition of understated elegance.
Overview:
The vanilla girl aesthetic distilled into nail form. A creamy off-white or ivory covers four nails in smooth, opaque coverage, while the ring finger breaks the pattern with a silver or white glitter accent that catches light with every gesture. The coffin shape adds a hint of edge to what would otherwise be a purely minimalist design—the tapered tip prevents the off-white from reading too soft or predictable.
The glitter accent nail is what elevates this from "plain white manicure" to something with actual personality. The fine, packed glitter creates a textured, almost sugar-coated surface that contrasts sharply with the smooth cream finish of the other nails. This textural variation is what catches the eye—it is not about color contrast but about finish contrast.
Creamy whites are notoriously difficult to apply without streaking. The formula matters more here than with almost any other color— look for self-leveling formulas that spread evenly without leaving brush marks. Three thin coats typically produce better results than two thick ones.
Design Breakdown:
A single accent nail changes the entire character of a neutral manicure through texture rather than color.
Base Color: A creamy, opaque off-white or warm ivory. Not stark white—this shade has a yellow undertone that softens the overall effect.
Nail Shape: Short-medium coffin. The tapered tip adds a modern, slightly edgy silhouette to the clean color palette.
Design Element: Solid cream application on four nails, with the ring finger featuring a dense silver or white micro-glitter that creates a sugared, textured surface.
Finish: Glossy top coat on the cream nails; the glitter accent nail gets two to three coats of top coat to encapsulate the texture.
Get The Look at Home:
Streak-free white polish is one of the hardest techniques in nail care—thin coats and patience are the only reliable solution.
- Prep is critical: Buff ridges and push back cuticles. White and off-white polish magnifies every surface imperfection. Apply a ridge-filling base coat.
- Float the polish: Apply your ivory polish in three thin coats. Do not press hard with the brush—float the polish over the nail to minimize brush marks and bald spots.
- Glitter accent: On the ring finger, paint the ivory base first. While the last coat is still wet, either sprinkle fine iridescent glitter over it or apply a dense glitter topper polish.
- Encapsulate the glitter: The glitter nail will feel rough and textured. Apply two thick coats of glossy top coat, letting each dry fully, to build a smooth surface over the particles.
28 Effortless Hot Weather Day Hairstyles for Women 2026 ☀️💇♀️
26.Retro Beach Club Stripes

Multi-toned blue horizontal stripes in aqua, teal, sky blue, and white—nautical prep at its most polished.
Overview:
This set is a study in blue tonality: horizontal stripes in aqua, teal, sky blue, and white run across short squoval nails, creating a layered, almost textile-like effect. The stripes vary in width— some thicker, some thinner—which prevents the pattern from reading as uniform or mechanical. The overall impression is of stacked fabric bands, like a vintage beach towel or a preppy striped shirt translated into nail art.
The multi-tonal approach to blue creates depth that a single-color stripe pattern would lack. Each shade occupies a different point on the blue spectrum, from the warm aqua to the cool sky blue, and the white stripes between them act as visual breathing room that keeps the colors from blending into each other.
Horizontal stripes on short nails can visually widen the nail bed, which is actually a benefit for people with narrow or elongated nail shapes who want their hands to appear more proportional.
Design Breakdown:
Multiple shades of the same color family create tonal depth that reads as sophisticated rather than busy.
Base Color: A sheer or milky light blue that serves as the background layer for the stripes. This base color is visible between the stripe layers.
Nail Shape: Short squoval. The straight sidewalls provide parallel guides for the horizontal stripe lines.
Design Element: Horizontal stripes of varying widths in opaque white, bright aqua, deep teal, and sky blue, covering the entire nail surface.
Finish: Glossy top coat to smooth the layered texture of the stripes and create a unified, polished surface.
Get The Look at Home:
Layering the stripes one color at a time, with drying time between each, prevents the colors from bleeding into each other.
- Base layer: Paint all nails with a sheer, light blue polish and let it dry completely. The surface must be fully hard before applying tape.
- Tape the stripes: Cut small pieces of nail striping tape and lay them horizontally across the nail, leaving gaps where you want the different colored stripes to appear.
- Fill with color: Using a fine detail brush, carefully paint the exposed gaps between the tape with your teal, aqua, sky blue, and white polishes, varying the width of each stripe.
- Peel reveal: While the striped polishes are still wet, use tweezers to carefully remove the striping tape. This leaves perfectly crisp lines between the colors.
- Top coat: Once dry, float a generous layer of glossy top coat over the nail to level out the texture of the layered stripes.
27.Midnight Ocean Stars
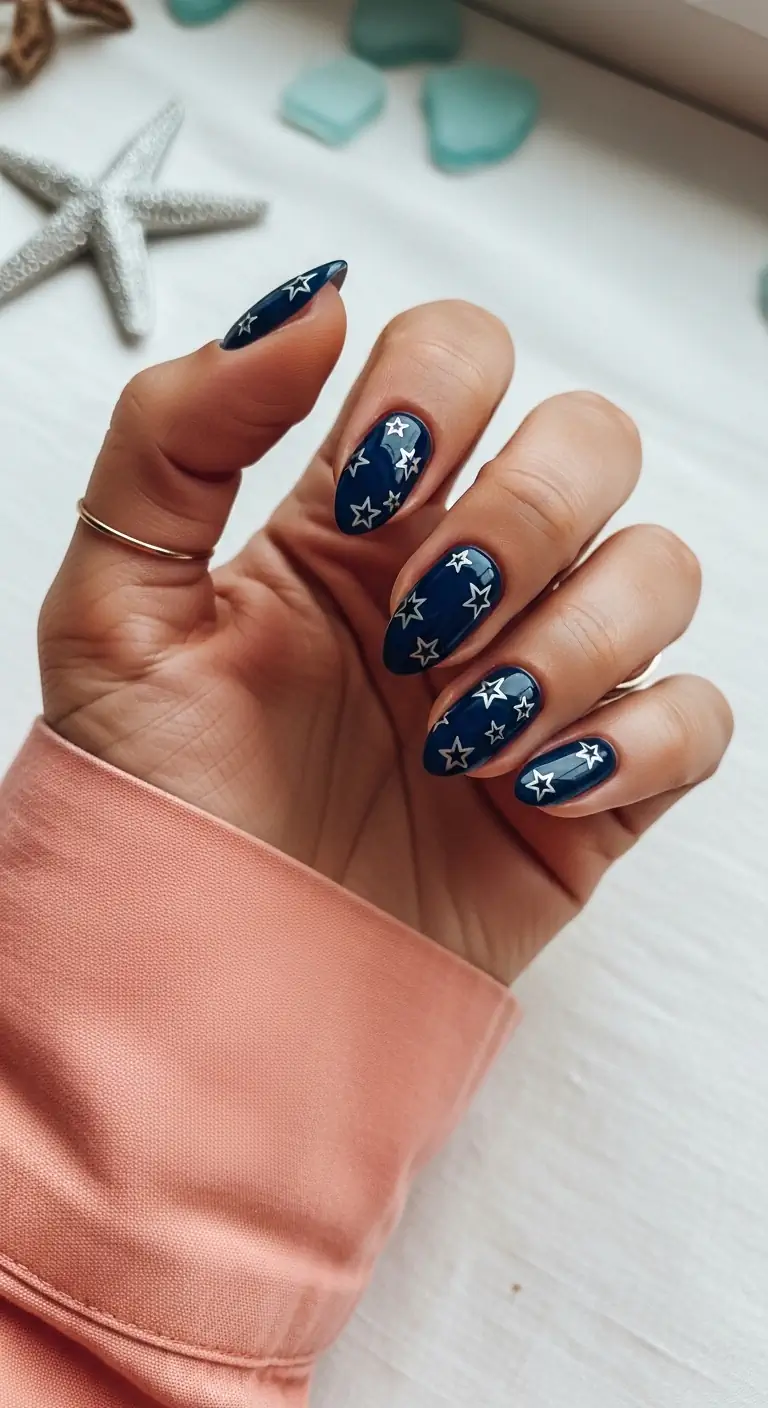
Deep navy nails with scattered silver star decals—moody, celestial, and anything but predictable.
Overview:
Deep navy blue is one of those colors that functions as a sophisticated alternative to black—it has the same depth and moodiness but reads warmer and more dimensional, especially in direct sunlight where the blue undertones become visible. Scattering silver or chrome star decals across the surface adds a celestial layer that transforms the set from "dark mani" to something that looks like a night sky mapped onto your fingertips.
The star decals are what make this design special. Silver or chrome stars in varying sizes scattered at random angles create the impression of a constellation. The metallic quality of the decals produces sharp, bright flashes of light against the dark, absorptive navy base—high contrast in its purest form.
Short-medium almond nails balance the dark color well. The tapered tip adds a feminine softness that prevents the navy from reading too heavy or wintery, which is a real risk with dark colors in summer.
Design Breakdown:
Dark metallic-on-dark combinations rely on high contrast to create visual impact.
Base Color: A deep, opaque navy blue with an ultra-glossy finish. The base needs to be fully pigmented so the silver decals read clearly against it.
Nail Shape: Short-medium almond. The rounded, tapered tip softens the intensity of the dark base.
Design Element: Silver or chrome star decals in mixed sizes, scattered randomly across the nails. The varying scale creates depth—larger stars read as closer, smaller ones as more distant.
Finish: High-gloss top coat applied in two layers to fully encapsulate the decals.
Get The Look at Home:
Metallic star decals are nearly impossible to replicate by hand at this level of precision—stickers are the clear choice.
- Navy base: Apply two coats of deep navy polish. Dark colors require careful, neat application around the cuticles— mistakes are highly visible. Let dry until slightly tacky.
- Star placement: Using precision tweezers, lift star decals from their sheet and place them on the nail at random angles. Let some hang slightly off the edges for a natural, scattered look.
- Press flat: Use a silicone tool or your fingertip to firmly press each decal flat against the nail surface, especially around the curved edges where lifting is most likely.
- File the overhang: If any decal extends past the free edge of the nail, gently file it off with a fine-grit nail file rather than cutting it.
- Double seal: Apply two generous coats of top coat, making sure to cap the free edge completely to prevent the decals from catching on fabric.

28 Trendy May Nail Designs for 2026 💅
28.Matcha Velvet Cat Eye
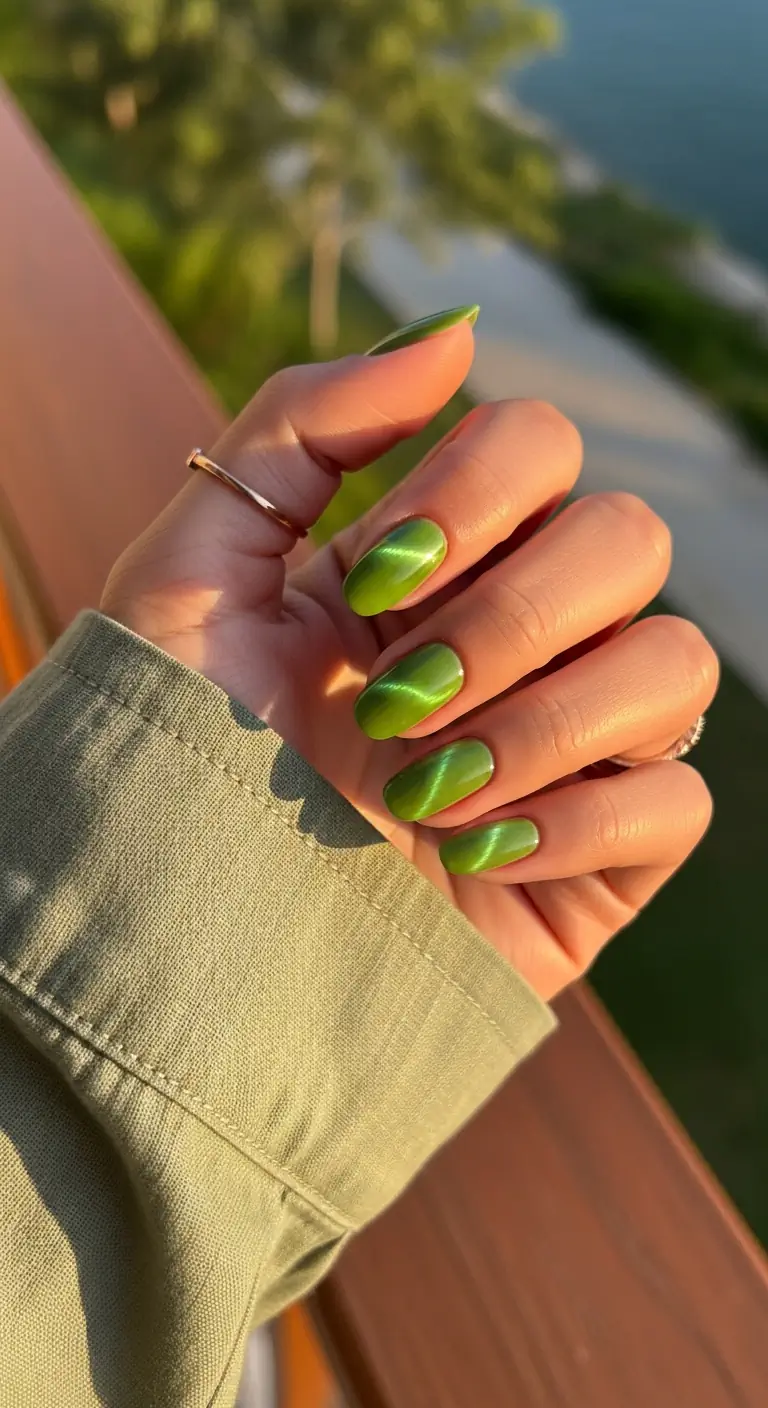
Chartreuse green with a magnetic cat-eye shimmer that shifts with every movement—liquid luxury on short nails.
Overview:
This is a magnetic cat-eye manicure in a striking chartreuse green. The color itself is polarizing: yellow-leaning enough to read as bold, green enough to avoid looking like traffic-cone neon. What makes it interesting is the magnetic cat-eye effect, which creates a diagonal shimmer band across the nail that moves and shifts as your hand changes position. The metallic particles suspended in the polish respond to a strong magnet, concentrating into a bright, light-catching stripe against the darker chartreuse background.
Short almond nails are an ideal canvas for this technique. The curved surface of the almond shape allows the magnetic shimmer to bounce light across the full width of the nail, creating a more dramatic cat-eye effect than a flat square surface would. The short length keeps the metallic finish from looking overwhelming—it becomes a detailed texture rather than a full-coverage statement.
The downside of magnetic polish is that it requires gel and a UV lamp to set properly. Regular magnetic polishes exist but tend to lose their crisp shimmer band within a day or two as the particles redistribute. If you want the cat-eye effect to last, committing to gel is worth the investment.
Design Breakdown:
Magnetic cat-eye polish creates an optical illusion that depends on the interaction between suspended metallic pigments and a strong magnet.
Base Color: A bright chartreuse or lime green magnetic gel polish. The base color should be vivid enough to provide contrast against the silver shimmer band.
Nail Shape: Short almond. The curved surface maximizes the light-catching quality of the magnetic shimmer.
Design Element: A diagonal shimmer band created by holding a strong magnet near the wet polish, concentrating the metallic particles into a bright, reflective stripe.
Finish: The magnetic polish itself provides the finish— sealed with a glossy gel top coat for protection and depth.
Get The Look at Home:
You need gel polish and a strong nail magnet for this look. Regular polish versions exist but do not produce the same crisp effect.
- Optional dark base: Some cat-eye polishes pop more over a black or dark green base. Apply and cure a dark base coat first if desired.
- Apply magnetic polish: Paint a generous layer of the chartreuse magnetic gel. Do not cure it yet—the polish must be wet for the magnet to work.
- Create the cat-eye: Hold a strong nail magnet diagonally across the nail, about two millimeters above the surface. Hold it steady for ten to fifteen seconds while the metallic particles migrate toward the magnet, forming a bright shimmer band.
- Cure immediately: As soon as you like the pattern, place the nail under your UV/LED lamp to freeze the particles in place. If you wait too long, the shimmer will drift back to its original dispersed state.
- Top coat: Apply a glossy gel top coat and cure for a final, high-shine finish.
29.Poolside Daisy Chain
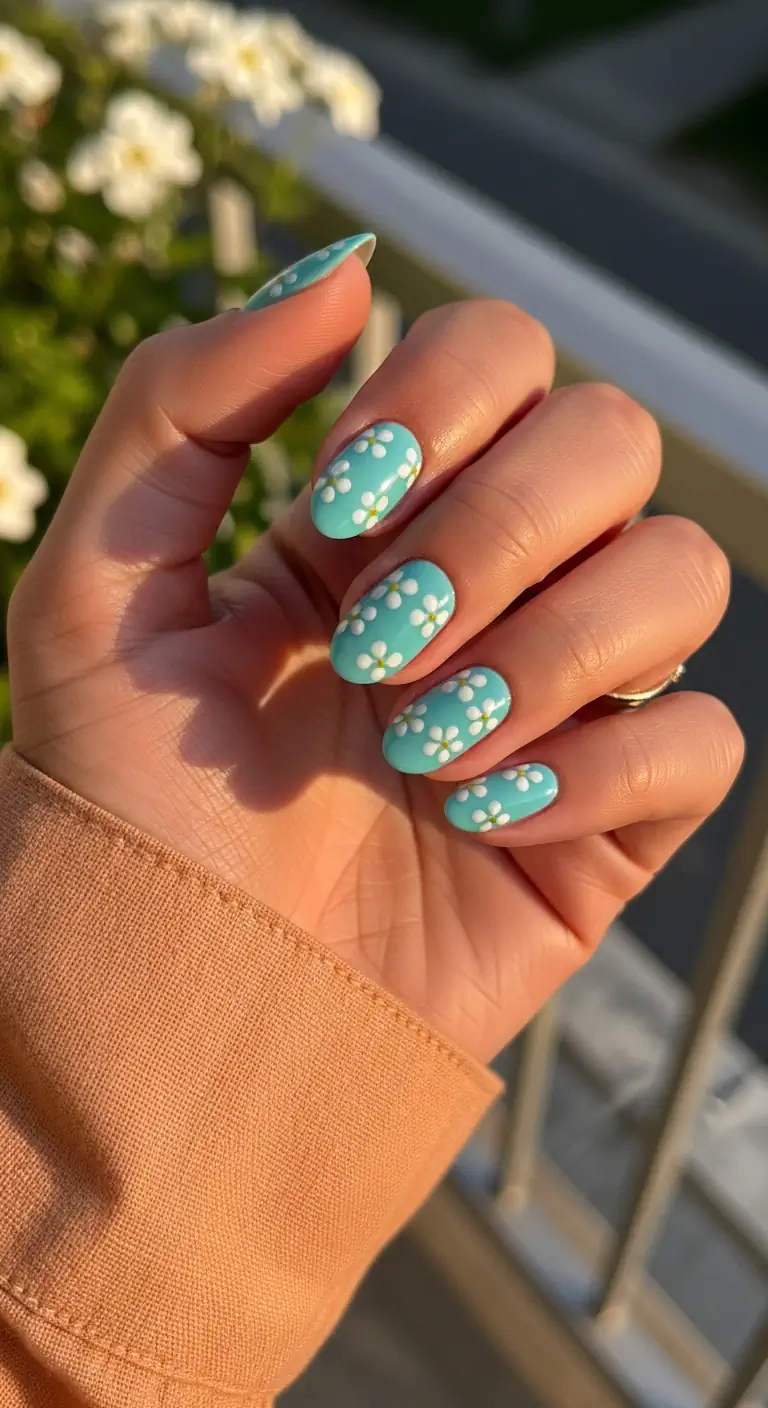
Bright turquoise blue loaded with scattered white daisies—pool-party nostalgia in nail form.
Overview:
If summer had an official nail color, this bright turquoise would be a serious contender. The shade reads as pool water on a cloudless day—saturated, vibrant, and universally associated with warm weather and good moods. Adding scattered white daisies with their sunny yellow centers pushes the nostalgia factor higher. The daisy is one of those motifs that never fully leaves fashion because it taps into something fundamentally cheerful.
Keeping the daisies small and scattered—rather than large and centralized—prevents the pattern from reading as juvenile. The short oval shape complements the rounded petals and organic flower forms, creating a cohesive visual language where every element echoes the others.
Design Breakdown:
High-contrast colors and simple, repeating shapes create a pattern that is immediately readable and visually satisfying.
Base Color: A bright, fully opaque turquoise or pool blue. This shade should read as cheerful and saturated, not muted or dusty.
Nail Shape: Short oval. The soft, rounded silhouette harmonizes with the organic curves of the daisy petals.
Design Element: Small white daisies with bright yellow centers scattered randomly across all nails. The flowers are kept small enough that the blue background remains visible between them.
Finish: Glossy top coat to enhance the vibrancy of the turquoise and add a wet-look shine.
Get The Look at Home:
The five-dot daisy technique is one of the first nail art methods most people learn—and it remains one of the most effective.
- Turquoise base: Apply two coats of bright turquoise polish. Let it dry completely—white polish mixed with wet turquoise turns light blue instead of staying crisp.
- Petal dots: Load a medium dotting tool with opaque white polish and place five dots in a tight circle for each flower. Add partial flowers at the nail edges for a natural, scattered pattern.
- Let the white set: Wait two to three minutes before adding the yellow centers. Wet white polish will absorb the yellow and create a green-tinged blob.
- Sunny centers: Use a smaller dotting tool to place a single bright yellow dot in the middle of each white flower.
- Top coat: Float the top coat gently to avoid dragging the dot texture across the nail surface.
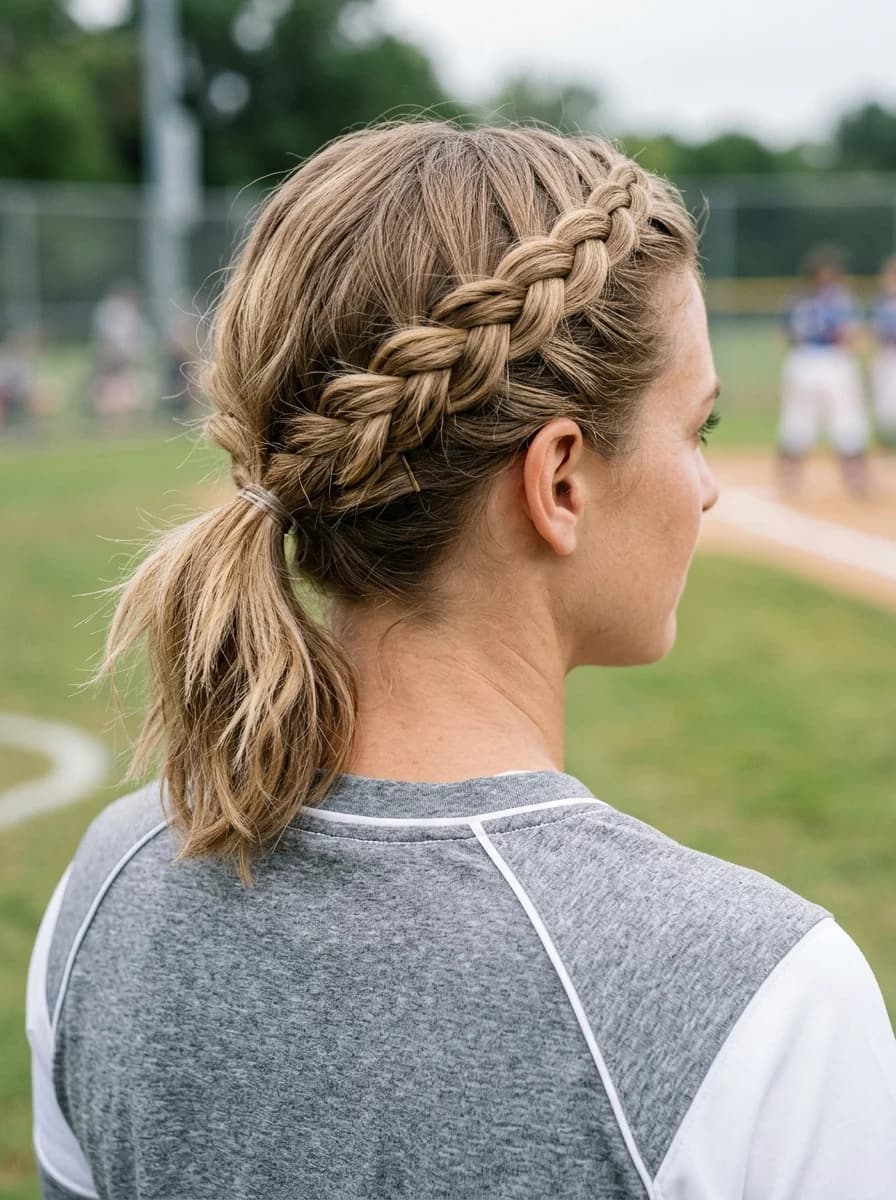
28 Stunning Softball Hairstyle Ideas with Braids for 2026 🥎✨
30.Limoncello & Orange Spritz
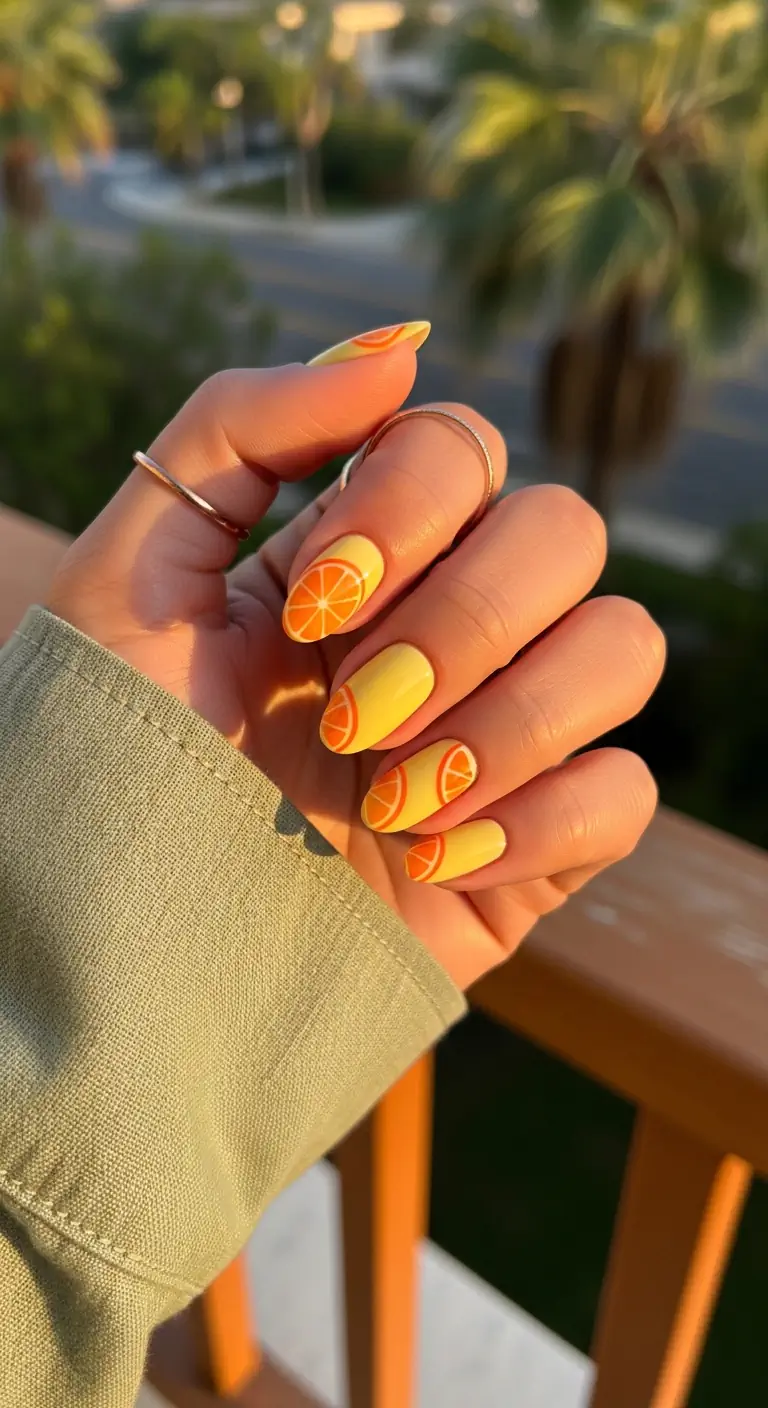
Sheer nude nails with bright tangerine French tips—clean, zesty, and effortlessly summer-ready.
Overview:
The most effective French tip variations are the ones that keep the formula simple: sheer base, bold tip, clean line. This design delivers exactly that—a translucent pink nude base that lets the natural nail show through, paired with vivid tangerine-orange tips that read as a burst of citrus color. The warmth of the orange against the cool neutrality of the nude creates a contrast that feels intentional and crisp rather than loud or costume-y.
Short squoval nails are the ideal shape for a colored French tip. The flat free edge provides a clean, straight line for the orange to follow, and the squared-off corners prevent the design from looking too soft or rounded. The overall effect is polished, modern, and low-maintenance enough to last a full two weeks without looking grown-out.
Design Breakdown:
A colored French tip is one of the simplest ways to update a classic format without committing to full-nail art.
Base Color: A sheer, translucent pink or nude that blurs nail imperfections while maintaining a "your nails but better" transparency.
Nail Shape: Short squoval. The flat tip provides a clean canvas for the French smile line.
Design Element: A medium-width French tip in vivid tangerine-orange. The tip is slightly thicker than a traditional white French to give the color enough space to register.
Finish: High-gloss top coat to smooth the transition between the sheer base and the opaque tip.
Get The Look at Home:
A silicone stamper hack produces a perfect French smile line in seconds without any freehand painting required.
- Sheer base: Apply two coats of your sheerest nude or pink polish. Let it dry fully—the next step depends on the surface being hard.
- Stamper method: Paint a stripe of tangerine-orange polish directly onto a silicone nail stamper pad. Press the tip of your nail into the painted stamper at a 45-degree angle—the polish will transfer onto the tip in a perfect French curve.
- Freehand alternative: If you prefer freehand, use a thin detail brush to paint the orange tip, following the natural curve of your free edge.
- Clean the line: Dip a small angled brush in acetone to sharpen the smile line and remove any orange polish that migrated onto the skin.
- Top coat: Seal the design with a generous glossy top coat to smooth the ridge between the sheer base and the painted tip.
31.Citrus Squeeze French Tips
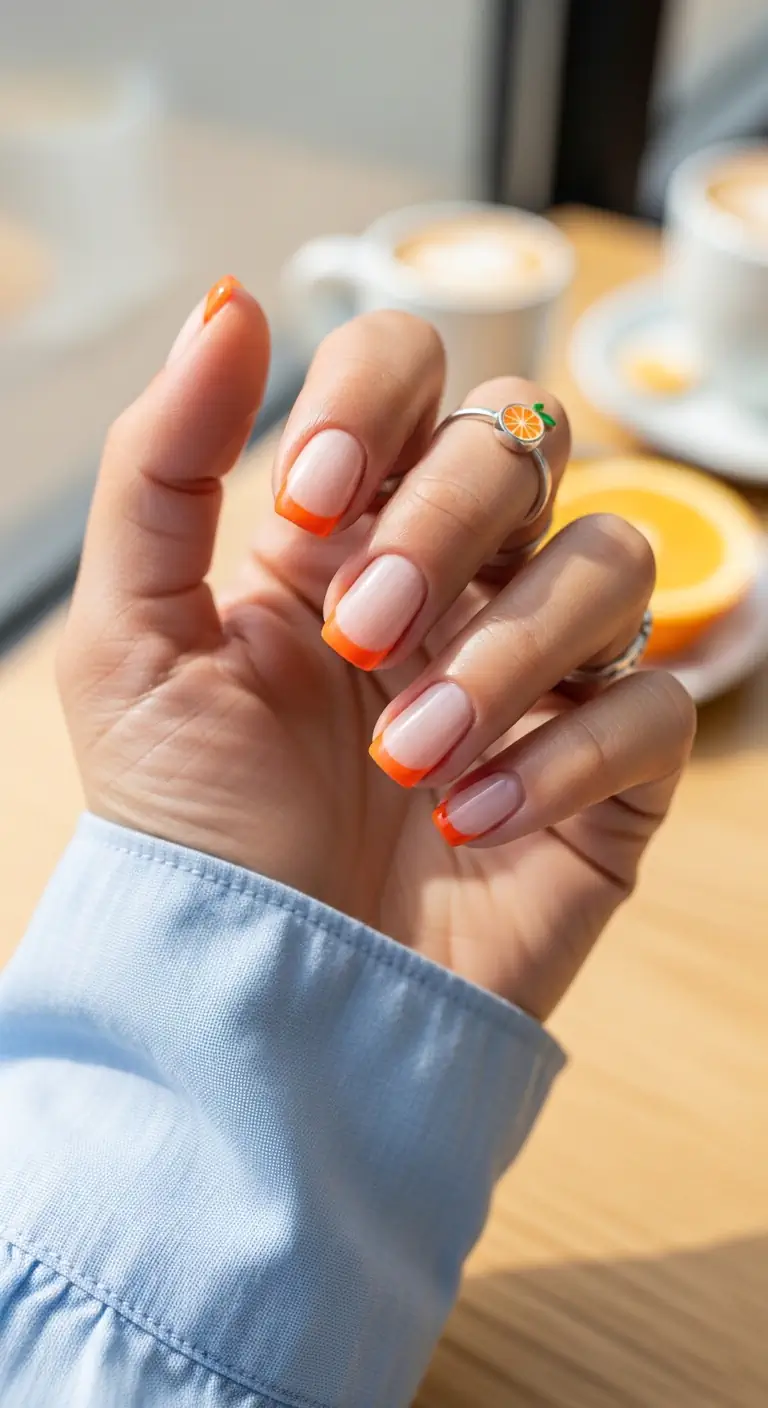
Sunny yellow nails with orange citrus slice details on select fingers—bright, zesty, and summer-personified.
Overview:
Yellow and orange are analogous colors on the wheel, which means they naturally harmonize without requiring a third tone to mediate between them. This set exploits that relationship: a bright sunny yellow base on most nails, with orange citrus slice segments painted on select fingers. The ring finger goes solid yellow, providing a clean visual anchor among the patterned nails.
The citrus slices are rendered as half-moons and partial rounds— cross-sections of fruit that show the internal segments rather than the exterior skin. This approach keeps the design graphic and modern rather than illustrative. On medium almond nails, the curved shape of the citrus segments echoes the curved nail tip, creating a visual rhyme that feels deliberate.
Yellow polish has a reputation for being streaky and difficult to apply, and that reputation is earned. Self-leveling formulas are worth the extra cost here—three thin coats of a streaky yellow looks far worse than two coats of a well-formulated one. OPI's I Canoli Wear OPI is a reliable reference for this type of sunny, opaque yellow.
Design Breakdown:
Analogous colors on the warm side of the wheel create a design that feels energetic without clashing.
Base Color: A bright, opaque sunny yellow. Full coverage in two to three coats without visible brush strokes.
Nail Shape: Medium almond. The tapered tip mirrors the curved segments of the citrus slice art.
Design Element: Orange citrus slice segments painted on select nails—half-circles detailed with thin white pith lines and internal segment divisions. The ring finger stays solid yellow.
Finish: Glossy top coat to enhance the warmth of both the yellow and orange and unify the surface.
Get The Look at Home:
Patience with the yellow application is what separates a clean result from a streaky mess.
- Yellow foundation: Apply three thin coats of bright yellow polish, letting each coat dry fully. Thin coats prevent streaking far better than one or two thick ones.
- Paint the citrus: Using orange polish and a detail brush, paint half-circle shapes along the sides or tips of select nails. The curved edge should follow the natural nail curve.
- Pith outline: With a fine liner brush and white polish, outline the curved inner edge of each orange half-circle. This white line defines the fruit anatomy.
- Segment lines: Still using white, draw three or four thin lines radiating from the center of the orange shape to its outer edge, creating the internal fruit segments.
- Juicy finish: Seal everything with a high-shine top coat to make the citrus art look wet and freshly squeezed.

35 Palm Tree Nail Art Ideas that are the Most Iconic Nail Art Designs 🌴✨
32.Amalfi Coast Color Block
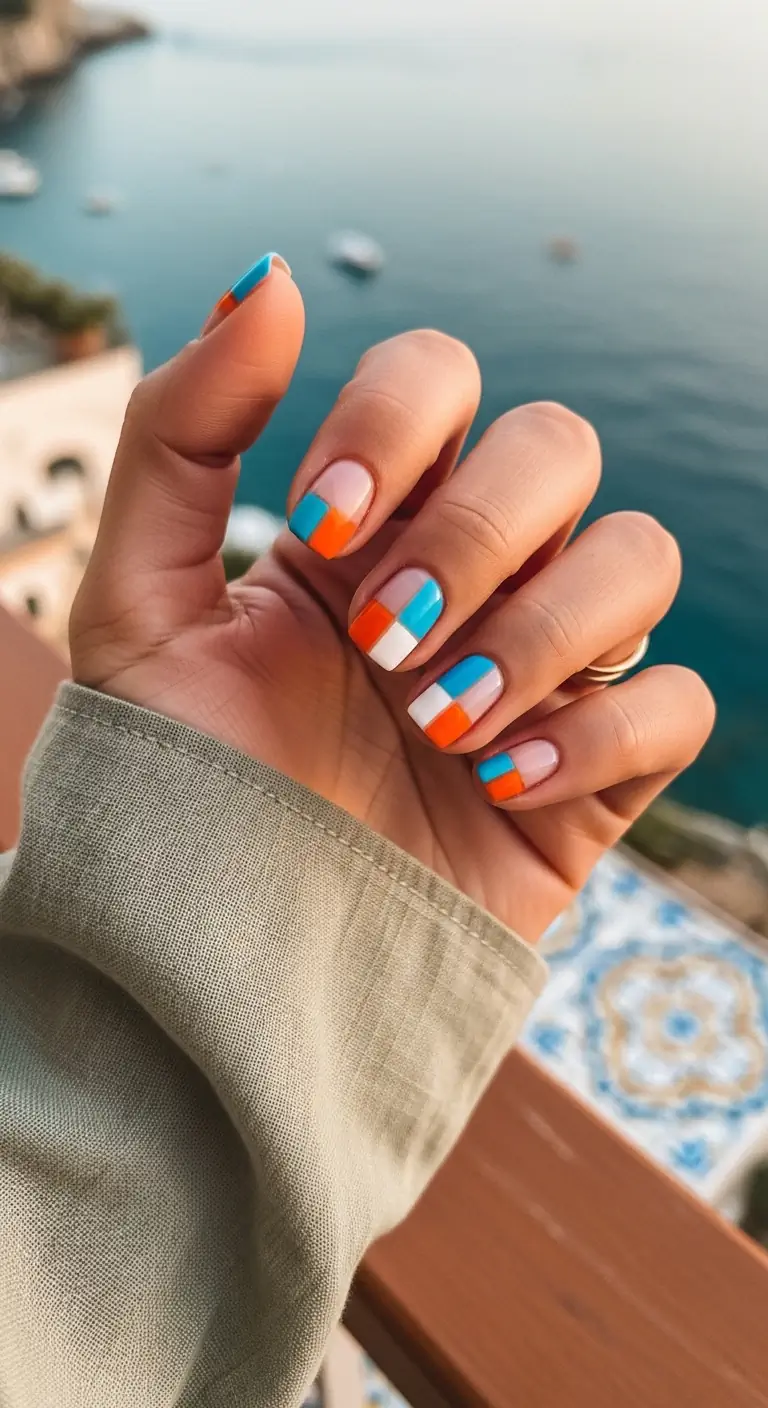
Nude nails with geometric color-blocked tips in azure, tangerine, and white—Mediterranean tile art on your fingertips.
Overview:
Geometric color-blocking on a clear or nude base is the nail art equivalent of a well-curated gallery wall: structured, intentional, and visually compelling without being loud. This set uses three colors—turquoise-blue, orange, and white—arranged in rectangular blocks at the tips of short squoval nails. The negative space of the nude base prevents the blocks from overwhelming the hand, while the high-contrast color palette draws the eye to the geometric precision of the design.
The color combination itself references Mediterranean ceramics— the bright blues and oranges of hand-painted tiles found along the Italian coast. By containing the blocks to the top half of the nail, the design functions as a modified French tip that adds architectural interest without sacrificing the clean, modern feel of a bare nail bed.
Design Breakdown:
Clean lines and high-contrast hues create a graphic impact that depends entirely on precision.
Base Color: A fully transparent or ultra-sheer nude that lets the natural nail show through. The transparency is a design element, not a placeholder.
Nail Shape: Short squoval. Geometric patterns require straight sidewalls and clean edges to look cohesive.
Design Element: Rectangular color blocks in turquoise-blue, orange, and white arranged on the top half of each nail. The blocks vary in size and placement across the nails.
Finish: Glossy top coat to level out the different layers of polish and create a unified surface.
Get The Look at Home:
Striping tape is essential for the crisp, straight edges that geometric designs demand—freehand rarely achieves the same sharpness.
- Nude foundation: Apply a clear base coat or sheer nude polish to protect the natural nail.
- Tape off sections: Use striping tape to block off the top half of the nail. Create vertical dividing lines within that section to define where each color block will sit.
- Fill the blocks: Using a fine detail brush, carefully fill each taped-off section with your turquoise, orange, and white polishes. Make sure the colors are fully opaque within each block.
- Peel while wet: Remove the tape immediately with tweezers while the polish is still wet. This ensures the lines stay razor-sharp rather than pulling or crumbling.
- Gloss and level: Apply two coats of top coat to smooth the slight ridges between the color blocks and the bare base.
33.Clean Girl Summer French
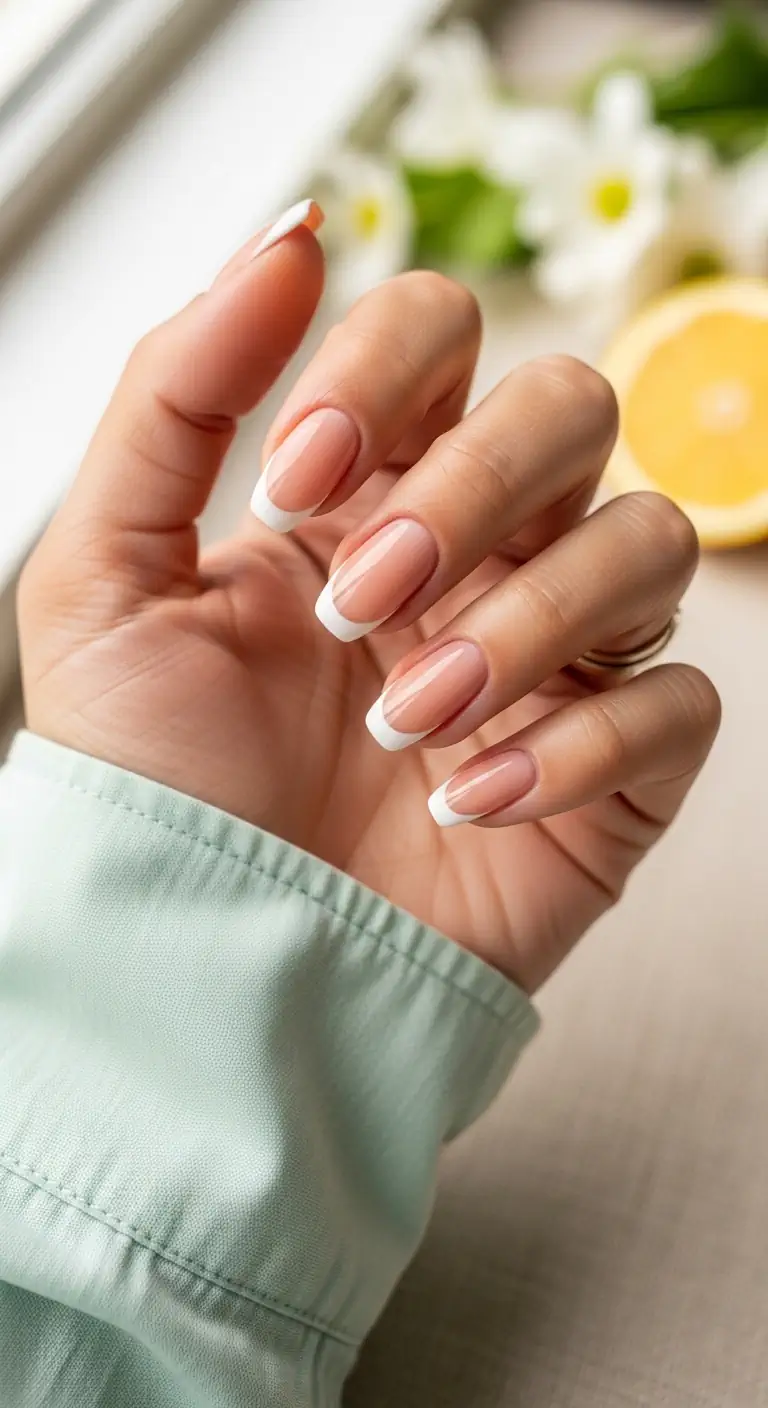
Coral-red nails with a silver chrome cuticle cuff—where classic color meets metallic edge.
Overview:
After thirty-three designs that ranged from neon chaos to chromatic subtlety, this set returns to the foundation of it all: a classic white French tip on a sheer nude base. There is a reason this format has survived every trend cycle since the 1970s—it works. The sheer nude base makes the natural nail look healthy and glowing, while the crisp white tip adds a clean, defined edge that reads as polished without trying too hard.
The short squoval shape is the ideal partner for a traditional French. The flat free edge provides a clean, straight line for the white to follow, and the squared-off corners prevent the design from looking too soft or rounded. This is a design that rewards precision—because there is no nail art to hide behind, the symmetry of the French line and the smoothness of the base application become the entire visual statement.
The practical upside of a classic French on short nails is its longevity. Because the base matches the natural nail color, grow-out at the cuticle is almost invisible, which means this set can last a full two weeks without looking neglected. It is the low-maintenance champion of the entire summer edit.
Design Breakdown:
A classic French relies entirely on the quality of the smile line and the smoothness of the base—there is nowhere to hide imperfections.
Base Color: A translucent, milky blush pink. This shade should neutralize any yellow tones in the natural nail while maintaining a "your nails but better" transparency.
Nail Shape: Short squoval. The flat free edge provides a clean canvas for the French smile line.
Design Element: A medium-width, crisp white tip that perfectly mirrors the curve of the cuticle. The line should be clean, symmetrical, and even across all nails.
Finish: Ultra-glossy top coat to blend the white and pink layers into one seamless, glass-like surface.
Get The Look at Home:
The silicone stamper trick has revolutionized at-home French manicures—it produces a perfect smile line without any artistic skill required.
- Flawless prep: Push back cuticles and gently buff ridges. Because this look is so sheer, every imperfection in the nail surface becomes visible. Apply a smoothing ridge-filler base coat.
- The glowing base: Apply two thin coats of a sheer jelly pink polish. Let it dry completely before the next step.
- Stamp the tip: Paint a stripe of stark white polish onto a silicone nail stamper. Press the tip of your nail into the stamper at a 45-degree angle. The white will coat the tip in a perfect French curve.
- Clean the smile: Use a stiff angled brush dipped in acetone to clean up the underside of the white line, making the curve incredibly crisp.
- Final glaze: Apply a super glossy top coat to blend the white and pink together seamlessly and add a glass-like shine.
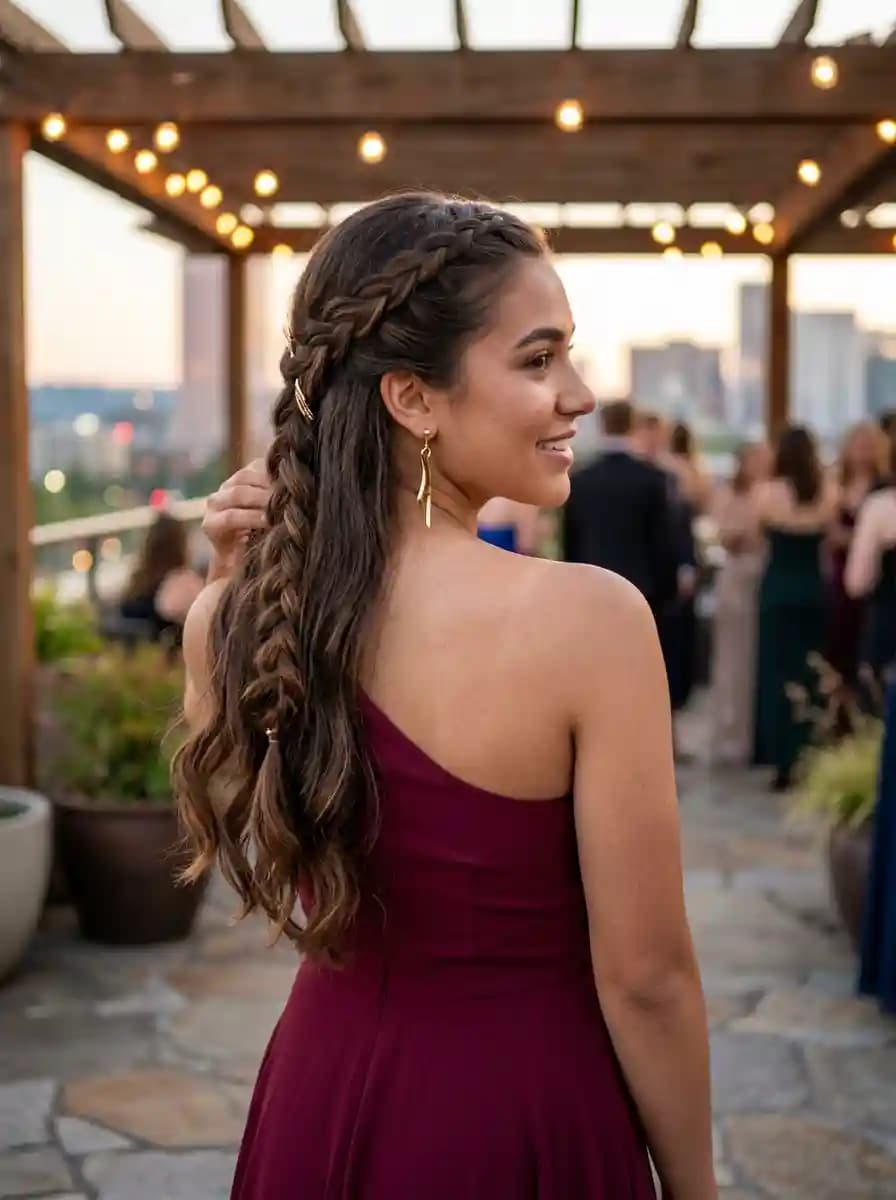
20 Stunning Half Up Half Down Hairstyles for Prom Night 2026 💃✨
34.Silver Lined Coral
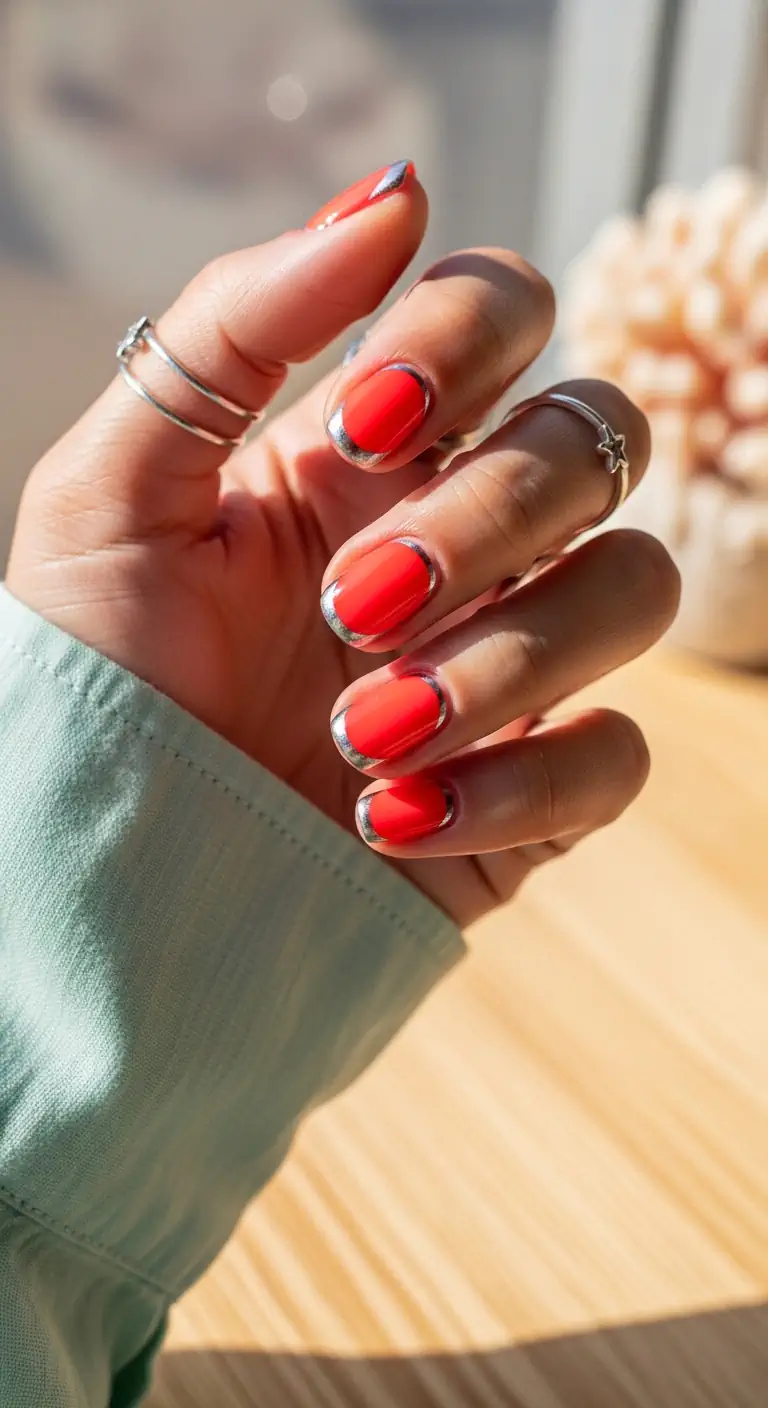
Multi-toned blue horizontal stripes in aqua, teal, sky blue, and white—nautical prep at its most polished.
Overview:
A vibrant coral-red base framed by a silver chrome metallic cuticle cuff. The cuff is a thin line of reflective silver that traces the U-shape of the cuticle and extends slightly up the sidewalls, creating a border that contains the coral like a picture frame. The effect is part jewelry, part nail art—the metallic line catches light in a way that reads as a custom accessory.
The cuticle cuff format flips the traditional French tip on its head. Instead of accentuating the free edge, the metallic detail sits at the base of the nail, drawing attention to the cuticle area and the overall shape of the nail bed. On short squoval nails, this placement creates a visual frame that makes the coral center appear more contained and deliberate.
Design Breakdown:
A warm, saturated base paired with cool metallic creates a contrast that is both striking and balanced.
Base Color: A vibrant, opaque coral-red. This shade leans slightly warm, reading as sunset-colored rather than blue-toned red.
Nail Shape: Short squoval. The clean edges emphasize the geometric precision of the metallic cuff outline.
Design Element: A thin silver chrome metallic line traced in a U-shape around the cuticle, extending halfway up the sidewalls. The cuff acts as a border that frames the coral center.
Finish: Glossy top coat over both the coral and the chrome to unify the surface and protect the metallic from tarnishing.
Get The Look at Home:
Chrome powder applied over a black gel base produces a true mirror finish that metallic polish alone cannot replicate.
- Coral base: Apply two solid coats of your coral-red polish. If using gel, apply a matte top coat and cure it—this prevents the chrome powder from sticking to the coral area.
- Draw the cuff: Using a fine detail brush and black gel polish, carefully outline the U-shape along your cuticle and halfway up the sidewalls. Cure the black line under your lamp.
- Apply the chrome: Take a small eyeshadow sponge and rub silver metallic chrome powder vigorously over the black gel line. The powder will only adhere to the glossy black surface, leaving the matte coral untouched.
- Dust off excess: Use a fluffy brush to wipe away loose silver powder from the cuticles and surrounding skin.
- Lock it in: Carefully trace over the silver cuff with a glossy top coat, then apply top coat over the entire nail to seal everything together.
35.Peachy Cabana Pinstripes
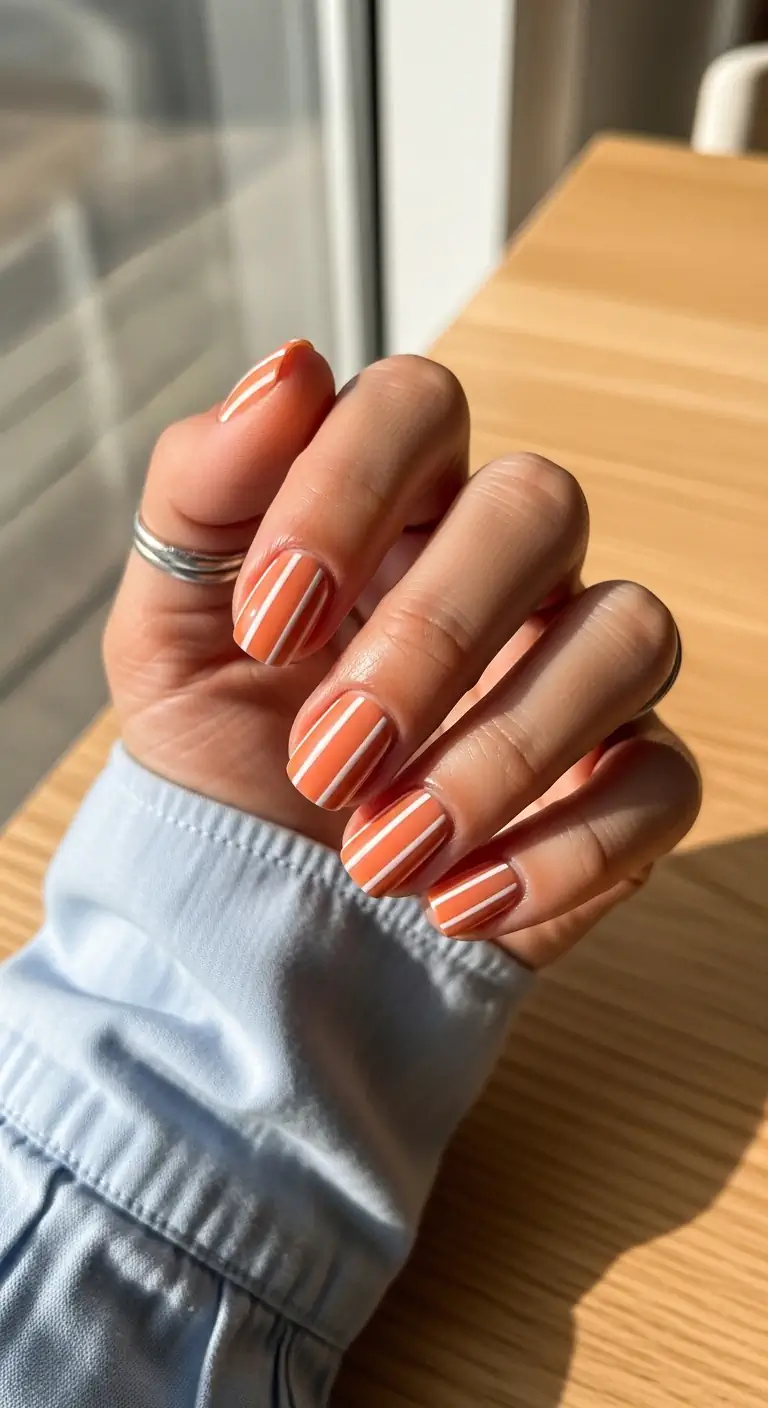
Sheer nude nails with a classic crisp white French tip—the design that started it all, and still reigns supreme.
Overview:
Peach and white vertical stripes create a design that feels like summer distilled into its simplest form. The warm peachy-coral base reads soft and inviting—the kind of shade that flatters every skin tone and photographs beautifully in natural light. The white vertical stripes add structure and graphic interest without overwhelming the gentle warmth of the peach.
Vertical stripes on short nails create a visual elongation that makes the nail bed appear longer and more slender. The clean parallel lines draw the eye upward, which is particularly effective on shorter nails where length is at a premium. The squoval shape provides straight sidewalls that echo the vertical direction of the stripes, creating a cohesive, intentional look.
Design Breakdown:
Clean parallel lines over a warm base create a graphic effect that relies on precision and steady hands.
Base Color: A warm, opaque peach or coral. This shade should read as a soft sunset—not too pink, not too orange, but perfectly balanced between the two.
Nail Shape: Short squoval. The straight sidewalls provide natural guides for vertical stripe placement.
Design Element: Thin white vertical stripes running from cuticle to free edge, evenly spaced across the nail surface. The stripes are uniform in width and perfectly parallel.
Finish: Glossy top coat to smooth the slight texture of the stripe lines and create a unified, polished surface.
Get The Look at Home:
Striping tape is the most reliable tool for perfectly straight parallel lines—freehand rarely produces results this clean.
- Peach base: Apply two solid coats of your peach or coral polish and let them dry completely. The base must be hard before applying tape, or the tape will pull up the color.
- Tape the stripes: Cut thin pieces of nail striping tape and lay them vertically across the nail at even intervals, from cuticle to free edge. Press firmly to prevent bleeding.
- Paint the lines: Using white polish and a fine detail brush, paint along the edges of the tape to create the white vertical stripes. The tape acts as a ruler.
- Remove tape: Peel the tape off while the white polish is still wet using tweezers. This ensures the lines stay razor-sharp rather than pulling at the edges.
- Top coat: Apply a generous glossy top coat to smooth out the texture of the stripe lines and create a unified surface.

29 Trendy Pink Summer Nails for 2026 💅
The Jelly Illusion: How Sheer Finishes Make Short Nails Look Longer
Here is something surprising: the finish you choose affects how long your nails appear more than the actual length does. Opaque, dark, or highly saturated colors create a hard visual boundary at the edge of the nail, which can make a short nail bed look wider and stumpier than it actually is. Sheer translucent finishes do the opposite — they blur the line between your natural nail and the polish, creating an optical elongation effect.
This is the reason "jelly" polishes and milky sheers are dominating 2026 summer content. A finish like "Rose Quartz Pearl Glaze" or "Vanilla Girl Shimmer" lets the natural nail bed show through, so the eye does not register a hard stop where the color ends. The result is a finger that looks longer and more elegant, even if the nail itself has not grown a millimeter. It is the same principle behind wearing nude heels — by matching your skin tone, you create an uninterrupted visual line.
The practical implication for short nail lovers: if you feel self-conscious about length, skip the opaque dark colors and reach for a sheer jelly or a milky pastel instead. You get color without the visual cutoff.
💡 DIY jelly hack: mix one drop of your favorite bright polish into a clear top coat. You get a custom translucent color that elongates your nails and looks like a high-end salon finish.
Why You Do Not Need Long Nails to Be Trendy
For the last few years, long coffin and stiletto shapes have dominated every nail feed, and if you prefer keeping your nails short, it has probably felt like the trends were not designed for you. That is finally shifting. Short square and squoval shapes are having a real resurgence in 2026, and the reason is practical: they provide a clean, structured canvas that works perfectly with this season's texture trends.
The flat surface of a short square is ideal for 3D gel details, micro art, and the raised water droplet effect that is trending this summer. Unlike long nails where the visual weight gets distributed across a larger area, short squares concentrate the design into a compact, intentional statement. A set like "Glossy Cherry Bomb Shorties" works because the short squoval shape keeps the dark red from looking heavy — it reads as punchy and intentional rather than vampy.
The other advantage is purely logistical: short squares do not break. They do not snag on seatbelt buckles, they do not bend backward when you reach into a bag, and they do not require the maintenance schedule that long acrylics demand. For summer — a season of travel, swimming, and general chaos — that durability is worth more than the extra millimeter of length.
💡 If you have naturally narrow nail beds, ask your tech for a "squoval" — a square with softly rounded corners. It gives you the clean, modern structure of a square shape without the sharp edges that catch on clothes and hair.
This concludes all the favorite short summer nail designs. Hopefully, exploring these low-maintenance options provides inspiration for the sunny season ahead. Short manicures offer a clean, stylish look that is easy to wear daily.
Consider saving your favorite designs to a summer mood board to make the next salon visit or DIY session easier.