Hair Trends
26 Stunning Summer Braided Hairstyles for Women 2026
You already know braids are having a moment, but this summer they're on another level. We're talking textured, romantic, effortlessly cool styles that work whether you're heading to a rooftop party or just grabbing iced coffee on a Saturday. The best part? Most of these look way more complicated than they actually are.
We've rounded up 26 braided hairstyles that cover every vibe—from beachy fishtails to sleek cornrows to romantic crown braids. Find the one that matches your mood, your outfit, and your plans. Let's get into it.
Braids That Do Not Hurt
2026 is the year braids got a major upgrade, and it is not what you would expect. Instead of super-tight, edge-pulling styles that caused headaches for days, everyone is asking for low-tension braids that actually feel comfortable. The biggest shift in braiding this year is prioritizing hair growth and scalp health over perfect neatness.
Two styles are leading the charge. Ivy braids — the viral look from last year — use a loose back-combing method that leaves fuzzy roots for a lived-in vibe. The trick is braiding loose at the root, almost like a child would braid. Then there are Tanavoho braids, an ancient African style making a comeback: braids that end with round puffs framing your head like a crown. Rihanna wore them years ago, but this is the year they are going mainstream.
The takeaway? Less tension means healthier edges and styles you can actually enjoy instead of counting down the days until you take them out.
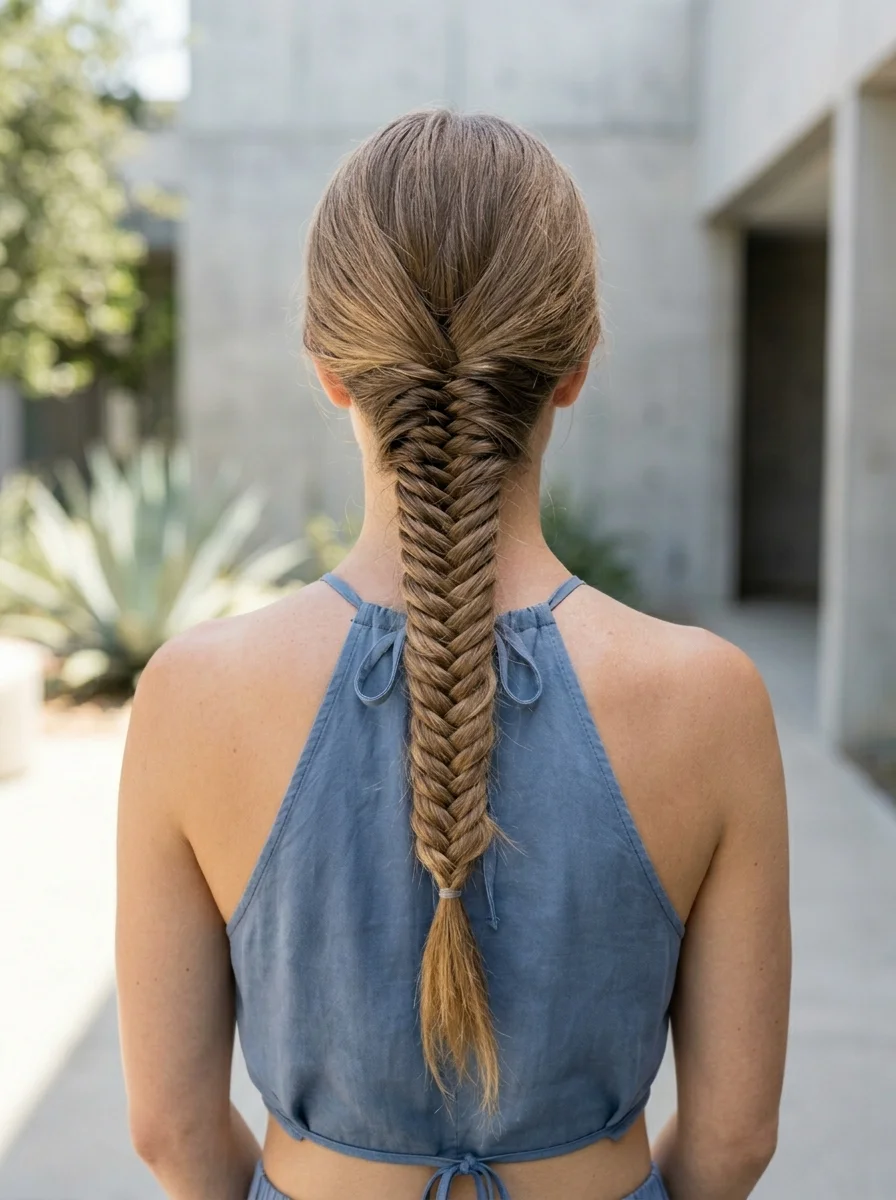
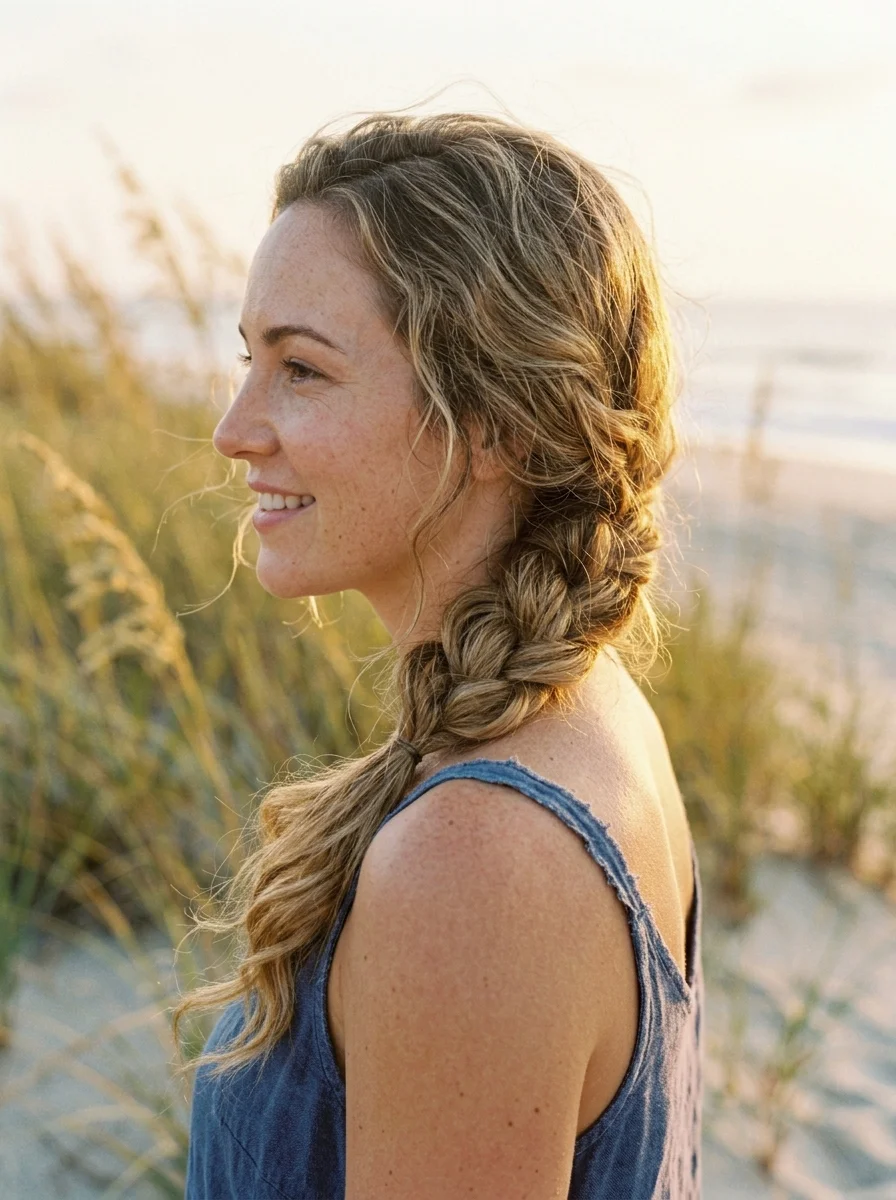
1.Effortless Side Fishtail Braid with Soft Waves
The overview: This honey blonde side fishtail is cottagecore romance at its most wearable. Pull it loose, pancake the edges, and let the soft waves frame your face while the braid sweeps casually to one side. It's the kind of style that makes people think you woke up looking this good.
Why this look is popular: The asymmetry of a side braid is inherently more interesting than a centered style, and the fishtail weave pattern creates visual texture that photographs beautifully in natural light. Honey blonde tones catch golden-hour glow like nothing else. It works on medium to long hair with enough wave to hold the soft shape without looking overdone.
Where this look is suitable: Brunch dates, outdoor weddings, cottagecore photo shoots, garden parties, farmers' market mornings. Too romantic for a boardroom, but perfect for any relaxed outdoor setting.
Step by step:
- Prep with texture. Apply a sea salt spray or texturizing mousse to damp hair. Air-dry or diffuse on low heat to encourage natural wave.
- Sweep to one side. Brush all hair over one shoulder. Decide which side feels more natural and work with that.
- Start the fishtail. Divide the gathered hair into two sections. Cross a small piece from the outer edge of one section over to the other. Repeat, alternating sides.
- Keep it loose. Don't pull tight as you braid. Leave enough slack so you can pancake it later without the whole thing falling apart.
- Secure and pancake. Tie off with a clear elastic. Gently pull the outer loops of the braid to widen it from top to bottom. Work slowly—one aggressive tug can flatten the whole thing.
- Frame the face. Pull a few wispy pieces free around your temples and ears. Tousle the waves with your fingers for a lived- in finish.
Tips and tricks: Second-day hair holds this style better than freshly washed hair. If your hair is slippery, dust a volumizing powder at the roots before braiding for extra grip. A light mist of flexible-hold hairspray keeps everything in place without making the waves crunchy.
20 Stunning Mother of the Bride Hairstyle Ideas for 2026 💍
2.Chic Fishtail Braid with a Twist
The overview: Medium-length hair and utterly modern, this sleek center-parted fishtail gets its edge from a twisted detail at the nape. It's clean, it's polished, and it's the kind of style that says you have things figured out—even if you absolutely do not. The minimalism is the point.
Why this look is popular: The twist at the nape breaks up the expected fishtail silhouette, adding an architectural element that elevates the whole look. Ash blonde reads modern and editorial, and the center part creates symmetry that photographs well from every angle. Works best on straight to wavy hair that holds a clean braid pattern.
Where this look is suitable: Date nights, gallery openings, minimalist weddings, upscale dinner parties. This is refined enough for formal settings but not so stiff that it feels out of place at a wine bar.
Step by step:
- Create a precise center part. Use the pointed end of a rat-tail comb for a razor-sharp line from forehead to crown.
- Smooth everything back. Apply a smoothing serum or light pomade from roots to ends. Brush with a boar bristle brush for maximum sleekness.
- Create the twist. At the nape, take a small section from each side and twist them around each other once or twice before incorporating them into the braid.
- Fishtail braid. Divide the remaining hair into two sections and fishtail braid down the length. Keep tension consistent—this look requires neatness.
- Secure tightly. Tie off with a small clear elastic. The sleek finish depends on everything staying flat and controlled.
- Set with shine. Mist with a shine spray for that glossy editorial finish. Avoid texturizing products—they'll kill the sleekness.
Tips and tricks: This style demands clean hair—skip the dry shampoo. A tiny amount of smoothing cream worked through each section before braiding keeps flyaways at bay. If your fishtail tends to bulge at the bottom, braid slightly tighter than feels natural and pancake just the top half for controlled volume.
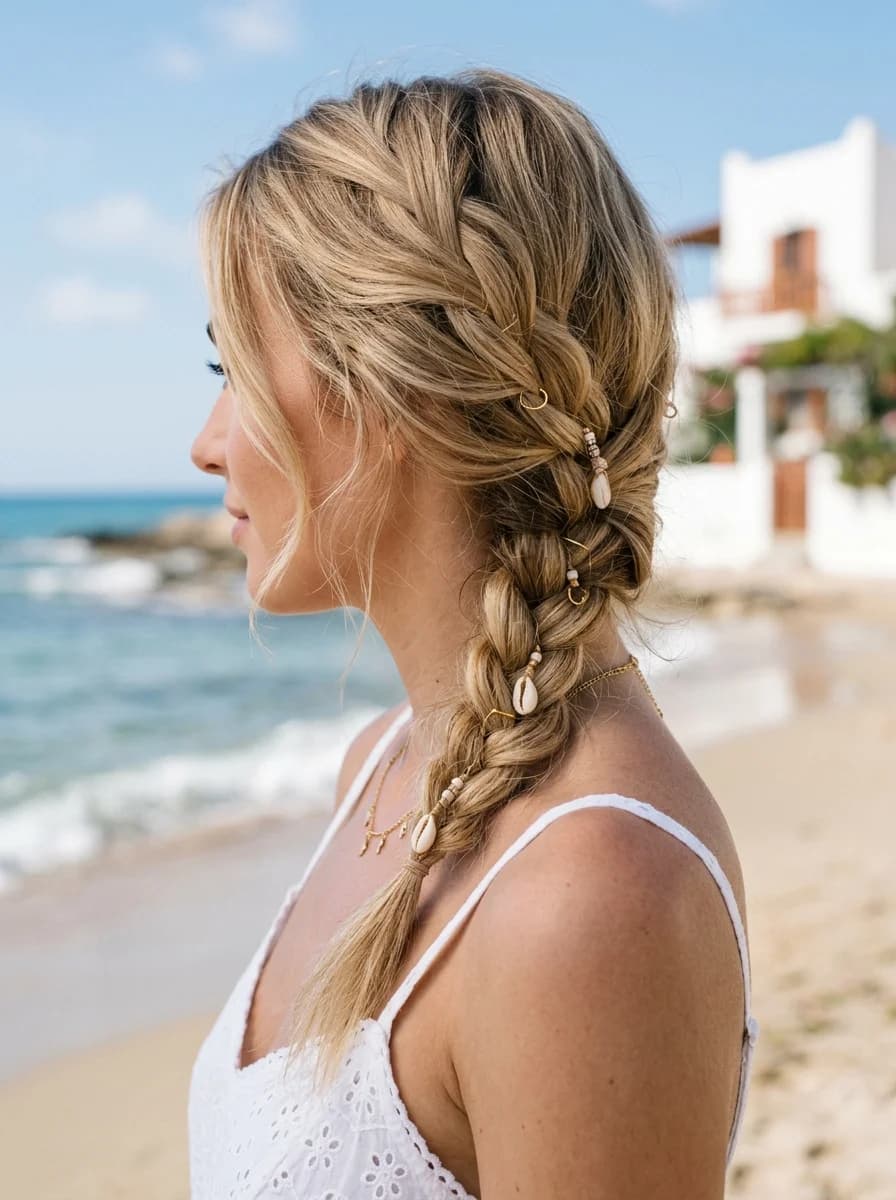
3.Boho Side Braids with Wavy Locks
The overview: Two small Dutch braids on one side paired with loose, tousled waves—that's the Mediterranean vacation energy you've been craving. The bronde colorway gives the braids dimension while the waves keep everything relaxed and sun-kissed. This is the hairstyle for women who want structure without stiffness.
Why this look is popular: The asymmetry of braids on one side with waves on the other creates visual interest without requiring a lot of effort. Dutch braids pop outward from the scalp, adding a 3D texture that catches light. Bronde—a blend of brown and blonde—works on a wide range of skin tones and looks especially good in summer sunlight.
Where this look is suitable: Beach vacations, rooftop cocktails, sightseeing, outdoor markets, European holiday photos. This is your "I'm on vacation and I know it" hairstyle.
Step by step:
- Texturize the waves. Apply sea salt spray to damp hair and scrunch upward. Let air-dry or diffuse for natural movement.
- Section for braids. On one side, take a 2-inch section from the hairline above the ear. Divide into three for a Dutch braid.
- Dutch braid the first section. Cross strands under (not over) to create a raised braid. Add small pieces from each side as you go. Keep it close to the scalp.
- Create the second braid. Take another section directly below the first and repeat. Secure both with small clear elastics.
- Loosen the waves. Run your fingers through the remaining hair to separate and tousle. Don't brush—it kills the texture.
- Set and forget. A light mist of texturizing spray keeps the waves piecey without stiffness.
Tips and tricks: Pancake the Dutch braids gently to make them look wider and more relaxed. If your hair is fine, clip the braids in place with small bobby pins that match your hair color to prevent them from sliding back. This style works even better on day-old hair.

26 Stunning Sunflower Floral Nails for Spring & Summer 2026 🌻
4.Beachy Waves with a Fishtail Accent Braid
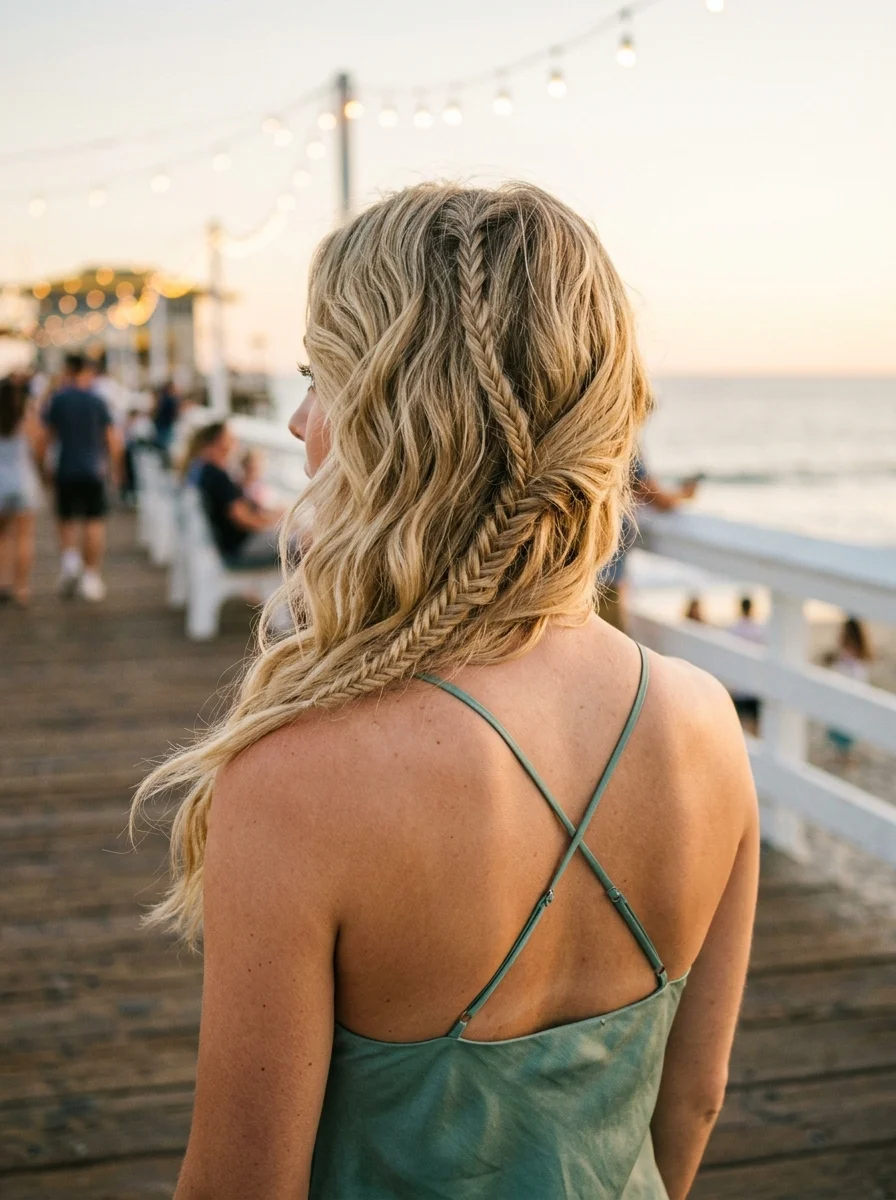
The overview: A single fishtail braid starting at the crown and melting into golden blonde beach waves—it's the kind of style that screams boardwalk energy without trying too hard. The braid adds just enough structure to keep the waves from looking like you rolled out of bed, even though the goal is to look like you rolled out of bed.
Why this look is popular: The accent braid technique gives you the best of both worlds: structure from the braid, movement from the waves. Golden blonde catches sunlight like a magnet and creates natural-looking dimension. This is one of the easiest braided styles to execute— even a loose, imperfect fishtail looks intentional against beachy waves.
Where this look is suitable: Beach days, boardwalk strolls, pool parties, casual outdoor dinners, vacation photos. It's the definition of casual summer hair.
Step by step:
- Create the waves first. Apply curl-enhancing cream to damp hair and scrunch. Air-dry or use a diffuser. Alternatively, use a large-barrel curling wand on dry hair, leaving the ends out.
- Section the braid. Take a 2-inch section from the crown, directly above where you want the braid to start.
- Fishtail braid downward. Braid loosely for 4-6 inches, then secure with a clear elastic. The braid should sit on top of the waves like a decorative strip.
- Pancake the braid. Gently pull the outer loops to widen the braid. This helps it blend with the volume of the waves rather than looking like a thin strip.
- Blend and tousle. Use your fingers to gently separate the waves around the braid so the transition looks seamless.
- Sea salt finish. Mist with sea salt spray for that authentic beach texture. Scrunch lightly to activate.
Tips and tricks: The key is making the braid look like it belongs in the waves, not like it was placed on top of them. Start the braid higher than you think you need to so it integrates naturally. If your waves fall flat by midday, a quick spritz of texturizing spray revives them instantly.
5.Textured Bob with Accent Braids and Gold Beads

The overview: Who says you need long hair for braids? This ash blonde bob gets a coastal European upgrade with two small accent braids adorned by gold beads. It's the hairstyle equivalent of a linen shirt and espadrilles—effortlessly chic, intentionally understated, and somehow better than anything more complicated.
Why this look is popular: Proving braids work on short hair opens up possibilities for everyone. The gold beads add a jewelry-like element that elevates a simple bob into something editorial. Ash blonde reads modern and pairs beautifully with gold tones. The textured finish keeps the bob from looking too polished or corporate.
Where this look is suitable: Coastal European vacations, seaside dining, art gallery openings, casual brunch, linen-dress occasions. This is quiet luxury for short hair.
Step by step:
- Texturize the bob. Apply a volumizing mousse or texturizing spray to damp hair. Blow-dry with your fingers for a tousled, piecey finish.
- Section for braids. Take a small section near each temple, about half an inch wide. Leave the rest of the hair to frame the face.
- Simple three-strand braid. Each section gets a basic three-strand braid for 2-3 inches. Keep them tight and small. Secure with tiny clear elastics.
- Add gold beads. Thread 2-3 small gold beads onto each braid and slide them down to the ends. The weight of the beads helps the braids hang properly.
- Finish the texture. Use your fingers to piece out the bob, separating sections for that editorial, lived-in look.
- Set lightly. A light mist of flexible-hold hairspray keeps everything in place without making the bob stiff.
Tips and tricks: The beads need something to grip—if your braids are too loose, they slide right off. Braid tightly and use a tiny dot of clear hair glue at the braid end if needed. Mix bead sizes for a more organic, less matchy-matchy look. This style works especially well on bobs that hit right at the jawline.
25 Trendy Beach Day Hairstyles for Vacation 2026 ☀️🌊
6.Double Crown Braids with a Wavy Ponytail
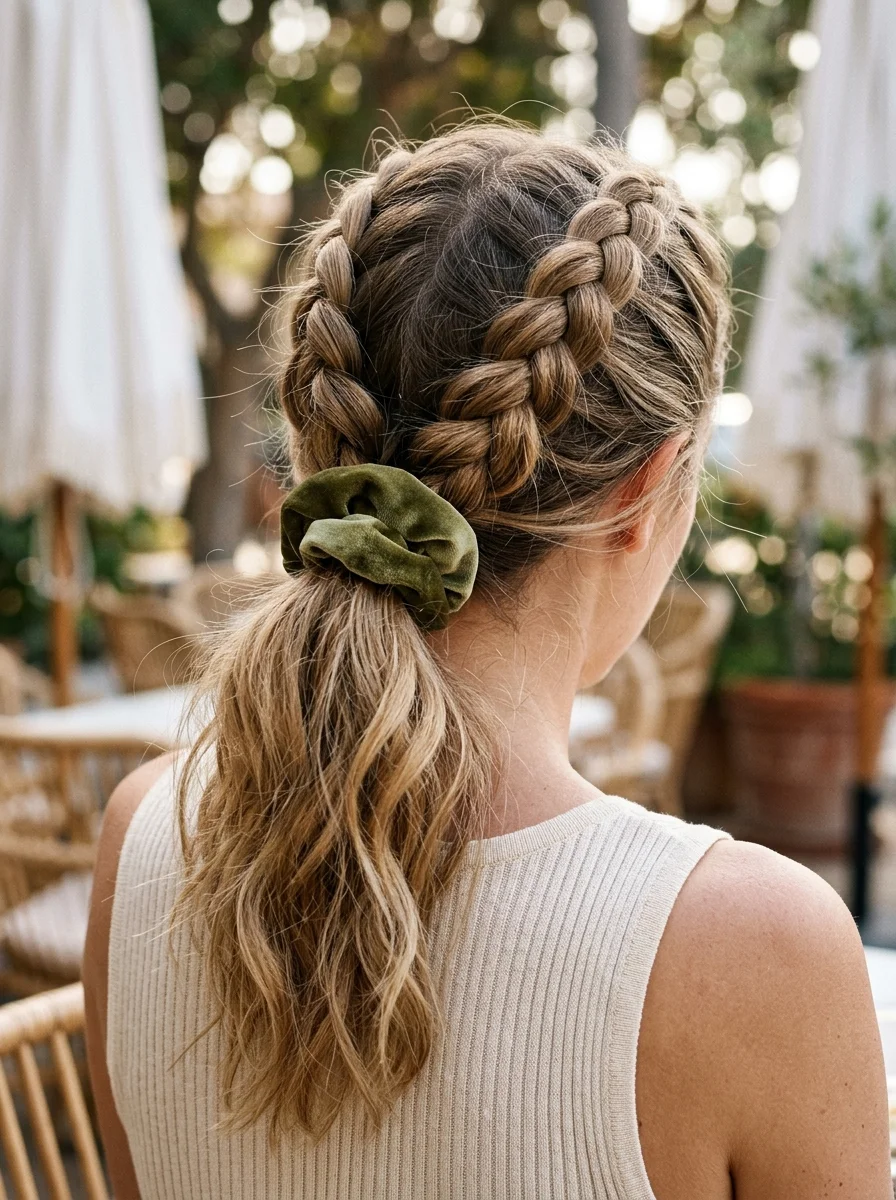
The overview: Dark blonde Dutch braids that feed into a wavy ponytail with a green scrunchie—yes, please. This is your go-to for weekend farmers' markets, casual dates, or any time you want to look cute without overthinking it. The scrunchie adds a pop of color that ties the whole look together.
Why this look is popular: Double crown braids create a frame around the face that's both flattering and functional—everything stays pulled back. The wavy ponytail adds movement and softness that balances the structured braids. Dark blonde with a colored scrunchie reads playful without being juvenile. It works on medium to long hair with enough thickness for two braids.
Where this look is suitable: Weekend errands, casual dates, farmers' markets, coffee runs, outdoor movies. This is everyday cute—polished enough to look intentional, relaxed enough for a Saturday morning.
Step by step:
- Create a center part. From forehead to crown. Symmetry matters here—take your time.
- Dutch braid each side. Starting at the hairline, cross strands under to create the raised braid. Add small sections from each side as you go. Stop at the nape.
- Gather the ponytail. Combine both braids and any remaining hair at the mid-back of your head. Secure with an elastic.
- Wave the ponytail. If the ponytail is straight, use a large-barrel curling wand to add loose waves. Leave the ends out for a modern finish.
- Add the scrunchie. Wrap the green scrunchie around the base of the ponytail. Position it so it's visible but not dominating.
- Pancake the braids. Gently pull the outer loops to widen the braids for a fuller look.
Tips and tricks: Match the scrunchie color to your outfit or keep it as a fun contrast. Silk scrunchies are gentler on hair than cotton ones and won't leave a crease when you take them out. If your ponytail waves fall flat, twist two sections around each other and let them cool—this creates waves that last all day.
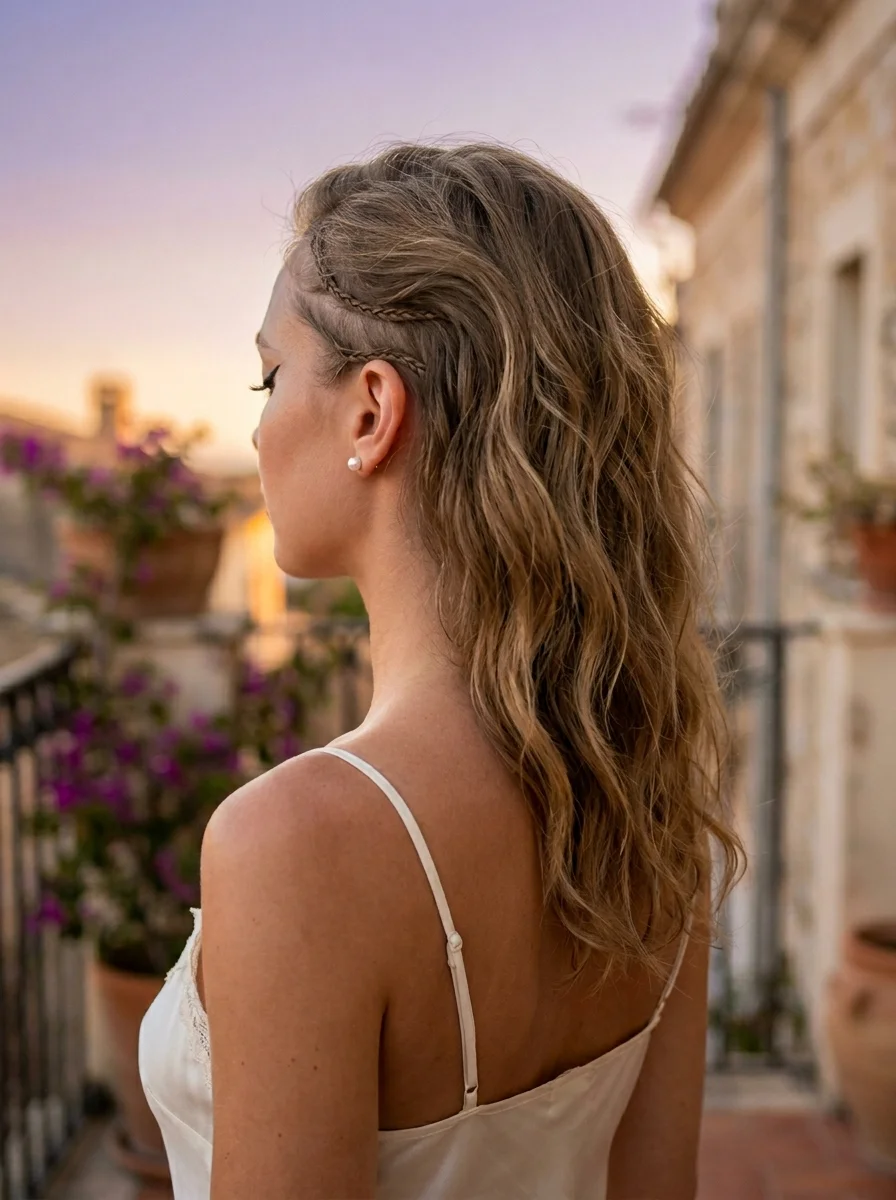
7.Wavy Mermaid Hair with Viking Braids
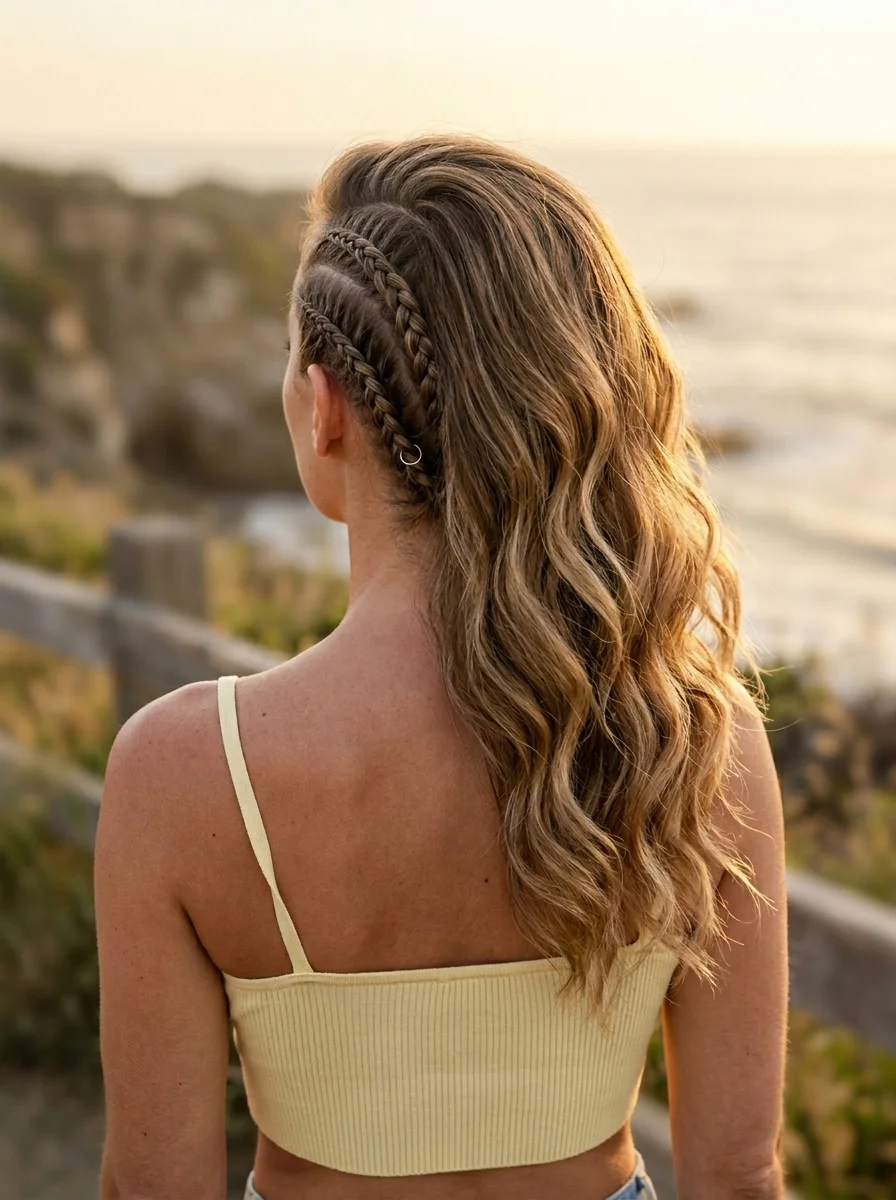
The overview: Caramel and honey blonde waves meet side cornrows adorned with a silver hair ring. This is edgy boho at its finest—perfect for the woman who wants her hair to match her personality. Bold, unapologetic, and a little bit wild. The Viking-inspired braids give it an edge that sets it apart from every other beachy wave style out there.
Why this look is popular: The contrast between tight cornrows and loose mermaid waves creates a visual tension that's magnetic. The silver hair ring adds a jewelry element that reads intentional, not accidental. Caramel and honey blonde tones complement each other beautifully, creating dimension that makes both the braids and waves look more dynamic. This is for women who want their hair to start conversations.
Where this look is suitable: Music festivals, beach parties, concerts, edgy photo shoots, vacation dinners. This is statement hair for when you want to be noticed.
Step by step:
- Create the waves. Apply curl cream to damp hair and scrunch. Let air-dry for natural mermaid texture, or use a waver iron for more defined S-waves.
- Section one side. On one side of the head, take a 3-inch section from the hairline. Divide it into three subsections for cornrows.
- Cornrow tightly. Braid each subsection close to the scalp, adding hair as you go. Keep tension firm and consistent. The braids should be visible and raised.
- Add the hair ring. Thread a silver hair ring through one of the cornrows near the temple. Close the ring securely.
- Blend the transition. Where the cornrows end and the waves begin, use your fingers to gently blend so the shift looks seamless.
- Volume and texture. Flip your head upside down and mist with texturizing spray for extra volume in the waves.
Tips and tricks: The cornrows need to be tight enough to stay put but not so tight they cause tension headaches. If you're not comfortable cornrowing yourself, ask a friend who can braid or visit a braiding salon for the initial section. The silver ring is a small detail that makes a huge difference—don't skip it.
27 Gorgeous Mint Green Nails That Are Popular Right Now (2026)
8.Soft Curls with Honey Highlights and Braided Twists
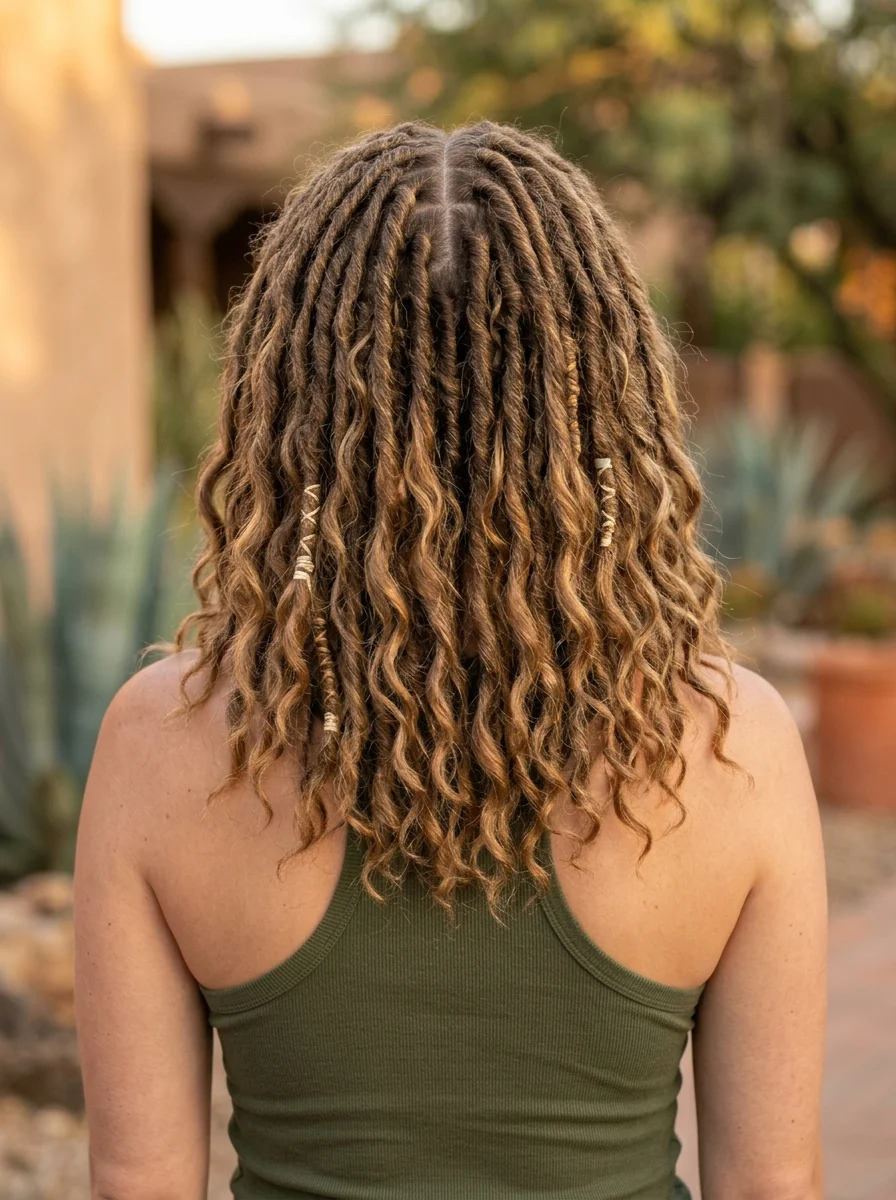
The overview: Warm brown curls with gold highlights get elevated by two- strand twists and gold cuffs. This desert boho vibe is all about texture and warmth. The gold accessories catch light against the rich brown tones, creating a look that's equal parts festival-ready and everyday wearable.
Why this look is popular: Two-strand twists protect natural curls while adding definition that lasts. The gold cuffs turn functional hair jewelry into a style statement. Warm brown with honey highlights is one of the most universally flattering color combinations—it adds warmth to cool skin tones and depth to warm ones. The soft curl texture keeps everything feeling romantic.
Where this look is suitable: Desert festivals, bohemian weddings, outdoor concerts, warm-climate vacations, brunch dates. This is for when you want your hair to feel like a warm afternoon.
Step by step:
- Define curls on damp hair. Apply a curl-defining cream section by section. Scrunch upward and let air-dry or diffuse on low heat.
- Section the twists. Take a 1-inch section near each temple. Divide each into two for the two-strand twist.
- Twist each section. Wrap the two strands around each other from root to tip. The twist should be firm but not so tight it pulls.
- Secure with cuffs. Slide a gold cuff onto the end of each twist and clamp it shut. Position the cuffs about half an inch from the ends.
- Fluff the curls. Use a wide-tooth comb or your fingers to gently separate and lift the curls for volume.
- Shine and set. Apply a light oil or shine serum to the curls for a healthy, glossy finish.
Tips and tricks: Don't over-twist—the two-strand technique should look like a rope, not a braid. If your curls are type 3C or tighter, the twists will hold beautifully on their own. For looser curl patterns, a small amount of styling gel at the ends before twisting helps them stay put. Mix cuff sizes for a more organic, collected-over-time look.
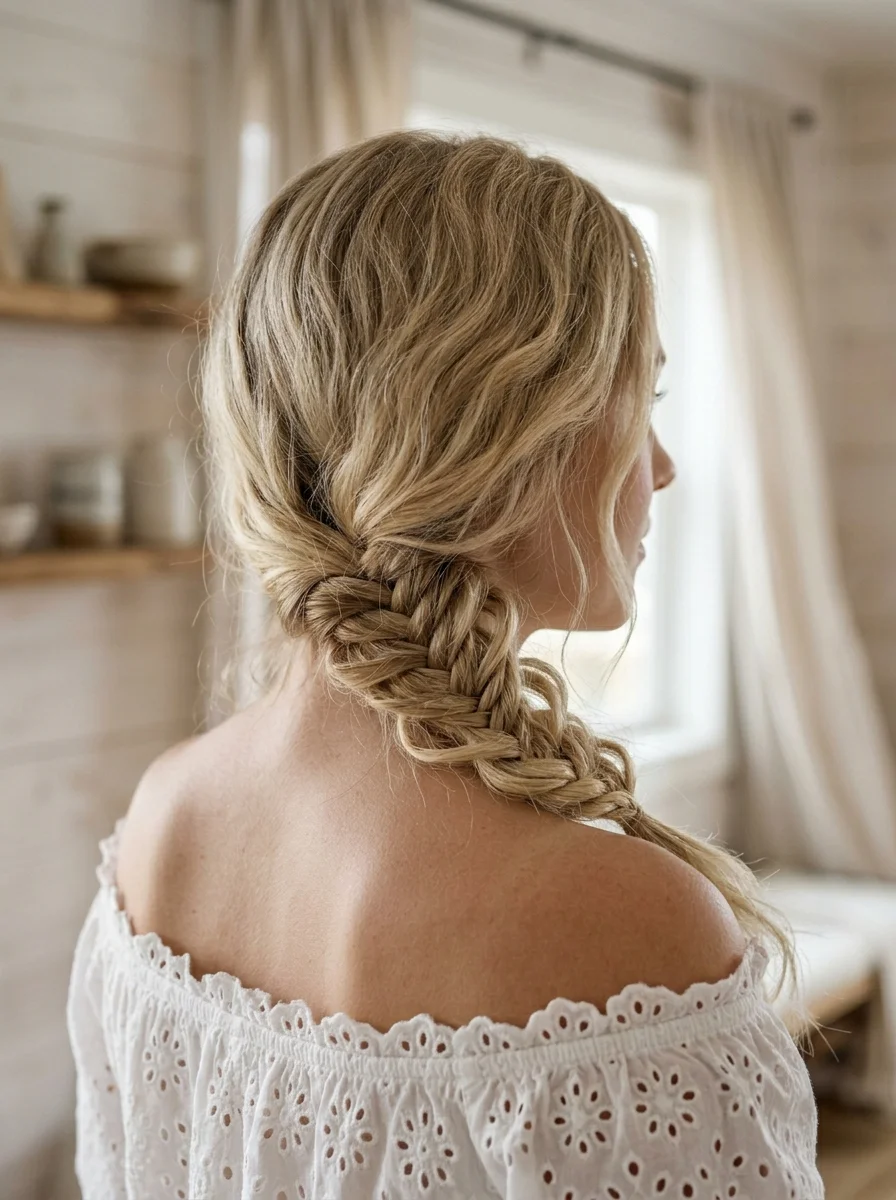
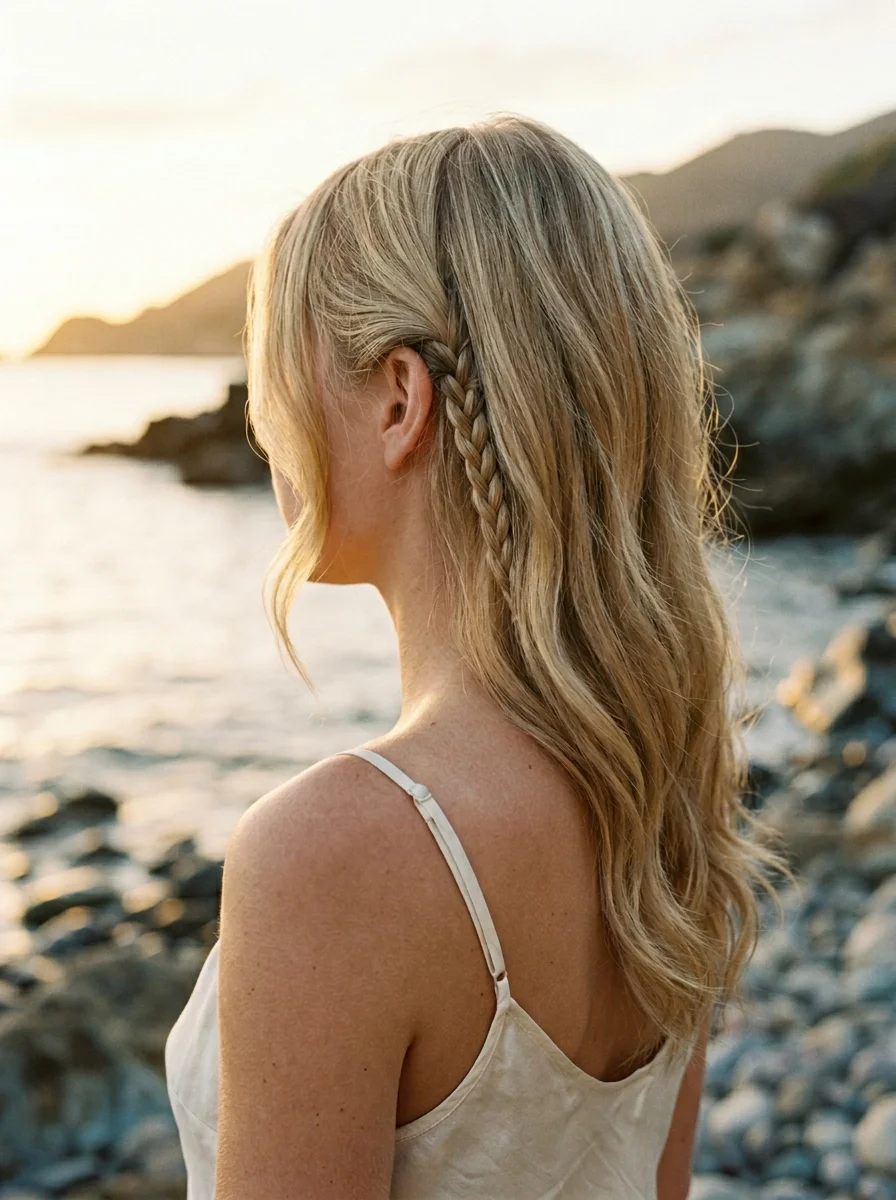
9.Boho Beachy Braid Crown Half-Up
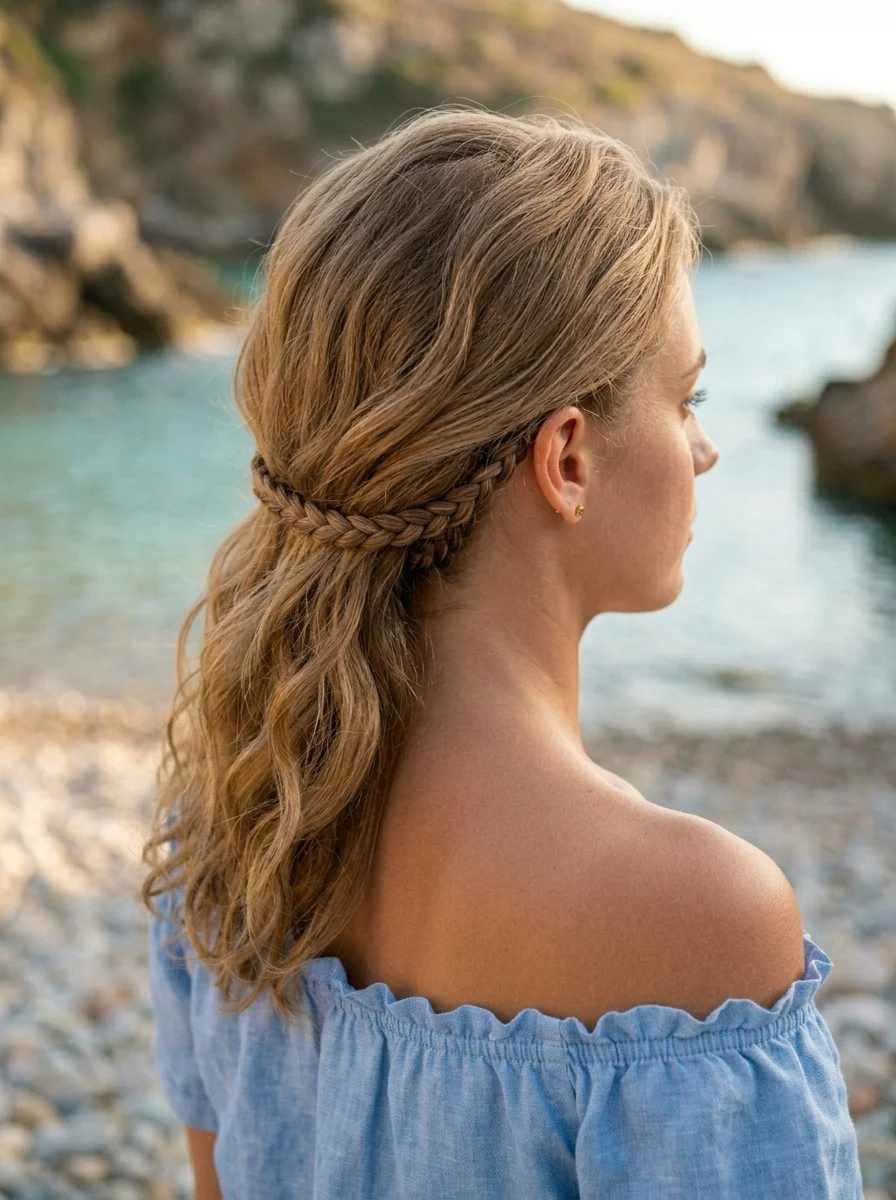
The overview: A sandy blonde fishtail braid crown that pulls the top half back while leaving the rest loose—that's beach cove energy right there. This half-up style keeps hair out of your face while still giving you that windswept, effortless look that makes people ask if you just came from the ocean (even if you came from your couch).
Why this look is popular: The braid crown acts as a natural headband, keeping hair controlled without clips or pins visible. The half-up format shows off length while the fishtail adds a bohemian detail that elevates the whole look. Sandy blonde is the quintessential summer color—warm, sun-kissed, and universally flattering.
Where this look is suitable: Beach days, cove picnics, outdoor weddings, vacation dinners, sunset photo sessions. This is romantic summer hair at its most wearable.
Step by step:
- Wave the hair. Apply sea salt spray to damp hair and scrunch. Let air-dry for natural beachy texture.
- Section the crown. Take a 3-inch section from one side of the head, above the ear. This will become the braid.
- Fishtail braid. Fishtail braid the section down its full length. Keep the tension medium—too tight and it won't wrap naturally.
- Wrap the crown. Pull the braid across the top of your head to the other side, like a headband. Pin it in place with bobby pins that match your hair color.
- Hide the end. Tuck the tail of the braid under the hair on the opposite side and pin it flat.
- Pancake and tousle. Gently pull the braid loops wider and tousle the remaining waves with your fingers.
Tips and tricks: If the braid won't stay pinned, criss-cross two bobby pins instead of using one—the X shape holds much better. For extra hold, spray the braid with texturizing spray before wrapping it. This style also works beautifully with a regular three-strand braid if fishtails aren't your thing.
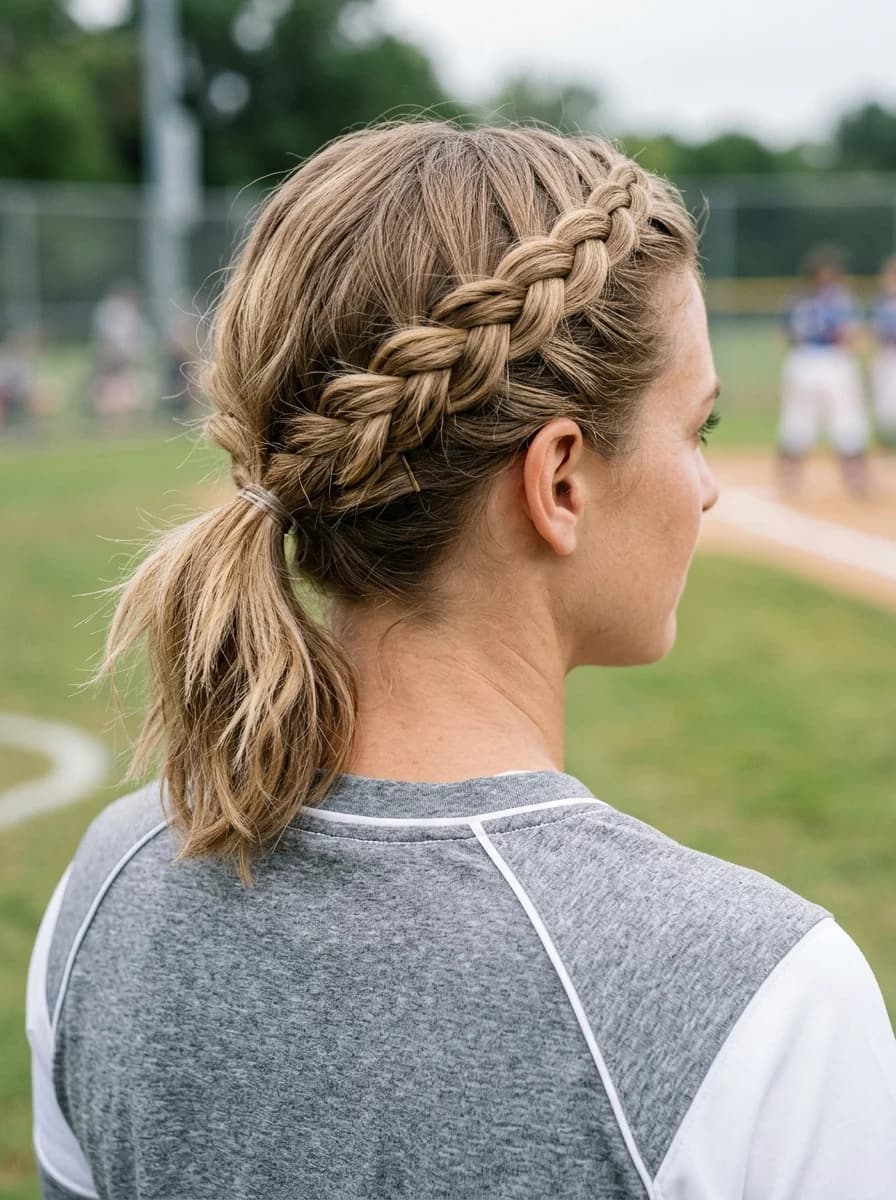
28 Stunning Softball Hairstyle Ideas with Braids for 2026 🥎✨
10.Sleek Cornrow Braids to Ponytail
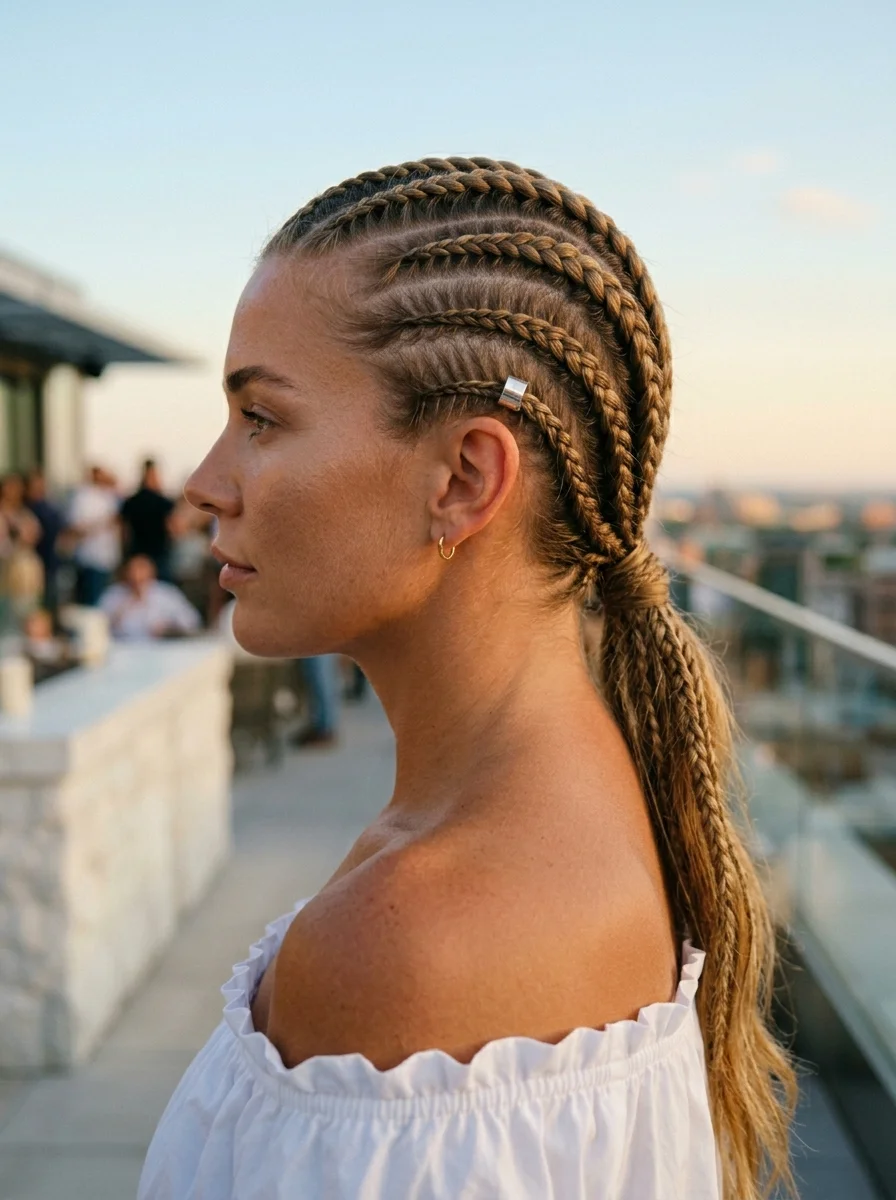
The overview: Feed-in cornrows in honey blonde that pull back into a mid ponytail with a silver cuff—that's rooftop bar energy. This style is sleek, polished, and built for summer nights when you want to look put together without a single hair out of place. The feed-in technique creates a natural, seamless look that gets better as the days go on.
Why this look is popular: Feed-in cornrows add hair gradually, creating a braid that starts thin and builds volume—more natural-looking than traditional cornrows. The silver cuff at the ponytail base adds a modern, jewelry-like accent. Honey blonde on cornrows creates stunning contrast and dimension. This style lasts for days with minimal maintenance.
Where this look is suitable: Rooftop bars, summer nightlife, upscale dinners, date nights, vacation evenings out. This is polished enough for any evening setting while staying cool in summer heat.
Step by step:
- Smooth the base. Apply a smoothing gel or edge control to damp hair. Brush with a boar bristle brush for maximum sleekness.
- Part precisely. Create clean, straight parts for each cornrow using a rat-tail comb. The parts are what make or break this look.
- Cornrow with feed-in. Start each braid with your natural hair, then gradually add small pieces of extension hair (or just continue with your own) as you braid backward. Keep tight to the scalp.
- Gather the ponytail. Once all cornrows reach the nape, gather them and any remaining hair into a ponytail. Secure with a strong elastic.
- Add the cuff. Wrap a silver metallic cuff around the base of the ponytail. Clamp it shut securely.
- Edge control. Use a small brush and edge control gel to smooth any flyaways along the hairline and parts.
Tips and tricks: The parts are everything here. Take your time getting them straight before you start braiding—crooked parts are impossible to fix afterward. A rat-tail comb with a metal tip gives you the most precision. Apply gel to each section before braiding for clean, defined lines that last.
11.Pearl-Adorned Dutch Braid with Soft Tousled Texture
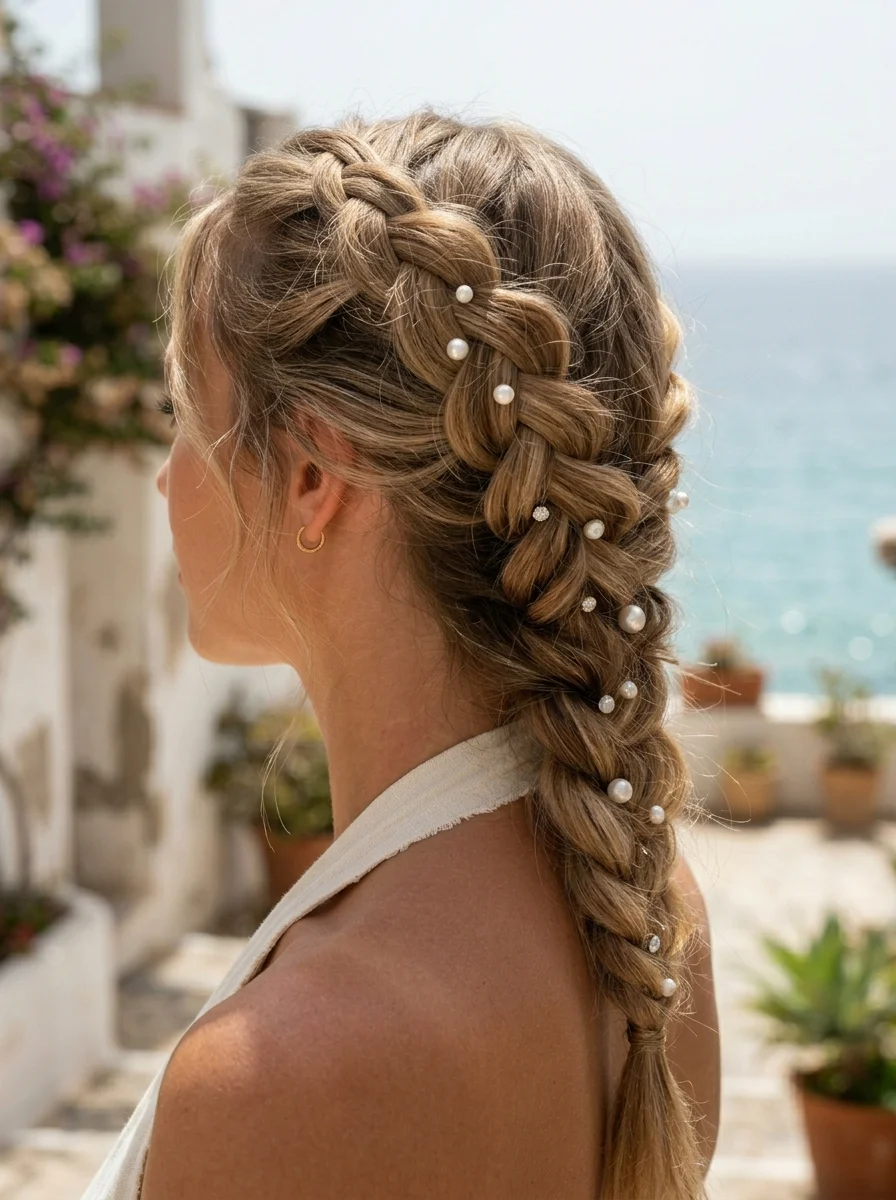
The overview: This ash blonde pancaked Dutch braid dotted with pearl pins is destination wedding perfection. It's romantic without being stuffy, elegant without trying too hard. The pearls catch light like scattered dewdrops, and the tousled texture keeps everything feeling soft and approachable.
Why this look is popular: The Dutch braid creates a raised, 3D pattern that's highly visible and photographable. Pearls are having a major fashion moment, and hair pearls translate that trend into something wearable. Ash blonde provides a cool-toned canvas that makes white pearls pop. The pancaked texture adds romance without requiring curls or waves.
Where this look is suitable: Destination weddings, rehearsal dinners, bridal showers, elegant garden parties, romantic evening events. This is formal enough for a wedding but not so structured that it feels stiff.
Step by step:
- Prep with volume. Apply a volumizing mousse to damp hair and blow-dry with a round brush for body and movement.
- Dutch braid. Start at the crown or one side and Dutch braid down the length. Keep the tension medium—you want it full, not tight.
- Pancake generously. Pull the outer loops of the braid wide from top to bottom. This creates the full, romantic shape that makes the pearls look like they're floating.
- Add pearl pins. Insert small pearl-tipped pins into the braid at irregular intervals. Odd numbers (5-9) look more natural than even. Space them asymmetrically.
- Release face-framing pieces. Pull a few wispy sections free around your face and ears for softness.
- Set with spray. A light mist of flexible-hold hairspray keeps the braid and pearls in place without stiffness.
Tips and tricks: Use pearl pins rather than glue-on pearls—they're easier to place and won't damage your hair. Push each pin in at an angle so it grips the braid securely. For a more organic look, mix pearl sizes. If you're worried about pearls falling out, a tiny dot of clear hair glue on the pin base adds insurance.
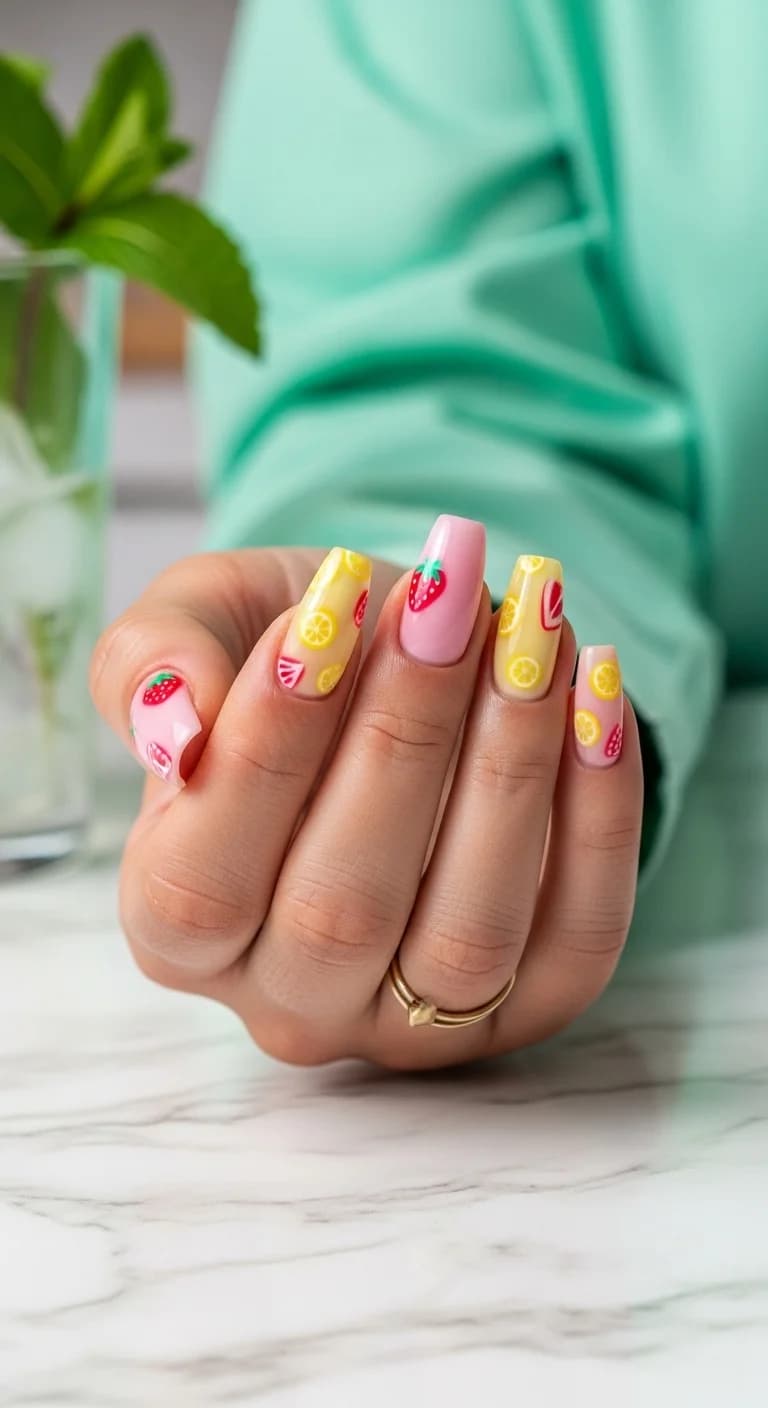
29 Bright Lemon Nail Art Designs for Summer & Spring (2026)
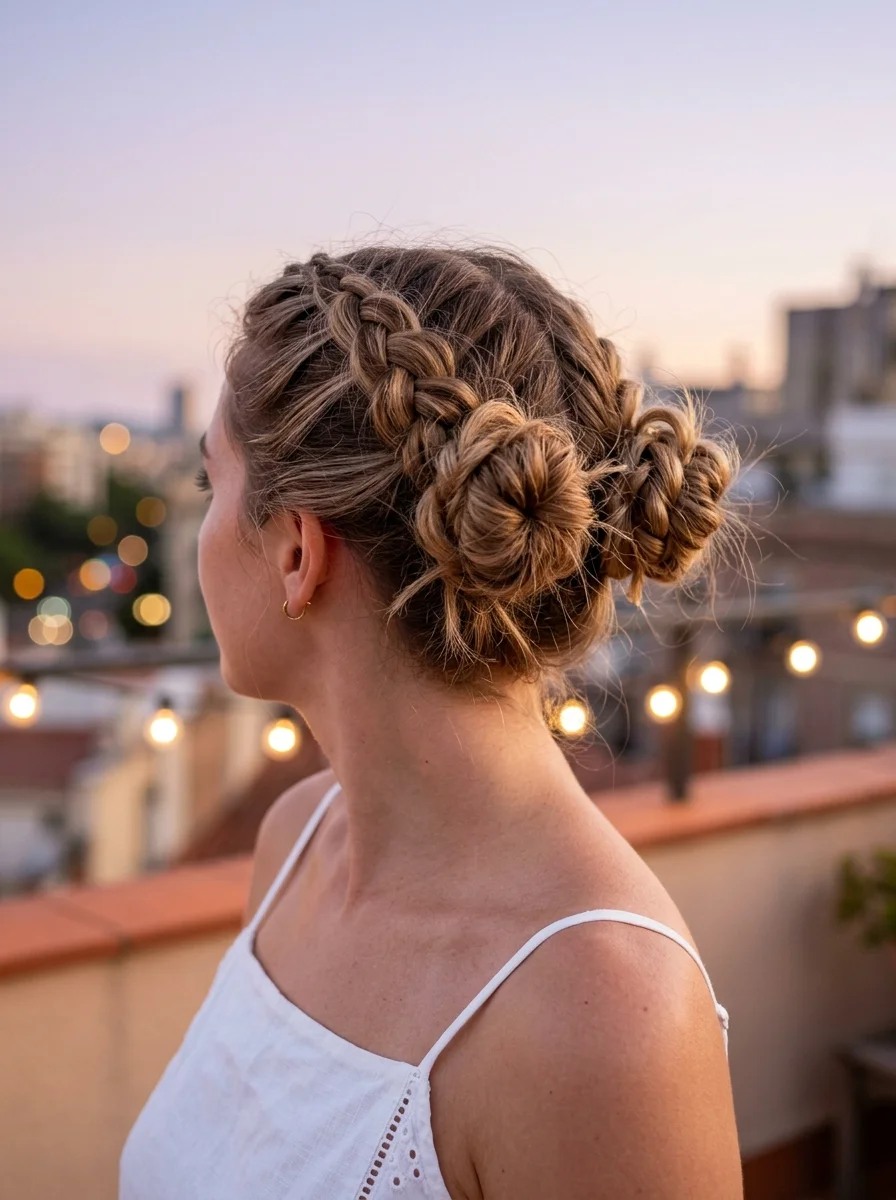
12.Double Dutch Braids into Twisted Buns
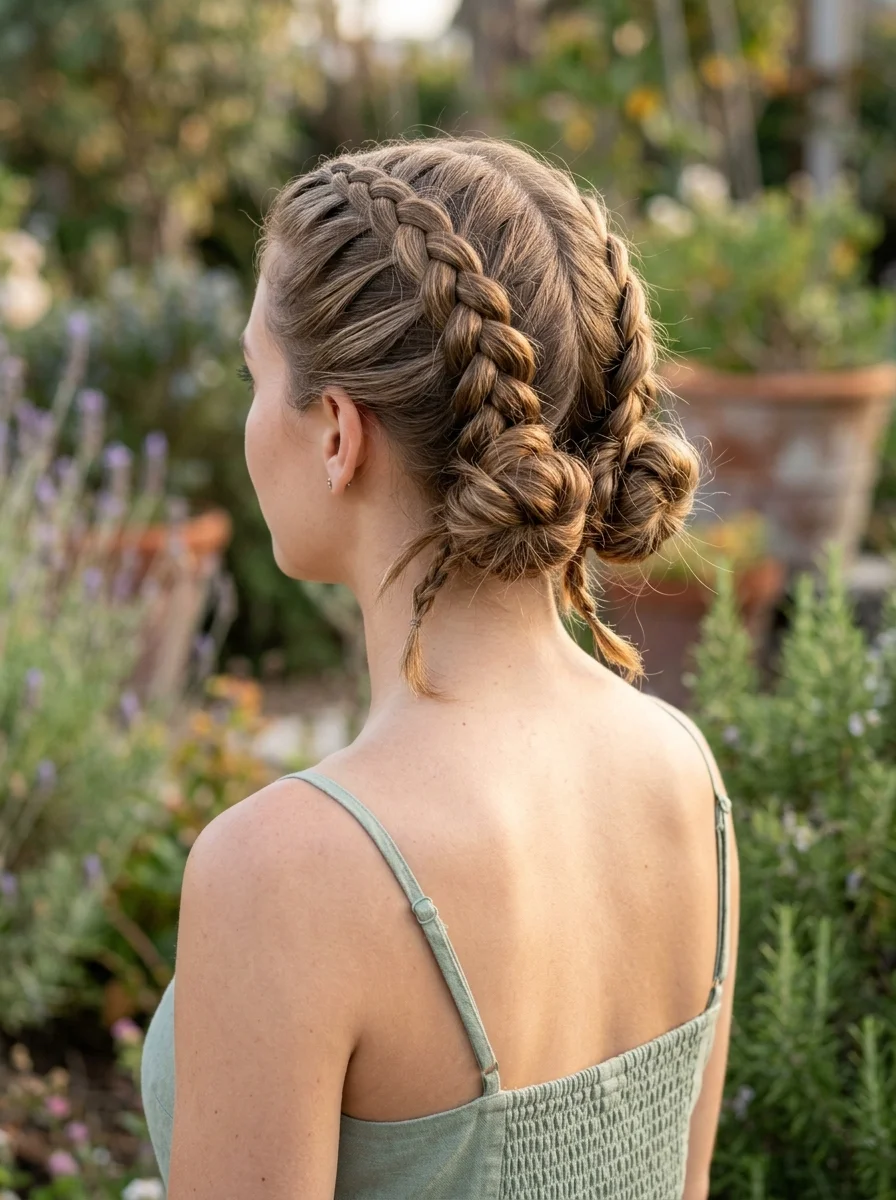
The overview: Dirty blonde Dutch braids that twist into double buns—that's garden party royalty. This style keeps things playful while still looking intentional. It's the hair equivalent of a sundress with sneakers: cute, comfortable, and totally you. The double buns add a youthful, fun element that keeps everything from feeling too serious.
Why this look is popular: Double buns are inherently playful, and the Dutch braids feeding into them add structure and visual interest. The braids keep hair secure and off the face, making this practical for warm weather. Dirty blonde has natural dimension that makes the braid pattern visible without being stark. It's a style that works on a wide range of hair textures.
Where this look is suitable: Garden parties, outdoor festivals, casual weddings, picnics, amusement parks, brunch with friends. This is fun, approachable hair that works anywhere you want to look cute and feel comfortable.
Step by step:
- Create a center part. From forehead to nape. Use a rat-tail comb for precision.
- Dutch braid each side. Starting at the hairline, cross strands under to create the raised braid. Braid to the crown and secure temporarily.
- Form the first bun. Take the braided section on one side, twist it around its base to form a bun. Pin securely with bobby pins that match your hair color.
- Repeat on the other side. Create a matching bun with the second braid. Try to make them the same size and height.
- Tuck and pin. Tuck any loose ends under the buns and pin them flat. Smooth the edges with a small brush and gel.
- Set in place. A strong-hold hairspray ensures the buns stay put all day.
Tips and tricks: If your buns feel loose, backcomb the braided sections slightly before coiling them—the added texture gives the pins something to grip. Criss-cross bobby pins in an X pattern for maximum hold. For finer hair, a doughnut bun maker underneath gives the buns extra volume and shape.
13.Elegant Braided High Ponytail for a Chic Vibe
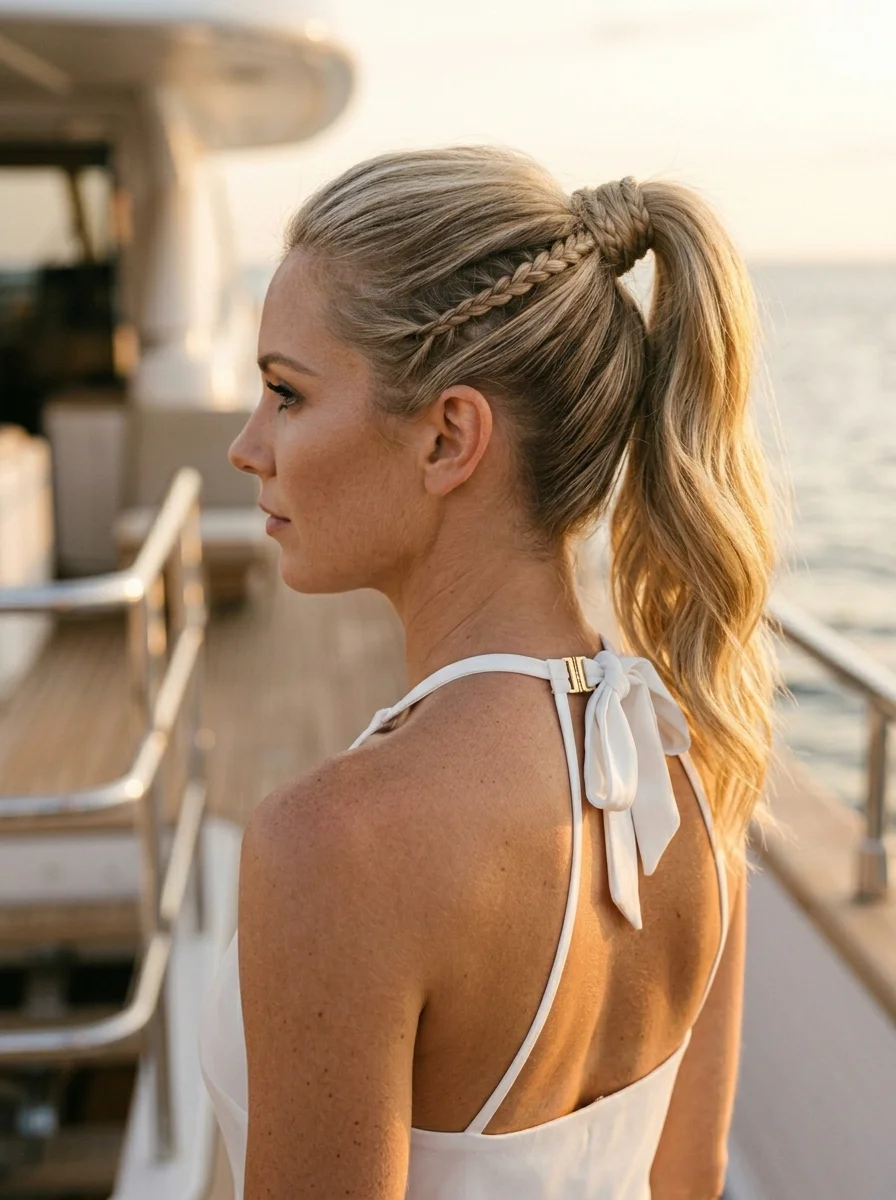
The overview: An ash blonde high ponytail with an accent braid woven through—that's yacht day energy. This style lifts your whole face and gives you that polished, put-together look that says you definitely have summer plans and probably a boat. The braid detail elevates a basic ponytail into something editorial.
Why this look is popular: The high ponytail is universally flattering—it lifts the face, creates a clean jawline, and adds height. The accent braid adds a detail that makes the style look considered rather than thrown together. Ash blonde reads modern and sophisticated. The ponytail stays secure through wind and movement, making it practical as well as beautiful.
Where this look is suitable: Yacht days, upscale beach clubs, summer dinners, cocktail parties, any occasion where you want to look polished and confident. This is power hair for summer.
Step by step:
- Slick the hair back. Apply a smoothing gel or pomade from roots to mid-lengths. Brush with a boar bristle brush for a sleek, bump-free base.
- Gather high. Pull all hair into a ponytail at the crown. The higher the ponytail, the more dramatic the effect.
- Create the accent braid. Before securing the ponytail, separate a 1-inch section from the underside. Braid it as a simple three-strand braid and secure with a tiny elastic.
- Secure the ponytail. Tie the main ponytail with a strong elastic. Wrap the base with the accent braid, pinning it underneath.
- Smooth and polish. Use a fine-tooth comb to smooth any bumps along the scalp. Apply a small amount of pomade to the ponytail for shine.
- Set with spray. A strong-hold hairspray locks everything in place for the entire day.
Tips and tricks: The height of the ponytail changes the entire vibe—higher reads more dramatic, lower reads more relaxed. For extra volume in the ponytail, backcomb the underside before gathering. A boar bristle brush is essential for achieving the sleek, polished base without bumps.

24 Stunning Festival Hairstyle Ideas for Music Concert Nights 2026 🎶✨
14.Romantic Crown Braid with Loose Tendrils
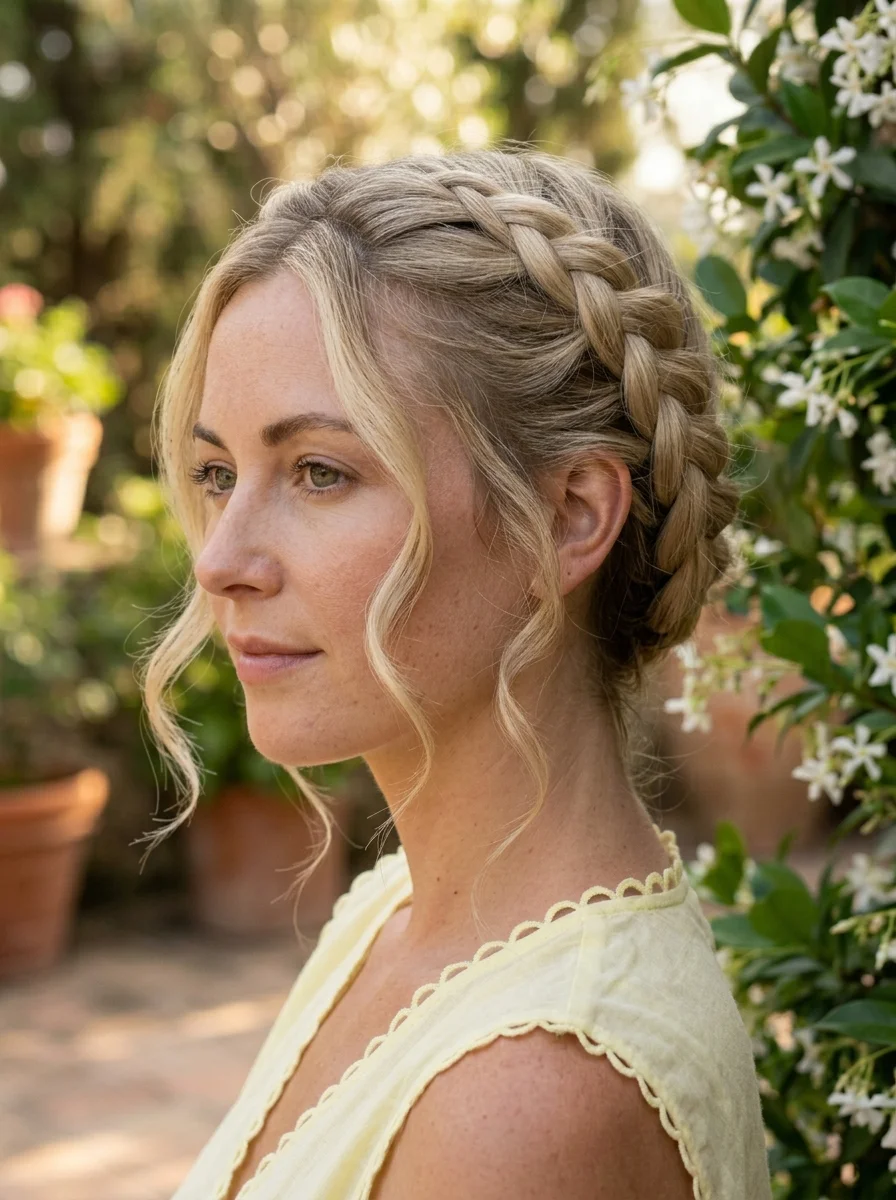
The overview: Dark blonde and golden tones weave into a crown braid with loose tendrils framing your face. This is outdoor wedding perfection—romantic, soft, and absolutely timeless. You'll feel like a character in a period drama, and honestly, that's the goal. The tendrils keep it from looking too "done."
Why this look is popular: The crown braid is one of the most romantic braided styles available—it frames the face beautifully and creates a halo effect that photographs from every angle. Loose tendrils add softness and movement that prevent the style from looking severe. The dark blonde and golden tones blend seamlessly, adding warmth and dimension to the braid pattern.
Where this look is suitable: Outdoor weddings, garden ceremonies, romantic date nights, formal summer events, engagement photos. This is special-occasion hair that still feels relaxed enough for outdoor settings.
Step by step:
- Prep with texture. Apply a light volumizing mousse to damp hair and blow-dry for body. Second-day hair works well here.
- Section for tendrils. Before braiding, pull 2-3 thin sections free around the face. Clip them aside.
- Crown braid. Starting at one side of the head, French or Dutch braid along the hairline, adding hair as you go. Continue around the entire head until all hair is incorporated.
- Secure and tuck. Tie off the braid and tuck the tail under the beginning of the braid. Pin it flat with bobby pins.
- Curl the tendrils. Use a small-barrel curling iron to add soft curls to the face-framing pieces. Let them cool, then gently separate with your fingers.
- Set softly. A light mist of flexible-hold hairspray keeps everything in place without making the tendrils stiff.
Tips and tricks: The tendrils make or break this look—too many and it looks messy, too few and it looks stiff. Two or three thin sections per side is the sweet spot. Curl them after braiding so they fall naturally around your face. Use a light-hold hairspray on the tendrils specifically—they need to move.
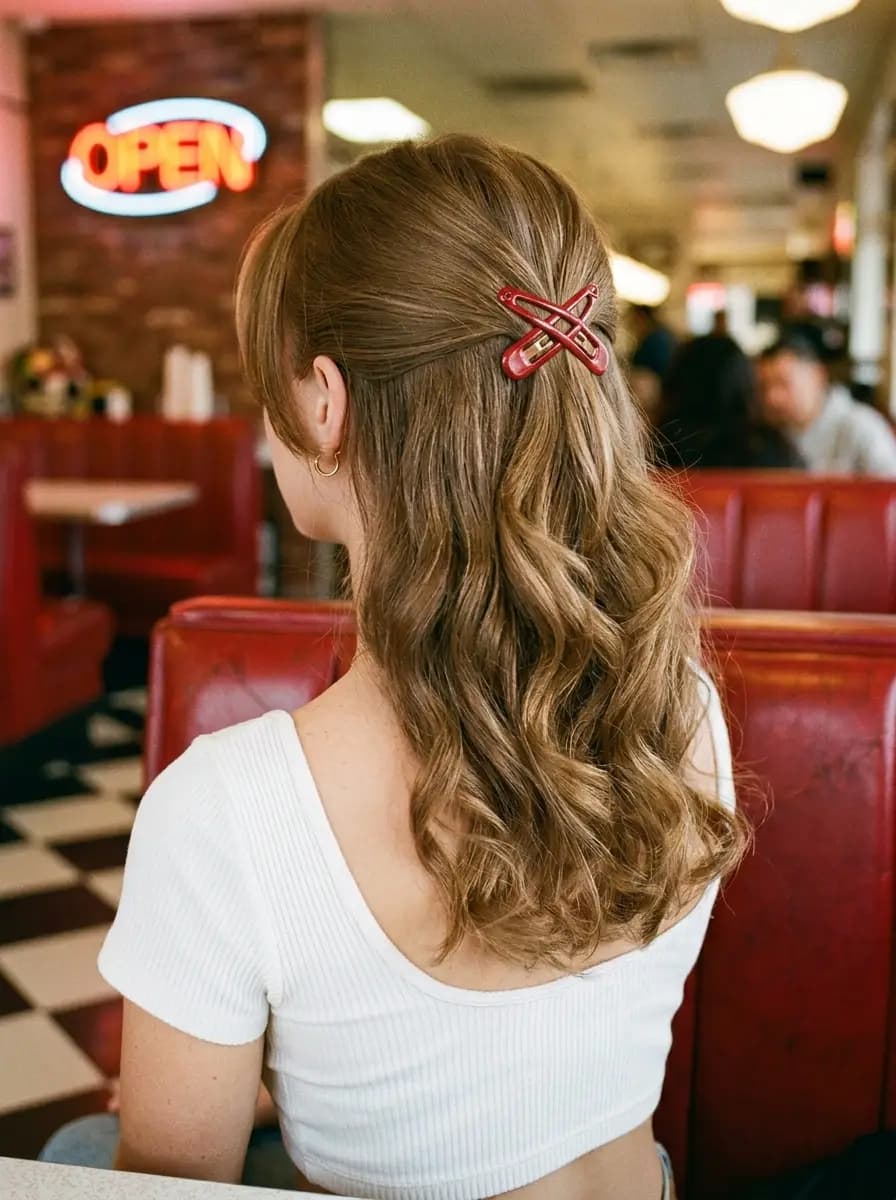
15.Elegant Braided Half-Up with Velvet Bow
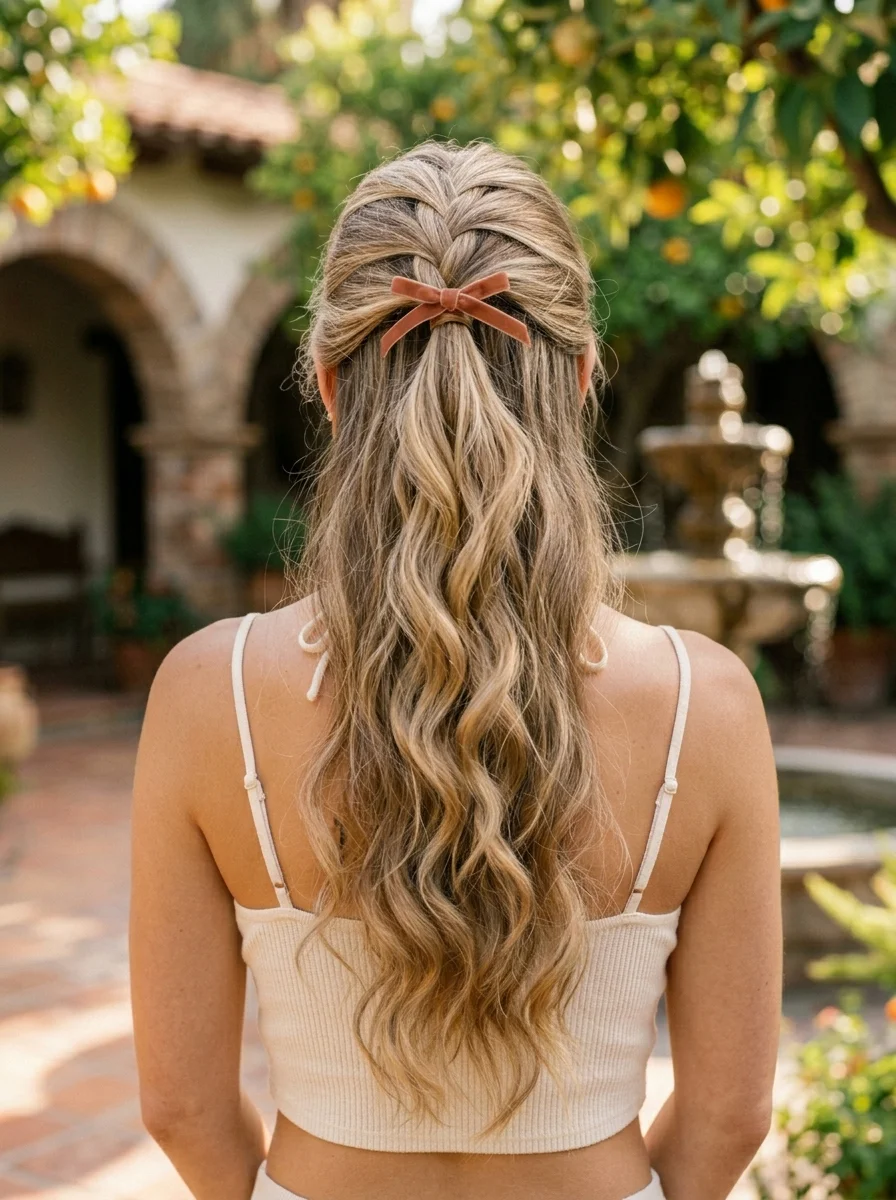
The overview: A bronde braided crown half-up finished with a rust velvet bow—that's summer date night sorted. This style is equal parts romantic and refined, perfect for rooftop dinners or evenings at the theater. The bow adds that finishing touch that makes everything feel special without being overdone.
Why this look is popular: The velvet bow trend has taken over fashion, and translating it into hair is the natural next step. The half-up format shows off length while the braided crown adds a romantic detail. Bronde tones provide a warm, dimensional base that makes both the braid and the bow pop. The rust color of the bow complements warm skin tones beautifully.
Where this look is suitable: Summer date nights, rooftop dinners, theater evenings, anniversary celebrations, upscale casual events. This is romantic hair that feels considered but not costumey.
Step by step:
- Create soft waves. Use a large-barrel curling wand on 1-inch sections, leaving the ends out. Break up with your fingers for a natural look.
- Section the crown. Take a 3-inch section from each side of the head, above the ears. These will become the braids.
- Braid each section. French braid or fishtail braid each section back toward the center. Keep the tension medium for a relaxed look.
- Meet at the back. Bring both braids to the center back of your head and secure them together with a small elastic.
- Add the bow. Clip or tie the rust velvet bow over the elastic where the braids meet. Position it so it sits flat against the head.
- Adjust and tousle. Pancake the braids slightly and tousle the remaining waves for a soft, romantic finish.
Tips and tricks: The velvet bow needs a secure base—if it's just clipped on, it tends to slide. Tie it around the elastic for a more secure hold, or use a small bobby pin on each side of the bow to anchor it. A rust or burgundy velvet works best for summer—it reads warm and rich without being heavy.

27 Coral Nail Art Designs for a Warm, Tropical Manicure (2026)
16.Chic Bubble Braid with a Twist
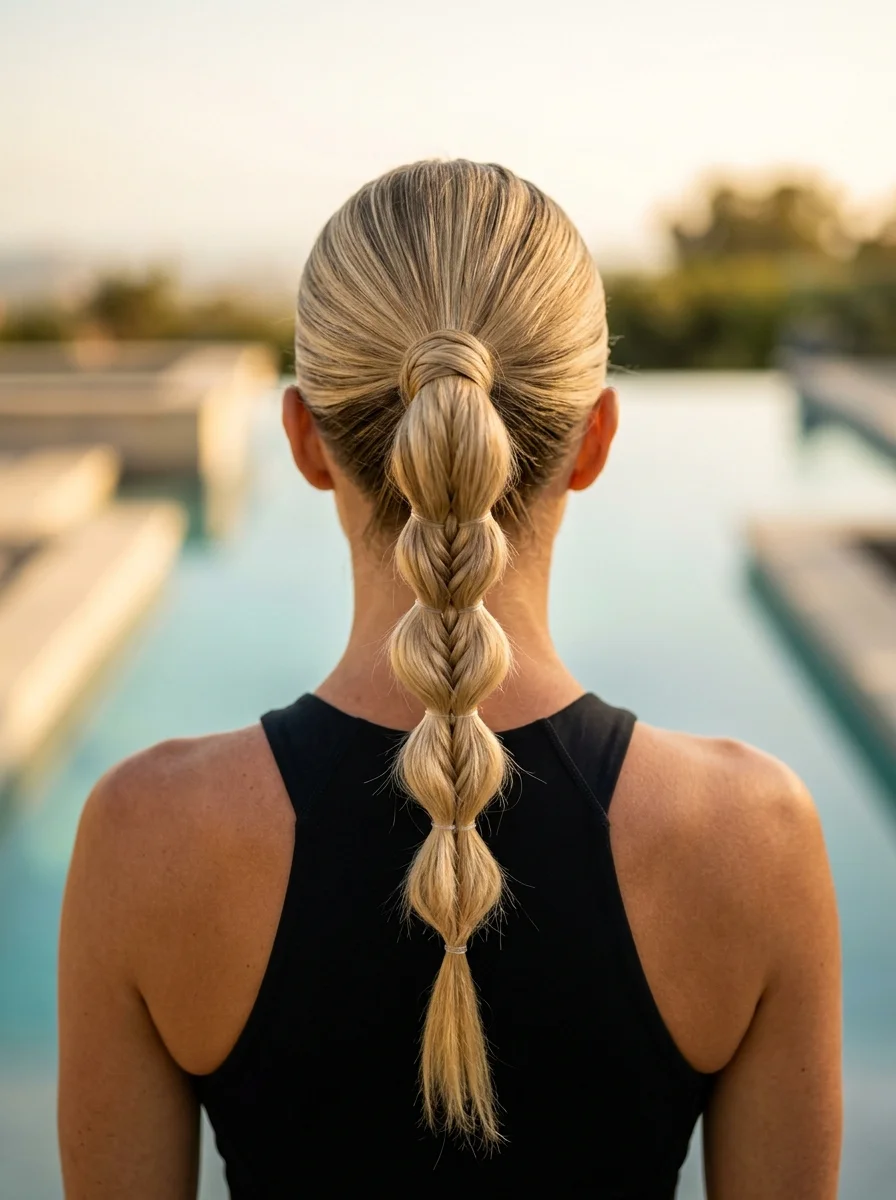
The overview: Ash blonde and platinum tones come together in a bubble braid with fishtail detail—pool party, here you come. This style is playful, eye-catching, and way easier than it looks. The fishtail twist at the base keeps it from feeling too basic, and the platinum highlights make each bubble pop.
Why this look is popular: Bubble braids are the easiest "braid" to execute—you're just tying elastics at intervals and pulling the sections apart. Adding a fishtail detail at the base introduces a textural contrast that elevates the whole look. The ash blonde to platinum gradient creates a color story that makes each bubble look dimensional and full. This style photographs incredibly well.
Where this look is suitable: Pool parties, beach clubs, brunch with friends, outdoor festivals, casual summer events. This is fun, statement hair that's perfect for when you want your hair to be the conversation starter.
Step by step:
- Smooth the hair. Brush thoroughly and apply a light smoothing serum for a clean base.
- Create a high ponytail. Gather all hair at the crown and secure tightly.
- Fishtail the base. Take a 1-inch section from the ponytail and fishtail braid it for 3-4 inches. Secure with a tiny elastic. Let it hang alongside the main ponytail.
- Bubble the ponytail. Tie an elastic 2 inches down from the base. Pull the section between elastics to create a rounded bubble. Repeat down the length.
- Integrate the fishtail. As you create each bubble, incorporate the fishtail braid into the section so it weaves through the bubbles.
- Adjust for fullness. Gently pull each bubble wider to create maximum volume. The bigger, the better.
Tips and tricks: Use clear elastics as a base and wrap colored ones over them for extra hold. The fishtail braid should be loose enough to pancake but tight enough to maintain its pattern. For finer hair, backcomb each bubble section slightly before pulling it apart for extra volume.
17.Braided Crown Half-Up with Loose Curls
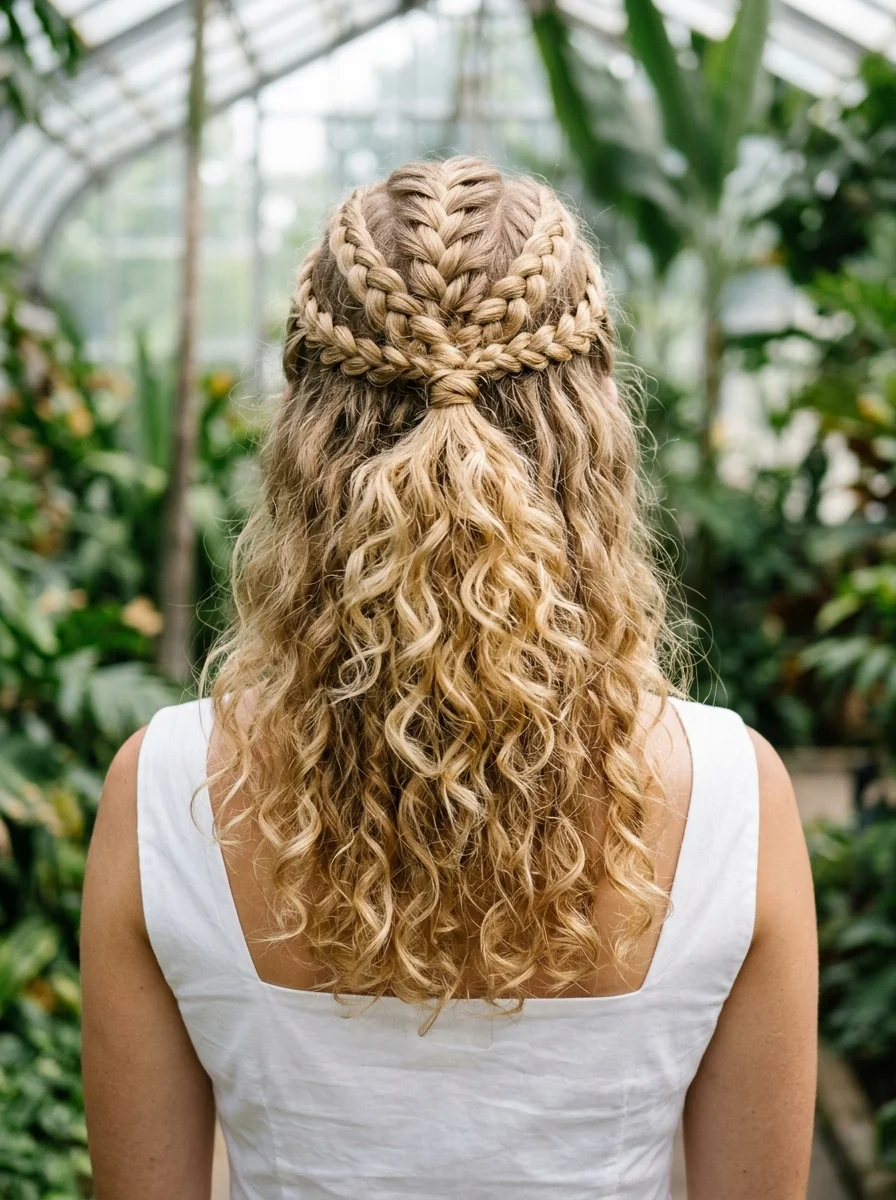
The overview: Golden blonde crown braid meets natural 3A/3B curls in this botanical garden dream. The braid keeps things structured while the curls bring all the volume and movement. It's the kind of style that makes strangers ask who your stylist is— and the answer is "nature and a good curl cream."
Why this look is popular: This style celebrates natural curl texture instead of fighting it. The braided crown adds structure that balances the volume of curly hair, creating a harmonious silhouette. Golden blonde highlights define individual curls and add dimension. The half-up format keeps hair controlled while showing off length and texture.
Where this look is suitable: Botanical garden visits, outdoor weddings, romantic dates, photo shoots, spring and summer events. This is nature-inspired hair that works anywhere you want to feel effortlessly beautiful.
Step by step:
- Define curls first. On damp hair, apply curl-defining cream section by section using the praying hands method. Scrunch upward and diffuse on low heat or air-dry.
- Section the crown. Once curls are dry, take a 3-inch section from each side of the head. Be careful not to disrupt the curl pattern.
- Braid the crown. French braid or fishtail each section back toward the center. Keep the braids loose enough to maintain the romantic feel.
- Secure at the back. Bring both braids together at the back of the head and pin them in place with bobby pins that match your hair color.
- Refresh curls. Mist the remaining curls with water and re-scrunch to revive any that were flattened during braiding.
- Volume boost. Flip your head upside down and shake the curls gently for extra volume at the roots.
Tips and tricks: Braid on dry, styled curls—not damp hair. Braiding wet curls will cause them to dry flat and lose their definition. Use a silk or satin scrunchie if you need to section while braiding to prevent frizz. A light curl-refreshing spray revives any curls that lose their shape during the process.
34 Stunning Summer First Date Hairstyles for 2026 💕☀️
18.Sleek Cornrows into a High Curly Puff
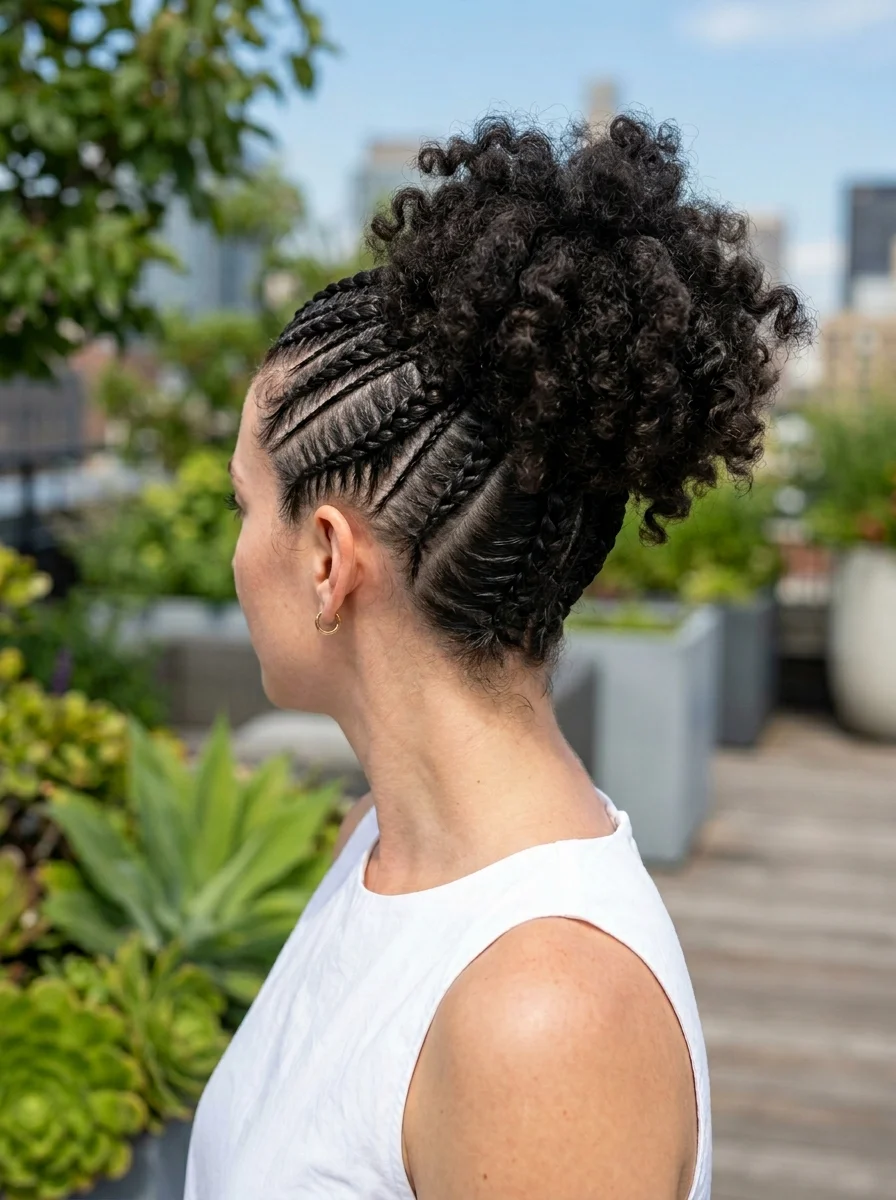
The overview: Natural black cornrows that feed into a voluminous curly puff—that's urban rooftop energy. This style celebrates texture in the most stunning way possible. The contrast between the sleek cornrows and the full, free puff is the whole point: controlled precision meeting untamed volume.
Why this look is popular: Cornrows keep the sides sleek and controlled while the curly puff showcases natural texture at its most dramatic. This is a protective style that lasts for days and gets better with age. The high placement creates a commanding silhouette that draws the eye upward. Natural black hair has a gorgeous sheen that makes the cornrow pattern highly visible.
Where this look is suitable: Urban rooftops, summer parties, concert venues, night outs, any setting where you want your hair to make a statement. This is bold, confident hair that commands attention.
Step by step:
- Moisturize and smooth. Apply a leave-in conditioner and smoothing gel to the sides and back. Use a boar bristle brush to sleek everything upward.
- Cornrow upward. Create cornrows that run from the hairline upward toward the crown. Add small sections as you go, keeping the braids tight and precise.
- Gather the puff. Once all cornrows reach the crown, gather all the hair into a high ponytail. Secure with a strong elastic or puff cuff.
- Shape the puff. Use your fingers to fluff and shape the curly puff into a rounded, voluminous form. Pick it out with an afro pick for extra height.
- Sleek the edges. Apply edge control gel along the hairline and cornrows. Use a small brush or toothbrush to smooth every flyaway.
- Set and shine. Mist the cornrows with a strong-hold spray. Apply a light oil sheen to the puff for healthy shine.
Tips and tricks: The cornrows need consistent tension—too loose and they'll fray within a day, too tight and they'll cause discomfort. Aim for firm but comfortable. A satin scarf wrapped around the cornrows overnight preserves the sleekness. For the puff, a pick rather than a comb maintains curl definition while adding volume.
19.Boho Ribbon Woven French Braid
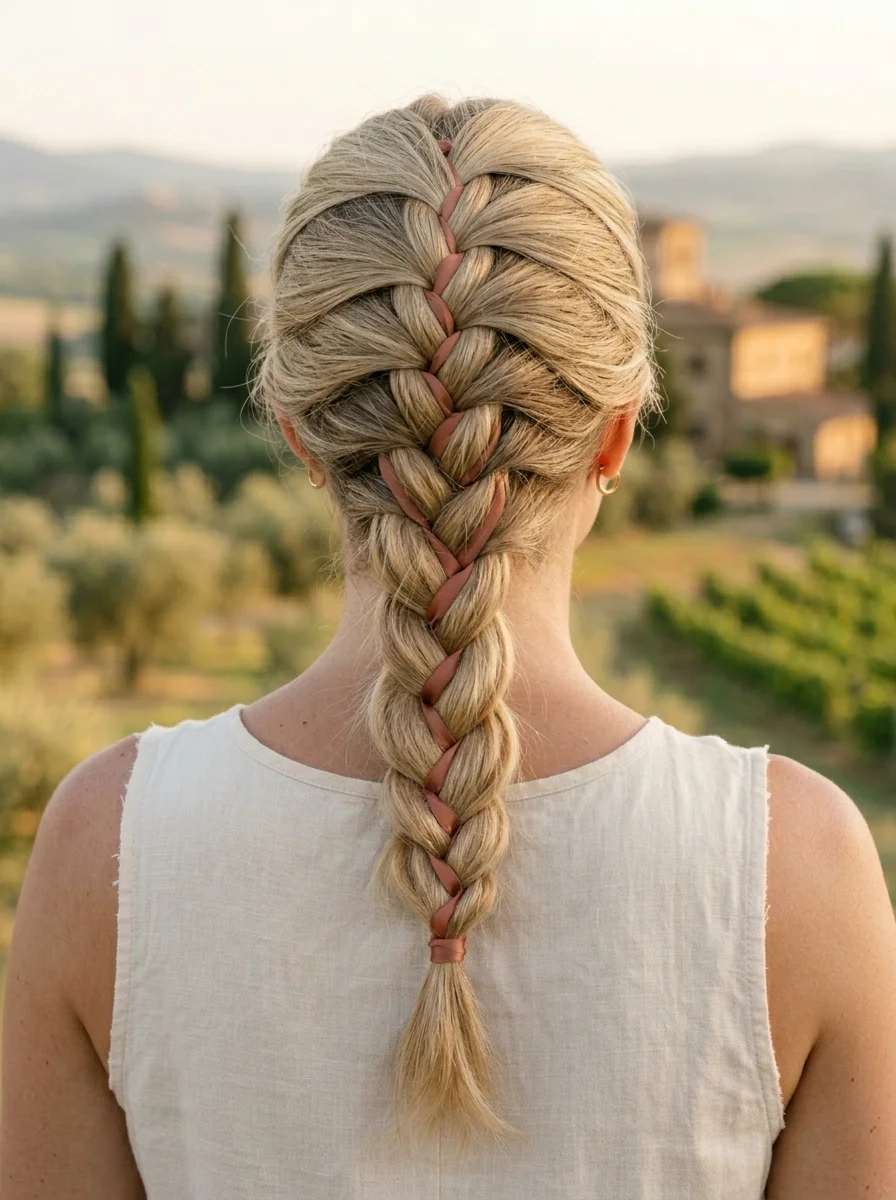
The overview: An ash blonde French braid with dusty rose ribbon woven through—that's Tuscan vacation in hair form. This romantic style adds softness and dimension to a classic braid. The ribbon catches light differently than the hair, creating a subtle color play that makes the whole thing look more expensive than it is.
Why this look is popular: Ribbon-woven braids are one of the easiest ways to add color and texture without commitment. The dusty rose against ash blonde creates a muted, sophisticated palette that reads expensive. The French braid foundation is accessible to most skill levels, and the ribbon does most of the visual heavy lifting. It's a style that looks like it took an hour but takes fifteen minutes.
Where this look is suitable: Tuscan vacations, wine country tours, romantic getaways, garden parties, outdoor weddings. This is European summer energy distilled into a hairstyle.
Step by step:
- Prep the ribbon. Cut a length of dusty rose satin ribbon about twice the length of your hair. Fold it in half and anchor the midpoint at the crown with a bobby pin.
- Start the French braid. Take a section from the crown and begin French braiding, incorporating the ribbon as one of the three strands.
- Weave the ribbon through. As you braid, let the ribbon alternate with your hair as a strand. The ribbon should appear at regular intervals throughout the braid.
- Braid to the ends. Continue French braiding down the full length. Keep the tension medium—this is meant to look relaxed.
- Secure and adjust. Tie off the braid with a clear elastic. Wrap the ribbon ends around the elastic and tie a small bow.
- Pancake gently. Pull the outer loops to widen the braid and make the ribbon more visible.
Tips and tricks: The ribbon should be thin enough to braid with comfortably—about half an inch wide works best. Satin ribbons slide less than grosgrain, making them easier to work with. If the ribbon twists as you braid, stop and flatten it before continuing. A slightly wider ribbon creates a more dramatic effect; a thinner one is more subtle.

22 Office Nail Designs That Are Professional But Never Boring
20.Romantic Crown Braid with Loose Curls
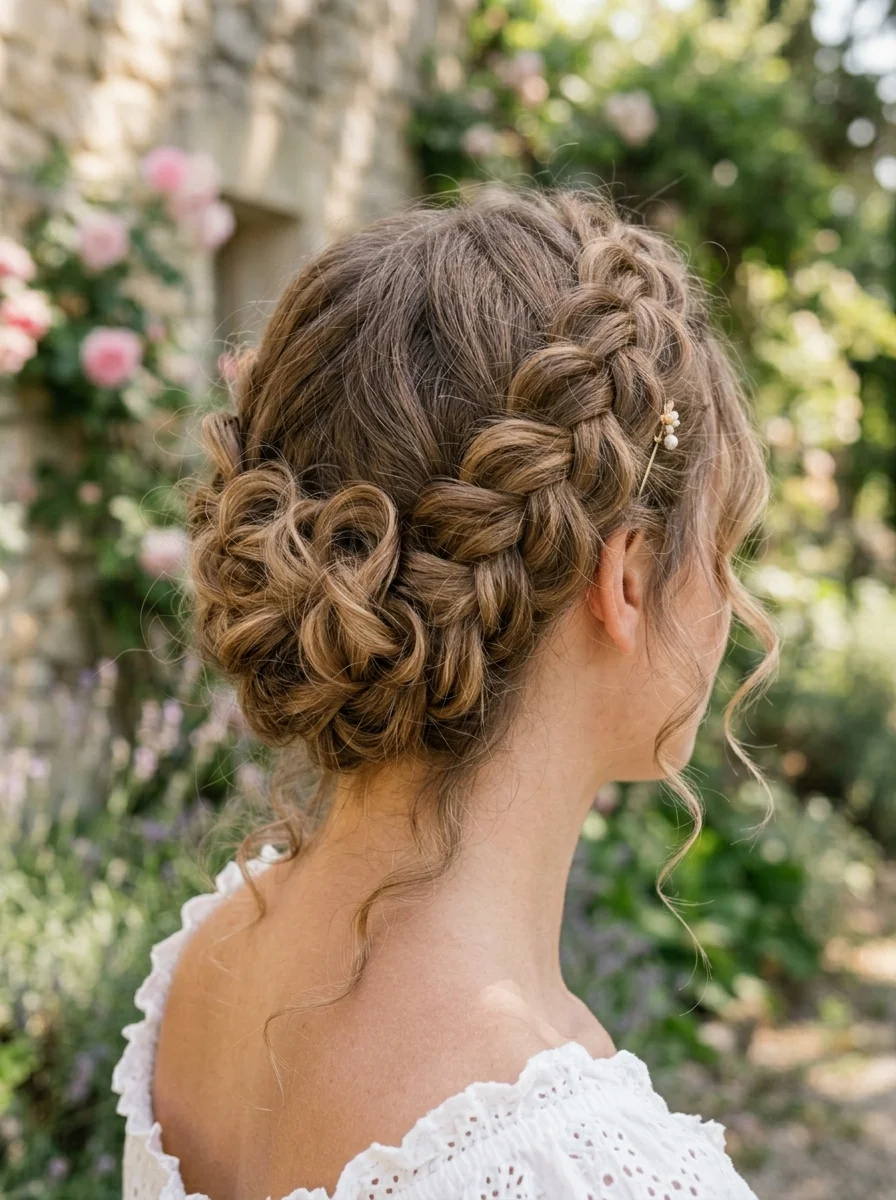
The overview: Medium brown and caramel tones come alive in a crown braid that feeds into a low bun with loose curls escaping from it. This is garden party perfection—romantic, feminine, and effortlessly elegant. You'll look like you belong in a sun- drenched vineyard, swirling rosé and speaking softly.
Why this look is popular: The crown braid into a low bun creates a structured base that the loose curls soften beautifully. Medium brown with caramel highlights is a warm, rich combination that looks expensive in any lighting. The style is formal enough for special occasions but not so rigid that it feels stiff. It works on medium to long hair with enough length for both a braid and a bun.
Where this look is suitable: Garden parties, vineyard visits, outdoor weddings, romantic dinners, engagement photos. This is refined, feminine hair that works in any elegant outdoor setting.
Step by step:
- Curl first. Use a 1.25-inch curling iron on 1-inch sections. Pin each curl to cool. This gives you defined curls that last.
- Section for the crown. Leave the face-framing curls and a few sections at the nape free. Clip them aside.
- Dutch braid the crown. Starting at one side, Dutch braid along the hairline, incorporating the top sections. Continue around to the other side.
- Create the low bun. Gather the remaining hair at the nape, including the braid tail. Twist into a loose bun and secure with pins.
- Release the curls. Unclip the reserved sections and let the curls fall naturally around the face and from the bun.
- Soft set. Mist with a flexible-hold hairspray. Gently pull a few curls loose from the bun for that "undone" quality.
Tips and tricks: Pin each curl while it's hot and let it cool completely before releasing—this doubles the hold time. The loose curls escaping from the bun should look accidental but are actually placed intentionally. Two or three curls per side is the sweet spot. A light shine spray on the curls makes the caramel highlights catch light beautifully.
21.Twisted Crown Braid with a Messy Bun
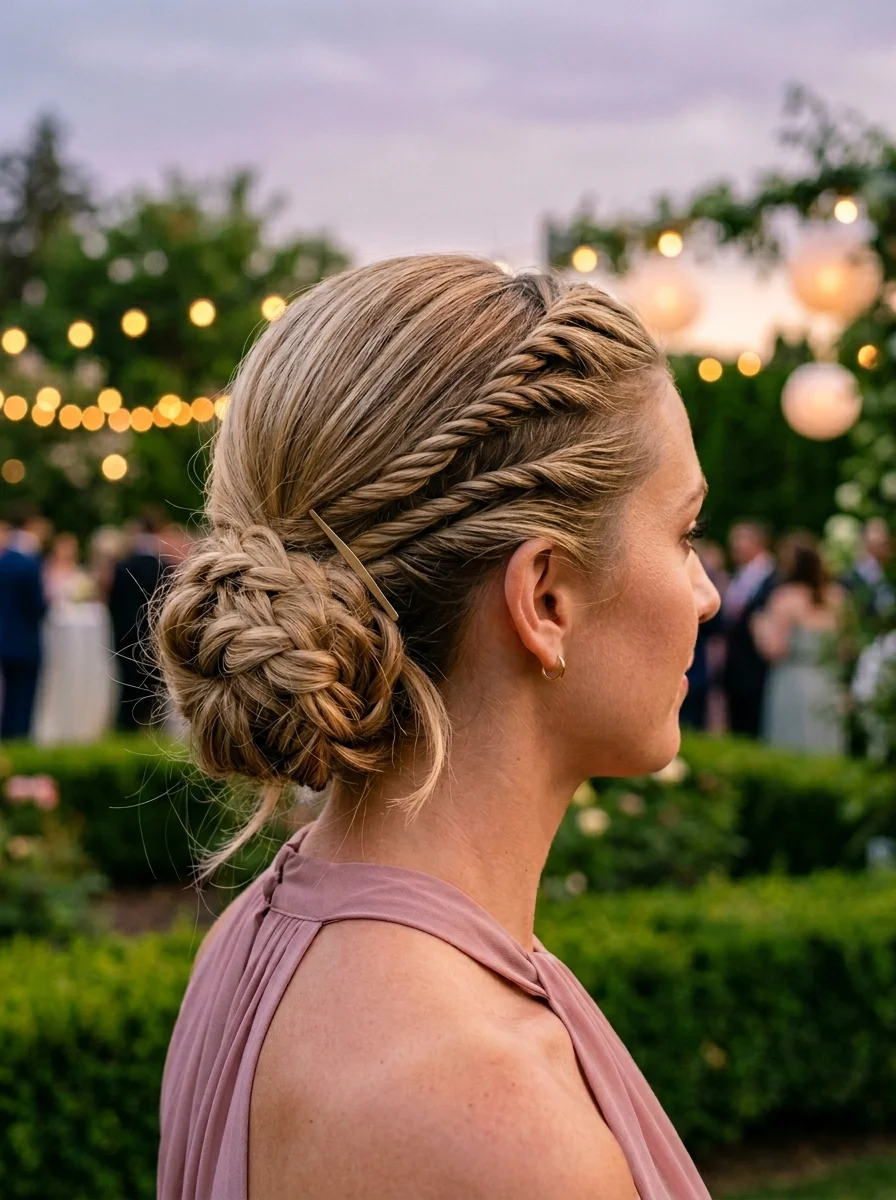
The overview: Ash blonde rope twists that pull back into a low braided bun—that's summer evening perfection. This style balances structure with that perfectly undone quality we're all chasing. It's the hair equivalent of a glass of wine on a warm patio: relaxed, warm, and exactly what you need.
Why this look is popular: Rope twists are easier than traditional braids but create a more interesting texture than simple pulled-back hair. The messy bun at the nape keeps everything relaxed and modern. Ash blonde is one of the most versatile summer tones—it reads cool and contemporary in any setting. The combination of twist and bun creates two focal points that keep the eye moving.
Where this look is suitable: Summer evening events, rooftop dinners, wine tastings, casual elegance occasions. This is refined enough for dinner but relaxed enough for drinks on a terrace.
Step by step:
- Prep with grip. Apply a texturizing spray to dry hair for grip. Rope twists slip on smooth hair.
- Create the rope twists. Take a section at each temple. Divide each into two strands and twist them around each other, adding hair as you go. Direct the twists backward.
- Secure at the nape. Bring both twists to the nape and join them with the remaining hair into a low ponytail.
- Form the messy bun. Loosely braid the ponytail, then wrap it around the base. Don't make it too neat—a few loops and loose ends are the goal.
- Pin and adjust. Secure with bobby pins, pulling a few pieces free for that effortlessly messy look.
- Soft set. A light mist of flexible-hold hairspray keeps everything in place without looking overdone.
Tips and tricks: The rope twist technique is simple: twist both strands in the same direction, then wrap them around each other in the opposite direction. This creates tension that holds the twist together. For the messy bun, backcomb the ponytail slightly before coiling it— the added texture makes the bun look fuller and more intentionally messy.

38 Trending Bandana Hairstyles for Women (2026)
22.Braided Updo with Loose Tendrils
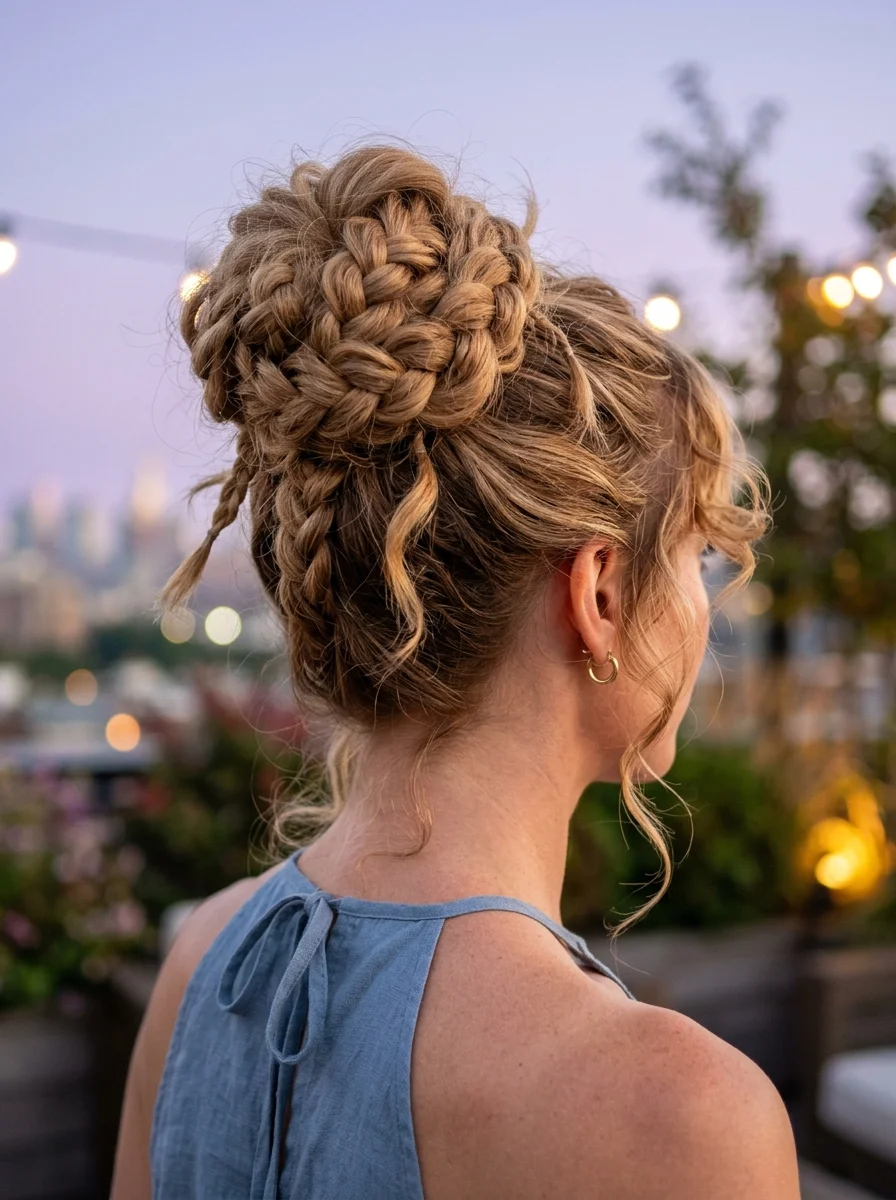
The overview: Multiple golden blonde braids gathered into a high bun with loose tendrils framing your face—that's rooftop dinner energy. This updo is polished enough for a nice restaurant but relaxed enough to actually enjoy your meal without worrying about your hair. The tendrils add the softness that keeps it from looking too severe.
Why this look is popular: Multiple braids gathered into a bun create more visual interest than a single braid or a plain bun. The texture of the braids is visible even when coiled, adding dimension to the updo. Golden blonde catches warm lighting beautifully, making this ideal for evening events. Loose tendrils soften the face and prevent the style from looking too pulled-back.
Where this look is suitable: Rooftop dinners, upscale restaurants, summer evening events, cocktail parties, date nights. This is polished evening hair that stays comfortable through a long dinner.
Step by step:
- Create multiple braids. Divide hair into 4-6 sections. Braid each section as a simple three-strand braid. Secure with small clear elastics.
- Gather at the crown. Pull all braids into a high ponytail. Secure with a strong elastic.
- Form the bun. Wrap the braids around the base of the ponytail, coiling them into a bun shape. Pin each braid as you wrap it.
- Release tendrils. Before braiding, you should have reserved 2-3 thin sections around the face. Curl these with a small-barrel iron and let them fall naturally.
- Adjust the bun. Pull a few loops loose for texture. Tuck any visible elastics under the bun.
- Set and shine. Mist with strong-hold hairspray on the bun. Apply a light shine serum to the tendrils for gloss.
Tips and tricks: The braids don't all need to be the same size—varied widths create more interesting texture in the bun. Curl the tendrils after the bun is complete so they fall naturally around your face. A small amount of pomade on the tendrils keeps them smooth and defined without looking greasy.
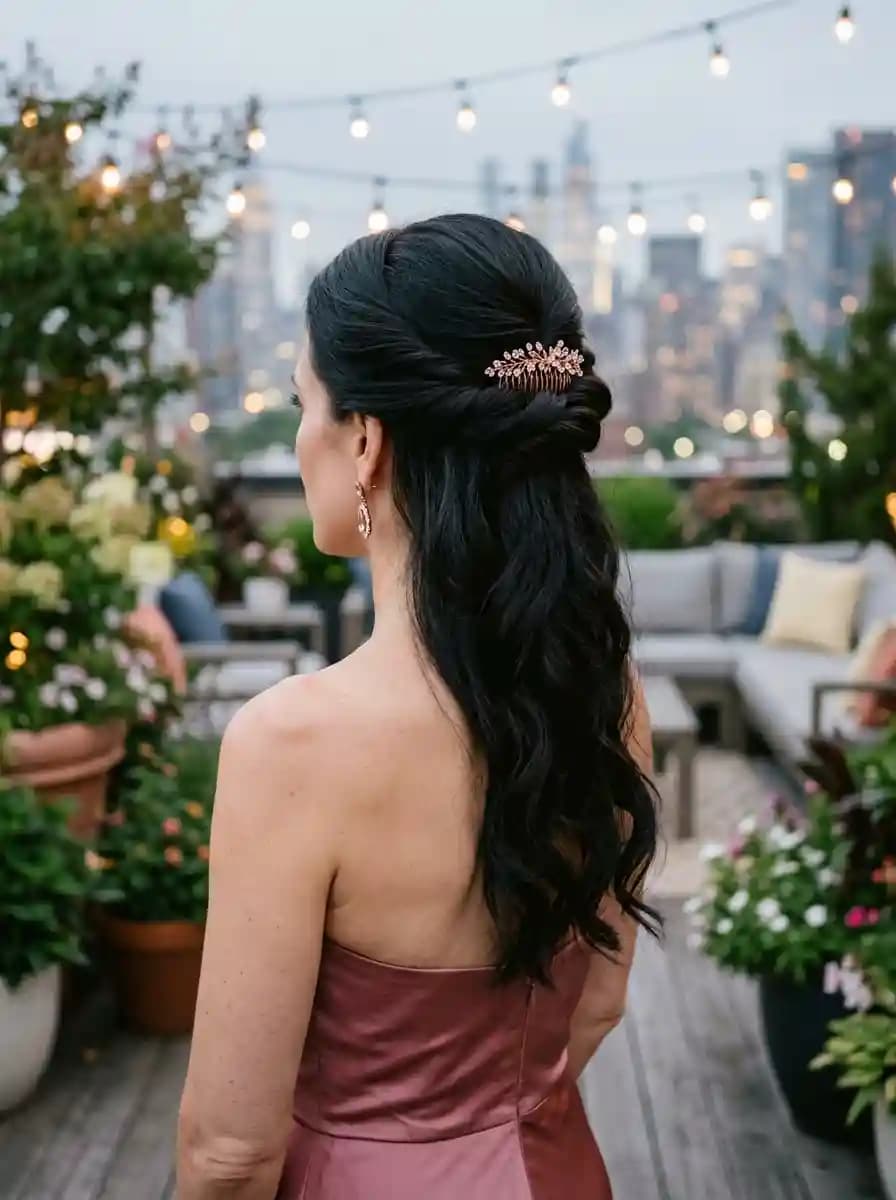
23.Whispering Waves with a Delicate Side Braid
The overview: Pale golden blonde waves with a tiny accent braid tucked behind your ear—beach sunset vibes, obviously. This is the hairstyle for those moments when you want to look effortlessly beautiful without drawing too much attention. Subtle, soft, and absolutely stunning in its simplicity.
Why this look is popular: The "less is more" approach resonates with women who want their natural beauty to take center stage. The tiny accent braid adds a detail that rewards a closer look without announcing itself. Pale golden blonde is ethereal and romantic, catching light like nothing else. This style proves that a small braid can have as much impact as an elaborate updo.
Where this look is suitable: Beach sunsets, casual evening walks, low-key dates, outdoor concerts, anywhere you want to feel soft and beautiful without trying too hard. This is quiet beauty hair.
Step by step:
- Create soft waves. Apply a light wave cream to damp hair and scrunch. Let air-dry for natural, effortless movement.
- Section the accent braid. Take a very thin section (half an inch) from the hairline near one ear. This is all you need.
- Simple braid. Braid the tiny section for its full length. Keep it tight and neat—it should look intentional.
- Tuck behind the ear. Pull the braid back and tuck it behind your ear. The waves should partially cover it, making it a hidden detail.
- Secure invisibly. Use a tiny bobby pin that matches your hair color to pin the braid end behind your ear.
- Final tousle. Run your fingers through the waves one last time for a natural, undone finish.
Tips and tricks: The accent braid should be thin enough that it's a detail, not a feature. If it's too thick, it competes with the waves instead of complementing them. A light-hold hairspray on the braid keeps it neat without making it stiff. This style works best on hair that has natural wave—if your hair is pin-straight, a quick pass with a large-barrel iron creates the base texture.
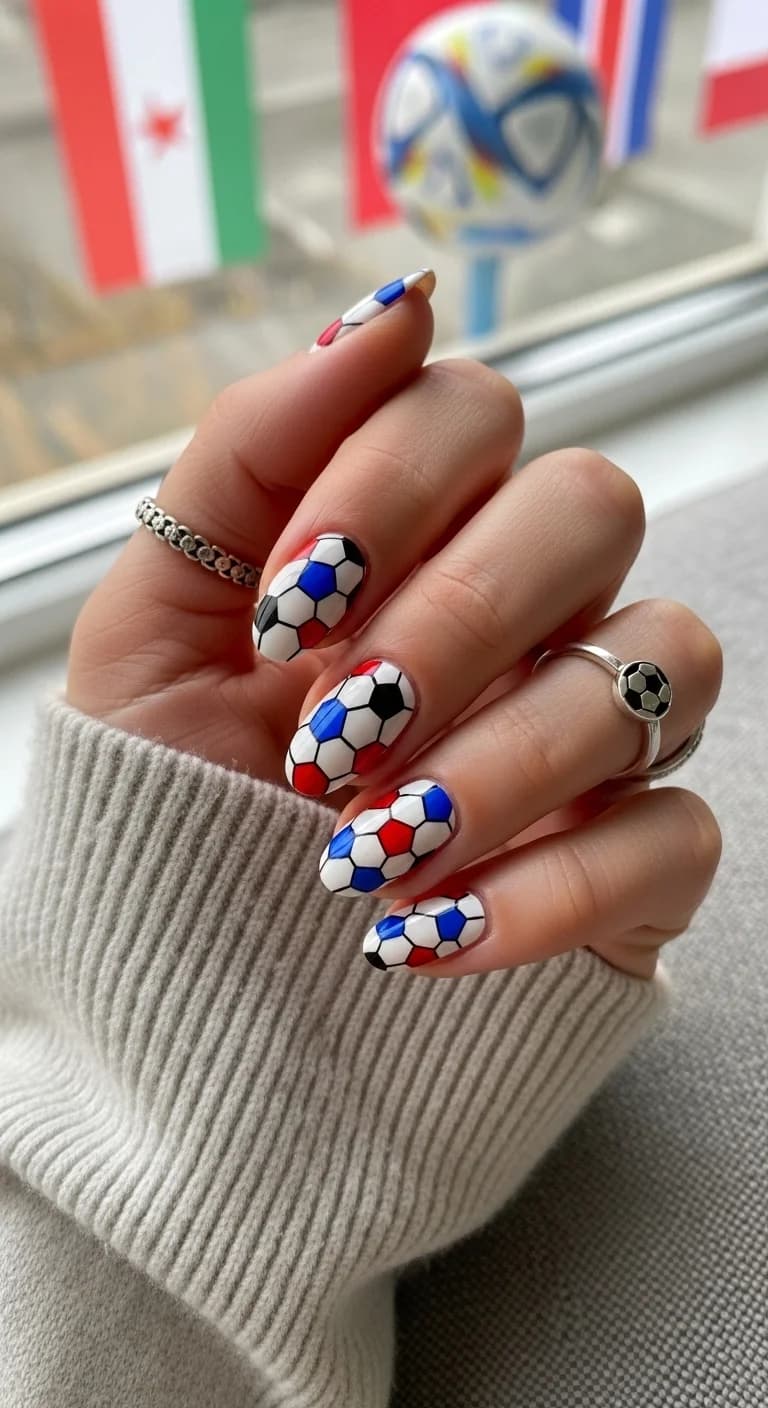
36 Trendy FIFA World Cup Nail Designs (2026)
24.Beachy Wavy Side Braid
The overview: Dirty blonde pancaked side braid with beachy texture—casual beach day sorted. This is the hairstyle you throw on when you want to look cute but also want to actually enjoy your day. No fuss, no stress, just good hair that survives sand, salt water, and wind.
Why this look is popular: The side braid is the most forgiving braid style—it doesn't need to be symmetrical or perfect. Pancaking it wide creates a full, relaxed shape that looks intentionally effortless. Dirty blonde is the ultimate low-maintenance color—it hides regrowth, looks good in any lighting, and pairs with everything. The beachy texture means frizz is a feature, not a flaw.
Where this look is suitable: Beach days, boardwalk walks, casual outdoor activities, camping trips, farmers' markets. This is no-nonsense summer hair that still looks great in photos.
Step by step:
- Embrace the texture. Skip the heat tools. Apply sea salt spray to damp or dry hair and scrunch for natural beachy texture.
- Sweep to one side. Brush all your hair over one shoulder. It doesn't matter which side—go with whatever feels natural.
- Loose three-strand braid. Braid loosely down the length, keeping the tension relaxed. This isn't a competition braid— imperfection is the goal.
- Secure casually. Tie off with a clear elastic or a fabric-covered band. Nothing too polished.
- Pancake aggressively. Pull the outer loops wide from top to bottom. The wider, the better. This is what creates the full, relaxed shape.
- Pull face-framing pieces. Release a few strands around your face for softness. Tousle everything with your fingers.
Tips and tricks: This style actually looks better at the end of the day when the braid has loosened naturally. If you're heading to the beach, braid it while your hair is damp from the ocean and let it dry in the shape—it'll set like a natural braid-out with extra texture. A baseball cap or sun hat pairs perfectly with this style.
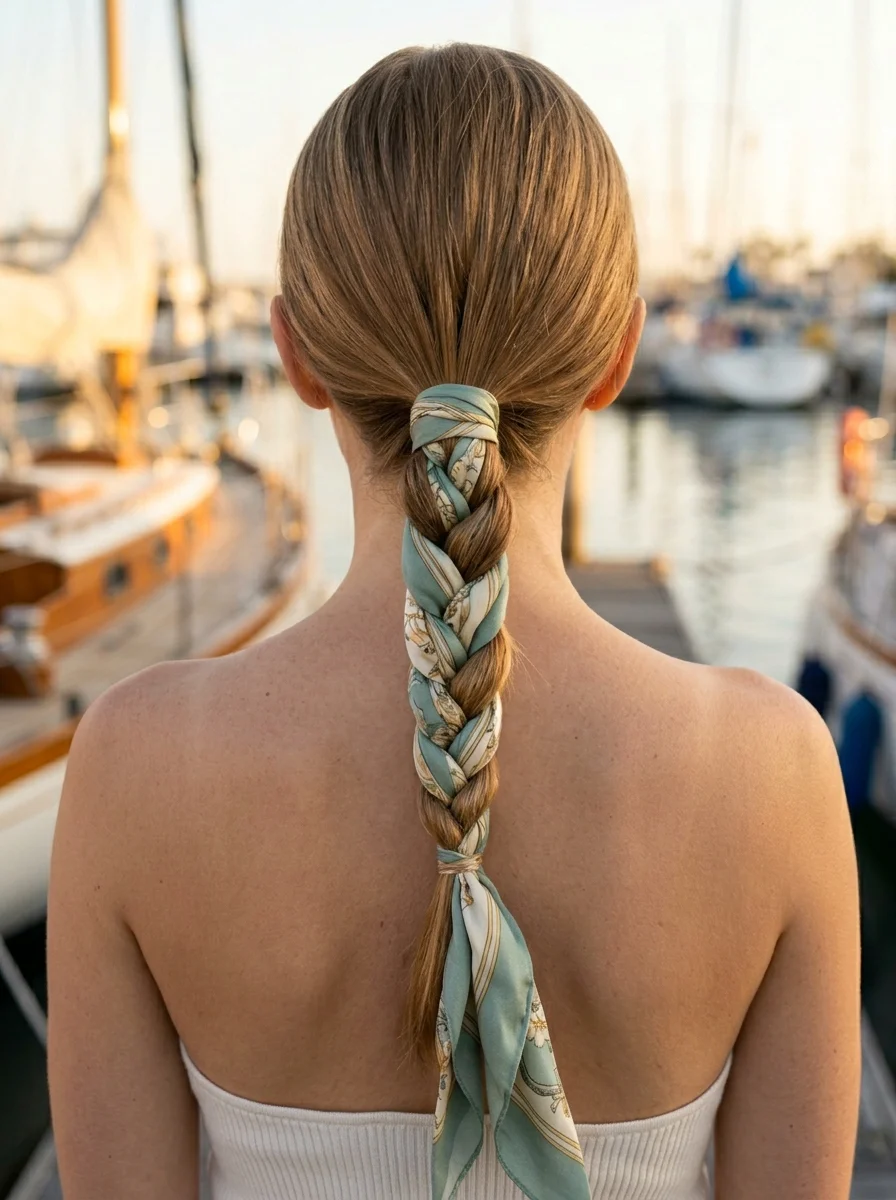
25.Silken Scarf Accent Braid
The overview: An ash brown low pony braid wrapped with a sage green silk scarf—that's yacht day sophistication. This style takes a simple braid and elevates it with a single accessory. It's proof that sometimes the smallest details make the biggest impact. The sage green against ash brown is a muted, expensive-looking combination.
Why this look is popular: A silk scarf transforms any braid from basic to editorial. The sage green color is having a major moment in fashion, and translating it into hair feels current without being trendy. Ash brown is a sophisticated neutral that lets the scarf be the star. The low ponytail placement keeps everything relaxed and modern. It's a style that works on any hair texture.
Where this look is suitable: Yacht days, coastal dining, resort vacations, upscale casual events, brunch by the water. This is quiet luxury for summer— simple, refined, and unmistakably intentional.
Step by step:
- Smooth the hair. Apply a light smoothing serum and brush thoroughly for a sleek base.
- Gather low. Pull hair into a low ponytail at the nape. Secure with a clear elastic.
- Prepare the scarf. Fold a silk scarf into a long, thin strip about half an inch wide. Tie it around the base of the ponytail.
- Braid with the scarf. Divide the ponytail into three sections, treating the scarf as one of the strands. Braid down the length with the scarf woven through.
- Secure the end. Tie off the braid with a small elastic, then wrap the remaining scarf length around the end and tie a small knot.
- Adjust for drape. Let the scarf ends hang naturally or tuck them into the braid for a cleaner look.
Tips and tricks: Silk scarves slip more than fabric ones, so braid tightly enough to hold the scarf in place. If the scarf is too slippery, tie a tiny elastic at each end to prevent fraying and add grip. The scarf should be about the same thickness as one of your braid sections—too thin and it disappears, too thick and it overwhelms the braid.

21 Stunning Concert Hairstyles for Women 2026 🎶✨
26.Double Dutch Braided Buns with a Boho Vibe
The overview: Ash blonde Dutch braids that coil into double buns—that's rooftop party energy. This playful style keeps things fun while still looking intentional. It's the perfect way to close out a summer because it embodies everything we love about braids: bold, beautiful, and unapologetically you.
Why this look is popular: Double buns are inherently fun, and the Dutch braids feeding into them add a structural element that elevates the look beyond simple space buns. The braids keep everything secure and off the face, making this practical for dancing and outdoor events. Ash blonde reads cool and modern, and the coiled buns have a bohemian quality that works for everything from festivals to rooftop parties.
Where this look is suitable: Rooftop parties, music festivals, outdoor dancing, summer celebrations, casual gatherings with friends. This is party hair that stays put through hours of movement.
Step by step:
- Create a clean center part. From forehead to nape. Use a rat-tail comb for precision—symmetry is essential for double buns.
- Dutch braid each side. Starting at the hairline, cross strands under to create the raised braid. Braid to the crown and secure with clear elastics.
- Coil the first bun. Take the braided section on one side, twist it around its base to form a tight coil. Pin securely with bobby pins.
- Repeat on the other side. Create a matching coiled bun with the second braid. Match the size and placement exactly.
- Tuck and secure. Tuck any loose ends under the buns. Criss-cross bobby pins for maximum hold.
- Edge control and set. Smooth the hairline with edge control gel. A strong-hold hairspray keeps the buns secure all night.
Tips and tricks: The tighter the coils, the more bohemian the look. If you want softer buns, backcomb the braids slightly before coiling them— the added texture creates a more relaxed shape. For fine hair, a small doughnut bun maker at the base of each bun adds volume and helps the coils hold their shape. Silk pillowcases preserve these buns overnight if you want to wear them for multiple days.
The 2026 Braid Trends
Forget the super-polished looks of previous years. The braid trends dominating 2026 are softer, bolder, and more creative. Here is what is actually worth trying this summer.
Short goddess boho braids: Shorter braids mixed with loose curls for a romantic, free-spirited look. Perfect if you want protection without waist-length commitment.
Ombre boho braids: Color gradients add visual interest without coloring your natural hair. The soft, undone texture means new growth is less obvious.
Stitch braids with loose curls: Structured cornrows at the top with soft, playful curls at the bottom — sleek and messy at the same time.
The common thread? Every single one of these styles prioritizes low tension and versatility. They work in humidity, they can be dressed up or down, and they do not require sacrificing your edges for the aesthetic.