Nail Trends
33 Stunning Polka Dot Nail Ideas that are Minimalist and Trendy 💅
Polka dots are literally one of the most versatile designs in the nail art world. You can go full-on retro with primary colors, keep it low-key with minimalist nude dots, or even mix them with French tips for a nautical vibe. I've curated 33 of the most stunning, trendy polka dot designs that are everywhere right now. Trust me, by the end of this list, you'll be reaching for your dotting tool!
In This Guide
1.Juicy Tangerine & Navy Pop

Orange and white with navy polka dots for a high-contrast nautical look.
Overview:
Orange and navy is a combination borrowed from nautical fashion, and it works on nails for the same reason it works on clothing: the warm orange and the cool navy create a balanced tension that feels both energetic and grounded.
The alternating base colors, orange on some nails, white on others, prevent the set from feeling monotonous. Each nail tells a slightly different story within the same color palette. The navy dots tie everything together by appearing on every nail regardless of the base color.
Polka dots are one of the most forgiving nail art techniques. The dots don't need to be perfectly round or evenly spaced. Slight irregularities read as handmade rather than mistakes. A dotting tool, bobby pin, or toothpick all produce acceptable results.
Design Breakdown:
Two-color base with navy dots across all nails. The alternating bases create rhythm.
Base Color: Tangerine orange on thumb, index, and pinky. White on middle and ring fingers.
Nail Shape: Medium-long almond. The curved shape softens the graphic dot pattern.
Design Element: Navy blue polka dots on all nails. Medium dot size, evenly spaced.
Finish: High-gloss top coat to make both colors look saturated.
Get The Look at Home:
The dots are the fast part. The alternating base colors are the only prep work.
- Color layout: Paint thumb, index, and pinky with two coats of tangerine. Paint middle and ring with two coats of white. Let all dry fully.
- Dotting: Using a medium dotting tool dipped in navy polish, place evenly spaced dots on each nail.
- Spacing: Aim for consistent spacing between dots. A staggered pattern, where each row is offset, looks more natural than a grid.
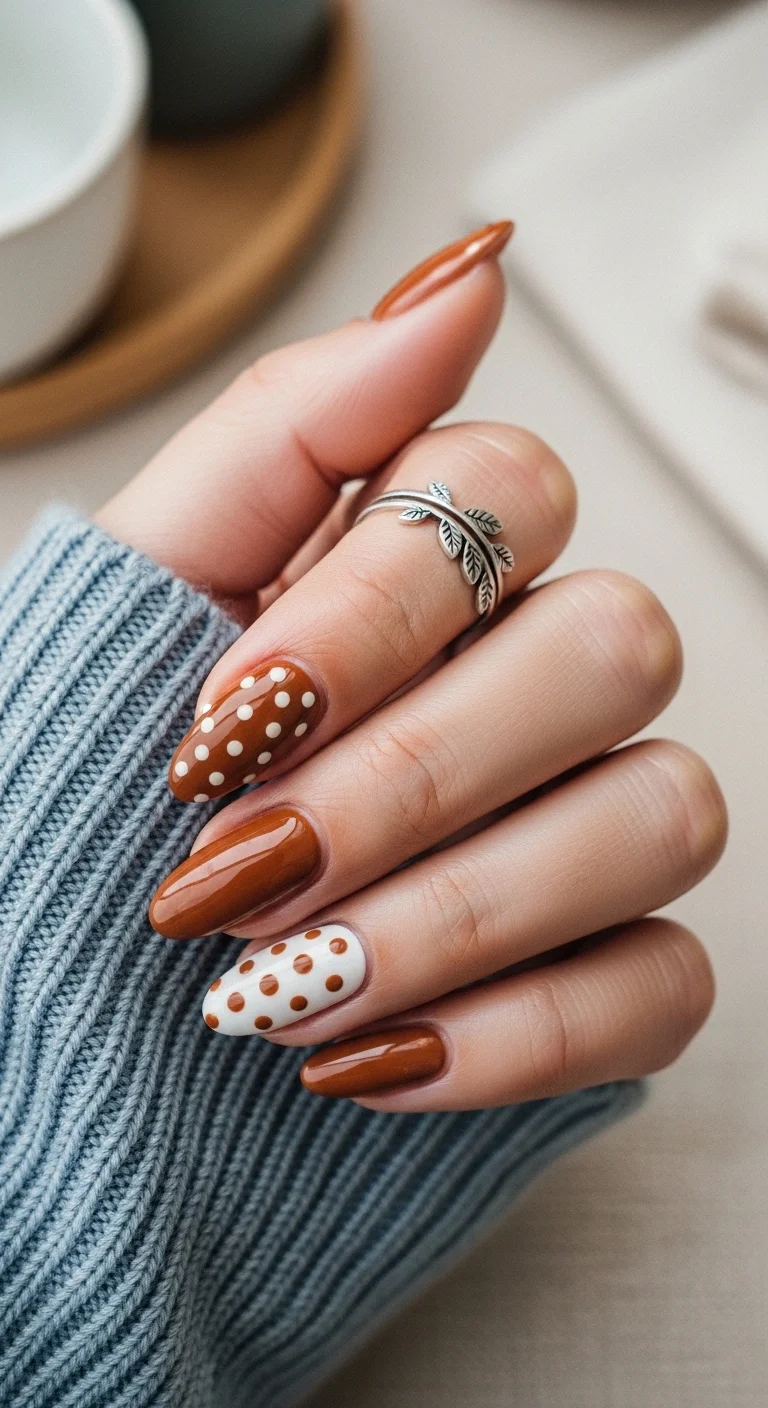
- Cleanup: Use a small brush dipped in acetone to fix any stray dots.
- Seal: One thick coat of top coat to protect the art.
30 Stunning Summer Hair Trends for 2026 ☀️🌊
2.Deep Plum & Creamy Dream

Deep plum with white dots and an inverted accent nail.
Overview:
Dark plum in warmer months walks a line between seasonal and transgressive. The key is the dot color: white dots on plum reads as playful and graphic, which pulls the dark base away from winter territory. It's the same color, reframed by its decoration.
The single white accent nail with plum dots reverses the pattern, creating a visual conversation between the two colors. That inversion is what makes the set feel designed rather than just decorated. Each color gets a turn being the background.
Deep plum polish tends to be more forgiving than bright colors because the dark pigment hides minor application imperfections. The white dots, however, need to be genuinely opaque. A sheer white over dark plum will look translucent and weak.
Design Breakdown:
Dark base with inverted accent. The color reversal is the design principle.
Base Color: Deep plum on four nails. White on the ring finger.
Nail Shape: Medium almond. The curved shape suits the moody color palette.
Design Element: White dots on plum nails. Plum dots on the white accent nail. Medium dot size.
Finish: High-gloss top coat to make the plum look jammy and the white look crisp.
Get The Look at Home:
The inversion technique requires planning. Decide which nails get which dot color before you start.
- Plum base: Two coats of deep plum on four nails. Let dry fully.
- White accent: Two coats of opaque white on the ring finger. Let dry.
- White dots on plum: Using a medium dotting tool and white polish, place dots on the plum nails.
- Plum dots on white: Using the same dotting tool and plum polish, place dots on the white accent nail.
- Consistency: The dot size should be the same across all nails.
- Seal: One thick coat of top coat over everything.
3.Terracotta Sage Garden
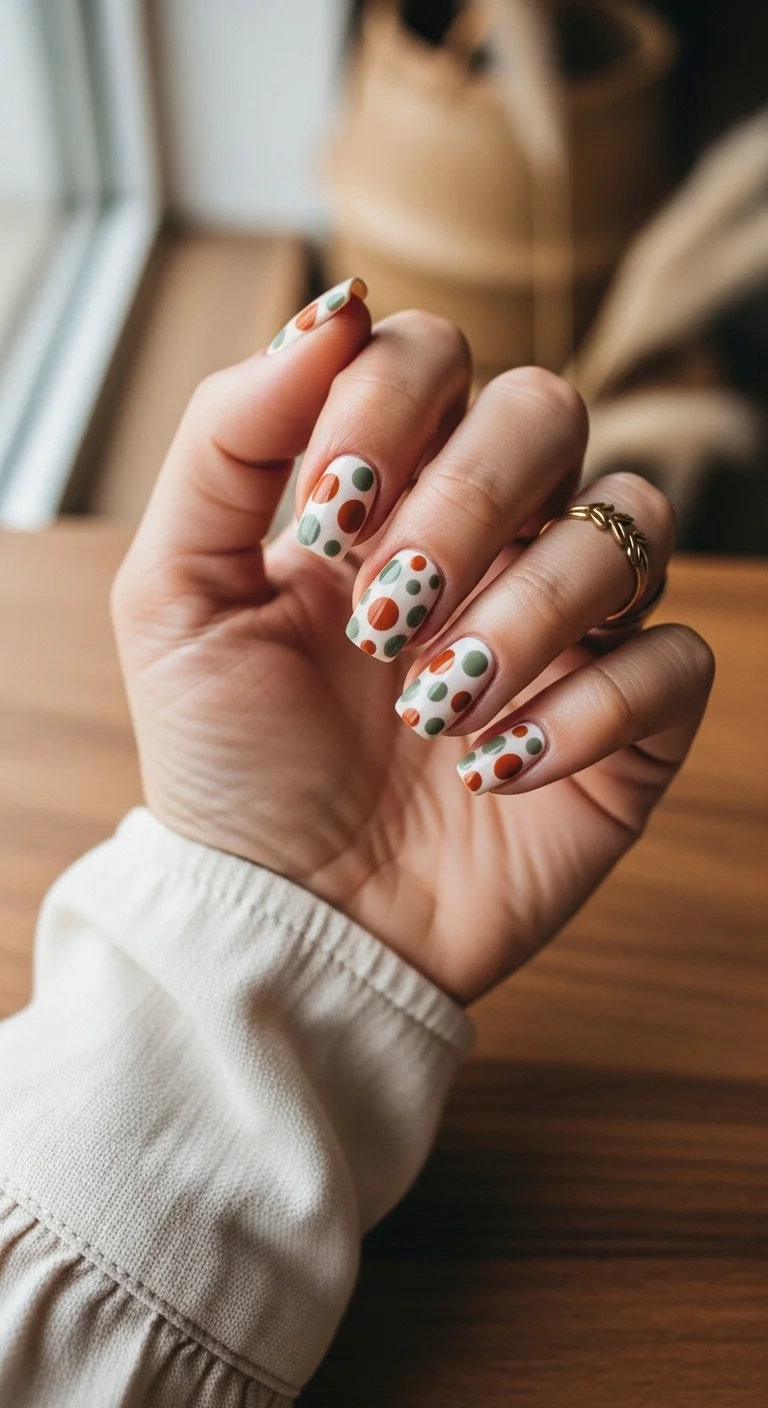
White base with earthy multi-colored polka dots.
Overview:
Multi-colored dots on white create a design that references terrazzo or confetti. The earthy palette, terracotta, sage, brown, keeps the dots from feeling like a child's birthday party. The muted tones read as sophisticated rather than playful.
The dot size variation is important. Uniform dots would read as polka dots, not speckles. The mix of small and medium dots creates an organic, scattered quality that feels more like a texture than a pattern.
The white base provides maximum contrast for each dot color. On a colored base, the earthy tones would blend into the background. On white, every dot is visible and distinct.
Design Breakdown:
Multi-color speckled dots on white. The earthy palette is the design principle.
Base Color: Crisp, opaque white.
Nail Shape: Medium almond. The curved shape softens the scattered dot pattern.
Design Element: Multi-colored dots in terracotta, sage green, and brown. Mixed sizes scattered across all nails.
Finish: High-gloss top coat to make the white look crisp and the dot colors look distinct.
Get The Look at Home:
Three dotting tools or a toothpick in different sizes creates the variation.
- White base: Two coats of opaque white. Let dry fully.
- Terracotta dots: Using a medium dotting tool, place terracotta dots randomly across each nail.
- Sage dots: Using a smaller dotting tool, add sage green dots in the gaps.
- Brown dots: Using the smallest dotting tool or a toothpick, add tiny brown dots for depth.
- Vary density: Some areas should have more dots than others. Don't aim for even coverage.
- Seal: One thick coat of top coat over everything.

28 Cute & Sporty Baseball Game Nail Ideas for 2026 ⚾
4.Midnight French Twist
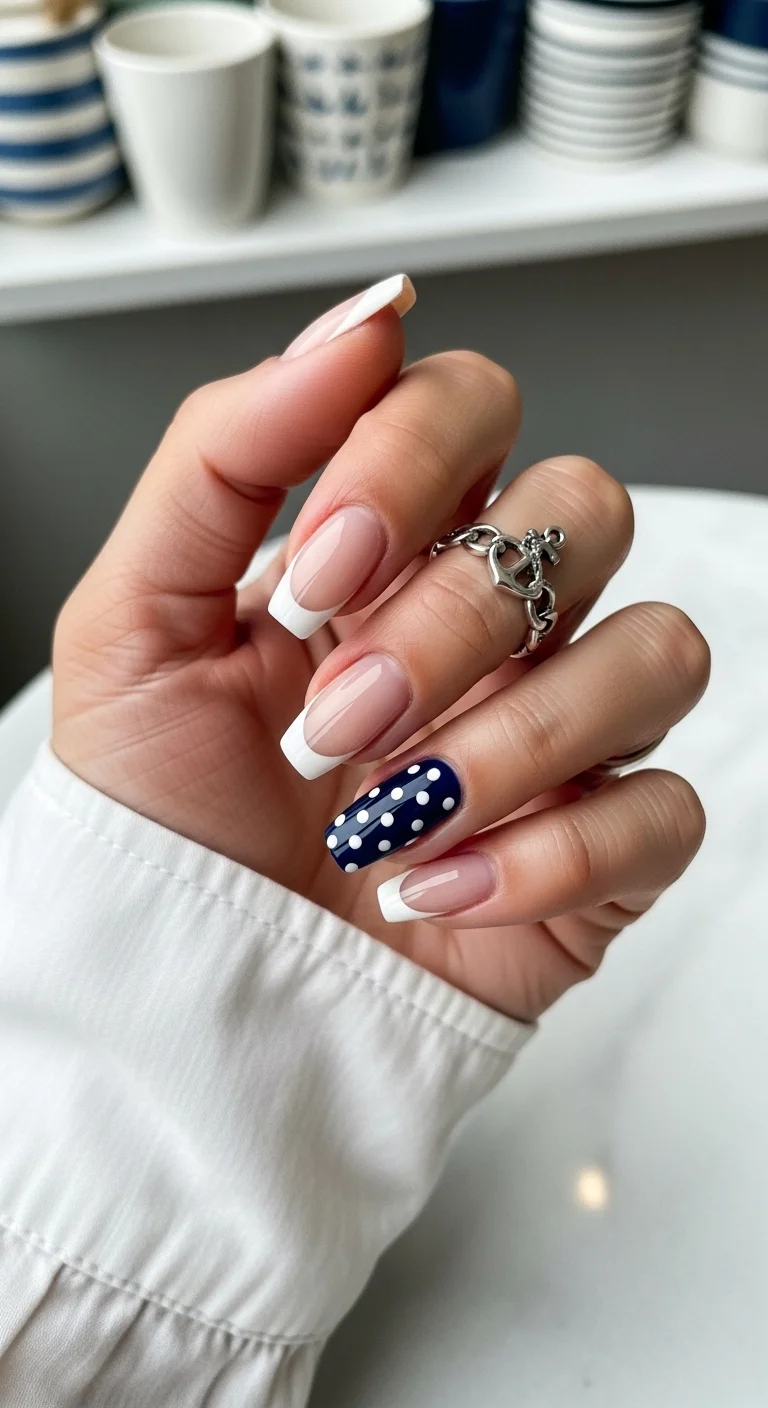
Classic French with a navy polka dot accent nail.
Overview:
A classic French manicure with a single polka dot accent is the most wearable version of patterned nails. The French provides the clean, professional framework, and the dot accent adds personality without disrupting the set's formality.
The navy accent nail with white dots is the focal point. Without it, this would be a standard French. The dots transform the design from "classic" to "classic with a twist." It's the nail equivalent of wearing a navy pocket square with a white shirt.
The navy needs to be fully opaque for the white dots to read clearly against it. A sheer or streaky navy will make the dots look weak and translucent. Two coats minimum.
Design Breakdown:
Classic French with a single dot accent. The navy accent is the design focal point.
Base Color: Sheer nude with white French tips on four nails. Navy with white dots on the ring finger.
Nail Shape: Medium-long coffin. The flat tip gives the French a clean edge.
Design Element: White polka dots on the navy accent nail. Medium dot size, evenly spaced.
Finish: High-gloss top coat to make the French look crisp and the navy look deep.
Get The Look at Home:
The French tips are the fast part. The navy accent is the only detail work.
- Nude base: Two coats of sheer nude on all nails. Let dry fully.
- White French tips: Paint white French tips on four nails. Two coats for opacity.
- Navy accent: On the ring finger, apply two coats of opaque navy.
- White dots: Using a medium dotting tool and white polish, place evenly spaced dots on the navy nail.
- Seal: One thick coat of top coat over all nails.
5.Cherry Red Sweetheart
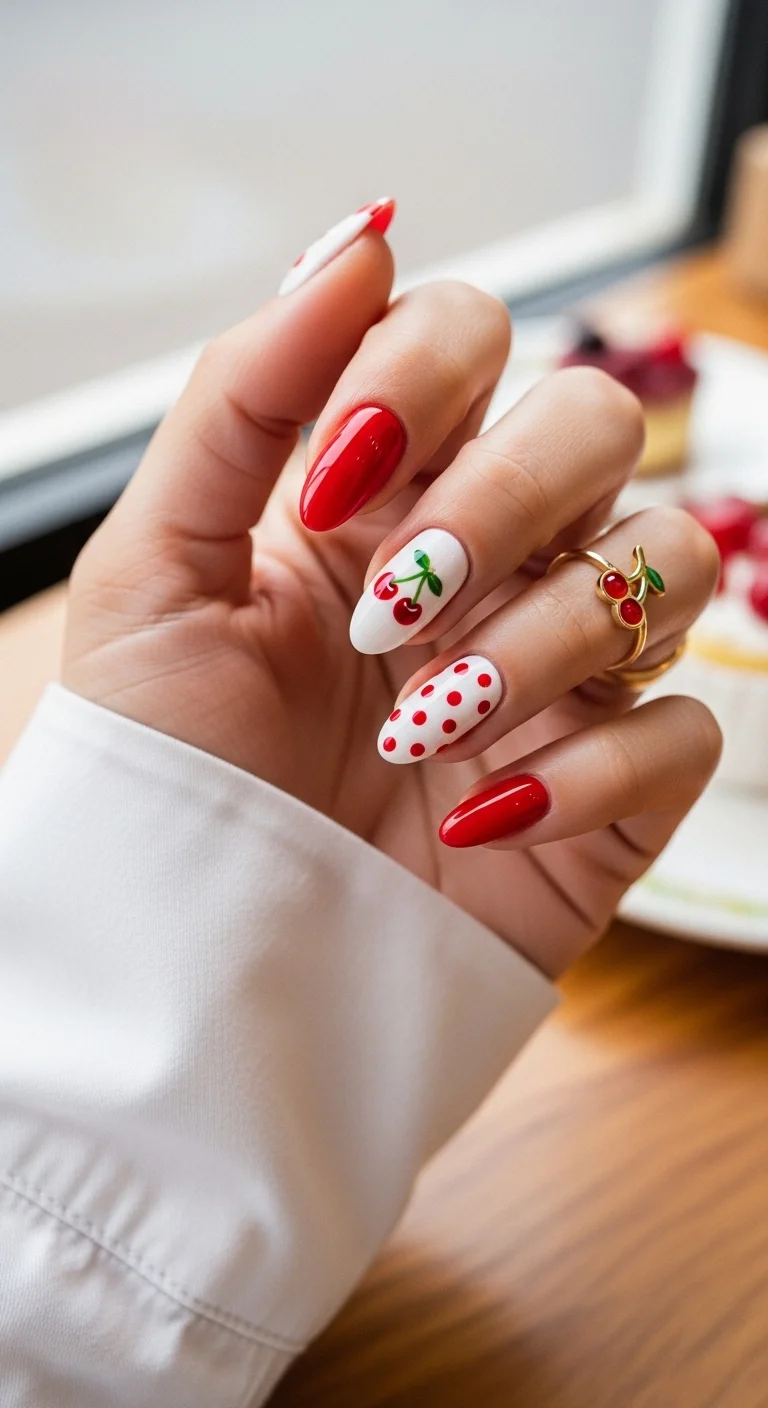
Red, white dots, and cherry art for a retro sweetheart look.
Overview:
Red and white polka dots sit at a crossroads between retro Americana and modern graphic design. This set deliberately splits the difference by using structured polka dots on some nails, solid red on others, and freehand cherry art on one nail. The result references vintage without committing to full costume.
The cherry art on the white accent nail adds a third element that breaks up the dot pattern. Without it, the set would be a standard red-and-white polka dot design. The cherries add a specific, illustrative quality that makes the set feel curated.
Red polish requires a base coat to prevent staining. Without it, two weeks of red polish leaves your natural nails with a yellow tint that takes days to grow out. A ridge-filling base coat protects against staining and smooths the surface.
Design Breakdown:
Three-pattern set: solid, dots, and fruit art. The variety is the design.
Base Color: Classic red on thumb and pinky. White with red dots on the middle finger. White with cherry art on the ring finger.
Nail Shape: Medium-long almond. The curved shape suits the retro aesthetic.
Design Element: Red polka dots on white. Hand-painted cherry pairs with green stems on the accent nail.
Finish: High-gloss top coat to make the red look juicy and the white look crisp.
Get The Look at Home:
A base coat is non-negotiable with red polish. The staining risk is real.
- Base coat: Apply a ridge-filling base coat on every nail. This prevents red pigment from staining the natural nail.
- Red nails: Two coats of red on thumb and pinky. Let dry fully.
- Dot nails: On the middle finger, apply two coats of white, then add red dots with a medium dotting tool.
- Cherry art: On the ring finger, apply white base, then paint cherry pairs using a dotting tool for the fruit and a liner brush for the green stems.
- Seal: One thick coat of top coat over everything. Cap the free edge to prevent tip chipping.

30+ Chic Pool Party Hairstyles for Summer 2026 🌊👙
6.Frosted Sugar Plum Dots

Mauve pink with white polka dots for a soft, frosted look.
Overview:
Mauve is a grey-toned pink that sits between warm and cool, which makes it one of the more versatile polka dot bases. It doesn't clash with warm skin tones or cool skin tones. It works with both. That adaptability is what makes it a reliable choice for a full-set dot design.
The white dots on mauve create a low-contrast pairing that reads as soft and feminine rather than bold and graphic. The effect is closer to frosting on a cake than paint on a wall. It's polka dots without the visual noise.
The dot size matters for this color combination. Medium dots, about 2mm, read as structured and intentional. Smaller dots would look like texture. Larger dots would overpower the muted mauve base.
Design Breakdown:
Single-color base with white dots on every nail. The soft palette is the design principle.
Base Color: Mauve or dusty pink.
Nail Shape: Medium coffin. The flat surface provides a clean canvas for the dot pattern.
Design Element: White polka dots on every nail. Medium dot size, evenly spaced.
Finish: High-gloss top coat to make the mauve look creamy.
Get The Look at Home:
Consistent dot size across all nails is what makes this design look professional.
- Mauve base: Two coats of mauve on all nails. Let dry fully.
- Dotting: Using a medium dotting tool dipped in white polish, place evenly spaced dots on each nail.
- Consistency: Use the same dotting tool for every nail to maintain uniform dot size.
- Don't rush: Let the white dots dry slightly before moving to the next nail to avoid smearing.
- Seal: One thick coat of top coat to protect the dots.
7.Bordeaux Cream Elegance
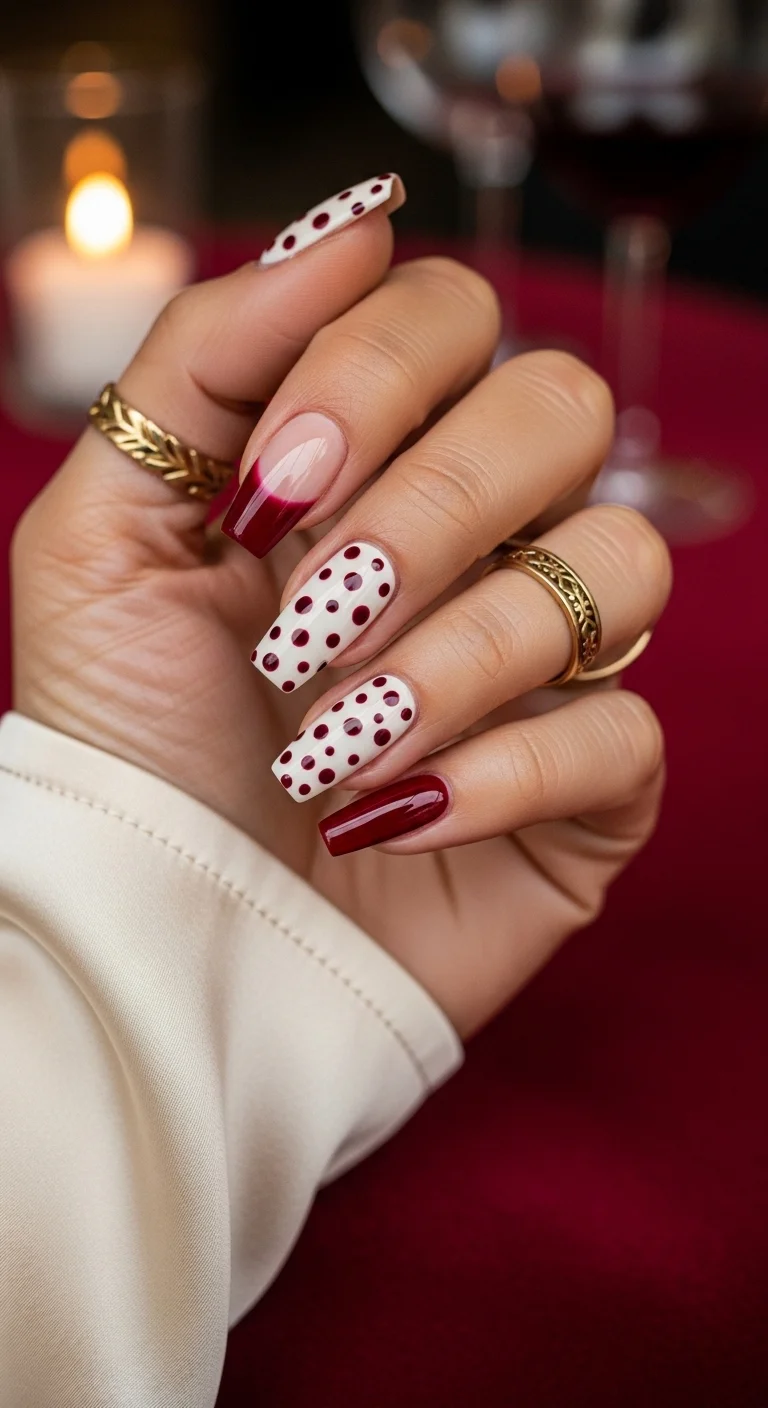
Bordeaux and cream with dots, French tip, and solid mix.
Overview:
This set uses multiple approaches to the same two-color palette: dots on white, a French tip, and a solid. The variety across nails creates a curated, mixed-media quality that feels more interesting than any single technique.
The bordeaux French tip is a refined alternative to the standard white French. The deep wine color adds warmth and sophistication while the French format keeps the design clean and structured. It's a French for someone who finds white too safe.
The solid bordeaux nail provides visual weight that balances the lighter dotted nails. Without it, the set would feel airy and 缺乏 grounding. The solid dark nail anchors the composition.
Design Breakdown:
Mixed-technique set using two colors. The variety is the design.
Base Color: White with bordeaux dots on two nails. Bordeaux French tip on one nail. Solid bordeaux on one nail.
Nail Shape: Medium-long coffin. The flat surface suits the different techniques.
Design Element: Bordeaux polka dots on white. Bordeaux French tip. Solid bordeaux.
Finish: High-gloss top coat to seal everything.
Get The Look at Home:
Each nail uses a different technique. Plan your layout before you start.
- Dot nails: On two nails, apply white base, then add bordeaux dots with a dotting tool.
- French tip: On one nail, paint a bordeaux French tip over a sheer nude base.
- Solid nail: On one nail, apply two coats of solid bordeaux.
- Thumb: Apply the remaining technique (dot, French, or solid) to the thumb.
- Seal: One thick coat of top coat over everything.

30 Stunning Beach Nail Ideas for the Best Vacation in 2026 🌊
8.Azure Blue Summer Breeze
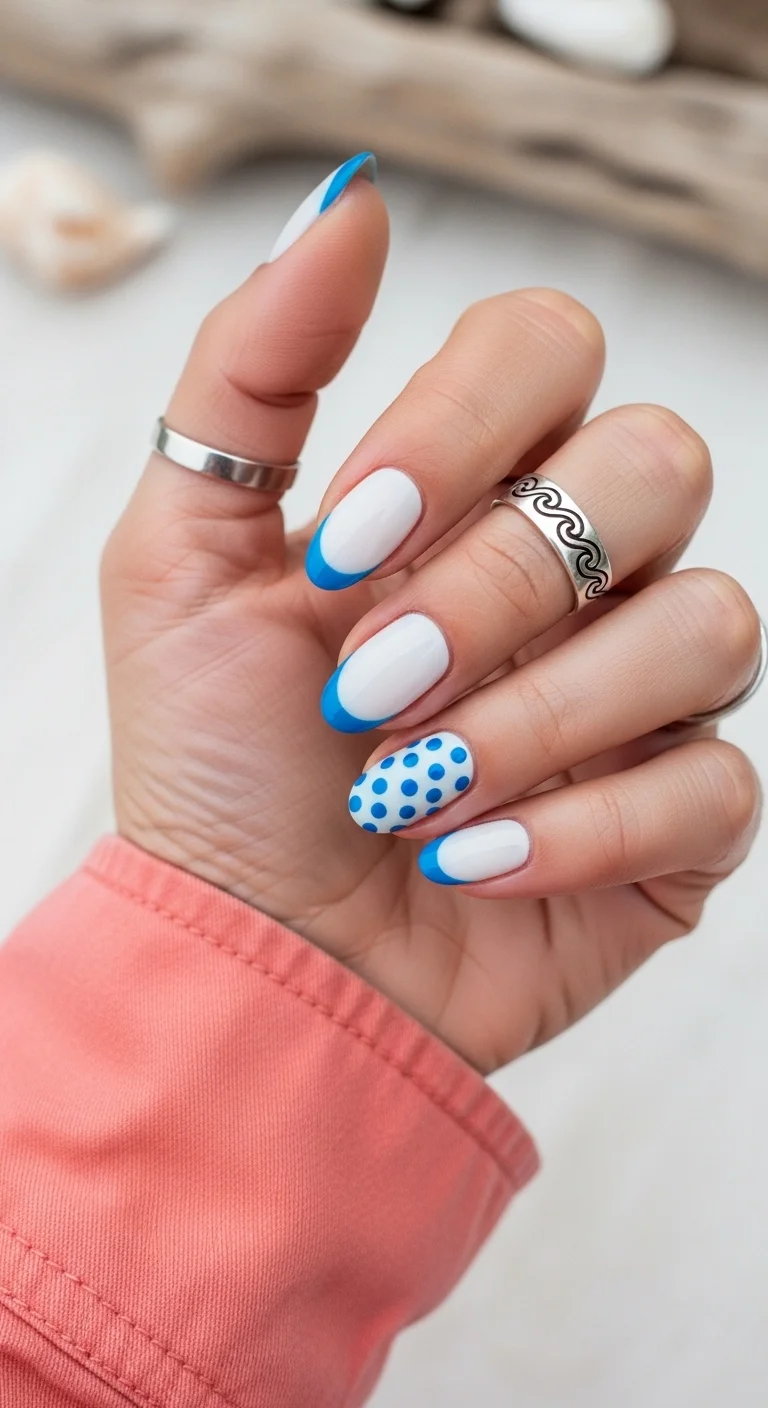
White with blue French tips and a blue dot accent.
Overview:
Blue and white is one of those color combinations that references specific things: nautical flags, Mediterranean tiles, summer skies. This set leans into all of those associations through French tips and polka dots.
The blue French tips on white nails create a clean, graphic foundation. The accent nail with blue dots on white adds a playful element that breaks up the French pattern. That variation prevents the set from feeling like a standard colored French.
The blue shade here is a mid-tone azure, not too dark, not too pastel. It's saturated enough to read as blue from a distance but soft enough to feel summery rather than wintery.
Design Breakdown:
Blue and white French with a dot accent. The color story is nautical.
Base Color: White on all nails. Blue French tips on four nails. Blue dots on the ring finger.
Nail Shape: Medium almond. The curved shape suits the summery color palette.
Design Element: Blue French tips on four nails. Blue polka dots on the ring finger accent.
Finish: High-gloss top coat to make the blue look saturated and the white look crisp.
Get The Look at Home:
The French tips and dot accent use different techniques. Do the French first, then the dots.
- White base: Two coats of opaque white on all nails. Let dry fully.
- Blue French tips: Paint blue French tips on four nails. Two coats for opacity.
- Blue dots: On the ring finger, use a medium dotting tool to place blue dots over the white base.
- Consistency: The blue shade should be the same on the tips and the dots.
- Seal: One thick coat of top coat over all nails.
9.Blackberry Rouge Gradient
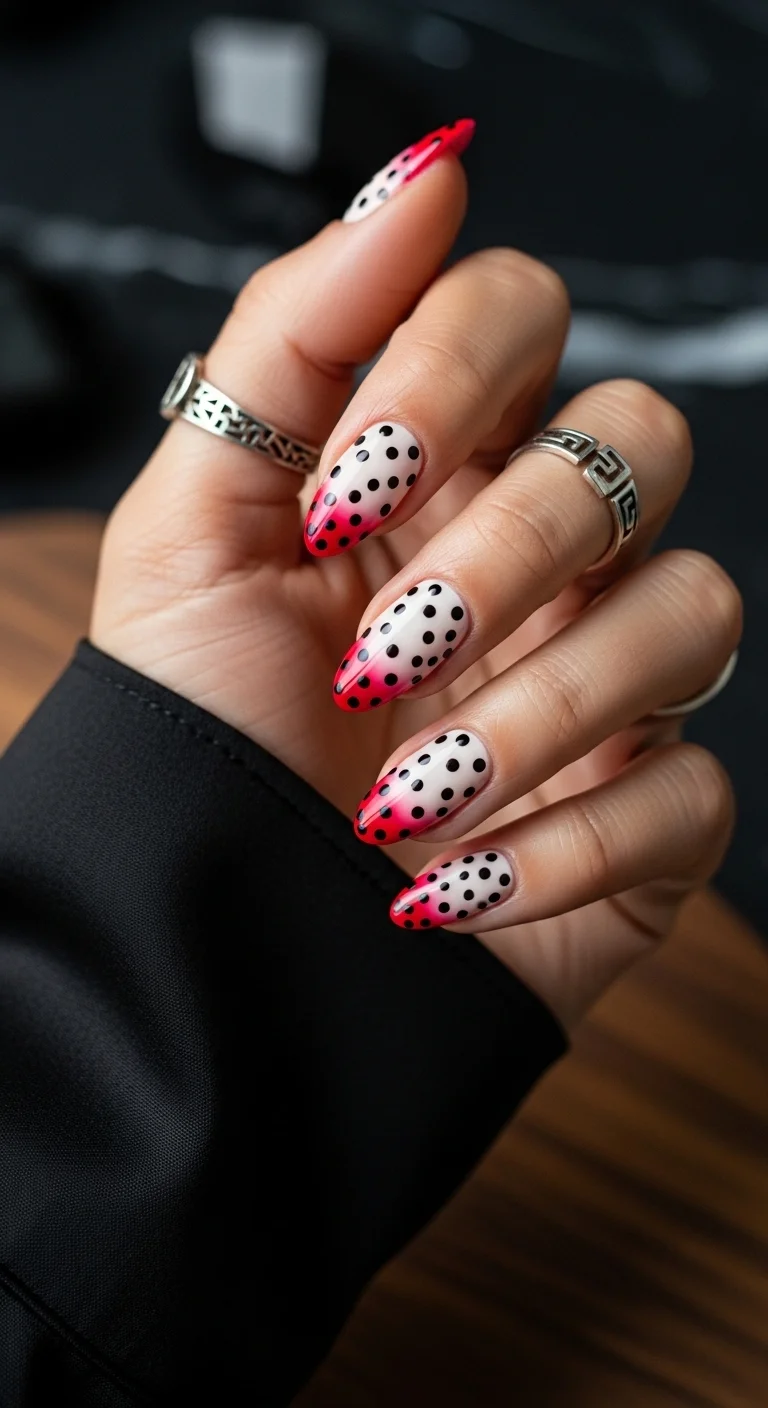
White-to-red gradient with black polka dots throughout.
Overview:
Polka dots over a gradient is an unusual combination that works because the dots add a third layer of visual interest to an already complex design. The gradient provides the color story; the dots provide the texture.
The white-to-red transition creates a fade effect that makes the dots appear to emerge from the base color. Near the cuticle, the black dots sit against white. Near the tips, they sit against red. That shifting background changes how the dots read across each nail.
The gradient needs to be seamless for the dots to look intentional. A visible line between the white and red zones would make the design look like two separate techniques layered on top of each other rather than a cohesive whole.
Design Breakdown:
Gradient with polka dot overlay. The two techniques work together to create depth.
Base Color: White at the cuticle fading to pink/red at the tips.
Nail Shape: Medium-long almond. The curved shape emphasizes the gradient flow.
Design Element: Black polka dots over the gradient on every nail. Medium dot size.
Finish: High-gloss top coat to make the gradient look seamless and the dots look sharp.
Get The Look at Home:
The gradient needs to be fully dry before the dots go on. Wet gradient plus wet dots equals smearing.
- Sponge the gradient: On each nail, sponge white at the cuticle fading to red/pink at the tip. Two to three passes for full opacity.
- Let dry completely: Wait at least five minutes. The gradient needs to be set before dotting.
- Dot the nails: Using a medium dotting tool and black polish, place evenly spaced dots over the gradient.
- Consistency: The dot size should be the same across all nails.
- Seal: One thick coat of top coat to protect the gradient and dots.

26 Stunning Summer Braided Hairstyles for Women 2026 ☀️💇♀️
10.Electric Turquoise Bubble
Turquoise with white polka dots for a bright, bubbly look.
Overview:
Turquoise and white is a pairing that references tropical water, pool tiles, and summer cocktails. The bright turquoise provides the energy; the white dots provide the structure. Together, they create a design that's cheerful without being loud.
The dot size on this set is slightly larger than typical polka dots, which gives the design a more graphic, retro quality. Smaller dots would read as texture. These larger dots read as a deliberate pattern choice.
Turquoise polish can be streaky in some formulas. The pigment particles tend to separate, which means uneven coverage if the bottle isn't shaken well. Three thin coats with proper dry time between each produces the best result.
Design Breakdown:
Single-color base with white dots on every nail. The bright palette is the design.
Base Color: Bright, opaque turquoise.
Nail Shape: Medium coffin. The flat surface provides a clean canvas for the dot pattern.
Design Element: White polka dots on every nail. Slightly larger dot size for a graphic, retro feel.
Finish: High-gloss top coat to make the turquoise look saturated.
Get The Look at Home:
Turquoise needs thin coats for even coverage. Thick coats will streak.
- Turquoise base: Three thin coats of turquoise on all nails. Let each coat dry fully.
- Dotting: Using a medium dotting tool dipped in white polish, place evenly spaced dots on each nail.
- Dot size: Slightly larger than standard polka dots for a more graphic feel.
- Don't rush: Let the white dots dry before moving to the next nail.
- Seal: One thick coat of top coat to protect the dots.
11.Rose Gold Night Out
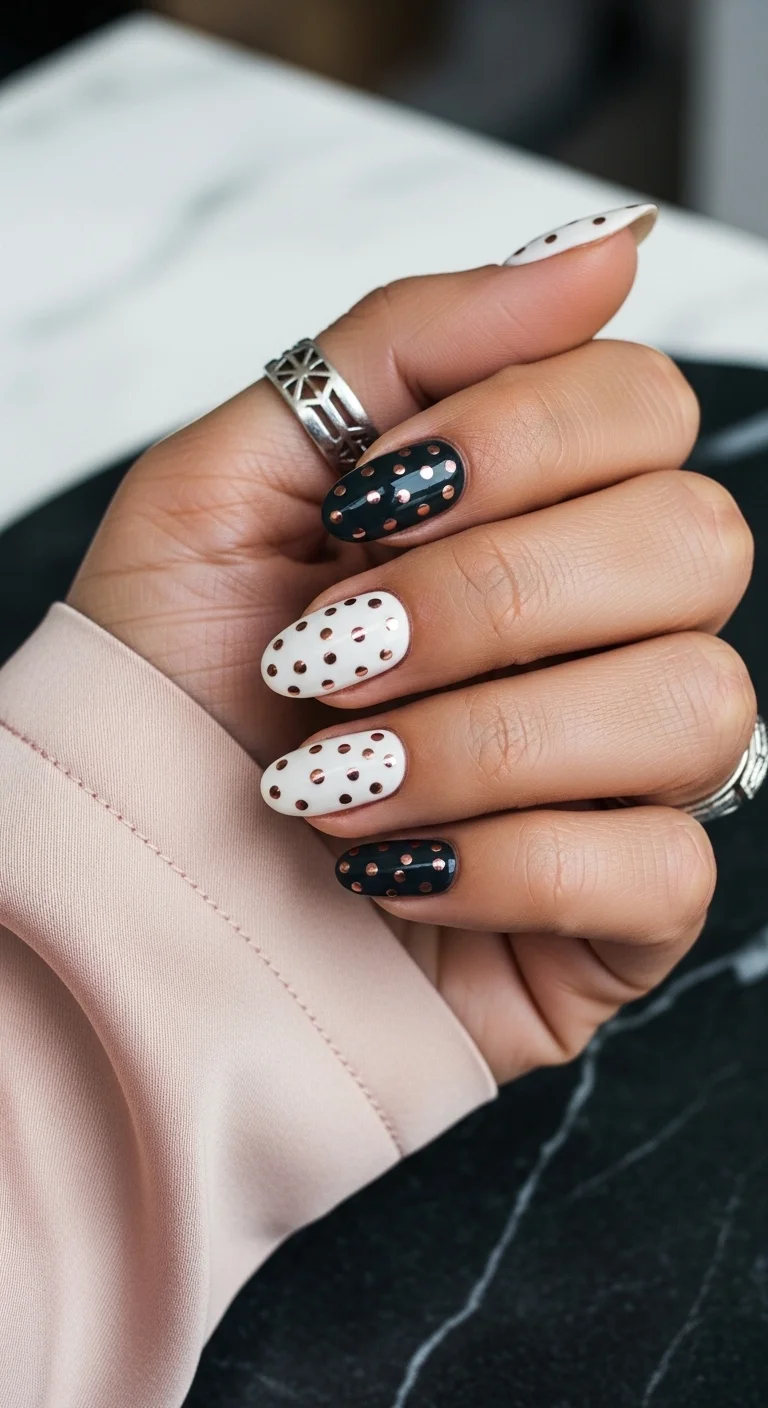
Black and white with rose gold metallic polka dots.
Overview:
Metallic dots on a black-and-white base create a design that bridges the gap between graphic and glamorous. The rose gold catches light from every angle, which means the dots shift between visible and invisible depending on how your hand moves. That dynamic quality keeps the set interesting.
The alternating black and white bases prevent the set from feeling monotonous. Each color provides a different backdrop for the same metallic dots: rose gold on black looks warm and dramatic; rose gold on white looks soft and delicate. Same dot, different mood.
Rose gold metallic polish separates quickly in the bottle. Roll the bottle between your hands before each application to ensure the metallic particles are evenly distributed.
Design Breakdown:
Two-color base with metallic dots. The alternating bases create contrast.
Base Color: Alternating black and white. Black on thumb and ring finger. White on index, middle, and pinky.
Nail Shape: Medium-long almond. The curved shape suits the metallic dot pattern.
Design Element: Rose gold metallic dots on all nails. Medium dot size, evenly spaced.
Finish: High-gloss top coat to seal the metallic dots and make the base colors look saturated.
Get The Look at Home:
Metallic polish settles quickly. Roll the bottle before each use.
- Color layout: Paint alternating nails black and white. Two coats each. Let dry fully.
- Metallic dots: Using a medium dotting tool dipped in rose gold metallic polish, place evenly spaced dots on each nail.
- Re-dip frequently: Metallic polish dries faster on the dotting tool than regular polish. Re-dip before every second dot.
- Seal: One thick coat of top coat to lock in the metallic dots.

35 Fun Birthday Nail Designs for 2026 🎂
12.Royal Emerald Gold Foil
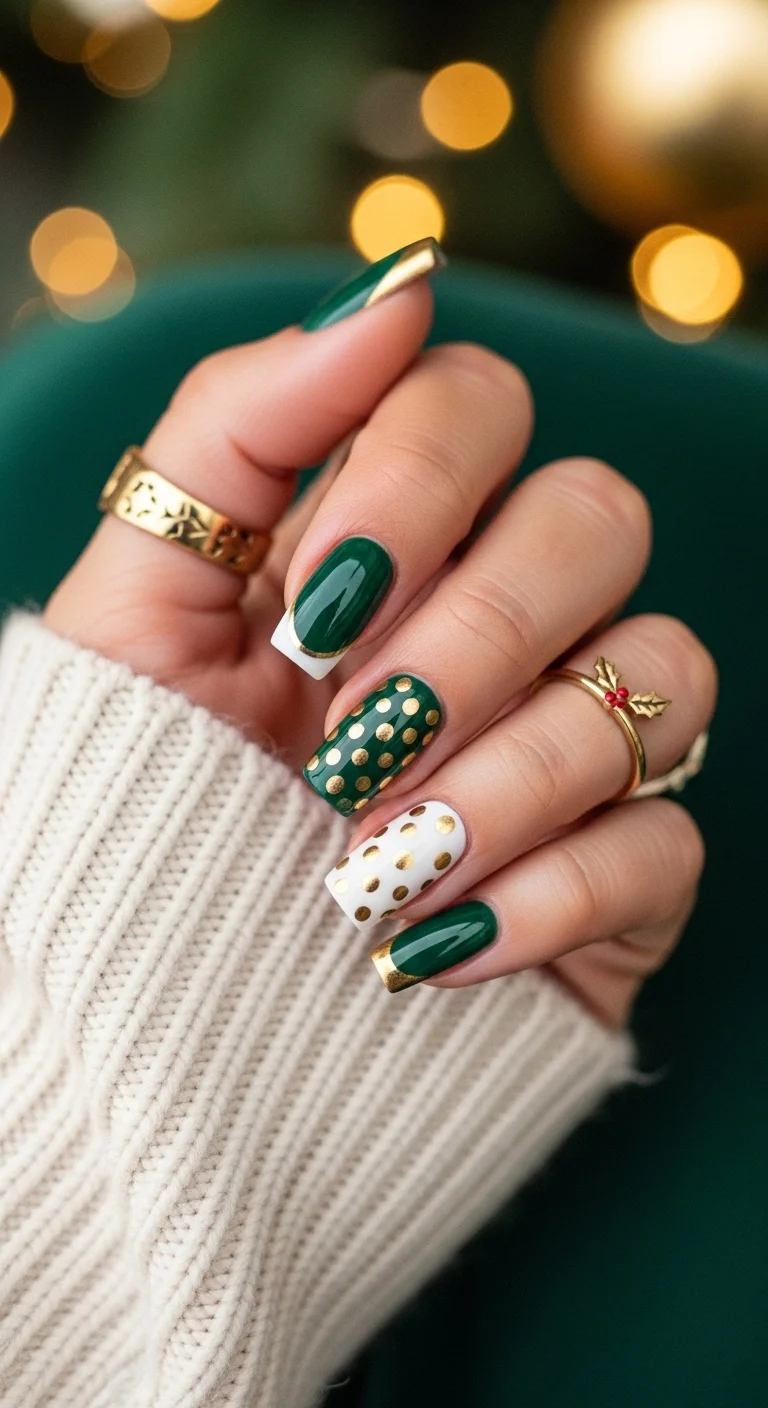
Emerald green, white, and gold polka dot mix.
Overview:
Emerald green and gold is a pairing borrowed from luxury fashion, and it works on nails for the same reason it works on handbags and jewelry: the deep green provides a rich backdrop that makes gold appear more luminous. The contrast is high enough to be visible but harmonious enough to feel refined.
The mixed approach, green with gold dots, white with gold dots, and green French tips, creates variety across the hand. Each nail does something slightly different within the same color story. That variation is what makes the set feel curated.
Gold metallic dots on green need to be genuinely metallic, not just yellow. A yellow dot on green would look muddy. A metallic gold dot catches light and creates the contrast that makes the design work.
Design Breakdown:
Multi-technique set using green, white, and gold. The variety is the design.
Base Color: Emerald green on some nails, white on others. Gold metallic dots throughout.
Nail Shape: Medium coffin. The flat surface showcases the different techniques.
Design Element: Gold metallic dots on green and white bases. Green French tips with gold accents on select nails.
Finish: High-gloss top coat to seal the gold and make the green look deep.
Get The Look at Home:
Plan your layout before you start. Each nail needs a different approach.
- Green nails: Two coats of emerald on designated nails. Let dry.
- White nails: Two coats of white on other nails. Let dry.
- Gold dots: Using a medium dotting tool and gold metallic polish, place dots on the green and white nails.
- French tips: On select nails, paint green French tips with a thin gold line along the smile line.
- Seal: One thick coat of top coat over everything.
13.Iridescent Pearl Bubbles
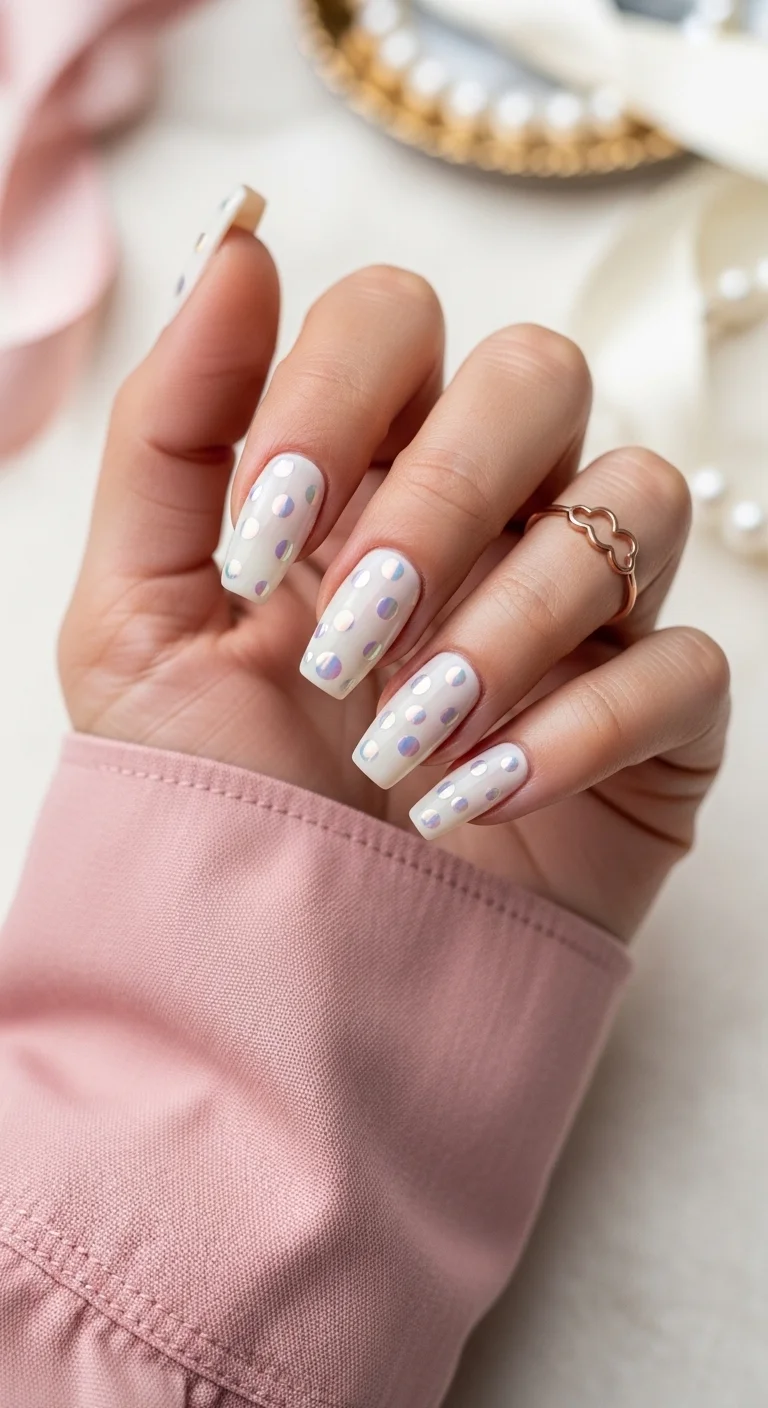
Pearly white with lavender iridescent polka dots.
Overview:
Iridescent dots on a pearly base create a design that shifts color depending on the angle of light. The lavender dots appear blue from some angles, pink from others. That color play is what makes the set visually interesting despite being only two elements.
The pearly white base amplifies the iridescent effect by providing a luminous backdrop. On a flat white, the dots would look more static. The pearlescence in the base and the dots together creates a cohesive shimmer that shifts across the entire nail.
Iridescent polishes are notoriously difficult to photograph accurately. They look different in every lighting condition, which means the design has more range in person than in photos. That's a feature, not a bug.
Design Breakdown:
Pearly base with iridescent dots. The color-shifting quality is the design.
Base Color: Pearly or opalescent white with a luminous finish.
Nail Shape: Medium coffin. The flat surface maximizes the shimmer effect.
Design Element: Lavender iridescent dots on every nail. Medium dot size, evenly spaced.
Finish: High-gloss top coat to amplify the iridescent quality.
Get The Look at Home:
Iridescent polish needs a pearly base for the best effect. Regular white won't produce the same luminous quality.
- Pearly base: Two coats of pearly or opalescent white on all nails. Let dry fully.
- Iridescent dots: Using a medium dotting tool dipped in lavender iridescent polish, place evenly spaced dots on each nail.
- Consistency: Use the same dotting tool for every nail to maintain uniform dot size.
- Seal: One thick coat of top coat to amplify the iridescent shimmer.
32 Stunning Summer Wedding Hairstyles for Brides ☀️💍
14.Modern Monochrome Lace
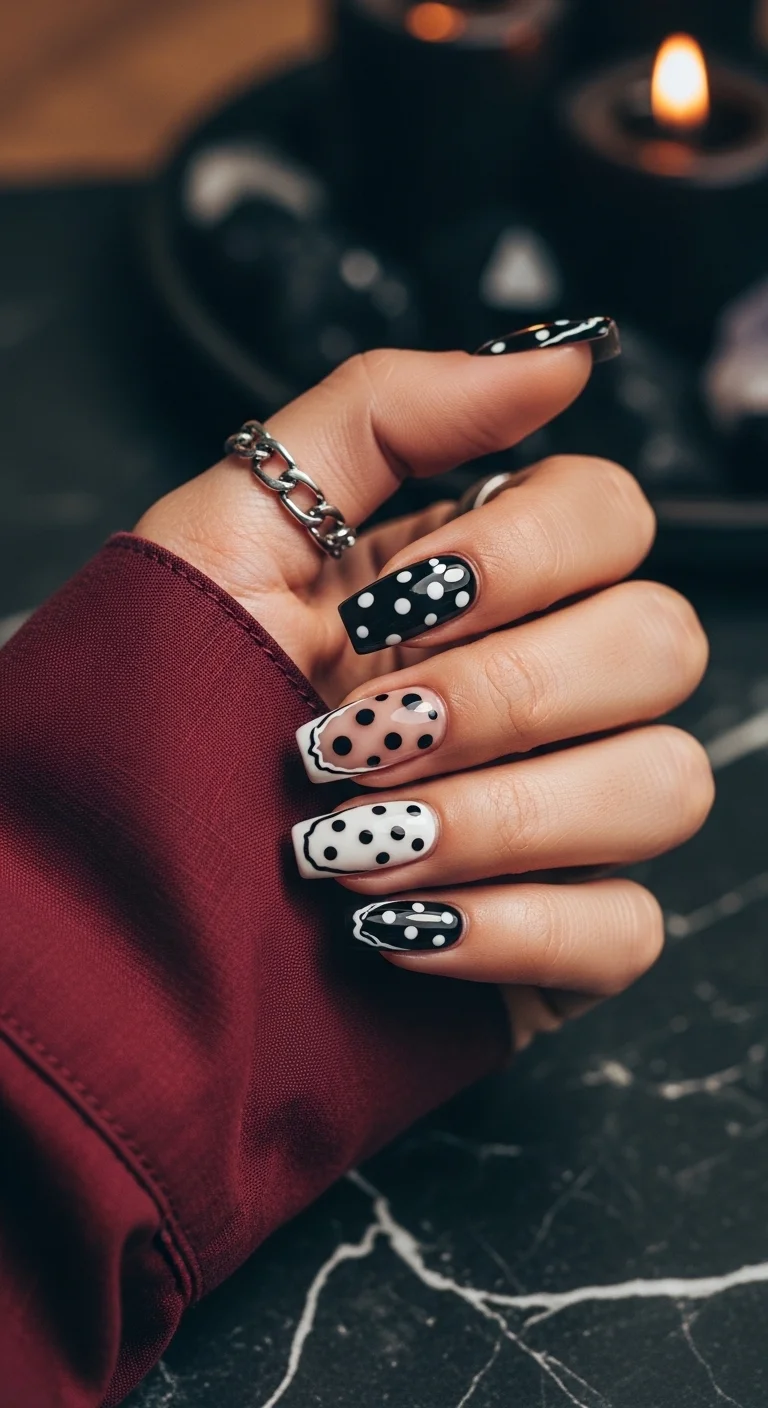
Black and white with dots and lace-inspired patterns.
Overview:
Black and white is the most graphic color combination available. It's high-contrast, timeless, and works in virtually any context. This set uses dots, solids, and lace-like patterns to create variety within the two-color constraint.
The lace-like patterns on some nails add a textural quality that dots alone can't achieve. The organic, flowing lines of the lace contrast with the structured dots, creating a design that balances geometry and fluidity.
The monochrome palette means every element needs to be executed cleanly. There's no color to hide imperfections behind. The white needs to be fully opaque, and the black needs to be uniformly deep.
Design Breakdown:
Two-color set with multiple techniques. The variety within the monochrome palette is the design.
Base Color: Black and white on different nails.
Nail Shape: Medium coffin. The flat surface showcases the different patterns.
Design Element: White dots on black nails. Black dots on white nails. Lace-like patterns on select nails.
Finish: High-gloss top coat to make the black look deep and the white look crisp.
Get The Look at Home:
Each nail uses a different technique. The variety is intentional.
- Base colors: Apply black and white to alternating nails. Two coats each. Let dry fully.
- Dot nails: On some nails, add contrasting dots using a dotting tool.
- Lace patterns: On select nails, use a fine liner brush to draw flowing, organic line patterns.
- Consistency: Keep the black and white clean throughout. No bleeding between colors.
- Seal: One thick coat of top coat over everything.
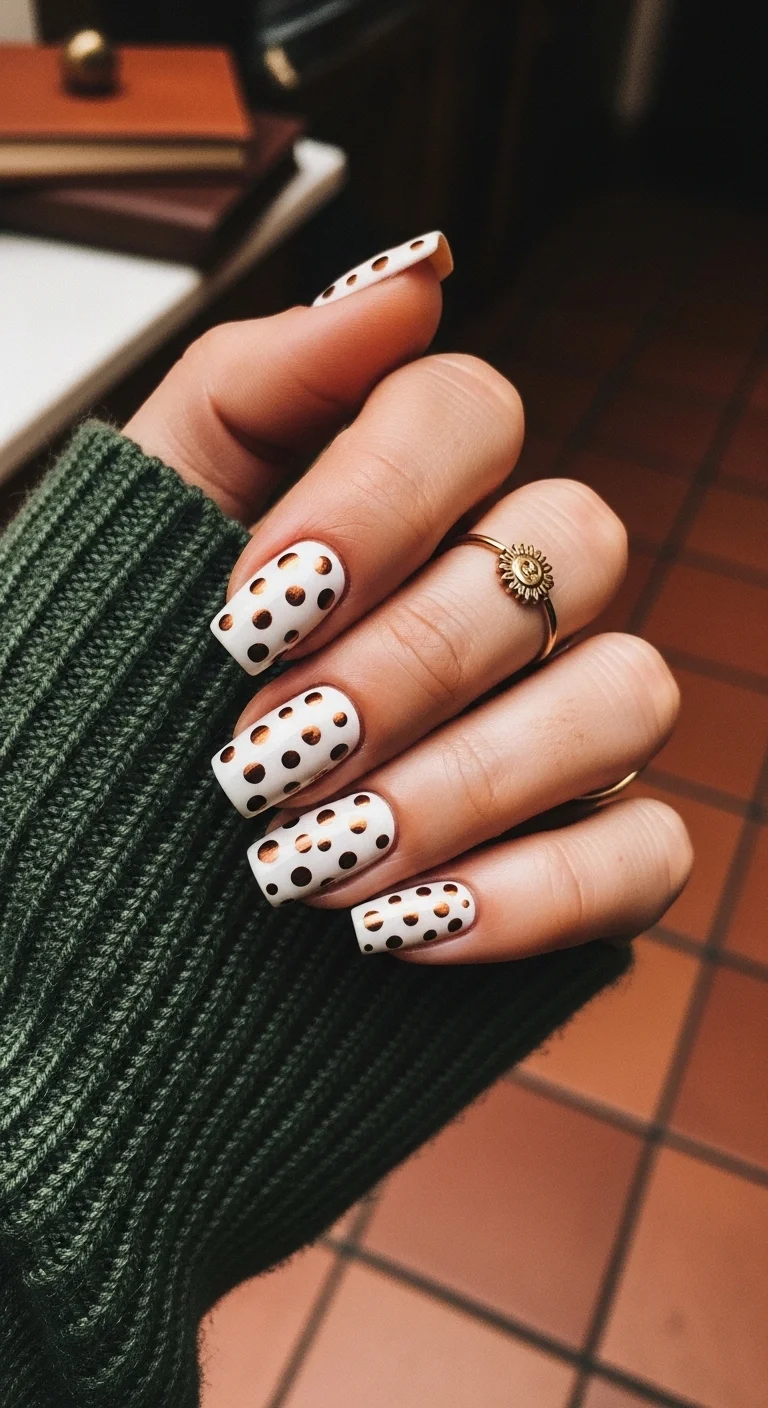
15.Copper Penny Shine
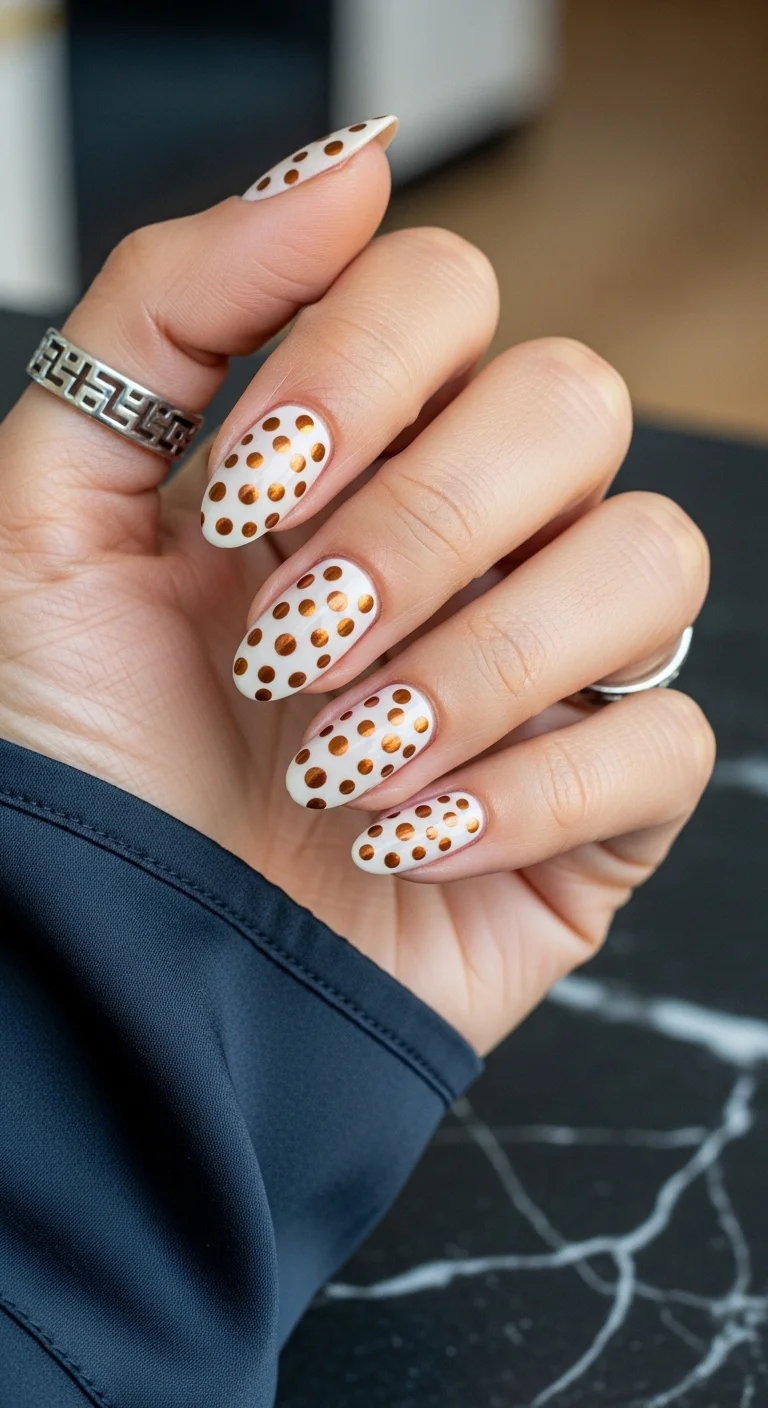
White base with copper metallic polka dots.
Overview:
Copper dots on white create a design that references penny tiles, the metallic flooring found in vintage bathrooms and kitchens. The warm copper against the clean white evokes a specific material quality that standard polka dots can't achieve.
The metallic quality of the dots means they catch light differently than flat polish. From some angles, the copper appears as a warm brown. From others, it flashes bright orange-gold. That dynamic quality keeps the set interesting despite being only two elements.
Copper metallic polish separates quickly in the bottle. Roll it between your hands before each application to ensure the metallic particles are evenly distributed.
Design Breakdown:
White base with metallic dots. The copper-on-white palette is the design.
Base Color: Crisp, opaque white.
Nail Shape: Medium-long almond. The curved shape suits the metallic dot pattern.
Design Element: Copper metallic dots on every nail. Medium dot size, evenly spaced.
Finish: High-gloss top coat to seal the copper dots and make the white look crisp.
Get The Look at Home:
Metallic polish needs re-dipping more frequently than regular polish.
- White base: Two coats of opaque white on all nails. Let dry fully.
- Copper dots: Using a medium dotting tool dipped in copper metallic polish, place evenly spaced dots on each nail.
- Re-dip frequently: Metallic polish dries on the dotting tool faster than regular polish.
- Consistency: Use the same dotting tool for every nail.
- Seal: One thick coat of top coat to lock in the metallic dots.

34 Cutest Butter Yellow Nail Designs for 2026 🧈
16.Lavender Gunmetal Glam
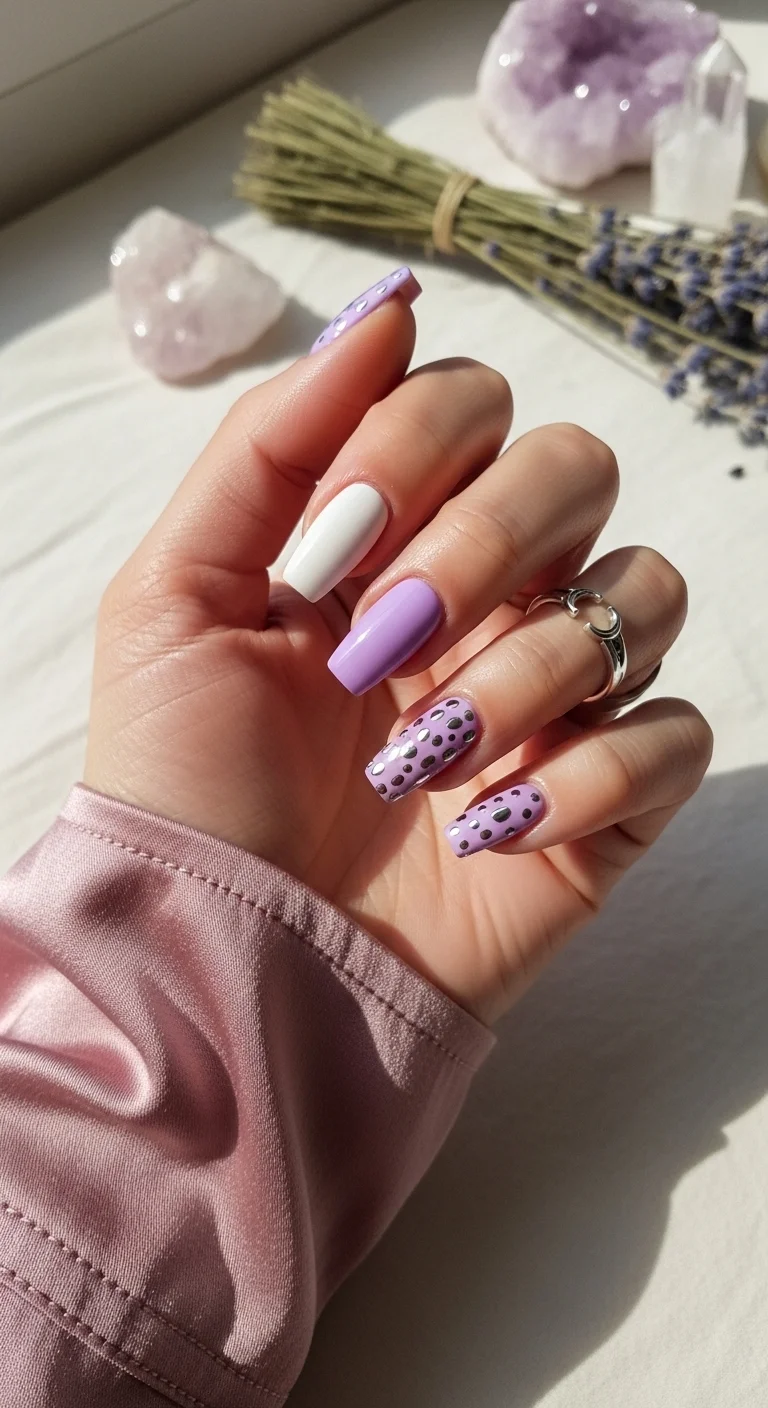
Lavender, white, and gunmetal dot mix.
Overview:
Lavender and gunmetal is an unusual pairing that works because the cool purple and the dark grey share similar undertones. They're both muted, both sophisticated, and both slightly unconventional. The white accent adds a clean element that prevents the set from feeling too dark.
The mixed approach, solid white, solid lavender, and lavender with dots, creates variety across the hand. Each nail does something different within the same color story. That variation is what makes the set feel curated rather than random.
Gunmetal dots on lavender are more subtle than black dots would be. The grey-on-purple contrast is lower, which gives the design a softer, more understated quality.
Design Breakdown:
Multi-color set with metallic dots. The muted palette is the design.
Base Color: White on one nail, lavender on two nails, lavender with gunmetal dots on two nails.
Nail Shape: Medium coffin. The flat surface showcases the different approaches.
Design Element: Gunmetal metallic dots on lavender accent nails. Medium dot size.
Finish: High-gloss top coat to seal the metallic dots.
Get The Look at Home:
Plan your layout before you start. The variety is intentional.
- Color layout: Paint one nail white, two nails solid lavender, two nails lavender for dots.
- Solid nails: Two coats each. Let dry fully.
- Gunmetal dots: Using a medium dotting tool and gunmetal metallic polish, place dots on the designated lavender nails.
- Seal: One thick coat of top coat over everything.
17.Periwinkle Silver Rain
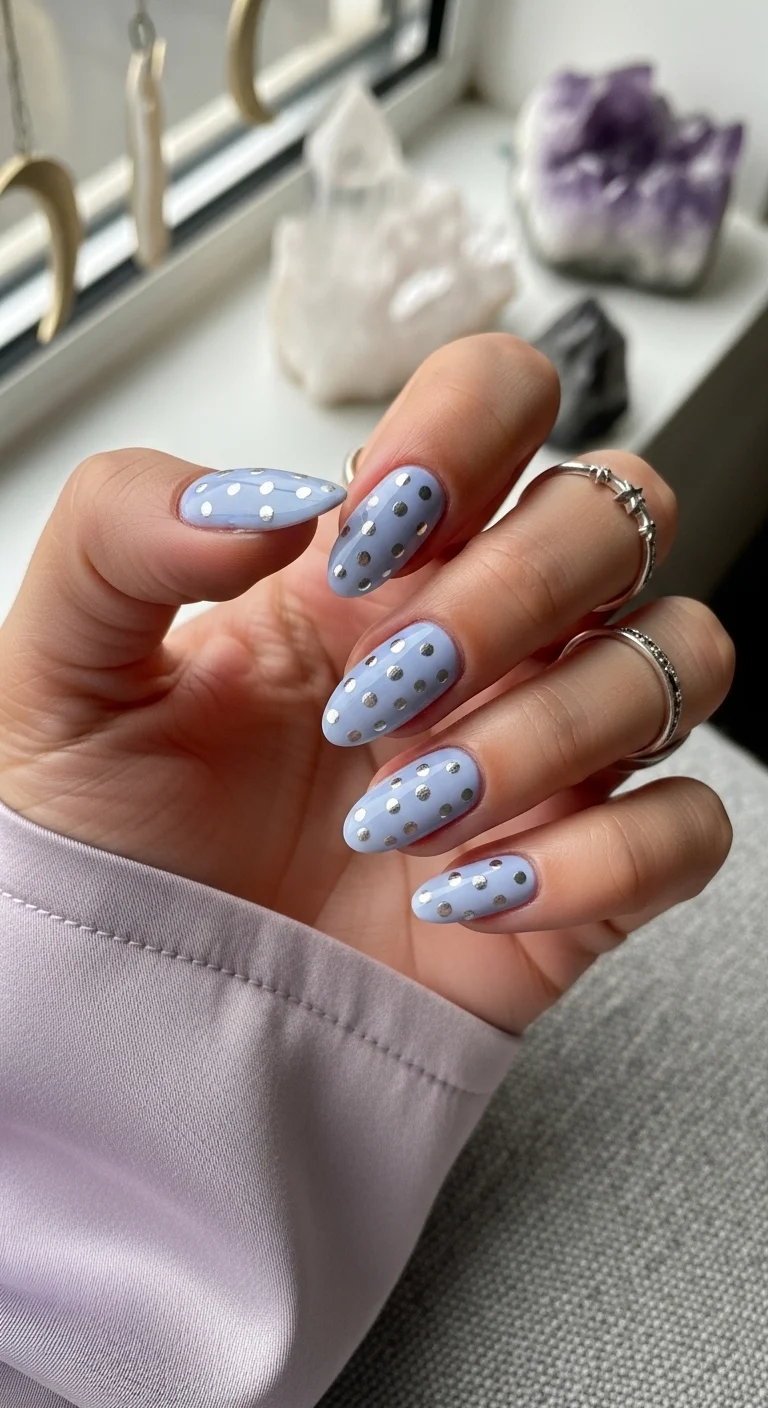
Periwinkle with silver metallic polka dots.
Overview:
Silver on periwinkle creates a cool-toned pairing that references moonlight on water. The metallic dots catch light differently than the flat periwinkle base, creating a shimmering effect that looks like rain on a window.
Periwinkle is a blue-purple that sits between lavender and sky blue. That in-between quality makes it more versatile than either parent color. It works with warm and cool skin tones, and it pairs with both gold and silver metallics.
The dot size on this set is slightly smaller than standard polka dots, which gives the design a more delicate, refined quality. Smaller dots on a pastel base read as texture rather than pattern.
Design Breakdown:
Pastel base with metallic dots. The cool palette is the design principle.
Base Color: Periwinkle or lavender-blue.
Nail Shape: Medium-long almond. The curved shape complements the cool, delicate palette.
Design Element: Silver metallic dots on every nail. Small to medium dot size.
Finish: High-gloss top coat to amplify the metallic shimmer.
Get The Look at Home:
Silver metallic dots on pastel need precise placement to avoid looking cluttered.
- Periwinkle base: Two coats of periwinkle on all nails. Let dry fully.
- Silver dots: Using a small dotting tool dipped in silver metallic polish, place evenly spaced dots on each nail.
- Dot size: Slightly smaller than standard polka dots for a more delicate look.
- Consistency: Use the same dotting tool for every nail.
- Seal: One thick coat of top coat to lock in the metallic dots.

25 Stunning Summer Vacation Hairstyles for 2026 ☀️🌊
18.Cacao Lace Bows
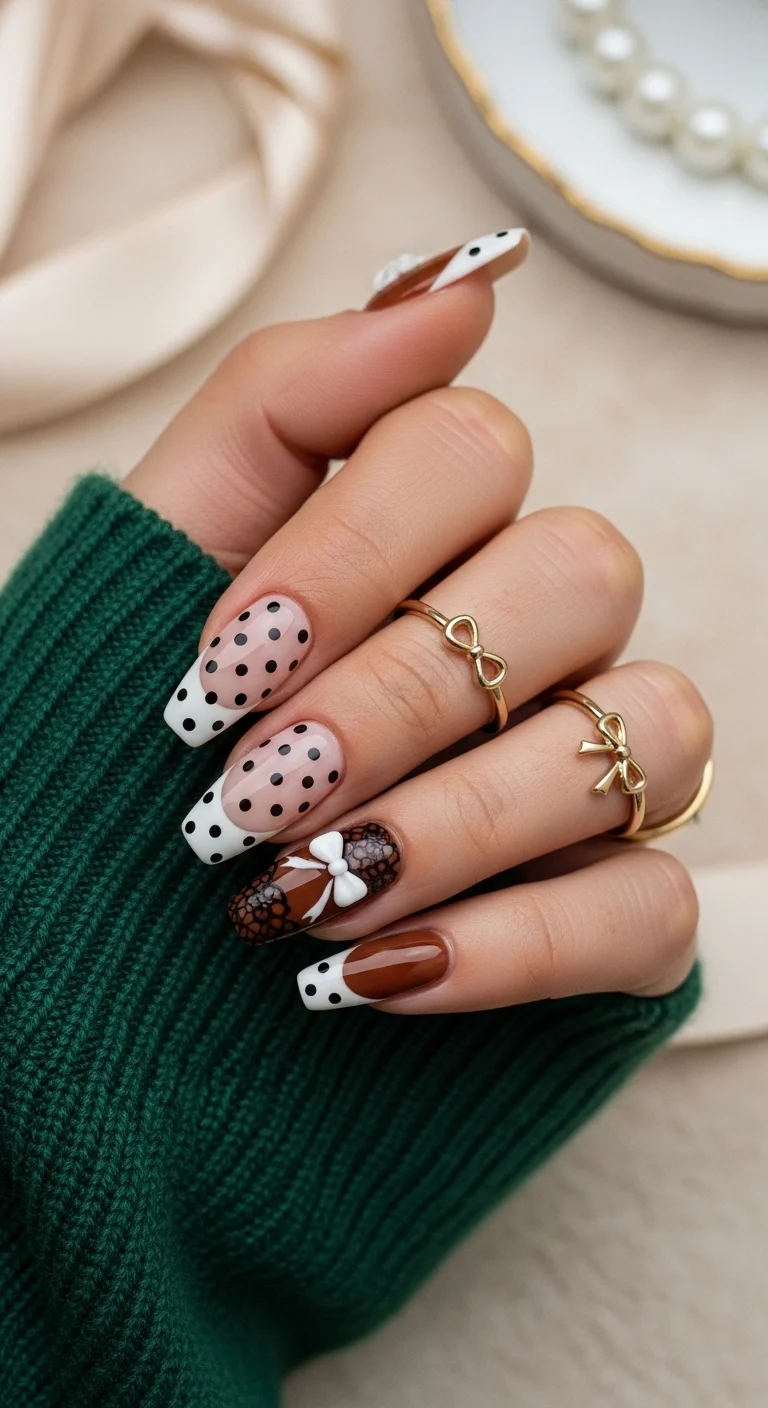
Brown and white with dots, lace art, and a 3D bow accent.
Overview:
This set uses multiple techniques to create a design that references vintage fashion: polka dots, lace patterns, and a 3D bow charm. The variety across nails creates a curated, mixed-media quality that feels like a collection of textile samples.
The 3D bow charm on the accent nail is the most eye-catching element. It adds physical dimension that flat nail art can't replicate. The practical downside: it catches on everything. Hair, clothing, bag linings. Budget for careful wear.
The brown palette grounds the design in earthy tones, which keeps the vintage references from feeling costume-y. The black dots and lace patterns add graphic contrast without introducing new colors.
Design Breakdown:
Multi-technique set with a 3D accent. The textile references are the design.
Base Color: Brown on some nails, white on others.
Nail Shape: Medium-long coffin. The flat surface suits the detailed art.
Design Element: Black dots on brown and white nails. Lace patterns on select nails. 3D bow charm on the accent nail.
Finish: High-gloss top coat to seal the art and charm.
Get The Look at Home:
The bow charm needs nail art gel for proper adhesion. Regular nail glue won't hold long-term.
- Base colors: Apply brown and white to alternating nails. Two coats each. Let dry.
- Dot nails: On some nails, add black dots using a dotting tool.
- Lace patterns: On select nails, use a fine liner brush to draw flowing lace-like lines.
- Bow charm: Apply a small bead of nail art gel to the back of the bow. Press onto the accent nail and hold for ten seconds.
- Seal: Two coats of top coat to protect the art and secure the charm.
19.Dusty Mauve Purple Punch
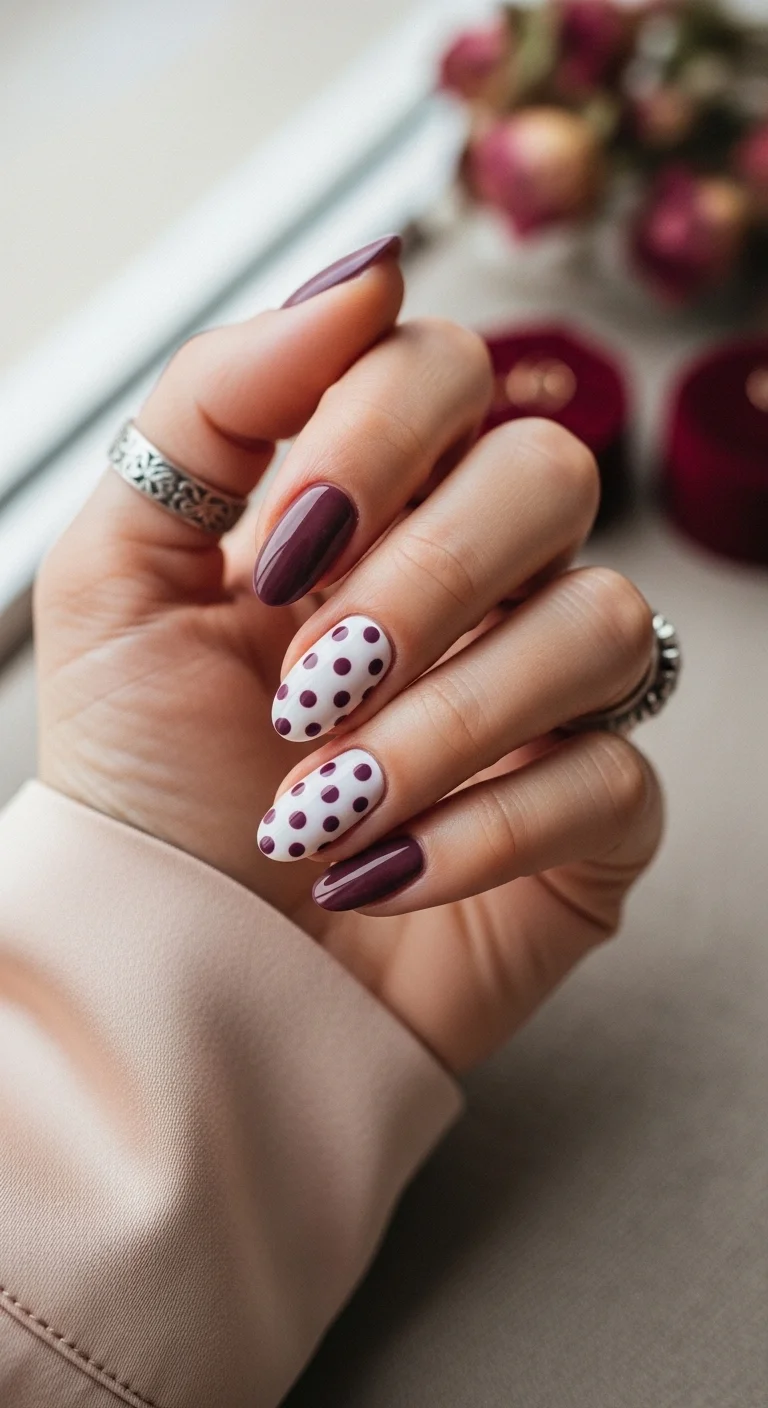
Dark plum and white with plum polka dots.
Overview:
Dark plum and white is a two-color pairing that works because the plum provides depth and the white provides contrast. The polka dots on the white nails create a playful element that balances the seriousness of the dark plum solids.
The alternating approach, solid plum and white with dots, creates a visual rhythm across the hand. Your eye moves from the dark, grounding solids to the lighter, patterned nails. That push-pull keeps the design interesting.
Plum dots on white need to be genuinely opaque. A sheer plum over white will look washed out and weak. Two coats of a pigment-dense plum ensures the dots are visible and defined.
Design Breakdown:
Two-color alternating set with dots on the white nails. The contrast is the design.
Base Color: Dark plum on two nails. White with plum dots on two nails.
Nail Shape: Medium almond. The curved shape suits the moody color palette.
Design Element: Plum polka dots on white nails. Medium dot size, evenly spaced.
Finish: High-gloss top coat to make the plum look jammy and the white look crisp.
Get The Look at Home:
The solid plum nails are fast. The dot nails need careful execution.
- Plum nails: Two coats of dark plum on two nails. Let dry fully.
- White nails: Two coats of opaque white on two nails. Let dry.
- Plum dots: Using a medium dotting tool and plum polish, place evenly spaced dots on the white nails.
- Thumb: Apply solid plum or white with dots to the thumb.
- Seal: One thick coat of top coat over everything.

31 Patriotic Fourth of July Nail Ideas for 2026 🇺🇸
20.Holographic Sky Bubbles
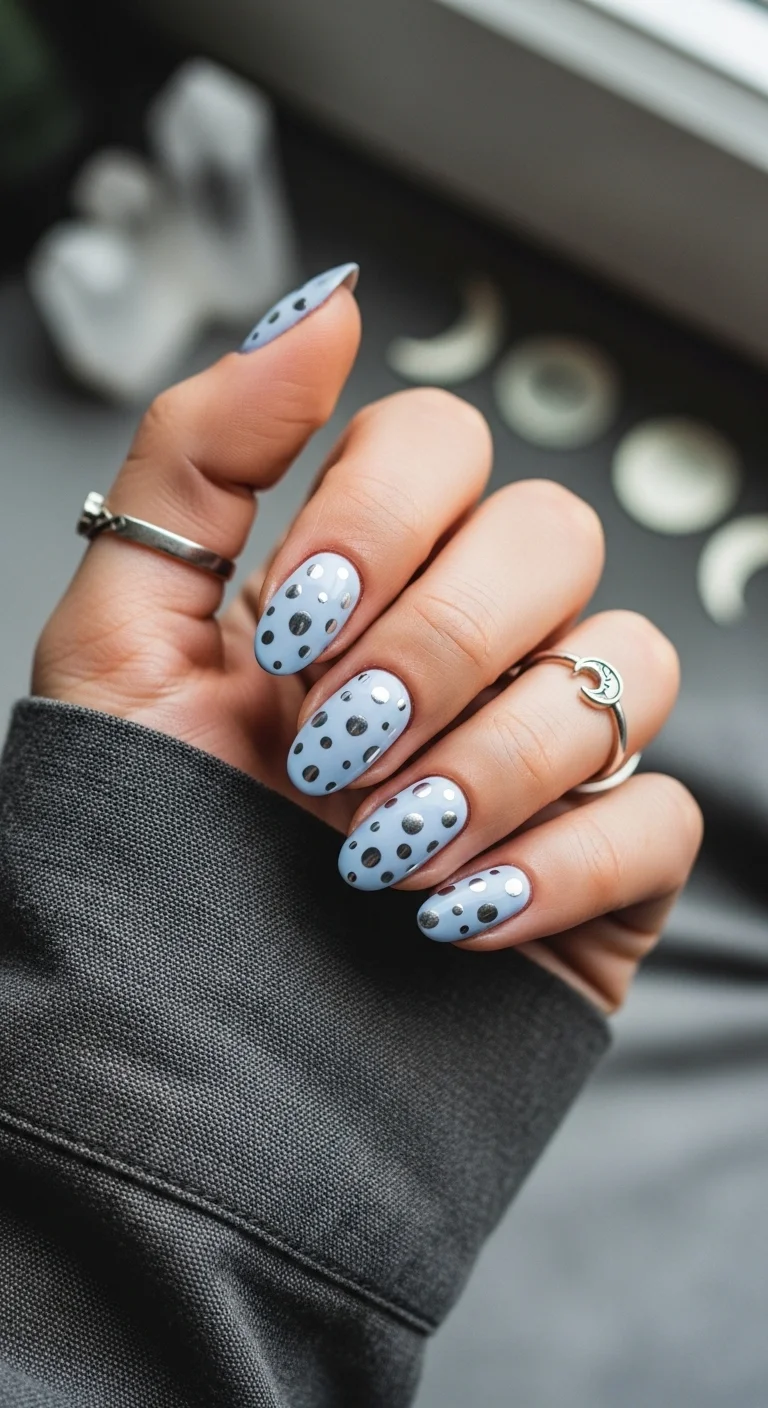
Light blue with silver holographic polka dots.
Overview:
Holographic dots on a pastel base create a design that shifts color with every movement. The silver holographic particles refract light into rainbow spectrums, which means the dots appear as different colors depending on the angle. It's polka dots with a hidden dimension.
The light blue base is cool enough to complement the silver holographic without competing with it. A warmer base would create a temperature clash that makes the holographic effect less visible. The cool-on-cool pairing lets the rainbow refraction stand out.
Holographic polishes are notoriously difficult to photograph. They look flat in photos but spectacular in person. This is a design that rewards real-life viewing over screen viewing.
Design Breakdown:
Pastel base with holographic dots. The color-shifting quality is the design.
Base Color: Light blue or periwinkle.
Nail Shape: Medium-long almond. The curved shape enhances the holographic light play.
Design Element: Silver holographic dots on every nail. Small to medium dot size.
Finish: High-gloss top coat to amplify the holographic shimmer.
Get The Look at Home:
Holographic polish needs a smooth base for the best effect. Any texture will disrupt the light refraction.
- Blue base: Two coats of light blue on all nails. Let dry fully.
- Holographic dots: Using a medium dotting tool dipped in silver holographic polish, place evenly spaced dots on each nail.
- Consistency: Use the same dotting tool for every nail to maintain uniform dot size.
- Seal: One thick coat of top coat to amplify the holographic shimmer.
21.Coffee Cream Swirl
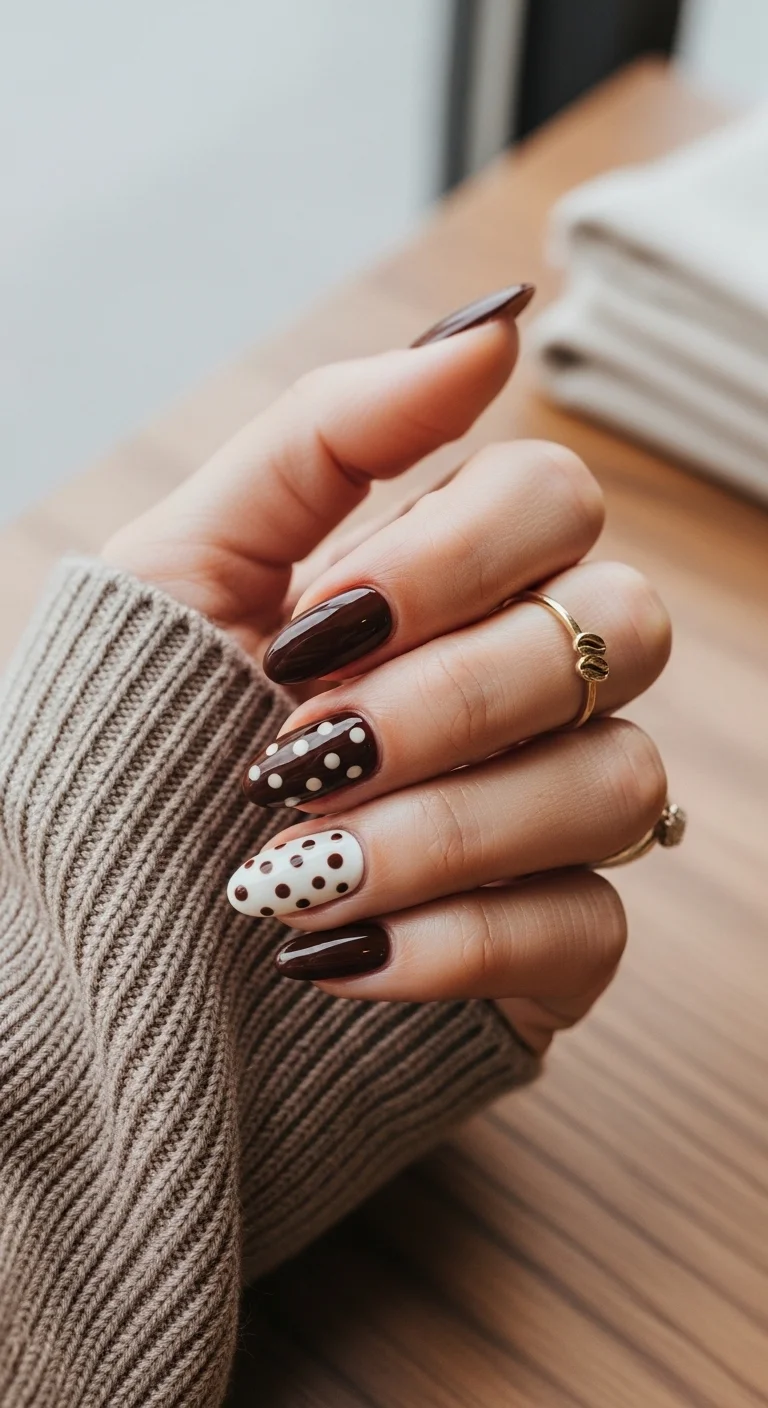
Dark brown and white with alternating polka dots.
Overview:
Brown and white is a pairing that references coffee, chocolate, and warm baked goods. The alternating approach, solid brown, brown with white dots, white with brown dots, creates variety within the two-color palette. Each nail does something different, but they all share the same color story.
The inverted dots, white on brown and brown on white, create a visual conversation between the two colors. Each color gets a turn being the background, which makes the set feel balanced and intentional.
Dark brown polish is more forgiving than bright colors because the deep pigment hides minor application imperfections. The white dots, however, need to be genuinely opaque to read clearly against the dark base.
Design Breakdown:
Two-color alternating set with inverted dots. The color reversal is the design.
Base Color: Dark brown on two nails, white with brown dots on two nails.
Nail Shape: Medium almond. The curved shape suits the warm color palette.
Design Element: White dots on brown nails. Brown dots on white nails. Medium dot size.
Finish: High-gloss top coat to make the brown look rich and the white look crisp.
Get The Look at Home:
The inversion technique requires planning. Decide dot colors before you start.
- Brown base: Two coats of dark brown on two nails. Let dry fully.
- White base: Two coats of opaque white on two nails. Let dry.
- White dots on brown: Using a medium dotting tool and white polish, place dots on the brown nails.
- Brown dots on white: Using the same dotting tool and brown polish, place dots on the white nails.
- Seal: One thick coat of top coat over everything.

21 Hot Summer Buns Hairstyle Ideas for 2026 ☀️🔥
22.Golden Espresso Glam
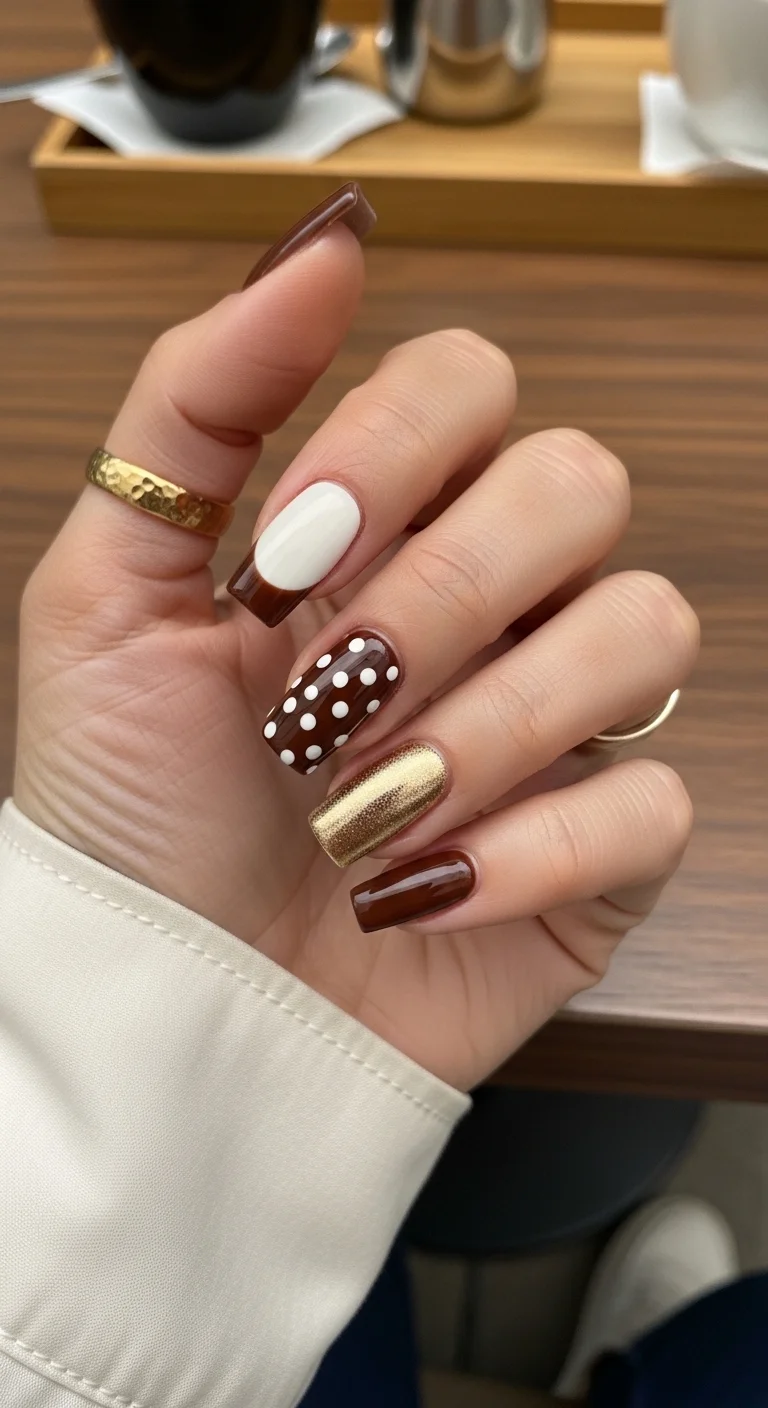
Brown, white dots, and gold metallic mix.
Overview:
Brown with white dots is a classic combination. Adding gold metallic to the mix elevates the design from casual to luxe. The gold shares the same warm undertone as the brown, which creates tonal harmony despite the different finishes.
The gold metallic nail breaks up the dot pattern and adds a texture that flat polish can't replicate. It catches light differently, creating a focal point that draws the eye.
The three-element approach, solid brown, dots, and gold, is more interesting than any single technique. The variety is what makes the set feel curated.
Design Breakdown:
Multi-technique set using brown, white, and gold. The variety is the design.
Base Color: Brown with white dots on two nails. Gold metallic on one nail. Solid brown on two nails.
Nail Shape: Medium coffin. The flat surface showcases the different techniques.
Design Element: White dots on brown nails. Gold metallic accent nail.
Finish: High-gloss top coat to seal everything.
Get The Look at Home:
Each nail uses a different technique. Plan your layout first.
- Brown nails: Two coats of brown on designated nails. Let dry.
- Gold accent: On one nail, apply gold metallic polish or chrome powder.
- White dots: On two brown nails, use a medium dotting tool to place white dots.
- Thumb: Apply solid brown to the thumb.
- Seal: One thick coat of top coat over everything.
23.Urban Slate Charcoal Dots
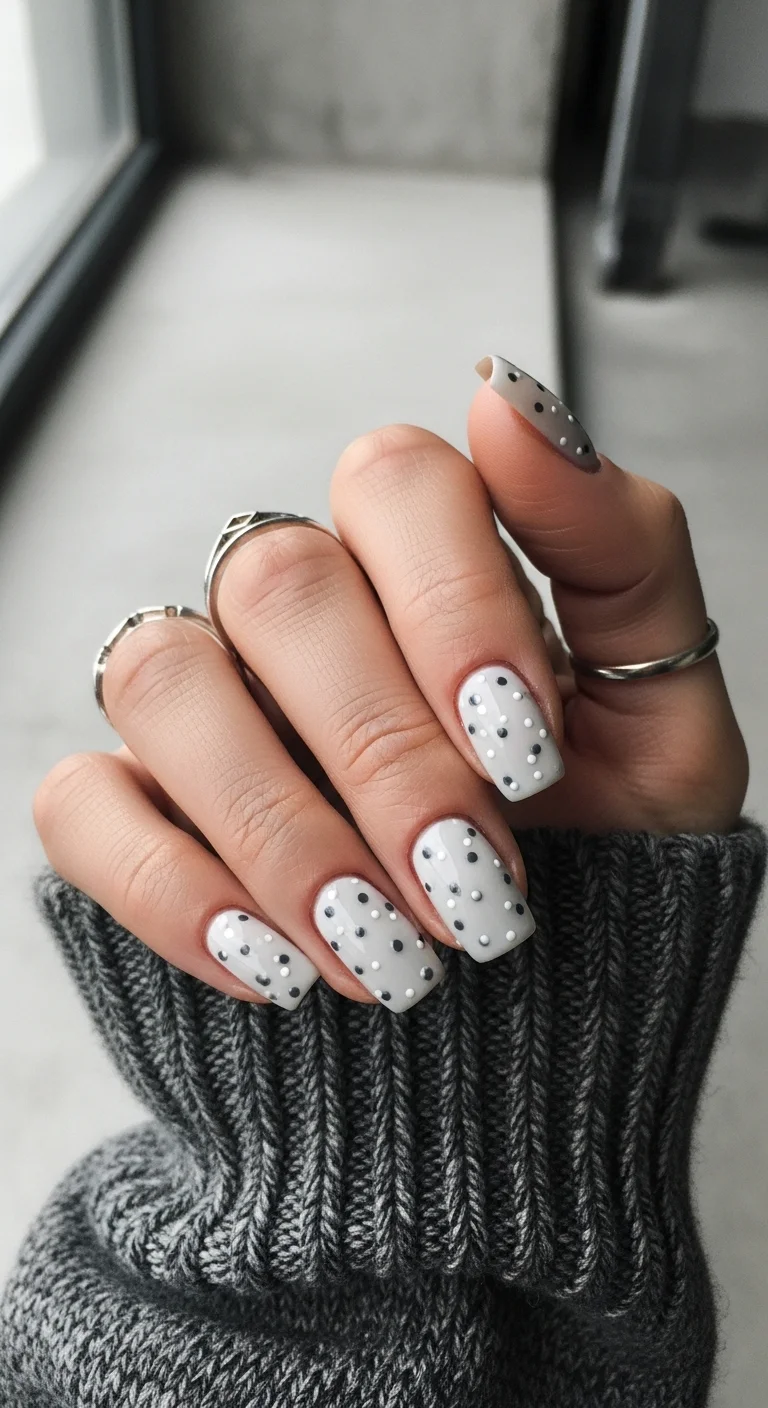
White with mixed black and grey polka dots.
Overview:
Black and grey dots on white create a monochrome design that references terrazzo or stone textures. The two dot colors add depth that a single color wouldn't achieve. The black dots provide contrast; the grey dots provide subtlety.
The varying dot sizes are important for this design. Uniform dots would read as polka dots, not speckles. The mix of small and medium dots creates an organic, scattered quality that feels more like a texture than a pattern.
The monochrome palette means every element needs to be executed cleanly. There's no color to hide imperfections behind. The white needs to be fully opaque, and the dots need to be precisely placed.
Design Breakdown:
Monochrome speckled dots on white. The varied sizes create depth.
Base Color: Crisp, opaque white.
Nail Shape: Medium coffin. The flat surface provides a clean canvas for the dots.
Design Element: Black and grey dots in mixed sizes scattered across all nails.
Finish: High-gloss top coat to make the white look crisp.
Get The Look at Home:
Two dot colors and multiple sizes require careful tool selection.
- White base: Two coats of opaque white. Let dry fully.
- Black dots: Using a medium dotting tool, place black dots randomly across each nail.
- Grey dots: Using a smaller dotting tool, add grey dots in the gaps between the black ones.
- Vary density: Some areas should have more dots than others.
- Seal: One thick coat of top coat over everything.

27 Stunning Graduation Day Nail Ideas for 2026 🎓
24.Bordeaux Bow Polka Dot
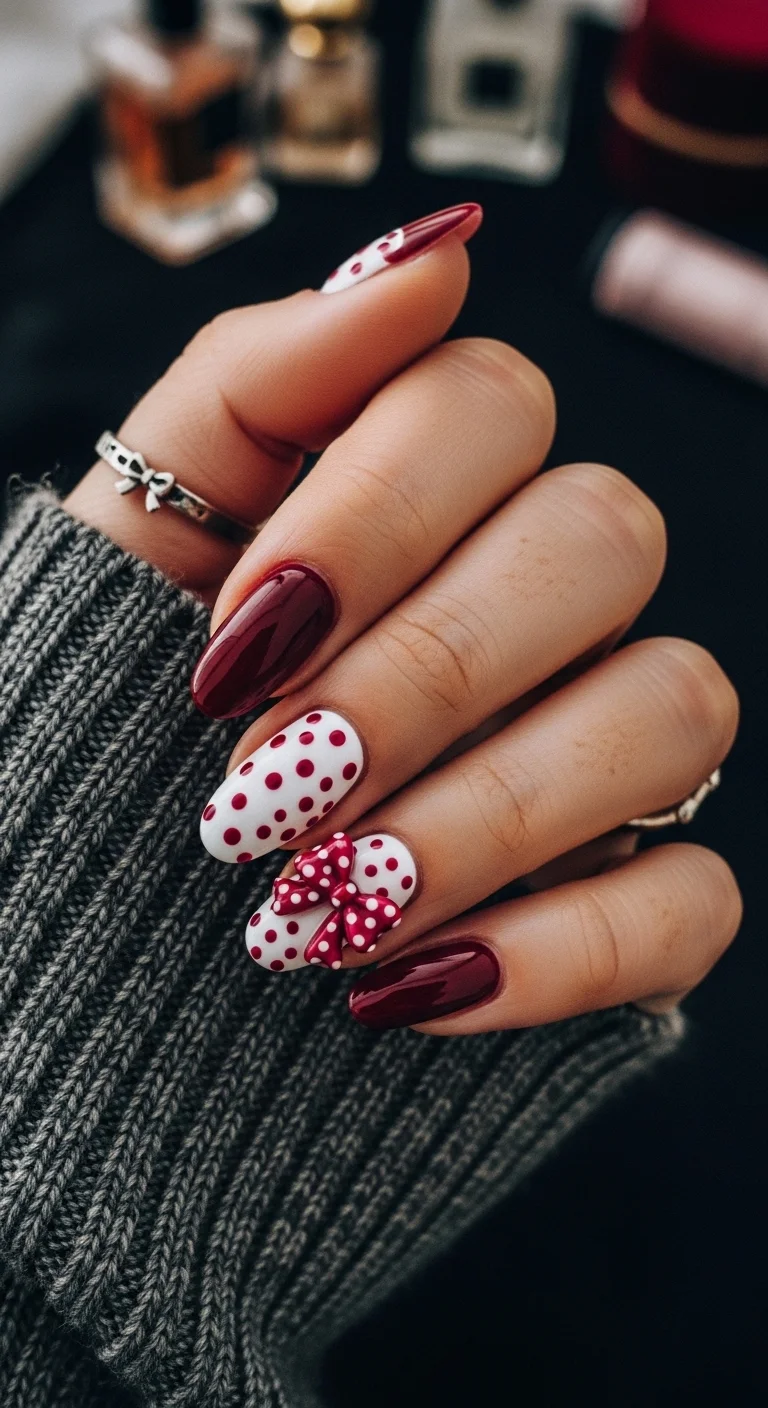
Bordeaux and white dots with a 3D bow charm accent.
Overview:
A 3D bow charm over polka dots adds physical dimension that flat nail art can't replicate. The bow becomes the focal point, and the surrounding dots provide context. It's the nail equivalent of wearing a bow-tie with a polka-dot shirt.
The practical downside of 3D charms: they catch on everything. Hair, clothing, bag linings. Sealing the edges with a thick bead of top coat around the base reduces snagging but doesn't eliminate it. Budget for careful wear.
The bordeaux and white palette keeps the design grounded in warm, sophisticated tones. The red bow adds a pop of color that ties back to the bordeaux without being identical.
Design Breakdown:
Mixed-technique set with a 3D accent. The bow charm is the focal point.
Base Color: Solid bordeaux on two nails. White with bordeaux dots on two nails.
Nail Shape: Medium almond. The curved shape suits the vintage aesthetic.
Design Element: Bordeaux polka dots on white nails. 3D polka dot bow charm on the accent nail.
Finish: High-gloss top coat to seal everything.
Get The Look at Home:
The bow charm needs nail art gel for proper adhesion. Regular nail glue won't hold long-term.
- Bordeaux nails: Two coats of bordeaux on two nails. Let dry.
- Dot nails: On two nails, apply white base, then add bordeaux dots.
- Bow charm: Apply a small bead of nail art gel to the back of the bow. Press onto the accent nail and hold for ten seconds.
- Seal edges: Apply top coat around the base of the bow to prevent lifting.
- Final coat: One thick coat of top coat over all nails.
25.Citrus Mint Sorbet
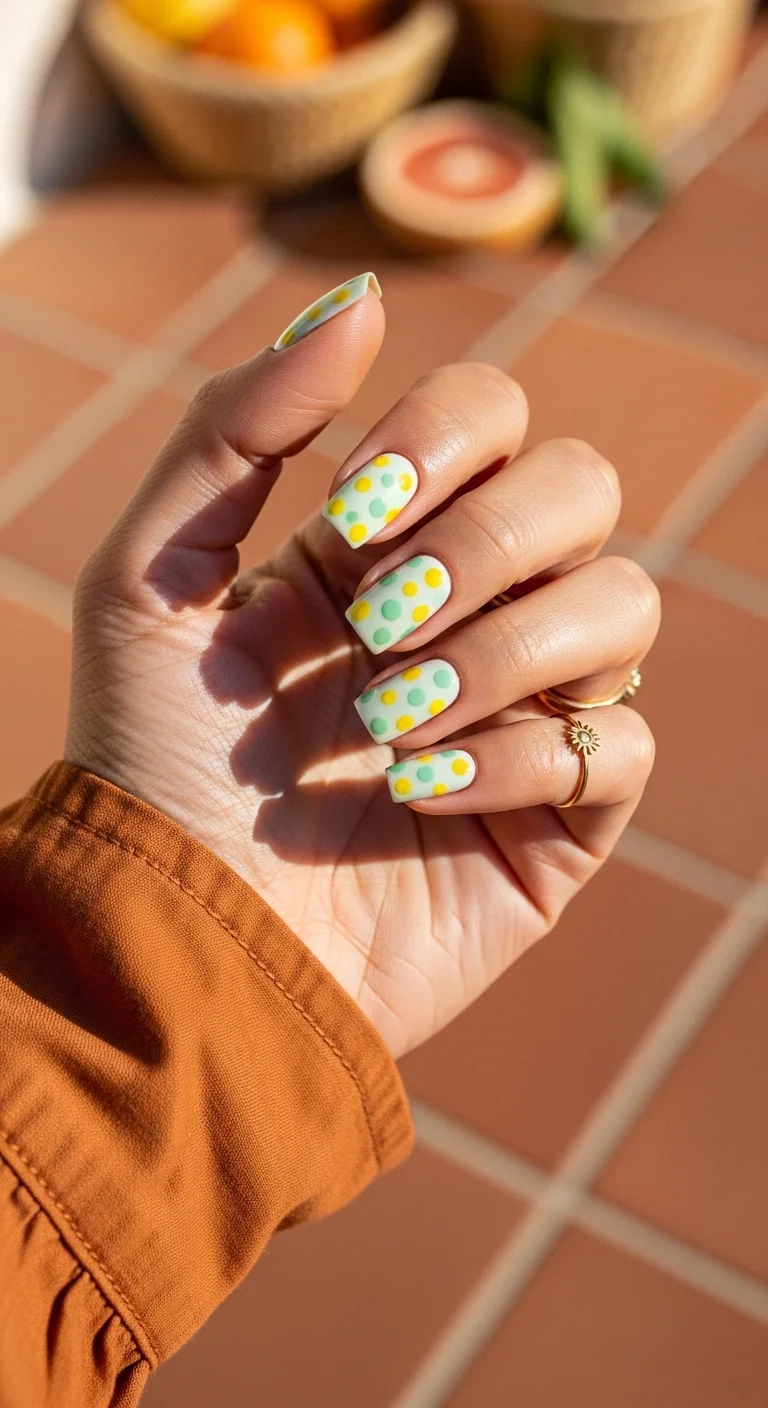
White with yellow and green citrus-inspired dots.
Overview:
Yellow and green dots on white reference citrus fruit, lemons and limes, without being literal about it. The two colors share a similar saturation level, which creates visual harmony despite being different hues.
The dot size variation adds an organic quality. Uniform dots would read as a manufactured pattern. The mix of small and medium dots creates a scattered, confetti-like effect that feels handmade.
The white base provides maximum contrast for both colors. On a colored base, the yellow and green would blend into the background. On white, every dot is visible and distinct.
Design Breakdown:
Two-color dots on white. The citrus palette is the design.
Base Color: Crisp, opaque white.
Nail Shape: Medium coffin. The flat surface provides a clean canvas for the dots.
Design Element: Yellow and green dots in mixed sizes scattered across all nails.
Finish: High-gloss top coat to make the colors look vibrant.
Get The Look at Home:
Two dot colors require separate tools or thorough cleaning between colors.
- White base: Two coats of opaque white. Let dry fully.
- Yellow dots: Using a medium dotting tool, place yellow dots randomly across each nail.
- Green dots: Using a smaller dotting tool, add green dots in the gaps between the yellow ones.
- Vary density: Some areas should have more dots than others.
- Seal: One thick coat of top coat over everything.
28 Effortless Hot Weather Day Hairstyles for Women 2026 ☀️💇♀️
26.Antique Bronze Grid
White with bronze metallic polka dots.
Overview:
Bronze dots on white create a design that references penny tiles or hammered metal. The warm bronze catches light differently than flat polish, creating a dynamic quality that shifts between brown and gold depending on the angle.
The uniform dot size and spacing across all nails creates a grid-like pattern that feels structured and intentional. It's polka dots treated as a systematic design rather than a casual decoration.
Bronze metallic polish separates quickly in the bottle. Roll it between your hands before each application to ensure the metallic particles are evenly distributed.
Design Breakdown:
White base with metallic dots. The bronze-on-white palette is the design.
Base Color: Crisp, opaque white.
Nail Shape: Medium coffin. The flat surface provides a clean canvas for the dot grid.
Design Element: Bronze metallic dots on every nail. Uniform size and spacing.
Finish: High-gloss top coat to seal the metallic dots.
Get The Look at Home:
Metallic polish needs re-dipping more frequently than regular polish.
- White base: Two coats of opaque white on all nails. Let dry fully.
- Bronze dots: Using a medium dotting tool dipped in bronze metallic polish, place evenly spaced dots on each nail.
- Re-dip frequently: Metallic polish dries on the dotting tool faster than regular polish.
- Grid consistency: Keep the dot spacing uniform across all nails.
- Seal: One thick coat of top coat to lock in the metallic dots.
27.Teal Coral Carnival
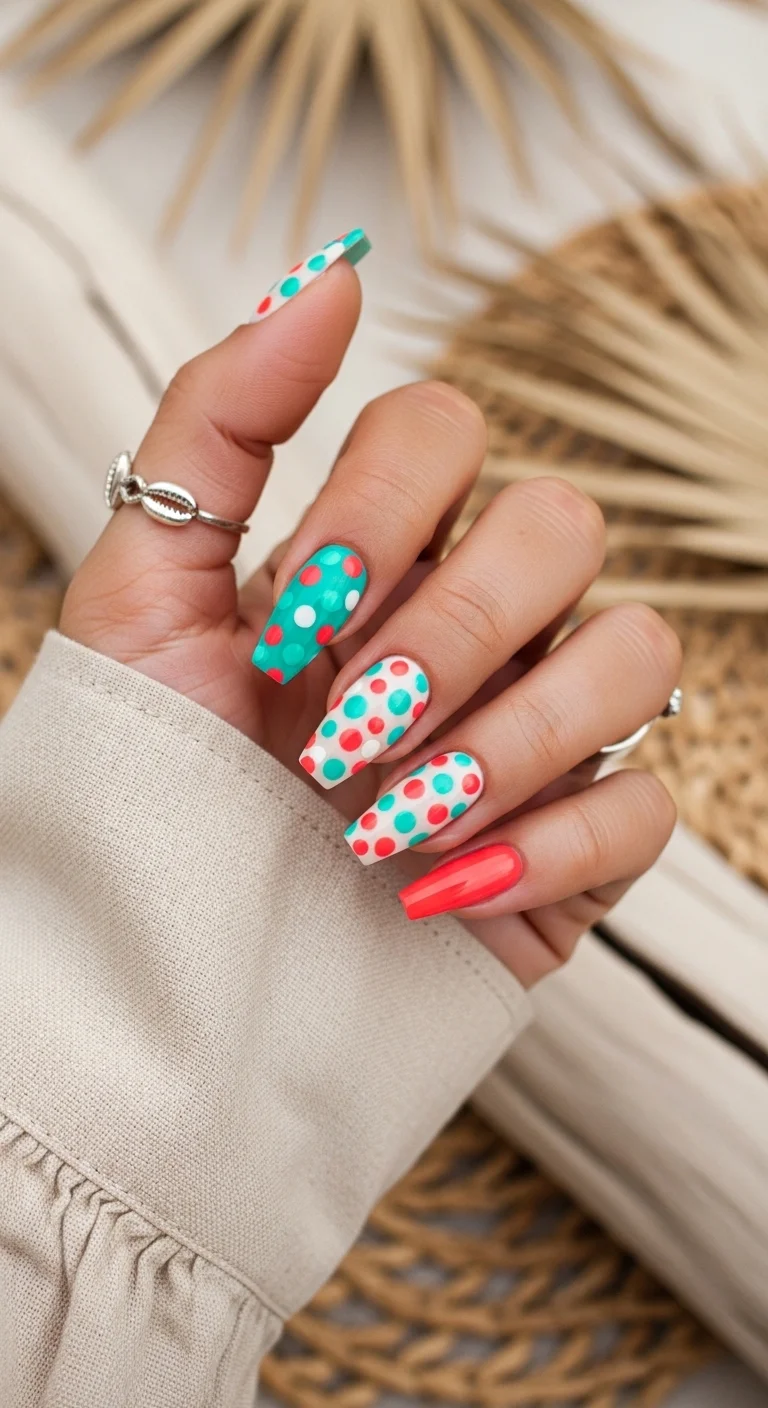
Teal, coral, and white multi-color dot mix.
Overview:
Three-color dot designs walk a fine line between festive and chaotic. The safety net here is the white base, which provides a neutral backdrop that allows teal and coral to coexist without competing. The white dots on colored nails and the colored dots on white nails create a visual exchange that ties everything together.
The solid coral nail provides a visual anchor that prevents the set from feeling like pure pattern. Every design benefits from at least one element of visual rest.
Teal and coral sit on opposite sides of the color temperature spectrum, which creates a natural contrast. Adding white as a third color provides the neutral buffer that keeps the two from clashing.
Design Breakdown:
Multi-color dot mix with a solid accent. The three-color palette is the design.
Base Color: Teal with white/coral dots on some nails. White with teal/coral dots on others. Solid coral accent.
Nail Shape: Medium coffin. The flat surface showcases the multi-color pattern.
Design Element: Multi-colored dots in teal, coral, and white across all nails.
Finish: High-gloss top coat to make all colors look vibrant.
Get The Look at Home:
Three dot colors require three separate tools or careful cleaning between colors.
- Color layout: Apply teal, white, and coral to different nails. Two coats each. Let dry.
- Teal dots: On white and coral nails, place teal dots.
- White dots: On teal and coral nails, place white dots.
- Coral dots: On teal and white nails, place coral dots.
- Seal: One thick coat of top coat over everything.

28 Trendy May Nail Designs for 2026 💅
28.Toffee Cream Swirl
Caramel and white with alternating polka dots.
Overview:
Caramel and white is a warm, inviting pairing that references toffee, caramel sauce, and creamy desserts. The alternating approach creates variety within the two-color palette without introducing new colors.
The inverted dots, white on toffee and toffee on white, create a visual rhythm across the hand. Your eye moves from one color to the next, following the pattern's logic. That movement is what makes the set interesting.
Caramel polish can lean either warm or cool depending on the brand. For this design, lean toward the warm side. A warm caramel complements the white better than a cool, grey-toned version.
Design Breakdown:
Two-color alternating set with inverted dots. The warm palette is the design.
Base Color: Solid caramel on two nails. White with caramel dots on two nails.
Nail Shape: Medium-long almond. The curved shape suits the warm, creamy palette.
Design Element: White dots on caramel nails. Caramel dots on white nails. Medium dot size.
Finish: High-gloss top coat to make the caramel look rich.
Get The Look at Home:
The inversion technique requires planning. Decide dot colors before you start.
- Caramel base: Two coats of caramel on two nails. Let dry fully.
- White base: Two coats of opaque white on two nails. Let dry.
- White dots on caramel: Using a medium dotting tool, place dots on the caramel nails.
- Caramel dots on white: Using the same dotting tool, place dots on the white nails.
- Seal: One thick coat of top coat over everything.
29.Gold Dust Nude
Sheer nude with gold metallic polka dots.
Overview:
Gold dots on nude create the most minimal version of metallic polka dots. The sheer base barely registers as a color, which means the gold dots appear to float directly on the natural nail. The effect is delicate and refined.
The sheer quality of the base means regrowth is nearly invisible. The natural nail showing through the nude means there's no harsh line where the polish ends and new growth begins. This extends the manicure's useful life by several days.
Gold metallic dots on nude need to be genuinely metallic, not just yellow. A yellow dot on nude would look like a stain. A metallic gold dot catches light and creates the contrast that makes the design work.
Design Breakdown:
Sheer base with metallic dots. The minimalism is the design.
Base Color: Sheer nude or natural nail.
Nail Shape: Medium-long almond. The curved shape suits the delicate palette.
Design Element: Gold metallic dots on every nail. Small to medium dot size.
Finish: High-gloss top coat to amplify the gold shimmer.
Get The Look at Home:
The sheer base needs thin application for the gold dots to appear to float.
- Nude base: One to two thin coats of sheer nude. Let dry fully.
- Gold dots: Using a small dotting tool dipped in gold metallic polish, place evenly spaced dots on each nail.
- Consistency: Use the same dotting tool for every nail to maintain uniform dot size.
- Seal: One thick coat of top coat to lock in the gold dots.
28 Stunning Softball Hairstyle Ideas with Braids for 2026 🥎✨
30.Primary Color Pop
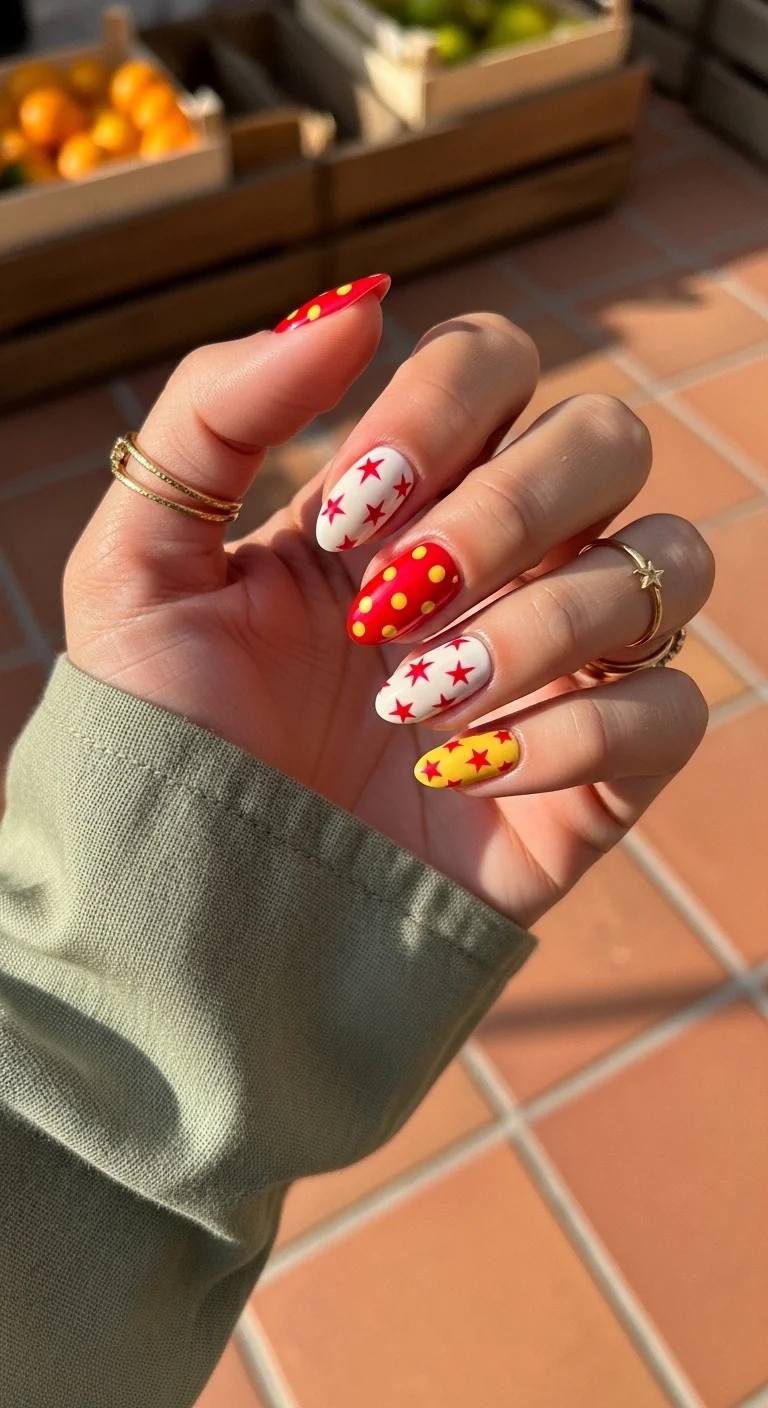
Red, white, and yellow with stars and dots.
Overview:
This design expands beyond polka dots to include stars, which adds a third shape to the visual vocabulary. The mix of dots and stars on different colored bases creates a playful, almost toy-like quality that's more graphic than decorative.
The primary color palette, red, white, yellow, is one of the most high-contrast combinations available. Every color is bold enough to stand on its own, which means the set reads as energetic and confident.
The star shapes need to be clean and sharp to read as stars rather than blobs. A fine liner brush or nail art pen is essential for consistent star points.
Design Breakdown:
Multi-shape, multi-color set. The variety is the design.
Base Color: Red on some nails, white on others, yellow on one nail.
Nail Shape: Medium-long almond. The curved shape suits the playful theme.
Design Element: Yellow dots on red nails. Red stars on white nails. Red stars on the yellow nail.
Finish: High-gloss top coat to make all colors look vibrant.
Get The Look at Home:
Stars require a fine liner brush. Practice the shape on paper first.
- Color layout: Apply red, white, and yellow to different nails. Two coats each. Let dry.
- Yellow dots: On red nails, use a dotting tool to place yellow dots.
- Red stars: On white and yellow nails, use a fine liner brush to draw five-pointed stars.
- Star consistency: Keep the star size similar across all nails.
- Seal: One thick coat of top coat over everything.
31.Noir Garden Dots
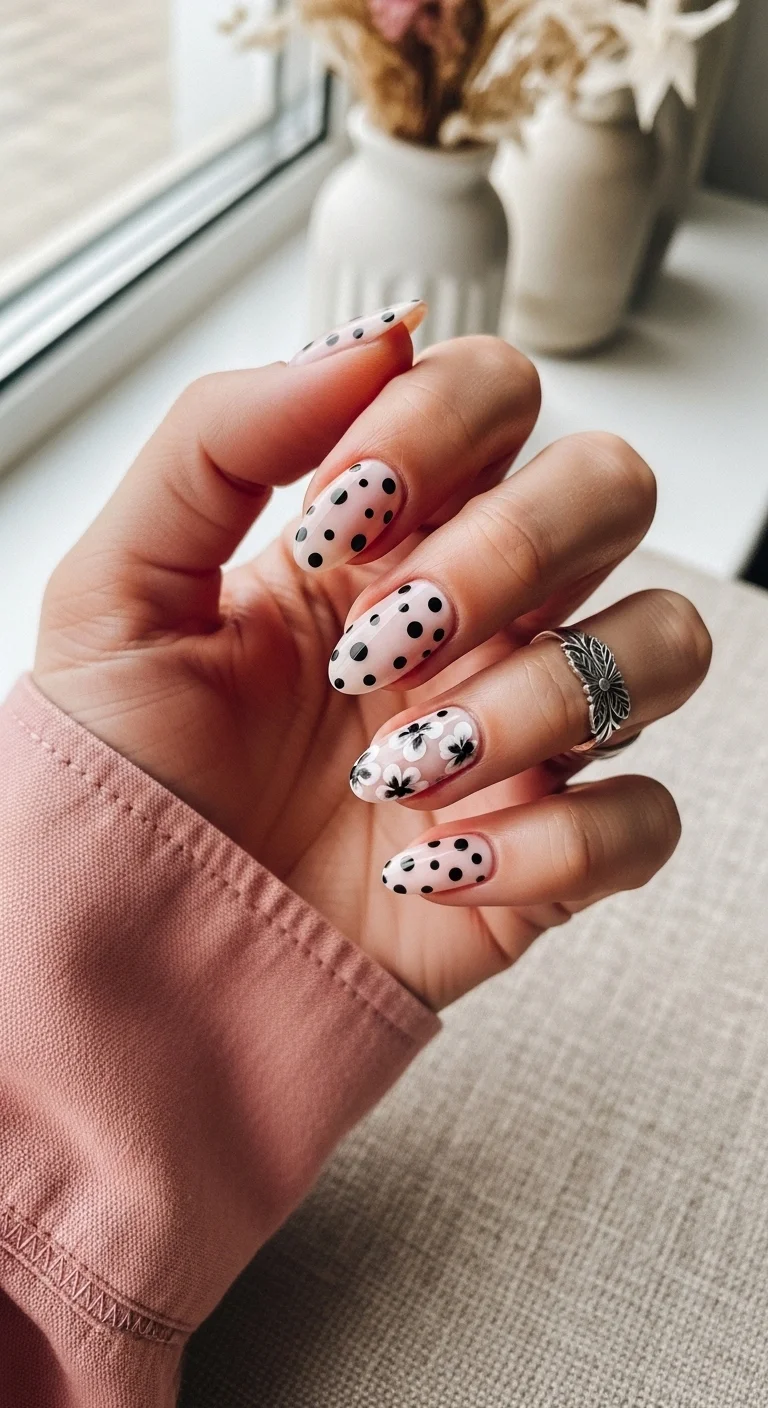
Sheer nude with black dots and a floral accent nail.
Overview:
Black dots on sheer nude create the most graphic version of minimal polka dots. The high contrast between the black and the transparent base makes every dot visible and defined. There's nowhere to hide imperfections.
The floral accent on the ring finger adds an organic element that contrasts with the geometric dots. Without it, the set would be purely graphic. The flowers introduce a natural, botanical quality that softens the overall effect.
The sheer base means regrowth is nearly invisible, which extends the manicure's useful life. It also means the black dots appear to float directly on the natural nail, creating a dimensional quality.
Design Breakdown:
Minimal dots with a single floral accent. The contrast is the design principle.
Base Color: Sheer nude on all nails.
Nail Shape: Medium-long almond. The curved shape suits the delicate palette.
Design Element: Black dots on four nails. Black floral art on the ring finger accent.
Finish: High-gloss top coat to seal everything.
Get The Look at Home:
The floral accent needs a fine liner brush for the detailed petals.
- Nude base: One to two thin coats of sheer nude on all nails. Let dry fully.
- Black dots: Using a medium dotting tool and black polish, place dots on four nails.
- Floral accent: On the ring finger, use a fine liner brush and black polish to draw small flower and leaf shapes.
- Consistency: The dot size should be similar across all dotted nails.
- Seal: One thick coat of top coat over everything.

35 Palm Tree Nail Art Ideas that are the Most Iconic Nail Art Designs 🌴✨
32.Coffee Sky High Contrast
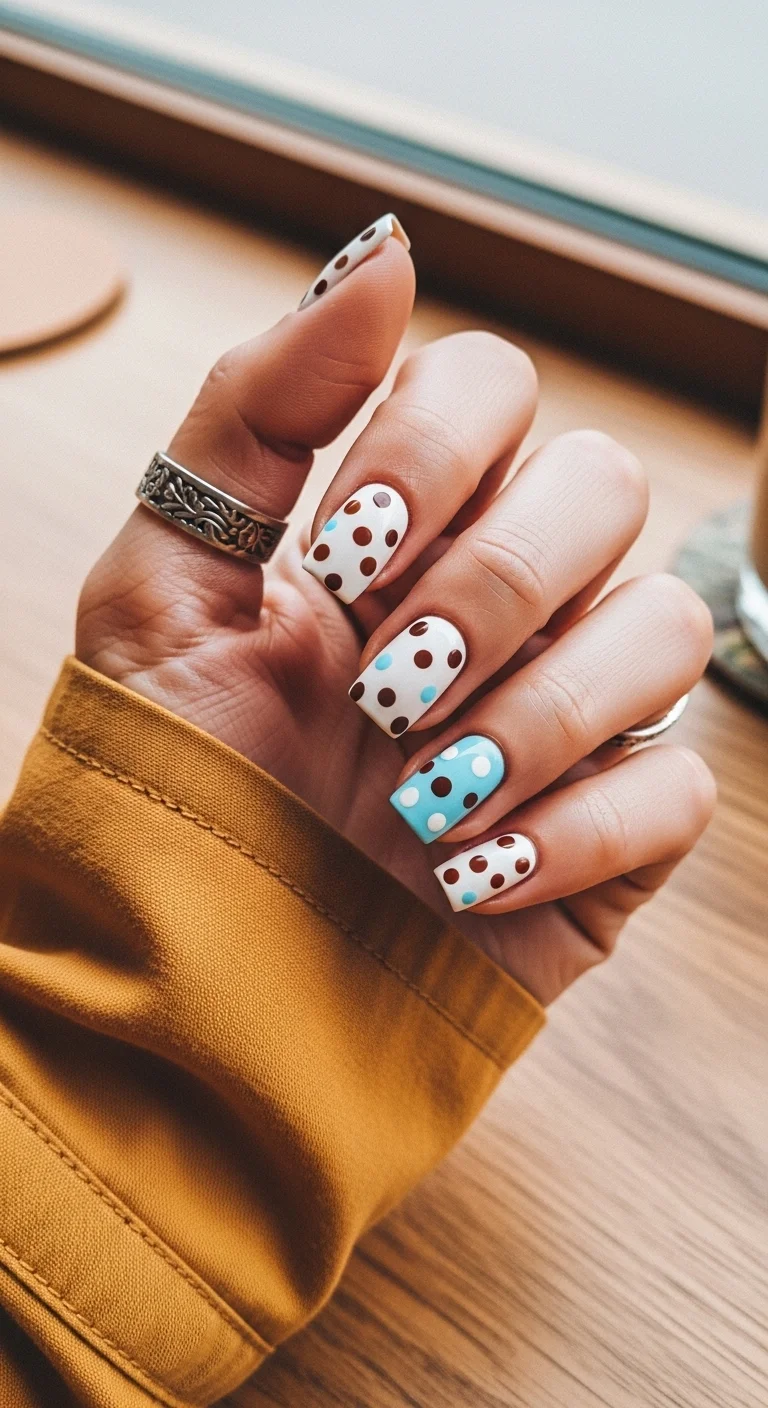
White and blue with multi-color polka dots.
Overview:
Brown and blue dots on different colored bases create a design that references terrazzo or speckled stone. The two dot colors add depth that a single color wouldn't achieve. The brown provides warmth; the blue provides coolness.
The multi-base approach, white on some nails, blue on others, adds another layer of variety. Each nail combines a different base with different dot colors, which means no two nails look identical.
The dot size variation prevents the design from looking like a manufactured pattern. The mix of small and medium dots creates an organic, scattered quality that feels handmade.
Design Breakdown:
Multi-color, multi-base dot mix. The variety is the design.
Base Color: White on some nails, light blue on others.
Nail Shape: Medium coffin. The flat surface showcases the multi-color pattern.
Design Element: Brown and blue dots in mixed sizes scattered across all nails.
Finish: High-gloss top coat to make all colors look vibrant.
Get The Look at Home:
Two dot colors and multiple bases require careful planning.
- Color layout: Apply white and light blue to different nails. Two coats each. Let dry.
- Brown dots: Using a medium dotting tool, place brown dots on all nails.
- Blue dots: Using a smaller dotting tool, add blue dots in the gaps between the brown ones.
- Vary density: Some areas should have more dots than others.
- Seal: One thick coat of top coat over everything.
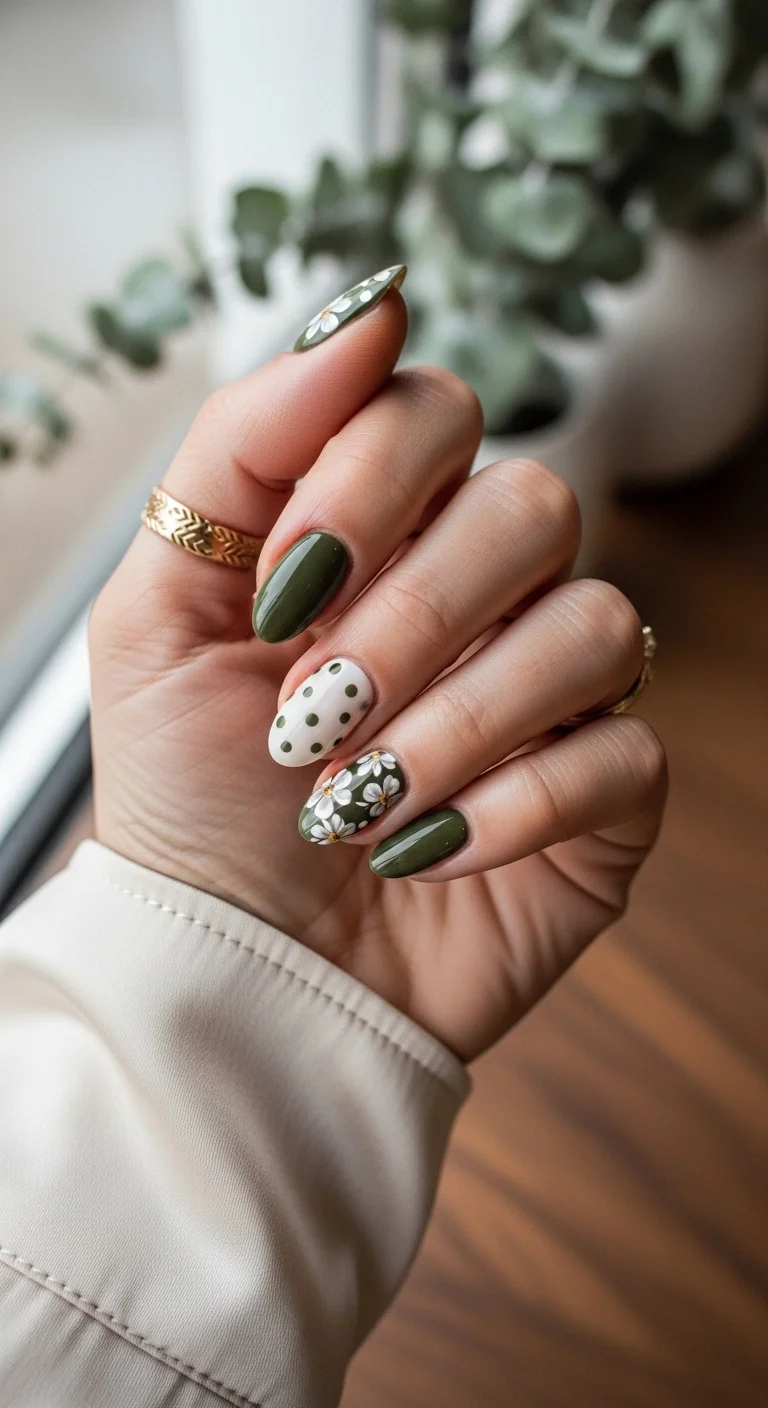
33.Olive Grove Daisy Dreams
Olive green with white dots and a daisy accent nail.
Overview:
Olive green is a neutral that works with almost everything in a wardrobe. Adding white dots and daisy art transforms it from a solid color into a botanical design without introducing new colors. The green-on-green approach keeps the palette tight.
The daisy accent on the ring finger is the focal point. The white petals and yellow centers create a small burst of brightness that draws the eye. Without it, the set would be a standard polka dot design. The daisies add a specific, illustrative quality.
Olive green polish can be streaky in some formulas. Three thin coats with proper dry time between each produces the best result for even, opaque coverage.
Design Breakdown:
Olive green with dots and a daisy accent. The botanical theme is the design.
Base Color: Olive green on most nails. White with green dots on one nail.
Nail Shape: Medium almond. The curved shape suits the botanical theme.
Design Element: Green dots on white nails. White daisies with yellow centers on the accent nail.
Finish: High-gloss top coat to make the olive look rich.
Get The Look at Home:
The daisy accent needs a small dotting tool for the petals.
- Olive base: Two to three thin coats of olive green on most nails. Let dry fully.
- Dot nail: On one nail, apply white base, then add olive green dots.
- Daisy accent: On the ring finger, use a small dotting tool and white polish to place five dots in a circle for each daisy. Add a yellow center dot.
- Leaf details: Add small green leaf strokes near the daisies.
- Seal: One thick coat of top coat over everything.
The Golden Rule of Expensive-Looking Polka Dots
The single biggest mistake people make with polka dot nails is uniformity. Same dot size, same spacing, same color on every nail — it reads as a repeating pattern rather than a curated design. The fix is straightforward once you see it: treat each nail as an individual canvas within a cohesive set, not a copy-paste job across all ten.
The most polished 2026 versions use negative space, alternating dot densities, and mixed techniques within the same color story. A single accent nail with dense dot coverage, two or three nails with widely scattered dots, and a couple of solid nails in a matching chrome or creme finish. The variation creates visual rhythm that keeps the eye moving across the hand instead of landing on one repetitive pattern. Pairing dots with French tips — tiny dots along the smile line of a classic French — is another trick that elevates the entire set from "cute" to "editorial."
Why Your Bobby Pin Is Ruining Your Dots (And What to Use Instead)
Every single person who has tried DIY polka dots has been through this: you dip a bobby pin in white polish, press it onto a dark base, and instead of a crisp round dot, you get a sheer, irregular smear that looks nothing like the salon version. It's not a skill issue. It's a tool issue.
The pro secret is swapping your regular nail polish for a thick art gel. Regular polish is formulated to self-level across the nail surface, which makes it too thin for clean dot work — especially when you're layering a light color over a dark one. Art gel has a pudding-like consistency that holds its shape the moment it touches the nail. No bleeding, no sheer spots, no second-guessing whether the dot is actually opaque.
Pair it with a silicone dotting tool — not metal, not a bobby pin — and you'll get perfectly round dots on the first try every time. Brands like Beetles and Modelones make reliable art gel sets that include a dotting tool, and the whole kit costs less than a single salon visit. Worth keeping in your nail kit even if you usually get professional manicures, because touch-ups with art gel are faster and cleaner than anything you've tried before.
And there you have it! I really hope scrolling through these playful and chic polka dot designs gave you all the inspiration you needed for your next manicure. Polka dots are truly timeless, and I just know one of these sets is going to look absolutely stunning on you.
Don't forget to pin your favorite looks to your Pinterest boards right now, so you're ready for your next salon visit! I'd love to hear which design is your favorite—are you going for a bold color pop or a subtle minimalist dot? Let me know in the comments below!