Nail Trends
35 Fun Birthday Nail Designs for 2026 🎂
Choosing the perfect birthday manicure is often as important as selecting the outfit itself. Birthday nails appear in almost every photo—from clinking glasses and blowing out candles to opening gifts. The goal is to find a design that feels celebratory and cohesive with the party's aesthetic. Whether you prefer a subtle 'quiet luxury' neutral or an eye-catching glitter finish, this curated list of the 35 best birthday nail designs for 2026 offers plenty of sophisticated options to ensure the manicure looks polished and festive.
In This Guide
1.Melted Penny Mirror Chrome
Liquid copper mirror finish on medium almond nails.
Overview:
Copper chrome looks like you dipped your fingers in molten metal. The effect is dramatic enough that it becomes the focal point of any outfit — which is either exactly what you want for a birthday or too much, depending on your personality. There's no middle ground with this finish.
The warm bronze undertone keeps the chrome from reading as cold or industrial. Under warm indoor lighting, these nails look like polished pennies. In direct sunlight, they shift toward bright rose-gold. That dual personality makes the finish more wearable than a true silver chrome, which can feel harsh against warm skin tones.
One technical reality: chrome powder requires a no-wipe gel top coat underneath. Regular polish won't give the powder anything to adhere to. If you try this over standard lacquer, you'll brush shimmer off your nails and onto your clothes for the rest of the day. This is a gel-only technique.
Design Breakdown:
Full-coverage chrome over a warm base. The base color determines the chrome's undertone — skip this step and the chrome looks flat.
Base Color: Warm cinnamon or burnt orange gel polish. Two coats, fully cured. The warm base gives the copper chrome depth and richness.
Nail Shape: Medium almond. The curved shape maximizes the chrome's reflective surface area.
Design Element: Copper chrome pigment buffed to a mirror finish. The powder is rubbed into a cured no-wipe top coat until the surface is uniformly reflective.
Finish: Mirror chrome sealed with a final gel top coat. The seal prevents the chrome from wearing off at the edges.
Get The Look at Home:
Chrome powder is unforgiving on uneven surfaces. Buff and smooth the nail before starting — every ridge and imperfection shows through the mirror finish.
- Prep: File into almond shape. Push back cuticles. Buff any ridges smooth.
- Warm base: Two coats of burnt orange or cinnamon gel. Cure each coat fully.
- No-wipe top coat: Apply and cure for only 30 seconds. The surface should be slightly "grabby" — fully cured no-wipe coat won't hold the powder.
- Buff chrome: Using a sponge applicator, rub copper chrome powder firmly across the nail until the surface turns mirror-reflective.
- Dust off: Use a soft fluffy brush to remove excess powder from skin and cuticles.
- Seal: Apply gel top coat, making sure to cap the free edge. Cure fully. The chrome will peel at the tips without proper edge sealing.
30 Stunning Summer Hair Trends for 2026 ☀️🌊
2.Lemon Cream Dream Swirls
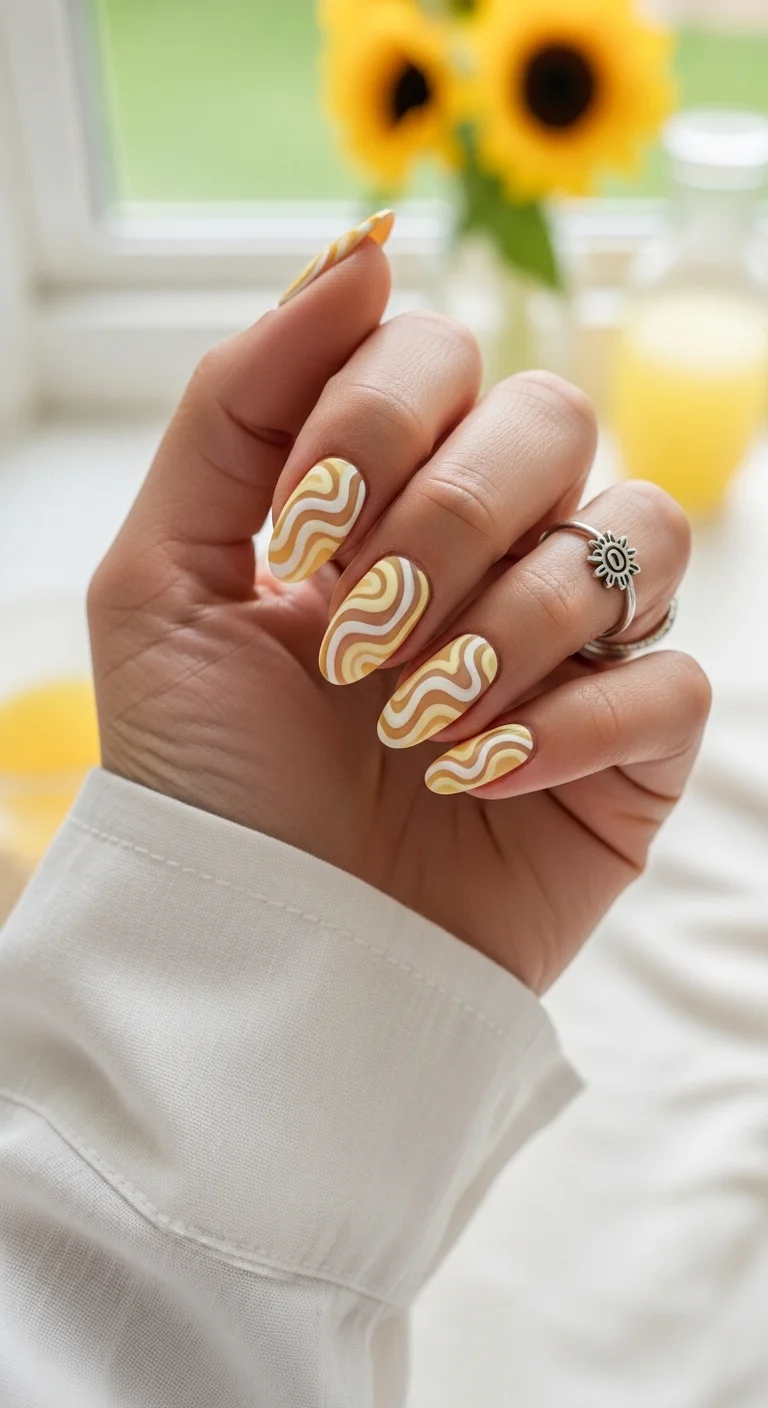
Abstract lemon-cream swirl art on almond nails.
Overview:
Yellow nail art divides people — some see sunshine, others see caution tape. These swirls thread the needle by keeping the palette within two colors: a warm custard yellow and cream white. The restricted palette prevents the yellow from overwhelming the design, and the swirl pattern breaks up the color into organic shapes that feel more painterly than graphic.
The swirl technique is forgiving by nature. Unlike geometric patterns where every line needs to be straight, swirls look better with slight irregularity. A wobbly curve reads as "hand-painted" rather than "sloppy," which is a distinction that matters in nail art. This is one of the more beginner- friendly designs on this list.
The medium almond shape complements the flowing curves of the swirl pattern. On square nails, the swirls would hit the straight edges at odd angles and lose their organic quality. The rounded shape lets the curves continue naturally to the nail border.
Design Breakdown:
Two-color abstract swirl art. The limited palette is what keeps the design from looking chaotic.
Base Color: Creamy warm yellow and opaque white. The yellow should lean toward custard or butter — avoid anything with a greenish cast.
Nail Shape: Medium almond. The curved edges complement the flowing swirl lines.
Design Element: Abstract swirl patterns in yellow and white, layered and overlapping. Each nail has a unique composition.
Finish: Glossy top coat. The shine makes the yellow look warm and the white look crisp.
Get The Look at Home:
Work one color at a time across all nails. Finish all the yellow swirls first, then add white.
- Base coat: Apply a ridge-filling base coat. Yellow pigment settles into ridges more than other colors.
- Yellow swirls: Using a thin liner brush and warm yellow polish, draw flowing S-curves across each nail. Vary the direction and number of swirls per nail.
- White swirls: Let the yellow dry, then layer white swirl lines alongside and overlapping the yellow curves.
- Overlap effect: Where yellow and white intersect, the slight blending creates a third tonal range that adds depth.
- Cleanup: A flat brush in acetone sharpens any lines that wandered into the cuticle area.
- Top coat: One thick coat to smooth the layered texture and seal the design.
3.Midnight Merlot Gloss
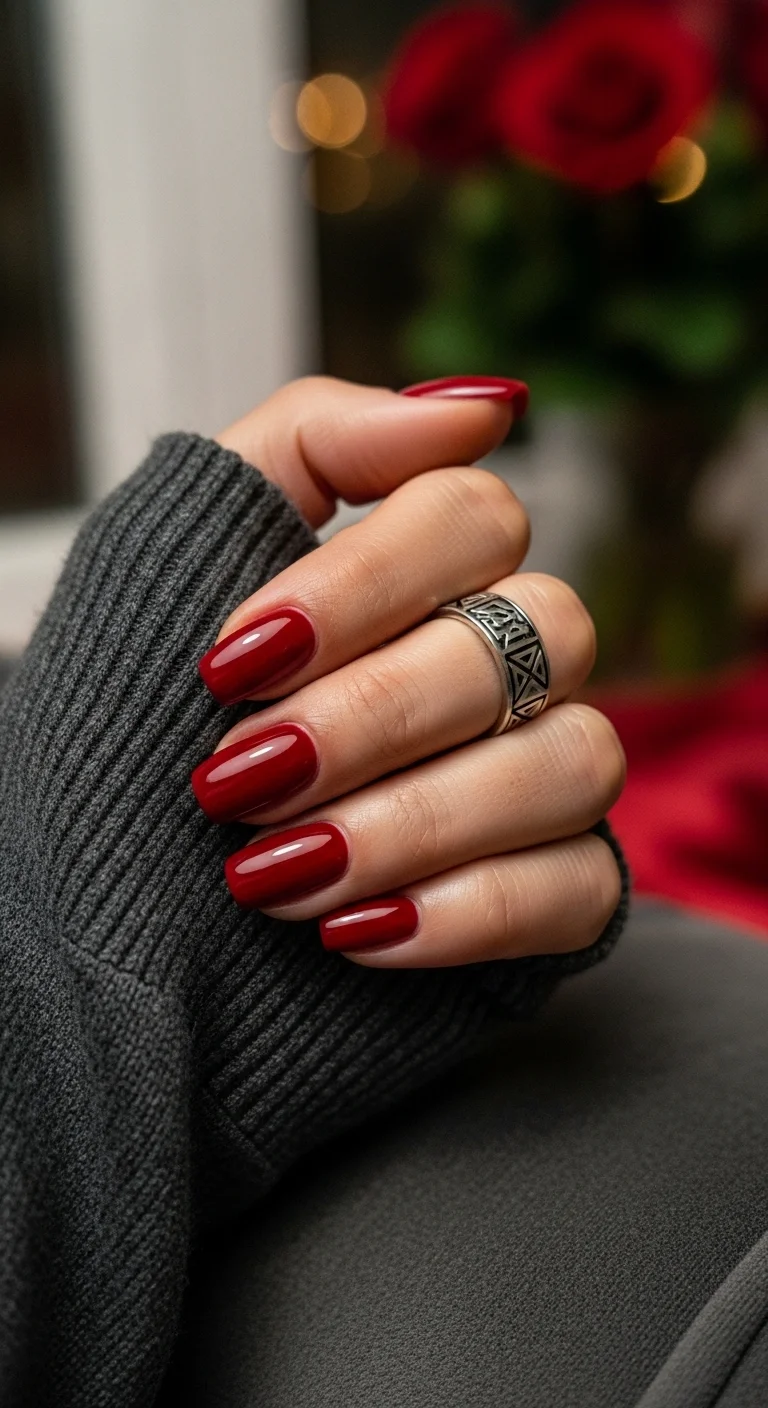
Rich merlot wine red with glass-like high shine.
Overview:
Dark red polish is the nail equivalent of a good bottle of wine — it only gets better with context. A deep merlot like this works for birthdays because it photographs well in every lighting condition. Restaurant candlelight makes it glow. Flash photography makes it look almost black. Daylight reveals the warm burgundy undertone. The color adapts to its environment.
The ultra-glossy finish is what makes this design work. Matte merlot looks like dried blood. Glossy merlot looks like liquid silk. The finish is the entire design — there's no nail art, no embellishment, no accent. Just color and shine. That restraint is its own kind of statement.
Short squoval nails are the right canvas for a dark single- color set. The compact shape keeps the dark polish looking casual rather than dramatic. On long stilettos, the same color reads as gothic or editorial. On short nails, it reads as refined.
Design Breakdown:
Single color, no art. The finish quality determines whether this looks expensive or basic.
Base Color: Rich, opaque merlot or burgundy wine red. Two coats for full depth. The polish should look nearly black in low light but reveal warm red tones in direct light.
Nail Shape: Short squoval or rounded. The practical shape keeps the dark color wearable.
Design Element: None. Solid, even coverage.
Finish: Ultra-glossy, glass-like top coat. The shine is what elevates the color from "dark polish" to "merlot."
Get The Look at Home:
Dark polish shows every imperfection. Prep work matters more than the application itself.
- Prep: Push back cuticles. Buff ridges. Dark polish over rough nail surfaces looks uneven.
- Base coat: Non-negotiable with dark reds. Without it, the pigment stains your natural nails yellow for days.
- First coat: Thin, even coverage. Dark polish pools at the cuticle if the coat is too thick.
- Second coat: Full opacity. Wipe the brush on the bottle neck between strokes to remove excess.
- Cuticle cleanup: Dip an angled brush in acetone and clean the cuticle line before the polish dries. Dark polish against skin is highly visible.
- Top coat: One generous layer. Cap the free edge — dark polish chips more visibly than light colors.

28 Cute & Sporty Baseball Game Nail Ideas for 2026 ⚾
4.Flamenco Ombre French
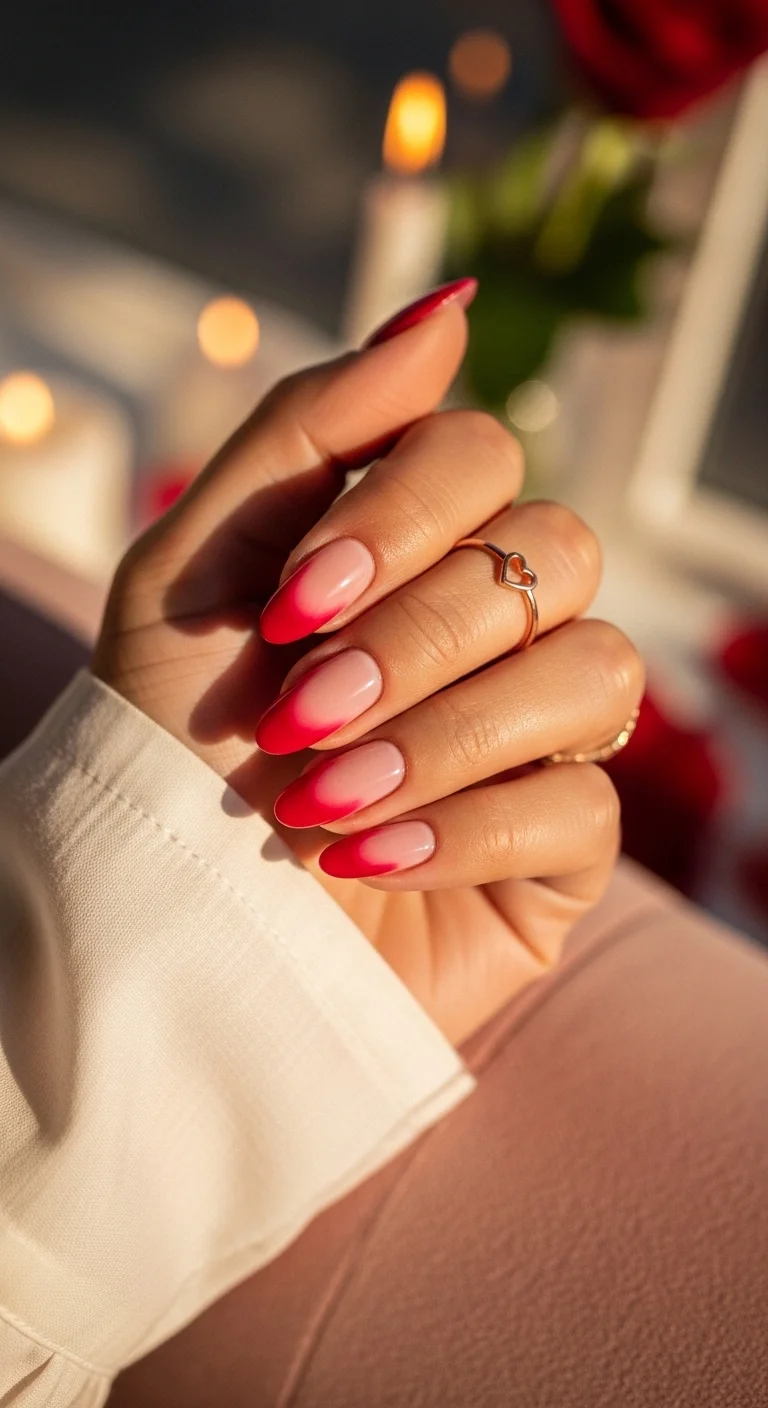
Warm red-to-nude gradient tips on almond nails.
Overview:
The classic French tip is a solved design — white line, nude base, done. What makes this version interesting is the ombre twist: instead of a hard white line at the tip, the color fades from deep red into the nude base through a soft gradient zone. The result looks like the nail is blushing from the fingertips inward.
The warm red used here isn't fire-engine or burgundy — it sits somewhere in between, closer to a warm flamenco red that has enough orange in its undertone to feel inviting rather than severe. That temperature choice is what makes the gradient work. A cool-toned red fading into warm nude creates a visible temperature clash in the transition zone.
The gradient zone is narrower than a standard ombre — the color change happens in roughly the last third of the nail. That tighter transition keeps the design looking like a French tip that happens to be gradient, rather than a full ombre that happens to use French proportions.
Design Breakdown:
French tip proportions with ombre execution. The narrow gradient zone is what separates this from a full-nail ombre.
Base Color: Warm nude matching the natural nail bed at the cuticle, transitioning to warm flamenco red at the tips.
Nail Shape: Medium almond. The curved tip complements the soft gradient transition.
Design Element: Gradient French — color concentrated at the tip fading into nude. No hard smile line.
Finish: High-gloss top coat. The shine makes the gradient look seamless.
Get The Look at Home:
The narrow gradient zone requires a smaller sponge area than a full ombre. Fold your makeup sponge to create a thinner application edge.
- Nude base: Two coats of warm nude. Let dry fully.
- Sponge setup: Paint a thin stripe of nude and a thin stripe of warm red side by side on the edge of a makeup sponge. Fold the sponge to create a narrow blending zone.
- Tip application: Press the sponge onto just the tip of each nail, with red concentrated at the very edge and nude fading toward the center. Two to three dabs per nail.
- Build gradually: Let each layer dry one minute, then repeat. The gradient should be subtle — not a hard color block.
- Cleanup: Run a flat brush in acetone along the cuticle line and sidewalls.
- Top coat: Two coats to smooth the sponge texture and seal the gradient.
5.Cyber Silver Liquid Chrome
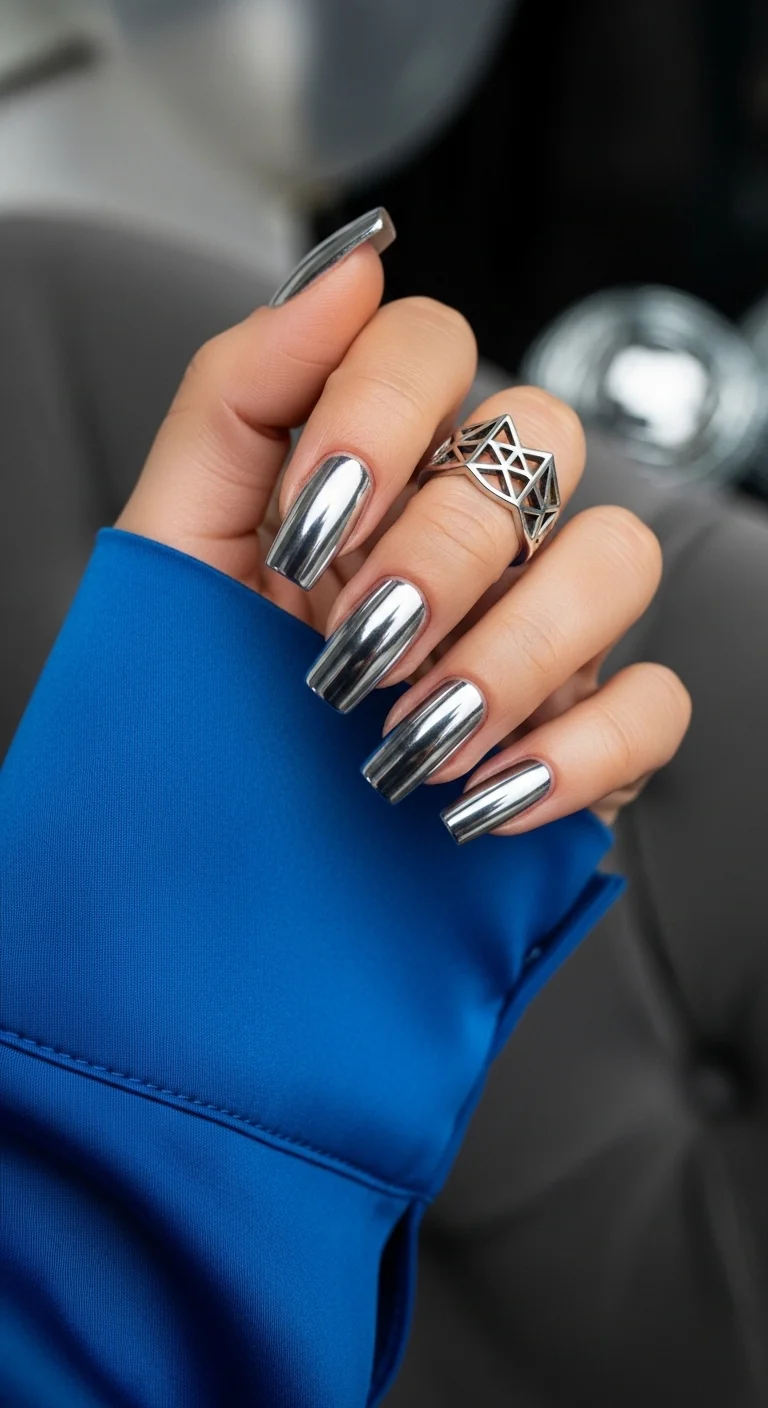
Full silver mirror chrome with liquid-metal reflectivity.
Overview:
Silver chrome is the most aggressive mirror finish available in nail design. It reflects everything — your phone screen, the person sitting across from you, the overhead lights. Wearing it is essentially committing to being a human reflector for the duration of the manicure. That's either thrilling or exhausting, depending on how much attention you want on your hands.
The liquid-metal quality of a well-applied silver chrome is genuinely striking. No other nail finish creates the same optical illusion — your nails look like they're made of polished steel rather than painted keratin. The effect is closer to jewelry than to nail polish.
The catch: silver chrome shows every scratch, chip, and imperfection. A copper or rose-gold chrome can hide minor wear because the warm tone blends with the natural nail underneath. Silver against a bare nail bed creates high contrast at any sign of growth or chipping. Budget about a week of perfect wear before touch-ups become necessary.
Design Breakdown:
Full-coverage silver chrome. The mirror finish is the entire design — no embellishment needed.
Base Color: Black or very dark grey gel polish. The dark base is what makes silver chrome look like actual metal rather than glittery grey.
Nail Shape: Medium almond or coffin. The smooth, curved surfaces maximize the mirror effect.
Design Element: Silver chrome powder buffed to a mirror finish over the dark base.
Finish: Mirror chrome sealed with gel top coat. The seal is critical — unsealed chrome oxidizes and dulls within days.
Get The Look at Home:
The dark base is essential. Silver chrome over white or nude looks like cheap glitter, not liquid metal.
- Dark base: Two coats of black or very dark grey gel. Cure fully between coats.
- No-wipe top coat: Apply and cure for 30 seconds. The slightly tacky surface holds the chrome powder.
- Chrome application: Using a silicone tool or sponge applicator, rub silver chrome powder firmly across the entire nail surface. Buff until uniformly mirror-like.
- Check for gaps: Look at the nail from multiple angles. Any areas that look dull need more buffing.
- Dust off: Soft brush to remove powder from skin.
- Seal: Gel top coat over everything, capping the free edge. Two coats if the chrome feels textured.

30+ Chic Pool Party Hairstyles for Summer 2026 🌊👙
6.Tangerine Dream Frenchies
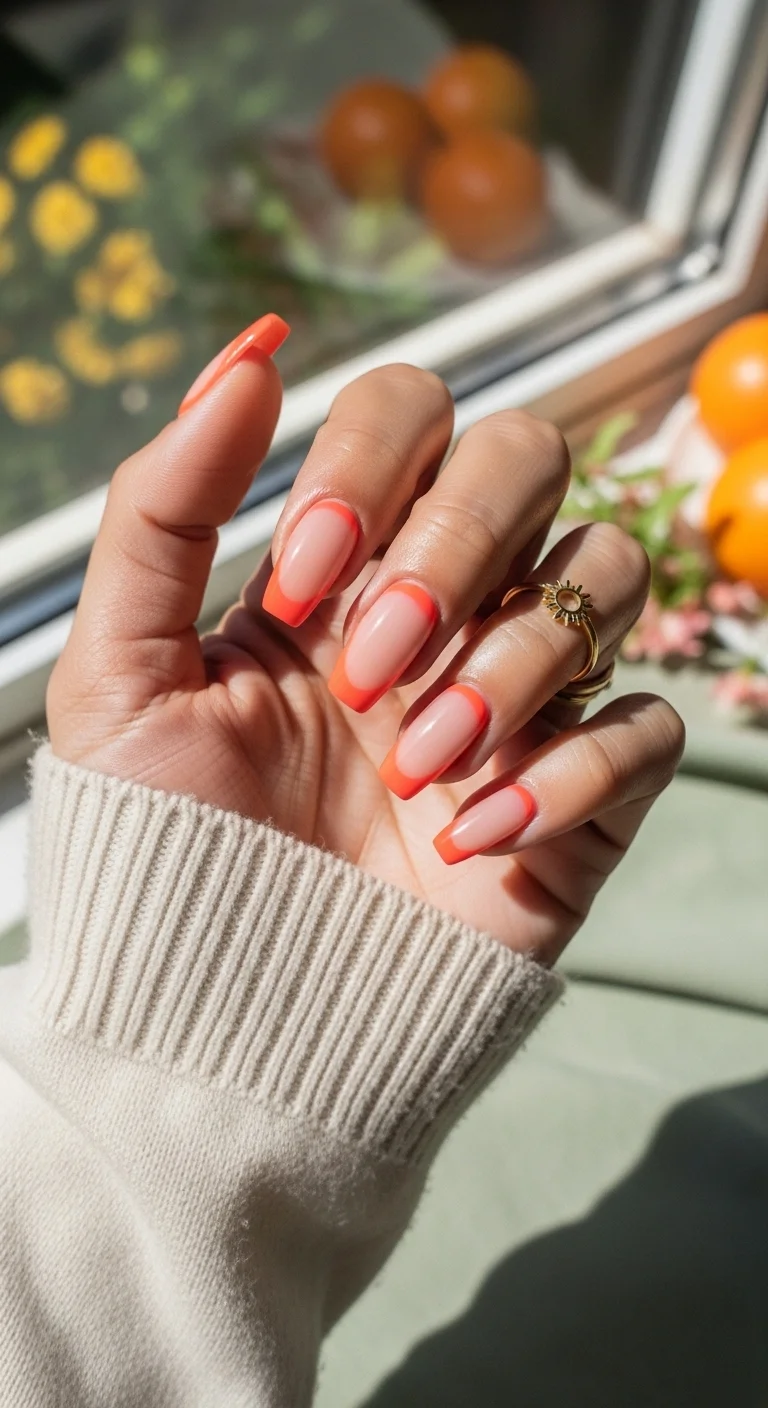
Vibrant tangerine French tips on coffin nails.
Overview:
Colored French tips are a simple upgrade that changes the entire personality of a manicure. Replace the white with tangerine and suddenly the French goes from "professional" to "I have plans tonight." The warm orange is bold enough to register as a statement but not so loud that it clashes with jewelry or clothing.
The nude base does critical work here. It matches the natural nail bed tone, which means the orange tip reads as an accent rather than a full-color manicure. That restraint — color on the tips only — keeps the design versatile. It works with a summer dress at brunch and with a black blazer at dinner.
Coffin shape is the better canvas for colored French tips than almond. The flat tip gives the smile line a defined horizontal frame, making the color application more precise. On almond nails, the curved tip makes the smile line harder to paint symmetrically.
Design Breakdown:
Classic French proportions with a color swap. The nude base is what makes the colored tips work.
Base Color: Sheer nude-pink that matches the natural nail bed. Two coats for even coverage.
Nail Shape: Coffin or ballerina, medium-long. The flat tip provides a clean frame for the colored French line.
Design Element: Vibrant tangerine orange French tips with crisp, clean smile lines. Medium thickness.
Finish: High-gloss top coat. The shine makes the orange look juicy and the nude look natural.
Get The Look at Home:
Colored tips are harder than white because the contrast against nude is less forgiving. Two-stroke method helps.
- Nude base: Two coats of sheer nude-pink. Let dry fully.
- First stroke: Load a thin liner brush with tangerine polish. Start from one sidewall and sweep toward the center.
- Second stroke: Start from the other sidewall and sweep to meet the first stroke at the center. This two- stroke method is more forgiving than a single pass.
- Cleanup: Dip a flat brush in acetone and run it along the smile line to sharpen the curve.
- Consistency: Compare all nails side by side before top coating. The tip thickness should be uniform.
- Top coat: One generous coat, capping the free edge.
7.Electric Cobalt Lattice
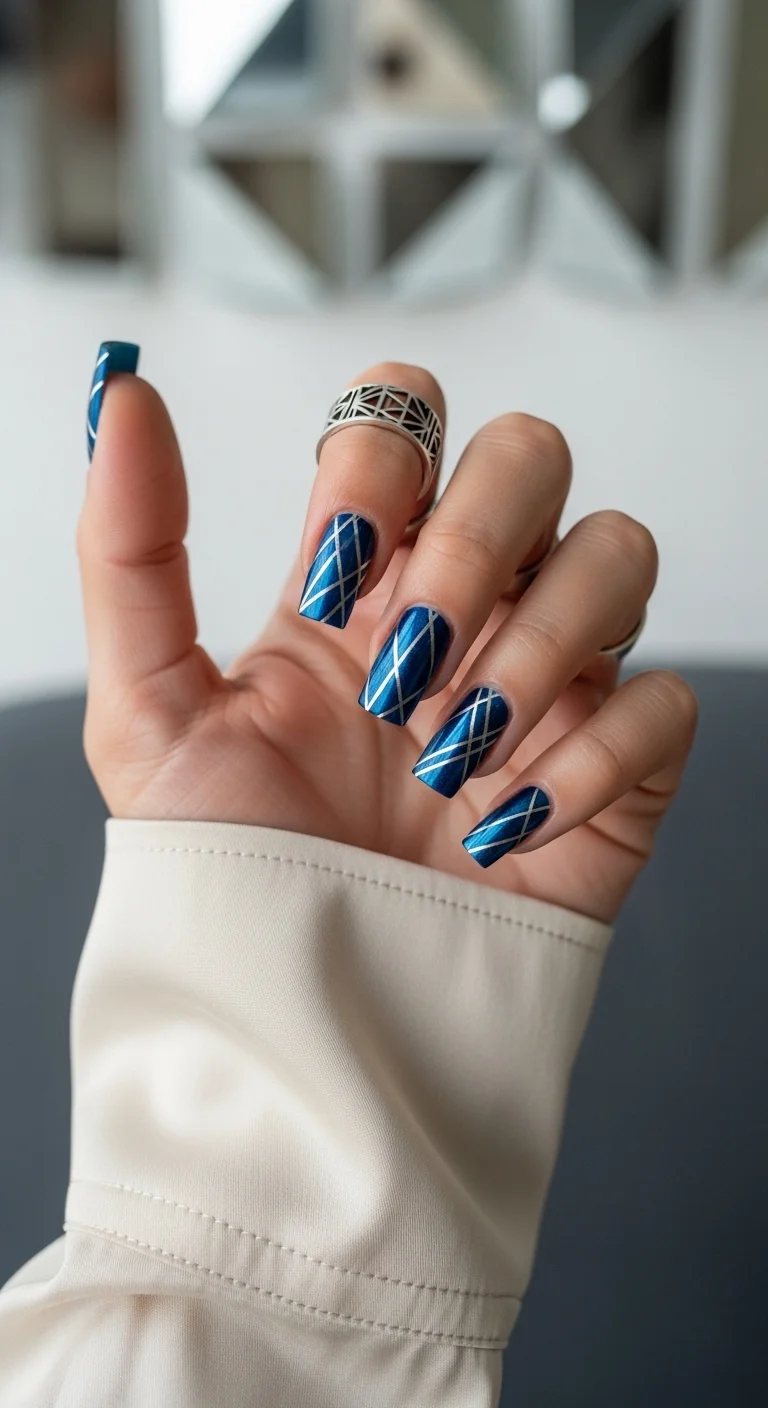
Silver lattice grid over electric cobalt chrome base.
Overview:
Geometric nail art has a precision problem: the human eye detects irregularity in straight lines faster than it catches mistakes in organic shapes. A wobbly swirl looks intentional. A wobbly grid looks sloppy. These lattice lines are remarkably uniform, which suggests either a very steady hand or stamping plates. Either way, the precision is what makes the design work.
The cobalt blue underneath the lattice is magnetic cat-eye, which adds a dimension that a flat blue wouldn't provide. The shimmer shifts as you move your hand, creating the impression that the lattice is sitting on top of moving water rather than a static surface. The combination of geometric rigidity over organic shimmer is the design's central tension.
Silver over cobalt is a cold palette — it reads as winter or evening rather than daytime casual. For a birthday, it works best at nighttime venues: cocktail bars, rooftop parties, restaurants with mood lighting. Under warm light, the silver warms up and the cobalt deepens, creating a more complex color interaction.
Design Breakdown:
Geometric metallic overlay on a magnetic base. The lattice requires precision tools for clean results.
Base Color: Deep cobalt blue cat-eye gel. The magnetic shimmer provides the dimensional background.
Nail Shape: Long coffin. The flat surface area gives the lattice pattern room to repeat cleanly.
Design Element: Silver metallic lattice grid created with striping tape or stamping. Diamond-shaped repeating pattern across all nails.
Finish: Glossy top coat over both the cat-eye base and the metallic lattice.
Get The Look at Home:
Striping tape is the most reliable way to get clean lattice lines. Freehand works but requires significant practice.
- Cobalt base: Apply two coats of cobalt blue gel. Cure.
- Cat-eye effect: Apply magnetic shimmer polish over the wet blue. Hold the magnet for 10 seconds to create the diagonal light band. Cure.
- Lattice lines: Apply thin silver striping tape in diagonal lines one direction, then cross them in the other direction to create diamonds.
- Press firmly: Smooth each tape line from edge to edge. Tape that doesn't adhere fully will lift within a day.
- Trim: Cut tape about 0.5mm inside the nail border on both sides. Tape reaching the edge peels off.
- Top coat: Thick, self-leveling top coat in one stroke. Going back over it shifts the tape.

30 Stunning Beach Nail Ideas for the Best Vacation in 2026 🌊
8.Emerald Cat-Eye Galaxy
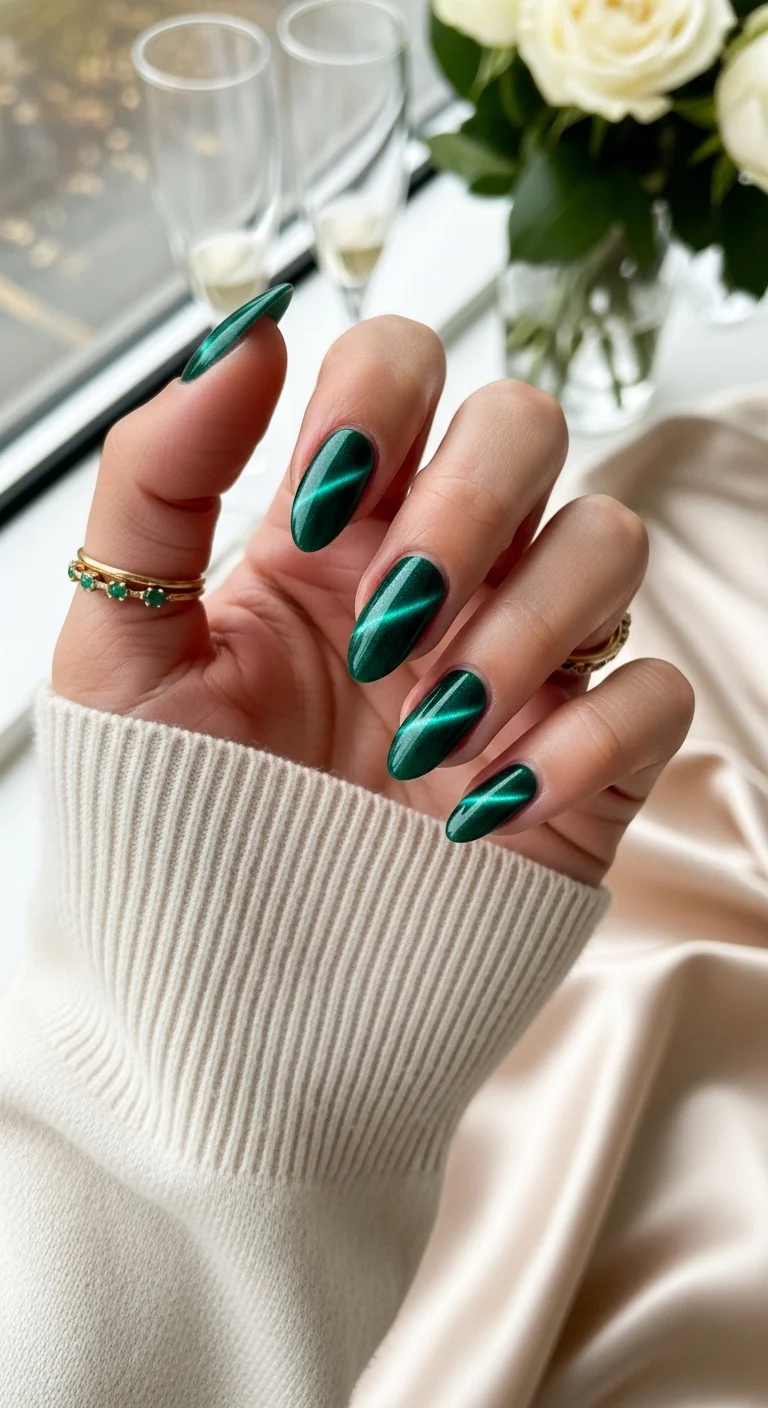
Magnetic emerald green with diagonal light band shimmer.
Overview:
Cat-eye polish in a jewel tone is one of the more luxurious finishes available in nail design. The magnetic pigment creates a concentrated band of light that moves as you tilt your hand — an optical effect that flat polish can't replicate. In emerald, the result looks like a polished gemstone rather than painted nail.
The deep green has a slight blue undertone, which keeps it from reading as Christmas-green. That temperature distinction matters: blue-based emerald reads as sophisticated and year-round; yellow-based emerald reads as seasonal. These nails work in June just as well as in December.
Solid cat-eye without additional art is the right call here. The magnetic shimmer is visually complex enough — adding embellishments would compete with the light band rather than complement it. Sometimes the finish IS the design.
Design Breakdown:
Full-coverage cat-eye gel. The magnetic shimmer is the entire design — no art or embellishment.
Base Color: Deep emerald green cat-eye gel. The magnetic particles should shift between bright teal and deep green depending on the light angle.
Nail Shape: Long almond. The tapered shape enhances the diagonal light band's movement.
Design Element: None. The cat-eye shimmer band is the design.
Finish: High-gloss gel top coat. The shine amplifies the magnetic depth effect.
Get The Look at Home:
The magnet angle determines where the light band sits. Hold it at the same angle across all nails for consistency.
- Base coat: Apply gel base coat and cure.
- Cat-eye polish: Apply one thick coat of emerald cat-eye gel. Do NOT cure yet.
- Magnetize: Hold the magnet 5mm above the nail at a 45-degree angle for 10-15 seconds. The shimmer will concentrate into a diagonal band.
- Cure: Immediately cure under the lamp while holding the magnet position. The particles shift if disturbed before curing.
- Second coat: Repeat the process for deeper color. Apply magnet, cure.
- Top coat: Gel top coat, cure. The gloss is what makes the emerald look like a gemstone.
9.Glossy Dark Chocolate Truffle
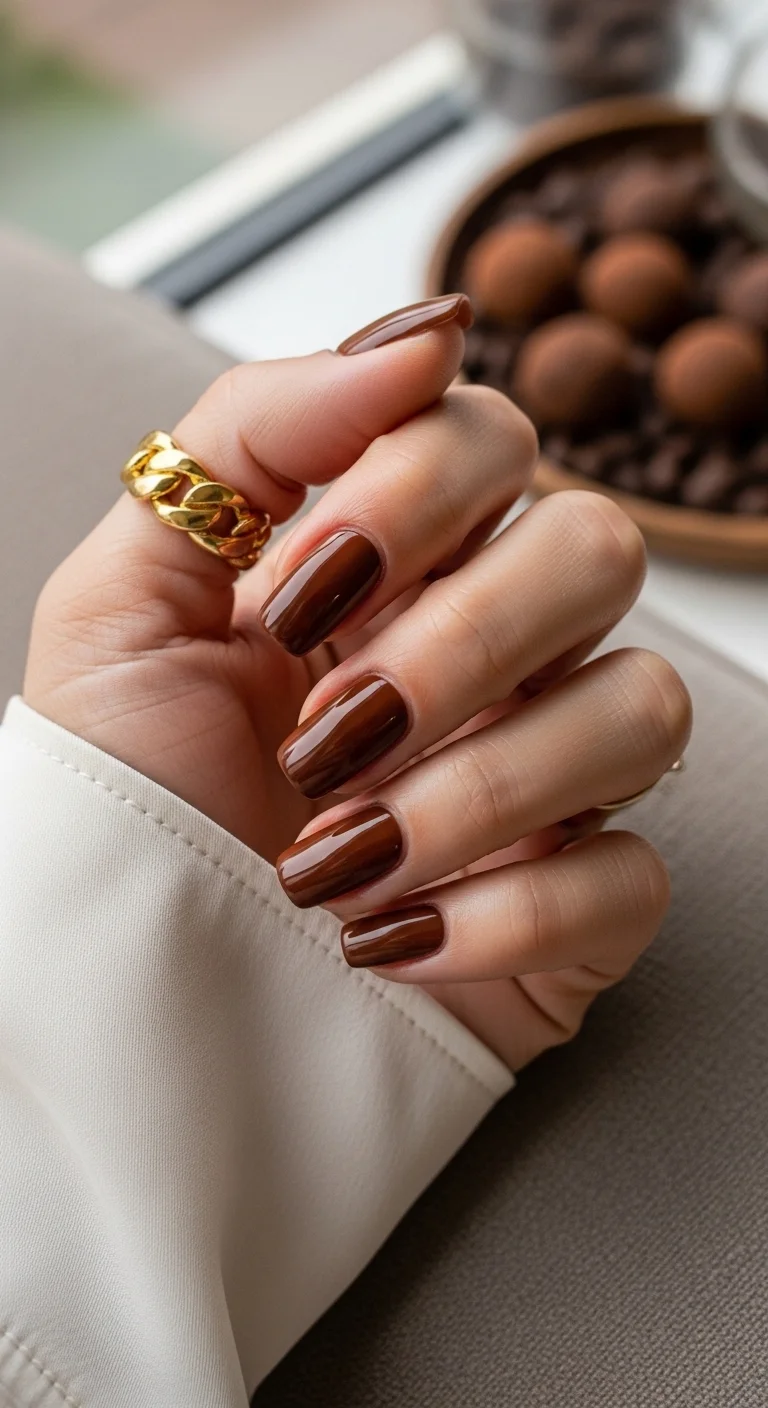
Rich dark chocolate brown with ultra-glossy finish.
Overview:
Brown nail polish has an image problem. People associate it with autumn or Halloween, which limits its perceived seasonality. But a dark chocolate brown with a high-gloss finish — no shimmer, no art, no embellishment — is one of the most versatile neutrals in the nail color spectrum. It reads as warm, rich, and quietly expensive.
The short squoval shape is what makes this color feel wearable rather than dramatic. Dark polish on long nails tends toward theatrical. On short nails, the same color feels like a deliberate, understated choice — closer to "expensive manicure" than "nail art."
The ultra-glossy finish transforms the brown from flat to dimensional. Without the shine, dark brown reads as muddy. With it, the color looks like liquid chocolate — warm, reflective, and rich. The finish does more work than the color itself.
Design Breakdown:
Single color, no art. The gloss and the color depth are the entire design.
Base Color: Rich dark chocolate brown. The formula should be fully opaque in two coats with warm, reddish-umber undertones.
Nail Shape: Short squoval or rounded. The practical shape keeps the dark color casual.
Design Element: None. Solid, even coverage.
Finish: Ultra-glossy, glass-like top coat. The shine makes the brown look like melted chocolate.
Get The Look at Home:
This is a quick, low-maintenance design. The application is straightforward, but the prep determines the result.
- Prep: File into a clean squoval. Push back cuticles. Buff any ridges — they show through dark polish.
- Base coat: Apply a ridge-filling base coat. Let dry completely.
- First coat: Thin, even coverage. Wipe the brush on the bottle neck between strokes to prevent pooling at the cuticle.
- Second coat: Full opacity. Let each coat dry at least three minutes.
- Cuticle cleanup: A small angled brush in acetone cleans the cuticle line before the polish sets.
- Top coat: One thick, self-leveling coat. Cap the free edge to prevent tip chipping.

26 Stunning Summer Braided Hairstyles for Women 2026 ☀️💇♀️
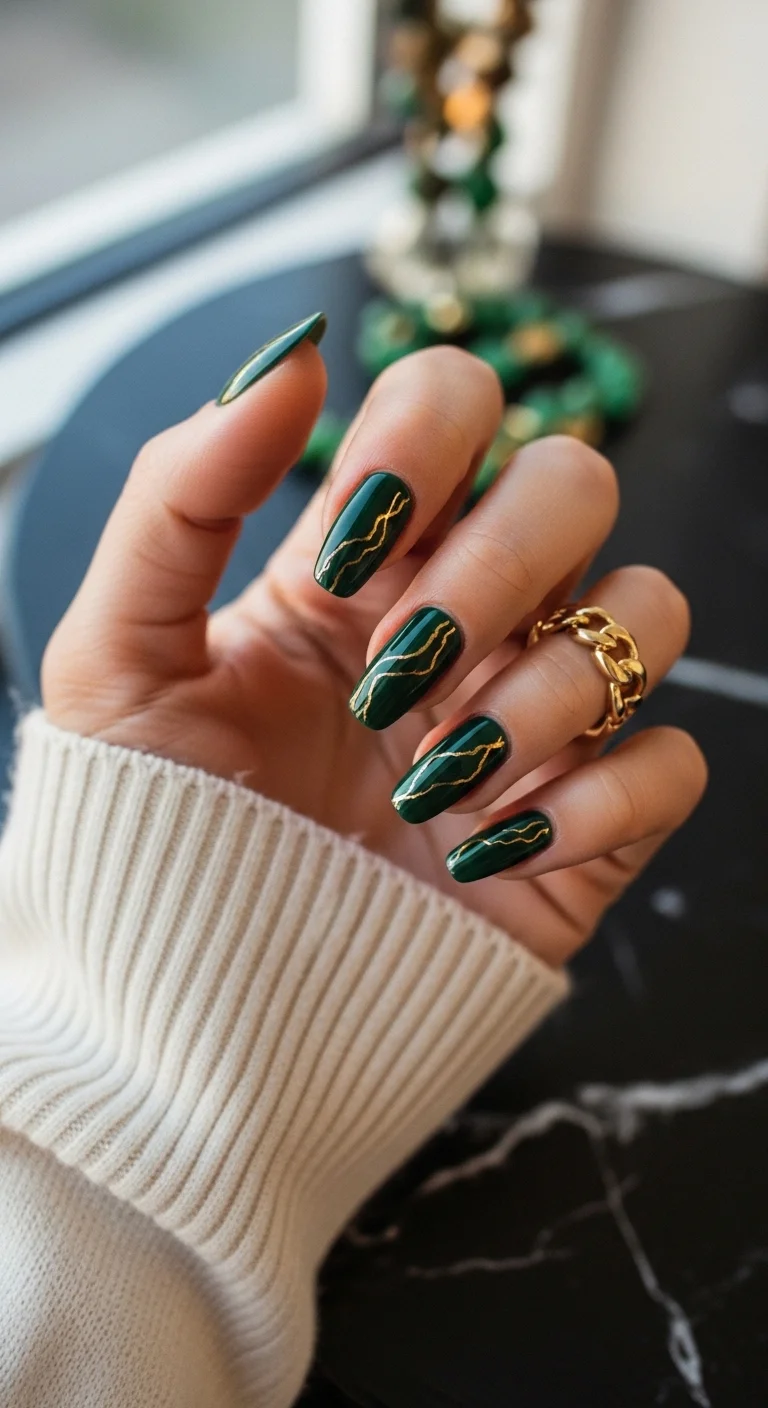
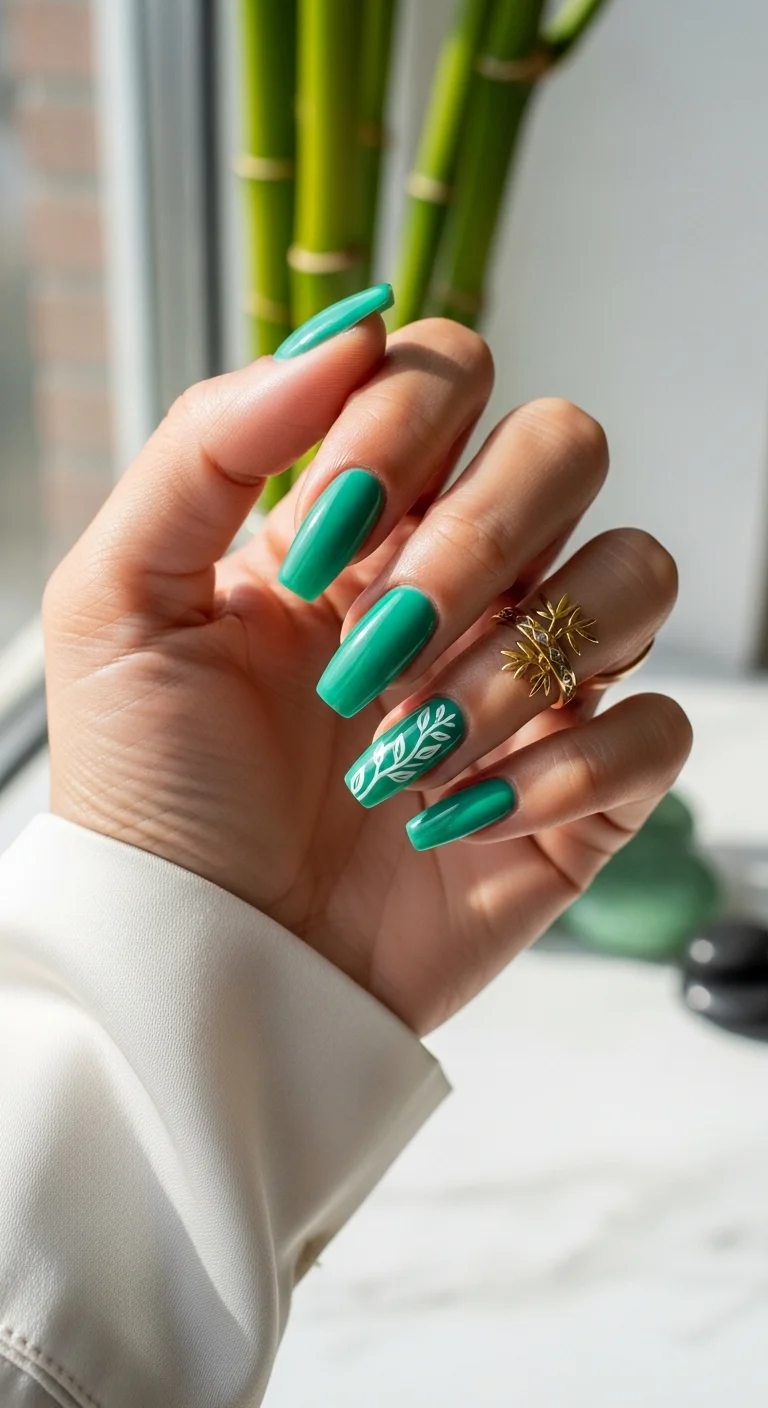
10.Forest Green Gold Veins
Organic gold marble veins over deep forest green base.
Overview:
Gold veins on dark green create the illusion of polished malachite or kintsugi-repaired jade. The combination feels organic — like something you'd find in nature rather than something painted on. That naturalistic quality is what separates this from other green-and-gold designs that lean more decorative.
Each nail has a unique vein pattern, and that's essential. No two pieces of marble or malachite have identical veining. If the gold lines were uniform across all nails, the effect would read as a stamped pattern rather than a geological surface. The variation is what sells the illusion.
The gold veins are thin and irregular — they branch, taper, and change direction organically. Thick, uniform gold lines would look like striping tape. These delicate, varied lines look like mineral deposits. The technique matters as much as the color.
Design Breakdown:
Organic metallic veining over a dark base. The variation in line weight and direction is what makes the design feel natural.
Base Color: Deep forest green or dark emerald. Two coats for full opacity. The green should be dark enough to provide strong contrast against the gold.
Nail Shape: Long coffin. The flat surface area gives the vein patterns room to branch and flow.
Design Element: Gold metallic veins created with thin liner brush or gold foil. Irregular, organic branching patterns — no two nails should match.
Finish: Glossy top coat. The shine makes the green look deep and the gold look metallic.
Get The Look at Home:
Work quickly — gold metallic polish dries faster on the brush than regular polish. Re-dip frequently.
- Green base: Two coats of deep forest green. Let dry fully.
- Gold veins: Using a thin liner brush and gold metallic polish, draw irregular diagonal lines across each nail. Vary the thickness — press harder for wider sections, lighter for thin tapering ends.
- Branching: From each main vein line, pull smaller branches outward. Two to three branches per main line.
- Variation: Make every nail different. Change the direction, number of branches, and line weight on each nail.
- Check from distance: Hold your hand at arm's length. The gold should look balanced across all nails without being uniform.
- Top coat: One thick coat to seal the metallic lines and smooth the surface.
11.Champagne Pearl Shimmer
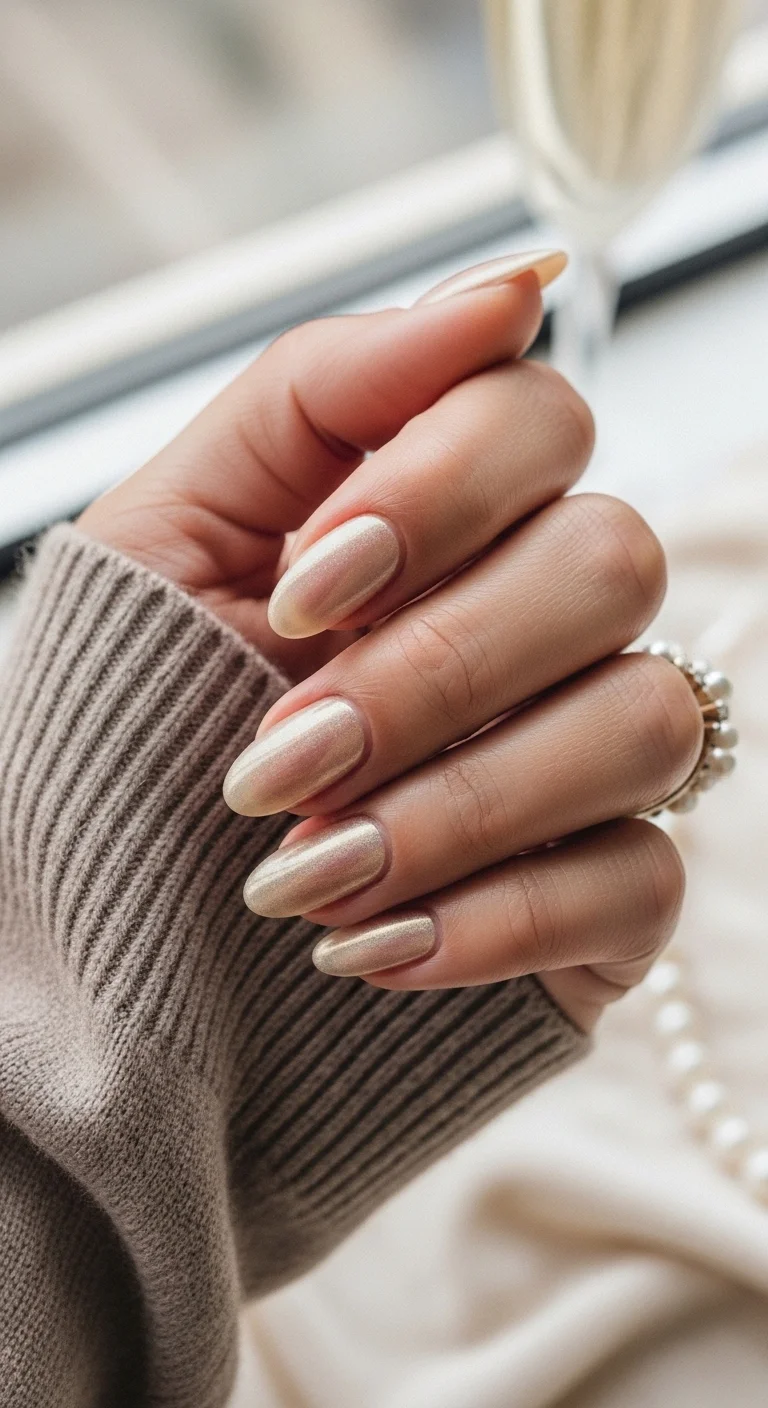
Pearlescent champagne beige with golden micro-shimmer.
Overview:
Pearl-finish nail polish sits in an interesting middle ground between cream and shimmer. It's not flat like a solid color, and it's not sparkly like a glitter. The pearlescent effect creates a soft, luminous sheen that catches light gently rather than aggressively. The result looks expensive without being flashy.
Champagne beige is one of the more universally flattering pearl shades. The warm pink-beige undertone harmonizes with most skin tones, and the golden micro-shimmer adds warmth without shifting the color toward yellow. It's the nail equivalent of champagne — celebratory without being loud.
The minimalist approach (solid color, no art, no accent nails) suits this finish. The pearl effect is subtle enough that adding embellishments would compete with it rather than complement it. Let the finish speak for itself.
Design Breakdown:
Single-color pearl finish. The luminosity is the design.
Base Color: Warm champagne beige with pearlescent shimmer. The base should have visible golden micro-shimmer throughout.
Nail Shape: Oval or almond. The soft curves complement the gentle luminosity of the pearl finish.
Design Element: None. Solid, even coverage.
Finish: Pearlescent chrome. The smooth, light- reflective metallic sheen IS the design.
Get The Look at Home:
Pearl finishes show brush strokes more than cream finishes. Use thin coats and let each dry before the next.
- Prep: File into oval. Push back cuticles. Buff ridges — pearl finish amplifies surface texture.
- Base coat: A smoothing base coat helps the pearl finish lay flat.
- First coat: Thin, even coverage. Brush in one direction — back-and-forth strokes create visible lines in pearl finishes.
- Second coat: Full coverage. Let dry completely.
- Third coat (optional): If the shimmer looks patchy, a third thin coat evens it out.
- Top coat: One coat of glossy top coat. The shine amplifies the pearl luminosity.

34 Cutest Butter Yellow Nail Designs for 2026 🧈
12.Tropical Teal Botanical
Solid emerald teal with white botanical accent on ring finger.
Overview:
The accent nail formula — solid color on four nails, art on one — is a reliable structure because it works. The solid nails provide a color anchor, and the accent nail provides visual interest. The key is making the accent feel intentional rather than random. Here, the white botanical art on the ring finger works because white and teal are a natural pairing — it looks like the leaf grew from the color rather than being stuck on top.
The botanical illustration is delicate — thin white lines forming leaf and vine motifs. Heavy, opaque white art would look painted on. These fine lines look drawn or stamped, which gives the design an illustrated, almost engraved quality. The detail rewards close inspection without being visible from across the room.
Emerald teal is a strong color that doesn't need much help to make a statement. The single accent nail adds a layer of craft to what would otherwise be a solid-color manicure. It says "I thought about this" without saying "I spent three hours on my nails."
Design Breakdown:
Solid base with one botanical accent nail. The restraint is what keeps the design sophisticated.
Base Color: Rich emerald teal. Two coats for full opacity. The color should be vibrant without being neon.
Nail Shape: Coffin or ballerina with slightly softened corners. The modern shape suits the bold color.
Design Element: White botanical leaf and vine illustration on the ring finger only. Fine-line work with delicate detailing.
Finish: High-gloss top coat. The shine makes the teal look deep and saturated.
Get The Look at Home:
The botanical art is the only challenging step. Use a very thin liner brush or a stamping plate for precision.
- Teal base: Two coats of emerald teal on all nails. Let dry fully.
- Plan the art: Decide what leaf motif you want on the ring finger before painting. Simple vine with 3-5 leaves is enough.
- White lines: Using a thin liner brush and opaque white, draw a center vine line, then add small leaf shapes branching off it.
- Detail: Add tiny veins inside each leaf using the very tip of the liner brush. The detail is what makes the art look refined.
- Cleanup: A flat brush in acetone fixes any white that strayed from the design.
- Top coat: One coat over everything to seal the art and unify the finish.
13.Lavender Chrome Tips
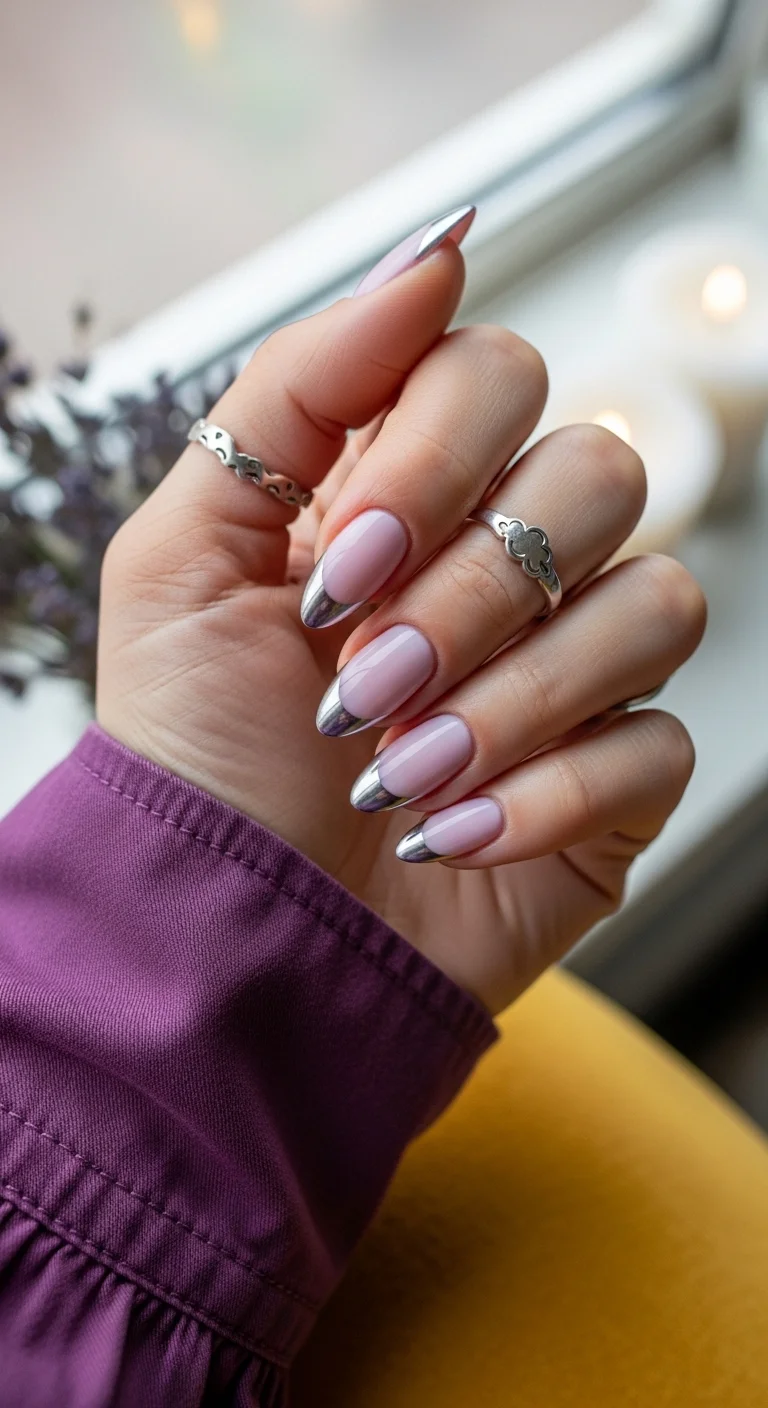
Soft lavender base with mirror-finish silver chrome tips.
Overview:
French tips with a metallic twist are having a moment, and this lavender-and-silver version is a strong example of why. The soft pastel base provides a feminine, romantic foundation, while the chrome tips add a futuristic edge that prevents the design from reading as purely sweet. The tension between the two aesthetics — soft and hard, matte and metallic — is what makes the design interesting.
The chrome tips require a different application process than regular French tips. You can't just paint silver polish in a tip shape — the mirror effect only comes from chrome powder buffed onto a cured gel surface. That extra step means this design falls into the intermediate-to-advanced skill category. If you're new to chrome, practice the powder application on a single nail before committing to all ten.
Lavender and silver share a cool undertone, which is why the pairing feels harmonious. A warm-toned base (peach, coral) with silver chrome would create a temperature mismatch that looks unintentional. The cool-lavender-to-silver transition reads as deliberate and cohesive.
Design Breakdown:
Pastel base with chrome tips. The two different finishes (cream base, metallic tips) create the design's character.
Base Color: Soft lavender or lilac cream. Two coats for smooth, opaque coverage.
Nail Shape: Almond with a tapered point. The curved tip complements the chrome's reflective quality.
Design Element: Silver mirror-chrome tips applied over the lavender base. Sharp, defined smile line between the two finishes.
Finish: Cream lavender base, mirror-chrome tips. The contrast between the two finishes IS the design.
Get The Look at Home:
The chrome tips are applied separately from the lavender base — this is a two-process design.
- Lavender base: Two coats of lavender gel. Cure fully.
- Tip isolation: Apply French tip guides or tape to mask the lavender area, leaving only the tip exposed.
- No-wipe top coat on tips: Apply no-wipe gel top coat to the exposed tip area only. Cure.
- Chrome on tips: Rub silver chrome powder onto the cured tip area using a small applicator. The powder only adheres to the no-wipe top coat.
- Remove guides: Carefully peel off the tape/guides.
- Seal: Apply gel top coat over the entire nail to seal the chrome tips and protect the lavender base. Cure.
32 Stunning Summer Wedding Hairstyles for Brides ☀️💍
14.Minty Gold Marble Waves
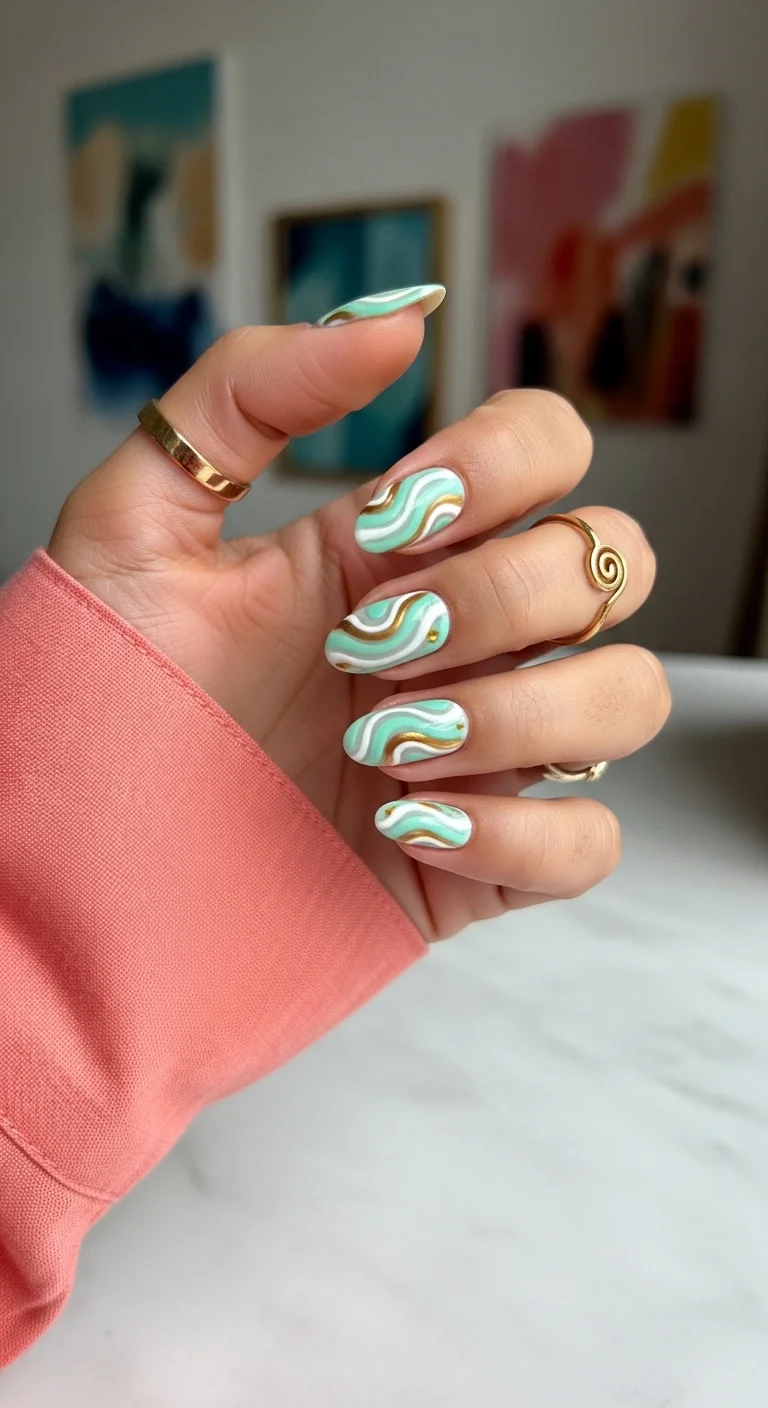
Organic mint and white marble swirls with gold dot accents.
Overview:
Marble nail art that uses warm metallics instead of black or grey veins feels fresher and more contemporary. The gold accents here — dots and thin lines scattered within the mint- and-white swirls — add warmth to what would otherwise be a purely cool-toned design. That temperature contrast is what makes the marble feel alive rather than stone-like.
No two nails have identical patterns, which is both the strength and the challenge of marble designs. Every nail is a unique composition, which means the set as a whole looks hand-crafted rather than printed. The downside is that achieving consistent quality across all ten nails requires patience — marble is a technique where each attempt produces a different result.
The gold dots are a small addition that changes the design's register. Without them, this is a nice mint marble. With them, the design gains a jewelry-like quality — the dots catch light the way tiny gold beads would on fabric. The shift from "nail art" to "nail jewelry" is subtle but meaningful.
Design Breakdown:
Organic marble swirls with metallic accent dots. The three- color palette (mint, white, gold) is what keeps the design cohesive.
Base Color: Soft mint green and creamy white. The two colors should be similar in value (lightness) to prevent either from dominating.
Nail Shape: Medium almond. The curved shape complements the organic swirl patterns.
Design Element: Abstract marble swirls in mint and white, with small gold metallic dot accents scattered within the design.
Finish: Glossy top coat. The shine makes the mint look fresh and the gold dots catch light.
Get The Look at Home:
The marble happens on a wet surface. Work one nail at a time — the polish dries too fast to do multiple nails in one pass.
- Base coat: Apply one coat of white. Let dry.
- Wet layer: Apply a second thin coat of white. Do NOT let it dry.
- Drop mint: Place 2-3 small dots of mint green directly onto the wet white surface.
- Swirl: Using a toothpick, drag through the dots in flowing S-curves. Three or four drags per nail. Don't over-mix — you want distinct color bands, not muddy blend.
- Gold dots: While the marble is still wet, place tiny gold metallic dots at the intersections of mint and white swirls.
- Dry and seal: Wait five minutes, then apply two coats of top coat to smooth the textured surface.
15.Midnight Starlight Almonds
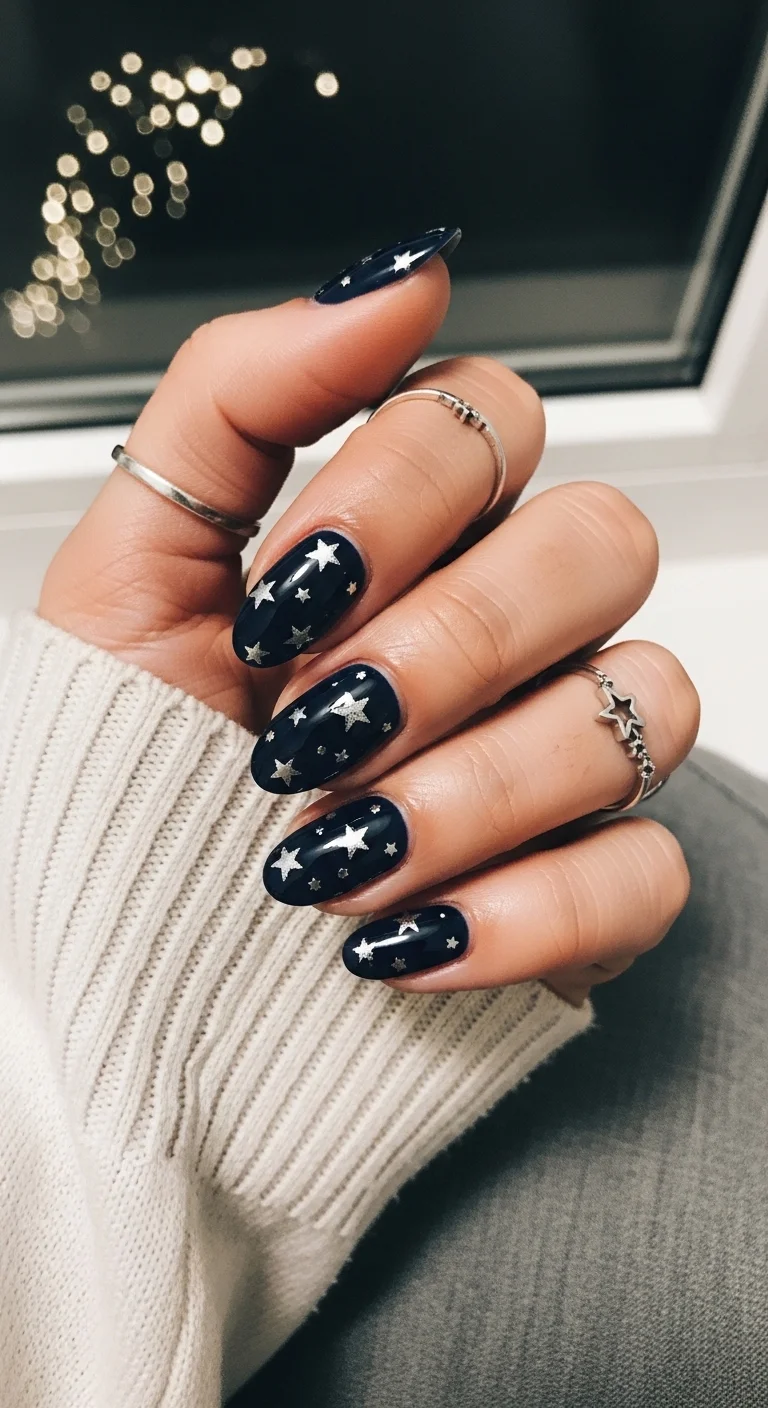
Scattered silver and white stars over midnight navy base.
Overview:
Star nail art works best when it mimics the actual night sky — a few larger stars, several medium ones, and lots of tiny dots that read as distant constellations. This set gets the hierarchy right. The varied star sizes create a sense of depth that uniform star stamps can't achieve.
The midnight navy base is essential. Black would make the stars look like a Halloween costume. Navy provides enough color that the design reads as "celestial" rather than "gothic." There's a warmth to navy that black doesn't have — it's the difference between looking at the actual night sky and looking at a black canvas with dots on it.
The silver and white stars against the dark background create high contrast that photographs well. Under low light, the silver catches whatever illumination is available and creates genuine sparkle points. For a birthday dinner in a dimly lit restaurant, this design becomes its own ambient lighting.
Design Breakdown:
Star hierarchy is what makes this design work — large, medium, and tiny stars in a natural scatter pattern.
Base Color: Deep midnight navy. Dark enough to read as night sky but blue enough to avoid reading as black.
Nail Shape: Medium-long almond. The curved surface creates natural light variation across the stars.
Design Element: Silver and white star motifs in varying sizes — large statement stars, medium starbursts, and tiny dot constellations. Scattered randomly across all nails.
Finish: Glossy top coat. The shine makes the navy look deeper and the silver stars catch more light.
Get The Look at Home:
Work from largest stars to smallest. The big stars set the composition; the small dots fill the gaps.
- Navy base: Two coats of deep midnight navy. Let dry fully — star art on wet polish creates grey smudges.
- Large stars: Using a thin liner brush and silver polish, draw one large star per nail — a center point with four or six lines radiating outward.
- Medium stars: Add one or two smaller starbursts per nail using the same technique but lighter pressure.
- Tiny dots: Using a small dotting tool, scatter white dots between the stars. These read as distant constellations.
- Vary density: Some nails should have more stars than others. Uniform density across all nails looks stamped.
- Top coat: One thick coat, floating the brush over the star art.

35 Palm Tree Nail Art Ideas that are the Most Iconic Nail Art Designs 🌴✨
16.Purple Cat-Eye Tiger Stripes
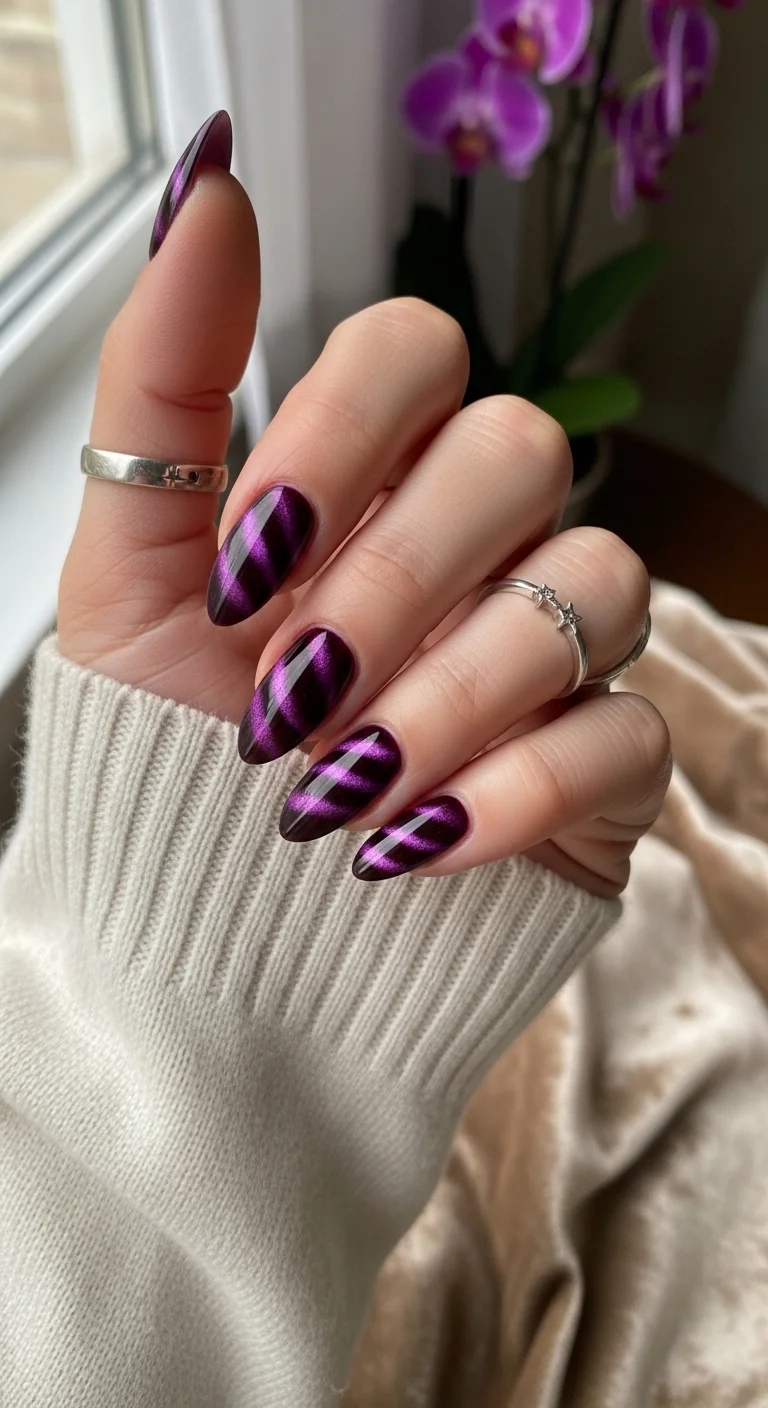
Magnetic magenta-purple shimmer in diagonal tiger-stripe bands.
Overview:
Cat-eye polish applied in diagonal bands creates a pattern that's somewhere between tiger stripes and aurora borealis. The magnetic shimmer concentrates into bright magenta-violet streaks against the dark base, producing an effect that changes dramatically depending on the light angle. In dim light, these nails look nearly black. In direct light, they explode into vivid purple.
The technique is the same as standard cat-eye, but the magnet is held at a different angle for each stripe. Instead of one continuous light band, you're creating three to four separate bands per nail. That means three to four separate magnet applications per nail — which takes patience but produces a more complex visual effect than a single band.
The deep purple reads as glamorous rather than playful. It's a nighttime color — cocktail bars, dinner parties, evening celebrations. Under fluorescent office lighting, it would look muted and almost black. The design wants warm, low light to show its full range.
Design Breakdown:
Multi-band cat-eye application. Each stripe requires its own magnet pass — there's no shortcut.
Base Color: Deep purple or black gel base. The dark background makes the magenta shimmer bands pop.
Nail Shape: Almond or stiletto. The pointed shape emphasizes the diagonal stripe direction.
Design Element: Three to four diagonal magnetic shimmer bands per nail, creating a tiger-stripe effect in vivid magenta-purple.
Finish: High-gloss gel top coat. The shine amplifies the magnetic depth between the dark and light zones.
Get The Look at Home:
The magnet needs to be held steady for each stripe. Work slowly — rushing produces faint, undefined bands.
- Dark base: Two coats of deep purple or black gel. Cure fully.
- Cat-eye polish: Apply one coat of purple cat-eye gel over the dark base. Do NOT cure.
- First stripe: Hold the magnet at a 45-degree angle near the cuticle area for 10 seconds. A bright band will form.
- Move and repeat: Shift the magnet slightly toward the tip and hold again. Repeat three to four times, moving down the nail to create separate bands.
- Cure immediately: The bands will blur if not cured quickly. Cure under UV lamp.
- Top coat: Gel top coat, cure. The gloss makes the dark zones look deeper.
17.Sparkling Raspberry Sorbet
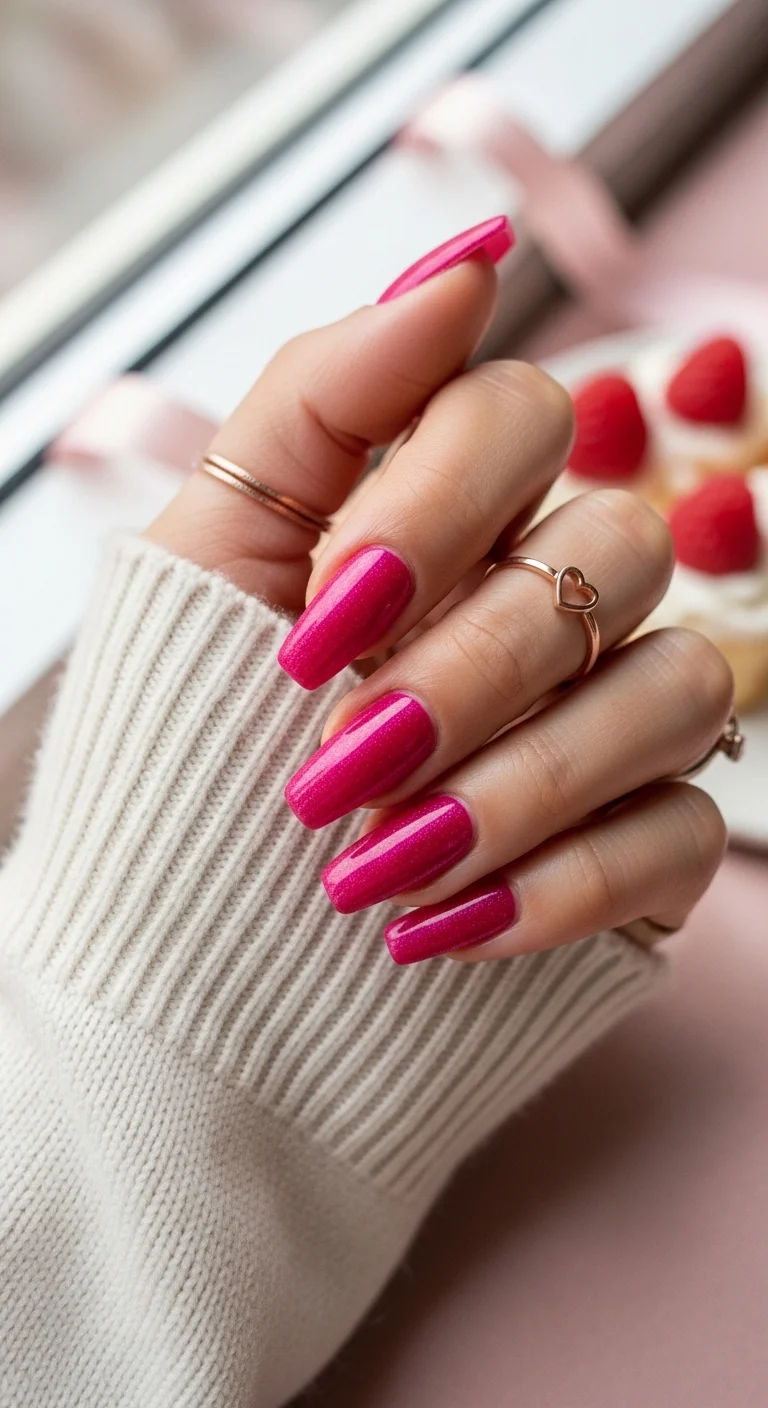
Raspberry pink micro-glitter with gold-fleck shimmer.
Overview:
Glitter nail polish has one significant advantage over other finishes: it hides application mistakes. The light- refracting particles break up the visual surface, making brush strokes and minor unevenness invisible. For a DIY birthday manicure, that forgiveness is valuable. You don't need a perfectly smooth base to get a good result.
This raspberry pink sits at the right saturation level for a glitter finish. Too light and the glitter overwhelms the base color — you end up with "glitter with a hint of pink" rather than "pink with glitter." Too dark and the sparkle disappears into the depth. This mid-tone fuchsia lets both the color and the shimmer coexist as equal partners.
The fine micro-glitter (as opposed to chunky hex glitter) gives the finish a sophisticated sparkle. Chunky glitter reads as craft supply. Micro-glitter reads as satin with light-catching texture. For a birthday that involves actual dinner and drinks rather than a costume party, the fine glitter is the better choice.
Design Breakdown:
Solid glitter finish. The sparkle distribution is the design — no additional art needed.
Base Color: Vibrant raspberry or hot fuchsia pink with embedded fine micro-glitter. The glitter should reflect lighter pink and subtle gold tones.
Nail Shape: Square or coffin. The flat surface maximizes the glitter's light-catching area.
Design Element: None. Full-coverage glitter polish.
Finish: Glossy with visible micro-glitter shimmer. The top coat smooths the glitter texture while preserving the sparkle.
Get The Look at Home:
Glitter polish dries faster than cream polish. Work quickly and don't go back over areas that are starting to set.
- Base coat: Apply a ridge-filling base coat. Glitter magnifies surface texture.
- First coat: Thin, even coverage. Glitter polish is often thinner than cream — the first coat will look sparse.
- Second coat: Full coverage. Let each coat dry at least three minutes.
- Third coat (if needed): Some glitter formulas need a third coat for even distribution.
- Texture check: Run your fingertip over the nail. If the glitter feels rough, apply a second layer of top coat.
- Top coat: Two coats minimum. The first layer fills the gaps between glitter particles; the second creates a smooth surface.

25 Stunning Summer Vacation Hairstyles for 2026 ☀️🌊
18.Rose Gold Mirror Chrome

Liquid rose gold chrome with warm copper undertones.
Overview:
Rose gold chrome is the most flattering metallic finish for most skin tones. The warm pink-copper undertone harmonizes with the natural warmth in human skin, whereas silver chrome can read as cold against warm undertones and gold chrome can look yellow against cool ones. Rose gold threads the needle — it has enough warmth to glow and enough cool pink to avoid looking brassy.
The mirror effect on this finish is genuinely striking. It reflects with the clarity of a copper mirror — you can see shapes and colors reflected in the nail surface. That level of reflectivity transforms the hand into a focal point. For a birthday, that attention is usually welcome.
Maintenance reality: chrome finishes show wear faster than cream or shimmer. The mirror surface scratches, and the scratches are visible because they disrupt the reflection. Avoid abrasive tasks — opening packages, scrubbing pans, aggressive keyboard typing — for the first 24 hours after application while the top coat fully hardens.
Design Breakdown:
Full-coverage rose gold chrome. The mirror finish is the entire design.
Base Color: Warm pink or rose-toned gel polish. Two coats, fully cured. The warm base gives the chrome its rosy depth.
Nail Shape: Medium-long almond. The curved shape maximizes the chrome's reflective surface.
Design Element: Rose gold chrome powder buffed to a mirror finish.
Finish: Mirror chrome sealed with gel top coat.
Get The Look at Home:
The chrome application is the same process as copper or silver chrome — the base color determines the chrome's undertone.
- Rose base: Two coats of warm pink or rose gel polish. Cure fully.
- No-wipe top coat: Apply and cure for 30 seconds. The slightly grabby surface holds the chrome.
- Chrome powder: Using a sponge applicator, rub rose gold chrome powder firmly across the nail. Buff until mirror-reflective.
- Check angles: Look at the nail from multiple angles. Any dull spots need more buffing.
- Dust off: Soft brush to remove excess powder.
- Seal: Gel top coat, cap the free edge, cure. Two coats if the surface feels textured.
19.Sage Garden Floral
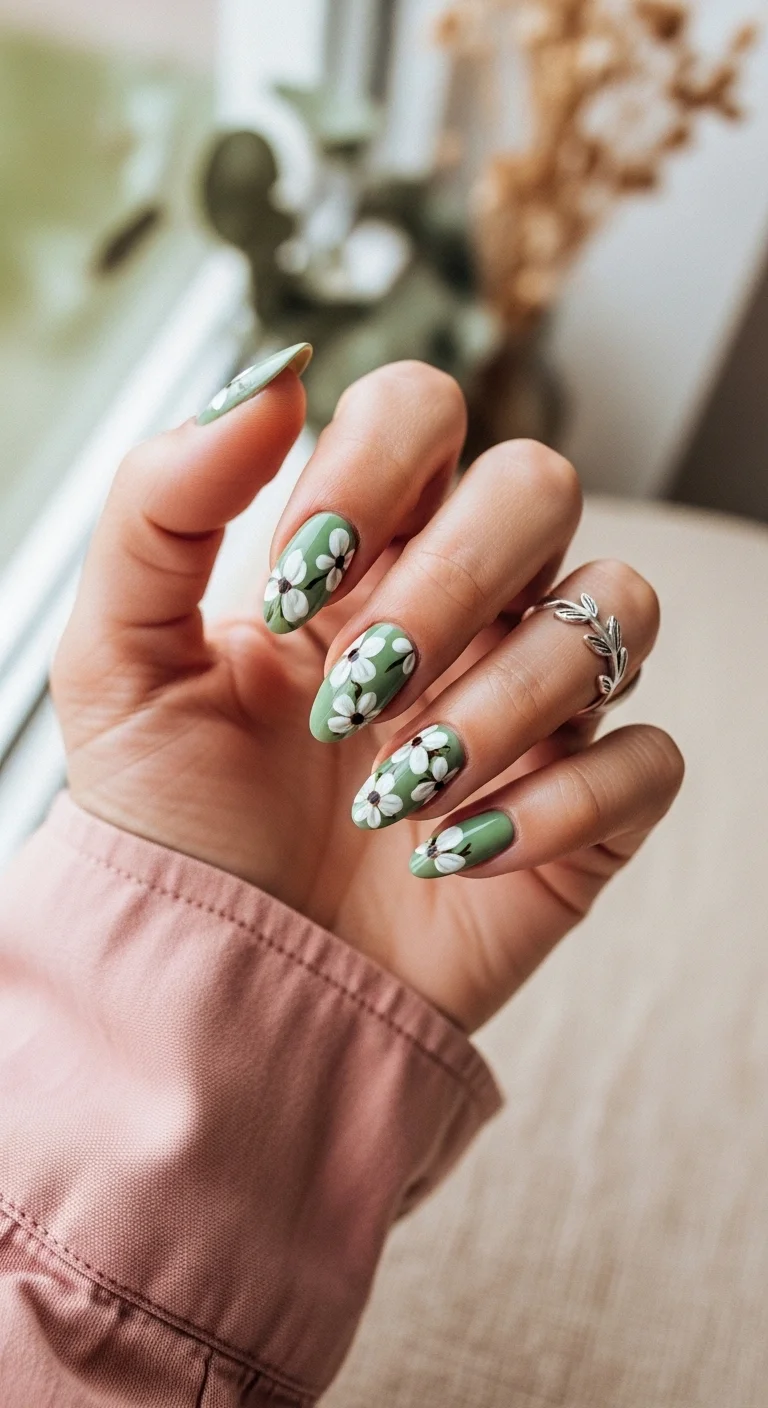
White five-petal flowers with dark centers on sage green base.
Overview:
Sage green with white flowers is the nail equivalent of a garden-party dress — it's feminine without being fussy, pretty without being precious. The earthy sage grounds the design, preventing the white flowers from reading as juvenile. On a pastel pink or baby blue base, the same flowers would look like stickers from a children's craft kit. On sage, they look botanical.
The floral density varies across nails — some have two flowers, others have three or four. That variation is important. Uniform flower placement across all nails looks like wallpaper. Staggered, slightly different compositions on each nail look like someone actually painted them by hand.
The dark centers on the flowers are what make them read as botanical rather than decorative. Without the dark dot, white five-petal flowers look like generic shapes. With it, they reference actual flower anatomy — the stamen and pistil. That small detail elevates the entire design.
Design Breakdown:
Hand-painted botanical art on a muted base. The flower placement varies per nail for an organic look.
Base Color: Muted sage green — earthy, not neon. A dusty mid-tone green that reads as natural and calming.
Nail Shape: Medium almond, slightly shorter than some other designs on this list. The compact shape suits the delicate art.
Design Element: White five-petal flowers with dark brown or black dot centers, plus tiny green leaf accents. Two to four flowers per nail, randomly placed.
Finish: Glossy top coat. The shine makes the sage look richer and the white petals look crisp.
Get The Look at Home:
The flowers are fast to paint — five dots in a circle, one dot in the center. Budget 20 minutes for both hands.
- Sage base: Two coats of sage green. Let dry fully.
- Petal dots: Using a medium dotting tool and opaque white, press five dots in a loose circle. Two to four flowers per nail, placed randomly.
- Dark centers: Wait 60 seconds for the white to set. Use a smaller dotting tool and dark brown or black to place one dot in each flower center.
- Leaf accents: Using a toothpick and a darker green than the base, add one or two tiny leaf strokes near each flower cluster.
- Vary density: Some nails should feel busier than others. Uniform density looks stamped.
- Top coat: Float the brush over the art to avoid smearing the dark centers.

29 Trendy Pink Summer Nails for 2026 💅
20.Blue Sky Aura Clouds
Wispy white clouds floating across a sky-blue gradient.
Overview:
Cloud nail art on a blue base is one of the more whimsical designs in this collection. The sky-blue gradient creates a believable atmosphere — the white clouds don't look like stickers placed on a surface; they look like they're floating in an actual sky. That environmental quality is what makes the design work as a composition rather than just "clouds on nails."
The aura effect — where the blue has a soft, diffused glow rather than a hard, uniform color — adds depth to the sky illusion. A flat sky-blue background would make the clouds look two-dimensional. The gradient variation creates the impression of actual atmospheric depth, with lighter zones suggesting distance and more saturated areas suggesting proximity.
This is a design that benefits from a jelly or translucent finish on the blue base. The slight transparency lets light pass through the nail, creating a glow that mimics actual sky. Fully opaque blue would flatten the effect.
Design Breakdown:
Gradient blue base with illustrative cloud art. The translucency of the blue is what sells the sky illusion.
Base Color: Soft sky blue with a slightly translucent or jelly finish. Lighter near the cuticle, more saturated at the tips.
Nail Shape: Medium almond. The curved shape complements the organic cloud forms.
Design Element: Wispy white cloud formations painted across the nails. The clouds should look organic — irregular shapes with soft, blended edges.
Finish: Glossy with a slight jelly/translucent quality that gives depth to the cloud layers.
Get The Look at Home:
The clouds should look soft, not stamped. Use a small sponge or a dry brush to dab the white into organic shapes.
- Blue base: Two coats of sheer sky blue. The slight translucency is intentional.
- Gradient variation: Using a sponge, add slightly more blue saturation at the tips of some nails and more white near the cuticles of others.
- Cloud shapes: Using a small piece of makeup sponge or a dry detail brush, dab opaque white into organic cloud shapes. Don't paint — dab. The texture creates a more natural cloud appearance.
- Cloud density: One to two clouds per nail. Leave plenty of blue visible — the sky is as important as the clouds.
- Soft edges: While the white is still slightly wet, gently tap the edges with a clean finger to blur them.
- Top coat: One coat to seal the art and enhance the translucent depth.
21.Teal Silver Storm Swirls

Dynamic silver chrome swirls over deep teal base.
Overview:
Chrome swirls over a solid color create a two-layer effect: the base color sits in the background while the metallic swirls catch light in the foreground. Your brain reads them as separate planes rather than a flat pattern. That dimensionality is what makes this design more visually engaging than a standard painted swirl.
The teal and silver combination reads as oceanic — it evokes storm-tossed water, metallic waves, something turbulent and beautiful. That specific mood is what makes the design interesting. A different color combination with the same swirl pattern (pink and gold, for instance) would read as warm and romantic. The color determines the story; the pattern provides the structure.
The swirl patterns vary slightly from nail to nail, which is what keeps the design from looking stamped. Each nail has its own unique flow — some swirls are tighter, some are more open, some cross the nail diagonally while others curve horizontally. The variety is the point.
Design Breakdown:
Metallic swirl overlay on a solid base. The chrome is the design element; the teal is the canvas.
Base Color: Deep teal or turquoise. Two coats for full opacity. The color should be saturated enough to contrast strongly with the silver.
Nail Shape: Medium almond. The curved surface creates natural light variation across the chrome swirls.
Design Element: Silver chrome swirl patterns over the teal base. Each nail has a unique swirl composition.
Finish: Glossy with metallic chrome reflective quality. The interplay of cream teal and mirror silver is the design.
Get The Look at Home:
Chrome swirls can be done with a thin brush and chrome paste, or by applying chrome powder through a stencil. The stencil method is more forgiving for beginners.
- Teal base: Two coats of deep teal gel. Cure fully.
- No-wipe top coat: Apply and cure for 30 seconds.
- Swirl stencil: Apply swirl-pattern nail vinyls or tape to create the swirl shapes. Press edges firmly.
- Chrome application: Rub silver chrome powder over the exposed areas. The powder adheres only to the no-wipe top coat between the stencil lines.
- Remove stencil: Peel carefully while the powder is still fresh.
- Seal: Gel top coat over everything to protect the chrome swirls. Cure fully.

21 Hot Summer Buns Hairstyle Ideas for 2026 ☀️🔥
22.Matte Burnt Orange Leaf
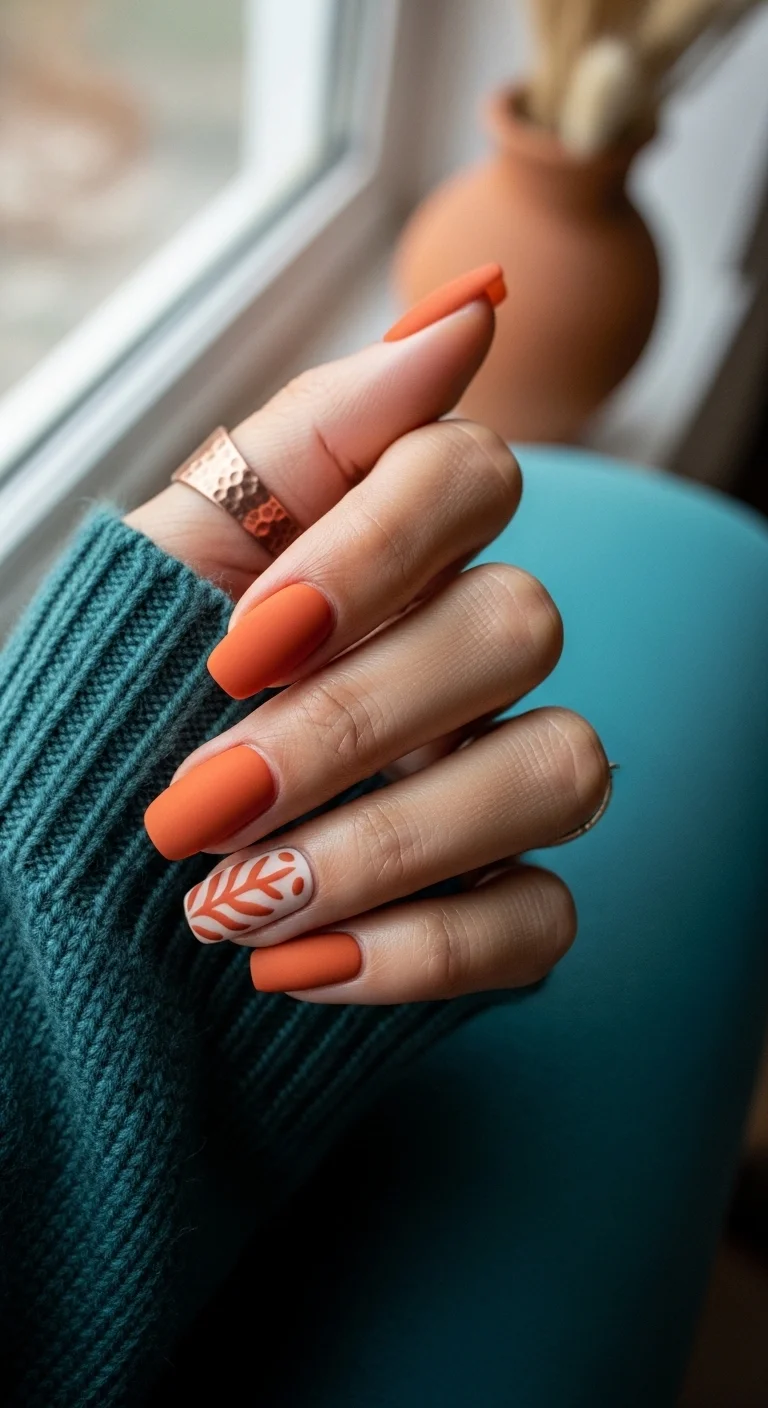
Velvet matte terracotta with botanical leaf accent nail.
Overview:
Matte top coat transforms burnt orange from "summer coral's cousin" to "autumn in a bottle." The flat finish absorbs light instead of reflecting it, which deepens the color and gives it a velvety, almost textile quality. Glossy burnt orange looks like paint. Matte burnt orange looks like suede.
The ring finger accent — cream base with a burnt orange leaf motif — provides a visual break from the solid matte color. The leaf design inverts the color relationship: instead of orange with art, it's cream with orange art. That inversion creates a subtle focal point without disrupting the overall color story.
Matte finishes amplify every flaw in the base coat. Streaks, brush marks, and uneven thickness that glossy top coat hides are fully visible under matte. This means the base application needs to be significantly more precise than usual. Three thin coats, fully dried between each, with a self-leveling formula.
Design Breakdown:
Matte solid nails with one inverted-color accent nail. The matte finish is what makes this design distinctive.
Base Color: Warm burnt orange or terracotta on four nails; cream or off-white on the ring finger accent.
Nail Shape: Coffin or ballerina. The flat tip complements the earthy, architectural quality of the matte finish.
Design Element: Burnt orange leaf or vine motif on the cream accent nail. Simple botanical illustration with clean lines.
Finish: True matte on the orange nails; the accent nail can be matte or glossy — both work.
Get The Look at Home:
The leaf art is simple — a center stem with small leaf shapes branching off. Don't overcomplicate the botanical.
- Orange base: Two coats of burnt orange on thumb, index, middle, and pinky. Let dry fully.
- Cream accent: Two coats of cream on the ring finger. Let dry.
- Leaf art: Using a thin liner brush and burnt orange, draw a center stem line on the ring finger, then add small leaf shapes branching outward.
- Dry completely: The art must be fully set before matte top coat — matte over wet art creates smudges.
- Matte coat: Apply matte top coat to the four orange nails in one confident stroke per nail. Don't go back over areas — it creates texture differences.
- Accent seal: Glossy or matte top coat on the ring finger, depending on your preference.
23.Neon Violet Geometric
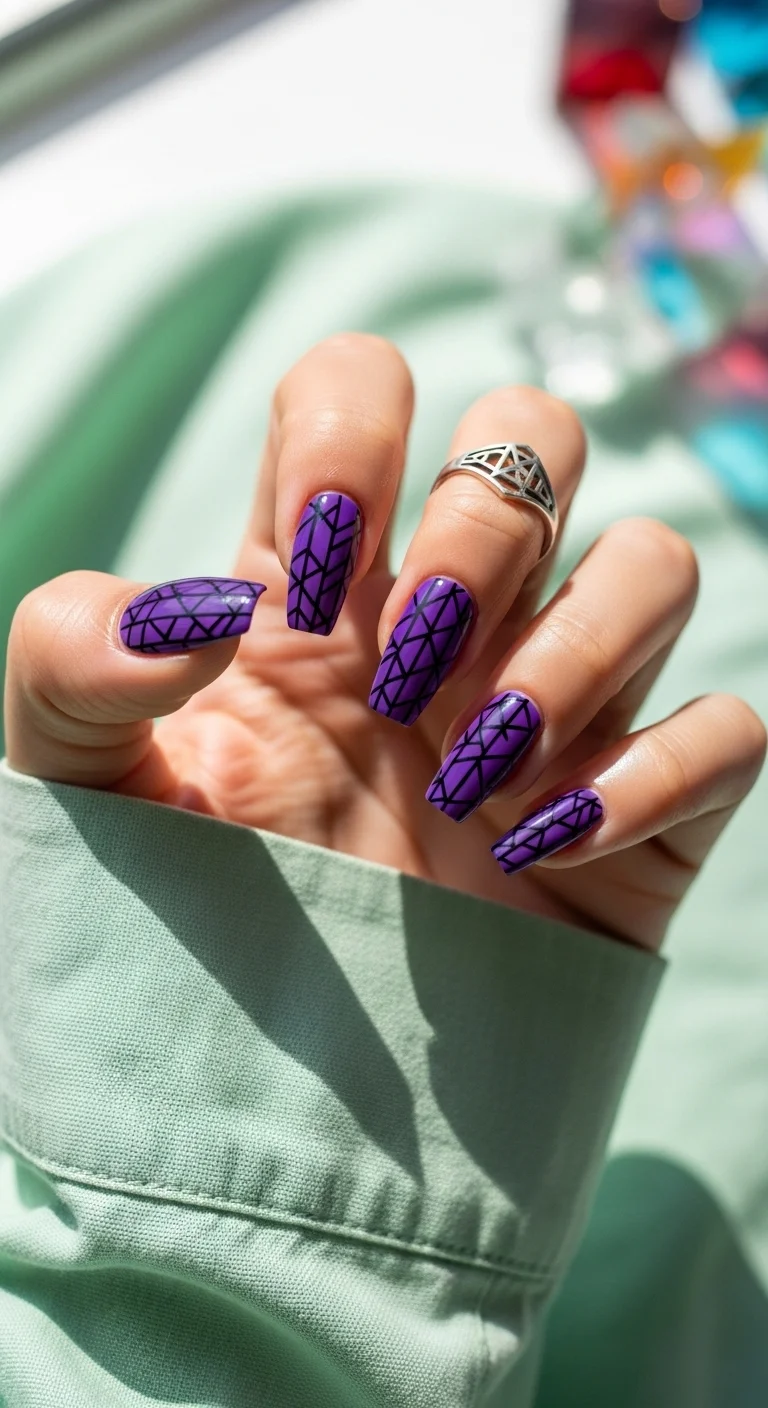
Black intersecting geometric lines over electric violet base.
Overview:
Geometric line work over a bright color creates a stained- glass effect — the black lines define cells of color that your eye reads as individual panels. On this electric violet, the effect is particularly striking because the purple has an inner shimmer that glows through the geometric grid. It looks like light passing through colored glass.
The precision of the black lines is what makes or breaks this design. Unlike organic swirls or marble, geometric patterns demand straight lines and consistent angles. Any wobble in the line work is immediately visible because the human eye detects irregularity in straight lines faster than in curves. This is a design where stamping plates or striping tape produce significantly better results than freehand.
The electric violet base has a subtle inner shimmer that catches light independently of the black grid. That dual layering — shimmer underneath, geometric lines on top — creates visual depth that a flat purple wouldn't provide. The shimmer is what makes the design feel alive rather than just graphic.
Design Breakdown:
Geometric overlay on a shimmer base. The line precision is what determines whether this looks professional or amateur.
Base Color: Electric violet or vibrant purple with subtle inner shimmer. Two coats for full saturation.
Nail Shape: Coffin or ballerina. The flat surface provides a stable canvas for the geometric pattern.
Design Element: Black intersecting lines creating a diamond/triangular lattice pattern across all nails.
Finish: Glossy with the purple's inner shimmer visible through the black grid.
Get The Look at Home:
Striping tape is the most reliable tool for clean geometric lines. Freehand is possible but requires significant practice.
- Violet base: Two coats of electric violet shimmer gel. Cure fully.
- Map the lines: Using thin black striping tape, lay diagonal lines in one direction across the nail. Space them evenly.
- Cross lines: Apply a second set of diagonal lines in the opposite direction, creating a diamond grid.
- Press firmly: Smooth each tape line from center to edge. Unpressed tape lifts within hours.
- Trim edges: Cut tape about 0.5mm inside the nail border. Tape at the edge peels off.
- Top coat: Thick, self-leveling top coat in one confident stroke. Going back shifts the tape.

33 Trendy Polka Dot Nail Ideas for 2026 💅
24.Velvet Merlot Matte
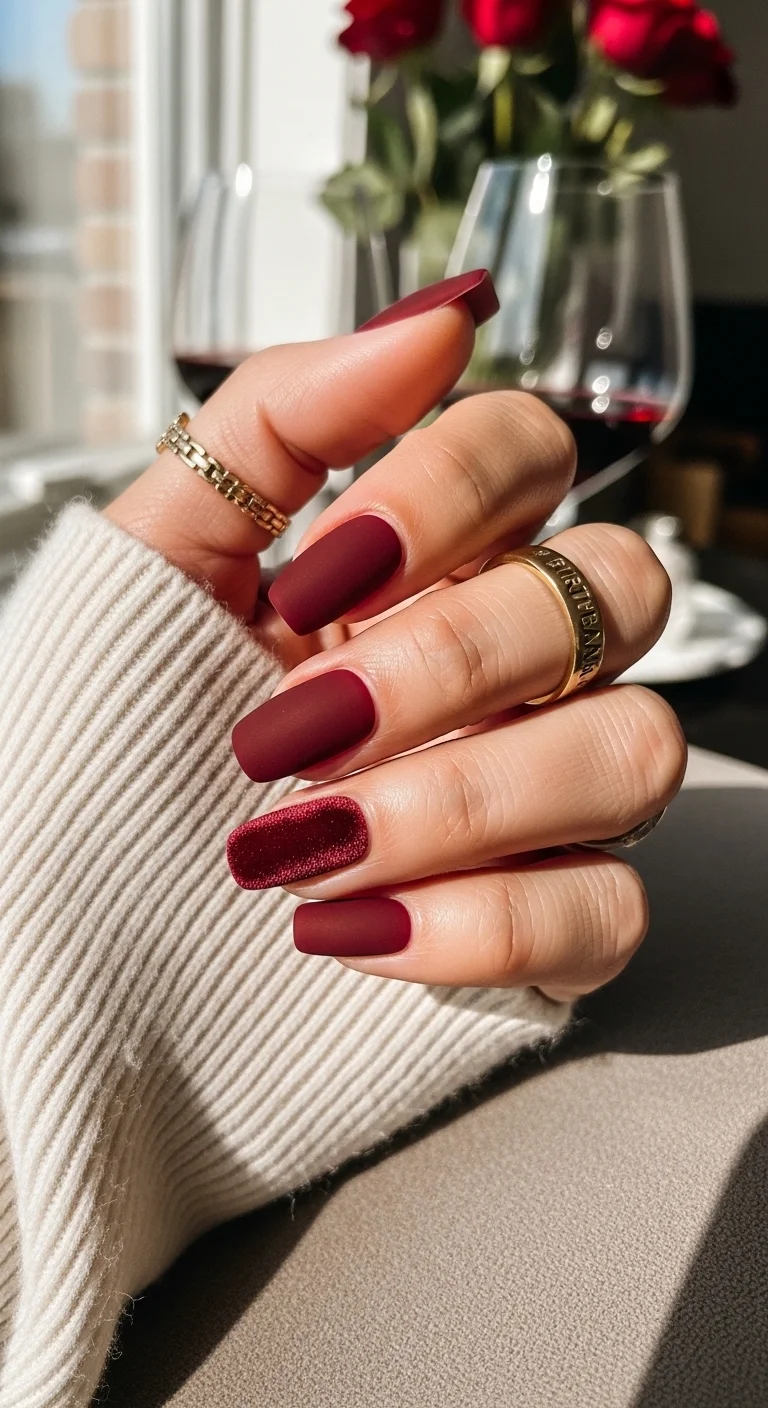
Deep merlot matte with red glitter accent on ring finger.
Overview:
The contrast between matte and glitter on the same hand creates a texture tension that's hard to achieve with a single finish. The matte nails absorb light; the glitter nail reflects it. Your eye bounces between the two surfaces, and that visual movement keeps the design interesting.
Merlot is one of the few dark colors that looks equally good in matte and glossy finishes. In matte, it looks like velvet or wine-stained wood. In glossy, it looks like liquid silk. The glitter accent adds a third texture — sparkling, dimensional, eye-catching — that completes the textural range.
The ring finger is the standard accent nail placement, and it works here because the glitter creates a natural focal point at the center of the hand. When you gesture or hold a glass, the glitter nail catches attention while the matte nails provide a rich, dark backdrop. The two finishes complement rather than compete.
Design Breakdown:
Matte solids with one glitter accent nail. The texture contrast is the design.
Base Color: Deep merlot or burgundy wine red on all nails. The ring finger gets a micro-glitter overlay.
Nail Shape: Coffin or ballerina. The flat tip complements the sophisticated, evening-wear energy.
Design Element: Solid matte merlot on four nails. Fine red glitter on the ring finger for sparkle accent.
Finish: True matte on four nails; micro-glitter sparkle on the ring finger.
Get The Look at Home:
Apply the glitter coat first on the ring finger, then do matte on the remaining nails. Matte over mistakes is harder to fix than glitter.
- Merlot base: Two coats of deep merlot on all nails. Let dry fully.
- Glitter accent: Apply one to two coats of fine red glitter polish on the ring finger only. Let dry.
- Dry completely: All nails must be fully dry before matte top coat — matte over wet polish bubbles.
- Matte coat: Apply matte top coat to the four non-accent nails. One stroke per nail. Don't go back over areas.
- Glitter seal: Apply glossy top coat over the ring finger glitter to smooth the texture.
- Cuticle cleanup: Clean edges with acetone before the matte coat fully sets.
25.Golden Flake White Almonds
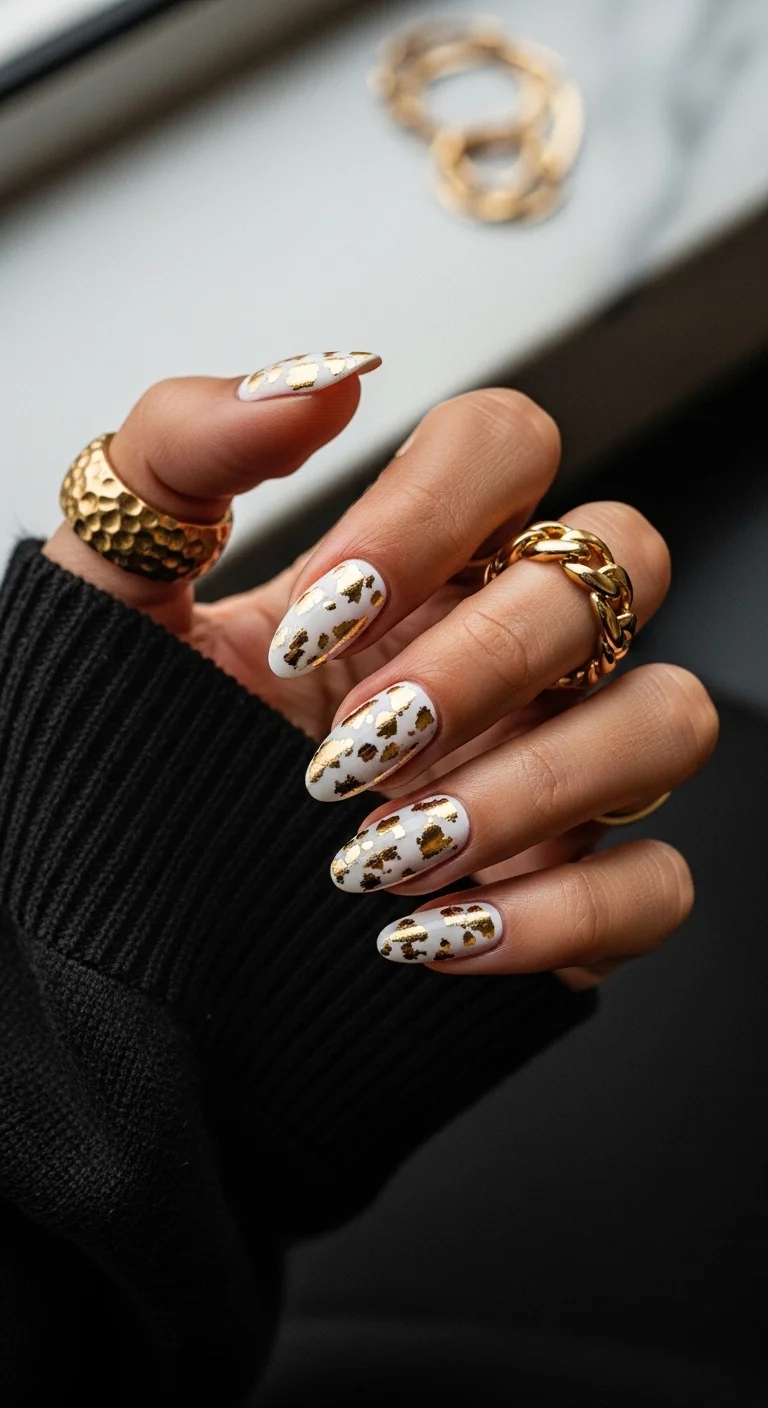
Irregular gold leaf fragments scattered over clean white.
Overview:
Gold leaf on white is one of the simplest high-impact combinations in nail design. The white provides a clean, bright canvas. The gold adds warmth, texture, and a sense of luxury. Together, they look like something from a high-end editorial shoot — despite being achievable at home with basic supplies.
The irregularity of the gold leaf is what makes this design work. Each flake is a different size and shape, and they're placed randomly across the nail. That randomness looks organic and hand-crafted — like gold dust scattered by wind rather than carefully positioned. Uniform gold shapes (circles, squares, hearts) would look like stickers. These irregular fragments look like real gold leaf.
The white base needs to be fully opaque. Any streakiness in the white shows through the gold leaf gaps and makes the design look unfinished. Two coats minimum, three if the formula is thin.
Design Breakdown:
Gold leaf scattered over an opaque white base. The random placement is what gives the design its character.
Base Color: Clean, fully opaque white. Two to three coats for complete coverage with no visible nail bed.
Nail Shape: Medium-long almond. The curved surface catches light across the gold flakes from multiple angles.
Design Element: Irregular gold leaf fragments scattered randomly across each nail. Vary the density — more gold on some nails, less on others.
Finish: Glossy top coat. The shine makes the white look crisp and the gold flakes catch light.
Get The Look at Home:
Gold leaf adheres to wet or tacky polish. Apply it before the top coat dries, not after.
- White base: Two to three coats of opaque white. Let dry fully.
- Tacky layer: Apply a thin coat of clear polish. While it's still wet, this becomes the adhesive for the gold.
- Place gold: Using tweezers or a dry brush, pick up small gold leaf fragments and press them onto the tacky surface. Don't try to flatten them perfectly — slightly crumpled foil catches more light.
- Vary density: More gold near the cuticle on some nails, scattered randomly on others. Avoid identical placement on every nail.
- Press flat: Use a silicone tool to gently press the gold leaf flat against the nail.
- Seal: Two coats of top coat. The gold leaf needs encapsulating to prevent lifting at the edges.
28 Effortless Hot Weather Day Hairstyles for Women 2026 ☀️💇♀️
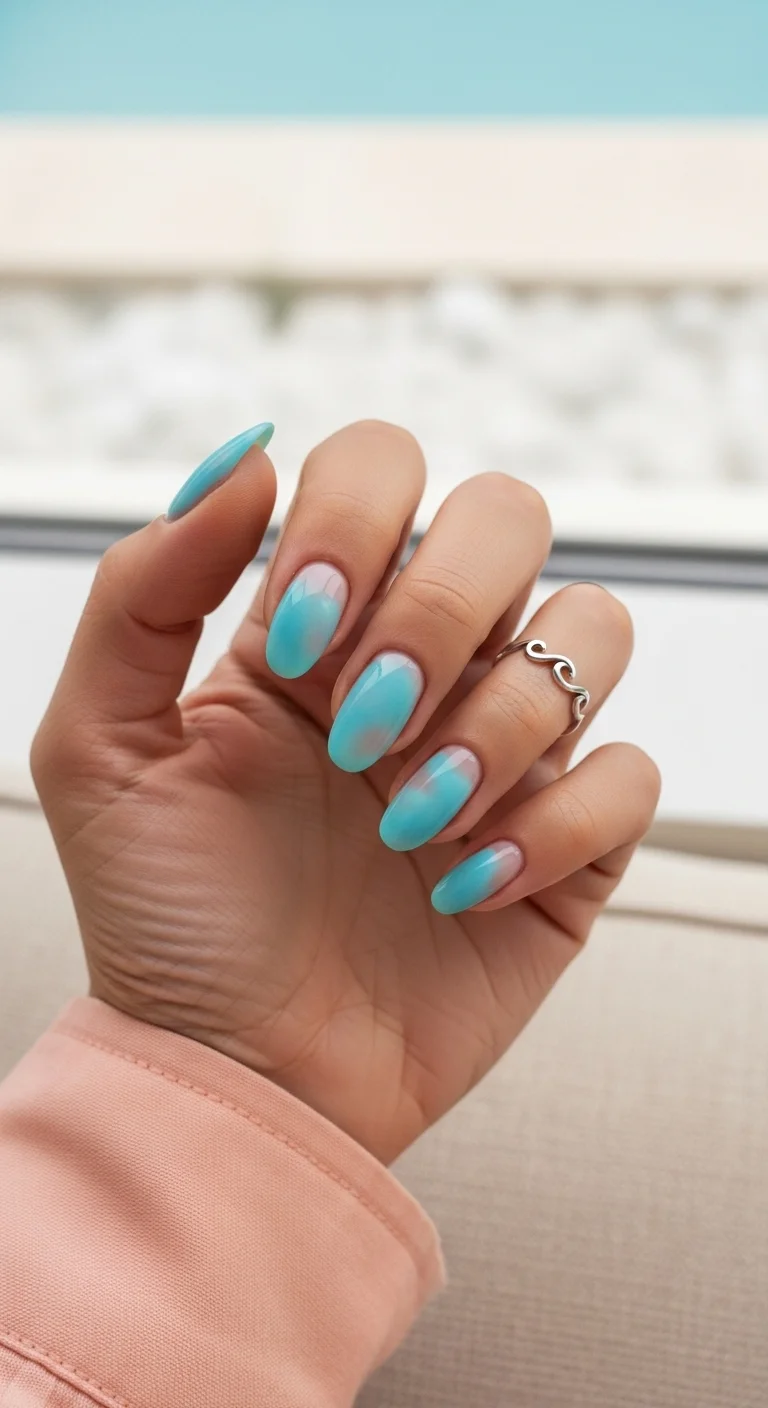
26.Icy Blue Chrome Frenchies
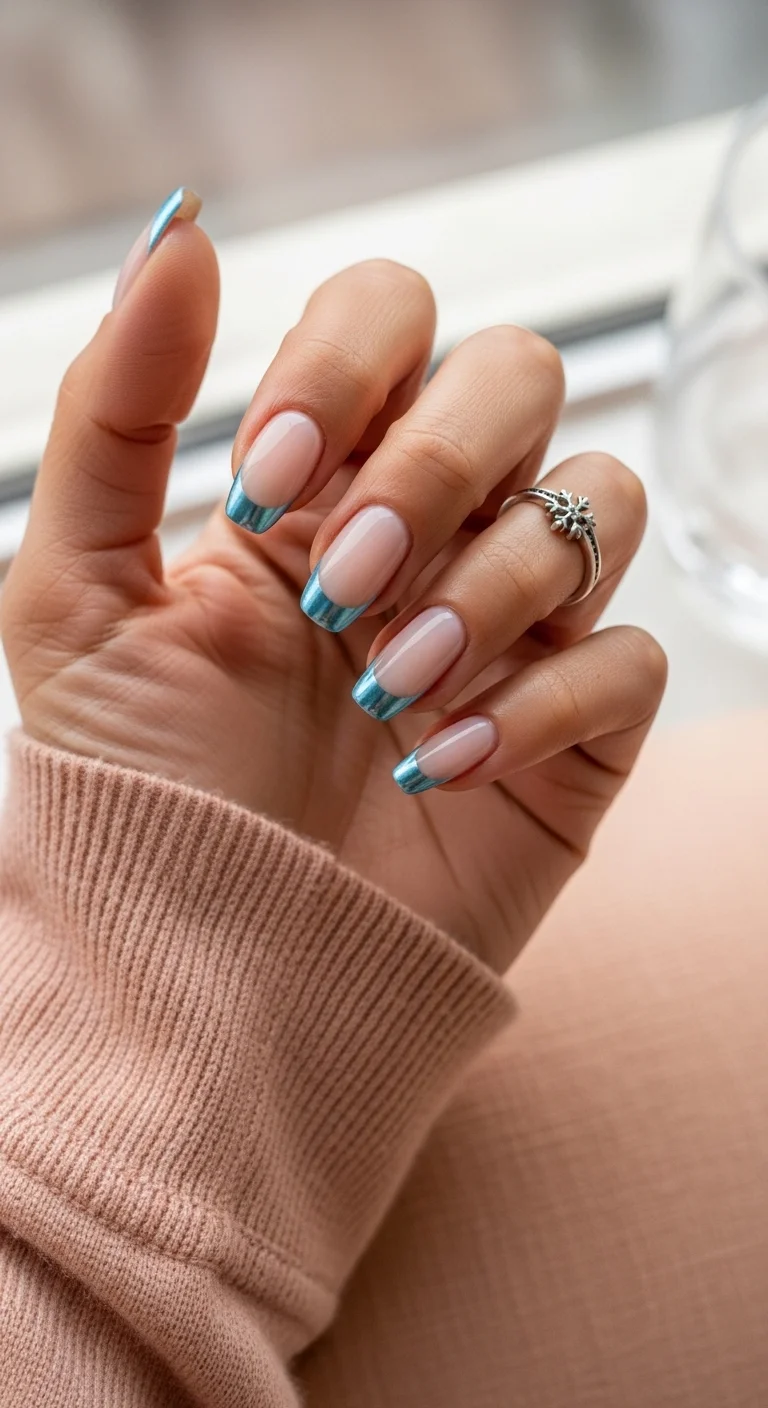
Mirror-finish icy blue chrome tips on nude almond nails.
Overview:
Chrome French tips are the modern evolution of the classic white-tipped French. The mirror finish on the tips catches light in a way that white polish simply can't — it transforms a conservative design into something that feels current without abandoning the French template entirely.
The icy blue specifically reads as cool and wintery, which makes it an interesting choice for a birthday. It works particularly well for winter birthdays or anyone who prefers cool tones over warm ones. The smile line between the nude base and the chrome tip is sharp and defined — that precision is what separates a well-executed chrome French from a messy one.
The nude base is doing critical work here. It matches the natural nail bed, which means the chrome tips read as an accent rather than a full-coverage design. That restraint keeps the manicure versatile — it works for a formal dinner and for casual daytime plans.
Design Breakdown:
Classic French proportions with chrome tips. The smile line precision is what determines the quality.
Base Color: Sheer nude or pale pink that matches the natural nail bed.
Nail Shape: Almond or oval. The curved tip complements the chrome's reflective curve.
Design Element: Icy blue or turquoise chrome tips with a sharp, defined smile line. Mirror-finish chrome powder application.
Finish: Glossy nude base, mirror-chrome tips. The contrast between cream and metallic finishes is the design.
Get The Look at Home:
The chrome tips are applied separately from the nude base — this is a two-process design requiring gel and chrome powder.
- Nude base: Two coats of sheer nude gel. Cure fully.
- Tip isolation: Apply French tip guides to mask the nude area, leaving only the tip exposed.
- No-wipe top coat on tips: Apply to the exposed tip area only. Cure.
- Chrome on tips: Rub icy blue chrome powder onto the cured tip area. The powder only adheres to the no-wipe surface.
- Remove guides: Peel carefully to reveal a clean smile line.
- Seal: Gel top coat over the entire nail to protect the chrome and the nude base. Cure.
27.Peachy Sunset Ombre
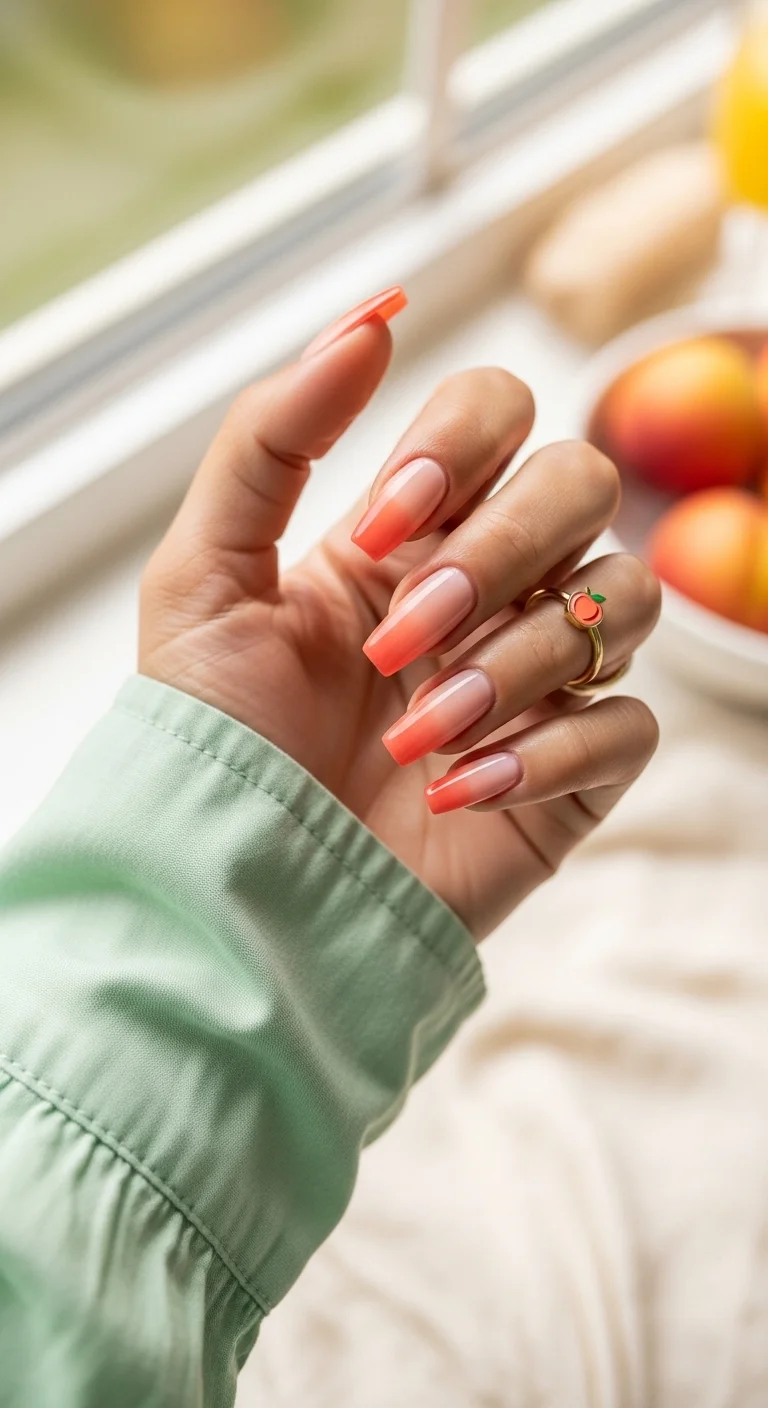
Seamless nude-to-coral gradient on long coffin nails.
Overview:
A well-executed ombre gradient is one of the most satisfying results in nail art. The colors blend so smoothly that there's no visible transition point — just a continuous flow from one shade to the next. This peachy version achieves that seamlessness over a longer nail, which gives the gradient more room to breathe.
The warm peach-coral palette is universally flattering. The nude at the cuticle matches most skin tones, making the gradient appear to grow naturally from the nail bed into the saturated coral tip. That naturalistic quality — the color looking like an extension of the body rather than paint on a surface — is what makes warm ombres so popular.
Long coffin nails are the ideal canvas for this gradient. The flat tip provides a defined endpoint for the color, and the length gives the blend zone enough vertical space to transition smoothly. On short nails, the gradient would be compressed and the blend would look abrupt.
Design Breakdown:
Two-color gradient with no art. The blend quality is the entire design.
Base Color: Sheer nude at the cuticle transitioning to vibrant coral-peach at the tips. Both colors should be warm-toned.
Nail Shape: Long coffin or ballerina. The extended length provides vertical space for a smooth gradient.
Design Element: None. Pure gradient. The seamless blend is the design.
Finish: High-gloss, glass-like shine. The gloss makes the gradient look like sunset light.
Get The Look at Home:
Sponge technique is the only reliable method for a seamless gradient. Brush blending leaves visible streaks.
- Base coat: Apply a ridge-filling base coat. Let dry completely.
- Sponge setup: Paint a stripe of nude and a stripe of coral side by side on a makeup sponge. Dab on paper first to remove initial excess.
- First pass: Press the sponge onto the nail with nude at the cuticle and coral at the tip. Three to four gentle dabs.
- Build opacity: Let each layer dry one minute, then repeat. Three to four rounds builds full coverage.
- Cuticle cleanup: Use a small brush dipped in acetone to clean any overflow from the skin.
- Top coat: Two coats. The sponge leaves a pebbled texture that needs smoothing.

31 Stunning Prom Nails for Women in 2026 💃
28.Coffee & Cream Abstract
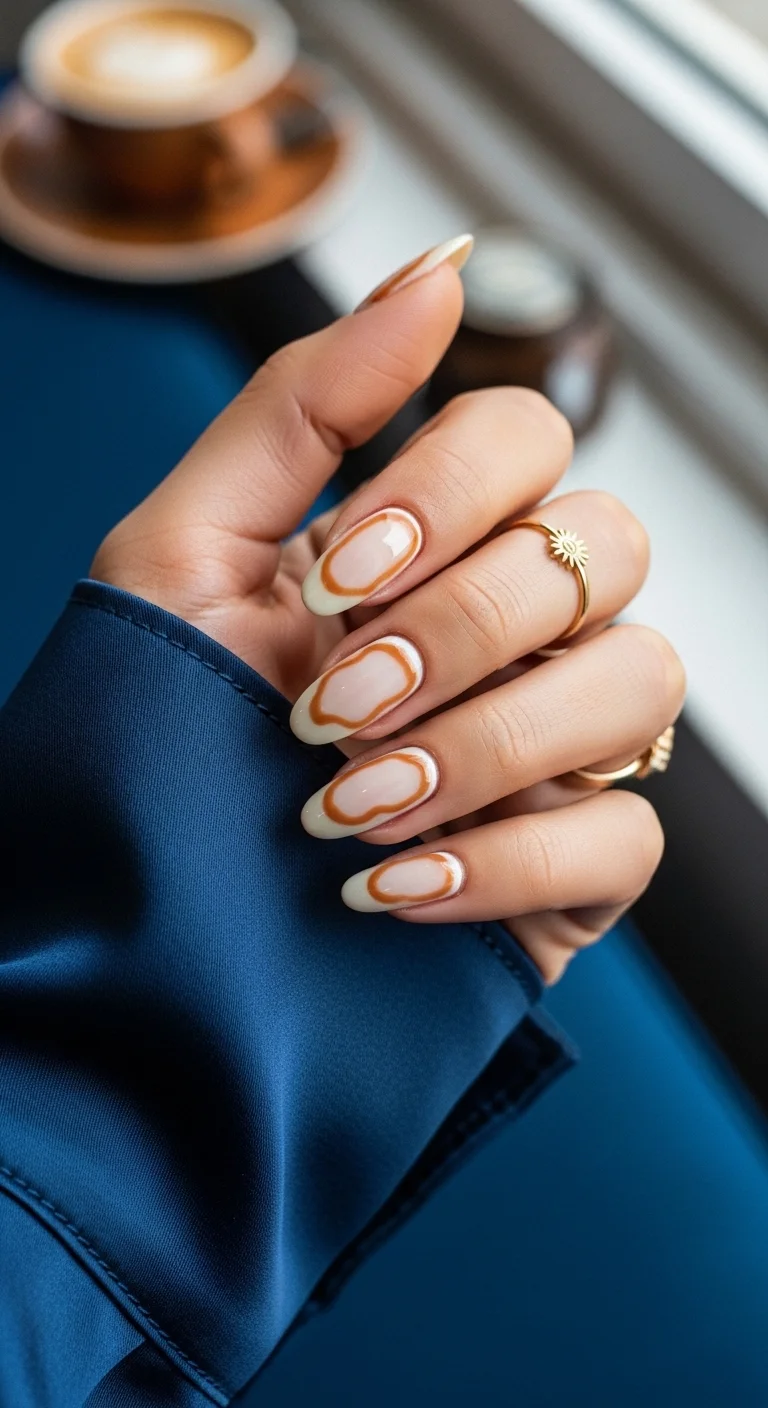
Organic brown outlines creating abstract negative-space French tips.
Overview:
Abstract nail art that references something specific (in this case, latte art) without literally depicting it is more interesting than straightforward illustration. The brown outlines here create freeform shapes that suggest coffee swirling into cream — the association is there if you look for it, but the design works purely as abstract art if you don't.
Every nail has a different pattern, which makes the set feel bespoke. The brown linework is fluid and organic — no two curves are the same, no two shapes are identical. That variation is what separates hand-painted abstract from printed pattern. The "imperfections" are the design.
The three-color palette (nude, cream, brown) stays within the coffee spectrum, which creates a cohesive visual story even though each nail looks different. The warm tones work across skin tones and seasons — this isn't a design that's limited to fall or winter despite the coffee reference.
Design Breakdown:
Abstract freehand art in a narrow warm palette. The linework quality is what determines whether this looks editorial or messy.
Base Color: Nude or sheer pink as the foundation. Cream or ivory for the filled sections within the abstract shapes.
Nail Shape: Long almond. The curved shape complements the organic linework.
Design Element: Brown organic outlines creating abstract shapes with cream/ivory fills. Each nail has a unique composition.
Finish: High-gloss, wet-look shine. The gloss makes the brown lines look like liquid coffee.
Get The Look at Home:
Draw the brown outlines first, then fill the shapes with cream. The outlines define the composition.
- Nude base: Two coats of sheer nude. Let dry fully.
- Brown outlines: Using a thin liner brush and warm brown polish, draw flowing, organic curved lines across each nail. The lines should create enclosed or semi- enclosed shapes.
- Cream fills: Using a small brush and cream or ivory polish, fill in some of the enclosed shapes. Leave others empty (nude shows through).
- Vary per nail: Each nail should have a different arrangement of outlines and fills. No two nails should match.
- Check balance: Hold both hands at arm's length. The visual weight should feel roughly even.
- Top coat: One thick coat to smooth the layered texture and seal the design.
29.Black Tie Gold Geometric
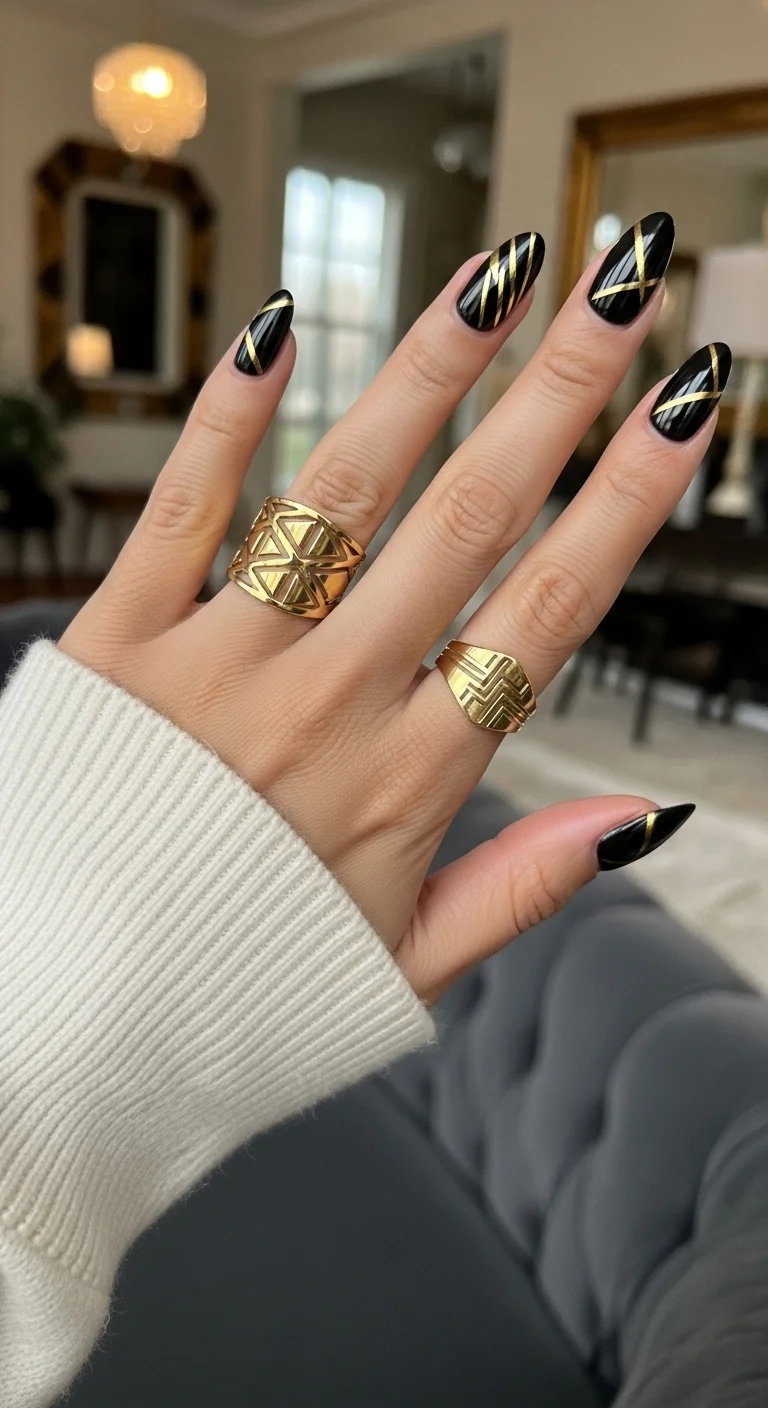
Precision gold metallic lines in Art Deco patterns over jet black.
Overview:
Black and gold is the most formal color combination in nail design. It's the tuxedo of manicures — inherently dressed-up, inherently evening-appropriate. The geometric line work here adds an Art Deco quality that references 1920s glamour without being costume-y.
Each nail has a different geometric pattern — parallel diagonals on one, crisscross on another, angular lines on a third. That variation prevents the set from looking like a repeating stamp while maintaining cohesion through the consistent color palette. The variety says "these were individually designed," which is the difference between curated and manufactured.
Gold metallic polish over black requires opaque gold. Thin or sheer gold over black looks greenish and muddy. The gold needs to sit on top of the black as a distinct, reflective layer. Metallic polish or chrome paint works better than shimmer polish for this purpose.
Design Breakdown:
Geometric metallic overlay on black. The gold precision and pattern variety are the design.
Base Color: Jet black. Two coats for full opacity. The black should be deep enough to provide maximum contrast against the gold.
Nail Shape: Long almond or stiletto. The pointed shape complements the angular geometric patterns.
Design Element: Gold metallic lines in varied geometric patterns — diagonals, crisscross, angular. Each nail has a unique pattern.
Finish: Ultra-glossy black with reflective metallic gold lines.
Get The Look at Home:
Gold striping tape works better than gold polish for clean, precise geometric lines.
- Black base: Two coats of jet black. Let dry fully.
- Map the patterns: Decide which geometric pattern goes on which nail before starting. Variety is the goal.
- Gold lines: Using thin gold striping tape, apply geometric patterns — parallel diagonals on one nail, crisscross on another, angular lines on a third.
- Press firmly: Smooth each tape line from center to edge. Unpressed tape lifts within hours.
- Trim: Cut tape about 0.5mm inside the nail border.
- Top coat: Thick, self-leveling top coat in one stroke. Going back over it shifts the tape.
28 Stunning Softball Hairstyle Ideas with Braids for 2026 🥎✨
30.Mauve Glitter Accents
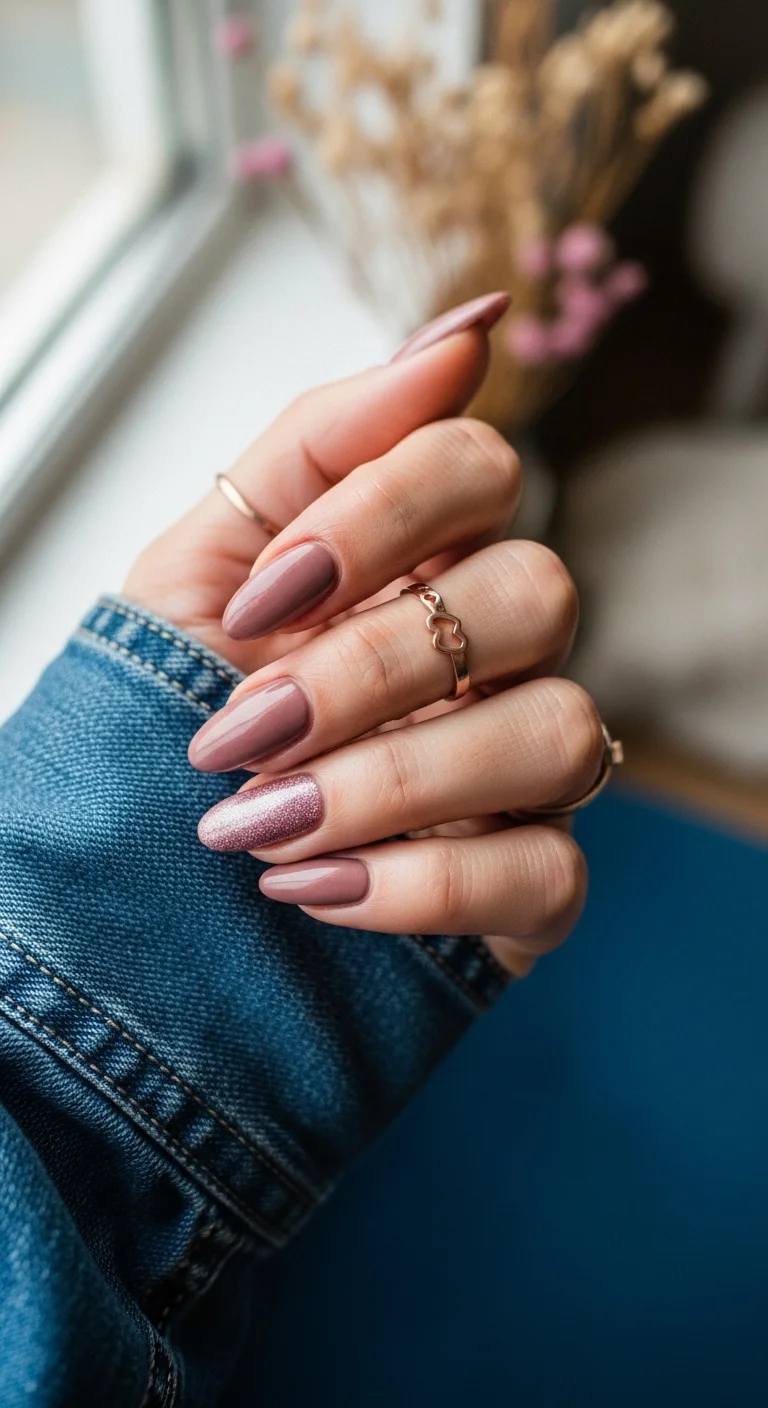
Sophisticated dusty mauve with rose gold glitter accent nail.
Overview:
The single glitter accent nail is a reliable birthday manicure structure. It gives you sparkle without committing to a full glitter set, which can feel overwhelming for people who prefer understated nail design. The mauve provides the sophistication; the glitter provides the celebration.
Dusty mauve is one of the more versatile neutral-adjacent colors. It's not quite pink, not quite purple, not quite brown — it sits in a tonal range that works with most wardrobes and most skin tones. That neutrality is what makes it a safe choice for a birthday manicure that needs to work across multiple days and outfits.
The rose gold glitter on the ring finger complements the mauve's warm undertone. Silver glitter would create a temperature mismatch — cool metallic against warm mauve. Rose gold shares the warmth and feels like a natural extension of the base color rather than an interruption.
Design Breakdown:
Solid mauve nails with one glitter accent. The color harmony between mauve and rose gold is what makes this work.
Base Color: Dusty mauve or rose-mauve on four nails. Fine rose gold glitter on the ring finger.
Nail Shape: Medium almond. The classic shape suits the understated elegance.
Design Element: Solid mauve on thumb, index, middle, and pinky. Full-coverage rose gold glitter on ring finger.
Finish: Glossy on mauve nails. Textured sparkle on the glitter accent.
Get The Look at Home:
This is one of the quickest designs on the list — solid color plus one accent nail. Budget 15 minutes.
- Mauve base: Two coats of dusty mauve on four nails. Let dry.
- Glitter accent: One to two coats of fine rose gold glitter on the ring finger. Let dry.
- Texture check: Run your fingertip over the glitter nail. If it feels rough, add another layer of top coat.
- Mauve top coat: One coat of glossy top coat on the four mauve nails.
- Glitter seal: Two coats of top coat on the ring finger to smooth the glitter texture.
- Cuticle cleanup: Clean edges before the top coat fully sets.
31.Lavender Lace Botanical
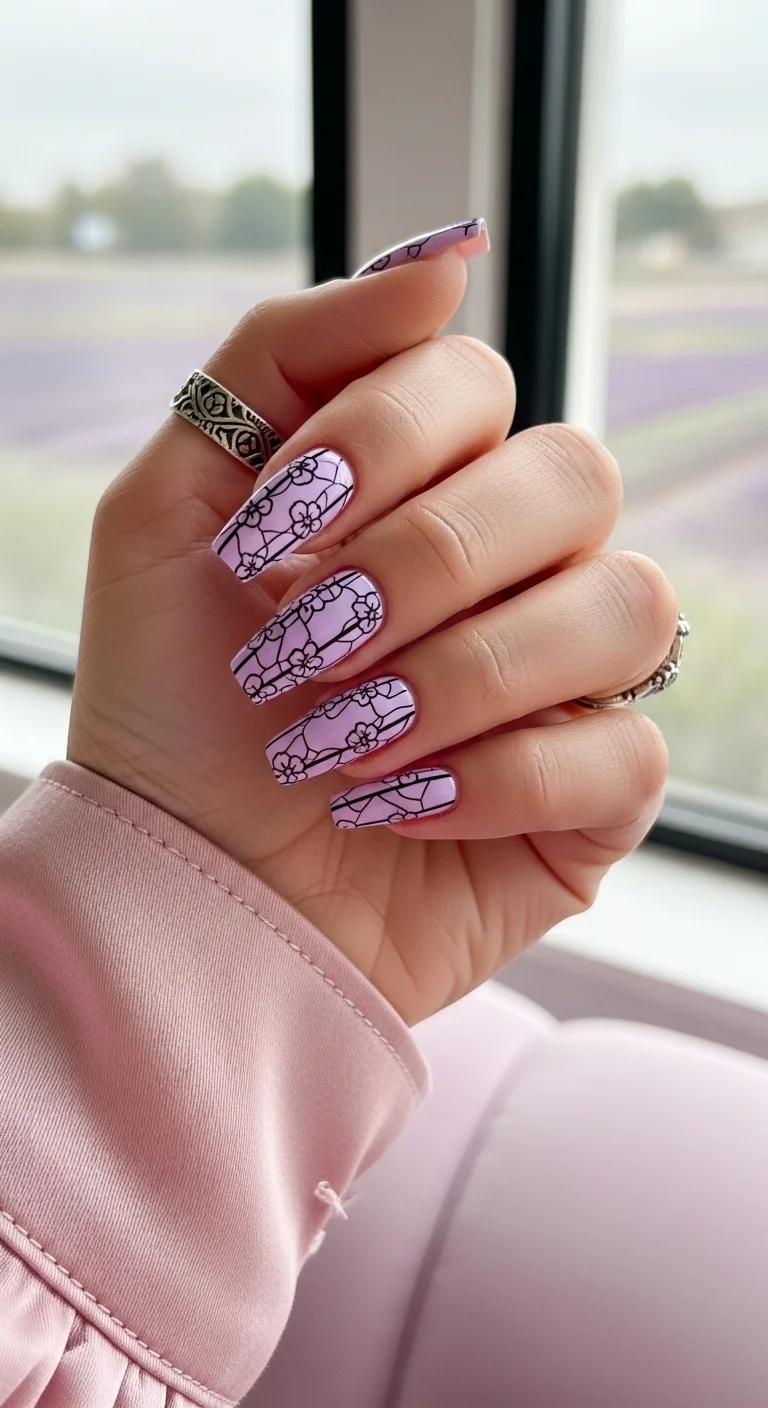
Fine black lace and botanical patterns over soft lavender.
Overview:
Black line art over a pastel base creates a graphic quality that neither color achieves alone. The lavender provides soft, feminine warmth. The black lines provide structure and definition. Together, they create a stained-glass or lace effect — delicate but defined, pretty but not precious.
The botanical and lattice patterns span across all nails as a cohesive design rather than individual art per nail. That continuity — where the pattern appears to flow from one nail to the next — requires planning. You need to consider how the pattern connects at the nail edges, not just how it looks on each individual nail surface.
The fine linework here is remarkably precise, suggesting either stamping plates or a very skilled hand. For a DIY attempt, stamping plates produce significantly more consistent results than freehand for this type of detailed pattern. The investment in a good botanical stamping plate pays for itself across multiple manicures.
Design Breakdown:
Continuous pattern across all nails. The lace/botanical motif requires precision tools for clean results.
Base Color: Soft lavender or lilac. Two coats for smooth, opaque coverage.
Nail Shape: Coffin or ballerina. The flat surface provides a stable canvas for the detailed pattern.
Design Element: Fine black line work depicting botanical stems, flowers, and geometric lattice/netting. The pattern flows across all nails as a cohesive design.
Finish: Glossy top coat. The shine makes the lavender look luminous and the black lines look crisp.
Get The Look at Home:
Stamping plates are the most reliable tool for this level of detail. Freehand is possible but demands significant skill.
- Lavender base: Two coats of lavender gel or polish. Let dry fully.
- Plan the pattern: Look at your stamping plate or design reference. Decide which elements go on which nails before starting.
- Stamp or paint: Using a botanical stamping plate and black stamping polish, transfer the pattern to each nail. Align carefully so the design flows between nails.
- Freehand additions: If stamping, use a thin liner brush to add connecting elements between the stamped sections.
- Check continuity: Hold your hand together and verify the pattern appears to flow from nail to nail.
- Top coat: One coat to seal the stamping and protect the fine lines.

29 Best Tropical Vacation Nails for Women in 2026 🌴
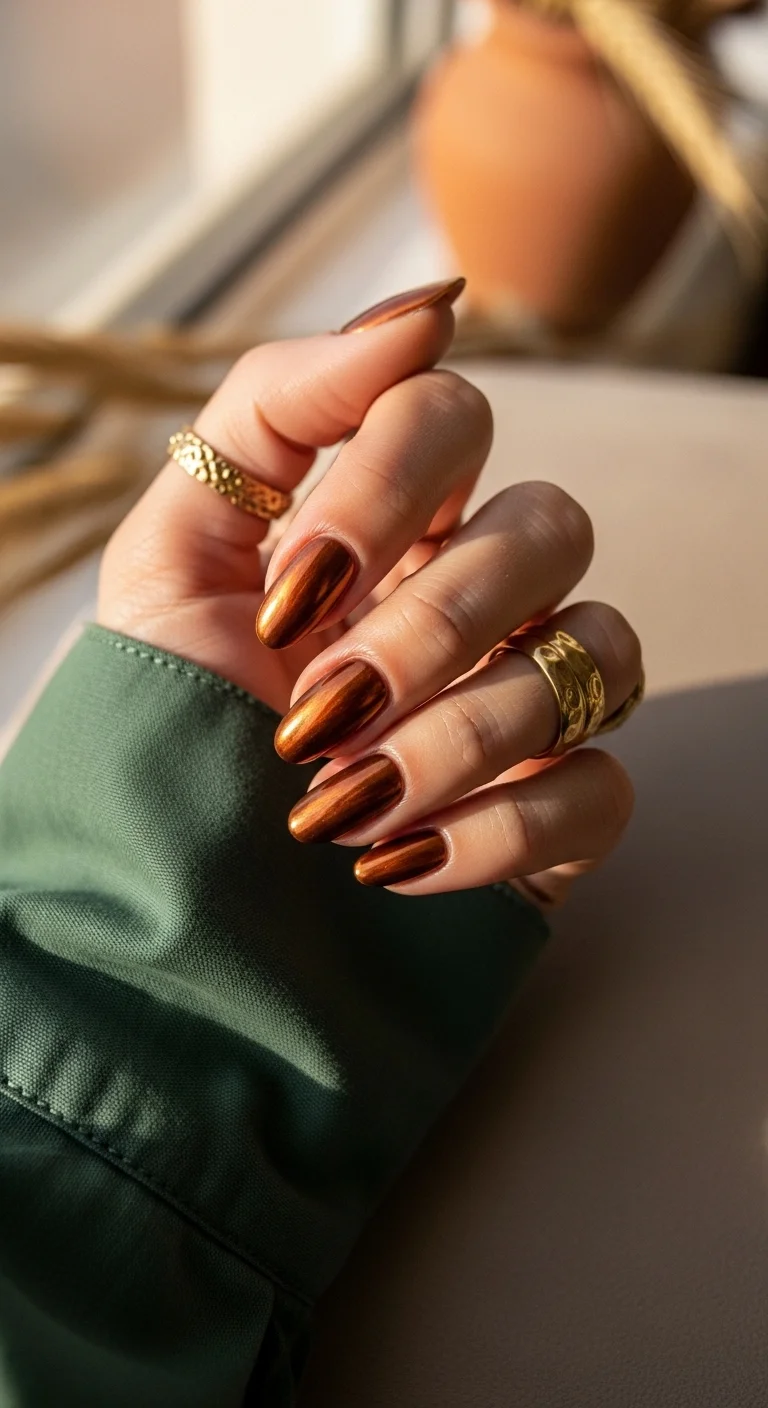
32.Chocolate Bronze Chrome
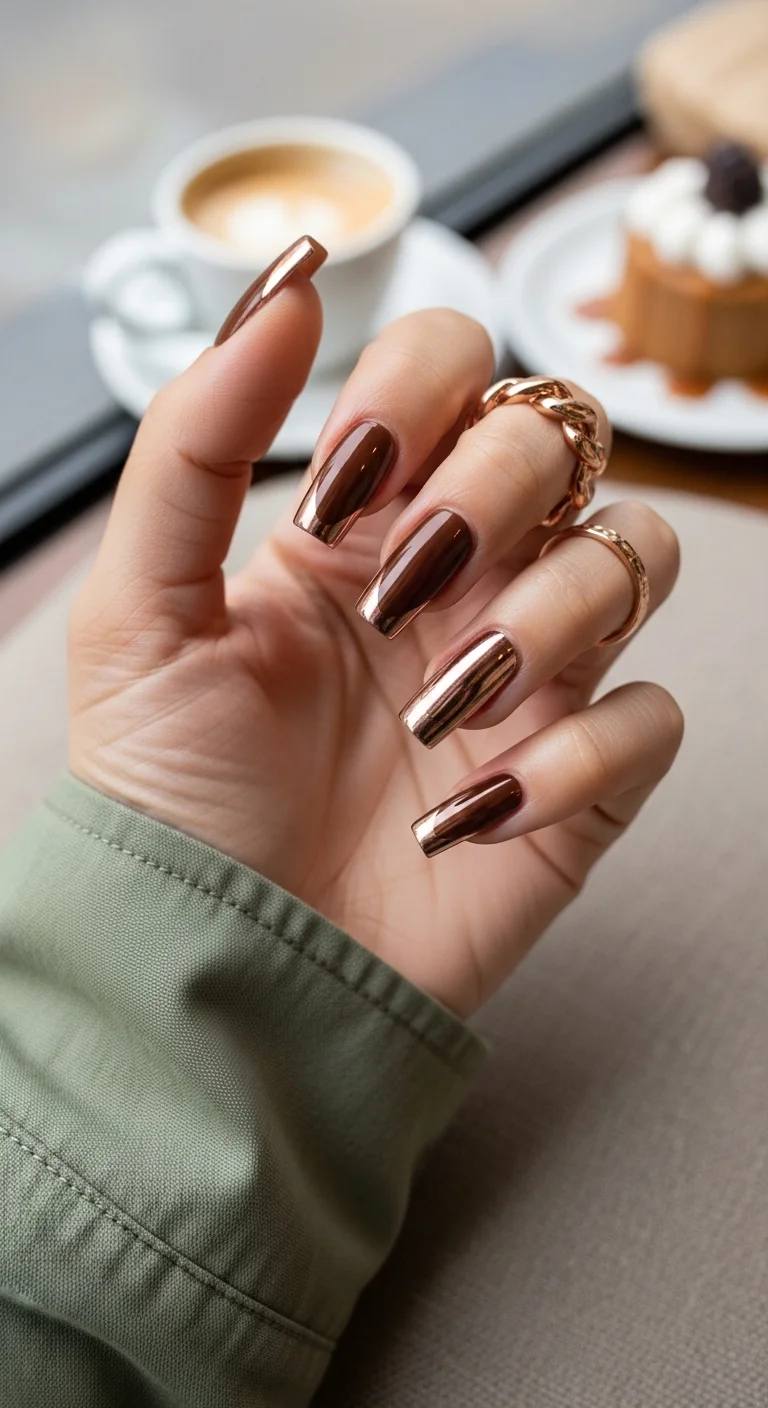
Deep chocolate brown chrome with warm bronze mirror finish.
Overview:
Brown chrome is an unusual finish that sits between copper and chocolate. The warm bronze overlay on a dark brown base creates a color that shifts between mocha and rose-gold depending on the light angle. It's more interesting than standard copper chrome — the darker base adds depth that lighter chrome finishes lack.
The long coffin shape maximizes the chrome's reflective surface. Each nail becomes a small bronze mirror, reflecting the surrounding environment with warm, golden tones. The effect is luxurious without being ostentatious — it looks expensive without looking like you tried too hard.
This is one of the few chrome finishes that reads as warm rather than cool. Silver and icy-blue chrome feel wintery and cold. This bronze-chocolate chrome feels like warm coffee or melted caramel — an inviting, approachable warmth that works across seasons.
Design Breakdown:
Full-coverage brown chrome. The warm metallic finish is the entire design.
Base Color: Deep chocolate brown gel polish. Two coats, fully cured. The dark base gives the chrome its rich depth.
Nail Shape: Long coffin. The flat tip and tapered sides provide a large reflective surface.
Design Element: Bronze or copper chrome powder buffed to a mirror finish over the brown base.
Finish: Chrome/mirror finish. The warm metallic sheen is the design.
Get The Look at Home:
Same chrome technique as copper or rose gold — the dark brown base determines the undertone.
- Brown base: Two coats of deep chocolate brown gel. Cure fully.
- No-wipe top coat: Apply and cure for 30 seconds.
- Chrome powder: Rub bronze or copper chrome powder firmly across the nail using a silicone applicator. Buff until mirror-reflective.
- Check coverage: Look from multiple angles. Any dull spots need more buffing.
- Dust off: Soft brush to remove excess powder from skin and cuticles.
- Seal: Gel top coat, cap free edge, cure. Two coats if the surface feels textured.
33.Pink Beige Luxe Tweed
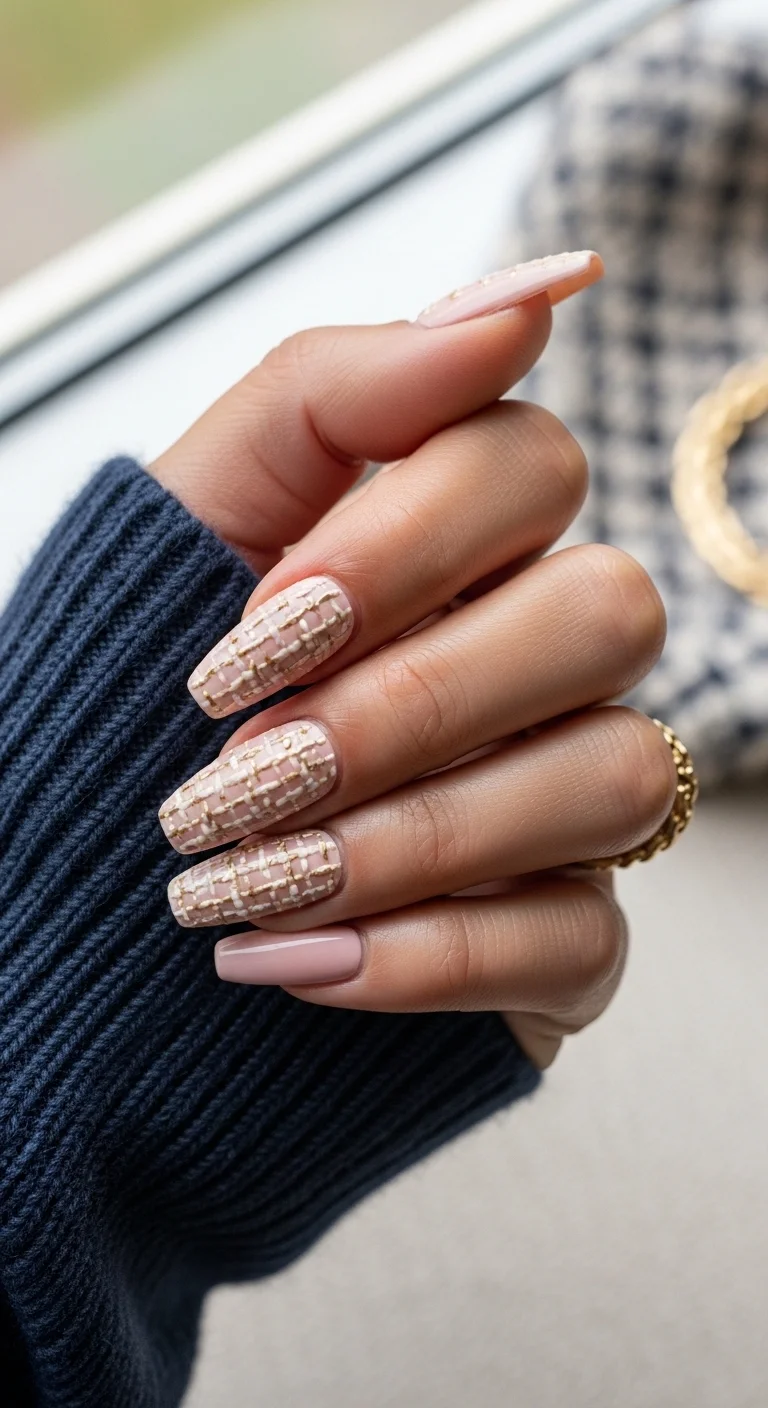
Dimensional tweed weave pattern in cream and gold over blush pink.
Overview:
Nail art that mimics fabric texture is a relatively niche category, and tweed is one of the more recognizable textile references. The interlocking horizontal and vertical lines create an instantly readable "woven" quality that reads as Chanel-inspired luxury. It's nail art that references fashion rather than nature.
The raised, dimensional quality of the tweed lines is what sells the illusion. Flat painted lines look like a grid pattern. Raised lines — created with builder gel or thick acrylic — catch light and cast tiny shadows, creating the physical texture of actual woven thread. The dimensionality is what separates "tweed nail art" from "plaid nail art."
The solid pinky nail provides visual relief from the dense tweed pattern on the other fingers. Without that clean accent, the tweed across all five nails would feel visually heavy. The solid nail lets the eye rest between the textured ones.
Design Breakdown:
Dimensional fabric-texture art on three nails with a solid accent. The raised lines create the tweed illusion.
Base Color: Soft blush pink or nude. Cream and gold for the raised tweed thread-work on accent nails.
Nail Shape: Long coffin. The flat surface provides a stable canvas for the dimensional art.
Design Element: Raised tweed/bouclé texture created with intersecting horizontal and vertical lines in cream and gold. Three nails feature the tweed; the pinky is solid.
Finish: Mixed — textured/matte on tweed nails, glossy on the solid pinky.
Get The Look at Home:
The tweed lines require builder gel or thick acrylic paste to achieve the raised texture. Regular polish won't hold the dimension.
- Pink base: Two coats of blush pink on all nails. Cure or dry fully.
- Horizontal lines: Using a thin brush and builder gel mixed with cream polish, draw horizontal lines spaced about 2mm apart across three nails.
- Vertical lines: Let the horizontal lines set, then draw vertical lines at the same spacing, creating the woven grid.
- Gold accents: Using gold metallic polish, add thin gold lines intermittently within the grid for sparkle.
- Cure: If using builder gel, cure under UV lamp before sealing.
- Seal: Top coat around the raised lines, not over them. Coating the tops flattens the texture.
34.Pink Navy Plaid Squovals
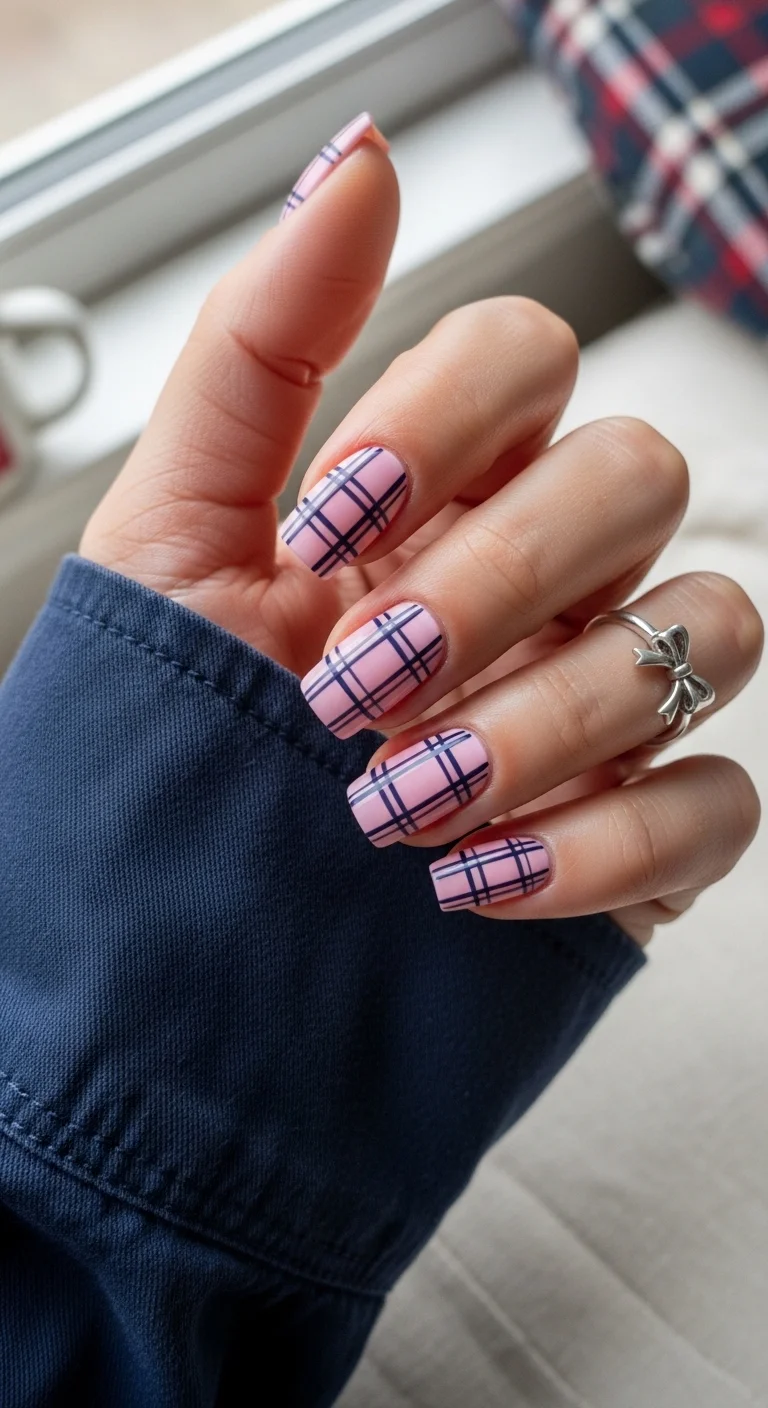
Crisp navy plaid lines over soft baby pink base.
Overview:
Plaid nail art walks a fine line between "preppy" and "costume." The deciding factor is always the color palette. Pink and navy is a classic combination that reads as intentionally preppy rather than accidentally busy. The soft pink keeps the design feminine; the navy keeps it structured. Together, they reference British tartan without leaning into costume territory.
The plaid lines are crisp and precisely spaced, which is essential for this pattern. Uneven spacing or wobbly lines immediately read as "homemade" rather than "hand-painted." For this design, stamping plates or striping tape produce significantly better results than freehand painting.
Short squoval nails are the right shape for plaid. The straight edges mirror the geometry of the plaid lines, creating a cohesive visual framework. On almond or stiletto nails, the curved edges would clip the plaid pattern at odd angles and lose the graphic quality.
Design Breakdown:
Geometric pattern on a pastel base. Line precision is what makes this look preppy rather than sloppy.
Base Color: Soft baby pink or blush. Two coats for smooth, opaque coverage.
Nail Shape: Short squoval. The straight edges complement the geometric plaid pattern.
Design Element: Navy blue plaid/tartan lines — intersecting horizontal and vertical lines of varying thickness, with thin white accent lines creating the traditional plaid grid.
Finish: Glossy top coat. The shine makes the pink look fresh and the navy look crisp.
Get The Look at Home:
Work in rounds: all horizontal lines first across all nails, then all vertical lines. This is faster than completing one nail at a time.
- Pink base: Two coats of baby pink. Let dry fully.
- Thick horizontal lines: Using a striper brush and navy polish, draw horizontal lines spaced about 3mm apart. Let dry before adding more lines.
- Thin horizontal lines: Add thinner navy lines between the thick ones for depth.
- Vertical lines: Repeat the same line pattern vertically, creating the plaid grid. Where lines cross, the doubled-up navy creates darker "overlap" squares.
- White accents: Using a thin striper and white polish, add one or two thin white lines within the plaid pattern for contrast.
- Top coat: One coat, floating the brush to avoid dragging the plaid lines.
35.Periwinkle Blue Frenchies
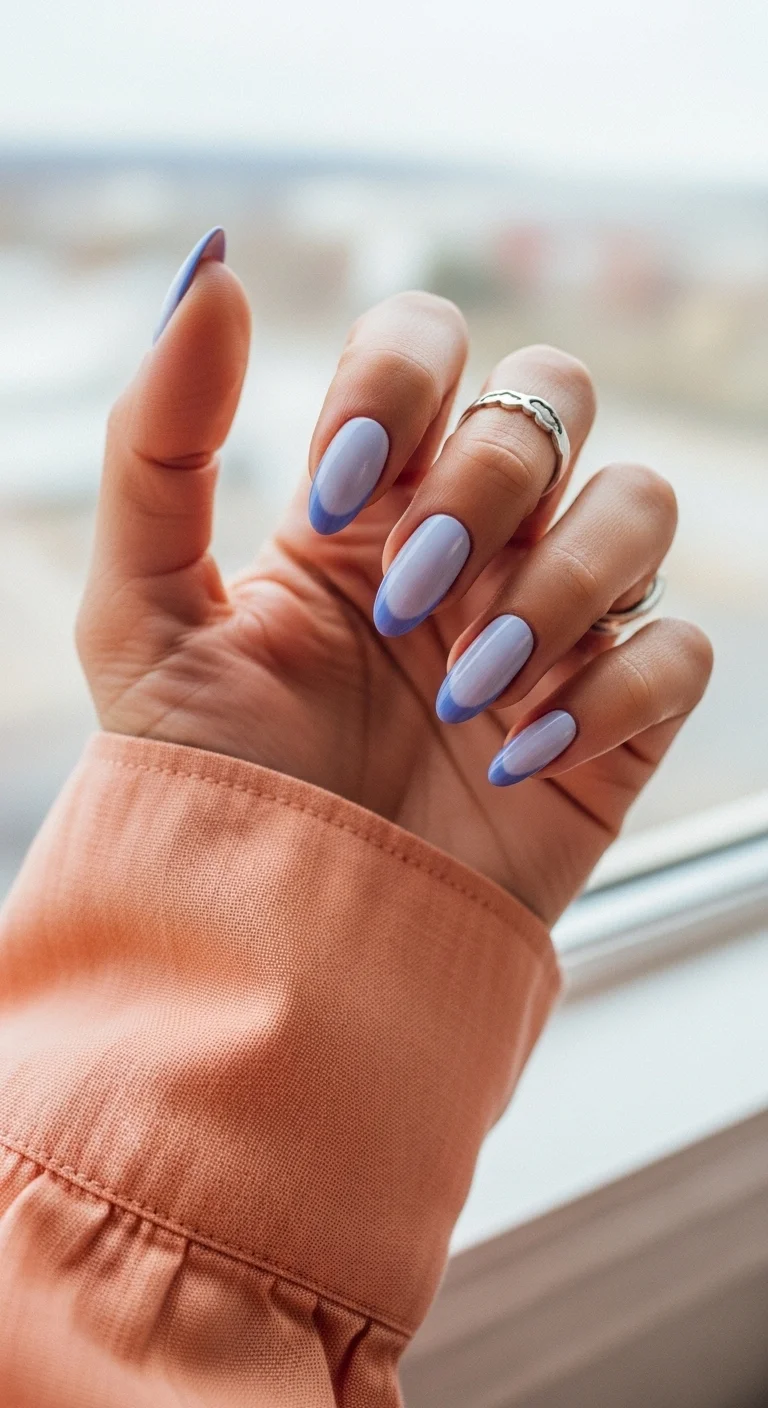
Tonal blue-on-blue French tips in soft periwinkle shades.
Overview:
Tonal French tips — using two shades of the same color family for the base and the tip — are a modern twist on the classic white-on-nude formula. Here, the light periwinkle base and the slightly deeper cornflower tip share a cool undertone that makes the transition feel natural rather than jarring. It's a French that whispers instead of announces.
The soft smile line — more of a gentle curve than a sharp arc — adds to the design's understated quality. A hard, precise smile line would make the French feel more formal and traditional. The blurred edge keeps it relaxed and contemporary. It's a French for people who find the classic version too stiff.
Blue-on-blue works because both shades are cool-toned and similar in saturation. If the tip were significantly darker or brighter than the base, the contrast would be too strong and the design would read as two separate colors rather than a tonal gradient. The subtlety of the difference is what makes this work.
Design Breakdown:
Tonal French with a soft smile line. The subtle color difference between base and tip is the design.
Base Color: Soft periwinkle or lavender-blue. Two coats for smooth coverage.
Nail Shape: Medium almond. The curved tip complements the soft smile line.
Design Element: Deeper cornflower or periwinkle blue tips with a softly curved smile line. The tip color is slightly more saturated than the base.
Finish: Glossy top coat. The shine unifies the two blue tones.
Get The Look at Home:
The soft smile line is easier to achieve than a sharp one — it's more forgiving of slight imperfections.
- Light base: Two coats of soft periwinkle. Let dry fully.
- Tip color: Using a thin liner brush and the deeper periwinkle, paint the tips with a gentle, slightly curved line. Don't aim for a sharp arc — a soft, diffused edge is the goal.
- Blend option: If the smile line looks too harsh, use a clean, slightly damp brush to gently blur the boundary between base and tip.
- Consistency: Compare all nails. The tip thickness should be roughly uniform, but slight variation is fine with this soft style.
- Top coat: One generous coat. The gloss helps the two blue tones blend visually.
Choosing the Perfect
Birthday Shape
Your birthday is the one day you should feel completely extra. The right nail shape can change the entire vibe of your birthday look.
For the Party Girl
Long coffin or stiletto shapes are pure drama. They elongate the fingers and make even a simple birthday mani look like a high-fashion editorial statement.
For the Elegant Dinner
Medium almond is the gold standard for 'it-girl' elegance. It’s sophisticated, feminine, and won’t get in the way while you’re cutting your cake.
The Birthday Mani Maintenance Kit
Between opening presents, clapping during 'Happy Birthday,' and perhaps a few too many celebratory cocktails, your birthday nails go through a lot. I always keep a mini"Party-Proof" kit in my clutch for emergenies.
Pro-tip for 2026: If you're wearing chrome or glitter, apply a fresh top coat the night before your big celebration. It adds that extra layer of 'glassy' protection and ensures your nails are at their peak shine for the cameras!
How to Pick Nails That Pop in Birthday Pictures
Your birthday is going to generate approximately ten thousand photos, and your hands will be in at least half of them. Between the cake cutting, the toast holding, the gift opening, and the obligatory flat-lay of your outfit, your nails need to read well on camera. Not all finishes photograph the same way.
The flash test: Chrome and metallic finishes look incredible under flash photography — they catch the light and create that glossy, magazine-quality reflection. Matte finishes, on the other hand, can look flat or even dull in flash photos. If your celebration involves club lighting, dinner candles, or any scenario where flash will be used, lean toward gloss or chrome. A set like "Chocolate Bronze Chrome" will look more dynamic in those flash photos than a matte equivalent ever could.
The close-up test: Intricate hand-painted art like "Lavender Lace Botanical" looks stunning in detail shots and ring selfies, but can read as visual noise in wide group photos. If you want your nails to register in shots from across the table, go with high-contrast color blocking or a bold chrome finish that reads clearly from any distance.
The movement test: Finishes with shimmer, chrome, or reflective elements look dynamic when your hands are moving — perfect for candid birthday videos and toasts. Flat, solid colors can read static and flat on video. Something like "Peachy Sunset Ombre" has built-in movement because the gradient shifts across the nail, creating visual interest even in motion.
How to Make Your Manicure Lasts the Entire Celebration
Birthday nails have it harder than any other manicure. They need to survive pre-party prep, the actual celebration, the hungover brunch the next morning, and possibly a full week of birthday dinners and drinks. That is a lot of wear for a single set. Here is how to stack the odds in your favor.
Shape is your first line of defense. Short squoval and soft almond shapes are significantly less prone to chipping than long stilettos or coffins. The rounded edges distribute impact better, and there is less free edge to catch on things. If longevity matters more than drama, this is the shape conversation to have with your tech. You can still go bold with the finish — chrome on a soft almond reads just as celebratory as chrome on a stiletto.
The cap-the-edge trick is non-negotiable. When your tech applies the top coat, ask them to brush a thin layer over the very tip of each nail — the free edge. This seals the layers and prevents tip chipping, which is the number one reason birthday manicures start looking tired by day three. Most techs will do this automatically if you ask.
Carry a mini gloss top coat in your bag. A tiny bottle of clear top coat can rescue a dull spot or a lifting edge in seconds. One swipe on the morning of your celebration refreshes the shine and buys you another day of wear. It sounds simple, but it is the single most effective thing you can do beyond the salon chair.
💡 Try not to soak your hands for the first 12 hours after your appointment. The top coat continues to cure and harden during that window. Dishes, baths, and swimming can wait until tomorrow.
With so many versatile options, selecting a birthday design can be one of the most enjoyable parts of the celebration prep. Whether you opt for a classic, understated look or a detailed pattern, the chosen manicure is sure to complement the final styling.
Consider saving your favorite designs to a 'Birthday Inspo' Pinterest board to share directly with the nail technician. Having a clear reference helps streamline the appointment and ensures the desired results. Have a wonderful birthday celebration filled with memorable moments, good company, and a perfectly styled manicure.