Nail Trends
30 Stunning Vacation Nail Ideas for Your Next Getaway in 2026
There is a distinct anticipation in the week leading up to a vacation. Between packing and planning the itinerary, selecting a durable pre-trip manicure is often a key detail. A well-chosen nail design serves as a versatile accessory that complements every outfit throughout the trip.
Whether lounging poolside at a resort, walking through historic European streets, or relaxing in wine country, the manicure should match both the destination's aesthetic and the practical demands of travel. This curated collection highlights the top vacation nail trends for 2026, offering ideal options to save for the next salon visit.
The Destination Rule: Let Your Itinerary Pick Your Nails
Here is the biggest mistake people make with vacation nails: they pick a design before they figure out where they are going. Showing up to a cozy mountain cabin with neon coral palm trees is a vibe mismatch that no amount of good lighting can fix. The shift in 2026 vacation nail trends is toward destination-specific choices — letting the landscape, architecture, and energy of your trip dictate the palette and style.
Heading to a coastal town or beach resort? "Electric Coral Ocean Waves" or "Turquoise Water Ripple Marble" are obvious fits because they echo the colors already around you. Off to a safari or jungle retreat? "Olive Snake Print Safari" is muted enough to feel grounded in the landscape. City vacation? "Midnight Cityscape Starry Sky" or "Icy Silver Metal Chrome" match the urban energy. The principle is simple: your nails should feel like they belong in the photos you are going to take, not like they were copied from a generic summer board.
The easiest shortcut is to pull two colors from your actual packing palette — the dress you plan to wear for dinner, the color of the hotel tiles you saw on Instagram, the shade of the water at your beach. That built-in cohesion makes every photo look intentional.
💡 Look up your accommodation on Instagram before you go. If the villa has blue shutters and white walls, a crisp white and cobalt geometric set will look like it was custom-made for your vacation content.
1.Soft Pink Bow Coquette Nails
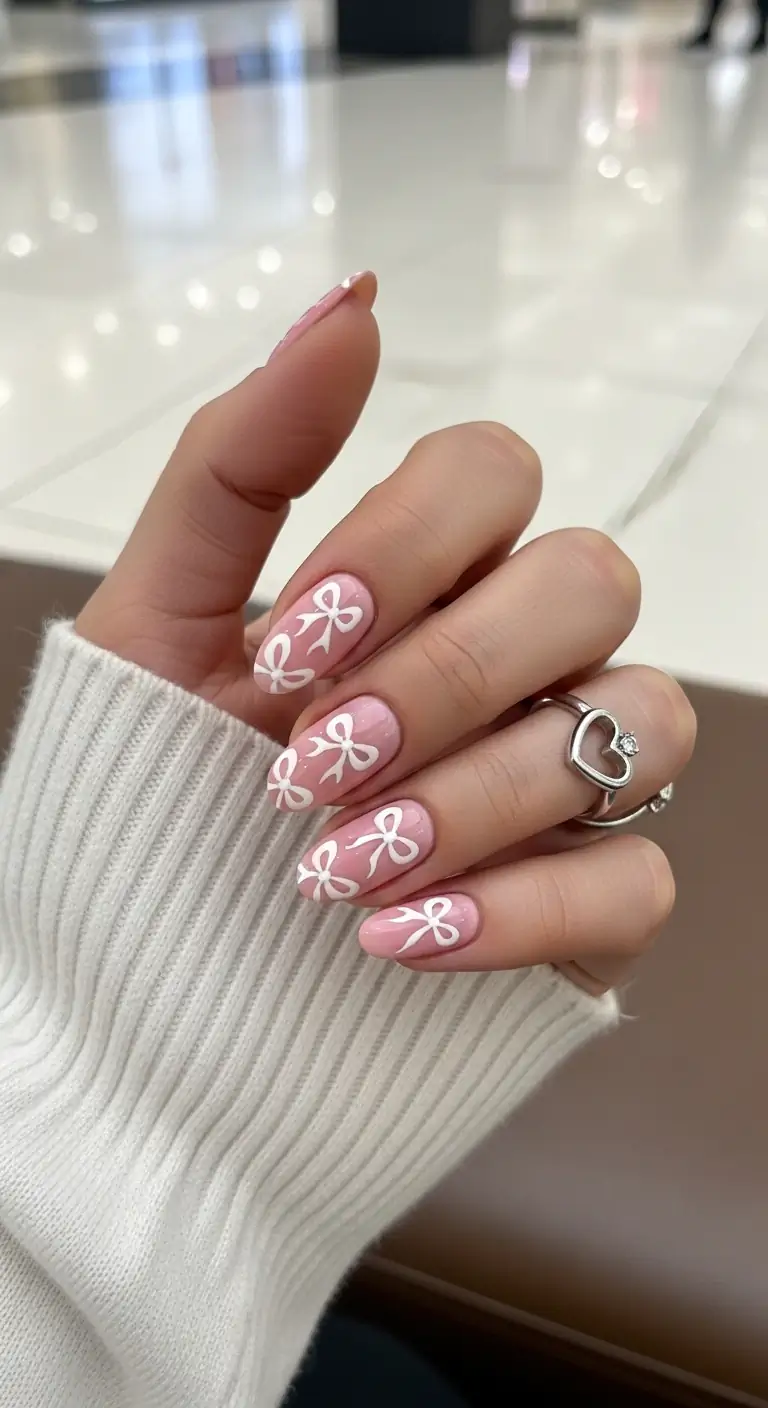
Sheer baby pink almond nails adorned with delicate white coquette bows.
Overview:
Coquette aesthetic meets vacation energy in this design. The sheer baby pink base reads almost translucent against the skin, letting the white bows steal the spotlight on every single nail. There's something about the combination that feels both nostalgic and current — like a bow on a gift you actually want to open.
Medium almond tips keep the silhouette refined while offering enough surface area for the bow details to land cleanly. The glossy finish amplifies the sweetness without tipping into saccharine territory. For anyone craving a design that whispers rather than shouts, this one delivers.
Practical consideration: the bow embellishments may catch on fabric or hair, especially during the first few days. Those with active lifestyles might find the three-dimensional elements require extra caution. The visual payoff is substantial for a resort dinner or date night, though.
Design Breakdown:
The magic of this manicure is its precision detailing on an understated base. It's all about creating balance.
Base Color: A semi-sheer, milky soft pink. OPI "Mod About You" or Essie "Ballet Slippers" work well — you want translucency, not full coverage.
Nail Shape: Medium almond. The tapered shape elongates the fingers and gives the bows room to breathe.
Design Element: Multiple hand-painted white bows in varying sizes on every nail. The ring finger gets a slightly larger, more centered bow for subtle emphasis.
Finish: High-gloss, glass-like top coat that makes the bows look embedded rather than sitting on top.
Get The Look at Home:
This design looks intricate but is achievable at home with patience and the right tools.
- Prep: Shape into a clean almond, push back cuticles, and buff the nail surface smooth.
- Base coat: Apply a protective base coat for adhesion and longevity.
- Milky pink: Apply 1-2 coats of sheer milky pink. Let each coat dry fully.
- Draw the bows: Use a razor-thin detailing brush and opaque white polish. Start with a tiny center dot, draw two symmetric loops, then add ribbon tails. Vary the size and placement on each nail.
- Scattered dots: Fill empty spaces with tiny white dots using a superfine dotting tool for the scattered effect.
- Seal: Finish with a durable, high-shine top coat to lock everything in place and make the hand-painted lines look crisp.
30 Stunning Summer Hair Trends for 2026 ☀️🌊
2.Architectural Monochrome Windowpane
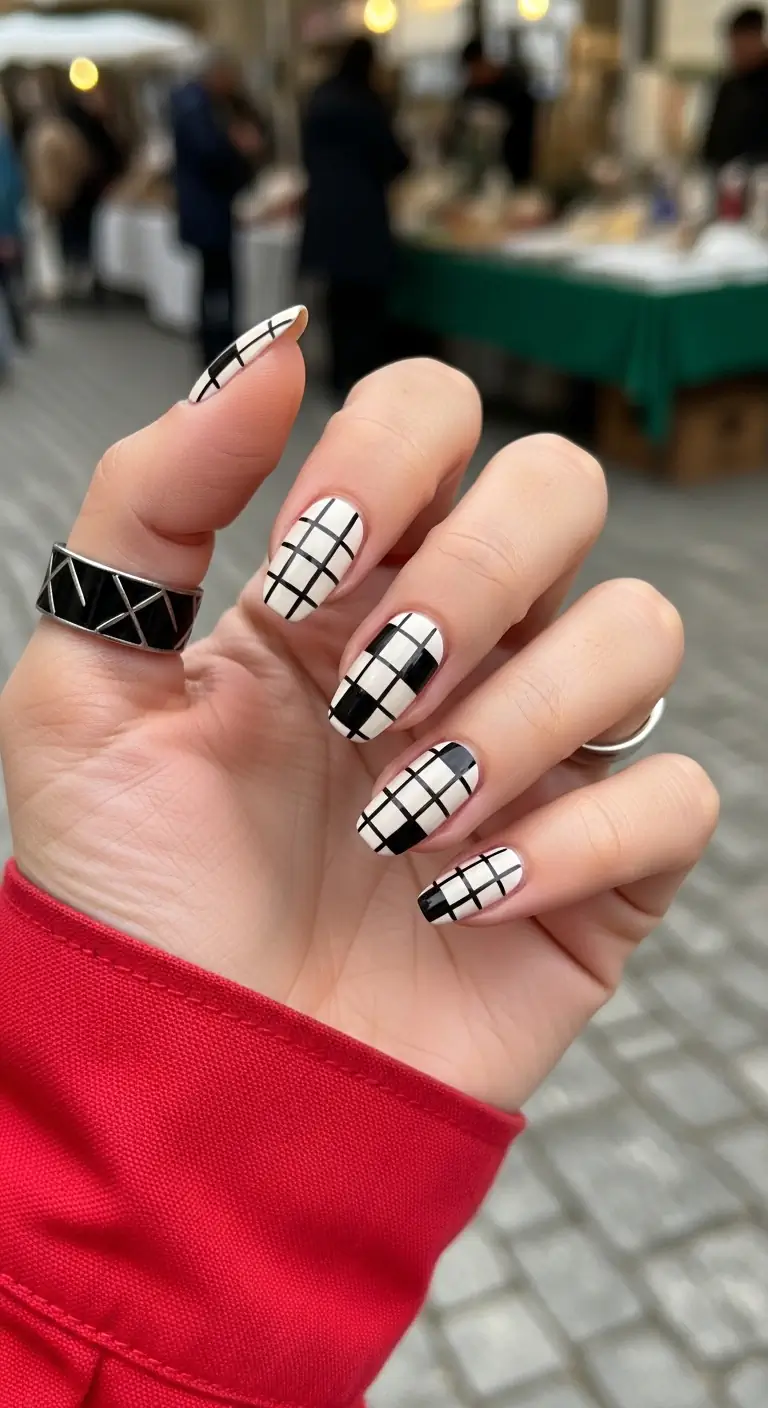
Crisp white almond nails with black windowpane grid and checkerboard accent.
Overview:
Sharp geometry and stark contrast define this monochrome design. The white base acts as a clean canvas for the black windowpane grid that stretches across each nail with architectural precision. Every line lands exactly where it should, creating a sense of order that feels almost meditative.
The ring finger breaks the pattern with a bold checkerboard block that commands attention without disrupting the overall cohesion. It's the kind of accent that makes people look twice. Long almond tips give the grid enough real estate to breathe, preventing the design from feeling cramped.
One downside: stark white base shows every chip and imperfection. Regular touch-ups will be necessary to maintain that crisp, gallery-worthy look. The grid work demands a steady hand — this is a design best left to experienced nail artists or attempted with striping tape.
Design Breakdown:
A masterclass in clean lines and geometry. The precision required is high, but the result is flawlessly structured.
Base Color: A creamy off-white or light beige. Pure white works too, but off-white reads warmer against most skin tones.
Nail Shape: Long almond. The elongated shape gives the grid pattern room to establish its rhythm.
Design Element: Fine black lines in a windowpane grid pattern. Ring finger features a bold filled-in checkerboard block for accent.
Finish: High-gloss top coat that makes the graphic design look smooth and modern.
Get The Look at Home:
Precision is key here. A long-haired liner brush and patience are non-negotiable.
- Prep: Shape into a long almond, remove cuticles, and buff the surface smooth.
- Base coat: Apply a protective base coat.
- Cream base: Paint 2 coats of creamy off-white and allow to dry completely.
- Vertical lines: Using a long-haired liner brush and black polish, draw straight vertical lines evenly spaced across the nail. Let dry.
- Horizontal lines: Draw horizontal lines across the vertical ones to create the grid. Keep a cleanup brush dipped in acetone nearby for wobbly lines.
- Checkerboard accent: On the ring finger, fill in alternating squares to create a bold checkerboard block.
- Seal: Finish with a chip-resistant, glossy top coat.
3.Oxblood Micro Heart Romance
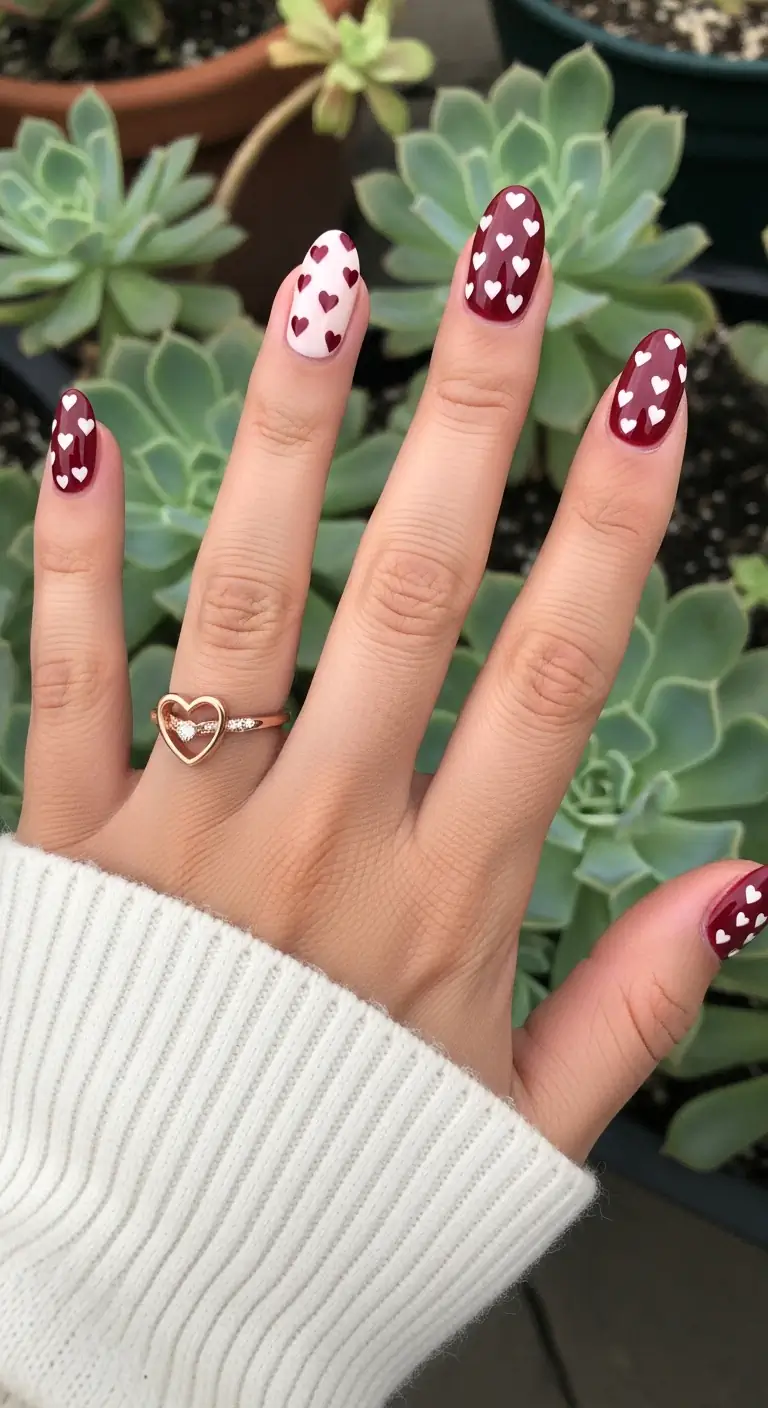
Deep oxblood almond nails with scattered micro-hearts for subtle romance.
Overview:
Romance doesn't have to mean bright red and pink. This oxblood base with micro-hearts scattered across every nail is the grown-up version of Valentine's nail art — moody, sophisticated, and just sweet enough to notice up close.
The ring finger flips the script with a white base and burgundy hearts, creating a reverse accent that breaks the dark palette without clashing. It's a small design decision that changes the entire dynamic of the set, giving the eye a place to rest.
Oxblood polish is notoriously difficult to remove — it stains everything it touches. Use a peel-off base coat if you're planning to switch designs within a week, or commit to the acetone-soaked foil wrap method for clean removal.
Design Breakdown:
Contrasting tones and delicate detail work create a romantic set with depth.
Base Color: A deep, rich oxblood or burgundy wine. Essie "Wicked" or OPI "Lincoln Park After Dark" capture the right depth.
Nail Shape: Medium almond. The rounded shape softens the dark color's intensity.
Design Element: Tiny scattered micro-hearts in white and pale pink across all nails. Ring finger is a reverse accent — white base with burgundy hearts.
Finish: High-gloss top coat that makes the burgundy look like liquid velvet.
Get The Look at Home:
Micro-hearts require a steady hand, but the small scale is actually forgiving — imperfections look intentional at this size.
- Prep: Shape into a soft almond and apply base coat.
- Color blocking: Paint thumb, index, middle, and pinky in oxblood (2 coats). Paint ring finger white (2 coats). Let dry completely.
- Hearts on dark nails: Using a fine dotting tool and white/pale pink polish, place two tiny dots side by side, then drag a thin line down from each to meet at a point.
- Hearts on accent nail: Repeat the same technique on the ring finger using burgundy polish over the white base.
- Scatter placement: Vary the heart positions — some near the cuticle, some near the tip, some off-center. Random distribution looks more organic.
- Seal: Apply a glossy top coat. Cap the free edge to prevent chipping on the dark color.
28 Cute & Sporty Baseball Game Nail Ideas for 2026 ⚾
4.Electric Coral Ocean Waves
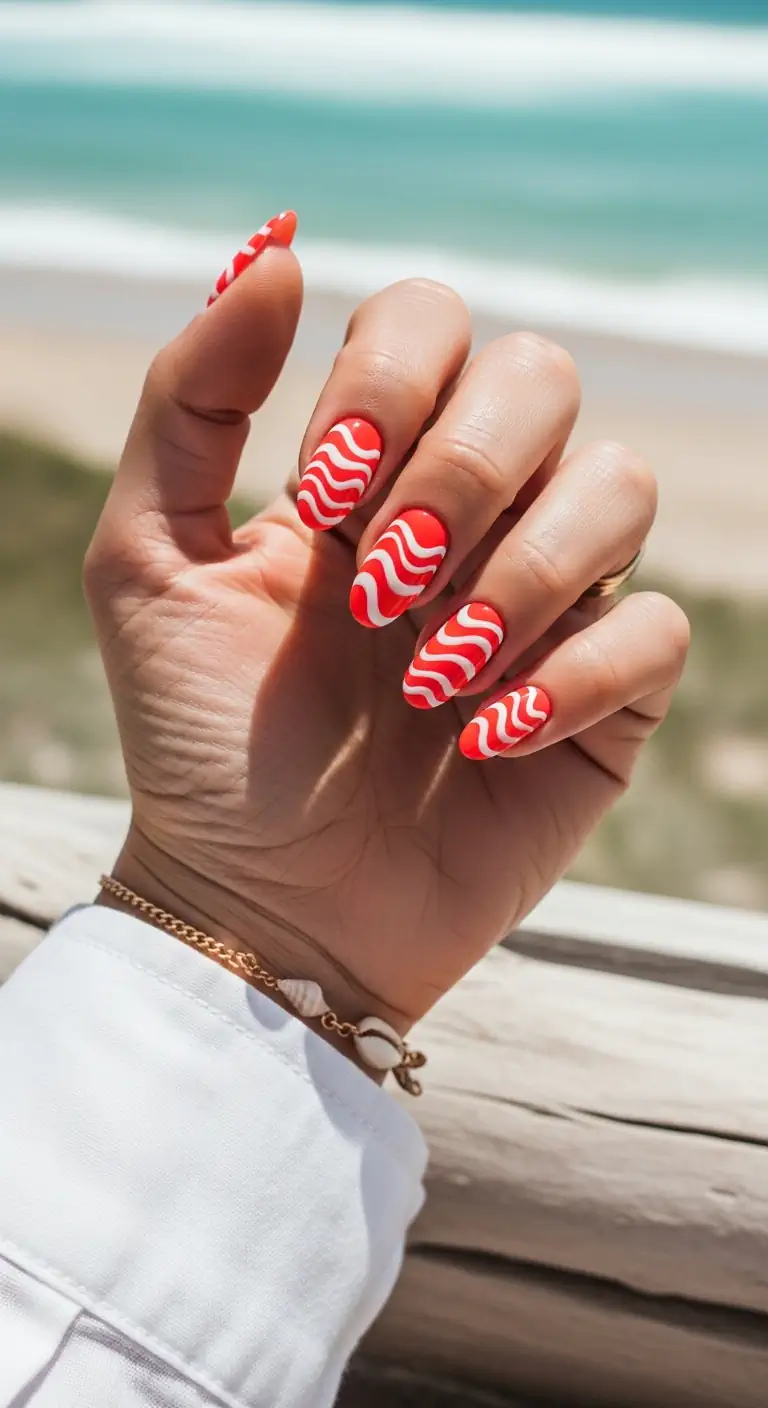
Electric coral almond nails with white wave stripes for a bold ocean-inspired look.
Overview:
Bright coral is one of those colors that photographs differently than it looks in person — it's warmer on camera, more electric in real life. The white wave stripes running horizontally across each nail add movement and break up what would otherwise be a solid block of color.
The wave pattern varies slightly from nail to nail, which keeps the design from looking like a stamped repeat. Some waves are thicker, some thinner, some curve more dramatically. That organic variation is what makes it feel hand-painted rather than mass-produced.
Coral polish can stain natural nails significantly. A good base coat is essential — try OPI's "Nail Envy" as a ridge-filling, stain-preventing foundation. Without it, you'll be dealing with a yellowish tint for days after removal.
Design Breakdown:
Bold color with flowing line work creates a design that feels alive with movement.
Base Color: A bright, electric coral or poppy red-orange. China Glaze "Flip Flop Fantasy" or Essie "Bikini So Teeny" (coral version) hit the right intensity.
Nail Shape: Medium almond. The curved shape complements the organic wave lines.
Design Element: White wavy horizontal stripes running across each nail. Wave thickness and flow vary per finger for organic variation.
Finish: High-gloss top coat for a juicy, sun-drenched look.
Get The Look at Home:
The wave lines don't need to be perfect — ocean waves aren't uniform, and neither should these be.
- Prep: Shape into almond, apply base coat.
- Coral base: Apply two even coats of electric coral. Let dry fully.
- Wave lines: Using a thin liner brush and white polish, draw wavy horizontal lines across each nail. Don't try to make them identical — let each wave flow naturally.
- Vary the thickness: Make some waves thicker, some thinner. Press harder for wider lines, lighter for thinner ones.
- Clean up: Use a brush dipped in acetone to fix any lines that went onto the skin.
- Seal: Apply a thick layer of glossy top coat to smooth out any texture from the line work.
5.Lemon Chiffon Tangerine Sunbursts
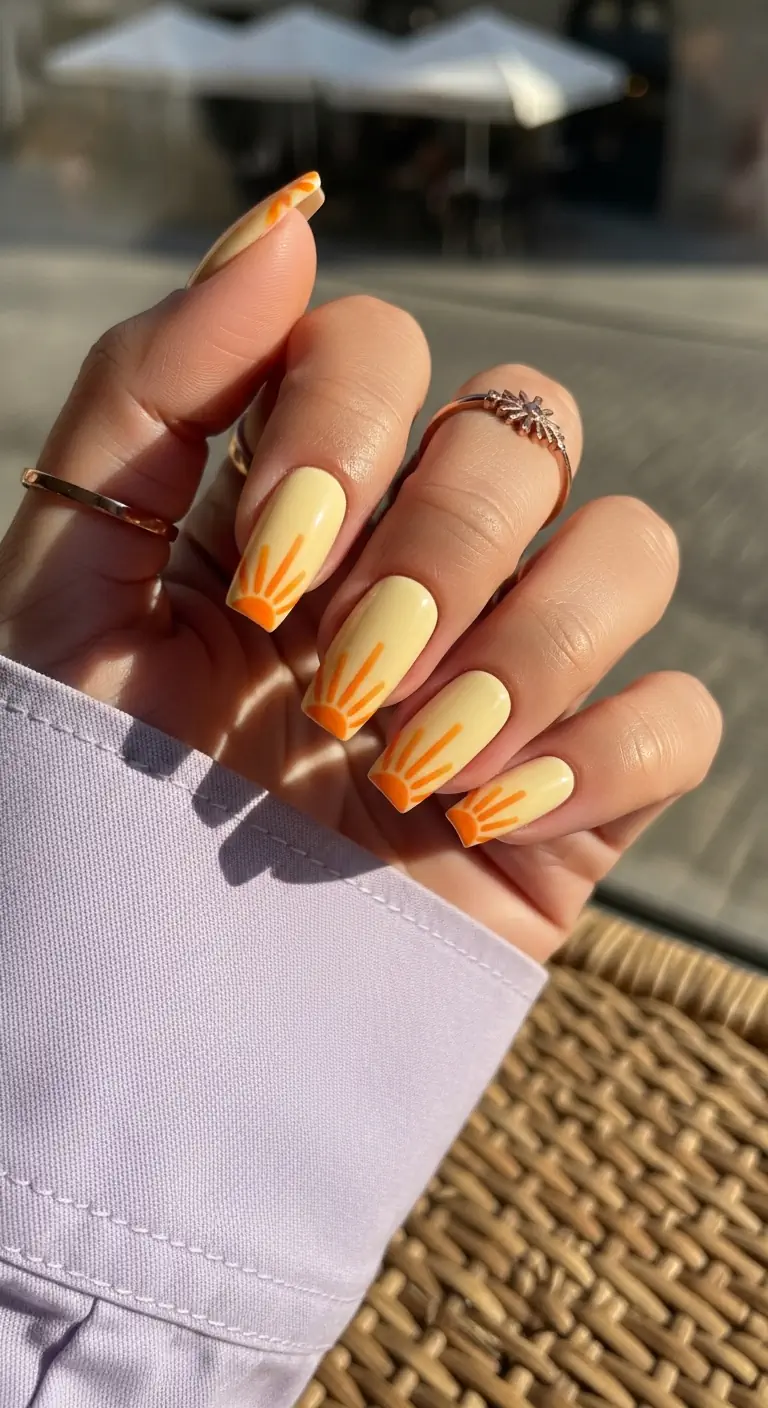
Pastel lemon almond nails with tangerine sunburst rays for a citrus-inspired vacation look.
Overview:
Pastel yellow is a tricky color — too sheer and it looks like a nicotine stain, too opaque and it looks like correction fluid. This lemon chiffon shade hits the sweet spot: creamy enough to read as intentional, soft enough to feel airy. The tangerine sunburst rays elevate it from "solid pastel" to "designed set."
The sunburst rays radiating from the cuticle create a visual effect that draws the eye toward the center of each nail. On long almond tips, the rays have enough space to fan out dramatically, creating that "golden hour" feeling the name promises.
Yellow polish is the most streaky color in any brand's lineup. Three thin coats are standard — don't try to rush it with two thick ones. A ridge-filling base coat also helps smooth the surface before color goes down.
Design Breakdown:
Citrus-inspired color with radiating line work that creates warmth and movement.
Base Color: A soft, creamy lemon chiffon or pastel buttery yellow. Essie "Lemon Drop" or OPI "I Just Can't Cope-acabana" work well.
Nail Shape: Long almond. The elongated shape gives the sunburst rays room to fan out from the cuticle.
Design Element: Orange tangerine sunburst rays radiating from the cuticle base, 3-5 rays per nail fanning toward the tip.
Finish: High-gloss top coat to keep the citrus palette looking fresh and juicy.
Get The Look at Home:
Sunburst rays look complex but are just straight lines radiating from a single point.
- Prep: Shape into a long almond, apply base coat.
- Yellow base: Apply three thin coats of pastel yellow. Let each dry fully — rushing yellow polish causes streaks.
- Map the rays: Using a thin liner brush and orange polish, draw 3-5 lines radiating outward from the cuticle center. Start at the cuticle and flick toward the tip.
- Vary per nail: Change the number of rays and their angles on each finger. Some nails get 3 wide rays, others get 5 thin ones.
- Clean up: Use acetone and a brush to fix any polish that touched the skin.
- Seal: Apply a thick, glossy top coat to smooth the texture and add shine.
30+ Chic Pool Party Hairstyles for Summer 2026 🌊👙
6.Ocean Blue French with Tortoise Shell
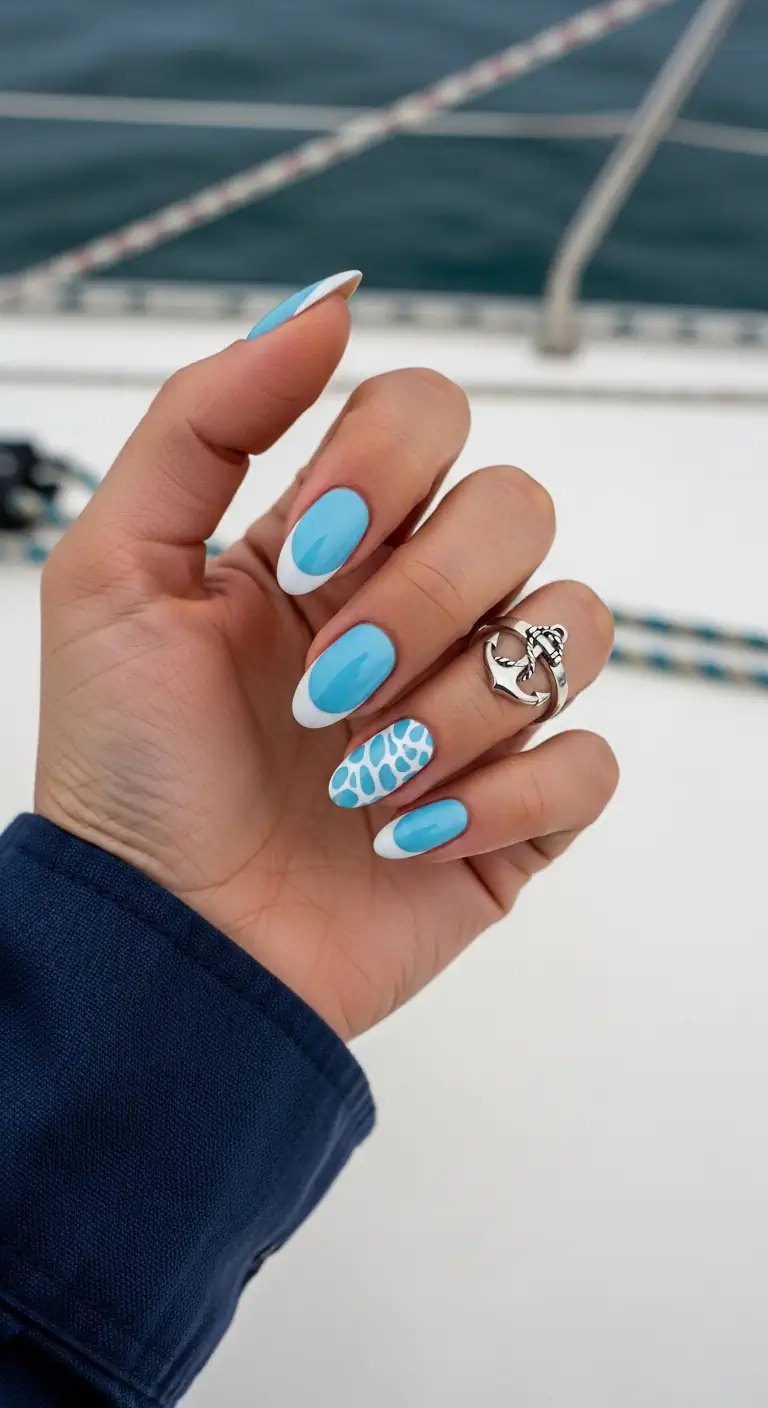
Sky blue almond nails with white French tips and a tortoise-shell accent on the ring finger.
Overview:
A French tip is the safe choice for vacation nails. Adding a tortoise-shell accent on the ring finger is what makes this set interesting. The amber-and-blue tortoise pattern breaks the uniformity just enough to give the hand a focal point without disrupting the overall blue story.
The sky blue base is bright enough to feel vacation-ready but not so loud that it clashes with outfits. It's the kind of color that looks equally good against a white linen dress as it does with denim. The white French tips keep the look clean and classic.
Tortoise-shell nail art requires layering multiple translucent colors — amber, caramel, and dark brown — while they're still wet. If the layers dry before you blend, you lose the organic, mottled effect. Work one nail at a time and move quickly.
Design Breakdown:
Classic French structure with one bold accent that elevates the entire set.
Base Color: A bright sky blue or turquoise. Essie "Bikini So Teeny" or OPI "Can't Find My Czechbook" capture the right ocean tone.
Nail Shape: Medium almond. The curved tip is ideal for French smile lines.
Design Element: White French tips on most nails. Ring finger features a full tortoise-shell pattern in amber, caramel, and dark brown over the blue base.
Finish: High-gloss top coat that makes the blue look like tropical water.
Get The Look at Home:
The French tips are straightforward. The tortoise-shell accent takes practice but is worth the effort.
- Prep: Shape into medium almond, apply base coat.
- Blue base: Apply two coats of sky blue on all nails. Let dry.
- French tips: Using a liner brush or French tip guides, paint white tips on all nails except the ring finger.
- Tortoise-shell accent: On the ring finger, while a fresh layer of blue is still tacky, drop small dots of amber, caramel, and dark brown. Gently swirl them together with a toothpick for the mottled effect.
- Clean up: Use a cleanup brush with acetone to sharpen the French smile lines.
- Seal: Apply glossy top coat to all nails for a unified, high-shine finish.
7.Matte Black & Nude Negative Space
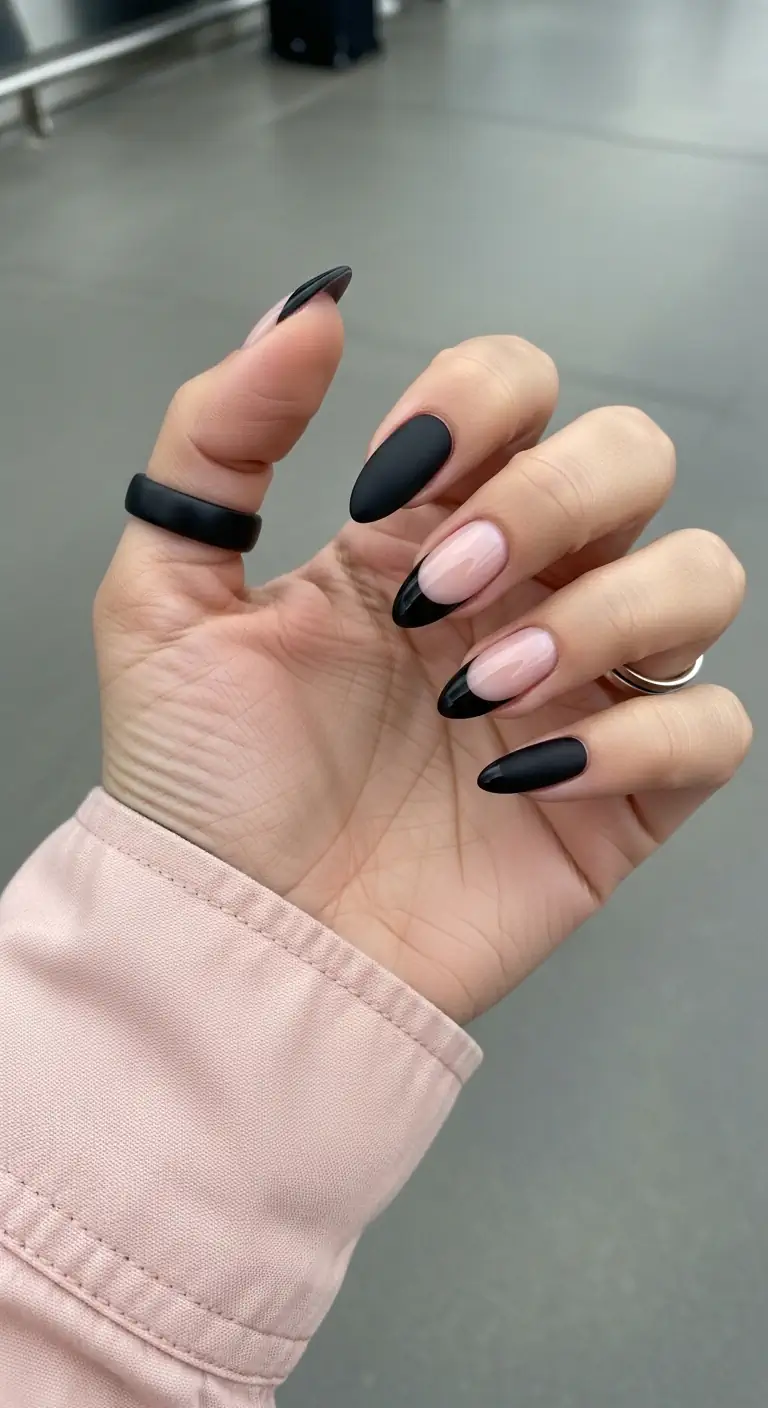
Matte black negative-space French tips on nude base with solid black accent nails.
Overview:
Negative space nail art is one of the few trends that actually gets better with time. As your nails grow out, the bare-nude section expands and the design evolves — it's the only manicure that improves while you wear it. The matte black tips over nude create a graphic, architectural look that feels more like fashion than nail art.
The mix of techniques — French tips on some nails, solid black on others — gives the set visual rhythm. Your eye moves from the open, airy negative space to the dense, opaque black and back again. That push-and-pull is what makes this design feel dynamic rather than repetitive.
Matte top coats are less durable than glossy ones. Expect to reapply the matte finish every 3-4 days to maintain that flat, velvety look. Without maintenance, the matte starts developing shiny spots where you touch things most frequently.
Design Breakdown:
Negative space meets graphic black for a modern, editorial manicure.
Base Color: Nude or sheer pink for the negative-space nails; opaque black for the solid accent nails.
Nail Shape: Long almond or stiletto. The dramatic length suits the bold contrast.
Design Element: Black French tips over nude base on middle and ring fingers. Index and pinky are solid matte black.
Finish: Matte top coat across all nails for a flat, velvety texture.
Get The Look at Home:
The contrast between matte and the negative space is the entire design. Get the line work clean and the rest follows.
- Prep: Shape into long almond or stiletto, apply base coat.
- Color blocking: Paint index and pinky fingers solid black (2 coats). Leave middle and ring fingers with just base coat or a sheer nude.
- French tips: On the nude nails, use a liner brush to paint black French tips. Keep the smile line sharp and angular.
- Dry fully: Wait at least five minutes before applying matte top coat — matte over wet polish causes bubbling.
- Matte finish: Apply matte top coat to all nails in one confident stroke per nail. Don't go back over areas — it creates texture differences.
- Maintenance: Reapply matte top coat every 3-4 days to keep the finish consistent.
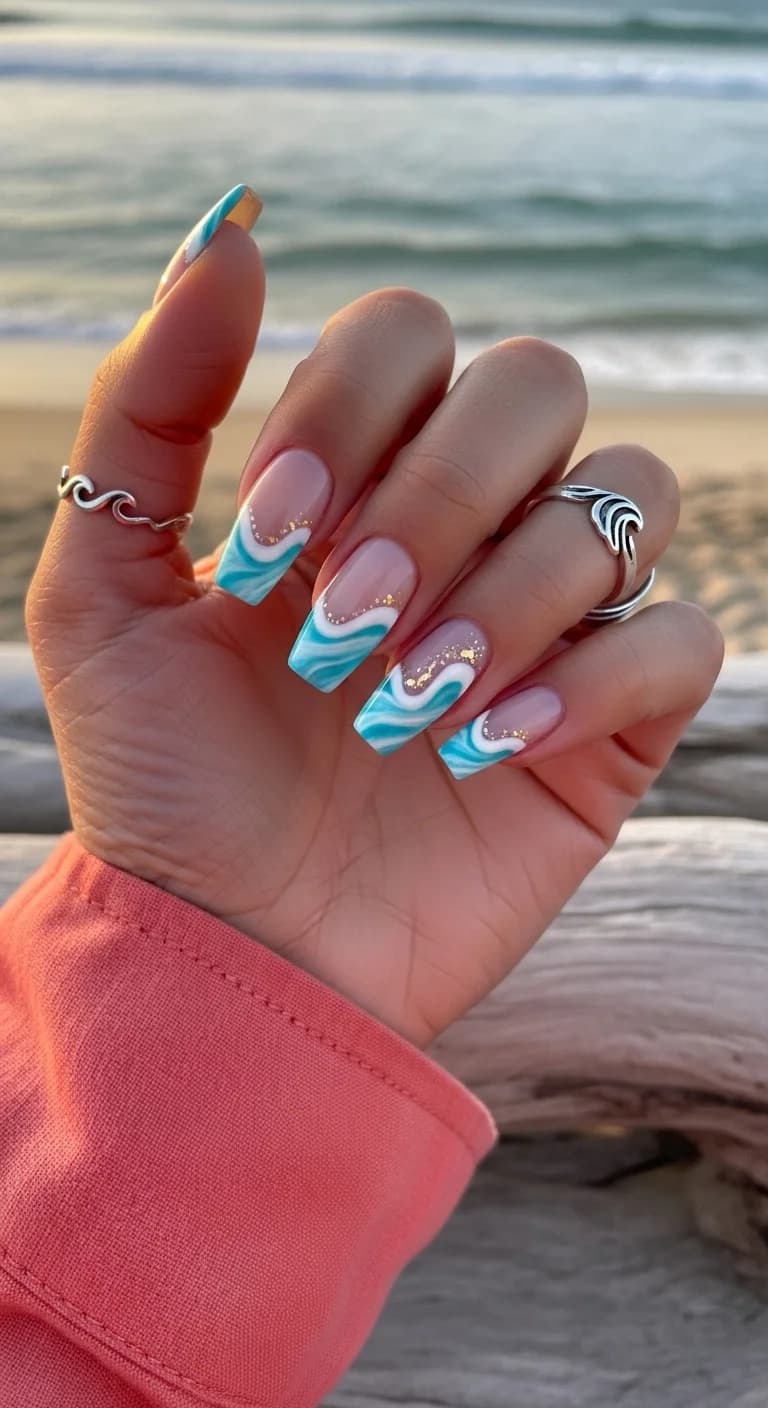
30 Stunning Beach Nail Ideas for the Best Vacation in 2026 🌊
8.Classic True Red Velvet Matte
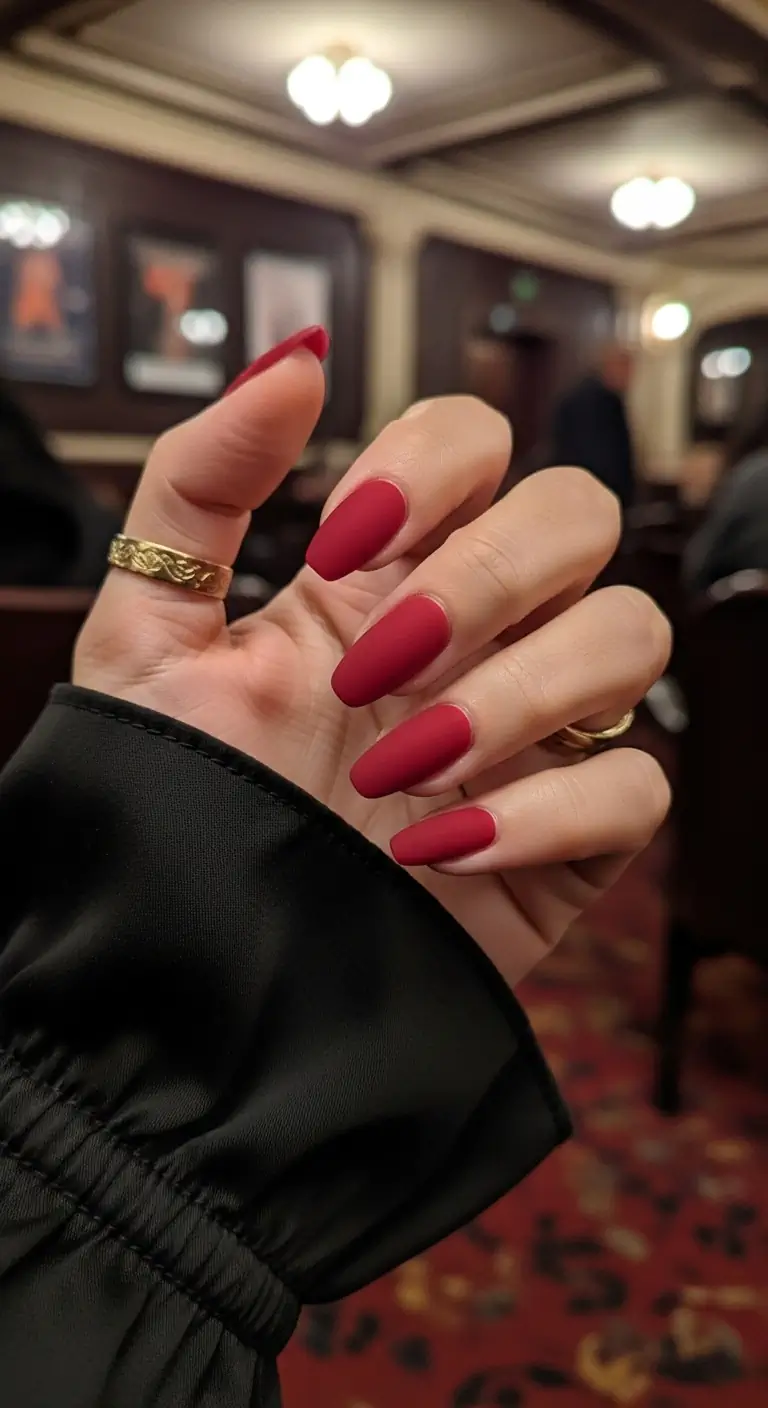
Solid scarlet red almond nails with a luxurious velvet matte finish.
Overview:
Sometimes the strongest statement is the simplest one. Solid red nails with a matte finish are the nail equivalent of a red lipstick — timeless, confident, and impossible to ignore. The velvet texture transforms what would be a standard red manicure into something that feels tactile and luxurious.
The specific shade matters enormously. This isn't a dark burgundy or a bright coral — it's a true scarlet red, the kind that looks equally good against white linen and black leather. The matte finish amplifies the color's depth by removing the surface reflection that normally dilutes red polish.
Matte red shows every cuticle imperfection more than glossy red does. Push your cuticles back thoroughly before starting, and use a cleanup brush to trace the cuticle line after each coat. The extra five minutes of cleanup makes the difference between "salon" and "DIY."
Design Breakdown:
Single-color, no art. The matte finish IS the design choice.
Base Color: A true scarlet red — not orange-red, not blue-red, just red. OPI "Big Apple Red" or Essie "Really Red" are reliable choices.
Nail Shape: Medium-long almond. The tapered shape adds sophistication to the bold color.
Design Element: None. Solid, full-coverage color.
Finish: Velvet matte top coat for that soft-touch, non-reflective texture.
Get The Look at Home:
Matte polish amplifies every flaw in the base coat. Precision matters more here than with any glossy design.
- Prep: Push cuticles back thoroughly. Buff any ridges — matte shows everything.
- Base coat: Apply a ridge-filling base coat and let it dry completely.
- Thin layers: Apply three thin coats of red rather than two thick ones. Let each dry fully.
- Cuticle cleanup: Use an angled brush dipped in acetone to trace the cuticle line. Red against skin is immediately visible.
- Matte top coat: Apply in one confident stroke per nail. Don't go back over areas — it creates visible texture differences.
- Edge check: Make sure the matte coat covers the free edge to prevent tip wear from showing as shiny spots.
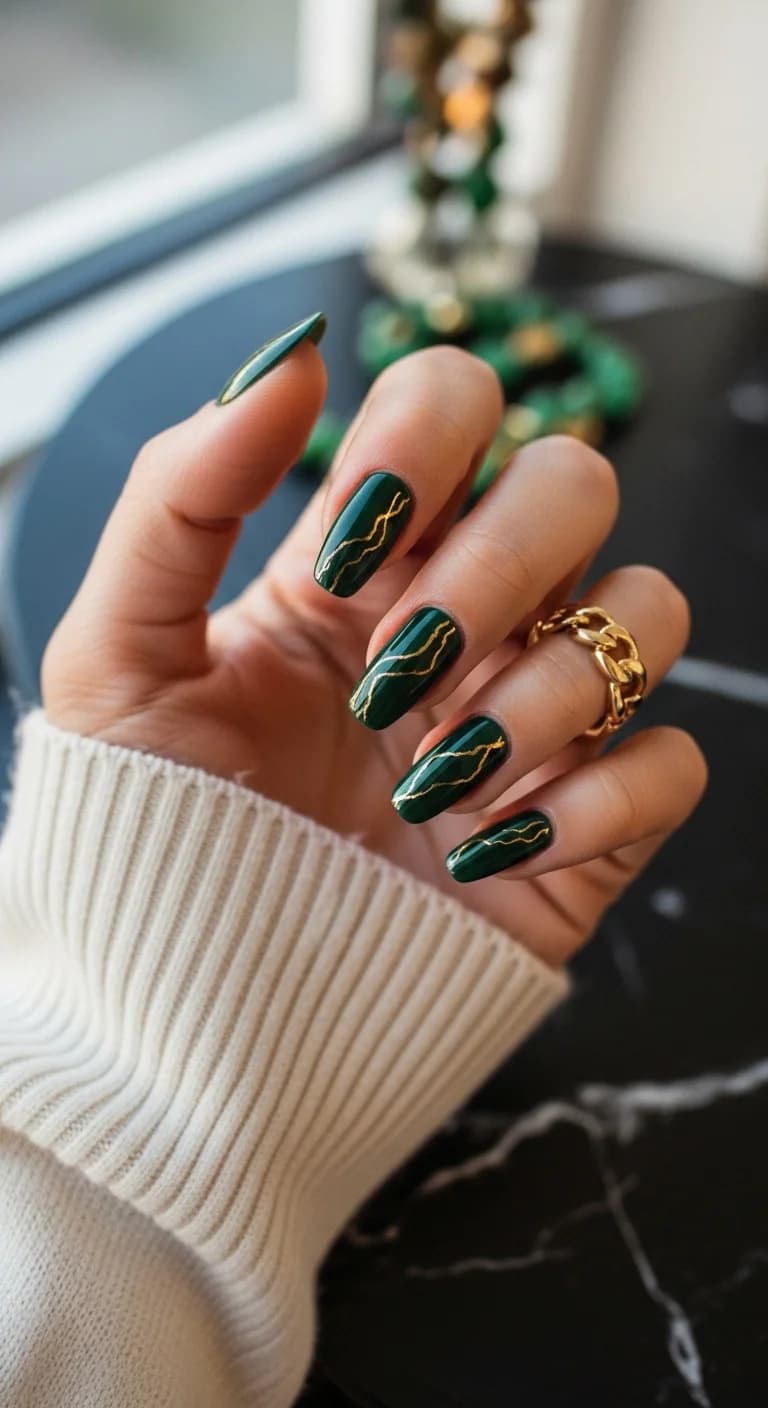
9.Midnight Blue Starry Night Sky
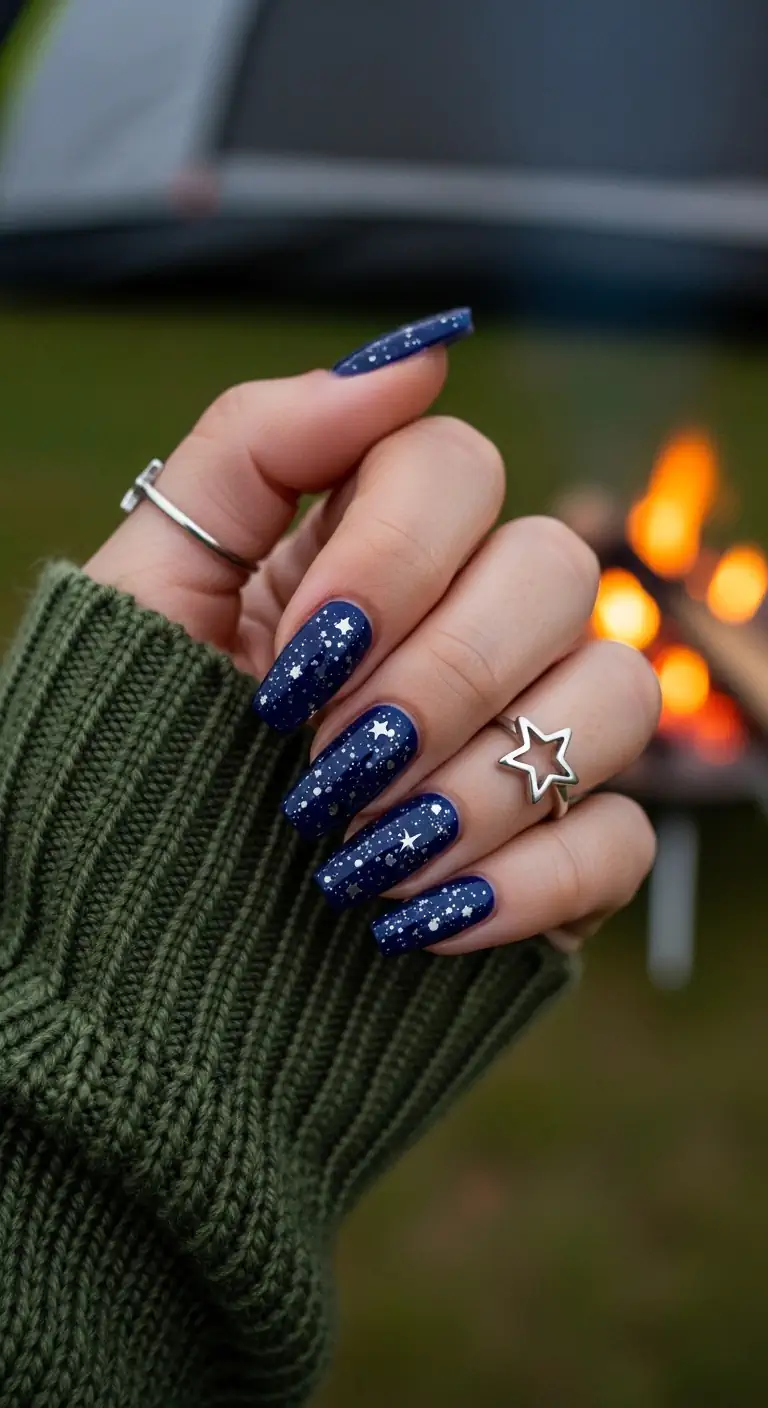
Deep midnight navy coffin nails with scattered star motifs and glitter shimmer.
Overview:
Starry sky nails are one of those designs that look better at night — literally. The deep midnight navy base absorbs light while the scattered white and silver stars catch it, creating a contrast that shifts depending on your lighting. Under candlelight at a seaside restaurant, these nails practically glow.
The coffin shape provides a wide, flat canvas that suits the star pattern perfectly. On almond or stiletto shapes, the stars get compressed toward the tip and lose the "open sky" feeling. The coffin's flat edge lets the constellation scatter naturally across the full nail surface.
The fine glitter embedded in the navy base adds a layer of depth that flat navy wouldn't achieve. It looks like distant stars behind the hand-painted ones — a subtle detail that makes the design feel dimensional rather than two-dimensional.
Design Breakdown:
Deep base with scattered celestial art creates a design that rewards close inspection.
Base Color: A deep midnight navy or dark blue. OPI "Russian Navy" or Essie "After School Boy Blazer" capture the right depth.
Nail Shape: Long coffin or ballerina. The flat tip provides an open canvas for the star pattern.
Design Element: Scattered white and silver star shapes with dot constellations. Fine glitter shimmer throughout the base.
Finish: High-gloss top coat that makes the navy look like the night sky.
Get The Look at Home:
Stars are simpler than they look — most are just two crossed lines with a dot in the center.
- Prep: Shape into a long coffin, apply base coat.
- Navy base: Apply two coats of deep midnight navy. Let dry fully.
- Stars: Using a fine liner brush and white polish, draw small "+" shapes scattered across each nail. Add a tiny dot at each intersection for the star's center.
- Constellations: Connect some stars with thin lines to create constellation patterns. Vary the groupings per nail.
- Glitter overlay: Apply a thin layer of fine silver glitter polish over the entire nail for the background shimmer.
- Seal: Apply a thick glossy top coat to smooth the glitter texture and add depth.
26 Stunning Summer Braided Hairstyles for Women 2026 ☀️💇♀️
10.Rich Chocolate & Gold Foil Stripes
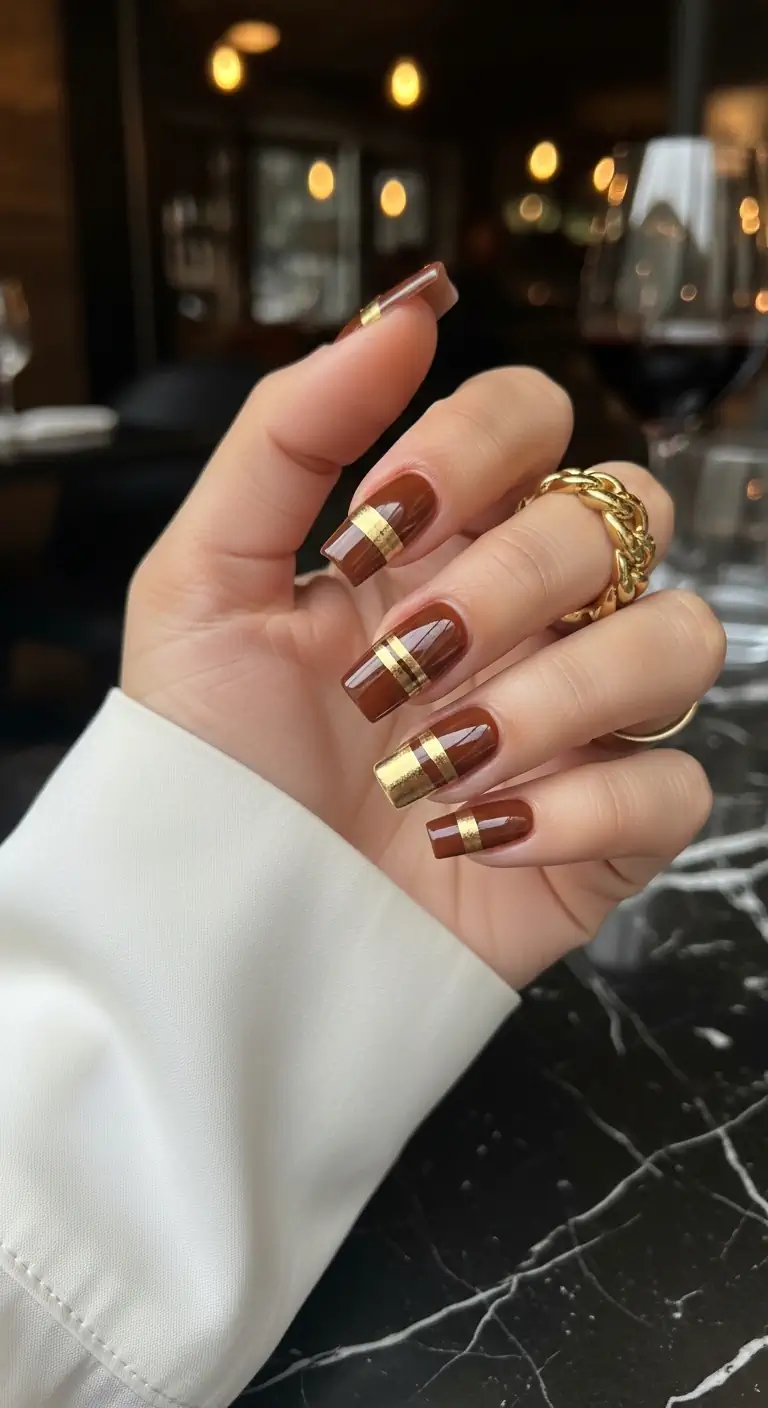
Rich chocolate brown coffin nails with gold metallic foil stripes for a luxe vacation look.
Overview:
Brown nails in summer feel contrarian, and that's exactly why they work. While everyone else reaches for pastels and neons, deep chocolate reads as deliberate and confident. The gold foil stripes elevate it from "autumn manicure" to "luxury resort" without changing the base color.
The varying stripe widths — some nails get a single wide band, others get double thin lines — create visual interest without breaking the color story. It's the same principle as a pinstripe suit: the pattern provides structure, the variations provide personality.
Gold foil striping tape is more durable than hand-painted gold lines, which tend to feather at the edges after a few days. If you're investing time in this design, use tape for the stripes and save yourself the touch-up headaches.
Design Breakdown:
Warm, rich tones with metallic accents for a design that feels expensive.
Base Color: A rich, opaque chocolate or espresso brown. OPI "Squeaky Gridge" or Essie "Mink Muffs" capture the right warmth.
Nail Shape: Medium-long coffin. The flat tip gives the horizontal stripes a clean, architectural line.
Design Element: Horizontal gold metallic foil stripes of varying widths. Some nails get a single wide band, others get double thin lines.
Finish: High-gloss top coat that makes the brown look like polished mahogany.
Get The Look at Home:
Gold striping tape is your best friend here. It creates cleaner lines than freehand ever will.
- Prep: Shape into coffin, apply base coat.
- Chocolate base: Apply two coats of rich brown polish. Let dry completely — tape pulls up wet polish.
- Stripe placement: Cut lengths of gold foil striping tape. Press them horizontally across each nail at varying positions — center, slightly above, or double stripes.
- Trim ends: Snip the tape about 0.5mm inside the nail border on both sides. Tape that reaches the edge peels off within a day.
- Press firmly: Use a silicone tool or your fingertip to press the tape flat from edge to edge.
- Seal: Apply a thick, self-leveling top coat in one stroke. Going back over it will shift the tape.
11.Lavender Dreamscape Clouds
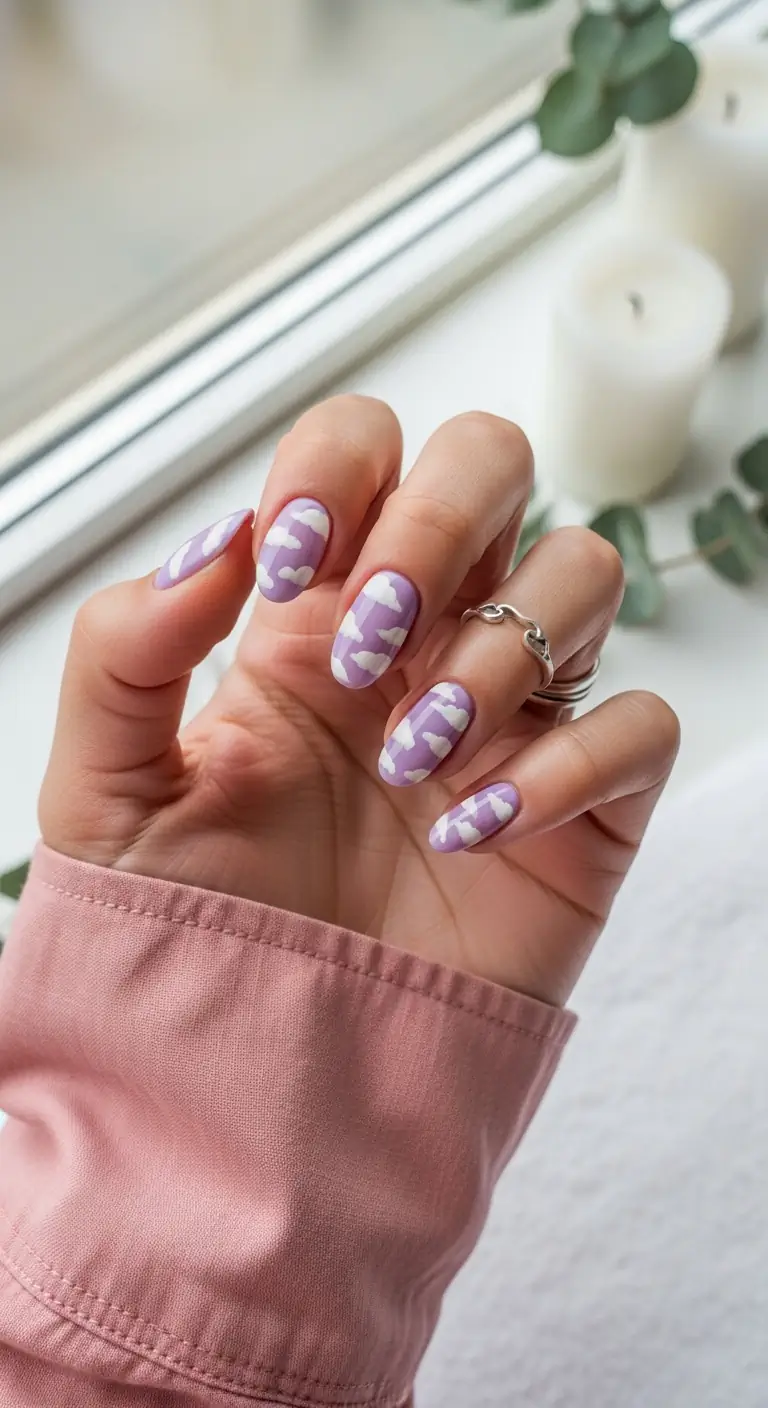
Soft lavender almond nails with hand-painted white cloud shapes for a dreamy vacation vibe.
Overview:
Lavender nails are having a moment, and the cloud art pushes this from "nice pastel" into "designed set." The white clouds scattered across each nail look like something from a Studio Ghibli film — soft, organic, and slightly surreal. It's the kind of nail art that makes people lean in for a closer look.
The lavender base is muted enough to function as a neutral. It pairs with white, denim, navy, and even black without clashing. The clouds add whimsy without making the set feel juvenile — the key is that they're painterly, not cartoonish.
Cloud shapes are forgiving to paint because perfection isn't the goal. Real clouds are irregular, blobby, and asymmetric. If your painted clouds look too uniform, they'll actually look less realistic. Let the brush wander.
Design Breakdown:
Pastel base with organic painted art creates a whimsical, dreamy aesthetic.
Base Color: A soft lavender or lilac. Essie "Lilacism" or OPI "Do You Lilac It?" hit the right pastel tone.
Nail Shape: Medium almond. The curved shape complements the organic cloud forms.
Design Element: White fluffy cloud shapes hand-painted across each nail. Placement varies per nail for organic variation.
Finish: High-gloss top coat that makes the lavender look like a twilight sky.
Get The Look at Home:
Clouds are one of the most forgiving nail art shapes — real clouds aren't symmetrical, so neither do yours need to be.
- Prep: Shape into medium almond, apply base coat.
- Lavender base: Apply two coats of soft lavender. Let dry.
- Cloud shapes: Using a dotting tool or small brush and white polish, place 2-3 overlapping dots to form each cloud. Don't flatten them into circles — let the dots overlap organically.
- Vary placement: Put clouds near the cuticle on some nails, near the tip on others. Leave some negative space visible between clouds.
- Layer for depth: Add a second, slightly more translucent layer of white on top of each cloud for a fluffy, dimensional look.
- Seal: Apply glossy top coat to smooth any texture from the layered white.
35 Fun Birthday Nail Designs for 2026 🎂
12.Mint Green Botanical Ferns
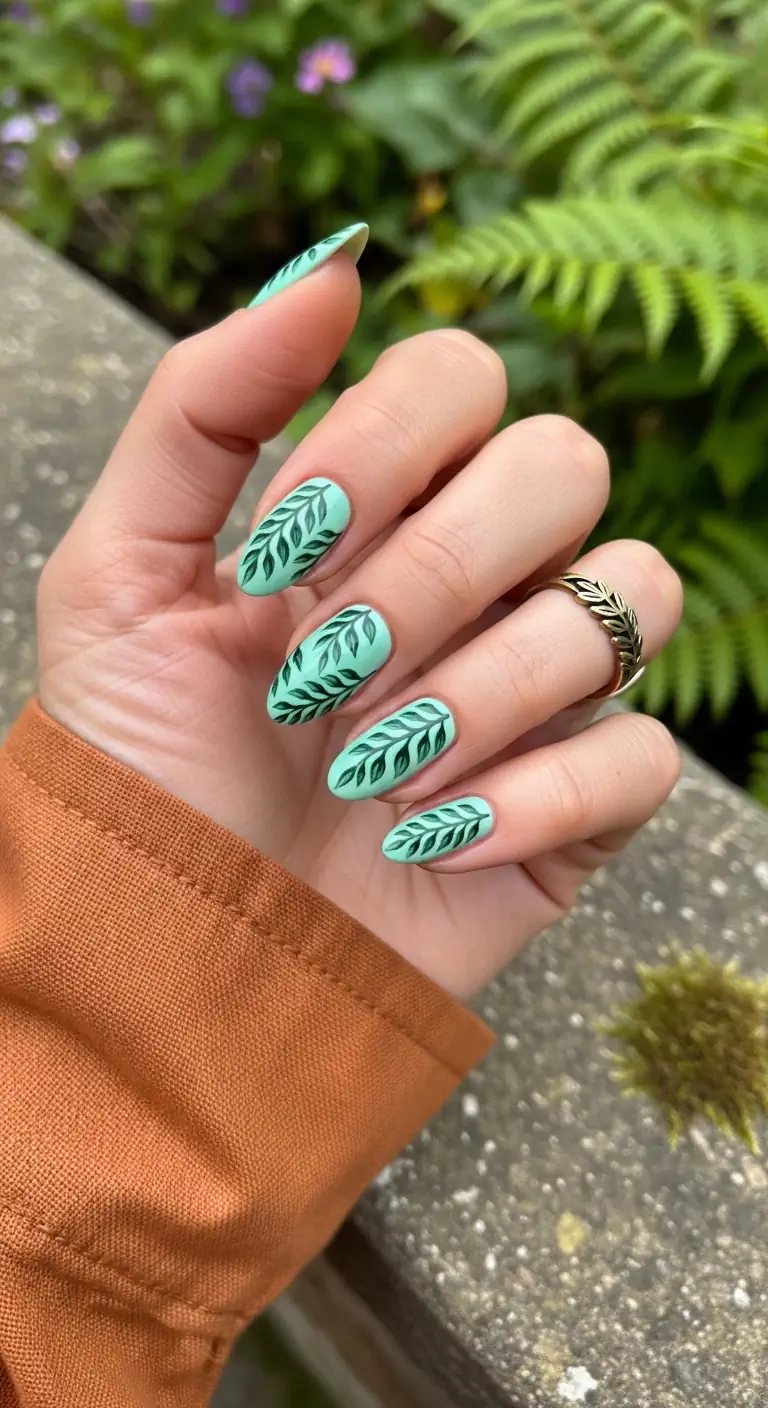
Mint green almond nails with dark green fern frond silhouettes for a botanical vacation look.
Overview:
Botanical nail art is everywhere this season, but most of it leans toward flowers. Fern fronds are a refreshing departure — they're more structured, more graphic, and they pair naturally with mint green in a way that flowers don't. The result looks like a pressed botanical specimen under glass.
The dark green silhouettes against the mint base create a tonal contrast that's sophisticated rather than high-contrast. Both colors live in the same family, so the design feels cohesive and grounded. It's the kind of set that looks equally at home in a botanical garden or a beachside café.
Fern fronds are actually easier to paint than flowers because they follow a predictable pattern: a central stem with small leaves branching off at regular intervals. Master one frond and you can replicate it across all ten nails with minor variations.
Design Breakdown:
Tonal green palette with botanical silhouettes for a nature-inspired, sophisticated set.
Base Color: A creamy mint green or seafoam. Essie "Mint Candy Apple" or Zoya "Neeka" work well.
Nail Shape: Medium-long almond. The elongated shape gives the fern fronds room to stretch vertically.
Design Element: Dark green botanical fern frond silhouettes painted on each nail. Leaf orientation and position vary per nail.
Finish: High-gloss top coat that creates a pressed-specimen-under-glass effect.
Get The Look at Home:
Fern fronds follow a simple pattern: central stem, then leaves branching off. Once you nail the technique, it's repeatable.
- Prep: Shape into medium-long almond, apply base coat.
- Mint base: Apply two coats of mint green. Let dry.
- Central stem: Using a thin liner brush and dark green polish, draw a slightly curved vertical line from cuticle to tip.
- Add leaves: Starting from the stem, flick small outward strokes on both sides to create the leaf pattern. Keep the strokes short and uniform.
- Vary per nail: Tilt the stem direction on each nail — some slightly left, some right, some centered.
- Seal: Apply glossy top coat to protect the fine line work.
13.Midnight Cityscape Starry Sky
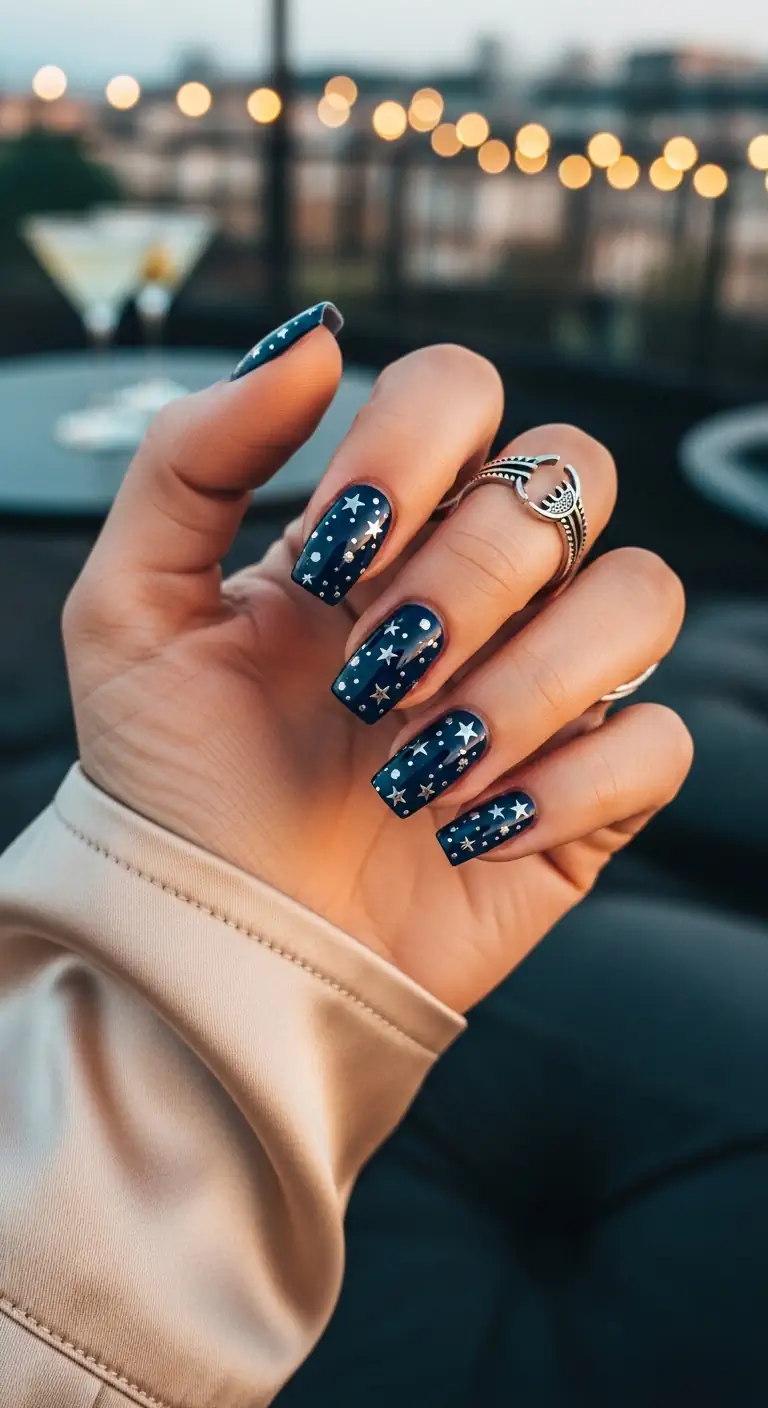
Deep midnight navy square nails with scattered star motifs and constellation dots.
Overview:
Two starry sky designs on the same list? Yes — because the execution here is fundamentally different from item #9. This version uses a square shape with slightly rounded corners, which creates a wider, flatter canvas for the constellation pattern. The stars are scattered more densely, and the gold accents add warmth that the all-silver version lacks.
The square shape gives this design a more structured, architectural feel compared to the coffin version. It reads "modern city apartment" rather than "bohemian stargazer." The rounded corners prevent the dark color from looking too harsh against the skin.
Multi-color star accents (white, silver, and gold) add depth that a single metallic wouldn't achieve. The gold catches warm light, the silver catches cool light, and the white provides the highest contrast against the navy. Together, they create a celestial field that looks dimensional.
Design Breakdown:
Dense star scatter with multi-metallic accents on a structured square shape.
Base Color: Deep midnight navy blue. China Glaze "First Mate" or OPI "Russian Navy" provide the right depth.
Nail Shape: Medium-long square with slightly rounded corners. The flat top provides maximum canvas for star placement.
Design Element: Scattered star motifs in white, silver, and gold with tiny dot constellations connecting some stars.
Finish: High-gloss top coat for depth and dimension.
Get The Look at Home:
Dense star scatter requires patience but no special technique — it's just careful placement.
- Prep: Shape into square with rounded corners, apply base coat.
- Navy base: Apply two coats of deep midnight navy. Let dry.
- White stars: Using a fine liner brush, draw small "+" shapes scattered across each nail. Place 4-6 per nail.
- Metallic accents: Add silver and gold star shapes using metallic polish or small star decals. Mix the metals deliberately.
- Constellation dots: Use a dotting tool to place tiny dots between stars, suggesting constellation connections.
- Seal: Apply a thick glossy top coat to smooth any raised elements and add depth.
32 Stunning Summer Wedding Hairstyles for Brides ☀️💍
14.Neon Orange Chevron Zig-Zags
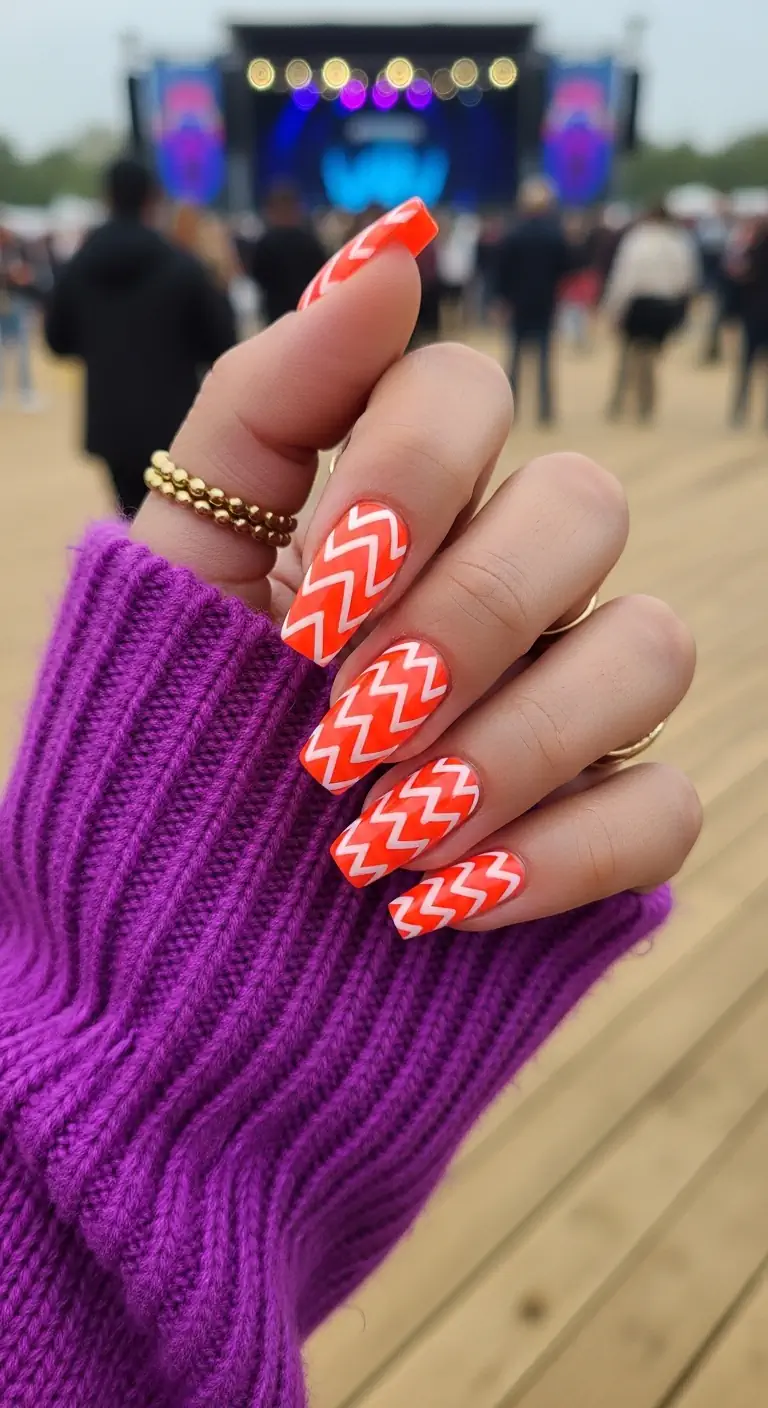
Neon orange coffin nails with bold white chevron stripes for a high-energy vacation look.
Overview:
Neon orange is not a subtle choice, and the white chevron stripes make it even louder. This is a "main character at the pool" manicure — maximum visibility, zero apologies. The zig-zag pattern adds structure to what would otherwise be a solid block of screaming color.
Coffin shape is the right call for neon. The flat tip provides a clean horizon line for the chevrons to land on, and the tapered sides prevent the bright color from overwhelming the hand. On almond or oval shapes, neon orange can look like traffic cones. On coffin, it looks intentional.
Neon polishes dry matte by default — the fluorescent pigments don't contain the light-refracting particles that give standard polish its shine. A glossy top coat isn't optional; it's what turns "bright orange" into "blindingly neon orange."
Design Breakdown:
Maximum impact, maximum brightness. This design doesn't do "understated."
Base Color: A bright, saturated neon orange-red. Orly "Orange Punch" or China Glaze "Orange You Hot" deliver the right intensity.
Nail Shape: Long coffin. The flat tip provides a clean edge for the chevron pattern.
Design Element: Bold white chevron/zig-zag stripes running horizontally across each nail. 3-4 zig-zags per nail.
Finish: High-gloss top coat to amplify the neon's intensity and add shine.
Get The Look at Home:
Chevron stripes are just V-shapes repeated in rows. Practice the angle on paper first.
- Prep: Shape into long coffin, apply base coat.
- Neon base: Apply two coats of neon orange. Neon formulas streak on the first coat — the second evens everything out.
- Chevron lines: Using a thin liner brush and white polish, draw connected V-shapes across each nail. Keep the angle consistent — about 45 degrees.
- Stack them: Draw 3-4 rows of chevrons, spacing them evenly from cuticle to tip.
- Clean up: Use a brush dipped in acetone to sharpen the V-points if they're wobbly.
- Seal: Apply a thick glossy top coat. This is what makes the neon truly pop.
15.Soft Lilac Purple Ombre
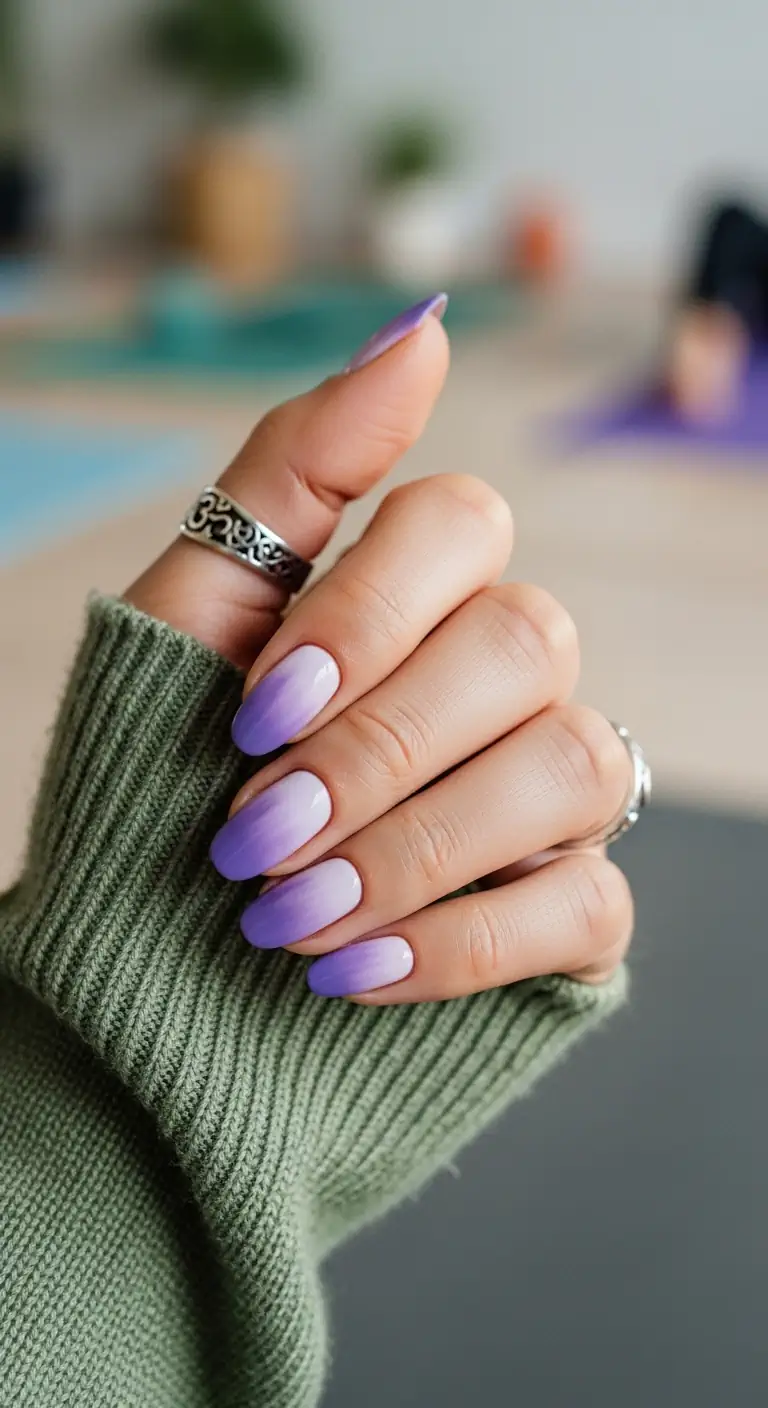
Soft lilac-to-lavender gradient on oval nails for a dreamy, seamless ombre effect.
Overview:
Ombre nails are a solved design problem — sponge, two colors, blend, done. So the question with any new ombre variation is always: what makes this one different? Here, the answer is the tonal range. Both colors are cool-toned pastels, which means the transition zone stays clean instead of turning muddy.
The oval shape complements the gradient because there are no hard corners to interrupt the color flow. The fade looks smoother on rounded shapes than on square or coffin, where the gradient hits a hard edge at the tip. It's a subtle difference that affects the overall polish of the design.
Pastel ombre is one of the most forgiving gradient techniques because the color contrast is low. Even imperfect blending reads as intentional in the pastel range. This is a good "gateway ombre" for anyone who's never tried the technique before.
Design Breakdown:
Tonal pastel gradient that relies on smooth blending rather than bold contrast.
Base Color: Soft lilac-pink at the cuticle, transitioning to lavender-purple at the tips.
Nail Shape: Medium oval or almond. Rounded shapes make the gradient look smoother.
Design Element: Smooth vertical ombre gradient. No additional art — the blend is the design.
Finish: High-gloss top coat to smooth the sponge texture and add depth.
Get The Look at Home:
Ombre is all about thin layers and patience. Build the gradient gradually.
- Prep: Shape into oval, apply base coat.
- Base coat of lighter color: Apply two coats of the lilac-pink. Let dry.
- Sponge setup: Paint stripes of lilac-pink and lavender-purple side by side on a makeup sponge.
- Dab: Press the sponge onto the nail with the lighter color at the cuticle and darker at the tip. Dab 3-4 times, moving slightly to blend.
- Repeat: Build opacity with 2-3 thin sponged layers. Let each layer dry before the next.
- Seal: Apply a thick top coat to smooth the sponge texture and create a seamless finish.
34 Cutest Butter Yellow Nail Designs for 2026 🧈
16.Rose Gold Glitter Glam
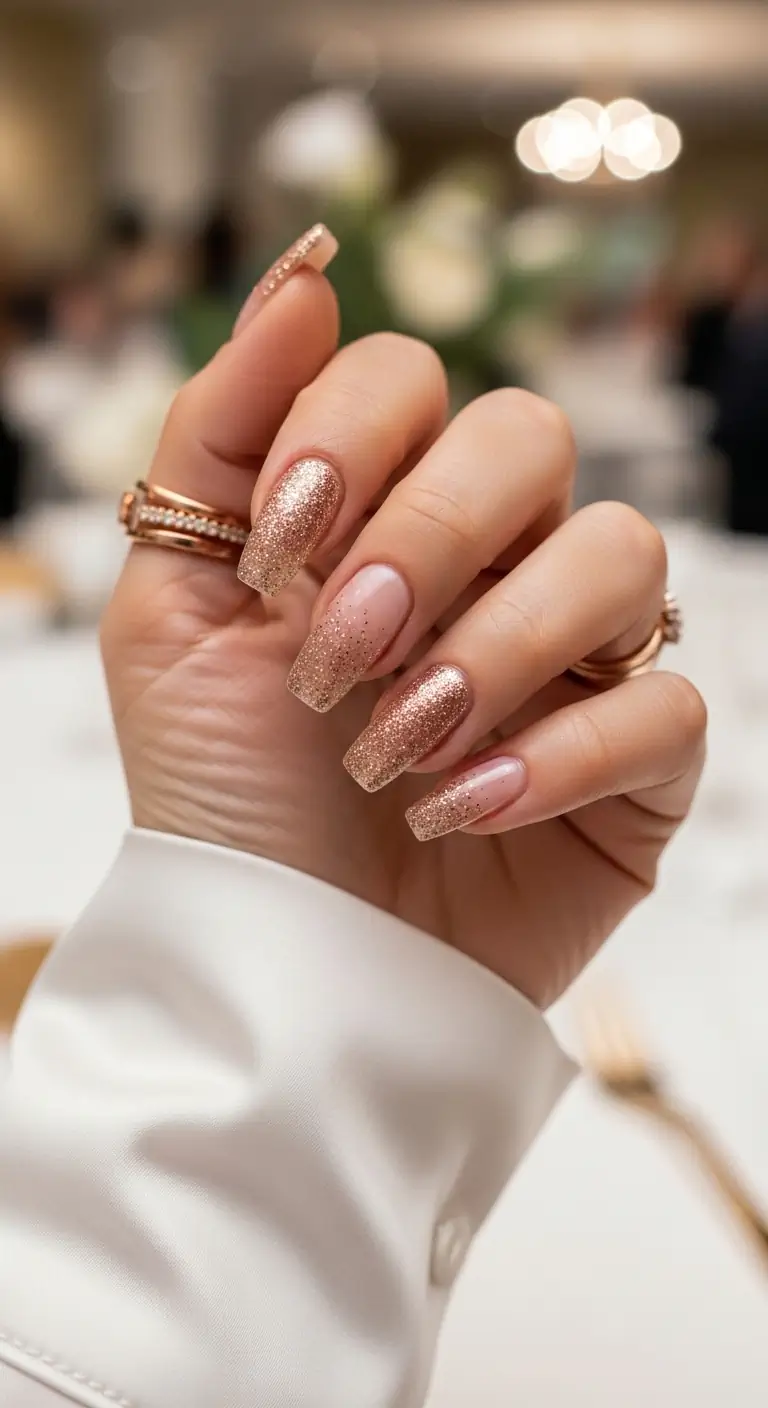
Nude-pink coffin nails with rose gold glitter gradient and full-glitter accent nails.
Overview:
Rose gold glitter is the jewelry of the nail world. It catches light from every angle, creates a warm glow against the skin, and pairs with literally every outfit in your suitcase. The gradient approach — denser at the tips, fading toward the cuticle — prevents the sparkle from becoming overwhelming.
The ring and middle fingers get full glitter coverage, which creates a deliberate contrast with the sheerer fade on the other nails. It's the same principle as wearing a statement ring: one or two focal points, everything else supporting. Too many full-glitter nails and the design loses its sense of hierarchy.
Glitter polish is textured, which means you need at least two coats of top coat to get a smooth surface. The first coat fills the gaps between glitter particles; the second creates the glass finish. Skip either coat and you'll feel the grit every time you run your fingers over your nails.
Design Breakdown:
Glitter gradient with strategic full-coverage accent nails for a balanced sparkle design.
Base Color: Nude or sheer pink for the gradient nails. Ring and middle fingers are fully covered in rose gold glitter.
Nail Shape: Long coffin. The flat tip provides a clean endpoint for the glitter fade.
Design Element: Rose gold glitter density gradient — heavier at tips, sparse toward cuticle. Ring and middle fingers get full dense coverage.
Finish: Glitter/sparkle with a thick glossy top coat for smoothness.
Get The Look at Home:
The gradient is created by dragging glitter upward with a dry brush — less glitter as you move toward the cuticle.
- Prep: Shape into long coffin, apply base coat.
- Nude base: Apply two coats of nude or sheer pink on all nails. Let dry.
- Gradient nails: Apply rose gold glitter polish near the tip of each nail. Use a dry, fluffy brush to drag the glitter upward toward the cuticle, creating a fade.
- Full accent nails: On ring and middle fingers, apply two full coats of rose gold glitter for maximum density.
- Encapsulate: Apply two coats of thick, self-leveling top coat. Run your finger over the nail — if you feel grit, add another layer.
- Cap the edge: Wrap top coat over the free edge to prevent glitter from chipping at the tips.
17.Olive Snake Print Safari
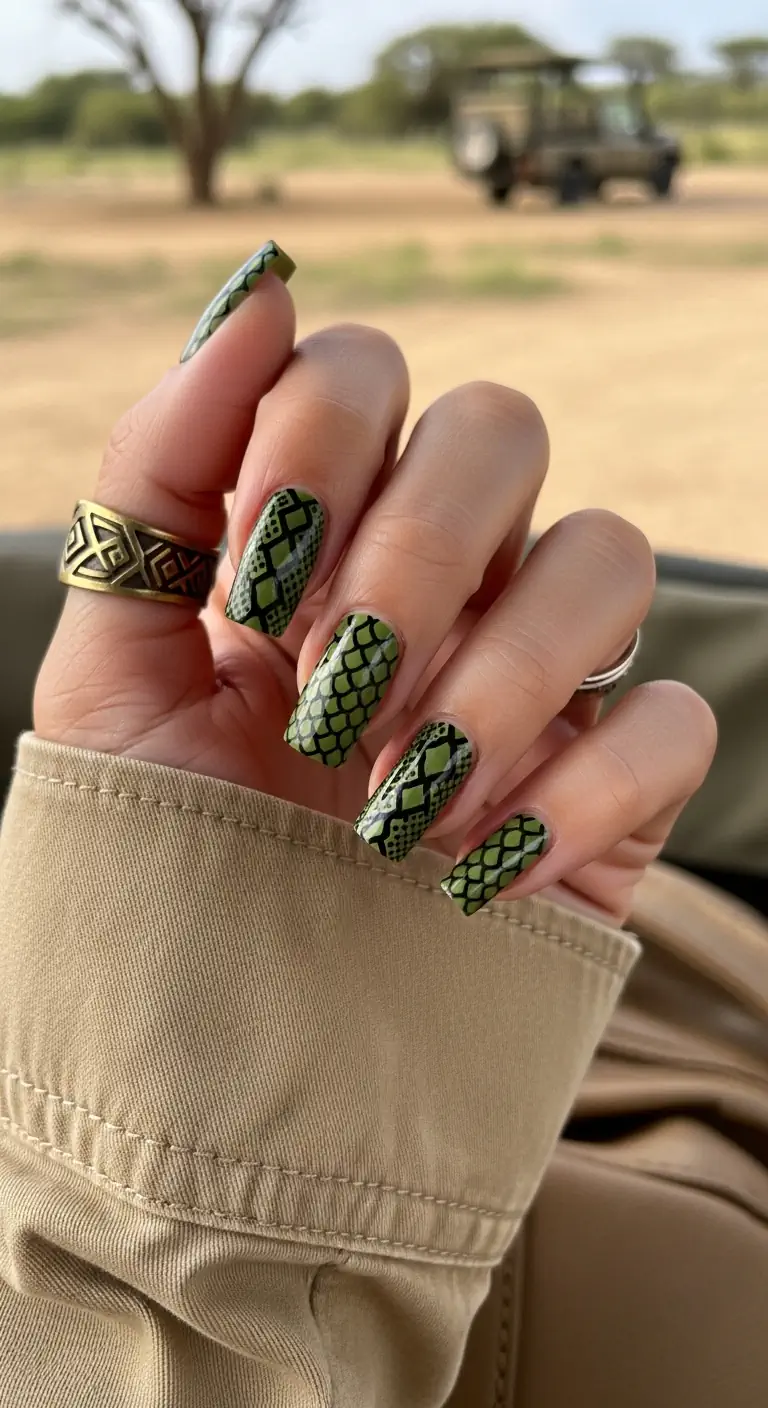
Olive green coffin nails with black snakeskin pattern for a safari-inspired vacation look.
Overview:
Animal print on nails walks a thin line between "fashion-forward" and "costume." The key is the color palette. Olive green with black snake print reads as safari-chic rather than Halloween costume because both colors are muted and earthy. The fine linework creates a textured effect that looks expensive up close.
Coffin shape is the natural home for snake print. The flat, angular tip mimics the geometric quality of reptile scales, creating a visual harmony between the nail shape and the art pattern. On almond or oval, the same print would look softer and less structured.
Snake print requires a steady hand for the fine linework. If freehand feels intimidating, use a stamping plate with a reptile pattern — it's faster and produces more consistent results. The trade-off is that stamped designs lack the organic variation that hand-painting provides.
Design Breakdown:
Earthy tones with detailed animal print for a sophisticated take on the safari trend.
Base Color: A muted olive or army green. Zoya "Hunter" or Essie "Win Me Over" capture the right earthy tone.
Nail Shape: Long coffin. The angular shape complements the geometric quality of the snake pattern.
Design Element: Black reptile/snakeskin scale pattern with fine linework covering the entire nail surface.
Finish: High-gloss top coat that makes the olive look rich and the black linework look crisp.
Get The Look at Home:
Snake print is just overlapping U-shapes. Master the basic unit and the pattern builds itself.
- Prep: Shape into long coffin, apply base coat.
- Olive base: Apply two coats of olive green. Let dry completely.
- Scale pattern: Using a thin liner brush and black polish, draw small overlapping U-shapes in rows. Each row should offset from the one above, like fish scales.
- Fine details: Add tiny lines within some scales for texture. Not every scale needs detail — the variation creates realism.
- Clean up: Use acetone and a brush to fix any lines that went onto the skin.
- Seal: Apply a thick glossy top coat to smooth the raised line work and add depth.
25 Stunning Summer Vacation Hairstyles for 2026 ☀️🌊
18.Turquoise Water Ripple Marble
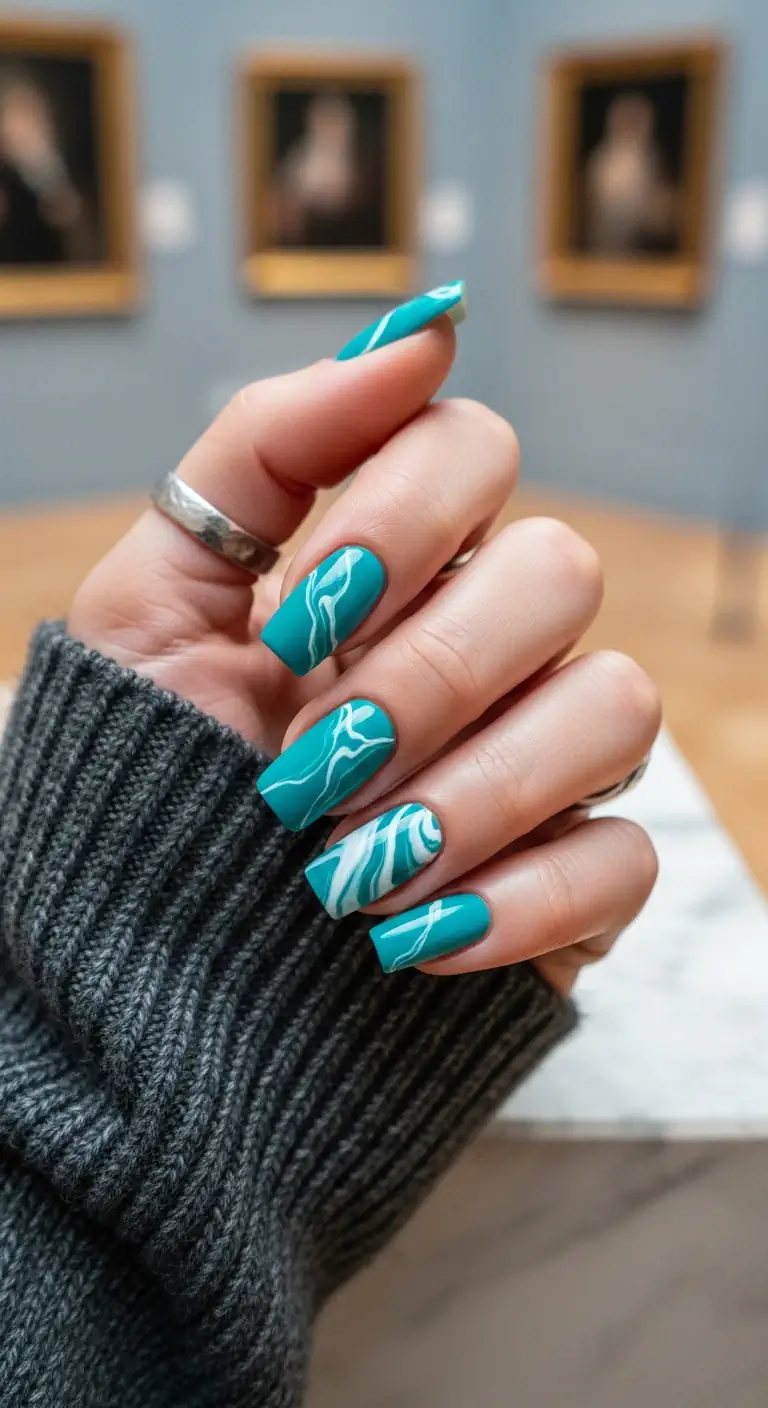
Vibrant turquoise coffin nails with white marble veining for a water-ripple effect.
Overview:
Turquoise and white marble is the nail equivalent of looking into a swimming pool from above — the white veining looks like light refracting through water, and the turquoise base creates the illusion of depth. It's a design that photographs exceptionally well, especially against blue skies or ocean backgrounds.
The ring finger gets a bolder, more concentrated marble swirl compared to the subtler single-line veins on the other nails. That variation is what prevents the design from looking like a stamped repeat. Each nail has its own unique pattern, which is exactly how real marble works — no two slabs are identical.
Marble nail art using the wet-on-wet technique is forgiving because the "mistakes" improve the design. Overworked swirls look muddy; underworked ones look like clean veining. The sweet spot is somewhere in between, and you'll find it faster than you think.
Design Breakdown:
Turquoise base with organic white veining creates a design that looks like polished stone.
Base Color: A vibrant turquoise or teal blue. OPI "Cancun in a Bottle" or Essie "Show It Off" hit the right ocean tone.
Nail Shape: Medium-long coffin. The flat tip provides a defined edge for the marble pattern.
Design Element: White marble veining and water ripple swirl patterns. Ring finger has bolder, more concentrated swirls.
Finish: High-gloss top coat that creates the "polished stone" illusion.
Get The Look at Home:
Marble is a "work messy, clean up later" technique. Embrace the chaos.
- Prep: Shape into coffin, apply base coat.
- Turquoise base: Apply two coats of turquoise. Let dry.
- Wet layer: Apply a thin second coat of turquoise. Do NOT let it dry — you're working into this wet surface.
- Drop white: Place thin lines of white polish onto the wet turquoise using a liner brush.
- Drag gently: Use a toothpick to drag through the white lines in one direction. Three or four drags per nail — over-mixing turns everything muddy.
- Bold accent: On the ring finger, add more white and swirl more aggressively for a concentrated marble effect.
- Seal: Wait 10 minutes, then apply a thick glossy top coat. Rushing smears the marble.
19.Baby Blue 3D Pearl Drops
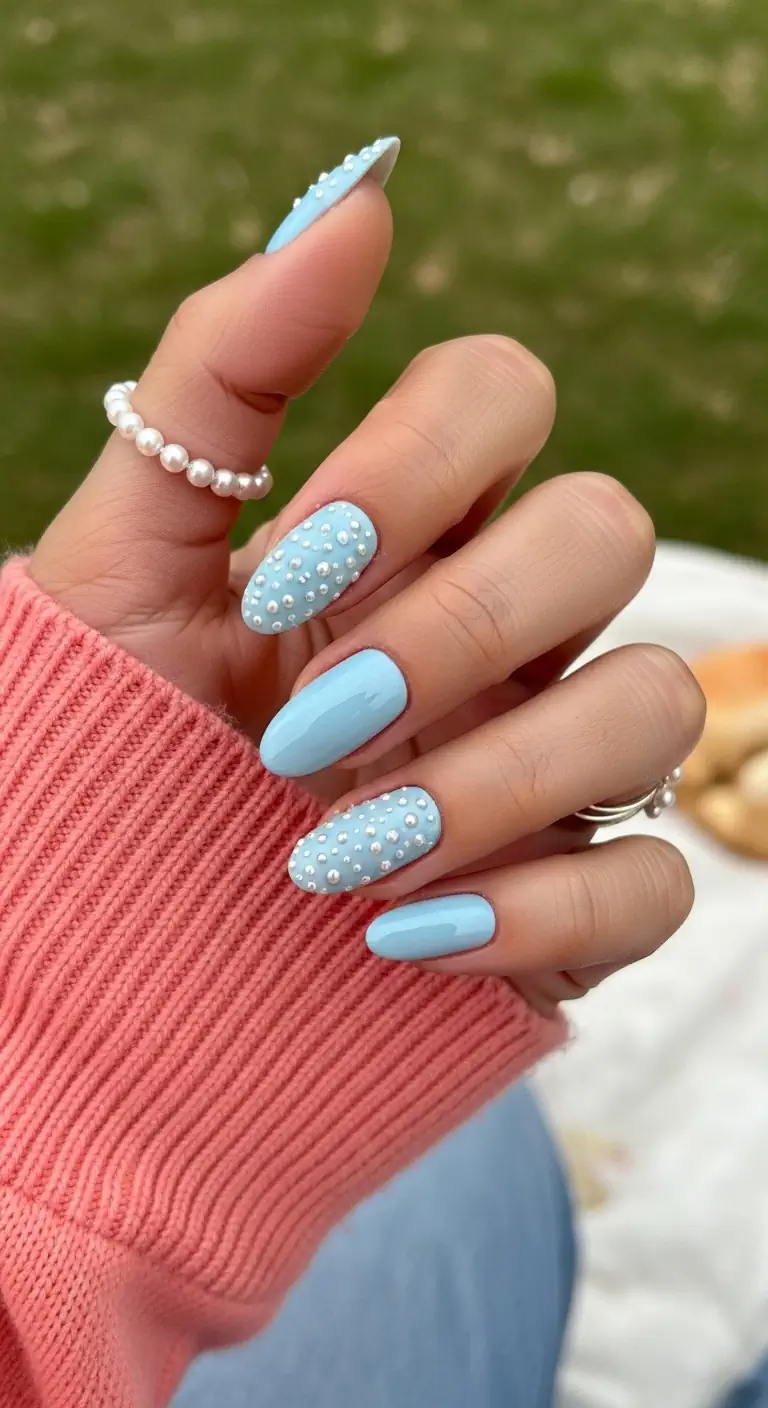
Soft baby blue almond nails with dimensional 3D pearl droplet embellishments.
Overview:
3D pearl embellishments are polarizing. Done well, they look like jewelry for your hands. Done badly, they look like something fell off your craft shelf. The key is restraint — a few well-placed pearls on a clean base create elegance; pearls scattered everywhere create clutter.
Baby blue is the ideal base for pearl accents because both elements share a cool undertone. The pearls pick up the blue's cooler qualities, creating a monochromatic harmony that feels cohesive. Gold or rose-gold pearls would fight the blue; white pearls complement it.
The practical reality of 3D nail embellishments: they snag on hair, knitwear, and pillowcases. Sealing the edges with a thick bead of gel or top coat around each pearl reduces this, but doesn't eliminate it. Budget about a week of wear before something catches.
Design Breakdown:
Clean pastel base with dimensional pearl accents for an elegant, jewelry-like effect.
Base Color: A soft pastel baby blue. Essie "Bikini So Teeny" or OPI "I Believe in Manicures" work well.
Nail Shape: Medium-long almond. The curved shape echoes the round form of the pearls.
Design Element: 3D raised pearl droplet accents scattered on select nails for dimensional texture.
Finish: High-gloss top coat that makes the blue look like porcelain.
Get The Look at Home:
3D embellishments need proper adhesive. Regular top coat won't hold pearls through a vacation.
- Prep: Shape into medium-long almond, apply base coat.
- Blue base: Apply two coats of baby blue. Let dry.
- Plan placement: Hold pearls over different nails before committing. Odd-numbered placements (3 or 5 across the hand) look more natural than symmetrical pairs.
- Attach pearls: Apply a small bead of nail art gel or jewelry gel to the back of each pearl. Press onto the cured nail surface. Cure under UV/LED lamp.
- Edge seal: Using a detail brush, apply top coat around the base and edges of each pearl. This prevents lifting and snagging.
- Full gloss: Top coat the remaining nail surface for a unified finish.
31 Patriotic Fourth of July Nail Ideas for 2026 🇺🇸
20.Aqua Black Mermaid Scales
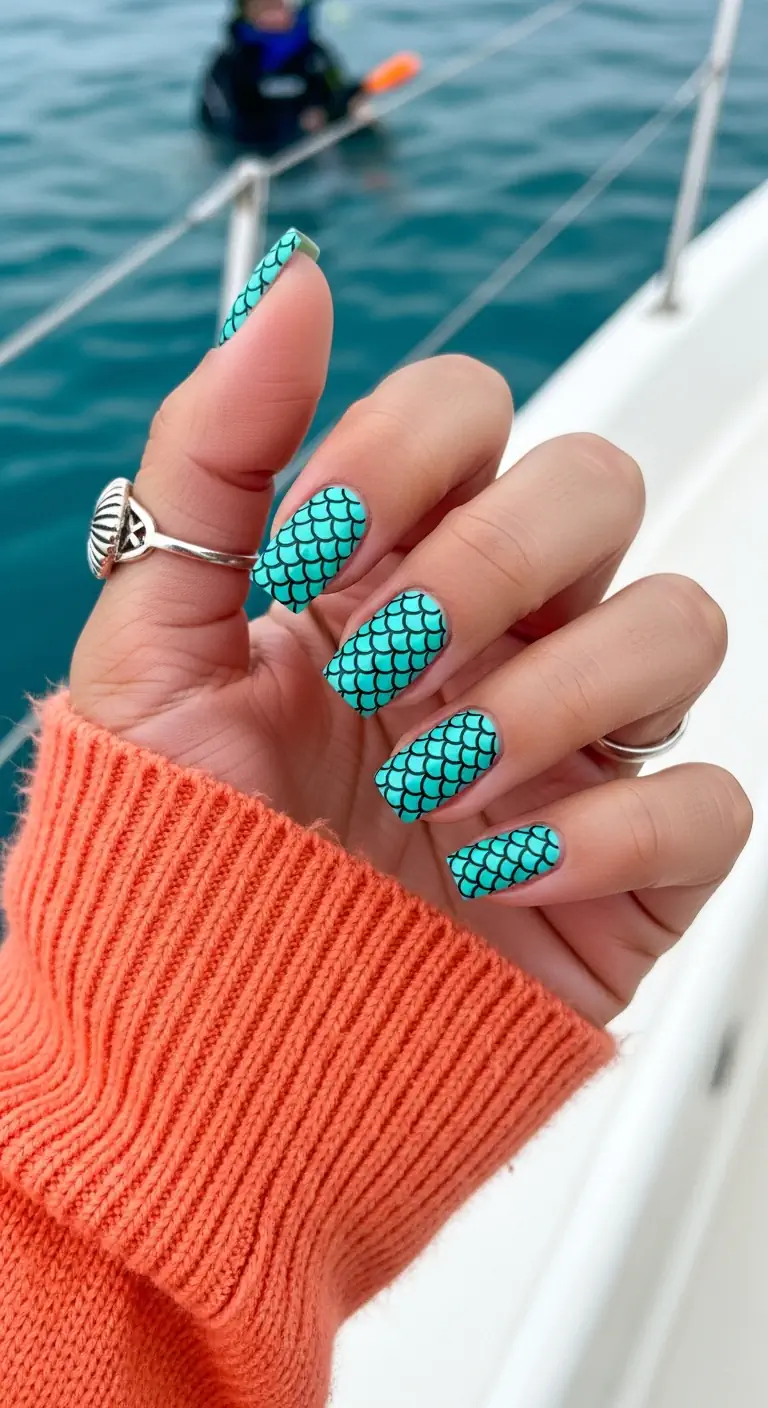
Aqua-to-black ombre almond nails with mermaid scale pattern for a fantasy ocean look.
Overview:
Mermaid nails are having a renaissance, and this aqua-to-black gradient is why. The dark-to-light transition creates the illusion of depth — like looking into deep ocean water where light fades as you go deeper. The scale pattern overlaid on top turns it from "ombre" into "creature."
The gradient from aqua at the cuticle to black at the tip is counterintuitive (most ombres go light-to-dark), but it works because it mimics how light behaves underwater. The bright aqua catches the eye first, then the dark tip grounds the design. It's a small inversion that makes the whole set feel more dynamic.
Scale patterns require a stamping plate or very steady freehand work. The U-shaped scales need to overlap in rows, with each row offset from the one above. It's time-consuming but meditative — put on a podcast and work row by row.
Design Breakdown:
Ocean-inspired gradient with scale texture for a fantasy, editorial look.
Base Color: Aqua teal at the cuticle transitioning to black at the tips. The gradient does the heavy lifting.
Nail Shape: Medium-long almond. The tapered shape mimics the organic curve of fish scales.
Design Element: Mermaid/fish scale pattern overlaid on the aqua-to-black gradient. Scales created with stamping or hand-painting.
Finish: Glossy or chrome top coat to enhance the aquatic, iridescent quality.
Get The Look at Home:
The gradient goes down first, then the scales are painted on top. Work one nail at a time.
- Prep: Shape into medium-long almond, apply base coat.
- Gradient: Apply aqua polish to the bottom half and black to the top half. Blend with a sponge for a seamless transition.
- Build opacity: Repeat the sponging 2-3 times for full color saturation.
- Scale pattern: Using a thin liner brush and black or dark teal polish, draw overlapping U-shaped scales in rows. Offset each row from the one above.
- Cure/set: Let the scale pattern dry fully before applying top coat — wet scales smear under the brush.
- Seal: Apply a glossy or chrome top coat to enhance the aquatic shimmer.
21.Icy Silver Metal Chrome
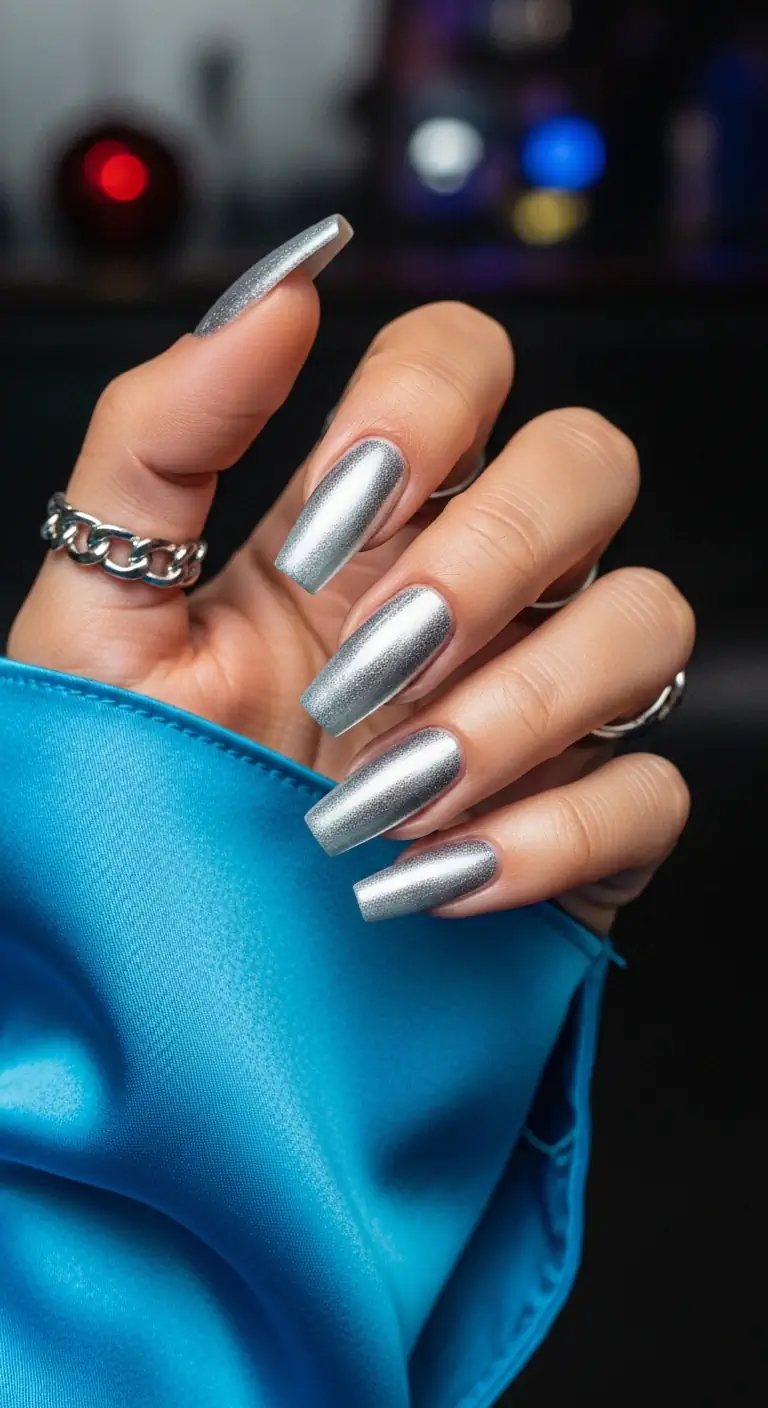
Full metallic silver chrome nails with a mirror-like reflective finish.
Overview:
Chrome nails are one of the few designs that genuinely look better in person than in photos. The mirror-like surface reflects your surroundings, which means the nails constantly change color and brightness depending on where you are. Under fluorescent office lights they read cold silver; in warm sunlight, they pick up golden tones from the environment.
Full chrome is a commitment — there's no "subtle" version of a mirror finish. Every fingerprint, every scratch, every imperfection in the nail surface is magnified by the reflective coating. The base needs to be flawless before the chrome powder goes down, which means extra prep time and a self-leveling base coat.
Chrome powder application requires a no-wipe gel top coat as the adhesive layer. Regular polish won't give the powder anything to stick to. The investment in a proper gel system (UV lamp included) is worth it for this design — regular polish chrome looks dull by comparison.
Design Breakdown:
Full metallic coverage with no art. The chrome IS the design.
Base Color: Metallic silver chrome applied over a smooth base. No color — pure reflection.
Nail Shape: Medium-long almond or coffin. Both shapes suit the futuristic aesthetic.
Design Element: None. Full chrome mirror finish across all nails.
Finish: Chrome/mirror — a highly reflective, liquid-metal surface.
Get The Look at Home:
Chrome powder application is a gel technique. You'll need a UV/LED lamp and no-wipe top coat.
- Prep: Shape nails, push back cuticles, buff surface perfectly smooth. Any ridge shows through chrome.
- Base color: Apply black or dark gel polish as the undercoat. Cure under UV/LED lamp.
- No-wipe top coat: Apply a no-wipe gel top coat over the cured base. Cure for 30 seconds.
- Rub chrome powder: Using a silicone applicator or eyeshadow sponge, rub silver chrome powder onto the cured surface. Buff until mirror-smooth.
- Brush off excess: Gently brush away loose powder with a fluffy brush.
- Seal: Apply one coat of gel top coat over the chrome to protect the finish. Cure. This prevents the chrome from scratching or dulling.
21 Hot Summer Buns Hairstyle Ideas for 2026 ☀️🔥
22.Sunny Lemon Daisy Art
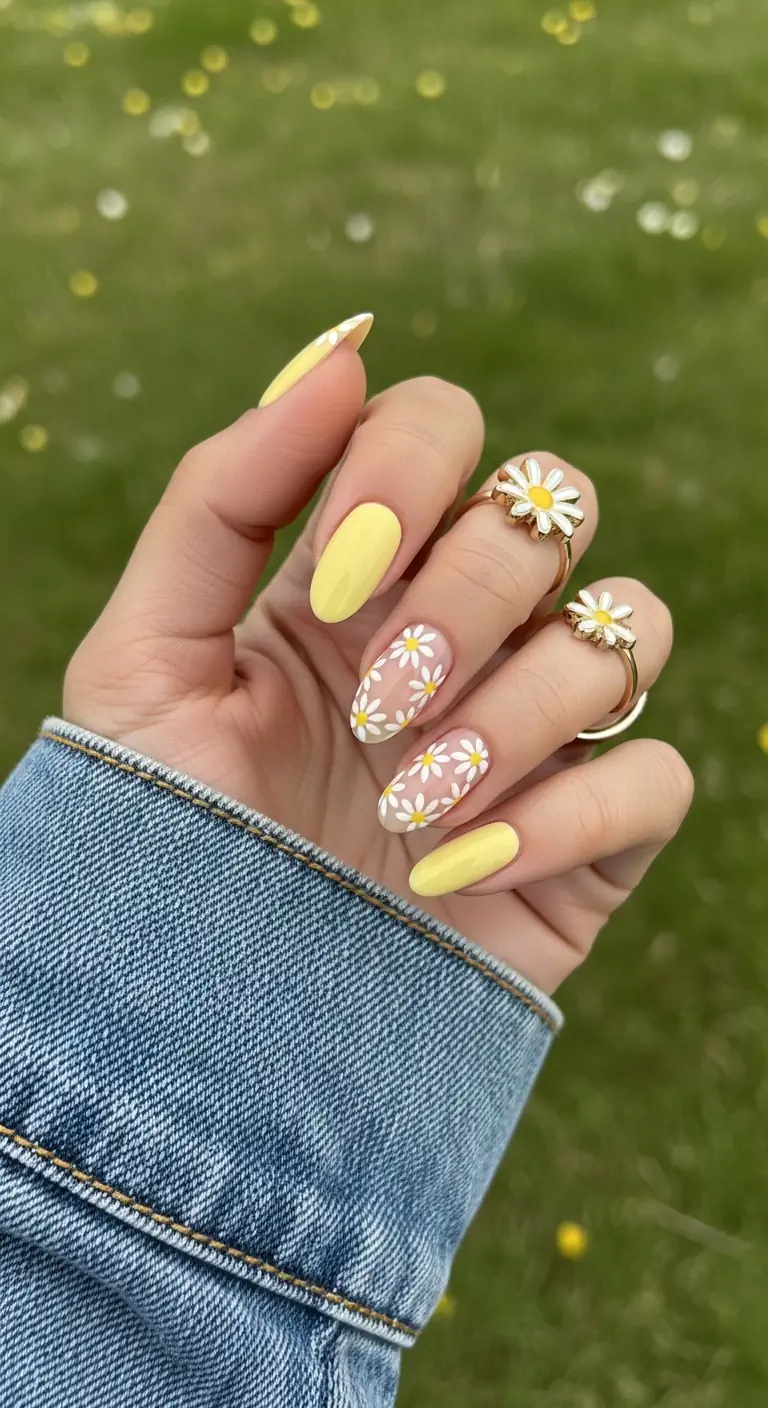
Bright lemon yellow almond nails with white daisy floral art for a cheerful vacation look.
Overview:
Yellow and daisies is a combination that works on a nearly biological level — it's the color of sunshine and the flower of summer. The hand-painted white daisies against the bright lemon base create a cheerful, uncomplicated set that doesn't need explaining. It looks happy, and that's enough.
Daisy nail art is one of the most forgiving freehand techniques available. Five dots in a circle, one dot in the center, done. You can paint a daisy with a bobby pin and two colors. That accessibility is its strength — it's one of the only detailed designs that consistently looks good when done at home.
Yellow polish streaks. It always streaks. Budget three thin coats instead of two, and use a ridge-filling base coat. The extra time invested in the base layer pays dividends when the yellow goes down smoothly.
Design Breakdown:
Bright, cheerful base with simple floral art for an approachable, high-impact design.
Base Color: A bright, sunny lemon yellow. Essie "Lemon Drop" or OPI "I Just Can't Cope-acabana" deliver the right warmth.
Nail Shape: Medium almond. The rounded shape suits the organic flower forms.
Design Element: Hand-painted white daisy flowers with yellow centers scattered across each nail.
Finish: High-gloss top coat for a bright, fresh finish.
Get The Look at Home:
Daisies are five dots and a center dot. This is the easiest freehand floral technique available.
- Prep: Shape into medium almond, apply base coat.
- Yellow base: Apply three thin coats of lemon yellow on all nails except the middle and ring finger. Let each dry fully.
- Petal circles: Using a dotting tool and opaque white, press five dots in a loose circle. The dots don't need to touch — gaps between petals look more natural. Do this only on sheer nude colored nails that is the ring and middle fingers.
- Yellow centers: Wait 60 seconds for white to set. Use a smaller dotting tool and yellow polish to place a single dot in each flower's center.
- Spacing: Aim for 2-3 daisies per nail. Leave visible yellow between flowers.
- Seal: Float the top coat over the art without pressing. Dragging through wet yellow centers smears the color across the petals.
23.Milk Bath Pressed Flowers
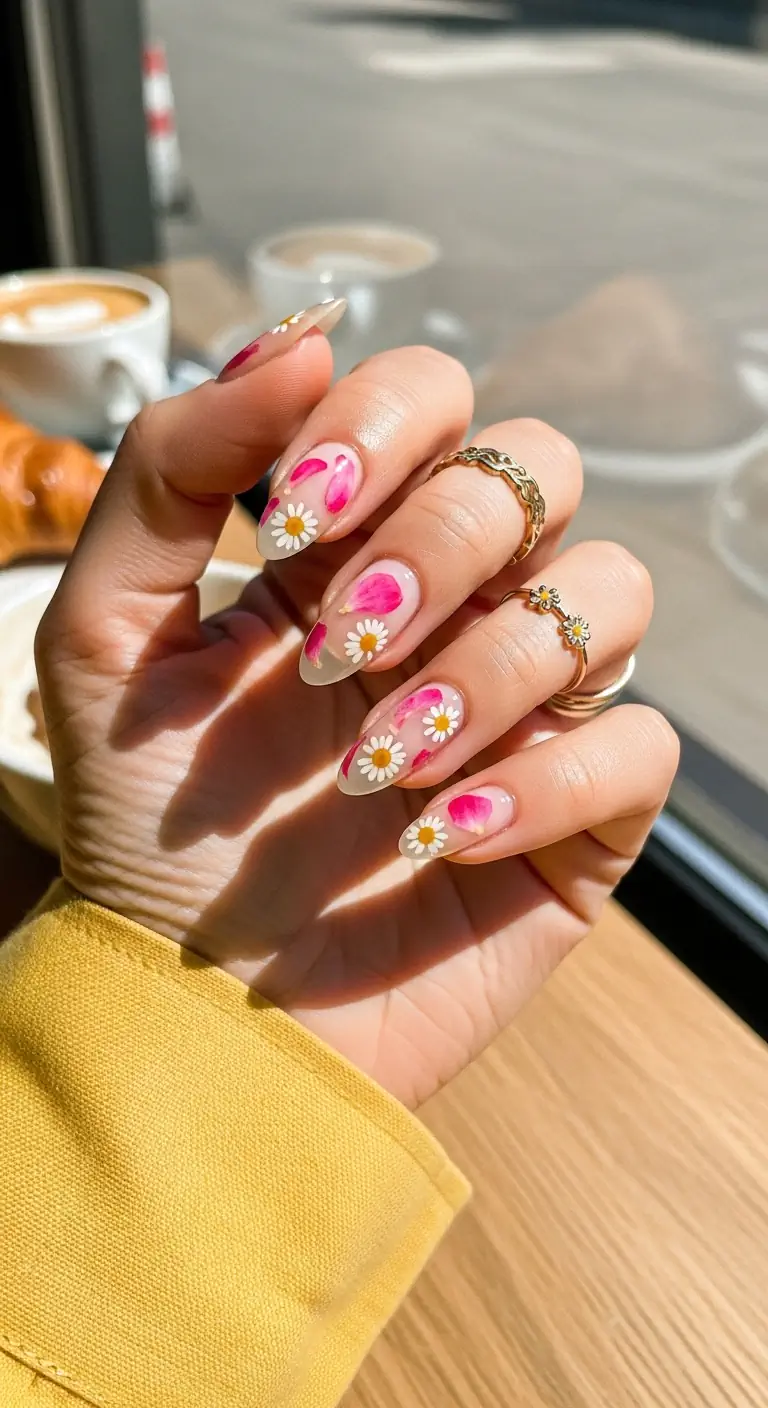
Milky white almond nails with pressed dried flowers visible through the translucent base.
Overview:
Milk bath nails look like flowers preserved in resin — the translucent white base creates a foggy, dreamy quality that makes the pressed flowers look submerged rather than sitting on top. It's one of the few nail art techniques where the "imperfect" placement of botanical elements actually improves the design.
The translucent base is what makes this work. If the white were opaque, the flowers would look like stickers on a solid background. The milky translucency creates depth — you can see petals at different depths within the polish layers, which gives the design a three-dimensional quality that photos barely capture.
Pressed flower nail art requires either real dried flowers (available from nail supply shops) or high-quality decals. Real flowers are more beautiful but more fragile — they can tear during application and darken over time. Decals are more durable but less organic-looking.
Design Breakdown:
Translucent base with embedded botanical elements for a resin-like, dimensional effect.
Base Color: Milky white or translucent "milk bath" white. The key is translucency — you should be able to see the natural nail through the first coat.
Nail Shape: Medium-long almond. The elongated shape provides enough surface area for flower placement.
Design Element: Real or faux pressed dried flowers embedded within the polish layers. Wildflowers, petals, and small botanical elements visible through the milky base.
Finish: Glossy top coat with slight milky translucency. Multiple coats needed to encapsulate the flowers.
Get The Look at Home:
The flowers go down between polish layers, not on top. This encapsulation technique is what creates the "submerged" look.
- Prep: Shape into medium-long almond, apply base coat.
- First milky coat: Apply one thin coat of milky white. Let dry.
- Place flowers: While the second coat is still tacky, use tweezers to place pressed flowers onto the nail. Press gently to embed.
- Encapsulate: Apply a second coat of milky white over the flowers. The flowers should be visible through the polish but not raised.
- Smooth: Apply a third coat if any flower edges are sticking up. The surface should be perfectly smooth.
- Seal: Apply a thick glossy top coat to create the glass-like, resin finish.
27 Stunning Graduation Day Nail Ideas for 2026 🎓
24.Classic French with Gold Foil
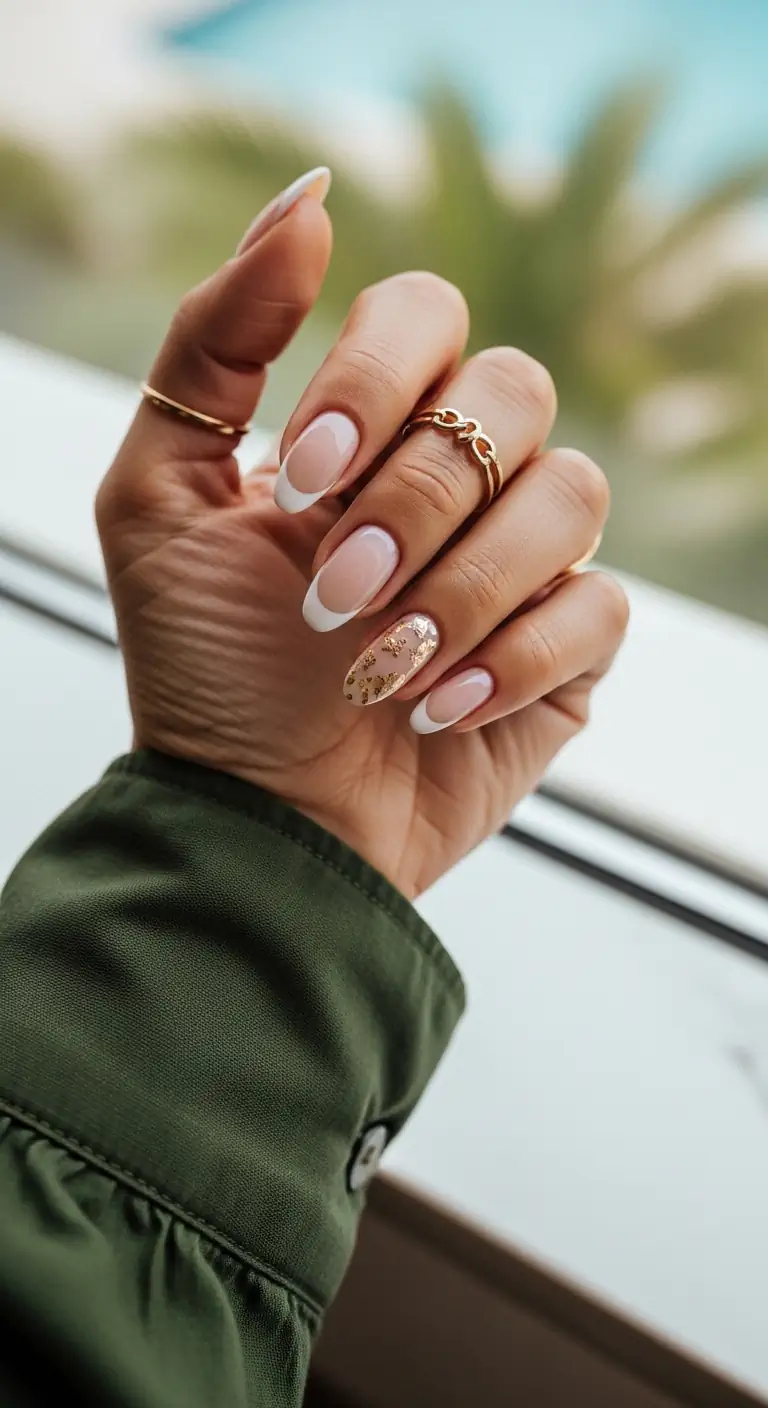
Classic French manicure elevated with gold foil leaf accents on select nails.
Overview:
A French manicure is the most enduring nail design in history for a reason: it works everywhere, with everything, on everyone. Adding gold foil accents doesn't change the fundamental design — it just adds a layer of luxury that makes the French feel intentional rather than default.
The gold foil is applied sparingly — a few flakes on select nails, not a full-coverage glitter bomb. That restraint is what keeps the design sophisticated. The foil catches light unpredictably, creating organic metallic accents that look like they were placed by accident (in the best possible way).
Real gold leaf (cosmetic grade) gives a significantly different effect than gold foil polish. Leaf sits flat against the surface and has irregular, organic edges. Foil polish creates uniform sparkle, which looks synthetic by comparison. The investment in actual gold leaf is worth it for this design.
Design Breakdown:
Timeless French structure with organic metallic accents for a touch of luxury.
Base Color: A sheer, warm-toned nude or pink that mimics the natural nail bed.
Nail Shape: Medium almond or squoval. Both shapes suit the classic French line.
Design Element: Crisp white French tips with gold foil leaf accents scattered on select nails.
Finish: High-gloss top coat to seal the foil and create a smooth surface.
Get The Look at Home:
The French tips are the foundation. The gold foil is applied after, into a tacky top coat layer.
- Prep: Shape into almond or squoval, apply base coat.
- Nude base: Apply two coats of sheer nude. Let dry.
- French tips: Using a liner brush or French guides, paint white tips on all nails. Clean up the smile line with acetone.
- Tacky layer: Apply a thin coat of clear polish or gel. While it's still wet/tacky, this becomes the adhesive for the gold.
- Place gold foil: Using tweezers, press small fragments of gold leaf onto the tacky surface. Concentrate on 2-3 accent nails. Don't flatten perfectly — crumpled foil catches more light. Do this only on your accent nail (ring finger).
- Seal: Apply a thick top coat over everything to encapsulate the foil and create a smooth surface.
25.Chocolate Caramel 3D Drips
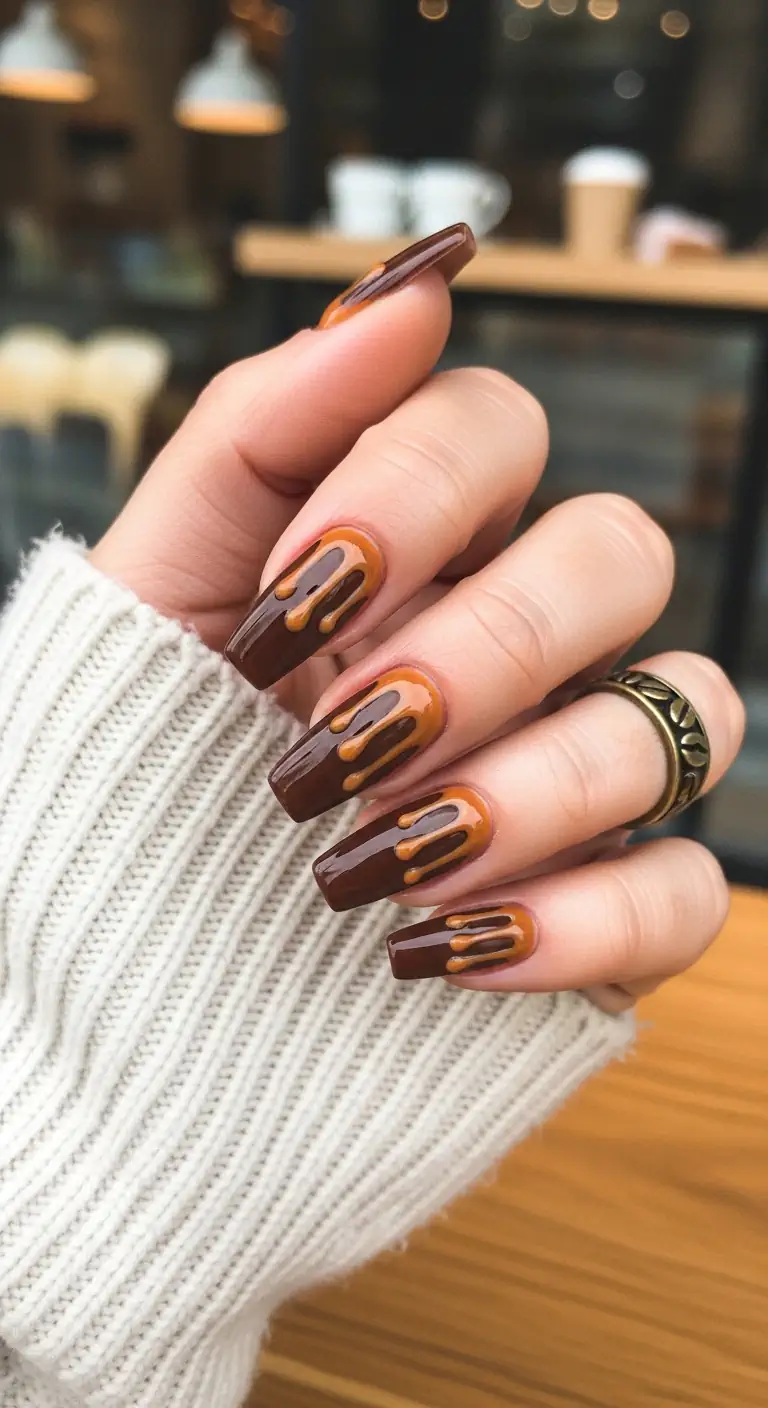
Deep chocolate brown coffin nails with raised 3D caramel drip effect for a decadent look.
Overview:
3D drip nails look like melted chocolate or caramel flowing down the nail surface. The raised texture catches light differently than flat polish, creating a dimensional effect that photographs beautifully. On a deep chocolate base, the caramel drips look almost edible — like dessert for your fingertips.
The drip pattern varies slightly per nail, which is essential. If every drip is identical, the design looks stamped rather than hand-crafted. Some drips should be longer, some shorter, some wider at the base. The organic variation is what makes the 3D effect convincing.
3D drip effects require building up polish in layers. Regular polish works but dries slowly between layers. Gel polish is faster because you can cure each drip layer individually. The trade-off is that gel requires a UV lamp, which limits your travel-friendliness.
Design Breakdown:
Decadent dark base with raised texture for a tactile, 3D effect.
Base Color: A deep, opaque chocolate brown. OPI "Squeaky Gridge" or Essie "Mink Muffs" work well.
Nail Shape: Medium-long coffin. The flat tip gives the drips a clean visual endpoint.
Design Element: 3D caramel-colored drip effect flowing from the cuticle area downward. Drip length and width vary per nail.
Finish: High-gloss top coat that makes the drips look wet and the brown look rich.
Get The Look at Home:
Building 3D drips requires patience — each layer needs to set before the next goes down.
- Prep: Shape into coffin, apply base coat.
- Chocolate base: Apply two coats of deep brown. Let dry completely.
- Drip placement: Using a dotting tool or brush, place a blob of caramel-colored polish near the cuticle. Let it drip downward naturally — don't force the shape.
- Build layers: Apply 2-3 layers of the drip color, letting each dry before the next. This builds the raised 3D texture.
- Vary per nail: Make some drips longer, some shorter. The organic variation is what makes the design convincing.
- Seal: Apply a thick glossy top coat to encapsulate the drips and create a smooth overall surface.
28 Effortless Hot Weather Day Hairstyles for Women 2026 ☀️💇♀️
26.Matte Slate Geometric Lines
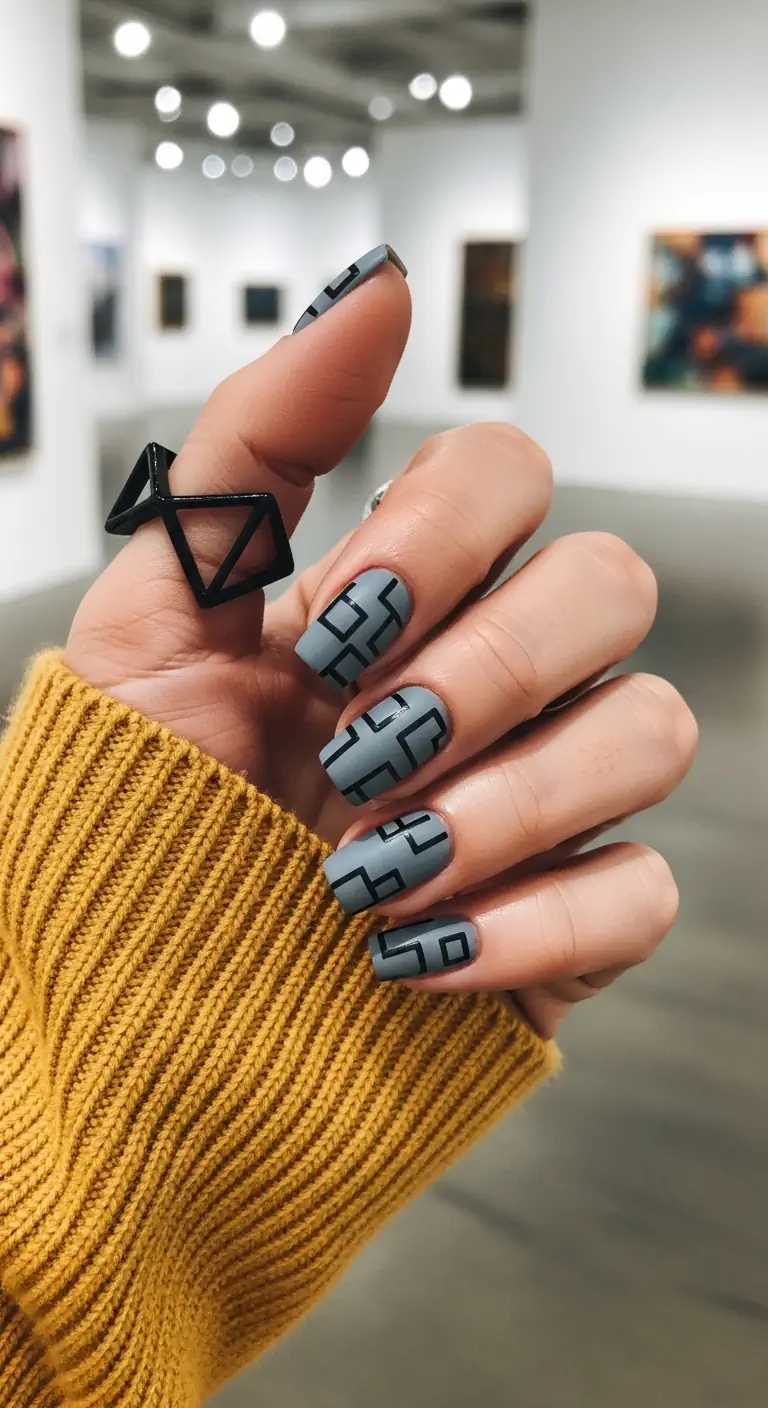
Matte slate blue-gray squoval nails with black geometric line art for a modern minimalist look.
Overview:
Geometric line art on a matte surface is one of those designs that looks like it belongs in a design museum. The flat, non-reflective finish removes the visual noise of shine, letting the black lines stand out with architectural clarity. Every angle, every intersection, every deliberate gap in the pattern is fully visible.
Slate blue-gray is an underrated color for nail art. It's neutral enough to function as a base but interesting enough to stand on its own. The grey undertone keeps it from looking like a children's art project; the blue undertone keeps it from looking like concrete. It sits in a sophisticated middle ground.
Matte finishes show surface imperfections more than glossy ones. Any bumps, ridges, or uneven polish application that glossy top coat hides will be fully visible under matte. Spend extra time on surface prep — buff, smooth, and use a ridge-filling base coat.
Design Breakdown:
Muted base with graphic line work for a modern, gallery-worthy design.
Base Color: A muted slate blue-gray. Essie "Chinchilly" or OPI "Taupe-less Beach" hit the right cool-toned neutral.
Nail Shape: Short-medium squoval. The practical shape lets the line art carry all the visual interest.
Design Element: Black geometric line art — angular shapes, interlocking rectangles, and maze-like patterns. Each nail has a unique section of the pattern.
Finish: Matte top coat for a flat, architectural finish.
Get The Look at Home:
Geometric line art requires patience and a steady hand. Tape can help with straight lines.
- Prep: Shape into squoval, buff surface smooth, apply ridge-filling base coat.
- Slate base: Apply two coats of slate blue-gray. Let dry.
- Plan the pattern: Visualize the geometric shapes before painting. Each nail gets a different section of a continuous pattern.
- Line work: Using a thin liner brush and black polish, draw angular lines, rectangles, and geometric shapes. Use tape as a guide for perfectly straight lines.
- Fill selectively: Some shapes get filled in with black, others stay open. The contrast between filled and empty shapes creates the visual rhythm.
- Matte seal: Apply matte top coat in one stroke per nail. Don't go back over areas — it creates texture differences.
27.Cherry Red & Silver Chrome
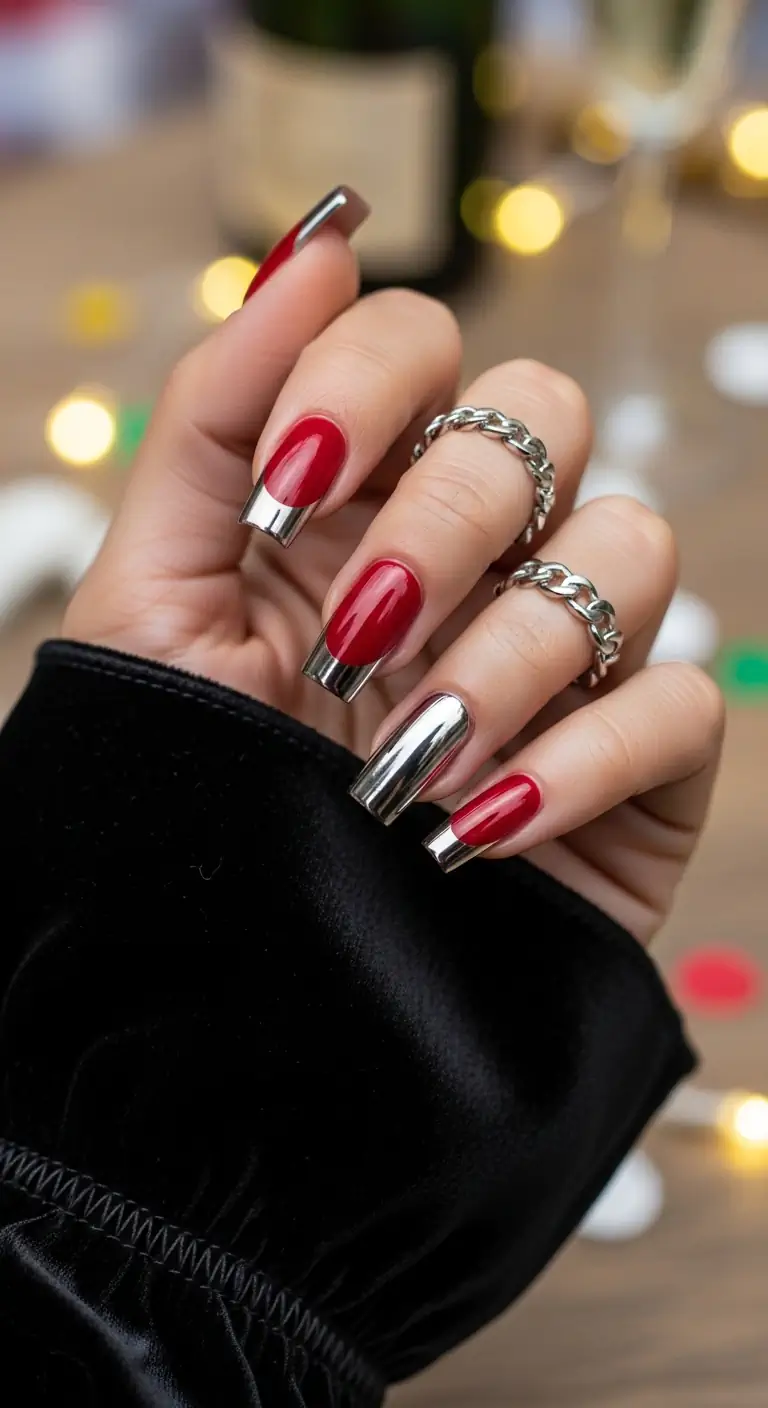
Cherry red coffin nails with silver chrome French tips and full chrome ring finger accent.
Overview:
Red and silver is a combination that borrows from both classic and futuristic aesthetics. The cherry red base reads traditional; the silver chrome tips read modern. Together, they create a tension that makes the design feel dynamic rather than safe. The ring finger gets the full chrome treatment, which escalates the contrast to its maximum point.
The chrome French tips are more technically demanding than standard white tips. Chrome powder needs a no-wipe gel base to adhere to, which means the tips require a separate application step from the red base. It's extra work, but the mirror-like finish on the tips is worth the effort.
Cherry red is one of the most staining polish colors. Always use a base coat — and not just any base coat. A ridge-filling, stain-preventing formula like OPI's "Nail Envy" is worth the investment. Without it, your nails will look slightly pink for days after removal.
Design Breakdown:
Classic red with metallic chrome accents for a high-contrast, mixed-finish design.
Base Color: Classic cherry red. OPI "Big Apple Red" or Essie "Really Red" deliver the right true-red tone.
Nail Shape: Medium-long coffin. The flat tip provides a clean edge for the chrome French line.
Design Element: Silver chrome French tips on index, middle, and pinky. Ring finger is fully covered in silver chrome for maximum contrast.
Finish: Glossy on red nails, mirror chrome on silver nails. Mixed finishes create visual texture.
Get The Look at Home:
Chrome tips require gel technique — regular polish chrome doesn't achieve the mirror finish.
- Prep: Shape into coffin, apply base coat.
- Red base: Apply two coats of cherry red on all nails. Let dry.
- Chrome tips: On index, middle, and pinky, apply no-wipe gel top coat only to the tip area. Cure. Rub silver chrome powder onto the cured tips. Brush off excess.
- Full chrome accent: On ring finger, apply no-wipe top coat over the entire red nail. Cure. Rub silver chrome powder over the entire surface.
- Seal: Apply gel top coat over all chrome areas to protect the mirror finish.
- Cure final: Cure everything under UV/LED lamp for a durable, long-lasting finish.
28 Trendy May Nail Designs for 2026 💅
28.Soft Peach Sunset Ombre
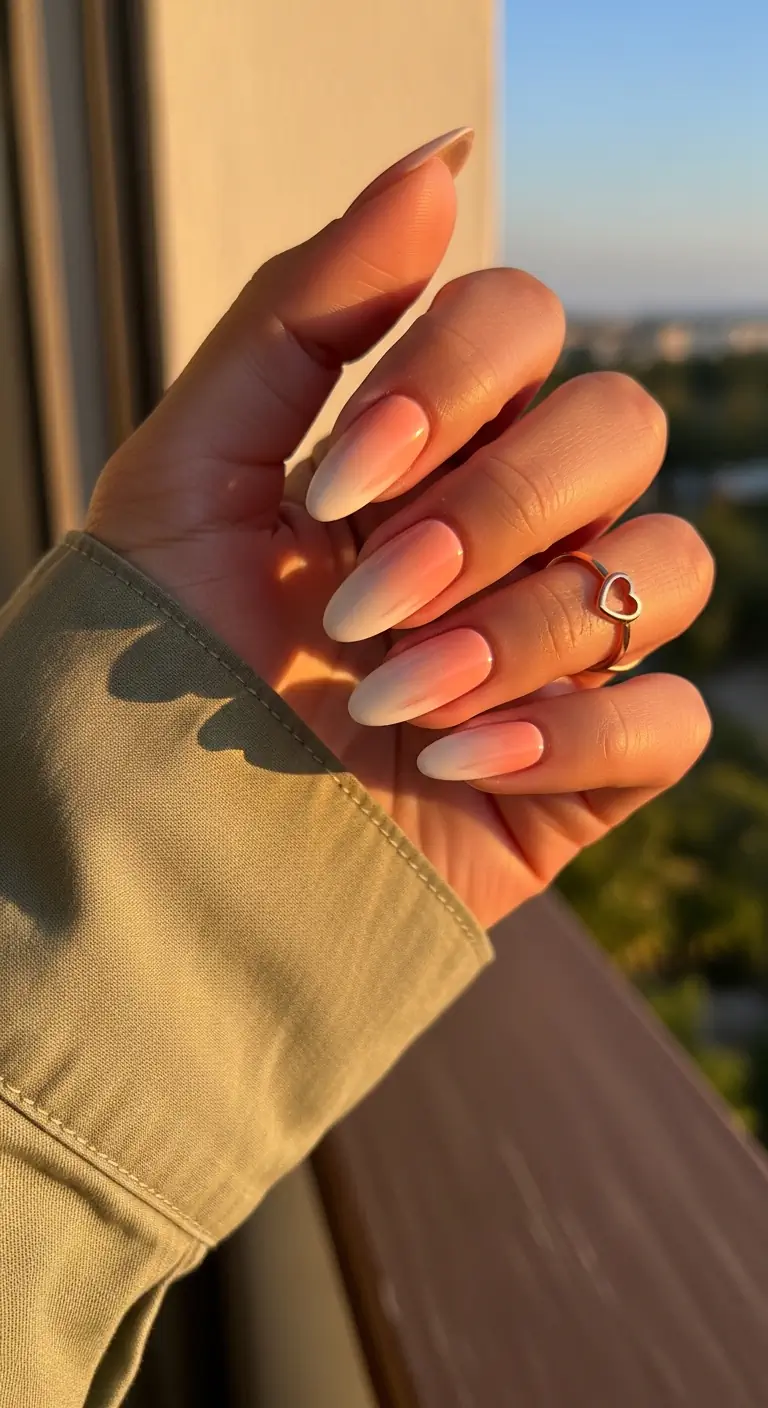
Soft peach-to-white gradient on long almond nails for a sunset-inspired ombre.
Overview:
A peach-to-white gradient is the nail equivalent of a sunset fading into horizon. The warm peach at the cuticle transitions to milky white at the tip, creating a seamless color story that feels organic rather than designed. It's one of those rare designs that looks better in motion than in a still photo.
Long almond is the ideal shape for this gradient because the tapering tip provides a natural fade point. The color doesn't hit a hard edge — it dissolves into the white, creating that "airbrushed" quality that separates good ombre from great ombre. The rounded sides help the blend look smooth from every angle.
Peach polish is notoriously sheer. Getting enough opacity for the gradient to register usually requires sponging on three to four thin layers. It's time-consuming, but the result — a smooth, barely-there fade — is worth the effort. Rushing this design produces a patchy, uneven result.
Design Breakdown:
Warm-to-cool gradient that relies on smooth blending and thin layers.
Base Color: Soft peach-pink at the cuticle, transitioning to milky white at the tips.
Nail Shape: Long almond. The tapered tip provides a natural fade point for the gradient.
Design Element: Smooth vertical ombre gradient from warm peach to white. No additional art.
Finish: High-gloss top coat to smooth the sponge texture and add depth.
Get The Look at Home:
Peach and white are both sheer colors. Build the gradient slowly with thin sponged layers.
- Prep: Shape into long almond, apply base coat.
- Peach base: Apply two coats of soft peach. Let dry.
- Sponge setup: Paint peach and white polish side by side on a makeup sponge.
- Dab: Press the sponge onto the nail with the peach at the cuticle and white at the tip. Dab 3-4 times to blend.
- Repeat: Build opacity with 2-3 thin sponged layers. Let each dry before the next.
- Seal: Apply a thick top coat to smooth the sponge texture and create a seamless, airbrushed finish.
29.Bright Citrus Orange Slices
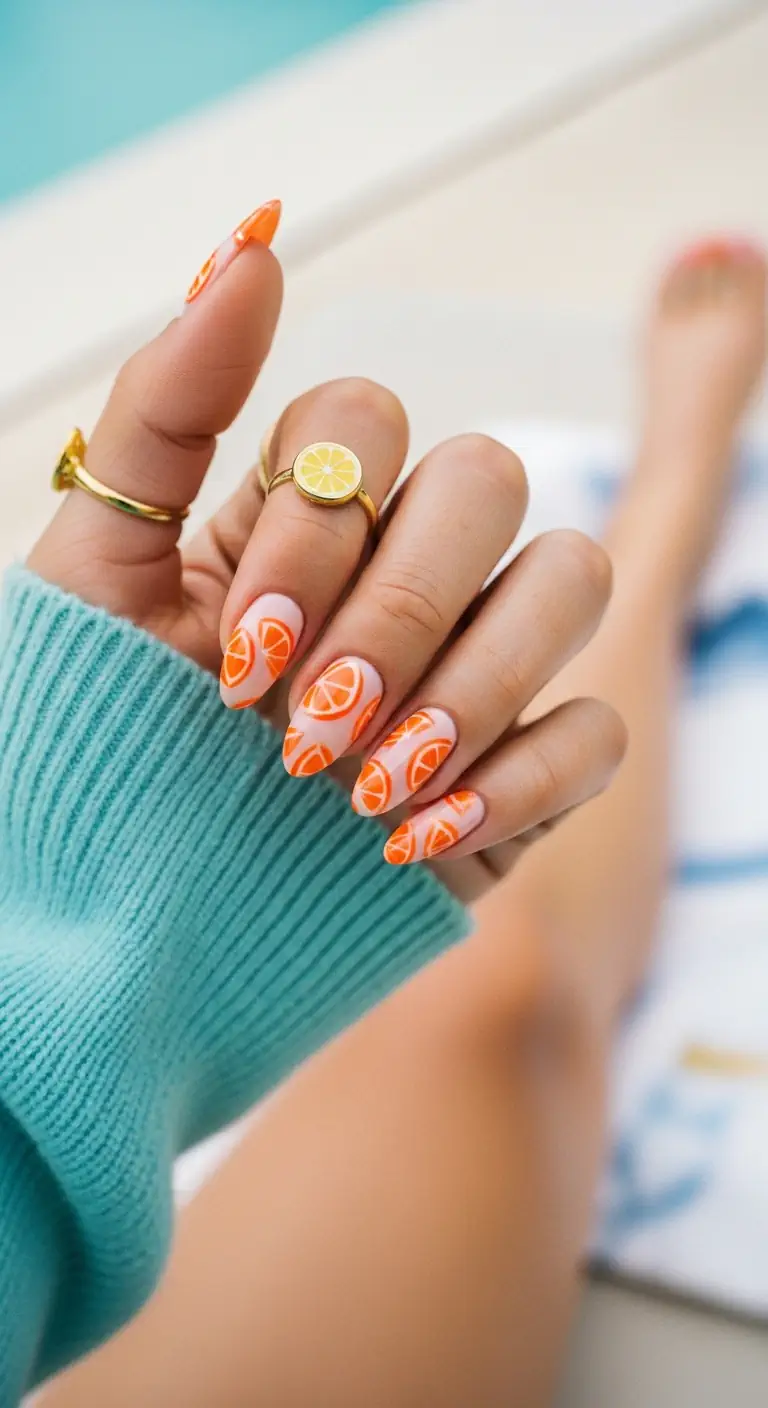
Pale nude almond nails with hand-painted orange slice art for a citrus-inspired vacation look.
Overview:
Fruit nail art walks a thin line between "editorial food styling" and "children's birthday party." This design stays on the right side because the pale nude base keeps things grounded. The orange slices are painterly rather than cartoonish — you can see the white rind detail and the individual pulp segments, which elevates the art from "cute" to "crafted."
The ring finger stays solid, which breaks the pattern and gives the eye a place to rest. Without that solid nail, the citrus art on every finger could feel overwhelming. One solid nail in the same color family creates a visual pause that makes the art nails more impactful.
Orange slice cross-sections are more detailed than they appear. Each slice needs the outer rind (a thin white circle), the inner membrane (radial lines), and the pulp segments (filled orange triangles). The detail work takes patience, but the result is worth it.
Design Breakdown:
Neutral base with detailed citrus art for a sophisticated take on the fruit nail trend.
Base Color: Pale nude-pink sheer base. The neutral canvas lets the orange art pop without competing.
Nail Shape: Medium almond. The rounded shape suits the circular citrus slices.
Design Element: Hand-painted orange slice cross-sections in bright tangerine with white rind and segment details. Ring finger is solid for balance.
Finish: High-gloss top coat for a fresh, juicy finish.
Get The Look at Home:
Orange slices are circles with radial lines. Start with the outline, then add the detail.
- Prep: Shape into medium almond, apply base coat.
- Nude base: Apply two coats of pale nude-pink on all nails. Let dry.
- Slice outlines: On accent nails, use a dotting tool and orange polish to draw half-circles or full circles. Don't worry about perfection — citrus slices aren't perfectly round.
- Rind detail: Using a fine brush and white polish, outline each slice with a thin white circle for the rind.
- Segment lines: Draw thin white radial lines from the center of each slice outward to create the pulp segments.
- Seal: Apply glossy top coat in one stroke without pressing — the detail work is delicate and can smear.
28 Stunning Softball Hairstyle Ideas with Braids for 2026 🥎✨
30.Liquid Gold Mirror Chrome
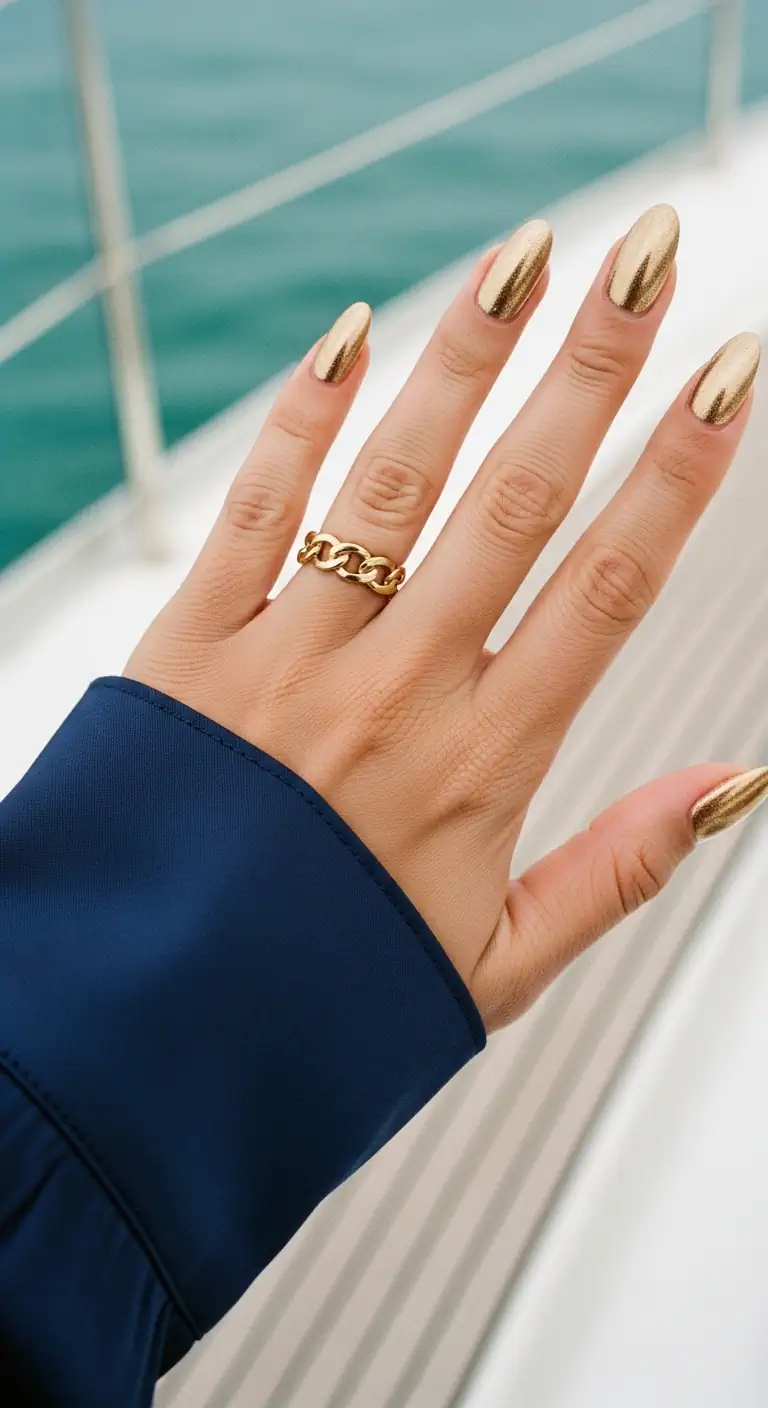
Full liquid gold chrome nails with a molten, mirror-like metallic finish.
Overview:
Full gold chrome is the most aggressive form of nail jewelry. There's no subtlety here — every hand gesture becomes a statement because the nails are literally reflecting light like mirrors. Under warm lighting, they glow like molten metal; under cool lighting, they shift to a sharper, more antique gold.
The two-tone effect visible in some nails — darker gold at the cuticle fading to brighter gold at the tips — adds dimension that uniform gold wouldn't achieve. It's a gradient within the chrome, which is technically challenging to achieve because chrome powder is inherently uniform in reflectivity.
Gold chrome scratches more easily than silver chrome because the warm tone shows dark marks more clearly. A protective top coat is essential, and reapplying it every few days will extend the mirror finish's lifespan. Budget about a week of perfect chrome before touch-ups become necessary.
Design Breakdown:
Full metallic coverage with a molten, liquid-metal aesthetic.
Base Color: Warm liquid gold chrome applied over a smooth base.
Nail Shape: Medium-long almond. The curved shape enhances the "molten" quality of the chrome.
Design Element: Full coverage metallic gold chrome with subtle two-tone gradient — darker at cuticle, brighter at tips.
Finish: Mirror chrome / high-shine metallic. The most reflective finish possible.
Get The Look at Home:
Gold chrome requires the same gel technique as silver, but the warm tone demands a different undercoat.
- Prep: Shape into medium-long almond, buff surface perfectly smooth.
- Base color: Apply a warm-toned gel polish (brown, burgundy, or deep orange) as the undercoat. This warms the gold chrome from beneath. Cure.
- No-wipe top coat: Apply no-wipe gel top coat. Cure for 30 seconds.
- Rub gold chrome: Using a silicone applicator, rub gold chrome powder onto the cured surface. Buff until mirror-smooth.
- Gradient effect: For the two-tone look, apply slightly more pressure near the cuticle and less toward the tips during the buffing stage.
- Seal: Apply gel top coat over the chrome to protect the mirror finish. Cure. Reapply top coat every few days to prevent scratching.
Choosing the Perfect
Vacation Shape
When you are on vacation, the last thing you want is a broken nail or a set that interferes with your activities. Functional elegance is the name of the game for 2026.
For the Active Soul
Short oval or squoval shapes are nearly indestructible and won’t get in the way of hiking, swimming, or luggage handling.
For the Photo Op
Medium almond and coffin shapes provide that high-fashion silhouette that makes every cocktail photo look like a magazine spread.
The Vacation Maintenance Kit
UV rays, chlorine, and saltwater can be surprisingly tough on your manicure. Even the best gel set can use a little love after a few days in paradise. I never travel without a tiny"Mani-SOS" kit in my carry-on.
Applying a fresh layer of high-gloss topcoat every 3-4 days can significantly extend the life and shine of your design. Also, a pro-tip for 2026: mineral sunscreens can sometimes dull the finish of certain topcoats, so try to wash your palms after applying your SPF to keep your nails sparkling!
How to Keep Your Mani Alive Through Travel
There is a specific kind of travel heartbreak where you look down after your first flight and see a chip so deep it catches on everything. Travel is genuinely hard on nails — suitcase zippers, seatbelt buckles, digging through carry-ons for passports, and the constant cycle of hand sanitizer and sunscreen. The finishes that survive your daily commute are not always the same ones that survive a travel day.
The most durable choice for travel is a gel manicure on short to medium squoval or rounded nails. Gel does not chip the way regular polish does under the combination of sunscreen chemicals and pool chlorine, and shorter shapes do not catch on luggage the way stilettos or long coffins do. A design like "Classic French with Gold Foil" on a short squoval will look just as polished on day five as it did at the airport, because the shape and finish are working with the travel reality rather than against it.
If you are committed to longer nails for the vacation photos, at least be strategic about the finish. Metallic chrome, fine glitter, and tortoiseshell patterns are far more forgiving than solid opaque colors because the visual texture distracts from minor edge chips.
💡 If you are going somewhere for more than a few days, gel is non-negotiable. It survives saltwater, sunscreen, and the luggage carousel in ways that regular lacquer simply cannot.
Hope now you are sure what nail will you select for your next vacation. Finding a set that aligns with personal style can elevate the overall travel look, making the choice both functional and aesthetic.
Saving preferred designs to a Pinterest board ensures they are easily accessible for the next salon appointment. Safe travels, scenic sunsets, and memorable experiences are wished for all upcoming journeys. Enjoy the getaway.