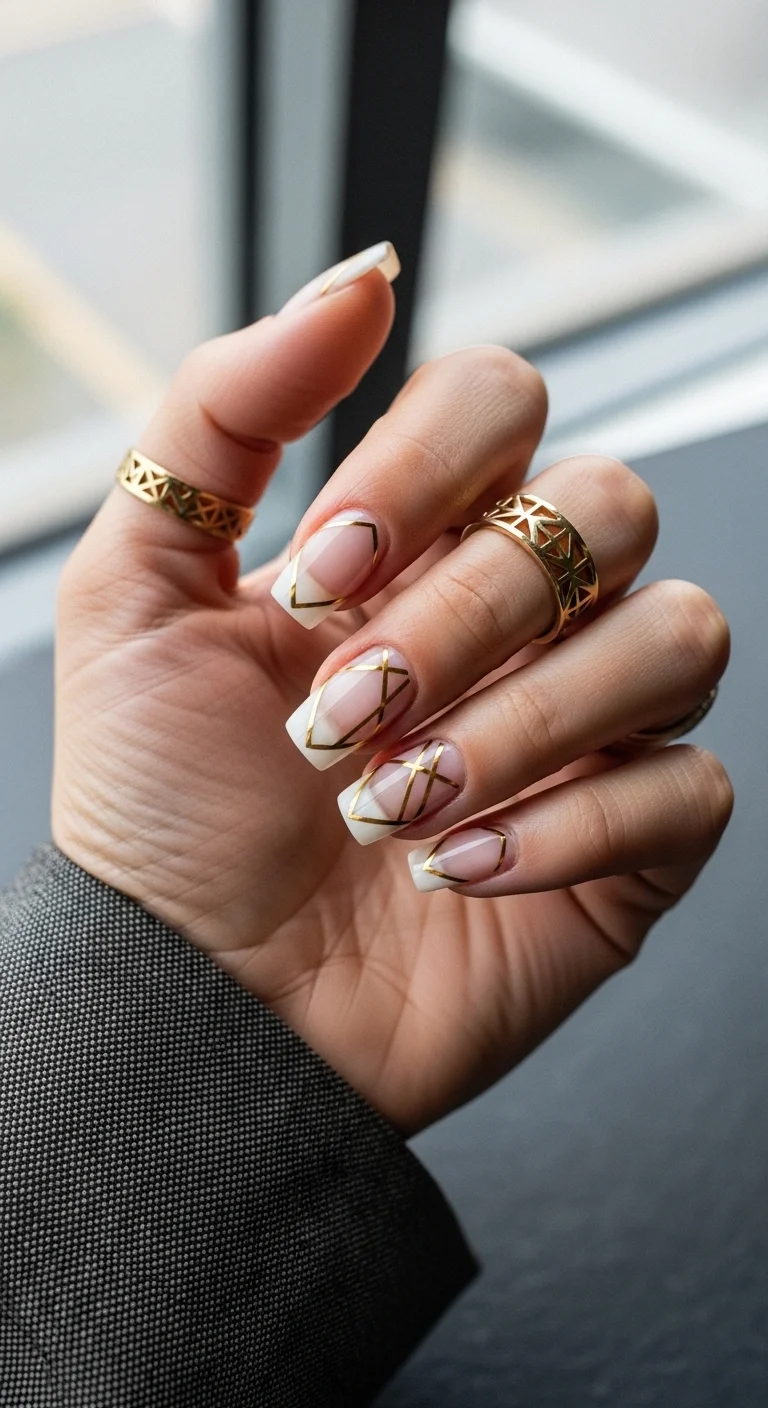
Nail Trends
27 Stunning June Nail Ideas for Spring to Summer Transition 💅
June is finally here, and it is time to give your fingertips the summer makeover they deserve! Whether you are prepping for a tropical getaway, a summer wedding, or just want to match the vibrant energy of the season, this curated list of June nail designs is sure to keep you inspired. From juicy fruit motifs to sophisticated coastal aesthetics, here are 27 stunning nail ideas to kick off your summer in style.
Why Pearly Finishes & Sea Glass Are Taking Over June
If you have been scrolling nail inspo lately, you have probably noticed the shift. June is entering its Mermaid Core era, and beauty editors are calling it the biggest texture trend of the summer. Flat matte colors are stepping aside for pearly finishes and sea glass-inspired shades that catch light from every angle.
But the story here is texture, not just color. The most interesting June nails right now are built around finishes you can actually see the depth of: 3D gel water droplets that look wet to the touch, iridescent chrome powders that shift in the sun, and encapsulated sea glass chips that catch the light like the real thing. These tactile finishes are what separate a current manicure from one that looks like it belongs to last summer.
If you want your June manicure to feel on-trend without going full costume, ask your nail tech for a glazed or pearl top coat over your base color. It gives the nail that underwater shimmer without looking like chunky glitter. It reads as elevated at a outdoor brunch and photographs even better in natural light, which is ultimately what makes it the defining finish of the season.
In This Guide
1.Espresso Mosaic Shorties
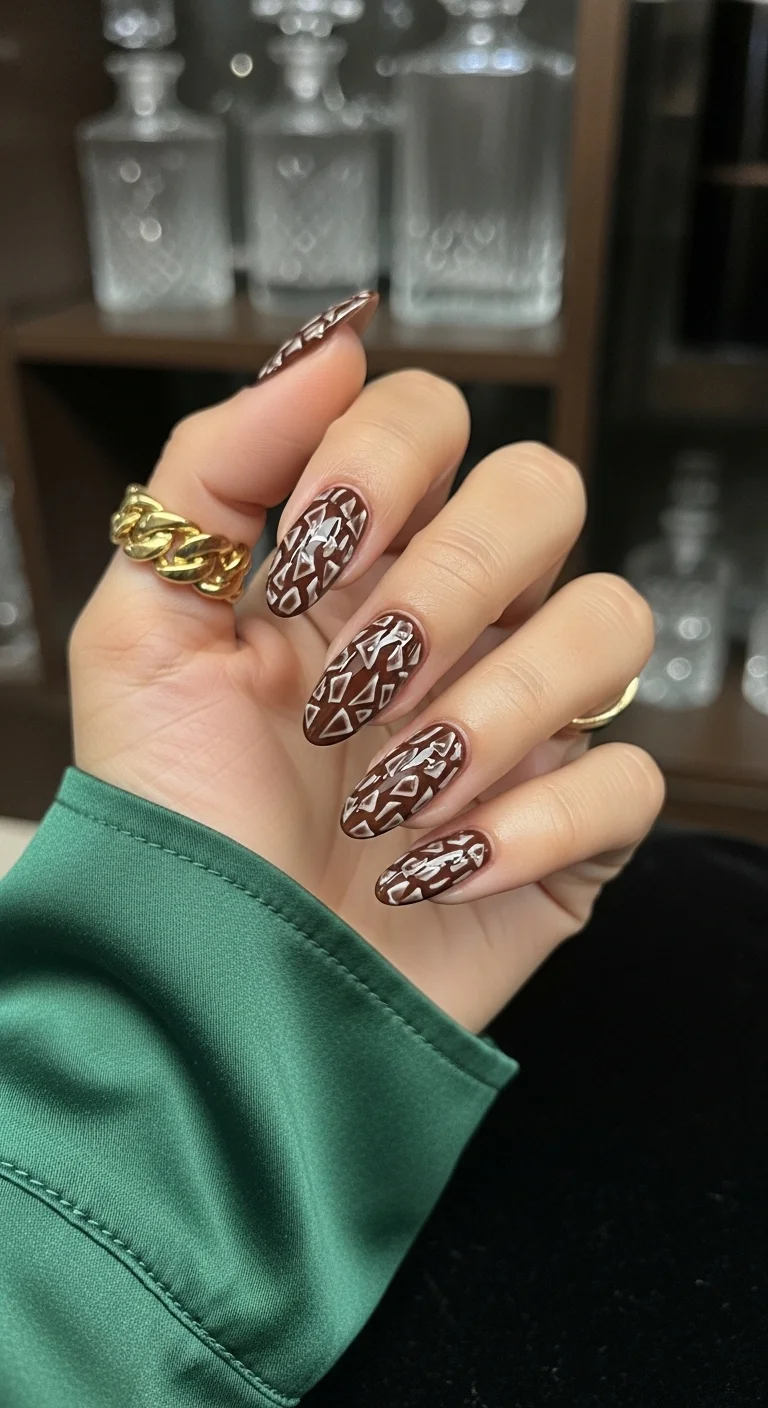
A rich chocolate brown base with white geometric mosaic overlay.
Overview:
Brown nails in summer are a deliberate contradiction, and that tension is exactly what makes this set work. The espresso base is deep enough to read as moody, but the scattered white triangles keep it from feeling like a November manicure that overstayed its welcome.
The geometric shards are the entire design. Without them, this is a solid brown set that could exist in any season. With them, the nails take on a shattered-glass quality that catches the light unevenly and gives each finger a slightly different pattern. The randomness is the point.
One practical note: the white polish needs to be genuinely opaque. If you use a sheer or streaky white, the triangles will look washed out against the dark brown instead of crisp. Budget two coats of white for each shape, or use a one-coat white like OPI "Alpine Snow" and save yourself the hassle.
Design Breakdown:
Dark base with high-contrast geometric overlay. The shapes are irregular on purpose.
Base Color: A rich, cool-toned espresso brown. Essie "Wicked" or OPI "Squeaky Gridge" nail the depth without leaning too warm.
Nail Shape: Medium almond. The tapered shape softens the sharp geometry of the triangles and keeps the design from looking too harsh.
Design Element: Hand-painted white triangles and irregular polygons scattered across each nail. No two nails should match exactly.
Finish: High-gloss top coat. The shine creates contrast between the flat white shapes and the reflective brown base.
Get The Look at Home:
This looks intricate, but it's really just triangles. Steady hands help, but the irregular shapes are forgiving.
- Brown foundation: Two coats of espresso brown. Let each dry fully. Dark polish shows every brush stroke, so use thin, even layers.
- Map the shapes: Using a fine liner brush and white polish, outline irregular triangles across the nail. Don't plan them too carefully. Vary the sizes.
- Fill in: Carefully fill each outlined shape with white. Two thin coats per triangle gives better opacity than one thick one.
- Spacing: Leave some brown visible between shapes. The dark gaps are what make the white pop.
- Cleanup: A flat brush dipped in acetone sharpens any wobbly edges on the triangles.
- Seal: One thick coat of top coat, floated over the nail without dragging through the white art.
30 Stunning Summer Hair Trends for 2026 ☀️🌊
2.The Cutest Denim Frenchie
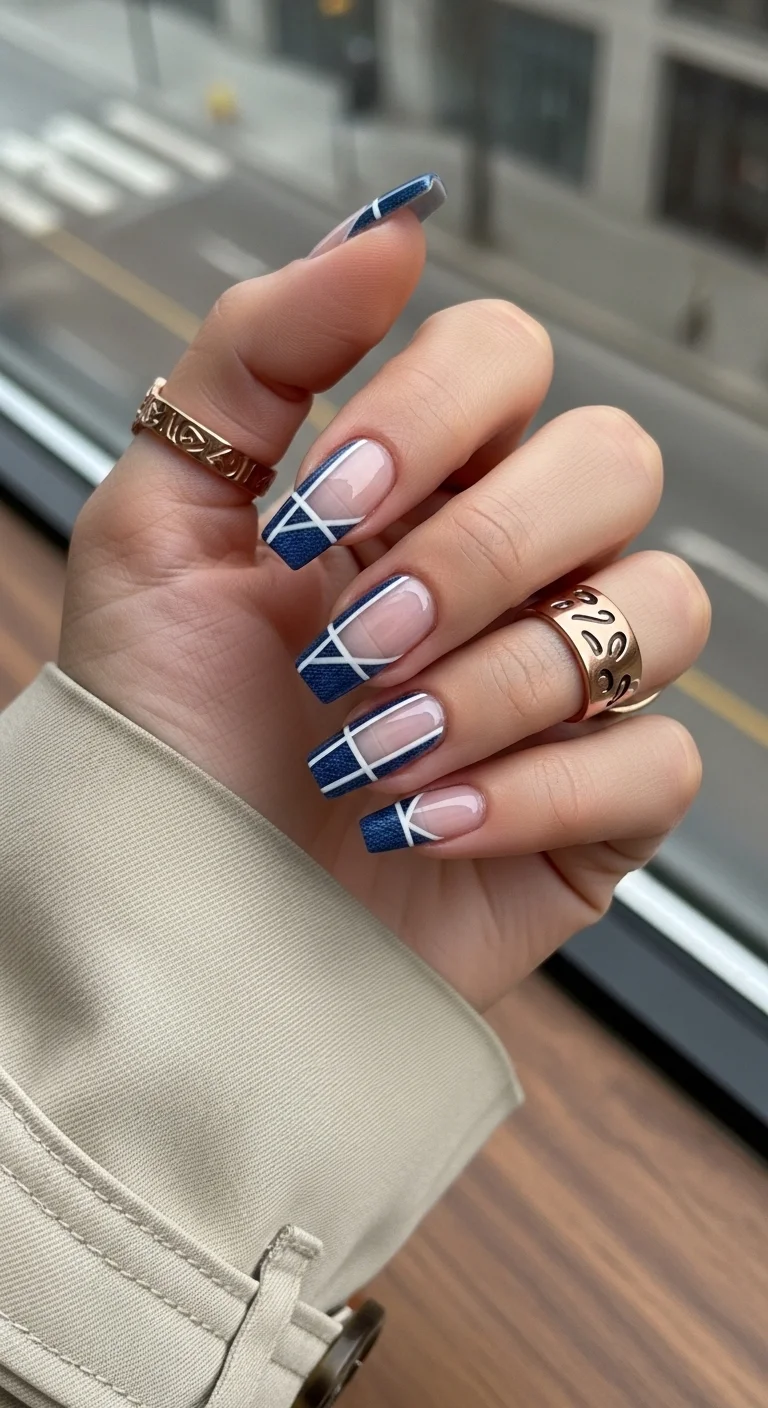
Navy French tips with geometric white cross-hatching for a denim-inspired look.
Overview:
French tips with a twist are nothing new, but adding white criss-cross lines over navy creates something that genuinely reads as denim fabric rather than just "blue French." The texture illusion is the whole selling point.
The sheer nude base does important work here. It keeps the overall look light and lets the navy tips dominate visually. On an opaque base, the French line would lose its crispness and the geometric detail would compete with the background. The transparency is load-bearing for the design.
The challenge with this design is getting the white lines truly straight. They cross over each other at angles, which means every line has to be precise or the whole pattern looks sloppy. Using striping tape is almost mandatory unless you've been doing nail art for years. Even then, the tape gives you cleaner edges than freehand.
Design Breakdown:
A French tip with layered geometric detail. The navy and white combination creates the denim illusion.
Base Color: Sheer milky nude or pink. The natural nail should be visible through the base.
Nail Shape: Long coffin. The flat tip provides a clean geometric edge for the French line.
Design Element: Navy blue French tips with white criss-cross lines painted over the blue section. The lines form X shapes across each tip.
Finish: High-gloss top coat. The shine makes the navy look saturated and the white lines look crisp.
Get The Look at Home:
The French tips are straightforward. The criss-cross lines are where patience matters.
- Sheer base: Two coats of milky nude. Let dry completely. Any tackiness will cause the French guide stickers to pull up the base.
- Navy tips: Using a French liner brush or guide stickers, paint deep navy tips on all nails. Two coats for full opacity.
- Line work: Using a thin liner brush and white polish, draw diagonal lines across each navy tip, spacing them about 3mm apart.
- Cross lines: Draw a second set of diagonal lines in the opposite direction, creating a grid of X shapes over the navy.
- Cleanup: Run an angled brush dipped in acetone along the smile line to sharpen the French edge.
- Seal: Two coats of top coat. The first locks the art; the second smooths any raised texture from the line work.
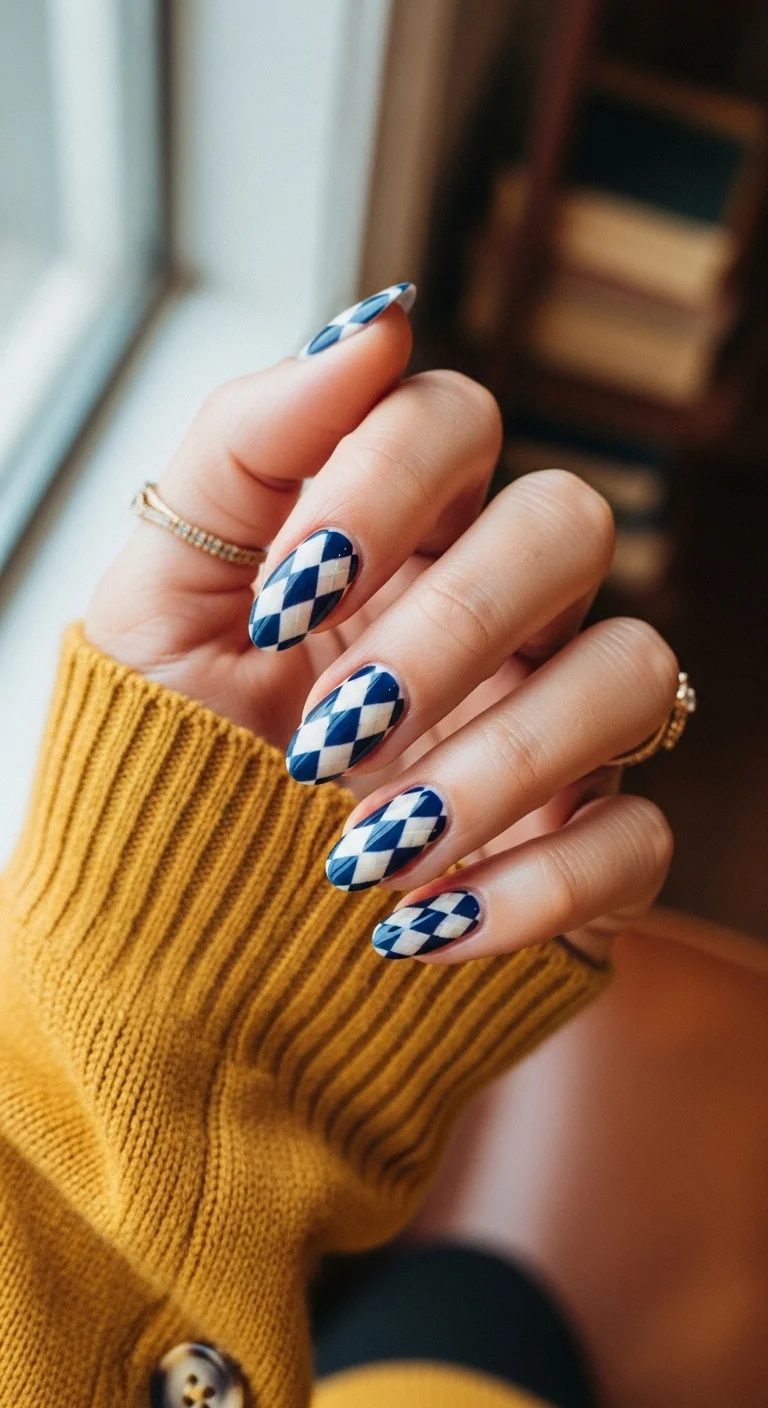
3.Picnic Perfect Navy Checks
A full-coverage navy and white diamond check pattern with a preppy edge.
Overview:
Gingham and checkered nails cycle in and out of trend cycles, but this version avoids the usual pitfall of looking like a picnic blanket. The diamond orientation (rather than square checks) gives the pattern an argyle quality that reads more "heritage knit" than "tablecloth."
Full-coverage pattern on every nail is a bold commitment. There are no accent nails, no breathing room, no solid-color breaks. The entire hand is pattern, which means the execution has to be consistent across all ten nails. Any wobble in the diamond spacing on one finger becomes obvious when you compare it to the others.
The almond shape is a good choice here because the curved edges soften the rigid geometry of the diamonds. On square nails, this same pattern would feel much more aggressive and graphic.
Design Breakdown:
Precision is everything with checkered patterns. The diamonds need consistent sizing and spacing.
Base Color: Crisp, opaque white. You need a solid foundation so the navy diamonds read as sharp, deliberate shapes.
Nail Shape: Medium almond. The tapered shape helps the diamond pattern flow naturally across the nail surface.
Design Element: A harlequin diamond pattern using deep navy blue over white. Each nail gets a full grid of alternating diamonds.
Finish: Ultra-glossy top coat to make the colors look deep and saturated.
Get The Look at Home:
This pattern requires either striping tape or an extremely steady hand. There's no forgiving shortcut.
- White base: Two coats of opaque white. Let each dry fully. Any tackiness will cause the tape to lift the polish.
- Tape the grid: Apply thin striping tape diagonally in one direction, spacing lines about 4mm apart. Then apply a second set of diagonal lines in the opposite direction, creating diamond-shaped gaps.
- Paint the navy: Carefully fill in alternating diamonds with navy polish. Don't paint over the tape itself.
- Peel while wet: Remove the tape immediately before the navy polish sets. Pull at a low angle to avoid chipping the diamond edges.
- Touch-ups: Use a tiny brush to fix any bleeding between diamonds. This is where the design lives or dies.
- Seal: One thick coat of top coat to smooth the surface and lock in the pattern.

27 Elegant Wedding Guest Nail Designs for Family in 2026 💍
4.Peach Sorbet Ombre
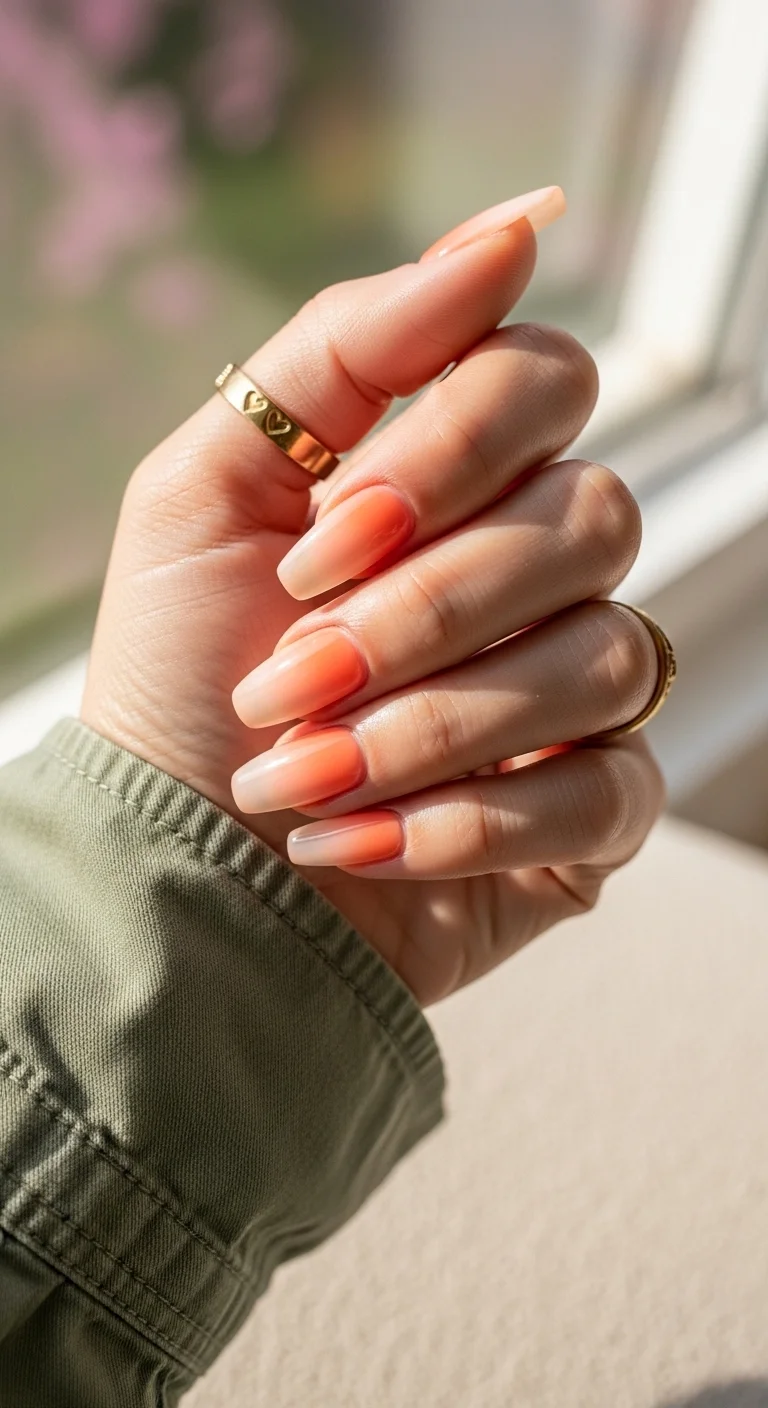
A smooth peach-to-white gradient with a juicy, sun-warmed finish.
Overview:
Ombre nails are a solved design problem, which means the question with any new gradient is always: what makes this one different? Here, the answer is the color placement. The peach concentrates at the tips and fades toward the cuticle, which is the reverse of most gradient nail art. That inversion makes the fingertips look dipped in sorbet.
The peach-to-white transition is forgiving across skin tones because both colors share warm undertones. Cooler ombres (like blue-to-white) can look disconnected on warmer skin, but this combination stays cohesive regardless. The gradient also hides regrowth better than a solid color, which extends the manicure's useful life by a few days.
The honest challenge: achieving a seamless blend without a sponge is nearly impossible. Brush-applied gradient lines are visible no matter how thin the coats. Budget a makeup sponge and about twenty minutes of dabbing.
Design Breakdown:
A tip-focused gradient that relies on sponge blending for the smooth transition.
Base Color: Milky, semi-sheer white at the cuticle fading to a warm peach-orange at the tips. The white should be translucent enough to let some natural nail show through.
Nail Shape: Medium-long coffin. The flat tip provides a defined edge where the peach is most concentrated.
Design Element: Sponge-applied vertical gradient using two to three shades of peach and white.
Finish: High-gloss top coat to give it that wet, juicy appearance.
Get The Look at Home:
The sponge technique matters more with light colors like peach because sheer pigments show every imperfection.
- White base: Apply two thin coats of milky white over the entire nail. Let each dry fully.
- Sponge setup: Paint stripes of white and peach side by side on a dry makeup sponge. Dab the sponge on paper first to remove the initial excess.
- Dab the gradient: Press the sponge onto the nail with the peach concentrated at the tip. Move the sponge slightly up and down to blend the transition zone.
- Build opacity: Let the first layer dry, then repeat the sponging two to three more times. Each pass builds better color saturation.
- Clean edges: Use a brush dipped in acetone to remove polish from your skin and cuticles.
- Final blend: Apply a thick top coat while the last sponged layer is still slightly wet. The top coat helps the colors merge further.
5.Pressed Violet Wildflowers
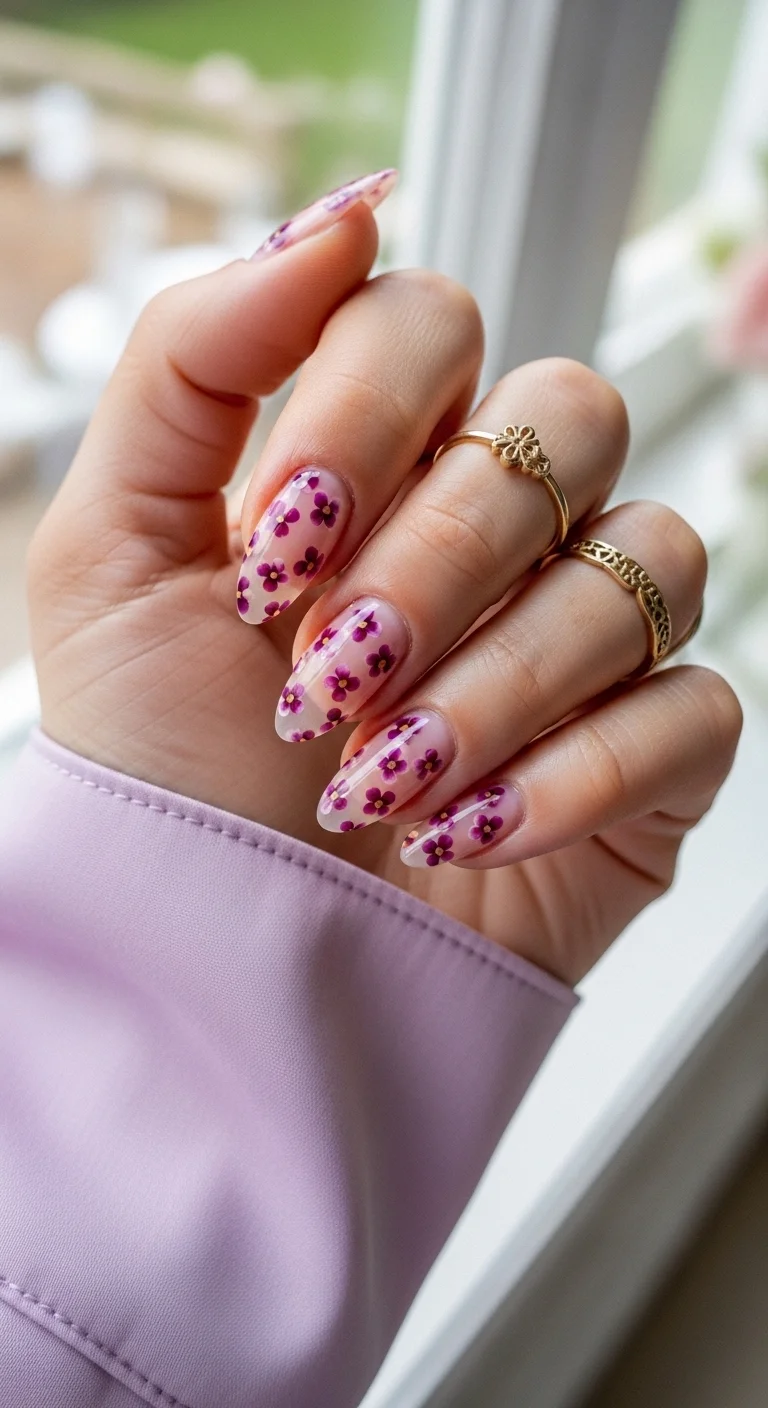
Delicate purple wildflowers on a sheer, barely-there base.
Overview:
Sheer-base floral nails have a reputation for looking precious, but the dark purple petals on this set push the design toward something more botanical than cutesy. These look like pressed flowers in a field guide, not stickers from a craft store.
The scattered placement is key. Each nail gets two to four flowers at random angles and positions, with visible sheer base between them. That negative space is what makes the flowers look like they're floating rather than stamped. If you fill the entire nail surface with flowers, the design collapses into wallpaper.
One caveat: hand-painted five-petal flowers at this scale require a very fine dotting tool or toothpick. The petals are small enough that a standard dotting tool creates blobs instead of petals. If you don't have the right tools, consider nail stamps or water-slide decals as an alternative.
Design Breakdown:
Minimalist floral with a sheer base. The flowers are the only element, so their execution matters.
Base Color: Sheer, translucent pink or clear. The natural nail should be visible through the base.
Nail Shape: Medium almond. The organic curves echo the rounded petal shapes.
Design Element: Small five-petal flowers in deep purple with darker centers. Two to four flowers per nail, scattered at random angles.
Finish: High-gloss top coat for a fresh, glass-skin appearance.
Get The Look at Home:
The flowers are simpler than they look because imperfection reads as organic at this scale.
- Sheer base: One or two coats of a tinted sheer base coat. Let dry fully.
- Petal dots: Dip a small dotting tool in purple polish and place five dots in a loose circle. The dots don't need to touch.
- Center: Use a smaller dotting tool or toothpick to place a dark purple or black dot in the center of each flower.
- Placement: Scatter flowers randomly across each nail. Vary the angle and distance between them.
- Spacing: Leave visible sheer base between flowers. The empty space is part of the design.
- Seal: Float a glossy top coat over the art without dragging through the wet dots.

21 Stunning Concert Hairstyles for Women 2026 🎶✨
6.Deep Sea Mermaid Shimmer
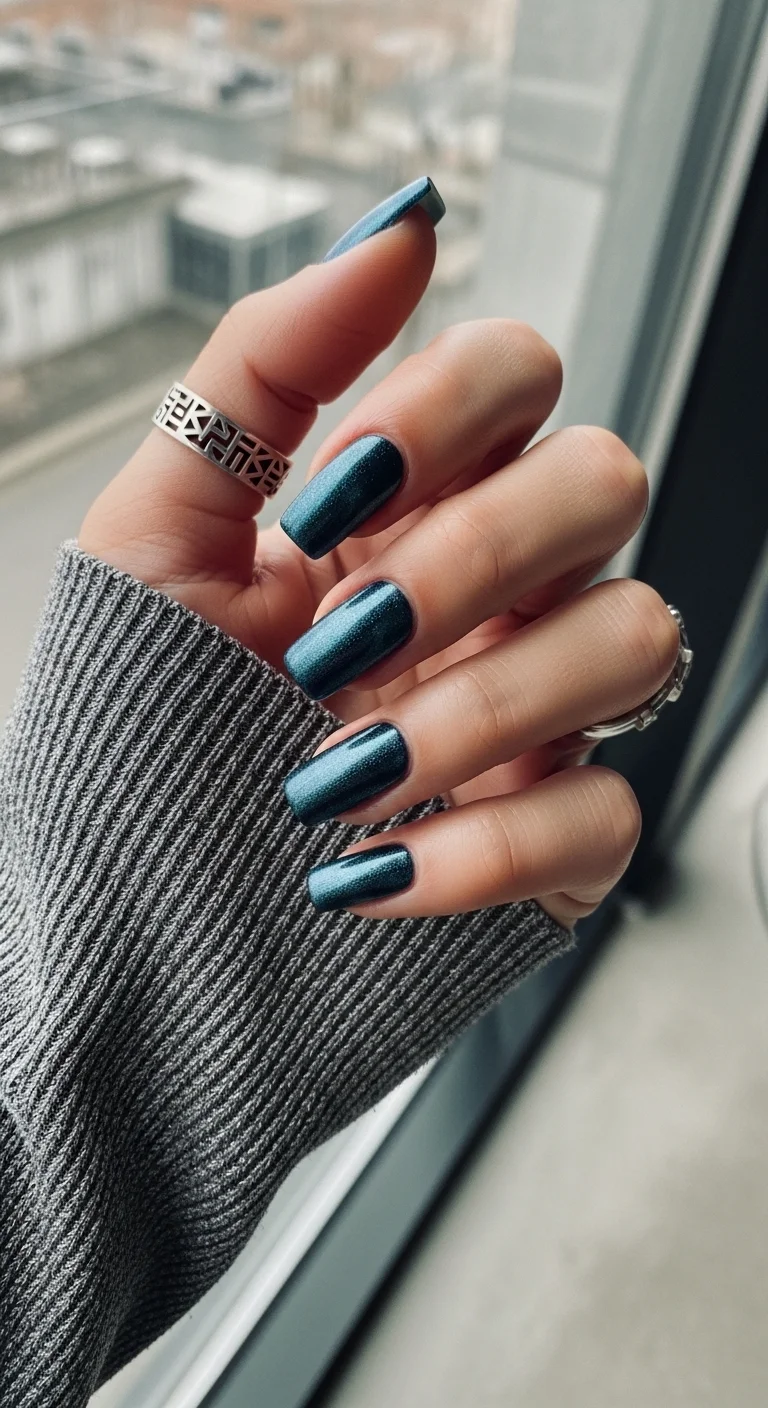
A dark teal magnetic shimmer with a cat-eye light reflection.
Overview:
Metallic shimmer polishes are everywhere right now, and most of them look the same: fine glitter particles spread evenly across the nail. This one is different because it uses a magnetic or cat-eye formula. The shimmer concentrates into a lighter band that shifts as you move your hand, creating a three-dimensional effect that flat metallics can't replicate.
The short square shape is the right call for this color. Deep teal on long nails can tip into costume territory. On short nails, the same color feels controlled and wearable. The square edges also complement the straight line of the magnetic shimmer band.
The practical downside: magnetic polishes are unforgiving. If you hold the magnet too close, the shimmer line becomes too narrow and harsh. Too far away, and the effect barely registers. The sweet spot is about 5mm above the wet polish, held still for 10 to 15 seconds. It takes practice.
Design Breakdown:
A single-color metallic that relies on the magnetic formula for all its visual interest.
Base Color: A deep, pigmented teal with magnetic shimmer particles. The base should be dark enough that the lighter shimmer band creates visible contrast.
Nail Shape: Short square. Clean, practical, and the flat surface showcases the magnetic line.
Design Element: Solid full-coverage magnetic teal. No accent nails or additional art. The cat-eye effect is the design.
Finish: High-gloss top coat to seal the magnetic particles and add depth.
Get The Look at Home:
The magnet technique is everything. Practice on one nail before committing to the full hand.
- Prep: File into a short square. Apply a ridge-filling base coat. Metallic polish highlights every surface imperfection.
- First coat: Apply one thin coat of the magnetic teal. Let it dry completely.
- Magnetic coat: Apply a thick second coat. Immediately hold the magnet 5mm above the wet polish. Keep it still for 10 to 15 seconds.
- Repeat if needed: If the shimmer line is too faint, apply another thick coat and re-magnetize. Two to three coats builds better depth.
- Cleanup: Dark metallics show every mistake around the cuticles. Use a cleanup brush before the polish fully sets.
- Seal: Apply a thick top coat without dragging the brush through the magnetic pattern.
7.Social Butterfly Ombre

A sunny yellow gradient with purple butterfly decals and scattered white dots.
Overview:
Butterflies on nails have a tendency to look juvenile. The coffin shape and the muted purple tone of these particular butterflies keep this set on the right side of that line. The silhouettes are small enough to read as abstract shapes from a distance, which saves the design from reading as a children's sticker collection.
The yellow-to-clear ombre is the foundation, and it works because the yellow is concentrated at the tips rather than the cuticle. That placement means the brightest color is where your eye lands first, and the fade toward the natural nail creates a gradient that looks intentional rather than like regrowth.
The white dots scattered between the butterflies serve a practical purpose: they fill the negative space so the design doesn't feel sparse on nails with fewer butterflies. Without them, some nails would look empty next to others that are covered in art.
Design Breakdown:
A gradient base with layered decal art. The butterflies sit on top of the ombre, not within it.
Base Color: Bright lemon yellow at the tips fading to clear or milky white at the cuticle.
Nail Shape: Medium almond. The curved shape echoes the organic wing forms of the butterflies.
Design Element: Small purple butterfly silhouettes placed over the ombre, with tiny white dots scattered in the surrounding space.
Finish: High-gloss top coat to blend the decal edges into the polish surface.
Get The Look at Home:
Stickers or stamping plates make the butterflies achievable for anyone. Freehand at this scale is extremely difficult.
- Sponge the ombre: Paint yellow and white stripes on a makeup sponge. Dab onto the nail with yellow at the tip, fading toward the cuticle. Build in two to three layers.
- Smooth the blend: Apply a thin coat of milky white over the entire nail to soften any visible sponge texture.
- Butterfly placement: Once dry, use tweezers to place butterfly stickers on two to three nails per hand. Vary the sizes and angles.
- White dots: Using a small dotting tool and white polish, place tiny dots in the empty spaces around the butterflies.
- Press flat: Use a silicone tool or fingertip to smooth the sticker edges flat against the nail.
- Double seal: Apply two coats of top coat over the stickers to prevent lifting.

33 Trendy Polka Dot Nail Ideas for 2026 💅
8.Cherry On Top Blue Tips
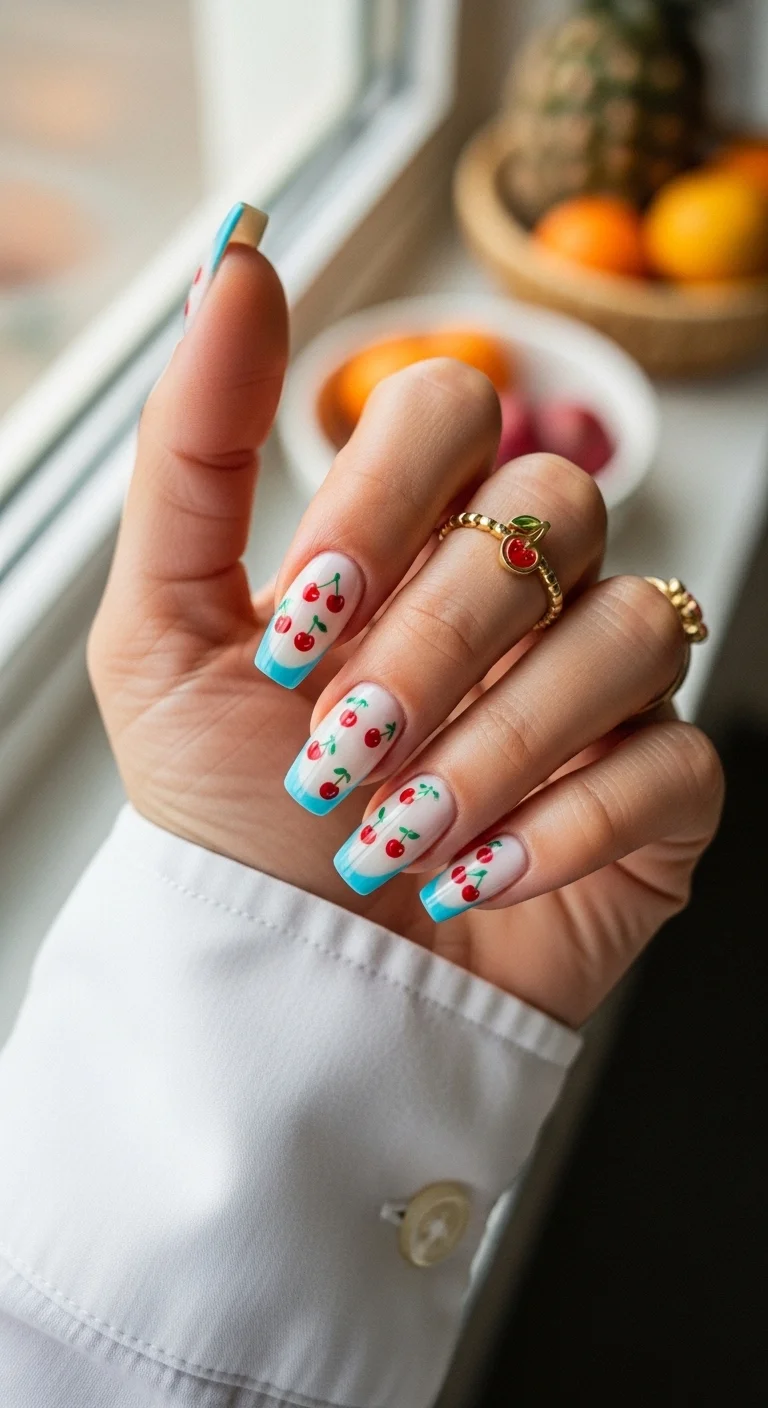
Turquoise French tips paired with scattered cherry fruit art on a milky base.
Overview:
Fruit nail art and French tips are two trends that rarely appear together, which is partly why this combination feels fresh. The turquoise tips provide a clean geometric frame, and the cherries scattered across the milky base add organic detail that rewards closer inspection.
The color pairing of turquoise and red works because they sit near-opposite each other on the color wheel. The green stems on the cherries bridge the gap between the two, creating a three-color palette that feels deliberate rather than random.
The long coffin shape is essential for this design. Shorter nails wouldn't have enough surface area to fit both the French tip and multiple cherry motifs without looking cramped. If you're working with short nails, consider dropping the French tip and doing cherries only.
Design Breakdown:
A two-part design that splits between geometric French tips and organic fruit art.
Base Color: Milky, semi-sheer white on the nail bed. The transparency lets the cherry art sit cleanly on top.
Nail Shape: Long coffin. The flat tip gives the French line a clean edge, and the length accommodates the cherry detail.
Design Element: Turquoise French tips on all nails. Hand-painted red cherry pairs with green stems and leaves scattered across the milky base area.
Finish: High-gloss top coat to make the cherries look like small, shiny jewels.
Get The Look at Home:
The French tips come first. The cherries are the detail work that goes on after.
- Milky base: Two coats of sheer white. Let dry fully.
- Turquoise tips: Using a French liner brush, paint straight-across tips in turquoise. Two coats for full opacity.
- Cherry dots: Using a medium dotting tool and bright red polish, place two dots close together where you want each cherry pair.
- Stems: With a thin liner brush and green polish, draw a small V-shape connecting each pair of red dots. Add a tiny leaf stroke at the junction.
- Placement: Scatter two to three cherry pairs per nail across the milky base area. Vary the positions.
- Seal: One thick coat of top coat to protect the hand-painted details.
9.Liquid Silver & Milky White
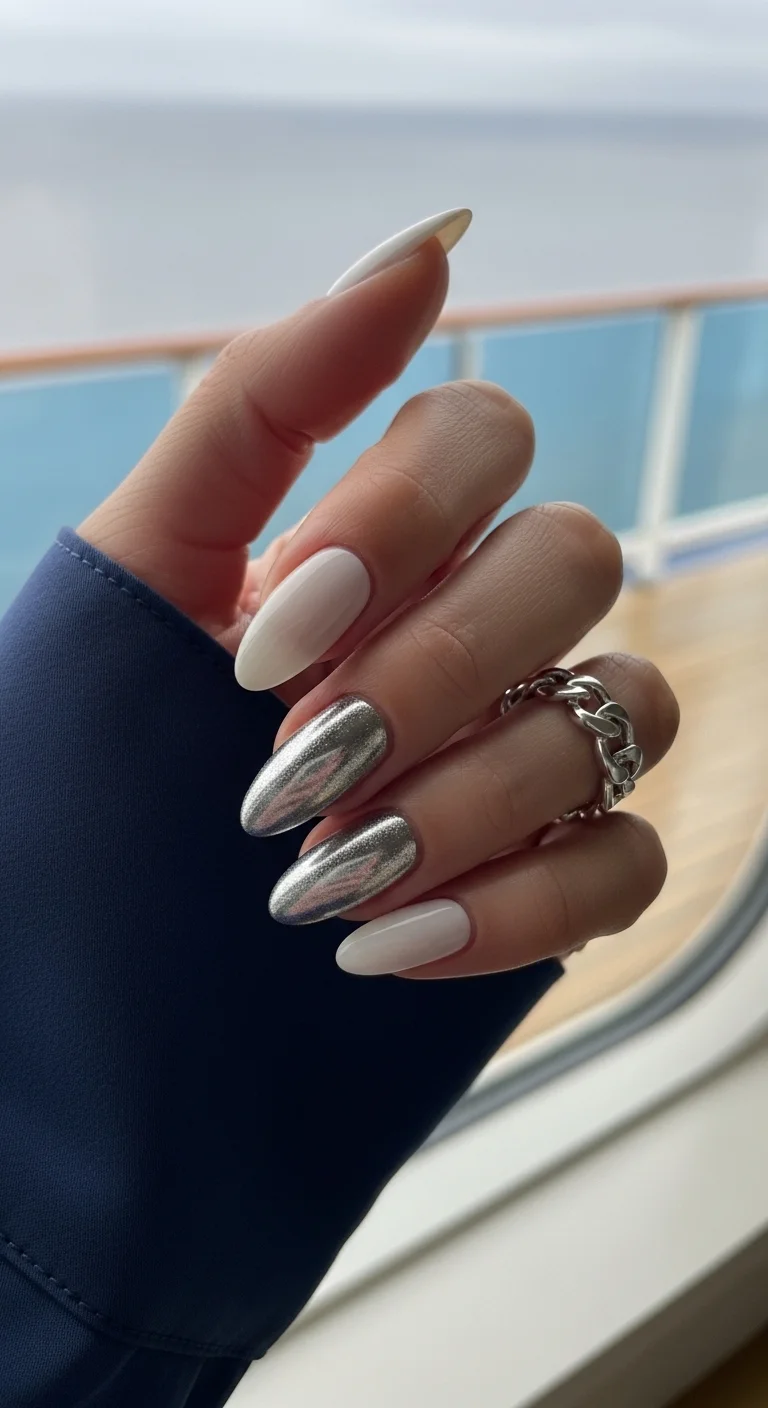
Creamy milky white paired with reflective silver chrome accents.
Overview:
Chrome accent nails are having a moment, and this silver-on-white version is one of the cleaner executions. The milky white reads soft and approachable; the silver chrome reads hard and futuristic. Placing them on the same hand creates a contrast that neither color achieves alone.
The key detail is the milky quality of the white. Pure opaque white next to silver chrome would look stark and clinical. The semi-sheer, creamy white softens the transition between the two finishes and makes the overall set feel more considered.
Chrome powder application is the technical hurdle here. It requires a no-wipe gel top coat as the base layer. Regular polish won't give the powder anything to adhere to, and you'll end up brushing shimmer off your nails for the rest of the day. If you're working with regular polish, a metallic silver polish like Essie "No Place Like Chrome" is a more forgiving alternative to actual chrome powder.
Design Breakdown:
Two finishes, two colors, deliberately placed. The accent nails do the heavy lifting.
Base Color: Milky, semi-sheer white on three nails per hand. The translucency gives the white a soft, creamy quality.
Nail Shape: Medium-long almond. The tapered shape emphasizes the clean contrast between the two finishes.
Design Element: Solid silver chrome on the middle and ring fingers. Milky white on the remaining nails. No additional art.
Finish: Mirror-chrome on the accent nails; high-gloss on the white nails. The texture difference is the design.
Get The Look at Home:
The chrome step requires specific products. Budget extra time for the prep work.
- White nails: Two coats of milky white on the index, pinky, and thumb. Let dry fully.
- Chrome prep: On the accent nails, apply a black or dark base coat. This makes the silver more reflective.
- No-wipe top: Apply a no-wipe gel top coat to the dark nails. Cure under a UV or LED lamp.
- Rub the chrome: Using a sponge applicator, rub silver chrome powder over the cured top coat until the surface is mirror-smooth.
- Dust off: Use a soft brush to remove excess powder from the cuticles and surrounding skin.
- Final seal: Apply glossy top coat to all nails, making sure to cap the edges of the chrome nails to prevent flaking.

26 Stunning Summer Braided Hairstyles for Women 2026 ☀️💇♀️
10.Butter & Gold Luxury
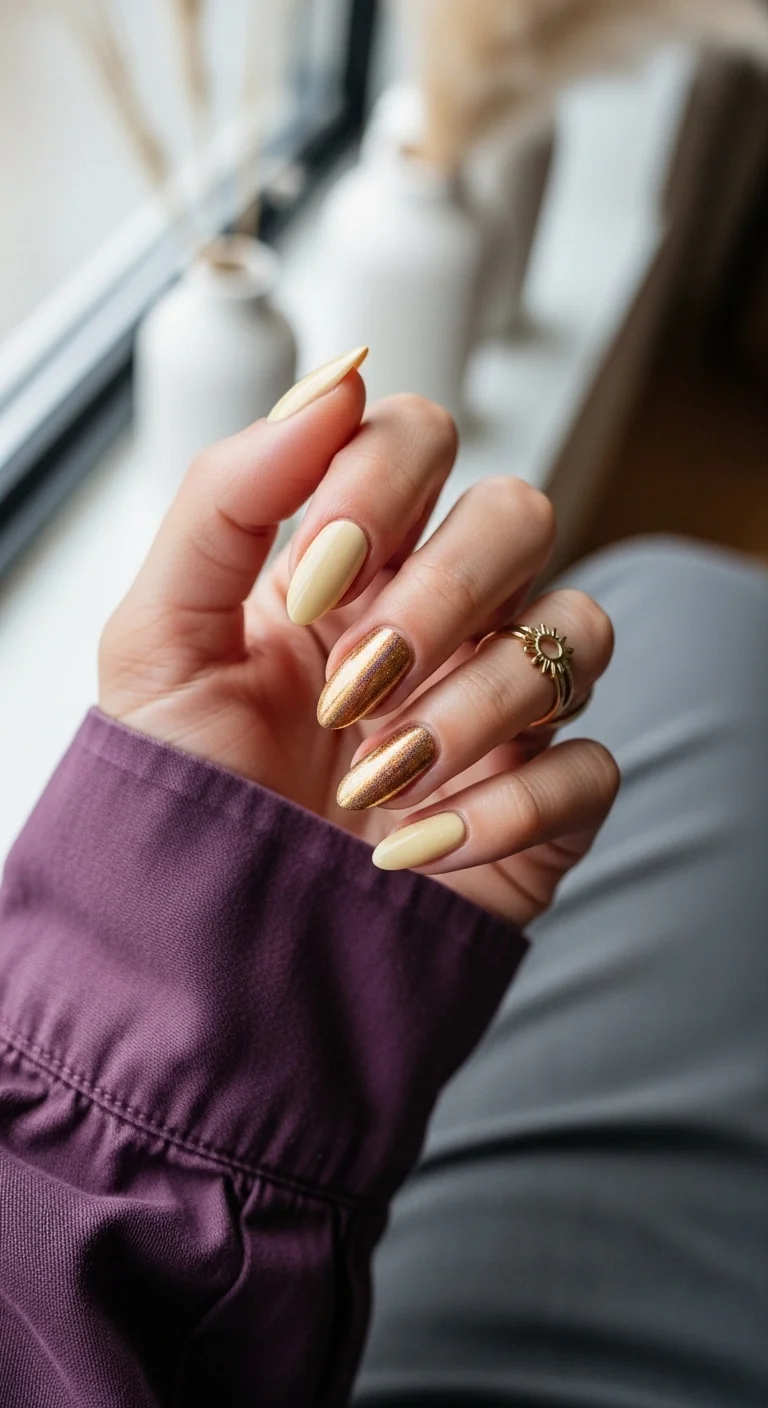
Soft butter yellow paired with warm, coppery gold chrome accents.
Overview:
Butter yellow is the color of the season, but it has a problem: on its own, pale yellow can read as unfinished or sickly. Adding gold chrome accents solves that problem by giving the eye a high-shine anchor point. The gold makes the yellow look intentional rather than accidental.
The warm, almost coppery tone of the gold chrome is what makes this pairing work. A cool-toned silver against butter yellow would look disconnected. The gold shares the same warm undertone as the yellow, so the two colors feel like they belong together even though their finishes are completely different.
One thing to know: butter yellow polish is notoriously streaky. The pale pigment means every brush stroke is visible, and achieving full opacity often requires three thin coats instead of two. A ridge-filling base coat underneath helps, but patience with the application is the real requirement.
Design Breakdown:
A warm-toned pairing where the metallic accent elevates the pastel base from casual to refined.
Base Color: A creamy, opaque butter yellow. Not neon, not pastel. Think egg yolk warmth. Essie "Lemonade" or Zoya "Tilly" hit the right tone.
Nail Shape: Medium almond. The curved shape lets both colors breathe without competing for space.
Design Element: Solid gold chrome on the middle and ring fingers. Butter yellow on the remaining nails.
Finish: Ultra-glossy on the yellow; mirror-chrome on the gold. The contrast between cream and metallic is the design.
Get The Look at Home:
The yellow application is where most people struggle. Three thin coats beats two thick ones every time.
- Yellow base: Apply three thin coats of butter yellow to the non-accent nails. Let each coat dry fully before the next.
- Chrome prep: On the accent nails, apply a warm yellow or tan base. This gives the gold chrome a warmer foundation.
- Chrome application: Apply a no-wipe gel top coat, cure, then rub gold chrome powder with a sponge applicator. Buff until mirror-smooth.
- Dust and clean: Remove excess powder from the cuticles. Wipe any stray gold off the yellow nails with a slightly damp brush.
- Edge check: Make sure the chrome extends to the nail edges. Chrome that stops short of the edges will chip within a day.
- Seal everything: High-gloss top coat over all nails. Cap the free edge on the chrome nails especially.
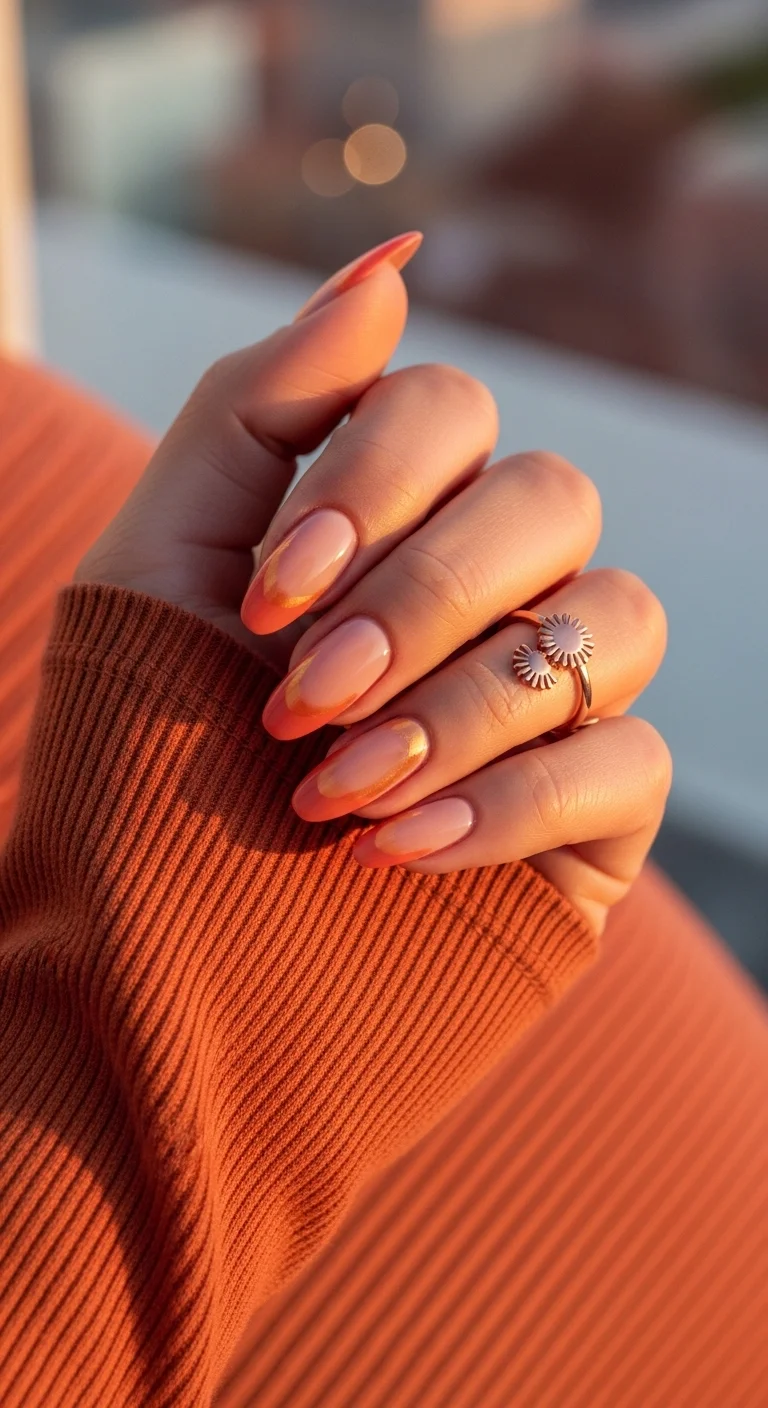
11.Hot Girl Summer Aura
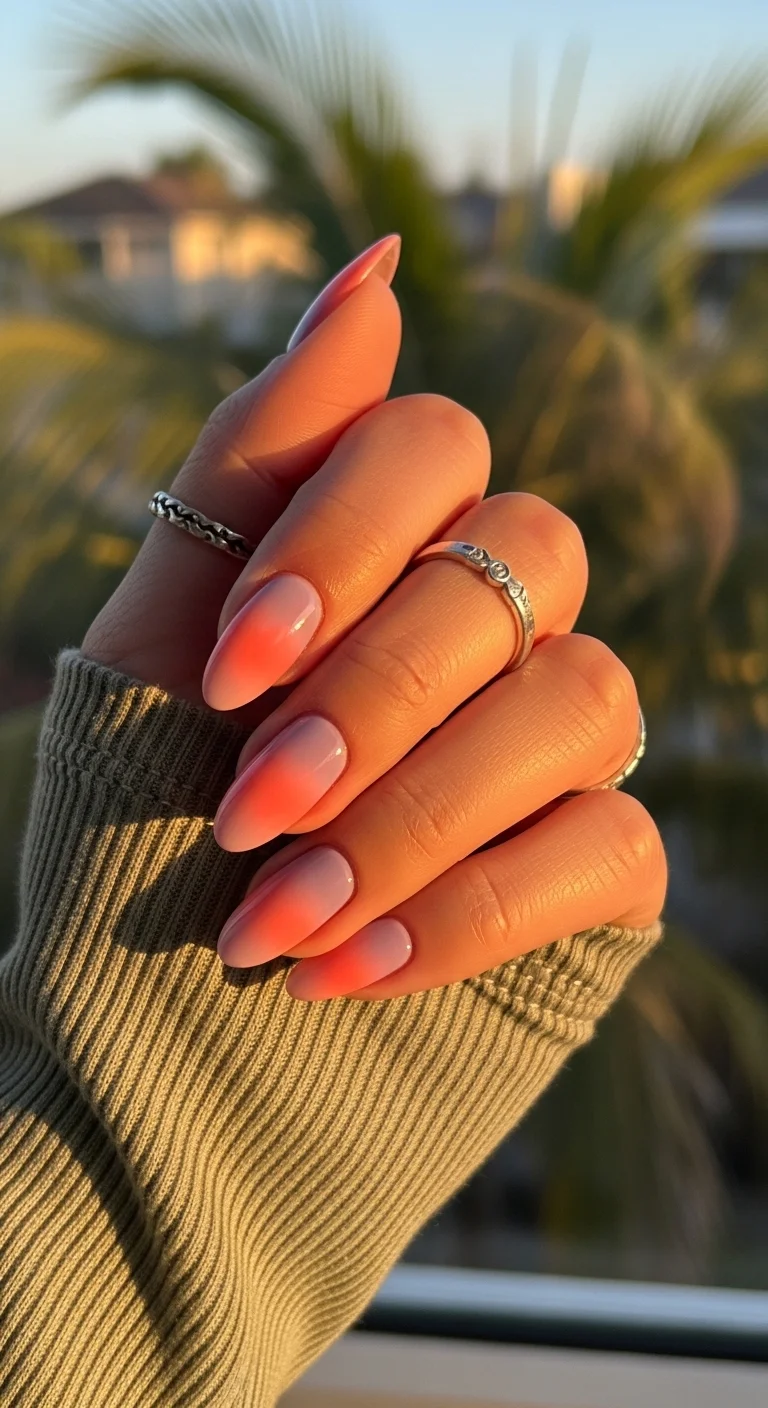
A sun-warmed coral gradient that fades from tips to cuticle.
Overview:
"Aura nails" usually means a diffused circle of color in the center of the nail. This design takes a different approach: the coral concentrates at the tips and gradients down toward the cuticle, creating a vertical ombre that looks like dipped fingertips rather than a glowing orb.
The color is more coral than orange, which matters for skin tone compatibility. Pure orange can clash with cooler complexions, but the pink undertone in coral keeps it universally flattering. Under warm light the nails look almost salmon; in cool light, they shift toward peach. That color-shifting quality gives the design more range than a standard single-tone gradient.
The honest difficulty here is the blend zone. Where the coral meets the nude, there's a visible transition line that needs to be seamless. If you're using a sponge, three to four light dabs produce a smoother gradient than one heavy press. Rushing this step leaves a hard stripe across the nail that reads as a mistake rather than a fade.
Design Breakdown:
A tip-focused gradient using warm coral tones. The technique is the same as any ombre, but the color choice is what makes it work.
Base Color: Milky, semi-sheer nude at the cuticle fading to a warm coral-salmon at the tips. The nude should be close to your natural nail bed color.
Nail Shape: Medium-long almond. The tapered shape emphasizes the gradient flow from tip to base.
Design Element: Vertical sponge-applied ombre using two to three shades of coral and nude. No additional art or accents.
Finish: High-gloss top coat to give the gradient a wet, luminous quality.
Get The Look at Home:
The sponge technique is identical to the Peach Sorbet Ombre, but the color mixing is slightly different.
- Nude base: Two coats of milky nude over the entire nail. Let dry fully.
- Sponge setup: Paint stripes of nude and coral side by side on a makeup sponge. Dab on paper first to remove excess.
- Dab the gradient: Press the sponge onto the nail with the coral concentrated at the tip. Move slightly up and down to blend the transition zone.
- Build layers: Let each pass dry before the next. Three to four light dabs build better opacity than one heavy press.
- Clean edges: Use a flat brush dipped in acetone to remove polish from the skin around your cuticles.
- Final blend: Apply a thick top coat while the last layer is still slightly tacky. The top coat helps merge the colors at the transition zone.

35 Fun Birthday Nail Designs for 2026 🎂
12.Barbiecore Gold Edge French
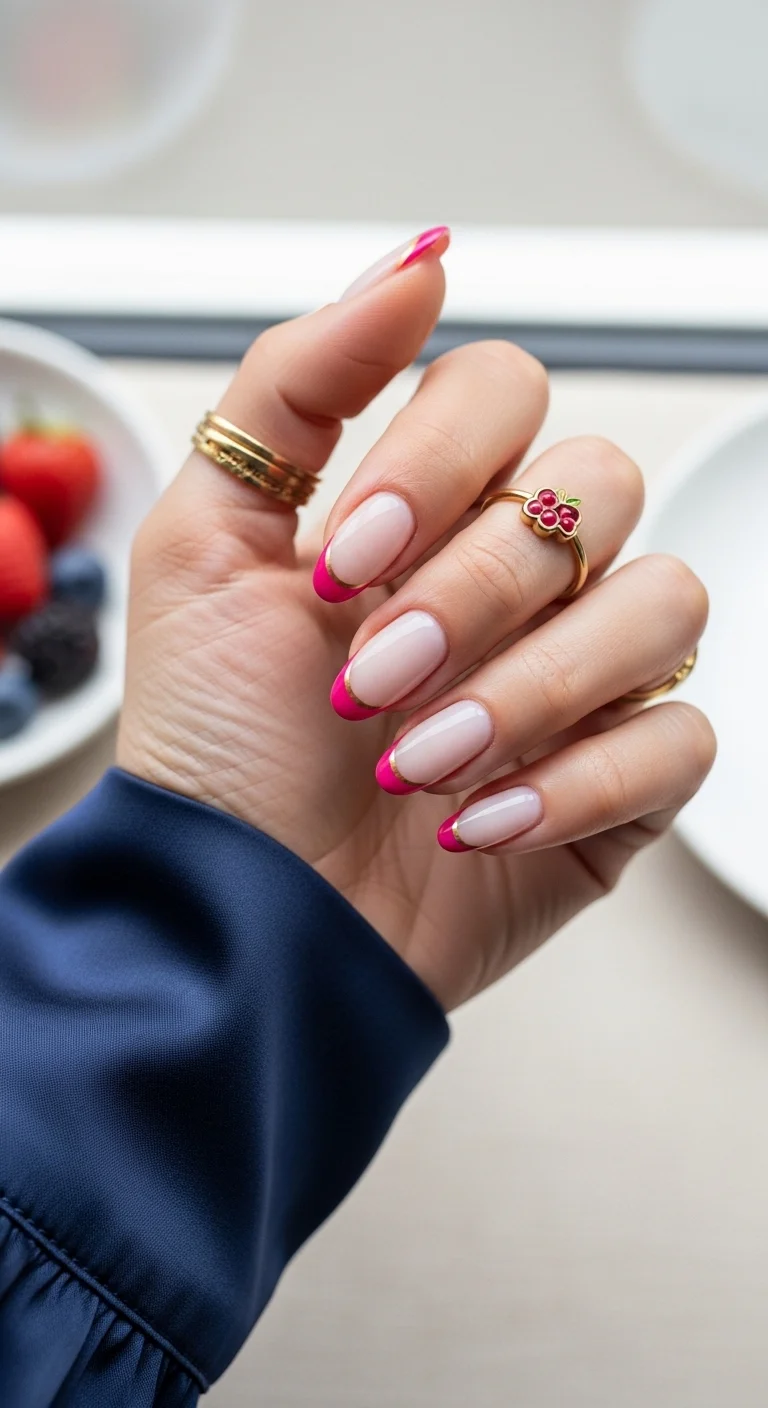
Hot pink French tips outlined with a fine gold chrome border.
Overview:
Hot pink French tips are already a step beyond classic white, but adding a gold chrome line along the smile line is the detail that separates this set from every other colored French out there. The gold acts like a picture frame, sharpening the border between pink and nude and adding a metallic texture that the eye keeps returning to.
The milky nude base is important. A more opaque nude would compete with the pink for attention. The semi-sheer base lets the natural nail show through, which keeps the focus on the French tips and the gold detailing. It also means regrowth is less visible, which extends the manicure's useful life.
The gold line is where this design either succeeds or fails. It needs to be genuinely thin, about the width of a single striping tape strand. Anything thicker and the gold overwhelms the pink instead of framing it. If you're not confident with a liner brush, gold striping tape cut to fit the smile line curve is a more forgiving option.
Design Breakdown:
A French tip with metallic framing. The gold line is the hardest part and the most important.
Base Color: Sheer, milky nude or pink. The natural nail should be visible through the base.
Nail Shape: Medium coffin. The flat tip gives the French line a clean geometric edge.
Design Element: Hot pink French tips with a thin gold metallic line tracing the smile line where the pink meets the nude.
Finish: Ultra-glossy top coat to make the pink look saturated and the gold look reflective.
Get The Look at Home:
The pink tips come first. The gold line goes on last, after the pink is fully dry.
- Nude base: Two coats of milky nude. Let dry completely.
- Pink tips: Using a French liner brush and hot pink polish, paint the smile line from sidewall to center on each nail. Two thin coats for full opacity.
- Dry time: Wait at least five minutes. The gold line will smear if the pink is even slightly tacky.
- Gold line: Using a very thin liner brush and gold metallic polish, trace a single line along the smile line where the pink meets the nude.
- Cap the tip: Optionally, add a thin gold line along the very free edge of the nail for extra sparkle.
- Seal: One thick coat of top coat. Float the brush to avoid shifting the gold line.
13.Gilded Art Deco French
White French tips layered with gold geometric Art Deco line work.
Overview:
Art Deco-inspired nail art has a tendency to look busy, but this design keeps things controlled by limiting the gold geometry to the French tip area. The base stays sheer, the white tip provides a clean canvas, and the gold lines do all the visual work within that defined space. It's structured chaos.
The gold lines vary from nail to nail. Some get simple chevron V-shapes, others get criss-crossing diagonals, and one or two get more complex intersecting patterns. That variation is what makes the set look curated rather than stamped. If every nail had the same gold pattern, the design would feel rigid and manufactured.
The technical challenge is keeping the gold lines within the white tip boundary. Gold that bleeds onto the sheer base looks sloppy. Using striping tape to mask the smile line before painting the gold geometry saves a lot of cleanup time.
Design Breakdown:
A French tip with geometric gold overlay. The white tip is the canvas; the gold lines are the art.
Base Color: Sheer nude that lets the natural nail show through. The transparency keeps the focus on the tip art.
Nail Shape: Medium-long coffin. The flat tip provides a defined area for the geometric work.
Design Element: White French tips with gold metallic line work. Chevron V-shapes, criss-crossing diagonals, and intersecting lines in varying patterns across different nails.
Finish: High-gloss top coat to seal the gold lines and add a reflective finish.
Get The Look at Home:
This is a layered design. Complete each layer before moving to the next. Patience between steps is non-negotiable.
- Nude base: Two coats of sheer nude. Let dry fully.
- White tips: Paint straight-across white French tips. Two coats for full opacity. Let dry completely.
- Mask the smile line: Optionally, apply a thin strip of tape along the smile line to keep the gold within the white area.
- Gold geometry: Using a fine liner brush and gold metallic polish, draw chevrons, diagonals, or criss-cross patterns within the white tip area. Vary the pattern per nail.
- Cleanup: Remove any tape. Use a small brush dipped in acetone to sharpen any gold lines that crossed the boundary.
- Seal: One thick coat of top coat to lock in the gold and smooth the surface.
27 Stunning Beach Wedding Hairstyles for Brides & Family 2026 🌊💍
14.Bridal Bliss Floral Lace
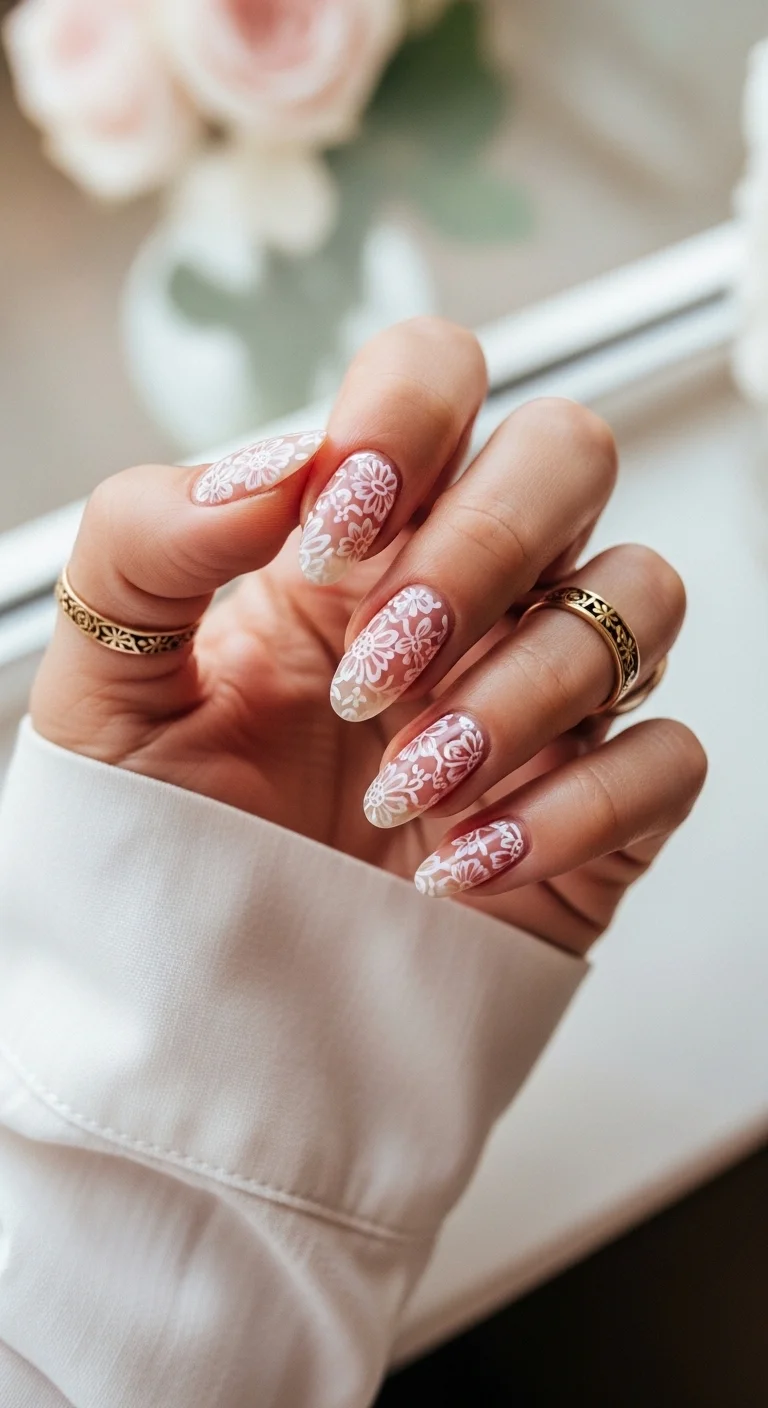
Detailed white floral lace covering the full nail over a sheer base.
Overview:
Floral lace nail art either looks like actual fabric laid over the nail or like a beginner's stamping attempt. The difference comes down to the density of the pattern. This set covers nearly the entire nail surface with flowers, leaves, and connecting vine lines, which creates a textile quality that sparser floral designs can't achieve.
The sheer base underneath is doing essential work. It creates the illusion that the lace is floating on the nail rather than painted onto an opaque surface. On a white or nude base, the pattern would lose its transparency and look like a sticker. On sheer, it looks like actual lace fabric draped over the fingertip.
The practical reality: hand-painting this level of detail across all ten nails takes hours. Stamping plates with lace patterns produce nearly identical results in a fraction of the time. If you're doing this at home, invest in a floral lace stamping plate rather than attempting every petal freehand.
Design Breakdown:
Full-coverage white lace pattern over a transparent base. The density of the art is what sells the textile illusion.
Base Color: Sheer, translucent pink or clear. The natural nail should be visible through the gaps in the lace pattern.
Nail Shape: Medium almond. The curved shape complements the organic floral forms in the lace.
Design Element: Full-coverage white floral lace pattern with flowers, leaves, and connecting vine-like lines. The pattern covers most of the nail surface.
Finish: High-gloss top coat to make the white pattern look embossed on the nail.
Get The Look at Home:
A stamping plate is the realistic path to this level of detail. Hand-painting is possible but extremely time-consuming.
- Sheer base: Two coats of sheer pink or clear. Let dry fully.
- Stamping prep: Apply white stamping polish to a floral lace stamping plate. Scrape off the excess.
- Pick up: Press a clear stamper onto the plate to pick up the lace design.
- Transfer: Roll the stamper across the nail surface, pressing firmly from one edge to the other.
- Cleanup: Use a small brush dipped in acetone to remove any lace pattern that transferred onto the skin.
- Seal: Two coats of top coat. The first locks the stamped pattern; the second smooths the surface.
15.Mocha Safari Zebra Stripes

Dark mocha zebra stripes over a warm nude base with shimmer between the lines.
Overview:
Animal print in neutral tones is the gateway for anyone who finds traditional black-and-white zebra too loud. The mocha-and-nude palette keeps the pattern grounded in warm earth tones, which makes it easier to wear with everyday clothing than a high-contrast version would be.
The lighter shimmer between the dark stripes is the subtle detail that elevates this beyond basic animal print. Without it, the design would be brown stripes on a tan base. With it, the negative space between the stripes catches light differently, creating a dimensional quality that shifts as you move your hand.
The diagonal orientation of the stripes matters. Vertical zebra stripes on nails tend to look like they're running uphill. Diagonal stripes create a sense of movement and flow that follows the natural curve of the nail. The irregularity is intentional, so don't worry about making the lines perfectly parallel.
Design Breakdown:
Animal print that relies on warm tonal contrast rather than high contrast. The shimmer is the secret weapon.
Base Color: A warm, creamy nude-tan. Not pink-toned. Think camel or khaki.
Nail Shape: Medium coffin. The flat surface gives the diagonal stripes room to travel.
Design Element: Irregular diagonal zebra stripes in dark mocha brown, with a lighter champagne or gold shimmer filling some of the negative space between the stripes.
Finish: High-gloss top coat to make the shimmer particles catch light and the dark stripes look rich.
Get The Look at Home:
Animal print is one of the most forgiving freehand designs because the lines are supposed to be irregular.
- Nude base: Two coats of warm nude-tan. Let dry fully.
- Dark stripes: Using a liner brush and dark mocha brown, paint diagonal wavy lines across each nail. Vary the thickness and spacing.
- Branch lines: Add shorter lines that branch off the main stripes. Some should taper to a point, others should end abruptly.
- Shimmer fill: Using a small brush and champagne shimmer polish, fill in select areas between the dark stripes.
- Don't overthink: Nature isn't symmetrical. If both hands look different, that's correct.
- Seal: One thick coat of top coat to smooth the texture and add shine.

30 Stunning Vacation Nail Ideas for Your Next Getaway in 2026 💅
16.Aegean Sea Marble
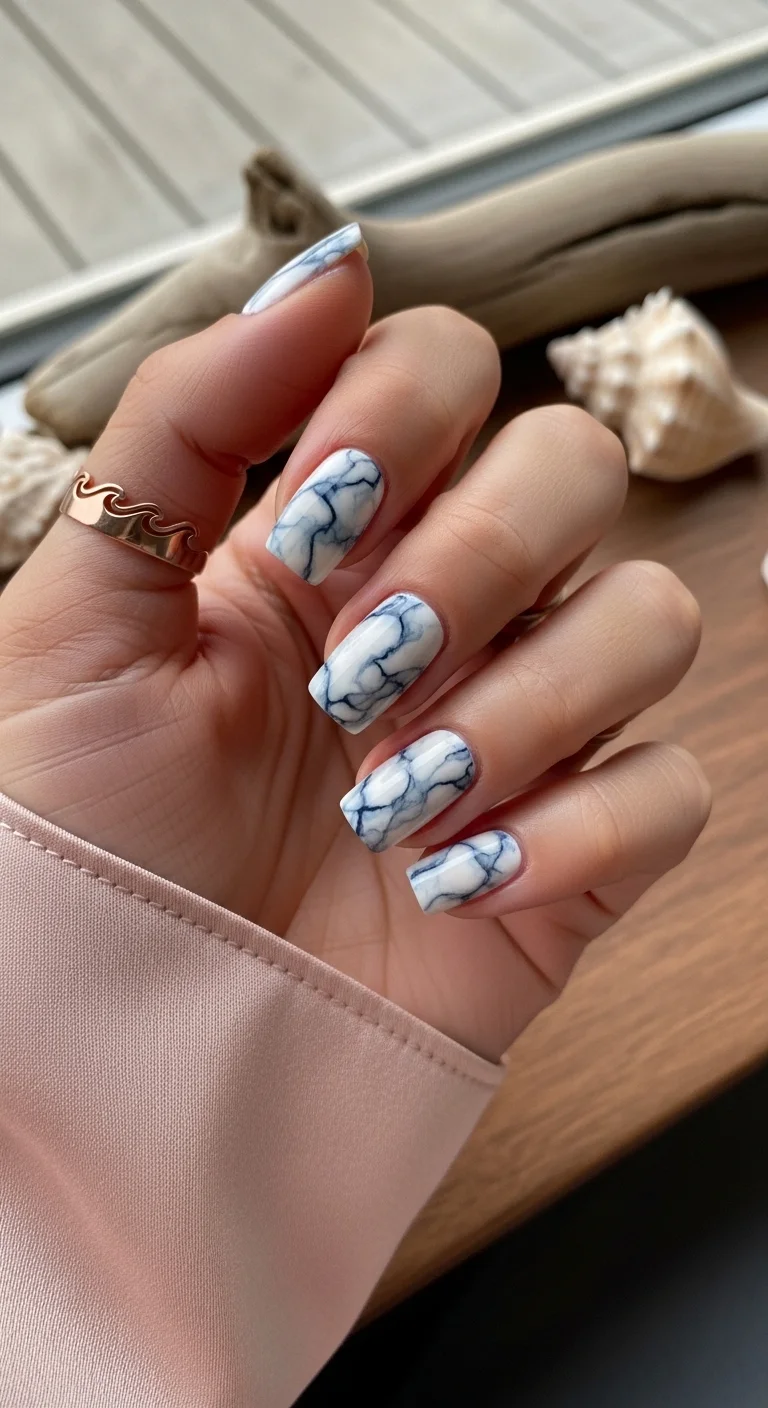
White marble with soft blue-grey veining for a Mediterranean stone effect.
Overview:
Blue marble nails usually go too dark or too saturated, which pushes the design into territory that looks painted rather than geological. This version keeps the veining in a muted blue-grey range, which makes the marble look more like actual stone and less like nail art trying to be stone.
The white base is essential for the realistic effect. It acts as the "calcium carbonate" foundation that you'd see in real marble, and the blue-grey veins sit on top like mineral deposits. On a nude or colored base, the marble would lose its mineral quality and start looking like abstract swirls.
Every nail will look different, and that's the entire point. If you try to match the vein patterns across all ten fingers, you'll overwork the design and end up with muddy grey smudges instead of crisp, organic lines. Let the marble do what marble does: look like it was formed by accident.
Design Breakdown:
A wet-on-wet marble technique using blue-grey veining over a white foundation. Organic variation is the goal.
Base Color: Crisp, opaque white. The white needs to be fully pigmented so the veins read as distinct mineral lines.
Nail Shape: Medium coffin. The flat surface gives the marble room to develop its organic pattern.
Design Element: Soft blue-grey veins that branch and curve across the white base. The veins should vary in thickness and intensity.
Finish: Ultra-glossy top coat to mimic the polished surface of real marble.
Get The Look at Home:
The blooming gel technique produces the most realistic marble. Regular polish works too, but the blend won't be as seamless.
- White base: Two coats of opaque white. Let dry completely.
- Blooming layer: Apply a clear blooming gel or a wet top coat. Do NOT cure or let it dry.
- Drop the veins: Using a thin brush, drop small amounts of blue-grey polish into the wet blooming layer. The color will spread naturally.
- Guide the lines: Use the brush tip to gently pull the spreading color into thin, vein-like lines. Three to four drags per nail, maximum.
- Vary intensity: Some veins should be dark and defined, others should be faint and diffused. This creates depth.
- Seal: Wait ten minutes for the marble to set, then apply a generous top coat.
17.Versace-Inspired Monochromatic
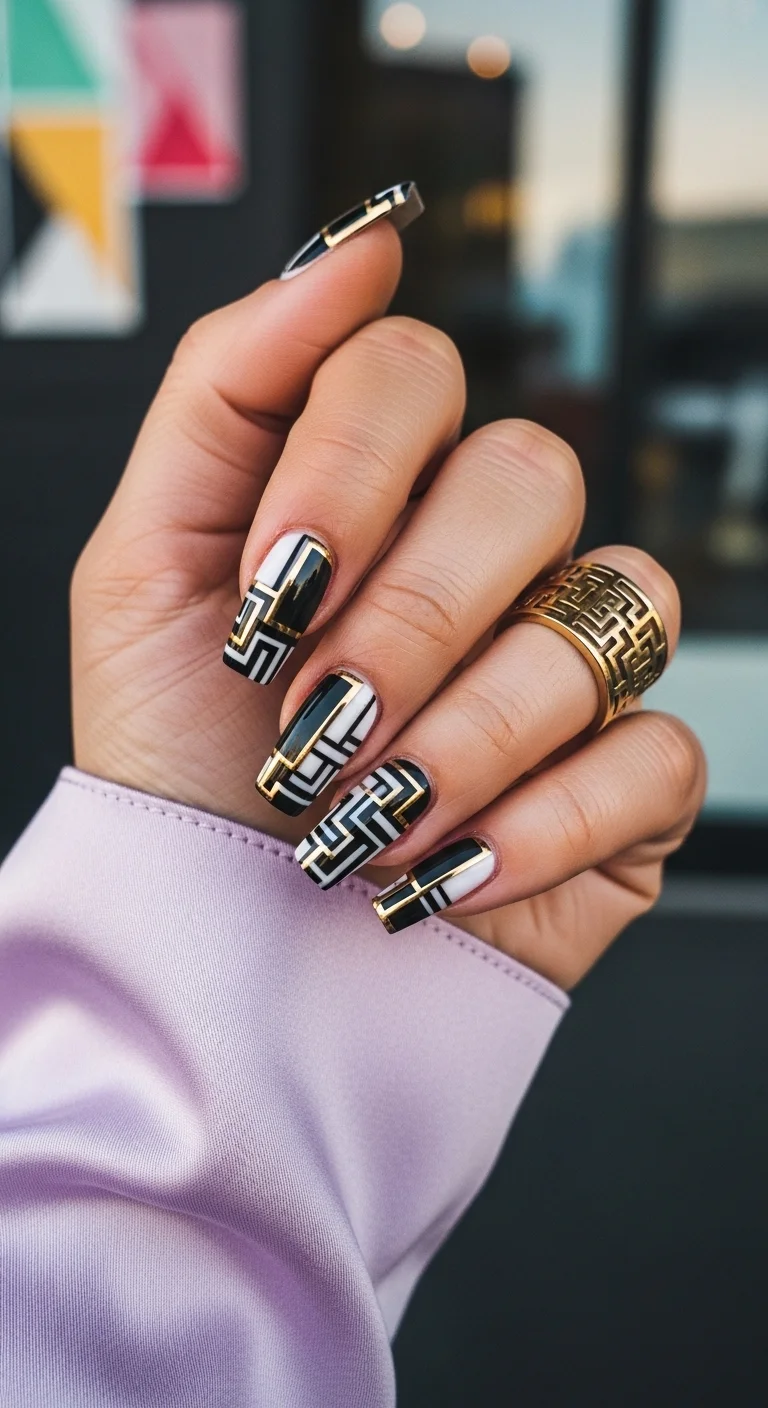
Black and white geometric patterns with gold chrome accents inspired by Greek key motifs.
Overview:
Geometric nail art that references high fashion is a tricky balance. Too literal and it looks like a costume. Too abstract and the reference disappears. This set lands in the middle by using the Greek key pattern, which is recognizable enough to register as a fashion reference but geometric enough to work as standalone graphic design.
The variety across nails is what makes this set work. Some nails lean more black, others more white, and the gold chrome lines act as borders between the two colors. The result is a collection of individual compositions that share a color palette but each tell a slightly different visual story.
The gold chrome lines are not optional. Without them, the black and white geometric patterns look flat and one-dimensional. The gold adds a third dimension that creates the illusion of depth, like the patterns are layered on top of each other rather than sitting on the same plane.
Design Breakdown:
High-contrast geometric art with metallic accents. Each nail is a different composition within the same three-color palette.
Base Color: Opaque white on some nails, opaque black on others. The alternating bases create visual variety.
Nail Shape: Medium-long coffin. The flat surface provides stable ground for the geometric patterns.
Design Element: Greek key-inspired geometric patterns in black and white, with gold chrome lines as borders and accents. Each nail has a unique pattern layout.
Finish: High-gloss top coat to make the black look deep and the gold look reflective.
Get The Look at Home:
This design requires planning. Sketch your pattern layout on paper before touching polish to nail.
- Alternating bases: Paint some nails white, others black. Two coats each. Let dry fully.
- Map the geometry: Using a fine liner brush, outline the geometric shapes on each nail. Greek key patterns use right-angle turns, not curves.
- Fill the blocks: Fill in the outlined sections with the opposite color. Black blocks on white nails, white blocks on black nails.
- Gold borders: Using a thin liner brush and gold metallic polish, trace lines along the borders between black and white sections.
- Precision check: Use a cleanup brush dipped in acetone to sharpen every edge. This design lives or dies on clean lines.
- Seal: One thick coat of top coat to protect the layered art and add shine.
24 Stunning Bridesmaid Hairstyles for Weddings 2026 💍✨
18.Copper Sun Frenchie
Warm coral French tips outlined with a fine gold metallic border.
Overview:
This is the warm-toned cousin of the Barbiecore Gold Edge French. Where that set used hot pink for maximum punch, this one uses a soft coral that sits somewhere between peach and burnt orange. The effect is quieter and more understated, but the gold chrome line along the smile line keeps it from disappearing into neutral territory.
Coral French tips are harder to execute than they look. The color is sheer enough that achieving an opaque, even tip often requires three thin coats instead of two. Going too thick on any single coat creates visible brush marks that the gold line can't fully hide.
The almond shape complements this color combination particularly well. The curved tip echoes the organic warmth of the coral, while the gold line adds the geometric precision that prevents the whole thing from looking too soft. It's a push-pull between warm and structured that keeps the design interesting.
Design Breakdown:
A warm-toned French with metallic framing. The coral needs patience to build opacity.
Base Color: Sheer, milky nude that lets the natural nail show through.
Nail Shape: Medium-long almond. The curved tip suits the warm, organic color palette.
Design Element: Warm coral French tips with a thin gold metallic line tracing the smile line.
Finish: Ultra-glossy top coat to make the coral look juicy and the gold look reflective.
Get The Look at Home:
Coral polish needs thin layers and patience. Three coats is normal, not excessive.
- Nude base: Two coats of milky nude. Let dry fully.
- Coral tips: Using a French liner brush, apply three thin coats of warm coral to the tips. Let each coat dry before the next.
- Dry check: Press gently on the tip color. If it indents, it's not dry enough for the gold line.
- Gold line: Using a very thin liner brush and gold metallic polish, trace a single line along the smile line.
- Cap the edge: Add a thin gold line along the free edge for extra polish.
- Seal: One thick coat of top coat. Float the brush to avoid smearing the gold.
19.Sunny Side Polka Dots
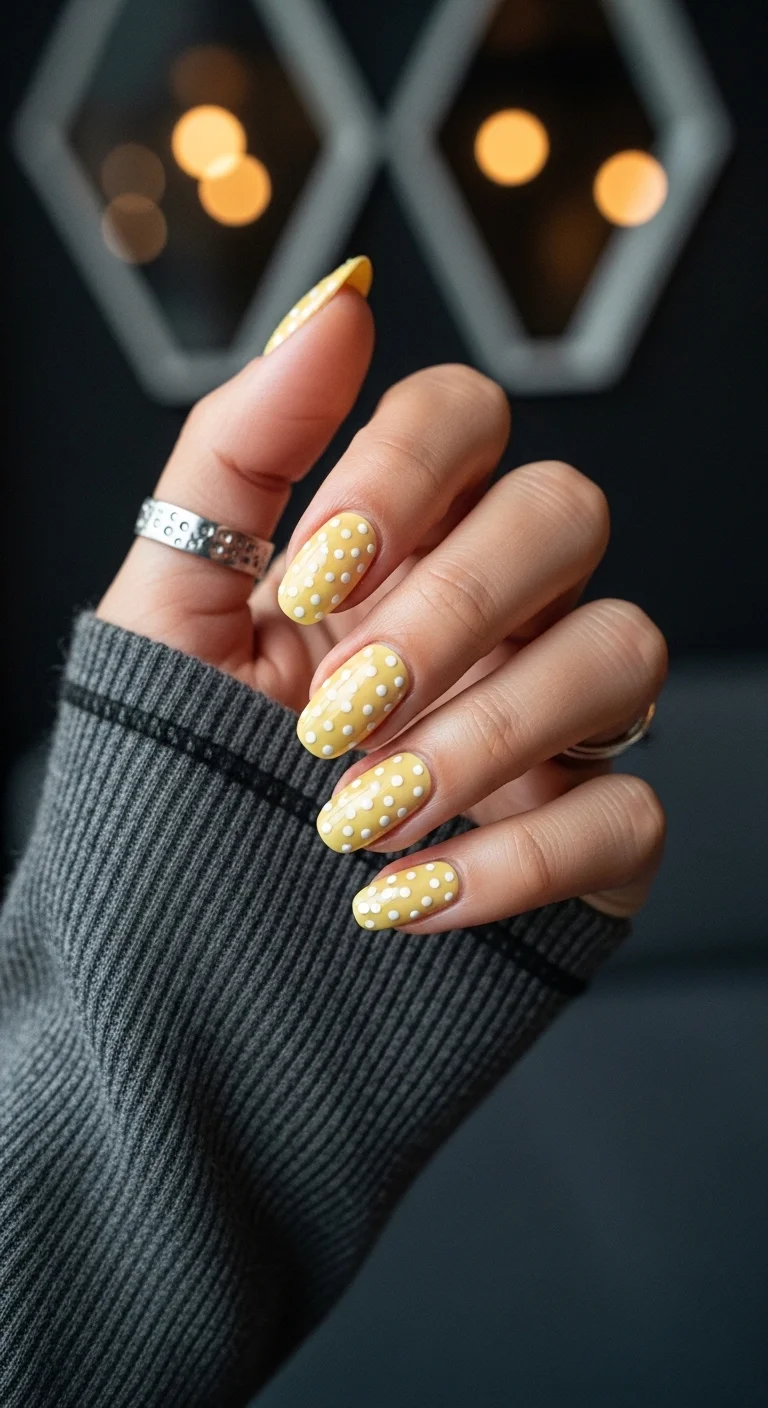
Mustard yellow with scattered white polka dots in mixed sizes.
Overview:
Polka dot nails are the most accessible entry point into nail art. The technique is genuinely simple: dip a tool in polish, press it onto the nail, done. The challenge with this set isn't the dots themselves but the base color. This isn't a bright lemon yellow. It's a warm, almost mustard-toned gold that reads as sophisticated rather than childish.
The mixed dot sizes are a small detail that changes the overall feel. Uniform dots in a grid pattern look retro and deliberate. Randomly sized dots scattered at varying densities look more organic, like seeds on a berry or stars in a sky. The effect is playful without being rigid.
Yellow polish, regardless of the shade, has a reputation for being streaky. The pigment particles in yellow formulas tend to separate, which means you get uneven coverage if you don't shake the bottle well. Three thin coats with proper dry time between each is the baseline requirement.
Design Breakdown:
Single-color base with scattered dot accents. The base color does the heavy lifting.
Base Color: A warm, opaque mustard yellow. Not neon, not pastel. The warmth is what keeps it from reading as a children's color.
Nail Shape: Medium almond. The curved shape softens the graphic quality of the polka dots.
Design Element: White polka dots in mixed sizes scattered across each nail. The spacing varies from nail to nail.
Finish: High-gloss top coat to saturate the yellow and make the white dots pop.
Get The Look at Home:
The dots are the easy part. The yellow base is where patience matters.
- Yellow base: Three thin coats of mustard yellow. Shake the bottle thoroughly before use. Let each coat dry fully.
- Dotting tools: Prepare two or three different-sized dotting tools. A bobby pin end works for medium dots.
- Large dots first: Place a few larger white dots randomly across each nail.
- Fill with small dots: Use a smaller tool to place tiny dots in the gaps between the larger ones.
- Asymmetric layout: Avoid placing dots in the center of every nail. Off-center clusters look more natural.
- Seal: Float a thick top coat over the dots without pressing. Dragging through wet dots smears them.

35 Palm Tree Nail Art Ideas that are the Most Iconic Nail Art Designs 🌴✨
20.Luxe Carrara White Marble
White marble with grey and subtle mauve veining that mimics real Carrara stone.
Overview:
Grey marble on white is a classic, but this version adds a subtle purple-mauve undertone to the veining that you don't notice immediately. It's the kind of detail that reveals itself slowly: first you see white marble, then you notice the grey veins, then you catch the faint mauve threads running through them. That layered discovery is what makes the design feel expensive rather than generic.
The veining density matters more than the color. Too many veins and the nail looks busy, like a countertop sample. Too few and it looks like grey squiggles on white. This set hits the middle ground where each nail has enough vein structure to read as marble but enough white space to breathe.
The almond shape is the right canvas for marble because the curved surface lets the veins follow an organic path. On square nails, marble veining tends to look forced because the straight edges fight the natural flow of the pattern.
Design Breakdown:
A classic white marble with multi-tonal veining. The purple undertone is the subtle differentiator.
Base Color: Crisp, opaque white. A solid foundation is essential for realistic marble.
Nail Shape: Medium-long almond. The curved surface lets the veins follow an organic, geological path.
Design Element: Grey and soft mauve-purple veins that branch and curve across the white base. The veins vary in thickness and intensity.
Finish: Ultra-glossy top coat to mimic the polished surface of real Carrara marble.
Get The Look at Home:
This is a wet-on-wet technique. The colors need to blend at their edges, not sit as hard lines.
- White base: Two coats of opaque white. Let dry completely.
- Vein colors: On a piece of foil, place small drops of grey and mauve-purple polish side by side.
- Draw the veins: Using a very thin brush, pick up grey polish and draw light, squiggly lines across the nail. Don't press hard.
- Add mauve threads: Without cleaning the brush, pick up a tiny amount of mauve and draw thinner lines that run alongside or cross the grey veins.
- Soften: Dip a clean brush in a little top coat and lightly dab at the veins to blur their edges. Don't over-blend.
- Seal: Wait five minutes, then apply a generous top coat to smooth the surface.
21.Toffee Ribbon Stripes
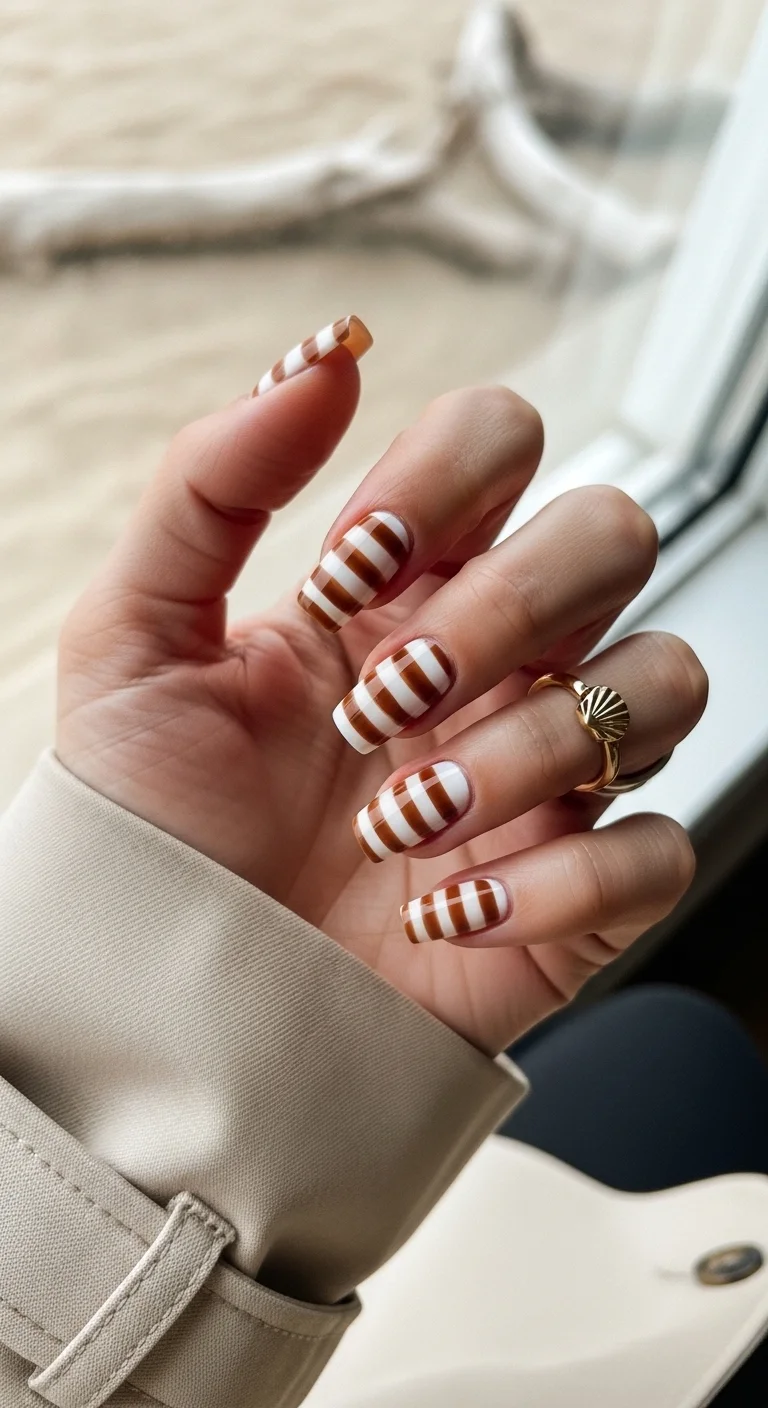
Crisp horizontal stripes in warm toffee brown and white.
Overview:
Horizontal stripes on nails have a reputation for making fingers look wider, and that concern isn't entirely unfounded. The mitigating factor here is the stripe thickness: these are narrow enough that the eye reads the pattern as texture rather than width. The toffee-and-white color combination also helps by keeping the contrast warm and contained rather than stark.
The stripe spacing is what separates this from candy-cane nails. The lines are evenly distributed across the entire nail, which creates a rhythm that feels deliberate and measured. There's no focal point, no accent nail, no variation. Every finger gets the same pattern, and that consistency is the design.
Striping tape is almost mandatory for this level of precision. Freehand horizontal lines that are truly parallel across all ten nails is an unrealistic expectation, even for experienced nail artists. The tape does the work; you just paint over it and peel.
Design Breakdown:
Strict horizontal striping. The uniformity is the point.
Base Color: Crisp, opaque white. The white stripes need to be fully pigmented so they don't look translucent next to the toffee.
Nail Shape: Medium coffin. The flat surface provides a clean canvas for the horizontal lines.
Design Element: Evenly spaced horizontal stripes alternating between white and warm toffee brown. Each nail gets four to five stripes.
Finish: High-gloss top coat to make the colors look rich and the lines look crisp.
Get The Look at Home:
Striping tape is your best friend here. Without it, the lines won't be parallel.
- White base: Two coats of opaque white. Let dry fully. Tape on tacky polish pulls up the base.
- Tape placement: Apply horizontal strips of nail tape across each nail, spacing them about 3mm apart. Press firmly.
- Paint the toffee: Carefully paint warm toffee brown over the entire nail, covering both the tape and exposed white.
- Peel while wet: Remove the tape immediately before the toffee sets. Pull at a low angle to keep the stripe edges clean.
- Touch-ups: Use a small brush to fix any bleeding between stripes.
- Seal: One thick coat of top coat to smooth the surface and lock in the pattern.
29 Fun FIFA World Cup Watch Party Hairstyles (2026)
22.Mermaid Pearl Seashells

Three-dimensional seashell ridges over a pearly pink base.
Overview:
3D nail art is polarizing. Done well, it looks like jewelry. Done poorly, it looks like something dried on the nail by accident. The difference comes down to two things: the precision of the raised lines and the restraint of the color palette. This set gets both right.
The raised ridges fan out from the cuticle toward the tip, mimicking the natural structure of a scallop shell. Each ridge catches light differently as the hand moves, creating a dimensional effect that flat nail art can't achieve. The pearly pink base amplifies this by adding a shimmer that shifts between warm and cool depending on the angle.
The practical downside: 3D ridges snag on everything. Hair, knitwear, pillowcases, the lining of your bag. Sealing the edges with a thick bead of top coat around the base of each ridge helps, but doesn't eliminate the issue. Budget for about a week of wear before something catches.
Design Breakdown:
A 3D textured design using builder gel or thick polish to create raised seashell ridges.
Base Color: Soft, shimmering pearlescent pink. The pearlescence adds depth to the valleys between the ridges.
Nail Shape: Medium-long almond. The curved shape echoes the natural fan of a seashell.
Design Element: Raised, 3D vertical ridges that fan outward from the cuticle toward the tip. Six to eight ridges per nail.
Finish: High-gloss top coat to make the pearl shimmer catch light in the valleys between ridges.
Get The Look at Home:
You need 3D builder gel or a very thick top coat for the raised ridges. Regular polish won't hold the shape.
- Pearl base: Two coats of shimmery pink. Let dry completely.
- Ridge prep: Using a thin liner brush and clear 3D builder gel, draw a single line from the cuticle to the tip.
- Fan the ridges: Draw additional lines that curve outward from the same cuticle point, creating a fan shape. Space them evenly.
- Build height: Go over each ridge a second time to make the texture more pronounced.
- Cure or dry: If using gel, cure in a lamp. If using thick polish, wait at least fifteen minutes.
- Seal carefully: Apply top coat over the entire nail, working it into the valleys between ridges.
23.Straw Bag Basketweave
A textured basketweave weave in white over a warm nude base.
Overview:
Basketweave nail art is one of the few designs that looks better in person than in photos. The texture catches light in ways that a flat image can't capture, creating shadows and highlights that shift with every hand movement. In photographs, it can read as a flat print. In real life, the dimension is obvious and striking.
The nude base underneath the white weave is what makes the design work. Without it, the basketweave would float on an opaque background and lose its textile quality. The visible nude between the woven strips creates the illusion that the weave is sitting on top of the nail rather than being part of it.
This is a time-intensive design. Each woven strip needs to be painted individually, and the over-under pattern requires planning before execution. Budget at least an hour for both hands, and consider doing the design on one hand at a time rather than alternating between hands.
Design Breakdown:
A 3D textured pattern that mimics woven straw or wicker. The over-under structure is what sells the illusion.
Base Color: A warm, creamy nude. The base should be visible between the woven strips.
Nail Shape: Medium-long coffin. The flat surface provides stable ground for the weave pattern.
Design Element: Raised white strips woven in an over-under basketweave pattern that covers the entire nail surface.
Finish: Matte or satin top coat to emphasize the fabric-like texture. High-gloss would flatten the 3D effect.
Get The Look at Home:
Plan the weave pattern on paper first. The over-under logic needs to be consistent or the pattern falls apart.
- Nude base: Two coats of warm nude. Let dry fully.
- Horizontal strips: Using a liner brush and white 3D gel, draw short horizontal lines in rows across the nail. Leave gaps between them.
- Vertical strips: Draw vertical lines that pass over and under the horizontal ones. Where a vertical line crosses a horizontal one, paint over it (over) or skip it (under).
- Build texture: Go over the "over" sections a second time to make them more raised than the "under" sections.
- Cure or dry: Let the 3D gel cure or the thick polish dry completely.
- Matte seal: Apply a matte or satin top coat to give it a realistic straw or wicker appearance.

29 Best Tropical Vacation Nails for Women in 2026 🌴
24.Gelato Swirl Marble
Multi-colored pastel swirls over a milky white base in a marble pour effect.
Overview:
Marble nails usually stick to one or two colors. This version throws four or five into the mix, which risks turning into a muddy mess if the colors aren't kept separate at their borders. The technique here is "drag marbling," where colors are pulled alongside each other rather than blended into each other. The result looks like poured paint or stirred gelato.
The milky white base is what prevents the colors from becoming overwhelming. It acts as a visual buffer between the swirls, giving the eye a place to rest. Without it, the purple, pink, teal, and yellow would collide directly and create brown at their meeting points.
The biggest mistake people make with multi-color marble is over-swirling. Each drag of the brush mixes the colors slightly. Three or four drags per nail is the maximum before the individual colors disappear into grey. Stop earlier than you think you should.
Design Breakdown:
A multi-color drag marble using pastels over a neutral base. The color separation is what makes it work.
Base Color: Milky, semi-sheer white. The transparency lets the swirls look like they're floating.
Nail Shape: Medium-long coffin. The flat surface gives the swirls room to develop their organic pattern.
Design Element: Swirled ribbons of purple, pink, teal, and yellow that flow alongside each other without fully blending.
Finish: High-gloss top coat to make the colors look deep and the swirls look fluid.
Get The Look at Home:
Work wet-on-wet. The colors need to be dragged while the polish is still fluid.
- Milky base: One coat of milky white. Let it dry slightly but stay tacky.
- Drop the colors: While the base is tacky, place small dots of purple, pink, teal, and yellow directly onto the nail.
- Drag, don't swirl: Use a toothpick or fine brush to pull the colors in S-shapes. Three to four drags maximum.
- Stop early: If you keep swirling, the colors will merge into grey. The individual colors need to remain visible.
- Clean skin: Use a brush dipped in acetone to remove polish from the cuticles before it sets.
- Seal: Wait five minutes, then apply a generous top coat to smooth the surface.
25.Electric Lemonade Waves
Dimensional yellow waves over a nude base for a textured, modern look.
Overview:
3D wave nails have been trending for several months, and most versions use neutral or pastel tones. The bright yellow here is a deliberate escalation. It takes a design that usually reads as subtle and textural and turns it into something that reads as bold and graphic. The color does half the work before the texture even registers.
The nude base is essential. It creates negative space between the yellow waves, which is what makes the 3D texture visible. On a yellow base, the waves would disappear into the background color and the entire design would flatten into a solid yellow nail.
The challenge with thick 3D waves is drying time. If you're using regular polish instead of gel, each wave ridge needs fifteen to twenty minutes to set before you can apply top coat without flattening the texture. Gel users can cure each layer, which is significantly faster. Patience is the real requirement here.
Design Breakdown:
A high-texture design that uses negative space to showcase raised 3D waves.
Base Color: Clear or very sheer nude. The transparency between the waves is part of the design.
Nail Shape: Medium-long coffin. The flat surface gives the horizontal waves room to travel.
Design Element: Thick, raised 3D wavy lines in bright opaque yellow, running horizontally across each nail.
Finish: High-gloss top coat to make the yellow look juicy and the waves look wet.
Get The Look at Home:
3D builder gel or thick polish is required. Regular polish won't hold the raised shape.
- Clear base: One coat of clear or very sheer nude. Let dry fully.
- Wave prep: Using a thin brush and yellow 3D gel, draw a wavy horizontal line across the nail.
- Build height: Go over the line two or three times to make the ridge stand out from the nail surface.
- Additional waves: Draw two to three more wavy lines below the first, spacing them about 3mm apart.
- Cure or dry: If using gel, cure each wave layer. If using polish, wait fifteen to twenty minutes between layers.
- Seal: Carefully apply glossy top coat over the waves without pressing down and flattening the ridges.
30 Stunning Mother of the Groom Hairstyle Ideas for 2026 💍✨
26.Amalfi Tile French
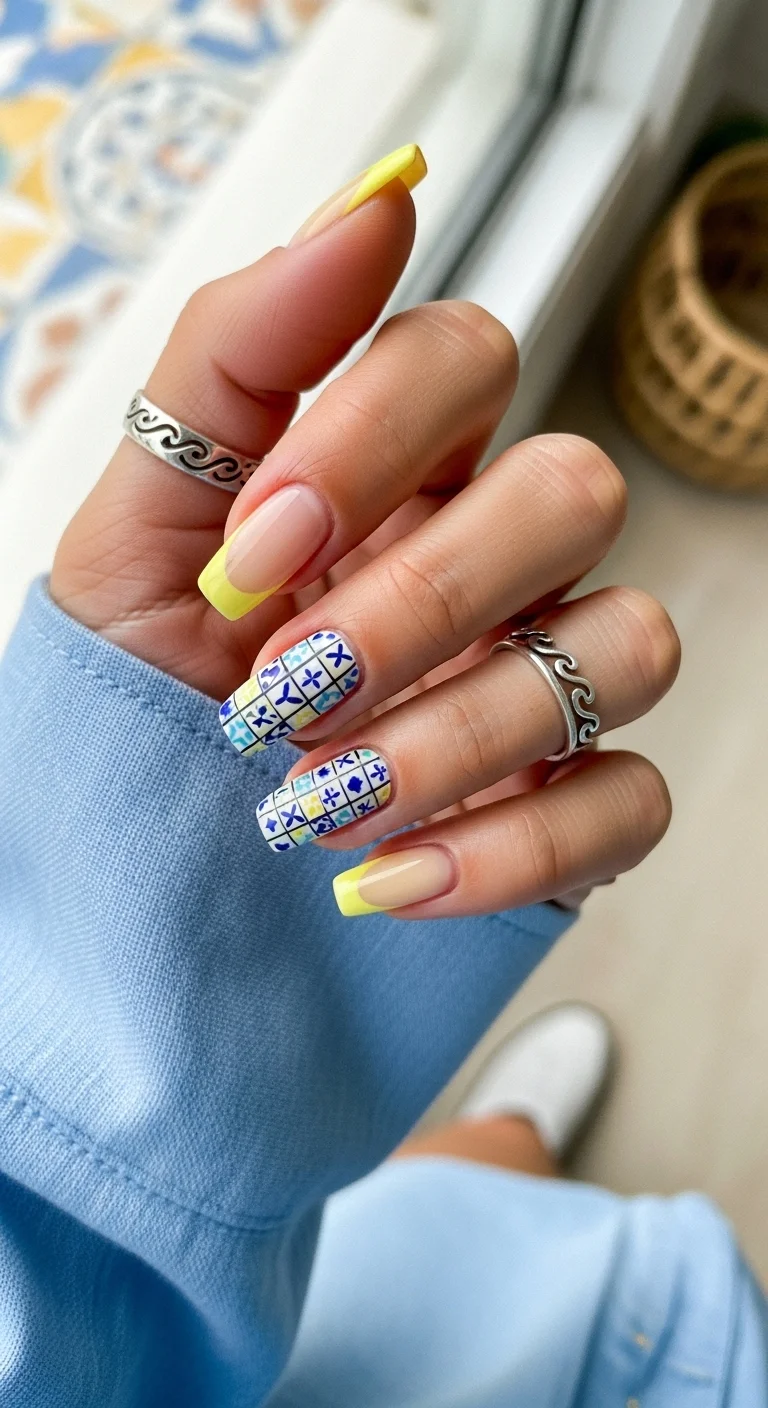
Yellow French tips paired with intricate blue and white tile art on accent nails.
Overview:
Themed nail art walks a fine line between "editorial" and "costume." This set lands on the right side because the tile art is confined to two accent nails while the remaining nails stay clean with simple yellow French tips. The restraint is what makes the design feel curated rather than themed.
The tile patterns themselves are the star. Small geometric motifs, crosses, diamonds, and floral elements in blue on a white background. The level of detail is remarkable for the scale, and it rewards close inspection. From a distance, the accent nails read as "patterned." Up close, each tiny element reveals itself.
The yellow French tips balance the busy accent nails. Without them, the tile art would dominate the entire hand and feel overwhelming. The yellow provides a solid, cheerful anchor that lets the detailed nails shine without competing.
Design Breakdown:
A two-part design that splits between clean French tips and detailed tile art on accent nails.
Base Color: Sheer nude on the French tip nails. White on the accent nails to provide a clean canvas for the tile patterns.
Nail Shape: Medium-long coffin. The flat surface suits both the geometric French and the detailed tile work.
Design Element: Bright yellow French tips on three nails. Blue and white Mediterranean tile patterns on the middle and ring fingers.
Finish: High-gloss top coat to make the yellow look saturated and the tile art look crisp.
Get The Look at Home:
A stamping plate for the tile patterns is the realistic path. Hand-painting these motifs at this scale takes hours.
- French tips: On three nails per hand, apply sheer nude base and paint bright yellow French tips. Two coats for opacity.
- Accent base: On the middle and ring fingers, apply two coats of opaque white. Let dry fully.
- Stamp the tiles: Using blue stamping polish and a Mediterranean tile stamping plate, transfer the design to the white nails.
- Add yellow details: Using a tiny brush, fill in select elements of the tile pattern with yellow polish to tie the accent nails to the French tips.
- Cleanup: Use a small brush and acetone to sharpen the French lines and remove any stamped design from the skin.
- Seal: Two coats of top coat to protect the stamped art and add shine.
27.Mimosa Morning Matte Yellow
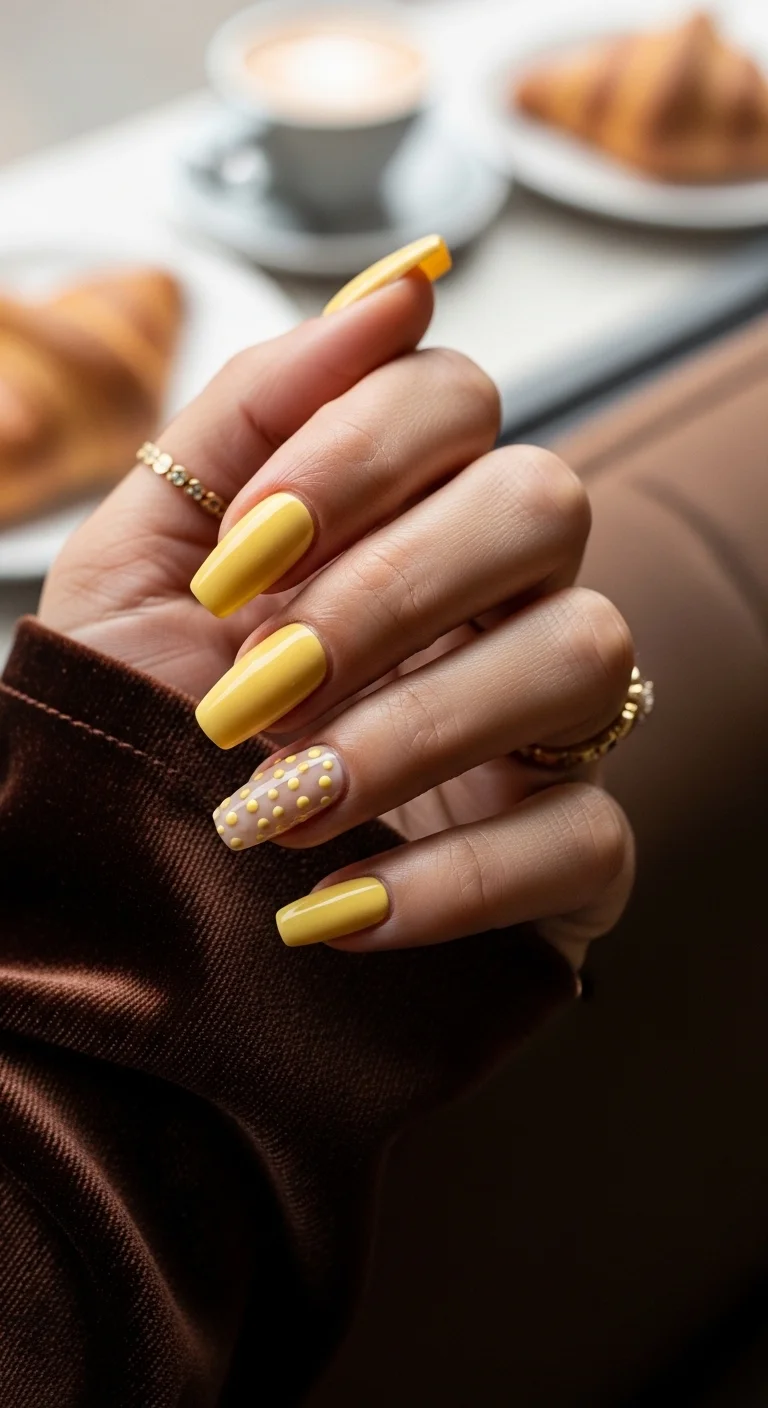
Solid mustard yellow with a single accent nail featuring 3D raised dots.
Overview:
The appeal of this set is the contrast between the simple solid yellow and the single textured accent nail. Four nails are straightforward color. One nail has raised 3D dots that catch light and create shadow. That asymmetry is what makes the design interesting rather than basic.
The yellow here is mustard-toned, which is a different proposition than bright lemon yellow. Mustard reads as warm and earthy, which gives the set a more grounded, sophisticated quality. It pairs naturally with brown, cream, and gold tones in your wardrobe rather than requiring bright or pastel clothing to match.
The 3D dots on the accent nail are the same yellow as the solid nails, not clear. This is a subtle but important distinction. Yellow dots on a nude base create a tonal connection to the solid nails while maintaining enough contrast to be visible. Clear dots would look like texture without color, which would disconnect the accent nail from the rest of the set.
Design Breakdown:
Minimal design with a single textured accent. The simplicity is the point.
Base Color: Warm, opaque mustard yellow on four nails. Sheer nude on the accent nail.
Nail Shape: Long coffin. The length adds drama to the simple color and gives the accent nail room for the dot pattern.
Design Element: Solid yellow on most nails. One accent nail with raised 3D yellow polka dots in a scattered pattern over a nude base.
Finish: High-gloss top coat on the solid nails. The accent nail can be glossy or satin depending on preference.
Get The Look at Home:
This is one of the fastest designs on this list. The solid nails take minutes; the accent nail takes five.
- Yellow nails: Two to three coats of mustard yellow on four nails per hand. Let each coat dry fully.
- Accent base: Two coats of sheer nude on the ring finger. Let dry.
- 3D dots: Using a medium dotting tool and the same yellow polish, place raised dots on the accent nail. Press firmly to deposit a thick bead of polish.
- Spacing: Scatter the dots evenly across the nail. Six to eight dots per nail is the right density.
- Dry time: The 3D dots need extra drying time because they're thicker than a standard coat. Wait at least ten minutes.
- Seal: Apply top coat to all nails. On the accent nail, float the brush over the dots without pressing down.

28 Trendy May Nail Designs for 2026 💅
How to Get That 'Your Nails But Juicier' Look
Heavy, opaque polish can feel too heavy for peak summer. That is why Jelly, Gummy, and Glass nails are dominating trend reports. Instead of painting the nail a solid block of color, the idea is to make it look like tinted, juicy glass. The effect is lighter and more breathable, which is exactly what you want when the humidity hits.
The key is using milky sheer or cloud white polishes that build translucency rather than opacity. Done right, it creates that coveted "your nails but better" look with a glossy, gummy depth that feels deliberately undone. It works across every nail length and looks as appropriate at the office as it does at a beachside dinner.
The most common mistake people make at home is applying two thick coats of sheer polish. It streaks, it pools at the cuticles, and it never dries evenly. The fix is counterintuitive: apply three to four ultra-thin coats, letting each one dry completely between applications.
It takes patience, but the result looks like you dipped your fingertips in liquid candy rather than painted them. That translucent depth is what makes the difference between a streaky mess and a salon-quality jelly finish.
And there you have it—27 ways to kick off your summer with the perfect June manicure! Whether you chose a soft pastel or a vibrant neon, these designs are sure to leave you feeling inspired for the sunny days ahead. June is all about that beautiful transition, and your nails are the perfect way to embrace the new season.
Don't forget to pin your absolute favorites to your Pinterest boards so you have them ready for your next nail appointment! It's the best way to make sure you get exactly the look you're dreaming of.