Hair Trends
32 Trending Bridal Hairstyles for Summer Weddings
A summer wedding demands a hairstyle that holds through heat, photographs under direct sun, and stays intact through tears, laughter, and hours of dancing. These 32 looks range from fully-contained updos to romantic flowing styles — each one chosen for its ability to survive a summer celebration without requiring constant adjustment.
Some lean into braided texture for maximum hold. Others rely on accessories — pearl pins, crystal combs, floral accents — to add occasion-ready polish to otherwise simple foundations. Every style here was selected with real summer conditions in mind: humidity, sun exposure, and the kind of movement that happens when you are genuinely enjoying your own wedding. Find the one that matches your dress, your venue, and how much time you want to spend in the salon chair.
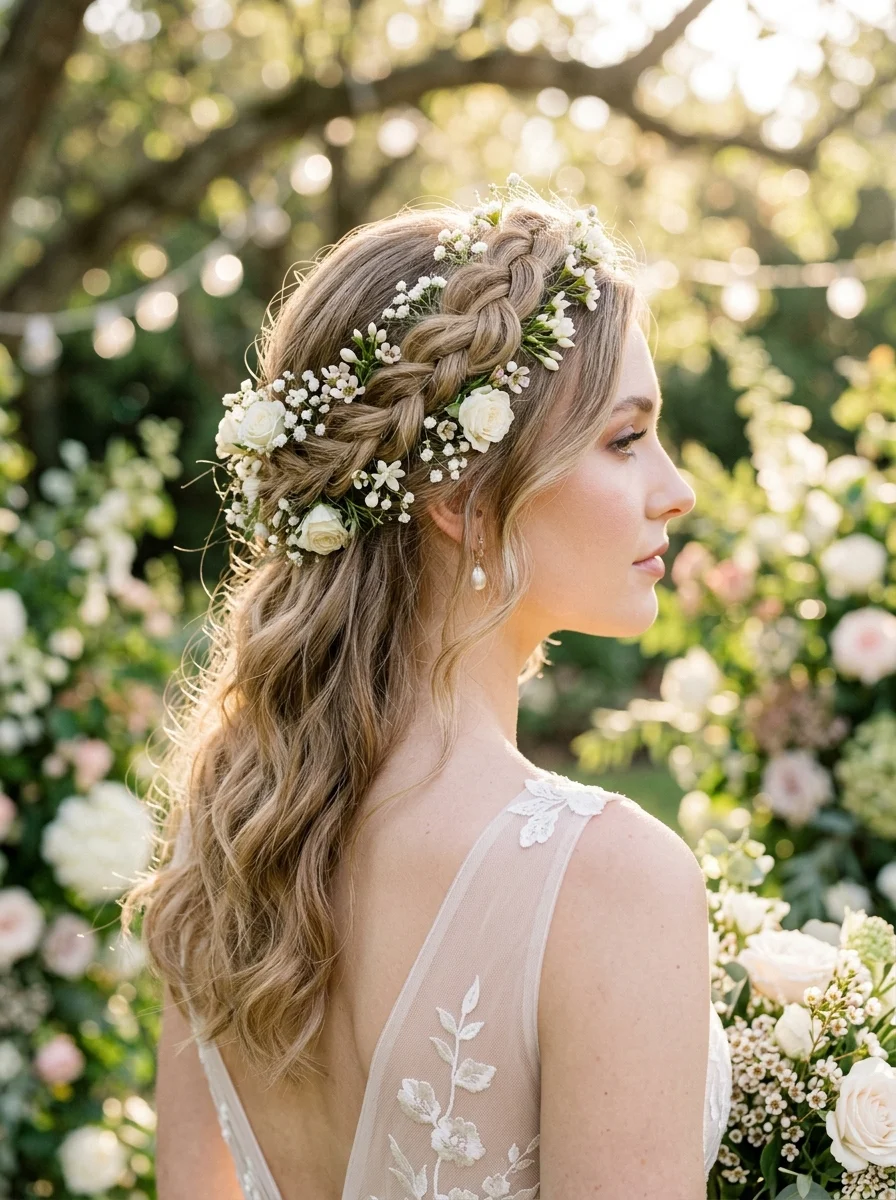
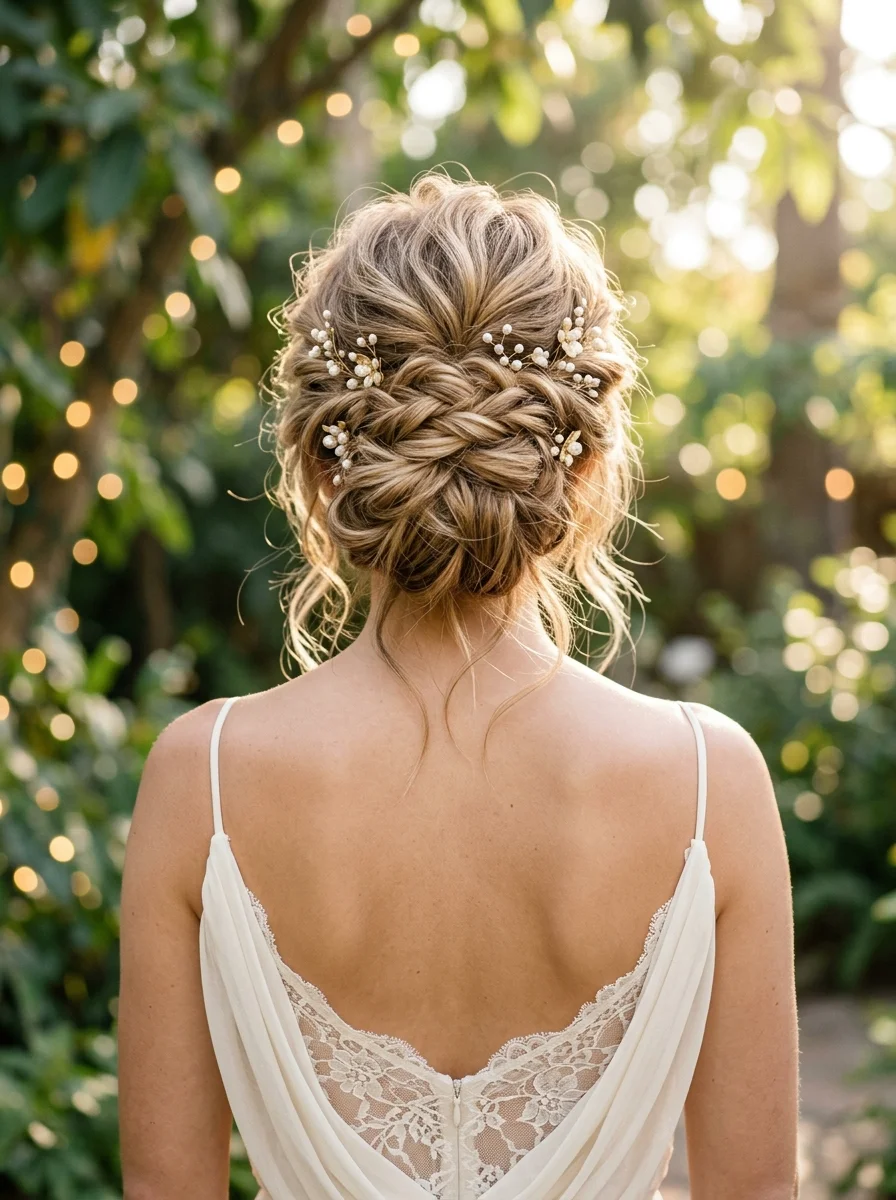
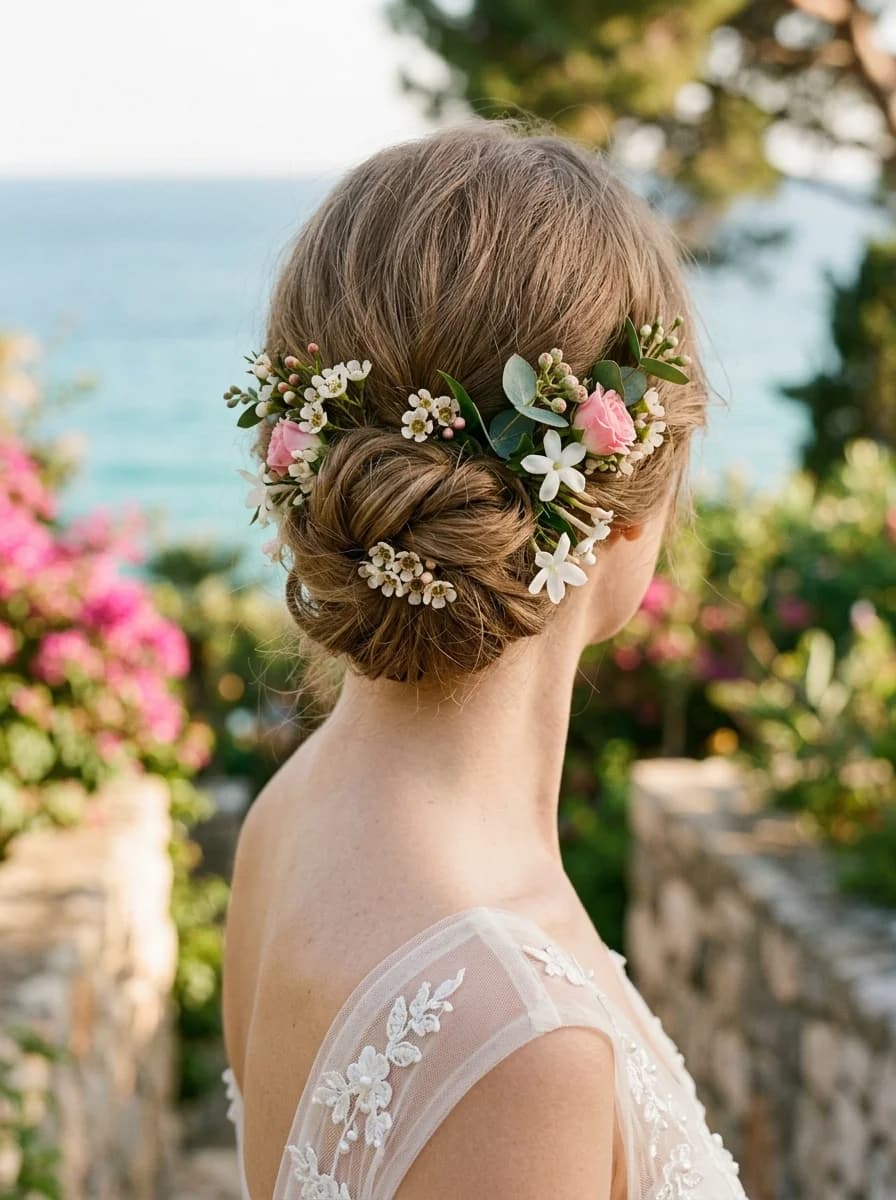
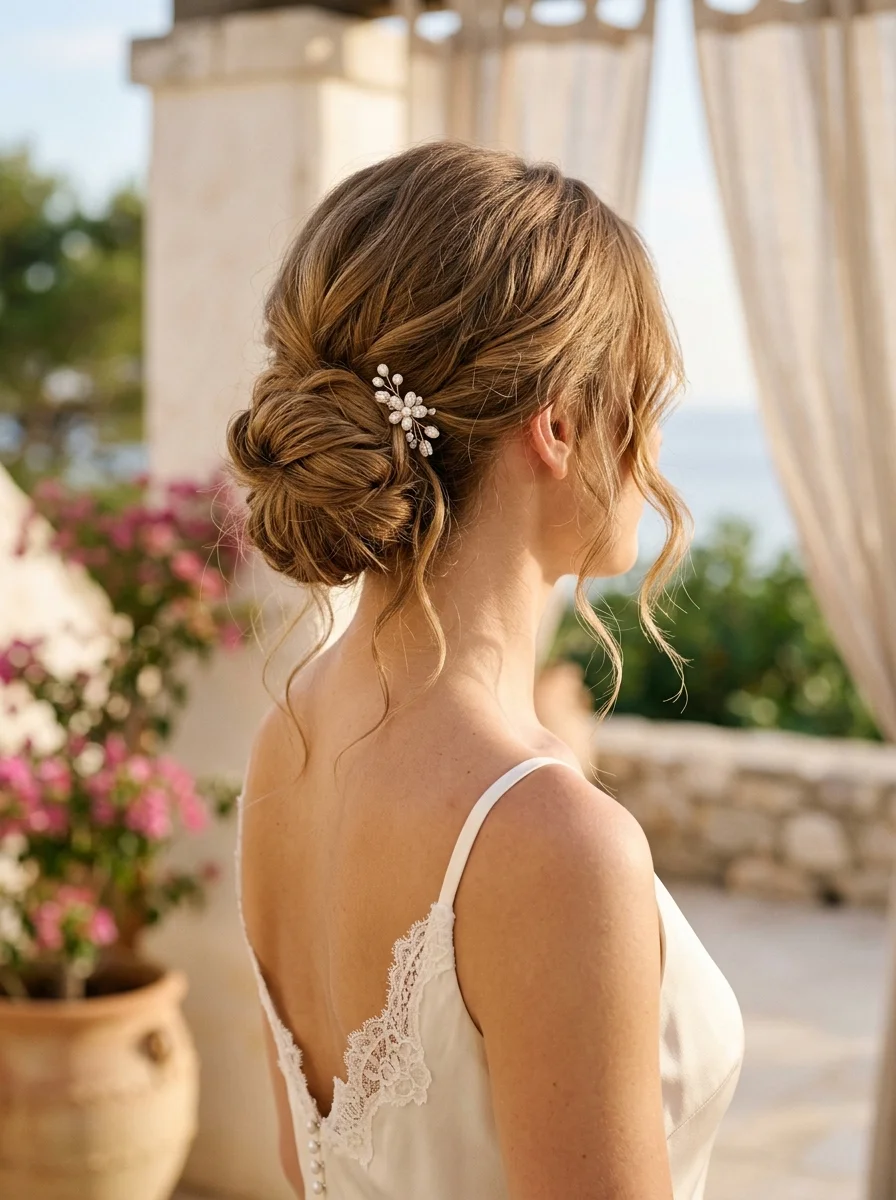
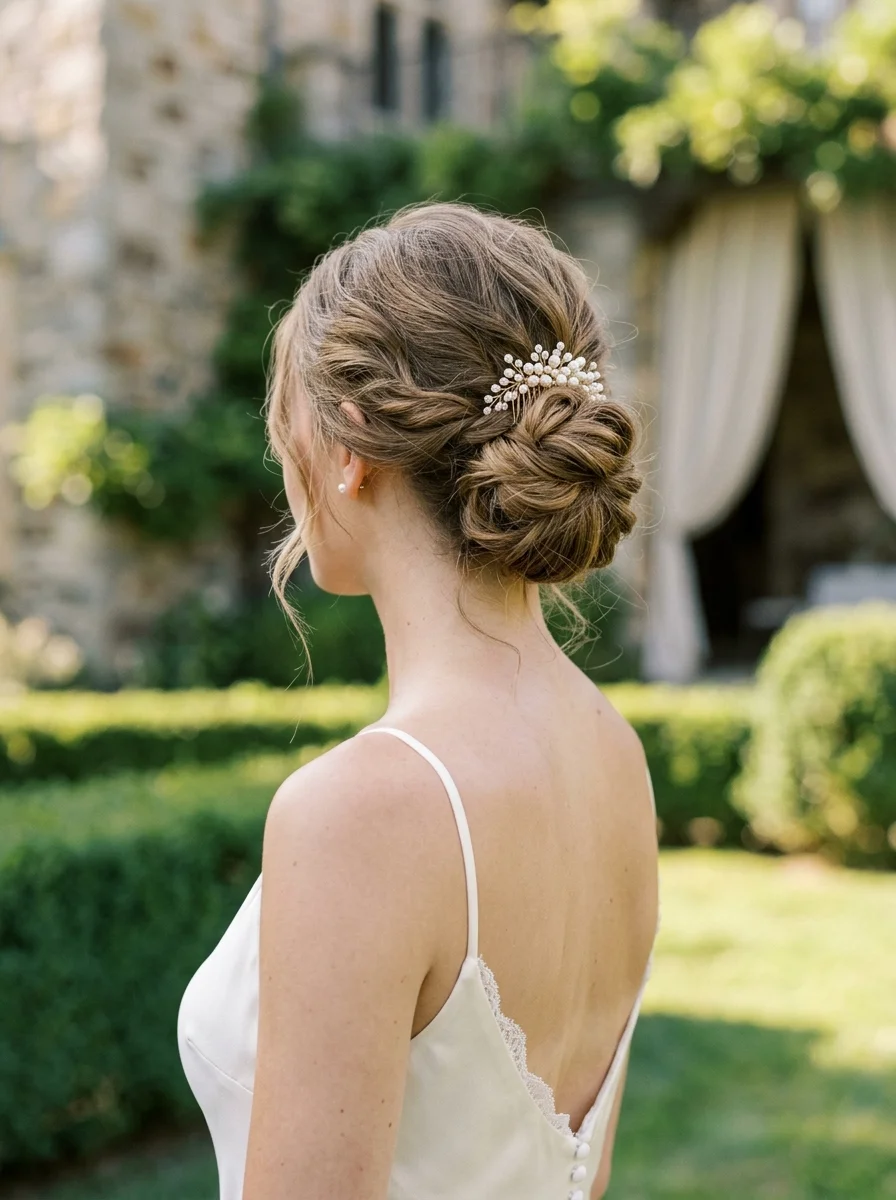
1.Twisted Crown Half-Up with Cascading Curls and Pearl Embellishments
The overview: The twisted crown half-up occupies a specific space in bridal hair, delivering the visual weight of an updo from the front while keeping the length and movement of worn-down hair. Loose, uniform waves cascade through the full length of medium-to-long hair, with two twisted sections from the temples meeting at the back of the crown. A pearl-adorned comb sits at the junction, while individual pearl pins are scattered through the waves at irregular intervals to add points of reflection that read particularly well against a white wedding dress.
Why this look is popular: It solves the classic bridal dilemma of wanting your hair both up and down at the same time. The crown section stays controlled and polished, while the flowing curls below provide movement and softness. Pearl accents add bridal formality without requiring a veil or tiara.
Where this look is suitable: Garden weddings, outdoor ceremonies, any venue where you want hair to move naturally. The half-up construction keeps hair off the face during the ceremony while still photographing as a "hair down" style.
Step by step:
- Prep with heat protection. Apply a thermal spray to damp hair. Blow-dry with a round brush for smoothness at the roots.
- Create waves. Using a 1.25-inch curling iron, wrap 1-inch sections, alternating direction. Leave the last inch of each section straight for a modern, relaxed finish.
- Cool completely. Let curls set for at least 10 minutes. Touching them while warm collapses the pattern.
- Break up the curls. Gently run fingers through to create soft, blended waves.
- Twist the crown. Take two sections from above each temple. Twist each section backward toward the crown. Pin them together with crisscrossed bobby pins.
- Place the pearl comb. Insert the comb at the junction of the twists, angling it so the pearls face outward.
- Scatter pearl pins. Tuck individual pearl pins into the waves at various points along the crown and sides.
- Set with flexible spray. A light mist of medium-hold hairspray preserves movement while maintaining the shape.
Tips and tricks: If your hair resists curl, apply a texturizing spray before curling and pin each curl into a coiled shape to cool. The pearl placement should feel organic rather than symmetrical — clusters of 2-3 pins look more natural than single pins evenly spaced. This style is best on medium to thick hair with some natural wave.

21 Stunning Concert Hairstyles for Women 2026 🎶✨
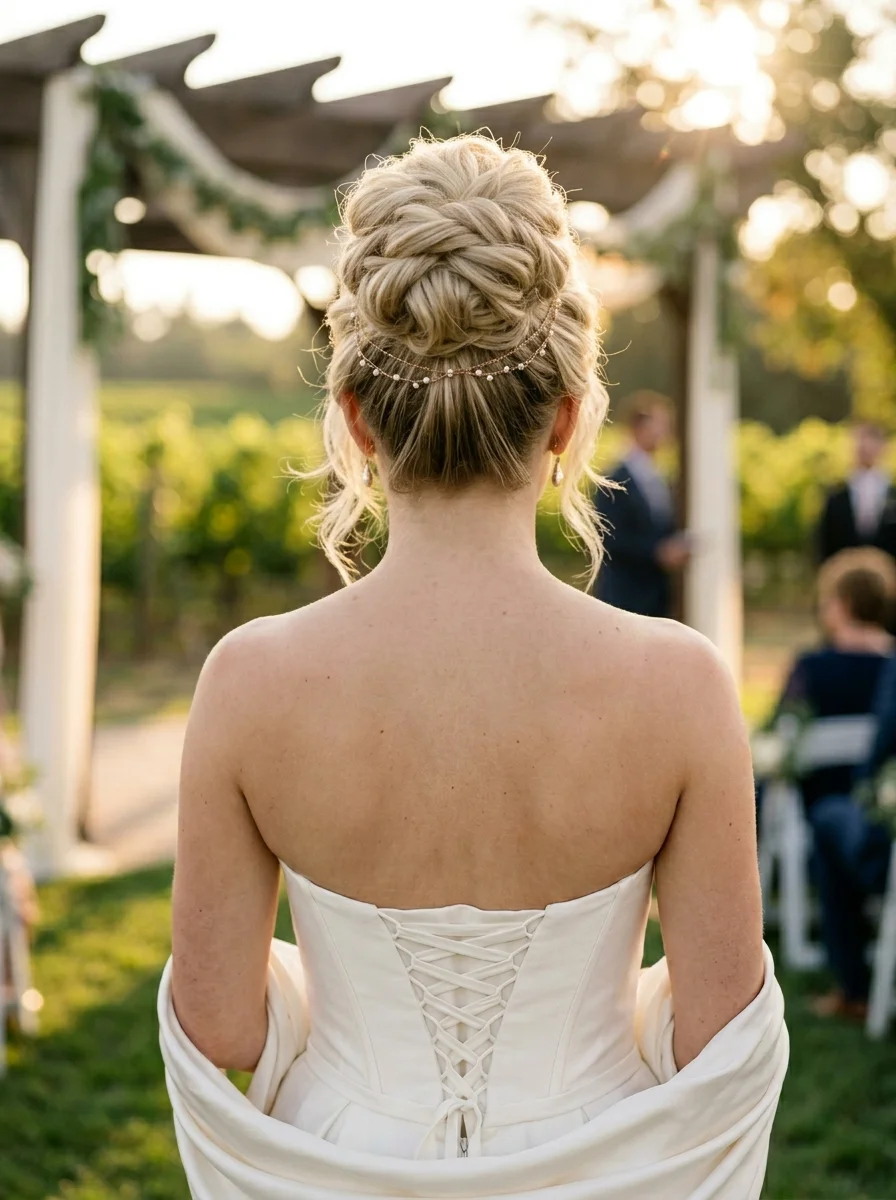
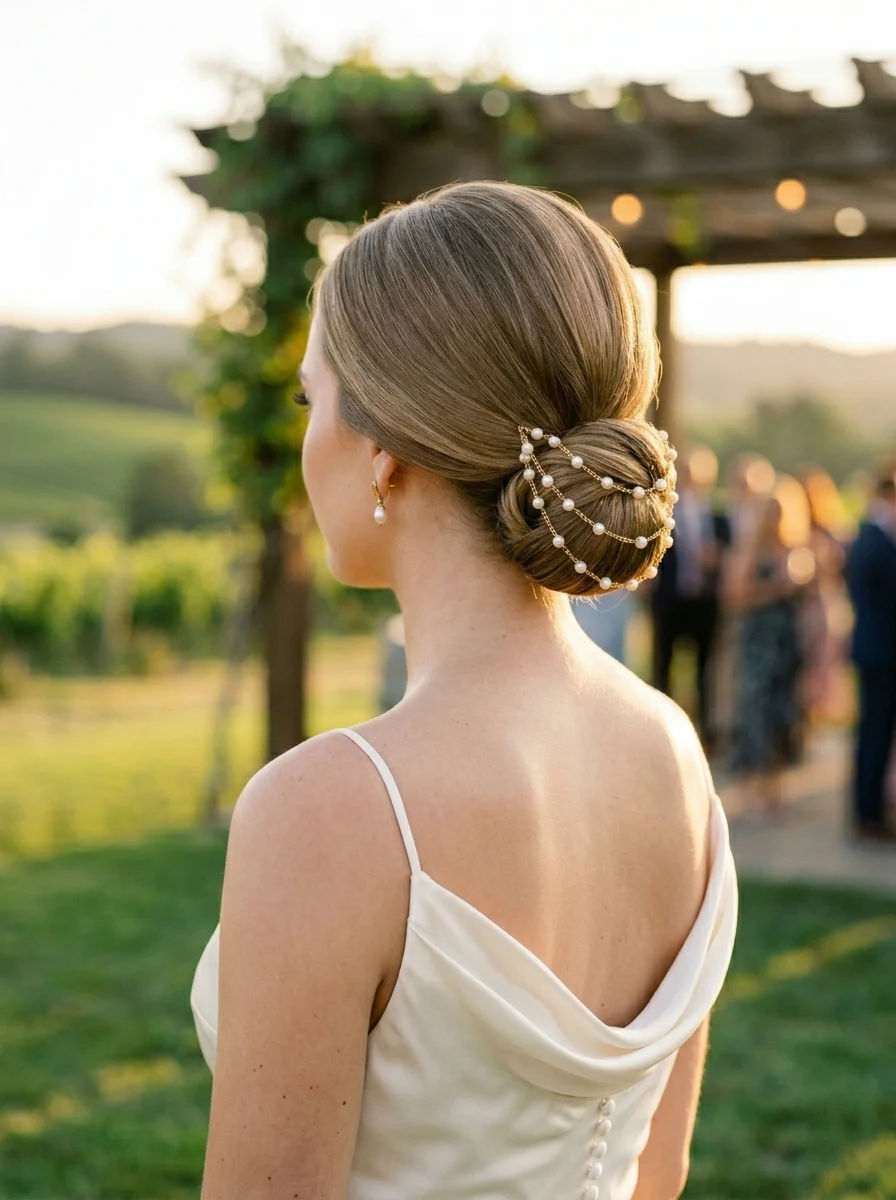
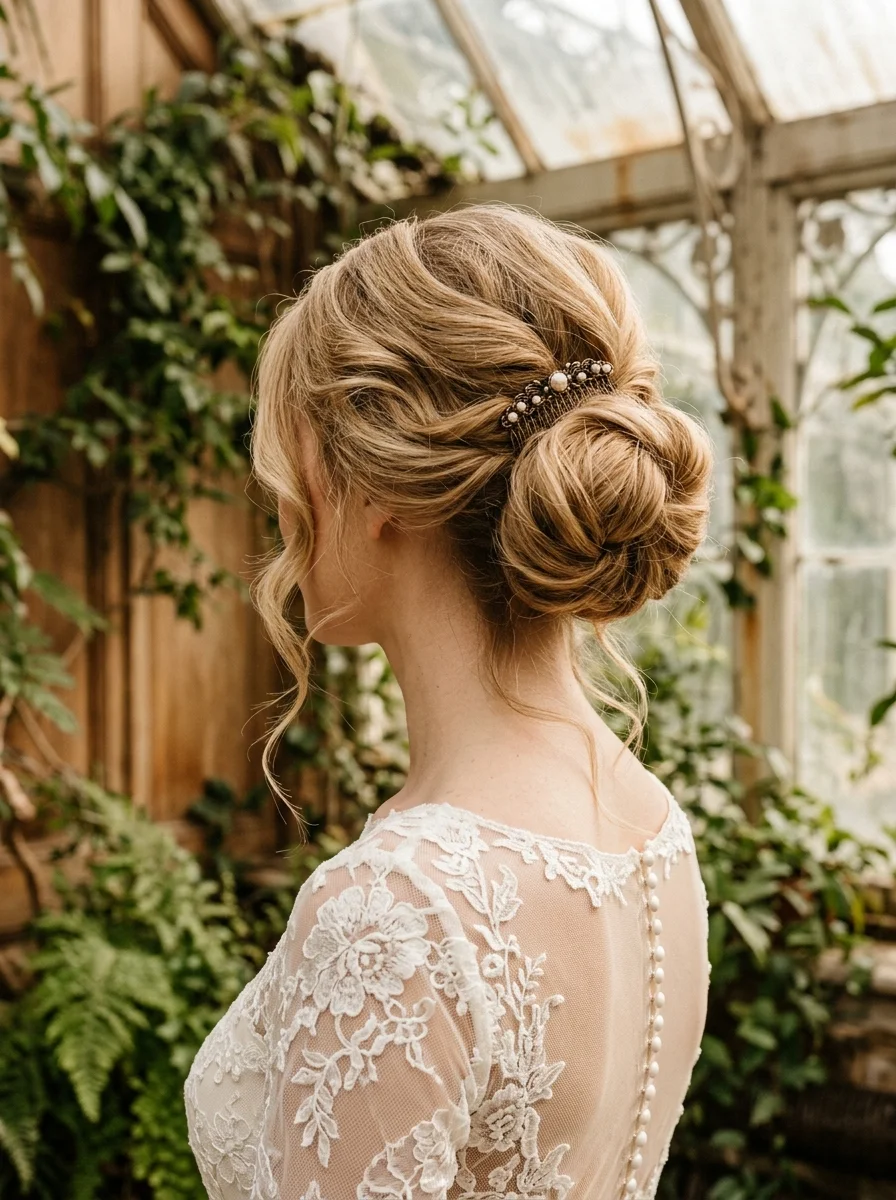
2.Twisted Crown Updo with Delicate Pearl Vine
The overview: This is a full updo constructed from multiple twisted sections of medium brown hair with subtle highlights, layered and pinned at the nape to create a textured, voluminous, and organic shape. A delicate pearl vine winds through the twists from one side to the other, creating a continuous line of sparkle that draws the eye around the entire structure. Face-framing wispy pieces are left out at the temples, providing a soft and slightly undone finish that is also practical for summer heat by maintaining air channels to keep the scalp cool.
Why this look is popular: The twisted construction reads as intricate and complicated — like it required professional hands — but the technique is accessible. The pearl vine eliminates the need for multiple separate accessories; one continuous piece does the decorating work across the entire updo.
Where this look is suitable: Outdoor garden weddings, vineyard ceremonies, any setting where a romantic, slightly undone aesthetic fits the venue. The full updo nature makes it heat-proof and photographable from every angle.
Step by step:
- Add texture to damp hair. Work a texturizing mousse through from roots to ends. Blow-dry with a diffuser or air-dry for natural grip.
- Section the hair. Create a middle or deep side part. Leave out face-framing pieces at the temples.
- Twist and pin the first section. Take a section from one side, twist it loosely, and pin it at the nape. Leave the end free.
- Layer additional twists. Continue taking sections, twisting, and pinning them at the nape, layering them to build up the updo shape. Each twist should overlap the previous one.
- Tuck and secure. Once all twists are pinned, tuck the free ends under the layered sections. Use bobby pins that match your hair color.
- Weave the pearl vine. Starting at one side, thread the pearl vine through the twists, tucking it in and out to create a continuous line.
- Adjust face-framers. Curl the loose temple pieces with a small curling iron for softness.
- Set lightly. Mist with flexible-hold hairspray. Avoid saturation — the twists need to maintain their texture.
Tips and tricks: The pearl vine should be positioned after the updo is fully pinned, not during construction. This allows you to see the final shape before committing the accessory placement. For maximum hold on fine hair, backcomb each section slightly before twisting.
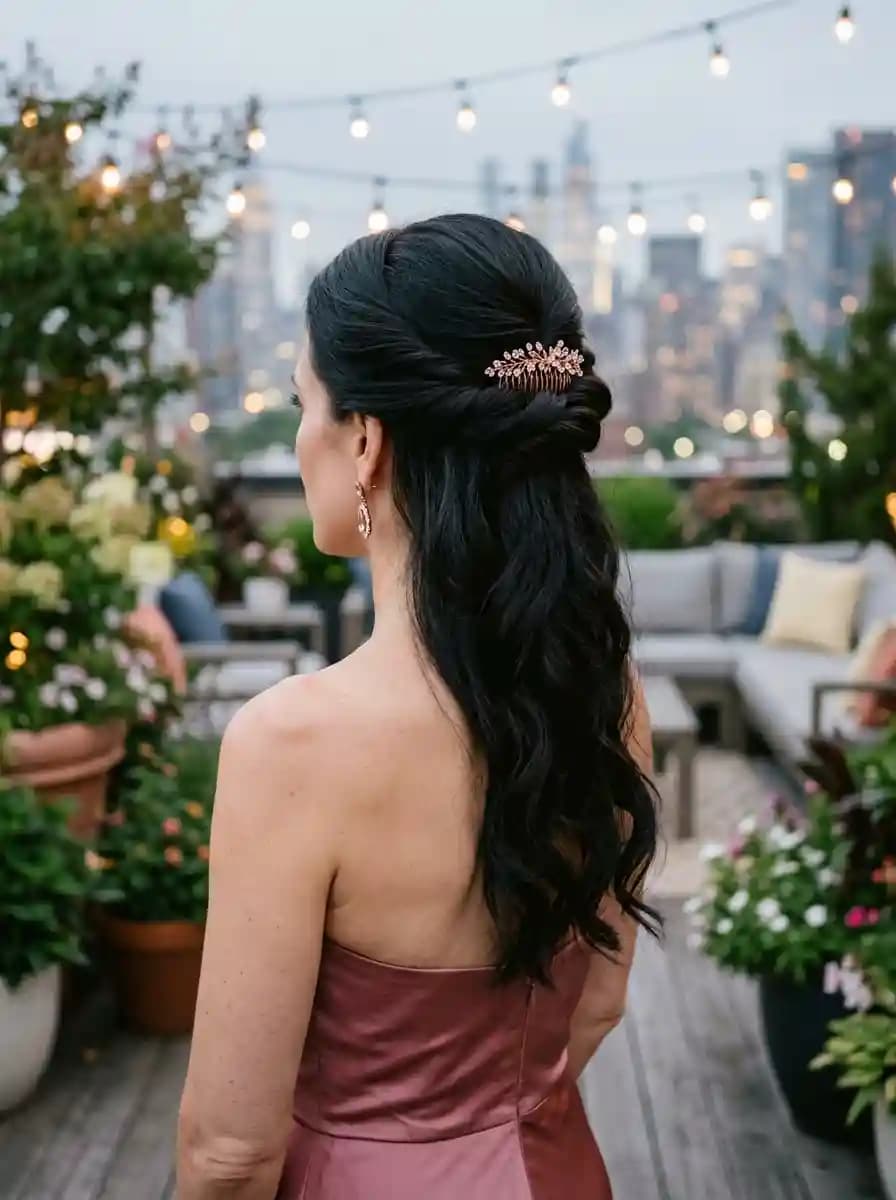
3.Sparkling Half-Up Waves with a Leafy Brooch
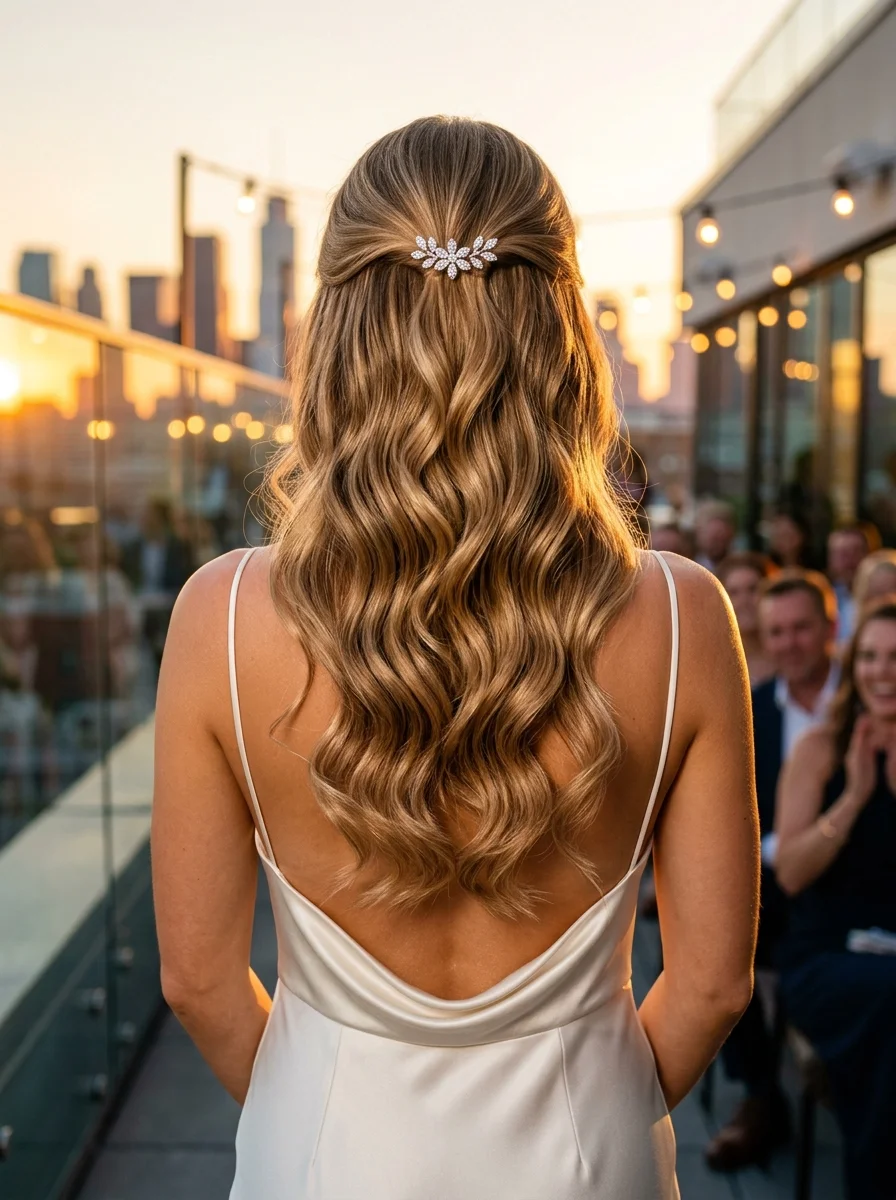
The overview: This style features dark brown hair with warm undertones styled in loose, natural-looking waves falling past the shoulders in varied directions with a slightly tousled finish. The top section is swept back from the face and secured at the crown with a gold leafy brooch decorated with small crystals. The brooch does the structural work of holding the section in place while functioning as the primary accessory, and its botanical leafy design is versatile enough to complement most wedding color palettes.
Why this look is popular: The brooch-as-functional-accessory eliminates the need for visible pins or elastics at the back. One piece does the holding and the decorating simultaneously. The loose wave pattern photographs naturally and moves with the bride rather than sitting stiffly.
Where this look is suitable: Garden weddings, outdoor ceremonies, daytime events where the botanical brooch motif fits naturally. Works in both casual and semi-formal settings depending on the brooch's material.
Step by step:
- Prep with texturizing spray. Apply to damp hair for grip. If hair is freshly washed, add dry shampoo at the roots for volume.
- Curl in alternating directions. Use a 1.5-inch curling wand. Wrap sections away from the face on one side, toward the face on the other. This creates the varied wave pattern.
- Cool in pinned curls. Pin each curl to the head in a coiled shape. Let them set for 10 minutes.
- Release and separate. Remove pins and gently run fingers through to create loose waves. Do not brush.
- Gather the top section. From the temples upward, pull the top section back. Keep it loose — tight gathering contradicts the wave texture.
- Secure with the brooch. Open the brooch, slide it through the gathered section, and close it. Ensure it catches enough hair to hold securely.
- Adjust and set. Gently pull a few face-framing pieces forward. Mist with flexible-hold hairspray.
Tips and tricks: Test the brooch's grip on a small section before committing to the full style. Some brooches with flat backs don't hold well on thick hair. If the brooch slides, secure the gathered section with a hidden elastic first, then place the brooch over it decoratively.
27 Stunning June Nail Ideas for 2026 💅
4.Hollywood Waves With Pearl Hair Clip
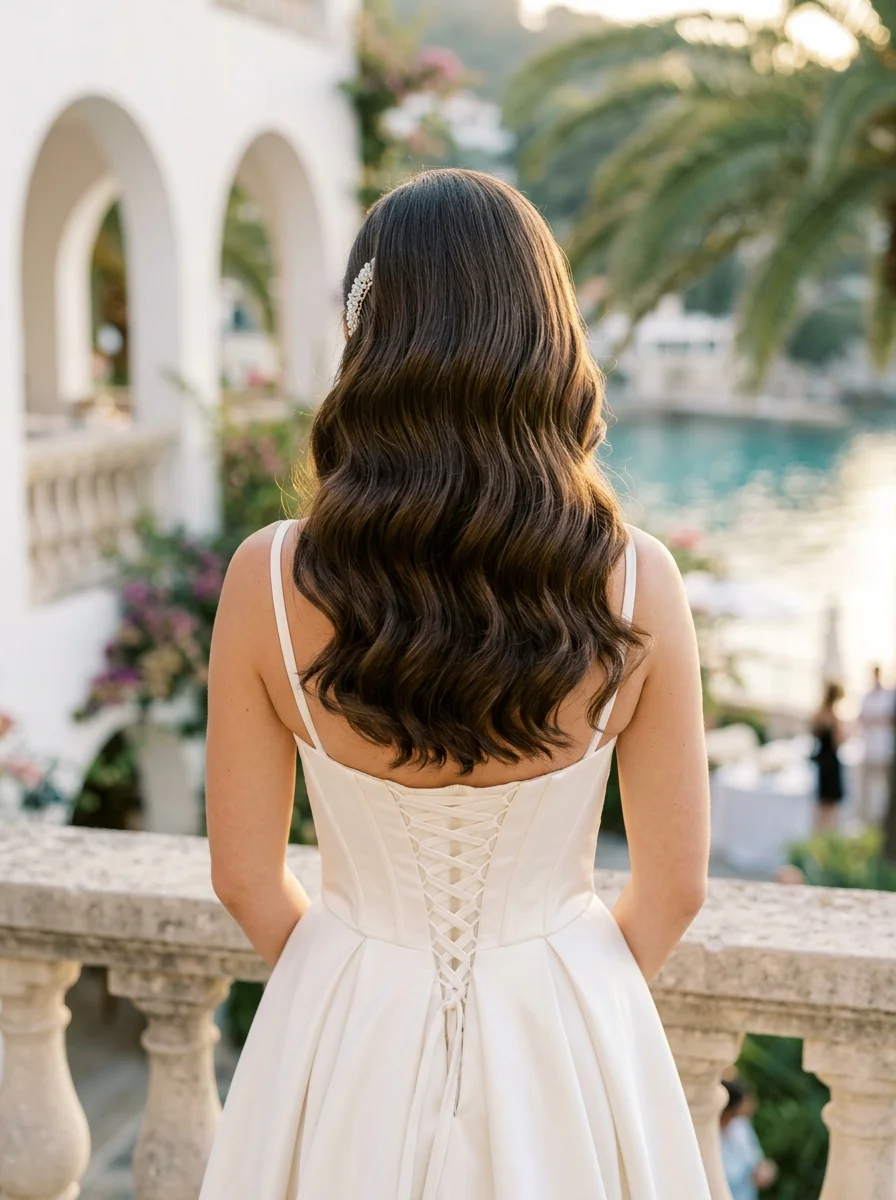
The overview: Classic Hollywood waves — the structured, high-shine S-pattern that defined 1930s and 1940s cinema — are translated here for a modern bride. Glossy brunette hair is styled with a deep side part and large, uniform S-waves that start at mid-length and continue to the ends. The waves are connected into a continuous, smooth, almost liquid surface with zero frizz, and a pearl and crystal barrette is clipped just behind the ear on the lighter side of the part to add a formal bridal touch.
Why this look is popular: Hollywood waves photograph better than any other down hairstyle because the consistent wave pattern catches light uniformly across the entire head. The pearl clip adds a bridal element without compromising the vintage silhouette. Works on all lengths past the chin.
Where this look is suitable: Evening weddings, formal receptions, black-tie events. The glamour factor is high — this is not a beach-ceremony hairstyle.
Step by step:
- Blow-dry perfectly smooth. Use a boar bristle brush and direct the nozzle downward to seal the cuticle. Apply a heat protectant and a shine serum.
- Create a deep side part. The closer to the temple, the more dramatic the volume. Secure the lighter side behind the ear.
- Curl in one direction only. Use a 1.5-inch curling iron. Wrap each section away from the face. Hold for 5-7 seconds.
- Pin each curl. As you release, pin each curl into a flat coil against the head. Let all curls cool completely — 15 minutes minimum.
- Brush into waves. Remove pins. Using a medium-bristle brush, brush through the curls in long, smooth strokes. The curls will merge into connected S-waves.
- Refine with fingers. Shape each wave section with your fingers, encouraging the S-pattern.
- Set with medium-hold spray. Strong hold will create a helmet effect. Medium hold preserves movement while maintaining the shape.
- Add the clip. Position the pearl clip behind the ear on the lighter side of the part.
Tips and tricks: The brush-through step is where most people fail. Use a brush with natural bristles and brush slowly — aggressive brushing creates frizz rather than waves. For extra hold on fine hair, set the brushed waves with large velcro rollers for 20 minutes before spraying.
5.Braided Crown Updo with Romantic Wisps
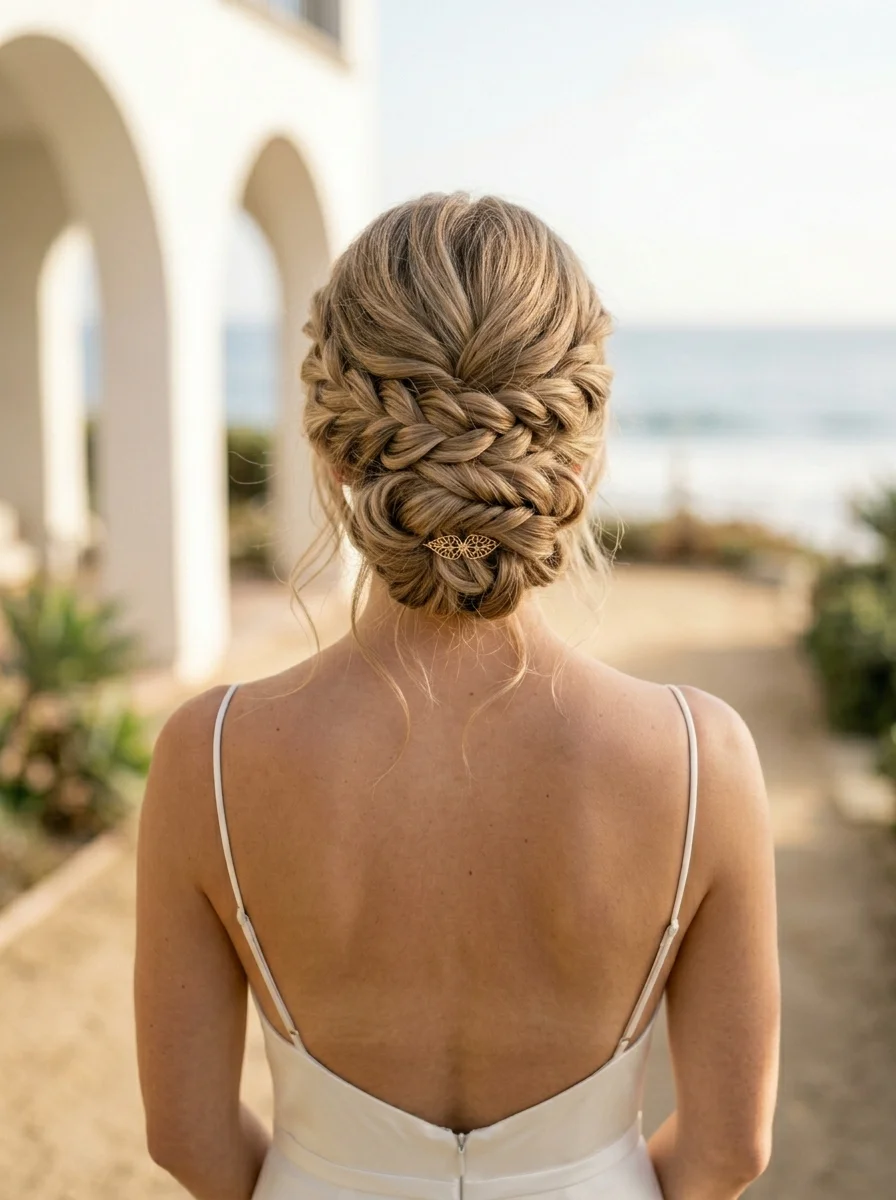
The overview: Two Dutch braids start at the front hairline on each side, wrap around the back of the head, and meet at the nape where they transition into a low, textured bun. The braids are pancaked (pulled apart) for width and softness, and a small gold butterfly clip is pinned at the braid junction. Delicate wispy pieces frame the temples and nape to frame the face, creating a romantic, airy finish.
Why this look is popular: The braided crown is one of the few bridal styles that looks equally impressive from every angle — front, side, and back. The raised Dutch braid texture creates visible dimension even in flat photography. The loose wisps keep it from reading as severe or overly structured.
Where this look is suitable: Outdoor garden weddings, barn receptions, vineyard ceremonies. The bohemian crown silhouette matches rustic and natural venues perfectly.
Step by step:
- Prep with texture. Apply mousse or texturizing spray to damp hair. Blow-dry with a diffuser or air-dry. Day-old hair holds braids best.
- Create a center or side part. Part the hair where you want the braids to begin.
- Dutch braid the first side. Starting at the temple, divide a section into three. Cross the outer strands under the middle strand, adding small sections from the hairline and crown as you braid backward.
- Dutch braid the second side. Mirror the technique on the opposite side.
- Meet at the nape. Continue both braids until they meet at the nape. Secure with a clear elastic.
- Pancake the braids. Gently pull the outer loops of each braid outward to widen them. This is what creates the full, crown-like appearance.
- Form the bun. Twist the braided tails and the remaining hair into a low, textured bun. Pin with bobby pins at 12, 3, 6, and 9 o'clock positions.
- Pull out wisps. Deliberately release small pieces around the temples and nape. Curl them with a small iron if desired.
Tips and tricks: The pancaking step is non-negotiable for this style. Without it, the braids read as thin and tight rather than crown-like. Pull each loop gently — you want width, not a completely flat braid. Fine-haired brides should apply dry shampoo before braiding for extra grip.
25 Top Curly Hairstyle Trends for 2026 ➰✨
6.Boho Braided Updo with Pearl Accents
The overview: A single Dutch braid starts at the temple along a deep side part, runs along the hairline, and wraps around to the nape where the remaining hair is gathered into a low, messy updo with visible twisted texture. Gold and pearl hairpins are scattered through the braid and the bun, while face-framing tendrils are left out at the temples. The style is built on the contrast between the structured braid along the hairline and the deliberately relaxed, undone texture of the updo.
Why this look is popular: The asymmetric braid placement adds visual interest without the time commitment of a full crown braid. The pearl and gold pins add bridal formality to the bohemian base. Wavy and curly textures hold this style best.
Where this look is suitable: Beach weddings, garden ceremonies, rustic venues. The bohemian character suits relaxed, outdoor settings with natural light.
Step by step:
- Texturize the hair. Apply a sea salt spray or texturizing mousse to damp hair. Diffuse or air-dry for natural texture.
- Create a deep side part. Brush hair to one side.
- Dutch braid along the hairline. Starting at the temple on the heavier side of the part, create a Dutch braid (strands under) that follows the hairline and continues around to the nape.
- Gather remaining hair. Combine the braid tail with all loose hair at the nape.
- Twist into an updo. Twist the gathered hair loosely and wrap it into a bun shape. Pin with bobby pins, leaving the texture visible and messy.
- Pancake the braid. Pull the braid loops gently to widen them and create softness.
- Add pearl pins. Insert pearl and gold hairpins at random intervals through the braid and updo.
- Set with light spray. Flexible-hold hairspray to preserve movement.
Tips and tricks: This style is most forgiving on second-day hair when natural oils provide grip. If using fresh flowers instead of pearl pins, add them at the last possible moment — flowers exposed to summer heat will wilt within 2-3 hours outside of refrigeration.
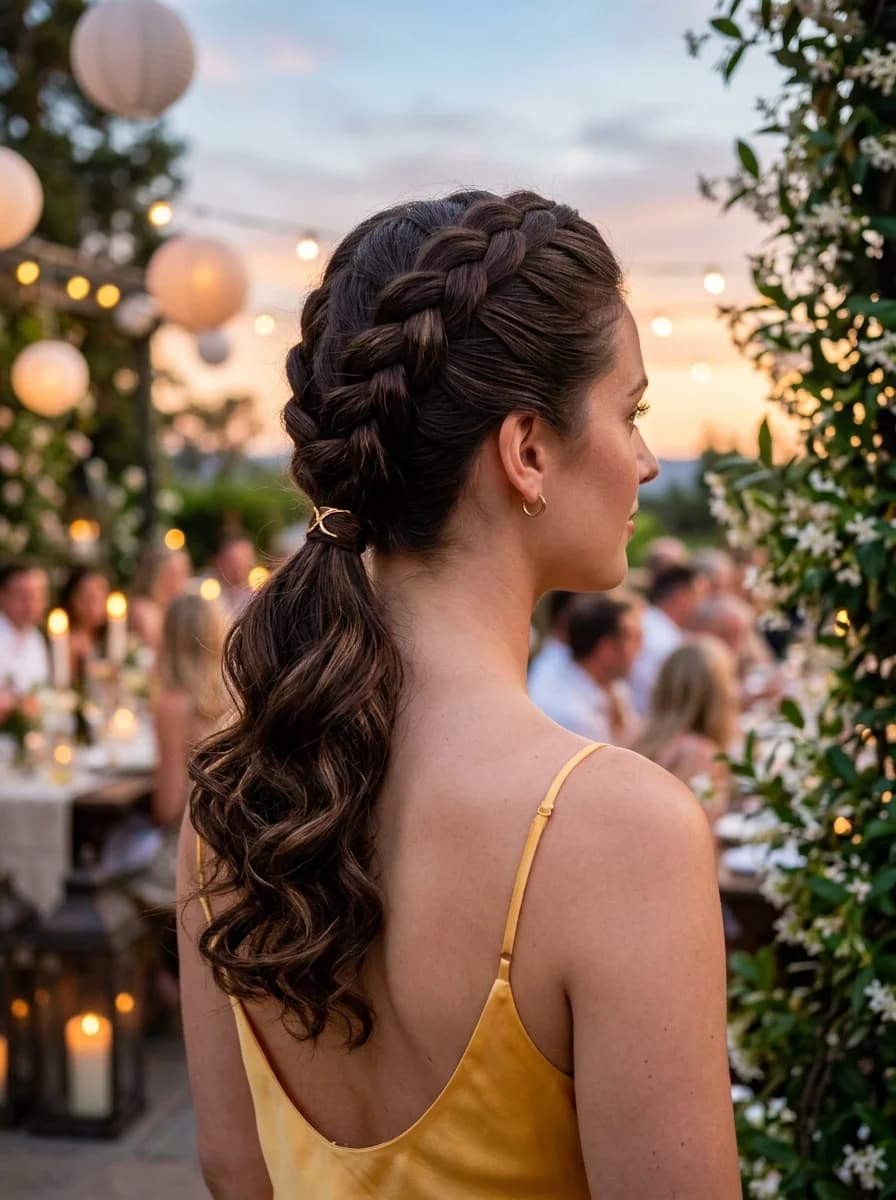
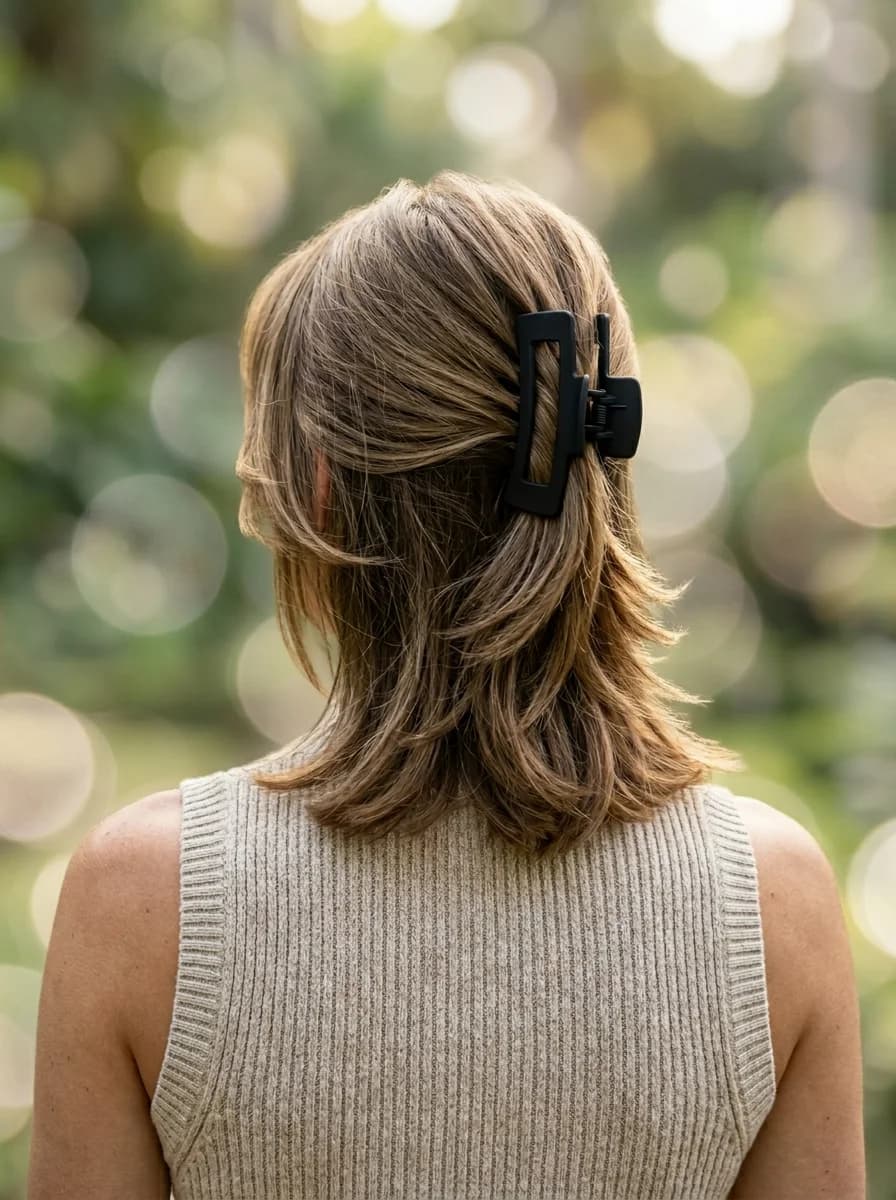
7.Chic Low Ponytail with a Glam Gold Clip
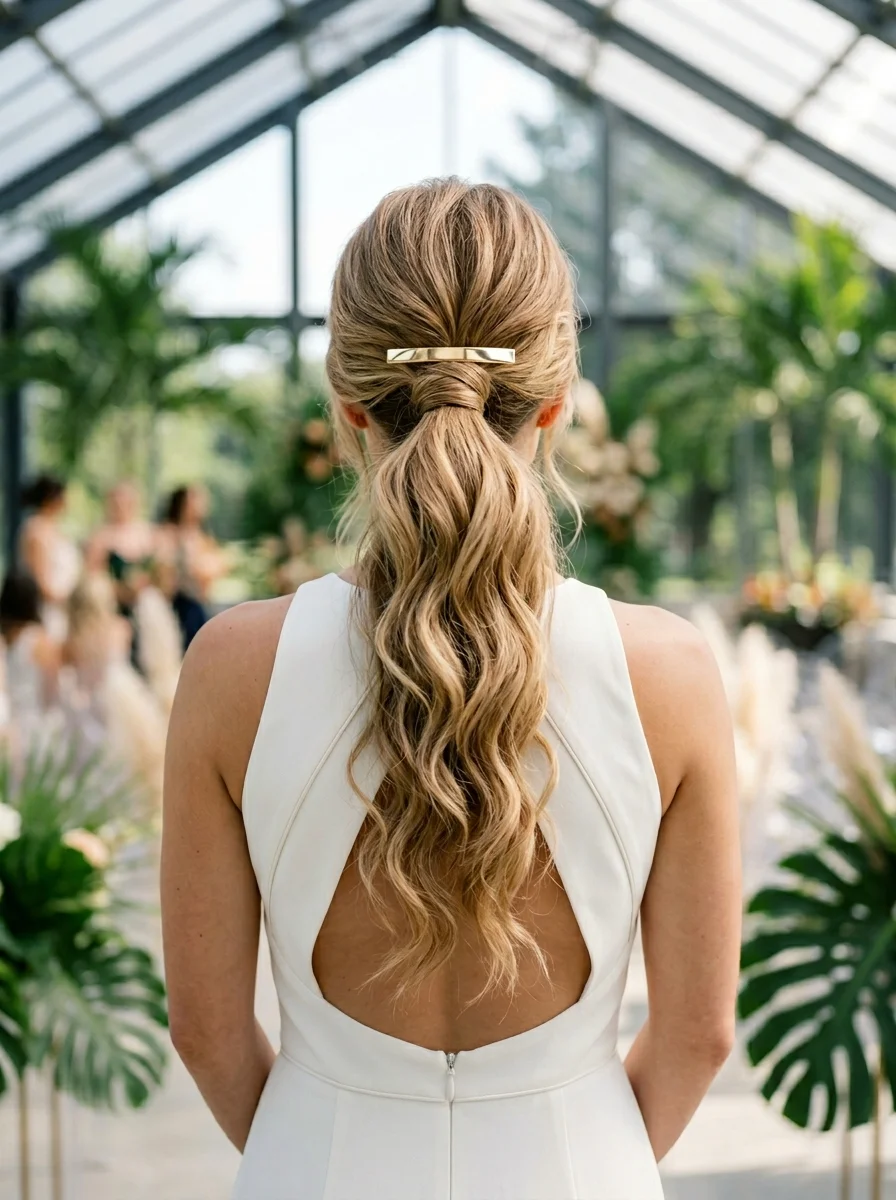
The overview: This style features a smoothly gathered low ponytail at the nape with soft, loose waves through the length. The hair is pulled back from the temples without tension, creating a natural silhouette, and secured at the base with a large gold sculptural barrette that secures the ponytail while functioning as the primary focal accessory. The hair has a glossy finish with visible wave movement.
Why this look is popular: The low ponytail is one of the fastest bridal styles — under 10 minutes from start to finish. The gold barrette elevates it from "default ponytail" to "chosen accessory." The wavy texture prevents the ponytail from looking flat or schoolgirl-like.
Where this look is suitable: Civil ceremonies, elopements, micro-weddings. The minimal, modern aesthetic fits intimate settings and contemporary venues.
Step by step:
- Smooth the hair. Apply a lightweight smoothing serum to damp hair. Blow-dry with a paddle brush for smoothness.
- Create waves. Using a 1.25-inch curling iron, wrap random sections. The goal is texture, not uniform curl.
- Gather at the nape. Brush all hair to the nape, keeping it slightly loose. Do not pull tight.
- Secure with the barrette. Open the gold clip and slide it over the gathered section at the nape. Ensure it catches all the hair and sits flush against the head.
- Adjust the waves. Tousle the ponytail length with fingers to enhance the wave pattern.
- Set with spray. Light mist of medium-hold hairspray to maintain the waves.
Tips and tricks: The barrette's grip strength determines the style's longevity. Test it before the wedding — if the clip slides on smooth hair, backcomb the ponytail base slightly or use a small elastic underneath and let the barrette sit over it decoratively. Fine hair benefits from dry shampoo at the roots before gathering for added volume.
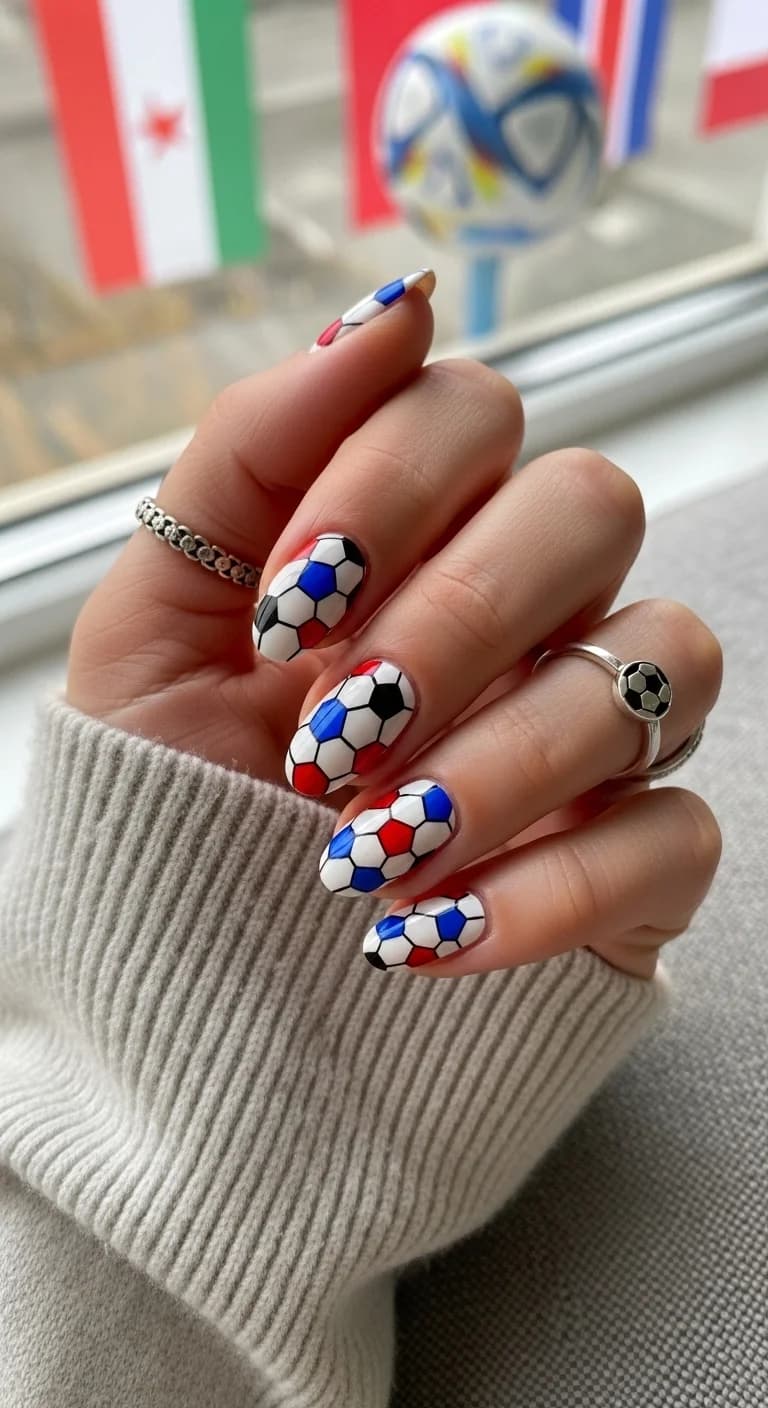
36 Trendy FIFA World Cup Nail Designs (2026)
8.Boho Braided Half-Up with Lavender Touches

The overview: Long, wavy hair features two fishtail braids starting at the temples, sweeping back, and meeting at the crown where dried lavender sprigs are tucked into the intersections. The braids are pancaked for width, with loose, tousled waves falling past the shoulders and small gold feather charms dangling from the braids. The lavender and gold feathers provide organic color and texture for an earthy, free-spirited bohemian look.
Why this look is popular: The fishtail braid's fine texture photographs with more detail than standard braids. Dried lavender lasts through an entire ceremony without wilting (fresh flowers would look limp within hours), making it a practical botanical choice.
Where this look is suitable: Outdoor boho weddings, field ceremonies, garden parties. The lavender and gold accents match earthy, natural wedding color palettes.
Step by step:
- Prep with texture. Apply a texturizing spray to damp hair for grip. Day-old hair is ideal.
- Create loose waves. Using a large barrel curling wand, create soft, varied waves throughout the hair.
- Section for braids. Take two sections from the temples, about 2 inches wide each.
- Fishtail braid each section. Divide each section into two strands. Cross a small piece from the outer edge of the left strand to the right, then from the outer edge of the right to the left. Repeat.
- Braid to the crown. Continue each fishtail braid until you reach the crown area. Secure with clear elastics.
- Pancake the braids. Gently pull the outer loops to widen each braid for a fuller appearance.
- Pin the braids together. Cross the two braids at the crown and pin them securely. The ends can be tucked into the waves.
- Add lavender and charms. Tuck dried lavender sprigs and gold feather charms into the braid intersections.
Tips and tricks: Dried lavender can be sourced from craft stores or florists weeks in advance — it does not require refrigeration and stays intact for months. If using fresh herbs or flowers, add them day-of and keep the stems wrapped in damp paper until the last minute.
9.Boho Fishtail Braid with Pearl Accents
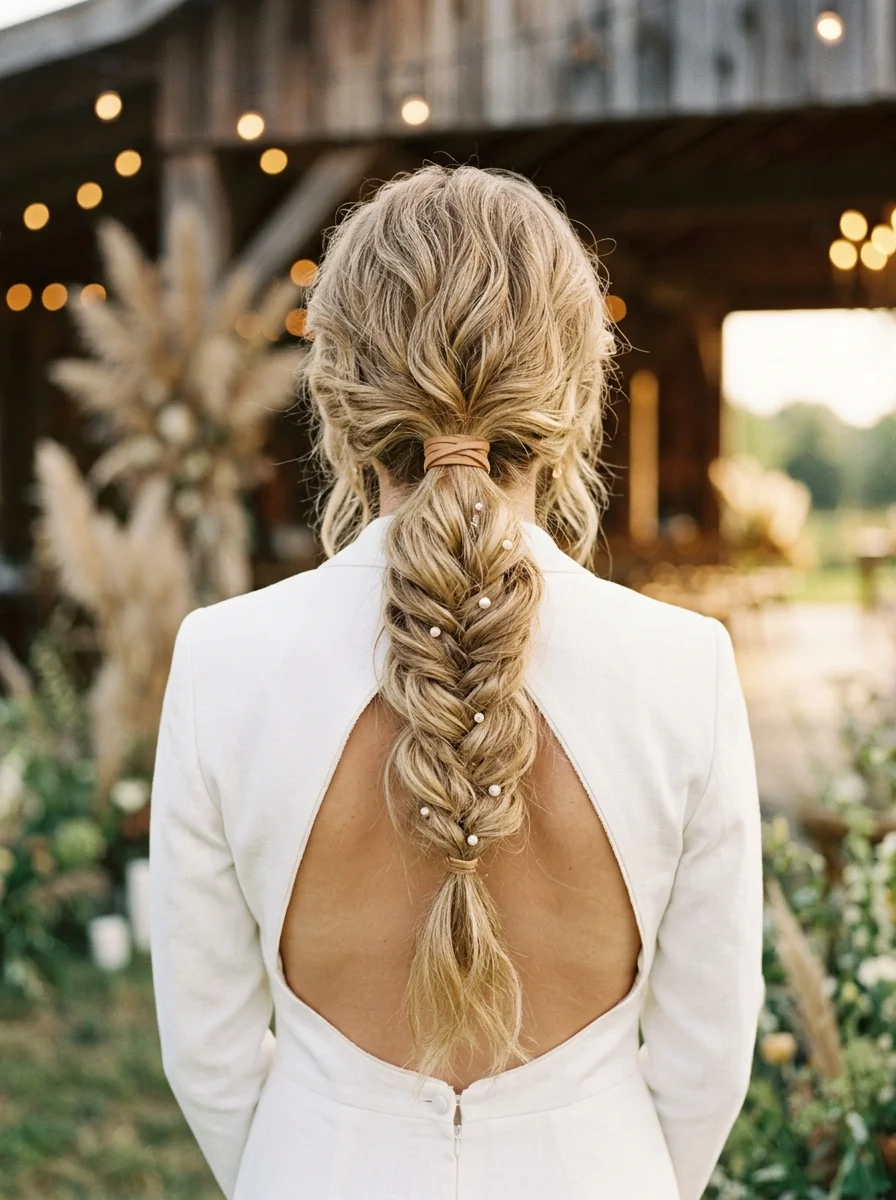
The overview: A single low fishtail braid starts at the nape and is pancaked to nearly double its original width, hanging down the center back with a visible V-shaped crossover pattern. A brown leather cord wraps the top of the braid to conceal the elastic, while small pearl pins are scattered at intervals through the braid. The pancaking technique transforms the braid from a narrow rope into a substantial, voluminous bohemian statement with a lived-in, relaxed finish.
Why this look is popular: The fishtail braid on loose, textured hair is one of the most requested bohemian bridal styles. The pancaking technique creates volume that fine-haired brides particularly benefit from. The leather cord adds an earthy element that complements outdoor venues.
Where this look is suitable: Beach weddings, forest ceremonies, any outdoor venue where the bohemian aesthetic fits. The braid construction survives wind and movement better than loose styles.
Step by step:
- Texturize the hair. Apply dry shampoo or texturizing spray from roots to ends for grip. This step is critical — slippery hair fishtails unravel.
- Gather into a low ponytail. Brush all hair to the nape. Secure with a clear elastic. Keep it slightly loose for softness.
- Fishtail braid. Divide the ponytail into two sections. Take a small piece from the outer edge of the left section, cross it to join the right section. Repeat from the outer edge of the right section. Continue alternating.
- Secure the end. Tie off with a small clear elastic approximately 2 inches from the bottom.
- Pancake thoroughly. Starting from the bottom, gently pull the outer edges of each braid segment. The braid should visibly widen. Work your way up.
- Wrap the leather cord. Take an 8-inch leather cord and wrap it around the top elastic. Tie in a double knot. Trim excess.
- Add pearl pins. Insert pearl pins through the braid at irregular intervals.
- Set with spray. Light mist of flexible-hold hairspray.
Tips and tricks: The pancaking step determines the braid's final appearance. Pull each segment gently and evenly — pulling too hard on one side creates a lopsided braid. If the leather cord feels too rustic, substitute with a satin ribbon in your wedding color.
31 Stunning Summer Birthday Party Hairstyles for 2026 🎂☀️
10.Chic Fishtail Braid with a Twist
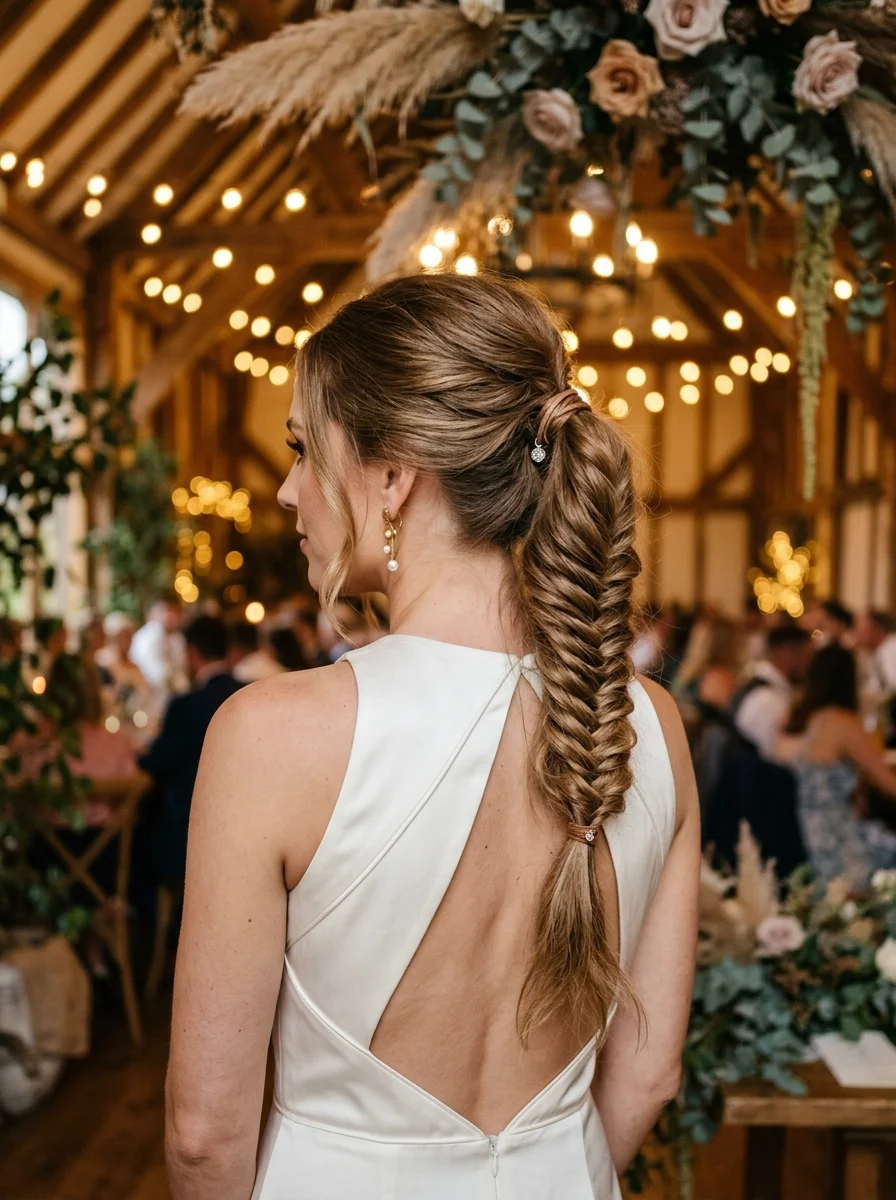
The overview: A tight, even fishtail braid starts at the crown and extends down the center back, presenting a uniform, visible crossover pattern with no loose strands. Unlike the intentionally messy bohemian version, this braid is clean, tight, and even; the hair at the crown is smooth with no bumps or volume, minimal face-framing pieces are left out, and the overall finish is sleek, clean, and deliberately structured.
Why this look is popular: The polished fishtail bridges the gap between casual and formal. It's structured enough for a wedding but less severe than a slicked-back updo. The clean lines photograph well from the back, which is where most bridal portraits are taken.
Where this look is suitable: Church weddings, reception dinners, any setting where a clean, polished silhouette is preferred over a messy bohemian one.
Step by step:
- Smooth the hair. Blow-dry with a paddle brush until completely smooth. Apply a lightweight serum for shine.
- Create a low ponytail at the nape. Brush all hair into a low ponytail. Secure with an elastic that matches your hair color.
- Wrap the elastic. Take a thin strand from the ponytail, wrap it around the elastic, and pin the end underneath.
- Fishtail braid with even tension. Divide the ponytail into two sections. Cross small, even pieces from the outer edge of one section to the inner edge of the other. Maintain consistent tension throughout.
- Secure at the end. Tie off with a small clear elastic.
- Minimal pancaking (optional). Unlike the boho version, this braid benefits from only slight pancaking. Pull just enough to soften the edges without losing the tight pattern.
- Set with medium-hold spray. A clean, glossy finish requires medium hold — strong hold looks stiff.
Tips and tricks: The key to an even fishtail is strand size consistency. Each crossover piece should be roughly the same width — about 1/4 inch. Uneven pieces create a lumpy, irregular braid. If your hair is dark, use a black or dark brown elastic rather than a clear one; clear elastics catch light and become visible.
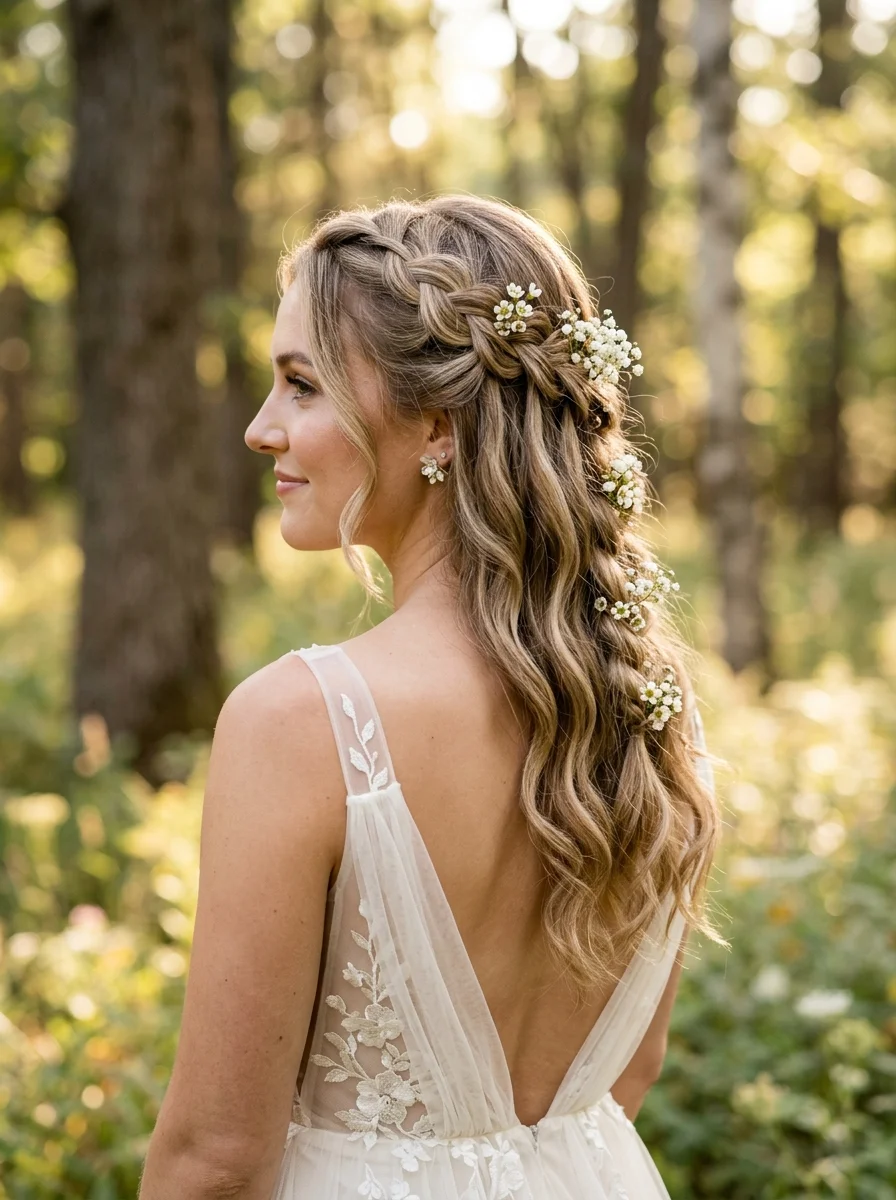
11.Enchanting Crown Braid with Baby's Breath
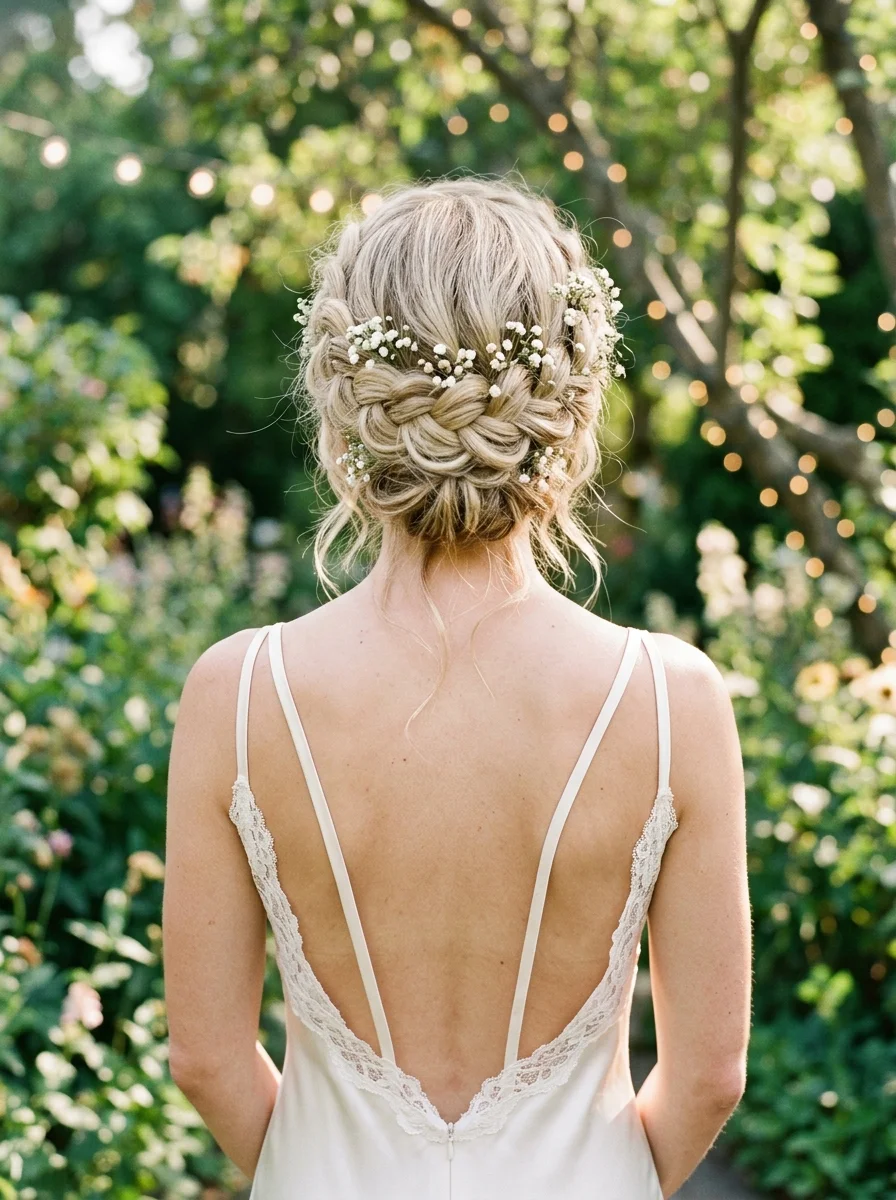
The overview: A single Dutch braid starts above one ear, wraps around the back of the head, and returns to the starting point to form a complete crown that is heavily pancaked for width. The remaining hair is worn in loose, natural waves, and fresh baby's breath sprigs are tucked into the braid loops at irregular intervals. The braid functions as a built-in headband, keeping hair away from the face while creating a romantic, 360-degree garden-inspired effect.
Why this look is popular: The crown braid is the most comprehensive solution for keeping hair entirely off the face and neck in summer heat. The baby's breath adds a romantic, ethereal quality that photographs beautifully — the small white flowers catch light and create soft texture against the braid.
Where this look is suitable: Outdoor ceremonies, garden weddings, any venue where a fairy-tale aesthetic fits. The crown silhouette requires a venue that matches its romantic character.
Step by step:
- Prep for grip. Apply a light mousse to damp hair. Blow-dry with a diffuser. Day-old hair holds the braid best.
- Create loose waves. Using a large barrel curling iron, create soft waves throughout the hair. This texture sells the romantic aesthetic.
- Start above one ear. Take a section of hair above the left ear, divide into three strands. Begin a Dutch braid (cross strands under) following the hairline.
- Add hair as you go. Pick up small sections from the hairline and crown as you braid backward. Maintain consistent tension.
- Complete the circle. Continue the Dutch braid around the entire head. Once you return to the starting point, finish as a standard three-strand braid for the remaining tail.
- Tuck and pin. Lift the beginning of the braid and tuck the tail underneath. Pin with 3-4 bobby pins in different directions.
- Pancake aggressively. Pull each braid loop outward to create width. This is the most important step.
- Add baby's breath. Tuck small sprigs into the braid loops. Place them at irregular intervals — a symmetrical floral pattern looks artificial.
Tips and tricks: Baby's breath should be added as close to the ceremony as possible. While it holds better than most cut flowers, summer heat accelerates wilting. Keep the stems wrapped in damp paper until you're ready to place them. For an evening wedding, consider using preserved baby's breath — it looks identical but lasts indefinitely.
32 Bright & Fun Summer Toe Nail Designs (2026)
12.Romantic Braided Updo with a Chic Bow Accent
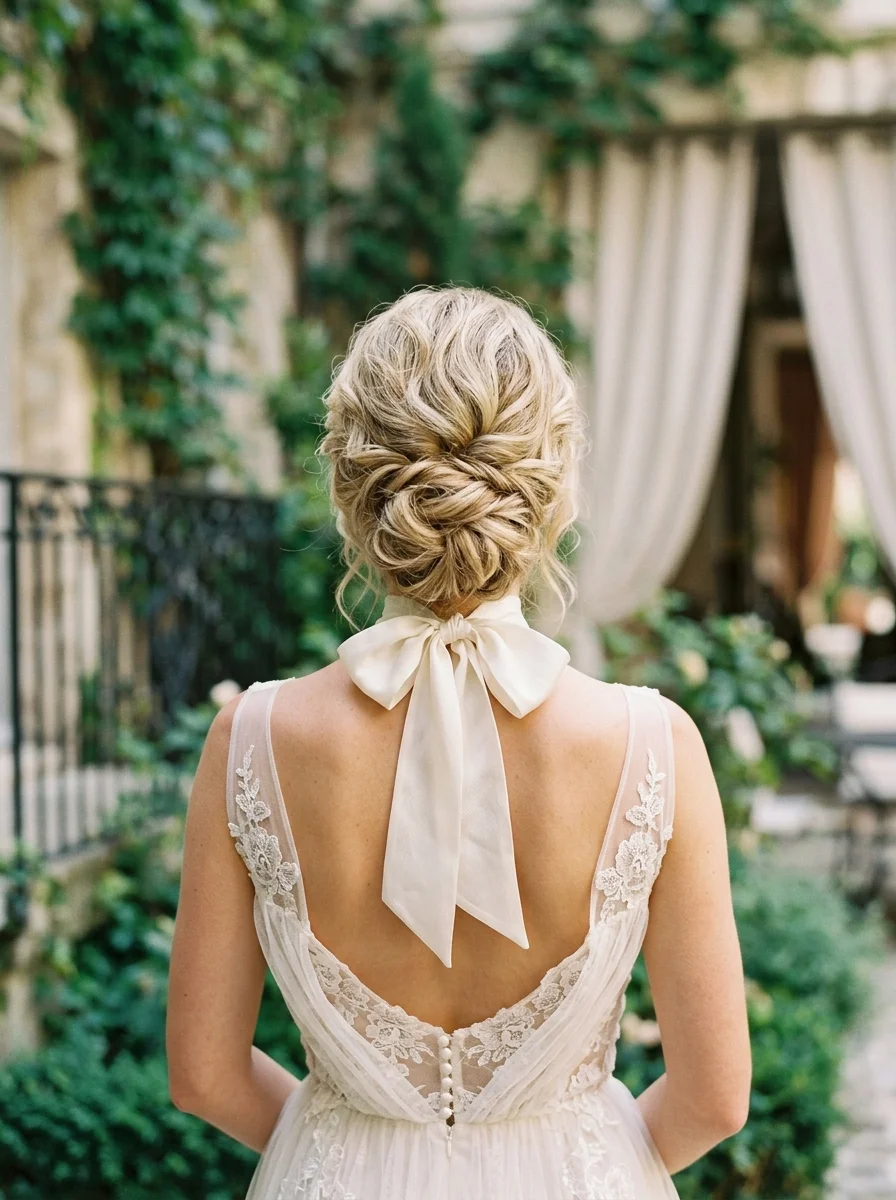
The overview: Medium brown hair is gathered into a low, textured updo at the nape constructed from twisted and braided sections layered together for volume and visual texture. Face-framing pieces are left out at the temples.
Why this look is popular: The velvet bow has emerged as a trending bridal accessory, particularly for modern and minimalist weddings. It adds a sculptural element that pearl pins and crystal combs don't provide. The textured updo base ensures the bow doesn't look like an afterthought.
Where this look is suitable: Modern weddings, city hall ceremonies, evening receptions. The fashion-forward aesthetic works best in contemporary venues with clean lines.
Step by step:
- Add texture. Apply a texturizing spray to damp hair. Create soft waves with a curling wand. The texture helps the updo hold its shape.
- Create a deep side part. Brush hair to one side, leaving out face-framing pieces.
- Twist and pin sections. Take sections from the sides and back, twist loosely, and pin at the nape. Layer the twists to build up the updo shape.
- Leave the back open. Unlike a solid bun, keep the center slightly open — you'll pin the bow here.
- Secure all pieces. Tuck in loose ends and pin with bobby pins that match your hair color.
- Pin the bow. Position the velvet bow at the back of the updo. Use two bobby pins through the bow's center band, crossed for security.
- Adjust face-framers. Curl the temple pieces with a small curling iron.
- Set with spray. Light mist of flexible-hold hairspray.
Tips and tricks: Velvet bows can be difficult to secure on thick hair. Use a small section of hair or a clear elastic as an anchor point, then pin the bow onto that anchor rather than directly into the updo. This prevents the bow from slipping during dancing.
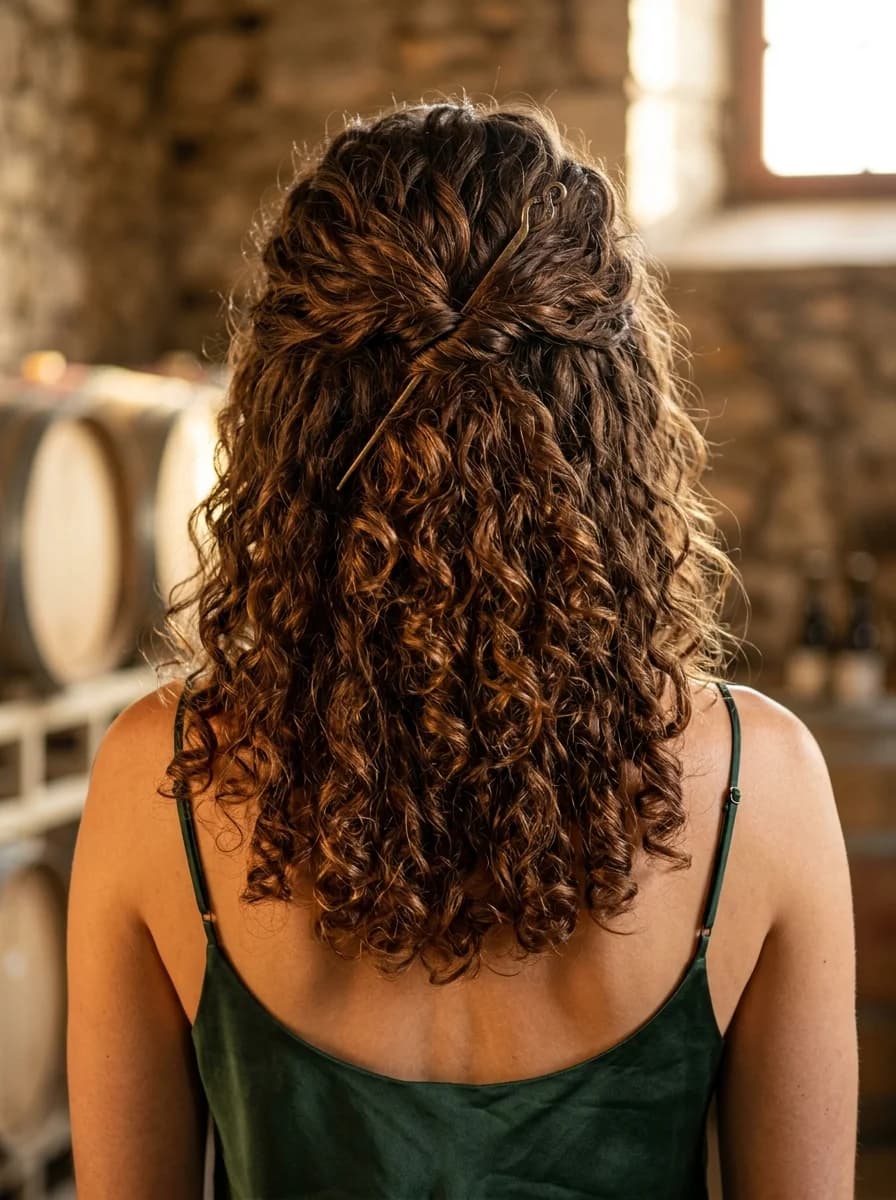
13.Romantic Curly Updo with Pearl Accents
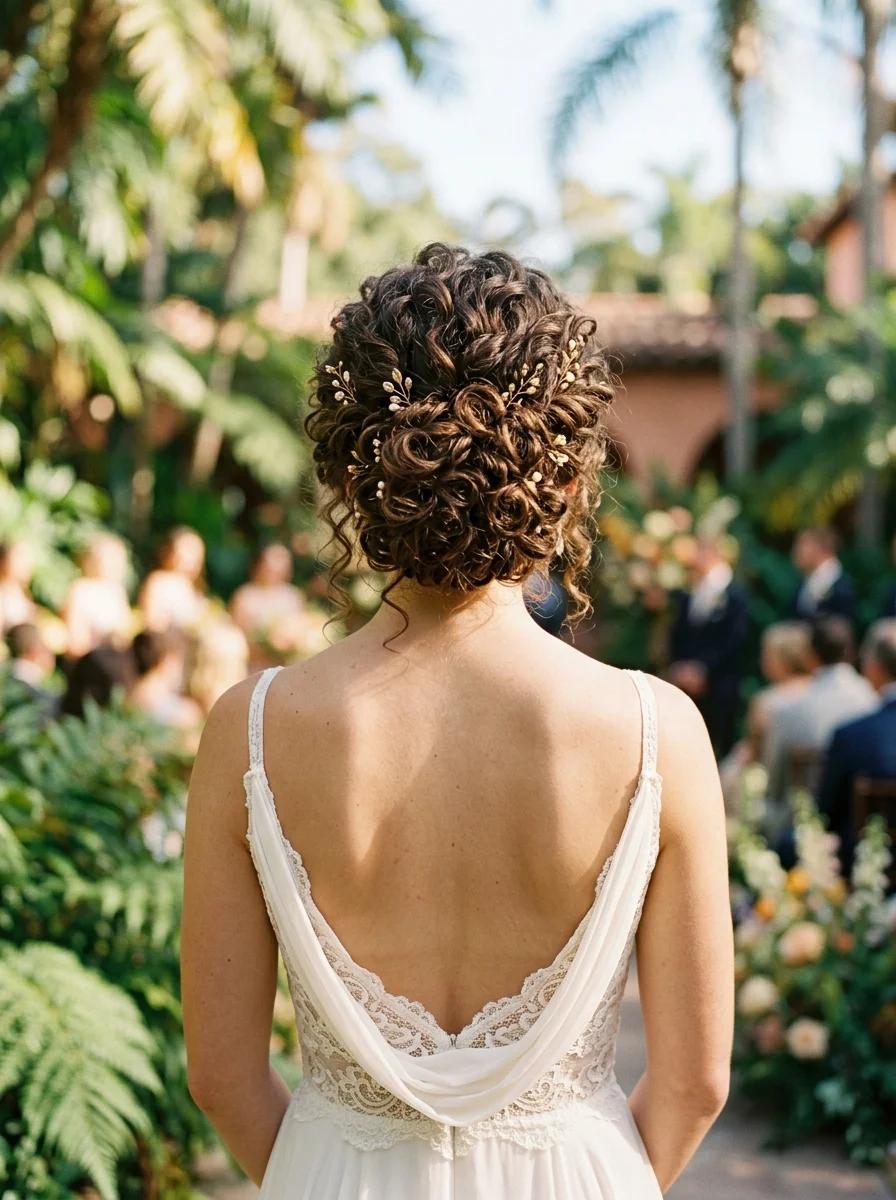
The overview: Dark brown hair with defined, bouncy curls is gathered into a full, textured updo at the back of the crown. Individual curl clumps are pinned in place but not smoothed or blended, preserving the volume and texture of curled hair while achieving formal containment. Pearl and gold pins are scattered through the curls, and several curled tendrils are left out at the temples and nape to frame the face.
Why this look is popular: It proves that curly hair and formal updos are fully compatible. The defined curls within the updo create more texture and visual interest than a smooth bun ever could. The pearl accents add bridal sparkle without requiring straightening.
Where this look is suitable: Garden weddings, vineyard ceremonies, any outdoor venue where natural texture is an asset. The volume of the updo matches the scale of outdoor settings.
Step by step:
- Define the curls. On damp hair, apply a curl-defining cream section by section. Scrunch upward. Diffuse on low heat or air-dry.
- Ensure full dryness. Curls set best when 100% dry. Any moisture will cause the updo to fall within hours.
- Identify the gathering point. Decide where the updo will sit — typically the occipital ridge (the slight bump at the back of the head).
- Start gathering from the sides. Take sections from each side, twist them gently, and pin them at the gathering point. Don't smooth the curls — leave their texture intact.
- Layer from the bottom up. Starting at the nape, roll sections upward and pin them at the gathering point. Each new section should overlap the previous one.
- Pin strategically. Use bobby pins that match your hair color. Insert each pin through the base of a curl and into the hair beneath.
- Add pearl pins. Insert pearl pins into the updo at various points. Place them where they catch light — typically on the outer edge of the curl mass.
- Set with flexible spray. Medium-hold spray preserves the curls' movement while maintaining the updo structure.
Tips and tricks: This style requires more bobby pins than a straight-hair updo because curls have less surface area for pin grip. Budget 20-25 pins minimum for medium-length hair. A silk scarf tied around the updo overnight preserves the shape for multi-day events.

21 Hot Summer Buns Hairstyle Ideas for 2026 ☀️🔥
14.Boho Curls with Golden Embellishments
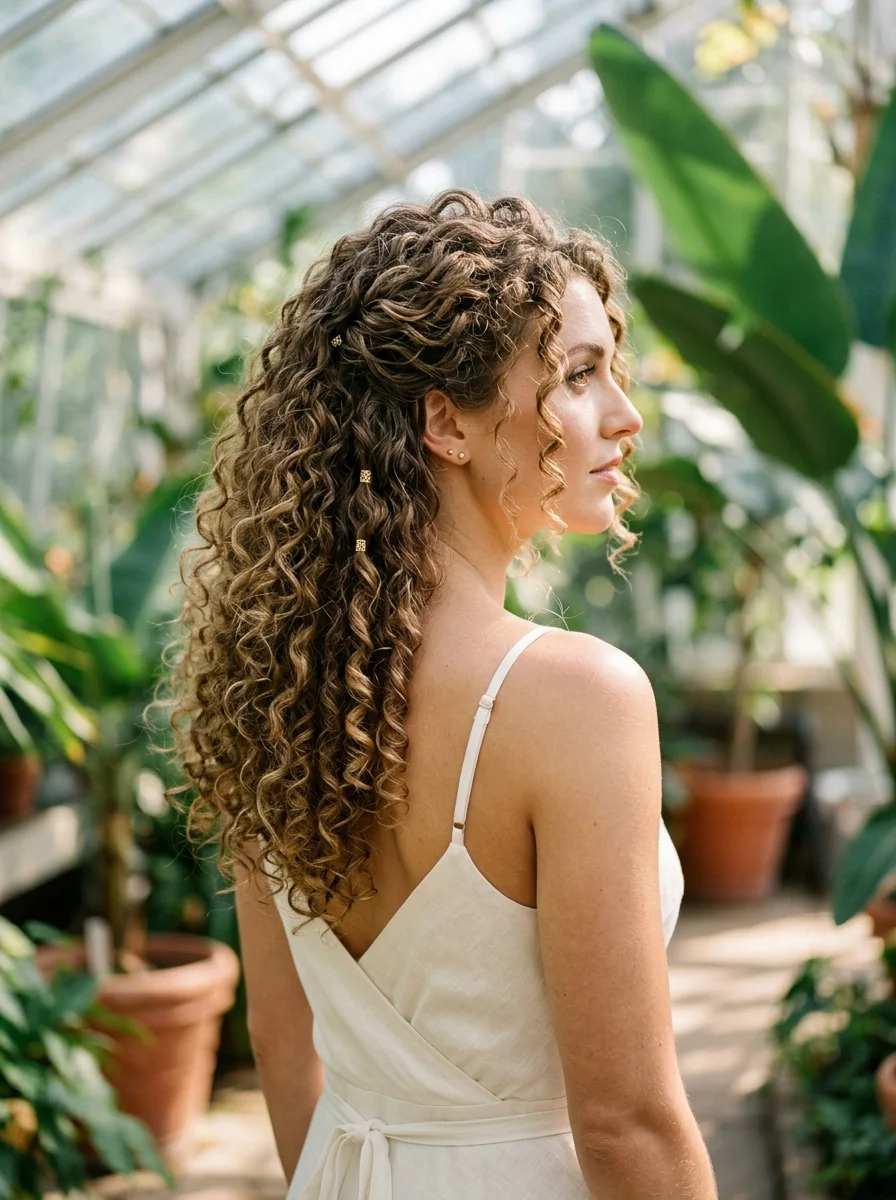
The overview: Defined, voluminous dark curls fall past the shoulders, with a section from one temple swept back and pinned at the crown with small gold geometric hairpins (circles, triangles, lines). The other side is left completely free, creating a beautiful asymmetry. The curls have a glossy, hydrated finish, and the scattered pins create a constellation effect for an effortless bohemian look.
Why this look is popular: It celebrates natural texture rather than requiring extensive manipulation. The gold pins add a deliberate bridal element without compromising the organic curl pattern. The asymmetry makes it photograph more dynamically than a symmetrical style.
Where this look is suitable: Beach weddings, outdoor daytime ceremonies, casual receptions. The low-maintenance character fits relaxed, warm-weather settings where heavy styling would feel out of place.
Step by step:
- Hydrate and define. Apply a leave-in conditioner and curl cream to soaking wet hair. Scrunch upward. Use a denman brush for even product distribution.
- Diffuse or air-dry. For maximum volume, diffuse on low heat with head flipped upside down. For natural texture, air-dry without touching.
- Select the pin-back section. Choose a 2-inch section from the temple on one side. This will be the only section that gets styled.
- Gently sweep back. Take the selected section and sweep it toward the crown. Don't pull tight — keep the natural wave.
- Pin with gold accents. Insert 3-5 small gold geometric pins at the sweep point. Vary the pin shapes for visual interest.
- Adjust volume. Fluff the remaining curls with your fingers at the roots for added lift.
- Set with curl-friendly spray. A flexible-hold spray designed for curls preserves definition without crunch.
Tips and tricks: The gold pins need to grip actual hair, not just slide through. If your curl pattern is very soft or fine, create a small twist in the section before pinning — this gives the pins something to hold against. For extra staying power in humidity, apply an anti-humidity spray before the curl cream.
15.Sun-Kissed Waves with a Delicate Pearl Headband

The overview: Blonde hair with golden highlights is styled in soft, loose waves that fall past the shoulders with subtle movement. A delicate headband decorated with pearls and crystals sits across the crown, approximately 1 inch behind the hairline where it catches light and creates a tiara-like effect. The overall finish is sun-kissed, blended, and romantic.
Why this look is popular: The pearl headband provides tiara-level bridal impact without the weight or formality. The loose wave pattern is universally flattering and works on most hair lengths. The style requires minimal salon time — the headband does the heavy lifting.
Where this look is suitable: Beach ceremonies, outdoor garden weddings, daytime events. The relaxed wave pattern and headband accessory fit venues where a full updo would feel overdressed.
Step by step:
- Prep for waves. Apply a volumizing mousse to damp hair. Blow-dry with a diffuser or air-dry.
- Curl with a large barrel. Using a 1.5-inch curling wand, wrap 1.5-inch sections. Leave the ends straight for a modern finish.
- Break up the curls. Run fingers through the curls to create soft, blended waves. Do not brush.
- Position the headband. Starting at the center of the crown, slide the headband into place. Adjust it so it sits comfortably behind the hairline.
- Secure with pins if needed. If the headband slides, use bobby pins on each side, inserted downward through the headband into the hair.
- Adjust front pieces. Pull a few face-framing strands forward from beneath the headband.
- Set with light spray. Medium-hold hairspray preserves the waves without stiffness.
Tips and tricks: Not all headbands are wedding-ready. Look for headbands with silicone grips or interior teeth — these stay in place on all hair types. Avoid headbands that are purely decorative without anchoring mechanisms; they will slide within an hour. Test the headband's position with a veil if you plan to wear one.

27 Stunning Graduation Day Nail Ideas for 2026 🎓
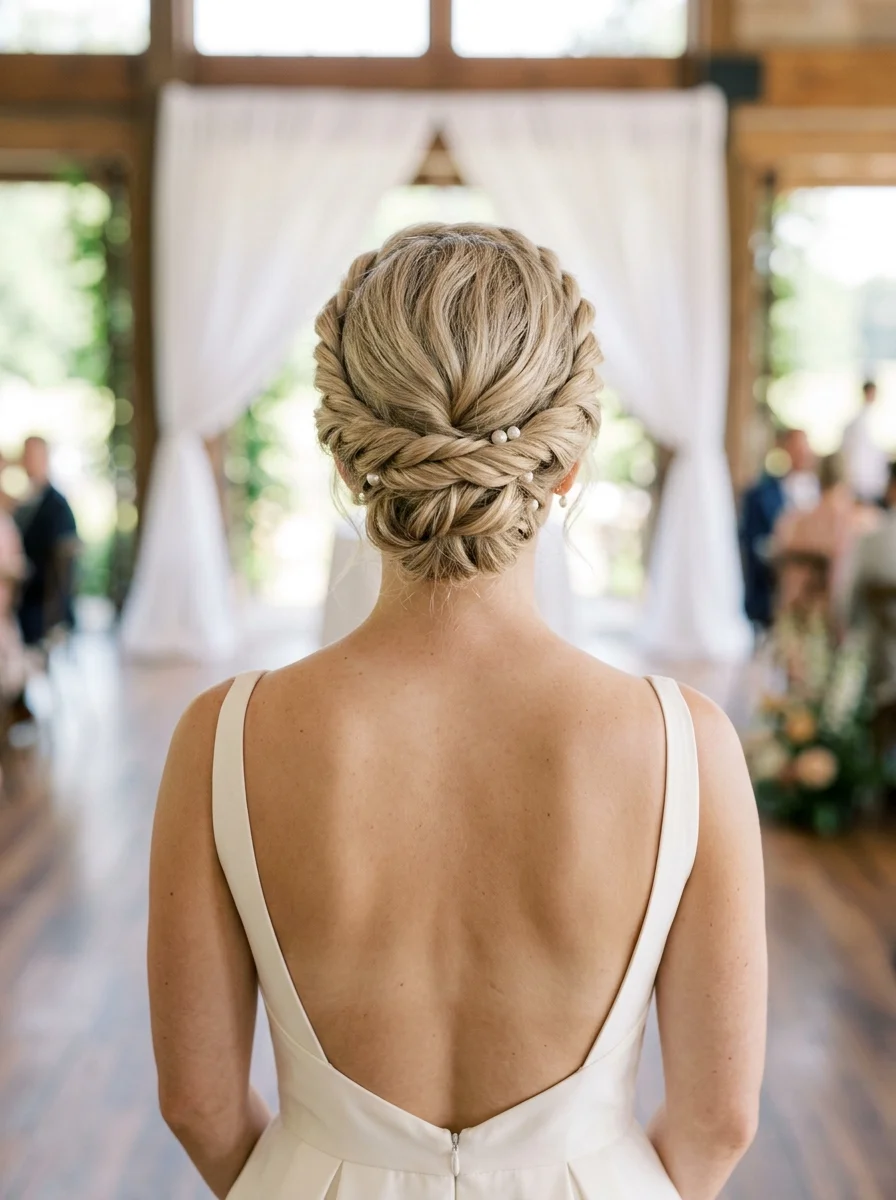
16.Braided Crown Half-Up with Cascading Waves
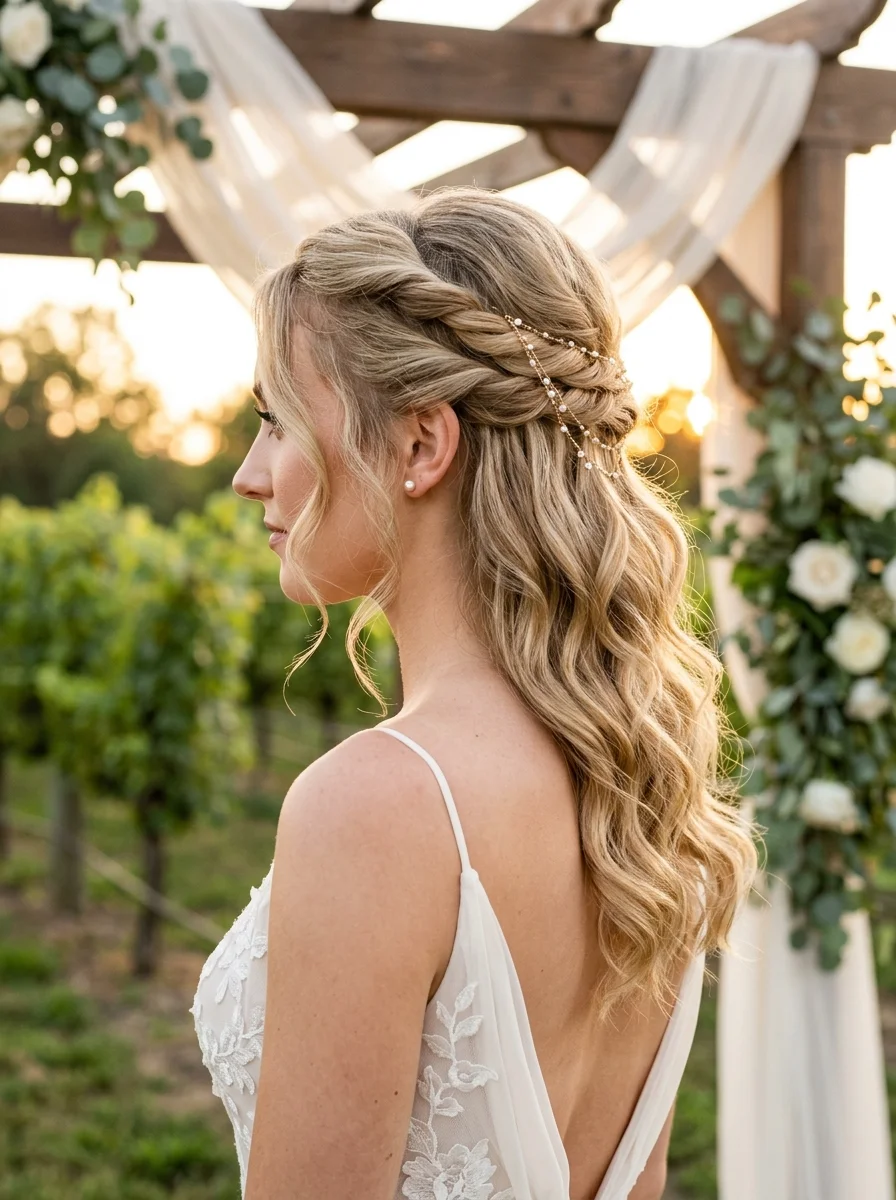
The overview: A Dutch braid starts at one temple, sweeps across the crown, and ends behind the opposite ear where it is pinned and pancaked for width. A pearl and crystal hair vine is woven along the braid's path, and the remaining hair falls in soft, cascading waves past the shoulders. The braid functions as a headband, framing the face with texture while leaving the length and movement of the hair intact.
Why this look is popular: The half-braid, half-waves combination satisfies both "I want a braid" and "I want my hair down" impulses simultaneously. The pearl vine adds bridal sparkle along the braid without requiring individual pin placement. The style photographs well from every angle.
Where this look is suitable: Garden weddings, vineyard ceremonies, outdoor receptions. The romantic hybrid nature fits venues that are formal but not black-tie.
Step by step:
- Prep with texture. Apply a texturizing spray to damp hair. Create loose waves with a curling wand.
- Create a deep side part. The part should start at the temple where the braid begins.
- Start the Dutch braid. At the temple, divide a 2-inch section into three. Dutch braid (cross under) along the hairline, adding hair from the crown as you go.
- Continue across the crown. Braid horizontally across the top of the head. Stop when you reach behind the opposite ear.
- Secure the end. Pin the braid tail with bobby pins, tucking it under the loose waves.
- Pancake the braid. Gently pull the outer loops to widen the braid and create a softer appearance.
- Weave the hair vine. Thread the pearl vine along the braid, pinning it at 2-3 points.
- Set with spray. Light mist of flexible-hold hairspray.
Tips and tricks: The braid's position across the crown needs to account for where your veil will sit. If you're wearing a veil, the braid should sit below the veil attachment point. Test this combination during your trial — veils and crown braids can conflict structurally.
17.Bohemian Braided Crown with Cascading Waves
The overview: A very loose Dutch braid wraps from one temple around the entire crown, heavily pancaked to create a wide, flat halo, while the remaining hair falls in soft, loose waves. Fresh white flowers, including baby's breath and small roses, are tucked into the braid loops at irregular intervals. The overall texture is soft, organic, and distinctly bohemian.
Why this look is popular: The halo crown braid with flowers is the definitive bohemian bridal hairstyle. The loose, pancaked braid creates more visual volume than a tight braid, and fresh flowers add organic texture that matches outdoor settings perfectly.
Where this look is suitable: Boho weddings, garden ceremonies, forest or field venues. The natural, flower-adorned aesthetic is designed for outdoor, earthy settings.
Step by step:
- Prep for texture. Apply a sea salt spray or texturizing mousse to damp hair. Diffuse or air-dry for natural wave.
- Create deep side part. The part determines where the braid begins.
- Start the Dutch braid at one temple. Begin loosely — loose sections create a wider braid.
- Braid around the head. Continue around the crown, adding hair from the hairline and crown as you go. Keep the tension deliberately slack.
- Secure at the starting point. Once the braid completes the circle, tuck the tail under and pin.
- Pancake heavily. Pull each braid loop outward until the braid is nearly twice its original width. This is the key step.
- Create waves in remaining hair. Use a large barrel curling wand on any sections that aren't naturally wavy.
- Add flowers. Tuck fresh flowers and baby's breath into the braid loops. Place them at irregular intervals.
Tips and tricks: Fresh flowers need protection from heat. If the ceremony is outdoors in direct sun, spray the flowers lightly with water and keep them in a cool place until the last possible moment. For a backup, have a second set of flowers ready for the reception.
27 Stunning Beach Wedding Hairstyles for Brides & Family 2026 🌊💍
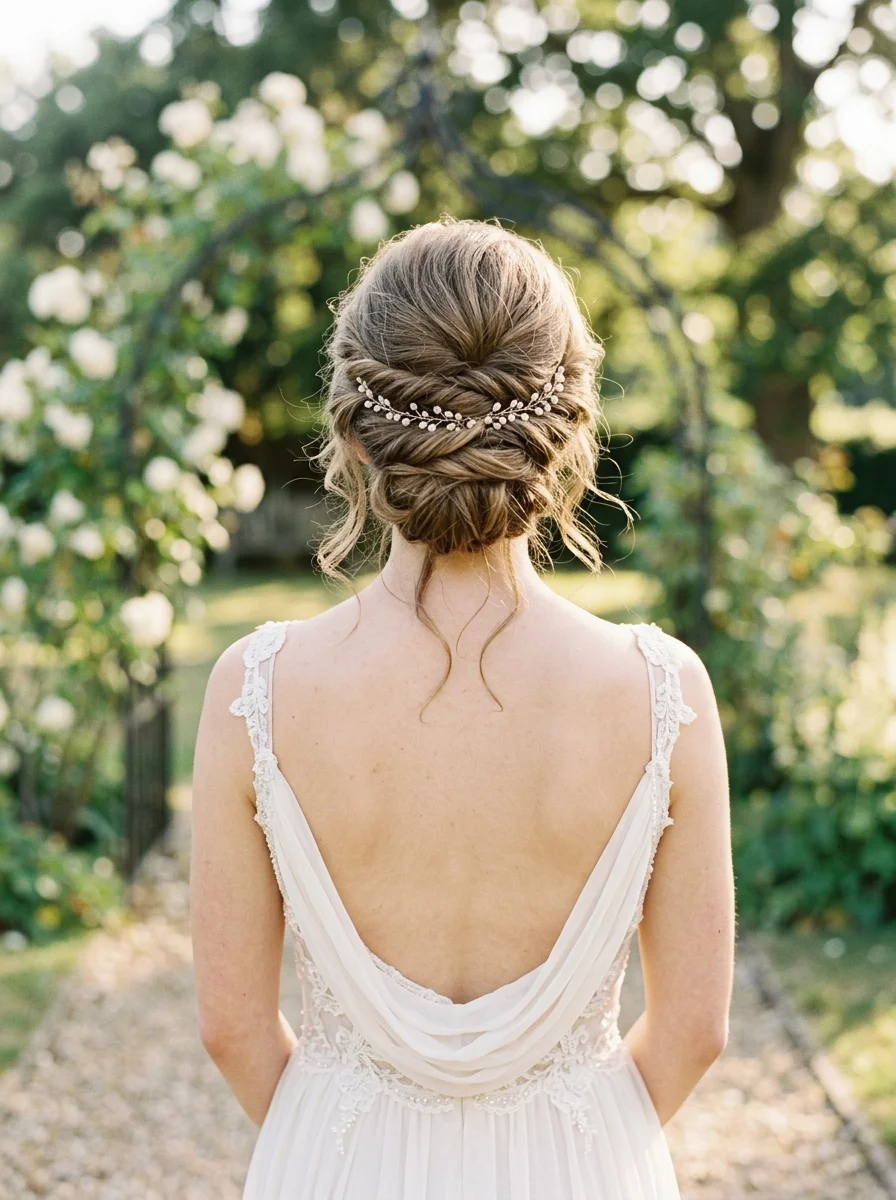
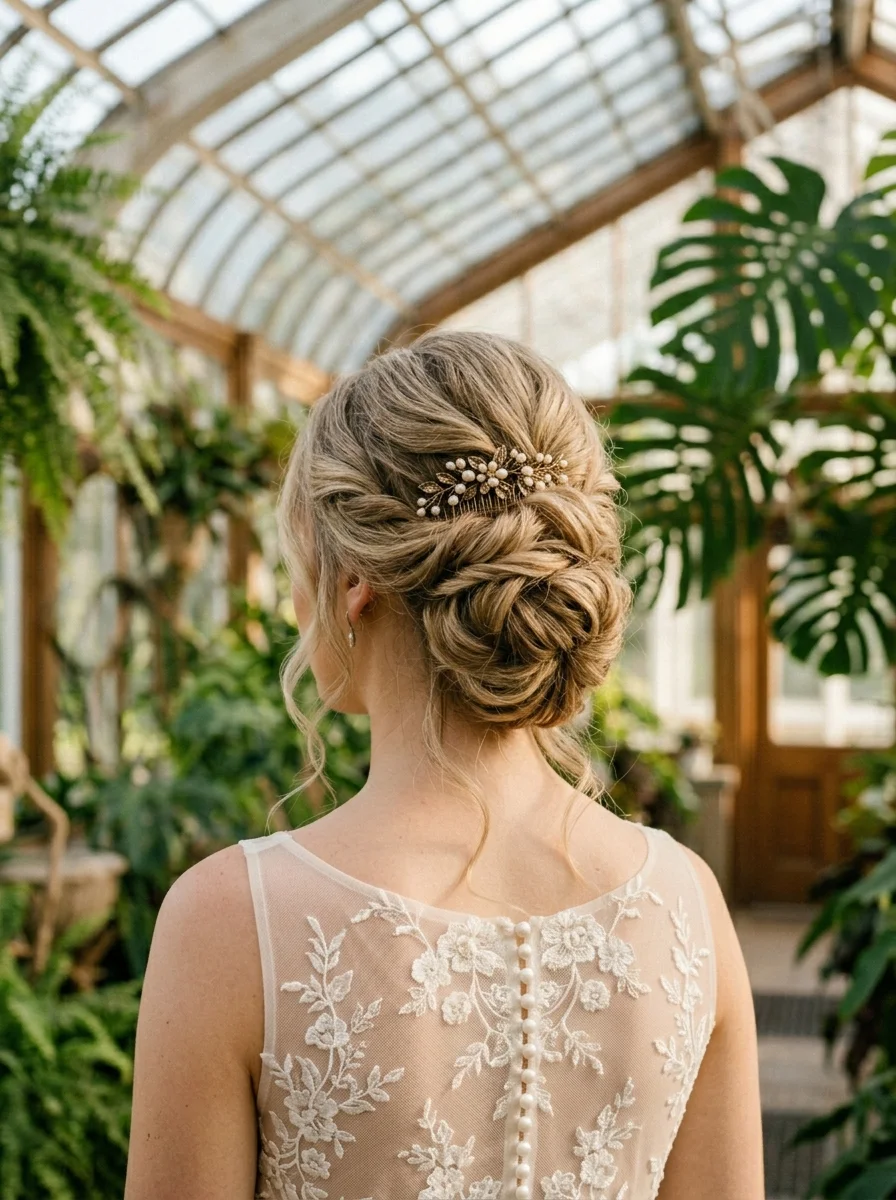
18.Textured Braided Updo with Pearl Hair Vine
The overview: Multiple pancaked braids are pinned into a rounded, textured, and organic updo at the crown, overlapping and interweaving to create dimensional texture with soft edges. A delicate pearl hair vine winds through the braided structure, creating a continuous line of sparkle across the surface, while small wispy pieces are left out to frame the face.
Why this look is popular: The multi-braid construction creates maximum texture and volume — ideal for brides with fine to medium hair who want their updo to look substantial. The pearl vine adds bridal sparkle without overwhelming the braided texture.
Where this look is suitable: Formal evening weddings, ballroom receptions, any venue where a dramatic, textured updo matches the setting. The multi-braid construction reads as intricate and high-effort.
Step by step:
- Prep with texture. Apply a texturizing spray to damp hair. Blow-dry with a diffuser for grip.
- Section the hair. Divide hair into 4-6 sections. Clip each separately.
- Braid each section. Create a standard three-strand braid on each section. Secure ends with small clear elastics.
- Pancake each braid. Pull the outer loops of each braid to widen them. The width creates the volume.
- Pin the first braid. Starting at the center, coil one braid into a flat spiral and pin it against the head. This is the base.
- Layer remaining braids. Pin the other braids around the base braid, overlapping their edges. Each braid contributes to the full, rounded shape.
- Tuck ends. Tuck all braid ends under the structure. Pin securely.
- Weave the pearl vine. Thread the pearl vine through the braided updo, tucking it in and out to create a continuous sparkle line.
Tips and tricks: The pearl vine should be woven after the updo is fully pinned. If you try to braid the vine into the sections, the vine's flexibility makes even tension nearly impossible. For best results, use a vine with a thin wire core — it holds its shape and is easier to weave.
19.Chic Low Bun with Delicate Sparkle
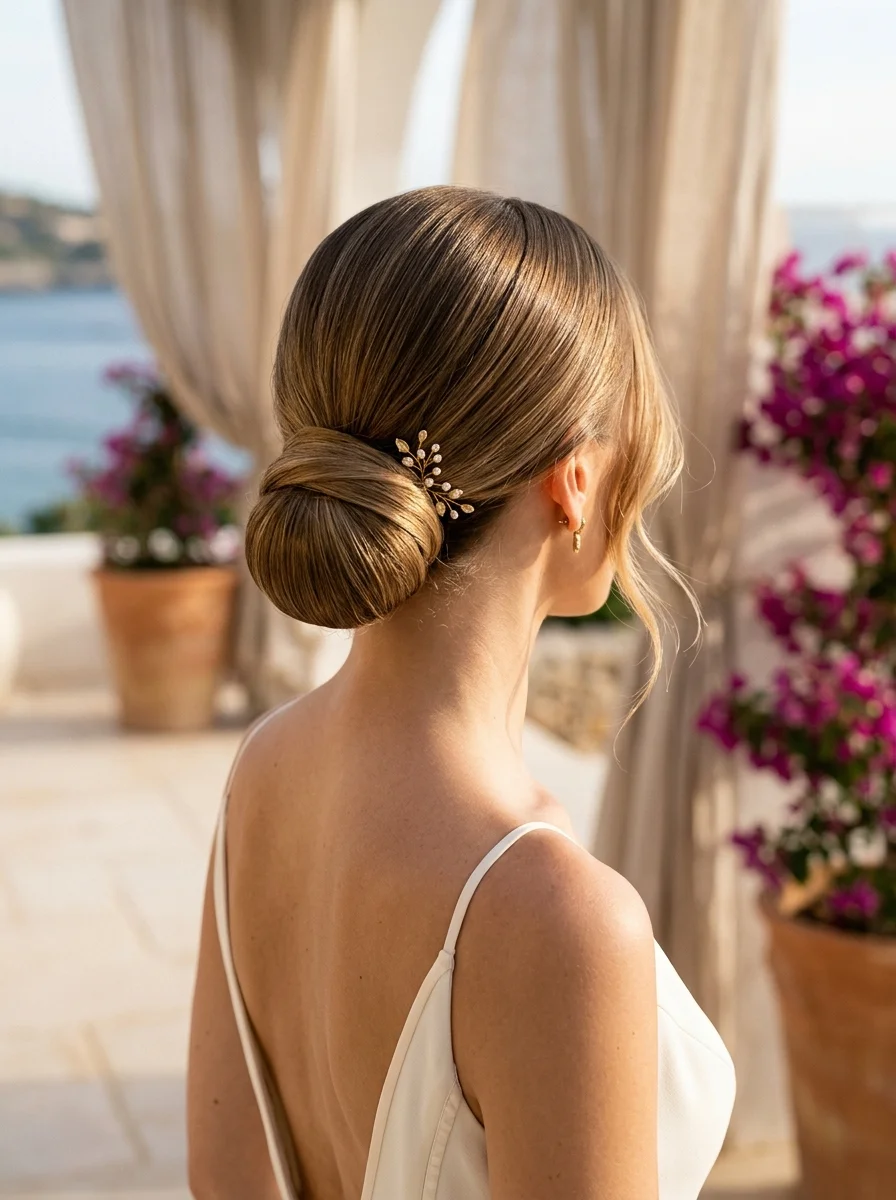
The overview: Hair is pulled back into a perfectly smooth, rounded low bun at the nape with zero visible flyaways, creating a clean, minimal, and architectural silhouette. A single crystal and metal hairpiece is tucked into the side of the bun. This sculpted bun is polished and glossy, presenting a clean, modern style that stands in contrast to loose, messy looks.
Why this look is popular: The sleek low bun is the most timeless bridal updo. It reads as sophisticated in photographs from every decade and works with virtually any dress neckline. The sparkling accessory adds personality without compromising the clean silhouette.
Where this look is suitable: Black-tie weddings, civil ceremonies, evening receptions. The polished, refined character suits formal venues and classic wedding aesthetics.
Step by step:
- Blow-dry completely smooth. Apply a smoothing serum to damp hair. Blow-dry with a paddle brush, directing the nozzle downward. Use a boar bristle brush for the final pass.
- Brush into a low ponytail. Gather all hair at the nape. Use a boar bristle brush to eliminate every bump. Secure with an elastic that matches your hair color.
- Smooth the crown. Apply a small amount of pomade to the crown area. Smooth with a fine-tooth comb.
- Twist the ponytail. Twist the ponytail tightly. The tighter the twist, the neater the bun.
- Wrap around the base. Wind the twisted ponytail around the elastic. Tuck the end underneath.
- Pin with U-pins. U-shaped hairpins work better than bobby pins for smooth buns. Insert them at 12, 3, 6, and 9 o'clock positions.
- Add the hairpiece. Insert the sparkling accessory into the side of the bun. Angle it so the crystals face outward.
- Final smoothing. Apply a drop of serum to your palms and smooth any flyaways.
- Set with strong-hold spray. A sleek bun requires strong hold to maintain its polished surface through hours of dancing.
Tips and tricks: The smoothness depends on the blowout. If the hair starts with any wave or texture, the bun will have bumps. Consider having your stylist do a silk press or Brazilian blowout a few days before the wedding for the smoothest possible base. For fine hair, a hair donut inside the bun creates the rounded shape without requiring thick hair.

33 Trendy Polka Dot Nail Ideas for 2026 💅
20.Boho Curls Low Ponytail with Sparkling Accents
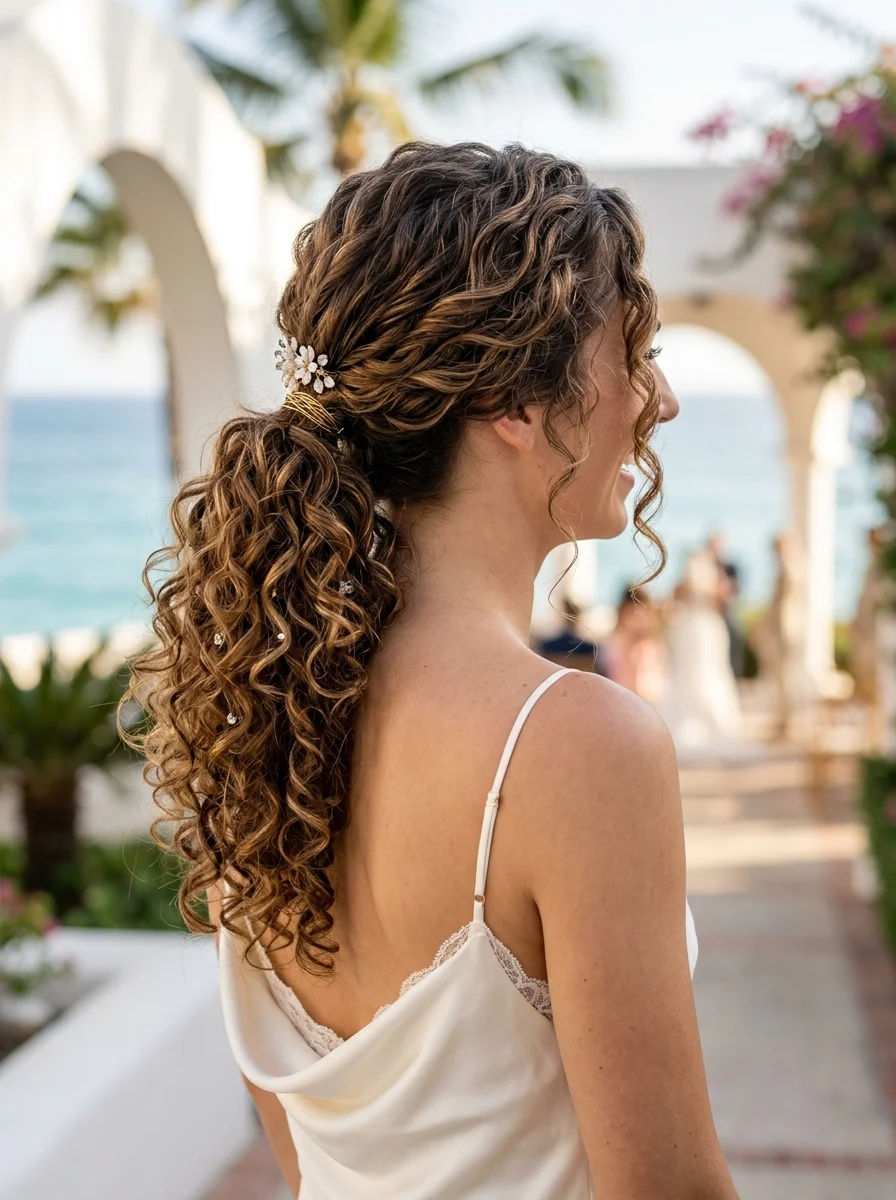
The overview: Defined, bouncy curls are gathered into a low, loose ponytail at the nape, maintaining visible curl definition throughout its length. Small crystal hairpins are scattered through the ponytail at irregular intervals, and face-framing curled tendrils are left out at the temples. The style is entirely about volume and texture, maintaining the natural curl pattern rather than smoothing it flat.
Why this look is popular: The curly low ponytail proves that pulled-back hair doesn't have to be sleek to be bridal. The scattered crystal pins add sparkle without requiring a traditional updo. This style photographs dynamically because the movement of the curls and the sparkle interact differently in every shot.
Where this look is suitable: Outdoor summer weddings, beach ceremonies, garden receptions. The relaxed, textured character fits casual and warm-weather venues.
Step by step:
- Define the curls. On damp hair, apply a curl-defining cream and gel. Scrunch upward. Diffuse on low heat or air-dry.
- Ensure full dryness. Curls maintain shape when 100% dry. Any moisture causes drooping.
- Gather at the nape. Take all hair at the nape and gather loosely. Do not pull tight — the curl pattern needs room to maintain its shape.
- Leave face-framers out. Deliberately release 3-4 curled pieces around the temples and hairline.
- Secure with a spiral or clear elastic. A spiral elastic holds without crushing curls. If using a standard elastic, wrap it loosely.
- Add crystal pins. Insert small crystal pins through the ponytail at various points along its length. Concentrate a few near the base for density.
- Fluff the ponytail. Gently shake the ponytail to enhance volume and separate the curls.
- Set with curl-friendly spray. Flexible-hold spray preserves curl definition while maintaining the shape.
Tips and tricks: Gathering curly hair into a ponytail inevitably reduces volume at the crown. To compensate, tease the root area at the crown before gathering. This creates a lifted silhouette that balances the ponytail's weight. For natural curls, this style is best on day-two hair when the curl pattern has settled.
21.Elegant Low Chignon with Pearl Embellishment
The overview: A smooth, round low chignon at the nape is constructed from gathered, twisted hair pinned flush against the head. A chain of pearls wraps around the chignon's circumference, creating a defined circle that separates the bun from the surrounding hair. The surrounding hair is pulled back smoothly with no visible flyaways, and small face-framing pieces are left out.
Why this look is popular: The chignon is the most classic bridal updo, and the pearl chain adds a contemporary twist. The chain encircling the bun creates a jewelry-like effect that photographs beautifully. The style is heat-proof and survives hours of dancing without loosening.
Where this look is suitable: Formal weddings, evening receptions, black-tie events. The polished, refined character matches traditional and luxurious settings.
Step by step:
- Smooth the hair. Apply a heat protectant and smoothing serum. Blow-dry with a paddle brush until glass-smooth.
- Create a low ponytail. Gather all hair at the nape. Use a boar bristle brush for a polished surface. Secure with an elastic.
- Twist the ponytail. Twist the ponytail firmly from base to end.
- Coil into a chignon. Wrap the twisted ponytail around the base, forming a tight coil. The coil should sit flat against the head.
- Pin with U-pins. Insert U-shaped pins horizontally through the coil into the hair beneath. Space them evenly.
- Place the pearl chain. Wrap the pearl chain around the chignon's circumference. Secure the chain ends by tucking them under the chignon or pinning them.
- Set with strong-hold spray. A sleek chignon needs strong hold to maintain its shape.
Tips and tricks: The pearl chain should be slightly larger than the chignon's circumference — about 1-2 inches of slack. If the chain is too tight, it cuts into the bun and looks strained. If it's too loose, it slides off. Measure the bun's circumference with a piece of string before cutting the chain.
30 Stunning Summer Hair Trends for 2026 ☀️🌊
22.Effortless Wavy Half-Up with Golden Wave Clip
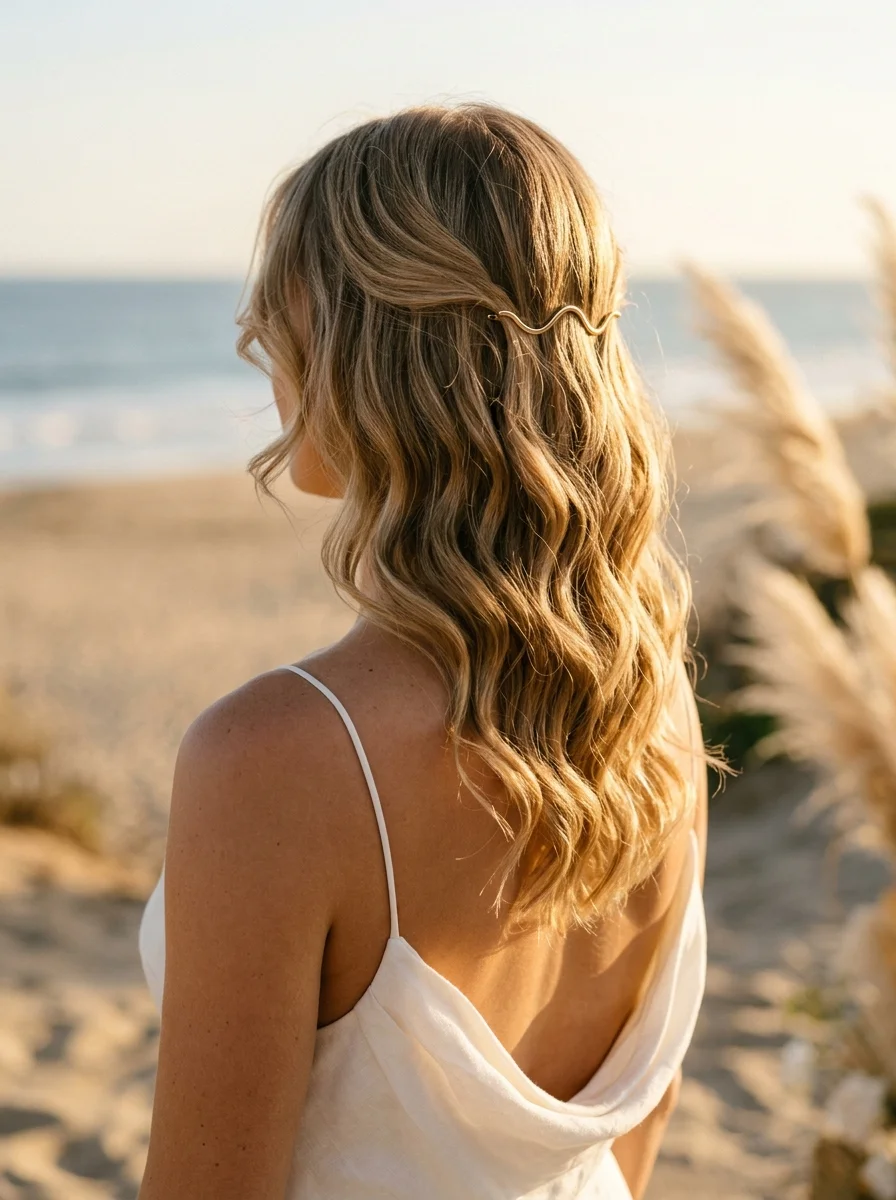
The overview: Loose, beachy waves are styled with visible texture, movement, and a sun-kissed finish, with the top section pulled back from the temples and secured at the back of the crown with a gold wave-shaped clip. The undulating shape of the clip echoes the wave pattern in the hair, creating a cohesive visual connection between the accessory and the styling.
Why this look is popular: The wave-shaped clip is an on-trend accessory that adds visual interest without adding complexity. The half-up construction keeps hair off the face while maintaining length. The beachy wave texture photographs as natural and effortless.
Where this look is suitable: Beach weddings, outdoor daytime ceremonies, casual receptions. The relaxed wave texture and modern clip fit laid-back summer venues.
Step by step:
- Prep with texturizing spray. Apply to damp hair for grip and wave enhancement.
- Create beachy waves. Using a 1.25-inch curling wand, wrap sections loosely, leaving the ends straight. Alternate curl direction.
- Break up with fingers. Run fingers through to create soft, tousled waves. Do not brush.
- Gather the top section. From the temples up, pull the top section back. Keep the gathering loose to maintain the wave texture.
- Secure with the wave clip. Open the clip and slide it over the gathered section at the back of the crown. Ensure it catches all the gathered hair.
- Adjust face-framers. Pull a few pieces forward around the temples.
- Set with light spray. Flexible-hold hairspray preserves movement.
Tips and tricks: The wave clip needs to be positioned where the head's curvature creates natural tension. Clips placed at the very crown (where the head rounds) tend to slide off. Position it slightly lower, at the occipital ridge, where the head flattens. Test the clip's grip before the wedding — some gold-toned clips are slippery on certain hair types.
23.Glamorous Hollywood Waves with a Sparkling Side Accessory
The overview: Dark hair features deep, glossy S-shaped Hollywood waves swept entirely to one side for a dramatic, asymmetrical silhouette. The waves are connected and uniform with a high-shine finish, requiring a barrel iron and brush-through to form the S-curves. A crystal and silver hairpiece is pinned above the ear on the exposed side.
Why this look is popular: The side-swept Hollywood wave is one of the most glamorous bridal hairstyles available. The asymmetry is universally flattering — it elongates the neck and draws attention to the face. The crystal hairpiece adds bridal sparkle at the most visible point.
Where this look is suitable: Evening weddings, black-tie receptions, formal ballroom settings. The red-carpet character demands a venue with matching elegance.
Step by step:
- Blow-dry perfectly smooth. Use a round brush for volume at the roots. Apply a heat protectant and shine serum.
- Create a deep side part. The part should be closer to one temple than the other, creating the asymmetry.
- Curl large sections. Using a 1.5-inch curling iron, wrap sections away from the face. Hold for 5-7 seconds.
- Pin each curl to cool. Release each curl into a flat coil pinned against the head. Let all curls cool for 15 minutes.
- Sweep to one side. Once cooled, brush all hair to the heavy side of the part.
- Brush into connected waves. Use a medium-bristle brush to connect the curls into continuous S-waves. Brush slowly and deliberately.
- Tease for volume at the crown. Lightly backcomb the crown area on the heavy side for lift.
- Add the crystal hairpiece. Pin the sparkling accessory above the ear on the exposed side.
- Set with medium-hold spray. Preserve movement while maintaining the wave structure.
Tips and tricks: The cool-down period is non-negotiable for Hollywood waves. If you release curls while they're still warm, they'll lose the S-pattern within an hour. To speed the process, use a cool shot from your blow-dryer on each pinned curl before releasing.

30 Stunning July Nail Designs for Summer 2026 💅
24.Soft Romantic Chignon with Wispy Tendrils
The overview: A low, textured chignon at the nape is constructed from loosely twisted sections, presenting an organic, slightly irregular shape. Deliberate wispy tendrils are curled and left out to frame the face, temples, and nape, and a pearl and crystal hairpiece is tucked into one side. The style is intentionally soft, romantic, and imperfect.
Why this look is popular: The soft chignon with wisps is the most romantic variation of the classic low updo. The loose construction creates the illusion of effortless styling, and the face-framing pieces soften facial features in photographs.
Where this look is suitable: Garden weddings, outdoor ceremonies, daytime events. The soft, romantic character matches natural-light settings and floral-heavy decor.
Step by step:
- Add texture. Apply a texturizing spray to damp hair. Create soft waves with a curling wand.
- Gather loosely at the nape. Take all hair at the nape and hold as if making a low ponytail. Do not pull tight.
- Leave out face pieces. Deliberately pull out sections around the temples and hairline. Set them aside — you'll curl them later.
- Twist the first section. Take a section from the side, twist loosely, and pin at the nape.
- Build the chignon. Continue taking sections, twisting, and pinning. Layer them to create the chignon shape. The goal is organic texture, not a perfect circle.
- Tuck and pin. Tuck all ends under the layered sections. Pin with bobby pins that match your hair color.
- Pancake for volume. Gently pull the outer edges of the chignon outward for a softer shape.
- Curl the tendrils. Using a small curling iron, curl the reserved face-framing pieces away from the face.
- Add accessory. Tuck the hairpiece into the side of the chignon.
Tips and tricks: The wisps should be curled after the chignon is complete. If you curl them first, they'll lose their shape during the updo construction. Use a 3/4-inch curling iron for the tendrils — smaller barrel creates tighter curls that hold longer against face oils.
25.Effortless Romantic Chignon with Pearl Accents

The overview: A low, textured chignon features a visible twisted and layered construction, with curled face-framing wispy pieces left out for softness. Six to eight individual pearl hairpins are scattered through the chignon and the surrounding hair at varying depths. The style has a soft, romantic, and intentionally undone finish with a high density of pearl accents.
Why this look is popular: The scattered pearl pin technique creates more visual interest than a single accessory. The textured chignon base provides a soft, romantic foundation that pearl pins elevate without overwhelming. The style is heat-proof and photographs beautifully from every angle.
Where this look is suitable: Garden weddings, daytime ceremonies, outdoor receptions. The romantic character and scattered sparkle match natural-light venues and floral decor.
Step by step:
- Texturize and wave. Apply texturizing spray to damp hair. Create loose waves with a curling wand.
- Gather at the nape. Take all hair at the nape. Keep it loose — tight gathering contradicts the texture.
- Leave out face-framers. Pull pieces from the temples and hairline.
- Twist and pin the chignon. Take sections, twist loosely, and pin at the nape. Build the chignon by layering twists.
- Pancake for volume. Pull the chignon's edges outward for a softer shape.
- Curl the face-framers. Use a small curling iron on the reserved pieces.
- Place pearl pins. Insert pearl pins at various depths. Some should sit on the surface; others should be partially tucked under twists. Place 6-8 pins.
- Set with flexible spray. Medium-hold spray preserves texture without stiffness.
Tips and tricks: The constellation effect works best with odd numbers — 7 pins looks more natural than 6 or 8. Place them at different angles: some horizontal, some vertical, some at a 45-degree angle. This variation in direction creates a more organic scattered effect than all pins in the same orientation.
35 Cute & Sporty Athletic Hairstyles for Women (2026)
26.Braided Crown Updo with Pearl Accents
The overview: A Dutch braid starts at one temple, wraps around the back of the head, and meets the opposite temple, pancaked for width to frame the face. All remaining hair is gathered into a low, textured updo at the nape, and pearl pins are scattered through both the braid and the updo. The braid provides the framing, keeping face-framing pieces minimal.
Why this look is popular: The braided crown creates a framing effect that draws attention to the face — ideal for brides who want their hair to highlight their features rather than compete with them. The updo ensures all hair is contained and heat-proof. Pearl accents add bridal sparkle at key points.
Where this look is suitable: Formal outdoor weddings, evening garden receptions, vineyard ceremonies. The braided crown adds a romantic, regal quality that matches natural but elevated settings.
Step by step:
- Prep with texture. Apply mousse or texturizing spray to damp hair. Blow-dry with a diffuser.
- Create a side part. The part starts at the temple where the braid will begin.
- Dutch braid along the hairline. Starting at one temple, Dutch braid along the hairline, adding hair as you go. Continue around the back of the head.
- Stop at the opposite temple. Once the braid reaches the opposite temple, continue as a standard three-strand braid for the remaining tail.
- Gather remaining hair. Combine the braid tail with all loose hair at the nape.
- Twist into an updo. Twist the gathered hair and pin into a low, textured updo. Tuck the braid tail into the updo.
- Pancake the braid. Pull the braid loops outward for width.
- Add pearl pins. Insert pearl pins through the braid and updo at various points.
- Set with spray. Medium-hold hairspray for lasting hold with movement.
Tips and tricks: The braid-to-updo transition is the most challenging part. The braid tail should be integrated into the updo — not left hanging. Tuck it under a twist and pin it securely. If the end is visible, you can conceal it with a pearl pin placed directly over the junction point.
27.Romantic Twisted Updo with Pearl Pins
The overview: Every section of ash blonde hair is twisted and pinned into a cohesive updo at the back of the crown, creating continuous twisted texture from the hairline to the nape. Pearl pins are inserted through the twists at various depths, some visible and others partially concealed. Face-framing twisted tendrils are left out at the temples to complete the rounded, full silhouette.
Why this look is popular: The full-twist construction creates maximum texture and volume — ideal for brides with fine hair who want their updo to look substantial. The consistent twisted texture photographs with depth and dimension. Pearl pins add sparkle without interrupting the texture.
Where this look is suitable: Evening weddings, formal receptions, indoor venues. The sculptural, textured character matches settings with controlled lighting where texture reads well.
Step by step:
- Prep with texture. Apply texturizing spray to damp hair. Blow-dry with a diffuser to enhance natural texture.
- Create waves. Using a curling wand, create loose waves throughout. The waves make the twists easier to form.
- Section the hair. Divide hair into 6-8 sections. Clip each separately.
- Twist each section. Take one section, twist it from root to end, and coil it into a flat pinwheel shape. Pin with bobby pins.
- Layer the twists. Continue twisting and pinning sections, working from the bottom up. Each new section should overlap the previous one.
- Fill gaps. Where the updo has gaps, take small pieces from the surrounding hair, twist them, and pin them into the gap.
- Add pearl pins. Insert pearl pins at various angles through the twists.
- Set with flexible spray. Medium-hold preserves the twisted texture without stiffness.
Tips and tricks: The all-twist updo requires more hair than other styles because the twisting process consumes length. If your hair is shoulder-length or shorter, consider clip-in extensions or a smaller updo positioned higher on the head. For fine hair, backcomb each section before twisting to add grip and volume.

28 Cute & Sporty Baseball Game Nail Ideas for 2026 ⚾
28.Braided Chignon with a Pearl Comb
The overview: Two soft, twisted braids start at the temples, run along the hairline, and meet at the nape where all remaining hair is gathered into a smooth, polished low chignon. A pearl comb is inserted at the base of the chignon, angled upward, creating a clean, structured, and elegant frame against the head.
Why this look is popular: The braided frame creates visual interest from every angle without requiring a full crown braid. The pearl comb adds a classic bridal element that complements the chignon's polished character. The style is heat-proof and stays secure through long events.
Where this look is suitable: Formal weddings, church ceremonies, evening receptions. The polished, structured character matches traditional and elegant settings.
Step by step:
- Smooth the hair. Apply a heat protectant and smoothing serum. Blow-dry with a round brush for a smooth finish.
- Section for braids. Take two sections from the temples, about 2 inches wide each. Clip the remaining hair out of the way.
- Twist each section. Twist the section from the temple backward, adding hair from the hairline as you go. Stop when you reach the nape.
- Braid the sections. Gently pull the braid loops outward for softness.
- Gather remaining hair. Combine the braids with all loose hair at the nape.
- Form the chignon. Twist the gathered hair and coil into a smooth, round chignon. Pin with U-pins.
- Insert the pearl comb. Slide the comb into the base of the chignon, angling it upward so the pearls face outward.
- Set with medium-hold spray. Preserve the smooth finish while maintaining the structure.
Tips and tricks: The pearl comb needs to grip hair beneath the chignon, not just the chignon itself. Slide it through the chignon's base and into the hair at the nape. Combs with longer teeth (minimum 2 inches) provide more secure anchoring. Test the comb's grip before the wedding by gently shaking your head — if it shifts, the position needs adjustment.
29.Soft Chignon with Romantic Curls and Pearl Comb
The overview: A low, soft chignon at the nape contains the back and crown sections of the hair, while romantic, bouncy loose curls frame the face and fall past the shoulders on both sides. A large pearl comb is inserted vertically at the crown of the chignon. The style is balanced, being structured at the back and soft at the front.
Why this look is popular: The chignon-and-curls combination offers the best of both worlds — the containment of an updo for heat management with the softness of loose hair for romance. The pearl comb at the crown adds height and a regal quality.
Where this look is suitable: Romantic garden weddings, evening ceremonies, receptions where you want both structure and softness. The hybrid character fits venues that are formal but not severe.
Step by step:
- Create curls throughout. Using a 1.25-inch curling wand, curl all hair. Let curls cool completely.
- Section for the chignon. Part off the front sections that will remain loose — take sections from the temples to approximately ear level. Clip them forward.
- Gather the back section. Take all remaining hair (everything behind the ears) and gather at the nape.
- Form the chignon. Twist the gathered section and coil into a soft, low chignon. Pin with bobby pins.
- Release the front sections. Unclip the loose curls and let them fall naturally around the face.
- Insert the pearl comb. Slide the comb vertically into the crown of the chignon. The comb's teeth should face downward, with the pearl-adorned top sitting at the chignon's highest point.
- Blend the sections. Take small pieces from the loose curls and tuck them slightly into the chignon to create a seamless transition.
- Set with flexible spray. Medium-hold preserves curls and chignon structure.
Tips and tricks: The transition between loose curls and chignon is where this style can look disconnected. To create a seamless blend, backcomb the loose curls at the crown slightly before letting them fall. This creates volume at the transition point that visually connects the two sections.
20 Stunning Mother of the Bride Hairstyle Ideas for 2026 💍
30.Romantic Braided Chignon with Pearl Accent
The overview: A smooth, round low chignon at the nape features two soft, pancaked braids running from the temples along the hairline, wrapping around the chignon's perimeter, and tucking underneath. A pearl and leaf hair comb is tucked at the side where the braids meet the chignon, creating a textured frame around the smooth center.
Why this look is popular: The braided frame adds substantial visual weight without requiring a full crown braid. The texture contrast between braids and smooth chignon creates depth in photographs. The pearl comb marks the transition point elegantly.
Where this look is suitable: Romantic garden weddings, vineyard ceremonies, formal receptions. The braided-frame silhouette works best with natural, earthy venues.
Step by step:
- Smooth the hair. Apply a smoothing serum to damp hair. Blow-dry with a paddle brush for a smooth finish.
- Section for braids. Take two sections from the temples, approximately 2 inches wide. Clip the remaining hair.
- Dutch braid each section loosely. Braid from the temple backward. Keep tension loose for wider braids.
- Pancake the braids. Pull each braid loop outward aggressively — the braids should be visibly wide and soft.
- Gather remaining hair. Take the unbraided hair at the back and gather into a low ponytail at the nape.
- Form the chignon. Twist the ponytail and coil into a smooth, round chignon. Pin with U-pins.
- Wrap the braids. Take each braid, wrap it around the chignon's perimeter, and tuck the end underneath. Pin securely.
- Add the comb. Insert the pearl and leaf comb at the side where the braids meet the chignon.
- Set with medium-hold spray. Preserve the smooth chignon surface and the braided texture.
Tips and tricks: The braids need to be long enough to wrap around the chignon — at minimum, 6-8 inches from the temple to the braid end. If your hair is on the shorter side, stop braiding before you run out of length and pin the shorter braids directly into the chignon sides rather than wrapping them all the way around.
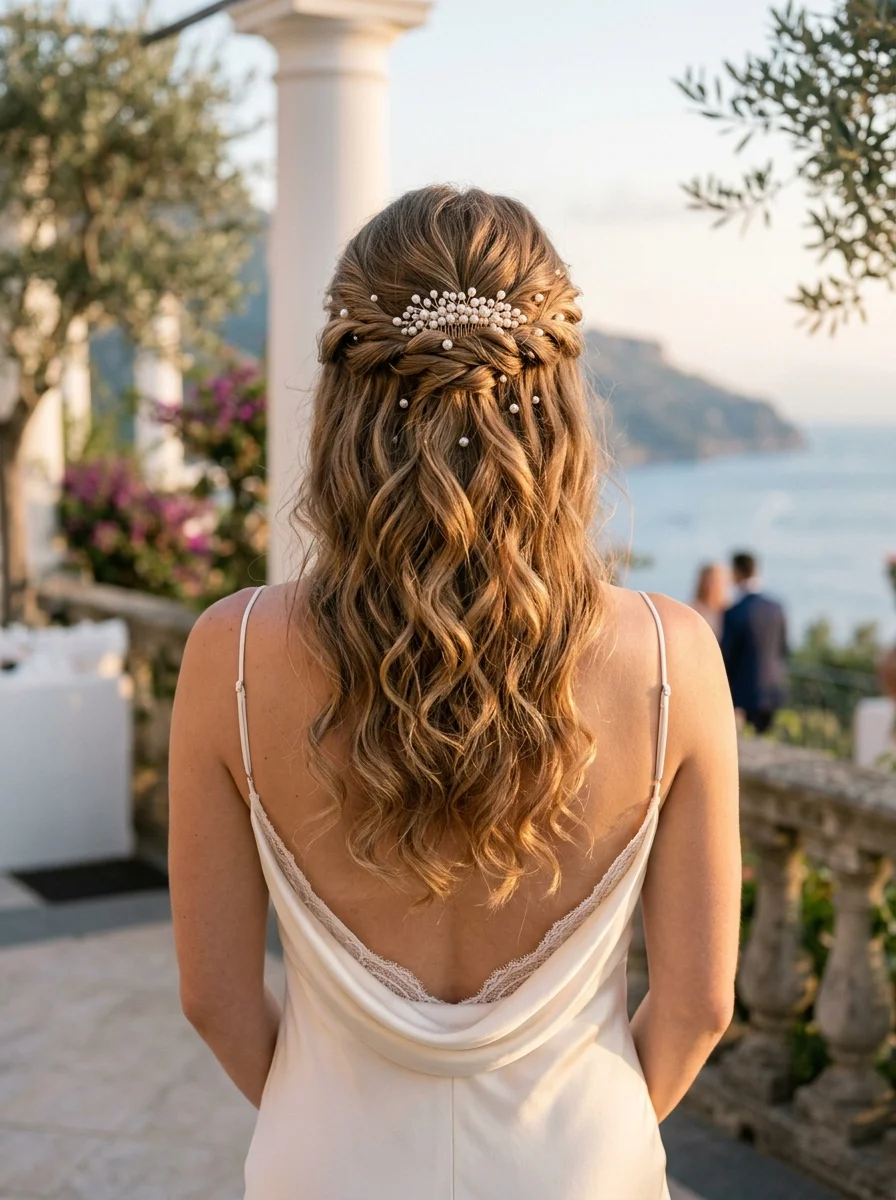
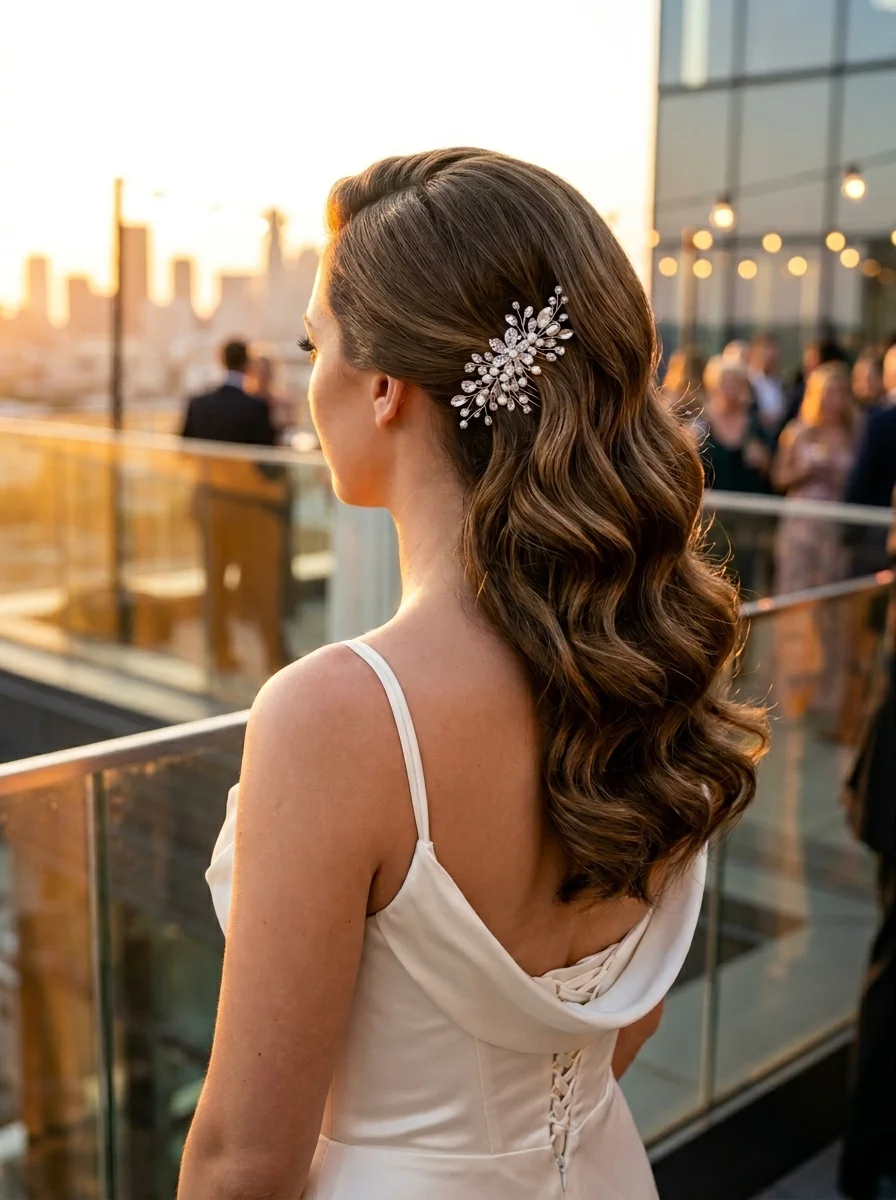
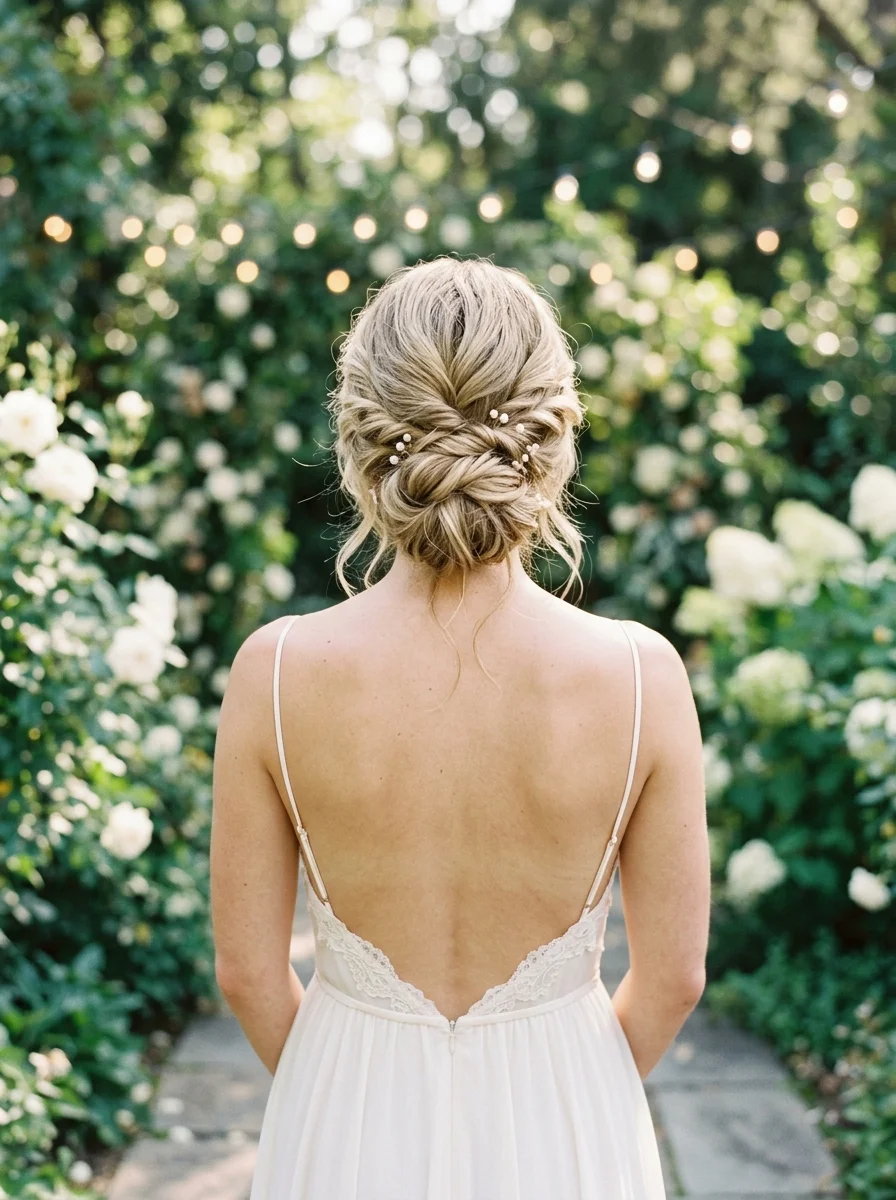
31.Romantic Wavy Half-Up with Delicate Pearl Accents

The overview: Soft, flowing waves are styled in a half-up construction, with the top section gathered at the crown and secured with a small twist. A cluster of 3-5 pearl pins is arranged at the twist's securing point, creating a flower-like grouping that secures the twist while leaving the remaining waves falling past the shoulders with natural movement and a glossy finish.
Why this look is popular: The pearl cluster at the back creates a focal point that draws the eye without requiring a large accessory. The half-up construction keeps hair off the face while maintaining movement. The wave texture is universally flattering.
Where this look is suitable: Beach weddings, outdoor daytime ceremonies, garden receptions. The romantic wave pattern and pearl cluster match natural, light-filled settings.
Step by step:
- Prep with volumizing mousse. Apply to damp hair for root lift and wave body.
- Create waves. Using a 1.25-inch curling wand, wrap sections loosely. Alternate curl direction.
- Break up with fingers. Run fingers through to create soft, flowing waves.
- Gather the top section. From the temples up, pull the top section to the crown. Create a small twist at the securing point.
- Pin with pearl cluster. Insert 3-5 pearl pins in a tight grouping at the twist's securing point. Arrange them in a circular pattern for the flower effect.
- Adjust face-framers. Pull a few pieces forward around the temples.
- Set with flexible spray. Light mist preserves waves without stiffness.
Tips and tricks: The pearl cluster works best when the pins are inserted at slightly different angles — some vertical, some at 45 degrees, some horizontal. This variation in direction creates a more natural flower-like arrangement. If you have very fine hair, use pearl pins with a textured grip or silicone coating at the base to prevent sliding.

30 Stunning Beach Nail Ideas for the Best Vacation in 2026 🌊
32.Boho Braided Half-Up with Baby's Breath
The overview: Long, wavy hair features a Dutch braid starting at one temple, running across the crown, and ending behind the opposite ear where it is pinned and pancaked for width. Baby's breath sprigs are tucked into the braid sections at intervals, and the remaining hair falls in loose, soft waves past the shoulders, creating a romantic, bohemian, and naturally elegant look.
Why this look is popular: The Dutch braid crown provides structure and keeps hair off the face, while the loose waves underneath maintain a romantic, flowing quality. Baby's breath adds a natural, organic bridal element without the weight or expense of a full floral crown. The half-up construction is practical for summer heat.
Where this look is suitable: Outdoor garden weddings, rustic barn receptions, vineyard ceremonies. The bohemian character and fresh flowers match natural, earthy venues perfectly.
Step by step:
- Prep with texture. Apply a sea salt spray to damp hair. Diffuse or air-dry for natural wave and grip.
- Create loose waves. Using a 1.25-inch curling wand, create soft waves throughout the hair. Let cool completely.
- Start the Dutch braid. Take a 2-inch section at one temple. Divide into three and begin a Dutch braid (cross strands under), following the hairline across the crown.
- Add hair as you go. Pick up small sections from the hairline as you braid across. Stop adding new sections when you reach behind the opposite ear.
- Secure the end. Continue as a standard three-strand braid for 2 inches, then secure with a clear elastic. Tuck the tail under the loose waves and pin.
- Pancake the braid. Gently pull the outer loops to widen the braid for a softer, fuller appearance.
- Add baby's breath. Tuck small sprigs into the braid loops at irregular intervals. Space them evenly across the braid length.
- Set with flexible spray. Light mist of medium-hold hairspray preserves the braid and waves without stiffness.
Tips and tricks: For the most natural placement, insert the baby's breath stems diagonally into the braid pockets rather than straight in. This keeps the stems hidden and the flowers sitting flush against the braid. Mist the flowers lightly with water before placing them to prevent wilting in summer heat. If your hair is very dark, white baby's breath creates higher contrast; if your hair is light blonde, ask your florist for preserved baby's breath with a slightly green stem for visibility.