Hair Trends
30 Stunning Mother of the Groom Hairstyle Ideas for 2026
Your son is getting married, and all eyes are going to be on you during the ceremony. No pressure, right? The mother of the groom hairstyle you choose says a lot — it tells the room you're proud, polished, and not here to blend into the background. This isn't the day for a safe ponytail or whatever you threw together at the last family dinner. You deserve a look that matches the weight of the moment.
We pulled together 30 mother of the groom hairstyles that actually deliver. Some are classic updos for the woman who wants to look timeless. Others are soft half-up styles if you'd rather keep things romantic without going full formal. There are braids, waves, chignons, and a few styles with accessories that elevate the whole thing without trying too hard. Whatever your hair type, your dress code, or your personal vibe, there's something here for you.
The Age-Appropriate Glam Guide
Being the mother of the groom is not about looking twenty-five again. It is about looking like the best, most confident version of yourself right now. The biggest trend in 2026 mother-of-the-groom styling is embracing your natural texture and color instead of fighting it. Silver hair? Let it shine. Natural waves? Work with them, not against them.
Stylists are now recommending styles that honor your hair's natural state while adding just enough polish to feel special. Think soft chignons instead of tight buns, loose waves instead of rigid curls, and accessories that complement rather than overwhelm. The goal is not to disappear into the background — it is to stand out in a way that feels authentic to who you are.
The prep? If you have gray or silver hair, ask your stylist about a purple shampoo treatment the week before the wedding. It neutralizes yellow tones and makes your natural color look luminous in photos.
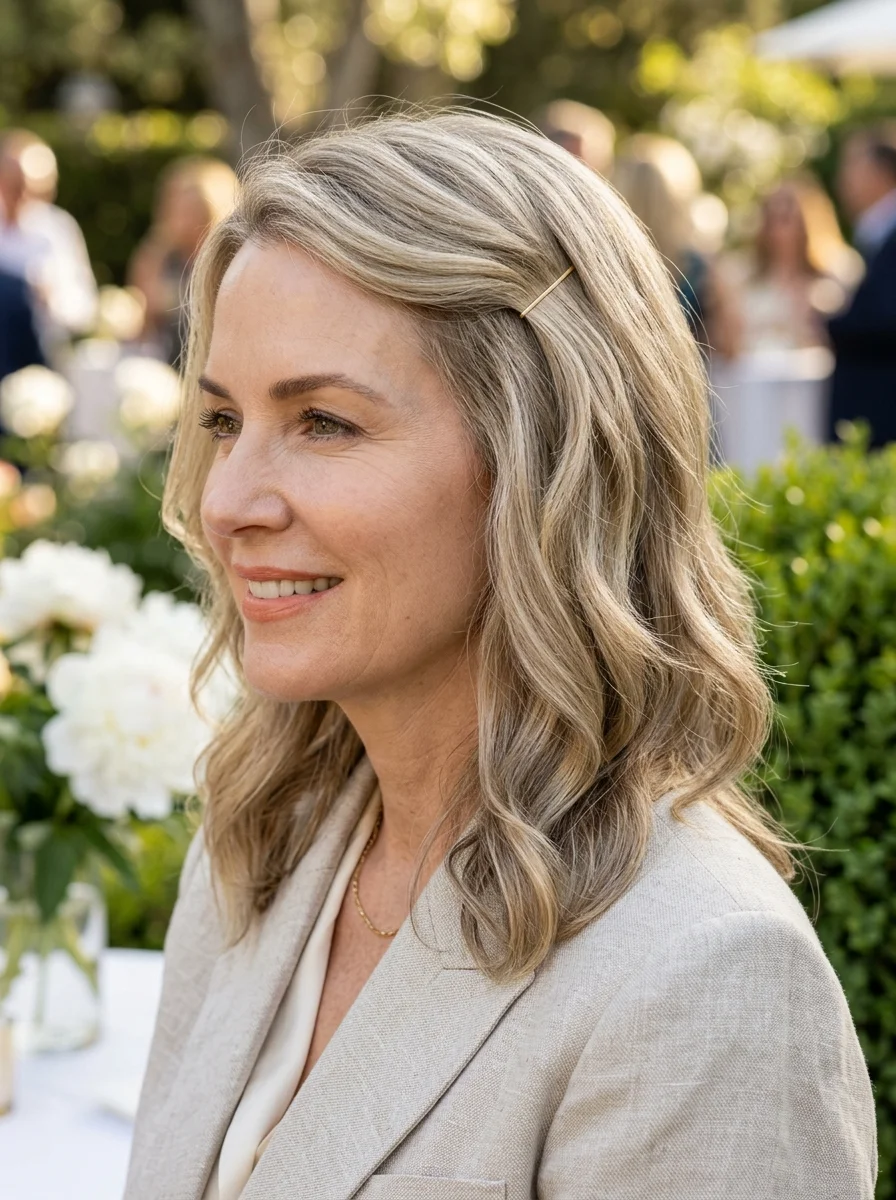
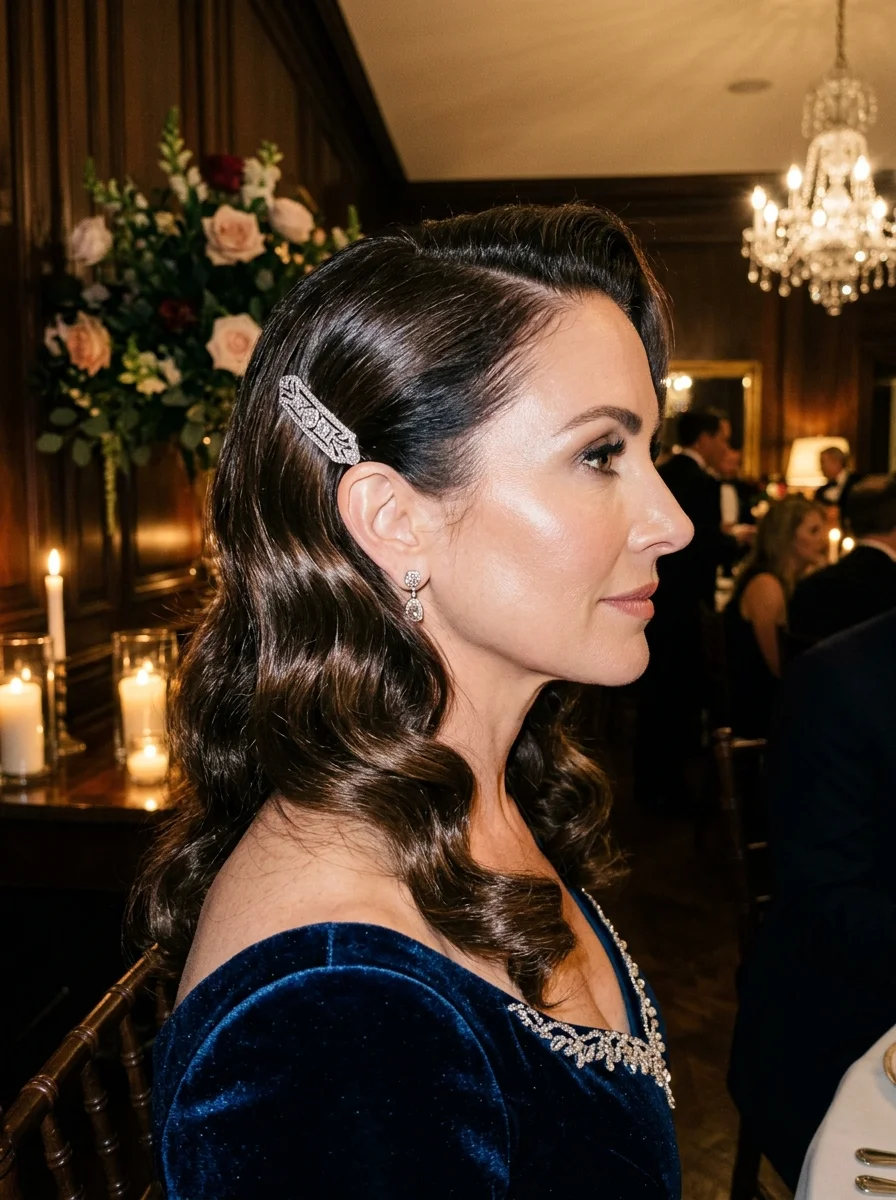
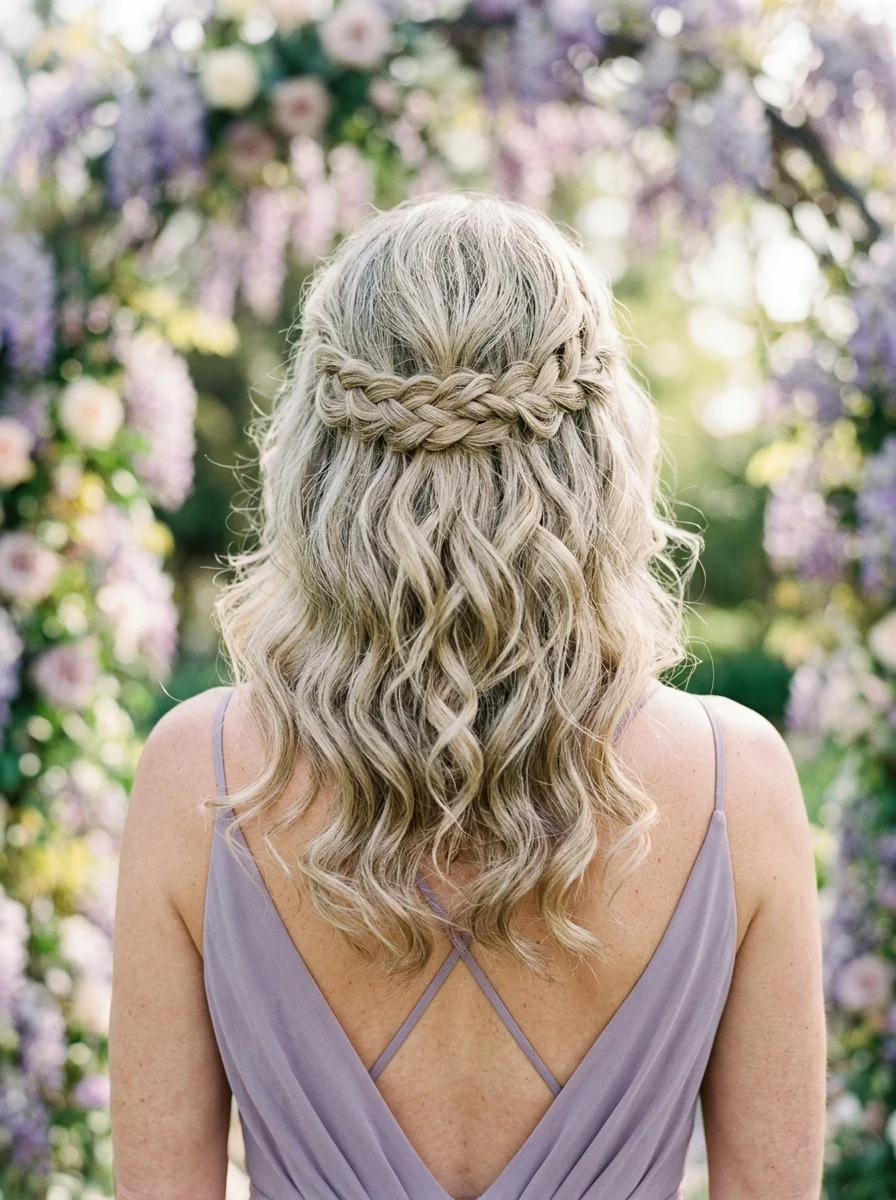
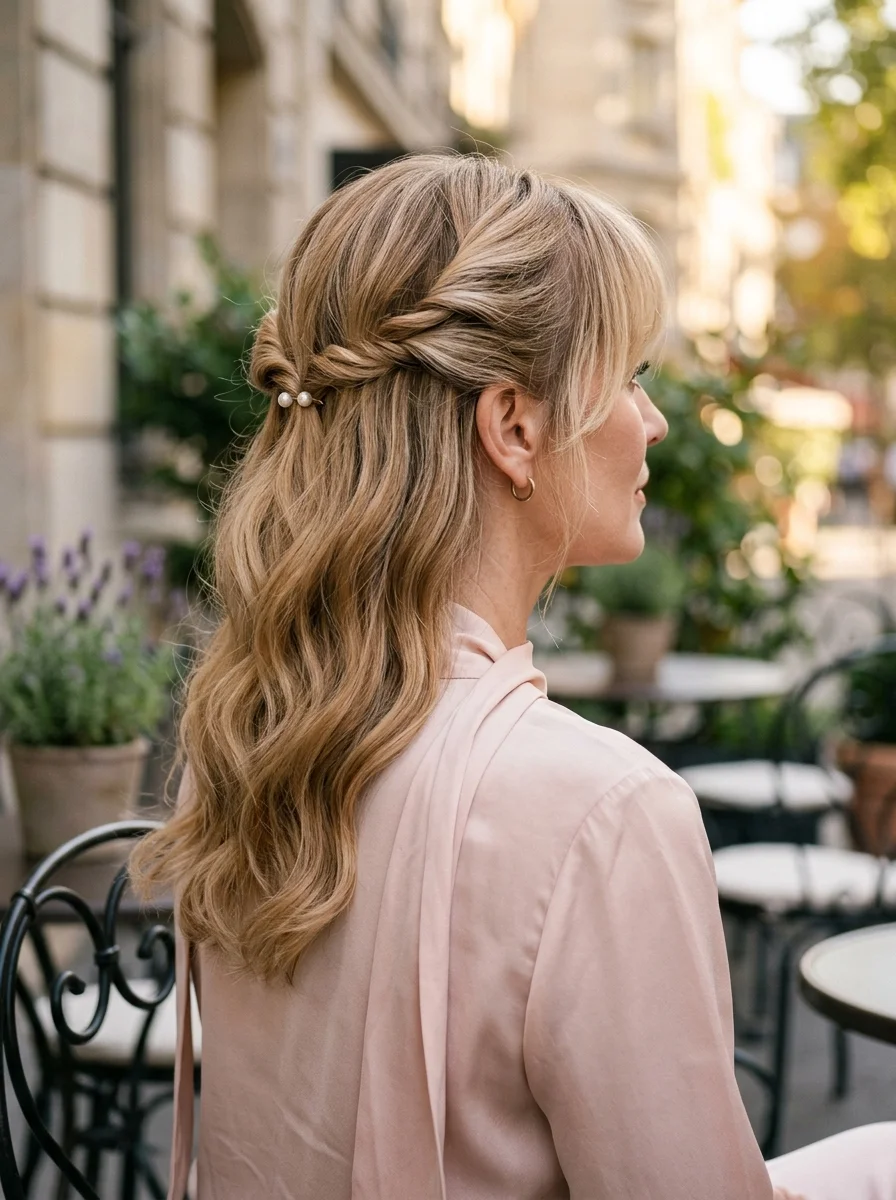
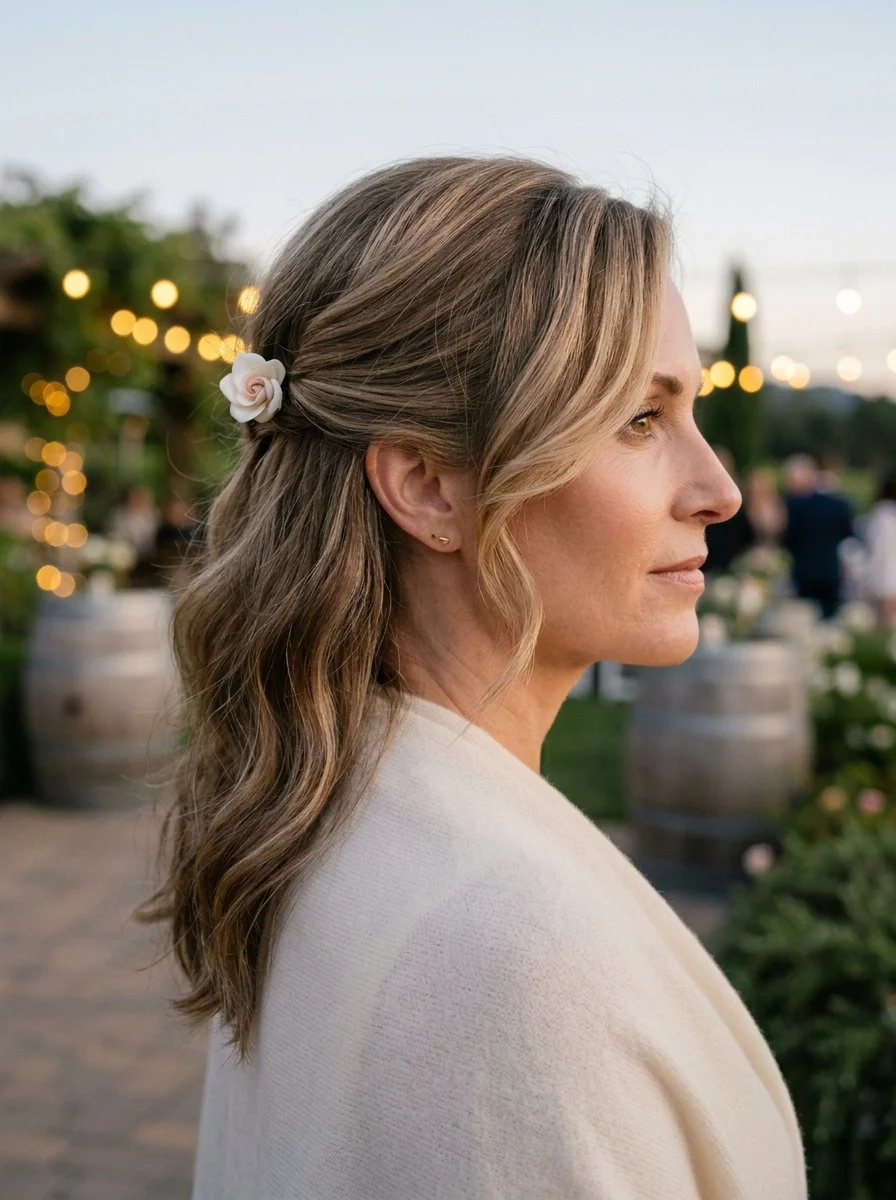
1.Romantic Pearl-Adorned Chignon
The overview: This golden blonde chignon sits low at the nape, soft and undone in the best possible way. Freshwater pearls are scattered throughout — not in a predictable pattern, but placed like they just landed there naturally. The texture is loose, the vibe is romantic, and the whole thing reads effortless even though someone clearly thought about every detail. It's the kind of updo that makes people say "she looks amazing" without being able to pinpoint exactly why.
Why this look is popular: Pearls are having a moment in bridal and formal hair because they add texture and light without looking costume-y. The scattered placement feels organic rather than stiff, and a low chignon works on virtually every face shape. Golden blonde hair especially benefits from the pearl contrast — the warm and cool tones play off each other beautifully.
Where this look is suitable: Romantic outdoor ceremonies, coastal weddings, garden venues. Anywhere where the natural light can catch the pearls and give them that soft glow. Works beautifully on medium to long hair with some natural wave.
Step by step:
- Prep with texture. Apply a light texturizing spray or mousse to damp hair and blow-dry with a round brush for volume at the roots.
- Create loose waves. Use a 1.25-inch curling wand on 1-inch sections, alternating curl direction. Leave the last inch out for a modern finish.
- Gather low. Pull all hair to the nape. Don't smooth it too much — you want some texture and movement in the gathered section.
- Twist and pin. Twist the gathered hair into a loose chignon shape. Secure with bobby pins that match your hair color, tucking them underneath so they're invisible.
- Scatter pearls. Pin small freshwater pearl accessories throughout the chignon at irregular intervals. Odd numbers look more natural than even.
- Release face-framing pieces. Gently pull a few soft pieces around the temples and ears. Mist with flexible-hold hairspray.
Tips and tricks: Second-day hair holds this style better than freshly washed hair. If your hair is fine, backcomb the crown slightly before gathering to add volume. Use a boar bristle brush to smooth flyaways without flattening the texture.
25 Top Curly Hairstyle Trends for 2026 ➰✨
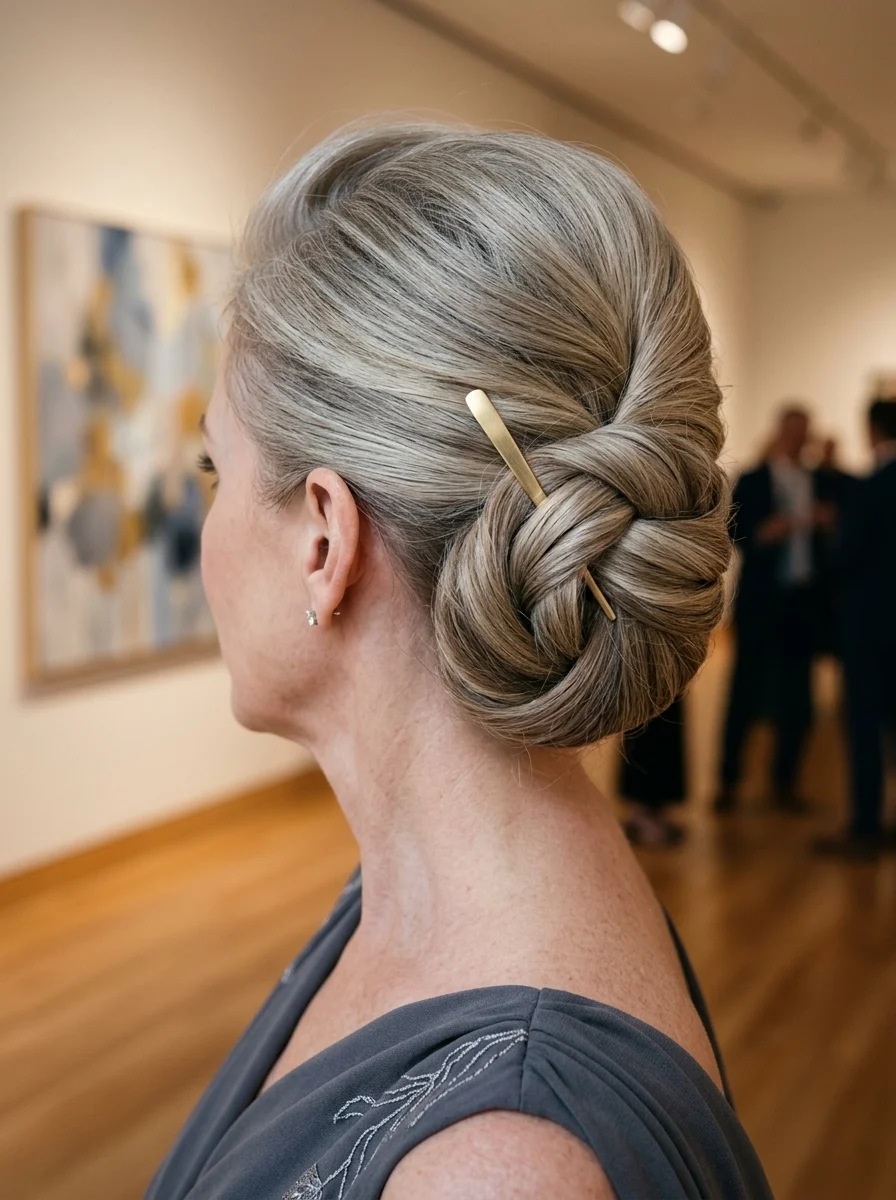
2.Chic Twisted Chignon with Golden Thread Accent
The overview: Ash blonde hair twisted into a sleek, sculpted bun that sits right at the nape. The gold thread woven through the bun catches the light without shouting for attention. It's the kind of detail that makes people lean in closer to get a better look — and that's exactly the point. This is precision meets warmth, structure meets shimmer.
Why this look is popular: The gold thread transforms a simple chignon into something special without adding bulk or height. Ash blonde hair can sometimes read cool or flat — the warm gold thread adds dimension and prevents the color from looking washed out. The sleek twist also photographs cleanly from every angle.
Where this look is suitable: Modern venues — think art galleries, rooftop spaces, or anywhere with clean lines. The sleekness of this style pairs perfectly with structured dresses and minimalist jewelry.
Step by step:
- Smooth with product. Apply a smoothing cream or serum to damp hair. Blow-dry straight with a paddle brush for maximum sleekness.
- Part precisely. Create a clean center or side part. Use a rat-tail comb for sharp lines.
- Gather and twist. Pull all hair to the nape. Twist tightly into a chignon shape, keeping the surface smooth as you wrap.
- Thread placement. As you twist, lay a thin gold metallic thread along the surface of the twist, letting it follow the spiral. Secure the thread end under the bun.
- Pin securely. Use bobby pins that match your hair color, inserting them underneath the bun so they're hidden.
- Set with spray. Mist with a strong-hold hairspray. Use a fine-tooth comb to smooth any remaining flyaways.
Tips and tricks: Keep the thread taut against the hair as you twist — if it's loose, it wraps unevenly. A light shine spray after setting adds extra gloss to the ash blonde tone. This style works best on straight or slightly wavy hair that can be smoothed easily.
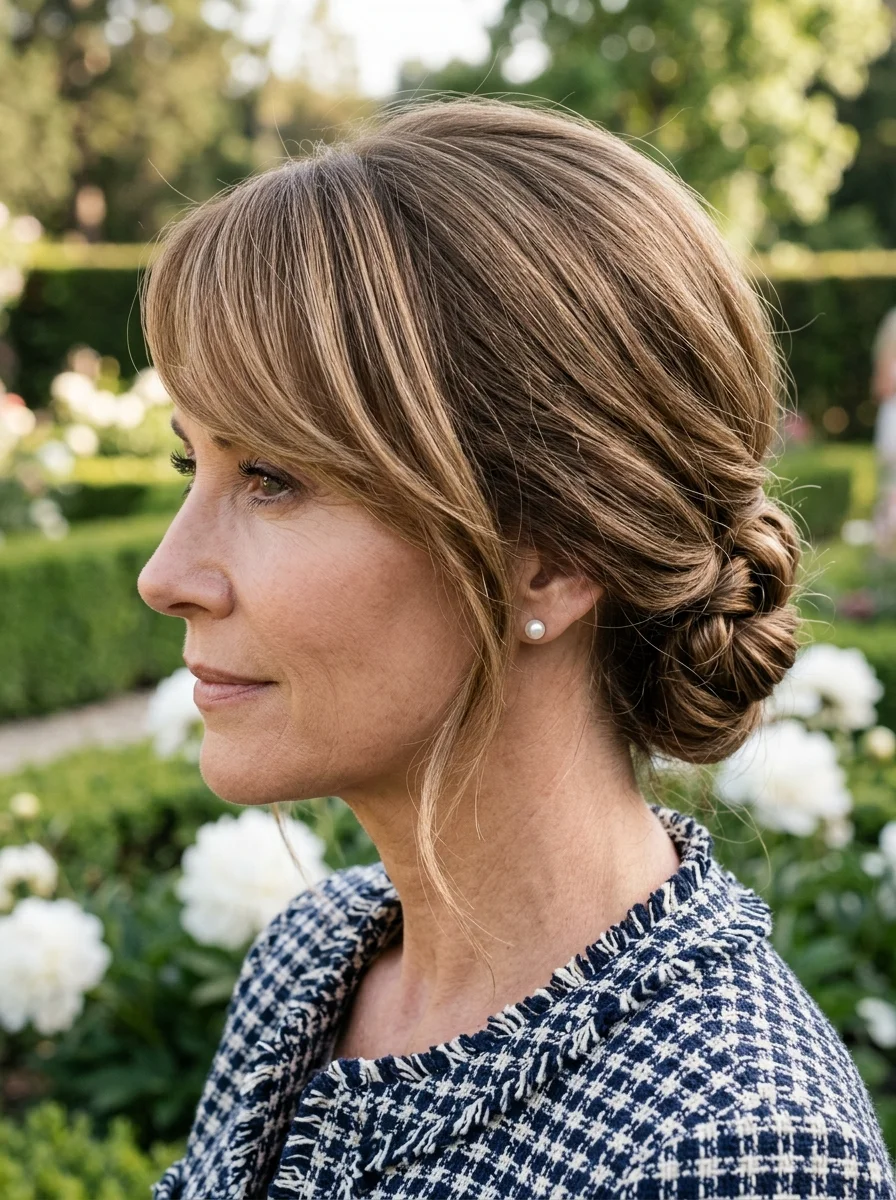
3.Elegant Braided Chignon with Golden Hairpin
The overview: Medium to long hair braided into a low bun that has real dimension. The braid gives the chignon texture and depth that a smooth bun simply can't match, and a single gold barrette holds everything in place with quiet authority. This is what refined looks like when it's done right — no filler, no fuss, just a well-executed style that honors your natural color.
Why this look is popular: Braided chignons are more visually interesting than smooth buns — the pattern creates shadows and highlights that make the hair look thicker and more dimensional. On silver or gray hair, the braid pattern is especially visible and striking. The gold barrette adds a warm accent that prevents the cool tones from feeling flat.
Where this look is suitable: Formal art gallery settings, refined ceremonies, any occasion where you want to look distinguished without being overdone. Especially striking on silver, gray, or salt-and-pepper hair.
Step by step:
- Smooth and prep. Apply a light smoothing serum to damp hair. Blow-dry with a boar bristle brush for maximum smoothness and shine.
- Create a low ponytail. Gather all hair at the nape and secure with a clear elastic.
- Braid the ponytail. Create a simple three-strand braid down the full length. Secure the end with a small elastic.
- Wrap into a chignon. Twist the braid around the base of the ponytail, forming a flat bun shape. Pin underneath with matching bobby pins.
- Add the barrette. Place a gold barrette at the side of the chignon, clipping through the outer layer of the bun to hold it securely.
- Set it. Mist with strong-hold hairspray. Use a fine-tooth comb to smooth the crown and any flyaways.
Tips and tricks: Backcomb the crown lightly before gathering for added volume at the top. If your silver hair tends to be dry, apply a light hair oil before styling for extra shine. The braid doesn't need to be perfect — slight imperfections add character to the chignon.

29 Trendy Pink Summer Nails for 2026 💅
4.Sparkling Curls with a Touch of Glam
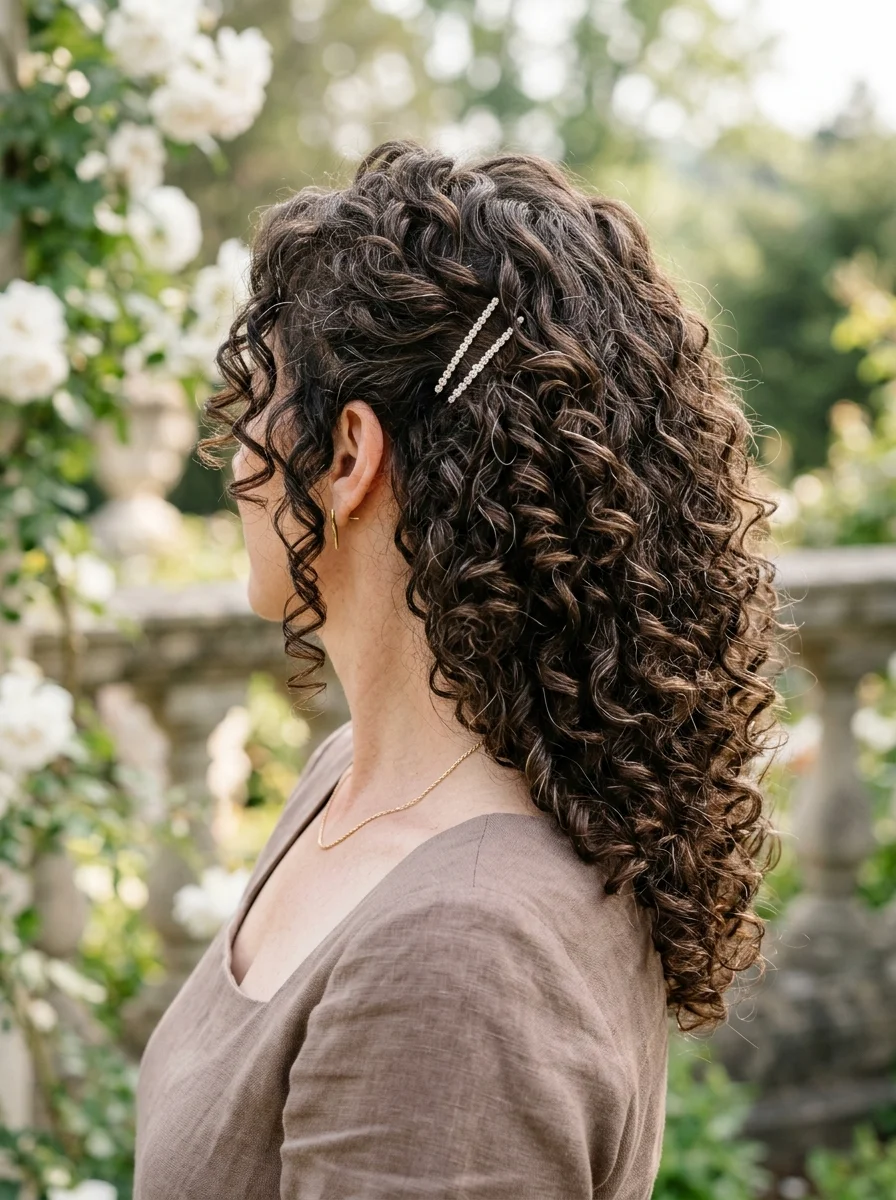
The overview: Dark brunette 3B/3C natural curls left to do what they do best — cascade. Two double rhinestone clips sit on one side, catching light with every movement. The curls are defined and bouncy, the accessories add just enough sparkle, and the whole look celebrates your natural texture instead of fighting it. You don't need an updo to look formal and put-together — this proves it.
Why this look is popular: Natural curls have incredible body and movement that straightened styles simply can't replicate. The rhinestone clips add a formal element that elevates the look beyond everyday wear. On dark brunette hair, the crystal sparkle creates high contrast that catches every light source in the room.
Where this look is suitable: Garden weddings, outdoor ceremonies, any venue where you want your natural texture to shine. This look proves you don't need an updo to look formal and put-together.
Step by step:
- Define curls on damp hair. Apply a curl-defining cream or gel section by section. Use the praying hands method to distribute evenly.
- Diffuse or air-dry. Use a diffuser on low heat if you're short on time, or let curls air-dry for the most natural definition. Don't touch them while they dry.
- Break the cast. Once fully dry, scrunch out any product crunch with a light oil on your hands.
- Section one side. Take a small section above the ear on one side and pin it back with the rhinestone clips.
- Place the clips. Stack the two double rhinestone clips vertically, about half an inch apart, for maximum sparkle.
- Fluff and set. Gently lift the roots with your fingers for volume. Mist with a light-hold hairspray to keep curls defined without stiffness.
Tips and tricks: Don't use a brush on dry curls — it causes frizz. Use a wide-tooth comb only when hair is wet and saturated with product. For extra definition, twist individual curls around your finger after applying product. Sleep on a satin pillowcase to preserve the curl pattern overnight.
5.Wavy Ponytail with a Chic Scarf Tie
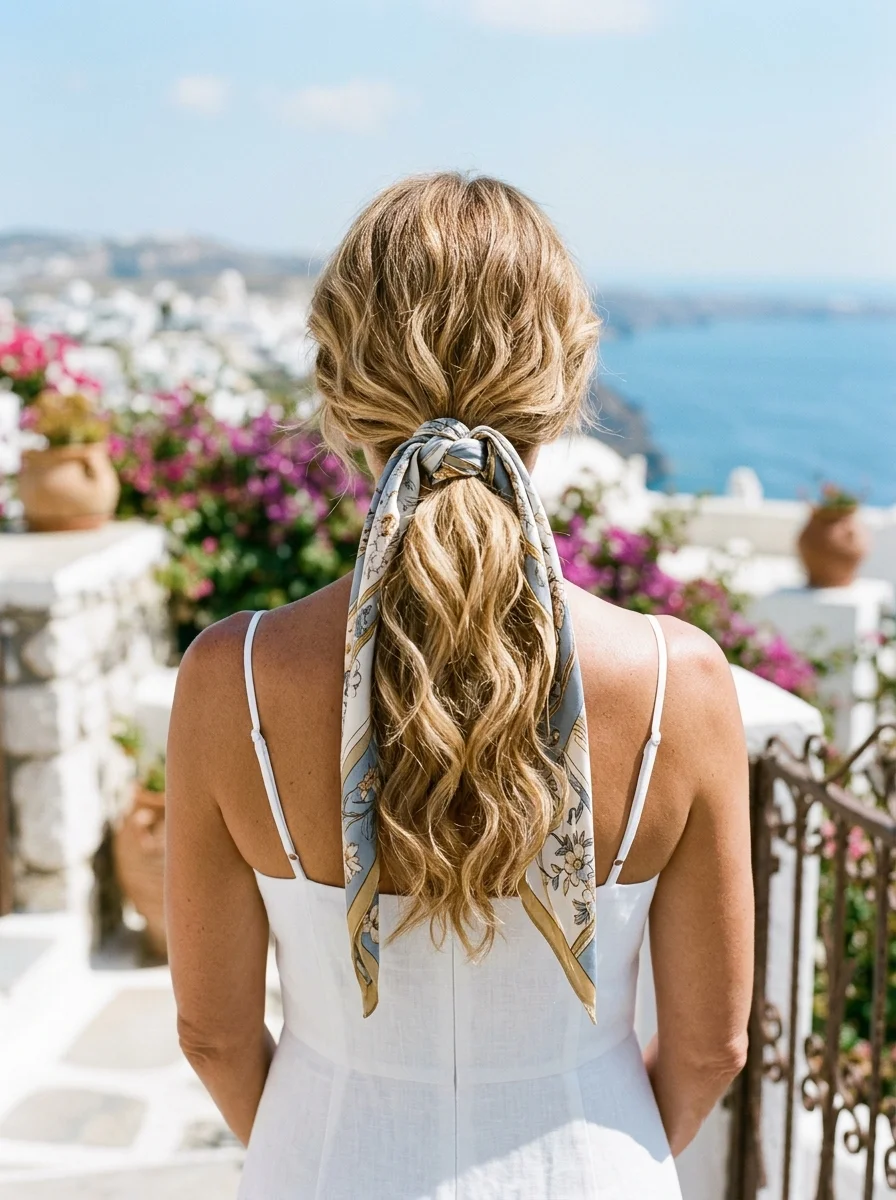
The overview: Honey blonde waves gathered into a low ponytail, secured with a silk scarf tie that trails behind you as you walk. It's relaxed, it's chic, and it says you're not trying too hard — even though this look took some real thought. The waves add movement, the scarf adds personality, and the whole thing feels like vacation even if you're at a local venue.
Why this look is popular: A low ponytail is universally flattering — it elongates the neck and works with virtually any neckline. The silk scarf tie adds a luxury detail that reads as intentional rather than thrown together. Honey blonde tones glow in natural light, making this especially photogenic for outdoor ceremonies.
Where this look is suitable: Destination weddings, summer ceremonies, beach or coastal venues. The scarf detail gives it a vacation-ready feel that matches lighter dress codes and outdoor settings.
Step by step:
- Create waves. Use a 1.25-inch curling wand on 1-inch sections, leaving the ends out. Alternate curl direction for a natural look.
- Break up the waves. Run your fingers through the curls to separate them into softer waves. Don't use a brush.
- Gather low. Pull all hair to the nape, keeping the waves loose and relaxed. Don't smooth it too much.
- Tie with scarf. Secure with an elastic first, then tie a silk scarf around the base of the ponytail. Let the scarf ends trail down with the hair.
- Adjust and set. Pull a few face-framing pieces loose around the temples. Mist with flexible-hold hairspray.
Tips and tricks: Choose a scarf color that complements your dress rather than matching it exactly — tonal harmony looks more sophisticated. A silk or satin scarf won't create friction or frizz like cotton will. For extra hold, wrap a small section of hair around the elastic before tying the scarf.
27 Stunning Beach Wedding Hairstyles for Brides & Family 2026 🌊💍
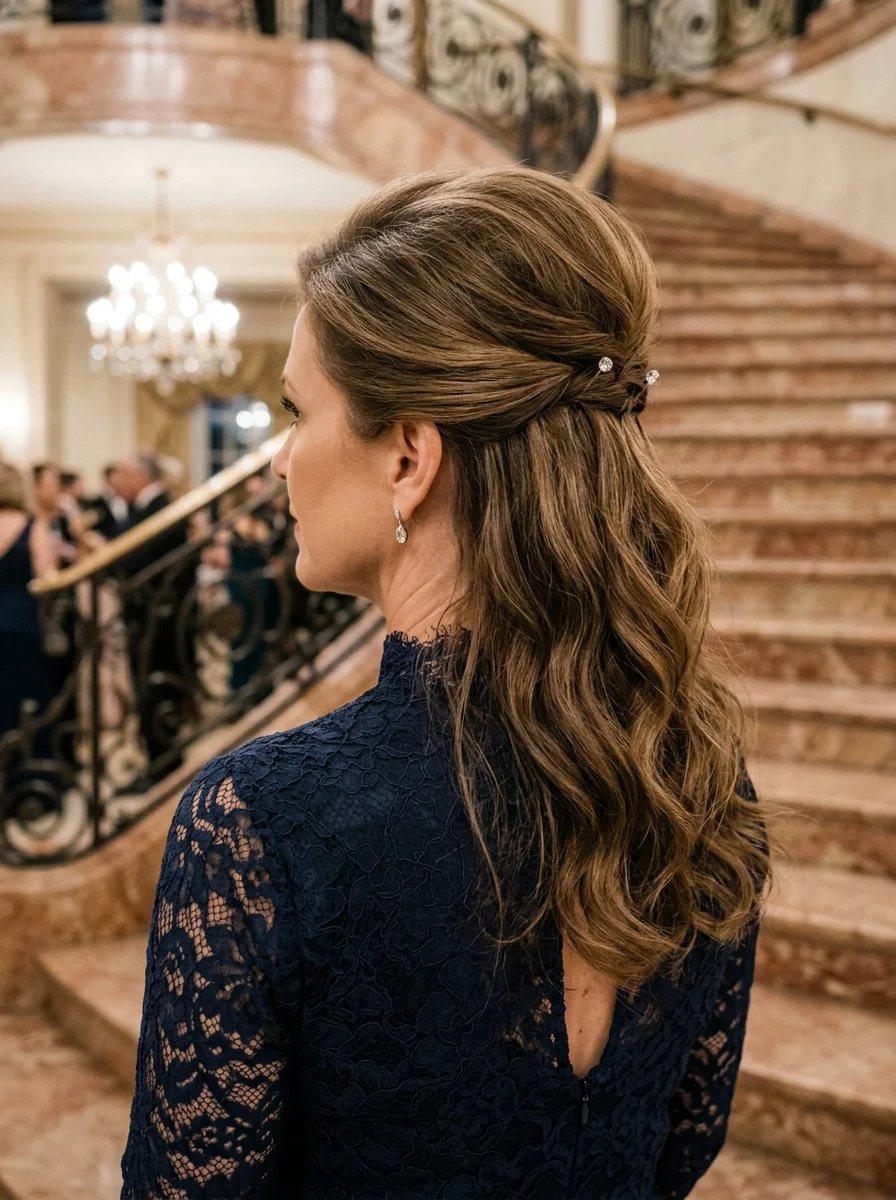
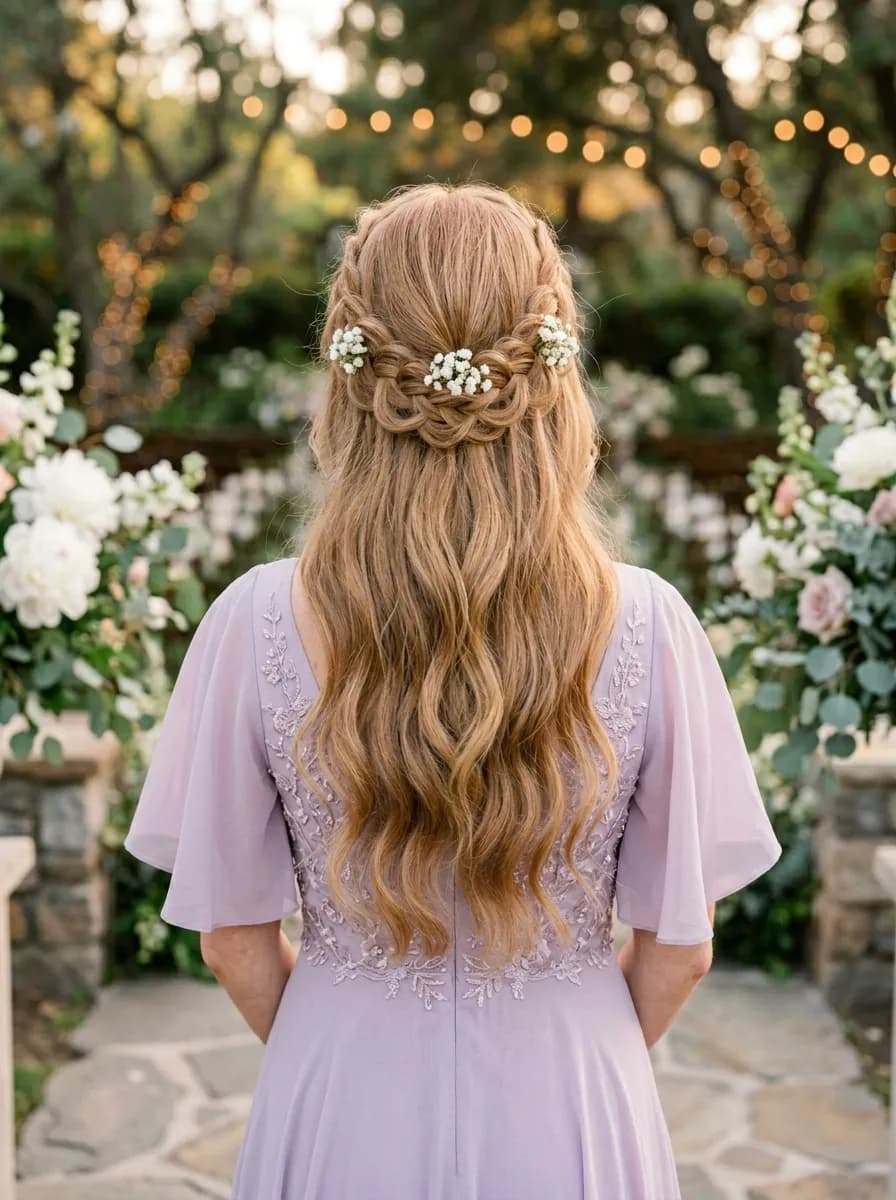
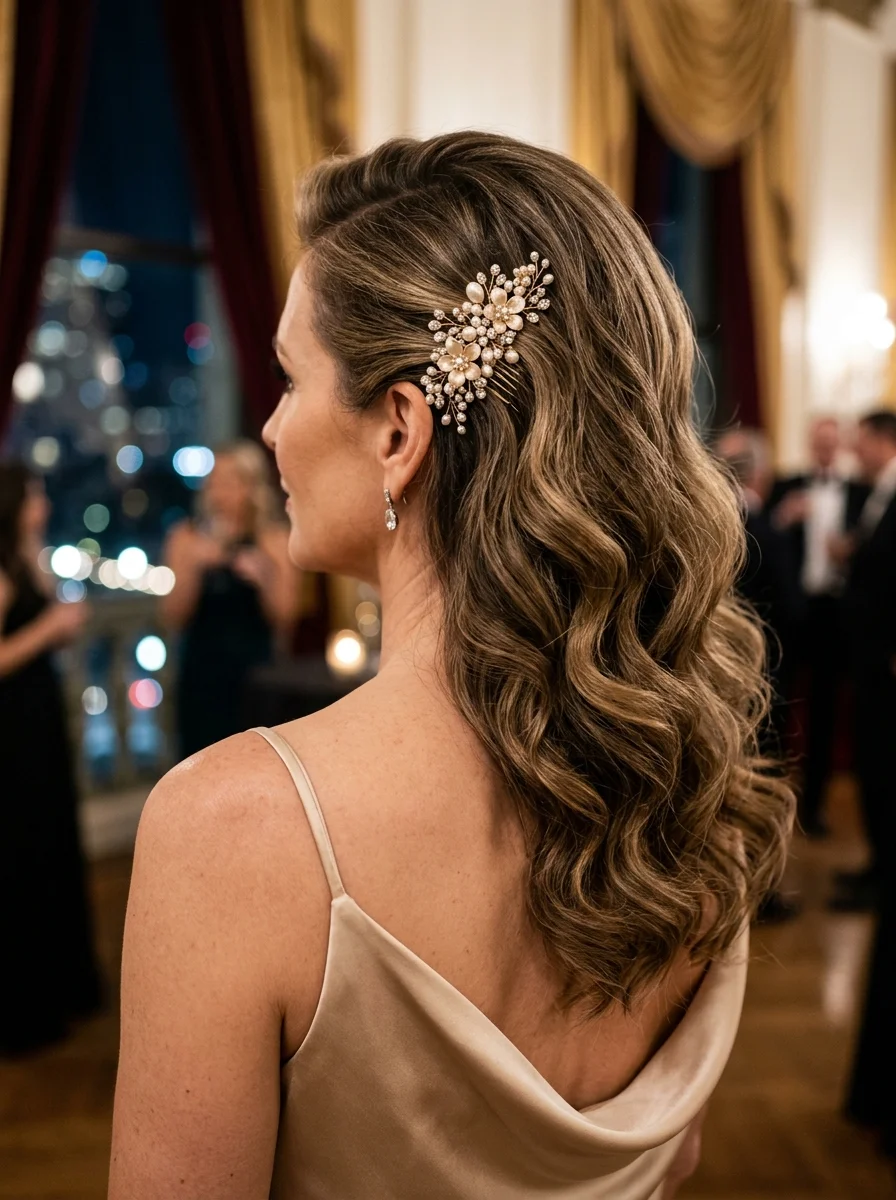
6.Twisted Crown Half-Up with Pearls

The overview: Ash blonde hair twisted back from the face and pinned at the crown, with the rest falling in soft waves. Pearl pins are tucked into the twists, and a delicate ribbon weaves through the whole thing. It's half-up in the most elegant sense — structured enough to feel formal, loose enough to feel like you. The combination of twists, pearls, and ribbon creates layers of detail that reward a closer look.
Why this look is popular: Half-up styles keep hair off your face while still showing length and movement. The twisted crown adds structure and visual interest from the front and side views. Pearl pins scattered through the twists catch light without overwhelming the style, and the ribbon adds a romantic softness.
Where this look is suitable: Romantic garden ceremonies, spring and summer weddings. The pearls and ribbon give it a bridal-adjacent feel without competing with the wedding party.
Step by step:
- Wave the hair. Create soft waves with a large-barrel curling iron. Brush through gently for a natural finish.
- Section the crown. Take a 2-inch section from each temple. These will become your twists.
- Twist each section. Twist each section away from the face, keeping the tension moderate. Don't twist too tight — you want softness.
- Pin at the crown. Bring both twists to the back of the head and pin them where they meet. Cross the pins for extra hold.
- Add pearl pins. Tuck small pearl pins into the twists at irregular intervals. Five to seven pins scattered throughout looks natural.
- Weave the ribbon. Thread a delicate ribbon through the twists, letting it weave in and out. Tie or tuck the ends discreetly.
- Set with spray. Mist with flexible-hold hairspray to keep the twists in place without stiffness.
Tips and tricks: Backcomb the crown slightly before twisting for added lift. Use ribbon that's thinner than you think — wide ribbon overwhelms the twist detail. If your hair is slippery, spray each section with a light-hold hairspray before twisting for better grip.
7.Effortless Wavy Lob with Chic Bobby Pin Accent
The overview: Ash blonde and silver tones in a loose, wavy lob that hits just above the shoulders. A gold barrette pins back one side, keeping the hair off your face while letting the waves do their thing. It's the kind of style that looks like you woke up this way — but better. The color blend is sophisticated, the waves are relaxed, and the barrette adds just enough structure.
Why this look is popular: The lob (long bob) is one of the most versatile lengths for formal events — it's long enough to wave but short enough to look intentional and modern. The ash blonde and silver blend reads sophisticated without being severe. A single gold barrette adds a focal point without cluttering the style.
Where this look is suitable: Garden parties, daytime ceremonies, semi-formal events where you want to look polished without going full formal. Works on fine to medium hair.
Step by step:
- Prep with volume spray. Apply a volumizing spray to damp hair, focusing on the roots.
- Diffuse or rough-dry. Dry hair with a diffuser or by scrunching with your hands until about 80% dry.
- Create waves. Use a 1.25-inch curling wand on random sections, wrapping away from the face. Leave the ends straight.
- Break up the waves. Shake the hair with your fingers to separate the curls into natural-looking waves.
- Pin one side. Take a section above one ear and sweep it back. Secure with a gold barrette.
- Set it. Mist with a light texturizing spray for hold and movement.
Tips and tricks: A texturizing spray gives the waves more grip and definition than hairspray alone. For finer hair, blow-dry with a round brush first to create a smooth base before adding waves. The barrette placement matters — positioning it just above the ear creates the most flattering line.

29 Stunning Summer Almond Nails for Women in 2026 💅
8.Soft Wavy Half-Up with Delicate Floral Accent
The overview: Warm blonde waves pulled back in a soft half-up style, pinned with a dusty rose flower that looks like it was plucked from the venue's centerpiece. The front sections are swept back gently, leaving a few face-framing pieces. It's romantic without being precious, and the floral accent ties you into the wedding's color palette without being matchy.
Why this look is popular: The half-up format is forgiving — it works on most face shapes and hair textures without requiring precision styling. A floral accent adds a natural element that feels organic rather than overdone. Warm blonde tones glow in evening lighting, making this particularly flattering for ceremonies that transition into receptions.
Where this look is suitable: Evening winery weddings, ceremonies with a romantic soft palette. The dusty rose flower works beautifully with blush, ivory, and sage color schemes.
Step by step:
- Create soft waves. Use a large-barrel curling iron on 1-inch sections. Brush through the waves with a wide-tooth comb for a blended look.
- Section the front. Take 2-inch sections from each temple, leaving a few wispy pieces out in front.
- Sweep and pin. Pull the front sections back toward the crown. Cross them over each other and pin where they meet.
- Add the flower. Pin a dusty rose flower clip or fresh bloom where the sections meet. Position it so it sits naturally among the waves.
- Adjust face-framing pieces. Gently pull the loose pieces around your face to the desired length and shape.
- Set with spray. Mist with flexible-hold hairspray to keep the waves soft and the pinned sections secure.
Tips and tricks: If using a fresh flower, wrap the stem in floral tape before pinning to prevent it from wilting or damaging the hair. Choose a bloom that matches the wedding's floral arrangements for a cohesive look. A light mist of shine spray on the waves adds a healthy glow in photos.
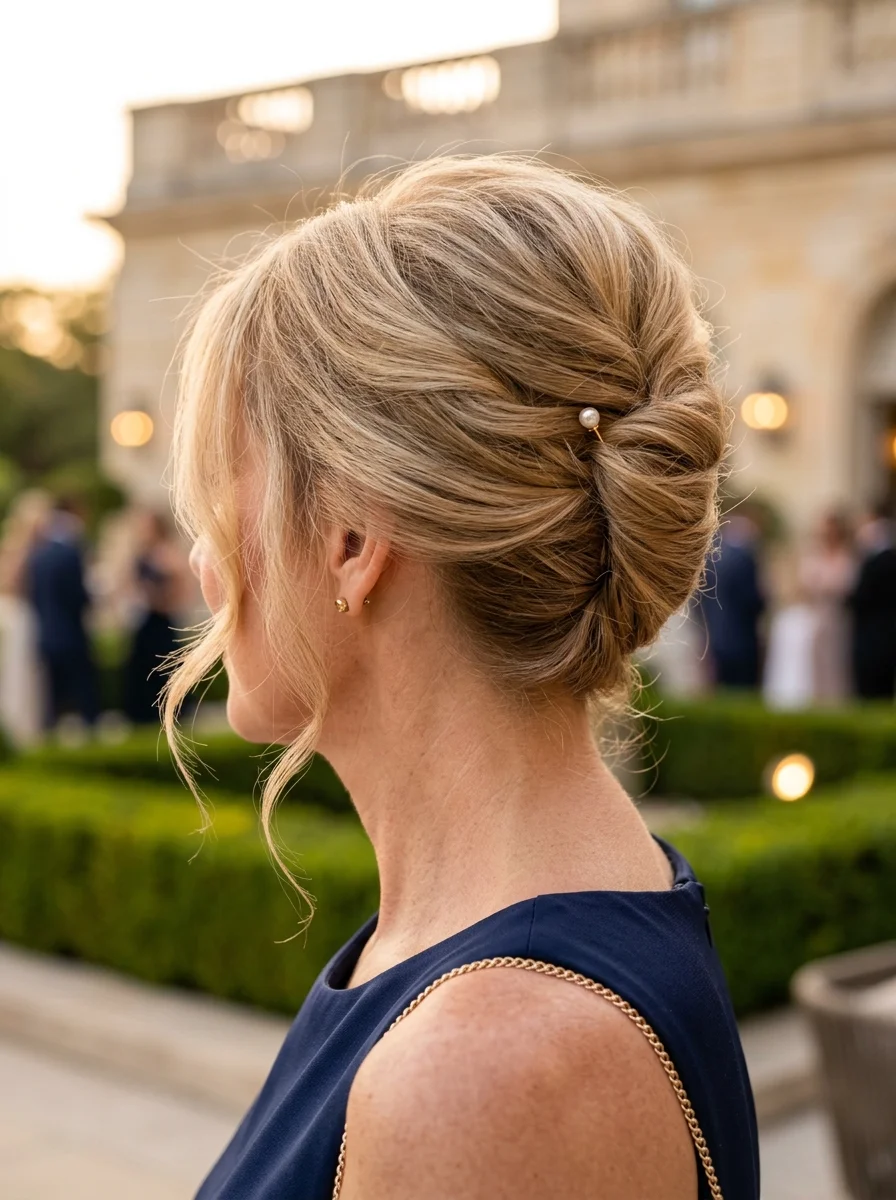
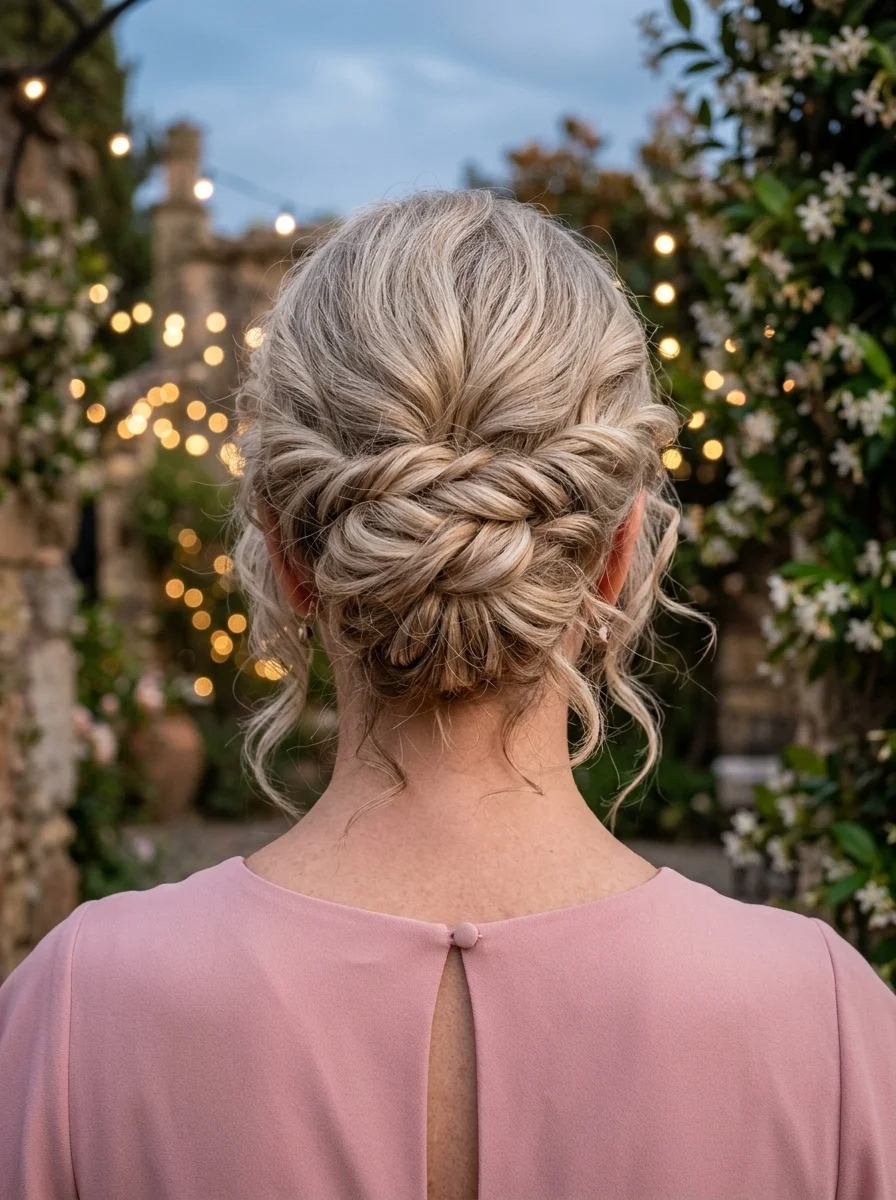
9.Effortless Chic Woven Updo with Pearl Accents
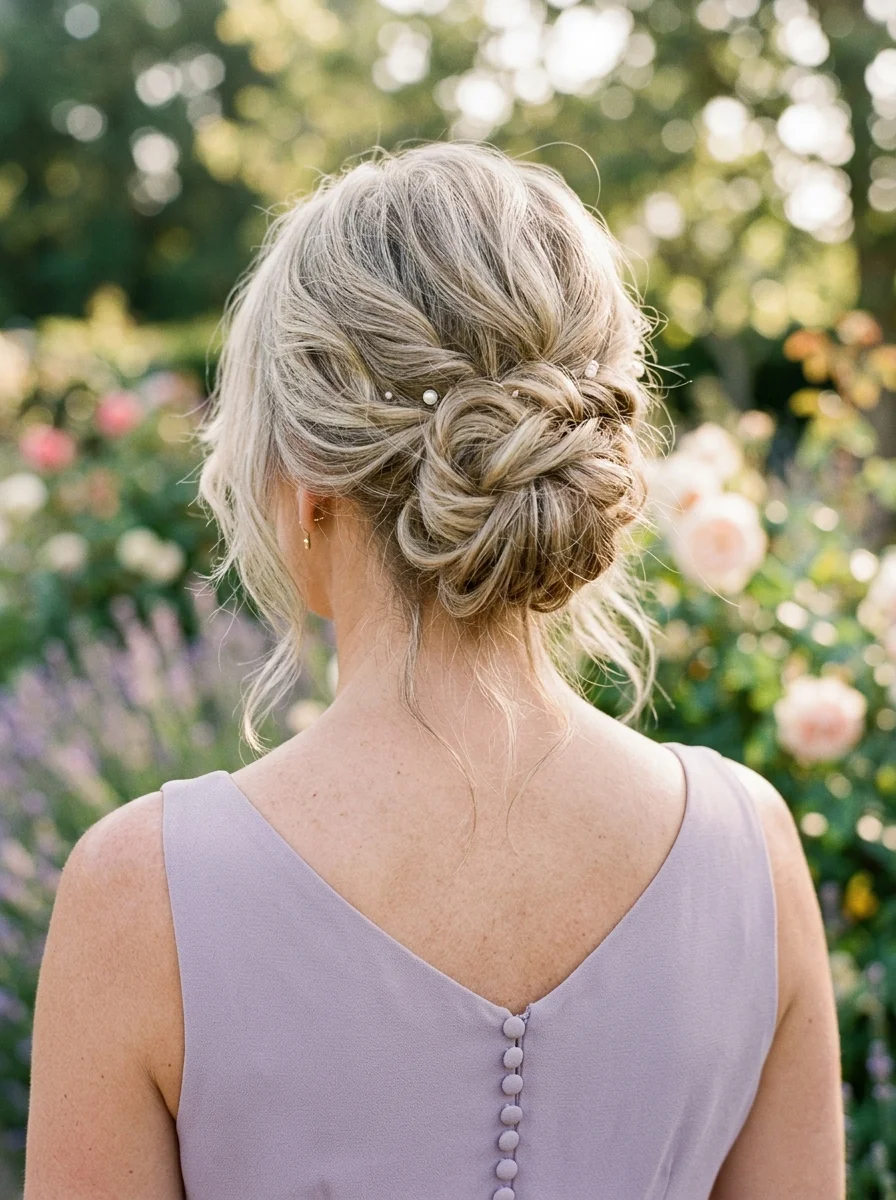
The overview: Ash blonde and platinum tones woven into a low updo that has real texture. Pearl pins are tucked throughout, catching light without overwhelming the style. The weaving technique gives the updo dimension — it's not a simple bun, it's a sculptural piece that happens to be made of hair.
Why this look is popular: A woven updo looks more complex than a standard bun, which makes it feel special without requiring hours of styling. The weave creates natural shadows and highlights that make the hair look thicker and more dimensional. Pearl pins scattered throughout add scattered points of light without weighing the style down.
Where this look is suitable: Outdoor garden ceremonies, formal receptions, any venue where the light can play off the pearls and the dimensional color. This style photographs beautifully from every angle.
Step by step:
- Prep with grip. Apply a texturizing spray or dry shampoo to give the hair something to hold onto. Slippery hair won't maintain the weave.
- Loosely section. Divide the hair into three to four irregular sections at the back of the head.
- Weave and fold. Take each section, loosely twist or weave it, and fold it toward the nape. Pin each section as you go, building the updo organically.
- Tuck and pin. Tuck the ends of each section underneath the woven shape. Use matching bobby pins to secure everything.
- Add pearl pins. Scatter small pearl pins throughout the woven sections. Focus on areas where the weave creates natural pockets.
- Set it. Mist with strong-hold hairspray. Gently pull at a few sections to loosen the weave slightly for a more relaxed finish.
Tips and tricks: Work with second-day hair for the best grip. If your hair is fine, backcomb each section lightly before weaving to add volume. The weave doesn't need to be symmetrical — organic, uneven weaving looks more modern and sophisticated.
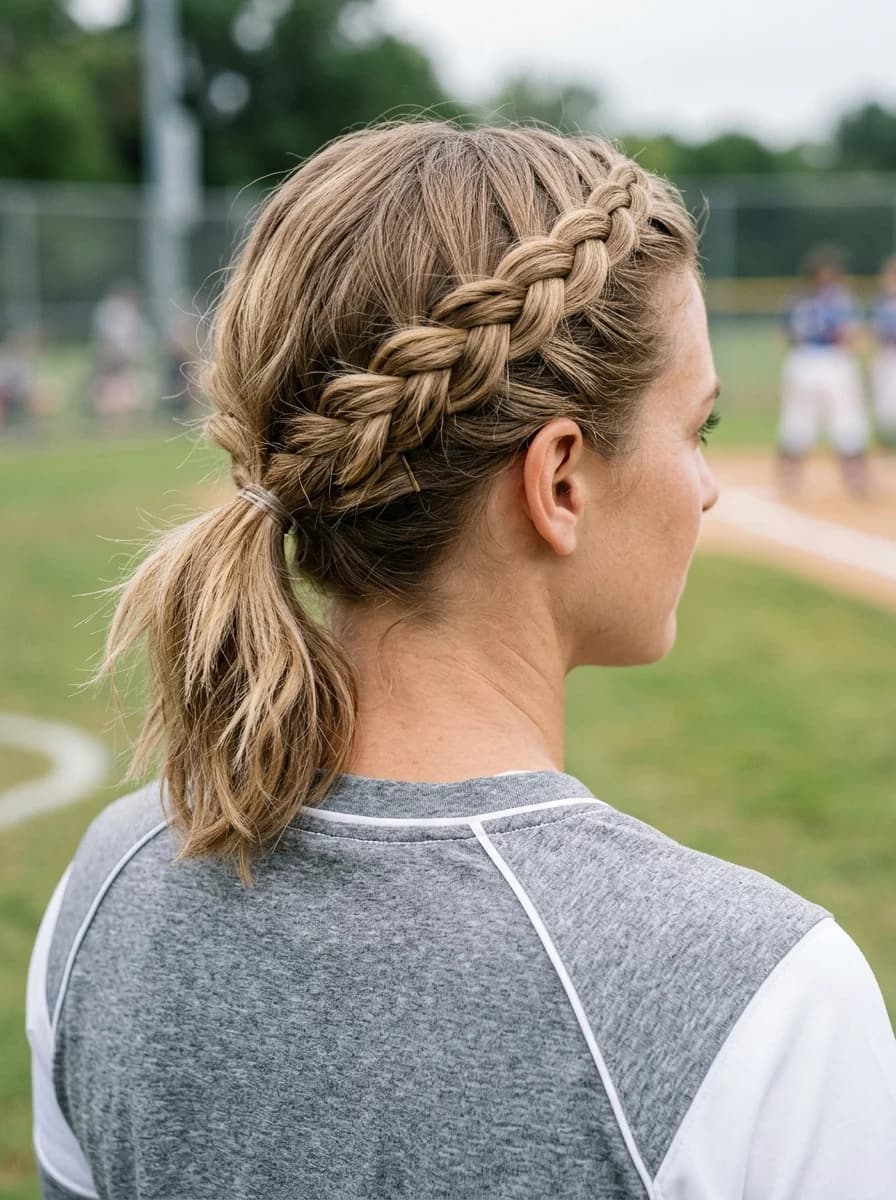
28 Stunning Softball Hairstyle Ideas with Braids for 2026 🥎✨
10.Braided Crown Half-Up with Beachy Waves
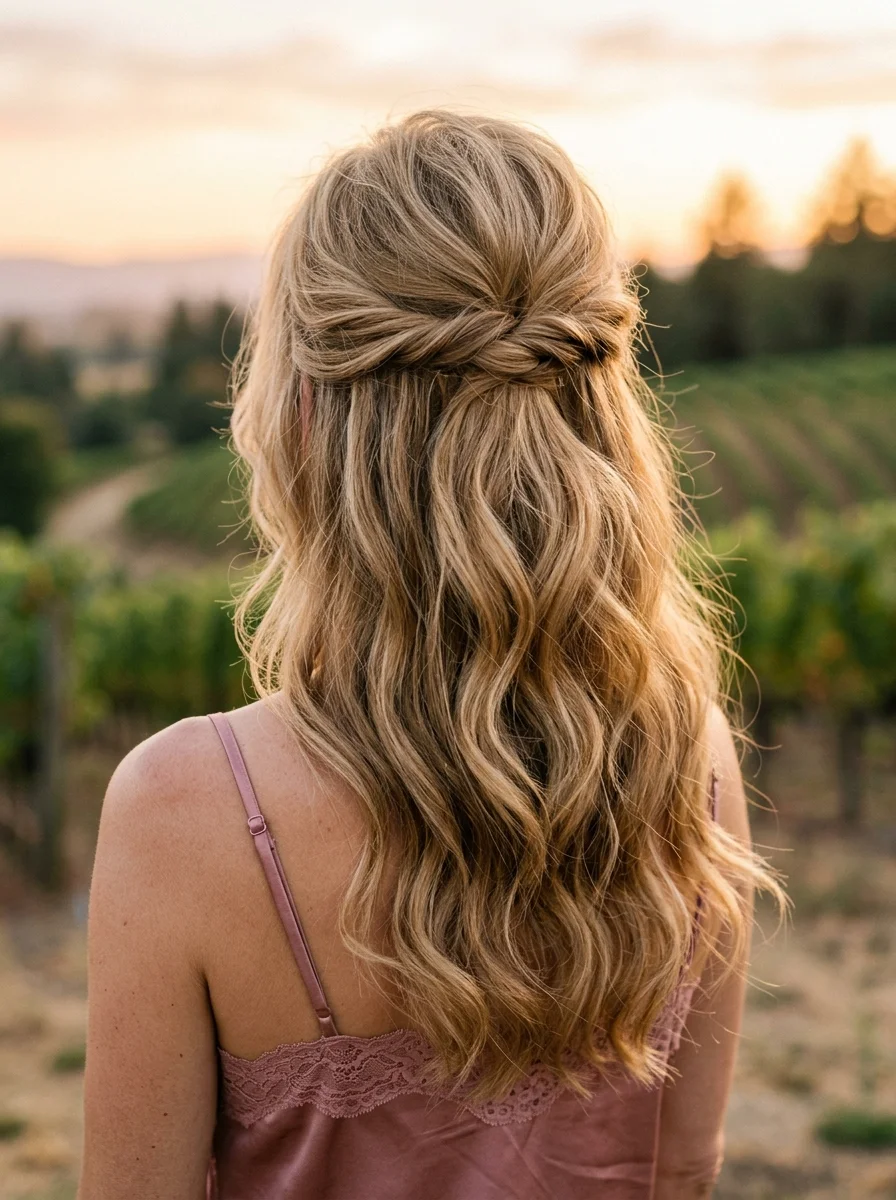
The overview: Golden blonde hair twisted from both the temples and meeting at the nape, with voluminous waves flowing down from underneath. The twists keep the front clean and off your face, while the waves add movement and softness. It's structured and free at the same time — which is harder to pull off than it sounds. The golden blonde tone catches sunset light in a way that makes the whole thing glow.
Why this look is popular: The twisted braid is a timeless style that works across generations — it's not too young, not too matronly, just elegant. The twisted braid creates a natural frame for the face, and the waves underneath add volume and movement. On golden blonde hair, the braid pattern is highly visible and creates beautiful dimension.
Where this look is suitable: Vineyard at sunset, outdoor venues where golden hour light makes everything look cinematic. The beachy waves keep it from feeling too stiff or formal.
Step by step:
- Create waves first. Use a large-barrel curling wand on 1.5-inch sections. Let them cool completely before touching.
- Section for the braid. Take a 3-inch section from both temple.
- Twist both the braids. Twist both the braids along the hairline, adding small sections as you go. Merge both the twisted brain ends to the center of the nape and tie them together with an elastic.
- Release and fluff the waves. Shake out the waves gently with your fingers. Pull a few pieces forward to frame the face.
- Set it. Mist with flexible-hold hairspray. A light shine spray on the waves adds extra glow.
Tips and tricks: Braid with slightly damp hair for better grip and a smoother result. If your hair is layered, the shorter pieces may poke out of the braid — use a small amount of styling cream to smooth them in. The waves underneath don't need to be perfect — the braid is the focal point.
11.Deep Side Part Hollywood Waves with Vintage Sparkle
The overview: Dark brunette hair swept into deep, sculpted Hollywood waves with a dramatic side part. A crystal barrette sits at the temple, holding back the deep side section. This is old Hollywood glamour updated for 2026 — the waves are polished but not rigid, the sparkle is vintage but not costumey. It's the kind of hair that makes people stop and stare.
Why this look is popular: Hollywood waves are one of the most universally flattering formal styles — they frame the face beautifully and create a dramatic silhouette. The deep side part adds asymmetry that's more interesting than a center part. On dark brunette hair, the sculpted waves catch light in glossy ribbons that look incredible in photos.
Where this look is suitable: Black-tie galas, formal evening ceremonies, any event where you want to make a statement. Pair with a floor-length gown and you'll look like you stepped out of a classic film.
Step by step:
- Smooth the base. Apply a smoothing cream and blow-dry hair straight with a paddle brush. The smoother the base, the cleaner the waves.
- Create a deep side part. Use a rat-tail comb for precision. The deeper the part, the more dramatic the result.
- Wave with a large barrel. Use a 1.5-inch curling iron, wrapping sections away from the face. Pin each curl to cool in a coiled shape.
- Release and brush. Once completely cool, release the pins and brush through with a soft bristle brush. The waves should merge into a continuous S-pattern.
- Sculpt the waves. Use your fingers and a tail comb to define each ridge of the wave pattern. Clip the waves in place and let them set for 10 minutes.
- Add the barrette. Place a crystal barrette at the temple on the deep-part side. Mist with strong-hold hairspray.
Tips and tricks: The key to Hollywood waves is patience — let each curl cool completely before brushing. Use a shine spray for that glossy finish. If your hair won't hold a wave, apply a setting lotion before curling. Sleeping on a silk pillowcase preserves the waves overnight for a second-day event.

22 Office Nail Designs That Are Professional But Never Boring
12.Elegant Twisted Half-Up with Soft Waves
The overview: Bronde hair twisted back from both sides and pinned at the crown, with the rest cascading in soft, loose waves. Crystal pins are scattered where the twists meet, catching light without overwhelming the style. It's formal enough for a ballroom but relaxed enough that you won't feel like you're wearing a costume. The bronde dimension makes the twists visually interesting from every angle.
Why this look is popular: The twisted half-up is a crowd-pleaser because it's easy to wear and works on most hair types. The crystal pins add just enough sparkle for a formal event without tipping into overdone. Bronde (brown-blonde blend) is one of the most flattering color options because it bridges warm and cool tones.
Where this look is suitable: Classic ballroom receptions, formal evening ceremonies. The twisted detail adds visual interest from behind, which matters when you're standing at the front of the room during the ceremony.
Step by step:
- Create soft waves. Use a large-barrel curling iron on 1.5-inch sections. Brush through with a wide-tooth comb for a blended finish.
- Section the front. Take 2-inch sections from each temple, leaving a few face-framing pieces out.
- Twist each section. Twist each section away from the face, keeping the tension moderate. The twist should be visible but not tight.
- Pin at the crown. Bring both twists to the back of the head and pin where they meet. Cross the pins for extra security.
- Add crystal pins. Place crystal pins where the twists meet. Three to five pins clustered together create a focal point.
- Adjust and set. Pull the face-framing pieces to the desired length. Mist with flexible-hold hairspray.
Tips and tricks: The twists don't need to be perfectly symmetrical — slight variation looks more natural. For extra hold, backcomb the crown area lightly before twisting. Crystal pins catch light from every direction, so place them where they'll be most visible during the ceremony.
13.Boho Waterfall Braid Half-Up
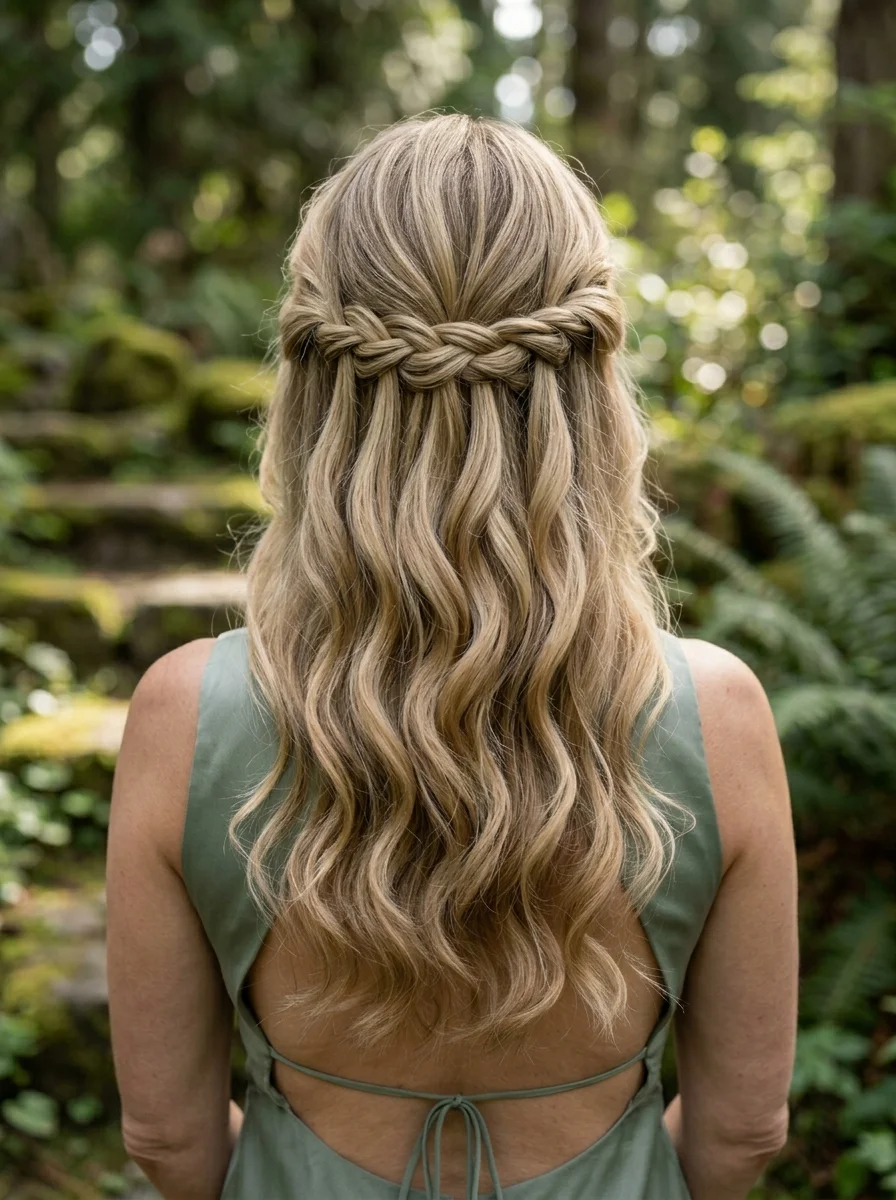
The overview: Ash blonde hair woven into a waterfall fishtail braid that runs from one temple to the back of the head. The braid sits on top of loose waves, and the "waterfall" strands fall through each section, creating a cascading effect. It's bohemian without being messy, intricate without being fussy. The ash blonde dimension makes every woven strand visible.
Why this look is popular: The waterfall braid is one of the most photogenic half-up styles because it creates a visible pattern that catches the eye. The fishtail technique adds more texture than a standard three-strand braid. On ash blonde hair with highlights, the braid shows off the color dimension beautifully.
Where this look is suitable: Garden or vineyard ceremonies with a relaxed bohemian vibe. This style works particularly well with highlights or balayage because the braid shows off the color dimension.
Step by step:
- Wave the hair first. Create loose waves with a large-barrel curling iron. Brush through gently.
- Start the braid. Take a 2-inch section at one temple. Divide into two for a fishtail braid.
- Waterfall technique. Cross a small piece from the outer edge over to the other side. Then drop the bottom strand and pick up a new section from above to replace it. This creates the "waterfall" effect.
- Continue along the side. Keep braiding along the side of the head, dropping and picking up sections as you go. Maintain consistent tension.
- Continue to the opposite side. Continue doing so until the braid reaches the opposite side of the head.
- Secure the braid. Secure the end of the braid with a bobby pin or under the braid itself.
- Pancake the braid. Gently pull the outer loops to widen the braid and make the waterfall strands more visible.
- Add finishing touches. Add any hair accessories or pins to the braid.
Tips and tricks: Practice the waterfall technique once or twice before the event — it's a specific motion that feels awkward at first. Keep the dropped strands even in length for a cleaner look. A texturizing spray before braiding helps the strands hold their shape without slipping.

24 Stunning Festival Hairstyle Ideas for Music Concert Nights 2026 🎶✨
14.Chic Twisted Chignon with Loose Tendrils
The overview: Ash blonde hair twisted into a low chignon, secured with a single pearl pin. The key detail here is the loose tendrils that fall around the face and ears — they soften the whole look and keep it from feeling too structured. It's polished, but it breathes. The pearl pin adds a quiet elegance that doesn't compete with the relaxed texture.
Why this look is popular: The loose tendrils are what make this chignon special — they add softness and movement that a tight bun lacks. The single pearl pin is a restrained accessory choice that reads as confident rather than decorated. Ash blonde tones look particularly elegant in this relaxed updo format.
Where this look is suitable: Upscale garden receptions, outdoor ceremonies. The loose pieces catch the breeze and move naturally, which looks incredible in photos and video.
Step by step:
- Prep with texture. Apply a light texturizing spray to give the hair grip. Smooth hair with a boar bristle brush without flattening it.
- Leave tendrils out. Before gathering, separate 1-inch sections on each side of the face and behind the ears. Let them hang loose.
- Gather and twist. Pull the remaining hair to the nape. Twist into a chignon, wrapping loosely for visible texture.
- Pin underneath. Secure with bobby pins that match your hair color, tucking them under the bun.
- Add the pearl pin. Place a single pearl pin at the side of the chignon for a subtle focal point.
- Shape the tendrils. Use a curling wand to add a slight bend to the loose tendrils if they're straight. Mist with flexible-hold hairspray.
Tips and tricks: The tendrils should look natural, not styled — a slight bend is more flattering than a defined curl. Use a 1-inch curling wand and wrap loosely for the most organic result. Keep the chignon slightly off-center for a more modern, less formal appearance.
15.Bubble Braid Half-Updo with Loose Waves
The overview: Golden blonde hair pulled into a half-up bubble braid — that's the style where sections are tied off to create rounded "bubbles" down the length. The rest of the hair falls in loose waves. It's playful without being juvenile, trendy without being try-hard, and it photographs like a dream. The golden blonde tone makes each bubble glow.
Why this look is popular: Bubble braids are easier than actual braiding — you're just tying elastics at intervals and pulling the sections apart. The result looks more complex than it is. The half-up version keeps the volume and interest at the crown while the loose waves add softness below.
Where this look is suitable: Rooftop receptions, modern venues, more casual ceremonies where you want a contemporary edge. The bubble braid adds a trendy element that younger guests will notice and appreciate.
Step by step:
- Create waves. Use a 1.25-inch curling wand on 1-inch sections. Break up the waves with your fingers.
- Gather the half-up section. Take a section from the temples upward and secure it at the crown with an elastic.
- Bubble the section. Tie an elastic 2 inches down from the base. Gently pull the section between the two elastics to create a rounded bubble.
- Continue bubbling. Add more elastics at 2-inch intervals down the length, pulling each section apart to form bubbles.
- Adjust the bubbles. Gently pull the edges of each bubble to make them fuller and more uniform.
- Set it. Mist with flexible-hold hairspray to keep the bubbles defined and the waves soft.
Tips and tricks: Use clear elastics so they disappear into the golden blonde hair. For more defined bubbles, make sure each section is pulled tight before gently puffing it out. If your hair is fine, backcomb each bubble slightly for added volume. This style works on medium to long hair.
36 Trendy FIFA World Cup Nail Designs (2026)
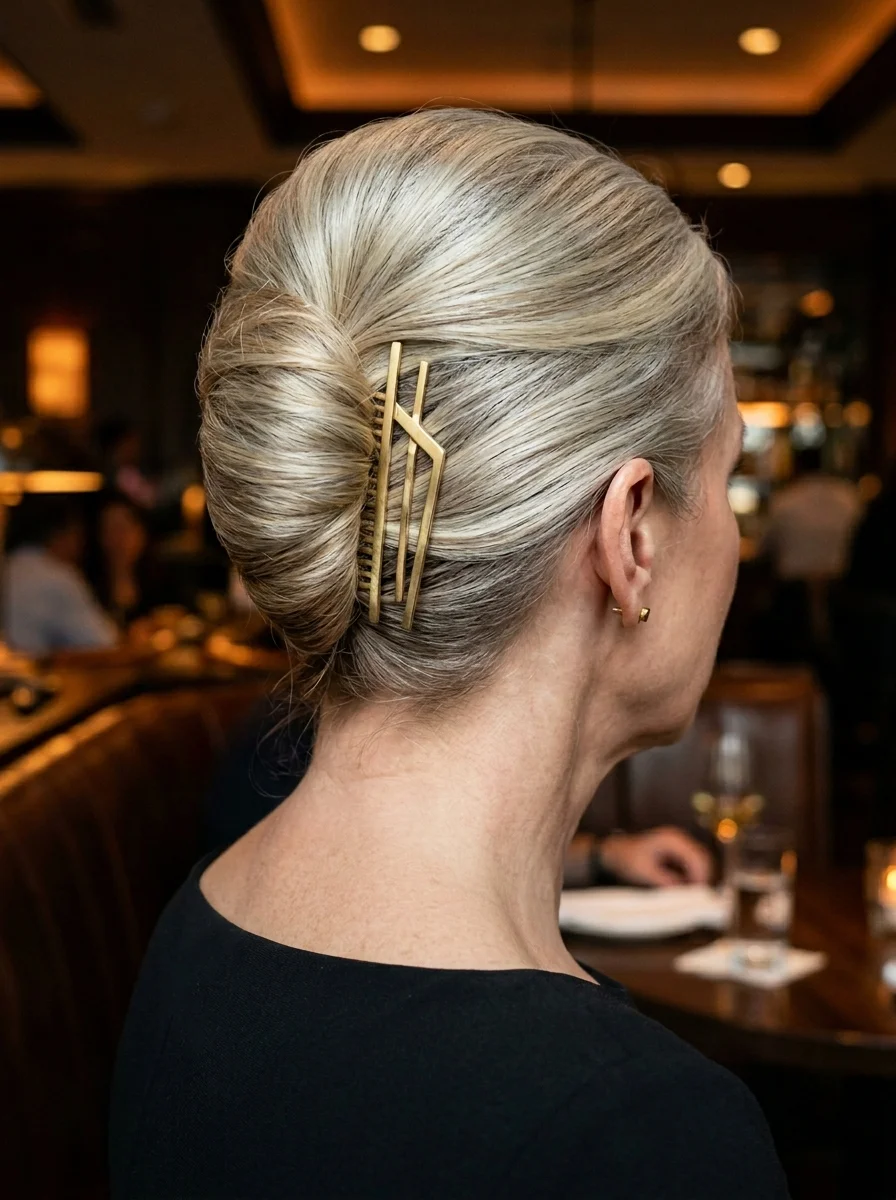
16.Effortless Messy Bun with Chic Gold Chain Accent

The overview: Dark blonde hair pulled into a messy bun that's anything but accidental. A gold chain is wrapped around the base, adding an unexpected edge to an otherwise casual style. The bun sits high enough to show off your neckline, and the loose pieces around your face keep it soft. It's the hairstyle equivalent of wearing jeans with a blazer — casual meets polished.
Why this look is popular: The messy bun is universally flattering and comfortable — you can wear it all day without it loosening or feeling heavy. The gold chain elevates it from everyday to event-appropriate without overcomplicating the style. Dark blonde hair provides a warm base that complements gold accessories naturally.
Where this look is suitable: Rustic lodge or barn venues, casual celebrations where you want to look dressed up without overdressing. The gold chain elevates the whole thing without making it feel formal.
Step by step:
- Add texture. Apply dry shampoo or texturizing spray to give the hair grip and volume. This is essential for a messy bun that holds.
- Gather high. Pull all hair into a high ponytail at the crown. Don't smooth it too much — texture is the goal.
- Create the bun. Twist the ponytail loosely and wrap it around the base. Don't tuck the ends — let them stick out slightly for a casual finish.
- Pin loosely. Use bobby pins to secure the bun, but don't make it too tight. Pull a few sections loose for volume.
- Add the gold chain. Wrap a thin gold chain around the base of the bun two to three times. Tuck the ends underneath to secure.
- Frame the face. Pull loose pieces around the temples and ears. Mist with flexible-hold hairspray.
Tips and tricks: The messier the better for this style — don't overthink it. If the bun feels too loose, add a few more pins rather than tightening it. A light texturizing spray on the loose pieces around the face adds definition without stiffness. For extra security, use a hair tie first, then build the bun around it.
17.Soft Honey Blonde Layers with Wispy Fringe
The overview: Honey blonde layers cut to fall just below the shoulders, with wispy bangs that brush the eyebrows. No accessories, no pins, no complications — just a really good haircut that frames your face and moves naturally. Sometimes the best hairstyle is the one that doesn't try to be anything other than well-cut hair. The honey blonde tone is warm and flattering in every light.
Why this look is popular: A great haircut speaks for itself. The layers create natural movement and volume without any styling effort, and the wispy fringe softens the face and draws attention to the eyes. Honey blonde is universally flattering — warm enough to glow, natural enough to look effortless.
Where this look is suitable: Daytime garden ceremonies, casual celebrations, any wedding where you want to look polished without going full formal. Works on most hair textures from straight to wavy.
Step by step:
- Wash and condition. Use a volumizing shampoo and lightweight conditioner. Avoid heavy conditioners that weigh down the layers.
- Blow-dry with a round brush. Dry section by section, lifting at the roots for volume. Roll the ends under with the brush for a polished finish.
- Shape the fringe. Use a round brush to blow-dry the bangs forward, lifting at the roots for a light, wispy finish.
- Add a light bend. If desired, use a large-barrel curling iron on the ends of the layers for a subtle inward curve.
- Finish with shine. Apply a light shine serum to the ends for a healthy, glossy finish. Avoid the roots to prevent flatness.
Tips and tricks: Get the cut trimmed two weeks before the event so it has time to settle into its natural shape. A heat protectant spray is essential before any hot tools. For fine hair, a root-lifting spray before blow-drying makes a noticeable difference in volume.

28 Stunning Baddie Summer Hairstyles for 2026 🔥☀️
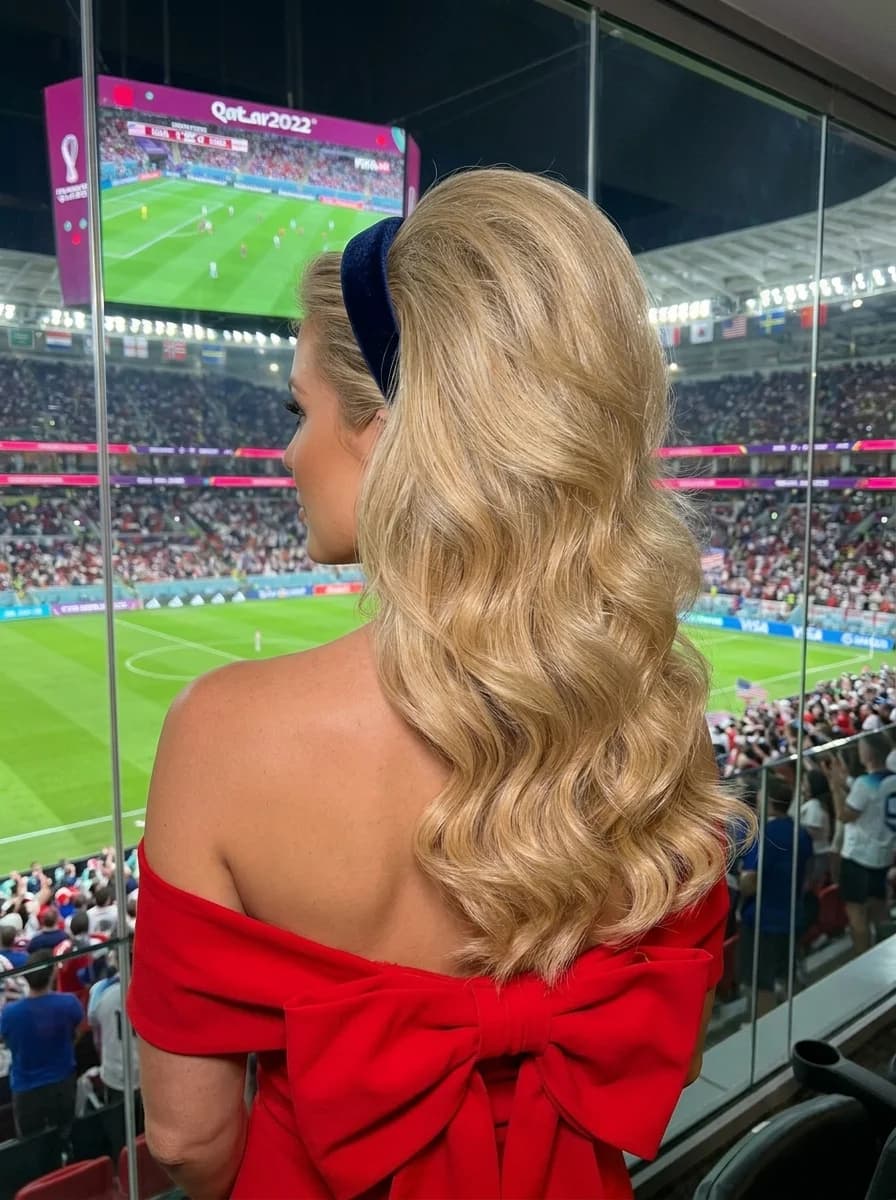
18.Elegant Low Ponytail with Hollywood Waves
The overview: Pale blonde hair gathered into a sleek low ponytail, but the tail itself is styled in structured Hollywood waves. A velvet bow sits at the base, covering the elastic and adding a luxe detail. It's a ponytail that means business — the kind you'd wear to a black-tie event and own the room. The contrast between the sleek crown and the wavy tail is what makes this look work.
Why this look is popular: This style takes a familiar, easy-to-wear format — the low ponytail — and elevates it with Hollywood wave technique. The sleek crown is universally flattering, and the velvet bow adds a tactile, luxurious detail. Pale blonde hair catches light in the waves, making each ridge visible and dramatic.
Where this look is suitable: Black-tie formal events, evening ceremonies, any occasion where you want polished glamour without a full updo. The contrast between sleek and wavy makes it photograph beautifully.
Step by step:
- Smooth the base. Apply a smoothing cream and blow-dry hair straight with a paddle brush. The crown must be sleek.
- Gather into a low ponytail. Pull hair to the nape and secure with a strong elastic. Smooth the surface with a boar bristle brush.
- Wave the tail. Using a 1.5-inch curling iron, create Hollywood waves in the ponytail. Pin each curl to cool in a coiled shape.
- Release and brush. Once cool, release the pins and brush the waves into a continuous S-pattern. Use a tail comb to define each ridge.
- Add the velvet bow. Tie or clip a velvet bow around the base of the ponytail, covering the elastic completely.
- Set it. Mist the crown with strong-hold hairspray for sleekness. Use a flexible spray on the waves to maintain movement.
Tips and tricks: The crown must be smooth for this look to work — use a boar bristle brush and a light serum to eliminate any flyaways. Let each curl in the ponytail cool completely before releasing. The velvet bow should be proportional to your hair — too small gets lost, too large overwhelms.
19.Braided Crown Half-Up Waves
The overview: Ash blonde and silver tones braided into a crown that wraps around the head, with loose waves flowing from underneath. The braid is tight enough to hold its shape but not so tight that it looks severe. It's a style that says you've been to a few weddings before and you know exactly what works. The silver tones catch light in the braid pattern, making it visually striking.
Why this look is popular: The braided crown is a proven winner — it's elegant, practical, and flattering on virtually everyone. It keeps hair off your face during the ceremony while the waves underneath provide movement and softness. On ash blonde and silver hair, the braid pattern is highly visible and creates beautiful texture.
Where this look is suitable: Romantic garden ceremonies, outdoor weddings. The crown braid keeps hair off your face during the ceremony, and the waves give you movement for the reception.
Step by step:
- Create waves. Use a large-barrel curling iron on 1.5-inch sections. Let them cool, then brush through gently.
- Start the braid. Take a 2.5-inch section at one temple. Begin a Dutch braid, crossing strands under.
- Braid around the crown. Continue the braid along the hairline, adding small sections as you go. Work your way around to the other side.
- Secure the end. Pin the end of the braid behind the opposite ear, tucking it under the loose hair.
- Adjust the waves. Shake out the waves gently and pull a few pieces forward to frame the face.
- Set it. Mist with flexible-hold hairspray to keep the braid defined and the waves soft.
Tips and tricks: Keep consistent tension as you braid around the crown — uneven tension creates visible lumps. If your hair is layered, shorter pieces may escape the braid — use a small amount of styling cream to smooth them in. The braid should sit flat against the head, not raised too high.

27 Stunning Graduation Day Nail Ideas for 2026 🎓
20.Braided Updo with Loose Tendrils
The overview: Ash blonde and silver hair braided and pinned into an updo that has real dimension. The braids create texture and visual interest, while loose tendrils around the face and nape keep the whole thing from feeling too structured. It's the balance between polished and relaxed that makes this work. The silver tones make every braid ridge visible and striking.
Why this look is popular: Braided updos look more intricate than smooth buns, which makes them feel special and event-worthy. The loose tendrils add softness that prevents the style from looking severe. On silver and ash blonde hair, the braid texture creates natural highlights and shadows that photograph beautifully.
Where this look is suitable: Evening garden ceremonies, formal receptions, candlelit events. The loose tendrils catch candlelight beautifully, and the braided detail photographs well from every angle.
Step by step:
- Prep with texture. Apply a texturizing spray to give the hair grip. Braid hold depends on texture.
- Section the hair. Divide into three to four sections. Leave 1-inch pieces out at the temples and nape for tendrils.
- Braid each section. Create three-strand braids on each section. Secure the ends with small clear elastics.
- Pin into an updo. Arrange the braids at the back of the head, folding and tucking them to create a cohesive shape. Pin with matching bobby pins.
- Loosen for texture. Gently pull at the braids to widen them and create more volume within the updo.
- Shape the tendrils. Use a curling wand to add a slight wave to the loose pieces. Mist with flexible-hold hairspray.
Tips and tricks: The tendrils should look natural, not styled — a slight bend is more flattering than a defined curl. Don't braid too tightly — looser braids create more volume when pinned into the updo. Use bobby pins that match your silver or ash blonde tone so they disappear into the style.
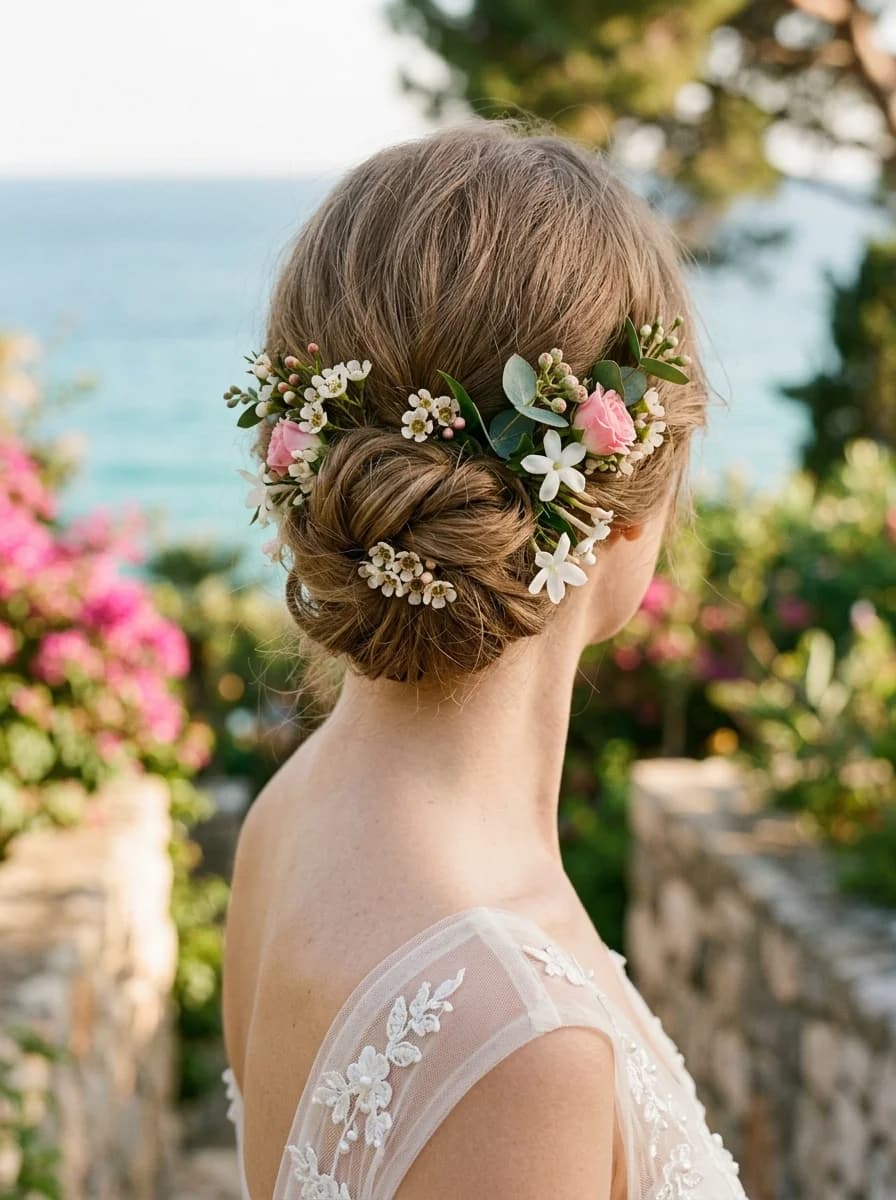
21.Boho Crown Braid with Cascading Flowers
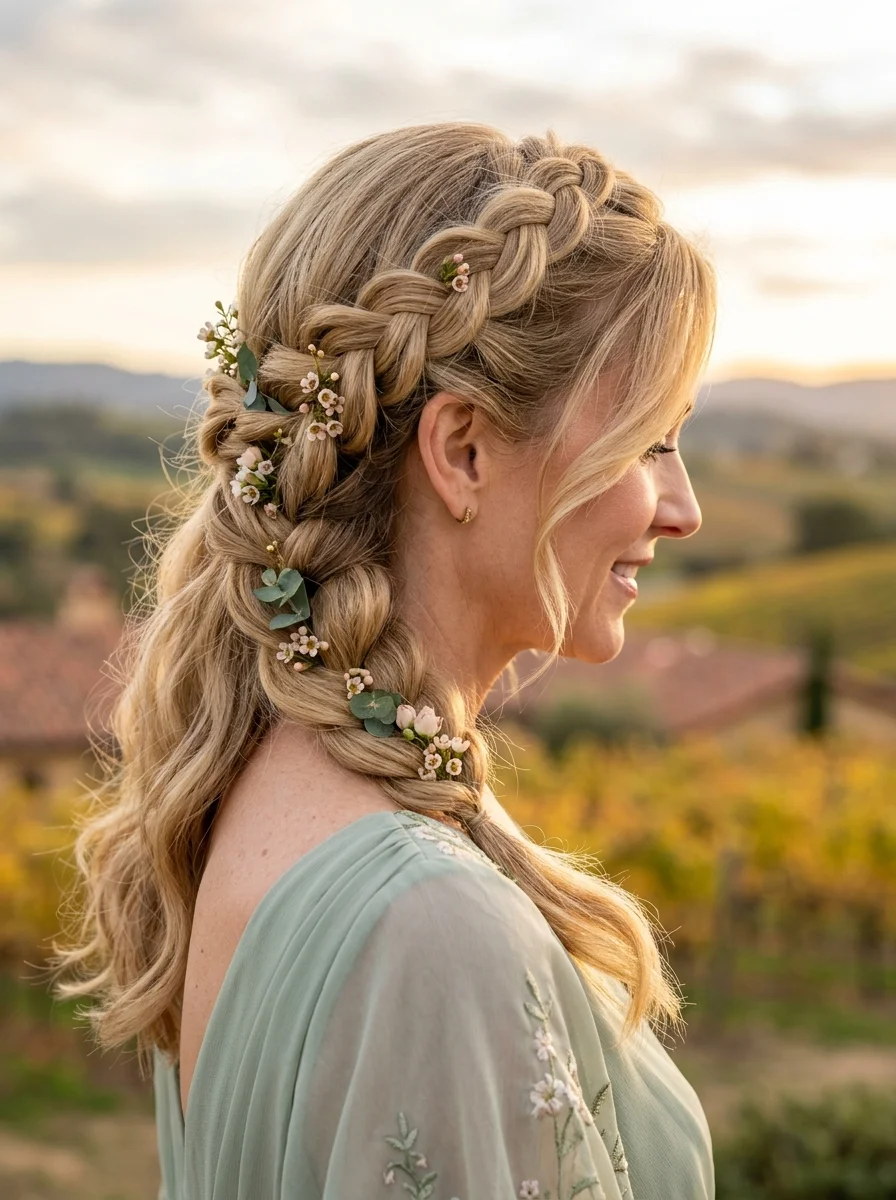
The overview: Golden blonde hair braided into a full crown, woven through with wax flowers and eucalyptus. It's the kind of hairstyle that makes you look like you belong in a field somewhere, even if you're in a banquet hall. The flowers add color and texture, and the braid itself is wide and pancaked for maximum impact. This is botanical beauty meets bridal elegance.
Why this look is popular: The crown braid with flowers is a showstopper that creates an instant focal point. The pancaked (widened) braid provides a wide canvas for floral placement, and the combination of fresh or preserved flowers with hair is inherently romantic. Golden blonde hair is an ideal base for this style because the warm tone complements natural greenery and blooms.
Where this look is suitable: Bohemian or outdoor weddings where the floral elements match the venue's aesthetic. Talk to your florist about using blooms that coordinate with the arrangements. Perfect for garden, forest, or vineyard settings.
Step by step:
- Prep the hair. Apply a texturizing spray for grip. The braid needs texture to hold its shape and support the flowers.
- Create the crown braid. Start at one temple and Dutch braid around the head, adding hair as you go. Keep the braid wide and loose.
- Pancake the braid. Gently pull the outer loops of the braid to widen it significantly. This creates the canvas for the flowers.
- Secure the braid. Tuck the end behind the starting point and pin securely. The braid should sit flat against the head.
- Add flowers. Weave small sprigs of wax flowers and eucalyptus through the braid, tucking stems under the braid loops. Distribute them evenly.
- Set it. Mist with strong-hold hairspray. Avoid spraying directly on fresh flowers — hold the can at a distance.
Tips and tricks: Use preserved or silk flowers if you're worried about fresh blooms wilting. Wrap wire stems in floral tape before inserting to prevent them from scratching the scalp. Start with fewer flowers and add more as needed — it's easier to add than to remove.
24 Stunning Bridesmaid Hairstyles for Weddings 2026 💍✨
22.Twisted Crown Half-Up with Loose Waves
The overview: Warm blonde hair twisted back from the face on both sides, meeting at the crown where a pearl pin holds everything together. The rest of the hair falls in loose, natural waves. It's Parisian-chic in the sense that it looks effortless but clearly involves some skill. The twist is tighter than a braid, which gives it a more modern feel.
Why this look is popular: Twists are faster and easier than braids, but they create a similar visual effect. The half-up format is universally flattering, and the pearl pin adds a refined focal point. Warm blonde tones glow in natural light, making this style particularly photogenic for outdoor ceremonies.
Where this look is suitable: Classic, timeless ceremonies, Parisian-chic venues, any event with a refined aesthetic. The warm blonde tone and pearl detail work with everything from navy to champagne to ivory.
Step by step:
- Create waves. Use a large-barrel curling iron on 1.5-inch sections. Brush through with a wide-tooth comb for a natural finish.
- Section the front. Take 2-inch sections from each temple. Leave a few face-framing pieces loose.
- Twist each section. Twist each section away from the face, keeping the tension moderate. The twist should be visible and smooth.
- Pin at the crown. Bring both twists to the back and pin where they meet. Cross the pins for extra hold.
- Add the pearl pin. Place a single pearl pin at the center where the twists meet. This becomes the focal point.
- Set it. Mist with flexible-hold hairspray to keep the twists defined and the waves soft.
Tips and tricks: The twists should be tight enough to hold their shape but not so tight that they look severe. Use a light styling cream on each section before twisting for smoother results. The pearl pin should be proportional to the twist — too large overwhelms, too small gets lost.
23.Effortless Chignon with Soft Face-Framing Bangs
The overview: Light brown and honey blonde tones in a low chignon that sits right at the nape. Soft, wispy bangs frame the face, creating a youthful touch without looking like you're trying to recapture your twenties. The chignon itself is simple and clean — it's the bangs that give this style its personality. The dimensional color adds warmth and depth to the overall look.
Why this look is popular: The combination of a classic chignon with face-framing bangs creates a look that's both timeless and modern. The bangs soften angular features and draw attention to the eyes, while the chignon keeps the overall silhouette clean and elegant. Light brown and honey blonde tones are universally flattering.
Where this look is suitable: Any wedding where you want a timeless look that flatters your face shape. The bangs soften angular features and draw attention to your eyes. Works equally well for daytime and evening ceremonies.
Step by step:
- Smooth the hair. Apply a smoothing serum and blow-dry straight with a paddle brush. The chignon needs a sleek base.
- Separate the bangs. Section out the fringe area. Use a round brush to blow-dry them forward with a slight curve.
- Gather into a low ponytail. Pull all remaining hair to the nape and secure with an elastic.
- Form the chignon. Twist the ponytail and wrap it into a neat bun at the nape. Pin underneath with matching bobby pins.
- Refine the bangs. Use a flat iron on low heat to smooth the bangs if needed. They should fall softly across the forehead.
- Set it. Mist with strong-hold hairspray on the chignon. Use a light spray on the bangs to keep them in place without stiffness.
Tips and tricks: The bangs should be wispy, not heavy — less is more. If your bangs are too long, get them trimmed a week before the event so they settle. A light dry shampoo on the bangs prevents them from getting oily throughout the day. The chignon doesn't need to be perfect — a slightly imperfect shape looks more modern.
30 Trendy Summer French Tip Nail Designs for 2026 💅
24.Sleek Chin-Length Bob with a Side Part

The overview: Honey blonde hair cut into a precision blunt bob that hits right at the chin. Deep side part, clean lines, zero fuss. Pearl drop earrings finish the look. This isn't a hairstyle that needs accessories or updo tricks — it's a great cut that does all the work for you. The honey blonde tone adds warmth and dimension to the clean geometric shape.
Why this look is popular: A precision bob is one of the most confident style choices you can make. It communicates that you don't need volume or accessories to look polished. The deep side part adds asymmetry and drama, while the chin-length cut highlights the jawline and neck. Honey blonde keeps it warm and approachable.
Where this look is suitable: Modern, sophisticated venues — minimalist spaces, art galleries, architectural settings. The clean lines pair beautifully with structured dresses and minimalist jewelry. Works best on straight to slightly wavy hair.
Step by step:
- Wash and condition. Use a smoothing shampoo and conditioner. Avoid volumizing products that create frizz.
- Blow-dry straight. Use a paddle brush and dry section by section, pulling the hair straight as you go.
- Flat iron if needed. Pass a flat iron through each section for a sleek, polished finish. Use a heat protectant first.
- Create the deep side part. Use a rat-tail comb for a precise, sharp line. The deeper the part, the more dramatic.
- Tuck or sweep. Tuck the shorter side behind the ear or let it fall naturally. The longer side should sweep across the forehead.
- Finish with shine. Apply a light shine serum to the ends for a glossy finish. Avoid the roots.
Tips and tricks: Get the bob trimmed two weeks before the event for the sharpest lines. A heat protectant is essential before flat-ironing. For fine hair, a light volumizing mousse at the roots prevents the bob from looking flat. Pearl earrings are the perfect accessory — they complement the clean lines without competing.
25.Elegant Twisted Chignon with Floral Embellishment
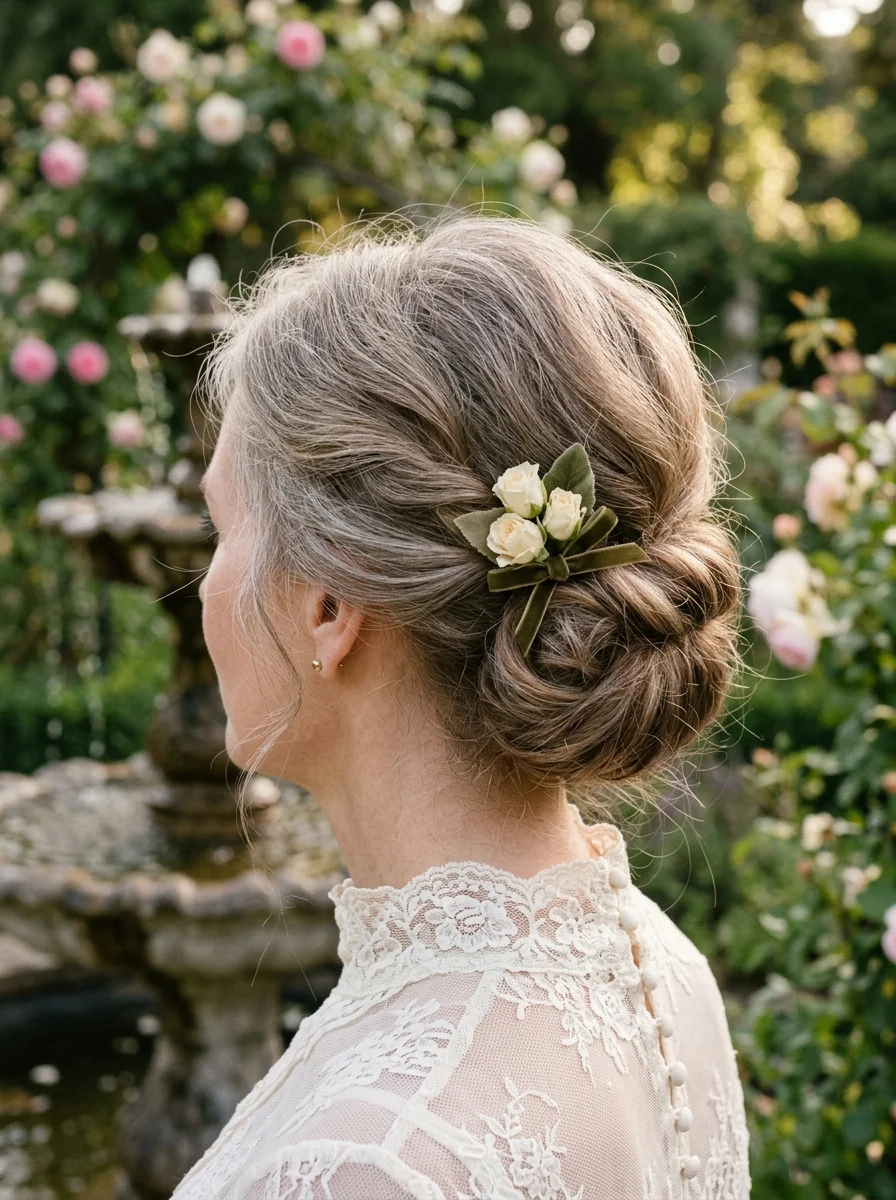
The overview: Silver-grey hair twisted into a low chignon that's both structured and soft. Cream roses are tucked into the bun, adding a romantic touch that connects you to the wedding's floral design. The twist gives the chignon texture, and the flowers give it warmth. It's the kind of look that makes people say "that's exactly what a mother of the groom should look like."
Why this look is popular: The twisted chignon with flowers is a classic for a reason — it's elegant, photogenic, and connects your look to the wedding's overall aesthetic. Silver-grey hair provides a stunning backdrop for cream roses, creating a soft contrast that's both modern and timeless. The twist adds visual interest that a smooth bun lacks.
Where this look is suitable: Romantic garden ceremonies, spring and summer weddings. The cream roses work with white, ivory, blush, and sage color palettes. Ideal for ceremonies where the floral design is a key element.
Step by step:
- Smooth the base. Apply a smoothing serum to damp hair and blow-dry straight with a paddle brush. Silver-grey hair benefits from extra shine.
- Gather low. Pull all hair to the nape and secure with a clear elastic.
- Twist into a chignon. Twist the ponytail tightly and wrap it around the base, forming a structured bun. Pin underneath with matching pins.
- Add cream roses. Tuck two to three small cream roses into the chignon, positioning them at different angles. Use floral pins to secure.
- Refine the shape. Use a tail comb to smooth any flyaways on the crown and around the chignon.
- Set it. Mist with strong-hold hairspray. Avoid spraying directly on the flowers.
Tips and tricks: Use preserved or silk roses if you're concerned about wilting. Coordinate the rose color with the wedding's floral arrangements for a cohesive look. If using fresh roses, wrap the stems in floral tape before inserting to prevent damage to the hair. A light shine spray on silver-grey hair enhances its natural luminosity.
20 Stunning Half Up Half Down Hairstyles for Prom Night 2026 💃✨
26.Elegant Chignon with a Velvet Bow Accent
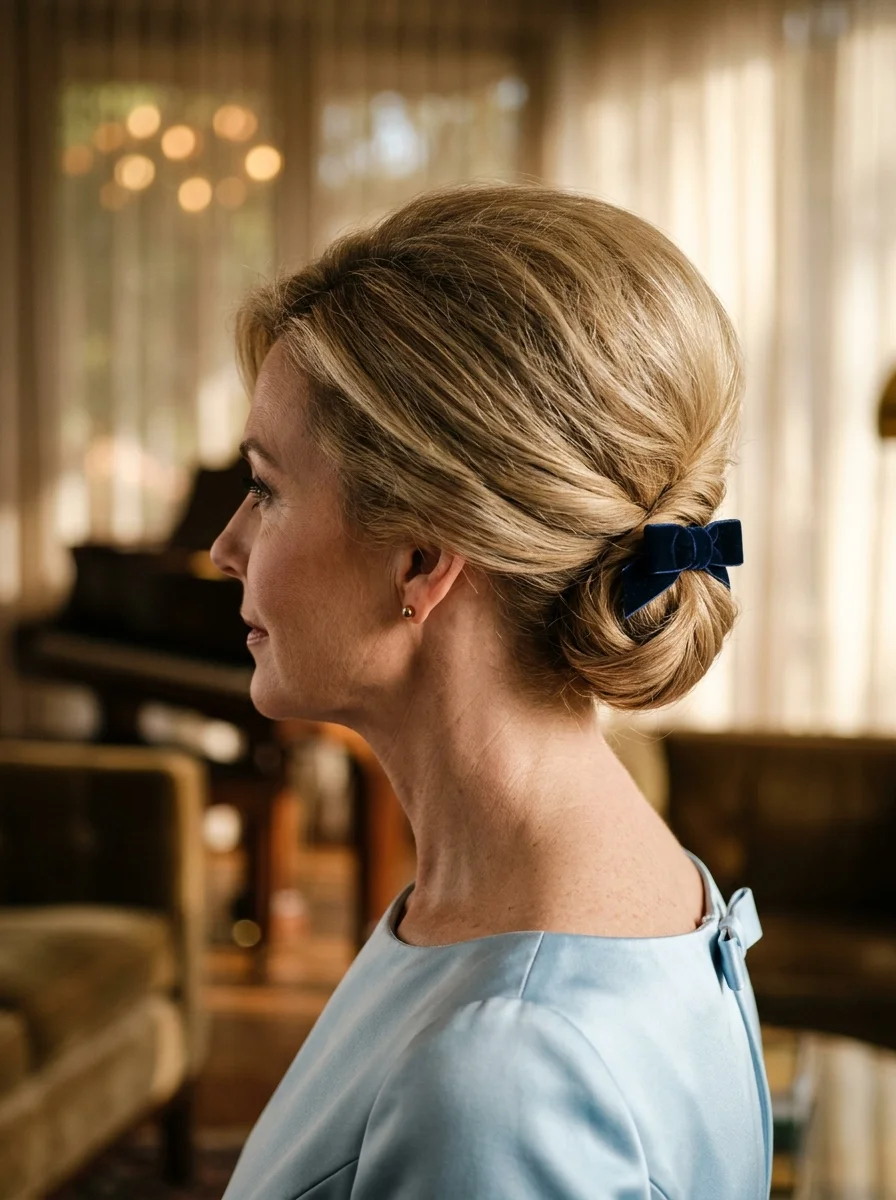
The overview: Golden blonde hair gathered into a low, smooth chignon. A navy velvet bow sits at the base, adding a preppy-chic detail that feels intentional without being loud. The bow is the kind of accessory that sparks conversations — people will ask where you found it, and you'll enjoy telling them. It's classic, polished, and just a little bit playful.
Why this look is popular: The velvet bow adds a tactile, luxurious element to a classic chignon. Navy velvet works across seasons — it's rich for fall and winter, crisp for spring. Golden blonde hair complements the warm tone of the velvet beautifully. The overall effect is preppy-chic without being costumey.
Where this look is suitable: Preppy or classic venues — country clubs, historic estates, any setting where tradition meets personal style. The navy bow works with navy, gold, cream, and burgundy color palettes.
Step by step:
- Smooth the hair. Apply a smoothing cream and blow-dry straight with a paddle brush. The chignon needs a sleek, polished base.
- Gather into a low ponytail. Pull all hair to the nape and secure with a strong elastic. Smooth the surface with a boar bristle brush.
- Form the chignon. Twist the ponytail and wrap it into a neat, smooth bun. Pin underneath with matching bobby pins.
- Add the velvet bow. Clip or tie a navy velvet bow at the base of the chignon, covering the elastic. Position it so it sits flat and centered.
- Refine the surface. Use a fine-tooth comb and a small amount of styling cream to smooth any flyaways on the crown.
- Set it. Mist with strong-hold hairspray to keep the chignon sleek and the bow in place.
Tips and tricks: Choose a bow that's proportional to your head and bun size — too large overwhelms, too small gets lost. A velvet bow stays in place better than silk or satin because the fabric has more grip. If the bow tends to slip, use a small bobby pin on each side to anchor it to the hair.
27.Braided Crown Half-Up with Loose Waves
The overview: Brown hair with natural silver streaks braided into a crown that wraps around the head, with loose waves flowing underneath. The silver streaks add natural dimension to the braid, and the waves keep the whole thing from feeling too formal. It's a style that embraces what your hair is doing naturally and works with it — not against it. The color variation makes the braid pattern pop.
Why this look is popular: Natural silver streaks in brown hair create built-in dimension that makes braids visually striking. The crown braid is a timeless style that works across generations. The half-up format keeps it approachable and comfortable while still looking formal enough for a wedding.
Where this look is suitable: Rustic-elegant venues — think barns with chandeliers or estates with vineyards. The natural color variation in the braid is a feature, not a flaw. Works beautifully for outdoor and indoor ceremonies.
Step by step:
- Create waves. Use a large-barrel curling iron on 1.5-inch sections. Brush through gently with a wide-tooth comb.
- Start the braid. Take a section at one temple. Begin a Dutch braid, crossing strands under to create a raised pattern.
- Braid around the crown. Continue along the hairline, adding small sections as you go. Work around to the other side.
- Secure the end. Pin the braid end behind the opposite ear, tucking it under the loose hair.
- Adjust the waves. Shake out the waves gently. Pull a few pieces forward to frame the face.
- Set it. Mist with flexible-hold hairspray to keep the braid defined and the waves natural.
Tips and tricks: The natural silver streaks are an asset — don't try to hide them. They make the braid pattern more visible and create beautiful dimension. If your hair is gray-resistant to holding a curl, apply a setting lotion before using hot tools. Keep the braid tension consistent for the cleanest result.
35 Cute & Trendy Short Summer Nails for 2026 ☀️
28.Soft Wavy Half-Up with Delicate Floral Accent
The overview: Dark blonde and bronde tones pulled back in a soft half-up style, pinned with a blush rose that ties into the wedding's color story. The waves are loose and natural, the floral accent is subtle, and the whole thing reads romantic without being overdone. It's the kind of style that looks just as good at the end of the night as it did at the beginning.
Why this look is popular: The half-up format is low-maintenance and forgiving — it doesn't require precision styling or constant touch-ups. A blush rose adds a natural element that connects you to the wedding's palette. Dark blonde and bronde tones are rich and dimensional, catching light beautifully in photos.
Where this look is suitable: Wine country ceremonies, vineyard venues, any setting with a soft, romantic palette. The blush rose pairs beautifully with dusty pink, mauve, and sage color schemes.
Step by step:
- Create soft waves. Use a large-barrel curling iron on 1-inch sections. Brush through with a wide-tooth comb for a blended look.
- Section the front. Take 2-inch sections from each temple, leaving a few wispy pieces loose in front.
- Sweep and pin. Pull the front sections back toward the crown. Cross them and pin where they meet.
- Add the blush rose. Pin a blush rose clip or fresh bloom where the sections meet. Position it to sit naturally among the waves.
- Adjust face-framing pieces. Gently pull the loose pieces to the desired length and shape.
- Set with spray. Mist with flexible-hold hairspray to keep the waves soft and the pinned sections secure.
Tips and tricks: Choose a rose that matches the wedding's floral arrangements for a cohesive look. If using a fresh flower, wrap the stem in floral tape before pinning. A light mist of shine spray on the waves adds a healthy glow that photographs beautifully.
29.Soft Hollywood Waves with a Sparkling Hair Comb
The overview: Bronde hair styled into soft Hollywood waves that sweep to one side, held in place by a crystal floral comb. The waves are structured but not stiff — they move when you move, which is the whole point. The comb adds sparkle without being costume jewelry, and the side sweep creates a dramatic silhouette that commands attention.
Why this look is popular: Hollywood waves are one of the most glamorous formal styles, and the side sweep adds drama that center-parted waves don't. The crystal floral comb serves as both a functional holder and a decorative element. Bronde hair catches light in the waves, creating visible ridges and dimension.
Where this look is suitable: Black-tie formal events, evening ceremonies, any occasion where you want old-Hollywood glamour. Pair with statement earrings and a classic gown for a look that's pure timeless elegance.
Step by step:
- Smooth the base. Apply a smoothing cream and blow-dry hair straight with a paddle brush. The waves need a sleek foundation.
- Create a deep side part. Use a rat-tail comb for precision. Sweep all hair to one side.
- Wave with a large barrel. Use a 1.5-inch curling iron, wrapping sections away from the face. Pin each curl to cool in a coiled shape.
- Release and brush. Once cool, release the pins and brush through with a soft bristle brush. The waves should merge into a continuous S-pattern.
- Sculpt and clip. Define each wave ridge with your fingers and a tail comb. Place the crystal floral comb at the temple to hold the swept side.
- Set it. Mist with strong-hold hairspray. A light shine spray adds extra gloss to the waves.
Tips and tricks: Let each curl cool completely before brushing — this is the most important step for lasting waves. The crystal comb should be placed where it catches light but doesn't overwhelm the wave pattern. For fine hair, apply a setting lotion before curling for extra hold. Sleep on a silk pillowcase to preserve the waves overnight.
29 Fun FIFA World Cup Watch Party Hairstyles (2026)
30.Elegant Twisted Chignon with Art Deco Comb
The overview: Silver-platinum hair twisted into a sleek chignon that sits low and clean at the nape. A gold Art Deco comb is placed at the side, adding geometric detail that feels both vintage and modern. The twist is smooth, the comb is striking, and the whole look says you have taste — the kind that doesn't follow trends but sets them. The silver-platinum color is luminous, and the gold comb creates a stunning contrast.
Why this look is popular: The Art Deco comb is a statement accessory that transforms a simple chignon into something architectural and intentional. Silver-platinum hair is one of the most striking natural colors, and the gold comb creates a warm-cool contrast that's visually dynamic. The sleek twist keeps the focus on the accessory.
Where this look is suitable: Modern formal venues — art deco hotels, geometric spaces, anywhere with architectural detail. The comb's design echoes the venue's aesthetic without being literal. Ideal for evening ceremonies and formal receptions.
Step by step:
- Smooth the base. Apply a smoothing serum and blow-dry straight with a paddle brush. The chignon must be sleek and polished.
- Gather low. Pull all hair to the nape and secure with a strong elastic. Smooth the surface with a boar bristle brush.
- Twist into a chignon. Twist the ponytail tightly and wrap it into a smooth, compact bun. Pin underneath with matching bobby pins.
- Refine the surface. Use a fine-tooth comb and a small amount of styling cream to smooth any flyaways on the crown and around the chignon.
- Place the Art Deco comb. Slide the gold comb into the side of the chignon at an angle, ensuring it sits securely and the geometric pattern is visible.
- Set it. Mist with strong-hold hairspray for all-day hold. The style should be immovable.
Tips and tricks: The comb should be placed at an angle that shows the full geometric design — experiment before the event to find the best position. Silver-platinum hair benefits from a purple shampoo to maintain its cool tone. A light mist of shine spray enhances the metallic quality of both the hair and the comb. Use bobby pins that match your silver tone so they disappear.
The Photo-Ready Secret
What looks amazing in the mirror does not always translate to photos. The biggest mistake mothers of the groom make is choosing a style that is too flat or too busy — both of which can disappear or distract in professional wedding photos. The secret to photo-ready hair is dimension and movement.
Styles with soft waves, textured braids, or subtle accessories catch light from every angle, creating depth that makes you look radiant in every shot. Avoid overly sleek styles that can look flat in photos, and skip accessories that are too small to register on camera. A pearl pin that looks prominent in your hand can vanish entirely in a group shot.
The photographer tip? Ask your photographer about the venue lighting beforehand. For outdoor ceremonies, styles with natural texture photograph best in golden hour light. For indoor venues, styles with subtle shine or metallic accents catch artificial lighting beautifully.