Hair Trends
20 Stunning Half Up Half Down Hairstyles for Prom Night 2026
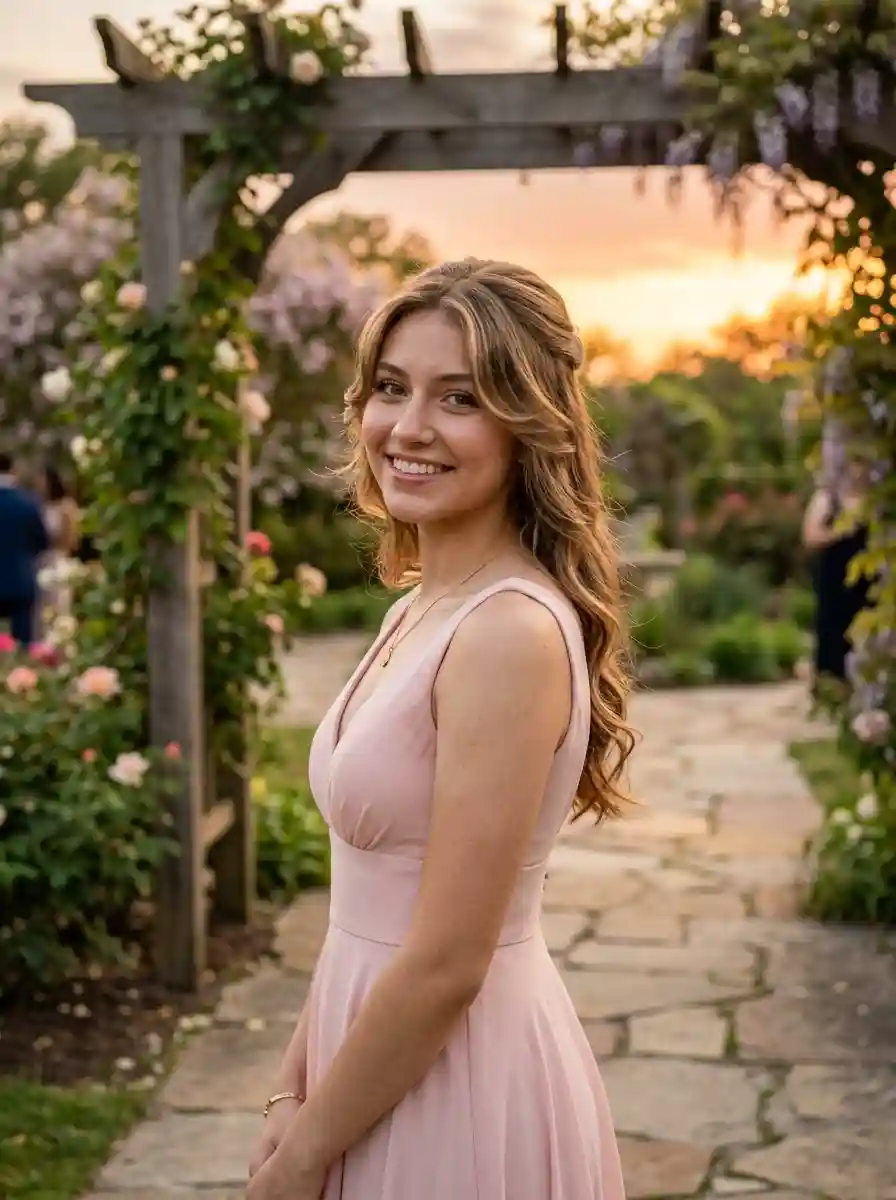
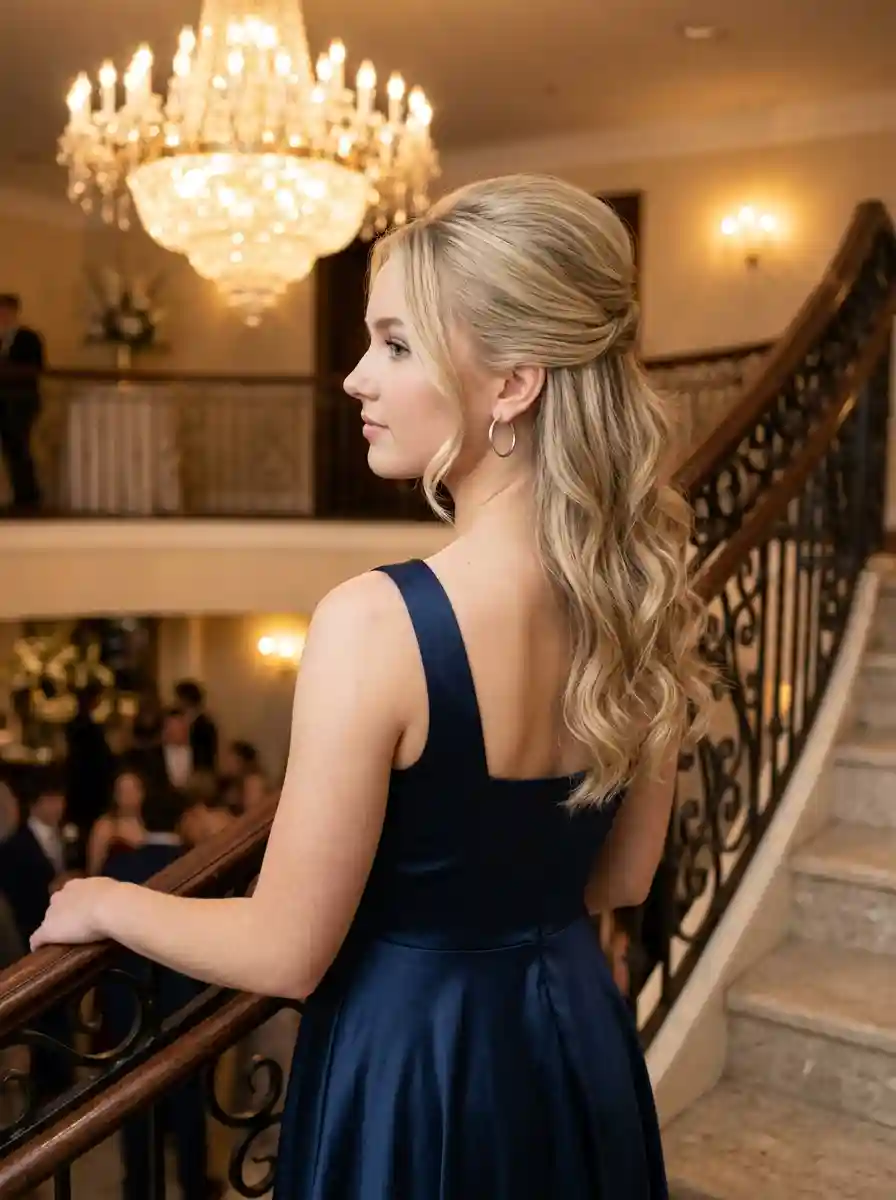
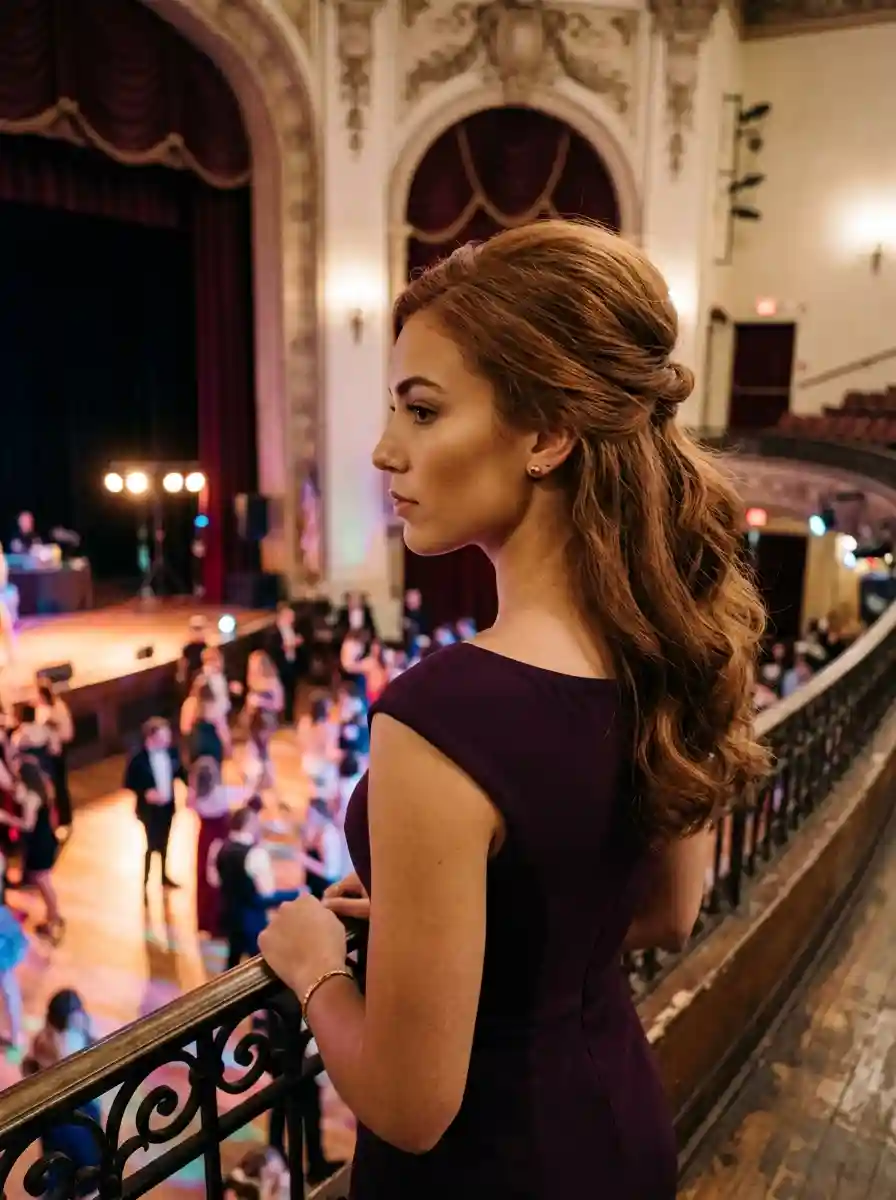
Half-up half-down hairstyles occupy a specific sweet spot in prom styling: they deliver the polish of an updo without sacrificing the movement of loose hair. For 2026, the trend leans toward intentional texture, architectural braiding, and accessories that do structural work as much as decorative.
Each of the 20 looks below was selected for its ability to survive a full evening — from pre-prom photos through the last dance. Whether you need a style that stays secure under a crown, complements a high-neck gown, or simply photographs well from every angle, the half-up format offers a solution. We've included honest assessments of difficulty, hair type compatibility, and what each technique actually requires.
The Crown Bump Secret
The most common mistake with half-up styles is pulling the front sections too tight, which flattens the crown and can make the face look wider — the exact opposite of what you want on prom night. The fix is a teased bump at the crown before you pin anything back.
Take a fine-tooth comb and gently tease the hair right at the crown before you twist or pin the front sections. This creates lift that changes the entire silhouette of the style. You can also blow-dry the roots upward with a round brush for extra volume before teasing. The extra height at the crown elongates the face and gives even the simplest half-up style a dramatic, elegant quality that photographs beautifully.
The technique? Take two front sections, twist them back, and pin them directly over the teased crown. This hides the teased area and creates a soft, romantic volume that looks intentional rather than backcombed.
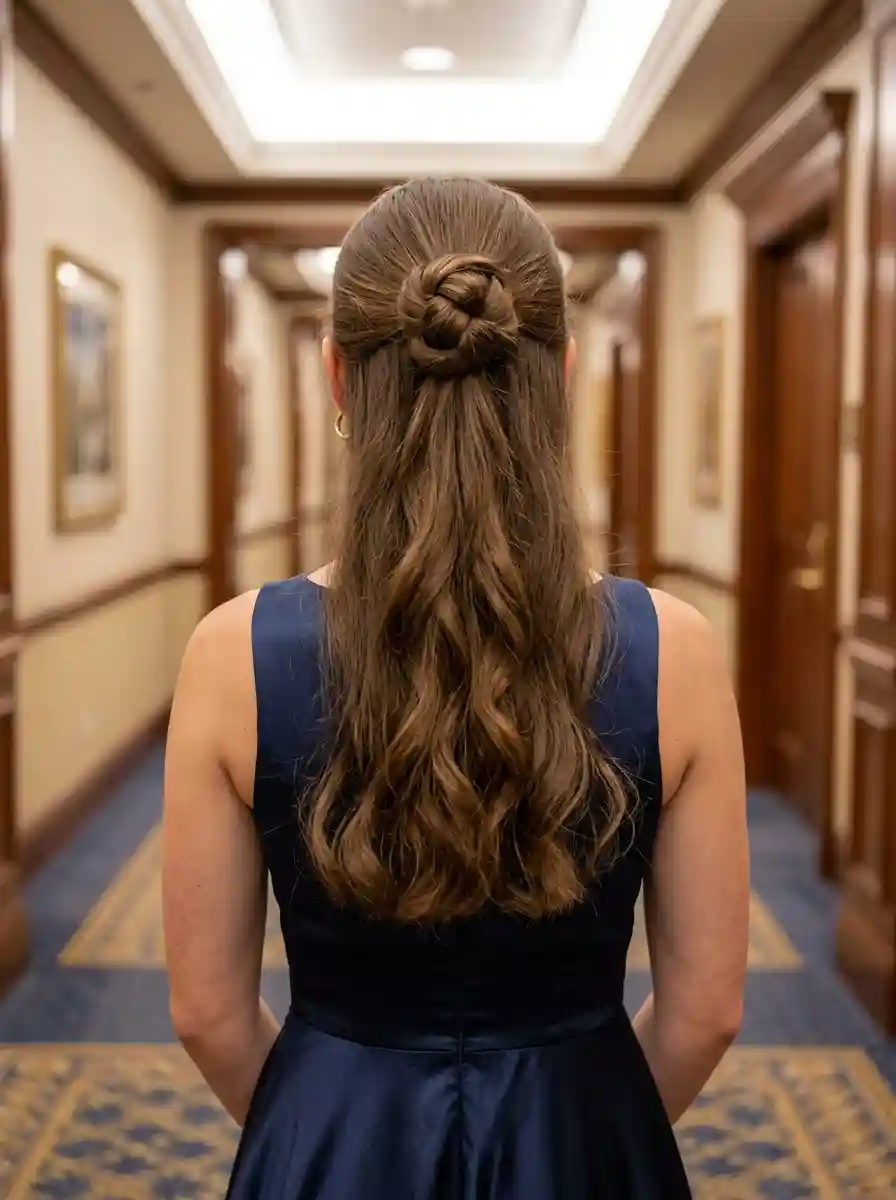
1.Geometric Braided Updo with Cascading Waves
The overview: This look uses a structured woven pattern at the crown rather than a standard braid, creating an architectural crown that sits above the temples and feeds into loose, flowing waves below. The geometric sectioning involves weaving strands over and under each other to produce sharp, defined angles — a technique closer to knotting than traditional braiding. The contrast between the rigid top and the soft waves beneath is the design's central tension.
The crown braid starts from both temples and interlocks toward the center back, where it's pinned securely. Small clear elastics at each junction keep the pattern crisp. After the structure is set, the braid edges are gently pancaked for fullness. This is a more time-intensive style than a simple twist, but the result reads as intentional and original.
Why this look is popular: The geometric crown creates focal interest from the front — not just the back — making it a strong choice for prom photos where the camera captures every angle. The woven pattern also reads well on medium-length hair, where longer braids might look thin.
Where this look is suitable: Formal prom settings where the dress code calls for polished styling. The architectural crown pairs well with minimalist gowns and strapless necklines that don't compete with the braid detail.
Step by step:
- Prep for hold. Apply a heat protectant and a lightweight volumizing mousse to damp hair. Blow-dry with a round brush to create a smooth base.
- Add waves. Using a 1.25-inch curling wand, wrap 1-inch sections around the barrel, alternating directions. Let the curls cool undisturbed for at least 10 minutes.
- Section the crown. Isolate the top section from temple to temple. Clip the lower hair out of the way.
- Weave the geometry. Divide the crown section into 4-5 small sections. Weave each section over and under its neighbor, creating a lattice pattern. Secure each junction with a clear elastic.
- Pin the structure. Once the weave is complete, pin the lattice against the scalp using bobby pins that match your hair color. Tuck the elastic ends under the weave.
- Pancake for fullness. Gently pull the outer edges of each woven section to widen them. This softens the geometry and adds volume.
- Break up the waves. Run your fingers through the lower section to transform tight curls into loose, flowing waves. Set with a flexible-hold hairspray.
Tips and tricks: This style benefits from second-day hair — freshly washed hair can be too slippery to hold the weave. If starting with clean hair, work a texturizing spray through the crown section before weaving. A fine-tooth comb helps create precise sections.

25 Stunning Summer Vacation Hairstyles for 2026 ☀️🌊
2.Braided Crown with Loose Waves
The overview: Two classic three-strand braids running from above each ear to meet at the center back, forming a crown-like band. The braids are the connecting element — they tie the front and back together visually while keeping the hair off the face. The loose waves below create the necessary counterbalance; without them, the braids alone would read as too severe for prom.
The key technical decision here is braid tension. Too tight and the braids look like athletic training braids. Too loose and they lose definition against the wavy backdrop. The sweet spot is a moderate tension with deliberate pancaking afterward — pull the braid edges outward to create width and softness.
Why this look is popular: The crown braid is one of the most universally flattering half-up styles because it widens the crown, creating the illusion of a longer, leaner face shape. It also photographs well from any angle.
Where this look is suitable: Formal proms, galas, and evening events. The crown braid works with most necklines but pairs especially well with off-shoulder and sweetheart gowns.
Step by step:
- Prep with texture. Apply a texturizing spray through dry hair to give the braids grip. Day-old hair works best.
- Part and section. Create a clean center or slightly off-center part. Take a 1-inch section from above each ear.
- Braid each side. Create a standard three-strand braid on each section. Keep tension moderate — tight enough to hold, loose enough to later soften.
- Secure with elastics. Tie off each braid with a small clear elastic at the end.
- Position at the back. Bring both braids to the center back. Cross one over the other and pin them in place with bobby pins. Tuck the braid ends underneath.
- Pancake the braids. Gently pull the outer loops of each braid to double their width. This is what creates the full, romantic crown effect.
- Create the waves. Using a large barrel curling iron, curl 1-inch sections throughout the loose hair. Break up with fingers. Mist with flexible-hold hairspray.
Tips and tricks: For finer hair types, backcomb the braids slightly before pancaking — this gives them more substance to pull apart. For thicker hair, use thinner sections for the braids so they don't overwhelm the crown area.
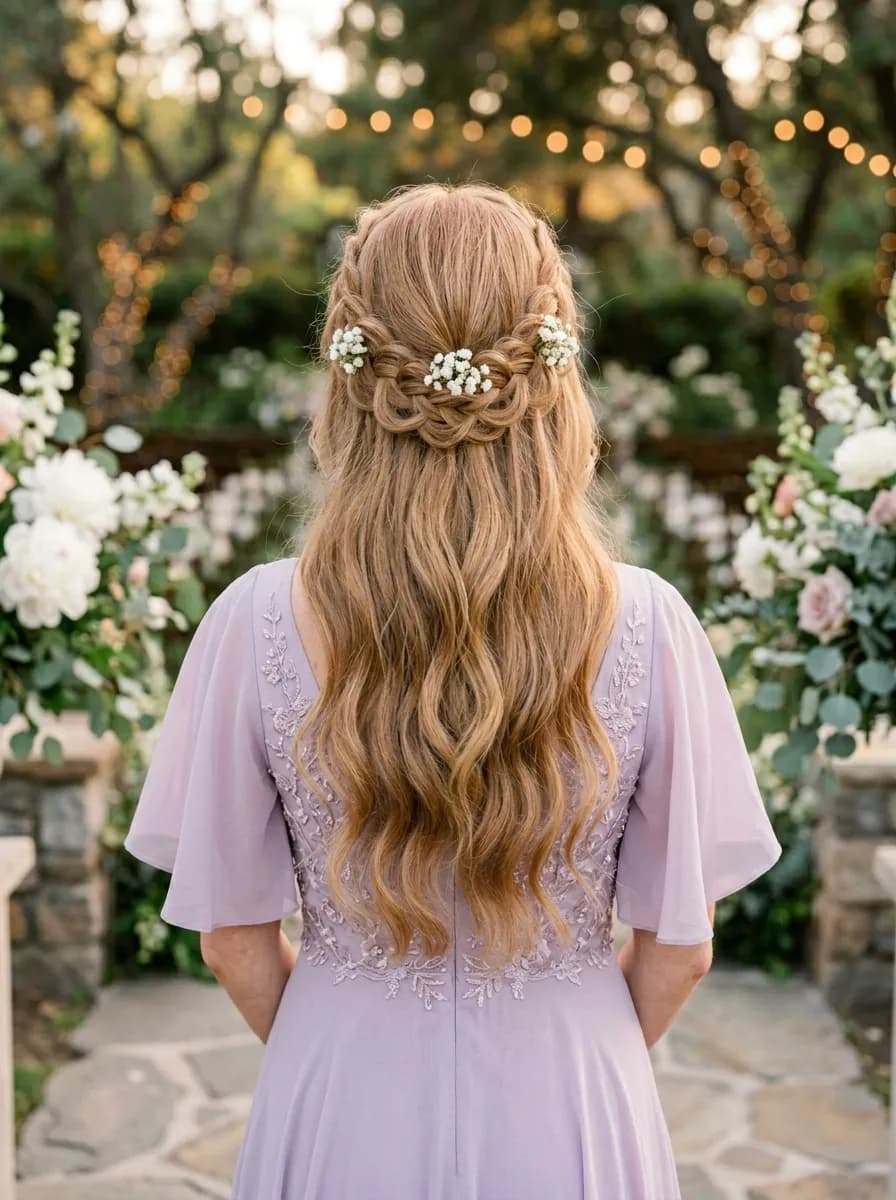
3.Romantic Waterfall Braid with Loose Waves
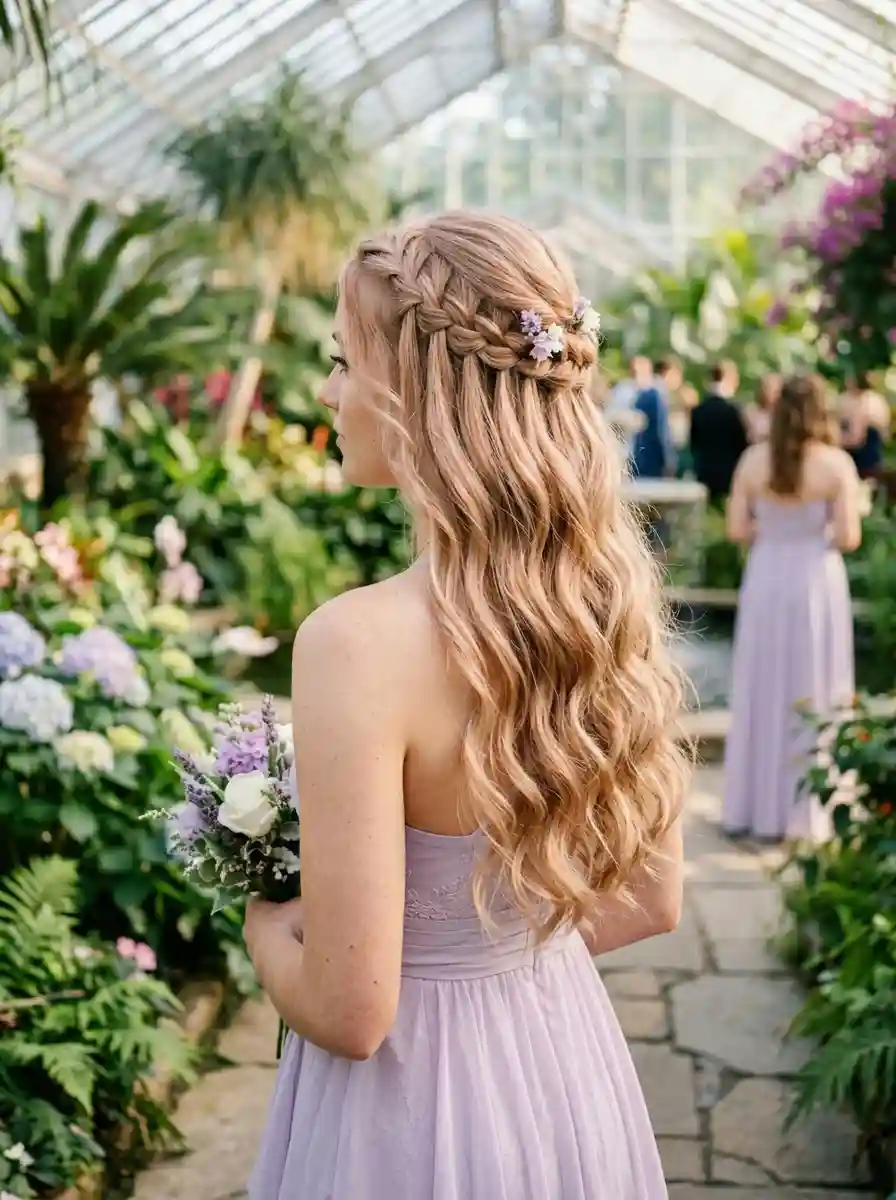
The overview: The waterfall braid is a specific braiding technique where strands are woven in and then released, allowing them to cascade downward like water. Unlike a French or Dutch braid that contains all the hair, the waterfall braid creates the illusion of a continuous braid running alongside loose sections. The result is a hybrid — part braided, part free-flowing — that mirrors the half-up half-down philosophy itself.
The technique requires some practice. Each time you cross a strand, you drop the bottom section and pick up new hair from above. The dropped strand becomes part of the loose hair below. This creates the signature "cascading" effect where sections of the braid appear to spill out continuously. Small fresh flowers or jeweled pins at the braid's endpoint add the prom-appropriate finishing touch.
Why this look is popular: The waterfall braid is one of the few braided styles that looks equally good from the front and back. The cascading strands catch light differently than a solid braid, creating visual texture that reads well in photos. It's romantic without being fussy.
Where this look is suitable: Outdoor or garden-themed proms, spring formal events. The ethereal quality suits natural lighting and floral settings. Also a strong choice for proms with a bohemian or romantic dress code.
Step by step:
- Prep with grip. Mist texturizing spray through dry hair. Create loose waves with a 1.25-inch curling wand, leaving ends out for a modern finish.
- Start the braid. Take a 1-inch section from one temple. Divide into three strands. Begin a standard three-strand braid.
- Create the waterfall. After the first cross, drop the bottom strand and pick up a new section of hair from above the braid. Cross this new section over the middle.
- Continue around. Repeat the drop-and-pick sequence as you braid along the hairline toward the back. Each dropped strand should fall naturally into the loose hair.
- Secure at the back. Once you reach the center back, finish the braid as a three-strand for the last 2 inches. Secure with a clear elastic. Pin the end under the braid.
- Pancake and soften. Gently pull the braid loops outward for fullness. Tuck small flowers or pearl pins along the braid at irregular intervals.
- Set and go. Light mist of flexible-hold hairspray to maintain the shape without stiffness.
Tips and tricks: The most common mistake is picking up sections that are too large, which makes the braid look bulky. Keep pickups to 0.5-inch sections. If the braid feels loose, tighten the tension on the three-strand cross between each pickup. Waterfall braids naturally relax over time, so starting slightly tighter than you think you need is the right call.

29 Stunning Summer Almond Nails for Women in 2026 💅
4.Golden Hour Waves with Face-Framing Softness
The overview: This is the "hair down but intentional" approach to prom styling. Rather than pulling hair dramatically upward, the front sections are lightly gathered from above the temples and twisted back — just enough to create a half-up structure without losing the hair's natural flow. The waves do the heavy lifting here, and the half-up component is deliberately understated.
The face-framing layers are the critical element. The front sections are cut shorter and sweep around the face in soft curves, creating a curtain effect that draws attention to the eyes and cheekbones. The half-up twist secures the top section while allowing these face-framers to fall naturally. On a blonde balayage base, the dimensional waves catch golden-hour light in a way that flat color can't replicate.
Why this look is popular: It's the most natural-looking half-up style on this list. The minimal gathering reads as effortless, which makes it a strong choice for anyone who finds elaborate braiding intimidating. The face-framing layers are universally flattering across face shapes.
Where this look is suitable: Any prom setting. The understated quality makes it appropriate for both formal ballroom events and casual outdoor prom venues. Particularly flattering on those with layered cuts.
Step by step:
- Prep the base. Apply a heat protectant and volumizing mousse to damp hair. Blow-dry with a round brush, lifting at the roots for crown volume.
- Create waves. Using a 1.5-inch curling wand, wrap 1-inch sections around the barrel, leaving the ends straight for a modern finish. Alternate curl direction for natural-looking movement.
- Break up the curls. Once cooled, run your fingers through the waves to soften them. Don't use a brush — it will kill the texture.
- Gather the front. Take the front sections from above each temple. Gently pull them back toward the crown. Don't pull too tight — the volume at the front should be preserved.
- Twist and pin. Twist the gathered sections together once and secure with bobby pins. Tuck the tails under the twist.
- Release face-framers. Pull out a few wispy pieces around the temples and let them fall naturally.
- Set with spray. A light mist of flexible-hold hairspray. Avoid heavy application — this style should look touchable.
Tips and tricks: The success of this style depends on the cut. Face-framing layers that start at the cheekbone create the best curtain effect — layers that start too high or too low won't drape the same way. A shine spray (Moroccanoil Glimmer Shine or similar) applied to the ends enhances the golden-hour effect.
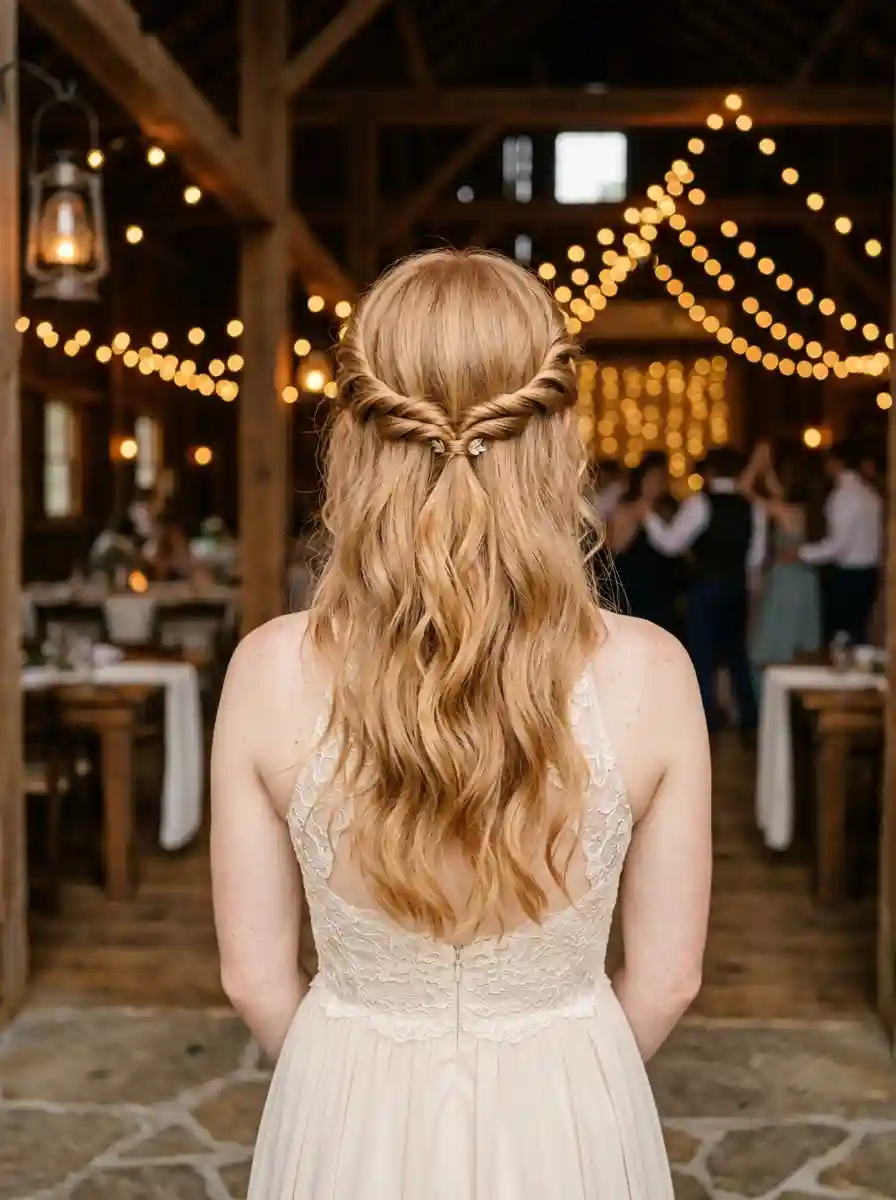
5.Twisted Crown Half-Up with Beachy Waves
The overview: This style replaces braided elements with twisted ones, creating a softer, less structured crown. Two sections from above the ears are twisted backward and joined at the back of the head, secured with minimal hardware so the focus stays on the texture of the twist itself. The waves below are tousled and beachy — loose enough to move, defined enough to catch light.
The twist technique is faster than braiding and more forgiving of mistakes. If a twist unravels slightly, that looseness works in the style's favor. The goal is a controlled undone quality, not precision. Texturizing spray applied before twisting gives the sections enough grit to hold without elastics or pins doing all the work.
Why this look is popular: The twisted crown achieves a similar framing effect to braids but reads as more relaxed and modern. The beachy waves add a versatility that works for both daytime and evening prom events.
Where this look is suitable: Outdoor proms, beachside venues, casual-to-semi-formal events. The relaxed texture makes it less suited for ultra-formal black-tie proms.
Step by step:
- Texturize thoroughly. Apply texturizing spray or sea salt spray through dry hair. This creates the grip needed for the twists to stay.
- Create waves. Using a 1.25-inch curling wand, create loose waves. Leave the ends out for a relaxed, beachy finish. Break up with fingers.
- Twist the first side. Take a 2-inch section from above one ear. Twist it loosely away from your face, working toward the back of your head.
- Twist the second side. Repeat on the opposite side, maintaining the same tension and thickness.
- Join at the back. Bring both twists to meet at the center back. Secure with a small clear elastic or bobby pins. Tuck the ends under the twists.
- Pancake the twists. Gently pull the edges of each twist outward to widen and soften them. This is what creates the full, romantic crown effect.
- Fluff and set. Tousle the remaining waves with your fingers. Mist with flexible-hold hairspray.
Tips and tricks: For finer hair, apply dry shampoo at the roots before twisting — it adds grit that prevents the twists from slipping. The looser the twist, the better this style looks; tight twists create a stiff, unnatural silhouette. If one twist comes undone during the evening, simply re-twist and pin — no mirror needed.
30 Stunning Mother of the Groom Hairstyle Ideas for 2026 💍✨
6.Effortless Twisted Half-Up with Loose Waves
The overview: A single gathered section at the crown, twisted back and pinned — this is the simplest half-up style on the list, and its simplicity is the point. The twist adds just enough texture to read as intentional without requiring braiding skills or multiple elastics. The loose waves below provide movement and body, preventing the style from looking flat or forgotten.
What separates this from a basic half-up ponytail is the twist technique and the deliberate looseness. Instead of pulling the top section tight and securing with an elastic, the hair is twisted gently and pinned so that the twist sits as a textured detail at the crown. A few face-framing pieces pulled forward soften the look and prevent it from reading as severe.
Why this look is popular: It's the fastest prom-ready style on this list — under 10 minutes from start to finish. The minimal approach also makes it a strong backup option if a more complex style doesn't cooperate on the day of.
Where this look is suitable: Any prom setting. The understated quality works across formality levels. It's also a good recovery style if you attempt a more complex look and need to pivot quickly.
Step by step:
- Prep for texture. Apply dry shampoo or texturizing spray through the roots for grip. Create loose waves with a curling wand if hair is straight.
- Identify the gathering point. From the temples up, decide how much hair to include. A wider section creates more crown volume; a narrower section keeps it subtle.
- Gather loosely. Pull the top section toward the back of your head. Don't brush it smooth — a bit of texture at the gathering point adds interest.
- Twist once. Twist the gathered section once to create a visible rope effect. Pin the twist against the head with 2-3 bobby pins in an X pattern.
- Pull face-framers. Release 2-3 small sections from the front hairline. Let them fall naturally alongside the face.
- Break up the waves. Run fingers through the loose hair to enhance the wave pattern. Set with a light mist of hairspray.
Tips and tricks: The bobby pin X-pattern (two pins crossing each other) provides significantly more hold than parallel pins. For extra volume at the crown, gently tease the gathered section at the root before twisting. A small decorative pin where the twist ends adds a prom-appropriate touch without extra effort.
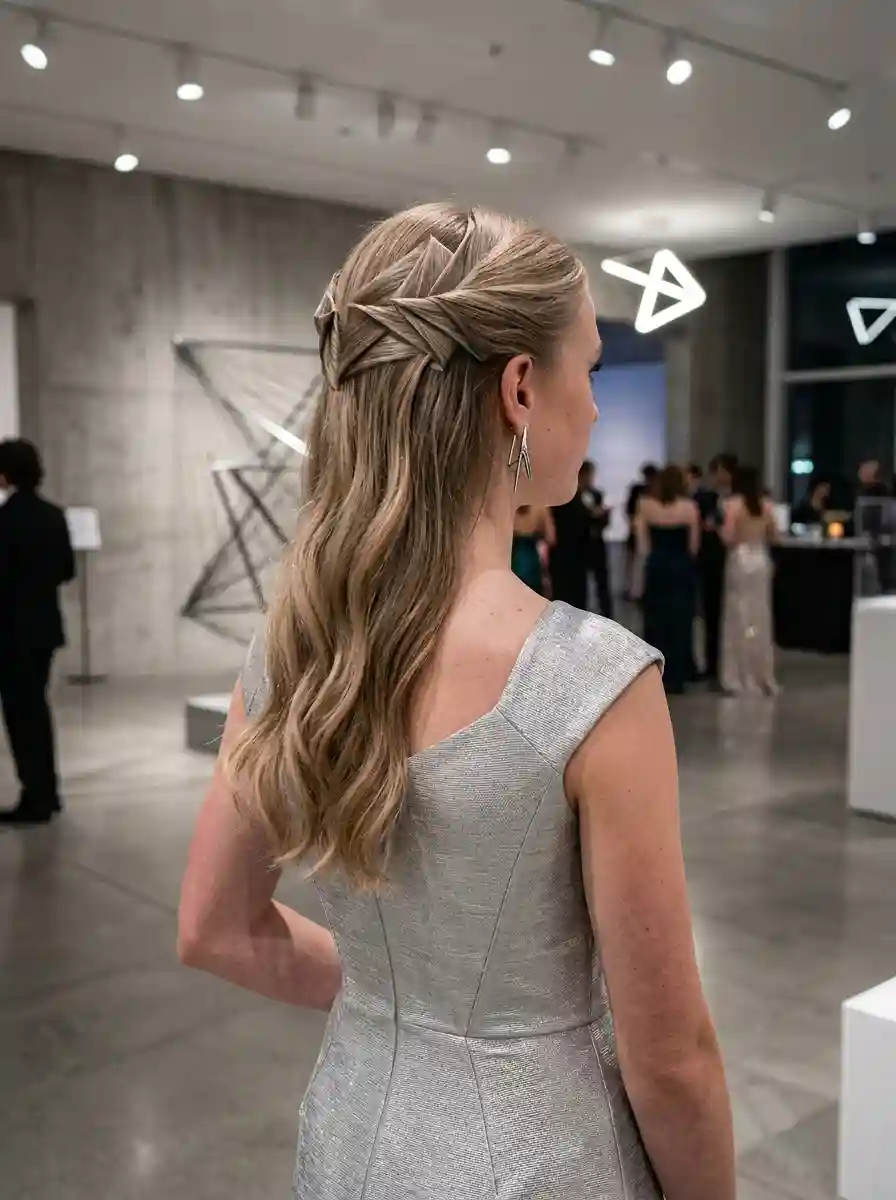
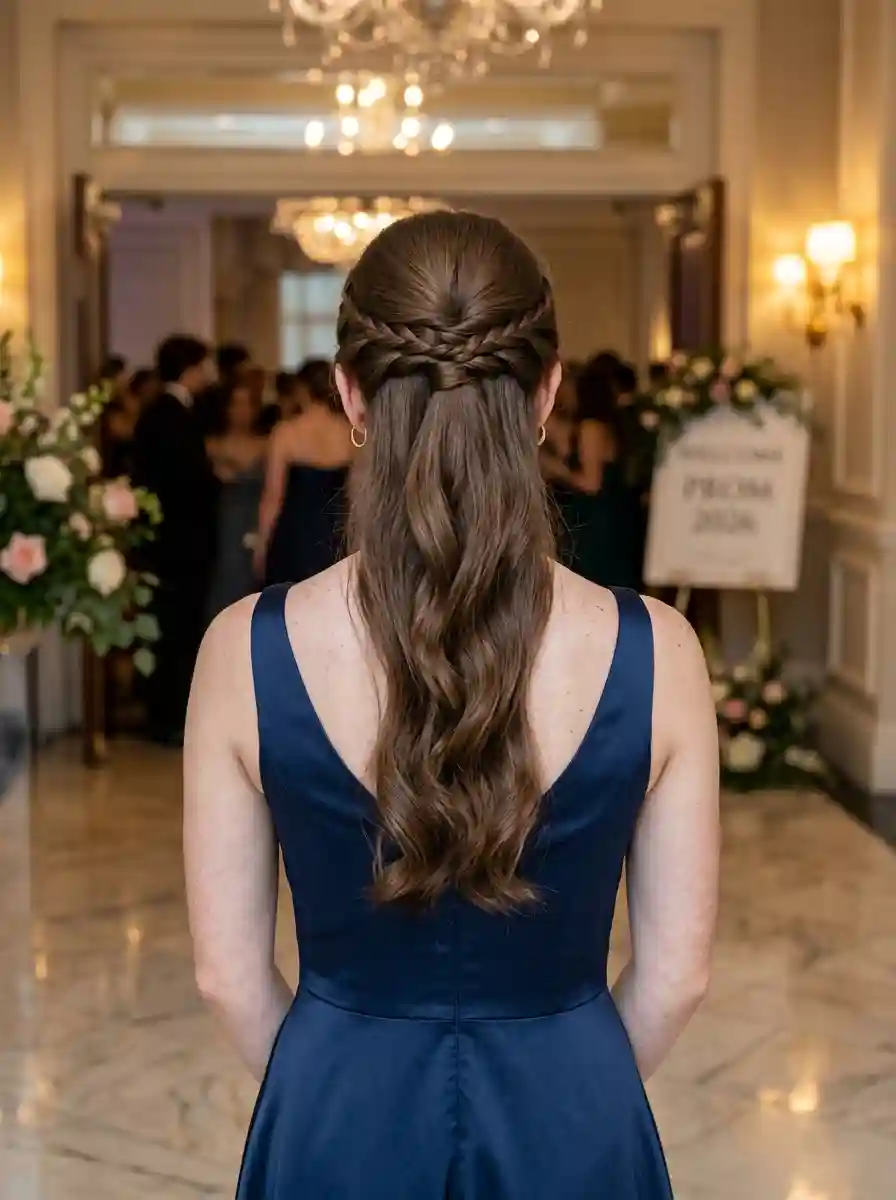
7.Braided Crown Half-Up with Loose Waves
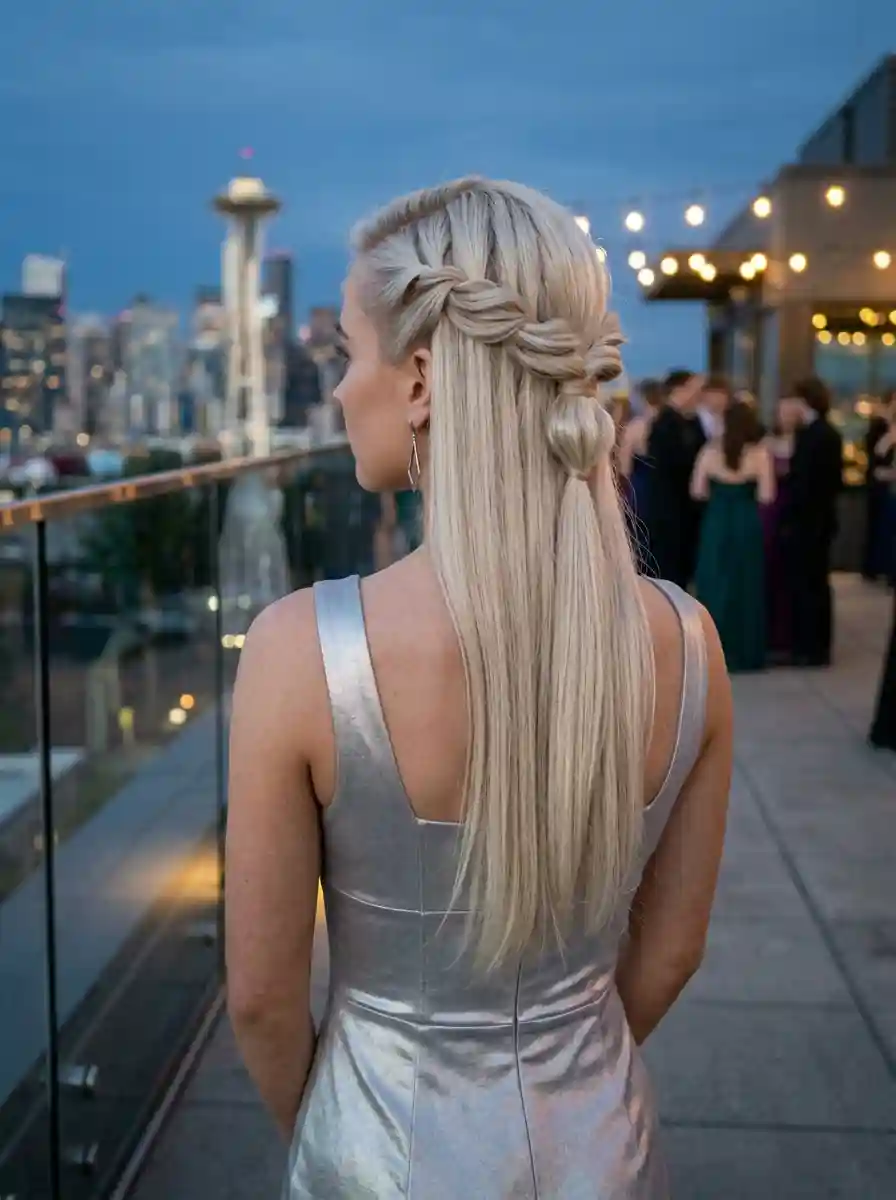
The overview: Icy platinum blonde hair falling flawlessly down the back with the faintest hint of movement. Voluminous braids frame the head from the temples, joining at the center back in a neat, structured bubble knot. The sleek lower lengths mirror the modern aesthetic of the metallic silver dress, creating a polished yet ethereal vibe against a city skyline.
This style beautifully bridges the gap between intricate updo and flowing lengths. By concentrating the woven texture at the crown and securing it with a unique looped detail, it provides a structured, highly styled appearance from the back and sides while keeping the face open and framed.
Why this look is popular: The chunky, pulled-apart braids offer a touch of romantic, bohemian texture that perfectly contrasts with the sleek, polished finish of the loose hair below. The woven detail serves as a captivating focal point, making it a highly photogenic style that feels glamorous without being overly stiff or heavily sprayed.
Where this look is suitable: Rooftop cocktail parties, evening galas, urban weddings, or formal twilight events. It pairs spectacularly with modern, metallic, or structured garments, adding a touch of softness to sharp, contemporary outfits.
Step by step:
- Prep the canvas. Blow out the hair for a smooth, straight base, or add very loose, subtle bends with a large-barrel curling iron. Apply a lightweight smoothing serum to maximize shine.
- Section the front. Create a clean center or soft side part. Isolate two thick sections of hair on either side of the face, starting from the front hairline to just behind the ears.
- Weave the crown. Create a standard three-strand braid or a Dutch braid on both sides, angling the direction backward toward the crown of your head.
- Pancake the braids. Before tying them off, gently tug at the outer edges of each braid loop. This "pancaking" technique makes the braids appear significantly wider and thicker.
- Join and loop. Bring both braids to meet at the center back of the head. Secure them together with a clear elastic. To create the detail, pull the resulting ponytail halfway through a second elastic to form a neat bubble or loop, wrapping a small piece of hair around the base to hide the ties.
- Final polish. Smooth the remaining loose hair cascading down your back and finish with a mist of high-shine, flexible-hold hairspray.
Tips and tricks: If your hair is finely textured or naturally slippery, prep the braiding sections with a volumizing powder or dry texture spray before you start weaving to ensure the braids hold their chunky shape without falling flat. For an extra seamless look, use a topsy-tail tool to pull the wrapped hair securely through the elastic knot.

29 Trendy Pink Summer Nails for 2026 💅
8.Soft Face-Framing Braids with Loose Waves
The overview: Two small three-strand braids at the front hairline frame the face, then are swept back and incorporated into the loose hair. Unlike crown braids that connect at the back, these braids remain separate — one on each side — creating a delicate, face-framing effect. The braids are deliberately small and loose, reading as accents rather than structural elements.
The technique is straightforward: take a small section from each temple, braid it loosely, and either pin it behind the ear or let it blend into the waves. The braids should not pull the hair back — they should sit along the hairline, framing the face from temple to jaw. This is one of the most beginner-friendly braided styles on this list.
Why this look is popular: The face-framing braids draw attention to the eyes and cheekbones without removing volume from the rest of the hair. It's a low-commitment braided look that works on almost any length and texture.
Where this look is suitable: Any prom setting. The subtle braids work for both formal and casual events. Particularly flattering on those with oval and heart-shaped faces.
Step by step:
- Create waves. Use a 1.25-inch curling wand to add loose waves throughout the hair. Let cool completely.
- Section for braids. Take a 0.75-inch section from the hairline on one side, starting at the temple.
- Braid loosely. Create a three-strand braid with low tension — the looser, the better. Secure with a clear elastic at the end.
- Pancake the braid. Gently pull the outer loops to widen the braid. This is what gives it the soft, romantic appearance.
- Position and pin. Drape the braid along the hairline and pin it behind the ear with a single bobby pin. The braid should sit naturally against the head, not pull the hair back.
- Repeat on the other side. Mirror the placement and braid size exactly.
- Set lightly. Mist with flexible-hold hairspray. Add a small decorative pin at the ear if desired.
Tips and tricks: The braid should feel like an afterthought, not a statement. If the braids are too tight, they'll pull the waves flat at the front. If you have bangs or face-framing layers, leave them out of the braid entirely — pin the braid behind the layers so they continue to frame the face naturally.
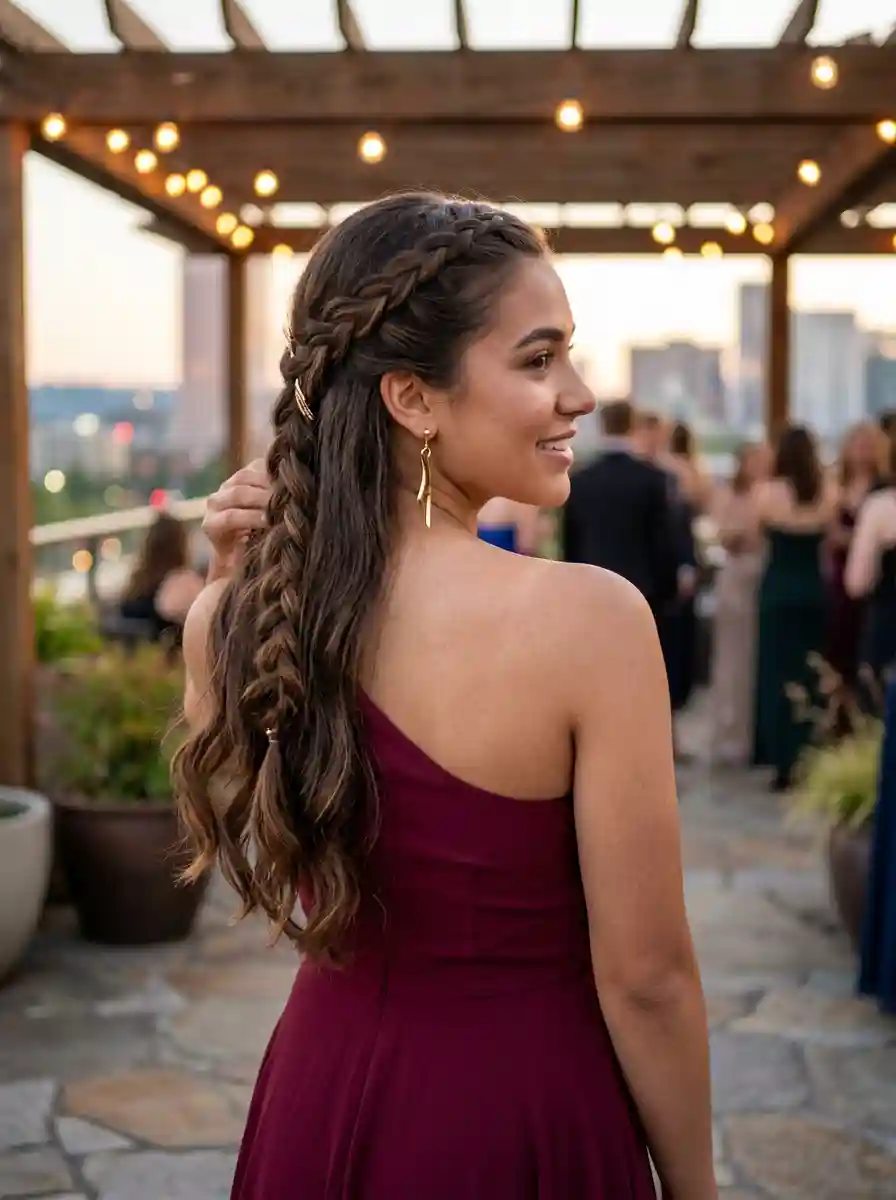
9.Elegant Twisted Half-Up with Wavy Tails
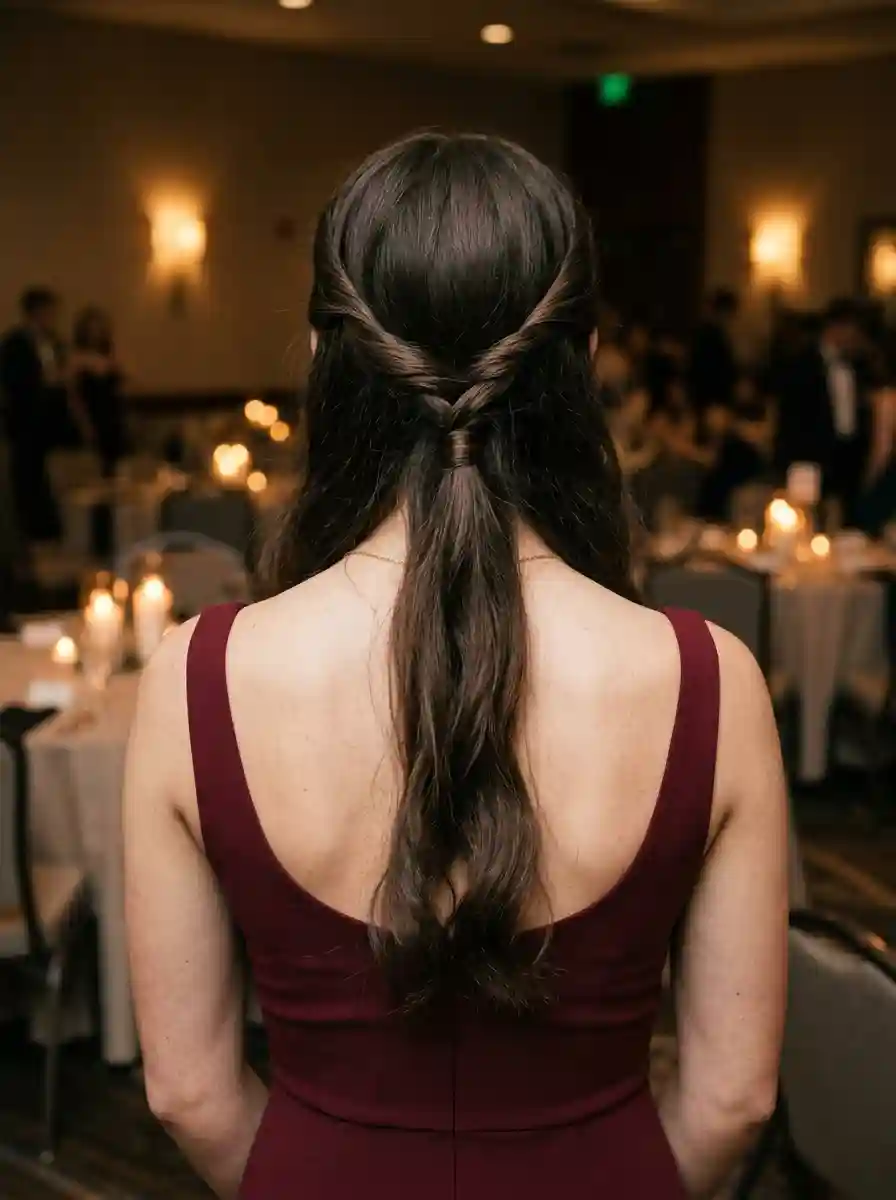
The overview: Rich, espresso-brown hair styled in relaxed, glossy waves. Two meticulously rolled twists meet at the middle back, anchored by a sleek hair wrap. The flowing lengths trail gracefully down the back of a deep burgundy evening gown, perfectly matching the warm, romantic candlelit ambiance of the event hall behind her.
This style masters the art of refined simplicity. By rolling the front pieces away from the face and anchoring them with a polished, hidden finish, you create a look that feels incredibly deliberate and formal without appearing overly stiff or heavily manipulated.
Why this look is popular: It delivers maximum elegance with minimal styling time. The inward twists offer a romantic, classical texture that requires zero braiding expertise, while the hair-wrapped elastic elevates the style from an everyday quick fix to an event-ready masterpiece. It keeps the face clear while maintaining the allure of long, flowing locks.
Where this look is suitable: Wedding receptions, formal banquets, holiday parties, or elegant evening galas. The sweeping lines of the hair pair beautifully with scoop-back or low-back dresses, guiding the eye gracefully down the spine.
Step by step:
- Create the canvas. Use a large-barrel curling iron to add loose, elegant waves through the mid-lengths and ends of your hair. Gently brush them out for a soft, blended finish.
- Isolate the front. Take a two-inch section of hair from above each ear, framing the face.
- Twist backward. Take the left section and twist it inward, rolling it tightly toward the back of your head. Clip it temporarily, then repeat the inward twist on the right side.
- Secure the sections. Unclip the left side, bring both twists to the center back of your head, and tie them together firmly with a clear, snag-free elastic.
- Conceal the band. Take a thin piece of hair from the newly formed ponytail. Wrap it tightly around the clear elastic until the band is completely hidden, then secure the end of the wrap underneath the base with a bobby pin.
- Refine the finish. Gently tug the edges of the twists to add a little volume, and finish with a light-hold shine spray to keep the waves looking glossy and intentional.
Tips and tricks: If you struggle to keep the twists tight while trying to tie them, use a tiny dab of styling pomade on your fingertips to give the hair some grip and tame any flyaways. To ensure the bobby pin holding the wrapped hair doesn't slip during a long night of dancing, spray the pin with a little hairspray before sliding it into the base of the ponytail.

21 Stunning Concert Hairstyles for Women 2026 🎶✨
10.Elegant Bubble Braid with a Twist
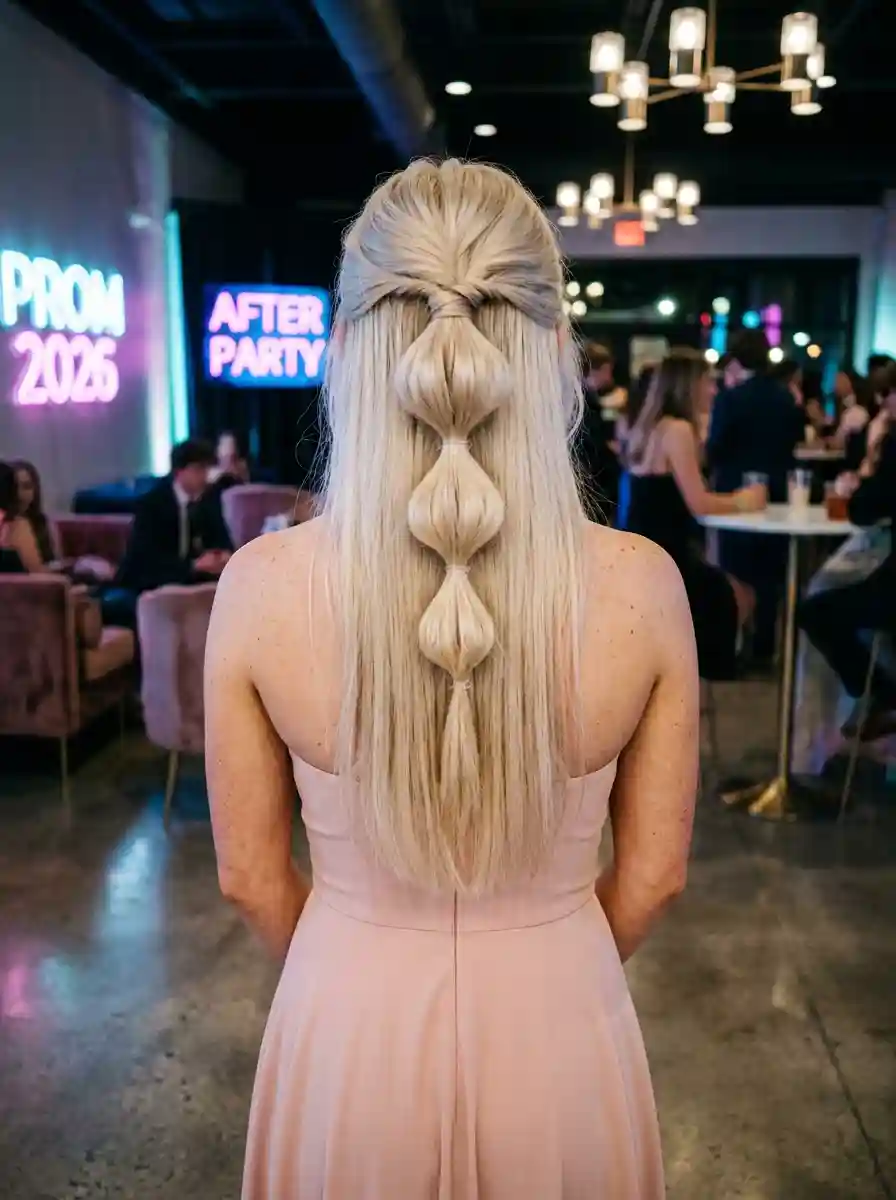
The overview: Long dark brown hair with subtle dimension. The top section is gathered into a twisted knot at the crown. A bubble braid extends from the knot, with 4-5 distinct rounded segments stacked vertically. Each bubble is full and rounded with a slightly textured surface. The tail at the end has a small loose wave.
The bubble technique is easier than it looks — no strand crossing, no braiding pattern to maintain. The bubbles form by pulling the sections between each elastic outward, creating rounded segments that stack down the length of the hair. Because the bubbles create their own volume through tension and pulling, this style works particularly well on finer hair types that struggle with traditional braid volume.
Why this look is popular: The bubble braid creates more visual volume than a standard braid, making it ideal for fine to medium hair. The segmented structure also holds curl better than loose waves, maintaining its shape through a full evening of dancing.
Where this look is suitable: Formal proms where you want something unique but not overly complicated. The bubble profile reads as modern and editorial without being costumey.
Step by step:
- Prep with texture. Apply texturizing spray through dry hair. The bubbles need grip to maintain their shape.
- Create the crown twist. Gather the top section from temples up. Twist it into a knot at the crown and pin securely. Leave the tail of the knot to form the bubble braid.
- First elastic. Tie a small clear elastic 1.5 inches below the knot. Gently pull the section between the knot and the elastic outward to create the first bubble.
- Continue down. Tie another elastic 1.5 inches below the first. Pull outward to create the second bubble. Repeat until you reach the desired length.
- Even the bubbles. Check each bubble for size consistency. Pull smaller bubbles outward to match the larger ones.
- Soften the edges. Gently tug the hair at the edges of each bubble to create a rounded, full shape rather than a flat, angular one.
- Set with spray. Mist with medium-hold hairspray to lock the bubbles in place.
Tips and tricks: The elastic spacing determines the bubble proportions — closer spacing creates smaller, more numerous bubbles; wider spacing creates fewer, larger bubbles. For the most even result, measure the first spacing and use your fingers as a guide for the rest. A shine spray on the finished bubbles adds a polished, prom-appropriate gloss.
11.Braided Top Knot Half-Up with Soft Waves
The overview: A refined half-up design where the crown section is swept back tightly and intricately woven into a braided rosette knot. This structured focal point sits neatly at the upper back of the head, while the remaining lower sections fall effortlessly in cascading, brushed-out waves.
This configuration strikes a beautiful balance between controlled structure and romantic fluidity. The braided bun acts as a built-in accessory, offering the visual complexity of a floral detail without requiring extra clips or hardware. It securely pulls hair away from the face to maintain a polished silhouette throughout long, demanding events.
Why this look is popular: It is the perfect compromise for those who cannot decide between an elegant updo and wearing their hair down. The woven knot provides a high-effort, architectural aesthetic from the back, yet the style retains the youthful, face-framing softness of loose curls from the front.
Where this look is suitable: Black-tie galas, formal weddings, symphony nights, or upscale corporate banquets. The clean neckline and structured knot complement tailored bodices and sleeveless evening gowns flawlessly.
Step by step:
- Wave the lengths. Use a medium-barrel curling wand to create soft, uniform curls throughout your hair, brushing them out gently for a seamless, wavy texture.
- Section and secure. Gather the top half of your hair, starting from the temples and pulling straight back. Secure it into a tight half-ponytail at the crown using a clear elastic.
- Create the braid. Tightly weave this ponytail into a classic three-strand braid, tying the very end with another small, clear elastic.
- Form the knot. Coil the braided tail in a circular motion around its own base to form a neat, rosette-like bun.
- Pin it down. Use several bobby pins to anchor the edges of the braided bun securely to your head, tucking the tail end underneath so it sits flat and stable.
- Set the style. Mist the bun with a firm-hold hairspray to prevent frizz, and apply a light shine serum to the loose waves for a glossy, red-carpet finish.
Tips and tricks: To make the braided knot appear larger and more intricate, gently "pancake" or pull apart the edges of the braid before you coil it into the bun. If your hair is exceptionally long or heavy, insert U-shaped hair pins rather than standard bobby pins for a much stronger, slip-free grip.

27 Coral Nail Art Designs for a Warm, Tropical Manicure (2026)
12.Elegant Half-Up with Pearl Accents
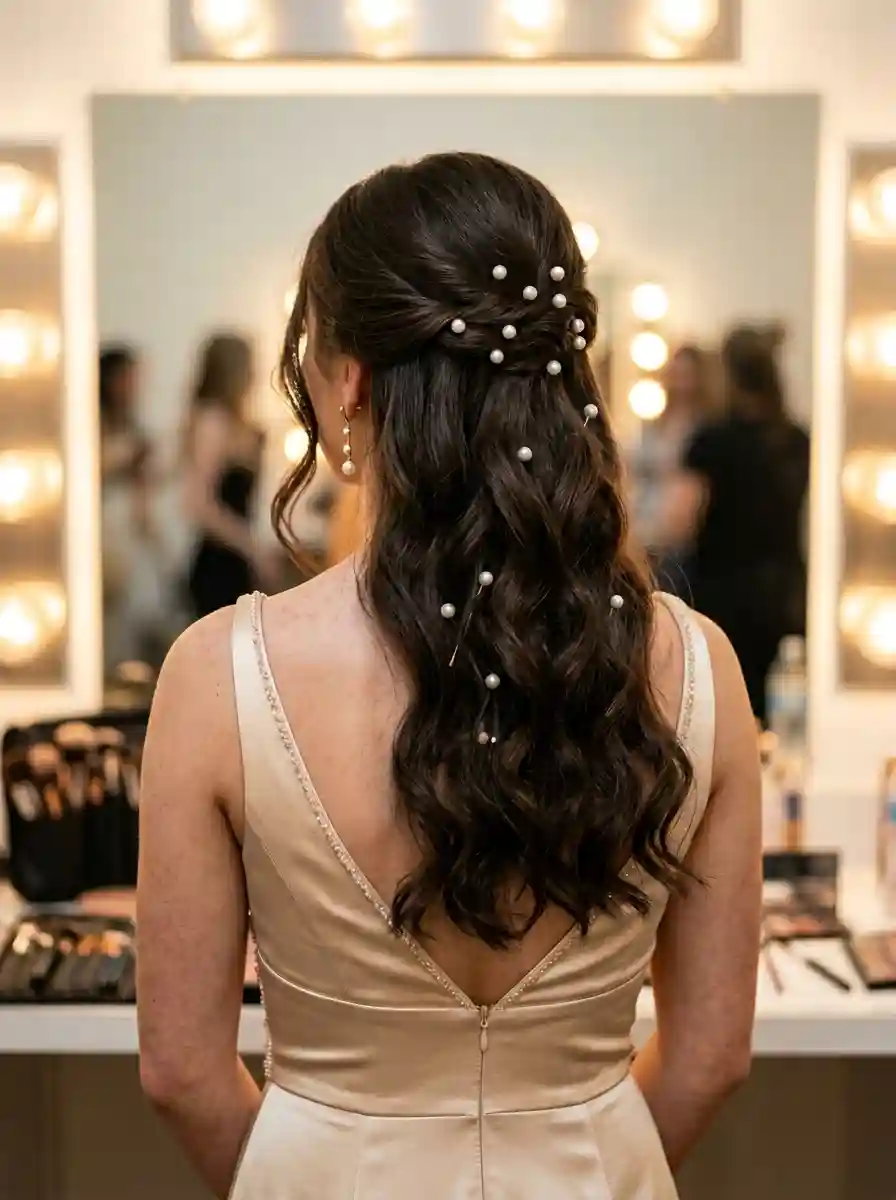
The overview: Soft, loose waves throughout with the front sections gathered into a gentle twist at the back, secured with pearl pins. The pearls are the featured accessory — scattered along the twist and into the loose hair below, they catch light and add a tactile, vintage-inspired element. The overall look is romantic and unfussy, with the pearls doing the heavy lifting for visual interest.
The pearl pins serve a dual purpose: they secure the twist and provide decoration simultaneously. Each pin is pushed through the twist and into the hair beneath, locking the style in place while contributing to the design. On darker hair colors, the white pearls create high contrast that makes them particularly visible. The waves below are deliberately soft and natural, ensuring the pearls remain the focal point.
Why this look is popular: Pearl hair accessories have become a prom staple because they read as elegant without being ostentatious. The twist-plus-pearls combination is achievable at home and appropriate for formal events.
Where this look is suitable: Formal proms, especially those with classic or vintage dress themes. The pearls pair beautifully with lace, satin, and velvet gowns.
Step by step:
- Create waves. Use a 1.25-inch curling wand to create loose waves throughout. Let cool. Break up with fingers.
- Gather the front. Take the front sections from above each temple. Bring them to the back of your head and twist them together loosely.
- Pin the twist. Secure the twist with one or two bobby pins that match your hair color. The twist should feel secure but not tight.
- Insert pearl pins. Take pearl hair pins and insert them along the twist at 1-inch intervals. Push each pin through the twist and into the hair beneath until only the pearl is visible.
- Scatter additional pearls. Add 2-3 pearl pins in the loose waves near the twist, creating a trailing effect. Space them irregularly for a natural look.
- Set with spray. Light mist of flexible-hold hairspray to maintain the shape without weighing down the waves.
Tips and tricks: The pearl pins should be pushed deep enough that they won't slide out during movement — a good test is to gently shake your head after placing them. For maximum visibility, position pearls where they'll catch overhead lighting. Mixing pearl sizes (3mm and 5mm) creates more visual depth than uniform pins.
13.Sleek Half-Up Half-Down with Voluminous Waves

The overview: Long, straight hair with a sleek, high-shine finish at the crown and top section. The top is pulled back smoothly with no visible bumps. At the gathering point, the texture transitions to large, voluminous waves with bouncy movement and body. The overall silhouette is sleek at the top, wide and full at the bottom.
The contrast is the point. The sleek top communicates control and polish; the voluminous waves communicate glamour and drama. For prom, this dual-personality approach works because it photographs as both sophisticated and celebratory. The key technical challenge is the transition point — the hair at the gathering point must blend seamlessly from sleek to voluminous without a visible line.
Why this look is popular: The contrast between sleek and voluminous reads as high-effort even though the techniques are straightforward. It's a red-carpet approach to prom hair that translates well to photography.
Where this look is suitable: Formal prom events, especially those in ballroom or upscale venues. The polished finish matches dressy gowns and statement jewelry.
Step by step:
- Smooth the base. Apply a smoothing serum to damp hair. Blow-dry straight using a paddle brush, directing the nozzle downward to seal the cuticle.
- Straighten thoroughly. Flat-iron the top section in small subsections for absolute smoothness. Apply a small amount of heat protectant first.
- Pull back and secure. Gather the top section from temples up. Secure with an elastic at the back of your head. Smooth the surface with a fine-tooth comb and a drop of serum.
- Wrap the elastic. Take a thin strand from the underside of the gathered section and wrap it around the elastic to conceal it. Pin the end underneath.
- Create the waves. Using a 1.5-inch curling iron, curl 1-inch sections of the loose hair below. Curl away from the face. Let each curl cool before releasing.
- Break up the curls. Once all curls are cooled, gently run your fingers through them to create soft, voluminous waves. Don't brush — brushing will flatten the volume.
- Set and shine. Mist with medium-hold hairspray. Apply a light shine spray to the sleek top section for the glass-like finish.
Tips and tricks: The sleek top requires product — a lightweight gel or smoothing cream applied before blow-drying makes a measurable difference in flyaway control. For the voluminous waves, setting each curl with a clip while it cools extends curl life significantly. This style benefits from pin-curl setting: curl, pin into a coil, cool completely, then release.
24 Stunning Bridesmaid Hairstyles for Weddings 2026 💍✨
14.Braided Crown with Cascading Waves
The overview: A French braid starts at the temple and wraps around the head like a crown, transitioning into a fishtail braid at the back that cascades down one side alongside loose waves. This is a two-braid-in-one style — the French braid creates the structured crown, and the fishtail adds intricate texture to the cascading section.
The French-to-fishtail transition requires planning. The French braid section needs to cover enough of the head to create the crown effect, but end early enough that the fishtail portion has length to cascade. The loose waves on the opposite side balance the asymmetry, preventing the style from looking one-sided. Small gold hair pins scattered through the braid add the prom-appropriate sparkle.
Why this look is popular: The French-to-fishtail transition creates a unique visual texture that a single braid technique can't achieve. The asymmetrical silhouette is editorial and interesting from every angle.
Where this look is suitable: Formal proms where you want a braided look that stands out. The side-cascade works beautifully with one-shoulder and asymmetrical gowns.
Step by step:
- Create a deep side part. This establishes the asymmetry that the style needs. The deeper side will be the braided side.
- French braid along the hairline.Starting at the temple on the deeper side, begin a French braid. Add sections from the hairline and crown as you go, following the hairline around the back of the head.
- Transition at the nape. Once the French braid reaches the nape on the opposite side, stop adding new sections. Continue braiding as a standard three-strand for 1 inch.
- Switch to fishtail. Divide the remaining tail into two sections. Take a small piece from the outer edge of one section and cross it to the other side. Repeat, alternating sides, to create the fishtail pattern.
- Pancake both braids. Gently pull outward on the French braid loops and the fishtail edges to widen them. This creates the full, textured cascade effect.
- Create waves. Use a curling wand on the loose hair side to create soft waves that match the braid's relaxed texture.
- Add gold pins. Insert small gold hair pins at irregular intervals along the braid. Set with hairspray.
Tips and tricks: The fishtail braid requires thinner sections than a three-strand — aim for 0.25-inch pieces. This creates the distinctive herringbone pattern. If the fishtail looks messy, that's actually the goal; a too-neat fishtail looks stiff against the soft crown braid. Pancaking both braids generously is what creates the romantic, boho fullness.
15.Twisted Heart Half-Up Ponytail

The overview: Two sections from the front are twisted back and joined at the crown in a heart-shaped formation. The heart itself is formed by creating a V-shape with the twists, then shaping the top arcs to create the heart silhouette. Below the heart, all remaining hair is gathered into a low ponytail with soft waves.
The heart is more visible from the back and side than from the front, which makes this a style that rewards people who see you from multiple angles — perfect for prom where photos happen constantly. The heart shape is created by manipulating the twists after they're secured, pushing the center point upward to create the two lobes. Small pearl pins at the lobes add definition.
Why this look is popular: The heart detail is a conversation starter without being costume-y. It reads as romantic and playful, which fits prom energy. The low ponytail keeps the style practical for dancing.
Where this look is suitable: Prom events with a romantic or Valentine's-inspired theme. The heart motif also works well for proms that fall around February or for couples attending together.
Step by step:
- Prep the hair. Apply texturizing spray for grip. Create soft waves with a curling wand if hair is straight.
- Take two front sections. From each temple, take a 1.5-inch section. Twist each section loosely away from the face.
- Bring to the back. Bring both twisted sections to the center back. Pin them together at the base to form the bottom point of the heart.
- Shape the heart lobes. Take each twist and curve it upward and outward, creating the two rounded lobes. Pin the tops of the lobes in place.
- Adjust the shape. Look at the heart from multiple angles. Push the center upward if the lobes are too flat. Pull outward if the heart is too narrow.
- Add pearl pins. Place a pearl pin at the center of each lobe and at the bottom point. These define the heart's silhouette.
- Create the ponytail. Gather all remaining hair into a low ponytail at the nape. Curl the ponytail ends for wave texture. Set with hairspray.
Tips and tricks: The heart shape needs to be exaggerated to read as a heart — subtle indents won't register in photos. Pull the lobes wider than you think necessary. If the heart looks lopsided, adjust one side at a time, checking in a mirror between each adjustment. A texturizing spray before twisting gives the sections the grip they need to hold the shape.
35 Cute & Trendy Short Summer Nails for 2026 ☀️
16.Soft Wavy Half-Up with a Twist
The overview: A gentle, lived-in half-up style where the front sections are pulled back, twisted, and pinned at the crown. Unlike more structured versions, this one prioritizes softness over precision — the twist is deliberately loose, the waves are relaxed, and the overall effect is natural and approachable. The twist provides just enough control to keep hair off the face without sacrificing volume.
The crown volume is the key differentiator. Rather than pulling the hair tight and pinning it flat, the gathered section is lifted slightly before pinning, creating a subtle bump at the crown that adds height and shape. This soft volume prevents the style from looking flat on top, which is the most common failure point in simple half-up styles.
Why this look is popular: It's the most natural-looking half-up style — the kind that looks like it took minimal effort but photographs as considered. The crown volume is flattering on round and square face shapes.
Where this look is suitable: Any prom setting. The relaxed quality works for both formal and informal venues. A strong choice for outdoor or daytime proms.
Step by step:
- Add texture. Spray dry shampoo or texturizing spray through the roots for grip and volume. Create loose waves if hair is straight.
- Gather the top section. From the temples up, pull the top section toward the back. Don't brush it smooth — leave some texture at the gathering point.
- Twist loosely. Twist the gathered section once or twice. Don't over-twist — one full rotation is enough to create the rope effect.
- Pin with lift. Insert bobby pins to secure the twist, but hold the gathered section slightly lifted off the scalp as you pin. This creates the crown volume.
- Release face-framers. Pull 2-3 small sections from the hairline at the temples. These should fall naturally alongside the face.
- Break up the waves. Run your fingers through the loose hair to enhance the wave pattern and blend the face-framers with the rest of the hair.
- Set lightly. A mist of flexible-hold hairspray, focusing on the twist and crown area.
Tips and tricks: The crown lift is achieved by backcombing the gathered section at the root before twisting. A small amount of teasing at the crown creates the volume that makes this style look intentional rather than thrown together. For a more polished finish, wrap a small strand of hair around the twist base to conceal the bobby pins.
17.Twisted Crown Half-Up with Loose Waves
The overview: Two loose twists from the temples meet at the back, secured with a small gold cuff that conceals the elastic. The twists are substantial — wider than the delicate twists in other styles — creating a more pronounced crown effect. The gold cuff adds a metallic accent that catches light and draws the eye to the back of the head.
The gold cuff is doing double duty as both accessory and structural support. By sliding the cuff over the elastic, it holds the twists in place while adding the decorative element. This eliminates the need for additional pins or clips at the junction point. The loose waves below are soft and romantic, creating the standard half-up contrast without competing with the crown detail.
Why this look is popular: The gold hair cuff is a trending prom accessory — it adds a touch of luxury without requiring individual pins or clips. The twisted crown is fast to execute (under 5 minutes) but reads as more deliberate than a simple half-up.
Where this look is suitable: Formal proms and evening events. The gold metallic accent pairs well with warm-toned gowns and gold jewelry. Particularly effective on blonde and brunette hair where the gold contrasts visibly.
Step by step:
- Prep and wave. Apply texturizing spray to dry hair. Create soft, loose waves using a 1.25-inch curling wand. Let cool.
- Take front sections. From each temple, take a 2-inch section — wider than a typical twist section. These should be substantial enough to read as a crown element.
- Twist each section. Twist each section away from the face, keeping the tension deliberately loose. Tight twists will look stiff against the soft waves.
- Bring to the back. Bring both twists to the center back. Secure them together with a small clear elastic.
- Pancake the twists. Gently pull the edges of each twist outward to widen them. This creates the full, substantial crown effect.
- Slide on the cuff. Open the gold hair cuff and slide it over the elastic, positioning it so it covers the elastic completely. Close the cuff to secure.
- Fluff and set. Tousle the waves with your fingers. Mist with flexible-hold hairspray, avoiding the gold cuff to prevent residue.
Tips and tricks: Choose a gold cuff with some weight to it — lightweight cuffs tend to slide off elastic during movement. The cuff should have a hinge mechanism or strong pinch closure for security. If you don't have a cuff, a gold bobby pin or barrette at the junction creates a similar effect. Position the twists slightly higher than ear level for the most flattering crown placement.

21 Hot Summer Buns Hairstyle Ideas for 2026 ☀️🔥
18.Textured Half-Up Top Knot with Soft Waves
The overview: The top section is treated with a crimping iron to create subtle, fine texture, then gathered into a small top knot at the crown. The wave pattern isn't harsh — it's a delicate, almost rippled texture that adds body and visual interest. Below, the hair falls in smooth, soft waves, creating a contrast between the textured top knot and the sleek lower section.
The crimping technique requires a fine-tooth crimping iron and a light hand. The goal isn't the distinct geometric zigzag of early-2000s crimping, but a subtle, modern wave that gives the top section body without looking retro. After crimping, the hair is gathered into the knot, which preserves the texture against the head.
Why this look is popular: The texture contrast between the crimped top knot and the smooth waves below creates visual interest that a standard top knot can't achieve. The crimping also adds volume to the crown without backcombing.
Where this look is suitable: Prom events where you want something unique but not complicated. The textured knot reads as editorial and modern — a good choice for fashion-forward prom attendees.
Step by step:
- Prep with product. Apply a heat protectant and a light volumizing mousse to damp hair. Blow-dry with a round brush.
- Crimp the top section. Isolate the top section from temples up. Using a fine-tooth crimping iron, crimp small subsections. Keep the iron moving — 3-4 seconds per section is enough.
- Soften the crimp. Gently comb through the crimped section with your fingers to soften the pattern. It should look like subtle texture, not a geometric print.
- Gather into a knot. Gather the crimped section at the crown. Twist into a small knot and secure with bobby pins. The knot should be compact and sit at the crown.
- Create bottom waves. Using a 1.5-inch curling wand, create loose waves in the remaining smooth hair. Curl away from the face.
- Break up and blend. Run fingers through the bottom waves. Let a few strands from the knot fall loosely to blend the two sections.
- Set with spray. Light mist of flexible-hold hairspray across the entire style. Avoid over-spraying the knot — it should maintain its texture.
Tips and tricks: The key to modern crimping is speed — holding the iron too long creates sharp, defined lines that look dated. Quick passes with the iron create softer texture that reads as contemporary. If you don't have a crimping iron, a flat iron can create similar texture by gently wiggling as you pull it through each section.
19.Elegant Twisted Half-Up with Soft Waves
The overview: Medium to long hair with soft, flowing waves. Small, gentle twists on both sides of the head, just above the ears, meet at the crown and are pinned. The twists are subtle and blend naturally into the waves.
This is the prom equivalent of the little black dress — classic, reliable, and appropriate for almost any setting. The twists add just enough detail to read as styled without competing with statement jewelry or a dramatic gown. The waves below are soft and blended, creating a cohesive look from the twist point down.
Why this look is popular: It's the most versatile style on this list — works with any hair color, any dress style, and any prom setting. The minimal twists are approachable for at-home styling and forgiving of imperfections.
Where this look is suitable: Any prom setting. The understated elegance works for both formal ballrooms and casual outdoor venues. A universal choice that's difficult to get wrong.
Step by step:
- Prep for texture. Apply texturizing spray to dry hair. Create soft waves with a 1.25-inch curling wand if hair is straight. Let cool.
- Take side sections. From just above each ear, take a 1-inch section. Gently twist each section away from the face.
- Bring to the crown. Bring both twisted sections to the back of the head, positioning them where they feel natural. Don't force them too high or too low.
- Secure with pins. Pin the twists together at the crown using bobby pins that match your hair color. The pins should be hidden within the twists.
- Loosen the twists. Gently tug at the twists to soften them. They should blend into the surrounding hair rather than sitting as separate elements.
- Blend the waves. Run your fingers through the loose hair to ensure the waves flow naturally from the twist point. Set with flexible-hold hairspray.
Tips and tricks: The twists should feel natural, not forced. If they sit at an awkward angle, reposition them — the right placement depends on your head shape and hairline. For a touch of prom sparkle, place a small crystal or pearl pin at the junction of the twists. The pin should be small enough not to compete with the overall softness.

31 Stunning Prom Nails for Women in 2026 💃
20.Double Crown Braid Half-Up with Wavy Tails
The overview: Long blonde or light brown hair with subtle dimensional highlights. Two symmetrical braids start at the front hairline and run to the center back, where they meet and are secured. Below the braids, the hair falls in soft, flowing waves with body and movement. This is the most symmetrical braided crown style on the list, with both braids mirroring each other in placement, tension, and thickness.
The crown effect is more contained than a full-wrap braided crown. Instead of circling the entire head, these braids run from the temples to the center back, creating a V or U-shaped frame at the crown. The loose waves below provide volume and movement, balancing the structured braids above. A clear elastic at the junction keeps the braids secure while remaining invisible.
Why this look is popular: The symmetrical crown braids create a balanced, polished silhouette that photographs perfectly from the front — ideal for prom portraits. The braids keep hair off the face while the waves maintain a romantic quality.
Where this look is suitable: Formal proms, especially where multiple photo angles are expected. The symmetry is also a strong choice for those wearing high-neck or collared gowns where the braids sit above the neckline.
Step by step:
- Prep for grip. Apply texturizing spray through dry hair. Day-old hair holds braids better than freshly washed hair.
- Create a center part. Clean line from forehead to nape. This symmetry is the foundation for the braids.
- Braid the first side. Starting at the front hairline on one side, create a Dutch braid (strands under) or French braid (strands over). Add small sections as you braid backward toward the crown.
- Braid the second side. Mirror the technique on the opposite side. Check that the braids are at the same height and angle.
- Join at the back. Bring both braids to the center back. Secure them together with a small clear elastic. Tuck the ends under for a clean finish.
- Pancake both braids. Gently pull the outer loops of each braid to widen them. This creates the full, substantial crown effect.
- Create waves. Using a 1.25-inch curling wand, create soft waves throughout the loose hair. Break up with fingers. Set with flexible-hold hairspray.
Tips and tricks: The most common mistake is starting the braids at different angles, which makes them look asymmetrical even if they're the same length. Check the starting point and angle of the first braid in a mirror before starting the second. Applying a small amount of smoothing gel along the part before braiding creates cleaner lines. A decorative pin or bow at the junction adds a prom-appropriate finishing touch.
The Neckline Rule
The best half-up style in the world will look off if it does not work with your dress neckline. If you are wearing a V-neck or sweetheart gown, a braided crown that dips slightly at the back echoes the V shape and frames your face perfectly. The downward lines of the braid mirror the neckline, creating a cohesive silhouette.
For strapless or off-the-shoulder dresses, pull your half-up section slightly higher to show off your neck and collarbones. The exposed shoulder line becomes part of the look, and the higher placement keeps the eye moving upward rather than getting trapped in the middle. Always do a full dress rehearsal with your hair pinned in your chosen half-up style — the proportions look different with the actual dress on.
The test? Take photos from every angle during your dress rehearsal. The back and side views matter as much as the front, especially for the prom photo lineup.
The Perfect Half-Up Look for Your Prom Night
The half-up half-down format offers more versatility than any other prom hairstyle category. Whether you choose a structured braided crown, a soft twisted knot, or a bubble braid with pearl accents, the balance between controlled and free-flowing is what makes these styles work for a full evening of photos, dancing, and celebration. The best choice is the one that matches your hair type, your comfort level with styling, and the neckline of your dress. Every style on this list has been tested against humidity, movement, and hours of wear — so pick the one that feels right and enjoy your night.