Nail Trends
29 Trendy Pink Summer Nails for 2026 💅
From eye-watering neons that practically glow in the dark to those sophisticated, jammy mauves that give total "quiet luxury" vibes, this curated list of 29 designs will have you running to your nail tech. Grab your favorite iced latte and dive into the ultimate pink summer nail guide!
Milky Strawberry & Soft Chrome: How Pink Nails Got Their 2026 Upgrade
The flat, opaque neons that dominated 2025 are being replaced by something softer — finishes that look "lit from within" rather than painted on top. Vogue has already called it: milky white and pink nails are back, and the 2026 version is all about translucent, glaze-like finishes that read as expensive rather than loud.
The two biggest drivers of this shift are aura nails and soft chrome finishes. Aura nails — where a soft pink gradient radiates from the center of the nail outward — create that airbrushed, dimensional effect that photos can't quite capture but everyone notices in person. Pink chrome, meanwhile, is being called the "fresh twist" on metallic nails by beauty editors, blending the softness of pink with a reflective finish that catches light from every angle. Both trends share the same core idea: pink doesn't have to shout to be noticed.
In This Guide
1.Neon Safari Mix
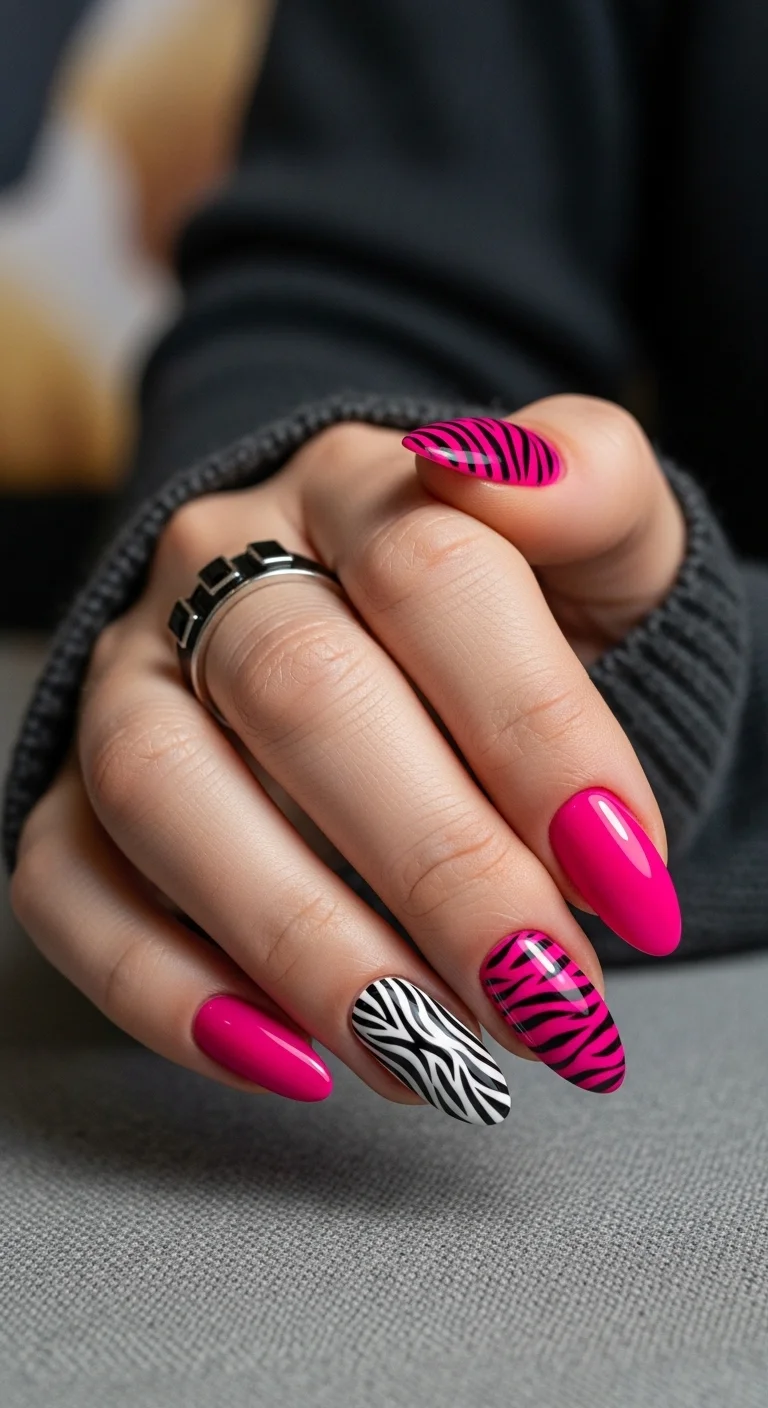
A wild mashup of neon pink and animal print.
Overview:
Neon pink zebra print is not a subtle choice. The set commits fully to the Y2K revival energy: saturated hot pink on most nails, black zebra stripes concentrated on the middle and ring fingers, with one accent nail flipping the contrast to black stripes over white. The effect is loud in a way that works at festivals, pool parties, or anywhere the dress code leans "more is more."
The design holds up better on almond shapes than stiletto. The softer point keeps the animal print from reading too aggressive, and the medium-long length gives each nail enough surface area for the zebra pattern to look intentional rather than cramped. One practical note: neon polishes dry matte, so the glossy top coat here is doing heavy lifting. Without it, the pink reads flat and chalky.
Design Breakdown:
High-contrast pattern mixing that relies on clean lines between the neon and monochrome sections.
Base Color: A blindingly bright neon fuchsia. Essie "Come Here!" or OPI "Hibiscus" both hit the right saturation without leaning too orange.
Nail Shape: Medium almond. The softer tip balances the boldness of the print.
Design Element: Black zebra stripes over pink on most nails; black stripes over white on the ring finger. The stripes are wavy, uneven Y and V shapes.
Finish: High-gloss top coat. Neon polish demands gloss to look alive.
Get The Look at Home:
A thin liner brush is non-negotiable here. The zebra stripes need to look hand-painted, not stamped.
- Base coat: Apply over every nail. Neon pigments stain badly without it.
- Color blocking: Paint most nails two coats of neon pink. Leave the ring finger blank for white.
- White accent: Two coats of opaque white on the ring finger. OPI "Alpine Snow" covers well in two.
- Zebra stripes: Using a fine liner brush and black gel, draw wavy, uneven lines. Vary the thickness. Keep the lines organic looking.
- Tonal stripes: On the pink nails, paint the same black zebra pattern directly over the pink base.
- Top coat: One thick, self-leveling layer. Cap the free edge to prevent tip chipping.
30 Stunning Summer Hair Trends for 2026 ☀️🌊
2.3D Strawberry Milk Dots
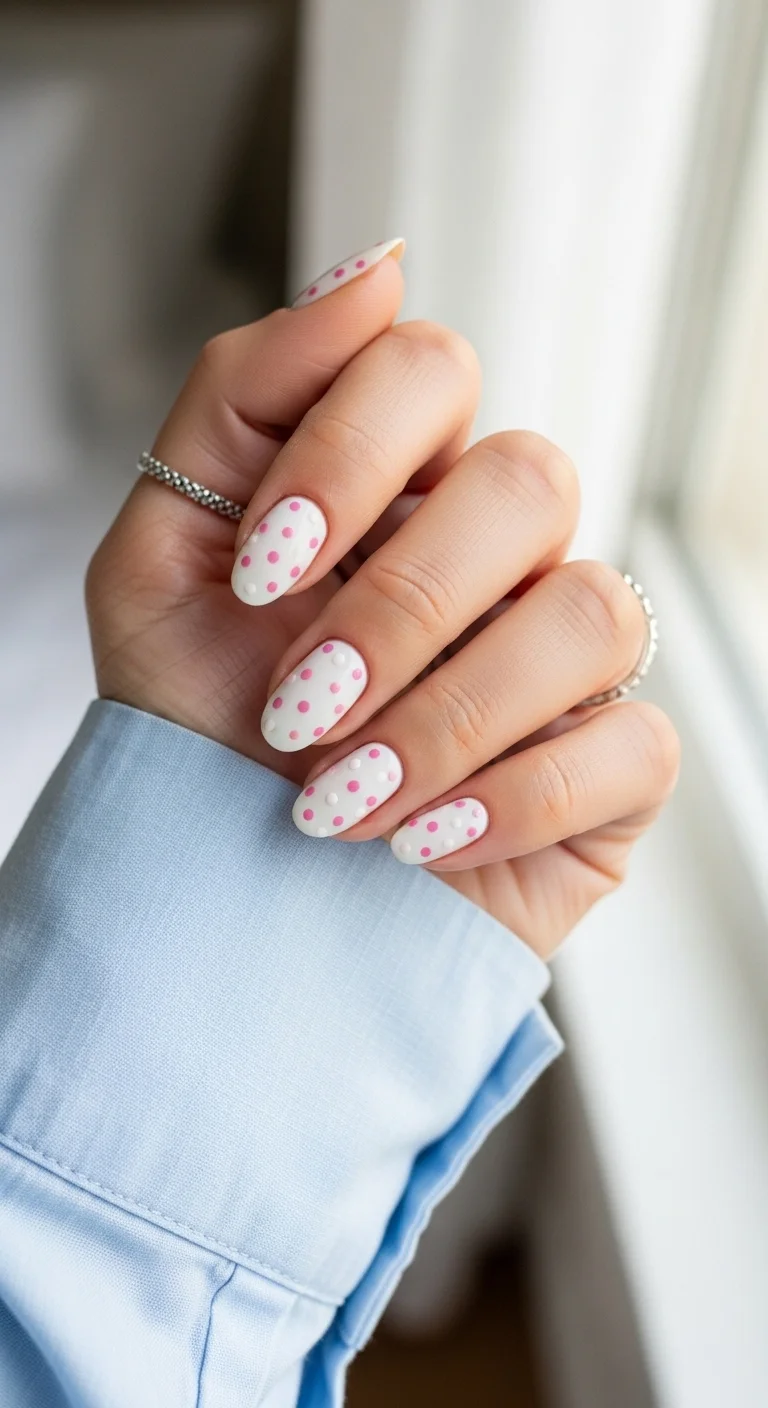
Textured, tactile polka dots on a crisp white base.
Overview:
The raised texture on these dots is the entire point. Flat polka dots are fine. Raised ones that you can feel under your fingertips are a different experience entirely. The milky white base keeps things clean, and the scattered pink and white dots create a tactile surface that's more fidget toy than nail art.
This works because the color palette stays tight: white base, pink dots, white dots. The two-tone dotting adds dimension without visual clutter. The almond shape with medium length is the right call for this design — short nails don't give the dots enough room to breathe, and anything longer starts to feel costumey for what's essentially a playful everyday set.
Design Breakdown:
The 3D effect comes from thick builder gel or high-viscosity polish applied with a dotting tool.
Base Color: A bright, opaque white. Needs to be streak-free because the dots sit on top — any imperfection in the base is visible between them.
Nail Shape: Medium almond. The rounded surface lets the raised dots catch light from multiple angles.
Design Element: Alternating 3D dots in bubblegum pink and white, placed in a loose grid pattern across each nail.
Finish: Glossy base with high-gloss 3D dots. A no-wipe top coat over just the dots keeps them extra smooth.
Get The Look at Home:
This takes patience. The dots need to hold their shape without spreading.
- White base: Two coats of opaque white. Let each coat dry completely — any tackiness will flatten the dots.
- Map the grid: Use a faint pencil dot to mark dot placement. This prevents crowding.
- The 3D dot: Dip a large dotting tool into thick builder gel or high-viscosity pink polish. Press down, lift straight up. The dot should stand proud of the surface.
- Flash cure: If using gel, cure each nail for 10 seconds after dotting so the dots don't flatten while you work on other nails.
- White dots: Repeat with white 3D gel in the spaces between the pink dots.
- Seal: No-wipe top coat just over the dots to keep them smooth and snag-free.
3.Rose Gold Ribbon Wraps
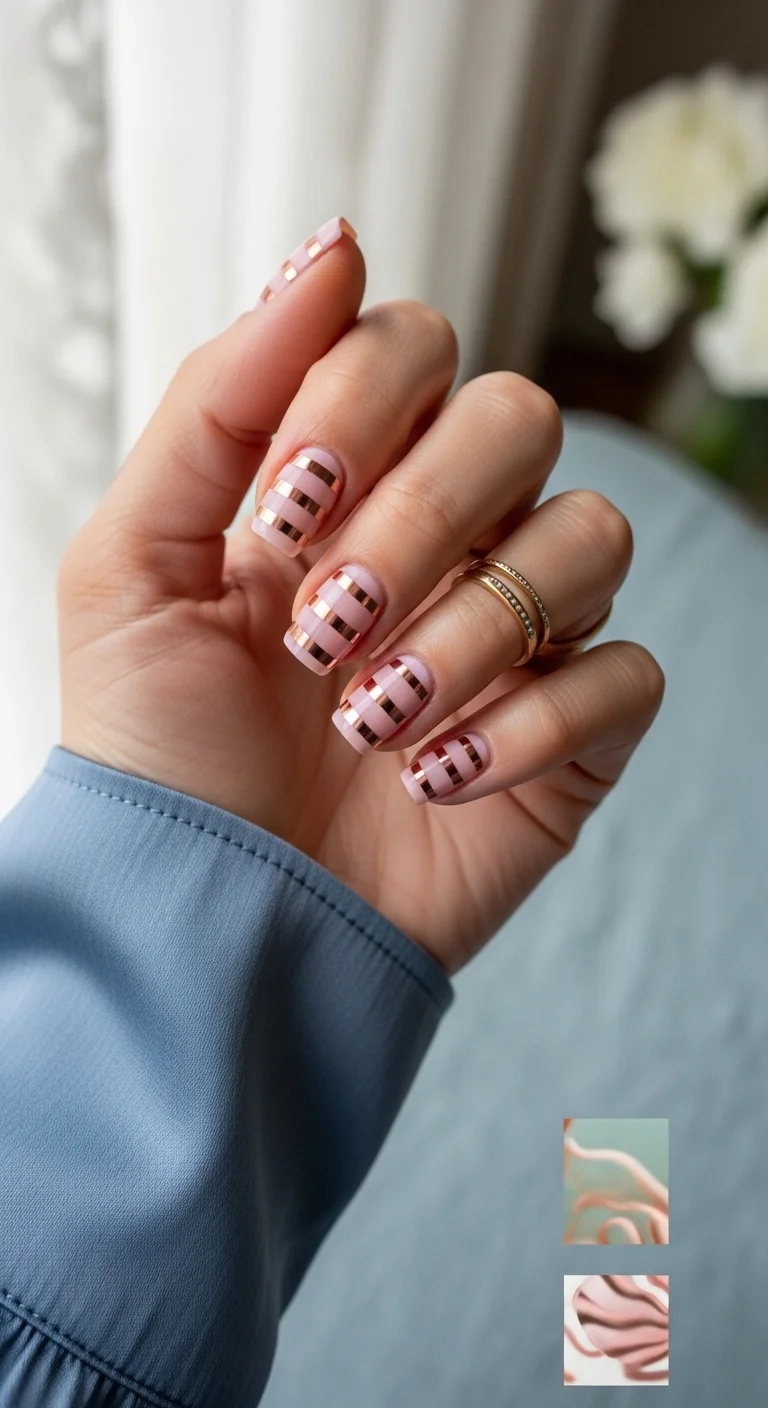
Elegant horizontal metallic banding on a soft pink base.
Overview:
Three or four horizontal lines of rose gold metallic tape across a sheer pink base. That's the entire design. What makes it work is the precision of the spacing — each stripe sits equidistant from the next, creating an architectural rhythm that solid pink can't achieve alone.
The short squoval shape is doing important work here. On longer nails, horizontal stripes can widen the appearance of the nail bed. On short nails, they create a sense of proportion and structure. The rose gold catches warm light beautifully, which is why this reads as expensive in restaurant lighting but more understated in daylight. One thing to watch: striping tape that reaches the nail edge will peel off within a day. Trim it about 0.5mm inside the border on both sides.
Design Breakdown:
Minimalist metallic striping. The execution lives or dies on even spacing and clean tape edges.
Base Color: A sheer, creamy petal pink. Essie "Ballet Slippers" or OPI "Bubble Bath" give that "your nails but better" look.
Nail Shape: Short squoval. Clean, modern, and the straight edges complement the horizontal lines.
Design Element: Three to four horizontal rose gold metallic tape stripes across each nail. Striping tape, not paint.
Finish: High-gloss top coat. Two layers — the first holds the tape, the second smooths the surface.
Get The Look at Home:
Striping tape is your primary tool. A steady hand matters less than patience with the trimming.
- Base coats: Two thin coats of sheer pink. Let dry completely. Tape pulls up wet polish.
- Tape placement: Press three strips of rose gold tape horizontally across each nail. Use the edge of a credit card to smooth them flat.
- Trim: Cut the tape about 0.5mm inside the nail edge on both sides. Tape that reaches the edge catches on everything.
- Press firmly: Use a silicone tool to burnish the tape into the nail, especially at the sidewalls.
- First top coat: One layer to lock the tape in place.
- Second top coat: One more layer for a smooth, glass-like surface over the tape ridges.

28 Cute & Sporty Baseball Game Nail Ideas for 2026 ⚾
4.Sun-Kissed Penny Bronze
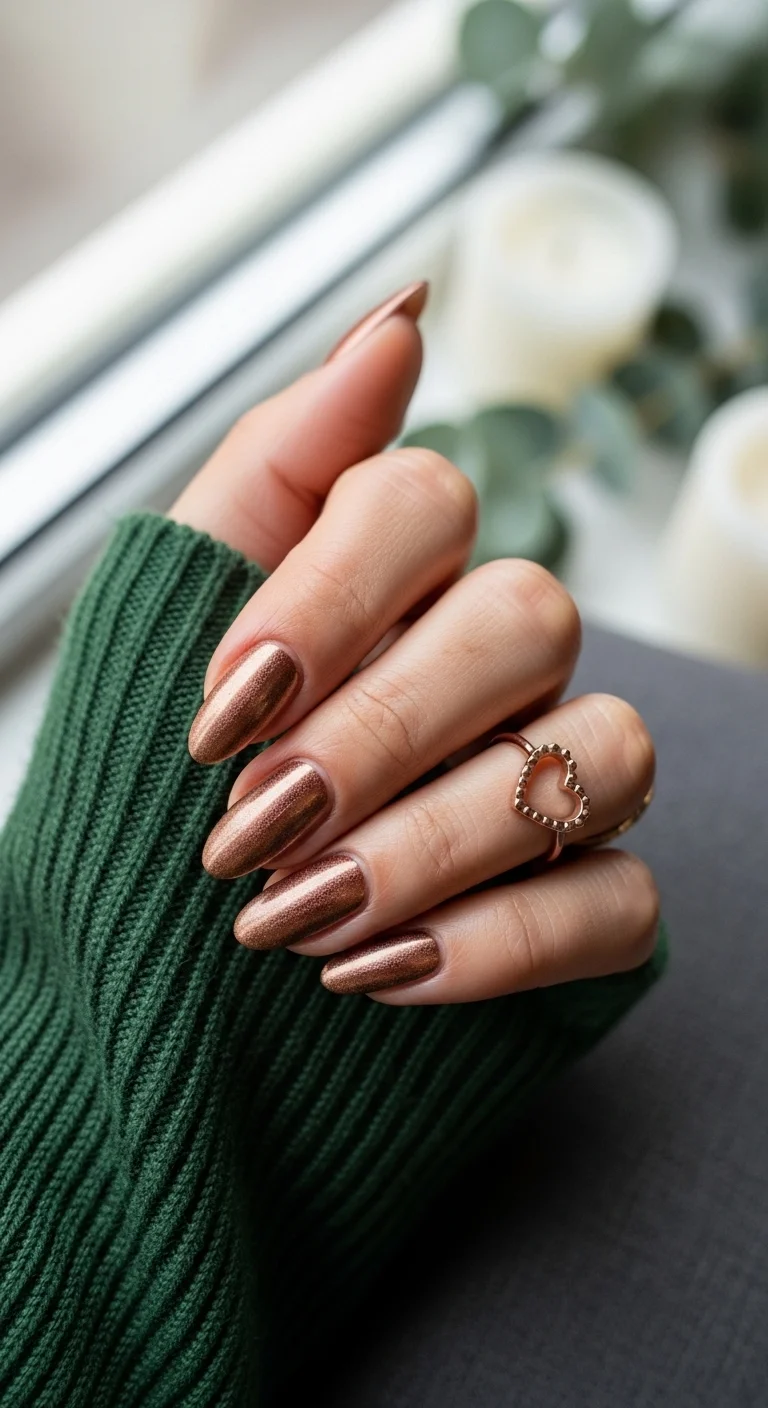
A glowing, shimmering bronze with a subtle pink undertone.
Overview:
A warm copper-bronze metallic that sits somewhere between rose gold and old penny. The fine micro-shimmer throughout the formula creates a dimensional effect — not chunky glitter, not flat chrome, but something in between that shifts between warm copper and soft pink depending on the angle. The almond shape with medium-long length lets the metallic catch light across a curved surface, which is where this type of finish looks its best.
Single-color metallic sets live or die on application technique. Brush strokes are the enemy. The formula needs to self-level, and the application needs to use as few strokes as possible per nail. Three thin coats beats two thick ones every time — thick metallic coats bubble and streak. This is also one of the few designs where a ridge-filling base coat matters more than usual. Every bump in the nail surface gets amplified by the reflective pigment.
Design Breakdown:
A monochromatic metallic that relies entirely on formula quality and application precision.
Base Color: A deep rose-tinted bronze with fine metallic shimmer. Cirque Colors "Bronze Age" or OPI "Sun, Sea, and Sand in My Pants" are in this range.
Nail Shape: Medium-long almond. The curve catches light from every angle.
Design Element: Full-coverage metallic. No additional art — the color and finish are the statement.
Finish: High-gloss. The shine is what creates the molten-metal look.
Get The Look at Home:
Metallic polish application is about minimizing strokes and maximizing self-leveling time.
- Ridge-filling base: Apply a smoothing base coat and let it cure fully. Metallics amplify every surface imperfection.
- Thin layers: Three thin coats rather than two normal ones. Each coat should look slightly translucent on its own.
- The pull technique: Use as few strokes as possible per nail. Start at the cuticle, pull to the tip in one confident motion.
- Dry between coats: Wait at least three minutes. Metallic polish that isn't dry between coats drags and creates visible brush marks.
- Cleanup: A small brush dipped in acetone removes excess from the cuticle line. Dark metallics look messy if they bleed onto skin.
- Top coat: Fast-drying, high-shine formula. Cap the free edge.
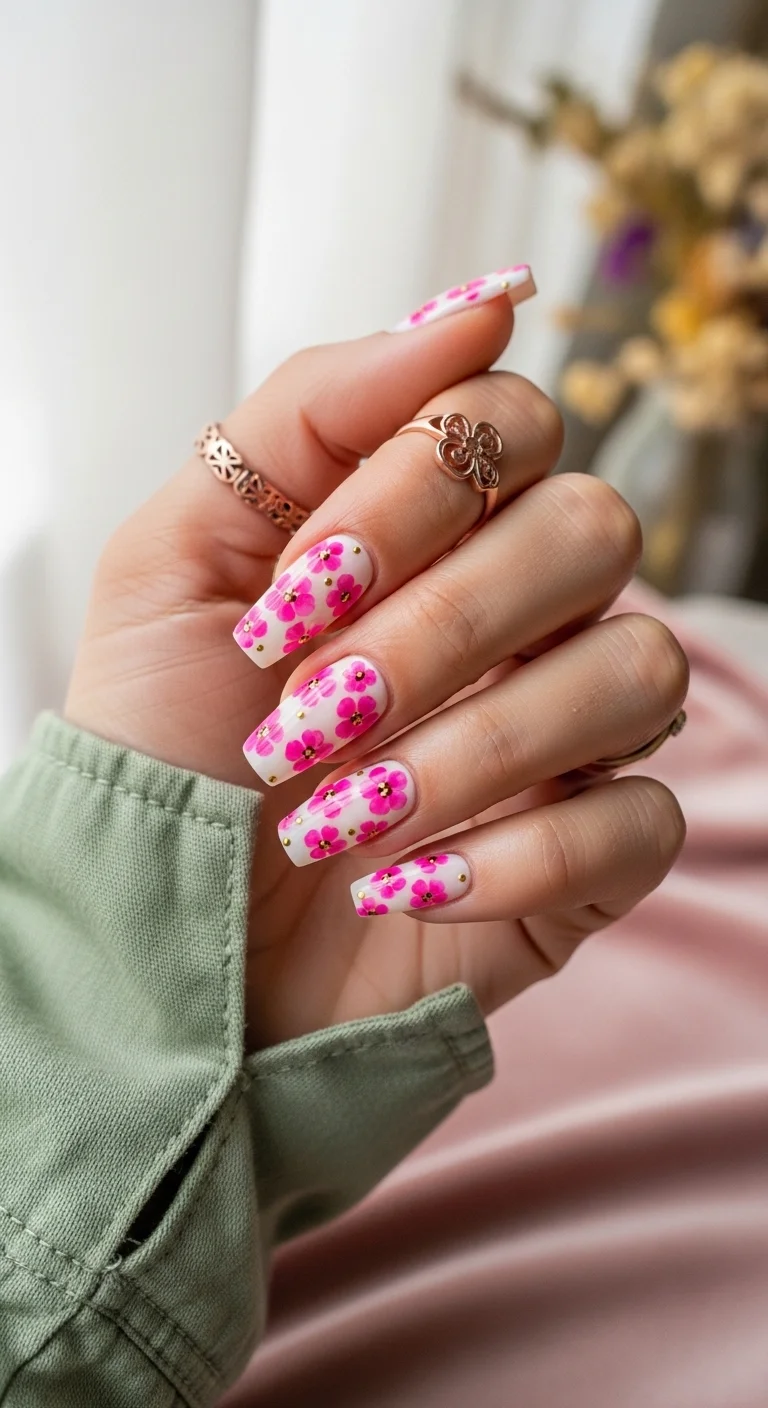
5.Pink Petal Dream Coffin
Dainty pink florals with a touch of gold for a romantic summer vibe.
Overview:
Hand-painted five-petal flowers in hot pink over a milky white base, each centered with a tiny gold metallic dot. The coffin shape gives each nail a generous rectangular canvas, and the floral pattern is consistent enough across all nails to read as a cohesive set without looking stamped or manufactured.
The gold center dots are a small detail that changes the entire feel. Without them, this is a competent floral nail art set. With them, the flowers read as deliberate and slightly elevated — closer to jewelry than craft. The milky white base lets the natural nail peek through slightly, which keeps the overall look from feeling heavy despite the long length.
One honest drawback: hand-painted florals take time. Budget 45 minutes to an hour for both hands if you're doing this at home. The petal placement alone requires a steady hand and a dotting tool that you're comfortable with.
Design Breakdown:
Delicate brushwork over a semi-sheer base. The gold accents tie the design together.
Base Color: A milky, semi-opaque white. It provides a soft background that makes the pink petals look vivid by contrast.
Nail Shape: Long coffin. The flat tip and tapered sides give each flower room to sit without crowding.
Design Element: Five-petal pink flowers with tiny gold caviar bead or stud centers. Petals are layered for slight dimension.
Finish: High-gloss top coat. Thick enough to seal the gold studs so they don't pop off.
Get The Look at Home:
Dotting tools and a fine detail brush. The flowers are built dot by dot.
- Milky base: Two coats of a milky white or very pale nude. Let dry fully.
- Petal dots: Using a medium dotting tool and hot pink polish, place five dots in a circle. Use a fine brush to pull each dot toward the center.
- Layering: Once dry, add a slightly lighter pink in the petal centers for depth.
- Gold centers: Use a tiny dot of nail glue or top coat to place a gold caviar bead in each flower center.
- Filler dots: Scatter small gold dots in the empty spaces between flowers for balance.
- Seal: Thick top coat, making sure to encapsulate the gold studs completely.

30+ Chic Pool Party Hairstyles for Summer 2026 🌊👙
6.Raised Ripple Pink Swirls
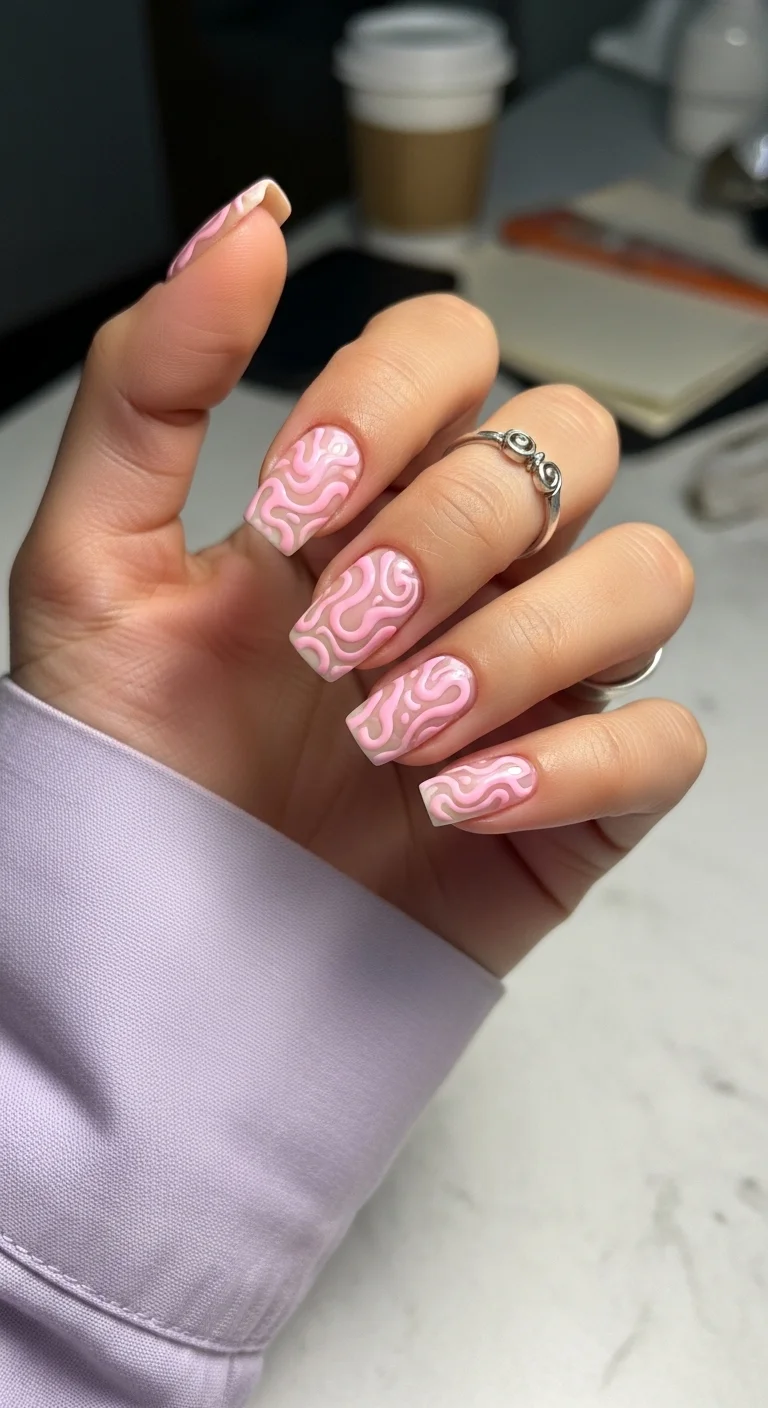
Tactile, squiggly 3D art in a soft bubblegum pink.
Overview:
3D gel nail art that looks like brain coral or topographic contour lines. Raised wavy swirls cover the entire nail surface in a monochromatic pink-on-pink palette — the base is a soft baby pink, and the raised lines are a slightly lighter shade of the same family. The texture is the point: each nail feels sculptural rather than painted.
This design works because of the tonal restraint. Using two shades of pink rather than contrasting colors keeps the 3D texture from looking busy. The coffin shape grounds the organic, curvy lines with its flat tip. The matte or satin base finish with glossy raised lines creates a texture contrast that's subtle in photos but obvious in person.
The practical reality: 3D gel is thick, and it needs a full 60-90 second cure to harden all the way through. Rushing the cure leaves soft centers that dent or deform. Use a no-wipe 3D gel if possible — it eliminates the final top coat step and keeps the raised edges crisp.
Design Breakdown:
Sculptural raised lines over a matte base. The 3D gel does the heavy lifting.
Base Color: A sheer, skin-toned nude or soft baby pink. It should look like a natural nail with a healthy glow.
Nail Shape: Medium coffin. The flat tip provides a stable platform for the raised art.
Design Element: Raised, 3D wavy swirl lines in a creamy bubblegum pink. Lines vary in thickness for an organic feel.
Finish: Matte base with glossy 3D lines. The contrast makes the texture pop.
Get The Look at Home:
A thick 3D sculpting or pudding gel is required. Regular polish won't hold the raised shape.
- Foundation: Two coats of sheer nude, topped with a matte top coat. This makes the glossy 3D art stand out.
- The swirl: Dip a long liner brush into thick pink 3D gel. Move in slow, loopy motions across the nail.
- Build height: If the lines aren't raised enough, go over them a second time after the first layer sets.
- Fill gaps: Add tiny dots of pink gel in the negative space between swirls for visual balance.
- Full cure: 60-90 seconds under UV/LED. The thick gel needs the full time to harden completely.
- Skip top coat: No-wipe 3D gel maintains crisp raised edges. Adding top coat flattens the texture.
7.Magenta Heart Confetti
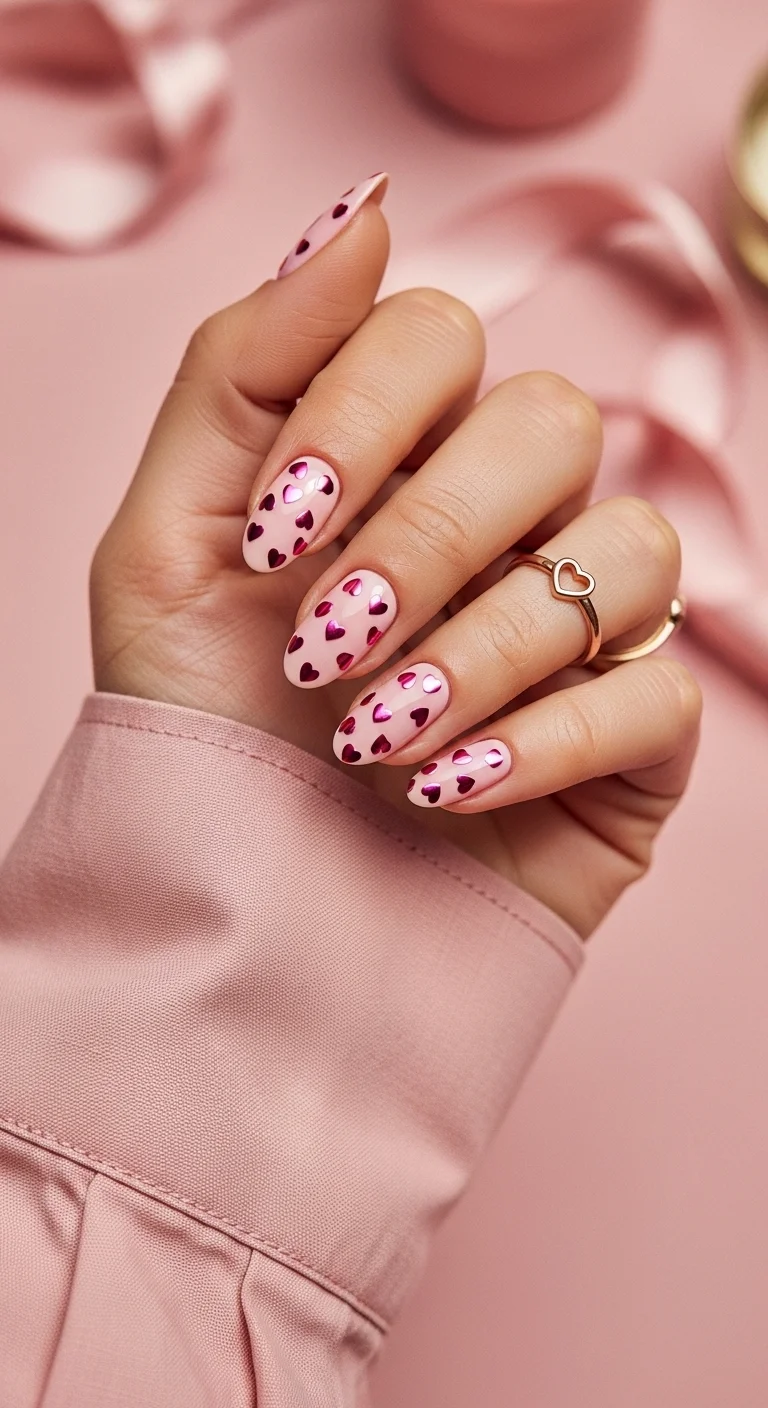
A romantic shower of metallic hearts on a soft pink base.
Overview:
Heart-shaped sequins scattered across a milky baby pink base like confetti. The hearts are metallic magenta — they catch light with a foil-like sheen that flat polish can't replicate. Some nails have a single heart near the tip; others have multiple hearts at varying sizes. The randomness is what makes it work — too uniform and it looks stamped.
The almond shape with medium-long length is ideal for this. The curved surface gives the hearts room to catch light from different angles, and the length is enough to feel elegant without being impractical. The double top coat step is critical here: one layer to lock the sequins in place, a second to smooth the surface. Skip either layer and the heart edges will snag on hair and knitwear within hours.
Design Breakdown:
Sequin placement design. The hearts are physical embellishments, not hand-painted.
Base Color: A soft, milky baby pink. Sheer enough to look natural, opaque enough to provide a clean canvas.
Nail Shape: Classic almond. The soft curves complement the rounded heart shapes.
Design Element: Metallic fuchsia heart-shaped sequins, scattered randomly to look like falling confetti.
Finish: Thick, plumping top coat to encapsulate the sequins completely.
Get The Look at Home:
A wax pencil or dampened orange wood stick makes picking up individual sequins manageable.
- Base: Two coats of baby pink. Don't let the second coat dry completely — or use a tacky base coat for adhesion.
- Placement: Use a wax pencil to pick up each heart sequin and press it onto the nail. Avoid placing them too close to the edge.
- Press flat: Gently press each heart into the polish with a silicone tool so it conforms to the nail curve.
- First top coat: One layer to lock the hearts in place. Let it dry.
- Second top coat: A thicker layer to fully encapsulate the sequins for a smooth-to-the-touch finish.
- Edge check: Run your finger over each nail. Any raised corners need another layer of top coat.

30 Stunning Beach Nail Ideas for the Best Vacation in 2026 🌊
8.Stiletto Fuchsia Mirror

Vivid, mirror-finish fuchsia that demands attention.
Overview:
A deep fuchsia chrome with a mirror-like metallic finish on sharp stiletto nails. No nail art, no embellishments — the chrome effect is the entire design. The reflection is strong enough to see light sources bouncing off the surface, which gives the nails a liquid-metal quality that flat metallic polish can't achieve.
Stiletto is the right shape for this. The aggressive point amplifies the chrome's dramatic effect — the reflection narrows to a point at the tip, creating a visual line that draws the eye. On round or square shapes, the same chrome reads less directional and more like generic metallic. The length is necessary for the stiletto to work; anything shorter than medium-long and the point looks stubby rather than sharp.
Chrome powder is messy. The burnishing process sends fine metallic dust into your cuticles, onto your skin, and onto whatever surface you're working over. Apply liquid latex around the nails beforehand for easier cleanup. The no-wipe top coat underneath the chrome needs to be cured for exactly half the usual time — too long and the powder won't adhere; too short and it clumps.
Design Breakdown:
Full-coverage chrome powder over a colored gel base. The mirror finish depends on precise curing times.
Base Color: A deep fuchsia gel. The base color affects how the chrome reads — darker bases produce a richer, more saturated mirror.
Nail Shape: Sharp stiletto. The pointed tip creates a directional reflection.
Design Element: Full-coverage metallic chrome. Zero visible glitter grain — pure sheet of color.
Finish: Ultra-glossy no-wipe top coat. The seal protects the delicate chrome from scratching.
Get The Look at Home:
Chrome powder application is a specific process. Follow the curing times exactly.
- Shape and base: File to a sharp point. Apply two coats of fuchsia gel. Cure completely.
- No-wipe top coat: Apply and cure for exactly 30 seconds. The surface should be slightly tacky.
- Burnish: Dip a sponge applicator into fuchsia chrome powder. Rub firmly onto the nail until a mirror forms.
- Dust off: Use a soft brush to remove excess powder from cuticles and skin.
- Final seal: Another layer of no-wipe top coat. Cap the free edge to prevent chrome peeling.
- Cleanup: Acetone and a brush removes stray metallic dust from skin.
9.Magenta Rainfall Ombre
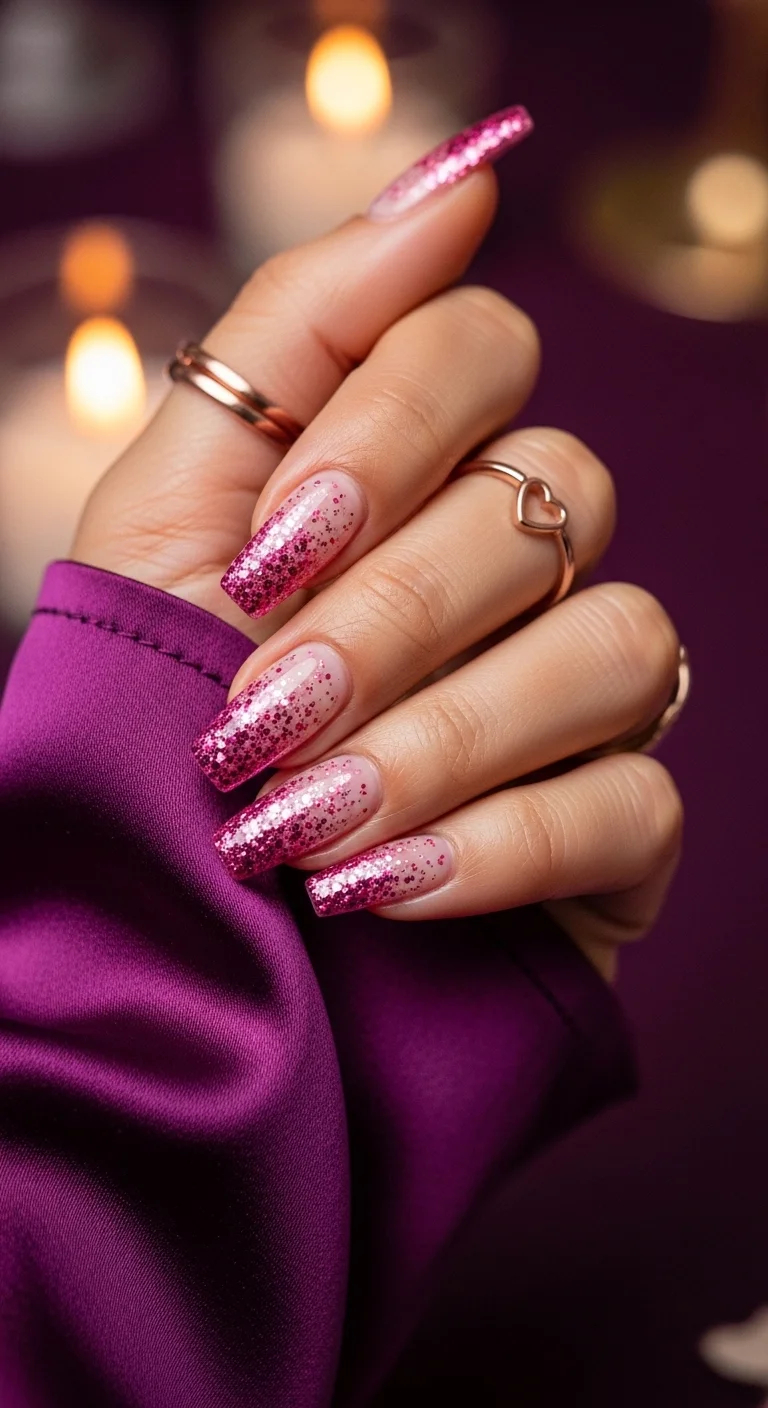
A sparkling magenta gradient that fades into a soft nude base.
Overview:
Dense magenta glitter concentrated at the tips, diffusing toward the cuticle on a sheer nude base. The glitter particles are mixed — fine shimmer alongside larger hex pieces — which creates a multidimensional sparkle rather than flat, uniform glitter. The effect looks like glitter raining down from the tips and dissolving halfway to the cuticle.
Long coffin is the ideal shape for glitter ombre. The extra length gives the gradient room to transition smoothly — on short nails, the jump from dense glitter to bare nude happens too abruptly and looks choppy. The sheer nude base is also doing practical work: as the nails grow out, the transition between new growth and polish is invisible because the base is already sheer. This is one of the lowest-maintenance glitter designs you can wear.
Glitter texture is the main challenge. Even with a thick top coat, the surface can feel slightly gritty. A "glitter grabber" top coat (like Essie's) or two layers of regular top coat solves this. The sponge method for applying glitter is worth learning — painting glitter polish directly onto the nail deposits too much clear base and not enough actual glitter.
Design Breakdown:
A tapered glitter placement that builds density toward the tip. The sponge method gives the best opacity.
Base Color: A sheer "cover" pink or nude. It hides the natural nail line while letting the glitter take focus.
Nail Shape: Long coffin. The extra length allows a smoother gradient fade.
Design Element: Mixed-size magenta glitters — fine shimmer and larger hex pieces — concentrated at the tips and fading toward the center.
Finish: Thick, glassy top coat to smooth the glitter texture. Two layers minimum.
Get The Look at Home:
A makeup sponge is the key tool. It soaks up excess clear base and deposits only the glitter.
- Nude base: Two coats of sheer nude or ballet slipper pink. Let dry fully.
- Sponge prep: Paint magenta glitter polish onto a makeup sponge. Dab on paper first to remove initial excess.
- Dab onto nail: Press the glitter-loaded sponge onto the top half of the nail. Most pressure at the tip, lighter toward the center.
- Build the tip: Add a second layer of glitter only to the very edge for deeper density.
- Press down: While the glitter is tacky, use a clean finger to press down any protruding pieces.
- Top coat: Two layers of thick top coat for a completely smooth, snag-free surface.

26 Stunning Summer Braided Hairstyles for Women 2026 ☀️💇♀️
10.Electric Fuchsia Chrome Tips
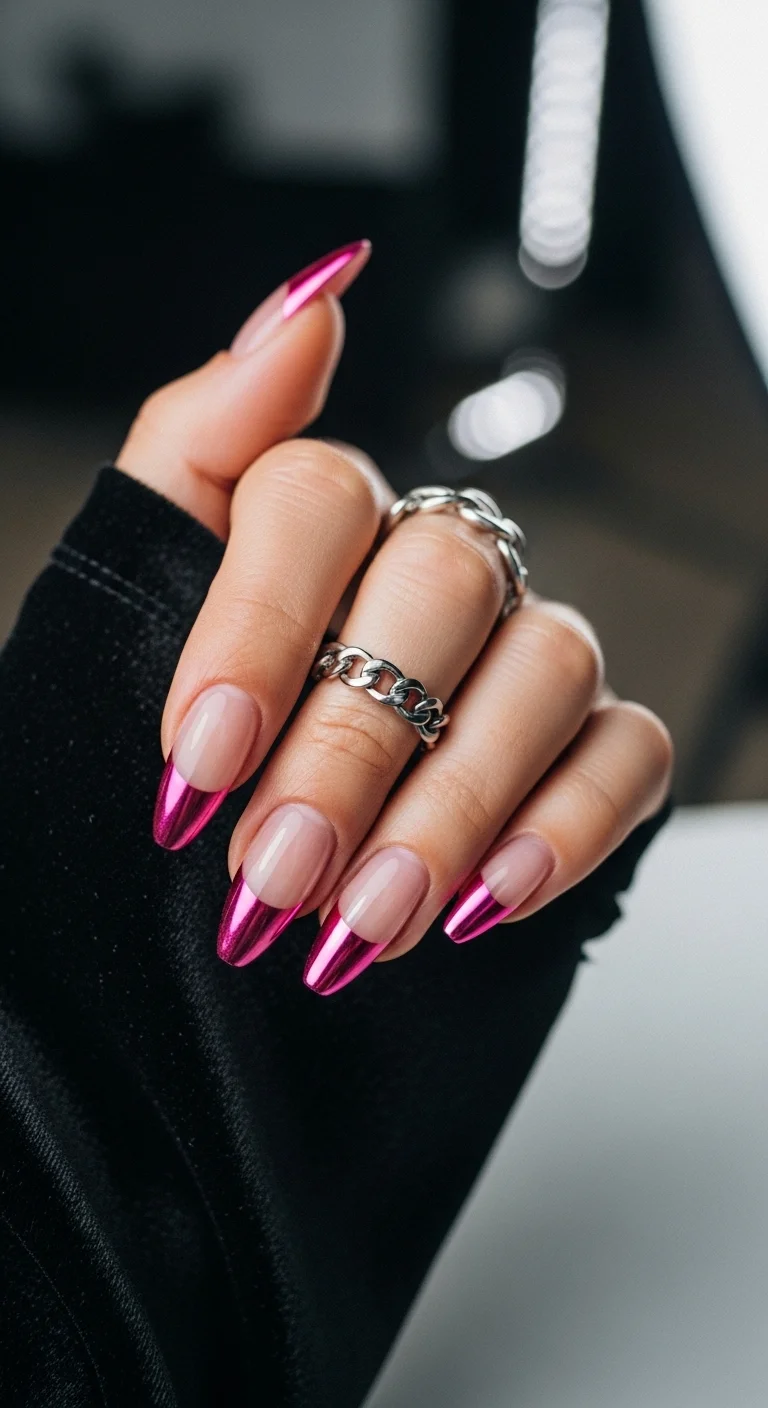
A futuristic twist on the classic French manicure.
Overview:
A sheer nude base with fuchsia chrome French tips. The chrome powder is applied only to the tip area — roughly the top 30-40% of each nail — creating a metallic smile line that catches light differently than the glossy nude beneath it. The contrast between the understated base and the bold chrome tip is the design's core tension.
The chrome-on-French technique requires a specific order of operations. You paint the fuchsia tip first, cure it, then apply no-wipe top coat only to the tip area and cure that for half the usual time. The chrome powder adheres only where the fresh top coat sits, so the nude base stays clean. If you accidentally get chrome on the nude section, a soft brush removes it before the final seal. The almond shape is ideal — the curved tip creates a natural smile line guide.
Design Breakdown:
Chrome powder applied selectively to French tips. Precision in the smile line and curing times is everything.
Base Color: A sheer, high-gloss nude. OPI "Put It in Neutral" or Essie "Sheer Permission" work well.
Nail Shape: Slim almond. The curved tip provides the smile line.
Design Element: Metallic fuchsia chrome tips, slightly deeper than a traditional French to show off more color.
Finish: High-gloss no-wipe top coat over both base and chrome for a seamless transition.
Get The Look at Home:
The chrome only sticks to freshly cured no-wipe top coat. Keep the application area precise.
- Nude base: Two coats of sheer nude gel. Cure completely.
- Map the tip: Using a fuchsia gel and thin liner brush, draw the smile line. Fill in the tip. Cure.
- Top coat on tips only: Apply no-wipe top coat exclusively to the fuchsia area. Cure for 30 seconds.
- Rub chrome: Use a sponge applicator to rub fuchsia chrome powder onto the tips. It adheres only to the fresh top coat.
- Dust off: Soft brush to remove stray chrome from the nude section.
- Final seal: High-gloss top coat over the entire nail to lock in the chrome and unify the surface.
11.Geometric Coral Crush
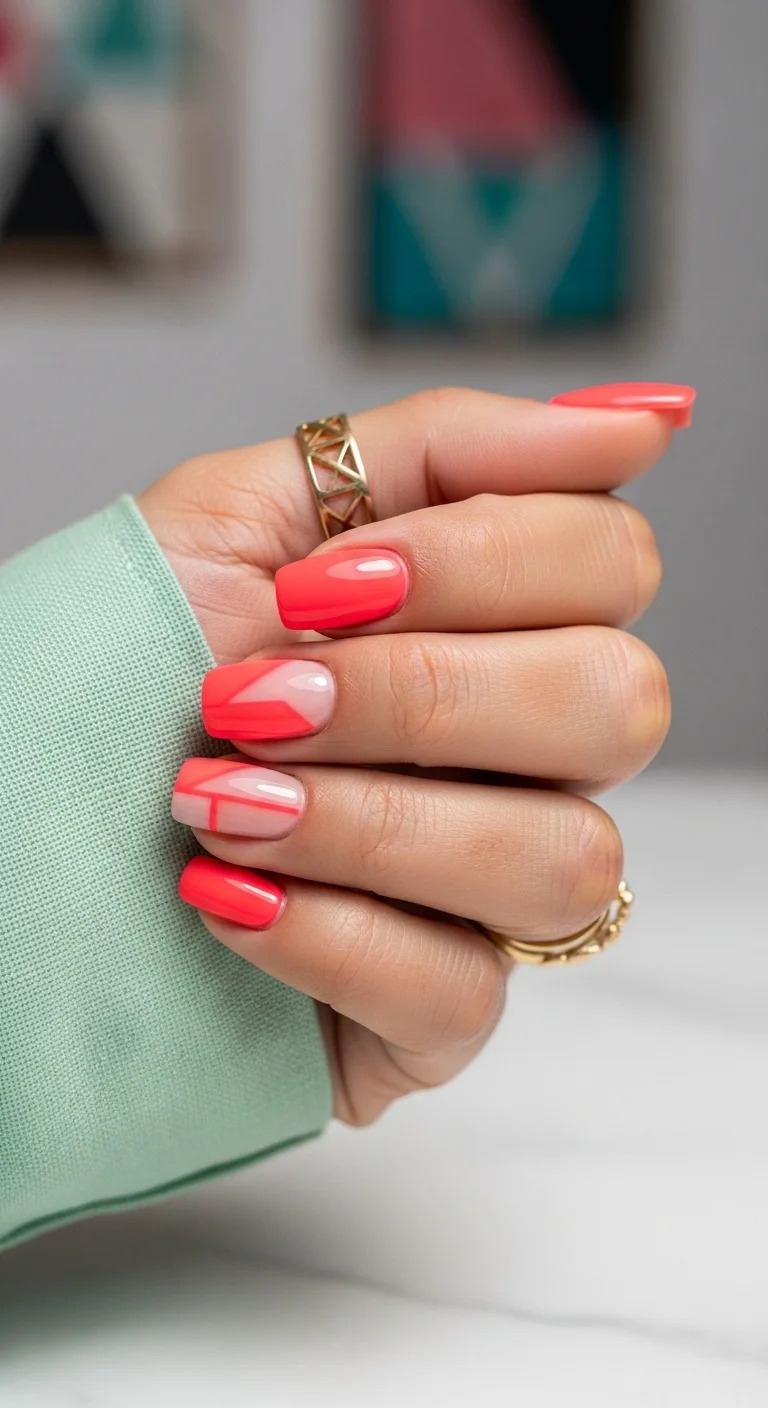
Clean lines and bold coral tones for a modern, architectural look.
Overview:
Coral-pink with geometric negative-space designs. Some nails are solid coral; others feature diagonal color blocking over a nude base, creating angular asymmetrical shapes. One nail has thin coral pinstripes in a crisscross grid. The mix of solid and patterned nails across the hand keeps the set from feeling repetitive.
Short squoval is the right shape for geometric nail art. The straight edges of the nail echo the straight lines of the design, and the practical length means the angular patterns don't get distorted by excessive curvature. The coral leans warm — more pink than orange — which makes it flattering across a range of skin tones. Negative space designs are also more forgiving than full-coverage art: the bare nail sections hide any imperfections in the coral application.
Design Breakdown:
Blocking and straight lines create an abstract, modern-art inspired layout. Tape helps enormously.
Base Color: A bright, creamy coral-pink. Essie "Come Here!" or OPI "Coral-ing Your Blushes" are in this range.
Nail Shape: Short squoval. The geometric shape of the nail mirrors the geometric art.
Design Element: Negative-space triangles, diagonal color blocks, and thin intersecting lines in matching coral.
Finish: High-gloss top coat that makes the negative space sections look healthy and polished.
Get The Look at Home:
Striping tape or a very steady hand with a long liner brush. The negative space is what makes the design feel modern.
- Clear base: Start with a high-shine base coat on all nails.
- Outline: Use a long liner brush to draw diagonal lines dividing the nail into sections.
- Fill blocks: Carefully fill certain sections with coral polish, leaving others bare to show the natural nail.
- Intersecting lines: Draw one or two thin coral lines through the negative space to tie the look together.
- Cleanup: A flat brush dipped in acetone sharpens any wobbly lines.
- Top coat: A generous layer to level out the surface where polish meets bare nail.

35 Fun Birthday Nail Designs for 2026 🎂
12.Dreamy Pink Aura Squoval
A soft, 'lit-from-within' pink glow on a neutral base.
Overview:
A soft gradient that moves from near-white at the cuticle to hot pink at the tips — no harsh transition lines, just a seamless color melt. The squoval shape with short length keeps the design grounded and practical while the gradient does the visual work. This is one of those designs that looks like airbrush work but can be achieved with a sponge.
The aura effect depends on the gradient being truly seamless. Any visible line between the pink and white breaks the illusion. The sponge technique is more forgiving than an airbrush for at-home application — multiple light dabs build a smoother transition than one heavy press. The jelly or translucent quality of the lighter areas is what gives this its ethereal, cotton-candy appearance.
Design Breakdown:
A sponge-applied gradient with the most saturated color at the tip. The blend zone is everything.
Base Color: A milky, sheer nude or white. This acts as the foundation for the gradient.
Nail Shape: Short squoval. The practical shape lets the color effect carry all the visual interest.
Design Element: A soft-edged bloom of hot pink at the tips, fading through medium pink to near-white at the cuticle.
Finish: Glossy with a slight jelly translucency in the lighter areas.
Get The Look at Home:
An old eyeshadow applicator works better than a makeup sponge for this — it gives more control over the blend zone.
- Base: Two coats of milky nude. Let dry or cure completely.
- Sponge setup: Paint a stripe of hot pink and a stripe of milky white side by side on a sponge. Dab on paper first.
- Dab from the tip: Press the sponge onto the nail with the pink concentrated at the tip. Use light, repeated dabs.
- Build the blend: Reposition the sponge slightly for each dab so the transition line shifts and blurs.
- Intensify the tip: Add a second layer of pink only to the very edge for deeper saturation.
- Top coat: A thick layer that further blends the gradient and smooths any sponge texture.
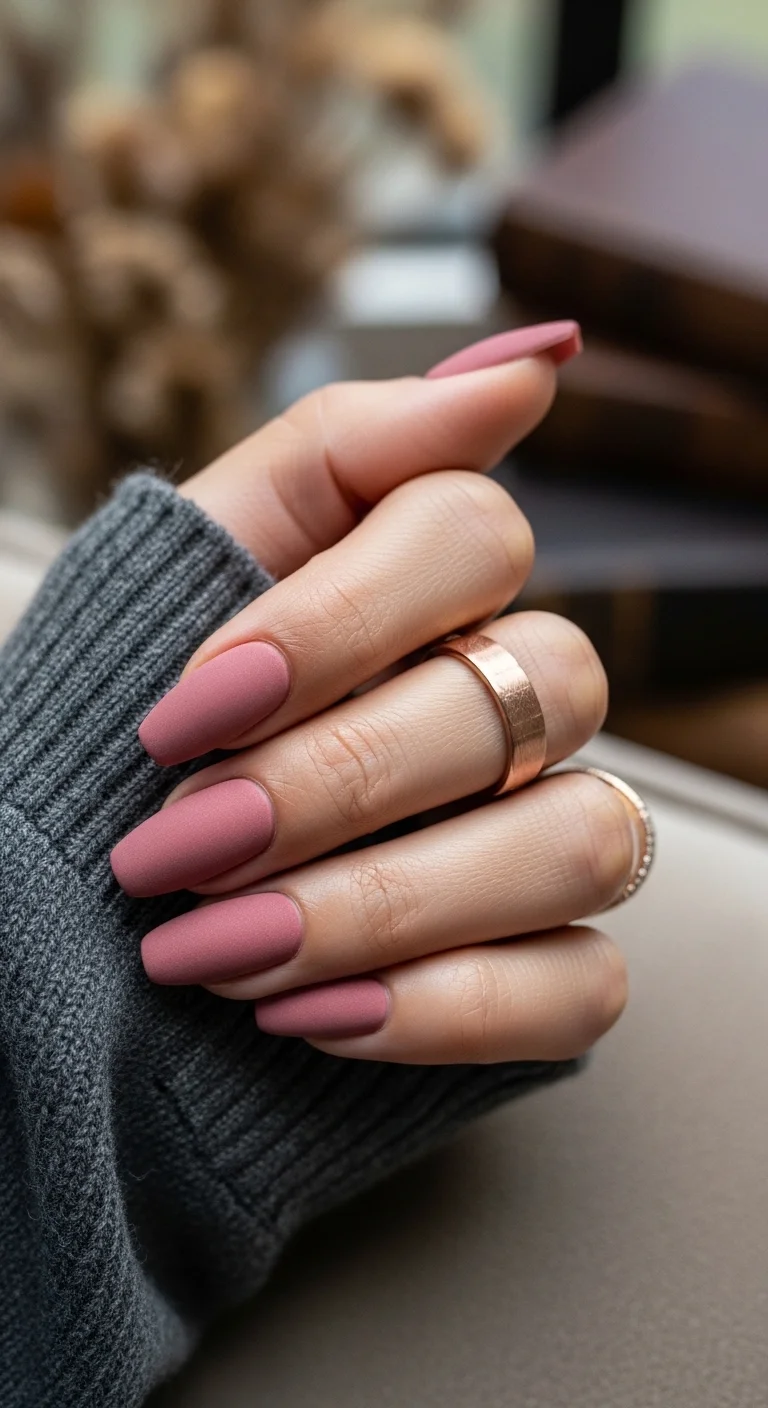
13.Matte Mauve Velvet Coffin
A velvety, sophisticated take on summer pink.
Overview:
A single shade of dusty mauve-rose with warm brownish undertones, set in a full matte finish across long coffin nails. No nail art, no embellishments — the color and the matte texture are the entire design. The matte finish gives the surface a soft, fabric-like appearance that looks like velvet under certain lighting.
Matte top coats amplify every flaw in the base coat. Streaks, brush marks, and uneven thickness that glossy finishes hide are fully visible under a flat surface. This means the mauve needs three thin coats rather than two, with full drying time between each. The coffin shape's sharp lines contrast nicely with the soft matte texture — the tension between structured shape and velvety finish is what makes the set interesting.
Practical note: matte nails pick up stains and discoloration faster than glossy ones. Cooking, cleaning products, and even certain fabrics can leave marks. Wipe them with a bit of rubbing alcohol if they start looking dingy after a few days.
Design Breakdown:
Monochromatic matte. The finish IS the design. Base coat precision matters more here than any other finish.
Base Color: A dusty, mid-tone mauve pink with warm undertones. Essie "Mink Muffs" or OPI "Squeaker of the House" are close matches.
Nail Shape: Long coffin. The sharp lines provide contrast to the soft matte surface.
Design Element: Solid color, zero art. The flat matte surface is the visual focus.
Finish: True matte top coat. Not satin, not "velvet matte" — fully flat.
Get The Look at Home:
Surface prep determines whether matte nails look intentional or sloppy. Buff every ridge.
- Buff: Smooth any ridges on the natural nail. Matte polish shows every imperfection.
- Ridge-filling base: Apply a smoothing base coat. Let it dry completely.
- Three thin coats: Apply the mauve in three thin layers. Each should look slightly translucent on its own.
- Dry between coats: At least three minutes. Matte top coat on undried polish causes bubbling.
- Matte top coat: Apply in one confident stroke per nail. Don't go back over the same area — it creates texture differences.
- Cuticle oil: Matte finishes can make fingers look dry. Hydrate the cuticles after the top coat sets.
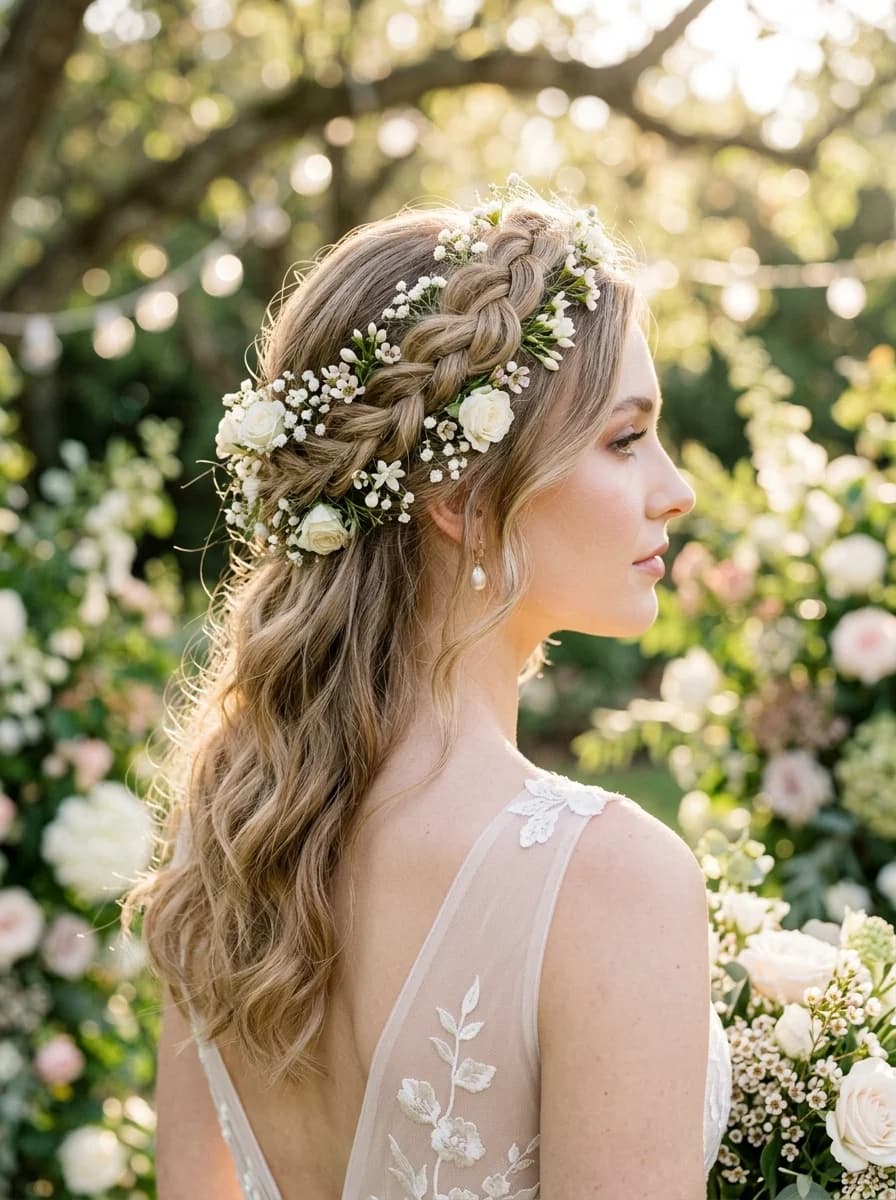
32 Stunning Summer Wedding Hairstyles for Brides ☀️💍
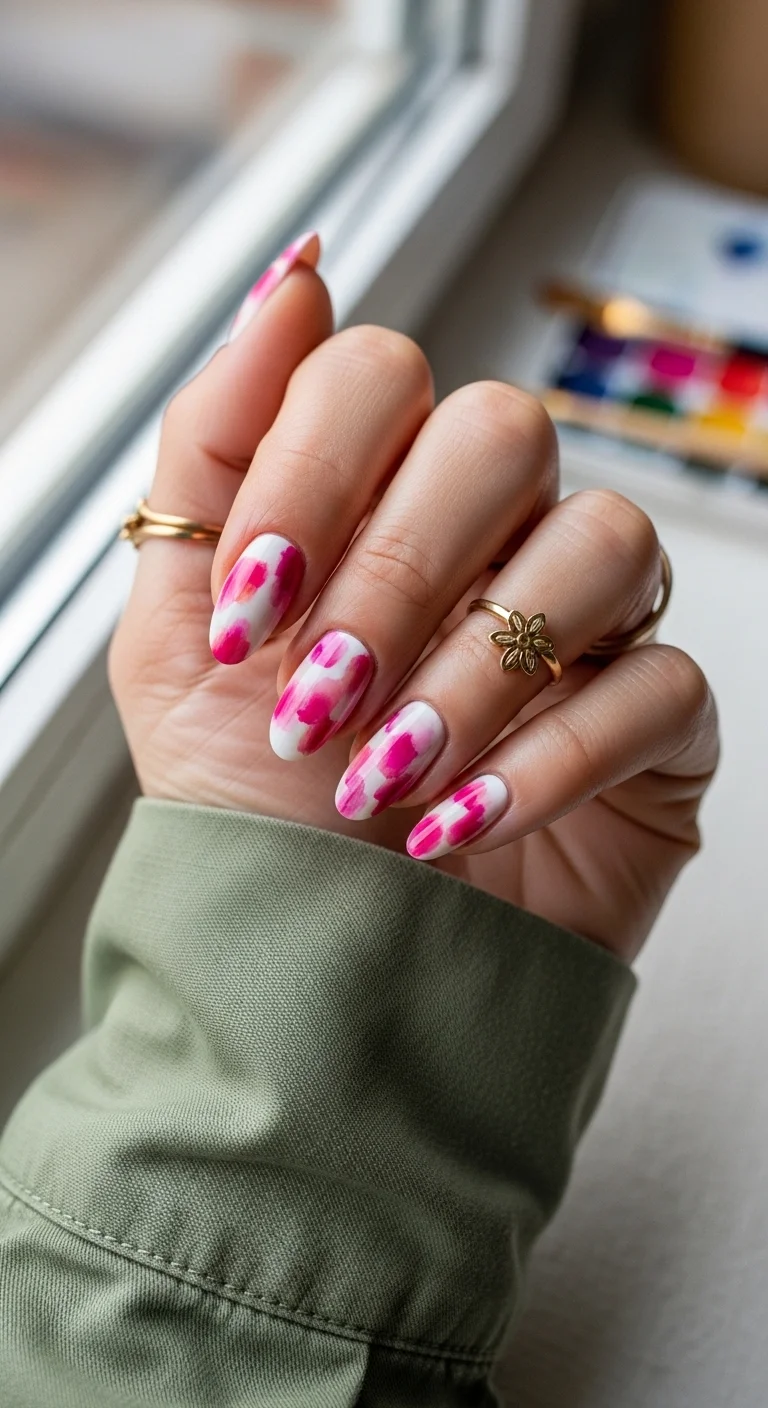
14.Pink Watercolor Wash
An artistic, painterly look with soft washes of fuchsia.
Overview:
Abstract fuchsia splotches that bleed and blend over a white base, looking like wet paint dropped onto a canvas. No two nails are identical — the watercolor technique produces organic, unrepeatable patterns where the pink spreads differently on every surface. The white base acts as the canvas, and the varying density of the pink creates natural depth without deliberate layering.
This works better on almond shapes than square. The soft, rounded edges complement the formless, bleeding nature of the watercolor effect. Square nails would create an odd contrast between the geometric shape and the organic art. The technique itself is forgiving — the "mistakes" (uneven spread, unexpected bleeds) are what make watercolor nails look professional rather than amateur. Trying to control the spread is where most people go wrong.
Design Breakdown:
A "blooming" or alcohol-thinned technique that creates soft, translucent layers of color.
Base Color: A crisp, opaque white. It acts as the canvas for the watercolor art.
Nail Shape: Medium almond. The soft curves match the flowing, formless nature of the effect.
Design Element: Abstract strokes of hot pink and light pink, layered to create depth and "bleed" effects.
Finish: High-gloss top coat that makes the watercolor look like it's still wet.
Get The Look at Home:
Rubbing alcohol or blooming gel thins the polish enough to create the bleeding effect.
- White canvas: Two coats of white polish. Let dry completely.
- The tint: On foil, mix a drop of hot pink polish with a drop of rubbing alcohol to create a watery tint.
- The wash: Use a brush to dab the tint onto the nail. Let it spread naturally — don't guide it.
- Layering: Once the first layer is dry, add a few dabs of full-strength pink in the centers of the washes for depth.
- White highlights: Tiny swirls of white polish within the pink to look like light reflecting on water.
- Seal carefully: Float the top coat over the art without dragging. Pressing down smears the watercolor.
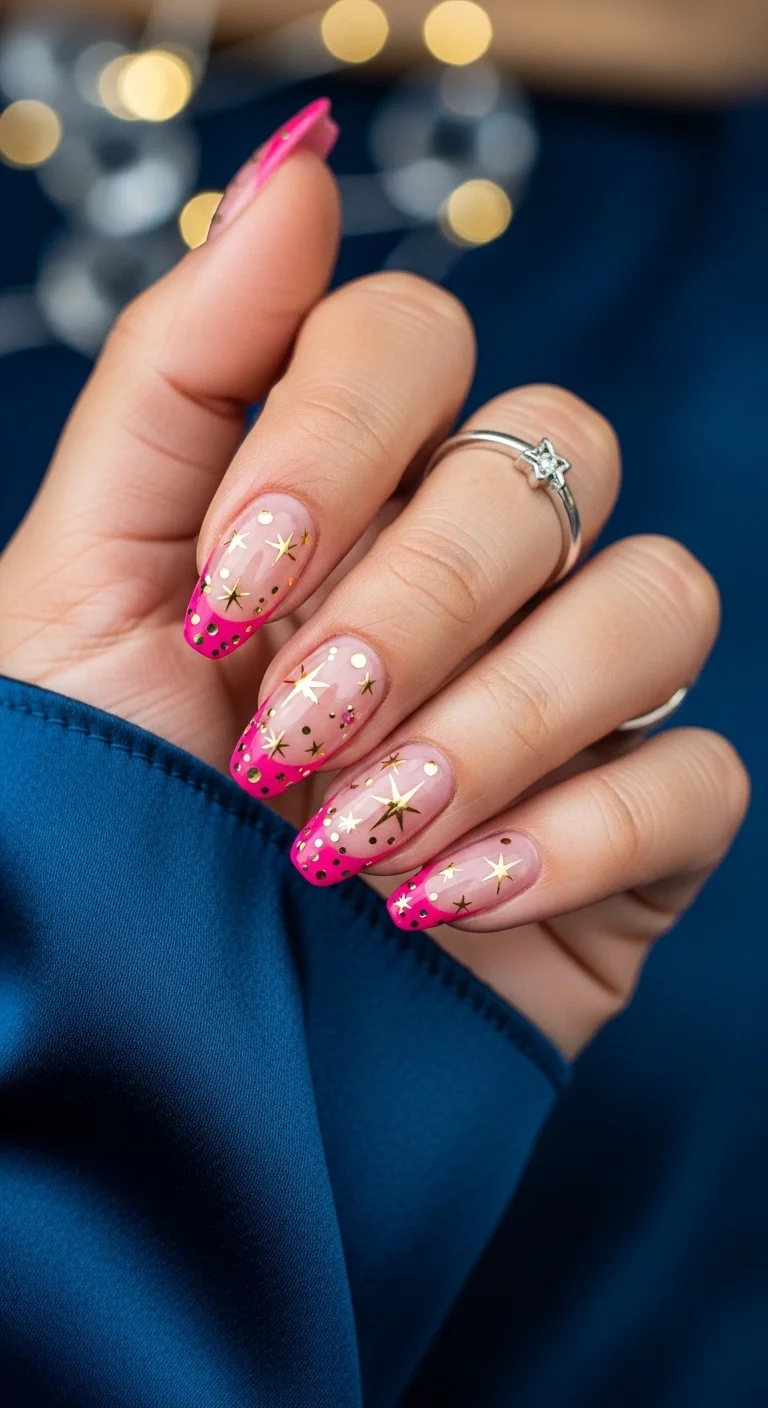
15.Midnight Star French Tips
A whimsical, celestial take on the classic pink French tip.
Overview:
Hot fuchsia French tips on a sheer nude-pink base, decorated with gold metallic starburst stickers and scattered gold and white dots. The French tips have a deep smile line — covering more of the nail than a traditional French — which gives the gold art more room to sit between the tip and the cuticle.
The star stickers do most of the visual heavy lifting here. Without them, this is a colored French tip — competent but unremarkable. With them, the design reads as a complete celestial story. The gold dots function like "space dust" filling the gaps between stars, which prevents the nude base from looking empty. Gold foil or stamping plates work better than hand-painting for the star shapes — the precision of manufactured stars keeps the design looking clean.
Design Breakdown:
French tip technique with metallic celestial embellishments. The star placement matters more than the French line.
Base Color: A sheer nude-pink that keeps the focus on the tips and the gold art.
Nail Shape: Elegant almond. The curved tip provides the French smile line.
Design Element: Hot pink French tips with gold metallic starburst stickers and tiny "space dust" dots.
Finish: High-gloss top coat to seal the stickers and make the gold reflective.
Get The Look at Home:
Gold star stickers or a stamping plate make the celestial elements much easier than freehand.
- Base layer: Two coats of sheer nude-pink. Let dry.
- The tip: Use a liner brush and hot pink polish to paint French tips with a deep smile line.
- Star placement: Press gold metallic star stickers onto the nude area between the tip and cuticle. Vary the sizes.
- Space dust: Use a dotting tool to add tiny gold and white dots around the stars.
- Press flat: Use a silicone tool to smooth the sticker edges so they lie flush against the nail.
- Seal: Thick top coat to lock in the gold so it doesn't rub off.

34 Cutest Butter Yellow Nail Designs for 2026 🧈
16.Fuchsia & Silver Sparkle Party
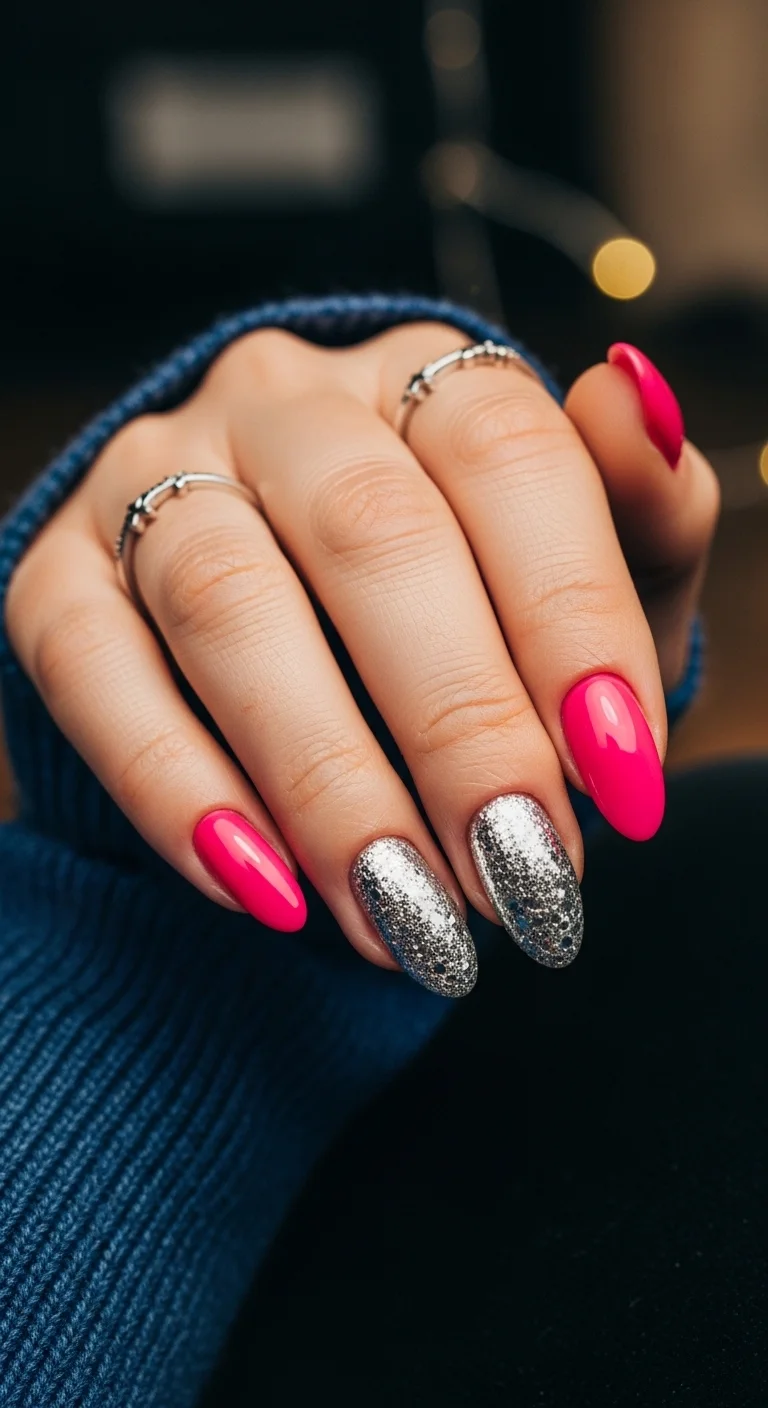
Bold pink paired with a high-voltage silver glitter accent.
Overview:
Alternating between solid hot fuchsia and full-coverage silver glitter. Three nails are opaque fuchsia cream; two nails (middle and ring fingers) are densely packed with silver glitter. The contrast between smooth cream and textured sparkle is the design's appeal.
This is one of the easiest high-impact nail designs to execute. You don't need any artistic skill — just the ability to paint solid color and apply glitter polish. The sponge method for the glitter nails deposits more particles per coat than brushing directly, which is how you get that fully opaque, dense sparkle. Medium almond keeps the busy glitter from overwhelming the hand. On longer shapes, two glitter nails next to each other can look heavy.
Design Breakdown:
High-contrast alternation between opaque cream and full-coverage holographic glitter.
Base Color: A saturated hot fuchsia cream. OPI "Can't Hardly Wait" or Essie "Bold & Boulder" are in this range.
Nail Shape: Medium almond. Balanced enough to handle the glitter without looking costume-y.
Design Element: Full-coverage silver holographic glitter on two accent nails. Mixed glitter sizes for extra dimension.
Finish: Glossy on the fuchsia nails; thick glitter-smoothing top coat on the silver nails.
Get The Look at Home:
The sponge method is the difference between sparse glitter and full-coverage sparkle.
- Paint the fuchsia: Two coats on the index, pinky, and thumb. Let dry.
- Glitter base: One thin coat of silver glitter on the middle and ring fingers.
- Sponge it: Paint a generous amount of glitter onto a makeup sponge. The sponge absorbs the clear base, leaving only glitter.
- Dab on: Press the glitter-loaded sponge onto the accent nails for instant opaque coverage.
- Cleanup: A small brush with acetone removes stray glitter from cuticles.
- Smooth: Two layers of thick top coat on the glitter nails to eliminate texture.
17.Classic Fuchsia Frenchie
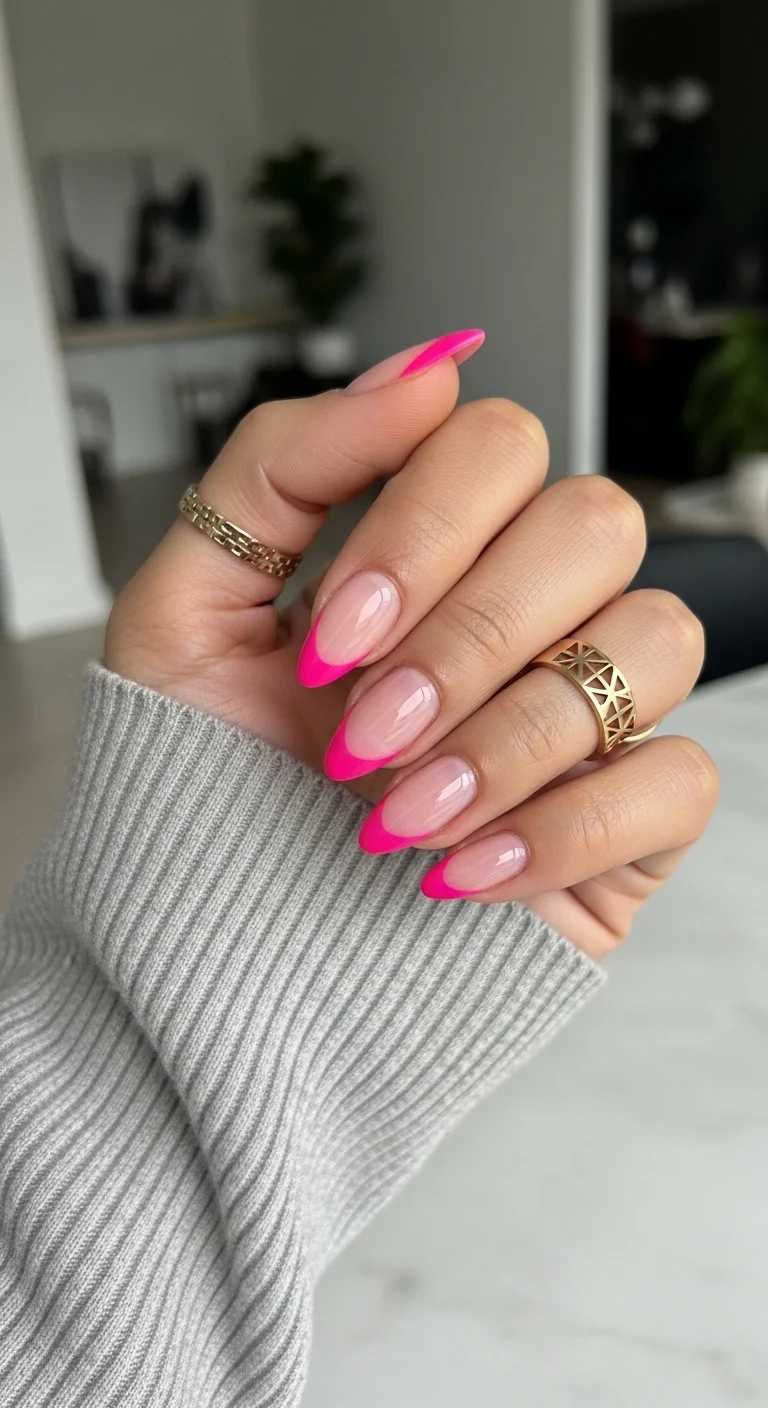
The timeless French manicure reimagined in a bold fuchsia.
Overview:
A sheer nude-pink base with thin, crisp hot fuchsia French tips. The smile line is precise and narrow — the pink covers just enough of the tip to register as a deliberate color choice without dominating the nail. The nude base is slightly translucent, showing a natural nail tone beneath.
The French manicure's popularity with colored tips comes down to one thing: the smile line. A clean, sharp curve between the nude and the pink is what separates a professional-looking set from an amateur one. An angled brush dipped in acetone is non-negotiable for cleanup — it sharpens the smile line in seconds. The almond shape naturally guides the curve, which is why this shape is more forgiving for French tips than square or squoval.
Design Breakdown:
Minimalist French with a color swap. The smile line precision is everything.
Base Color: A sheer, peachy-pink cover gel. It should hide discoloration while looking like a natural nail.
Nail Shape: Long almond. The pointed tip guides the French curve.
Design Element: A crisp, thin French tip in high-pigment hot pink.
Finish: Ultra-glossy, long-wearing top coat.
Get The Look at Home:
A silicone stamper method makes this a five-minute manicure. The two-stroke technique also works well.
- Base prep: Two coats of sheer nude. Let dry or cure.
- The stamper method: Paint a thick line of pink polish onto a silicone nail stamper. Push the nail tip into the stamper at a 45-degree angle.
- Alternative — two strokes: Using a French liner brush, sweep from one sidewall to center, then repeat from the other side.
- Cleanup: An angled brush dipped in acetone runs along the smile line to sharpen the curve.
- Balance check: Ensure the tips are the same thickness on every finger.
- Seal: High-gloss top coat to smooth the transition between nude and pink.

25 Stunning Summer Vacation Hairstyles for 2026 ☀️🌊
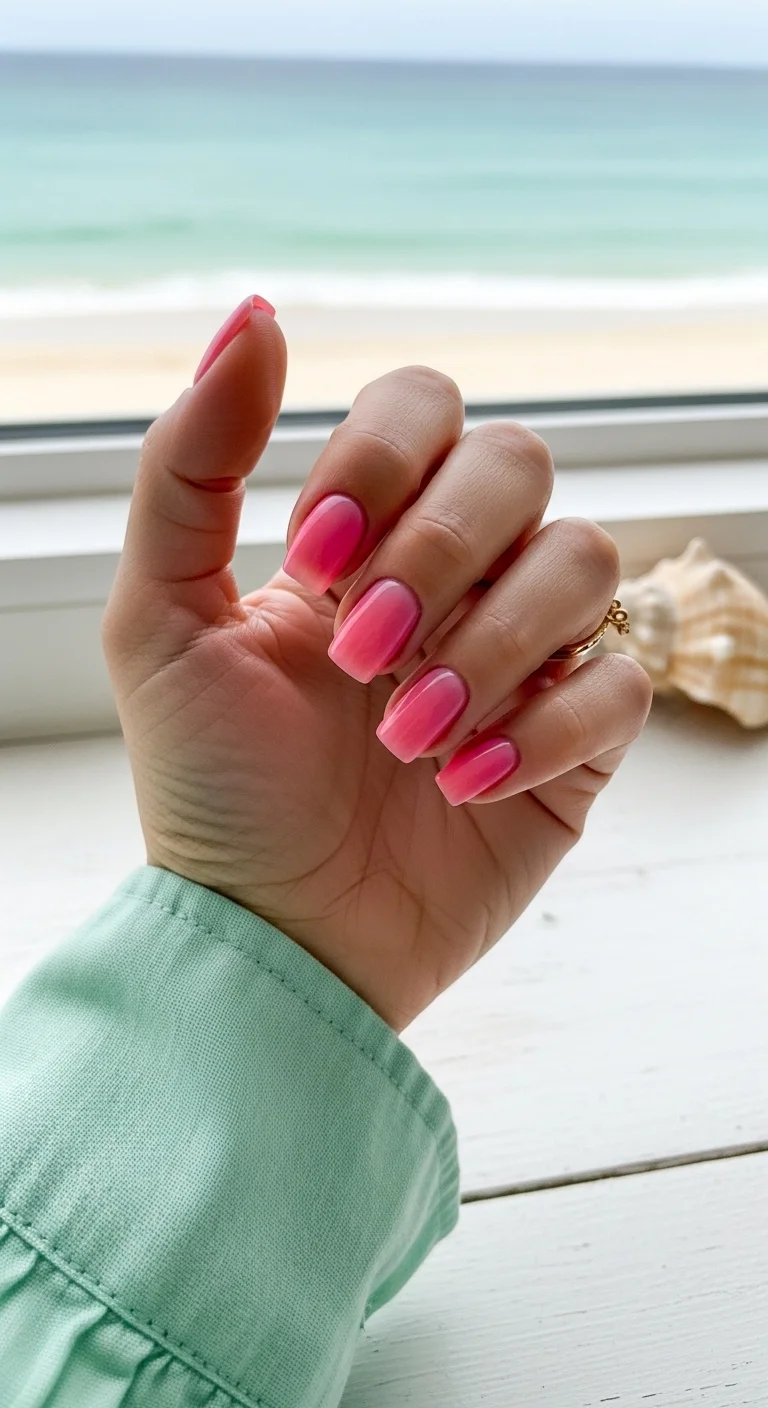
18.Strawberry Cream Boomer Ombre
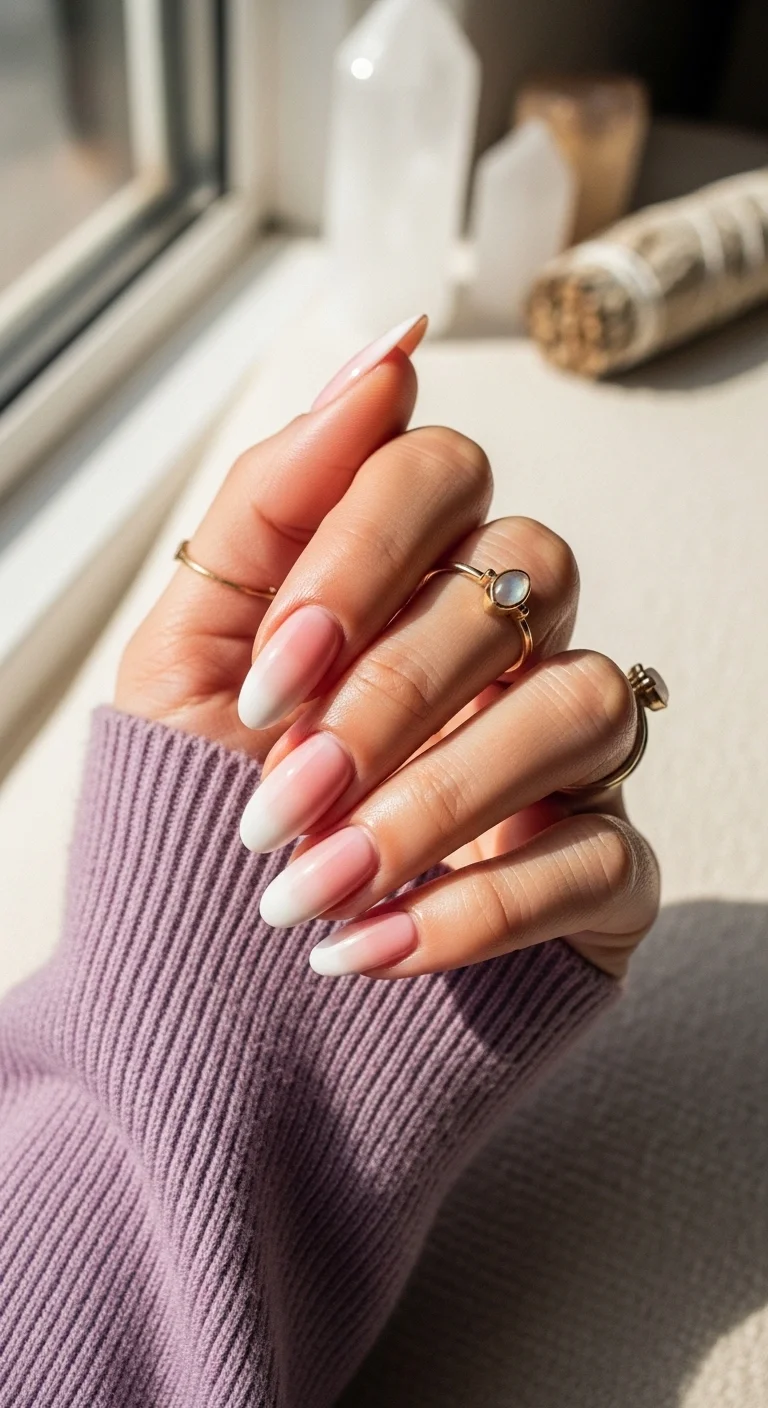
A dreamy, seamless fade from petal pink to milky white.
Overview:
A seamless gradient from soft baby pink at the cuticle to milky white at the tips. No hard line between the colors — just a smooth, continuous fade that looks like strawberry cream melting into vanilla. The technique is the same as a "baby boomer" French, but the pink is more saturated than the traditional barely-there version.
The gradient's quality depends on the blend zone. A visible transition line between pink and white breaks the illusion. The sponge technique with multiple light dabs builds a smoother blend than one heavy press. A milky or sheer top coat over the finished gradient acts like a real-life filter, hiding any remaining sponge texture and further blurring the color transition. This design also photographs exceptionally well — the soft fade reads clearly even in low-resolution images.
Design Breakdown:
A gradient using a blending technique to merge two soft colors. The milky top coat is the secret weapon.
Base Color: A soft, cool-toned baby pink at the base.
Nail Shape: Long, tapered almond. The length is key to making the gradient look smooth and not choppy.
Design Element: A milky white fade starting at the tip, melting into the pink base.
Finish: A creamy, semi-translucent top coat that blurs the colors together.
Get The Look at Home:
The makeup sponge builds the gradient, but the milky top coat is what makes it look seamless.
- Base color: Two coats of soft pink. Let dry fully.
- Sponge setup: Paint a stripe of white and a stripe of pink on a makeup sponge. Overlap them slightly.
- Dab: Press the sponge onto the nail, moving it slightly up and down to blur the line between colors.
- Repeat: Two to three rounds, letting each layer dry in between. The white tip should be most opaque.
- The blur coat: A thin, sheer milky white or sheer pink top coat over the whole nail. This hides sponge texture and blends the gradient.
- Finish: High-shine top coat for a creamy, luminous glow.
19.Abstract Pink Ribbon Swirls
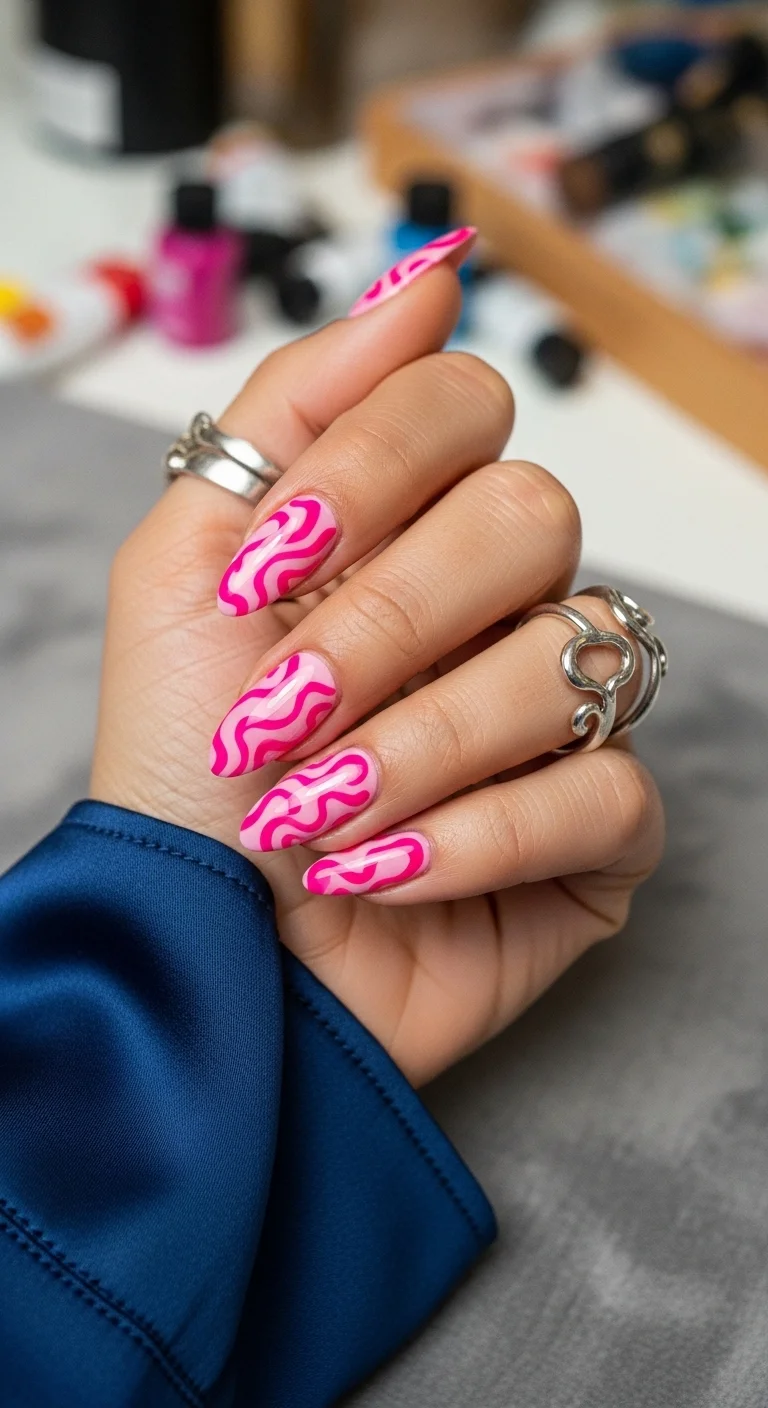
Flowing, loopy abstract lines in shades of pink.
Overview:
Abstract wavy swirls in hot fuchsia over a soft baby pink base. The lines vary in thickness — some are bold ribbons, others are thin trailing wisps — creating a sense of movement across each nail. No two nails have the same swirl pattern, which is part of the design's appeal: each finger looks like a unique piece of abstract art.
The tone-on-tone palette keeps this from looking busy. Using two shades of the same color family (light pink base, hot pink art) means the swirls read as texture rather than competing patterns. The almond shape with medium-long length complements the loopy, curving lines — the nail's natural taper echoes the swirls' organic movement. This is one of those designs where a long-haired striper brush makes a significant difference in line quality.
Design Breakdown:
Varying line weights and organic curves create a sense of motion. The brush's hair length matters.
Base Color: A creamy, opaque bubblegum pink. It needs to be fully solid for the art to pop.
Nail Shape: Slim almond. The curves of the nail echo the loopy swirls.
Design Element: Hand-painted abstract swirls in deep fuchsia. Each nail has a unique variation.
Finish: High-gloss top coat to make the swirls look freshly painted.
Get The Look at Home:
A long-haired striper brush gives you the flow and control needed for smooth, continuous curves.
- Prep: Two even coats of light pink. Let dry or cure fully.
- First swirl: Dip a striper brush into fuchsia polish. Start at the nail's side and pull a long, loopy S-shape toward the tip.
- Vary thickness: Press harder for thicker sections, lift for thin tails. The variation creates movement.
- Second swirl: Add a smaller swirl that "hugs" the first one for visual depth.
- Negative space: Don't overdo it. Leave some base visible so the design doesn't get cluttered.
- Lock it in: Thick top coat applied without dragging the brush through the swirls.

31 Patriotic Fourth of July Nail Ideas for 2026 🇺🇸
20.Coquette Bow & Cross Shorties
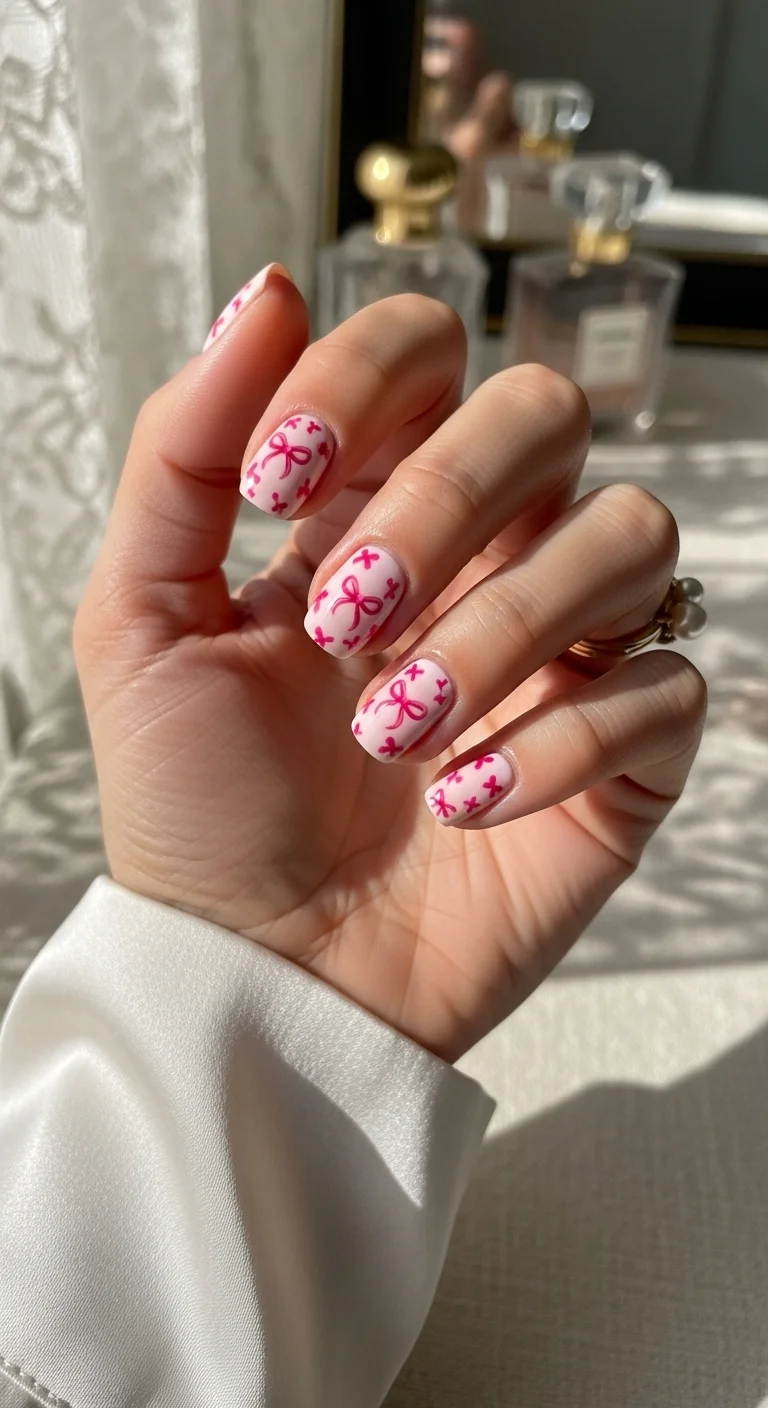
Ultra-feminine 'coquette' aesthetic with bows and dainty details.
Overview:
Hand-painted ribbon bows and small cross or plus symbols in hot pink over a sheer milky pink base. The pattern repeats across every nail, creating a consistent textile-like motif. The bows are small and dainty, drawn with thin lines that give them a delicate, embroidered quality.
The sheer base does important work here. It creates a "your nails but better" foundation that lets the hot pink art stand out without competing with an opaque background. Short rounded or soft squoval is the right call — the coquette aesthetic is inherently youthful and delicate, and long nails would make the bows look costume-y rather than charming. The pearl ring and gold band in the styling photo reinforce the dainty, feminine direction.
Design Breakdown:
Delicate hand-painted motifs over a sheer base. A tiny detailer brush is essential.
Base Color: A very pale, milky pink. Sheer enough to show natural nail, opaque enough to even out the tone.
Nail Shape: Short rounded or soft squoval. The practical length reinforces the dainty aesthetic.
Design Element: Hand-painted fuchsia bows and small cross/plus motifs. Thin, flowing ribbon lines.
Finish: Soft-gloss finish. Not mirror-shiny — more of a natural, healthy sheen.
Get The Look at Home:
A very steady hand and a tiny detailer brush. The bows are built from two triangles and two ribbon tails.
- Base color: Two coats of the lightest milky pink. Let dry completely.
- The bow: Draw two small triangles meeting at the points. Pull two thin, slightly curved lines down for the ribbon tails.
- The crosses: Add tiny fuchsia plus or X marks in the empty spaces between bows.
- Carving: If a bow looks blobby, use a brush with a tiny bit of base color to reshape the edges.
- Consistency: Keep the bows roughly the same size across all nails for a balanced look.
- Seal: Top coat to protect the delicate linework from chipping.
21.Fuchsia Hibiscus Island Vibe
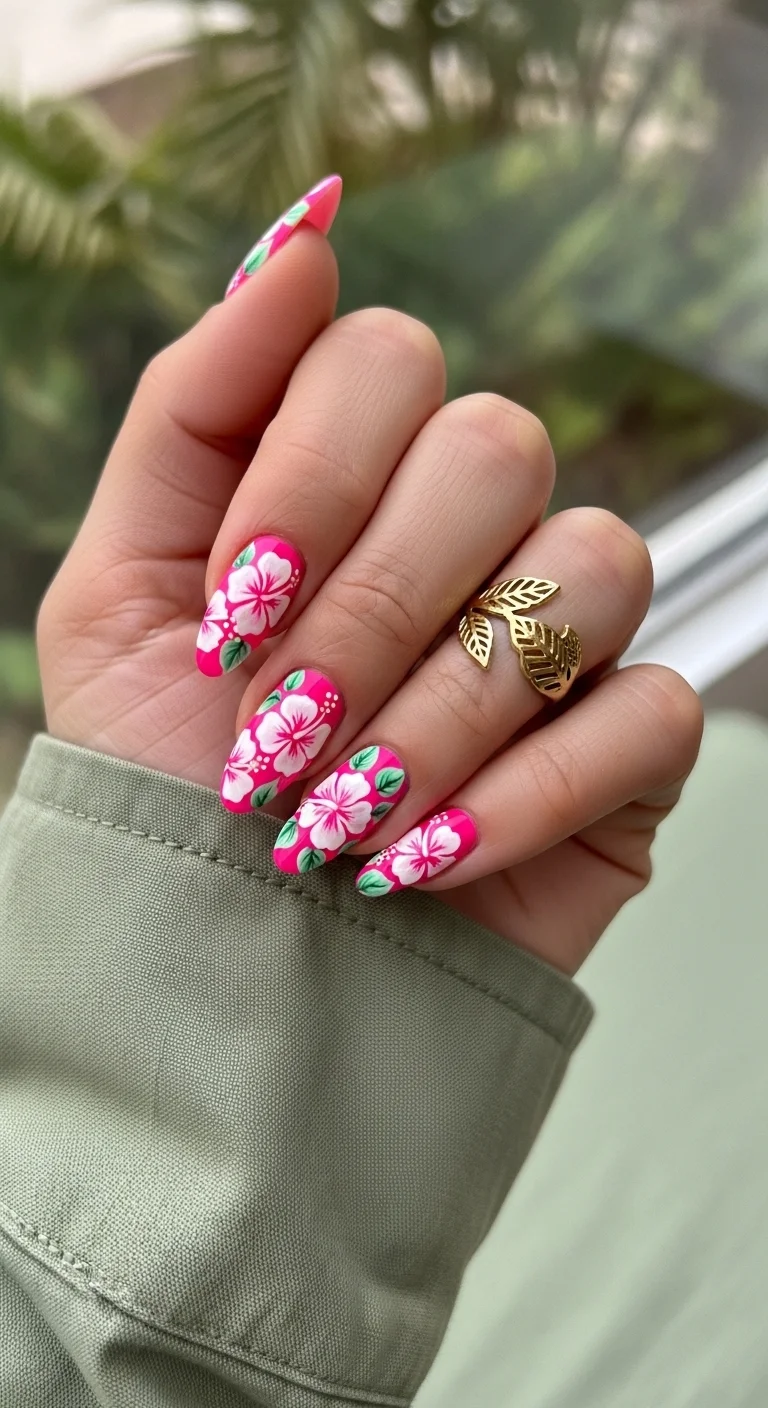
Tropical fuchsia paired with crisp white island florals.
Overview:
Vivid fuchsia base with hand-painted white hibiscus flowers covering every nail. Each flower has five white petals with subtle pink gradient shading toward the center, a small red stamen detail, and kelly green leaf accents. The floral coverage is maximalist — this isn't a subtle accent nail situation, it's full botanical art across all ten fingers.
The hibiscus petals use a flat brush technique: five large heart-shaped strokes arranged in a circle, with thin white lines radiating from the center to create the petal texture. The green leaves tucked behind each flower provide essential color contrast — without them, the white-on-fuchsia reads as washed-out rather than tropical. The almond shape with medium-long length gives each flower enough surface area for the petals to look proportional rather than cramped.
Design Breakdown:
High-contrast tropical floral art. The green leaves are what make the design pop.
Base Color: A vibrant, hot fuchsia with a slight blue undertone. Essie "Watermelon" or OPI "Rich Girls & Boys" hit the right saturation.
Nail Shape: Long almond. The extra length fits the large hibiscus petals.
Design Element: Hand-painted white hibiscus flowers with pink shading, red stamen, and green leaf accents.
Finish: Ultra-glossy top coat to make the colors look saturated and tropical.
Get The Look at Home:
A flat brush for the petals and a fine liner for the stamen details.
- Tropical base: Two coats of fuchsia. Let dry or cure fully.
- Petals: Using white polish and a flat brush, paint five large heart-shaped petals in a circle.
- Petal lines: With a thin liner brush, draw white lines from the flower center outward into each petal for texture.
- Stamen: A tiny yellow dot in the center, with a thin white line extending outward topped with small dots.
- Leaves: Bright green, one or two per flower, tucked behind the petals for contrast.
- Seal: Thick top coat to protect the detailed art and add shine.

21 Hot Summer Buns Hairstyle Ideas for 2026 ☀️🔥
22.Fuchsia Dream Marble Swirls

Bold solid fuchsia mixed with dreamy marble accents.
Overview:
Mix-and-match design: index and pinky fingers are solid glossy fuchsia, while the middle two nails feature pink-and-white marble swirl patterns. The marble looks like liquid paint dragged together — fuchsia, baby pink, and white flowing into each other with soft, blurred edges. The solid accent nails ground the busy marble and prevent the set from looking chaotic.
The wet-on-wet technique for marble is more forgiving than people expect. The "mistakes" — uneven swirls, unexpected color bleeds — are what make the marble look organic rather than manufactured. The coffin shape's flat tip provides a clean frame for the organic swirls, creating an interesting tension between the structured shape and the fluid art. Long coffin gives the marble room to flow across the nail surface.
Design Breakdown:
Alternating solid and marble nails. The wet-on-wet technique creates the stone-like swirls.
Base Color: Deep fuchsia cream for solid nails; white base for marble accents.
Nail Shape: Long coffin. The flat tip frames the organic marble swirls.
Design Element: Marble swirls of fuchsia, baby pink, and white on accent nails. Solid fuchsia on the others.
Finish: High-gloss, "wet" look finish that enhances the marble's depth.
Get The Look at Home:
Working into wet polish is the key. Don't let the base dry before adding the marble colors.
- Solid nails: Paint index and pinky with two coats of fuchsia. Let dry.
- Marble base: Paint accent nails white. While still wet, add drops of fuchsia and light pink.
- The swirl: Use a toothpick to gently drag the colors in a figure-8 motion. Don't over-mix.
- Clean up: Use a brush with acetone to clean skin around the marble nails.
- Depth: Once dry, add thin "veins" of dark fuchsia with a liner brush for extra detail.
- Seal: Thick top coat to level the surface and give the marble that polished stone look.
23.Velvet Berry Cat-Eye
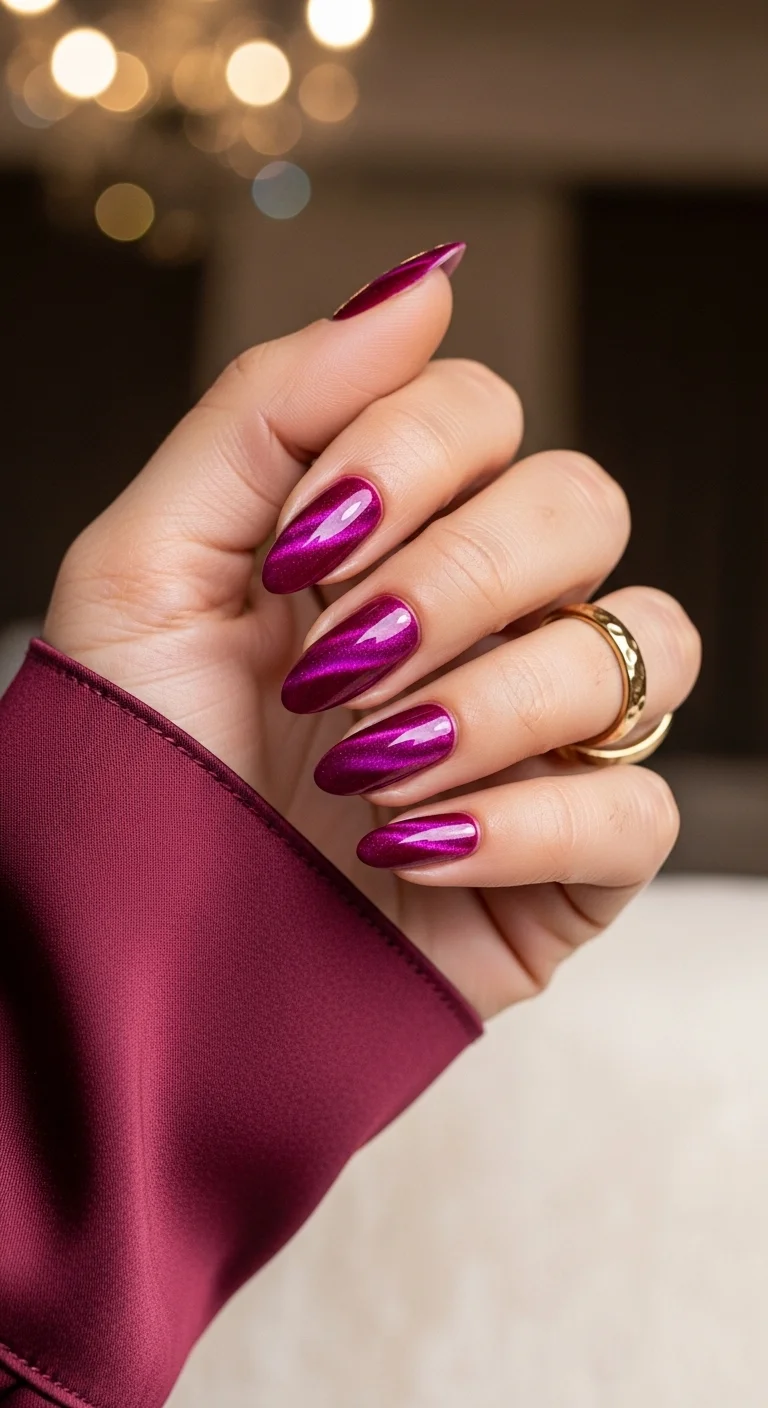
A mesmerizing, magnetic berry shade with a velvet finish.
Overview:
A deep berry-wine gel with magnetic cat-eye shimmer. The diagonal stripe of bright magenta shimmer shifts between dark plum and vivid fuchsia depending on the light angle. No nail art — the magnetic effect creates all the visual interest. The result looks like polished velvet or a gemstone with natural chatoyancy.
Cat-eye gel requires a specific technique: apply the magnetic polish, hold the magnet 0.5 inches from the nail for 10 seconds, then immediately flash-cure for 10 seconds to freeze the particles in place. If you wait too long before curing, the shimmer particles settle back into a uniform layer and you lose the diagonal stripe. The magnet's angle determines where the stripe sits — hold it diagonally for the classic cat-eye line.
The almond shape is ideal for this effect. The curved surface lets the shimmer roll across the nail as you tilt your hand, which is where the cat-eye effect looks most dramatic. On flat shapes like square, the shimmer has less surface to move across.
Design Breakdown:
Magnetic gel polish with a strong magnet to pull shimmer particles into a diagonal line.
Base Color: A deep, rich berry-magenta. Darker bases make the magnetic shimmer pop more.
Nail Shape: Elegant almond. The curve helps the light roll across the shimmer.
Design Element: A diagonal "cat-eye" stripe of high-intensity silver-berry shimmer.
Finish: High-gloss top coat to maximize the light reflection and depth.
Get The Look at Home:
You need magnetic gel and a nail magnet. The flash-cure step is non-negotiable.
- Optional dark base: A black or dark pink base coat adds depth. Cure.
- Magnetic gel: Apply a thick layer of berry magnetic gel. Do NOT cure yet.
- The magnet: Hold it 0.5 inches from the nail for 10 seconds. You'll see the shimmer form a line.
- Flash cure: Immediately cure for 10 seconds to freeze the particles before they settle.
- Full cure: Repeat for all nails, then do a full 60-second cure.
- Gloss: High-shine top coat to bring out the depth of the magnetic effect.

27 Stunning Graduation Day Nail Ideas for 2026 🎓
24.Neon Pink Python Coffin
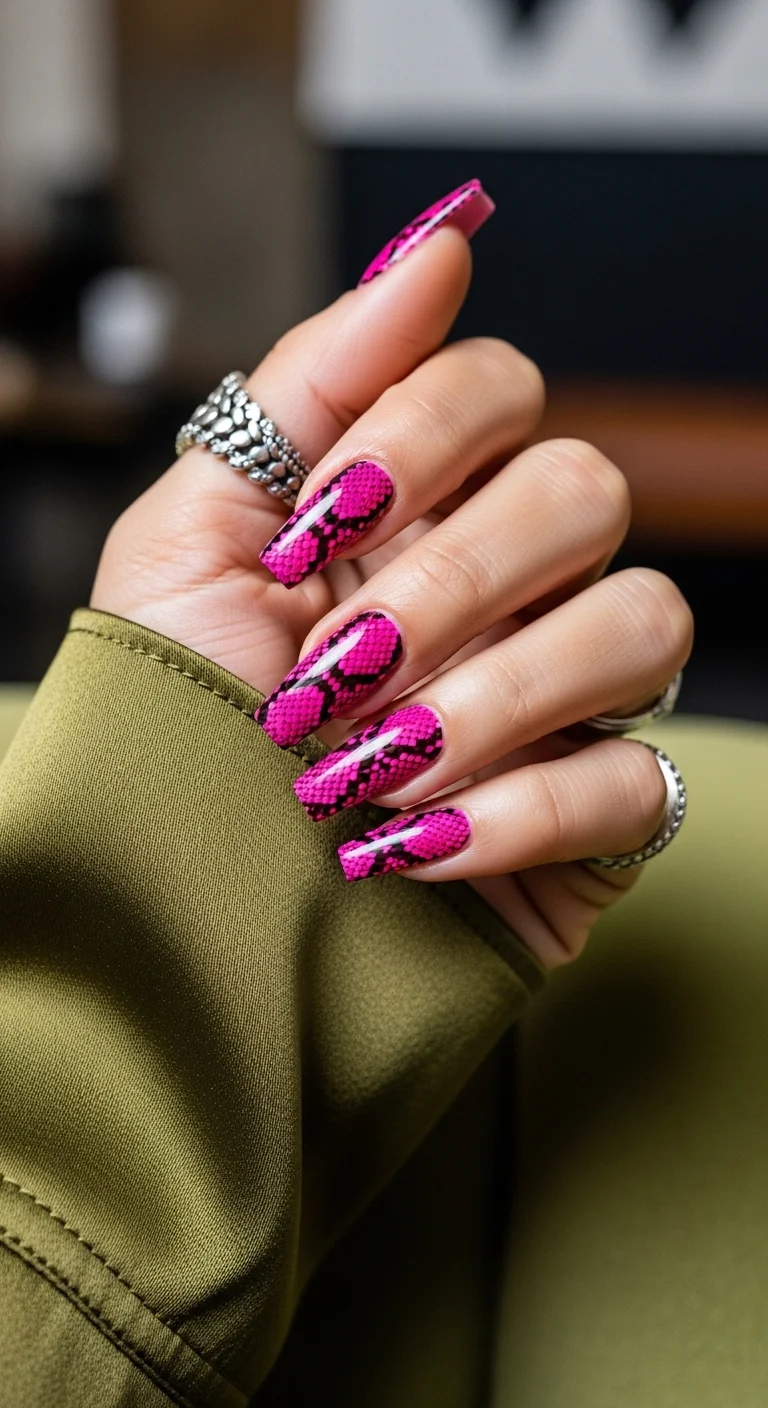
An edgy, high-fashion take on neon pink with animal texture.
Overview:
Electric neon pink base with a black python scale pattern overlaid on every nail. The scales are slightly irregular and organic — not perfectly uniform — which makes the print look more like actual snakeskin than a stamped pattern. The neon is extremely vivid, almost fluorescent, and the black overlay creates high contrast that makes the pink appear even brighter.
The netting technique is the easiest way to achieve this at home. A piece of fine mesh (like from a loofah) stretched tightly over the nail and dabbed with black polish creates the scale pattern when lifted. The key is using minimal polish on the sponge — too much black bleeds under the netting and blurs the scale edges. Coffin shape is the right call: the flat tip and tapered sides give the python print a structured frame that keeps it looking high-fashion rather than craft-project.
Design Breakdown:
Netting technique or detailed stamping creates the reptile scale pattern over a neon base.
Base Color: A blindingly bright neon fuchsia. Thin formula so it doesn't hide the pattern details.
Nail Shape: Long coffin. The structured shape amplifies the edgy, high-fashion vibe.
Design Element: Black snakeskin overlay with varying scale sizes mimicking natural python.
Finish: High-gloss top coat that looks like expensive snakeskin leather.
Get The Look at Home:
A piece of fine mesh netting is your primary tool. Stretch it tightly for clean scales.
- Neon base: Two coats of neon pink. Let dry completely.
- Netting: Wrap a small piece of fine mesh tightly over the nail. Hold it in place with one hand.
- Sponge black: Dab black polish over the netting using a sponge. Use minimal polish to prevent bleeding.
- The reveal: Carefully lift the netting straight up to show the scale pattern.
- Accent scales: Use a tiny brush to add a few darker pink scales for dimension.
- Lock it in: Thick top coat to smooth out any texture from the sponging.
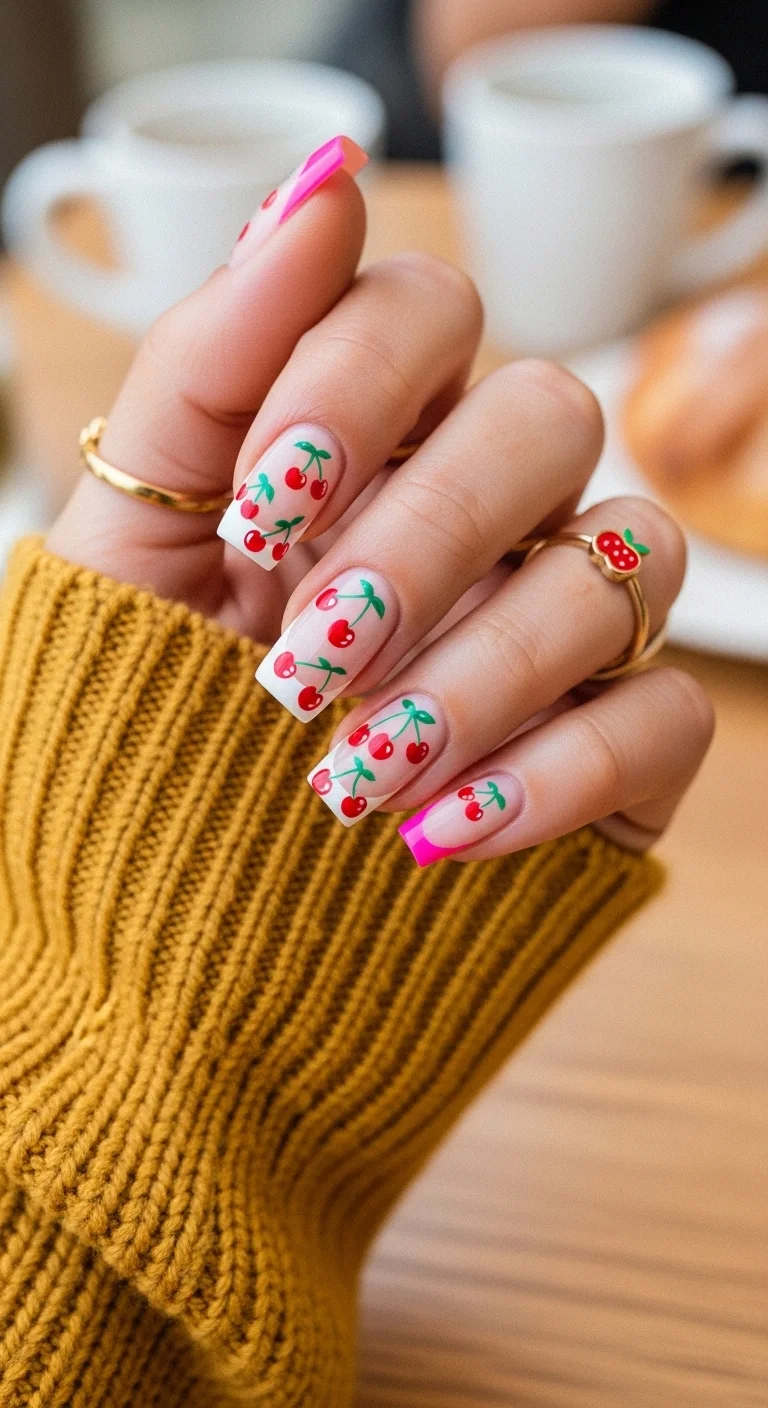
25.Cherry Berry Frenchie
A sweet summer treat featuring cherries and pink tips.
Overview:
Hand-painted cherry motifs on a sheer nude base, with hot pink French tips on the thumb and pinky. The cherries are illustrated in pairs with green stems and tiny leaves, scattered across the middle fingers. A small heart accent near the cuticle on one nail adds an extra detail that rewards closer inspection.
This design splits the visual load between two techniques: French tips and fruit art. Separating them onto different nails keeps each element readable — layering cherries on top of French tips would create visual clutter. The sheer nude base gives the cherries a clean canvas and keeps the overall look light despite the length. The cherry ring in the photo matches the nail art, which is a styling choice worth noting: themed jewelry reinforces the design story.
Design Breakdown:
Two-part design dividing French tips and fruit art onto separate nails.
Base Color: A sheer, milky nude. Clean and polished without being opaque.
Nail Shape: Long coffin. The flat tip provides a clean landing for the French color.
Design Element: Hot pink French tips on thumb and pinky. Hand-painted cherry pairs on the middle fingers.
Finish: Super-glossy top coat for a juicy, candy-like sheen.
Get The Look at Home:
Dotting tools make the cherries fast and consistent.
- Sheer base: Two coats on all nails. Let dry fully.
- French tips: Paint hot pink tips on thumb and pinky using a liner brush. Two thin coats for opacity.
- Cherry dots: Use a medium dotting tool to place two bright red dots side-by-side on the nude nails.
- Stems: With a thin liner brush and grass-green polish, draw thin, curvy stems connecting the cherries at the top.
- Highlight: A tiny white dot on each cherry makes them look 3D and shiny.
- Seal: Thick top coat to protect the art and give a professional finish.
28 Effortless Hot Weather Day Hairstyles for Women 2026 ☀️💇♀️
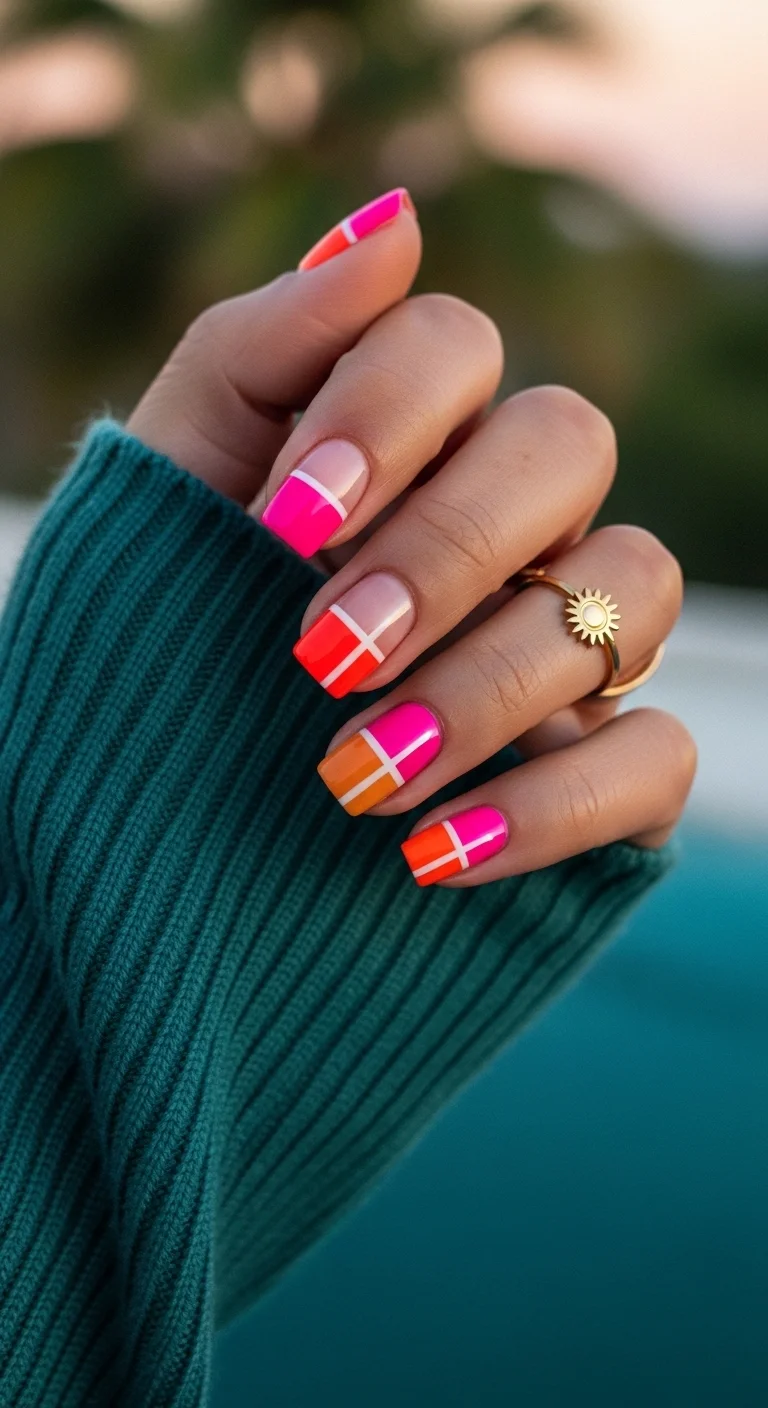
26.Sunset Color-Block Square
A bright, punchy color-block look inspired by summer sunsets.
Overview:
Geometric color-blocking using thin white lines to create a windowpane or tartan effect over hot pink and bright orange blocks. Each nail features a different combination of the two colors separated by white grid lines, with some sections showing the natural nail base. The effect looks like a sunset filtered through a geometric lens.
Striping tape is the secret to those crisp white lines. Freehand grid lines at this scale are nearly impossible to keep straight, and the contrast between white and the bold colors means any wobble is immediately visible. The short square shape is essential — the straight edges of the nail mirror the straight lines of the grid. On longer or rounded shapes, the geometric precision of the design would fight against the nail's natural curvature.
Design Breakdown:
High-contrast geometric blocks separated by thin white grid lines. Tape is your best friend.
Base Color: The colors themselves: hot pink, bright tangerine, and white for the grid lines.
Nail Shape: Short, sharp square. The geometric shape complements the geometric art.
Design Element: Horizontal and vertical blocks of color separated by thin white lines. Each nail has a different layout.
Finish: Super-glossy, cream-finish top coat.
Get The Look at Home:
Striping tape creates the grid. Remove it while the polish is wet for the cleanest lines.
- Clear base: Start with a base coat on all nails.
- First tape line: Place striping tape vertically down the middle. Paint one side pink, the other orange. Remove tape while wet.
- Dry completely: Wait for the first layer to harden before adding the horizontal tape.
- Cross section: Place horizontal tape and paint alternating blocks. Remove while wet.
- White grid: Use a thin liner brush to paint white lines along where the tape was for a cleaner look.
- Top coat: Thick layer to level out the surface where different colors meet.
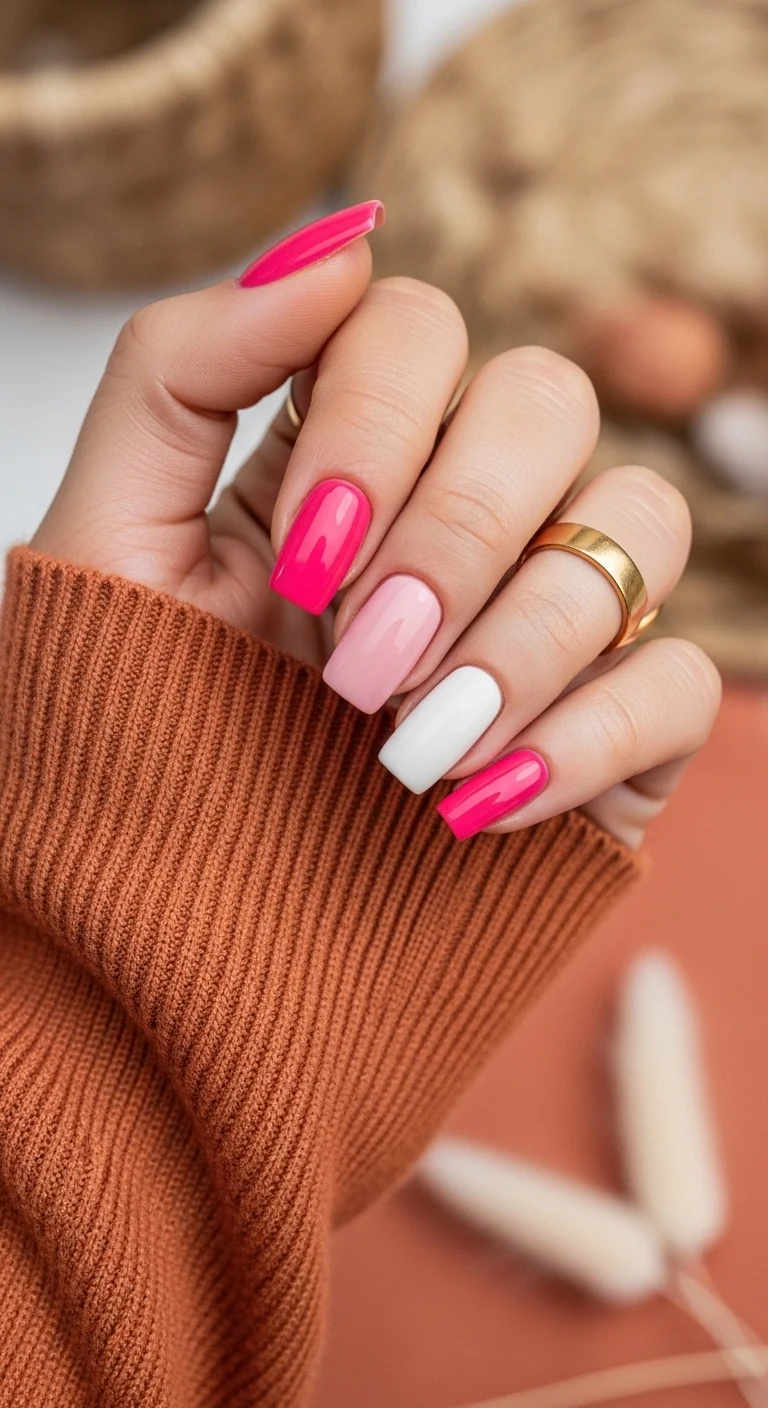
27.Skittle Pink Palette
A gradient of pink shades from thumb to pinky.
Overview:
Each nail painted a different solid shade in a pink-to-white gradient. The thumb and index finger are hot fuchsia, the middle finger is soft baby pink or dusty rose, and the ring finger is crisp white. No nail art, no patterns — just clean solid color application across five coordinating shades.
The "skittle" technique is one of the lowest-effort, highest-reward nail trends. It requires zero artistic skill — just the ability to pick five polishes that work together. The gradient flows from bold on the outer fingers to soft in the center, which creates a visual rhythm across the hand. Square shape with medium length is the right call: the uniform shape helps tie the different colors into a cohesive set rather than looking like five random polishes.
Design Breakdown:
Monochromatic gradient where each nail is a different shade. Color selection is the entire skill.
Base Color: Five shades: hot fuchsia, bubblegum pink, dusty rose, baby pink, and white.
Nail Shape: Medium square. The uniform shape ties the different colors together.
Design Element: A monochromatic gradient across the hand, darkest on thumb, lightest on ring finger.
Finish: High-gloss cream finish on every nail. Same top coat across all fingers for uniform shine.
Get The Look at Home:
This is about picking the right five shades. Line them up from darkest to lightest before you start.
- The palette: Line up five polishes from darkest to lightest. If you don't have five, mix white into a darker pink on foil to create intermediate shades.
- Application: Two smooth coats of each color on its corresponding finger.
- Consistency: Use polishes with the same finish — all cream or all shimmer — so the set looks intentional.
- Cleanup: Keep cuticles clean so the focus stays on the color transition.
- Top coat: The same formula on all nails for a uniform shine.
- Variation: Try matte top coat on this look for a completely different velvet vibe.

28 Trendy May Nail Designs for 2026 💅
28.Lightning Pink Edge

Electric abstract strokes for a high-energy summer look.
Overview:
Abstract jagged streaks in jet black and hot fuchsia over a soft pink base. The strokes have a feathered, brushstroke quality — not clean geometric lines but wild, organic marks that resemble lightning bolts or claw marks. Some nails show a soft pink gradient at the cuticle before transitioning to black with the pink streaks running through.
This design works because of the contrast between the calm base and the aggressive art. The soft pink underneath acts as a visual rest area — without it, the black and fuchsia streaks would read as chaotic rather than energetic. The almond or stiletto shape amplifies the jagged lines' dramatic effect. The technique is all about the flick of the wrist: start at the nail edge and flick inward to create the tapered, lightning-like shape. Messier is better here — clean lines would kill the energy.
Design Breakdown:
Abstract flicked strokes that create a sense of speed and electricity. The messier, the better.
Base Color: A soft, pastel bubblegum pink. Calm background for the electric art.
Nail Shape: Slim almond or stiletto. The pointed tip complements the jagged strokes.
Design Element: Hand-painted jagged strokes in black and hot fuchsia, concentrated on the nail edges.
Finish: High-gloss top coat for vibrant, electric-looking colors.
Get The Look at Home:
The flick technique: start at the edge and pull inward. The faster the flick, the sharper the point.
- Base: Two coats of light pink. Let dry or cure.
- Fuchsia flick: Dip a fine liner brush into fuchsia. Start at the nail edge and flick inward toward the center for a tapered line.
- Black layer: Once fuchsia is dry, repeat the same flick with black, overlapping slightly.
- Vary length: Make some strokes long, some short, for an organic crackling effect.
- Balance: Keep the strokes on one or two sides of each nail so the base color shows through.
- Seal: Top coat to protect the fine points of the lightning strokes.
29.Peach & Pink Block Party
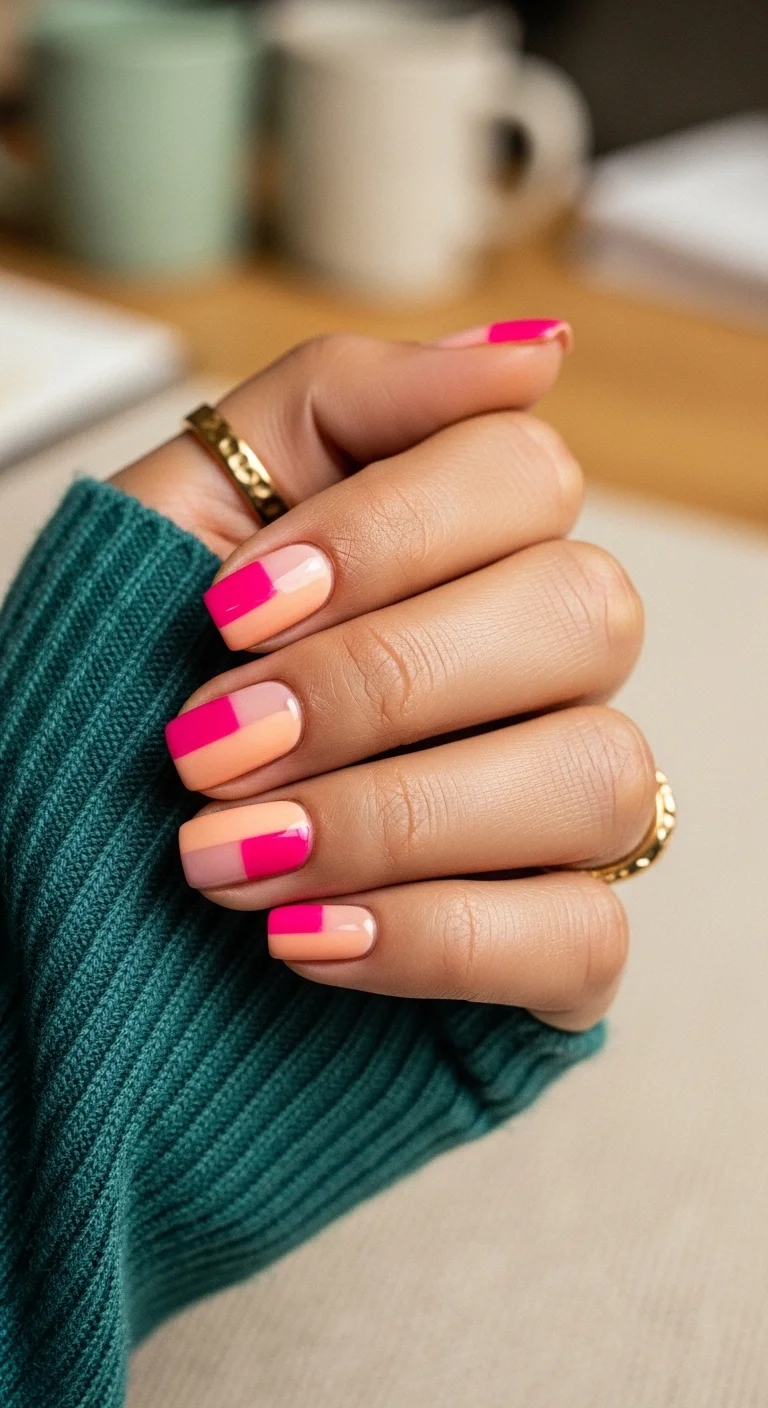
A sophisticated, architectural block design in warm summer tones.
Overview:
Vertical two-tone color-blocking: each nail is split down the center with hot pink on one half and soft peach on the other. The dividing line is clean and sharp. The thumb is solid hot pink, breaking the pattern just enough to keep the set from feeling too uniform.
The short square shape is what makes this work. On longer nails, the vertical split can look like a stripe down the middle and lose the color-block quality. On short nails, the two halves read as equal sections of a geometric composition. The warm peach and pink together create a sunset feel without the orange-heavy intensity of a true sunset palette. This is a good option for anyone who wants color-blocking without the complexity of tape grids or negative space — two colors, one clean line, done.
Design Breakdown:
Vertical color split with a clean center line. One color per half.
Base Color: Hot pink and soft peach. The warm tones complement each other without competing.
Nail Shape: Short square. The straight edges emphasize the geometric split.
Design Element: Vertical two-tone split — pink on one half, peach on the other. Solid pink on the thumb.
Finish: Glossy top coat for a clean, polished surface.
Get The Look at Home:
A thin strip of tape down the center keeps the dividing line sharp.
- Base coat: Clear base on all nails.
- Tape the center: Place a thin strip of striping tape vertically down the middle of each nail. Press firmly.
- First color: Paint peach on one half of each nail. Remove tape while the polish is still wet.
- Dry: Wait for the peach to set completely before painting the other half.
- Second color: Paint hot pink on the remaining half. Use a clean-up brush to sharpen the center line.
- Thumb: Solid hot pink on the thumb for a clean anchor.
- Seal: Thick top coat to level the surface where the two colors meet.
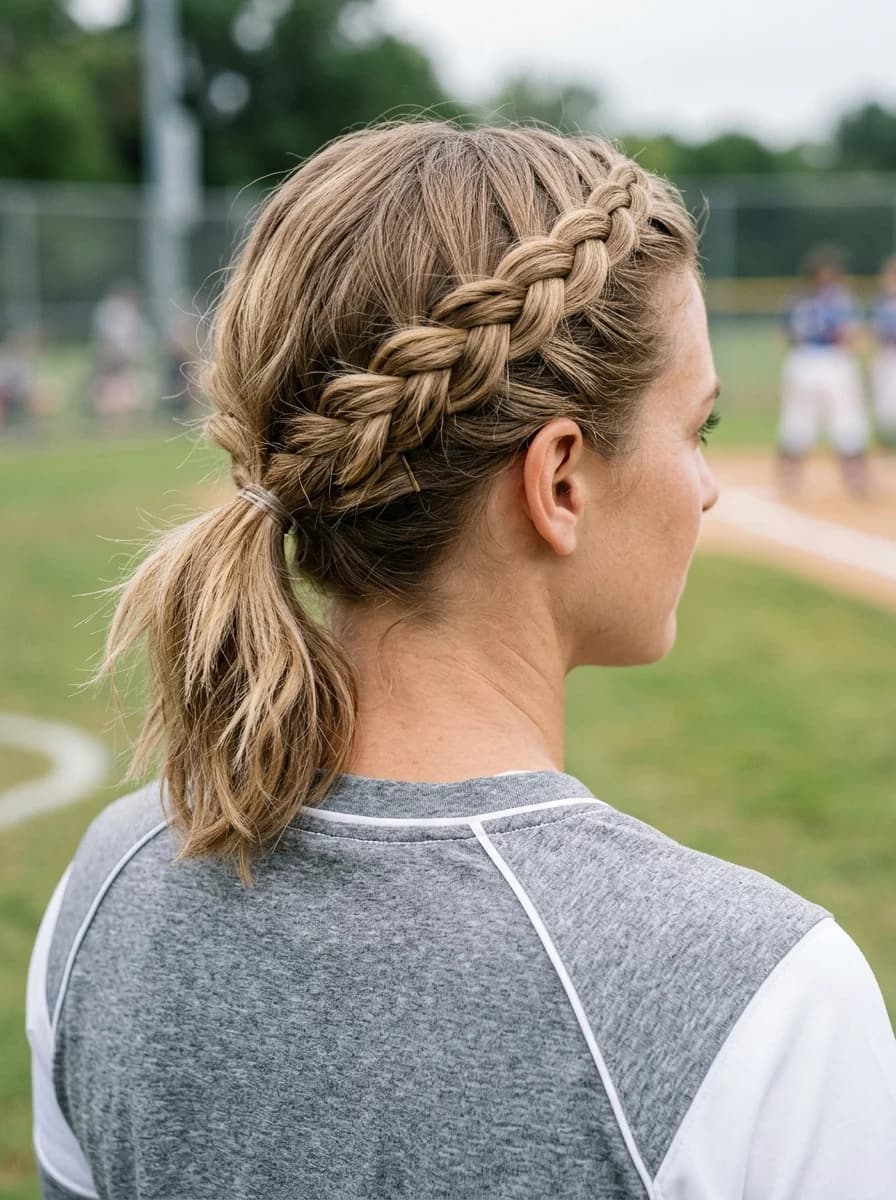
28 Stunning Softball Hairstyle Ideas with Braids for 2026 🥎✨
The Streaky Pink Problem: Why Three Thin Coats Beat Two Thick Ones
Pink polish is one of the hardest colors to apply cleanly. Soft pinks, in particular, have a tendency to dry with visible brush strokes and patchy spots — especially the lighter shades that look gorgeous in the bottle but turn streaky the moment they hit the nail. It's not your technique. It's the pigment.
The fix is counterintuitive: more coats, not thicker ones. Three ultra-thin coats will give you a flawless result that two thick coats never will. The first coat will look streaky and translucent — that's normal. Let it dry for a full two to three minutes, then apply the second coat in the opposite direction from the first. If you brushed left to right, go right to left. This cross-hatching cancels out the streaks by filling the gaps from a different angle. The third coat goes back in the original direction and locks everything into an even, opaque finish.
For chrome powders over pink, there's an additional timing trick. Apply a no-wipe top coat over your cured pink base and cure it for exactly half the recommended time — usually around 30 seconds. A full cure creates a surface so smooth that the chrome powder has nothing to grip. A partial cure leaves just enough tack for the powder to adhere evenly without clumping.
The Right Pink for Your Skin Tone (Because One Shade Definitely Doesn't Fit All)
Not all pinks work on all hands. The wrong undertone can make your skin look washed out, ashy, or jaundiced — none of which is what you're going for with a fresh summer manicure. Here's the breakdown by undertone so you can pick the shade that actually flatters you.
If you have cool undertones (you see blue veins at your wrist, and silver jewelry looks better than gold), lean into the balletcore side of the spectrum. Dusty roses, berry-magentas, and soft ballet-slipper pinks with subtle blue or purple undertones will harmonize with your skin rather than fighting it. These shades have dominated 2026 for a reason — they read as soft and romantic without veering into chalky territory.
For warm undertones (green veins, gold jewelry looks best), reach for peachy-pinks, coral-pinks, and warm bubblegum shades. The yellow-orange undertones in these pinks complement golden and olive skin naturally. Summer is the season to go brighter here — as the temperature rises, the pink can get bolder without looking aggressive.
If you have deep skin, don't let anyone talk you into pale pinks. Vivid fuchsias, hot neons, and deep magenta chromes are where this skin tone shines brightest. Allure has already flagged bright pink with a cat-eye shimmer as a top 2026 trend, and it's easy to see why — the contrast between a saturated pink and rich skin creates a visual pop that pale shades simply can't deliver. When in doubt, OPI's "Bubble Bath" or Essie's "Ballet Slippers" — the translucent milky pinks — are the universal safety net that works on literally every skin tone.
Honestly, while it is easy to talk about pink nails all day, these 29 stunning designs speak for themselves! Hopefully, this list gives you all the inspo you need for your next appointment. There is something so empowering about a fresh pink mani—it’s like a little boost of confidence right at your fingertips. Now, it's just a matter of choosing which design to rock for the next beach day!
Which of these 29 designs is living rent-free in your head right now? Whether it is the bold "Neon Safari" or the soft "Strawberry Milk" vibe, you can easily save to your favorites.