Hair Trends
21 Hot Summer Buns Hairstyle Ideas for 2026
You know that feeling when it's 90 degrees and your hair is sticking to the back of your neck? That's your sign to put it up. Summer buns aren't just a lazy-day backup plan — they're the move. The right bun keeps you cool, looks intentional, and works whether you're headed to a farmers market, a rooftop bar, or a friend's backyard wedding.
We've rounded up 21 summer bun hairstyles that go way beyond the basic top knot. Some are sleek and editorial. Others are messy in the best possible way. A few have braids, ribbons, or accessories that make them feel special. Whatever your hair texture or your plans, there's a bun here that'll make you forget you ever complained about summer hair.
The Sleek Messy Bun Trend
Messy hair is officially the trend of 2026, but it is not about looking like you gave up. It is about looking like you tried just enough. The slick messy bun is everywhere right now, hitting that perfect balance between polished and undone.
The 2026 version is all about intentional texture. Start with day-old hair — the natural oils give you grip. Pull your hair into a high ponytail, then twist it tightly before wrapping it into the bun. The tighter the twist, the more volume and structure you get. Then gently pull at sections to create that I-woke-up-like-this texture. Use a boar bristle brush to smooth just the top layer before twisting for that sleek-on-top, messy-on-bottom look.
The trick? Two perfectly placed face-framing pieces and maybe a gold pin or ribbon. That is enough to signal that the messiness was intentional.
The 2026 Bun Accessories
Your bun is only as good as what you put in it, and the accessory game has leveled up beyond basic elastics. Here is what is actually worth buying this summer.
Ribbon ties: These are not just functional anymore — they are a fashion statement. Wrap them around your bun base or tie them in a bow for instant polish. Choose grosgrain over satin for better grip; satin slips out, but grosgrain has texture that actually holds.
Oversized claw clips with metallic details: Minimalist clips are out. Gold, silver, or jeweled designs that actually show are replacing basic clips and adding instant glam to even the messiest bun.
The styling hack? Decorative hairpins and French combs add vintage glam and work especially well with sleek buns. Scatter pearl pins through your bun or use a decorative comb to anchor a twist. For summer, tassel scarves add movement that works perfectly with relaxed bun styles.
1.Effortless Braided Chignon with Tortoiseshell Clip
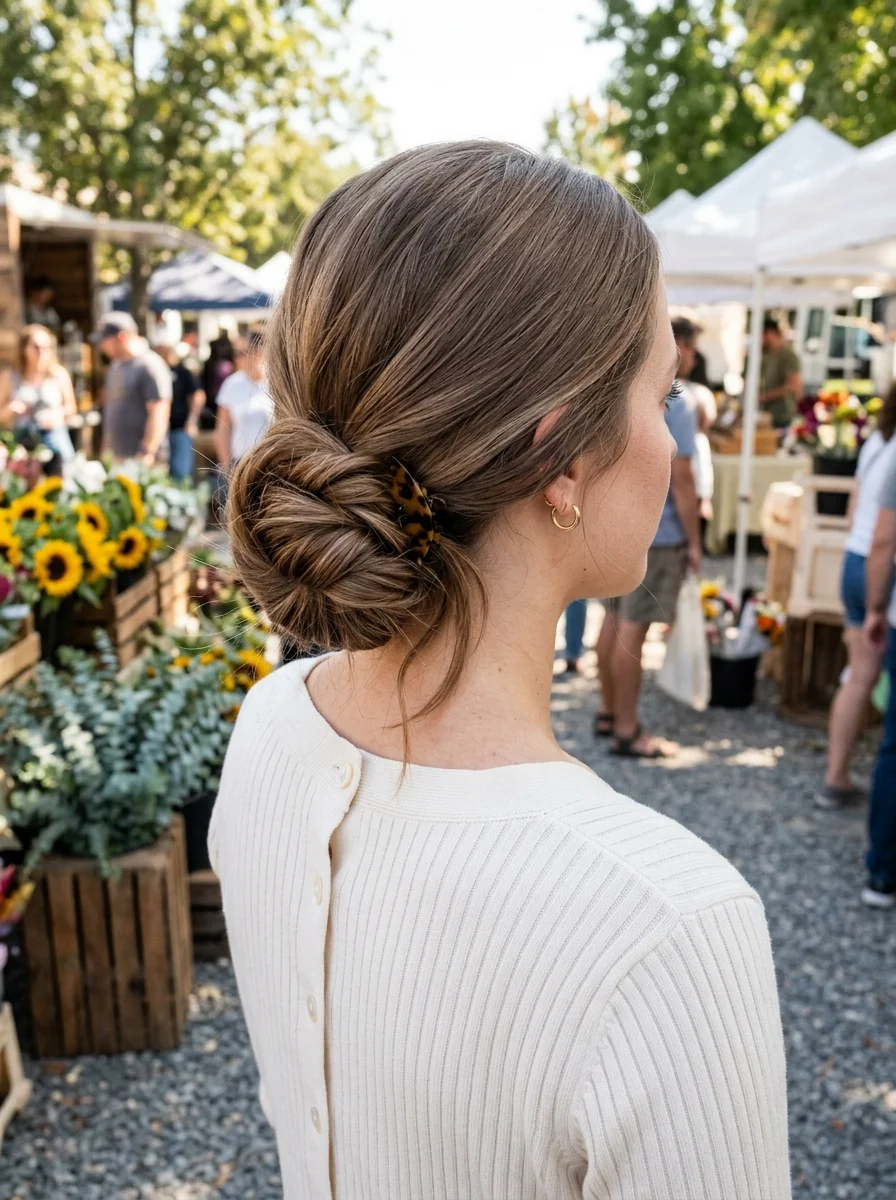
The overview: Hair is loosely braided or twisted into a low chignon at the nape. A statement tortoiseshell claw clip secures the bun while adding a polished, retro-inspired detail. Face-framing pieces are left soft around the temples. It's the kind of hairstyle that makes people ask who did your hair, even though you did it yourself in under five minutes.
Why this look is popular: The claw clip comeback isn't slowing down, and pairing it with a braided chignon adds texture and dimension. It's quick, it's chic, and it works on second-day hair without looking like you gave up.
Where this look is suitable: Farmers market runs, weekend brunch, casual coffee dates, any situation where you want to look pulled together without overthinking it.
Step by step:
- Prep with texture. Spritz dry shampoo or texturizing spray through your roots for grip and volume.
- Create a loose braid or twist. Gather your hair at the nape and twist it into a rope braid, or simply twist the whole ponytail into a coil.
- Wrap into a chignon. Coil the twisted hair around its base, tucking the ends underneath.
- Secure with a claw clip. Open the tortoiseshell clip and clamp it over the bun, positioning it so it sits flat against your head.
- Soften the edges. Pull a few wispy pieces around your face and ears for an effortless finish.
Tips and tricks: If your clip feels loose, anchor it with a bobby pin or two underneath. The clip is the star, but the pins do the real work.

28 Stunning Baddie Summer Hairstyles for 2026 🔥☀️
2.Chic Crown Braid with a Twisted Low Bun
The overview: A Dutch braid runs along the hairline from one temple around the crown to the other side, where it meets the rest of the hair gathered into a twisted low bun. A gold cuff or braid ring marks the transition point. It's romantic without being precious.
Why this look is popular: Crown braids feel timeless, but the twisted low bun keeps the whole thing modern. The gold cuff adds just enough shine to make it feel intentional rather than overly styled.
Where this look is suitable: Park picnics, outdoor lunches, casual date afternoons, any time you want to look like you woke up in a French film.
Step by step:
- Part and section. Create a deep side part and section off the crown area for the braid.
- Dutch braid the crown. Starting from one temple, Dutch braid along the hairline, picking up small sections as you go around the head.
- Secure the braid. Once you reach the opposite side, braid the remaining length and pin it behind the ear.
- Gather the rest into a low bun. Collect all remaining hair at the nape, twist it, and coil into a low bun.
- Add the gold cuff. Slide a gold cuff or braid ring where the braid meets the bun to anchor the look.
Tips and tricks: Pancake the braid by gently pulling at each section to make it look wider and more voluminous. This gives the crown braid that lush, full appearance.
3.Bohemian Crown Braid with a Low Textured Bun
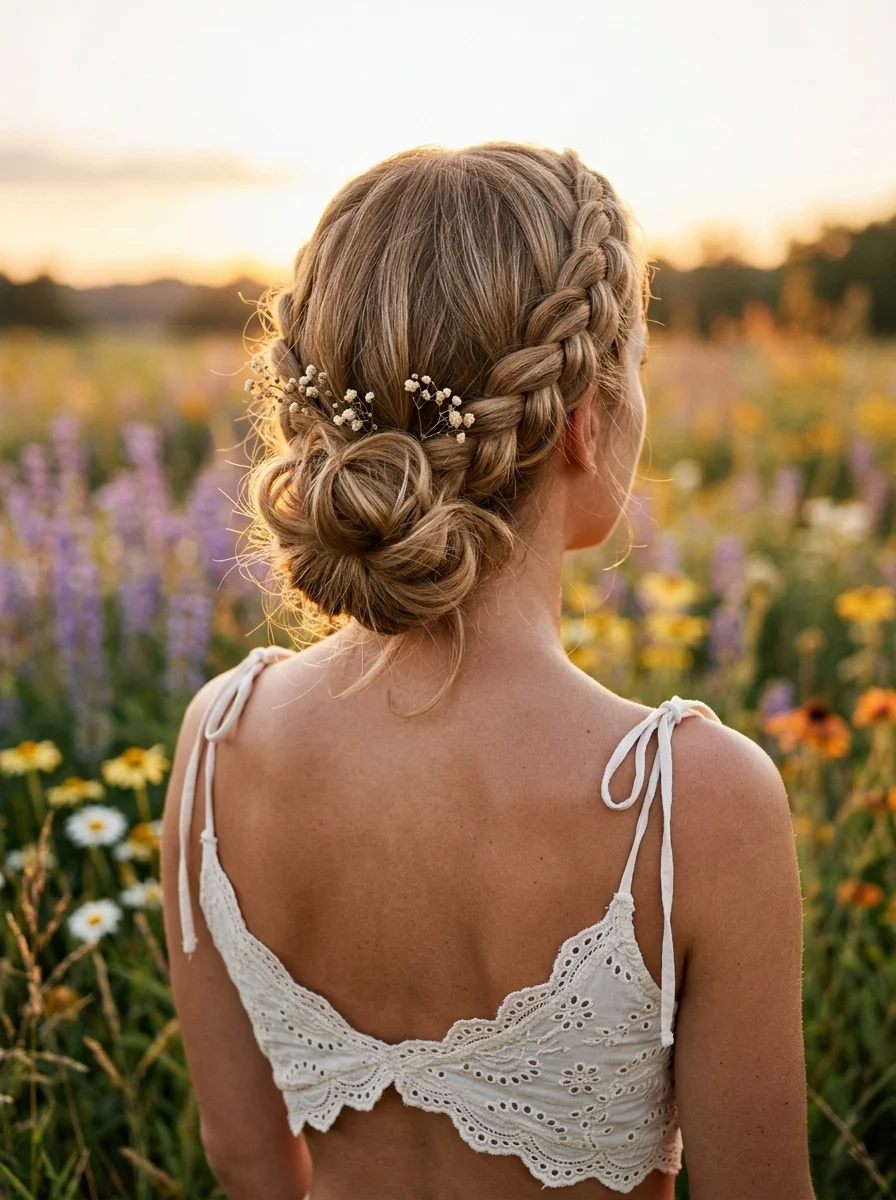
The overview: A Dutch braid crown wraps around the head, slightly loose and pancaked for width. The remaining hair is gathered into a textured, deconstructed low bun with small sprigs of baby's breath tucked throughout. Sprigs of baby's breath are tucked into the braid and bun for an undone, bohemian feel that looks like it belongs in a wildflower field.
Why this look is popular: Boho braids with floral accents have been a wedding guest staple for years, and this version nails the balance between styled and effortless. The baby's breath adds softness without overwhelming the braid work.
Where this look is suitable: Boho-themed weddings, outdoor garden parties, music festivals, any event where floral hair accessories feel right at home.
Step by step:
- Start with day-old hair. Slightly textured hair holds braids better and gives the bun a more organic look.
- Create the Dutch braid crown. Braid from one side around the head, picking up hair as you go, keeping it slightly loose.
- Secure the braid end. Tuck the braid tail behind the opposite ear and pin it in place.
- Form the low bun. Gather the remaining hair at the nape, loosely twist, and pin into a textured bun. Don't aim for perfection — the messier the better.
- Tuck in baby's breath. Slide small sprigs of baby's breath into the braid and bun at random intervals for a scattered, wildflower effect.
Tips and tricks: Use fresh baby's breath if you can — it lasts all day and smells incredible. If you're using faux flowers, make sure they're small and lightweight so they don't weigh down the style.

28 Trendy May Nail Designs for 2026 💅
4.Festival-Ready Braided Flower Bun
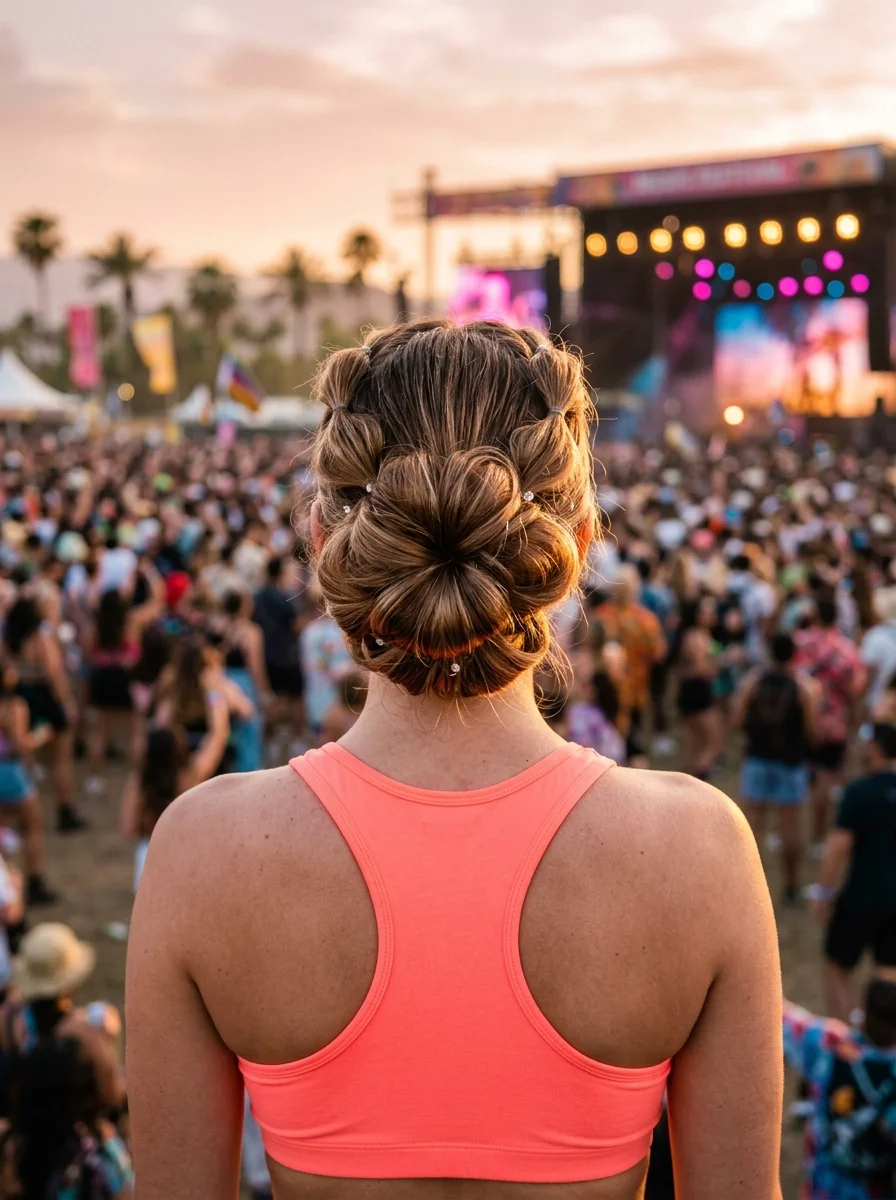
The overview: Hair is divided into sections — some braided, some in bubble ponytails — then coiled into a layered, petal-like bun at the crown. Rhinestone pins are placed strategically to catch light and add dimension. This is a bun that demands attention.
Why this look is popular: Festival hair is about going bigger and bolder than your everyday style. The petal-shaped bun is architectural and eye-catching, while the rhinestone pins add the kind of sparkle that photographs beautifully in any lighting.
Where this look is suitable: Music festivals, outdoor concerts, themed parties, any event where you want your hair to be a conversation starter.
Step by step:
- Section the hair. Divide your hair into four to six sections, alternating between braids and bubble ponytails.
- Create the bubbles and braids. Braid some sections fully; for others, add elastics at intervals and pull apart to create bubbles.
- Coil into a bun. Starting with the longest section, wrap each braid or bubble around the base at the crown, pinning as you go.
- Shape the petals. Arrange the bubble and braid sections so they fan outward like petals, creating a flower-like shape.
- Add rhinestone pins. Scatter small rhinestone bobby pins throughout the bun for sparkle.
Tips and tricks: Crimp your hair before styling for extra texture and volume. The crimped pattern adds dimension to both the braids and the bubbles.
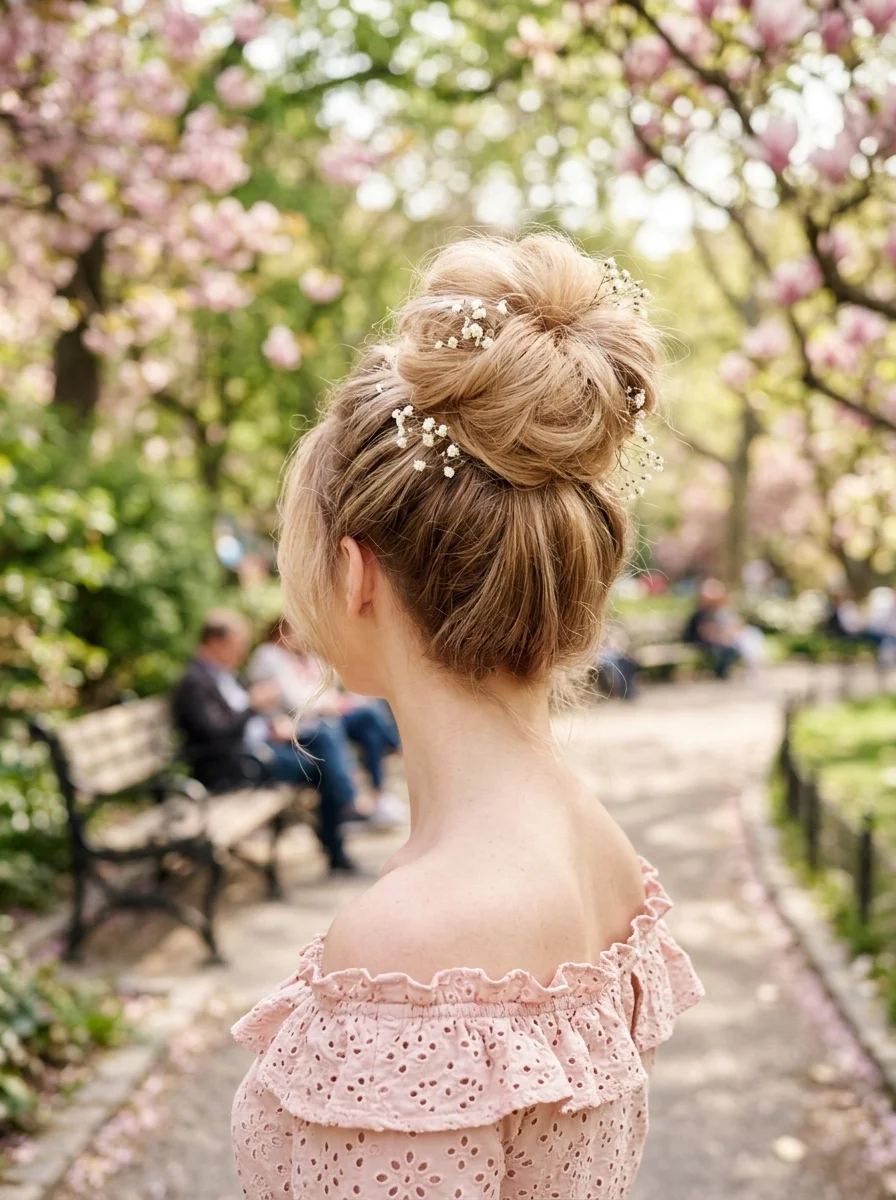
5.Effortless Romantic Updo with Baby's Breath
The overview: A high, deconstructed bun sits at the crown with loose pieces framing the face. Baby's breath sprigs are scattered throughout the bun and around the face for a soft, ethereal effect. It's the hairstyle that makes you look like you just walked through a garden and your hair simply cooperated. No effort required — or so it seems.
Why this look is popular: The high messy bun is a classic summer look, but adding baby's breath transforms it from casual to romantic. It photographs beautifully and works on virtually every hair texture.
Where this look is suitable: Garden parties, outdoor weddings, afternoon tea, any event where you want to feel romantic without looking overly styled.
Step by step:
- Add texture. Work volumizing mousse or texturizing spray through damp hair and let it air-dry for natural body.
- Gather into a high ponytail. Pull your hair up to the crown and secure with an elastic, leaving the tail loose.
- Create the messy bun. Wrap the ponytail loosely around the base, pulling sections outward to create volume. Secure with pins, leaving pieces loose and imperfect.
- Frame the face. Pull out soft tendrils around your temples and ears.
- Tuck in baby's breath. Slide small sprigs into the bun and around your face at random points.
Tips and tricks: Don't brush your hair before putting it up. The natural texture from sleeping on it or air-drying gives the bun more body and makes the "effortless" look actually effortless.
25 Top Curly Hairstyle Trends for 2026 ➰✨
6.Braided Double Buns with Star Charms
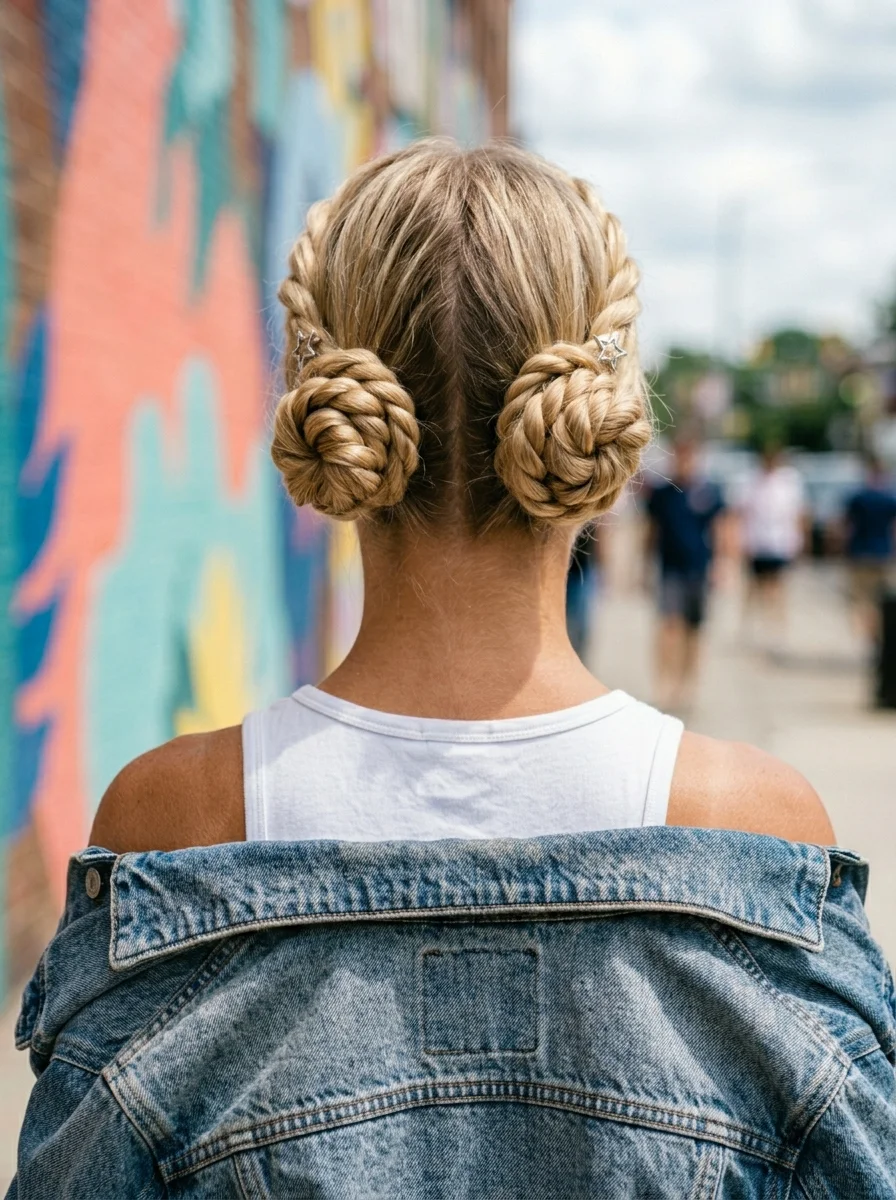
The overview: A center part divides the hair into two sections. Each side is braided and coiled into a bun positioned high on the crown. Silver star charms are woven into the braids, scattered across both buns. It's playful, a little rebellious, and guaranteed to stand out.
Why this look is popular: Double buns have a nostalgic, youthful energy that never gets old. Adding braids and metallic star charms takes the style from costume territory into something genuinely cool and fashion-forward.
Where this look is suitable: Street style moments, casual outings with friends, music events, any time you want your hair to match your bold energy.
Step by step:
- Create a center part. Use a comb to make a clean part from forehead to nape.
- Braid each section. On each side, create a standard three-strand braid or Dutch braid from the part down to the ends.
- Coil into buns. Wrap each braid around its base to form a bun, pinning as you go.
- Add star charms. Thread small silver star charms through the braids at random intervals.
- Soften the look. Pull out a few face-framing pieces and gently tug at the buns for a less rigid appearance.
Tips and tricks: Use a rattail comb for a crisp center part. If your buns feel loose, wrap a small elastic around the base of each bun before pinning — it adds security without visible hardware.
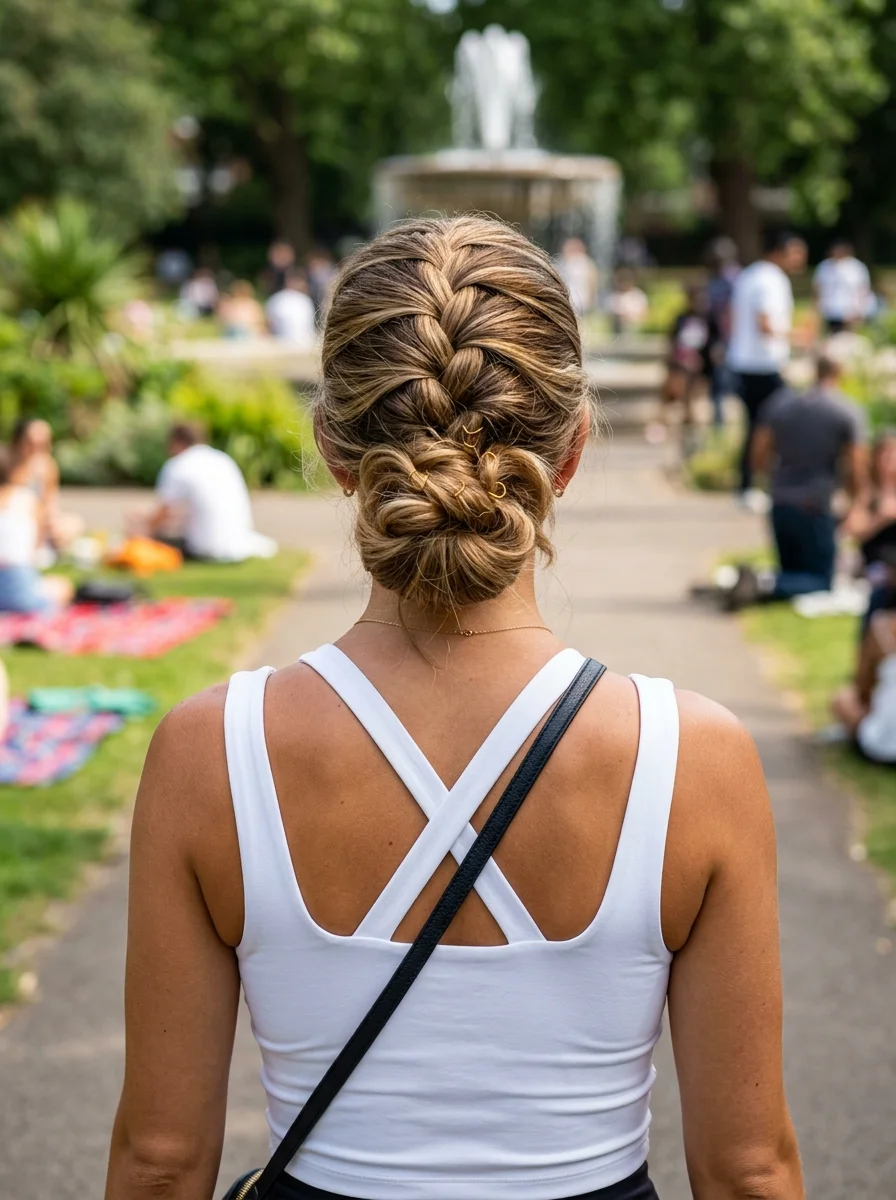
7.Braided Bun with a Twist (Upside-Down Braid to Top Knot)
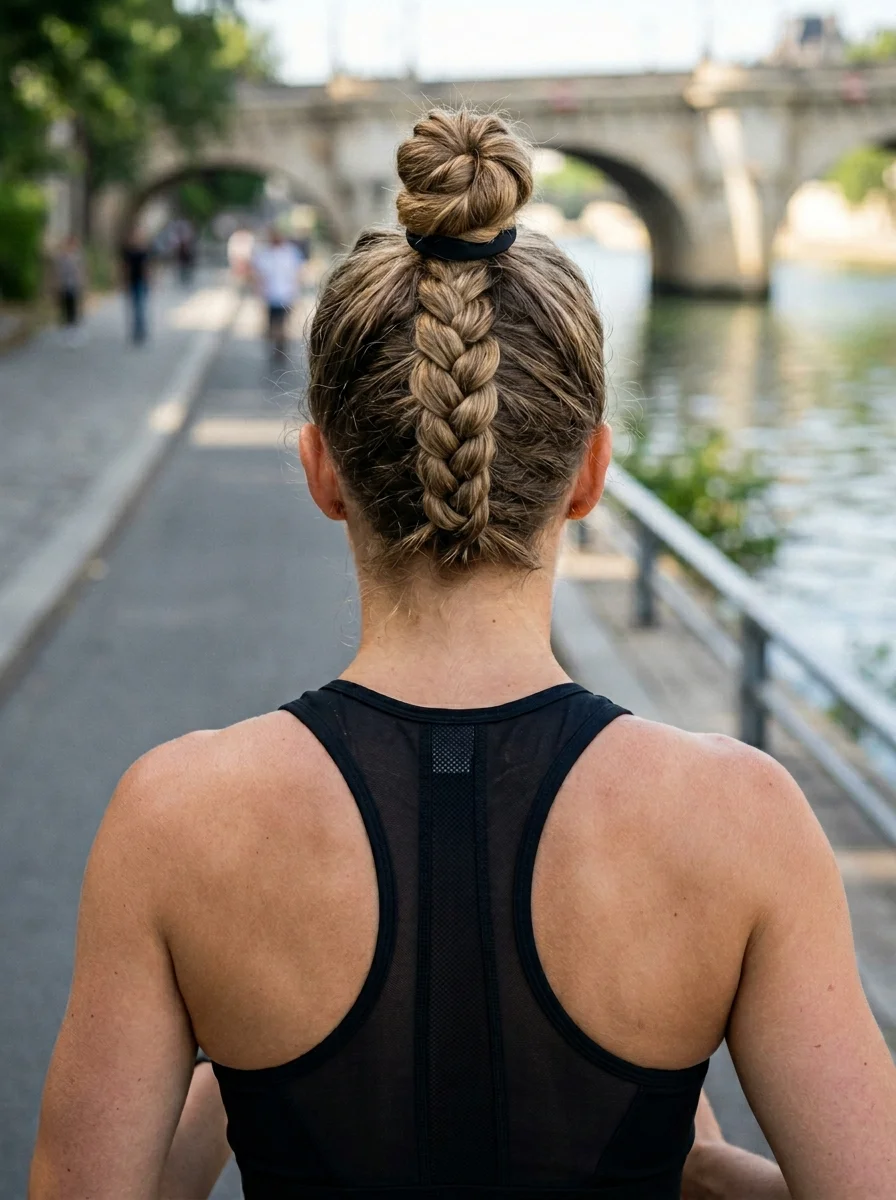
The overview: An upside-down Dutch braid starts at the nape and travels upward to the crown, where it feeds into a high, textured top knot. The braid is visible from behind while the front reads as a standard top knot. It's an active hairstyle that keeps everything secure while adding visual interest from every angle.
Why this look is popular: The upside-down braid adds a surprise detail that people don't expect. It's functional — keeping shorter hairs at the nape in check — and it looks way more polished than a regular top knot.
Where this look is suitable: Workout classes, hiking, running errands on a hot day, any active situation where you need your hair up but still want it to look good.
Step by step:
- Flip your head over. Bend at the waist so your hair hangs downward.
- Dutch braid from the nape. Starting at the nape, Dutch braid upward toward the crown, picking up sections as you go.
- Secure the braid. When you reach the crown, combine the braid with the rest of your hair into a high ponytail.
- Create the top knot. Twist the ponytail into a tight coil, wrap it around the base, and pin in place.
- Smooth and set. Use a light-hold hairspray to keep flyaways in check without making the style stiff.
Tips and tricks: Braid with slightly damp hair for the cleanest result. The braid holds better and the sections are easier to control when there's a little moisture in the hair.

30 Stunning July Nail Designs for Summer 2026 💅
8.Chic French Twist with a Golden Comb Accent
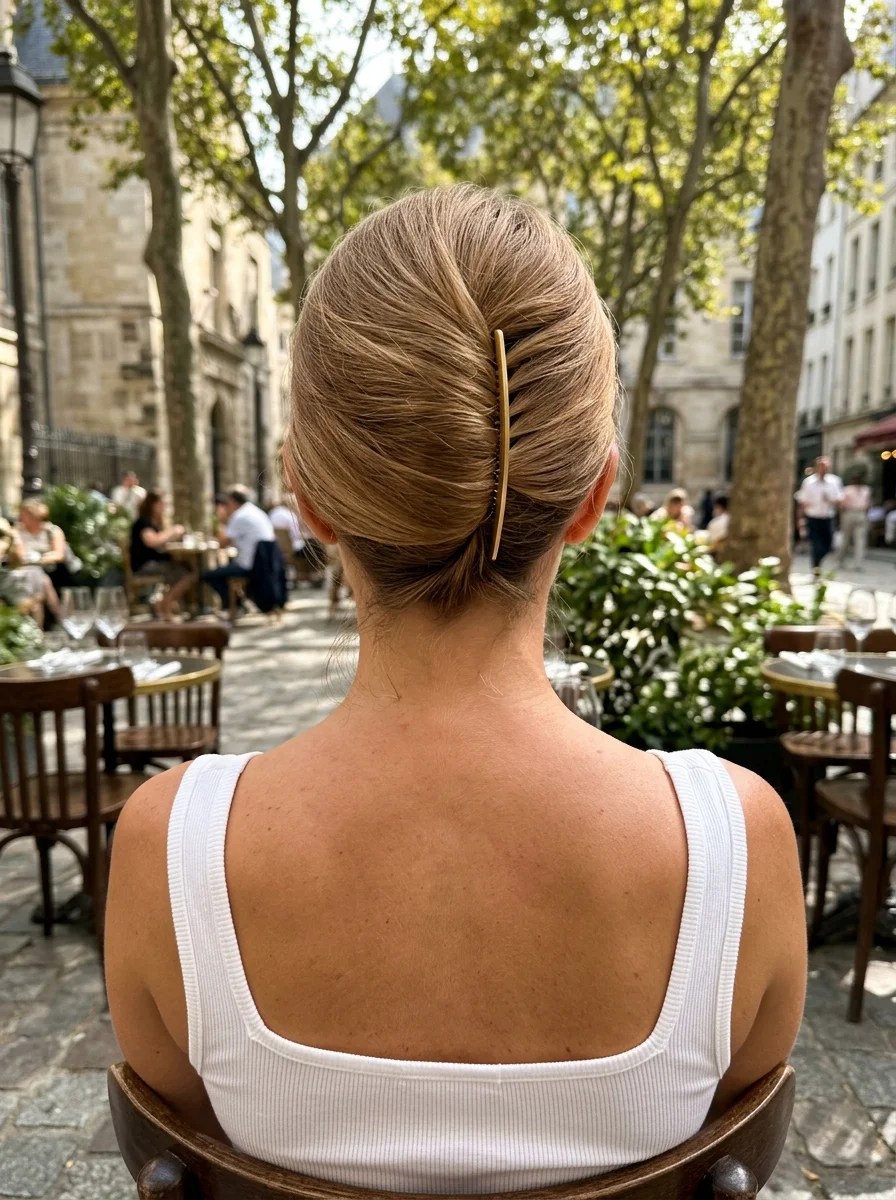
The overview: Hair is smoothed back and folded into a vertical roll at the back of the head. A decorative gold comb is inserted along the fold to secure the twist and add a refined accent. It's the kind of updo that makes you look like you have a personal stylist, even if you just watched a YouTube tutorial.
Why this look is popular: The French twist is back in a big way, and a gold comb elevates it from vintage to modern luxe. It's a style that works for day or night and holds up in humidity better than most updos.
Where this look is suitable: Parisian-inspired outings, outdoor dining, cocktail hours, any occasion where classic elegance is the goal.
Step by step:
- Smooth the hair. Apply a smoothing cream and blow-dry or flat iron for a sleek base.
- Gather and twist. Pull all your hair to one side, twist it tightly, and fold it upward against the back of your head.
- Tuck the ends. Fold the ends of the twist down and tuck them inside the roll.
- Pin in place. Use bobby pins to secure the twist from the inside, hiding them within the fold.
- Insert the gold comb. Slide a decorative gold comb into the fold from the top, letting it sit along the twist as both a functional anchor and an accent piece.
Tips and tricks: Backcombing the underside of your hair before twisting gives the style more grip and volume. It helps the twist hold its shape and look fuller from every angle.
9.Elegant Twisted Rose Bun with Golden Pin
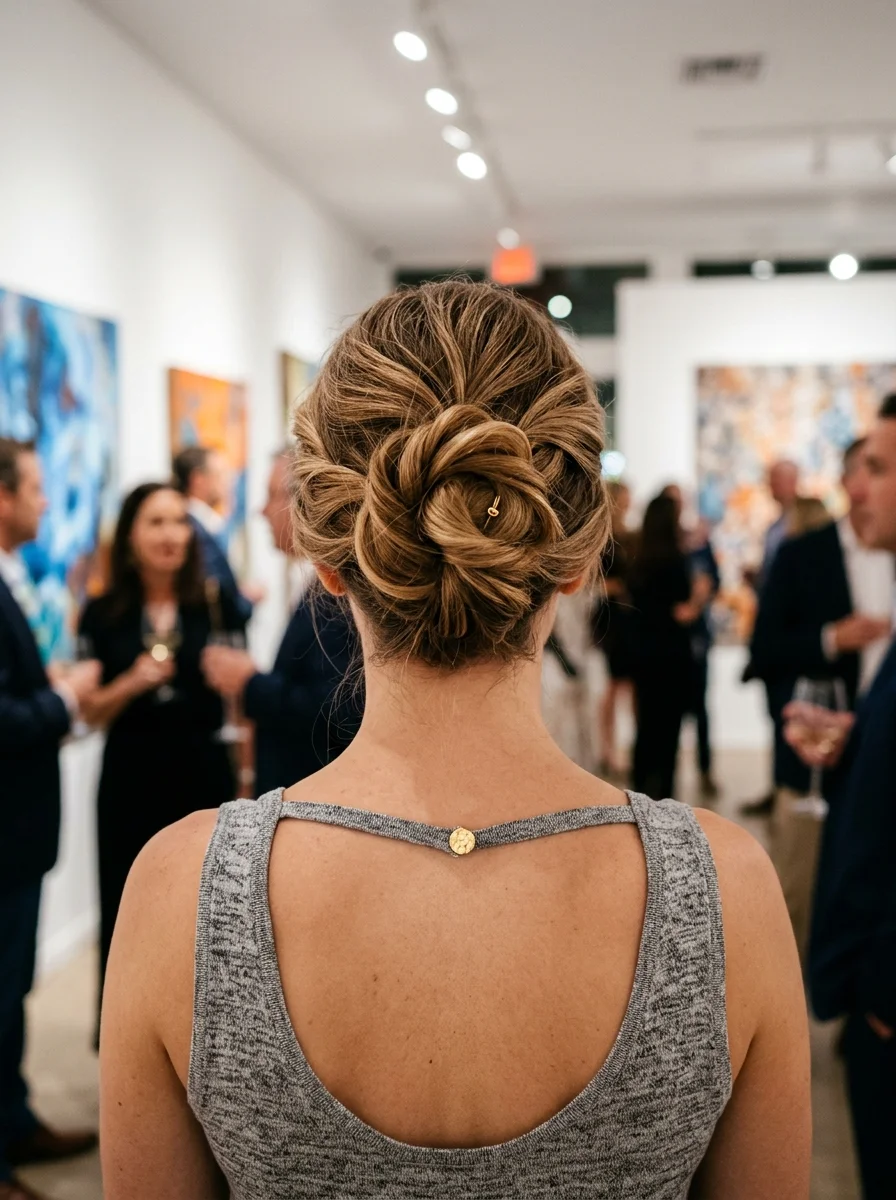
The overview: Hair is divided into sections, each twisted and coiled to resemble rose petals. The sections overlap to form a rounded bun shape, with a gold pin placed at the center to complete the flower effect. It's sculptural, it's elegant, and it makes a regular bun look like a work of art.
Why this look is popular: The rose bun takes the classic twisted bun and elevates it into something genuinely artistic. The gold pin adds a focal point that draws the eye, making this a statement style that doesn't need additional accessories.
Where this look is suitable: Art gallery openings, cocktail parties, upscale dinners, any event where you want your hair to feel like an accessory in itself.
Step by step:
- Start with smooth hair. Apply a light smoothing serum for shine and control.
- Divide into sections. Split your hair into three to four equal sections.
- Twist each section. Tightly twist each section, then wrap it around the base in a petal-like pattern, pinning as you go.
- Layer the petals. Overlap the twisted sections to create the layered look of rose petals.
- Add the gold pin. Place a decorative gold pin at the center of the bun to anchor the style and add a finishing touch.
Tips and tricks: Lightly spray each twisted section with hairspray before pinning. This keeps the twists smooth and prevents flyaways from disrupting the petal shape.
30 Stunning Mother of the Groom Hairstyle Ideas for 2026 💍✨
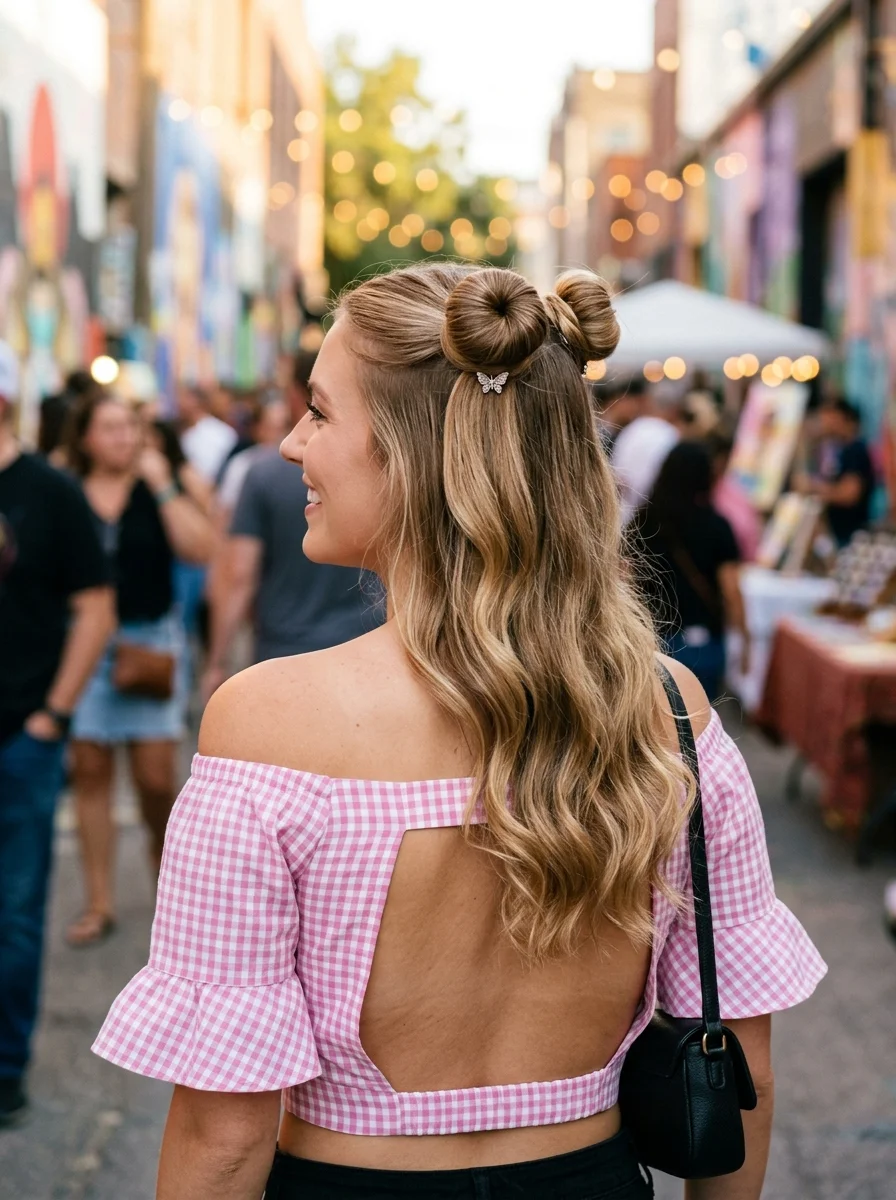
10.The Chic Top Knot Half-Up with Loose Waves
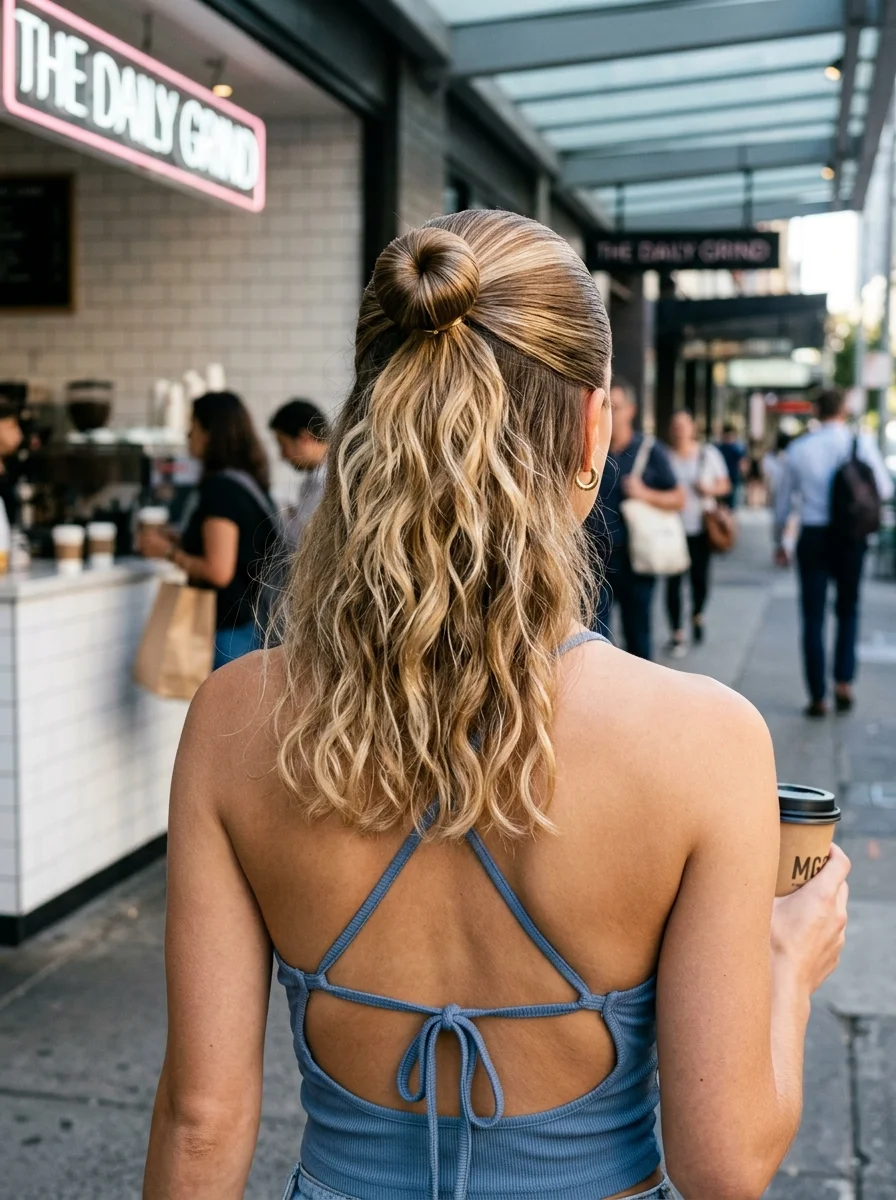
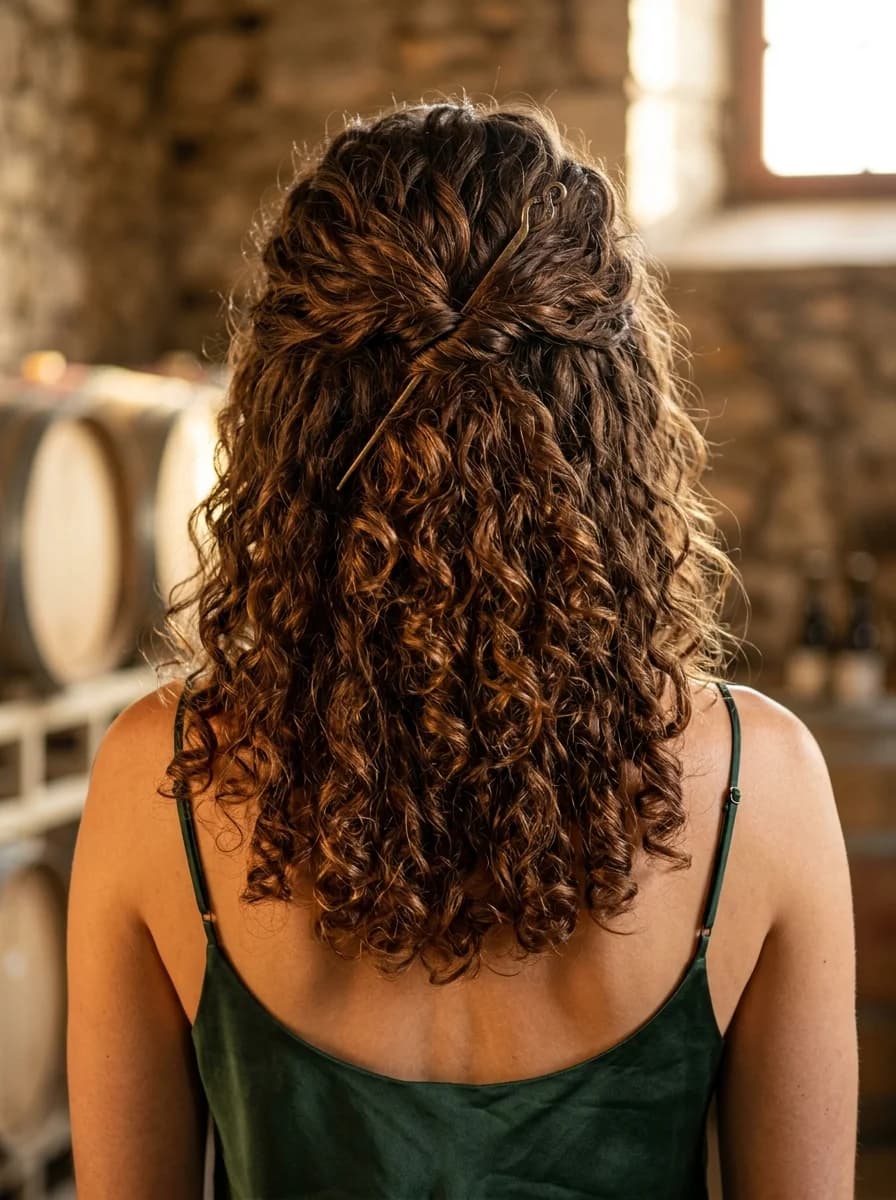
The overview: The top half of the hair is gathered into a relaxed bun at the crown. The bottom half falls in loose, natural-looking waves. The transition between the two sections is soft and blended. It's the best of both worlds — your hair is out of your face but still flowing. This is the hairstyle equivalent of having your cake and eating it too.
Why this look is popular: Half-up styles let you show off your length while keeping your face clear. The top knot adds a casual, modern edge that keeps the waves from looking too "done."
Where this look is suitable: Coffee shop hangs, casual workdays, lunch dates, any situation where you want to look cute without committing to fully up or fully down.
Step by step:
- Create loose waves. Use a large-barrel curling iron or braid damp hair overnight for natural-looking waves.
- Section the top half. Gather hair from above your ears to the crown, leaving the bottom section loose.
- Twist into a top knot. Twist the top section into a bun, securing it with an elastic and pins.
- Pull for volume. Gently tug at the bun to loosen it and add fullness.
- Blend the transition. Pull a few pieces from the bun to cascade into the waves below, blurring the line between the two sections.
Tips and tricks: Curl the bottom section before pulling the top half up. It's much easier to style the waves first than to try curling around an existing bun.
11.Elegant Pearl-Adorned Chignon
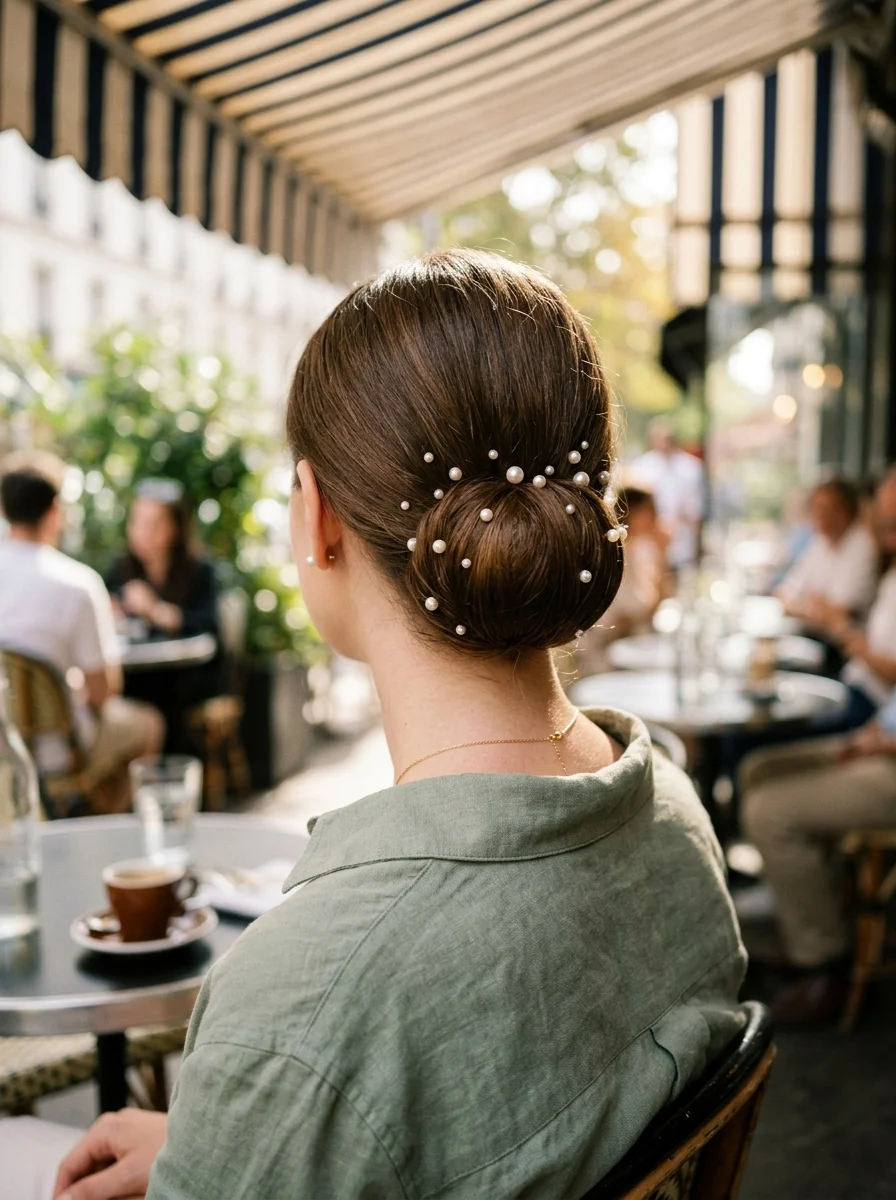
The overview: Hair is smoothed back into a sleek, low chignon at the nape. Pearl-tipped bobby pins are scattered along the twist, adding subtle points of light throughout the style. It's understated elegance that speaks for itself.
Why this look is popular: Pearls are having a moment in fashion and accessories, and translating that to hair feels natural. This chignon proves that minimalism and glamour aren't opposites — they're partners.
Where this look is suitable: Garden parties, summer weddings, formal daytime events, any occasion where you want to look polished and timeless.
Step by step:
- Create a sleek base. Apply smoothing serum and blow-dry straight for a polished foundation.
- Gather into a low ponytail. Secure all hair at the nape with a clear elastic.
- Twist into a chignon. Twist the ponytail into a tight coil, wrap it around the base, and pin securely.
- Add pearl pins. Insert pearl-tipped bobby pins along the twist, spacing them evenly for a balanced look.
- Set with spray. Finish with a light-hold hairspray to maintain smoothness without crunch.
Tips and tricks: Warm the pearls slightly with your fingers before placing them — they slide into the hair more smoothly and stay in place better.

28 Cute & Sporty Baseball Game Nail Ideas for 2026 ⚾
12.Sleek High Bun with a Golden Kiss
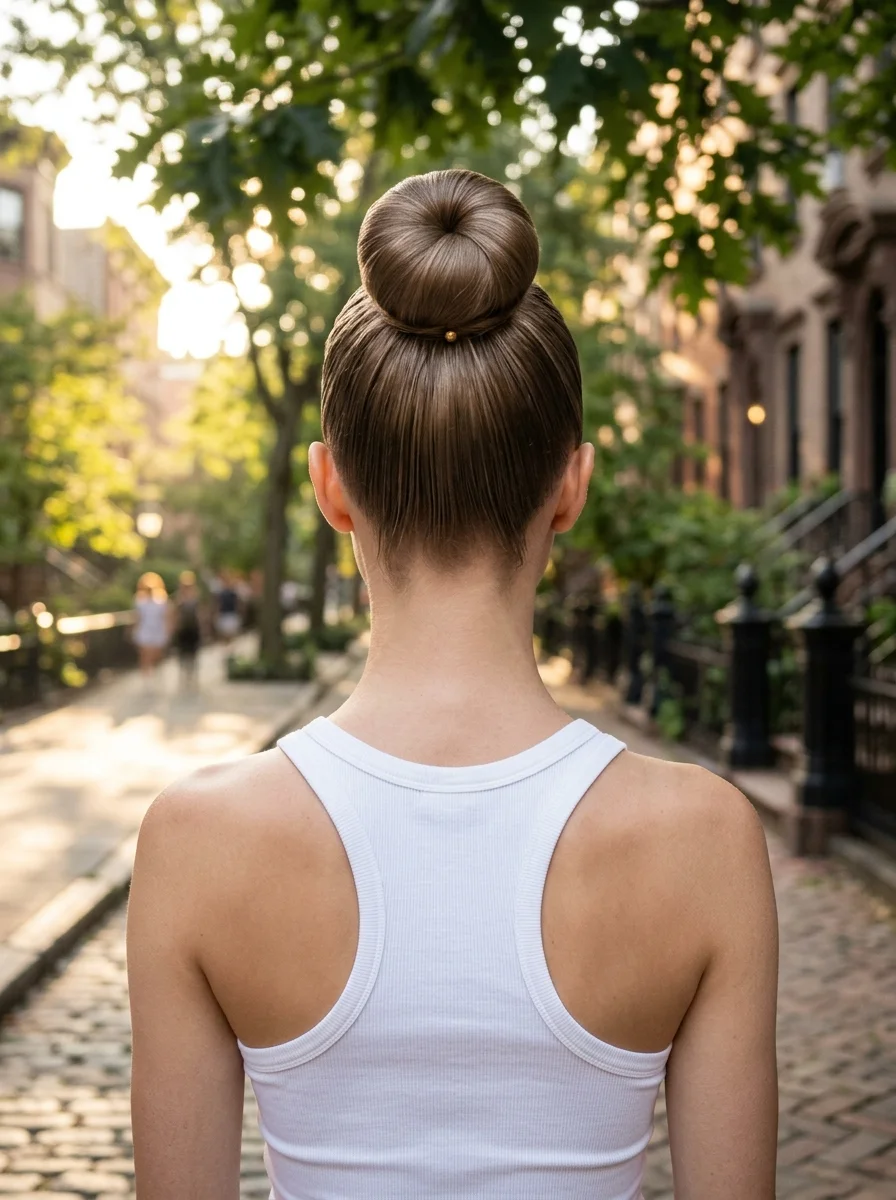
The overview: Hair is smoothed upward into a tight, sleek bun at the crown. The golden balayage highlights create dimension and movement within the bun itself. No flyaways, no loose pieces — just clean lines.
Why this look is popular: The sleek high bun is a power move. It elongates your neck, highlights your bone structure, and the golden balayage adds warmth that feels very summer. It's minimal but never boring.
Where this look is suitable: Upscale brunches, date nights, rooftop dinners, any time you want to look sharp and sophisticated.
Step by step:
- Apply gel or pomade. Work a smoothing product through your hair from root to tip for a sleek, controlled base.
- Gather into a high ponytail. Use a boar bristle brush to pull all your hair up to the crown, securing with a strong elastic.
- Smooth the base. Apply more product around the ponytail base and brush away any flyaways.
- Twist and coil. Twist the ponytail tightly, wrap it around the base, and pin from the inside.
- Polish the finish. Wrap a small section of hair around the elastic to hide it, and set with strong-hold hairspray.
Tips and tricks: Use a toothbrush sprayed with hairspray to smooth any baby hairs along your hairline. It gives you precision that a regular brush can't match.
13.The Twisted Top Knot — Sleek, Chic, and Edgy
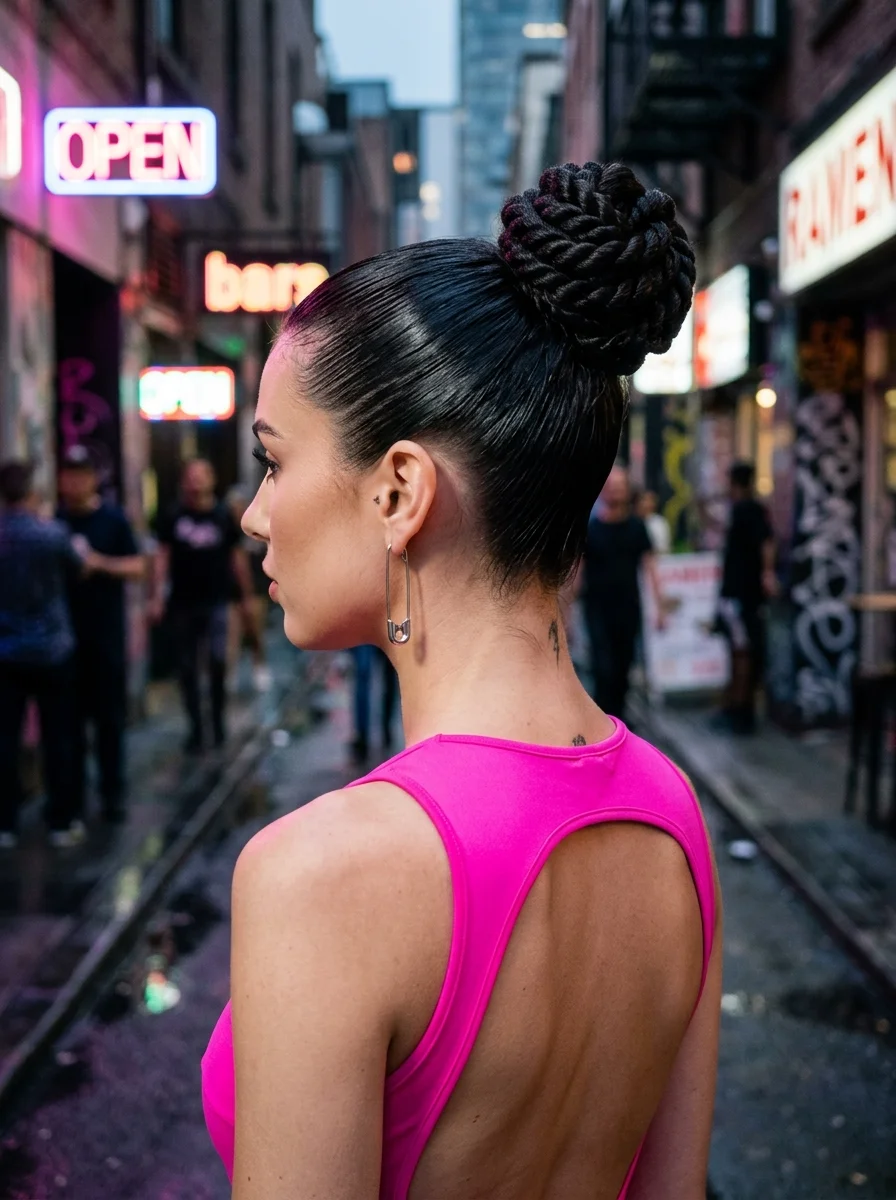
The overview: Hair is gathered into a high ponytail, then twisted tightly into an elongated knot that stands upright at the crown. The shape is sleek and structured, with minimal flyaways and a clean finish. It's not your average top knot — this one has height and structure, with a deliberate elongated shape that reads as editorial and fashion-forward.
Why this look is popular: The elongated top knot takes the casual bun and makes it sharp. It's a style that works with bold earrings and strong makeup, making it a favorite among anyone who treats getting dressed as an art form.
Where this look is suitable: Fashion-forward events, rooftop bars, gallery openings, any setting where your personal style is part of the conversation.
Step by step:
- Smooth the base. Apply gel or pomade and brush hair upward into a sleek high ponytail.
- Twist the ponytail. Twist the entire ponytail tightly until it begins to coil on itself.
- Build upward. Rather than wrapping flat, guide the twisted hair upward as you coil, creating height.
- Pin the structure. Secure the base with strong pins, allowing the twisted knot to stand upright.
- Polish. Smooth any flyaways with a fine-tooth comb and hairspray.
Tips and tricks: The tighter you twist, the taller the knot stands. If yours keeps flopping, you haven't twisted tightly enough. Commit to the twist and it'll hold.

26 Stunning Summer Braided Hairstyles for Women 2026 ☀️💇♀️
14.Chic Nautical Bun with Silky Scarf
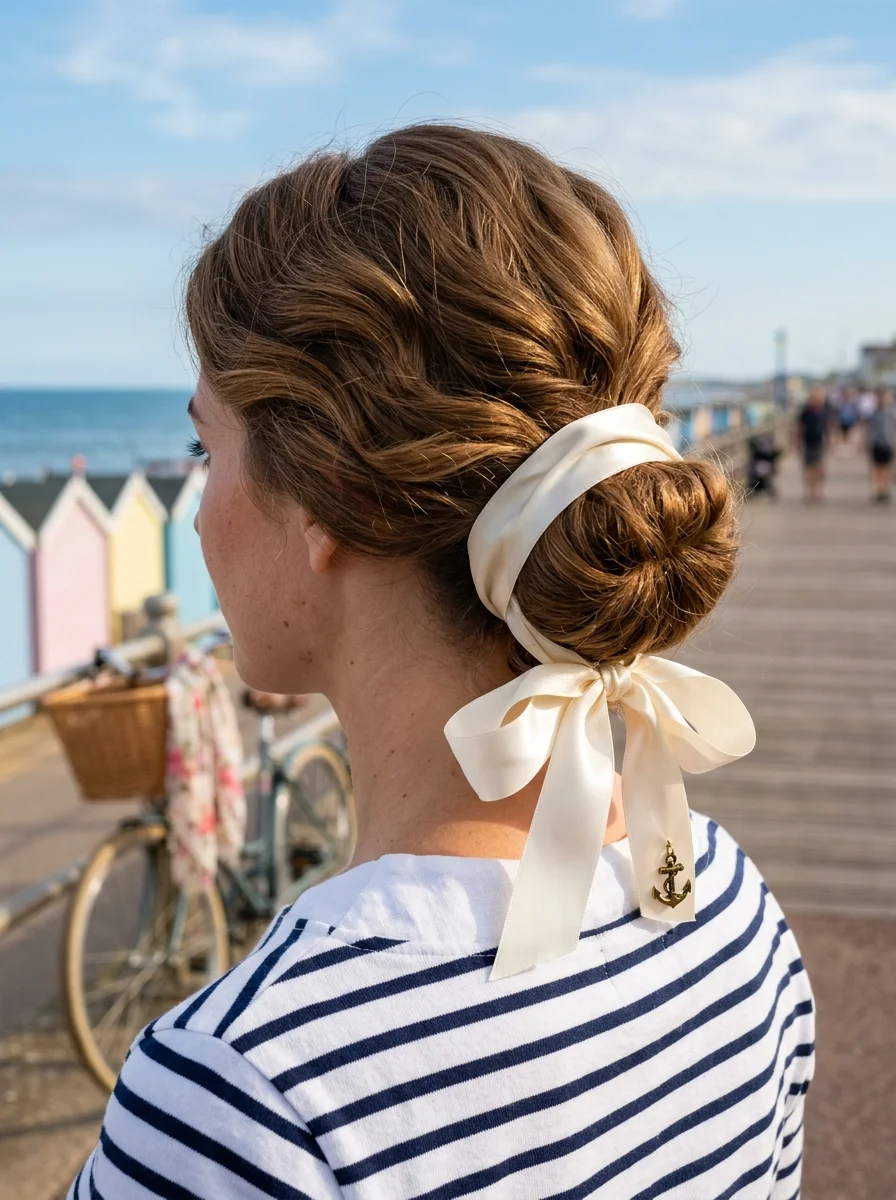
The overview: A relaxed low bun sits at the nape, with a nautical-striped silky scarf wrapped around the base. The scarf's ends trail down one side, catching the breeze and adding movement. It's the hairstyle that makes a striped shirt and white sneakers look like a curated outfit.
Why this look is popular: Scarves in hair are a summer constant, and the nautical theme gives the style a specific personality. It's casual enough for the beach but polished enough for lunch by the harbor.
Where this look is suitable: Beach boardwalks, sailing trips, coastal towns, any setting where a breezy, maritime-inspired look feels right.
Step by step:
- Gather into a low ponytail. Pull your hair to the nape and secure with a clear elastic.
- Twist into a bun. Wrap the ponytail into a loose, relaxed bun and pin in place.
- Wrap the scarf. Fold the scarf into a long strip and wrap it around the base of the bun, tying it once or twice.
- Position the ends. Let the scarf ends trail down one side, adjusting for length and drape.
Tips and tricks: Choose a scarf with a silk or satin finish — it glides against the hair without causing friction or tangles, and it holds its shape better in humidity.
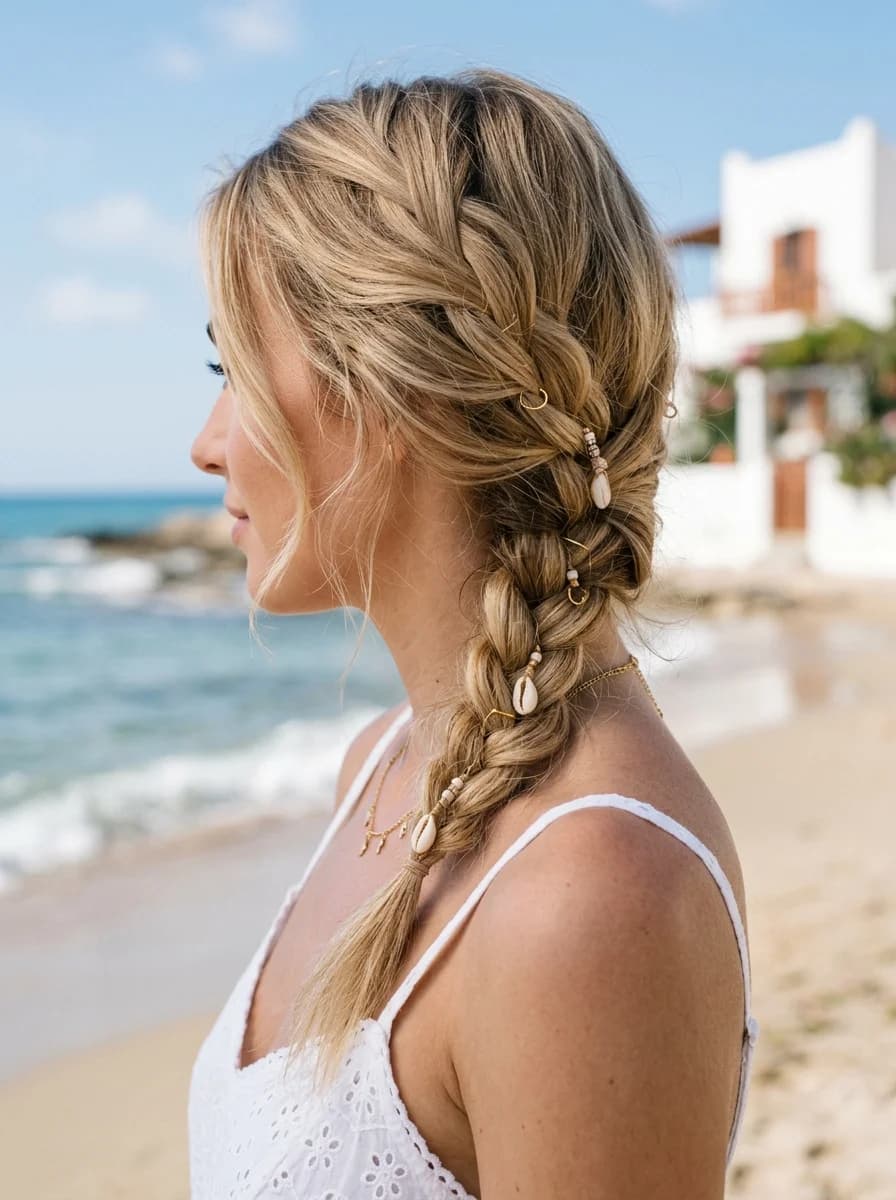
15.Elegant Braided Bun with Sky Blue Ribbon
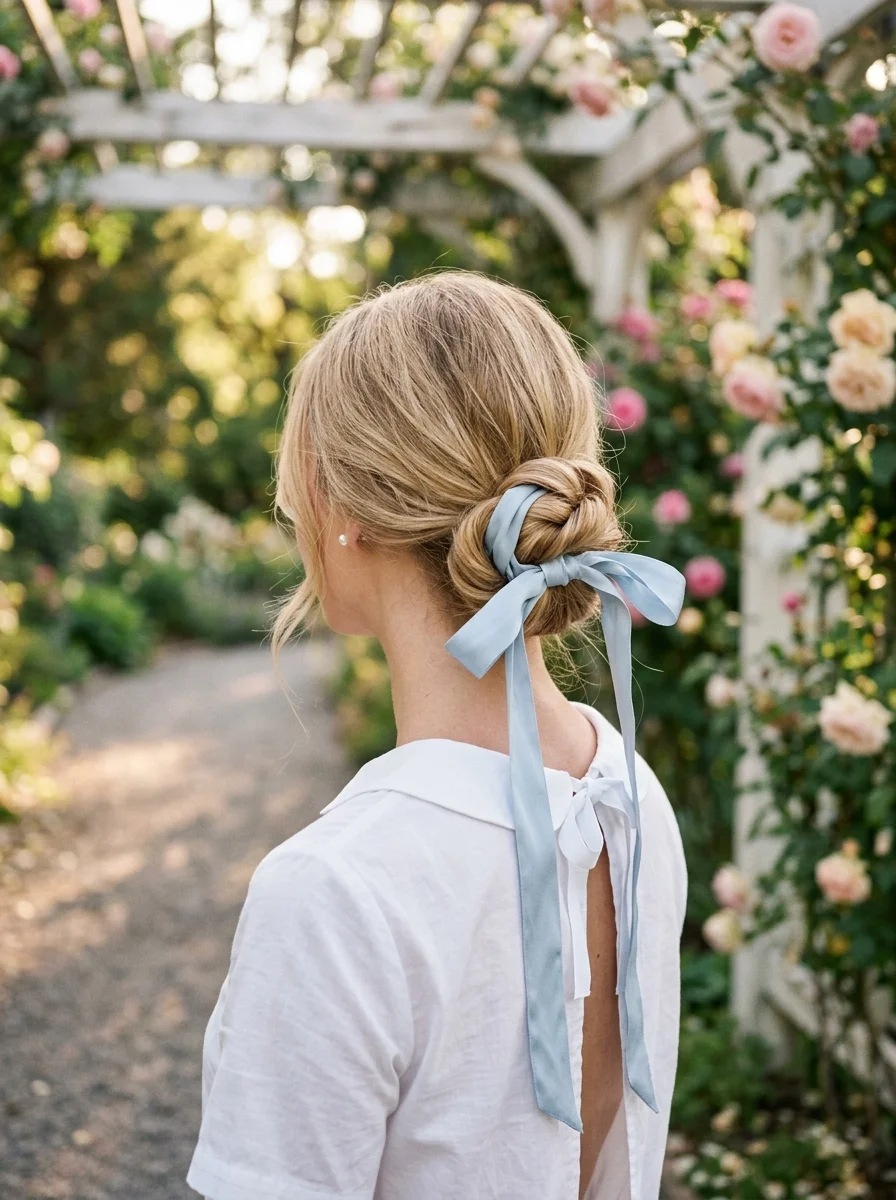
The overview: Hair is braided with a sky-blue ribbon woven through the sections. The braided length is then coiled into a bun at the back of the head, with the ribbon tied in a bow at the base. It's the kind of hairstyle that makes you feel like you're living in a Nancy Meyers film.
Why this look is popular: Ribbon details add a preppy, romantic quality that feels fresh in summer. The sky-blue color is soft and flattering, and weaving it through the braid makes the whole style feel cohesive and considered.
Where this look is suitable: Garden parties, wedding guest duties, afternoon teas, any event where polished femininity is the dress code.
Step by step:
- Prepare the ribbon. Cut a length of ribbon and secure one end to a bobby pin at the base of your ponytail.
- Braid with the ribbon. Incorporate the ribbon into a three-strand braid, treating it as one of the strands.
- Coil into a bun. Wrap the braided length around the base, tucking the ends underneath.
- Tie the bow. Use the remaining ribbon length to tie a neat bow at the base of the bun.
- Secure and set. Pin any loose sections and finish with a light mist of hairspray.
Tips and tricks: Use a grosgrain ribbon for better grip. Satin ribbons look beautiful but can slip out of the braid — grosgrain holds its place and adds a subtle texture.

35 Fun Birthday Nail Designs for 2026 🎂
16.Elegant Evening Updo with Velvet Ribbon Detail
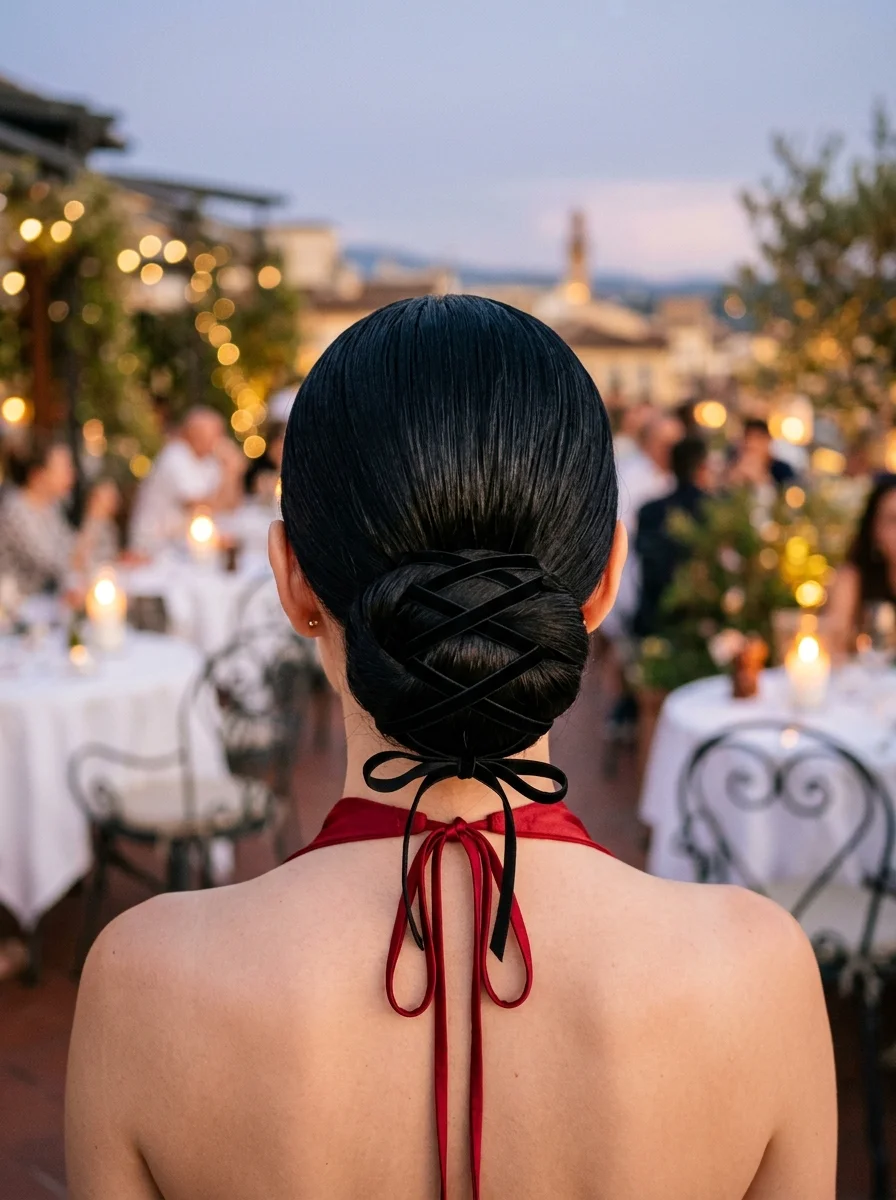
The overview: Hair is swept into a structured French twist or low chignon. A velvet ribbon is threaded through the style or tied at the base, adding a rich, textural accent that contrasts with the smooth hair. The velvet adds a rich, tactile quality that makes the whole updo feel luxurious and event-worthy.
Why this look is popular: Velvet in summer might sound counterintuitive, but as an accessory it adds depth and sophistication that lighter fabrics can't match. It's a small detail that signals you put thought into every element of your look.
Where this look is suitable: Summer galas, formal evening events, black-tie dinners, any occasion where your hairstyle needs to hold its own against a formal dress.
Step by step:
- Prep for smoothness. Apply a smoothing treatment and blow-dry straight for a sleek foundation.
- Create the updo. Style into a French twist or low chignon, securing with hidden pins.
- Add the velvet ribbon. Thread the ribbon through the twist or wrap it around the bun's base, tying it in a simple knot or bow.
- Adjust the drape. Position the ribbon so it sits flush against the style without pulling or distorting the shape.
- Set with spray. Finish with a strong-hold spray to lock everything in place for the evening.
Tips and tricks: Choose a ribbon that matches your outfit's color palette. A tonal match feels sophisticated, while a contrasting color makes the ribbon a statement piece.
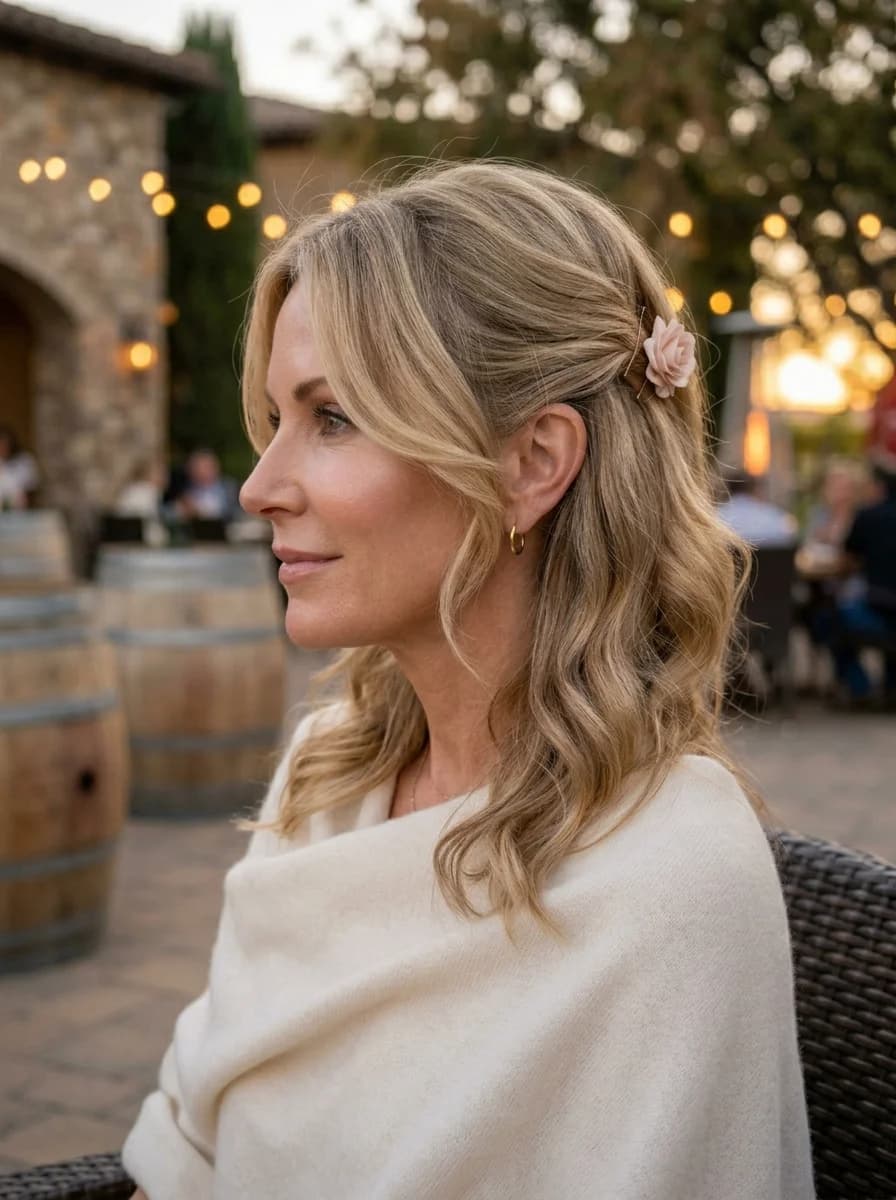
17.Elegant French Twist with a Daisy Accent
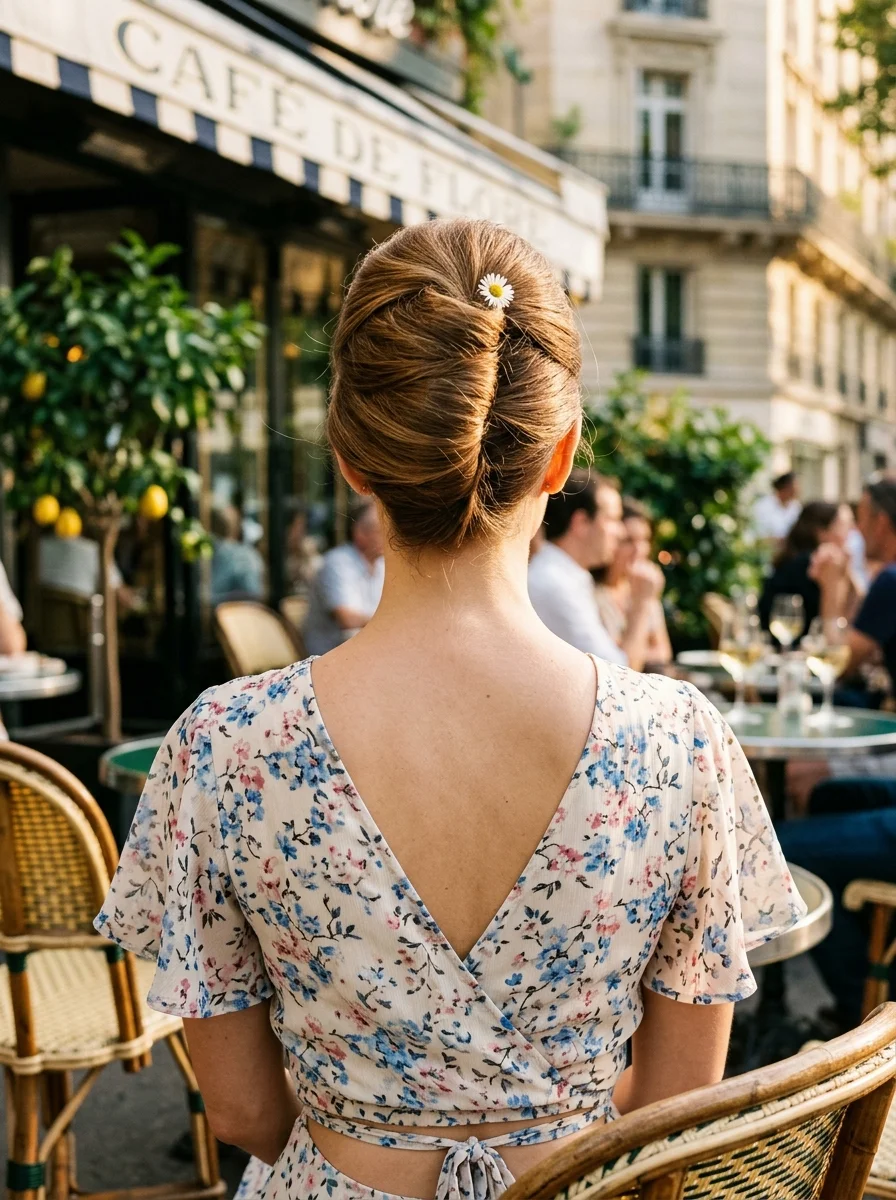
The overview: A classic French twist with a clean fold. A single daisy is tucked into the top of the twist, its petals visible against the hair. The rest of the style is smooth and unadorned. It's a minimalist approach to floral hair that feels modern and intentional — one flower, no clutter, maximum impact.
Why this look is popular: The single-flower approach is a refreshing alternative to heavy floral crowns. It's simple, photogenic, and the daisy adds a cheerful, summer-specific touch that feels genuine rather than overdone.
Where this look is suitable: Bridal showers, garden parties, spring and summer weddings, any event where understated floral accents feel appropriate.
Step by step:
- Create the French twist. Smooth your hair back, twist it into a vertical roll, and pin from the inside.
- Secure with pins. Use bobby pins along the fold to anchor the twist invisibly.
- Prep the daisy. Trim the stem to about two inches and wrap the base with floral tape for grip.
- Tuck the daisy in. Slide the stem into the top of the French twist, positioning the bloom so it sits prominently.
Tips and tricks: Mist the daisy with a light coat of hairspray before tucking it in. It extends the flower's life and helps the petals hold their shape throughout the event.

25 Stunning Summer Vacation Hairstyles for 2026 ☀️🌊
18.Tropical Twist Low Bun with Silky Scarf Accent
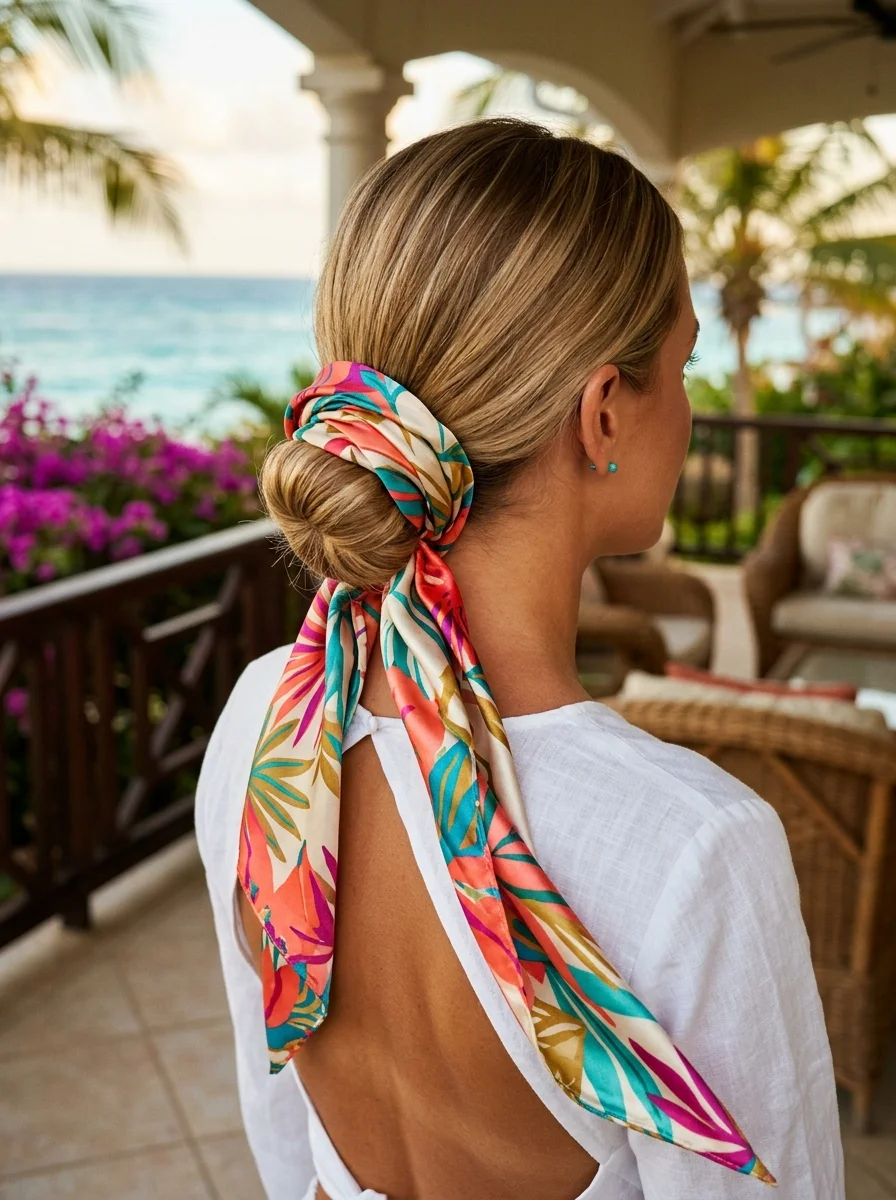
The overview: A loose, relaxed low bun sits at the nape. A tropical-print silky scarf is wrapped around the base, with the ends either tied in a bow or left to trail. The overall effect is effortless resort chic. The scarf brings color and pattern to the style, turning a simple bun into a vacation-ready look that works poolside or at a resort restaurant.
Why this look is popular: A silk scarf instantly makes any bun feel like a holiday. The tropical print adds vacation energy, and the silky texture keeps your hair protected from sun and salt without sacrificing style.
Where this look is suitable: Poolside lounging, resort dining, tropical vacations, any setting where your hair should match the laid-back luxury of your surroundings.
Step by step:
- Twist into a low bun. Gather your hair at the nape and twist it into a relaxed bun, securing with pins.
- Fold the scarf. Fold your tropical-print scarf into a long, narrow strip.
- Wrap the scarf. Wind the scarf around the base of the bun, covering the pins and elastic.
- Tie or drape. Either tie the scarf in a bow or let the ends trail down your back for a relaxed effect.
Tips and tricks: Wrap the scarf loosely — too tight and it flattens the bun. You want it to sit around the bun like a frame, not constrict it.
19.Double High Space Buns with Beachy Waves
The overview: Two high buns sit on either side of the crown, with the lower sections of hair left down in loose, beachy waves. The buns are casual and slightly messy, with texture throughout. It's part '90s nostalgia, part beach party.
Why this look is popular: Space buns are pure fun, and leaving some hair down in waves softens the look so it doesn't read as costume. It's a style that signals you're here to have a good time.
Where this look is suitable: Beach days, music festivals, pool parties, any event where the dress code is basically "have fun with it."
Step by step:
- Create waves. Scrunch sea salt spray into damp hair and let it air-dry for natural texture.
- Part down the center. Create a clean center part from forehead to nape.
- Section the top half. On each side, gather the top section of hair, leaving the bottom half down.
- Form the buns. Twist each section into a bun on top of the head, securing with elastics and pins.
- Tousle the waves. Shake out the loose sections and add more sea salt spray for definition.
Tips and tricks: Don't make the buns too symmetrical. Slightly uneven buns look more relaxed and beachy than perfectly matched ones.

34 Stunning Summer Butterfly Nails for Women in 2026 🦋
20.Sleek High Bun with a Poolside Glow
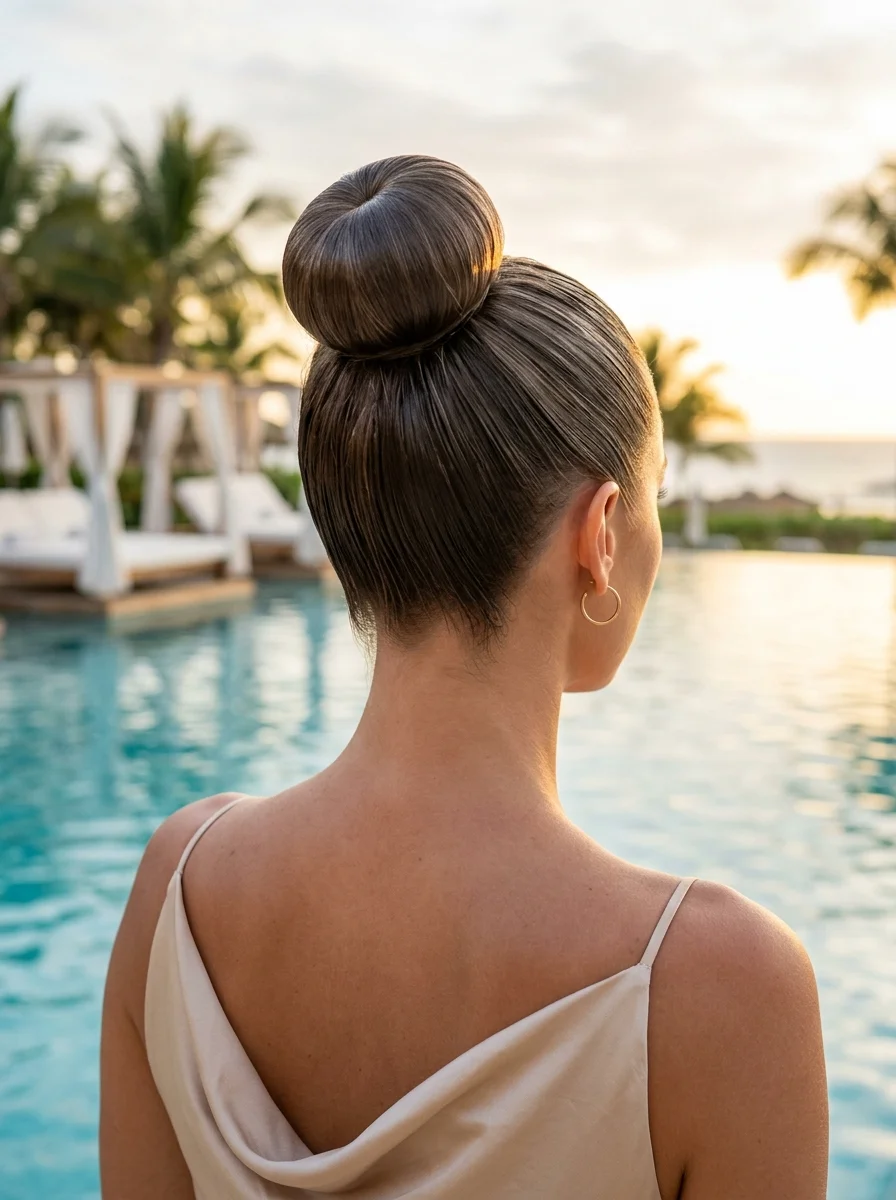
The overview: Hair is gelled flat against the head and pulled into a tight, high bun at the crown. Every strand is in place — no flyaways, no texture, just pure sleekness with a high-shine finish. This is the bun that says you're lounging by the pool at a luxury resort, and you look incredible doing it.
Why this look is popular: The gel-slicked bun is the ultimate "I woke up like this" power move for summer. It keeps your hair completely off your neck, works in water, and looks impossibly chic with a swimsuit or linen set.
Where this look is suitable: Poolside lounging, luxury resort outings, beach clubs, any scenario where you want to look cool and collected in the heat.
Step by step:
- Apply gel generously. Work strong-hold gel through damp or dry hair, coating every strand from root to tip.
- Brush into a high ponytail. Use a dense bristle brush to smooth all hair upward to the crown, eliminating bumps.
- Secure tightly. Wrap a strong elastic around the ponytail base multiple times for maximum hold.
- Twist into a bun. Twist the ponytail into a tight coil and wrap it flat against the crown, pinning from the inside.
- Set and shine. Apply a finishing gel or edge control around the hairline, and add a shine spray for that wet-look glow.
Tips and tricks: Tie a silk scarf around your head for 10 minutes after styling. It presses the hair flat and helps the gel set for an even sleeker finish.
21.Effortless Chignon with a Sweet Ribbon Bow
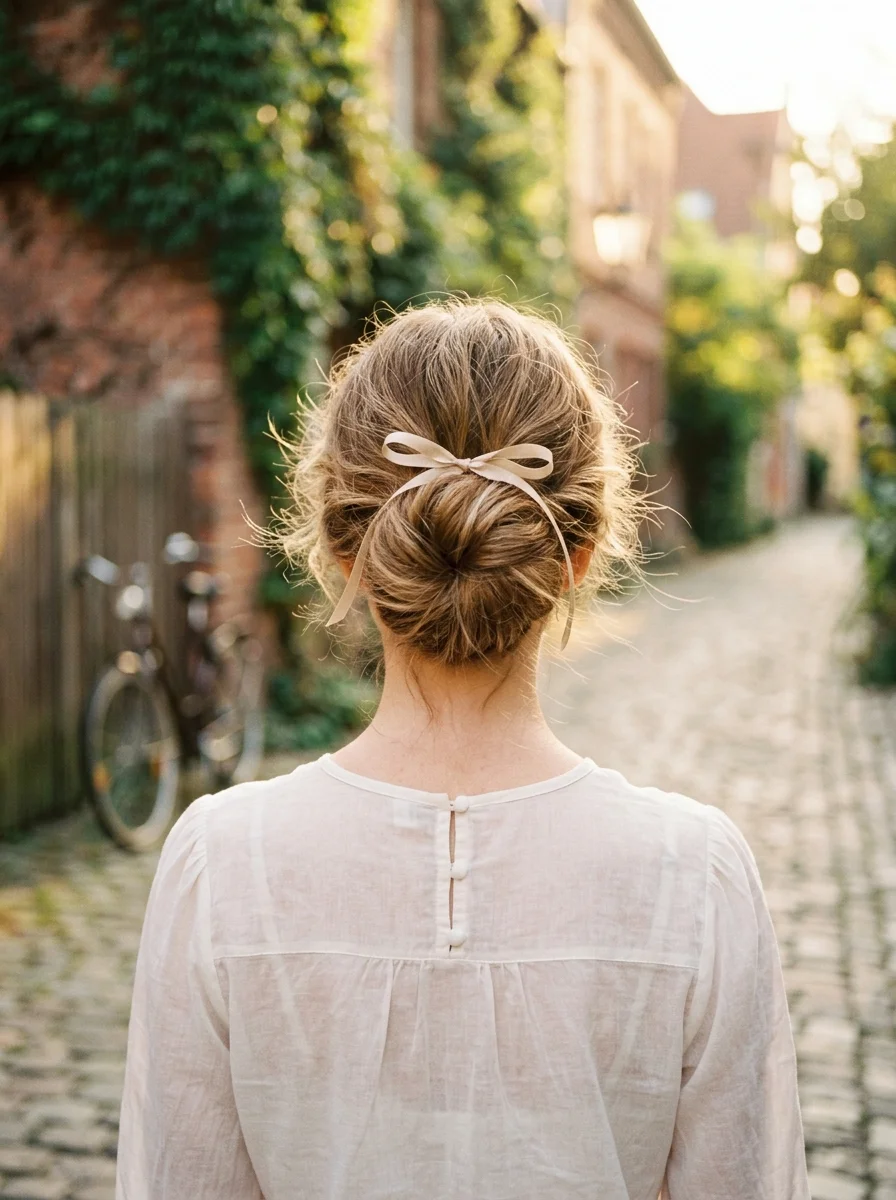
The overview: Warm blonde hair is swept into a deconstructed low chignon, with a satin ribbon tied into a bow at the base. The bow adds a sweet, romantic detail that transforms a simple bun into something you'd wear to dinner on a warm evening with someone you like.
Why this look is popular: Ribbon bows are having a fashion moment, and they translate perfectly to hair. This style balances the casual ease of a messy chignon with the polished sweetness of a bow — it's romantic without being overly precious.
Where this look is suitable: Romantic dinners, evening walks, outdoor dining, any time you want your hair to feel soft, feminine, and a little bit special.
Step by step:
- Create a low ponytail. Gather your hair loosely at the nape and secure with a clear elastic.
- Form a messy bun. Pull the ponytail partway through the elastic on the last wrap to create a loop, then twist and pin the remaining hair around it.
- Loosen the bun. Gently tug at sections to create a deconstructed, lived-in shape.
- Tie the ribbon. Wrap a satin ribbon around the base of the bun and tie it in a bow, letting the tails fall naturally.
- Frame the face. Pull out soft tendrils around your temples and ears for a romantic finish.
Tips and tricks: Use a ribbon with wire edges if you want the bow to hold its shape. Without wire, the bow tends to droop by the end of the night — wired ribbon stays perky for hours.