Nail Trends
29 Trendy Summer Almond Nails You Need to Try in 2026 💅✨
Hours of research on the hottest nail trends have gone into curating this list of 29 almond-shaped beauties for 2026. Whether the preference is minimalist chic or bold glitter and neon, there is something here for every summer aesthetic. So grab an iced latte, get comfy, and find the next favorite manicure!
Why Almond Nails Are Summer 2026's Most Flattering Shape?
If you haven't tried almond nails yet, 2026 is the summer to change that. Celebrity nail artists are calling this shape the "quiet luxury of nail shapes," and for good reason. The soft taper hits a near-perfect balance between feminine and practical — it elongates your fingers without requiring the maintenance of stilettos or the daily snag risk of coffins.
What makes almond nails so universally flattering is how they interact with the natural nail bed. The curved sides draw the eye upward, creating the illusion of length even on shorter nails. If you have wider nail beds or shorter fingers, this shape effectively reshapes your entire hand. That's not marketing — it's basic visual geometry.
They're also the best canvas for 2026's biggest finishes: chrome, aura gradients, and the milky sheer looks that are dominating feeds right now. The tapered tip catches light at more angles than a flat square or coffin, which means metallic and pearlescent finishes actually look more dynamic on almond than on any other shape.
💡 The trick: Almond nails are especially flattering if you have wider nail beds or shorter fingers — they create the illusion of length without needing extreme extension past the fingertip.
In This Guide
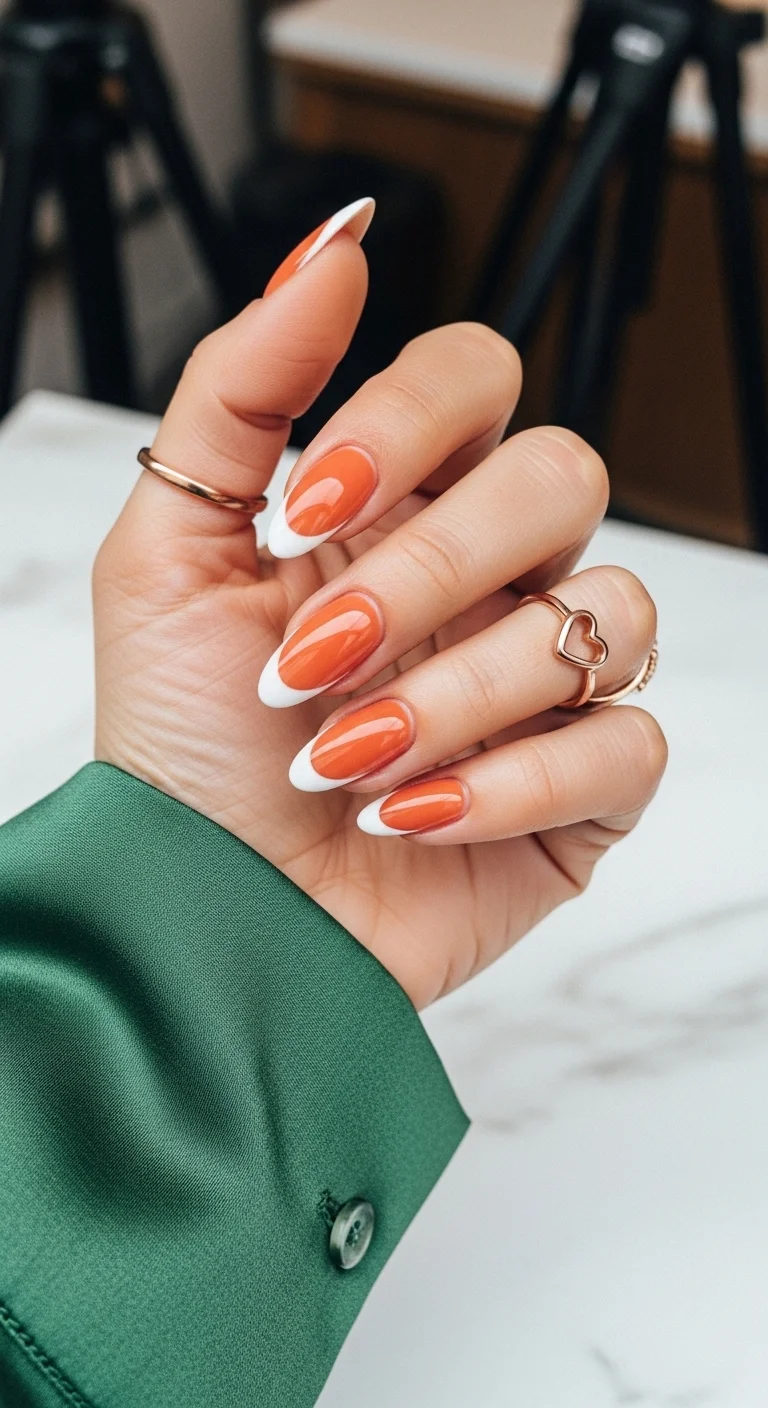
1.Citrus Glaze Frenchies
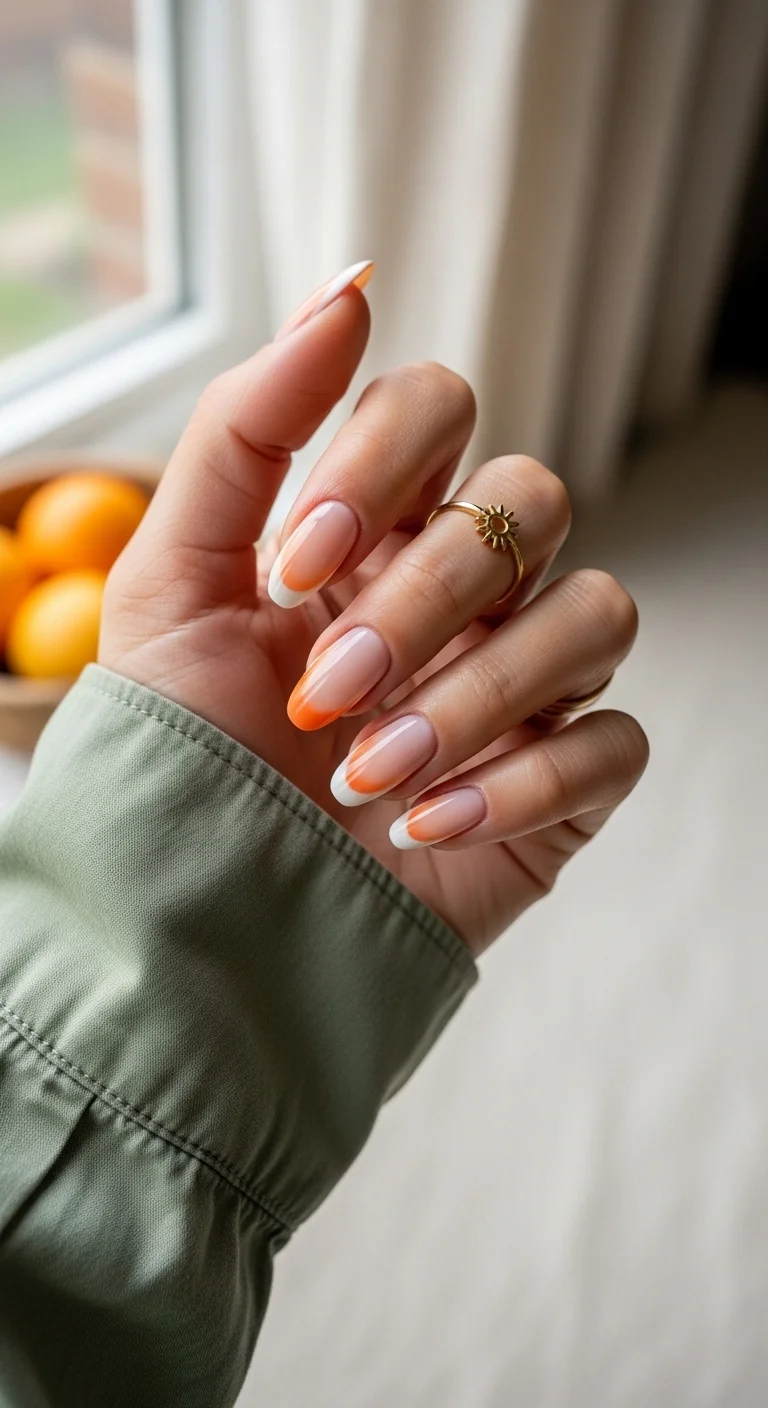
Orange French tips with a thin white outline for a citrus-inspired look.
Overview:
A double-layered French tip, orange with a white outline, is a step beyond the standard colored French. The white line along the smile line acts like a picture frame, sharpening the border between the orange and the nude base. That detail elevates the entire design.
The almond shape is doing essential work here. The curved tip echoes the organic quality of the orange, while the tapered sides keep the French line from looking too rigid. On coffin or square nails, the same design would feel more geometric and less fluid.
The white outline needs to be genuinely thin. A thick white line would overwhelm the orange instead of framing it. A liner brush or nail art pen is essential for consistent line weight. Practice the curve on paper before committing to the nail.
Design Breakdown:
Layered French with a white outline. The framing technique is the design principle.
Base Color: Sheer, milky nude that lets the natural nail show through.
Nail Shape: Medium-long almond. The curved tip complements the warm orange.
Design Element: Orange French tips with a thin white line tracing the smile line on every nail.
Finish: High-gloss top coat to make the orange look juicy and the white look crisp.
Get The Look at Home:
The white outline goes on last. The orange needs to be fully dry first.
- Nude base: Two coats of sheer nude on all nails. Let dry fully.
- Orange tips: Using a French liner brush, paint orange tips on all nails. Two coats for opacity.
- White outline: Using a very thin liner brush and white polish, trace a single line along the smile line.
- Consistency: The white line should be the same thickness across all nails.
- Cleanup: Use a flat brush dipped in acetone to sharpen all lines.
- Seal: One thick coat of top coat to protect the art.
30 Stunning Summer Hair Trends for 2026 ☀️🌊
2.Sunset Shimmer Ombre
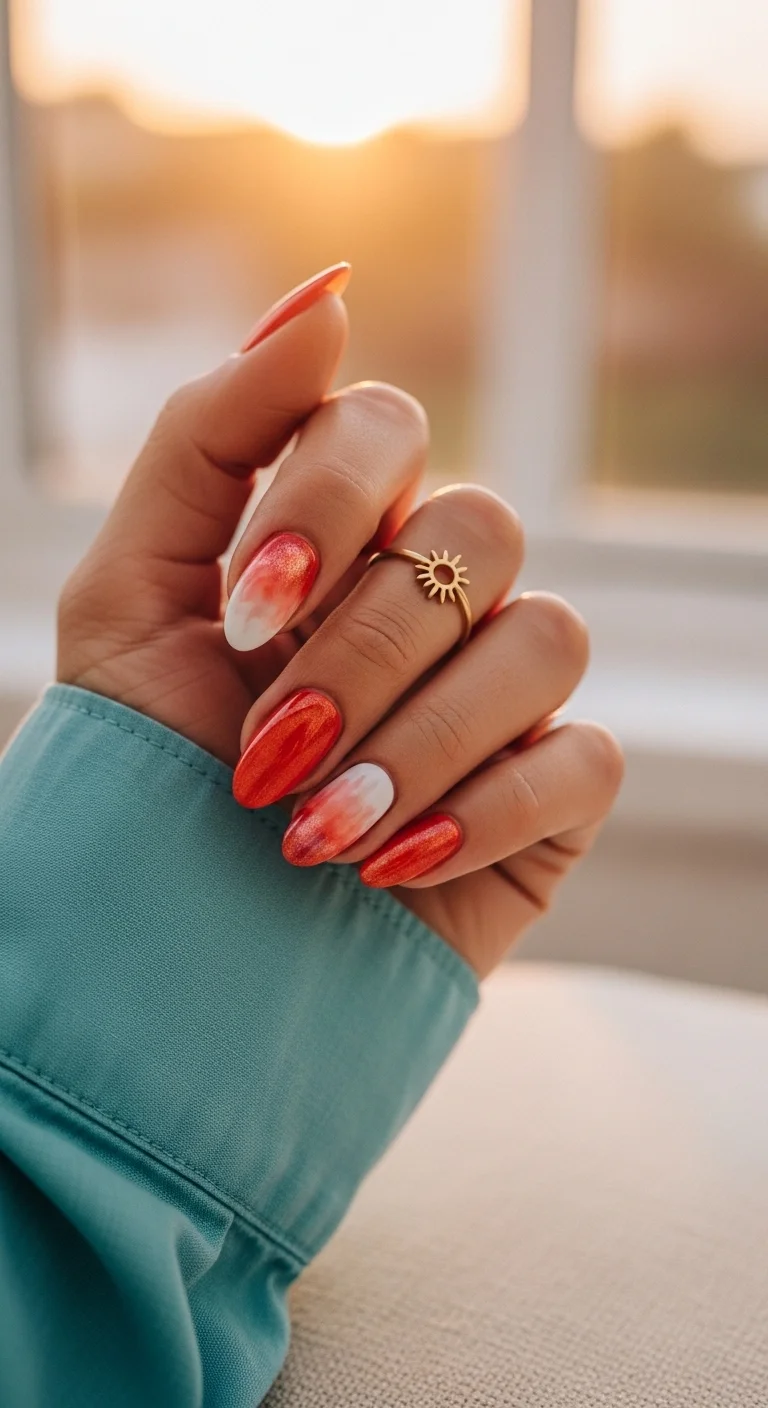
Red-orange shimmer with swirl accent nails.
Overview:
Shimmer polish on a solid color catches light differently than flat polish. The fine glitter particles create a dimensional quality that shifts as the hand moves. Pair that with swirl patterns on accent nails, and you get a set that's dynamic from every angle.
The swirl technique on the white accent nails uses the same red-orange shimmer as the solid nails, which creates a tonal connection despite the different patterns. The colors are identical; only the application method changes.
Shimmer polishes settle quickly in the bottle. Roll the bottle between your hands before each application to ensure the glitter particles are evenly distributed. Skipping this step produces patchy, uneven shimmer.
Design Breakdown:
Shimmer solids with swirl accent nails. The tonal connection is the design principle.
Base Color: Red-orange shimmer on solid nails. White with red-orange shimmer swirls on accent nails.
Nail Shape: Medium-long almond. The curved shape suits the organic swirl patterns.
Design Element: Shimmer swirl patterns on white accent nails using the same red-orange as the solid nails.
Finish: High-gloss top coat to amplify the shimmer effect.
Get The Look at Home:
The swirl technique is wet-on-wet. The colors need to be dragged while still fluid.
- Solid nails: Two coats of red-orange shimmer on designated nails. Let dry fully.
- Swirl nails: On white accent nails, apply a wet coat of white. While still wet, drop small amounts of the red-orange shimmer and drag with a toothpick.
- Don't over-blend: Three to four drags per nail. The individual colors need to remain visible.
- Seal: Wait five minutes, then apply a generous top coat to smooth the surface.
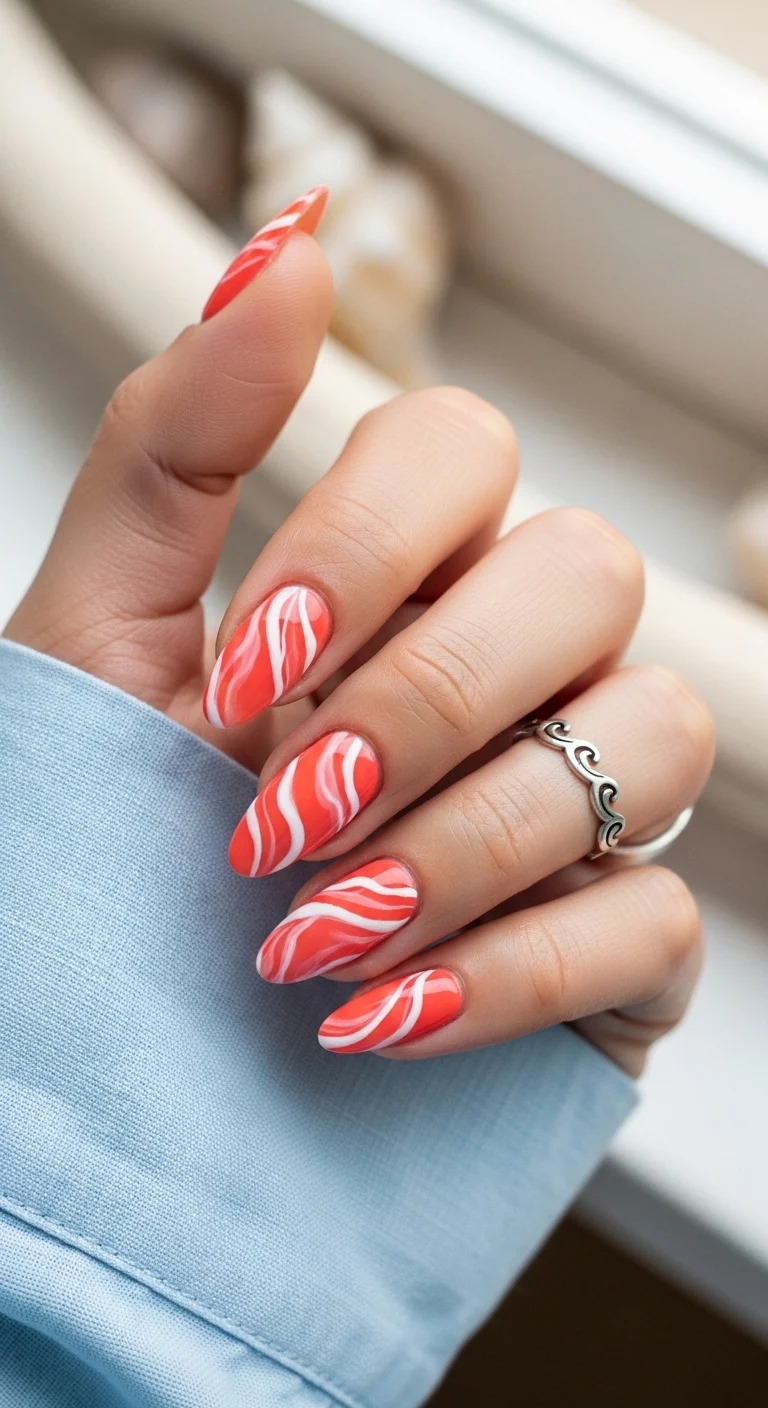
3.Strawberry Swirl Marble
Coral-red with white swirl marble patterns.
Overview:
Coral-red with white swirls creates a design that references strawberry ice cream, candy, and summer desserts. The organic, flowing swirls look like cream being stirred into fruit, which gives the design a playful, edible quality.
The swirl technique produces a different pattern on every nail, which is what makes marble work as a design. If you try to match the swirls across all ten fingers, you'll overwork the pattern and end up with muddy pink instead of clean, distinct swirls.
The coral-red base is warm enough to feel summery but muted enough to avoid looking neon. That balance is what makes the design wearable in more contexts than a brighter version would be.
Design Breakdown:
Two-color swirl marble. The organic swirls are the design.
Base Color: Coral-red with white swirl patterns.
Nail Shape: Medium-long almond. The curved surface lets the swirls follow an organic path.
Design Element: White swirl lines over the coral-red base on every nail. Each nail has a unique pattern.
Finish: High-gloss top coat to make the coral look juicy and the swirls look fluid.
Get The Look at Home:
The swirl technique is wet-on-wet. The white needs to be applied while the coral is still fluid.
- Coral base: One coat of coral-red. Let it dry slightly but stay tacky.
- Drop the white: Place small dots or lines of white polish onto the tacky coral base.
- Swirl: Using a toothpick or fine brush, drag the white into the coral in S-shapes. Three to four drags maximum.
- Don't over-blend: The individual colors need to remain visible. Stop before they merge into pink.
- Vary each nail: Every nail should have a different swirl pattern.
- Seal: Wait five minutes, then apply a generous top coat to smooth the surface.

28 Cute & Sporty Baseball Game Nail Ideas for 2026 ⚾
4.Lavender Dreamscape Swirls
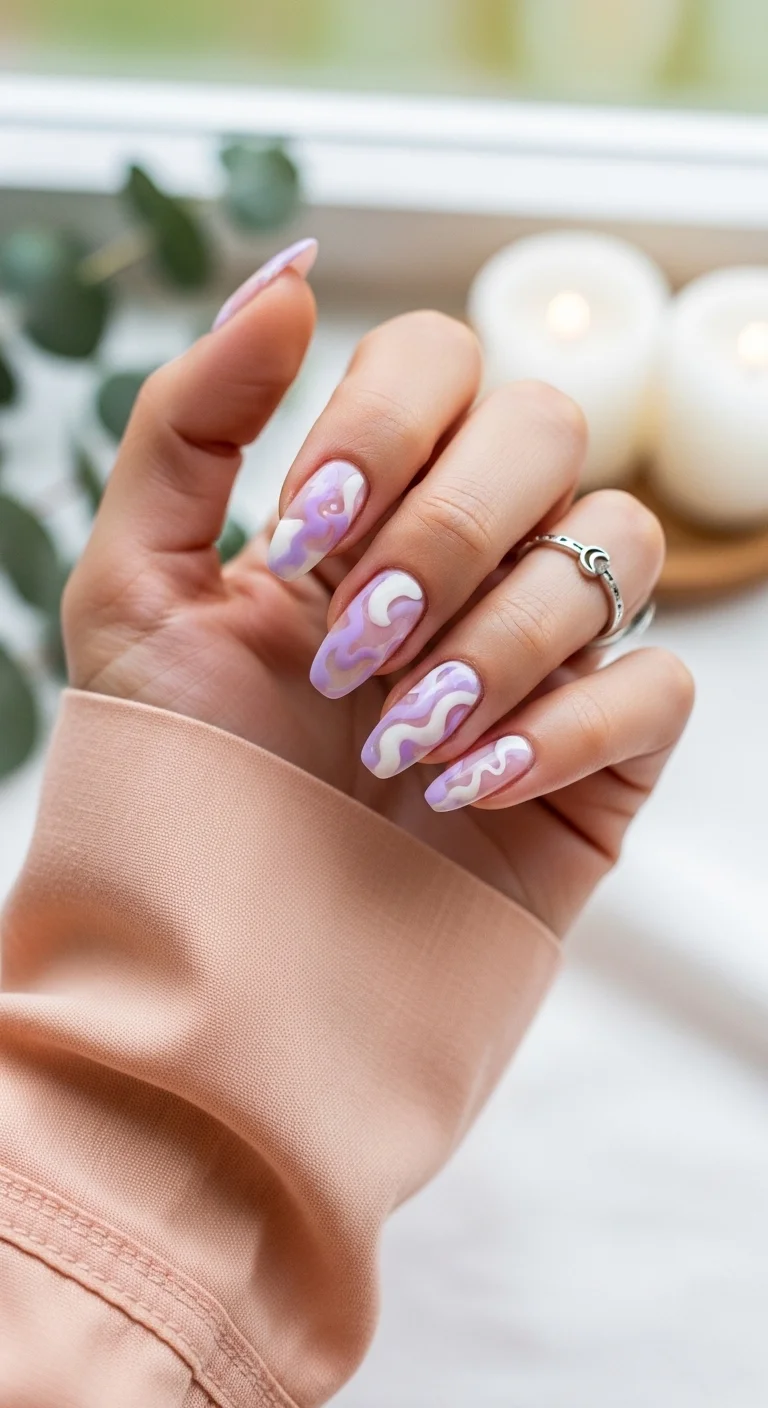
Lavender with organic white swirl patterns.
Overview:
Lavender with white swirls is a softer, more dreamy version of the marble concept. The cool purple base paired with white creates a design that references clouds, waves, or abstract watercolor. The organic shapes are what make it feel handcrafted rather than manufactured.
The swirl density varies across the nails, which prevents the pattern from feeling repetitive. Some nails have tighter, more complex swirls, while others have looser, simpler curves. That variation is what makes the set feel natural.
Lavender polish can be streaky in some formulas. The pigment particles tend to separate, which means uneven coverage if the bottle isn't shaken well. Three thin coats with proper dry time produces the best result.
Design Breakdown:
Two-color swirl marble. The organic swirls are the design.
Base Color: Soft lavender with white swirl patterns.
Nail Shape: Medium almond. The curved shape complements the flowing swirl patterns.
Design Element: White swirl lines over the lavender base on every nail. Each nail has a unique pattern.
Finish: High-gloss top coat to make the lavender look creamy and the swirls look fluid.
Get The Look at Home:
The swirl technique is wet-on-wet. The white needs to be applied while the lavender is still fluid.
- Lavender base: One coat of lavender. Let it dry slightly but stay tacky.
- Drop the white: Place small dots or lines of white polish onto the tacky lavender base.
- Swirl: Using a toothpick or fine brush, drag the white into the lavender in organic, flowing shapes.
- Vary density: Some nails should have more swirls than others.
- Don't over-blend: The white and lavender need to remain distinct.
- Seal: Wait five minutes, then apply a generous top coat to smooth the surface.
5.Double Dip Tangerine
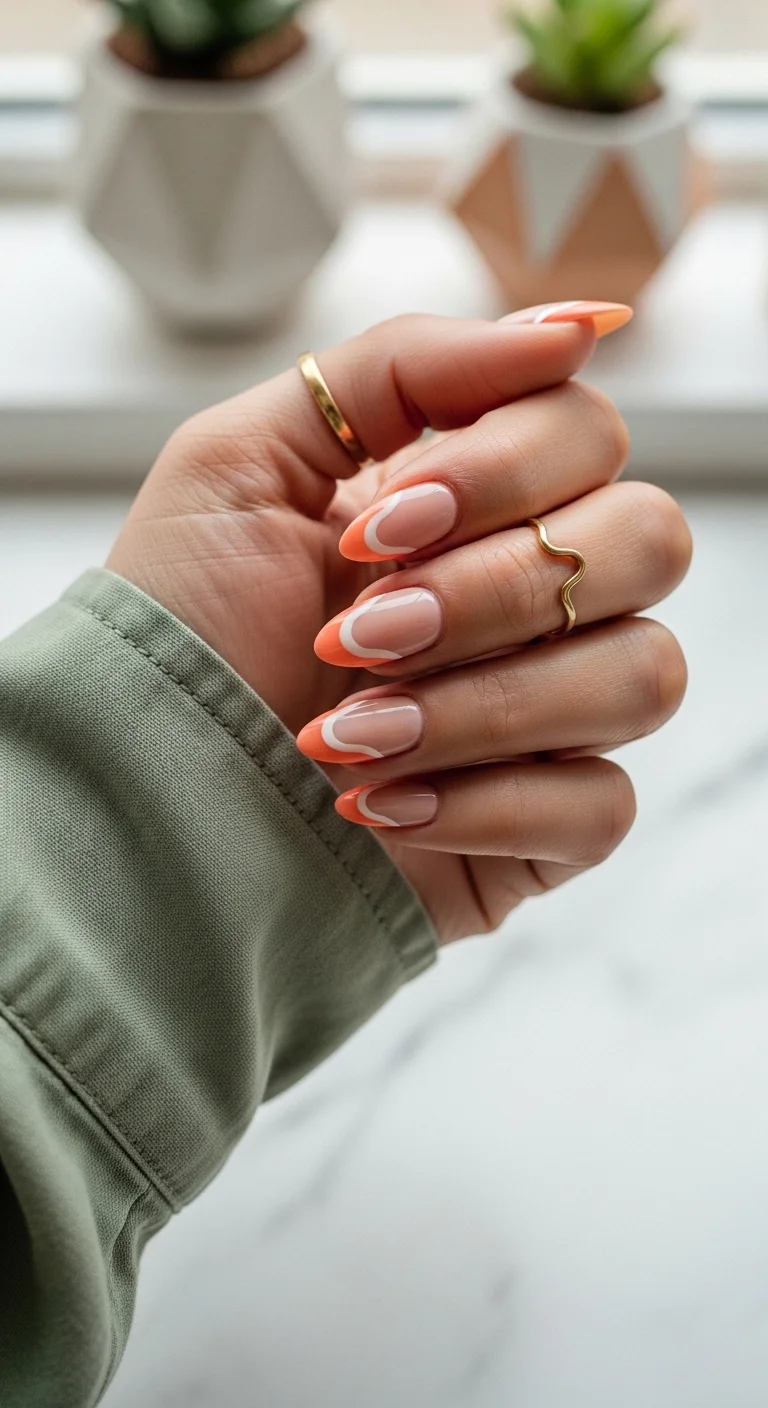
Orange French tips with a white accent line.
Overview:
This design is a variation on the layered French from item 1, but the proportions are different. The orange tip is slightly thinner, and the white accent is positioned differently, creating a more understated version of the same concept.
The difference between item 1 and item 5 is subtle but important. Item 1 has a bolder orange with a more prominent white outline. Item 5 has a softer application that feels more casual and everyday. Both work, but they serve different moods.
The almond shape is consistent across both designs because the curved tip is what makes the French line look natural. On shorter or squarer nails, the same design would feel more rigid and less fluid.
Design Breakdown:
Layered French with a white accent. The variation from item 1 is the proportion.
Base Color: Sheer, milky nude that lets the natural nail show through.
Nail Shape: Medium-long almond. The curved tip complements the warm orange.
Design Element: Orange French tips with a thin white accent line on every nail. The proportions are softer than item 1.
Finish: High-gloss top coat to make the orange look juicy.
Get The Look at Home:
The proportions matter. Keep the orange slightly thinner than item 1 for a more understated look.
- Nude base: Two coats of sheer nude on all nails. Let dry fully.
- Orange tips: Using a French liner brush, paint orange tips on all nails. Two coats for opacity.
- White accent: Using a very thin liner brush and white polish, trace a line along the smile line or just above it.
- Proportions: The orange should be slightly thinner than in item 1. The white should be delicate.
- Seal: One thick coat of top coat to protect the art.

30+ Chic Pool Party Hairstyles for Summer 2026 🌊👙
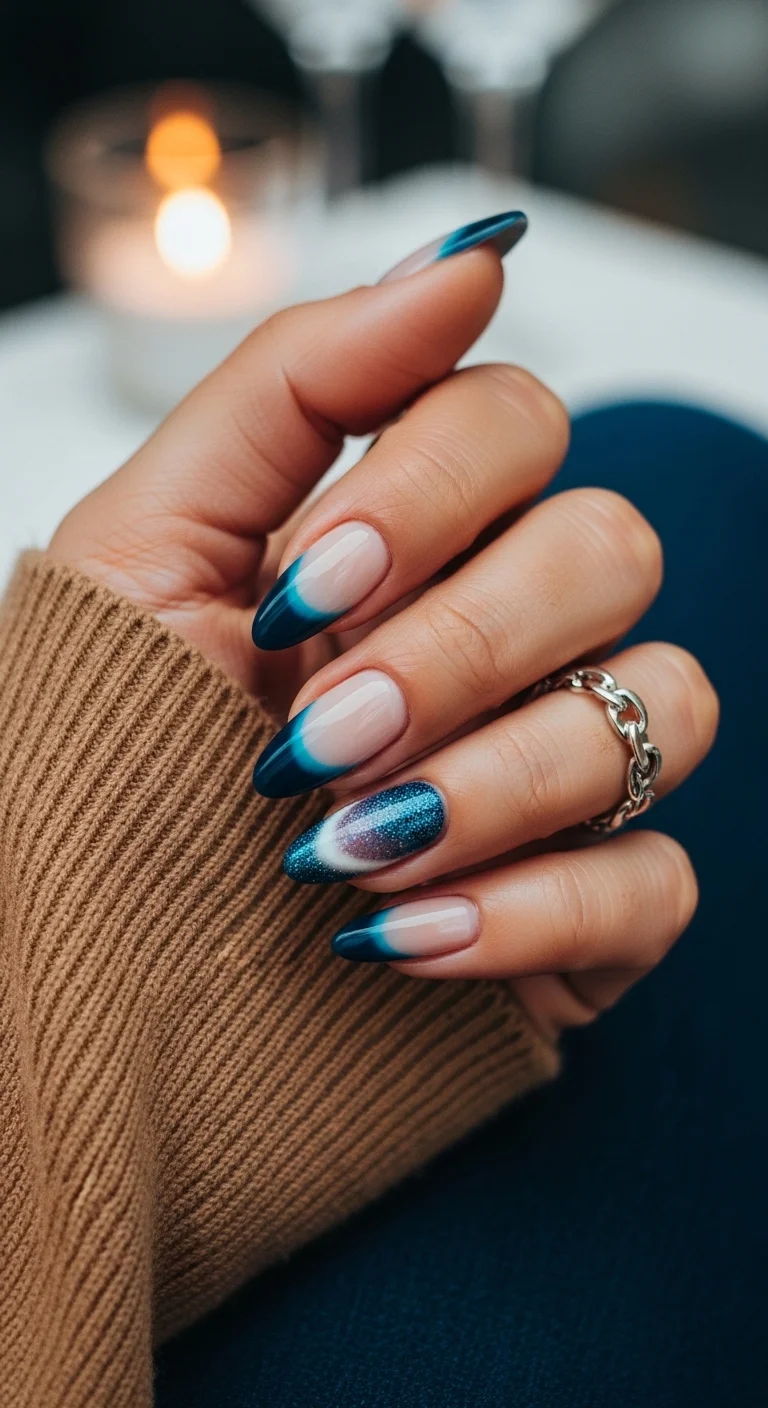
6.Midnight Lunar Aura
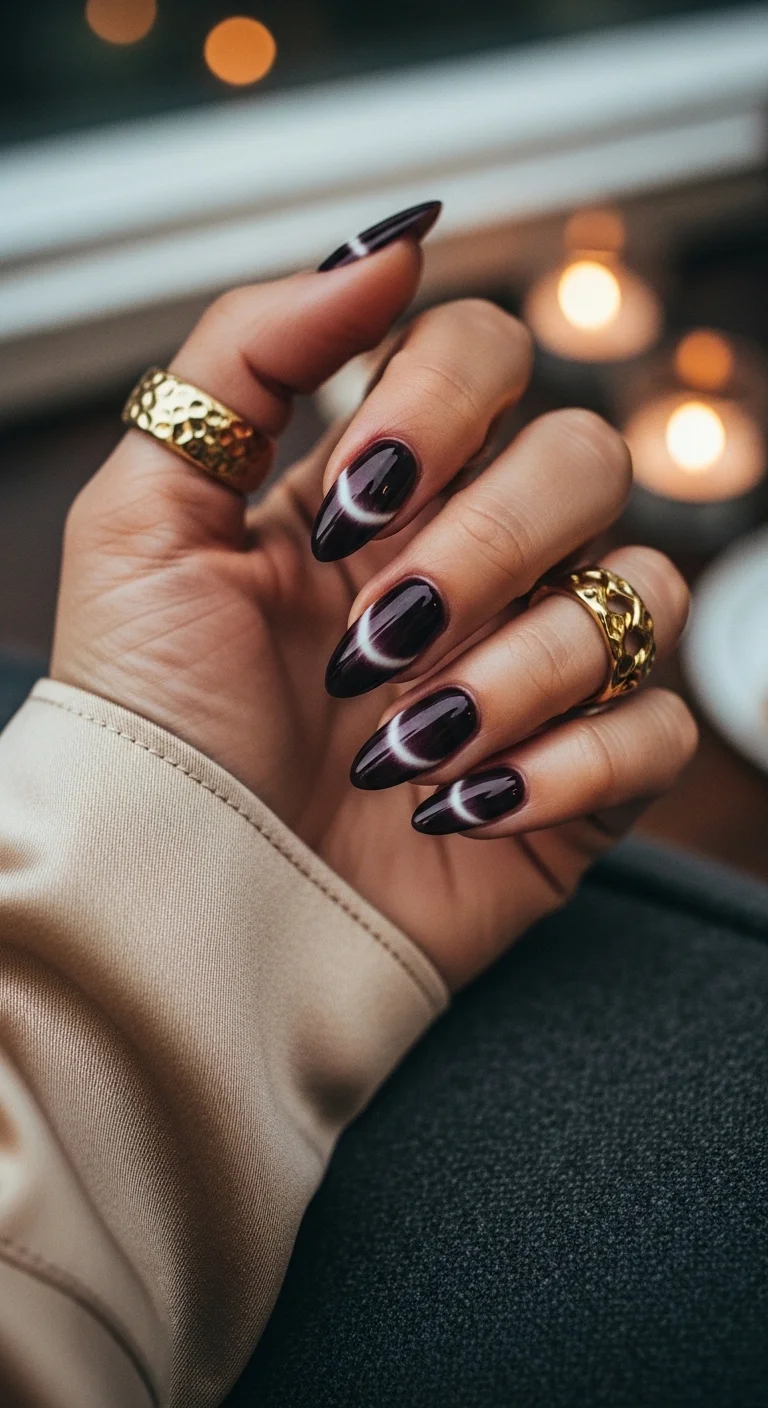
Dark base with a luminous aura shimmer effect.
Overview:
A dark base with a lighter shimmer aura creates a design that looks like moonlight on dark water. The shimmer concentrates into a band that shifts as the hand moves, creating a three-dimensional quality that flat dark polish can't achieve.
The aura effect requires either a magnetic/cat-eye polish or a carefully placed shimmer topper over a dark base. The magnetic approach produces the most dramatic result because the shimmer line is concentrated rather than dispersed.
Dark polish on almond nails is a bold choice. The length and curve of the almond shape make the dark color feel more dramatic than it would on shorter nails. It's a design for someone who wants maximum impact.
Design Breakdown:
Dark base with magnetic shimmer. The aura effect is the design.
Base Color: Very dark, almost black with subtle purple or burgundy undertones.
Nail Shape: Medium-long almond. The elongated shape enhances the dramatic dark color.
Design Element: Lighter shimmer aura or cat-eye effect that shifts across the dark base.
Finish: High-gloss top coat to amplify the shimmer and make the dark base look deep.
Get The Look at Home:
Magnetic polish requires specific technique. Practice on one nail before committing to the full hand.
- Dark base: Two coats of very dark polish. Let dry fully.
- Magnetic coat: Apply a thick coat of magnetic or cat-eye polish. Immediately hold the magnet 5mm above the wet polish. Keep still for 10 to 15 seconds.
- Repeat if needed: If the shimmer line is too faint, apply another thick coat and re-magnetize.
- Cleanup: Clean the cuticles before the polish fully sets. Dark polish against skin is very visible.
- Seal: Apply top coat without dragging the brush through the magnetic pattern.
7.Matcha Marble Bliss
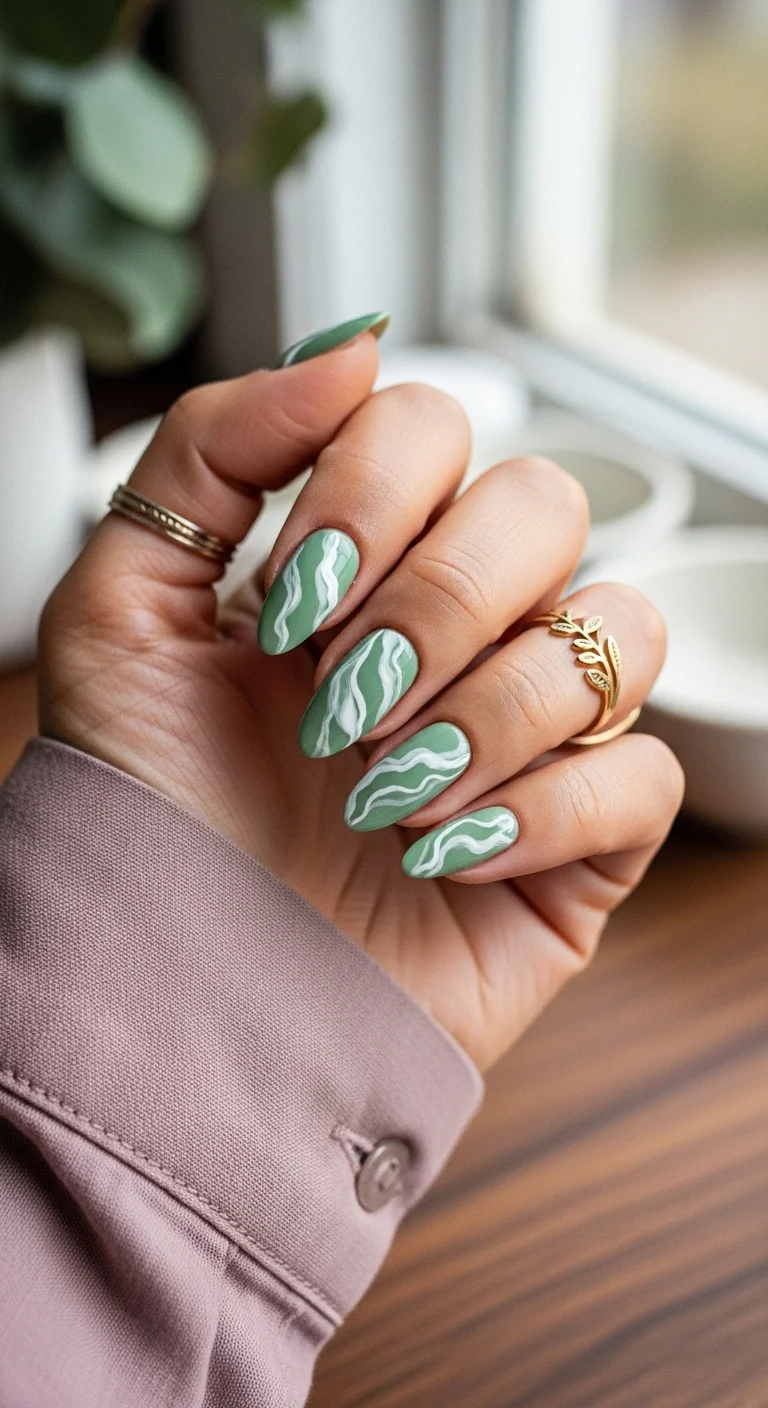
Matcha green with white swirl marble patterns.
Overview:
Matcha green with white swirls references both the tea ceremony and marble stone. The earthy, muted green paired with organic white swirls creates a design that feels natural and grounded. It's botanical without being floral.
The swirl technique produces a different pattern on every nail, which is what makes marble work. The inconsistency between nails reads as intentional variation rather than mistakes. It's one of the more forgiving freehand designs.
Matcha green is a mid-tone that works across skin tones. It's not so light that it washes out, and not so dark that it overwhelms. That balance is what makes it a reliable choice for a full-set swirl design.
Design Breakdown:
Two-color swirl marble. The organic swirls are the design.
Base Color: Matcha or sage green with white swirl patterns.
Nail Shape: Medium almond. The curved shape complements the organic swirl patterns.
Design Element: White swirl lines over the matcha base on every nail. Each nail has a unique pattern.
Finish: High-gloss top coat to make the green look rich and the swirls look fluid.
Get The Look at Home:
The swirl technique is wet-on-wet. The white needs to be applied while the green is still fluid.
- Green base: One coat of matcha green. Let it dry slightly but stay tacky.
- Drop the white: Place small dots or lines of white polish onto the tacky green base.
- Swirl: Using a toothpick or fine brush, drag the white into the green in organic, flowing shapes.
- Vary each nail: Every nail should have a different swirl pattern.
- Don't over-blend: The white and green need to remain distinct.
- Seal: Wait five minutes, then apply a generous top coat to smooth the surface.

30 Stunning Beach Nail Ideas for the Best Vacation in 2026 🌊
8.Burnt Sienna Fade
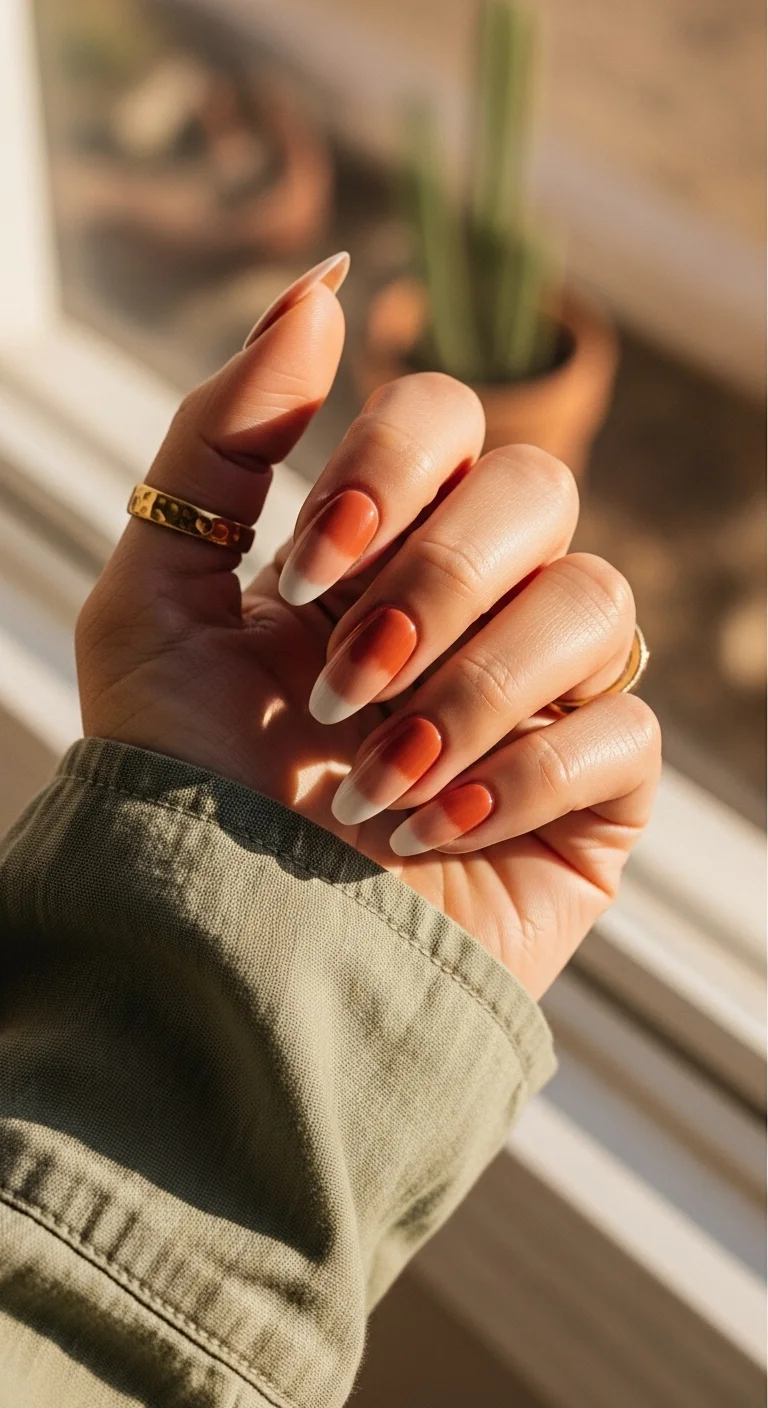
Burnt sienna French tips for an earthy, warm look.
Overview:
Burnt sienna is a warm, earthy orange that references clay, terracotta, and autumn leaves. As a French tip, it creates a design that's more grounded and sophisticated than a brighter orange would be. It's a French for someone who prefers warm neutrals over neons.
The French format keeps the design clean and structured. The burnt sienna provides the color; the sheer nude provides the negative space. The balance between the two is what makes the design feel intentional rather than heavy.
The almond shape is essential for this color because the curved tip softens the earthy tone. On square nails, burnt sienna would feel more rigid and less organic. The almond's natural curves complement the warm, clay-like color.
Design Breakdown:
Simple French with an earthy color. The burnt sienna is the design.
Base Color: Sheer nude that lets the natural nail show through.
Nail Shape: Medium-long almond. The curved tip complements the earthy color.
Design Element: Burnt sienna French tips on every nail. Clean, consistent smile lines.
Finish: High-gloss top coat to make the sienna look rich and warm.
Get The Look at Home:
The French needs consistent thickness across all nails. Use guides or a steady hand.
- Nude base: Two coats of sheer nude on all nails. Let dry fully.
- Sienna tips: Using a French liner brush, paint burnt sienna tips on all nails. Two coats for opacity.
- Smile line: Use a flat brush dipped in acetone to sharpen the curve where the sienna meets the nude.
- Consistency: The tip thickness should be the same across all nails.
- Seal: One thick coat of top coat over all nails.
9.Pearlescent Pink Clouds
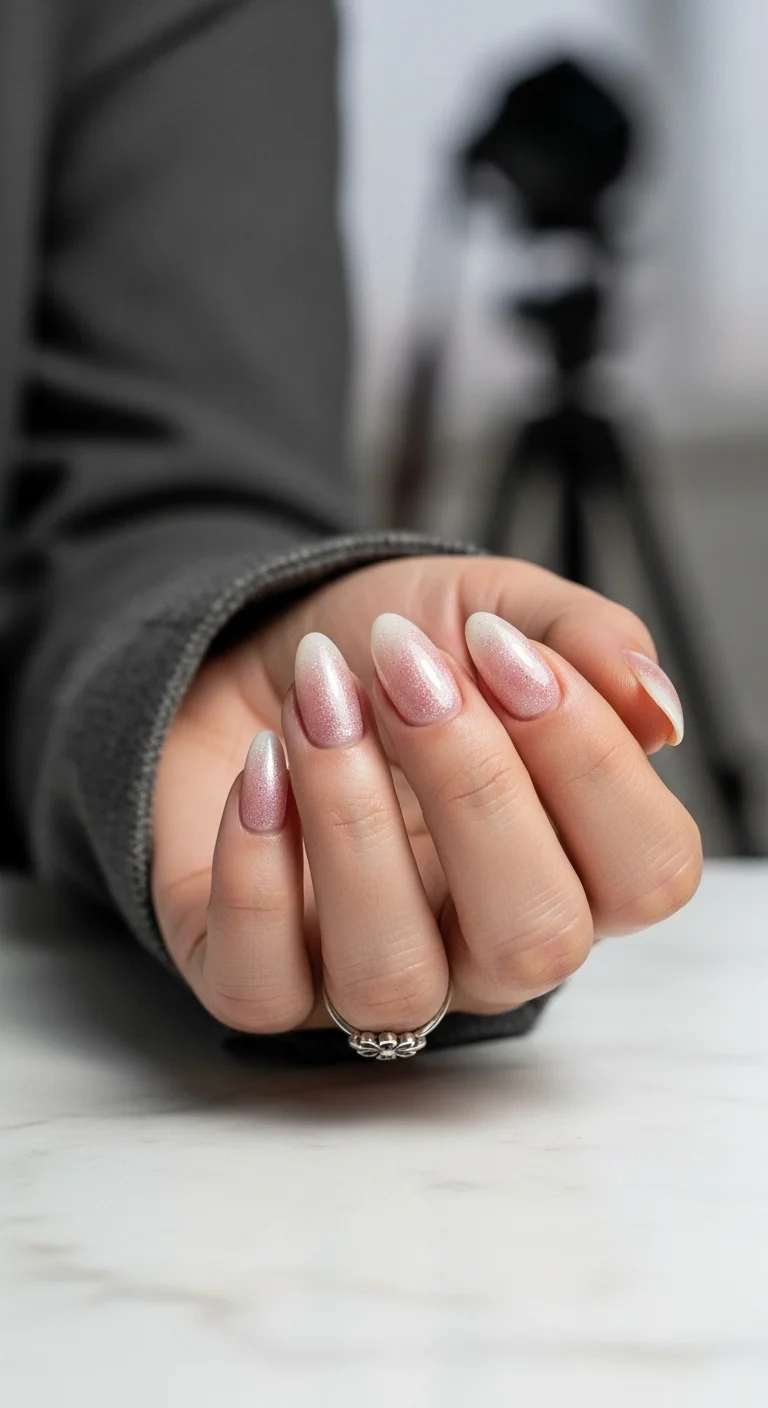
Sheer white with pink pearlescent shimmer.
Overview:
Pearlescent shimmer on a sheer white base creates a design that shifts between white and pink depending on the angle of light. The effect is cloud-like and ethereal, like looking through frosted glass at a sunset.
The sheer quality of the base means the pearlescent shimmer appears to float on the natural nail rather than sitting on top of an opaque surface. That transparency creates a depth that fully opaque polishes can't achieve.
Pearlescent polishes are notoriously difficult to photograph accurately. They look different in every lighting condition, which means the design has more range in person than in photos. That's a feature, not a bug.
Design Breakdown:
Sheer base with pearlescent shimmer. The color-shifting quality is the design.
Base Color: Sheer, milky white with pink pearlescent shimmer.
Nail Shape: Medium almond. The curved shape enhances the soft, cloud-like quality.
Design Element: Pink pearlescent shimmer over the sheer white base on every nail.
Finish: High-gloss top coat to amplify the pearlescent effect.
Get The Look at Home:
Pearlescent polish needs thin, even coats for the best shimmer distribution.
- Sheer base: One coat of sheer white or clear. Let dry fully.
- Pearlescent coat: Two to three thin coats of pink pearlescent polish. Let each coat dry fully.
- Even application: Brush in one direction to avoid streaking the pearlescent particles.
- Seal: One thick coat of top coat to amplify the shimmer.

26 Stunning Summer Braided Hairstyles for Women 2026 ☀️💇♀️
10.Sage Copper Chrome
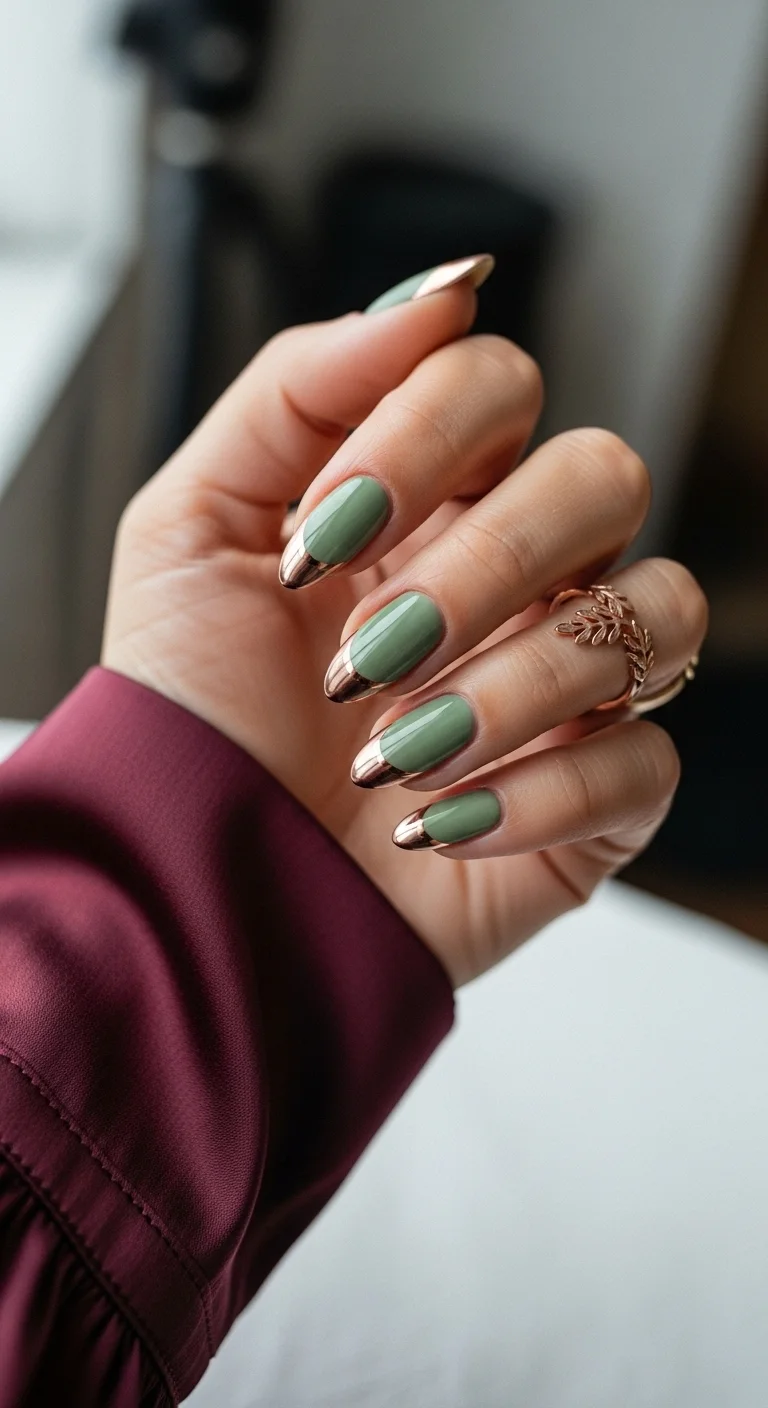
Sage green with copper chrome French tips.
Overview:
Copper chrome on sage green is a warm-on-cool pairing that works because the metallic copper provides enough warmth to balance the cool green. The French format keeps the two colors separated, which prevents them from blending into each other.
The chrome tips need to be genuinely metallic, not just copper- colored polish. The mirror-like finish of chrome is what creates the contrast against the matte-looking sage. Without the chrome quality, the copper would blend into the green.
Chrome powder requires a no-wipe gel top coat as the base layer. Regular polish won't give the powder anything to adhere to. If you're working with regular polish, a metallic copper like Essie "Got It From My Mammos" is a more forgiving alternative.
Design Breakdown:
Colored base with metallic French tips. The texture contrast is the design principle.
Base Color: Sage green on all nails.
Nail Shape: Medium-long almond. The curved tip complements the earthy green.
Design Element: Copper chrome French tips on every nail. The metallic finish creates a texture contrast with the sage.
Finish: High-gloss on the sage; mirror-chrome on the tips.
Get The Look at Home:
Chrome tips require specific products. Budget extra time for the preparation.
- Sage base: Two coats of sage green on all nails. Let dry fully.
- Chrome prep: On the tips, apply a dark base coat, then no-wipe gel top coat. Cure.
- Rub the chrome: Using a sponge applicator, rub copper chrome powder over the cured tips until mirror-smooth.
- Dust off: Use a soft brush to remove excess powder from the cuticles.
- Final seal: Apply glossy top coat to all nails, capping the chrome edges.
11.Lilac Liquid Silver
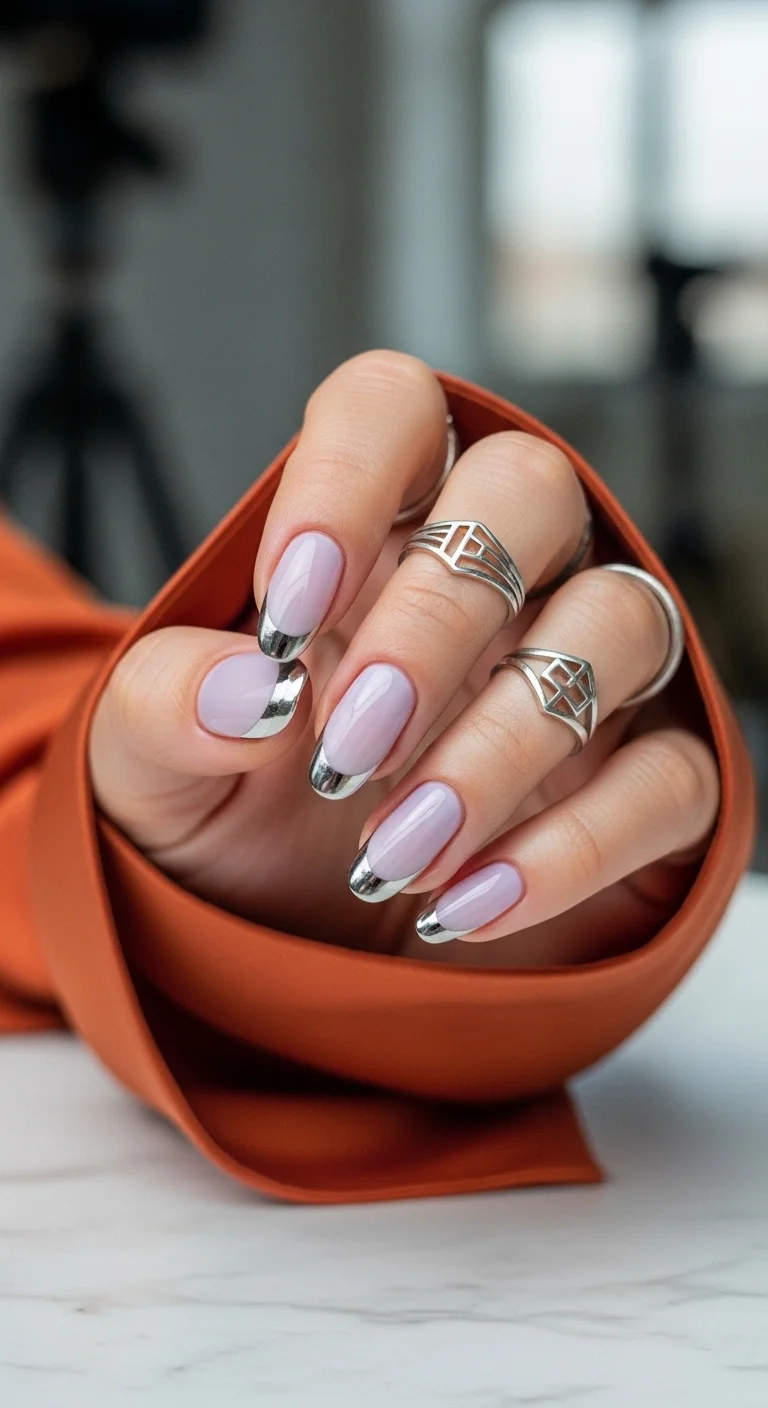
Lilac base with mirror-like silver chrome French tips.
Overview:
Silver chrome on lilac is a cool-on-cool pairing that feels modern and refined. The mirror-like chrome creates a texture contrast against the soft, creamy lilac that's more interesting than either finish alone.
The French format keeps the two elements separated, which prevents the chrome from overwhelming the lilac. The lilac dominates the nail surface; the chrome provides a metallic accent at the tip. That balance is what makes the design feel wearable rather than flashy.
Chrome powder requires a no-wipe gel top coat as the base layer. Regular polish won't give the powder anything to adhere to. If you're working with regular polish, a metallic silver like Essie "No Place Like Chrome" is a more forgiving alternative.
Design Breakdown:
Colored base with metallic French tips. The texture contrast is the design principle.
Base Color: Soft lilac on all nails.
Nail Shape: Medium almond. The curved tip complements the cool purple.
Design Element: Silver chrome French tips on every nail. The mirror finish contrasts with the cream lilac.
Finish: High-gloss on the lilac; mirror-chrome on the tips.
Get The Look at Home:
Chrome tips require specific products. Budget extra time for the preparation.
- Lilac base: Two coats of lilac on all nails. Let dry fully.
- Chrome prep: On the tips, apply a dark base coat, then no-wipe gel top coat. Cure.
- Rub the chrome: Using a sponge applicator, rub silver chrome powder over the cured tips until mirror-smooth.
- Dust off: Use a soft brush to remove excess powder.
- Final seal: Apply glossy top coat to all nails, capping the chrome edges.

35 Fun Birthday Nail Designs for 2026 🎂
12.Dainty Daisy French
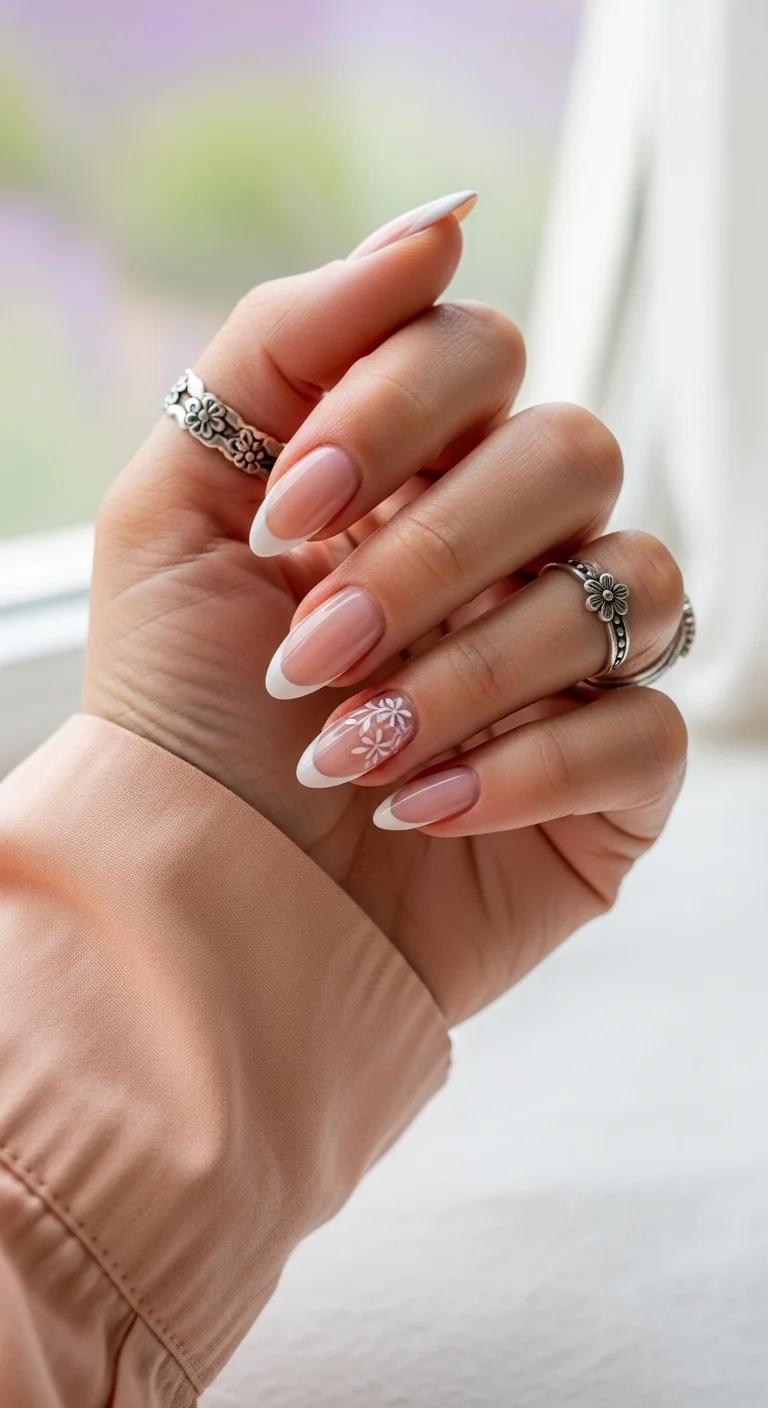
Classic white French with a daisy accent nail.
Overview:
A classic French manicure with a single daisy accent is the most wearable version of floral nail art. The French provides the clean, professional framework, and the daisy adds a small, organic detail that breaks up the uniformity.
The daisy on the ring finger is the focal point. Without it, this would be a standard French. The flower transforms the design from "classic" to "classic with personality." It's a subtle enough detail that it doesn't disrupt the set's formality.
Daisies are one of the most accessible floral designs because the technique is simple: five dots in a circle, one dot in the center. The flowers don't need to be perfect or identical. The casual quality is what makes them feel organic.
Design Breakdown:
Classic French with a single floral accent. The daisy is the design focal point.
Base Color: Sheer nude on all nails. White French tips on four nails.
Nail Shape: Medium-long almond. The curved tip suits the classic French format.
Design Element: White French tips on four nails. White daisy art on the ring finger accent.
Finish: High-gloss top coat to make the French look crisp and the daisy look fresh.
Get The Look at Home:
The French tips are the fast part. The daisy accent is the only detail work.
- Nude base: Two coats of sheer nude on all nails. Let dry fully.
- White French tips: Paint white French tips on four nails. Two coats for opacity.
- Daisy accent: On the ring finger, use a small dotting tool and white polish to place five dots in a circle. Add a yellow center dot.
- Consistency: The French tip thickness should be the same across all nails.
- Seal: One thick coat of top coat over all nails.
13.Sparkling Sage Duo
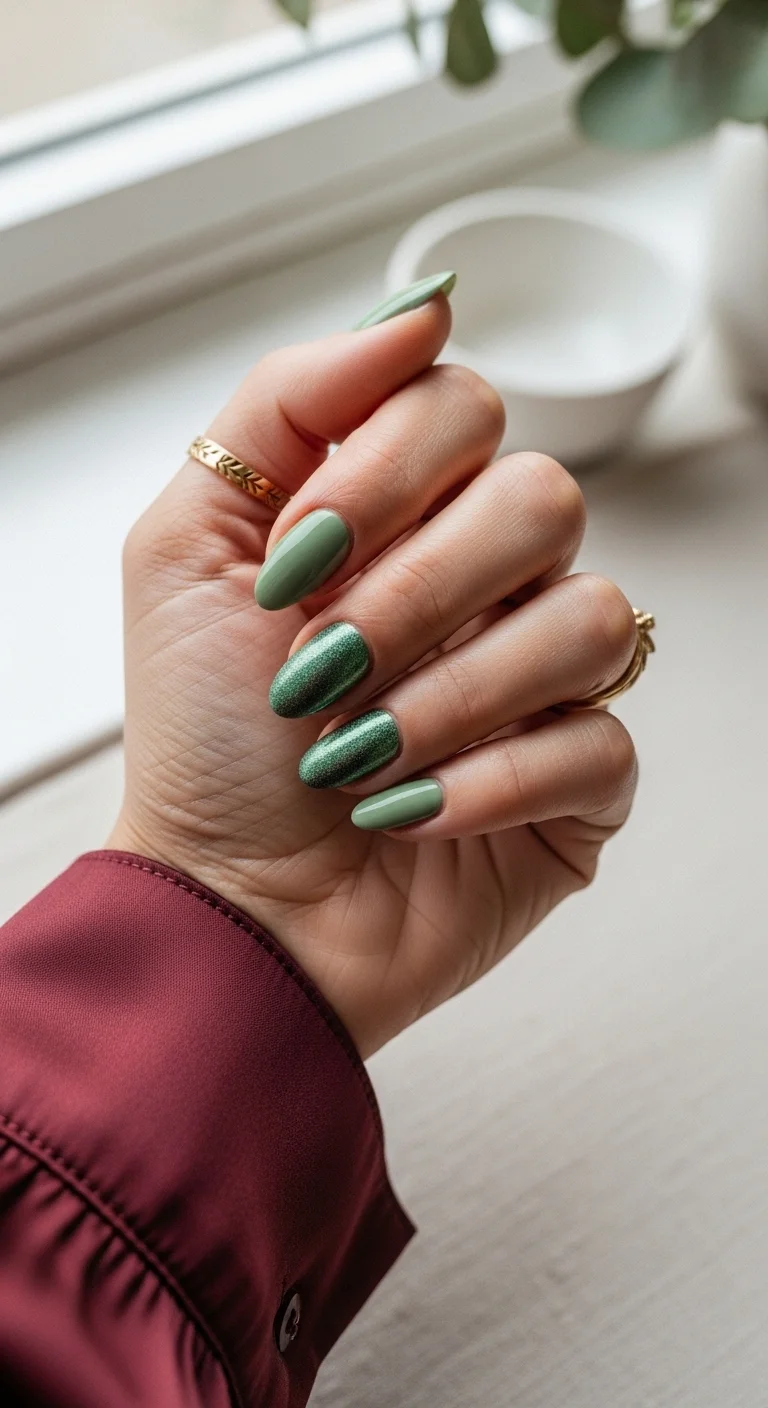
Sage green with green metallic shimmer accent nails.
Overview:
Sage green with green metallic shimmer creates a tonal design where both elements share the same hue but differ in finish. The cream sage provides a matte-like quality; the metallic shimmer provides a reflective, dimensional quality. Same color, different texture.
The two accent nails on the middle and ring fingers break up the solid sage and add a focal point. Without them, the set would be a standard solid green. The metallic accents elevate the design from simple to considered.
Green metallic polish settles quickly in the bottle. Roll the bottle between your hands before each application to ensure the metallic particles are evenly distributed.
Design Breakdown:
Cream and metallic in the same color family. The texture contrast is the design.
Base Color: Sage green cream on three nails. Green metallic on two accent nails.
Nail Shape: Medium almond. The curved shape suits the earthy green palette.
Design Element: Alternating cream sage and metallic green nails. No additional art.
Finish: High-gloss on the cream sage; metallic on the accent nails.
Get The Look at Home:
The cream and metallic nails are painted separately. Complete one before starting the other.
- Sage cream nails: Two coats of sage green on three nails. Let dry fully.
- Metallic accent: On two nails, apply green metallic polish. Two coats for full coverage.
- Consistency: The metallic coverage should be even and dense.
- Seal: One thick coat of top coat over all nails to unify the different finishes.
32 Stunning Summer Wedding Hairstyles for Brides ☀️💍
14.Hibiscus Island Punch
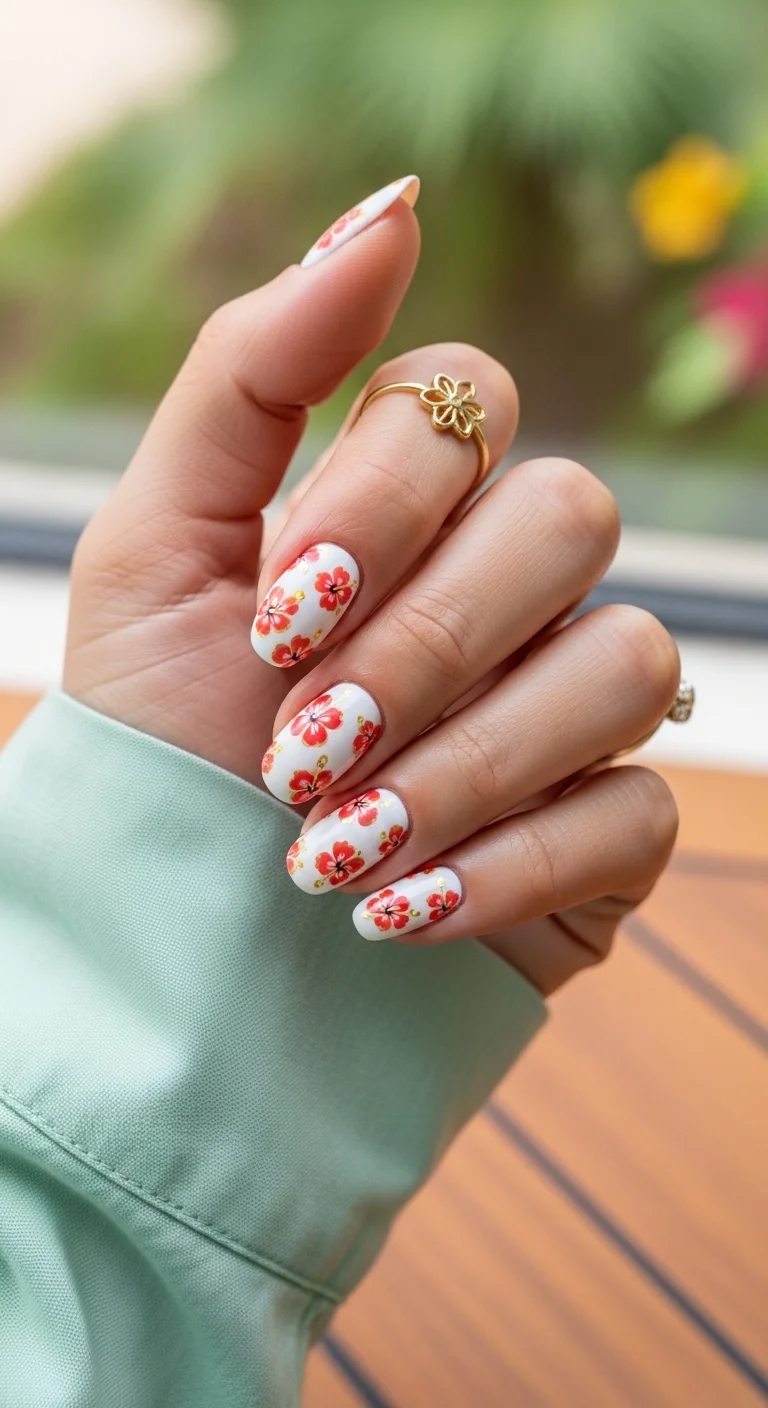
White base with scattered red hibiscus flowers.
Overview:
Hibiscus flowers on white create a tropical design that's bold without being neon. The red flowers against the clean white background are high-contrast enough to be visible from a distance, which makes the design work for both casual and dressy occasions.
The scattered placement of the flowers across all nails creates a pattern that reads as textile-like rather than individual illustrations. The flowers look like they were printed on fabric rather than painted on nails.
The white base needs to be fully opaque for the red flowers to read clearly against it. A streaky or sheer white would make the flowers look weak and washed out. Two coats of a pigment- dense white like OPI "Alpine Snow" ensures the backdrop is clean.
Design Breakdown:
Tropical floral on a white base. The scattered flowers are the design.
Base Color: Crisp, opaque white.
Nail Shape: Medium almond. The curved shape suits the organic flower shapes.
Design Element: Red hibiscus flowers scattered across all nails. Each nail has two to three flowers.
Finish: High-gloss top coat to make the white look crisp and the red look vibrant.
Get The Look at Home:
The hibiscus flowers are simpler than they look because at this scale, five-petal shapes are forgiving.
- White base: Two coats of opaque white. Let dry fully.
- Flower petals: Using a small dotting tool and red polish, place five dots in a circle for each hibiscus.
- Flower centers: Using a smaller dotting tool, add a yellow or dark center dot.
- Placement: Scatter two to three flowers per nail. Leave visible white between them.
- Leaf details: Add small green leaf strokes near some flowers for depth.
- Seal: One thick coat of top coat to protect the art.
15.Deep Sea Tie Dye
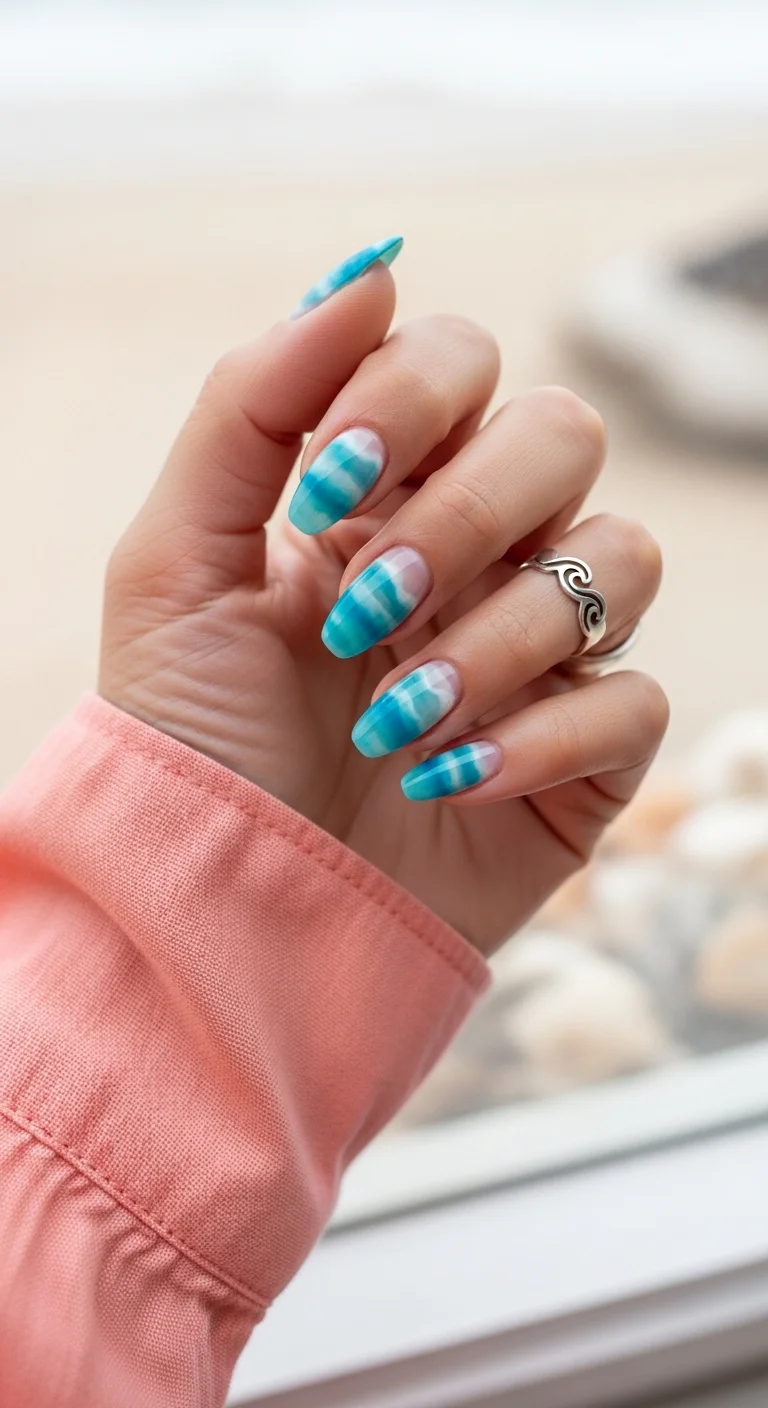
Blue and white tie-dye pattern for a beachy, oceanic look.
Overview:
Tie-dye on nails references the DIY fabric technique, which gives the design a handmade, crafty quality that polished nail art usually avoids. The organic, unpredictable swirls of color look like they were created by dipping fabric rather than painting nails.
The blue and white palette references ocean water, pool tiles, and summer skies. The specific shade of blue, a mid-tone teal, is warm enough to feel summery but cool enough to feel fresh. It's not navy (too dark) and not baby blue (too pale).
The tie-dye technique produces a different pattern on every nail, which is what makes it work. The inconsistency between nails reads as intentional variation rather than mistakes. It's one of the more forgiving freehand designs.
Design Breakdown:
Blue and white tie-dye pattern. The organic swirls are the design.
Base Color: Blue and white tie-dye on every nail.
Nail Shape: Medium-long almond. The curved surface lets the tie-dye pattern flow naturally.
Design Element: Organic swirls of blue and white on every nail. Each nail has a unique pattern.
Finish: High-gloss top coat to make the blue look deep and the white look crisp.
Get The Look at Home:
The tie-dye technique is wet-on-wet. The colors need to be applied while the base is still fluid.
- White base: One coat of white. Let it dry slightly but stay tacky.
- Drop the blue: Place small dots or lines of blue polish onto the tacky white base.
- Drag: Using a toothpick or fine brush, drag the blue into the white in organic, flowing shapes.
- Vary each nail: Every nail should have a different tie-dye pattern.
- Don't over-blend: The blue and white need to remain distinct.
- Seal: Wait five minutes, then apply a generous top coat to smooth the surface.

34 Cutest Butter Yellow Nail Designs for 2026 🧈
16.Great Wave Navy
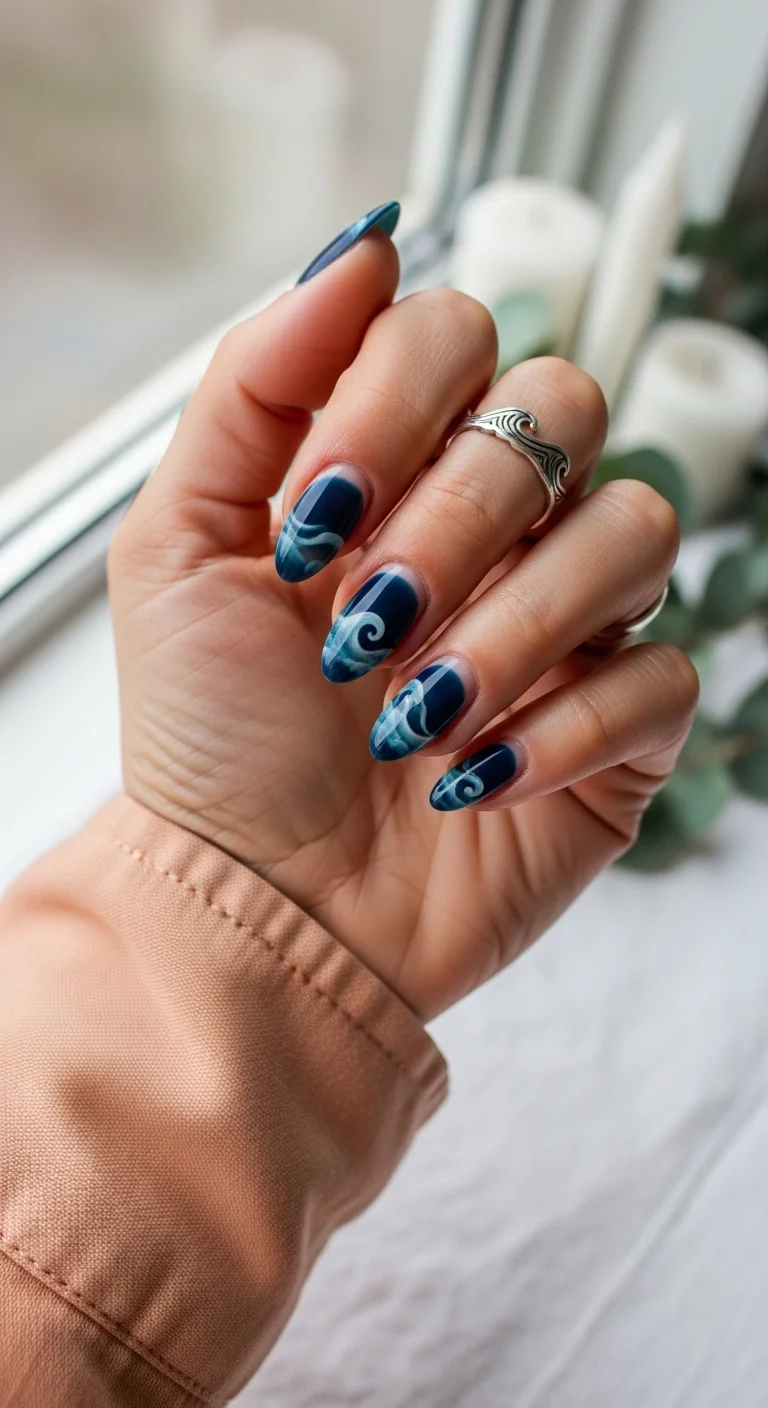
Dark navy with ocean-inspired wave swirl patterns.
Overview:
Navy with lighter blue swirls references ocean waves, deep water, and the movement of the sea. The dark base provides the depth; the lighter swirls provide the motion. Together, they create a design that looks like looking down into deep water.
The swirl technique produces organic, flowing shapes that look like waves frozen in motion. The inconsistency between nails is what makes the design feel natural. Waves aren't uniform, and neither are these swirls.
The navy base is dark enough that the lighter blue swirls need to be genuinely opaque to register. A sheer or streaky light blue would disappear into the navy. Two coats of a pigment-dense light blue ensures the swirls are visible.
Design Breakdown:
Dark base with lighter swirl patterns. The ocean reference is the design.
Base Color: Dark navy with lighter blue/teal swirl patterns.
Nail Shape: Medium-long almond. The curved surface lets the waves flow naturally.
Design Element: Lighter blue swirl lines over the navy base on every nail. Each nail has a unique wave pattern.
Finish: High-gloss top coat to make the navy look deep and the swirls look fluid.
Get The Look at Home:
The swirl technique is wet-on-wet. The light blue needs to be applied while the navy is still fluid.
- Navy base: One coat of dark navy. Let it dry slightly but stay tacky.
- Drop the light blue: Place small dots or lines of light blue polish onto the tacky navy base.
- Swirl: Using a toothpick or fine brush, drag the light blue into the navy in wave-like, organic shapes.
- Vary each nail: Every nail should have a different wave pattern.
- Don't over-blend: The two blues need to remain distinct.
- Seal: Wait five minutes, then apply a generous top coat to smooth the surface.
17.Futuristic Frosting
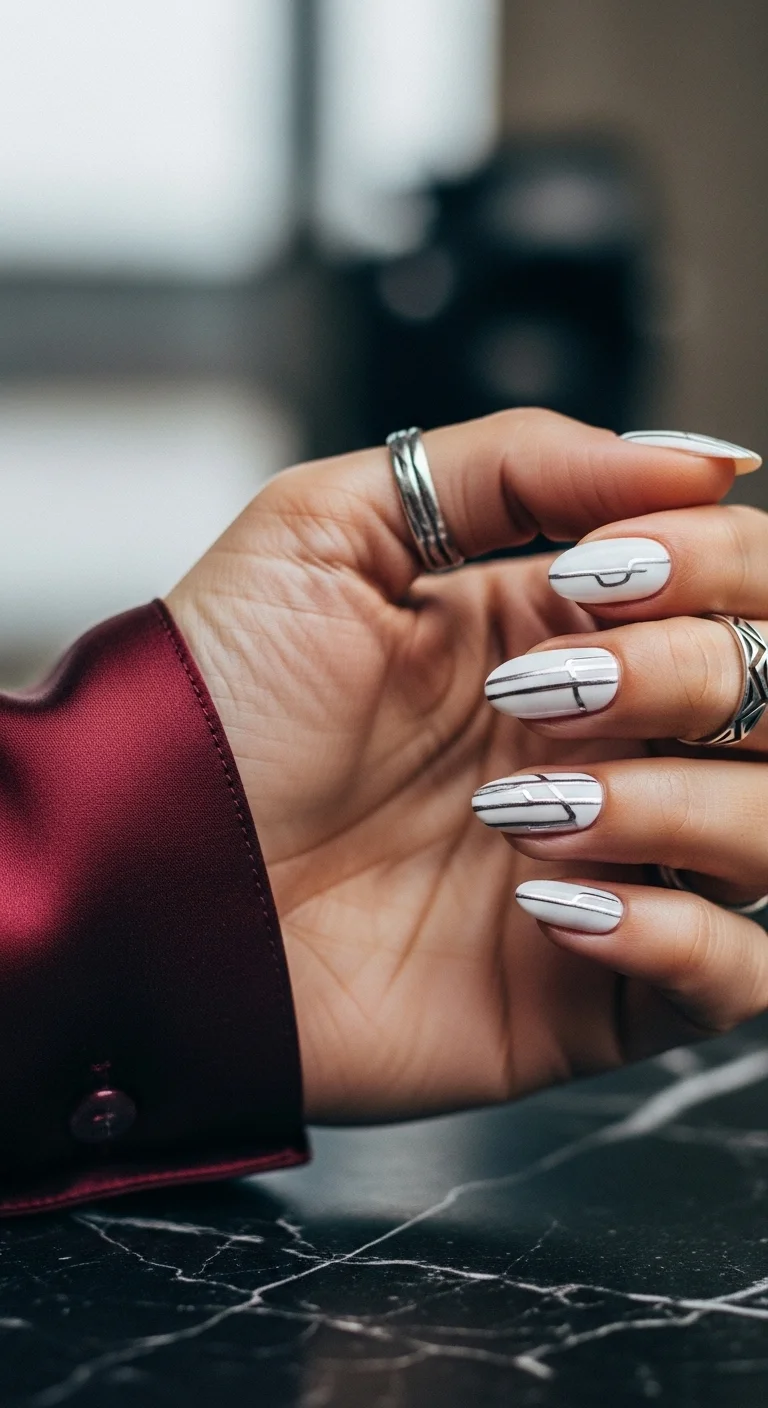
White with thin black geometric line art.
Overview:
Thin black lines on white create a design that references architecture, circuitry, and modern graphic design. The lines are angular and precise, which gives the set a futuristic, high-tech quality that's the opposite of organic or floral.
The line weight is critical. These lines are thin enough to read as detail rather than pattern. Thicker lines would make the design feel heavy and graphic. The delicacy is what makes it feel sophisticated.
The white base needs to be fully opaque for the black lines to read clearly against it. A sheer or streaky white would make the lines look weak and indistinct. Two coats of a pigment- dense white ensures the backdrop is clean.
Design Breakdown:
White base with geometric line art. The precision is the design.
Base Color: Crisp, opaque white.
Nail Shape: Medium almond. The curved shape softens the angular lines.
Design Element: Thin black geometric lines on every nail. The lines are angular and vary in direction.
Finish: High-gloss top coat to seal the line art.
Get The Look at Home:
A nail art pen is essential for the thin, consistent line weight.
- White base: Two coats of opaque white. Let dry fully.
- Line art: Using a fine nail art pen or liner brush and black polish, draw thin geometric lines on each nail.
- Vary direction: Each nail should have lines going in different directions for visual variety.
- Line weight: Keep the lines thin and consistent. Don't go over the same line twice.
- Seal: One thick coat of top coat to protect the art.

25 Stunning Summer Vacation Hairstyles for 2026 ☀️🌊
18.Arctic Blue Gradient
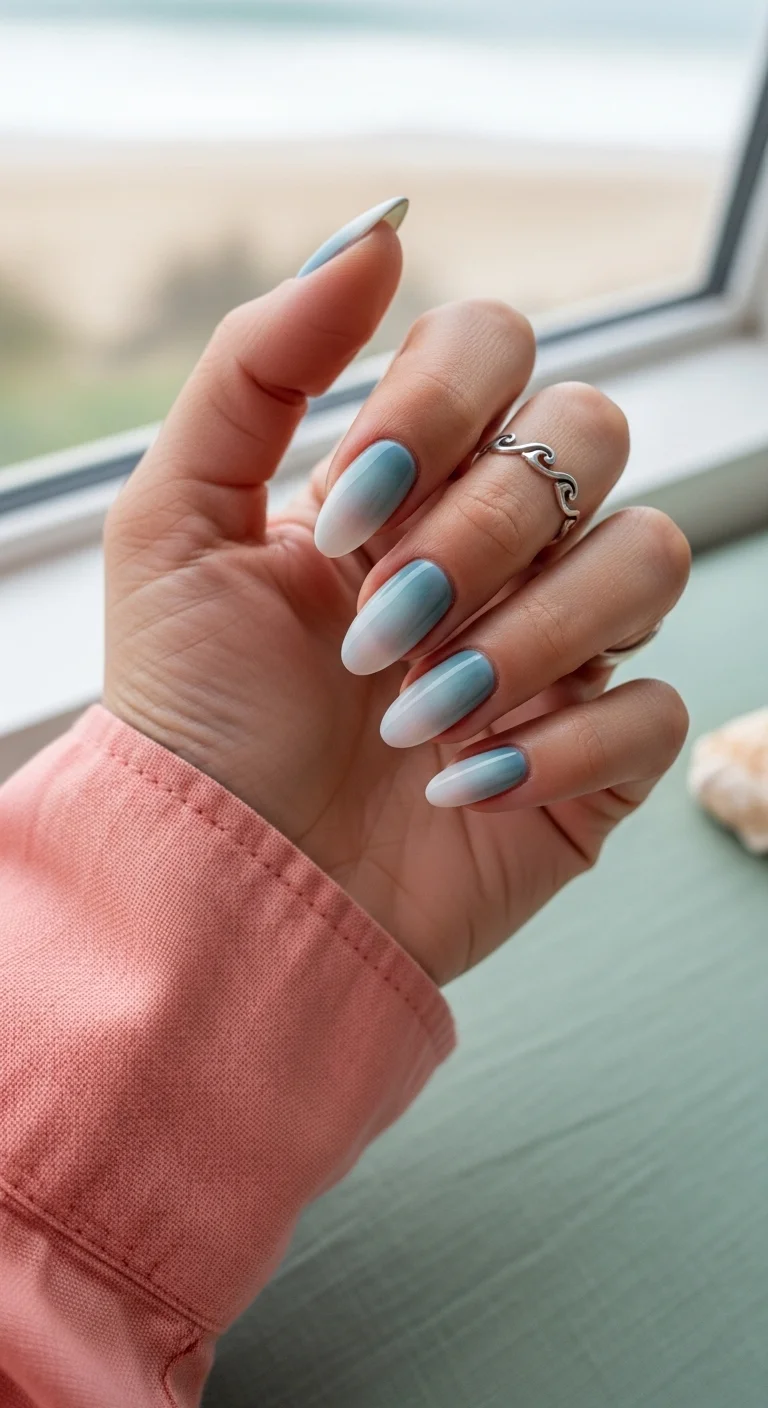
Light blue to white seamless gradient.
Overview:
A blue-to-white gradient is one of the most versatile ombre designs because it references multiple things: ocean waves, winter skies, and frosted glass. The specific shade of blue determines the mood. This soft, muted blue reads as calm and serene rather than bold or energetic.
The seamless blend is the technical challenge. A visible line between the blue and white zones would make the design look like two separate colors layered on top of each other rather than a smooth transition. The sponge technique produces the best blend, but it requires multiple passes to build opacity.
The gradient direction matters. Blue at the tips fading to white at the cuticle creates a "dipped" effect. White at the tips fading to blue creates a "frosted" effect. This design uses the dipped approach.
Design Breakdown:
Two-color gradient. The seamless blend is the design.
Base Color: Light blue at the tips fading to white at the cuticle.
Nail Shape: Medium-long almond. The curved shape emphasizes the gradient flow.
Design Element: Sponge-applied gradient using light blue and white. The transition should be seamless.
Finish: High-gloss top coat to make the gradient look smooth and luminous.
Get The Look at Home:
The sponge technique is the standard for gradients. Build opacity in multiple light passes.
- White base: One coat of white over the entire nail. Let dry.
- Sponge setup: Paint stripes of blue and white side by side on a makeup sponge. Dab on paper first.
- Dab the gradient: Press the sponge onto the nail with blue at the tip, white at the cuticle. Move slightly up and down to blend.
- Build layers: Let each pass dry, then repeat. Three to four layers builds better opacity.
- Clean edges: Use a brush dipped in acetone to remove polish from the skin.
- Seal: Apply a thick top coat while the last layer is still slightly wet to help the colors blend.
19.Stormy Marble Flow
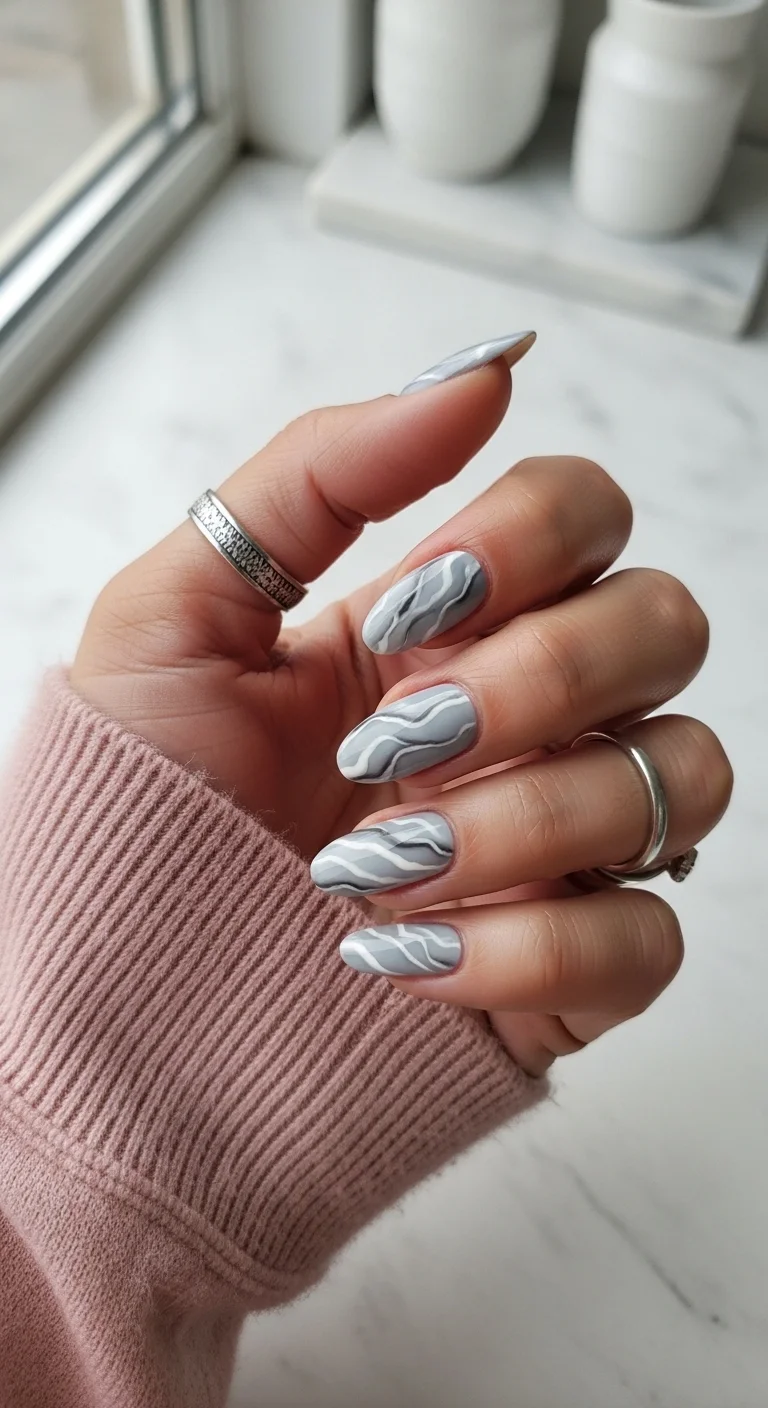
Grey and white marble swirl for a moody, stormy look.
Overview:
Grey and white marble references storm clouds, lightning, and the drama of a summer thunderstorm. The organic swirls create a pattern that looks like weather systems viewed from above. It's marble with a meteorological mood.
The grey tone matters for the overall effect. A cool grey creates a stormy, dramatic quality. A warm grey would feel more muted and earthy. This design uses a cool grey that reads as atmospheric rather than neutral.
The swirl technique produces a different pattern on every nail, which is what makes marble work. The inconsistency between nails reads as natural variation rather than inconsistency. It's one of the more forgiving freehand designs.
Design Breakdown:
Two-color marble. The organic swirls are the design.
Base Color: Grey and white marble swirl on every nail.
Nail Shape: Medium-long almond. The curved surface lets the marble swirls follow an organic path.
Design Element: Grey swirl lines over the white base on every nail. Each nail has a unique pattern.
Finish: High-gloss top coat to make the marble look polished.
Get The Look at Home:
The marble technique is wet-on-wet. The grey needs to be applied while the white is still fluid.
- White base: One coat of white. Let it dry slightly but stay tacky.
- Drop the grey: Place small dots or lines of grey polish onto the tacky white base.
- Swirl: Using a toothpick or fine brush, drag the grey into the white in organic, flowing shapes.
- Vary each nail: Every nail should have a different marble pattern.
- Don't over-blend: The grey and white need to remain distinct.
- Seal: Wait five minutes, then apply a generous top coat to smooth the surface.

31 Patriotic Fourth of July Nail Ideas for 2026 🇺🇸
20.Soft Olive Mist
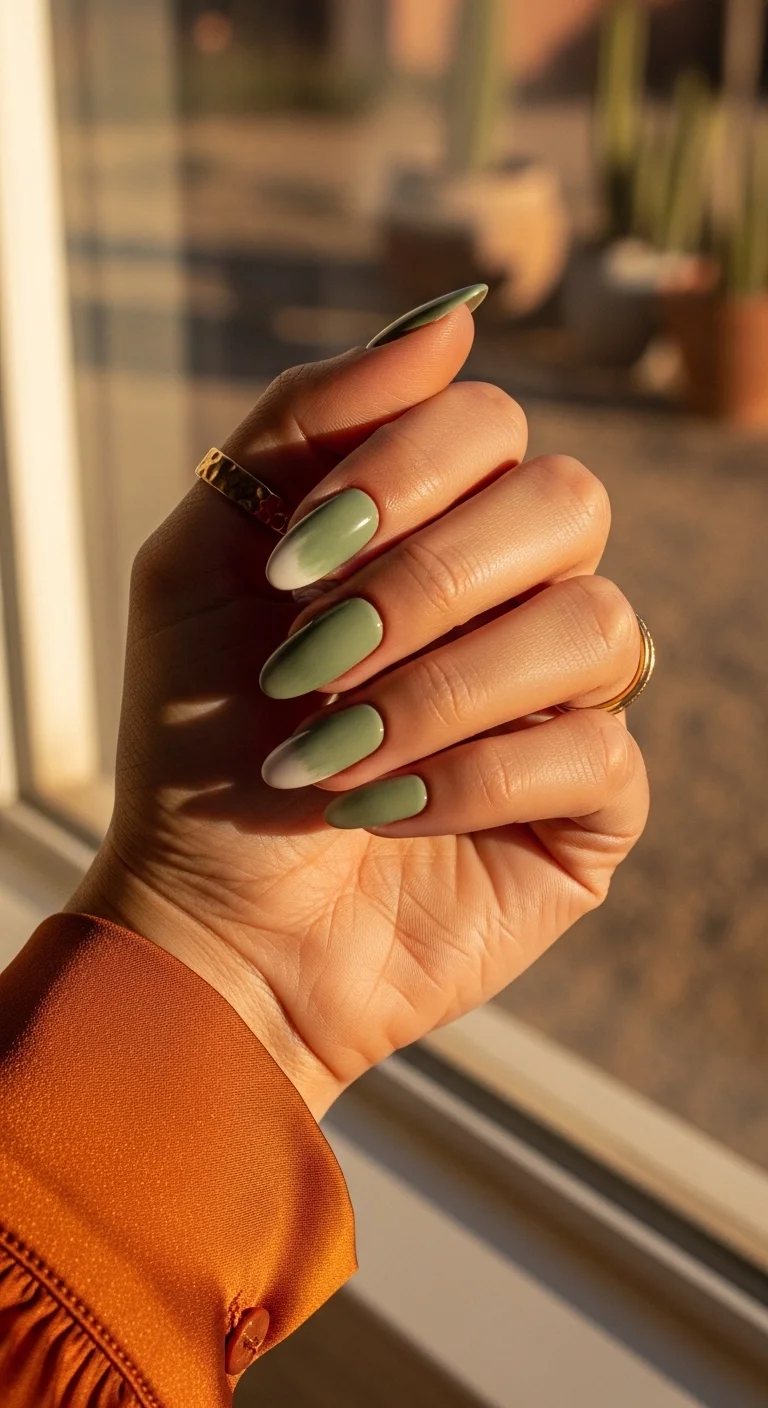
Olive green to white gradient for a misty, diffused look.
Overview:
Olive green fading to white creates a design that references mist, fog, and the diffused quality of early morning light. The gradient is subtle enough that it reads as a single color from a distance, revealing its complexity only up close.
The olive tone is warm enough to feel earthy but muted enough to avoid looking muddy. It's a green that works across skin tones because the grey undertone prevents it from clashing with warm or cool complexions.
The gradient direction, green at the tips fading to white at the cuticle, creates a "dipped" effect that's more interesting than solid green. The white at the base makes the nails look longer by extending the visual line of the finger.
Design Breakdown:
Two-color gradient. The diffused blend is the design.
Base Color: Olive green at the tips fading to white at the cuticle.
Nail Shape: Medium-long almond. The curved shape emphasizes the gradient flow.
Design Element: Sponge-applied gradient using olive green and white. The transition should be seamless.
Finish: High-gloss top coat to make the gradient look smooth and luminous.
Get The Look at Home:
The sponge technique produces the best blend. Build opacity in multiple light passes.
- White base: One coat of white over the entire nail. Let dry.
- Sponge setup: Paint stripes of olive green and white side by side on a makeup sponge. Dab on paper first.
- Dab the gradient: Press the sponge onto the nail with green at the tip, white at the cuticle. Move slightly up and down to blend.
- Build layers: Let each pass dry, then repeat. Three to four layers builds better opacity.
- Clean edges: Use a brush dipped in acetone to remove polish from the skin.
- Seal: Apply a thick top coat while the last layer is still slightly wet to help the colors blend.
21.Jungle Leaf Minimalist
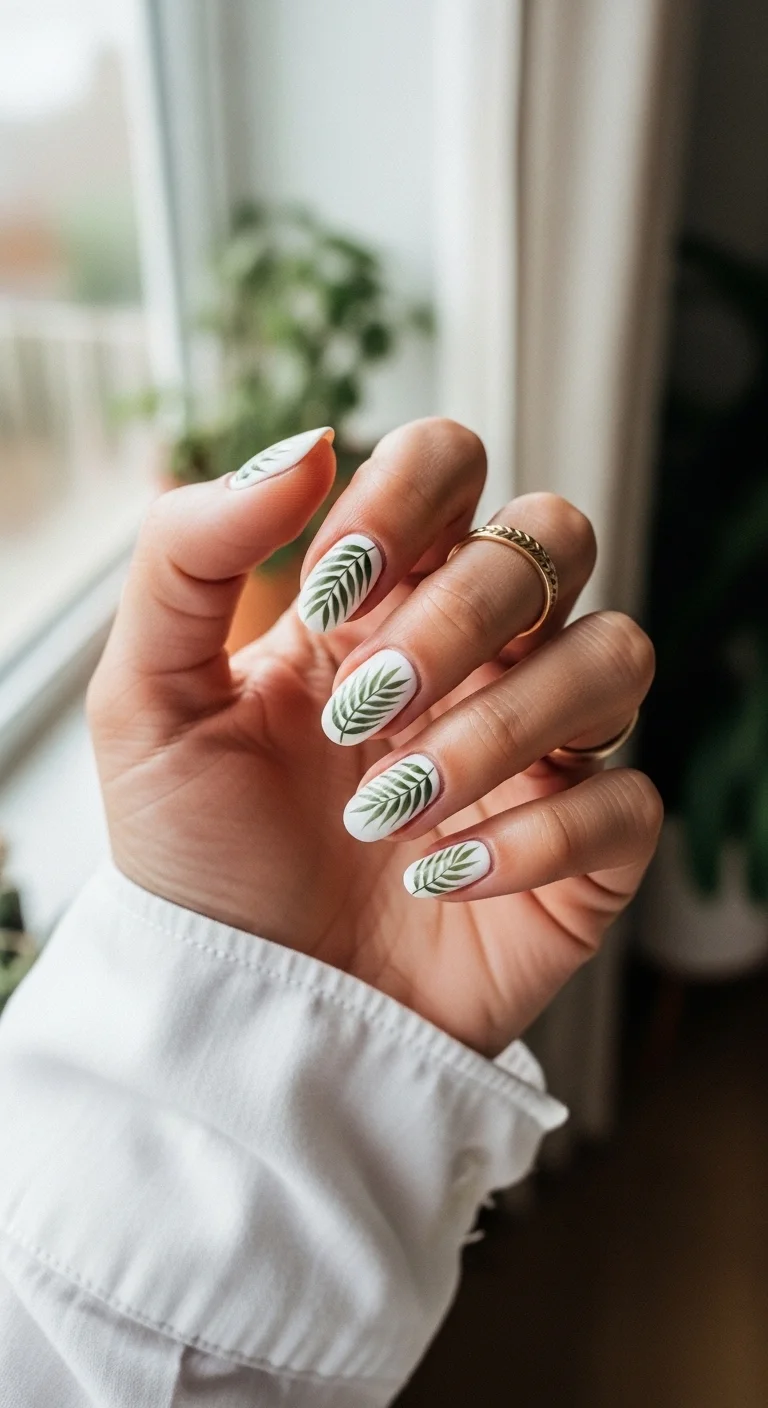
White base with detailed green leaf botanical art.
Overview:
Green leaves on white create a design that references tropical foliage without being literal about it. The leaf art is detailed enough to be recognizable but simplified enough to work as a pattern rather than an illustration.
The multiple shades of green in the leaves add depth that a single green wouldn't achieve. Dark green for the veins, lighter green for the leaf body, and occasionally a third shade for highlights. That layering makes the leaves look dimensional rather than flat.
The white base provides maximum contrast for the green leaves. On a colored base, the leaves would blend into the background. On white, every leaf detail is visible and distinct.
Design Breakdown:
Botanical line art on a white base. The detailed leaves are the design.
Base Color: Crisp, opaque white.
Nail Shape: Medium almond. The curved shape complements the organic leaf forms.
Design Element: Green leaf line art on every nail. Multiple shades of green for depth. Each nail has a different leaf arrangement.
Finish: High-gloss top coat to seal the botanical art.
Get The Look at Home:
A fine liner brush is essential for the thin leaf strokes. Use multiple green shades for depth.
- White base: Two coats of opaque white. Let dry fully.
- Leaf outlines: Using a thin liner brush and dark green polish, draw leaf shapes on each nail.
- Fill with lighter green: Using a lighter green, fill in some of the leaf areas for depth.
- Vary placement: Some nails should have more leaves than others. The inconsistency is organic.
- Seal: One thick coat of top coat to protect the art.

21 Hot Summer Buns Hairstyle Ideas for 2026 ☀️🔥
22.Minty Floral Mix
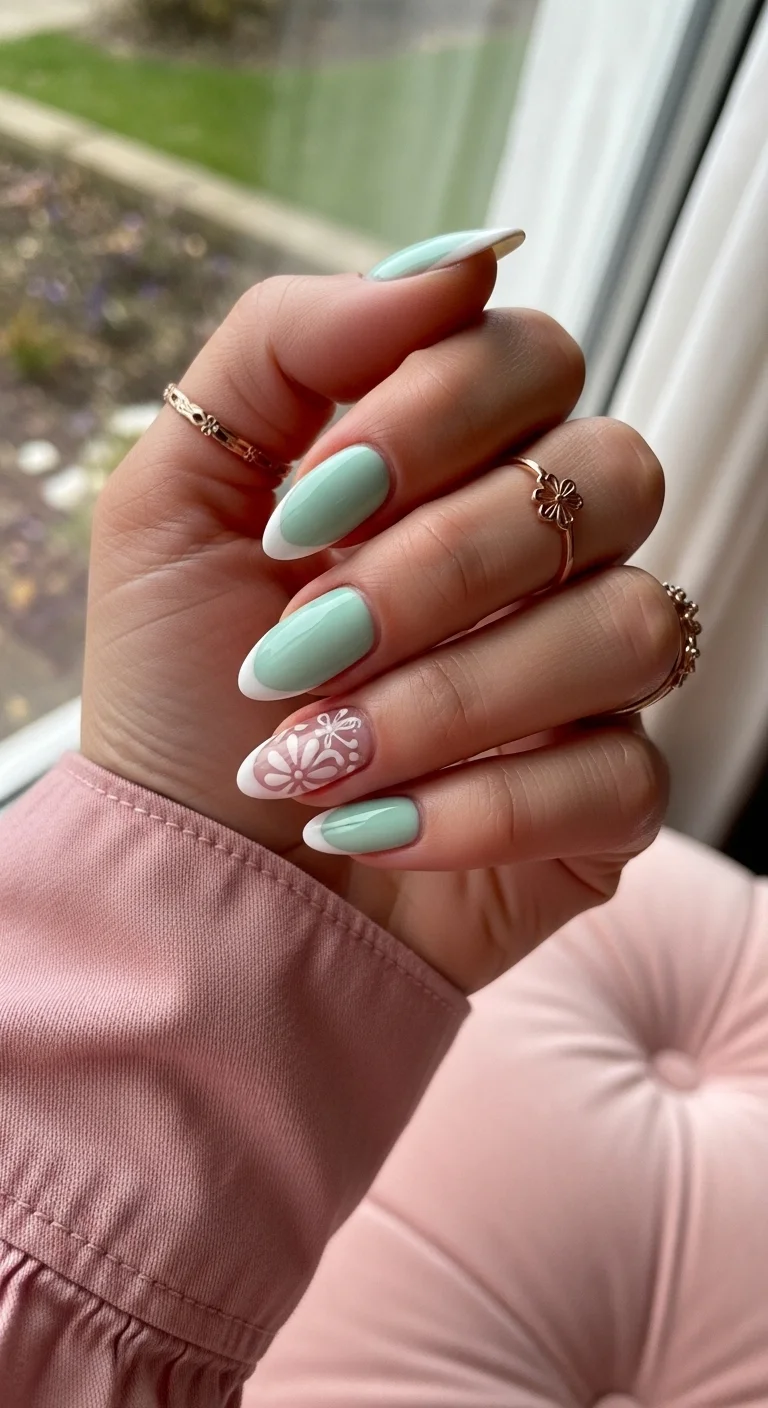
Mint French tips with a white floral accent nail.
Overview:
Mint French tips with a floral accent create a design that's both structured and organic. The French format provides the geometric framework; the floral art adds a natural, botanical quality. The two approaches complement rather than compete.
The floral accent on the ring finger is the focal point. The white flowers on the sheer base contrast with the mint tips, creating a visual break that draws the eye. Without it, the set would be a standard colored French.
The mint shade is bright enough to register as a color choice rather than a pastel. That brightness makes the set feel summery and fresh rather than muted and transitional.
Design Breakdown:
Colored French with a floral accent. The contrast between geometric and organic is the design.
Base Color: Sheer nude on all nails. Mint green French tips on four nails.
Nail Shape: Medium-long almond. The curved tip complements the mint green.
Design Element: Mint French tips on four nails. White floral art on the ring finger accent.
Finish: High-gloss top coat to make the mint look fresh and the floral look crisp.
Get The Look at Home:
The French tips are the fast part. The floral accent is the only detail work.
- Nude base: Two coats of sheer nude on all nails. Let dry fully.
- Mint French tips: Paint mint green French tips on four nails. Two coats for opacity.
- Floral accent: On the ring finger, use a small dotting tool and white polish to place five dots in a circle for each flower. Add a yellow center dot.
- Consistency: The French tip thickness should be the same across all nails.
- Seal: One thick coat of top coat over all nails.
23.Peach Rose Foil
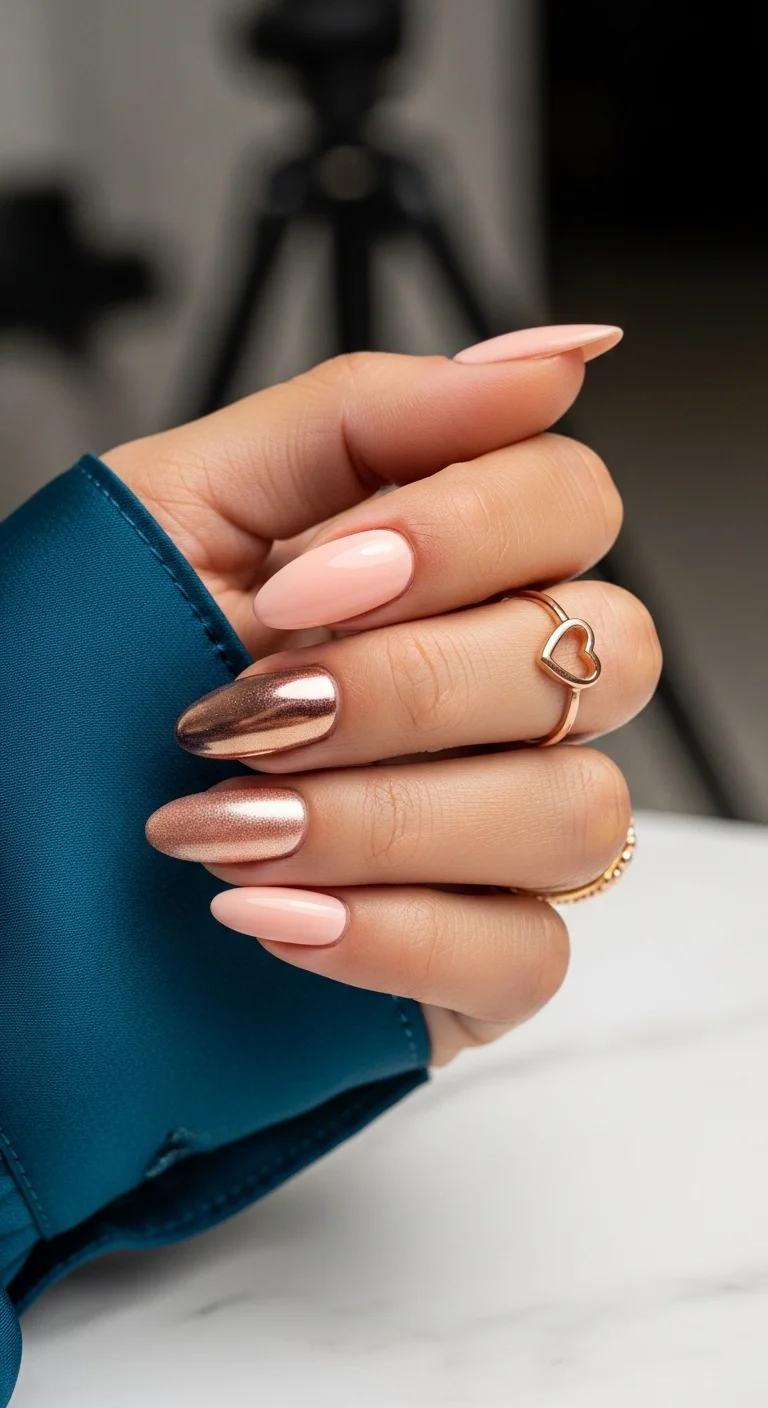
Peach solids with rose gold metallic accents.
Overview:
Peach and rose gold share the same warm undertone, which makes them feel harmonious despite being different finishes. The cream peach reads as soft and approachable; the metallic rose gold reads as luxe and dimensional. Together, they create a set that's both casual and refined.
The two accent nails on the middle and ring fingers provide a focal point that breaks up the solid peach. Without them, the set would be a standard solid color. The metallic accents elevate the design from simple to considered.
Rose gold metallic polish settles quickly in the bottle. Roll the bottle between your hands before each application to ensure the metallic particles are evenly distributed.
Design Breakdown:
Cream and metallic in the same color family. The texture contrast is the design.
Base Color: Peach cream on three nails. Rose gold metallic on two accent nails.
Nail Shape: Medium-long almond. The curved shape complements the warm color palette.
Design Element: Alternating cream peach and metallic rose gold nails. No additional art.
Finish: High-gloss on the peach; metallic on the accents.
Get The Look at Home:
The cream and metallic nails are painted separately. Complete one before starting the other.
- Peach cream nails: Two coats of peach on three nails. Let dry fully.
- Rose gold accent: On two nails, apply rose gold metallic polish. Two coats for full coverage.
- Consistency: The metallic coverage should be even and dense.
- Seal: One thick coat of top coat over all nails to unify the different finishes.

27 Stunning Graduation Day Nail Ideas for 2026 🎓
24.Electric Orange Smile
Bright orange French tips with a white accent line.
Overview:
This design is a variation on the layered French from items 1 and 5, but the orange is brighter and more saturated. The white accent line adds a framing element that sharpens the border between the orange and the nude base.
The brighter orange makes this set feel more energetic and playful than the warmer versions. It's a French for someone who wants maximum color impact without committing to a full-color nail.
Bright orange polish can be streaky in some formulas. The pigment particles tend to separate, which means uneven coverage if the bottle isn't shaken well. Three thin coats with proper dry time produces the best result.
Design Breakdown:
Layered French with a white accent. The bright orange is the design.
Base Color: Sheer, milky nude that lets the natural nail show through.
Nail Shape: Medium-long almond. The curved tip complements the bright orange.
Design Element: Bright orange French tips with a thin white accent line on every nail.
Finish: High-gloss top coat to make the orange look electric.
Get The Look at Home:
Bright orange needs thin coats for even coverage. Thick coats will streak.
- Nude base: Two coats of sheer nude on all nails. Let dry fully.
- Orange tips: Using a French liner brush, paint bright orange tips on all nails. Three thin coats for opacity.
- White accent: Using a very thin liner brush and white polish, trace a line along the smile line.
- Dry time: Let each coat of orange dry fully before adding the white.
- Seal: One thick coat of top coat to protect the art.
25.Gridlock Greenery
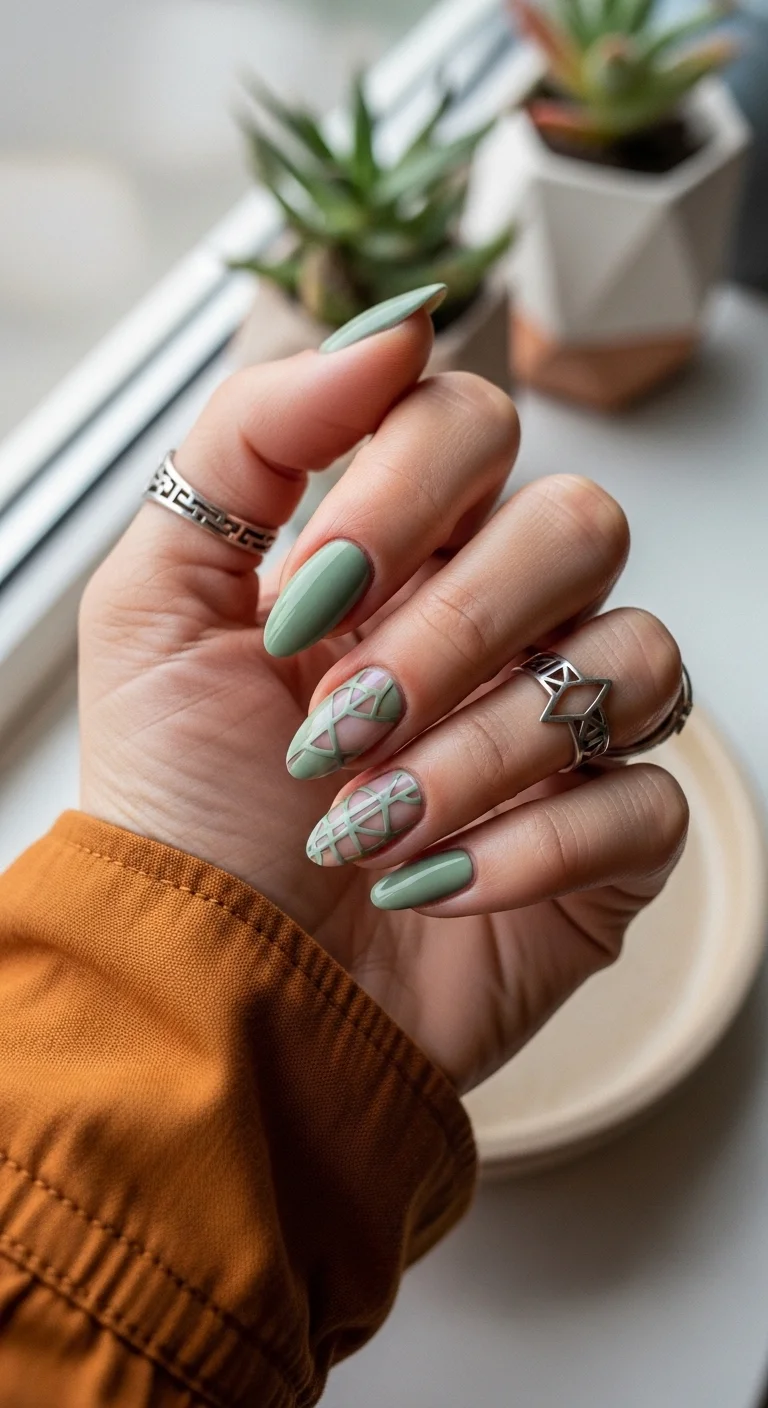
Sage green with criss-cross lattice accent nails.
Overview:
Sage green with a criss-cross lattice pattern on accent nails creates a design that references woven fabric or garden trellises. The geometric lattice contrasts with the soft, organic quality of the sage, creating an interesting tension.
The lattice pattern needs consistent line spacing to look intentional. If the criss-cross lines are different angles or widths, the pattern collapses into random lines rather than a structured grid. Striping tape helps maintain consistency.
The sage green is a muted, earthy tone that works across skin tones. It's not bright enough to clash with warm complexions, and not cool enough to wash out cool complexions. The grey undertone is what makes it universally wearable.
Design Breakdown:
Sage green with geometric accent nails. The lattice pattern is the design focal point.
Base Color: Sage green on three nails. Sheer nude with lattice pattern on two accent nails.
Nail Shape: Medium-long almond. The curved shape complements the earthy green.
Design Element: Criss-cross lattice lines in green or white on the accent nails.
Finish: High-gloss top coat to seal the art and make the sage look rich.
Get The Look at Home:
Striping tape helps create consistent lattice lines.
- Sage nails: Two coats of sage green on three nails. Let dry fully.
- Accent base: On two nails, apply sheer nude.
- Lattice lines: Using a thin liner brush and green or white polish, draw criss-crossing diagonal lines on the accent nails.
- Consistency: Keep the line spacing uniform across both accent nails.
- Seal: One thick coat of top coat over all nails.
28 Effortless Hot Weather Day Hairstyles for Women 2026 ☀️💇♀️
26.Cosmic Teal French
Teal French tips with a metallic accent nail.
Overview:
Teal French tips with a metallic accent nail create a design that's both structured and dimensional. The French format provides the clean framework; the metallic accent adds depth and texture that flat polish can't replicate.
The metallic accent nail breaks up the uniformity of the French tips and adds a focal point. Without it, the set would be a standard colored French. The metallic quality elevates the design from simple to considered.
Teal is a cool-toned color that works across skin tones. The blue-green balance means it's not too cool for warm complexions and not too warm for cool complexions. That versatility is what makes it a reliable choice for a French tip.
Design Breakdown:
Colored French with a metallic accent. The texture contrast is the design.
Base Color: Sheer nude on all nails. Teal French tips on four nails.
Nail Shape: Medium-long almond. The curved tip complements the cool teal.
Design Element: Teal French tips on four nails. Teal metallic shimmer on the ring finger accent.
Finish: High-gloss on the French nails; metallic on the accent.
Get The Look at Home:
The French tips and metallic accent use different techniques. Complete the French first, then the accent.
- Nude base: Two coats of sheer nude on all nails. Let dry fully.
- Teal French tips: Paint teal French tips on four nails. Two coats for opacity.
- Metallic accent: On the ring finger, apply teal metallic polish. Two coats for full coverage.
- Consistency: The teal shade should be the same on the tips and the accent.
- Seal: One thick coat of top coat over all nails.
27.Frosted Champagne Sparkle
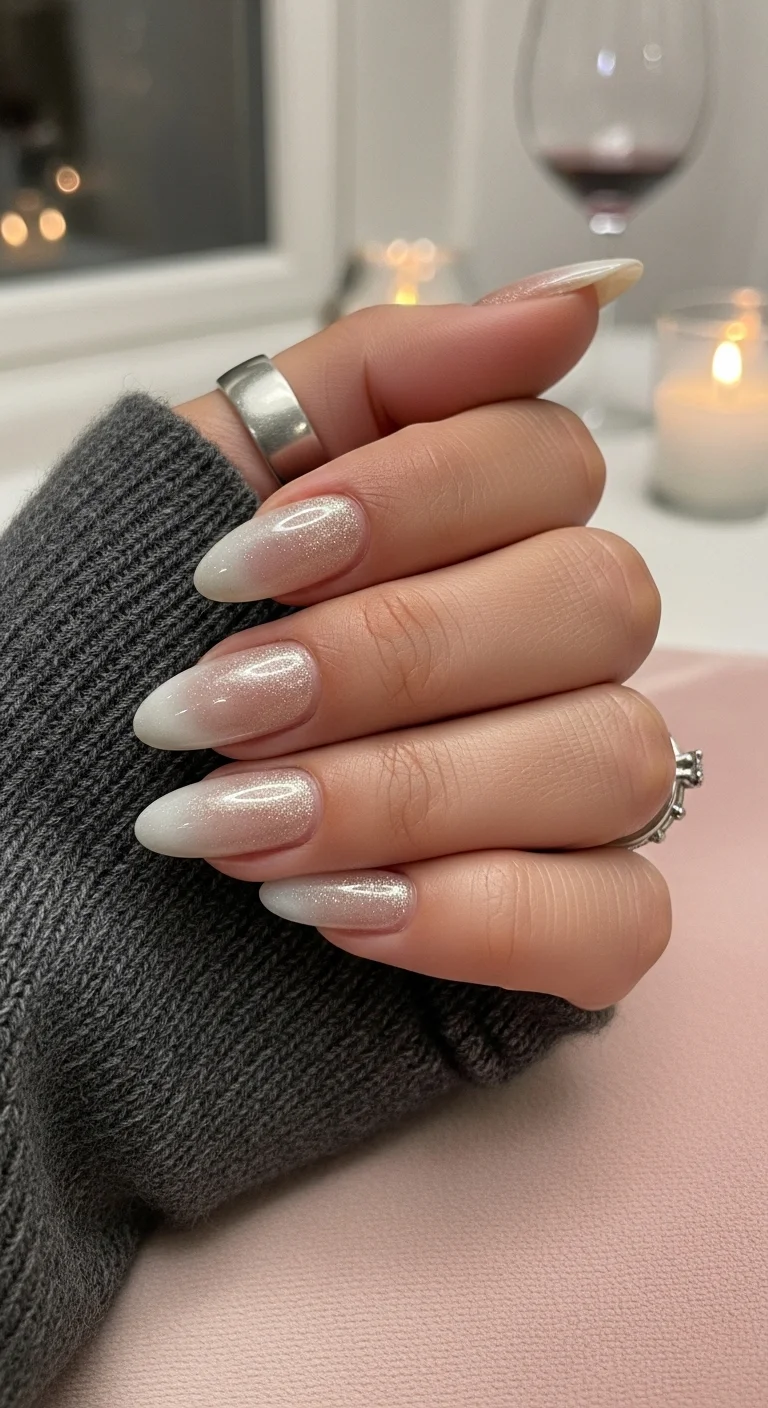
Sheer white with champagne glitter for a frosted, sparkling look.
Overview:
Champagne glitter on a sheer white base creates a design that shifts between white and gold depending on the angle of light. The fine glitter particles catch light from every direction, creating a frosted, sparkling quality that flat polish can't replicate.
The sheer quality of the base means the glitter appears to float on the natural nail rather than sitting on top of an opaque surface. That transparency creates a depth that fully opaque polishes can't achieve.
Glitter polishes are notoriously difficult to remove. The particles bond to the nail surface and resist standard acetone. Wrapping each nail in foil with acetone-soaked cotton for ten minutes is the most effective removal method.
Design Breakdown:
Sheer base with glitter shimmer. The sparkling quality is the design.
Base Color: Sheer, milky white with champagne glitter.
Nail Shape: Medium almond. The curved shape enhances the glitter's light-catching quality.
Design Element: Champagne glitter shimmer over the sheer white base on every nail.
Finish: High-gloss top coat to amplify the glitter sparkle.
Get The Look at Home:
Glitter polish needs thin, even coats for the best shimmer distribution.
- Sheer base: One coat of sheer white or clear. Let dry fully.
- Glitter coat: Two to three thin coats of champagne glitter polish. Let each coat dry fully.
- Even application: Brush in one direction to avoid streaking the glitter particles.
- Smooth surface: Apply an extra coat of top coat to fill in the texture left by the glitter.
- Seal: One thick coat of top coat to amplify the sparkle.

28 Trendy May Nail Designs for 2026 💅
28.Baby Blue Horizon
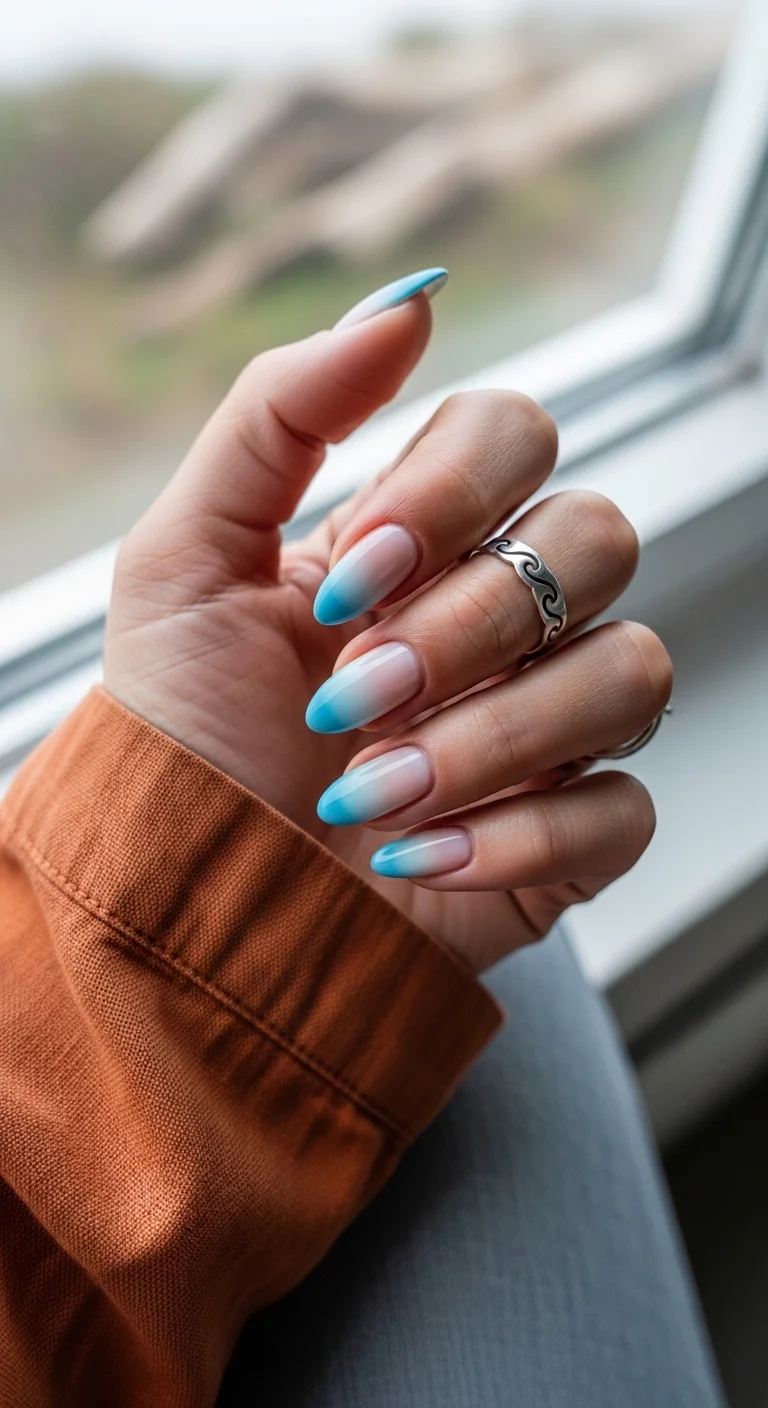
Baby blue to white gradient for a soft, horizon-like effect.
Overview:
A baby blue gradient is a softer, more pastel version of the blue-to-white ombre. The specific shade of blue, a light, powdery baby blue, reads as calm and serene rather than bold or energetic. It's a gradient for someone who prefers quiet elegance over high-impact color.
The seamless blend is the technical challenge. A visible line between the blue and white zones would make the design look like two separate colors layered on top of each other rather than a smooth transition. The sponge technique produces the best blend, but it requires multiple passes to build opacity.
Baby blue polish can be streaky in some formulas. The pastel pigment tends to separate, which means uneven coverage if the bottle isn't shaken well. Three thin coats with proper dry time produces the best result.
Design Breakdown:
Two-color gradient. The soft blend is the design.
Base Color: Baby blue at the tips fading to white at the cuticle.
Nail Shape: Medium-long almond. The curved shape emphasizes the gradient flow.
Design Element: Sponge-applied gradient using baby blue and white. The transition should be seamless.
Finish: High-gloss top coat to make the gradient look smooth and luminous.
Get The Look at Home:
The sponge technique produces the best blend. Build opacity in multiple light passes.
- White base: One coat of white over the entire nail. Let dry.
- Sponge setup: Paint stripes of baby blue and white side by side on a makeup sponge. Dab on paper first.
- Dab the gradient: Press the sponge onto the nail with blue at the tip, white at the cuticle. Move slightly up and down to blend.
- Build layers: Let each pass dry, then repeat. Three to four layers builds better opacity.
- Clean edges: Use a brush dipped in acetone to remove polish from the skin.
- Seal: Apply a thick top coat while the last layer is still slightly wet to help the colors blend.
29.Pistachio Wave Motion
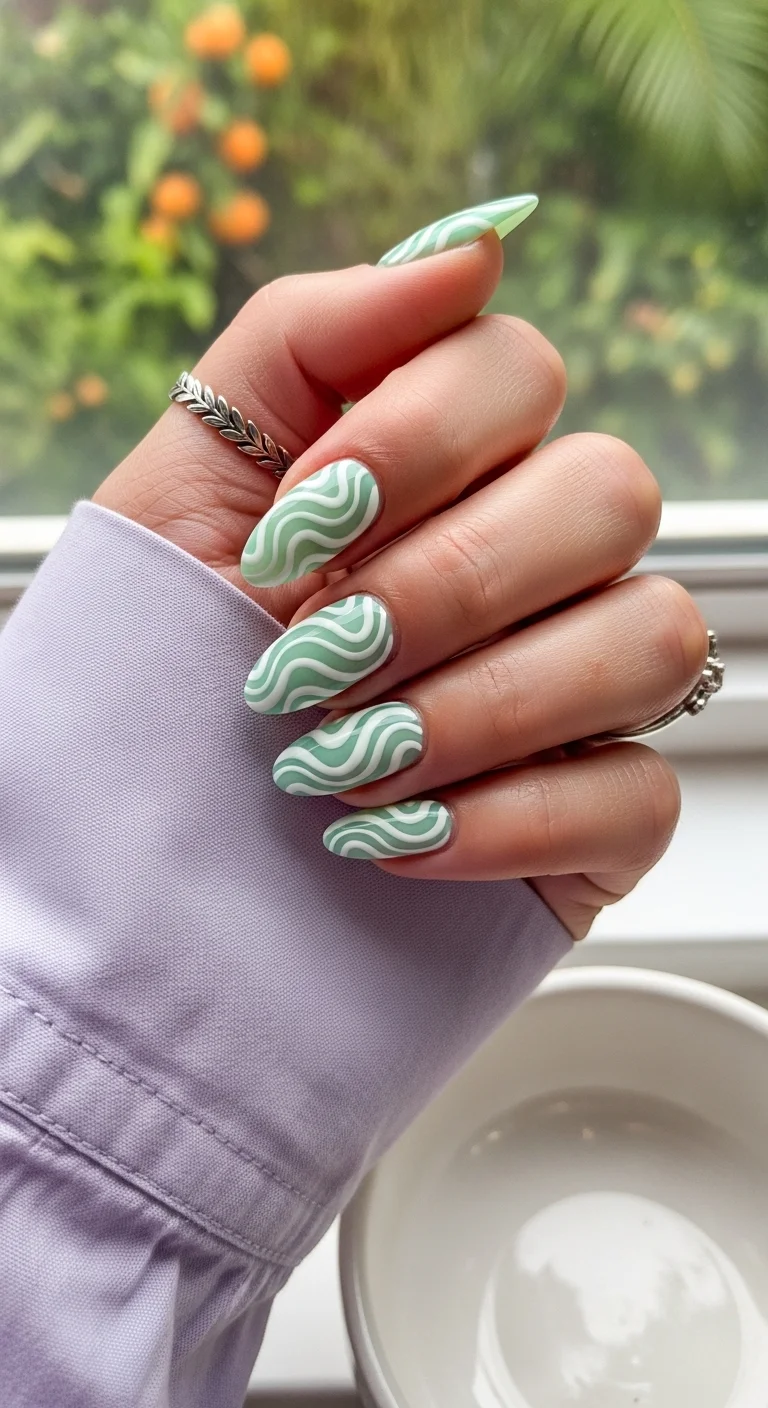
Pistachio green with organic white wave patterns.
Overview:
Pistachio green with white wave patterns creates a design that references ocean waves, wind, and the organic movement of nature. The soft, flowing waves contrast with the structured quality of the green base, creating an interesting tension.
The wave pattern produces a different result on every nail, which is what makes it work as a design. The inconsistency between nails reads as natural variation rather than mistakes. It's one of the more forgiving freehand designs.
Pistachio green is a warm, muted green that works across skin tones. It's not as cool as mint, which means it pairs better with warm complexions. The yellow undertone is what makes it feel earthy rather than clinical.
Design Breakdown:
Green base with white wave patterns. The organic movement is the design.
Base Color: Pistachio green with white wave patterns.
Nail Shape: Medium-long almond. The curved surface lets the waves flow naturally.
Design Element: White wave lines over the pistachio base on every nail. Each nail has a unique pattern.
Finish: High-gloss top coat to make the green look rich and the waves look fluid.
Get The Look at Home:
The wave technique is wet-on-wet. The white needs to be applied while the green is still fluid.
- Green base: One coat of pistachio green. Let it dry slightly but stay tacky.
- Drop the white: Place small dots or lines of white polish onto the tacky green base.
- Drag: Using a toothpick or fine brush, drag the white into the green in wave-like, organic shapes.
- Vary each nail: Every nail should have a different wave pattern.
- Don't over-blend: The white and green need to remain distinct.
- Seal: Wait five minutes, then apply a generous top coat to smooth the surface.
28 Stunning Softball Hairstyle Ideas with Braids for 2026 🥎✨
The 2026 Color Cheat Sheet: Butter Yellow, Pistachio & the Shades You'll Actually Wear
Let's talk about the actual colors you'll be reaching for this summer, because the palette has shifted noticeably from last year. The neons and stark whites that dominated 2025 are stepping aside for something softer. The 2026 summer palette is built around shades that read as creamy, saturated, and deliberate rather than loud.
Butter yellow is the undisputed frontrunner — it's been trending on TikTok for months with millions of views, and it looks even better on almond nails than on any other shape because the tapered tip echoes the softness of the color. Pistachio green is running a close second, often called "the new butter yellow" by nail editors. Rounding out the top five: milky lavender, peach sorbet, and a barely-there pink that reads as polished rather than bare.
The insider move is mixing finishes within the same color family. A butter yellow French tip with a chrome accent nail. Pistachio swirls on a milky white base with a single glossy top coat. The colors do the work of being cheerful; the finishes do the work of being interesting. Keep both in the same tonal range and you can't go wrong.
And there you have it! These gorgeous almond designs are sure to inspire excitement for some summer fun. Choosing the next set should be the best part of a beauty routine, and any of these will look absolutely stunning on the fingertips.
Don't forget to pin favorites to Pinterest boards right now to be all set for the next salon visit! Pinning designs helps avoid 'choice paralysis' when looking at all the colors. Which design stands out the most? Drop a comment below and share those summer travel plans!