Nail Trends
31 Stunning Prom Nails for Women in 2026 💃
Prom night is more than just a dance—it’s the ultimate fashion milestone, a night where every detail from your corsage to your clutch needs to be absolutely flawless. But if there’s one accessory that can truly tie your entire aesthetic together, it’s a show-stopping manicure that reflects your unique style and 2026's most exciting trends.
Whether you’re channeling 'Quiet Luxury' with understated pearls, going full 'Coquette' with 3D bows, or embracing the high-drama of mirror chrome and 'oil-slick' shifts, your nails are the finishing touch to your prom look. This guide curates 31 of the most stunning prom nail designs for 2026, ranging from timeless romantic florals to sharp, modern geometrics.
Why 3D Blooms and Velvet Finishes Are the Prom 2026 Signature?
Flat polish had a good run till end of 2025, but as the 2026 has arrived; prom nails are about texture you can actually feel. The biggest shift this year is the move toward dimensional finishes — velvet magnetic cat-eyes that shift like liquid metal under the light, and 3D gel blooms that sit above the nail surface like tiny sculptures. It's less about what color you pick and more about how the surface interacts with movement and light.
The 3D flower trend is picking up serious momentum. Nail artists are building miniature gardens using blooming gel, which spreads on contact and creates soft, petal-like edges that look organic rather than painted. The effect is delicate up close but reads as a soft texture from across a room, which is exactly what you want for prom photos where your hands are holding a bouquet or resting on a date's arm.
If you're not ready to commit to full 3D on every nail, the velvet cat-eye finish is the easier entry point. It creates a concentrated band of shimmer that shifts as you move your hand, and it works with any color. The key is the magnet tool: hold it at the right distance (about half a centimeter) and the pigment concentrates into that signature light ribbon. Too close and the particles clump. Too far and nothing happens. Worth practicing on a spare tip before the real application.
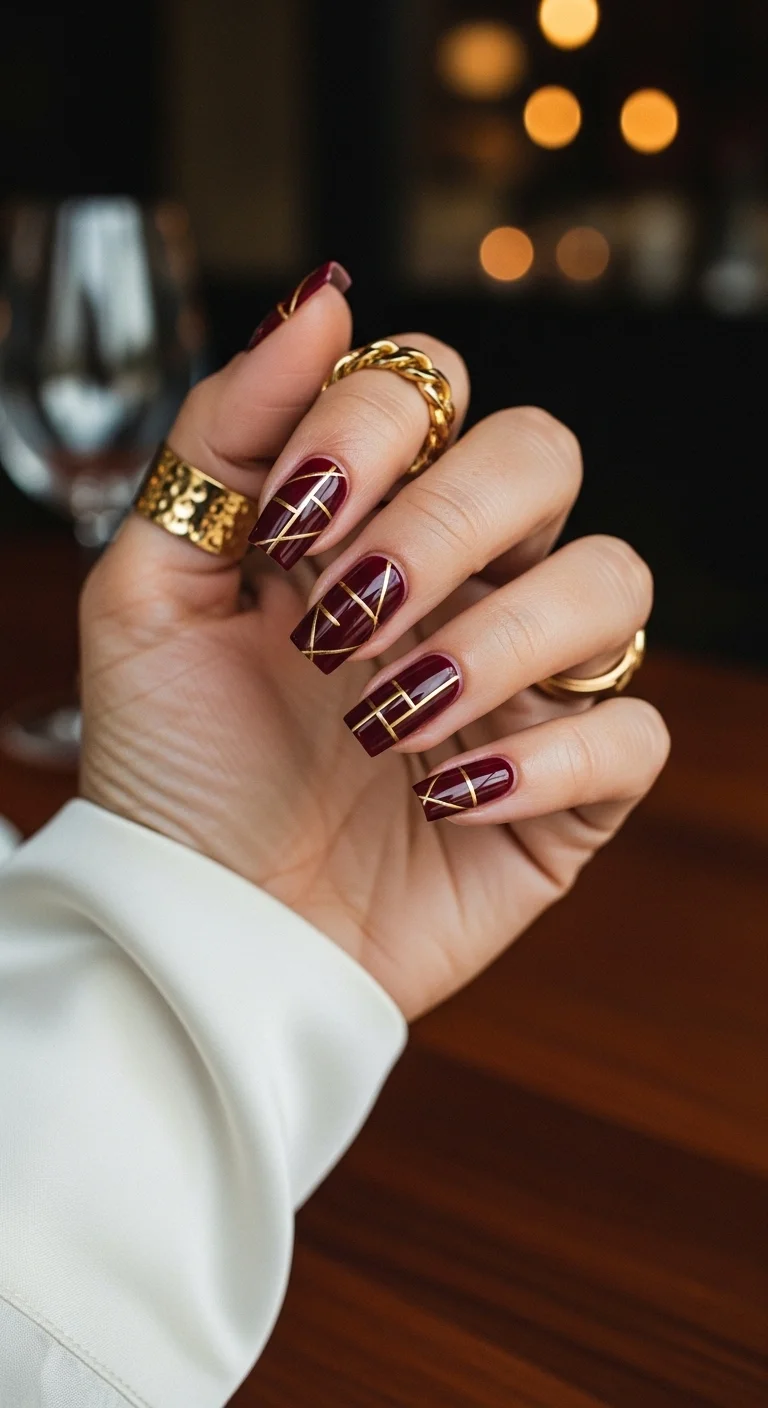
1.Burgundy Luxe Geometry
Sharp lines, deeper color.
Overview:
Wine-dark burgundy is one of those colors that looks different under every light source. In daylight it reads berry-red; under warm evening lighting, it deepens toward oxblood. The gold striping tape on this set creates intersecting diagonal lines that break up the solid color and catch light from multiple angles, which is exactly what you want when your hands are holding a clutch or a glass all night.
The geometric pattern works because it's random rather than uniform. Some nails have three crossing lines, others have two parallel diagonals. That asymmetry keeps the design from looking like a stencil. The medium coffin shape gives enough surface area for the lines to breathe without the nail looking overcrowded.
The challenge with striping tape on dark polish is visibility during application. Every millimeter of misalignment shows against the deep base. Budget extra time for placement, and use a toothpick to press the tape edges down firmly before top-coating. Loose tape ends lift within hours.
Design Breakdown:
Dark base, metallic lines. The contrast carries the design, but precision determines whether it looks intentional or messy.
Base Color: A rich, opaque wine burgundy. Essie "Wicked" or OPI "Malaga Wine" both deliver the right depth without leaning too purple.
Nail Shape: Medium coffin or ballerina. The flat tip provides a clean frame for the geometric lines.
Design Element: Gold metallic striping tape in intersecting diagonal patterns. The lines vary from nail to nail, creating a random geometric effect rather than a repeating grid.
Finish: High-gloss top coat. The shine amplifies the gold's reflectivity against the dark base.
Get The Look at Home:
The tape is unforgiving on dark polish. Work slowly and press firmly.
- Burgundy base: Two thin coats of deep burgundy. Let each coat dry completely. Thick coats will bubble and create ridges under the tape.
- Tape placement: Cut short lengths of gold striping tape. Press the first line diagonally across the nail. Add a second line crossing the first at roughly a 45-degree angle.
- Vary the pattern: On the next nail, try parallel diagonals instead of a criss-cross. The randomness across all ten nails is what makes the set look curated.
- Trim precisely: Snip the tape about 0.5mm inside the nail edge on both sides. Tape that reaches the free edge catches on everything and peels off within a day.
- Seal: Apply a thick, self-leveling top coat in one confident stroke. Going back over wet top coat shifts the tape.
30 Stunning Summer Hair Trends for 2026 ☀️🌊
2.Chocolate Gold Swirls
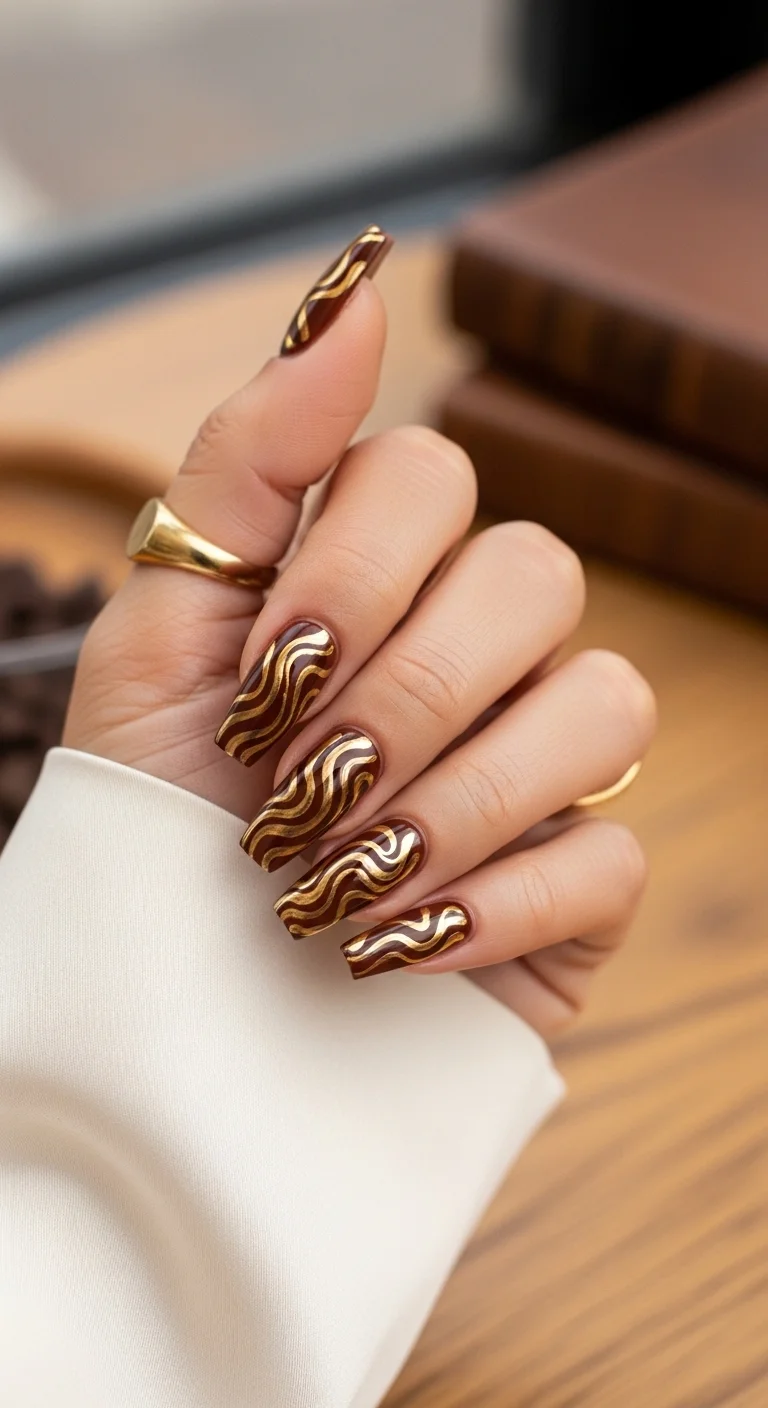
Retro warmth meets molten metallic.
Overview:
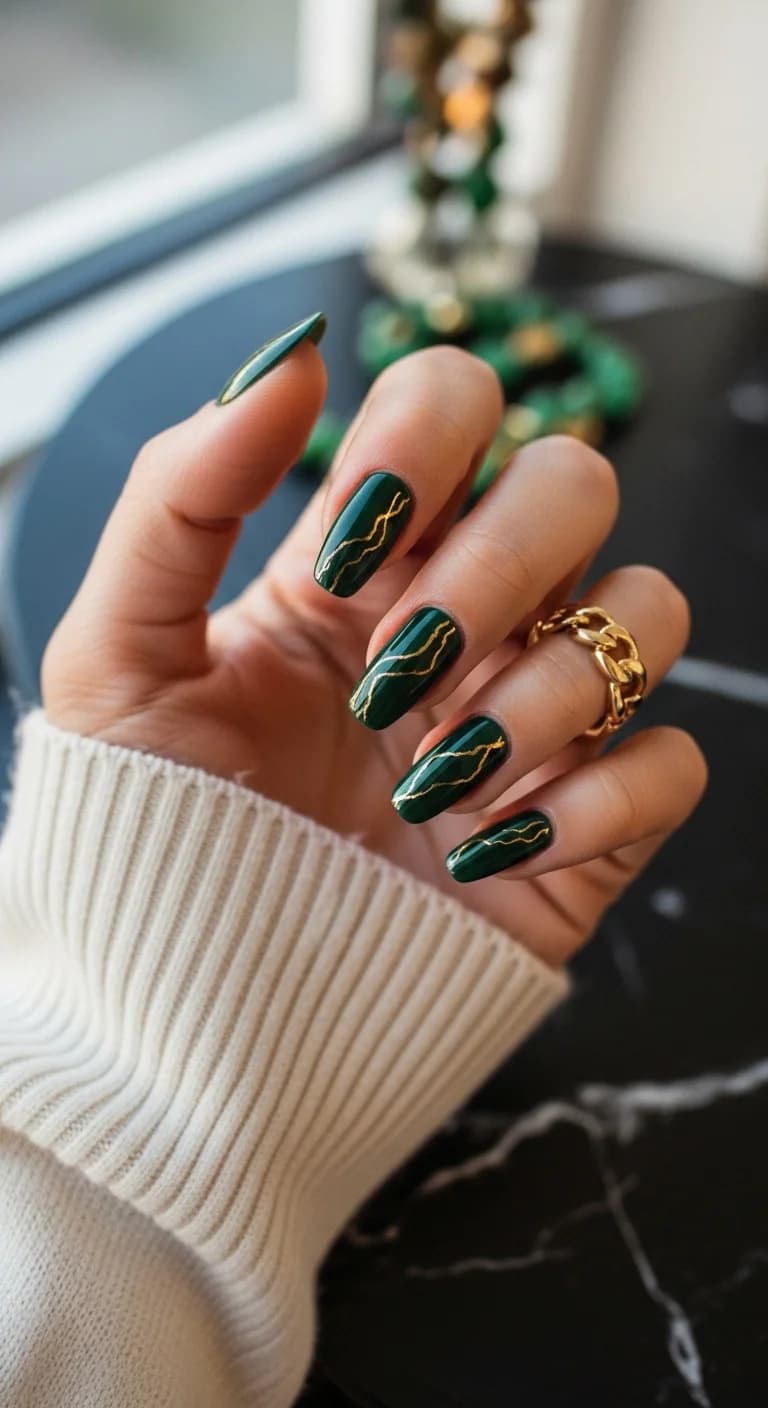
Brown nail polish has spent years in the "avoid" category, mostly because the wrong shade reads muddy rather than rich. This warm chocolate brown sidesteps that problem entirely. It sits in the caramel-to-cocoa range, warm enough to flatter most skin tones without pulling orange or grey.
The gold swirls are the main event. They're thick, organic, and deliberately uneven, which gives the set a hand-painted quality. Each nail has a slightly different swirl pattern, and that variation is what prevents the design from looking like a repeat stamp. Under warm lighting, the gold catches like liquid metal against the matte depth of the brown.
The honest downside: gold metallic polish over dark brown requires at least two coats to show up at full opacity. A single coat looks patchy and dull. The swirls also need to be thick enough to read as gold rather than thin brown-on-brown lines. This is not a design for delicate, wispy strokes.
Design Breakdown:
A two-tone design that depends on the gold being genuinely opaque against the brown.
Base Color: A warm, medium-toned chocolate brown. Think melted milk chocolate, not espresso. OPI "Squeaker of the House" or Essie "Saddle Me Up" hit the right warmth.
Nail Shape: Long coffin. The length gives the swirls room to curve and flow without looking cramped.
Design Element: Thick, wavy gold metallic lines running vertically or diagonally across each nail. The lines vary in width and curvature, creating an organic, molten effect.
Finish: High-gloss. The shine creates the "liquid gold" illusion and keeps the brown from looking flat.
Get The Look at Home:
Thick strokes are key here. Thin lines disappear into the dark base.
- Brown base: Two smooth coats of chocolate brown. Let each dry fully.
- Map the flow: Before painting, visualize the swirl direction on each nail. Vertical waves on some, diagonal on others. The variety matters.
- Gold swirls: Using a medium liner brush loaded with gold metallic gel, pull thick wavy lines from cuticle toward tip. Don't try to make them uniform. Let the brush wobble naturally.
- Second coat on gold: If any swirls look patchy, go back with a second pass of gold. Better to build opacity than to end up with thin, muddy lines.
- Seal: One thick coat of non-wipe top coat to lock the metallic in place and add the final gloss.
3.Blinding Mirror Chrome
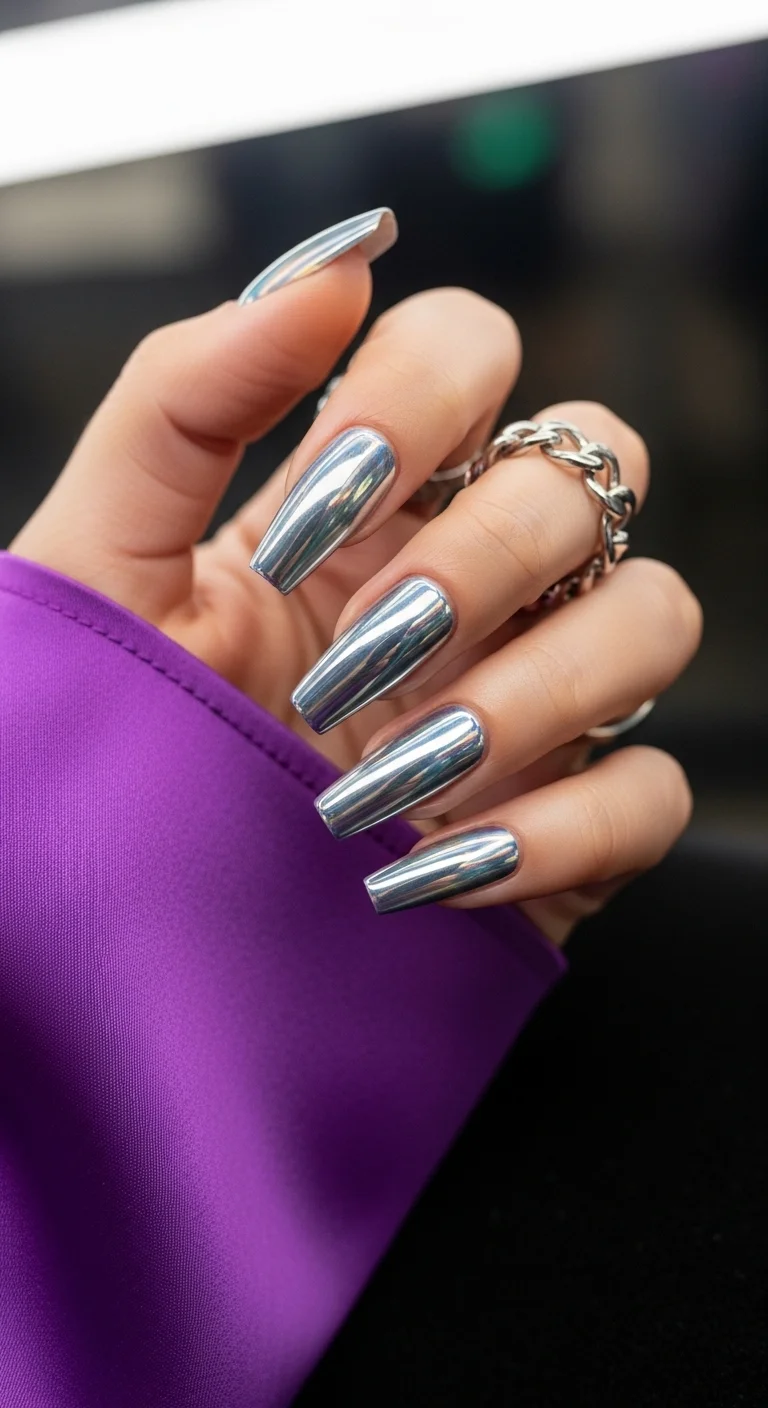
Pure reflection, zero subtlety.
Overview:
Chrome nails are the loudest option on this list, and that's the point. There's no design element to analyze, no color combination to evaluate. The entire statement is the finish itself: a flawless, mirror-like silver that reflects your surroundings like polished steel.
The coffin shape works well here because the flat surface area maximizes the reflective plane. On almond or round nails, the curve breaks up the mirror effect and creates distorted reflections. On long coffin, the chrome reads as a continuous, uninterrupted surface.
The practical reality of chrome powder: it shows every imperfection in the base layer. Any bump, ridge, or unevenness in the black gel underneath will telegraph through the chrome as a visible flaw. This means the prep work matters more than the chrome application itself. If you're doing this at home, budget serious time for surface smoothing.
Design Breakdown:
Single-finish design. The chrome powder IS the art. Surface prep is everything.
Base Color: Jet black gel polish. The black base is what creates the depth and reflectivity of the silver chrome. A lighter base produces a washed-out, grey chrome instead.
Nail Shape: Long coffin. The flat tip surface creates the best mirror effect.
Design Element: Fine-milled silver chrome pigment rubbed into a no-wipe gel top coat. No additional art needed.
Finish: Ultra-reflective mirror chrome sealed with a chrome-specific top coat to prevent dulling.
Get The Look at Home:
This technique is all about timing. The chrome powder adheres to the top coat at a specific curing stage.
- Smooth the surface: Buff the natural nail or extension until perfectly even. Any texture shows through the chrome.
- Black gel base: Apply two coats of jet-black gel polish, curing between coats.
- No-wipe top coat: Apply a no-wipe top coat and cure for only 30 seconds. The surface needs to be slightly "grabby" for the powder to adhere.
- Buff the chrome: Using an eyeshadow applicator, pick up silver chrome powder and rub it onto the nail in firm circular motions. The mirror effect appears as you buff.
- Dust off excess: Use a soft brush to remove any loose particles. Stray glitter will dull the mirror if left on.
- Seal: Apply a chrome-specific top coat and cure fully. Regular top coat can cloud the chrome finish.
28 Cute & Sporty Baseball Game Nail Ideas for 2026 ⚾
4.Tropical Teal & Peach French
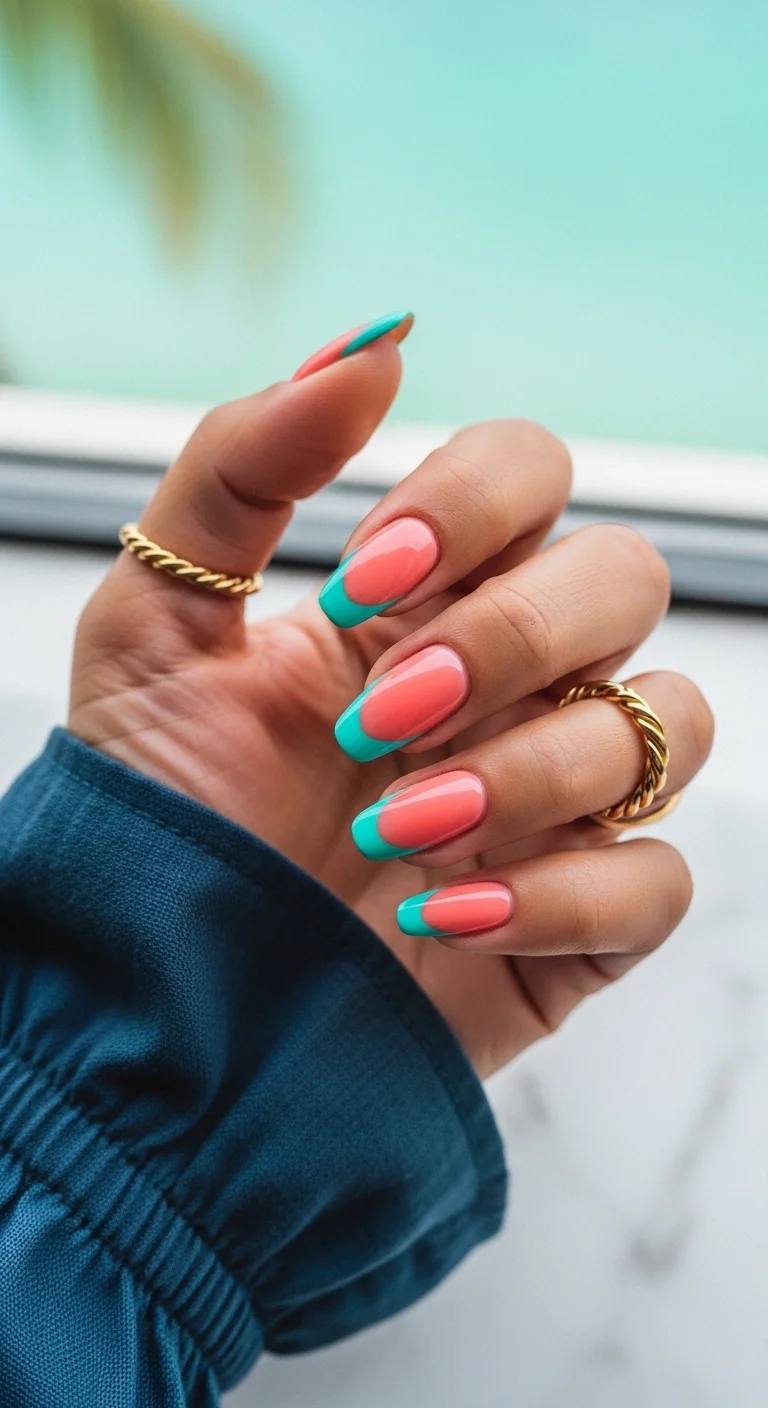
Two-color French with tropical contrast.
Overview:
Colored French tips are having a持续 moment, and this coral-and-teal pairing is one of the more interesting combinations out there. The warm peach base cools down next to the bright teal tip, creating a color temperature contrast that keeps the eye moving between the two tones.
The almond shape softens what could otherwise feel like a harsh color block. The curve of the nail mirrors the curve of the smile line, and together they give the design a fluid, rounded quality. It reads summery without being theme-park tropical.
A few things to know before attempting this at home. Peach polish is notoriously streaky, and the teal needs to be fully opaque to avoid looking muddy over the warm base. Two coats minimum on the teal, three thin coats on the peach if your formula is on the thinner side. The smile line also needs to be crisp. A wobbly curve between two high-contrast colors is immediately noticeable.
Design Breakdown:
A two-color French that depends on sharp opacity and a clean smile line.
Base Color: A creamy, opaque coral-peach. Avoid anything with a pink cast; you want the warm orange undertone to contrast with the cool teal. Essie "Tart Deco" or OPI "Crawfishin' for a Compliment" work well.
Nail Shape: Medium almond. The tapered tip makes the smile line curve look natural rather than forced.
Design Element: Deep-curved French tips in bright teal or turquoise. The tip thickness is consistent across all nails.
Finish: High-gloss gel finish. The shine makes both colors look saturated and wet.
Get The Look at Home:
Practice the smile line curve on a piece of paper first if you haven't done colored French tips before.
- Peach base: Apply two to three thin coats of coral-peach. Let each coat dry fully. The base needs to be streak-free before the tips go on.
- Map the smile: Using a thin liner brush and teal polish, draw the curved smile line across each nail. Start from one sidewall, sweep to the center, repeat from the other side.
- Fill the tip: Paint the area below the smile line with teal. Two coats for full opacity over the peach base.
- Clean the line: Dip a flat, stiff brush in acetone and run it along the smile line to sharpen any wobbles. This step makes or breaks the design.
- Top coat: One thick layer of high-shine top coat to seal and add the wet-look finish.
5.Midnight Lace Romance
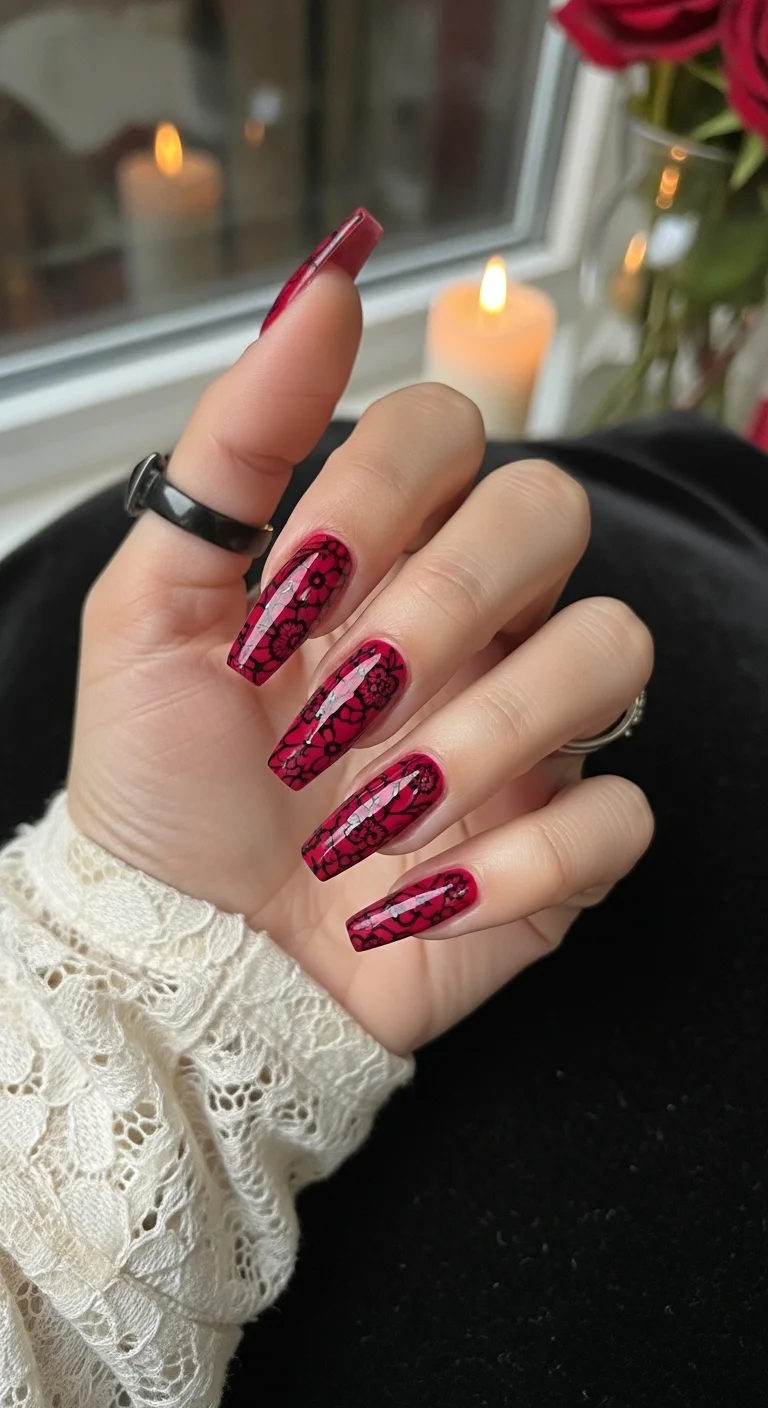
Gothic romance in two colors.
Overview:
Black lace over red is one of those combinations that's been done a thousand times but still lands every time. The reason it works is simple contrast: the bright cherry red glows through the black pattern like light through a fabric screen. The lace motifs are dense enough to read as a texture rather than scattered shapes, which gives the set a cohesive, intentional quality.
The long coffin shape is the right call for this design. The flat, extended surface gives the lace pattern room to develop across the full nail. On shorter shapes, the pattern gets compressed and loses the delicacy that makes it look like actual lace rather than random black splotches.
One thing to note: the red base in this image is a bright, slightly translucent cherry, not a dark burgundy. That translucency is part of what makes the lace work. Light passes through the red and reflects back, creating a glow that a fully opaque red wouldn't achieve. If your red formula is very opaque, consider mixing it with a drop of clear coat for the first layer.
Design Breakdown:
Two-color overlay. The lace detail is what makes this design succeed or fail.
Base Color: A bright, slightly translucent cherry red. Not burgundy, not wine. Think cherry cola, not merlot. OPI "I'm Not Really a Waitress" is a reliable match.
Nail Shape: Long coffin. Extended length is necessary for the lace pattern to read as intricate rather than cramped.
Design Element: Black floral lace motifs covering most of the nail surface. Stamping plates with lace patterns are the most reliable way to achieve clean, consistent results.
Finish: High-gloss top coat to protect the fine lines of the lace pattern.
Get The Look at Home:
Stamping is the most forgiving method for lace patterns. Freehand work at this detail level is extremely difficult.
- Red base: Two coats of bright cherry red. Let dry completely. The lace stamp will drag wet polish.
- Stamp preparation: Apply black stamping polish to a lace-patterned plate. Scrape once firmly to remove excess. Press the stamper down with a rolling motion to pick up the design.
- Transfer: Roll the stamper over the nail from one side to the other. Press firmly but don't twist, which smears the pattern.
- Cleanup: Use a small angled brush dipped in acetone to remove any black polish from the skin around the cuticles.
- Touch-ups: If any sections of the lace didn't transfer, use a toothpick dipped in black polish to fill in the gaps. Keep the修补 minimal.
- Seal: Float the top coat over the design in one stroke. Dragging the brush through the lace will smear the fine lines.
30+ Chic Pool Party Hairstyles for Summer 2026 🌊👙
6.Emerald Malachite Gold
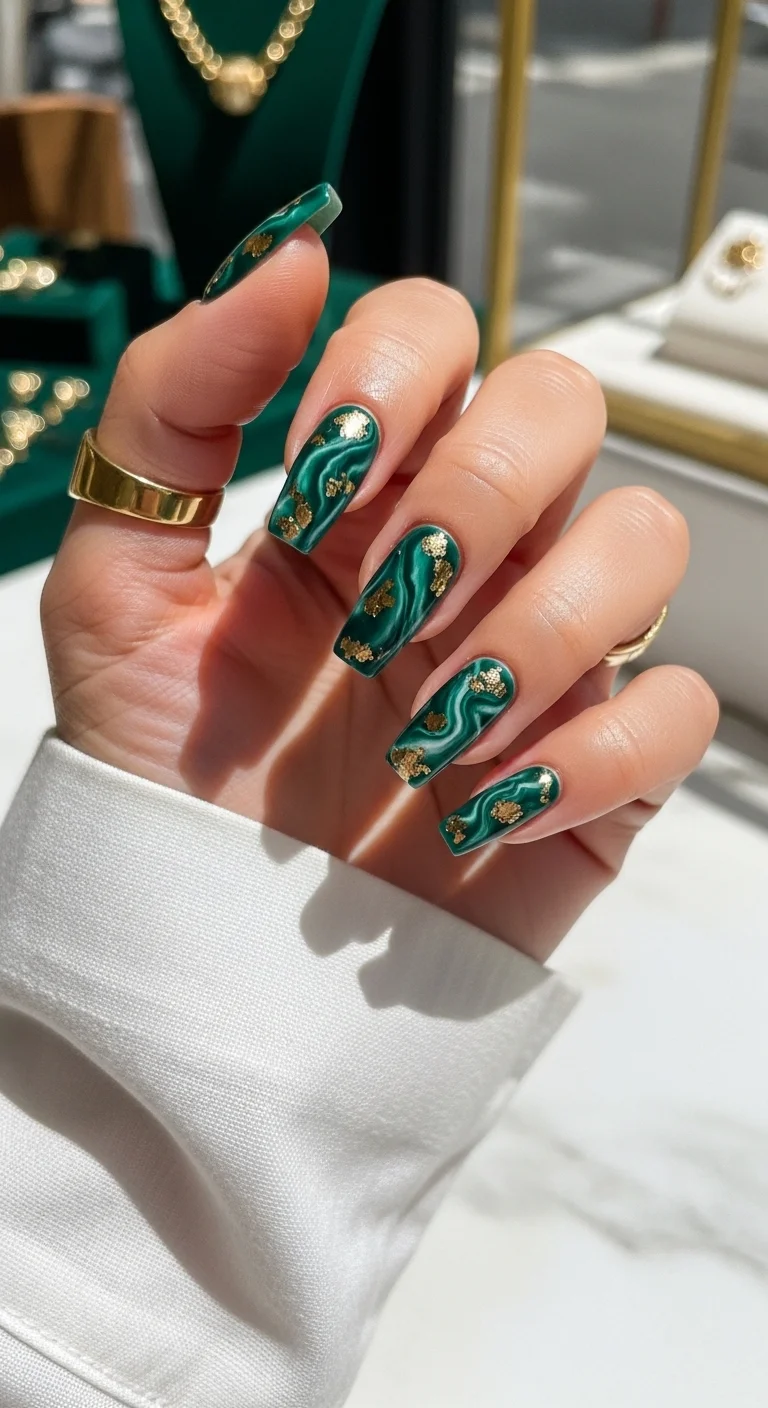
Gemstone texture with metallic accents.
Overview:
Malachite nails attempt to replicate the look of polished green stone, and this version nails the effect better than most. The base isn't a flat green. It's a layered mix of deep emerald, lighter teal, and thin white veins that create the characteristic banded pattern of real malachite. The result looks like each nail was cut from a gemstone rather than painted.
The gold leaf flakes scattered across the surface add a second texture layer. Against the cool green, the warm gold creates a temperature contrast that catches light differently than the surrounding polish. The flakes are irregularly shaped and placed randomly, which reinforces the "natural stone" illusion. Perfectly round glitter would break that effect.
The wet-on-wet technique used for the marbling requires working quickly. The green layers need to be blended before they set, which means you have about 60 to 90 seconds per nail to get the swirl pattern right. Rushing produces muddy results. Working too slowly lets the polish set before the veins are established.
Design Breakdown:
A wet-on-wet marble technique topped with metallic foil. Speed and restraint are both necessary.
Base Color: A mix of deep emerald green, medium teal, and white. The green should dominate, with the teal and white creating depth and vein patterns.
Nail Shape: Long coffin. The flat surface showcases the stone-like pattern without distortion.
Design Element: Swirled wet-on-wet marble creating malachite-style banding, topped with irregular gold leaf flakes pressed into the tacky surface.
Finish: Ultra-thick glossy top coat. Two coats minimum to level out the texture from the gold leaf.
Get The Look at Home:
Pre-mix your greens on foil and work one nail at a time. The polish sets fast.
- Green base: Apply a coat of dark emerald green. Do NOT let it dry. You're working into the wet surface.
- Add depth: Drop small dots of teal and white polish directly onto the wet emerald. Space them randomly.
- Create veins: Using a toothpick or fine brush, drag through the wet dots in sweeping curves. Don't over-mix. Three to four drags per nail creates the banded effect.
- Gold leaf: While the polish is still tacky, use tweezers to place small gold leaf flakes randomly across the surface. Press them flat.
- Dry time: Let the design set for at least 10 minutes. The marble needs to fully harden before top-coating or the pattern smears.
- Smooth finish: Apply two coats of thick top coat. The first fills in the texture around the gold leaf. The second creates the polished-stone surface.
7.Liquid Gold Sparkle
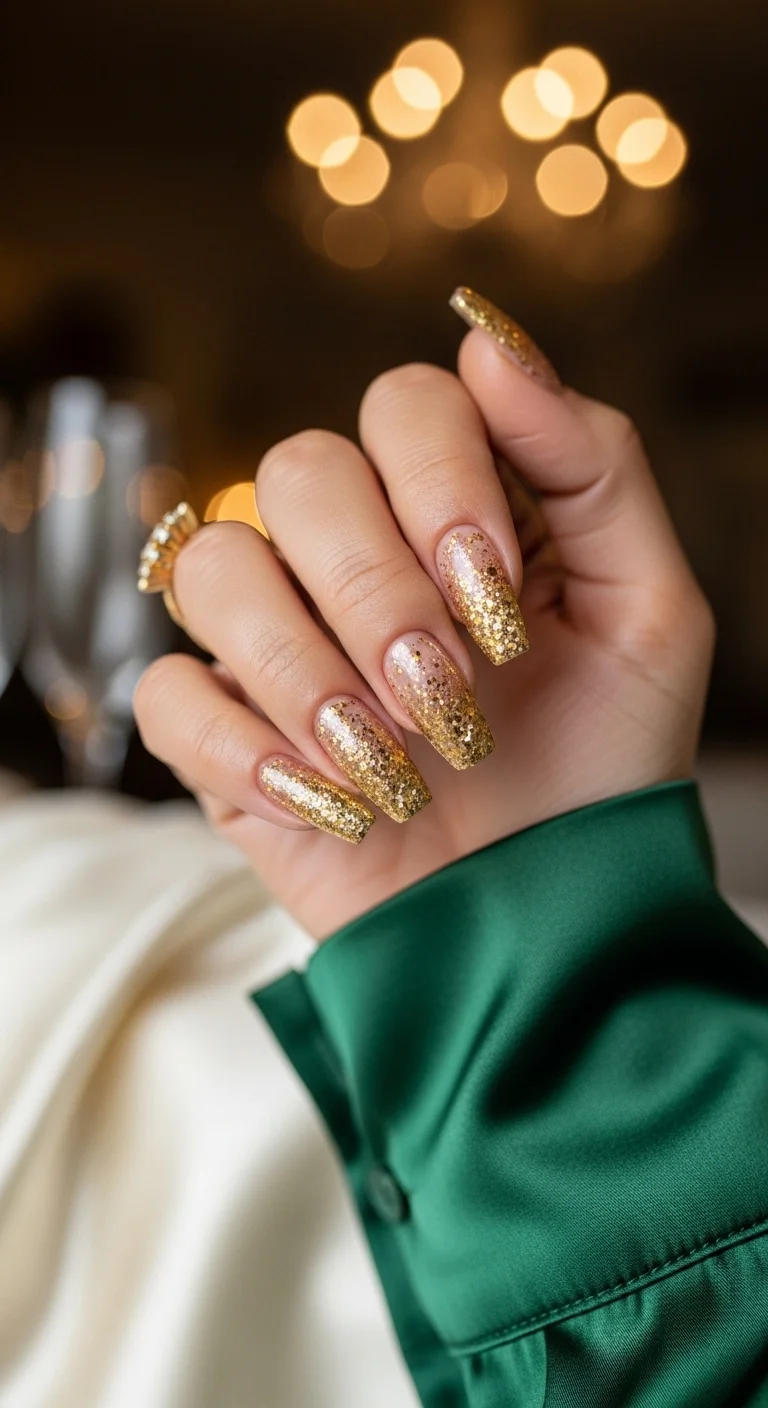
Champagne celebration in gradient form.
Overview:
Gold glitter ombre is one of the most reliably flattering nail designs for formal events. The gradient concentrates the sparkle at the tips and lets it fade toward the cuticle, which creates an elongating effect on the fingers. It's also one of the few glitter designs that looks better in person than in photos, because the individual particles catch light at angles that cameras flatten.
The nude-to-gold transition is the key to keeping this from looking like a full-glitter nail. The sheer pink base at the cuticle provides visual breathing room. Without it, the dense gold at the tips would feel heavy and unbalanced.
The main challenge with glitter ombre is getting a smooth gradient rather than an abrupt line. The sponge technique helps, but the real trick is dabbing the sponge on paper first to remove excess glitter before touching the nail. A sponge loaded with too much glitter produces a hard edge instead of a fade.
Design Breakdown:
Gradient technique using glitter density to create the fade. The sponge application determines the quality of the transition.
Base Color: A sheer, warm-toned nude or milky pink. It should look like a natural nail bed, not a solid color. Essie "Ballet Slippers" or OPI "Bubble Bath" are standard choices.
Nail Shape: Long coffin or tapered square. The length provides enough gradient space for the fade to develop.
Design Element: Dense gold glitter concentrated at the tips, fading toward the center. The glitter should include a mix of fine and chunky particles for dimension.
Finish: Multiple layers of top coat. Glitter creates surface texture that needs to be fully encapsulated for a smooth finish.
Get The Look at Home:
The sponge technique is standard for glitter gradients, but the preparation matters more than the application.
- Nude base: Apply one or two coats of sheer nude. Let dry fully.
- Sponge prep: Paint a stripe of gold glitter polish onto the edge of a makeup sponge. Dab the sponge on paper two or three times to remove the initial excess.
- First pass: Press the sponge onto the nail with the glitter concentrated at the tip. Three to four gentle dabs per nail. Reposition the sponge slightly each time to blur the edge.
- Build the tip: Add more glitter polish to the sponge, but only to the very edge. Dab just the tip of the nail for maximum density at the free edge.
- Check the fade: Hold your hand at arm's length. If you see a hard line where the glitter stops, dab a clean section of sponge along that line to soften it.
- Encapsulate: Apply two to three coats of thick top coat. Run your finger over the nail after each coat. If you feel grit, add another layer.
30 Stunning Beach Nail Ideas for the Best Vacation in 2026 🌊
8.Golden Ivy Forest
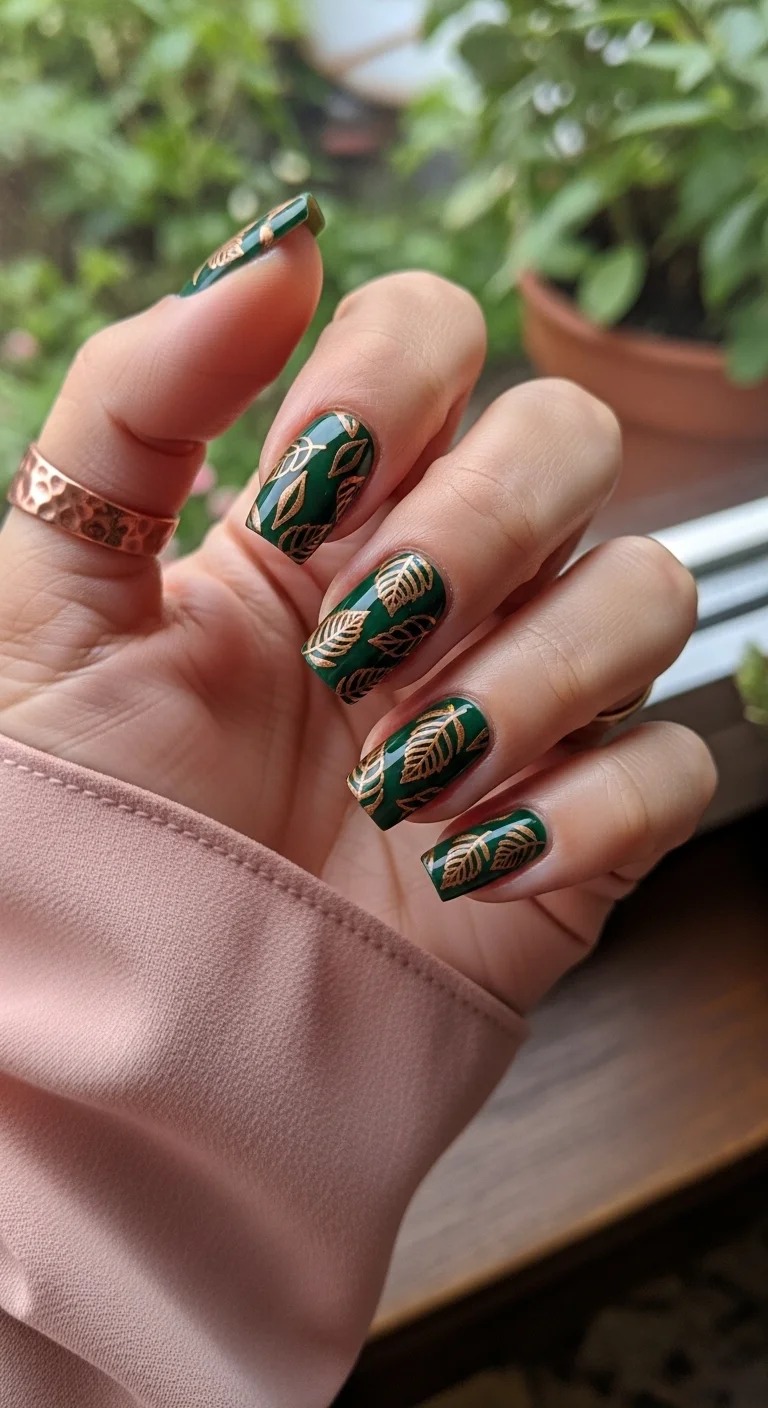
Botanical illustration in metallic on dark green.
Overview:
Dark green with gold is a color pairing that leans botanical rather than holiday. The deep forest base has enough blue in its undertone to read as moody and sophisticated rather than festive. The gold leaf motifs scattered across each nail reinforce the nature reference without tipping into literal territory.
What makes this design work is the variety of leaf patterns across the nails. Some nails show two or three large leaves; others have smaller, more dispersed botanicals. That variation prevents the "wallpaper effect" where every nail looks stamped from the same plate. Each nail feels like a separate illustration.
The medium almond shape is a good match for the botanical theme. The organic curve of the nail complements the organic shapes of the leaves. Longer or more angular shapes would create a tension between the natural motif and the artificial silhouette.
Design Breakdown:
Dark base with detailed metallic art. The contrast between the matte depth of the green and the reflective gold creates visual richness.
Base Color: A deep, creamy forest green with blue undertones. Avoid anything with yellow undertones, which would clash with the gold. Zoya "Hunter" or Essie "Off Tropic" deliver the right depth.
Nail Shape: Medium almond. The tapered shape mirrors the pointed tips of the leaves.
Design Element: Gold metallic leaf and vine patterns, either stamped or hand-painted. The motifs vary across nails for an organic, botanical feel.
Finish: High-gloss top coat. The shine creates depth in the dark green and makes the gold pop.
Get The Look at Home:
Stamping works well for the leaf patterns if you have a botanical plate. Hand-painting gives more control over placement.
- Green base: Two coats of forest green. Let dry completely.
- Leaf placement: Using a botanical stamping plate or a fine liner brush with gold metallic gel, add leaf patterns to each nail. Vary the size and position on each finger.
- Detail work: If hand-painting, start with the main leaf shape, then add thin vein lines inside each leaf using the tip of the liner brush.
- Vine connections: On one or two nails, connect the leaves with thin gold stem lines. Not every nail needs vines.
- Check balance: Hold both hands at arm's length. If one hand has significantly more gold than the other, add a small leaf to balance it.
- Seal: One thick coat of top coat. Float the brush to avoid dragging the metallic details.
9.Magenta Party Ombre
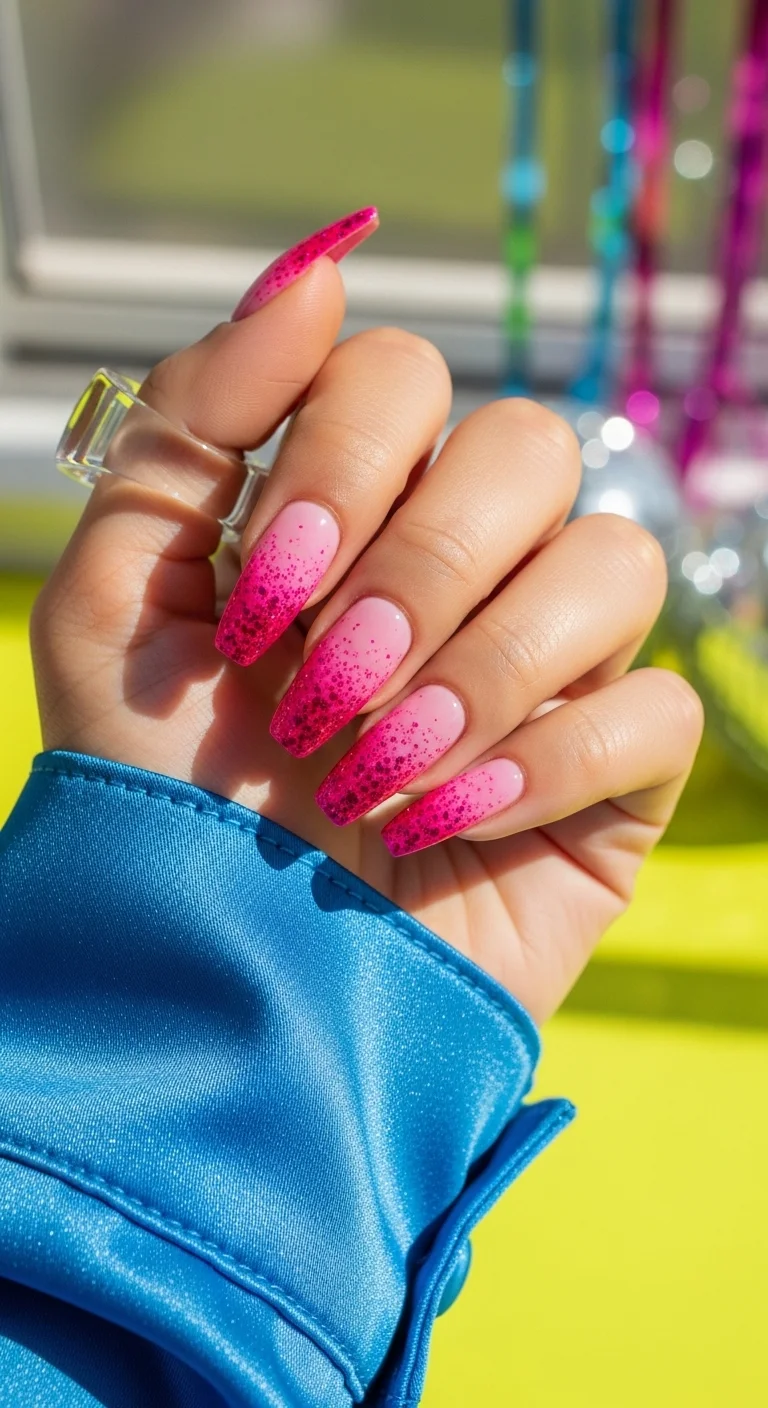
Pink gradient with scattered sparkle.
Overview:
Pink glitter gradients work because the color does the heavy lifting. The transition from soft baby pink at the base to saturated magenta at the tips creates a natural visual flow that the eye follows without effort. The glitter particles scattered through the mid-section add texture without interrupting the gradient.
The long coffin shape gives the gradient enough length to develop properly. On shorter nails, the pink-to-magenta transition compresses and can look like a hard line rather than a fade. The extended tip also provides more surface area for the densest glitter concentration.
One practical note: magenta glitter polish is often sheerer than you'd expect. The color density comes from multiple sponge applications rather than a single heavy coat. Each dab builds opacity gradually. If you try to achieve full coverage in one pass, you'll end up with a thick, bumpy layer that takes forever to dry.
Design Breakdown:
Sponge-applied glitter gradient. The fade quality depends on dabbing technique rather than polish quantity.
Base Color: A soft, semi-sheer baby pink. Not opaque. The sheerness lets the natural nail show through slightly, which makes the gradient feel lighter.
Nail Shape: Long coffin. The extended length gives the gradient room to develop from light pink to dense magenta.
Design Element: Fine magenta glitter particles concentrated at the tips, fading toward the mid-nail. The glitter should be fine enough to create a smooth gradient, not chunky hex pieces.
Finish: High-gloss top coat. Two to three layers to smooth the glitter texture.
Get The Look at Home:
The sponge is the right tool for this gradient. Brush application creates streaks rather than a fade.
- Pink base: Two thin coats of baby pink. Let each dry fully before the next.
- Sponge prep: Paint a stripe of magenta glitter polish onto a makeup sponge. Dab on paper first to remove the initial saturation.
- Gradient application: Press the sponge onto the nail with the glitter end at the tip. Four to five dabs per nail, repositioning slightly each time to blur the transition line.
- Build the tip: Add more glitter polish to the sponge edge. Dab only the free edge of the nail for maximum density at the very tip.
- Check consistency: Compare all ten nails. If some have more glitter than others, add another pass to the lighter ones.
- Smooth: Apply two to three coats of top coat, checking for grit between each layer.
26 Stunning Summer Braided Hairstyles for Women 2026 ☀️💇♀️
10.Matte Black & Leopard
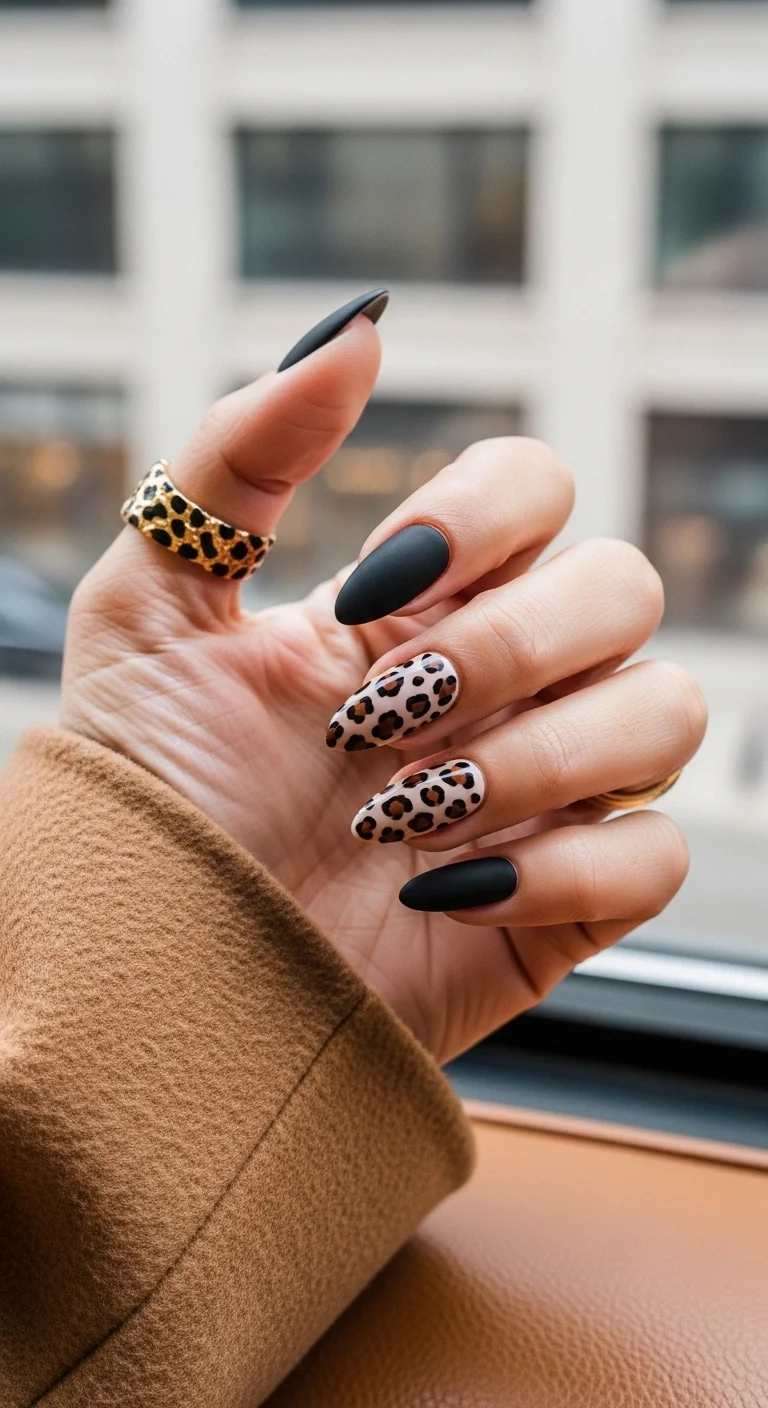
Texture contrast in animal print.
Overview:
Matte black is the quiet foundation that makes the leopard print stand out. The flat, non-reflective finish on the black nails absorbs light, while the tan-based leopard accents sit at the same level of visual weight. The texture contrast between matte black and the patterned nails is what creates the design's tension.
The leopard spots themselves follow a traditional color scheme: warm tan base, brown inner spots, black irregular brackets around the edges. The spots are medium-sized and spaced widely enough that the tan base is visible between them. Overcrowded leopard print looks busy; this spacing keeps it readable.
Matte top coat is the right call for the black nails, but it has a downside: matte finishes show oils, fingerprints, and smudges more readily than glossy ones. By the end of a long event, the black nails may look slightly worn or shiny in spots where they've been touched. Carry a small matting spray or blotting papers if you want them to stay flat all night.
Design Breakdown:
Two-texture design: matte black solids with glossy leopard accents. The finish contrast is the design principle.
Base Color: Pitch black on the solid nails; warm tan or nude on the leopard accent nails. The tan should be warm-toned to complement the brown in the spots.
Nail Shape: Medium almond. The tapered shape suits the "cat-like" energy of leopard print.
Design Element: Hand-painted leopard spots on two accent nails (middle and ring finger typically). Brown inner spots bracketed by irregular black lines. Remaining nails are solid black.
Finish: Matte top coat on the black nails. Glossy on the leopard accents for texture contrast.
Get The Look at Home:
Leopard spots should look organic. Perfect circles don't read as animal print.
- Black nails: Paint the thumb, index, and pinky with black polish. Let dry, then apply matte top coat.
- Tan nails: Paint the middle and ring fingers with warm tan. Two coats for opacity.
- Brown spots: Using a medium dotting tool and chocolate brown, place irregular blobs on the tan nails. Vary the size and spacing.
- Black brackets: With a tiny liner brush and black polish, paint two or three small curved lines around each brown spot. The brackets should be irregular, not symmetrical.
- Fill gaps: Add a few small black dots in the empty tan spaces to balance the pattern density.
- Glossy seal: Apply high-shine top coat to the leopard nails only. The contrast between matte black and glossy leopard is the entire point.
11.Minty Fresh Florals
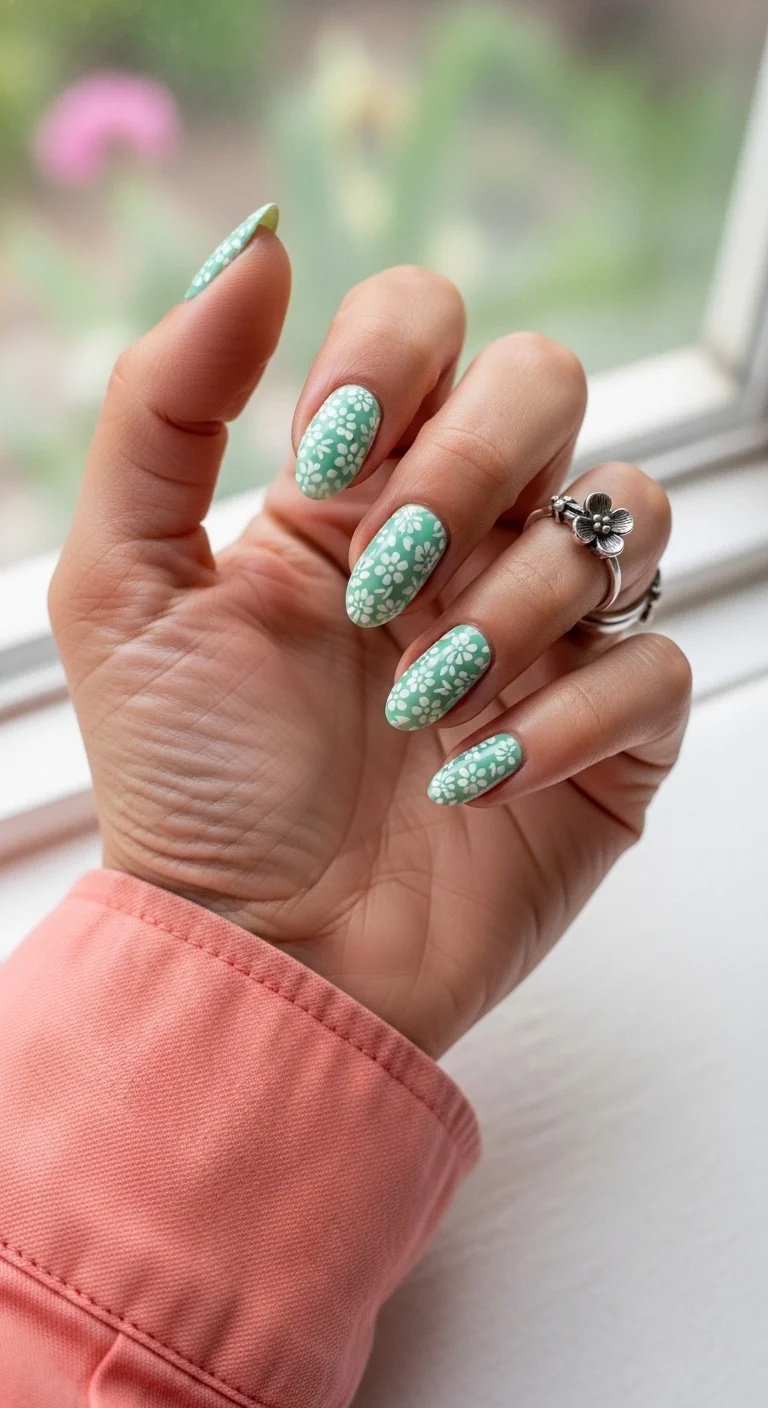
Vintage wallpaper in miniature.
Overview:
Daisy nail art has survived every trend cycle since the '90s because the technique is almost impossible to mess up. Five dots in a circle, one dot in the center, and you have a recognizable flower. That accessibility is the design's real strength.
The mint green base modernizes what could otherwise feel retro to the point of dated. On white or cream, daisies read nostalgic. On mint, they read current. The cool undertone of the mint also keeps the yellow centers from looking muddy, which is a problem that shows up on warmer base colors.
One thing to watch for: all-over floral patterns can look busy on longer nails. Short to medium lengths keep the pattern proportional and prevent the daisies from getting squeezed near the edges, where partial petals look unfinished.
Design Breakdown:
A classic pattern that depends on clean dotting technique and even spacing.
Base Color: A creamy, opaque pastel mint. Essie "Mint Candy Apple" or OPI "That's Hula-rious" are both reliable options.
Nail Shape: Medium oval. The rounded shape complements the circular flower forms.
Design Element: White five-petal daisies with yellow centers, scattered across every nail in a staggered pattern. Some flowers are cut off by the nail edge for a wallpaper effect.
Finish: High-gloss top coat to protect the dot work.
Get The Look at Home:
Budget about 20 minutes for both hands. This is one of the fastest freehand designs available.
- Mint base: Two coats of pastel mint. Let dry fully. Tackiness will cause the white petals to drag.
- Petal circles: Using a medium dotting tool dipped in opaque white, press five dots in a loose circle. The dots don't need to touch. Small gaps look more natural.
- Yellow centers: Wait 60 seconds for the white to set. Use a smaller dotting tool dipped in mustard yellow to place a single dot in each flower center.
- Spacing: Two to three daisies per nail. Leave visible mint between flowers. The green space is part of the design.
- Top coat: Float the brush over the nail without pressing. Dragging through wet yellow centers smears the color into the white petals.
35 Fun Birthday Nail Designs for 2026 🎂
12.Celestial Navy Stars
Night sky with scattered constellations.
Overview:
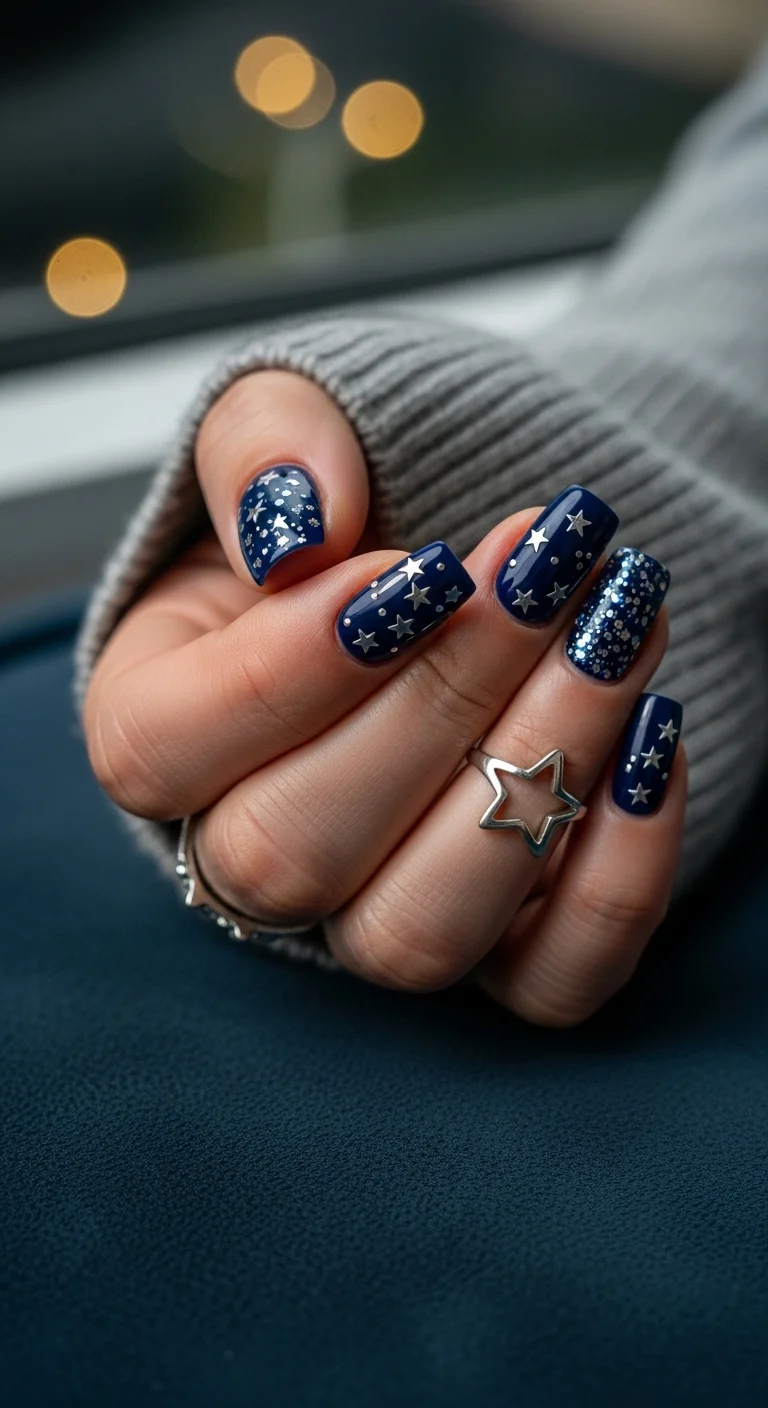
Navy blue sits in a comfortable middle ground between black and bright color. It has the depth of a dark shade without the severity, which makes it a practical choice for formal events where you want something moodier than pastel but not as heavy as black.
The silver star decals scattered across the navy nails create a literal night-sky reference that stays on the tasteful side of thematic. The stars are different sizes, and the scattered dots between them fill the negative space without overcrowding it. The full glitter accent nail on the ring finger adds texture variety.
A practical consideration: short nails limit the number of stars you can fit on each nail. Two or three stars per nail looks deliberate. More than that starts to look cluttered. Keep the star count low and let the navy base do the work.
Design Breakdown:
Deep base with metallic accents and one full-glitter nail for texture contrast.
Base Color: A deep, glossy navy blue. China Glaze "First Mate" or Essie "Butler Please" deliver the right depth.
Nail Shape: Short to medium square. The geometric shape keeps the celestial theme from looking too literal.
Design Element: Silver star decals in mixed sizes on the navy nails. One full silver glitter accent nail on the ring finger. Tiny silver dots scattered between the stars.
Finish: High-gloss on the navy nails. Full-glitter finish on the accent nail for texture contrast.
Get The Look at Home:
Decals are more reliable than hand-painting stars at this size.
- Navy base: Paint all nails navy except the ring finger. Let dry completely.
- Glitter accent: Paint the ring finger with dense silver glitter polish. Two to three coats for full coverage.
- Star placement: Use fine-tipped tweezers to peel star decals off the backing sheet. Press two or three stars onto each navy nail. Vary the sizes.
- Dot accents: Using a small dotting tool and silver polish, place tiny dots in the empty navy spaces between the stars.
- Seal: Apply top coat over all nails. For the glitter accent, use two coats to smooth the texture.
13.Deep Amethyst Chrome
Royal purple with dimensional shift.
Overview:
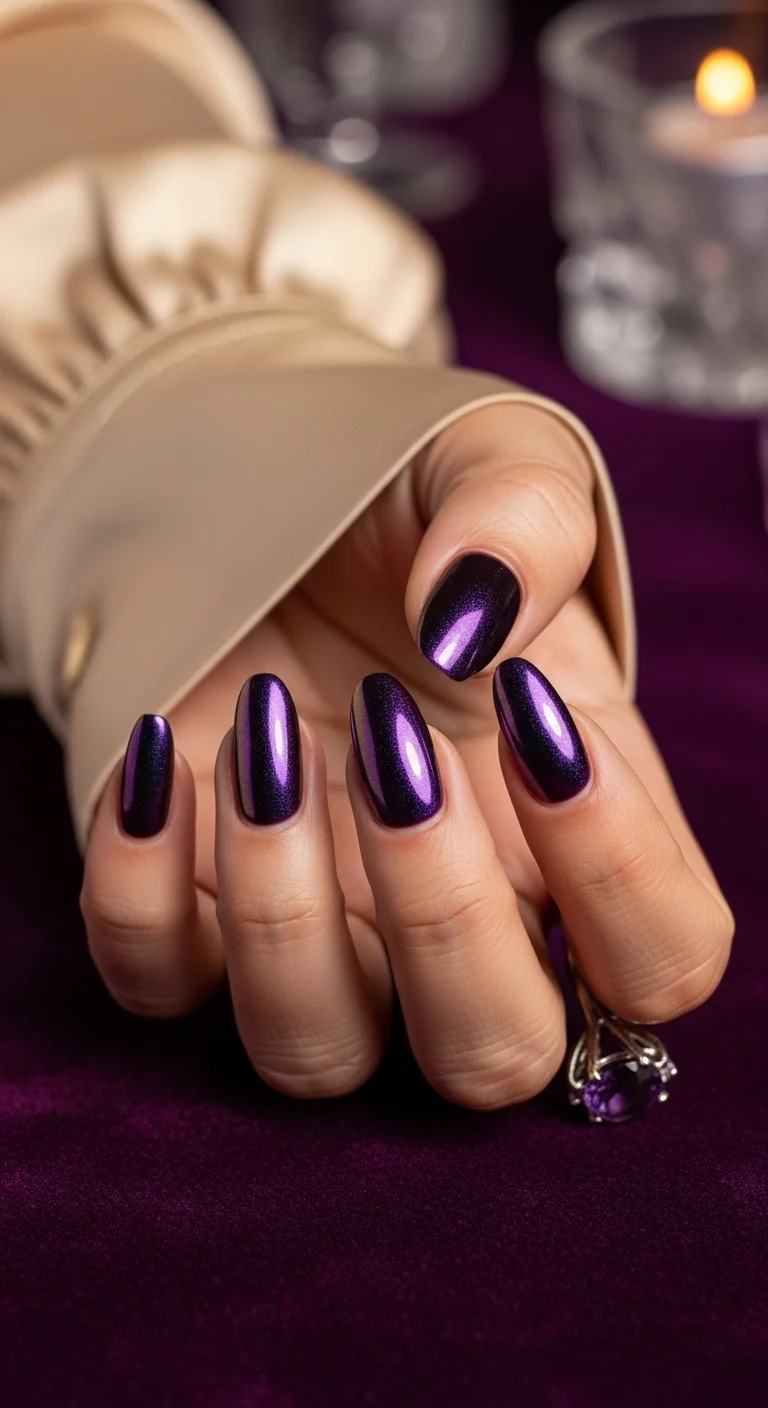
Chrome and magnetic polishes occupy a similar visual space: both create depth that flat polish can't replicate. This amethyst version falls somewhere between the two. The base is a dark, almost-black purple, and the surface layer shifts between deep violet and brighter magenta-purple depending on the angle of light.
The medium oval shape keeps the look refined. Chrome finishes on longer or more dramatic shapes (stiletto, long coffin) tend to read costume-y rather than formal. The oval keeps the focus on the color itself rather than the silhouette.
The challenge with dark chrome polishes is that they show wear more visibly than lighter finishes. The metallic particles at the tips start to dull or chip within a few days, and the contrast between the worn tips and the fresh cuticle area is noticeable. Gel application lasts significantly longer than regular polish for this reason.
Design Breakdown:
Single-finish design. The dimensional color shift is the entire statement.
Base Color: A deep, dark purple that approaches black in low light. The chrome or magnetic pigment creates the brighter violet flashes on top.
Nail Shape: Medium oval. The classic shape keeps the dramatic finish grounded.
Design Element: Purple chrome powder buffed into a dark base, or a magnetic cat-eye polish with violet shimmer. No additional art.
Finish: Ultra-glossy top coat to amplify the metallic reflection.
Get The Look at Home:
The chrome application timing is critical. Too cured and the powder won't adhere; too uncured and it sinks in.
- Dark base: Apply two coats of deep purple or black gel polish. Cure between coats.
- No-wipe top coat: Apply and cure for exactly 30 seconds. The surface should be slightly tacky.
- Buff the chrome: Using an eyeshadow applicator, rub purple chrome powder onto the nail in firm circular motions until the surface is mirror-smooth.
- Dust off: Use a soft brush to remove loose particles from the skin and cuticles.
- Seal: Apply a chrome-specific top coat and cure fully. Regular top coat can cloud the finish over time.
32 Stunning Summer Wedding Hairstyles for Brides ☀️💍
14.Silver Foil Sage
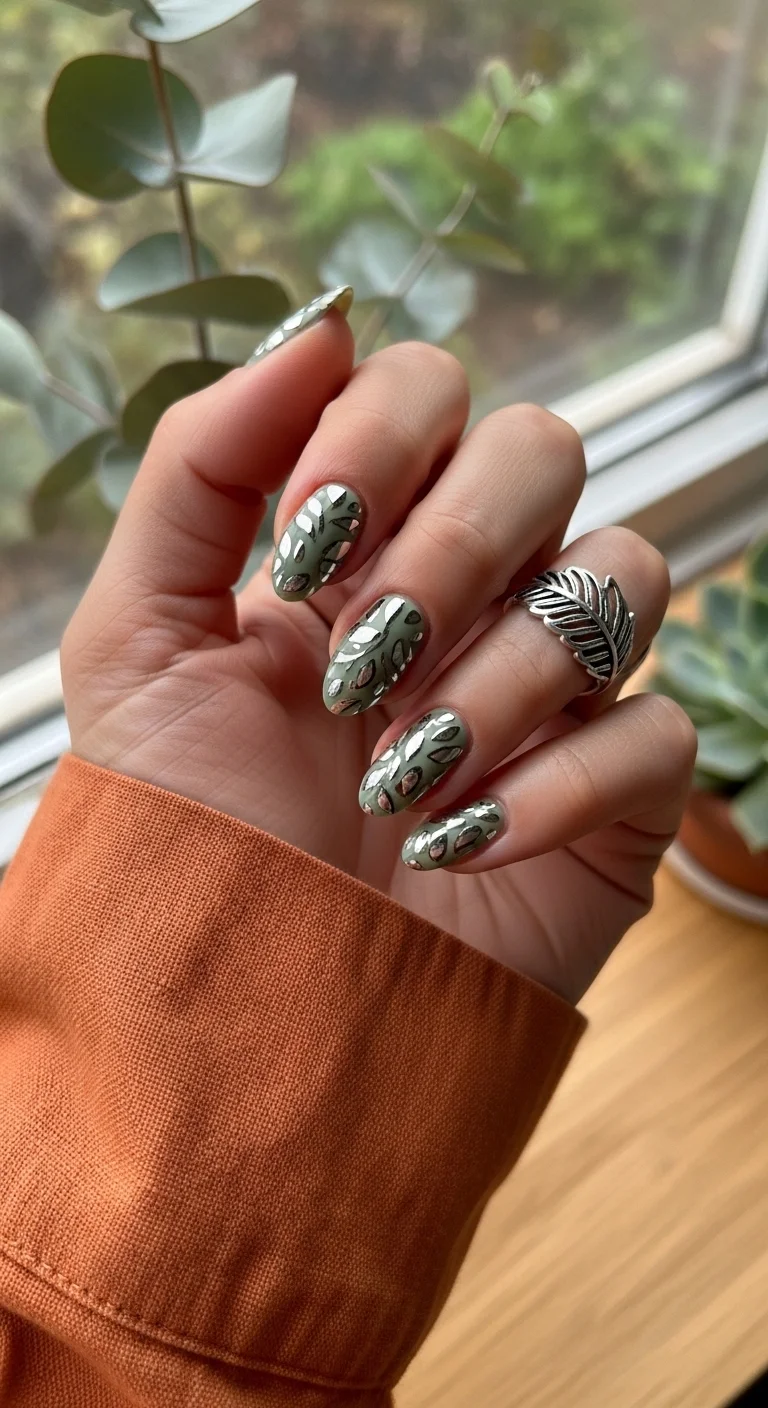
Earthy tone with metallic fracture.
Overview:
Sage green has moved from trend to staple, and this application shows why. The muted, grey-toned green works as a neutral that's more interesting than beige or grey. It flatters most skin tones without competing with jewelry or clothing.
The silver foil scattered across the nails adds a fractured, mineral-like texture. Against the muted sage, the bright silver creates a contrast that reads organic rather than decorative. The irregular shapes of the foil pieces reinforce that natural quality. Perfectly cut geometric foil would create a different, more structured effect.
The darker spots visible on some nails create additional depth, almost like a stone or animal texture layered beneath the foil. This layering effect is what separates the design from a simple foil-over-solid application. It takes more time, but the dimensional result justifies it.
Design Breakdown:
Muted base with metallic texture. The foil placement should look random, not planned.
Base Color: A muted, grey-toned sage green. Essie "Sew Psyched" or Zoya "Sage" match the tone.
Nail Shape: Short oval. The organic shape complements the mineral-like foil texture.
Design Element: Irregular silver leaf foil pieces pressed into the tacky polish surface. Some nails have additional darker green or black accents beneath the foil for depth.
Finish: High-gloss top coat. Two coats minimum to smooth the foil texture.
Get The Look at Home:
Foil adheres to tacky polish, not dry polish. Timing matters.
- Sage base: Apply two coats of sage green. While the second coat is still slightly tacky, move to the next step.
- Foil placement: Using tweezers, press small pieces of silver leaf foil onto the tacky surface. Don't try to flatten them perfectly. Slightly crumpled foil catches more light.
- Dark accents (optional): On one or two nails, dab a tiny amount of dark green or black polish in random spots before adding the foil. This creates the layered depth visible in the image.
- Press flat: Once the foil is placed, use a silicone tool or your fingertip to press the edges flat against the nail.
- Seal: Apply two coats of top coat. The first fills in the foil texture. The second creates the smooth, polished surface.
15.Deep Sea Cat Eye
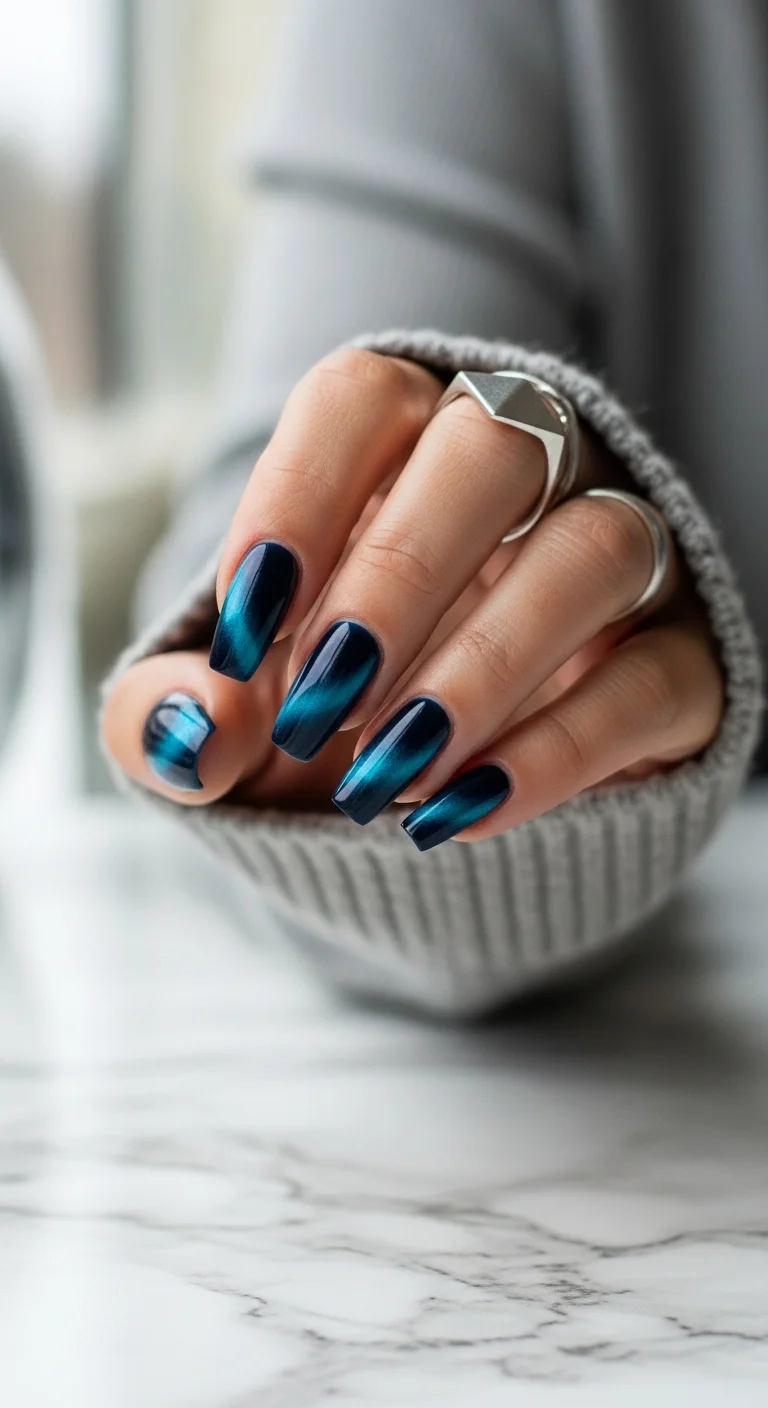
Magnetic shimmer under dark water.
Overview:
Cat-eye polish uses magnetic particles suspended in the formula to create a concentrated band of light that shifts as you move your hand. The effect is hypnotic in person, though photos often flatten it into a simple gradient. You need to see these in motion to appreciate them.
The deep teal-black base is what makes the magnetic line pop. A lighter base wouldn't provide enough contrast. The band of bright teal running diagonally across each nail looks like light filtering through deep water, which is where the "deep sea" reference comes from.
The magnet tool is non-negotiable for this technique. Holding the magnet at the right distance (about half a centimeter) and angle determines where the light band settles. Too close and the particles clump; too far and they don't concentrate. It takes practice to find the sweet spot.
Design Breakdown:
Magnetic particles create the signature light-shifting line. The magnet is as important as the polish.
Base Color: A dark teal-black. The base needs to be deep enough to contrast with the bright magnetic particles. Cirque Colors "Mystic Moonstone" or similar cat-eye polishes work well.
Nail Shape: Medium to long coffin. The flat surface gives the magnetic line room to travel across the nail.
Design Element: Teal magnetic cat-eye gel polish with a strong magnet tool. The magnet creates the concentrated light ribbon.
Finish: High-gloss top coat to enhance the depth and the "liquid" effect.
Get The Look at Home:
You need a cat-eye magnet for this. Regular polish won't produce the effect.
- Dark base: Apply a coat of black or dark teal gel polish. Cure.
- Cat-eye layer: Apply a generous coat of teal magnetic polish. Do NOT cure yet.
- Magnet placement: Hold the magnet about 0.5cm above the nail surface for 10 to 15 seconds. You'll see the bright particles shift to form a diagonal line.
- Cure immediately: Once the line is where you want it, cure right away. The particles will drift if you wait too long.
- Seal: Apply top coat and cure one final time. The gloss intensifies the magnetic effect.
34 Cutest Butter Yellow Nail Designs for 2026 🧈
16.Burnt Orange Glitter
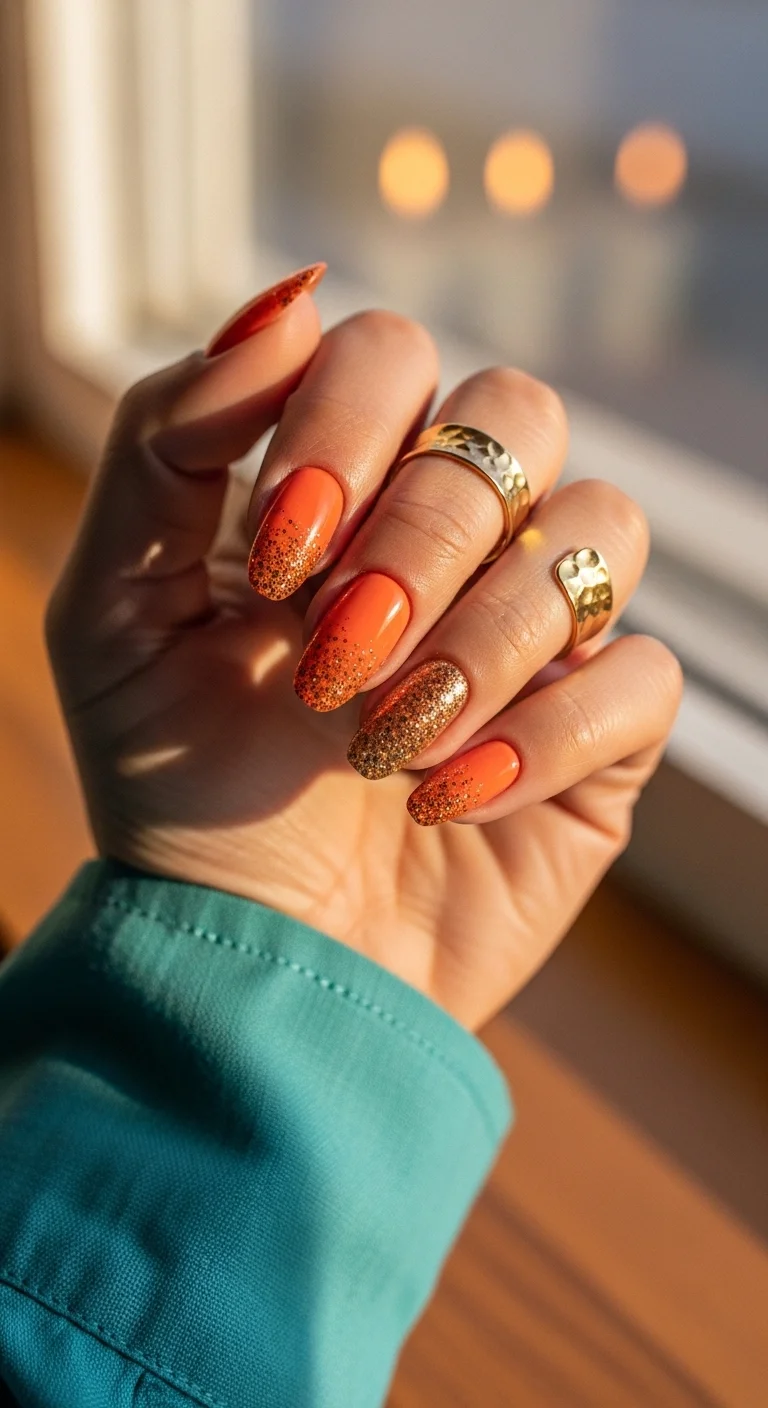
Sunset warmth with metallic fade.
Overview:
Burnt orange sits in an unusual spot on the color spectrum. It's warm enough to feel summery but deep enough to avoid looking neon or juvenile. The terracotta undertone gives it an earthy quality that pairs naturally with gold metallics.
The glitter ombre on most nails concentrates the sparkle at the tips and fades toward the cuticle. The full glitter accent nail on the ring finger breaks the pattern and adds a focal point. Without that accent, the gradient alone might read as predictable.
The main challenge with orange polish formulas is streaking. Warm oranges tend to have thinner pigmentation than cooler tones, which means the base needs careful application. Three thin coats rather than two standard ones usually solves the problem. Skipping that step leaves visible brush marks that the glitter can't fully hide.
Design Breakdown:
Warm base with glitter gradient. The accent nail breaks the repetition.
Base Color: A bright, warm burnt orange or terracotta. Not neon, not pastel. Think roasted pumpkin. OPI "Sun, Sea, and Sand in My Pants" or Essie "Playing Koi" work well.
Nail Shape: Short to medium almond. The rounded shape keeps the warm color looking soft rather than aggressive.
Design Element: Copper and gold glitter concentrated at the tips, fading toward the cuticle on most nails. One accent nail (ring finger) is fully covered in dense gold glitter.
Finish: High-gloss top coat. Two to three layers to smooth the glitter texture.
Get The Look at Home:
The sponge technique applies here, but the orange base needs extra coats for opacity.
- Orange base: Apply three thin coats of burnt orange. Let each coat dry fully before the next.
- Glitter sponge: Paint copper-gold glitter polish onto a makeup sponge. Dab on paper first to remove excess.
- Gradient application: Press the sponge onto the nail tip, dabbing four to five times per nail to build the fade.
- Accent nail: Paint the ring finger with two to three coats of dense gold glitter polish for full coverage.
- Blend check: If the gradient edge looks harsh, dab a clean sponge section along the transition line to soften it.
- Seal: Two to three coats of top coat. Check for grit between each layer.
17.Teal Grid Lines
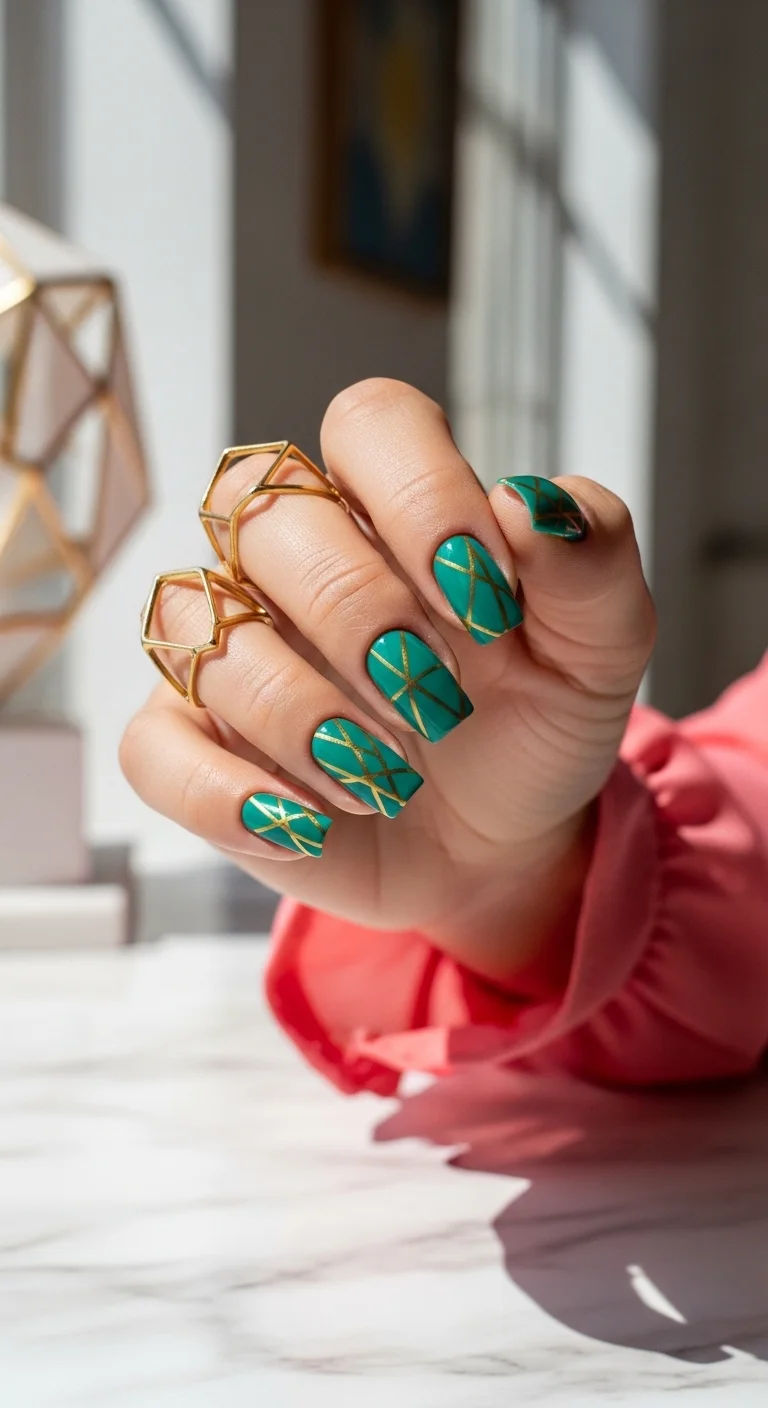
Architectural lines on saturated color.
Overview:
Geometric nail art depends entirely on precision. The lines need to be genuinely straight, the spacing needs to be intentional, and the metallic polish needs to be opaque enough to show up cleanly against the base color. When all three conditions are met, the result looks like it required a ruler.
This teal-and-gold version works because the base color is saturated enough to hold its own against the metallic gold. A paler teal would wash out under the gold lines. The short square shape reinforces the geometric theme. Straight edges on the nail mirror straight edges in the design.
The random grid pattern (rather than a uniform one) is what keeps the design interesting. Some nails have more crossing lines than others. That asymmetry prevents the "wallpaper effect" where every nail looks identical from a distance.
Design Breakdown:
Structured metallic lines on a saturated base. The precision of the tape placement determines the quality.
Base Color: A bright, saturated teal with a creamy finish. Not mint, not navy. Think tropical water. Essie "Fall for Jenny" or Zoya "Robyn" hit the right tone.
Nail Shape: Short square. The flat edges complement the geometric line work.
Design Element: Gold metallic striping tape in intersecting diagonal and horizontal lines, creating a random grid pattern. The line count varies per nail.
Finish: High-gloss top coat to seal the tape and amplify the gold's reflectivity.
Get The Look at Home:
A steady hand helps, but striping tape is more forgiving than freehand painting.
- Teal base: Two coats of saturated teal. Let dry completely. Tape applied over tacky polish pulls up the base.
- First line: Press a length of gold striping tape diagonally across the nail. Smooth it down firmly from edge to edge.
- Cross lines: Add a second line crossing the first at a different angle. On some nails, try parallel lines instead of crossing.
- Vary the pattern: Move to the next nail and try a different arrangement. Horizontal lines, diagonal grids, or a single bold stripe. The variety is the point.
- Trim ends: Snip the tape about 0.5mm inside the nail border. Tape that reaches the free edge peels off quickly.
- Seal: One thick coat of self-leveling top coat. Don't go back over it, which shifts the tape.
25 Stunning Summer Vacation Hairstyles for 2026 ☀️🌊
18.Lavender Sugar Dust
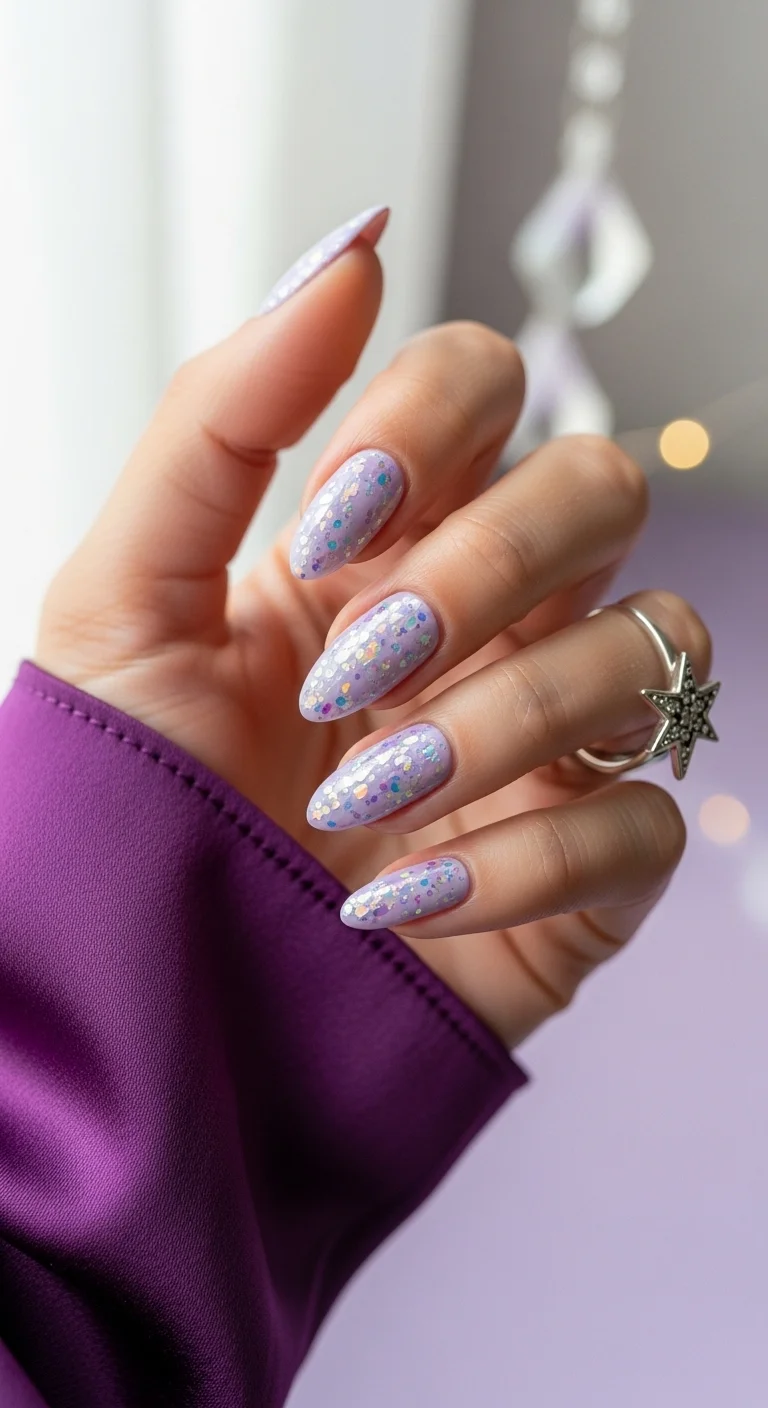
Pastel sparkle with multi-color shift.
Overview:
Lavender is one of those pastels that manages to feel both soothing and playful, depending on the finish. In a flat cream, it reads calm and muted. Add chunky iridescent glitter, and the entire energy shifts. The holographic particles catch light in pink, blue, and silver flashes that transform the base from "安静" to "fairy."
The glitter distribution in this design is even rather than gradient. Every nail has roughly the same density of sparkle, which creates a uniform texture across the hand. That consistency is what makes the design feel cohesive rather than scattered.
The long oval shape complements the ethereal quality of the lavender-and-glitter combination. More angular shapes (square, coffin) would create a tension between the soft sparkle and the sharp silhouette. The oval lets both elements work together.
Design Breakdown:
Pastel base with multi-tonal glitter. The chunk size and distribution are what create the "sugar dust" effect.
Base Color: A creamy, opaque lavender. Not too pink, not too blue. OPI "Do You Lilac It?" or Essie "Go Ginza" are reliable choices.
Nail Shape: Long oval. The curved shape enhances the dreamy, fairy-like quality.
Design Element: Chunky iridescent and holographic glitter in mixed sizes, scattered evenly across each nail. The particles shift between pink, blue, and silver depending on the light angle.
Finish: Thick, plumping top coat to encapsulate the glitter and create a smooth surface.
Get The Look at Home:
Pressing individual glitter pieces gives more control than shaking from a bottle.
- Lavender base: Two coats of opaque lavender. Let dry fully.
- Glitter application: While the second coat is still slightly tacky, use a wax pen or tweezers to pick up individual pieces of chunky glitter and place them on the nail.
- Distribution: Aim for roughly even coverage across each nail. Concentrate more glitter near the center, less near the edges.
- Press flat: Use a silicone tool to press each glitter piece flat against the nail surface. Raised edges will snag.
- Sheer overlay (optional): For a "trapped under glass" effect, apply a thin sheer coat of lavender over some of the glitter before the final top coat.
- Encapsulate: Two thick coats of top coat. Run your finger over the nail after each coat. If you feel texture, add another layer.
19.Opal Cloud Dream
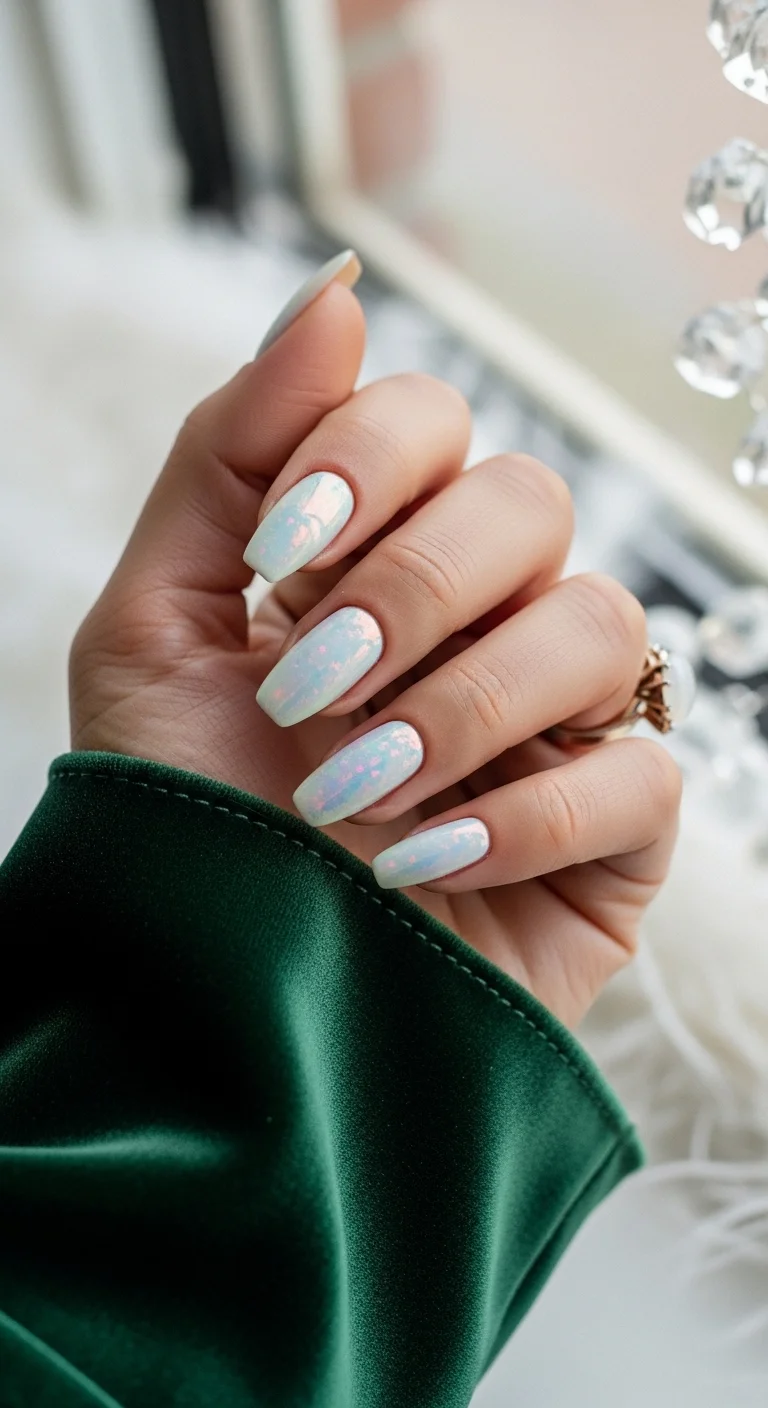
Milky iridescence with opal shimmer.
Overview:
Milky white nails have been trending for a while, but most versions stop at a plain, slightly translucent cream. This opal-finish version adds an iridescent layer that shifts between pink and blue depending on the angle. The effect is subtle in low light but striking in direct sun or under flash photography.
The medium square shape works well for this design because the flat surface maximizes the iridescent shift. On curved shapes, the color change happens across a smaller visible plane, making it less noticeable. Square nails provide a wider canvas for the shimmer to develop.
The practical downside of opal and iridescent finishes is that they magnify imperfections in the base coat. Any streakiness in the milky white underneath becomes visible as uneven shimmer distribution. Two even coats of base, fully dried between each, are necessary for a clean result.
Design Breakdown:
Milky base with iridescent overlay. The shimmer is what elevates this from plain white to opal.
Base Color: A semi-sheer milky white or marshmallow. The sheerness is intentional, it lets light pass through and interact with the iridescent layer.
Nail Shape: Medium square. The flat surface showcases the full range of the iridescent shift.
Design Element: Iridescent opal shimmer or "unicorn skin" flakes layered over the milky base. The particles shift between pink, blue, and silver.
Finish: Ultra-glossy wet-look top coat to enhance the opal depth.
Get The Look at Home:
The sandwich technique (flakes between sheer layers) creates the most realistic opal effect.
- Milky base: Apply one coat of sheer milky white. Let dry.
- Flake layer: While the second coat is still tacky, dab iridescent opal flakes onto the nail surface.
- Sheer overlay: Apply another thin coat of milky white OVER the flakes. This traps them between layers, creating the "inside the nail" depth.
- Additional flakes: Add a few more flakes on top of the sheer overlay for 3D dimension.
- Build opacity: If the base is too sheer, add one more milky coat. The flakes should still be visible through each layer.
- Glossy seal: One thick coat of high-shine top coat to bring out the fire in the flakes.
31 Patriotic Fourth of July Nail Ideas for 2026 🇺🇸
20.Crystal Ombre Elegance
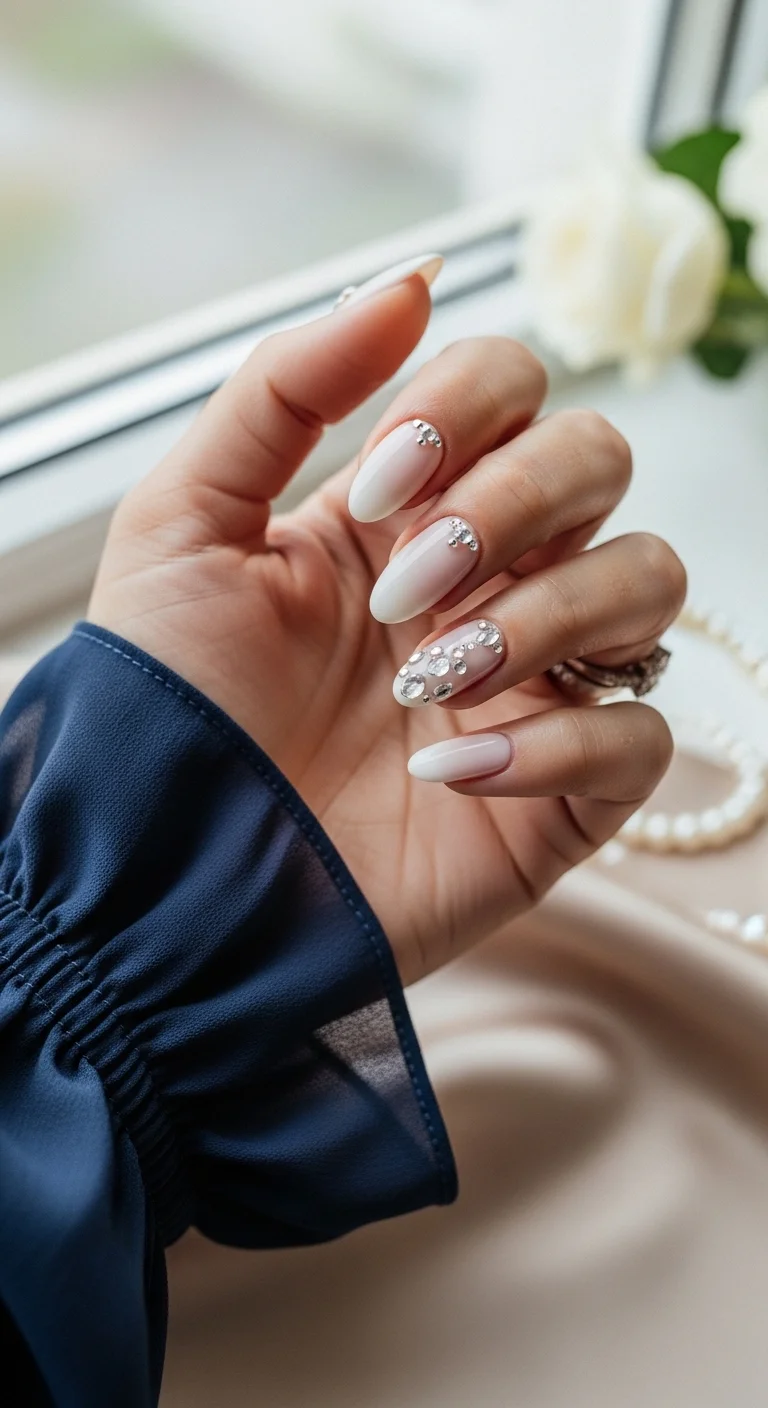
Classic gradient with crystal detail.
Overview:
The nude-to-white gradient, often called "Boomer" or French ombre, is one of the most versatile formal nail designs. The fade from warm nude at the cuticle to soft white at the tip mimics the look of a natural nail but with a more polished, deliberate transition. It works with virtually any dress color or style.
The crystal accents at the cuticle on the ring finger add a focal point without overwhelming the simplicity of the gradient. Small rhinestones placed near the cuticle area catch light when you gesture, which is exactly where attention falls during handshakes and photo poses.
The long oval shape is the classic choice for this design. The tapered tip makes the white gradient look like a natural extension of the nail rather than a painted line. Shorter or more angular shapes can make the fade look compressed and less seamless.
Design Breakdown:
Seamless gradient with minimal crystal embellishment. The fade quality determines the design's success.
Base Color: A warm-toned nude that matches your skin tone at the cuticle, transitioning to opaque white at the tip.
Nail Shape: Long oval. The curved tip makes the gradient look natural and elongated.
Design Element: Nude-to-white French ombre created with a sponge. Small crystal rhinestones placed at the cuticle on one or two accent nails.
Finish: High-gloss top coat. Avoid getting top coat over the crystals, as it dulls their facets.
Get The Look at Home:
The sponge technique is standard, but the key is building the gradient in thin layers rather than one heavy pass.
- Nude foundation: Apply two coats of warm nude. Let dry completely.
- Sponge setup: Paint a strip of nude and a strip of white side by side on a makeup sponge, overlapping slightly in the middle.
- First pass: Bounce the sponge onto the nail, moving it slightly up and down to blur the transition line.
- Build the fade: Repeat three to four times until the white tip is solid and the transition is smooth. Let the sponge dry slightly between passes.
- Crystal placement: Using a dot of nail glue or thick top coat, place three to five small crystals at the cuticle area of the accent nail.
- Seal around crystals: Apply top coat around the crystals, not over them. Covering the facets kills the sparkle.
21.Petrol Oil Slick
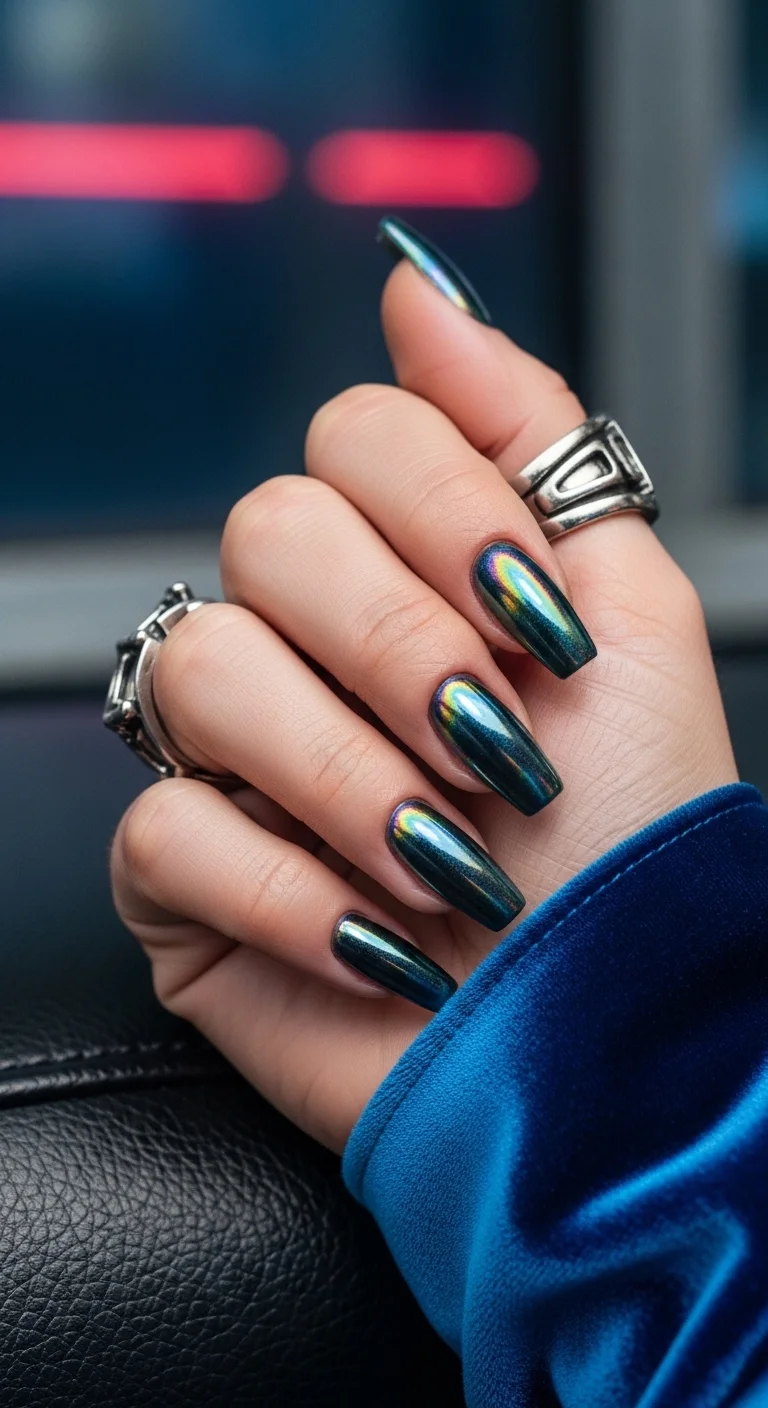
Color-shifting chrome with hidden depths.
Overview:
Multichrome pigments create a color-shifting effect that looks different from every angle. This petrol version shifts between teal, green, gold, and hints of purple, similar to the iridescent sheen on a beetle's wing or oil on water. The base is dark enough that the colors appear to glow from within rather than sitting on top.
The long coffin shape gives the multichrome room to develop. On shorter nails, the color shift happens across a smaller surface area, and you lose some of the drama. The extended tip provides a wider plane for the teal-to-green-to-gold transition to play out.
One thing to know about multichrome powders: they require a black base to show their full range. Applying the same powder over a white or clear base produces a washed-out, pastel version of the shift. The black is load-bearing for the color intensity.
Design Breakdown:
Full-nail multichrome finish. The black base and the pigment quality determine the effect.
Base Color: Jet black gel polish. The black is essential for the multichrome pigments to show their full color range.
Nail Shape: Long coffin. The extended flat surface maximizes the visible color shift.
Design Element: Multichrome "oil slick" pigment powder that shifts between teal, green, gold, and purple. No additional art needed.
Finish: Ultra-glossy mirror-finish top coat to enhance the color shift and protect the pigment.
Get The Look at Home:
The pigment application is the same as regular chrome, but the color payoff depends on the quality of the multichrome powder.
- Black base: Apply two coats of jet black gel polish. Cure between coats.
- No-wipe top coat: Apply and cure for 30 seconds. The surface needs to be slightly grabby for the pigment to adhere.
- Buff the pigment: Using an eyeshadow applicator, rub the multichrome powder onto the nail in firm circular motions. The teal-to-green-to-gold shift will emerge as you buff.
- Check the shift: Tilt your hand under light to see if all three colors are visible. If the shift is weak, apply more pigment and buff again.
- Dust off: Use a soft brush to remove any loose powder from the skin.
- Seal: Apply a chrome-specific top coat and cure fully. Regular top coat can cloud the multichrome finish.
21 Hot Summer Buns Hairstyle Ideas for 2026 ☀️🔥
22.Pressed Flower Petals
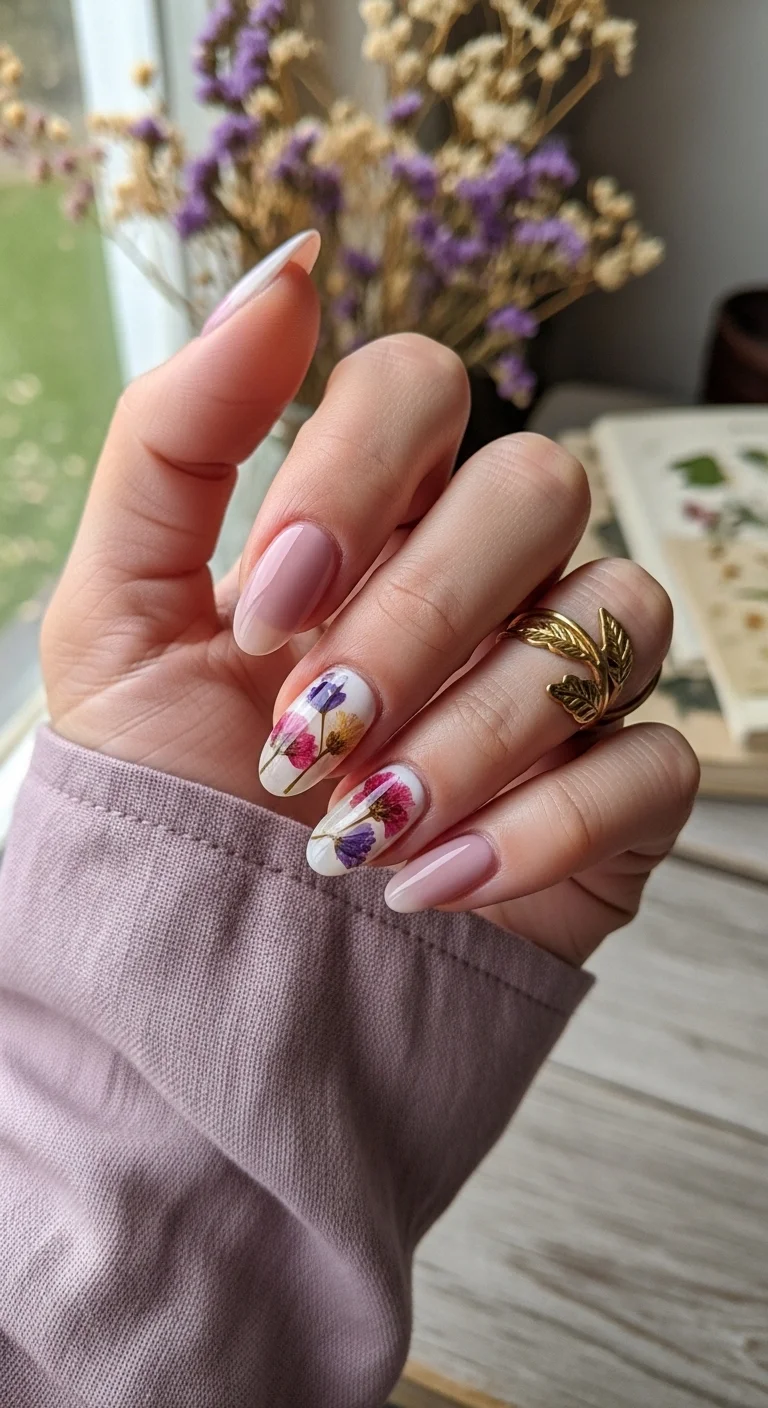
Botanical art trapped under glass.
Overview:
Using real dried flowers in nail art creates an effect that hand-painting can't replicate. The petals have natural color variations, organic shapes, and a translucent quality that reads as genuinely botanical rather than illustrated. Each nail becomes a small pressed-flower specimen.
The sheer milky pink and white bases keep the focus on the flowers. A colored base would compete with the petals for attention. The white accent nails, where most of the flowers are placed, act as a clean canvas that lets the purple, pink, and yellow of the dried flowers show clearly.
The practical challenge with dried flowers is thickness. Petals that aren't pressed flat enough create bumps under the top coat, which catches on clothing and hair. Multiple coats of builder gel or top coat are needed to fully encapsulate the flowers and create a smooth surface.
Design Breakdown:
Botanical elements encapsulated in gel. The pressing and sealing steps are what make or break the design.
Base Color: Sheer milky pink on most nails. Opaque white on the accent nails where flowers are placed.
Nail Shape: Long oval. The curved surface accommodates the organic shapes of the dried petals.
Design Element: Tiny real dried flowers (baby's breath, mini daisies, pressed petals in purple, pink, and yellow) encapsulated in clear gel on the white accent nails.
Finish: Thick, high-gloss builder gel or top coat to create a smooth, glass-like surface over the flowers.
Get The Look at Home:
You'll need a kit of mini dried nail flowers, available from most nail supply shops.
- Base colors: Apply sheer pink on most nails, white on the accent nails. Let dry.
- Flower placement: On the white nails, apply a thin layer of wet clear polish or gel. While it's wet, use tweezers to place the dried flowers onto the nail.
- Flatten: Gently press the petals down with a silicone tool so they don't stick up above the nail surface.
- Encapsulate: Apply a thick layer of builder gel or two to three coats of top coat over the flowers. Each coat should fully cover the petals.
- Check smoothness: Run your finger over the nail. If you feel any raised edges, add another coat of top coat.
- Final seal: One last coat of high-gloss top coat for the glass-like finish.
23.Silver Vein Blue Marble
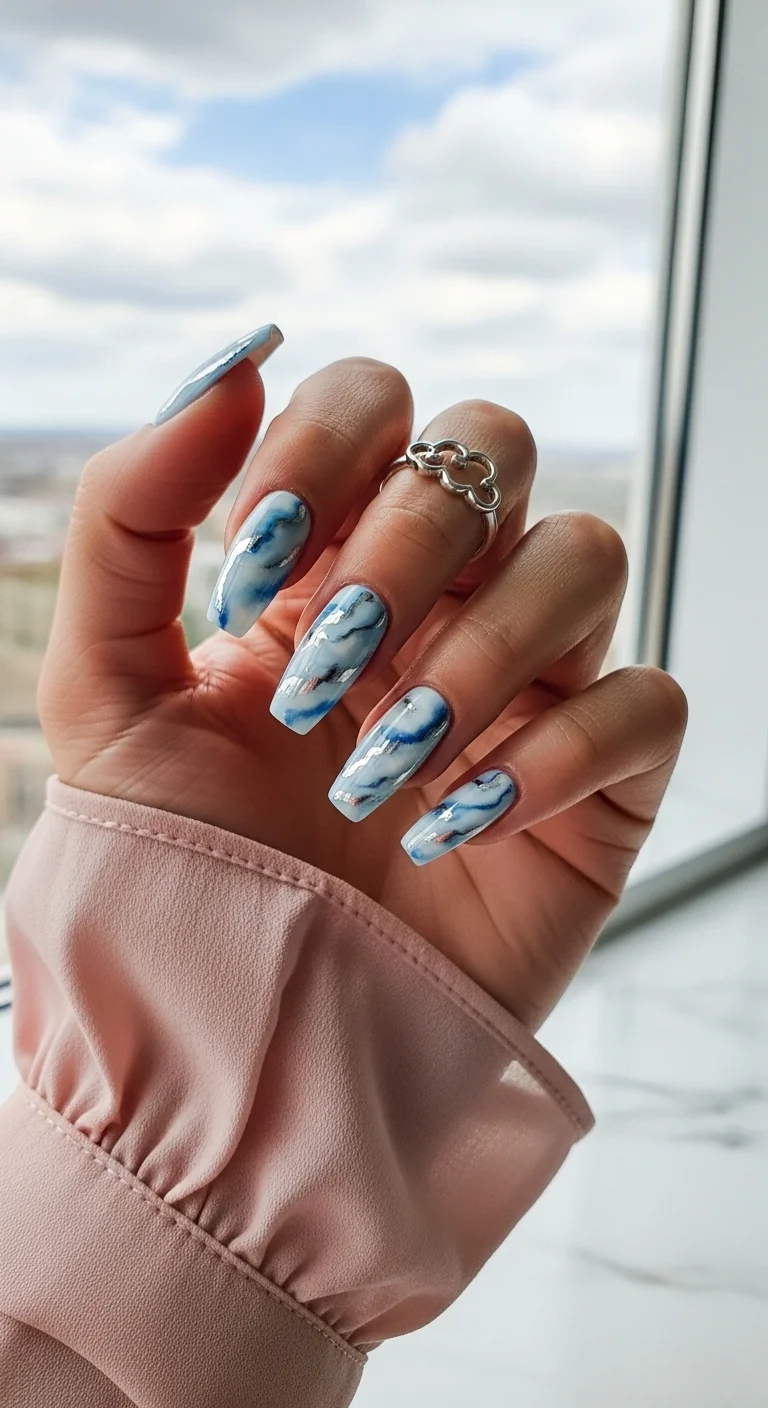
Cool-toned stone with metallic fractures.
Overview:
Blue marble nails attempt to replicate the look of polished stone like azurite or blue quartz. This version uses a white base with blue veining to create a lighter, more airy version of the typical dark marble. The result reads as cool-toned luxury rather than moody darkness.
The silver metallic veins running through the blue marble add a second layer of detail. They follow the natural flow of the blue swirls, which makes the silver look like mineral deposits within the stone rather than a separate design element. That integration is what separates good marble nail art from blue-smudge-on-white.
The wet-on-wet technique used for the marbling requires working quickly. The blue polish needs to spread into the white base before either color sets. If the white is too dry, the blue sits on top as a hard line rather than blooming into a soft vein. Work one nail at a time.
Design Breakdown:
Wet-on-wet marble with metallic accent lines. Speed and restraint are both necessary.
Base Color: A solid, opaque white. The white needs to be fully dry before the blue veining goes on.
Nail Shape: Long coffin. The flat surface showcases the marble pattern without distortion.
Design Element: Blue marble veining created by dragging thinned blue polish through wet white base, topped with thin silver metallic lines following the vein patterns.
Finish: High-gloss top coat to mimic polished stone.
Get The Look at Home:
Thin the blue polish with a drop of acetone before applying. Full-strength polish creates hard lines instead of soft veins.
- White base: Two coats of opaque white. Let dry completely.
- Blue prep: On a palette, mix a drop of sky blue polish with a drop of acetone. You want a thin, watery consistency.
- Apply the blue: Using a messy, old brush, dab the thinned blue onto the white nail. Let it spread naturally into smoky patterns. Don't try to control it.
- Add depth: Repeat with a darker navy blue in smaller amounts. The two blues create dimension.
- Silver veins: Once the blue is dry, use a thin liner brush and silver metallic polish to draw jagged lines following the blue swirl patterns.
- Seal: Two coats of top coat to smooth the surface and add the polished-stone shine.
27 Stunning Graduation Day Nail Ideas for 2026 🎓
24.Rose Gold Frenchie
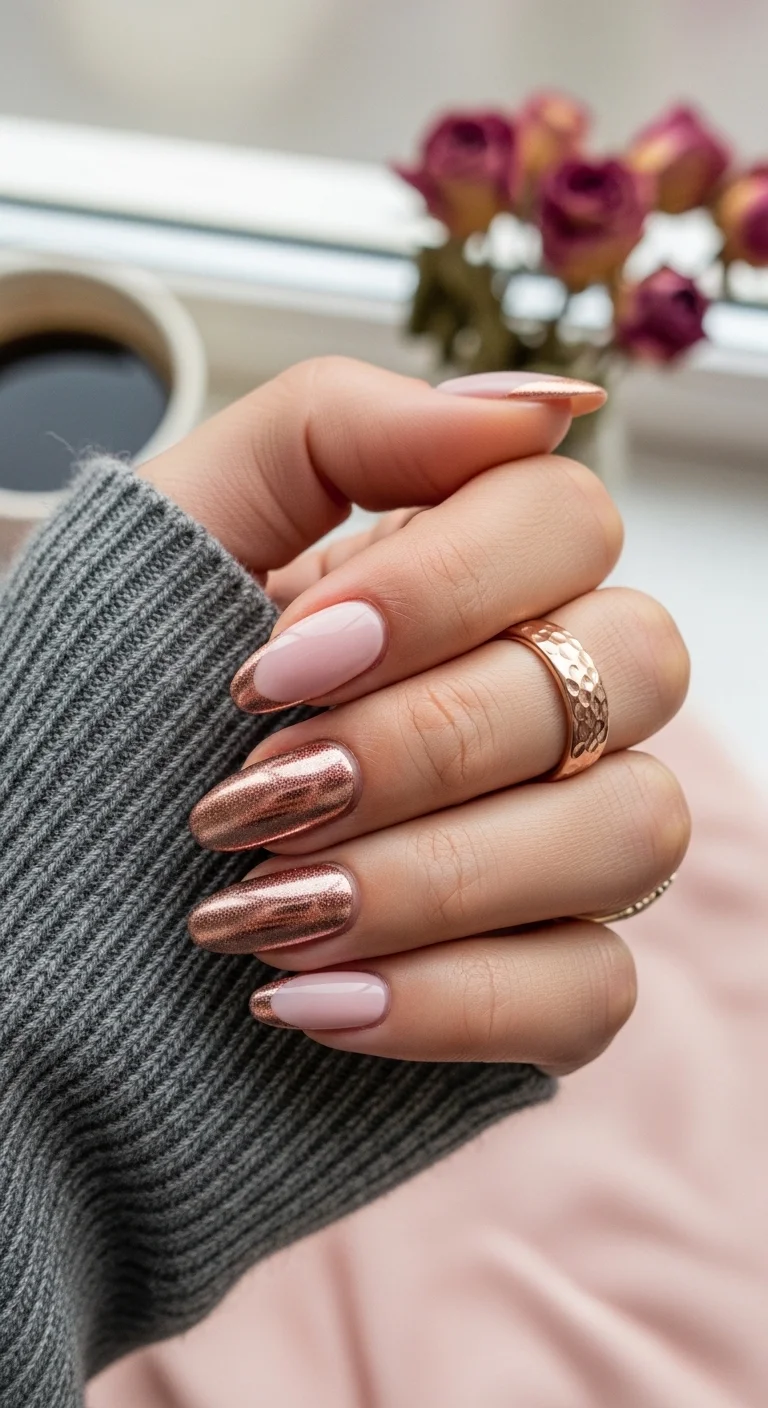
Metallic French with chrome accent nails.
Overview:
Rose gold sits at a unique intersection of warm and cool. It's warmer than silver but cooler than yellow gold, which makes it one of the most versatile metallics for mixing with jewelry in both tones. On nails, that versatility translates to a design that pairs with almost any dress color.
This design splits between two treatments: rose gold chrome French tips on some nails, and full rose gold chrome coverage on the accent nails. The French tips keep the look restrained; the full chrome nails add the drama. That balance prevents the set from being either too minimal or too metallic.
The chrome application on the accent nails requires the same black-base technique as other chrome designs. The rose gold pigment over a dark base creates a deeper, more copper-toned chrome than it would over a light base. The French tips, by contrast, are painted directly over the nude base for a lighter, more rose-toned metallic.
Design Breakdown:
Two-treatment design mixing French tips with full chrome accent nails. The chrome base color affects the final tone.
Base Color: A sheer, warm-toned nude or milky pink for the French tip nails. Black gel base for the chrome accent nails.
Nail Shape: Medium oval. The classic shape keeps the rose gold looking elegant rather than trendy.
Design Element: Rose gold metallic French tips on most nails. Full rose gold chrome on the middle and ring finger accent nails.
Finish: High-gloss top coat. The chrome nails need a chrome-specific sealant to prevent dulling.
Get The Look at Home:
The two different base colors mean you'll work in rounds: French tips first, then chrome accent nails.
- Nude base for French nails: Apply two coats of sheer nude on the French tip nails. Let dry.
- Rose gold tips: Using a liner brush and rose gold metallic polish, paint the French tip curve. Start from one sidewall, sweep to center, repeat from the other side.
- Chrome base for accent nails: Paint the middle and ring fingers with black gel. Cure.
- Chrome application: Apply no-wipe top coat to the black nails, cure 30 seconds, then rub rose gold chrome powder until mirror-smooth.
- Clean up: Brush away any stray chrome particles from the nude nails before sealing.
- Seal all nails: Apply top coat to every nail. Use chrome-specific top coat on the chrome nails.
25.Peachy Pearl Accents
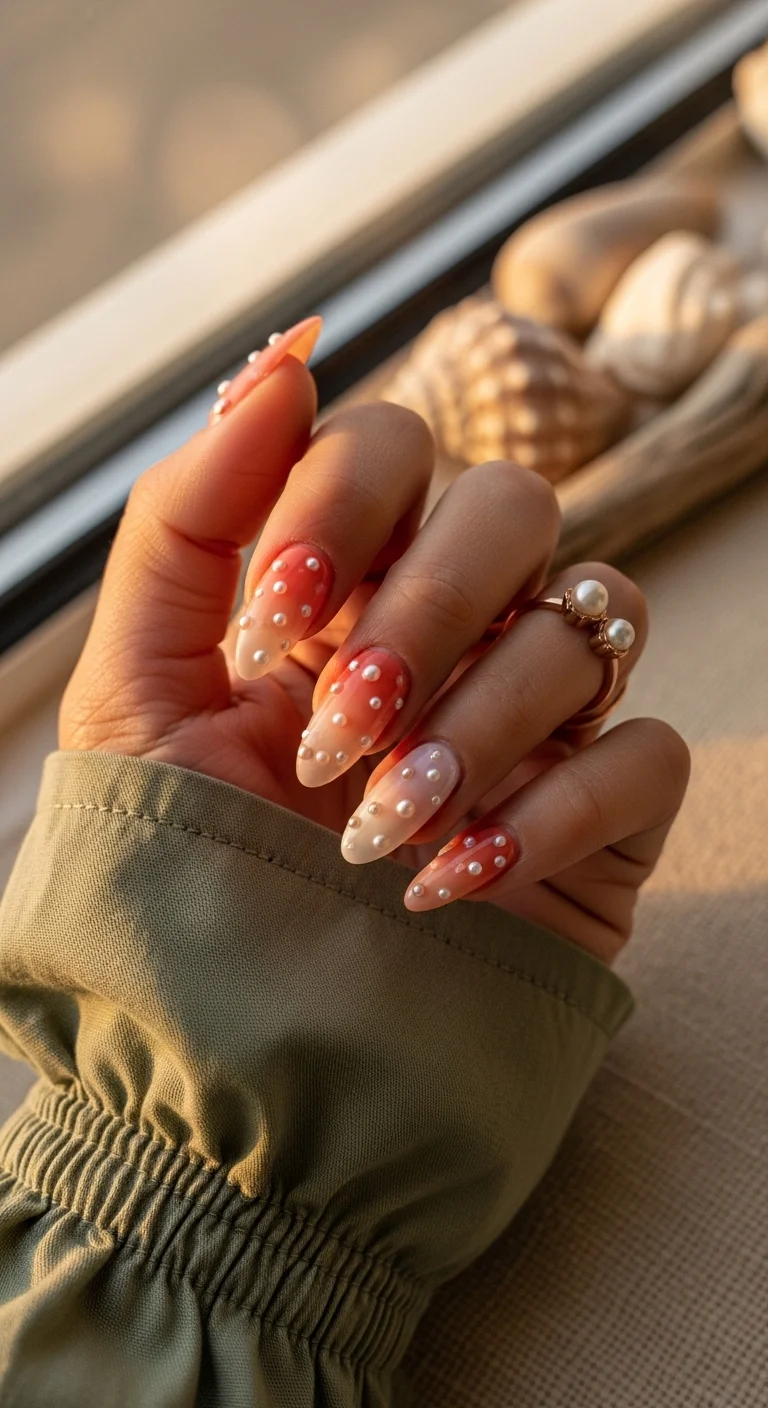
Coastal elegance with pearl texture.
Overview:
Pearl embellishments on nails occupy a strange middle ground. Done well, they look like jewelry. Done poorly, they look like craft supplies stuck to polish. The difference comes down to size variety and placement. Using pearls of different sizes and scattering them unevenly creates an organic, coastal effect rather than a uniform, manufactured one.
The peach-to-nude gradient underneath provides a warm, sunset-like backdrop that complements the cool white of the pearls. The color temperature contrast between the warm base and the cool pearls is what makes each element distinct. A pink or white base would cause the pearls to blend into the background.
The practical reality of 3D pearl embellishments: they snag on everything. Hair, knitwear, pillowcases, fabric clutches. Sealing the edges with a thick bead of top coat around each pearl reduces lifting, but it doesn't eliminate the catching. Budget about a week of wear before something catches and pulls one off.
Design Breakdown:
Gradient base with 3D pearl accents. The pearl placement and sealing determine both the look and the longevity.
Base Color: A warm peach fading into a soft nude or cream. The gradient is subtle, not dramatic.
Nail Shape: Long almond. The tapered shape complements the rounded pearls.
Design Element: Small 3D half-pearls of varying sizes scattered across the nails. More concentrated near the cuticle on some nails, sparser on others.
Finish: Satiny or iridescent top coat over the base. The pearls should NOT be covered with top coat, as it kills their luster.
Get The Look at Home:
You'll need a wheel of mini nail pearls and strong nail adhesive. Regular top coat won't hold them.
- Peach gradient: Using a sponge, create a soft fade from peach at the cuticle to cream at the tip. Two to three passes for a smooth transition.
- Iridescent base: Apply a coat of pearl or iridescent shimmer polish over the gradient for a unified glow.
- Pearl placement: Dab small dots of nail adhesive where you want each pearl. Use a wax pen to place pearls of different sizes onto the glue dots.
- Random scatter: Cluster some pearls together and leave other areas bare. Symmetric placement looks rigid.
- Edge seal: Using a detail brush, apply top coat around the base and edges of each pearl. This prevents lifting.
- Avoid covering pearls: Do NOT apply top coat over the pearls themselves. The matte/pearl finish is what makes them look like real pearls.
28 Effortless Hot Weather Day Hairstyles for Women 2026 ☀️💇♀️
26.Baby Blue Coquette Bows
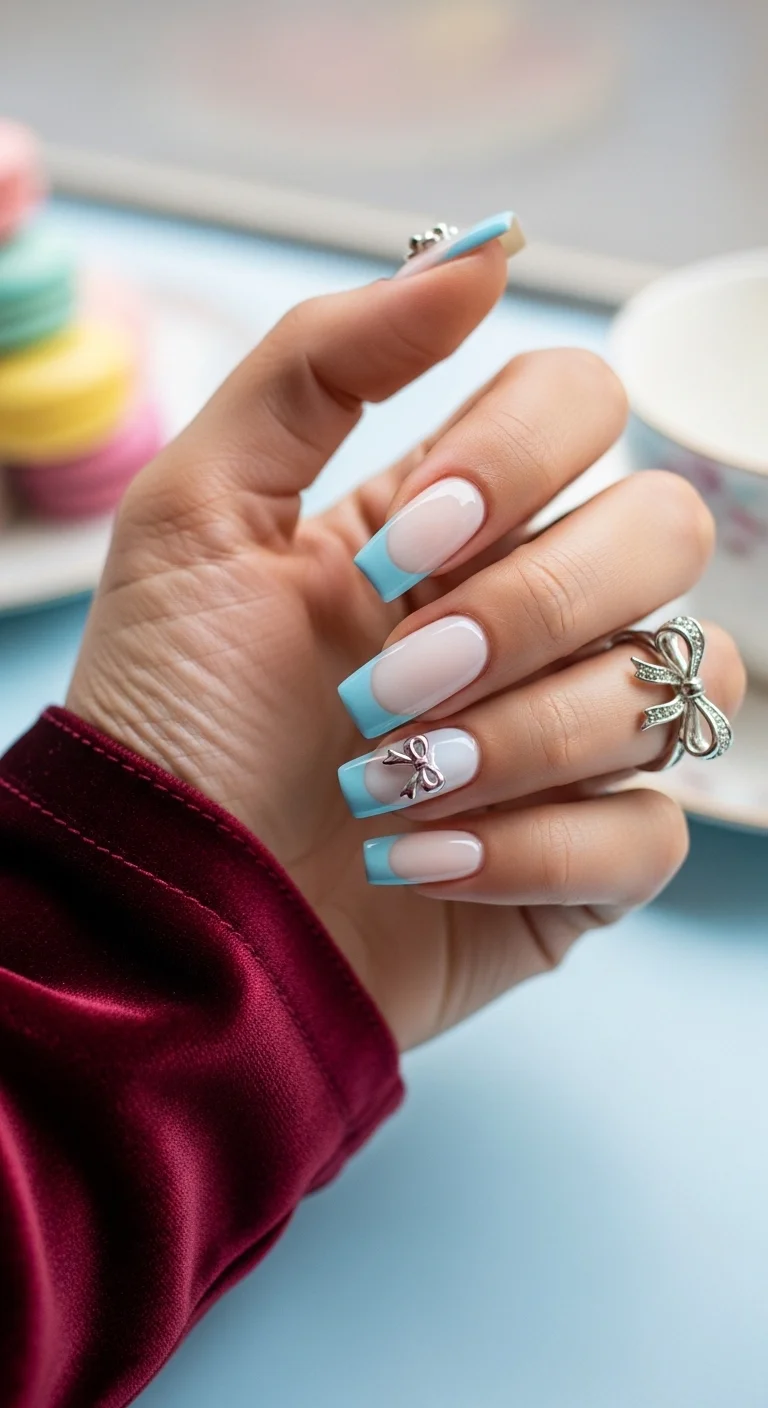
Pastel French with metallic bow detail.
Overview:
Coquette-style nails lean into hyper-feminine details: bows, pearls, pastels, and soft shapes. This design uses baby blue French tips as the foundation and adds a single 3D silver bow charm on the ring finger as the statement piece. One charm per hand is enough. More than that crosses from accent into costume.
The baby blue is a good choice for a colored French because it's soft enough to read as a neutral from a distance but clearly blue up close. Brighter or more saturated blues would dominate the design and make the silver charm feel redundant rather than complementary.
The 3D bow charm is the trickiest element. It needs to be glued down with jewelry-grade adhesive, not regular top coat. And the edges need to be sealed with a bead of top coat around the base to prevent it from catching on hair or fabric. Even with proper attachment, expect to lose the charm within a week or two if you're active with your hands.
Design Breakdown:
Colored French tips with one 3D accent charm. The charm attachment method determines longevity.
Base Color: A sheer milky white or nude. The sheerness keeps the focus on the blue tips.
Nail Shape: Medium square. The flat surface gives the bow charm a stable foundation to sit on.
Design Element: Baby blue French tips on most nails. One 3D silver bow charm on the ring finger accent nail.
Finish: High-gloss "squishy" gel finish. The gloss around the matte silver charm creates texture contrast.
Get The Look at Home:
The charm is the make-or-break step. Use jewelry gel or UV-cure adhesive, not regular nail glue.
- Blue tips: Paint baby blue French tips using a liner brush for precision. Two coats for opacity.
- Milky overlay: Apply a thin coat of milky white over the entire nail to soften the look.
- Glue the charm: Apply a generous dot of rhinestone glue or jewelry gel to the ring finger. Press the silver bow charm into the glue and hold for 10 seconds.
- Cure: If using UV-cure adhesive, cure under a lamp for 30 seconds. Air-dry glue needs at least two minutes.
- Edge seal: Using a detail brush, apply top coat around the base of the charm to anchor it. Don't fill in the bow's details.
- Top coat the rest: Apply high-shine top coat to all remaining nail surface.
27.Nude Gold Flake
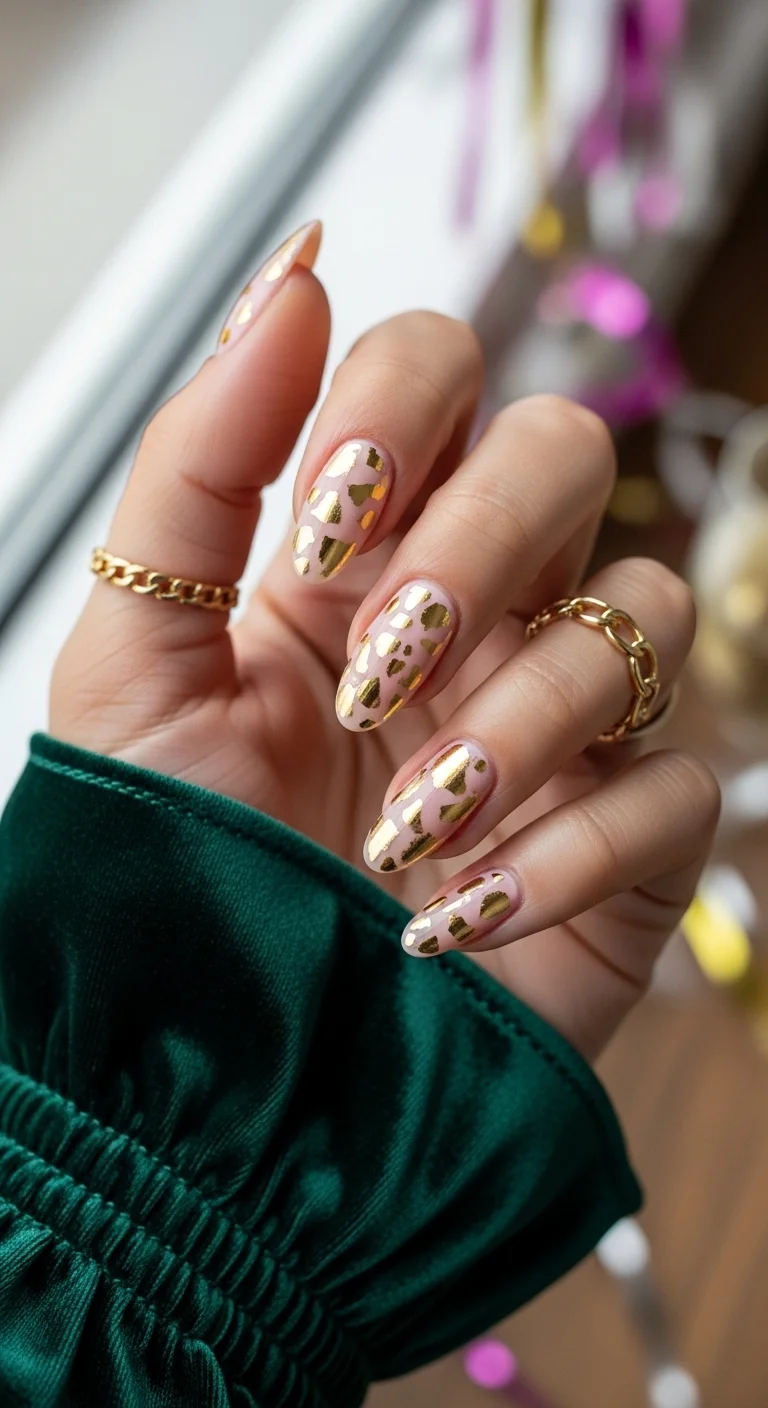
Minimal foil on natural base.
Overview:
Nail art that looks like it took an hour but actually takes ten minutes is a specific category, and gold flake over nude is its best example. The sheer nude base lets your natural nail show through, and the scattered gold flakes add just enough metallic interest to elevate the look beyond plain polish.
The irregular shapes of the foil pieces are what make this design work. Uniform glitter creates sparkle; irregular foil creates texture. The difference is the same as the difference between a sequin and a piece of gold leaf. One is manufactured; the other looks organic.
This is a good option for people who want something special but can't commit to a bold color or busy pattern. The nude base is invisible enough to match any outfit, and the gold catches light without demanding attention. It's the nail equivalent of a simple gold bracelet.
Design Breakdown:
Minimalist foil application. The quality of the nude base and the randomness of the foil placement are what make it look effortless.
Base Color: A very sheer, skin-toned nude. It should almost disappear against your natural nail bed. Essie "Ballet Slippers" or OPI "Bubble Bath" are standard choices.
Nail Shape: Medium almond. The organic shape complements the irregular foil pieces.
Design Element: Real gold leaf flakes (cosmetic grade) scattered randomly across each nail. The pieces vary in size and shape.
Finish: High-gloss top coat. Two coats to fully encapsulate the foil and prevent any sharp edges from lifting.
Get The Look at Home:
This is one of the fastest designs on this list. Budget 10 minutes total.
- Prep: Buff nails and push back cuticles. This look needs a clean canvas because the base is so sheer.
- Nude layer: Apply one or two coats of sheer nude. Let dry.
- Foil application: While the last coat is still slightly tacky, use a dry brush to pick up small gold leaf fragments. Tap them onto the nail randomly.
- Random scatter: Don't try to place every piece deliberately. Some nails should have more gold than others. The unevenness is the point.
- Flatten: Press the foil flat with a silicone tool or your fingertip. Raised edges will catch on things.
- Double seal: Two coats of top coat. The first fills in the foil texture. The second creates the smooth, glass-like surface.
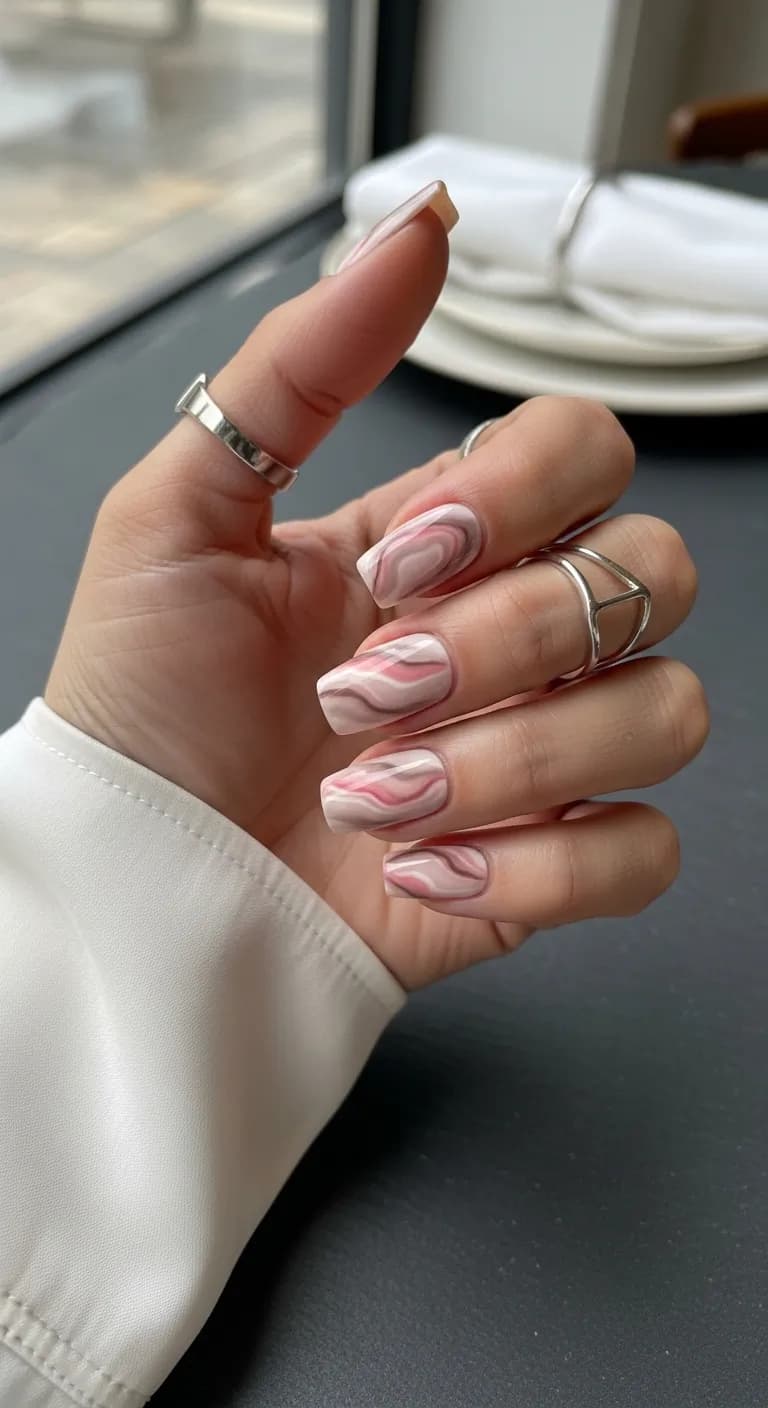
28 Trendy May Nail Designs for 2026 💅
28.Lavender Doily Lace
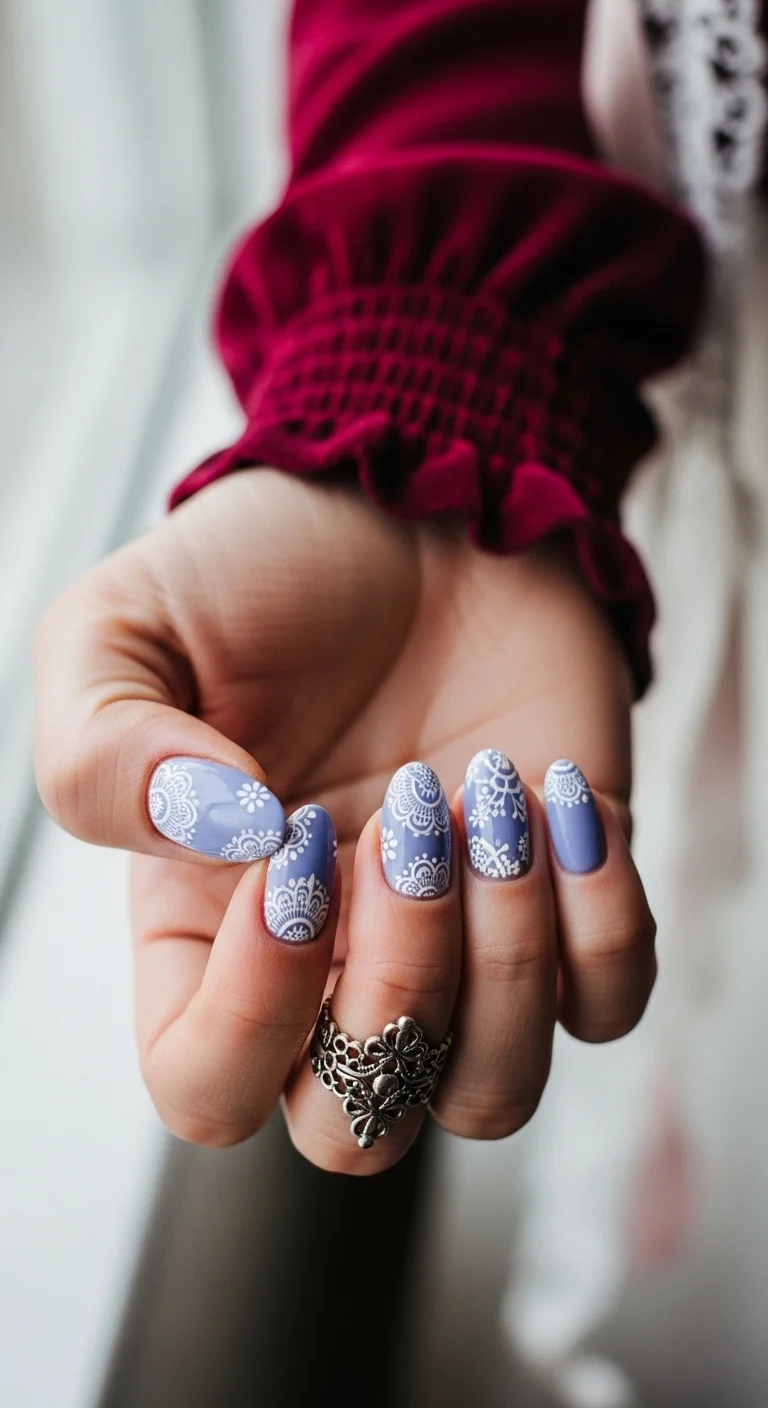
Vintage lace stamping on cool purple.
Overview:
White lace patterns on a colored base reference vintage textiles, and the execution determines whether the result looks elegant or crafty. Stamping plates with lace or mandala designs produce the cleanest results because the pattern is pre-etched with consistent line weight. Freehand lace at this detail level is extremely difficult.
The lavender base in this image leans cool, almost periwinkle. That cool undertone keeps the white lace from looking too stark. A warmer purple (like orchid or mauve) would create a higher contrast that could feel aggressive rather than delicate. The grey-toned lavender is the right match for this particular pattern.
One practical note about lace stamping: the thinner the lines in the plate design, the better the result. Thick-lined lace patterns look chunky and lose the delicate quality that makes the design appealing. Look for plates labeled "fine line" or "micro detail."
Design Breakdown:
Stamping-based design. The plate quality and the polish consistency determine the line clarity.
Base Color: A cool-toned, muted lavender. Essie "Lilacism" or Zoya "Lilith" match the grey-purple tone.
Nail Shape: Short to medium oval. The rounded shape fits the soft, vintage aesthetic.
Design Element: White lace or mandala stamping patterns covering most of each nail. The pattern varies slightly from nail to nail depending on placement.
Finish: High-gloss or satin top coat. Both work with the vintage theme.
Get The Look at Home:
Stamping is the way to go. Fine-line lace patterns are nearly impossible to freehand consistently.
- Lavender base: Two coats of cool-toned lavender. Let dry completely. The stamp will drag wet polish.
- Stamp preparation: Apply white stamping polish to a fine-line lace plate. Scrape once firmly. Roll the stamper over the plate to pick up the design.
- Transfer: Roll the stamper over the nail from one side to the other. Press firmly but don't twist.
- Cleanup: Use a small angled brush dipped in acetone to remove white polish from the skin around the cuticles.
- Touch-ups: If any sections didn't transfer, use a toothpick and white polish to fill small gaps. Keep修补 minimal.
- Seal: Float the top coat over the design without dragging the brush. Smearing the fine lines ruins the lace effect.
29.Forest Aura Chrome
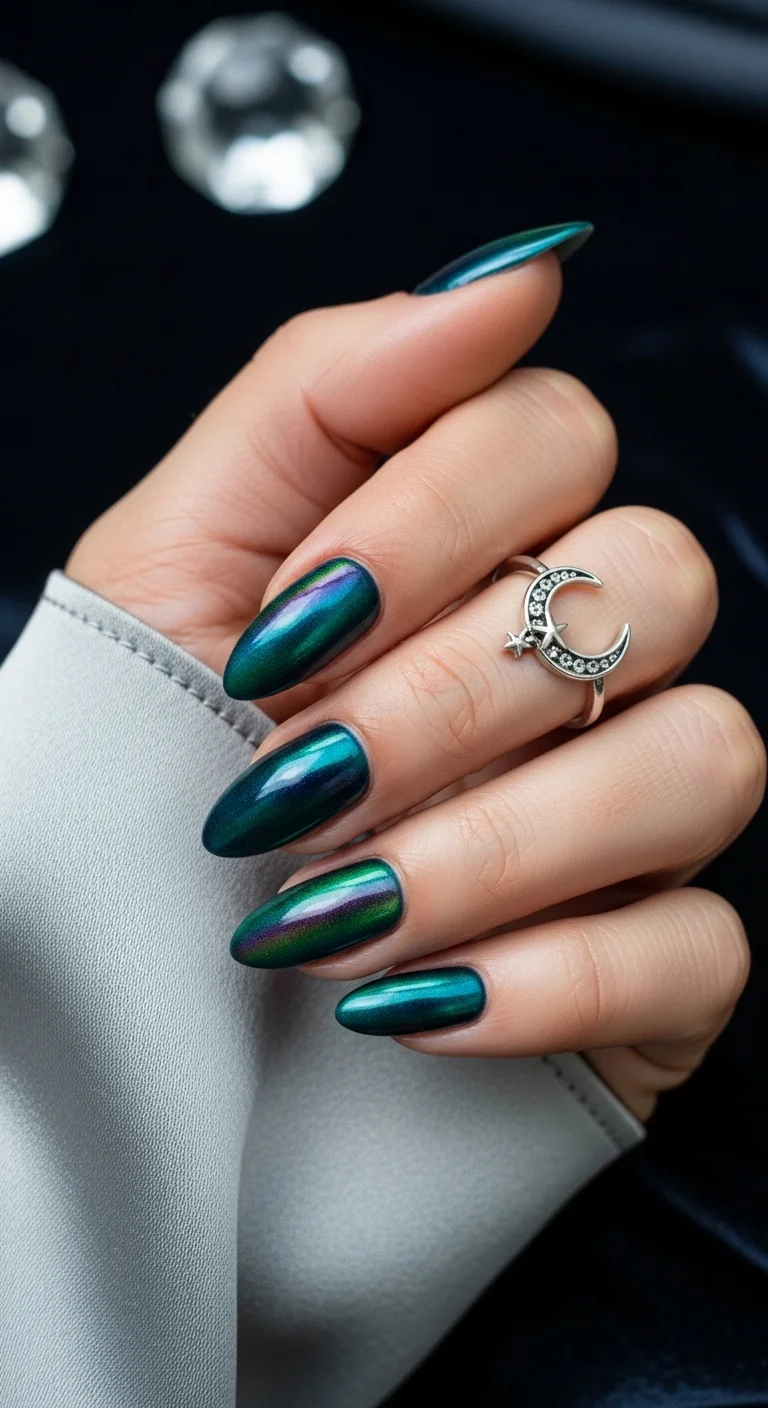
Green-to-purple aurora shift.
Overview:
Aura chrome is a newer category of multichrome pigment that creates a soft, diffused color shift rather than the sharp transitions of traditional multichrome. This forest version shifts between deep emerald green and dark purple, with the colors blending into each other at the transition zone rather than hard-switching.
The medium almond shape works well for aura effects because the curved surface creates natural gradient zones. The color shifts most dramatically at the highest point of the nail curve, where light hits directly. On flat surfaces, the shift is less visible.
The black base is essential here, same as with other chrome techniques. But the aura pigment is more forgiving than standard chrome powder. It doesn't require the same precise curing time, and it's more tolerant of uneven application. A good option for people trying multichrome for the first time.
Design Breakdown:
Aurora multichrome finish. The soft color transition is what distinguishes "aura" from standard multichrome.
Base Color: Black gel polish. The dark base provides the depth needed for the green-to-purple shift to develop.
Nail Shape: Medium almond. The curved surface maximizes the visible color transition.
Design Element: Green-to-purple aurora multichrome pigment buffed into a black base. No additional art needed.
Finish: Ultra-glossy top coat to enhance the aurora effect and create the "glowing from within" appearance.
Get The Look at Home:
Aura pigments are more forgiving than standard chrome, making this a good entry point for multichrome.
- Black base: Two coats of black gel polish. Cure between coats.
- No-wipe top coat: Apply and cure for 30 to 45 seconds. The surface should be slightly tacky.
- Buff the aura pigment: Using an eyeshadow applicator, rub the green-to-purple aurora powder onto the nail. The soft color blend will emerge as you buff.
- Check the shift: Tilt your hand to see both the green and purple tones. If one color dominates, add more pigment to the other area.
- Dust off: Remove loose particles with a soft brush.
- Seal: Apply top coat and cure. The gloss intensifies the aurora glow.
28 Stunning Softball Hairstyle Ideas with Braids for 2026 🥎✨
30.Electric Pink Tips
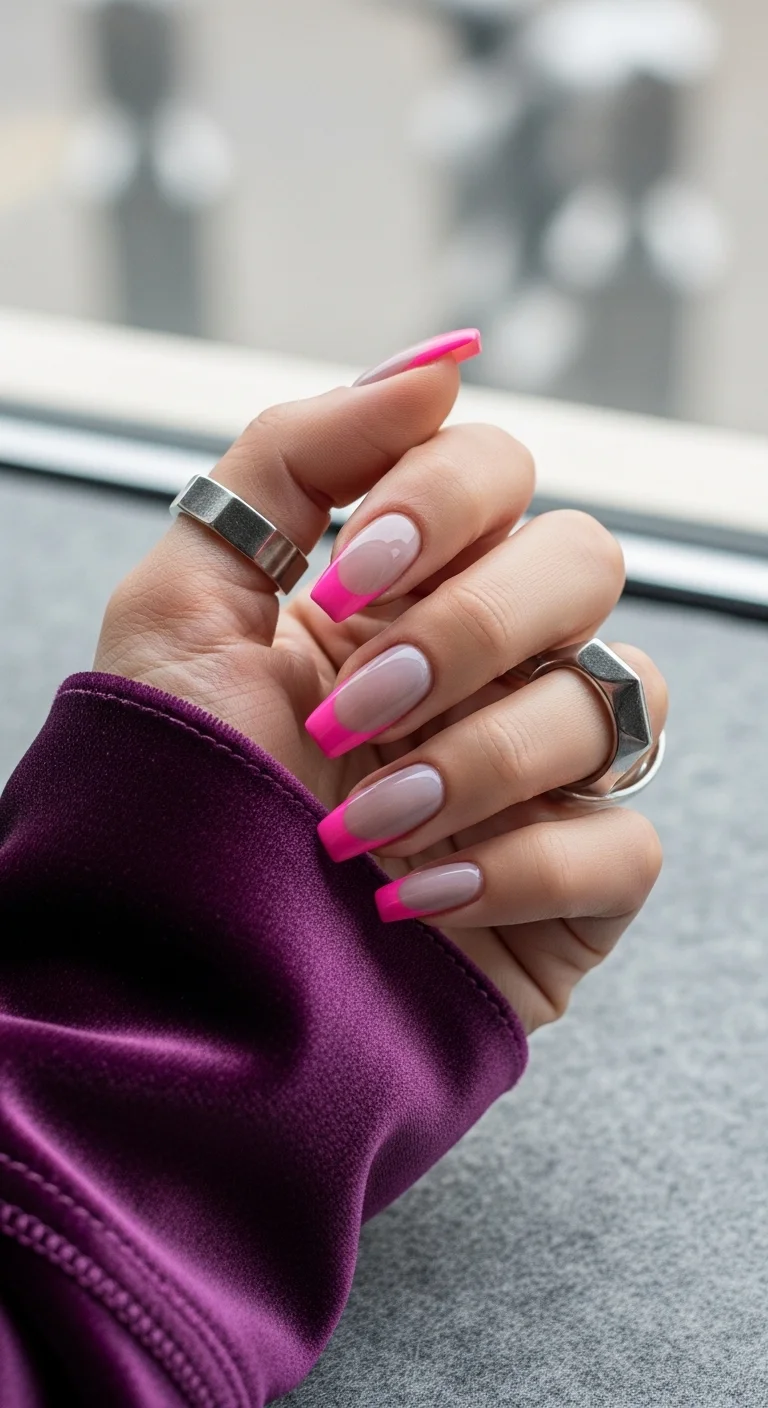
Neon French with maximum contrast.
Overview:
Hot pink French tips are a straightforward way to add color without committing to a full set of neon. The sheer nude base keeps the design grounded, and the bright pink tips provide the visual punch. From a distance, it reads as a standard French. Up close, the neon saturation reveals itself.
The medium oval shape is a practical choice for colored French tips. The curve of the nail mirrors the curve of the smile line, and the shorter length means the pink tip is proportionally thicker relative to the nail bed. That thickness is necessary for the neon to register as a deliberate color rather than a thin, faded line.
Neon polishes have a specific characteristic worth knowing: they dry matte. The fluorescent pigments used in neon formulas don't produce the same glossy finish as standard polish. Without a glossy top coat, the tips look flat and chalky rather than bright and saturated. The top coat isn't optional for this design.
Design Breakdown:
Colored French with neon pigment. The top coat is what transforms "flat neon" into "bright neon."
Base Color: A sheer, cool-toned nude. The cool undertone prevents the nude from competing with the warm pink.
Nail Shape: Medium oval. The curved tip makes the smile line look natural.
Design Element: Deep-curved French tips in neon hot pink. The tip thickness is consistent across all nails.
Finish: Ultra-glossy top coat. The gloss is what makes the neon pop rather than look chalky.
Get The Look at Home:
Neon polish can be streaky. Two thin coats on the tips is better than one thick one.
- Nude base: Two coats of sheer nude. Let dry completely.
- Map the smile: Using a thin liner brush and neon pink, draw the curved smile line from one sidewall to the center. Repeat from the other side.
- Fill the tip: Paint the area below the smile line with neon pink. Apply two thin coats for full opacity.
- Clean the line: Dip a flat brush in acetone and run it along the smile line to sharpen any wobbles.
- Top coat: One thick layer of high-gloss top coat. This step transforms the flat neon into the bright, saturated finish.
- Cap the edge: Wrap the top coat over the free edge to prevent tip chipping, which is more visible with neon.
31.Frosty Blue & Silver
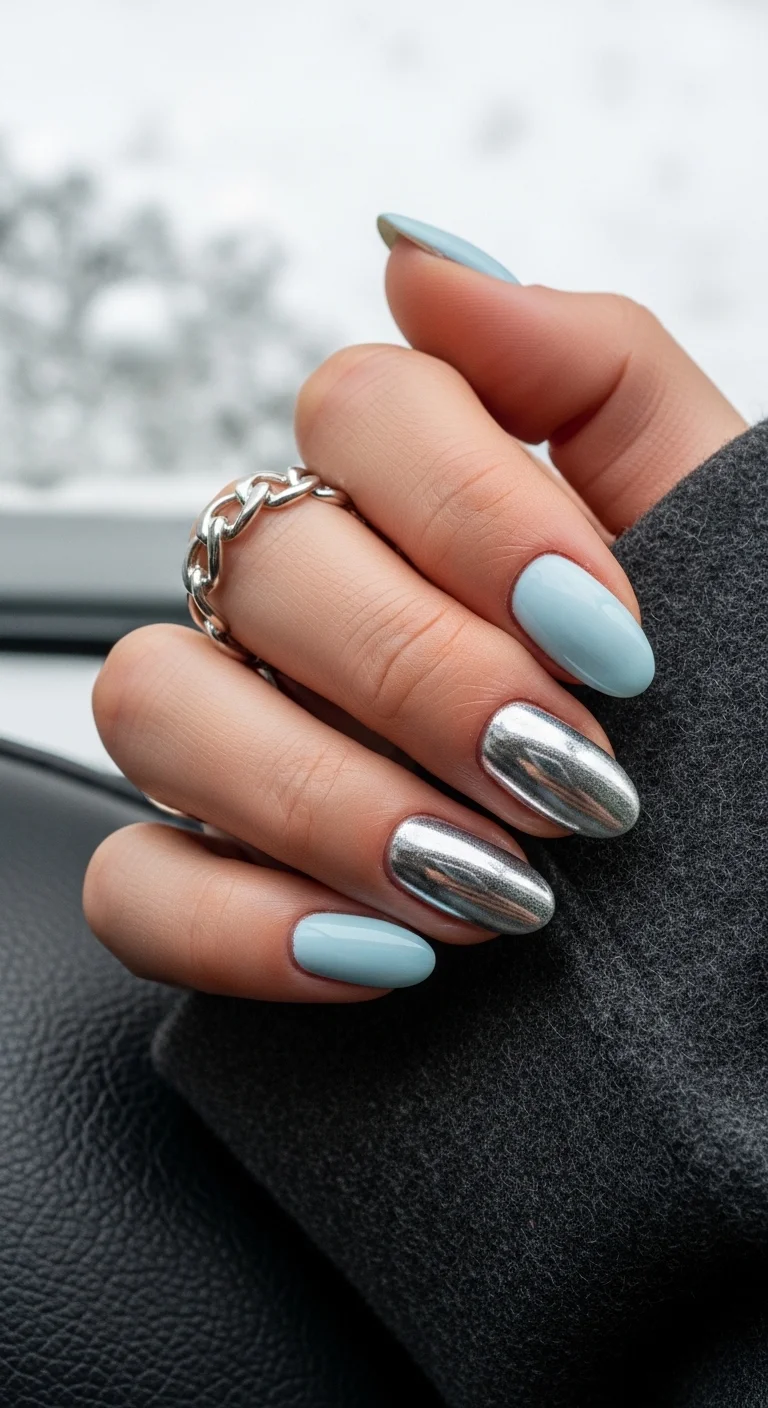
Cool blue with mirror chrome accent.
Overview:
Pairing a solid pastel with a chrome accent nail is a reliable way to add interest to a simple color. The baby blue reads clean and soft; the silver chrome reads bold and reflective. Each finish makes the other look more extreme by contrast. The blue looks softer next to the chrome, and the chrome looks more dramatic next to the blue.
The medium oval shape keeps the design approachable. Chrome on longer or more angular shapes can feel aggressive. On a soft oval, the mirror finish reads as an accent rather than the main event.
The chrome accent nails require a black base underneath the silver powder, which means those nails go through a different process than the blue ones. If you're doing this at home, finish all the blue nails first, then switch to the black-base-plus-chrome process for the accents. Mixing up the order risks getting silver chrome dust on the blue nails, which is extremely difficult to remove once it's embedded in the top coat.
Design Breakdown:
Two-finish design: solid pastel plus mirror chrome accent. The different base processes need to stay separate.
Base Color: A creamy, opaque baby blue for most nails. Black gel for the chrome accent nails.
Nail Shape: Medium oval. The soft shape balances the hard reflectivity of the chrome.
Design Element: Solid baby blue on most nails. Full silver mirror chrome on one or two accent nails per hand.
Finish: High-gloss on the blue. Mirror-finish chrome on the accents.
Get The Look at Home:
Keep the chrome process separate from the blue to avoid contamination.
- Blue nails: Paint all nails baby blue except the accent nails. Two coats, let dry fully.
- Chrome base: Paint the accent nails with black gel polish. Cure.
- Chrome application: Apply no-wipe top coat to the black nails, cure 30 seconds, then rub silver chrome powder until mirror-smooth.
- Dust carefully: Use a soft brush to remove silver particles from the blue nails. Any remaining chrome dust will show as metallic specks.
- Separate top coat: Use a clean brush for the chrome top coat to avoid getting silver in your blue polish bottle.
- Final coat: Apply high-shine top coat to all nails to unify the finishes.
The Prom Night Maintenance Kit
Between the dancing, the photos, and the after-party, your manicure needs to go the distance. A few simple safety precautions can ensure your nails stay flawless until the sun comes up.
If you’re wearing press-ons, keep a small tube of high-quality nail glue in your clutch for emergency repairs. For gels or acrylics, a quick swipe of cuticle oil before you leave the house will keep the area looking hydrated and fresh for all those close-up hand shots with your corsage!
And there you have it! Hopefully, scrolling through these gorgeous designs has provided plenty of excitement for the big night. Choosing prom nails should be fun and stress-free, and one of these sets is sure to look absolutely stunning.
Be sure to pin any favorite photos straight to a Pinterest board, so they are ready to show the nail tech. This simple trick prevents last-minute panic when sitting down in the salon chair.