Hair Trends
24 Stunning Bridesmaid Hairstyles for 2026
Being a bridesmaid means you get to stand beside your best friend looking your absolute best. The right hairstyle balances the wedding's formality with your personal style, stays put through tears, toasts, and dance-offs, and photographs beautifully from every angle.
We've rounded up 24 bridesmaid hairstyles that span every texture, length, and wedding theme. Whether you're drawn to twisted chignons, braided crowns, or soft half-up styles, each look comes with practical steps and product recommendations to help you nail it on the day.
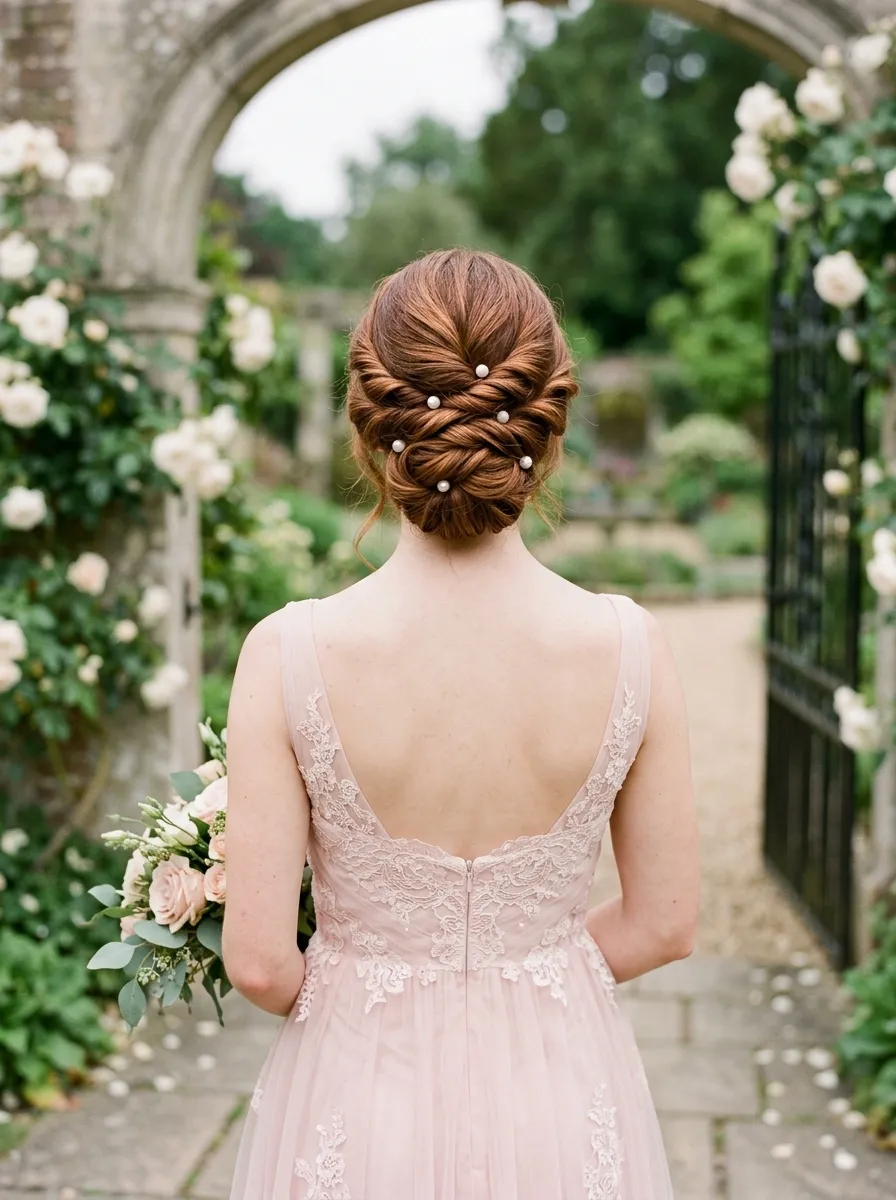
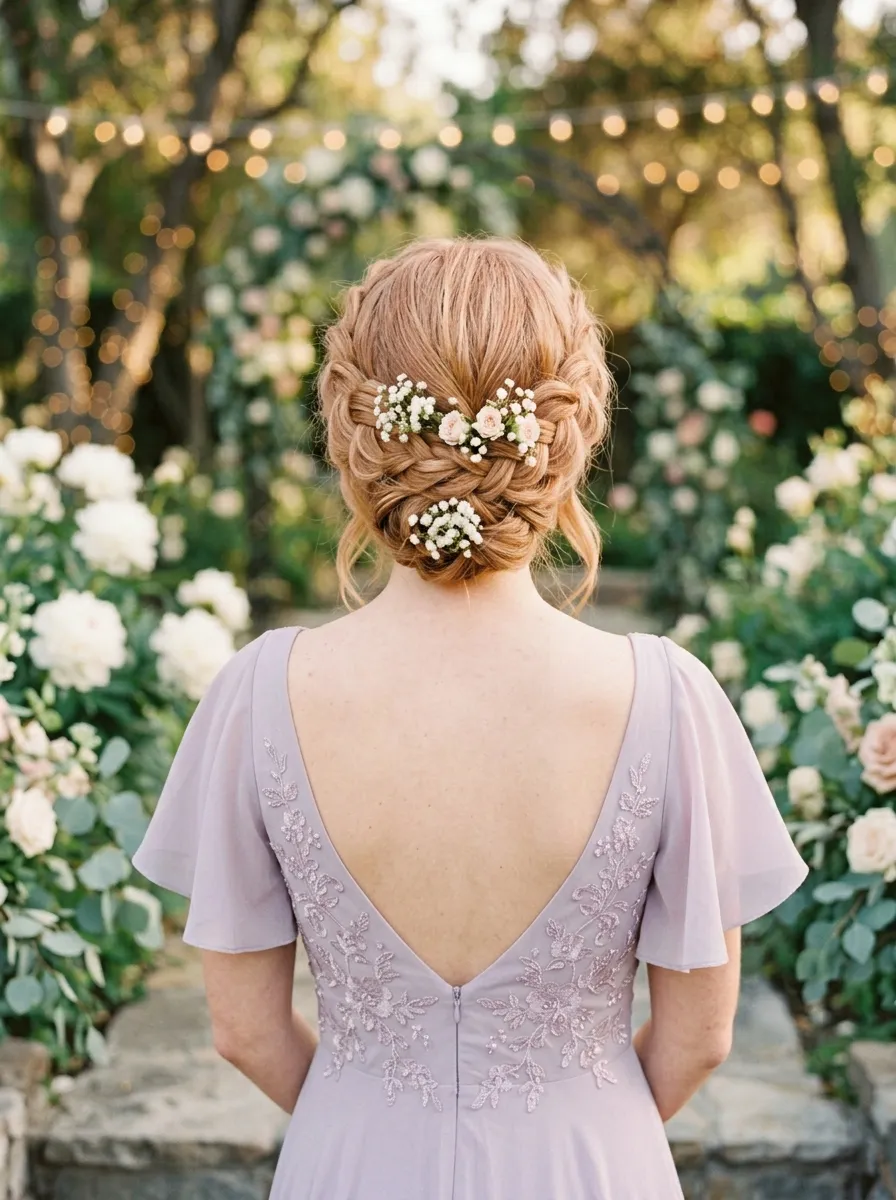
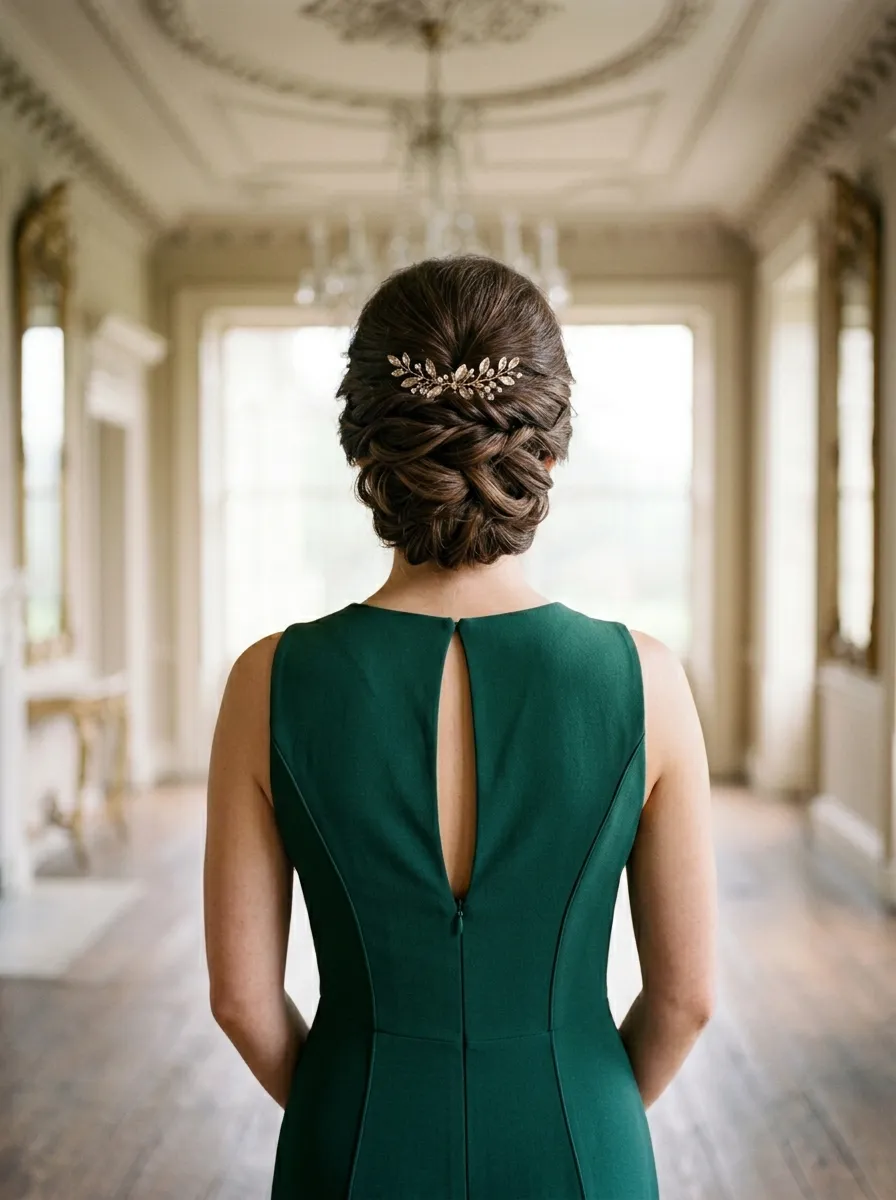
1.Twisted Updo with Pearl Accents
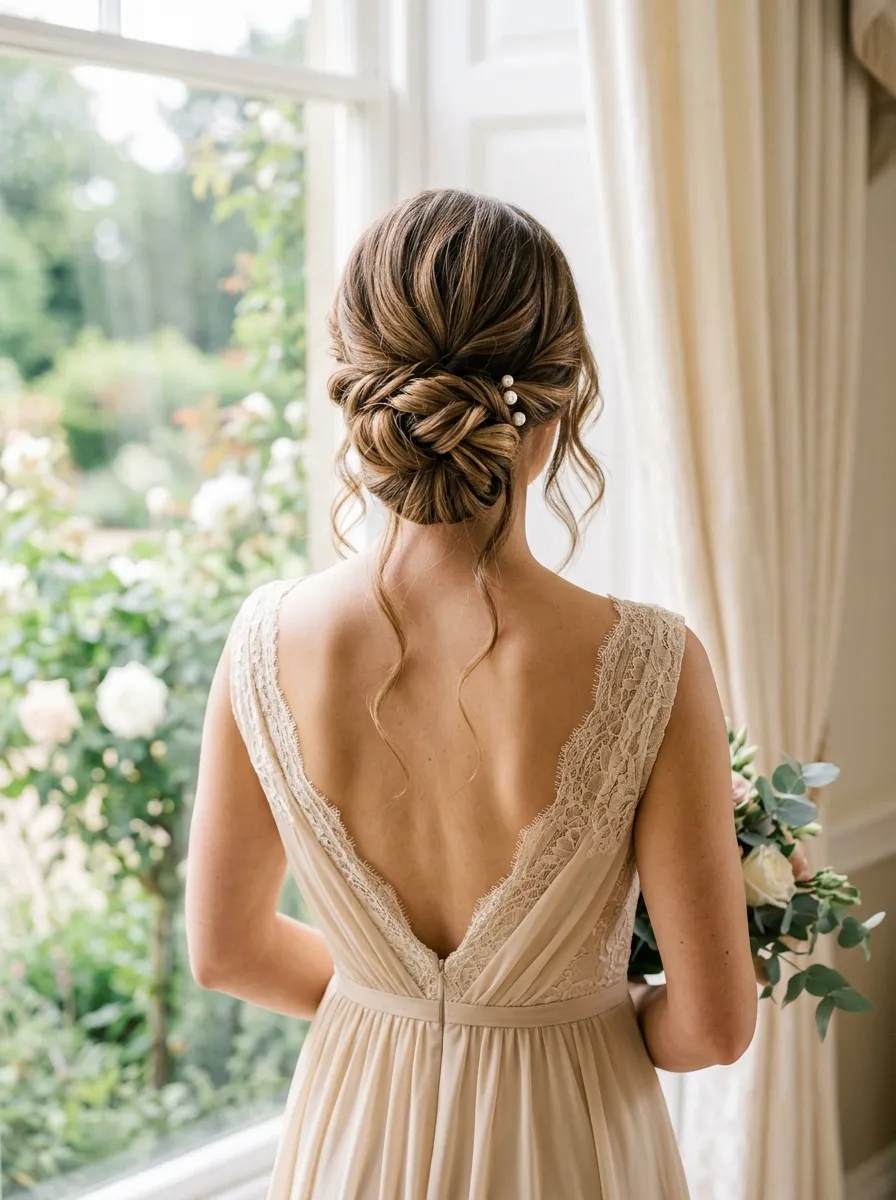
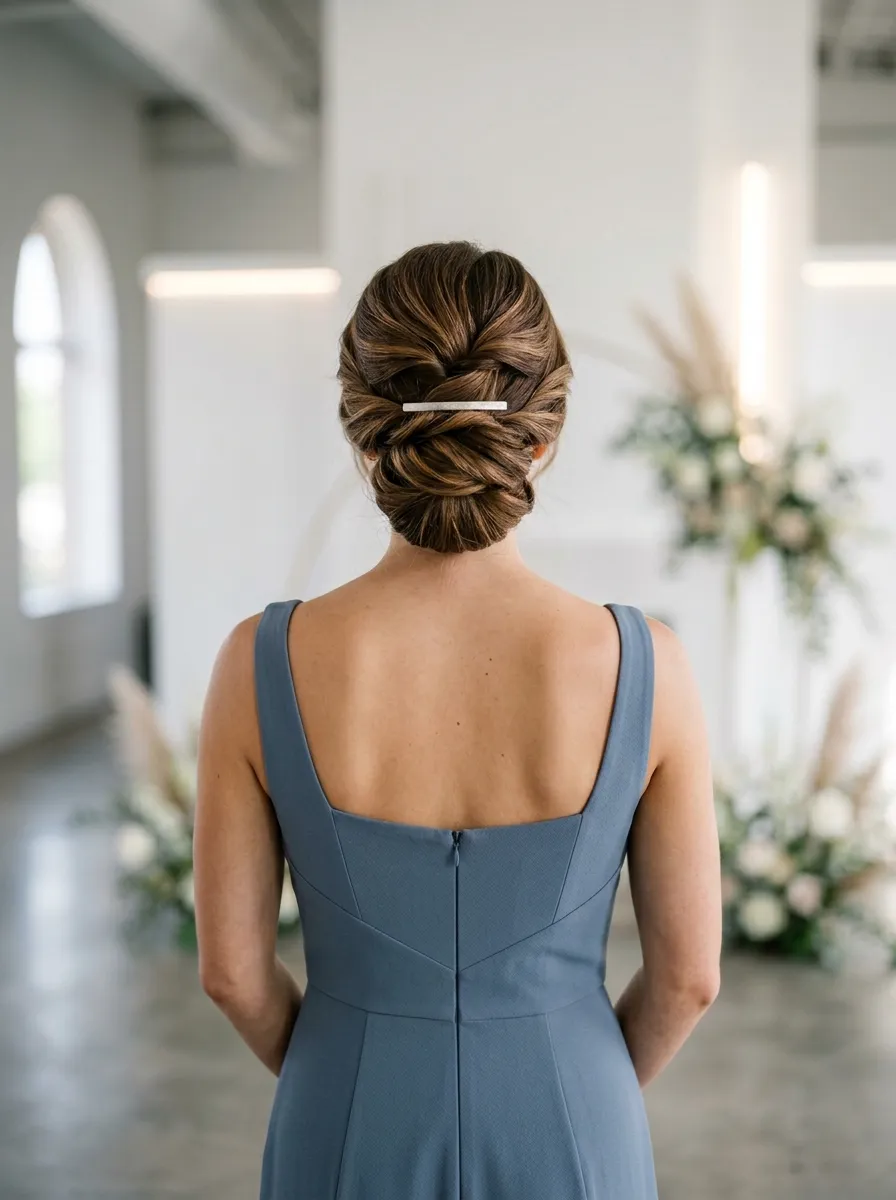
The overview: A low, voluminous bun built from rope twists pinned in concentric layers. Hair color appears to be a warm chestnut brown with subtle caramel highlights that add dimension to each twist. Pearl-tipped U-pins are tucked at irregular intervals for a curated but organic feel. The crown is smoothed but not flat, with light volume at the top.
Why this look is popular: Pearl accessories are dominating wedding season, and this style showcases them without overwhelming the hair. The twisted texture works on medium to thick hair and photographs with depth even in low-light reception settings.
Where this look is suitable: Garden ceremonies, ballroom receptions, vineyard weddings. The pearl accents lean feminine and classic, pairing well with lace or satin bridesmaid dresses.
Step by step:
- Prep with texture. Apply Oribe Dry Texturizing Spray or a salt spray to day-old hair for grip.
- Section the crown. Tease the crown lightly with a fine-tooth comb for lift, then smooth the top layer over it.
- Gather at the nape. Pull hair into a low ponytail without securing it — hold it in one hand as you twist.
- Create rope twists. Divide the ponytail into 3-4 sections. Twist each section tightly until it starts to kink, then wrap it around the base and pin.
- Layer and pin. Continue wrapping and pinning each twisted section, alternating directions so the bun builds volume.
- Add pearls. Insert pearl pins deep into the twists, angling them so the pearls sit on the surface.
- Set it. Mist with L'Oréal Elnett Satin Hairspray from 12 inches away for flexible hold that won't stiffen the twists.
Tips and tricks: If your hair is fine, backcomb each section before twisting to add volume. For extra-polished results, smooth a tiny amount of Moroccanoil Treatment Light over flyaways before the final hairspray.
30 Stunning Summer Hair Trends for 2026 ☀️🌊
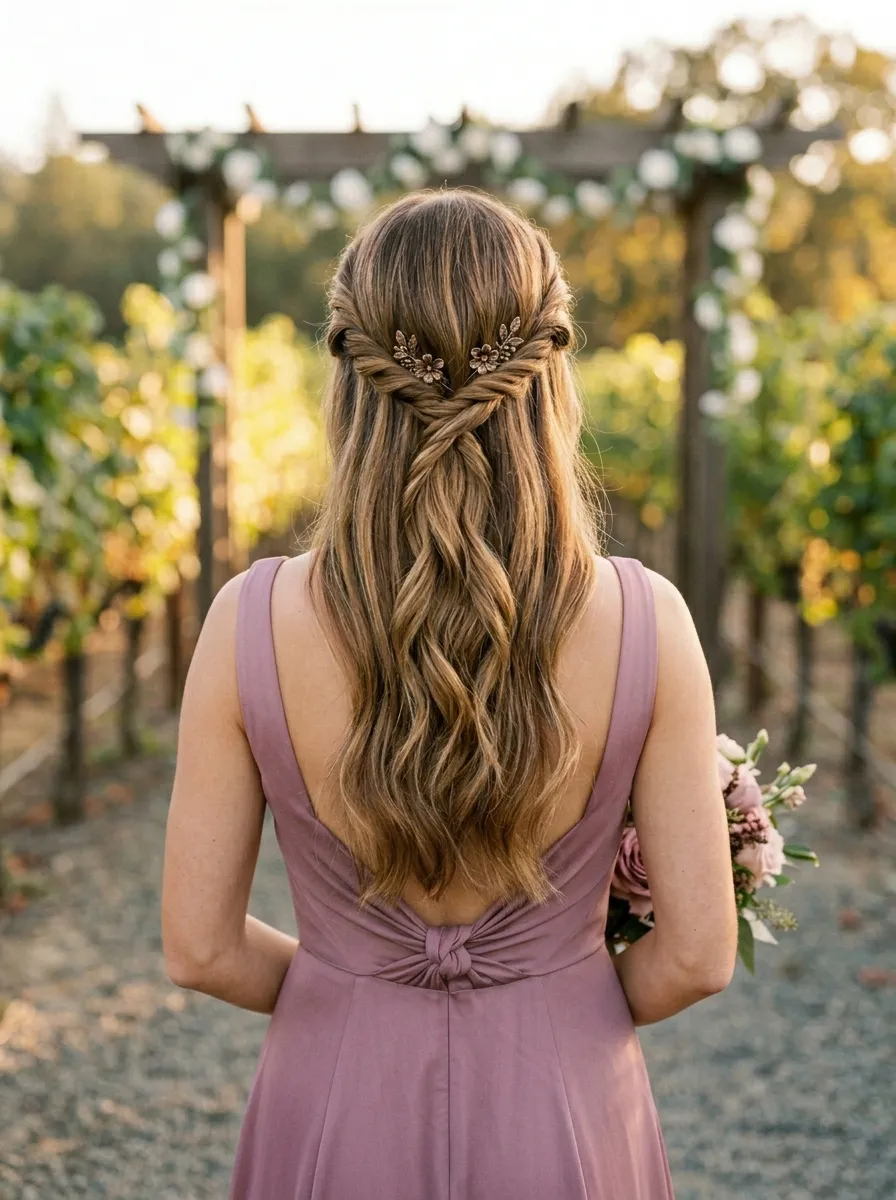
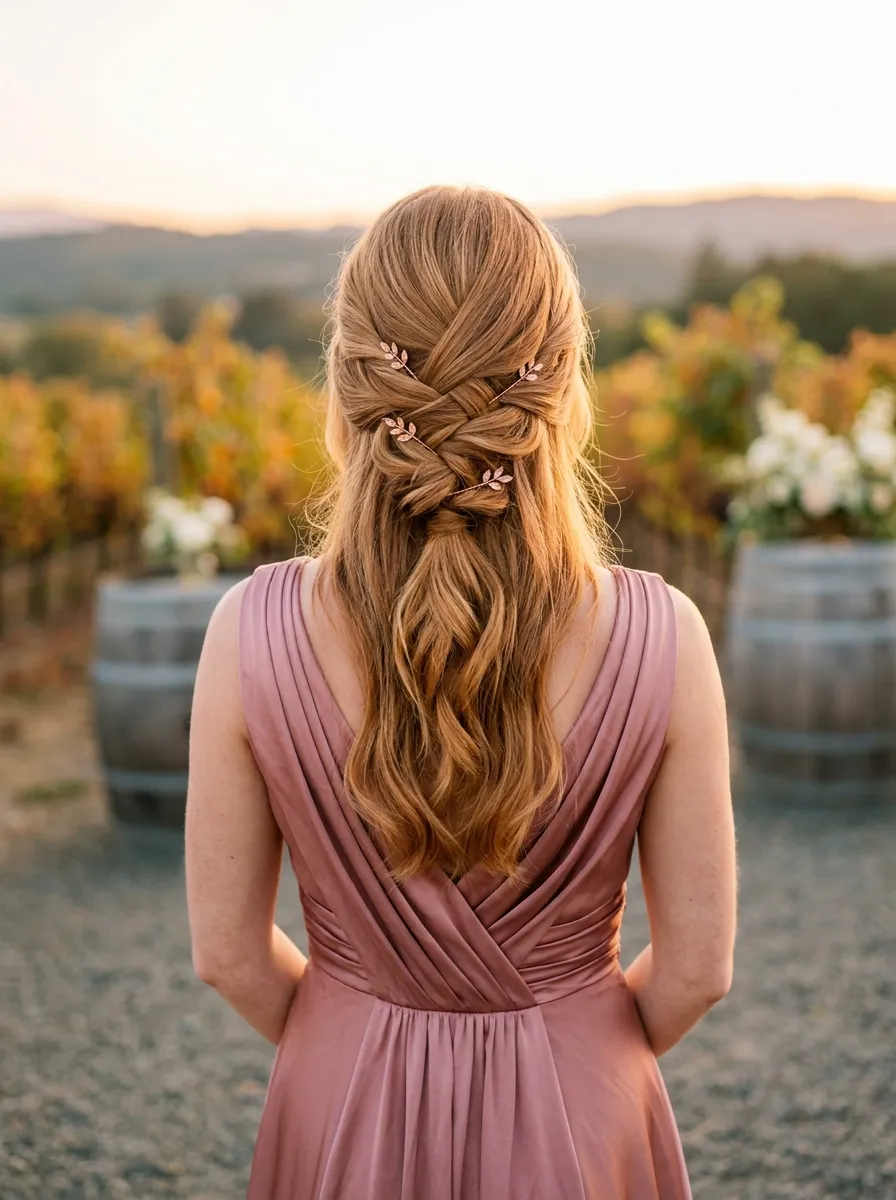
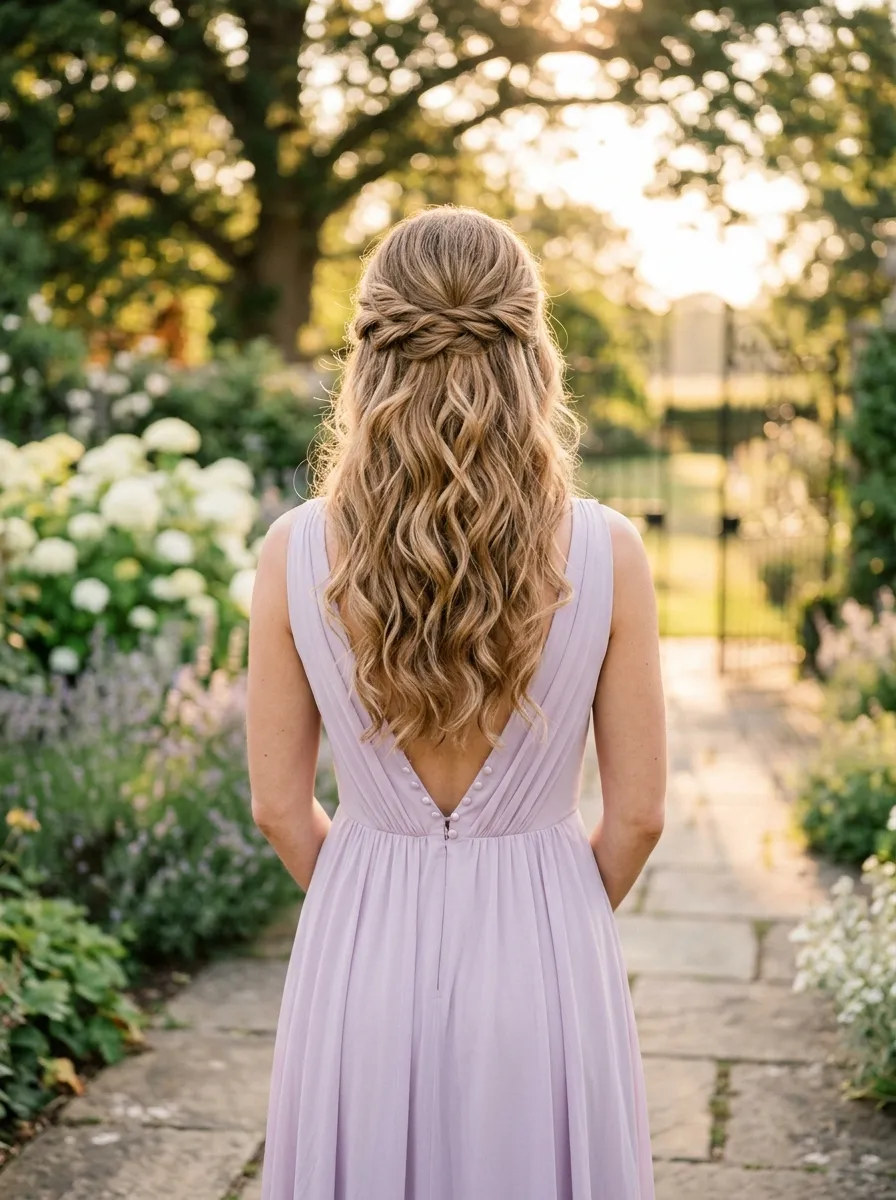
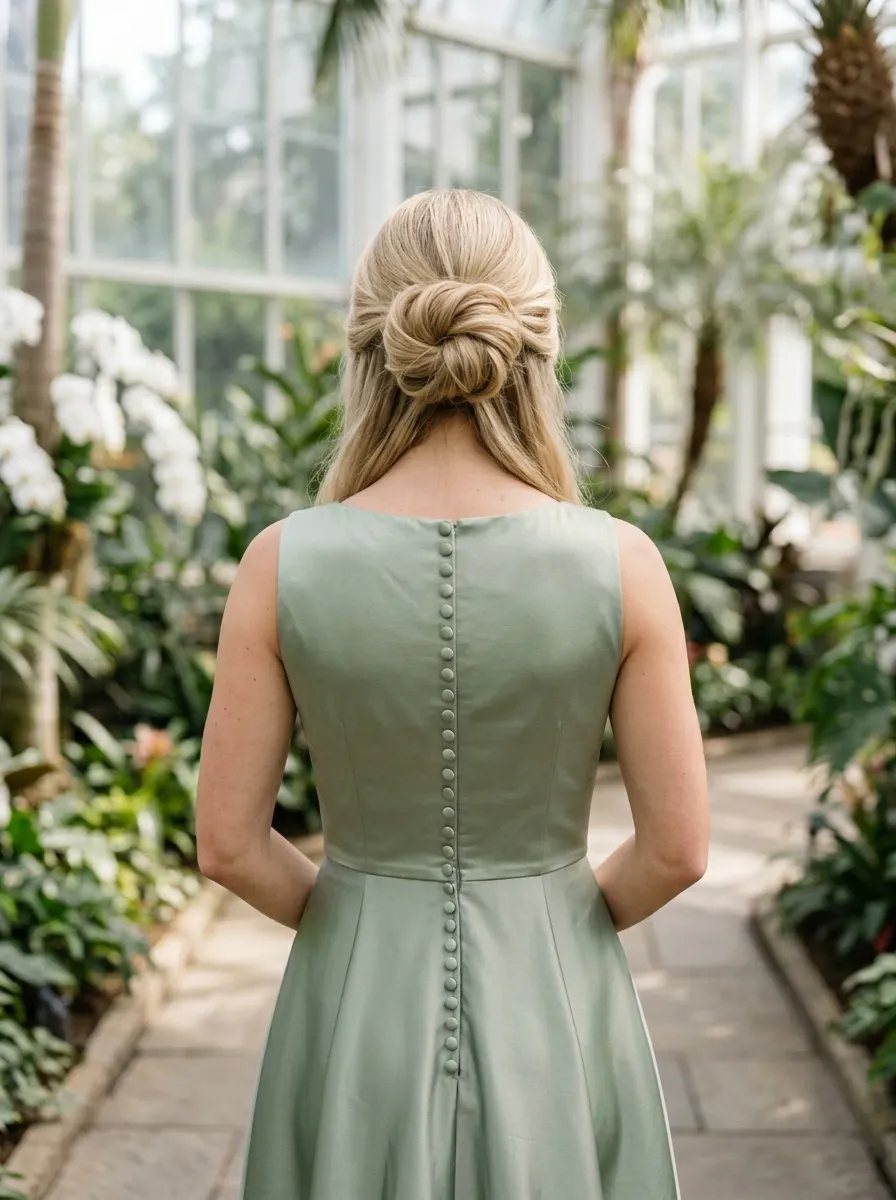
2.Golden Hour Half-Up Twist with a Low Bun & Sparkle
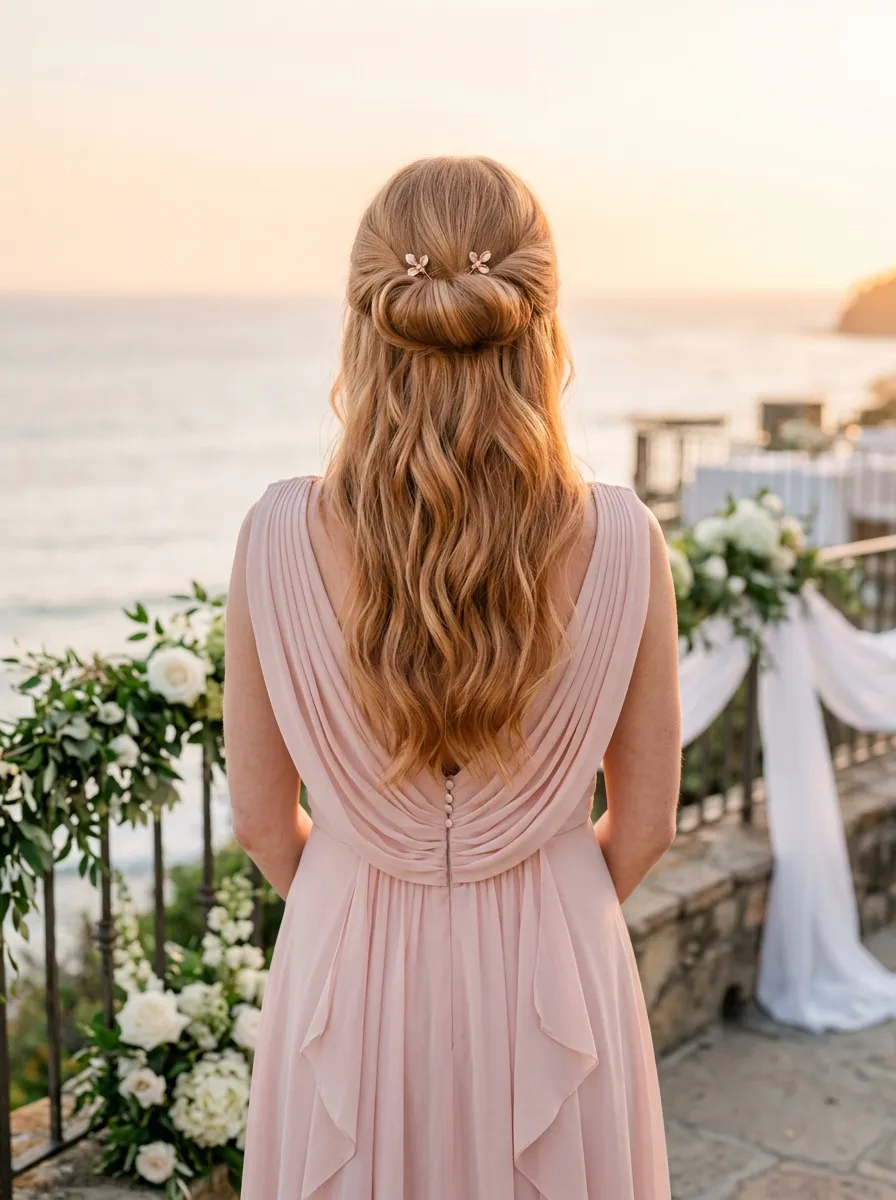
The overview: The front sections are twisted back and meet at the crown, then feed into a loose low bun. The remaining length falls in soft, S-shaped waves created with a large-barrel curling iron. Delicate sparkly pins dot the twist-bun junction.
Why this look is popular: Half-up styles offer the best of both worlds — the elegance of an updo with the softness of worn-down hair. The low bun keeps the back clean for dress details while the waves add movement.
Where this look is suitable: Outdoor ceremonies with natural light, golden-hour receptions, beachside weddings. The sparkly pins complement shimmer or sequin dresses without competing.
Step by step:
- Curl first. Use a 1.25-inch curling wand, wrapping sections away from the face. Let each curl cool in your palm before releasing.
- Brush through. Once all sections are curled, brush gently with a wide-tooth comb to create soft, uniform waves.
- Twist the front. Take a 2-inch section from each temple, twist each backward, and bring them to meet at the crown.
- Form the bun. Secure the twisted sections with an elastic, then twist the tail into a loose bun and pin.
- Place pins. Cluster 3-4 sparkly pins where the twist meets the bun for a concentrated shine effect.
- Break up waves. Run fingers through the loose hair to separate waves and add volume.
Tips and tricks: For waves that last all day, use a heat protectant like Bumble and Bumble Hairdresser's Invisible Oil Heat/UV Protective Primer before curling. Let curls cool completely before brushing — this sets the shape and prevents drooping.
3.Twisted Chignon with a Touch of Sparkle
The overview: The chignon sits at the nape and is composed of multiple rope twists woven together. A silver-toned leaf pin with small clear crystals rests at the top edge of the chignon. The surface is smooth on top with visible twist texture through the bun.
Why this look is popular: The twisted chignon reads as polished but not severe. The textured construction adds the visual weight of thicker hair, making it a go-to for fine-haired bridesmaids who want an updo with presence.
Where this look is suitable: Black-tie weddings, evening receptions, church ceremonies. The single statement pin keeps it refined rather than costume-like.
Step by step:
- Prep for grip. Apply Living Proof Full Dry Volume & Texture Spray to damp roots, then blow-dry with a round brush for smoothness with body.
- Create the base. Gather hair at the nape into a loose ponytail, positioned exactly where you want the chignon to sit.
- Divide and twist. Split the ponytail into 4-5 sections. Twist each section individually from root to end.
- Pin each twist. Coil each twisted section around the base and pin. Alternate directions for maximum texture.
- Adjust the shape. Gently pull on the outer edges of each coil to soften and expand the chignon.
- Insert the pin. Slide the leaf pin into the chignon at an angle so it catches light naturally.
Tips and tricks: Criss-cross your bobby pins for a stronger hold that won't shift during dancing. If your hair is slippery, rub a bit of texture powder into your palms before twisting.

35 Fun Birthday Nail Designs for 2026 🎂
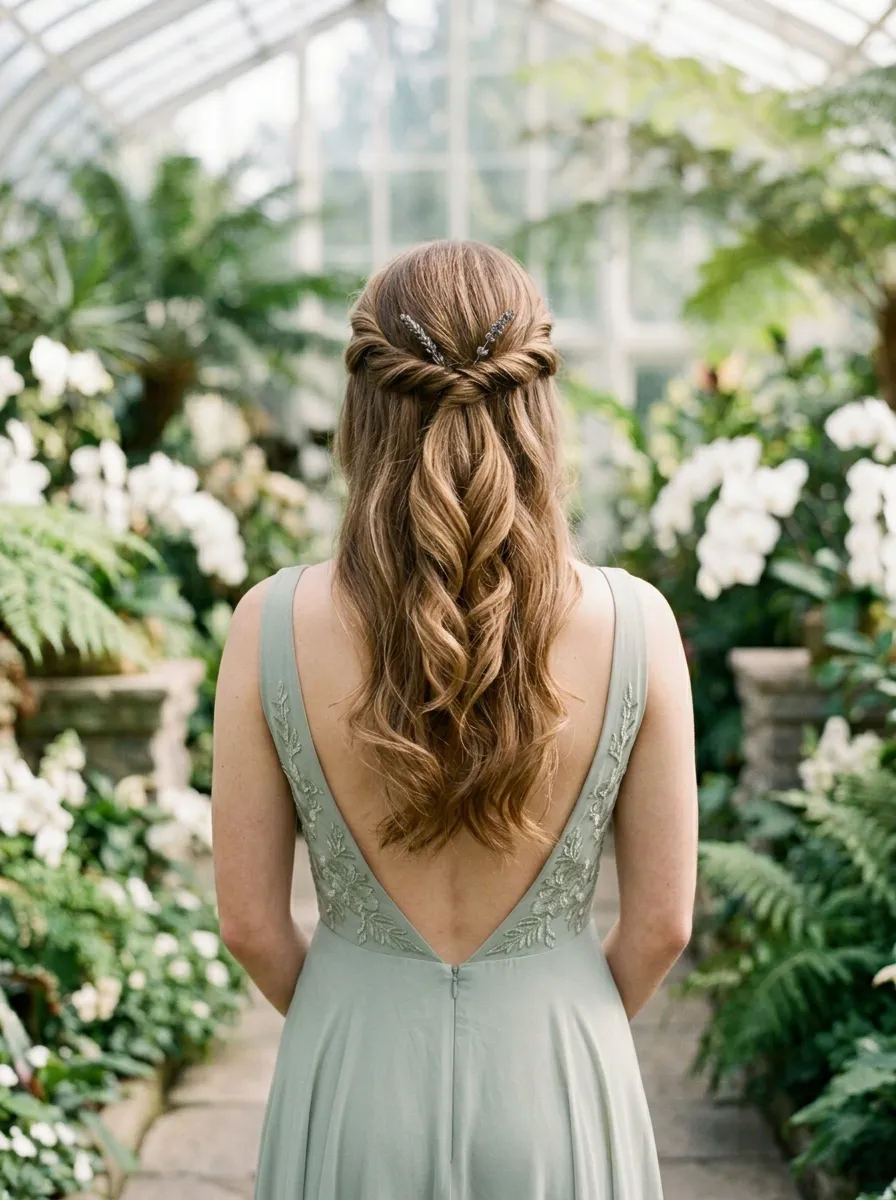
4.Twisted Crown Braid with Loose Waves
The overview: Two rope twists originate above each ear and meet at the center back, crossing and weaving into a single twisted band across the crown. Below, the hair falls in loose, undone waves. Small crystal or pearl pins are tucked along the twist line.
Why this look is popular: The twisted crown acts like a headband woven from your own hair, keeping face-framing strands back without accessories. It works on both straight and wavy textures with minimal product.
Where this look is suitable: Garden weddings, daytime ceremonies, rustic barn venues. The loose waves keep the overall look soft and approachable.
Step by step:
- Add wave texture. Use a 1.5-inch curling iron to create loose waves through all hair — wrap sections away from the face.
- Section the crown. Part off a horseshoe-shaped section from temple to temple across the crown. Clip the rest down.
- Twist each side. On each side, take a 2-inch section above the ear and twist backward, away from the face.
- Meet and weave. Bring both twists to the center back. Cross the right twist over the left, then continue twisting the two together into a single rope.
- Pin along the path. Secure the woven twist with bobby pins every inch, hiding them under the twist.
- Release lower hair. Let the remaining hair down and finger-comb the waves for a natural finish.
- Add pins. Tuck decorative pins along the twist for sparkle.
Tips and tricks: For a softer look, pancake the twist by gently pulling it wider after pinning. This style is forgiving on second-day hair since natural oils help twists hold their shape.
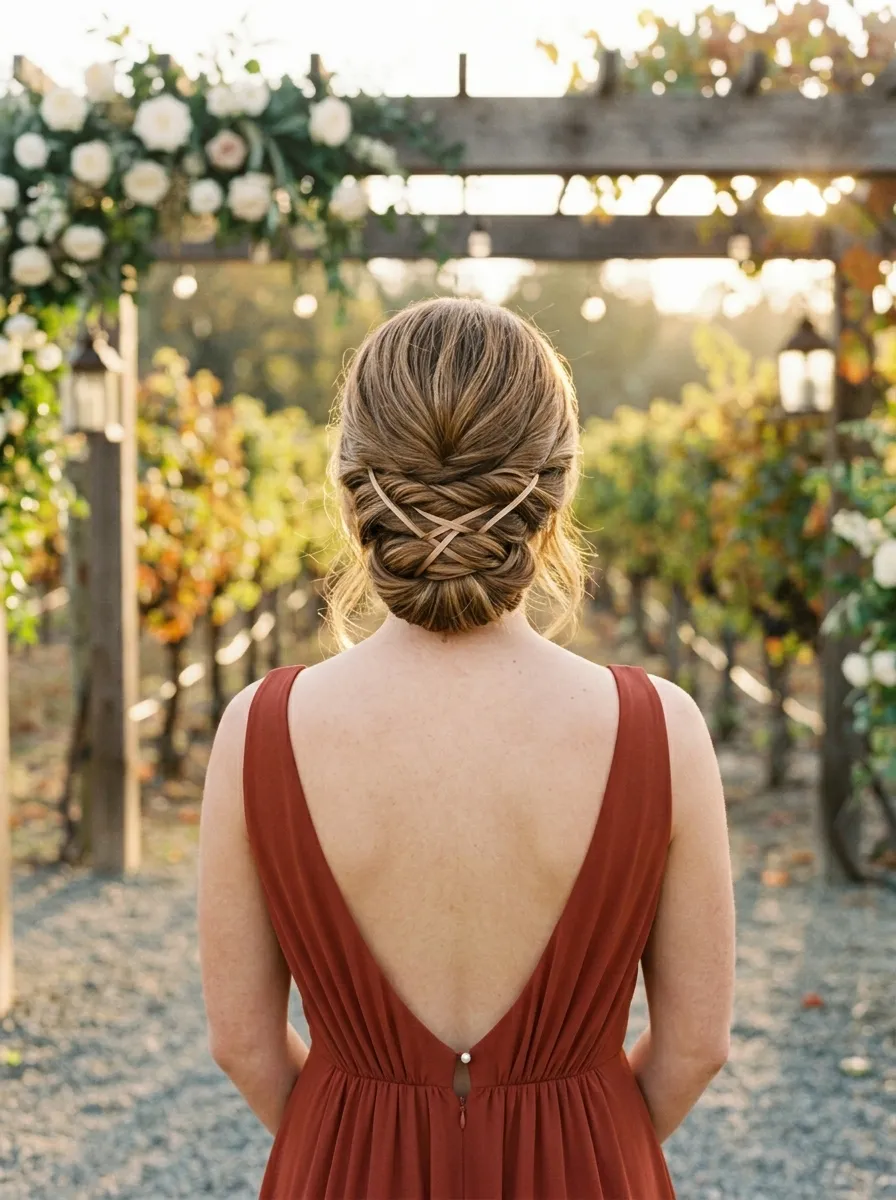
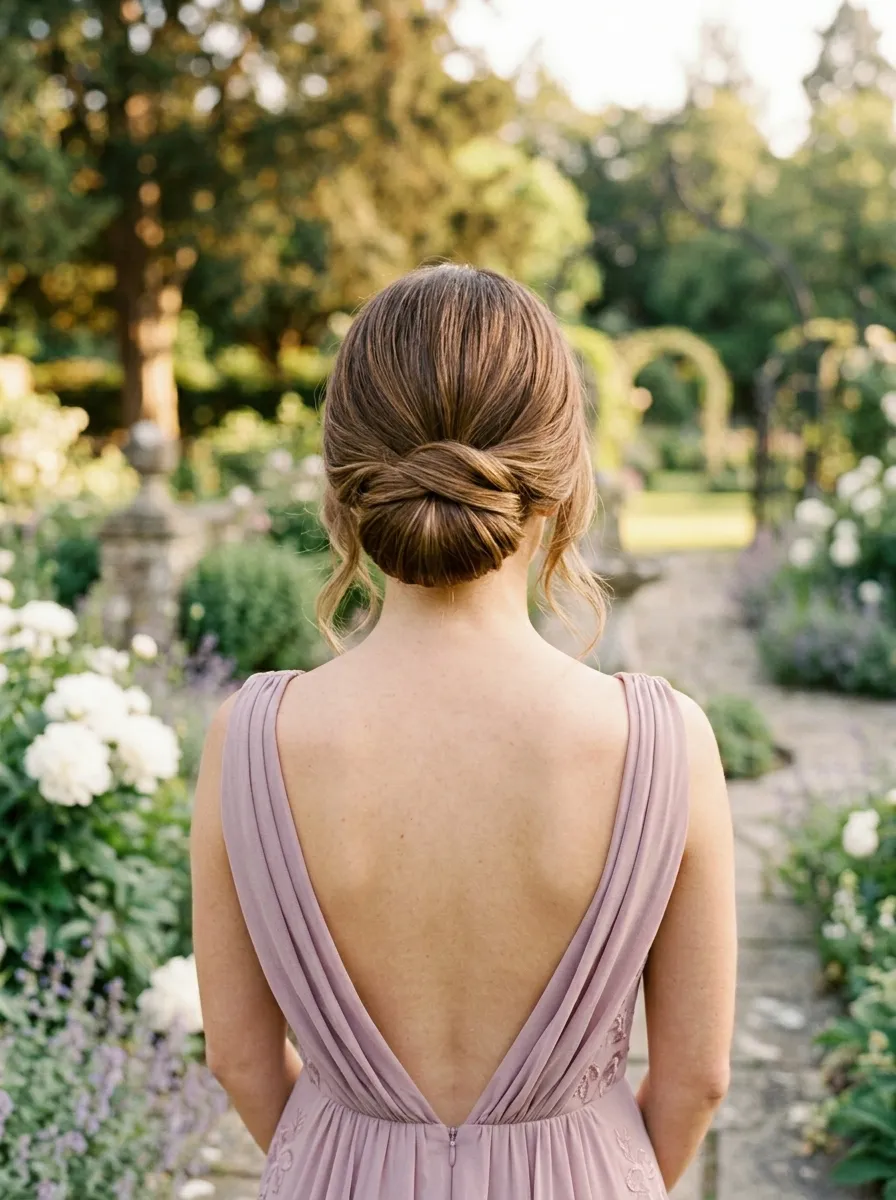
5.Elegant Twisted Chignon with Subtle Gold Pin
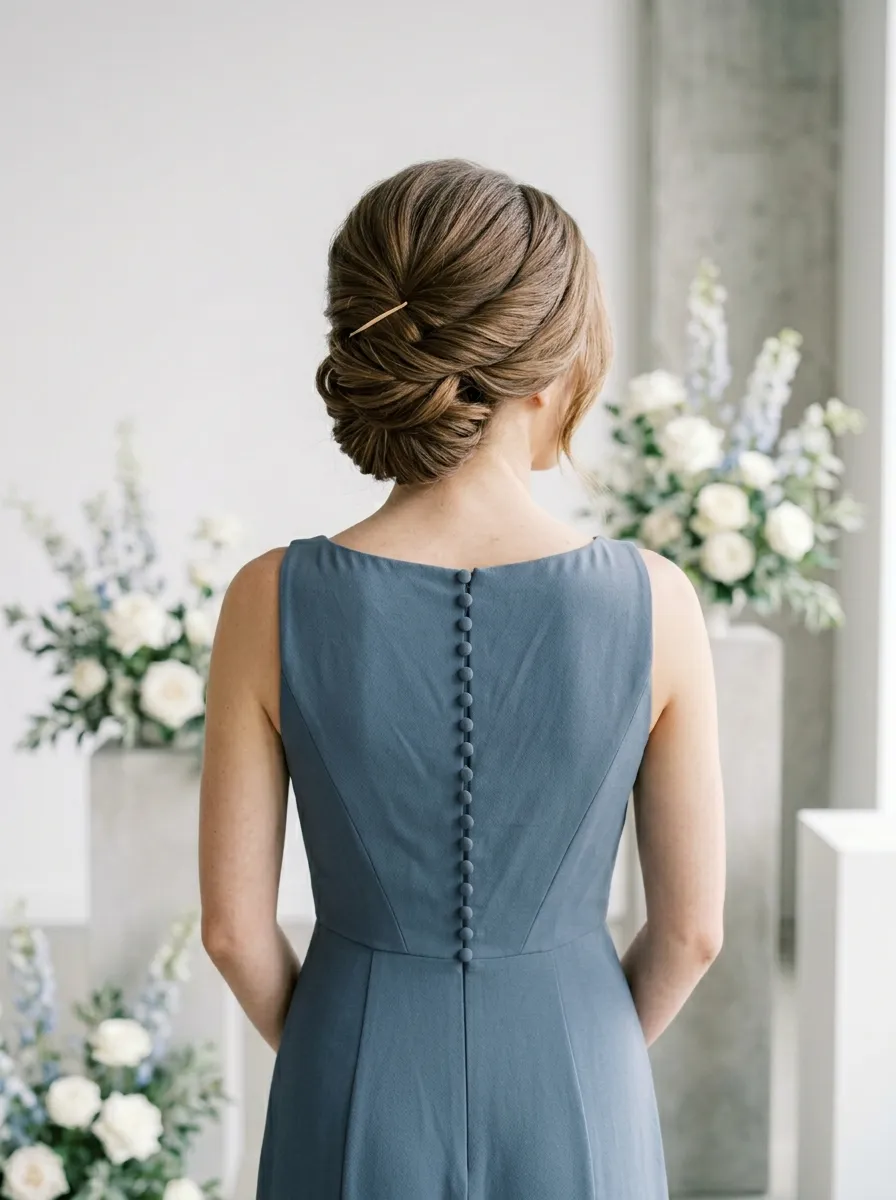
The overview: The chignon sits low on the nape with visible layered twist construction. The gold pin is subtle and slim, tucked horizontally at the top edge. The surface is smoothed but not slick, with a natural sheen.
Why this look is popular: This is the bridesmaid equivalent of a little black dress — timeless, flattering, and appropriate for nearly every wedding formality level. The gold pin adds just enough interest without requiring floral or crystal accessories.
Where this look is suitable: Church weddings, civil ceremonies, evening receptions. It pairs well with high-neck or off-shoulder dress silhouettes.
Step by step:
- Smooth the base. Blow-dry hair with a round brush for smoothness. Apply a dime-sized amount of Olaplex No. 6 Bond Smoother for shine without weight.
- Gather low. Pull hair to the nape and secure loosely with an elastic.
- Twist and coil. Take the ponytail, twist it, then coil it around its own base, tucking the end underneath.
- Add texture twists. Pull out small sections from the coil, twist each, and pin them around the outer edge for a layered effect.
- Insert the pin. Slide the gold bar pin through the top layer of the chignon at a slight angle.
- Polish. Smooth flyaways with a boar bristle brush and a light mist of hairspray.
Tips and tricks: Aveda Control Paste works well on baby hairs along the hairline — warm a pea-sized amount between your fingers and smooth back. For longer-lasting hold, apply hairspray to each section as you build the chignon.
22 Best Graduation Day Hairstyles for 2026 🎓✨
6.Elegant Twisted Chignon with a Silky Ribbon
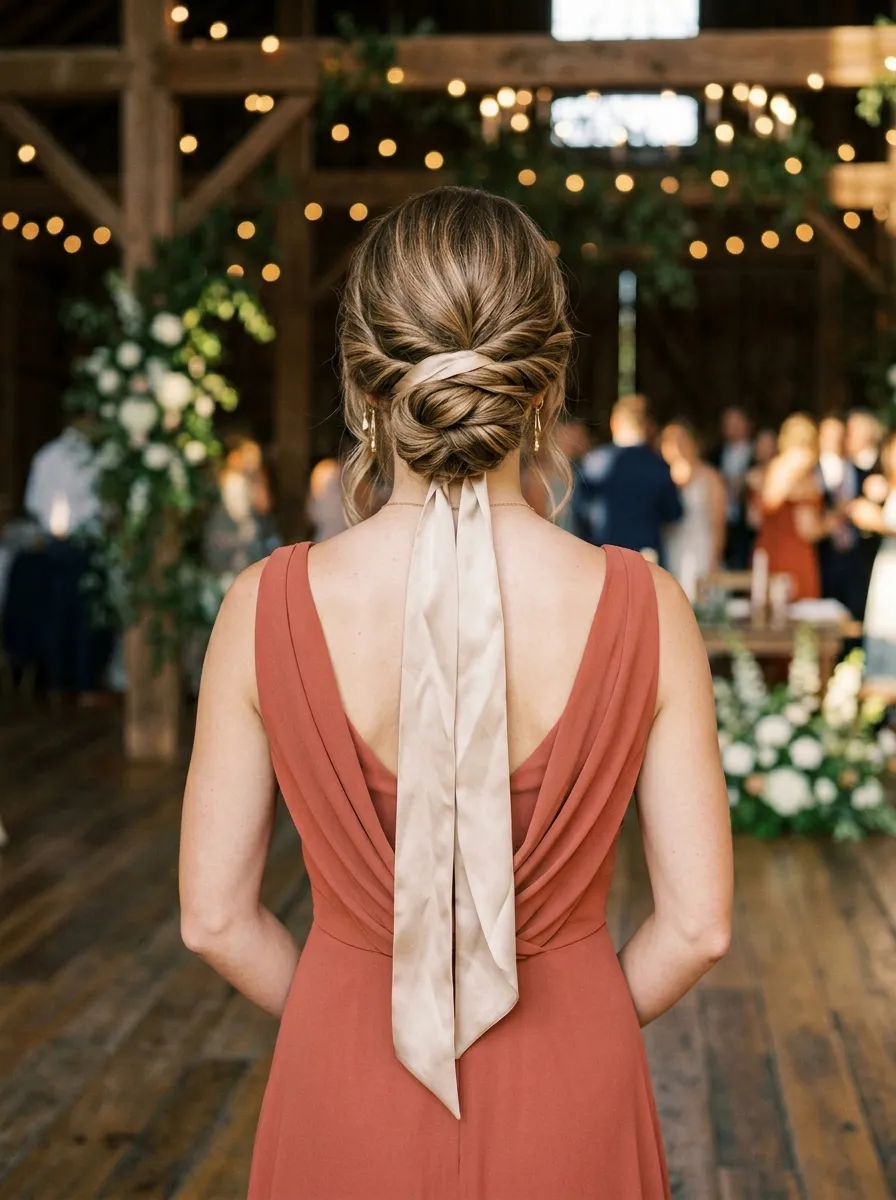
The overview: The chignon is built from twisted sections that create a textured, almost woven surface. A satin ribbon in a muted tone wraps around the base once and ties, with the tails hanging down the back.
Why this look is popular: Ribbons are a low-commitment way to incorporate the wedding colors without dyeing hair or buying elaborate accessories. They also photograph well against neutral or pastel bridesmaid dresses.
Where this look is suitable: Rustic weddings, boho ceremonies, garden parties. Works for both bridesmaids and flower girls with ribbon color coordination.
Step by step:
- Build the chignon. Follow the same twisted-chignon technique from the previous style — twist, coil, and pin sections at the nape.
- Leave the base loose. Don't pin too tightly around the bottom edge — leave room to thread the ribbon.
- Thread the ribbon. Take a 24-inch length of 1-inch satin ribbon. Wrap it around the base of the chignon once.
- Tie. Tie a double knot at the center back, then finish with a small bow or let the tails hang.
- Secure. Pin the ribbon knot to the chignon with a bobby pin so it doesn't slide.
Tips and tricks: Cut the ribbon ends at an angle to prevent fraying. If the ribbon is slippery, dab a tiny drop of fabric glue on the inner knot before tying. Match the ribbon to your dress or bouquet flowers for a coordinated look.
7.Braided Crown with Cascading Waves & Leafy Accents
The overview: A loose Dutch or French braid starts above each ear and wraps around the back of the crown, meeting and pinning at the center. Below the braid, the hair falls in flowing waves. Small gold-toned leaf pins are scattered along the braid path.
Why this look is popular: The braided crown adds structure without requiring all hair to be up. It keeps hair off the face during outdoor ceremonies while letting the length and wave pattern stay visible.
Where this look is suitable: Forest or garden weddings, daytime events, beach ceremonies. Works with floral crowns or greenery accents.
Step by step:
- Create loose waves. Curl all hair with a 1-inch barrel, alternating curl directions for a natural, textured wave pattern.
- Section the crown. Isolate a 2-inch strip from temple to temple across the crown.
- Braid each side. Starting at the right temple, Dutch braid along the hairline to the center back. Repeat from the left temple.
- Pin the braids. Cross the two braids at the center back and pin securely. Pancake the braids by pulling at outer edges.
- Weave in pins. Tuck leaf-shaped pins along the braided sections, spacing them evenly.
- Set. Lightly mist with Kenra Volume Hairspray 25 for humidity-resistant hold.
Tips and tricks: This style works well with hair extensions clipped at the crown for added length and volume in the braid. If your hair is shorter, focus the braid thickness by keeping sections small and deliberate.

30 Stunning Vacation Nail Ideas for Your Next Getaway in 2026 💅
8.Elegant Braided Updo with Loose Tendrils
The overview: Multiple small braids and twists are interlaced and pinned into a low chignon. Soft tendrils frame the face on both sides, and a few shorter pieces are left loose at the nape. Small pearl pins are tucked into the braids.
Why this look is popular: The combination of braids and twists creates visual interest that photographs well from every angle. The face-framing tendrils prevent the updo from feeling severe and flatter most face shapes.
Where this look is suitable: Formal evening weddings, black-tie events, cathedral ceremonies. Pairs well with backless or low-back dresses.
Step by step:
- Texture prep. Apply texturizing spray to dry hair for grip.
- Create small braids. Make 3-4 small Dutch or French braids in the front section and along the sides, leaving the ends free.
- Gather into ponytail. Gather all hair at the nape into a low ponytail, including the loose braid tails.
- Twist and pin. Twist the ponytail into a chignon, pinning the braided sections on the outer surface for visibility.
- Pull tendrils. Use a fine-tooth comb tail to gently pull out small face-framing pieces and nape wisps.
- Add pins. Dot pearl pins along the braided sections.
Tips and tricks: For tendrils that stay wavy all night, wrap each piece around a 0.5-inch curling iron before releasing. This gives a more defined bend that lasts through humidity and dancing.
9.Twisted Chignon with a Delicate Hair Vine
The overview: The chignon sits at the nape with visible twisted sections creating a woven effect. A delicate vine-style hair accessory winds through the twists, catching light with small leaf or crystal details.
Why this look is popular: Hair vines are having a major moment because they add dimension and shine that photographs beautifully. This style is particularly popular for evening weddings where candlelight and dance floor lights catch the metal details.
Where this look is suitable: Ballroom weddings, winter events, sophisticated evening receptions. Works well with jewel-toned dresses.
Step by step:
- Smooth and prep. Blow-dry hair straight with a round brush. Apply a shine serum for gloss.
- Gather low. Pull hair into a low ponytail at the nape. Don't tighten — keep it soft.
- Twist into chignon. Twist the ponytail, then coil it into a flat chignon against the nape. Pin as you go.
- Wrap the vine. Starting at the bottom edge, weave the hair vine through the outer twists of the chignon, spiraling upward.
- Tuck the end. Tuck the vine tail under the chignon and pin it in place.
- Adjust. Fan out the vine details so they're visible from multiple angles.
Tips and tricks: Choose a vine with flexible wire so you can mold it to the shape of your chignon. If the vine keeps slipping, secure it at 3-4 points with bobby pins that match your hair color.

30+ Chic Pool Party Hairstyles for Summer 2026 🌊👙
10.Braided Crown with Cascading Waves & Baby's Breath
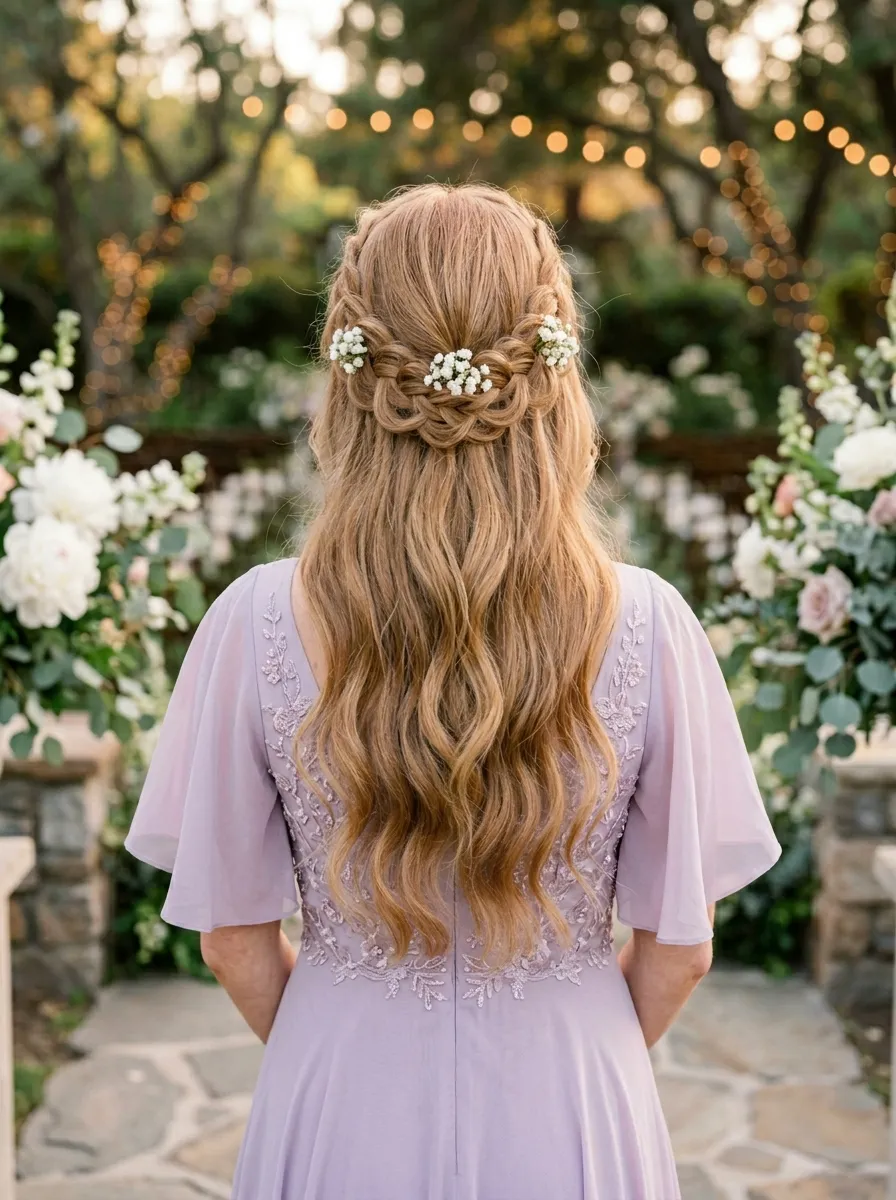
The overview: A three-strand Dutch braid starts at one temple and wraps around the crown to the opposite side. The braid is pancaked for fullness. Tiny sprigs of baby's breath are tucked into the braid sections. The hair below falls in loose waves with soft, natural movement.
Why this look is popular: The baby's breath adds a fresh, natural element without the formality of a floral crown. It's affordable, available year-round, and photographs as soft white dots against the hair.
Where this look is suitable: Garden weddings, spring and summer ceremonies, boho-chic themes. Complements light and airy dress fabrics like chiffon and organza.
Step by step:
- Prep with texture. Spray dry shampoo or texture spray through roots for volume.
- Create waves. Use a 1.25-inch curling iron to create loose waves through all hair.
- Start the crown braid. Dutch braid from one temple, picking up hair as you work across the crown.
- Complete the halo. Continue the braid around to the opposite temple and pin the end underneath.
- Pancake the braid. Gently pull each braid section outward to double the width.
- Add baby's breath. Insert sprigs into the braid sections, spacing them evenly.
Tips and tricks: Fresh baby's breath will last the day without water if kept cool before the ceremony. For a longer-lasting option, use preserved baby's breath — it looks identical but won't wilt.
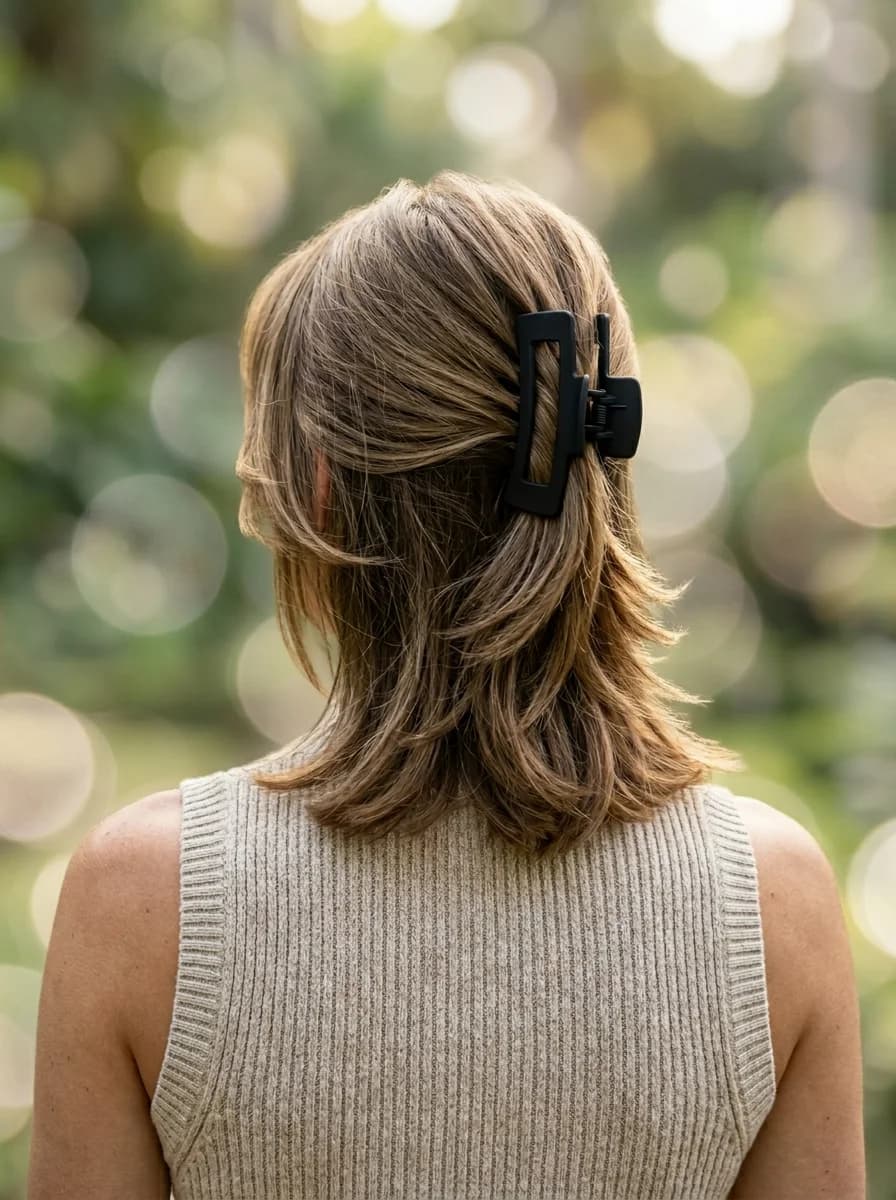
11.Elegant Twisted Chignon with a Modern Clip
The overview: The chignon is low and compact with visible twist texture. A modern hair clip — likely silver or gold-toned with geometric lines — is positioned at the top center of the chignon.
Why this look is popular: Modern hair clips have replaced traditional jeweled pins for bridesmaids seeking a minimalist, fashion-forward look. The clean lines of the clip contrast the textured chignon for a balanced aesthetic.
Where this look is suitable: City weddings, contemporary venues, art gallery receptions. Works well with minimalist or modern dress styles.
Step by step:
- Smooth blow-dry. Blow-dry hair straight with a paddle brush for a sleek base.
- Gather low. Pull hair to the nape into a ponytail, smooth all surface hair before securing.
- Twist the chignon. Twist the ponytail and coil it into a compact chignon. Pin securely.
- Smooth surface. Use a boar bristle brush and a dab of pomade to smooth any bumps.
- Attach the clip. Open the clip and slide it over the top edge of the chignon, clamping down.
Tips and tricks: Test the clip's grip before the wedding day — some smooth metal clips slip on fine hair. Line the inner edge with a small bobby pin for extra hold if needed.

29 Best Tropical Vacation Nails for Women in 2026 🌴
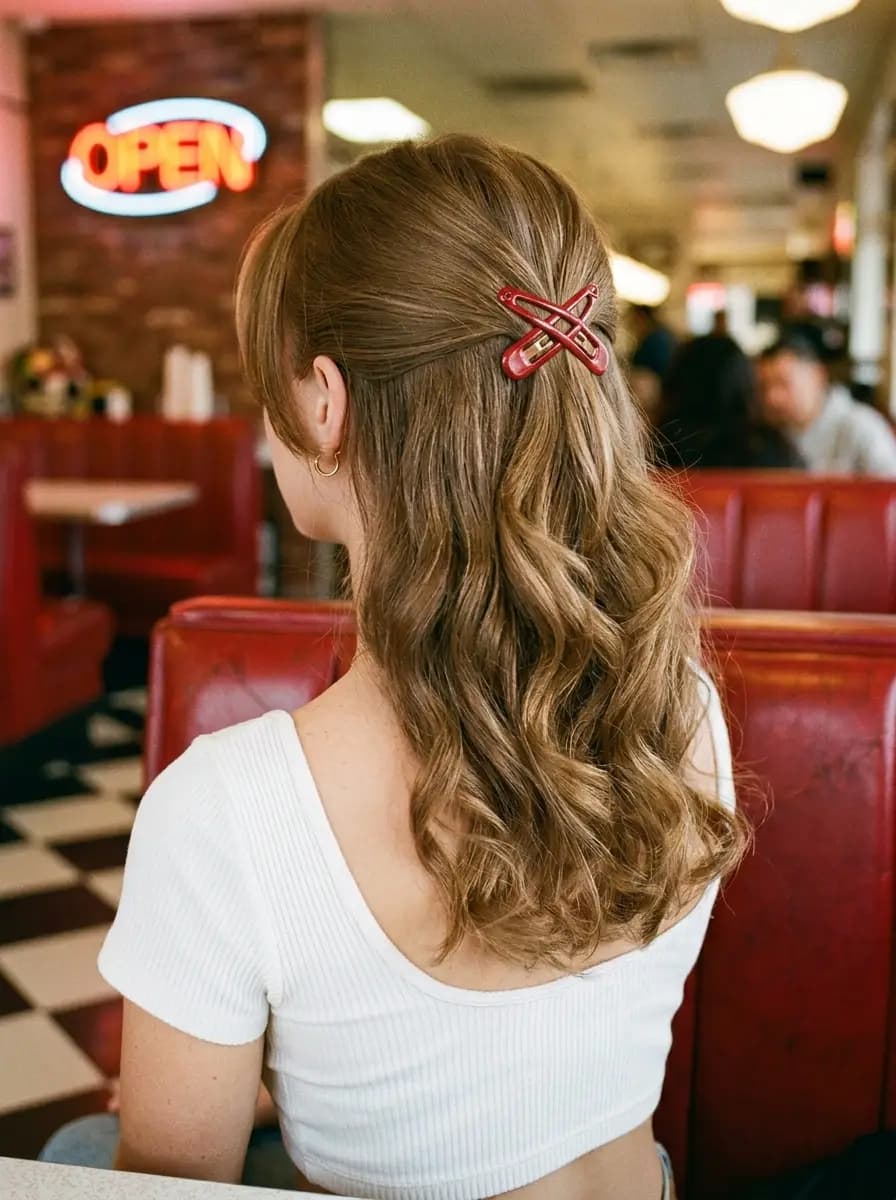
12.Boho Curls Half-Up with Pearl Pins
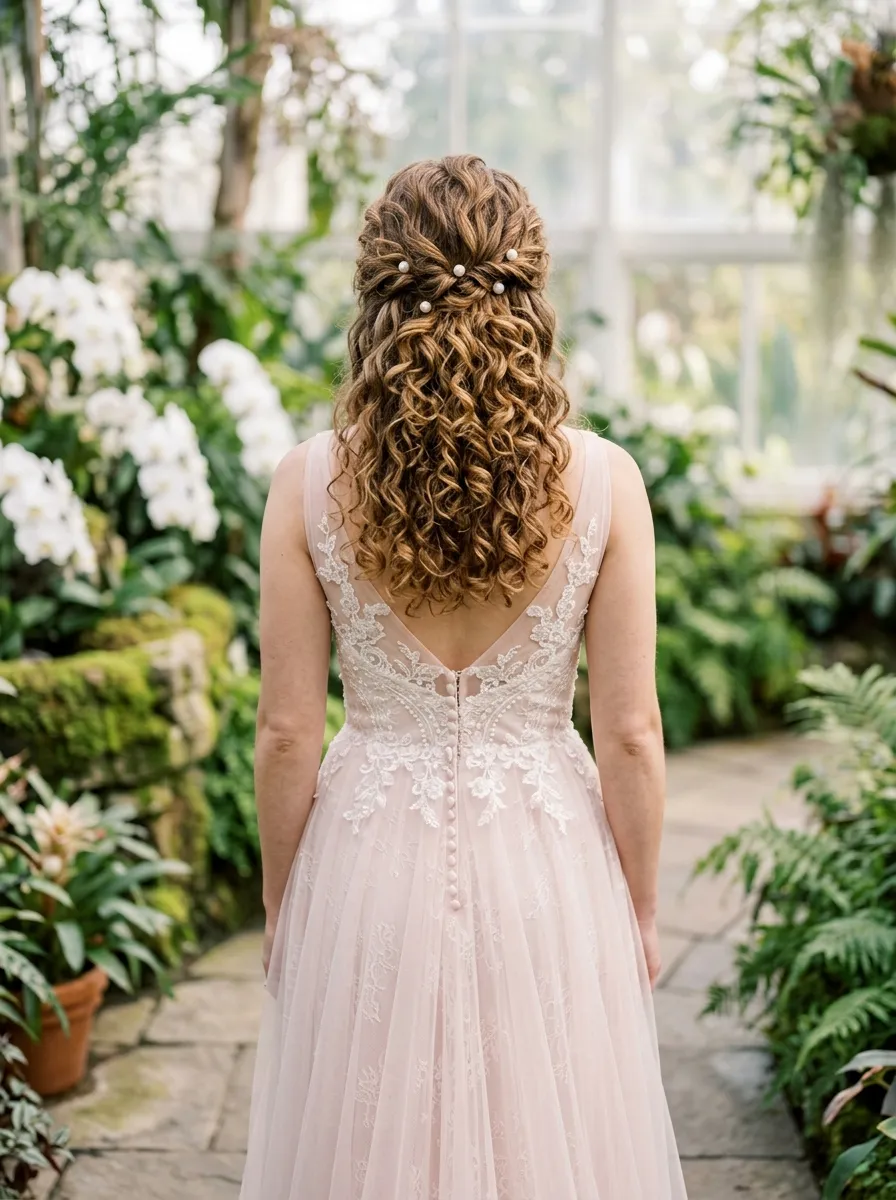
The overview: The top section from the temples back is gathered and twisted, pinned at the crown, then dotted with pearl-tipped pins. The curls are voluminous, bouncy, and frame the face.
Why this look is popular: The half-up, half-down combination shows off curl pattern while keeping hair off the face. Pearl pins are a classic bridal accessory that works for bridesmaids across all age ranges.
Where this look is suitable: Beach weddings, outdoor ceremonies, casual daytime events. Complements floaty, relaxed dress styles.
Step by step:
- Define curls. Use a 1-inch curling wand, wrapping each section vertically. Hold for 10 seconds, then release into your palm.
- Cool completely. Let curls cool in your cupped hand before dropping — this sets the shape.
- Gather the half-up section. Take a 3-inch section from each temple and bring to the back, twisting loosely.
- Pin the twist. Secure the twist at the crown with bobby pins in an X pattern for hold.
- Insert pearl pins. Space 3-4 pearl pins along the twist line.
- Break up curls. Flip head upside down and shake gently at the roots for volume, then finger-comb curls.
Tips and tricks: For curls that last through an outdoor wedding, use a mousse like Redken Guts 10 before blow-drying, then set each curl with a clip while it cools. This locks in the shape against humidity.
13.Glamorous Wavy Half-Up with Vintage Sparkle
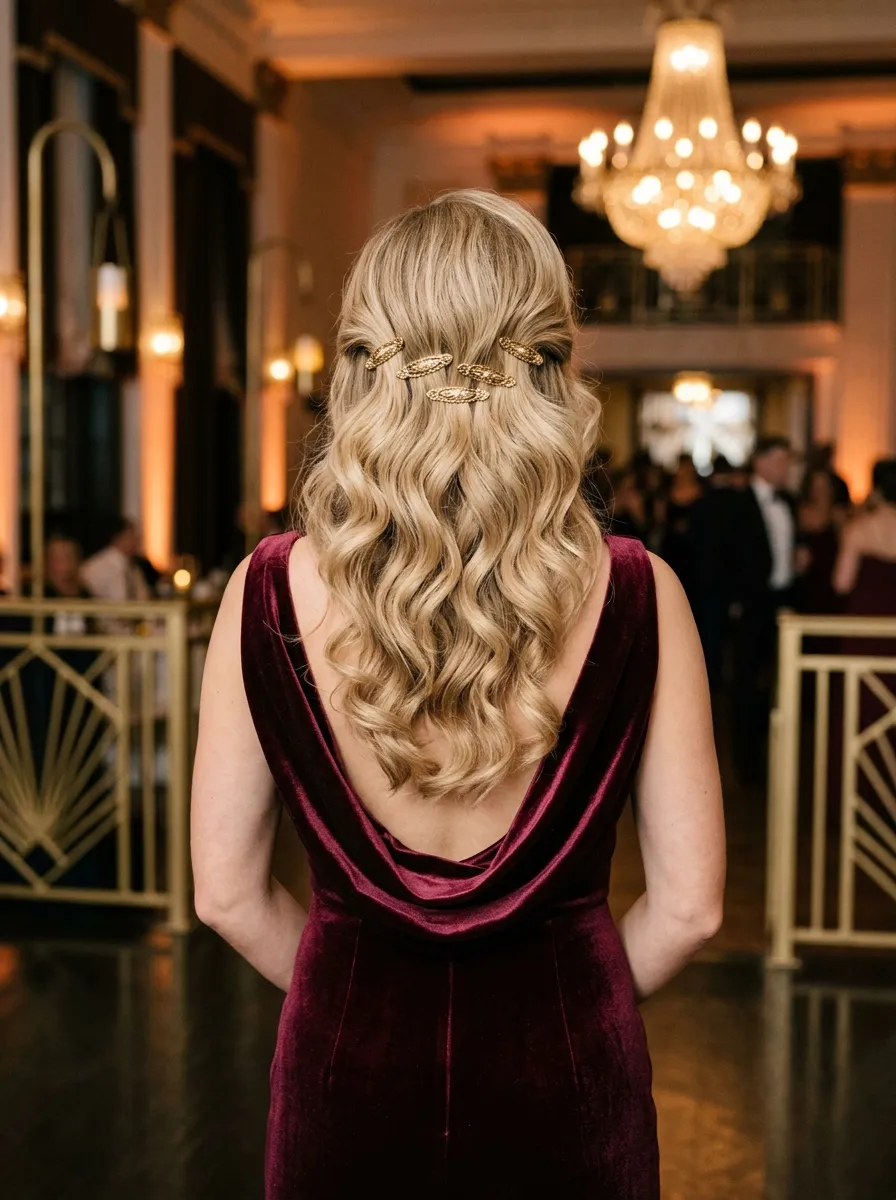
The overview: Old Hollywood waves meet a modern half-up style. The top section is swept back and pinned with decorative jeweled clips in an Art Deco or vintage style. The waves below are uniform and polished, typical of a finger-wave or curling-iron pattern.
Why this look is popular: Vintage styling continues to resonate for formal weddings. The jeweled clips provide a focal point that reads as heirloom-quality in photos.
Where this look is suitable: Black-tie weddings, evening receptions, winter galas. Pairs best with satin or velvet dresses.
Step by step:
- Set the waves. Use a 1.5-inch curling iron, curling away from the face. Brush through after cooling for smooth, uniform waves.
- Section off top. Part off a U-shape section from temple to temple across the crown.
- Sweep back. Comb the top section back smoothly and gather at the crown.
- Pin at crown. Twist the gathered section into a soft pouf and pin. Slightly tease the roots for height.
- Attach clips. Place vintage clips over the pinned area, fanning them for a clustered effect.
- Polish waves. Run a shine spray like Amika The Shine Overcoat through the loose waves.
Tips and tricks: For true Old Hollywood volume, set the top section on hot rollers before styling. This creates lasting lift at the crown that won't flatten during the ceremony.
29 Fun FIFA World Cup Watch Party Hairstyles (2026)
14.Braided Half-Up with Loose Waves & Delicate Pins
The overview: Two twisted sections from each side meet at the center back and interlock into a small braided detail. Below, the hair falls in soft, loose waves. Small crystal or pearl pins dot the braided section.
Why this look is popular: The braided half-up feels intricate without requiring complex braiding skills. It's approachable for DIY styling but still looks intentional and detailed.
Where this look is suitable: Garden parties, daytime weddings, bridal showers. The loose waves keep the overall feel relaxed and natural.
Step by step:
- Wave all hair. Use a 1.25-inch wand to create loose, relaxed waves through all sections.
- Twist your sides. Take a 2-inch section above each ear, twist backward, and bring to the center back.
- Weave together. Cross the right twist over the left and continue twisting them together for 2 inches.
- Pin the braid. Pin the woven section flat against the head. Fan the twist edges for width.
- Add pins. Place 2-3 delicate pins at the junction.
- Soften. Finger-comb the lower waves for a natural, undone finish.
Tips and tricks: For a more relaxed look, pull out a few strands around the face before pinning the twists. These should be 0.25-inch sections, wrapped around a curling iron briefly to match the wave pattern.
15.Rustic Dutch Braid with Floral Pins
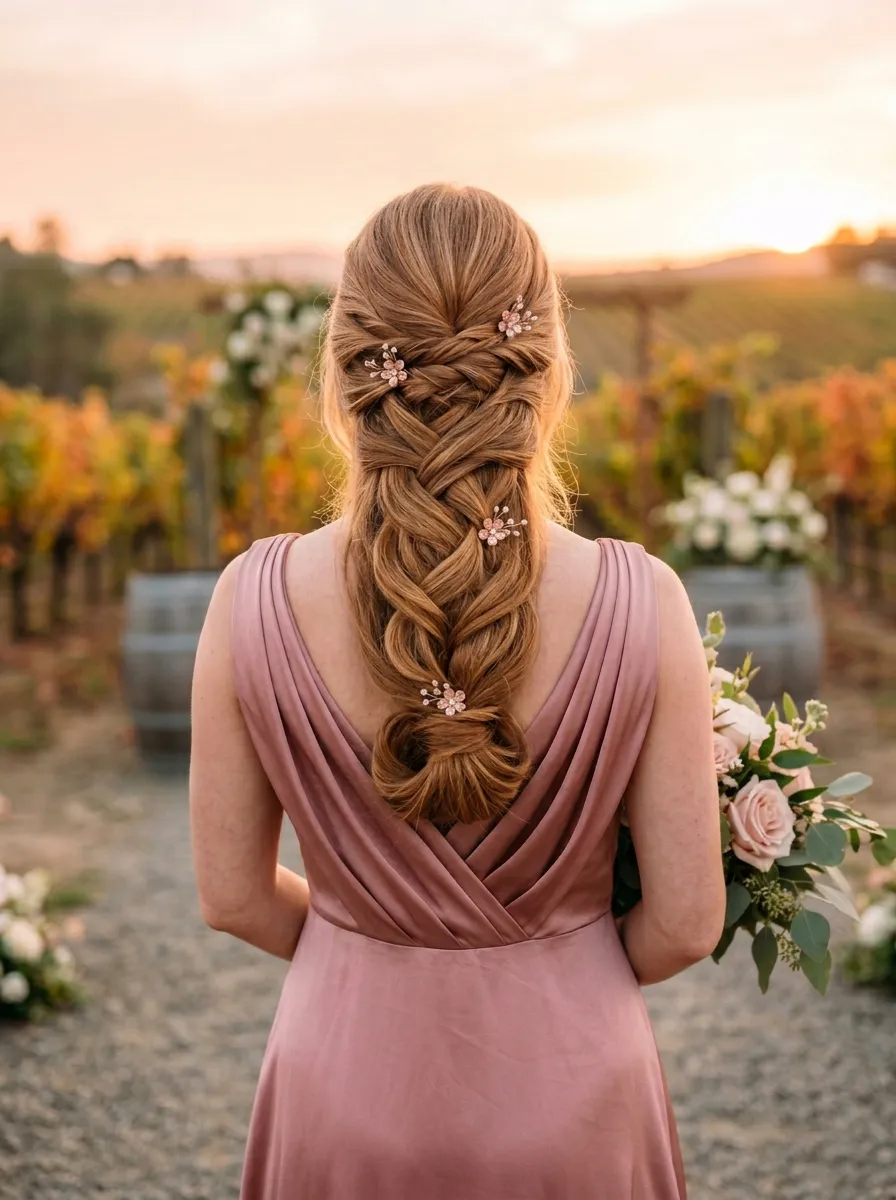
The overview: A Dutch braid begins near the crown and continues down the center back, with each section pancaked wide for a voluminous, almost ribbon-like effect. Small floral pins with crystal or pearl centers are placed at intervals along the braid.
Why this look is popular: The Dutch braid stands out from the head, creating a 3D effect that's both rustic and refined. Floral pins tie into natural or garden wedding themes without needing fresh flowers.
Where this look is suitable: Vineyard weddings, barn venues, woodland ceremonies. Pairs well with lace dresses and natural makeup.
Step by step:
- Texture prep. Apply texturizing powder or spray to roots for grip and volume.
- Flip and braid. Flip your head upside down. Starting at the crown, Dutch braid downward (cross strands under, not over).
- Take large sections. Use 1.5-inch sections for a chunkier braid — this looks more rustic and intentional.
- Braid to the ends. Continue the Dutch braid past the nape to the ends, then secure with a clear elastic.
- Pancake heavily. Pull each section outward firmly until the braid doubles in width and looks woven.
- Add floral pins. Insert pins from the outside edge of the braid, angling them inward.
Tips and tricks: Reserve the largest, most detailed pins for the crown section where they'll be most visible. Use smaller pins toward the nape for a tapered effect.

22 Office Nail Designs That Are Professional But Never Boring
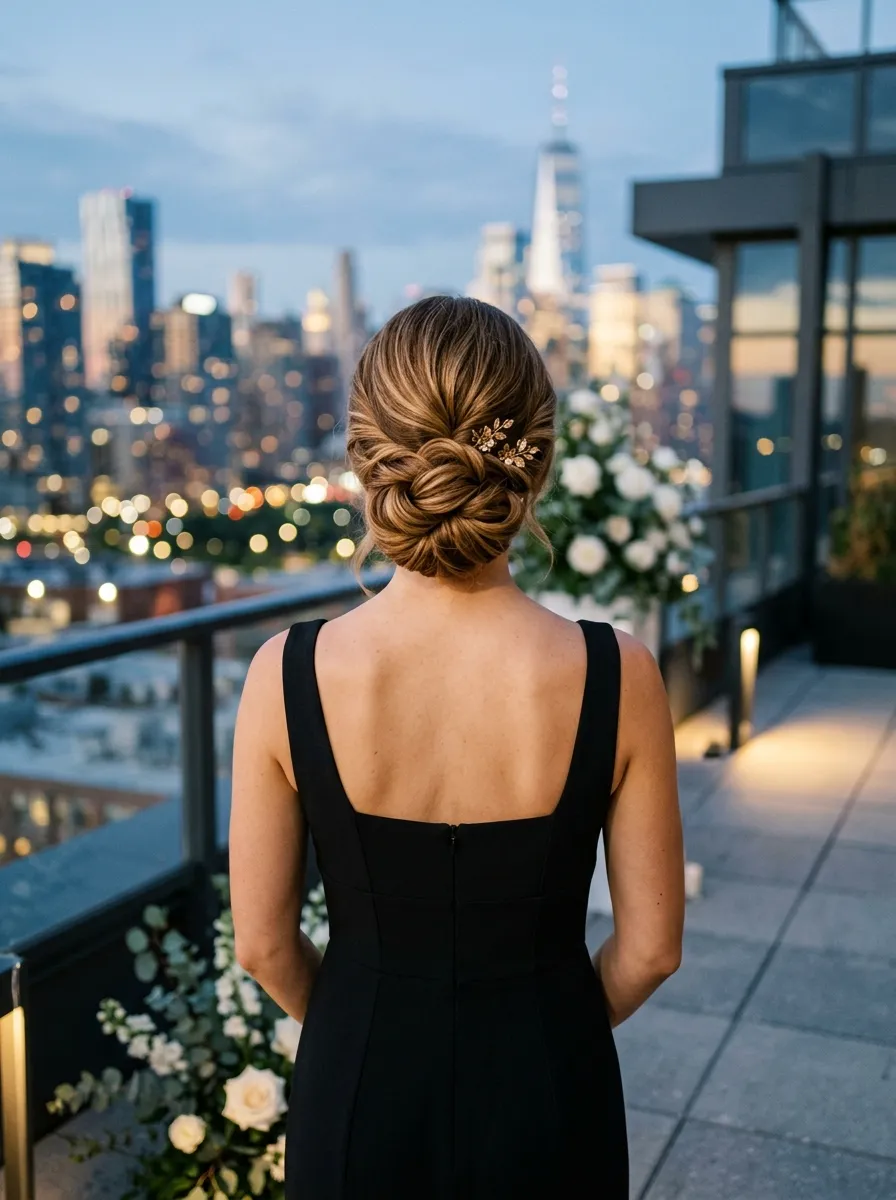
16.Braided Low Chignon with a Golden Leaf Hairpiece
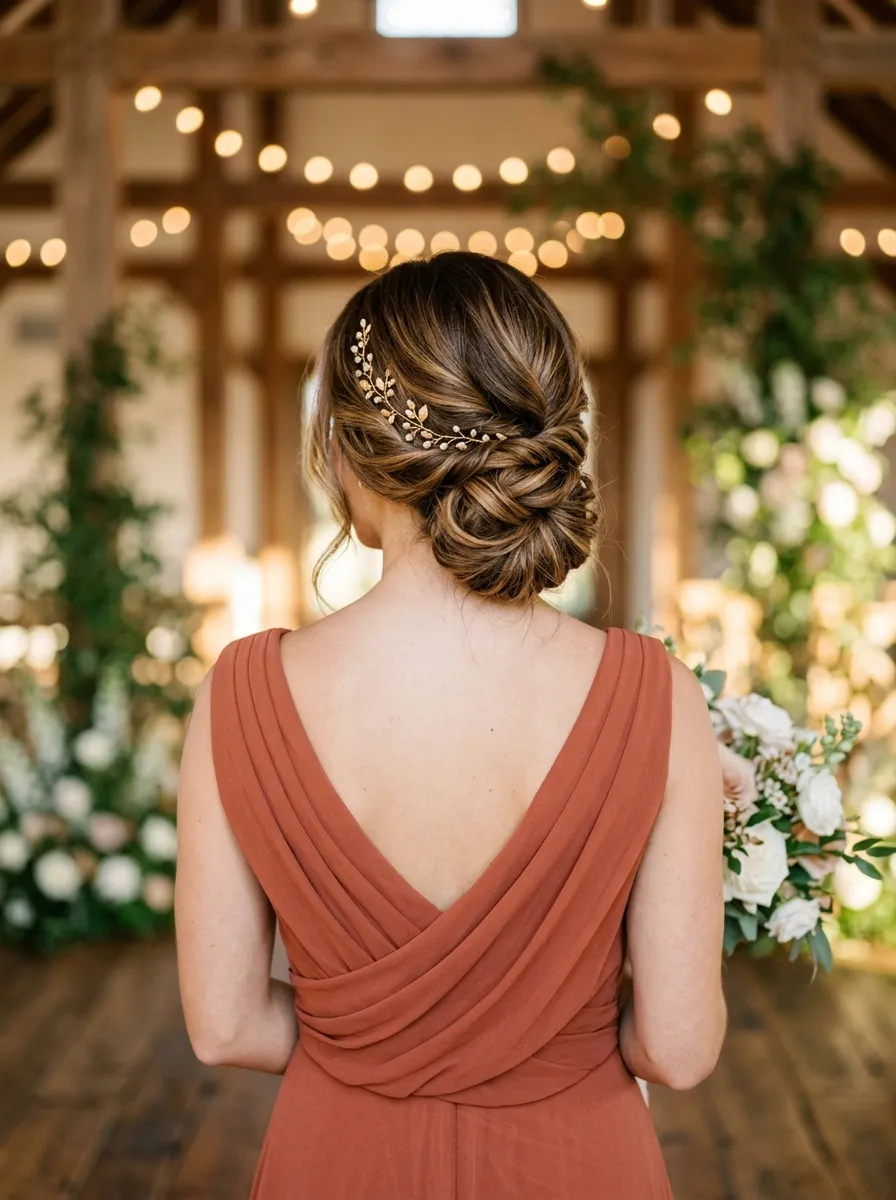
The overview: A three-strand braid runs down the back and is coiled into a low chignon pinned close to the nape. A gold-toned leaf hairpiece sits on the side of the chignon. The hair at the crown is smoothed back with natural volume.
Why this look is popular: The braided chignon combines two classic wedding styles — braids and low buns — into one cohesive look. The golden leaf hairpiece adds warmth and a touch of nature that suits outdoor and indoor venues alike.
Where this look is suitable: Fall weddings, rustic venues, evening ceremonies. The gold accents complement earth-toned and jewel-toned dresses.
Step by step:
- Smooth and gather. Brush hair back into a low ponytail at the nape. Keep surface smooth.
- Braid the ponytail. Create a three-strand braid with the ponytail, keeping tension medium — not too tight.
- Wrap into chignon. Coil the braid around the base of the ponytail, pinning as you wrap.
- Tuck the end. Tuck the braid end under the chignon and secure with two crossed pins.
- Position the leaf. Slide the golden leaf hairpiece into the side of the chignon, angling it upward.
- Set. Spray with medium-hold hairspray, focusing on the braided areas.
Tips and tricks: If your braid isn't thick enough to make a substantial chignon, split the ponytail into two sections, braid each separately, and wrap them together for double the volume.
17.Bohemian Fishtail Braid with Delicate Hair Vine
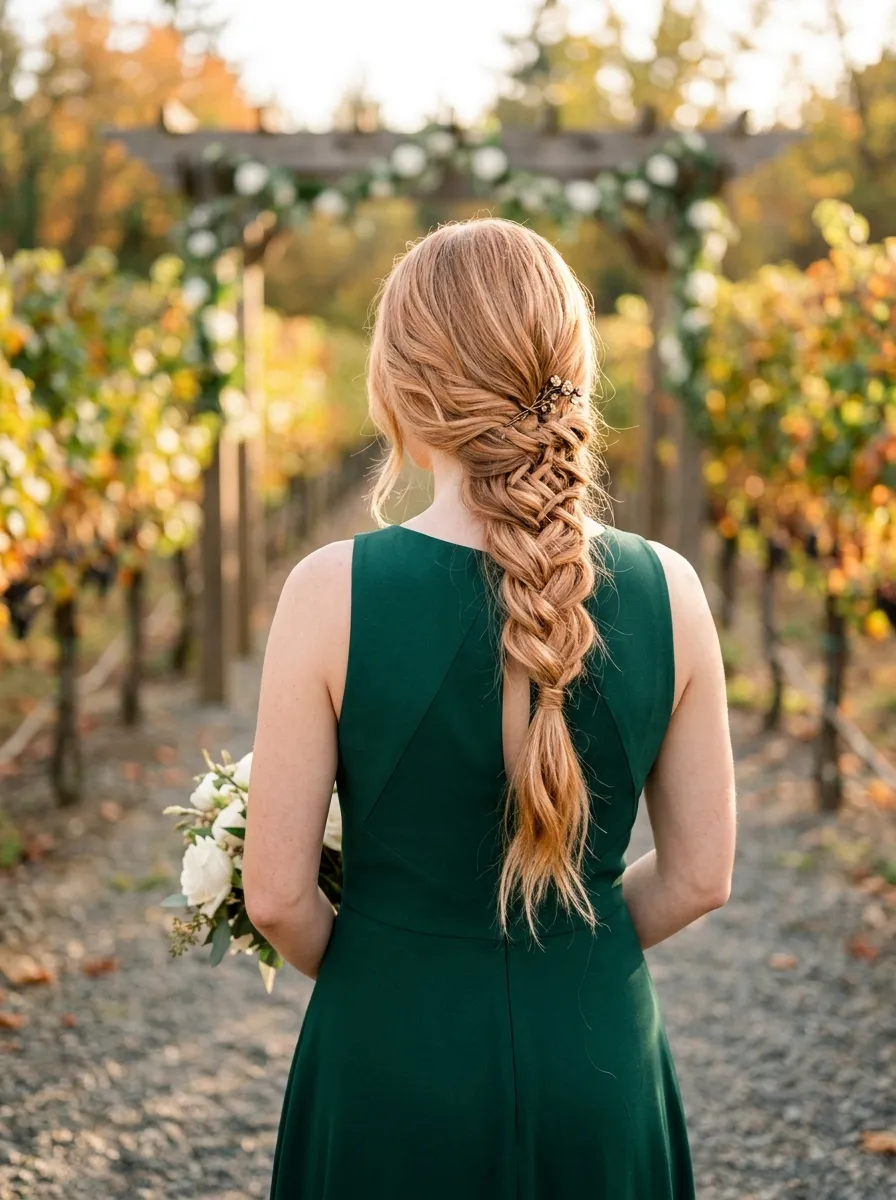
The overview: The fishtail braid starts at the nape and falls over the right shoulder. It's loosely constructed and pancaked wide for a soft, romantic texture. A delicate vine — gold or silver with small leaves — is threaded through the braid length.
Why this look is popular: Fishtail braids read bohemian but the hair vine elevates them to wedding-appropriate. The side-swept placement keeps the back of the dress visible.
Where this look is suitable: Beach weddings, boho ceremonies, outdoor receptions. Works especially well with off-shoulder or one-shoulder dresses.
Step by step:
- Prep with texture. Spritz texturizing spray through dry hair for grip.
- Gather to one side. Sweep all hair to one shoulder. Don't brush — keep it slightly tousled.
- Start the fishtail. Divide hair into two sections. Take a small piece from the outside of the right section, cross it to the inside of the left section. Alternate sides.
- Keep it loose. Don't pull sections tight as you braid. Hold the braid loosely between your fingers.
- Secure. Tie the end with a clear elastic.
- Pancake. Gently pull the outer edges of the braid to widen it. Start at the top and work down.
- Weave the vine. Starting at the top, weave the hair vine through the braid openings, alternating sides.
Tips and tricks: For a fishtail braid with more texture, curl the hair before braiding — the waves will create natural grip and the braid will look fuller. Use a curling wand with a 1-inch barrel.

26 Stunning Summer Braided Hairstyles for Women 2026 ☀️💇♀️
18.Romantic Braided Updo with Delicate Floral Accents
The overview: A Dutch braid starts above each ear and wraps around the crown, meeting at the back where the hair is braided again and pinned into a low bun. Small white or blush flowers are tucked into the braided sections.
Why this look is popular: This updo reads bridal but works beautifully for bridesmaids because the flowers can be coordinated with the bouquet palette. The dual-braid construction keeps hair secure through long ceremonies.
Where this look is suitable: Garden weddings, spring and summer ceremonies, floral-themed events. Pairs with floral-print or solid pastel dresses.
Step by step:
- Texture prep. Apply mousse to damp hair and blow-dry with a diffuser for volume and grip.
- Create two braids. Dutch braid from each temple around the crown to the nape. Secure temporarily.
- Combine at nape. Gather all hair at the nape, including the braid ends, and create a three-strand braid.
- Coil into bun. Wrap the nape braid into a flat bun and pin securely.
- Pancake everything. Loosen all braids by pulling at their edges for a fuller, softer appearance.
- Add flowers. Tuck small blooms into the crown braid and around the bun.
Tips and tricks: If using real flowers, keep stems in water until the last possible moment. Insert them into the braid with the stems pointing toward the center of the bun so they're secure and hidden.
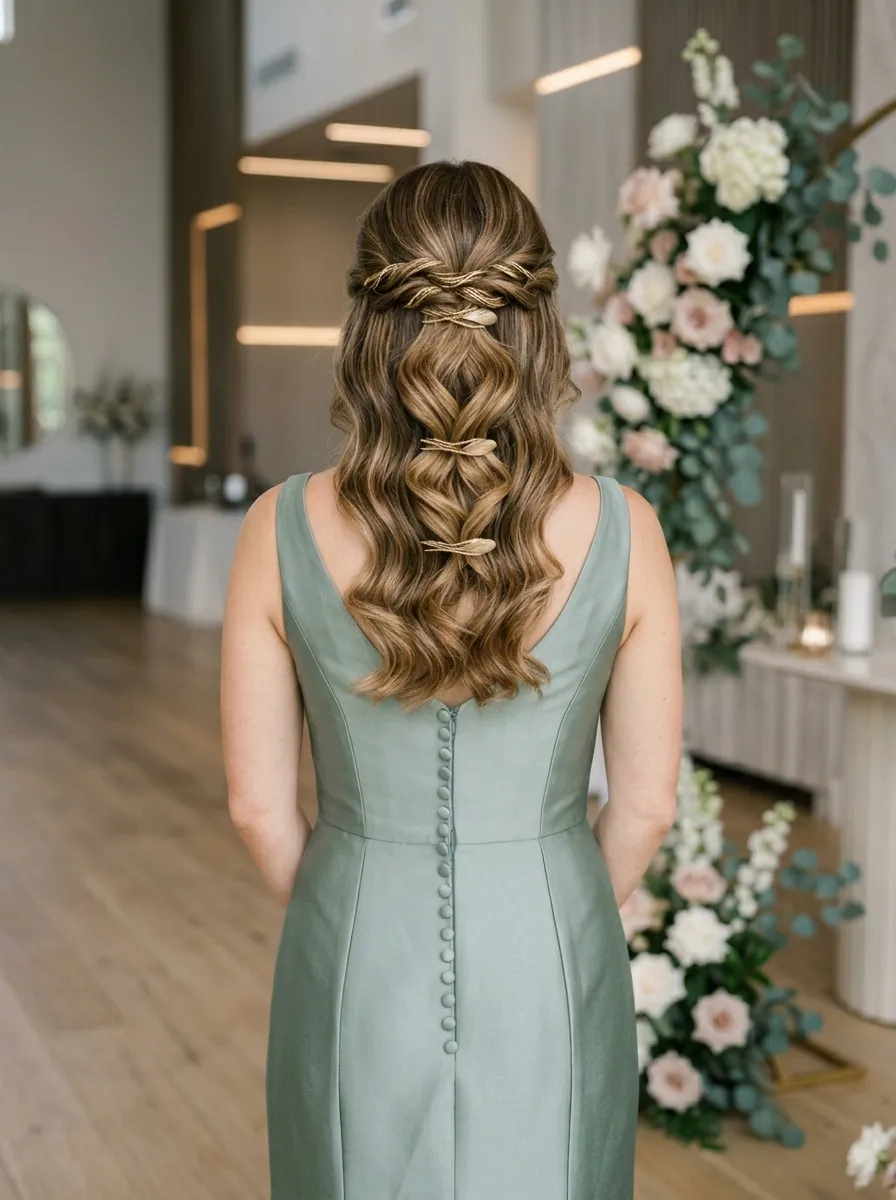
19.Braided Half-Up Twist with Loose Waves
The overview: Two rope twists start above each ear and meet at the back of the crown, forming a twisted knot. Below, the hair falls in soft, tousled waves. The overall texture is touchable and natural.
Why this look is popular: The twisted knot creates the illusion of a braided updo without requiring actual braiding, making it a faster option for bridal parties getting ready together.
Where this look is suitable: Daytime weddings, beach ceremonies, bridal showers. The loose waves keep the look relaxed and fresh.
Step by step:
- Curl for waves. Use a 1.25-inch curling iron on all hair, alternating curl direction for a natural wave pattern.
- Section the front. Part the front hair from temple to temple, isolating about a 3-inch section on each side.
- Twist each side. Take the right section and twist it tightly until it starts to coil — then release slightly so it relaxes.
- Meet and knot. Bring both relaxed twists to the center crown and tie them into a simple overhand knot.
- Pin the knot. Secure the knot with 2-3 bobby pins tucked underneath.
- Adjust volume. Pull the knot gently to widen it, and loosen the twists for a softer look.
- Finger-comb waves. Run fingers through the loose hair to separate and soften waves.
Tips and tricks: If your hair is too silky for a knot to hold, wrap a small clear elastic around the twists before knotting. Then hide the elastic with a decorative pin.
35 Cute & Trendy Short Summer Nails for 2026 ☀️
20.Braided Crown Half-Up with Twisted Detail
The overview: A braid or twist runs from temple to temple across the back of the crown, with woven detail visible. The lower hair is styled in defined waves. Small decorative pins are tucked where the twist meets the hair.
Why this look is popular: The braided crown band adds a structural element while still showing off hair length. It's a middle ground between fully up and fully down that works for both formal and semi-formal weddings.
Where this look is suitable: Garden weddings, rustic venues, summer ceremonies. Complements both strapless and high-neck dress styles.
Step by step:
- Prep and wave. Curl all hair with a 1-inch iron, then brush through for soft waves.
- Section the crown. Part off a 2-inch horseshoe section from one temple to the other.
- Braid the section. Create a regular three-strand braid with the section, keeping tension medium.
- Twist into a band. Coil the braid into a flat, horizontal band across the back of the crown.
- Pin the band. Secure the braided band with pins along its top and bottom edges.
- Pancake for width. Gently pull the braid edges outward to widen the band.
- Add pins. Tuck small decorative pins along the bottom edge of the band.
Tips and tricks: For a crown band that stays put, pin it at 4-5 points along its length, not just at the ends. Criss-cross your bobby pins for security.
21.Elegant Braided Updo with a Twinkle
The overview: The updo sits low on the nape and is composed of intertwining braids and twisted sections that create a woven, almost basket-like texture. A sparkling pin or small comb is placed at the top or side.
Why this look is popular: The multi-texture construction reads as intricate and bespoke, while the single sparkly accessory prevents the look from feeling over-accessorized.
Where this look is suitable: Black-tie weddings, evening galas, winter celebrations. Works well with high-neck or jeweled dresses.
Step by step:
- Texture prep. Apply a thickening spray to damp hair, then blow-dry with a round brush.
- Section for braids. Divide hair into 4-5 sections. Braid or twist each section individually.
- Start at the nape. Gather one section at the nape as the base, pin it into a small coil.
- Layer sections. Take each remaining braided section and wrap it around the base coil, pinning as you go.
- Adjust shape. Pull and tweak each section to create soft volume and visible braid texture.
- Add sparkle. Insert the hair accessory where the sections converge, usually near the top or side.
Tips and tricks: This style benefits from having a variety of braid sizes — make some sections thin and others thick for contrasting textures that look more organic.
34 Stunning Summer First Date Hairstyles for 2026 💕☀️
22.Elegant Twisted Crown Braid
The overview: The top section is twisted and wrapped into a flat, circular knot at the crown. The twist is soft and slightly loosened for texture. The lower hair flows in smooth, loose waves.
Why this look is popular: The crown knot creates height and visual interest at the top of the head, which lengthens the face and looks elegant in profile. It's a great option for bridesmaids with medium-length hair.
Where this look is suitable: Church weddings, formal ceremonies, evening events. The elevated crown makes it appropriate for more traditional settings.
Step by step:
- Create waves. Loosely wave all hair with a 1.25-inch curling iron.
- Separate top section. Part off a 3-inch section from the front hairline to the crown.
- Twist the section. Twist the section tightly until it begins to coil on itself.
- Wrap into a knot. Let the twisted section naturally coil into a flat knot at the crown. Pin the coil flat against the head.
- Add texture. Gently pull at the outer edges of the knot to widen and soften it.
- Finish. Lightly spray the knot with hairspray and smooth the lower waves with fingers.
Tips and tricks: For crown knots that hold their shape, twist the section in one direction only — don't alternate. The rope twist will naturally coil in the direction you twisted.
23.Elegant Twisted Chignon with Loose Tendrils
The overview: The chignon sits at the nape with visible twisted sections that are pinned loosely for an undone look. Thin tendrils frame the face on each side, reaching jaw-length. The crown is slightly elevated with soft volume.
Why this look is popular: The loose tendrils soften the updo and flatter round or square face shapes. The textured chignon looks intricate but is achievable with basic twisting technique.
Where this look is suitable: Garden weddings, daytime ceremonies, bridesmaid luncheons. Works with both casual and formal dress codes.
Step by step:
- Prep with volume. Apply volumizing mousse to roots and blow-dry with a round brush for lift.
- Leave out tendrils. Isolate a 0.5-inch section at each temple. Set aside.
- Gather the rest. Pull remaining hair to the nape into a loose ponytail.
- Twist and coil. Twist the ponytail, then loosely coil it around the base. Don't pull tight — leave air gaps.
- Pin loosely. Pin the chignon, leaving some ends visible for texture.
- Curl the tendrils. Wrap the reserved face-framing pieces around a 0.75-inch curling iron for a soft bend.
- Adjust and set. Pull a few pieces loose from the chignon for additional softness. Mist with flexible-hold hairspray.
Tips and tricks: The key to this look is controlled imperfection. After coiling the chignon, use a tail comb to gently tug small pieces loose around the hairline and nape — these become the tendrils that give the style its romantic feel.

28 Trendy May Nail Designs for 2026 💅
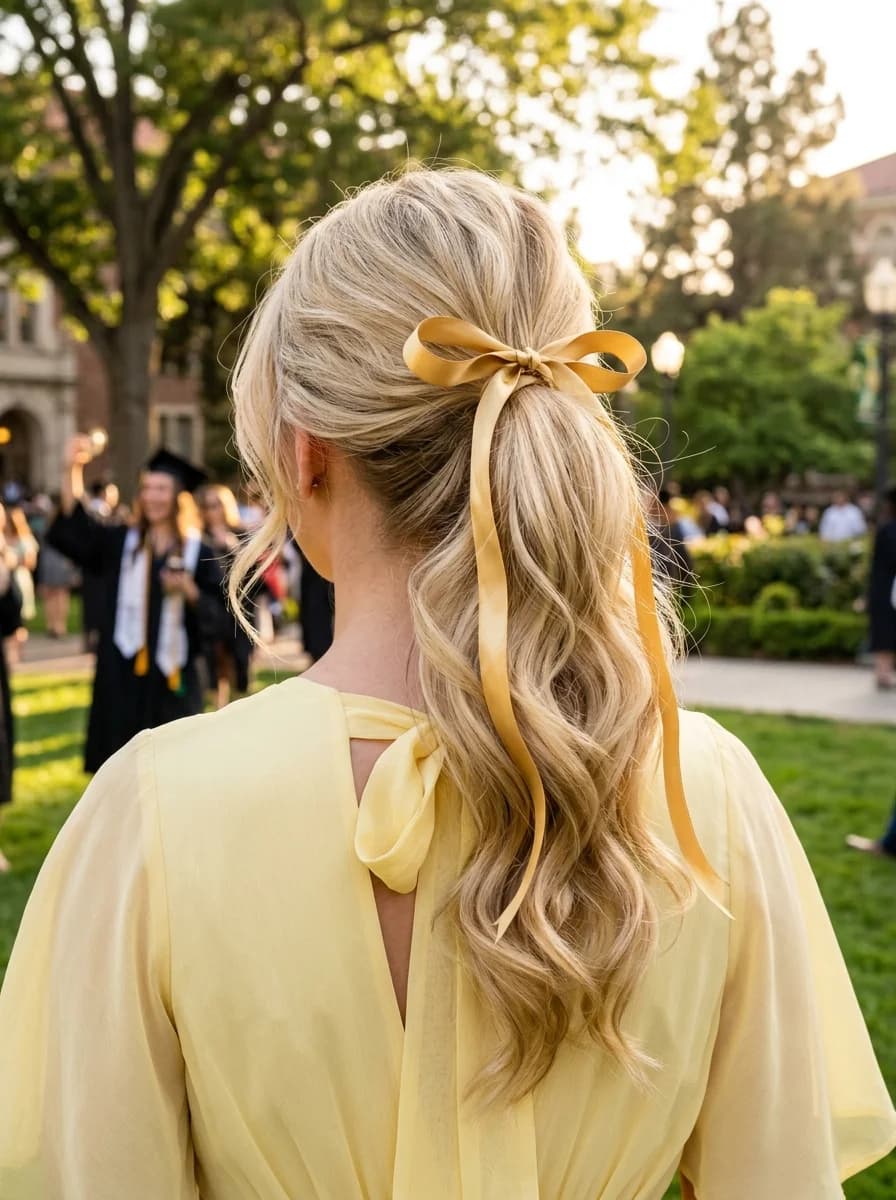
24.Elegant Twisted Low Ponytail with a Golden Bar Clip
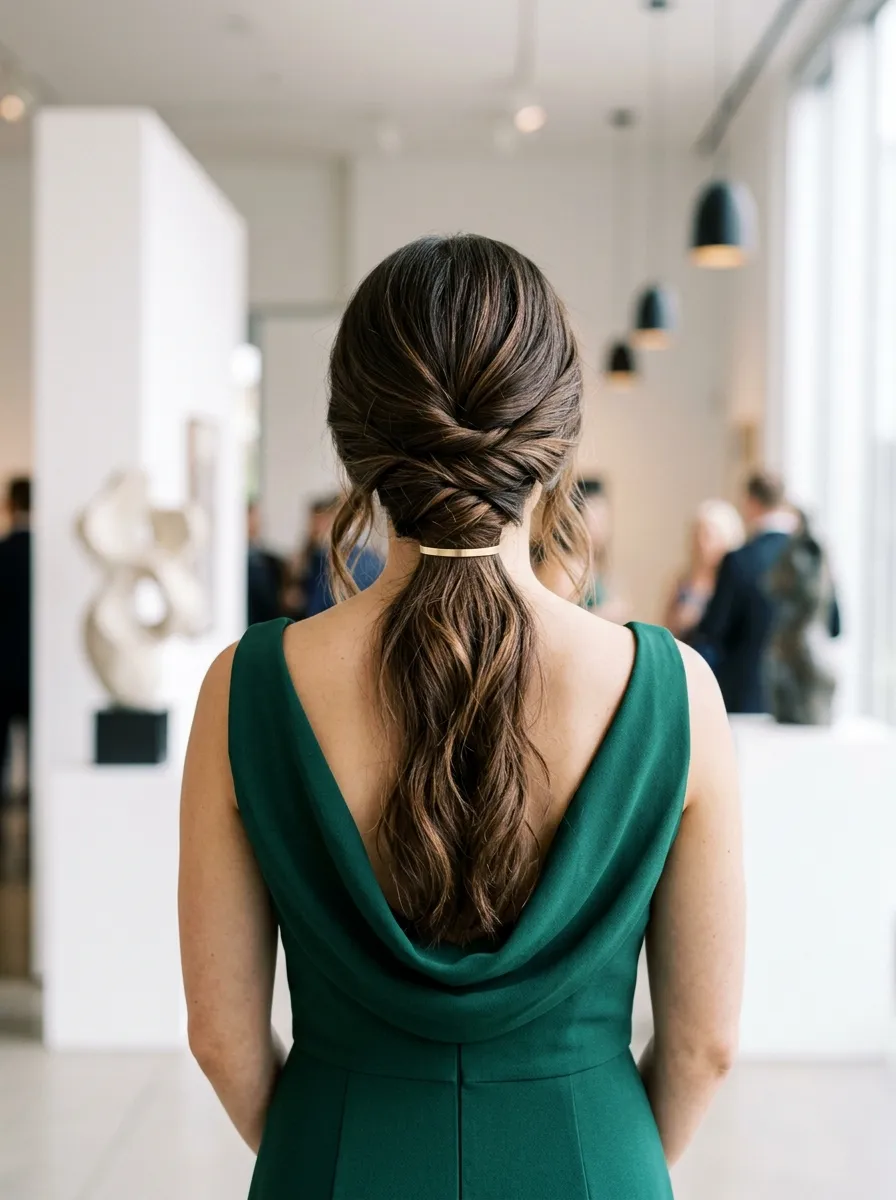
The overview: The crown section is twisted and woven into a sculpted knot, then gathered into a low ponytail at the nape. The ponytail falls in soft waves. A gold bar clip sits horizontally at the base.
Why this look is popular: The twisted crown detail elevates a simple ponytail into a wedding-appropriate style. It's more comfortable than an updo and easier to touch up throughout the day.
Where this look is suitable: Outdoor weddings, daytime events, warm-weather ceremonies. The ponytail keeps hair off the neck while still feeling special.
Step by step:
- Add wave. Curl all hair with a 1.25-inch iron, then brush through for soft wave.
- Section the crown. Isolate a 3-inch section from the top of the head.
- Twist the crown. Twist the section, wrap it into a small knot, and pin flat against the head.
- Gather the ponytail. Pull all hair into a low ponytail at the nape, incorporating the twisted crown piece.
- Secure. Use a clear elastic that won't compete with the gold clip.
- Add the clip. Slide the gold bar clip over the elastic. Use a wrap-around technique if the clip has an opening.
- Finally. Loosen a few front pieces for softness and spray with light-hold hairspray.
Tips and tricks: To prevent the ponytail from slipping throughout the day, wrap a thin section of hair around the elastic before adding the bar clip. This hides the elastic and gives the clip a textured surface to grip.
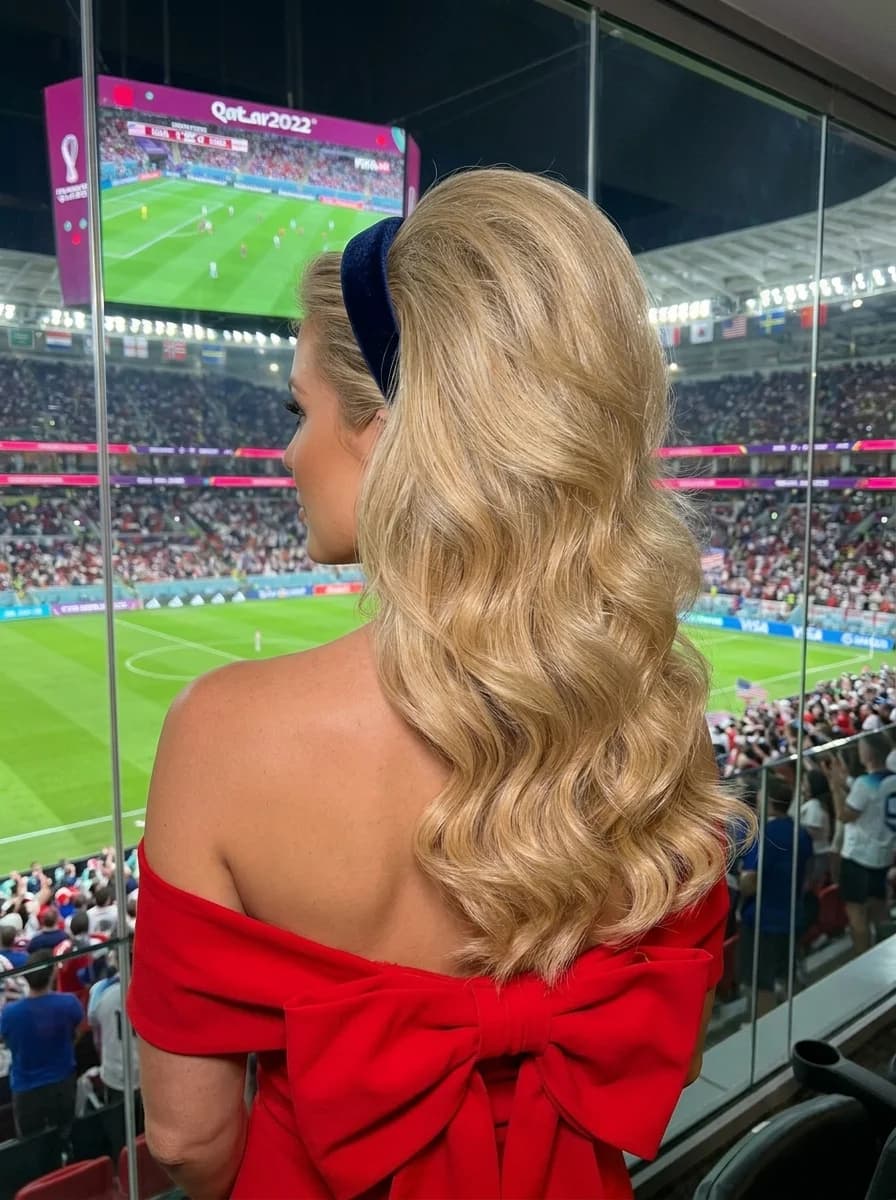
The Neckline Rule
Your hairstyle should not just match the wedding vibe — it needs to flatter your specific dress. The most common mistake bridesmaids make is choosing a hairstyle without considering the neckline. If you are wearing an off-the-shoulder or strapless dress, the golden rule is to keep your hair away from your shoulders so the dress details can actually be seen. A sleek low bun or twisted chignon becomes your best friend here.
On the flip side, if your dress has a deep V-neck or a plunging silhouette, an updo or sweeping waves will elongate your neck and enhance the overall line. A halter or high-neck dress calls for the opposite approach — a sleek, slicked-back bun keeps the focus entirely on the dress architecture while looking incredibly polished in photos.
The rule of thumb? Do a trial run with your actual dress, not just a photo of it. The neckline interacts with your hair in ways you cannot predict from a picture. Pin the front up, then drop it down, and see which silhouette photographs better from the angles your friend's photographer will be shooting.
Find Your Bridesmaid Hair Match
Your bridesmaid hairstyle should make you feel confident from the ceremony through the last dance. Consider your dress neckline, the wedding venue, and how much dancing you plan to do when choosing your style. Practice your top choice at least once before the big day so you know exactly what products and tools you need.