Nail Trends
27 Coral Nail Art Designs for a Warm, Tropical Manicure (2026)
Coral sits in a sweet spot between pink, orange, and red that makes it one of the most versatile warm tones for nail art. It works across seasons, flatters a wide range of skin tones, and pairs naturally with everything from metallic gold to cool mint green. These 27 designs take that versatility and run with it, mixing coral with geometric blocks, tropical florals, watercolor techniques, and classic French tips. Grab your favorite warm-weather drink and let these coral nail ideas inspire your next manicure.
In This Guide
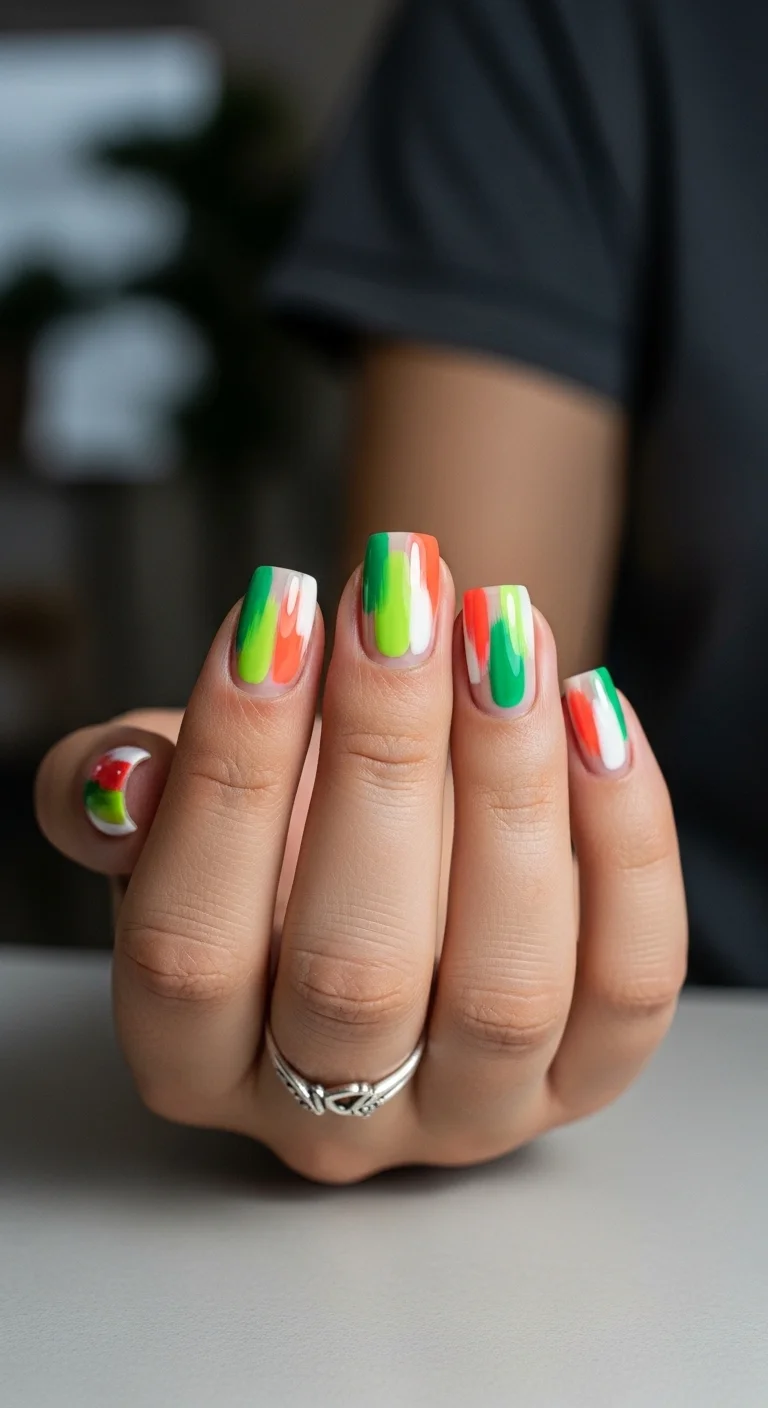
1.Mondrian Coral Color Block
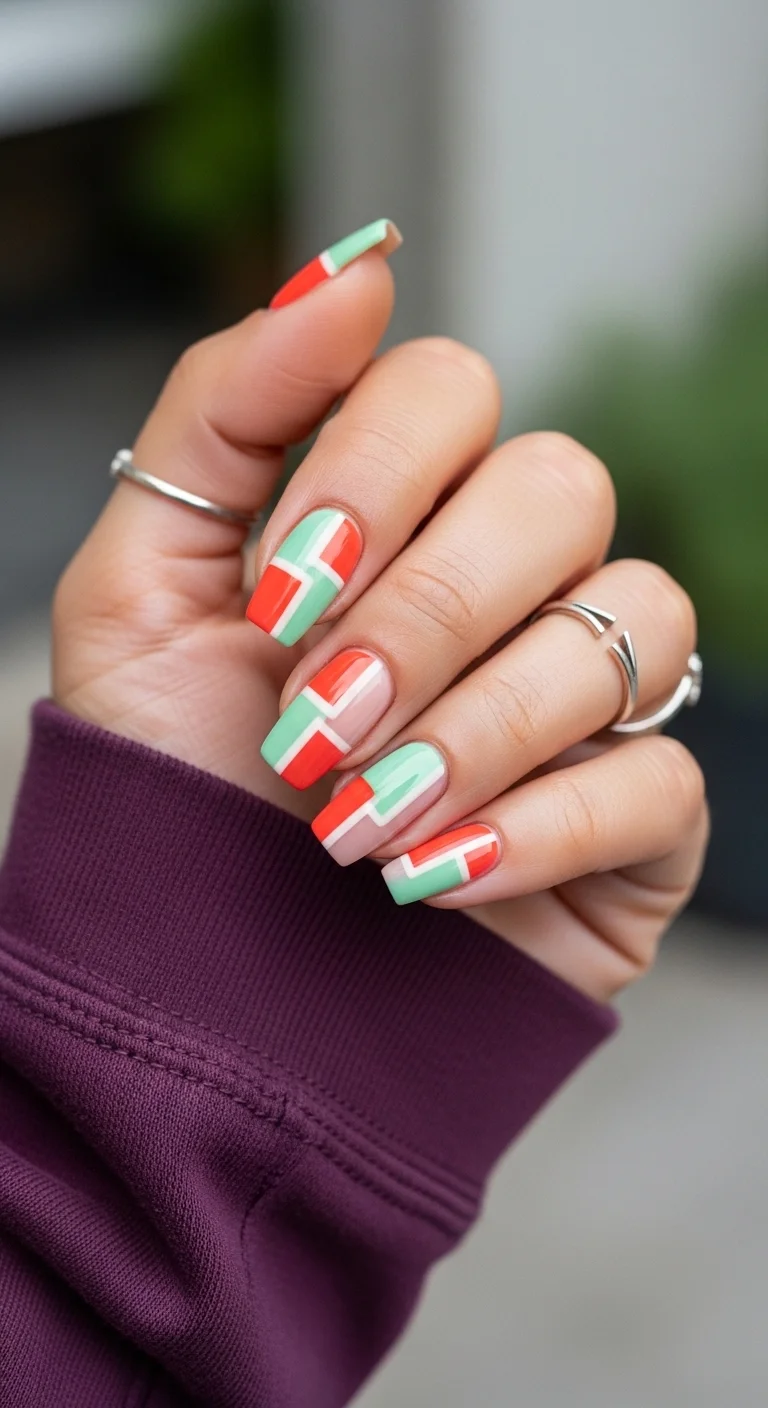
A modern, Mondrian-inspired design that treats each nail like a tiny canvas.
Overview:
Color-blocking on nails usually looks like someone couldn't decide on a single shade and gave up. This design makes the indecision deliberate. The coral-red, mint green, white, and nude sections are arranged in clean geometric blocks with sharp dividing lines, which gives the whole set an architectural quality that random color placement never achieves.
The white lines between each block are doing more work than you'd think. Without them, the coral and mint would bleed into each other visually, creating a muddy transition zone. The white acts as grout between tiles, giving each color its own defined territory. The effect is closer to stained glass than typical color-block nails.
Square nails are the right call here. The flat edges and sharp corners reinforce the geometric structure. Almond or oval would soften the block edges and undermine the whole point of the design. Medium length keeps the proportions balanced: enough surface for three or four color sections per nail without cramming.
Design Breakdown:
Geometric color placement with white dividing lines. Precision matters more than creativity.
Nail Shape: Medium square. Clean edges complement the geometric structure.
Design Element: Asymmetric color blocks in coral-red, mint green, and nude, separated by thin white lines. Each nail carries a different arrangement of the same four colors.
Finish: High-gloss top coat to saturate the colors and create a smooth, glass-like surface over the raised paint lines.
Get The Look at Home:
The white dividing lines need to be thin and consistent. Striping tape helps, but freehand works if you accept a more handmade quality.
- Map the blocks: Using a thin liner brush and white polish, sketch the dividing lines first. Each nail gets a slightly different grid layout.
- Fill the blocks: Paint each section with its designated color. Work one color at a time across all nails to keep your brush clean.
- Clean the lines: An angled brush dipped in acetone sharpens any bleeding edges. The white lines should be thin and crisp.
- Dry check: Wait at least five minutes before top coating. The multiple color layers are thick and need time to set.
- Seal: Two coats of top coat to smooth the raised texture of the color blocks.

29 Best Tropical Vacation Nails for Women in 2026 🌴
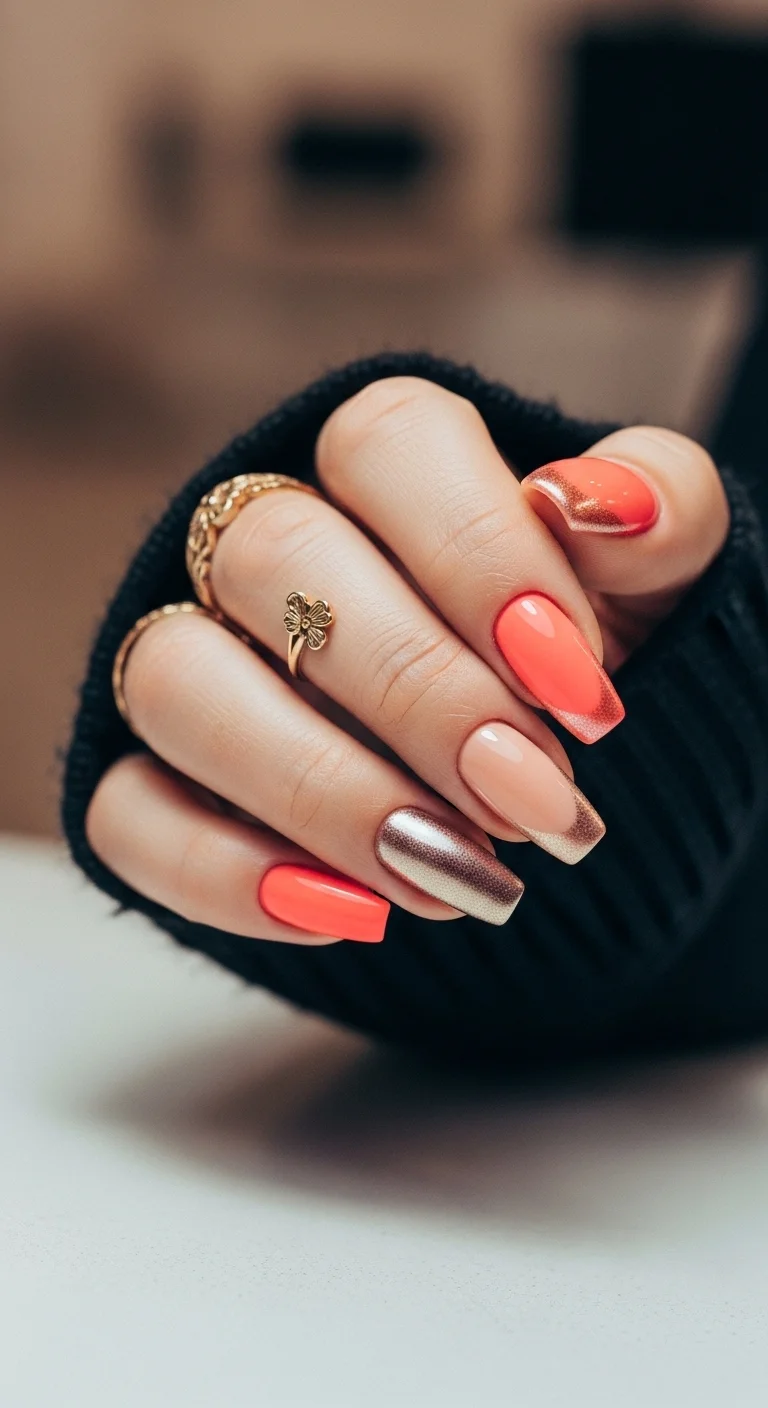
2.Coral & Gold Foil Luxe
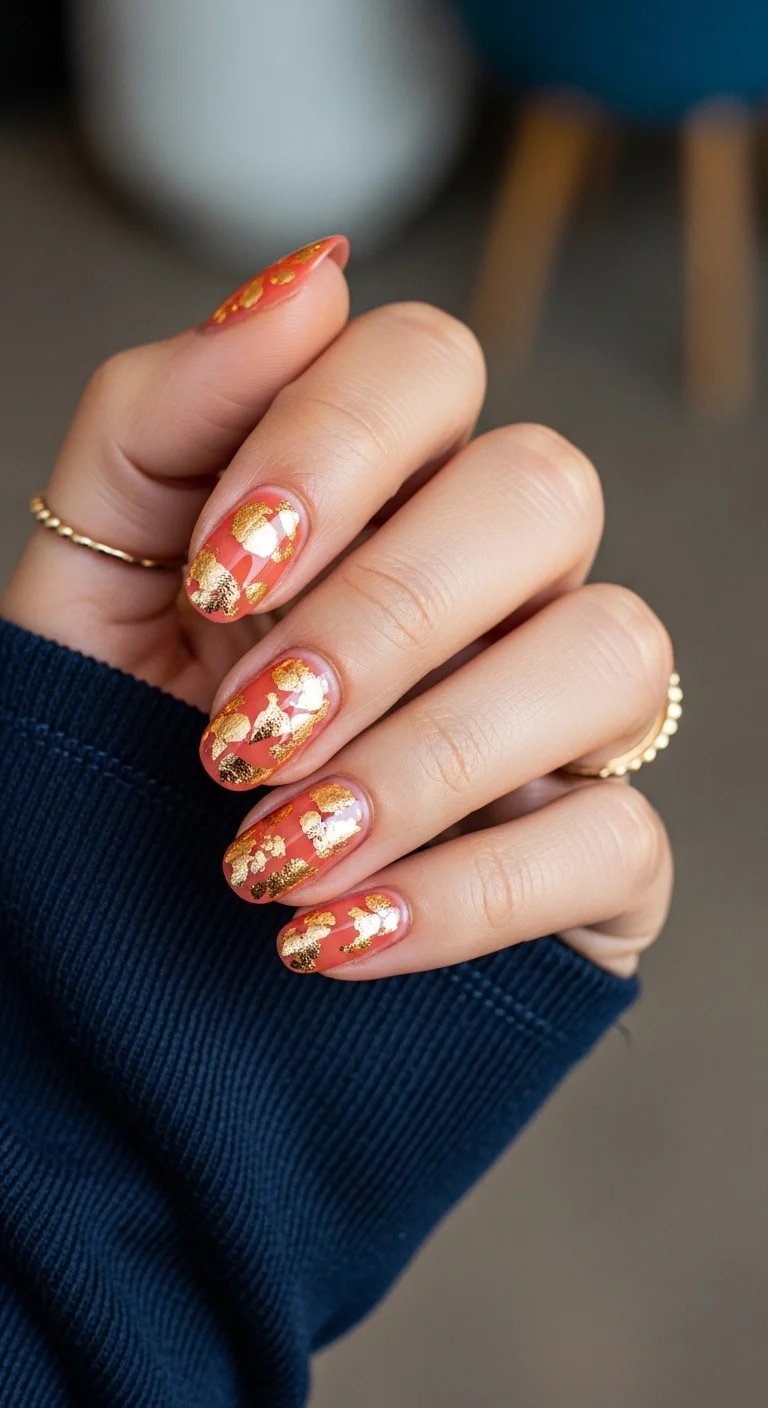
A warm, luxe take on the coral trend with irregular metallic accents.
Overview:
Gold foil on nails is one of those techniques that looks expensive but is actually simpler than hand-painted art. The irregular, organic edges of real gold leaf catch light in ways that uniform glitter or metallic polish can't replicate. Each piece sits slightly differently, which means no two nails look identical. That's the entire appeal.
The warm coral base is doing critical work here. A cool-toned pink would fight the gold. A bright red would overwhelm it. This particular coral has enough orange warmth to sit next to the gold without competing for attention. The foil flakes read as extensions of the base color rather than a separate element layered on top.
The practical challenge with gold leaf is adhesion. It needs a tacky surface to stick to, but if the polish is too wet, the foil sinks and loses its texture. The sweet spot is a base coat that's dry to the touch but not fully cured, about sixty seconds after application. Press the foil gently, then seal immediately with a thick top coat to prevent lifting.
Design Breakdown:
Warm base with metallic texture. The foil adds dimension that flat color alone can't achieve.
Base Color: A warm, opaque coral with orange undertones. OPI "Coral Craze" or Essie "Sunday Funday" hit the right warmth.
Nail Shape: Medium almond. The tapered shape gives the foil flakes room to scatter naturally.
Design Element: Randomly placed gold foil flakes scattered across the coral base. Vary the density: heavier on some nails, sparser on others.
Finish: Ultra-glossy top coat to encapsulate the foil and smooth the surface texture.
Get The Look at Home:
Work with tweezers for the foil placement. Fingers transfer oils that weaken adhesion.
- Coral base: Two coats of opaque coral. Let dry until just slightly tacky.
- Foil placement: Using tweezers, press small, irregular pieces of gold leaf onto the nail. Vary the density across nails.
- Flatten: Press the foil flat with a dry brush or silicone tool. Jagged edges catch on things and peel off within a day.
- Seal: Two coats of thick top coat. The first locks the foil in place; the second creates a smooth, glassy surface over the raised texture.
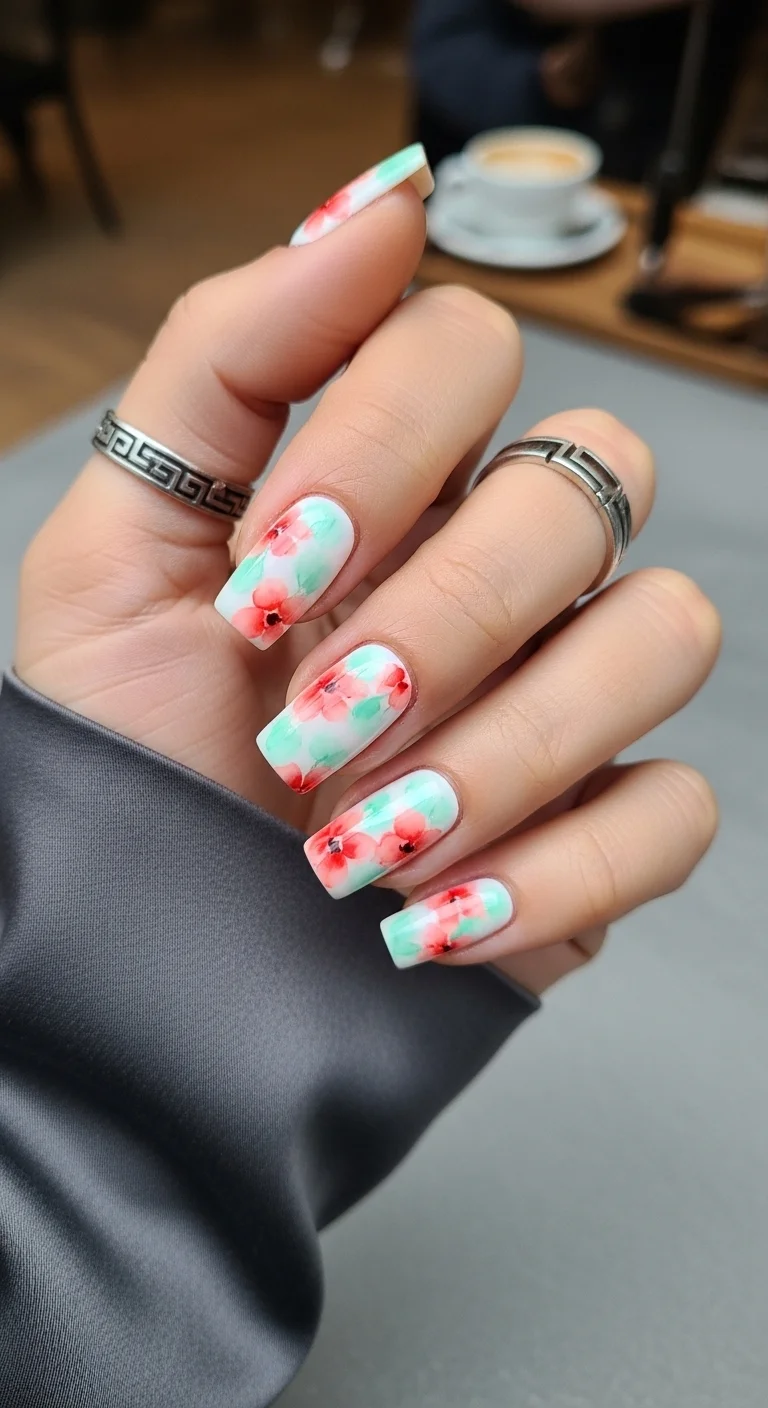
3.Tropical Hibiscus on Milky White
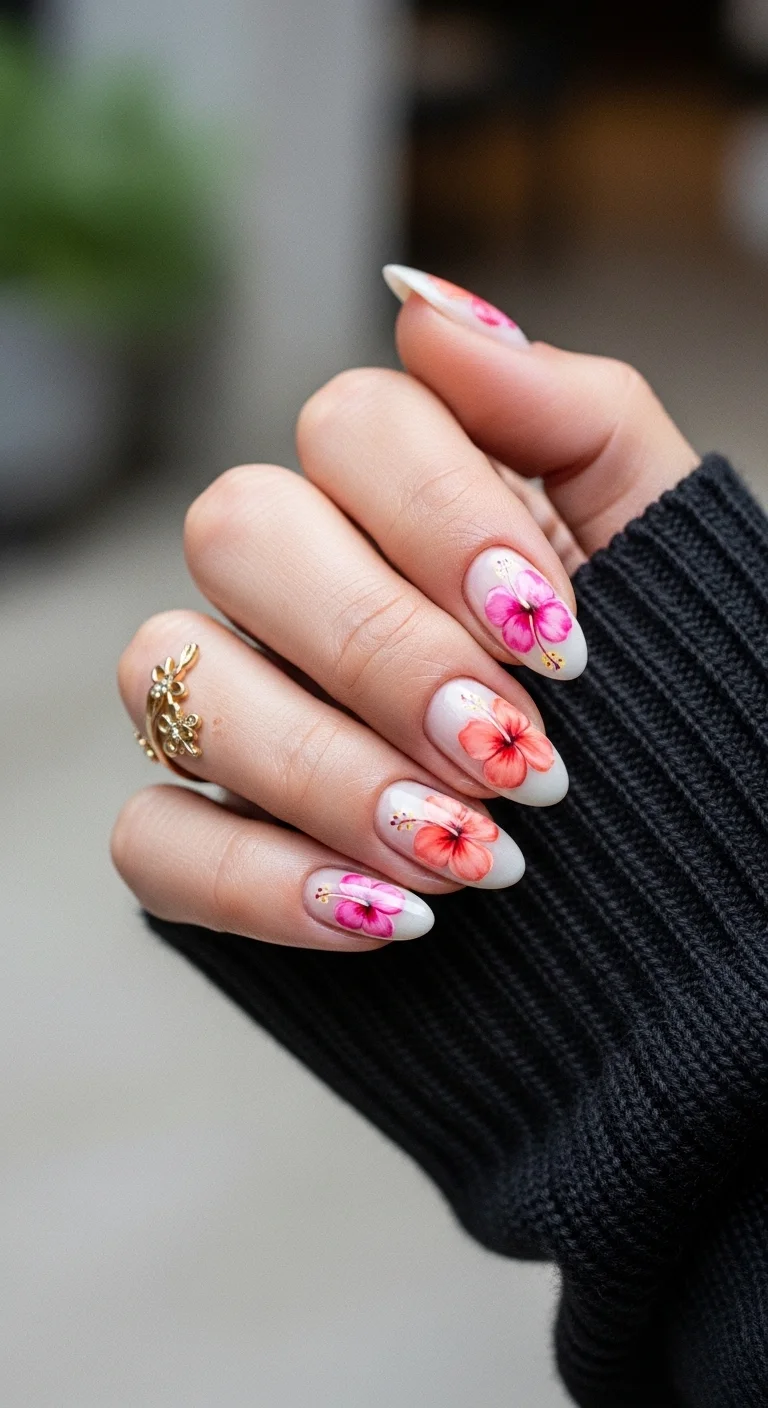
Botanical illustration meets nail art with detailed tropical blooms.
Overview:
Hand-painted hibiscus flowers on a milky white base create a design that reads as "botanical illustration" rather than "nail art stamp." The translucent quality of the white base lets light pass through, which gives the flowers a watercolor-like depth that opaque white wouldn't achieve. The petals look like they're floating rather than painted on.
The color range within the flowers is what separates this from simplified floral stickers. Each hibiscus uses at least three tones: a deep coral at the center, a softer pink on the outer petals, and tiny yellow stamens. The green leaves vary between a bright emerald and a darker forest green. That layering creates the illusion that you're looking at actual petals with light and shadow.
This design demands patience. Each flower takes two to three minutes to paint properly, and there are four or five per hand. Budget at least an hour for the art alone. The good news: the slightly imperfect, hand-painted quality is part of the charm. Perfectly symmetrical flowers would look printed.
Design Breakdown:
Detailed botanical art on a translucent base. The milky white creates depth behind the petals.
Base Color: A sheer, milky white. Not opaque enough to look clinical, not sheer enough to look unfinished.
Nail Shape: Medium almond. The tapered tip echoes the organic curves of the petals.
Design Element: Hand-painted hibiscus flowers with layered coral-pink petals, yellow stamens, and green leaves. Each nail carries one or two blooms at different angles.
Finish: High-gloss top coat to intensify the watercolor depth and protect the fine detail work.
Get The Look at Home:
Paint all the flower centers first across all nails, then build the petals outward. This is faster than finishing one flower at a time.
- Milky base: Two coats of sheer milky white. Let dry fully.
- Flower centers: Using a small dotting tool and deep coral, place a dot where each flower's center will be. Two per nail on most nails.
- Petal strokes: Using a small round brush and coral-pink polish, flick outward from the center dot in petal shapes. Five to six petals per flower.
- Color variation: Mix a touch of white into your coral-pink. Use this lighter shade on the outer edges of each petal for depth.
- Stamens: Tiny yellow dots in the center of each flower using the smallest dotting tool you have.
- Leaves: Using a thin liner brush and green polish, paint small almond shapes along the edges of the flowers. Alternate between two greens for depth.
- Seal carefully: Float the top coat over the art without dragging. Botanical detail work is delicate.
25 Trendy Beach Day Hairstyles for Vacation 2026 ☀️🌊
4.Coral-to-Mint Sunset Gradient
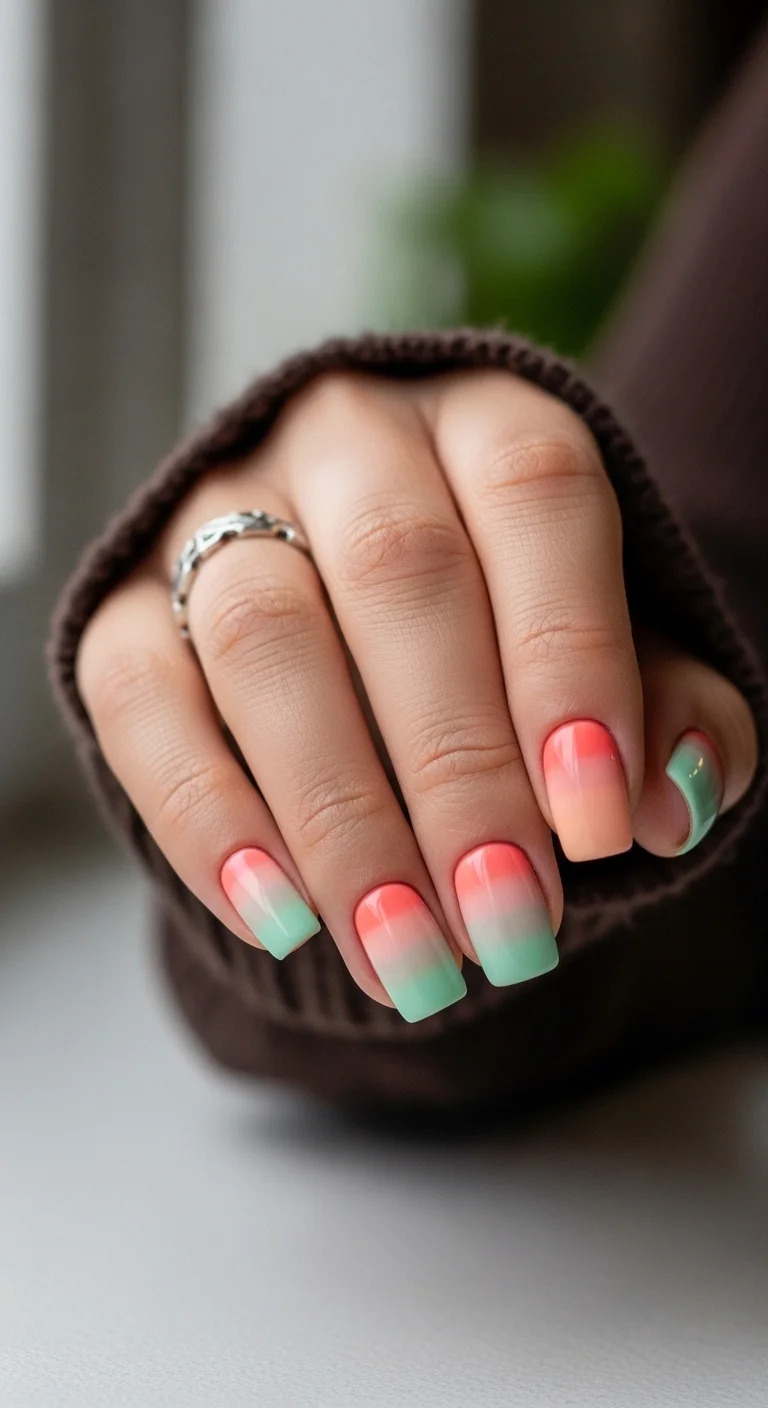
A warm-to-cool ombre that captures the exact moment a sunset meets the ocean.
Overview:
Coral fading into mint is an unusual gradient choice because the two colors sit on opposite sides of the warm-cool spectrum. Most ombre designs stick to colors that naturally blend (pink to purple, blue to green). Pairing a warm coral with a cool mint means the transition zone has to be handled carefully, or you end up with a muddy grey band where the colors meet.
This design avoids that problem by using a soft, diffused blend rather than a hard transition. The coral thins out gradually, and the mint picks up gradually, with a barely-there nude section in the middle that acts as a buffer. The result reads as a sunset dissolving into water rather than two colors forced together.
The sponge technique is non-negotiable here. Brushing the two colors directly onto the nail creates a visible line. A makeup sponge atomizes the polish into tiny droplets that overlap and blend at the molecular level. Four to five light passes builds better opacity than one heavy press, and each layer needs thirty seconds of dry time before the next.
Design Breakdown:
A warm-to-cool gradient that depends on a seamless blend between two colors that don't naturally mix.
Base Color: Opaque white undercoat for opacity. The gradient itself transitions from coral-pink at the cuticle to mint green at the tips.
Nail Shape: Medium square. The flat surface gives the gradient room to develop without distortion.
Design Element: Sponge-applied two-color ombre. Coral at the base, mint at the tip, with a soft nude buffer in the transition zone.
Finish: High-gloss top coat to blend the gradient transitions and add a glassy depth.
Get The Look at Home:
A white base coat underneath the gradient is non-negotiable. Without it, both colors sheer out and the blend looks washed-out.
- White base: Two thin coats of opaque white. Let dry completely.
- Sponge setup: Paint a stripe of coral and a stripe of mint side by side on a makeup sponge. Dab on paper first to remove the initial excess.
- First pass: Press the sponge onto the nail with the coral aligned at the cuticle. Three to four light dabs. The first layer will look sheer.
- Build opacity: Re-apply polish to the sponge and repeat three to four more times, letting each layer dry for thirty seconds.
- Buffer zone: If the coral and mint are blending into grey where they meet, add a thin stripe of nude between them on the sponge.
- Seal: Two coats of thick top coat to smooth the sponge texture and blend the gradient transitions.
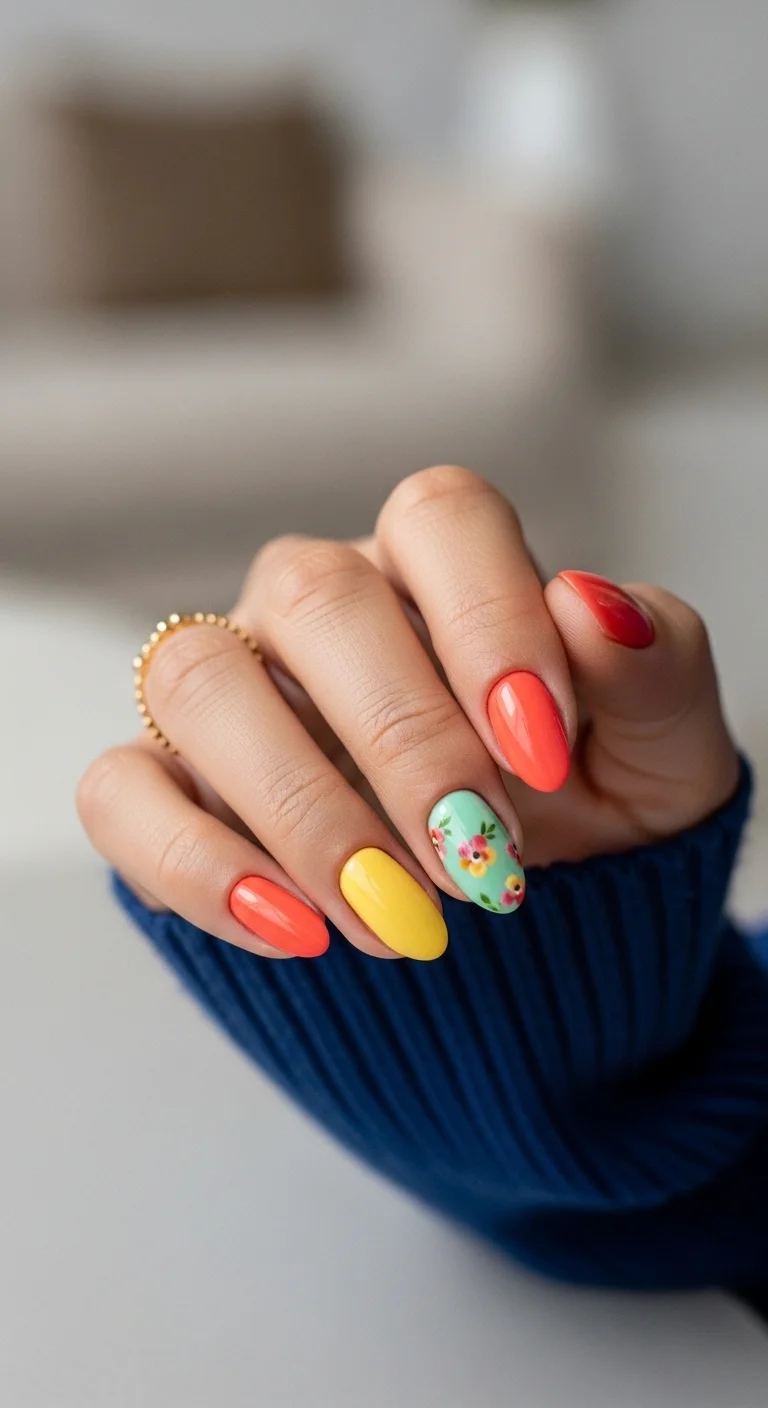
5.Confetti Dot Party
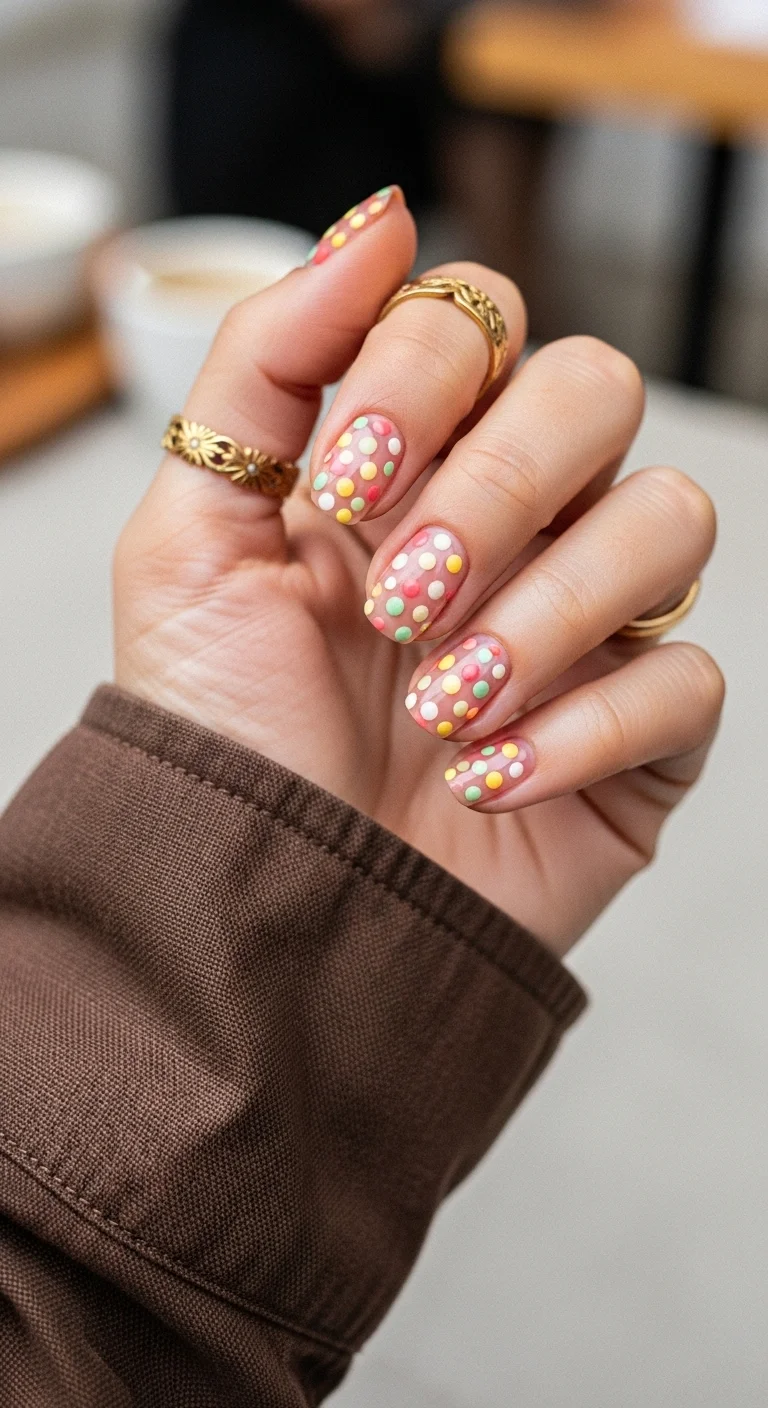
A playful, confetti-like dot pattern that feels celebratory without being loud.
Overview:
Multi-colored polka dots on a sheer base is a design that looks like it took five minutes but actually requires strategic planning. The challenge isn't painting dots. It's making sure the colors are distributed evenly across the hand without clustering too many of the same shade on one nail. Randomness that looks intentional is harder than it sounds.
The sheer pink base is what keeps this design from reading as juvenile. On an opaque white base, the same dots would look like a children's game. On sheer pink, the dots seem to float above your natural nail, which gives the whole thing a delicate, almost ephemeral quality. The dots become texture rather than pattern.
Dot size matters. These are small, roughly two millimeters across. Any larger and the design shifts from "confetti" to "polka dot shirt." The smallest dotting tool in your kit is the right one. Press straight down, lift straight up. Don't twist.
Design Breakdown:
Multi-colored dots on a transparent base. The negative space between dots is as important as the dots themselves.
Base Color: Sheer milky pink. The natural nail should be partially visible.
Nail Shape: Short oval. The soft, rounded shape complements the circular dots.
Design Element: Small polka dots in mint green, coral-pink, sunny yellow, and white scattered across all nails. Colors are distributed evenly, with no two dots of the same color touching.
Finish: High-gloss top coat to smooth the raised dot texture.
Get The Look at Home:
Work in color layers. All dots of one color first across all nails, then the next color. This keeps your tool clean and your distribution even.
- Sheer base: Two coats of milky pink. Let dry fully.
- Green dots: Using a small dotting tool, place five to seven green dots on each nail. Space them irregularly.
- Pink dots: Clean the tool. Place coral-pink dots in the gaps between green. Avoid placing two dots of the same color adjacent.
- Yellow dots: Repeat with yellow, filling remaining gaps.
- White dots: A few final white dots in the smallest remaining spaces.
- Dry check: Wait at least five minutes before top coating. The dots are raised and need time to set.
- Seal: Two coats of top coat to encapsulate the dots and create a smooth surface.

30 Stunning Beach Nail Ideas for the Best Vacation in 2026 🌊
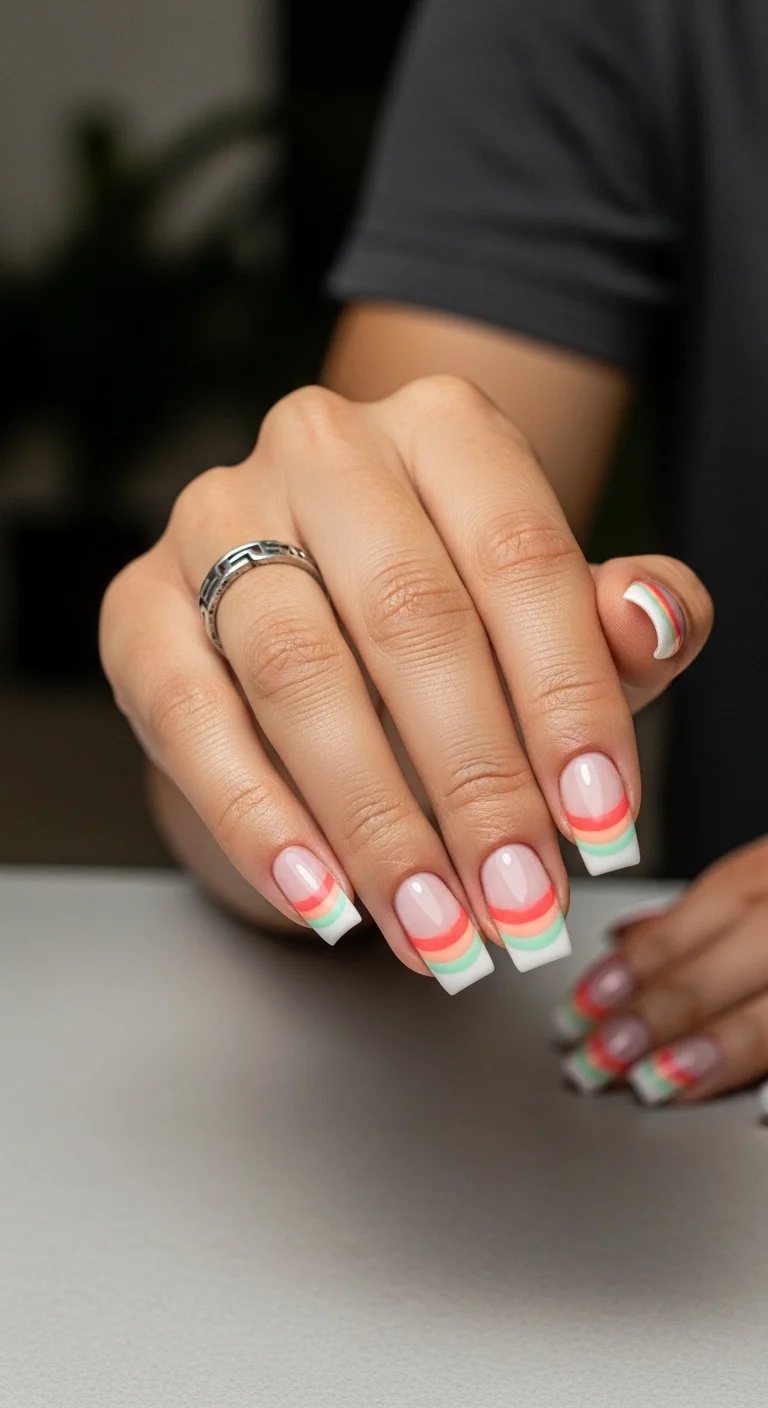
6.Coral French with Mint Tips
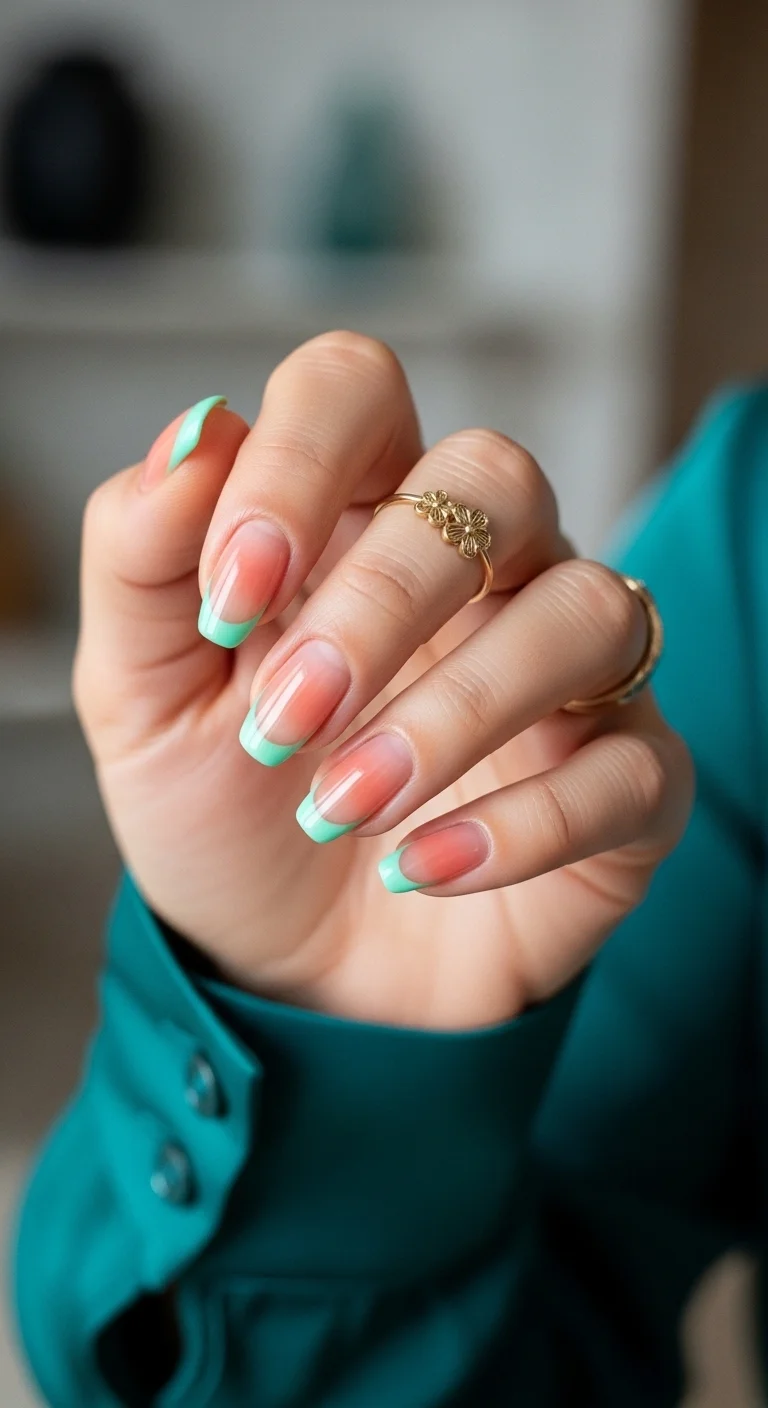
A two-tone French that pairs warm coral with cool mint for a fresh, modern look.
Overview:
Colored French tips are having a moment, but most versions stick to a single color on every nail. This design does something more interesting by splitting the French between two tones: coral blush fading upward from the cuticle and mint green tips at the free edge. The two colors never touch directly. The sheer nude base in the middle creates a breathing room that prevents the warm and cool tones from clashing.
The coral blush effect is what elevates this beyond a standard French. Instead of a hard line where the color starts, the coral diffuses upward from the cuticle like a watercolor wash. The effect is closer to a natural flush than a painted design. It makes your nail beds look healthy and warm, which is a flattering trick that hard-edged color blocks can't replicate.
The mint tips need to be opaque in one or two coats. Thin, watery mint polish over a sheer base looks streaky and unfinished. Essie "Mint Candy Apple" or OPI "That's Shore Fresh" both cover well in two thin layers.
Design Breakdown:
Two-tone French with a diffused coral base and sharp mint tips. The contrast between soft and precise is the design.
Base Color: Sheer milky nude as the foundation. Coral blush diffused from the cuticle, mint green at the tips.
Nail Shape: Medium almond. The curved tip gives the mint French line a soft, natural edge.
Design Element: Coral gradient fading upward from the cuticle on all nails. Mint green French tips on all nails.
Finish: High-gloss top coat to unify the two color zones.
Get The Look at Home:
The coral blush is applied with a sponge, not a brush. Brushing creates hard edges.
- Nude base: Two coats of sheer milky nude. Let dry fully.
- Coral blush: Dab a small amount of coral polish onto a makeup sponge. Press the sponge gently near the cuticle area only. Two to three light passes builds a soft gradient that fades toward the center.
- Mint tips: Using a French liner brush and mint polish, paint the smile line from sidewall to center. Two thin coats for opacity.
- Cleanup: An angled brush dipped in acetone sharpens the mint smile line. The coral edge should remain soft and diffused.
- Seal: One thick coat of glossy top coat. Cap the free edge on every nail.
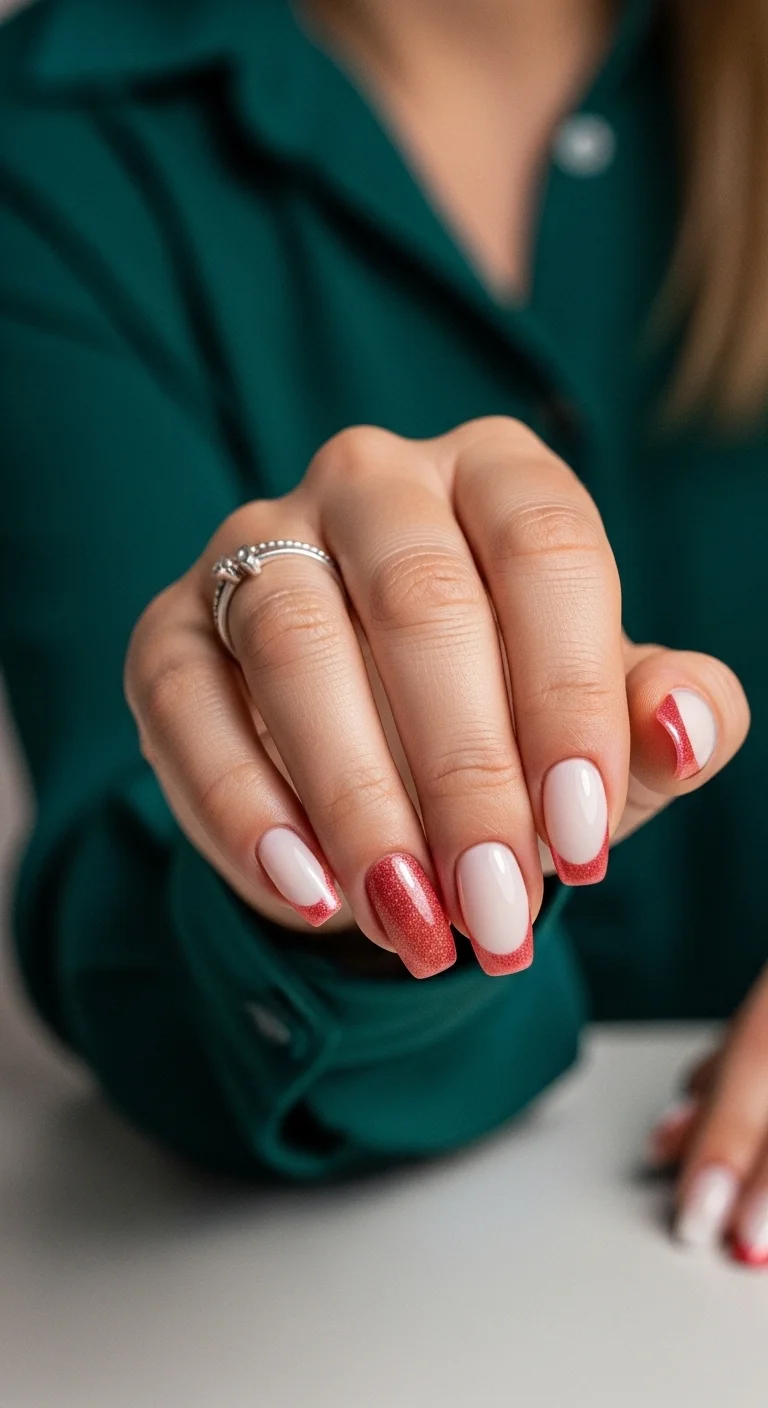
7.Matte Coral with Confetti Accent
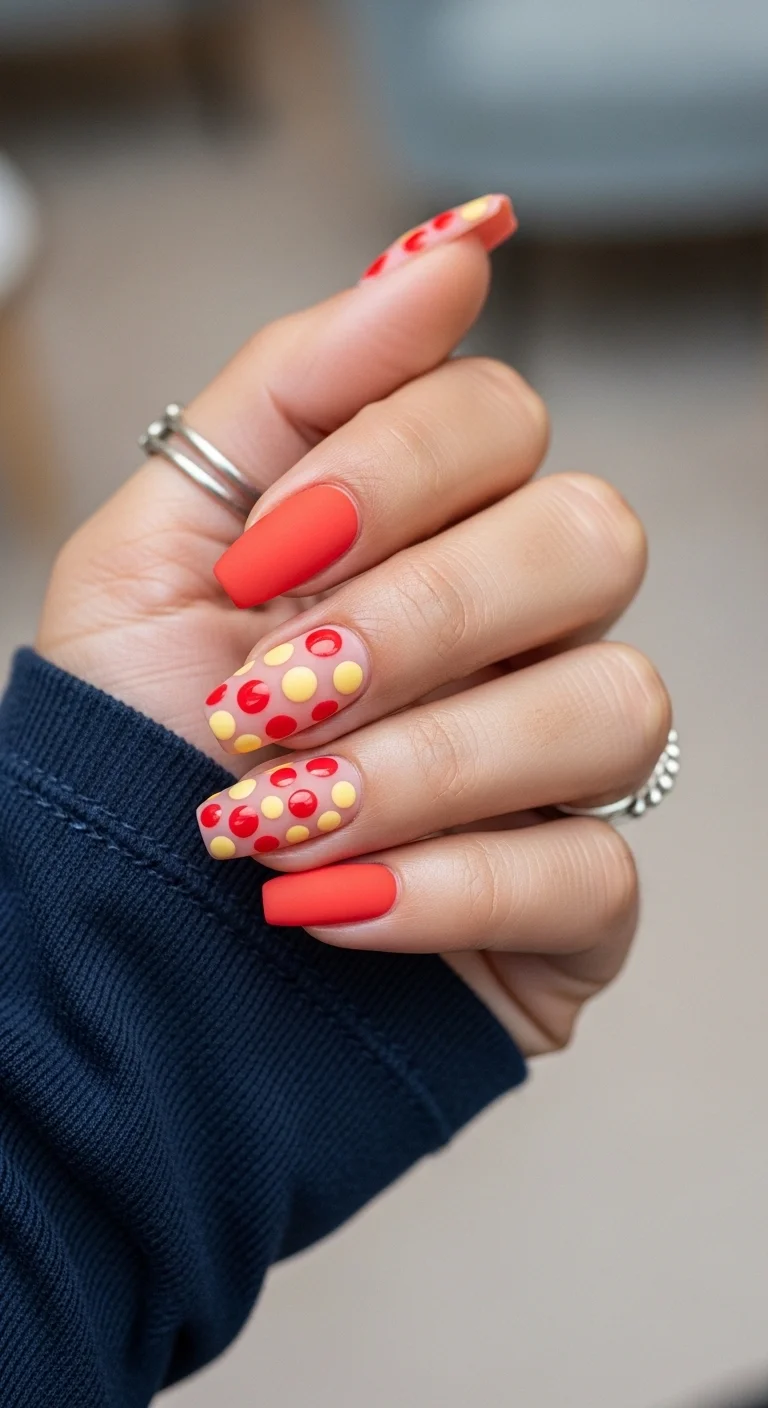
A matte-and-glossy mix that plays with texture as much as color.
Overview:
Matte and glossy finishes on the same hand create a texture contrast that photos don't fully capture. In person, your eye bounces between the flat, velvety matte nails and the shiny, dimensional dotted nails. It's a subtle push-and-pull that keeps the design interesting at every angle.
The two finishes also serve a structural purpose. The matte coral nails function as solid anchors: bold, simple, and easy to read from a distance. The dotted nails are the detail work: closer inspection reveals the red and yellow dots on a sheer base. This hierarchy means the design works at both arm's length and up close, which is something most polka dot sets can't claim.
Coffin shape is essential. The flat tip gives the matte surface a modern, architectural edge. Round or almond would soften the matte finish into something less intentional. The medium length keeps the dots from looking cramped and the matte from looking heavy.
Design Breakdown:
Split-finish design: solid matte anchors and sheer glossy accents. Texture contrast is the key principle.
Base Color: Opaque coral-red on the matte nails. Sheer nude on the dotted accent nails.
Nail Shape: Medium coffin. The flat tip reinforces the modern, structured aesthetic.
Design Element: Solid matte coral on index and pinky. Red and yellow polka dots on sheer nude on middle and ring fingers.
Finish: True matte top coat on the solid nails. High-gloss on the dotted nails.
Get The Look at Home:
Do all the dot work first with glossy top coat, then apply matte to the solid nails. Matte over dots kills the contrast.
- Coral nails: Two coats of opaque coral-red on index and pinky. Let dry.
- Nude accent nails: Two coats of sheer nude on middle and ring fingers.
- Dots: Using a small dotting tool, place red and yellow dots on the nude nails. Alternate colors and space them evenly.
- Gloss the dots: Apply glossy top coat to the dotted nails only. Let dry.
- Matte the solids: Apply true matte top coat to the coral nails only. One stroke per nail.
- Edge cleanup: Clean any matte polish that migrated onto the glossy nails with a small brush and acetone.

30+ Chic Pool Party Hairstyles for Summer 2026 🌊👙
8.Coral Swirl on Cream
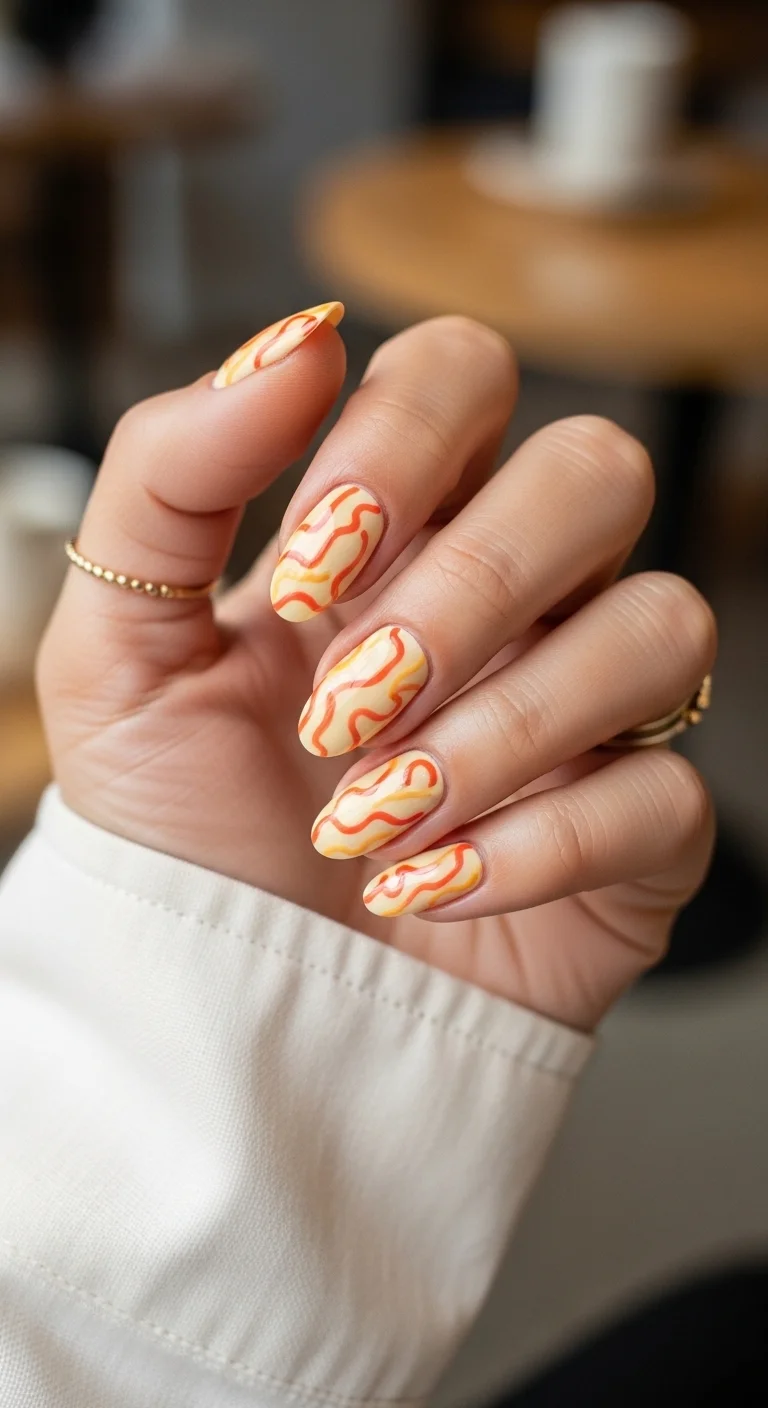
An organic, freehand swirl that looks like a topographic map in coral tones.
Overview:
Abstract swirl nails are one of those designs where the "mistakes" actually make it better. The wavy lines in this set aren't trying to be perfectly parallel or evenly spaced. They meander across each nail at slightly different angles and thicknesses, which gives the whole hand a流动, organic quality that geometric patterns can't replicate.
The pale yellow base does something interesting to the coral lines: it warms them up. On a white base, the same coral would read as pink. On yellow, it leans more toward a true coral with orange undertones. The base color isn't just background. It's actively shaping how you perceive the design color.
The swirl technique is simple but requires confidence. Hesitant strokes create wobbly, uneven lines. The key is loading enough polish onto a thin liner brush and committing to each curve in one fluid motion. If you stop mid-line, you get a blob. Practice the S-curve motion on paper before touching the nail.
Design Breakdown:
Freehand abstract lines over a warm base. The organic quality of the swirls is the point.
Base Color: A pale, creamy butter-yellow. Not bright enough to compete with the coral lines, not sheer enough to look unfinished.
Nail Shape: Medium almond. The curved shape complements the flowing, wavy lines.
Design Element: Hand-painted coral-red wavy lines flowing across each nail at organic angles. Two to three lines per nail, varying in thickness.
Finish: High-gloss top coat to smooth the raised texture of the painted lines.
Get The Look at Home:
The lines need to be painted in single, confident strokes. Loading enough polish on the brush is the key to avoiding wobbly lines.
- Yellow base: Two coats of pale butter-yellow. Let dry fully.
- Brush prep: Load a thin liner brush with coral polish. Wipe the excess on the bottle neck. You want enough to draw a complete line without re-dipping.
- First line: Starting near the cuticle, drag the brush in a gentle S-curve across the nail. One fluid motion.
- Additional lines: Add one or two more lines at different angles. Let them flow naturally. Don't try to make them parallel.
- Thickness variation: Press harder for thicker sections, lighter for thinner ones. The variation creates visual interest.
- Seal: Two coats of top coat to smooth the raised line texture and create a unified surface.
9.Tropical Leaf French
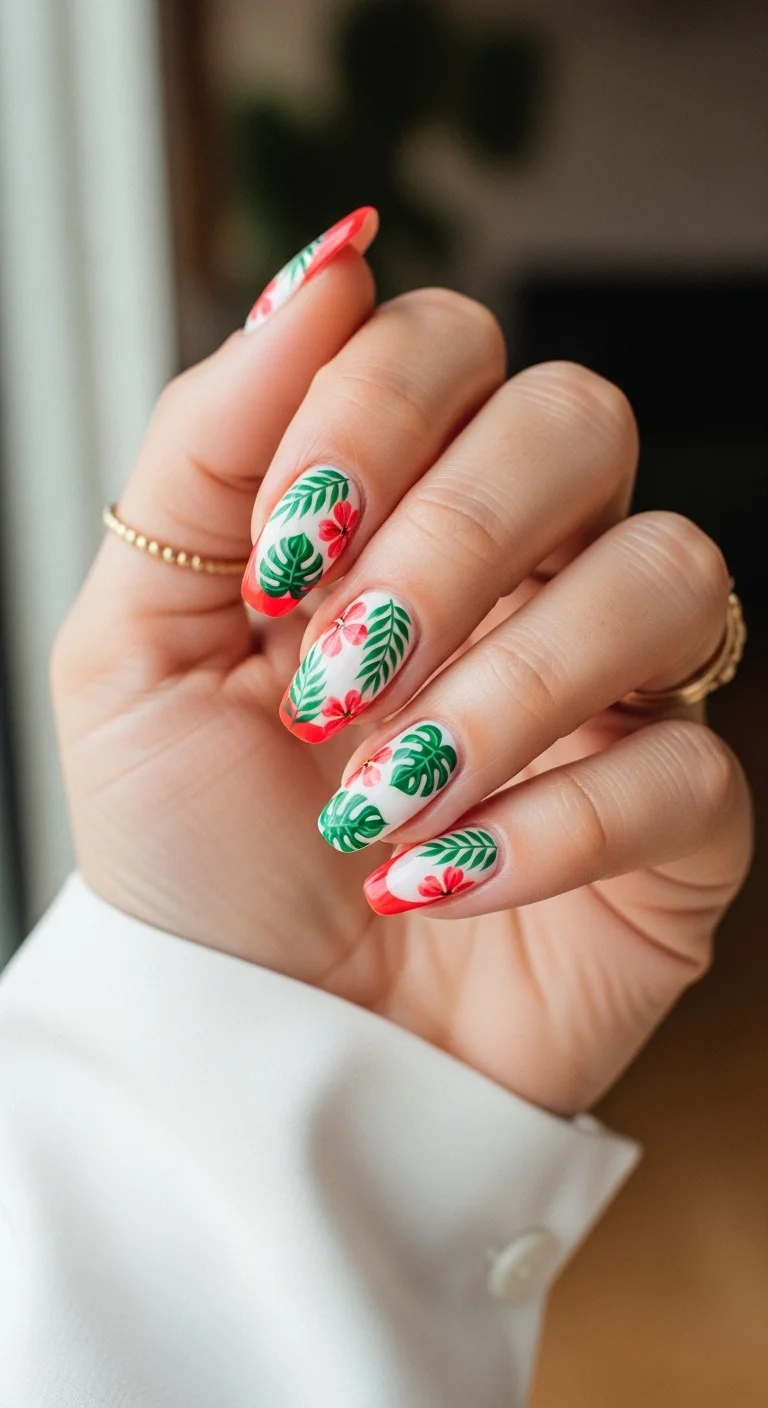
A French manicure that went on vacation and came back with stories.
Overview:
Coral French tips are already a step beyond classic white. Adding tropical leaf art on top of the French structure transforms the set from "colored tips" into a complete narrative. The leaves and hibiscus flowers aren't scattered randomly. They're placed along the sides of the nail, framing the French tip rather than covering it. The tip remains the dominant visual element; the botanical art is supporting detail.
The white base behind the leaves creates a clean, illustrative quality. Without it, the green and coral art would sit directly on the sheer nude, which would make the colors look less saturated and the details less crisp. The white functions like a gallery wall: it makes everything in front of it look sharper.
This design requires both French-painting skills and freehand botanical skills, which puts it in a higher difficulty tier than most French variations. If you're comfortable with a liner brush, the botanical elements are forgiving because tropical leaves are supposed to look organic and slightly imperfect.
Design Breakdown:
Structured French tips with organic botanical art layered on top. Two distinct techniques sharing one nail.
Base Color: Opaque white as the foundation for the botanical art. Coral for the French tips.
Nail Shape: Long almond. The extended tip gives the French line and the leaf art room to coexist.
Design Element: Coral French tips on all nails. Detailed tropical leaves and small hibiscus flowers painted along the sides of the white base, framing the French tip.
Finish: High-gloss top coat to saturate the colors and protect the detailed art.
Get The Look at Home:
Do the French tips first, then add the botanical art. The leaves should overlap the white base but stop before the French line.
- White base: Two coats of opaque white on all nails. Let dry fully.
- Coral French tips: Using a French liner brush, paint the smile line. Two thin coats for opacity.
- Leaf outlines: Using a thin liner brush and dark green polish, draw the central vein of each leaf along the sides of the nail.
- Leaf fill: Using a lighter green, fill in the leaf shapes with short, feathery strokes that follow the vein direction.
- Hibiscus flowers: On two or three nails, add a small coral flower with five petals near the cuticle area. Yellow dot in the center.
- Cleanup: An angled brush dipped in acetone sharpens the French smile line if any green or coral drifted over it.
- Seal: Two coats of top coat to smooth the raised art texture.

35 Palm Tree Nail Art Ideas that are the Most Iconic Nail Art Designs 🌴✨
10.Coral Watercolor Swirls
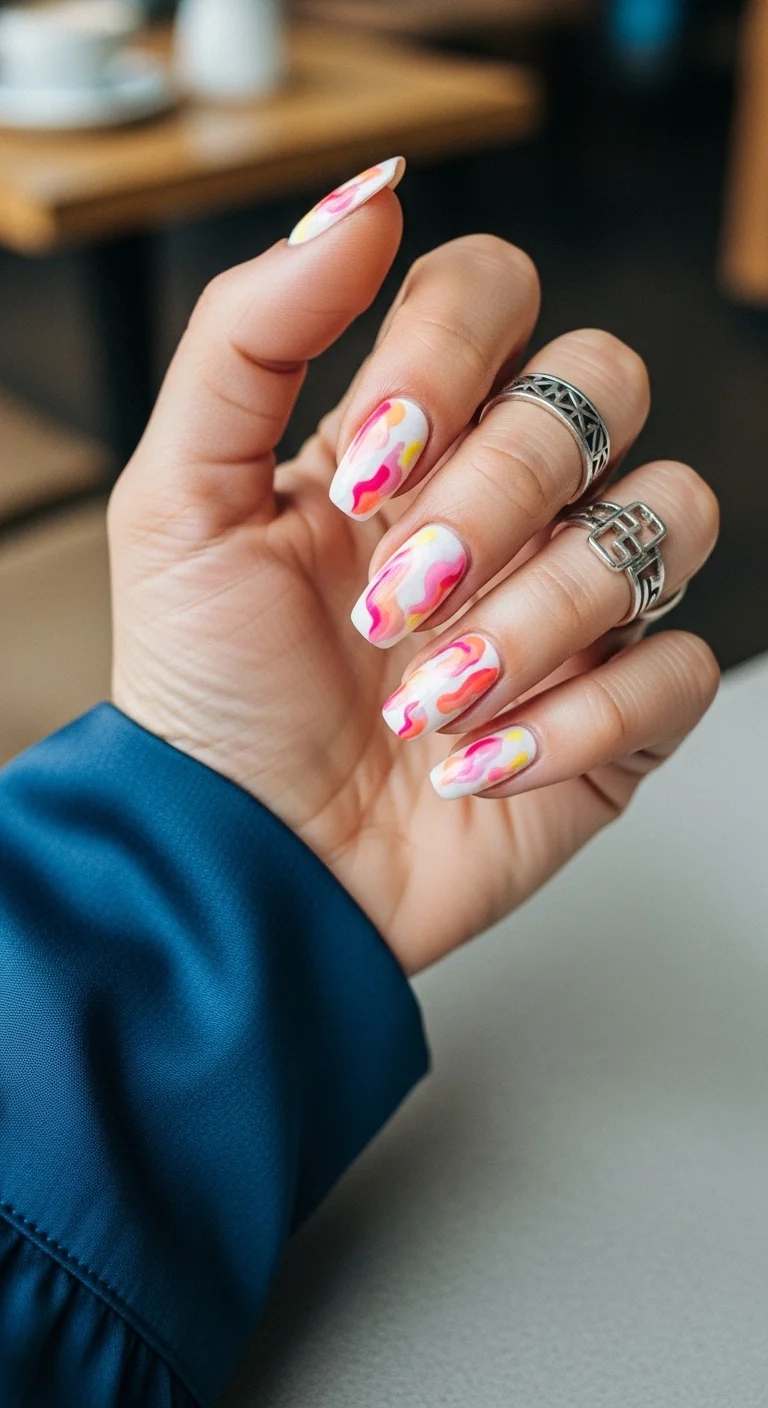
An abstract, painterly design that looks like a sunset dissolved into watercolor.
Overview:
Watercolor nails are one of the few techniques where less control produces better results. The blooming effect happens when you intentionally allow colors to spread and blur into each other on a wet surface. The loosest, most gestural application usually looks the most professional. Tight, controlled strokes kill the effect entirely.
The coral, pink, and yellow together pull from the same warm family, which prevents any single color from dominating. The white base between the swirls creates negative space that keeps the design from reading as muddy. Each color has room to breathe, and the blurred edges where colors meet create soft, organic gradients that no brush could replicate intentionally.
The technique requires either blooming gel or isopropyl alcohol as a solvent. Alcohol is cheaper and more accessible, but it works faster and gives you less time to adjust. Blooming gel is more forgiving because it keeps the polish workable for longer. If you're new to this, start with blooming gel.
Design Breakdown:
Abstract color-blending technique using blooming gel or alcohol to create soft, diffused edges.
Base Color: Milky white or very pale nude. Essentially a blank canvas.
Nail Shape: Long coffin. The flat surface and tapered sides give the watercolor room to flow.
Design Element: Overlapping blobs of coral, pink, and sunny yellow with deliberately blurred borders. White space between colors is part of the design.
Finish: Thick glossy top coat to smooth the surface and intensify the color saturation.
Get The Look at Home:
Embrace randomness. The more you try to control the spread, the worse it looks.
- White canvas: Apply a milky white gel base and cure. This needs to be fully set before the next step.
- Blooming medium: Brush a thin layer of blooming gel over the cured white. Do NOT cure yet.
- Drop the colors: Using a detail brush, place small blobs of coral, pink, and yellow gel directly onto the wet blooming surface. The colors will immediately start spreading outward.
- Assist the blur: If not using blooming gel, dip a clean brush in 70% isopropyl alcohol and gently tap it near each color blob.
- Stop early: The biggest mistake is continuing to add color. Two to three blobs per nail is plenty. The white space between colors is part of the design.
- Cure and seal: Once satisfied, cure everything. Apply two coats of top coat to smooth the surface.
11.Sunset Stripe Vertical
A graphic, high-contrast stripe pattern that moves vertically instead of horizontally.
Overview:
Vertical stripes on nails walk a fine line between "retro wallpaper" and "optical illusion." This version leans into the graphic quality rather than trying to be subtle. The coral, orange, green, and white stripes are thick enough to read clearly from a distance and varied enough in width to avoid looking like a barcode.
The color combination is unusual. Coral and orange sit next to each other on the color wheel, which creates a warm, harmonious zone. The green is the curveball: it sits on the cool side and creates a complementary contrast that makes the warm stripes look warmer by comparison. The white stripes act as visual breaks that prevent the colors from running together.
Vertical stripes elongate the nail visually, which makes short square nails look longer than they are. That's a useful trick if you want the drama of length without the maintenance of actual long nails. The flat square tip also gives each stripe a clean, even stopping point.
Design Breakdown:
Bold vertical stripes in four colors. The width variation between stripes is what keeps it from looking mechanical.
Base Color: Opaque white. The stripes are painted on top, so the foundation needs to be clean and streak-free.
Nail Shape: Short square. The flat tip gives each stripe a clean, geometric endpoint.
Design Element: Vertical stripes in coral, orange, mint green, and white. Stripe widths vary: some thin, some thick. Each nail gets a different stripe arrangement.
Finish: High-gloss top coat to smooth the raised stripe ridges.
Get The Look at Home:
Striping tape gives you the cleanest lines. Freehand works if you accept a more handmade look.
- White base: Two coats of opaque white. Let dry completely.
- Stripe taping: Apply thin striping tape vertically across each nail at varying widths. Press the edges firmly.
- Color application: Paint each exposed section with its designated color. Work one color at a time.
- Peel while wet: Remove the tape immediately, before the polish sets. Pull at a low angle to keep the edges clean.
- Touch-ups: An angled brush dipped in acetone cleans any bleeding between stripes.
- Seal: Two coats of top coat to smooth the raised stripe texture.

25 Stunning Summer Vacation Hairstyles for 2026 ☀️🌊
12.Coral, Nude & Chrome Mix
A mixed-texture set that alternates between cream, foil, and chrome finishes.
Overview:
Mixing three different finishes on one hand is a design choice that could easily feel scattered. It works here because all three textures share the same warm color family. The coral-orange cream, the nude with gold foil, and the full metallic bronze all live in the same sunset palette. The textures are different; the temperature is consistent.
The chrome nail is the design's statement piece. Full-coverage metallic bronze on one or two nails creates a focal point that anchors the simpler cream and foil nails. Without it, the set would feel safe. With it, the whole hand reads as curated rather than random.
Chrome powder requires a no-wipe gel top coat underneath. Regular polish won't give the powder anything to adhere to, and you'll end up brushing shimmer off your nails for the rest of the day. If you're working with regular polish, a metallic polish like Essie "Good as Gold" or OPI "Glitzerland" approximates the chrome effect without the powder step.
Design Breakdown:
Three textures in one warm palette. The chrome nail is the anchor; the other finishes support it.
Base Color: Coral-orange cream on two nails, sheer nude with gold foil on two nails, full metallic bronze chrome on one accent nail.
Nail Shape: Medium coffin. The flat surface gives the chrome maximum reflective area.
Design Element: Alternating finishes: solid coral cream, nude base with scattered gold foil, and one full metallic bronze nail.
Finish: High-gloss on the cream and foil nails. Mirror-chrome on the accent nail.
Get The Look at Home:
Do the chrome nail last. Chrome powder is messy and will transfer to the other nails if they're still wet.
- Coral nails: Two coats of opaque coral-orange on two nails. Let dry fully.
- Foil nails: Two coats of sheer nude on two nails. While still tacky, press gold foil flakes onto the surface.
- Chrome nail: On one nail, apply a no-wipe gel top coat and cure. Rub bronze chrome powder into the cured surface with a silicone applicator. Buff until mirror-smooth.
- Seal everything: One coat of top coat over all nails. The chrome nail may need a second coat to lock the powder.
13.Sunset Ombre Square
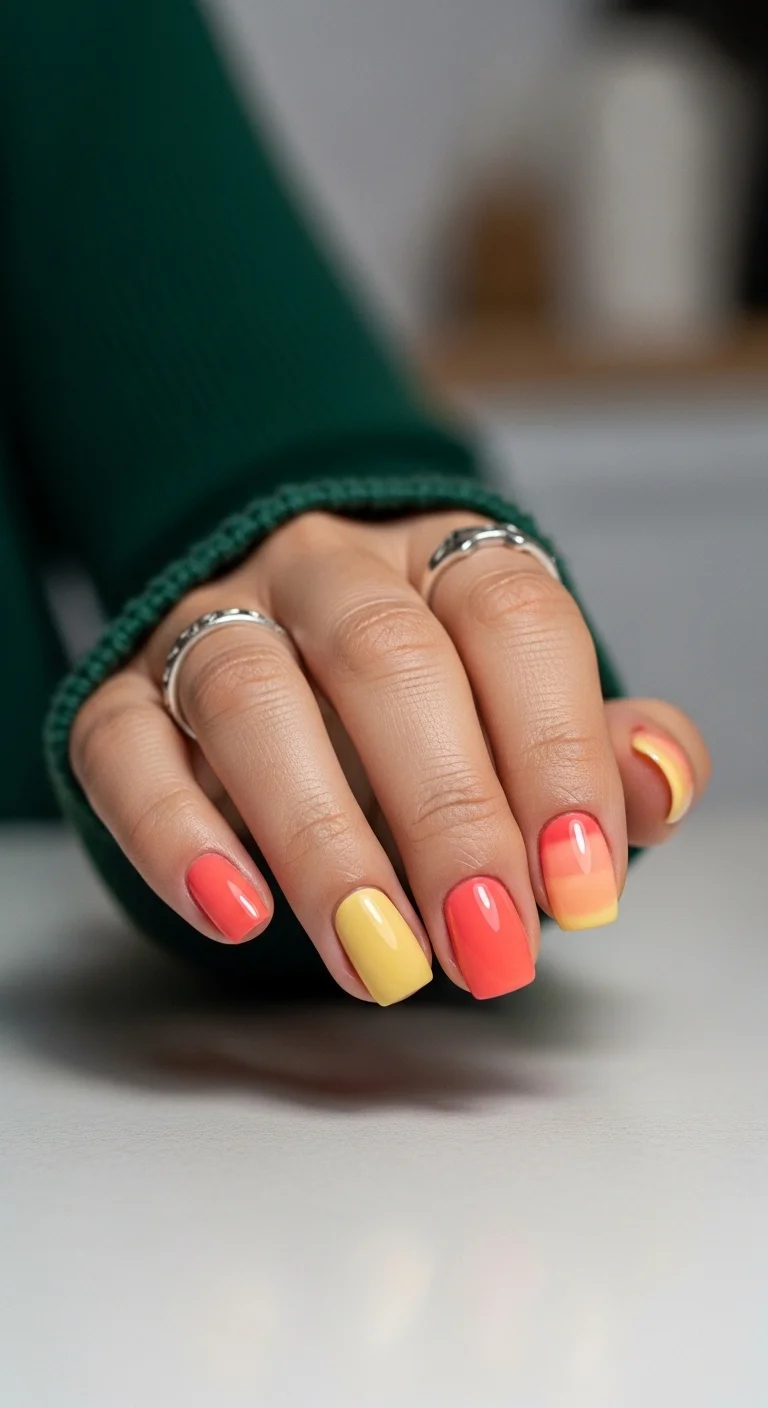
A warm, three-color ombre that captures the exact palette of a summer sunset.
Overview:
A three-color gradient that transitions from coral through peach to yellow is one of the harder sponge techniques. The challenge is blending the coral into the yellow without creating an orange-brown band between them. The middle color has to do the mediating work, and the sponge has to hit the nail at exactly the right moisture level.
What makes this version work is the color temperature. All three shades are warm: the coral leans orange, the middle is a soft peach, and the yellow is buttery rather than neon. Because they share the same warm undertone, the transitions feel natural rather than forced. It reads as a single color shifting through different light conditions.
Short square is the right shape for this. The flat tip gives the gradient a clean, defined endpoint, and the shorter length means the color transition doesn't need to stretch as far. On longer nails, the same gradient would need a fourth color to fill the extra space without looking stretched.
Design Breakdown:
A three-color warm gradient that depends on shared undertones for a seamless blend.
Base Color: Opaque white undercoat for opacity. The gradient uses coral at the cuticle, peach in the middle, and yellow at the tips.
Nail Shape: Short square. The compact surface keeps the gradient transitions tight.
Design Element: Sponge-applied three-color ombre. Coral at the base, peach in the center, yellow at the tips.
Finish: High-gloss top coat to blend the gradient transitions and add a warm glow.
Get The Look at Home:
A white base coat underneath the gradient is non-negotiable. Without it, the warm pigments sheer out and the sunset looks washed-out.
- White base: Two thin coats of opaque white. Let dry completely.
- Sponge setup: Paint three horizontal stripes on a makeup sponge: coral at the top, peach in the middle, yellow at the bottom. Dab on paper first.
- First pass: Press the sponge onto the nail with the coral aligned at the cuticle. Light dabs, three to four passes.
- Build opacity: Re-apply polish to the sponge and repeat three more times, letting each layer dry for thirty seconds.
- Blending check: If the transitions look harsh, add a thin stripe of peach between the coral and yellow on the sponge.
- Seal: Two coats of thick top coat to smooth the sponge texture and blend the transitions.

29 Trendy Pink Summer Nails for 2026 💅
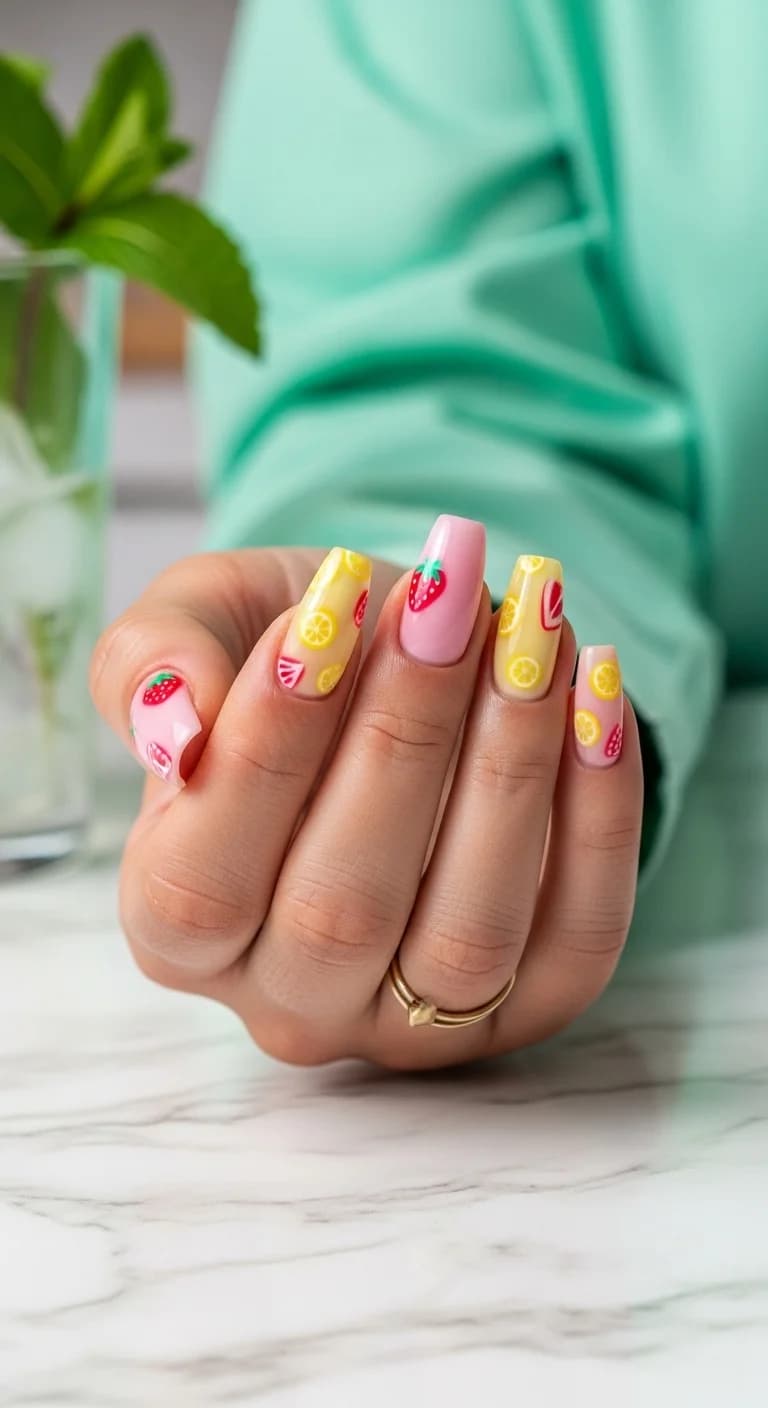
14.Tropical Fruit Medley
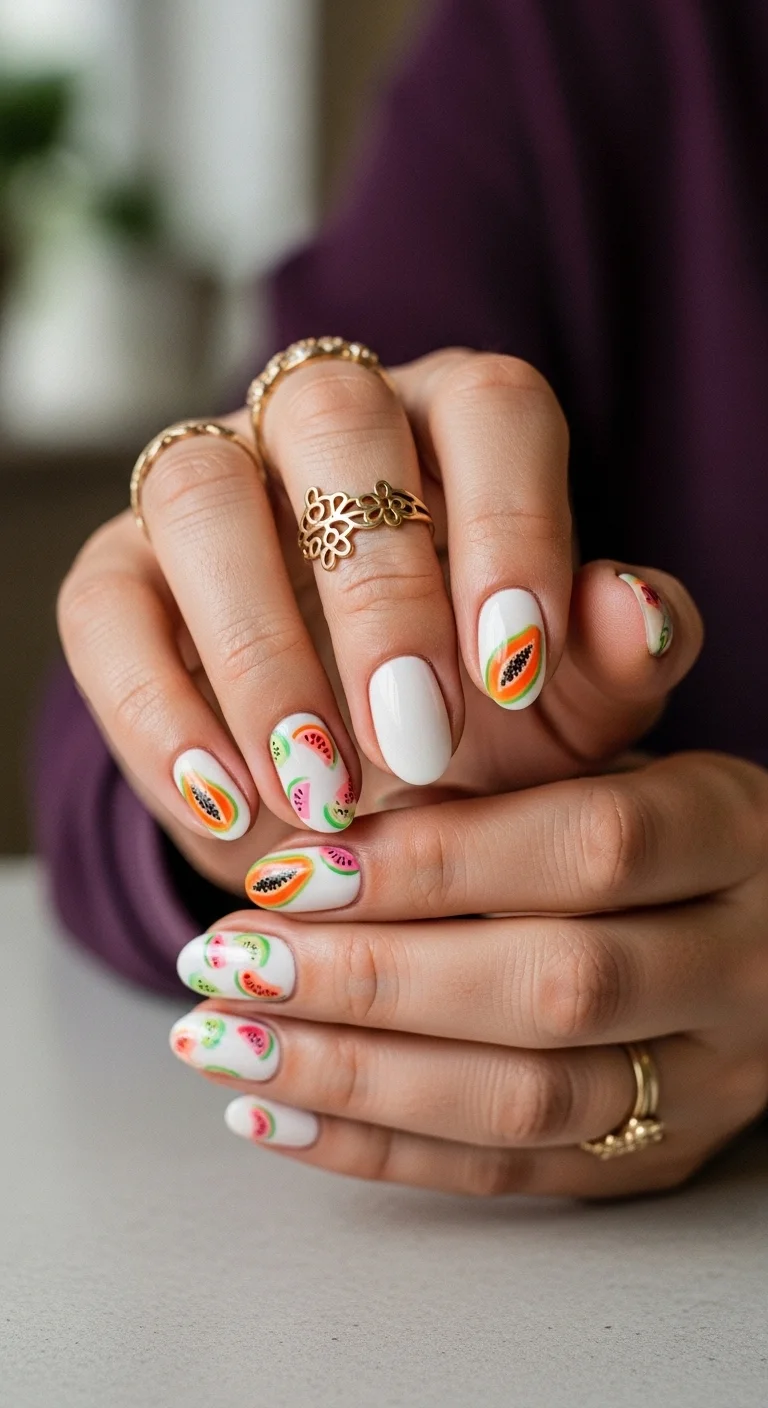
A playful fruit salad across ten nails with hand-painted tropical slices.
Overview:
Fruit nail art walks a thin line between "editorial food styling" and "children's birthday party." This design stays on the right side because of the white base and the detail level in each fruit. The papaya halves show seeds. The watermelon slices show rind gradients. The kiwi cross-sections show seed patterns. That level of specificity elevates the fruit from "cute shapes" to recognizable illustrations.
The white base is doing more than providing contrast. It functions as the "plate" in a food styling composition. Each fruit sits on white like a slice on a cutting board, which gives the set a clean, editorial quality that a colored base would undermine. The colors of the fruit are doing all the visual work; the white stays out of the way.
This design is time-intensive. Each fruit takes two to three minutes to paint with any level of detail, and there are two to three per nail. Budget at least an hour for the art. The good news: fruit is forgiving. An imperfect watermelon slice still reads as watermelon. Don't stress about precision.
Design Breakdown:
Hand-painted fruit illustrations on a clean white base. Each fruit uses two to four colors for realistic detail.
Base Color: Bright, opaque white. The fruit colors need a clean canvas to read clearly.
Nail Shape: Short oval. The rounded shape complements the organic curves of the fruit slices.
Design Element: Hand-painted tropical fruit: papaya halves (orange flesh, black seeds), watermelon slices (red flesh, green rind, black seeds), and kiwi cross-sections (green flesh, white center, black seeds).
Finish: High-gloss top coat to make the fruit look juicy and protect the detailed art.
Get The Look at Home:
Paint all the fruit of one type first across all nails, then move to the next fruit. This keeps your color palette consistent.
- White base: Two to three thin coats of opaque white. Let each dry fully.
- Papaya halves: Using a small brush and orange polish, paint half-circle shapes. Add tiny black dots in the center for seeds.
- Watermelon slices: Paint red triangles or half-circles. Add a thin green line along the curved edge for the rind. Black dots for seeds.
- Kiwi slices: Paint green circles with a white center dot. Add tiny black dots radiating outward from the center for seeds.
- Leaf accents: A few tiny green leaf strokes near the fruit add color depth.
- Seal: Two coats of top coat to smooth the raised art texture and make the colors pop.
15.Mint & Coral Watercolor Floral
A dreamy, watercolor-washed floral that blends cool mint with warm coral blooms.
Overview:
Watercolor florals are one of those designs where the technique does most of the heavy lifting. The soft, bleeding edges of the mint and white base create an atmospheric background that makes the coral flowers look like they're emerging from fog. Sharp, defined flower edges would fight the watercolor effect. Loose, gestural strokes work with it.
The color temperature contrast is what makes this design interesting. Mint is cool. Coral is warm. Putting them on the same nail creates a subtle visual tension that keeps your eye moving. The white sections between the colors act as neutral ground, preventing the mint and coral from directly competing. It's the same principle as putting a white frame between two paintings in a gallery.
The square shape works well here because the flat edges give the watercolor pattern a defined border. On almond or stiletto, the colors would bleed off the sides and lose the "painting in a frame" quality that makes the design feel intentional.
Design Breakdown:
Abstract watercolor base with loose floral elements. The blurred edges between colors are the design.
Base Color: Mint green and white applied in a watercolor technique. The two colors bleed into each other.
Nail Shape: Medium square. The flat edges frame the watercolor pattern.
Design Element: Soft coral-red floral elements painted loosely over the mint-and-white watercolor base. The flowers should have blurred edges, not defined petals.
Finish: High-gloss top coat to intensify the watercolor depth and smooth the surface.
Get The Look at Home:
The watercolor base is applied wet-on-wet. Don't wait for the first color to dry before adding the second.
- White base: One thin coat of white. Let dry.
- Mint application: Apply a thin coat of mint green to the lower two-thirds of the nail. While still wet, use a clean brush dipped in alcohol or blooming gel to blur the upper edge into the white.
- Color blending: The mint and white should bleed into each other with soft, organic edges. Don't try to control the blend.
- Cure or dry: Let the base set completely before adding the flowers.
- Floral elements: Using a small brush and coral polish, paint loose, abstract flower shapes. Five to six petals per flower, with intentionally blurred edges. The flowers should look like they're part of the watercolor, not sitting on top of it.
- Flower centers: A tiny dot of deeper red or brown in the center of each flower.
- Seal: Two coats of top coat to smooth the surface and intensify the watercolor effect.
30 Stunning Summer Hair Trends for 2026 ☀️🌊
16.Red-to-Pink Sunset Ombre
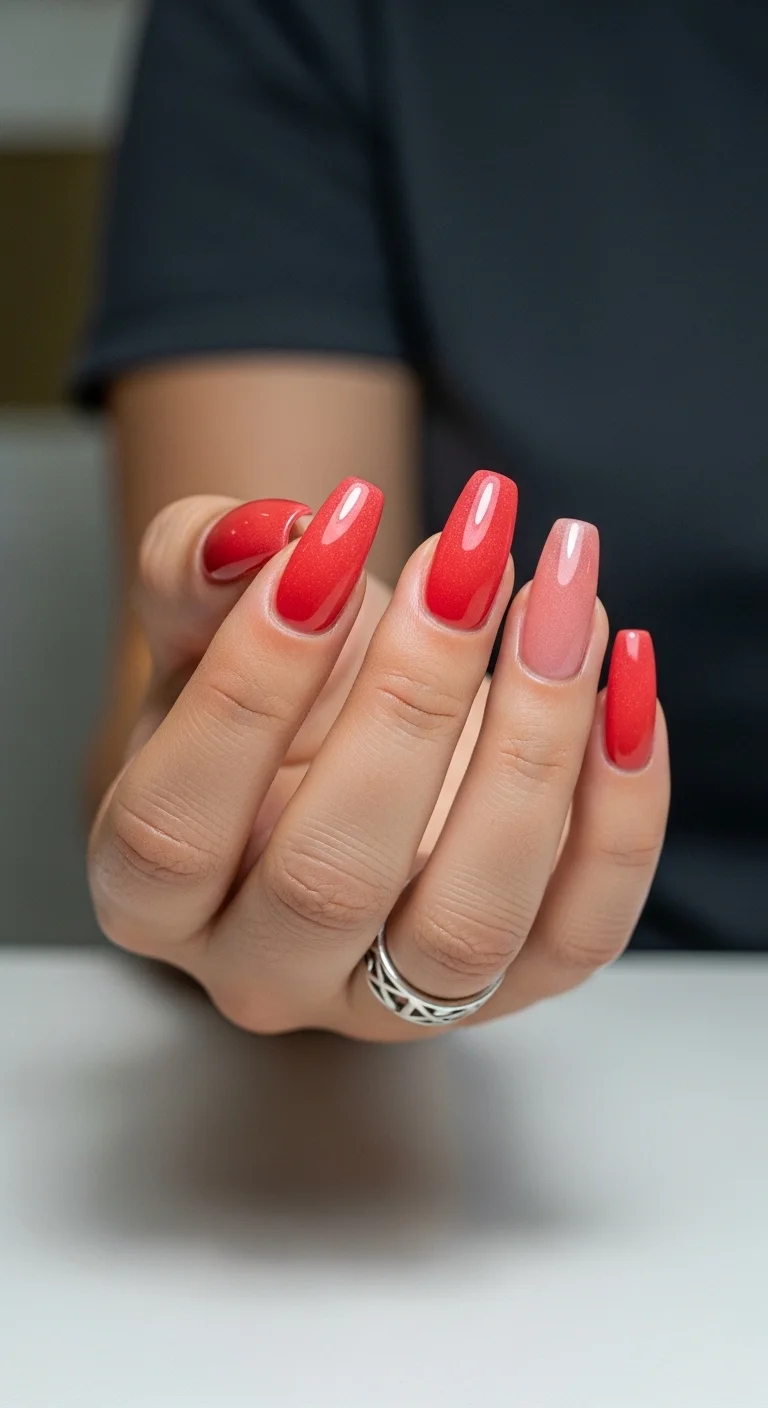
A romantic, warm-toned ombre that captures the blush of a sunset sky.
Overview:
A red-to-pink gradient is one of the most universally flattering ombre combinations because both colors share the same warm undertone. The transition feels natural, like watching a single color shift through different light conditions. There's no jarring contrast or muddy middle zone. The blend happens effortlessly.
The depth at the cuticle and the softness at the tips create a visual weight that draws attention upward. Your nails look longer because the eye follows the gradient from dark to light. It's a subtle optical trick that works on every nail shape and length.
The sponge technique is essential here. Brushing the two colors directly creates a visible line. A makeup sponge atomizes the polish into overlapping micro-droplets that blend at the molecular level. Four to five light passes builds opacity gradually without flooding the cuticle.
Design Breakdown:
A warm gradient that relies on shared undertones for a seamless, natural-looking transition.
Base Color: Opaque white undercoat for opacity. The gradient transitions from deep red at the cuticle to soft pink at the tips.
Nail Shape: Medium almond. The tapered tip gives the pink endpoint a delicate, refined finish.
Design Element: Sponge-applied two-color ombre. Red at the base, pink at the tips, with a soft peach buffer in the transition zone.
Finish: High-gloss top coat to blend the gradient transitions and add a glassy depth.
Get The Look at Home:
A white base coat is non-negotiable. Without it, both colors sheer out and the sunset effect looks washed-out.
- White base: Two thin coats of opaque white. Let dry completely.
- Sponge setup: Paint a stripe of red and a stripe of pink side by side on a makeup sponge. Dab on paper first to remove the initial excess.
- First pass: Press the sponge onto the nail with the red aligned at the cuticle. Three to four light dabs. The first layer will look sheer.
- Build opacity: Re-apply polish to the sponge and repeat three to four more times, letting each layer dry for thirty seconds.
- Buffer zone: If the red and pink are blending into brown where they meet, add a thin stripe of peach between them on the sponge.
- Seal: Two coats of thick top coat to smooth the sponge texture and blend the gradient transitions.
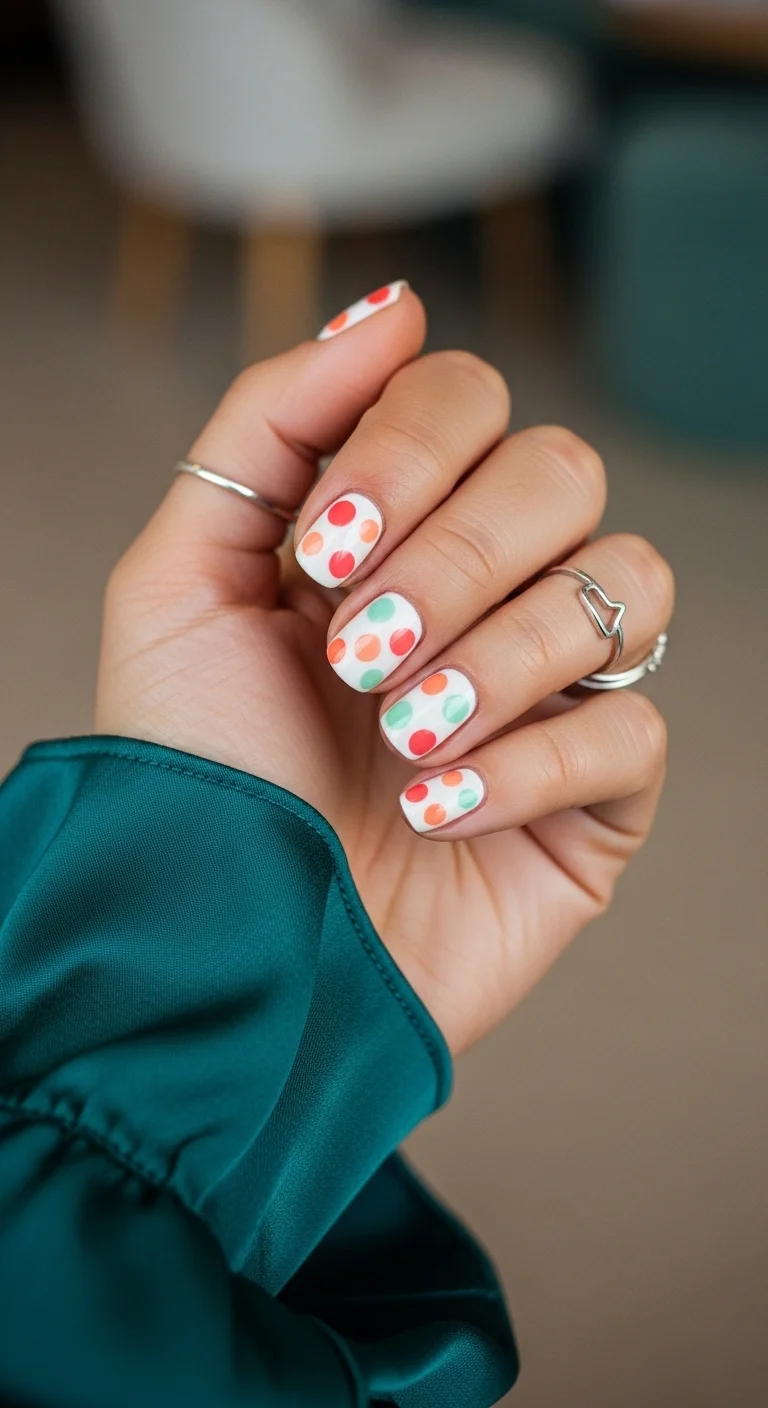
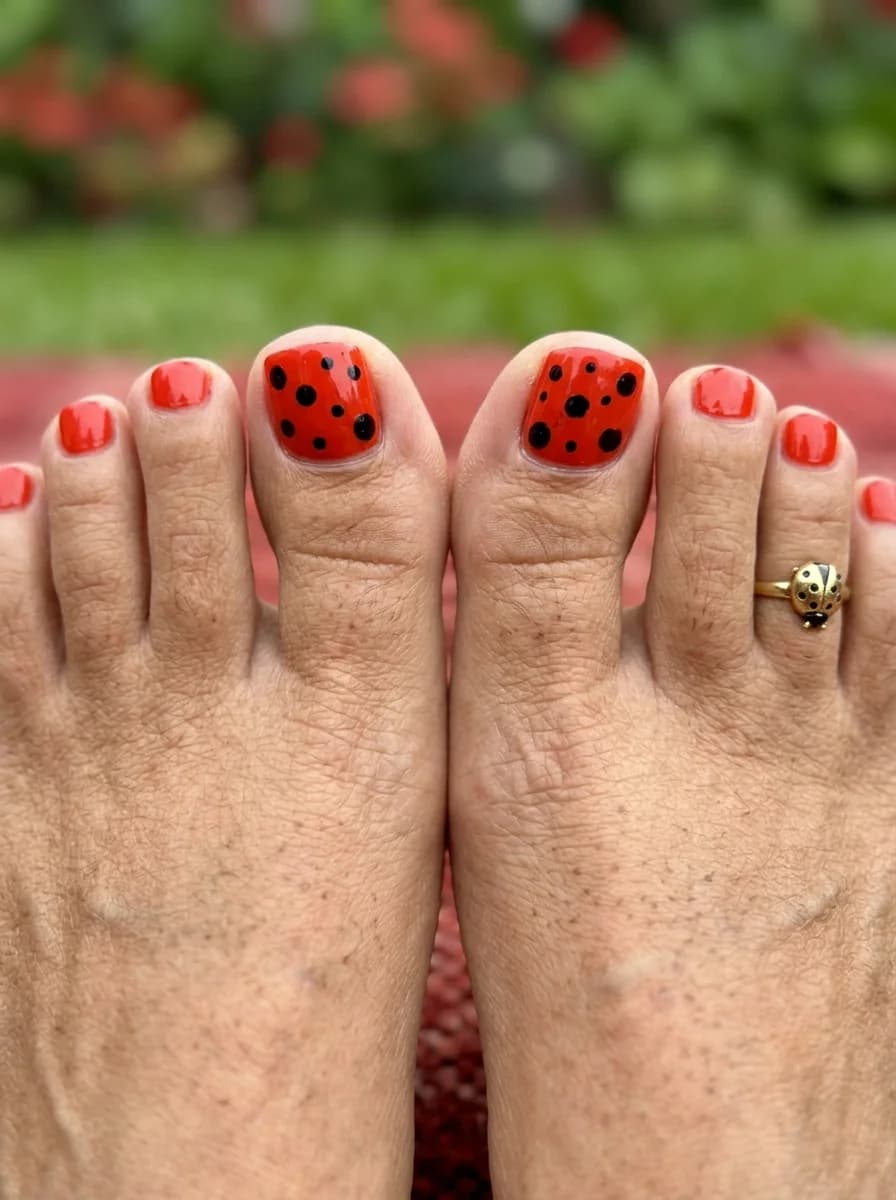
17.Polka Dot Party on White
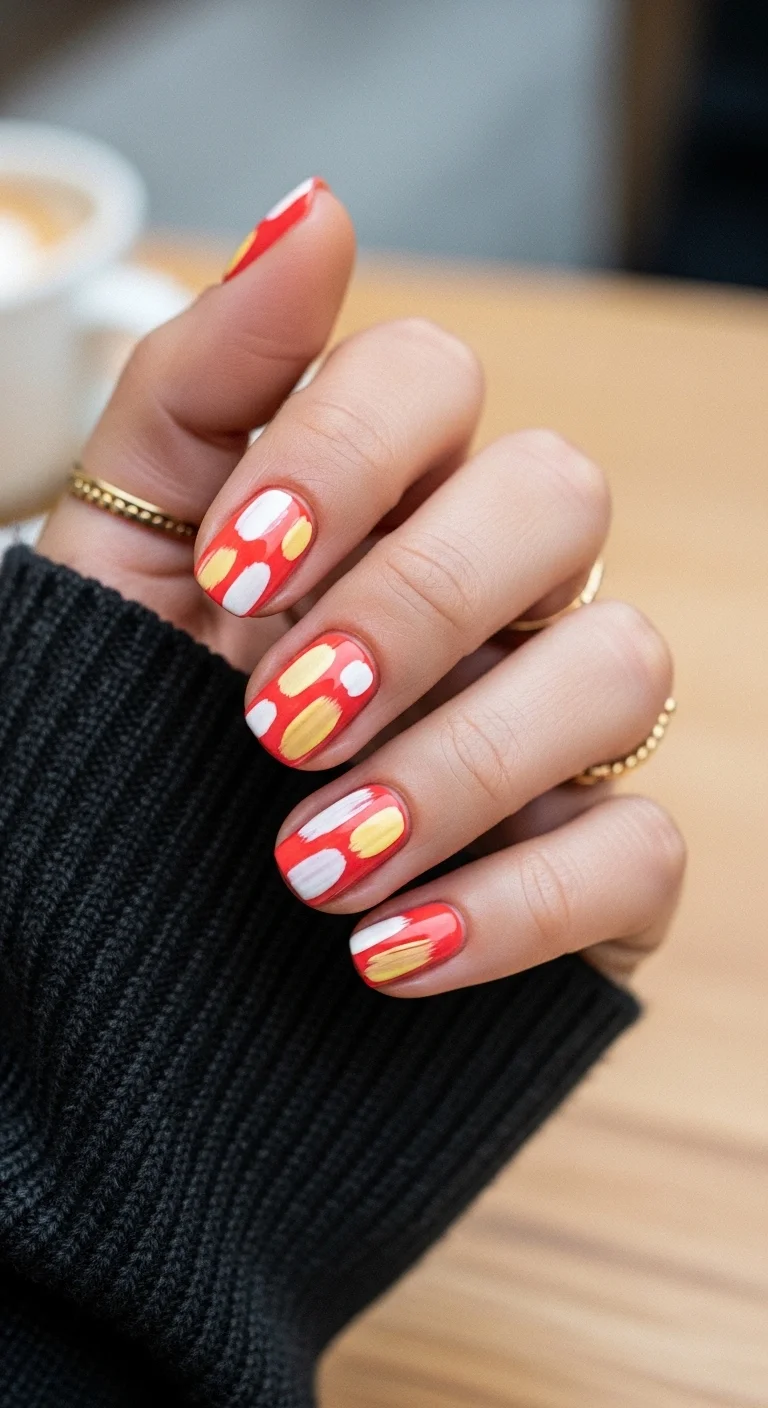
A playful, confetti-like pattern that celebrates color without taking itself too seriously.
Overview:
Multi-colored polka dots on a white base is a design that looks effortless but requires strategic planning. The challenge isn't painting dots. It's making sure the colors are distributed evenly across the hand without clustering too many of the same shade on one nail. Controlled randomness is harder than it sounds.
The white base is what makes this design work. On a colored base, the dots would fight for attention. On white, each dot has its own defined territory. The negative space between dots becomes as important as the dots themselves, creating a rhythm that keeps your eye moving across the hand.
Dot size matters. These are small, roughly two millimeters across. Any larger and the design shifts from "confetti" to "polka dot shirt." The smallest dotting tool in your kit is the right one. Press straight down, lift straight up. Don't twist.
Design Breakdown:
Multi-colored dots on a white base. The negative space between dots is as important as the dots themselves.
Base Color: Bright, opaque white. The dot colors need a clean canvas to read clearly.
Nail Shape: Short oval. The soft, rounded shape complements the circular dots.
Design Element: Small polka dots in red, yellow, and coral scattered across all nails. Colors are distributed evenly, with no two dots of the same color touching.
Finish: High-gloss top coat to smooth the raised dot texture.
Get The Look at Home:
Work in color layers. All dots of one color first across all nails, then the next color. This keeps your tool clean and your distribution even.
- White base: Two coats of opaque white. Let dry fully.
- Red dots: Using a small dotting tool, place five to seven red dots on each nail. Space them irregularly.
- Coral dots: Clean the tool. Place coral dots in the gaps between red. Avoid placing two dots of the same color adjacent.
- Yellow dots: Repeat with yellow, filling remaining gaps.
- Dry check: Wait at least five minutes before top coating. The dots are raised and need time to set.
- Seal: Two coats of top coat to encapsulate the dots and create a smooth surface.
29 Bright Lemon Nail Art Designs for Summer & Spring (2026)
18.Tropical Floral Bouquet
A botanical garden across ten nails with layered tropical blooms.
Overview:
Hand-painted tropical florals on a nude base create a design that reads as "art" rather than "nail decoration." The neutral background lets the flower colors do all the visual work. Each bloom becomes a miniature painting that rewards closer inspection.
The coral, yellow, and mint green color palette is unusual for floral nail art. Most tropical designs stick to pink and green. Adding yellow and mint creates a more complex, layered color story that feels fresh rather than predictable. The flowers look like they're growing in a real garden, not stamped from a single template.
This design requires patience and a steady hand. Each flower takes two to three minutes to paint with any level of detail. Budget at least an hour for the art. The slightly imperfect, hand-painted quality is part of the charm.
Design Breakdown:
Detailed botanical art on a neutral base. The nude background lets each flower color stand out independently.
Base Color: A warm, opaque nude. Not too pink, not too beige. The flowers need a neutral stage.
Nail Shape: Medium almond. The tapered tip echoes the organic curves of the petals.
Design Element: Hand-painted tropical flowers in coral, yellow, and mint green with layered petals and visible stamens. Each nail carries one or two blooms at different angles.
Finish: High-gloss top coat to intensify the colors and protect the fine detail work.
Get The Look at Home:
Paint all the flower centers first across all nails, then build the petals outward. This is faster than finishing one flower at a time.
- Nude base: Two coats of opaque nude. Let dry fully.
- Flower centers: Using a small dotting tool and deep coral, place a dot where each flower's center will be. Two per nail on most nails.
- Petal strokes: Using a small round brush and coral polish, flick outward from the center dot in petal shapes. Five to six petals per flower.
- Color variation: Mix yellow and mint into some petals for depth. Not every flower needs to be the same color.
- Leaves: Using a thin liner brush and green polish, paint small almond shapes along the edges of the flowers.
- Seal carefully: Float the top coat over the art without dragging. Botanical detail work is delicate.
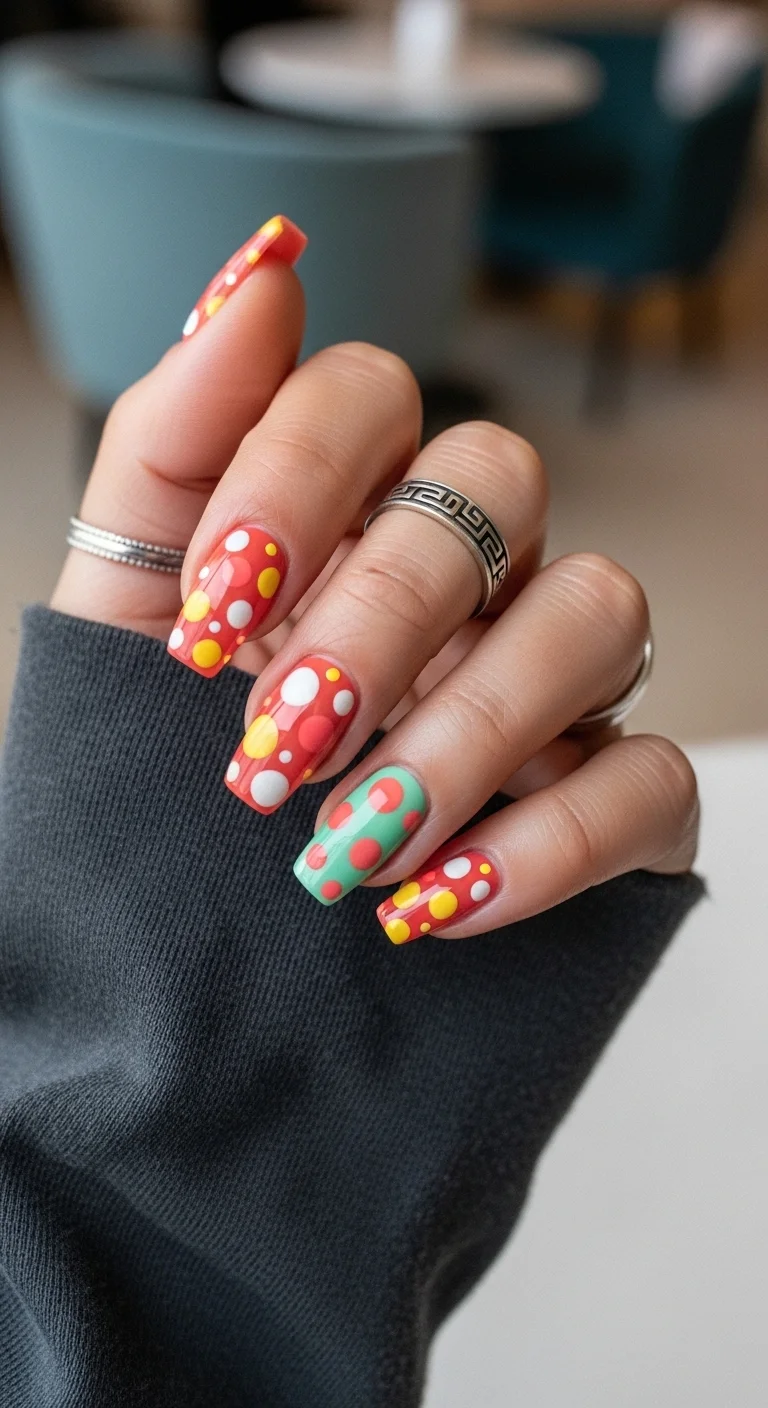
19.Mint & Coral Confetti Dots
A fresh, spring-inspired dot pattern that mixes warm and cool tones.
Overview:
Mixing warm and cool dots on the same nail creates a visual tension that keeps the design interesting. The coral and orange dots pull your eye in one direction; the mint green pulls it in another. The white base between them acts as neutral ground, preventing the warm and cool tones from directly competing.
This color combination is unusual for polka dot nails. Most versions stick to a single color family. The contrast between warm coral and cool mint gives the set a more complex, curated quality that feels intentional rather than random.
Short square nails are the right canvas for this design. The flat surface gives each dot its own defined territory, and the compact length keeps the pattern from feeling overwhelming. Medium or long nails would need more dots to fill the space, which could shift the design from "playful" to "busy."
Design Breakdown:
Warm and cool dots on a white base. The color temperature contrast is the design's main appeal.
Base Color: Bright, opaque white. The dot colors need a clean canvas to read clearly.
Nail Shape: Short square. The flat surface gives each dot defined territory.
Design Element: Small polka dots in coral, mint green, and orange scattered across all nails. Warm and cool dots alternate to create visual rhythm.
Finish: High-gloss top coat to smooth the raised dot texture.
Get The Look at Home:
Alternate warm and cool dots as you place them. This prevents too many of the same temperature from clustering together.
- White base: Two coats of opaque white. Let dry fully.
- Coral dots: Using a small dotting tool, place five to seven coral dots on each nail. Space them irregularly.
- Mint dots: Clean the tool. Place mint dots in the gaps between coral. The warm-cool contrast is the point.
- Orange dots: Repeat with orange, filling remaining gaps and balancing the warm-cool ratio.
- Dry check: Wait at least five minutes before top coating. The dots are raised and need time to set.
- Seal: Two coats of top coat to encapsulate the dots and create a smooth surface.

26 Stunning Summer Braided Hairstyles for Women 2026 ☀️💇♀️
20.Coral & Pink Floral Cascade

A soft, romantic floral that cascades from cuticle to tip.
Overview:
Cascading florals create a sense of movement that static flower placement can't achieve. The blooms in this design aren't scattered randomly. They flow from the cuticle area downward, as if petals are falling from a tree. The motion makes the design feel alive rather than stamped.
The milky white base gives the flowers a watercolor-like depth. Light passes through the translucent base, which makes the coral and pink petals look layered rather than flat. Opaque white would create a more graphic, sticker-like effect. Milky white creates atmosphere.
The coral-to-pink color range within each flower is what separates this from simplified floral stamps. Each bloom uses at least two tones: a deeper coral at the center and a softer pink on the outer petals. That layering creates the illusion of real petals with light and shadow.
Design Breakdown:
Directional floral art on a translucent base. The cascading placement creates movement across the hand.
Base Color: Sheer, milky white. Not opaque enough to look clinical, not sheer enough to look unfinished.
Nail Shape: Medium almond. The tapered tip complements the downward flow of the floral cascade.
Design Element: Hand-painted coral and pink flowers with layered petals, cascading from cuticle to tip. Two to three blooms per nail, with leaves filling the gaps.
Finish: High-gloss top coat to intensify the watercolor depth and protect the fine detail work.
Get The Look at Home:
Start with the largest flower near the cuticle, then work smaller toward the tip. This creates the cascading effect naturally.
- Milky base: Two coats of sheer milky white. Let dry fully.
- Large flowers: Using a small round brush and coral polish, paint the largest flowers near the cuticle area. Five to six petals per flower.
- Small flowers: Using pink polish, paint smaller flowers below the coral ones. These should be slightly less detailed.
- Petal variation: Mix a touch of white into your coral and pink. Use this lighter shade on the outer edges of each petal for depth.
- Leaves: Using a thin liner brush and green polish, paint small almond shapes between the flowers to fill gaps.
- Seal carefully: Float the top coat over the art without dragging. Botanical detail work is delicate.
21.Coral Swirl Abstract
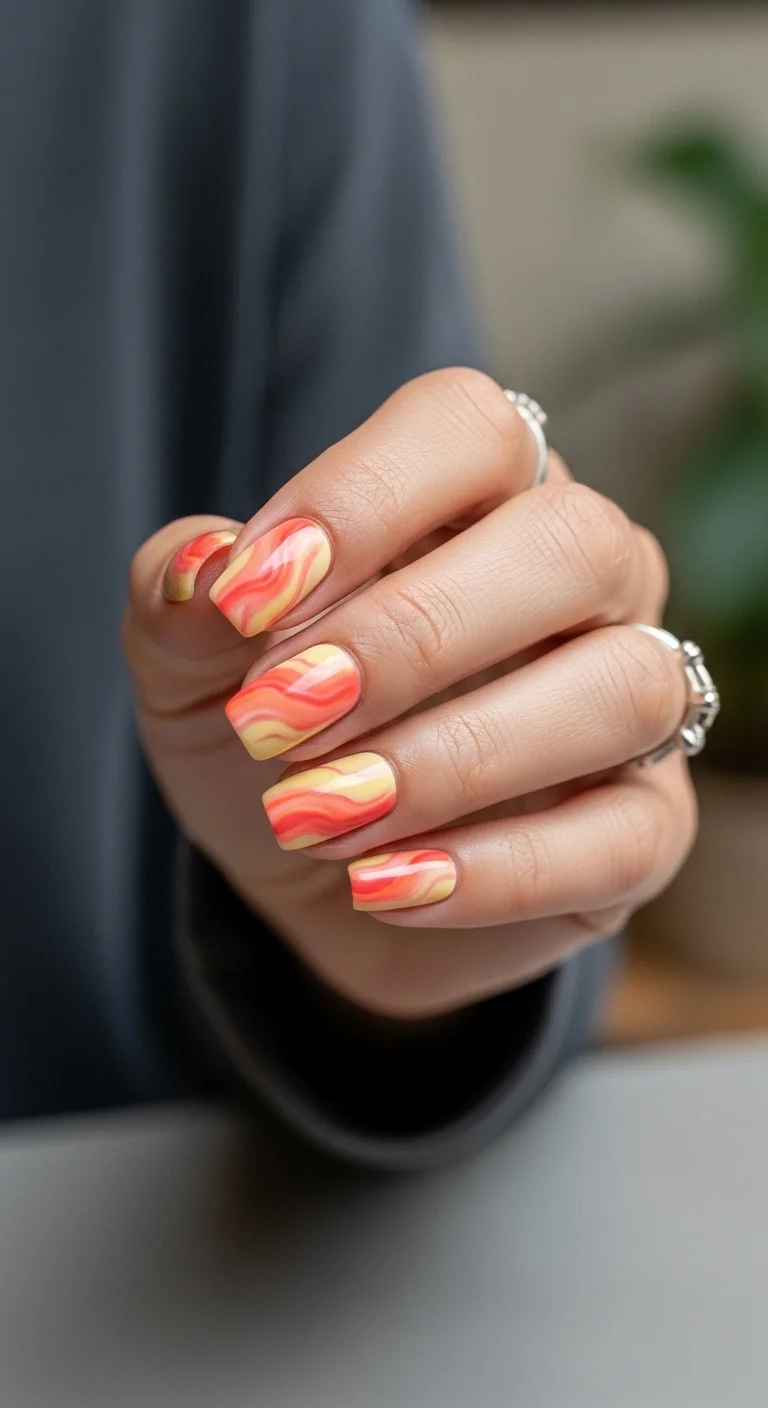
An organic, freehand swirl that looks like a topographic map in warm tones.
Overview:
Abstract swirl nails are one of those designs where the "imperfections" actually make it better. The wavy lines in this set aren't trying to be perfectly parallel or evenly spaced. They meander across each nail at slightly different angles and thicknesses, which gives the whole hand an organic quality that geometric patterns can't replicate.
The white base does something interesting to the warm swirl lines: it makes them pop. Without the clean background, the coral, orange, and yellow would compete with a colored base for attention. On white, each line has its own defined territory. The negative space between swirls becomes as important as the lines themselves.
The swirl technique is simple but requires confidence. Hesitant strokes create wobbly, uneven lines. The key is loading enough polish onto a thin liner brush and committing to each curve in one fluid motion. If you stop mid-line, you get a blob.
Design Breakdown:
Freehand abstract lines over a white base. The organic quality of the swirls is the point.
Base Color: Bright, opaque white. The warm swirl lines need a clean canvas to read clearly.
Nail Shape: Medium coffin. The flat surface gives the swirls room to flow without distortion.
Design Element: Hand-painted swirl lines in coral, orange, and yellow flowing across each nail at organic angles. Two to three lines per nail, varying in thickness.
Finish: High-gloss top coat to smooth the raised texture of the painted lines.
Get The Look at Home:
The lines need to be painted in single, confident strokes. Loading enough polish on the brush is the key to avoiding wobbly lines.
- White base: Two coats of opaque white. Let dry fully.
- Brush prep: Load a thin liner brush with coral polish. Wipe the excess on the bottle neck. You want enough to draw a complete line without re-dipping.
- First line: Starting near the cuticle, drag the brush in a gentle S-curve across the nail. One fluid motion.
- Additional colors: Add orange and yellow lines at different angles. Let them flow naturally. Don't try to make them parallel.
- Thickness variation: Press harder for thicker sections, lighter for thinner ones. The variation creates visual interest.
- Seal: Two coats of top coat to smooth the raised line texture and create a unified surface.
35 Cute & Trendy Short Summer Nails for 2026 ☀️
22.Glitter Tip French
A French manicure that traded its white tips for something with more sparkle.
Overview:
Glitter French tips take the classic structure and add a layer of dimension that flat color can't achieve. The individual glitter particles catch light at different angles, which means the tips shift and shimmer as you move your hands. It's a subtle effect that photos don't fully capture.
The red glitter over a sheer nude base creates a more wearable version of a bold color choice. A solid red French tip would read as aggressive. The glitter diffuses the color into thousands of tiny reflections, which softens the overall impact while keeping the warmth and energy of red.
The key to clean glitter French tips is patience. Glitter polish is thicker than cream polish, which means it doesn't flow as smoothly off the brush. Two thin coats cover better than one thick coat, and each layer needs adequate dry time to prevent dragging.
Design Breakdown:
Classic French structure with a textured, light-catching twist. The glitter adds dimension that flat tips can't achieve.
Base Color: Sheer milky nude as the foundation. The natural nail should be partially visible.
Nail Shape: Medium almond. The curved tip gives the glitter French line a soft, natural edge.
Design Element: Red glitter French tips on all nails. The glitter is dense enough to read as red from a distance but sparkly up close.
Finish: High-gloss top coat to encapsulate the glitter and create a smooth surface over the raised texture.
Get The Look at Home:
Use a French liner brush for the glitter tips. The thicker glitter polish needs a wider brush than standard cream French tips.
- Nude base: Two coats of sheer milky nude. Let dry fully.
- First glitter coat: Using a French liner brush, paint the smile line with red glitter polish. Two thin coats for opacity.
- Cleanup: An angled brush dipped in acetone sharpens the smile line. Glitter polish is harder to clean than cream, so work carefully.
- Dry check: Wait at least five minutes before top coating. Glitter polish takes longer to set.
- Seal: Two coats of thick top coat to encapsulate the glitter and create a smooth, glassy surface.
23.Polka Dot Accent French
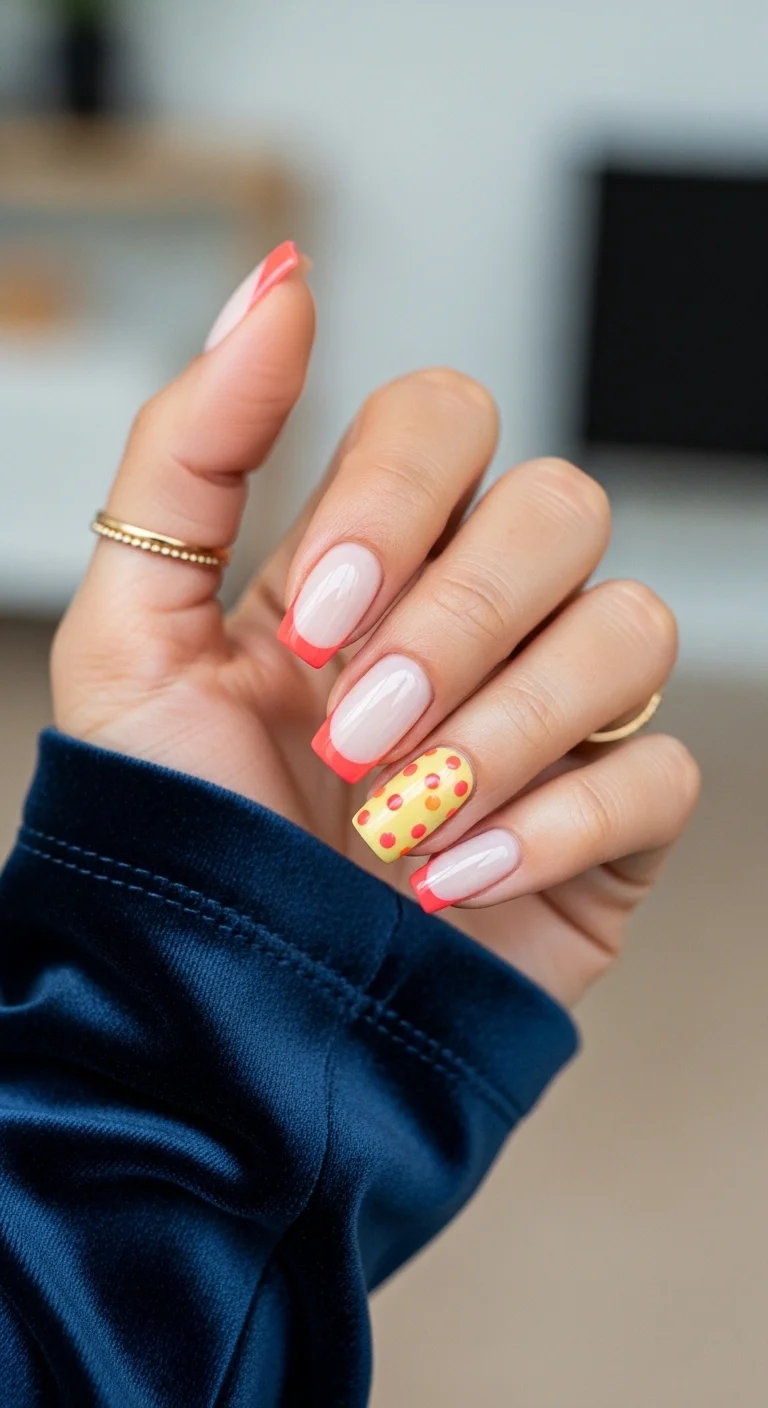
A French manicure with a playful twist on one accent nail.
Overview:
Accent nails work best when they feel like a natural extension of the set rather than a completely different design. This polka dot accent nail uses the same color palette as the French tips, which creates visual continuity. The red and yellow dots on the accent nail echo the warmth of the French tips without copying the structure.
The white French tips provide a clean, structured framework that makes the playful accent nail feel intentional. Without the classic French on the other nails, the polka dots would read as random. With them, the dots become a deliberate accent that adds personality without disrupting the overall sophistication.
This design works particularly well for people who want to try nail art but aren't ready for a full set of decorated nails. The accent nail is low-risk: if you don't love it, you only have one nail to redo.
Design Breakdown:
Classic French with a single accent nail. The accent uses the same color palette to maintain visual unity.
Base Color: Sheer milky nude as the foundation. White for the French tips. Red and yellow for the accent dots.
Nail Shape: Medium almond. The curved tip gives the French line a soft, natural edge.
Design Element: White French tips on nine nails. One accent nail with red and yellow polka dots on a nude base.
Finish: High-gloss top coat to unify the French tips and accent nail.
Get The Look at Home:
Do all the French tips first, then add the accent nail dots. This keeps the set cohesive.
- Nude base: Two coats of sheer milky nude on all nails. Let dry fully.
- French tips: Using a French liner brush and white polish, paint the smile line on nine nails. Two thin coats for opacity.
- Accent dots: On the ring finger, use a small dotting tool to place red and yellow dots on the nude base. Alternate colors and space them evenly.
- Cleanup: An angled brush dipped in acetone sharpens the French smile lines.
- Seal: One thick coat of glossy top coat. Cap the free edge on every nail.
27 Stunning Beach Wedding Hairstyles for Brides & Family 2026 🌊💍
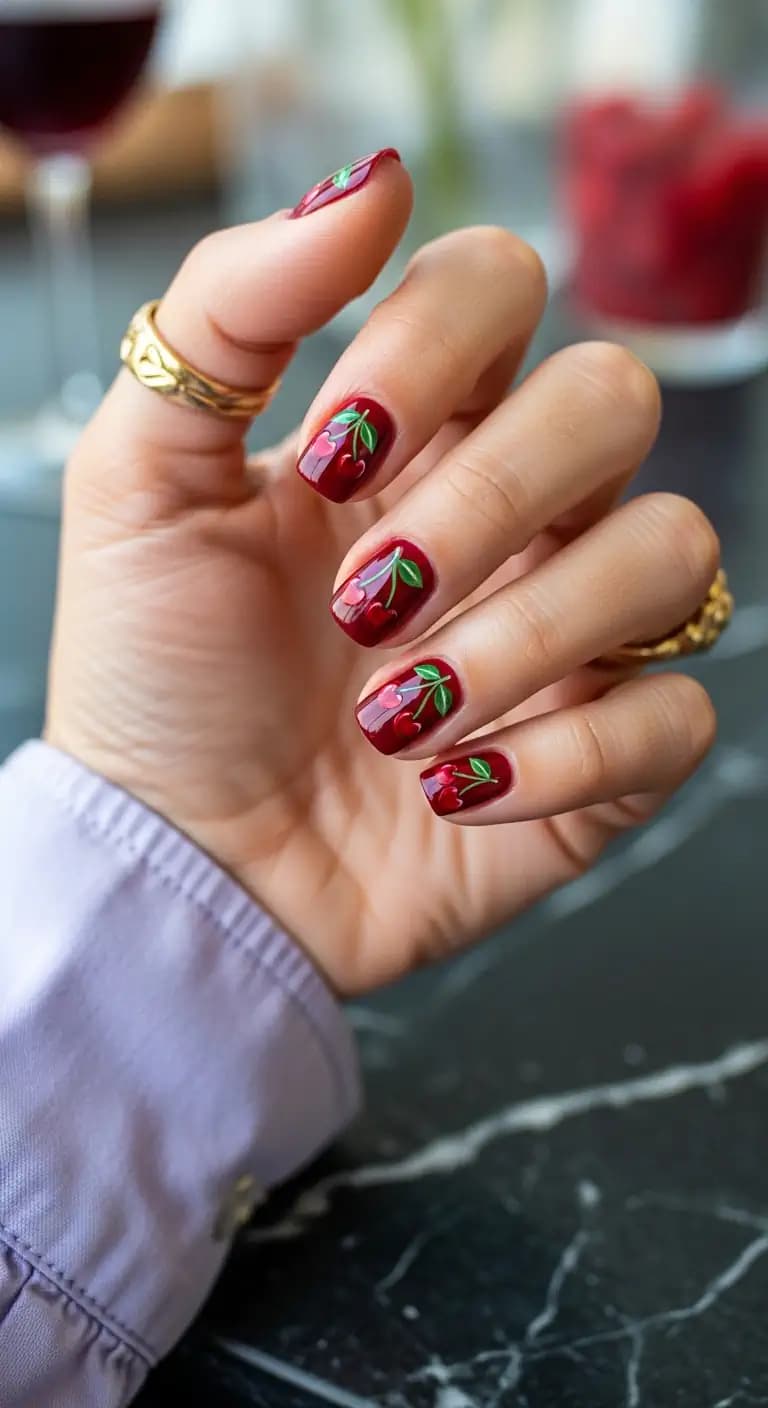
24.Coral French with Floral Accent
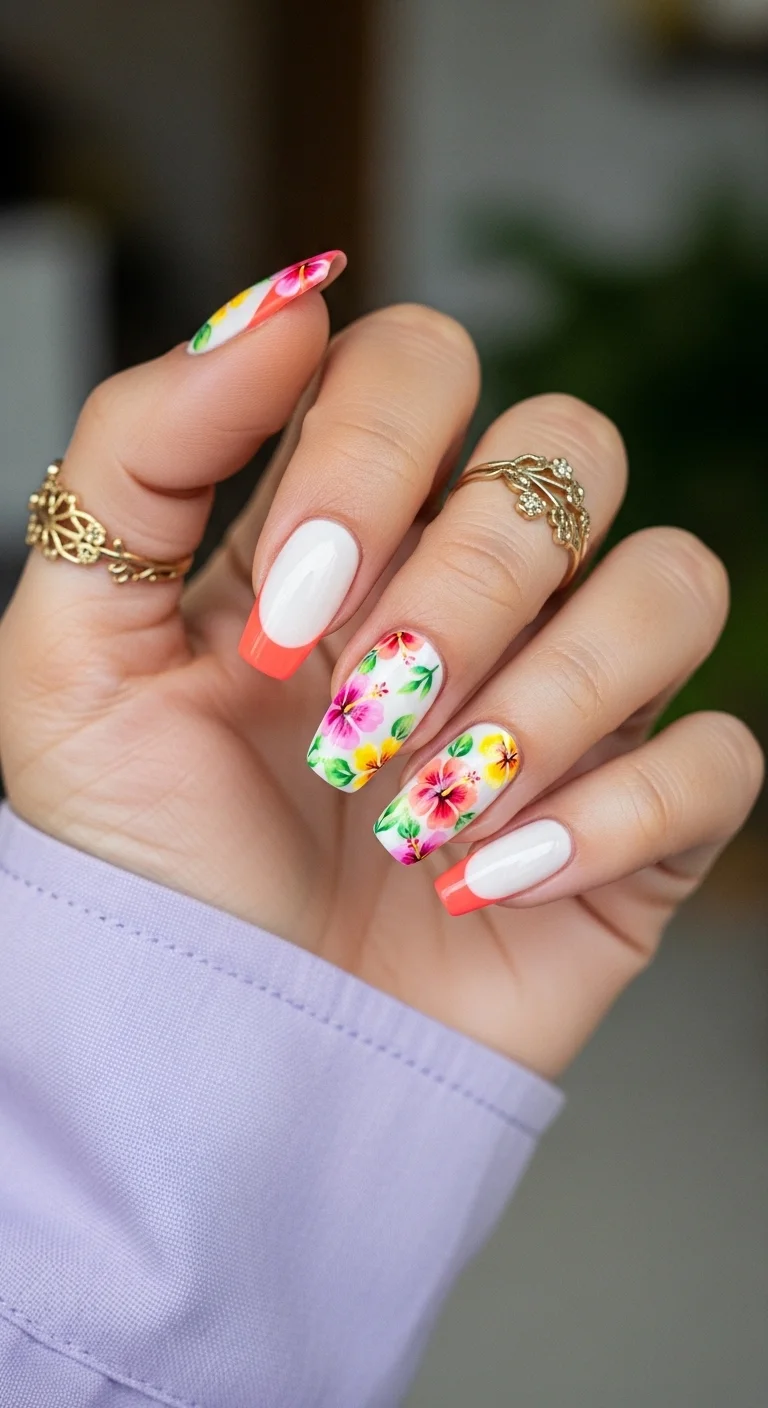
A French manicure softened by hand-painted botanical details.
Overview:
Adding floral accents to a French manicure creates a design that balances structure with softness. The French tips provide the clean, geometric framework. The flowers add organic, hand-painted warmth that prevents the set from feeling too rigid or formal.
The placement near the cuticle is strategic. Flowers at the tip would compete with the French line. Flowers at the base create a layered effect: botanical art at the bottom, clean French at the top. Your eye reads both elements without either one dominating.
The coral French tips are a warmer alternative to classic white. They flatter a wider range of skin tones and pair naturally with the warm-toned floral accents. The two elements share the same color temperature, which creates visual unity across the nail.
Design Breakdown:
Classic French structure with organic botanical art at the base. Two distinct techniques sharing one nail.
Base Color: Sheer milky nude as the foundation. Coral for the French tips. Multi-toned florals near the cuticle.
Nail Shape: Medium almond. The curved tip gives the French line a soft, natural edge.
Design Element: Coral French tips on all nails. Small hand-painted flowers in pink and yellow with green leaves near the cuticle area on two or three accent nails.
Finish: High-gloss top coat to unify the French tips and floral art.
Get The Look at Home:
Do the French tips first, then add the floral accents. The flowers should sit below the French line, not overlap it.
- Nude base: Two coats of sheer milky nude on all nails. Let dry fully.
- Coral French tips: Using a French liner brush and coral polish, paint the smile line on all nails. Two thin coats for opacity.
- Flower centers: On two or three accent nails, use a small dotting tool and pink polish to place flower centers near the cuticle.
- Petal strokes: Using a small round brush, flick outward from each center dot in petal shapes. Five to six petals per flower.
- Leaves: Using a thin liner brush and green polish, paint small almond shapes around the flowers.
- Seal carefully: Float the top coat over the art without dragging. Botanical detail work is delicate.
25.Full Red Glitter Glam
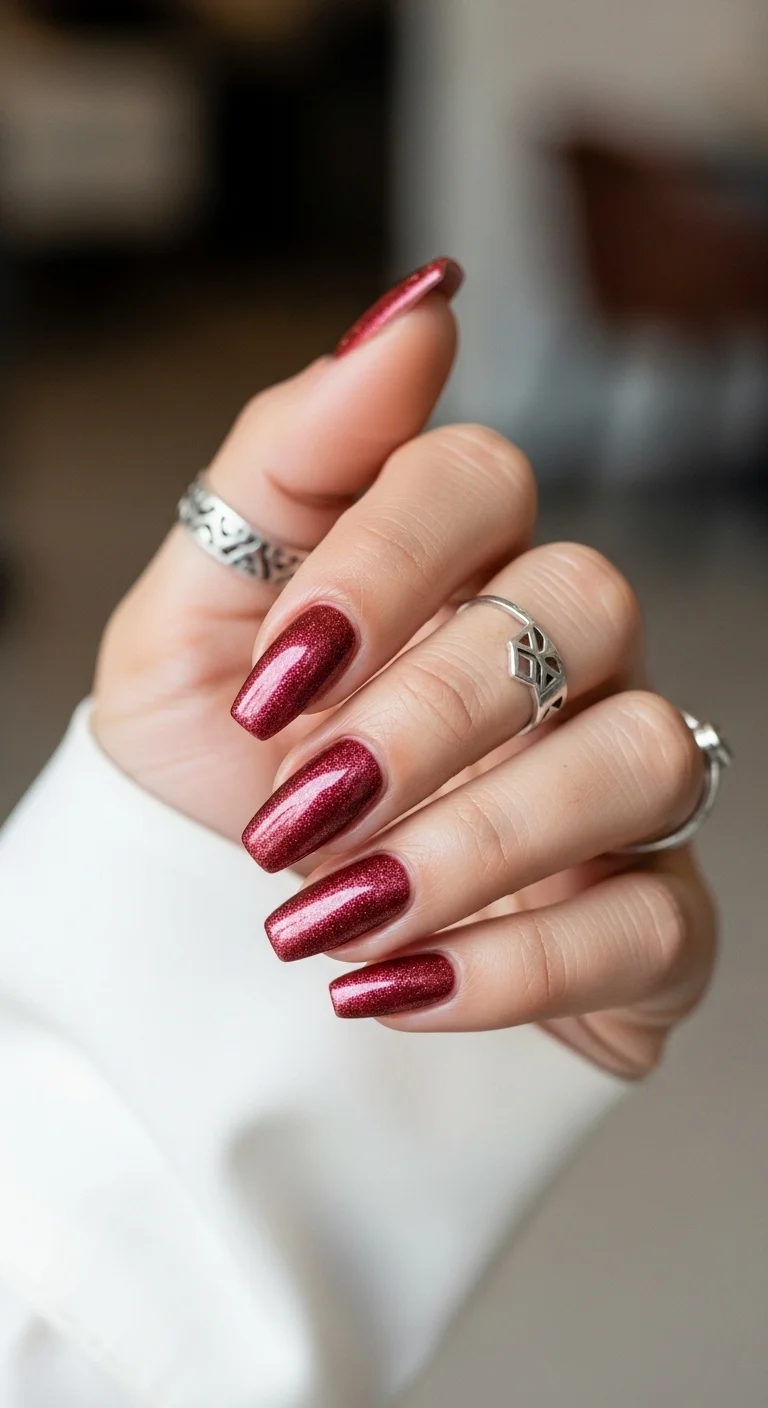
Maximum sparkle with minimum complexity — full red glitter on every nail.
Overview:
Full-coverage glitter nails are the simplest way to make a bold statement. There's no art to plan, no technique to master, no design to execute. You paint every nail with the same glitter polish, and the individual particles do all the visual work. It's the nail equivalent of wearing sequins.
Red glitter specifically creates a look that reads as both festive and sophisticated. The warm red base gives the glitter a rich foundation, while the individual sparkles catch light in ways that flat red polish can't. The effect shifts between a deep, warm red in low light and a dazzling sparkle in direct light.
The challenge with full glitter is removal. Glitter polish bonds more aggressively to the nail than cream polish, and the particles create a textured surface that resists standard soaking. The foil removal method works best: soak a cotton ball in acetone, place it on the nail, wrap with foil, and wait five minutes.
Design Breakdown:
Single-technique design. The glitter's light-catching properties create all the visual interest.
Base Color: A rich, warm red with dense glitter particles. OPI "Red Fingers & Mistletoes" or Essie "Set in Stones" (in red) hit the right density.
Nail Shape: Medium almond. The tapered shape maximizes light reflection from the glitter particles.
Design Element: Full-coverage red glitter on all ten nails. Three to four coats for maximum density and opacity.
Finish: High-gloss top coat to encapsulate the glitter and create a smooth, glassy surface over the raised texture.
Get The Look at Home:
Multiple thin coats build better opacity than one thick coat. Each layer needs adequate dry time to prevent dragging.
- Base coat: Apply a ridge-filling base coat. Glitter polish accentuates any nail surface imperfections.
- First glitter coat: Apply a thin coat of red glitter polish. It will look sheer. That's normal.
- Dry time: Wait two to three minutes. Glitter polish takes longer to set than cream polish.
- Second coat: Apply a second thin coat, overlapping the first. The density should be building.
- Third coat: For maximum sparkle, add a third coat. This fills any remaining gaps.
- Seal: Two coats of thick top coat to encapsulate the glitter and create a smooth surface.
32 Bright & Fun Summer Toe Nail Designs (2026)
26.Mint, Coral & Yellow Dot Mix
A cheerful, confetti-like pattern that mixes warm and cool tones.
Overview:
This color combination works because the three dot colors occupy different positions on the color wheel. Coral and yellow sit close to each other in the warm zone. Mint green sits on the cool side. The contrast between warm and cool creates visual energy that keeps the design from feeling flat.
The white base between the dots is essential. Without it, the three colors would bleed into each other visually, creating a muddy impression. The white acts as a buffer zone, giving each dot its own defined territory. The result is crisp and clean rather than chaotic.
This design is forgiving for beginners. Dot placement doesn't need to be precise. The irregularity is part of the charm. The only rule is to avoid placing two dots of the same color directly adjacent to each other.
Design Breakdown:
Three-color dot pattern on a white base. The warm-cool contrast between the colors is the design's main appeal.
Base Color: Bright, opaque white. The dot colors need a clean canvas to read clearly.
Nail Shape: Short oval. The soft, rounded shape complements the circular dots.
Design Element: Small polka dots in mint green, coral, and yellow scattered across all nails. Colors are distributed evenly, with no two dots of the same color touching.
Finish: High-gloss top coat to smooth the raised dot texture.
Get The Look at Home:
Work in color layers. All dots of one color first across all nails, then the next color. This keeps your tool clean and your distribution even.
- White base: Two coats of opaque white. Let dry fully.
- Mint dots: Using a small dotting tool, place five to seven mint dots on each nail. Space them irregularly.
- Coral dots: Clean the tool. Place coral dots in the gaps between mint. Avoid placing two dots of the same color adjacent.
- Yellow dots: Repeat with yellow, filling remaining gaps.
- Dry check: Wait at least five minutes before top coating. The dots are raised and need time to set.
- Seal: Two coats of top coat to encapsulate the dots and create a smooth surface.
27.Stripe & French Combo
A French manicure that borrowed a few tricks from the stripe playbook.
Overview:
Combining French tips with striped accent nails creates a set that balances classic structure with playful detail. The French tips on most nails keep the overall look polished and wearable. The striped accent nails add personality and visual interest without overwhelming the set.
The stripe colors — red, orange, and mint green — pull from both warm and cool sides of the color wheel. The contrast between warm and cool stripes creates visual energy that flat color can't achieve. The white French tips provide a neutral resting point between the more active striped nails.
This design works well for people who want variety across their hand. The French nails and the striped nails are different enough to feel like two separate designs, but they share the same color palette, which keeps everything cohesive.
Design Breakdown:
Two design techniques in one set: classic French and colorful stripes. The shared color palette creates visual unity.
Base Color: Sheer milky nude as the foundation. White for the French tips. Red, orange, and mint green for the stripes.
Nail Shape: Medium almond. The curved tip gives the French line a soft, natural edge.
Design Element: White French tips on seven nails. Two accent nails with vertical stripes in red, orange, and mint green on a white base.
Finish: High-gloss top coat to unify the French tips and striped nails.
Get The Look at Home:
Do all the French tips first, then add the striped accent nails. This keeps the set cohesive.
- Nude base: Two coats of sheer milky nude on all nails. Let dry fully.
- French tips: Using a French liner brush and white polish, paint the smile line on seven nails. Two thin coats for opacity.
- Stripe base: On two accent nails, apply two coats of opaque white. Let dry.
- Stripe taping: Apply thin striping tape vertically across each accent nail at varying widths. Press the edges firmly.
- Color application: Paint each exposed section with its designated color: red, orange, or mint green.
- Peel while wet: Remove the tape immediately, before the polish sets. Pull at a low angle to keep the edges clean.
- Seal: Two coats of top coat to smooth the raised stripe texture and unify the set.

28 Stunning Baddie Summer Hairstyles for 2026 🔥☀️
Coral nails are one of those rare trends that feels both energizing and effortless. Whether you gravitate toward the bold geometry of color blocks, the soft romance of watercolor florals, or the luxury of gold foil accents, there's a coral design here that fits your style. The warm undertone of coral works as a neutral or a statement color, which means it adapts to whatever mood you're in.
Pin your favorite designs to your Pinterest boards so you have them ready for your next salon visit. Your next warm-toned manicure is just one appointment away.