Hair Trends
25 Stunning Summer Vacation Hairstyles for 2026
You've booked the flights, you've picked the resort, and you've already started a Pinterest board for outfits. But your hair? That's the part most people forget about until they're standing in a hotel bathroom at 7 a.m. with a mini straightener and zero plan.
These 25 vacation hairstyles are built for real travel — styles that hold up in humidity, look good in photos, and don't require a professional stylist to achieve. Whether you're wandering through cobblestone streets, lounging by the pool, or dancing at a beach festival, there's something here that'll keep up with your itinerary.
The Vacation Hair Survival Kit
Your suitcase space is precious and you do not need your entire bathroom cabinet. Here is what actually matters for vacation hair.
Travel-size dry shampoo: This is your best friend for those I-slept-through-my-alarm vacation mornings. A quick spritz at the roots revives day-old hair instantly.
Pre-swim hair protectant: Apply before hitting the pool or ocean to create a barrier against chlorine and saltwater damage. A leave-in conditioner or hair oil works for this.
Silk scrunchies and one multi-purpose styler: Silk scrunchies prevent breakage and do not leave crease marks. Pick one styling product that works for both day and night looks — a texturizing cream or a flexible-hold spray.
The packing trick? Wash your hair the night before your flight. Freshly washed hair retains moisture better and handles the dry airplane air much better than day-old hair.
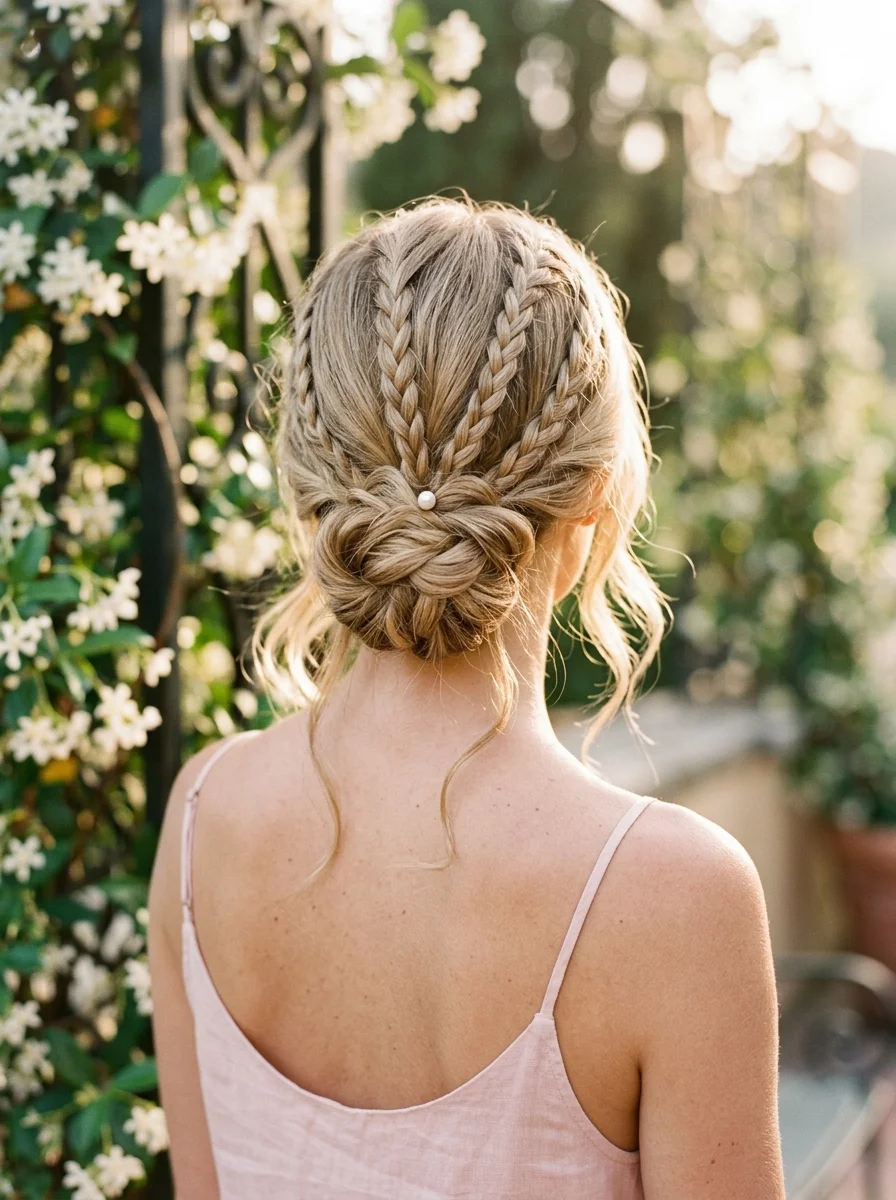
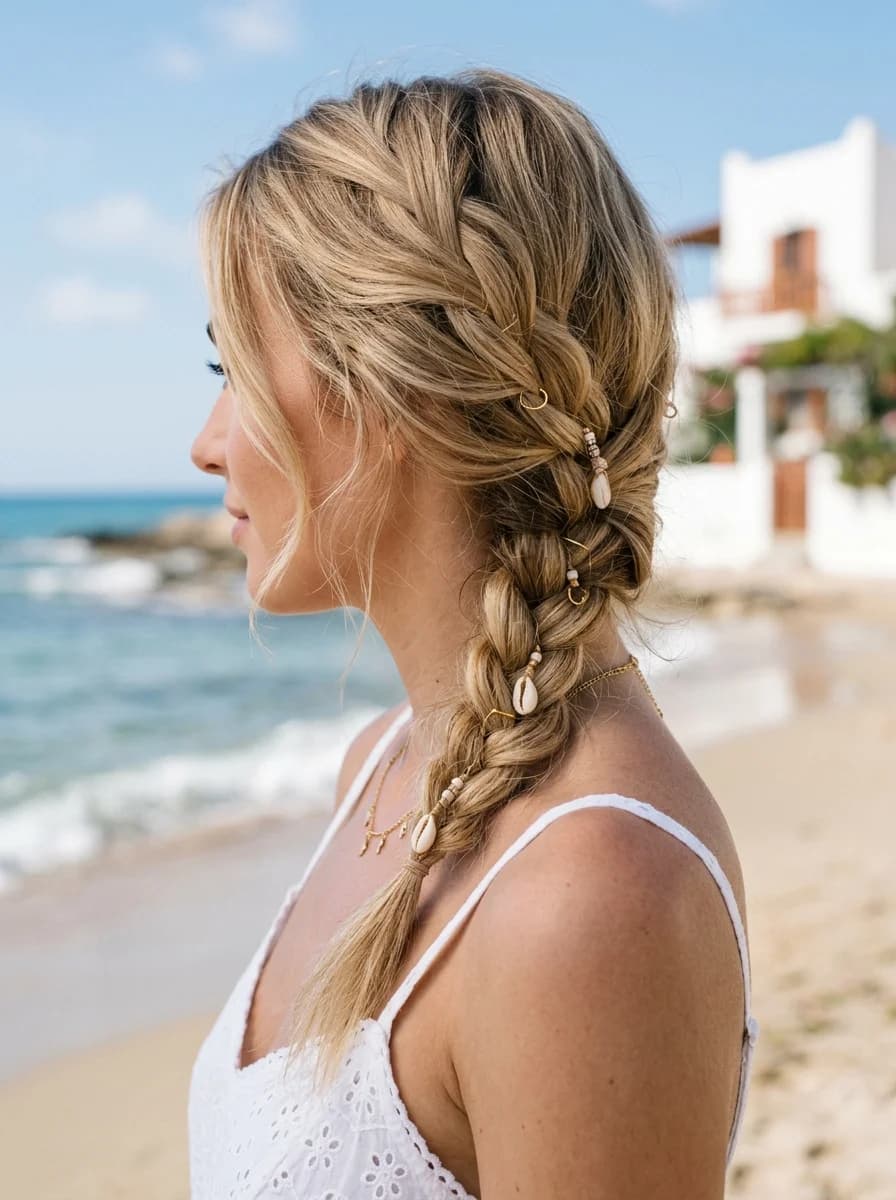
1.Boho Bubble Braid with Pearls
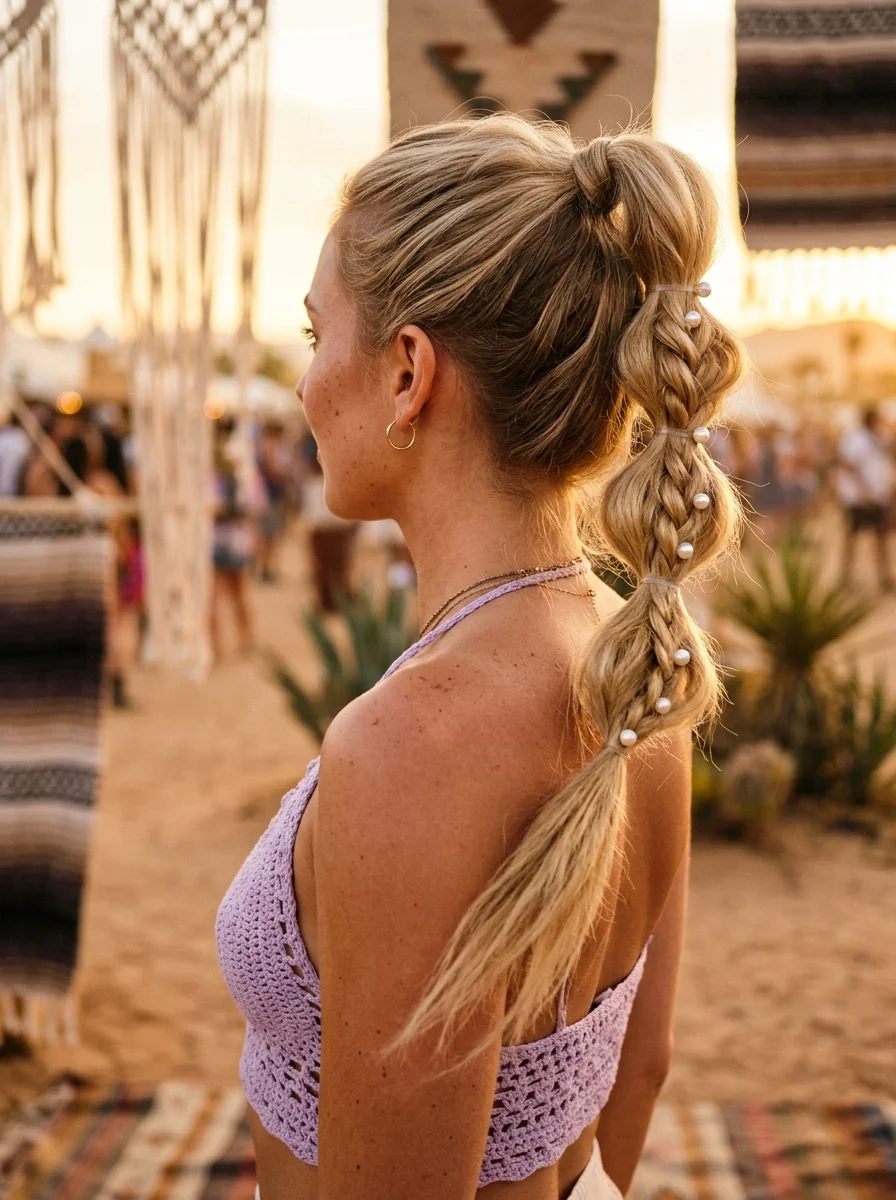
The overview: This ash blonde high bubble pony takes a classic style and makes it feel expensive. The braided detail running along the crown adds texture before transitioning into graduated bubble sections secured with clear elastics, each one dotted with scattered pearl pins at random intervals. It reads as effortlessly chic — the kind of hairstyle that looks like it belongs at a desert festival where the dress code is "bohemian but make it luxury."
Why this look is popular: Bubble braids are easier than actual braiding, but the added braid detail at the crown gives this version more dimension. The pearls catch light in a way that elevates the whole thing from casual to intentional.
Where this look is suitable: Desert festivals, outdoor markets, golden hour photo walks, and any vacation moment where you want boho energy with a polished finish.
Step by step:
- Braid the crown section. Take a section from the top of your head and create a simple three-strand braid, securing at the back.
- Gather into a high ponytail. Combine the braid with the rest of your hair and secure at the crown.
- Create bubbles. Add elastics every two inches down the ponytail, gently pulling each section outward to create rounded shapes.
- Add pearl pins. Insert small pearl-headed pins randomly throughout the bubble sections.
Tips and tricks: Second-day hair holds this style best. If your hair is fine, backcomb each bubble section lightly before pinning the pearls — the extra grip keeps everything in place.

21 Hot Summer Buns Hairstyle Ideas for 2026 ☀️🔥
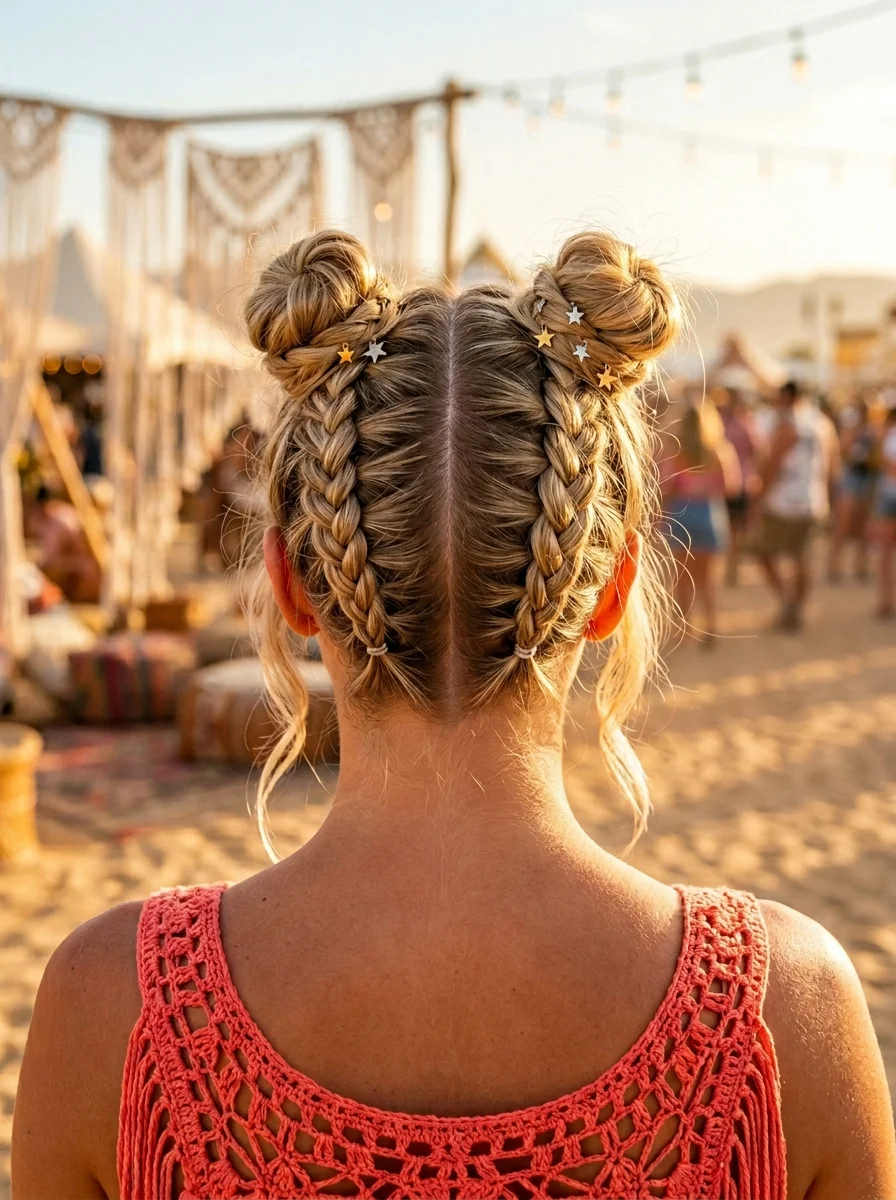
2.Festival-Ready Double Dutch Braids with Top Knots & Star Charms
The overview: Featuring a clean center part, these golden blonde Dutch braids start at the hairline and travel back along each side to form two playful top knots positioned just above the crown. Tiny star-shaped charms are clipped along the braid tracks at random intervals. This is the hairstyle that photographs like a dream at beach festivals — the braids keep everything secure while the star charms catch the light and add a celestial sparkle that's impossible to ignore.
Why this look is popular: Dutch braids create a raised, 3D texture that shows up better in photos than flat French braids. The top knots keep hair off your neck in the heat, and the star charms add personality without requiring any styling skill.
Where this look is suitable: Beach festivals, outdoor concerts, summer fairs, and any day where you need your hair completely out of your face while still looking styled.
Step by step:
- Part precisely. Create a clean center part from forehead to nape using a rat-tail comb.
- Dutch braid each side. Cross strands under (not over) to create the raised effect. Add small sections from each side as you braid backward.
- Form top knots. Twist each braid into a compact bun at the crown and secure with pins.
- Add star charms. Clip star-shaped accessories along the braid tracks at random intervals.
Tips and tricks: Keep the braids tight at the start — this helps them stand out and prevents frizz in humid weather. For fine hair, pancake the braids gently after braiding to make them appear wider.
3.Braided Crown Updo with a Chic Metal Cuff
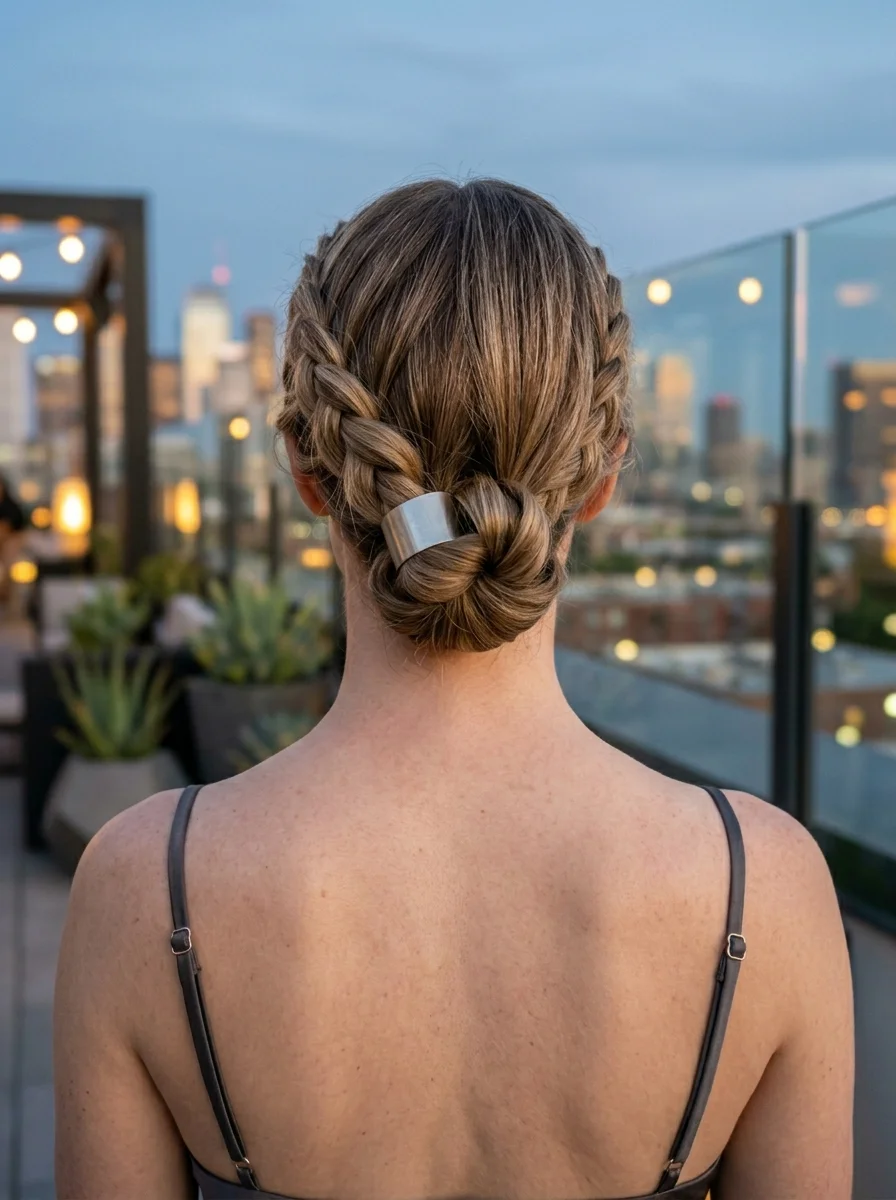
The overview: Bronde hair is woven into Dutch braids that wrap around the crown, meet at the nape, and tuck into a low bun. A silver metal cuff sits secured at the base of the bun, adding a modern edge to an otherwise romantic style. This is rooftop dinner hair — the kind that pairs perfectly with a linen dress and a cocktail as the sun sets over the city skyline.
Why this look is popular: Crown braids have a regal quality that makes any dinner feel more special. The low bun keeps things grounded and wearable, while the metal cuff adds a contemporary detail that prevents it from looking too precious.
Where this look is suitable: Rooftop dinners, evening strolls through historic towns, outdoor dining, and any vacation night where you want to feel polished without going full formal.
Step by step:
- Braid the crown. Dutch braid around the perimeter of your head, incorporating hair as you go.
- Secure the braid. Pin the braid end behind your ear and tuck it under the existing braid.
- Form the low bun. Gather the remaining hair at the nape and twist into a compact bun.
- Add the cuff. Slide a silver metal cuff over the base of the bun and adjust until secure.
Tips and tricks: Start with slightly damp hair for better grip. Dry hair can be slippery and makes it harder to keep the braid tight and even.

26 Stunning Sunflower Floral Nails for Spring & Summer 2026 🌻
4.Braided Crown with a Low Ponytail and Ribbon
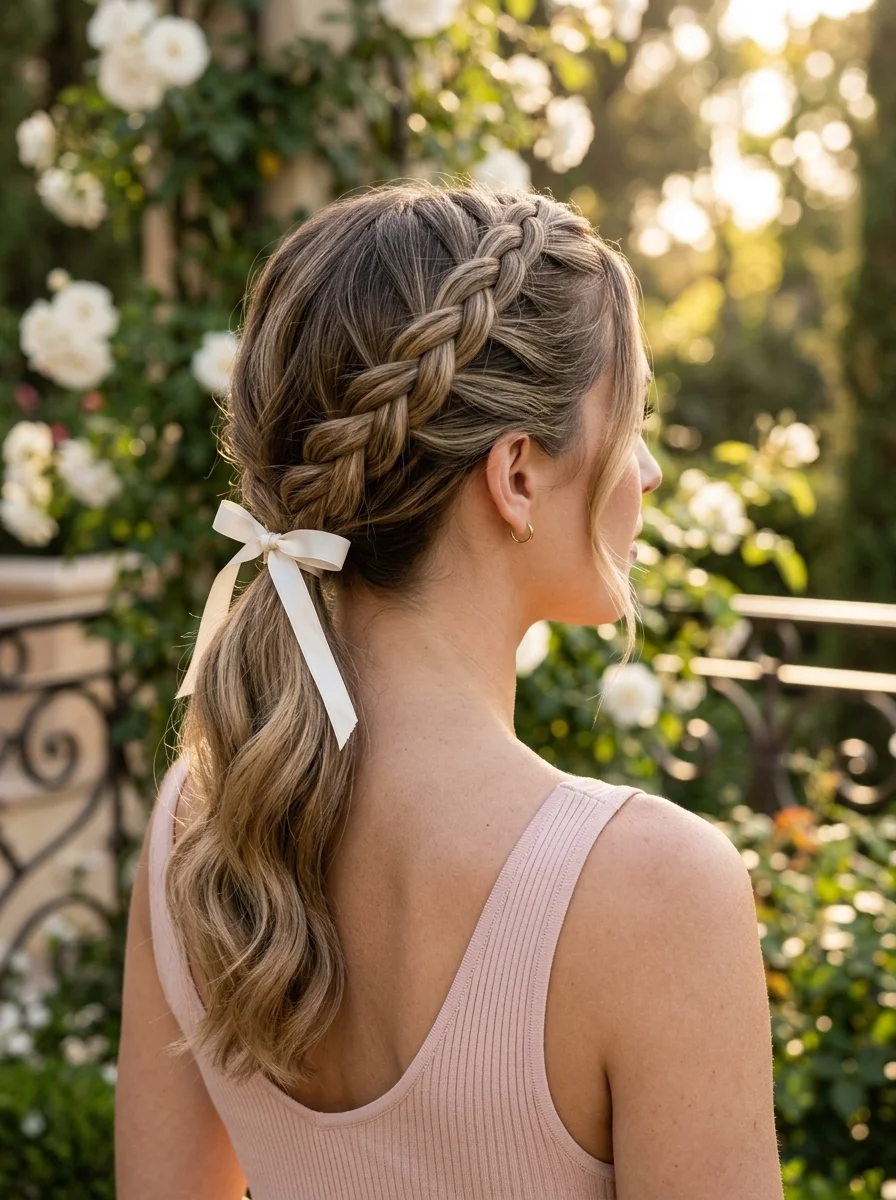
The overview: Dark blonde hair is braided into a Dutch braid crown that wraps from temple to temple, with the remaining hair gathered into a low ponytail at the nape and tied with a white ribbon bow trailing down one side. This is garden party energy — feminine, romantic, and the kind of look that makes people ask who did your hair.
Why this look is popular: The braid crown adds visual interest to what would otherwise be a simple low pony. The ribbon bow is a small detail that reads as intentional and polished — it says you thought about every element of your look.
Where this look is suitable: Garden parties, afternoon tea, daytime sightseeing, and any vacation moment where you want to feel feminine and put-together.
Step by step:
- Create the braid crown. Dutch braid from one temple across the top of your head to the other, securing behind the ear.
- Gather into a low ponytail. Collect all remaining hair at the nape and secure with an elastic.
- Add the ribbon. Tie a white ribbon around the base of the ponytail into a neat bow, letting the ends trail down one side.
Tips and tricks: Use a ribbon that matches your outfit's color palette. White works universally, but dusty blue or sage green are beautiful alternatives for garden settings.
5.Bohemian Crown Braid with Wavy Texture
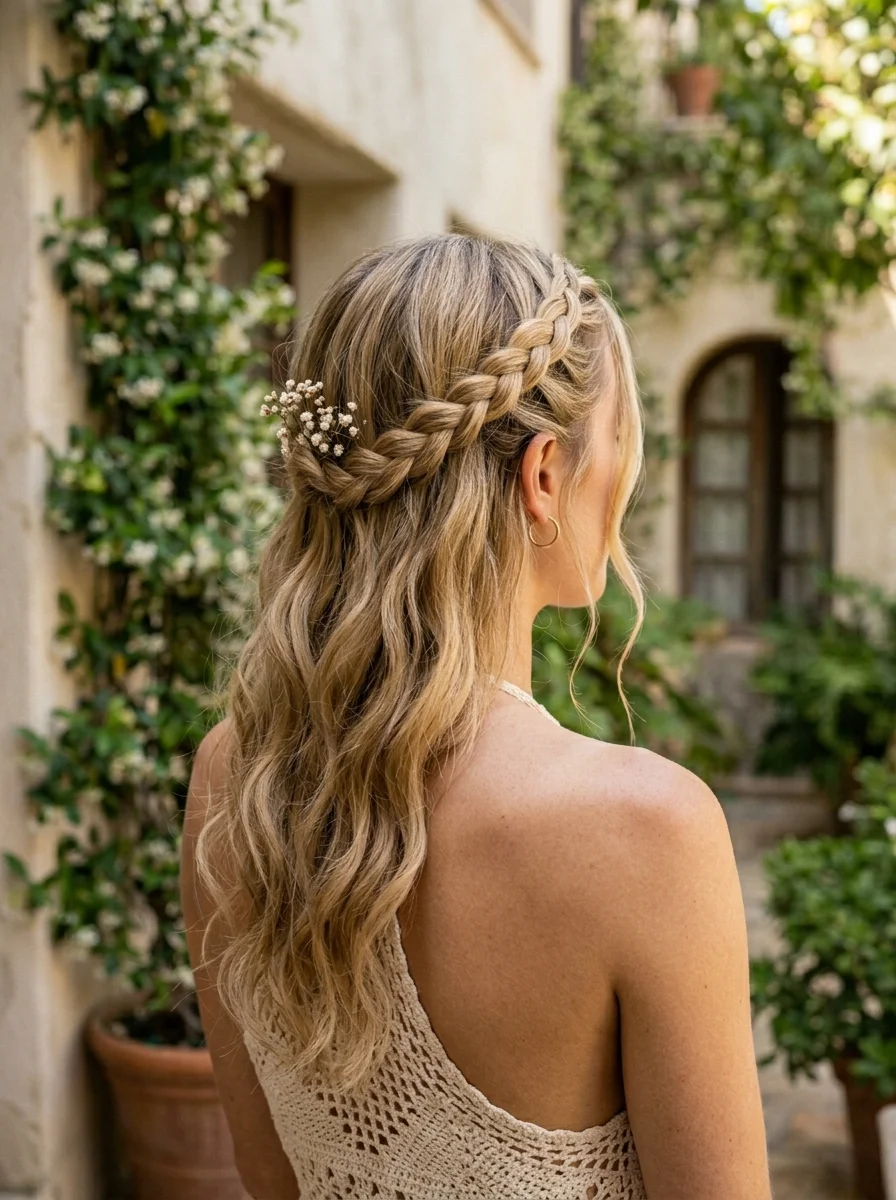
The overview: Honey blonde hair is woven into a loose crown braid with small sprigs of dried baby's breath tucked into the weave at random intervals, leaving the remaining hair falling in soft, natural waves around the shoulders. This is Mediterranean courtyard energy — the kind of hairstyle that makes you look like you belong in a terracotta-tiled villa with a glass of rosé in hand. The dried flowers add a romantic, timeless quality that elevates the entire look.
Why this look is popular: Crown braids are inherently romantic, but the addition of dried flowers gives this version a bohemian edge that feels current. The loose waves keep it from looking too structured or formal.
Where this look is suitable: Mediterranean courtyards, wine tasting afternoons, sunset strolls, and any vacation moment where you want dreamy, romantic energy.
Step by step:
- Braid loosely. Create a Dutch braid that wraps around the crown, keeping it relaxed and slightly messy.
- Tuck in flowers. Slide small sprigs of dried baby's breath into the braid at random intervals.
- Wave the remaining hair. Use a curling wand to create soft, natural waves throughout the loose sections.
Tips and tricks: Pancake the braid gently after securing to make it appear fuller and more relaxed. The dried flowers should look like they were just tucked in — don't overthink the placement.
30 Stunning Summer Hair Trends for 2026 ☀️🌊
6.Bubble Ponytail with Chic Gold Rings
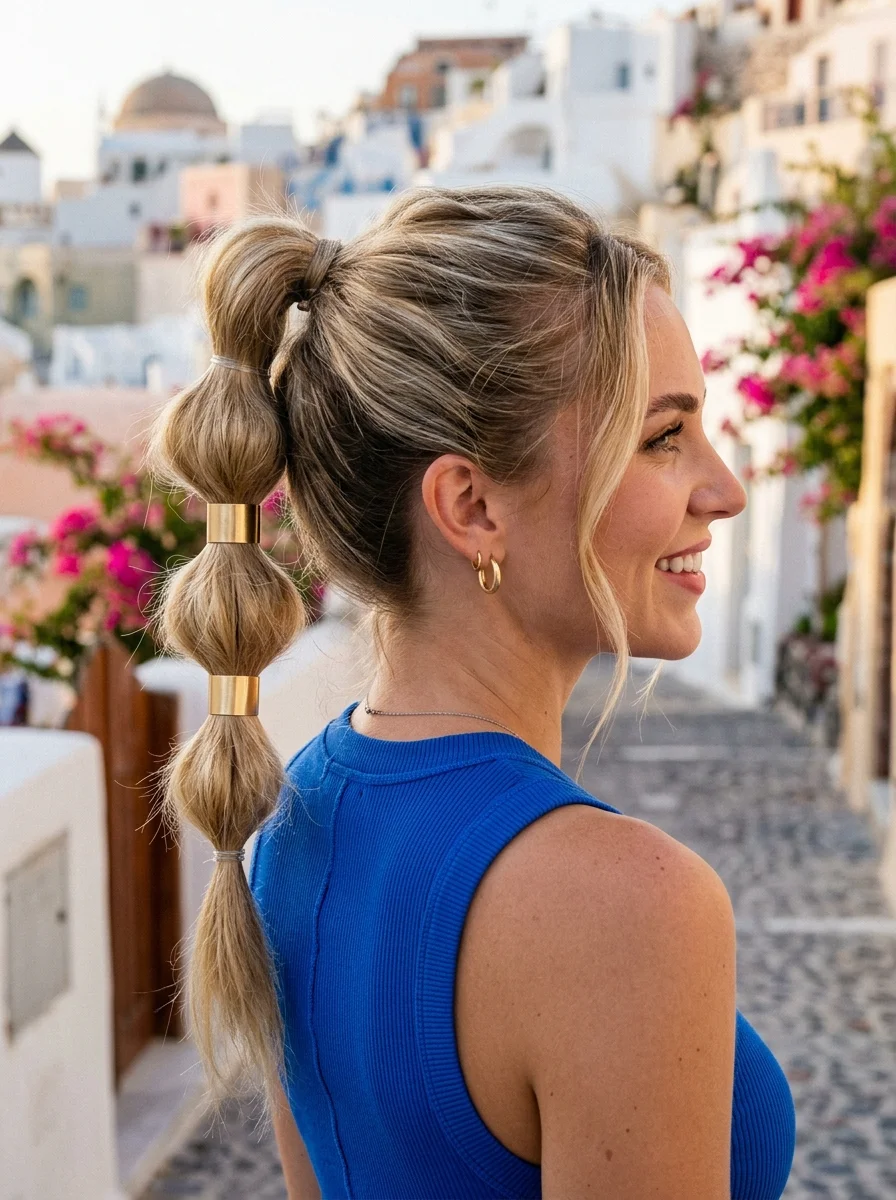
The overview: Dirty blonde hair is gathered into a smooth high ponytail, with bubble sections created every two inches down the length. Each section is accented with small gold ring cuffs placed at each elastic point that catch the Mediterranean sun. This is Greek island energy — the kind of hairstyle that looks effortless but clearly someone understood proportion and balance. The gold rings add a luxurious detail that transforms a simple bubble ponytail into something worth photographing.
Why this look is popular: Bubble ponytails are visually striking and easier than actual braiding. The gold ring cuffs add a luxe detail that elevates the whole look without requiring any additional styling skill.
Where this look is suitable: Greek island excursions, waterfront dining, boat trips, and any sunny day where you want polished yet relaxed energy.
Step by step:
- Smooth the base. Apply smoothing serum and brush hair into a sleek high ponytail at the crown.
- Create bubbles. Add elastics at two-inch intervals, gently pulling each section outward to create volume.
- Add gold rings. Slide a gold ring cuff over each elastic for that polished finish.
Tips and tricks: Use clear elastics as a base first, then slide the gold rings over them. This gives you better hold and makes the rings easier to adjust.
7.Effortless Beach Waves Half-Up with Seashell Clip
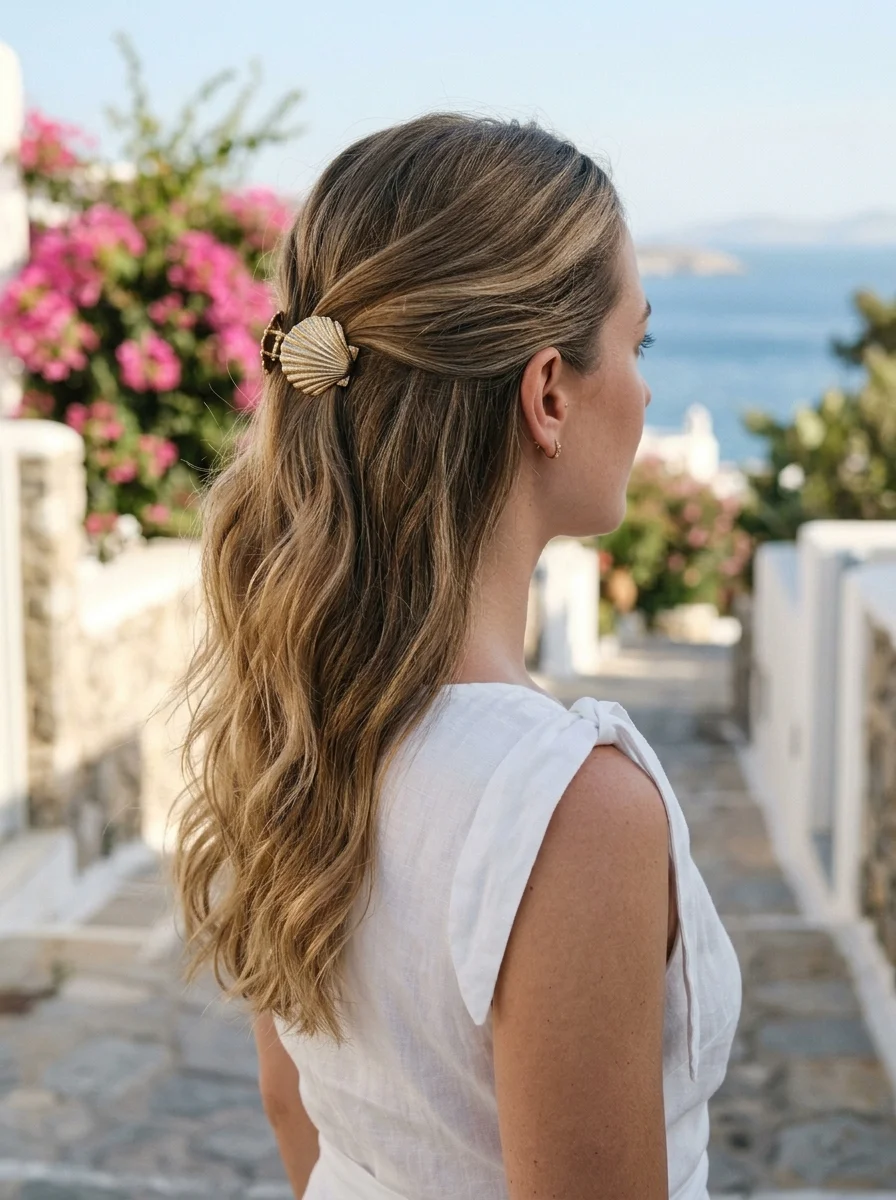
The overview: Light brown hair with blonde highlights is styled into loose, natural beach waves, with the top section pulled back and secured at the back of the head with a gold seashell-shaped claw clip. This is coastal town energy — the kind of hairstyle that says you've been walking along the shore all morning and your hair just naturally looks this good. The seashell clip is a small, thematic detail that ties the whole look together.
Why this look is popular: Half-up styles keep hair off your face while maintaining length and movement. The seashell clip adds a coastal touch that feels intentional without being costumey.
Where this look is suitable: Coastal town exploration, beach boardwalks, seaside cafes, and any vacation day where you want relaxed, beachy energy.
Step by step:
- Create waves. Apply sea salt spray to damp hair and scrunch upward. Let air dry or use a diffuser.
- Section the top half. Gather the hair from above your ears and pull it back smoothly.
- Clip it. Secure the gathered section at the back of your head with a gold seashell claw clip.
Tips and tricks: Don't curl too tightly — these waves should look like they naturally fall this way. If your hair is naturally straight, use a flat iron to create slight bends rather than curls.

30 Cute Ladybug Nail Trends That Are Taking Over (2026)
8.Double Dutch Braids into a Playful Ponytail
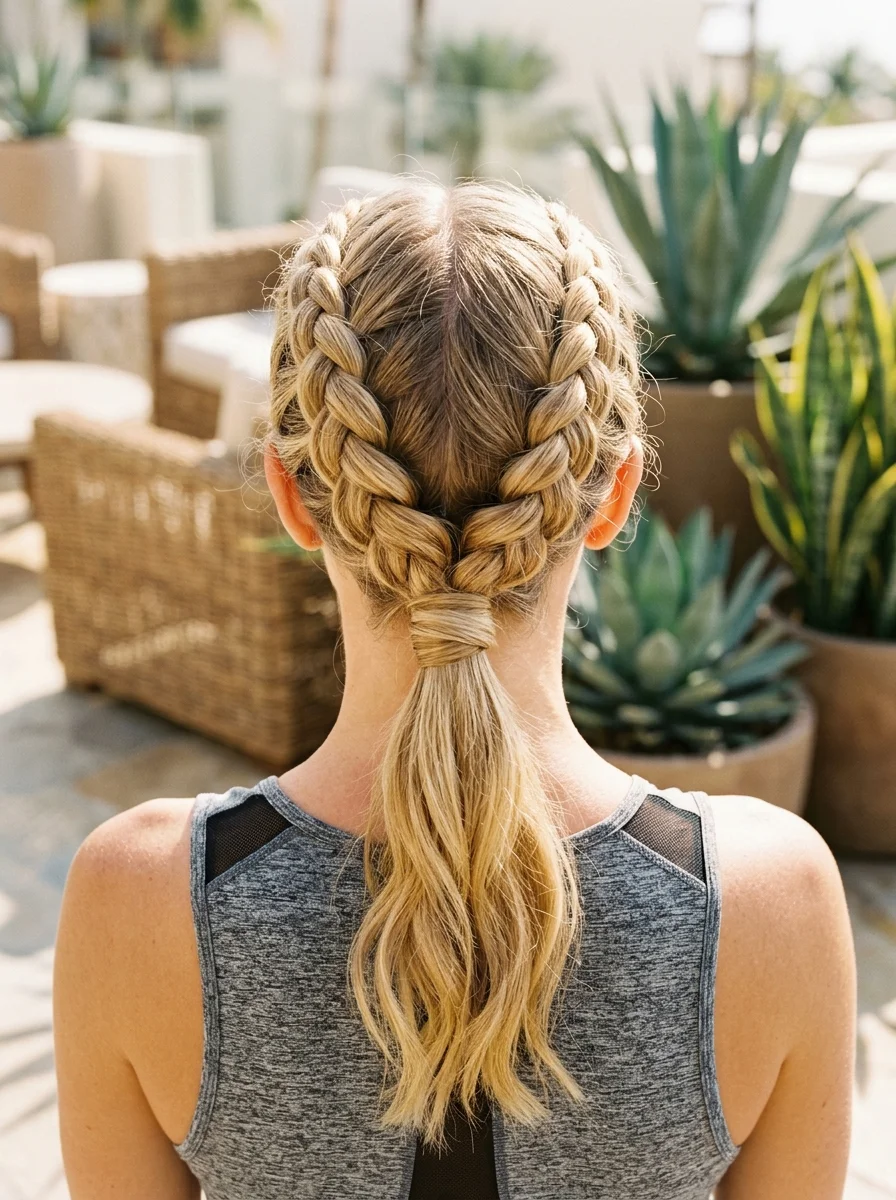
The overview: Medium blonde hair features two Dutch braids starting from the hairline and meeting at the back, where the braids transition into a relaxed, slightly messy ponytail at the nape. The braids keep everything structured and secure while the loose ponytail adds a playful, carefree finish. This is active vacation hair — built for hiking, exploring, and moving through your day without constant adjustment.
Why this look is popular: Dutch braids hold better than almost any other style in heat and humidity. The ponytail transition keeps it from looking too athletic, making it versatile enough for both adventure and downtime.
Where this look is suitable: Active vacation days, hiking trails, market exploring, and any time you need your hair secure but still want to look styled.
Step by step:
- Part down the center. Use a rat-tail comb for a clean, even part from forehead to nape.
- Dutch braid each side. Cross strands under to create the raised effect, braiding back toward the nape.
- Secure into a ponytail. Gather both braids and any remaining hair into a relaxed ponytail at the nape.
- Mess it up. Gently pull at the ponytail to create volume and a slightly undone finish.
Tips and tricks: Use a strong-hold hairspray on the braids before you start your day. The combination of braids and product will keep everything in place through hours of activity.
9.Elegant French Braid Crown with a Chic Low Bun
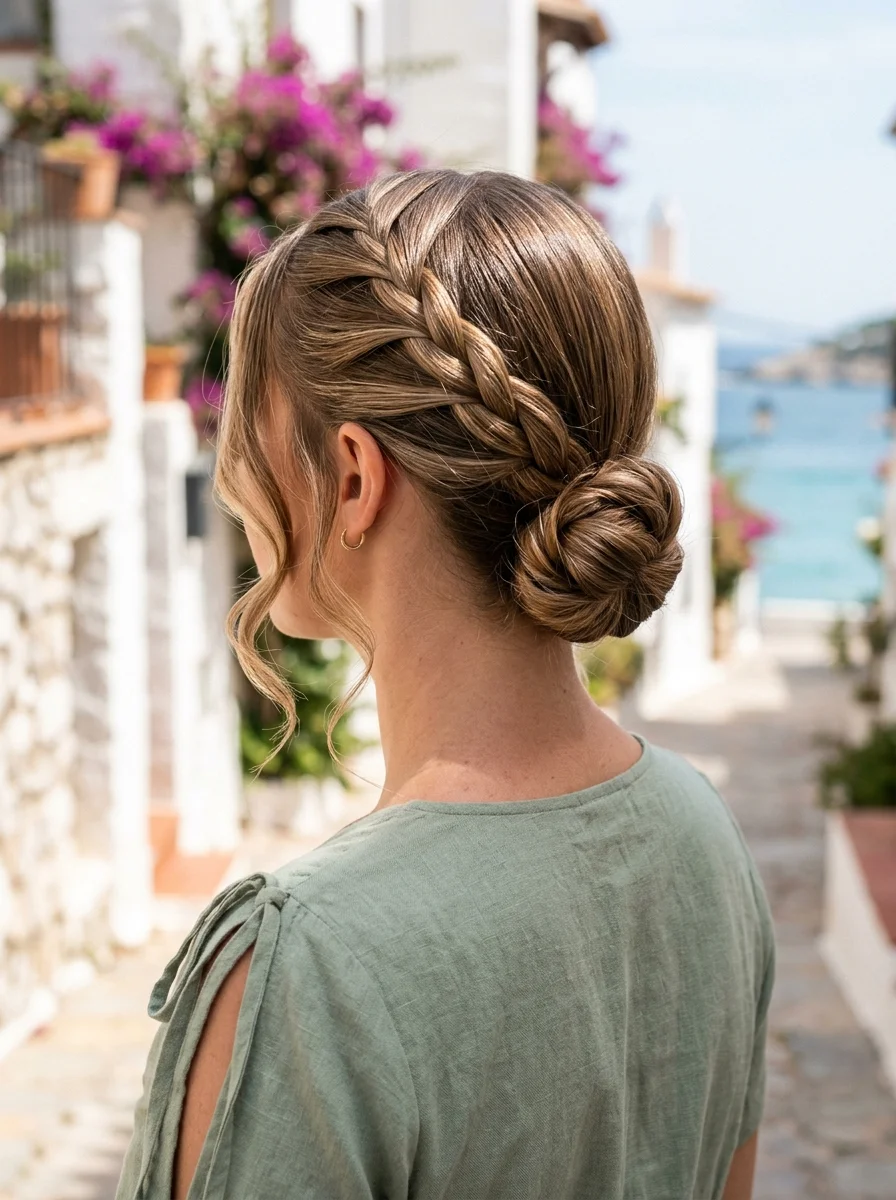
The overview: Medium brown hair with cinnamon highlights is woven into a French braid wrapping around the crown from temple to temple, with the remaining hair gathered into a sleek low bun at the nape. This is seaside village energy — the kind of hairstyle that pairs perfectly with a linen midi dress and sandals as you wander through narrow streets. The French braid gives it a classic, timeless quality while the low bun keeps it modern and wearable.
Why this look is popular: French braids are smoother and more refined than Dutch braids, making this style feel elevated. The low bun is practical for warm weather while still looking polished enough for dinner.
Where this look is suitable: Seaside village exploration, waterfront dinners, sightseeing in historic towns, and any vacation day where you want classic, refined energy.
Step by step:
- Braid the crown. French braid from one temple across the top of your head, incorporating hair as you go.
- Secure the braid. Pin the end behind the opposite ear and tuck it under the existing braid.
- Form the low bun. Gather the remaining hair at the nape and twist into a smooth, compact bun.
- Polish. Apply a light-hold hairspray to smooth any flyaways and set the style.
Tips and tricks: Apply a smoothing serum before braiding to keep the French braid clean and bump-free. This style works best on day-old hair that has natural grip.
24 Stunning Bridesmaid Hairstyles for Weddings 2026 💍✨
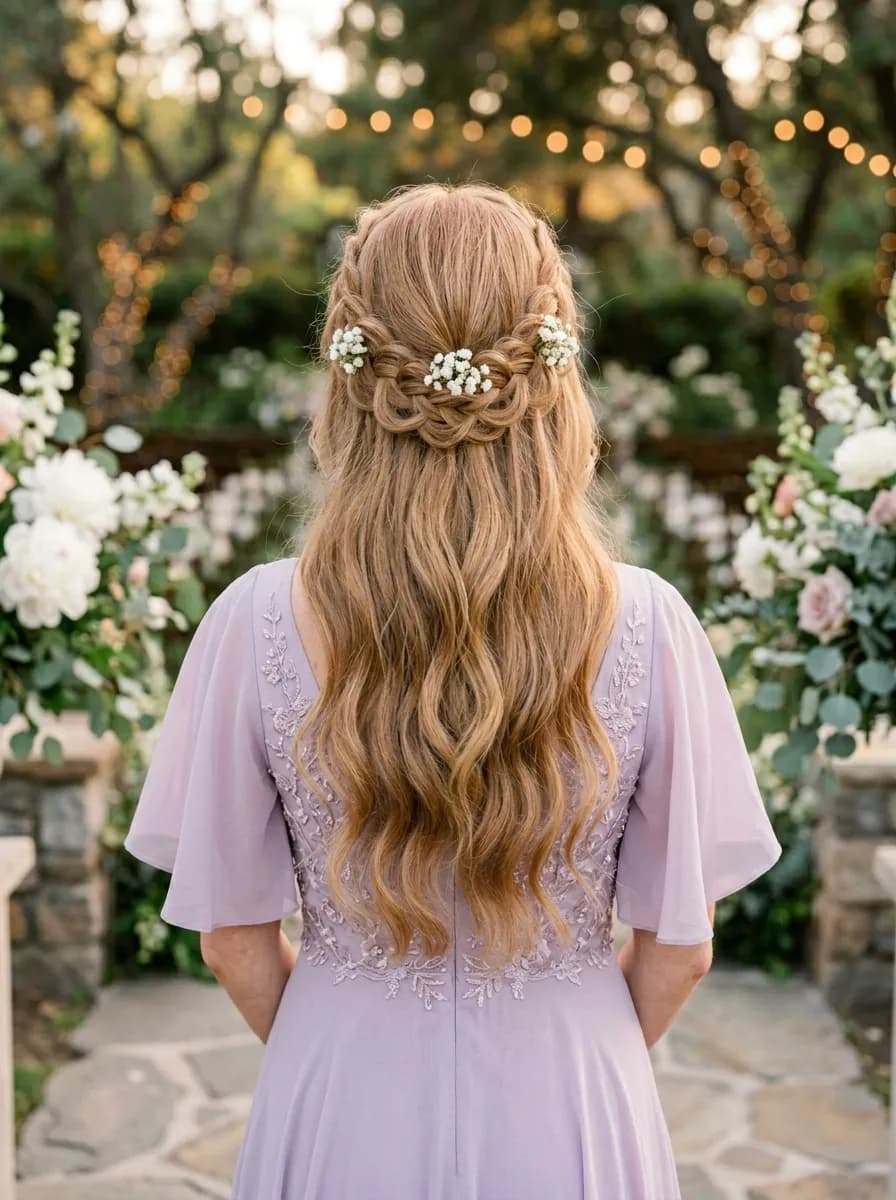
10.Boho Beach Waves with Braided Crown
The overview: Golden blonde hair features three small braids on each side of the head running from the front hairline across the crown, meeting at the back to twist into a small knot, with the remaining hair falling in loose, tousled waves. This is sunset beach energy — free-spirited, romantic, and perfectly suited to barefoot walks along the shore as the sky turns pink. The three-braid detail adds visual interest without overwhelming the relaxed wave texture.
Why this look is popular: The combination of structured braids and loose waves creates a beautiful contrast. It's bohemian without being messy, and the three-braid detail is more interesting than a single crown braid.
Where this look is suitable: Sunset beach walks, barefoot dinners on the sand, coastal bonfires, and any evening where you want effortless, romantic energy.
Step by step:
- Create three braids. Take three small sections from the front hairline and braid each one, securing with tiny elastics.
- Direct them back. Pull all three braids to the back of your head, spacing them evenly across the crown.
- Twist into a knot. Combine the three braids at the back and twist them into a small, secure knot.
- Wave the rest. Use a curling wand to create loose, tousled waves throughout the remaining hair.
Tips and tricks: Keep the braids slightly loose — the relaxed quality is what makes this style work. Too tight and it reads as formal rather than bohemian.
11.Braided Crown Updo with a Pearl Accent
The overview: Ash blonde hair is divided into four sections, each braided in Dutch braids that converge at the back and tuck into a low bun, with a single pearl pin placed where the braids meet. This is garden party hair — the kind of hairstyle that looks like it took hours but actually comes together faster than you'd think. The four-braid detail adds dimension and texture that a simple bun could never achieve.
Why this look is popular: Multiple braids create more visual interest than a single braid, and the pearl accent adds a refined finishing touch. The low bun is practical for warm weather while still looking special.
Where this look is suitable: Garden parties, afternoon tea, destination weddings, and any vacation moment where you want elegant, timeless energy.
Step by step:
- Section the hair. Divide your hair into four equal sections — two on each side of a center part.
- Braid each section. Dutch braid each section toward the back of your head, securing with small elastics.
- Combine into a bun. Gather all four braids at the nape and twist into a low bun.
- Add the pearl. Insert a single pearl pin where the braids meet at the top of the bun.
Tips and tricks: Don't braid too tightly. The relaxed quality of the braids is what makes this look romantic rather than severe.

28 Trendy May Nail Designs for 2026 💅
12.Braided Crown Low Ponytail with Ribbon
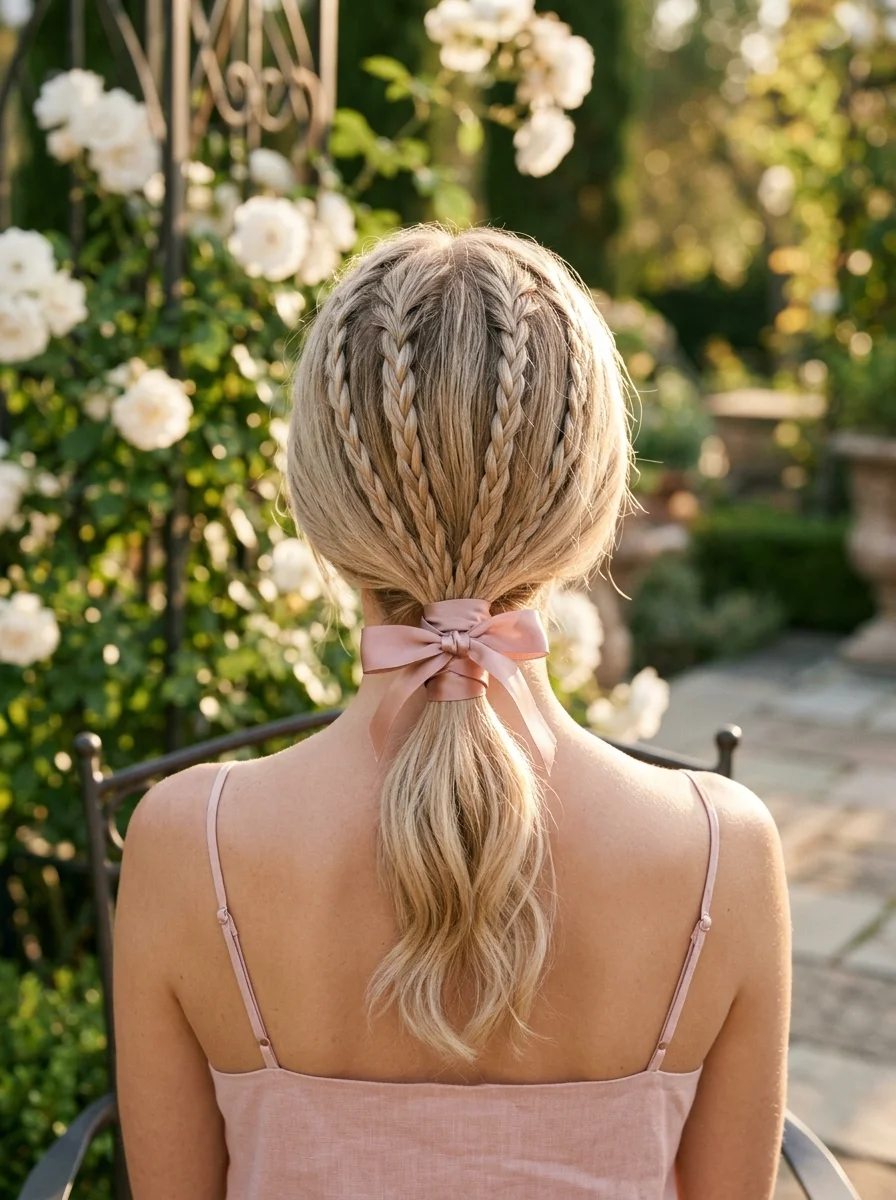
The overview: Golden blonde hair is braided into a Dutch braid crown wrapping from temple to temple, with the remaining hair gathered into a low ponytail at the nape and a dusty-pink ribbon tied around the base. This is afternoon tea energy — refined, feminine, and the kind of look that makes you feel like you're living in a period drama for the day. The ribbon adds a soft, romantic touch that elevates the whole style.
Why this look is popular: The braid crown adds structure and visual interest to a simple low ponytail. The dusty-pink ribbon adds a soft, feminine detail that photographs beautifully in natural light.
Where this look is suitable: Afternoon tea, garden tours, scenic walks, and any vacation day where you want polished, feminine energy.
Step by step:
- Braid the crown. Dutch braid from one temple across the top of your head to the other, securing behind the ear.
- Gather the ponytail. Collect all remaining hair at the nape and secure with an elastic.
- Add the ribbon. Tie a dusty-pink ribbon around the base of the ponytail into a neat bow.
Tips and tricks: Use a ribbon made of grosgrain or silk for a more polished finish. Satin ribbons tend to slip and lose their shape throughout the day.
13.Boho Braided Crown with Wavy Tresses
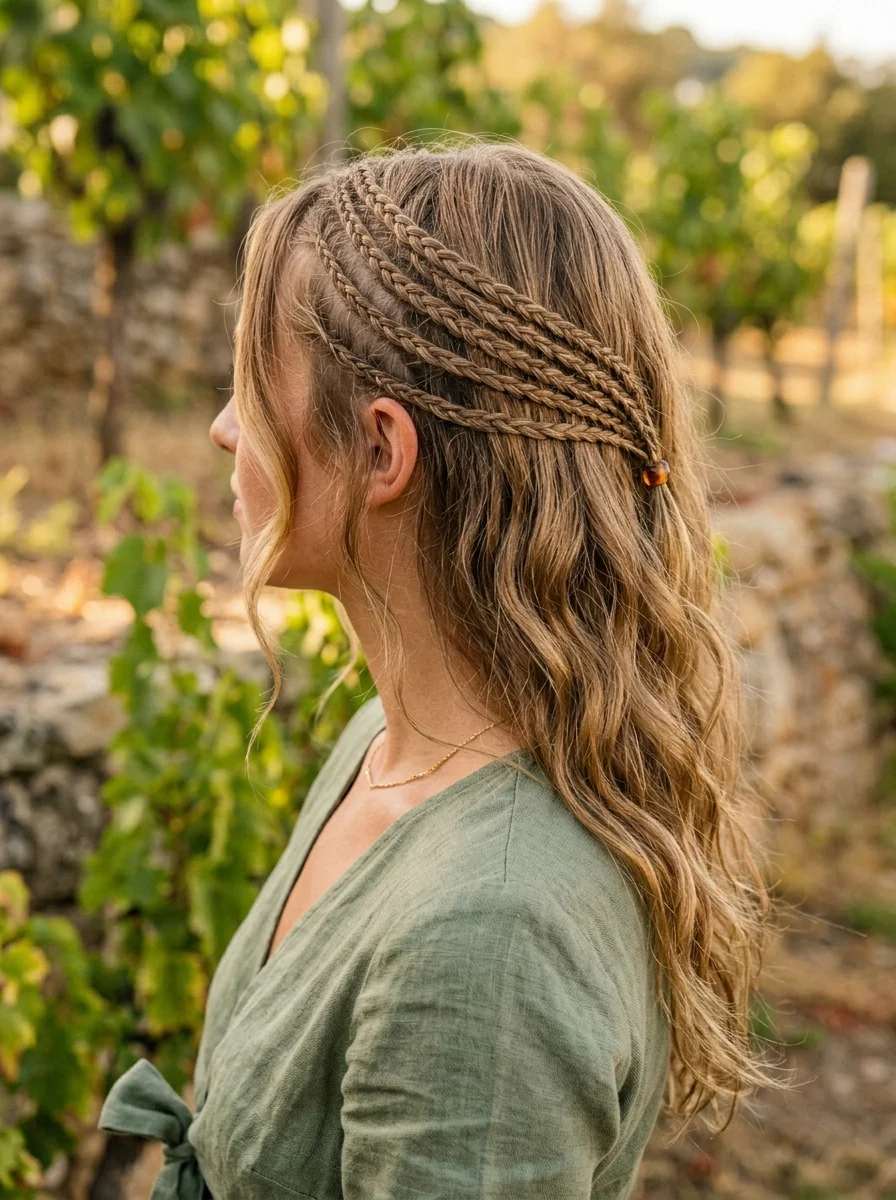
The overview: Bronde hair features multiple small braids crisscrossing across the crown, secured with an amber-colored clip at the back, with the remaining hair falling in loose, romantic waves. This is wine country energy — the kind of hairstyle that looks like you spent the morning wandering through vineyards and just happened to look incredible. The amber clip adds a warm, earthy detail that ties the whole look together.
Why this look is popular: Multiple braids create a crown-like effect that's more intricate than a single braid. The amber clip adds a warm, bohemian touch that feels organic rather than overdone.
Where this look is suitable: Wine country tours, vineyard lunches, scenic drives, and any vacation day where you want boho-chic energy with a polished finish.
Step by step:
- Create multiple braids. Take small sections from the front and braid each one, varying the thickness for visual interest.
- Direct them back. Pull the braids across the crown in different directions, creating a crisscross pattern.
- Secure with clip. Gather the braids at the back and secure with an amber-colored claw clip.
- Wave the rest. Use a curling wand to create loose, romantic waves throughout the remaining hair.
Tips and tricks: Don't make all the braids the same size. Varying the thickness creates a more organic, bohemian effect.

24 Stunning Festival Hairstyle Ideas for Music Concert Nights 2026 🎶✨
14.Pearl-Kissed Braided Updo
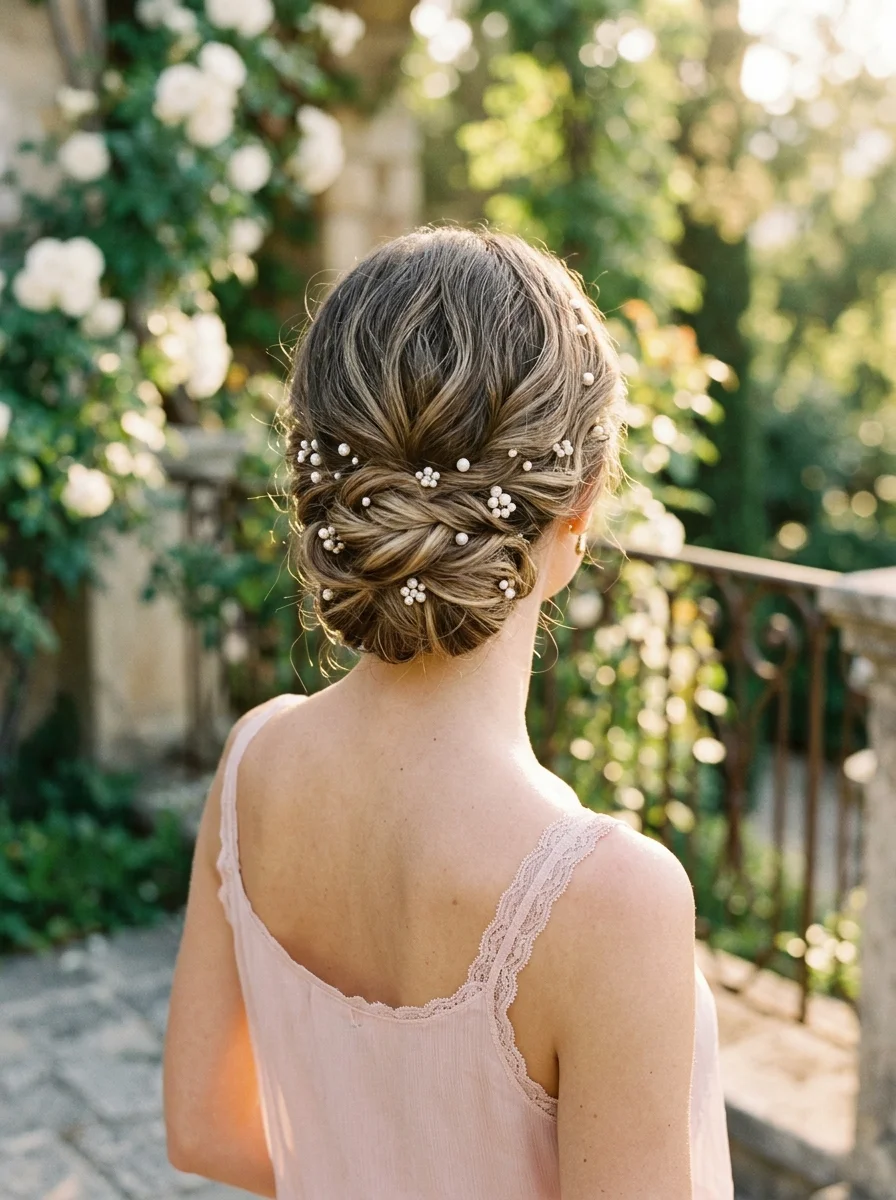
The overview: Ash blonde hair is twisted into a soft, romantic updo at the back of the head, with pearl pins of varying sizes scattered throughout the twist at random intervals like tiny stars. This is destination wedding energy — the kind of hairstyle that makes you look like you should be walking down an aisle, even if you're just heading to dinner. The scattered pearls add a dreamy, ethereal quality that photographs beautifully from every angle.
Why this look is popular: Twisted updos are softer and more romantic than structured buns. The scattered pearl pins add sparkle without being overwhelming, and they catch light in photos in a way that's absolutely stunning.
Where this look is suitable: Destination weddings, anniversary dinners, sunset cruises, and any special vacation evening where you want to feel absolutely radiant.
Step by step:
- Add texture. Apply texturizing spray to give the hair body and grip.
- Twist sections. Take large sections and twist them toward the back of your head, pinning as you go.
- Form the updo. Gather all twisted sections at the back and pin them into a soft, organic shape.
- Add pearls. Insert pearl pins of varying sizes throughout the updo at random intervals.
Tips and tricks: Use bobby pins that match your hair color to secure the twists — they should be invisible. The pearls are the only accessory this style needs.
15.Sleek High Ponytail with Creamy Bow Accent
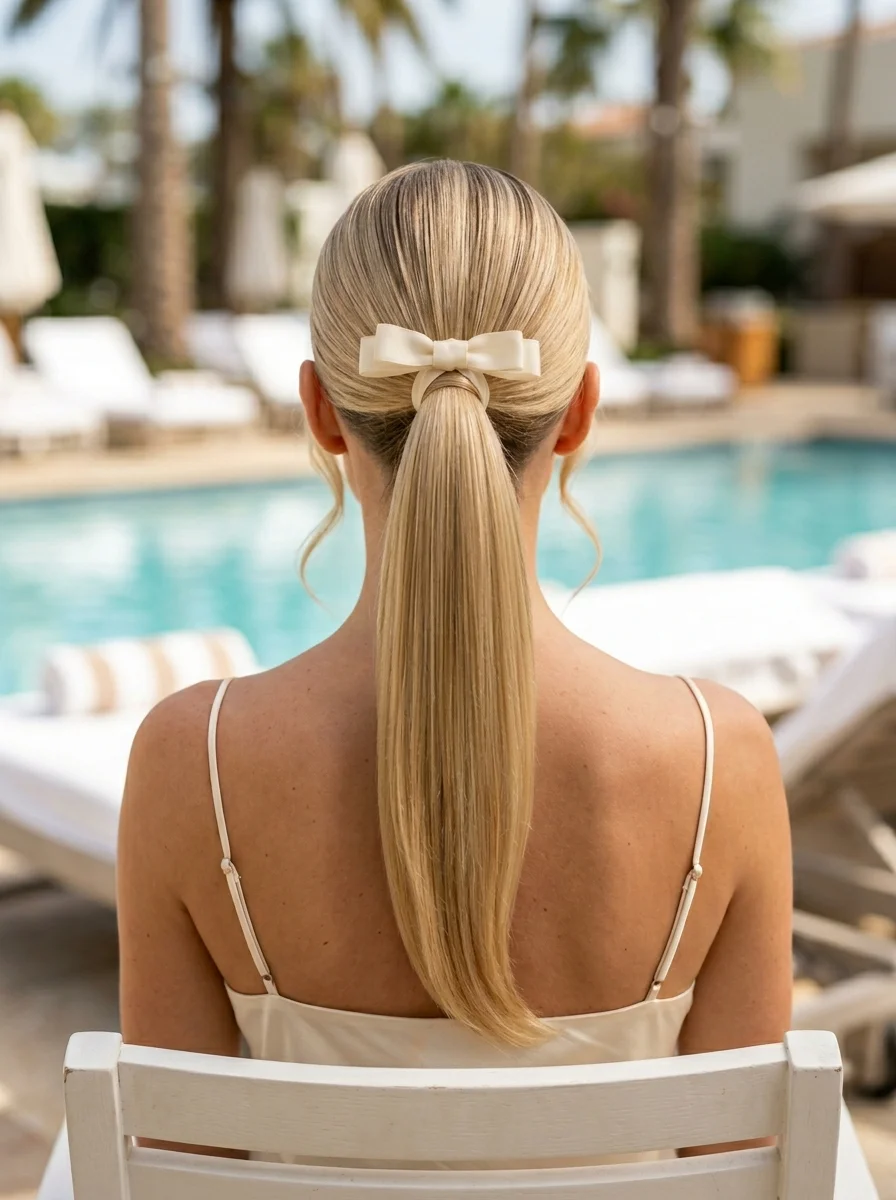
The overview: Platinum blonde hair is pulled into an ultra-sleek, ultra-high ponytail with no flyaways, with an ivory bow tied at the base. This is pool and yacht energy — the kind of hairstyle that says you're lounging in luxury and you know it. The contrast of the sharp, polished ponytail against the soft bow creates a look that's simultaneously powerful and feminine.
Why this look is popular: A sleek high ponytail is the ultimate power hairstyle. The ivory bow adds a soft, feminine detail that keeps it from feeling too severe. It's minimal, polished, and photographs like a dream.
Where this look is suitable: Poolside lounging, yacht days, resort dining, and any sunny afternoon where you want polished, luxurious energy.
Step by step:
- Smooth thoroughly. Apply gel or pomade and brush hair flat, eliminating every bump.
- Secure high. Gather hair at the crown and tie tightly with a strong elastic.
- Polish the length. Run a flat iron through the ponytail for a pin-straight finish.
- Add the bow. Tie an ivory bow around the base of the ponytail, adjusting until centered.
Tips and tricks: Use a boar bristle brush to get the hair flat against your head. A regular brush will leave ridges that break the sleek illusion.

27 Stunning Graduation Day Nail Ideas for 2026 🎓
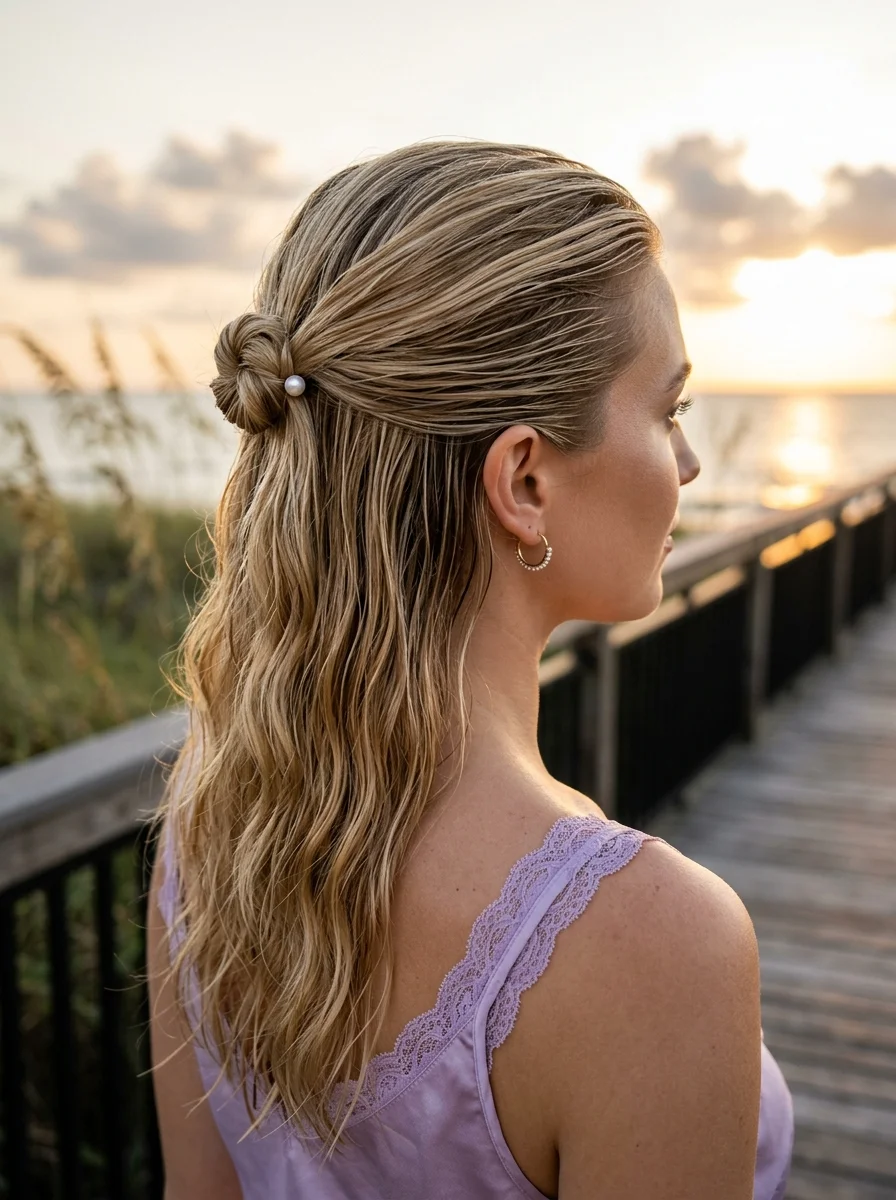
16.Twisted Crown Bun with Pearl Accent
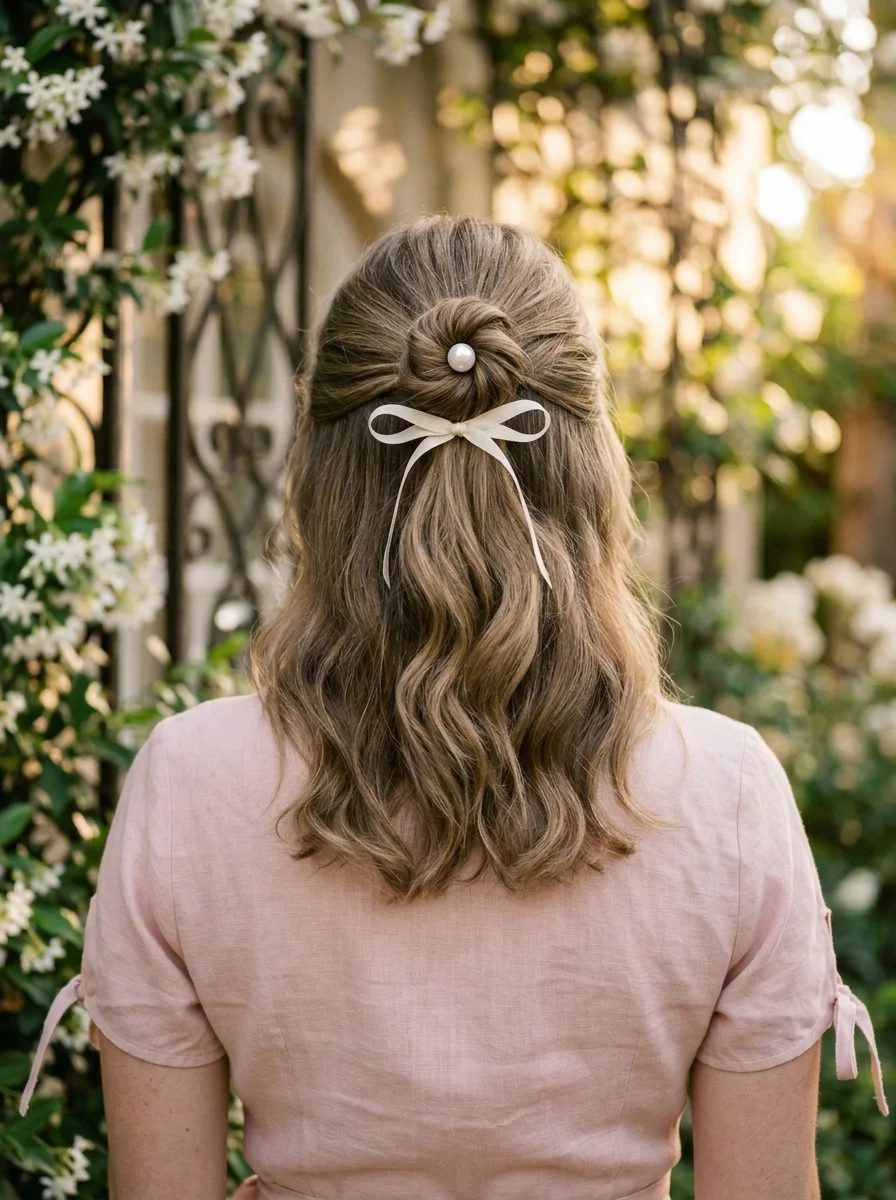
The overview: Ash blonde hair features the top half twisted into a bun at the crown, secured by a pearl pin, with a delicate ribbon trailing down one side from the bun. This is cottagecore energy — the kind of hairstyle that makes you look like you should be picking wildflowers in a meadow. The twisted bun adds a romantic, slightly undone quality that feels effortless and timeless.
Why this look is popular: The half-up construction keeps hair off your face while maintaining length. The twisted bun adds architectural interest, and the pearl pin is a small detail that elevates the whole look.
Where this look is suitable: Cottagecore outings, countryside walks, farmers market visits, and any vacation day where you want romantic, whimsical energy.
Step by step:
- Section the top half. Gather the hair from above your ears and pull it back.
- Twist into a bun. Twist the gathered section and wrap it into a small bun at the crown.
- Pin and accent. Secure with bobby pins, then insert a pearl pin at the top of the bun.
- Add the ribbon. Tie a delicate ribbon around the base of the bun, letting the ends trail down one side.
Tips and tricks: Pull out a few face-framing pieces to keep the look soft and romantic. Too sleek and it loses the cottagecore charm.
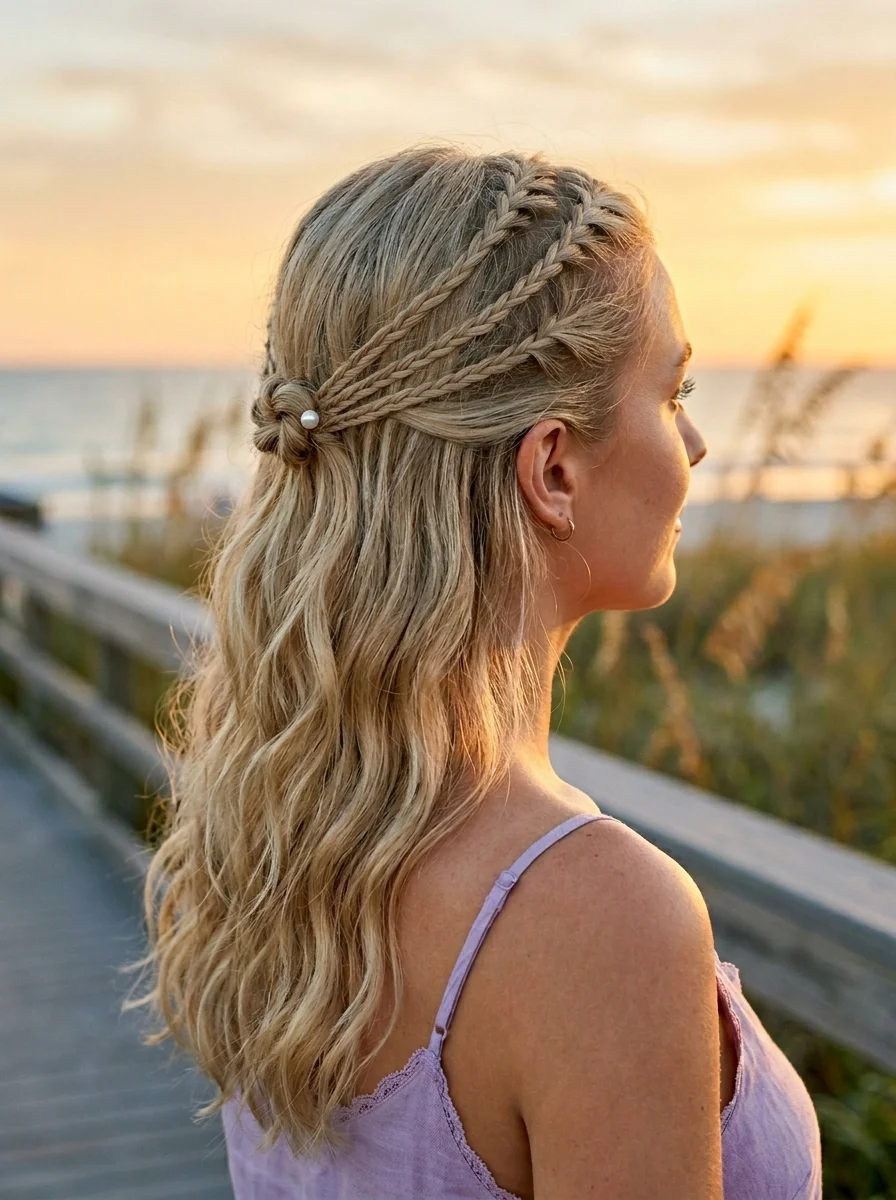
17.Double Braided Crown with Loose Waves

The overview: Warm blonde hair is styled into two rope braids crossing over each other across the crown, with the remaining hair falling in loose, effortless waves around the shoulders. This is beach town energy — the kind of hairstyle that looks like you rolled out of bed and into something incredible. The rope braids add texture and visual interest without the formality of traditional braids.
Why this look is popular: Rope braids are faster to create than traditional braids and have a more relaxed, modern quality. The loose waves keep the whole look soft and beachy.
Where this look is suitable: Beach town exploration, boardwalk strolls, casual seaside dining, and any vacation day where you want effortless, relaxed energy.
Step by step:
- Create rope braids. Take two sections from the front and twist each one, then wrap them around each other to form rope braids.
- Cross them over. Pull the rope braids across the crown in opposite directions, creating an X pattern.
- Secure at the back. Pin the braid ends behind your ears and tuck them under.
- Wave the rest. Use a curling wand to create loose, effortless waves throughout the remaining hair.
Tips and tricks: Twist the rope braids in the same direction for a more defined pattern. The looser you keep them, the more bohemian the effect.
28 Effortless Hot Weather Day Hairstyles for Women 2026 ☀️💇♀️
18.Twisted Rope Updo with Loose Tendrils
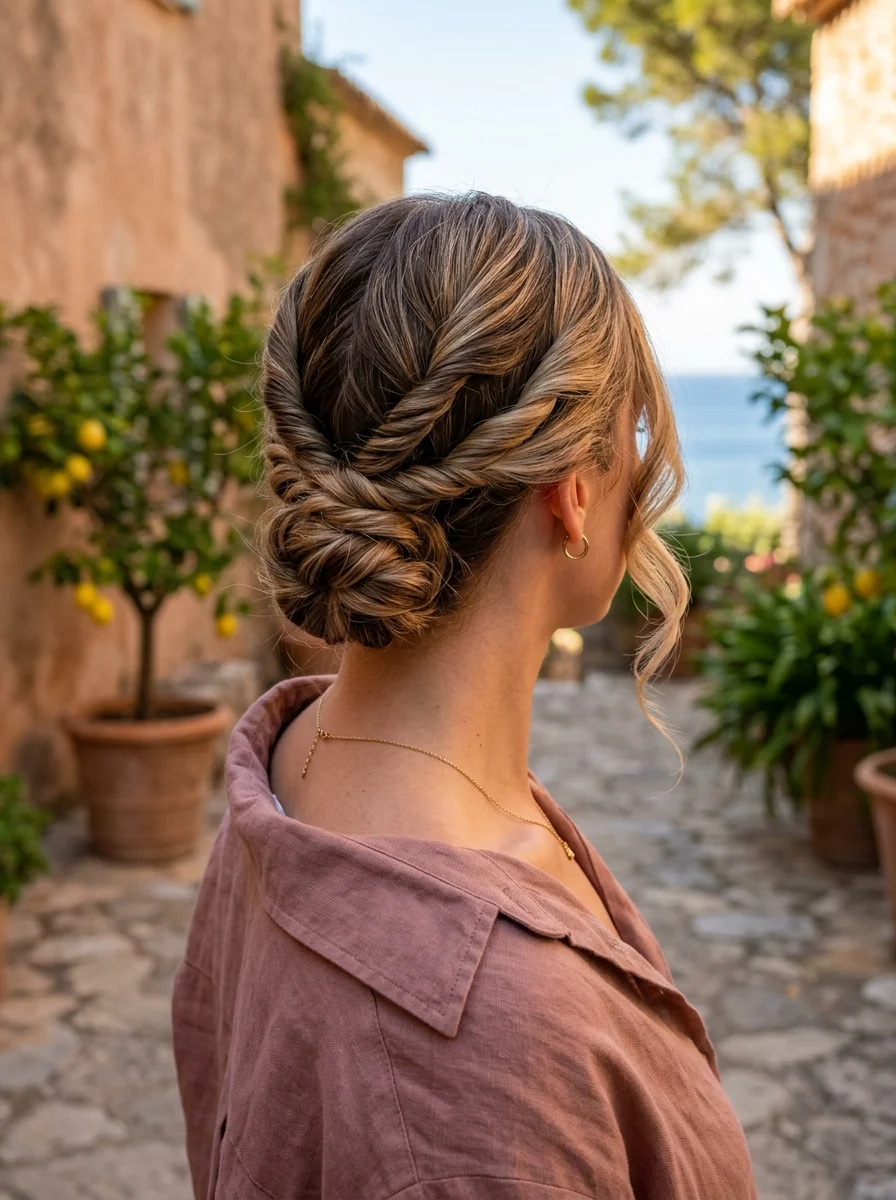
The overview: Warm blonde hair with golden undertones is twisted into rope sections and gathered into a low bun at the nape, with loose tendrils left out around the face and ears for softness. This is coastal village energy — romantic, slightly undone, and perfectly suited to narrow streets and seaside cafes. The rope twists add texture and dimension that a regular bun could never achieve.
Why this look is popular: Rope twists create a more interesting texture than regular twists or braids. The loose tendrils keep the look soft and romantic, while the low bun is practical for warm weather.
Where this look is suitable: Coastal village exploration, seaside dining, romantic evening walks, and any vacation moment where you want soft, romantic energy.
Step by step:
- Section and twist. Divide your hair into large sections and twist each one into a rope braid.
- Gather at the nape. Pull all twisted sections to the nape and secure into a low bun.
- Release tendrils. Gently pull out a few strands around your face and ears for softness.
- Adjust and finish. Tug at the bun to create volume and set with light hairspray.
Tips and tricks: Keep the tendrils thin — about a quarter inch wide. Thicker pieces can look messy rather than intentionally romantic.
19.Chic Scarf Bun with a Vintage Floral Twist
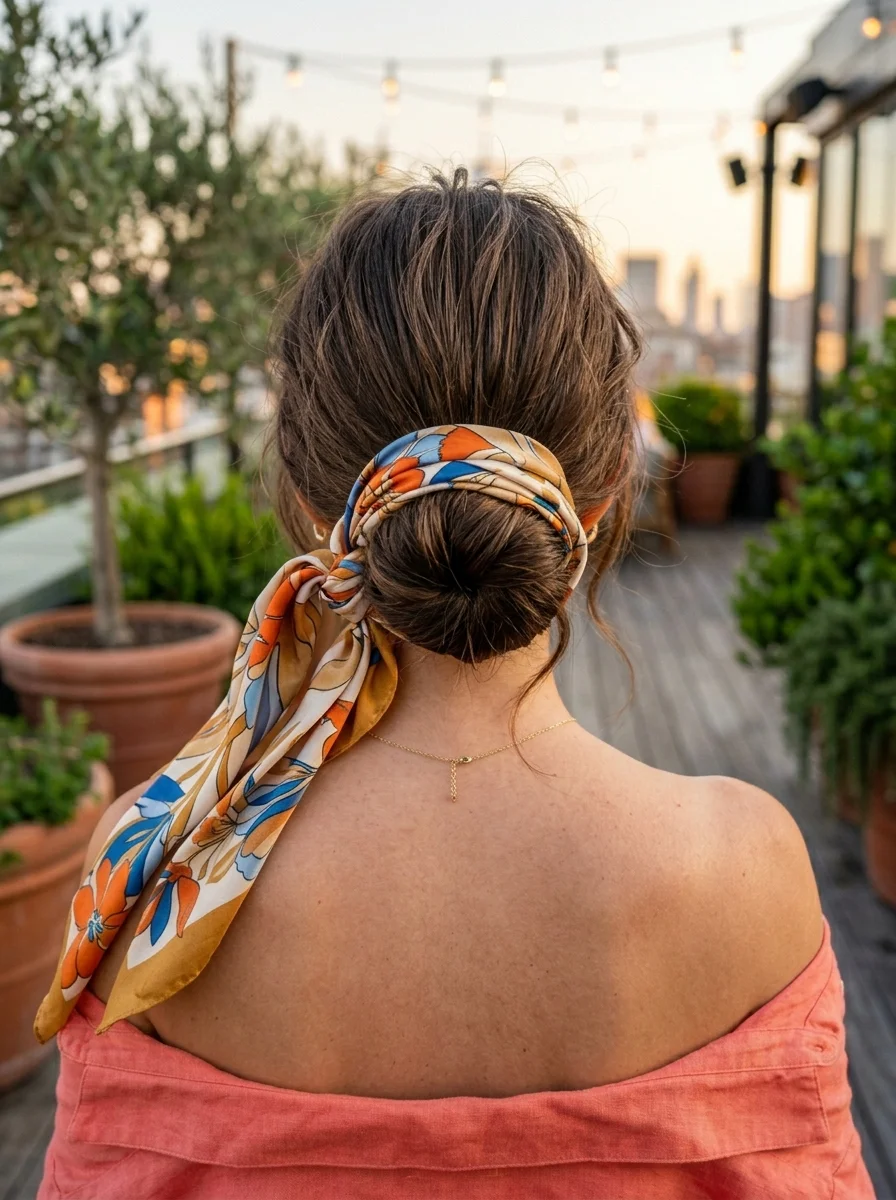
The overview: Brunette balayage hair is gathered into a low bun at the nape, with a floral silk scarf wrapped around the base and its ends trailing down one side. This is rooftop dinner energy — the kind of hairstyle that makes you look like you just stepped out of a vintage film. The floral scarf adds a romantic, nostalgic quality that transforms a simple bun into something with real personality.
Why this look is popular: Silk scarves are the accessory that makes any bun look intentional. The floral pattern adds visual interest and a vintage quality that feels current and timeless at the same time.
Where this look is suitable: Rooftop dinners, evening strolls, wine bar nights, and any vacation evening where you want vintage, romantic energy.
Step by step:
- Gather into a bun. Pull your hair into a low bun at the nape, twisting and tucking the ends under.
- Wrap the scarf. Fold the silk scarf into a long strip and wrap it around the base of the bun.
- Tie and trail. Tie the scarf in a knot or bow, letting the ends trail down one side.
Tips and tricks: Choose a scarf with a pattern that complements your outfit. Floral prints work universally, but geometric or abstract patterns can add a more modern edge.

34 Stunning Summer Butterfly Nails for Women in 2026 🦋
20.Elegant Twisted Low Bun with Loose Strands

The overview: Warm blonde hair is twisted into a rose-shaped bun at the nape, with loose strands left out around the face and ears for softness and movement. This is upscale dinner energy — the kind of hairstyle that makes you feel like you're dining at a Michelin-starred restaurant, even if you're just at the best table the resort has to offer. The rose-shaped twist adds an architectural quality that elevates the entire look.
Why this look is popular: The rose-shaped twist is a modern take on the classic low bun. It's sculptural and interesting without being overdone, and the loose strands keep it feeling approachable.
Where this look is suitable: Upscale dinners, anniversary celebrations, formal resort evenings, and any vacation moment where you want refined, elegant energy.
Step by step:
- Create a low ponytail. Gather hair at the nape and secure with an elastic.
- Twist into a rose. Twist the ponytail around its base in a spiral pattern, creating a flat, rose-like shape.
- Pin securely. Use bobby pins to secure the rose shape, tucking them underneath where they won't be visible.
- Release strands. Gently pull out a few strands around your face for softness.
Tips and tricks: Use a fine-tooth comb and a little pomade to keep the twist smooth. This look relies on cleanliness — any frizz breaks the rose illusion.
21.Twisted Low Bun with Face-Framing Tendrils
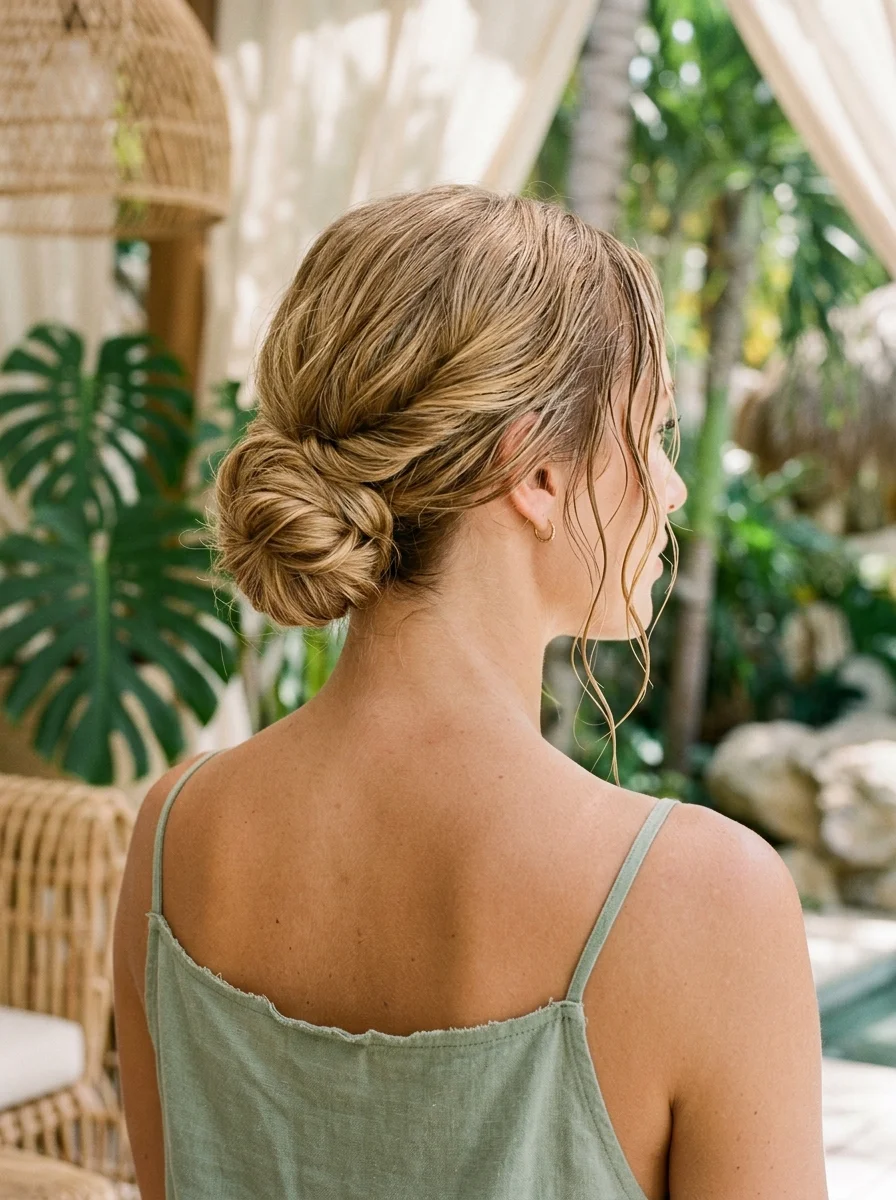
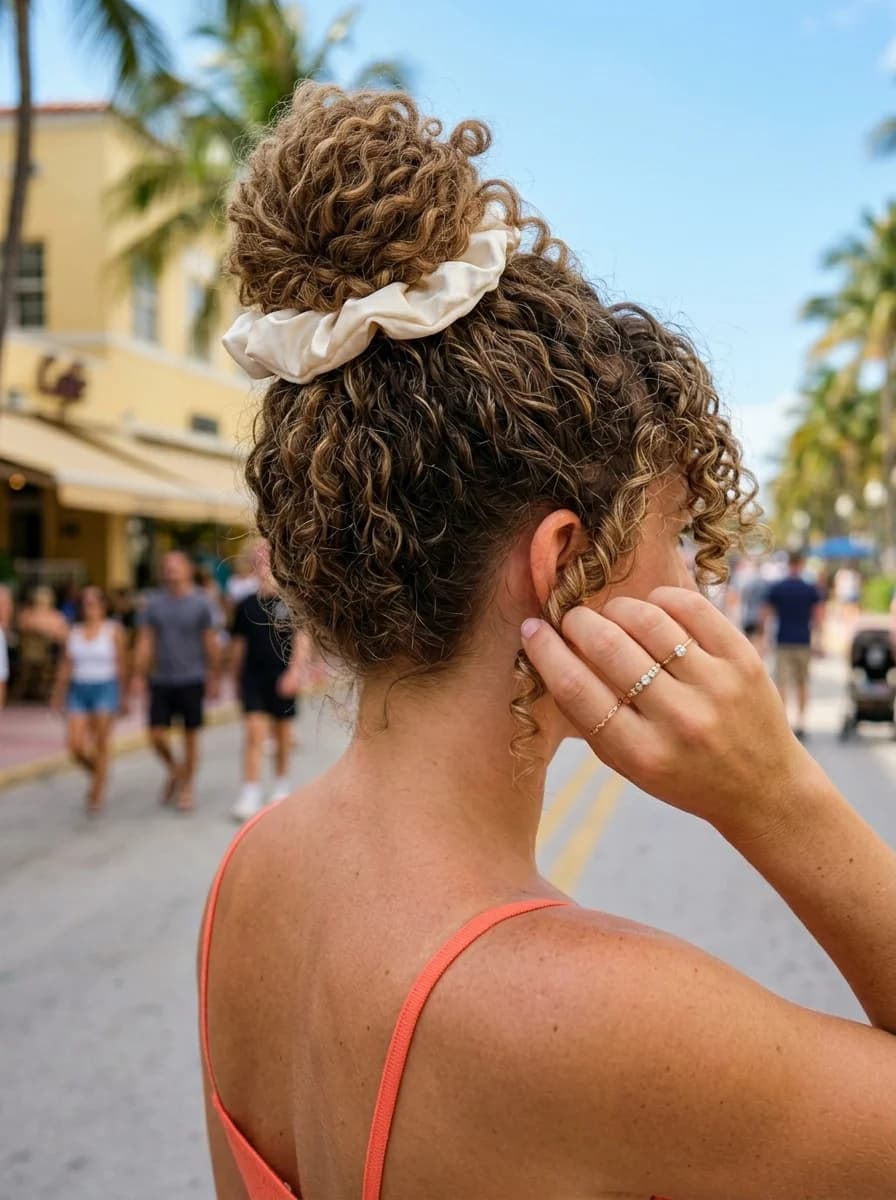
The overview: Honey blonde hair is twisted into a relaxed low bun at the nape, with wet-look tendrils left out around the face and styled with gel or pomade for a sleek, glossy finish. This is tropical resort energy — the kind of hairstyle that looks like you just stepped out of the pool and somehow ended up looking like a magazine cover. The wet-look tendrils add a modern, editorial quality that makes this bun feel current rather than basic.
Why this look is popular: The wet-look trend is having a major moment, and it pairs perfectly with a relaxed low bun. The tendrils add softness and movement while the wet finish adds edge.
Where this look is suitable: Tropical resort dinners, poolside cocktails, beach club afternoons, and any vacation moment where you want modern, editorial energy.
Step by step:
- Gather the bun. Pull your hair into a low, relaxed bun at the nape and secure with pins.
- Section tendrils. Pull out thin sections around your face and ears before securing the bun.
- Add wet-look finish. Apply gel or pomade to the tendrils, smoothing them down for a sleek, glossy effect.
Tips and tricks: Use a strong-hold gel for the tendrils — you want them to stay sleek and glossy, not dry out and frizz. Reapply if needed throughout the day.

30+ Chic Pool Party Hairstyles for Summer 2026 🌊👙
22.Braided Crown Bun with Silky Scarf Accent
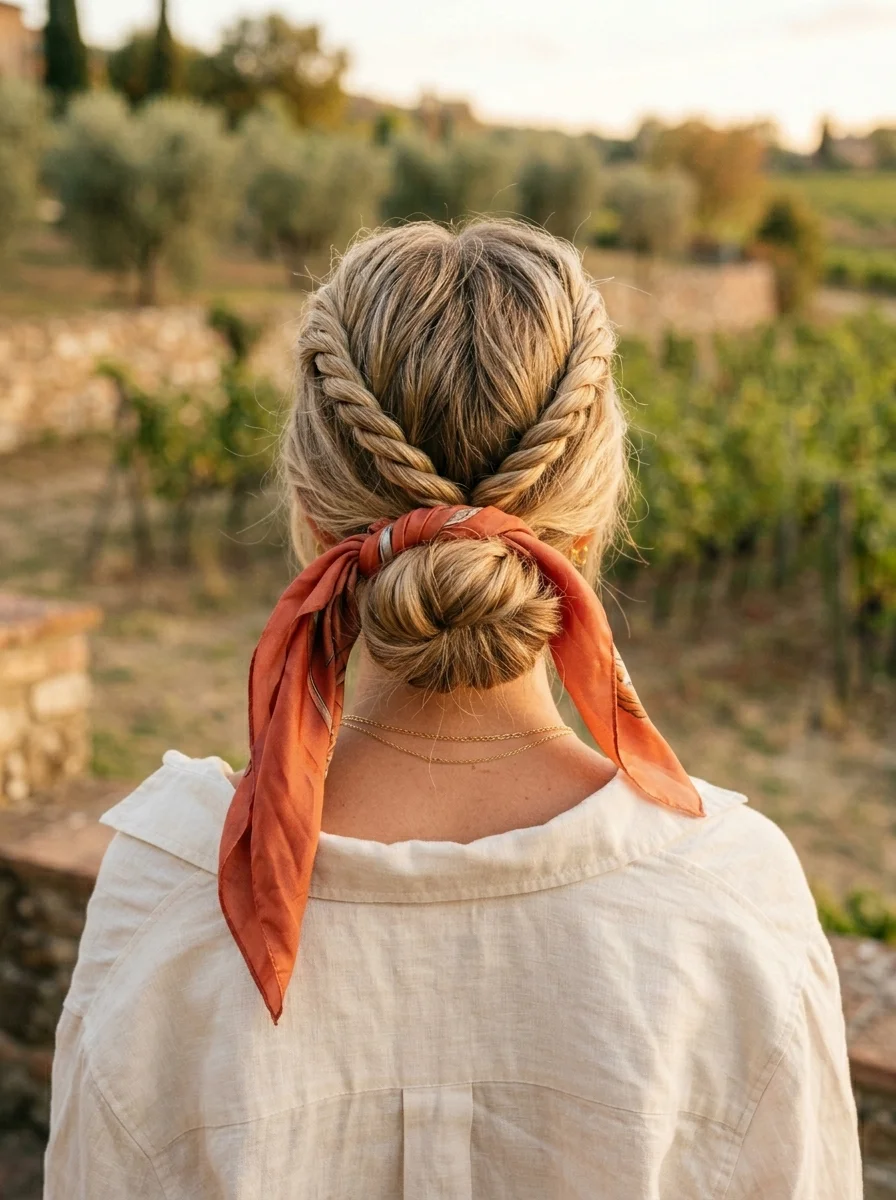
The overview: Dirty blonde hair is braided into a crown that wraps around the head with a rust-colored silk scarf threaded through the braids, and the remaining hair is gathered into a bun at the back. This is countryside vineyard energy — the kind of hairstyle that looks like you've been wine tasting all afternoon and your hair just keeps getting better. The silk scarf adds warmth and texture that elevates the braided crown from pretty to stunning.
Why this look is popular: Threading a scarf through braids is a simple technique that adds major visual impact. The rust color works beautifully with dirty blonde hair and adds a warm, autumnal quality that feels rich and luxurious.
Where this look is suitable: Countryside vineyard tours, scenic drives, outdoor lunches, and any vacation day where you want warm, bohemian energy.
Step by step:
- Braid the crown. Dutch braid around the perimeter of your head, incorporating hair as you go.
- Thread the scarf. As you braid, lay a rust-colored silk scarf along the braid path, incorporating it into the sections.
- Form the bun. Gather any remaining hair at the back and twist into a compact bun.
- Secure and adjust. Pin the bun in place and adjust the scarf for even visibility.
Tips and tricks: Fold the scarf into a narrow strip before threading it through the braids. A wide scarf will bulk up the braids and make them harder to manage.
23.Wet-Look Half-Up Twist with Pearl Accent
The overview: Ash blonde hair features a wet-look finish throughout, with the top section twisted back and secured with a pearl pin at the back of the head, and the remaining hair falling in wet-look waves. This is beach sunset energy — editorial, modern, and the kind of hairstyle that makes you look like you just walked off a fashion set. The wet-look finish adds a sleek, high-fashion quality that transforms a simple half-up style into something truly striking.
Why this look is popular: The wet-look trend is everywhere right now, and it works beautifully with half-up styles. The pearl pin adds a soft, feminine detail that balances the edgy wet finish.
Where this look is suitable: Beach sunsets, waterfront dinners, evening cocktails, and any vacation night where you want modern, editorial energy.
Step by step:
- Apply wet-look product. Work gel or pomade through damp hair for a sleek, glossy finish.
- Twist the top section. Gather the hair from above your ears and twist it back.
- Secure with pearl. Pin the twist at the back of your head with a pearl-headed pin.
- Define the waves. Use your fingers to shape the remaining hair into piecey, wet-look waves.
Tips and tricks: Reapply gel throughout the evening to maintain the wet-look finish. It tends to dry out, especially in warm weather.

27 Coral Nail Art Designs for a Warm, Tropical Manicure (2026)
24.Sleek High Ponytail with Wet-Look Shine
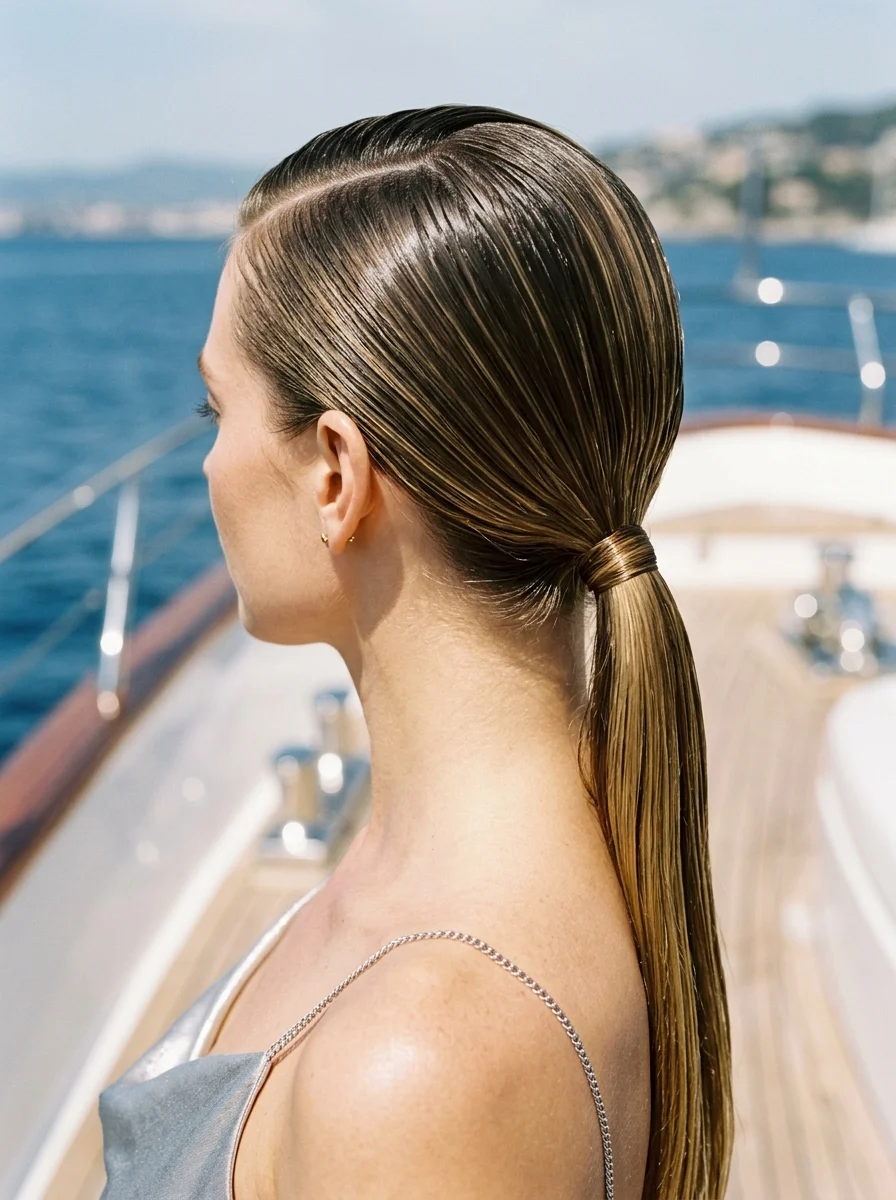
The overview: Brunette hair with golden undertones is pulled into an ultra-high, ultra-sleek ponytail, with the entire style finished with gel or pomade for a wet-look shine throughout. This is yacht day energy — the kind of hairstyle that says you're spending the day on the water and you're doing it in serious style. The wet-look finish adds a modern, editorial quality that transforms a simple ponytail into something worth photographing.
Why this look is popular: A sleek high ponytail is already a power move, but the wet-look finish takes it to another level. It's modern, it's editorial, and it holds up beautifully in heat and humidity.
Where this look is suitable: Yacht days, poolside lounging, beach club afternoons, and any sunny day where you want sleek, high-fashion energy.
Step by step:
- Smooth with gel. Apply strong-hold gel and brush hair flat, eliminating every bump.
- Secure high. Gather hair at the crown and tie tightly with a strong elastic.
- Add wet-look finish. Apply additional gel or pomade throughout the ponytail for a glossy, wet appearance.
- Polish. Use a fine-tooth comb to smooth any remaining flyaways.
Tips and tricks: A boar bristle brush is essential for getting the hair flat against your head. Regular brushes leave ridges that break the sleek illusion.
25.Sleek Wet-Look Low Bun with Deep Side Part
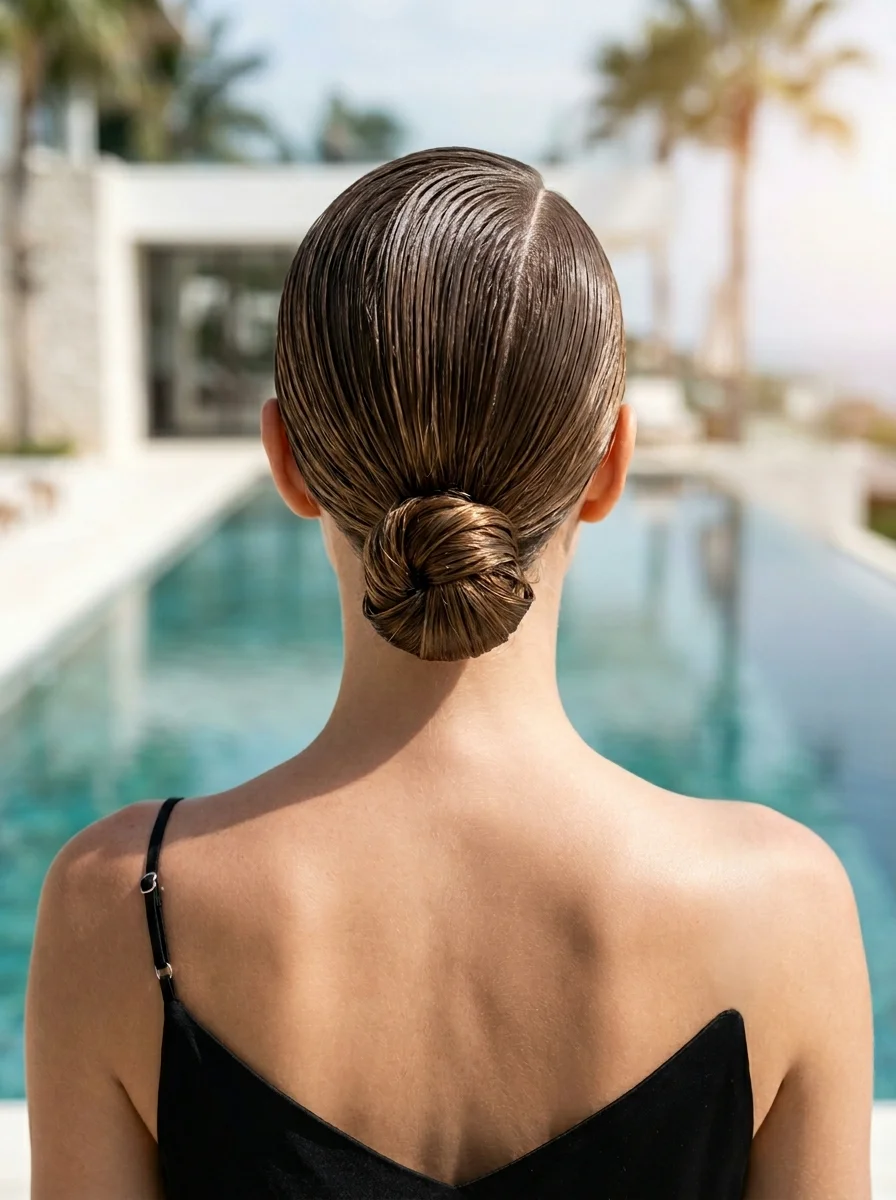
The overview: Brunette hair with honey highlights is parted in a deep side part, smoothed flat, and gathered into a sleek low bun at the nape, with the entire style finished with gel for a wet-look shine throughout. This is poolside luxury energy — the kind of hairstyle that makes you look like you're lounging at the most exclusive resort in the world. The deep side part adds drama and asymmetry, while the wet-look finish gives it a modern, editorial quality that's absolutely striking.
Why this look is popular: The deep side part adds instant drama and sophistication. The wet-look finish is modern and editorial, and the low bun keeps everything practical for a day by the pool.
Where this look is suitable: Poolside luxury, resort dining, spa days, and any vacation moment where you want sleek, high-fashion energy with minimal effort.
Step by step:
- Create a deep side part. Use a comb to make a dramatic part on one side of your head.
- Smooth with gel. Apply strong-hold gel and brush hair flat, following the direction of the part.
- Gather into a bun. Pull all hair to the nape and twist into a sleek, compact bun.
- Add wet-look finish. Apply additional gel throughout for a glossy, editorial shine.
Tips and tricks: Use clips to hold the hair flat while the gel sets — this ensures the deepest part stays sharp and the sleekness lasts all day.
25 Trendy Beach Day Hairstyles for Vacation 2026 ☀️🌊
The Ten-Minute Vacation Rule
Vacation mode means no one wants to spend an hour on their hair. These styles are genuinely doable in under ten minutes — no exaggeration.
The heatless wave hack: Braid damp hair the night before, sleep on it, and wake up with effortless beach waves. Zero heat, zero time, maximum impact.
The sleek high ponytail: Apply gel, brush flat, secure high, done. The wet-look finish is trending and looks expensive with zero effort.
The messy bun with face-framing pieces: Pull hair up, twist, pin, and pull out a few pieces around your face. Works on day-old hair, which you will definitely have on vacation.
The half-up twist: Grab the top section, twist it back, and secure with a cute clip or pearl pin. Two minutes. If a style takes longer than ten minutes on vacation, skip it — your time is better spent exploring.