Nail Trends
34 Stunning Summer Butterfly Nails for Women in 2026 🦋
Nothing says summer breeze and whimsical vibes quite like a fresh set of butterfly nails. Whether you're chasing sunsets at the beach or attending a garden wedding, these fluttering designs are the ultimate way to bring nature's magic to your fingertips in 2026.
Butterflies have always been a symbol of transformation and beauty, and this season, they are taking over the nail scene in a major way. From classic monarch patterns to modern 3D embellishments and ethereal holographic wings, there is a butterfly look for every aesthetic. Here are 34 of the most stunning, trendy, and social-media-worthy butterfly nail ideas that will have you feeling like the main character all summer long.
In This Guide
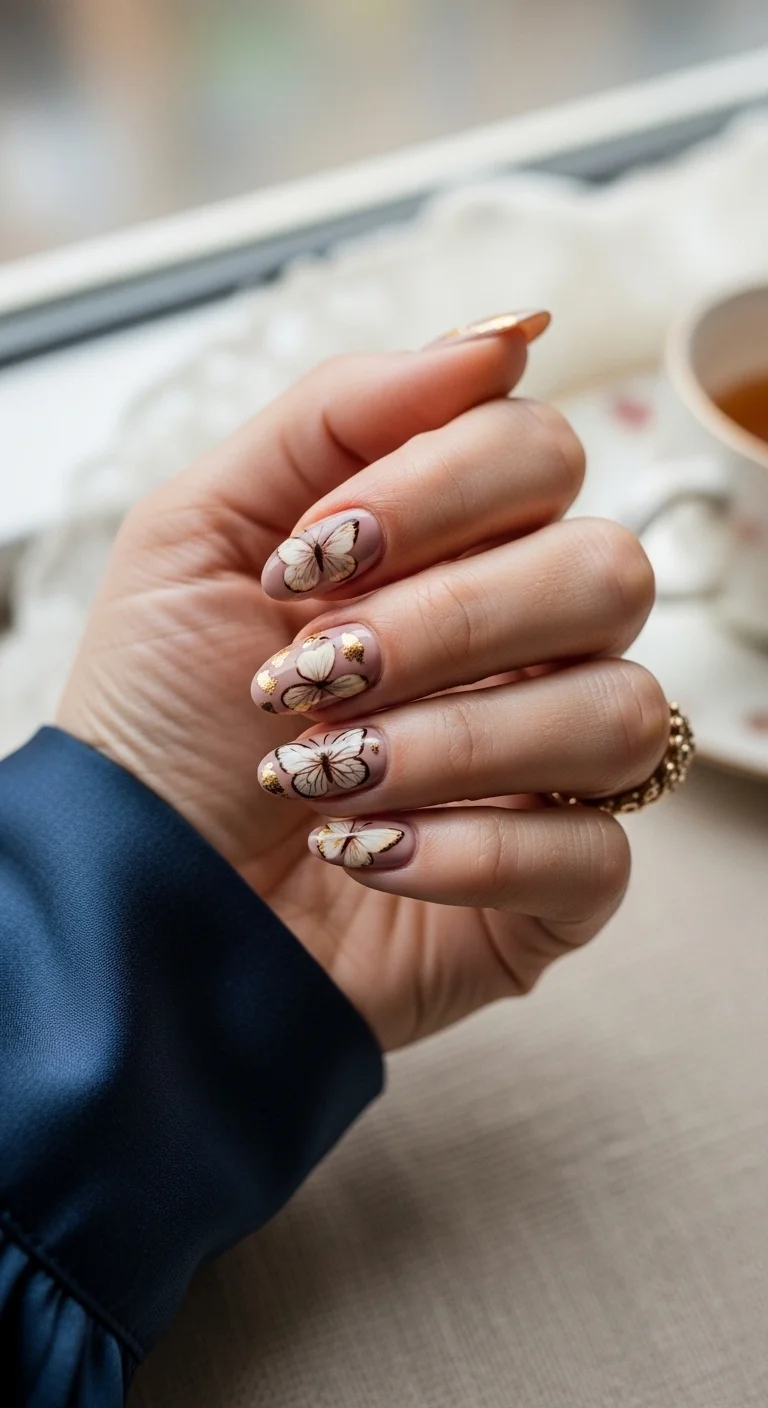
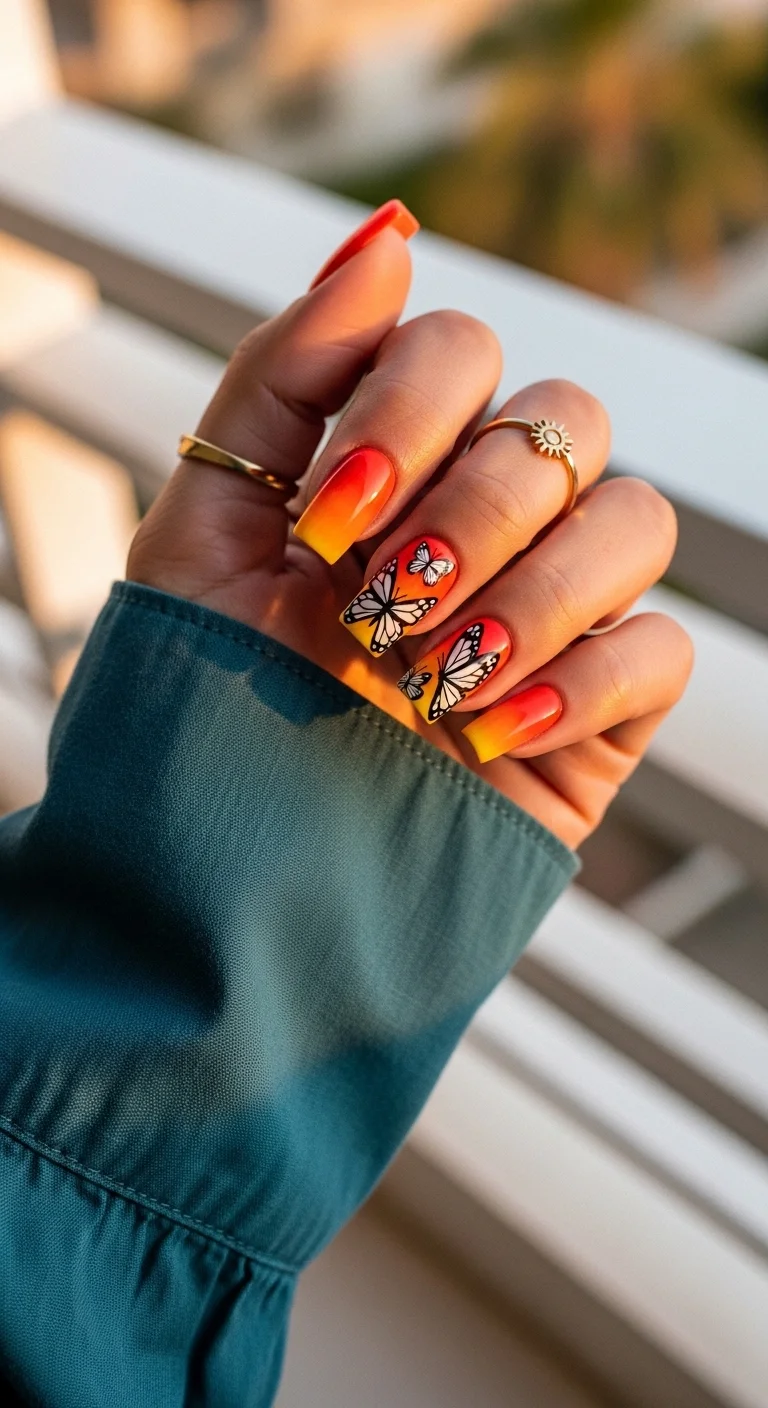
1.Sun-Kissed Monarch Monarchs
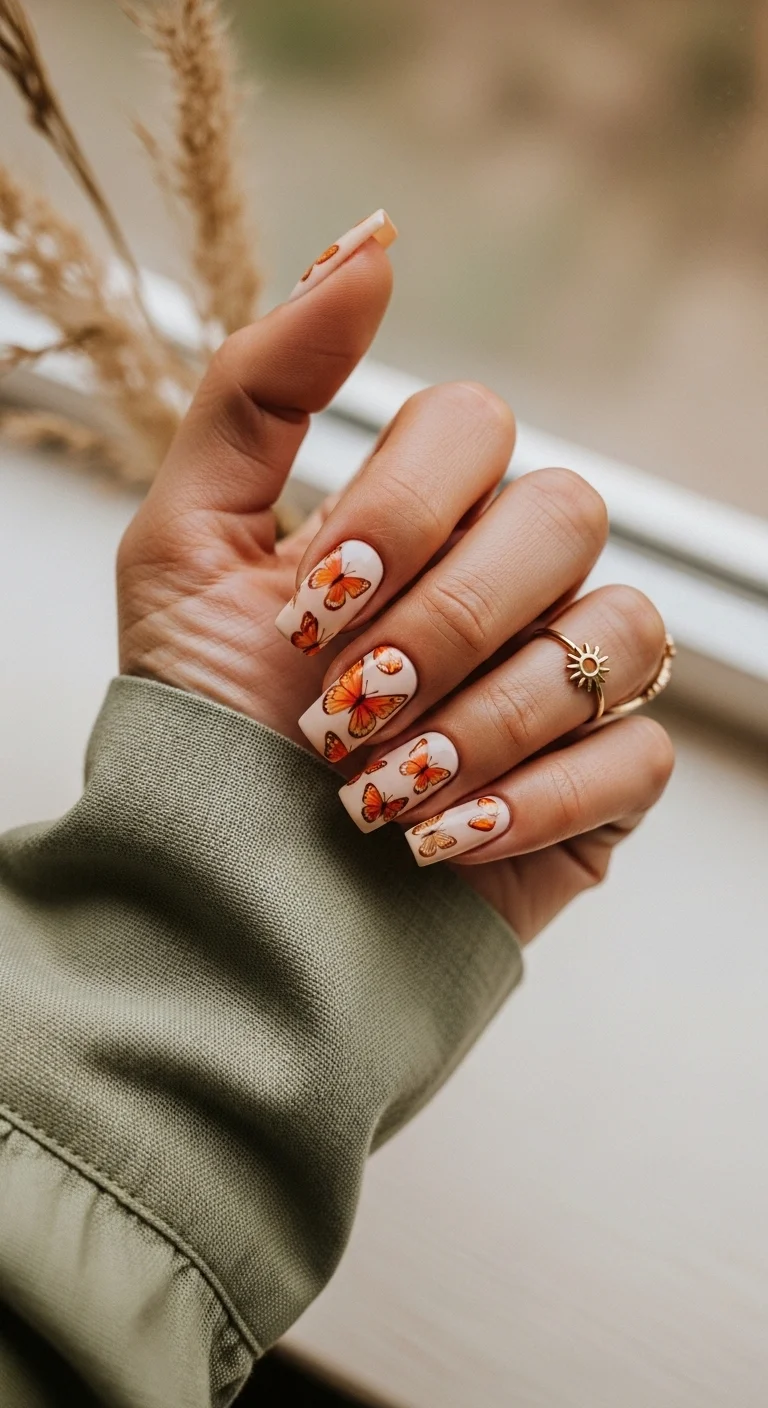
A warm, earthy take on the butterfly trend.
Overview:
The warm nude base on this set reads like a natural extension of your skin, which is exactly why the orange monarch decals feel so grounded rather than costume-y. This works because the creamy beige leans slightly peach, giving the butterflies a sun-warmed quality instead of a stark, artificial contrast.
The challenge with this design is placement. Multiple butterflies per nail can quickly look cluttered if you aren't strategic about spacing. Our editorial team found that staggering them at different angles, with some wings slightly cropped at the nail edge, creates a sense of movement rather than a static sticker pattern.
Design Breakdown:
Base Color: A milky beige with a peach undertone. Two coats should give full opacity.
Nail Shape: Coffin. The flat tip provides a stable canvas for the butterfly details.
Design Element: Orange monarch butterfly decals with black wing outlines and orange-white interior details. Applied at varied angles across multiple nails.
Finish: Glossy top coat, applied in two layers to encapsulate the decals and prevent peeling.
Get The Look at Home:
Here is how to build this set step by step.
- Base coat: Apply a ridge-filling base coat to create a smooth surface for the decals.
- Nude foundation: Two thin coats of milky beige. Let each coat dry fully before moving on.
- Decal placement: Use fine-point tweezers to position the monarch stickers. Press from the center outward to eliminate air bubbles.
- Edge check: Run a cleanup brush dipped in acetone around the cuticle line for a crisp finish.
- Seal it: Two layers of glossy top coat, capping the free edge to prevent lifting.
30 Stunning Summer Hair Trends for 2026 ☀️🌊
2.Champagne Sparkle & Gold Wings
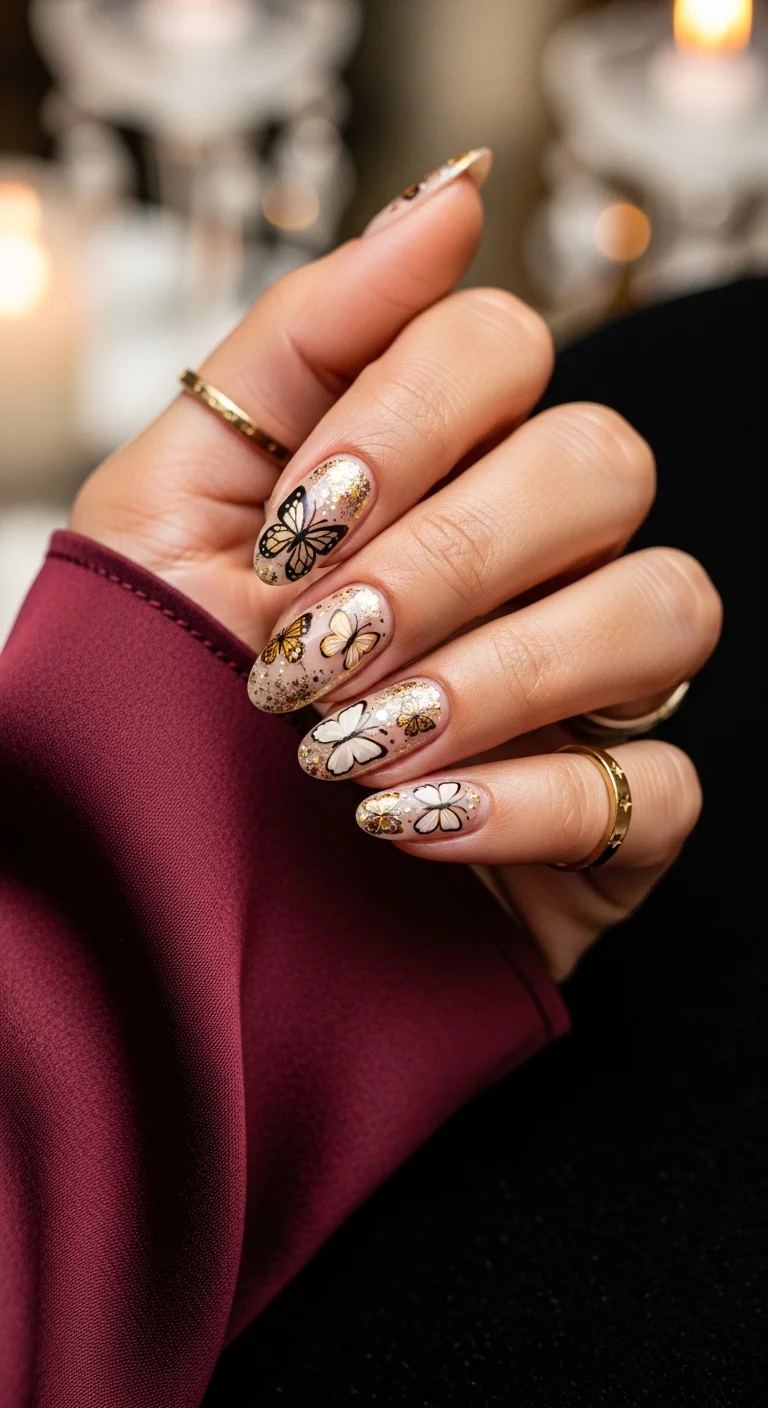
A dreamy, ethereal set for summer events.
Overview:
A champagne base with gold glitter fading from the cuticle creates dimension that flat color simply cannot achieve. The glitter catches light unevenly, which makes the nails look like they have depth rather than sitting on a single plane.
One practical note: gold glitter polish can feel gritty even after top coat. Budget extra time for a third layer of top coat, or use a glitter-smoothing product before your final seal. The white and gold metallic butterflies with black outlines sit on top of this textured base, so pressing them firmly with a silicone tool is essential.
Design Breakdown:
Base Color: Nude champagne with gold glitter concentrated at the cuticle, fading toward the tip in a soft ombre.
Nail Shape: Almond. The tapered tip mimics the natural curve of a butterfly wing.
Design Element: Mixed white and gold metallic butterfly decals with black outlines, scattered at varying angles.
Finish: Glossy with visible glitter texture beneath the top coat.
Get The Look at Home:
Follow these steps for the champagne sparkle effect.
- Sheer base: One coat of a milky nude to even out the nail bed.
- Glitter ombre: Dab gold glitter polish near the cuticle and use a dry brush to pull it toward the center. Build gradually.
- Butterfly application: Place decals at different angles. Use a silicone tool to press edges flat against the glitter texture.
- Smoothing layer: Apply a glitter-smoothing top coat or a thin layer of builder gel before the final top coat.
- Final seal: Two coats of glossy top coat, capping the free edge.
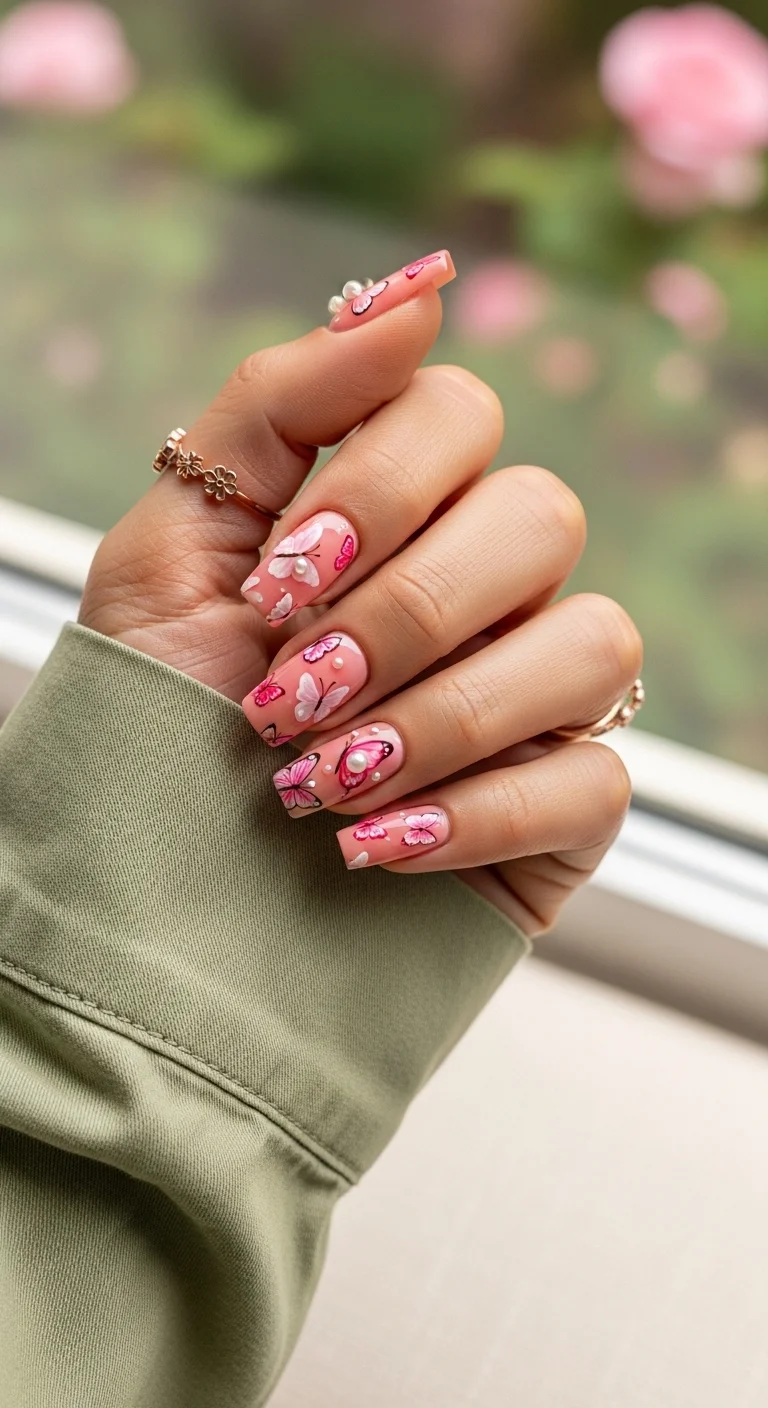
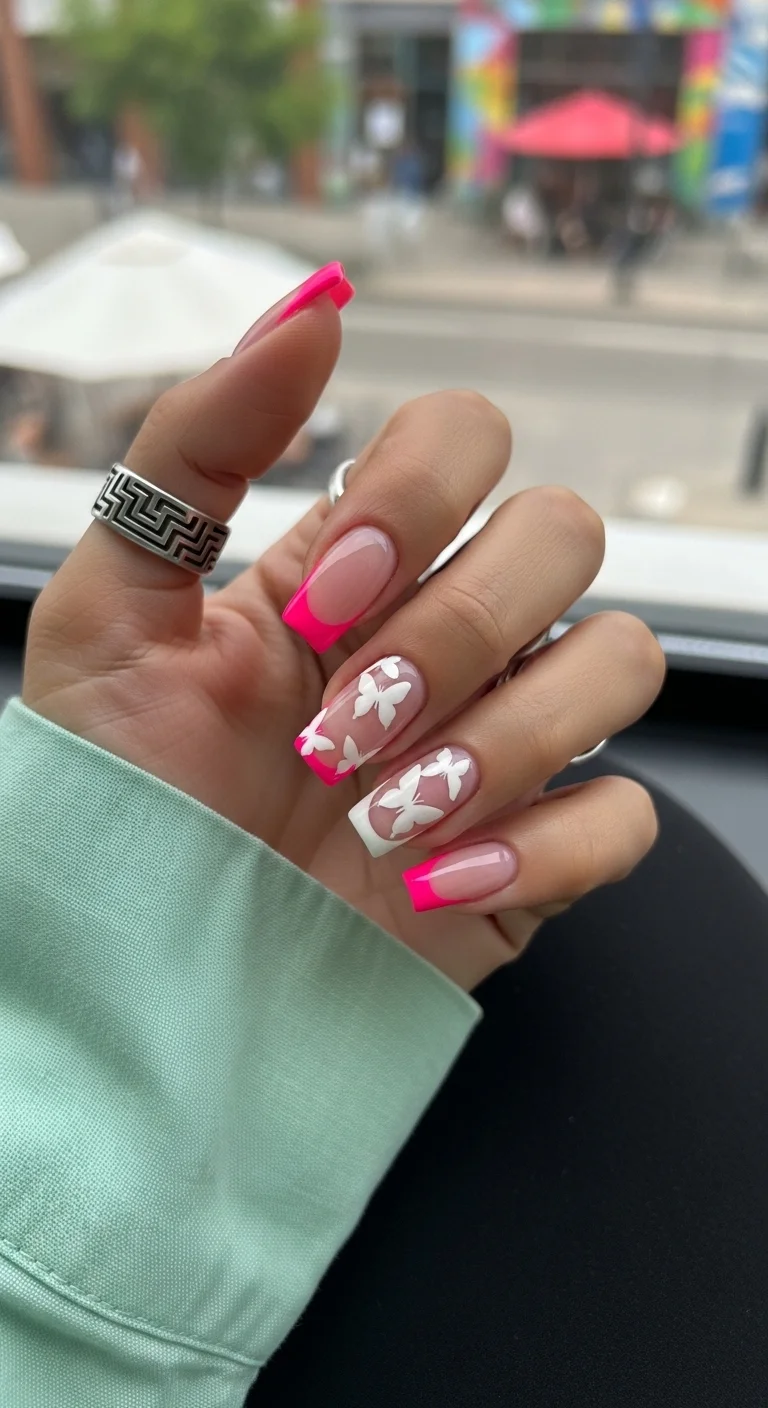
3.Pearlescent Pink Flutter
Sweet, feminine, and textured.
Overview:
Pearlescent finishes depend entirely on light angle. In direct sunlight, this pink shifts from a soft blush to a bright, almost metallic sheen. The white and pink butterflies with fine black outlines sit nicely against this shifting backdrop because they read as matte against the shimmer.
The honest downside is the pearl bead accents on the ring finger. They catch on hair, fabric, and everything else. One practical note: if you work with your hands frequently, consider skipping the 3D elements or using a strong nail glue and sealing around the beads with an extra layer of top coat.
Design Breakdown:
Base Color: Soft pearlescent pink with a subtle shimmer that shifts in light.
Nail Shape: Coffin. The flat surface accommodates both the decals and the pearl accents.
Design Element: White and pink butterfly decals with fine black outlines, plus small white pearl bead accents at the cuticle on the ring finger.
Finish: Glossy with pearlescent shimmer visible throughout.
Get The Look at Home:
This set requires patience with the bead placement.
- Pearl base: Two coats of pearlescent pink. Let each coat dry completely to avoid dragging the shimmer.
- Butterfly placement: Apply decals toward the tips of the nails, leaving space near the cuticle for the pearl accents on the ring finger.
- Bead application: Use a dotting tool dipped in nail glue to place each pearl individually at the cuticle of the ring finger.
- Seal around beads: Apply top coat around, not over, the pearls to maintain their luster while securing them.
- Final coat: One more layer of top coat over the rest of the nails for a uniform glossy finish.

28 Cute & Sporty Baseball Game Nail Ideas for 2026 ⚾
4.Electric Blue Lightning Wings
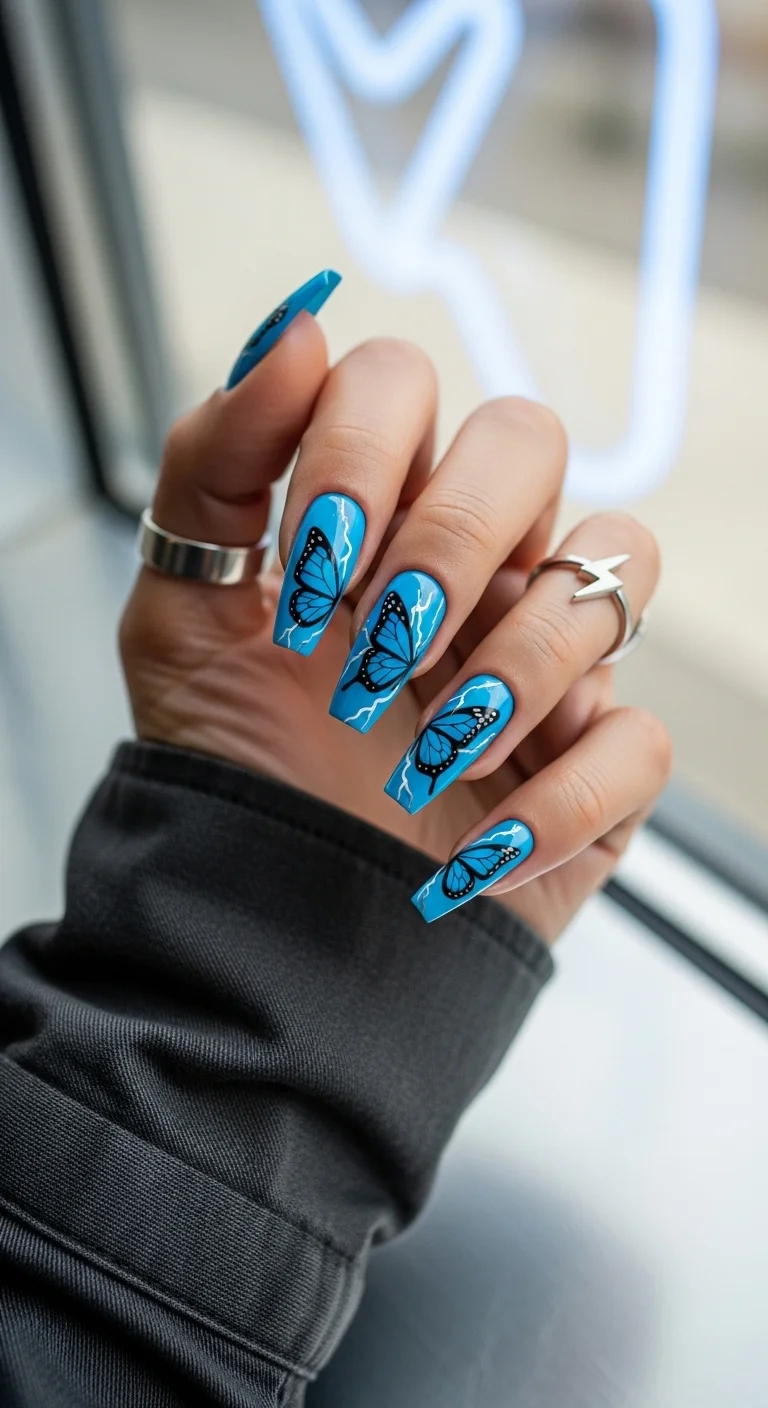
For anyone who wants their butterflies with edge.
Overview:
This electric blue base is so saturated it almost reads neon in direct light. The black butterfly wing silhouettes provide high contrast, while the white lightning bolt streaks add visual chaos that keeps the design from feeling too polished or predictable.
Worth mentioning: this color photographs beautifully but is limiting in professional settings. The lightning bolt streaks require a steady hand with a striper brush, or they can look like accidental scratches rather than intentional design elements.
Design Breakdown:
Base Color: Vivid electric blue or cyan, applied in two thin coats for full opacity.
Nail Shape: Long coffin. The extended length provides room for the lightning and butterfly elements.
Design Element: Black butterfly wing silhouettes on the nail edges, paired with thin white lightning bolt streaks across the blue space.
Finish: High-gloss, smooth top coat.
Get The Look at Home:
Here is the approach for this bold design.
- Blue base: Two coats of the most saturated electric blue you can find. Let each coat cure or dry fully.
- Butterfly silhouettes: Use a black striper brush to paint half-butterflies along the nail edges, varying the angle on each nail.
- Lightning bolts: With a white detail brush, flick thin, jagged lines across the blue space. Keep the lines uneven for a natural look.
- Dry time: Budget extra time here. The black and white detail work needs to set before top coat, or it will smear.
- Top coat: One thick, floating layer of top coat to smooth the surface without dragging the design.
5.Liquid Gold & Black Lace Wings
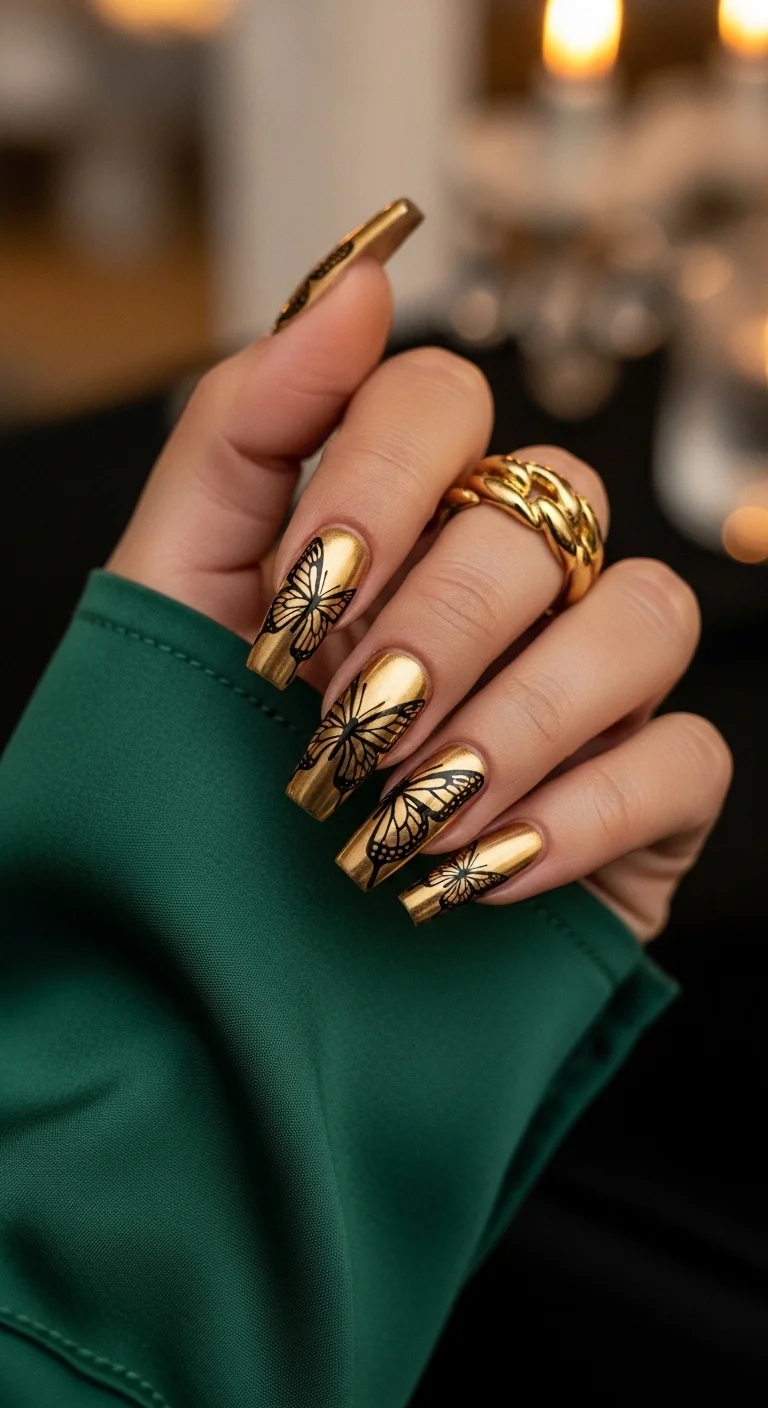
Pure luxury on your fingertips.
Overview:
Liquid gold chrome is one of the most difficult finishes to execute at home. The metallic surface shows every brush stroke, and uneven application reads as patchy rather than reflective. This design works because the black butterfly and lace-inspired veining breaks up the gold surface, hiding minor imperfections in the chrome application.
The black outlines create a stained-glass effect against the gold. This works best on longer nails where there is enough surface area for the intricate veining to read clearly.
Design Breakdown:
Base Color: Metallic liquid gold chrome, buffed to a high shine.
Nail Shape: Long coffin. The architectural shape enhances the metallic quality.
Design Element: Black butterfly and lace-inspired outlines with fine veining details painted over the chrome.
Finish: High-shine metallic chrome that reflects like a mirror.
Get The Look at Home:
You will need chrome powder and a steady hand for this set.
- Dark base: Apply a black gel base coat and cure. This helps the gold chrome appear richer.
- Chrome application: Buff gold chrome powder into the cured surface using a sponge applicator until fully reflective.
- Wipe excess: Use a lint-free wipe to remove any loose chrome powder before painting the design.
- Lace detailing: With a fine liner brush and black gel paint, draw butterfly outlines and lace-inspired veining across each nail.
- Double seal: Apply a base coat first, then a chrome-safe top coat to prevent the metallic finish from dulling or chipping.

30+ Chic Pool Party Hairstyles for Summer 2026 🌊👙
6.Fuchsia Glitter Ombre Dream
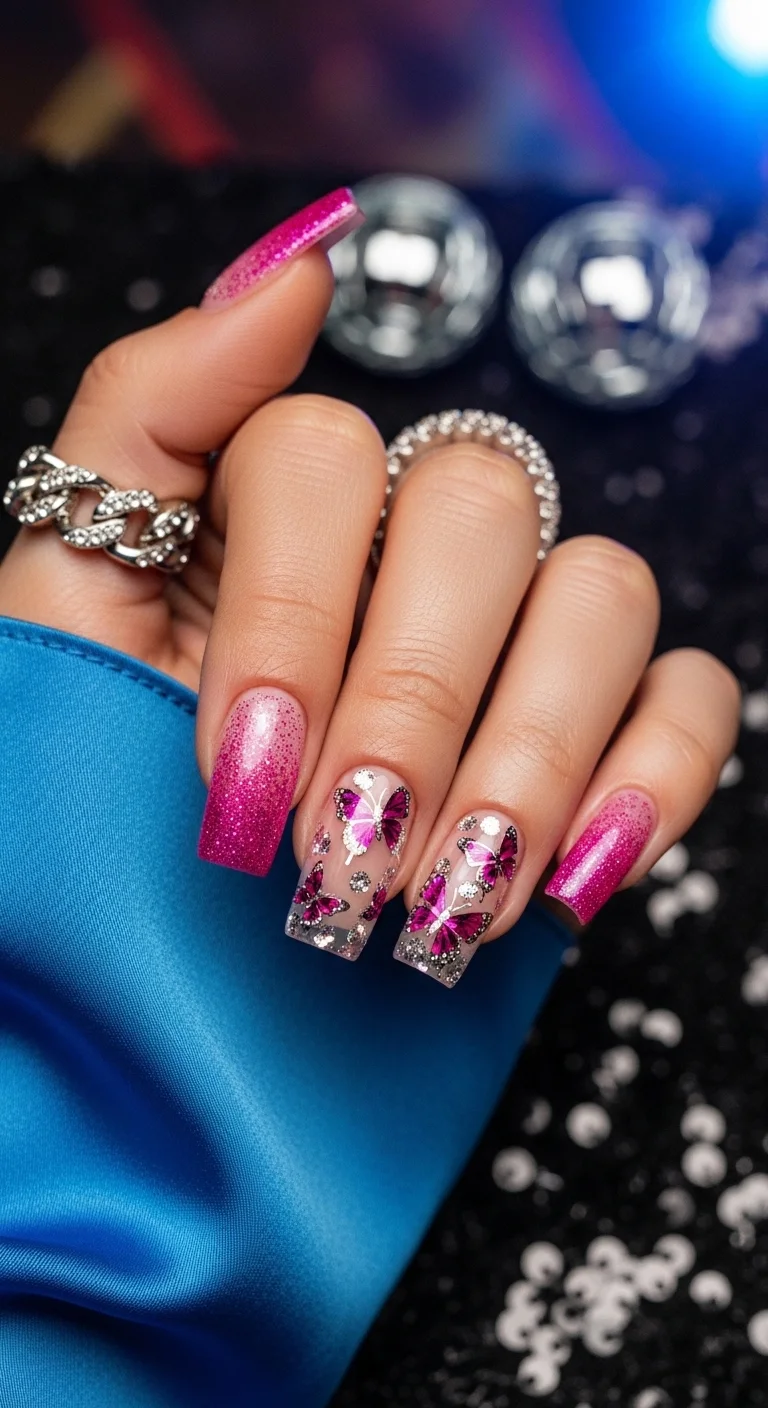
A layered, textured approach to summer color.
Overview:
The fuchsia-to-silver glitter gradient on some nails creates a focal point, while the clear sections with magenta butterfly decals and silver chunky glitter flakes add visual variety across the set. This contrast between opaque glitter and translucent sections keeps the design from feeling monotonous.
The honest downside: chunky glitter and small silver rhinestones create a rough surface that catches on everything. Even with a thick top coat, the texture remains. This is a set that requires awareness of what you touch, especially with long hair.
Design Breakdown:
Base Color: Fuchsia glitter that gradients into silver, with clear or sheer sections on accent nails.
Nail Shape: Long square. The structured shape balances the busy design.
Design Element: Magenta butterfly decals placed over clear sections, surrounded by silver chunky glitter flakes and small silver rhinestone accents on select nails.
Finish: Glossy, though some texture from the chunky glitter and rhinestones will remain.
Get The Look at Home:
This set involves building layers, so take your time.
- Glitter gradient: Apply dense fuchsia glitter at the base of each nail and use a dry brush to pull it toward the tip, fading into silver.
- Clear sections: Leave some nails with just a clear base for the accent design.
- Butterfly placement: Apply magenta butterfly decals over the clear sections. Press firmly with a silicone tool.
- Glitter and rhinestones: Press silver chunky glitter flakes into a tacky top coat layer. Use a dotting tool to place rhinestones near the cuticle.
- Build it up: Apply two to three layers of top coat to encapsulate the glitter and rhinestones as much as possible.
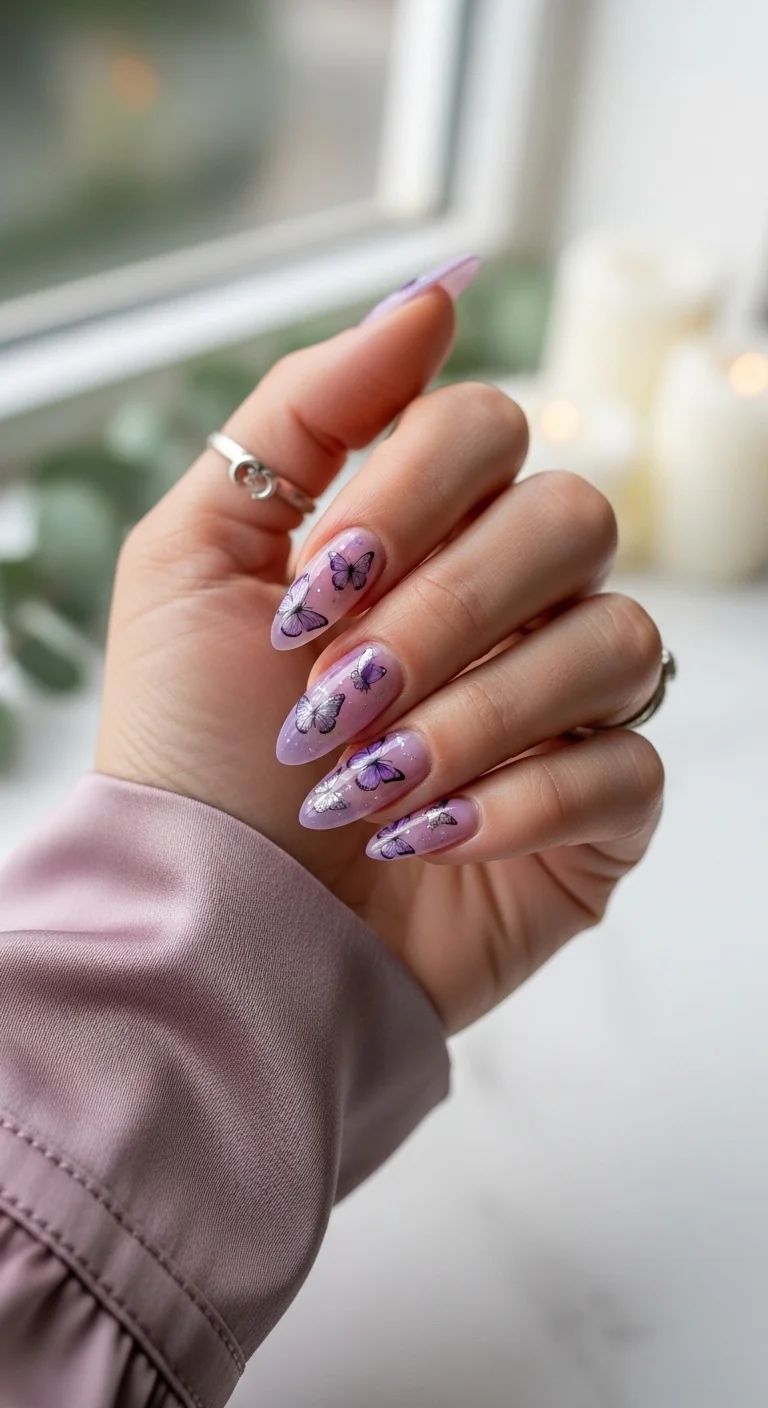
7.Lavender Sparkle & Silver Foil
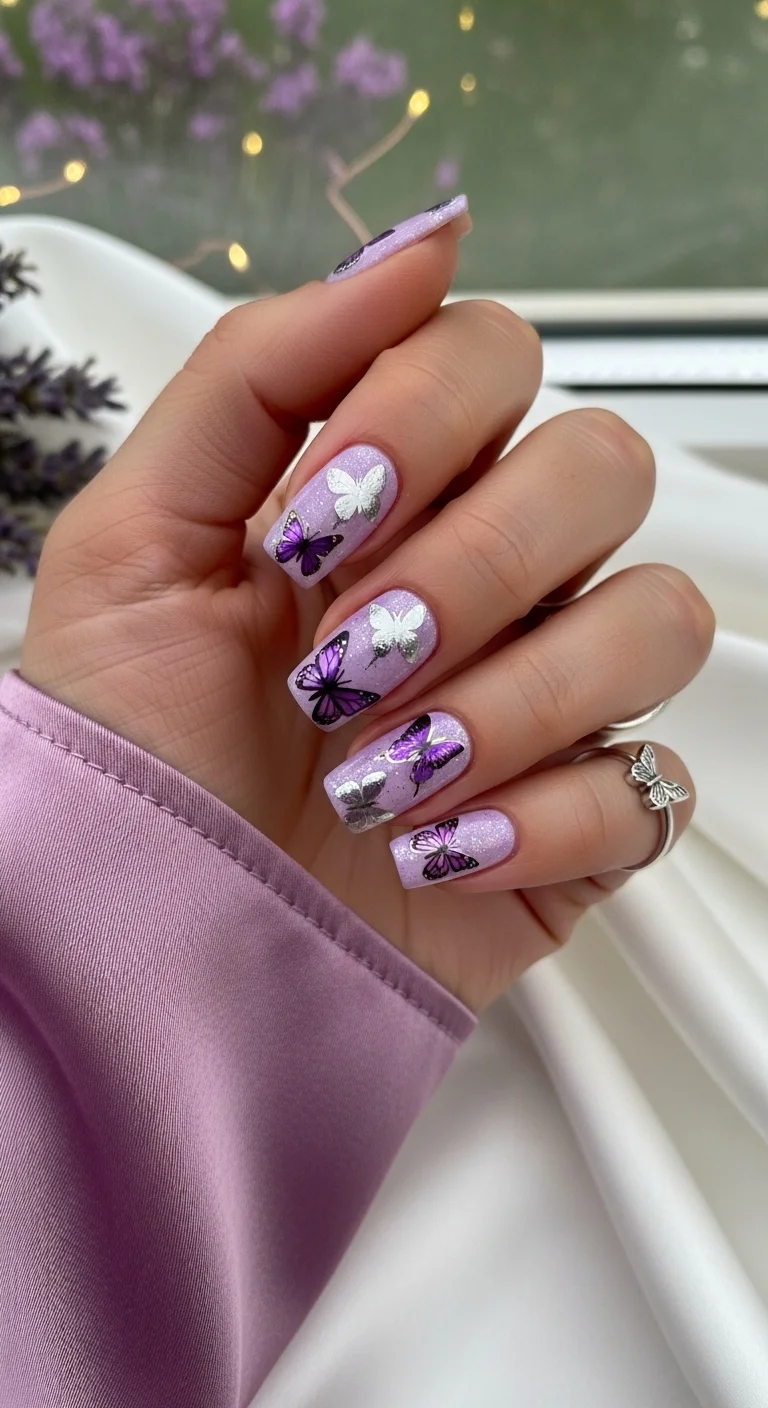
Soft, sparkly, and totally magical.
Overview:
The fine silver micro-glitter throughout the lavender base gives this set a consistent sparkle that reads as one unified shimmer rather than scattered glitter particles. The purple and silver foil butterfly stickers complement the base because they echo the same cool tones.
One practical note: foil butterfly stickers can lift at the edges after a few days, especially near the tips. The key technique is to seal the edges with an extra layer of top coat or a thin strip of builder gel along the decal perimeter. Budget extra time for this step if you want the set to last.
Design Breakdown:
Base Color: Soft lavender infused with fine silver micro-glitter throughout.
Nail Shape: Coffin. The flat surface provides good adhesion for the foil stickers.
Design Element: Purple and silver or white foil butterfly stickers placed at varying angles across the nails.
Finish: Glossy with visible sparkle from the micro-glitter base.
Get The Look at Home:
Follow these steps for a long-lasting foil butterfly set.
- Lavender base: Two coats of fine glitter lavender polish. Let dry completely.
- Sticker placement: Apply butterfly stickers at different angles on each nail for visual variety.
- Press flat: Use a silicone tool or orangewood stick to press all sticker edges firmly against the nail.
- Edge sealing: Run a thin brush with top coat along the perimeter of each sticker to prevent lifting.
- Final coats: Two layers of glossy top coat over the entire nail, capping the free edge.

30 Stunning Beach Nail Ideas for the Best Vacation in 2026 🌊
8.Sheer Lavender & Dark Flutter
A moody, sophisticated take on pastels.
Overview:
Sheer jelly nails are unforgiving. The translucent finish reveals every ridge, bump, and imperfection in the natural nail underneath, which means thorough nail prep is non-negotiable. A buffed, smooth surface is the foundation this design depends on.
The dark purple butterfly decals with black outlines pop against the light lavender jelly because of the tonal contrast. The almond or stiletto shape elongates the fingers, which works in the design's favor. The glossy jelly finish catches light in a way that makes the nails look wet.
Design Breakdown:
Base Color: Sheer translucent jelly lavender, applied in thin coats to maintain the see-through quality.
Nail Shape: Almond or stiletto. The pointed tip adds drama to the translucent base.
Design Element: Dark purple butterfly decals with black outlines, placed near the center or tips of each nail.
Finish: Glossy jelly effect, achieved with a thick, self-leveling top coat.
Get The Look at Home:
This set is all about thin layers and patience.
- Nail prep: Buff and smooth the natural nail surface thoroughly. Apply a ridge-filling base coat.
- Jelly coats: Apply one thin coat of sheer lavender. If the coverage is too light, add a second thin coat rather than one thick one.
- Decal application: Place dark purple butterfly stickers while the final jelly coat is still slightly tacky for better adhesion.
- Float the top coat: Apply a generous layer of top coat without dragging the brush across the decals. Let it self-level.
- Cure fully: If using gel, cure each layer thoroughly to maintain the glass-like clarity of the jelly finish.
9.Dusty Rose & Silver-Edge Wings
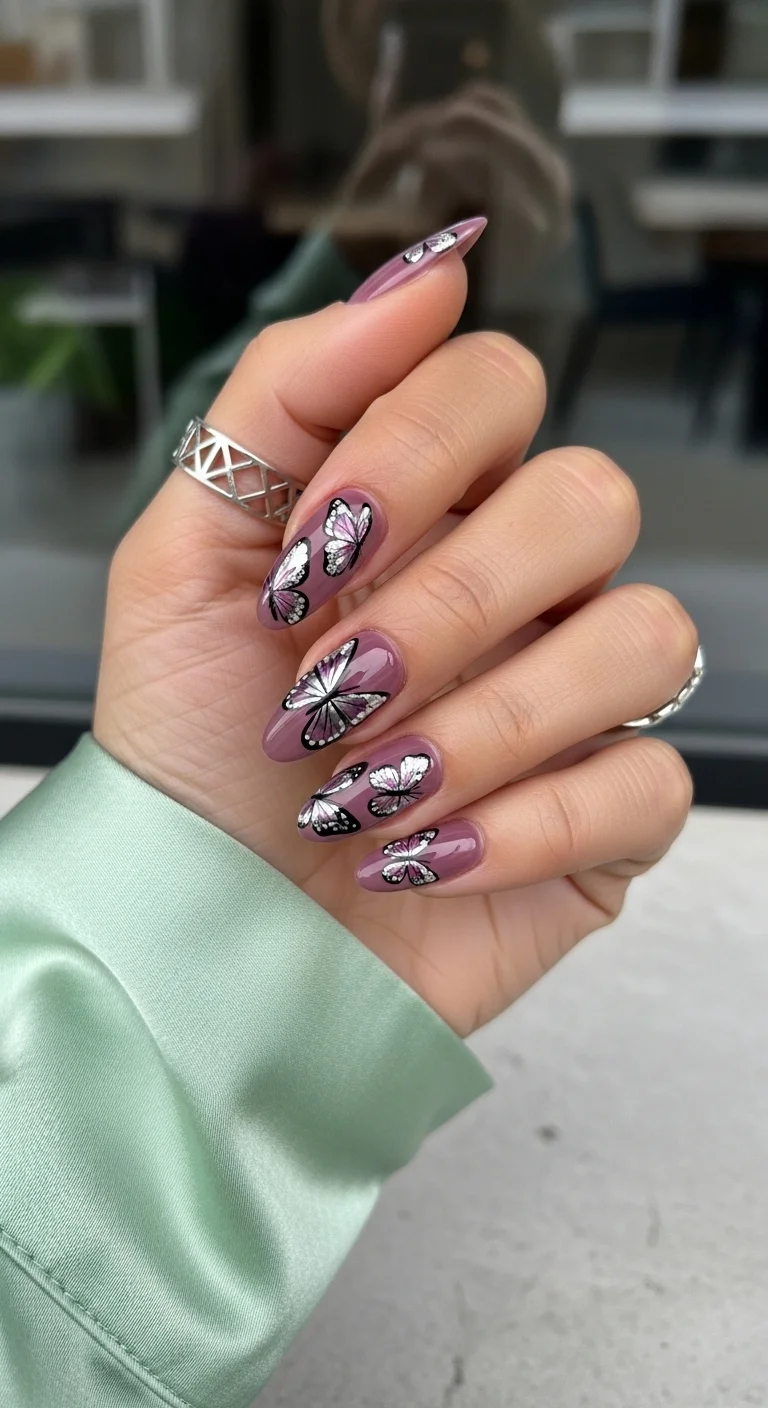
Romantic, vintage, and ultra-glam.
Overview:
The dusty rose base pairs well with both warm and cool-toned skin because it sits at the intersection of pink and mauve. The white and black butterflies with silver chrome foil edges create a stained-glass effect that elevates this beyond typical butterfly nail art.
The key technique here is the silver chrome foil edging. It requires precision with a fine brush and adhesive, and the foil will not adhere evenly if the base coat is too dry or too wet. The honest downside: achieving consistent foil coverage across all ten nails takes practice.
Design Breakdown:
Base Color: Dusty rose or mauve, applied in two coats for full, creamy coverage.
Nail Shape: Almond or stiletto. The elongated shape suits the stained-glass aesthetic.
Design Element: White and black butterflies with silver chrome foil applied along the wing edges, creating a leaded-glass or stained-glass appearance.
Finish: High-gloss top coat to seal the foil and unify the surface.
Get The Look at Home:
This design requires a steady hand and foil adhesive.
- Dusty rose base: Two smooth coats. Let dry completely before starting the design work.
- Butterfly outlines: Use a fine liner brush with black polish to draw the butterfly wing shapes.
- Fill sections: Paint the wing interiors with white or a lighter shade of pink.
- Foil edges: Apply a thin line of foil adhesive along the wing edges. Let it turn tacky, then press silver chrome foil onto the adhesive. Peel away carefully.
- Top coat: Two layers of glossy top coat to seal the foil and protect the design from chipping.

26 Stunning Summer Braided Hairstyles for Women 2026 ☀️💇♀️
10.Minty Fresh Block & Black Outlines
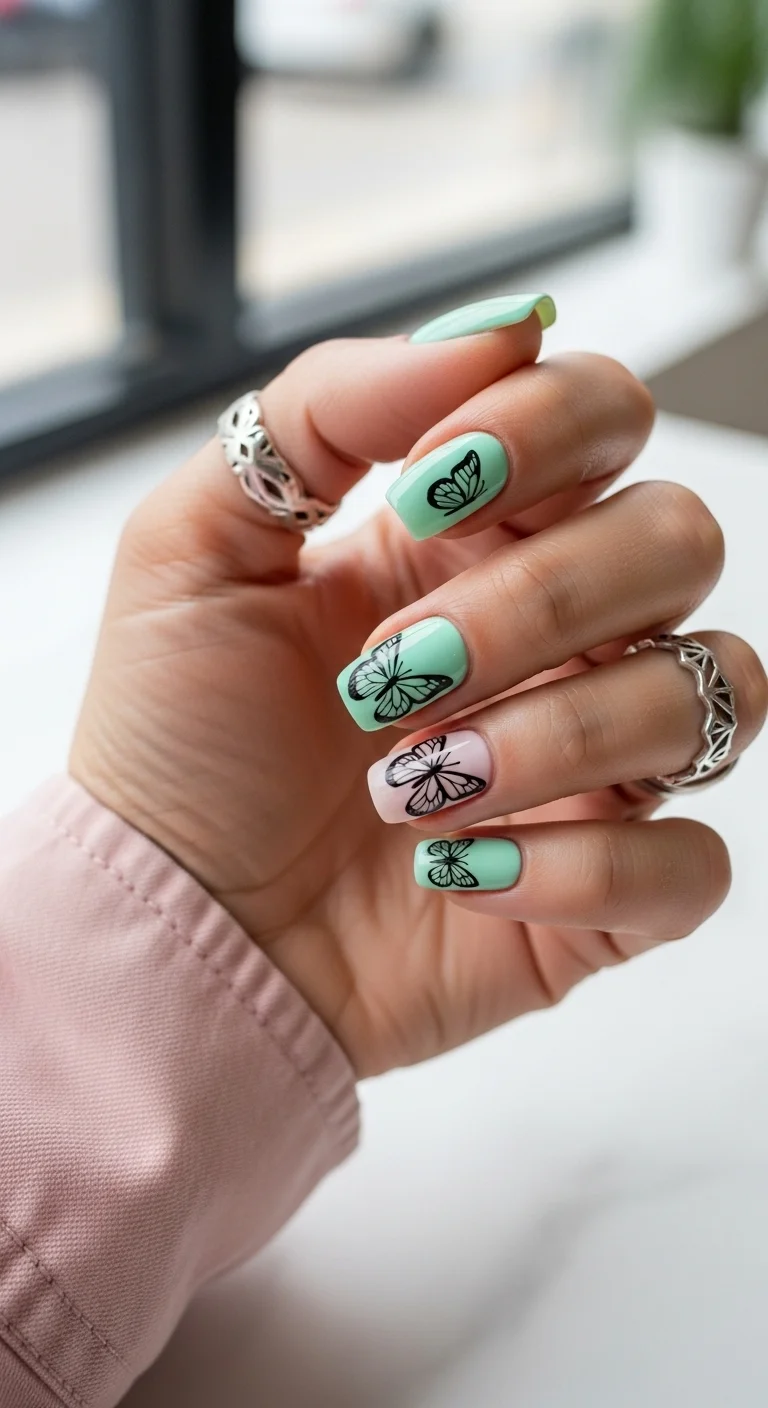
A punchy, graphic take on summer colors.
Overview:
Mint green and dusty pink is a combination that works because the two colors sit opposite each other on the cool-warm spectrum, creating visual tension without clashing. The black outline-only butterfly designs on every nail add a graphic, illustrative quality that keeps the pastels from reading too soft.
The honest downside: black outline-only designs show imperfections more than filled designs would. A shaky hand is more visible when the butterfly is just lines rather than a solid shape. This is a design that benefits from a confident, steady application, or the use of butterfly stamps for consistency.
Design Breakdown:
Base Color: Mint green on four nails, dusty pink on the ring finger as an accent.
Nail Shape: Coffin. The flat tip suits the graphic, illustrative style of the design.
Design Element: Black outline-only butterfly designs on every nail, with no fill color inside the wings.
Finish: Glossy top coat for a clean, polished look.
Get The Look at Home:
This is a two-color base with detailed line work on top.
- Color blocking: Paint four nails mint green and the ring finger dusty pink. Two coats each.
- Dry completely: The base must be fully dry before adding the black outlines, or the colors will bleed.
- Outline work: Use a fine nail art brush with black polish to draw butterfly outlines on each nail. Keep the lines thin and consistent.
- Vary the angles: Position each butterfly differently to create visual interest across the set.
- Seal it: Two coats of top coat to protect the line work and add a uniform glossy finish.
11.Rainbow Stripe Flutter
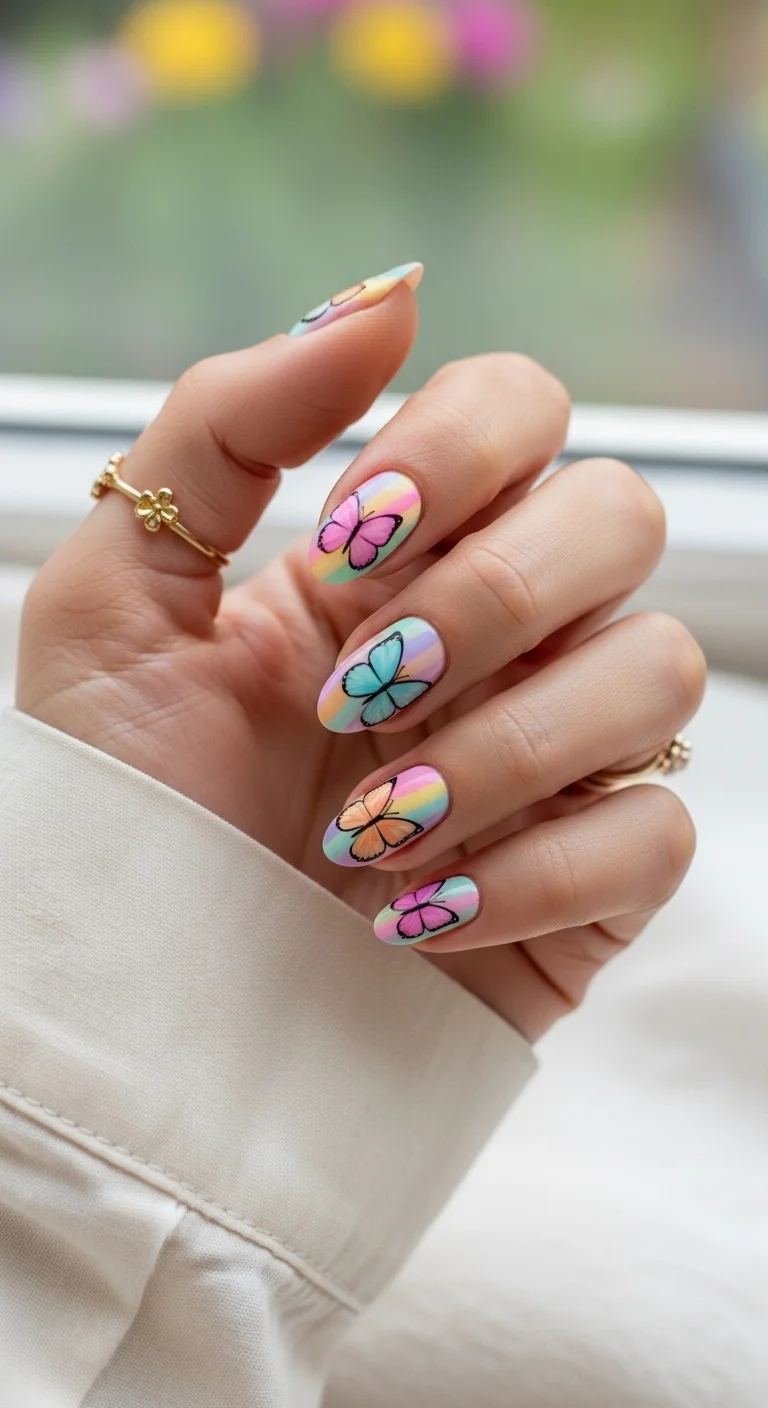
A playful gradient with a graphic twist.
Overview:
The pastel rainbow gradient blending pink, peach, mint, and lavender creates a soft, diffused color field that the black butterfly silhouettes sit on top of. The wing interiors are colored to match the gradient beneath them, which makes the butterflies feel integrated into the design rather than layered on.
The challenge with this design is keeping the gradient clean. The colors need enough space to blend without becoming muddy. On shorter nails, the transitions can look rushed. This design reads best on medium to long almond shapes where each color has room to breathe.
Design Breakdown:
Base Color: Pastel rainbow gradient, with pink, peach, mint, and lavender blending softly into one another across the nail.
Nail Shape: Almond. The elongated shape provides enough surface for the gradient to read clearly.
Design Element: Black butterfly silhouettes with wing interiors colored to match the underlying gradient, creating a tone-on-tone effect.
Finish: Glossy top coat that makes the gradient appear smooth and glass-like.
Get The Look at Home:
This gradient technique takes patience but is achievable at home.
- White base: One coat of white to make the pastel colors appear brighter and more true-to-pan.
- Gradient application: Use a small makeup sponge to dab each pastel color in horizontal bands across the nail, overlapping the edges slightly to blend.
- Build the gradient: Repeat the sponging two to three times, letting each layer dry between applications for smooth transitions.
- Butterfly silhouettes: Once the gradient is dry, use a black detail brush to paint the butterfly outlines. Fill the wing interiors with the matching gradient color.
- Top coat: One thick, floating layer of top coat to smooth the sponged texture and seal the design.

35 Fun Birthday Nail Designs for 2026 🎂
12.Rose Gold Metallic Magic
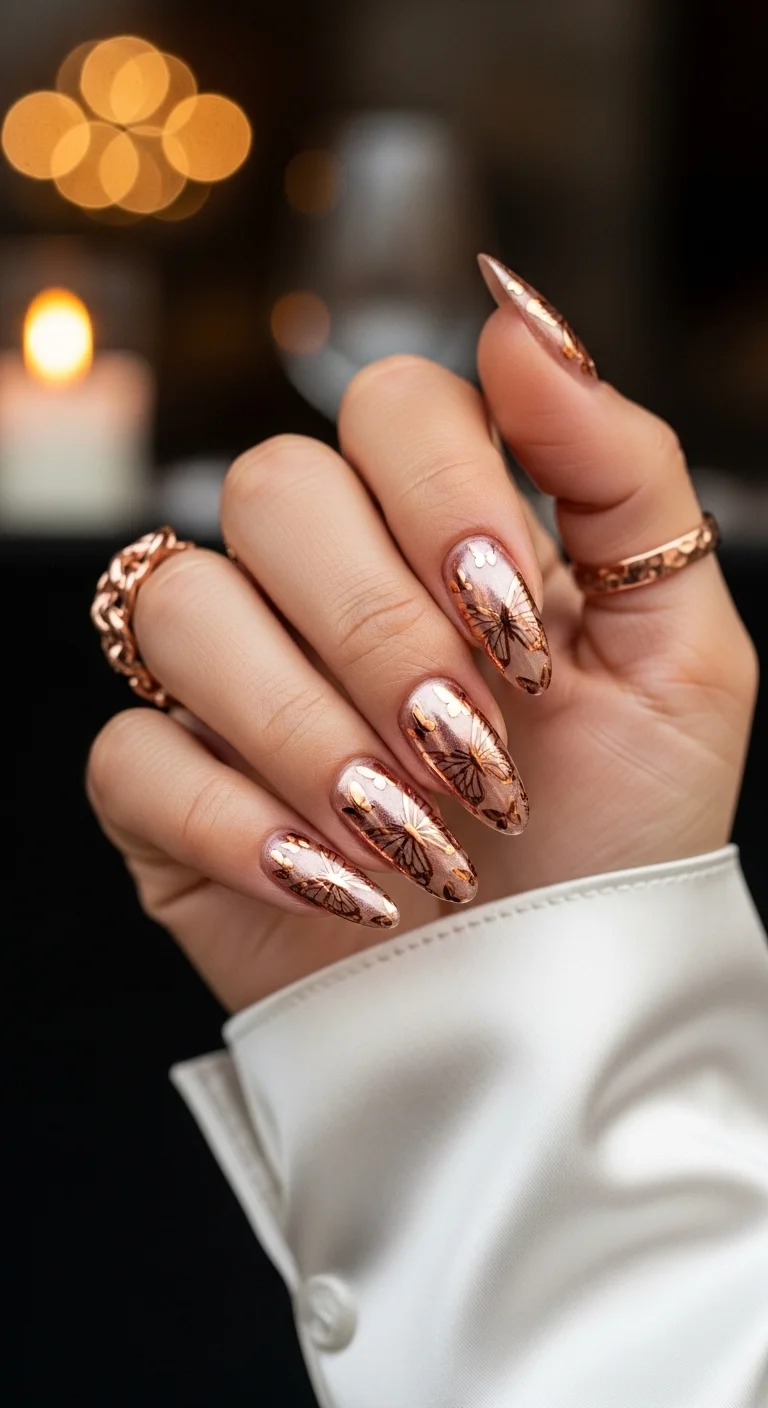
Ethereal, glowing, and ultra-luxe.
Overview:
Rose gold chrome sits between warm gold and cool pink, which makes it one of the more versatile metallic finishes. The black-outlined butterfly illustrations with intricate wing veining create sharp contrast against the reflective base, and the small gold foil flakes add texture without overwhelming the design.
The honest downside: rose gold chrome shows fingerprints and smudges almost immediately. Keeping the finish pristine requires frequent buffing with a soft cloth. The chrome application itself is also unforgiving. Brush strokes and uneven coverage are common problems, so using a sponge applicator rather than a brush improves results.
Design Breakdown:
Base Color: Rose gold chrome metallic, buffed to a high-shine mirror finish.
Nail Shape: Almond or stiletto. The pointed shape complements the metallic drama.
Design Element: Black-outlined butterfly illustrations with intricate wing veining, plus small gold foil flakes scattered near the cuticle or along the butterfly wings.
Finish: High-shine metallic chrome that reflects light from every angle.
Get The Look at Home:
This chrome set requires specific tools and careful technique.
- Base coat: Apply a beige or light pink gel base and cure fully.
- Chrome application: Use a sponge applicator to buff rose gold chrome powder into the cured surface until it is uniformly reflective.
- Clean the surface: Wipe away loose powder with a lint-free wipe before adding the design.
- Butterfly veining: Use a fine liner brush with black gel paint to draw the butterfly outlines and intricate wing veining. Keep the lines thin and deliberate.
- Foil accents: Press small gold foil flakes into a tacky top coat layer near the cuticle or along the butterfly wings.
- Double seal: Apply a water-based top coat first to preserve the chrome shine, then a regular top coat for durability.
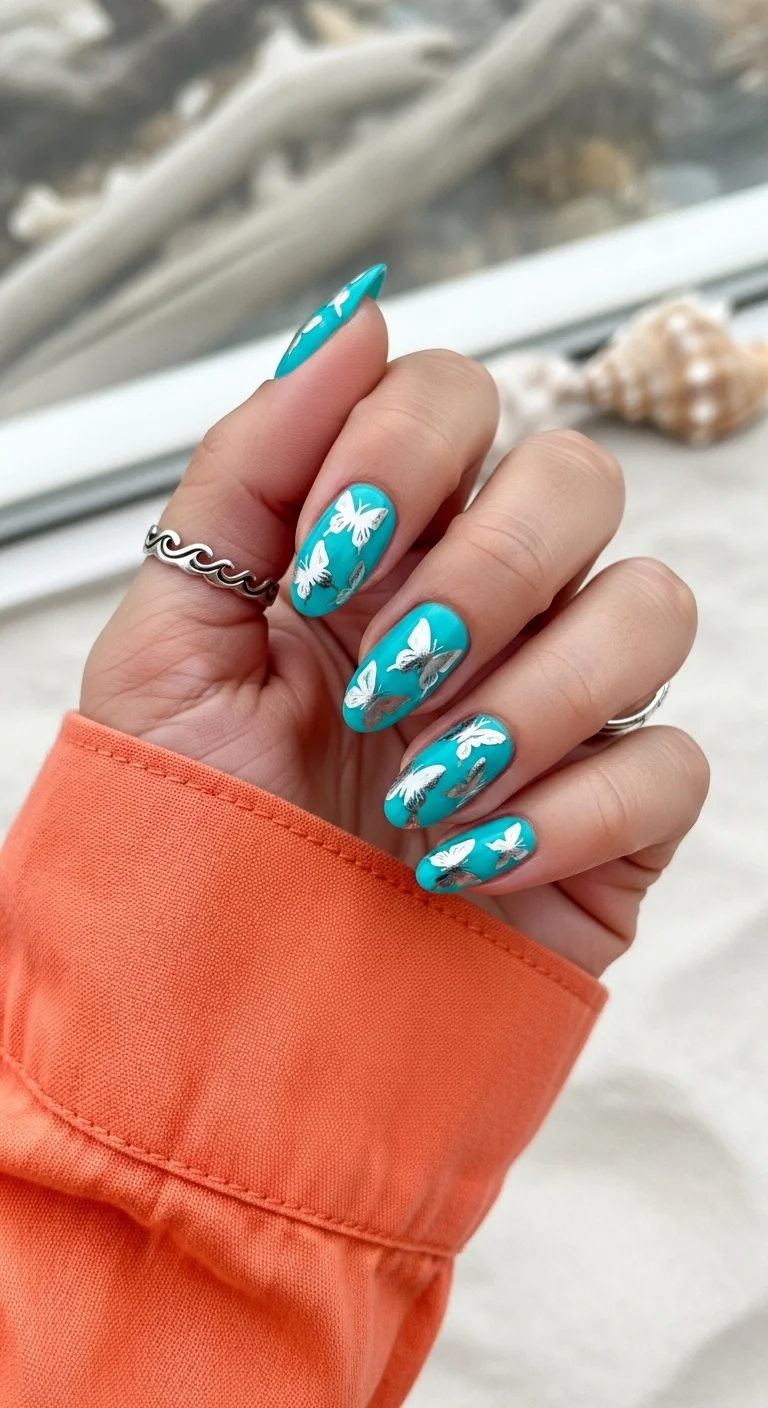
13.Turquoise Dream & White Flutter
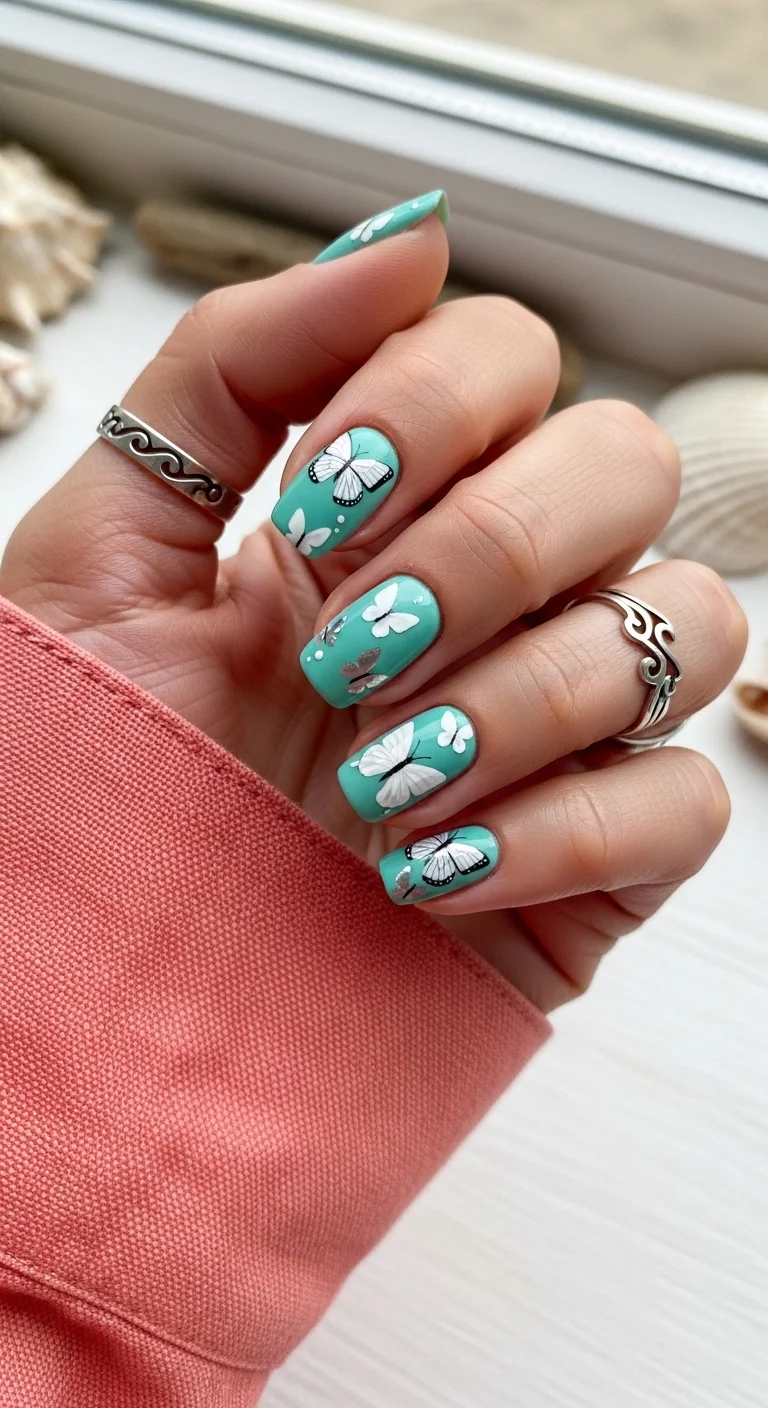
A punchy, tropical-ready set with clean contrast.
Overview:
Turquoise is one of those colors that makes every other shade look washed out. This particular teal reads creamy and slightly muted, which keeps it from feeling too loud on short nails. The white butterfly silhouettes with black-outlined wing edges pop against the base without competing for attention.
This works because the short almond shape keeps the design grounded. The small white dot clusters scattered around the butterflies add movement without cluttering the nail. One practical note: turquoise polish stains. Always use a base coat, or you'll be dealing with green-tinged nails for a week.
Design Breakdown:
The key technique here is letting the base color do the heavy lifting while the butterflies provide a graphic counterpoint.
Base Color: A creamy, slightly muted teal or seafoam green. It has enough depth to read sophisticated rather than juvenile.
Nail Shape: Short almond or oval. The soft curves complement the organic butterfly shapes.
Design Element: White butterfly silhouettes with black-outlined wing edges and small white dot clusters for texture.
Finish: High-gloss top coat to seal the design and add depth.
Get The Look at Home:
The honest downside to this design is that the white silhouettes need clean edges to look intentional. Budget extra time for the outlining.
- Base coat: Always start with a protective layer when working with turquoise.
- Turquoise base: Apply two thin coats of a creamy teal polish. Let each coat dry fully.
- Butterfly shapes: Use a dotting tool and white polish to create the basic wing forms. Keep them simple.
- Outlines: Take a fine liner brush and black polish to trace the wing edges. Steady hands win here.
- Dot accents: Add small white dots in the open turquoise space for movement.
- Top coat: Seal with a glossy top coat, capping the free edge.
32 Stunning Summer Wedding Hairstyles for Brides ☀️💍
14.Deep Teal & Gold Foil Monarchs
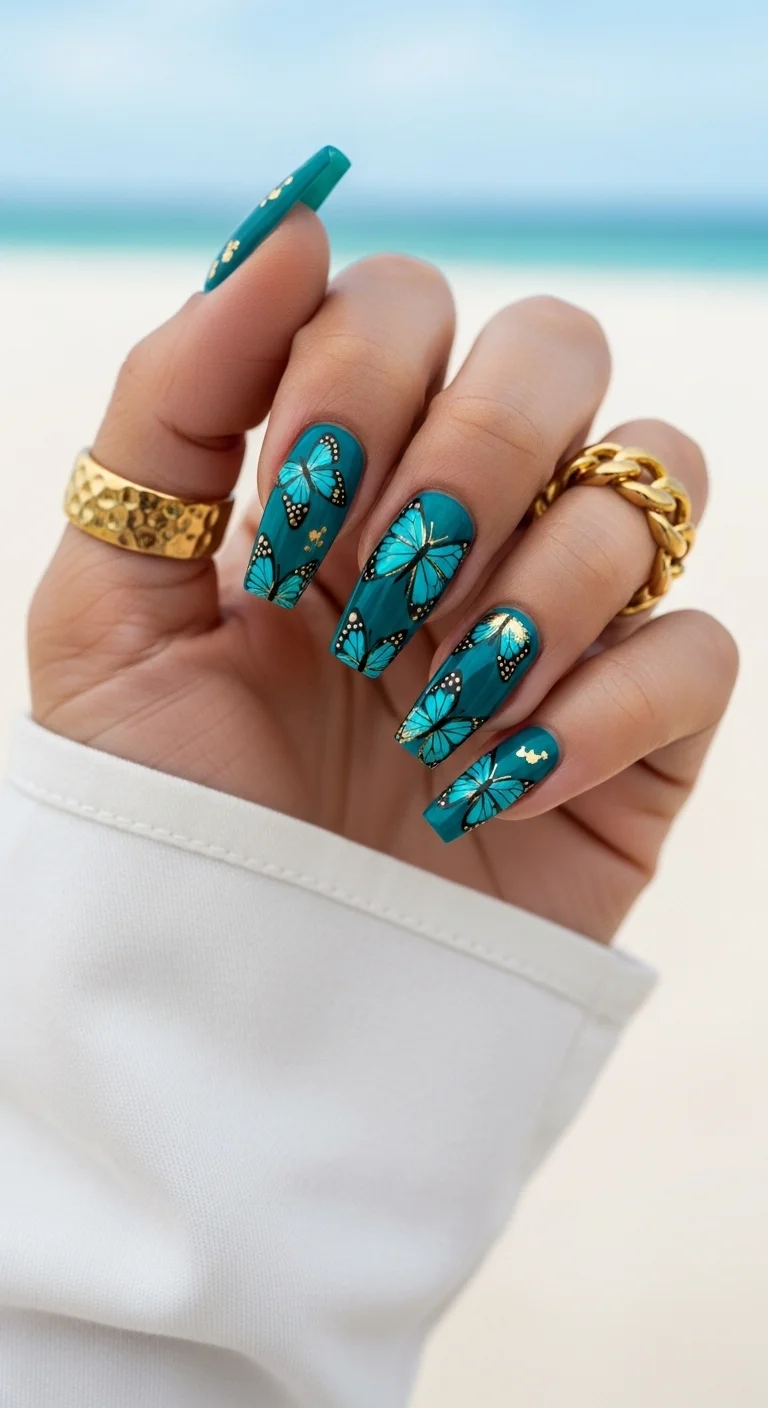
A moody, rich take on the monarch trend.
Overview:
This deep teal leans dark enough to feel autumnal but the bright cyan monarch wings keep it anchored in summer. The gold foil flakes scattered throughout add a textural element that flat polish alone can't achieve.
The challenge with this design is the gold foil application. It requires patience and a light touch. Press too hard and the foil tears. Don't press hard enough and it won't adhere. Dark teal also shows every chip immediately, so plan on shorter wear time or keep a matching polish handy for quick touch-ups.
Design Breakdown:
This design uses the contrast between the dark base and the bright monarch patterns to create visual depth.
Base Color: A deep, opaque teal or dark cyan with a hint of blue. It should look almost black in low light.
Nail Shape: Long coffin. The dramatic length enhances the moody aesthetic.
Design Element: Monarch butterfly patterns in bright cyan with black veining, white dots, and gold foil flakes.
Finish: Thick, glossy top coat to encapsulate the foil and create a smooth surface.
Get The Look at Home:
Gold foil application is where most people struggle. Here's how to get it right.
- Teal base: Apply two coats of deep teal like OPI's "I'm Not Really a Waitress" or Essie's "Off Tropic." Let it get slightly tacky, not fully dry.
- Foil placement: Press small gold foil flakes onto the nail with a soft brush. Work in sections.
- Monarch details: Place monarch stickers or hand-paint the bright cyan wings with black veining.
- White dots: Add the signature monarch white dots along the wing edges with a dotting tool.
- Seal it: Apply a thick top coat to smooth the foil texture and protect the design.
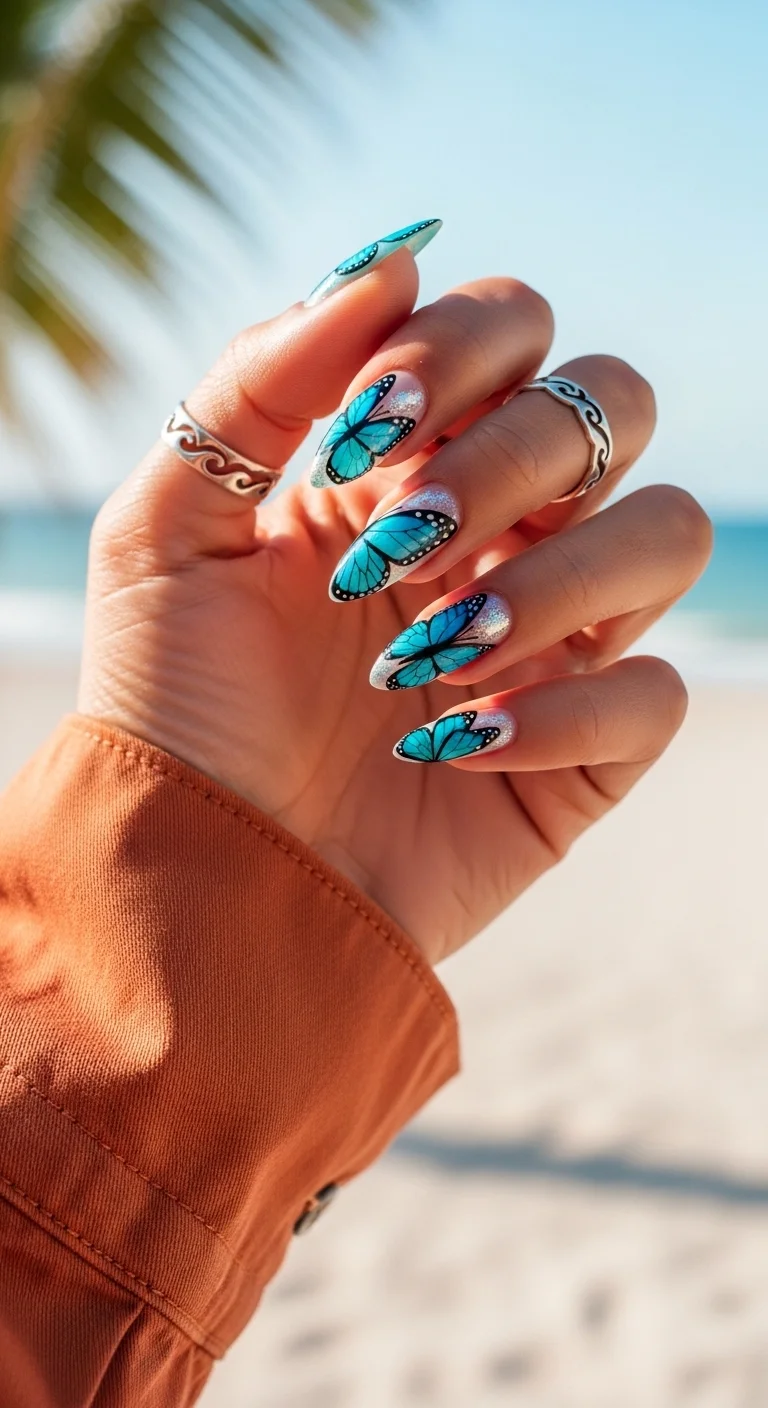
15.Turquoise & Silver Flutter
A cool-toned summer classic with metallic depth.
Overview:
This turquoise leans more blue-green than the previous design, giving it a sharper, more electric feel. The white butterflies with black outlines provide the graphic structure, while the silver holographic shimmer overlay on the wings adds a third dimension that flat polish can't replicate.
One practical note: holographic shimmer looks stunning in direct light but can appear muddy in dim settings. If you work in an office with fluorescent lighting, this design may not read the way you expect. The short oval shape keeps it wearable for everyday.
Design Breakdown:
This set balances three elements: bold color, graphic art, and metallic texture. The trick is not overdoing any single one.
Base Color: A vibrant blue-green turquoise, brighter and more saturated than a muted teal.
Nail Shape: Short oval or round. The soft shape tempers the bold color.
Design Element: White butterflies with black outlines and a silver holographic shimmer overlay on the wing shapes.
Finish: Glossy top coat that preserves the holographic effect without dulling it.
Get The Look at Home:
The key technique is layering the shimmer over the butterfly shapes without flooding the entire nail.
- Turquoise base: Two even coats of vibrant blue-green polish. Let dry completely.
- Butterfly art: Paint white butterfly shapes with a small brush or apply pre-made decals.
- Black outlines: Use a fine liner brush to trace the wing edges. Keep lines thin and consistent.
- Shimmer layer: Apply silver holographic polish or powder specifically over the white wing areas.
- Top coat: Seal with a glossy top coat. Avoid pressing too hard, which can shift the shimmer.

34 Cutest Butter Yellow Nail Designs for 2026 🧈
16.Lavender Aura & Silver Butterfly
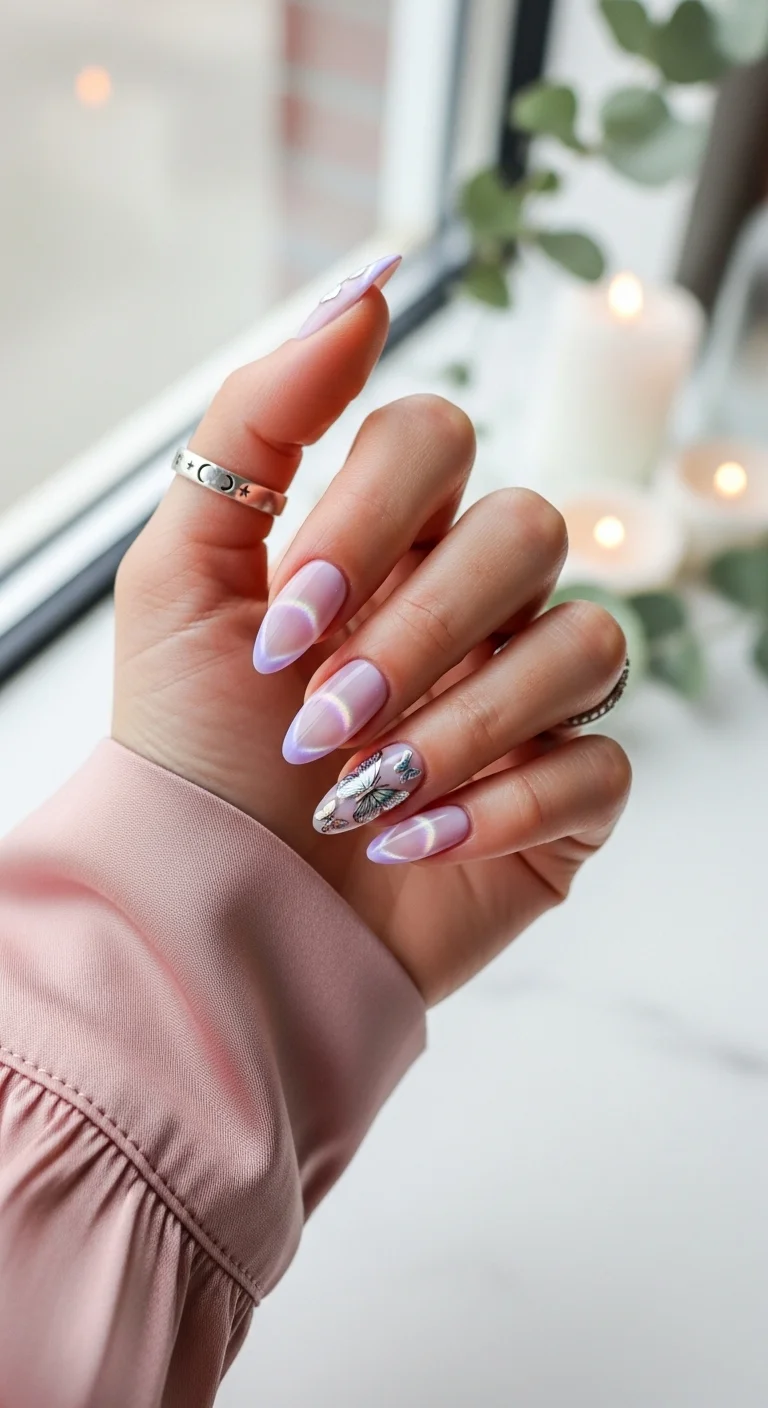
An ethereal, minimalist take on the butterfly trend.
Overview:
The aura effect shifts from pale purple to soft pink depending on the light, creating an iridescent quality that looks like the color is glowing from within. The single raised silver butterfly on the ring finger acts as a focal point while the remaining nails stay plain lavender, keeping the overall look restrained.
Worth mentioning: the embossed butterfly catches on knitwear and delicate fabrics. This design works best with smoother materials like silk, cotton, or leather. The almond shape elongates the fingers and complements the soft color palette.
Design Breakdown:
This design relies on the aurora shimmer to create movement across the nail surface. The raised butterfly adds a tactile element.
Base Color: Soft lavender with aurora or iridescent shimmer particles that shift between purple and pink.
Nail Shape: Almond. The tapered tip enhances the ethereal quality.
Design Element: A single large, detailed silver or metallic butterfly on the ring finger only. Slightly raised or embossed for texture.
Finish: High-gloss top coat that preserves the shimmer shift.
Get The Look at Home:
The honest downside is that the raised butterfly will snag on certain fabrics. Plan your outfit accordingly.
- Lavender base: Apply two coats of soft lavender with aurora shimmer. Let dry fully.
- Aura effect: For a more pronounced aura, sponge a slightly darker purple at the center and blend outward.
- Butterfly placement: Apply a silver butterfly sticker or decal to the ring finger only. Press firmly.
- Plain nails: Leave the remaining nails in solid lavender without additional art.
- Top coat: Apply a thick top coat to smooth the sponged texture and lock the butterfly in place.
17.Midnight Navy & Silver Space Butterflies
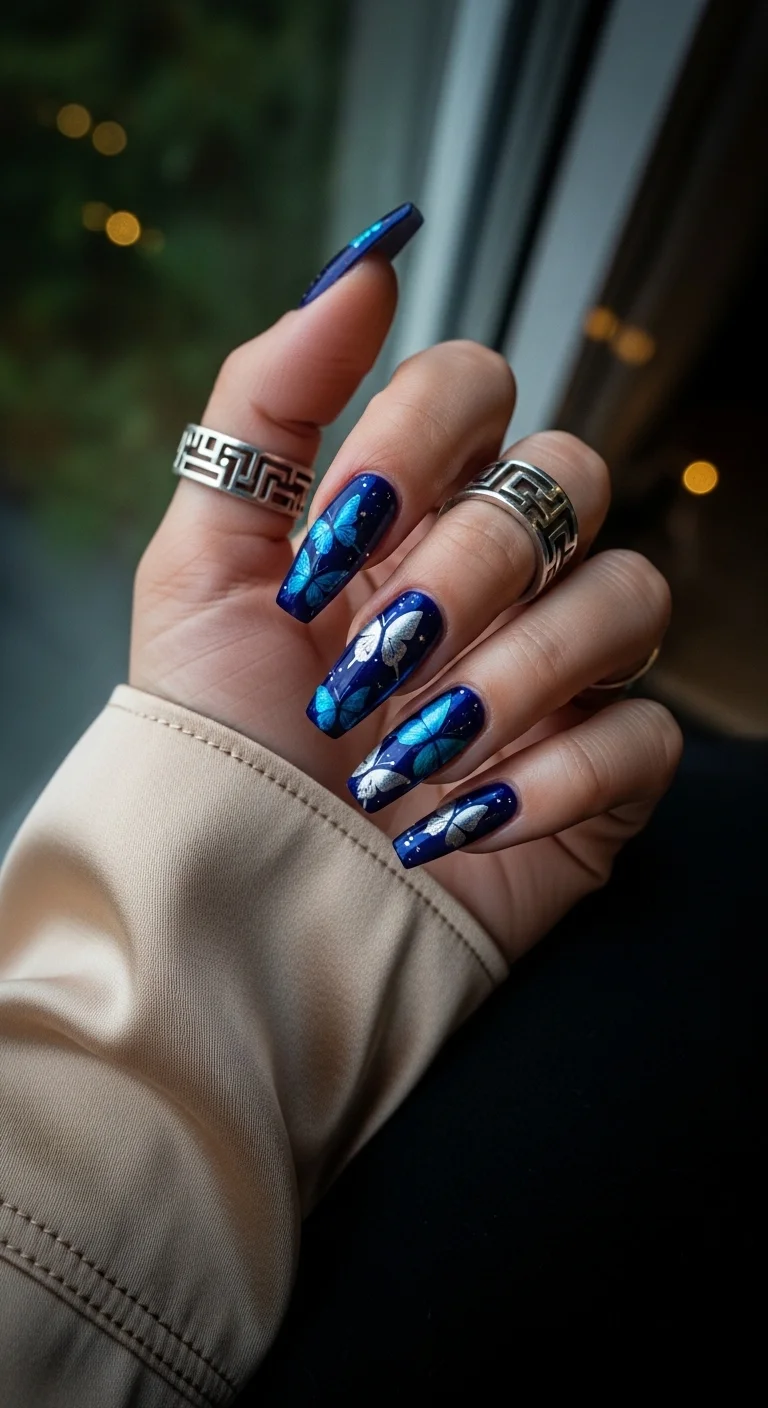
A celestial, galaxy-inspired butterfly set.
Overview:
This midnight navy with micro-glitter creates a galaxy effect that serves as the backdrop for multiple butterflies in bright cyan and metallic silver. The tiny white star dots scattered throughout tie the cosmic theme together. It's a high-contrast design that reads dramatic without being chaotic.
The challenge with this design is the micro-glitter removal. Budget extra time for soaking off, or use a peel-off base coat if you plan to switch designs frequently. Navy also shows every imperfection in application, so clean edges matter.
Design Breakdown:
The key to this look is layering the butterflies at different angles to create a sense of depth and movement.
Base Color: Deep midnight navy with micro-glitter or fine-shimmer particles for a galaxy effect.
Nail Shape: Long coffin. The dramatic length gives the design room to breathe.
Design Element: Multiple butterflies in bright cyan/teal and silver/metallic white with black outlines. Tiny white star dots.
Finish: High-gloss top coat to deepen the navy and make the glitter sparkle.
Get The Look at Home:
This design requires more time than most butterfly sets. The multiple butterfly sizes and star dots add complexity.
- Navy base: Apply two coats of midnight navy with micro-glitter. Let dry fully.
- Butterfly layers: Place or paint butterflies at varying angles. Start with larger ones, then add smaller ones.
- Color mix: Alternate between bright cyan and metallic silver butterflies for visual variety.
- Star dots: Use a fine dotting tool and white polish to add tiny star-like dots in the open navy space.
- Top coat: Apply a thick, glossy top coat to smooth the surface and enhance the galaxy effect.

25 Stunning Summer Vacation Hairstyles for 2026 ☀️🌊
18.Periwinkle & Deep Blue Flutter
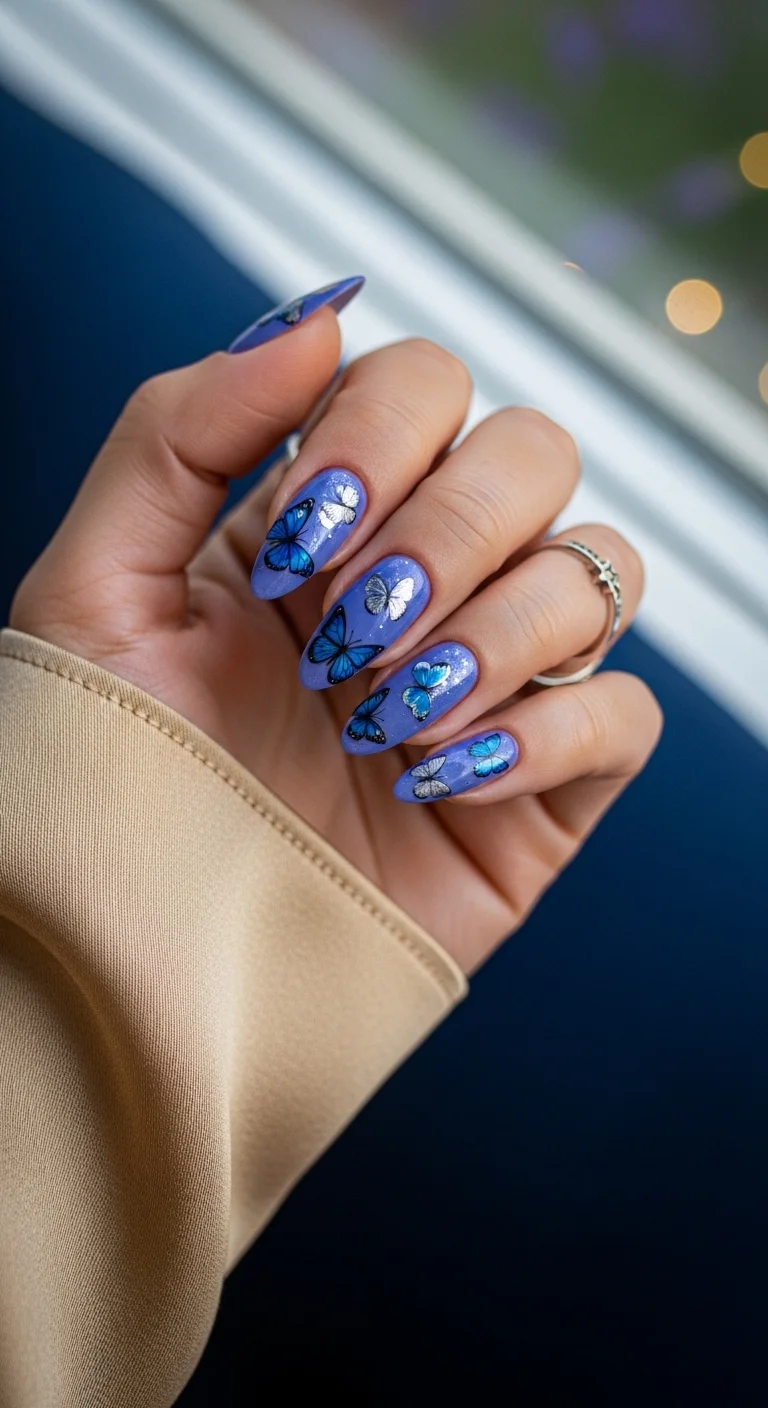
A tonal, soft-glam butterfly design.
Overview:
Periwinkle sits right between blue and violet, making it one of the more versatile summer shades. The darker blue butterflies paired with silver and white ones create a tonal gradient across the nail. Fine glitter shimmer adds subtle dimension without overwhelming the soft color palette.
This design is straightforward, but the periwinkle base can wash out on warmer skin tones. Our editorial team recommends testing the shade against your wrist before committing. The medium almond shape keeps the look balanced and wearable.
Design Breakdown:
This design uses a monochromatic palette with metallic accents to create depth without contrast.
Base Color: A creamy periwinkle blue, opaque in two coats.
Nail Shape: Medium almond. The length gives the butterflies room without going dramatic.
Design Element: Darker blue butterflies alongside silver and white butterflies, all with black outlines. Fine glitter shimmer throughout.
Finish: Glossy top coat that enhances the glitter without creating a textured surface.
Get The Look at Home:
The key technique is layering the different butterfly tones to create a cohesive gradient effect.
- Periwinkle base: Apply two thin coats of periwinkle. Ensure even coverage.
- Dark blue butterflies: Paint or place darker blue butterfly shapes first. These anchor the design.
- Silver and white: Add silver and white butterflies in the remaining space. Vary the sizes.
- Black outlines: Use a fine liner brush to outline all butterfly shapes.
- Glitter touch: Dust fine glitter shimmer over the entire nail before the top coat.
- Top coat: Seal with a glossy top coat to smooth the glitter texture.
19.Blue Sky & Cloud Flutter
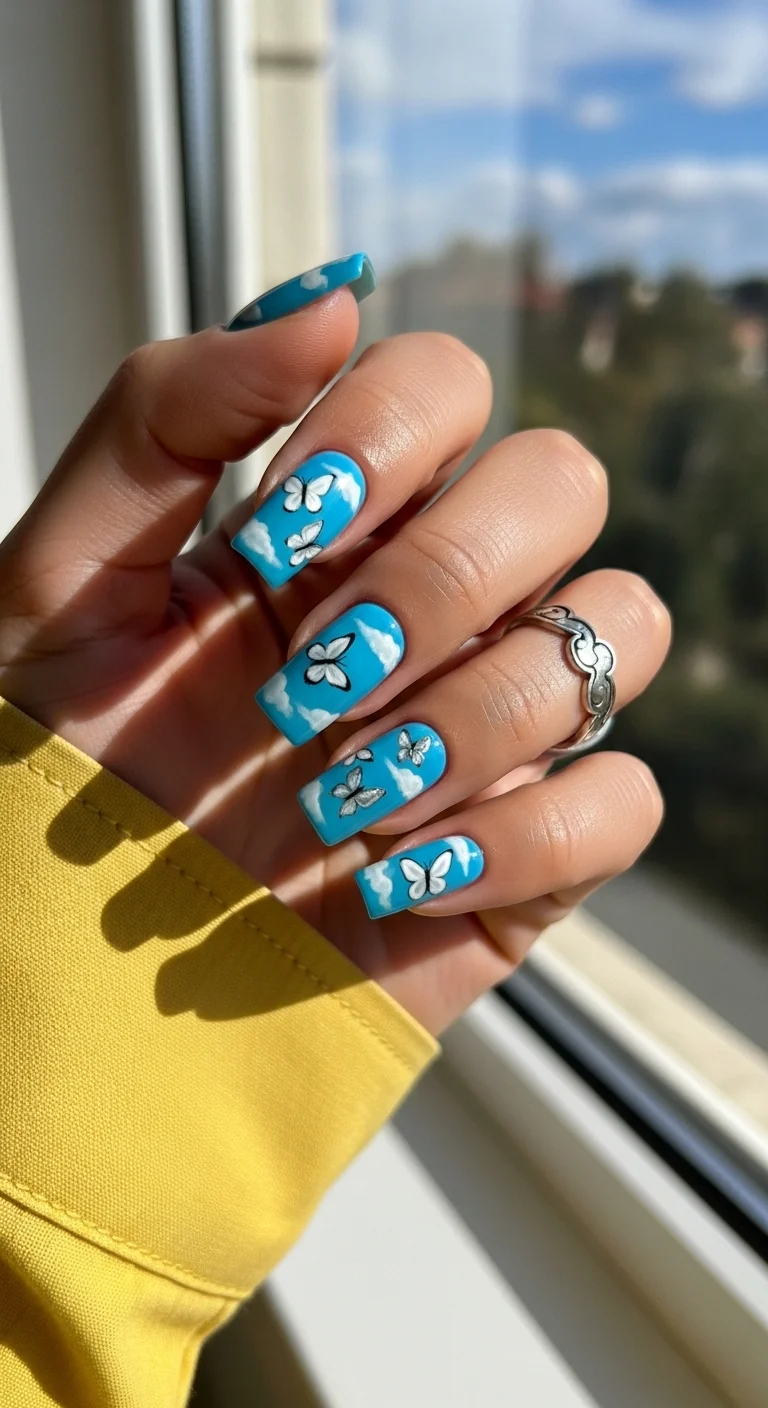
A whimsical, sky-inspired butterfly design.
Overview:
This bright sky blue reads cheerful without being neon. The white cloud shapes and white butterflies with black-outlined wing edges create a cohesive sky theme. It's a straightforward design that works well on short nails.
The honest downside is that clouds can look childish if they're not executed with clean edges. Budget extra time for the cloud shaping. Short coffin nails keep the design contained and prevent it from feeling overdone.
Design Breakdown:
This design works best when the clouds and butterflies share the same white tone, creating visual unity.
Base Color: A bright, opaque sky blue. It should read clean, not pastel.
Nail Shape: Short coffin. The flat tip provides a clean frame for the sky theme.
Design Element: White cloud shapes and white butterflies with black-outlined wing edges.
Finish: High-gloss top coat to enhance the blue and seal the design.
Get The Look at Home:
The key technique is keeping the clouds soft and organic while the butterflies stay graphic.
- Sky blue base: Apply two coats of bright sky blue. Let dry fully.
- Cloud shapes: Use a makeup sponge or small brush to dab on white cloud forms. Keep edges soft.
- Butterfly shapes: Paint or place white butterfly silhouettes in the open blue space.
- Black outlines: Trace the butterfly wing edges with a fine liner brush and black polish.
- Top coat: Seal with a glossy top coat. Apply thin layers to avoid smudging the clouds.

31 Patriotic Fourth of July Nail Ideas for 2026 🇺🇸
20.Neon Lime & Green Flutter
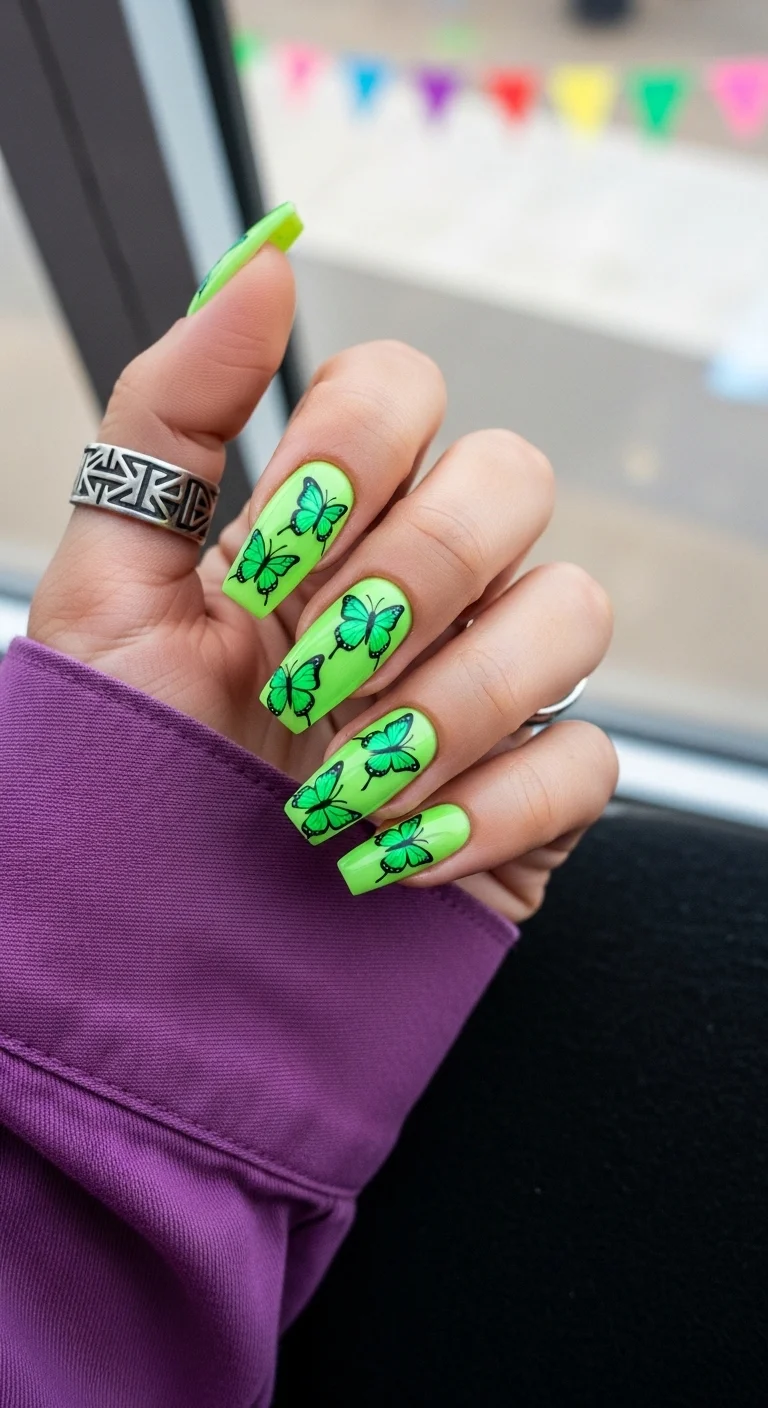
A bold, high-energy neon butterfly set.
Overview:
This neon lime green verges on fluorescent, which makes it a polarizing choice. The darker emerald green butterflies with black outlines ground the brightness and add definition. It's a design that demands attention and won't work for anyone who prefers subtle nails.
The challenge with neons is streaking. They almost always require a white base coat to achieve even coverage. Without it, you'll need three or four coats, which increases drying time and the risk of smudging. Medium coffin shape gives the neon room to make an impact.
Design Breakdown:
This set is all about the contrast between the neon base and the deeper butterfly tones.
Base Color: Neon lime green, almost fluorescent yellow-green. High pigment is essential.
Nail Shape: Medium coffin. The structured shape balances the wild color.
Design Element: Darker emerald green butterflies with black outlines. The tone-on-tone approach keeps it cohesive.
Finish: Glossy top coat to prevent neon yellowing over time.
Get The Look at Home:
Neon polish is unforgiving. A white base coat is non-negotiable for even results.
- White base: Apply one coat of white polish as a foundation. This makes the neon pop.
- Neon layer: Apply two thin coats of neon lime green. Let each coat dry completely.
- Butterfly art: Paint or place darker emerald green butterfly shapes on the nails.
- Black outlines: Use a fine liner brush to trace the wing edges and add antennas.
- Top coat: Seal with a glossy top coat to protect the neon from fading.
21.Blue Ombre & Silver Monarch
A gradient-meets-nature butterfly design.
Overview:
This design combines a silver-to-cyan gradient with full monarch wing patterns covering most of each nail. The silver glitter at the cuticle fading into bright cyan creates an ombre effect, while the monarch wings layered on top add organic structure.
The honest downside is the gradient blending. Getting a seamless fade between silver glitter and solid cyan requires practice and a steady sponge technique. The almond stiletto shape elongates the fingers and gives the monarch wings room to spread across the nail surface.
Design Breakdown:
This design layers two distinct techniques: gradient blending and detailed wing painting.
Base Color: Silver glitter at the cuticle area fading into bright cyan or turquoise blue at the tip.
Nail Shape: Almond or stiletto. The pointed tip enhances the dramatic gradient.
Design Element: Full monarch butterfly wing patterns covering most of each nail, painted over the gradient.
Finish: High-gloss top coat to smooth the glitter texture and deepen the colors.
Get The Look at Home:
The gradient requires patience. Work in thin layers and blend while the polish is still wet.
- Base prep: Apply a white or nude base to help the colors show true.
- Gradient: Use a makeup sponge to dab silver glitter at the cuticle and cyan at the tip. Blend where they meet.
- Dry time: Let the gradient dry completely before adding the wing details.
- Monarch wings: Paint the monarch wing patterns with a fine brush, covering most of the nail.
- Top coat: Apply two layers of top coat to smooth the glitter and seal the design.

21 Hot Summer Buns Hairstyle Ideas for 2026 ☀️🔥
22.Sunset Orange & Yellow Ombre
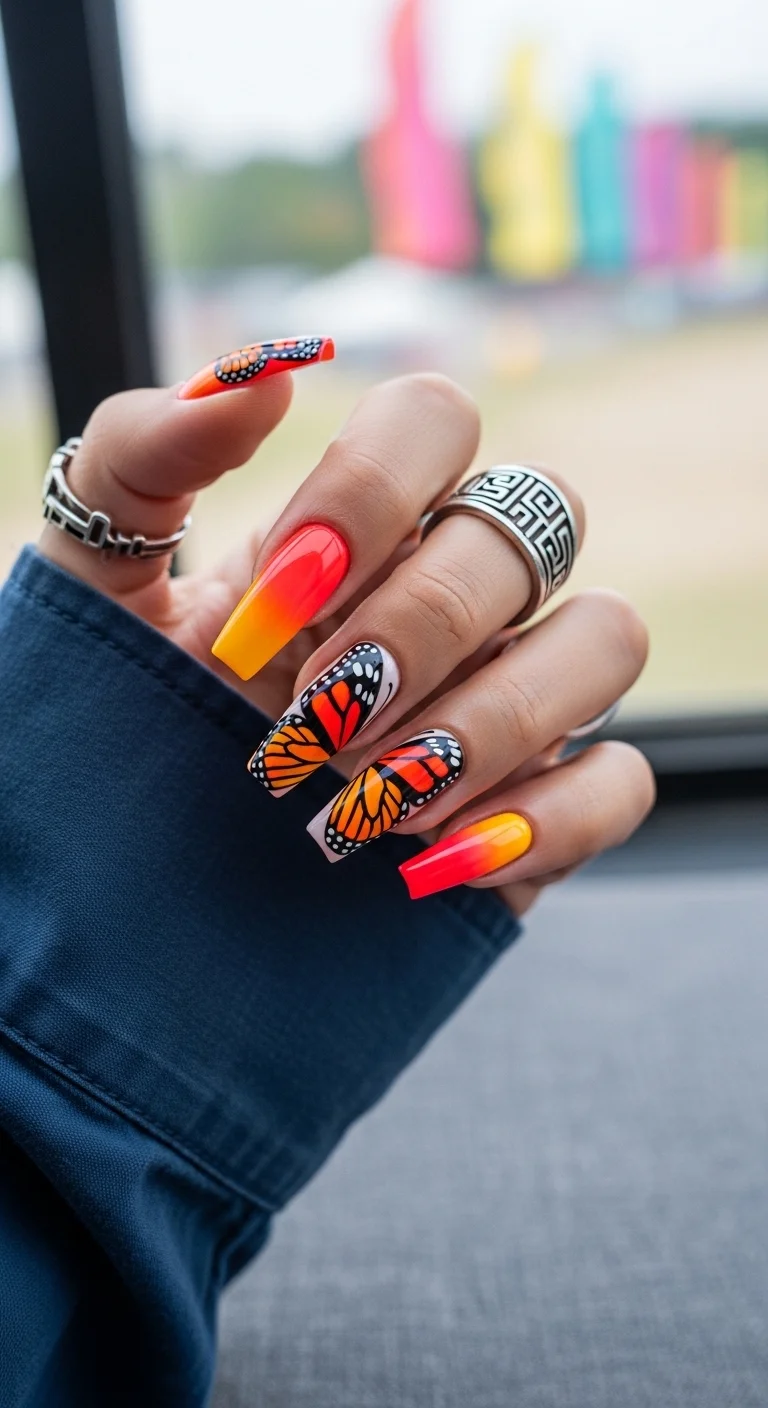
A warm-toned ombre with monarch accents.
Overview:
The orange-to-yellow sunset gradient is a classic summer combination that works because the colors sit next to each other on the color wheel. The monarch wing patterns on the middle and ring fingers tie the warm palette together without covering every nail.
One practical note: ombre blending with warm tones can turn muddy if the colors mix too aggressively. Work quickly and use a light sponge touch. The coffin shape gives the gradient room to transition smoothly from cuticle to tip.
Design Breakdown:
This design keeps the ombre on all nails while limiting the monarch art to two fingers for a balanced look.
Base Color: Bright orange at the base fading into sunny yellow at the tip.
Nail Shape: Coffin. The flat tip provides a clean edge for the gradient.
Design Element: Monarch butterfly wing patterns on the middle and ring fingers only.
Finish: Glossy top coat to make the sunset colors pop.
Get The Look at Home:
The key technique is blending the ombre while the polish is still wet to avoid harsh lines.
- Base coat: Apply a clear base coat for protection.
- Ombre blend: Use a makeup sponge. Dab orange at the base and yellow at the tip, then blend where they meet.
- Dry time: Let the ombre dry fully before adding butterfly art.
- Monarch wings: Paint monarch wing patterns on the middle and ring fingers with black and orange.
- Detailing: Add white dots along the wing edges for the classic monarch look.
- Top coat: Seal with a glossy top coat to protect the design.
23.Nude & Pink Pearl Flutter

A delicate, feminine butterfly design with 3D accents.
Overview:
This nude and pink combination reads soft and romantic. The sheer milky base lets the natural nail show through, while the hand-painted pink butterflies with black outlines add definition. The small white pearl beads near the cuticles on several nails introduce a 3D element that elevates the design.
The honest downside is pearl longevity. These beads pop off with daily wear, especially if you type frequently or work with your hands. Use a strong adhesive and seal with a thick top coat. The almond shape keeps the overall look refined.
Design Breakdown:
This design combines hand-painted art with 3D embellishments. The key is keeping the butterflies subtle so the pearls stand out.
Base Color: Nude or pale pink with a sheer, milky finish.
Nail Shape: Almond. The soft curves complement the feminine palette.
Design Element: Hand-painted pink butterflies with black outlines and small white pearl beads near the cuticle area.
Finish: Glossy top coat, applied carefully around the pearls to maintain their luster.
Get The Look at Home:
Pearls require patience and a steady hand. Secure them well or they'll be gone within a day.
- Nude base: Apply two coats of sheer nude or pale pink polish.
- Butterfly art: Use a fine brush to paint pink butterfly shapes with black outlines.
- Pearl placement: Apply a small dot of nail glue or thick top coat near the cuticle, then press the pearl into place.
- Seal it: Apply top coat around the pearls, not over them, to keep their finish intact.

27 Stunning Graduation Day Nail Ideas for 2026 🎓
24.Neon Pink French & White Flutter
A modern French twist with butterfly accents.
Overview:
This design updates the classic French tip with neon hot pink, adding white butterfly silhouettes on the ring and middle fingers for a contemporary touch. The nude or sheer pink base keeps the look clean while the neon tips provide the punch.
One practical note: neon French tips require precision. Uneven lines are immediately visible against the nude base. Use tape or French tip guides if your freehand skills aren't solid. The coffin shape gives the French tip a sharp, modern edge.
Design Breakdown:
This design uses the French tip as the primary statement, with the butterflies as a secondary accent.
Base Color: Nude or sheer pink, providing a natural-looking canvas.
Nail Shape: Coffin. The flat tip creates a crisp French line.
Design Element: Neon hot pink French tips on all nails. Solid white butterfly silhouettes (no outline detail) on the ring and middle fingers.
Finish: Glossy top coat to seal the design and prevent neon yellowing.
Get The Look at Home:
The key technique is getting crisp French lines. Tape or guides are your best friend here.
- Base color: Apply two coats of nude or sheer pink. Let dry fully.
- French tips: Use tape or French tip guides to paint the neon hot pink tips. Apply two thin coats.
- Butterfly art: Paint or place solid white butterfly silhouettes on the ring and middle fingers.
- Remove guides: Peel tape while the polish is still slightly tacky for cleaner lines.
- Top coat: Seal with a glossy top coat to protect the neon and smooth the surface.
25.Blue Sky & Pink Flutter
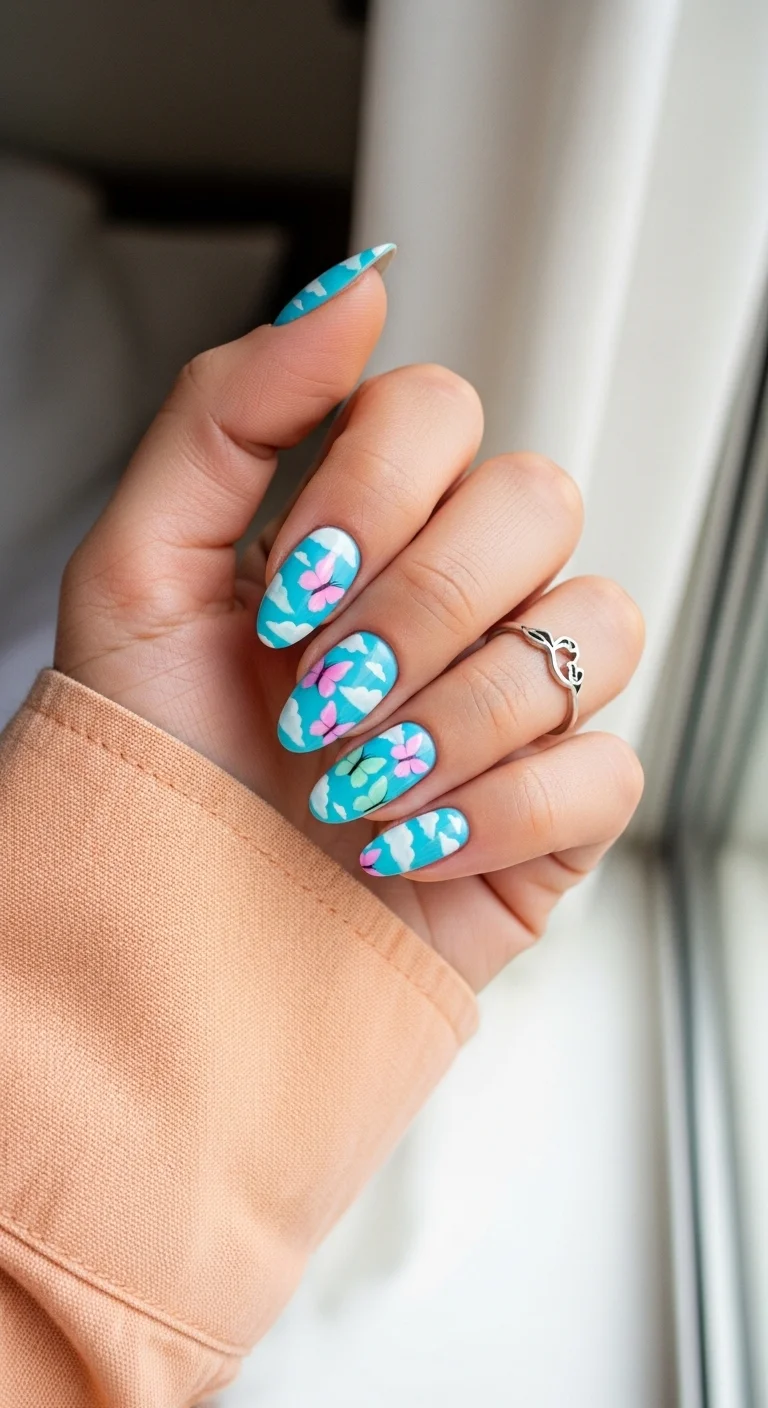
Sky-inspired nail art with hand-painted clouds and butterflies
Overview:
This design pairs a vivid sky blue with wispy white clouds and delicate pink and green butterflies that seem to float across the nail. The combination reads playful without tipping into cartoon territory, thanks to the fine black antennae and subtle color choices on the butterfly wings.
Design Breakdown:
The bright turquoise base creates an immediate focal point. Two coats of OPI's "Can't Find My Czechbook" or similar shade delivers the right opacity without looking heavy.
The white clouds are painted using a thin detail brush, and the key technique is keeping them slightly irregular so they look natural rather than stamped on. The pink and green butterflies add a second dimension of color without competing with the blue.
Get The Look at Home:
Start with your sky blue base, then layer the clouds once the base is fully dry. Budget extra time for the butterfly details, as the fine antennae require a steady hand. The challenge with this design is the cloud shapes. If they're too uniform, the whole thing looks manufactured rather than dreamy.
One practical note: this design photographs beautifully in natural light but can appear washed out under fluorescent office lighting.
28 Effortless Hot Weather Day Hairstyles for Women 2026 ☀️💇♀️
26.Sunset Orange & Gold Wings
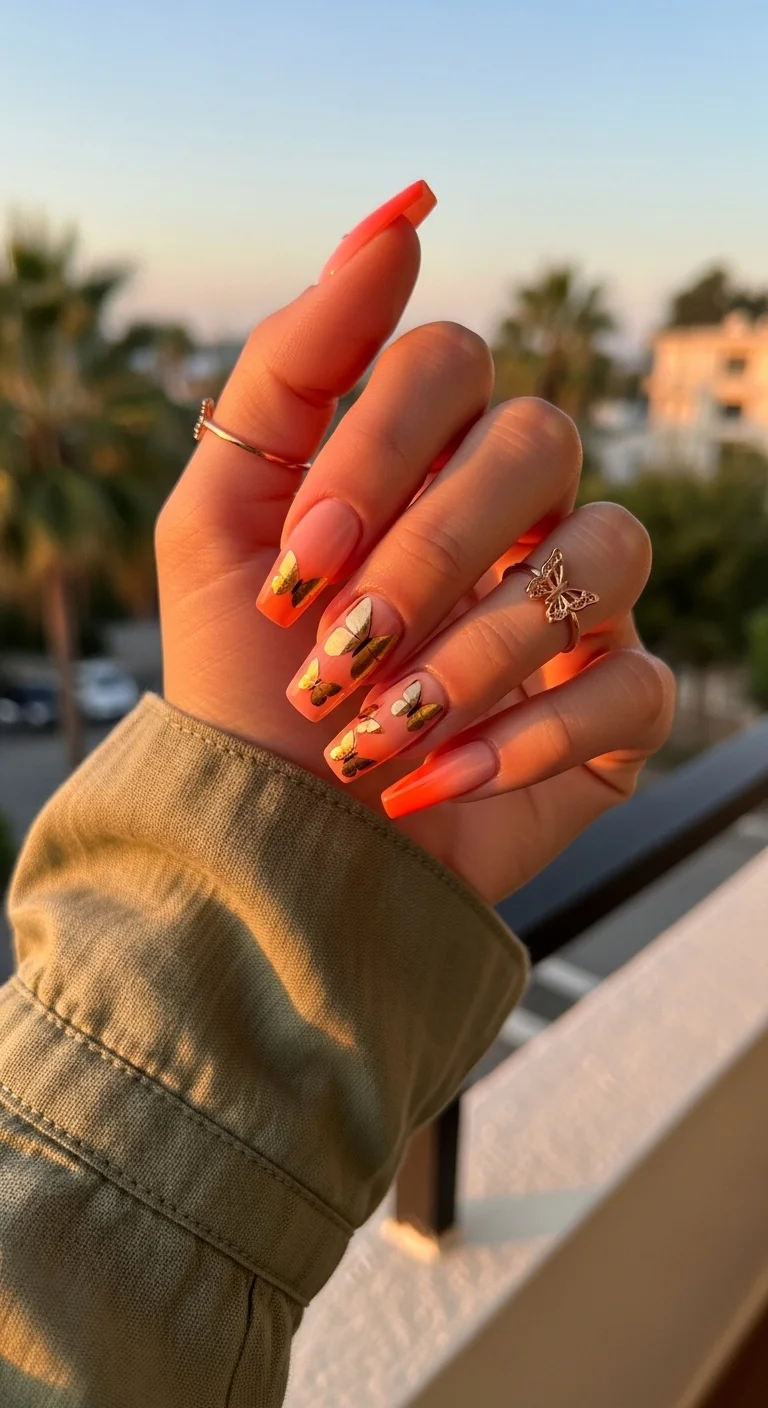
Warm coral nails with dimensional gold butterfly appliques
Overview:
There is something undeniably eye-catching about metallic gold against a warm coral base. This coffin-shaped design keeps most nails a solid sunset orange, then places dimensional gold butterfly charms on two accent fingers for maximum impact.
Design Breakdown:
The coral-orange shade leans warm, almost like a tropical sunset. We tested this with Beetles Gel Polish in "Tropical Sunset" and found the warmth pairs perfectly with gold hardware.
The 3D butterfly appliques sit slightly raised from the nail surface. They catch light from every angle, which is the whole point of choosing metallic over flat gold polish.
Get The Look at Home:
The honest downside is durability. Those 3D charms can catch on hair, fabric, and basically everything else. Seal them with an extra layer of top coat around the edges, though even that only extends their lifespan by a few days.
Application is straightforward otherwise. Press the charms into tacky gel polish, cure, then encapsulate with top coat. Worth mentioning: these work best on longer nail lengths where the charm proportions look balanced.
27.Dusty Rose & Creamy Butterfly
Muted rose nails with hand-painted butterflies and gold foil accents
Overview:
Not every butterfly design needs to shout. This almond-shaped look uses a muted dusty rose base that feels sophisticated, then adds cream-colored butterflies with fine black outlines for definition. Scattered gold foil flakes tie the whole palette together.
The color story reads elevated rather than juvenile, making this a solid choice for someone who wants nail art that works in professional settings.
Design Breakdown:
The dusty rose shade has a slight mauve undertone that prevents it from looking too pink. Essie's "Lady Like" is a close match for the base color.
The butterflies are painted in cream rather than pure white, which creates a softer contrast against the rose background. The black fine-line outlines give each wing structure without overwhelming the delicate color palette.
Get The Look at Home:
The key technique here is restraint with the gold foil. A few scattered pieces look intentional; too many and the design veers into cluttered territory. Apply the foil while the top coat is still tacky, pressing gently with a clean brush.
The challenge with this design is achieving clean black outlines on such a small scale. A super-fine detail brush or a nail art pen with a 0.1mm tip makes a significant difference in the final result.

28 Trendy May Nail Designs for 2026 💅
28.Neon Orange French & Gold Flutter

Warm-toned nails with metallic butterfly appliques
Overview:
This almond-shaped design takes a warm coral-orange base and elevates it with gold metallic 3D butterfly charms placed on the middle and ring fingers. The result is a look that balances everyday wearability with a touch of dimension.
Design Breakdown:
The coral tone leans slightly neon but stops short of being aggressive. It reads warm and inviting rather than traffic-cone bright. The solid base on most fingers keeps the overall effect grounded.
The gold butterfly appliques are the star here. They're small enough to remain elegant but dimensional enough to catch the light and create visual interest. Our editorial team found that the gold tones pair well with both warm and cool skin tones.
Get The Look at Home:
Budget extra time for placement. The butterfly charms need to sit centered on the nail plate, and adjusting them after the gel has started to cure is nearly impossible. Use a dot of nail glue for extra security if you're working with regular polish instead of gel.
One practical note: this design looks best when the remaining nails are kept clean and simple. Adding more decoration would compete with the butterfly accents rather than complement them.
29.Holographic Silver & Pink Flutter
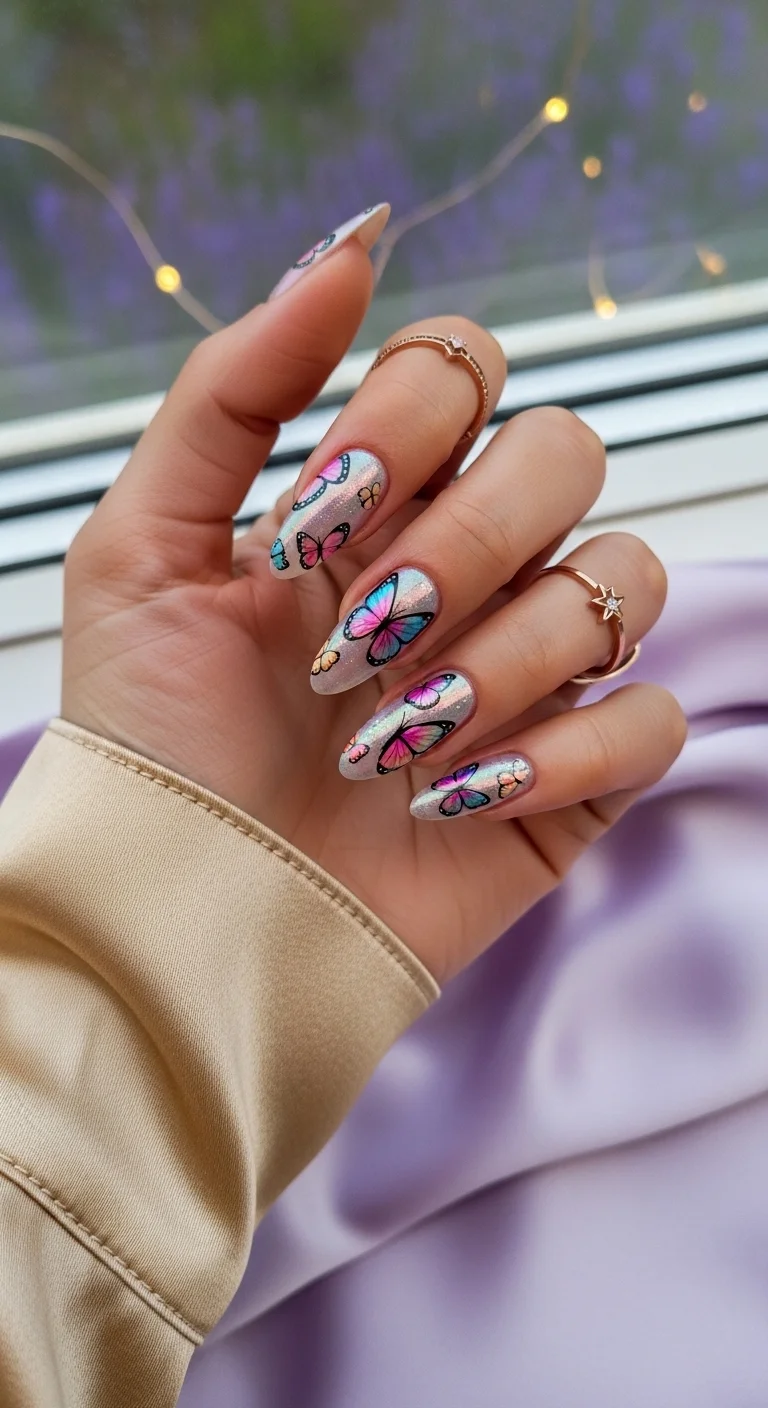
Iridescent silver nails with multi-colored butterfly details
Overview:
What happens when you combine holographic silver with pastel butterflies? A design that shifts color with every movement of your hand. This almond-shaped look features a holographic base with a pink-to-blue color shift, overlaid with pink, blue, and small yellow butterflies outlined in black.
The holographic effect creates a liquid-metal appearance that serves as an unexpectedly modern backdrop for the whimsical butterfly details.
Design Breakdown:
The holographic silver base does most of the heavy lifting visually. China Glaze's "OMG" or a similar linear holo formula delivers the right level of prismatic reflection. The pink-to-blue shift is inherent to the holographic pigment, not a separate color application.
The butterflies use two main colors (pink and blue) with smaller yellow accent butterflies. The black outlines are essential here, they prevent the butterfly details from disappearing into the busy background.
Get The Look at Home:
The honest downside is that holographic polish shows every imperfection in the nail surface. Any ridges, bumps, or uneven application becomes magnified under the reflective finish. A ridge-filling base coat is non-negotiable with this formula.
Painting detailed butterflies over a holographic base also presents a technical challenge. The slick surface resists fine brushstrokes, so the base needs to be fully cured and slightly buffed before adding the butterfly artwork.
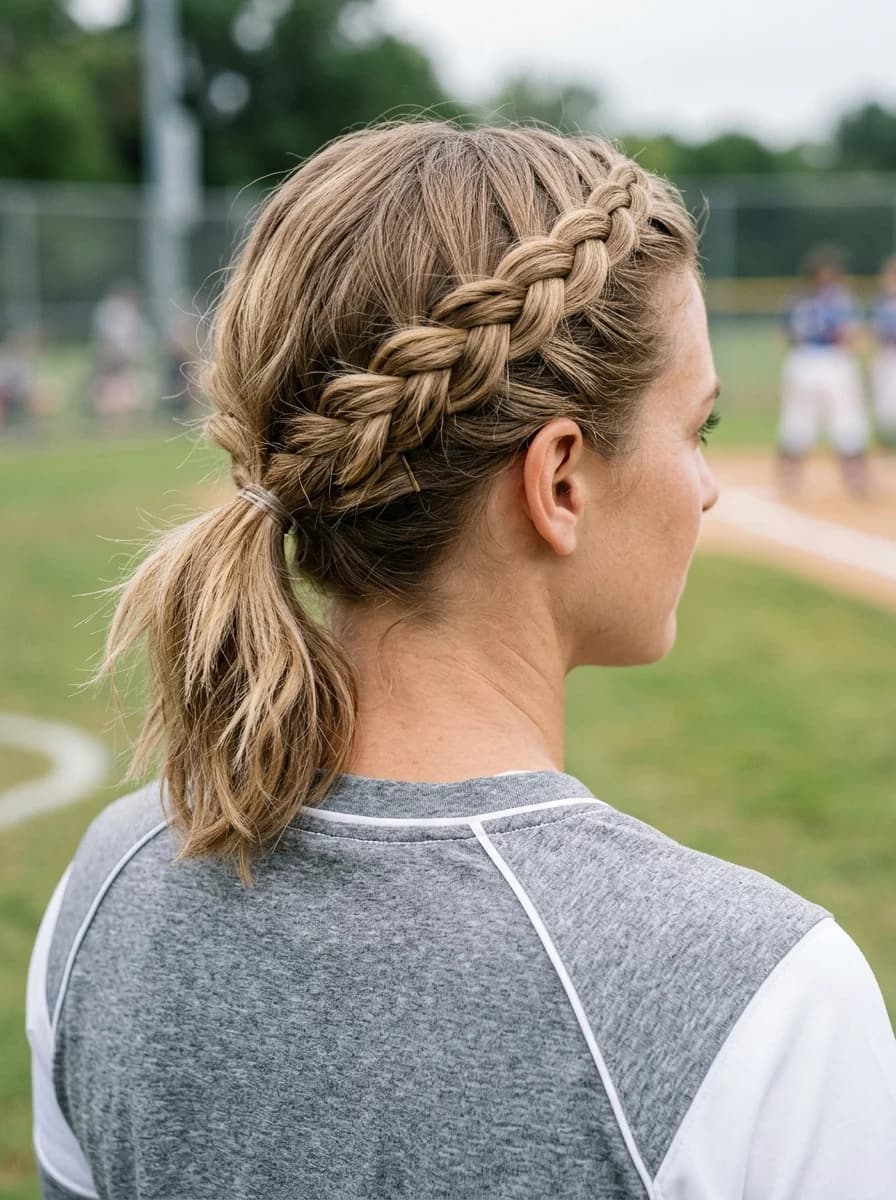
28 Stunning Softball Hairstyle Ideas with Braids for 2026 🥎✨
30.Magenta & Black Monarch Wings
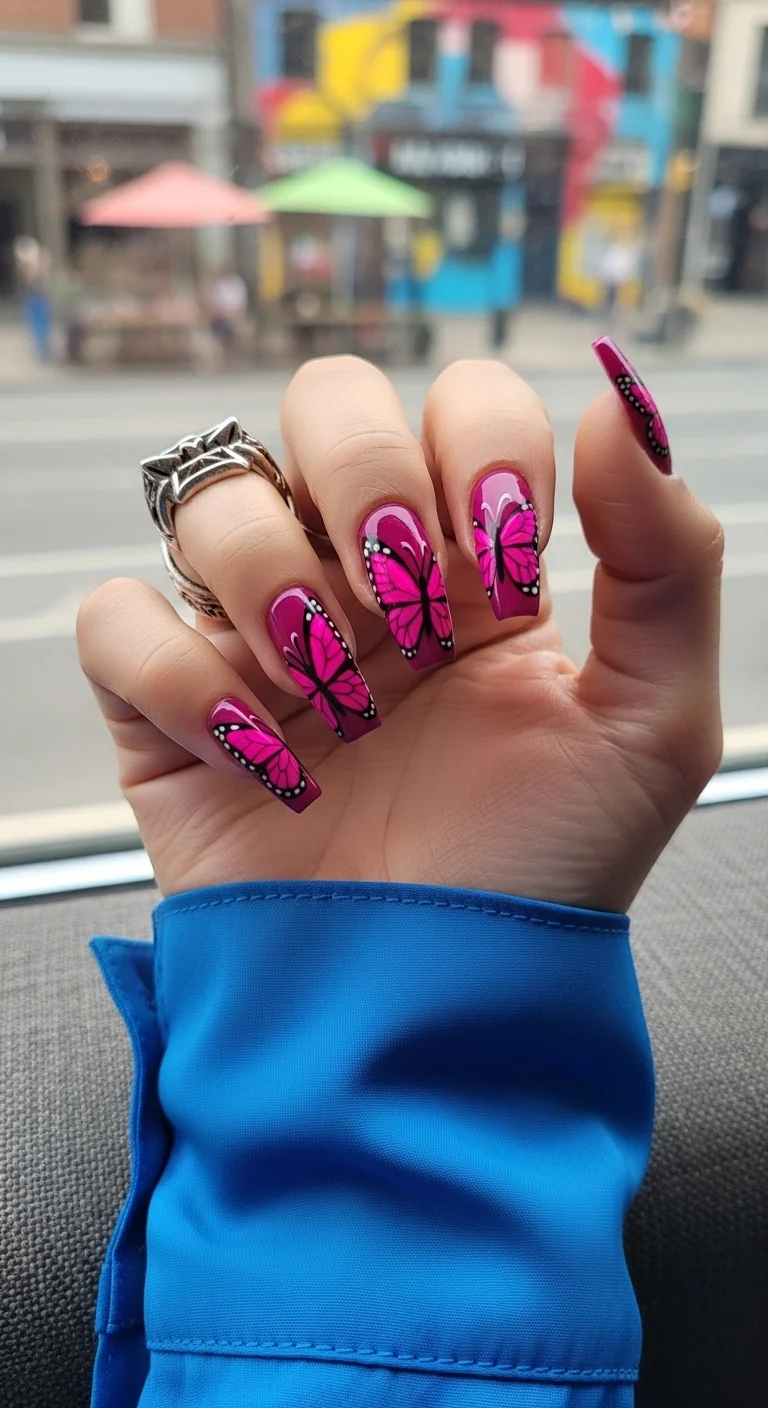
Bold monarch-inspired nail art with magenta and black details
Overview:
Monarch butterfly wings translate surprisingly well to nail art when you swap the traditional orange for deep magenta. This coffin-shaped design covers the entire nail in a wing pattern, complete with bright pink cells, bold black veins, and tiny white dots along the edges.
Design Breakdown:
The deep magenta base provides a rich foundation. The wing pattern uses a brighter pink for the cell sections, creating contrast within the same color family. The black veins are painted with deliberate thickness to mimic actual monarch wing structure.
Those small white dots along the nail edges are what make this design recognizable as monarch wings rather than abstract pattern work. They require patience and a very fine dotting tool.
Get The Look at Home:
Budget extra time for this one. The wing pattern is intricate, and each nail requires multiple layers of detail work. Painting all the black veins first, then filling in the pink cells, produces cleaner results than the reverse approach.
The challenge with this design is maintaining consistent proportions across all ten nails. The veins need to follow a similar pattern on each finger for the overall effect to read as cohesive rather than random.
31.Fiery Red-Orange Ombre
Sunset gradient nails with contrasting white butterfly accents
Overview:
This coffin-shaped design captures the exact colors of a summer sunset, blending from deep red at the cuticle through orange to bright yellow at the tips. White monarch butterflies with black outlines sit on the middle and ring fingers, creating a stark contrast against the warm gradient.
The ombre transition is smooth and intentional, which elevates this beyond a simple two-tone gradient.
Design Breakdown:
The three-color ombre requires careful blending. We recommend using a makeup sponge to dab each color in overlapping sections, building the gradient gradually. Each layer needs to dry before adding the next to prevent muddying.
The white butterflies are a smart design choice. Against the fiery background, white reads clean and crisp where colored butterflies might get lost in the warm tones. The black outlines ensure every wing detail remains visible.
Get The Look at Home:
The honest downside is that achieving a seamless three-color ombre takes practice. The transition between red and orange is forgiving, but the orange-to-yellow blend can look patchy if the sponge is too dry or the polish too thick.
One practical note: the ombre base needs to be completely dry before adding butterfly details, otherwise the white paint picks up the underlying colors and turns muddy. Give this design at least an extra 15 minutes of drying time.

35 Palm Tree Nail Art Ideas that are the Most Iconic Nail Art Designs 🌴✨
32.Limoncello Cream & Yellow Monarch
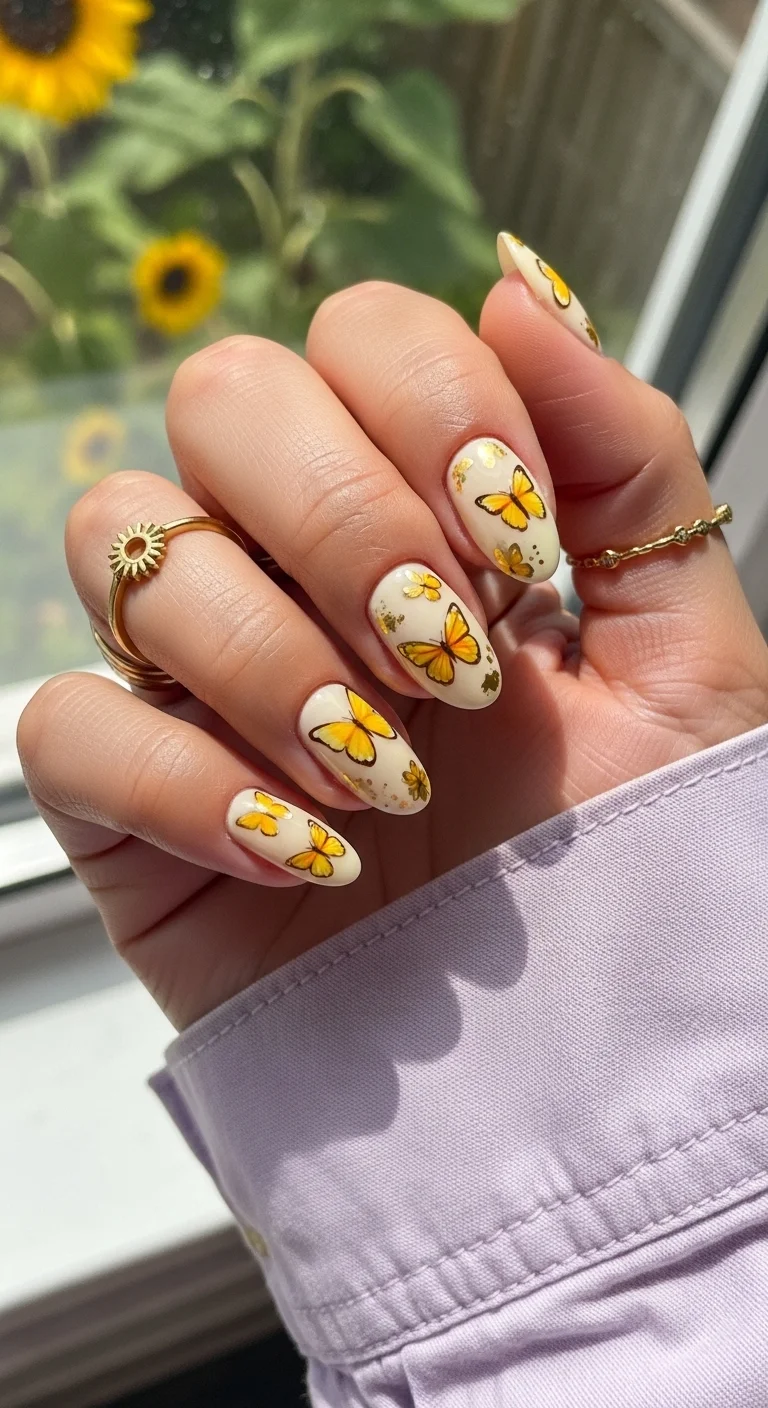
Milky vanilla nails with sunny butterfly details and gold foil
Overview:
A milky vanilla base with yellow butterflies and scattered gold foil creates a look that feels like summer distilled into nail art. This almond-shaped design uses an off-white foundation that lets the warmer yellow and gold elements take center stage.
Design Breakdown:
The cream or off-white base has a slightly warm undertone that prevents it from reading clinical. It functions as a neutral canvas that makes the yellow butterflies appear to glow rather than sit flat on the surface.
The yellow butterflies use black outlines for definition, which prevents them from blending into the light background. The gold foil flakes are scattered sparingly, adding texture and light reflection without overwhelming the butterfly details.
Get The Look at Home:
The key technique is keeping the gold foil placement random-looking but balanced. Cluster it too heavily on one side and the design feels lopsided. We recommend applying foil to three or four nails rather than all ten for the most natural effect.
Worth mentioning: cream and off-white polishes often require three coats for full opacity. Budget extra drying time, and make sure each coat is thin to prevent the polish from looking thick or uneven.
33.Sunny Yellow & Black Flutter
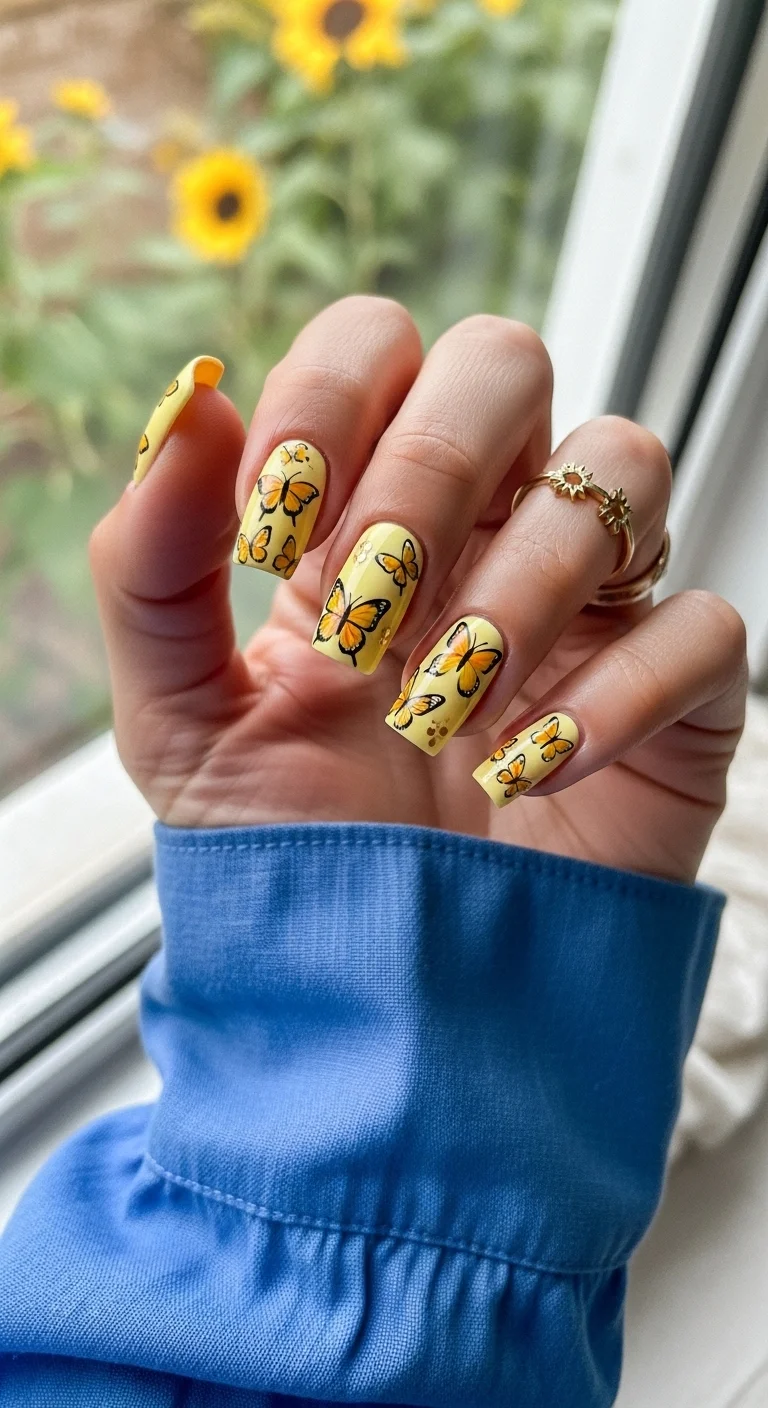
Vibrant yellow nails with monarch butterfly details and gold foil dots
Overview:
Bright, warm yellow is a bold choice for nails, and this coffin-shaped design commits fully. The saturated yellow base serves as a canvas for orange and yellow monarch-style butterflies with black outlines, plus small gold foil dots that add subtle shimmer.
This is a high-energy design that reads cheerful and unapologetic. The black outlines on the butterflies provide necessary contrast so the warm tones don't blend together.
Design Breakdown:
The sunny yellow shade needs to be warm-toned rather than cool or neon. Think marigold or daffodil rather than highlighter. Essie's "Butler Please" or a similar warm yellow delivers the right saturation.
The monarch butterflies use both orange and yellow in their wing patterns, which creates depth within the warm color family. The gold foil dots are applied last, adding a third dimension of warm-toned shimmer.
Get The Look at Home:
The honest downside is that bright yellow polish is notoriously streaky. Even with three thin coats, getting complete, even coverage can be frustrating. A white base coat underneath helps the yellow appear truer and reduces the number of coats needed.
One practical note: yellow polish also tends to stain nails and surrounding skin. Using a good base coat and cleaning up the cuticle line immediately after application saves significant cleanup time later.
20 Stunning Half Up Half Down Hairstyles for Prom Night 2026 💃✨
34.Soft Yellow & Pastel Flutter
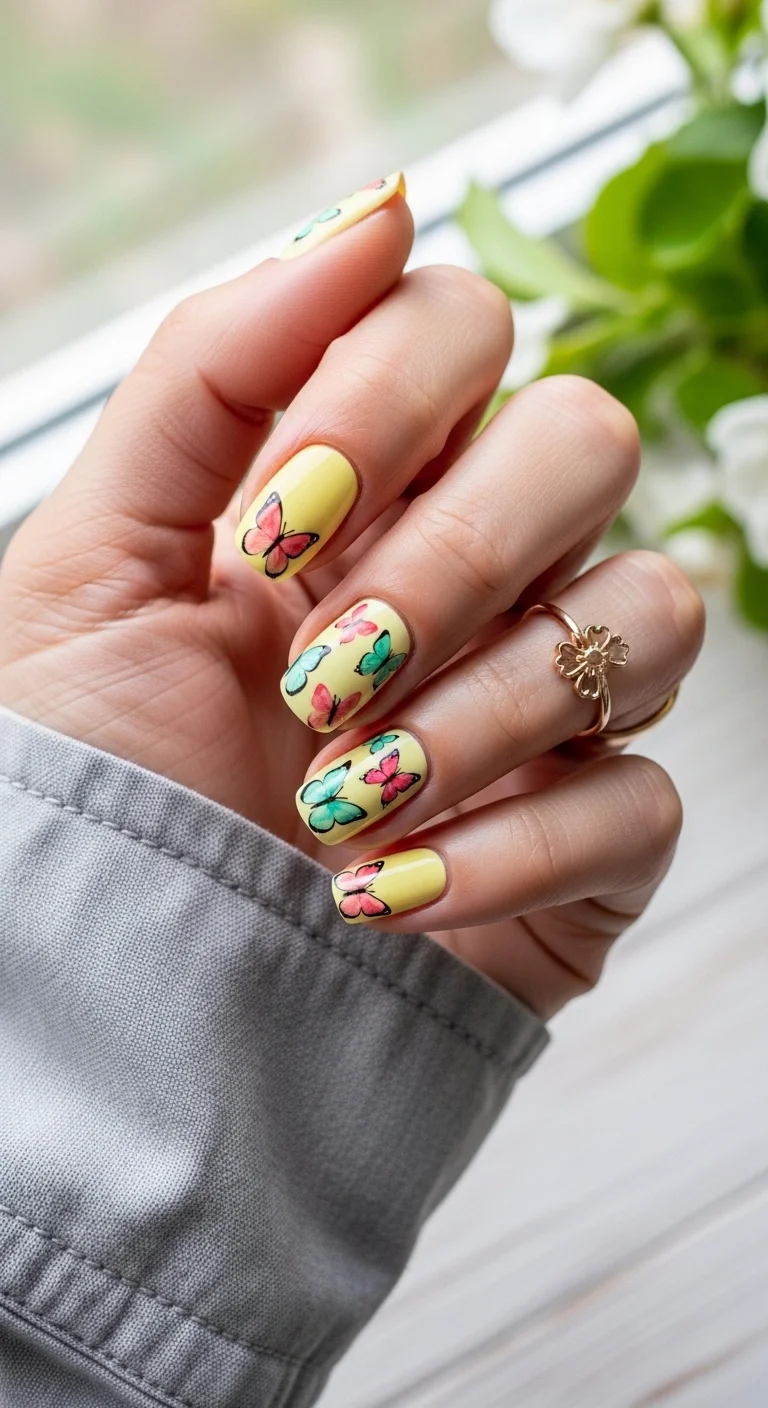
Buttery pastel nails with colorful butterfly accents
Overview:
Pastel yellow reads differently than its brighter counterpart. This almond-shaped design uses a soft, buttery yellow that feels gentle rather than loud, then adds pink and teal butterflies with black outlines for a playful color contrast.
The pastel base gives the design a softer, more approachable feel. Where bright yellow demands attention, this shade invites closer inspection.
Design Breakdown:
The soft yellow has a creamy quality that works well as a neutral-leaning pastel. It pairs naturally with both the pink and teal butterflies without either color feeling jarring or out of place.
The multicolored butterflies are the design's main feature. Pink and teal are complementary colors, so placing them side by side on the same nail creates visual interest without chaos. The black outlines keep each color distinct.
Get The Look at Home:
The challenge with pastel yellow is that it can appear sheer even after multiple coats. Two coats over a white base usually solves this, but the added layer means longer overall application time.
Budget extra time for the multicolored butterfly details. Each butterfly requires switching between pink, teal, and black, which means more brush cleaning and color switching than a single-color butterfly design. The result is worth the effort, but plan accordingly.
The Butterfly Cheat Sheet: Matching Your Nails to Your Summer Vibe
Your nails need to work with your summer plans, not against them. A full-coverage 3D butterfly set is a terrible choice for a hiking trip in the Smokies, just like a minimalist sheer nude is going to feel underwhelming at a beachside wedding. The trick is matching the complexity of the design to what your summer actually looks like.
For beach vacations and pool days: Milky pastels with single-butterfly accents are your sweet spot. Butter yellow, soft lavender, and milky pink are dominating 2026 summer palettes because they read expensive without requiring constant maintenance. A single butterfly on the ring finger gives you the trend without the worry of ten charms snagging on your towel.
For festivals and parties: Chrome finishes, holographic bases, and multiple dimensional butterflies per nail. The lighting at outdoor summer events makes metallic and iridescent finishes look like they are moving on their own. If you are only going to go maximalist once this summer, make it for the event where people will actually see your hands in motion.
For work and everyday life: Micro motifs and tonal butterflies — same color family as the base, just slightly darker or lighter. The butterfly is there, but it reads as texture rather than a statement. Dusty rose with a mauve butterfly, or sheer lavender with a slightly deeper purple wing. It's the most underestimated approach in the butterfly space and honestly the most wearable.
For travel (especially flights): Skip the 3D elements entirely. Stick with flat decals or hand-painted butterflies in a gel finish that can handle the chaos without losing a charm somewhere over the Atlantic.
And there you have it! Hopefully, scrolling through these gorgeous butterfly designs has provided plenty of excitement for the next salon visit. Choosing summer nails should be fun and stress-free, and one of these butterfly sets is sure to look absolutely stunning.
Be sure to pin any favorite photos straight to a Pinterest board, so they are ready to show the nail tech. This simple trick prevents last-minute panic when sitting down in the salon chair. Which butterfly design is the favorite, and where will it be rocked this summer?