Hair Trends
28 Stunning Baddie Summer Hairstyles for 2026
Summer is your excuse to experiment with your hair like never before. Whether you're heading to a music festival, a beach vacation, or just want to elevate your everyday look, these baddie hairstyles will give you that main character energy all season long.
From playful space buns to sleek updos with statement accessories, we've curated 28 looks that are equal parts bold and wearable. These styles work with every hair texture and length, so grab your styling tools and get ready to turn heads.
The Humidity-Proof Slick Back
Let's be honest: nothing ruins a flawless high ponytail faster than stepping outside into 80% humidity and watching your meticulously laid edges dissolve into a frizzy halo. Summer heat and sweat are the ultimate enemies of edge control, causing your favorite gels to break down, flake, or liquefy within minutes.
The most common mistake is reaching for a water-based edge control when the temperature climbs. Stylists will tell you those products actually make the problem worse — the water content causes your natural edges to revert the second they hit moisture in the air, curling right back up no matter how much you smoothed them down.
The fix? Switch to a sweat-proof, non-water-based pomade or wax during summer months. Apply it in paper-thin layers — heavy application gets tacky and shows flakes. Tie your hair down with a silk edge scarf for ten minutes while you do your makeup, and those edges will stay glass-smooth from brunch through a full night out.
1.Messy Double Space Buns with Wispy Bangs
The overview: Double space buns are the baddie equivalent of a power suit — they announce that you're here to have fun and you're not apologizing for it. This version leans into the messiness: center-parted, loosely twisted, with wispy bangs that brush your eyebrows and metallic pins scattered throughout for that effortlessly cool festival energy. The less perfect they look, the better they work.
Why this look is popular: The controlled chaos of messy buns communicates confidence. The wispy bangs soften the face while the double bun structure creates a playful, youthful silhouette. It works on medium to long hair and takes under 10 minutes.
Where this look is suitable: Concerts, festival days, casual outings, and any time you want playful edgy energy without overthinking it.
Step by step:
- Create a center part. Use the pointed end of a rat-tail comb for precision from forehead to nape.
- Gather each side. Collect hair on each side into high ponytails positioned just above the ears.
- Twist into buns. Loosely twist each ponytail and wrap it around the base. Don't aim for perfection — the messiness is the point.
- Secure with pins. Use bobby pins that match your hair color. Tuck them in randomly rather than in a pattern.
- Pull out pieces. Gently tug strands around your face, ears, and the nape for softness.
- Add accessories. Scatter metallic pins or weave thin chains through the buns.
Tips and tricks: Second-day hair holds this style better than freshly washed hair. If your hair is fine, backcomb the crown slightly before gathering to add volume. The bangs can be adjusted — push them to the side for a different feel.
31 Stunning Summer Birthday Party Hairstyles for 2026 🎂☀️
2.Beachy Waves with Face-Framing Layers
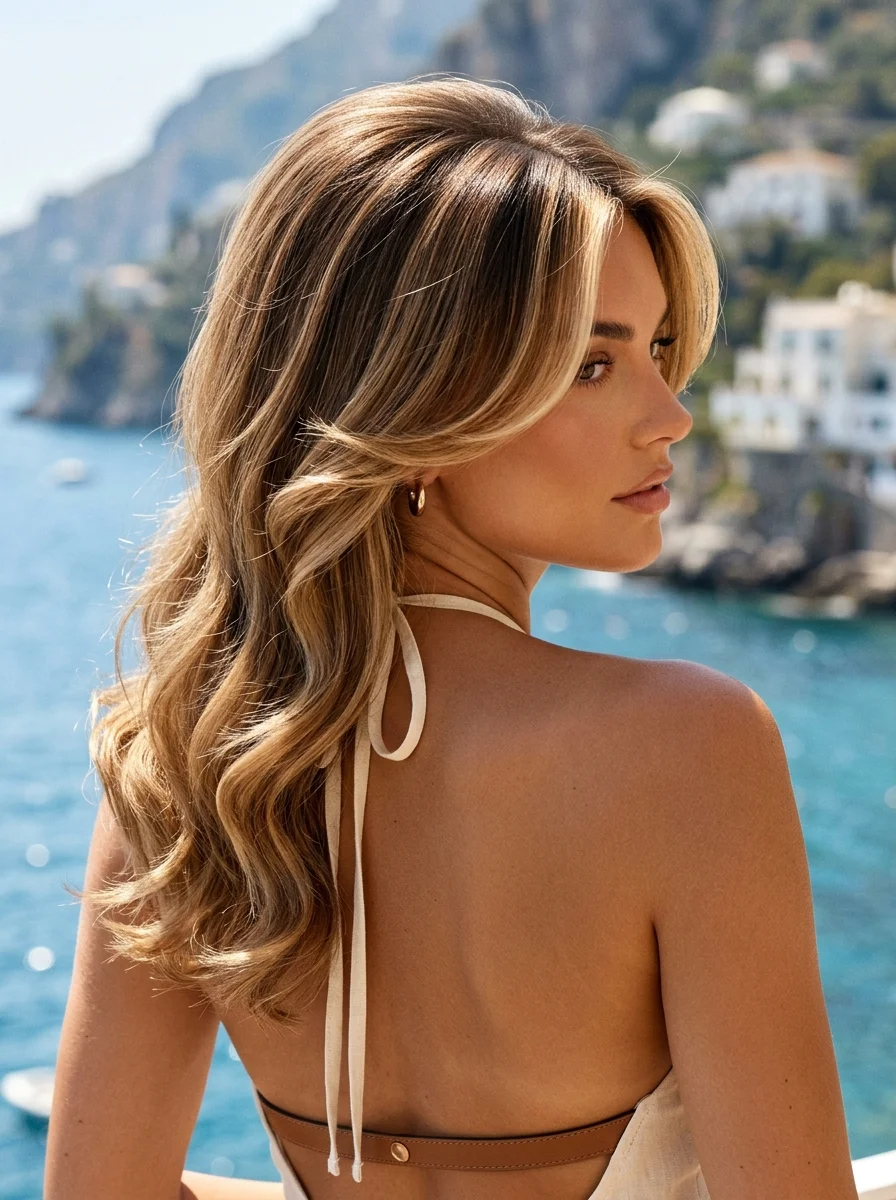
The overview: Beachy waves are the baddie default — they say "I woke up gorgeous" while clearly being intentional. The face-framing layers are what elevate this from generic waves to a strategically flattering cut. They hit right at the cheekbones, creating movement and softness that photographs beautifully from every angle.
Why this look is popular: The undone quality says "I didn't try" while clearly being styled. Face-framing layers add dimension without requiring accessories. Works on every hair type and the texture improves as the day goes on.
Where this look is suitable: Vacation brunches, rooftop dinners, beach days, and everyday cool-girl energy. The most versatile style on this list.
Step by step:
- Prep with texture. Apply sea salt spray or wave-enhancing mousse to damp hair.
- Curl with ends out. Use a large barrel curling iron or flat iron, leaving the last inch of each section straight for that modern finish.
- Alternate directions. Curl one section toward your face, the next away. This creates natural-looking variation.
- Finger-comb only. Never brush these waves — run your fingers through to break them up into soft, separated texture.
- Finish with light hold. A light-hold hairspray and a touch of shine serum on the ends completes the look.
Tips and tricks: The face-framing pieces should be curled away from your face to open up your features. For finer hair, flip your head upside down and scrunch with texturizing spray for instant volume. Gold hoops or a bandana complete the baddie aesthetic.
3.Sleek Bronde Bob with Subtle Face-Framing
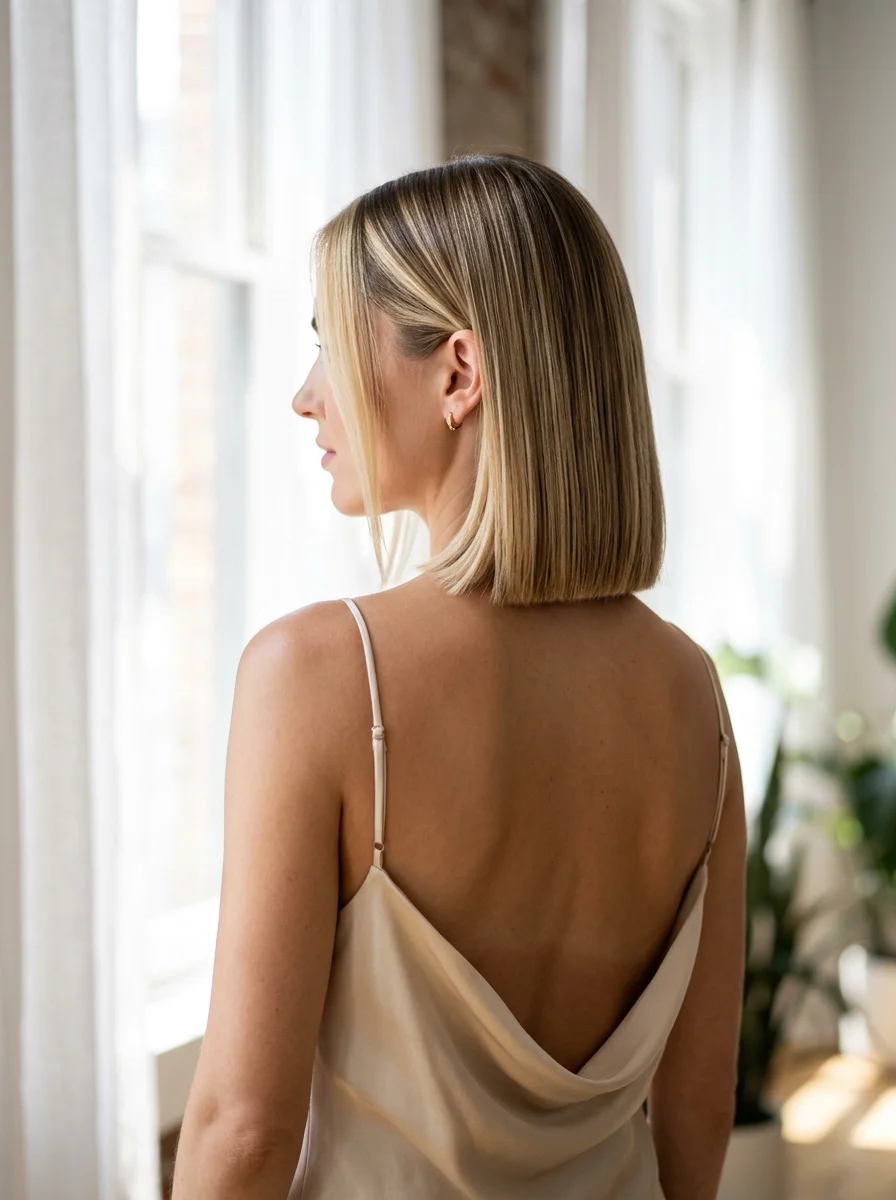
The overview: The blunt bob is the power cut of the moment — sharp precision, strong silhouette, unapologetically polished. The bronde color blend (brown meets blonde) adds warmth without committing to either extreme. The subtle face-framing pieces soften the severity just enough to keep it feminine while the sleek finish radiates control and self-assurance.
Why this look is popular: The blunt perimeter makes hair appear thicker and healthier. The sleek finish looks incredibly polished with minimal daily effort once the precision cut is in place. It's boss babe energy that works in boardrooms and cocktail bars alike.
Where this look is suitable: Power meetings, upscale dinners, and any setting where you want to project confidence and sophistication.
Step by step:
- Smooth prep. Apply smoothing serum and heat protectant to damp hair.
- Blow-dry section by section. Use a round brush, pulling straight down and under for a beveled finish.
- Flat iron for glass hair. Work through small sections for mirror-like smoothness.
- Face-framing detail. Gently curl the front pieces away from your face with a small round brush or flat iron.
- Finish with shine. Light-hold or shine spray for that polished, high-gloss finish.
Tips and tricks: Invest in a quality flat iron — it's the most important tool for this cut. Regular trims every 4-6 weeks keep the blunt line sharp. Delicate gold hoop earrings complement the chic vibe perfectly.
27 Gorgeous Mint Green Nails That Are Popular Right Now (2026)
4.Double Dutch Braids into a Wavy Ponytail with Star Charms
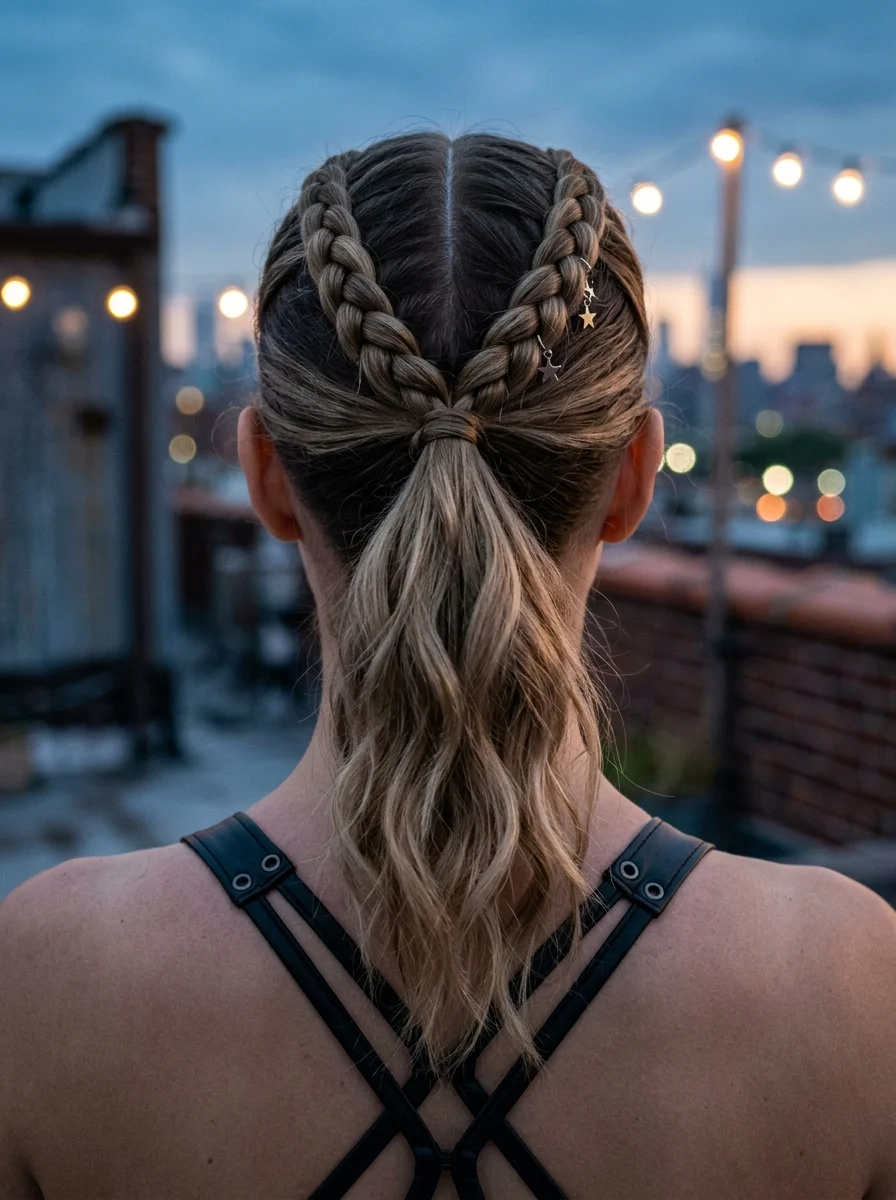
The overview: Two sculpted Dutch braids meeting at the back and transitioning into loose, effortless waves — the contrast between structured and free-spirited is what makes this style magnetic. Star-shaped charms clipped along the braids add a celestial sparkle that catches light from every angle. This is the hairstyle that stops people mid-scroll.
Why this look is popular: Dutch braids create a raised, 3D texture that photographs better than flat French braids. The wave transition keeps it from looking too athletic. Charms add personality without requiring skill to apply.
Where this look is suitable: Night out, festivals, showstopper moments — anywhere you want edgy yet chic energy.
Step by step:
- Part precisely. Create a clean center part from forehead to nape using a rat-tail comb.
- Dutch braid each side. Cross strands under (not over) to create the raised effect. Add small sections from each side as you braid backward.
- Meet at the back. Secure both braids where they meet at the nape with a clear elastic.
- Texturize the ponytail. Use a curling wand on 1-inch sections, leaving ends out. Break up with fingers.
- Add charms. Clip star-shaped accessories along the braid tracks at random intervals.
Tips and tricks: Keep the braids tight at the start — this helps them stand out and prevents them from getting messy too quickly. For fine hair, pancake the braids gently after braiding to make them appear wider and more voluminous.
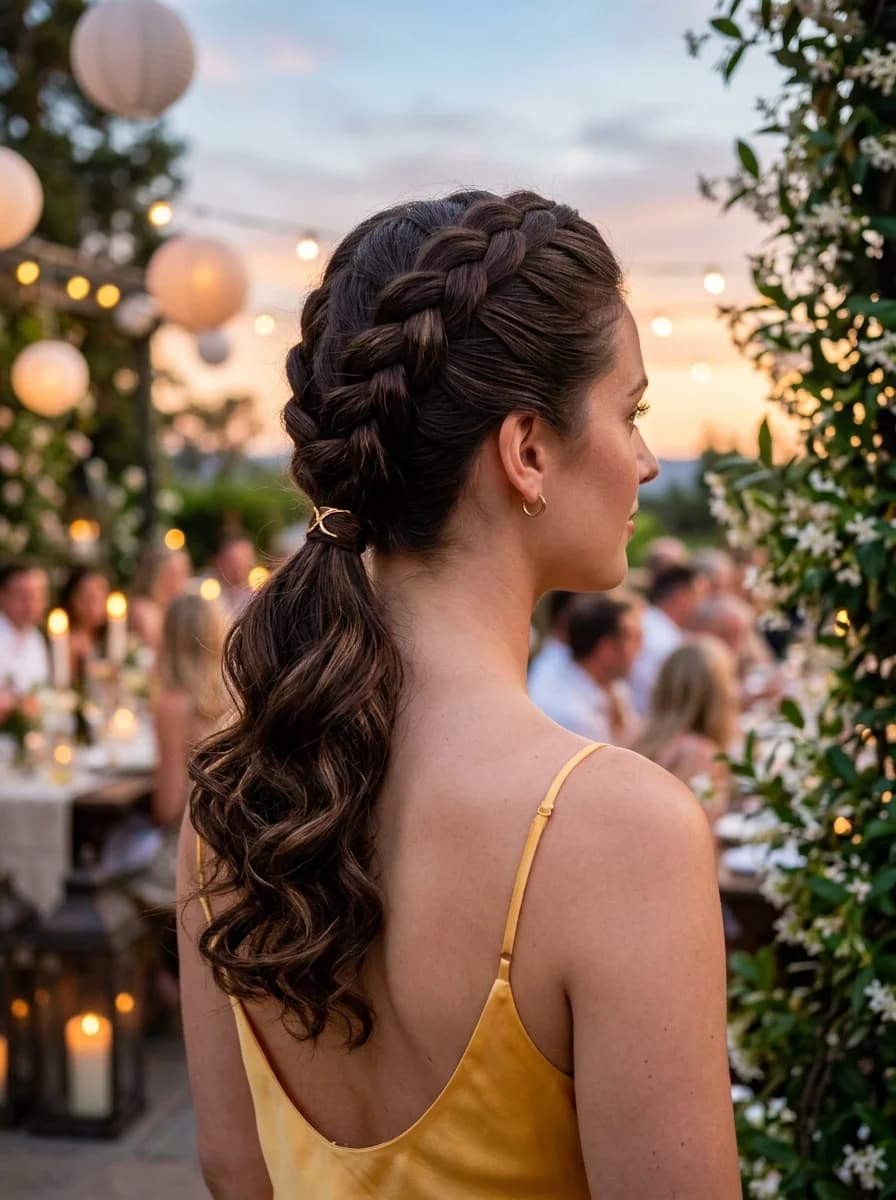
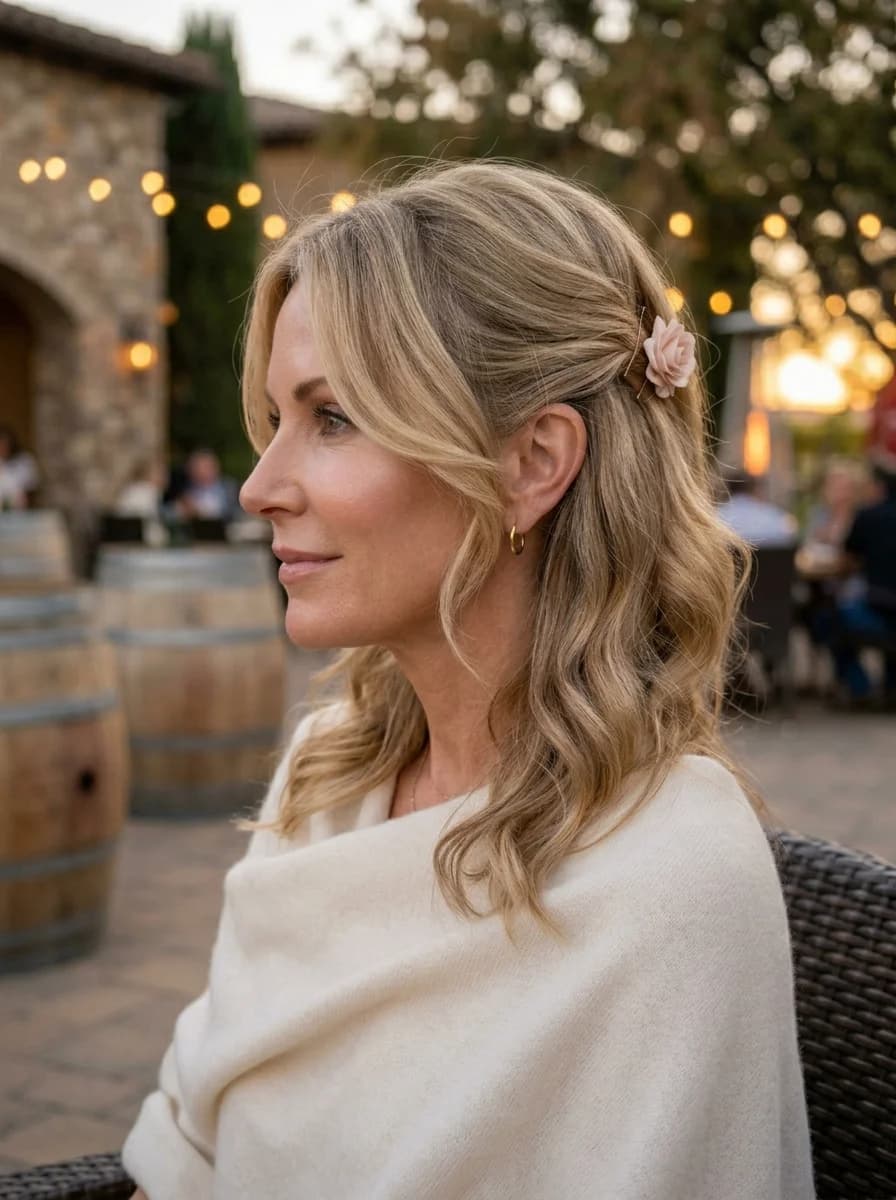
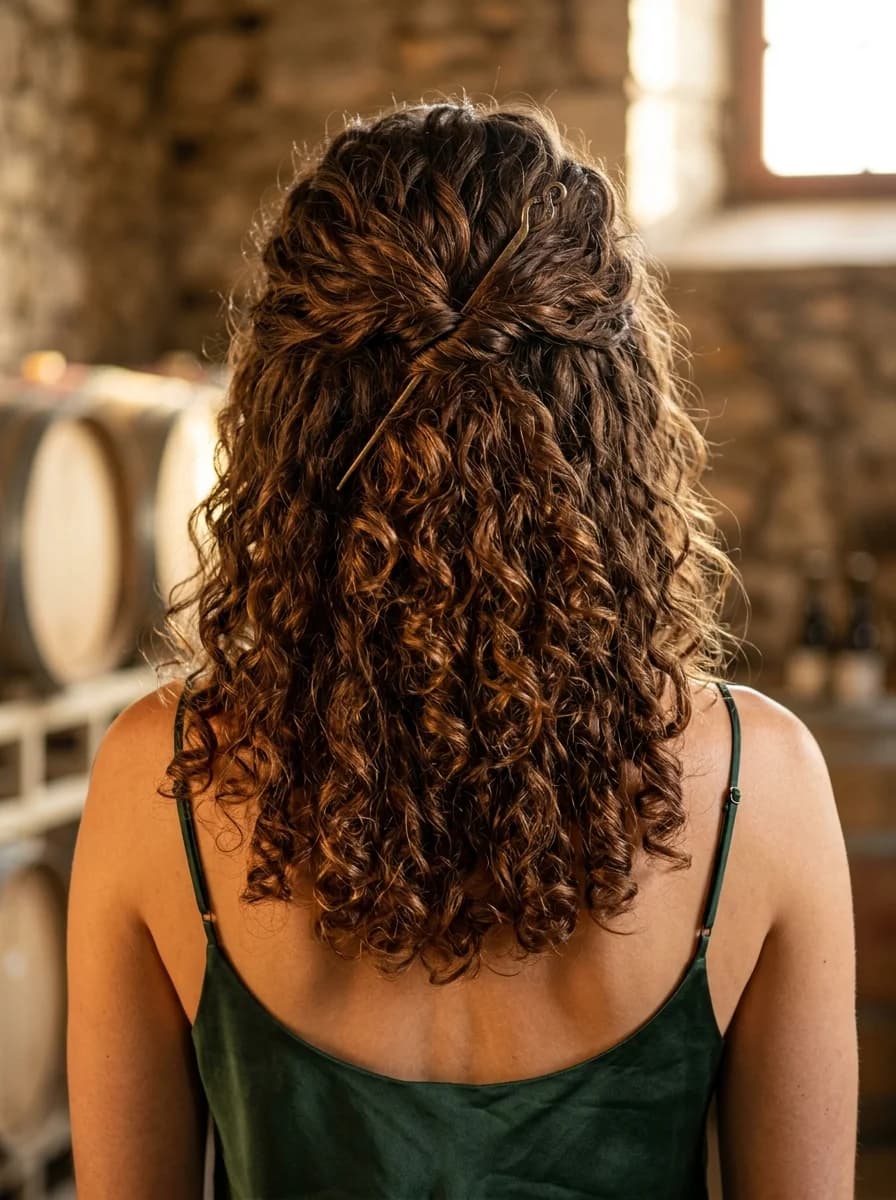
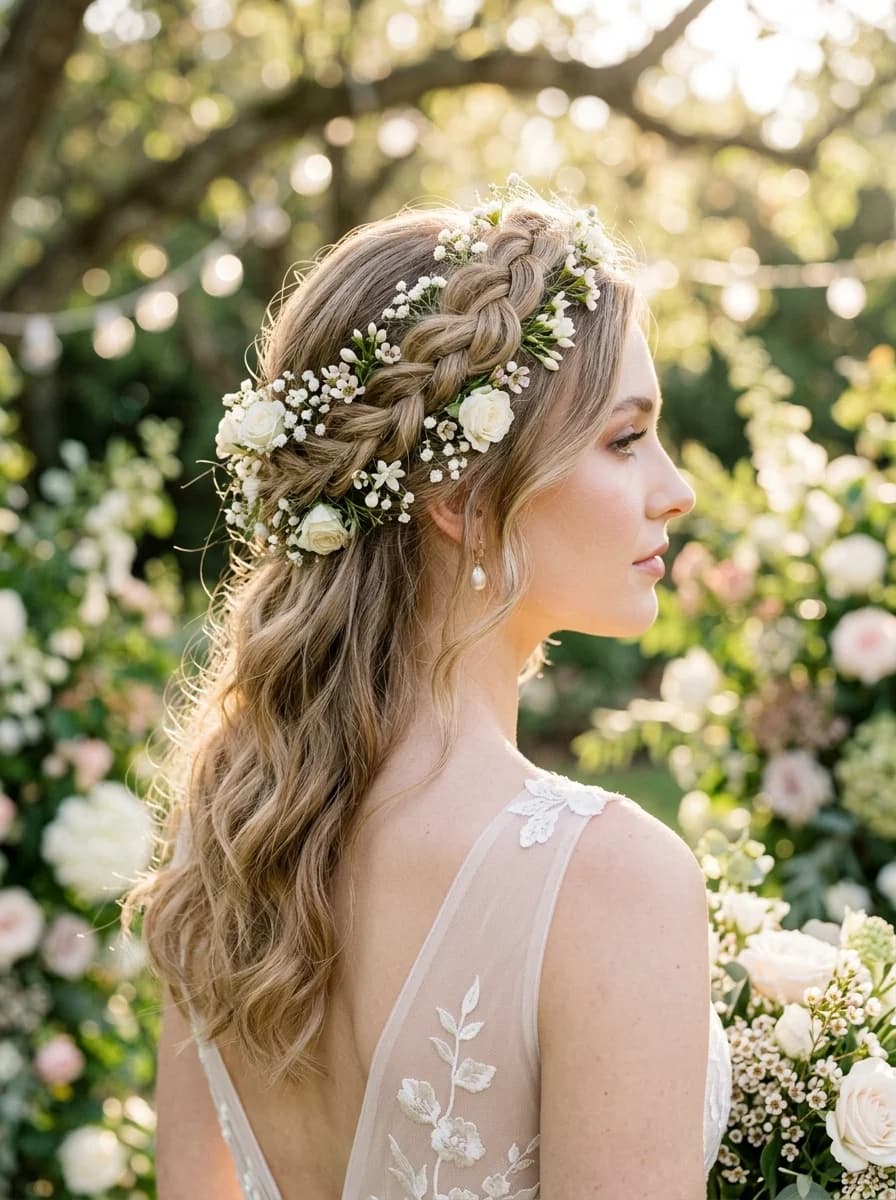
5.Boho Crown Braid Half-Up
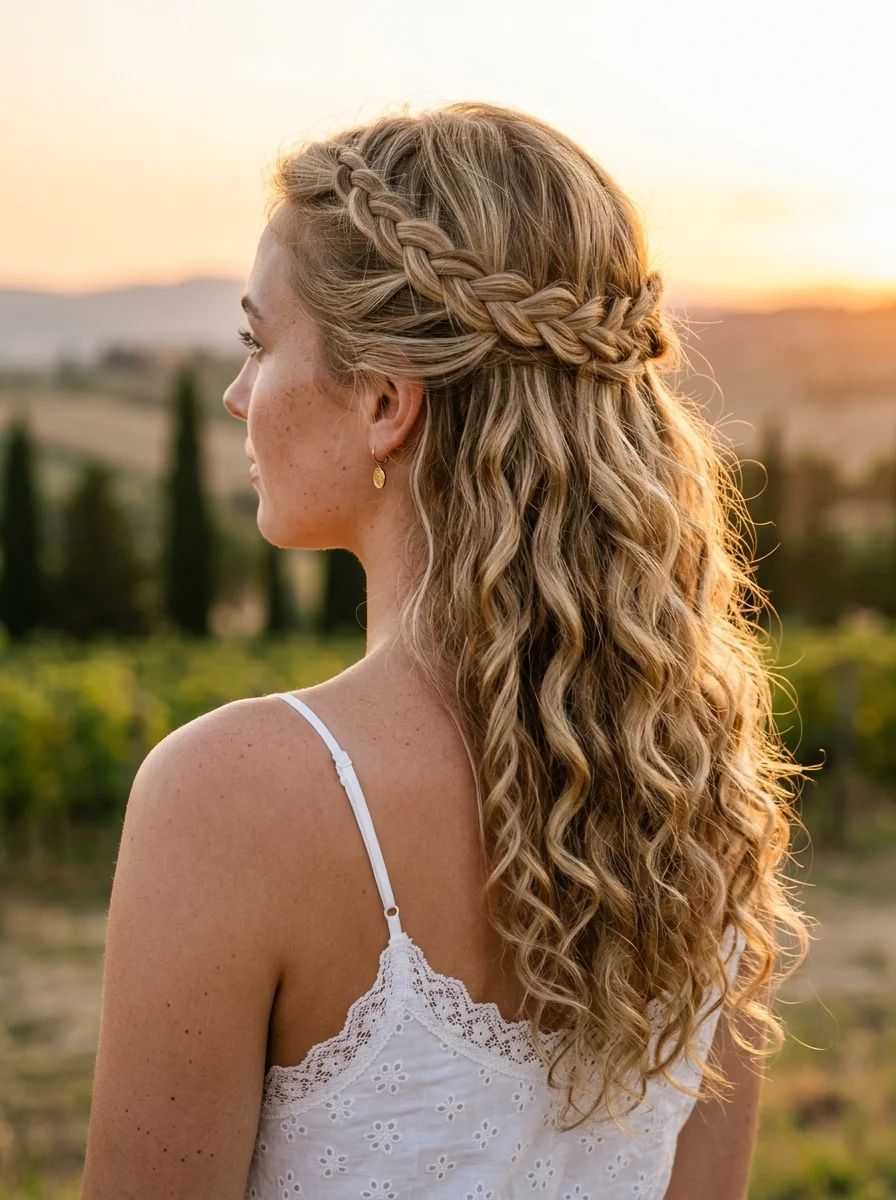
The overview: The crown braid is feminine but the baddie execution is deliberate — tight and clean braids against perfectly imperfect curls. It reads as effortless but requires skill, which is exactly the baddie energy. Tuck gold hairpins into the braid for a subtle glow that catches light during golden hour photos.
Why this look is popular: The contrast of structured crown braid against flowing curls is regal yet relaxed. It embraces flyaways and imperfections as part of the charm. Works on medium to long hair with any curl pattern.
Where this look is suitable: Summer picnics, vineyard exploring, golden hour photos, and laid-back weddings where you want dreamy ethereal energy.
Step by step:
- Create a deep side part. This determines where the braid starts and how it frames your face.
- Dutch braid along the hairline. Cross strands under to create the raised effect. Keep it slightly loose — don't pull too tight.
- Secure at the opposite side. Pin the braid end behind the opposite ear with bobby pins.
- Curl the bottom half. Use a curling wand on the remaining loose hair. Keep the curls relaxed and natural.
- Pancake the braid. Gently pull the outer loops to widen the braid for a fuller, more romantic effect.
- Add gold pins. Tuck delicate gold hairpins into the braid at random intervals.
Tips and tricks: Optional: add delicate floral pins for a more romantic touch. Tease the crown slightly before braiding for extra volume. A flexible-hold hairspray keeps everything in place without stiffness.
30 Stunning Mother of the Groom Hairstyle Ideas for 2026 💍✨
6.Golden Heart Crown Braid
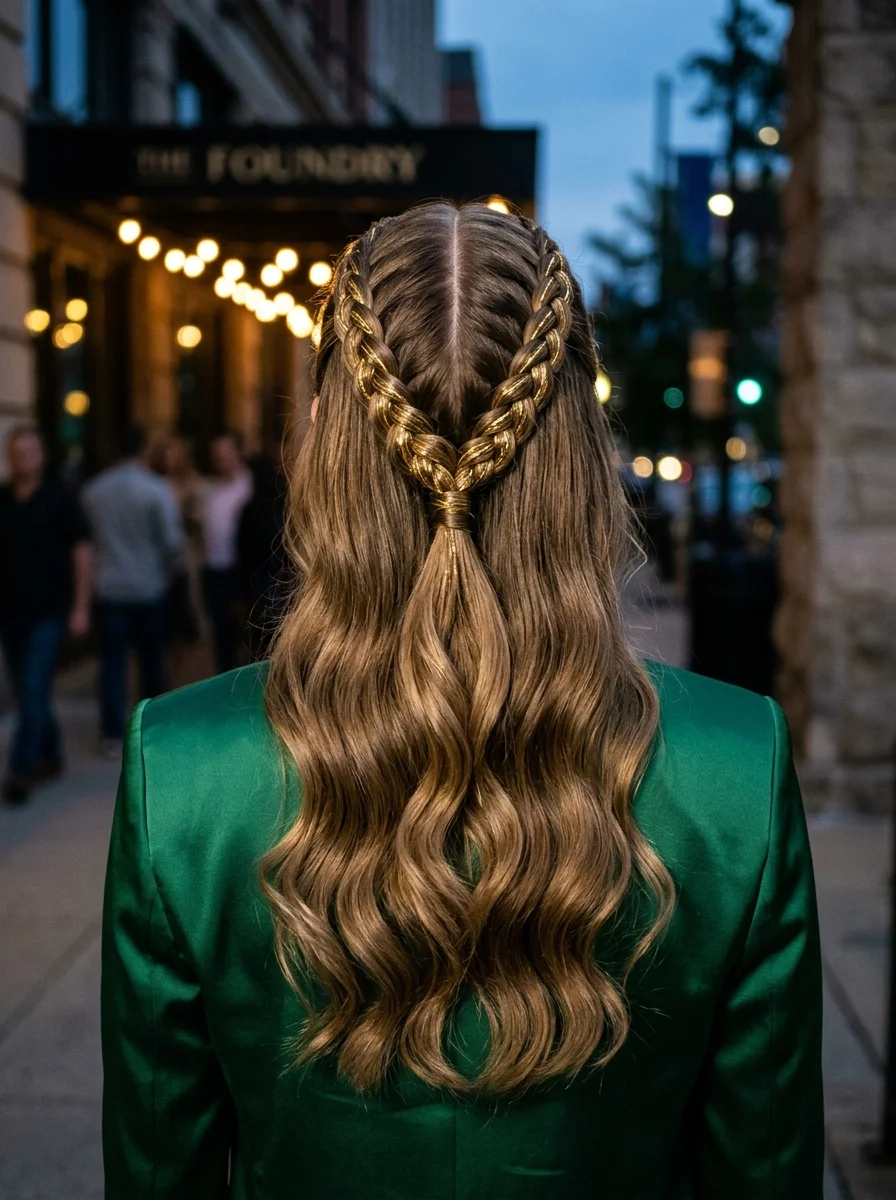
The overview: Two French braids that curve from the temples to meet at the crown, forming a perfect heart shape when they join. Golden sparkly fibers woven through the braids add luxury, while the remaining hair cascades in loose waves below. This is intricate, head-turning artistry that says you walked into any room and owned it.
Why this look is popular: The heart shape is romantic yet bold. The gold accents scream luxury. It's a technical hairstyle that showcases skill while remaining feminine and wearable.
Where this look is suitable: Date nights, special events, and any time you want to make a memorable statement.
Step by step:
- Part precisely down the center. The heart shape depends on perfect symmetry.
- Start the first French braid. Begin at one temple, braiding inward and slightly downward toward the center of your head.
- Curve toward the center. As you braid, direct the braid toward the middle of your crown where the heart's point will form.
- Repeat on the other side. Mirror the braid path exactly so both braids meet at the same point.
- Weave in gold fibers. Thread golden sparkly strands through the braids as you go, or add them after.
- Curl the remaining hair. Use a large barrel wand for loose, bouncy waves below the braided heart.
Tips and tricks: Practice the heart shape on a mannequin or with a friend first — the curve is the hardest part. Use a fine-tooth comb to keep the part razor-sharp. Gold fiber can be found at beauty supply stores in the hair accessories section.
7.Chic Bubble Ponytail with a Twist
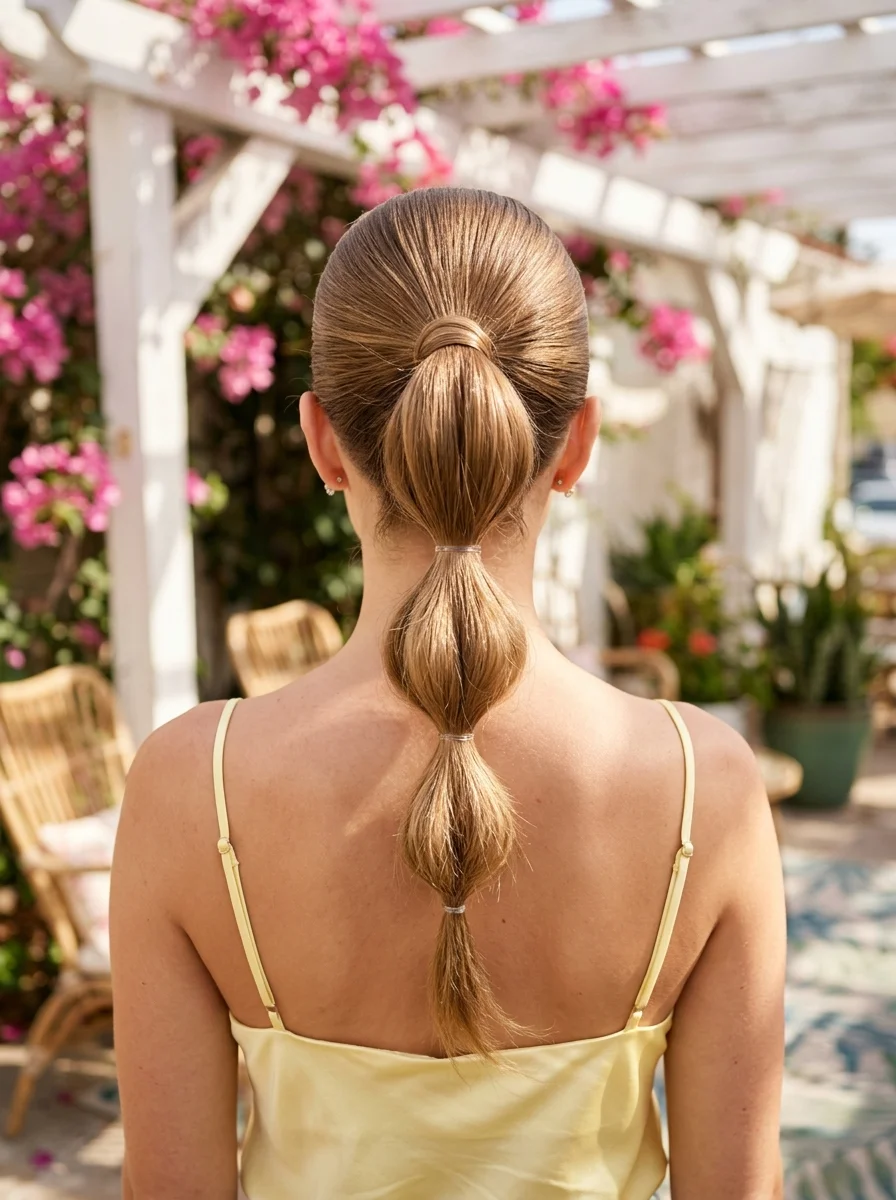
The overview: The bubble ponytail is visually rhythmic and photographically striking — a modern twist on a classic that reads confident and trend-forward. Each bubble is gently pulled to create volume and dimension, creating a silhouette that's impossible to ignore. It's playful without being juvenile, structured without being stiff.
Why this look is popular: Bubble braids are easier than actual braiding — you're just tying elastics and pulling sections apart. The result looks more complex than it is. Adding a scarf at the base personalizes the look.
Where this look is suitable: Sunny days, fun nights out, casual-chic events, and any time you want playful yet stylish energy.
Step by step:
- Smooth the base. Brush hair thoroughly and apply a light smoothing serum for a polished crown.
- Create the high ponytail. Gather all hair at the crown and secure tightly with a strong elastic.
- Add bubble elastics. Place clear elastics at regular 2-inch intervals down the ponytail.
- Pull each bubble. Gently tug the hair between each elastic outward to create rounded, voluminous shapes.
- Maintain even spacing. Check that each bubble is roughly the same size for a balanced look.
- Optional: add scarf. Wrap a colorful scarf around the ponytail base for extra flair.
Tips and tricks: Day-old hair provides better grip for creating defined bubbles. For finer hair, use clear elastics as a base first, then wrap decorative ones over them for extra hold. A light-hold hairspray keeps everything in place without crunch.

33 Trendy Polka Dot Nail Ideas for 2026 💅
8.Effortless Bubble Braid with Chic Gold Accents
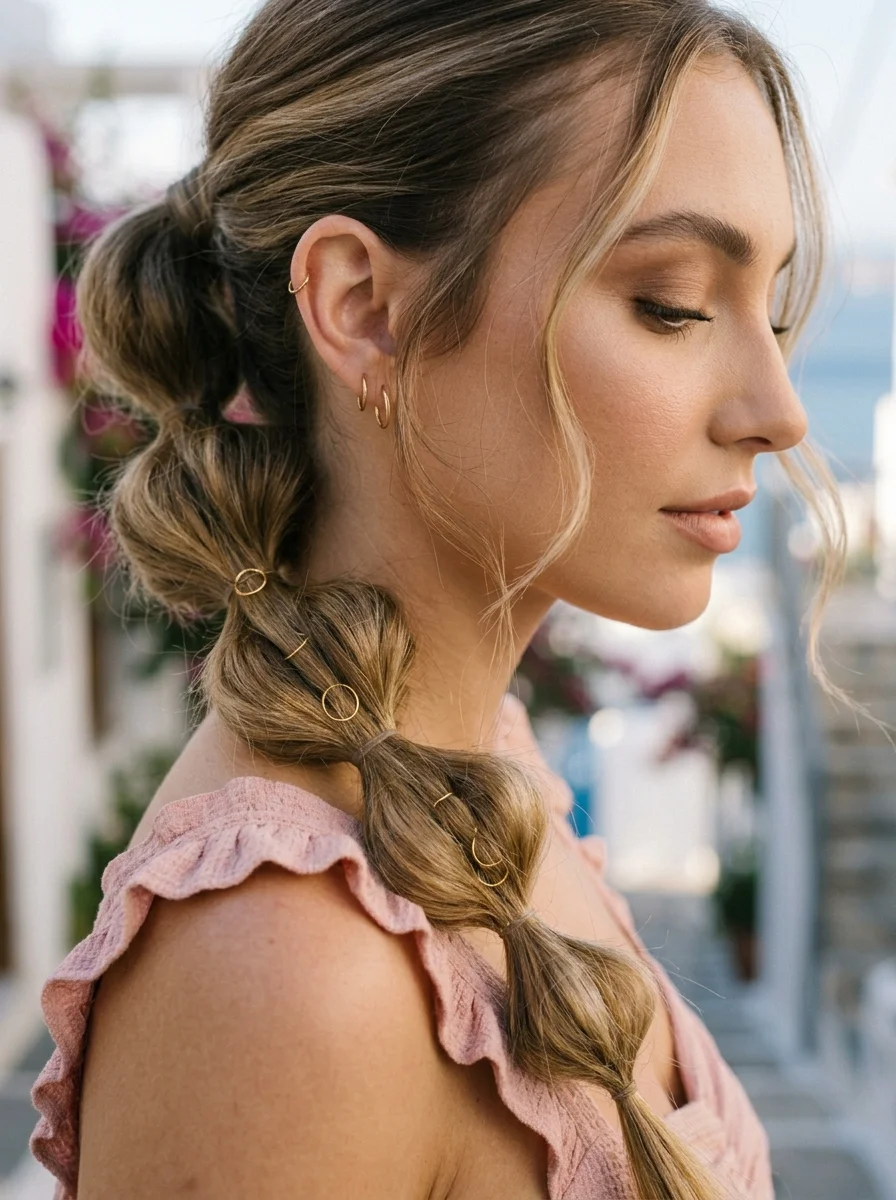
The overview: Gold accents elevate a casual bubble braid from everyday to luxury territory. The low placement feels relaxed but the metallic details make it deliberate and glamorous. Small gold hair rings and cuffs slipped between the elastics catch light as you move, creating a subtle sparkle that reads expensive without trying too hard.
Why this look is popular: The low ponytail placement is more relaxed than a high bubble braid. The gold accents add visual interest and a touch of luxury. Works beautifully on medium to long hair and takes under 10 minutes.
Where this look is suitable: Vacation strolling through sun-drenched villages, resort dining, and any time you want polished yet effortlessly relaxed energy.
Step by step:
- Texturize for grip. Apply texturizing spray to give the hair body and hold.
- Gather low and soft. Create a low ponytail at the nape — keep it soft, not tight.
- Create bubbles. Add elastics at 1-2 inch intervals. Pull each section outward to create round, airy shapes.
- Add gold accents. Slide small gold hair rings, cuffs, or tiny pearls onto strands between elastics.
- Pull out face-framing pieces. Gently tug soft wisps around your face for a relaxed, romantic frame.
Tips and tricks: The gold accessories are available at most beauty supply stores in packs of 20-50. Mix different sizes for a more organic, curated look. For curly hair, the bubbles will have more natural texture and volume — embrace it.
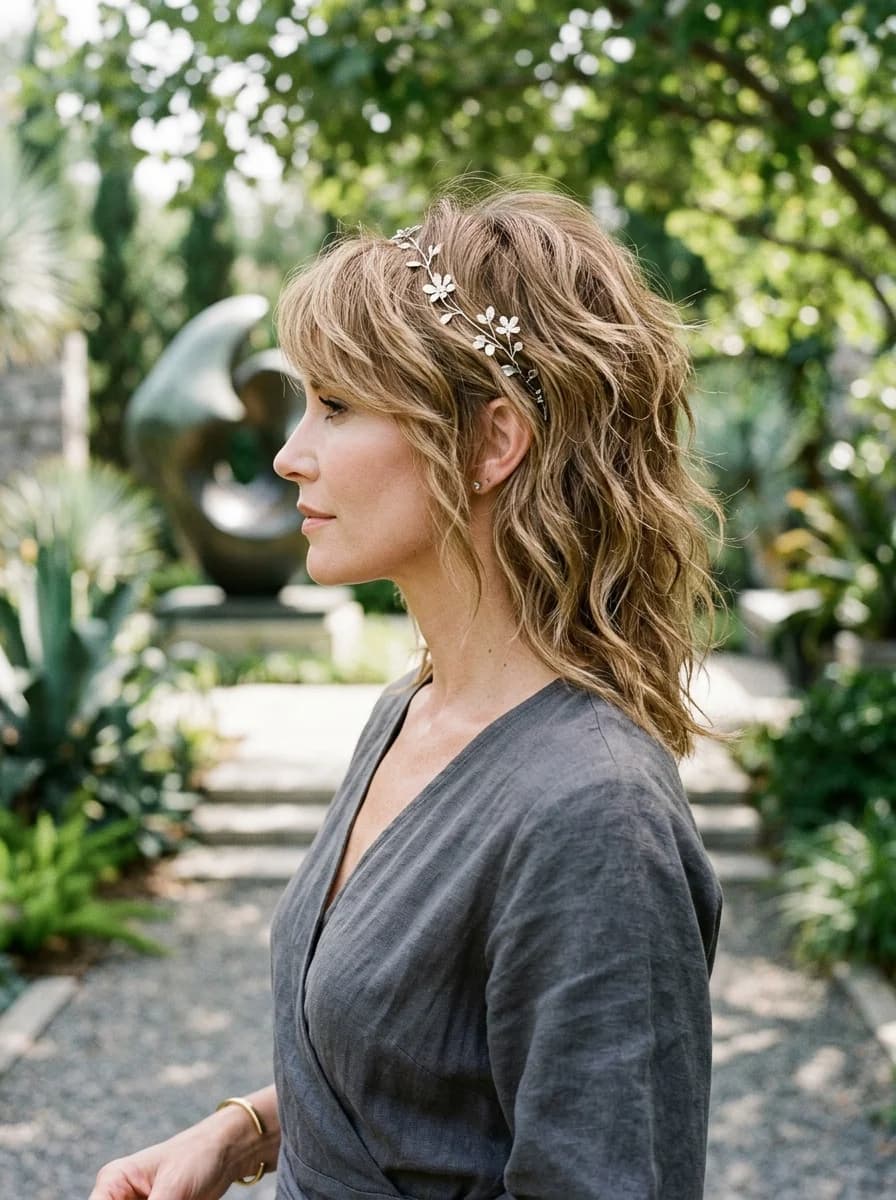
9.Effortless Shag with Butterfly Sparkle
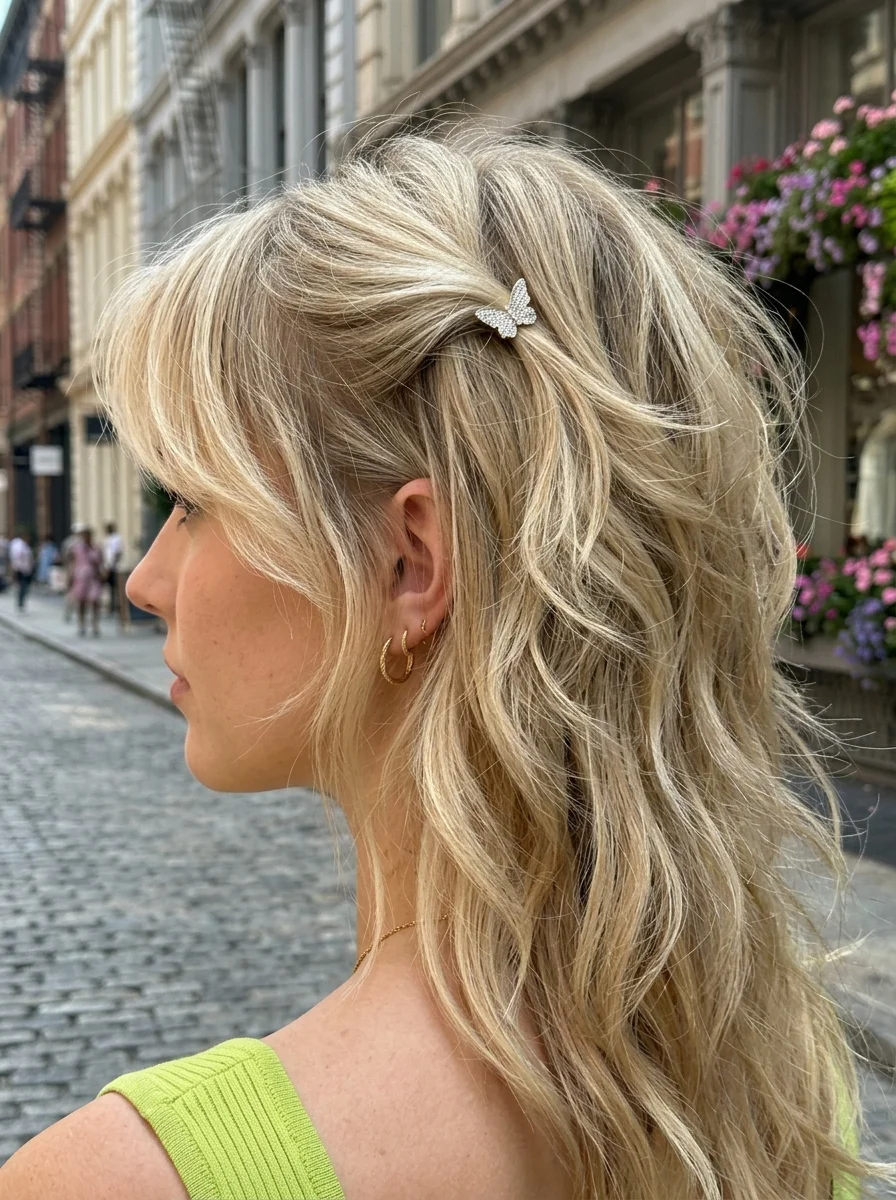
The overview: The shag's built-in texture means zero effort while looking intentionally styled. Multiple soft layers create movement and volume without bulk, while curtain-like bangs frame the face at the cheekbones. A butterfly clip near the temple adds a sparkle detail that transitions from effortlessly cool to totally dreamy. It's confidence through imperfection.
Why this look is popular: The shag is having a major revival because it's the ultimate wash-and-wear cut. The built-in texture means you can air-dry and go. The butterfly clip adds a Y2K-nostalgic touch that's currently trending hard.
Where this look is suitable: Everyday cool-girl energy, "just rolled out of bed but make it fashion" moments, and casual outings where you want edge with sweetness.
Step by step:
- Prep with texture. Apply texturizing or sea salt spray to damp hair.
- Diffuse or air-dry. Scrunch as it dries to enhance the natural texture. A diffuser on low heat adds volume.
- Add a few loose waves. Use a large barrel curling iron on random sections for piecey definition.
- Break up the waves. Pull them apart gently for a tousled, undone effect.
- Clip the butterfly. Secure a small butterfly clip near your temple for that sparkle detail.
- Set lightly. Light-hold hairspray keeps the texture without stiffness.
Tips and tricks: Ask your stylist for a shag with "soft, blended layers" rather than chunky ones — the difference is everything. The curtain bangs should hit at your cheekbones for the most flattering face-framing effect.
25 Top Curly Hairstyle Trends for 2026 ➰✨
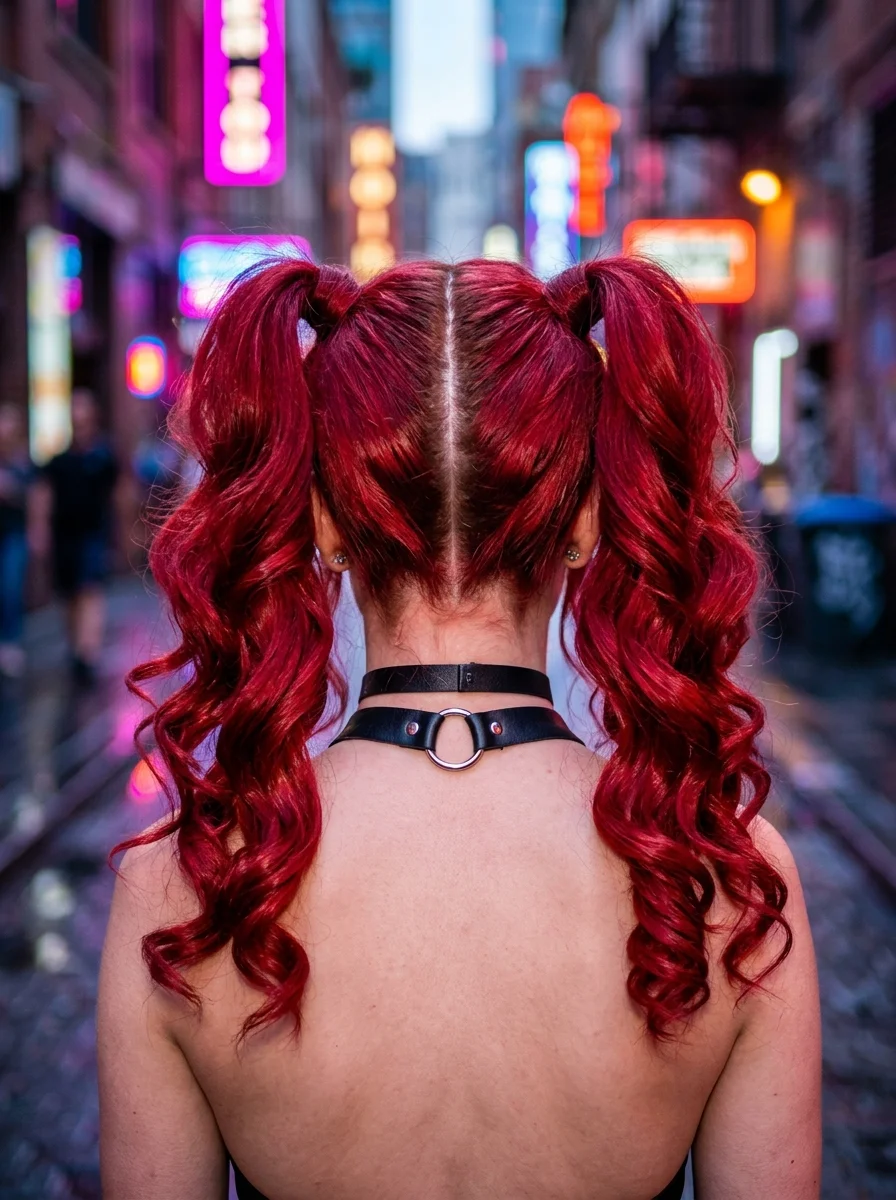
10.Vibrant Cherry Pigtails with Loose Curls
The overview: High pigtails are inherently playful, but the cherry red color and voluminous curls make this fierce rather than juvenile. The clean center part adds striking visual precision, and the bold color choice screams "I'm here and I'm not hiding." This is the hairstyle that makes people stare — and you'll love every second of it.
Why this look is popular: The cherry red is polarizing in the best way — it's bold, unapologetic, and impossible to ignore. High pigtails create a youthful silhouette while the color and curl volume keep it fierce. Clean center part adds visual precision.
Where this look is suitable: Making a statement, playful outings, parties, and nights out where you want bold, edgy, totally confident energy.
Step by step:
- Part with precision. Use a fine-tooth comb to create a razor-sharp center part from forehead to nape.
- Gather each pigtail. Collect each side into high pigtails just above the ears. Secure tightly with strong hair ties.
- Curl away from face. Use a curling wand on each pigtail, wrapping sections away from your face.
- Loosen the curls. Use your fingers to gently tug and loosen each curl for softness and movement.
- Add glittery clips. Place decorative clips near each pigtail base for extra pop.
Tips and tricks: If you're not ready to commit to permanent cherry red, semi- permanent color or colored extensions achieve the same effect. The clean center part is critical — any crookedness throws off the entire look. Use a fine-tooth comb and check in a mirror from multiple angles.
11.Sleek Half-Up Twisted Bun with Flowing Waves
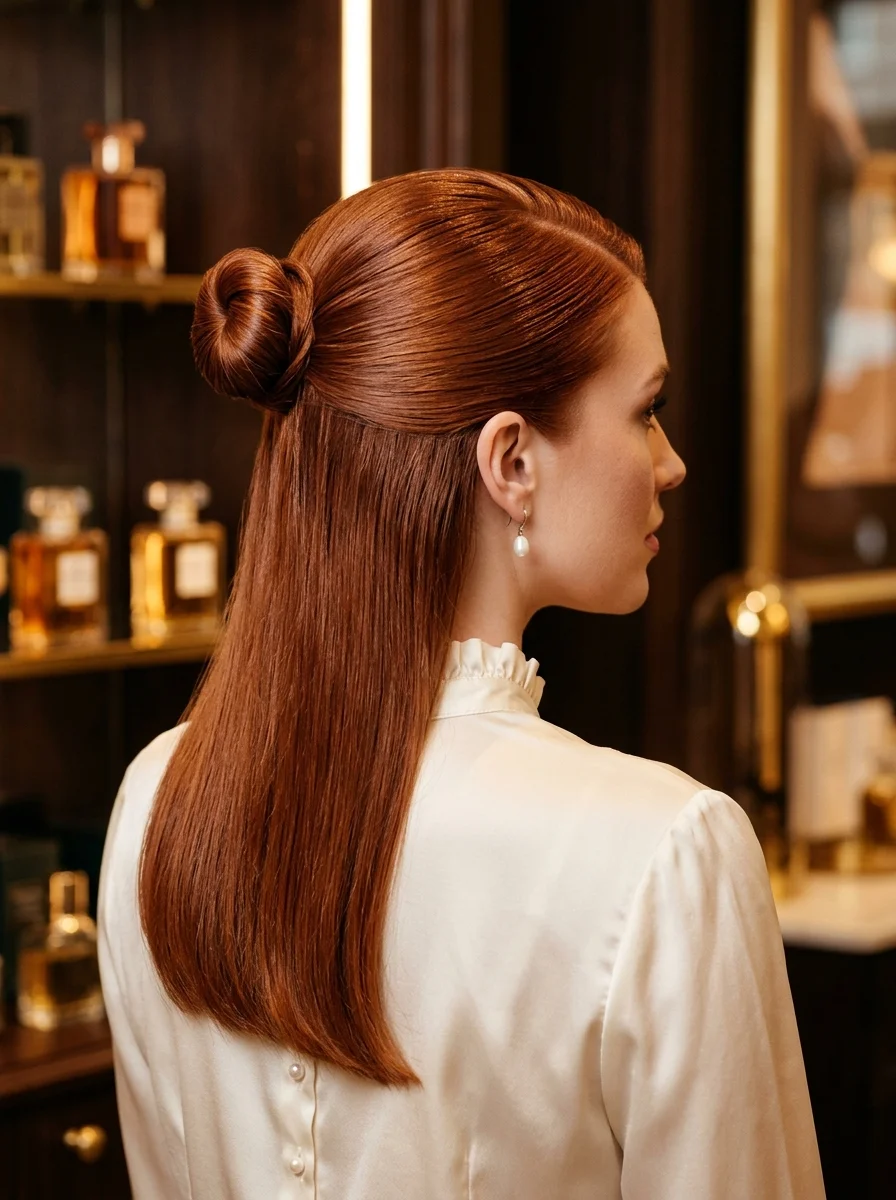
The overview: The juxtaposition of the ultra-polished, editorial sleekness on top with flowing length below screams controlled glamour. The auburn or copper color is striking and unusual — it catches light in a way that flat brown can't. The glass-hair finish on the lower half signals high-maintenance beauty that a baddie invests in.
Why this look is popular: The half-up construction keeps hair off your face while maintaining length and movement. The twisted bun adds architectural interest. The auburn/copper color is having a major moment right now.
Where this look is suitable: Luxe cocktail events, upscale dinners, and evening galas where you want polished sophistication.
Step by step:
- Sleek the top section. Apply smoothing serum to the crown section and brush flat with a fine-tooth comb.
- Create the twisted bun. Twist the sleeked section and coil it into a compact donut shape. Secure with pins.
- Flat iron the lower half. Work through small sections for a glass-hair finish. Bevel the ends inward slightly.
- Refine the crown. Go back over the top with gel and a fine-tooth comb for maximum sleekness.
Tips and tricks: A boar bristle brush is essential for achieving the sleek crown. For curly or coily hair, use a strong-hold edge control gel and a fine-tooth comb to get every strand smooth. The contrast between sleek and flowing is the design — don't blend them.

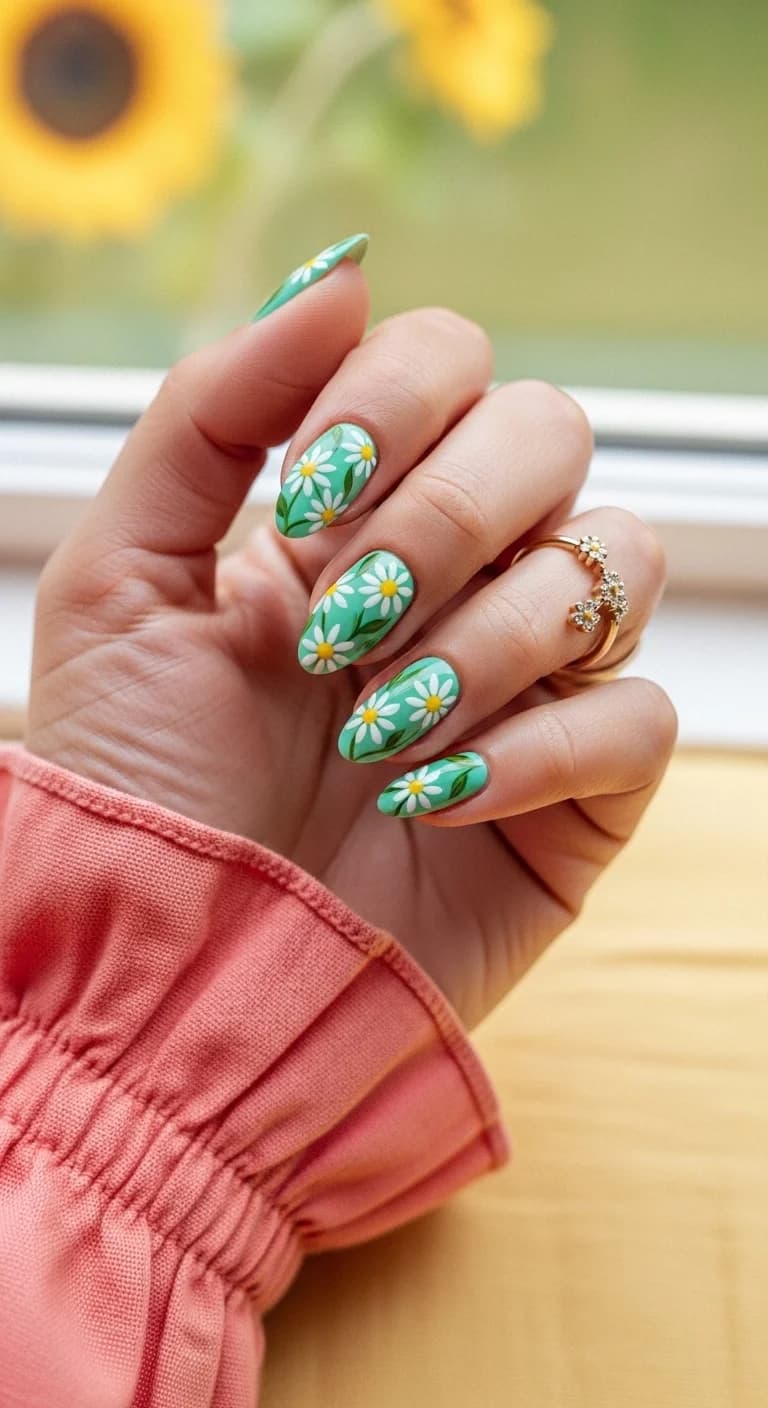
26 Stunning Sunflower Floral Nails for Spring & Summer 2026 🌻
12.Bohemian Braided Crown with Loose Waves
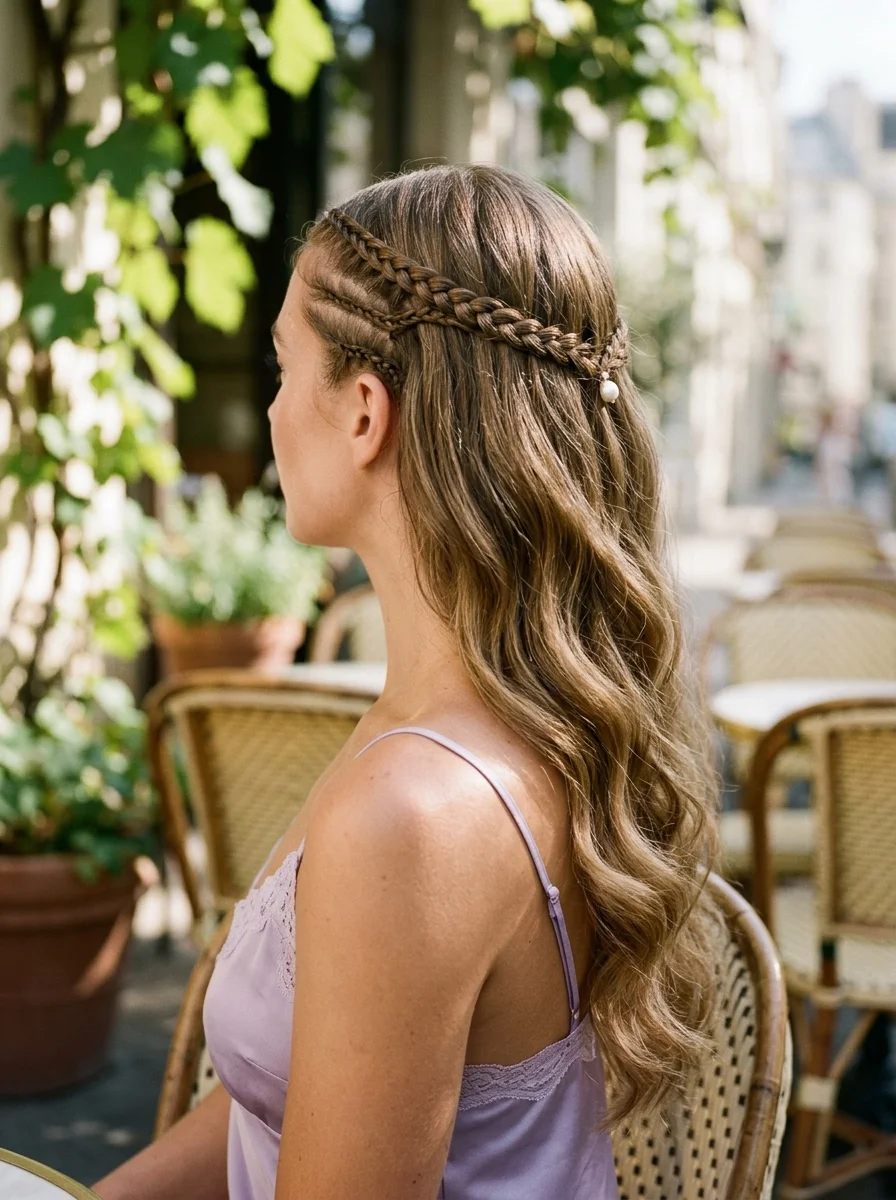
The overview: Two Dutch braids wrapping around the crown with the remaining hair falling in loose, romantic waves — this is the boho queen aesthetic done right. The braids are tight and clean, the waves are perfectly imperfect. It reads as effortless but requires skill, which is the baddie move. A small pearl or bead accent where the braids meet adds a refined finishing touch.
Why this look is popular: The crown braid is inherently feminine but the baddie execution keeps it from looking costumey. It's romantic without being precious, and the loose waves add movement and softness.
Where this look is suitable: Outdoor cafes, European vacations, summer brunches, and garden parties where effortless chic is the goal.
Step by step:
- Create a center part. This determines the symmetry of the crown braid.
- Dutch braid each side. Start at the hairline, cross strands under, and braid along the crown toward the back.
- Meet at the back. Secure both braids where they meet with a clear elastic. Tuck the ends under.
- Wave the remaining hair. Use a curling wand or air-dry with texturizing spray for loose, natural waves.
- Add accent. Place a small pearl or bead where the braids meet for a refined touch.
Tips and tricks: The braids should be tight and clean to contrast with the loose waves — that tension is the design. If your hair is fine, pancake the braids after securing to make them appear wider. A center part is essential for symmetry.
13.Grommet Tie-Up High Ponytail
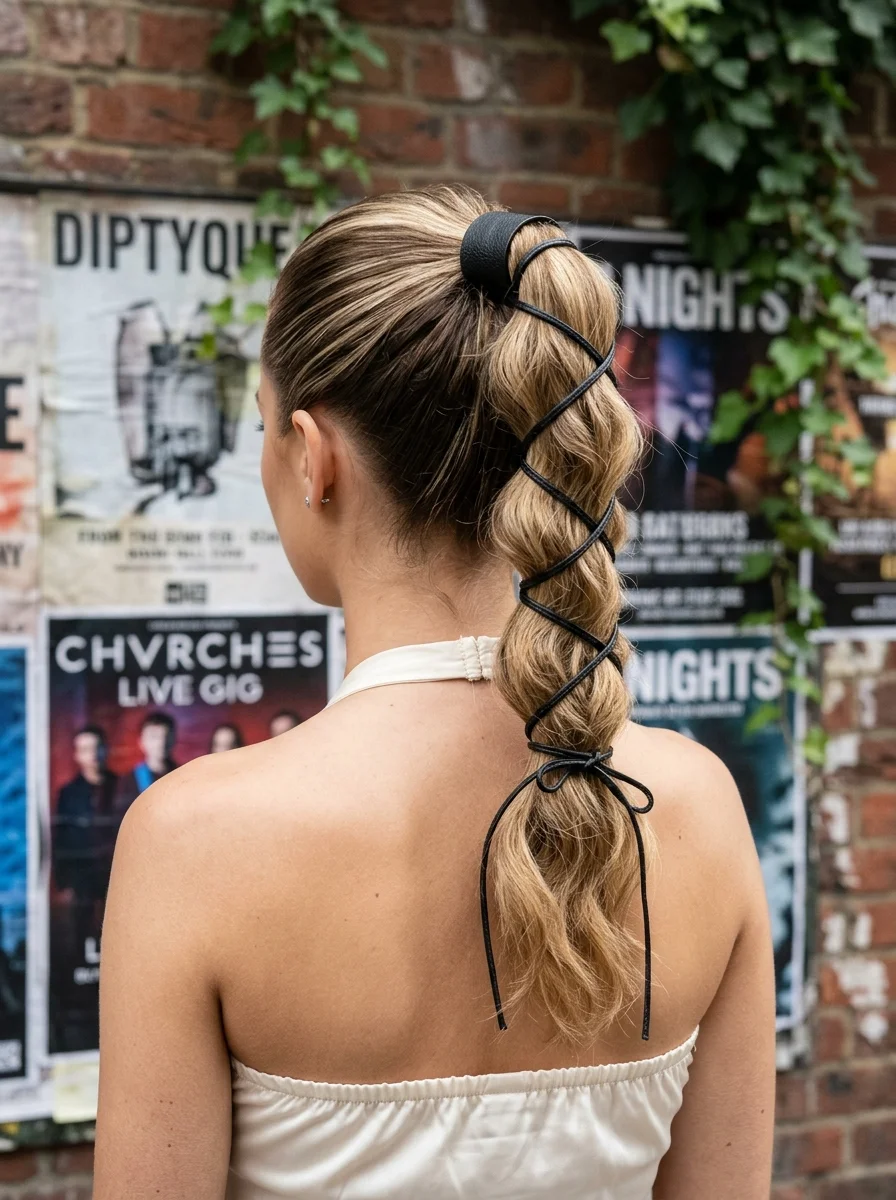
The overview: This is peak baddie energy — the leather corset lacing transforms a basic high ponytail into a statement piece. It's edgy, provocative, and fashion-forward. The contrast of dark leather against blonde hair is visually striking, and the style is unapologetically bold. This is the ponytail that turns heads when you walk into a room.
Why this look is popular: The corset lacing is a unique detail that no one else will have. It's functional too — the leather wrap holds the ponytail more securely than an elastic alone. The high placement creates a visual lift on the face.
Where this look is suitable: Concert venues, edgy street style, music festivals, and nights out where you want to command attention.
Step by step:
- Create the high ponytail. Gather hair at the crown and secure with a strong elastic.
- Add the leather wrap. Wrap a thick black leather cuff around the base. Secure with the built-in closure.
- Lace the cord. Thread a black leather cord through the wrap and lace it criss-cross down the length of the ponytail.
- Tie at the bottom. Secure the cord in a bow at the end. Trim excess if needed.
- Add volume at crown. Gently backcomb or texturize the crown area for height and texture.
Tips and tricks: The leather wrap and cord are available at craft stores or online hair accessory shops. Start with the lacing at the top and work downward, keeping the tension even. For a more subtle version, use brown leather instead of black.
32 Stunning Summer Wedding Hairstyles for Brides ☀️💍
14.Sleek High Ballerina Bun
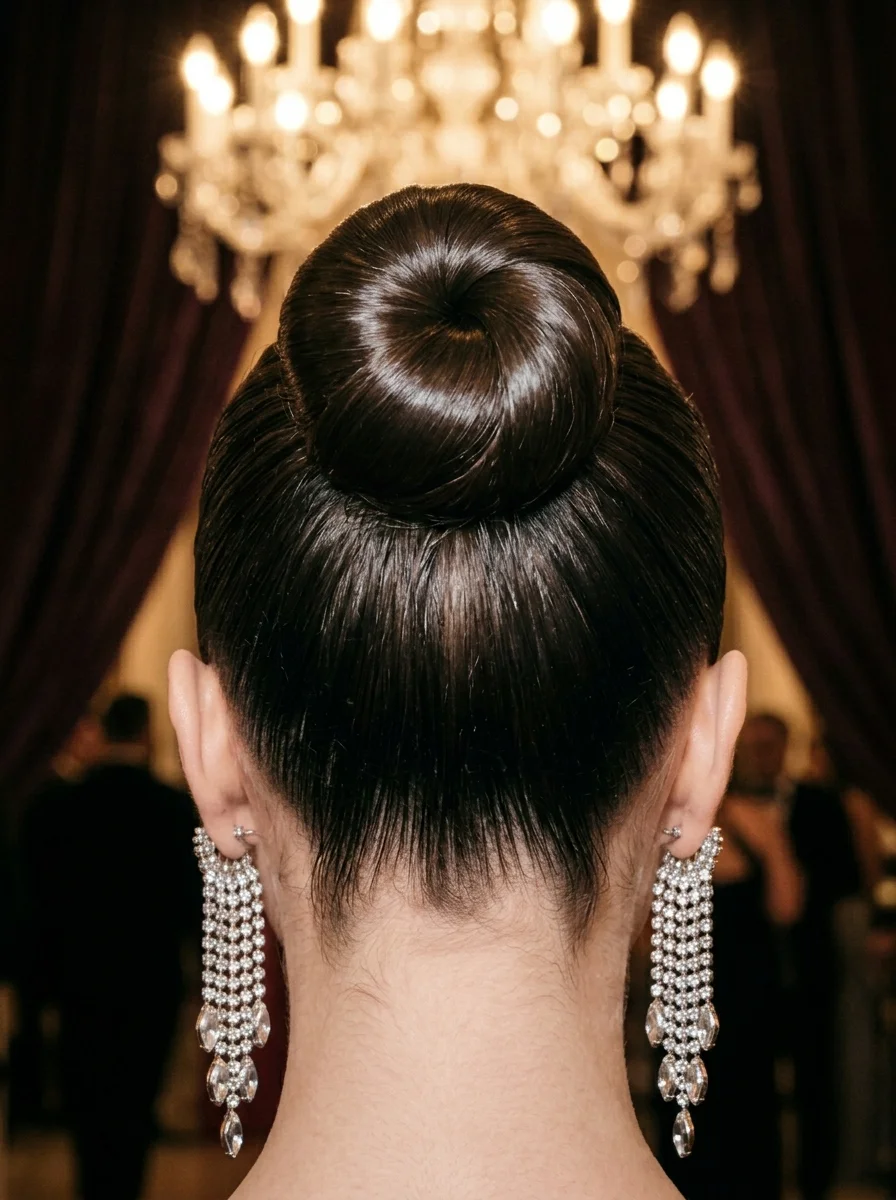
The overview: The precision is jaw-dropping — every strand is in place, the comb lines are intentional and architectural, the bun is perfectly round and centered. It's power dressing for hair. Pair with oversized crystal chandelier earrings and you have a "don't mess with me" energy that is peak baddie confidence. This is the most formal style on this list.
Why this look is popular: The extreme sleekness communicates discipline and high-maintenance beauty. The high placement creates a visual lift on the face. It's minimal but impactful — the bun itself is the statement.
Where this look is suitable: Black-tie galas, operas, formal events, and red carpet moments where you want to project power and elegance.
Step by step:
- Apply strong-hold product. Use gel or pomade from roots to ends for maximum sleekness.
- Brush upward. Using a fine-tooth comb, brush all hair from the nape and sides toward the crown. Create visible comb lines for that architectural effect.
- Secure the ponytail. Gather at the crown and secure tightly with a strong elastic.
- Form the bun. Twist the ponytail and wrap it around the base into a perfectly round donut shape. Pin with color- matched bobby pins.
- Refine the surface. Go back over the crown with gel and a fine-tooth comb to ensure every strand is smooth.
Tips and tricks: A boar bristle brush helps distribute product evenly and creates a smoother finish. Use a donut bun maker for a perfectly round shape if your natural hair doesn't form one easily. The visible comb lines are intentional — don't try to smooth them away.
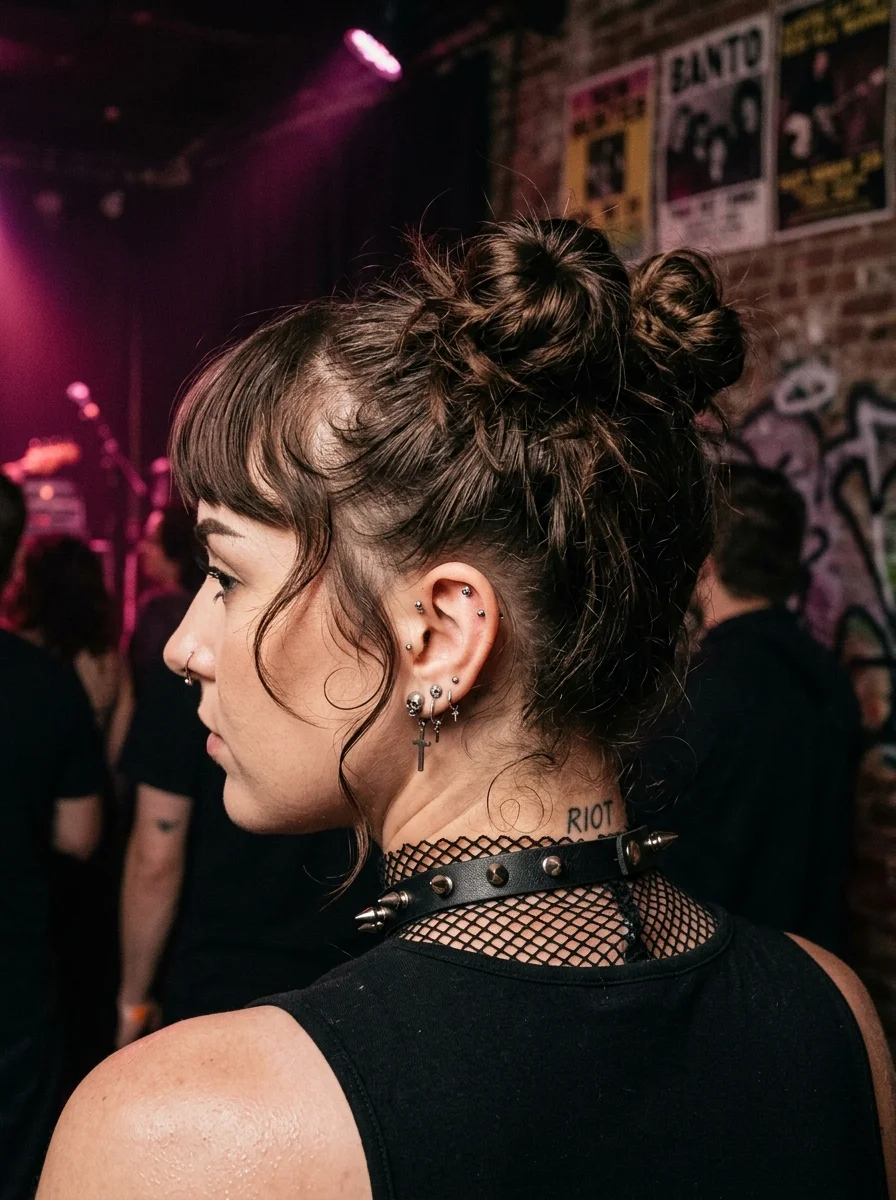
15.Messy High Bun with Natural Curls
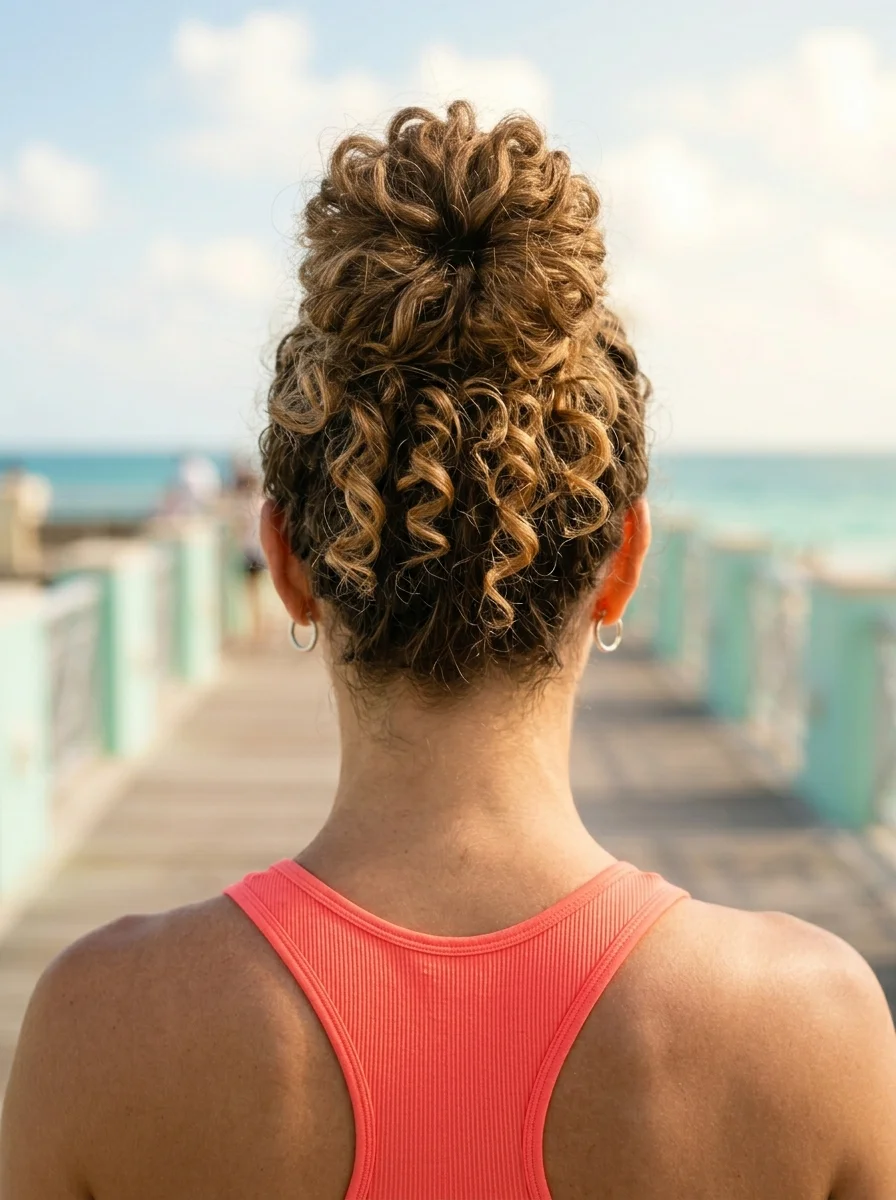
The overview: Embracing natural texture in a deliberately undone way is the baddie move here. It's not messy from neglect — it's messy with intention. The curl definition is excellent, the honey brown and caramel color catches light beautifully, and the style says "I woke up like this" while clearly being thoughtfully styled.
Why this look is popular: It celebrates natural texture rather than fighting it. The messy bun is quick and low-maintenance. The high placement keeps hair off the neck in summer heat while the loose tendrils soften the face.
Where this look is suitable: Beach boardwalks, casual summer days, pier outings, and any time you want relaxed, vacation-ready energy.
Step by step:
- Define curls first. On damp hair, apply curl-defining cream section by section. Scrunch upward and air-dry or diffuse on low heat.
- Gather loosely. Collect hair at the crown without pulling tight. You want volume and softness.
- Create the bun. Pull the ponytail through a scrunchie but don't pull all the way through on the last loop. Let curls spill over and around.
- Pull out tendrils. Gently tug a few spiral curls to hang freely around your face and nape.
Tips and tricks: A silk or satin scrunchie is gentler on curly hair than a regular elastic — less breakage and frizz. Don't touch the curls too much once they're dry — manipulation creates frizz. The messier the bun, the better it looks.

35 Fun Birthday Nail Designs for 2026 🎂
16.Sleek High Ponytail with Natural Curls
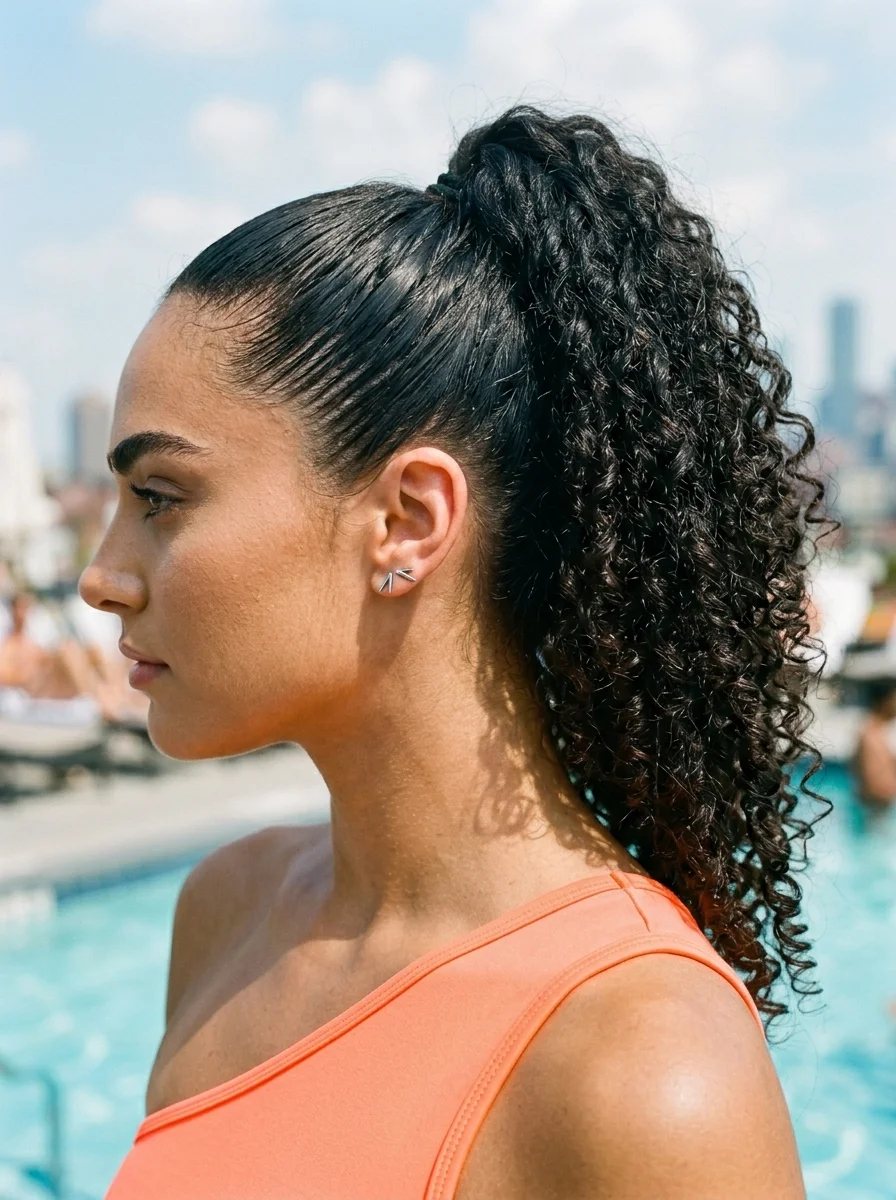
The overview: The contrast between the slicked-down, almost armored crown and the free-flowing natural curls is the power move. It's structured but not restrictive, polished but not permed. The visible comb lines add an editorial, high-fashion element, and the style celebrates natural texture while keeping it fierce and controlled.
Why this look is popular: The slicked crown with visible comb lines is a high-fashion detail that elevates the entire style. The natural curls in the ponytail create dramatic volume and movement. It's protective styling that looks editorial.
Where this look is suitable: Pool parties, rooftop lounges, summer day events, and any time you want polished yet natural energy.
Step by step:
- Apply edge control. Use strong-hold gel or edge control along the hairline, sides, and nape.
- Create comb lines. Use a fine-tooth comb to brush hair toward the crown, creating visible, precise comb-stroke lines.
- Secure the high ponytail. Gather at the crown and secure tightly with a strong elastic.
- Define the curls. Apply curl cream to the ponytail length. Scrunch and let the natural curl pattern shine.
- Refine the sleekness. Go back over the crown with more product and the comb for maximum precision.
Tips and tricks: A boar bristle brush helps distribute product evenly. For 4A+ hair textures, use a strong-hold edge control rather than regular gel — it provides better hold against natural curl pattern. The visible comb lines are intentional design elements, not mistakes.
17.Sleek High Ponytail with Face-Framing Wisps
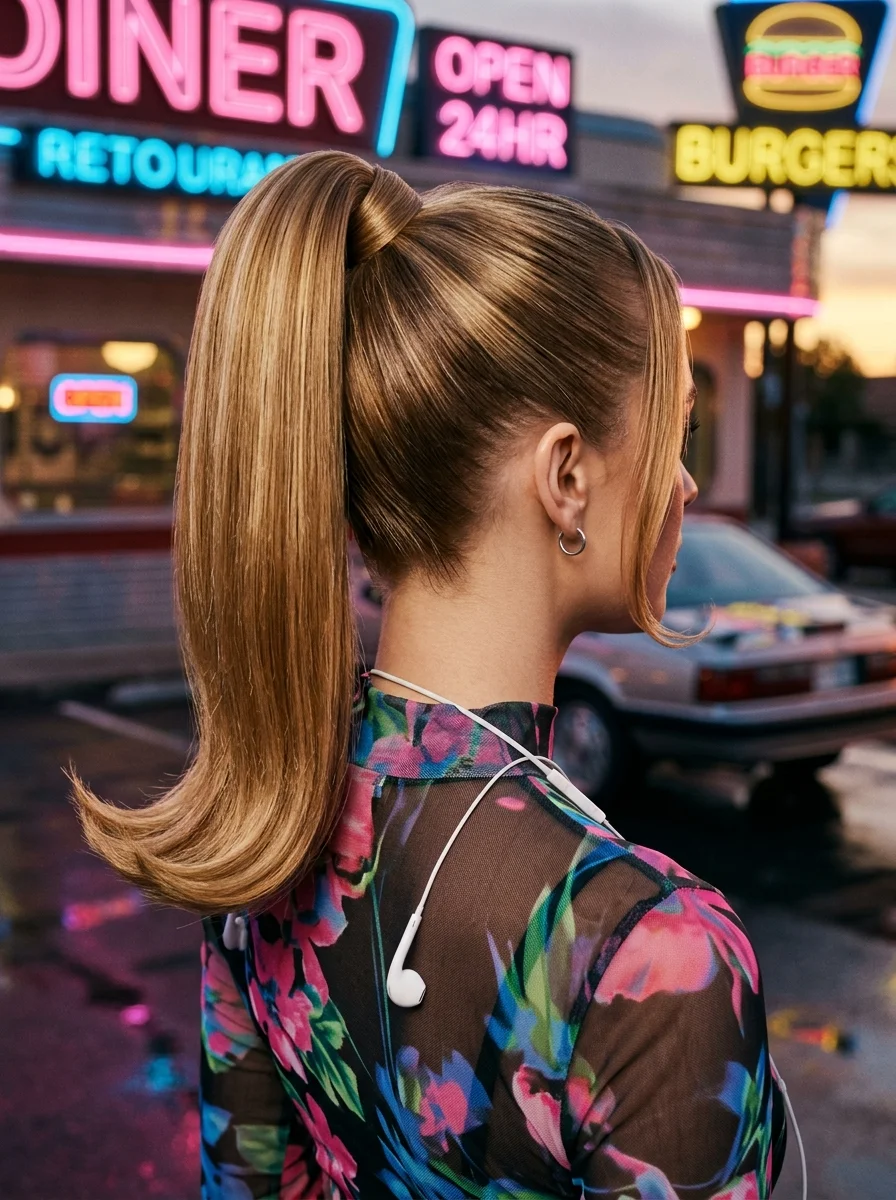
The overview: The face-framing wisps are the signature baddie detail — they soften the severity of the high ponytail while adding a flirty, feminine touch. The glass-hair finish and hair- wrapped base show attention to detail, and the overall look is polished without being stiff. It's the kind of ponytail that turns heads.
Why this look is popular: The wispy pieces soften the high ponytail and make it more wearable. The glass-hair finish is aspirational and photogenic. The hair-wrapped elastic adds a polished detail that separates baddie styling from gym hair.
Where this look is suitable: Retro diner dates, nights out, and casual-cool urban settings where you want polished yet playful energy.
Step by step:
- Flat iron to perfection. Work through small sections for a pin-straight, high-shine finish.
- Gather high. Pull hair into a high ponytail at the crown. Leave two thin sections out at the front.
- Wrap the elastic. Take a small section from the ponytail and wrap it around the base to conceal the elastic. Pin underneath.
- Straighten the wisps. Use a flat iron on the two face-framing pieces, curving them gently to frame your cheekbones.
- Add shine. Apply shine spray for the glass-hair finish.
Tips and tricks: The wisps should be thin — if they're too thick, they look like grown-out bangs rather than intentional styling. Use a light-hold hairspray on the wisps to keep them in place without stiffness. The hair-wrapped base is what separates this from a basic ponytail — don't skip it.

24 Stunning Festival Hairstyle Ideas for Music Concert Nights 2026 🎶✨
18.Chic Geometric Updo with Gold Bar Pins
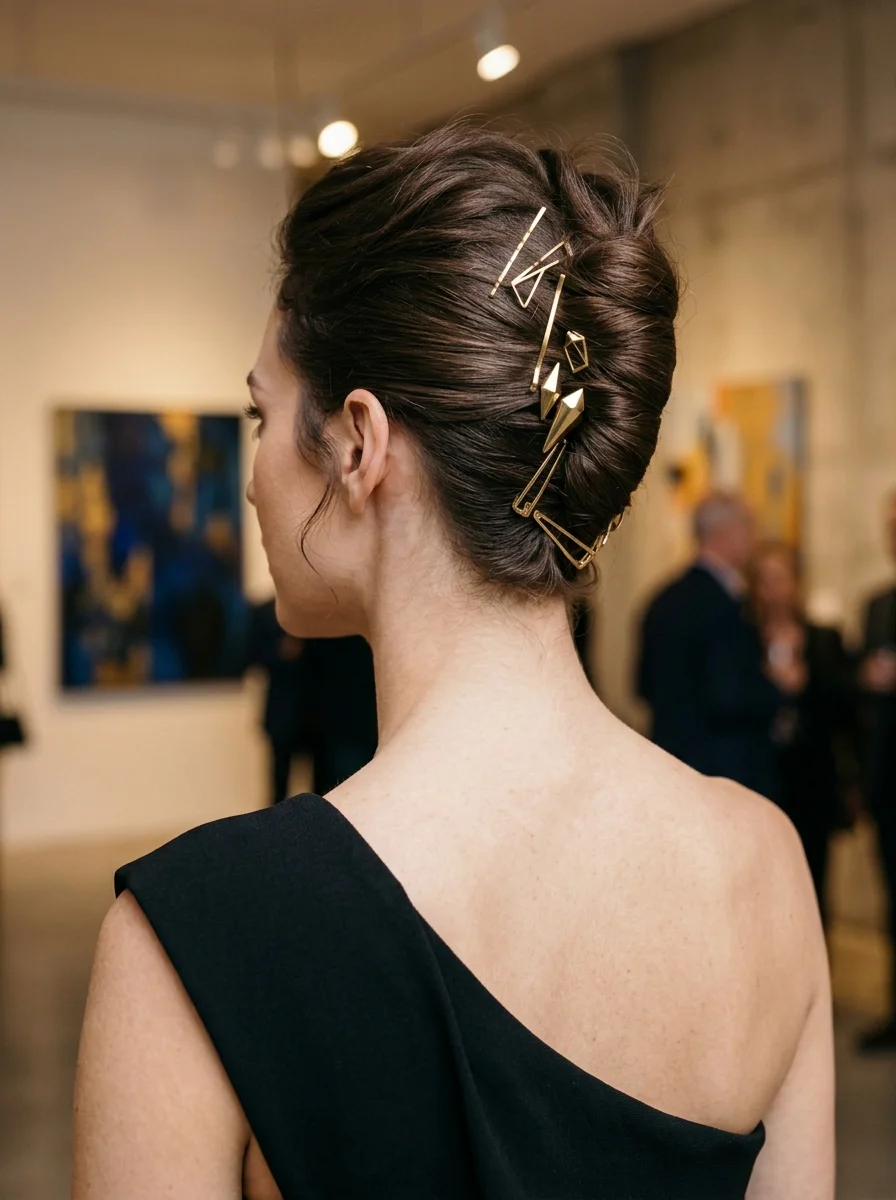
The overview: The gold geometric pins transform a classic updo into a wearable art piece. The asymmetric, scattered placement looks intentional and editorial — like jewelry for hair. It's sophisticated but not safe, artistic but not costume-y. A baddie wears this to an event where she wants to be remembered.
Why this look is popular: The gold geometric pins are a unique accessory that adds architectural interest. The low-to-mid chignon is timeless and flattering. The slightly undone quality keeps it from feeling overly formal.
Where this look is suitable: Art gallery openings, museum events, cultural soirées, and any setting where you want sophisticated, artistic energy.
Step by step:
- Create texture. Apply a texturizing spray for grip and volume before styling.
- Sweep back and up. Gather hair loosely toward the back of the head. Don't pull tight — maintain softness.
- Form the chignon. Twist and coil the hair into a low-to-mid bun. Pin with color-matched bobby pins. Leave pieces overlapping and tucking for dimension.
- Add gold pins. Arrange gold geometric bar pins in an asymmetric cluster on one side of the chignon. Mix different shapes for art-deco effect.
- Pull out soft tendrils. Gently tug a few pieces at the nape and around the ear for softness.
Tips and tricks: The pins are available from most beauty supply stores and online retailers. Arrange them on a flat surface first to plan your placement before inserting into the hair. The asymmetric placement is key — symmetrical looks too structured for this aesthetic.
19.Rich Espresso Caramel Swirl Waves
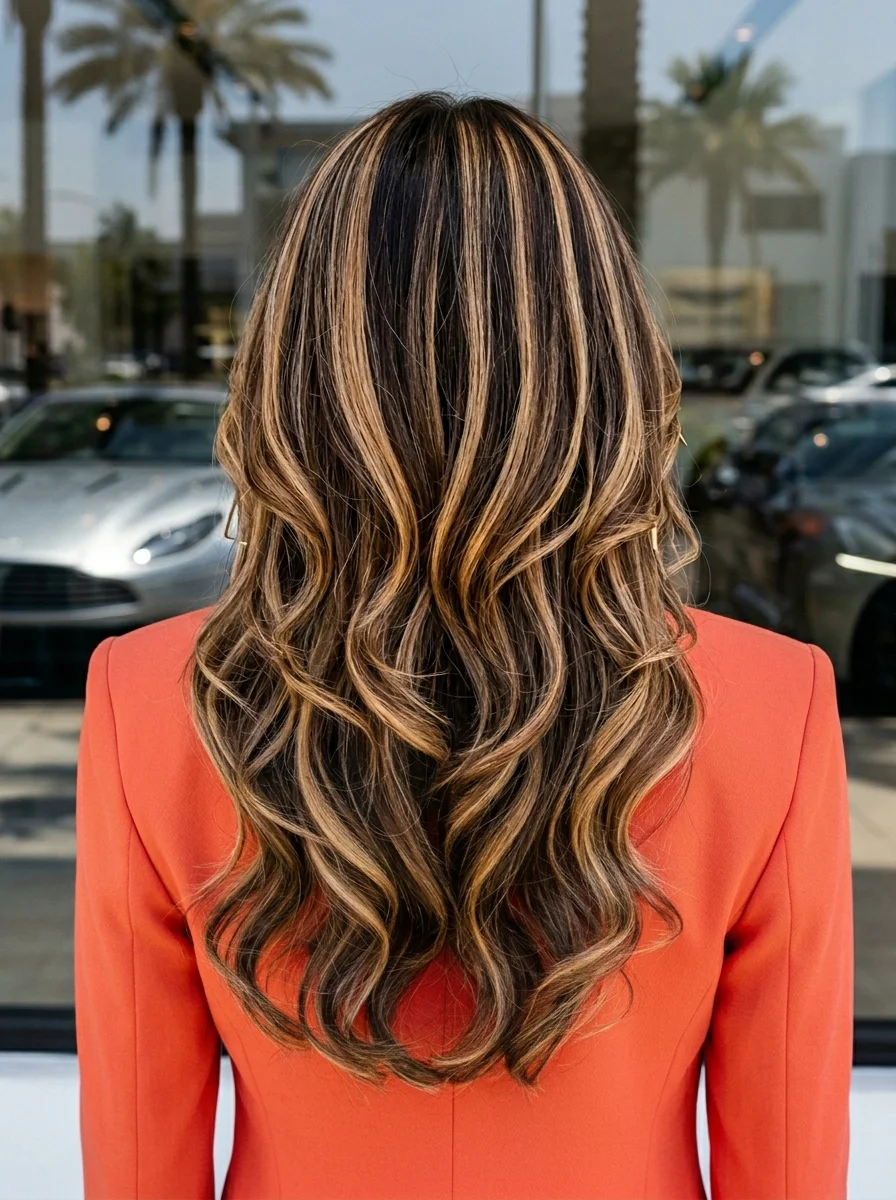
The overview: The length alone is a power statement — this is hair that demands attention. The chunky, high-contrast caramel highlights against the deep espresso base are bold and intentional, and the flawless wave pattern signals high- maintenance beauty. It's unapologetically glamorous, head-turning, and radiates main-character energy.
Why this look is popular: The extreme length is aspirational. The chunky highlight technique is bold — not subtle balayage but deliberate, high-contrast ribbons of color. The bombshell wave pattern is timeless and photographs beautifully.
Where this look is suitable: Luxury settings, red carpet-adjacent events, high-end brunches, and any time you want to radiate wealth and sophistication.
Step by step:
- Curl with a large barrel. Use a 1.5-2 inch curling iron. Wrap large sections away from the face. Hold each for 8-10 seconds.
- Let cool completely. Pin each curl up as you release it and let them cool for at least 10 minutes.
- Brush through. Use a wide-tooth comb or your fingers to blend the curls into soft, flowing waves.
- Add shine. Apply shine serum or light-hold hairspray for the polished, frizz-free finish.
Tips and tricks: Sleep on a silk pillowcase to preserve the waves overnight. For extra volume, flip your head upside down and shake out the waves before heading out. The chunky highlights require a skilled colorist — bring reference photos to your appointment.

29 Best Tropical Vacation Nails for Women in 2026 🌴
20.Bohemian Braided Updo with Pearl Embellishments
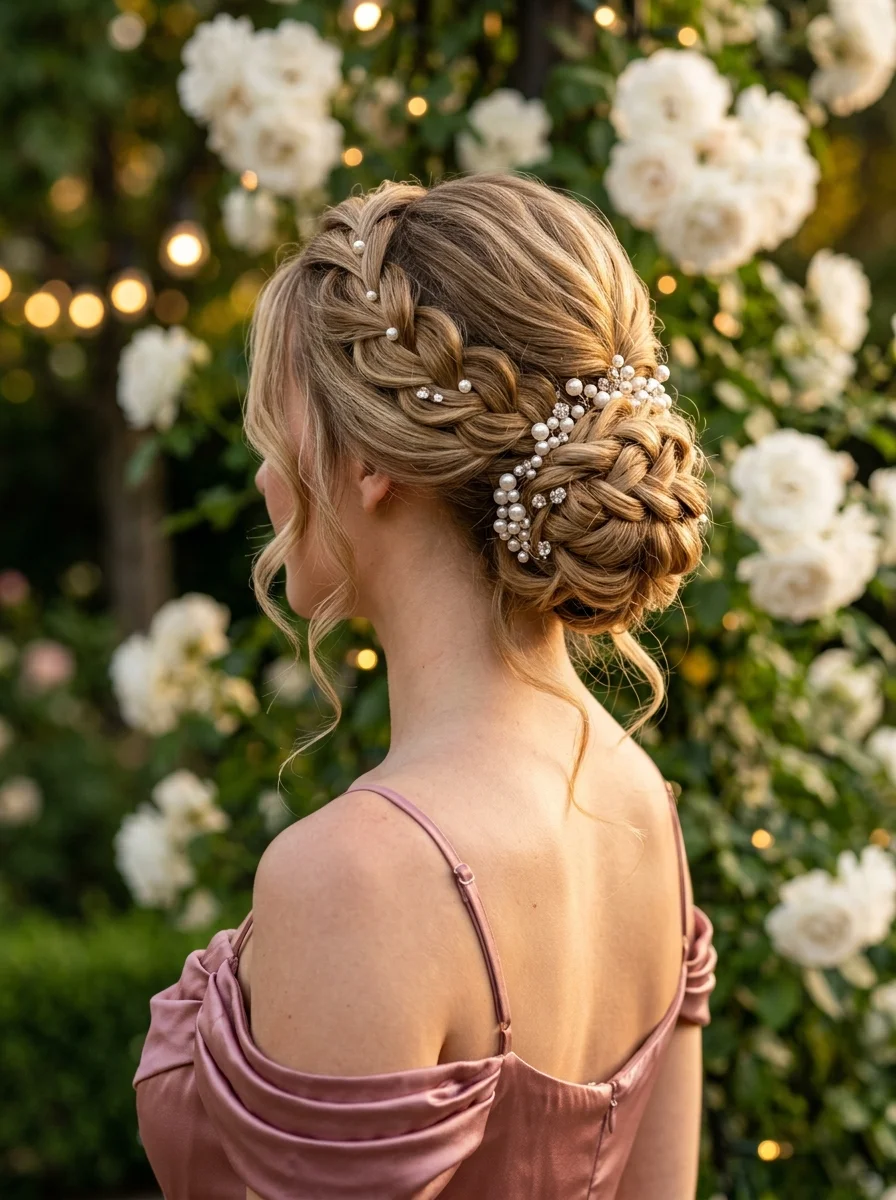
The overview: Dutch braids feeding into a low bun with pearl pins scattered throughout — this combination of structured braiding with luxurious pearl embellishments elevates the updo beyond basic. It signals effort and taste, a baddie who can look effortlessly put-together while still commanding attention. The face-framing tendrils keep it soft and feminine.
Why this look is popular: Pearls are having a major moment in hair accessories. The braided texture provides visual interest that a plain bun can't match. The low placement is universally flattering and comfortable for all-day wear.
Where this look is suitable: Garden weddings, engagement parties, romantic date nights, and any setting where refined bohemian elegance is the goal.
Step by step:
- Dutch braid each side. Start at the temples and braid along the sides toward the nape. Keep them slightly loose.
- Gather into a low bun. Combine both braids at the nape and coil into a loose, textured bun. Pin securely.
- Pancake the braids. Gently pull the outer loops to widen the braids for a fuller look.
- Add pearl pins. Scatter pearl-tipped pins along the braid ridges and cluster some into the bun.
- Leave out tendrils. Pull a few soft pieces around your face and give them a gentle bend with a curling iron.
Tips and tricks: The pearl pins are available at most beauty supply stores. Cluster them densely in the bun and scatter them more sparsely along the braids for a natural, organic placement. Crystal or rhinestone accent beads interspersed among the pearls add extra sparkle.
21.Beachy Waves High Pony with Butterfly Clips
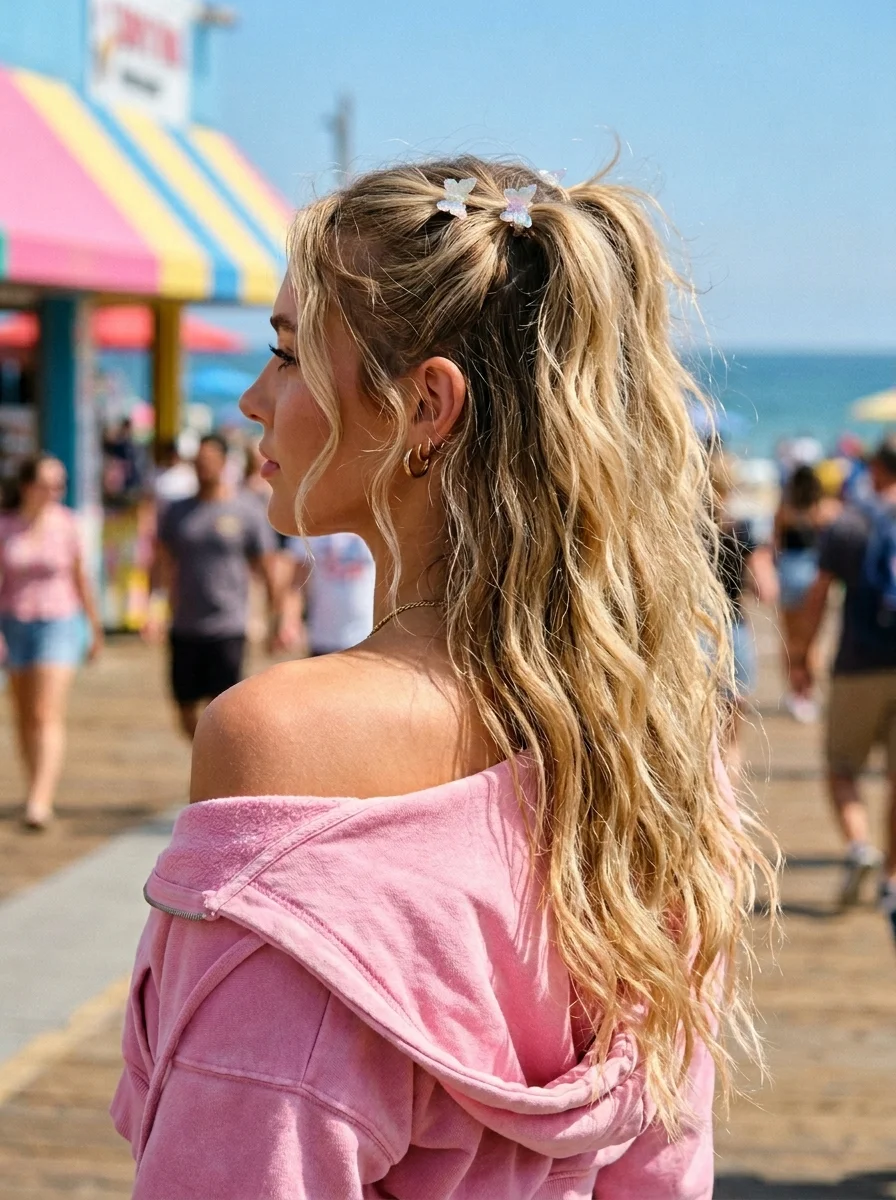
The overview: The Y2K butterfly clip revival paired with the undone high pony is peak baddie energy — it's nostalgic, flirty, and low-effort-looking (though clearly styled). The loose face- framing pieces and messy texture communicate "I woke up like this" confidence while the butterfly clips add a whimsical, iridescent touch.
Why this look is popular: Butterfly clips are a nostalgic accessory that's been fully embraced by the baddie aesthetic. The high pony with loose waves is flattering on every face shape. The undone texture is forgiving and improves throughout the day.
Where this look is suitable: Beach boardwalks, summer festivals, carnivals, and casual summer outings where you want playful, flirty energy.
Step by step:
- Create texture. Apply sea salt spray or texturizing spray to damp hair and scrunch.
- Gather high. Pull hair into a high ponytail at the crown. Keep it loose — don't pull tight.
- Wave the ponytail. Use a 1.25-inch curling wand on 1-inch sections, leaving ends out.
- Clip the butterflies. Place iridescent butterfly clips near the temples to pin back front sections.
- Pull out face-framing pieces. Let a few strands fall naturally around your face.
Tips and tricks: The iridescent butterfly clips catch light beautifully in photos — position them where they'll catch the most light. For finer hair, backcomb the crown slightly before gathering for more volume at the ponytail base.
31 Flattering Summer Hairstyles for Women Over 40 (2026)
22.Sunny Lemon Scarf Ponytail
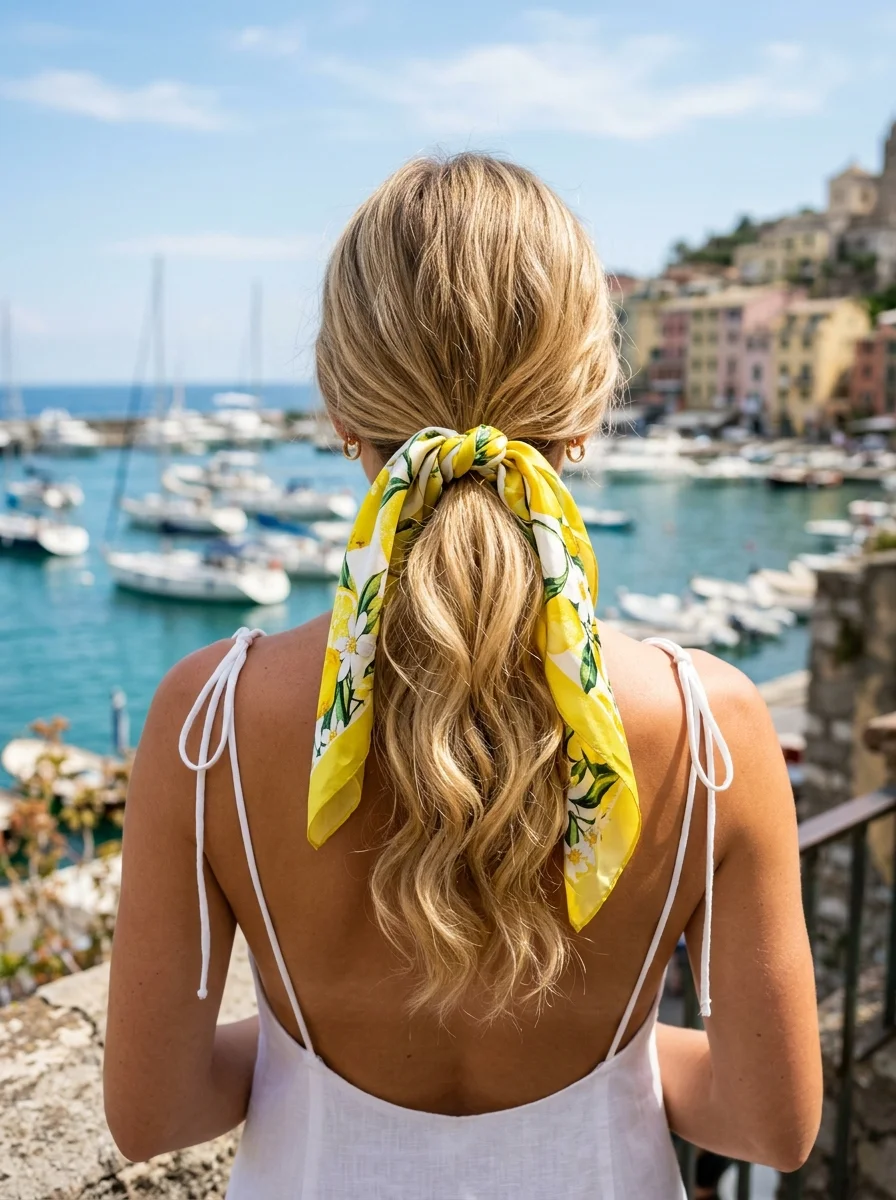
The overview: The scarf-as-hair-accessory move is a power play — it transforms a basic low ponytail into an intentional fashion statement. The citrus-yellow print against honey blonde hair is visually striking and photo-ready. It's aspirational vacation energy that reads "I have taste and I travel well."
Why this look is popular: The scarf adds color and personality to a simple ponytail. It's a quick accessory that makes a big impact. The lemon print is seasonally perfect for summer and photographs beautifully.
Where this look is suitable: Mediterranean vacations, Italian Riviera sightseeing, coastal brunches, and sunny day adventures.
Step by step:
- Add gentle waves. Use a large barrel iron for a single pass, creating a natural bend rather than defined curls.
- Gather low. Create a low ponytail at the nape with a relaxed, loose pull. Don't slick it.
- Tie the scarf. Fold the silk scarf into a band. Wrap it around the ponytail base and tie into a bow. Let the tails hang alongside the hair.
- Adjust the volume. Gently lift the crown area for natural volume without teasing.
Tips and tricks: Silk or satin scarves photograph better than polyester — the fabric has a natural sheen that reads luxury. The scarf width should be about 2 inches. Coordinate the scarf color with your outfit for a cohesive, styled look.
23.Shaggy Rocker Mullet with Textured Layers
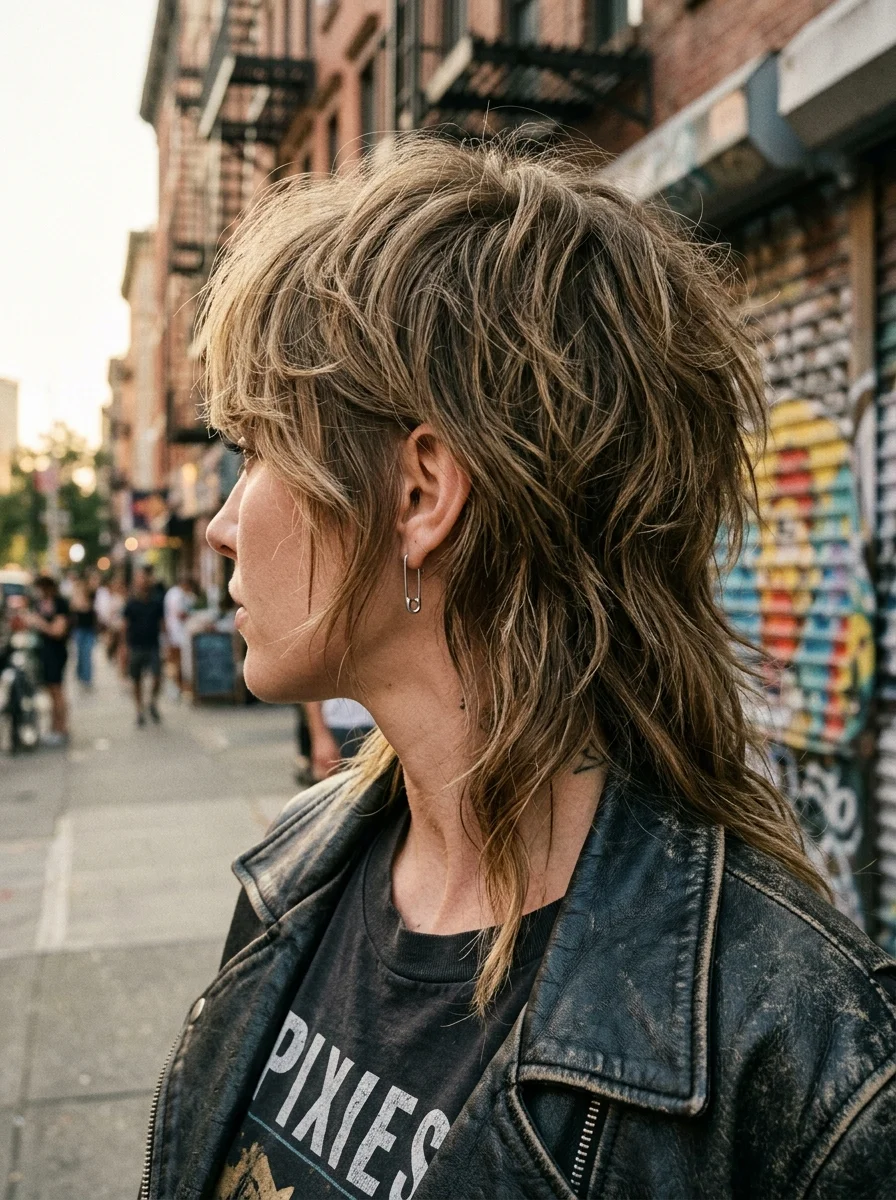
The overview: This is the anti-glamour baddie — raw, rebellious, and completely unapologetic. The mullet is having a major fashion moment, and this version is perfectly executed with razor-sharp layers and lived-in texture. It says "I don't follow trends, I set them." The silver safety pin earring is the finishing touch.
Why this look is popular: The mullet revival is one of the biggest hair trends of the year. The textured layers create volume and movement without product. It's a low-maintenance cut that looks intentionally styled.
Where this look is suitable: Urban street style, indie concerts, skate parks, and edgy editorial settings where rock-and-roll energy is the goal.
Step by step:
- Apply texturizing product. Work sea salt spray, dry shampoo, or matte pomade through damp or dry hair.
- Diffuse or air-dry. Let the natural texture emerge. Scrunch as it dries for maximum piecey-ness.
- Add root lift. Use your fingers to rough up the roots at the crown for height and texture.
- Shape the fringe. Push the bangs forward and slightly tousle them. They should look deliberately messy.
Tips and tricks: Ask your stylist for a "modern shag-mullet with razor-cut layers" — the razor technique creates the piecey texture that scissors can't replicate. This cut looks better with some grit, so skip the conditioner on the days you want maximum texture.

29 Stunning Summer Almond Nails for Women in 2026 💅
24.Sleek High Ponytail with a Classic Three-Strand Braid
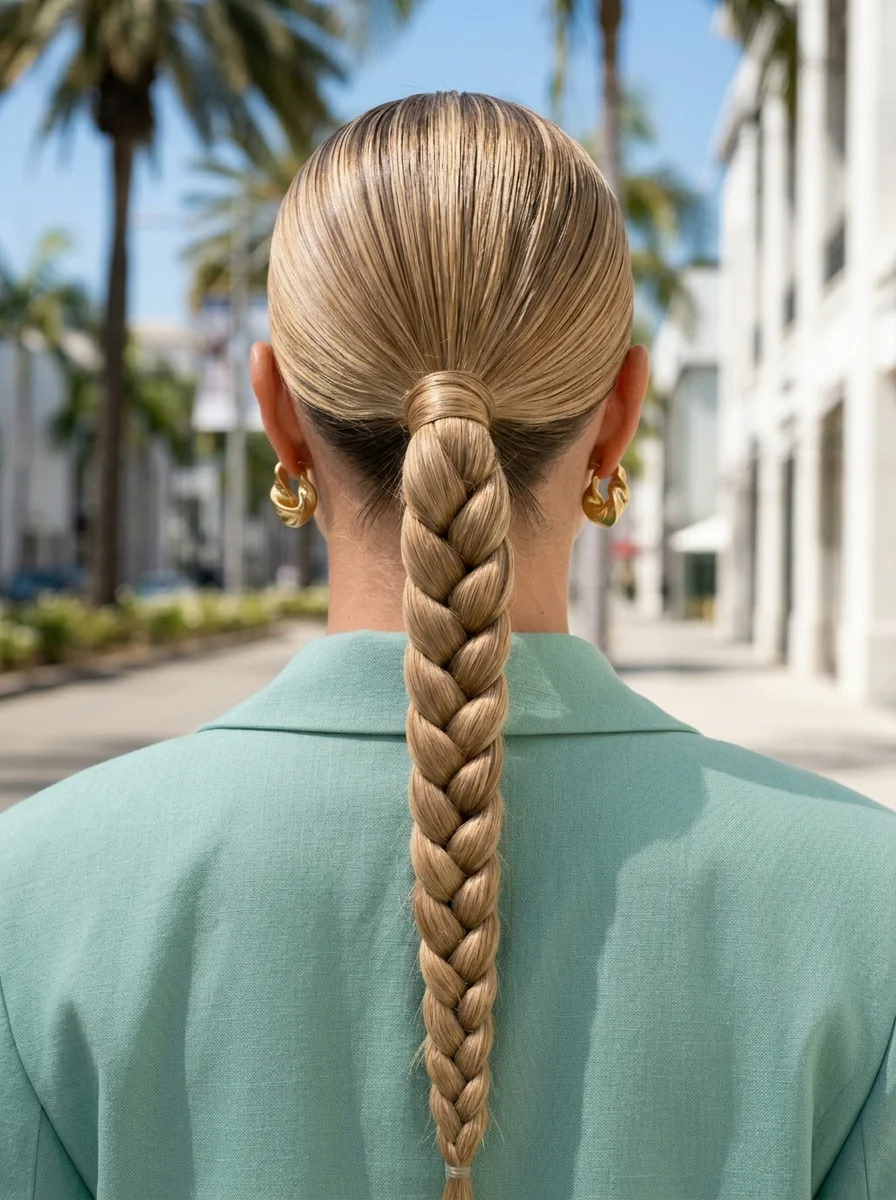
The overview: The absolute precision of this style is what makes it baddie-worthy. Not a single hair is out of place — it radiates control, discipline, and high-maintenance energy. The extreme length of the braid, the glass-like smoothness at the crown, and the chunky gold earrings create a "boss baddie" aesthetic. It's minimalism that screams wealth and intentionality.
Why this look is popular: The three-strand braid is the most reliable protective style — it prevents tangling and stays secure for hours. The sleek crown with no flyaways looks incredibly polished. The extreme length is aspirational and head-turning.
Where this look is suitable: Power brunches, business-casual outings, Miami street style, and any setting where polished warm-weather sophistication is the goal.
Step by step:
- Smooth with product. Apply strong-hold gel or edge control from roots to ends.
- Brush flat. Use a fine-tooth comb to eliminate every bump and flyaway. Create visible comb lines for editorial effect.
- Gather high. Secure the ponytail at the crown with a strong elastic.
- Wrap the base. Take a small section and wrap it around the elastic to conceal it.
- Braid tightly. Create a consistent three-strand braid from top to bottom. Maintain even tension throughout.
- Secure the end. Tie off with a clear elastic about 2 inches from the bottom.
Tips and tricks: The braid tension must be consistent — uneven tension creates visible kinks. Braid in natural light so you can see what you're doing. The champagne blonde color is best achieved through professional coloring; bring reference photos.
25.Glamorous Bouffant Half-Up with Cascading Waves & Pearl Accent
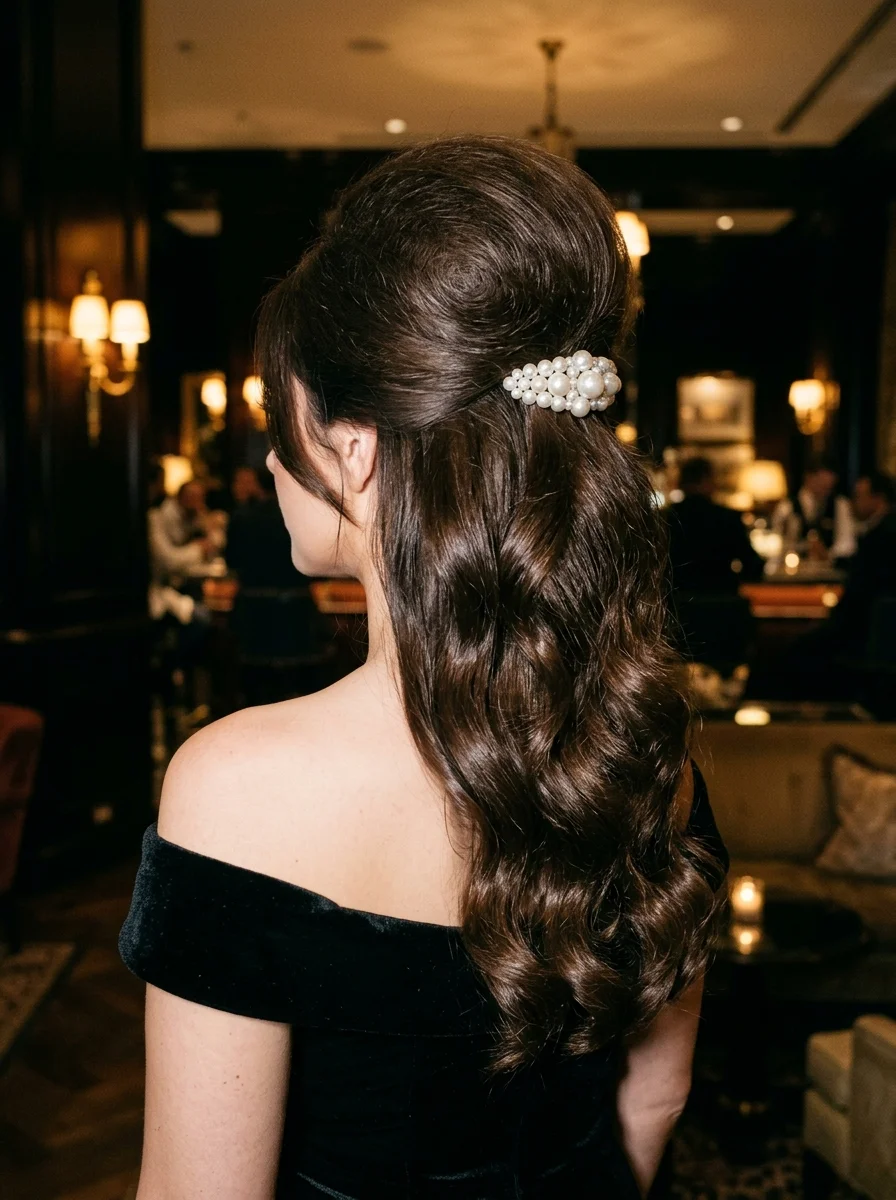
The overview: Old Hollywood glamour reimagined for the modern baddie. The bouffant volume at the crown is a power move — it literally adds height and presence. The glossy, perfectly formed waves and the pearl accent signal that this person arrived and everyone noticed. It's elegant without being stuffy, glamorous without being try-hard.
Why this look is popular: The bouffant creates instant volume and drama at the crown. The pearl barrette adds a refined, jewelry-like accent. The cascading waves are timeless and photograph beautifully from every angle.
Where this look is suitable: Evening cocktail events, upscale dinners, black-tie summer parties, and any formal setting where you want vintage glamour.
Step by step:
- Create the bouffant. Take the crown section and backcomb the roots for volume. Smooth the top layer over the backcombed section.
- Gather the half-up section. Sweep the front sections back and secure at the crown-back with the pearl barrette.
- Curl the remaining hair. Use a large barrel iron on 1-inch sections. Pin each curl to cool.
- Brush through. Once cool, brush the curls into large, flowing waves.
- Refine the bouffant. Use a light mist of hairspray and your fingers to shape the crown volume.
Tips and tricks: The backcombing is what creates the bouffant — don't skip it. Use a rat-tail comb to smooth the top layer over the backcombed section without flattening it. The pearl barrette should be positioned where it catches light and serves as a focal point.
20 Stunning Mother of the Bride Hairstyle Ideas for 2026 💍
26.Voluminous High Ponytail with a Chic Scarf Wrap
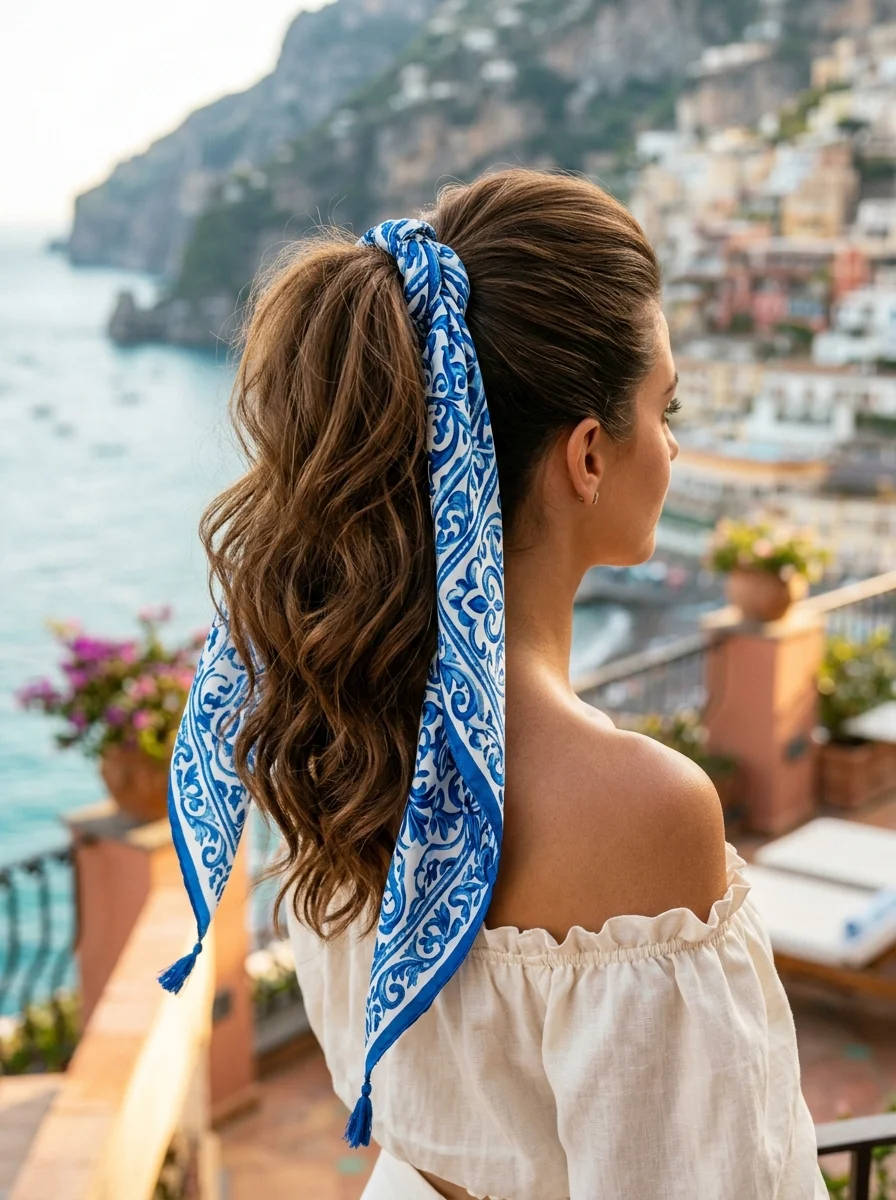
The overview: The volume in this ponytail is the main character — it's big, bold, and unapologetically dramatic. The blue-and- white Mediterranean scarf elevates it from "gym ponytail" to "I'm vacationing in Positano and I know I look incredible." The tassel detail adds movement and visual interest that plain hair ties can't match.
Why this look is popular: Big hair equals big energy. The scarf wrap is a practical accessory that adds color, pattern, and texture. The high placement creates a visual lift on the face. Works on any hair type that can hold a curl.
Where this look is suitable: Italian coastal vacations, Amalfi Coast sightseeing, resort dining, and any setting where aspirational travel-baddie energy is the goal.
Step by step:
- Create volume. Apply volumizing mousse to damp hair and blow-dry with a round brush, lifting at the roots.
- Curl for body. Use a large barrel iron on 1-inch sections, wrapping away from the face.
- Gather high. Pull hair into a high ponytail at the crown. Keep some natural volume at the roots — don't slick it flat.
- Wrap the scarf. Tie the Mediterranean scarf around the ponytail base. Let the ends cascade down alongside the hair.
- Fluff the waves. Use your hands to arrange the waves for maximum volume and movement.
Tips and tricks: The scarf should be large enough to wrap around and still have 12+ inch tails hanging. Silk or cotton scarves work better than polyester — they drape more naturally. The tassel detail adds movement, so choose scarves with that feature for extra visual interest.
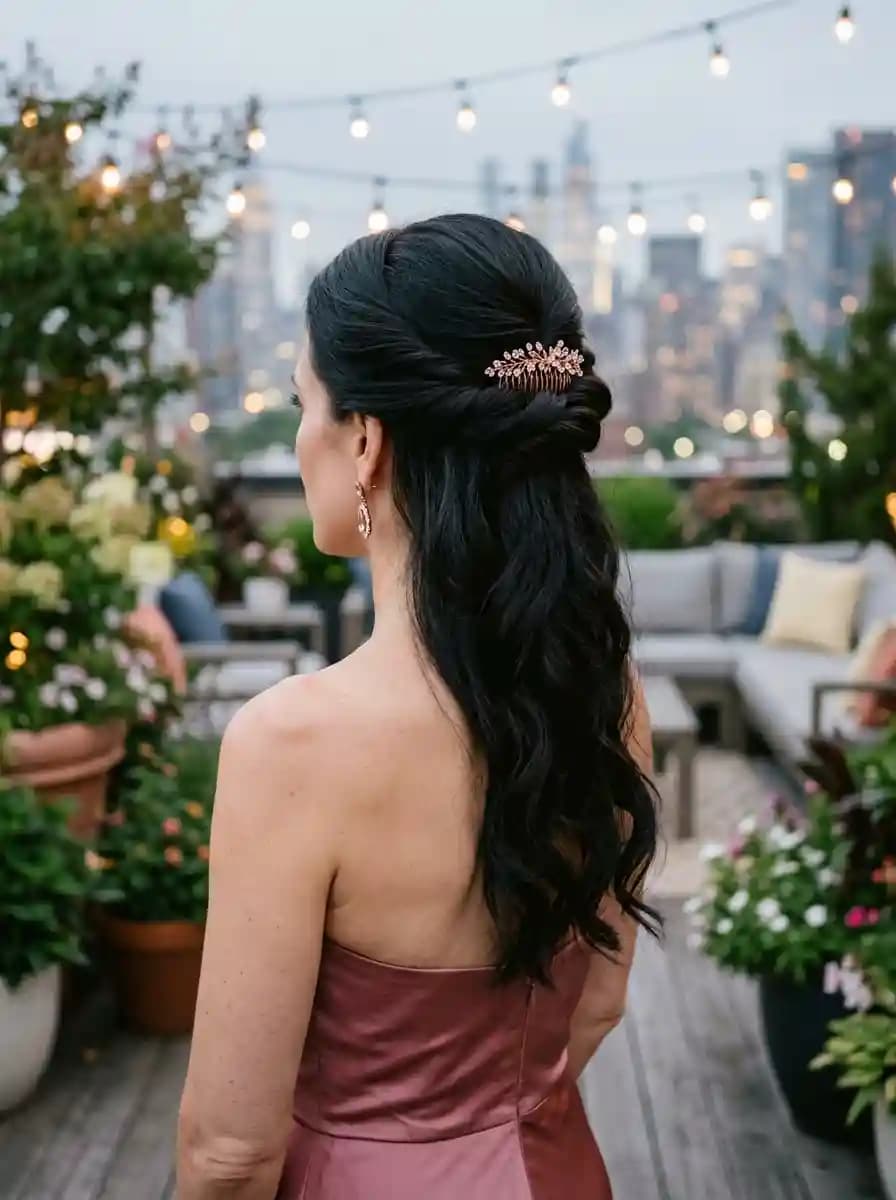
27.Voluminous Volute Waves with a Chic Claw Clip
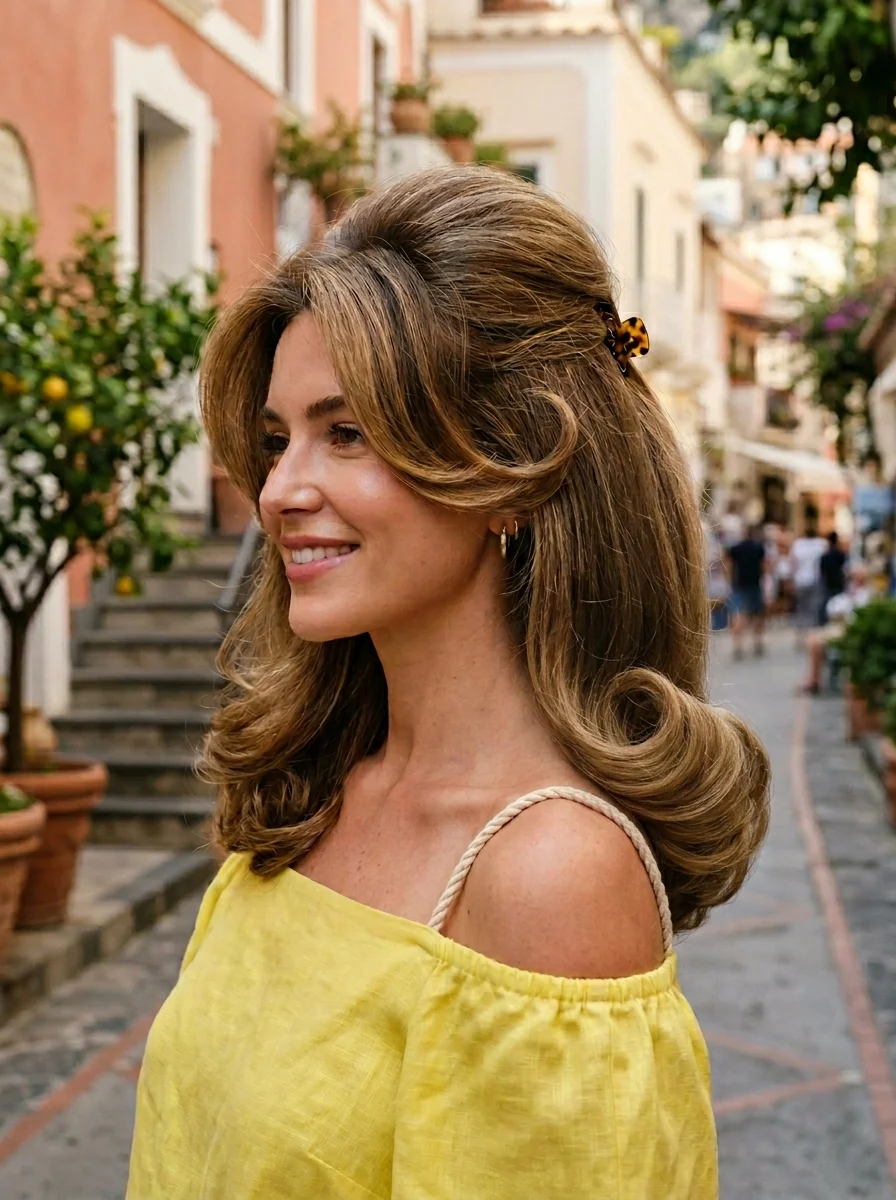
The overview: This is the "clean girl meets old money" baddie aesthetic. The claw clip is a deliberate throwback done with modern polish — it's casual but the volume and wave pattern are anything but effortless. The face-framing curtain bangs and bouncy layers create a flattering, head-turning silhouette that reads "I have great hair and I don't need to try too hard."
Why this look is popular: The claw clip is back and more popular than ever. The voluminous waves look like a professional blowout. The half-up styling keeps hair off your face while showing off the length and texture.
Where this look is suitable: European street style, afternoon promenading, al fresco dining, and any setting where polished-casual is the dress code.
Step by step:
- Blow-dry for volume. Use a round brush to lift at the roots and create body throughout.
- Curl for bounce. Use a large barrel iron or velcro rollers to create rounded, bouncy waves.
- Sweep the front sections back. Take the top section from the temples and pull it back.
- Clip it. Secure with a tortoiseshell claw clip at the back of the crown.
- Style the curtain bangs. Use a round brush to sweep them outward and to the side.
- Fluff the waves. Use your hands to arrange the waves for maximum volume and sweep.
Tips and tricks: Velcro rollers set at the crown while you do your makeup create lasting volume with minimal effort. The claw clip should be large enough to grip the half-up section securely — small clips won't hold thick or long hair. The curtain bangs need regular trimming every 4-6 weeks to maintain the right length.

29 Trendy Pink Summer Nails for 2026 💅
28.Copper Waves with a Micro Fringe
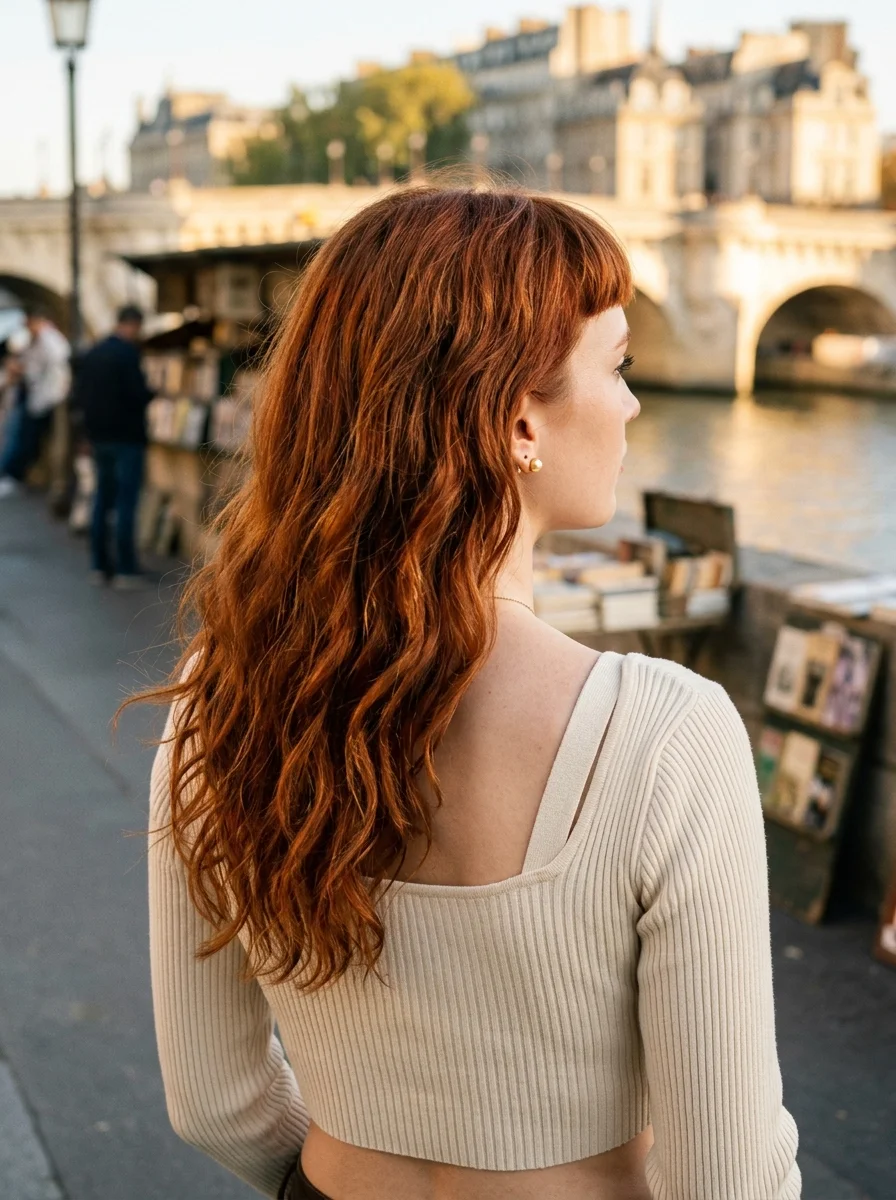
The overview: The copper-red color is an absolute power move — it's bold, polarizing, and impossible to ignore. Pairing that with a micro fringe (which requires serious commitment and confidence to pull off) creates a look that is equal parts fashion-forward and fearless. This baddie doesn't blend in — she stands out by design.
Why this look is popular: Copper-red is having a major moment — it's warm, vibrant, and flattering on a wide range of skin tones. The micro fringe is a high-fashion detail that signals confidence. The minimal accessories let the hair color and cut be the centerpiece.
Where this look is suitable: Parisian riverside strolls, art gallery visits, creative industry outings, and any cosmopolitan setting where you want to channel French-girl chic.
Step by step:
- Embrace natural texture. Apply a texturizing spray to damp hair and let it air-dry for that organic, undone quality.
- Enhance with a flat iron (optional). Create a few random bends in alternating directions for piecey definition.
- Style the fringe. Push the micro bangs forward and slightly piece them out with your fingers. Don't make them too neat.
- Keep accessories minimal. Small gold studs and a delicate chain are all you need. The hair is the statement.
Tips and tricks: The copper color requires maintenance — use color-safe shampoo and wash with cool water to prevent fading. The micro fringe grows out fast, so budget for trims every 3-4 weeks. This cut works best on straight to wavy hair; very curly hair would need the fringe flat-ironed daily.
The Quiet Luxury Accessory Shift
If you're still reaching for plastic claw clips and basic elastics, it is time for an upgrade. The biggest hair accessory trend for Summer 2026 is all about clean luxury and effortless styling. We are seeing a massive move toward oversized tortoiseshell clips, minimalist metallic bar pins, and elegant silk bows that look more like jewelry than hair tools.
Golden hair accessories — sleek metal cuffs, geometric clips, subtle gold ponies — are dominating the baddie aesthetic right now. They act like jewelry for your hair, instantly elevating a messy bun or a basic ponytail into something that looks expensive and intentional. The difference between a throwaway ponytail and a styled one is often just one well-placed gold barrette.
The move? Ditch the heavy, bedazzled Y2K clips. Wrap a vintage silk scarf around your ponytail base, or slide a single minimalist gold cuff over your hair tie. It's the ultimate "I didn't try too hard, but I still look better than you" energy — and it photographs like a dream.
The Japanese Bob & The Bixie
Not everyone wants to deal with waist-length extensions in the middle of July. If you are considering a chop, the Japanese bob is officially a leading baddie hairstyle for 2026. Known for its sleek, razor-sharp silhouette and polished minimalist finish, it acts almost like a built-in accessory that frames your jawline and makes everything you wear look more intentional.
If you want something with a bit more edge, the Bixie — a hybrid between a bob and a pixie — and the Modern Shag are the undisputed heavyweights of this year's cut trends. They give you that lived-in, effortless texture that looks incredible when air-dried with a little sea salt spray. No heat styling required, no commitment to daily maintenance.
The request to your stylist? Ask for "soft, blended layers" or a "razor cut" if you are going for a shag or bixie. Razor cutting removes bulk and creates that piecey, high-fashion movement that standard scissors simply cannot replicate. Bring reference photos from editorial shoots, not from Pinterest — the difference in quality will show in your results.