Hair Trends
25 Top Curly Hairstyle Trends for 2026
Your curls are not a problem to solve — they are the entire point. Whether you have loose S-waves that barely fringe on curly or tight corkscrews that spring back the moment you let go, the right cut and styling approach makes the difference between fighting your hair and actually enjoying it. The 25 styles below are built around real curl patterns, real hair textures, and real life — not salon-perfect ringlets that dissolve the moment you step outside.
Some of these require nothing more than a diffuser and a leave-in conditioner. Others involve braiding, pinning, and a level of patience that tests your relationship with bobby pins. The range is deliberate: curly hair shows up in boardrooms, on beach vacations, at farmers markets, and at formal dinners, and each setting calls for a different approach. Every style below includes the curl pattern it works best on, the specific steps to execute it, and the tricks that keep it from falling apart by noon.
The Curly Haircut Shift
In 2026, we have stopped trying to fight natural texture and started working with the natural curls. Stiff, overly structured curls are out. Lived-in styles that prioritize movement and natural shine are leading the way — sculpted pixies, curly bobs, and soft shag shapes that let your curl pattern do the talking.
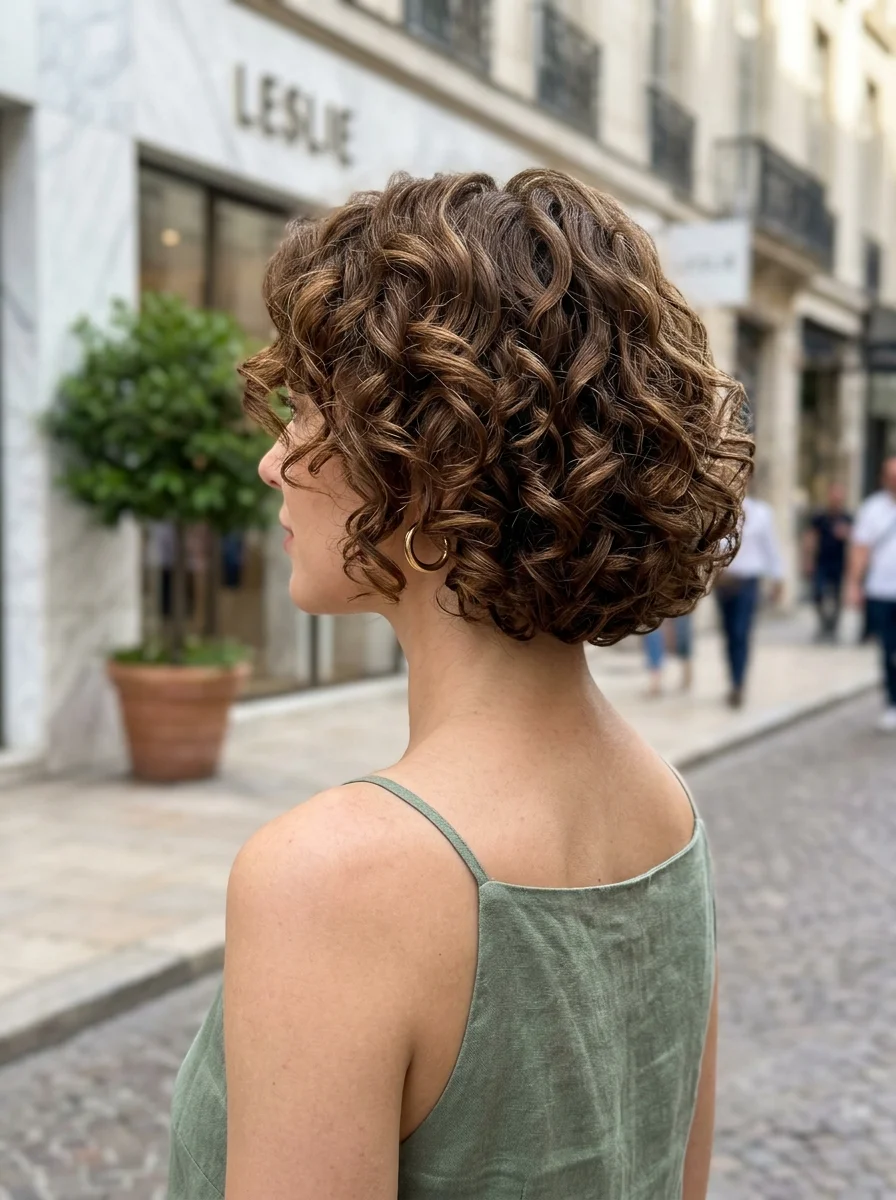
Short curly hair is having a massive moment. A sculpted pixie cut on tight coils creates a striking silhouette that requires almost no daily styling. On the other end, shoulder-length layered curls hit the sweet spot between manageability and volume — the layers remove bulk while keeping the shape defined. The key in every case is asking your stylist for a dry cut. Curly hair needs to be cut in its natural state to get the shape right; cutting wet curls is guessing at best.
The cut to ask for? A soft shag with face-framing layers that start at your cheekbones. This works across curl types from 2B waves to 4C coils because the layers create shape without forcing your curls into an unnatural silhouette. Bring reference photos of dry curly cuts, not straight hair transformations.
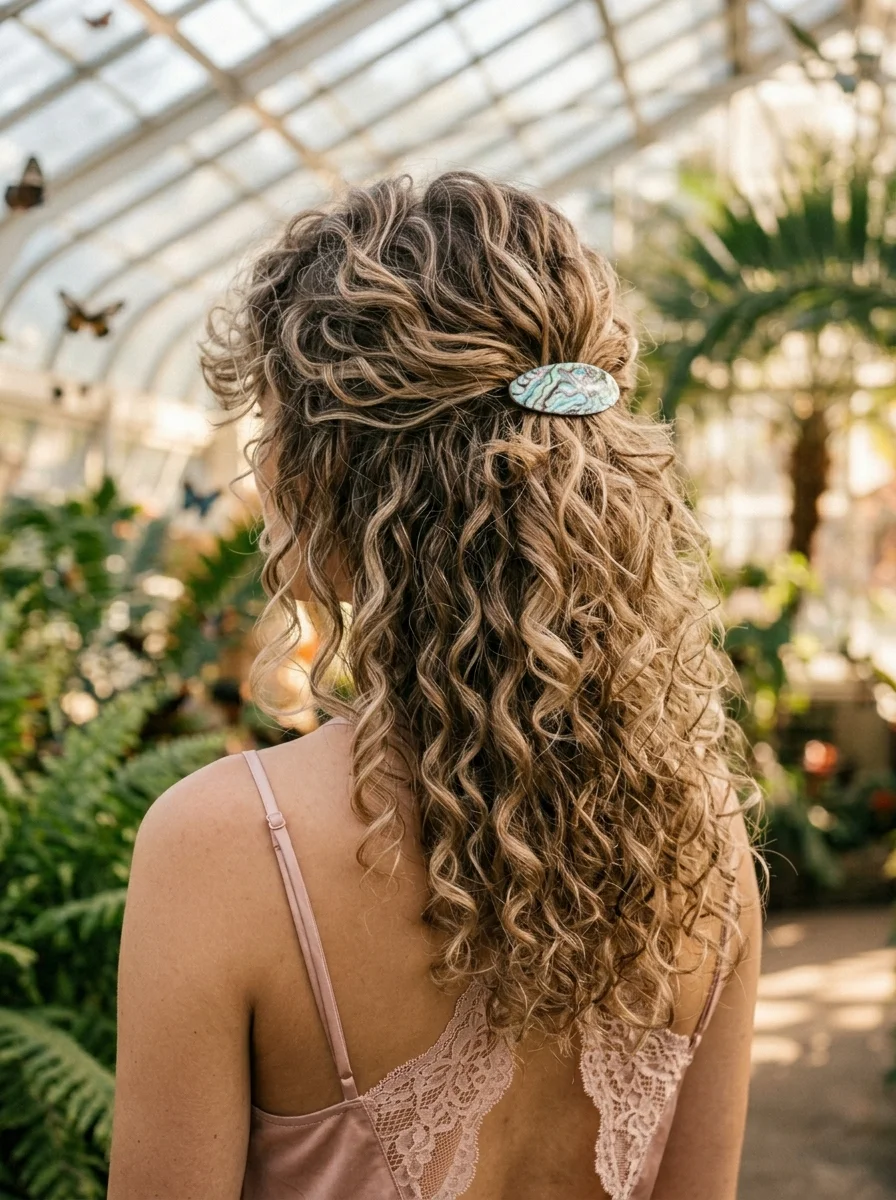
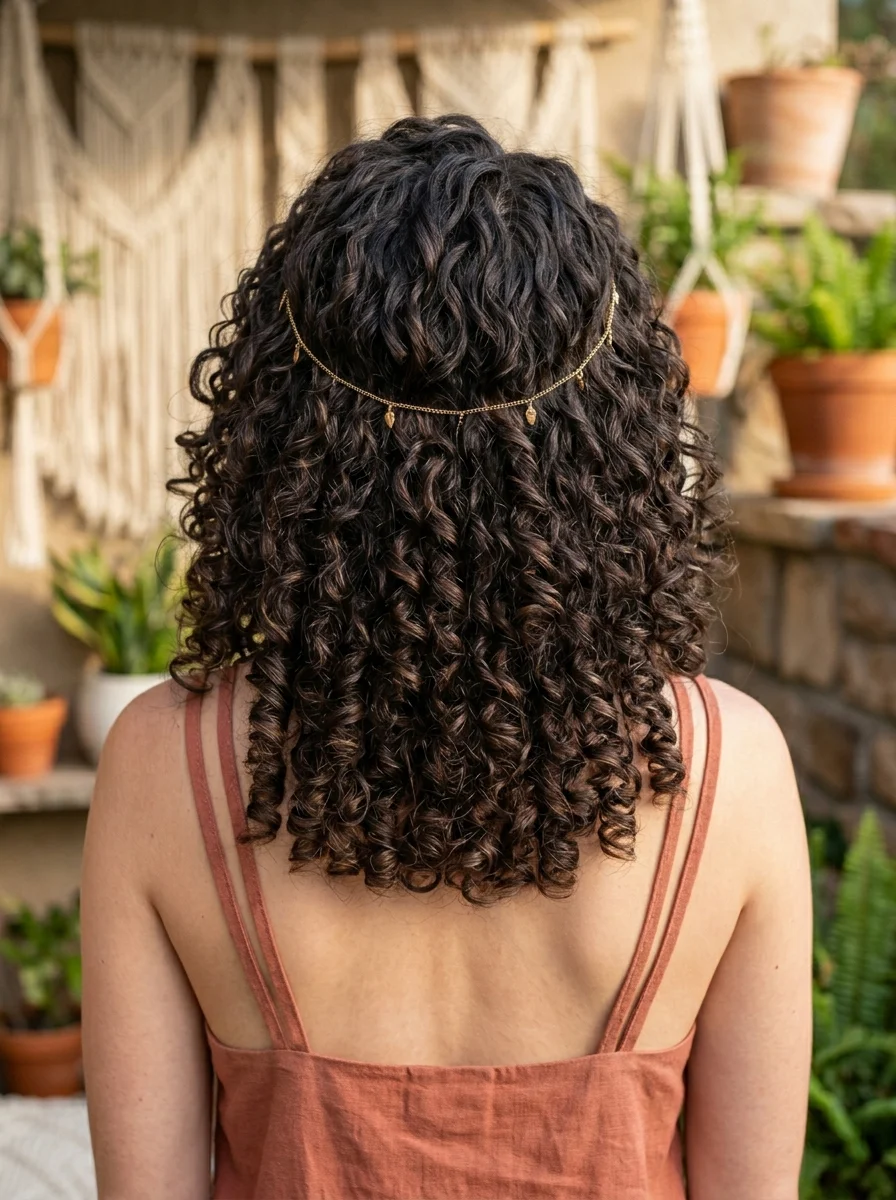
1.Elegant Half-Up Curls with Vintage Sparkle Clip
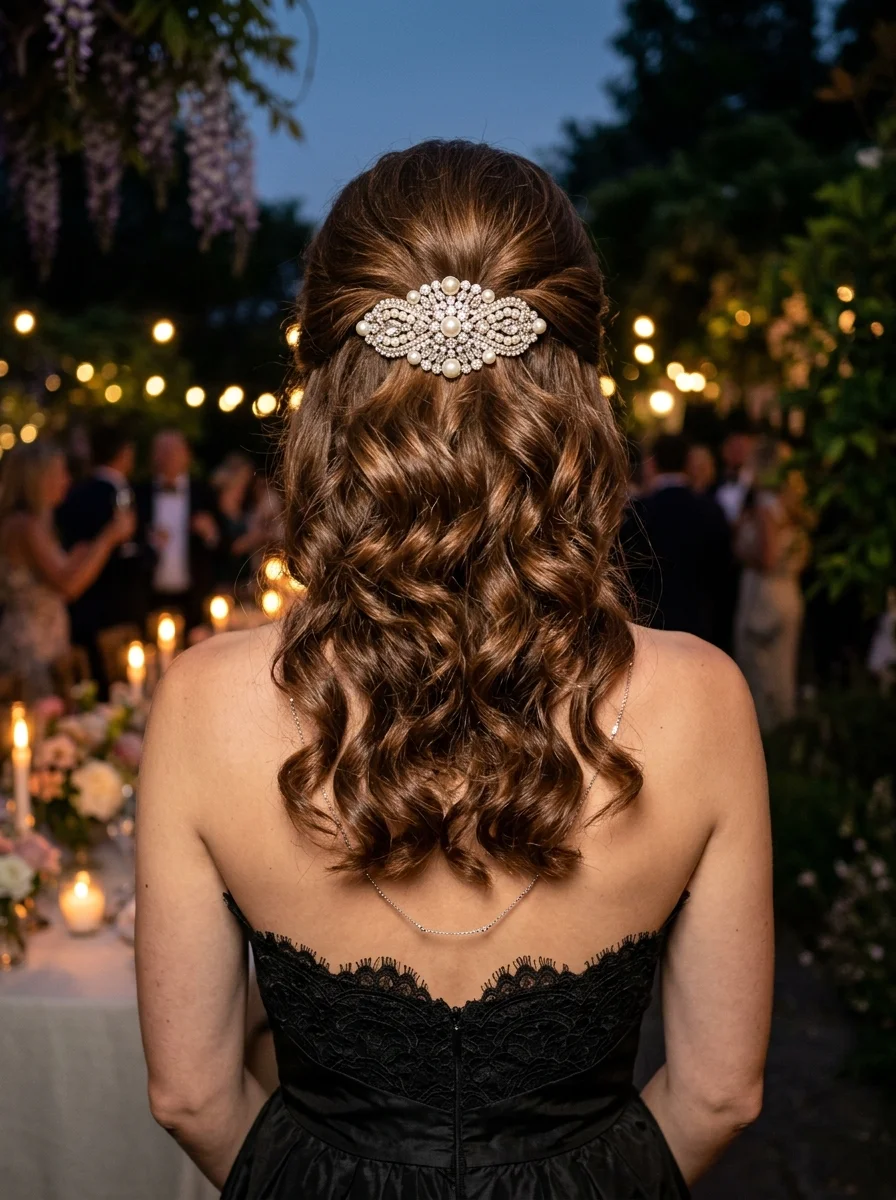
The overview: Short to long hair is styled into soft 2B-2C waves that fall just past the shoulders. The top section is gathered smoothly to the back and secured with a vintage-inspired pearl and crystal clip that catches light without screaming for attention. The remaining hair flows freely, creating natural dimension through the lengths. This is the kind of style that looks like you woke up luminous — even though the clip does most of the aesthetic heavy lifting.
The half-up construction is what makes this work for formal settings. It lifts the hair off the face, opens up the cheekbones, and gives the vintage clip a proper stage. The waves below add movement and softness, preventing the look from reading too severe.
Why this look is popular: The vintage sparkle clip has surged because it bridges two aesthetics that previously felt incompatible — relaxed, natural texture and old-Hollywood glamour. The half-up silhouette flatters most face shapes by lifting the cheekbones, and the pearl/crystal combination photographs with beautiful depth in ambient lighting. It also works across hair densities: fine hair gets volume from the clip's placement, while thick hair gets structure from the half-up section.
Where this look is suitable: Formal evening events, winter weddings, holiday parties, and any occasion where you want to look polished without committing to a full updo. The vintage clip reads as intentional and elevated, making it appropriate for settings where a bare elastic would feel underdressed.
Step by step:
- Prep damp hair. Apply a volumizing mousse like Moroccanoil Volumizing Mousse from roots to ends, focusing on the mid-lengths where wave definition matters most.
- Diffuse or air-dry. Use a diffuser on low heat to enhance natural wave pattern, or let hair air-dry for a more relaxed finish. Avoid touching the hair while it dries to prevent frizz.
- Add definition if needed. If certain sections dried too straight, use a 1.25-inch curling iron to add a quick bend to just those pieces. Wrap loosely and release quickly.
- Gather the top section. Starting at each temple, smooth the top half of the hair back toward the crown using a boar bristle brush. Keep the surface relaxed — not tight or slicked.
- Secure with the clip. Position the vintage pearl and crystal clip at the back of the head, directly over where the gathered section meets the loose hair. Ensure the clip grip is strong enough to hold through the evening.
- Adjust the waves. Gently separate the loose waves with your fingers and mist with a flexible-hold hairspray like Kenra Volume Spray 25. Avoid over-spraying — the waves should move naturally.
Tips and tricks: The clip does the styling work here, so invest in one that feels substantial — cheap clips lose their grip by mid-event. For hair that resists wave, spritz each section with a light-hold hairspray before curling to extend the hold. The balayage highlights make a significant difference in how the waves read on camera; if your hair is a single solid color, ask your stylist for subtle face-framing pieces to add the same dimension. Fine hair benefits from a root-lifting powder before the half-up section is gathered.
27 Stunning Beach Wedding Hairstyles for Brides & Family 2026 🌊💍
2.Deep Side Part Vintage Waves Bob
The overview: A chin-length bob in auburn-brown, styled with a deep side part on one side. The hair is sculpted into a Marcel wave pattern — uniform, glossy S-waves that sit close to the head and follow a consistent rhythm from root to end. The shorter side is tucked behind the ear, while the longer side sweeps across the forehead and falls to the jawline.
This Marcel wave pattern references 1940s glamour without feeling like costume. The waves are uniform and glossy, sitting close to the head with a defined S-pattern that catches light along each ridge. The deep side part creates dramatic asymmetry, sweeping the majority of hair to one side.
The Marcel wave technique produces waves that are more structured than natural texture but less rigid than curling-iron curls. The result is a pattern that looks deliberate and vintage-inspired while maintaining enough softness to feel modern.
Why this look is popular: The deep side part vintage bob photographs with striking clarity — the structured wave pattern creates defined highlights and shadows that give the hair a three-dimensional quality. The chin-length cut is universally flattering, framing the jawline and creating the illusion of higher cheekbones. It also requires less daily styling than longer curly hair, making it a practical choice for anyone tired of spending thirty minutes on their hair each morning.
Where this look is suitable: Vintage-themed events, cocktail parties, art gallery openings, and any setting where a polished, retro-inspired aesthetic feels appropriate. The structured waves also work in professional environments where you want to project confidence and attention to detail.
Step by step:
- Start with clean, dry hair. Apply a smoothing serum like Moroccanoil Treatment from roots to ends to eliminate frizz and add the glossy foundation this style requires.
- Create the deep side part. Use a rat-tail comb to draw a precise part from the forehead to the crown, positioned about two inches off-center. The deeper the part, the more dramatic the asymmetry.
- Wave with a Marcel iron or deep waver. Working in one-inch sections, clamp the iron to create a uniform S-pattern, starting near the root and working down. Hold each section for 5-7 seconds to set the wave without burning.
- Set the pattern. Pin each wave in place with duckbill clips while it cools. This locks the Marcel shape and prevents the waves from relaxing into looser curls.
- Remove clips and brush. Once all waves are cool, gently brush through with a soft-bristle brush to blend the waves together without disrupting the pattern.
- Tuck and finish. Tuck the shorter side behind the ear and secure with a bobby pin if needed. Apply a high-shine serum to the surface for the glossy, lacquered finish.
Tips and tricks: A Marcel waver or deep-wave iron produces more authentic vintage waves than a standard curling iron. If you do not own one, a flat iron can create a similar effect by bending the iron in alternating directions as you pass it through each section. The deep side part works best when the shorter side is about chin length — too short and it sticks out awkwardly, too long and it loses the asymmetrical tension. A light-hold hairspray before waving gives the hair enough grip to hold the pattern without stiffness.
3.Effortless Curly Updo with Face-Framing Tendrils
The overview: Medium to long 3A-3B curls are gathered into a loose, textured updo at the back of the head, with several face-framing tendrils left free to soften the silhouette. The updo itself is deliberately imperfect — curls pile and coil naturally rather than being smoothed into a uniform shape, creating a romantic, slightly undone quality. The tendrils that escape around the face add movement and warmth without looking accidental.
This style works because it respects the curl pattern instead of fighting it. The updo celebrates volume and texture rather than trying to minimize them, which means it actually gets better as the day progresses and the curls relax slightly.
Why this look is popular: The curly updo with face-framing tendrils strikes the balance between effort and ease — it reads as styled without looking overdone. The face-framing pieces contour the face naturally, softening the jawline and highlighting the cheekbones. For date night specifically, this style communicates that you put thought into your appearance without looking like you spent two hours in front of a mirror.
Where this look is suitable: Date nights, evening dinners, cocktail bars, and any setting where the lighting is warm and the atmosphere leans romantic. The face-framing tendrils photograph beautifully in candlelight, and the updo keeps hair off the neck — a practical benefit in crowded restaurants.
Step by step:
- Hydrate the curls. Apply a curl-defining cream like DevaCurl SuperCream to damp hair, scrunching upward to encourage curl formation. Let hair air-dry or diffuse on low heat.
- Section the face-framing pieces. Before gathering the updo, separate two to three tendrils on each side of the face and clip them out of the way.
- Gather loosely at the back. Flip your head upside down and gather the remaining hair into a loose ponytail position at the back of the head. Do not pull tight — keep the crown relaxed.
- Create the updo. Loop the hair through the elastic only halfway on the final pull-through, creating a looped bun. Pin sections of the loop in place with bobby pins, allowing individual curls to spill outward naturally.
- Release the tendrils. Unclip the face-framing pieces and let them fall naturally. Use your fingers to separate and shape them into soft spirals.
- Adjust and set. Gently tug at the updo to expand it and create more volume. Mist with a flexible-hold hairspray, focusing on the tendrils to keep them defined without stiffness.
Tips and tricks: This style works best on second-day curls when the pattern is defined but not crunchy. If working with freshly washed hair, apply a lightweight curl cream and let it dry completely before attempting the updo — wet curls collapse under their own weight. Use spin pins instead of traditional bobby pins for a more secure hold in thick curly hair. The face-framing tendrils should be slightly shorter than the rest of the updo to maintain the right proportion; if they are too long, they can look limp rather than intentional.

30 Stunning Beach Nail Ideas for the Best Vacation in 2026 🌊
4.Effortless Textured Lob for Wavy Hair
The overview: A shoulder-length lob with soft, invisible layers throughout creates natural movement and body without requiring any heat styling. The 2B-2C waves fall into a relaxed, air-dried pattern that looks lived-in and authentic — hair that appears to just fall that way. The lob length sits right at the collarbone, long enough to feel feminine but short enough to survive urban summer heat without becoming a sweaty curtain against your neck.
The beauty of this cut is that it does the styling work for you. The layers create shape, the point-cut ends provide texture, and the shoulder length is the sweet spot for wavy hair that wants to do its own thing without your constant intervention.
Why this look is popular: The textured lob reads as effortless, which is exactly the energy most people want in casual urban settings. It doesn't look like you tried too hard, but it also doesn't look like you rolled out of bed. The lived-in texture actually improves throughout the day as it responds to humidity and movement, meaning the style at 6 PM looks better than the style at 8 AM.
Where this look is suitable: Casual urban settings — coffee shops, weekend brunches, farmers markets, museum visits, and any daytime outing where you want to look put-together without appearing to have labored over it. The style adapts to virtually any casual dress code.
Step by step:
- Wash and towel-dry. Apply a leave-in conditioner like It's a 10 Miracle Leave-In Product to damp hair, focusing on the mid-lengths and ends where dryness shows most.
- Add sea salt spray. Mist a sea salt spray like Bumble and Bumble Surf Spray throughout the hair for texture and grip. Scrunch upward to encourage wave formation.
- Air-dry or rough-dry. Let hair air-dry for the most natural result, or use a diffuser on low heat for faster drying without disrupting the wave pattern. Do not touch the hair while it dries.
- Add definition if needed. If certain sections dried too straight, use a 1.25-inch curling wand to add a quick bend to just those pieces. Wrap loosely and release quickly.
- Shake and separate. Flip your head upside down and shake the roots with your fingers to add volume. Flip back and adjust the part.
- Finish minimally. A light mist of texturizing spray throughout the mid-lengths enhances the lived-in quality. Avoid heavy products that will weigh down the layers.
Tips and tricks: This cut requires a skilled stylist who understands layering and point-cutting — it's not a one-length bob with waves added. Ask for "invisible layers" or "ghost layers" if your stylist is familiar with the technique. Maintenance trims every 8-10 weeks keep the shape sharp. For fine hair, a volumizing powder at the roots prevents the layers from falling flat. The ash brown tone works well for cool skin tones but can wash out warmer complexions — ask your stylist about adding subtle warm highlights if needed.
5.Voluminous Curls with Vintage Flair Clip
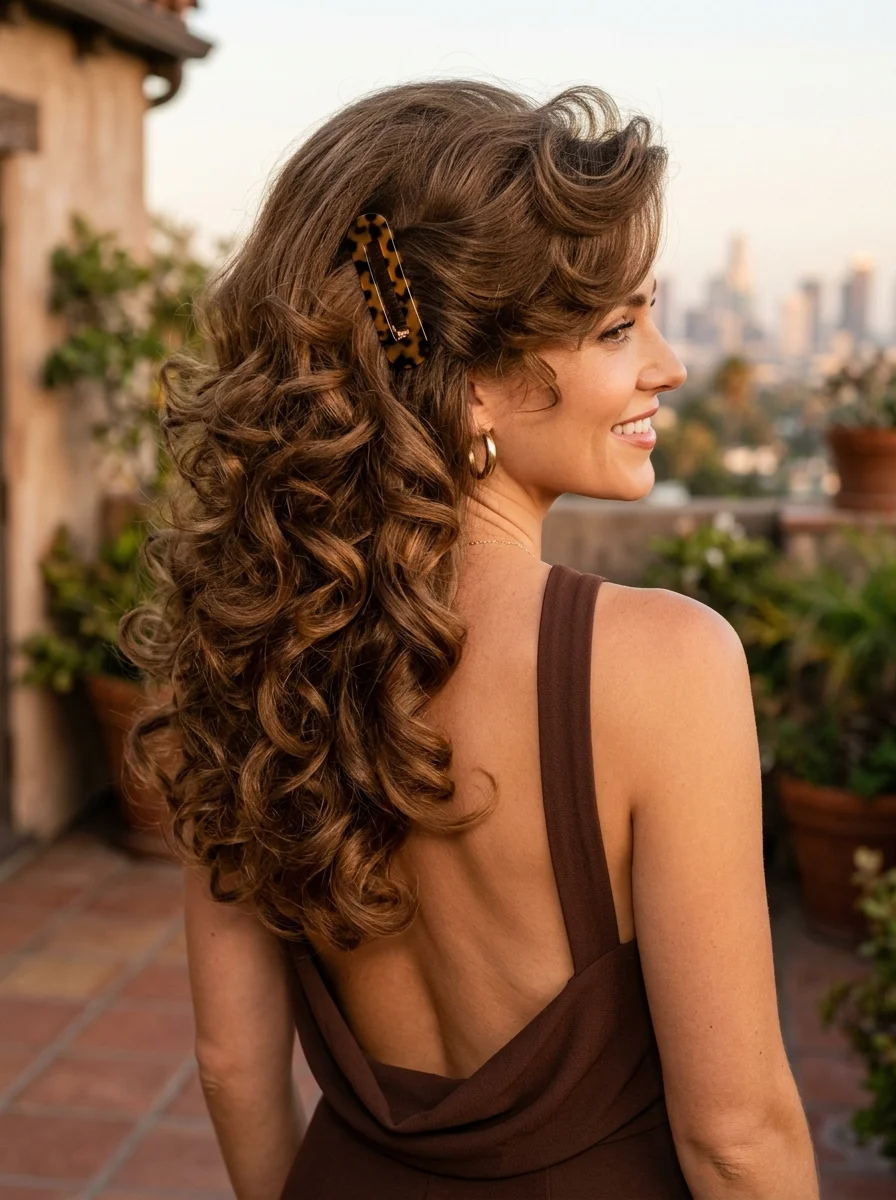
The overview: Short to long hair is styled into full 3A-3B curls that have genuine volume and bounce. The top section is pulled back and secured with a tortoiseshell claw clip, creating a half-up silhouette that references retro glamour while staying firmly modern. If you add golden highlights, it will catch light through the curls, adding dimension and warmth that makes the entire style glow.
The tortoiseshell claw clip has made a definitive comeback because it holds thick curly hair without slipping — something delicate barrettes and thin clips cannot manage. The half-up placement also reduces overall volume at the crown, which balances the fullness of the curls below.
Why this look is popular: Voluminous curls with a retro-glamorous clip signal that you embrace your natural texture and know how to accessorize it. The claw clip adds a structured counterpoint to the organic curl pattern, and the half-up construction keeps hair off the face while maintaining the fullness that makes curly hair special. The golden highlights amplify the curl dimension, making each ringlet visually distinct.
Where this look is suitable: Weekend outings, brunch dates, casual dinner parties, and any setting where the vibe is relaxed but you still want to look considered. The tortoiseshell clip reads as polished without being formal, making it appropriate for a wide range of social settings.
Step by step:
- Define the curls. Apply a curl-defining gel like Ouidad Climate Control Heat & Humidity Gel to wet hair, scrunching upward to encourage curl formation. The gel provides hold and frizz protection.
- Diffuse for volume. Use a diffuser on medium heat, cupping sections of hair upward toward the scalp. Dry to about 80% — letting the rest air-dry prevents over-drying and frizz.
- Scrunch out the crunch. Once fully dry, scrunch the curls with your hands to break the gel cast and reveal soft, bouncy curls. A few drops of argan oil on the ends adds shine.
- Section the top half. Gather the top section from each temple, smoothing lightly with your fingers. Do not brush — you want to preserve the curl pattern.
- Secure with the claw clip. Open the tortoiseshell clip and position it at the crown, gripping the gathered section. Adjust so the clip sits securely and the curls fall naturally around it.
- Fluff and finish. Gently separate any curls that clumped together and adjust the face-framing pieces. A light mist of flexible-hold hairspray keeps the volume without stiffness.
Tips and tricks: The claw clip needs to be large enough to grip the full section of curly hair — a clip that is too small will slide out by midday. Look for clips with strong spring mechanisms and teeth that interlock firmly. The golden highlights make a significant visual difference; if your hair is a single dark tone, ask your stylist for subtle face-framing pieces to achieve the same dimension. For very thick hair, the half-up section can be subdivided into two smaller sections, each clipped separately, to prevent the clip from straining.

28 Stunning Baddie Summer Hairstyles for 2026 🔥☀️
6.Golden Blonde Beachy Curls with Pearl Pin Accent
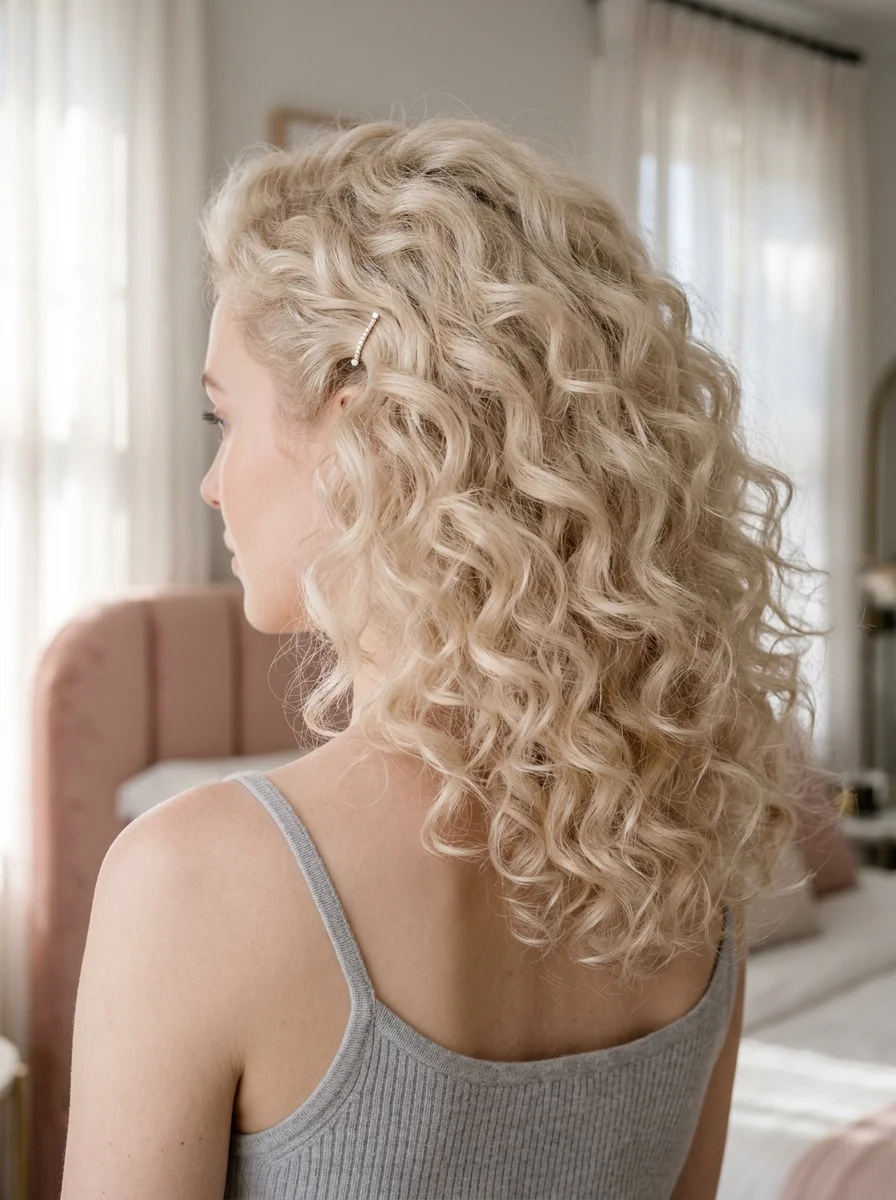
The overview: Medium to long hair is styled into 3A spiral curls that are swept to one side and secured with a single pearl pin near the temple. The side-swept placement creates romantic asymmetry, exposing one side of the face while the curls cascade over the opposite shoulder. The pearl pin adds a refined detail without overwhelming the style — one small, deliberate accent against the bright blonde curls.
The pearl pin serves a functional purpose beyond decoration: it anchors the side-swept section in place, preventing the curls from migrating back to center throughout the day. This means you get the romantic asymmetry without the constant readjustment that typically comes with it.
Why this look is popular: The combination of golden blonde curls and a pearl pin creates a romantic, slightly fairy-tale quality that photographs beautifully in warm lighting. The side-swept placement is universally flattering — it elongates the neck, highlights the jawline, and creates an asymmetrical frame that draws attention to the eyes. The pearl pin adds a touch of elegance that elevates the entire look without requiring additional accessories.
Where this look is suitable: Romantic dinners, garden parties, outdoor weddings (as a guest), and any setting where the atmosphere leans soft and feminine. The pearl pin reads as refined, making it appropriate for events where a bare elastic would feel underdressed.
Step by step:
- Define the curls. Apply a curl cream like SheaMoisture Coconut & Hibiscus Curl Enhancing Smoothie to wet hair, raking it through with your fingers to distribute evenly.
- Diffuse on low heat. Cup sections of hair in the diffuser and hold them against the scalp for 10-15 seconds before moving to the next section. This creates defined spirals without frizz.
- Sweep to one side. Once curls are fully dry, gently sweep all the hair to one side using your fingers. Do not brush — you want to preserve the curl definition.
- Secure with the pearl pin. Position the pearl pin near the temple on the exposed side, angling it to grip both the side-swept section and the hair beneath. The pin should hold the sweep in place without pulling.
- Arrange the curls. Drape the cascading curls over the shoulder, separating any that clumped together. A few drops of shine serum on the ends adds polish.
- Set lightly. A mist of flexible-hold hairspray on the curls and the pinned section keeps everything in place without stiffness.
Tips and tricks: Golden blonde curly hair is more fragile than darker tones due to the lightening process, so use a weekly deep-conditioning treatment like Olaplex No. 3 to maintain curl definition and prevent breakage. The pearl pin works best when it contrasts with the hair color — white pearl on golden blonde creates the strongest visual impact. For hair that doesn't hold curl well, apply a light-hold mousse before diffusing. If the side-swept section keeps slipping, anchor it with a bobby pin underneath the pearl pin for extra grip.
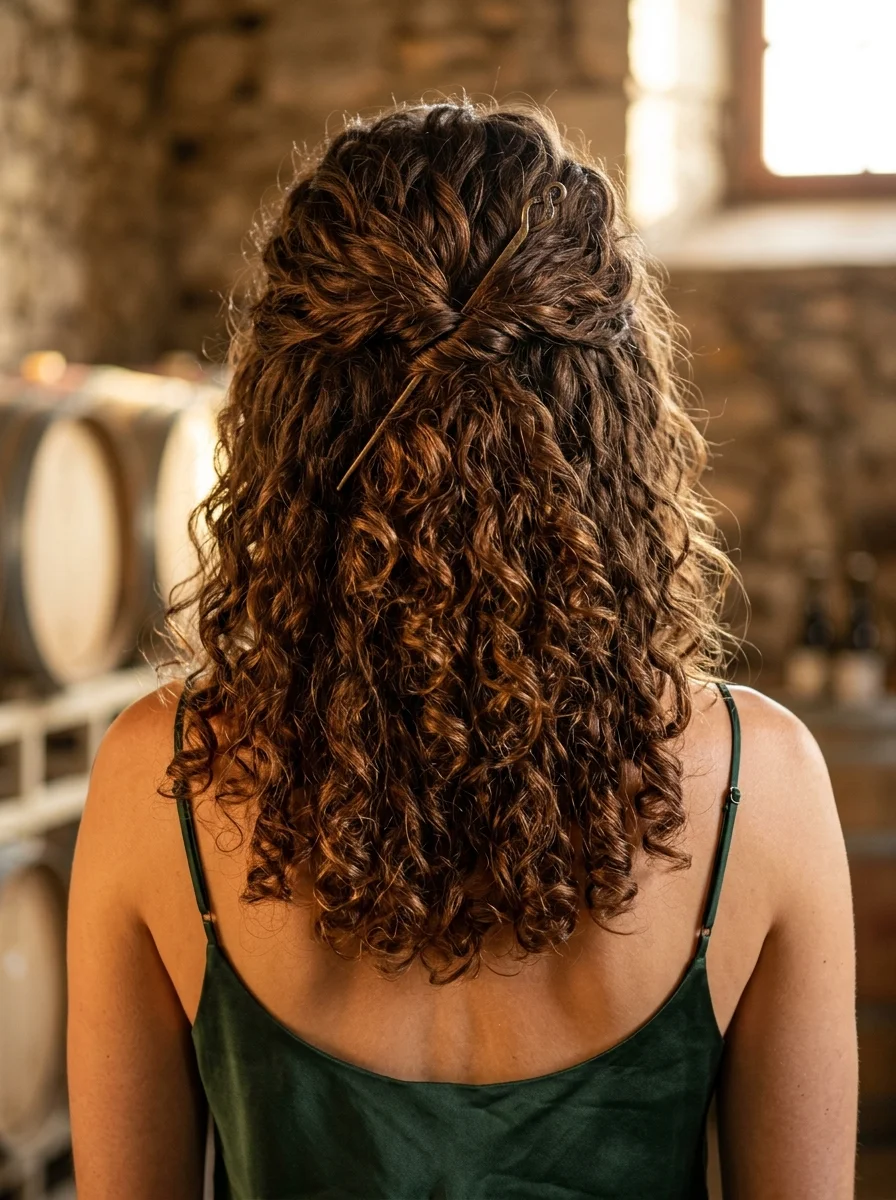
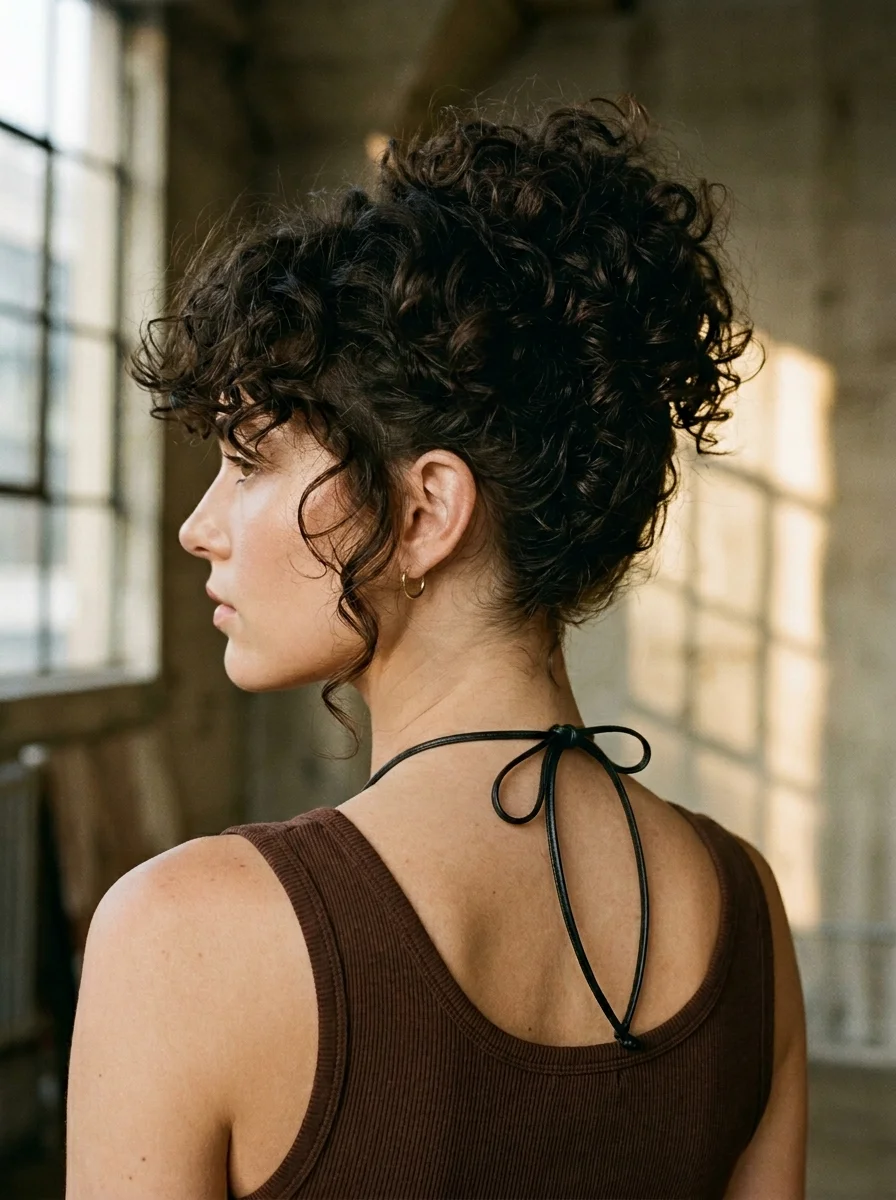
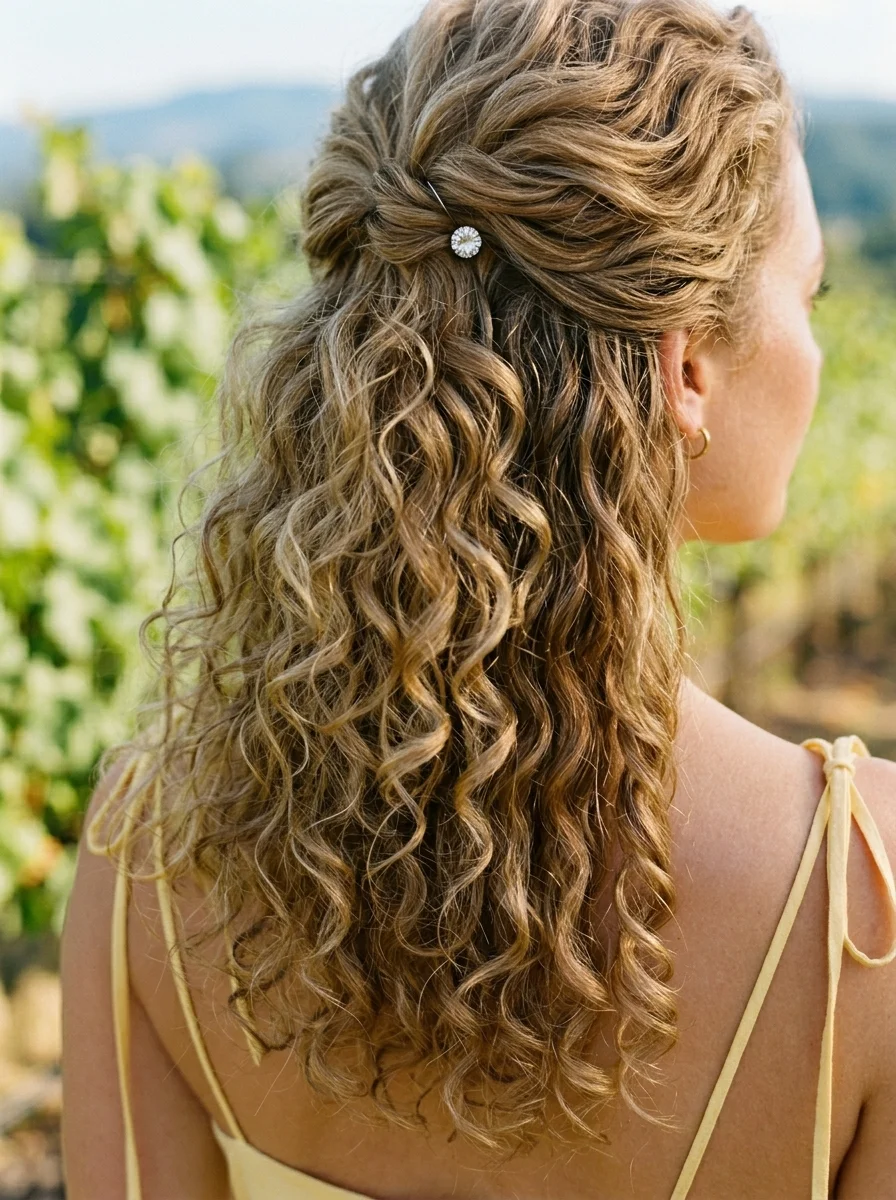
7.Twisted Half-Up with a Chic Hair Pin
The overview: A romantic, half-up style that beautifully showcases natural curl volume. The front sections are loosely gathered, twisted at the back, and anchored using a minimalist metal hair stick, allowing the remaining ringlets to cascade freely down the back.
This method is a fantastic way to elevate curly hair without compromising its structural integrity. By utilizing a smooth hair pin rather than a tight elastic band, you avoid disrupting the curl pattern, prevent the dreaded "ponytail dent," and significantly reduce breakage on delicate strands.
Why this look is popular: It effortlessly blends bohemian softness with elegant, structural hardware. The style keeps hair out of the face while maximizing the visual impact of the curls' natural bounce and texture. It reads as highly intricate and intentional, yet takes mere seconds to execute once you master the pinning technique.
Where this look is suitable: Vineyard weddings, romantic dinners, evening galas, or any upscale event where you want a look that feels both styled and beautifully organic. It pairs stunningly with slip dresses and open-back silhouettes.
Step by step:
- Define the curls. Start with well-moisturized, defined curls. Apply a curl cream or lightweight styling gel to damp hair, and diffuse or air-dry completely without breaking up the curl clumps.
- Section loosely. Gently gather the top section of your hair starting from just above the ears. Keep your touch light to maintain root volume and avoid flattening the curls.
- Create the twist. Bring the gathered sections to the center back of your head and loosely twist them around each other once or twice to create a subtle knot.
- Insert the pin. Take your hair stick and weave it through the top edge of the right side of the twist, catch some of the foundational base hair against the scalp to anchor it, and push it out firmly through the left side.
- Fluff and arrange. Gently pull at the crown to loosen it up and ensure volume isn't lost. Separate any larger curl clumps at the bottom for maximum fullness.
Tips and tricks: To ensure the hair stick stays perfectly in place, especially if your curls are on the finer side, spray the twisted section with a bit of dry texturizing spray before inserting the pin to add grip. If you have extremely heavy hair and worry about the pin slipping, you can secretly secure the twist with a tiny, clear polyband first, then slide the decorative pin directly over the band to conceal it.

27 Stunning Graduation Day Nail Ideas for 2026 🎓
8.Boho Beachy Waves with Elegant Clip Accent
The overview: Short to long hair with natural 2C-3A waves is styled into a relaxed half-up, secured with a turquoise clip that adds a pop of color against the muted blonde tones. The waves have a beachy, tousled quality — not perfectly defined, not completely frizzy, but somewhere in that appealing middle ground that looks like you just came from the coast. The turquoise clip introduces a bohemian accent that feels deliberate without being precious.
The half-up construction keeps the beachy waves flowing while preventing hair from falling into your face — a practical balance that works in both outdoor and indoor settings. The turquoise clip does the styling heavy lifting: without it, this is just wavy hair; with it, you have a defined aesthetic.
Why this look is popular: The boho beachy wave with a colored clip has become a go-to because it looks equally good at the beach and at brunch. The turquoise accent adds personality without being overwhelming, and the tousled waves actually improve in humid weather — a rare quality that makes this a reliable choice for summer. The half-up placement also photographs cleanly from the front, which matters more than you'd think.
Where this look is suitable: Beach vacations, casual outdoor dining, weekend errands, and any setting where the vibe is relaxed and the dress code is low-key. The turquoise clip adds enough visual interest to feel styled without appearing overdressed for a taco stand.
Step by step:
- Salt spray prep. Apply a sea salt spray like Sun Bum Sea Spray to damp hair, scrunching upward to encourage wave formation and add grit.
- Air-dry for texture. Let hair air-dry for the most authentic beachy texture. If time is short, diffuse on low heat while scrunching sections upward.
- Separate the top section. Gather the top half of the hair from each temple, smoothing lightly with your fingers. Keep the surface relaxed — bumps and texture are part of the look.
- Secure with the clip. Position the turquoise clip at the back of the head, gripping the gathered section. The clip should hold firmly without pulling or creating tension.
- Adjust the waves. Shake the loose waves gently with your fingers to add volume and separate any clumped sections. The waves should look effortless and slightly undone.
- Finish lightly. A mist of texturizing spray throughout the mid-lengths enhances the beachy quality. Avoid heavy products that weigh down the waves.
Tips and tricks: The turquoise clip works best when it contrasts with the hair color — bright turquoise on dirty blonde creates the strongest visual impact. For hair that is naturally straight, the waves will require a 1.25-inch curling iron to create the beachy foundation; wrap random sections and leave the ends slightly straighter for authenticity. Fine hair benefits from a volumizing powder at the roots before the half-up section is gathered. The sea salt spray can be drying over time, so alternate with a moisturizing leave-in conditioner on non-styling days.
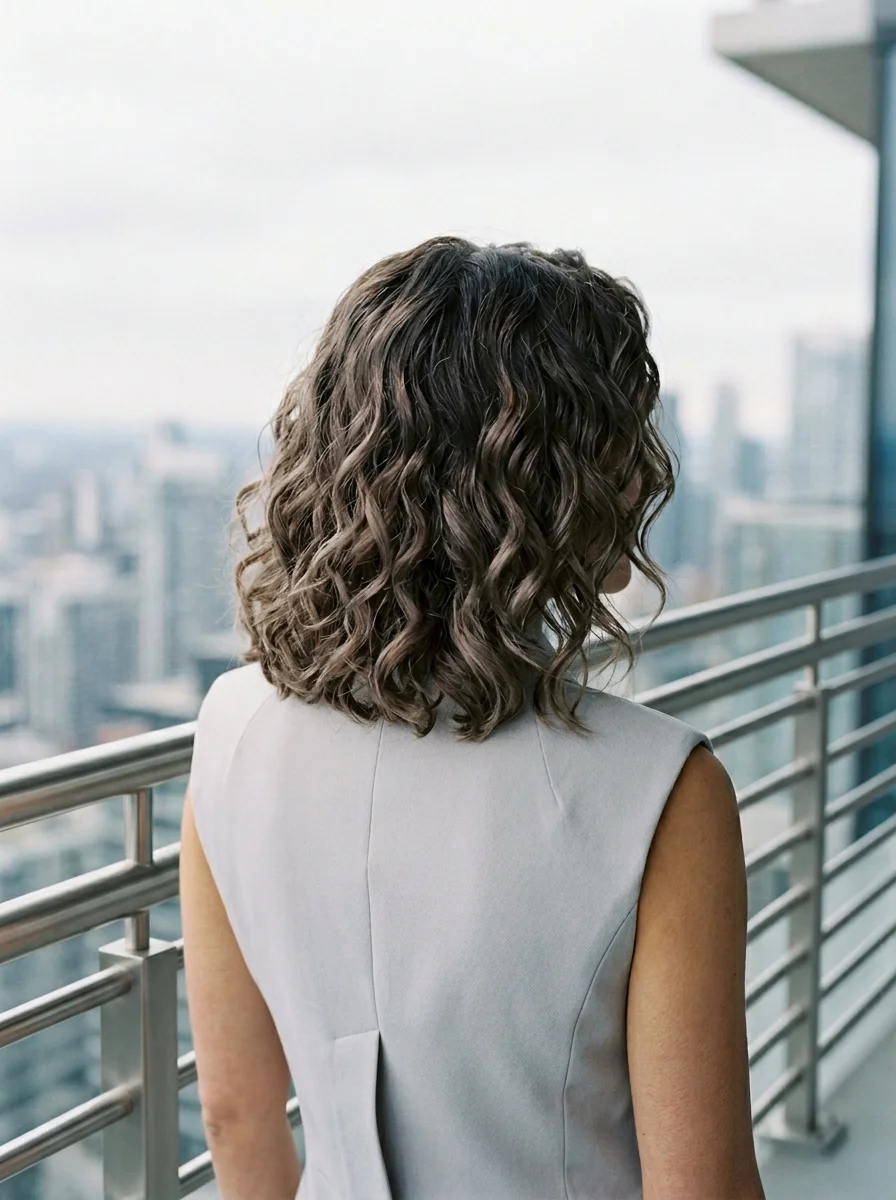
9.Effortless Mid-Length Curls with Subtle Layers
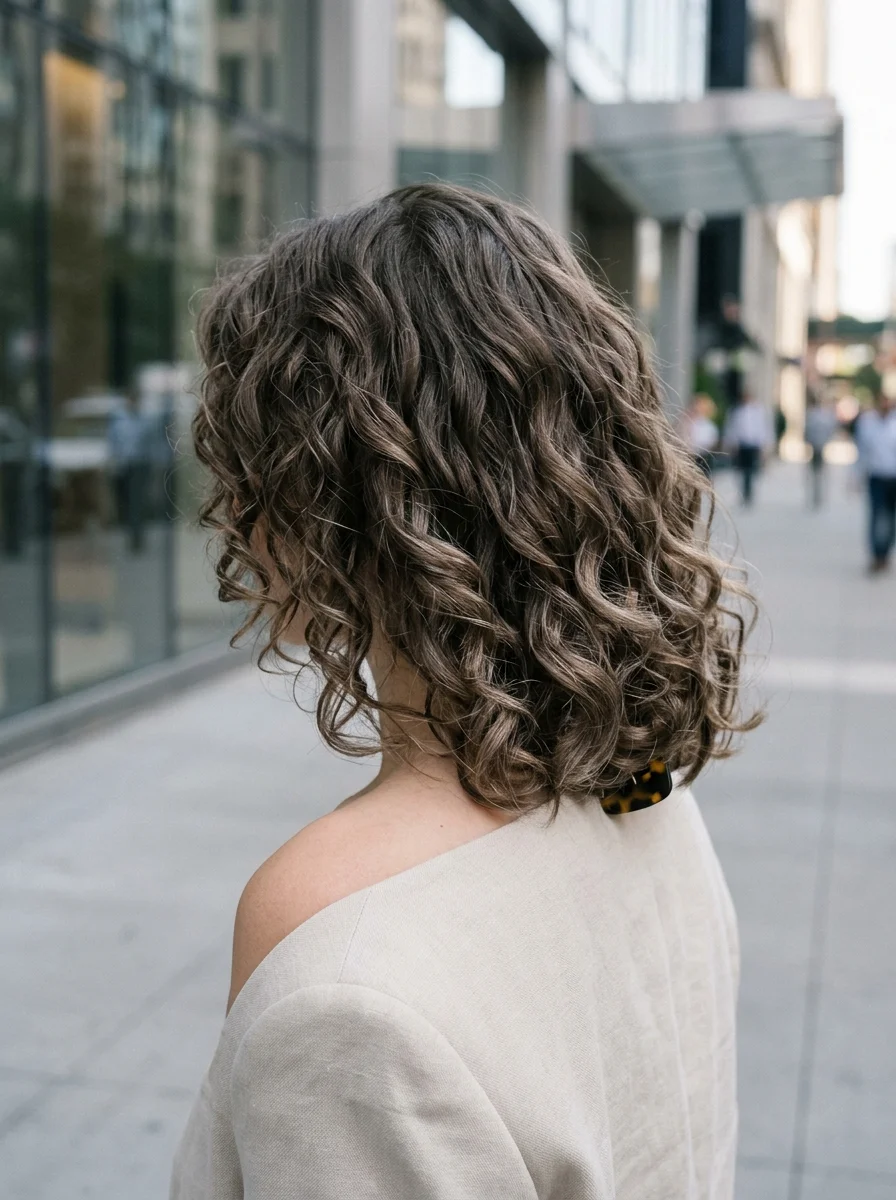
The overview: Short hair cut to a chin-to-shoulder length bob with subtle layers that create movement without removing bulk. The 2B-2C waves fall naturally into a relaxed, modern pattern. The layers are nearly invisible — they exist to shape the hair, not to create obvious layering — which gives the cut its modern, casual quality. The mid-length bob is long enough to feel feminine but short enough to style quickly.
Why this look is popular: The mid-length curl with subtle layers has become the default "I woke up like this" style for wavy-haired people who want structure without fuss. The invisible layers do the shaping work, meaning the cut looks good with minimal daily styling. The tortoiseshell clip adds a retro touch that elevates the look beyond bare-minimum effort, and the ash brown tone reads as modern and understated.
Where this look is suitable: Modern casual settings — co-working spaces, casual meetings, weekend brunches, and any environment where you want to look polished without appearing to have tried. The tortoiseshell clip adds enough structure to keep the look from reading too relaxed.
Step by step:
- Prep with leave-in. Apply a lightweight leave-in conditioner to damp hair, focusing on the ends. Avoid heavy products that will weigh down the waves.
- Air-dry or diffuse. Let hair air-dry for the most natural result, or use a diffuser on low heat for faster drying. Avoid touching the hair while it dries to prevent frizz.
- Add definition. If certain sections dried too straight, use a 1.25-inch curling wand to add a quick bend. Wrap loosely and release quickly for a subtle effect.
- Gather the top section. Smooth the top half of the hair back toward the crown using your fingers. Keep the surface relaxed with visible wave texture.
- Secure with the clip. Position the tortoiseshell clip at the back of the head, gripping the gathered section. The clip should sit flat against the head without protruding.
- Shake and finish. Flip your head upside down and shake the roots to add volume. A light mist of texturizing spray throughout the mid-lengths enhances the modern, casual quality.
Tips and tricks: The success of this style depends entirely on the cut — the invisible layers must be done by a stylist who understands wavy and curly hair. Ask for "internal layers" or "point-cutting" rather than traditional layering. The tortoiseshell clip should be proportional to the hair volume; a clip that is too small will slide out by midday. For fine hair, a volumizing mousse applied to damp hair before diffusing adds body without weight. The ash brown tone can look flat without subtle dimension — ask your stylist for barely-there highlights if your hair is one solid color.
20 Stunning Mother of the Bride Hairstyle Ideas for 2026 💍
10.Beachy Bronde Waves with Textured Bob
The overview: Hair is cut into a textured blunt bob and styled into tousled 2B-2C waves that look like they've been shaped by ocean wind. The blunt cut creates a clean, modern line at the ends, while the internal texture and waves add movement and dimension throughout. The bronde color reads as sun-kissed and natural, as if the highlights came from actual sun exposure rather than a salon appointment.
The textured blunt bob is having a moment because it requires the least amount of daily styling of any bob variation. The waves create their own shape, the blunt ends provide a clean frame, and the bronde color adds dimension that makes the style look more expensive than it is.
Why this look is popular: The beachy bronde bob photographs beautifully in natural light — the color dimension and wave texture create a rich, multi-tonal effect that reads as effortlessly chic. It works across settings from coastal resort to city street, and the blunt ends keep the look modern rather than bohemian. The bronde color also grows out gracefully, reducing salon maintenance.
Where this look is suitable: Coastal resort settings, beach clubs, outdoor dining, and any location where the aesthetic is relaxed luxury. The bronde tones and textured waves also work well in urban settings, particularly during summer months when lighter tones feel seasonal.
Step by step:
- Apply texturizing product. Work a sea salt spray or texturizing cream through damp hair, focusing on the mid-lengths where the wave pattern develops.
- Rough-dry for texture. Use a blow-dryer on medium heat, tousling the hair with your fingers as you dry. The goal is texture, not smoothness.
- Add wave definition. Use a 1.25-inch curling iron to add bends to random sections, alternating the direction of each curl. Leave the ends out for a more natural finish.
- Shake and separate. Flip your head upside down and shake the roots vigorously. This adds volume and breaks up any overly defined sections.
- Scrunch for texture. Scrunch the waves upward with your hands to enhance the tousled quality. A few drops of texture serum on the ends adds definition without weight.
- Set lightly. A mist of flexible-hold hairspray locks in the waves without creating stiffness. Focus on the crown area where volume matters most.
Tips and tricks: The bronde color is best achieved through balayage or hand-painted highlights, which create a more natural, sun-kissed effect than foils. Ask your stylist for a "bronde" tone that leans toward your natural base color for the most effortless result. The textured blunt bob requires regular trims every 8-10 weeks to maintain the clean line at the ends. Fine hair benefits from a volumizing mousse applied to damp hair before texturizing. For thicker hair, a lightweight smoothing serum prevents the ends from looking frizzy.
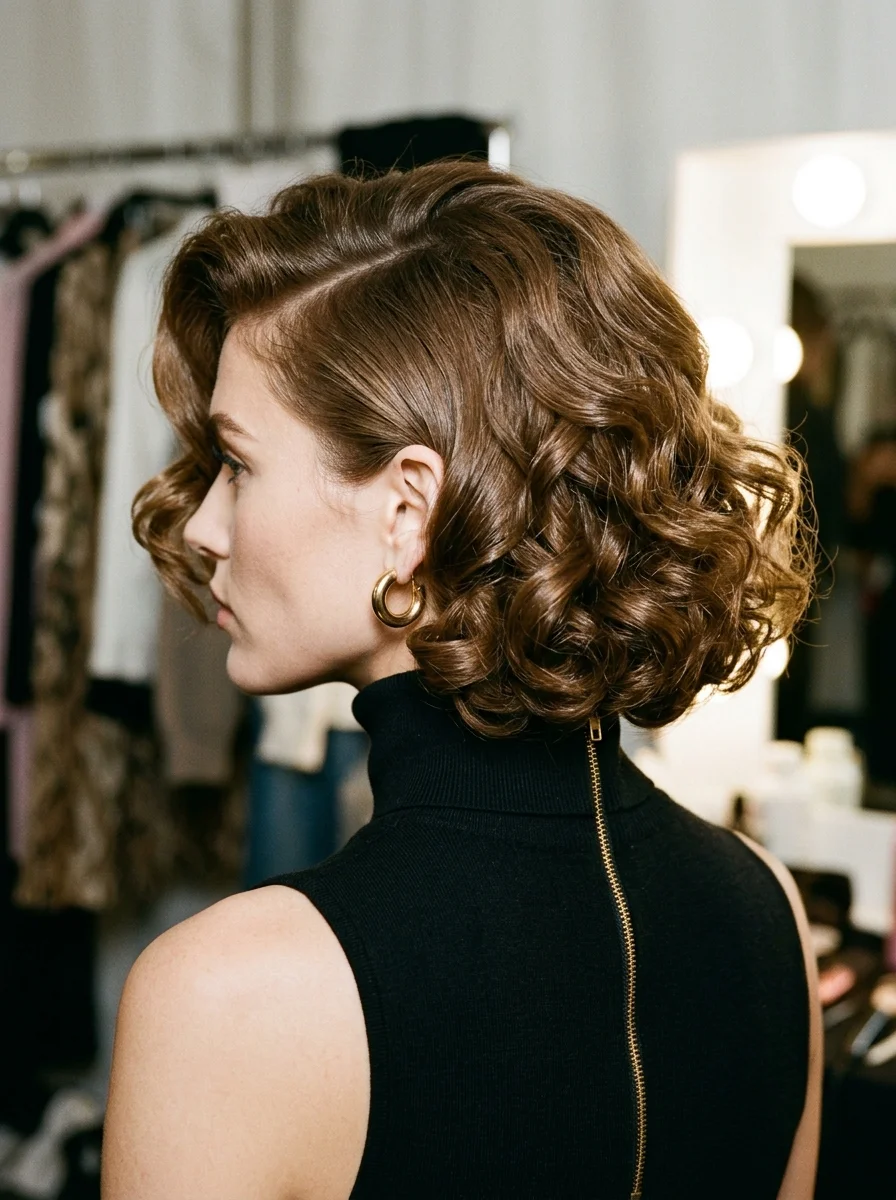
11.Textured Bob with Defined Curls
The overview: The 3A-3B ringlets of the graduated bob are defined and bouncy, with the graduated cut creating natural volume at the back while the longer front pieces frame the face.
The graduated bob is particularly effective for curly hair because it removes weight from the back — where curls tend to pile up and lose shape — while maintaining length at the front where it flatters the face. The result is a cut that shapes itself.
Why this look is popular: The textured bob with defined curls has become a street-style favorite because it reads as confident and modern. The graduated cut creates a dynamic silhouette that looks good from every angle, and the defined ringlets photograph with crisp detail. The honey highlights add warmth that makes the style feel approachable rather than severe, which is why it works in both casual and professional settings.
Where this look is suitable: Urban street style, creative workplaces, casual dining, and any setting where the aesthetic is modern and confident. The defined curls and graduated cut communicate intentionality without formality, making this appropriate for a wide range of social and professional environments.
Step by step:
- Define the curls. Apply a curl-defining gel like Eco Styler Olive Oil Gel to wet hair, raking it through with your fingers to ensure even distribution. The gel provides hold and frizz protection.
- Diffuse for definition. Use a diffuser on medium heat, cupping sections of hair upward toward the scalp. Focus on the crown area to build volume at the back.
- Scrunch out the crunch. Once fully dry, scrunch the curls with your hands to break the gel cast. This reveals soft, defined ringlets without the crunchy texture.
- Shape the front. Use your fingers to direct the longer front pieces forward, framing the face. A tiny amount of curl cream on the ends adds definition.
- Build volume at the crown. Flip your head upside down and shake the roots at the crown. A quick blast of dry shampoo at the roots adds instant lift.
- Finish with spray. A light mist of flexible-hold hairspray keeps the curls defined without stiffness. Focus on the crown area where volume matters most.
Tips and tricks: The graduated bob requires a stylist who understands curly hair geometry — the cut must account for how much the curls spring up when dry. Always request a dry cut consultation if possible. The honey highlights are most effective when concentrated around the face and at the crown, where they catch the most light. For very tight curl patterns (3C and above), the graduated cut may need to be slightly longer to prevent the back from appearing too short when the curls spring up. A silk pillowcase preserves curl definition overnight and reduces frizz.

29 Stunning Summer Almond Nails for Women in 2026 💅
12.High Curly Ponytail with Vibrant Scarf Tie
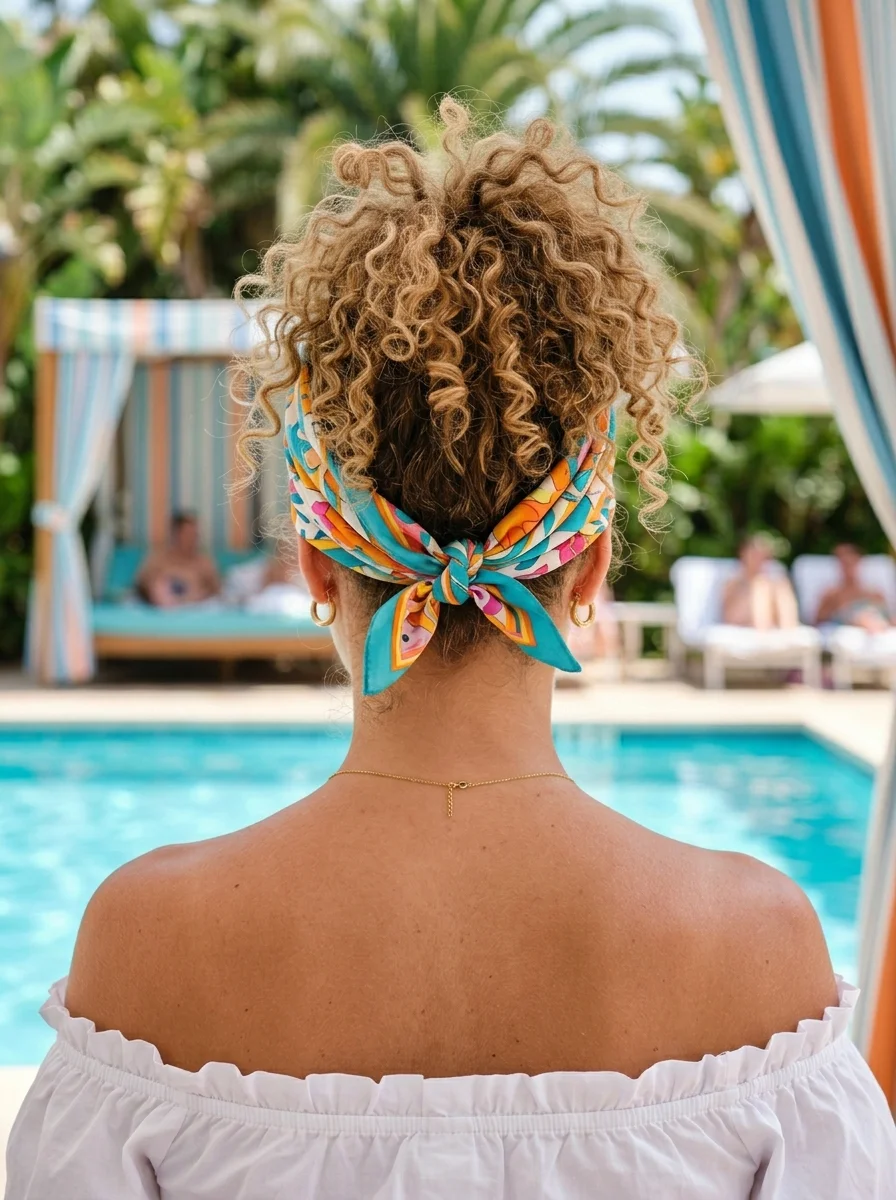
The overview: Brunette ombré fading to blonde at the ends, gathered into a high ponytail at the crown. The 3B-3C corkscrew curls cascade freely from the elastic, creating a voluminous fountain effect. A colorful silk scarf is tied around the base of the ponytail, with the ends left to hang and move with the curls. The ombré adds dimension, and the scarf provides a tropical, resort-ready accent.
The high ponytail placement maximizes the visual impact of the corkscrew curls — they spring outward and downward from the crown, creating a fountain effect that reads as playful and energetic. The silk scarf conceals the elastic while adding color and movement.
Why this look is popular: The high curly ponytail with a silk scarf has become a resort and tropical destination staple because it keeps hair off the neck in heat while maintaining a styled, vacation-ready appearance. The silk scarf adds color and personality without requiring additional accessories, and the high placement creates a youthful, energetic silhouette that photographs well against tropical backdrops.
Where this look is suitable: Resort vacations, tropical destinations, poolside gatherings, and any warm-weather setting where you want to keep hair contained while still looking polished. The silk scarf reads as intentional and styled, making it appropriate for resort dining and evening events.
Step by step:
- Define the curls. Apply a curl cream like Miss Jessie's Pillow Soft Curls to wet hair, scrunching upward to encourage curl formation. The cream provides soft hold without crunchiness.
- Diffuse for volume. Use a diffuser on medium heat, focusing on the roots to build volume at the crown. The higher the root volume, the more dramatic the ponytail.
- Gather high at the crown. Flip your head upside down and gather all the hair into a high ponytail position at the crown. Secure with a strong elastic that matches your hair color.
- Arrange the curls. Let the corkscrew curls cascade from the elastic, separating any that clumped together. The curls should fall naturally around the face and shoulders.
- Tie the silk scarf. Fold the scarf into a narrow band and wrap it around the base of the ponytail, covering the elastic. Tie the ends in a bow or knot, leaving the tails to hang.
- Adjust and finish. Pull a few face-framing curls free if needed. A light mist of flexible-hold hairspray keeps the curls defined without stiffness.
Tips and tricks: The high ponytail requires a strong elastic — standard drugstore elastics will snap under the weight of thick curly hair. Look for spiral cord elastics or athletic-grade ties. The silk scarf should be lightweight enough to drape naturally but substantial enough to stay tied. A 35-inch square scarf folded diagonally creates the ideal band width. For very thick hair, the ponytail may need to be secured with two elastics for extra hold. The ombré effect grows out gracefully, reducing salon maintenance.
13.Romantic Curls Chignon with Loose Tendrils
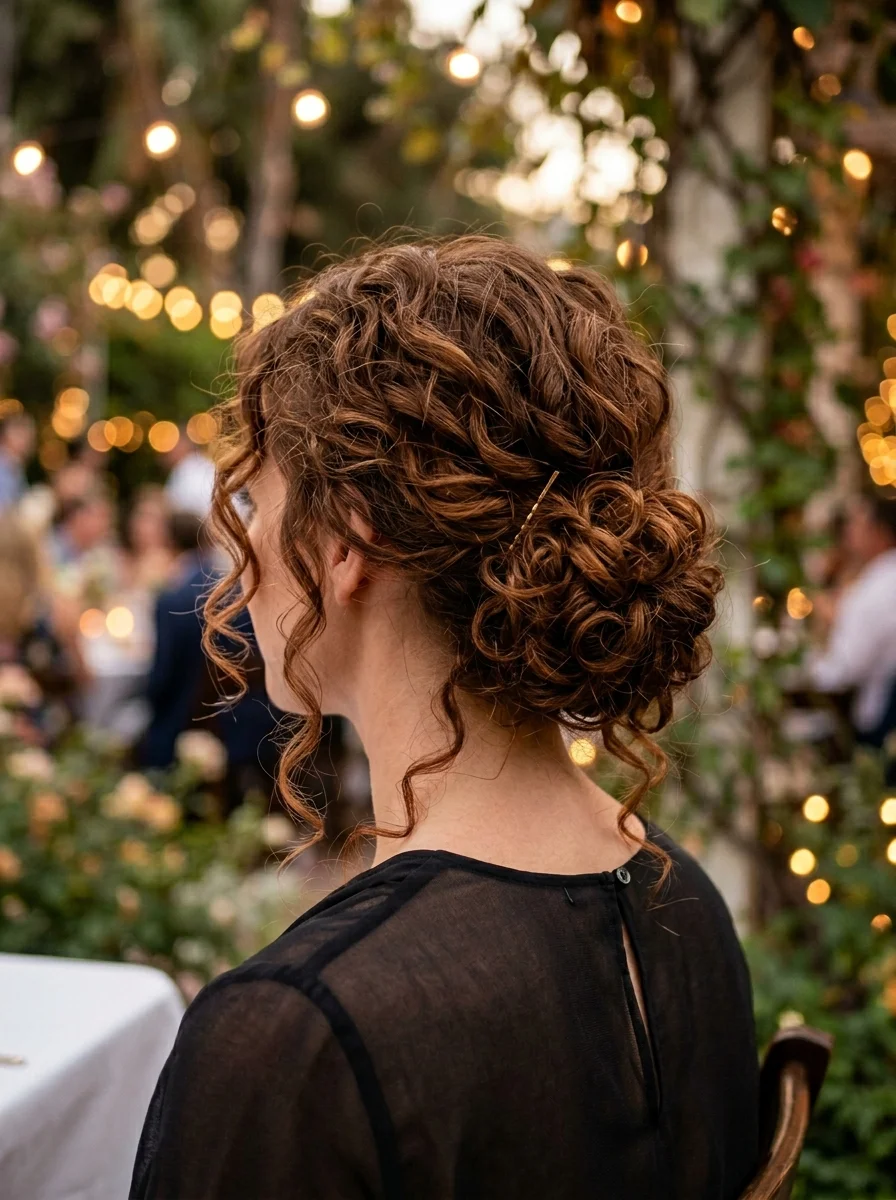
The overview: Medium to long hair styled into 2C-3A curls is gathered into a low chignon at the nape, with face-framing tendrils left loose to soften the silhouette. The chignon itself has a romantic, slightly undone quality — curls coil naturally within the bun rather than being smoothed into a uniform shape. The hair adds warmth that glows in ambient lighting, making this particularly effective for evening events.
The loose tendrils are what make this chignon work for romantic settings. Without them, a low chignon can read as severe or strictly formal. With them, the style becomes softer, warmer, and more approachable — exactly the right tone for a formal evening where you want to look elegant without appearing unapproachable.
Why this look is popular: The romantic curls chignon photographs with stunning depth in warm lighting — the auburn-copper tones create a rich, dimensional effect that flat or cool-toned hair cannot replicate. The face-framing tendrils soften the jawline and highlight the cheekbones, while the low chignon elongates the neck. It is a style that looks equally good from the front, side, and back, which matters at formal events where you are photographed from every angle.
Where this look is suitable: Formal evening events, winter galas, black-tie dinners, and any occasion where elegance is the goal. The auburn-copper tone and romantic tendrils make this less stiff than a traditional chignon, broadening its适用 range to include slightly less formal evening settings.
Step by step:
- Define the curls. Apply a curl-defining cream to damp hair and diffuse on low heat to create defined 2C-3A curls. Let hair cool completely before proceeding.
- Section the tendrils. Before gathering the chignon, separate two to three face-framing tendrils on each side and clip them out of the way.
- Gather low at the nape. Collect all remaining hair into a loose ponytail at the nape, securing with a clear elastic. Keep the crown relaxed — not tight or slicked.
- Create the chignon. Twist the ponytail loosely, then coil it around the base into a relaxed bun. Pin in place with bobby pins, allowing individual curls to spill outward naturally.
- Release the tendrils. Unclip the face-framing pieces and let them fall naturally. Use your fingers to separate and shape them into soft spirals.
- Set and adjust. Mist the chignon with a flexible-hold hairspray, and gently tug at sections to expand it. The tendrils should fall softly against the cheeks without looking stiff.
Tips and tricks: The auburn-copper tone is particularly striking in warm lighting, making this ideal for candlelit dinners and evening events with amber-toned lighting. If your hair is naturally dark, ask your stylist for a copper gloss treatment that adds warmth without full color commitment. The chignon works best on second-day curls when the pattern is defined but not crunchy. Use spin pins for a more secure hold than traditional bobby pins in thick curly hair. The tendrils should be slightly shorter than the chignon to maintain proportion — if they are too long, they can look limp.

21 Hot Summer Buns Hairstyle Ideas for 2026 ☀️🔥
14.Effortless Tousled Updo with Delicate Gold Pins
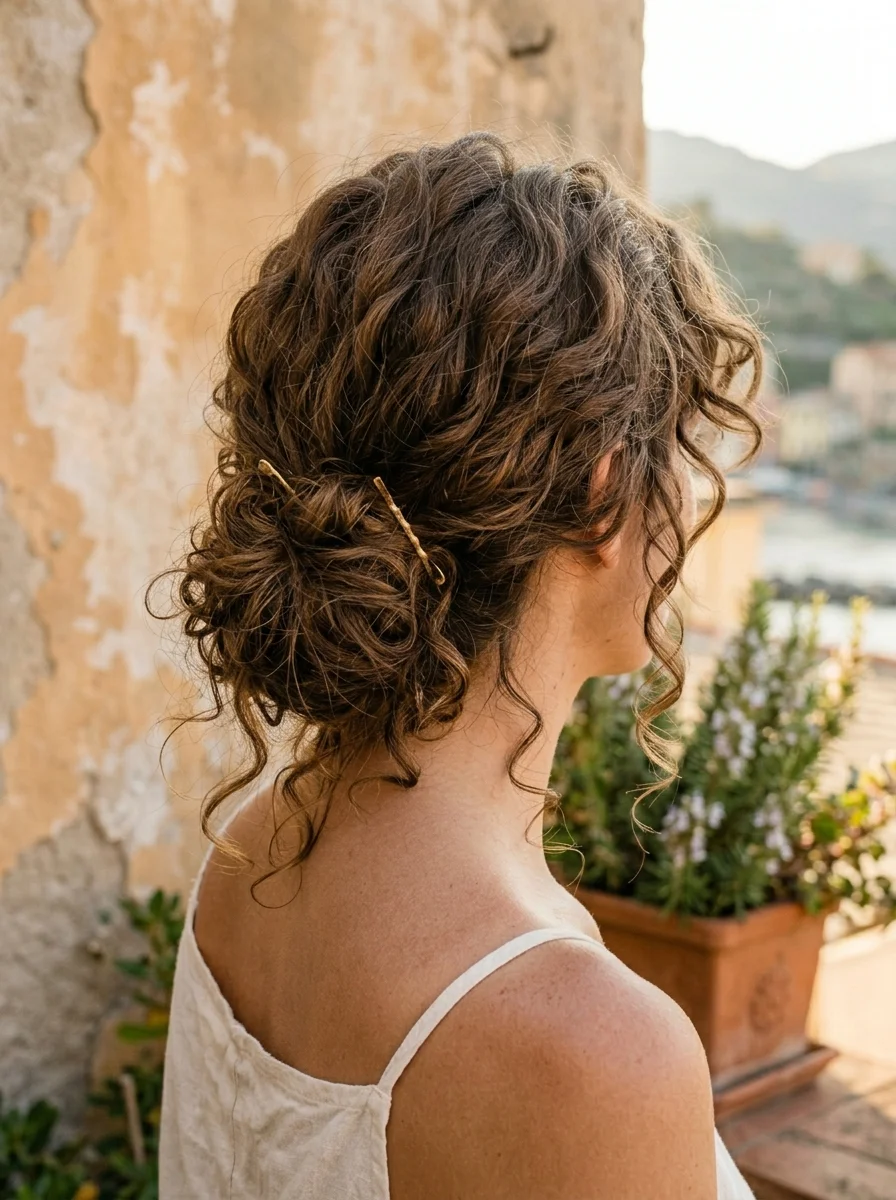
The overview: Medium to long hair with 2B-2W waves, gathered into a deconstructed low bun at the nape. The bun has a loose, tousled quality with waves spilling outward naturally. Three to five delicate gold pins are crossed through the bun in an organic, scattered arrangement, creating visual interest without rigid symmetry. The overall effect is effortless, Mediterranean, and sun-kissed. This look creates a Mediterranean holiday quality that looks like it was assembled in five minutes on a sunlit terrace.
The gold pins do the styling heavy lifting here. Without them, this is just a messy bun. With them, the same deconstructed shape reads as intentional and considered — a styled updo that happens to look effortless. The crossed arrangement creates visual rhythm without rigid symmetry.
Why this look is popular: The tousled updo with gold pins has become a Mediterranean holiday staple because it photographs beautifully against stone walls, blue doors, and sun-drenched terraces. The deconstructed shape reads as relaxed and European, while the gold pins add a refined detail that elevates the look beyond bare-minimum effort. It also keeps hair off the neck in warm weather — a practical benefit that does not compromise style.
Where this look is suitable: Mediterranean holidays, outdoor dining, seaside restaurants, and any warm-weather setting where the aesthetic is relaxed elegance. The gold pins add enough polish to make this appropriate for evening events while the deconstructed shape keeps it from reading too formal.
Step by step:
- Prep with texture. Spray texturizing spray throughout dry hair to add grip and volume. The waves should have enough texture to hold the updo without slipping.
- Gather loosely at the nape. Collect the hair into a loose ponytail at the nape, securing with a clear elastic. Keep the surface relaxed with visible wave texture.
- Create the deconstructed bun. Loop the ponytail through the elastic only halfway on the final pull-through, creating a looped bun. Pull sections of the loop outward to expand it and create texture.
- Pin and adjust. Secure any sections that feel too loose with bobby pins hidden within the bun. Gently tug at the crown to add lift and volume.
- Add the gold pins. Insert three to five delicate gold pins through the bun in a scattered, crossed arrangement. The pins should catch light from different angles without forming a rigid pattern.
- Finish with spray. A light mist of flexible-hold hairspray keeps the updo in place without stiffness. Pull a few face- framing pieces free for softness.
Tips and tricks: The gold pins should be delicate — thin, minimalist pins that add subtle shimmer without overwhelming the deconstructed bun. Look for pins with small decorative elements like tiny bars or dots rather than large gems or florals. The updo works best on second-day hair when natural texture provides enough grip. For fine hair, a volumizing powder at the roots before gathering creates the lift that prevents the bun from looking flat. The Mediterranean aesthetic is completed by keeping makeup minimal and skin dewy.
15.Vibrant Turban Headband with Loose Curls
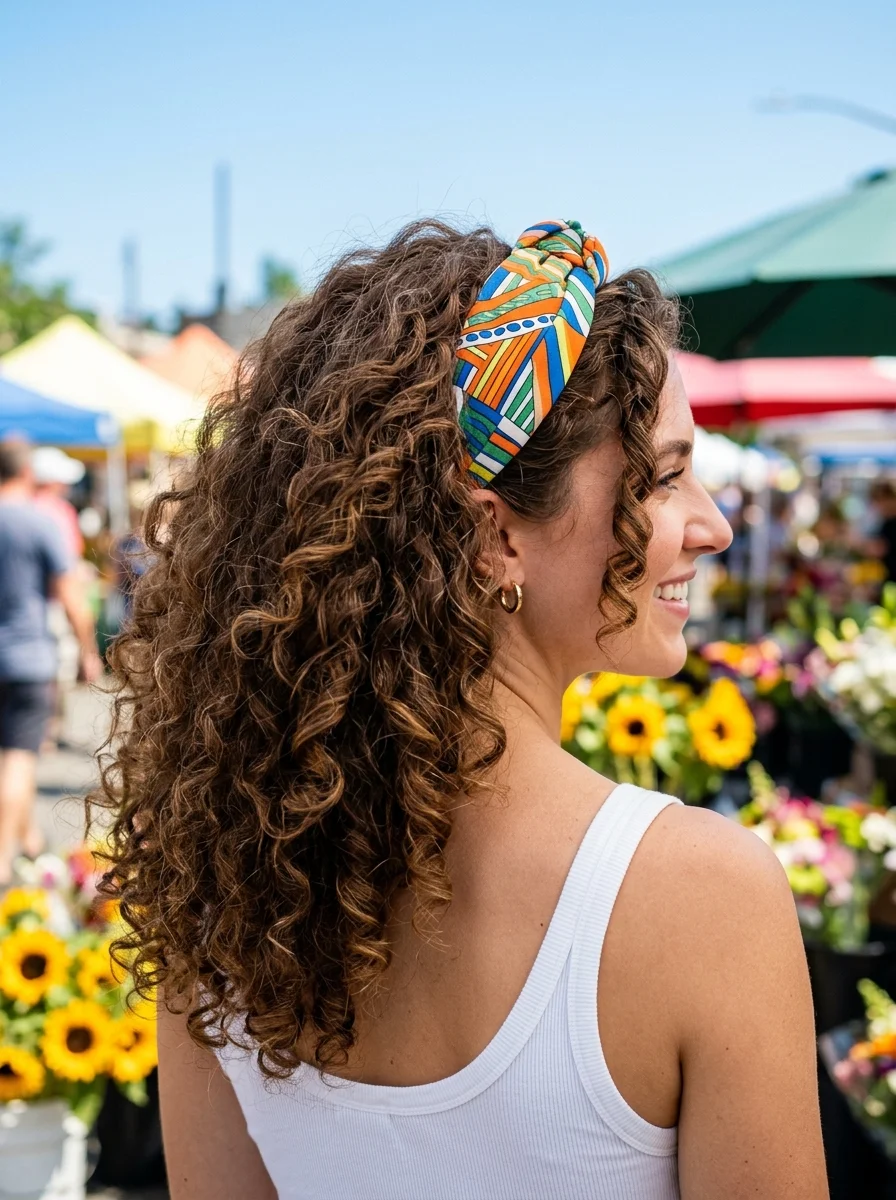
The overview: Chocolate brown hair with caramel highlights is worn loose with defined 3A-3B curls, accented by a wide, colorful turban headband that pushes the hair back from the face. The headband creates a crown-like effect, sitting an inch above the ears and exposing the forehead while the curls cascade freely behind it. The caramel highlights add warmth and dimension that complement the vibrant headband colors.
The turban headband solves the fundamental tension of curly hair management: it keeps hair off the face while allowing the curls to exist in their full, uncompressed glory. Unlike a hat, which flattens curls, or a traditional headband, which can slip on textured hair, the wide turban construction distributes pressure evenly and stays in place.
Why this look is popular: The turban headband with loose curls has become a farmers market and festival favorite because it adds instant color and personality with zero styling effort. The wide band creates a bold visual statement while the loose curls maintain femininity and movement. It also manages curly hair in humid conditions without requiring heat tools or elaborate styling.
Where this look is suitable: Farmers markets, outdoor festivals, casual weekend outings, and any daytime setting where the aesthetic is colorful and relaxed. The turban headband reads as intentional and styled, making it appropriate for events where you want to look put-together without appearing formal.
Step by step:
- Define the curls. Apply a curl-defining cream to damp hair and diffuse on low heat to create defined 3A-3B curls. Let hair cool completely before adding the headband.
- Scrunch out the crunch. Once fully dry, scrunch the curls with your hands to break any gel cast and reveal soft, bouncy ringlets.
- Position the headband. Slide the wide turban headband over your head, positioning it about one inch above the ears. The front edge should sit across the forehead, pushing the hair back from the face.
- Adjust the hair. Pull the curls forward over the headband so they fall naturally around the face and shoulders. The headband should be visible but not dominant.
- Build volume behind. Gently lift the curls at the crown behind the headband to create volume. A quick shake of the roots adds instant lift.
- Secure if needed. If the headband shifts, anchor it with two bobby pins crossed in an X shape underneath the fabric at the temples.
Tips and tricks: The turban headband should be wide enough to create a visible band — at least three inches wide. Narrower headbands slip more easily on curly hair and fail to create the crown-like effect. The fabric should have some texture or grip; smooth silk slides off curly hair, while cotton or jersey knit stays in place. For tighter curl patterns (3C and above), the headband may need to be positioned slightly further back to prevent compressing the curls at the hairline. The caramel highlights are most effective when concentrated at the crown and face-framing pieces, where they catch the most light.

31 Patriotic Fourth of July Nail Ideas for 2026 🇺🇸
16.Effortless Curly Bob with Tousled Bangs
The overview: Ashy light brown hair is cut into a shag-inspired bob with curtain bangs that part naturally and frame the face. The 2B-2C waves create a tousled, Parisian quality — hair that looks like it was styled by a breeze rather than a blow-dryer. The curtain bangs soften the forehead and draw attention to the eyes, while the bob length keeps the overall silhouette clean and modern.
The shag-inspired bob with curtain bangs has become the default "cool girl" haircut because it flatters most face shapes and requires minimal daily styling. The layers create shape, the bangs provide structure, and the waves do the rest.
Why this look is popular: The curly bob with tousled bangs reads as effortlessly Parisian — a quality that photographs beautifully in urban settings. The curtain bangs soften the face without the commitment of full bangs, and the shag layers create natural volume that improves throughout the day. It is also one of the lowest-maintenance curly cuts available: the shape is built into the cut, meaning daily styling is genuinely optional.
Where this look is suitable: Parisian-inspired street style, casual urban outings, coffee shop visits, and any setting where the aesthetic is understated and modern. The tousled bangs and shag layers communicate a relaxed confidence that works in both social and creative professional environments.
Step by step:
- Apply leave-in conditioner. Work a lightweight leave-in through damp hair, focusing on the ends and the bangs. The bangs need moisture to prevent them from looking frizzy.
- Diffuse the bangs first. Use a diffuser on low heat, directing the curtain bangs away from the face to create the soft, curtain-like part. Dry them until they hold their shape.
- Diffuse the rest. Move to the rest of the hair, cupping sections in the diffuser and holding them against the scalp. Dry to about 80% — letting the rest air-dry prevents frizz.
- Shape the bangs. Use your fingers to direct the curtain bangs away from the face, creating a soft, parted effect. A tiny amount of texturizing cream on the ends adds definition.
- Add volume at the roots. Flip your head upside down and shake the roots with your fingers. A quick blast of dry shampoo at the crown adds instant lift.
- Finish minimally. A light mist of texturizing spray throughout the mid-lengths enhances the tousled quality. Avoid heavy products that will weigh down the layers.
Tips and tricks: The curtain bangs require regular trims every 4-6 weeks to maintain the right length — too long and they lose the curtain effect, too short and they look like micro-bangs. Ask your stylist to point-cut the bangs for a softer, more natural edge. The shag layers should be cut dry to account for how much the waves spring up when dry. For hair that is naturally straight, the waves will require a 1.25-inch curling iron, but the curtain bangs can be shaped with a round brush and blow-dryer. The ashy tone works best on cool skin tones; warmer complexions may benefit from adding subtle warm highlights.
17.Effortless Curly Waves with Pearl Pin Accent
The overview: Dark espresso hair is styled into defined 3A curls that fall naturally around the shoulders, with pearl pins positioned on one side to create an asymmetrical accent. The pearl pins — usually two or three clustered together — add a refined, romantic detail against the dark hair without overwhelming the natural curl pattern. The curls themselves have a soft, bouncy quality that reads as both polished and natural.
The pearl pin cluster works because it introduces a focal point without requiring an updo or elaborate styling. The pearls catch light against the dark espresso tone, creating a contrast that photographs beautifully in soft lighting. The asymmetrical placement adds visual interest without disrupting the curl flow.
Why this look is popular: The curly waves with pearl pins have become a garden party and outdoor event staple because they add elegance without formality. The pearl pins signal that you put thought into your appearance without looking like you overdid it, and the dark espresso tone provides a rich backdrop that makes the pearls visually pop. The style also works across age groups — it reads as youthful on younger wearers and classic on mature ones.
Where this look is suitable: Garden parties, afternoon tea, outdoor weddings (as a guest), and any daytime setting where the aesthetic is refined but not formal. The pearl pins add enough polish to elevate the look beyond purely casual without competing with the natural beauty of the curls.
Step by step:
- Define the curls. Apply a curl-defining cream like Kinky-Curly Knot Today to damp hair, raking it through with your fingers to ensure even distribution.
- Diffuse for definition. Use a diffuser on low heat, cupping sections of hair upward toward the scalp. Hold each section for 10-15 seconds before moving to the next.
- Scrunch out the crunch. Once fully dry, scrunch the curls with your hands to break any gel cast. This reveals soft, defined curls without stiffness.
- Position the pearl pins. On one side of the head, near the temple, cluster two to three pearl pins in a small group. The pins should grip both the top layer and the hair beneath for security.
- Arrange the curls. Use your fingers to direct the curls naturally, separating any that clumped together. The curls should frame the face without looking stiff or overly arranged.
- Set lightly. A mist of flexible-hold hairspray on the curls and the pinned section keeps everything in place without stiffness.
Tips and tricks: Pearl pins create the strongest visual contrast against dark hair — the darker the hair, the more the pearls pop. For lighter hair tones, consider gold or rose-gold pins instead. The cluster of two to three pins creates more impact than a single pin; arrange them in a small triangle or diagonal line for the most pleasing composition. The dark espresso tone is enriched by a gloss treatment, which adds shine and depth to the curls. A silk pillowcase preserves curl definition overnight and prevents the pins from catching on cotton fibers.
31 Stunning Summer Birthday Party Hairstyles for 2026 🎂☀️
18.Rich Auburn Curls with Layered Length
The overview: Deep auburn hair falls in uniform 3A-3B spiral curls through long layers that create movement and prevent the length from looking heavy. The auburn tone has rich, warm undertones that shift between copper and burgundy depending on the lighting, giving the hair a dimensional quality that makes each curl visually distinct. The layered cut removes weight from the mid-lengths and ends, allowing the curls to spring upward and maintain their spiral shape throughout the length.
Long curly hair without layers tends to pyramid — wide at the bottom and heavy throughout. The layers here are cut to prevent that silhouette, creating a shape that is balanced from root to end. The auburn color amplifies the effect by adding tonal dimension that makes each layer visible.
Why this look is popular: Rich auburn curls have a classic, refined quality that photographs with stunning depth in both natural and artificial lighting. The layered cut allows the curls to maintain their spiral shape without being weighed down, which means the style looks consistently good throughout the day. The warm auburn tone also flatters a wide range of skin tones, making it a reliable choice for anyone considering a color change.
Where this look is suitable: Professional settings, formal events, dinner parties, and any environment where the aesthetic is polished and confident. The rich auburn tone and defined curls communicate intentionality without flashiness, making this appropriate for settings that require a put-together appearance.
Step by step:
- Hydrate thoroughly. Apply a rich curl cream like SheaMoisture Jamaican Black Castor Oil Strengthen & Restore Treatment Masque to damp hair, focusing on the mid-lengths and ends where dryness shows most.
- Define each curl. Use the shingling method: apply a curl-defining gel to small sections, smoothing it from root to end with your fingers to encourage each curl to form individually.
- Diffuse on low heat. Cup sections of hair in the diffuser and hold them against the scalp for 15-20 seconds before moving to the next section. The longer hold creates more defined spirals.
- Scrunch out the crunch. Once fully dry, scrunch the curls with your hands to break the gel cast. A few drops of argan oil on the ends adds shine and softness.
- Separate carefully. Use your fingers to gently separate any curls that clumped together, being careful not to disrupt the spiral pattern. Work from the bottom up.
- Finish with oil. A small amount of hair oil warmed between your palms and smoothed over the surface adds shine and reduces frizz without weighing down the curls.
Tips and tricks: The layered cut is critical — without it, long curly hair loses its shape and becomes a heavy curtain. Ask your stylist for "Deva layers" or "curl-by-curl" cutting, where each curl is cut individually to account for its specific spring pattern. The auburn color requires maintenance; a color-depositing conditioner like Moroccanoil Color Depositing Mask in Copper maintains the tone between salon visits. For very thick hair, the shingling method takes time but produces the most defined results. A silk pillowcase preserves the curl pattern overnight.
19.Golden Hour Waves with a Chic Half-Up Twist
The overview: Honey blonde hair styled into 2B-2C waves with golden-hour warmth. The top section is gathered into a twist at the back of the head, secured with a gold pin. The remaining waves flow freely past the shoulders, catching light along each bend. The waves catch golden-hour light beautifully, with the honey blonde tone amplifying the warm, sunlit quality.
The half-up twist is a step beyond a basic half-up — the twisted section adds texture and visual interest at the back of the head, turning a simple gathering into a styled detail. The gold pin anchors the twist and adds a warm metallic accent that complements the honey blonde tone.
Why this look is popular: The golden hour waves with a half-up twist have become a coastal evening favorite because they look their absolute best in warm, low-angle sunlight. The honey blonde tone and gold pin create a monochromatic warmth that photographs with stunning depth during sunset hours. The half-up construction also keeps hair off the face during outdoor dining while maintaining the softness that evening settings require.
Where this look is suitable: Coastal evening settings, sunset dinners, outdoor cocktail hours, and any warm-weather evening where the aesthetic is relaxed luxury. The honey blonde and gold combination reads as sun-kissed and seasonal, making it particularly strong for summer and early fall.
Step by step:
- Create the waves. Apply a wave-enhancing cream to damp hair and diffuse on low heat, or use a 1.25-inch curling iron to add bends to dry hair. The waves should be soft and relaxed, not tightly defined.
- Gather the top section. Collect the hair from each temple and smooth it back toward the crown. Do not pull tight — keep the surface relaxed with visible wave texture.
- Create the twist. Twist the gathered section once or twice at the back of the head, then secure it with a gold pin that grips both the twist and the hair beneath. The twist should sit flat against the head.
- Arrange the waves. Direct the remaining waves forward over the shoulders, separating any that clumped together. The waves should frame the face and fall naturally.
- Add shine. A few drops of shine serum smoothed over the surface of the waves adds the glossy, sunlit quality that makes this style photograph so well.
- Set lightly. A mist of flexible-hold hairspray on the waves and the twisted section keeps everything in place without stiffness.
Tips and tricks: The honey blonde tone is most effective when it has warm, golden undertones — ask your stylist for a "honey" or "golden" blonde rather than an ash or platinum tone. The gold pin should match the warmth of the hair color for a cohesive look. For naturally straight hair, the waves will require heat styling, but the half-up twist is forgiving enough that imperfect waves actually look better. Fine hair benefits from a volumizing mousse applied to damp hair before styling. The coastal evening aesthetic is completed by keeping jewelry minimal — the gold pin is the statement piece.
32 Bright & Fun Summer Toe Nail Designs (2026)
20.Golden Hour Waves (Short Version)
The overview: Sandy blonde hair cut to a shoulder-length lob is styled into soft 2B waves with a half-up twist secured at the back. The shorter length creates a lighter, more playful version of the golden hour aesthetic, with the sandy blonde tone adding warmth that glows in Mediterranean light. The waves have a relaxed, beachy quality — not too defined, not too messy — that works in both courtyard dining and evening strolls.
The shoulder-length lob is the ideal canvas for this style because it provides enough length for the waves to develop without the weight that drags down longer hair. The half-up twist keeps the top section controlled while the lob length allows the waves to move freely.
Why this look is popular: The shorter golden hour waves have gained traction because they offer the same sun-kissed warmth as longer versions with less maintenance. The sandy blonde tone reads as natural and vacation- ready, and the shoulder-length lob is one of the most universally flattering cuts available. The half-up twist adds a styled detail that elevates the look beyond bare-minimum effort.
Where this look is suitable: Mediterranean courtyard dining, coastal town exploration, sunset drinks, and any warm-weather evening where the aesthetic is relaxed elegance. The sandy blonde tone and soft waves create a vacation-ready quality that feels seasonal and location-appropriate.
Step by step:
- Prep with wave spray. Apply a wave-enhancing spray to damp hair, scrunching upward to encourage the 2B wave pattern. The spray adds texture and hold without stiffness.
- Air-dry or rough-dry. Let hair air-dry for the most natural result, or use a blow-dryer on medium heat while tousling with your fingers. The waves should look relaxed and lived-in.
- Add definition if needed. If certain sections dried too straight, use a 1.25-inch curling iron to add a quick bend. Wrap loosely and leave the ends out for a natural finish.
- Create the half-up twist. Gather the top section from each temple, smooth it back, and twist once at the back of the head. Secure with a small elastic or pin.
- Arrange the waves. Shake the loose waves gently with your fingers to add volume and separate any clumped sections. The waves should frame the face naturally.
- Finish with shine. A few drops of shine serum on the ends adds the glossy, sunlit quality that makes this style photograph beautifully in warm light.
Tips and tricks: The sandy blonde tone works best on warm to neutral skin tones. If your complexion runs cool, ask your stylist for a sandy blonde with subtle ash undertones to maintain the warmth without clashing. The shoulder-length lob requires trims every 8-10 weeks to maintain the right length — too long and the waves lose their bounce, too short and the half-up twist becomes difficult to construct. For naturally straight hair, the waves require heat styling, but the relaxed quality means imperfection is actually preferable. A sea salt spray provides the grit and texture that makes the waves look authentic.
21.Boho Curls with a Delicate Chain Crown
The overview: Deep brunette hair styled into tight 3A-3B spirals is adorned with a delicate gold chain headpiece that sits across the forehead and wraps around the crown. The chain adds a bohemian, almost mythological quality to the curls — something between a festival accessory and a piece of jewelry. The tight spirals provide a dense, textured canvas that makes the gold chain visually prominent without overwhelming the face.
The chain headpiece functions differently from a traditional headband or clip. It sits directly on the hair rather than pressing against it, which means it moves with the curls rather than against them. This integration is what gives the style its organic, bohemian quality.
Why this look is popular: The boho curls with a chain crown have become a festival and bohemian event staple because they create an instantly recognizable aesthetic with minimal effort. The gold chain photographs with beautiful detail against dark hair, and the tight spiral curls provide the texture and volume that make the headpiece visually impactful. The style also holds up well in outdoor conditions because the chain is secured at multiple points.
Where this look is suitable: Music festivals, bohemian-themed events, outdoor concerts, and any setting where the aesthetic is creative and free-spirited. The chain headpiece adds enough structure to make this appropriate for events where you want to look styled without appearing formal.
Step by step:
- Define the spirals. Apply a curl-defining gel to wet hair, using the shingling method to encourage each spiral to form individually. The tighter the definition, the more textured the backdrop for the chain.
- Diffuse on low heat. Cup sections of hair in the diffuser and hold them against the scalp for 15-20 seconds. The longer hold creates more defined spirals with less frizz.
- Scrunch out the crunch. Once fully dry, scrunch the curls to break the gel cast. A few drops of argan oil on the ends adds shine and softness.
- Position the chain. Drape the gold chain headpiece across the forehead, positioning it about an inch above the eyebrows. The chain should rest on the hair rather than pressing against the skin.
- Secure the chain. Wrap the chain ends around to the back of the head and secure them beneath the curls with small bobby pins. The chain should sit flat against the hair without pulling or creating tension.
- Adjust the curls. Pull curls forward over the chain to integrate it into the style. The chain should peek through the spirals rather than sitting on top of them.
Tips and tricks: The chain headpiece should be delicate — thin links that add subtle shimmer without overwhelming the curls. Heavy or chunky chains will flatten the spirals and disrupt the curl pattern. Secure the chain at multiple points (temples and back of head) to prevent shifting throughout the day. The deep brunette tone provides the strongest contrast against gold; lighter hair tones may benefit from rose gold or silver chains instead. For very tight curl patterns (3C and above), the chain may need to sit further back on the head to avoid compressing the curls at the hairline.
28 Effortless Hot Weather Day Hairstyles for Women 2026 ☀️💇♀️
22.Half-Up Curly Crown with Tortoiseshell Claw Clip
The overview: Honey-caramel blonde hair styled into defined 3A corkscrew curls is gathered into a half-up crown secured with a tortoiseshell claw clip. The half-up section pulls the top portion of curls back and upward, creating a crown-like volume at the back of the head while the remaining curls cascade freely. The tortoiseshell clip adds a warm, classic accent that complements the honey-caramel blonde tones.
The half-up crown works because it maximizes volume at the crown — the area where curly hair naturally wants to go — while keeping the face clear. The claw clip provides the structural support needed to hold thick curly hair without slipping, which is why it has become the go-to accessory for this style.
Why this look is popular: The half-up curly crown with a claw clip has become a Parisian cafe favorite because it looks effortlessly chic while managing voluminous curls. The tortoiseshell clip adds a retro touch that elevates the look beyond basic, and the crown volume creates a dramatic silhouette that photographs beautifully from every angle. The honey-caramel blonde tone adds warmth that feels approachable and inviting.
Where this look is suitable: Parisian cafe settings, casual daytime outings, brunch dates, and any environment where the aesthetic is relaxed sophistication. The tortoiseshell clip adds enough polish to keep the look from reading too casual, while the loose curls maintain a natural, unstudied quality.
Step by step:
- Define the corkscrews. Apply a curl-defining gel to wet hair, twisting small sections around your finger to encourage each corkscrew to form individually.
- Diffuse for volume. Use a diffuser on medium heat, focusing on the roots to build volume at the crown. The higher the root volume, the more dramatic the crown effect.
- Scrunch out the crunch. Once fully dry, scrunch the curls to break the gel cast. A few drops of shine serum on the ends adds polish.
- Gather the crown section. Collect the top half of the hair from each temple, lifting it upward and back toward the crown. Keep the surface relaxed with visible curl texture.
- Secure with the claw clip. Open the tortoiseshell clip and position it at the crown, gripping the gathered section. The clip should hold firmly without pulling or creating tension.
- Arrange the curls. Pull the loose curls forward over the shoulders and separate any that clumped together. The curls should frame the face and cascade naturally.
Tips and tricks: The claw clip needs to be large enough to grip the full section of curly hair — a clip that is too small will slide out by midday. Look for clips with strong spring mechanisms and teeth that interlock firmly. The honey-caramel blonde tone is achieved through a combination of honey and caramel highlights over a medium brown base; ask your stylist for a "honey-caramel" blend. For very thick hair, the crown section can be subdivided into two smaller sections, each clipped separately. A silk pillowcase preserves curl definition overnight.
23.Bohemian Braided Updo with a Touch of Nature
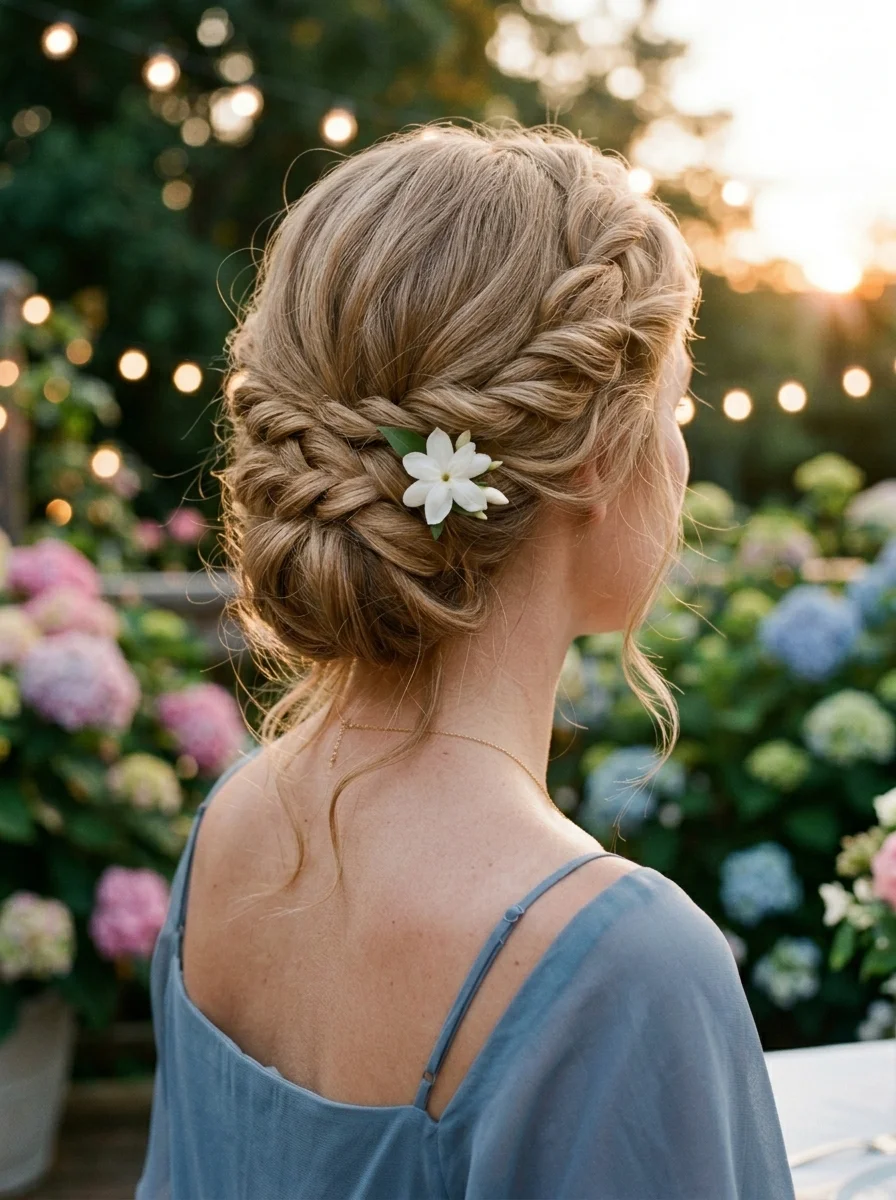
The overview: Dark blonde to caramel hair with 2C-3A waves is styled into a braided updo that incorporates small braids woven into a larger, loose structure. A small white flower is tucked into the braids, adding a natural, garden-wedding touch. The braided updo has a bohemian quality — not tightly constructed or rigidly symmetrical, but organically assembled with visible texture and movement.
The small white flower transforms the braided updo from a standard hairstyle into something more personal and occasion-specific. It signals that this is not everyday hair — it is hair for a moment, a celebration, a garden setting. The dark blonde to caramel tones provide a warm canvas that makes the white flower visually pop.
Why this look is popular: The bohemian braided updo with a flower has become a garden wedding staple because it photographs beautifully in outdoor settings. The braids add texture and detail that create visual interest from every angle, while the flower adds a romantic, organic element that connects the style to its natural surroundings. The dark blonde to caramel tone also photographs with warmth and dimension in natural light.
Where this look is suitable: Garden weddings (as a guest or bride), outdoor celebrations, botanical garden visits, and any setting where nature and romance intersect. The flower makes this seasonally specific — it is a style for spring and summer when fresh blooms are available and outdoor events are frequent.
Step by step:
- Prep with texture. Spray texturizing spray throughout dry hair to add grip and volume. The waves should have enough texture to hold the braids without slipping.
- Create small braids. Select three to four random sections throughout the hair and braid each one loosely. Secure the ends with small clear elastics. Leave the braids loose enough to maintain wave texture within them.
- Gather the updo. Collect all the hair, including the small braids, into a loose ponytail at the back of the head. Loop it through the elastic only halfway to create a looped bun.
- Weave and pin. Pull sections of the looped bun outward and pin them in place with bobby pins, allowing the small braids to weave through the structure. The updo should look organically assembled, not rigidly constructed.
- Add the flower. Tuck a small white flower into the braids, positioning it where it catches light and draws the eye. Secure with a floral pin or small U-pin hidden beneath the petals.
- Adjust and set. Gently tug at sections of the updo to loosen it and create more texture. Pull a few face-framing pieces free for softness. Mist with a flexible-hold hairspray.
Tips and tricks: Fresh flowers wilt in outdoor heat within an hour, so either use them right before you leave or opt for high-quality silk blooms that hold up indefinitely. Baby's breath is an excellent filler that resists wilting better than most flowers. The small braids should be loose enough to maintain curl texture within them — tight braids read as rigid rather than bohemian. For very thick hair, the updo may need extra pins; use spin pins for a secure hold without bulk. The dark blonde to caramel tone is achieved through balayage, which creates a natural, sun-kissed gradient.

29 Best Tropical Vacation Nails for Women in 2026 🌴
24.Golden Hour Curls

The overview: Golden blonde hair styled into defined 3A-3B spirals, worn fully down to showcase the curl pattern in its entirety. The golden blonde tone catches sunset light beautifully, with each spiral creating a distinct highlight that makes the hair appear to glow from within. The curls are defined but not crunchy — soft, bouncy ringlets that move naturally with every turn of the head.
This is the simplest style on this list and potentially the most striking. No clips, no pins, no updos — just well- defined curls and a color that maximizes golden-hour light. The entire effect depends on the quality of the curl definition and the warmth of the blonde tone.
Why this look is popular: Golden hour curls have become the ultimate sunset-rooftop style because they look their absolute best in warm, low-angle sunlight. The golden blonde tone amplifies the warm light, creating a luminous, almost halo-like effect that photographs with stunning depth. Wearing the curls fully down also communicates confidence in your natural texture — there is nowhere to hide when every curl is on display.
Where this look is suitable: Sunset rooftop gatherings, golden-hour photo sessions, outdoor evening events, and any setting where warm, natural light is the primary illumination. The golden blonde tone and defined curls create their best visual impact during the hour before sunset.
Step by step:
- Hydrate thoroughly. Apply a moisture-rich curl cream to wet hair, ensuring every strand is coated. The curls need hydration to maintain their spiral shape and prevent frizz.
- Define each curl. Use the finger-coiling method: twist small sections of hair around your finger to encourage each spiral to form individually. This takes time but produces the most defined results.
- Diffuse on low heat. Cup sections of hair in the diffuser and hold them against the scalp for 15-20 seconds. The longer hold creates more defined spirals with less frizz.
- Scrunch out the crunch. Once fully dry, scrunch the curls with your hands to break the gel cast. A few drops of argan oil on the ends adds shine and softness.
- Separate carefully. Use your fingers to gently separate any curls that clumped together, working from the bottom up. Be careful not to disrupt the spiral pattern.
- Finish with oil. A small amount of hair oil warmed between your palms and smoothed over the surface adds the glossy, luminous quality that makes this style glow in golden- hour light.
Tips and tricks: The golden blonde tone is the foundation of this style — without the warm, light-reflecting color, the curls lose their luminous quality. Ask your stylist for a golden or honey blonde with warm undertones. The finger-coiling method is time-consuming but produces the most defined spirals; if time is short, the shingling method is a faster alternative. A silk pillowcase preserves curl definition overnight, reducing the need for daily restyling. For hair that doesn't hold curl well, apply a light-hold mousse before diffusing to extend the spiral shape.
25.Effortless Boho Waves with a Sparkly Pin Accent
The overview: Sandy blonde hair with 2C-3A waves is gathered into a twisted half-up section at the back of the head, secured with a rhinestone pin that catches light and adds a refined sparkle. The waves have a relaxed, bohemian quality — tousled and natural rather than perfectly defined — while the rhinestone pin introduces an elegant detail that elevates the entire look. The sandy blonde tone reads as sun-kissed and vacation-ready.
The twisted half-up is a step beyond a basic gathering — the twist adds texture and visual interest at the back of the head, turning a functional section into a styled detail. The rhinestone pin anchors the twist while providing a focal point that catches light from multiple angles.
Why this look is popular: The boho waves with a sparkly pin have become a vineyard event favorite because they balance relaxed texture with refined detailing. The rhinestone pin adds enough sparkle to feel special without overwhelming the bohemian aesthetic, and the sandy blonde tone photographs beautifully in outdoor settings. The twisted half-up also keeps hair off the face during wine tasting and outdoor dining — a practical benefit that does not compromise style.
Where this look is suitable: Vineyard events, wine tasting dinners, outdoor garden parties, and any setting where the aesthetic is relaxed luxury. The rhinestone pin adds enough polish to elevate the look beyond purely casual, while the tousled waves maintain a natural, unstudied quality.
Step by step:
- Create the waves. Apply a wave-enhancing spray to damp hair and air-dry, or use a 1.25-inch curling iron to add bends to dry hair. The waves should be soft and tousled, not tightly defined.
- Add texture. Spray texturizing spray throughout the mid-lengths to add grit and volume. This gives the waves the lived-in, bohemian quality this style requires.
- Gather the top section. Collect the hair from each temple and smooth it back toward the crown. Keep the surface relaxed with visible wave texture.
- Create the twist. Twist the gathered section once or twice at the back of the head, then secure it with a rhinestone pin that grips both the twist and the hair beneath. The pin should sit flat against the head.
- Arrange the waves. Direct the remaining waves forward over the shoulders, separating any that clumped together. The waves should frame the face and fall naturally.
- Finish with spray. A mist of flexible-hold hairspray on the waves and the twisted section keeps everything in place without stiffness. The rhinestone pin should be visible and catching light.
Tips and tricks: The rhinestone pin should be proportionate to the twist — a pin that is too large overwhelms the section, while one that is too small disappears into the waves. Look for a pin with a setting that catches light from multiple angles; cluster-style settings are more effective than single stones. The sandy blonde tone works best when it has warm, golden undertones that complement the rhinestone sparkle. For naturally straight hair, the waves require heat styling, but the relaxed quality means imperfection is preferable. A sea salt spray provides the grit and texture that makes the waves look authentic rather than over-styled.

38 Trending Bandana Hairstyles for Women (2026)
Three Curly Hair Mistakes
Even the best curly haircut will fall flat if you are making these everyday errors. They are easy to fix once you know what to look for, and the difference shows immediately in how your curls behave.
1. Brushing dry curls. This is the single fastest way to destroy your curl pattern and end up with a cloud of frizz. Curls should only be detangled when they are wet and coated with conditioner, using a wide-tooth comb or your fingers. A brush on dry curls breaks up the clumps that define each curl and creates the fuzzy halo that no amount of product can fix.
2. Over-washing. Stripping your scalp of natural oils is the fastest route to dry, brittle curls. Curly hair needs its natural moisture. Washing once or twice a week with a sulfate-free shampoo, and using co-washes in between, keeps the curl pattern defined without drying out the strands.
3. Using a terry cloth towel. Rough towel fabric causes massive friction and frizz. Swap it for a microfiber towel or an old cotton t-shirt. Gently squeeze water out instead of rubbing — the difference in curl definition and frizz reduction is instant and obvious after one wash.