Nail Trends
28 Trendy May Nail Designs for 2026 💅 | Best Spring to Summer Nail Ideas
What Trends Are Going This Month?
May is the awkward middle child of nail seasons. The spring florals you loved in March feel tired by now, but summer's full neon assault is not quite appropriate either. You are in a transitional zone where the wrong shade can feel either too heavy or too. The solution that 2026 has landed on is the milky sheer — translucent washes of color that sit right between pastel and neutral.
"Soap nails" — those clean, milky pink or white translucent finishes — are dominating May content for exactly this reason. They read as fresh without feeling seasonal. A design like "Strawberry Milkshake Marbling" or "The Quiet Luxury French" works because the sheer base lets your natural nail show through, so the color feels like an enhancement rather than a statement. You are not committing to spring or summer. You are just existing in the milky middle, which is exactly where May lives.
The practical upside is significant: sheer finishes hide growth, blur nail imperfections, and do not create a harsh regrowth line the way opaque colors do. If you are the type of person who stretches a manicure to two weeks, May's milky sheers are the most forgiving option you have all year.
In This Guide
1.The Gold-Lined Minimalist
Elevated white shorties with a touch of luxury.
Overview:
White nails are having a moment again, and for good reason. But plain white reads "I ran out of ideas at the salon." These two hair-thin gold stripes change that equation entirely. They catch light at angles you wouldn't expect, especially under warm restaurant lighting, and they give short nails a sense of proportion that solid white never achieves on its own.
The trick is restraint. Two lines, not three. Gold, not silver — silver against white washes out. The placement matters more than you'd think: centering both stripes in the middle third of the nail creates that architectural feel. Move them too high and the nail looks top-heavy.
This is the kind of design that photographs well on a phone screen but looks even better in person. Our editorial team tested it with OPI's "Funny Bunny" as the base over a two-week wear period, and the gold tape held up better than hand-painted lines, which started feathering by day four.
Design Breakdown:
Precision is everything here. The white needs to be fully opaque with zero streaking, and the gold lines need to be genuinely thin.
Base Color: A bright, pigment-dense white. We recommend two coats minimum. Brands like OPI "Alpine Snow" or Essie "Blanc" give the best opacity.
Nail Shape: Short square with slightly softened corners. Anything longer than the fingertip starts to look costumey with this design.
Design Element: Two horizontal metallic gold stripes across the center. Striping tape works better than freehand unless you've been doing nail art for years.
Finish: High-gloss top coat. Matte kills the gold's reflectivity and defeats the purpose.
Get The Look at Home:
Budget about 45 minutes for this. The white polish needs proper dry time between coats or the tape will pull it up.
- Prep and shape: Push back cuticles. File into a clean square. Buff out any ridges since white polish magnifies every imperfection on the nail surface.
- White base: Apply two thin coats of opaque white. Let each coat dry for at least three minutes. Thick coats will bubble.
- Tape application: Cut two lengths of gold striping tape. Press the first one slightly above center, the second slightly below. Smooth them down firmly from edge to edge.
- Trim the ends: Snip the tape about 0.5mm inside the nail border on both sides. Tape that reaches the edge peels off within a day.
- Seal: Apply a thick, self-leveling top coat in one confident stroke. Going back over it will shift the tape.
30 Stunning Summer Hair Trends for 2026 ☀️🌊
2.Midnight Marble Dream
Moody yet feminine swirls for a high-fashion look.
Overview:
Marble nails cycle in and out of trend feeds, but this version skews darker and moodier than the usual Pinterest marble. The base is a barely-there nude, not white, and that makes the black-and-grey swirls feel submerged rather than painted on top. The effect is closer to polished onyx stone than typical nail art.
This design demands longer nails. On short shapes, the swirl pattern gets compressed and loses the organic, geological quality that makes it interesting. The sweet spot is a long square or coffin, about 5mm past the fingertip, where each nail has enough surface area to let the marbling look like an accident of nature rather than a deliberate pattern.
One thing to know: every nail will look slightly different, and that's the point. If you try to make them all match, you'll overwork the swirls and end up with muddy grey smudges instead of sharp contrast.
Design Breakdown:
Wet-on-wet technique. Looks intimidating, but the "mistakes" actually make it better.
Base Color: A sheer, warm-toned nude or milky pink. The base is visible between the swirls, so it needs to look like clean skin, not color.
Nail Shape: Long square or coffin. Anything under 4mm of free edge doesn't give the marble room to breathe.
Design Element: Dragged swirls of black, grey, and white. The key is high contrast. Don't blend the colors into each other; drag them alongside each other.
Finish: Super glossy. The gloss creates the "polished stone" illusion. Matte finish makes this look like paint, not marble.
Get The Look at Home:
This is a "work messy, clean up later" technique. Embrace the chaos.
- Shape and base: File into a long square. Apply one coat of sheer nude.
- Wet layer: Apply a second thin coat of nude. Do NOT wait for it to dry. You're working into this wet surface.
- Drop colors: Place tiny dots of black, white, and medium grey directly onto the wet nail. Space them randomly.
- Drag, don't swirl: Use a toothpick or detailing brush to pull the dots in one direction. The most common mistake is over-mixing. Three or four drags per nail, maximum.
- Clean skin immediately: Use a flat brush dipped in acetone to remove the mess around your cuticles before it sets.
- Top coat after full dry: Wait at least 10 minutes, then apply a thick glossy top coat. Rushing this step smears the marble.
3.Matte Mint & Silver Slay
Cool tones meets velvet texture for a fresh May vibe.
Overview:
Mint green gets a bad reputation for looking juvenile, mostly because it's usually done in glossy finishes that read "Easter egg." The matte treatment fixes that problem entirely. Matte mint looks like sea glass or frosted ceramic. It feels expensive in a way that glossy pastels don't.
The silver striping creates an interesting texture contrast that's hard to capture in photos but obvious in person. Your eye reads the velvety matte surface, then catches the metallic flash, then goes back to the matte. It's a subtle push-and-pull that keeps the design from being one-note.
Worth noting: matte top coats dull metallic tape, so if you want the silver to actually look silver (and not muted grey), you need to go back with a tiny brush and re-gloss just the stripes after the matte coat dries. It adds five minutes but makes or breaks the design.
Design Breakdown:
The entire design hinges on the contrast between matte and metallic. Get that right and everything else falls into place.
Base Color: A creamy, fully opaque pastel mint. Avoid anything with shimmer particles; they fight the matte finish.
Nail Shape: Short coffin or squoval. This color on long stiletto nails tilts into costume territory.
Design Element: Two parallel silver metallic lines across the center of each nail. Striping tape, not paint.
Finish: Matte top coat over everything first. Then selectively re-gloss only the silver lines.
Get The Look at Home:
The order of operations matters here more than any other design on this list.
- Shape and prep: File into a tapered coffin. Apply base coat.
- Two coats of mint: Let each coat dry fully. Matte top coat amplifies streaks, so the base needs to be flawless.
- Apply silver tape: Press two strips parallel across the center of each nail. Make sure they're equidistant from the center line.
- Matte everything: Apply matte top coat over the entire nail, tape included.
- Re-gloss the silver (critical step): Once the matte coat is fully set, use a thin liner brush to paint a narrow line of clear glossy top coat directly over each silver stripe. This restores the metallic shine against the matte background.

28 Cute & Sporty Baseball Game Nail Ideas for 2026 ⚾
4.Lemon Sorbet Frenchies
A juicy twist on the classic French manicure.
Overview:
Yellow nail polish is polarizing. People either love it or think it looks like a nicotine stain. The difference is always the shade. This isn't neon, and it isn't pastel. It's a warm, saturated mustard that sits closer to egg yolk than to highlighter. That warmth is what makes it work across skin tones instead of washing anyone out.
Putting a white French tip on yellow is an odd choice on paper, but in practice it creates a "citrus slice" effect. The white edge sharpens the whole nail and prevents the yellow from looking like a solid blob of color. On a long coffin shape, the proportions feel balanced: enough yellow to make a statement, enough white to ground it.
The honest challenge with this design? Yellow polish is notoriously streaky. Budget three thin coats instead of two, and use a ridge-filling base coat. Skip those steps and you'll spend the whole day staring at brush marks.
Design Breakdown:
A colorful French that depends on sharp pigmentation and clean edges.
Base Color: A creamy, warm mustard yellow. Avoid anything with a greenish cast. Think marigold, not chartreuse.
Nail Shape: Long coffin or ballerina. The angular shape complements the boldness of the color.
Design Element: Opaque white French tips. The contrast needs to be crisp, so the white must be fully covering in one or two coats.
Finish: Ultra-glossy. Gloss keeps yellow polish looking wet and fresh. Matte yellow reads dirty.
Get The Look at Home:
Yellow is the hardest polish color to apply cleanly. Here's how to avoid streaking.
- Buff and base: Lightly buff nail ridges. Apply a ridge-filling base coat and let it cure completely.
- Three thin yellows: Apply three deliberately thin coats. Each coat should look slightly translucent on its own. Let each dry for two to three minutes before the next.
- French guides or freehand: Place French tip sticker guides across the nail, or use a liner brush if you trust your hand. Paint the white tip in two thin layers for full coverage over the yellow.
- Clean the smile line: Dip a flat, stiff brush in pure acetone and run it along the border between yellow and white. This is where the design lives or dies.
- Seal with gloss: One thick coat of high-shine top coat. Cap the free edge to prevent tip chipping.
5.Cappuccino Swirls
Earthy, organic ripples for a cozy-chic aesthetic.
Overview:
Brown nail art that doesn't look like a Halloween costume? Harder than it should be. These cappuccino swirls thread that needle by keeping the tonal range narrow. Everything stays within the nude-to-chocolate spectrum, so the effect is warm and cohesive rather than muddy.
What separates this from generic marble is the "pour" technique. Instead of dragging colors across the nail (which creates hard, deliberate-looking lines), you're laying down pre-mixed ribbons of color that flow into each other with soft, blurred edges. The result looks like cream settling into espresso. Organic, a little bit random, and nearly impossible to replicate exactly from nail to nail.
This is a good "gateway" design for anyone who usually sticks to solid neutrals but wants to try something with texture. It reads as sophisticated from a distance and only reveals its complexity up close, which is exactly how the best nail art should work.
Design Breakdown:
A tonal marble using warm browns and cream. The narrow color range is what keeps it looking polished instead of chaotic.
Base Color: A sheer, warm nude. Not pink-toned; lean toward beige or caramel.
Nail Shape: Short squoval or rounded. The softened shape matches the organic nature of the swirls.
Design Element: Layered ribbons of chocolate brown, caramel, and cream-white. The colors should blend at their borders, not sit as distinct lines.
Finish: High-gloss. The shine creates the illusion of liquid movement within the design.
Get The Look at Home:
Pre-mix your colors on foil before touching the nail. This isn't a design you build on the nail surface.
- Shape and base: File into a short squoval. Apply one thin coat of warm nude.
- Palette prep: On a piece of foil, drop brown, tan, and white polish in a tight cluster. Use a brush to lightly drag them into each other, creating a marbled ribbon of blended color.
- Transfer to nail: Pick up a section of the blended color with a flat brush. Lay it onto the nail in a single, slightly wavy stroke. Don't press hard; let the brush float.
- Build in layers: Add one or two more strokes from different sections of your palette. Overlap slightly, but leave some bare base visible.
- Highlight: Drop a tiny dot of pure white into the center of the design with a dotting tool. Don't spread it; let it sit as a highlight.
- Smooth with top coat: Wait five minutes for the art to set. Apply a generous top coat to level out any texture ridges.

30+ Chic Pool Party Hairstyles for Summer 2026 🌊👙
6.Cloudy Day Chic
A moody, sophisticated twist on the classic French.
Overview:
Grey is the most underrated nail color in existence. It's the neutral that actually has personality — not warm like beige, not stark like white, just a cool, steady tone that works with everything. This matte grey base with thin white French tips takes that understated quality and builds something with real editorial weight.
The matte finish is what elevates this from "grey nails with white tips" to a genuine design choice. Matte grey absorbs light the way fabric does — it looks like suede or brushed concrete. The white tips, which would look ordinary on a glossy grey base, suddenly pop with crispness against the flat surface. It's a texture game more than a color game.
Short square is the right shape because the straight edges mirror the geometry of the thin French line. On longer, rounder shapes, the design would lose its architectural quality and start to look like a grown-out grey mani.
Design Breakdown:
The contrast between matte and crisp white is what makes this design work. Get the finish right and everything else follows.
Base Color: A medium, cool-toned dusty grey. Not too dark — you want it to read as "overcast sky," not "storm cloud."
Nail Shape: Short, clean square. The geometric edges reinforce the precision of the thin French line.
Design Element: Sharp, thin white French tips at the very edge. The line should be narrow — this isn't a bold French.
Finish: Matte top coat that gives the grey a velvety, light-absorbing surface.
Get The Look at Home:
The line between the grey and the white needs to be razor-sharp. Matte finish amplifies any wobble.
- Shape: File nails into a short, straight square. Apply base coat.
- Grey base: Two even coats of your grey polish. Let dry completely — matte top coat over tacky polish causes bubbling.
- White tips: Using a thin liner brush or French guides, paint a narrow white line across the free edge. One confident pass per nail.
- Clean up: An angled brush dipped in acetone runs along the smile line to sharpen it. This step is non-negotiable.
- Matte seal: Apply matte top coat over the entire nail. The white tips will matte down with the grey — that's fine.
7.Aperol Spritz Tips
Sun-kissed orange tips for a summer-ready feel.
Overview:
Orange is the color that separates people who follow nail trends from people who set them. Most nail consumers reach for pink, red, or nude. Orange requires confidence. This warm, sunset- toned version on a natural base is the gateway — it's bold enough to register as a deliberate choice but soft enough to work across skin tones.
The natural base is doing something important: it makes the orange tips look like they're floating. There's no visible boundary between the nail bed and the polish, which creates an effect closer to naturally sun-kissed nails than a painted design. On a colored or opaque base, the same tips would look like a standard French in an unusual color. On a sheer base, they look like something that belongs to the hand.
The almond shape follows the natural curve of the nail and gives the orange tips a soft, rounded smile line. This isn't a sharp, geometric French — it's organic and warm, like the drink it's named after.
Design Breakdown:
Minimal design with maximum warmth. The "naked" base is what makes the orange tips feel modern rather than themed.
Base Color: A sheer, healthy-looking nude or just a clear base coat. The natural nail bed should be visible.
Nail Shape: Elegant mid-length almond. The curved shape complements the soft smile line.
Design Element: Warm sunset-orange French tips with a soft, natural curve.
Finish: High-gloss for a juicy, sun-drenched look.
Get The Look at Home:
This is a quick design that rewards clean prep work. The base of the nail is exposed, so cuticle grooming matters.
- Groom: Push back cuticles and buff the nail surface. The natural nail is the backdrop here.
- Base: One coat of a sheer pink or nude polish. Let dry.
- Orange tips: Using a thin liner brush and a warm orange polish, paint the smile line from sidewall to center on each nail. Two thin passes for full opacity.
- Curve it: Follow the natural curve of your nail. Don't force a straight line — the almond shape wants a soft arc.
- Cleanup: An angled brush dipped in acetone sharpens the smile line. Run it along the border between nude and orange.
- Shine: Glossy top coat to seal and add that wet-look finish.

30 Stunning Beach Nail Ideas for the Best Vacation in 2026 🌊
8.Healthy Glow Glazed French
The 'clean girl' aesthetic perfected with a soft ombre.
Overview:
The "your nails but better" category has a new standard-bearer. A semi-sheer milky pink base transitions into soft white tips through a sponge-blended gradient rather than a hard French line, and the whole thing gets topped with a pearlescent chrome powder that shifts between pink and violet depending on the angle. The effect is closer to healthy, luminous skin than to painted nails.
The chrome powder step requires a no-wipe gel top coat underneath. Regular polish won't give the powder anything to adhere to, and you'll end up brushing shimmer off your nails (and onto your clothes) for the rest of the day. This is a gel-only design unless you have a water-based top coat.
This is the design that bridal magazines will be featuring by June. It photographs beautifully in natural light, works across all skin tones, and reads as expensive without being flashy. The glazed finish is what separates it from a standard Baby Boomer.
Design Breakdown:
A Baby Boomer gradient elevated with a chrome glaze for a luminous, glass-skin effect on the nails.
Base Color: Semi-sheer milky strawberry pink. The nail bed should show through slightly.
Nail Shape: Short-to-medium oval or almond. The rounded shape complements the soft gradient.
Design Element: Soft white ombre at the tips instead of a hard French line. Subtle chrome or iridescent glaze powder over the entire nail.
Finish: High-gloss with a pearlescent, light-shifting quality.
Get The Look at Home:
The sponge work creates the gradient; the chrome powder creates the glow. Both steps need patience.
- Base: Apply two coats of sheer milky pink. Let dry fully.
- Sponge the tip: Apply white polish to a makeup sponge and gently dab onto the tips, fading as you move toward the cuticle.
- Build: Repeat the sponging two to three times for smooth opacity at the tips.
- The glaze: Apply a no-wipe gel top coat and cure. Rub pearl chrome powder onto the surface with a silicone applicator.
- Brush off: Gently remove excess powder with a fluffy brush.
- Final seal: One last layer of glossy top coat to lock the chrome in place.
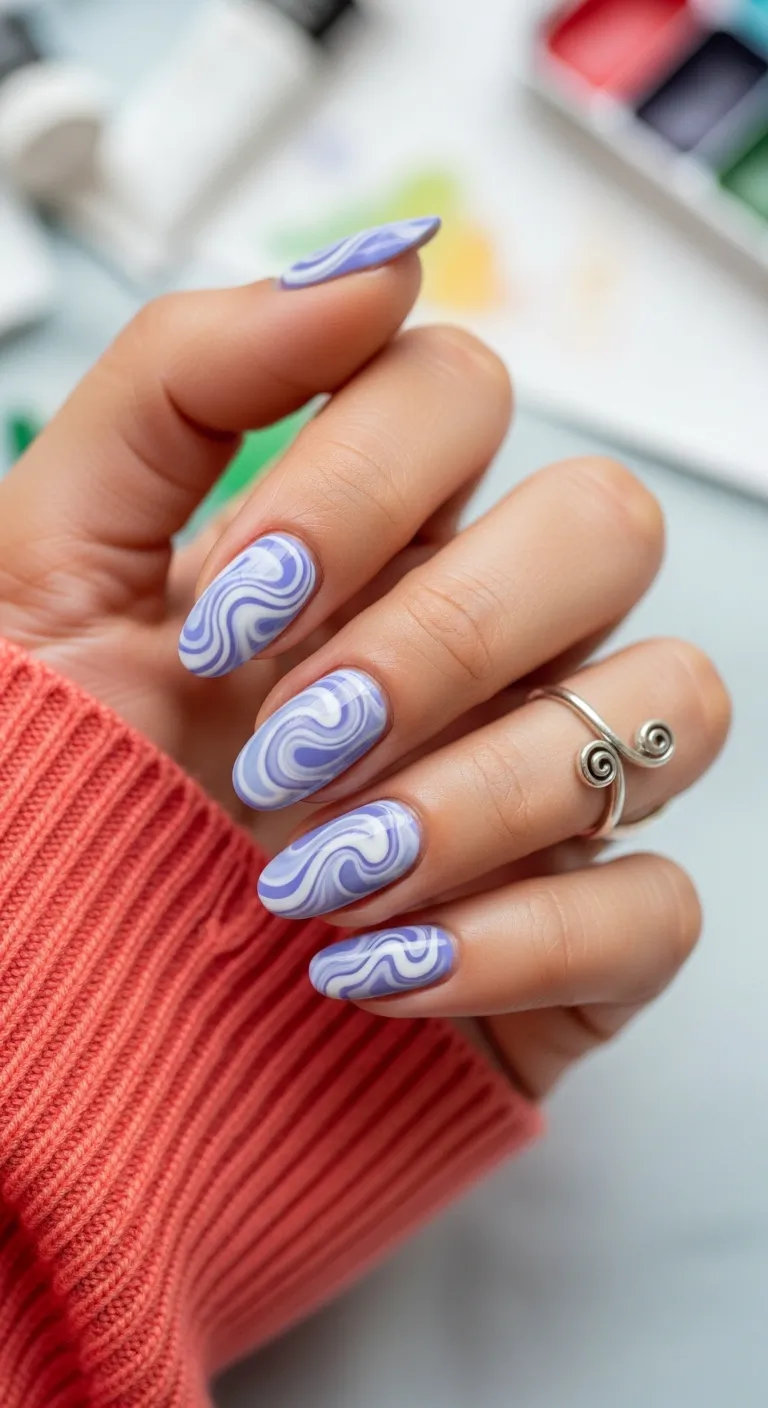
9.Strawberry Milkshake Marbling

Playful, pink swirls that look good enough to eat.
Overview:
Pink-and-white marble nails are a staple of spring nail art, but this version does something the others don't: it keeps the pink deliberately muted. This isn't hot pink or bubblegum — it's a soft blush, almost the color of strawberry ice cream that's started to melt. That restraint is what keeps the design sophisticated rather than saccharine.
The swirl pattern mimics the organic flow of cream into fruit puree — long, wavy lines that overlap and diverge without repeating. Every nail is slightly different, which is the whole point. If you try to make them match, you'll overwork the swirls and end up with a uniform pink instead of the layered, marbled effect.
Long almond is the ideal shape here. The extended nail bed gives the swirls room to flow naturally, and the tapered tip softens the overall look. On shorter nails, the same pattern would feel compressed and lose its fluid quality.
Design Breakdown:
A fluid marble technique that uses muted tones to keep the pink-and-white pairing from reading as juvenile.
Base Color: Sheer, pale pink base coat. The nail should show through slightly.
Nail Shape: Long almond. The extended length gives the swirls room to breathe.
Design Element: Flowing, organic swirls of blush pink and creamy white. Each nail unique.
Finish: High-shine glass-like top coat to smooth the swirl texture.
Get The Look at Home:
This is a liner-brush technique. The swirls need to be long and flowing, not short and choppy.
- Base tint: One layer of sheer pink to even out the nail bed. Let dry.
- Swirl prep: On a palette, place drops of white and blush pink polish next to each other.
- White lines: Using a liner brush, draw long, flowing "S" shapes across each nail with white polish.
- Pink follow: Trace alongside the white lines with your pink polish, letting them overlap slightly at the edges.
- Fill gaps: Add a few more tiny white swirls in the empty spaces for movement.
- Seal: Two coats of top coat to ensure the surface is perfectly smooth over the raised swirl lines.

26 Stunning Summer Braided Hairstyles for Women 2026 ☀️💇♀️
10.Champagne Toast Ombre
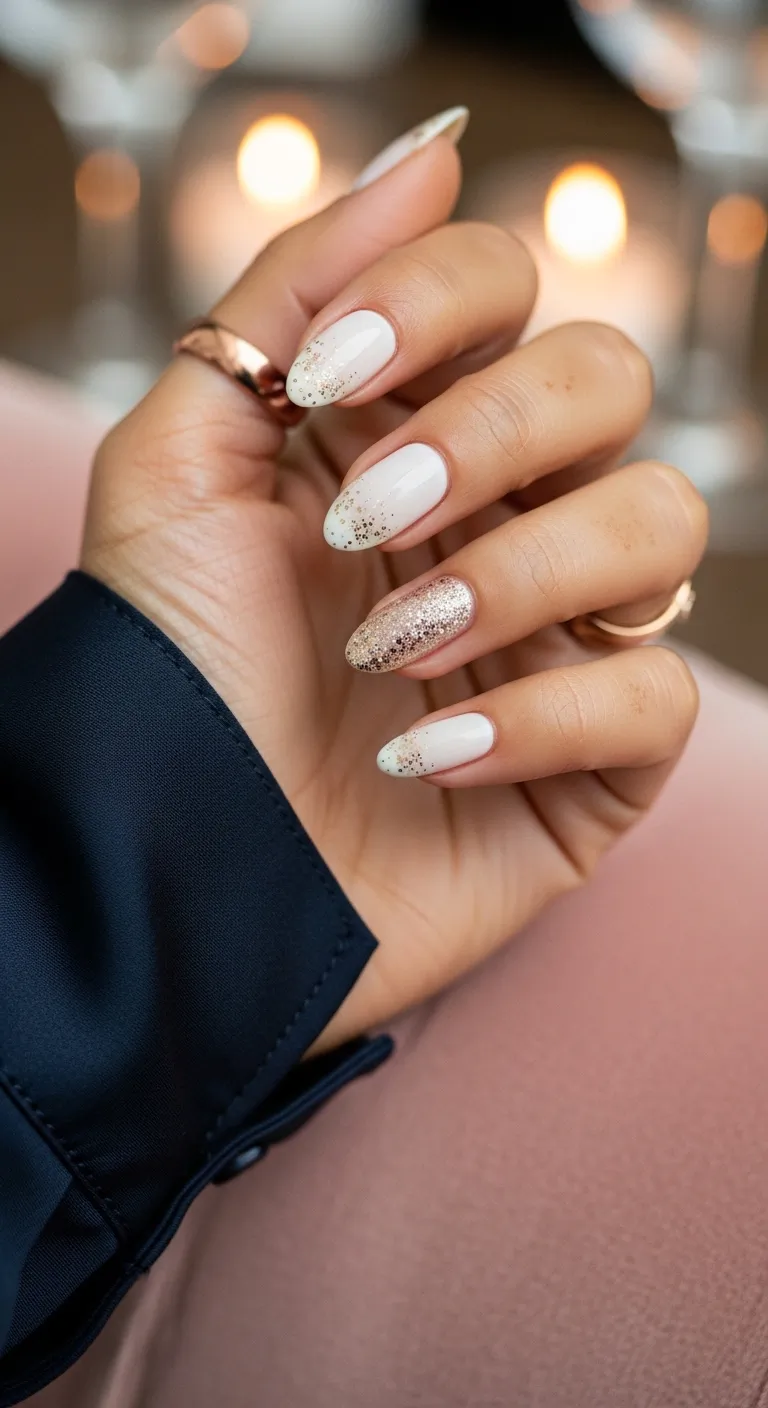
A celebratory sparkle for any May occasion.
Overview:
A reverse glitter gradient — heavy at the cuticle, fading toward the tip — is one of those designs that looks like it required professional tools but is actually achievable with a fluffy brush and a steady hand. The gold glitter starts dense at the base of the nail and diffuses outward into a creamy off-white, creating the impression that someone poured champagne over your fingertips.
The off-white base is the right choice here. A stark white would create too much contrast with the gold and make the gradient look like two separate elements rather than a seamless fade. The cream tone bridges the gap between gold and white, making the transition feel organic.
The ring finger accent nail — fully covered in gold glitter — breaks the pattern and adds a focal point. Without it, the gradient across all nails could feel monotonous. The full-glitter nail anchors the design and gives it a deliberate, curated quality.
Design Breakdown:
A reverse glitter gradient that concentrates sparkle at the cuticle and fades into a creamy base.
Base Color: Soft, creamy off-white or light ivory.
Nail Shape: Elegant almond or oval. The tapered shape gives the gradient a natural endpoint.
Design Element: Fine gold glitter concentrated at the cuticle, fading toward the middle. One full-glitter accent nail on the ring finger.
Finish: Ultra-glossy. The shine amplifies the glitter's reflective quality.
Get The Look at Home:
The trick is in the brush work — you're pulling glitter upward, not painting it downward.
- Base: Two coats of creamy off-white. Let dry fully.
- Glitter drop: Place a small amount of gold glitter polish near the cuticle on each nail.
- The fade: Use a dry, fluffy nail art brush to gently pull the glitter upward toward the tip. The brush should be almost dry — you're dragging particles, not painting.
- Build density: Add a second layer of glitter right at the cuticle for maximum impact.
- Accent nail: On the ring finger, apply two full coats of the gold glitter polish.
- Smooth: Glitter creates texture. Apply a thick, gel-like top coat to level the surface. Two coats if needed.
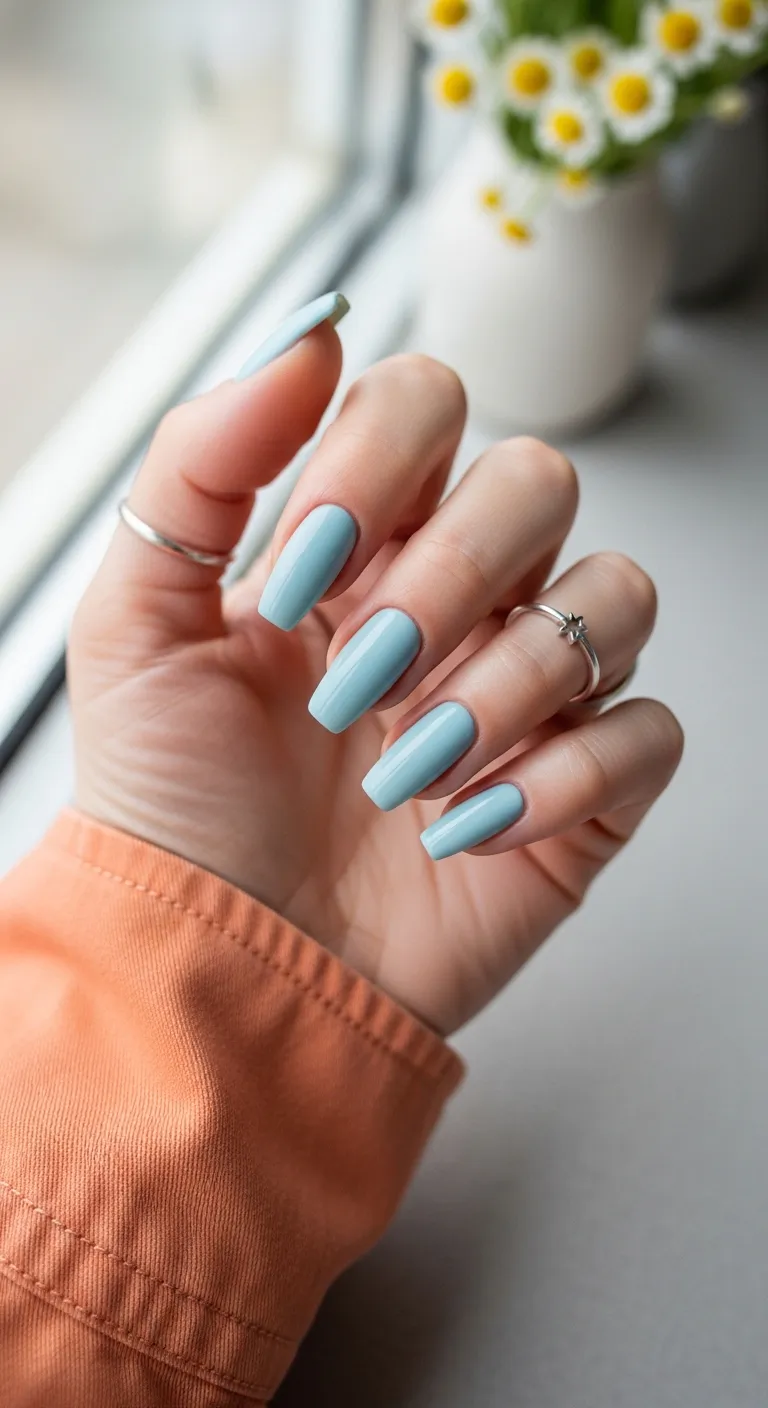
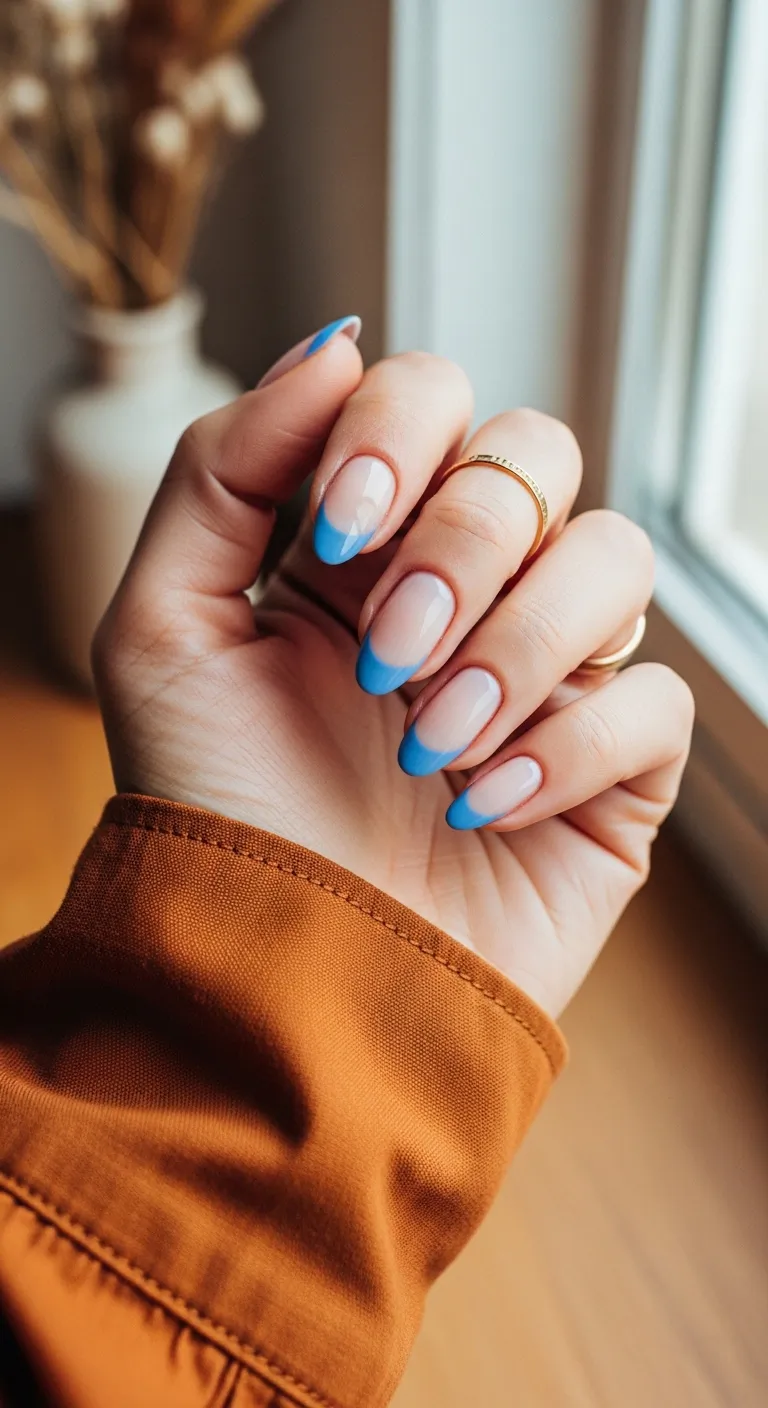
11.Baby Blue Frenchies
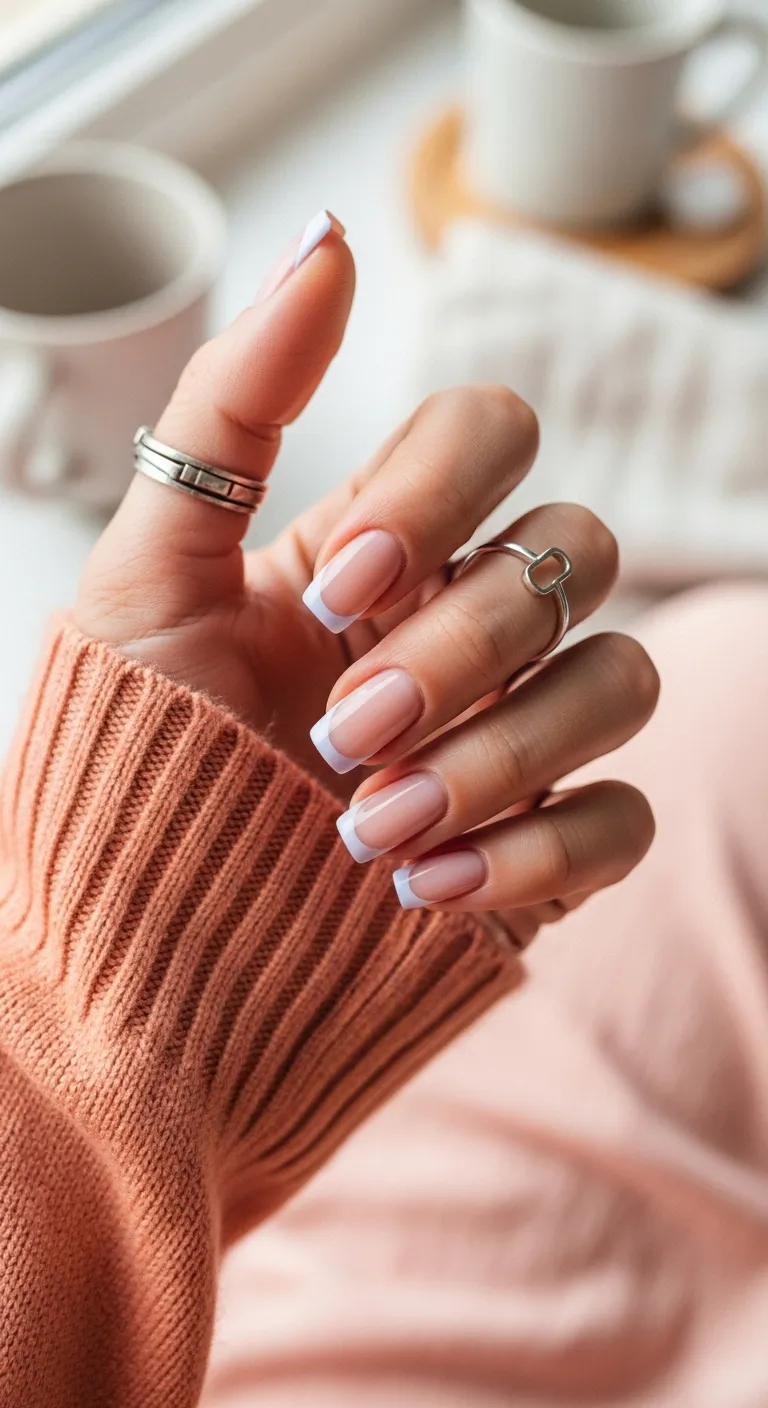
Cool, calm, and collected pastel tips for spring.
Overview:
Pastel blue French tips are having a moment that extends beyond the typical spring nail cycle. The shade here isn't sky blue or powder blue — it's a specific, slightly greyed baby blue that feels more editorial than juvenile. That grey undertone is what separates a "fashion" pastel from an "Easter egg" pastel.
The long square shape gives the design its edge. On almond or oval nails, baby blue French tips would skew sweet. On a squared-off shape, the same color reads as modern and graphic. The straight edges create a frame that contains the softness of the pastel.
The semi-sheer nude base is essential. It creates a "negative space" effect where the blue tips seem to float against the natural nail. On an opaque base, the design would lose its airiness and start to look like a standard colored French.
Design Breakdown:
A pastel French that depends on the right blue — greyed, not bright — and a clean, squared shape.
Base Color: Semi-sheer "naked" nude that closely matches your skin tone.
Nail Shape: Long, tapered square. The angular shape modernizes the pastel color.
Design Element: Pastel sky blue French tips with a crisp, straight line.
Finish: High-gloss top coat.
Get The Look at Home:
The smile line on a square shape should be straighter than on almond — less curve, more geometry.
- Base: Two thin coats of sheer nude. Let dry completely.
- Blue tips: Using a thin liner brush, draw a straight line across the tip of the nail. Fill in the free edge with baby blue polish.
- Clean: Dip an angled brush in acetone and run it along the smile line to sharpen it.
- Even out: If the blue is patchy, add a second thin layer to the tips only.
- Seal: Glossy top coat to blend the two colors seamlessly.

35 Fun Birthday Nail Designs for 2026 🎂
12.The Winter-to-Spring Pivot
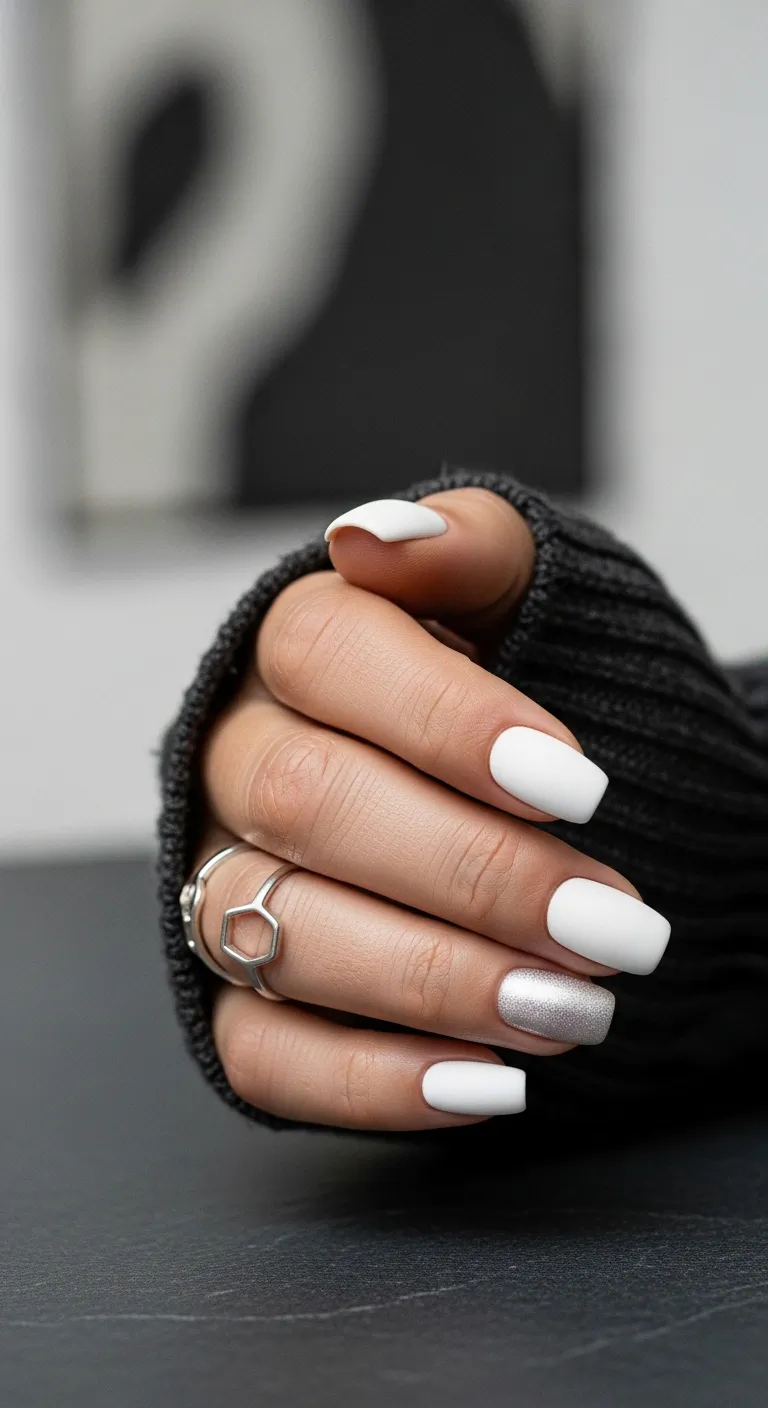
A crisp, clean look for those transitional May days.
Overview:
Transitioning your nail palette from dark winter tones to bright spring colors doesn't have to be abrupt. Stark matte white with a single silver glitter accent nail bridges the gap — it's clean enough to signal "spring" while the silver sparkle nods to the metallics you've been wearing all winter.
White polish on short nails is a bold choice because it shows everything: ridges, uneven cuticles, imprecise application. The matte finish amplifies these imperfections — glossy top coat hides bumps that matte exposes. This means the base coat work needs to be significantly more precise than usual. Three thin coats, fully dried between each, with a self-leveling formula.
The silver accent nail is the relief valve. It breaks the white monotony and adds a focal point that catches light. Without it, the set could read as clinical rather than designed.
Design Breakdown:
High-contrast texture play between matte white and full-coverage glitter.
Base Color: Stark, opaque chalk white.
Nail Shape: Short, practical square with rounded edges.
Design Element: One full accent nail of dense, textured silver glitter on the ring finger.
Finish: Matte top coat on white nails; glossy or textured on the silver accent.
Get The Look at Home:
White polish on matte is unforgiving. Thin layers and patience are non-negotiable.
- Prep: Buff nail ridges. Apply a ridge-filling base coat and let dry fully.
- White coats: Three very thin coats of white polish. Let each dry for at least three minutes. Thick coats bubble.
- Glitter accent: On the ring finger, apply two coats of silver glitter polish.
- Matte seal: Apply matte top coat to all white nails. Avoid the glitter nail.
- Gloss the accent: Apply glossy top coat only on the silver nail to make it sparkle.
- Final clean: Use a small brush to clean any white polish off your cuticles — it's very noticeable against skin.
13.Lavender Haze Fluidity
Dreamy, hypnotic swirls for the ultimate purple lover.
Overview:
Lavender nail art exists on a spectrum from "subtle wash of color" to "full commitment purple." This design lands somewhere in the middle — a creamy lavender base with flowing white swirls that create movement and depth without overwhelming the hand. The effect is closer to stirred cream in tea than to painted nails.
The swirl technique here is different from standard marble. Instead of dropping colors onto a wet surface and dragging them together, you're drawing deliberate "S" curves with a liner brush and then softening the edges. The result is more controlled than marble but more organic than stripes. It occupies a middle ground that looks effortless but requires a steady hand.
Long oval is the ideal canvas. The extended length gives the swirls room to develop their full curve, and the rounded tip softens the overall look. On shorter nails, the same swirls would look cramped and lose their flowing quality.
Design Breakdown:
Controlled swirls using a liner brush, not a wet-on-wet marble technique.
Base Color: Creamy mid-tone lavender. Not too pale — you need enough pigment to contrast with the white swirls.
Nail Shape: Long, slim oval. The elongated shape complements the flowing swirl lines.
Design Element: Large, flowing white "S" curves with a lighter lilac accent for depth.
Finish: High-gloss top coat.
Get The Look at Home:
The goal is to make the swirls look like they're floating in the polish, not sitting on top of it.
- Base: Two coats of your main lavender polish. Let dry fully.
- Swirl preparation: While working on one nail at a time, use a liner brush to drop white polish in "blobs" on the surface.
- Drag it: Gently drag the white polish into long, curving "S" shapes. Keep the brush light — you want the colors to sit alongside each other, not mix.
- Add depth: Add a few smaller swirls of a lighter lilac shade to create dimension.
- Soft touch: Don't press too hard. The brush should float over the surface.
- Seal: A generous layer of top coat smooths everything out.
32 Stunning Summer Wedding Hairstyles for Brides ☀️💍
14.Tonal Mauve Magic
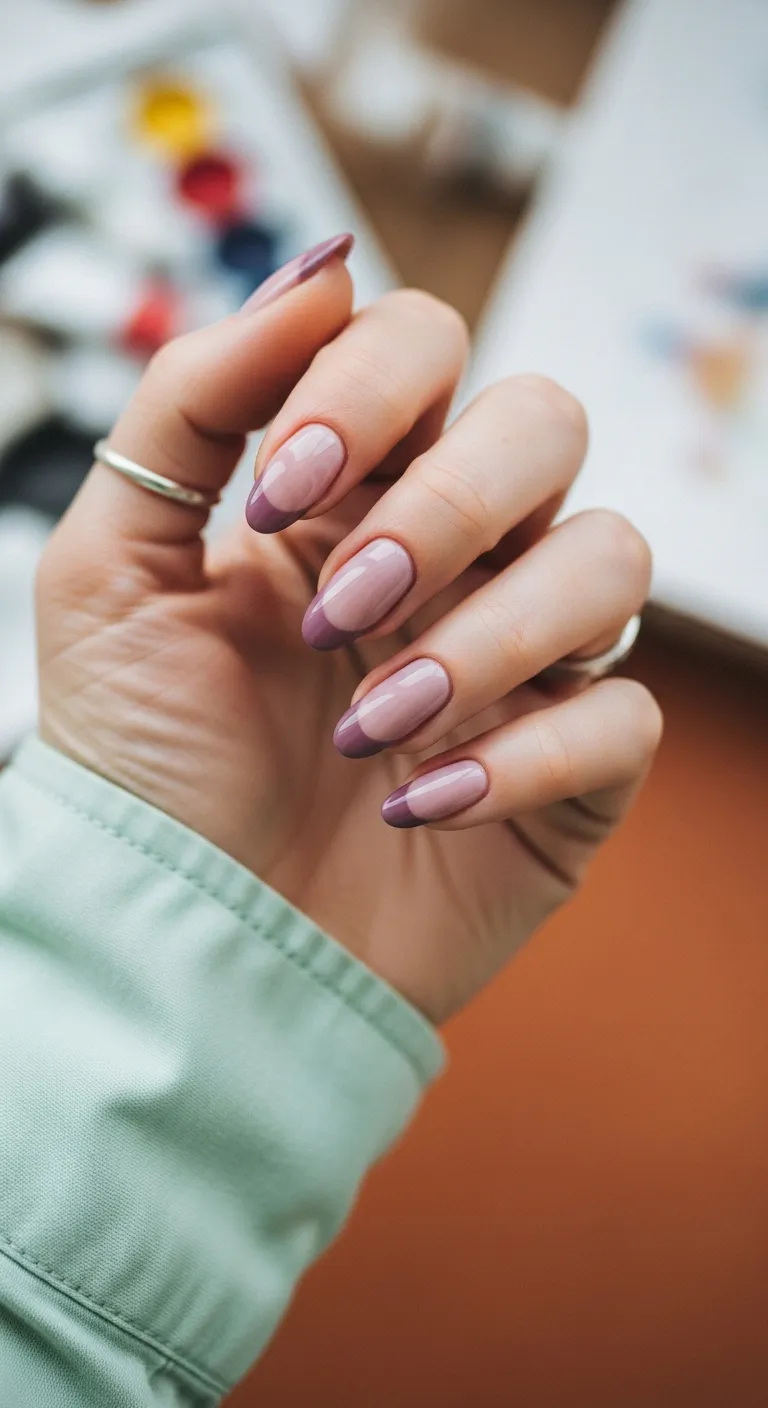
A sophisticated, muted take on the colorful French.
Overview:
Tonal dressing — wearing multiple shades of the same color — has been a fashion principle for years. Applied to nails, the same idea produces a French manicure that feels cohesive rather than contrasted. A sheer mauve base with slightly deeper mauve tips creates a design that reads as a single color with dimension rather than two separate polishes.
The challenge is getting the tonal difference right. If the base and tips are too close in shade, the design disappears into a solid color. If they're too far apart, you lose the tonal effect and get a standard colored French. The sweet spot is about two to three shades apart — enough contrast to register as a French, enough similarity to feel unified.
This is the design for someone who finds most colored French tips too loud. The muted mauve palette keeps everything understated while still offering more visual interest than a classic white-on-nude.
Design Breakdown:
A monochromatic French that uses two shades of the same color family for subtle dimension.
Base Color: Sheer, cool-toned nude with mauve undertones.
Nail Shape: Classic mid-length almond.
Design Element: Dusty mauve or "dried rose" French tips, two to three shades darker than the base.
Finish: Ultra-glossy, glass-like finish.
Get The Look at Home:
Finding the right two mauve shades is the entire design. Test them side by side before committing.
- Prep: Shape into a soft almond. Apply base coat.
- Nude base: One or two coats of your sheer mauve-toned nude. Let dry.
- French line: Using a thin brush and a deeper mauve, paint the tips following the natural curve of your nail.
- Symmetry check: Hold both hands side by side. The tip thickness should be consistent across all ten nails.
- Cleanup: An angled brush with acetone sharpens the smile line.
- Final shine: High-quality top coat to seal and add depth to the tonal effect.
15.Buttery Lemon Shorties
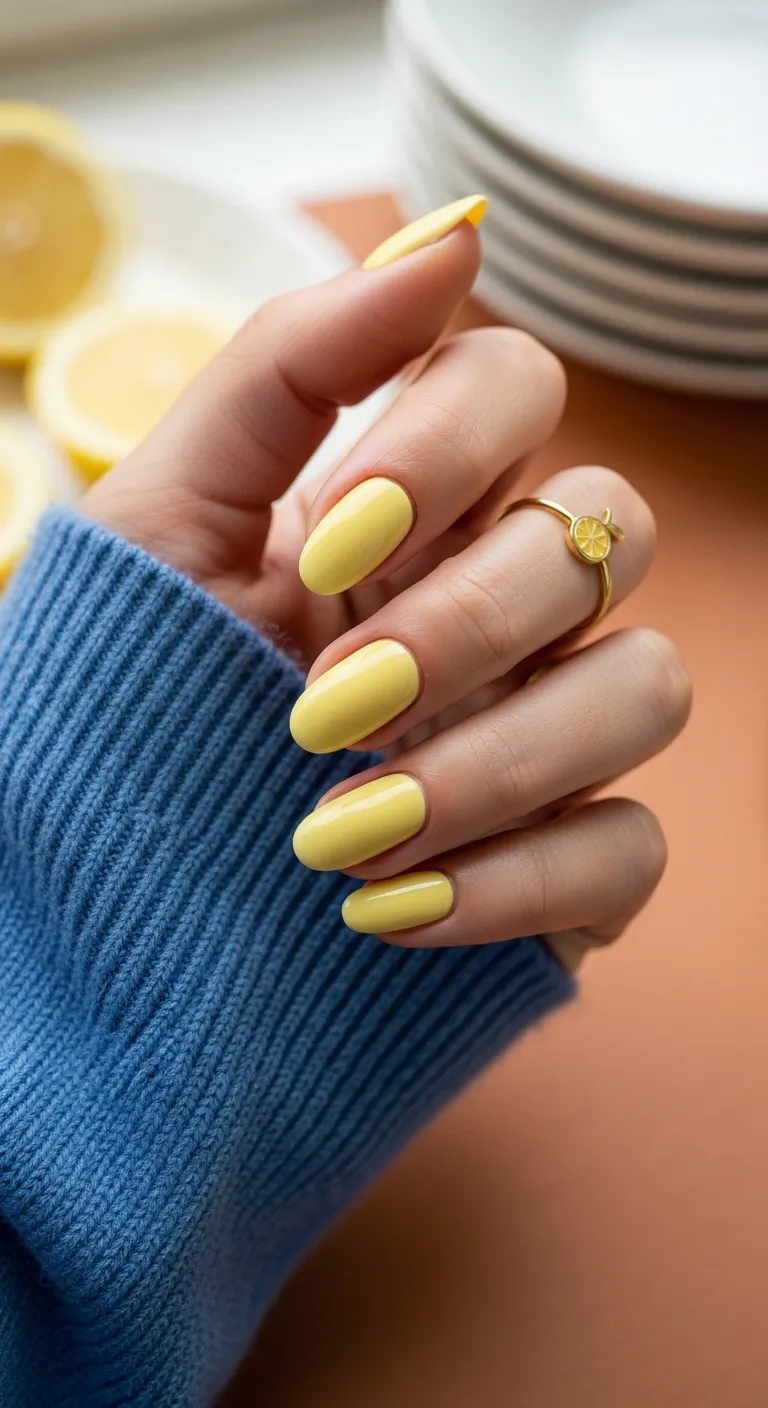
The ultimate 'pop of color' for a sunny May mood.
Overview:
Solid yellow nails on short almond shapes walk a line between "cheerful" and "aggressive" depending on the formula. This buttery, slightly muted yellow avoids the neon territory that makes people nervous about yellow polish. It's closer to the color of actual butter than to highlighter, which is what makes it wearable across skin tones.
The challenge with any yellow polish is streaking. Yellow pigments are naturally sheer, which means you need more coats to achieve opacity, and more coats means more opportunity for brush marks. Three thin coats with a ridge-filling base is the minimum. Some formulas require four. Budget the time or accept visible brush strokes — there's no shortcut.
Solid color on short nails is a power move. There's no art to distract from the application, which means the polish itself needs to be flawless. The glossy finish is what keeps this from looking flat — matte yellow reads chalky and dull.
Design Breakdown:
Single-color, no art. The application quality IS the design.
Base Color: Creamy, opaque lemon or "primrose" yellow. Not neon, not pastel — a true butter yellow.
Nail Shape: Short almond or oval. The compact shape keeps the bold color from feeling overwhelming.
Design Element: None. Solid full-coverage color.
Finish: High-gloss top coat for that "juicy" finish.
Get The Look at Home:
Yellow polish demands more patience than any other color. The payoff is worth it.
- Smooth surface: Buff nails gently to remove ridges. Yellow shows every imperfection.
- Base: Ridge-filling base coat. Let dry completely.
- Thin layers: Three deliberately thin coats of yellow. Each coat should look slightly translucent on its own.
- Dry time: Wait at least three minutes between coats. Rushing causes bubbling.
- Clean edges: Use a brush dipped in acetone to clean the cuticle line. Precision matters with bold colors.
- The gloss: Thick, shiny top coat for a professional, gel-like finish.

34 Cutest Butter Yellow Nail Designs for 2026 🧈
16.Clear Sky Creamsicle
Soft, airy blue for a serene and stylish look.
Overview:
Pastel blue is one of those colors that looks different on every hand. On cool-toned skin, it reads icy and clean. On warm-toned skin, it takes on a slightly greenish cast that makes it feel more like sea glass. This particular shade — a true sky blue with no grey or green undertone — is one of the more universally flattering options in the pastel blue family.
Solid pastel on long coffin nails is a specific aesthetic choice. The length gives the color room to read as intentional rather than like a quick single-coat mani. The coffin shape adds edge to what could otherwise feel soft and delicate. Together, the shape and color create something that's simultaneously bold and gentle.
The practical reality: pastel polishes are often streaky on the first coat. A white base coat underneath makes the blue pop while reducing the number of coats needed for full opacity. One coat of white, then two coats of blue, and you're there.
Design Breakdown:
Solid pastel that depends on smooth application and the right base prep for a streak-free finish.
Base Color: Creamy pastel sky blue. No shimmer — just clean, opaque pigment.
Nail Shape: Long coffin or tapered square. The length showcases the color.
Design Element: Solid full-coverage color. No art.
Finish: High-gloss top coat.
Get The Look at Home:
A white base coat is the secret weapon for pastels. It makes the color true and reduces streaking.
- Prep: Shape nails and apply a smooth base coat.
- White trick: One coat of opaque white polish. Let dry fully. This makes the blue pop.
- Blue coats: Two even coats of your sky blue polish. Let each dry completely.
- Side to side: Make sure the polish reaches the side walls of every nail.
- Cleanup: An angled brush and acetone clean any polish off the skin.
- Top it off: Glossy top coat for that glass-like shine.
17.The Classic Baby Boomer
The timeless gradient that always looks expensive.
Overview:
The Baby Boomer has survived every trend cycle since the 1970s because it solves a problem that no other nail design addresses: it makes your fingers look longer without requiring length. The pink-to-white gradient creates an optical illusion where the nail bed appears extended and the tip appears refined. It's the most flattering nail design in existence, and it's been hiding in plain sight for fifty years.
The gradient needs to be seamless. A hard line between pink and white defeats the entire purpose — it becomes a French tip with extra steps. The sponge technique is the only reliable way to achieve the fade, and you need to work in thin layers. One heavy press will leave a visible band of color instead of a smooth transition.
This is the design that wedding planners recommend to every bride who asks "what should I do with my nails?" It photographs beautifully, works with every outfit, and never looks dated. The oval shape reinforces the elongating effect.
Design Breakdown:
A seamless sponge-blended gradient from pink to white. The blend is everything.
Base Color: Sheer, "naked" pink or peach-toned nude.
Nail Shape: Elegant mid-length oval. The rounded shape maximizes the elongating effect.
Design Element: Perfectly blended ombre that transitions from pink at the cuticle to white at the tip. No hard lines.
Finish: High-gloss top coat.
Get The Look at Home:
The sponge is doing all the work. Don't try to paint this gradient with a brush.
- Base: Two coats of sheer pink. Let dry fully.
- Sponge setup: Apply pink and white polish side by side on a makeup sponge, slightly overlapping in the middle.
- Dab: Gently press the sponge onto the nail, moving it slightly up and down to blend the colors.
- Build: Repeat the sponging two to three times until you have the desired opacity. Use a fresh section of sponge each time.
- Clean: Acetone and a brush clean the messy skin around the nail.
- Seal: A thick layer of top coat smooths out the sponge texture.

25 Stunning Summer Vacation Hairstyles for 2026 ☀️🌊
18.Iridescent Fairy Dust
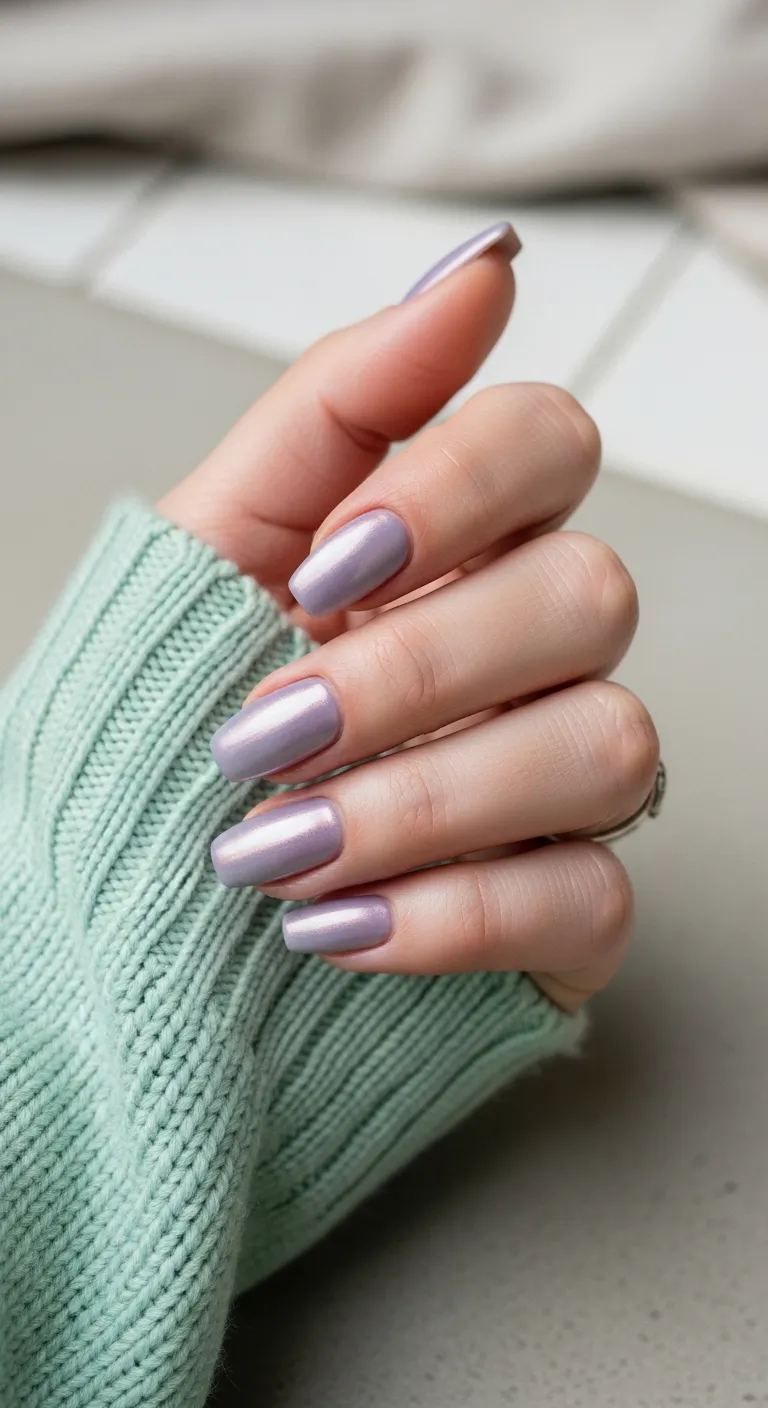
Magical, light-catching shimmer for a whimsical May.
Overview:
Iridescent shimmer is one of the few nail finishes that genuinely changes character depending on lighting. Under office fluorescents, this reads as a soft lilac. In direct sunlight, it shifts between pink, blue, and violet. At sunset, it practically glows. That dual personality makes it one of the more versatile options in the shimmer category.
The short coffin shape is the right call for iridescent finishes. On very long nails, the shimmer can look costume-y — like you're trying to be a fairy. On shorter, more contained shapes, the same shimmer reads as a sophisticated texture choice. The restraint in length is what keeps this design grounded.
Chrome powder gives a more intense, mirror-like iridescence than shimmer polish. If you want the "crushed pearl" effect shown in the image, chrome powder over a no-wipe gel base is the way to go. Shimmer polish gets you about 70% of the way there; chrome powder completes the transformation.
Design Breakdown:
A shimmer-forward design that uses light refraction as its primary visual element.
Base Color: Sheer pale lavender or lilac. The base color is secondary to the shimmer.
Nail Shape: Short coffin or squoval. Contains the shimmer's intensity.
Design Element: Iridescent shimmer or pearl chrome powder over the entire nail.
Finish: High-gloss top coat to enhance the light refraction.
Get The Look at Home:
Chrome powder over gel gives the most intense iridescence. Shimmer polish is a workable alternative.
- Base: Two coats of sheer lilac. Let dry.
- Shimmer option: Apply iridescent shimmer polish. Two coats for full coverage.
- Chrome option: Apply a no-wipe gel top coat, cure, then rub pearl chrome powder onto the surface with a silicone applicator.
- Even coverage: Make sure the shimmer or chrome is spread evenly across the entire nail. Missed spots show.
- Remove excess: Brush away any loose shimmer from your skin.
- Lock it in: Glossy top coat to protect the finish and add shine.
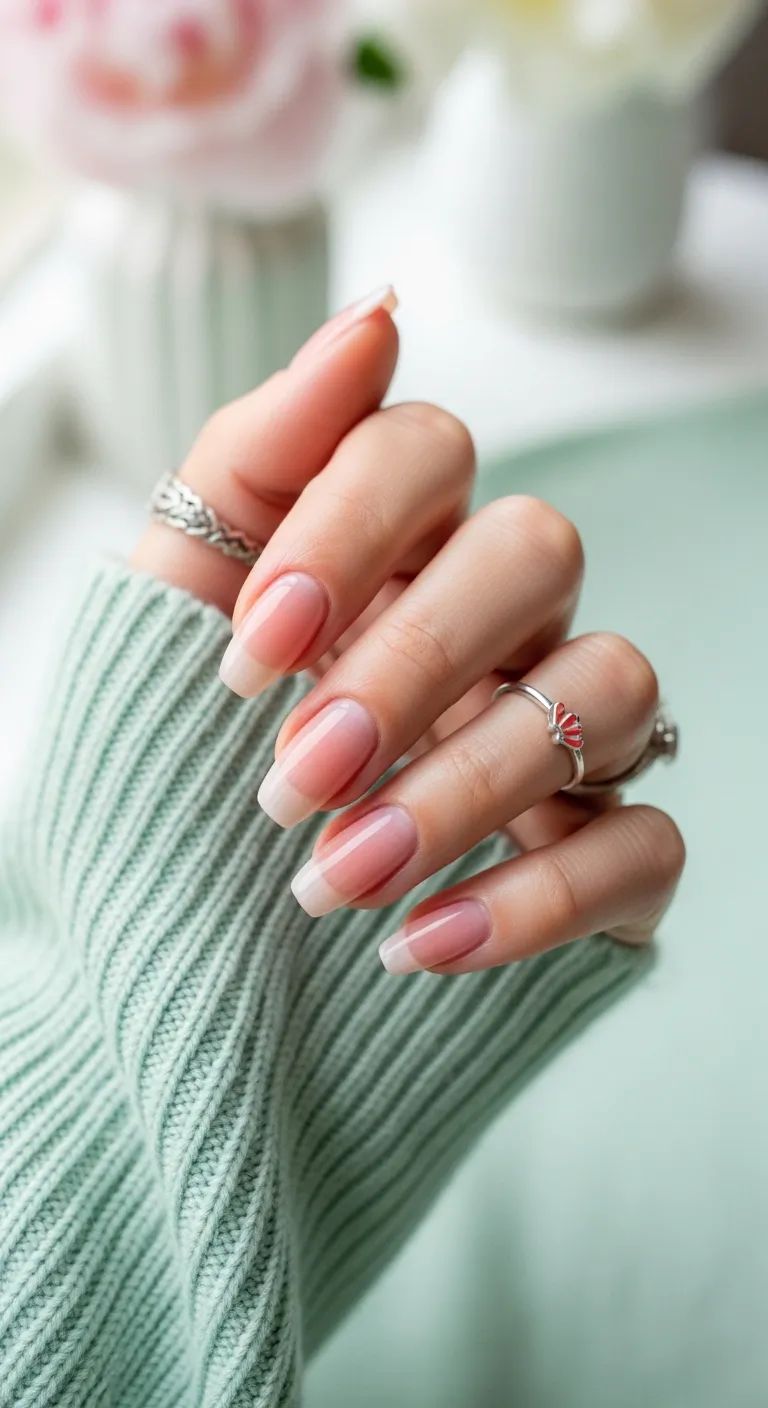
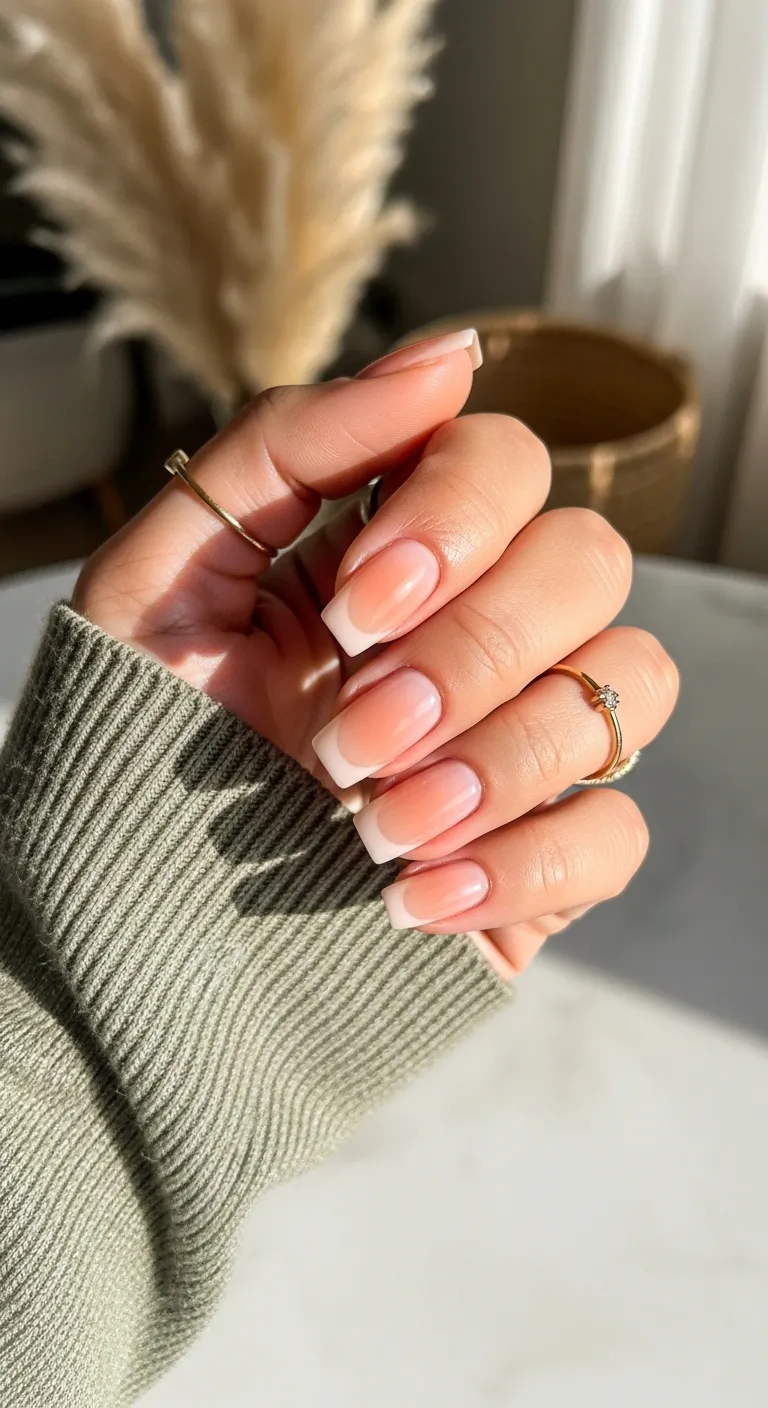
19.The Quiet Luxury French
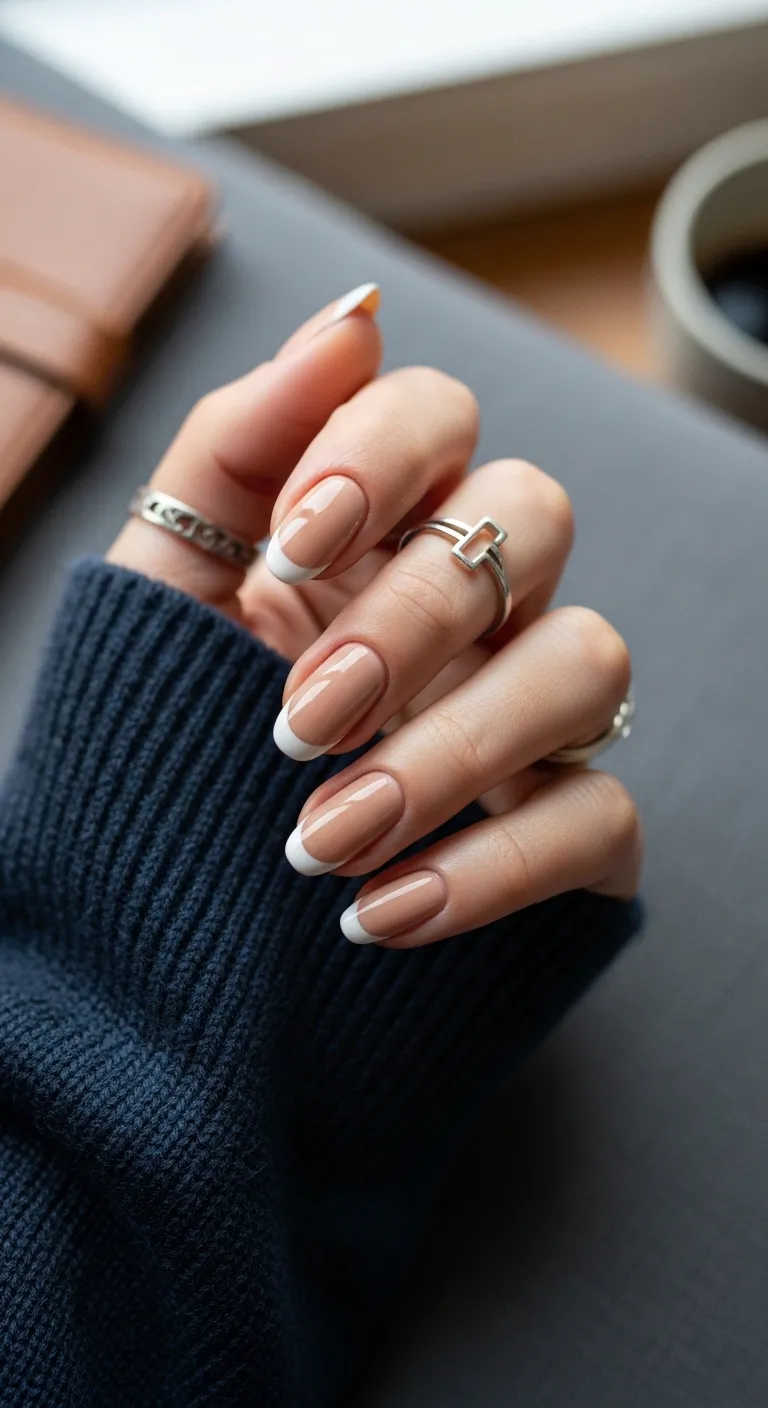
A timeless, ultra-polished classic that never fails.
Overview:
The classic French manicure is the most resilient nail trend in history because it solves a universal problem: how to look polished without looking like you tried. A sheer nude base with thin white tips creates a "your nails but better" effect that works at funerals and pool parties alike. It's the chameleon of nail design.
What separates a modern French from a dated one is the smile line. Thin, slightly curved, following the natural free edge — that's current. Thick, straight-across, with a harsh white border — that's 2003. The difference is millimeters, but it completely changes the design's character.
The oval shape is doing more work than it appears. It softens the geometry of the French line and creates a more organic, natural-looking result than square or coffin shapes. On oval nails, the French looks like it belongs to the hand rather than being applied on top of it.
Design Breakdown:
The most classic nail design in existence. The modern update is in the proportions and shape.
Base Color: Sheer, tan-toned nude that mimics the color of a healthy nail bed.
Nail Shape: Elegant mid-length oval.
Design Element: Crisp, thin white French tips that follow the natural curve of the nail.
Finish: High-gloss top coat.
Get The Look at Home:
The white line needs to be thin and symmetrical. This is where most French manicures go wrong.
- Groom: Push back cuticles and clean the nail surface. The natural nail is the backdrop.
- Base: Two coats of sheer nude. Let dry.
- The tip: Using a thin liner brush, paint a delicate white line around the free edge. Thinner at the sides, slightly thicker in the center.
- Curve: Follow the natural smile line of your nail. Don't force a straight line on a curved nail.
- Refine: An angled brush dipped in acetone sharpens the smile line. Run it along the border.
- Seal: Glossy top coat for a flawless, professional finish.

35 Palm Tree Nail Art Ideas that are the Most Iconic Nail Art Designs 🌴✨
20.Floral Field French
Soft, romantic tips inspired by spring wildflowers.
Overview:
There's a specific mauve that exists somewhere between dusty rose and dried lavender — not quite pink, not quite purple, just a muted, warm-toned middle ground. That's the color on these French tips, and it's what makes this design work as well as it does. The shade is interesting enough to draw the eye but subdued enough to avoid competing with an outfit.
The tonal effect between the sheer base and the mauve tips creates depth without contrast. The base and tips are in the same color family, just different intensities, which gives the design a cohesive, deliberate quality. It's more sophisticated than a white-on-nude French because the tonal shift is subtler.
The almond shape complements the softness of the mauve. On a square shape, the same tips would look more graphic and less romantic. The curve of the almond reinforces the organic, floral quality of the color.
Design Breakdown:
A tonal French using muted purple shades for a soft, romantic effect.
Base Color: Sheer, cool-toned lilac-pink nude.
Nail Shape: Graceful mid-length almond.
Design Element: Dusty lavender-mauve French tips, deeper than the base but in the same color family.
Finish: High-gloss top coat.
Get The Look at Home:
The smile line on almond shapes should follow the natural curve — slightly deeper in the center, thinner at the sides.
- Prep: File into an almond shape. Apply base coat.
- Nude layer: Two coats of a sheer, lilac-toned nude. Let dry.
- Tip time: Using a thin brush and dusty mauve polish, paint the French tips following the natural curve.
- Smile line: Aim for a soft, deep curve — not straight-across.
- Cleanup: An angled brush with acetone makes the lines perfectly smooth.
- Final gloss: High-shine top coat to bring out the depth of the mauve.
21.Matcha Latte Fade
A refreshing and unique vertical gradient in sage green.
Overview:
Vertical ombre — color transitioning from one side of the nail to the other rather than from cuticle to tip — is a technique that most nail art tutorials skip entirely. The standard horizontal gradient is straightforward: sponge up and down. The vertical version requires a different approach: sponging left-to-right while keeping the color concentration on one side. It's harder, but the result is more visually interesting.
The sage green used here is deliberately muted — closer to dried matcha powder than to fresh grass. That grey undertone is what makes the gradient feel sophisticated rather than decorative. The green fades into white at the opposite edge, creating a clean, minimalist effect that works in professional settings.
Long square nails provide the canvas this design needs. The gradient has to travel the full width of the nail, and shorter nails don't give the color transition enough room to develop naturally. The length is load-bearing here.
Design Breakdown:
A vertical gradient that transitions from sage green on one side to milky white on the other.
Base Color: Creamy, muted sage green.
Nail Shape: Long, sharp square. The flat surface showcases the horizontal color transition.
Design Element: Vertical ombre — green on one side, white on the other, blended in the center.
Finish: High-gloss top coat.
Get The Look at Home:
Vertical sponging requires a different motion than horizontal. Move the sponge side-to-side, not up-and-down.
- Prep: Shape nails and apply base coat.
- Sponge setup: Apply white polish to one side of a makeup sponge and sage green to the other.
- Dab vertically: Press the sponge onto the nail, keeping green on the left and white on the right.
- Blend center: Gently move the sponge side to side where the colors meet to blur the transition.
- Repeat: Two to three rounds of sponging for full opacity. Use a fresh sponge section each time.
- Seal: Thick top coat to smooth the gradient and add shine.

21 Hot Summer Buns Hairstyle Ideas for 2026 ☀️🔥
22.Glitter Mauve Surprise
A sparkling mauve set with a playful twist.
Overview:
A full-coverage shimmery mauve with a single white French tip accent nail is the kind of design that rewards close inspection. From a distance, it reads as a solid shimmer set. Up close, the ring finger reveals itself as something different — a white tip painted directly over the shimmer base, creating a "surprise" detail that adds personality without disrupting the overall cohesion.
The white tip over shimmer is technically challenging because white polish over a dark, shimmery surface tends to look grey and translucent. You'll need two thin coats of a high-pigment white to get full coverage without the shimmer bleeding through. Patience with this step is what separates a clean accent from a muddy one.
The almond shape keeps the sparkle elegant rather than costume- like. On longer, more dramatic shapes, full-coverage shimmer can tip into "disco ball" territory. The medium almond length contains the sparkle and lets the mauve color do the talking.
Design Breakdown:
Full shimmer coverage with one deliberate accent that breaks the pattern.
Base Color: Dense, shimmery dusty mauve or plum sparkle.
Nail Shape: Classic almond, medium length.
Design Element: One white French tip painted over the shimmery base on the ring finger accent nail.
Finish: High-gloss top coat.
Get The Look at Home:
The white tip needs to be fully opaque over the shimmer. Two thin coats are mandatory.
- Base: Apply two coats of shimmery mauve to all nails. Let dry fully.
- Accent tip: On the ring finger, use a thin brush to paint a white French tip directly over the shimmer.
- Opacity: Two thin coats of white to fully cover the shimmer underneath. Let each coat dry.
- Cleanup: An angled brush with acetone sharpens the smile line.
- Seal: Glossy top coat on all nails for a unified, sparkling finish.
23.Bubblegum Ripple
Sweet, organic pink swirls for a playful spring vibe.
Overview:
Bubblegum pink and white swirls work because the contrast between the two colors is high enough to create visual movement but low enough to avoid looking jarring. The pink here is saturated but not neon — think bubblegum, not highlighter — and the white is creamy rather than stark. Together, they create a marbled effect that looks like stirred yogurt or swirled taffy.
The technique is a variation on the "pour" method used in cappuccino swirls: pre-mix your colors on foil, pick up the blended ribbon with a flat brush, and lay it onto the nail in a wavy stroke. The key difference is the color range — pink and white have enough contrast to show individual swirls, while brown and cream blend into each other more readily.
The long oval shape gives the swirls room to develop their full wave pattern. On shorter nails, the same technique produces something that looks more like a smudge than a ripple. The length is what lets the design read as intentional marbling rather than accidental smearing.
Design Breakdown:
A pour-and-stroke marble technique using high-contrast pink and white for visible swirl definition.
Base Color: Sheer, pale pink base coat.
Nail Shape: Long, slim oval. The extended length lets the swirls develop fully.
Design Element: Flowing, organic ripples of bubblegum pink and creamy white.
Finish: High-gloss "wet look" top coat.
Get The Look at Home:
The ripple effect comes from the brush stroke, not from dragging through wet polish.
- Base tint: One coat of sheer pink. Let dry.
- Palette: Drop blobs of white and bright pink onto a piece of foil. Lightly swirl them together with a brush — don't over-mix.
- Pick up: Load a flat brush with the swirled mixture.
- Apply: Lay the color onto the nail in a single, wavy stroke. Let the brush float — don't press hard.
- Build: Add one or two more strokes from different sections of your palette for variety.
- Seal: Thick top coat to smooth the raised swirl texture and add shine.

29 Trendy Pink Summer Nails for 2026 💅
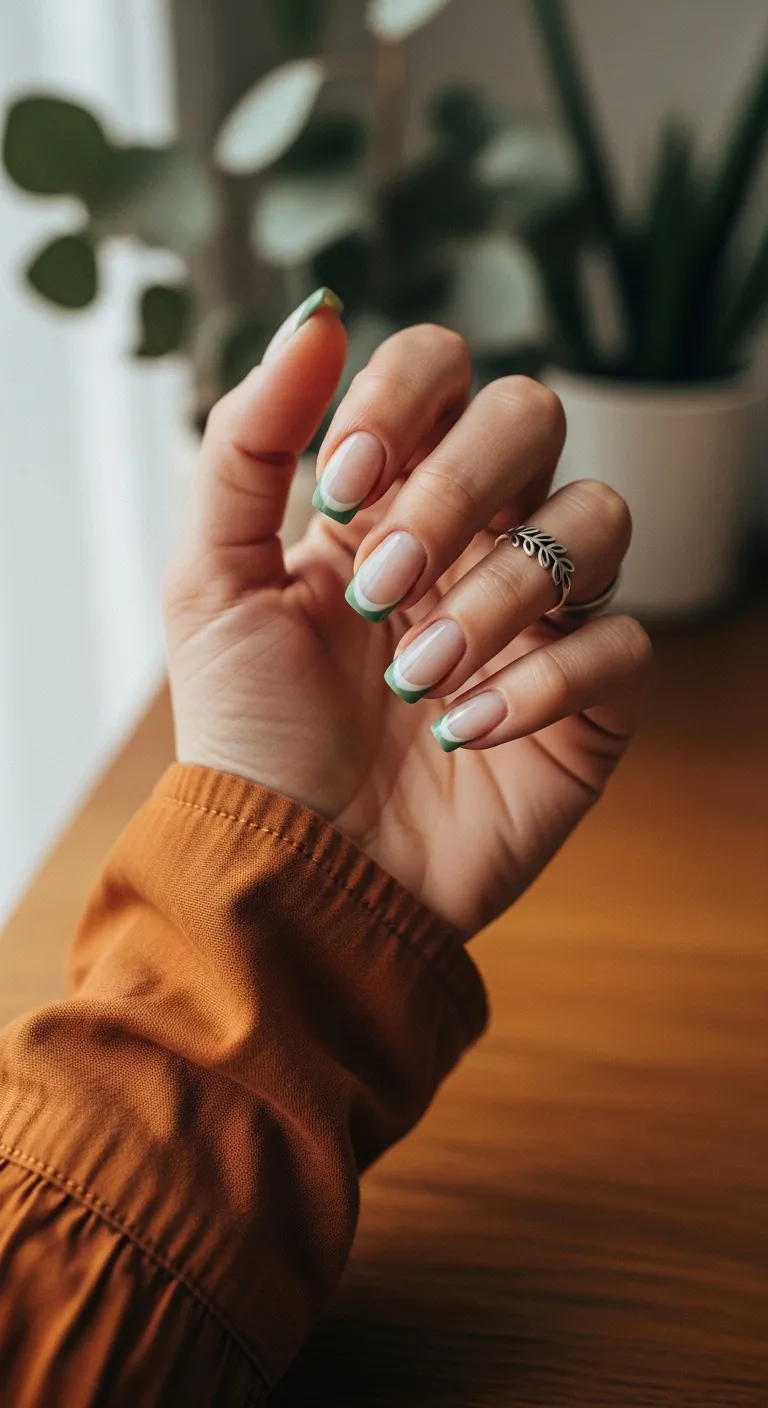
24.Garden Party Tips

Fresh, earthy green tips for a natural and chic look.
Overview:
Sage green on a French tip is the kind of design that makes people say "why didn't I think of that?" It's obvious in retrospect — green is a neutral in nature, so putting it on a nail feels inherently right — but it rarely shows up in standard French tip rotations. That's partly because finding the right sage is difficult. Too bright and it reads "Grinch." Too muted and it disappears into the nude base.
The shade here hits the mark: a grey-green that reads as earthy rather than decorative. Against a sheer nude base, the sage tips feel organic and grounded — like something that belongs in a garden rather than on a nail art Instagram feed. The contrast is gentle, which is what makes it wearable.
The almond shape complements the earthy quality of the color. Green on a square shape would feel more graphic and less natural. The curve of the almond mirrors the organic shapes found in nature — leaves, petals, stems — which reinforces the garden reference.
Design Breakdown:
A muted, earthy French tip that uses a grey-green instead of the usual pink, red, or white.
Base Color: Sheer, "naked" nude polish.
Nail Shape: Classic mid-length almond.
Design Element: Soft, creamy sage green French tips with a gentle smile line.
Finish: High-gloss top coat.
Get The Look at Home:
Look for a sage with grey undertone — that's what keeps it sophisticated rather than juvenile.
- Prep: Shape into a soft almond. Apply base coat.
- Nude layer: One or two coats of sheer nude. Let dry.
- Green tips: Using a thin brush and sage green polish, paint the French tips following the natural curve.
- Balance: Make sure the green line is smooth and symmetrical across all nails.
- Cleanup: An angled brush with acetone fixes any wobbles in the smile line.
- Final shine: High-quality top coat to seal and protect.
25.Santorini Blue Frenchies
Bold, Mediterranean-inspired blue tips for a vacation feel.
Overview:
Bright blue French tips are one of those designs that shouldn't work on paper — cobalt blue against a sheer nude is a jarring contrast — but in practice, the effect is striking. The blue is saturated enough to read as a deliberate statement rather than an experiment gone wrong, and the natural base grounds it enough to keep the overall design from feeling overwhelming.
The deeper smile line on these tips is what separates them from a standard colored French. The curve extends further down the nail bed, creating a more dramatic, elongated arc. It's a detail that changes the entire character of the design — from "blue tips" to something with real visual weight.
This is a vacation design, not an everyday mani. The cobalt blue is too bold for conservative settings, but it's exactly right for a beach trip, a pool day, or a rooftop dinner. It photographs exceptionally well — blue and skin tone create natural high contrast on camera.
Design Breakdown:
A high-contrast French using saturated Mediterranean blue with a deeper-than-usual smile line.
Base Color: Sheer, healthy-looking pinkish nude.
Nail Shape: Elegant mid-length almond.
Design Element: Saturated cobalt or cerulean blue French tips with a deep, dramatic curve.
Finish: High-gloss top coat.
Get The Look at Home:
The deep smile line is the defining feature. Take your time with the curve.
- Prep: Shape nails and apply base coat.
- Base: Two coats of sheer nude. Let dry.
- Blue tips: Using a thin brush, paint the bright blue tips with a slightly deeper curve than a standard French.
- Deep smile: Extend the curve further down the nail bed for a more dramatic look.
- Refine: A brush dipped in acetone sharpens the blue line.
- Seal: Glossy top coat to make the blue pop.
28 Effortless Hot Weather Day Hairstyles for Women 2026 ☀️💇♀️
26.Chocolate Glazed French
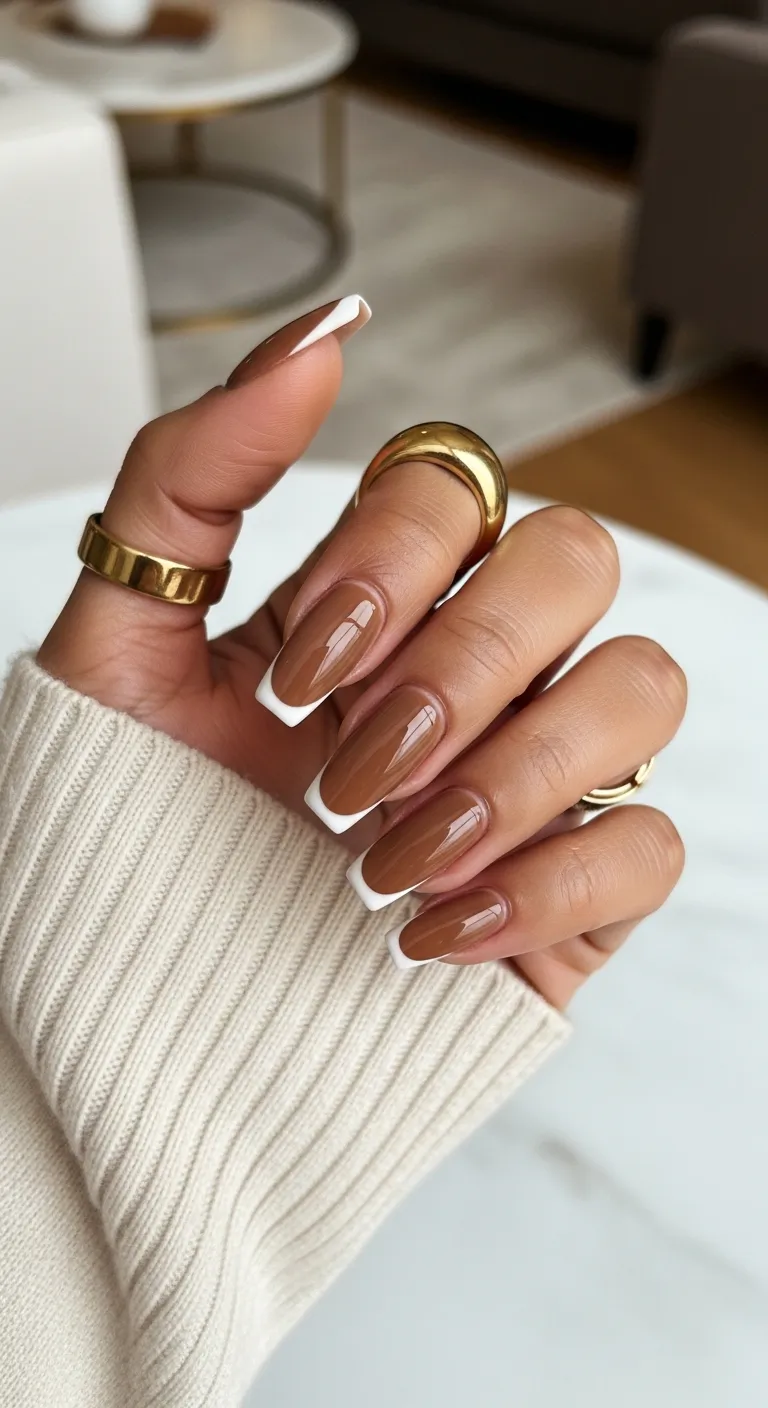
A warm, cozy twist on the French for a sophisticated May look.
Overview:
Brown nail polish exists in a strange cultural space — it's associated with autumn, with "latte nails," with cozy season. But this rich caramel brown paired with crisp white French tips proves that warm browns work just as well in May as they do in October. The white tips sharpen the brown's warmth and prevent it from looking muddy or dull.
The glazed, high-gloss finish is what elevates this from "brown nails with white tips" to something that reads as expensive. The shine creates depth in the brown base — you can see layers of color within the polish rather than a flat, opaque surface. It's the difference between a matte chocolate and a ganache.
The white tip over a dark base requires extra attention. White polish over brown tends to look grey and translucent on the first coat. Two thin layers of a high-pigment white are necessary for full opacity, and patience between coats prevents the white from dragging through the brown.
Design Breakdown:
A warm-toned French that pairs rich brown with white for high contrast and a glazed finish.
Base Color: Creamy, opaque caramel or milk-chocolate brown.
Nail Shape: Long, tapered square or almond. The length showcases the brown's depth.
Design Element: Crisp, opaque white French tips over the brown base.
Finish: High-gloss, glazed top coat.
Get The Look at Home:
White over dark requires two coats. Don't rush the opacity — thin layers build better coverage.
- Prep: Shape nails and apply base coat.
- Brown base: Two coats of rich caramel brown. Let dry completely.
- White tips: Using a thin brush, paint white across the free edge. First coat will look grey — that's normal.
- Second white: Once the first coat is dry, apply a second thin coat for full opacity.
- Clean lines: An angled brush with acetone sharpens the smile line.
- Final seal: Thick, glossy top coat to unify the colors and add the glazed finish.
27.Layered Sage & White
A unique, double-layered French tip for a modern twist.
Overview:
A double French tip — two concentric lines of color at the free edge — is one of those designs that looks like it requires professional precision but is actually achievable with patience and a steady hand. The thicker sage green line sits closest to the nail bed, with a thinner white line sitting right at the edge. The layered effect creates a sense of depth that a single- color French can't achieve.
The order of operations matters. The green line must be fully dry before you add the white, or the colors will bleed into each other at the boundary. Budget ten to fifteen minutes of dry time between the two lines — it feels excessive, but it's the difference between crisp layers and a muddy mess.
The square shape provides clean, straight edges that complement the geometric precision of the double line. On rounded shapes, the two concentric curves would be harder to keep parallel. The straight edges of the square act as a guide for both lines.
Design Breakdown:
A two-layer French that stacks a thicker colored tip with a thinner white edge.
Base Color: Sheer, "naked" nude polish.
Nail Shape: Clean, mid-length square.
Design Element: A thick sage green French tip with a thinner white French line at the very edge.
Finish: High-gloss top coat.
Get The Look at Home:
The green must be completely dry before adding the white. Patience is the only tool that makes this work.
- Prep: Shape into a square. Apply base coat.
- Nude base: Two coats of sheer nude. Let dry.
- Green tip: Paint a slightly thick sage green French tip. Let dry for at least ten minutes.
- White edge: Using a thin liner brush, paint a thinner white line at the very tip of the nail, overlapping the green edge.
- Parallel check: Hold your hand at arm's length. The two lines should appear parallel across all nails.
- Seal: Glossy top coat to blend the layers together.

33 Trendy Polka Dot Nail Ideas for 2026 💅
28.Sunset Glow Ombre
A soft, warm-toned gradient for a glowing May look.
Overview:
Peach-to-white ombre is the warm-weather equivalent of the Baby Boomer — same technique, different emotional register. Where the classic pink-to-white reads as bridal and timeless, the peach variation reads as summery and fresh. The warm undertone of the peach creates a sun-kissed effect that photographs beautifully in natural light.
The sponge technique is the same as any gradient, but the color choice introduces a specific challenge: peach is close enough to white that the transition zone can disappear entirely if you over-blend. The goal is a visible gradient where you can see where the peach ends and the white begins, not a uniform pale peach across the entire nail. Two to three dabs, then stop.
The square shape is an interesting choice for this design. Most ombre nails are done on almond or oval, where the gradient follows the natural taper. On a square, the gradient has a hard edge at the tip, which creates a more graphic, modern result. It's a subtle shape decision that changes the design's character.
Design Breakdown:
A sponge-blended gradient from warm peach to milky white. The warm undertone is what sets it apart from a standard Baby Boomer.
Base Color: Creamy, semi-sheer peach or apricot polish.
Nail Shape: Clean, mid-length square. The flat tip gives the gradient a defined edge.
Design Element: Seamless ombre fading from peach at the cuticle to white at the tips.
Finish: High-gloss top coat.
Get The Look at Home:
The gradient needs to be visible. Don't over-blend — you want to see where peach meets white.
- Base: Two coats of peach polish. Let dry completely.
- Sponge: Apply peach and white polish side by side on a makeup sponge.
- Dab: Press the sponge onto the nail, moving slightly up and down to blend the transition.
- Repeat: Two to three thin sponged layers for opacity. Use a fresh sponge section each time.
- Clean: Acetone and a brush remove the sponge mess from your skin.
- Seal: Thick top coat to smooth the sponge texture and add shine.
How a Single Tiny Element Makes Minimalist Nails Look Expensive
Minimalist nail art can cross into boring territory fast if there is nothing for the eye to catch. A solid neutral is elegant, sure, but it does not feel like a design. The 2026 solution is the micro detail — a single tiny element placed with intention that transforms a plain manicure into something that looks like it cost twice as much as it did.
The micro motif works because of the contrast between scale. A single small dot, a tiny flower center, a minuscule star near the cuticle — these elements read as deliberate and precious because they are small. "Lavender Haze Fluidity" works for this reason: the subtle color shift across the nail is the main event, and any large art would compete with it. A micro detail would support it instead.
The best part is that you do not need a steady hand or expensive brushes to execute this. A bobby pin with the rounded end dipped in polish creates a dot roughly half the size of a standard dotting tool. One press near the cuticle of your ring finger, and you have a micro accent that looks like it took professional precision.
💡 The ring finger is the ideal spot for a micro detail because it is the nail people notice first in photos and conversation. A single tiny element there reads as a deliberate accent rather than an afterthought.
And there you have it! Hopefully, scrolling through these gorgeous designs got you even more excited for your upcoming getaway. Choosing your vacation nails should be fun and stress-free, and one of these sets is sure to look absolutely stunning on you.
If you like these designs for this year's may trend, do pin your favorite on Pinterest and also you can follow us for more such designs for nails or hairs.