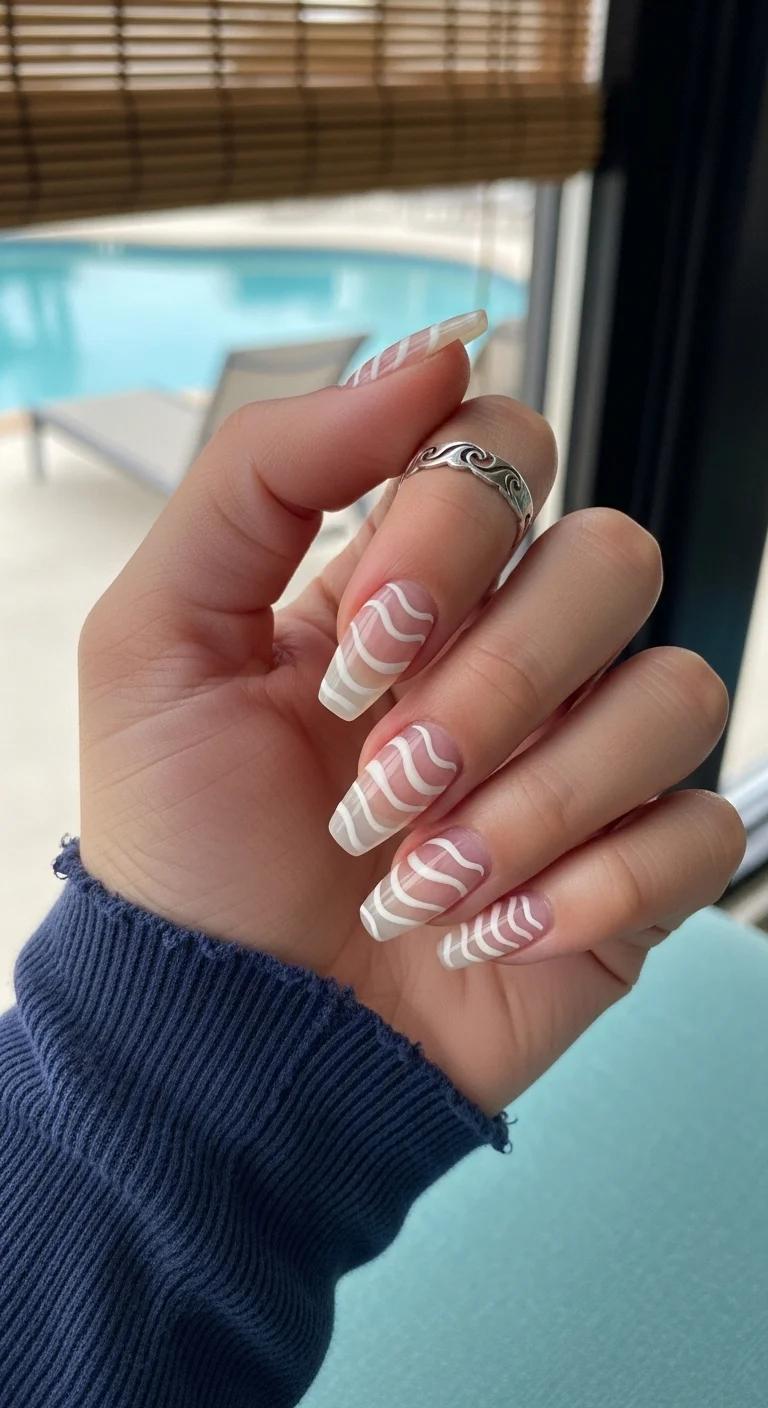
Nail Trends
30 Stunning July Nail Designs for Summer 2026
July is peak summer, and your nails should reflect that energy. From green gingham checks and tropical leaf prints to chrome textures and bold hibiscus blooms, these 30 nail designs capture everything we love about the hottest month of the year. Whether you prefer understated sage solids or maximalist fruit salad art, there is something here for every style and skill level.
What Makes July Nails Different From the Rest of Summer
June nails are about anticipation. You're easing into summer, testing the waters with pastels and transitional shades. August nails start looking backward, tilting toward deeper tones and end-of-season melancholy. July nails don't do either of those things. They are fully, unapologetically present. This is the month when neon looks right, when chrome feels earned, and when bold patterns like gingham and tropical prints match the actual energy of the world outside your window.
The color palette shifts noticeably in July. Soft spring pastels give way to saturated mid-tones: kelly green, coral, teal, warm bronze. Even the neutrals get warmer. Sage replaces mint. Taupe replaces grey. The entire spectrum tilts toward heat, which means your nail colors should too. A pale lavender that looked gorgeous in April can feel washed out in July's direct sunlight.
Texture matters more in summer than any other season because natural light is harsher and more revealing. A chrome finish that looked smooth under office fluorescents will show every imperfection in midday sun. A matte top coat that felt chic in spring can look flat and chalky against sun-kissed skin. July is the month to commit to glossy finishes that catch light and metallic accents that throw it back. If you've been saving that chrome powder or holographic topper for a special occasion, this is it.
In This Guide
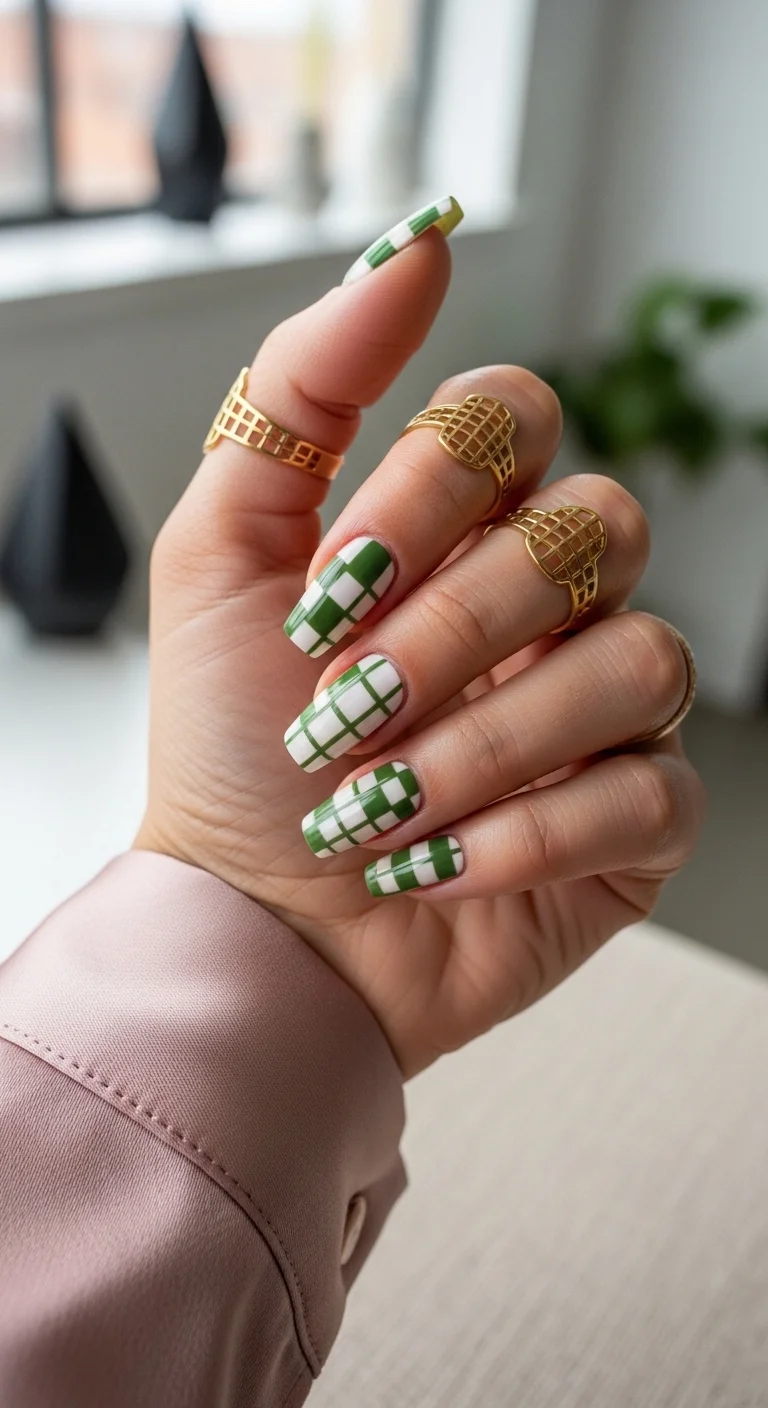
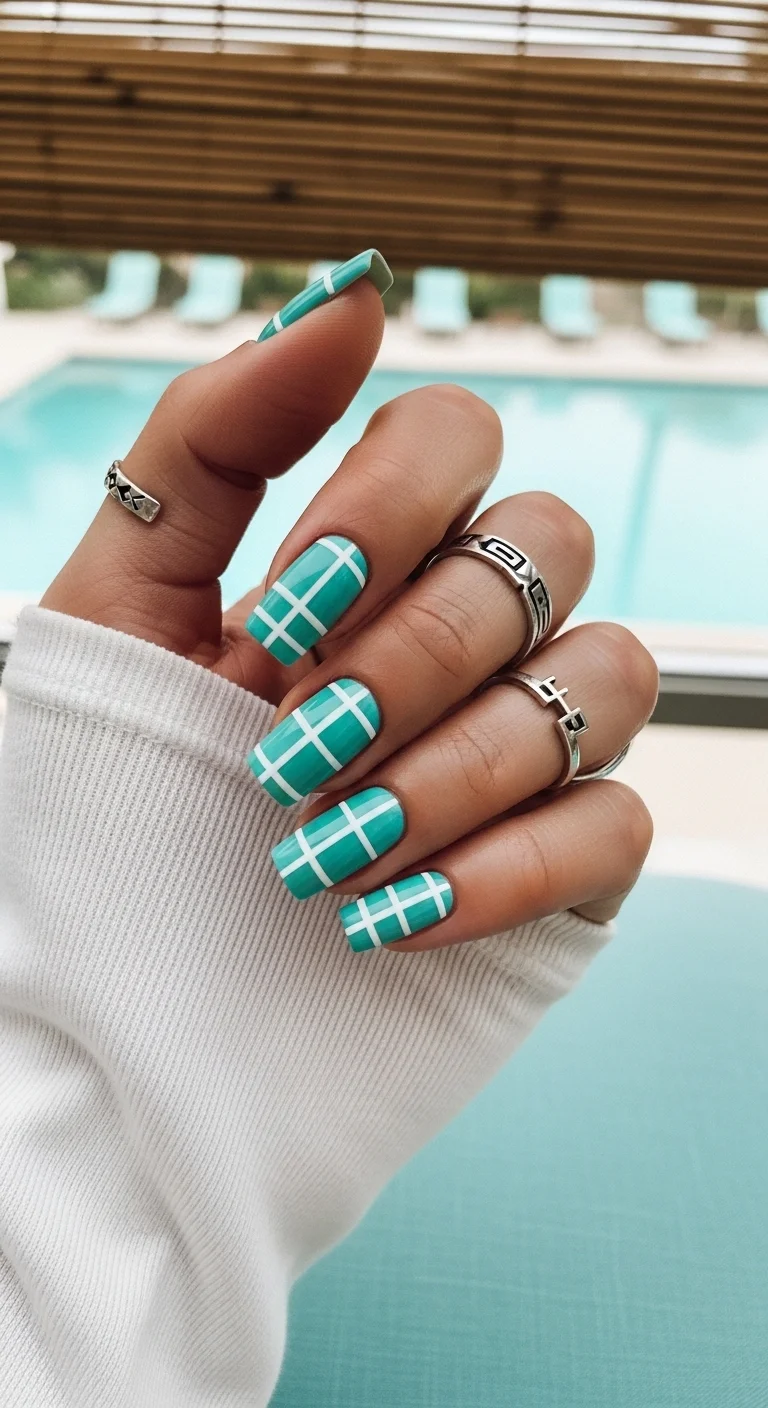
1.Green Gingham Check
A crisp, preppy check pattern that reads summer without trying too hard.
Overview:
Gingham is one of those patterns that immediately signals warm weather. It conjures picnic blankets, sundresses, and something cold to drink. Translating that pattern onto nails is a risk because the grid has to be precise or the whole thing falls apart. A crooked checkered pattern doesn't look handmade and charming. It looks like a mistake.
This green-and-white version works because the green is saturated enough to create real contrast against the white. Pale green checks would disappear at conversational distance. This shade, somewhere between kelly and emerald, holds its own. The alternating squares where the green lines overlap create darker intersection blocks that give the pattern its woven-fabric quality.
The almond shape softens the rigid geometry just enough. On a square nail, the grid lines would compete with the nail edges for attention. The curved tip lets the pattern breathe. If you attempt this at home, striping tape is practically mandatory. Freehanding straight lines on a curved surface is a patience test most people will fail.
Design Breakdown:
A two-color grid that depends entirely on line precision. The pattern does all the work; the nail shape just needs to stay out of the way.
Base Color: Bright, opaque white. Any translucency in the white weakens the contrast that makes the green checks pop.
Nail Shape: Medium almond. The curved tip softens the geometric grid without losing its structure.
Design Element: Green horizontal and vertical lines spaced evenly to create a checkered pattern. Where lines cross, the doubled green creates darker squares.
Finish: High-gloss top coat to smooth the raised texture of the painted lines.
Get The Look at Home:
The lines need to be fully dry before you paint the perpendicular set. Wet-on-wet grid lines bleed into each other.
- White base: Two coats of opaque white. Let dry completely.
- Horizontal lines: Using a striper brush and green polish, draw thin horizontal lines spaced about 3mm apart. Let dry fully.
- Vertical lines: Draw vertical lines at the same spacing. Where they cross, the doubled green creates the darker overlap squares.
- Check spacing: Hold both hands at arm's length. If any nail looks noticeably different in grid density, adjust before top coating.
- Seal: One thick coat of top coat to encapsulate the line texture. Float the brush to avoid dragging.
2.Sage Solid Summer
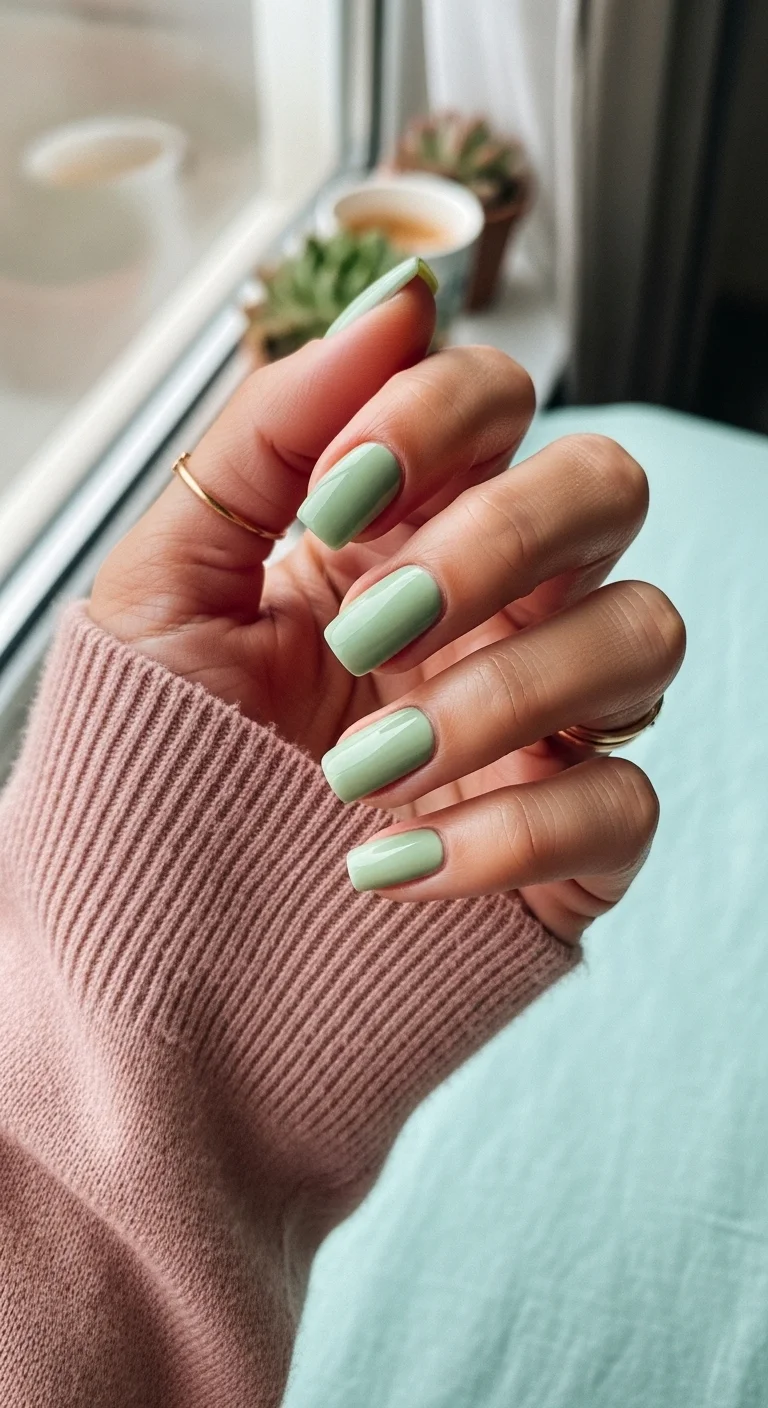
A quiet, sophisticated solid that goes with everything in your summer wardrobe.
Overview:
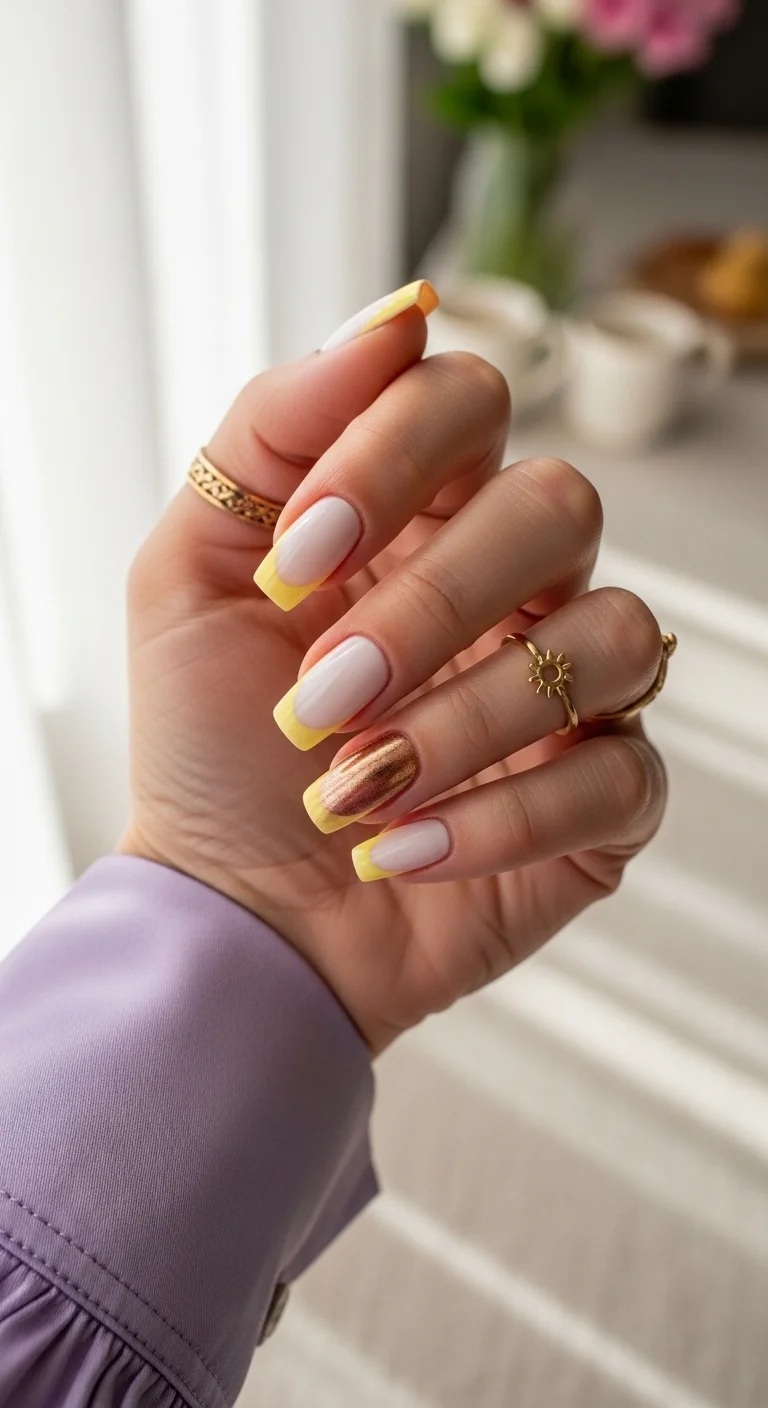
There's something quietly confident about a single-color manicure that doesn't try to be anything more than exactly what it is. Sage green occupies an unusual space in the color spectrum: it's muted enough to function as a neutral, but interesting enough that people notice it. It doesn't scream for attention the way neon or primary colors do.
The squoval shape reinforces the understated energy. Short nails in a muted green read as practical and polished rather than trendy. This is the kind of manicure that works in a professional setting, at a weekend farmers market, and everywhere in between. It asks nothing of you beyond the initial application.
Sage formulas vary by brand. Some lean grey, some lean olive, some lean mint. The version in this image sits right in the middle: enough green to register as green, enough grey to keep it from looking like a crayon. Two coats of a self-leveling formula will get you there. The high-gloss finish is doing a lot of work here. Without it, sage can read flat and chalky.
Design Breakdown:
Single-color, no art. The shade and the finish are the entire design.
Base Color: A creamy, fully opaque sage green. Not too grey, not too mint.
Nail Shape: Short squoval. Clean, practical, modern.
Design Element: None. Solid coverage.
Finish: High-gloss top coat. The shine is what keeps sage from looking flat.
Get The Look at Home:
A solid color is only as good as the base coat underneath. Prep matters more than people realize.
- Prep: Push back cuticles. Buff out ridges. Sage is muted enough that surface imperfections show less than with dark colors, but a smooth base still matters.
- Base coat: One coat of ridge-filling base. Let dry completely.
- Two thin coats: Apply sage green in thin, even coats. Let each dry for two to three minutes before the next. Thick coats bubble.
- Cleanup: Run an angled brush dipped in acetone along the cuticle line and sidewalls.
- Seal: One coat of high-gloss top coat. Cap the free edge.
3.Classic Cherry Red Almond
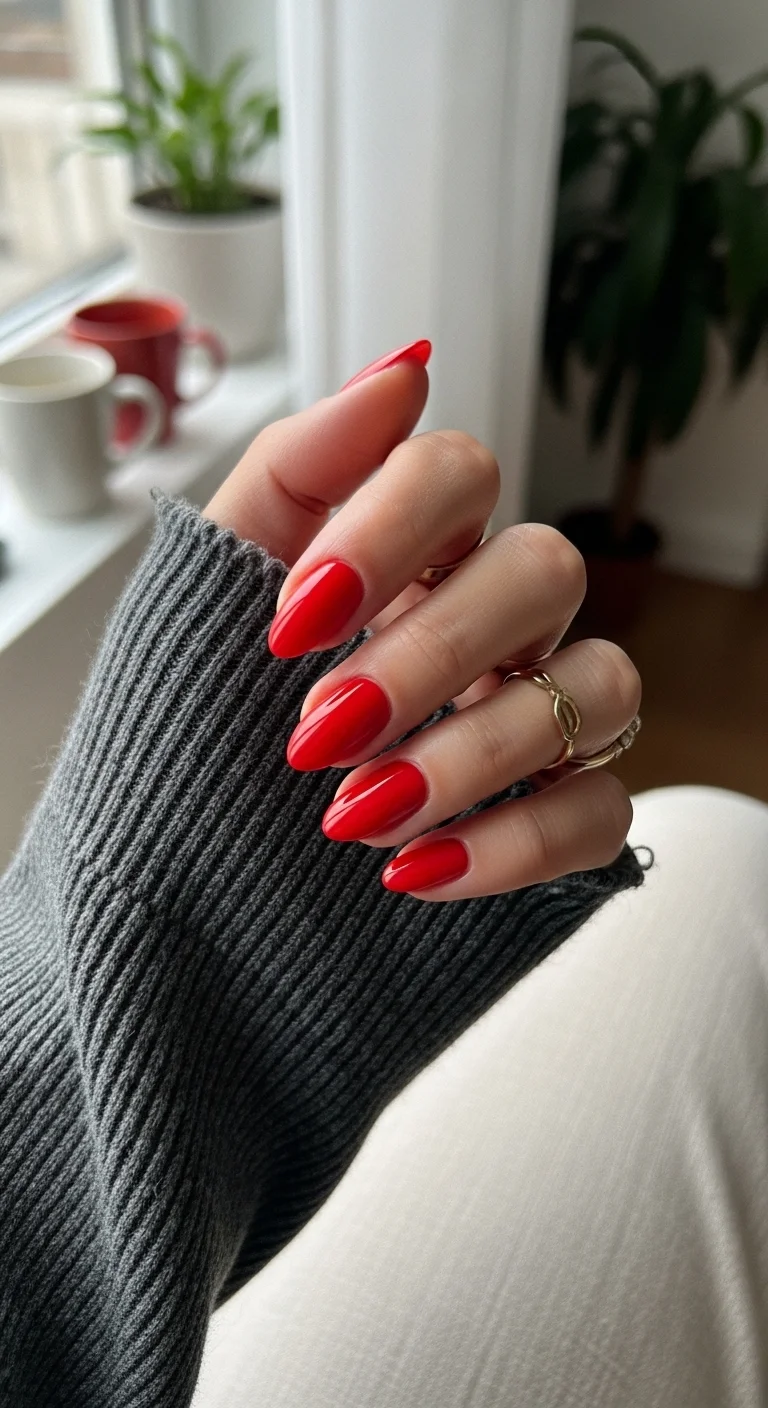
The kind of red that stops people mid-sentence to ask what shade you're wearing.
Overview:
Red nail polish is the oldest trick in the book, and it still works. A bright, true cherry red on almond nails is one of those combinations that never looks dated, never looks overdone, and never fails to photograph well. The color is warm enough to look lively under indoor lighting and saturated enough to hold its own in direct sun.
The almond shape is doing critical work here. Red on square nails reads as aggressive. Red on stiletto nails reads as costume. Red on almond reads as intentional. The tapered tip softens the boldness of the color just enough that it feels wearable rather than theatrical. Medium length keeps it practical.
Cherry red formulas tend to be more forgiving than other colors because the pigment is dense. Most good reds cover in two coats without streaking. The downside: red stains everything it touches during application. Cuticles, skin, the bottle rim. Budget an extra five minutes for cleanup, and use a base coat to prevent the pigment from migrating into your natural nail.
Design Breakdown:
Single-color, high-impact. The shade does all the talking.
Base Color: A bright, true cherry red. Not orange-red, not blue-red. Just red.
Nail Shape: Medium almond. The tapered tip softens the boldness of the color.
Design Element: None. Solid, glossy coverage.
Finish: Ultra-glossy. The shine turns red from "nice color" into "luxury."
Get The Look at Home:
Red polish stains. Base coat is non-negotiable, and cleanup needs to happen before the polish sets.
- Base coat: One coat of a staining-prevention base. Let it dry fully.
- First coat: Thin and even. Red is pigmented enough that the first coat should look nearly complete.
- Second coat: Builds full opacity. Work slowly near the cuticles. Getting red polish on your skin is easy; removing it cleanly is not.
- Cleanup immediately: Dip an angled brush in acetone and run it along every cuticle and sidewall before the polish sets. Red smears if you wait too long.
- Seal: One coat of glossy top coat. Cap the free edge to prevent tip wear, which shows faster on dark colors.

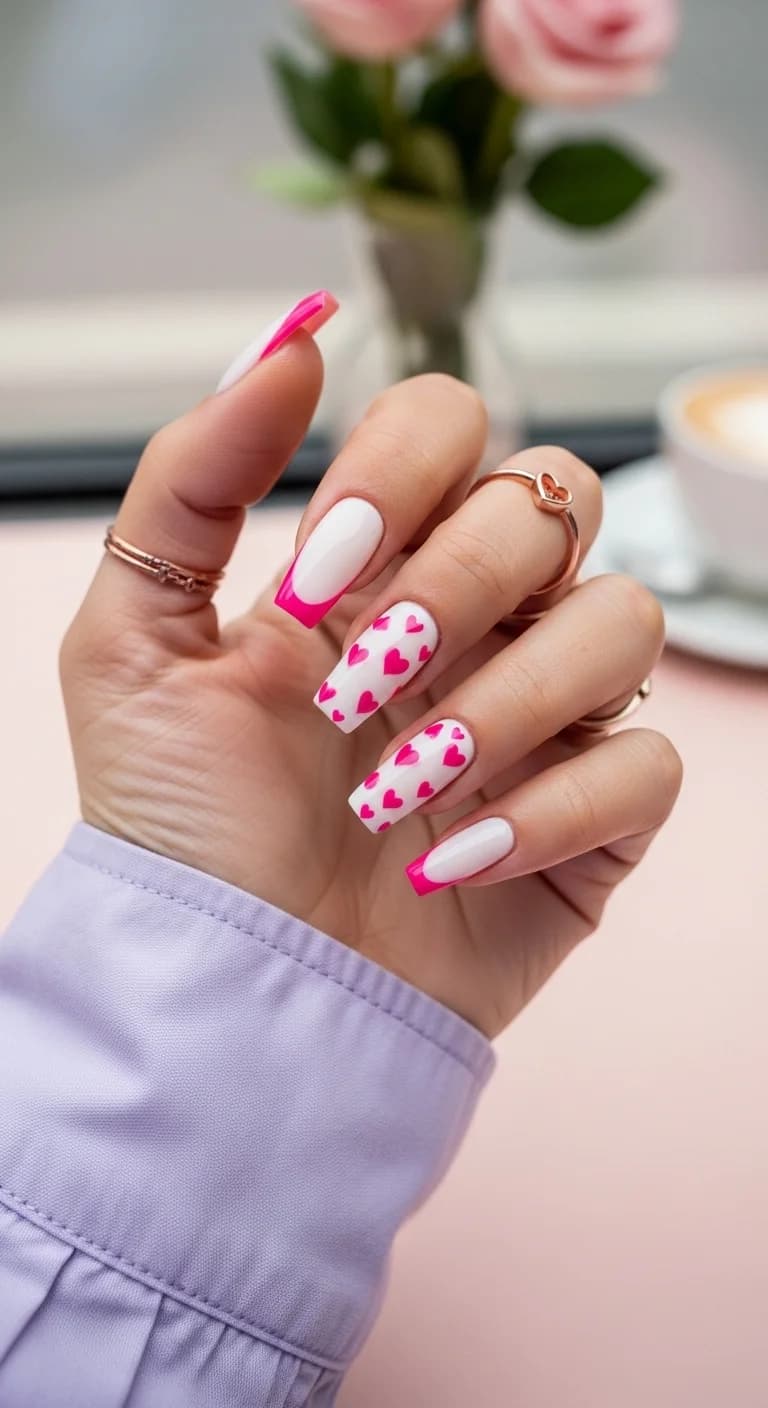
31 Patriotic Fourth of July Nail Ideas for 2026 🇺🇸
4.Ditsy Cherry Print
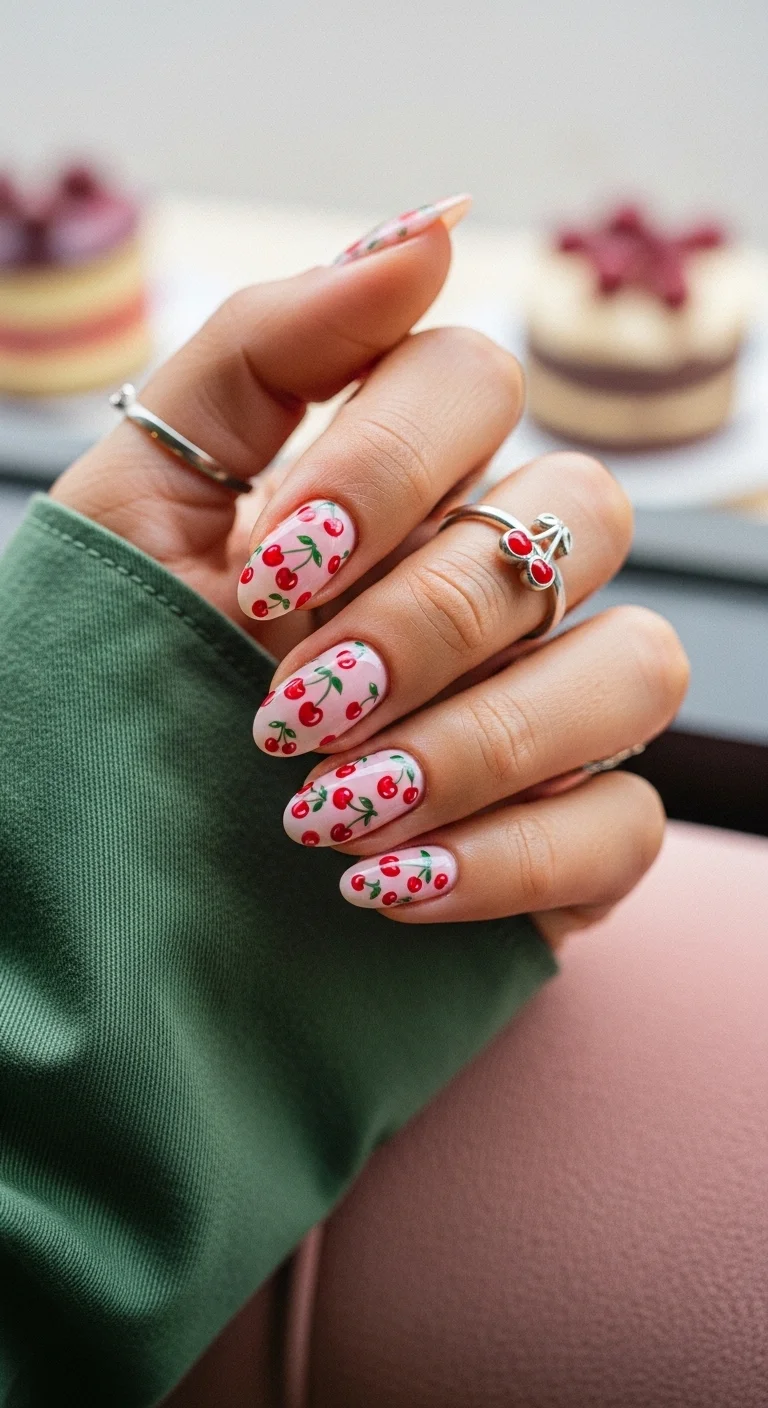
A sweet, vintage-inspired cherry print that's playful without being juvenile.
Overview:
Small-scale cherry prints on a pink base walk the line between "vintage wallpaper" and "nail art with personality." The key is scale. These cherries are tiny, maybe two millimeters across, which means they read as a pattern from a distance and reveal themselves as individual fruit illustrations up close. That dual reading is what makes the design interesting.
The soft pink background does something important: it keeps the red of the cherries from becoming overwhelming. On a white base, red cherries would read as high-contrast and bold. On this blush pink, they read as sweet and approachable. The green stems add just enough color variation to keep the palette from feeling one-note.
The hand-painted quality is part of the charm. These aren't decals or stamps. Each cherry pair is slightly different in size, angle, and stem placement. That inconsistency is what makes the design feel crafted rather than manufactured. If you're doing this yourself, resist the urge to make every cherry identical. Imperfection is the point.
Design Breakdown:
A scattered micro-pattern over a tonal base. The pink background unifies everything.
Base Color: A soft, semi-sheer blush pink. Warm enough to complement the red cherries without competing.
Nail Shape: Medium almond. The curved shape complements the organic, rounded cherry forms.
Design Element: Tiny red cherry pairs with thin green curved stems, scattered randomly across all nails.
Finish: High-gloss top coat to smooth the painted texture.
Get The Look at Home:
Use your smallest dotting tool for the cherry bodies. A toothpick works in a pinch but creates less consistent circles.
- Pink base: Two coats of soft blush pink. Let dry fully.
- Cherry bodies: Using a small dotting tool and bright red, place pairs of dots across each nail. Don't aim for perfect circles or perfect symmetry between the pair.
- Stems: With a toothpick and green polish, draw two curved lines from each cherry pair meeting at a point. Add a tiny leaf stroke at the join.
- Scatter pattern: Vary the density. Some nails get five or six cherry pairs; others get three. Random distribution looks more natural than a uniform grid.
- Dry check: Wait at least five minutes before top coating. The tiny dots smear instantly under a wet brush.
- Seal: One coat of top coat, applied in a single stroke per nail to avoid dragging the cherry art.
5.Wild Leopard Nude
An animal print that's earthy rather than loud, thanks to the muted palette.
Overview:
Leopard print is one of those patterns that cycles between "fashion forward" and "tacky" depending entirely on execution. The difference almost always comes down to color. Bright orange and black leopard reads as costume. Brown and nude leopard reads as a neutral with texture. This version lands firmly on the right side of that line.
The nude base keeps the overall look quiet. The brown spots, each outlined with a slightly darker ring, create an organic pattern that moves differently on every nail. No two spots are the same shape, and no two nails carry the same arrangement. That variation is what makes leopard print look right. Uniform spots look like a stamp; irregular spots look like actual fur.
Leopard art is more forgiving than most patterns because the "errors" read as natural variation. A slightly wobbly spot outline doesn't ruin the design. It makes the spot look more realistic. This is a good design for people who want to try freehand nail art without the pressure of geometric precision.
Design Breakdown:
Organic spots on a neutral base. The randomness is the design.
Base Color: A warm, semi-sheer nude that closely matches the natural nail tone.
Nail Shape: Medium almond. The tapered shape complements the organic spot forms.
Design Element: Irregular brown spots with slightly darker outlines scattered across all nails.
Finish: High-gloss top coat. The shine gives the nude base a polished, expensive look.
Get The Look at Home:
The spots should be different sizes and shapes on every nail. Uniformity kills leopard print.
- Nude base: Two coats of warm nude. Let dry fully.
- Spot shapes: Using a medium dotting tool and warm brown polish, place irregular blobs across each nail. Vary the size and spacing. Some should be close together; others should stand alone.
- Outlines: Using a thin brush and a darker brown, paint partial outlines around each spot. Don't fully enclose any spot. Two or three curved strokes per spot is enough.
- Extra details: A few tiny standalone brown dots between the larger spots add density without clutter.
- Dry check: Wait at least five minutes. Brown on nude smears easily if the surface is tacky.
- Seal: One coat of glossy top coat. Float the brush to avoid dragging the spot outlines.

25 Stunning Summer Vacation Hairstyles for 2026 ☀️🌊
6.Mixed Fruit Salad
A colorful medley of summer fruit that turns your nails into a still-life painting.
Overview:
Mixing multiple fruit types on one hand is a design choice that could easily feel scattered. It works here because the white base acts as a gallery wall, giving each fruit illustration its own space to breathe. The lemon, cherry, watermelon, and orange are all painted in a similar illustrative style, which creates visual cohesion despite the variety of subject matter.
Each nail carries a different fruit, which means your eye has something new to discover on every finger. The watermelon slice with its green rind and seed dots is the most detailed illustration. The lemon is the simplest. This range of complexity across the set keeps the design from feeling repetitive.
White polish is the foundation that makes everything work. A colored base would compete with the fruit art for attention. White stays out of the way and lets the colors pop. The trade-off is that white is unfivingiving about streaks. Three thin coats instead of two thick ones prevents the brush marks that plague white polish applications.
Design Breakdown:
Multiple fruit illustrations on a clean white canvas. Each nail gets a different fruit.
Base Color: Bright, fully opaque white. Streaky white weakens the entire design.
Nail Shape: Medium almond. The curved surface gives each fruit illustration a natural frame.
Design Element: Hand-painted fruit slices: lemon, cherry, watermelon, orange. Each nail features a different fruit.
Finish: High-gloss top coat to make the fruit look juicy and the white look clean.
Get The Look at Home:
Plan your layout before painting. Decide which finger gets which fruit.
- White base: Three thin coats of opaque white. Let each coat dry fully.
- Lemon: On one nail, paint a yellow circle with white radiating lines for segments. Add a thin green leaf.
- Cherry: On another nail, paint two small red circles with curved green stems meeting at a point.
- Watermelon: Paint a red half-circle with a green rind edge and tiny black seed dots.
- Orange: Paint an orange circle with white segment lines and a thin orange rind edge.
- Dry and seal: Wait at least five minutes. One thick coat of top coat over everything.
7.Citrus Orchard Mix
A sheer, breezy citrus print that feels like summer without the commitment of a solid color.
Overview:
Sheer bases with art on top have a practical advantage that solid bases don't: growth-out is nearly invisible. The natural nail shows through the base color, so the gap between the cuticle and the polish blends in rather than creating a harsh line. That makes this design one of the most low-maintenance options in the July lineup.
The citrus slices scattered across the nails come in multiple colors, which creates an unexpected rhythm. Your eye catches yellow, then orange, then pink, then back to yellow. The variety within a single fruit type keeps the design from reading as a one-note pattern. It's subtle, but it's the difference between "cute nail art" and "thoughtful nail art."
The long coffin shape gives each citrus slice enough surface area to read clearly. On shorter nails, the segment detail inside each slice would shrink to the point of invisibility. The length here is functional, not just decorative.
Design Breakdown:
Scattered citrus illustration over a transparent base. The negative space is part of the design.
Base Color: Sheer nude or milky pink. The natural nail should show through.
Nail Shape: Long coffin. The flat tip and extended surface give the citrus art room.
Design Element: Small citrus slice cross-sections in yellow, orange, and pink scattered across all nails. Each slice has white segment lines.
Finish: High-gloss top coat. The shine makes the sheer base look intentional rather than unfinished.
Get The Look at Home:
Keep the citrus slices small enough that three to five fit on each nail without overlapping.
- Sheer base: Two coats of milky nude. Let dry fully.
- Slice shapes: Using a small dotting tool and colored polish, place small circles in yellow, orange, and pink across each nail.
- Segment lines: With a very fine brush and white polish, draw radiating lines inside each circle. Three to four lines per slice.
- Scatter pattern: Vary the colors across nails. Not every nail needs all three colors.
- Seal: One coat of glossy top coat. Cap the free edge.
29 Bright Lemon Nail Art Designs for Summer & Spring (2026)
8.White Marble Swirl
A subtle, elegant swirl that looks like polished stone rather than nail art.
Overview:
White swirls on a sheer base create an effect that's closer to polished marble than typical nail art. The swirls don't follow a predictable pattern. They curve and bend at different angles on each nail, which makes the set feel organic rather than printed. The sheer nude underneath keeps the whole thing light and wearable.
The white lines vary in thickness, which is what sells the marble illusion. Real stone has veins that narrow and widen as they travel through the material. Uniform-width lines would read as stripes. The variation here creates a sense of depth that a flat pattern couldn't achieve.
This is a forgiving design for at-home execution. The swirls don't need to be precise, the spacing doesn't need to be even, and the line weight doesn't need to be consistent. In fact, the more irregular the swirls, the more realistic the marble effect looks. It's one of the few nail art techniques where messy actually produces better results.
Design Breakdown:
Abstract white linework over a transparent base. The randomness is intentional.
Base Color: Sheer nude or milky pink. The natural nail should be visible.
Nail Shape: Long coffin. The flat surface gives the swirls room to curve naturally.
Design Element: Thin to medium white swirl lines at varying angles across all nails. No two nails match.
Finish: High-gloss top coat to create the polished-stone effect.
Get The Look at Home:
Work with a striper brush that holds enough polish to draw a full curve without re-dipping. Inconsistent line weight is the goal.
- Sheer base: Two coats of milky nude. Let dry fully.
- First swirl: Using a striper brush and white polish, draw a single curved line across the nail from one side to the other. Let the line vary in thickness naturally.
- Additional swirls: Add two or three more lines at different angles. They should cross the first line at least once. Vary the spacing between lines.
- Line variation: Press harder in some sections to widen the line and lift lighter to thin it out. This variation is what makes the marble work.
- Seal: One coat of glossy top coat to smooth the raised line texture.
9.Teal Mermaid Shimmer
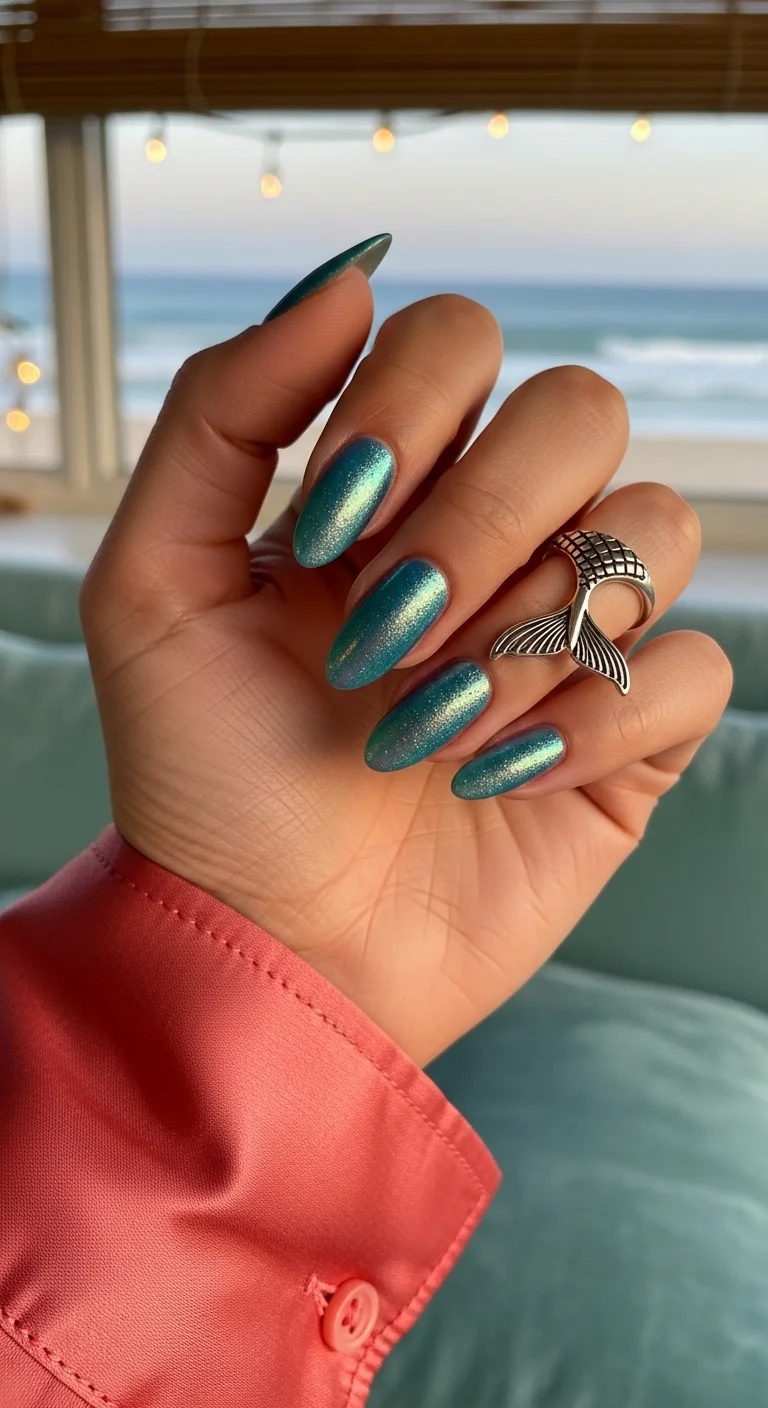
A mermaid-inspired shimmer that catches light from every angle.
Overview:
Metallic teal occupies a specific sweet spot in the shimmer nail category. It's not quite blue and not quite green, which means it shifts depending on the angle of your hand and the quality of the light. Under warm indoor lighting, it leans green. In natural daylight, it leans blue. That shifting quality makes it more interesting than a flat teal cream.
The almond shape complements the metallic finish. The curved surface creates a continuous highlight that travels from cuticle to tip, which is exactly what shows off shimmer polish best. Flat nail shapes break the highlight into segments, which diminishes the metallic effect.
Shimmer polishes are notoriously difficult to remove. The metallic particles bond to the nail in a way that regular cream formulas don't. Soaking a cotton pad in acetone and pressing it on each nail for fifteen seconds before wiping is significantly more effective than rubbing back and forth. The rubbing technique just pushes the shimmer around your cuticles.
Design Breakdown:
Single-color metallic. The finish is the design.
Base Color: A saturated metallic teal with blue-green color shift.
Nail Shape: Medium almond. The curved surface maximizes the metallic highlight.
Design Element: None. Full-coverage shimmer.
Finish: Built into the polish. No additional top coat finish changes needed, though a glossy top coat extends wear.
Get The Look at Home:
Metallic polishes show brush strokes more than cream formulas. Thin coats and minimal brush passes prevent streaking.
- Base coat: One coat of standard base. Shimmer polishes adhere well, so a ridge-filling base isn't necessary.
- First coat: Thin and even. Brush in one direction, from cuticle to tip, without going back over the same area.
- Second coat: Builds full opacity. Again, brush in one direction. Each stroke should overlap the previous one slightly.
- Cleanup: Shimmer particles spread more than cream polish. Clean the cuticle line with an angled brush and acetone.
- Seal: One coat of glossy top coat to extend wear and amplify the shimmer.
25 Trendy Beach Day Hairstyles for Vacation 2026 ☀️🌊
10.Holographic Lilac Frost
A cool-toned holographic that feels like wearing a crystal on each finger.
Overview:
Holographic polish is one of those finishes that looks completely different in person than it does in photos. Cameras struggle to capture the way holographic particles split light into a rainbow spectrum. In real life, these lilac nails shift through purple, silver, lavender, and occasionally pink depending on the light source. The effect is more complex than standard shimmer or metallic.
Lilac is a smart base choice for holographic because it's light enough that the holographic particles remain visible. Dark base colors absorb the rainbow effect and make the nails look like standard metallic. This pastel purple lets every color in the spectrum show through.
The squoval shape works well here. The flat surface area maximizes the holographic display, and the slightly rounded edges keep the overall look modern rather than boxy. Short to medium length is the right call because holographic polish attracts attention on its own. You don't need extra length to make a statement.
Design Breakdown:
Single-color holographic. The finish creates the entire visual effect.
Base Color: A light lilac or lavender with scattered holographic particles.
Nail Shape: Short to medium squoval. Flat surfaces maximize the holographic display.
Design Element: None. Full-coverage holographic.
Finish: Built into the polish. A glossy top coat enhances the holographic depth.
Get The Look at Home:
Holographic polishes are best applied in thin coats. Thick coats dull the rainbow effect because the particles stack on top of each other.
- Base coat: One coat. Let dry fully.
- First coat: Thin and even. The first coat will look sheer. That's normal for holographic formulas.
- Second coat: Builds opacity while keeping the particles dispersed enough to create the rainbow effect.
- Avoid over-brushing: Each pass should be in one direction. Going back and forth disrupts the particle alignment and creates patchy spots.
- Seal: One coat of glossy top coat. Avoid matte top coats, which completely kill the holographic effect.
11.Lavender Sprig Botanical
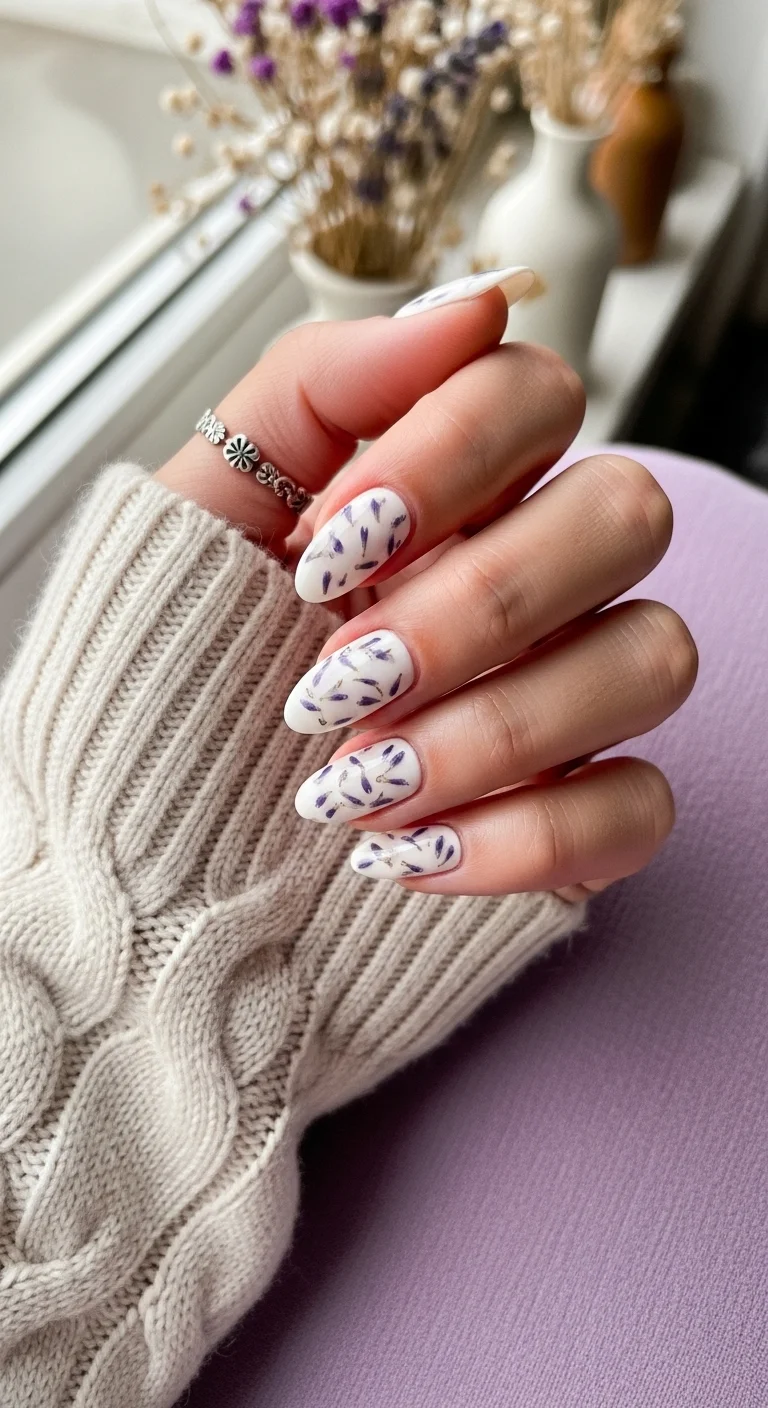
A quiet, botanical design that feels like pressing flowers into a journal.
Overview:
There's a specific quality to hand-painted botanical art that decals and stamps can't replicate: the slight wobble in each stem, the variation in petal size, the way one sprig leans slightly left while its neighbor tilts right. These imperfections are what make the design feel alive rather than manufactured.
The lavender sprigs on this white base create a pattern that reads as textile-like from a distance. The purple against white is a classic combination that never feels forced. Up close, each individual sprig reveals itself as a tiny painting with its own character. The white base is doing essential work here: it provides the contrast that makes the purple legible and the negative space that keeps the pattern from feeling crowded.
The almond shape suits botanical art well. The tapered tip mirrors the pointed form of the lavender buds, creating a visual harmony between the nail shape and the painted subject. Short square nails would truncate the sprigs and lose that proportional relationship.
Design Breakdown:
Delicate botanical illustration on a clean white ground. The simplicity of the palette is the strength.
Base Color: Bright, opaque white. The sprigs need a clean, high-contrast background.
Nail Shape: Medium almond. The tapered tip echoes the pointed lavender bud forms.
Design Element: Thin purple stems with small bud clusters at the tips, painted across all nails at varying angles.
Finish: High-gloss top coat to protect the fine line work.
Get The Look at Home:
Use the thinnest liner brush you have. The stems need to be delicate enough to read as stems, not green stripes.
- White base: Two to three thin coats of opaque white. Let each coat dry fully.
- Stems: Using a thin liner brush and green polish, draw curved lines from the base of the nail toward the tip. Vary the angle and curvature on each nail.
- Bud clusters: With a small dotting tool and purple polish, place tiny dots along the upper third of each stem. Cluster three to five dots at the tip of each stem.
- Variation: Not every nail needs the same number of sprigs. Two on one nail, three on another creates natural variation.
- Seal: One coat of top coat, applied carefully to avoid dragging the fine stems.
27 Gorgeous Mint Green Nails That Are Popular Right Now (2026)
12.Lemon Grove Tile
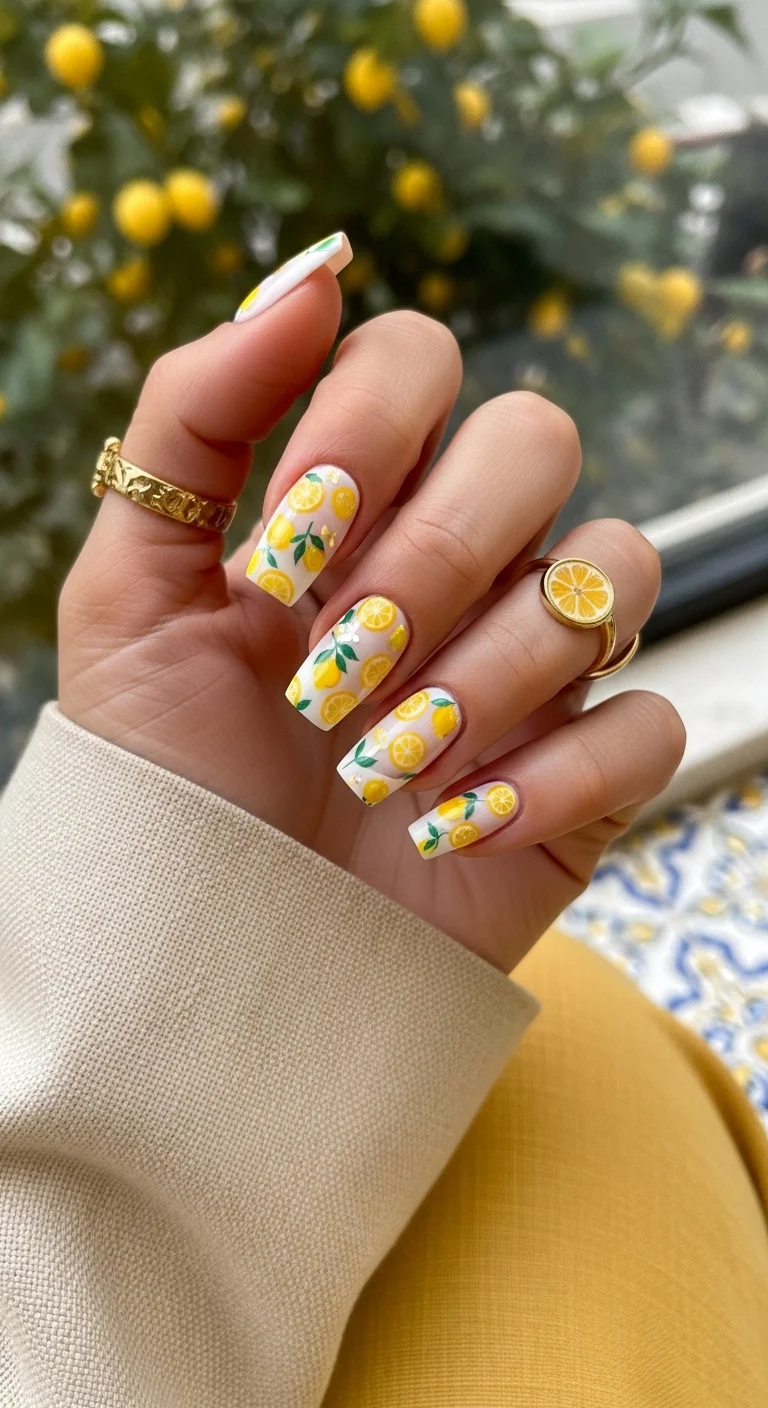
A Mediterranean-inspired lemon print that feels hand-painted on ceramic.
Overview:
White nails with detailed lemon art are a combination that borrows from Italian ceramic traditions. The white functions as a gallery wall or a blank tile, giving the yellow fruit and green leaves maximum visibility. The result is bright, cheerful, and surprisingly elegant for fruit art.
What makes this design work is the level of detail in each lemon. These aren't yellow circles. They're rendered with visible segments, rind edges, and even slight shadow variations that give them dimension. The green leaves attached to brown stems add a botanical quality that elevates the whole thing from "cute fruit pattern" to "intentional illustration."
Long coffin is the right canvas for this level of detail. Each lemon needs enough surface area for the segment lines to be visible. On shorter nails, the fruit would shrink to yellow blobs. The length here is functional: it gives the art room to be detailed.
Design Breakdown:
Detailed botanical illustration on white. The level of rendering is what makes this design special.
Base Color: Bright, opaque white. A clean, streak-free canvas is essential.
Nail Shape: Long coffin. The flat surface provides space for detailed fruit rendering.
Design Element: Hand-painted whole lemons with green leaves and brown stems. Each lemon shows visible segment detail.
Finish: High-gloss top coat to create a ceramic-tile sheen.
Get The Look at Home:
The detail work requires patience. Build the lemons in layers: base shape first, then segments, then leaves, then stems.
- White base: Three thin coats of opaque white. Let each coat dry fully.
- Lemon shapes: Paint yellow ovals on each nail. Vary the sizes and angles. Two to three lemons per nail.
- Segment lines: With a fine brush and white polish, draw radiating lines inside each lemon to show the segments.
- Stems: Connect the lemons with thin brown lines using a liner brush.
- Leaves: Paint small almond-shaped leaves along the stems using two shades of green for depth.
- Seal: Two coats of top coat to smooth the raised texture of the layered art.
13.Dark Chrome & 3D Flower
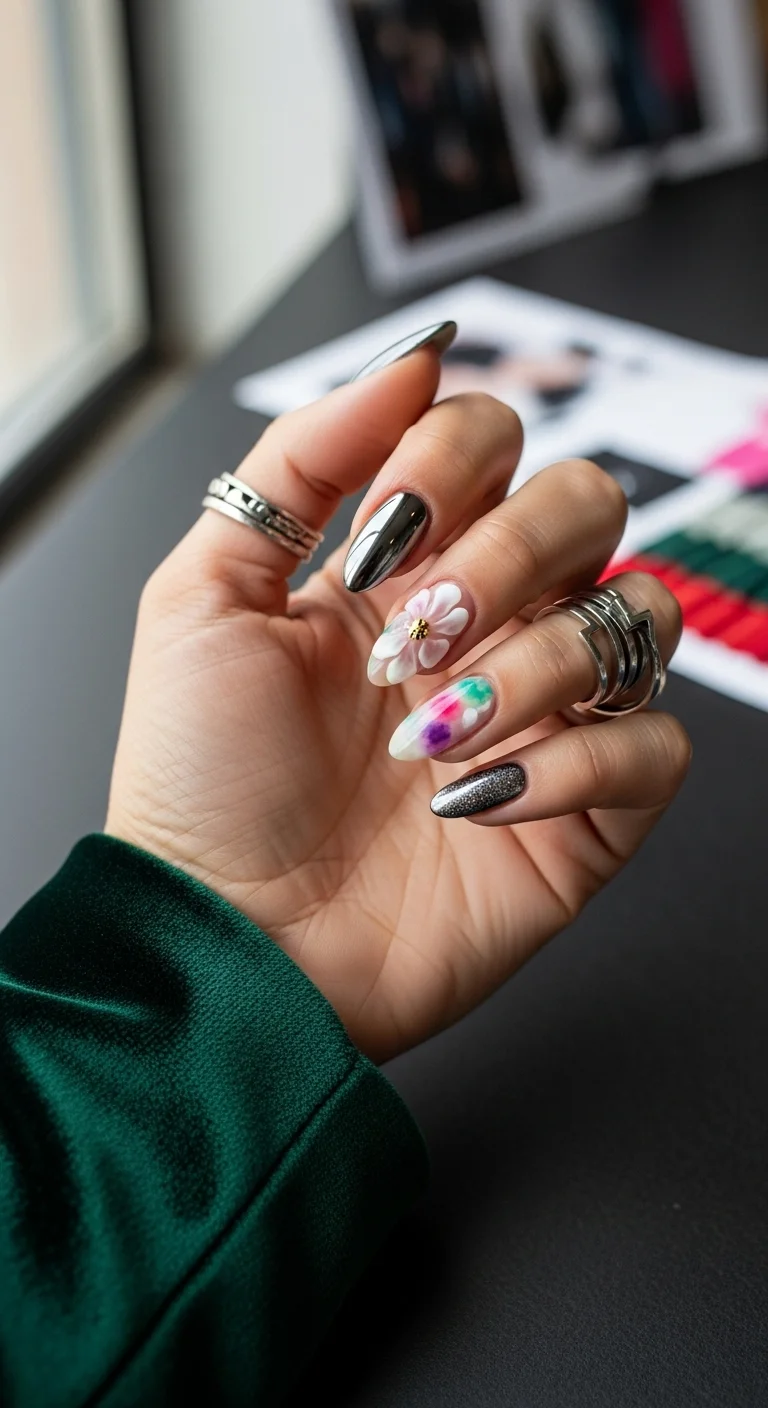
A moody, editorial mix of metallics, 3D texture, and watercolor softness.
Overview:
This is a set that refuses to pick a lane. Dark gunmetal chrome on most nails creates a moody, almost armored look. Then the ring finger breaks the pattern entirely with a 3D white flower that sits on top of the nail like a piece of jewelry. The middle finger splits the difference with a watercolor-style blend of purple, green, and white that bridges the dark chrome and the white flower.
The contrast is the entire point. Chrome nails are hard and reflective; the 3D flower is soft and organic; the watercolor nail is fluid and abstract. Three completely different finishes on one hand, held together by a restrained color palette of dark grey, white, purple, and green.
The 3D flower is the centerpiece, but it's also the weakest link practically. Raised nail art catches on everything: hair, clothing, headphone cables. Sealing the base of the flower with a thick bead of gel helps, but budget about a week before something catches. The chrome nails, by contrast, are extremely durable. Chrome powder sealed under a no-wipe top coat can last three weeks without significant wear.
Design Breakdown:
Mixed media set. Three different finishes unified by a dark, muted palette.
Base Color: Dark gunmetal chrome on most nails. White on the flower accent nail. Clear or sheer on the watercolor nail.
Nail Shape: Medium almond. The curved shape suits both the metallic and the organic elements.
Design Element: Chrome powder finish on most nails. A 3D white flower with a gold center on one accent nail. Abstract watercolor blobs in purple and green on another accent nail.
Finish: Ultra-glossy chrome on most nails; high-gloss over the art nails.
Get The Look at Home:
This set uses three different techniques. Work in rounds: chrome first, then watercolor, then the 3D flower last.
- Chrome nails: Apply black gel polish and cure. Apply no-wipe top coat and cure. Rub chrome powder onto the surface with a silicone applicator. Buff until smooth. Seal with another layer of no-wipe top coat.
- Watercolor nail: On a white or clear base, apply small blobs of purple and green gel. Use a brush dipped in alcohol to blur the edges. Cure.
- Flower nail: On a white base, use builder gel or 3D gel to sculpt five petals around a central gold bead. Cure between layers to build height.
- Edge seal: Apply top coat around the base of the 3D flower to reduce snagging.
- Final top coat: Apply glossy top coat over all nails for a unified finish.

28 Stunning Baddie Summer Hairstyles for 2026 🔥☀️
14.Tropical Monstera Leaf

A bold, botanical statement that turns your nails into a tropical greenhouse.
Overview:
Tropical leaf art on nails has a tendency to look like a beach souvenir shop poster. The difference between that and this is the rendering style. These leaves are painted with visible vein detail and varying shades of green, which gives them a botanical-illustration quality rather than a cartoon one. The monstera leaf with its characteristic holes is immediately recognizable, and the palm fronds add a second leaf type that creates visual variety.
The white base is essential. Green leaves on a colored base would lose their legibility. On white, every shade of green from lime to forest is visible, and the leaf shapes are crisp against the clean background. The white space between leaves is as important as the leaves themselves because it prevents the pattern from becoming a solid green mass.
The almond shape works well for leaf art because the tapered tip naturally frames the pointed ends of tropical leaves. The leaves can extend from cuticle to tip without looking truncated. On square nails, the leaf tips would need to be cut short, which robs them of their natural swept-back quality.
Design Breakdown:
Botanical illustration on a white ground. The variety of green shades creates depth.
Base Color: Bright, opaque white. Clean and streak-free.
Nail Shape: Medium almond. The tapered tip frames the pointed leaf forms.
Design Element: Large-scale tropical leaves (monstera, palm fronds) painted in multiple shades of green. Visible vein detail and varying leaf sizes.
Finish: High-gloss top coat to protect the detailed painting.
Get The Look at Home:
Work from the largest leaf to the smallest. The big shapes establish the composition; the smaller leaves fill gaps.
- White base: Two to three coats of opaque white. Let dry fully.
- Primary leaf: Using a medium brush and medium green, paint the largest leaf shape on each nail. For monstera, paint an oval and cut out the characteristic holes with acetone on a small brush.
- Secondary leaves: Add smaller palm fronds or leaf shapes in a darker green around the primary leaf.
- Vein detail: Using a thin liner brush and a darker green, paint the central vein and branching veins on each leaf.
- Color variation: Mix a lighter green for highlights on the leaf edges. This creates dimension.
- Seal: Two coats of top coat to smooth the raised texture of the layered art.
15.Copper Chrome & Turquoise Floral
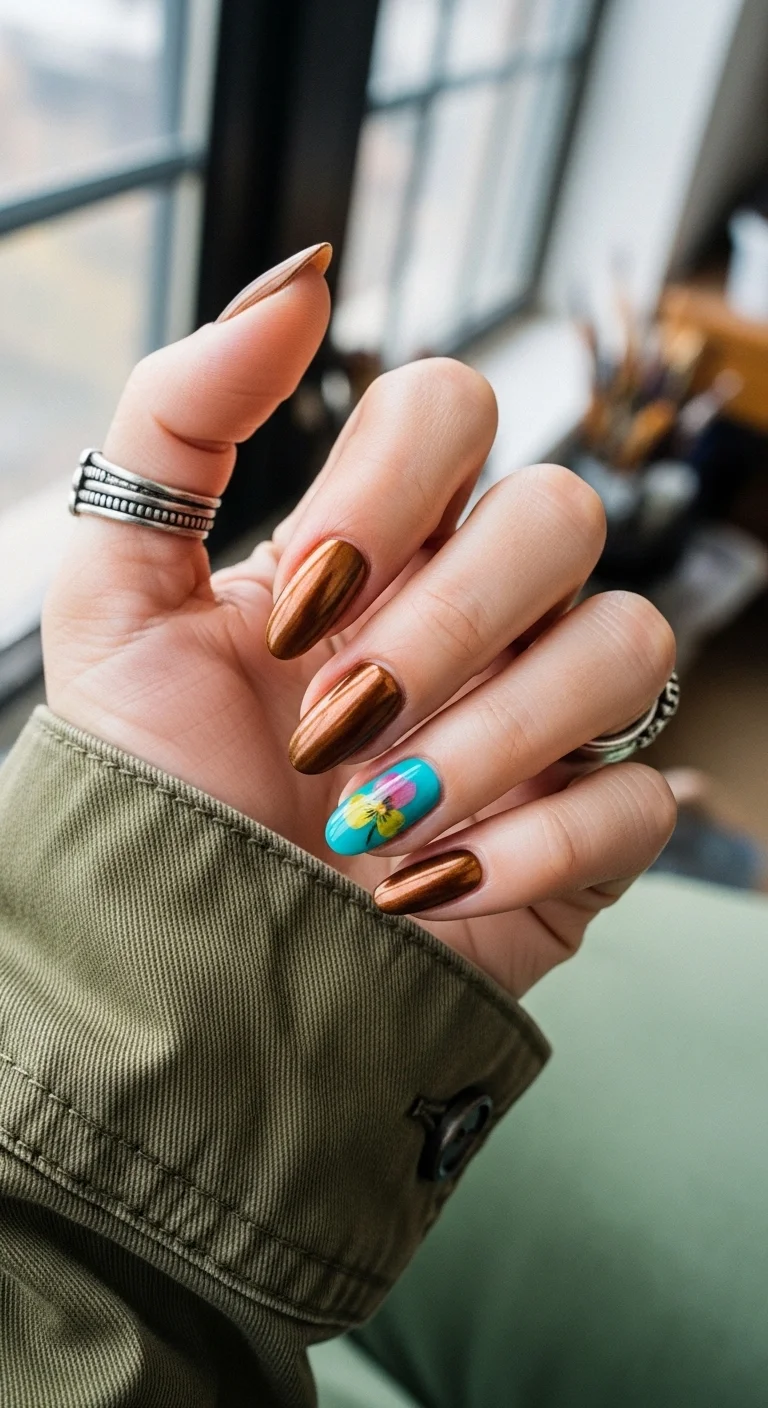
Warm copper meets cool turquoise for an unexpected color collision.
Overview:
Bronze chrome and turquoise is a pairing borrowed from Southwestern jewelry. The warm copper tone of the chrome creates a rich, almost antiqued metallic base. Then the ring finger breaks the pattern with a bright turquoise base topped with a floral illustration in pink, yellow, and green. The two colors shouldn't work together on paper. In practice, the warmth of the copper makes the turquoise look even cooler by comparison, and the turquoise makes the copper look even warmer.
The floral art on the turquoise nail adds a third layer of contrast. Where the chrome is hard and reflective, the painted flower is soft and organic. The pink petals and yellow center introduce warm tones that tie back to the copper, creating a visual bridge between the two dominant colors.
Chrome nails require specific technique. The powder needs a no-wipe gel top coat to adhere to, and the surface needs to be smooth for the chrome to lay flat. Any bumps in the base coat show through as irregularities in the chrome finish. If you're new to chrome, practice on a single nail first.
Design Breakdown:
Chrome metallic with one contrasting accent nail. The color collision is intentional.
Base Color: Warm bronze or copper chrome on most nails. Bright turquoise on the ring finger accent.
Nail Shape: Medium almond. The curved surface showcases the chrome's reflective quality.
Design Element: Full-coverage copper chrome on most nails. A hand-painted floral design on the turquoise accent nail.
Finish: Ultra-glossy chrome on the metallic nails; high-gloss over the accent art.
Get The Look at Home:
The chrome nails and the accent nail use completely different techniques. Do the chrome first, then the accent art.
- Chrome nails: Apply a dark base (black or dark brown) and cure. Apply no-wipe top coat and cure. Rub copper chrome powder with a silicone applicator. Buff smooth. Seal with no-wipe top coat.
- Accent nail: Paint two coats of bright turquoise. Let dry.
- Flower art: Using a small brush, paint pink petals in a circular arrangement. Add a yellow center dot and small green leaves.
- Blend the transition: Where the turquoise meets the chrome nails, make sure the colors don't overlap. Clean edges are key.
- Seal: Top coat over everything for a unified finish.

29 Best Tropical Vacation Nails for Women in 2026 🌴
16.Gold-Tipped Martini Frenchie
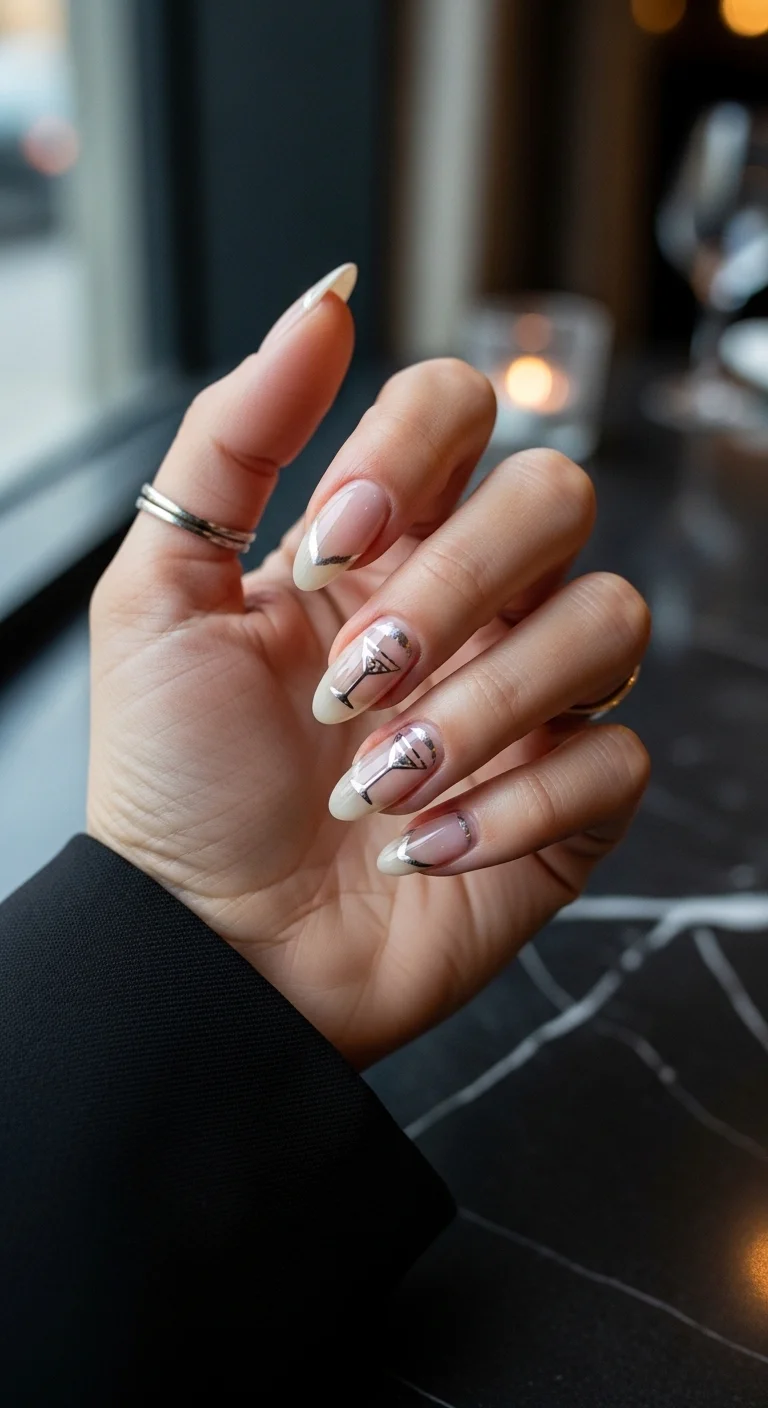
A sophisticated French manicure with a playful cocktail twist.
Overview:
A French tip is the safe choice. A French tip with gold metallic accents and a hand-painted martini glass on the ring finger is the choice that makes people lean in closer. The design takes the classic French structure and adds two layers of personality: a thin gold line at the smile line and a detailed cocktail illustration that rewards close inspection.
The gold accent line is barely a millimeter wide, but it changes everything about how the French tip reads. Without it, you have a standard white French. With it, the transition between nude base and white tip becomes a deliberate design element rather than just a color boundary. It's the kind of detail that separates "I got my nails done" from "I designed my nails."
The martini glass on the ring finger is the conversation starter. It's painted in fine black lines with a pink olive detail, creating a tiny illustration that stands out against the otherwise understated set. The restraint of the other four nails is what makes the accent work. If every nail had a cocktail illustration, the design would feel busy. One accent nail is enough.
Design Breakdown:
Classic French structure with metallic and illustrated accents on specific nails.
Base Color: Sheer milky nude for the French base. White for the tips.
Nail Shape: Medium almond. The curved shape complements both the French line and the cocktail illustration.
Design Element: White French tips with a thin gold metallic line at the smile line. Hand-painted martini glass with an olive on the ring finger.
Finish: High-gloss top coat to unify the gold, white, and illustration elements.
Get The Look at Home:
The gold line is the hardest part. Striping tape is more forgiving than freehand metallic paint.
- Nude base: Two coats on all nails. Let dry fully.
- White tips: Using a French liner brush, paint the smile line from sidewall to center. Two-stroke method.
- Gold line: Apply thin gold striping tape along the smile line, or paint a narrow gold line with a striper brush. Press firmly.
- Martini glass: On the ring finger, use a thin liner brush and black polish to draw a V-shaped glass with a stem and base. Add a small pink dot for the olive.
- Cleanup: An angled brush dipped in acetone sharpens the French smile line and the gold accent.
- Seal: Two coats of top coat. The first locks the gold tape; the second smooths the surface.
17.Neon Pink & Green Tip Mix
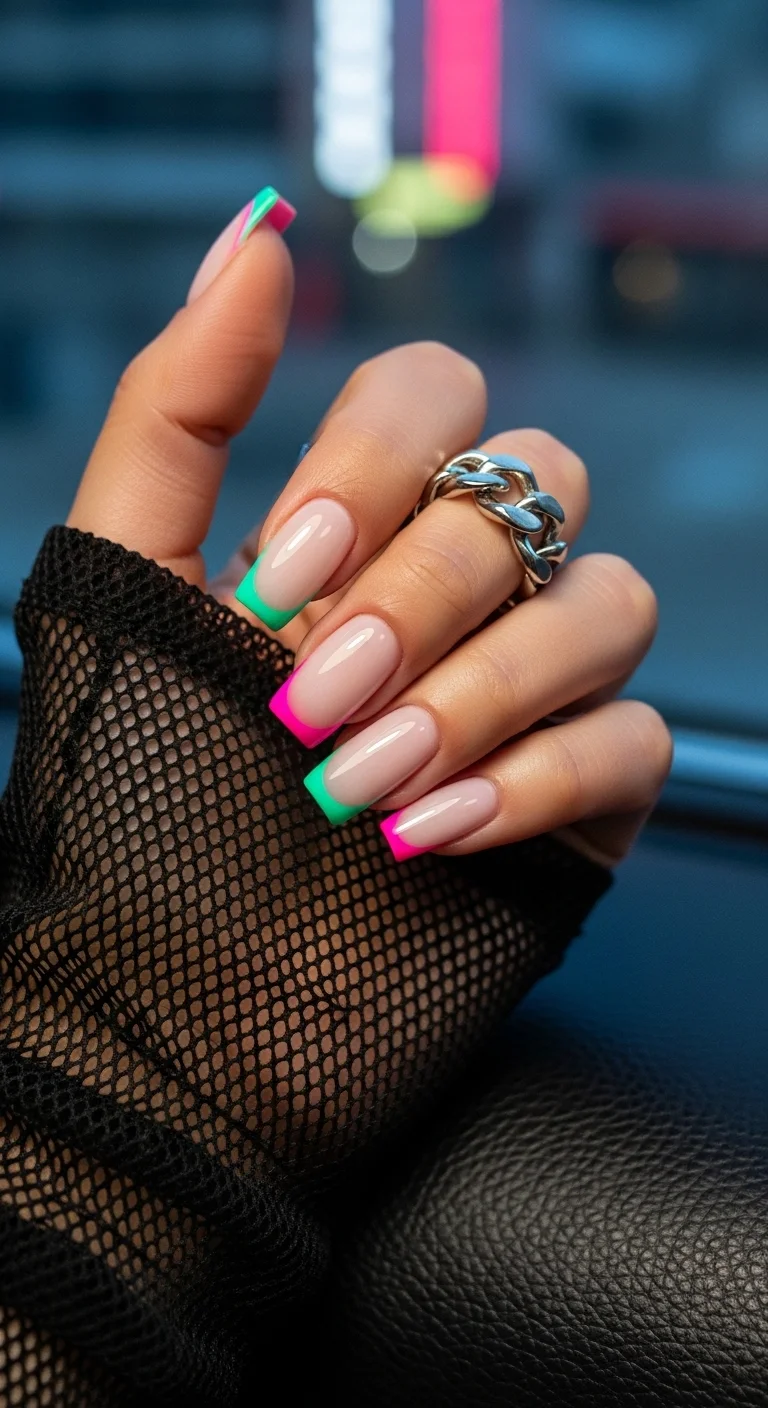
Two neon colors that shouldn't work together but absolutely do.
Overview:
Alternating neon tips is a simple concept that creates a high-impact result. The neon pink and neon green share the same intensity level, which means neither color dominates. They sit next to each other with equal visual weight, creating a push-pull effect that keeps your eye moving across the hand.
The nude base is doing critical work. Without it, neon pink and neon green together would read as costume jewelry. The neutral middle ground between the two colors gives the eye a place to rest, which makes the neons feel like calculated pops of color rather than an explosion. The long square shape provides a wide, flat canvas for the French tips, which matters because neons need surface area to register at their full intensity.
Neon formulas are notoriously inconsistent across brands. Some are opaque in one coat; others need three. The safest approach is to apply a white base layer under the neon, which makes even sheer formulas look vibrant. Without the white undercoat, neons sheer out against the natural nail tone and lose their electric quality.
Design Breakdown:
Two-tone neon French tips on a neutral base. The alternation creates the rhythm.
Base Color: Sheer milky nude. The natural nail should be visible through the base.
Nail Shape: Long square. The flat tip gives the neon French line a clean, geometric edge.
Design Element: Alternating neon pink and neon green French tips across the hand.
Finish: High-gloss top coat to make the neons look wet and saturated.
Get The Look at Home:
Map your color layout before painting. Decide which fingers get pink and which get green.
- Nude base: Two coats on all nails. Let dry fully.
- White undercoat: Paint white tips first on all nails. This makes the neons pop.
- Neon tips: Paint neon pink on the designated nails and neon green on the others, directly over the white tips. Two thin coats for each color.
- Cleanup: An angled brush dipped in acetone sharpens every smile line. This step is non-negotiable on a sheer base.
- Seal: One thick coat of glossy top coat. Cap the free edge.

26 Stunning Summer Braided Hairstyles for Women 2026 ☀️💇♀️
18.Olive Chrome Shimmer
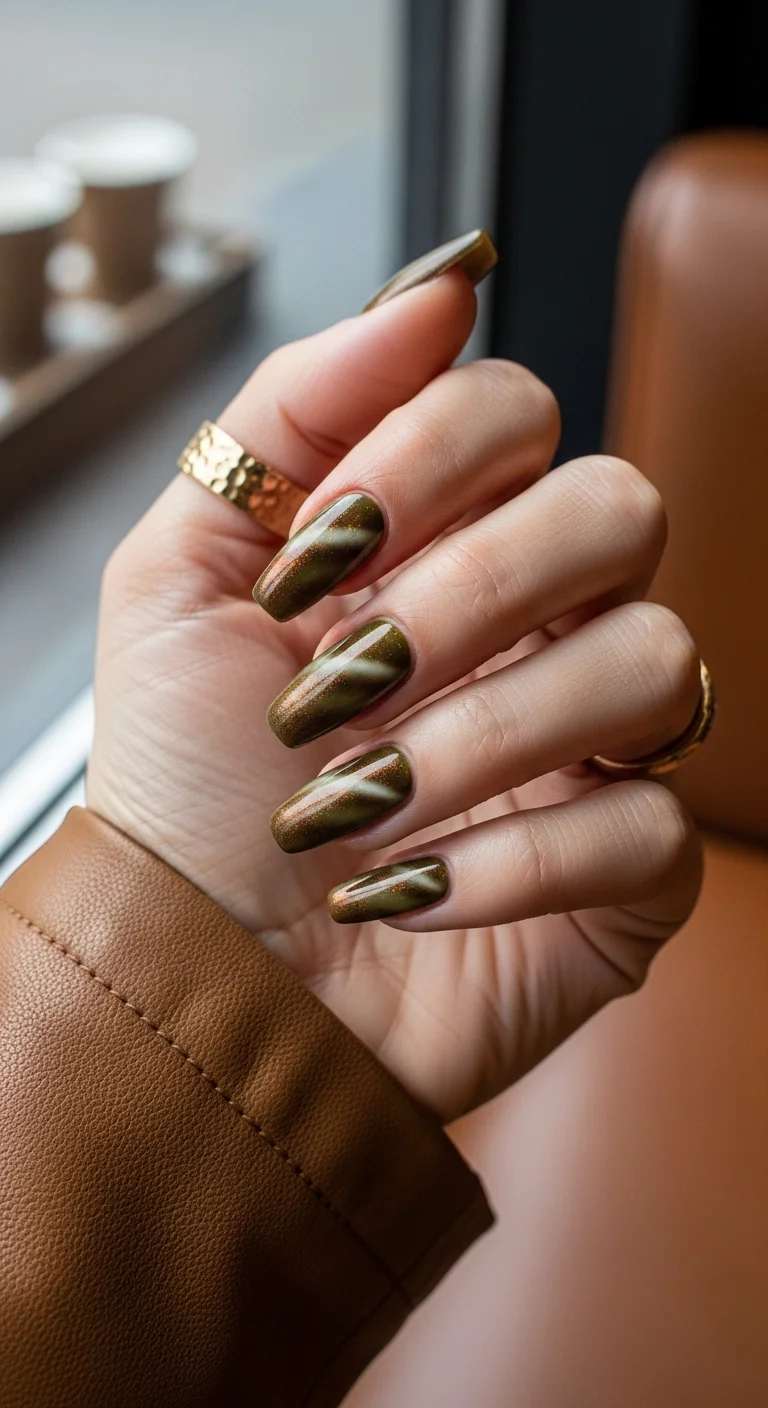
An earthy metallic that feels more sophisticated than your average green.
Overview:
Olive green metallic is a color that doesn't get enough attention. It sits between gold and green, which means it reads as warm and earthy rather than cold and synthetic. The gold shimmer particles embedded in the formula catch light at different angles, creating a dimensional effect that flat olive cream can't achieve.
The subtle white swirl detail on a few nails adds a layer of complexity without overwhelming the metallic base. The swirls look like wisps of smoke or veins of quartz running through stone. They're painted thinly enough that the olive shows through, which keeps the two elements integrated rather than stacked.
Long coffin is an excellent shape for metallic finishes. The flat tip and long sides create a large reflective surface that shows off the color shift in the shimmer. The length also lets the white swirls travel across the nail at angles that wouldn't be possible on shorter shapes.
Design Breakdown:
Metallic earth tone with subtle abstract detail. The shimmer does the heavy lifting.
Base Color: Metallic olive green with gold shimmer particles.
Nail Shape: Long coffin. The flat surface maximizes the metallic display.
Design Element: Subtle white swirl lines on two or three nails. Remaining nails are solid metallic olive.
Finish: Built-in metallic sheen with a glossy top coat for depth.
Get The Look at Home:
Apply the metallic base first, then add the white swirls on top once fully dry. Painting into wet metallic creates muddy streaks.
- Base coat: One coat. Let dry.
- Metallic base: Two thin coats of olive chrome. Brush in one direction to minimize stroke lines. Let dry fully.
- White swirls: On two or three nails, use a striper brush and white polish to draw thin, curving lines across the nail. Vary the angle and spacing.
- Swirl pressure: Press harder in some sections to widen the line and lift lighter to taper it. The variation creates movement.
- Seal: One coat of glossy top coat to smooth the surface and deepen the metallic.
19.Brown, Sage & Nude Trio
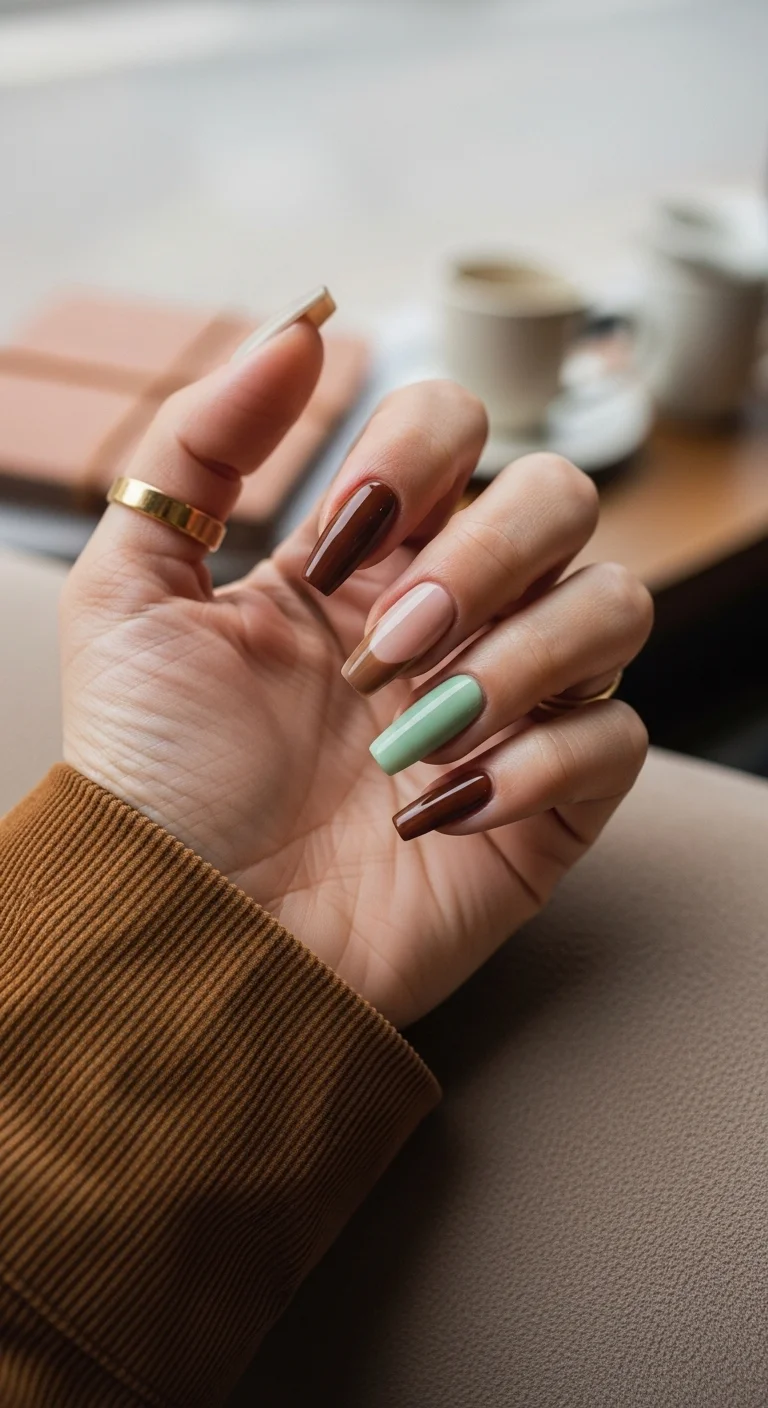
An earthy, grounded palette that proves neutral doesn't have to mean boring.
Overview:
Color-blocking three earth tones across one hand is a design that works because all three colors share warm undertones. The chocolate brown, the warm nude, and the sage green sit next to each other on the color wheel without any jarring transitions. Each color has enough contrast from the others to be distinct, but they're all pulling in the same temperature direction.
The alternation pattern matters. Brown, nude, green, brown, nude (or a similar rotation) creates a rhythm that keeps the eye moving. All three colors on adjacent nails would feel random. Alternating them creates intentionality. It's the difference between "I couldn't decide" and "I chose this specific sequence."
This palette works across seasons, which is unusual for a July nail article. Most summer designs lean bright and saturated. These muted earth tones read as sophisticated year-round. The long coffin shape adds a modern edge that prevents the subdued colors from looking conservative.
Design Breakdown:
Three-color rotation using earthy, warm-toned shades. The sequence is the design.
Base Color: Three solid colors alternating across the hand: dark chocolate brown, warm nude, and muted sage green.
Nail Shape: Long coffin. The length adds a contemporary edge to the muted palette.
Design Element: None. Solid color coverage, alternating across fingers.
Finish: High-gloss top coat to enrich each color and create a unified sheen.
Get The Look at Home:
Paint all nails of one color first, then move to the next. This prevents color contamination on the brush.
- Map the sequence: Decide which fingers get which color. Write it down if you need to.
- Brown nails: Two coats of chocolate brown. Let dry.
- Nude nails: Two coats of warm nude. Let dry.
- Green nails: Two coats of sage green. Let dry.
- Check consistency: Compare the opacity across all colors. If one looks thinner than the others, add another coat.
- Seal: One coat of glossy top coat across all nails.
30 Trendy Summer French Tip Nail Designs for 2026 💅
20.Pastel Rainbow Frenchie
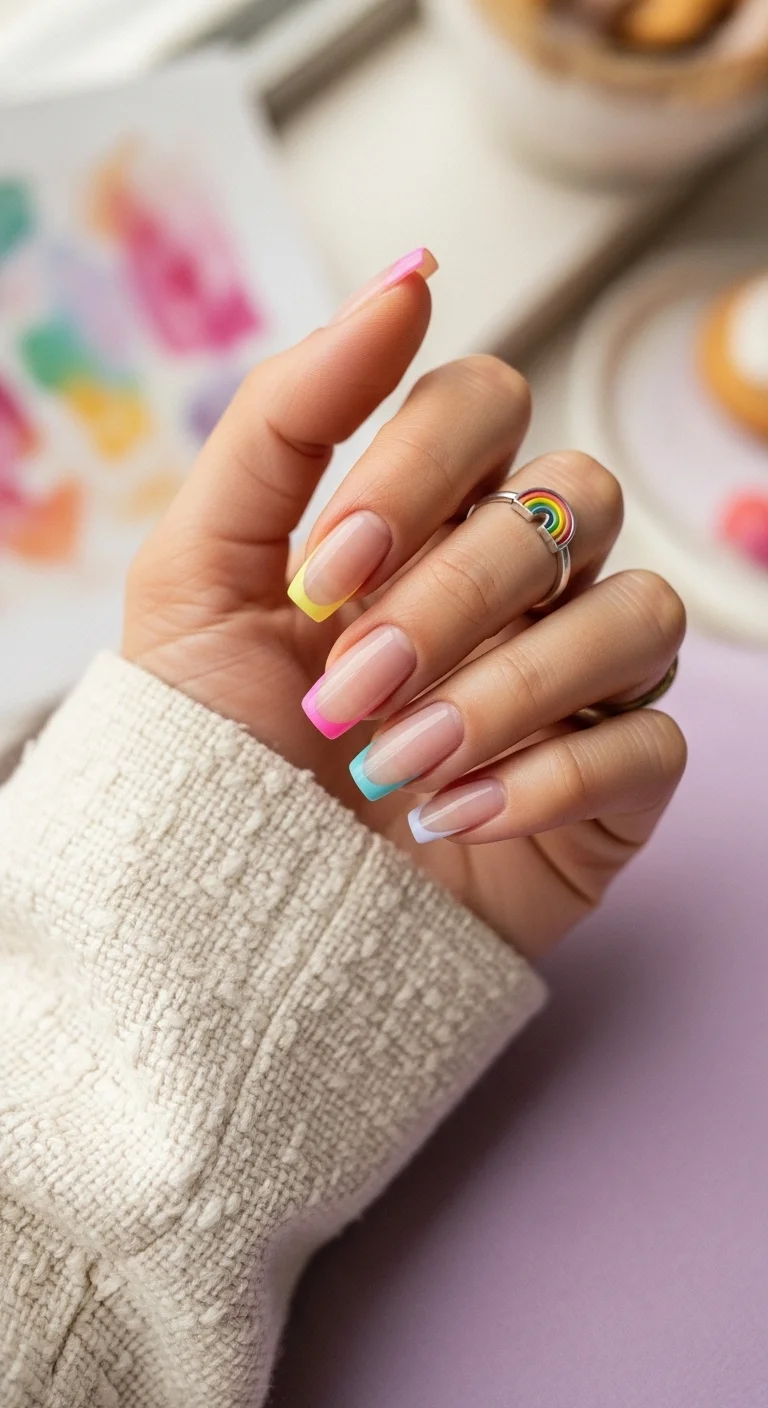
A soft rainbow that's more sherbet than neon, perfect for everyday wear.
Overview:
Rainbow French tips are one of those designs that sounds like it should be loud. This version isn't. The pastel tones keep each color soft enough that the overall effect reads as cheerful rather than overwhelming. Your eye registers "rainbow" before it registers any individual color, which means the design works as a unified concept rather than five different polishes competing for attention.
The nude base is what makes this wearable. A clear or white base would make the pastels look like Easter candy. The milky nude warms the palette and grounds each color against a skin-like background. The result is a French tip that feels colorful without being loud.
The challenge is consistency in the smile line. Each pastel tip needs to be the same thickness and curvature across all five nails. Because the colors are all different, uneven tips are more noticeable than they would be with a uniform color. An angled brush dipped in acetone is your best friend for cleaning up the smile line on each nail.
Design Breakdown:
Five different pastel tips on a unifying nude base. The shared undertone keeps it cohesive.
Base Color: Sheer milky nude. Warm enough to complement all five pastel shades.
Nail Shape: Long square. The flat tip gives each pastel color a clean, geometric frame.
Design Element: Each nail tipped in a different pastel color: pink, yellow, blue, lavender, peach (or similar rainbow rotation).
Finish: High-gloss top coat to unify the five colors under a single sheen.
Get The Look at Home:
Work one color at a time across both hands to maintain consistency in the smile line thickness.
- Nude base: Two coats on all nails. Let dry fully.
- Color mapping: Decide which finger gets which pastel color. Match corresponding fingers on both hands.
- Paint tips one color at a time: Paint all pink tips first, then all yellow tips, and so on. This keeps your brush clean and your technique consistent.
- Cleanup: An angled brush dipped in acetone sharpens each smile line. Do this before moving to the next color.
- Comparison: Hold both hands side by side. If any tip is noticeably thicker or thinner, fix it before top coating.
- Seal: One coat of glossy top coat. Cap the free edge on every nail.
21.Peach Sunset Ombre
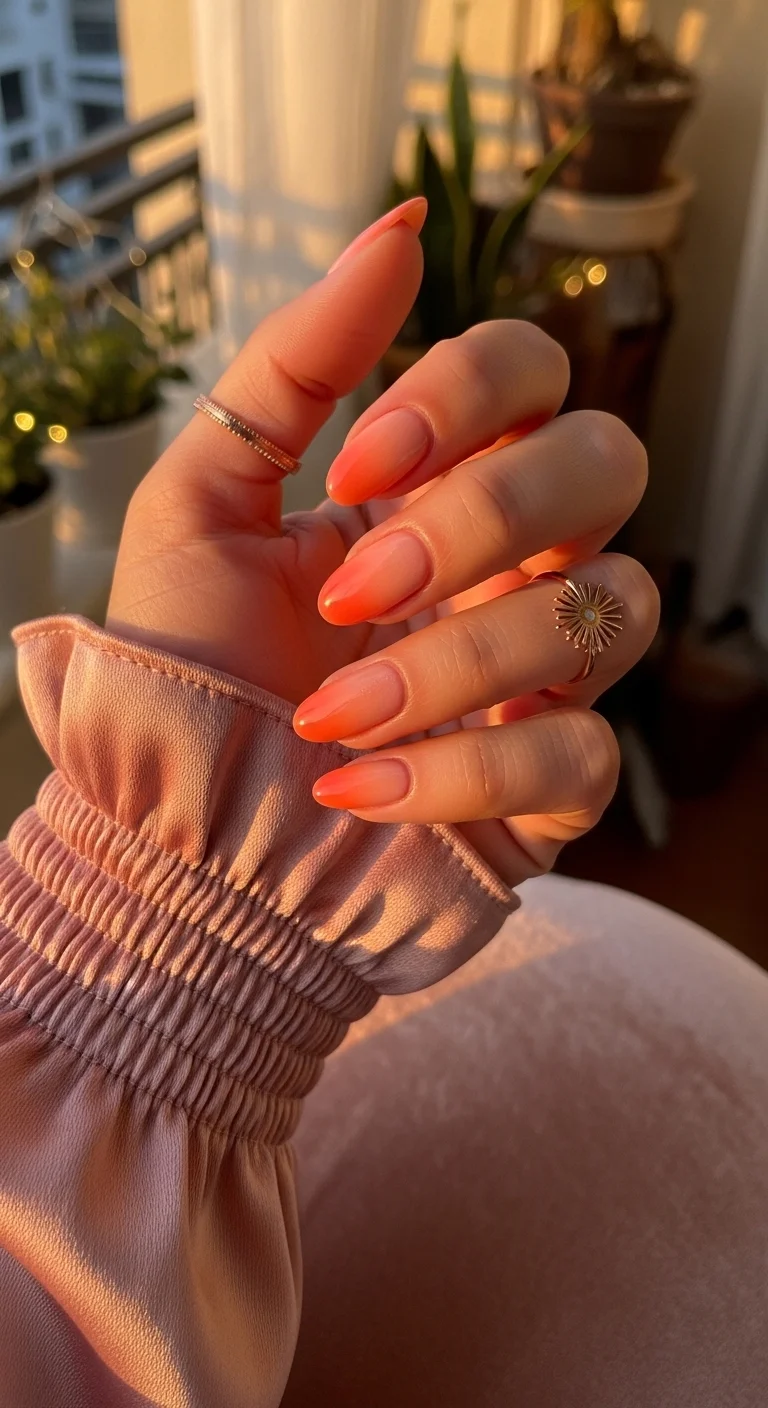
A warm gradient that catches golden-hour light like nothing else.
Overview:
A two-color gradient that transitions from sheer peach at the cuticle to a more saturated coral at the tip is one of those designs that looks effortless but depends entirely on the blend. The transition needs to be seamless, with no visible line where the two colors meet. A makeup sponge creates that blend, but the pressure and moisture level of each dab determines whether you get a smooth fade or a mottled patch.
The warm peach-to-coral range is flattering across most skin tones because it mirrors the natural warmth in human skin. The gradient essentially extends the natural color of your fingertips into a deliberate design. That's why this palette works when other ombre combinations might look disconnected from the hand.
The almond shape is ideal for vertical gradients. The tapered tip creates a natural focal point where the deepest color concentrates, and the wider base near the cuticle gives the lighter color room to fade. The shape does half the work of the gradient for you.
Design Breakdown:
A warm vertical gradient. The blend quality is everything.
Base Color: Sheer peach at the cuticle fading to saturated coral at the tips.
Nail Shape: Medium almond. The tapered tip concentrates the deeper color.
Design Element: Sponge-applied vertical ombre. No additional art.
Finish: High-gloss top coat to blend the gradient transitions and add warmth.
Get The Look at Home:
The sponge technique matters more with sheer colors. Each layer needs to dry before the next goes on.
- Base coat: One coat of standard base. Let dry.
- Sponge setup: Paint a stripe of peach and a stripe of coral side by side on a makeup sponge. Dab on paper first to remove excess.
- First pass: Press the sponge onto the nail with peach at the cuticle and coral at the tip. Dab gently. The first layer will be sheer.
- Build opacity: Re-apply polish to the sponge and repeat three to four times, letting each layer dry for thirty seconds.
- Dry completely: Wait at least ten minutes. The sponge leaves a textured surface that needs time to level.
- Seal: Two coats of thick top coat to smooth the sponge texture and intensify the gradient.

30+ Chic Pool Party Hairstyles for Summer 2026 🌊👙
22.Hibiscus French Tip
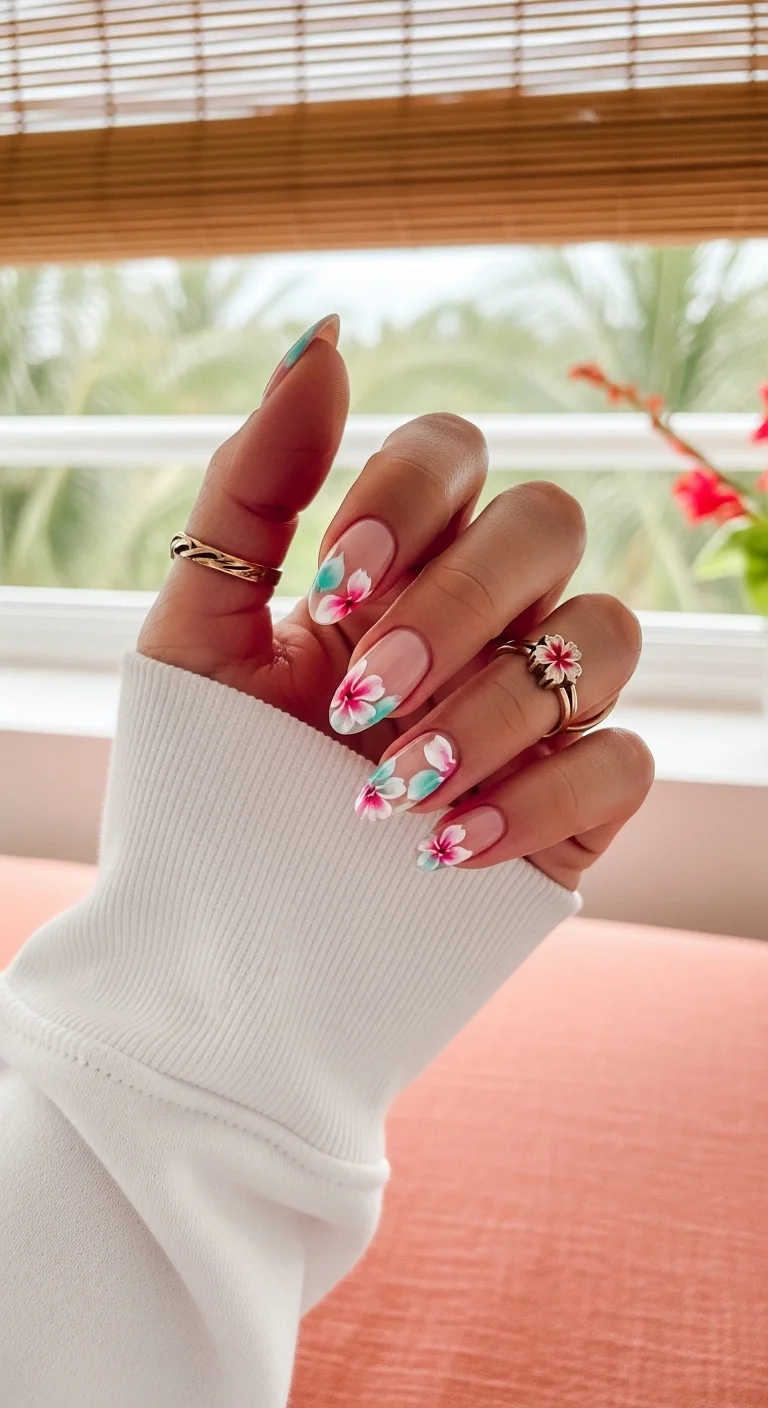
A tropical floral that manages to be both delicate and eye-catching.
Overview:
Putting floral art on a French tip design creates a layered effect where the structured smile line provides the architecture and the flowers provide the personality. The hibiscus blooms here are painted in pink with darker pink centers, and the teal leaves add a cool-toned counterpoint that keeps the warm palette from feeling monotonous.
The sheer nude base keeps the overall look light. Without it, pink flowers on pink tips would blend into each other and lose definition. The nude negative space between the cuticle and the French line gives each element room to be seen clearly. It's the nail equivalent of leaving white space around a painting on a gallery wall.
The teal in the leaves is an unexpected color choice that elevates the design. Most floral nail art uses standard green for foliage. Teal introduces a cool tone that creates a subtle temperature contrast against the warm pink petals. It's a small decision that changes the entire mood from "spring garden" to "tropical resort."
Design Breakdown:
French tips with botanical illustration layered on top. Two different techniques on the same nail.
Base Color: Sheer milky nude for the base. Soft pink for the French tips.
Nail Shape: Medium almond. The curved shape complements the organic flower forms.
Design Element: Soft pink French tips with hand-painted hibiscus flowers (pink petals, dark pink centers) and teal leaves placed near the smile line.
Finish: High-gloss top coat to protect the floral detail.
Get The Look at Home:
Paint the French tips first, then add the floral art on top. The flowers need a dry surface to sit cleanly.
- Nude base: Two coats on all nails. Let dry fully.
- Pink tips: Using a French liner brush, paint soft pink smile lines. Two thin coats for opacity.
- Hibiscus petals: On two or three nails, paint five-petal flowers near the smile line using pink polish. Add a darker pink dot in each center.
- Teal leaves: Using a thin brush and teal polish, paint small leaves around the flowers. Two to three leaves per flower.
- Cleanup: An angled brush dipped in acetone sharpens the French smile line.
- Seal: One thick coat of top coat to smooth the raised floral art.
23.Sage Green French Tip
A calm, earthy French that pairs with literally everything.
Overview:
Colored French tips are a simple upgrade from the classic white, and sage green might be the most wearable color to try first. It's muted enough to function as a neutral, interesting enough to look intentional, and soft enough that the contrast against a milky base feels gentle rather than stark.
The milky white base is a better choice here than sheer nude. A nude base would warm the overall palette and push the sage toward olive. The milky white keeps the green looking fresh and cool-toned. The result is a French tip that reads as "spring garden" rather than "autumn forest."
Short squoval is the right shape for a subtle French. The compact surface area keeps the colored tip from dominating the hand. Long nails with green tips would draw more attention than this design intends. The short length reinforces the understated, everyday energy.
Design Breakdown:
A colored French tip that prioritizes subtlety over statement.
Base Color: Milky white or semi-sheer off-white. Cool-toned to complement the sage.
Nail Shape: Short squoval. Clean, practical, understated.
Design Element: Sage green French tips on all nails. Same thickness and curvature across each finger.
Finish: High-gloss top coat to unify the green and white.
Get The Look at Home:
Green tips on short nails require a steady hand. The smile line is more visible because there's less nail to distract from it.
- Milky base: Two coats on all nails. Let dry fully.
- Green tips: Using a French liner brush and sage green polish, paint the smile line from sidewall to center. Two thin coats.
- Consistency: Compare the tip thickness across all nails. Adjust before the polish sets.
- Cleanup: An angled brush dipped in acetone sharpens every smile line.
- Seal: One coat of glossy top coat. Cap the free edge.

26 Stunning Sunflower Floral Nails for Spring & Summer 2026 🌻
24.Purple Shimmer Fade
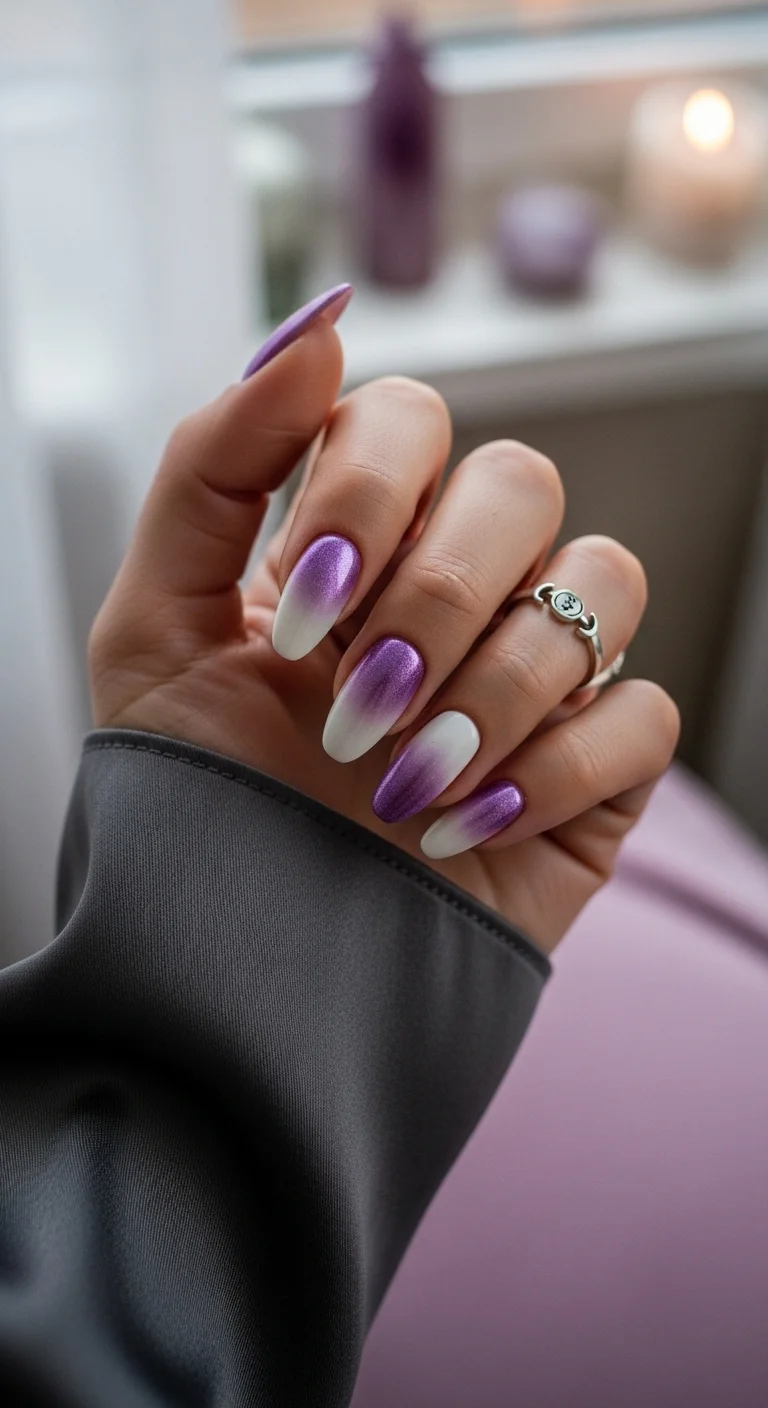
A moody shimmer gradient that looks like twilight settling over snow.
Overview:
Purple shimmer fading to white is an unusual gradient direction. Most ombre designs go dark at the cuticle and light at the tip, or vice versa. This one puts the saturated color at the base and lets it dissolve into clean white at the free edge. The effect is closer to watching ink disperse in water than a standard two-color fade.
The shimmer particles in the purple create a secondary effect within the gradient. Where the purple is densest (near the cuticle), the shimmer is most visible. As the color thins toward the white, the shimmer fades too, creating a transition that's not just about color but about texture and light. That dual-layer transition is what makes this gradient more interesting than a flat-color ombre.
The white tips need to stay truly white for this design to work. If the purple bleeds too far toward the tip, the gradient loses its contrast. Building the fade in thin sponge layers, with the purple concentrated at the base, gives you control over where the transition happens.
Design Breakdown:
A shimmer-to-matte gradient. The transition involves both color and texture.
Base Color: Metallic purple at the cuticle, fading to opaque white at the tips.
Nail Shape: Medium almond. The tapered tip showcases the white end of the gradient.
Design Element: Sponge-applied vertical ombre with shimmer purple at the base and white at the tip.
Finish: High-gloss top coat to blend the gradient and intensify the shimmer.
Get The Look at Home:
The purple needs to be concentrated at the base. Loading too much purple on the sponge pushes the color too far toward the tip.
- White base: Two coats of opaque white on all nails. Let dry fully.
- Sponge setup: Paint a stripe of purple shimmer and a stripe of white on a makeup sponge. The purple should be narrower than the white.
- First pass: Press the sponge with purple aligned at the cuticle. Dab gently. The first layer will be sheer.
- Build the fade: Re-apply and repeat three to four times, keeping the purple concentrated at the base each time.
- Dry completely: Wait at least ten minutes before top coating.
- Seal: Two coats of thick top coat to smooth the sponge texture.
25.Bold Hibiscus Bloom
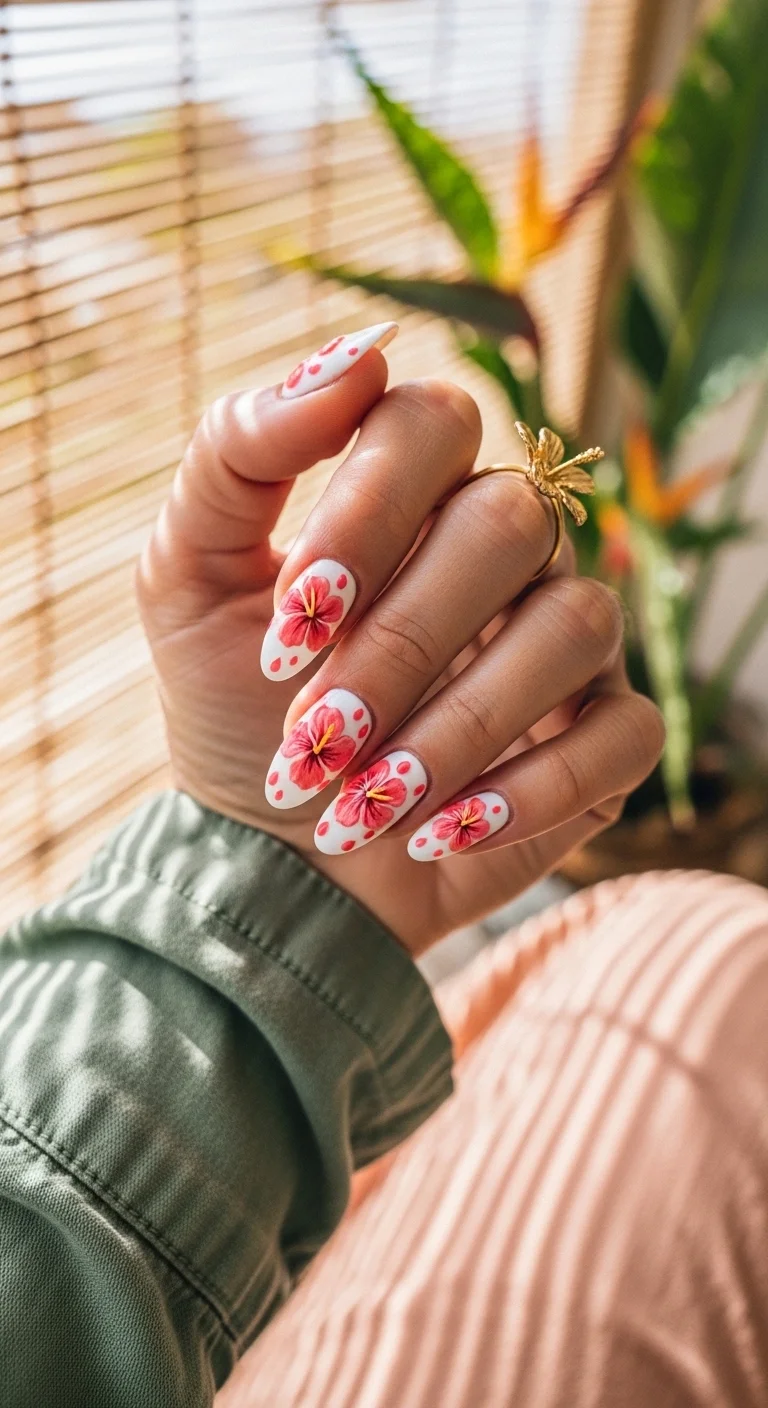
A statement floral that's loud, confident, and unapologetically tropical.
Overview:
Most floral nail art leans delicate. Small petals, thin stems, muted colors. This design goes the opposite direction. The hibiscus blooms here are large, saturated, and painted with visible petal texture that makes them feel almost three-dimensional. They dominate the nail surface rather than decorating it.
The red-pink petals with yellow centers create a warm, high-energy palette that demands attention. The small red dots scattered in the white space between flowers add density and prevent the background from looking empty. The white base is essential: it provides the contrast that makes every color in the petals pop.
Bold floral art like this works best on almond or stiletto shapes because the tapered tip gives each flower a natural frame. The petals can extend toward the point without looking cramped. On square nails, the same flowers would need to be smaller to fit the shape, and at that scale, they lose the bold, oversized quality that makes this design special.
Design Breakdown:
Oversized floral illustration on white. The scale is the design.
Base Color: Bright, opaque white. A clean canvas for the saturated flower colors.
Nail Shape: Medium almond. The tapered tip frames the pointed petal forms.
Design Element: Large hibiscus flowers with red-pink petals, yellow centers, and small red dot accents in the white space.
Finish: High-gloss top coat to make the colors look wet and vibrant.
Get The Look at Home:
Paint the petals first, then add the center details. Building from large shapes to small details is faster than the reverse.
- White base: Two to three thin coats of opaque white. Let dry fully.
- Petal shapes: Using a medium brush and red-pink polish, paint five large petals in a circular arrangement on each nail. Vary the angle and size.
- Center: Add a yellow dot in the center of each flower. While the yellow is wet, drag tiny lines outward into the petals for texture.
- Dot accents: Using a small dotting tool and red polish, place small dots in the white spaces between flowers.
- Dry check: Wait at least five minutes before top coating. Bold colors smear easily.
- Seal: Two coats of top coat to smooth the raised texture of the layered art.

21 Hot Summer Buns Hairstyle Ideas for 2026 ☀️🔥
26.Seashell Stripe Design

A coastal-inspired pattern that's more subtle than typical beach nail art.
Overview:
Seashell-inspired nail art usually means actual shells, starfish, and blue polish. This design takes a different approach. The radiating brown lines on a white base mimic the natural pattern of a scallop shell without illustrating the shell literally. The result is coastal-adjacent without being theme-park about it.
The lines fan out from a single point near the cuticle, widening as they approach the tip. This radial pattern creates a sense of movement that static stripes wouldn't achieve. Each line varies slightly in thickness, which sells the organic quality. Perfectly uniform lines would read as a geometric pattern. These read as a natural formation.
The brown-on-white palette keeps the design grounded. A shell pattern in blue and white would read as nautical. In brown and white, it reads as something you might find on a walk along the shore. The warmth of the brown makes it more versatile than a blue-based coastal design.
Design Breakdown:
Radial line pattern inspired by natural shell formations. The fanning motion is the design.
Base Color: Bright, opaque white. A clean background for the brown linework.
Nail Shape: Medium square coffin. The flat surface gives the radial lines room to fan out.
Design Element: Brown lines radiating from a single point near the cuticle, fanning outward toward the tip. Lines vary in thickness.
Finish: High-gloss top coat to smooth the raised line texture.
Get The Look at Home:
Start each line from the same origin point. If the lines don't converge at the cuticle, the radial effect breaks.
- White base: Two coats of opaque white. Let dry fully.
- Origin point: Mark a small dot near the cuticle center of each nail with a dotting tool. This is where all lines will converge.
- Radiating lines: Using a thin liner brush and brown polish, draw lines from the origin point outward toward the tip. Fan them across the full width of the nail.
- Line variation: Press harder near the tip to widen the lines and lighter near the origin to keep them thin.
- Check convergence: All lines should clearly originate from the same point. Adjust any stray lines before top coating.
- Seal: One coat of top coat to encapsulate the line texture.
27.Teal Poolside Check
A poolside-ready check that evokes tiled surfaces and cool water.
Overview:
Teal and white is a color combination that immediately reads "pool." The bright teal mimics the color of clean water in a tiled pool, and the white grid lines reinforce that association by mimicking grout lines. The result is a design that feels summery without being literal about it.
The grid pattern here is bolder than a typical gingham. The white lines are wider and more widely spaced, which creates a tile effect rather than a fabric one. Each teal square is large enough to read as a distinct block of color, and the white lines between them create a clean, geometric structure.
The square shape is the right call. The flat edges and right angles of the nail mirror the geometry of the grid. Almond or oval would soften the pattern and lose the tiled quality. The square shape reinforces the architectural feel that makes this design work.
Design Breakdown:
A two-color grid with wide spacing. The tile effect is the design.
Base Color: Bright, saturated teal. Opaque in two coats.
Nail Shape: Medium square. The flat edges reinforce the grid geometry.
Design Element: White horizontal and vertical lines creating a large-format grid. Lines are wider than gingham, creating a tile effect.
Finish: High-gloss top coat to make the teal look like water and the white look like clean grout.
Get The Look at Home:
Wider lines are easier to paint than thin ones, which makes this a good entry-level grid design.
- Teal base: Two coats of opaque teal. Let dry fully.
- Horizontal lines: Using a striper brush and white polish, draw horizontal lines spaced about 5mm apart. Let dry.
- Vertical lines: Draw vertical lines at the same spacing, creating a grid of teal squares.
- Line consistency: Try to keep the white lines the same width throughout. Inconsistent line weight weakens the tile effect.
- Seal: Two coats of top coat to smooth the raised line texture.

35 Palm Tree Nail Art Ideas that are the Most Iconic Nail Art Designs 🌴✨
28.Teal Chrome Texture Mix
A mermaid-worthy chrome set with textured accents that catch the light differently.
Overview:
Chrome nails are already attention-grabbing. Adding textured accent nails on top of that creates a set where every finger catches light differently. Most nails are smooth, reflective teal chrome. One nail has a wavy, raised texture that breaks the light into distorted reflections. Another nail features a silver scale pattern that adds a third type of light interaction.
The textured nail is the most technically demanding element. The waves are created with thick builder gel applied over the cured chrome, then sealed with another layer of top coat. The result is a surface that looks like water ripples frozen in metal. It's tactile as well as visual, which is unusual for nail art.
The scale-pattern nail uses a different technique entirely. The overlapping silver scales are painted or stamped over the teal base, creating a fish-scale effect that references mermaid aesthetics without going full costume. The silver against teal is a classic pairing that always looks intentional.
Design Breakdown:
Chrome base with mixed-media accent nails. Three different textures on one hand.
Base Color: Metallic teal chrome on most nails. Teal with silver scale pattern on one accent. Teal with wavy texture on another.
Nail Shape: Long coffin. The extended surface showcases the chrome and texture work.
Design Element: Smooth chrome on most nails. Raised wavy texture on one nail. Silver scale pattern on another.
Finish: Ultra-glossy chrome with textured accents sealed under top coat.
Get The Look at Home:
The chrome base is the foundation. Get it smooth before adding any texture work on top.
- Chrome base: Apply black or dark teal gel and cure. Apply no-wipe top coat and cure. Rub teal chrome powder with a silicone applicator. Buff smooth. Seal with no-wipe top coat.
- Wavy texture: On one nail, apply thick builder gel in wavy lines over the cured chrome. Cure immediately so the waves hold their shape.
- Scale pattern: On another nail, use a thin brush and silver metallic polish to paint overlapping half-circle scales in rows.
- Seal everything: Apply glossy top coat over all nails, including the textured accents, for a unified finish.
29.Abstract Pastel Watercolor
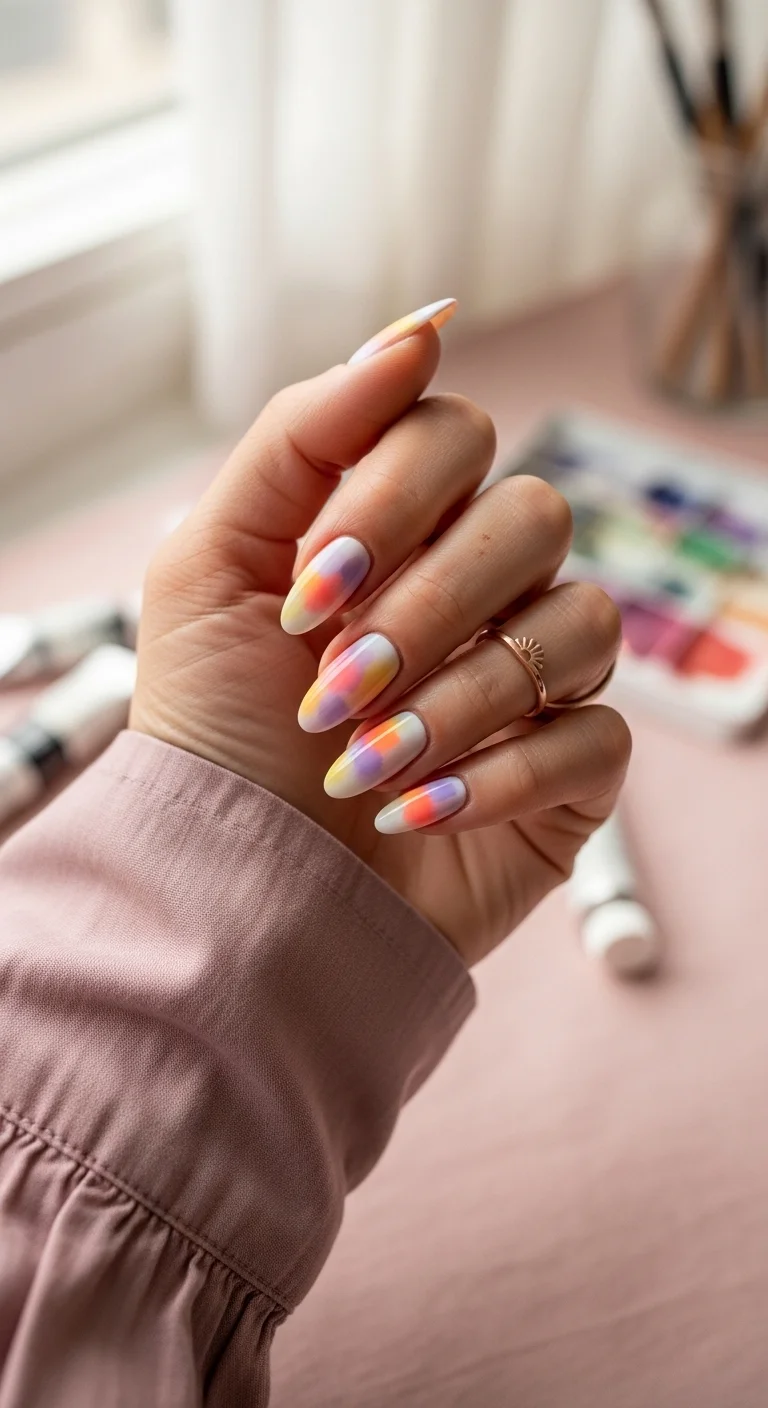
A dreamy, painterly blend that looks like a watercolor study on each nail.
Overview:
Watercolor nails are one of the few techniques where less control produces better results. The blooming effect happens when you intentionally allow colors to spread and blur into each other on a wet surface. The loosest, most gestural application usually looks the most professional, which is good news for anyone who lacks steady hands.
The pastel palette here includes purple, orange, yellow, and pink, all sitting at roughly the same lightness level. That shared value prevents any single color from dominating. The result looks like a faded photograph or a washed-out painting, deliberately soft rather than accidentally muddy.
The technique requires either blooming gel or isopropyl alcohol as a solvent. Blooming gel is more forgiving because it gives you more time to adjust the spread. Alcohol works faster and creates more dramatic blurring, but the window for adjustment is shorter. If you're new to watercolor nails, blooming gel is the safer choice.
Design Breakdown:
Abstract color-blending technique. The softness is the design.
Base Color: Milky white or very pale nude. A blank canvas for the color blend.
Nail Shape: Medium almond. The curved shape complements the flowing, formless watercolor effect.
Design Element: Overlapping blobs of purple, orange, yellow, and pink with deliberately blurred borders. No two nails match.
Finish: Thick glossy top coat to smooth the surface and intensify the color saturation.
Get The Look at Home:
Embrace randomness. The more you try to control the spread, the worse it looks.
- White canvas: Apply a milky white base and let it dry completely.
- Blooming medium: Brush a thin layer of blooming gel over the base. Do NOT cure yet.
- Drop the colors: Using a detail brush, place small blobs of purple, orange, yellow, and pink onto the wet blooming surface. The colors will immediately start spreading.
- Assist the spread: If the colors aren't spreading enough, tap near each blob with a brush dipped in alcohol to encourage more blurring.
- Stop early: Two to three blobs per nail is plenty. The white space between colors is part of the design.
- Cure and seal: Once satisfied, cure the blooming gel. Apply two coats of top coat to smooth the surface.
34 Stunning Summer First Date Hairstyles for 2026 💕☀️
30.Yellow Tip & Rose Gold Accent
A sunshine-yellow French with a metallic accent that adds just enough glamour.
Overview:
Yellow French tips are a cheerful alternative to the classic white. The specific shade here is a soft, buttery yellow, not neon, not mustard. It sits in the middle of the yellow spectrum where it reads as warm and inviting without being aggressive. On a milky white base, the yellow looks fresh rather than loud.
The rose gold accent nail on the ring finger is the detail that elevates the design. Without it, you have yellow French tips, which is pleasant but unremarkable. The metallic accent introduces a different texture and a warmer tone that complements the yellow without matching it. It's the nail people notice second, after the yellow tips register.
Short squoval keeps the design practical. Yellow French tips on long nails would draw more attention than most people want for everyday wear. The shorter length makes the color feel like a subtle choice rather than a bold one. It's a manicure that works at a desk, at brunch, and at a summer barbecue without needing to be explained.
Design Breakdown:
A colored French with one metallic accent nail. Simple structure, warm palette.
Base Color: Milky white or semi-sheer off-white for the French nails. Rose gold metallic on the ring finger accent.
Nail Shape: Short squoval. Practical, clean, modern.
Design Element: Soft yellow French tips on four nails. Full rose gold metallic coverage on the ring finger.
Finish: High-gloss top coat to unify the yellow, white, and metallic elements.
Get The Look at Home:
The yellow tips need to be the same thickness across all four nails. Inconsistency is more visible with colored tips than with white.
- Milky base: Two coats on all nails. Let dry fully.
- Yellow tips: Using a French liner brush and soft yellow polish, paint the smile line on four nails. Two thin coats for opacity.
- Rose gold accent: On the ring finger, apply two coats of rose gold metallic polish. Brush in one direction to minimize strokes.
- Cleanup: An angled brush dipped in acetone sharpens the French smile line on each nail.
- Seal: One coat of glossy top coat. Cap the free edge on every nail.
How to Pick the Right July Design for Your Lifestyle
The biggest mistake people make with summer nail art is choosing a design based on how it looks in a photo rather than how it will function in their actual life. A 3D flower accent nail is stunning in a close-up, but if you type all day or wash dishes by hand, it will catch on something within forty-eight hours. A full chrome set looks incredible under Instagram lighting, but the maintenance involved in keeping the finish smooth is more than most people want to commit to. Be honest about your habits before you commit to a design.
For low-maintenance lifestyles: Solid colors like the sage green or cherry red in this list are your best bet. They take fifteen minutes to apply, hide chips better than art-heavy designs, and grow out gracefully because there's no detailed pattern near the cuticle to reveal the gap. A glossy top coat every two or three days extends the wear significantly.
For medium effort: French tips, simple botanicals, and single-accent-nail designs give you visual interest without demanding constant upkeep. The lemon French tips, the sage green French, or the yellow tip with rose gold accent all fall into this category. They look intentional, photograph well, and survive a normal week of hand-washing and keyboard typing without significant wear.
For full commitment: Chrome sets, 3D accents, and multi-technique mixed sets like the dark chrome with flower accent require the most care. These are designs for people who genuinely enjoy maintaining their manicure or who have a salon appointment scheduled before the wear becomes visible. If that sounds like you, go for it. The results are worth the effort. If it doesn't, there's no shame in choosing a design that fits your actual routine.
Keeping Your July Manicure Alive Through the Heat
Heat, humidity, chlorine, and sunscreen are the four enemies of a summer manicure. Each one attacks polish differently, and understanding how helps you prevent the most common types of summer nail failure. Chlorine from pools strips the oils from both your nails and the polish surface, causing premature dullness and brittleness. Sunscreen contains chemicals that soften gel top coats and make them more susceptible to scratching and peeling. Humidity slows drying time, which means smudged nails hours after you thought they were set.
The pool problem: If you swim regularly, apply a thick layer of cuticle oil before entering the water. The oil creates a barrier between the chlorine and your polish. Reapply immediately after swimming. This single step can add three to four days of wear to a summer manicure. Also, invest in a hydrating nail treatment for overnight use. Chlorine dries out the nail plate, and dry nails flex more, which leads to chipping at the tips.
The sunscreen problem: Apply sunscreen to your hands before your nails. Let the sunscreen absorb for a full minute before touching anything. The oils in sunscreen are what damage polish, and they're most concentrated immediately after application. If you're reapplying throughout the day, try to keep the sunscreen away from the nail surface. Rub it into the backs of your hands and between your fingers, but avoid painting it directly over the nail.
The humidity problem: In humid climates, extend your drying time by at least fifty percent. What takes ten minutes to dry in dry air takes fifteen to twenty in humidity. A quick-dry top coat like Seche Vite is worth the investment in summer because it creates a hard shell faster than standard top coats. Apply it in one confident stroke and resist the urge to touch your nails for at least five minutes afterward.
Final Thoughts
July nails are all about finding the right balance between fun and wearable. A few of these designs, like the solid sage or the holographic lilac, take fifteen minutes and look polished for weeks. Others, like the mixed fruit salad or the dark chrome with a 3D flower, are projects that reward patience and a steady hand. Either way, the best summer manicure is the one that makes you look down at your hands and smile.