Hair Trends
22 Best Graduation Day Hairstyles for 2026
Graduation day deserves more than a last-minute ponytail. You spent years earning that degree—your hair should match the effort. The right hairstyle keeps you photo-ready under the cap, survives the stage walk, and looks stunning when you flip that tassel. We pulled together the most polished, cap-friendly, and outright gorgeous options for 2026. Find your look below.
Whether your ceremony is outdoors in the spring sun or in a formal auditorium, these styles hold up. Some tuck neatly under a cap. Others ditch the cap entirely. Either way, you'll look like you planned it—because you did.
The Cap-Proof Foundation
The biggest fear for graduation day is not just the weather — it is the dreaded cap hair flattening all your hard work. The secret to keeping your volume intact is in the foundation. For styled hair, a thin elastic headband worn underneath the cap anchors everything in place and prevents shifting when you walk across the stage. For natural hair, a flat-lay install technique creates a seamless base that keeps the cap from crushing your roots.
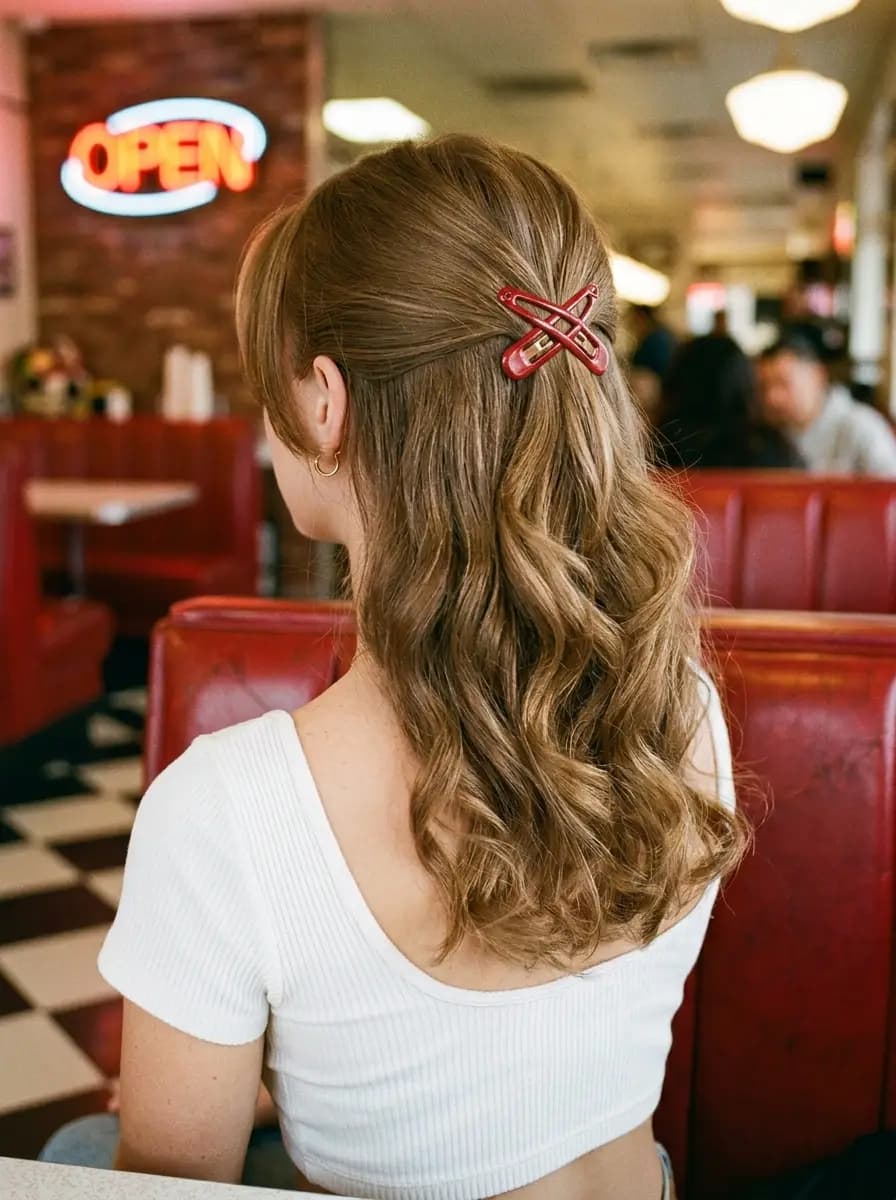
The mechanical trick is crossing your bobby pins in an X shape wherever you need maximum hold. A single pin slides out under weight; two pins crossed against each other create a grip that holds through the entire ceremony, the tassel flip, and the group photos. Focus the X-pins at the nape and the crown, where the cap puts the most pressure.
The anchor? If you are wearing a heavy updo, use four or five X-pins distributed around the base. That is enough to keep your style intact from the moment you put the cap on to the moment you take it off for photos.
The Short Hair Advantage
If you have short hair, you actually have a secret advantage on graduation day. The graduated bob and textured pixie are among the freshest haircuts trending for 2026, and they are incredibly cap-friendly. Because short hair does not have the heavy length that gets crushed flat under a cap, it naturally bounces back with built-in volume the second the cap comes off.
A short layered bob or a wispy pixie with a soft fringe looks chic under any cap and requires almost zero styling to look perfect for photos. The silhouette is already there — the cut does the work. The only prep needed is a texturizing powder at the roots before putting the cap on, which gives your hair instant lift and grip so it looks voluminous the moment you take the cap off for your diploma photo.
The benefit? While everyone with long hair is wrestling with crushed waves and flat curls, short hair graduates are walking off stage with their style intact. A quick finger-comb after the cap comes off is all it takes.
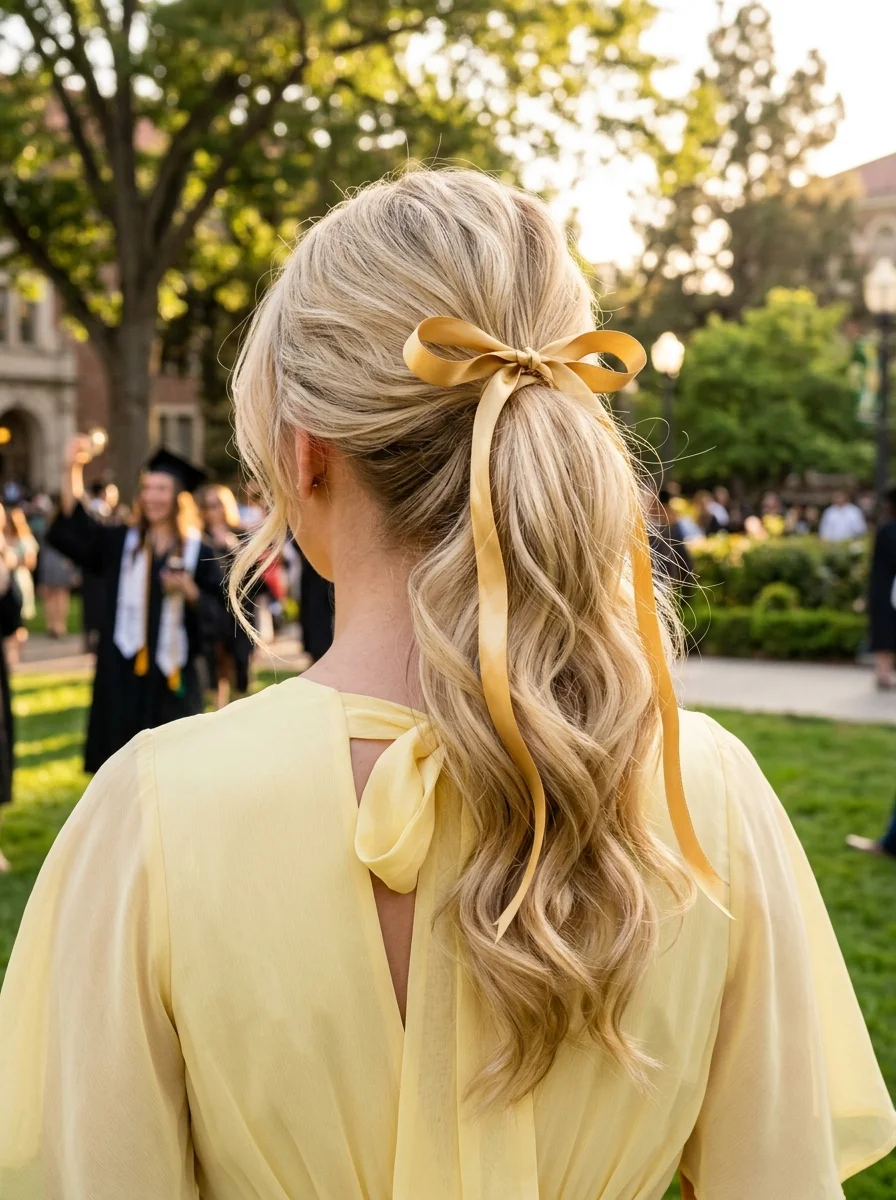
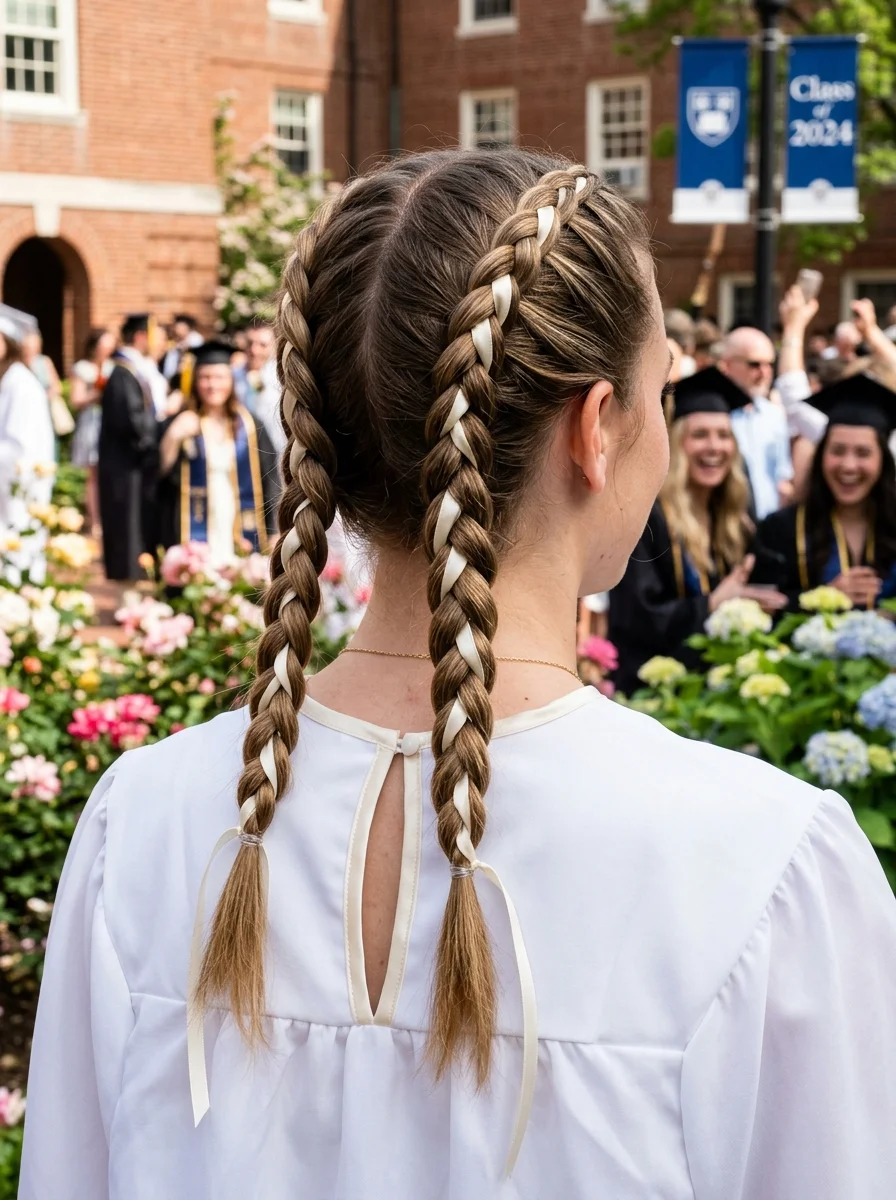
1.Sleek Low Braid with Silky Ribbon Wrap
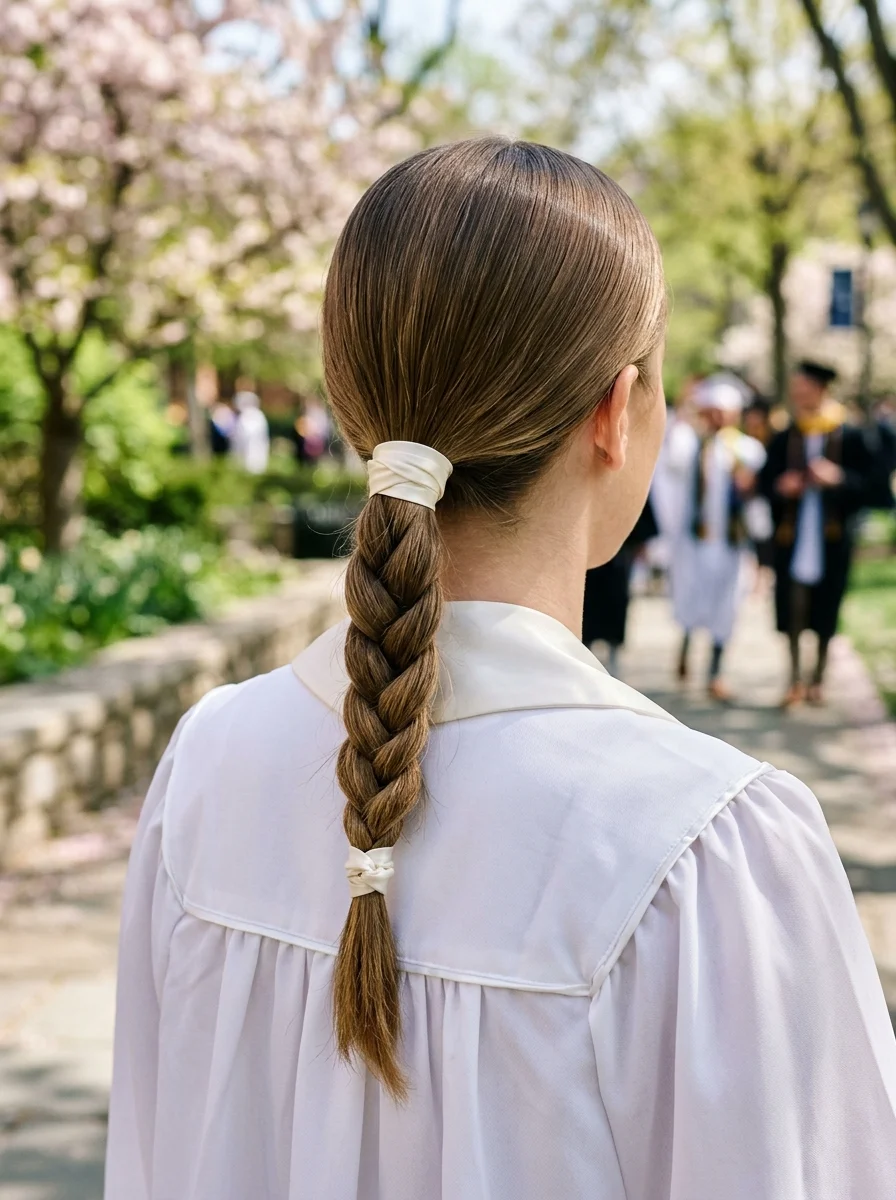
The overview: Ash brown hair with subtle golden highlights pulled back smoothly into a low three-strand braid at the nape, wrapped at the base with a cream silk ribbon that also ties off the braid's end. The finish is clean and polished with every strand lying flat against the head—exactly the kind of hairstyle that photographs beautifully from behind as you walk across the stage.
This works because the sleek foundation means zero flyaways under a graduation cap, while the ribbon detail transforms a basic braid into something that feels intentional and celebratory without competing with your gown.
Why this look is popular: The low braid is one of the few styles that actually looks better under a cap because the flat crown stays put while the braid provides visual interest from behind. The silk ribbon adds a soft, feminine detail that elevates the entire look beyond a simple ponytail.
Where this look is suitable: Perfect for outdoor ceremonies where wind is a factor, indoor auditoriums, and post-ceremony photos where the back view matters.
Step by step:
- Smooth the base. Apply a lightweight smoothing serum like Moroccanoil Treatment to damp or dry hair, then blow-dry with a boar bristle brush for maximum sleekness.
- Create a low ponytail. Gather all hair at the nape and secure with a clear elastic that matches your hair color.
- Braid the tail. Create a clean three-strand braid from the ponytail, keeping even tension throughout.
- Wrap with ribbon. Take an 18-inch length of cream silk ribbon, wrap it around the base of the braid to conceal the elastic, then weave it into the final braid stitches.
- Tie off the end. Tie the ribbon into a small, neat knot at the braid's end, leaving short tails.
- Set with spray. Mist with a light-hold hairspray like Kenra Volume Spray 25 to lock flyaways down without stiffness.
Tips and tricks: Second-day hair holds this style best because natural oils keep the braid secure. For extra-smooth results, use a fine-tooth comb along the crown and sides after applying product. Match the ribbon color to your gown or bouquet for a coordinated finish.
25 Trendy Beach Day Hairstyles for Vacation 2026 ☀️🌊
2.Elegant Pearl Bubble Ponytail
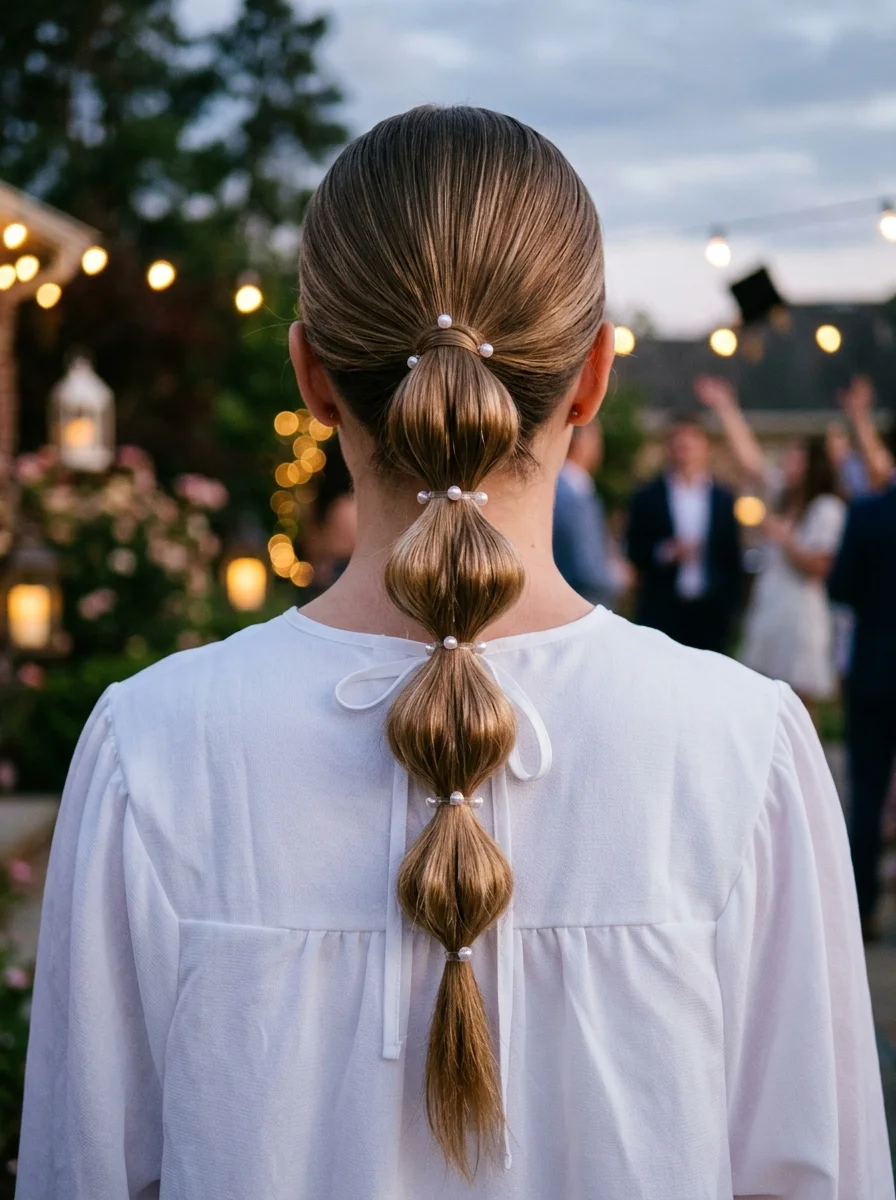
The overview: Honey blonde hair with warm caramel tones pulled into a sleek low ponytail and sectioned into four rounded bubbles, each secured with pearl-tipped elastics. A cream ribbon bow sits at the base where the ponytail begins.
The bubble technique is easier than braiding but photographs with the same visual impact. Adding pearl elastics turns each section into a deliberate design element rather than just segmented hair.
Why this look is popular: Bubble braids are the moment—playful enough for the celebration but polished enough for formal diploma photos. The pearls add a bridal-quality elegance that works beautifully against both light and dark graduation gowns.
Where this look is suitable: Ideal for evening ceremonies, reception dinners, and outdoor celebrations where the bubble detail catches light from multiple angles.
Step by step:
- Smooth the crown. Apply a smoothing cream to damp hair and blow-dry straight with a paddle brush for a bump-free foundation.
- Gather the ponytail. Pull all hair into a low ponytail at the nape and secure with a strong elastic.
- Create bubbles. Tie pearl-tipped elastics at 2-inch intervals down the ponytail. Gently pull each section apart to form rounded bubble shapes.
- Add the ribbon. Tie a cream silk ribbon into a bow around the base elastic, letting the tails hang naturally.
- Set with shine. Mist with a shine spray like Ouai Wave Spray for a glossy finish that catches reception lighting.
Tips and tricks: Use clear elastics as a base layer before adding pearl-tipped ones for extra hold. The bubbles should be gently pulled outward, not upward, to maintain the rounded silhouette. Fine hair benefits from a volumizing mousse applied before blow-drying.
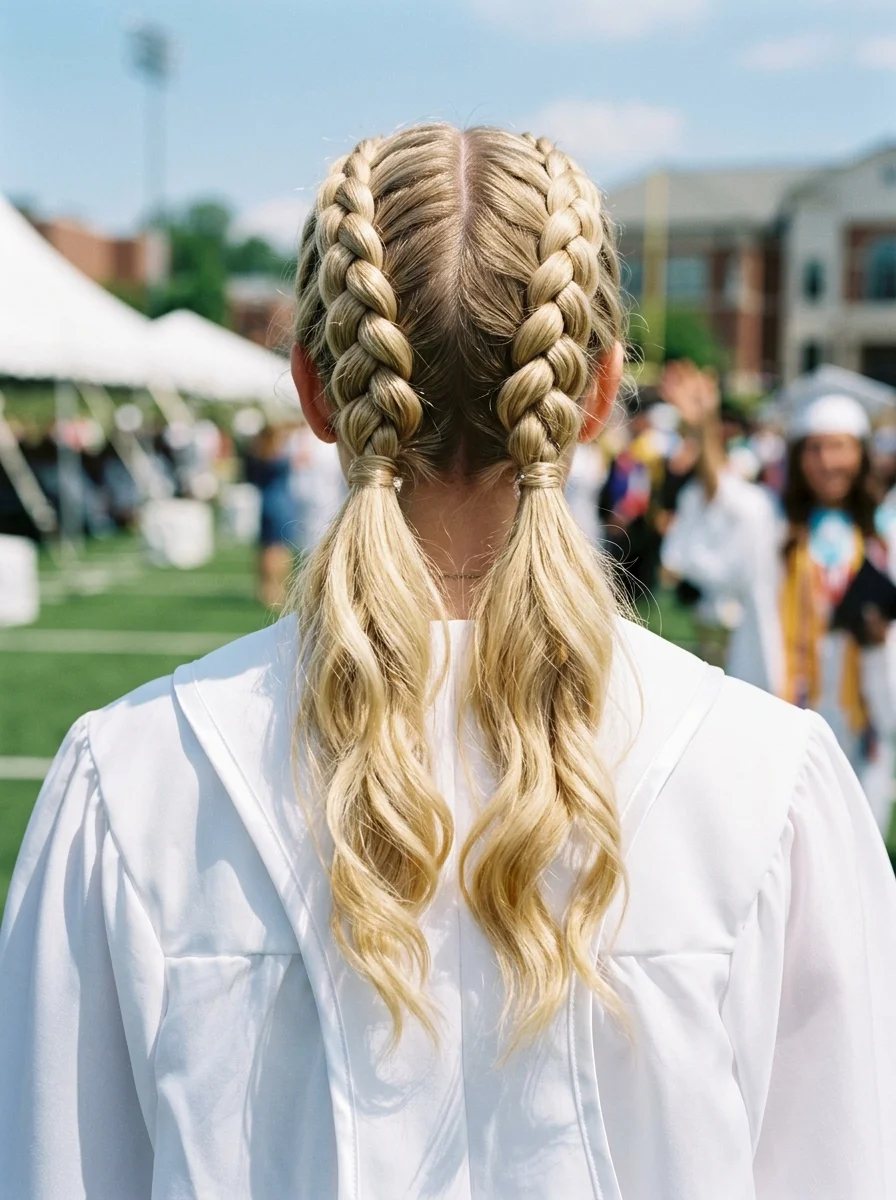
3.Double Braids with Satin Ribbon Accent
The overview: Bronde hair with ash tones parted down the center and braided into two Dutch braids, each threaded with cream satin ribbon woven through the plait. The ribbon crisscrosses through each braid from crown to ends, adding a preppy, collegiate detail that says campus style without trying too hard.
The Dutch braid technique (crossing strands under) creates raised plaits that sit visibly on top of the head, making the ribbon integration more prominent than it would be in flat French braids.
Why this look is popular: Double braids with ribbon are having a major preppy revival—think old-money campus aesthetic that photographs perfectly from behind. The raised Dutch braid pattern shows off the ribbon weaving clearly even from a distance.
Where this look is suitable: Campus ceremonies, garden parties, any daytime graduation event where the braid detail and ribbon will catch natural sunlight.
Step by step:
- Part precisely. Create a clean center part from forehead to nape using a rat-tail comb.
- Prep with texture. Apply Oribe Dry Texturizing Spray throughout for grip—slippery hair won't hold the ribbon in place.
- Position the ribbon. Cut two lengths of cream satin ribbon, each about 30 inches. Lay one alongside the first section of your Dutch braid.
- Dutch braid with ribbon. Braid each side using the Dutch technique (crossing under), weaving the ribbon with one strand so it integrates naturally into the plait.
- Secure ends. Tie off each braid with a clear elastic, then tie the ribbon into a small bow at the end.
- Pancake gently. Pull the outer edges of each braid slightly to widen the plait and make the ribbon more visible.
Tips and tricks: Keep the ribbon taut as you braid—if it's loose, it wraps around the outside instead of integrating into the pattern. Use ribbon no wider than half an inch for the most elegant result. Satin ribbon photographs with a subtle sheen that catches both natural and artificial light.

22 Office Nail Designs That Are Professional But Never Boring
4.Braided Crown with Bubble Tail and Pearl Accents
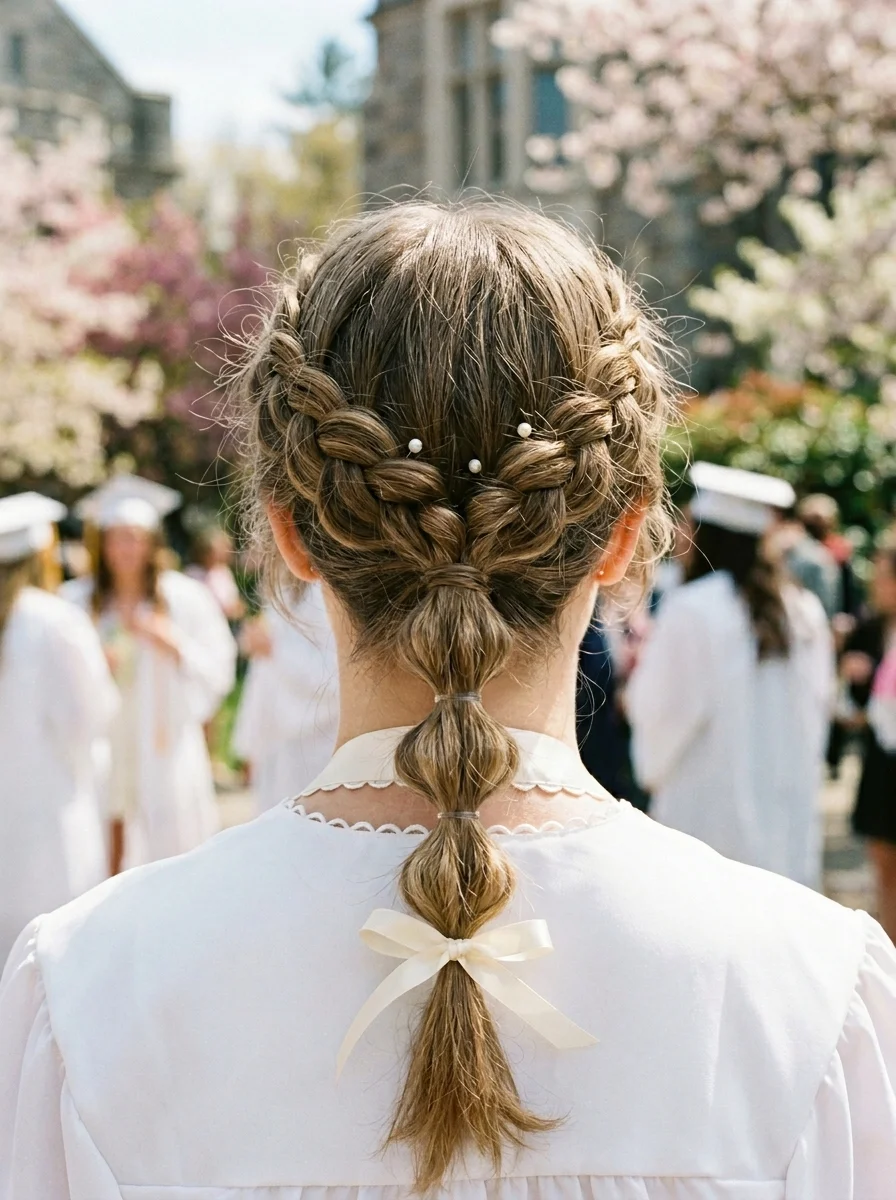
The overview: Bronde hair woven into two Dutch braids that wrap around the back of the head in a crown pattern, transitioning into a bubble ponytail at the nape. Small pearl pins are scattered throughout the braided sections, and a cream ribbon bow finishes the tail. The overall effect is bohemian-meets-collegiate with a romantic edge.
The combination of braided crown and bubble tail gives you the best of both worlds—structured detail at the top with playful volume at the bottom. The pearl pins add scattered points of light that catch beautifully in photos.
Why this look is popular: The braided crown keeps everything secure and cap-friendly while the bubble tail adds youthful energy. Pearls are the accessory of the moment for graduation season—they read as classic without being dated.
Where this look is suitable: Outdoor spring ceremonies, garden venues, post-graduation brunches. Works with or without a cap.
Step by step:
- Prep with texture. Apply a texturizing spray like R+Co Badlands Dry Shampoo Paste to add grip for braiding.
- Dutch braid each side. Starting at the temples, Dutch braid along the hairline, adding hair as you go. Continue around to the nape.
- Meet at the nape. Combine both braids and any remaining hair into a single ponytail. Secure with a strong elastic.
- Create the bubble tail. Tie elastics at 2-inch intervals, gently pulling each section to form rounded bubbles.
- Add pearl pins. Insert small pearl-tipped pins throughout the braided sections at irregular intervals—odd numbers look most natural.
- Finish with ribbon. Tie a cream ribbon into a bow at the base of the bubble tail.
Tips and tricks: The Dutch braids should be tight at the scalp for clean lines, then pancaked after braiding for fullness. Second-day hair holds this style best—if hair is freshly washed, apply dry shampoo at the roots before starting. Pearl pins with sharp points grip better than round-headed ones.
5.Elegant Pearl-Embellished Low Ponytail
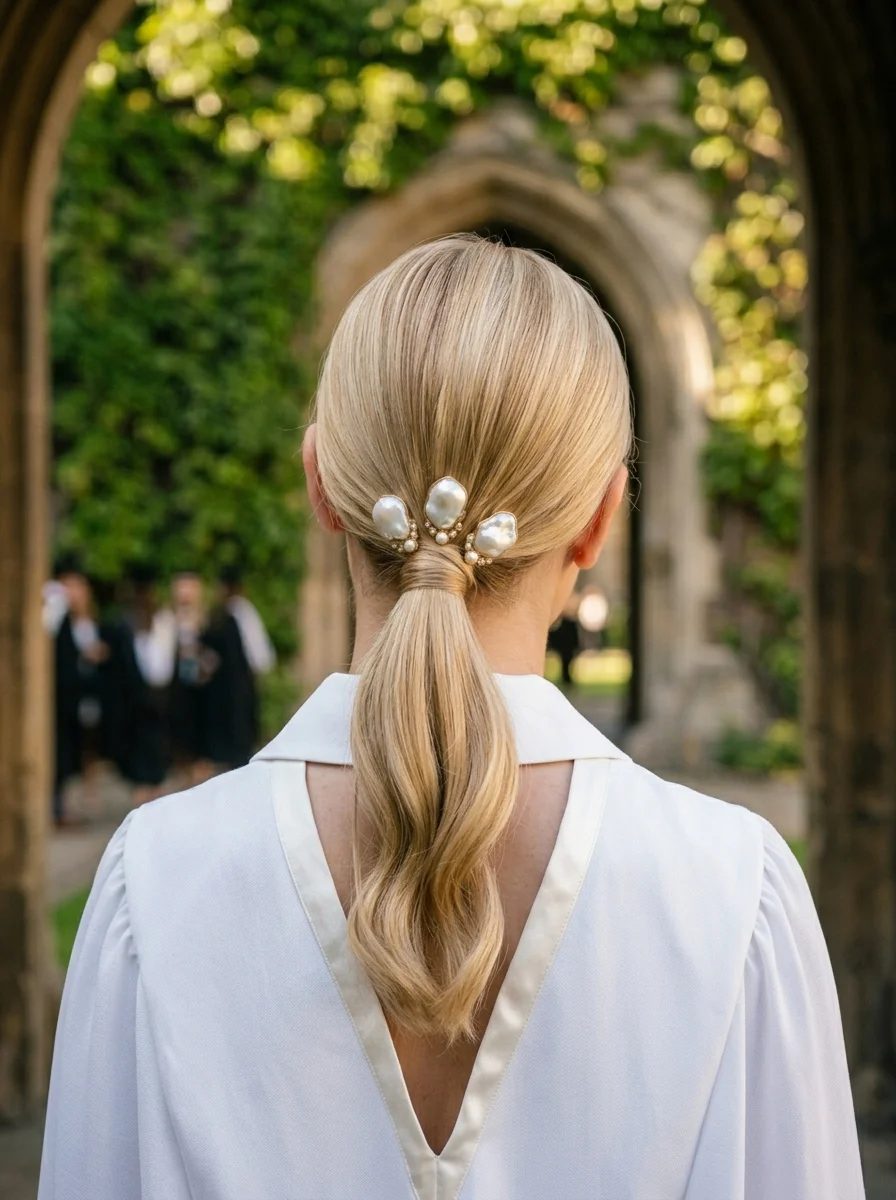
The overview: Platinum blonde hair smoothed into a sleek low ponytail at the nape, anchored by a statement pearl clip featuring three oversized pearls surrounded by smaller pearl accents. The finish is ultra-smooth with a mirror-like shine—this is the hairstyle that says you had your look planned weeks in advance.
The pearl clip does all the talking here. Against platinum hair, the pearls create a striking focal point that elevates a simple ponytail into something that belongs on an editorial spread. The sleek crown ensures zero cap interference.
Why this look is popular: The oversized pearl clip trend has dominated 2026 because it adds maximum impact with minimum effort. The low ponytail is universally flattering and comfortable for extended wear during long ceremonies.
Where this look is suitable: Formal indoor ceremonies, Ivy League-style venues, evening graduation dinners. Too polished for casual outdoor events but perfect for prestigious settings.
Step by step:
- Create the sleek base. Apply a smoothing serum like Olaplex No. 6 Bond Smoother to damp hair and blow-dry straight with a boar bristle brush.
- Gather the ponytail. Brush all hair back smoothly into a low ponytail at the nape. Use a fine-tooth comb to eliminate any bumps.
- Secure tightly. Use a strong elastic that matches your hair color. Wrap it three times for a firm hold.
- Attach the clip. Position the pearl statement clip directly above the elastic, clamping it over the gathered section.
- Polish the surface. Use a small amount of styling cream on a toothbrush to smooth any flyaways along the hairline and crown.
Tips and tricks: A boar bristle brush is essential for achieving the glass-like finish—it distributes product evenly and creates shine no regular brush can match. The clip should sit flat against the head; if it angles outward, adjust the clamp. For fine hair, apply a root-lifting spray before blow-drying to prevent the crown from looking flat.

38 Trending Bandana Hairstyles for Women (2026)
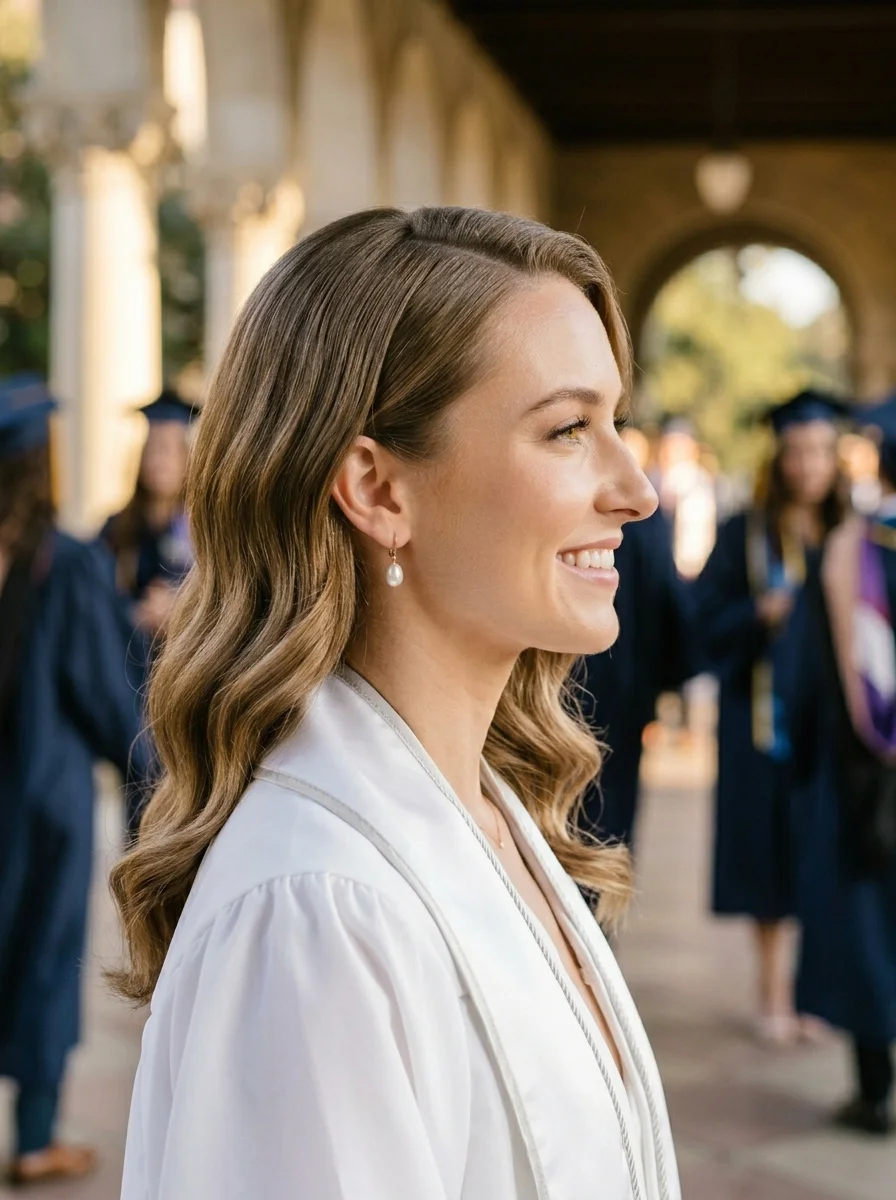
6.Effortless Waves with Face-Framing Layers
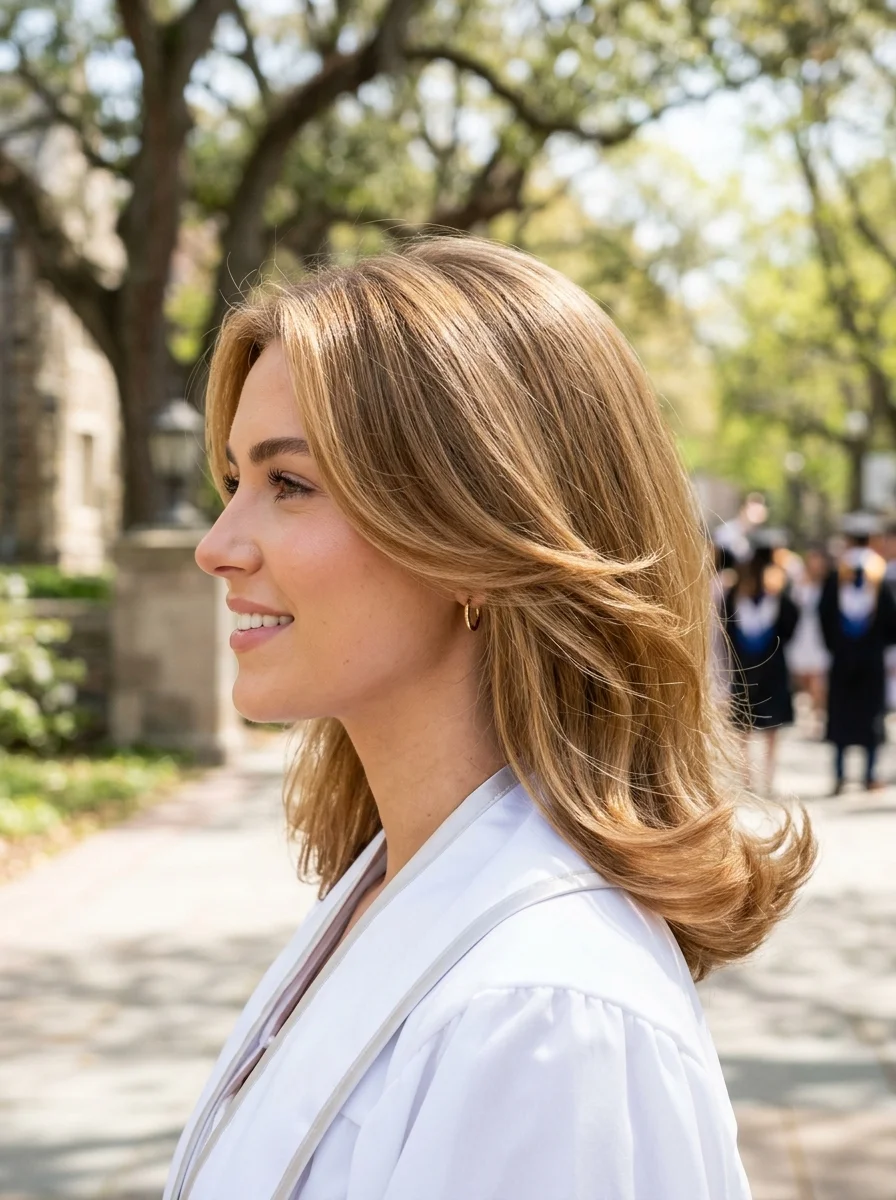
The overview: Golden blonde hair falling just past the shoulders with soft, loose waves and strategic face-framing layers that sculpt the features naturally. The layers hit right at the cheekbones, creating movement and dimension that catches light beautifully from every angle. This is the hairstyle for the graduate who wants to look polished without appearing overdone.
The beauty of this cut is that it requires almost no styling—the layers create shape and the waves add body. It works whether your cap is on or off, and it photographs well from both the front and side.
Why this look is popular: The lob with face-framing layers is the most requested cut of 2026 because it's low-maintenance but high-impact. The golden blonde tone glows in natural sunlight, making every candid photo look curated.
Where this look is suitable: Versatile enough for any ceremony—outdoor quad celebrations, indoor auditoriums, casual after-parties. The waves look equally good with or without the cap.
Step by step:
- Prep with mousse. Apply a lightweight volumizing mousse like Ouai Mousse to damp hair from roots to ends.
- Diffuse or air-dry. Let hair air-dry for natural texture, or use a diffuser on low heat for faster drying without disrupting the wave pattern.
- Add definition if needed. If certain sections dried too straight, use a 1.25-inch curling wand on just those pieces—wrap loosely and release quickly.
- Shake and separate. Flip your head upside down and shake the roots with your fingers for volume.
- Finish lightly. A mist of texturizing spray through the mid-lengths enhances the lived-in quality.
Tips and tricks: The cut matters as much as the styling—ask your stylist for "invisible layers" or "ghost layers" that create shape without obvious layering lines. Maintenance trims every 8-10 weeks keep the face-framing pieces at the right length. Gold hoop earrings complement the warm tones perfectly.
7.Braided Crown with Cascading Curls and Gold Accents
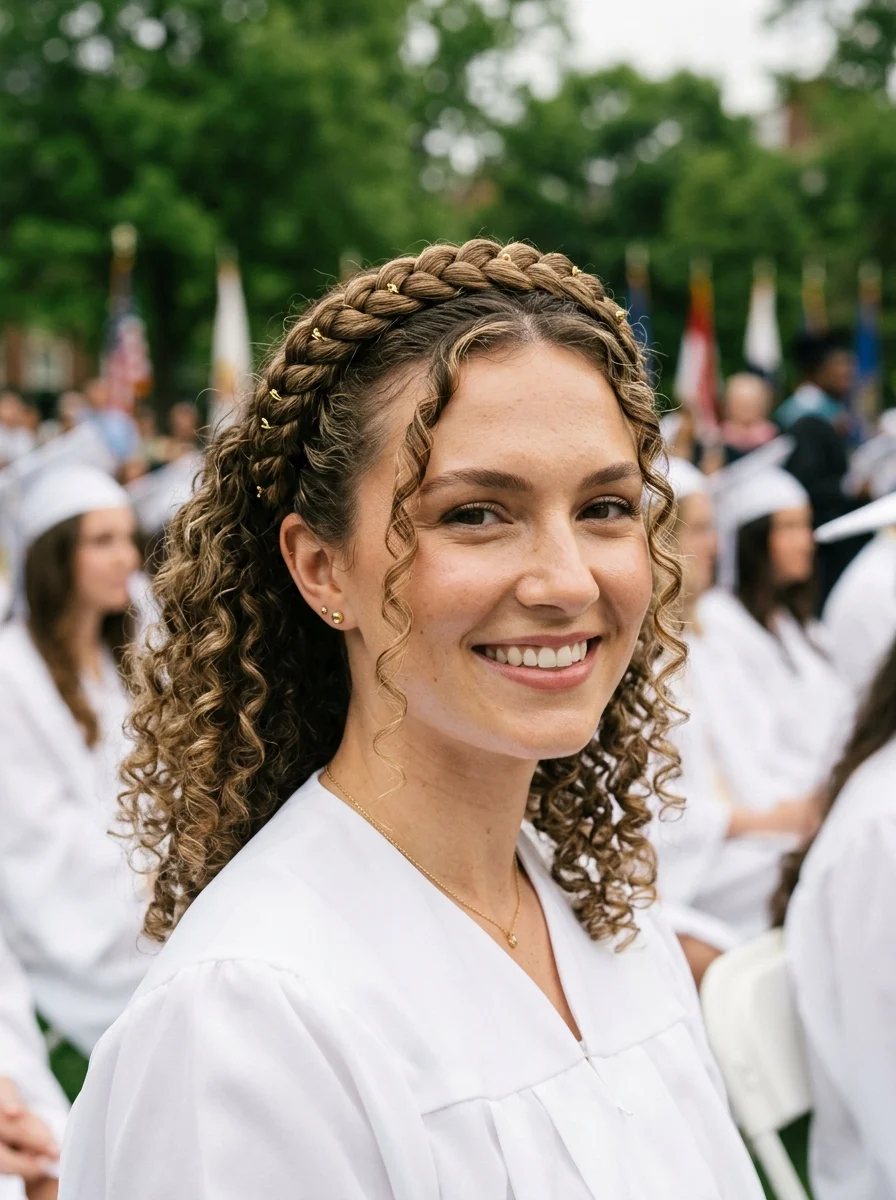
The overview: Brown hair with golden highlights woven into a Dutch braid crown that wraps along the hairline, with natural 3A-3B curls cascading freely from the crown down the back. Small gold cuff accents are clipped along the braid at irregular intervals, catching light with every turn. This is the hairstyle for the graduate who celebrates natural texture.
The braided crown keeps hair off the face during the ceremony while allowing the curls to show their full glory from behind. The gold cuffs add just enough sparkle to say "special occasion" without over-accessorizing.
Why this look is popular: Natural curls are having their moment, and this style celebrates them beautifully. The Dutch braid crown provides structure while the cascading curls create drama and movement that photographs with incredible depth.
Where this look is suitable: Outdoor ceremonies with natural light, garden venues, any celebration where the curl texture can catch sunlight and movement.
Step by step:
- Define the curls. On damp hair, apply a curl-defining cream like DevaCurl SuperCream section by section. Scrunch upward and air-dry or diffuse on low heat.
- Section for the braid. Leave the back curls free. Take a section from each temple to create the crown braid.
- Dutch braid the crown. Starting at one temple, Dutch braid along the hairline, adding small sections as you go. Continue around to the opposite side.
- Secure and pancake. Pin the braid end under the starting point. Gently pull the braid edges outward to widen it.
- Add gold cuffs. Clip small gold cuffs along the braid at irregular intervals—5-7 cuffs work well.
- Shape the curls. Separate any clumped curls with your fingers. Mist with a flexible-hold curl spray.
Tips and tricks: Plop curls in a microfiber towel after defining them to reduce frizz and speed drying. The braid needs grip to stay in place, so apply texturizing spray to the sectioned hair before braiding. Second-day curls hold the style better than freshly washed ones.

30 Stunning July Nail Designs for Summer 2026 💅
8.Braided Crown with Starry Accents
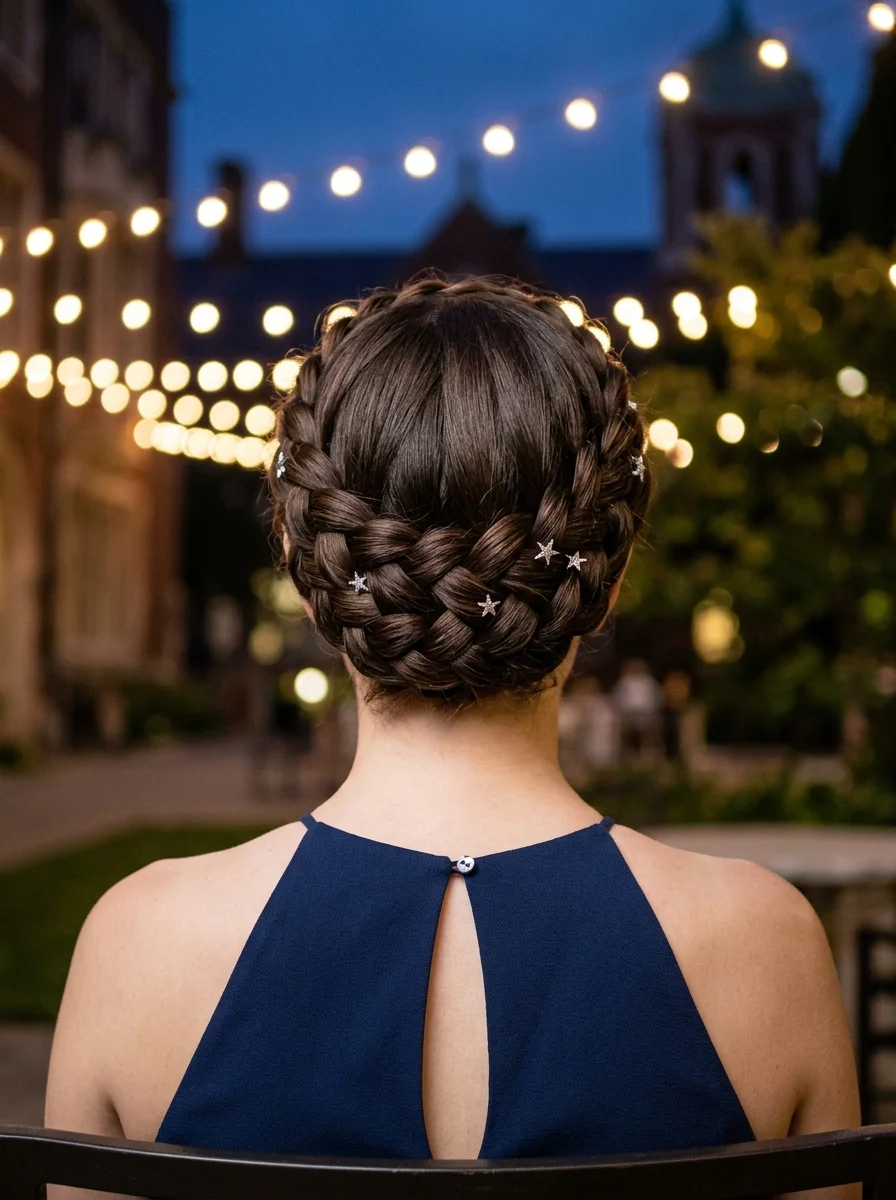
The overview: Dark espresso brown hair woven into multiple Dutch braids that wrap around the head and gather into a low braided updo at the nape. Small star-shaped crystal pins are scattered throughout the braided structure, catching light like tiny constellations.
The star pins transform a classic braided updo into something editorial and memorable. Against the dark hair, the crystal stars pop with every movement, creating a celestial effect that photographs beautifully in low light.
Why this look is popular: The braided crown updo is one of the most secure formal styles—it stays put through hours of celebration. The star pins add a whimsical, night-sky quality that feels celebratory without being costume-y.
Where this look is suitable: Evening ceremonies, formal dinners, gala-style graduation events. The star pins are designed to catch dramatic lighting.
Step by step:
- Smooth and prep. Apply a smoothing cream to damp hair and blow-dry straight with a round brush for maximum sleekness.
- Section the hair. Create 3-4 sections from the hairline to the crown. Clip each out of the way.
- Dutch braid each section. Braid each section tightly against the scalp, crossing strands under for the raised effect. Secure each at the nape.
- Form the updo. Twist and coil the braid tails into a low chignon at the nape. Pin securely with color-matched bobby pins.
- Add star pins. Insert star-shaped crystal pins throughout the braids at irregular intervals. Angle them to catch overhead lighting.
- Set with spray. Mist with strong-hold hairspray to lock everything in place for the evening.
Tips and tricks: Apply a high-shine serum before blow-drying to make the dark hair reflect light and make the braids more visible. Use bobby pins that match your hair color exactly—they'll disappear into the dark braids. The star pins should be placed where they'll catch the most light from above.
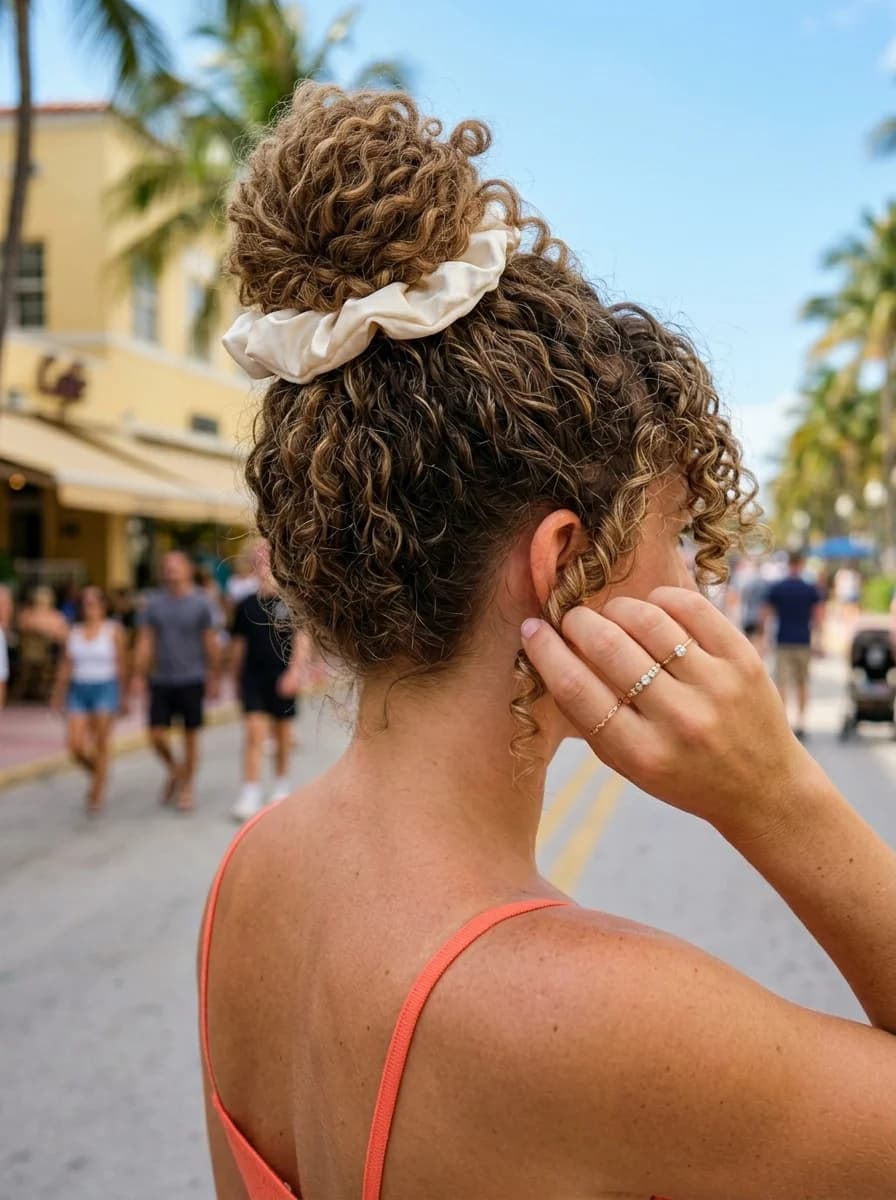
9.Braided Crown with Loose Curls and Pearls
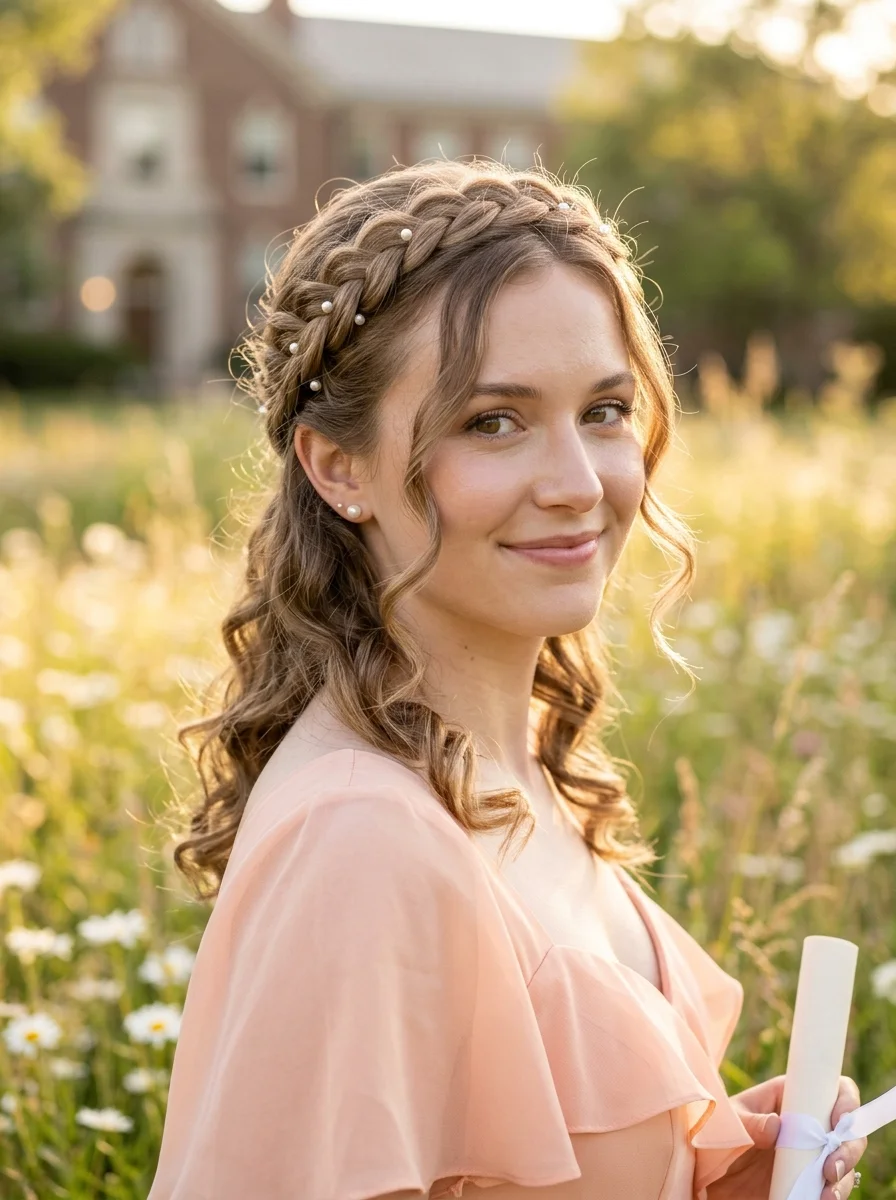
The overview: Light brown and caramel-toned hair styled into a half-up crown braid that wraps from one temple, with the remaining hair falling in loose, romantic curls past the shoulders. Small pearl pins are scattered along the braid like constellations.
The half-up construction keeps hair off the face during the ceremony while the flowing curls below provide movement and softness. Pearls threaded through the braid add a luminous detail that catches warm light beautifully.
Why this look is popular: The half-up crown braid with pearls strikes the balance between structured and romantic. The pearls add a bridal-quality elegance that photographs with incredible depth in golden-hour light.
Where this look is suitable: Golden-hour outdoor ceremonies, sunset celebrations, garden venues where warm lighting will enhance the pearl accents.
Step by step:
- Define curls first. Apply a curl cream to damp hair and diffuse on low heat or air-dry. Keep the curl pattern defined but not crunchy.
- Section for the braid. Take a 3-inch section from each temple and clip the remaining hair down.
- Dutch braid the crown. Starting at one temple, braid along the hairline, adding hair as you go. Continue to the opposite temple.
- Secure and pancake. Pin the braid end behind the opposite ear. Gently pull the edges to widen the braid for fullness.
- Add pearls. Insert pearl pins along the braid at irregular intervals. Use 7-11 pins for a natural, organic look.
- Release and shape. Let the remaining curls fall freely. Separate any clumped sections with your fingers.
Tips and tricks: The braid needs grip to stay in place—apply texturizing spray to the sectioned hair before braiding. Pearl pins with sharp points grip better than round-headed ones. For curly hair, the braid may need to be slightly wider to remain visible against the dense texture.
34 Stunning Summer First Date Hairstyles for 2026 💕☀️
10.Sleek Low Bun with Crystal Beaded Cage

The overview: Dark brown hair smoothed into an ultra-sleek low chignon at the nape, wrapped in a crystal beaded cage that forms a diamond net pattern over the bun. Every strand is flattened with gel for a lacquered finish, and the crystal cage catches every flash in the room. This is the hairstyle that makes the diploma the second most impressive thing on stage.
The crystal beaded cage is a modern alternative to a traditional jeweled clip—it wraps the entire bun in a geometric pattern that sparkles from every angle. Against the dark, glossy hair, the crystals create maximum contrast.
Why this look is popular: The beaded cage updo has exploded in 2026 because it transforms a simple bun into a statement piece. The sleek surface resists humidity and wind, meaning this looks the same at midnight as it did when you left the house.
Where this look is suitable: Black-tie graduation events, formal evening ceremonies, VIP reception dinners. This is maximum-impact hair.
Step by step:
- Apply strong-hold product. Work gel or high-shine pomade from roots to ends for maximum sleekness.
- Create the chignon. Gather hair into a low ponytail, twist tightly, and coil into a compact bun at the nape. Pin with color-matched bobby pins.
- Smooth the surface. Use a fine-tooth comb and additional product to flatten every bump along the crown and sides.
- Position the cage. Drape the crystal beaded cage over the chignon, adjusting the net pattern to sit evenly.
- Secure the cage. Use bobby pins hidden beneath the beadwork to anchor the cage at multiple points.
- Set with spray. Mist with strong-hold hairspray, focusing on the sleek crown to maintain the glass-like finish.
Tips and tricks: A boar bristle brush is essential for the sleek finish—it distributes product evenly and creates shine that a regular brush cannot. Apply gel to each section as you gather the ponytail to prevent flyaways. The crystal cage should sit flat against the bun; if it protrudes, adjust the pinning points.
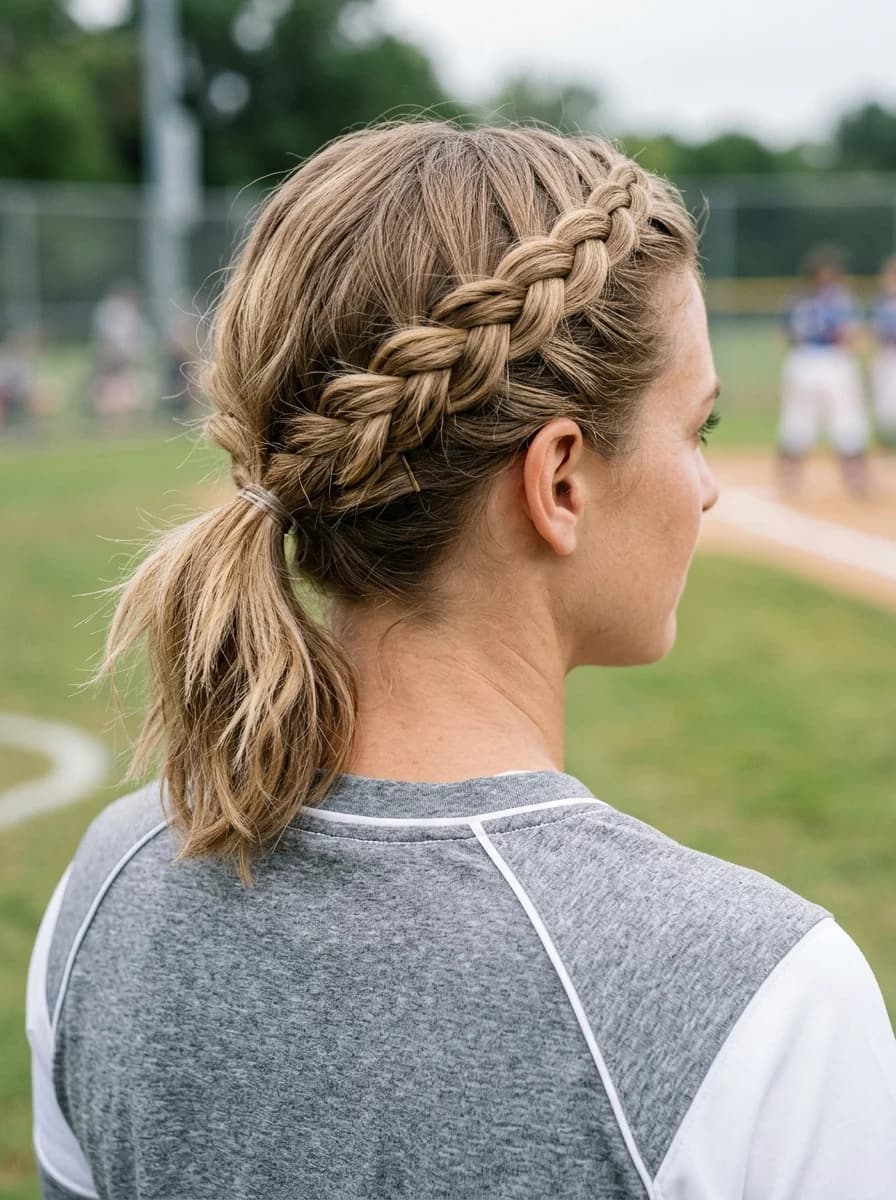
11.Classic Double Dutch Braids with Soft Waves
The overview: Icy platinum blonde hair parted down the center and braided into two clean Dutch braids that run from forehead to nape, with the remaining length falling in soft, wavy pigtails. The braids stay tight against the scalp while the tails below add softness and movement. This is sporty-chic graduation energy—the kind of balance that works for outdoor ceremonies where wind is a real factor.
Dutch braids are one of the most practical graduation styles because they stay completely flat against the head—no volume to collapse under a cap, no loose pieces to fall in your face during the walk across stage.
Why this look is popular: The double Dutch braid is the ultimate no-fuss graduation style—it stays secure through hours of celebration, looks good from every angle, and the wavy tails add just enough femininity to keep it from feeling too athletic.
Where this look is suitable: Athletic fields, outdoor ceremonies, windy settings, any situation where your hair needs to survive movement and weather without budging.
Step by step:
- Part precisely. Create a razor-sharp center part from forehead to nape using a rat-tail comb.
- Prep for grip. Apply texturizing spray throughout for hold—slippery platinum hair won't maintain the braid pattern.
- Dutch braid each side. Starting at the hairline, cross strands under to create raised braids. Add small sections from each side as you braid backward.
- Stop at the nape. Once all hair is gathered, continue as a regular three-strand braid for a few inches, then secure with clear elastics.
- Add waves to tails. Use a 1.25-inch curling wand on the loose tails, leaving the ends out for a modern finish. Break up with fingers.
Tips and tricks: Check your parts in a mirror from multiple angles before braiding—uneven parting throws off the entire symmetry. Apply a small amount of styling gel to each section before braiding to create clean, defined lines. Platinum hair shows every flyaway, so use edge control along the hairline.

29 Best Tropical Vacation Nails for Women in 2026 🌴
12.Golden Ribbon Low Ponytail with Soft Waves
The overview: Ash blonde and platinum tones fall into loose, soft waves gathered into a low ponytail at the nape, finished with a gold satin ribbon tied into a bow. The waves have a natural, lived-in quality with movement and body—the kind of hair that looks like it just falls that way. The gold ribbon adds ceremony-day flair without overdoing it.
This is the graduation hairstyle that bridges casual and formal effortlessly. The low ponytail keeps things practical while the waves and ribbon add enough polish to feel special. Youthful without being juvenile.
Why this look is popular: The gold ribbon against ash blonde hair creates a warm-cool contrast that photographs beautifully. The low ponytail is comfortable for long ceremonies and stays secure through the tassel flip.
Where this look is suitable: Campus ceremonies, outdoor celebrations, post-graduation brunches. Works for both daytime and evening events depending on the ribbon color.
Step by step:
- Create soft waves. Use a 1.25-inch curling wand on 1-inch sections, leaving the last two inches straight. Alternate curl direction.
- Break up the waves. Run your fingers through the curls to separate them into softer, more natural waves.
- Gather the ponytail. Brush the crown smooth and gather all hair into a low ponytail at the nape. Keep the surface relaxed—not tight.
- Secure the elastic. Use a strong elastic that matches your hair color.
- Tie the ribbon. Wrap a gold satin ribbon around the elastic and tie into a bow. Adjust the loops so they're even.
- Set lightly. Mist with a flexible-hold hairspray to maintain the wave pattern without stiffness.
Tips and tricks: Curl away from the face on both sides to open up your features. The ribbon photographs best when the loops are medium-sized—too small and it gets lost, too large and it overwhelms the ponytail. For waves that last all day, pin each curl in its coiled shape while it cools before releasing.
13.Golden Hour Curls with a Sunburst Sparkle
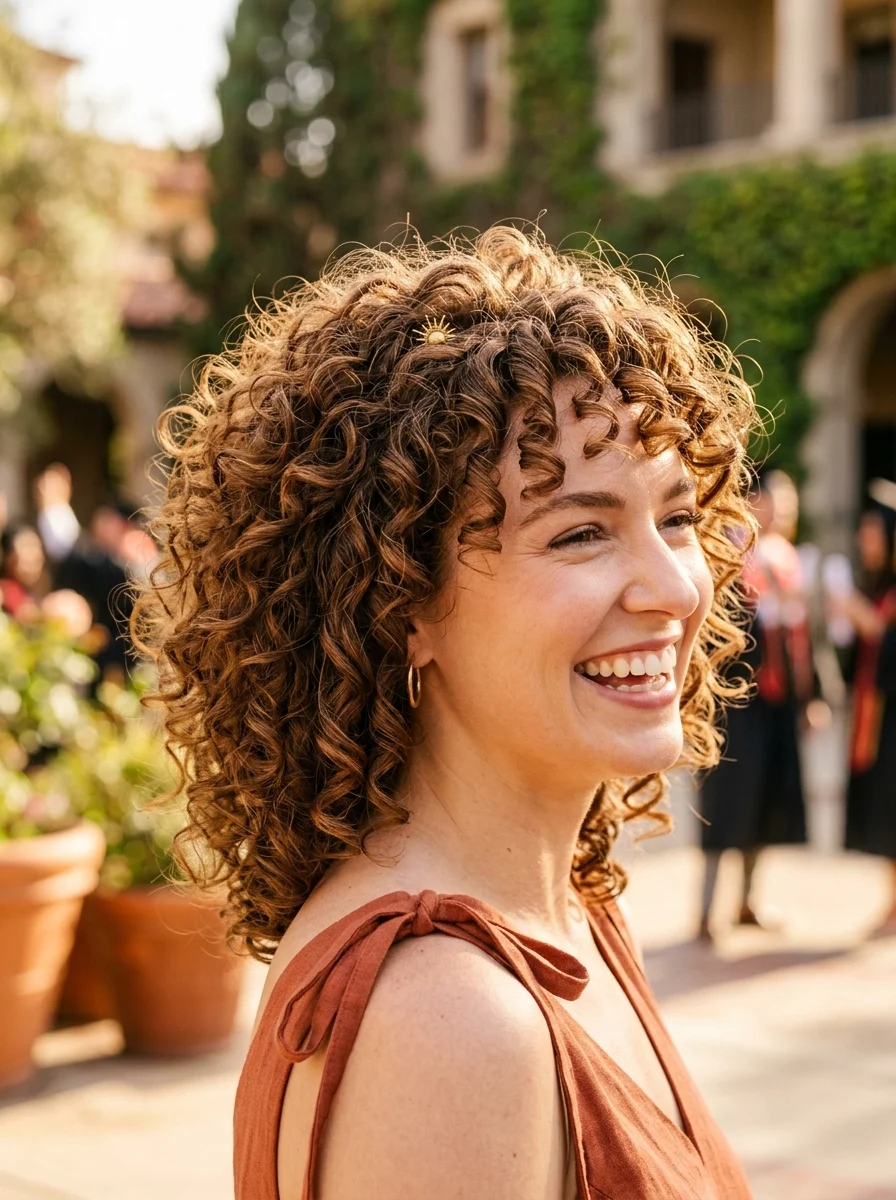
The overview: Chestnut brown balayage with golden highlights, fully embracing natural 3A-3B curl texture with a gold sunburst clip positioned at the crown. The curls are defined, bouncy, and full of natural volume—the kind that looks incredible in afternoon light. The sunburst clip adds a bohemian sparkle that catches golden-hour glow like it was made for it.
This style celebrates what your hair does naturally. The warm tones glow in afternoon light, making every candid photo look like it was taken by a professional. The sunburst clip is the single statement accessory that completes the look.
Why this look is popular: Natural curls are having their moment, and the sunburst clip trend adds a celestial, celebratory detail. The warm balayage tones photograph with incredible dimension in natural light.
Where this look is suitable: Outdoor afternoon ceremonies, garden venues, any setting where natural light will enhance the golden tones and curl definition.
Step by step:
- Hydrate curls. Apply a curl-defining cream like SheaMoisture Coconut & Hibiscus Curl Enhancing Smoothie to soaking wet hair.
- Scrunch and shape. Flip your head upside down and scrunch upward to encourage curl formation. Shake the roots for volume.
- Diffuse on low heat. Cup sections of hair in the diffuser and hold against the scalp for 10-15 seconds each.
- Break the cast. Once fully dry, scrunch out any product cast with a few drops of argan oil on your palms.
- Add the clip. Position the gold sunburst clip at the crown, securing it into the curls where it will catch the most light.
Tips and tricks: Golden blonde or highlighted curls are more fragile than darker tones—use a weekly deep-conditioning treatment like Olaplex No. 3 to maintain curl definition. The sunburst clip works best when it contrasts with the hair color against a warm background. For hair that doesn't hold curl well, apply a light-hold mousse before diffusing.
28 Effortless Hot Weather Day Hairstyles for Women 2026 ☀️💇♀️
14.Twisted Crown Braid with Loose Waves
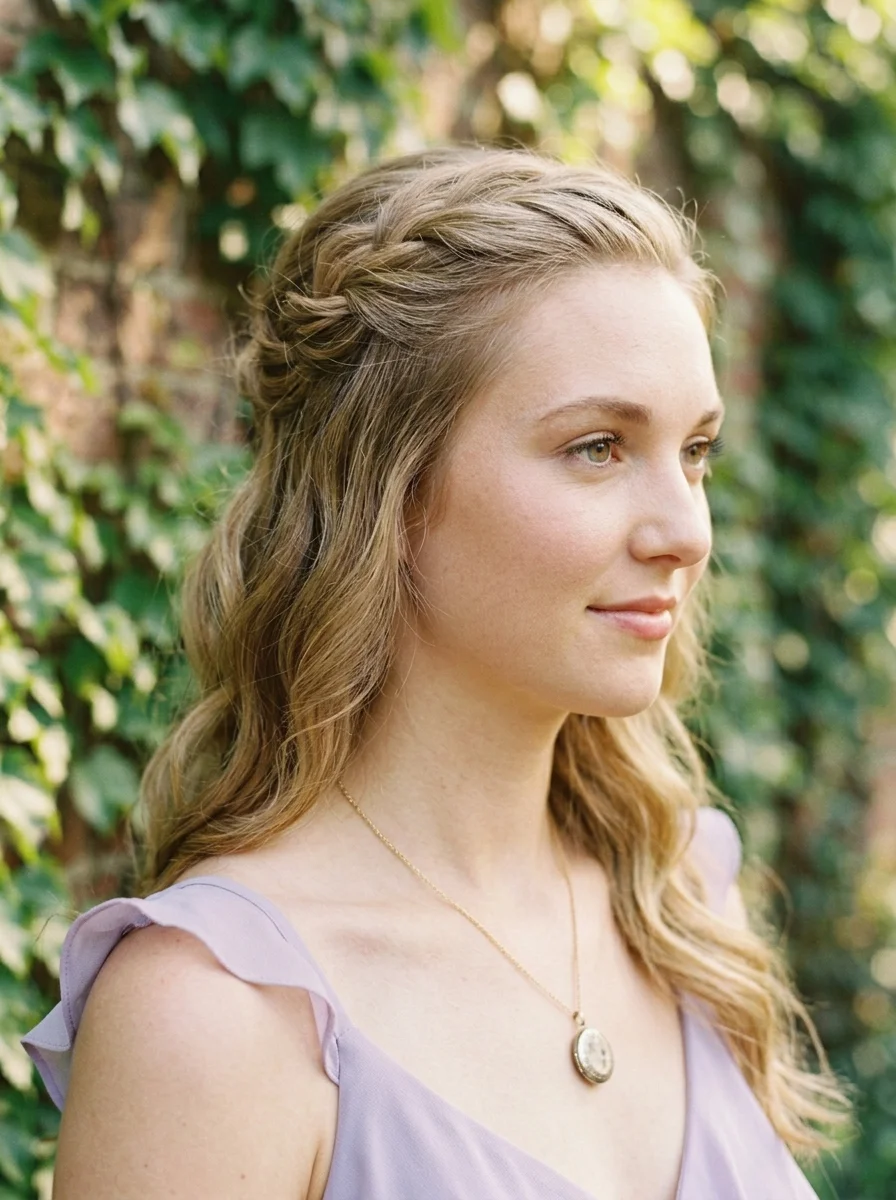
The overview: Light ash blonde hair styled into a flat twist crown that frames the face, with beachy waves flowing beneath. The twist creates a soft, romantic halo effect that keeps hair off the face while the loose waves below add movement and femininity.
The flat twist technique creates a softer, more organic line than a traditional braid—it looks like it was assembled by hand rather than constructed, which is exactly the energy for a spring graduation.
Why this look is popular: The twisted crown braid is more romantic than a standard braid but equally secure. The flat twist technique creates a smooth, continuous line that photographs beautifully from the side.
Where this look is suitable: Intimate ceremonies, outdoor garden settings, any venue where the soft, romantic quality of the twist will complement the atmosphere.
Step by step:
- Create waves. Use a 1.5-inch curling iron to create loose waves throughout the hair, wrapping sections away from the face.
- Start the twist. Take a section at one temple and divide it into two strands. Twist them over each other, adding small sections from the hairline as you work around the head.
- Continue the crown. Work the twist from one temple across the forehead to the opposite side, incorporating hair as you go.
- Secure the end. Pin the twist end behind the opposite ear with bobby pins hidden under the twist.
- Release the waves. Let the remaining hair fall freely. Separate any clumped sections with your fingers.
- Set lightly. Mist with flexible-hold hairspray to maintain the twist and wave pattern without stiffness.
Tips and tricks: The twist should be loose enough to look effortless but tight enough to hold through the ceremony. If your hair is fine, backcomb the section slightly before twisting for added volume. The flat twist works best on second-day hair when natural oils provide grip.
15.Velvet Bow Low Ponytail
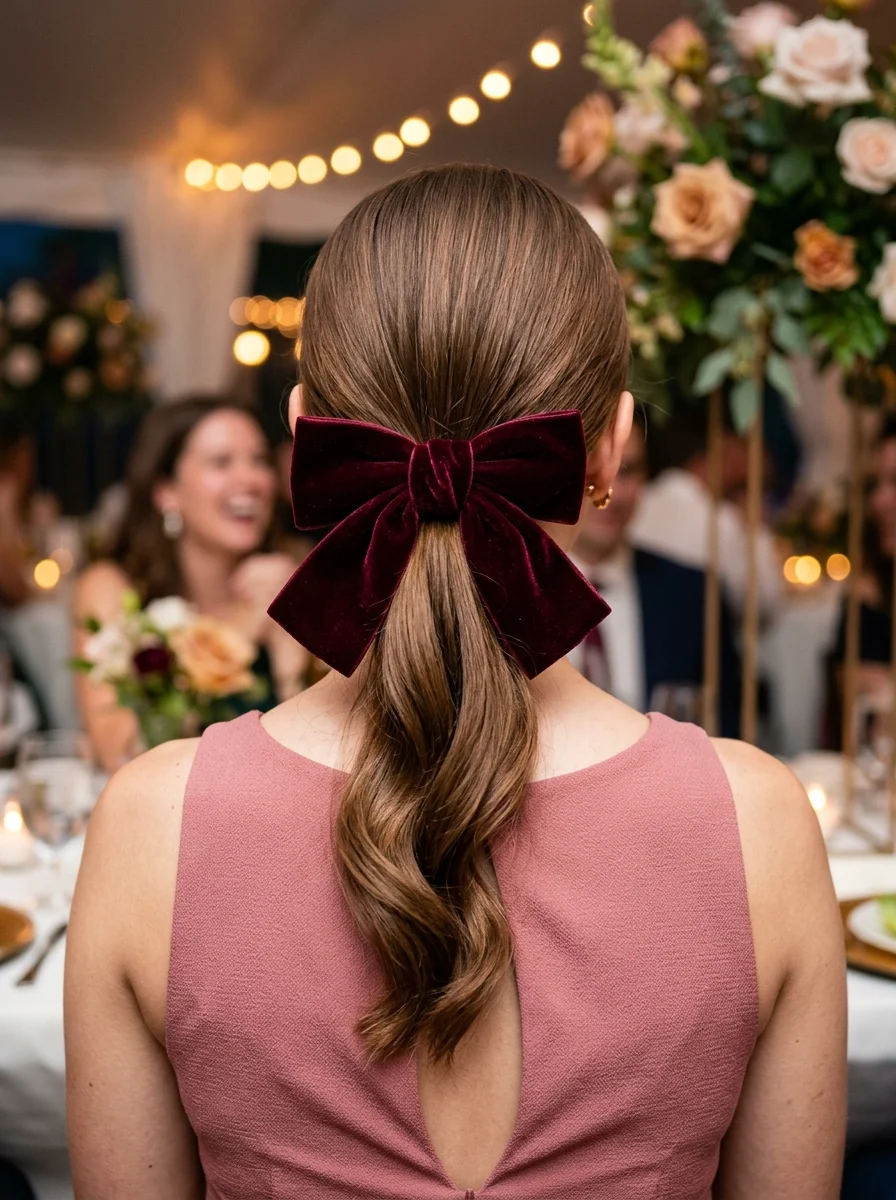
The overview: Medium brown balayage with warm highlights pulled into a sleek low ponytail at the nape, finished with an oversized burgundy velvet bow that commands attention. The velvet texture adds richness that photographs like a dream against the rose-pink dress. This is preppy, sophisticated, and unmistakably intentional—the hairstyle that says you had your outfit planned weeks in advance.
The burgundy velvet bow is the statement piece here. Against medium brown hair, it creates a rich, tonal contrast that reads as polished and expensive. The low ponytail keeps the silhouette clean so the bow gets full attention.
Why this look is popular: Velvet accessories are dominating 2026 because they add texture and luxury to even the simplest styles. The oversized bow trend channels old-money charm without pretension.
Where this look is suitable: Formal indoor ceremonies, evening receptions, any setting where the velvet texture and rich color will complement the atmosphere.
Step by step:
- Smooth with product. Apply a smoothing serum like Moroccanoil Treatment to damp hair and blow-dry straight with a round brush.
- Create the part. A clean center part or deep side part—either works, but the line must be sharp.
- Gather the ponytail. Brush all hair back into a low ponytail at the nape. Smooth the surface as you gather to eliminate bumps.
- Secure tightly. Use a strong elastic that matches your hair color.
- Add the bow. Clip or tie the oversized velvet bow at the base of the ponytail. Position it so the loops sit evenly and the tails hang naturally.
- Polish. Use a fine-tooth comb and light hairspray to smooth any flyaways over the crown and hairline.
Tips and tricks: The velvet bow should be proportional to your hair length—oversized bows work best on medium to long hair. Match the bow color to your outfit or bouquet for a coordinated look. For extra hold, apply a light gel before blow-drying to maintain the sleek surface throughout the ceremony.

27 Elegant Wedding Guest Nail Designs for Family in 2026 💍
16.Elegant Pearl-Adorned Chignon
The overview: Medium brown hair swept into a low chignon at the nape, adorned with a graduated cascade of pearl pins that trail along one side of the updo. The pearls start small near the crown and increase in size as they descend toward the chignon, creating a flowing, organic line. The overall effect is timeless and editorial—minimal effort, maximum impact.
The pearl cascade is the kind of detail that photographs incredibly well up close but also reads as a soft shimmer from a distance. Against the medium brown hair, the pearls create gentle points of light that catch from every angle.
Why this look is popular: The graduated pearl placement is a modern update on scattered pearl pins—it creates a deliberate design element rather than random decoration. The chignon itself is universally flattering and comfortable for extended wear.
Where this look is suitable: Black-tie ceremonies, formal evening events, any setting where the pearl detail will catch dramatic lighting.
Step by step:
- Smooth and prep. Blow-dry hair straight with a round brush. Apply a shine serum for gloss.
- Gather low. Pull hair into a low ponytail at the nape. Don't tighten—keep it soft.
- Twist into chignon. Twist the ponytail, then coil it into a flat chignon against the nape. Pin as you go.
- Add the pearl cascade. Start with small pearl pins near the crown on one side, working downward with progressively larger pearls toward the chignon.
- Adjust spacing. Ensure the pearls follow a natural, flowing line—don't space them too evenly or too rigidly.
- Set with spray. Mist with medium-hold hairspray to lock the chignon and pearls in place.
Tips and tricks: Pearl pins with sharp points grip better than round-headed ones—worth the upgrade. The graduated sizing should feel organic, not mathematical. For hair that won't hold a chignon, apply texturizing powder to the ponytail before twisting.
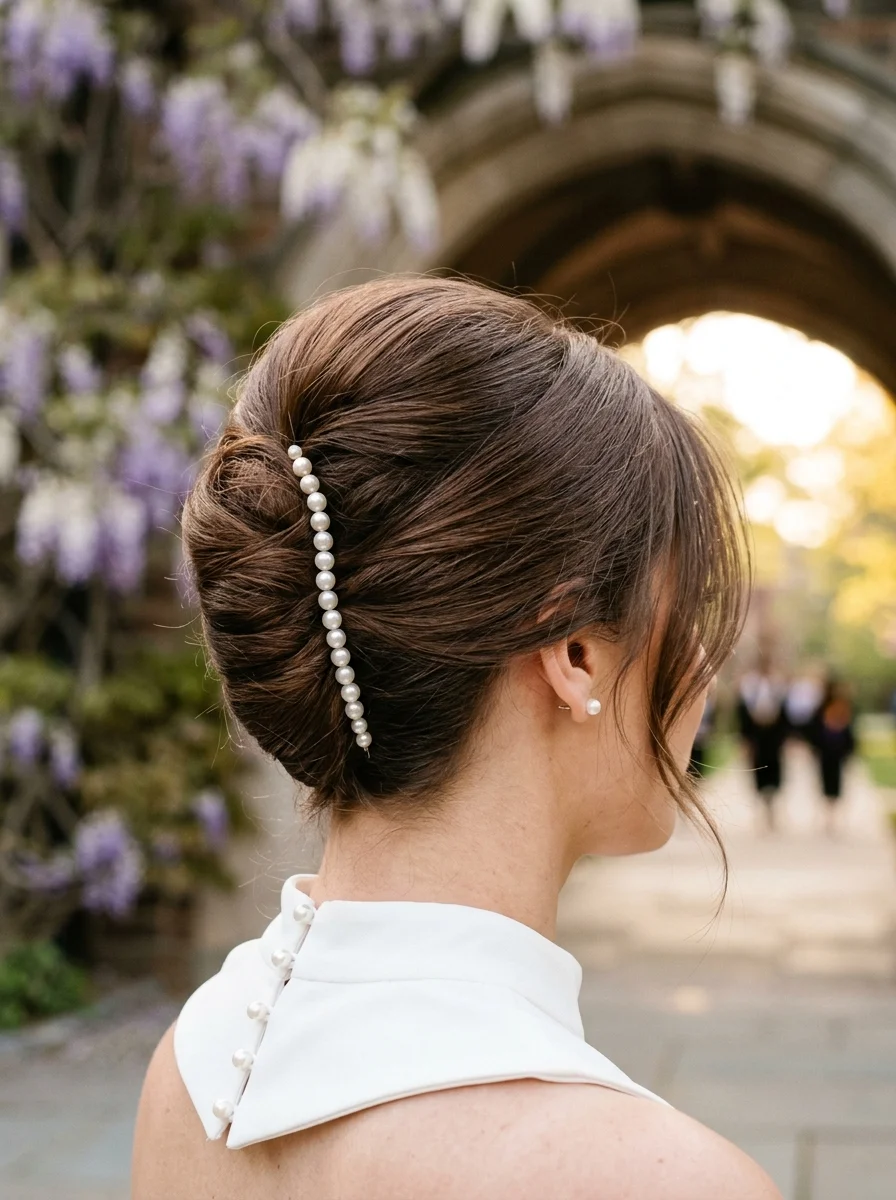
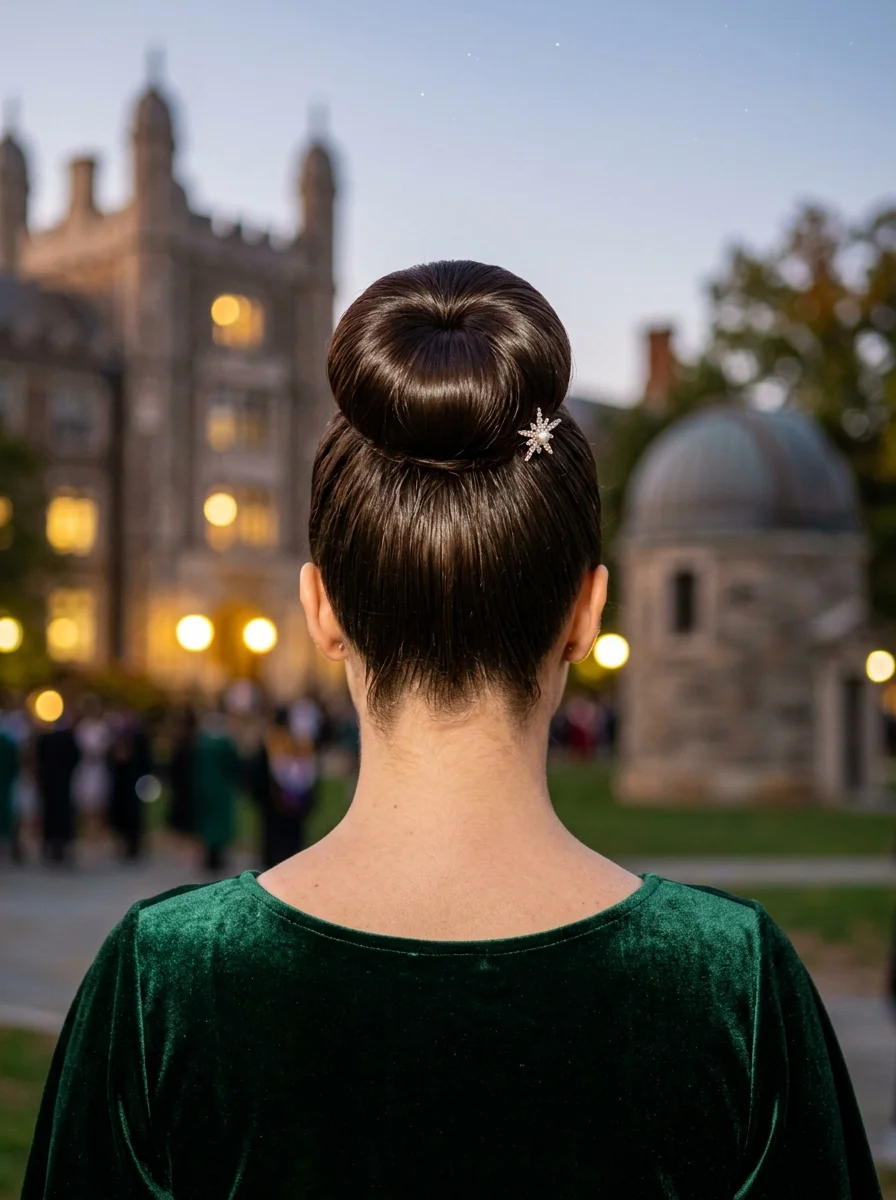
17.Classic Chignon with Velvet Ribbon Bow

The overview: Medium brown hair with subtle highlights, styled into a sleek center-parted low chignon at the nape. A navy velvet ribbon bow sits above the bun, adding a preppy, polished detail that reads as old-money campus style. The white collared dress with keyhole back completes the Ivy League aesthetic.
The navy velvet against medium brown hair creates a rich, sophisticated contrast. The bow sits at the base of the chignon as a deliberate design element, not an afterthought. This is the hairstyle that says you're graduating with honors—in every sense.
Why this look is popular: The velvet bow chignon channels the quiet luxury aesthetic that's dominating 2026. It's polished without being stiff, preppy without being juvenile, and photographs with timeless elegance.
Where this look is suitable: Campus ceremonies, chapel settings, any venue where the preppy-chic aesthetic complements the environment.
Step by step:
- Create the center part. Use a rat-tail comb for a razor-precise line from forehead to nape.
- Smooth the hair. Apply a smoothing cream and blow-dry straight with a boar bristle brush for maximum sleekness.
- Gather low. Brush all hair back into a low ponytail at the nape, keeping the center part visible.
- Form the chignon. Twist the ponytail and coil it into a compact bun. Pin with color-matched bobby pins.
- Add the bow. Tie the navy velvet ribbon into a bow above the chignon. Secure with a bobby pin through the knot if needed.
- Refine. Use a fine-tooth comb to smooth any flyaways along the part and hairline.
Tips and tricks: The center part must be razor-sharp for this look to work—any crookedness is immediately visible. Apply a light gel before blow-drying to maintain the sleek surface. The bow loops should be medium-sized and symmetrical for the most polished result.
28 Stunning Softball Hairstyle Ideas with Braids for 2026 🥎✨
18.Braided Rose Updo with Pearl Accents
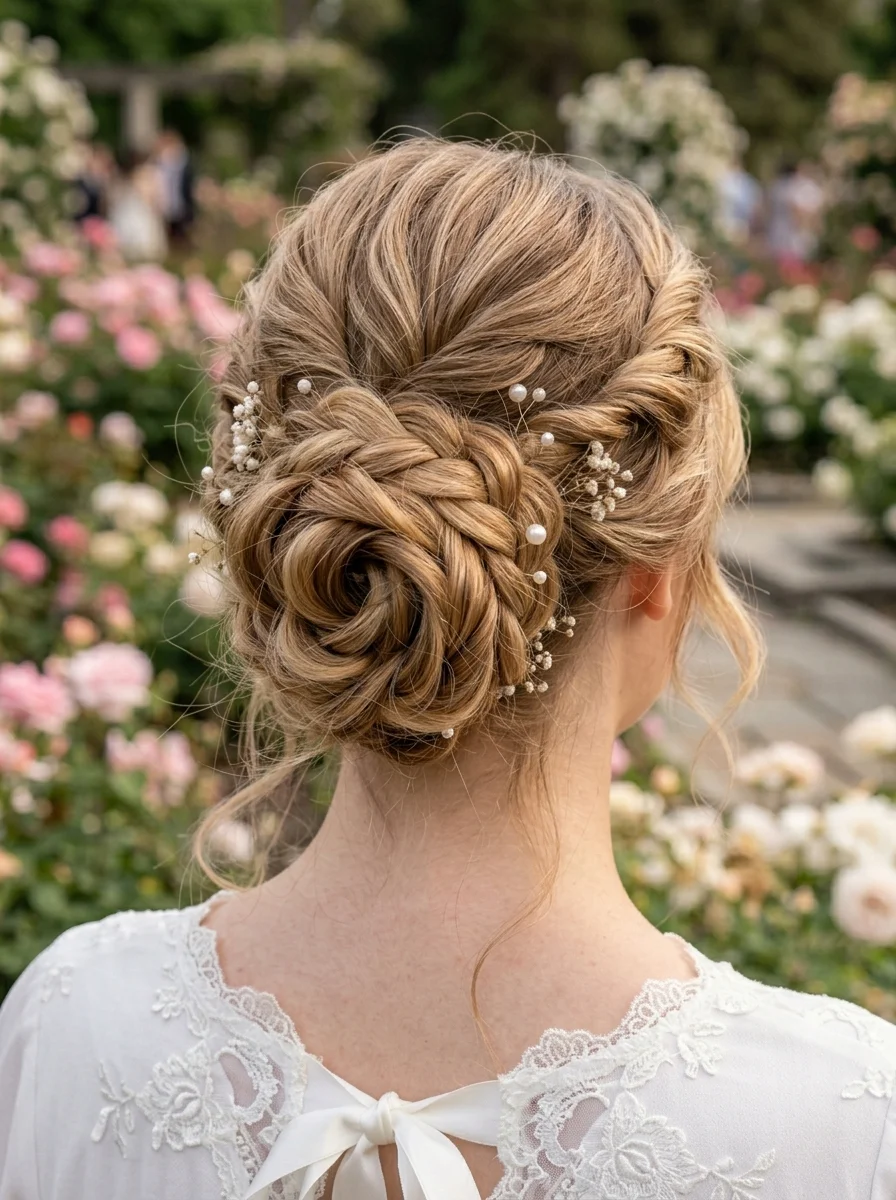
The overview: Dark blonde and light golden brown hair sculpted into braided rosettes that bloom across the back of the head. Small pearl pins and delicate sprigs of baby's breath are tucked between the rosettes, creating a garden of woven petals. This is the updo that turns your hair into an actual accessory—romantic, whimsical, and impossibly photogenic.
The rosette technique transforms standard braids into something sculptural. Each "flower" is a braid coiled into a spiral and pinned flat, creating a surface that catches light along every fold. The baby's breath adds an organic, freshly-gathered quality.
Why this look is popular: The braided rose updo is one of the most visually striking techniques—it reads as intricate and high-effort, which makes it feel appropriately special for graduation. The warm blonde tones show the braid definition clearly.
Where this look is suitable: Garden ceremonies, rose garden venues, outdoor celebrations where the floral hair will complement the surroundings.
Step by step:
- Smooth and prep. Apply a smoothing cream and blow-dry straight. The rosettes need clean, smooth braids to look defined.
- Create multiple braids. Section hair into 5-7 parts and braid each into a tight three-strand braid. Secure each with a small clear elastic.
- Form rosettes. Take one braid, coil it into a flat spiral against the head, and pin it in place with bobby pins.
- Arrange the pattern. Place rosettes across the back of the head, starting from the crown and working down. Vary sizes slightly.
- Add pearls and baby's breath. Tuck small pearl pins and dried baby's breath sprigs between the rosettes at irregular intervals.
- Smooth the front. Pull remaining front hair back smoothly. Use a fine-tooth comb and light hairspray to eliminate flyaways.
Tips and tricks: Use a rat-tail comb to tuck loose ends under each rosette—visible elastic bands break the illusion. This style takes practice—do a trial run at least once before graduation day. Fresh baby's breath wilts fast in heat; use dried flowers or silk alternatives for outdoor ceremonies.
19.Soft Hollywood Waves for Graduation Day
The overview: Medium brown bronde hair swept into a deep side part with soft Hollywood waves cascading past the shoulders. The waves have a structured, deliberate quality—each ridge catches light in a way that loose waves simply can't. This is timeless, glamorous, and says you're not just graduating—you're arriving.
The deep side part creates dramatic volume on one side that catches stage lighting beautifully. The structured wave pattern holds its shape for hours, which matters when you're sitting through a long ceremony.
Why this look is popular: Hollywood waves are the most photographed hairstyle in formal settings for a reason—they're universally flattering and radiate luxury. The deep side part adds instant drama and asymmetry.
Where this look is suitable: Formal evening ceremonies, opera house venues, gala-style graduation events where the structured waves will catch dramatic lighting.
Step by step:
- Curl in the same direction. Use a 1.25-inch curling iron, wrapping all sections away from the face. Hold each for 8-10 seconds.
- Pin each curl to cool. Pin each curl in its coiled shape and let them cool completely—at least 15 minutes.
- Brush into waves. Use a soft bristle brush to blend the curls into unified S-shaped waves. Brush in one direction only.
- Create the ridge. Use your fingers to pinch and sculpt the wave ridges into definition.
- Sweep to one side. Direct all hair over one shoulder and set with medium-hold hairspray.
Tips and tricks: Pinning the curls to cool is the most important step—it sets the wave pattern. A setting lotion or mousse before curling helps the waves hold their shape. The deep side part tends to fall flat over time—dry shampoo at the roots of the heavy side adds lasting lift.

27 Coral Nail Art Designs for a Warm, Tropical Manicure (2026)
20.Sleek Double Top Knot with Starry Sparkle
The overview: Dark espresso brown hair center-parted and twisted into two sleek, symmetrical top knots positioned high on the crown. A starburst crystal pin accents one of the knots, catching the evening light against the glossy dark hair.
The double top knot is modern, fashion-forward, and completely unexpected for graduation. The sleek finish keeps it polished while the starburst pin adds a celestial detail that elevates the entire look from edgy to editorial.
Why this look is popular: The double top knot is having a moment because it's bold, unexpected, and photographs like a fashion editorial. The sleek finish communicates discipline and intentionality.
Where this look is suitable: Evening ceremonies, arts-focused universities, any setting where the fashion-forward aesthetic will be appreciated.
Step by step:
- Create the center part. Use a fine-tooth comb for a razor-precise line from forehead to nape.
- Apply strong-hold product. Work gel or high-shine pomade from roots to ends for maximum sleekness.
- Divide into two sections. Split the hair evenly down the center part into left and right sections.
- Create each top knot. Gather each section into a high ponytail at the crown. Twist tightly and coil into a compact bun. Secure with pins.
- Smooth the surface. Go back over the crown and sides with more product and a fine-tooth comb for glass-like smoothness.
- Add the starburst pin. Position the crystal starburst pin on one of the top knots where it will catch overhead lighting.
Tips and tricks: Both knots should be identical in size and position—symmetry is everything here. Use a boar bristle brush to pull each section smooth before gathering. The starburst pin works best on dark hair where the crystal contrast is strongest. For extra hold, apply hairspray to a toothbrush and smooth along the hairline.
21.Effortless Textured Pixie with Side-Swept Bangs
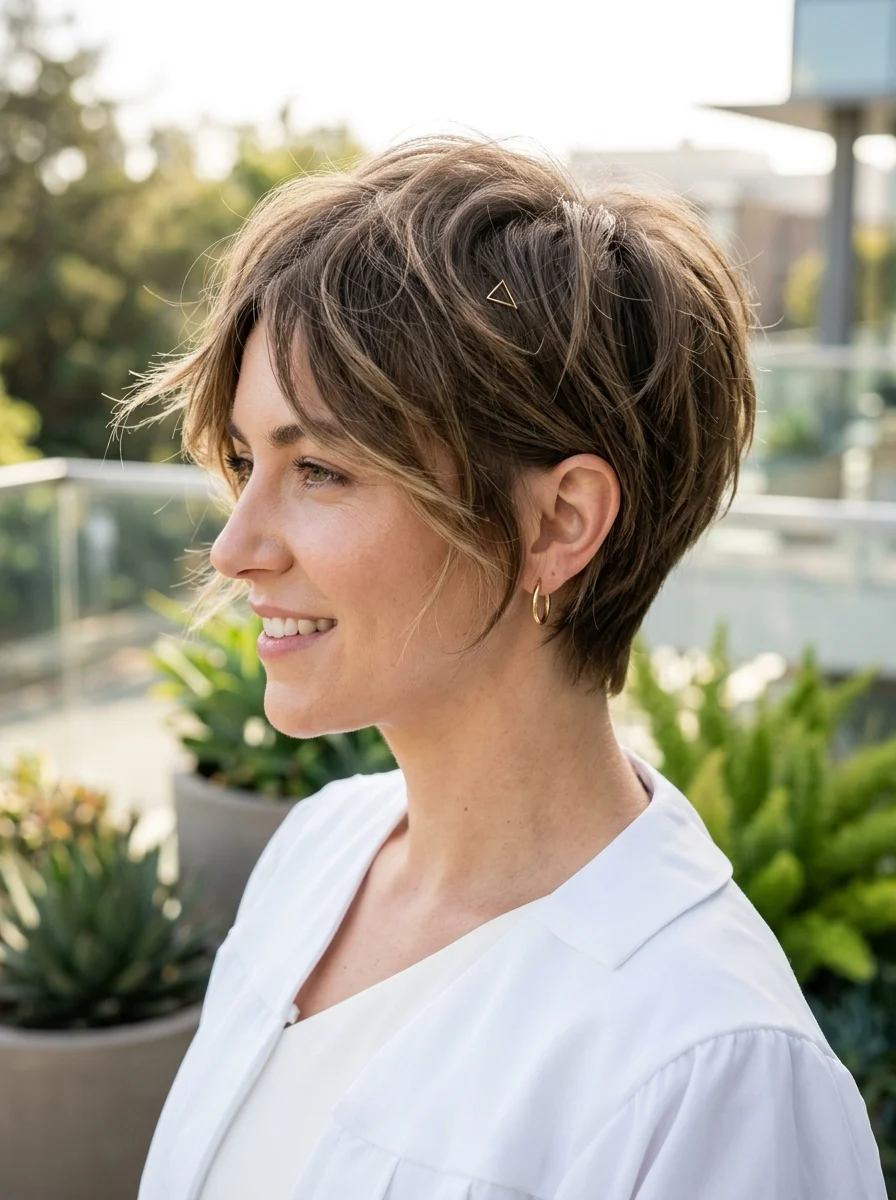
The overview: Ash brown hair with subtle highlights cut into a textured pixie with side-swept bangs and a small gold geometric pin tucked at the temple. Short hair on graduation day is a power move—no cap interference, no fuss, just clean confidence. The textured layers create natural volume and movement that looks effortless but requires a skilled cut.
The pixie eliminates every problem that long-haired graduates face—no cap adjustment, no wind drama, no tassel tangles. The side-swept bangs soften the face while the texture adds dimension that keeps it from looking flat.
Why this look is popular: Short hair is having a major moment because it's bold, modern, and requires almost no styling. The textured pixie is universally flattering and photographs with clean lines that work from every angle.
Where this look is suitable: Any ceremony—pixies are the most versatile graduation style. The gold pin adds enough polish for formal settings while the texture keeps it casual enough for outdoor celebrations.
Step by step:
- Apply texturizing product. Work a small amount of matte pomade or wax through damp hair for piecey definition.
- Rough-dry. Use your fingers, not a brush, to rough-dry the hair. A diffuser on low heat works too.
- Add root lift. Flip your head upside down and shake the roots with your fingers for volume.
- Shape the layers. Use your fingers to piece out the layers and create definition. Don't brush—the messiness is the design.
- Add the pin. Tuck the gold geometric pin at the temple, securing it into the shorter layers.
Tips and tricks: Ask your stylist for a "textured pixie with razor-cut layers"—the razor technique creates piecey texture that scissors can't replicate. A texturizing powder at the roots adds volume that lasts all day. The gold pin should be subtle—let the cut be the statement.
35 Cute & Sporty Athletic Hairstyles for Women (2026)
22.Effortless Romantic Chignon with Face-Framing Tendrils
The overview: Light brown and honey blonde hair gathered into an undone low chignon at the nape, with soft face-framing tendrils left loose around the ears and temples. The chignon is intentionally imperfect—some loops tighter, some looser—creating a romantic, pastoral quality that feels like a countryside ceremony even in a city auditorium.
This is the "I just threw it up" aesthetic done right. The face-framing tendrils soften the entire silhouette and add movement that catches light beautifully in photos. The undone quality means it actually gets better as the day progresses.
Why this look is popular: The deconstructed chignon strikes the perfect balance between effort and ease—it reads as styled without looking overdone. The face-framing pieces contour the face naturally, softening the jawline.
Where this look is suitable: Garden ceremonies, intimate celebrations, any setting where the romantic, undone aesthetic complements the atmosphere.
Step by step:
- Add texture. If hair is freshly washed, spray with dry shampoo or texturizing spray for grip.
- Loosely wave the hair. Use a large barrel curling wand on random sections. Don't aim for uniform curls—the imperfection is the point.
- Section the face-framing pieces. Before gathering the chignon, separate two to three tendrils on each side and clip them out of the way.
- Gather at the nape. Pull all remaining hair back loosely into a low ponytail. Don't smooth it—let the texture show.
- Twist and wrap. Twist the ponytail loosely and wrap it around the base to form a chignon. Don't tuck the ends too neatly.
- Release tendrils. Unclip the face-framing pieces and let them fall naturally. Use your fingers to separate them into soft curves.
Tips and tricks: The key word is "deconstructed"—if the chignon looks too perfect, pull it apart gently until it looks like you did it without a mirror. Bobby pins should match your hair color exactly. Pull the face-framing pieces out before setting with spray so they look natural, not accidentally escaped.
The Accessory Moment
When the cap comes off, your accessories are what make your graduation photos stand out. The biggest hair accessory trends for summer 2026 are oversized bows, pearl-encrusted pins, sculptural clips, and silk scarves tied in creative ways. These pieces elevate a simple style into something photo-ready in seconds.
A sleek low ponytail becomes editorial with an oversized velvet bow wrapped around the base. A simple half-up style reads as red-carpet with a few pearl pins scattered along the twist line. Silk scarves tied at the crown or wrapped around a bun add movement and color that catch the light during outdoor ceremonies. Match your accessory color to your gown's sash or your school colors for a coordinated look that shows you thought about the details.
The quick upgrade? If you only have one accessory, make it a large bow or a cluster of pearl pins at the back of your head. That is the angle your family photographer will be shooting most — the back of your cap-free head with diploma in hand.