Hair Trends
28 Effortless Hot Weather Day Hairstyles for Women 2026
There's a specific kind of frustration that comes with spending forty minutes on your hair only to step outside and feel it deflate in thirty seconds. The humidity wins, your curls surrender, and suddenly you're reaching for a ponytail holder you swore you wouldn't need. Hot weather hair doesn't have to be an afterthought, though. The trick is picking a style that actually cooperates with the climate instead of fighting it.
We pulled together twenty-eight hairstyles that hold up when the temperature climbs. Some are quick enough for a five-minute morning. Others give you a reason to slow down and actually enjoy getting ready before a night out. Every single one is built to survive real summer conditions—not just look good in a salon mirror.
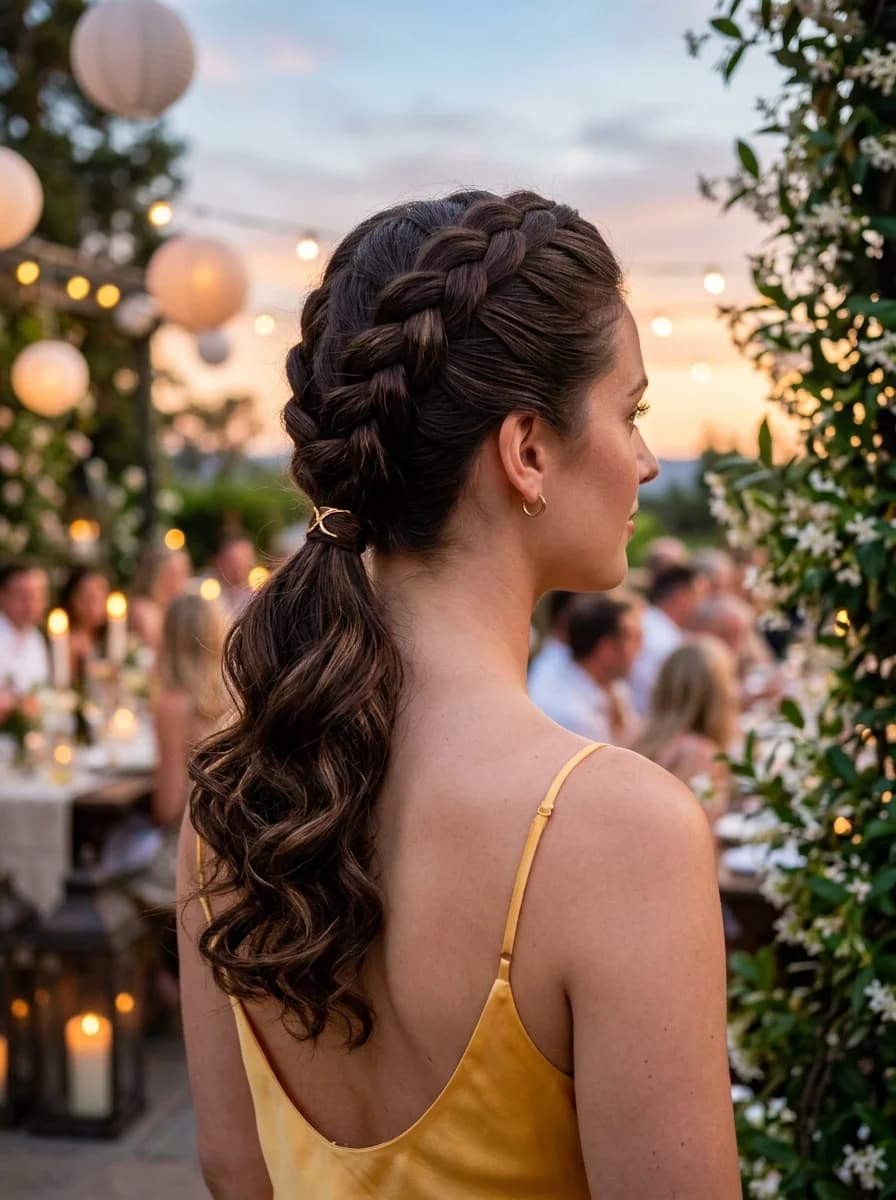
1.Braided Crown with Soft Waves and Daisy Accent
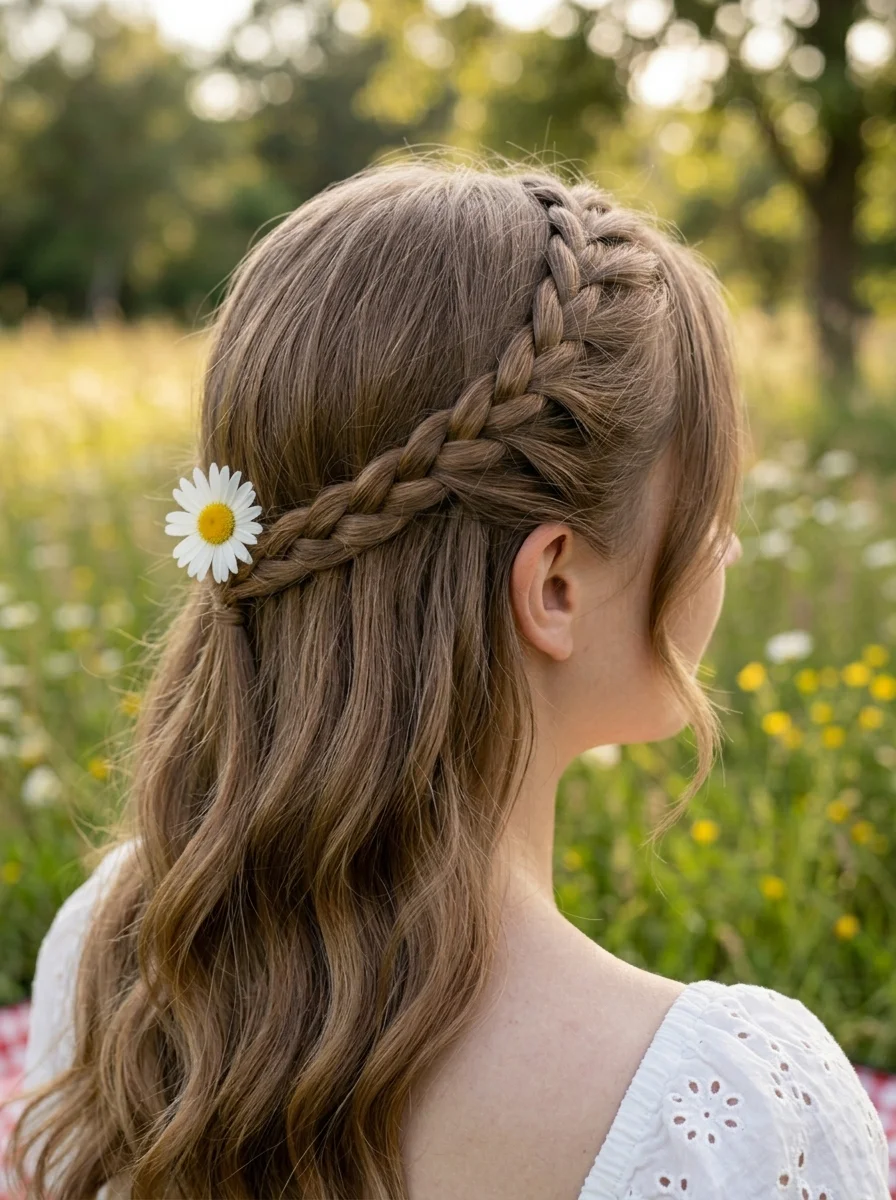
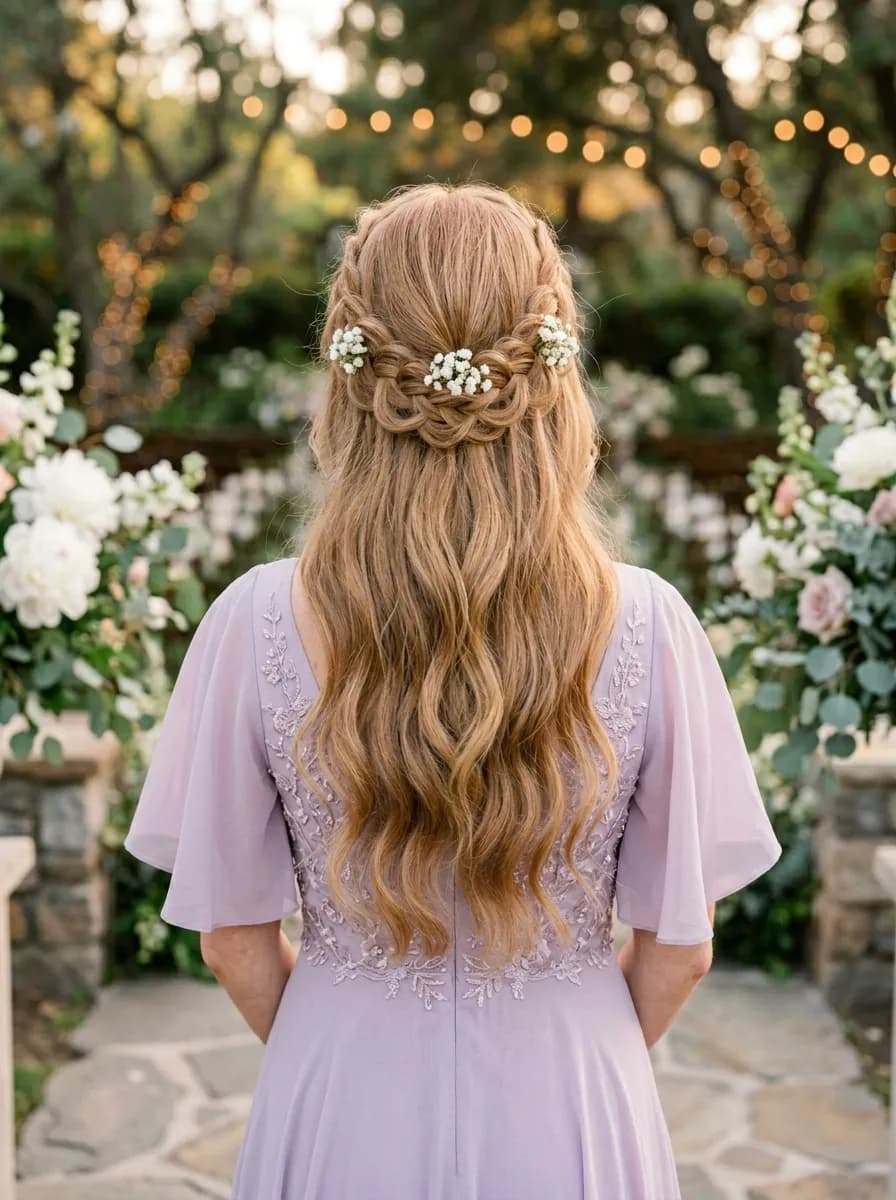
The overview: Medium to long-length hair worked into a half-up crown braid that wraps from the temple along the hairline, with the lower half falling in soft, loose waves. A single fresh daisy is tucked behind one ear where the braid ends, adding a whimsical, garden-party detail.
The braid keeps hair off the face during hot weather while the waves below add movement and softness. The daisy is the kind of detail that makes people smile—it's unexpected, organic, and perfectly imperfect.
Why this look is popular: The half-up crown braid is the most practical hot-weather style because it keeps hair contained without sacrificing length or movement. Fresh flowers add a seasonal touch that no accessory can replicate.
Where this look is suitable: Garden parties, outdoor picnics, farmers' markets, and any daytime event where the breeze will play with the loose waves.
Step by step:
- Prep with texture. Apply texturizing spray to dry hair for grip—second-day hair holds braids better than freshly washed.
- Create a deep side part. This determines where the braid starts and gives the crown an asymmetrical, more modern feel.
- Dutch braid along the hairline. Starting at the heavier side of the part, cross strands under to create the raised braid effect. Add small sections as you go.
- Secure at the opposite side. Pin the braid end behind the opposite ear with bobby pins.
- Add the daisy. Tuck a fresh daisy stem into the braid near the ear. Use a bobby pin to anchor it if needed.
- Wave the remaining hair. Use a curling wand on the loose sections. Break up with fingers for natural waves.
Tips and tricks: Fresh daisies wilt fast in heat—use dried flowers or silk alternatives if you'll be in direct sun for hours. Tease the crown slightly before braiding for a softer, more lifted silhouette. A flexible-hold hairspray keeps the braid in place without stiffness.

21 Stunning Concert Hairstyles for Women 2026 🎶✨
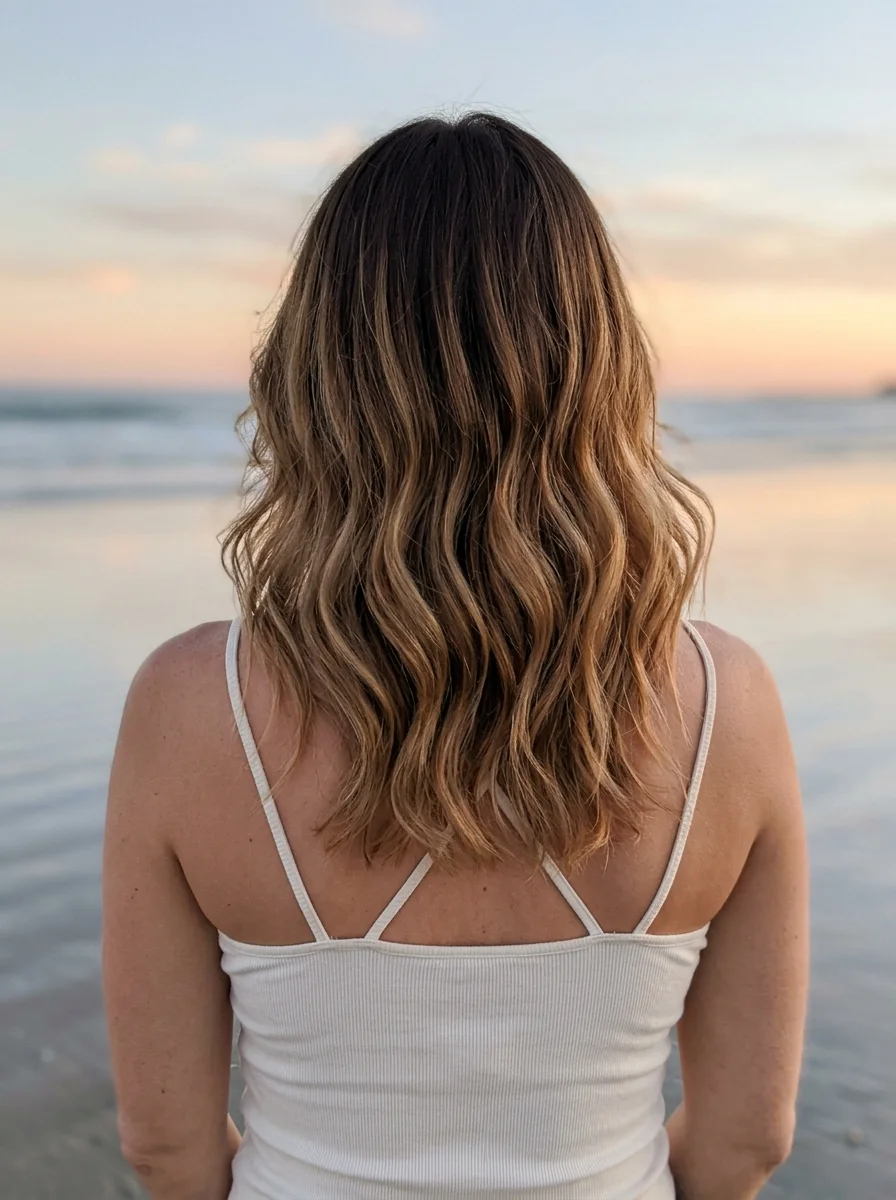
2.Golden Hour Waves with Sun-Kissed Blonde
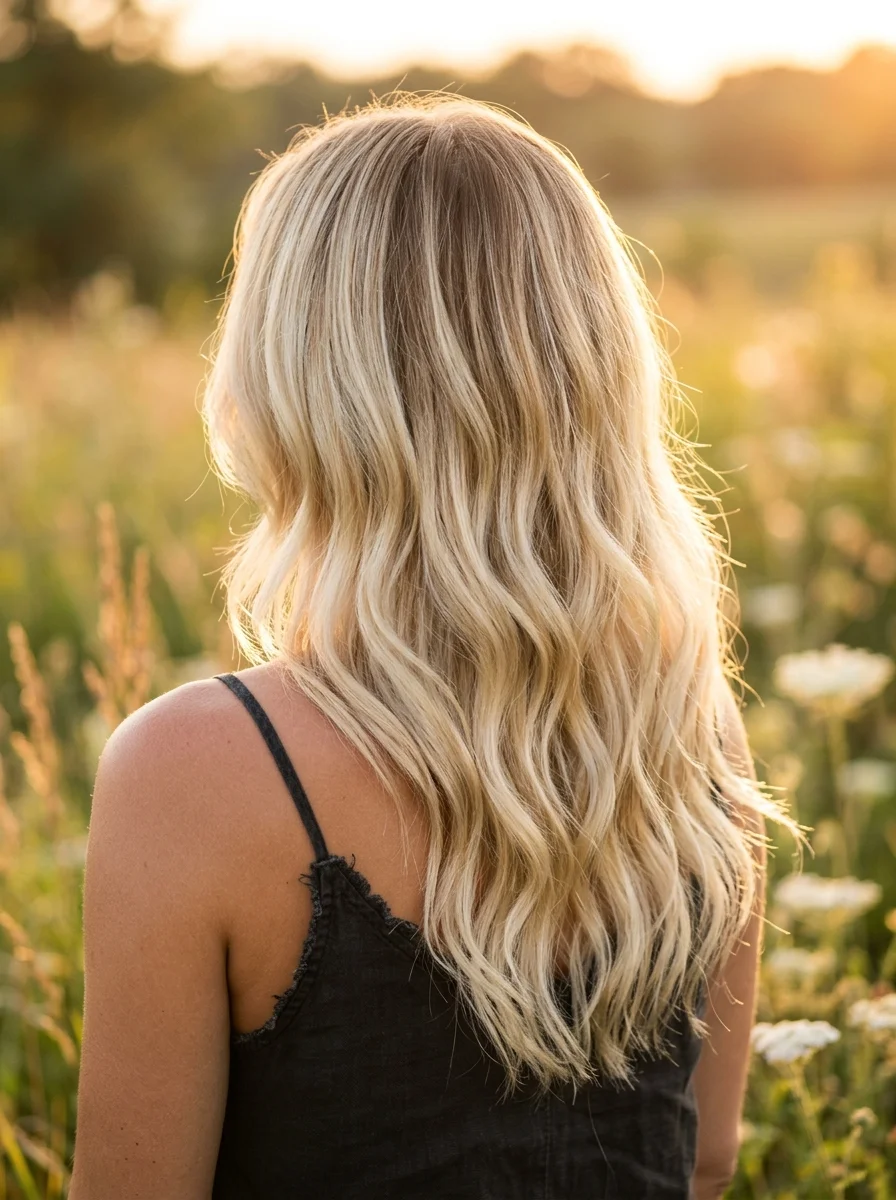
The overview: Medium to long hair that catches light like it was placed there on purpose. The waves are loose and beachy—the kind that look better after you've been outside for an hour.
The beauty of sun-kissed blonde waves is that they improve with sun exposure. The golden tones catch warm light from every angle, and the loose wave pattern gets more textured and lived-in as the day goes on.
Why this look is popular: Sun-kissed blonde is the most requested summer color because it mimics natural sun-lightening. The loose waves require minimal styling and actually look better with humidity.
Where this look is suitable: Sunset dinners, outdoor concerts, beach-side restaurants—anywhere the warm lighting will enhance the golden tones.
Step by step:
- Prep with salt spray. Mist damp hair with a sea salt spray like Bumble and Bumble Surf Spray from roots to ends.
- Air-dry or diffuse. Let hair dry naturally for the most authentic beach wave texture. If impatient, use a diffuser on low heat.
- Add definition if needed. If certain sections dried too straight, wrap 1-inch sections around a 1.25-inch curling wand, leaving the last inch out.
- Break up the waves. Run your fingers through the hair to separate curls into softer waves. Don't use a brush.
- Scrunch for texture. Scrunch the ends upward with your hands to encourage the wave pattern and add root volume.
Tips and tricks: The best beach waves come from hair that hasn't been washed in a day or two—freshly washed hair is too slippery. If you must wash, skip conditioner on the ends. A matte texturizing spray gives better results than anything with shine.
3.Beachy Waves Half-Up with Starfish Clips
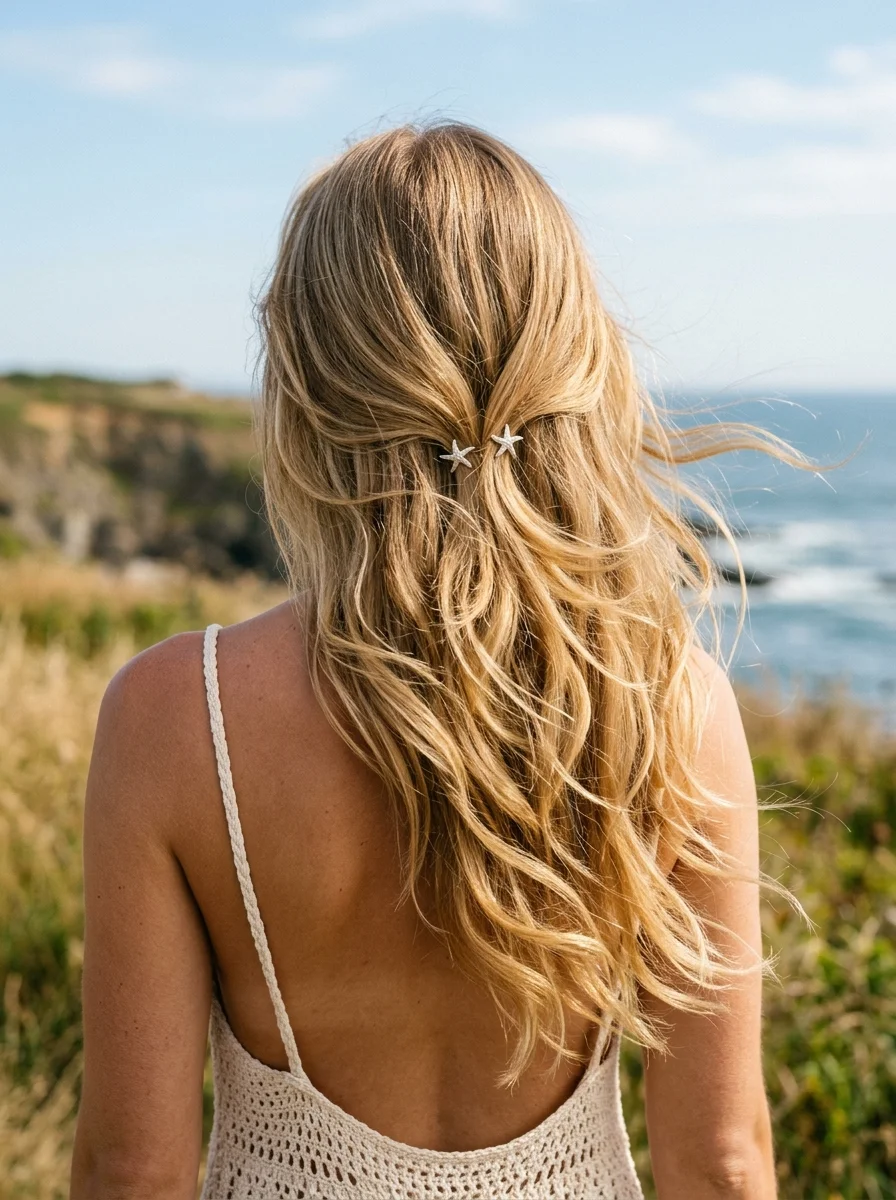
The overview: Medium to long-length hair pulled into a half-up style and secured with two silver starfish clips at the back of the crown. The remaining waves fall naturally past the shoulders, catching the ocean breeze.
Starfish clips are the summer accessory that actually stays put—they grip better than most decorative clips and add a nautical detail that feels organic rather than themed. The half-up construction keeps hair off the face while showing off the length.
Why this look is popular: Coastal-inspired accessories are dominating 2026 because they add personality without requiring commitment. The starfish clips photograph beautifully against ocean backdrops.
Where this look is suitable: Beach outings, coastal walks, seaside dining, and any ocean-adjacent setting where the nautical theme feels natural.
Step by step:
- Create waves. Use a 1.25-inch curling wand on 1-inch sections, leaving the ends out. Break up with fingers.
- Gather the half-up section. Take hair from each temple and pull it back to the crown. Keep it loose—tight gathering defeats the purpose.
- Clip with starfish. Position the two starfish clips where the gathered section meets, securing both sides.
- Adjust the waves. Shake the loose waves gently for natural movement and volume.
- Set lightly. A mist of flexible-hold hairspray keeps the waves defined without stiffness.
Tips and tricks: Choose starfish clips with strong spring mechanisms—cheap versions slip in wind. For finer hair, apply texturizing spray before gathering the half-up section for extra grip. The clips work best when they contrast with the hair color—silver on blonde creates the strongest visual impact.
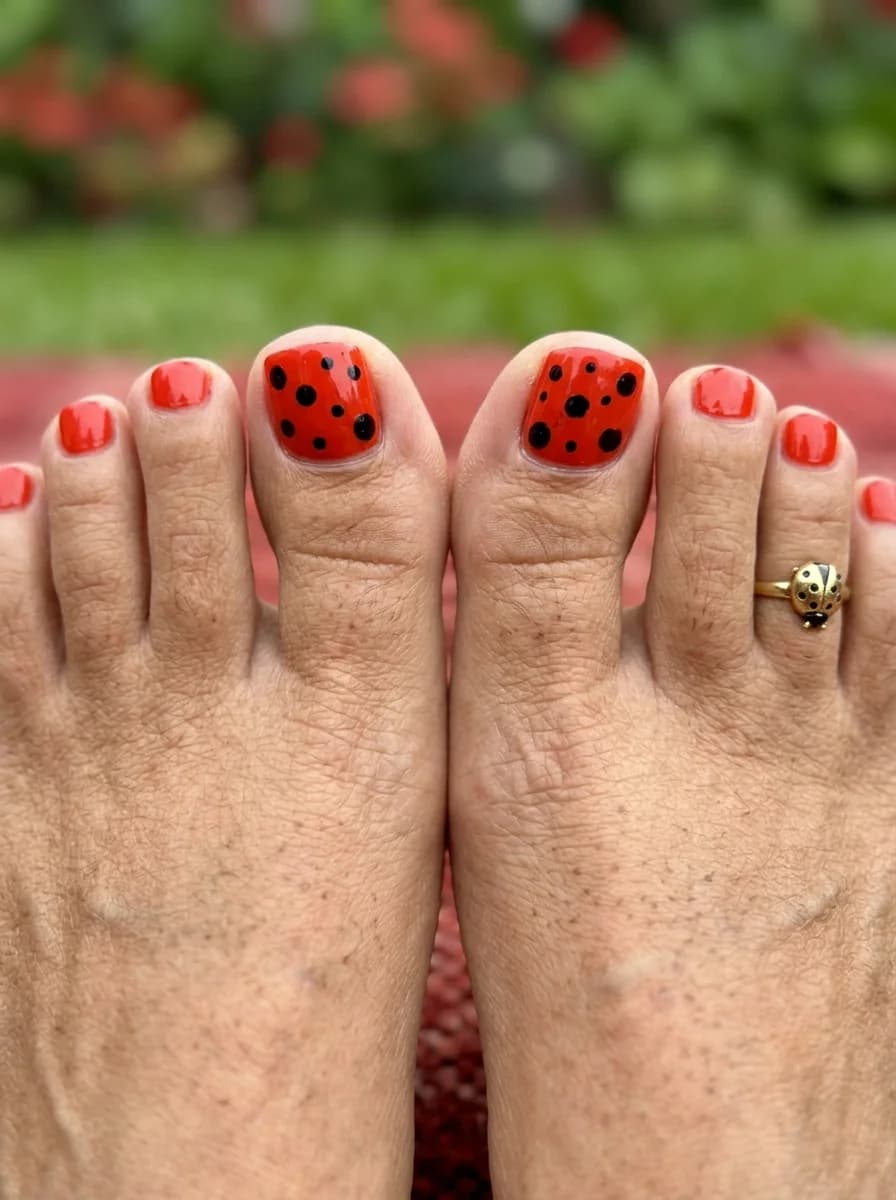
32 Bright & Fun Summer Toe Nail Designs (2026)
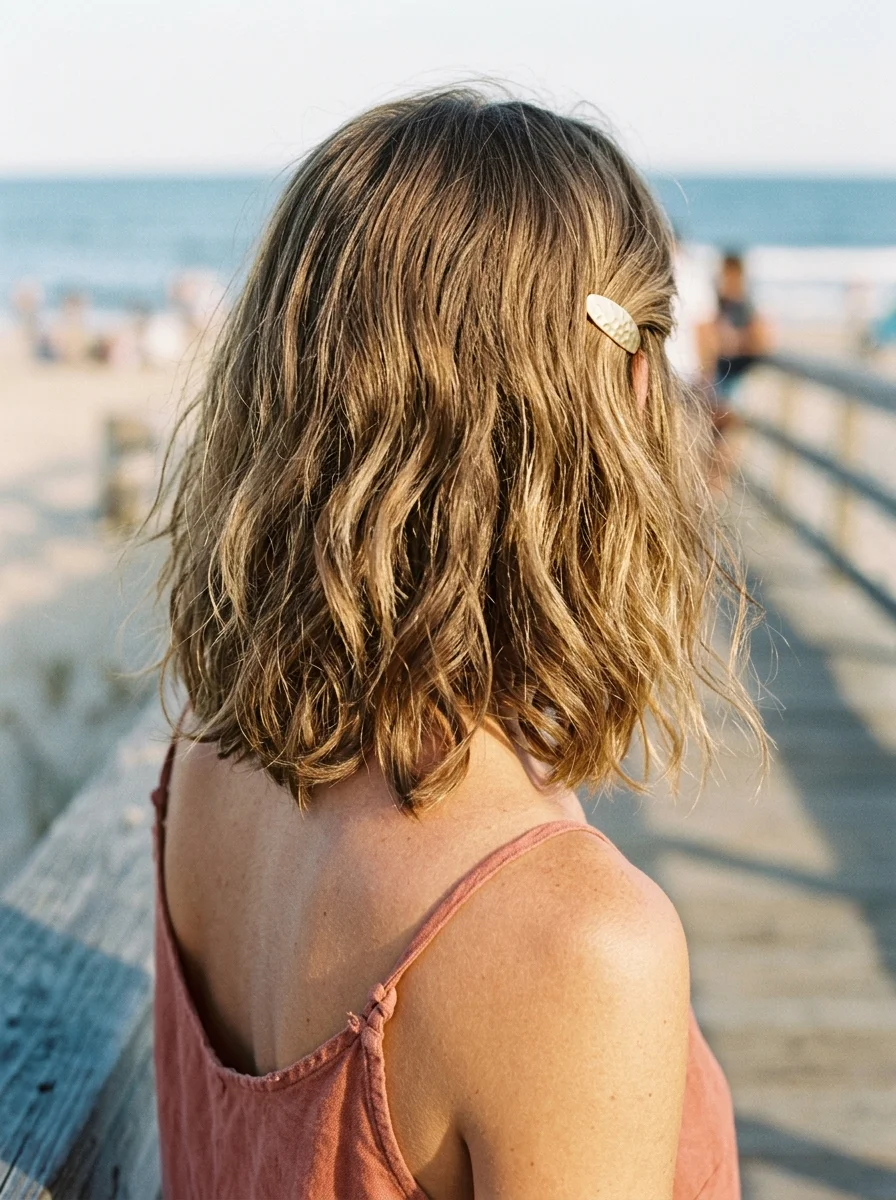
4.Beachy Blonde Layers with Subtle Movement
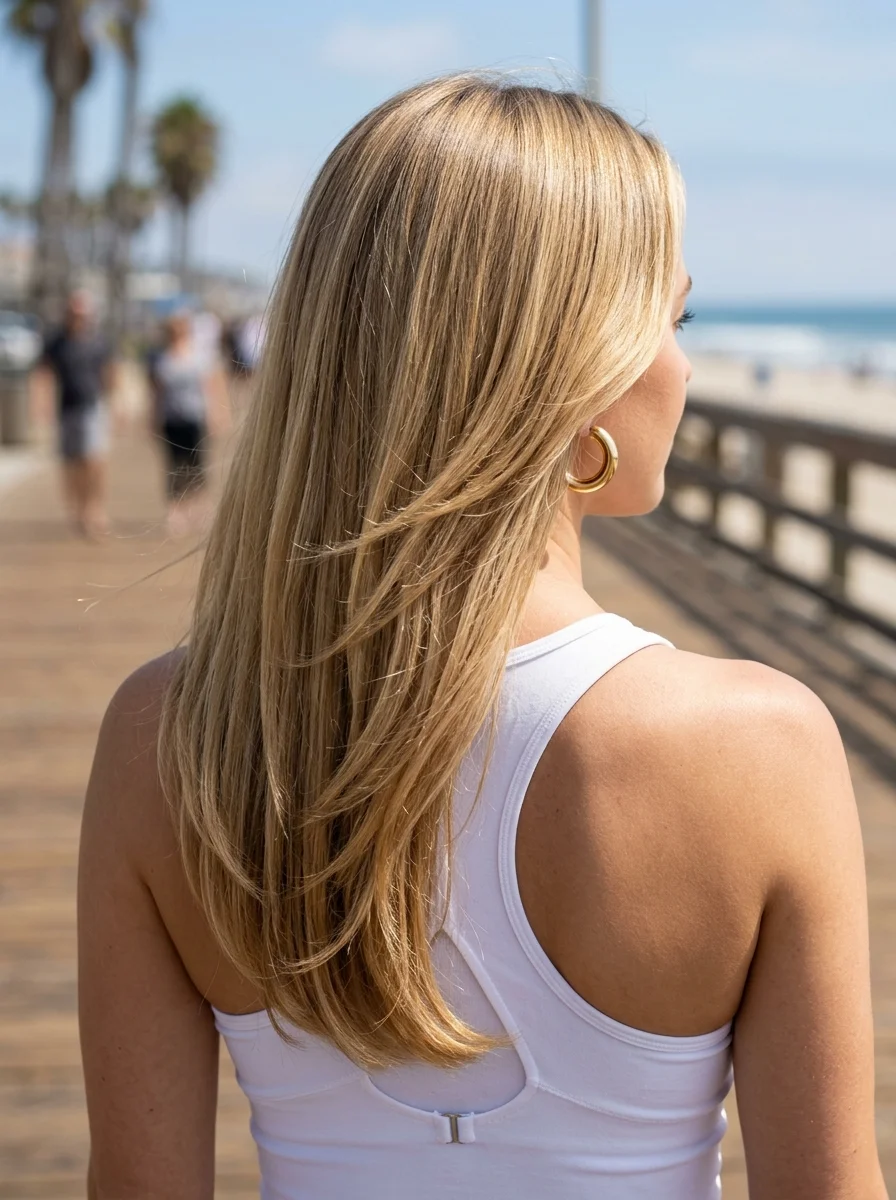
The overview: Short to long-length hair cut into a layered lob that falls past the shoulders with subtle, face-framing movement. The hair is mostly straight with just enough bend to keep it from looking flat—the kind of texture that looks like the ocean breeze styled it.
The layers are cut to move with you, not against you. They create natural body without requiring heat tools, and the sandy blonde color catches light beautifully even on overcast days.
Why this look is popular: The layered lob is the most requested summer cut because it's long enough to tie back but short enough to survive humidity. The subtle layers create movement that improves with air-drying.
Where this look is suitable: Boardwalk strolls, beach days, casual outdoor dining—anywhere the wind-tousled texture will be enhanced rather than ruined.
Step by step:
- Wash and condition. Use a lightweight shampoo and skip heavy conditioner on the roots.
- Apply leave-in. Work a lightweight leave-in conditioner through the mid-lengths and ends.
- Air-dry. Let hair dry naturally for the most authentic texture. Avoid touching it while it dries.
- Add subtle bends if needed. Use a flat iron to create gentle bends by twisting the iron as you pass through random sections.
- Finish with texture. A light mist of sea salt spray adds that final piecey, lived-in quality.
Tips and tricks: Ask your stylist for "invisible layers" that create shape without obvious layering lines. The cut matters as much as the styling—regular trims every 8-10 weeks keep the layers fresh. For extra volume, flip your head upside down and blast the roots with a blow dryer for 30 seconds.
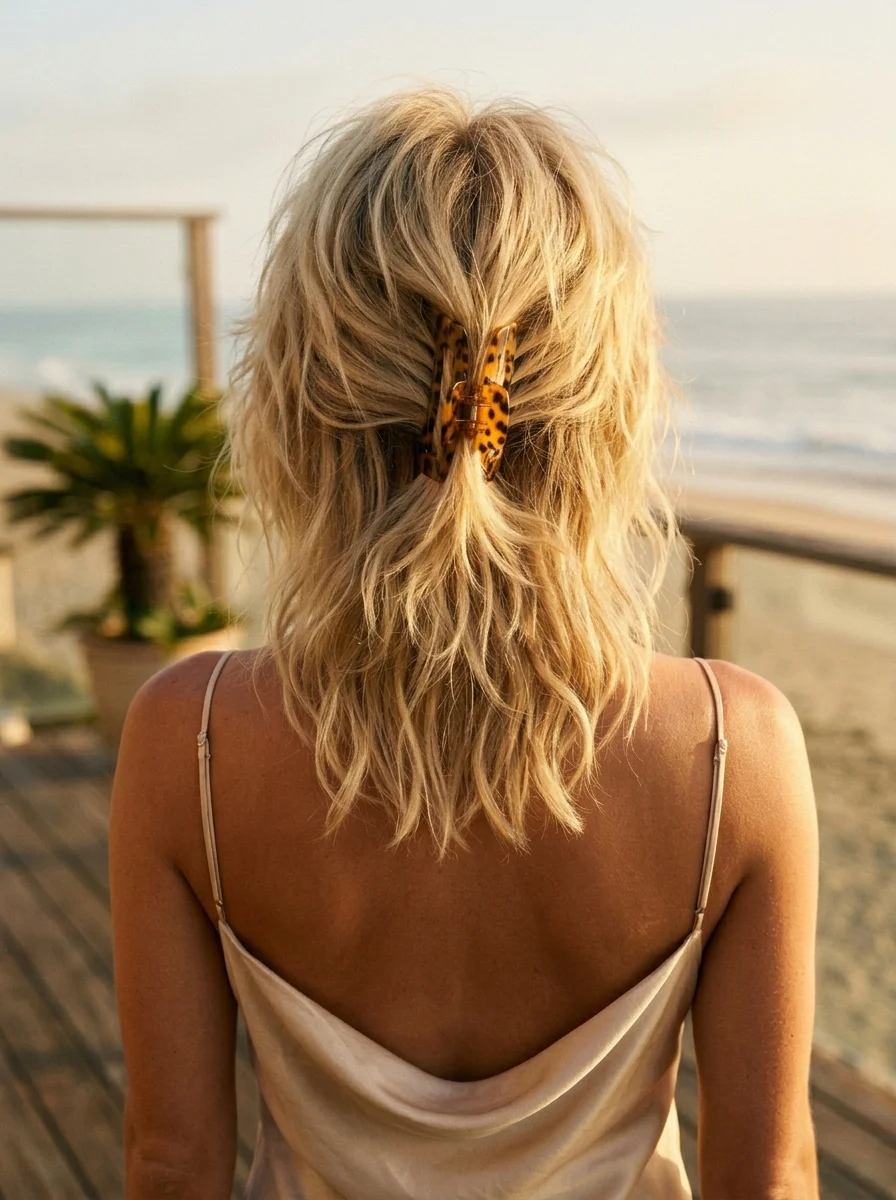
5.Twisted Half-Up with Elegant Claw Clip
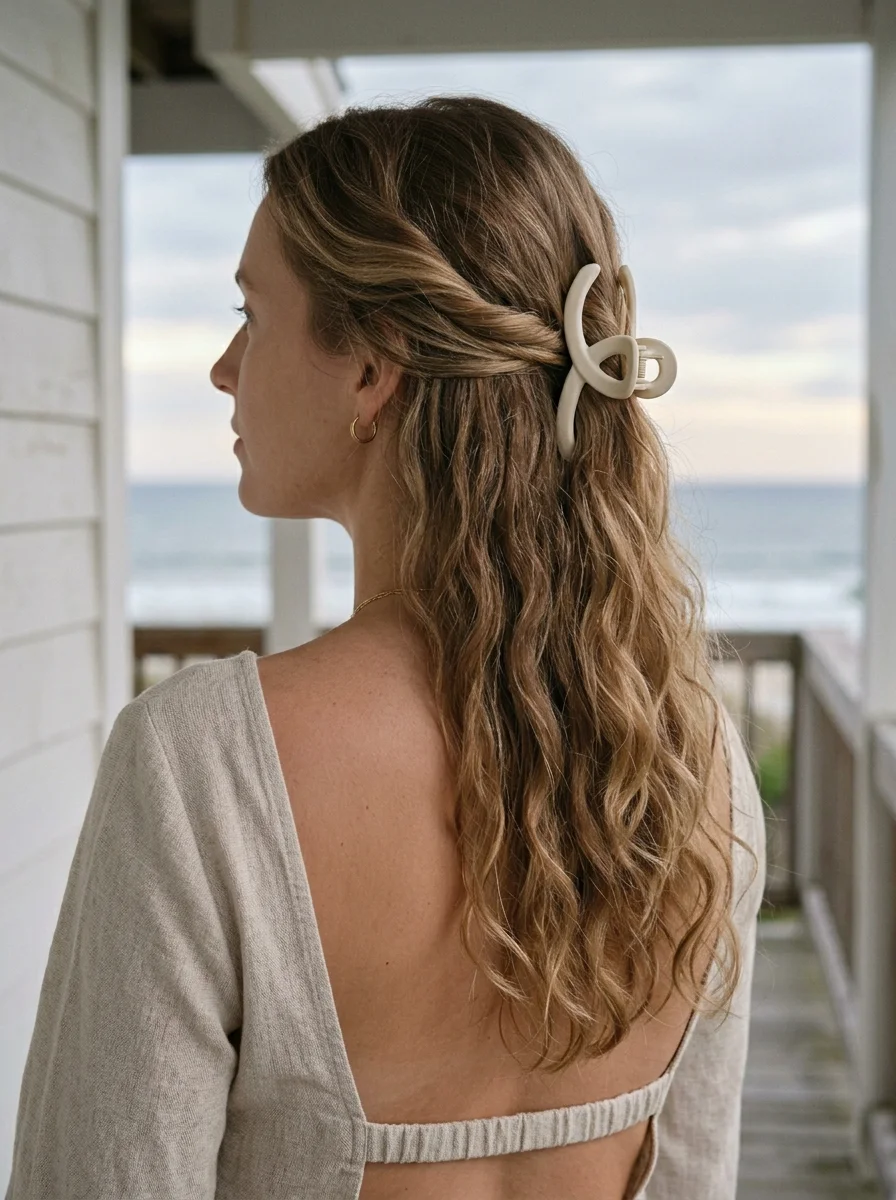
The overview: Medium to long-length hair twisted back from the face and held with a cream-colored sculptural claw clip. The twist adds structure while the loose pieces keep it relaxed and beachy. This look is something that survives a walk along the water without looking overdone.
The claw clip is the most practical hot-weather accessory—it holds more hair than bobby pins, takes three seconds to use, and the sculptural cream design adds enough polish to feel intentional.
Why this look is popular: The claw clip comeback shows no signs of slowing down because it transforms a basic updo into something with visual interest. The cream color complements bronde tones perfectly.
Where this look is suitable: Beach house mornings, coastal walks, casual outdoor brunches—any setting where the relaxed twist and clip detail will complement the atmosphere.
Step by step:
- Prep with texture. Apply sea salt spray or texturizing mousse to damp hair for beachy grip.
- Air-dry. Let hair dry naturally for the most authentic wave texture.
- Twist the top section. Gather hair from the temples and twist loosely toward the back of the head.
- Clip it. Secure the twist with the claw clip at the back of the crown. Let the tail fan out slightly above the clip.
- Pull out face-framing pieces. Tug soft strands around the temples and ears for a relaxed frame.
Tips and tricks: The claw clip should be large enough to grip all your hair—if it slips, your hair is too heavy for that clip size. Second-day hair holds this style better than freshly washed hair. Choose a clip with strong teeth that interlock firmly for wind-proof hold.

21 Hot Summer Buns Hairstyle Ideas for 2026 ☀️🔥
6.Effortless Beach Waves
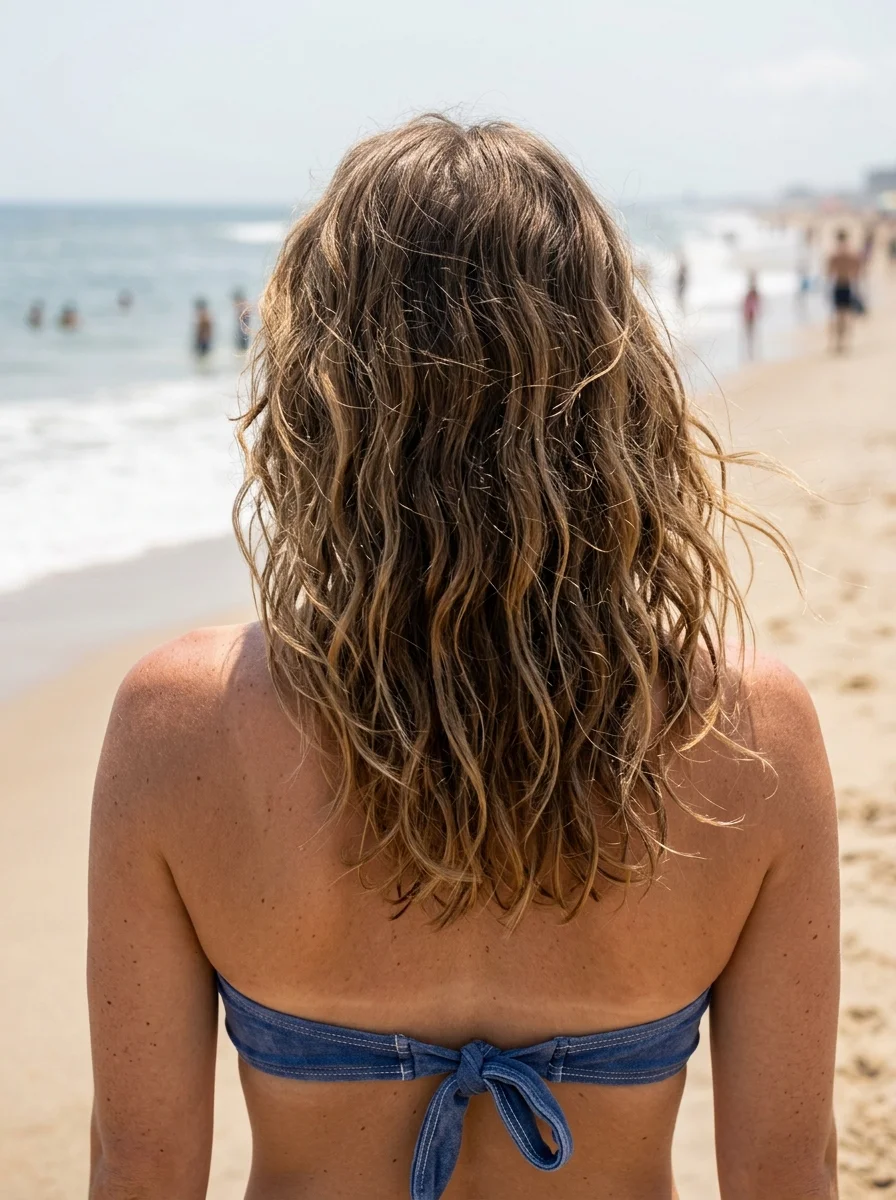
The overview: Short to long-length hair air-dried into tousled, mid-length waves with a matte, lived-in texture. No curling iron, no round brush—just whatever the salt spray and humidity decided to do.
This is the anti-effort hairstyle, and it works because it leans into what your hair already wants to do in humid conditions. The tousled texture actually improves as the day goes on—gaining volume and character rather than falling apart.
Why this look is popular: The effortless beach wave is the default summer hairstyle for a reason—it's the one style that actually looks better with salt air and humidity. Requires zero heat tools.
Where this look is suitable: Beach days, surf sessions, boardwalk hangs—anywhere that calls for a completely relaxed, carefree vibe.
Step by step:
- Wash lightly. Use a sulfate-free shampoo and skip conditioner on the ends—too much moisture weighs waves down.
- Apply salt spray. Mist damp hair with sea salt spray from roots to ends. Scrunch upward to encourage wave formation.
- Air-dry completely. Don't touch it while it dries—hands create frizz and flatten volume.
- Shake at the roots. Once dry, flip your head upside down and shake the roots with your fingers for lift.
Tips and tricks: Second-day hair is the best canvas for this style—if you must wash, skip conditioner on the ends. A matte texturizing spray gives better results than anything with shine. For extra volume, blast the roots with a blow dryer while your head is upside down for 30 seconds.
7.French Braid Crown Ponytail
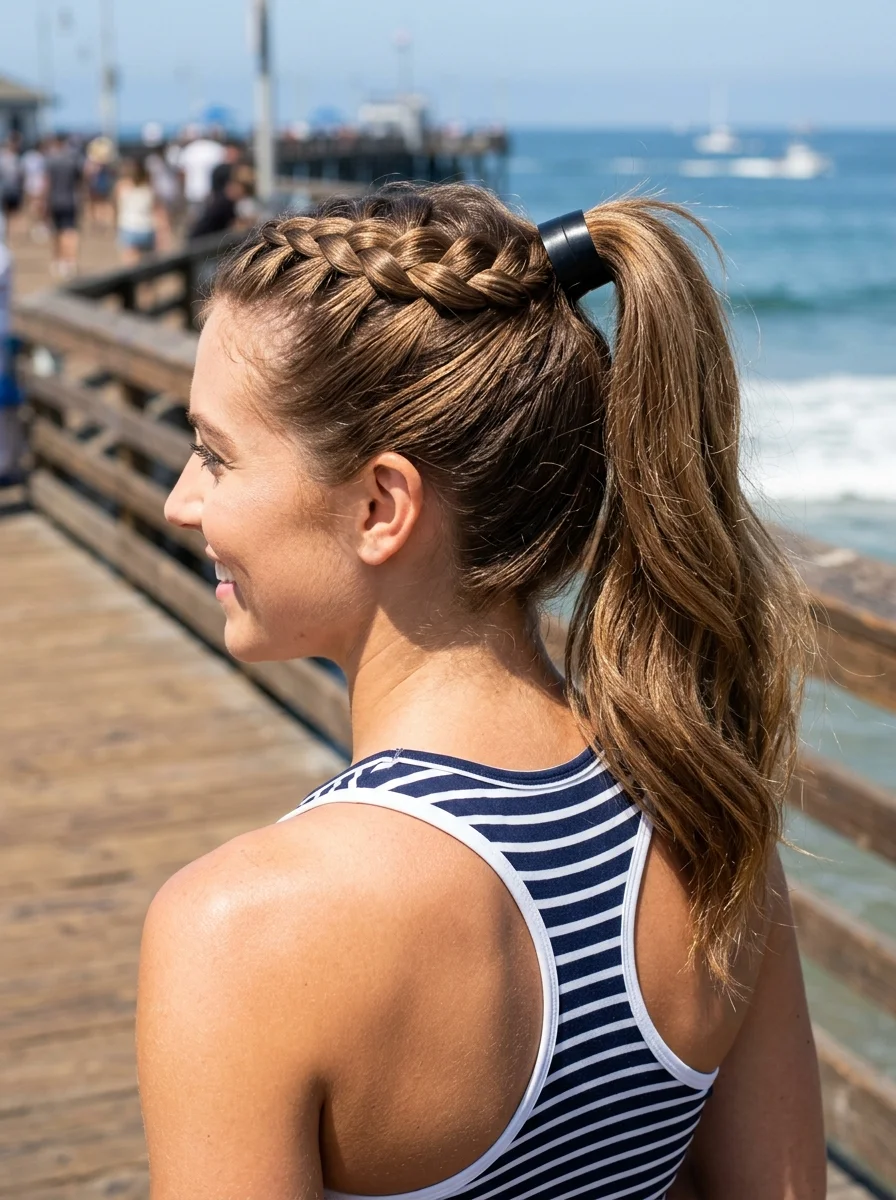
The overview: Medium to long-length hair with natural highlights, braided in a French braid that wraps from the hairline along the crown and feeds into a mid-height ponytail secured with a black cuff. The braid keeps everything off the neck while the ponytail still gives movement and swing.
The French braid crown is the most practical braid style for hot weather—it distributes tension across the entire scalp instead of concentrating it at one point, so you can stay active without developing a tension headache.
Why this look is popular: The braid-to-ponytail combination is the ultimate hot-weather workhorse—it's secure, stylish, and keeps hair completely off the neck. The black cuff adds a modern, polished touch.
Where this look is suitable: Active beach days, pier walks, outdoor sports, and any situation where your hair needs to survive movement and sweat without budging.
Step by step:
- Prep for grip. Apply texturizing spray to damp hair for hold—freshly washed hair is too slippery.
- French braid the crown. Starting at the hairline, French braid along the crown, adding small sections from each side as you braid backward.
- Gather the ponytail. Once you reach the back of the crown, gather the braid tail with the remaining hair into a mid-height ponytail.
- Secure with cuff. Slide the black cuff over the elastic and clamp it shut.
- Adjust volume. Gently pull at the braid edges to widen them for a fuller look.
Tips and tricks: Keep consistent tension throughout the braid—if one section is looser, the entire pattern looks uneven. A boar bristle brush smooths each section before braiding to eliminate bumps. The cuff should be proportional to your ponytail thickness.

29 Best Tropical Vacation Nails for Women in 2026 🌴
8.Textured Beachy Bob with Delicate Ear Chain Accent
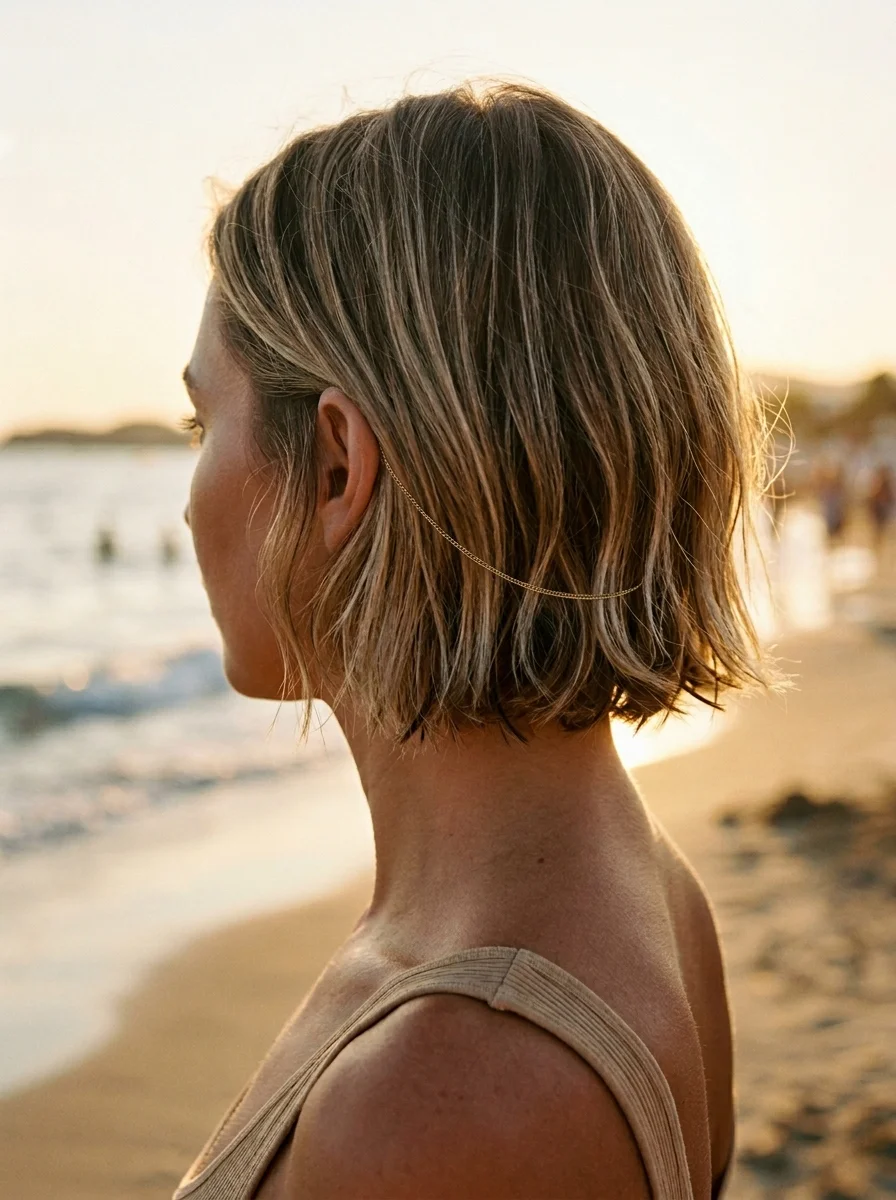
The overview: Short-length hair cut into a chin-length bob with piecey, tousled texture that looks like you slept on it in the best possible way. A delicate gold ear chain connects from the ear and disappears into the hair, adding just enough edge without trying to be something it's not.
The textured bob is the ultimate low-maintenance summer cut—short enough to survive heat without becoming a sweaty curtain against your neck, but long enough to tuck behind the ear. The ear chain adds a subtle sparkle that catches golden-hour light.
Why this look is popular: The textured bob is having a major moment because it requires almost no styling—the cut does the work. The ear chain trend adds personality without requiring multiple accessories.
Where this look is suitable: Sunset dinners, rooftop bars, beach-side restaurants—anywhere the golden-hour light will catch the ear chain sparkle.
Step by step:
- Wash and towel-dry. Squeeze out excess water with a microfiber towel—don't rub.
- Apply texturizing product. Work sea salt spray or matte paste through the mid-lengths and ends.
- Rough-dry. Use your fingers, not a brush, to rough-dry. A diffuser on low heat works too.
- Piece out the texture. Once dry, use your fingers to separate and define individual pieces.
- Add the ear chain. Hook the ear chain onto the ear and tuck the chain end into the hair behind the ear.
Tips and tricks: Ask your stylist for a bob with "point-cut ends" that create natural texture without blunt lines. Maintenance trims every 6-8 weeks keep the shape sharp. The ear chain should be lightweight—heavy chains pull on the ear and create discomfort.
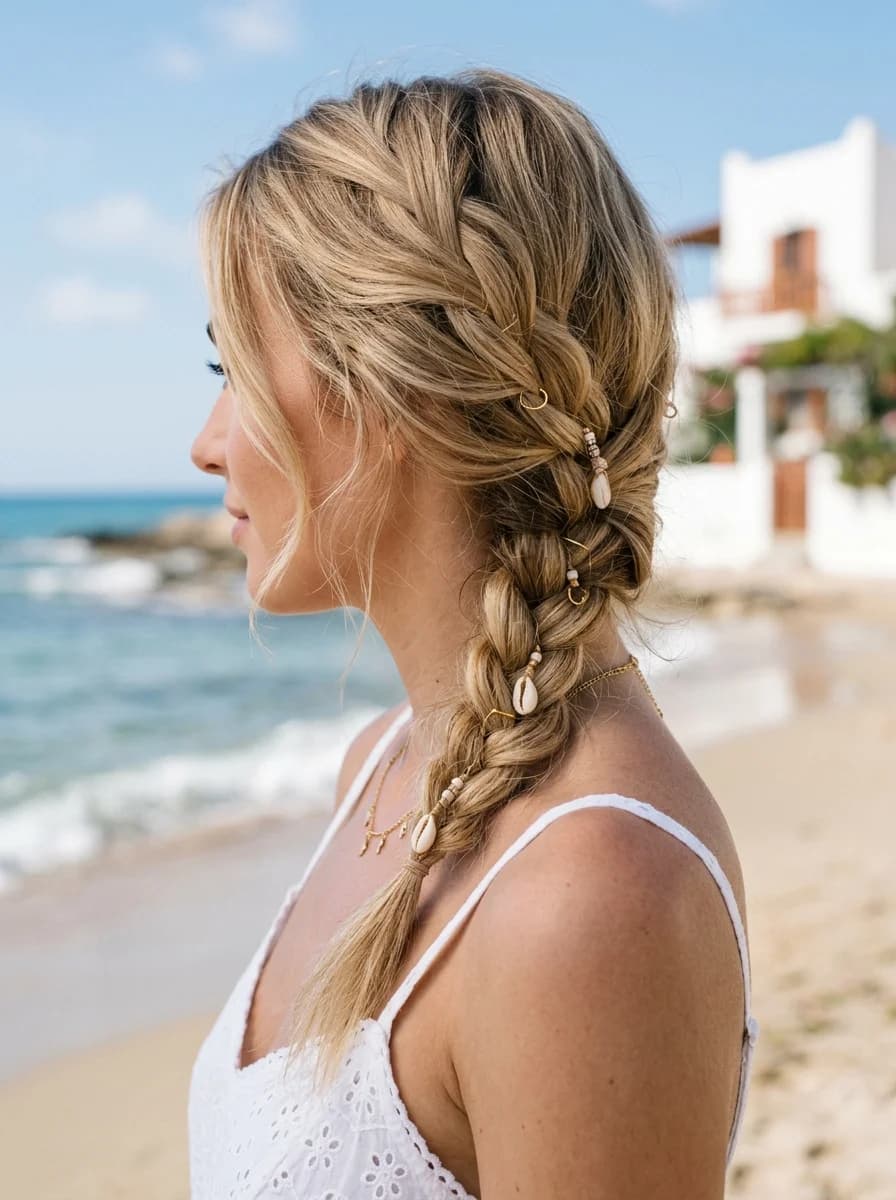
9.Boho Braids with Beachy Waves
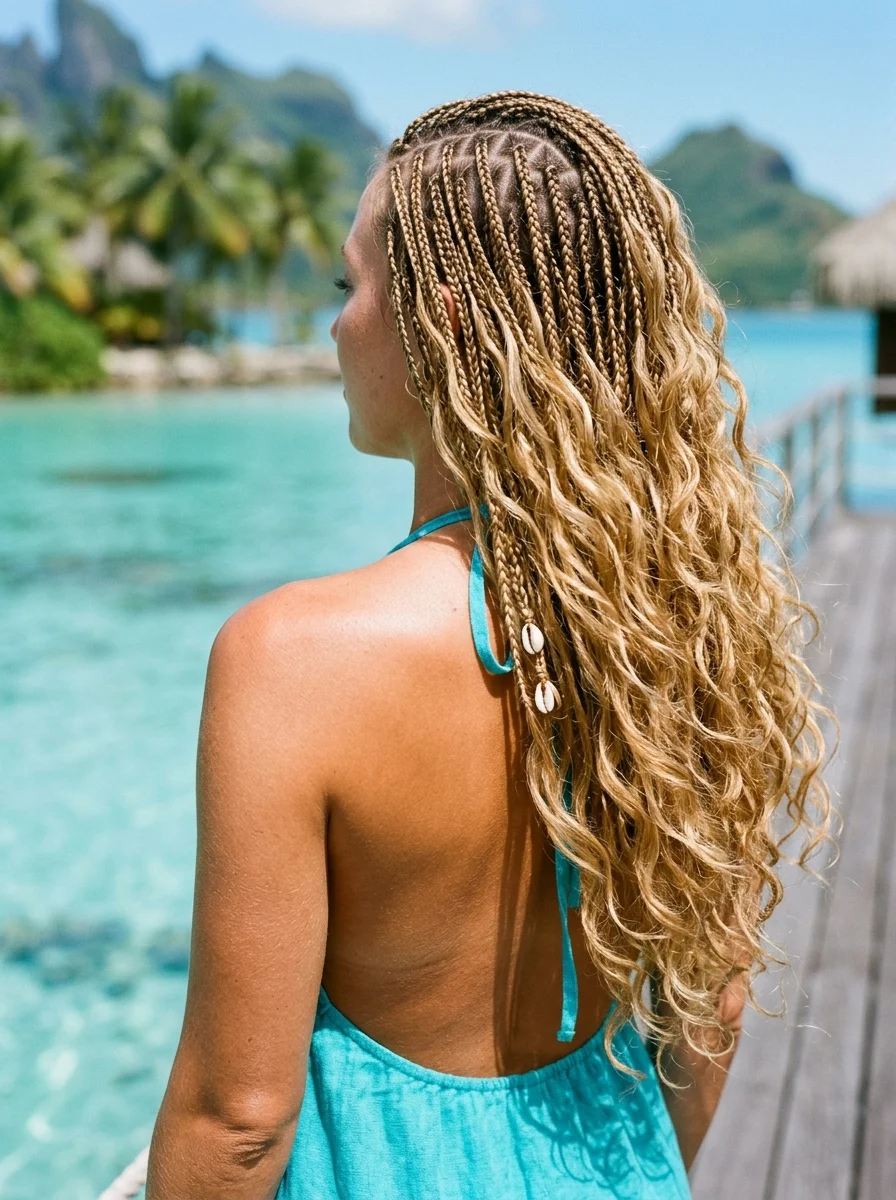
The overview: Medium to long-length hair with small box braids at the crown adorned with cowrie shells, the rest falling in loose, defined curls. The tropical overwater bungalow setting with turquoise water tells you this is full vacation mode—free-spirited, low-maintenance, and built for warm nights with no plans.
The box braids at the crown add structure and visual interest while the loose curls below provide volume and movement. Cowrie shells are a cultural symbol that carries meaning beyond decoration, and the gold tone complements the sun-kissed blonde beautifully.
Why this look is popular: Shell-adorned braids have a specific vacation appeal that regular braids don't—they're protective, low-maintenance, and actually get better as the trip goes on. The slight frizz that develops enhances the bohemian vibe.
Where this look is suitable: Tropical vacations, island-hopping trips, beach festivals, pool parties. This is a committed vacation hairstyle.
Step by step:
- Section the crown. Take a 4-inch section from the crown and divide it into small square sections.
- Braid each section. Create small box braids, adding cowrie shells by threading them onto one strand before finishing the braid.
- Define the curls. Apply curl cream to the remaining loose hair and scrunch upward to encourage curl formation.
- Diffuse or air-dry. Let curls dry naturally or use a diffuser on low heat. Don't touch them while they dry.
- Break the cast. Once dry, scrunch out any product cast with lightweight oil on your palms.
Tips and tricks: Pre-section and clip each section before braiding—this saves significant time and creates cleaner results. The cowrie shells stay more secure if you add a tiny dot of clear nail polish at the thread wrap. If you're new to box braids, start with the back sections where mistakes are less visible.

28 Stunning Baddie Summer Hairstyles for 2026 🔥☀️
10.Effortless Half-Up Waves with a Chic Barrette
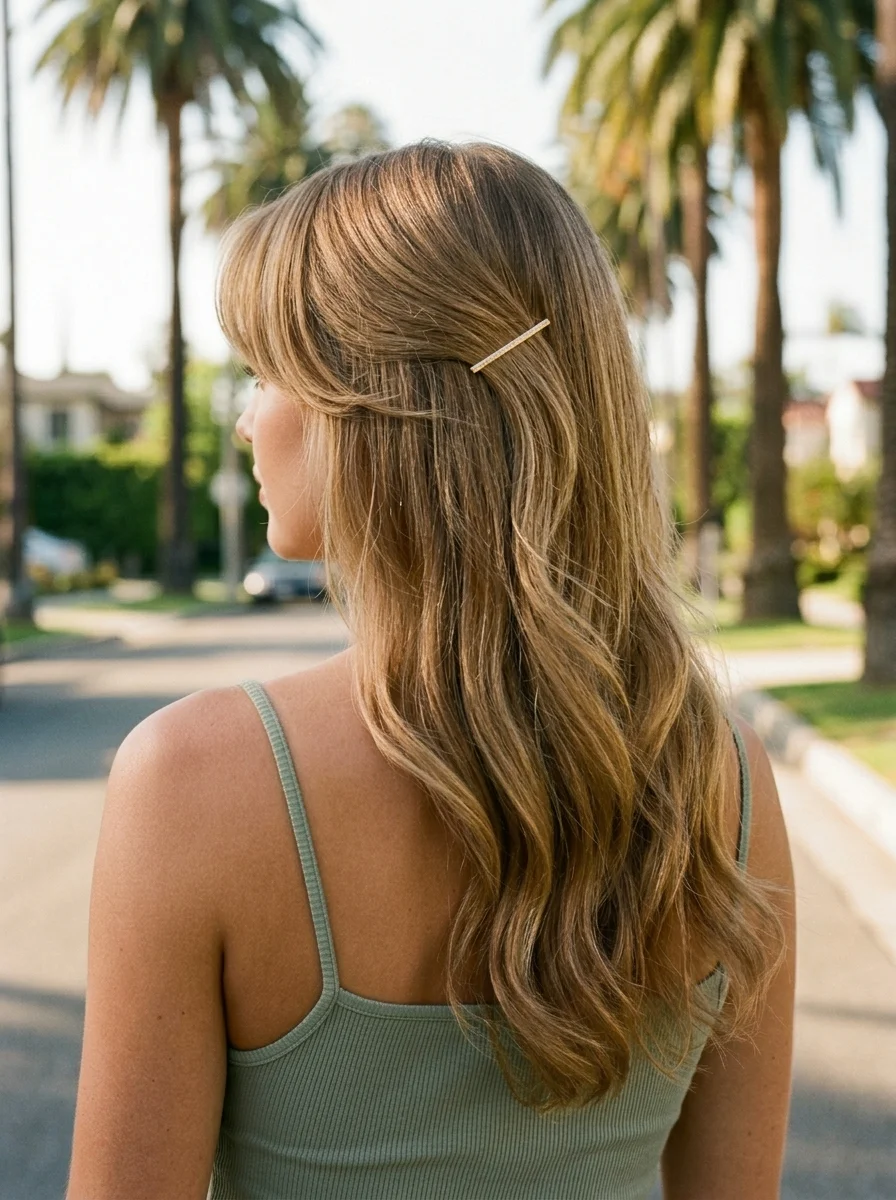
The overview: Short to long-length hair with soft, loose waves pulled halfway back and secured with a slim gold barrette that catches the light. The barrette pins back just enough hair to keep it off the face while the remaining waves flow naturally.
The slim gold barrette is the most versatile summer accessory—it adds a jewelry-like accent without overwhelming the style. Against the soft waves, it creates a focal point that says "I planned this" even though the whole look takes under ten minutes.
Why this look is popular: The half-up barrette style is the most requested summer look because it's fast, flattering, and works for virtually every occasion. The gold barrette adds warmth and polish.
Where this look is suitable: Weekend brunches, casual dinners, shopping trips, and any daytime event where simple polish is the goal.
Step by step:
- Create soft waves. Use a 1.25-inch curling wand on 1-inch sections, leaving the ends straight. Break up with fingers.
- Gather the top section. Take hair from each temple and smooth it back toward the crown. Keep it relaxed—bumps are part of the look.
- Clip with barrette. Secure the gathered section with the gold barrette at the back of the head.
- Adjust the waves. Shake the loose waves gently for natural volume and separation.
- Set lightly. A mist of texturizing spray through the mid-lengths enhances the lived-in quality.
Tips and tricks: The barrette should be proportional to your hair—slim barrettes work best on fine to medium hair, wider ones on thick. Gold hoop earrings complement the barrette for a cohesive look. For waves that last, apply heat protectant before curling and let each curl cool completely before touching.
11.Beachy Boho Fishtail Braid
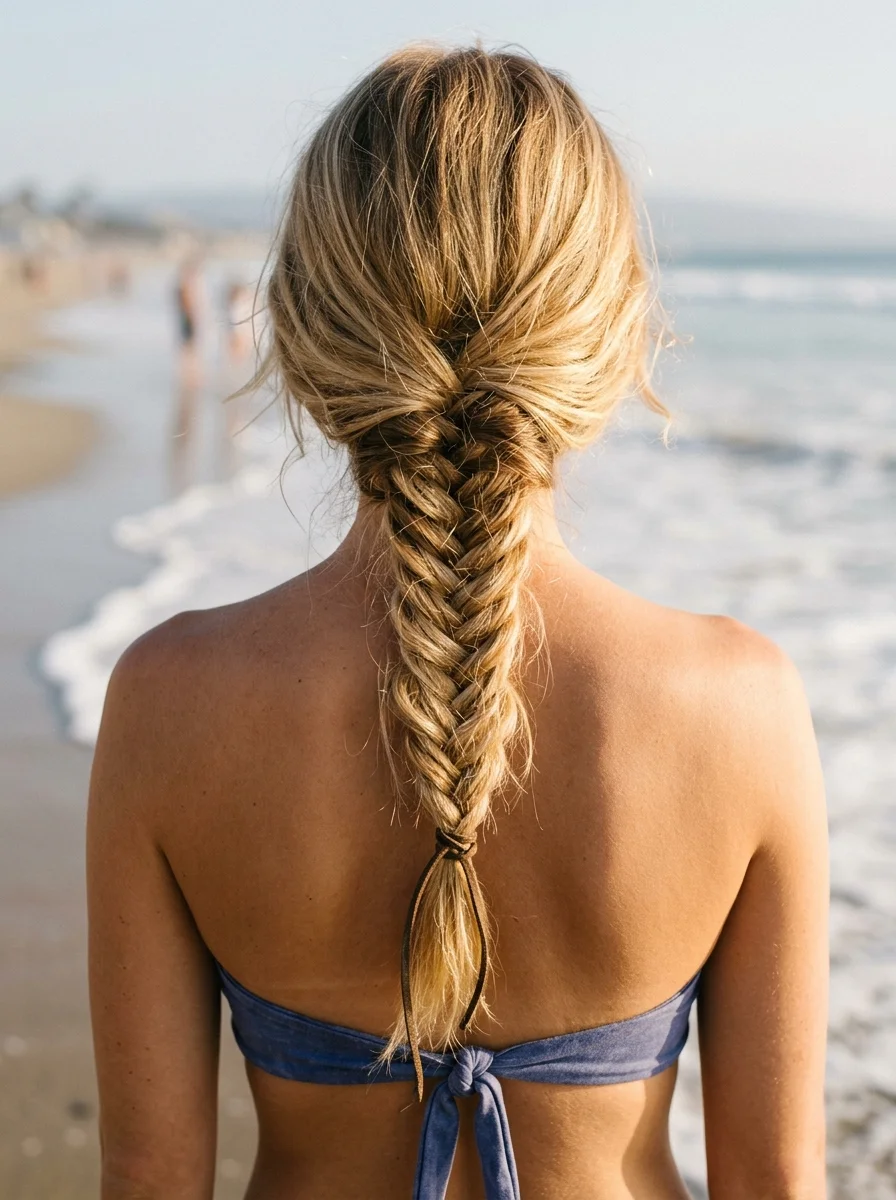
The overview: Medium to long-length hair woven into a loose, pancaked fishtail braid that drapes over one shoulder. A leather cord ties off the tail instead of a regular elastic, adding a rustic, handmade detail. The crown is teased slightly for volume before braiding, creating a lifted silhouette that catches the beach breeze.
The fishtail's flat profile means it won't catch wind the way bulkier braids do, making it practical for beach settings. The pancaking technique pulls the braid wide, transforming a tight plait into something that looks loose and organic.
Why this look is popular: The fishtail braid has a woven texture that reads as far more complex than it actually is—two sections, small crosses, done. The leather cord finish elevates it beyond a basic braid.
Where this look is suitable: Beach sunsets, outdoor festivals, bohemian-themed events—any setting where the earthy, relaxed aesthetic complements the atmosphere.
Step by step:
- Tease the crown. Backcomb the crown area with a fine-tooth comb for textured volume. Smooth the top layer over it.
- Gather to one side. Pull all hair over one shoulder. Split into two sections for the fishtail.
- Fishtail braid. Cross small pieces from the outer edge of each section to the other. Work from crown to ends.
- Secure with leather cord. Tie a leather cord around the tail about two inches from the bottom. Knot securely.
- Pancake the braid. Starting from the top, gently pull the outer edges outward to widen the entire braid.
Tips and tricks: Texturizing spray before braiding gives enough grip to hold the pancaked shape without unraveling. The leather cord should be supple, not stiff—stiff cord pulls and creates discomfort. For finer hair, the teasing at the crown is essential for creating the voluminous silhouette.

35 Palm Tree Nail Art Ideas that are the Most Iconic Nail Art Designs 🌴✨
12.Wavy Half-Up with a Sweet Cream Ribbon
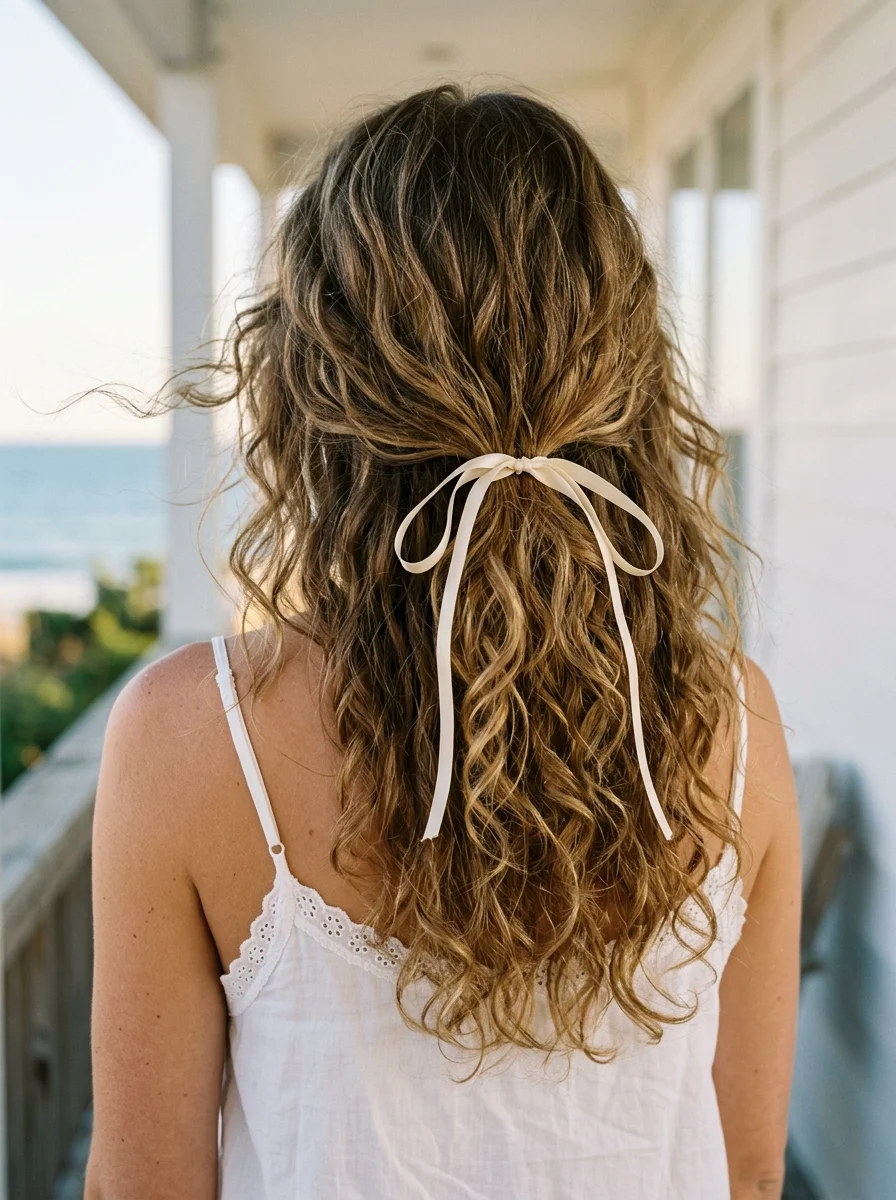
The overview: Medium to long-length hair with 2C-3A curls pulled into a half-up style tied with a cream ribbon bow at the back of the head. The curls do most of the heavy lifting here—the ribbon just finishes the thought.
The cream ribbon against the warm curl tones creates a soft, romantic contrast that photographs beautifully. The half-up construction keeps hair off the face while letting the curl pattern show its full glory.
Why this look is popular: Cottagecore isn't dead—this hairstyle is proof that some aesthetics age well when you commit to them. The ribbon adds a nostalgic, feminine touch that complements natural curls perfectly.
Where this look is suitable: Beach house mornings, garden parties, outdoor dining—any setting where the romantic, curl-forward aesthetic feels right.
Step by step:
- Define the curls. Apply curl cream to soaking wet hair, scrunching upward to encourage curl formation.
- Diffuse on low heat. Cup sections in the diffuser and hold against the scalp for 10-15 seconds each.
- Gather the half-up section. Take a section from each temple and pull it back to the crown, keeping the surface relaxed.
- Tie with ribbon. Secure the half-up section with an elastic, then tie the cream ribbon into a bow over it.
- Shape the curls. Separate any clumped curls with your fingers. A few drops of shine serum on the ends adds polish.
Tips and tricks: Plop your curls in a microfiber towel after defining them to reduce frizz and speed drying. The ribbon should be wide enough to create a visible bow—skinny ribbon gets lost in curly texture. For humidity-heavy days, a gel over the curl cream creates a stronger cast that lasts longer.
13.Bubble Ponytail with a Beachy Charm
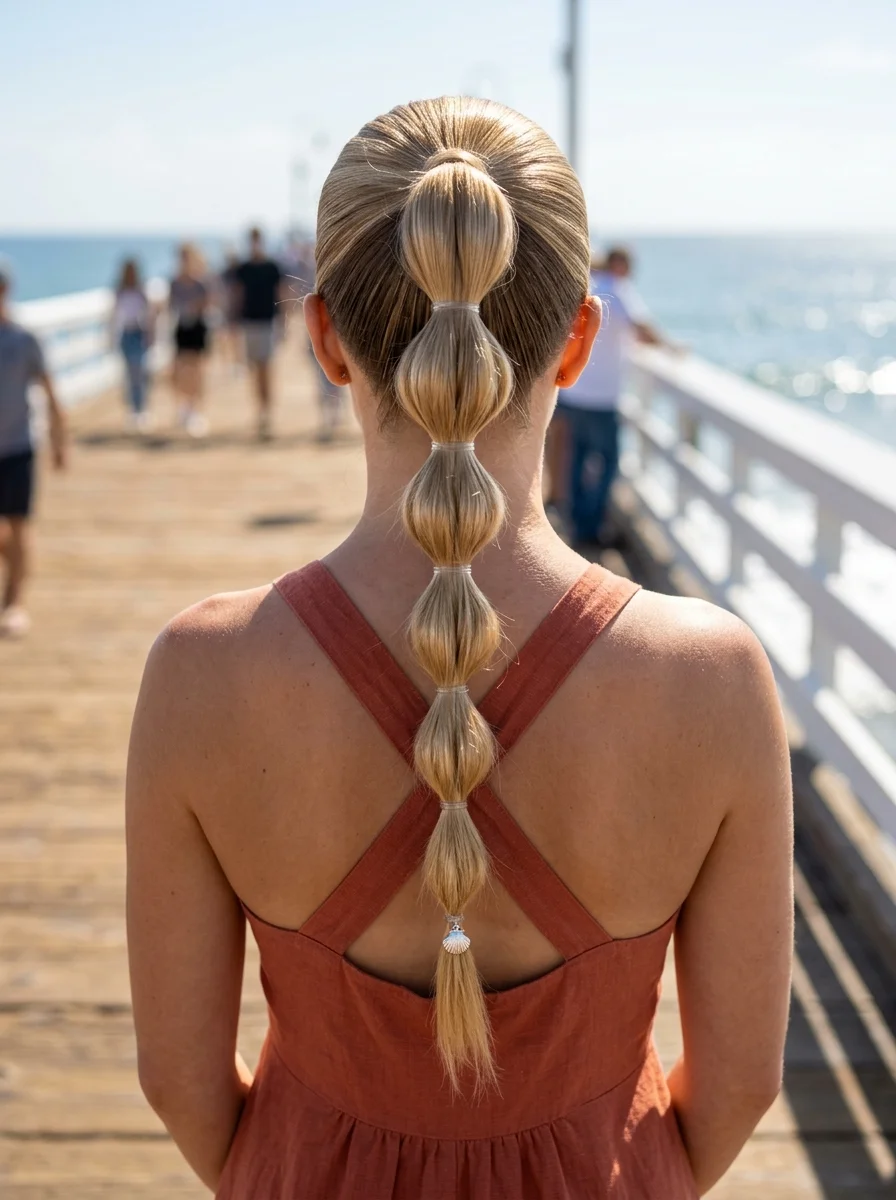
The overview: Medium to long-length hair swept into a sleek high ponytail, then sectioned into bubbles down the length. A small shell charm hangs from the final elastic, catching the light as you move.
The bubble ponytail is visually rhythmic and photographically striking—a modern classic that reads confident and summery. The shell charm at the end is the kind of detail that makes people look twice.
Why this look is popular: Bubble braids are easier than actual braiding—you're just tying elastics and pulling sections apart. The result looks more complex than it is, and the shell charm adds a beachy, thematic touch.
Where this look is suitable: Pier walks, beach boardwalks, outdoor festivals—any setting where the playful, graphic quality will be appreciated.
Step by step:
- Smooth the base. Apply smoothing serum to damp hair and blow-dry straight for a polished crown.
- Create the high ponytail. Gather all hair at the crown and secure tightly with a strong elastic.
- Create bubbles. Tie clear elastics at 2-inch intervals down the ponytail. Gently pull each section apart to create rounded bubbles.
- Add the charm. Clip or thread a small shell charm onto the final elastic at the tail.
- Adjust the bubbles. Ensure each bubble is roughly the same size for a balanced look.
Tips and tricks: Day-old hair provides better grip for creating defined bubbles. For finer hair, use clear elastics as a base first, then wrap decorative ones over them for extra hold. The shell charm should be lightweight—heavy charms pull the tail down and create sagging.
25 Trendy Beach Day Hairstyles for Vacation 2026 ☀️🌊
14.Effortless Wavy Lob with a Chic Barrette Tuck

The overview: Short-length hair with natural waves, one side tucked behind the ear and secured with a gold barrette. The asymmetry is subtle but effective—enough to feel styled without being dramatic.
The barrette tuck is the simplest way to add polish to a wavy lob—one accessory, one motion, and suddenly you look like you put thought into it. The gold barrette catches natural light beautifully against the ash blonde tone.
Why this look is popular: The tuck-and-clip is the most requested low-effort styling technique because it adds immediate polish with zero skill required. The asymmetry creates visual interest that photographs well.
Where this look is suitable: Countryside walks, casual outdoor dining, weekend errands—any setting where understated elegance is the goal.
Step by step:
- Prep with texture. Apply sea salt spray to damp hair and let air-dry for natural wave formation.
- Shape the waves. If certain pieces are too straight, use a flat iron to add subtle bends by twisting the iron.
- Tuck one side. Take the heavier side of your part and tuck it behind the ear.
- Clip with barrette. Secure the tucked section with the gold barrette just above the ear.
- Adjust the other side. Let the remaining hair fall naturally with its wave pattern.
Tips and tricks: The barrette should sit flat against the head—if it angles outward, adjust the clamp. Gold hoop earrings complement the barrette for a cohesive metallic accent. For fine hair, a volumizing powder at the roots before styling adds body that lasts.
15.Classic Double Dutch Braids
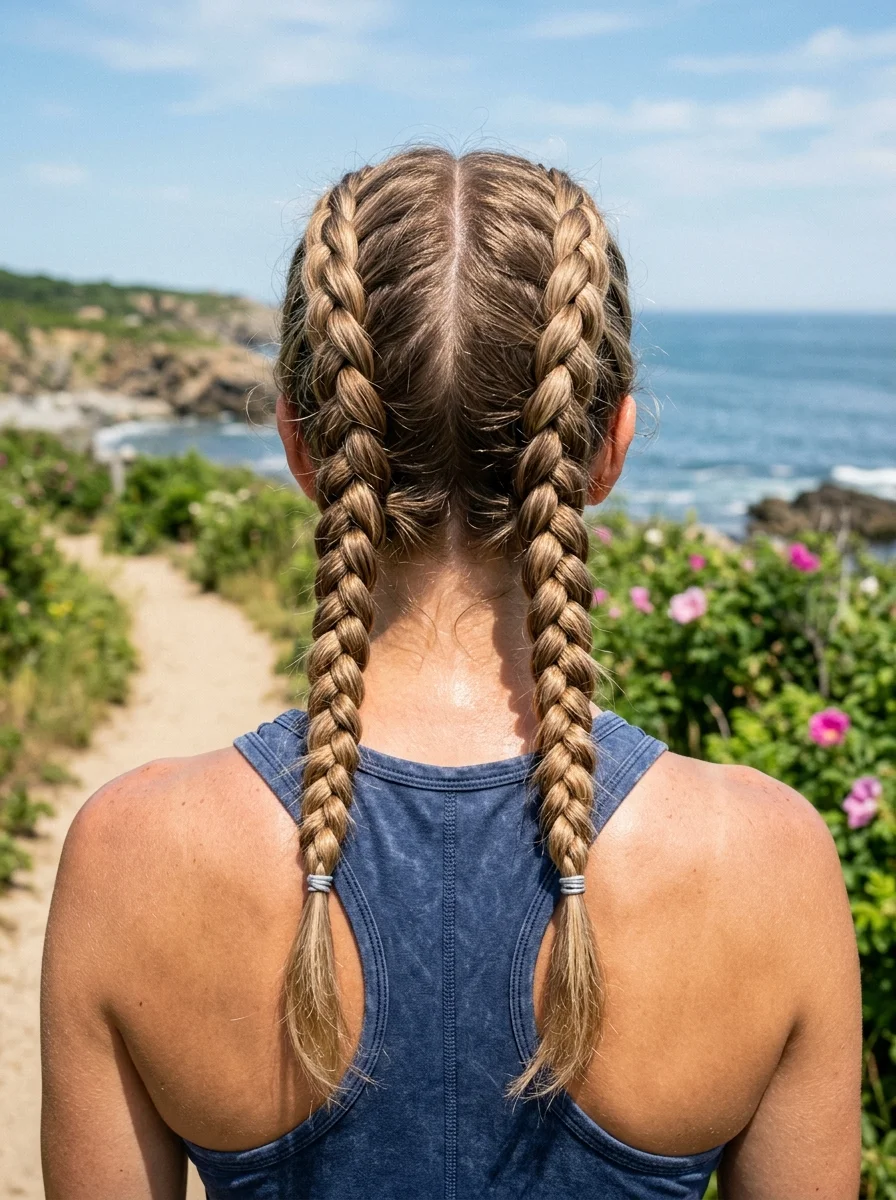
The overview: Medium to long-length hair parted down the center and braided into two clean Dutch braids that run from forehead to nape, with the remaining length hanging as wavy tails.
Double Dutch braids are the most secure hot-weather style—once they're in, they stay in. The raised braid pattern creates a graphic, intentional look that works for both athletic and casual settings.
Why this look is popular: The double Dutch braid is the ultimate no-fuss hot-weather style—it survives movement, sweat, and wind without budging. The raised braid pattern photographs with clean, graphic lines.
Where this look is suitable: Athletic beach days, hiking, outdoor sports, and any active situation where your hair needs to stay completely secure.
Step by step:
- Part precisely. Create a razor-sharp center part from forehead to nape using a rat-tail comb.
- Prep for grip. Apply texturizing spray throughout for hold.
- Dutch braid each side. Starting at the hairline, cross strands under to create raised braids. Add small sections as you braid backward.
- Continue to the ends. Once past the nape, continue as a regular three-strand braid and secure with clear elastics.
- Add waves to tails. If the tails are too straight, use a curling wand on just those sections.
Tips and tricks: Check your parts from multiple angles before braiding—uneven parting throws off the symmetry. Apply a small amount of styling gel to each section before braiding for clean, defined lines. Edge control along the hairline keeps the look polished.

28 Cute & Sporty Baseball Game Nail Ideas for 2026 ⚾
16.Beachy Bronde Waves
The overview: Short to Medium-length hair that blends brown and blonde so seamlessly you can't tell where one ends and the other begins. Tousled S-waves give it movement without structure—the kind of hair that catches the sunset and makes it look intentional.
Bronde is the ultimate summer color because it's low-maintenance—the grown-out roots look intentional rather than neglected. The S-waves have a natural rhythm that improves with humidity and wind.
Why this look is popular: Bronde is the most requested summer color because it's warm, dimensional, and requires minimal upkeep. The tousled wave pattern looks better with each passing hour.
Where this look is suitable: Sunset beach walks, coastal dining, bonfire gatherings—any setting where the warm tones will glow in natural light.
Step by step:
- Apply wave-enhancing product. Work a lightweight mousse through damp hair from roots to ends.
- Air-dry. Let hair dry naturally for the most authentic wave pattern. Avoid touching it while it dries.
- Add definition if needed. If certain sections are too straight, wrap them around a 1.25-inch wand, leaving ends out.
- Shake and separate. Flip your head upside down and shake the roots for volume. Separate waves with fingers.
- Finish with texture. A light mist of texturizing spray enhances the lived-in quality.
Tips and tricks: Bronde hair benefits from a purple shampoo once a week to prevent brassiness. The waves should be curled away from the face on both sides to open up features. For extra body, blast the roots with a blow dryer while your head is upside down.
17.Twisted French Knot with Delicate Leaf Pin
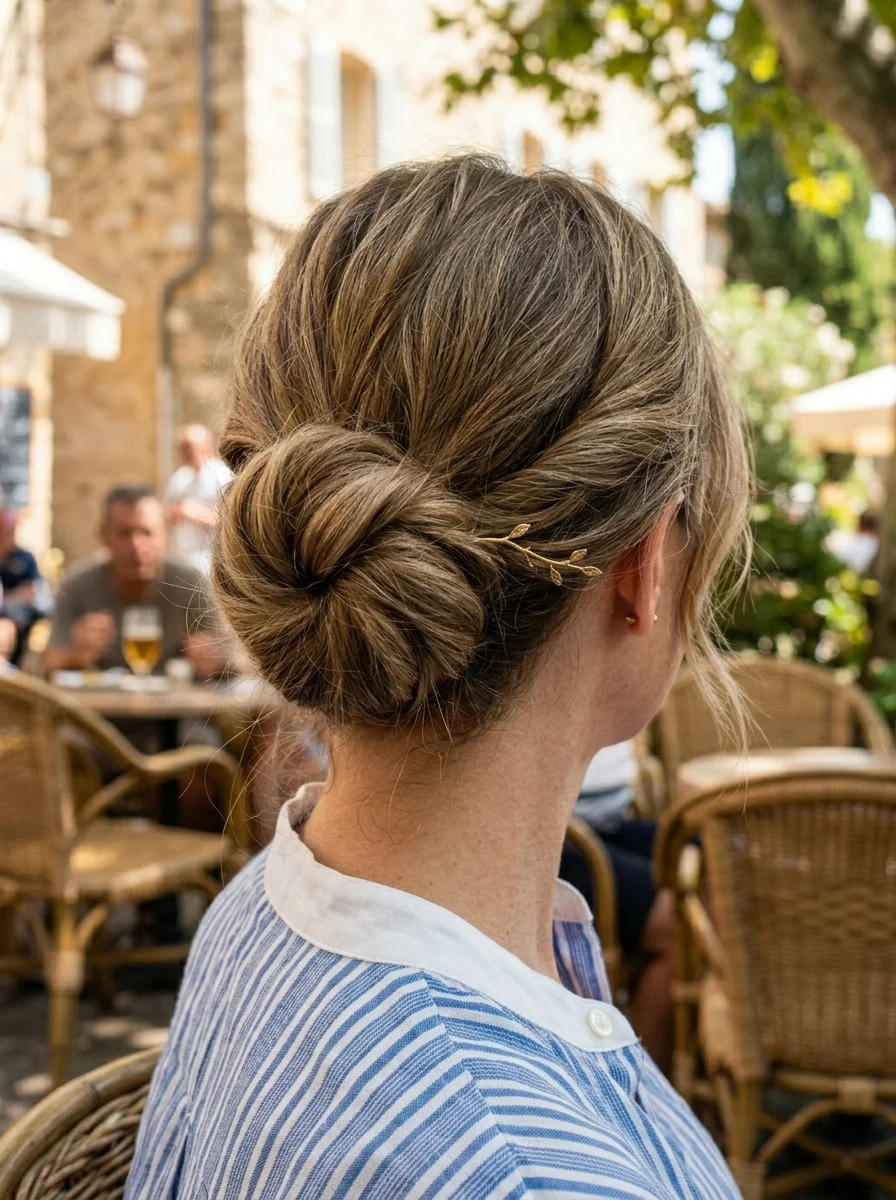
The overview: Medium to long-length hair twisted into a low chignon at the nape, held in place with a delicate gold leaf pin. The twist is loose and slightly undone—French in the truest sense: elegant, unbothered, and completely unbothered by what anyone else is doing.
The French knot is the hairstyle equivalent of a linen dress—it looks effortlessly chic because the technique is simple but the result is timeless. The gold leaf pin adds a nature-inspired detail that catches afternoon light.
Why this look is popular: The French knot is the most low-maintenance updo—it takes under five minutes and requires zero skill. The gold leaf pin trend adds a botanical, artisanal touch.
Where this look is suitable: Café afternoons, garden lunches, wine tastings—any setting where understated elegance is the aesthetic.
Step by step:
- Add texture. Apply texturizing spray to dry hair for grip—freshly washed hair is too slippery.
- Gather loosely. Pull all hair back into a low ponytail position at the nape. Don't secure it—just hold.
- Twist and wrap. Twist the ponytail loosely and wrap it around its own base to form a chignon.
- Pin and deconstruct. Secure with bobby pins, then gently pull at sections to loosen the chignon.
- Add the leaf pin. Tuck the gold leaf pin into the side of the chignon at an angle.
Tips and tricks: This style works best on second-day hair when natural oils help the twist hold. If your hair is fine, backcomb the ponytail base before twisting for added volume. The leaf pin should be positioned where it catches light naturally—typically the outer edge of the chignon.
31 Stunning Summer Birthday Party Hairstyles for 2026 🎂☀️
18.Effortless Beachy Waves Half-Up Claw Clip
The overview: Short-length hair twisted into a half-up style and clipped with a tortoiseshell claw clip. The remaining waves fall naturally past the shoulders with a sun-bleached, lived-in quality.
The tortoiseshell claw clip has made a definitive comeback because it holds thick hair without slipping. The warm pattern complements golden blonde tones perfectly, creating a cohesive warm-weather look.
Why this look is popular: The claw clip is the most practical updo accessory—it holds more hair than bobby pins and takes three seconds to use. The tortoiseshell pattern adds warmth that reads as expensive.
Where this look is suitable: Beach boardwalks, casual dining, resort vacations—any setting where effortless chic is the goal.
Step by step:
- Prep with texture. Apply sea salt spray to damp hair for beachy grip and wave enhancement.
- Air-dry. Let hair dry naturally for the most authentic texture.
- Twist the top section. Gather hair from the temples and twist loosely toward the back.
- Clip it. Secure the twist with the tortoiseshell claw clip at the back of the crown.
- Adjust the waves. Shake the loose waves for natural volume and separation.
Tips and tricks: The claw clip needs to be large enough to grip the full section—a clip that's too small will slide out by midday. Look for clips with strong spring mechanisms. Second-day hair holds this style better than freshly washed.
19.Festival-Ready Braids Messy Top Knot
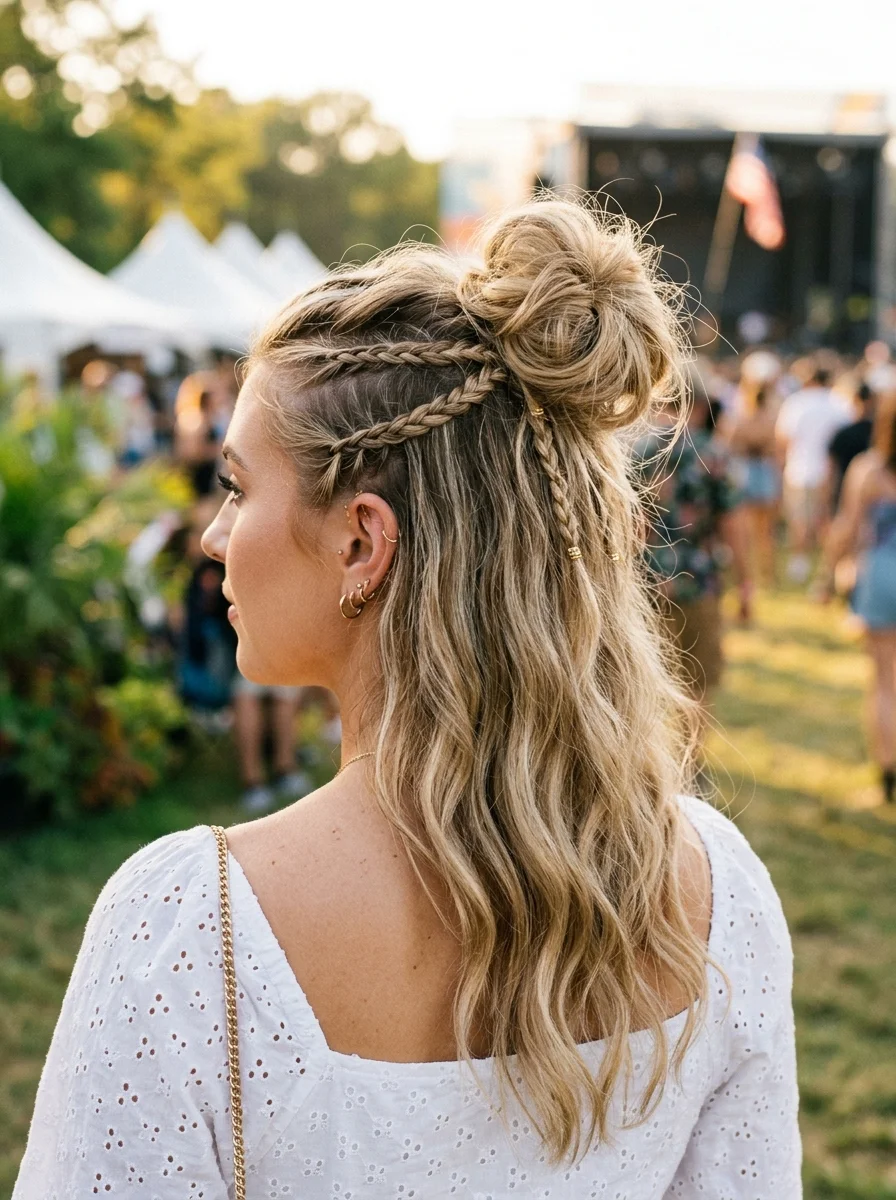
The overview: Medium to long-length hair with accent braids threaded with gold beads, all swept into a high messy bun at the crown. The small braids add texture and dimension to what would otherwise be a basic top knot.
The accent braids transform a messy bun from "I gave up" to "I planned this." The gold beads catch stage lighting and add just enough sparkle to feel festive without overdoing it.
Why this look is popular: The braided top knot is the most practical festival style—it keeps hair completely off the neck while the accent braids add visual interest. The gold beads add sparkle without requiring a full head of accessories.
Where this look is suitable: Music festivals, outdoor concerts, crowded venues—any setting where your hair needs to survive heat, movement, and zero access to mirrors.
Step by step:
- Create accent braids. Take 2-3 small sections from around the hairline and braid each into a tight three-strand braid. Thread gold beads onto each braid.
- Gather the bun. Pull all hair, including the braids, into a high ponytail at the crown.
- Form the messy bun. Don't pull the ponytail all the way through on the last wrap—leave it in a loop. Pin sections in place.
- Adjust. Pull gently at the bun to loosen it and create texture. Leave wispy pieces around the face.
- Set with spray. A strong-hold hairspray keeps everything in place through hours of dancing.
Tips and tricks: Keep consistent tension in the accent braids—if one is looser than the others, the bun will sit off-center. Use bobby pins that match your hair color to anchor the bun invisibly. The gold beads should be pressed firmly so they don't slide during movement.

31 Patriotic Fourth of July Nail Ideas for 2026 🇺🇸
20.Boho Textured Braid with Scarf Accent
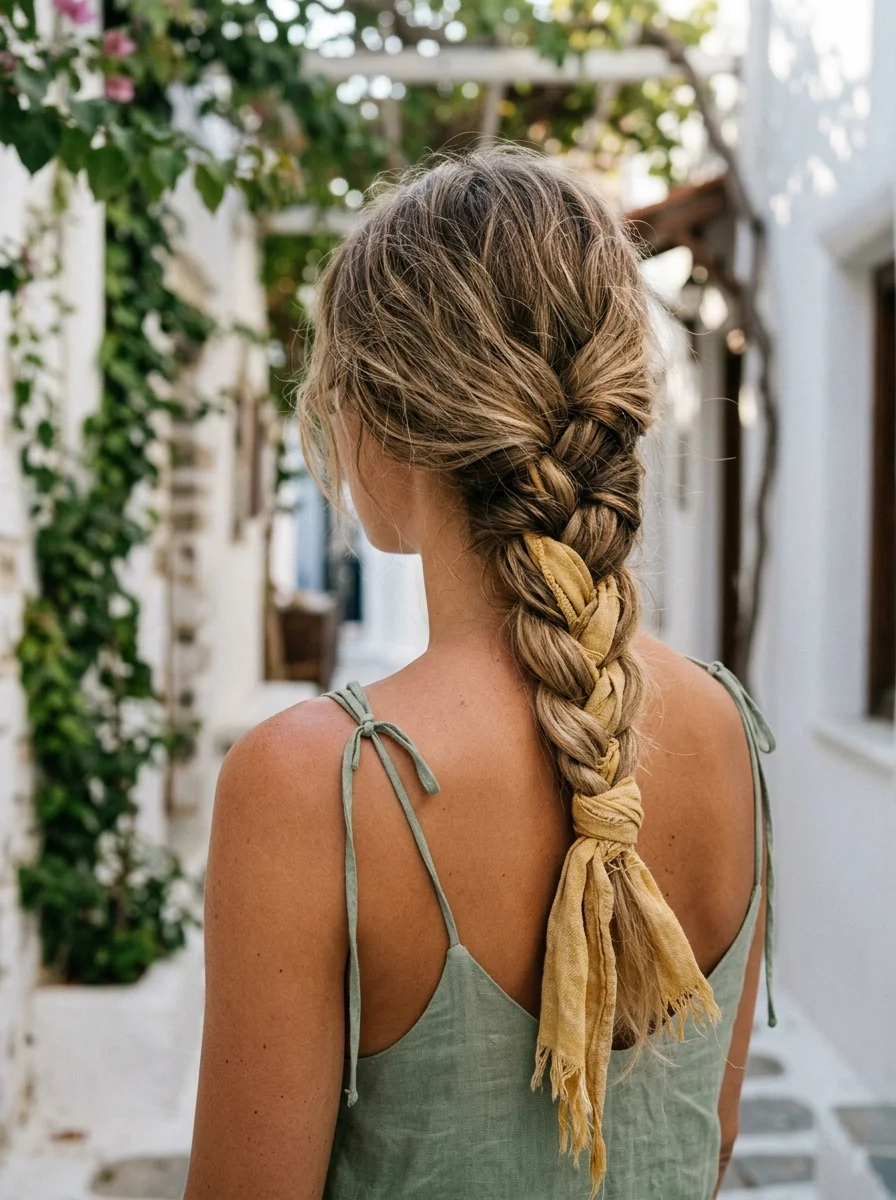
The overview: Medium to long-length hair woven into a textured side braid with a mustard-colored scarf threaded through the strands. The scarf wraps around the braid at intervals and ties off at the tail, adding warmth and visual interest without overcomplicating things. finest.
Threading a scarf through a braid is the easiest way to add color and personality to a basic style. The mustard tone complements dirty blonde hair beautifully, and the fabric adds texture that catches light differently than the hair itself.
Why this look is popular: The scarf-braid combination is the most versatile summer accessory—it adds color without requiring a hat and works with any outfit. The Mediterranean aesthetic is dominating 2026 fashion.
Where this look is suitable: Mediterranean vacations, European city walks, outdoor markets—any setting where the bohemian, traveled aesthetic complements the atmosphere.
Step by step:
- Prep with texture. Apply texturizing spray to dry hair for grip and volume.
- Thread the scarf. Cut a 40-inch length of lightweight scarf fabric. Lay it alongside the first section of your braid.
- Braid with the scarf. As you braid, weave the scarf with one strand so it integrates into the plait pattern.
- Secure at the tail. Tie the scarf ends into a knot at the bottom of the braid, leaving the tails to hang.
- Pancake gently. Pull the braid edges outward to widen the plait and make the scarf more visible.
Tips and tricks: Use scarf fabric no wider than 2 inches—wider fabric overwhelms the braid pattern. The mustard tone pairs particularly well with earth tones, whites, and linen fabrics. Cut the scarf ends at an angle to prevent fraying.
21.Sleek High Ponytail with a Chic Gold Band
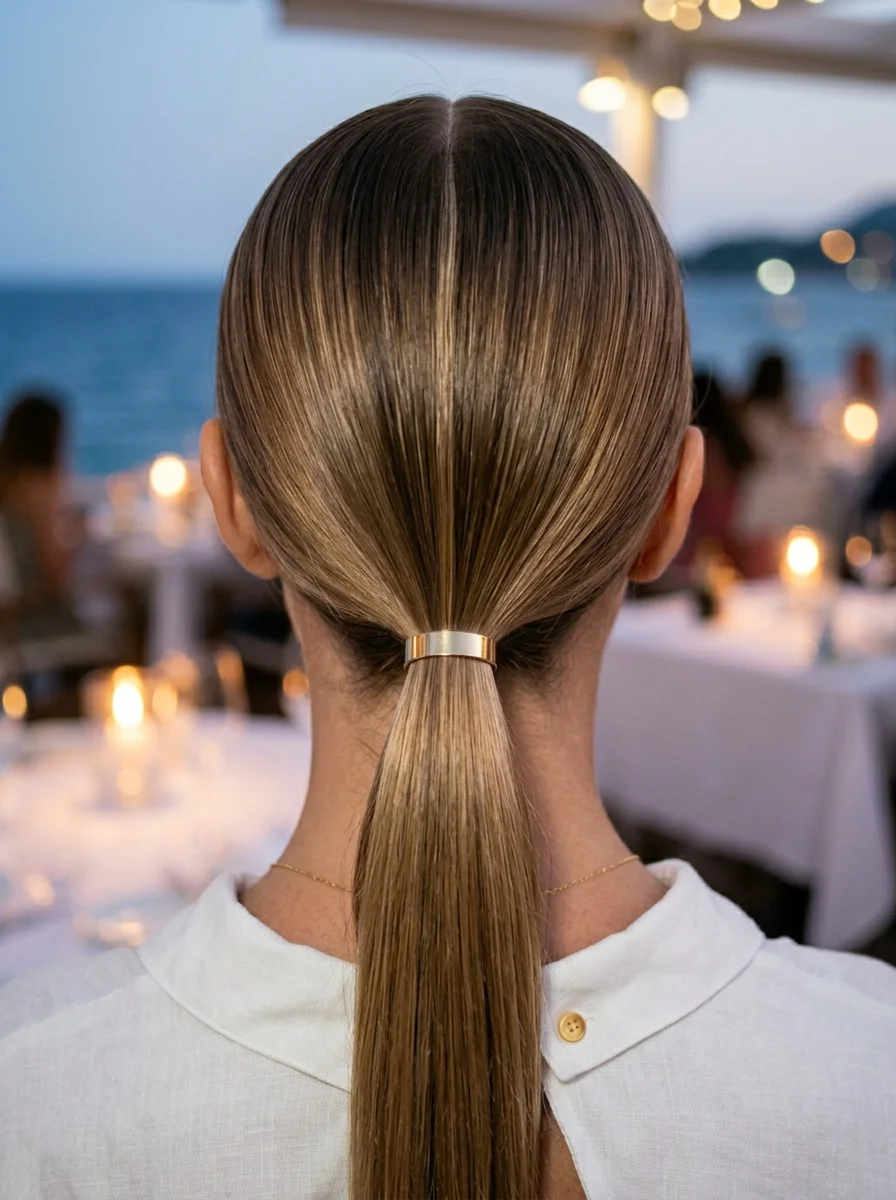
The overview: Medium to long-length hair pulled into a sleek, center-parted low ponytail finished with a gold metal cuff. Every strand is smoothed flat with a mirror-like shine.
The gold cuff transforms a basic ponytail into a statement piece. Against the sleek, polished surface, the metallic accent reads as expensive and intentional. The center part adds precision that elevates the entire look.
Why this look is popular: The sleek ponytail with a gold cuff is the most requested formal summer style—it's polished enough for fine dining but comfortable enough for warm weather. The mirror-like finish photographs beautifully.
Where this look is suitable: Fine dining, rooftop bars, upscale evening events—any setting where the sleek finish will complement the sophisticated atmosphere.
Step by step:
- Create the center part. Use a fine-tooth comb for a razor-precise line from forehead to nape.
- Apply smoothing product. Work a high-shine serum from roots to ends for maximum sleekness.
- Gather the ponytail. Brush everything flat toward the nape, eliminating every bump as you go.
- Secure tightly. Use a strong elastic that matches your hair color.
- Add the cuff. Slide the gold metal cuff over the elastic and position it to sit flat and centered.
- Refine the surface. Go back over the crown with more product and a fine-tooth comb for glass-like smoothness.
Tips and tricks: A boar bristle brush is essential for the sleek finish—it distributes product evenly and creates shine no regular brush can match. Second-day hair works better because natural oils help the product adhere. If the ponytail feels loose, anchor it with crossed bobby pins at the base.
24 Stunning Bridesmaid Hairstyles for Weddings 2026 💍✨
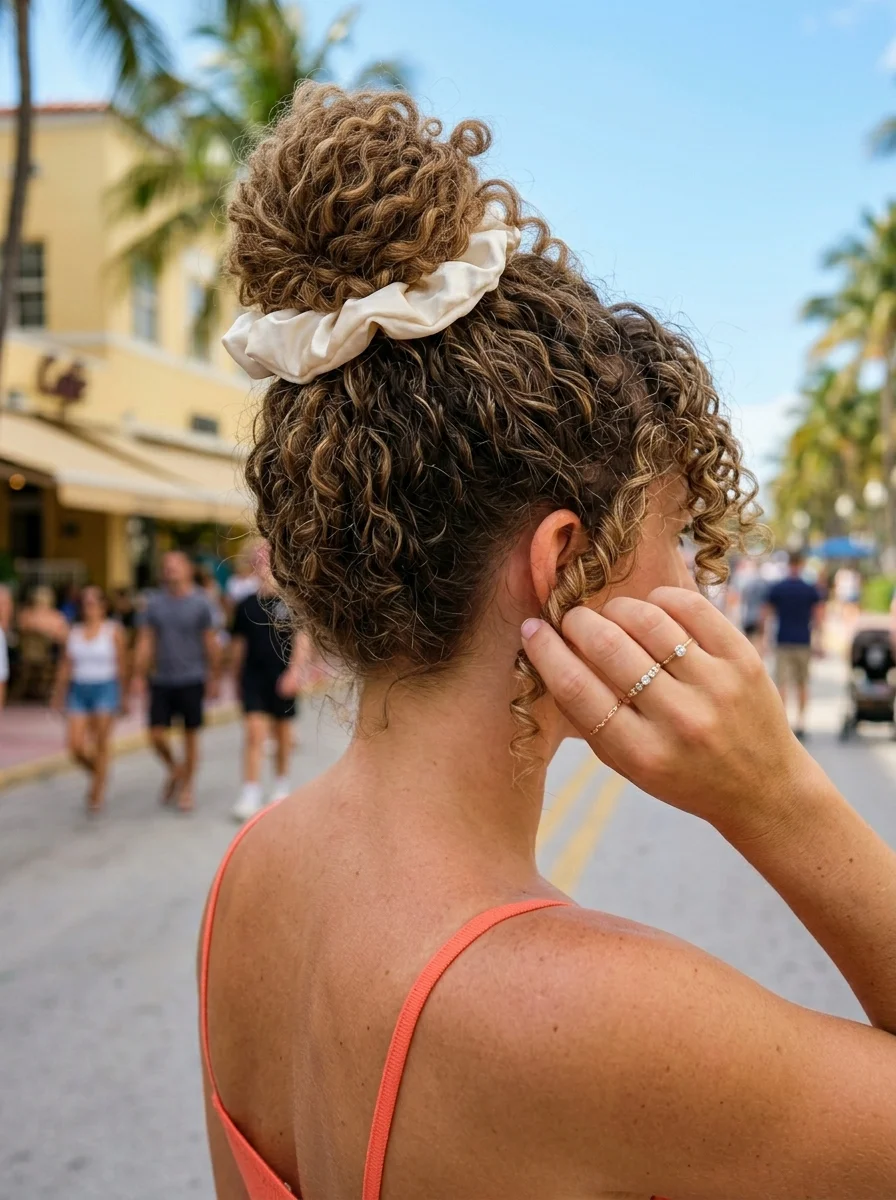
22.Voluminous Curly Top Knot with Chic Scrunchie
The overview: Medium to long-length hair with natural 3A-3B curls gathered into a high top knot wrapped with a cream silk scrunchie. The curls give the bun natural volume that no amount of teasing could replicate.
The silk scrunchie is gentler on curly hair than elastic bands—it won't create dents or breakage. The cream color complements the warm highlights beautifully, and the volume of the curly bun makes a statement without any accessories beyond the scrunchie.
Why this look is popular: The curly top knot celebrates natural texture while keeping hair completely off the neck—essential for hot weather. The silk scrunchie trend continues because it's both practical and chic.
Where this look is suitable: Tropical street markets, beach town exploring, casual outdoor dining—any hot setting where keeping hair off your neck is priority.
Step by step:
- Define the curls. Apply curl cream to damp hair and diffuse on low heat or air-dry completely.
- Gather high. Flip your head upside down and gather all curls into a high ponytail at the crown.
- Form the bun. Don't pull the ponytail all the way through—leave it in a looped bun. Arrange the curls so they show.
- Add the scrunchie. Wrap the cream silk scrunchie around the base of the bun. Adjust for comfort.
- Pull out tendrils. Gently tug a few curly pieces around the hairline for softness.
Tips and tricks: A silk or satin pillowcase the night before preserves curl definition and prevents frizz. The scrunchie should be silk or satin—cotton creates friction and breakage on curly hair. For extra volume, don't brush the curls before gathering—finger-comb only.
23.Textured Shaggy Mullet with Wispy Ends
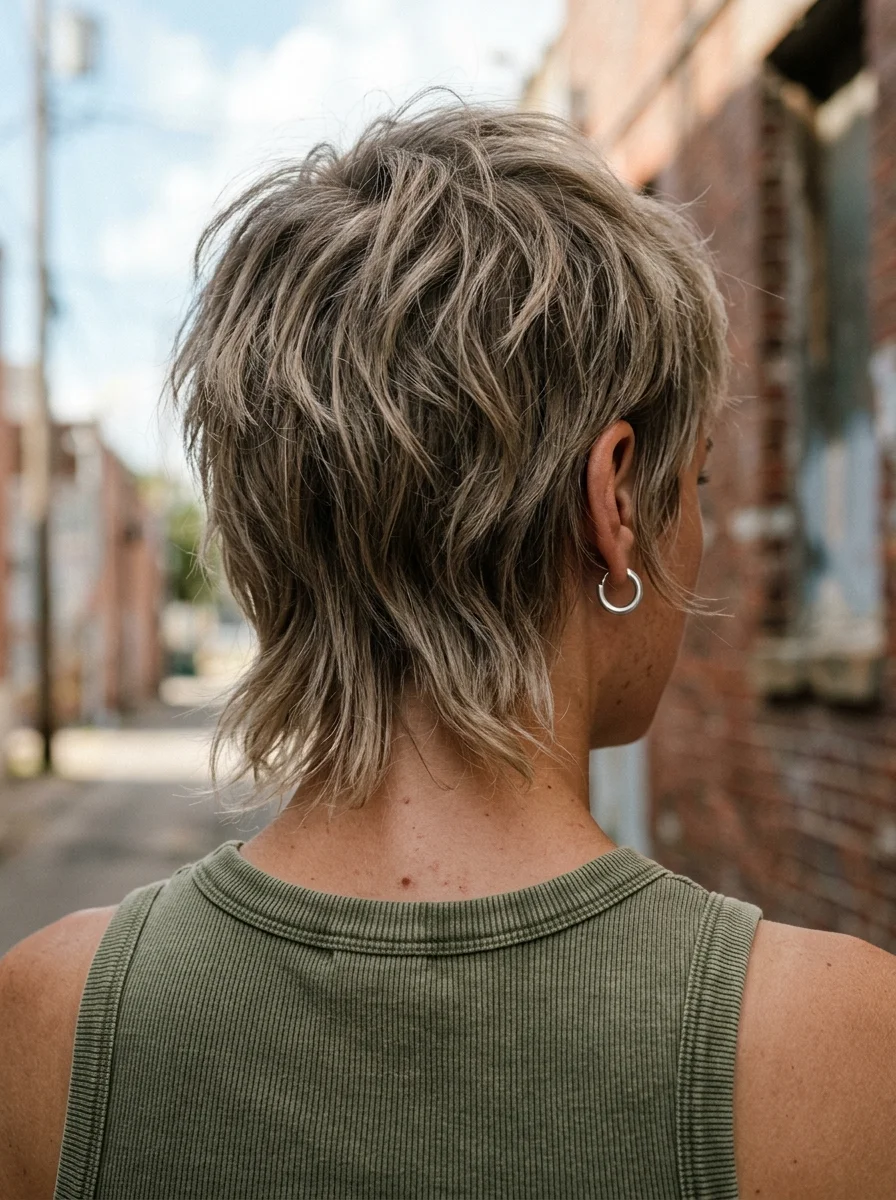
The overview: Short-length hair layered into a modern shag mullet with wispy, textured ends. It's shorter in the front, longer in the back, and completely unapologetic about it.
The modern mullet is the ultimate wash-and-wear cut. The built-in texture means you can air-dry and go. The ashy tones add dimension without maintenance, and it actually gets better as it gets messier.
Why this look is popular: The mullet revival is real and showing no signs of slowing down. The modern version is softer and more wearable than the 80s original—piecey layers create texture that looks intentional rather than accidental.
Where this look is suitable: Urban exploration, street style, casual outings—any setting where the edgy, fashion-forward aesthetic will be appreciated.
Step by step:
- Apply texturizing product. Work matte pomade or sea salt spray through damp hair.
- Rough-dry. Use your fingers, not a brush, to rough-dry. A diffuser on low heat works too.
- Add root lift. Flip your head upside down and shake the roots for volume.
- Shape the layers. Use your fingers to piece out the layers and create definition. Don't brush—the messiness is the design.
Tips and tricks: Ask your stylist for a "modern mullet with razor-cut layers"—the razor technique creates piecey texture that scissors can't replicate. Skip conditioner on show days for maximum grit and texture. A dry shampoo at the roots adds volume on day two.

27 Elegant Wedding Guest Nail Designs for Family in 2026 💍
24.Boho Flower Crown Updo
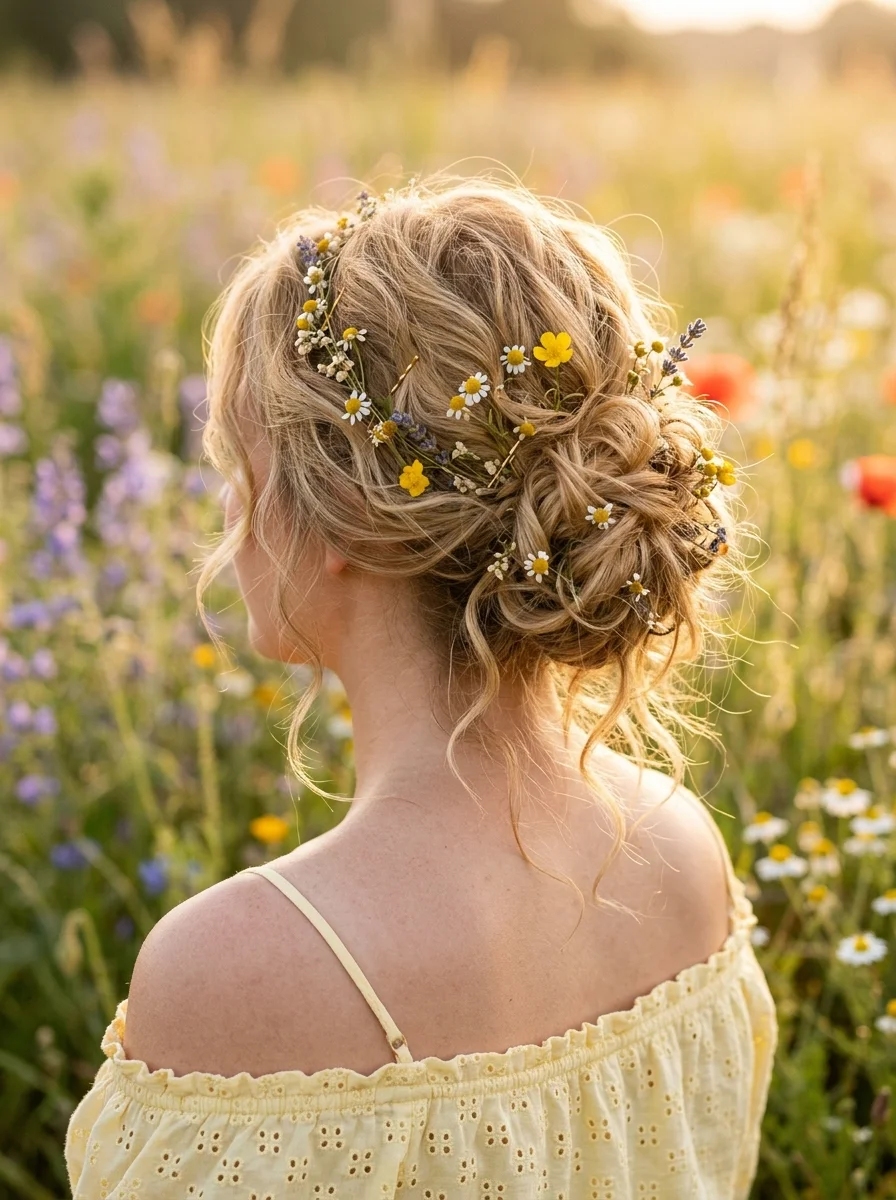
The overview: Medium to long-length hair gathered into a deconstructed updo with fresh wildflowers—daisies, lavender, buttercups—tucked throughout. It's messy on purpose, romantic by nature, and impossible to recreate exactly the same way twice.
Fresh flowers in hair are the ultimate summer accessory—they're temporary, organic, and catch light in a way no manufactured accessory can replicate. The deconstructed updo means each flower sits at a different angle, creating an organic, gathered-from-the-garden quality.
Why this look is popular: The flower crown updo has a whimsical, fairy-tale quality that photographs like a dream in natural outdoor settings. Fresh flowers add color and texture that no accessory can match.
Where this look is suitable: Garden parties, outdoor weddings, wildflower meadow photoshoots—any setting where the organic, romantic aesthetic will complement the surroundings.
Step by step:
- Prep with texture. Apply texturizing spray throughout the hair for grip and volume.
- Create loose waves. Use a curling wand on random sections for organic texture.
- Gather loosely. Pull all hair back into a low, loose bun at the nape. Don't smooth it—let the texture show.
- Pin and deconstruct. Secure with bobby pins, then gently pull at sections to create volume and imperfection.
- Add flowers. Tuck fresh wildflowers throughout the updo at random angles. Use 8-12 flowers for a natural look.
- Pull out tendrils. Release a few face-framing pieces around the ears and temples.
Tips and tricks: Fresh flowers wilt fast in heat—keep them in water until the moment you're ready to place them. Use dried flowers or silk alternatives for all-day wear. The updo should look like you assembled it by hand, not constructed it—imperfection is the goal.
25.Rustic Braided Crown
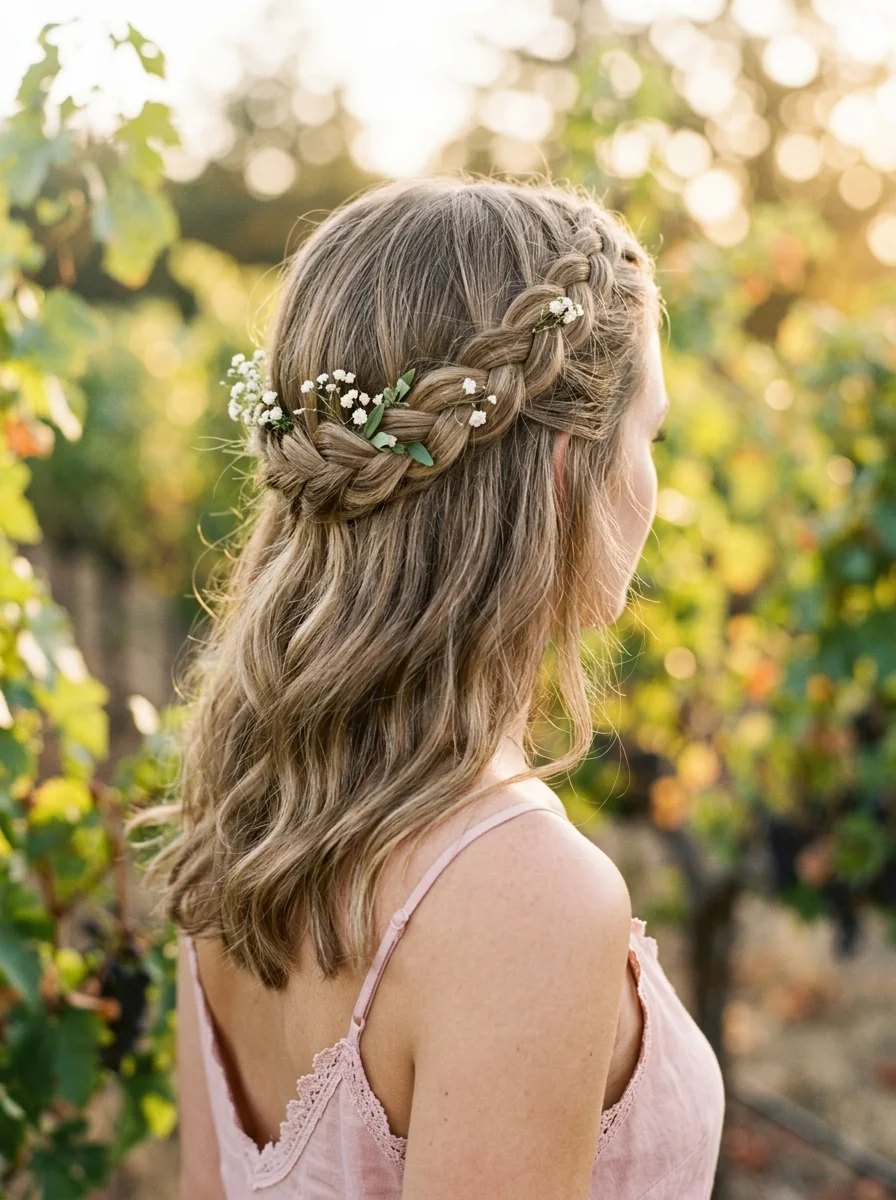
The overview: Medium to long-length hair braided into a half-up crown that wraps from temple to temple, with sprigs of baby's breath woven through the braid. The remaining hair falls in soft, loose waves below.
Baby's breath is the most reliable fresh flower for hair—it lasts hours out of water, doesn't wilt in heat, and adds a soft, cloud-like texture that complements rustic braids perfectly. The half-up construction keeps hair off the face while showing off the length.
Why this look is popular: The braided crown with baby's breath is a timeless combination that works across age groups and settings. The flowers add a natural, freshly-gathered quality that no accessory can replicate.
Where this look is suitable: Vineyard visits, rustic weddings, garden parties, and any outdoor setting where the romantic, pastoral aesthetic complements the environment.
Step by step:
- Prep for grip. Apply texturizing spray to dry hair for hold.
- Create the crown braid. Starting at one temple, Dutch braid along the hairline, adding hair as you go. Continue to the opposite temple.
- Secure the braid. Pin the end behind the opposite ear with bobby pins hidden under the braid.
- Add baby's breath. Tuck small sprigs into the braid sections at irregular intervals. Use 5-7 sprigs.
- Wave the remaining hair. Use a curling wand on the loose sections. Break up with fingers for natural waves.
Tips and tricks: Fresh baby's breath lasts several hours out of water—keep it in a damp paper towel until you're ready to place it. For a longer-lasting option, preserved baby's breath looks identical but won't wilt. The braid should be loose enough to tuck flowers into without forcing them.

25 Stunning Summer Vacation Hairstyles for 2026 ☀️🌊
26.Beachy Waves Bob with a Chic Hair Clip
The overview: Short-length hair styled in tousled waves with a leaf-shaped hair clip holding one side back. The bob sits right at the jawline—polished enough to take seriously but relaxed enough to not feel overdone.
The leaf clip adds a botanical, nature-inspired detail that complements the warm hair tones. Against the tousled bob, it creates a focal point that says you put thought into this—even though the whole look takes under ten minutes.
Why this look is popular: The beachy bob is the ultimate summer cut—short enough to survive heat but long enough to style. The leaf clip trend adds an organic, artisanal touch.
Where this look is suitable: Boardwalk afternoons, beach-side dining, casual outdoor events—any setting where the relaxed bob and clip detail will complement the atmosphere.
Step by step:
- Prep with texture. Apply sea salt spray to damp hair for grip and wave formation.
- Air-dry or rough-dry. Let hair dry naturally for the most authentic texture.
- Add definition. If certain pieces are too straight, use a flat iron to create subtle bends.
- Tuck and clip. Take the heavier side and tuck it behind the ear. Secure with the leaf clip.
- Piece out the texture. Use your fingers to separate and define individual waves.
Tips and tricks: Ask your stylist for a bob with point-cut ends that create natural texture without blunt lines. The leaf clip works best when it contrasts with the hair tone—gold on bronde creates the strongest visual impact. Maintenance trims every 6-8 weeks keep the shape sharp.
27.Chic Braided Double Buns
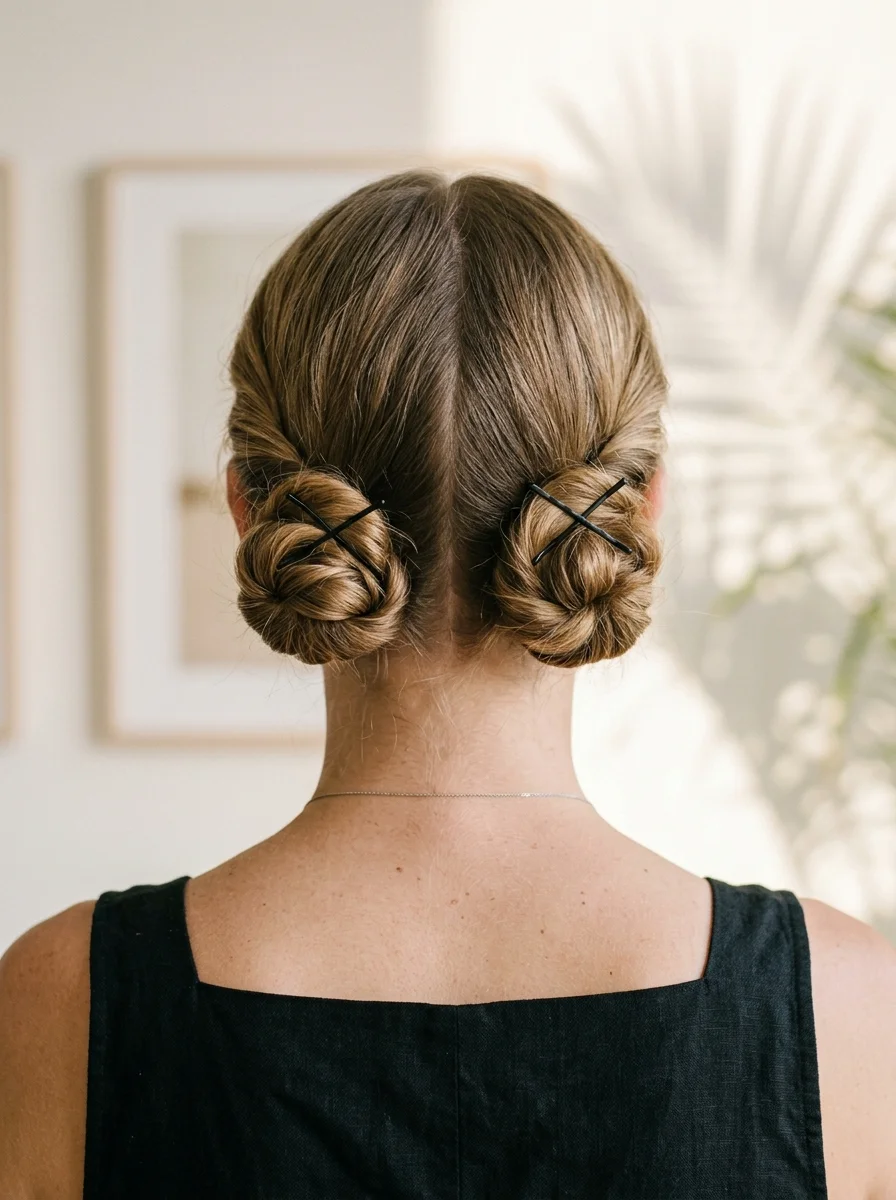
The overview: Medium to long-length hair parted precisely down the center, each side braided and coiled into a low bun at the nape, secured with X-pattern black bobby pins. The double buns sit symmetrically below each ear, creating a playful yet editorial silhouette.
The X-pattern bobby pins are the detail that elevates this from "space buns" to "fashion statement." The visible black pins create a graphic element against the light hair that reads as intentional design rather than functional necessity.
Why this look is popular: Double buns are having a fashion-forward moment because they're unexpected and photograph with editorial quality. The visible bobby pin trend turns a functional accessory into a design element.
Where this look is suitable: Art gallery openings, fashion events, creative outings—any setting where the bold, symmetrical aesthetic will be appreciated.
Step by step:
- Part precisely. Create a razor-sharp center part from forehead to nape.
- Divide into two sections. Gather each side into a low ponytail below the ear.
- Braid each ponytail. Create a tight three-strand braid with each ponytail. Secure the ends.
- Coil into buns. Wrap each braid around its own base to form compact buns. Pin securely.
- Add X-pattern pins. Place black bobby pins in an X pattern over each bun for the graphic effect.
Tips and tricks: The center part must be razor-sharp—any crookedness is immediately visible with this symmetrical style. Use bobby pins that match each other in size and color for the cleanest X-pattern. The braids should be tight enough to coil without lumping.
27 Gorgeous Mint Green Nails That Are Popular Right Now (2026)
28.Boho Beach Braid with Golden Chains
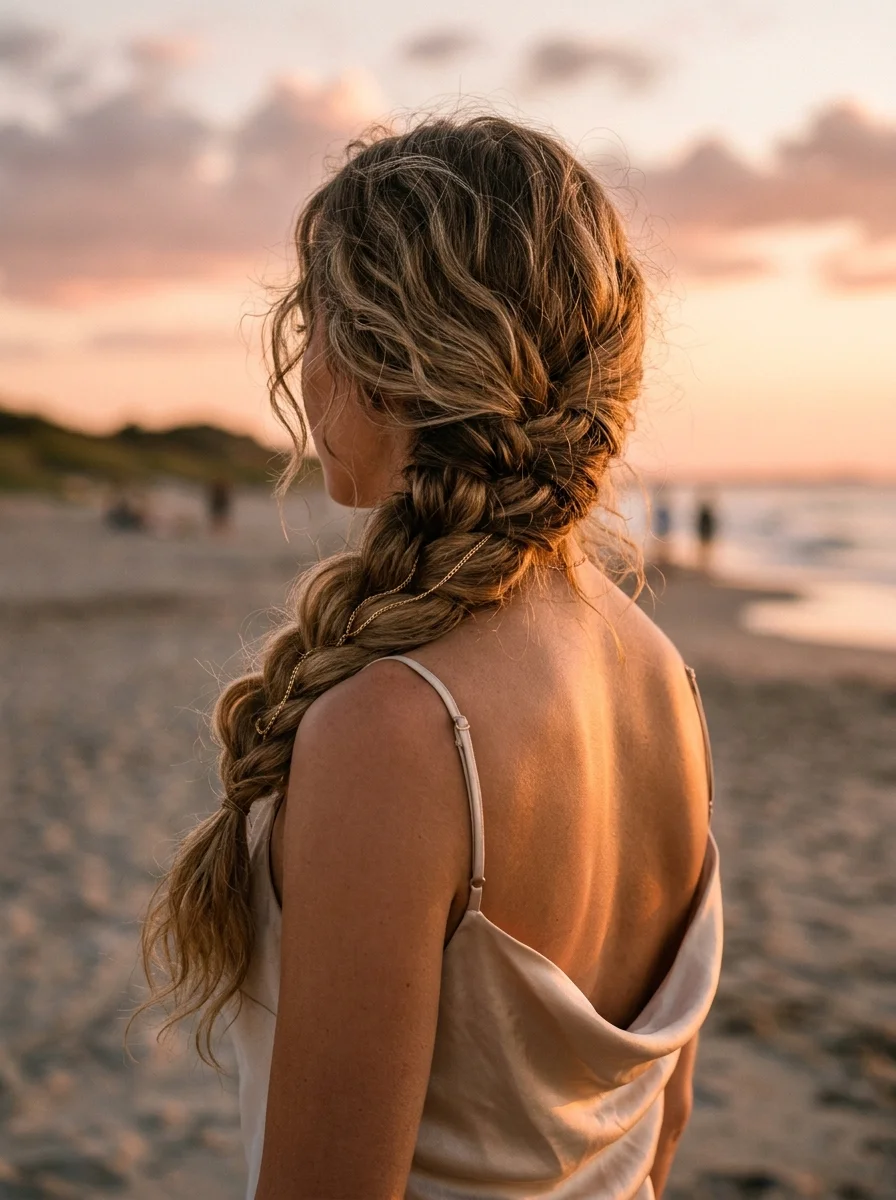
The overview: Medium to long-length hair woven into a loose side braid with delicate gold chains threaded through the strands. The chains catch the sunset light and add just enough shimmer to feel special without crossing into costume territory.
Hair chains are the accessory equivalent of a good pair of earrings—they elevate a simple look without overwhelming it. Against the loose braid, the gold chains create a tone-on-tone effect that looks rich and intentional.
Why this look is popular: The hair chain trend has exploded because it's the easiest way to add glamour without any styling skill. The chains catch light dramatically in golden-hour settings.
Where this look is suitable: Sunset beach evenings, outdoor dinners, golden-hour photoshoots—any setting where the warm light will enhance the chain sparkle.
Step by step:
- Prep with texture. Apply texturizing spray to dry hair for grip and volume.
- Create the braid. Pull all hair to one side and create a loose three-strand braid, keeping tension relaxed.
- Weave in chains. Thread delicate gold chains through the braid sections at intervals, laying them alongside one strand.
- Pancake the braid. Gently pull the outer edges to widen the braid and make the chains more visible.
- Secure the end. Tie off with a clear elastic, letting the chain tails dangle slightly.
Tips and tricks: Choose chains that are lightweight—heavy chain pulls the braid down and creates discomfort. Jewelry-making chain from a craft store works perfectly and costs a fraction of hair-specific versions. Cut the chains longer than you think you need; you can always trim the tails.
The Cooling Factor
Certain hairstyles can actually help you feel cooler — not just look like it. When you pull hair off your neck and create space for air circulation around your ears and temples, you are helping your body regulate heat more effectively. Protective styles like box braids, knotless braids, and high ponytails create that airflow zone that loose hair blocks.
Summer 2026 is seeing a surge in cuts designed to minimize heat trapping: soft bobs, bixie cuts, and textured shags that work with your natural texture instead of requiring heavy product and heat styling. Less product means less buildup against the scalp, which means less trapped heat. The most functional hot-weather haircuts are the ones that let your scalp breathe.
The coolest move? High ponytails and top knots are not just trendy — they create maximum airflow around your neck and ears, which are major heat-release points. If you are truly suffering in the heat, elevate your style literally.
The Hair Jewelry Trend
Hair jewelry is one of the biggest trends of 2026, and it is the easiest way to elevate a simple hot-weather style without adding heat or product. Delicate gold chains threaded through braids, pearl-encrusted clips, and sculptural metal cuffs transform a basic ponytail into a statement piece.
The practical advantage of accessories is that they actually help your style last longer. A claw clip holds a twisted updo more securely than pins alone. A gold cuff at the base of a ponytail keeps the elastic from slipping. Pearl pins woven into a braid add weight that prevents the braid from curling up as it dries. These pieces catch light beautifully in golden-hour photos and add personality without requiring any extra styling skill.
The buying rule? Invest in lightweight accessories with strong spring mechanisms. Heavy chains and clips pull on hair and create discomfort in the heat. Look for pieces with silicone grips or velvet lining on the inner edge — they will not slide on smooth, sun-warmed hair.