Nail Trends
29 Best Tropical Vacation Nails for Women in 2026 🌴

This guide showcases 29 gorgeous tropical nail ideas that are perfect for your next island getaway. Whether you’re lounging on the shores of Bora Bora or exploring the vibrant streets of Tulum, these designs—from hand-painted hibiscus flowers to sea-glass ombres—are the ultimate travel accessory for 2026!
Goodbye Flat Brights — The Jelly & Chrome Takeover Is Officially Here
Summer 2026 is having a full-on love affair with translucent finishes and dimensional chrome. Think jelly nails in watermelon pink, citrus orange, and aquamarine — colors that look like they're lit from within.
The real heavyweight this year? Ocean nails and mermaid chrome. According to leading beauty editors, ocean nails are the biggest beach manicure trend for the season. Glass chrome nails have been quietly gaining momentum since last year, and they've officially taken over as one of the defining nail trends of 2026.
But here's the part that actually is surprising: texture. Summer 2026 nail art is all about finishes that feel as good as they look — 3D gel flowers, raised water droplets, and realistic seashell designs that you can actually feel under your fingertips. It's a sensory thing that photos don't fully capture.
In This Guide
1.Sparkling Turquoise Lagoon
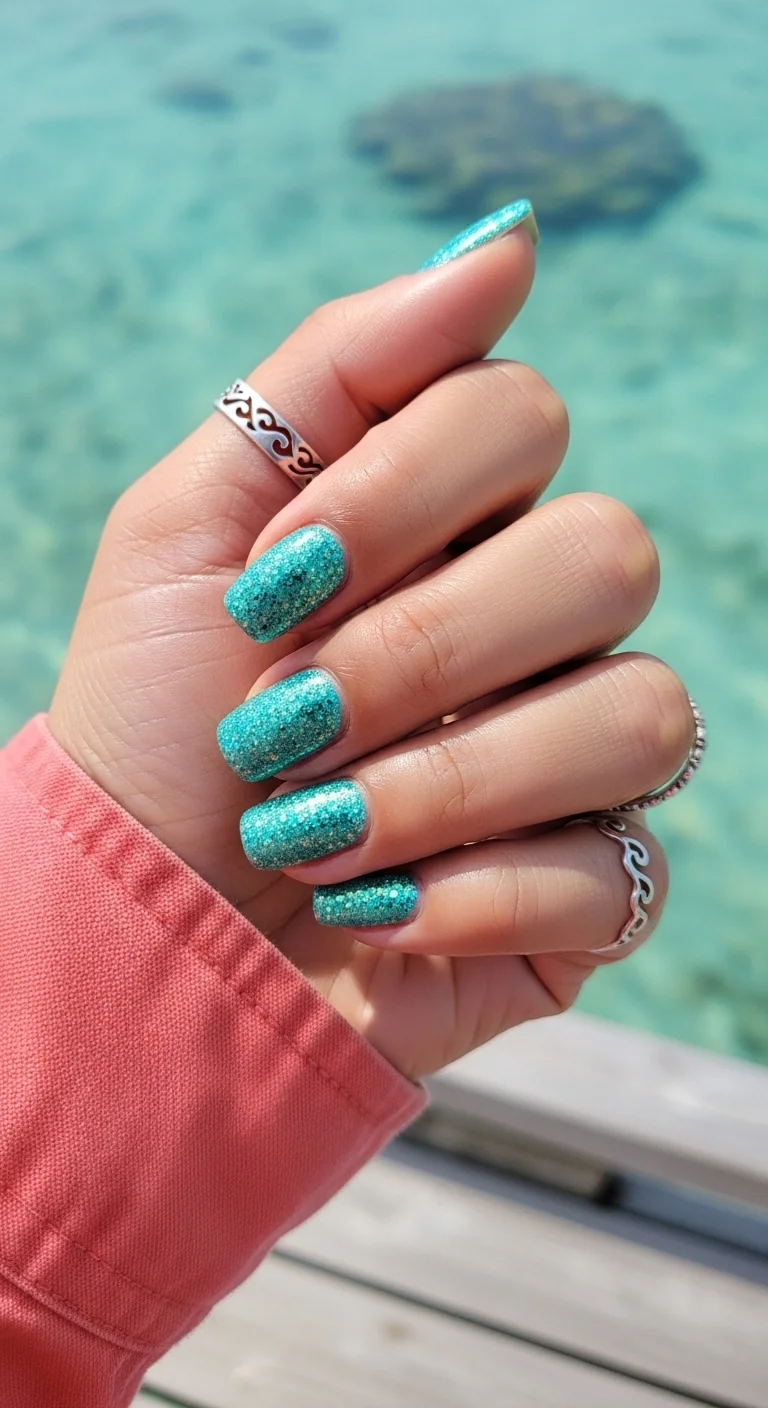
Glittery teal shorties that match the ocean waves perfectly.
Overview:
The glitter particles are mixed with fine gold and holographic teal, creating a textured, almost sandy sparkle that catches light from every angle. Full coverage on every nail, no accent nails, no variation. The simplicity is the point.
Short squoval is the practical choice here. Glitter polish on longer nails chips faster at the edges, and the textured surface makes snagging more likely. Short nails also mean the glitter reads as a solid block of sparkle rather than a busy pattern.
The sponge method for application deposits more glitter per coat than brushing directly, which is how you get that opaque, crushed-gemstone effect. Two layers of top coat are necessary — one to lock the glitter, a second to smooth the surface.
Design Breakdown:
Full-coverage glitter. The depth comes from mixed particle sizes, not from layering techniques.
Base Color: A semi-sheer turquoise jelly packed with holographic teal and gold glitters. Essie "Turquoise & Caicos" with a glitter topper works, or look for a pre-mixed formula.
Nail Shape: Short squoval. Sturdy for swimming, hiking, and luggage handling.
Design Element: Full-coverage glitter. No negative space, no accent nails — pure sparkle.
Finish: Two layers of high-shine top coat to smooth the glitter texture.
Get The Look at Home:
The sponge technique is the difference between sparse glitter and full-coverage sparkle.
- Prep: Shape into a soft squoval. Apply a clear base coat.
- First coat: One thin layer of turquoise glitter to establish the base color.
- Sponge it: Dab glitter polish onto a makeup sponge and press it onto the nail. The sponge absorbs the clear base, leaving only glitter.
- Clean up: A small brush dipped in acetone removes stray glitter from cuticles.
- Double top coat: One layer to lock the glitter, let it dry, then a second for a glass-like finish.
30 Stunning Summer Hair Trends for 2026 ☀️🌊
2.Crashing Cobalt Waves
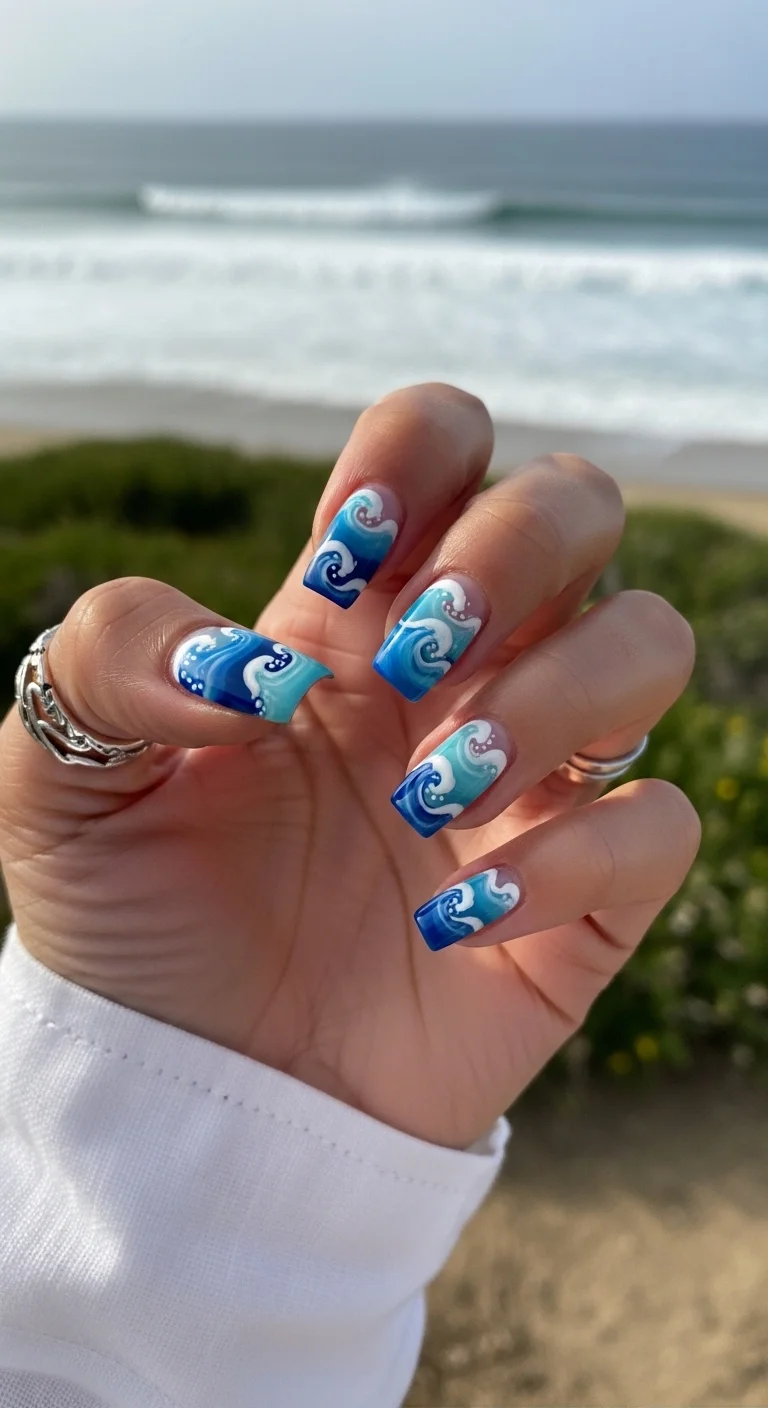
Hand-painted ocean waves for the ultimate beach babe aesthetic.
Overview:
Hand-painted ocean waves in multiple shades of blue — deep cobalt, cerulean, and sky blue — with white foam details on each nail. The waves curl and break differently on every finger, and the negative space near the cuticle creates a French-manicure-like base that keeps the design from feeling heavy. Each nail is a unique wave composition.
This design demands longer nails. The wave pattern needs enough surface area for the curling crests and foam details to register as ocean rather than abstract blue smudges. Coffin or square shapes work best — the flat tip gives each wave a clean edge. The white foam details are the hardest part. A very fine liner brush and minimal polish on the bristles are what keep the foam lines thin and organic-looking rather than thick and blobby.
Design Breakdown:
Layered blue tones with white foam details. The depth comes from color variation, not from 3D effects.
Base Color: A mix of sheer cobalt blue and milky white for a translucent ocean effect.
Nail Shape: Long square. The wide canvas is ideal for the wave patterns.
Design Element: Hand-painted waves with white foam crests. Each nail has a unique wave direction.
Finish: Glossy, wet-look top coat to mimic the surface of water.
Get The Look at Home:
The foam details make or break this design. Keep your brush dry and your lines thin.
- Blue gradient: Apply light blue on the bottom half, darker cobalt on the top. Blend where they meet with a damp brush.
- Wave base: Use a medium blue to draw the curved crest of the wave across the nail center.
- Foam: With your thinnest brush and opaque white, draw tiny swirling loops along the wave's top edge.
- Splashes: Add a few white dots near the cuticle for dynamic movement.
- Seal: Generous top coat to prevent the white lines from smudging.
3.Juicy Mango Ombre
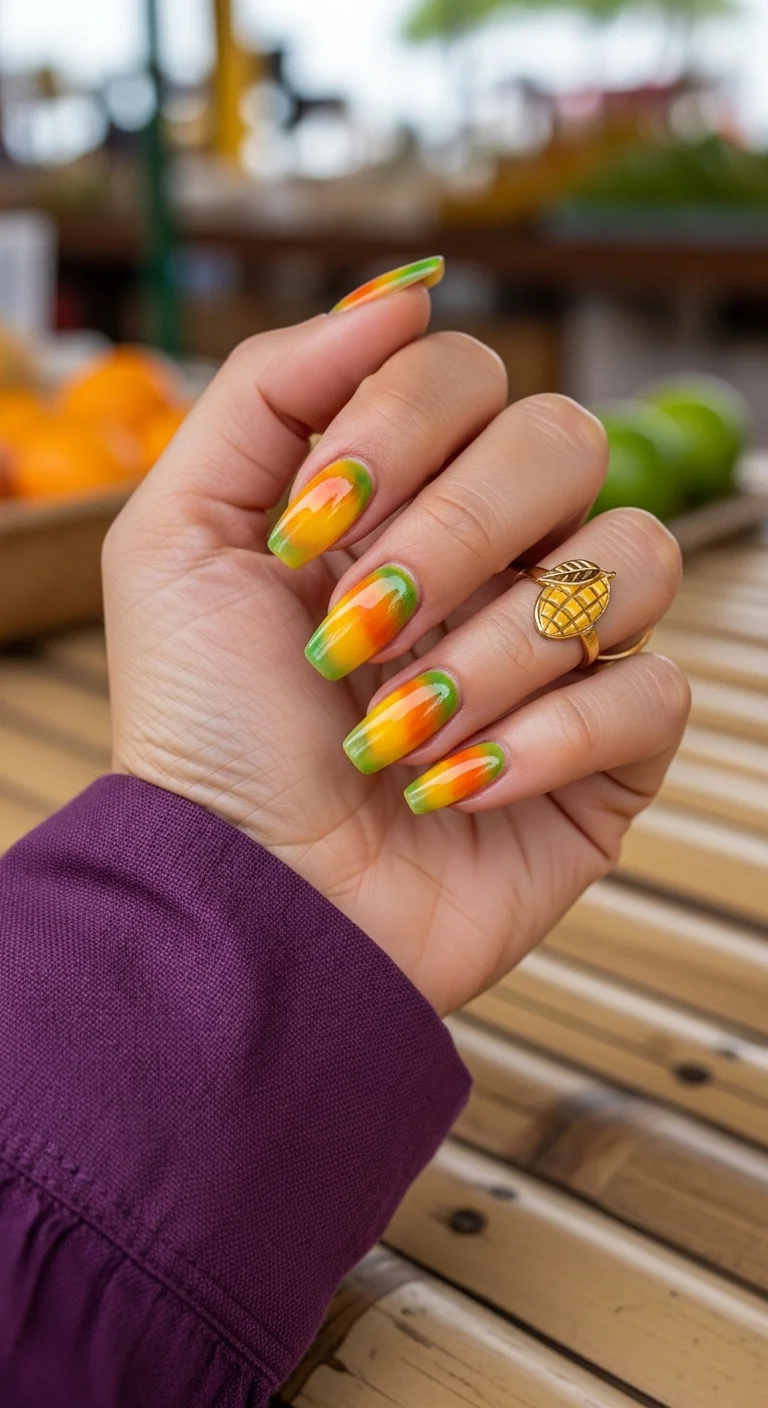
A tropical fruit-inspired gradient that looks good enough to eat.
Overview:
A vertical ombre blending lime green, tropical orange, and sun yellow across long coffin nails. The colors streak and blend with no hard lines — each nail has a unique blend pattern, some leaning more orange, others more yellow-green. The effect mimics a ripe mango's skin, which is exactly the reference the name promises.
The gradient works because the three colors share warm undertones. They naturally blend into each other without creating muddy brown transition zones. The lime green at the edges acts as a frame, preventing the orange and yellow from reading as a sunset. This is distinctly tropical fruit, not sky.
The sponge technique is essential for this blend. Brushing each color separately would create visible lines between them. The sponge deposits all three simultaneously, forcing them to merge on the nail surface. Budget four to five rounds of sponging for full opacity — yellow and green pigments are notoriously sheer.
Design Breakdown:
Three-color tropical gradient. The sponge technique creates the seamless blend.
Base Color: Lime green, tropical orange, and sun yellow blended in a vertical gradient.
Nail Shape: Long coffin. The length gives the gradient room to transition smoothly.
Design Element: Sponge-applied vertical ombre. Each nail has a slightly different color balance.
Finish: High-gloss top coat to make the colors look juicy and saturated.
Get The Look at Home:
Three colors on one sponge means you need to work fast before any of them dry on the sponge surface.
- Base coat: Apply a ridge-filling base coat. The gradient colors are translucent and will show any texture.
- Sponge setup: Paint thin stripes of green, orange, and yellow side by side on a makeup sponge. Dab on paper first to remove excess.
- Dab the gradient: Press the sponge onto the nail, shifting it slightly up and down with each dab to blur the lines between colors.
- Build layers: Let each pass dry, then repeat. Four to five rounds builds the opacity you need.
- Clean edges: Use a brush dipped in acetone to remove polish from the skin before the final top coat.
- Seal: Apply top coat while the last sponge layer is still slightly tacky to help the colors meld further.

28 Cute & Sporty Baseball Game Nail Ideas for 2026 ⚾
4.Midnight Pool Shimmer
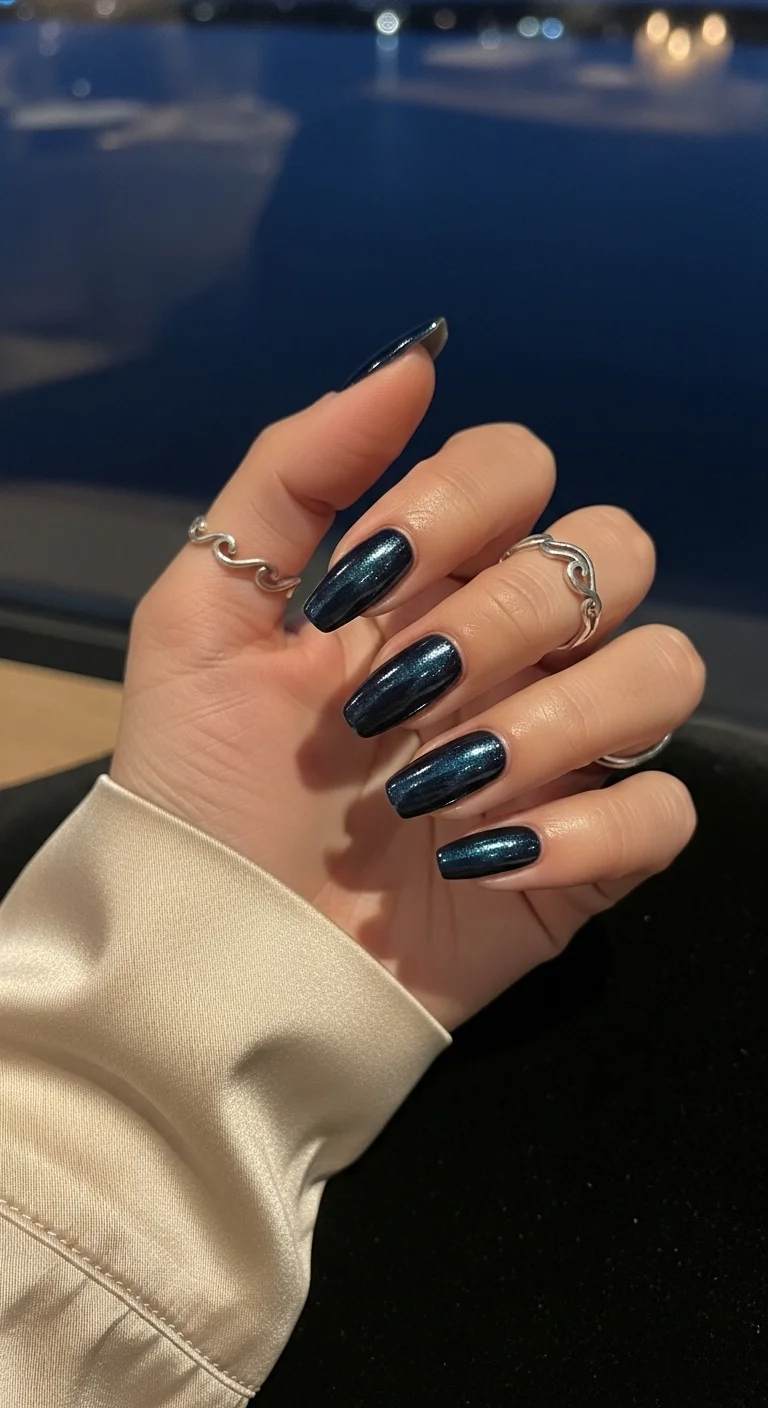
Deep teal shimmer that glows like a moonlit swimming pool.
Overview:
Deep teal-navy with fine shimmer particles that shift between blue and green depending on the light. The effect looks like a swimming pool at night — dark water with light refracting through it. It's moody and sophisticated, a counterpoint to the bright tropical colors that dominate this list.
The shimmer is subtle, not glitter. Fine metallic particles embedded in the formula create a dimensional quality that flat navy can't achieve. As the hand moves, the color shifts between deep teal and midnight blue, which keeps the single-color design from looking flat or one-note.
Dark polishes show every cuticle mistake. Cleanup is non-negotiable here. A small brush dipped in acetone, run along the cuticle line after each coat, keeps the edges crisp. The dark pigment also stains bare nails — always use a base coat.
Design Breakdown:
Single-color shimmer. The light-shifting quality is the entire design.
Base Color: Deep teal-navy with fine blue-green shimmer. OPI "Yoga-ta Get This Blue!" or Essie "Under the Twilight" hit the right depth.
Nail Shape: Medium oval. The curved surface lets the shimmer roll across the nail as you tilt your hand.
Design Element: Solid shimmer on every nail. No art, no accents — the color and finish do all the work.
Finish: High-gloss top coat to amplify the shimmer and make the teal look like liquid.
Get The Look at Home:
Dark shimmers are forgiving on application but unforgiving on cleanup. Work clean from the start.
- Base coat: Non-negotiable. Dark pigments stain bare nails for days.
- First coat: Thin and even. Dark polishes pool at the cuticle if you apply too much.
- Second coat: Slightly thicker for full opacity. The shimmer should be evenly distributed.
- Cleanup immediately: While the second coat is still wet, use a brush dipped in acetone to clean the cuticle line.
- Seal: One thick coat of top coat to lock in the shimmer and add depth.
5.Matte Neon Cocktail
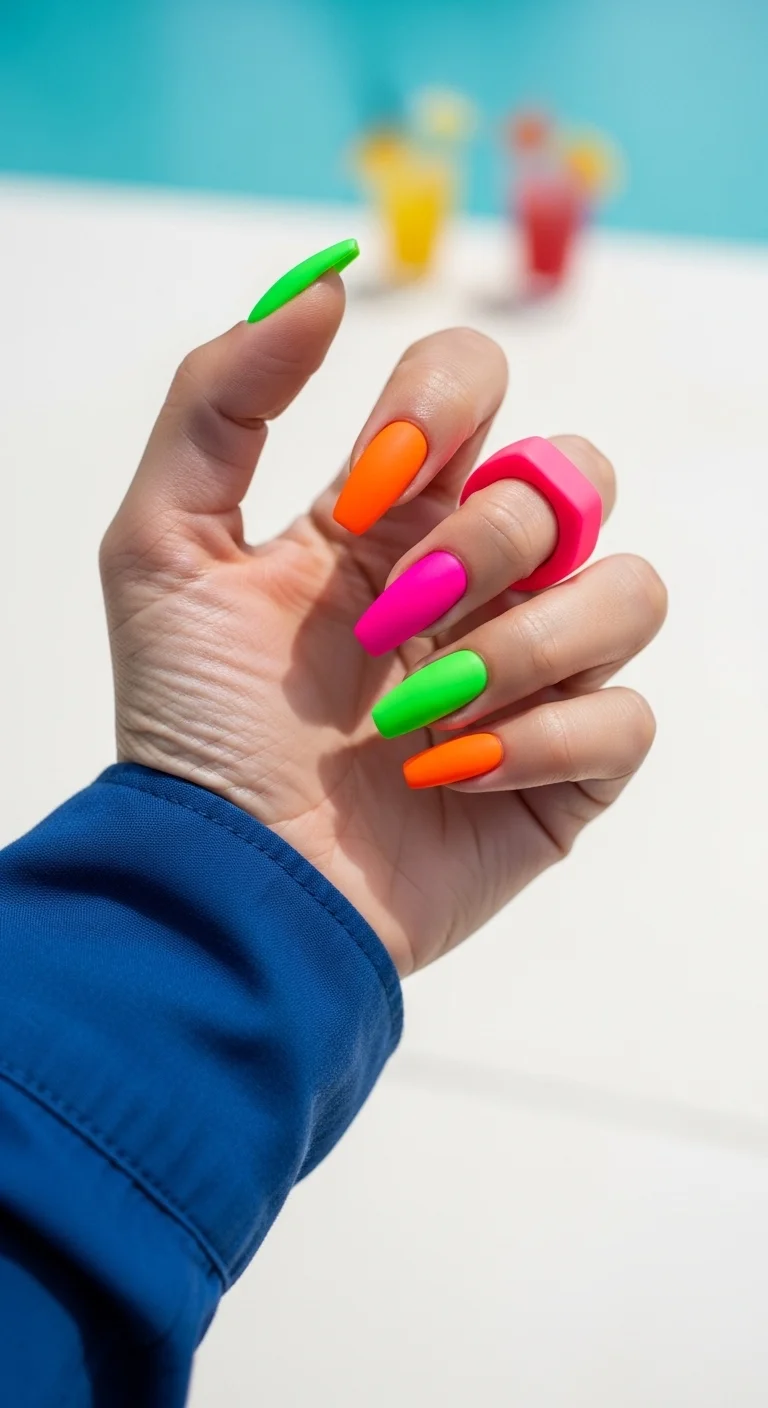
A skittle set of matte neons for maximum poolside impact.
Overview:
Each nail a different neon — green, orange, hot pink — in a full matte finish. No patterns, no art, just pure saturated color with a flat, velvety surface. The matte treatment on neon is unusual and effective: it makes the colors look thicker, almost like they're glowing from within rather than reflecting light off the surface.
The skittle approach (each nail a different color) works because the neons share the same saturation level. If one nail were pastel and another neon, the set would look uneven. Here, every color is equally loud, which creates visual rhythm across the hand despite the different hues.
Matte top coats over neon polish can dull the vibrancy slightly. The trick is applying the matte coat in one confident stroke — going back over the same area creates texture differences that are visible under the flat finish. One pass, then walk away.
Design Breakdown:
Multi-color neon skittle with matte finish. The flat texture intensifies the color pop.
Base Color: Neon green, neon orange, and neon hot pink. One color per nail, no mixing.
Nail Shape: Medium-long coffin. The flat surface showcases the matte texture.
Design Element: Solid neon on each nail. No art, no accents — the color variety is the design.
Finish: True matte top coat. Not satin, not "soft matte" — fully flat.
Get The Look at Home:
Neon polishes are streaky on the first coat. Trust the process — the second coat evens everything out.
- Base coat: Apply a smoothing base coat. Matte finish amplifies every ridge.
- First coat: Thin layer of each neon on its assigned nail. It will look patchy. That's normal.
- Second coat: Slightly thicker for full opacity. The color should be solid and even.
- Dry completely: Wait at least three minutes. Matte top coat on wet neon causes bubbling.
- Matte seal: One stroke per nail. Don't go back over the same area — it creates visible texture differences.
- Cuticle oil: Matte neons make fingers look dry. Hydrate the cuticles after the top coat sets.

30+ Chic Pool Party Hairstyles for Summer 2026 🌊👙
6.Pia Colada Pineapple Art
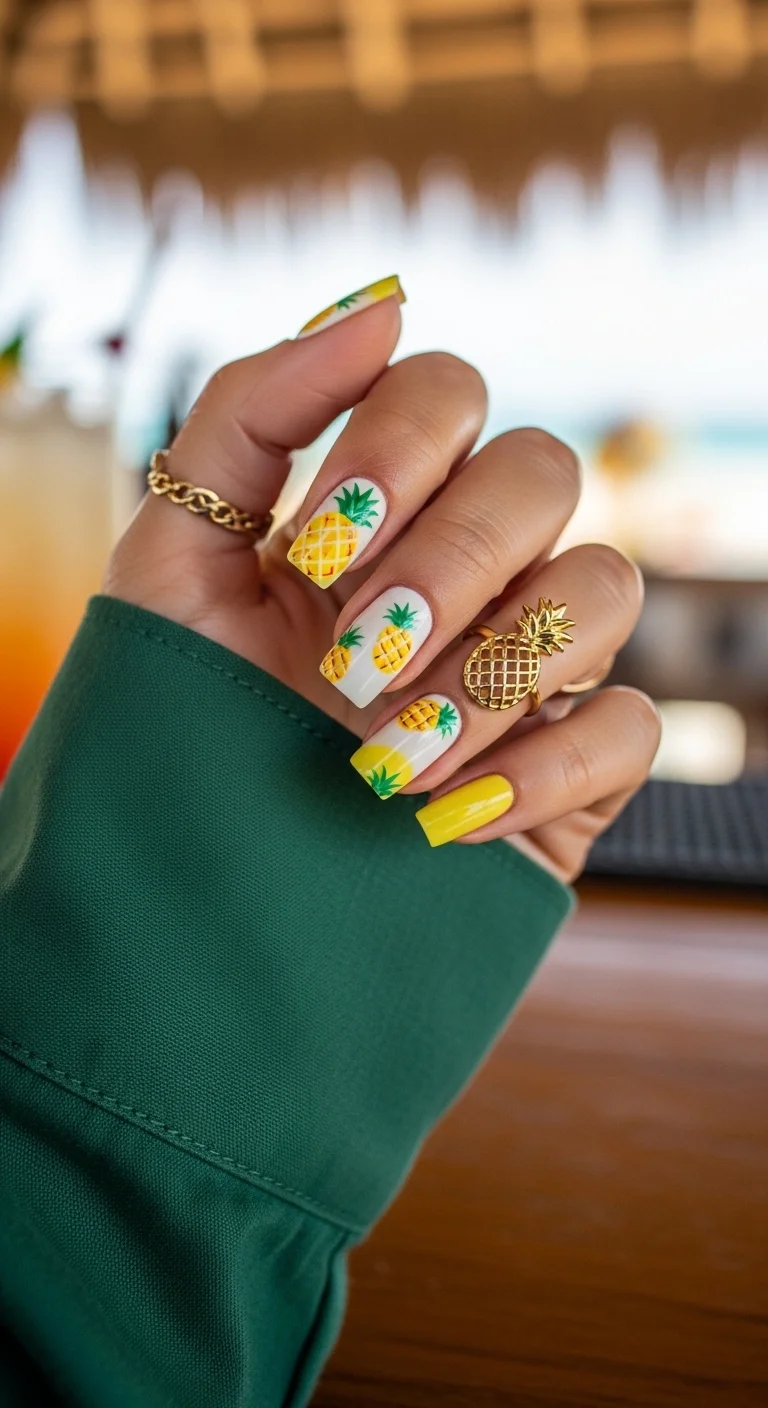
Hand-painted pineapples for a playful tropical drink vibe.
Overview:
Hand-painted pineapples on a white base, with one solid yellow nail on the pinky. The pineapples are rendered with crosshatch body detail and green leafy crowns, each slightly different in size and placement. The white background keeps the fruit art clean and readable.
The pineapple is one of the most recognizable tropical symbols, and the crosshatch texture on the body is what sells the reference. Without the grid pattern, the yellow shapes could be lemons, mangoes, or generic blobs. The crosshatch, combined with the green crown, makes them unmistakably pineapple.
The solid yellow pinky nail is a smart addition. It picks up the yellow from the pineapples and gives the eye a place to rest between the detailed art nails. Without it, the set might feel busy.
Design Breakdown:
Illustrated fruit art on white. The crosshatch texture is the design detail that sells the pineapple reference.
Base Color: Crisp opaque white on most nails. Solid sunshine yellow on the pinky.
Nail Shape: Medium squoval. The flat surface provides a canvas for the fruit illustration.
Design Element: Hand-painted pineapples with crosshatch bodies and green leafy crowns. One solid yellow accent nail.
Finish: High-gloss top coat to seal the art and make the white look crisp.
Get The Look at Home:
The crosshatch detail is easier than it looks — two sets of diagonal lines in opposite directions.
- White base: Two coats of opaque white on all nails except the pinky. Let dry fully.
- Yellow pinky: Two coats of sunshine yellow on the pinky nail.
- Pineapple body: Using a medium brush and yellow polish, paint an oval shape in the center of each white nail.
- Crosshatch: With a fine liner brush and light brown or gold polish, draw diagonal lines in one direction across the yellow body, then cross them in the opposite direction.
- Green crown: Using a thin brush and green polish, paint three to five leaf strokes fanning out from the top of the pineapple.
- Seal: One thick coat of top coat to protect all the art.
7.Dopamine Rainbow Vertical
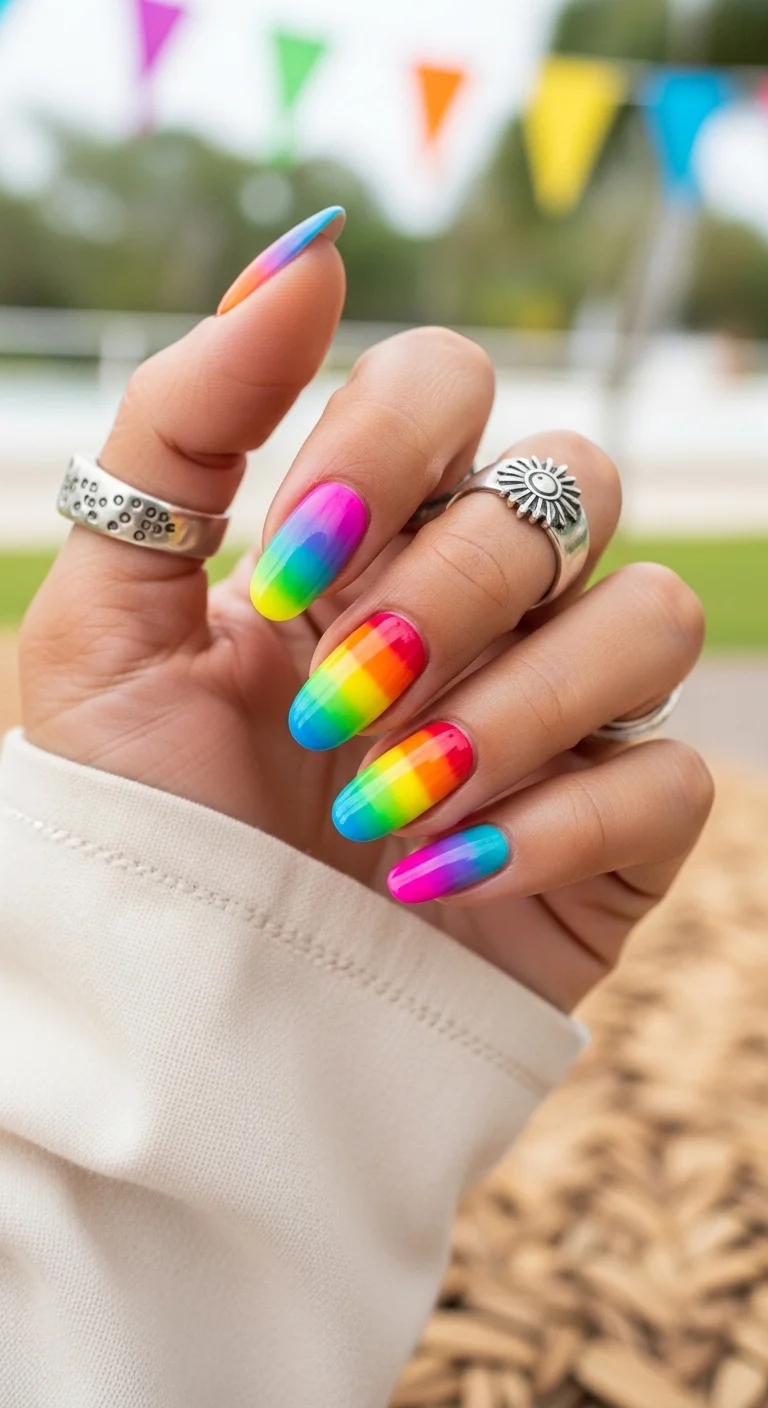
A full-spectrum rainbow for maximum dopamine dressing.
Overview:
Each nail features a different segment of the rainbow, flowing vertically from cuticle to tip. Hot pink, orange, yellow, green, blue — the colors are saturated and high-pigment, creating a set that's impossible to ignore. The vertical gradient on each nail makes the colors look like they're melting down the finger.
The vertical orientation is what makes this design work. Horizontal rainbow stripes would look like a flag. Vertical gradients look like color is flowing, which creates movement and energy. Each nail showcases a different part of the spectrum, so the full rainbow reveals itself across the entire hand.
Rainbow nails require clean transitions between colors. The sponge technique handles this naturally — the colors blend where they meet on the sponge. The key is not over-blending: three to four dabs per pass keeps the colors distinct while still creating a smooth gradient.
Design Breakdown:
Vertical rainbow gradients. Each nail is a different color segment.
Base Color: High-pigment rainbow shades — hot pink, orange, yellow, green, blue.
Nail Shape: Medium-long almond. The curved surface lets the gradient flow naturally.
Design Element: Sponge-applied vertical gradient on each nail. Each nail features a different color or color transition.
Finish: High-gloss top coat to make every color look saturated and vivid.
Get The Look at Home:
Work one nail at a time — the sponge dries fast, and you need the colors wet to blend properly.
- Base coat: Apply a ridge-filling base coat. Bright colors highlight texture.
- Sponge setup: Paint two to three rainbow colors side by side on a makeup sponge. The colors should overlap slightly.
- Dab vertically: Press the sponge onto the nail with the colors running from cuticle to tip. Shift slightly with each dab.
- Build opacity: Three to four rounds per nail. Let each round dry for thirty seconds before the next.
- Clean edges: Use a brush dipped in acetone to remove rainbow polish from the skin.
- Seal: One thick coat of top coat to smooth the surface and unify the colors.

30 Stunning Beach Nail Ideas for the Best Vacation in 2026 🌊
8.3D Pearl Seashell Fantasy
3D seashells and pearls for a full mermaidcore moment.
Overview:
This is the most elaborate design on the list. 3D seashell charms and scattered pearl beads sit on a sheer pink base with mint green French tips. The shells physically protrude from the nail surface, catching light and casting shadows that flat art can't replicate.
The mint tips ground the design. Without them, the pearls and shells would float on a plain base and read as craft-store embellishments. The French tip structure gives the design intention — it says "this is a manicure with 3D art," not "someone glued things to their nails."
The practical reality: 3D charms snag on everything. Hair, sweater knits, bag linings — anything with texture will catch on the raised elements. Sealing the edges with a thick bead of nail art gel around each charm reduces lifting, but won't eliminate snagging entirely. Budget about a week of wear before something catches.
Design Breakdown:
French tip base with 3D embellishments. The shells and pearls are the focal point.
Base Color: Sheer milky pink on the nail bed. Mint green French tips.
Nail Shape: Medium-long coffin. The flat surface provides a stable base for the 3D elements.
Design Element: Mint French tips on all nails. 3D seashell charms and pearl beads on two to three accent nails.
Finish: High-gloss top coat to seal the tips and make the pearls look lustrous.
Get The Look at Home:
3D charms need nail art gel or jewelry gel for adhesion. Regular nail glue won't hold against daily wear.
- Sheer base: Two coats of milky pink on all nails. Let dry fully.
- Mint tips: Paint mint green French tips on all nails. Two thin coats for opacity.
- Plan placement: Hold shells and pearls over different nails before committing. Odd-numbered placements look more natural.
- Attach charms: Apply a small bead of nail art gel to the back of each charm. Press onto the nail and hold for ten seconds.
- Seal edges: Using a detail brush, apply top coat around the base of each charm to prevent lifting.
- Final coat: Apply top coat to all nails, being careful not to cover the top of the charms.
9.Terracotta Turquoise Geo
Southwestern-inspired geometric blocks in earthy tropical tones.
Overview:
Geometric color-blocking in terracotta, turquoise, cream, and white. Some nails feature horizontal stripes, others have dot rows, and some are solid color. The mix of patterns creates a cohesive set that references southwestern tile work and tropical resort decor.
The color palette is doing the heavy lifting here. Terracotta and turquoise are complementary opposites — warm and cool, earthy and aquatic. That tension is what makes the design feel dynamic rather than random. The cream and white act as neutral buffers between the two bold colors.
The dot details — terracotta dots on cream, turquoise dots on terracotta — add texture without complexity. They're simple to execute with a dotting tool but create a handcrafted quality that solid color blocks can't achieve.
Design Breakdown:
Geometric patterns in a four-color palette. The stripe and dot variations create visual rhythm.
Base Color: Terracotta, turquoise, cream, and white. Each nail uses two to three of these colors.
Nail Shape: Medium squoval. The geometric shape of the nail mirrors the geometric art.
Design Element: Horizontal stripes, dot rows, and solid color blocks. Each nail has a different pattern combination.
Finish: High-gloss top coat to make the colors look rich and the patterns look sharp.
Get The Look at Home:
Plan your layout across all ten nails before you start. Each nail needs its own pattern assignment.
- Base colors: Paint each nail its designated base color. Two coats each. Let dry fully.
- Stripes: Using striping tape or a liner brush, paint horizontal stripes on the designated nails. Remove tape while wet.
- Dots: Using a dotting tool, place rows of dots on the designated nails. Match the dot color to the complementary base.
- Solid nails: Leave some nails as solid color for visual rest between the patterned nails.
- Cleanup: Use a brush dipped in acetone to sharpen any edges.
- Seal: One thick coat of top coat to level out the surface where different colors meet.

26 Stunning Summer Braided Hairstyles for Women 2026 ☀️💇♀️
10.Retro Island Swirls
70s-inspired tropical swirls for a retro island aesthetic.
Overview:
Psychedelic swirl patterns in turquoise, coral, and dark brown covering every nail. Each nail has a unique spiral composition — some swirl clockwise, others counterclockwise, and the color balance shifts from nail to nail. The effect looks like a 70s album cover filtered through a tropical lens.
The color combination is unexpected and effective. Turquoise and coral are classic tropical colors, but the addition of dark brown grounds the palette and prevents it from reading as generic beach art. The brown adds a retro quality that shifts the reference from "tropical vacation" to "vintage tropical vacation."
The swirl technique requires working wet-on-wet. Each color needs to be applied while the previous one is still fluid so they drag into each other naturally. If the base dries before you add the next color, the swirl lines become hard and deliberate-looking rather than organic.
Design Breakdown:
Psychedelic swirl pattern. The wet-on-wet technique creates the organic spiral lines.
Base Color: Turquoise, coral/salmon, and dark brown. Each nail uses all three colors.
Nail Shape: Medium almond. The curved surface lets the swirls follow a natural spiral path.
Design Element: Psychedelic swirl patterns covering every nail. Each nail has a unique spiral direction and color balance.
Finish: High-gloss top coat to make the colors look vivid and the swirls look fluid.
Get The Look at Home:
Work fast and don't overthink the swirl direction. The beauty is in the randomness.
- Turquoise base: One coat of turquoise on all nails. Let it dry fully.
- Wet layer: Apply a second thin coat of turquoise. Do NOT let it dry.
- Drop colors: Place dots of coral and brown directly onto the wet turquoise.
- Swirl: Using a toothpick or thin brush, drag the colors in a spiral motion. Three to four drags per nail, maximum.
- Don't over-blend: The colors should sit alongside each other, not merge into mud.
- Seal: Wait at least ten minutes, then apply a generous top coat to smooth the surface.
11.Sweet Watermelon Slices
Hand-painted watermelon cross-sections for a juicy summer look.
Overview:
Watermelon cross-sections painted on a clear or nude base. Each nail shows a different slice — some are half-circles, others are full rounds — with pink-to-hot-pink gradient flesh, a white rind line, and a green striped outer edge. Black seed dots complete the illustration.
The clear base is doing important work. It creates negative space between the watermelon slices, preventing the design from feeling crowded. The fruit sits on the nail like stickers on a transparent phone case — the background is part of the design.
The gradient within each slice is what makes these look realistic rather than cartoonish. The pink deepens toward the center, which mimics how a real watermelon looks when you cut it open. That detail separates "cute fruit art" from "convincing fruit art."
Design Breakdown:
Illustration art on a clear base. The gradient within each slice creates realism.
Base Color: Clear or very sheer nude. The natural nail shows through between the fruit.
Nail Shape: Medium almond. The curved shape complements the round fruit slices.
Design Element: Hand-painted watermelon slices with gradient pink flesh, white rind, green skin, and black seeds.
Finish: High-gloss top coat to make the fruit look juicy and fresh.
Get The Look at Home:
The gradient inside each slice is built in layers — pink first, then darker pink in the center.
- Clear base: One coat of clear base. Let dry fully.
- Slice shape: Using a medium brush and pink polish, paint half-circle or full-circle shapes on each nail.
- Gradient: While the pink is still wet, add a dot of darker pink or red in the center. Let it bleed naturally.
- Rind: Using a thin brush and white polish, draw a line around the curved edge of each slice.
- Green skin: Add a thin green line outside the white rind. Use a darker green for the stripes.
- Seeds: Using a toothpick and black polish, place three to five tiny dots in the pink area.
- Seal: One thick coat of top coat to protect all the art.

35 Fun Birthday Nail Designs for 2026 🎂
12.3D Hibiscus Dewdrops

Tropical hibiscus with realistic 3D water droplets.
Overview:
Pink hibiscus flowers painted on a milky white base, with 3D clear dewdrop accents scattered across the nail surface. The dewdrops are raised clear gel dots that catch light like actual water droplets, creating a realistic "just rained on flowers" effect.
The hibiscus flowers are detailed enough to be recognizable — five petals with darker pink centers and subtle veining. The 3D dewdrops add a layer of dimension that transforms the design from flat floral art into something that looks alive. The droplets sit on top of the flowers and the bare white spaces, creating depth through physical height.
The dewdrops require builder gel or a thick top coat applied in individual drops. Each drop needs to cure fully before you move to the next, or they'll flatten and lose their dome shape. Patience is the entire technique here.
Design Breakdown:
Floral illustration with 3D gel dewdrops. The raised droplets create realistic dimension.
Base Color: Milky white or sheer nude. The pale base lets the pink flowers and clear dewdrops stand out.
Nail Shape: Medium-long almond. The curved surface lets light hit the dewdrops from multiple angles.
Design Element: Hand-painted pink hibiscus flowers with darker centers. 3D clear gel dewdrops scattered across each nail.
Finish: High-gloss top coat over the flowers. The dewdrops are left un-coated to maintain their raised dome shape.
Get The Look at Home:
The dewdrops are the final step. Each one needs to cure individually to maintain its dome shape.
- Milky base: Two coats of milky white. Let dry fully.
- Hibiscus flowers: Using a medium brush and pink polish, paint five-petal flower shapes on each nail. Add darker pink dots in the centers.
- Details: Using a thin liner brush, add subtle vein lines on each petal for realism.
- Dewdrops: Using a dotting tool and clear builder gel, place individual drops on the petals and bare spaces. Flash cure each drop for ten seconds before adding the next.
- Full cure: Once all dewdrops are placed, cure the entire hand for sixty seconds.
- Seal the flowers: Apply top coat carefully around the dewdrops, sealing only the painted areas.
13.Electric Sunset Ombre
A blazing sunset gradient that glows under golden hour light.
Overview:
Hot pink transitioning to warm orange and soft peach across long coffin nails. The gradient is vertical, flowing from the deepest pink at the cuticle to the lightest peach at the tips. Each nail has a slightly different blend — some lean more pink, others introduce soft lavender undertones.
The color story is what makes this design work. Pink, orange, and peach are analogous colors — they sit next to each other on the color wheel, which means they blend naturally without creating muddy transitions. The result is a gradient that looks like a sunset reflected in tropical water.
The sponge technique handles the blend, but the color selection on the sponge matters more than usual. Place the darkest color (hot pink) at one end and the lightest (peach) at the other, with orange in the middle. The overlap zones create the natural-looking transition.
Design Breakdown:
Warm-toned vertical gradient. The analogous color palette ensures clean blending.
Base Color: Hot pink at the cuticle, warm orange in the middle, soft peach at the tips.
Nail Shape: Long coffin. The length gives the gradient room to transition from deep to light.
Design Element: Sponge-applied vertical ombre. Each nail has a slightly different color balance.
Finish: High-gloss top coat to make the sunset colors look luminous.
Get The Look at Home:
The gradient is built in thin layers. Heavy sponging creates a textured surface that top coat can't fully smooth.
- Base coat: Apply a ridge-filling base coat. The translucent gradient colors show every texture.
- Sponge setup: Paint hot pink, orange, and peach side by side on a makeup sponge. The colors should overlap slightly.
- Dab from the cuticle: Press the sponge onto the nail with pink at the cuticle and peach at the tip. Use light, repeated dabs.
- Build layers: Four to five rounds per nail for full opacity. Let each round dry for thirty seconds.
- Clean edges: Use a brush dipped in acetone to remove gradient polish from the skin.
- Seal: Apply a thick top coat to smooth the sponge texture and further blend the colors.
32 Stunning Summer Wedding Hairstyles for Brides ☀️💍
14.Jungle Gold Forest
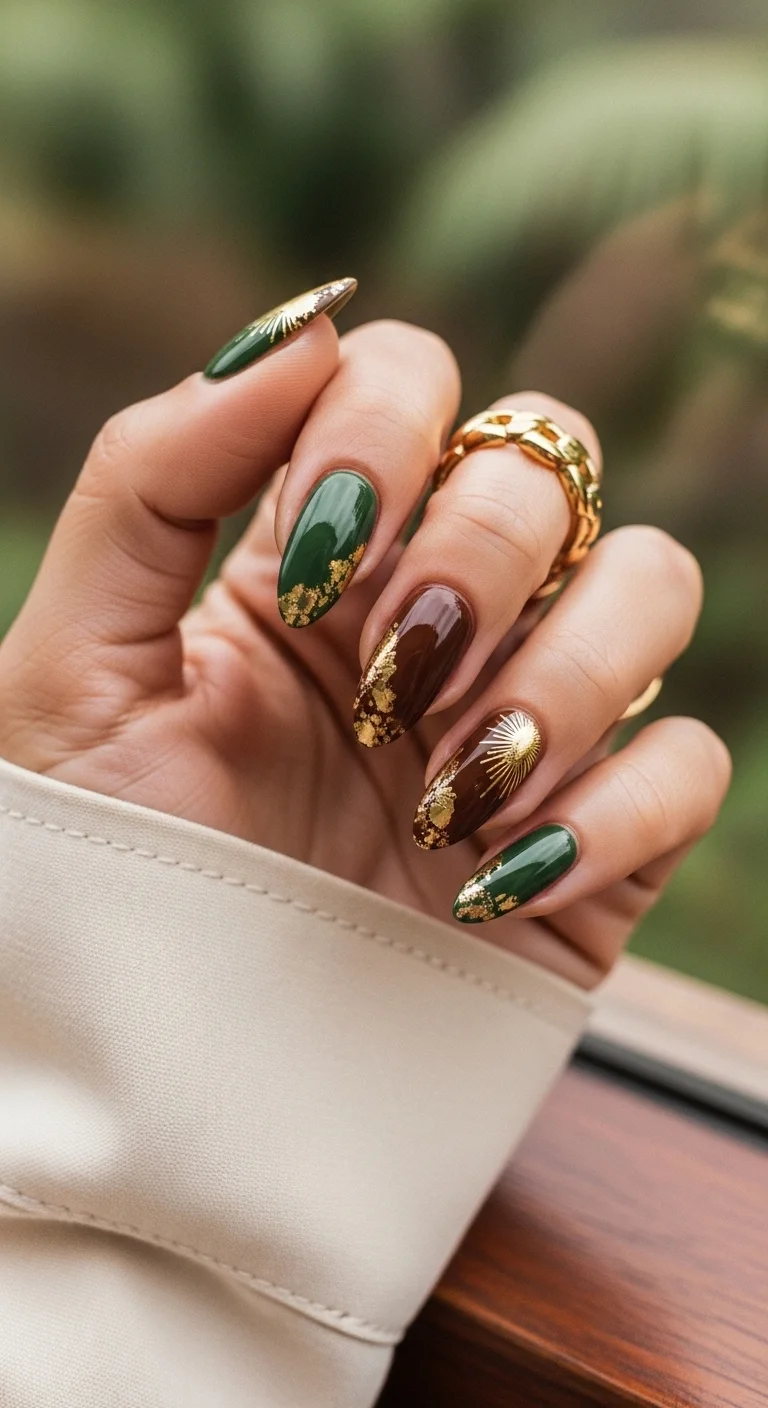
Deep jungle greens and browns with gold leaf luxury.
Overview:
Alternating deep forest green and rich chocolate brown nails, with gold leaf foil accents near the cuticle area. The earthy palette feels like a tropical rainforest floor — dark, rich, and layered with organic texture. The gold foil adds a luxurious quality that elevates the design beyond simple earth tones.
The alternating colors create depth across the hand. If every nail were green, the set would look flat. If every nail were brown, it would read as autumnal rather than tropical. The alternation between the two creates a visual rhythm that feels curated.
Gold leaf foil is forgiving to apply but unforgiving to seal. If the foil extends beyond the top coat boundary, it lifts and flakes within hours. Make sure the top coat fully encapsulates each piece of foil, extending slightly beyond the foil edges.
Design Breakdown:
Alternating earth tones with gold metallic accents. The foil adds luxury to the organic palette.
Base Color: Deep forest green on some nails, rich chocolate brown on others.
Nail Shape: Medium almond. The curved shape complements the organic color palette.
Design Element: Solid color on each nail (alternating green and brown). Gold leaf foil accents near the cuticle on two to three nails.
Finish: High-gloss top coat to seal the foil and make the earth tones look rich.
Get The Look at Home:
Gold leaf foil needs a tacky surface to adhere. Apply it while the polish is still slightly wet.
- Color block: Paint alternating nails green and brown. Two coats each. Let dry fully.
- Tacky layer: Apply one thin coat of clear polish over the accent nails. While it's still tacky, proceed.
- Foil placement: Using tweezers, press small pieces of gold leaf foil near the cuticle area. Press firmly with a silicone tool.
- Seal the foil: Apply top coat over the foil, extending slightly beyond the foil edges to prevent lifting.
- Remaining nails: Apply top coat to the solid color nails.
- Cleanup: Use a brush dipped in acetone to remove any foil fragments from the skin.
15.Holographic Mermaid Scale
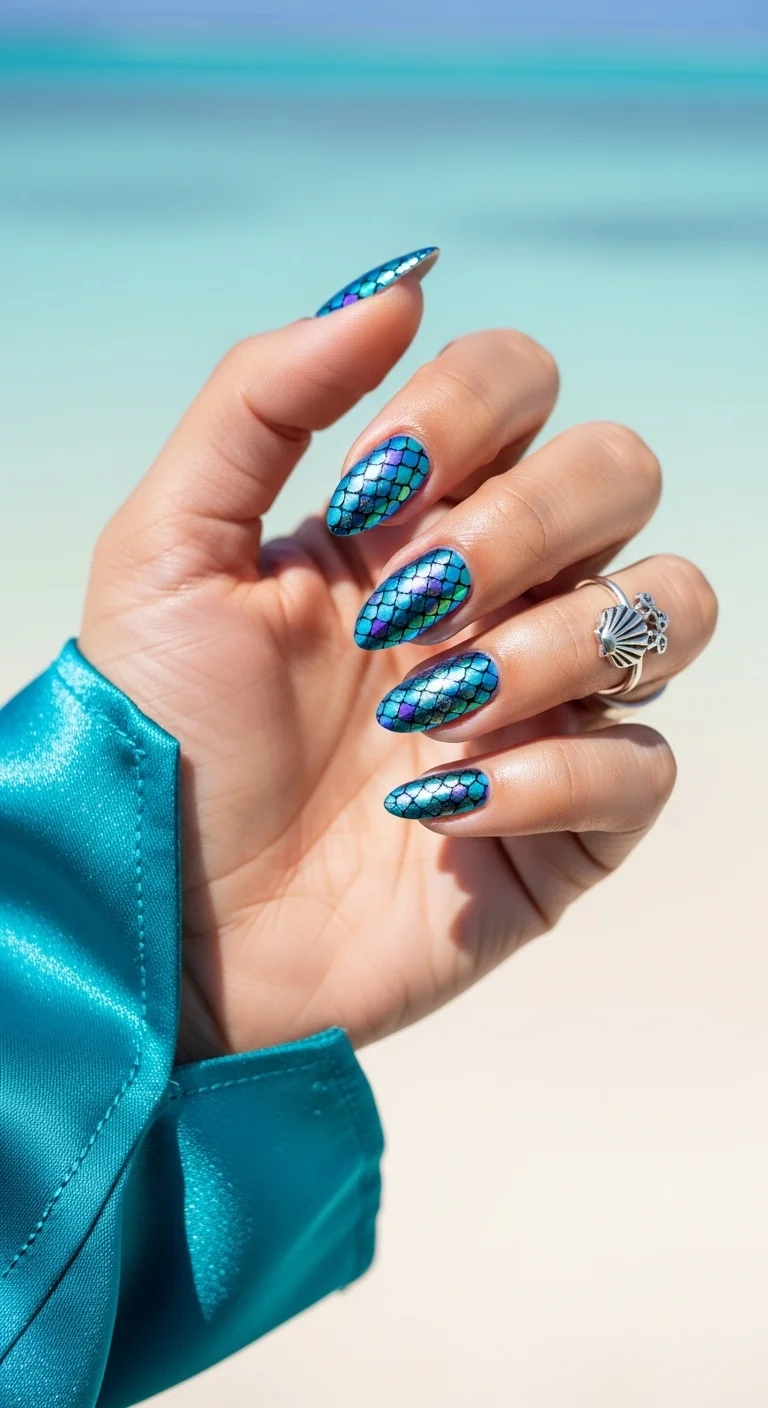
Iridescent mermaid scales that shift from teal to purple.
Overview:
An all-over mermaid scale pattern in teal-blue holographic chrome. The scales appear slightly raised, creating a textured surface that catches light differently at every angle. The color shifts from teal to blue to purple depending on how the light hits — it's mermaidcore distilled into a single manicure.
The holographic finish is what makes this design special. Standard teal polish would look flat and one-dimensional. The holographic particles create a color-shifting quality that makes the scales look iridescent, like actual fish scales catching light underwater.
The scale pattern is likely achieved with a stamping plate or textured gel. Freehand scales at this consistency would be extremely difficult. If you don't have a stamping plate, a dotting tool can create a simplified version — overlapping half-circles in rows — that still reads as scales from conversational distance.
Design Breakdown:
Full-coverage holographic chrome with scale texture. The color shift is the design.
Base Color: Teal-blue holographic chrome. The iridescent particles create the color shift.
Nail Shape: Medium-long almond or stiletto. The pointed shape enhances the mermaid aesthetic.
Design Element: All-over mermaid scale pattern. The scales are slightly raised for texture.
Finish: High-gloss top coat to amplify the holographic effect and smooth the scale texture.
Get The Look at Home:
A stamping plate is the most reliable way to get consistent scale patterns. Freehand works for a simplified version.
- Teal base: Two coats of teal polish. Let dry fully.
- Stamping: Apply holographic teal chrome stamping polish to the scale pattern plate. Scrape, pick up with a stamper, and press onto each nail.
- Alternative — freehand: Using a dotting tool and holographic polish, paint overlapping half-circles in rows across each nail.
- Even coverage: Make sure the scales cover the entire nail surface with no gaps.
- Cleanup: Use a brush dipped in acetone to remove holographic polish from the skin.
- Seal: Two coats of top coat to smooth the texture and protect the holographic finish.

34 Cutest Butter Yellow Nail Designs for 2026 🧈
16.Seafoam Coral Pebbles
Organic sea-inspired colors with a tactile pebble mosaic accent.
Overview:
A skittle set in seafoam green, soft coral, and milky white, with one accent nail featuring raised 3D pebble dots in all three colors. The pebble nail looks like a mosaic of smooth river stones — each dot is a different color, packed tightly together to create a tactile surface.
The three colors share the same muted, organic quality. None of them are bright or saturated — they look like colors you'd find on a beach, in sea glass and coral fragments. That cohesion is what makes the skittle approach work despite the different colors on each nail.
The 3D pebble accent is the focal point. The dots need to be packed tightly enough to look like a cohesive surface rather than scattered polka dots. Using a large dotting tool and builder gel creates the raised, smooth dome shape that reads as "pebble" rather than "dot."
Design Breakdown:
Muted skittle set with one 3D textured accent nail. The organic palette creates beach-inspired cohesion.
Base Color: Seafoam green, soft coral, and milky white. One color per nail.
Nail Shape: Medium almond. The curved shape suits the organic color palette.
Design Element: Solid color on most nails. One accent nail with tightly packed 3D dots in all three colors.
Finish: High-gloss top coat to make the muted colors look smooth and the pebble dots look glossy.
Get The Look at Home:
The pebble accent nail takes the most time. Pack the dots tightly — gaps between them break the mosaic illusion.
- Color block: Paint each nail its designated color. Two coats each. Let dry fully.
- Pebble accent: On one nail, use a large dotting tool and builder gel to place tightly packed dots in seafoam, coral, and white. Alternate colors.
- Flash cure: If using gel, cure each dot for ten seconds so it maintains its dome shape.
- Fill gaps: Add smaller dots in any remaining spaces between the larger pebbles.
- Full cure: Cure the accent nail for sixty seconds.
- Seal: Apply top coat over all nails. On the pebble nail, float the top coat over the dots without pressing down.
17.Island Mandala Rainbow
Holographic rainbow scales with tropical floral overlays.
Overview:
A holographic rainbow scale base with hand-painted black hibiscus flowers and leaf silhouettes layered on top. The rainbow shifts from yellow to green to cyan to blue to purple across the hand, and the black floral art creates a bold graphic contrast against the iridescent background.
The maximalism is the point. This design combines two strong elements — holographic rainbow and tropical floral — that would each dominate a set on their own. Layering them together creates a visual density that's overwhelming in the best way. Every nail is unique, with different color combinations and floral placements.
The black silhouettes are essential. Any other color would get lost against the shifting rainbow. Black provides maximum contrast, ensuring the floral art reads clearly regardless of which part of the rainbow is showing underneath.
Design Breakdown:
Holographic rainbow base with black floral overlay. The contrast between iridescent and matte black is the design principle.
Base Color: Holographic rainbow with a scale or mandala pattern. Each nail shows a different part of the spectrum.
Nail Shape: Medium-long almond. The curved surface lets the holographic shift catch light from every angle.
Design Element: Black hand-painted hibiscus flowers and leaf silhouettes over the rainbow base.
Finish: High-gloss top coat to amplify the holographic effect and seal the black art.
Get The Look at Home:
The holographic base needs to be fully dry before the black art goes on. Wet black polish on holographic creates a muddy smear.
- Rainbow base: Apply holographic rainbow polish or chrome powder. Let cure or dry fully.
- Black silhouettes: Using a thin liner brush and black polish, paint hibiscus flower shapes on each nail. Five petals arranged in a circle.
- Leaf details: Add small leaf shapes along the stems and around the flowers.
- Vary placement: Each nail should have a different floral arrangement. Some flowers near the cuticle, others near the tip.
- Don't over-paint: Leave enough rainbow visible between the black elements for the holographic effect to register.
- Seal: One thick coat of top coat to protect the black art and amplify the rainbow.

25 Stunning Summer Vacation Hairstyles for 2026 ☀️🌊
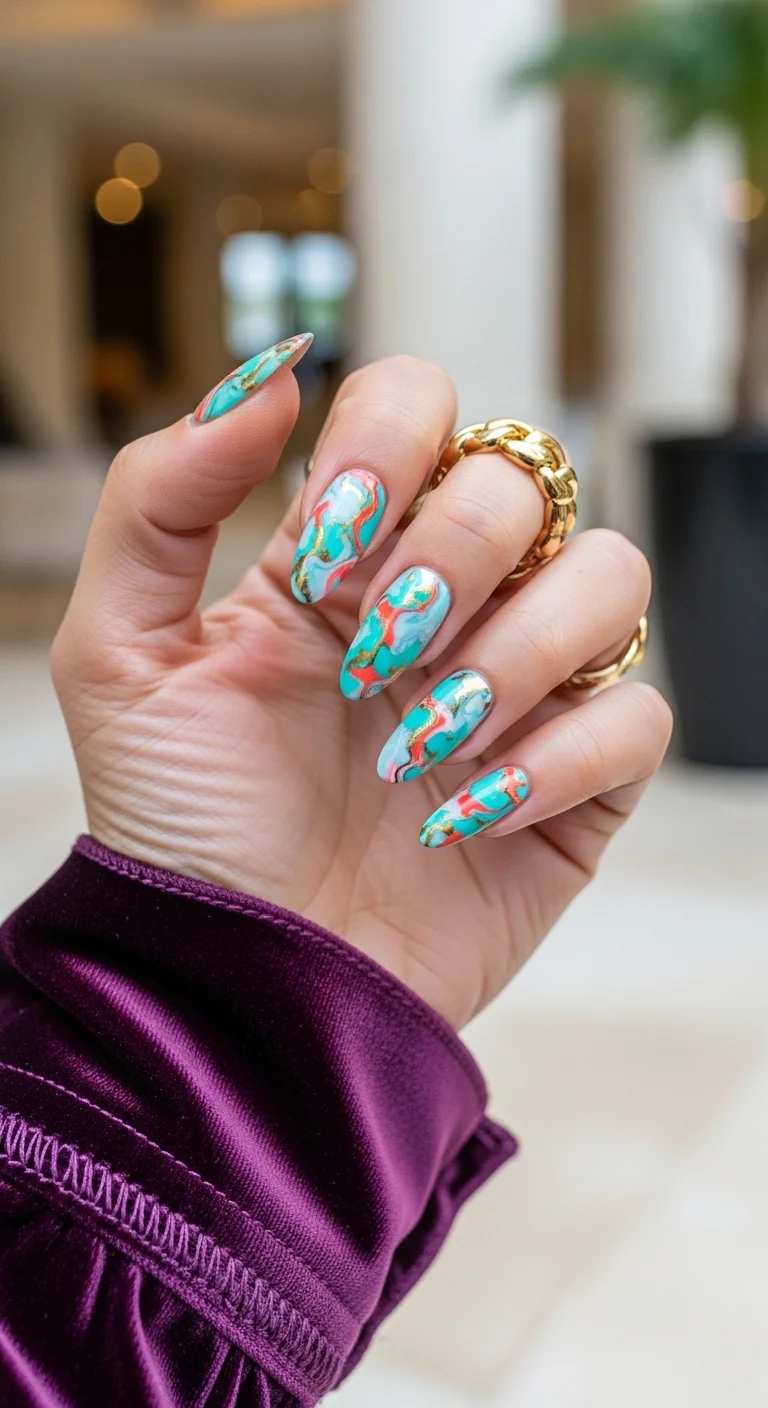
18.Turquoise Marble Veining
Turquoise stone marble with coral veining and gold luxury.
Overview:
Turquoise base with organic coral and gold veining running through it. The effect mimics natural turquoise stone — the kind you'd find in southwestern jewelry or Mediterranean ceramics. The coral veins add warmth, and the gold accents add luxury.
The marble technique creates a different pattern on every nail, which is what makes it look like real stone rather than a printed design. No two pieces of turquoise are identical, and no two nails should be either. The organic inconsistency is the entire point.
The gold veining is a subtle addition that changes the design's reading significantly. Without it, this is a competent marble nail. With it, the design reads as polished gemstone — something you'd find in a jewelry case rather than a paint palette.
Design Breakdown:
Stone-effect marble with warm veining. The organic swirls are the design.
Base Color: Turquoise or teal as the primary stone color. Coral and gold for the veining.
Nail Shape: Medium-long almond. The curved surface lets the marble veins follow organic paths.
Design Element: Turquoise base with coral and gold veining. Each nail has a unique swirl pattern.
Finish: High-gloss top coat to mimic the polished surface of real turquoise stone.
Get The Look at Home:
The marble technique is wet-on-wet. The veins need to be applied while the turquoise base is still fluid.
- Turquoise base: Two coats of turquoise. Let dry completely.
- Blooming layer: Apply a clear blooming gel or a wet top coat. Do NOT cure.
- Coral veins: Using a thin brush, drop small amounts of coral polish into the wet blooming layer. Guide the spreading color into thin, vein-like lines.
- Gold accents: Add thin gold metallic lines alongside the coral veins for a luxury stone effect.
- Vary intensity: Some veins should be dark and defined, others faint and diffused.
- Seal: Wait ten minutes, then apply a generous top coat to smooth the surface.
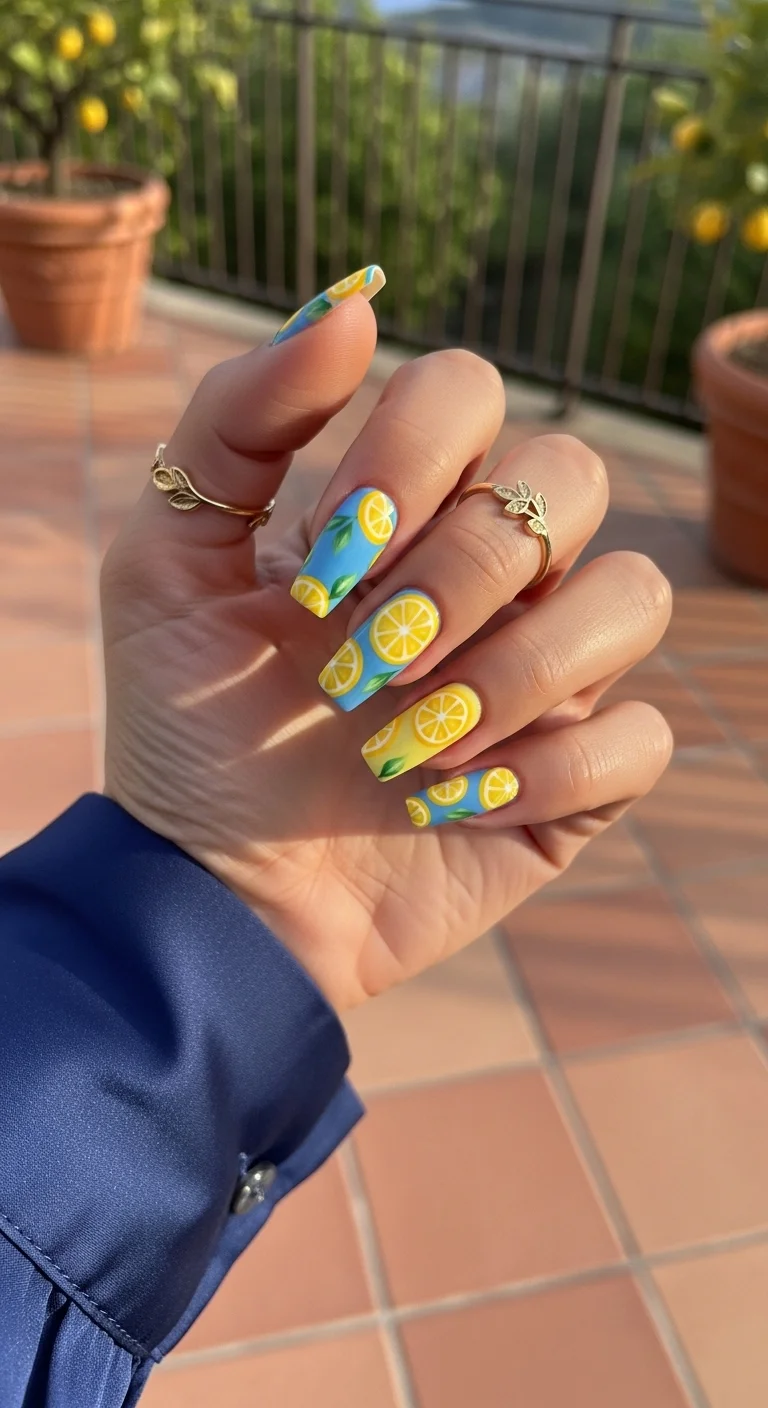
19.Amalfi Lemon Zest
Mediterranean blue meets hand-painted lemon slices.
Overview:
A gradient from sky blue to soft yellow, with hand-painted lemon slices and green leaves scattered across each nail. The blue-to- yellow transition evokes the Amalfi Coast — blue Mediterranean water meeting lemon groves. The fruit art is detailed enough to show the citrus segments and rind.
The gradient and the fruit art serve different purposes. The gradient creates the atmosphere — sunny, warm, coastal. The lemon slices create the narrative — this is a Mediterranean vacation, not just a blue-and-yellow manicure. Together, they tell a complete visual story.
The lemon slices need to be painted after the gradient is fully dry. Painting detailed art on a tacky gradient surface causes the colors to bleed. Wait at least five minutes, then apply the fruit with a fine detail brush.
Design Breakdown:
Gradient base with hand-painted fruit art. The Mediterranean color story is the design theme.
Base Color: Sky blue at the cuticle fading to soft yellow at the tips.
Nail Shape: Long coffin. The flat surface provides a canvas for the detailed lemon art.
Design Element: Sponge-applied gradient with hand-painted lemon slices and green leaf accents on each nail.
Finish: High-gloss top coat to make the gradient look seamless and the fruit look fresh.
Get The Look at Home:
Apply the gradient first, let it dry completely, then paint the lemons on top. Two separate sessions.
- Gradient base: Sponge blue and yellow polish onto each nail. Build opacity in four to five rounds.
- Dry fully: Wait at least five minutes before painting the fruit art.
- Lemon slices: Using a dotting tool and yellow polish, place half-circles and full circles on each nail.
- Segment lines: With a very fine brush and white polish, draw radiating lines inside each yellow circle to create the citrus segment pattern.
- Green leaves: Add one or two small green leaf strokes near each lemon for color contrast.
- Seal: One thick coat of top coat to protect all the art.

31 Patriotic Fourth of July Nail Ideas for 2026 🇺🇸
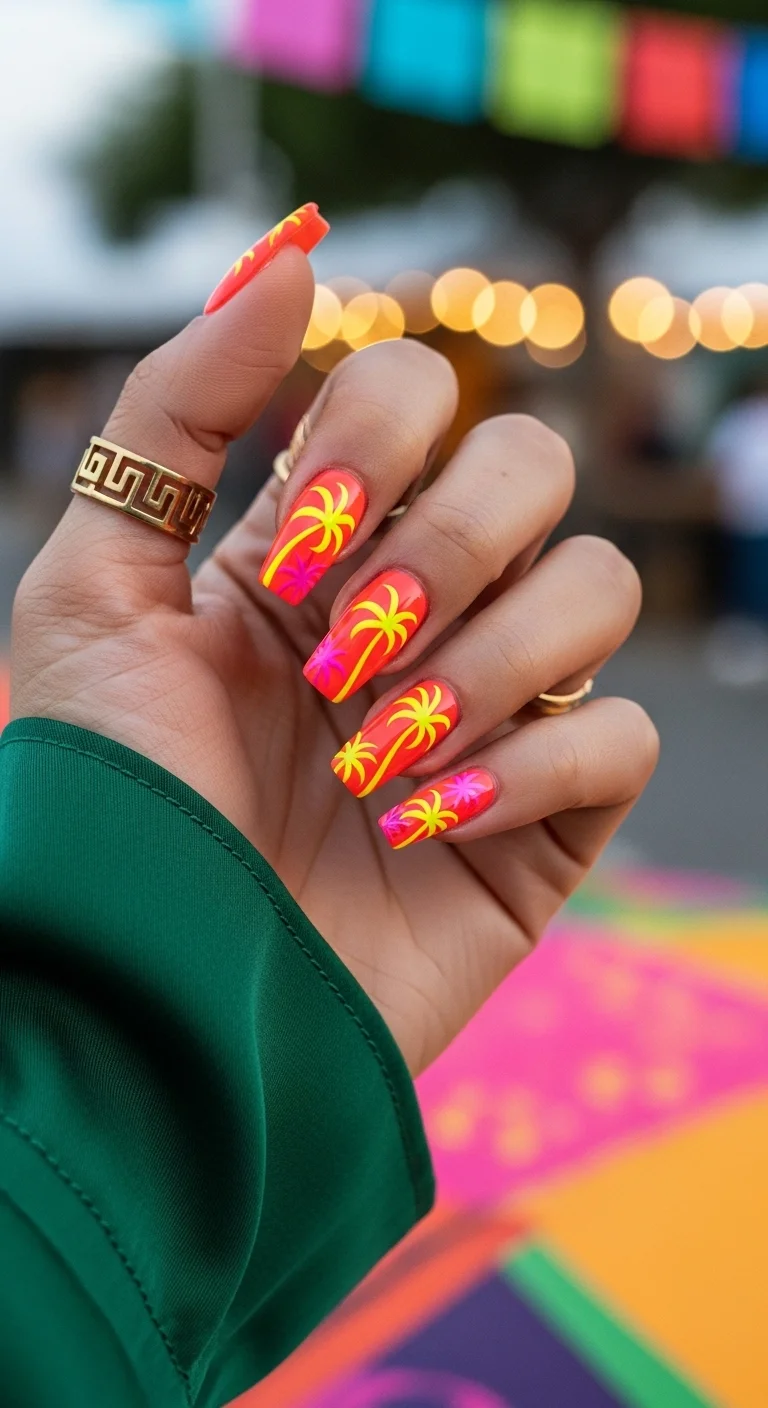
20.Palm Tree Sunset Silhouette
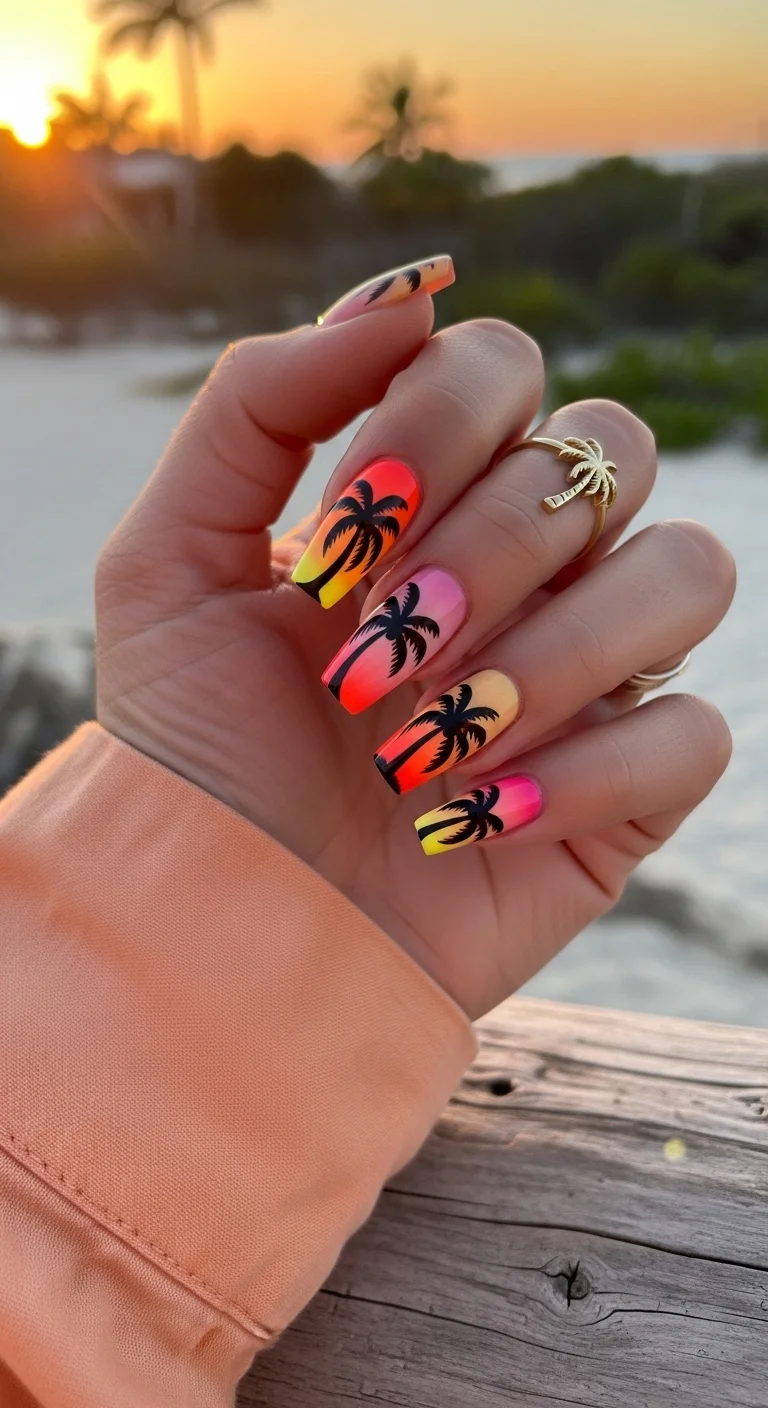
Black palm silhouettes over a blazing neon sunset gradient.
Overview:
Black palm tree silhouettes painted over a neon sunset gradient — hot pink, coral, orange, and golden yellow. Each nail shows a different palm tree pose: some lean, some stand straight, some are single trees, others are clusters. The black silhouettes against the vivid gradient create dramatic contrast.
The sunset gradient is the foundation that makes the silhouettes work. Without the warm, glowing background, the black palm trees would look like simple line art. Against the gradient, they read as a specific moment — sunset on a tropical beach — which is far more evocative.
The palm tree shapes need to be recognizable as palms, not generic trees. The key details are the curved trunk and the fan-shaped fronds at the top. A thin liner brush and minimal polish on the bristles keep the silhouettes crisp and organic.
Design Breakdown:
Sunset gradient with black silhouette art. The gradient is the atmosphere; the silhouettes are the story.
Base Color: Hot pink, coral, orange, and golden yellow in a vertical gradient.
Nail Shape: Long coffin. The flat surface provides a canvas for the detailed silhouette art.
Design Element: Black hand-painted palm tree silhouettes over the sunset gradient. Each nail has a unique tree composition.
Finish: High-gloss top coat to make the sunset colors look luminous and the silhouettes look sharp.
Get The Look at Home:
The gradient must be fully dry before the black art goes on. Wet black on wet gradient creates a muddy mess.
- Sunset gradient: Sponge hot pink, orange, and yellow onto each nail. Build opacity in four to five rounds.
- Dry fully: Wait at least five minutes before painting the silhouettes.
- Palm trunks: Using a thin liner brush and black polish, paint a curved vertical line for the trunk. Start thicker at the base, taper toward the top.
- Fronds: From the top of the trunk, paint five to seven curved lines fanning outward. Each frond should droop slightly at the tip.
- Vary the composition: Some nails get one tall palm, others get two shorter ones. The variety creates a skyline effect.
- Seal: One thick coat of top coat to protect the silhouettes.
21.Frothy Mint Seafoam
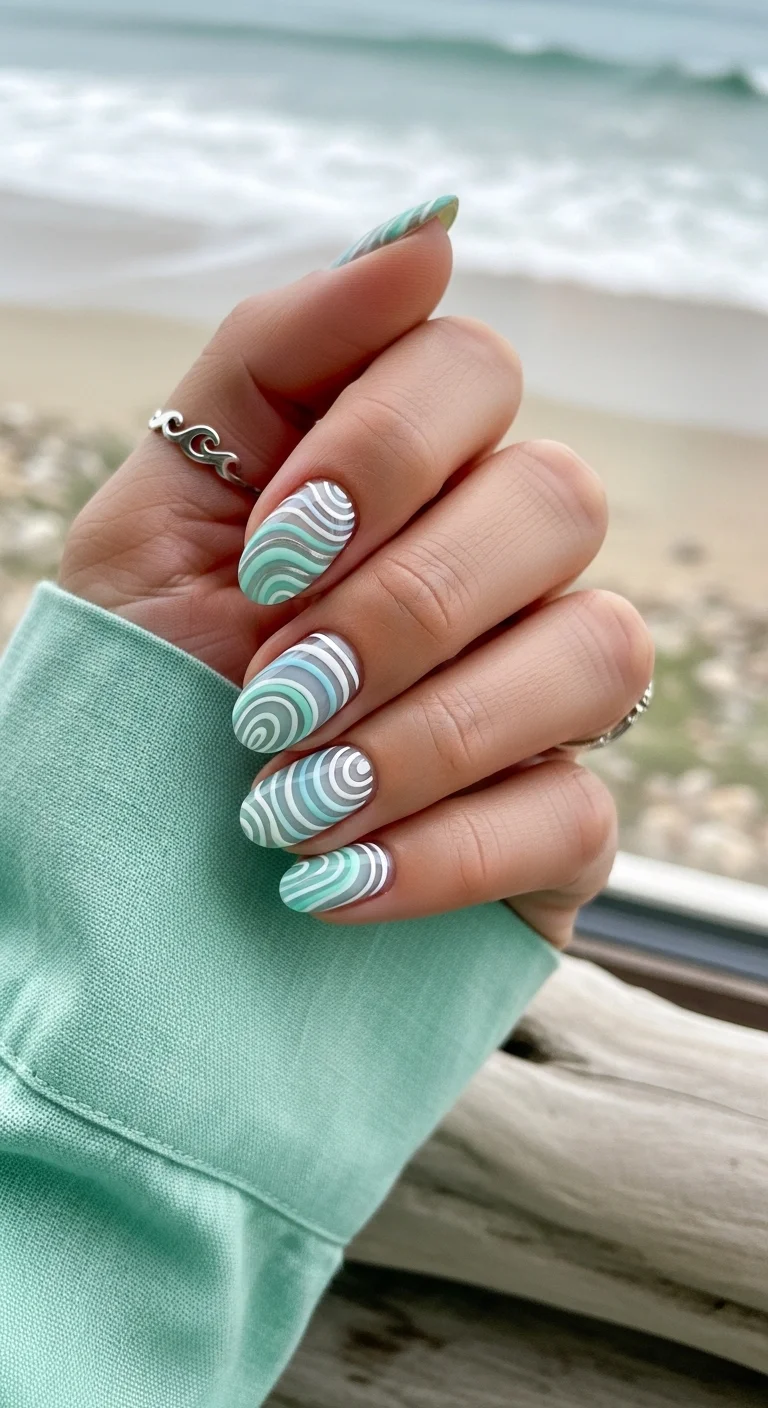
Concentric ocean wave swirls in cool mint tones.
Overview:
Concentric swirling wave patterns in mint green, teal, and white covering every nail. The bands of color spiral inward like ocean waves viewed from above — each nail has a slightly different swirl direction and color balance, creating an organic, flowing effect.
The cool-toned palette keeps the design feeling aquatic rather than psychedelic. Mint, teal, and white are all colors — they reference the ocean without being literal. The swirling motion adds energy without needing any representational art.
The swirl technique requires wet-on-wet application. Each color needs to be dragged while the previous one is still fluid. If the base dries before you add the next color, the swirl lines become hard-edged rather than organic. Work one nail at a time.
Design Breakdown:
Cool-toned swirl pattern. The organic motion is the design.
Base Color: Mint green, teal, and white. Each nail uses all three colors.
Nail Shape: Medium-long coffin. The flat surface lets the swirls spiral freely.
Design Element: Concentric swirl patterns covering every nail. Each nail has a unique spiral direction.
Finish: High-gloss top coat to make the cool tones look fresh and the swirls look fluid.
Get The Look at Home:
Work one nail at a time. The colors need to be dragged while wet to create organic swirls.
- Mint base: One coat of mint green on all nails. Let dry fully.
- Wet layer: Apply a second thin coat of mint. Do NOT let it dry.
- Drop colors: Place dots of teal and white directly onto the wet mint.
- Swirl: Using a toothpick or thin brush, drag the colors in a spiral motion. Three to four drags per nail, maximum.
- Don't over-blend: The colors should sit alongside each other, not merge into a single hue.
- Seal: Wait at least ten minutes, then apply a generous top coat to smooth the surface.

21 Hot Summer Buns Hairstyle Ideas for 2026 ☀️🔥
22.Pool Party Flamingo Ombre
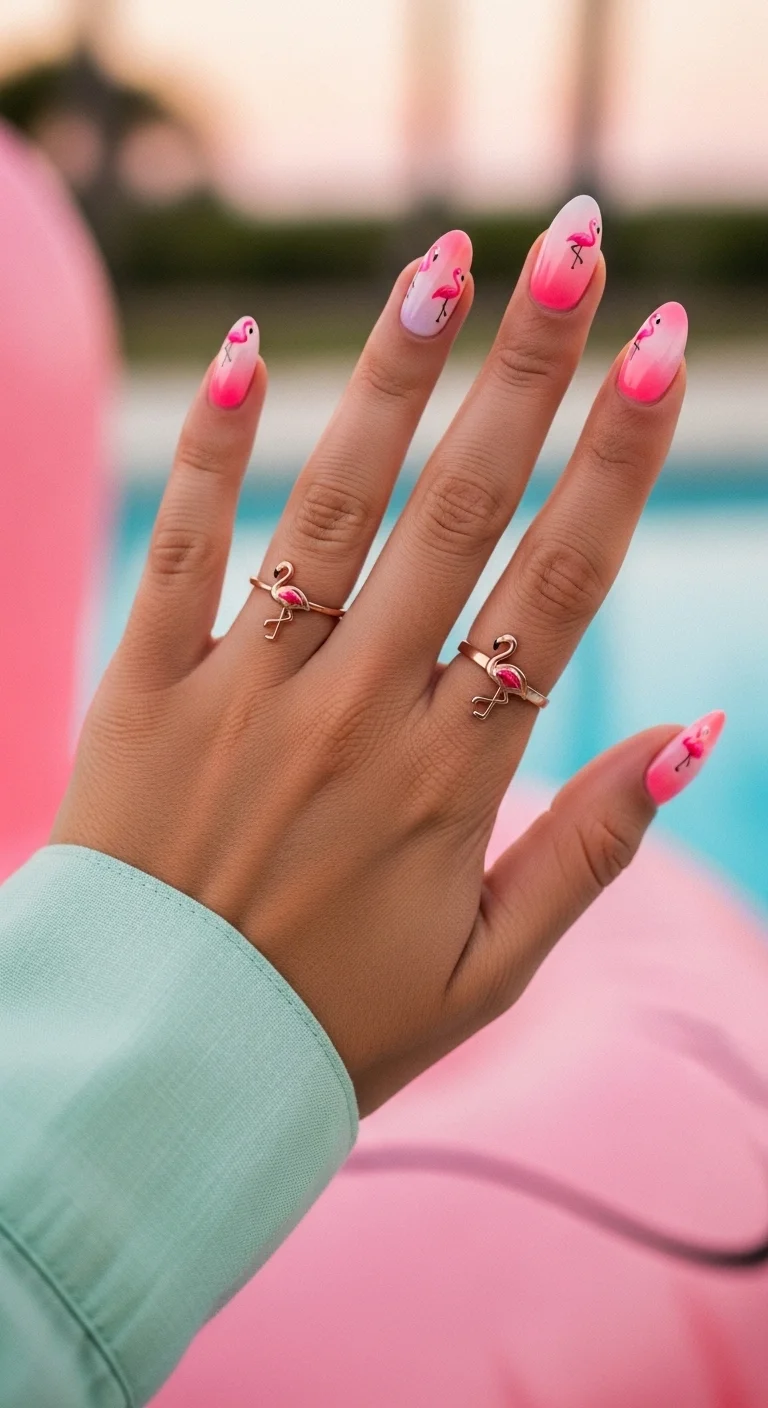
Flamingo silhouettes over a poolside pink gradient.
Overview:
Hand-painted flamingo silhouettes on a pink-to-white gradient. The gradient flows from white at the cuticle to vivid hot pink at the tips, creating a poolside sunset effect. The flamingos are painted in darker pink or black, standing in various poses across the nails.
The gradient and the flamingos work together to create a specific scene — pink sky, pink water, pink birds. The monochromatic approach (everything in the pink family) keeps the design cohesive despite having two distinct elements: gradient and illustration.
Flamingo silhouettes are easier to execute than detailed flamingo illustrations. The key shape is the curved neck and the one-legged stance. Get those two elements right and the bird is instantly recognizable. A fine liner brush and a steady hand are all you need.
Design Breakdown:
Pink gradient with silhouette art. The monochromatic palette unifies the two elements.
Base Color: White at the cuticle fading to hot pink at the tips.
Nail Shape: Medium-long almond. The curved shape complements the organic flamingo forms.
Design Element: Sponge-applied pink gradient with hand- painted flamingo silhouettes on each nail.
Finish: High-gloss top coat to make the gradient look seamless and the silhouettes look sharp.
Get The Look at Home:
The gradient must be fully dry before the flamingo art goes on. Detail work on a tacky surface bleeds.
- Pink gradient: Sponge white and hot pink onto each nail. Build opacity in four to five rounds.
- Dry fully: Wait at least five minutes before painting the flamingos.
- Flamingo body: Using a thin liner brush and dark pink or black polish, paint an oval shape for the body.
- Neck and head: From the top of the body, paint a curved S-shaped line for the neck. Add a small dot at the end for the head.
- Legs: Paint one or two thin lines extending downward from the body. One leg is the classic flamingo pose.
- Seal: One thick coat of top coat to protect the silhouettes.
23.Lavender Jellyfish Glow
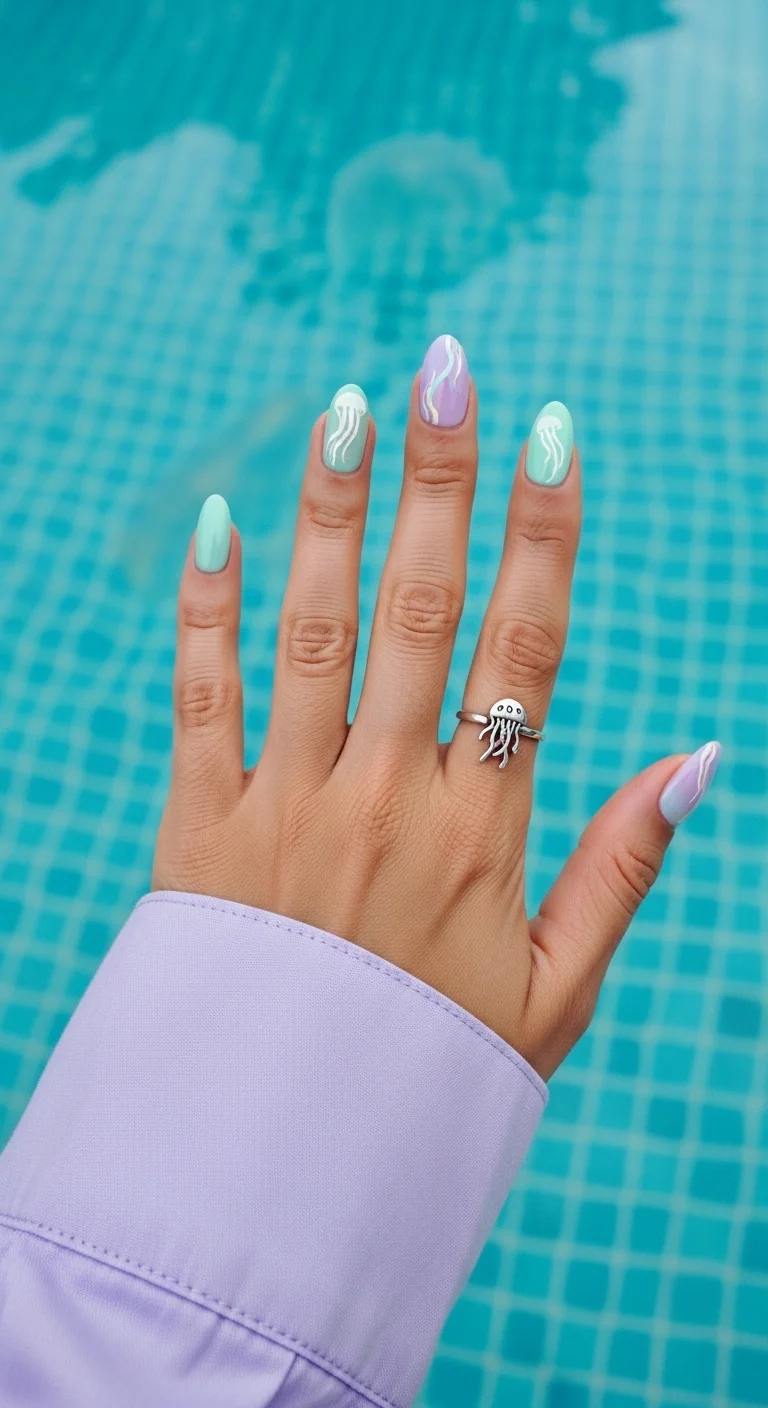
Lavender and mint with ethereal jellyfish silhouettes.
Overview:
Alternating lavender and mint green nails with white jellyfish silhouettes on select nails and wavy line art on others. The two pastel base colors alternate across the hand, creating a soft, aquatic palette. The white art sits on top like sea creatures floating through clear water.
The jellyfish silhouettes are simple but effective — a dome-shaped bell with trailing tentacle lines. They don't need detail to be recognizable. The wavy line art on the other nails evokes water currents or seaweed, reinforcing the underwater theme without being literal.
The lavender-and-mint combination is unusual and effective. Both colors are cool-toned pastels, so they harmonize despite being different hues. The white art creates a third layer that ties the two base colors together.
Design Breakdown:
Alternating pastel bases with white sea-themed art. The cool tones create an underwater atmosphere.
Base Color: Lavender on some nails, mint green on others. Alternating across the hand.
Nail Shape: Medium almond. The curved shape complements the organic jellyfish forms.
Design Element: White jellyfish silhouettes on two to three nails. White wavy line art on the remaining nails.
Finish: High-gloss top coat with a slight jelly quality to enhance the underwater effect.
Get The Look at Home:
The jellyfish are simple shapes — dome plus tentacles. Don't overthink the detail.
- Color block: Paint alternating nails lavender and mint. Two coats each. Let dry fully.
- Jellyfish: On two to three nails, use a dotting tool and white polish to paint a dome shape near the cuticle. Add three to five thin trailing lines for tentacles.
- Wave art: On the remaining nails, use a thin liner brush and white polish to paint loose, wavy horizontal lines.
- Vary the waves: Some lines should be thick, others thin. The variation creates movement.
- Cleanup: Use a brush dipped in acetone to sharpen any shaky lines.
- Seal: One thick coat of top coat over everything.

27 Stunning Graduation Day Nail Ideas for 2026 🎓
24.Pressed Tropical Blooms

Botanical illustration-style pressed tropical flowers.
Overview:
Hand-painted pressed flower art on a cream base. Each nail features a different botanical arrangement — pink hibiscus, orange bird-of- paradise, small berry accents — rendered in a style that looks like actual pressed dried flowers under glass. The illustration quality is high enough to reward close inspection.
The cream base is the right choice here. White would be too stark and modern for the vintage botanical aesthetic. Cream gives the design an aged, archival quality that matches the pressed-flower concept. The warmth of the cream also makes the pink and orange flowers look more natural.
This is the most time-intensive design on the list. Each flower needs multiple layers of color for the petals, stems, leaves, and berry details. Budget at least an hour for both hands. The result is worth it — these look like miniature botanical illustrations.
Design Breakdown:
Botanical illustration art on a warm neutral base. The detail quality is the design.
Base Color: Off-white or cream. Warm enough to complement the floral colors.
Nail Shape: Medium oval. The rounded shape suits the organic botanical forms.
Design Element: Hand-painted pressed flowers — hibiscus, bird-of-paradise, berries — in a botanical illustration style. Each nail has a unique arrangement.
Finish: High-gloss top coat to seal the detailed art and make the cream look polished.
Get The Look at Home:
Work in color layers — stems first, then petals, then details. Each layer needs to dry before the next.
- Cream base: Two coats of off-white or cream. Let dry fully.
- Stems and leaves: Using a thin liner brush and green polish, paint stems and leaf shapes on each nail.
- Petals: Using a medium brush, paint flower petals in pink, orange, and yellow. Five petals per hibiscus, three to four pointed petals per bird-of-paradise.
- Details: Add darker centers to the flowers, vein lines on the petals, and small berry dots in red or orange.
- Balance: Step back and check that no single color dominates. Add more of any underrepresented color.
- Seal: Wait five minutes, then apply a generous top coat to protect all the art.
25.Zen Bamboo Sanctuary
Minimalist bamboo stalks for a zen spa-inspired look.
Overview:
Hand-painted green bamboo stalks on a white base. Each nail features a different bamboo composition — some have single stalks, others have clusters — rendered in varying shades of green for depth. The design is clean, minimalist, and immediately evokes a tropical spa or zen garden.
The varying greens are what make the bamboo look three-dimensional. A single shade of green would look flat and graphic. By using darker green for the stalks and lighter green for the leaves, the design creates depth that mimics how bamboo actually looks in natural light.
The white space between the bamboo stalks is as important as the stalks themselves. It creates the "sanctuary" quality — the feeling of open, breathing space. Overcrowding the nails with bamboo would lose that zen quality entirely.
Design Breakdown:
Minimalist botanical art on white. The green variation creates depth.
Base Color: Crisp opaque white. The clean background lets the green bamboo stand out.
Nail Shape: Medium squoval. The geometric shape complements the vertical bamboo lines.
Design Element: Hand-painted bamboo stalks and leaves in varying shades of green. Each nail has a unique composition.
Finish: High-gloss top coat to make the white look pristine and the green look fresh.
Get The Look at Home:
Paint the stalks first with the darker green, then add leaves with the lighter green.
- White base: Two coats of opaque white. Let dry fully.
- Stalks: Using a thin liner brush and dark green polish, paint vertical lines for bamboo stalks. Add small horizontal lines at intervals for the bamboo nodes.
- Leaves: Using a lighter green and a small brush, paint elongated leaf shapes branching off the stalks.
- Vary density: Some nails should have one stalk with leaves, others should have two or three stalks.
- Leave white space: Don't fill every nail with bamboo. The breathing room is part of the design.
- Seal: One thick coat of top coat over everything.
28 Effortless Hot Weather Day Hairstyles for Women 2026 ☀️💇♀️
26.Neon Palms Festival Vibe
Neon-on-neon palm trees for maximum festival energy.
Overview:
Neon yellow palm tree silhouettes over a neon coral-to-pink gradient base. The neon-on-neon combination is loud, unapologetic, and designed for maximum visibility. This is festival nails — meant to be seen from across a crowd.
The neon yellow palms against the neon pink background create a vibrating color contrast that's almost uncomfortable to look at directly. That intensity is the point. The design doesn't want to be subtle. It wants to be the loudest thing in the room.
Neon polish dries matte, which means the glossy top coat is essential. Without it, the neon colors look flat and chalky. With it, they glow. The top coat transforms the entire design from "craft project" to "professional manicure."
Design Breakdown:
Neon gradient with neon silhouette art. The color-on-color intensity is the design.
Base Color: Neon coral fading to neon hot pink. The gradient provides the background.
Nail Shape: Long coffin. The flat surface showcases the neon art.
Design Element: Neon yellow palm tree silhouettes and floral/starburst accents over the gradient.
Finish: High-gloss top coat to make the neons glow. Non-negotiable.
Get The Look at Home:
Neon polish is streaky on the first coat. The second coat evens everything out. Trust the process.
- Neon gradient: Sponge neon coral and neon pink onto each nail. Build opacity in four to five rounds.
- Dry fully: Wait at least five minutes before painting the neon art.
- Palm trees: Using a thin liner brush and neon yellow polish, paint palm tree silhouettes on each nail. The neon yellow needs two coats over the pink for full opacity.
- Accents: Add neon yellow starburst or floral shapes on some nails for extra energy.
- Second coat on art: Neon over neon is translucent. A second coat on the yellow art makes it pop.
- Seal: Two coats of top coat to make the neons glow and protect the art.
27.Monstera Leaf Minimalism
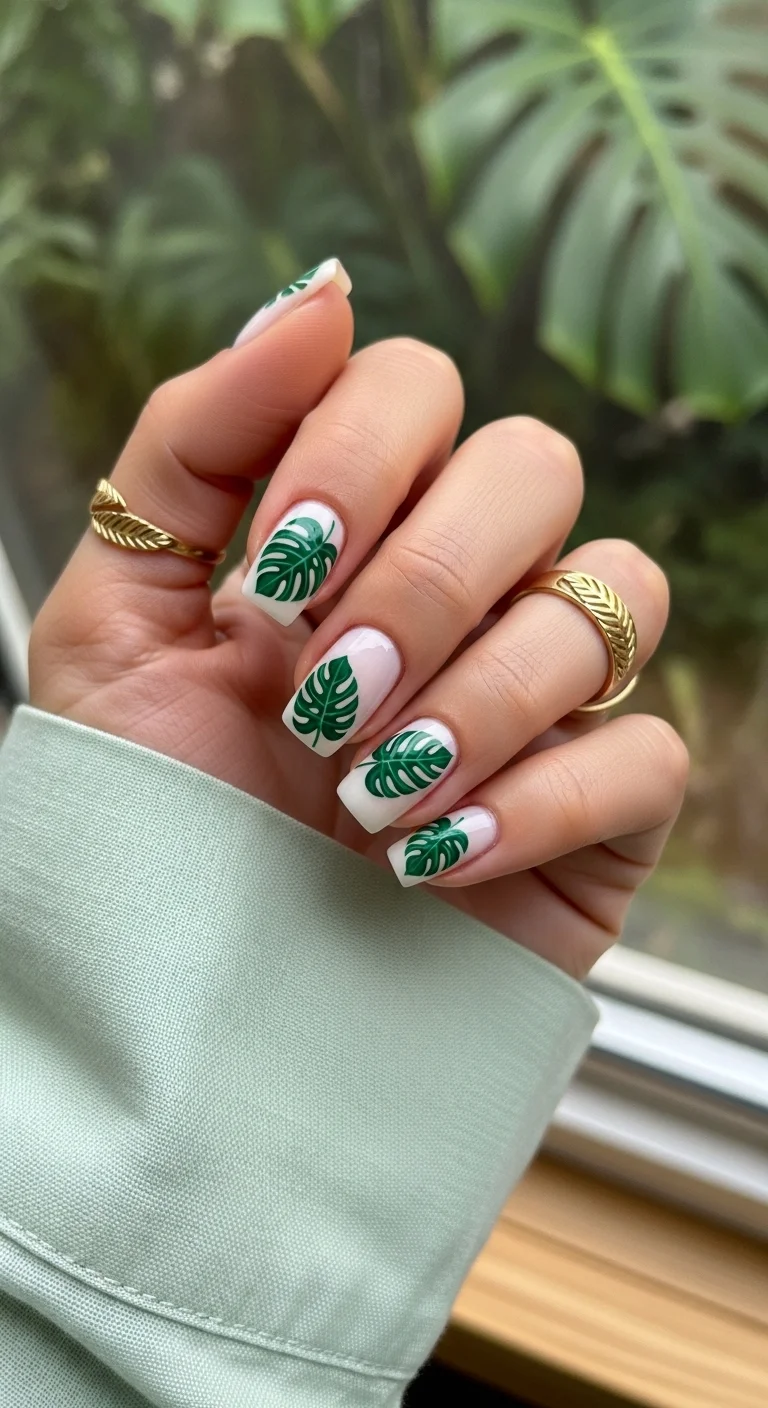
Clean monstera leaves on a milky white base for understated tropical.
Overview:
Hand-painted deep green monstera leaves on a milky white base. Each nail features a single leaf in a slightly different position — some near the cuticle, others near the tip, some angled left, others right. The negative space around each leaf is as important as the leaf itself.
The monstera leaf is one of the most recognizable tropical symbols, and its distinctive split-leaf shape is what makes it work at nail scale. You don't need to paint every detail — the general outline with a few characteristic splits is enough to register as monstera.
The milky white base gives the design a modern, clean quality. A stark white would look more graphic; a nude would look more natural. Milky white sits in between — soft enough to feel organic, clean enough to feel deliberate.
Design Breakdown:
Minimalist botanical art on milky white. The negative space is as important as the leaf.
Base Color: Milky white or sheer nude. The soft background lets the green leaves stand out without harsh contrast.
Nail Shape: Short to medium squoval. The practical shape keeps the design understated.
Design Element: One hand-painted monstera leaf per nail. Each leaf is in a different position and angle.
Finish: High-gloss top coat to make the white look creamy and the green look fresh.
Get The Look at Home:
The monstera outline is simpler than it looks — a rounded shape with two to three splits on each side.
- Milky base: Two coats of milky white. Let dry fully.
- Leaf outline: Using a medium brush and deep green polish, paint a rounded leaf shape on each nail. Vary the position.
- Splits: Using a thin brush, paint two to three angled lines from the leaf edge toward the center, creating the characteristic monstera splits.
- Stem: Add a thin green line extending from the leaf base toward the cuticle.
- Vary placement: Each leaf should sit in a different position on its nail. The variety creates visual interest.
- Seal: One thick coat of top coat over everything.

28 Trendy May Nail Designs for 2026 💅
28.Sage Green Tide
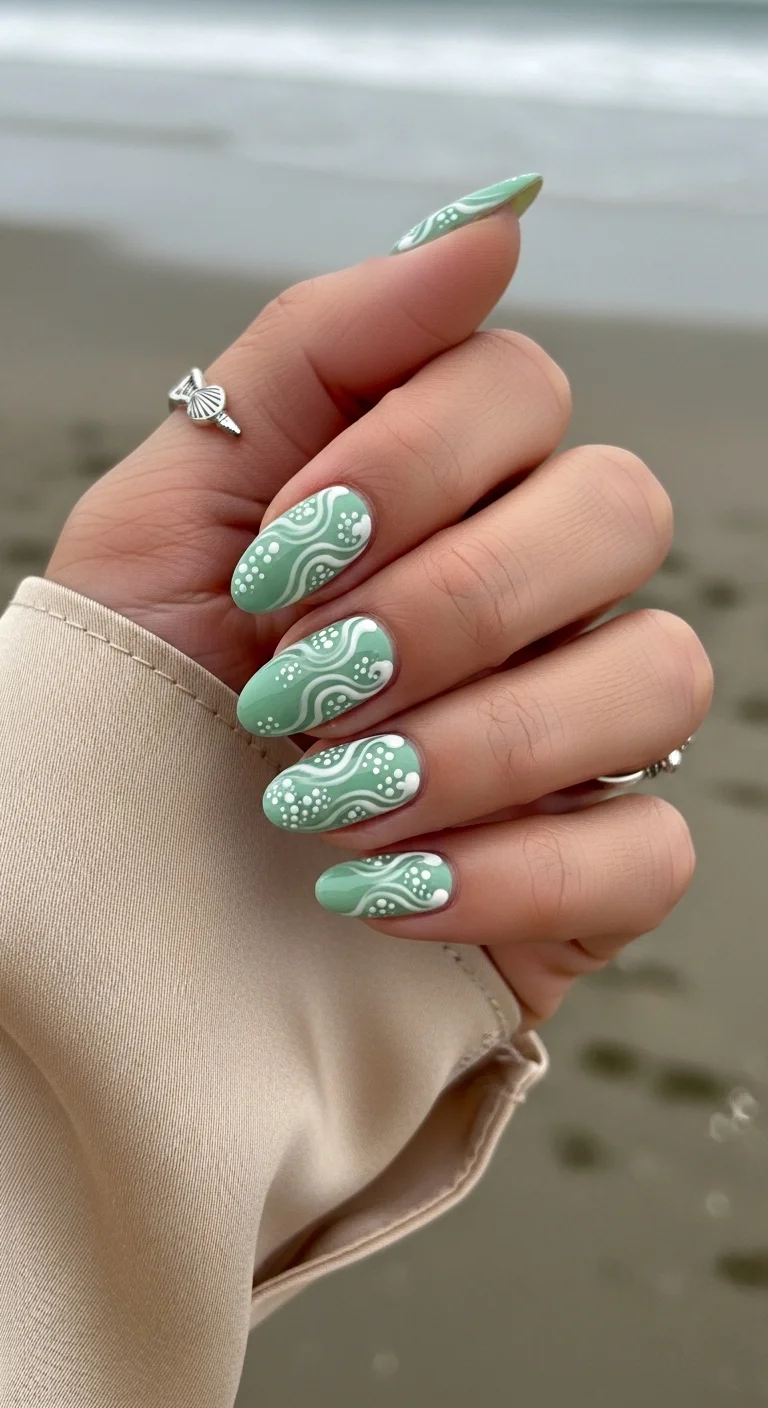
Muted sage waves with bubble-dot accents for a coastal feel.
Overview:
Sage green base with white swirling wave patterns and white dot clusters on every nail. The waves flow organically across the nail surface, and the dot clusters — scattered near the wave crests — read as sea foam or bubbles. The overall effect looks like a Japanese woodblock print of ocean waves.
The sage green is an unusual choice for ocean-themed nails, and it's what makes the design interesting. Brighter greens would look more tropical; darker greens would look more forest-like. Sage sits in a muted, earthy middle ground that feels coastal without being literal.
The dot clusters add texture without complexity. They're easy to execute with a dotting tool, but they create a handcrafted quality that elevates the wave art from "simple line drawing" to "considered design."
Design Breakdown:
Muted green with white wave art and dot accents. The Japanese woodblock aesthetic is the design reference.
Base Color: Sage or muted green. Earthy and understated.
Nail Shape: Medium-long almond. The curved shape complements the organic wave forms.
Design Element: White swirling wave patterns with white dot clusters on every nail.
Finish: High-gloss top coat to make the sage look smooth and the white art look crisp.
Get The Look at Home:
The waves are loose and organic — don't try to make them perfect. Imperfection is part of the aesthetic.
- Sage base: Two coats of sage green. Let dry fully.
- Wave lines: Using a thin liner brush and white polish, paint loose, swirling horizontal lines across each nail. Vary the thickness.
- Dot clusters: Using a small dotting tool, place clusters of white dots near the wave crests. Three to five dots per cluster.
- Vary the waves: Some waves should be thick and bold, others thin and delicate. The variation creates movement.
- Balance: Step back and check that the white art is evenly distributed across all nails.
- Seal: One thick coat of top coat over everything.
29.Bird of Paradise Florals
Bold bird-of-paradise florals in a painterly brushstroke style.
Overview:
Hand-painted bird-of-paradise (Strelitzia) flowers on a white base. Each nail features the distinctive orange and blue petals with green leaves, rendered in a bold, painterly style with visible brushstroke texture. The art is consistent across all nails but each arrangement is unique.
The bird-of-paradise is one of the most visually striking tropical flowers, and the bold color palette — orange, blue, green — makes it perfect for nail art. The painterly execution with visible brushstrokes adds a handcrafted quality that flat, smooth coverage can't achieve.
The white background is essential. Any other base color would compete with the already-vivid flower colors. White provides a clean canvas that lets the orange and blue dominate without visual noise.
Design Breakdown:
Painterly floral art on white. The visible brushstrokes are the design quality.
Base Color: Crisp opaque white. The clean canvas lets the flower colors pop.
Nail Shape: Medium-long almond. The curved shape complements the organic flower forms.
Design Element: Hand-painted bird-of-paradise flowers in orange, blue, and green. Each nail has a unique arrangement.
Finish: High-gloss top coat to seal the art and make the white look pristine.
Get The Look at Home:
The bird-of-paradise has a distinctive shape — pointed petals fanning outward from a central stem. Get that silhouette right and the flower is instantly recognizable.
- White base: Two coats of opaque white. Let dry fully.
- Green leaves: Using a medium brush and green polish, paint elongated leaf shapes on each nail. These form the base of the arrangement.
- Orange petals: Using a thin brush and bright orange polish, paint three to four pointed petals fanning outward from the stem.
- Blue petals: Add one or two blue petals alongside the orange ones. The blue creates the distinctive bird-of-paradise color combination.
- Brushstroke texture: Don't over-blend the colors. Let the brushstrokes show for a painterly quality.
- Seal: One thick coat of top coat to protect all the art.
28 Stunning Softball Hairstyle Ideas with Braids for 2026 🥎✨
The Streaky Polish Nightmare: Why Your Neons Never Look Smooth (And How to Fix It for Good)
Bright turquoise, electric orange, hot pink — they all have this infuriating habit of drying with visible brush strokes, patchy spots, and streaks that you didn't see until you hold your hand up to the light. It's the number one reason people give up on DIY vacation nails.
Here's the fix that actually works: stop doing two thick coats. Sure, almost every tutorial recommends two coats. But with tropical and neon polishes, three ultra-thin coats are your best friend. The first coat will look streaky and translucent. That is completely normal. Let it dry for a full two to three minutes. Then apply the second coat in the opposite direction — if you brushed left-to-right the first time, go right-to-left. This cross-hatching technique evens out the pigment and eliminates streaks in a way that no amount of thick layering ever will.
Bonus for the chrome girlies: If you're chasing that viral ocean chrome finish, here's the exact timing nail techs use: cure your base polish completely, apply a no-wipe top coat, then cure it for exactly 30 seconds — half the normal time. Cure too long and the chrome powder won't stick. Too short and it clumps into weird patches. That 30-second sweet spot is literally the difference between "homemade" and "salon."
Finding Your Tropical Shade Sweet Spot (Because Nobody Looks Good in the Wrong Undertone)
Here's something nobody tells you: not all tropical colors were made for every hand. Pick the wrong undertone and suddenly your vacation nails make your skin look ashy or washed out instead of glowing. It's not you — it's the polish. Here's a quick cheat sheet compiled after many trial-and-error salon visits:
For Cool Undertones: Ocean blues and turquoises are your natural habitat. These shades have subtle blue or purple undertones that harmonize beautifully with cool skin. Soft pastels also work well here — they're more versatile across different occasions than you'd expect, and they photograph beautifully in natural light.
For Warm Undertones: Reach for the high-energy shades. Citrus orange, coral, and tropical pinks were literally made for warm complexions. These colors are at their best when the sun is strong and the vibe is loud. They'll make your skin look like you just got back from a week in Ibiza.
For Deep Skin Tones: Do not be afraid of the brights. Vivid neons, electric blues, and bold tropical shades look absolutely stunning against rich skin tones. Jelly finishes and fruit motifs are huge this summer, and they pop especially well on deeper complexions — the translucency of the jelly lets your natural nail color peek through while the pigment does the heavy lifting.
Hopefully, scrolling through these gorgeous designs got you even more excited for your upcoming tropical getaway. Your vacation nails are the ultimate accessory, and one of these sets is sure to look absolutely stunning on you.
Don't forget to save your favorites to your "Nail Inspo" Pinterest board so you have them ready for your next salon visit! Which of these designs is the top choice?