Hair Trends
34 Stunning Summer First Date Hairstyles for 2026
Choosing what to do with your hair before a first date is its own special kind of anxiety. You want to look put-together without looking like you tried too hard, and you need something that won't dissolve the moment you step outside into summer humidity. The hairstyles below are designed for exactly that tightrope — styles that look effortless but hold up against heat, wind, and the nervous hair-touching you will absolutely do when conversation hits an awkward pause.
Some of these take five minutes with minimal tools. Others require braiding skills and a handful of bobby pins. The range is intentional — first dates happen in coffee shops and candlelit restaurants alike, and your hair should match the setting without requiring a professional stylist on speed dial. Each style includes specific steps and product recommendations so you can actually execute them, not just scroll past and forget.
The Seven-Second Rule
Research shows people form an impression of you within seconds of meeting — and your hair is doing most of the talking before you even say a word. Soft waves read as approachable and romantic. A sleek ponytail signals confidence and control. Loose curls come across as playful and free-spirited. The style you choose sends a signal before you shake hands.
The key is not to pick what you think your date wants to see. People with well-groomed hair are perceived as more successful and trustworthy, but authenticity matters more. If you choose a style that actually feels like you, you will smile more easily, make better eye contact, and come across as genuinely confident.
The science? When you feel good about your hair, you carry yourself differently. Your shoulders relax. You touch your face less. That confidence is what actually makes a strong first impression — the hairstyle is just the vehicle.
The Date Night Accessories
Summer 2026 belongs to hair accessories, and a single well-chosen piece can transform a basic style into a date-night look. Pearl pins catch candlelight beautifully and read as romantic. A satin bow adds instant polish without looking childish. Metallic cuffs or gold chains bring a modern edge that photographs well under restaurant lighting.
The styling rule is simple: the accessory should complement your outfit, not compete with it. If you are wearing statement earrings, keep hair accessories minimal. If your outfit is simple, let the hair accessory be the focal point. Tassel scarves, striped clips, and mermaidcore details are defining summer trends, but for a first date, subtlety wins — one well-placed pearl pin or a slim gold cuff does more than a handful of sparkly clips.
The rule? Match the accessory to the venue. Pearl pins for a dinner date. A gold claw clip for drinks. A silk scarf for an outdoor daytime date. Let the setting guide your choice.
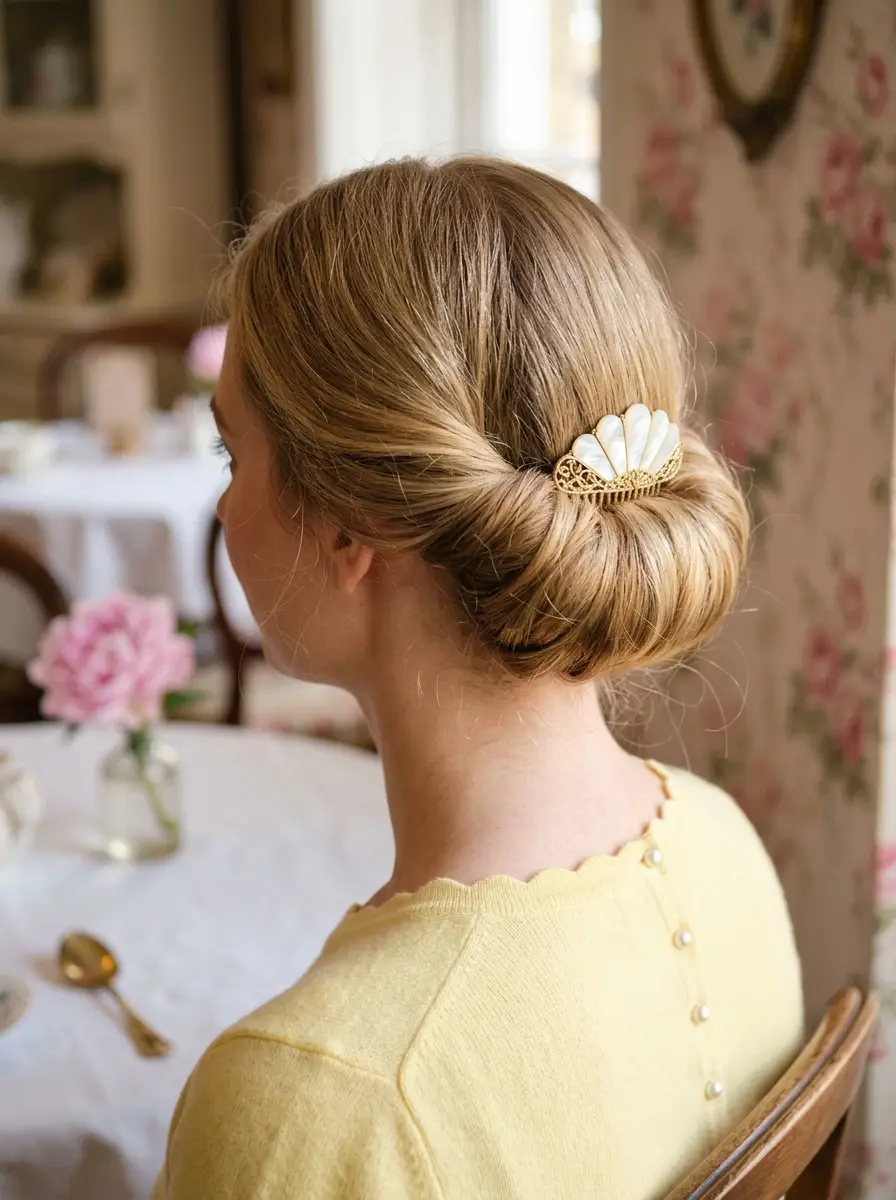
1.Sleek Low Bun with Statement Flower
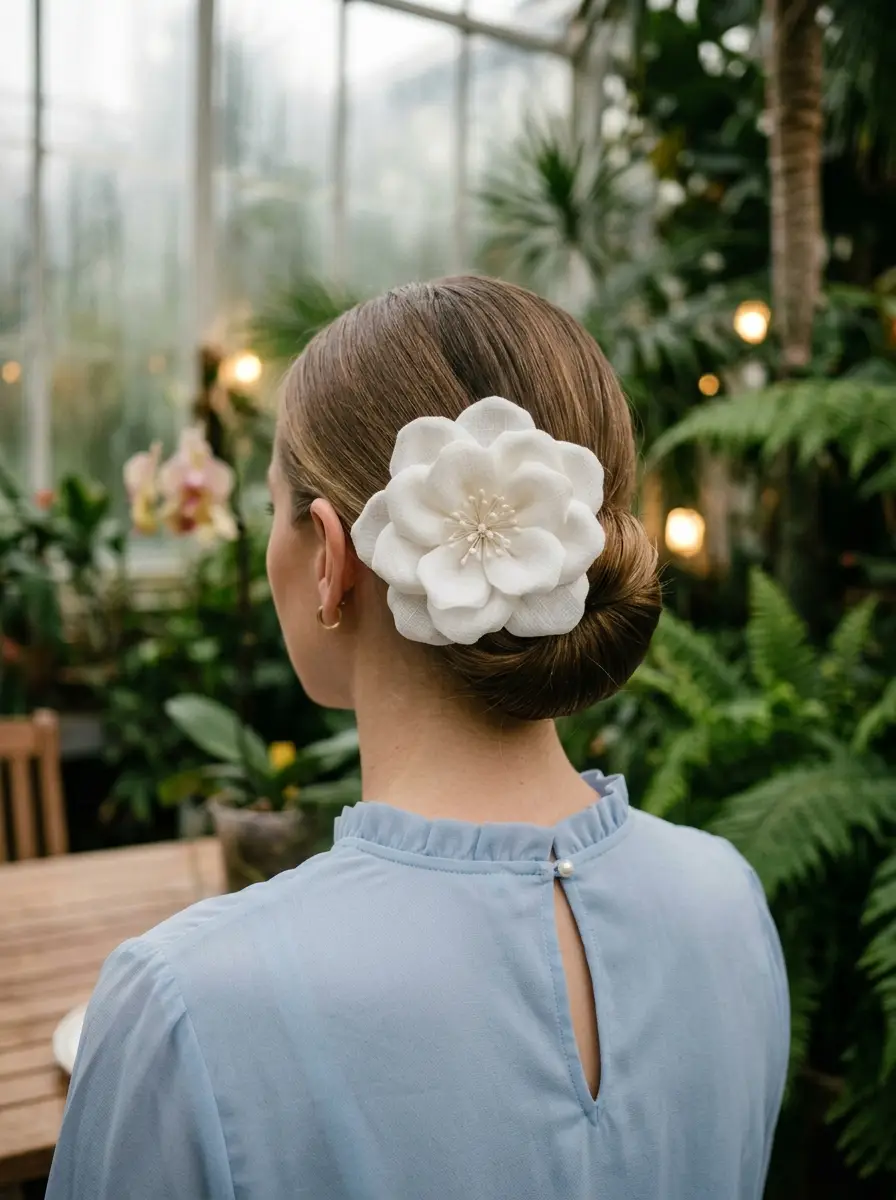
The overview: The hair is slicked back into a tight, polished low bun at the nape, finished with a large blush pink flower pinned just above or beside the bun. Every strand is smoothed down with a lacquered, almost wet-looking finish — no flyaways, no loose pieces. This is the kind of style that says you showed up fully composed and know exactly what you're doing.
The flower accessory does two things simultaneously: it adds a romantic, feminine touch to an otherwise severe silhouette, and it gives your date something to compliment immediately. The contrast between the structured bun and the soft petal texture creates visual interest without requiring extra styling effort.
Why this look is popular: The sleek low bun photographs beautifully from every angle — front, side, and back — which matters more than you'd think on a first date where someone is sitting across from you studying your face. The flower adds personality without being costume-y, and the lacquered finish holds up remarkably well in humidity because the gel or pomade creates a protective shell around the hair.
Where this look is suitable: Upscale restaurant dinners, rooftop bars, gallery openings, and any evening date where the dress code leans slightly elevated. This style pairs naturally with statement earrings since the neck is completely exposed.
Step by step:
- Start with clean, dry hair. Apply a smoothing serum like Moroccanoil Treatment from roots to mid-lengths to eliminate frizz and add slip.
- Brush hair straight back. Use a boar bristle brush to gather all hair toward the nape, eliminating any part line. Spray a light-hold hairspray on the brush to catch flyaways as you work.
- Secure the ponytail. Gather hair into a low ponytail at the nape and tie with a clear elastic. Keep the surface as smooth as possible — use a small amount of edge control along the hairline if needed.
- Create the bun. Twist the ponytail tightly, then coil it around the base into a compact bun. Secure with bobby pins matching your hair color, inserting them diagonally into the bun's base.
- Apply finishing product. Warm a small amount of high-shine pomade between your palms and smooth it over the surface of the bun and the top of the head. Use a fine-tooth comb for precision.
- Add the flower. Position the statement flower clip or pin just above the bun or slightly to one side. Secure with a bobby pin hidden beneath the petals if the clip alone doesn't feel stable.
Tips and tricks: This style works best on second-day hair when natural oils help the product grip. Fine hair benefits from a volumizing powder at the roots before smoothing back — it gives the illusion of a thicker bun. For very thick hair, use a doughnut bun maker to keep the shape compact and prevent it from sprawling outward. A silk flower avoids the wilting problem that fresh flowers create in summer heat.
2.Chic Messy Bun with a Bold Bandana
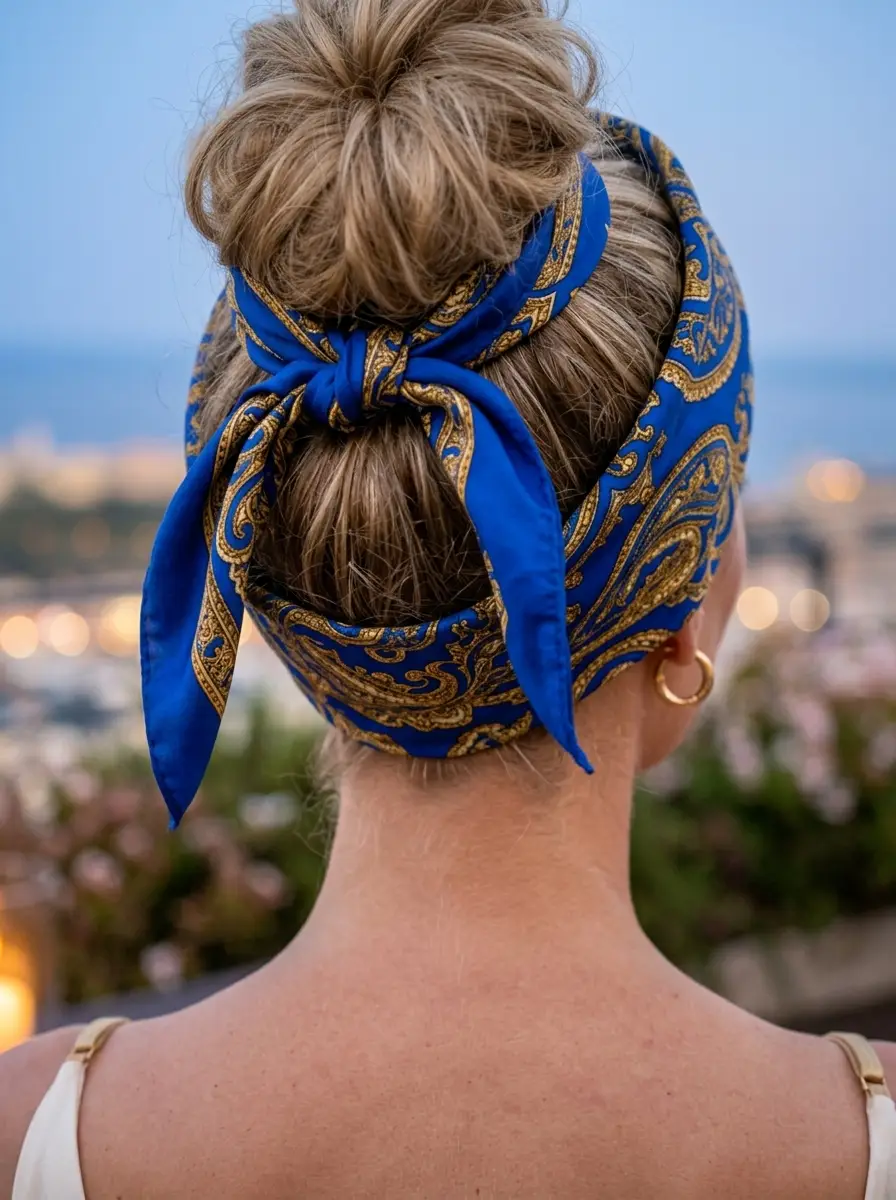
The overview: A textured messy bun sits at the crown with a blue silky bandana wrapped around its base, the ends left to hang casually. The bun itself is deliberately undone — loops pulled loose, strands escaping — while the bandana adds structure and a pop of color. It's the hairstyle equivalent of showing up in a great outfit like you just threw it on.
The bandana does the heavy styling lifting here. Without it, this is just a regular messy bun. With it, you've got a defined aesthetic that looks intentional and pulled-together even though the actual execution takes under five minutes.
Why this look is popular: The messy bun with a bandana strikes the perfect balance between casual and styled for a first date — you look like you care but not like you spent an hour in front of the mirror. The blue bandana adds visual interest without being overly precious, and the style holds up well in summer heat because loose texture actually looks better as the day goes on.
Where this look is suitable: Coffee shop dates, casual outdoor dinners, farmers market walks, and any daytime date where the vibe is relaxed. The bandana gives it enough polish to feel deliberate without making you look overdressed for a taco stand.
Step by step:
- Prep with texture. Spray dry shampoo or texturizing spray like Oribe Dry Texturizing Spray throughout the roots and mid-lengths to add grip and volume.
- Gather loosely at the crown. Flip your head upside down and gather hair into a high ponytail position, but don't pull it tight — keep the surface relaxed and slightly messy.
- Create the bun. Loop the ponytail through the elastic only halfway on the final pull-through, creating a looped bun. Leave the tail end hanging loose or tuck it partially under.
- Pull and loosen. Gently tug at sections of the bun to expand it and create texture. Pull out a few wispy pieces around the face and at the nape for softness.
- Add the bandana. Fold the bandana into a band roughly two inches wide. Wrap it around the base of the bun and tie the ends in a knot or bow, leaving the tails to hang.
- Final adjustments. Pull a few more face-framing pieces free if needed. A light mist of flexible-hold hairspray keeps everything in place without looking stiff.
Tips and tricks: Second-day or third-day hair works best for this style — freshly washed hair tends to be too slippery for the bun to hold its shape. A texturizing powder like Bumble and Bumble Prêt-à-Powder at the roots adds instant volume and grip. If your bandana slips, anchor it with two bobby pins crossed in an X shape underneath the knot. Straight hair may need a quick pass with a 1.25-inch curling iron on the face-framing pieces to add movement.
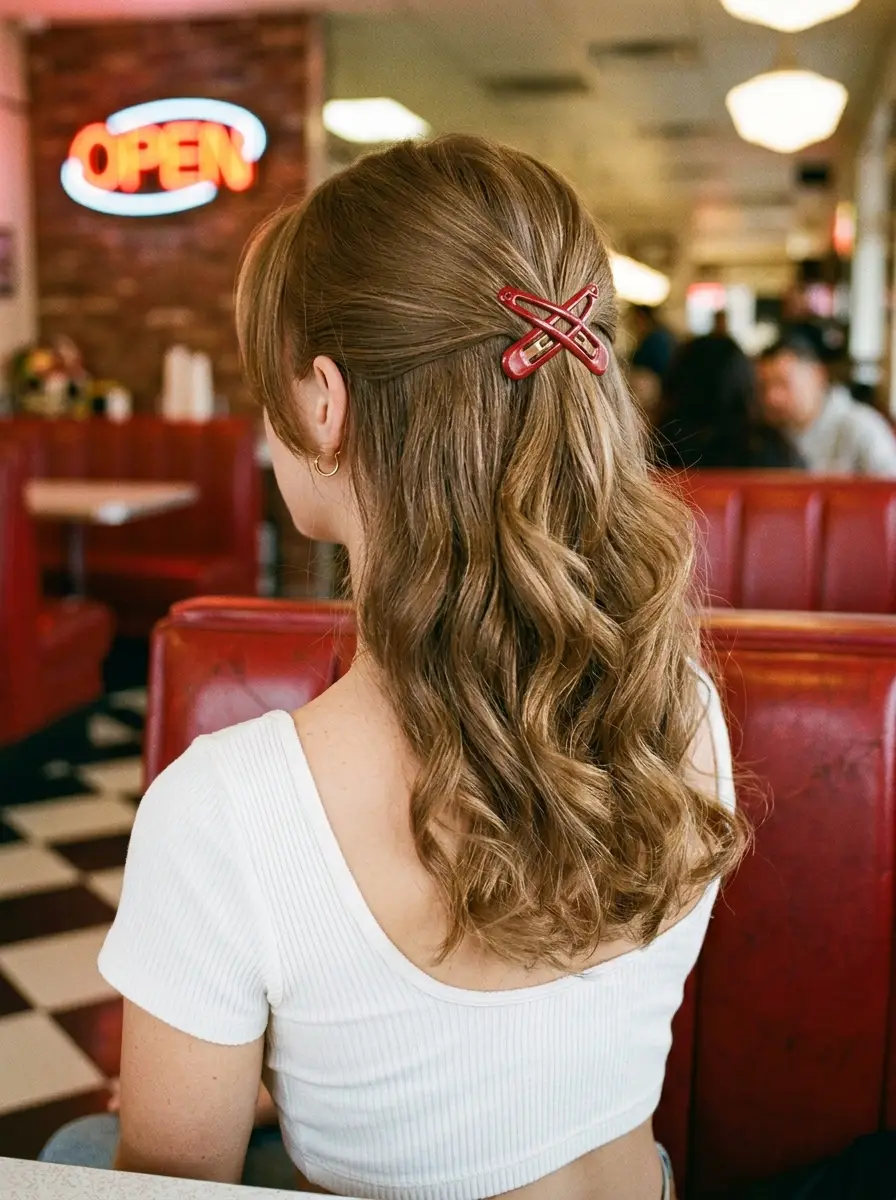
3.Retro Waves with a Cute Clip Accent
The overview: Medium-length hair with long layers is styled into soft, bouncy waves that cascade past the shoulders, with a curtain fringe framing the face. A red clip at the crown holds back the top section, adding a playful retro accent that anchors the entire look. The waves have a rounded, voluminous quality that reads as vintage-inspired without being costume-y.
The clip does more than decorate — it keeps the top section from falling into your face during dinner, which is a practical benefit you'll appreciate when you're leaning across a table trying to hear someone over restaurant noise.
Why this look is popular: Retro waves signal that you put thought into your appearance without going overboard. The curtain fringe softens the face naturally and works with most face shapes, while the clip adds a specific, personal touch that gives your date something to notice and comment on. The style also photographs exceptionally well in warm, ambient lighting.
Where this look is suitable: Dinner at a cozy Italian restaurant, a wine bar with warm lighting, outdoor summer concerts, and any evening date where the setting has a slightly romantic atmosphere. The retro vibe pairs well with vintage-inspired outfits.
Step by step:
- Prep damp hair. Apply a volumizing mousse like Moroccanoil Volumizing Mousse from roots to ends, then blow-dry with a round brush for lift at the roots.
- Curl in sections. Using a 1.5-inch barrel curling iron, curl two-inch sections of hair away from the face. Hold each section for 8-10 seconds, then release into your palm to cool before dropping.
- Brush through the curls. Once all sections are curled and completely cool, use a paddle brush or wide-tooth comb to break the curls into soft, unified waves.
- Shape the curtain fringe. Use a round brush to sweep the fringe pieces away from the face, creating a soft curtain effect. A quick blast of cool air from the dryer sets the direction.
- Add the clip. Gather the top section from each temple, pull it back to the crown, and secure with the decorative red clip. Keep the placement slightly off-center for a more natural look.
- Set the style. Mist with a medium-hold hairspray like Kenra Volume Spray 25, focusing on the waves and the clipped section. Avoid over-spraying — the waves should move naturally.
Tips and tricks: The key to retro waves that look intentional rather than pageanty is the brushing step — don't skip it. Unbrushed curls read as overly formal. A heat protectant like Ghd Bodyguard is non-negotiable before using the curling iron. For hair that doesn't hold curl well, spritz each section with a light-hold hairspray before wrapping it around the barrel. The clip works best when it contrasts with your hair color — red on dark hair, tortoiseshell on blonde.
4.Double Dutch Braids with Straight Hair
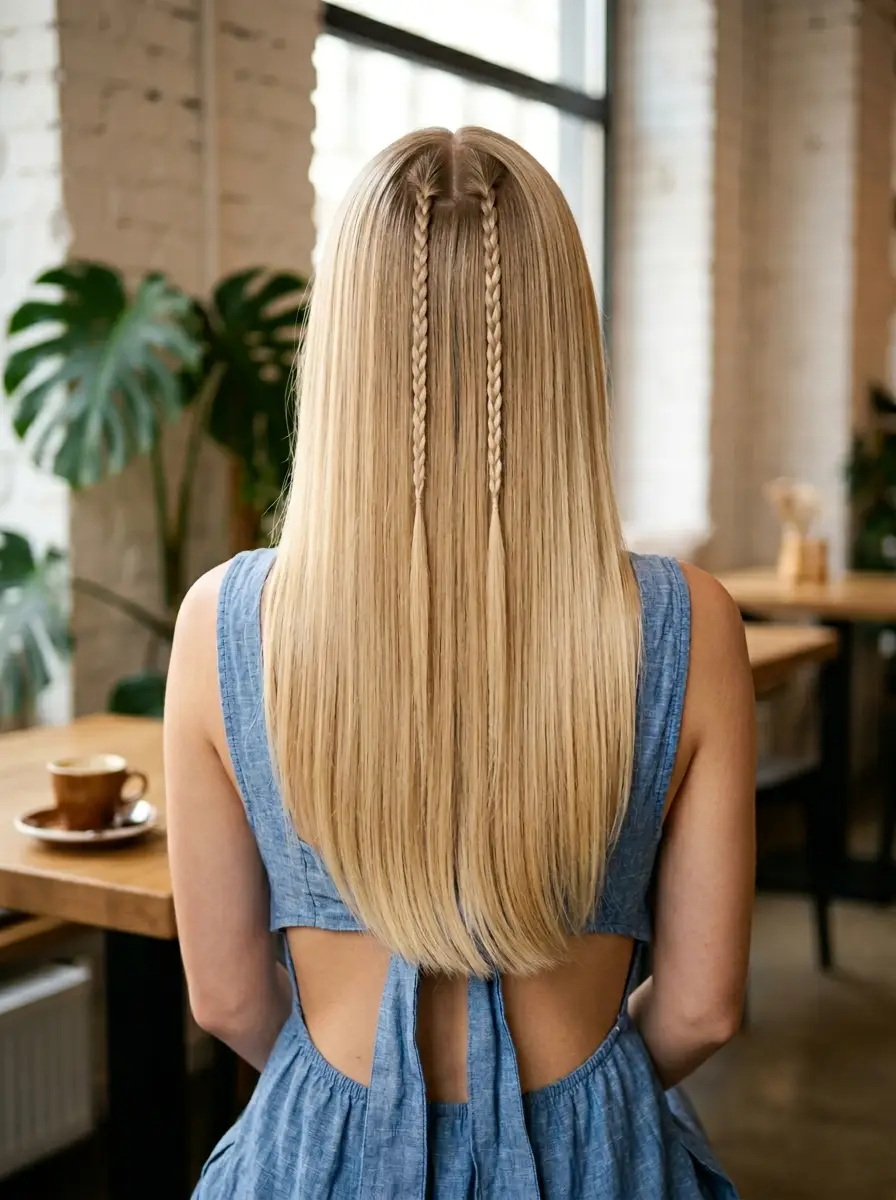
The overview: A sleek, blunt collarbone-length cut is paired with two small, tight Dutch braids at the crown that start near the parting and travel down a few inches before blending seamlessly into the straight, unbraided lengths. The braids add structure and visual interest to the top of the head while the rest of the hair remains clean and polished. It's a style that reads as both put-together and approachable.
The Dutch braid technique — where strands cross under rather than over — creates braids that sit on top of the hair instead of blending into it. This raised texture catches light and adds dimension even on very dark hair, which is why this particular braid style photographs so well.
Why this look is popular: Double Dutch braids have a youthful, sporty quality that feels fresh without being juvenile. They keep hair out of your face — a practical benefit on a first date where you want eye contact, not a curtain of hair. The straight lengths keep the overall look mature and polished, preventing the braids from reading as too casual.
Where this look is suitable: Daytime dates like brunch, outdoor activities, museum visits, or casual dinners. The style is clean and structured enough to work in semi-casual settings while remaining relaxed enough for a walk in the park.
Step by step:
- Straighten the hair. Flat-iron the entire head in half-inch sections using a 1-inch flat iron. Apply a heat protectant first and follow with a light serum for a polished finish.
- Create a clean center part. Use a rat-tail comb to draw a precise part from the forehead to the crown. This is the foundation for both braids sitting evenly.
- Section for the first braid. On one side of the part, pick up a small section at the front hairline and divide it into three equal strands.
- Dutch braid down. Cross the outer strands under the middle strand, adding small sections of hair as you work downward. Keep the braid tight and close to the scalp. Stop after about three inches and secure with a clear elastic.
- Repeat on the other side. Mirror the same braid on the opposite side, keeping the size and placement identical. Check symmetry from the front before securing.
- Smooth and finish. Run a flat iron through the unbraided lengths one more time if needed. Apply a drop of finishing oil like Olaplex No. 7 Bonding Oil to the ends for shine.
Tips and tricks: Dutch braids require practice to get even — if this is your first time, try it a few days before the date so you can troubleshoot. A rat-tail comb is essential for clean sectioning. If your hair is very silky and the braids slip, spritz each section with a light texturizing spray before braiding. The clear elastics should be small enough to disappear into the braid — Goody makes tiny ones that work well. For extra polish, pull the braid tails gently apart after securing to pancake them slightly and add fullness.
5.Velvet Bow Half-Up Waves
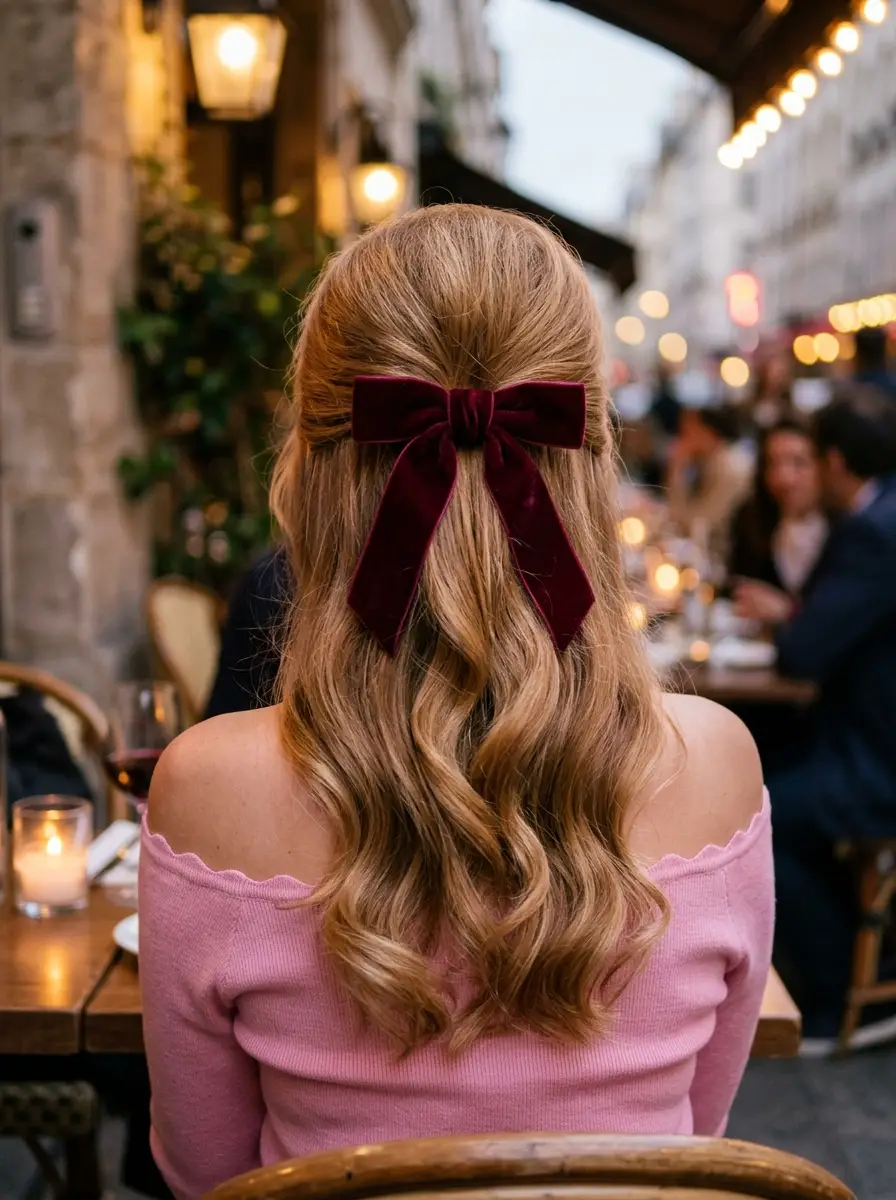
The overview: Loose waves flow through the full length of the hair while the top half is gathered smoothly to the back and secured with any bow. The contrast between the polished half-up section and the free-flowing waves creates a look that reads as romantic and Parisian without being overly done. The velvet texture of the bow adds richness that elevates the entire style.
The half-up construction is strategically practical: it keeps hair off your face so you can actually see and be seen, while the length in the back maintains the softness and femininity that a first date setting calls for.
Why this look is popular: The velvet bow has become a staple accessory because it instantly communicates "I made an effort" without looking like you spent hours getting ready. The half-up silhouette flatters almost every face shape by lifting the cheekbones while the waves soften the jawline. It also works across hair textures — the bow is the star regardless of whether your waves are natural or heat-styled.
Where this look is suitable: Evening dinner dates, wine bars, rooftop cocktails, and any setting with soft lighting. The burgundy velvet reads as autumnal but works year-round, especially in summer when most people default to beachy, carefree styles and you show up with something more considered.
Step by step:
- Create waves. Using a 1.25-inch curling iron, curl medium-sized sections of hair away from the face. Alternate curl direction on the bottom layer for a more natural pattern. Let each curl cool completely.
- Brush through. Gently brush the curls into soft waves using a paddle brush or wide-tooth comb. The waves should flow together rather than sitting as separate ringlets.
- Section the top half. Starting at the temples, gather the top half of your hair and smooth it back toward the crown. Use a boar bristle brush to eliminate bumps and create a polished surface.
- Secure the section. Tie the gathered section with a small elastic at the back of the head, positioned at or just below the crown.
- Add the bow. Clip the burgundy velvet bow directly over the elastic, making sure the tails drape naturally down the back. Adjust the bow so it sits centered or slightly off-center, depending on your preference.
- Finish with spray. A light mist of flexible-hold hairspray on the waves and a touch of shine serum on the ends keeps everything looking polished without stiffness.
Tips and tricks: The velvet bow works best when it's proportionate to your hair volume — oversized bows on thin hair can look costume-y, while tiny bows get lost in very thick hair. A bow roughly three to four inches wide is the sweet spot for most people. If your hair is naturally straight, the waves will relax within an hour in summer heat, so over-curl slightly at the start. A light-hold hairspray like Kenra 13 maintains the wave pattern without crunchiness.
6.Romantic Rose and Daisy Chignon with Fresh Blooms
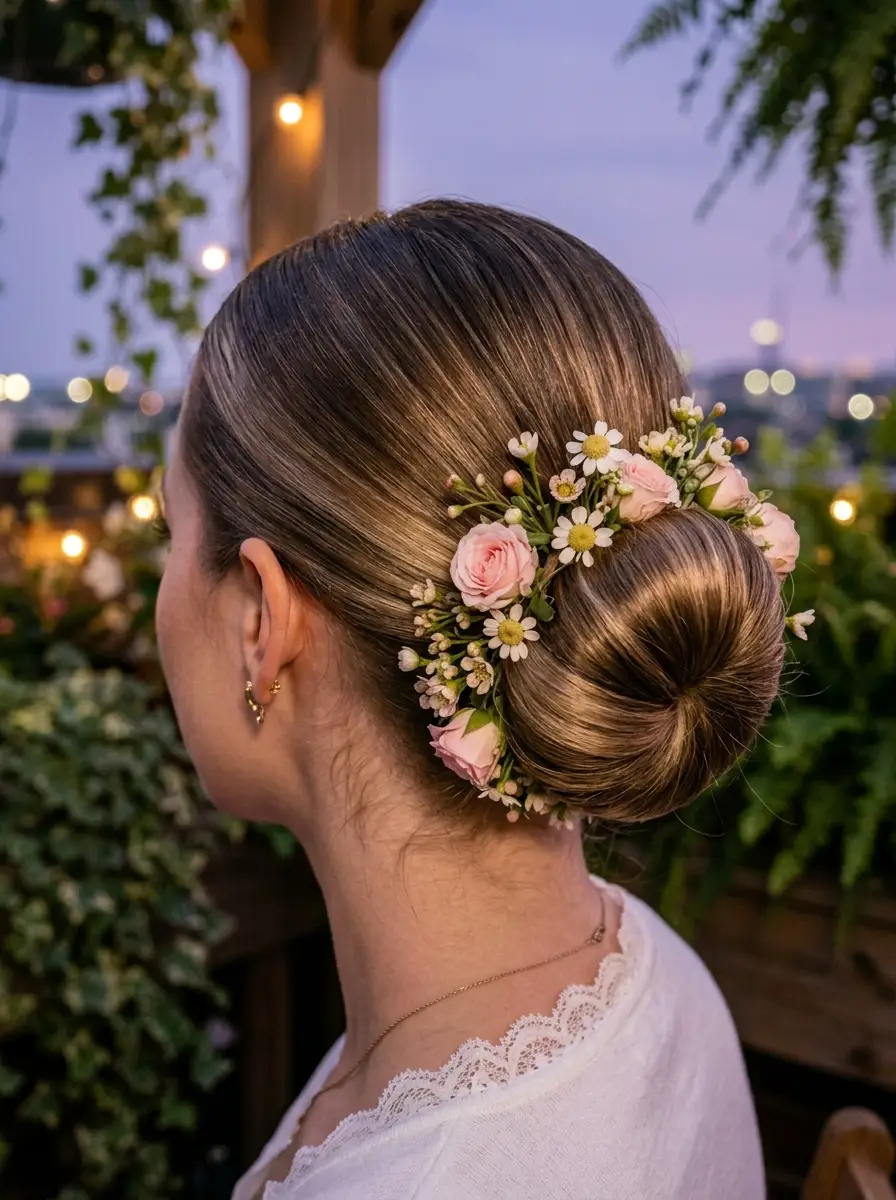
The overview: A classic low chignon sits at the nape, with a cascade of small pink roses, white daisies, and greenery tucked asymmetrically into the coil. The flowers aren't placed in a rigid pattern — they look like they were gathered from a garden and tucked in on impulse, which is precisely the illusion this style is designed to create.
Fresh flowers in hair signal occasion and intentionality. On a first date, that translates to: "I cared enough to do something special, but I'm not so invested that I'm overthinking it." The asymmetrical placement keeps the look from feeling too bridal.
Why this look is popular: The combination of a structured chignon and organic floral elements creates a fairy-tale quality that photographs like a dream, especially in outdoor or garden settings. It's a style that stands out without competing with your outfit, and the fresh flowers add a sensory element — subtle fragrance that your date will notice when they lean in close.
Where this look is suitable: Garden restaurant dinners, outdoor weddings (as a guest), botanical garden dates, rooftop dinners with greenery, and any setting where nature and romance intersect. The fresh flowers make it seasonal — this is a style for peak summer.
Step by step:
- Prep with texture. Spray texturizing spray throughout damp or dry hair to add grip. A loose braid or two throughout the length helps create the foundation for the chignon.
- Create a loose side braid. Braid the hair loosely to one side, securing the end with a clear elastic. Don't pancake the braid — keep it relaxed.
- Coil into a chignon. Wrap the braid around itself at the nape, forming a loose, organic coil. Pin in place with bobby pins, hiding them within the folds of the braid.
- Adjust for softness. Gently pull at sections of the chignon to loosen it and create texture. Leave a few face- framing tendrils free around the hairline.
- Add the flowers. Tuck small pink roses, daisies, and greenery into the chignon, concentrating them on one side for asymmetry. Use floral pins or small U-pins to secure each stem.
- Mist with hairspray. A light, flexible-hold spray keeps everything in place without weighing down the fresh blooms. Avoid spraying directly on the flowers.
Tips and tricks: Fresh flowers wilt in summer heat within an hour, so either use them right before you leave or opt for high-quality silk blooms that hold up indefinitely. If using fresh, store the flowers in the refrigerator until you're ready to place them, and mist the stems with water. Baby's breath is an excellent filler that resists wilting better than most flowers. For very thick hair, the chignon may need extra pins — use spin pins for a secure hold without bulk.
7.Braided Crown with a Messy Low Bun
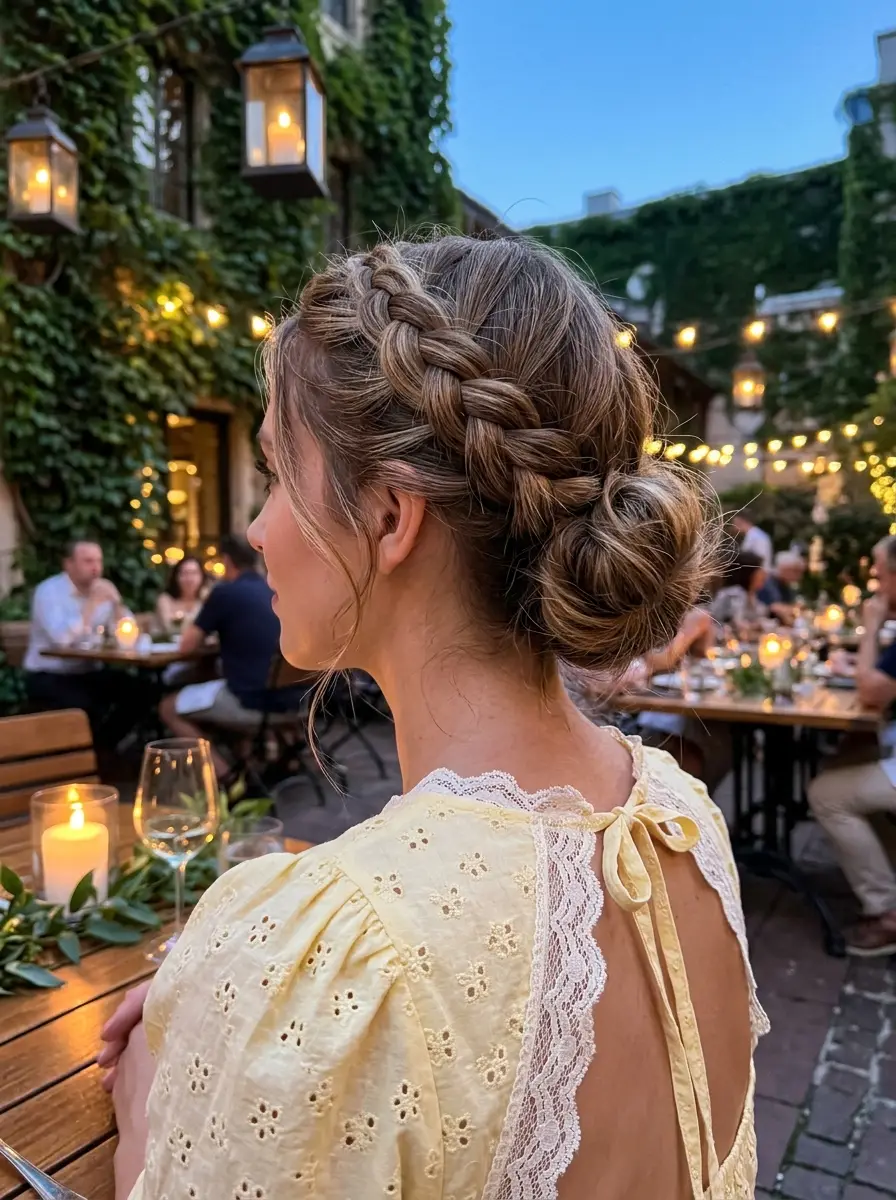
The overview: A French or Dutch braid wraps around the head like a crown, beginning at one temple and curving across the back to the other side. The remaining hair is gathered into a loose, messy bun at the nape, with wispy face-framing pieces left free to soften the silhouette. The braided crown adds structure while the messy bun keeps everything grounded in ease.
This style works because it combines two things that individually feel casual but together create something more considered. The braid crown elevates the messy bun from "I just threw this up" to "I know exactly what I'm doing."
Why this look is popular: The braided crown is one of those rare styles that gets compliments from strangers. It photographs with beautiful detail from every angle, and the messy bun at the back ensures the look doesn't feel overly precious. For first dates, it strikes the right tone: feminine, relaxed, and detailed enough to show effort without screaming "I spent two hours on this."
Where this look is suitable: Garden dinners, outdoor date nights, casual restaurant dates, and any summer evening where the setting is warm and slightly romantic. The style pairs beautifully with off-shoulder tops and sundresses.
Step by step:
- Start the braid. At one temple, pick up a section of hair and divide it into three strands. Begin a French braid (or Dutch for more visible texture), adding small sections as you work along the hairline toward the back of the head.
- Continue across the back. Once you reach the back of the head, continue the braid along the hairline toward the opposite ear, adding all remaining loose hair into the braid as you go.
- Secure the braid. When you reach the opposite side, stop adding hair and braid the remaining section a few inches down, then secure with a clear elastic.
- Gather the bun. Collect all remaining hair, including the braid tail, into a low ponytail at the nape. Loop it through the elastic only halfway to create a messy bun. Tuck the braid's tail into the bun.
- Adjust the texture. Pull gently at sections of the bun and the braid to loosen them. Pull out wispy pieces around the face and ears for softness.
- Pin and spray. Secure any sections that feel too loose with bobby pins hidden in the folds. Finish with a flexible- hold hairspray.
Tips and tricks: This style requires hair that's at least collarbone-length to create both the crown braid and the bun. Shorter hair can incorporate clip-in extensions for the added length. A texturizing spray before braiding gives the strands enough grip to hold the braid without slipping. If your braid feels too tight, gently pancake it by pulling the outer edges outward to create a fuller, more relaxed appearance.
8.Wavy Layered Lob with Face-Framing Bangs
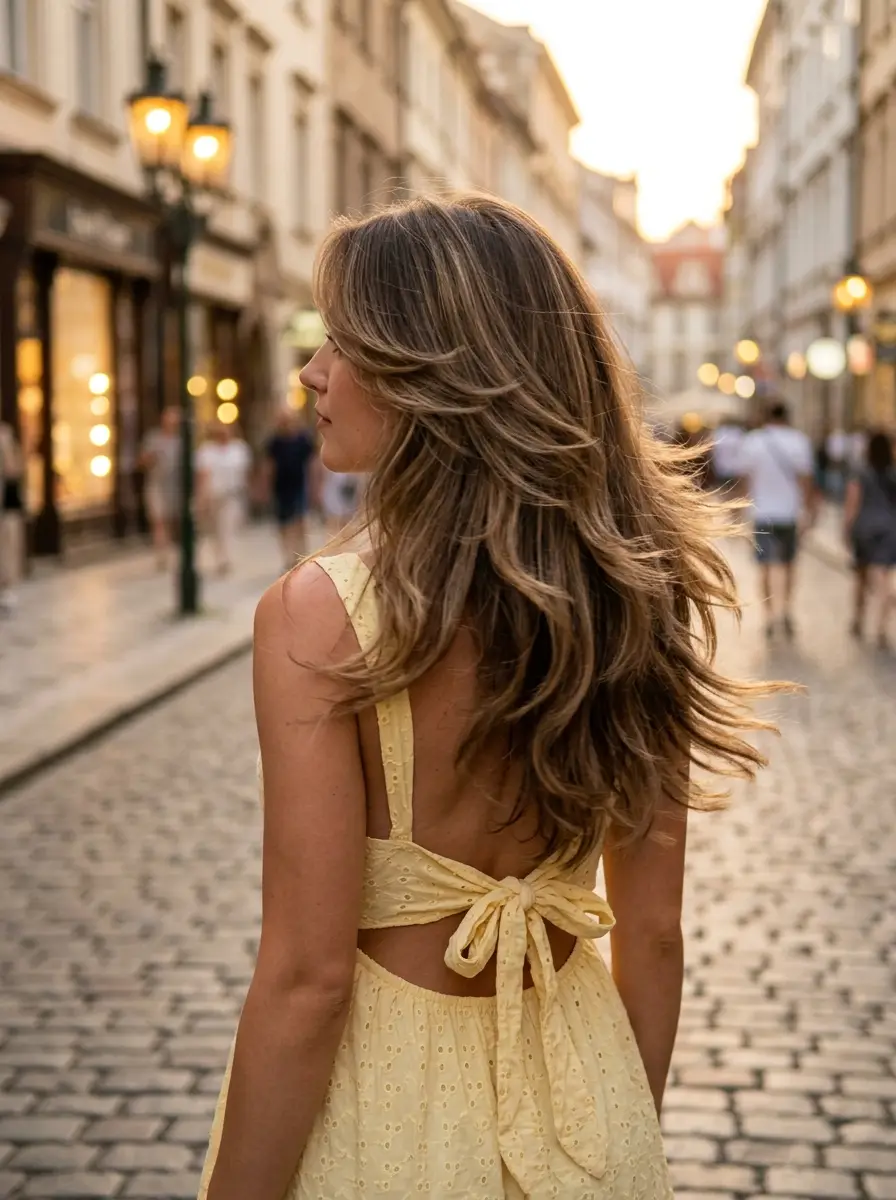
The overview: A shoulder-length lob with soft, choppy layers throughout creates natural movement and volume without requiring any heat styling. Face-framing pieces fall like grown-out curtain bangs, softening the cheekbones and drawing attention to the eyes. The overall effect is lived-in and natural — hair that looks like it just falls that way.
The beauty of this cut is that it does the styling work for you. The layers create shape, the face-framing pieces provide structure, and the shoulder length is long enough to feel feminine while short enough to survive summer heat without becoming a sweaty curtain against your neck.
Why this look is popular: The wavy layered lob reads as effortless, which is exactly the energy most people want on a first date. It doesn't look like you tried too hard, but it also doesn't look like you rolled out of bed. The face-framing pieces contour the face naturally, and the lived-in texture actually improves throughout the day as it responds to humidity and movement.
Where this look is suitable: Almost anywhere. Coffee shop dates, park walks, casual dinners, outdoor movie nights — this style adapts to the setting without requiring a change. Its natural quality makes it particularly strong for daytime first dates.
Step by step:
- Air-dry or rough-dry. Apply a sea salt spray like Bumble and Bumble Surf Spray to damp hair, then let it air-dry or rough-dry with a diffuser on low heat. The goal is natural movement, not polished waves.
- Add definition if needed. If certain sections dried too straight, use a 1.25-inch curling wand to add a quick bend to just those pieces. Wrap loosely and release quickly for a subtle effect.
- Shape the face-framing pieces. Use your fingers to direct the shorter front pieces away from your face, creating a soft curtain effect. A tiny amount of texturizing cream on the ends adds definition.
- Add volume at the roots. Flip your head upside down and shake the roots with your fingers. A quick blast of dry shampoo at the crown adds instant lift.
- Finish minimally. A light mist of texturizing spray throughout the mid-lengths enhances the lived-in quality. Avoid heavy products that will weigh down the layers.
Tips and tricks: This cut requires a skilled stylist who understands layering and point-cutting — it's not a one-length bob with waves added. Ask for "invisible layers" or "ghost layers" if your stylist is familiar with the technique. Maintenance trims every 8-10 weeks keep the face-framing pieces at the right length. For fine hair, a volumizing powder at the roots prevents the layers from falling flat.
9.The Chic Bubble Ponytail
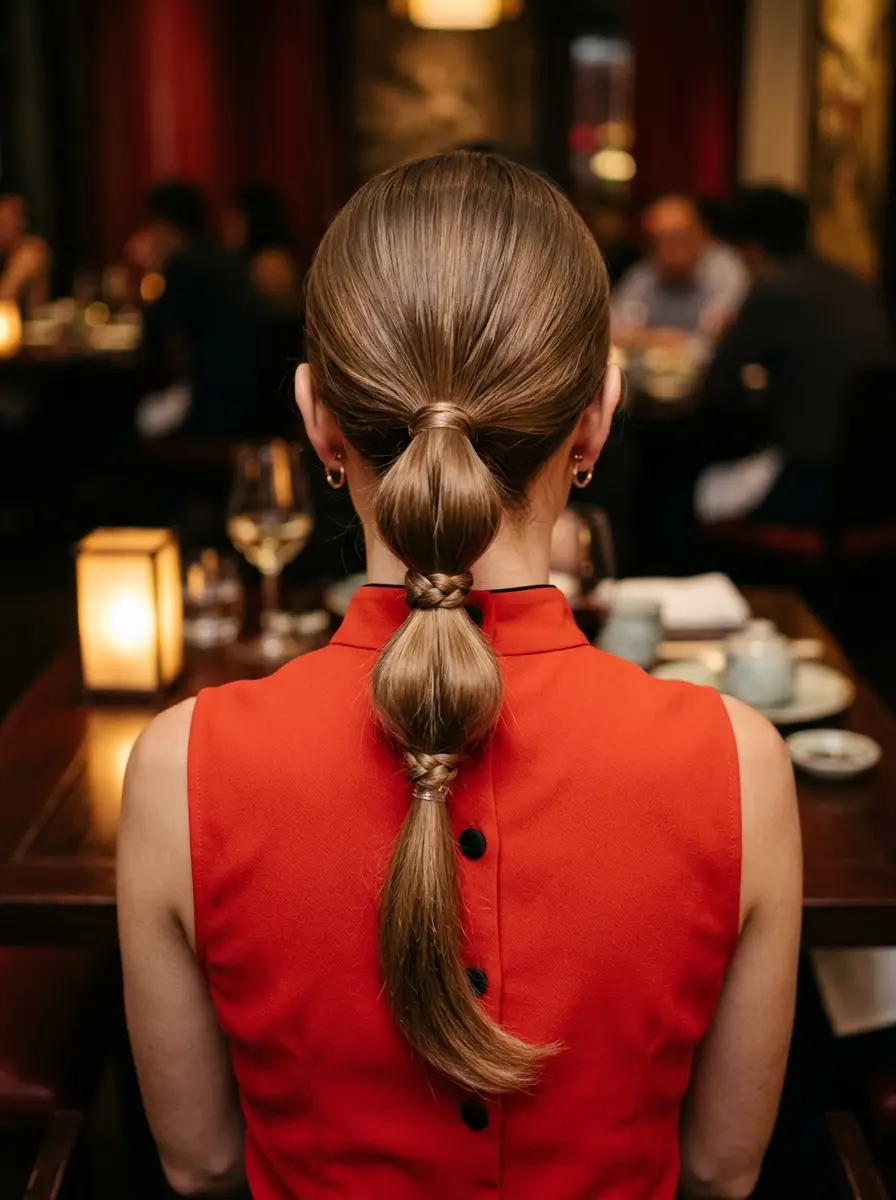
The overview: A sleek low ponytail at the nape is divided into bubble segments using elastics placed at regular intervals down the length. Each section is gently pulled outward to create a rounded, voluminous shape. The final section at the ends is braided for an unexpected detail. The overall look is smooth, polished, and architectural — nothing about this ponytail is accidental.
The bubble ponytail elevates a basic low pony into something that looks styled and considered. The braided end adds a finishing detail that separates it from the playground version of this style. It's the kind of ponytail that makes people ask "how did you do that?" — and the answer is surprisingly simple.
Why this look is popular: The bubble ponytail photographs with strong visual rhythm — the repeating rounded shapes create a pattern that draws the eye down the length of the hair. It holds up exceptionally well in summer heat because the elastics lock everything in place, and the sleek crown section resists humidity-related frizz better than loose styles.
Where this look is suitable: Elegant dinner dates, rooftop bars, upscale restaurant settings, and evening dates where you want something more polished than a standard ponytail. The sleek crown and structured bubbles read as sophisticated without being overdone.
Step by step:
- Sleek the crown. Apply a smoothing serum to dry hair, then brush everything into a low ponytail at the nape. Use a boar bristle brush for a flat, polished surface against the head.
- Secure the ponytail. Tie with a strong elastic that matches your hair color. The base should sit right at the nape — not lower, which reads as limp, and not higher, which changes the silhouette.
- Create the first bubble. Place a second elastic about two inches down from the base. Gently pull the section between the two elastics outward on all sides to create a rounded bubble shape.
- Repeat down the length. Continue placing elastics at equal intervals and puffing each section outward. Try to keep the bubble sizes consistent for a clean, rhythmic pattern.
- Braid the final section. For the last segment at the ends, create a simple three-strand braid and secure with a clear elastic. Tuck the very end under for a clean finish.
- Smooth and spray. Apply a small amount of edge control or pomade along the crown for a glass-like finish. Mist with a medium-hold hairspray to lock the bubbles in place.
Tips and tricks: The bubbles look best when they're even — use your fingers to measure the distance between elastics before securing. Hair that's very thick or very long creates dramatic bubbles; finer hair benefits from gently pancaking each section more aggressively. Clear elastics are essential for maintaining the clean look — colored ones interrupt the visual flow. A shine serum applied to the finished bubbles adds a luxe, polished quality.
10.Bubble Ponytail with a Twist
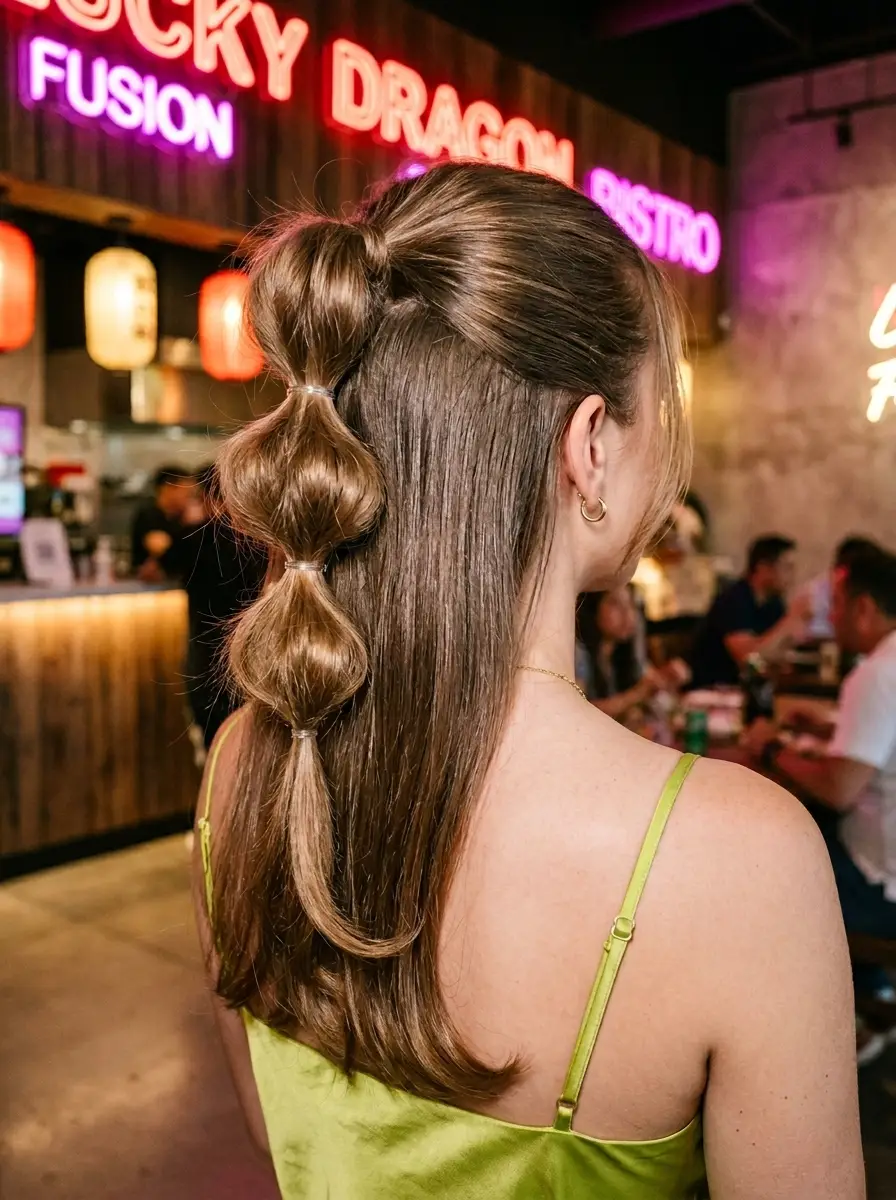
The overview: A half-up section at the crown creates the base for a bubble ponytail that cascades down the back. Each bubble segment is created by placing elastics at intervals and puffing the sections outward, but the half-up construction means the lower layers of hair flow freely beneath the bubbles. The result is playful, eye-catching, and more dimensional than a standard full ponytail.
The half-up approach gives you the best of both worlds: the structured, attention-grabbing bubble detail on top with loose, flowing hair underneath. It also reduces tension on the scalp compared to pulling all your hair into a single ponytail, which is a comfort factor that matters on a long first date.
Why this look is popular: This style photographs with depth and dimension — the bubbles sit on top of the flowing hair, creating a layered visual effect that looks more complex than it actually is. It's playful enough for a casual date but polished enough for a nicer setting, depending on how sleek you make the crown section.
Where this look is suitable: Casual date nights, outdoor movies, amusement parks, concert dates, and any setting where fun energy matches the vibe. The flowing lower layers keep it feminine while the bubbles add personality.
Step by step:
- Section the top half. Starting at the temples, gather the top half of your hair and smooth it back toward the crown. Use a tail comb for a clean horizontal section from ear to ear.
- Secure the half-up section. Tie it with an elastic at the crown. For extra polish, wrap a small strand of hair around the elastic to conceal it.
- Create bubbles. Place elastics at two-inch intervals down the half-up ponytail. Gently pull each section outward to create rounded bubble shapes.
- Add texture to the lower layers. If your lower layers need movement, add a few loose waves with a large-barrel curling iron, or spritz with sea salt spray for a natural texture.
- Adjust and set. Pull the bubbles to your desired fullness, ensuring they're even. Mist the entire style with a flexible-hold hairspray.
Tips and tricks: This style works best on hair that's at least shoulder-length. For shorter hair, you can still create two or three bubbles on the half-up section before running out of length. A texturizing spray on the lower layers before adding loose waves helps them hold better in humidity. The bubble sections look more defined when each elastic is pulled tight before puffing — loose elastics create misshapen bubbles.
11.Playful Double Space Buns with Loose Waves
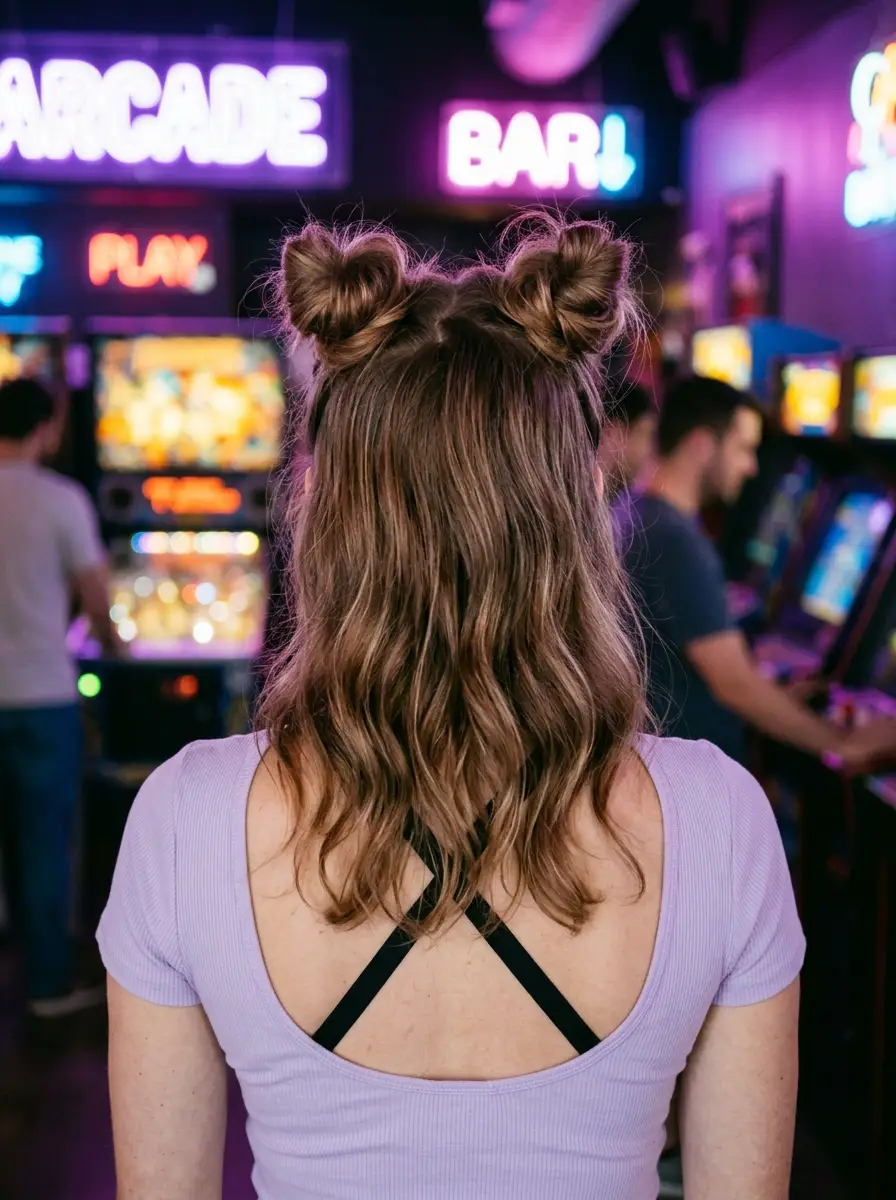
The overview: Shoulder-length hair with soft waves features two small space buns positioned at the front of the crown, one on each side of the part. The remaining hair flows freely past the shoulders, creating a playful contrast between the structured buns and the loose lengths. It's retro, fun, and unmistakably confident.
Space buns on a first date are a deliberate choice — they signal that you're fun, not afraid to be a little different, and not taking yourself too seriously. That kind of confidence is magnetic, especially in a summer setting where everyone else is defaulting to basic waves.
Why this look is popular: Double space buns have a nostalgic, playful quality that makes them instantly memorable. On a first date, being memorable is the whole point. The loose waves keep the style grounded in femininity so the buns read as quirky-cool rather than costume-y. The style is also remarkably durable — the buns stay put through dancing, walking, and wind.
Where this look is suitable: Night out dates, rooftop bars, concert dates, outdoor festivals, and any evening where the vibe leans energetic and fun. The style pairs particularly well with bold makeup and statement jewelry.
Step by step:
- Create loose waves. Using a 1.5-inch curling wand, add soft waves throughout the hair. Let them cool, then shake them out for a natural, flowing texture.
- Part and section. Create a clean center part. On each side, gather a section from the front crown area — roughly from the part to about two inches back and from the hairline to the top of the ear.
- Create the first bun. Twist the section tightly, then coil it around itself into a small bun. Secure with bobby pins and a small elastic. Position it at the front of the crown so it's visible from the front.
- Repeat on the other side. Mirror the same bun on the opposite side, keeping the size and placement symmetrical.
- Adjust the waves. Separate and fluff the loose waves with your fingers. Pull a few wispy pieces free around the buns for softness.
- Set with spray. A medium-hold hairspray keeps the buns secure and the waves defined without stiffness. Focus on the buns to prevent them from loosening.
Tips and tricks: The buns should be proportional to your head size — too large and they look costume-y, too small and they disappear. Aim for roughly golf-ball sized. For very thick hair, you may need to backcomb each section slightly before coiling to keep the buns compact. Thin hair benefits from a volumizing powder at the roots before sectioning. Bobby pins should match your hair color and be inserted in an X pattern for maximum hold.
12.Elegant Fishtail Braid with a Romantic Ribbon
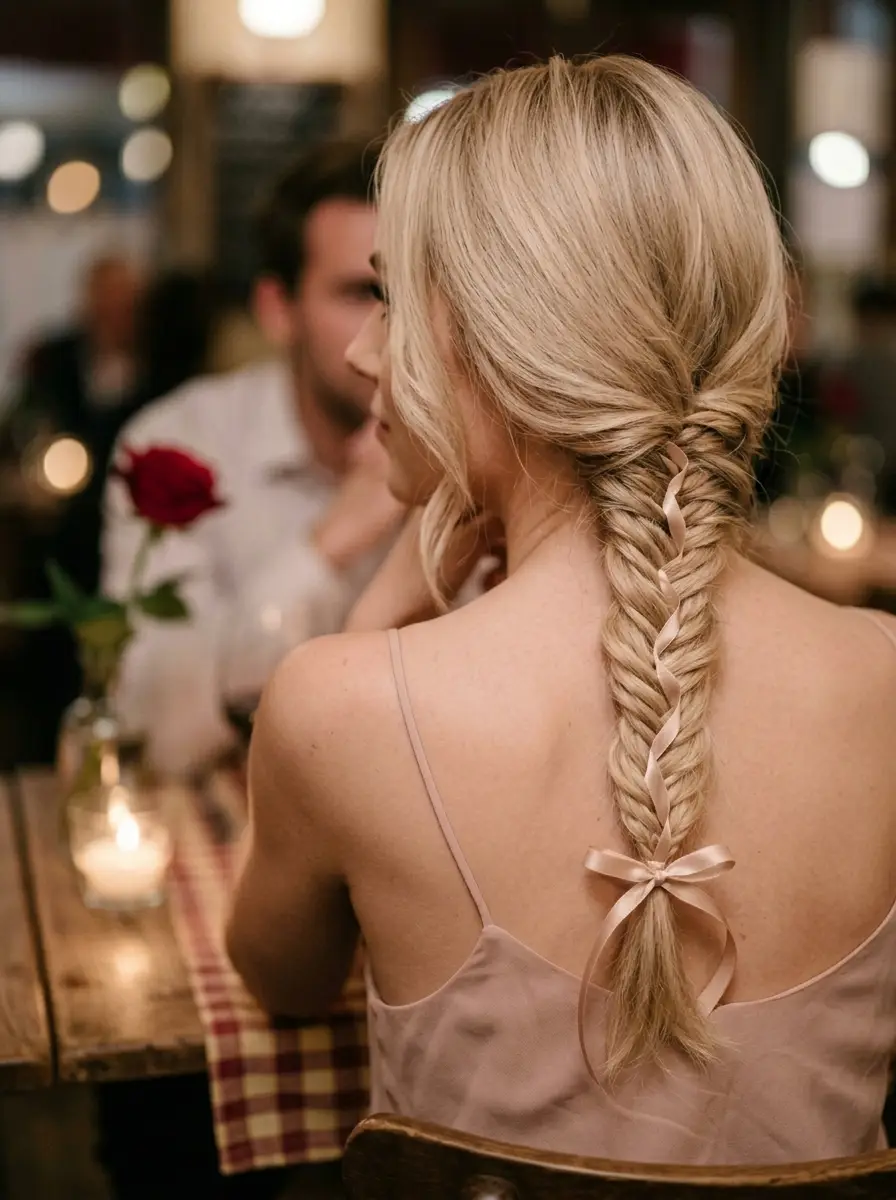
The overview: A side fishtail braid has a ribbon woven through its length, with loose waves framing the face and cascading over the shoulders. The braid is gently pancaked for fullness, and the ribbon — in a complementary tone — weaves in and out of the fishtail pattern, adding color and texture without overwhelming the braid's intricate structure.
The ribbon elevates a fishtail braid from "pretty" to "romantic." It's a small addition that changes the entire mood of the style, making it feel more considered and personal. The woven pattern of the ribbon against the fishtail creates a visual complexity that looks far more difficult than it actually is.
Why this look is popular: The fishtail braid with a ribbon reads as bohemian and romantic — two qualities that align perfectly with a first date atmosphere. The ribbon adds a pop of color that photographs beautifully, especially in golden-hour or candlelight settings. The loose waves around the face keep the look soft and approachable rather than overly styled.
Where this look is suitable: Candlelit dinners, wine bar dates, outdoor evening dates, and any setting with warm, ambient lighting. The romantic quality of the ribbon and braid combination suits intimate, low-key date environments.
Step by step:
- Add texture first. Spray a texturizing mist throughout dry hair, then add loose waves with a 1.5-inch curling iron. The texture helps the braid hold and gives the ribbon something to grip.
- Sweep to one side. Brush all hair over one shoulder. The braid will rest on whichever side feels most natural.
- Begin the fishtail. Divide the hair into two equal sections. Take a small strand from the outside of the left section and cross it over to the right. Then take a small strand from the outside of the right and cross to the left. Repeat, keeping consistent tension.
- Weave in the ribbon. After a few inches of braiding, lay the ribbon across the top of one section and incorporate it into the braid as if it were a strand. Continue weaving it in and out at regular intervals.
- Secure and pancake. Braid to the ends and secure with a clear elastic. Gently pull the outer edges of each section outward to pancake the braid and create fullness.
- Frame the face. Pull a few loose waves free around the face and tuck one side behind the ear for an asymmetrical finish.
Tips and tricks: The ribbon should be roughly twice the length of your hair to allow for weaving with room to spare. Satin or grosgrain ribbons hold their shape better than silk, which tends to slip. If the ribbon feels loose within the braid, a tiny dot of hair glue at the weaving points secures it without being visible. Pancake gently and evenly — over-pulling creates a messy look rather than a romantic one.
13.Chic Fishtail Braid with a Low Ponytail Wrap
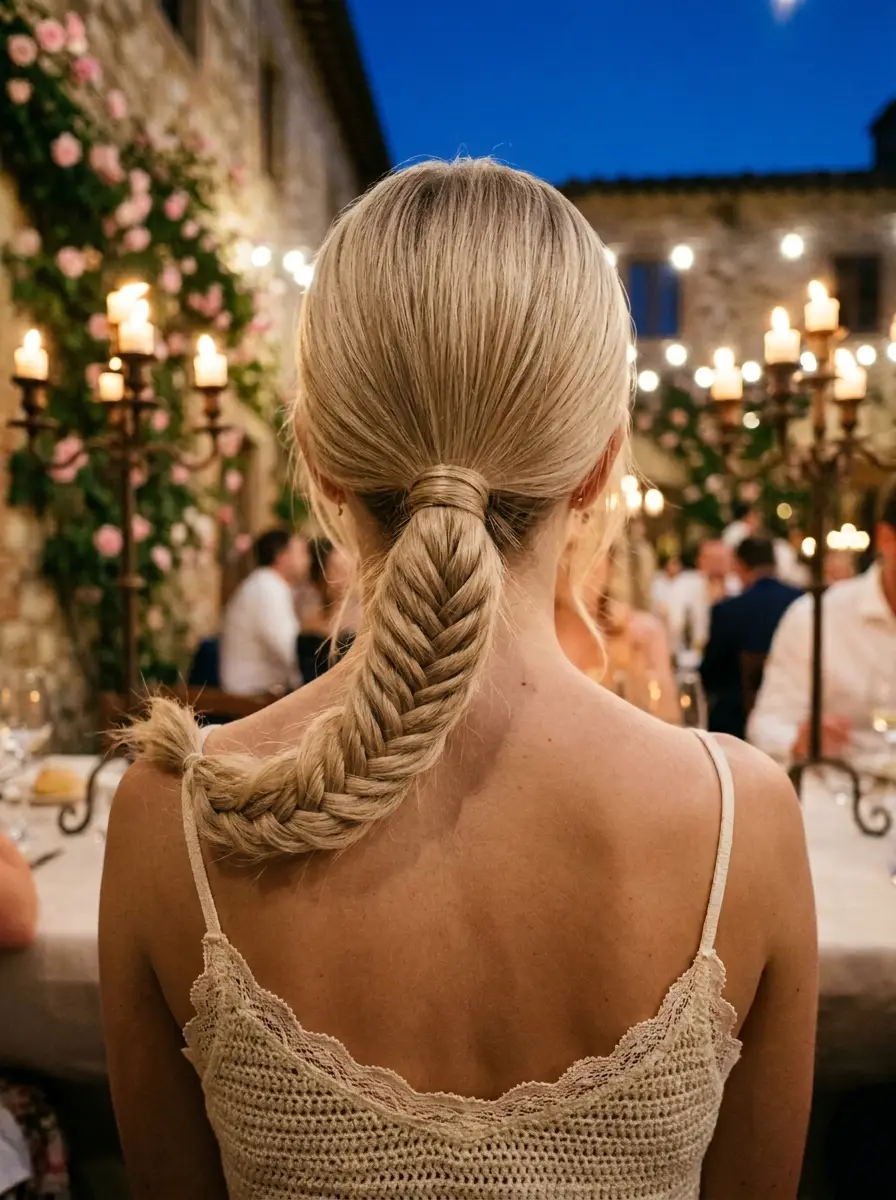
The overview: A low ponytail at the nape is braided into a fishtail that rests down the back, with the base wrapped in a strand of hair to conceal the elastic. The fishtail is gently pancaked for relaxed fullness, and the wrapped base creates a seamless, polished transition from head to braid. It's a refined take on a bohemian classic.
The hair-wrapped base is the detail that makes this work for a first date rather than a music festival. It signals polish and attention to detail — exactly the kind of subtle effort that registers subconsciously on a first impression.
Why this look is popular: The fishtail braid with a wrapped base is one of those styles that looks like it required a professional but actually takes about ten minutes with practice. It photographs with beautiful texture and detail, and the low placement at the nape keeps it elegant rather than youthful. The pancaked fishtail also holds up well in summer heat because the texture disguises any humidity-related frizz.
Where this look is suitable: Al fresco Italian dinner, waterfront restaurant dates, evening strolls, and any setting where romantic elegance matches the mood. The style pairs beautifully with dresses and off-shoulder tops.
Step by step:
- Gather the ponytail. Smooth hair into a low ponytail at the nape and secure with a clear elastic. Keep the crown smooth but not overly tight — a slight natural volume looks better than a flat, severe surface.
- Separate a wrapping strand. From the ponytail, separate a small section of hair roughly a quarter-inch wide. Set it aside — this will wrap the base.
- Braid the fishtail. Divide the remaining ponytail into two equal sections. Cross small strands from the outer edge of each section to the opposite side, working your way down. Keep the tension even and consistent.
- Secure the braid. When you reach about two inches from the ends, secure with a clear elastic. The wrapping strand is still separate at this point.
- Wrap the base. Take the reserved strand and wrap it tightly around the elastic at the ponytail base, covering it completely. Secure the end of the wrapping strand with a bobby pin tucked underneath.
- Pancake the fishtail. Gently pull the outer edges of each braided section outward, working from top to bottom. This creates the relaxed, full appearance that defines this style.
Tips and tricks: The wrapping strand works best when it's from a section with slightly shorter layers — the texture helps it stay in place. If the strand keeps unwinding, a tiny amount of hair wax on the end pins it securely. For the cleanest fishtail, use a rat-tail comb to separate each small strand precisely. The pancaking step should be done gently — yanking creates a frizzy appearance rather than a soft, full one.
14.Romantic Braided Updo with Fresh Flowers
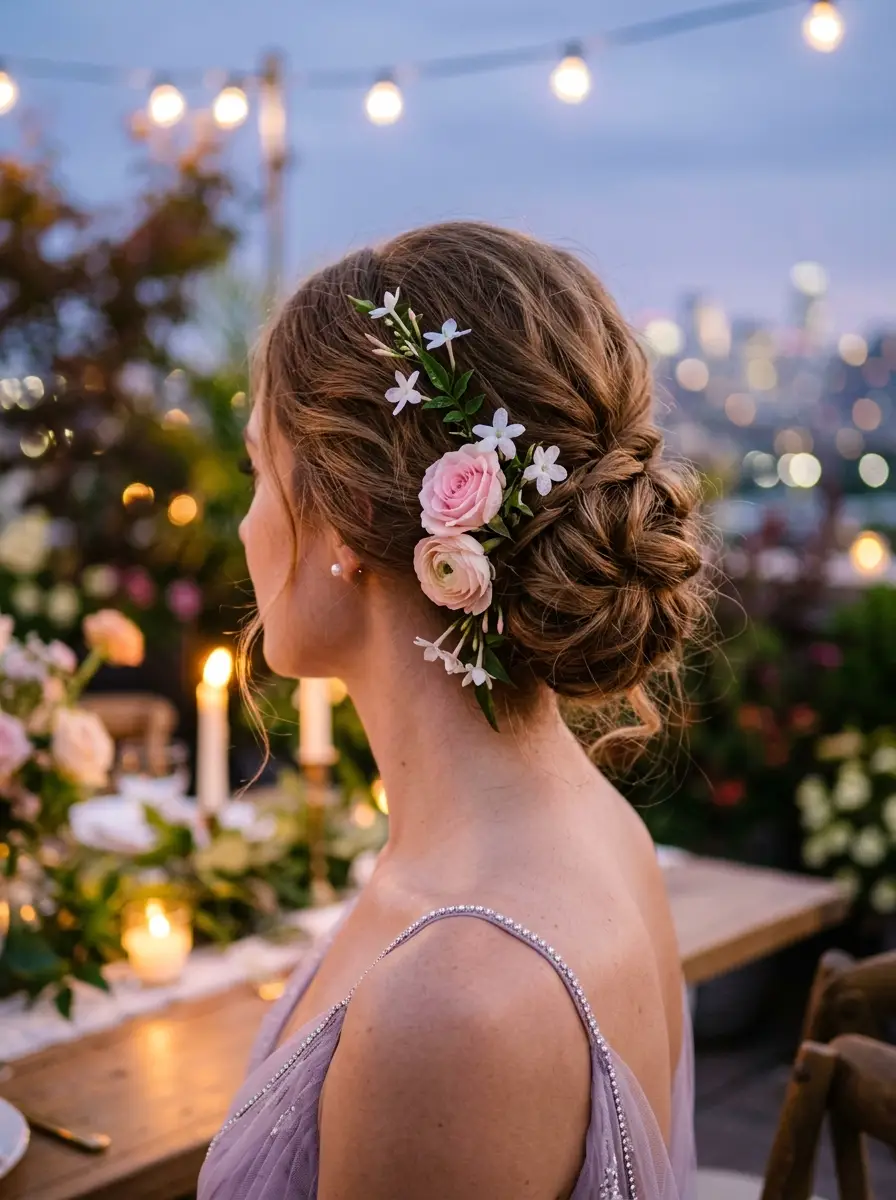
The overview: Hair is loosely braided throughout and then coiled into a low, relaxed chignon at the nape. Fresh blush roses and white flowers are tucked into the braided coils, with face-framing tendrils left free around the hairline. The braided texture of the chignon catches light and creates dimension, while the flowers add romance and seasonal relevance.
This is the hairstyle equivalent of showing up with a thoughtful gift — it communicates care and intention without being overwrought. The fresh flowers ground it firmly in summer, making it a seasonal statement that your date will notice and remember.
Why this look is popular: The braided updo with fresh flowers reads as fairy-tale romantic without veering into costume territory. The braided texture gives the chignon more visual interest than a smooth bun, and the fresh flowers add a natural, organic element that photographs beautifully in outdoor and warm-light settings. The face-framing tendrils keep the look soft and approachable.
Where this look is suitable: Rooftop garden dinners, outdoor restaurant dates, botanical garden visits, and any summer evening where the setting has greenery or floral elements. The fresh flowers make it specifically seasonal — this is a style for warm-weather first dates.
Step by step:
- Prep with texture. Spray texturizing mist throughout dry hair and create a few loose braids throughout the length to add grip and foundation texture.
- Create the main braid. Gather all hair to one side and braid loosely into a three-strand braid. Secure the end with a clear elastic. Don't pull tight — the braid should be relaxed and organic.
- Coil into a chignon. Wrap the braid around itself at the nape, forming a loose, circular coil. Pin in place with bobby pins, hiding them within the folds of the braid.
- Soften the hairline. Pull a few tendrils free around the face and ears. These should be thin, wispy pieces that frame the face without creating bulk.
- Add the flowers. Tuck blush roses and white flowers into the chignon, distributing them asymmetrically for a natural look. Use floral pins or small U-pins to secure each bloom.
- Set lightly. Mist with a flexible-hold hairspray, avoiding the flowers directly. A light touch of shine serum on the face-framing tendrils adds polish.
Tips and tricks: Fresh flowers need water — mist the stems with water before tucking them in, and consider storing them in the refrigerator until you're ready to place them. For a longer-lasting alternative, high-quality silk flowers look nearly identical in photos and won't wilt in summer heat. Baby's breath is an excellent filler that resists wilting better than most fresh flowers. The chignon holds best on second-day hair when natural oils provide additional grip.
15.Elegant Chignon with Soft Tendrils
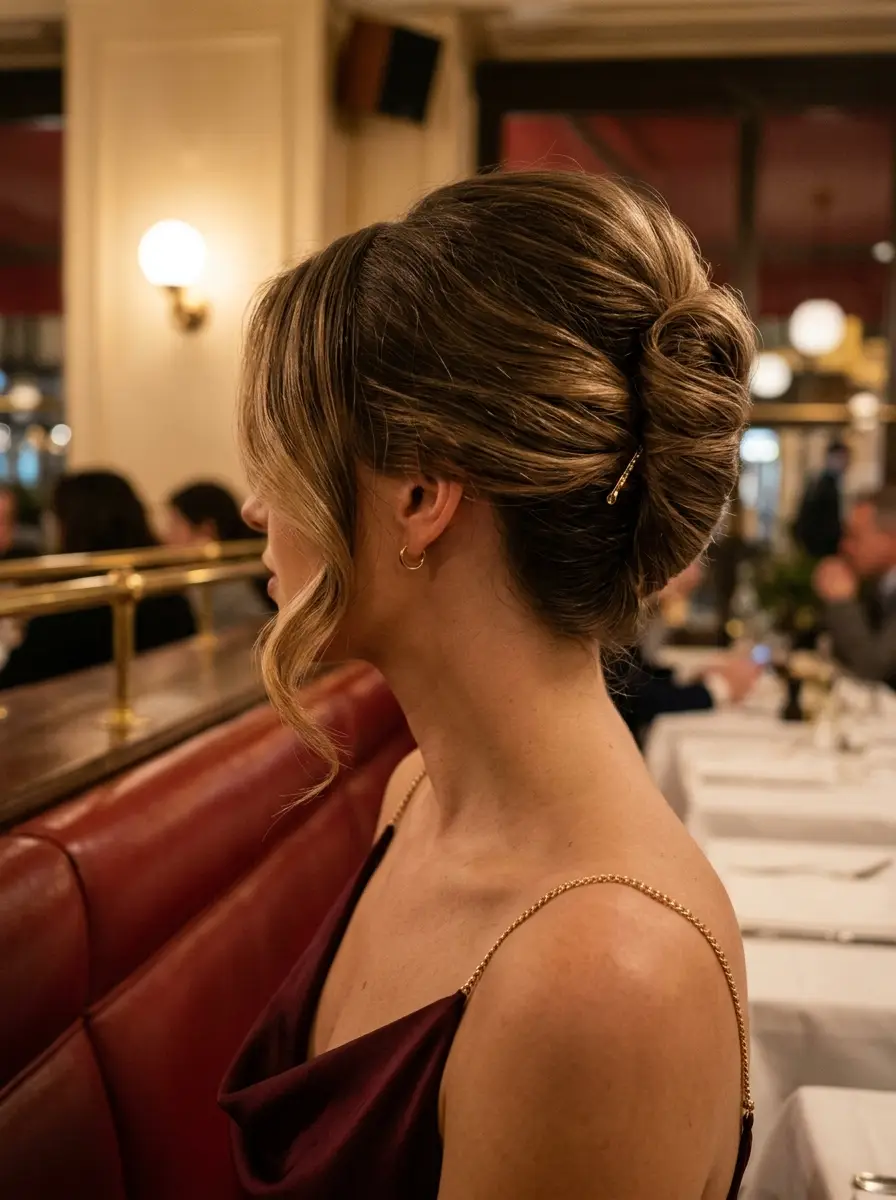
The overview: Hair is swept back into a structured low chignon at the mid-back level, with subtle volume at the crown and two soft, curled tendrils framing the face. The chignon is smooth and polished — not a single strand out of place — while the tendrils add just enough softness to prevent the style from reading as severe. It's the kind of elegance that looks effortless but requires precision.
The two tendrils are doing all the emotional heavy lifting here. Without them, this is a formal updo. With them, it's romantic and approachable — the difference between looking like you're attending a gala and looking like you're on a really good first date.
Why this look is popular: The elegant chignon with tendrils is one of the most universally flattering updos because it lifts the face and neck while the soft pieces frame and feminize the overall silhouette. It photographs beautifully from every angle, holds up through a full evening, and pairs with virtually any outfit from a cocktail dress to a silk camisole and tailored trousers.
Where this look is suitable: Upscale candlelit restaurants, cocktail bars, evening theatre dates, and any setting where the dress code leans elevated. This is a formal-adjacent style that signals you took the occasion seriously.
Step by step:
- Create volume at the crown. Backcomb the crown section lightly with a fine-tooth comb, then smooth the surface over the teased area with a boar bristle brush. This creates the subtle lift that prevents the style from looking flat.
- Separate the tendrils. Before gathering the rest of the hair, pull two thin sections free at the temples — one on each side. Clip them aside temporarily.
- Gather the chignon. Smooth all remaining hair into a low ponytail at the mid-back level. Secure with an elastic, then twist and coil the ponytail into a compact, smooth chignon. Pin securely with bobby pins matching your hair color.
- Curl the tendrils. Using a 0.75-inch curling iron, curl each tendril away from the face. Let them cool, then gently separate with your fingers for a soft, flowing effect.
- Smooth and finish. Apply a small amount of high-shine pomade to the surface of the chignon and the crown for a polished, glass-like finish.
- Set with spray. Mist with a strong-hold hairspray like Kenra Volume Spray 25 to lock everything in place for the evening. Avoid spraying the tendrils directly — they should move naturally.
Tips and tricks: The chignon shape depends entirely on your hair length and thickness. Very thick hair may need to be twisted tighter to keep the bun compact; fine hair benefits from a small doughnut filler to add volume. The crown volume should be subtle — over-teasing creates a dated look rather than a modern one. The tendrils should be thin enough to move with a breeze but thick enough to be visible. A rat-tail comb is essential for clean sectioning.
16.Effortless Tousled Updo with Chic Claw Clip Accent
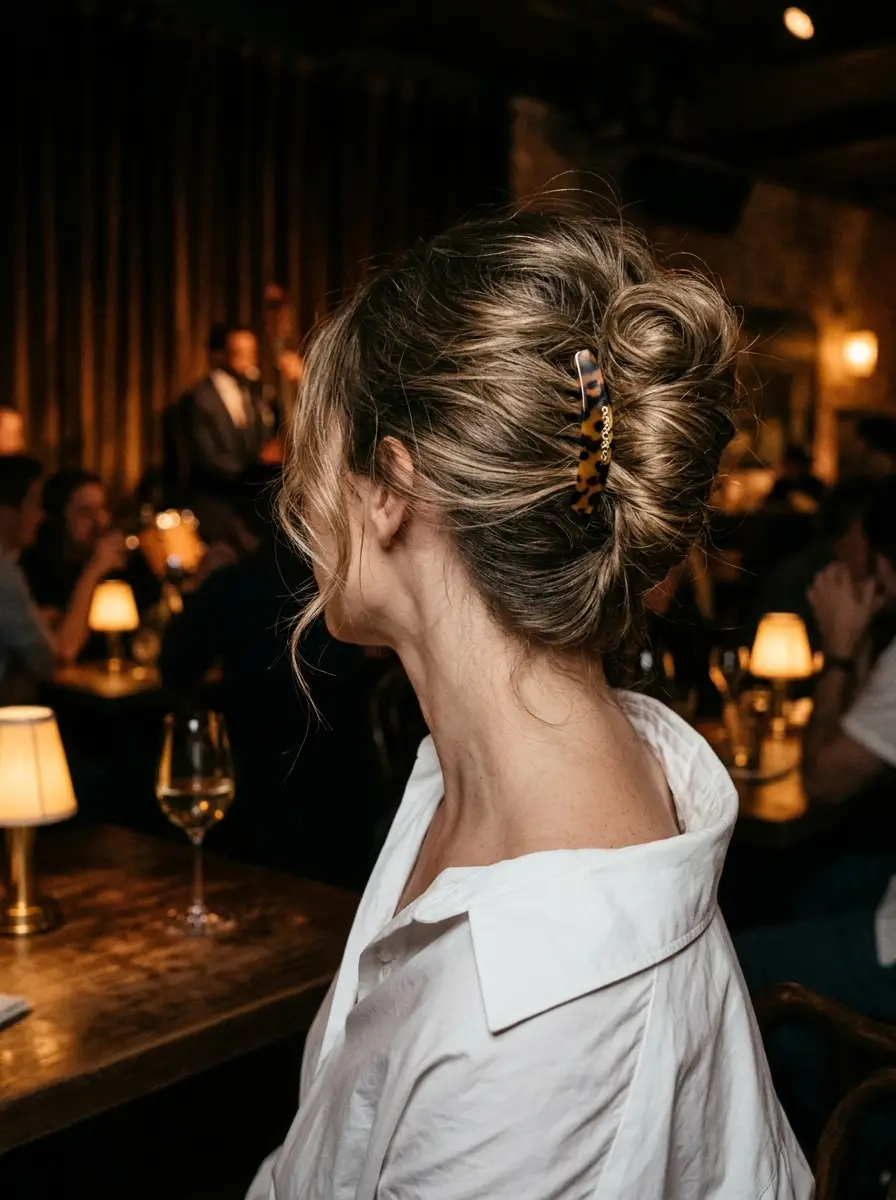
The overview: Hair is loosely twisted upward and secured with a tortoiseshell claw clip at the back of the head, with face-framing pieces left free to soften the look. The updo has a tousled, undone quality — sections pulled loose, ends poking out at natural angles — that reads as effortlessly chic rather than sloppy. The claw clip serves as both functional anchor and decorative accent.
The claw clip updo has earned its place as a modern first-date style because it communicates confidence. You're saying: "I look this good with minimal effort," which is exactly the message you want to send.
Why this look is popular: Claw clip updos have become a street-style staple because they're genuinely practical and surprisingly flattering. The upward direction of the twist creates a natural lifting effect on the face, and the tortoiseshell pattern of the clip adds a warm, organic accent that works with virtually any outfit. It also takes under three minutes to construct.
Where this look is suitable: Jazz bars, wine bars, casual evening dinners, and any date night setting where the vibe is relaxed but you still want to look polished. The claw clip adds enough visual interest to elevate the style beyond basic.
Step by step:
- Add texture. Spray texturizing mist throughout dry hair for grip and volume. A quick scrunch with your hands enhances any natural wave pattern.
- Gather and twist. Collect all hair at the back of the head, as if making a ponytail. Twist the entire section upward toward the crown, folding it against the back of the head.
- Secure with the clip. Open the claw clip and clamp it over the twisted section, making sure it grips both the twist and the hair against the scalp. The clip should sit horizontally at the back of the head.
- Pull and tousle. Gently pull sections loose from the twist for a more relaxed appearance. Let some ends poke out naturally above and around the clip.
- Frame the face. Pull a few wispy pieces free at the temples and ears. These face-framing pieces should be thin and natural-looking.
- Set lightly. A light mist of flexible-hold hairspray keeps the style in place without looking stiff. The goal is movement and ease.
Tips and tricks: The claw clip needs to be large enough to grip all your hair securely — measure against your hair thickness. Fine hair may need a smaller clip to avoid sliding; thick hair requires an oversized version. A tortoiseshell pattern works across hair colors and reads as more elevated than solid black or clear plastic. For extra hold, twist a few bobby pins into the base of the twist before adding the clip.
17.Elegant Twisted Chignon with a Vintage Fan Comb
The overview: Hair is swept to one side and rolled into a low, compact chignon at the nape, with a vintage fan comb positioned just above it. The chignon has a rolled, structured quality rather than a loose coil, and the fan comb — with its ornate teeth and decorative back — adds a period-quality elegance that sets this apart from standard updos.
The fan comb transforms a simple chignon into something with character and history. It suggests you appreciate detail and craftsmanship, which are qualities that register on a first date even if nobody explicitly names them.
Why this look is popular: Vintage accessories have surged in popularity because they add personality to modern styles in a way that mass-produced pieces cannot. The fan comb, in particular, photographs with beautiful detail — the ornate teeth catch light and create visual interest that elevates the entire look. The swept-to-one-side chignon also flatters most face shapes by creating asymmetry.
Where this look is suitable: Tea room dates, garden restaurant dinners, afternoon dates with a slightly refined atmosphere, and any setting where vintage or classic elegance matches the mood. The style pairs beautifully with floral prints and vintage-inspired outfits.
Step by step:
- Sweep to one side. Brush all hair smoothly to one side, choosing whichever direction feels most natural. Use a boar bristle brush for a flat, polished surface.
- Create the twist. Starting at the ends, roll the hair inward toward the nape, keeping the roll tight and smooth. Continue rolling until you reach the nape and the entire length is contained in the roll.
- Secure the chignon. Pin the rolled chignon in place with bobby pins, inserting them diagonally through the roll and into the base hair. Use at least four pins for security.
- Smooth the surface. Apply a small amount of pomade or smoothing cream to the surface of the chignon and the swept sections to eliminate flyaways and create a polished finish.
- Add the fan comb. Insert the vintage fan comb just above the chignon, pushing the teeth gently into the hair until the comb sits securely. Position it at a slight angle for visual interest.
- Set with spray. Mist with a strong-hold hairspray to lock the chignon and swept sections in place for the evening.
Tips and tricks: Vintage fan combs can be found at antique shops, estate sales, and Etsy — look for combs with metal teeth for better grip than plastic. If the comb feels loose, cross two bobby pins at the insertion point to create an anchor. For very thick hair, the chignon roll may need to be secured with U-pins in addition to bobby pins. The swept-to-one-side direction should follow your natural part for the most flattering effect.
18.Romantic Braided Crown with Soft Curls
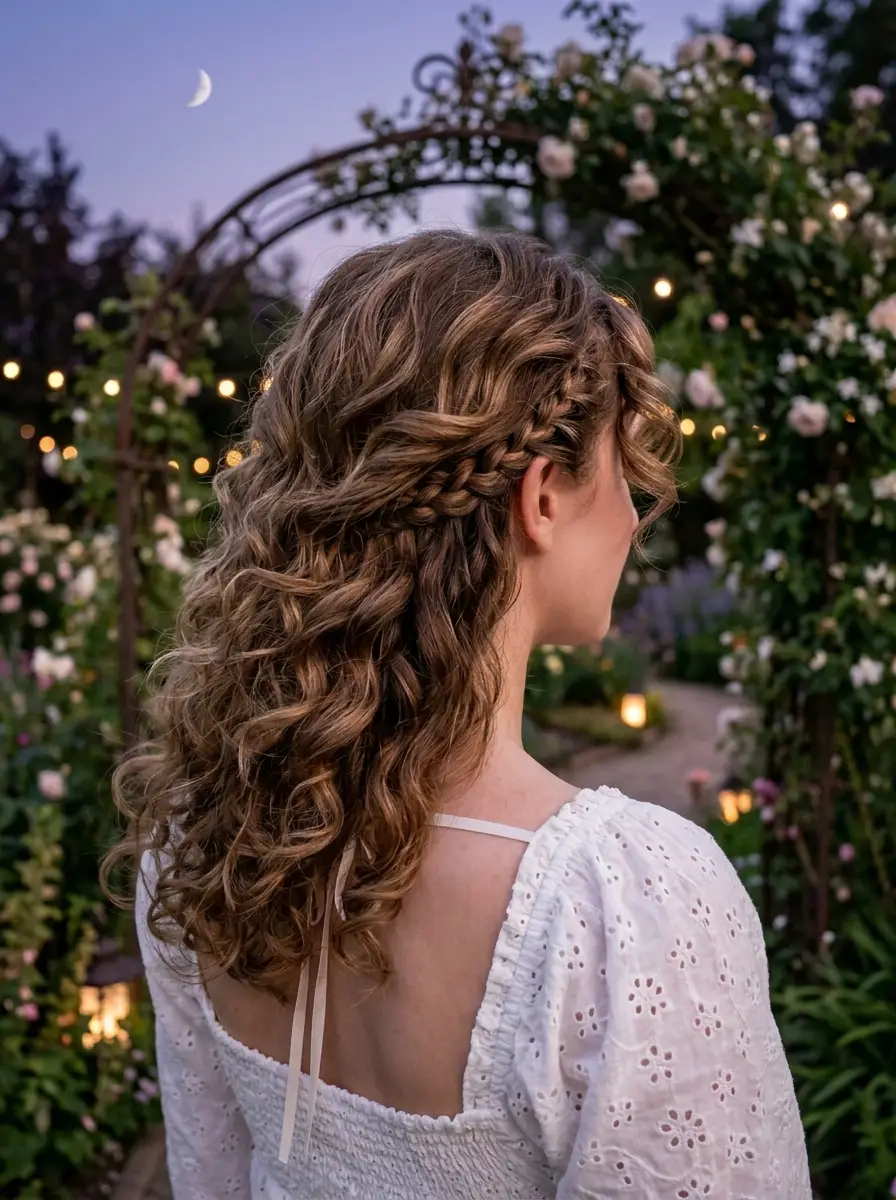
The overview: A section of hair from the temple is braided and swept across the back of the head, creating a half-up braided crown effect. The remaining natural curls fall freely past the shoulders, adding volume and romantic movement. The braid acts as a natural headband, keeping the top section structured while the curls provide softness and texture below.
This style works beautifully on naturally curly hair because the curls provide built-in volume and texture that straight hair requires heat tools to achieve. The braided crown adds definition and control to the top section where frizz tends to concentrate.
Why this look is popular: The combination of a structured braid and natural curls creates a look that feels organic and effortless rather than heavily styled. It's particularly popular because it celebrates natural texture instead of fighting it — a quality that resonates with the current cultural shift toward authenticity. The braided crown also keeps hair out of the face without requiring pins or clips.
Where this look is suitable: Cottagecore garden dates, outdoor brunch, afternoon tea dates, and any setting where a romantic, slightly whimsical vibe matches the mood. The natural curls make it particularly strong for daytime dates in warm weather.
Step by step:
- Define the curls. Apply a curl-defining cream like DevaCurl SuperCream to damp hair and let it air-dry or diffuse on low heat. The curls should be defined but not crunchy.
- Section for the braid. At one temple, pick up a section of hair roughly two inches wide. Divide it into three strands and begin a French or Dutch braid.
- Braid across the back. Continue the braid along the hairline across the back of the head, adding small sections as you go. Keep the braid loose enough to maintain curl texture within it.
- Secure at the opposite side. When you reach the opposite ear, stop adding hair and braid the remaining section a few inches down. Secure with a clear elastic and tuck the tail under the braid.
- Adjust the curls. Separate and fluff the loose curls below the braid with your fingers. Pull a few face-framing curls free around the temples.
- Set the braid. A light mist of flexible-hold hairspray on the braided section keeps it secure without creating stiffness. Avoid spraying the curls directly.
Tips and tricks: Naturally curly hair benefits from a lightweight curl cream rather than heavy gels, which can make the braid section look greasy. If your curls need more definition, scrunch a small amount of mousse through the ends while damp. The braid should be loose enough that individual curls are visible within it — a tight braid flattens the curl pattern. For added hold in humidity, a light anti-humidity spray like Living Proof No Frizz Nourishing Oil creates an invisible barrier.
19.Romantic Braided Crown Half-Up with Cascading Curls
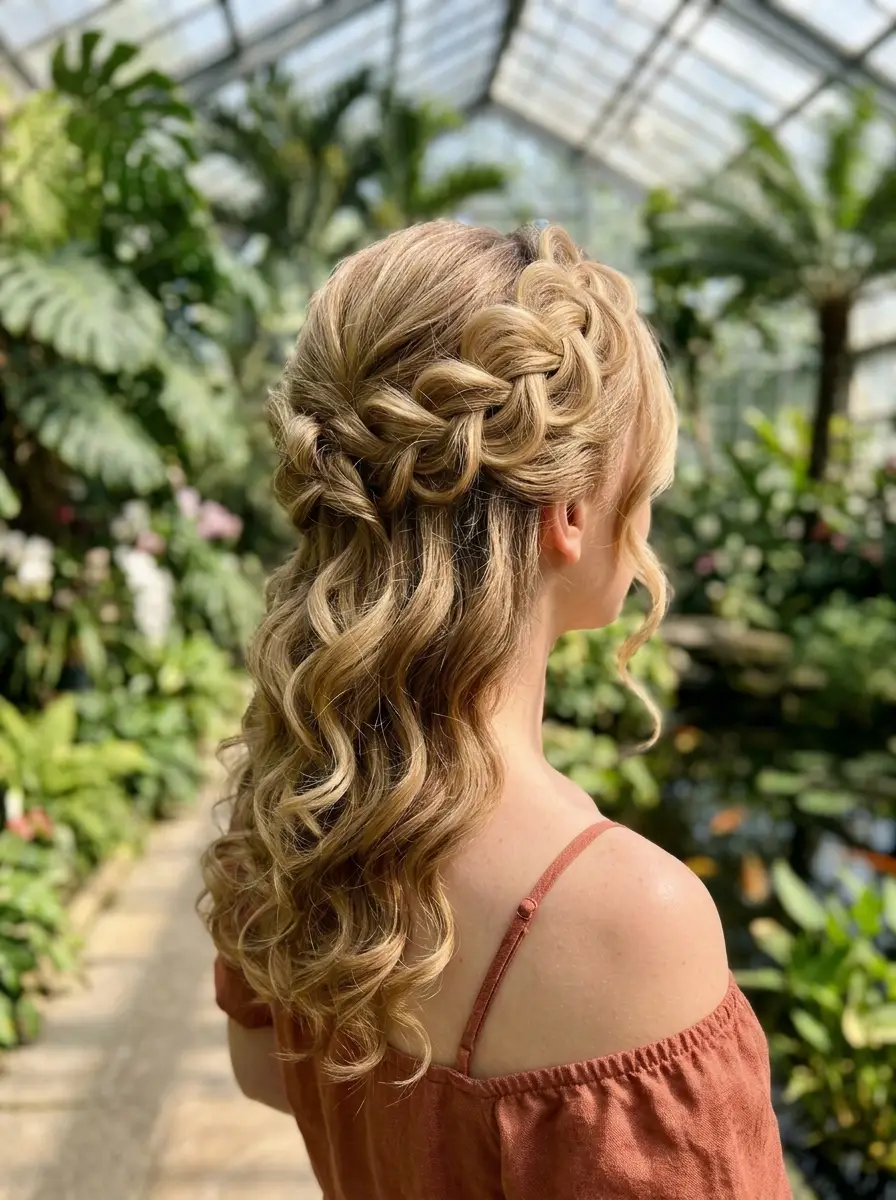
The overview: A thick, loose Dutch braid sweeps across the back of the head from one temple to the other, creating a braided crown effect. The remaining hair falls in defined spiral curls that cascade past the shoulders. The Dutch braid sits on top of the hair rather than blending in, creating visible texture and dimension that catches light beautifully.
The Dutch braid technique is key here — unlike a French braid that blends into the hair, the Dutch braid raises above the surface, creating a three-dimensional crown effect that photographs with stunning detail. The cascading curls below provide the romantic payoff.
Why this look is popular: This style reads as special-occasion without being bridal. The Dutch braid crown is visually striking from behind, which matters on a first date when you're walking ahead of someone or sitting at a bar. The spiral curls add glamour without looking overdone, and the half-up construction keeps everything comfortable for extended wear.
Where this look is suitable: Botanical conservatory dates, evening restaurant dinners, gallery openings, and any setting where the atmosphere leans romantic and slightly elevated. The cascading curls make this a strong choice for evening dates.
Step by step:
- Curl the hair first. Using a 1-inch curling iron, create defined spiral curls throughout all of the hair. Pin each curl to cool completely — this sets the spiral shape and ensures longevity.
- Section for the braid. Starting at one temple, pick up a section of hair roughly three inches wide. Divide into three strands and begin a Dutch braid — crossing outer strands under the middle rather than over.
- Braid across the back. Continue the Dutch braid along the hairline across the back of the head, adding small sections as you go. Keep the braid loose and thick for a voluminous crown effect.
- Secure and tuck. When you reach the opposite side, braid the remaining section a few inches down and secure with a clear elastic. Tuck the tail under the braid and pin it in place.
- Release the curls. Remove any pin curls and gently separate the spiral curls with your fingers. Don't brush — finger separation maintains the spiral definition.
- Adjust and set. Pull the braid gently outward to pancake it for fullness. Mist with a medium-hold hairspray to set the curls and the braid without stiffness.
Tips and tricks: The key to defined spiral curls that last is pinning each curl to cool — skip this step and they'll drop within an hour. A 1-inch barrel creates tight spirals; use a 1.25-inch barrel for looser, more relaxed curls. The Dutch braid should be thick enough to be visible from the front — if it's too thin, it disappears behind the head. Pancaking the braid after securing adds the volume needed to make it a true crown.
20.Effortless Chic Messy Bun with Wispy Bangs
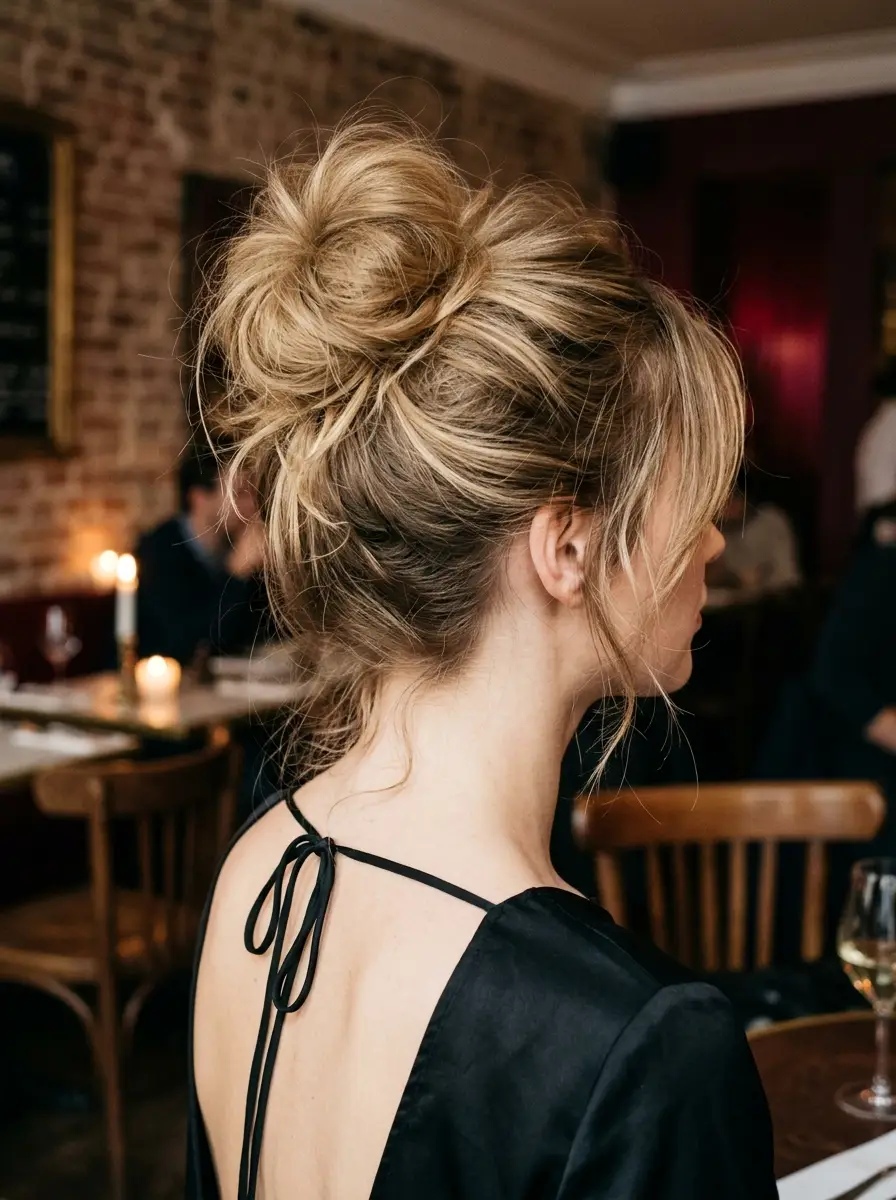
The overview: A high messy bun sits at the crown with a tousled, voluminous texture, while wispy curtain bangs sweep across the forehead and frame the face. The bun is deliberately undone — loops pulled loose, pieces escaping — creating a look that appears spontaneous but is actually carefully constructed. The bangs soften the forehead and draw attention to the eyes.
The wispy bangs are doing critical work here: they prevent the high bun from pulling the face taut and looking severe. Instead, they create a soft, feminine frame that makes the whole style feel approachable and romantic.
Why this look is popular: The messy bun with bangs has become a first-date staple because it strikes the exact balance between casual and put-together. The high placement lifts the face and creates the illusion of a more sculpted jawline, while the wispy bangs add softness and mystery. It's also extremely comfortable — no hair touching your neck in summer heat.
Where this look is suitable: Cozy restaurant dates, wine bar evenings, casual dinner dates, and any setting where the vibe is relaxed but you still want to look considered. The messy bun reads as approachable, which is exactly the energy you want on a first date.
Step by step:
- Prep for volume. Spray dry shampoo or volumizing powder at the roots throughout the crown area. This adds the grip and volume needed for a full-looking messy bun.
- Gather high. Flip your head upside down and gather hair into a high ponytail position at the crown. Don't pull it completely smooth — the texture at the base adds to the messy effect.
- Create the bun. Loop the ponytail through the elastic only halfway on the final pull-through, creating a looped bun. Leave the tail hanging or partially tucked.
- Pull and expand. Gently tug at sections of the bun to expand it and create volume. Pull out small pieces for a deliberately messy texture.
- Shape the bangs. Use a round brush to sweep the wispy bangs across the forehead, directing them slightly to one side. A quick blast of cool air from the dryer sets the direction.
- Final touches. Pull a few more wispy pieces free around the face and ears. A light mist of flexible-hold hairspray keeps everything in place without stiffness.
Tips and tricks: The bangs need to be genuinely wispy — thick, full bangs change the entire character of this style. If your bangs are growing out, a texturizing spray on the ends keeps them from looking greasy or flat. The bun sits best on second-day hair; freshly washed hair tends to be too slippery for the loops to hold. A small amount of texturizing cream on the bun ends adds definition without weight.
21.Elegant Twisted Chignon with Pearl Accents
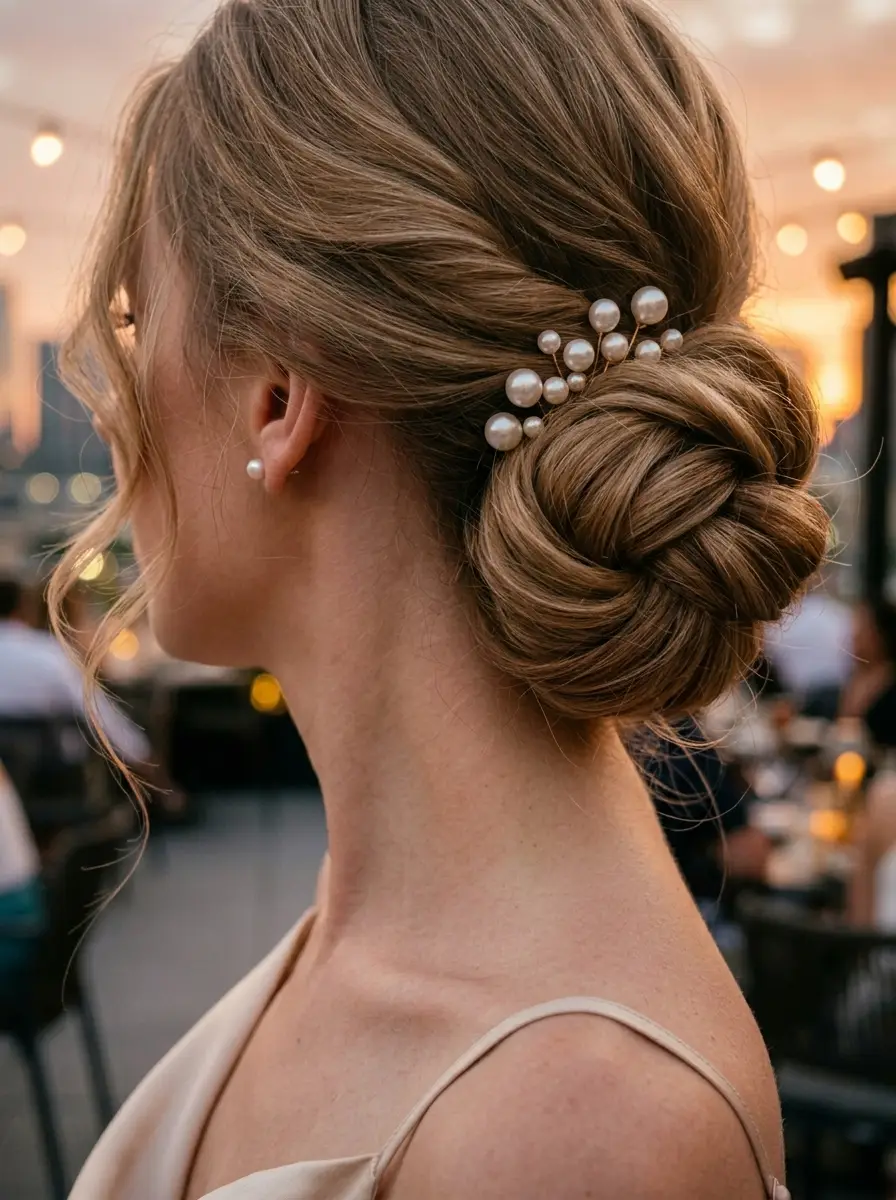
The overview: Hair is swept back into a low, structured chignon at the nape, with a cluster of pearl-tipped hair pins scattered through the coil. Soft face-framing tendrils fall at the temples, adding movement and femininity. The pearls catch light and create focal points within the dark hair, adding subtle luxury without being ostentatious.
Pearl hair pins have become the go-to accessory for anyone who wants to elevate a simple updo without going full bridal. They read as refined and intentional — exactly the energy a first date calls for.
Why this look is popular: The pearl accents add a luminous, eye-catching quality to the chignon that plain bobby pins simply cannot achieve. They photograph with beautiful detail, especially in warm lighting, and they signal a level of care and thoughtfulness that elevates the entire impression. The structured chignon keeps the look grounded in elegance while the pearls provide the sparkle.
Where this look is suitable: Rooftop restaurant dates, evening cocktail bars, upscale dinner dates, and any setting where the atmosphere leans sophisticated. The pearl accents pair naturally with delicate jewelry and elevated outfits.
Step by step:
- Smooth the hair back. Apply a smoothing serum and brush all hair straight back from the face, eliminating any part line. Use a boar bristle brush for a flat, polished surface.
- Separate the tendrils. Before gathering the rest, separate two thin sections at the temples and clip them aside. These will become the face-framing pieces.
- Create the chignon. Gather remaining hair into a low ponytail at the nape. Twist tightly, then coil around the base into a compact, structured chignon. Secure with bobby pins, hiding them within the folds.
- Add the pearl pins. Insert pearl-tipped hair pins at various points throughout the chignon, concentrating them on one side for asymmetry. Space them randomly — uniform placement looks rigid.
- Curl the tendrils. Using a 0.75-inch curling iron, create soft curls in the face-framing pieces. Let them cool, then gently separate with your fingers.
- Set with spray. Mist with a strong-hold hairspray to lock the chignon and pearl pins in place. A light shine spray on the surface adds a polished finish.
Tips and tricks: Pearl-tipped pins are available at most beauty retailers and online — look for ones with strong pin bases that won't bend when inserted into thick hair. For very fine hair, use fewer pins and position them where they're most visible from the front. The chignon should be tight enough to hold the pins securely — a loose bun won't anchor them. The face-framing tendrils should be thin enough to be wispy but thick enough to be visible from a distance.
22.Bohemian Pearl and Gold Twig Half-Up Hairstyle

The overview: Two twisted sections from each temple meet at the back of the head, secured with an elaborate gold wire vine hairpiece adorned with pearls that cascades down the back. The remaining hair falls in soft waves, creating a bohemian backdrop for the ornate hairpiece. The gold wire and pearls catch light and create a dramatic focal point.
This is a statement style — the hairpiece does the talking while the twisted half-up base provides a clean, minimal foundation. It's the kind of look that photographs spectacularly and makes a lasting impression without requiring elaborate hair construction.
Why this look is popular: The combination of gold wire, pearls, and organic vine-like structure creates a hairpiece that functions as wearable art. It elevates a simple half-up style into something that reads as special and considered. The bohemian quality of the vine complements both casual and formal settings, making it surprisingly versatile for a first date.
Where this look is suitable: Wine cellar dates, candlelit dinners, outdoor evening events, and any setting where the atmosphere leans romantic and slightly bohemian. The hairpiece adds enough drama to match a dressier outfit without overwhelming a simpler look.
Step by step:
- Add wave texture. Create soft waves throughout the hair using a 1.5-inch curling iron. Let them cool, then brush through for a natural, flowing texture.
- Create the twists. At each temple, take a section of hair roughly two inches wide and twist it tightly away from the face. Continue twisting until you reach the back of the head.
- Meet at the back. Bring both twisted sections to the back of the head, positioning them at the crown. Cross them over each other and secure with bobby pins in an X pattern.
- Position the hairpiece. Place the gold wire vine hairpiece over the secured twists, positioning the focal point at the crossing point. The vine should cascade naturally down the back.
- Secure the hairpiece. Use bobby pins to anchor the hairpiece at multiple points along its length, hiding the pins beneath the wire and pearls.
- Adjust the waves. Separate and fluff the loose waves beneath the hairpiece. A few face-framing pieces free at the temples complete the look.
Tips and tricks: Gold wire vine hairpieces are available from bridal accessory retailers and Etsy sellers — choose one that's proportionate to your hair volume. Very thick hair may need a larger piece to avoid looking overwhelmed. Fine hair benefits from the twisted sections being secured more tightly to support the hairpiece weight. If the wire feels heavy, add extra bobby pins at the temples for additional support.
23.Sleek Low Ponytail with a Velvet Bow
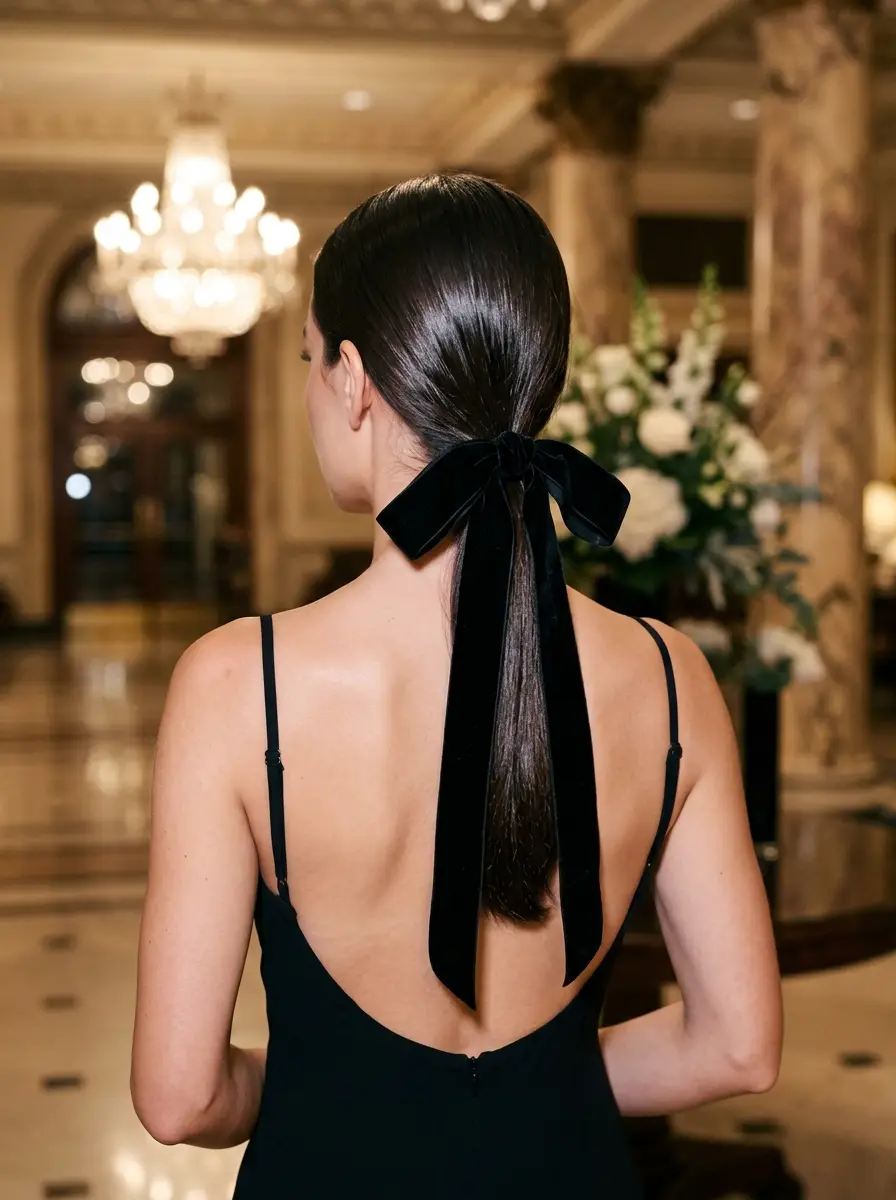
The overview: An ultra-sleek, glass-hair low ponytail sits at the nape with an oversized black velvet bow positioned at the base. The bow's trailing ribbons hang down the back, adding dramatic length and movement. The ponytail itself is pin- straight with a high-shine finish, creating a silhouette that is simultaneously minimal and luxurious.
The contrast between the severe sleekness of the ponytail and the soft, plush texture of the velvet bow is what makes this work. It's a study in controlled tension — precision meeting indulgence — and it photographs with striking visual impact.
Why this look is popular: The sleek ponytail with a velvet bow is one of those styles that looks like it belongs on an editorial spread. The glass-hair finish signals sophistication, while the oversized bow adds a dramatic, romantic quality that makes the style memorable. The trailing ribbons create movement that photographs beautifully, especially from behind.
Where this look is suitable: Grand hotel lobbies, formal restaurant dates, evening theatre outings, and any setting where the dress code is elevated. This is a statement style that pairs with cocktail dresses and tailored evening wear.
Step by step:
- Straighten thoroughly. Flat-iron all hair in thin, half-inch sections using a 1-inch flat iron. Apply a heat protectant first, then follow with a shine serum like Olaplex No. 7 for the glass-hair finish.
- Gather the ponytail. Brush all hair straight back into a low ponytail at the nape. Use a fine-tooth comb to eliminate every bump and flyaway. The surface should be perfectly smooth.
- Secure tightly. Tie with a strong elastic that matches your hair color. Wrap a small strand of hair around the elastic to conceal it, securing the end with a bobby pin underneath.
- Flat-iron the ponytail. Run the flat iron through the ponytail length one more time for a pin-straight, high-shine finish. Apply a light shine spray for extra gloss.
- Add the bow. Position the oversized black velvet bow directly over the elastic, ensuring the tails drape naturally down the back alongside the ponytail. The bow should sit flat against the head, not stick out.
- Final polish. Smooth any remaining flyaways with a small amount of pomade on a toothbrush. Mist with a strong- hold hairspray for all-night security.
Tips and tricks: The glass-hair finish requires thorough straightening — any waves or bends in the ponytail undermine the sleek effect. A ceramic flat iron with adjustable heat settings lets you customize temperature for your hair type. The velvet bow should be proportionate to your head — an oversized bow on a small frame can look overwhelming. The trailing ribbons should reach roughly mid-back for the most dramatic effect.
24.Braided Crown Twist Half-Up
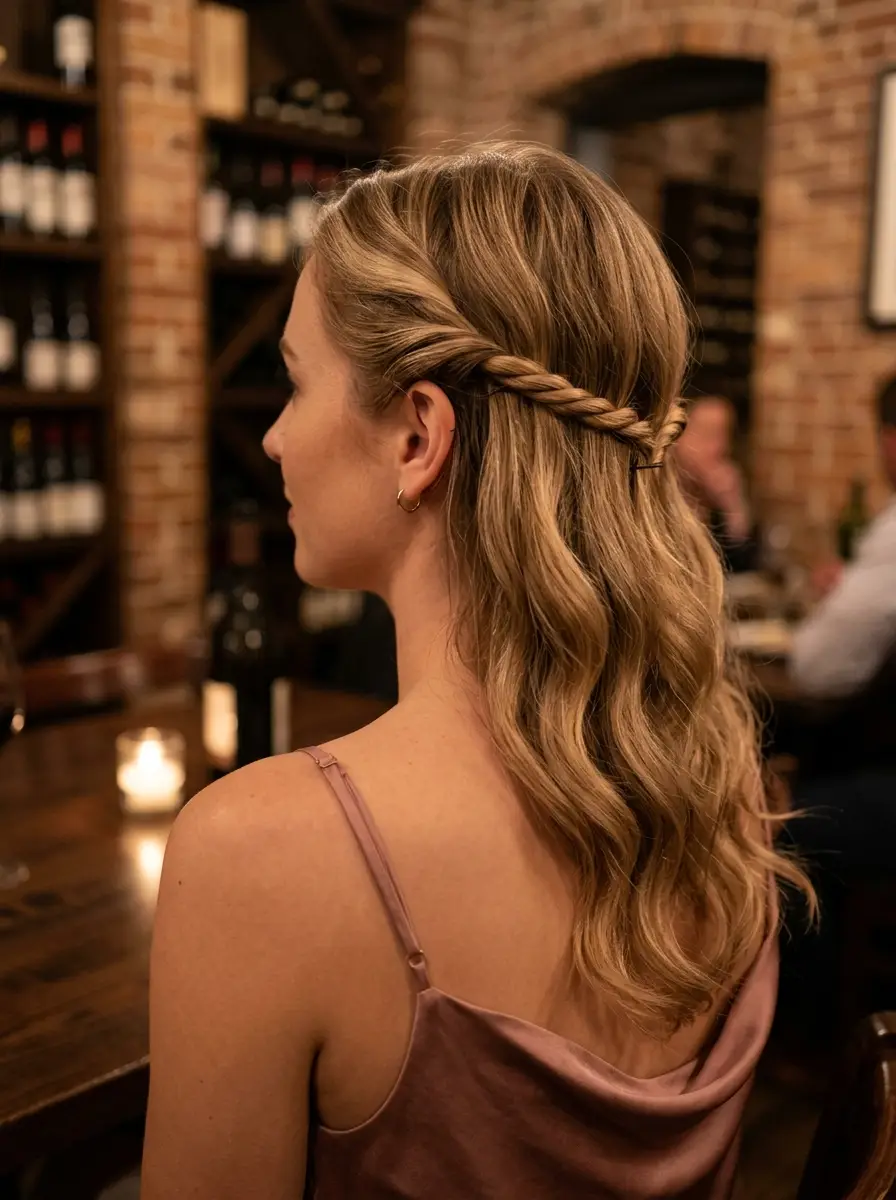
The overview: Two twisted sections from the temples are pulled to the back and secured at the crown, with the remaining hair falling in soft, natural waves. The twisted sections create a crown-like effect without requiring actual braiding technique, making this a more accessible alternative to the braided crown styles.
The simplicity of the twist makes this style particularly appealing for a first date — it looks polished and considered without requiring advanced skill. The soft waves below provide the romantic payoff that makes the style feel complete.
Why this look is popular: The braided crown twist is one of the most universally flattering half-up styles because it lifts the face and adds structure without the commitment of a full updo. It's quick to construct, holds well throughout an evening, and pairs with virtually any outfit. The soft waves below keep the look feminine and approachable.
Where this look is suitable: Cozy Italian wine bar dates, casual restaurant dinners, outdoor evening dates, and any setting where the atmosphere is warm and relaxed. The style is polished enough for a nicer venue but casual enough for a more laid-back setting.
Step by step:
- Add wave texture. Create soft, natural-looking waves using a 1.5-inch curling iron or by scrunching sea salt spray into damp hair and air-drying.
- Twist the first section. At one temple, take a section roughly two inches wide and twist it tightly away from the face, continuing until you reach the back of the head.
- Twist the second section. Repeat on the opposite side, twisting a similarly sized section away from the face toward the back.
- Secure at the back. Bring both twisted sections to the back of the head, cross them over each other, and secure with bobby pins in an X pattern at the crown.
- Adjust the waves. Separate and fluff the loose waves with your fingers. Pull a few wispy pieces free at the temples for softness.
- Set with spray. A light mist of flexible-hold hairspray on the twists and waves keeps everything in place without looking stiff.
Tips and tricks: The twists should be tight enough to hold their shape but not so tight that they pull at the scalp — comfort matters on a long first date. If the twists feel loose, a small amount of texturizing spray before twisting adds grip. The X-pattern bobby pin placement is essential for security — parallel pins slide out. For thicker hair, the twists may need to be pinned at multiple points along their length to stay flat against the head.
25.Braided Halo with Loose Waves
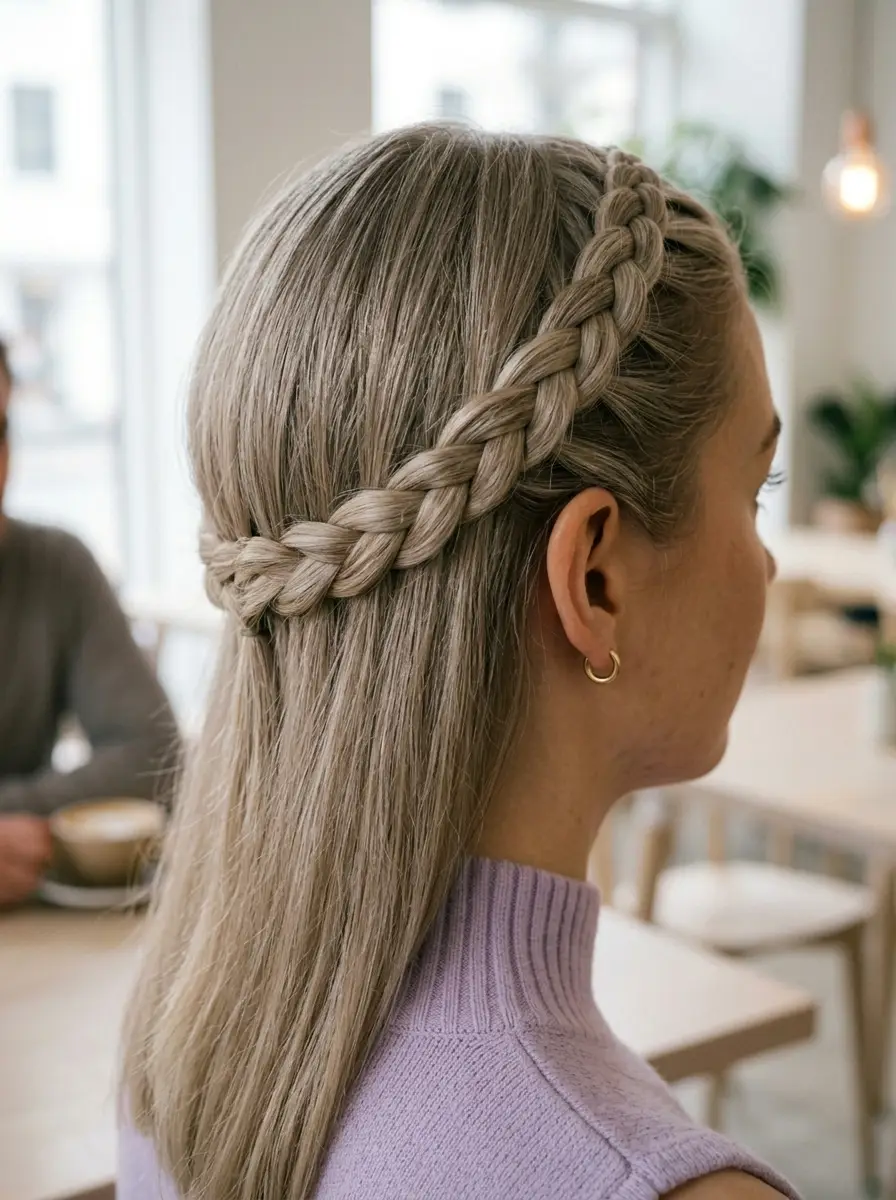
The overview: A thick Dutch braid curves across the back of the head like a halo or crown, beginning near one ear and wrapping around to the other side. The remaining hair falls in a slight, natural wave that moves freely with every turn of the head. The braid creates a defined, structured frame while the waves below keep everything soft and approachable.
The halo braid has an almost ethereal quality — it frames the head like a crown while the loose waves below prevent it from reading as severe or overly styled. On a first date, it strikes the balance between "I made an effort" and "I'm naturally this put-together."
Why this look is popular: The braided halo creates a beautiful frame for the face that photographs with stunning detail from every angle. The thick Dutch braid catches light and adds visible texture, while the natural waves below provide movement and softness. It's a style that works across hair colors — the braid shows up beautifully on both light and dark hair.
Where this look is suitable: Coffee shop dates, daytime outings, casual restaurant lunches, and any setting where the vibe is warm, relaxed, and slightly romantic. The natural waves make this a strong choice for daytime first dates.
Step by step:
- Start the braid. Near one ear, pick up a section of hair roughly three inches wide. Divide into three strands and begin a Dutch braid — crossing outer strands under the middle.
- Braid across the back. Continue the Dutch braid along the back of the head, adding all remaining loose hair as you go. The braid should sit at the back of the head, not on top — this creates the halo effect.
- Secure at the opposite side. When you reach the opposite ear, braid the remaining section a few inches down and secure with a clear elastic. Tuck the tail behind the ear and pin it in place.
- Loosen the waves. The remaining hair below the braid should fall naturally. If it's too straight, add a quick wave with a large-barrel curling iron, or scrunch with sea salt spray.
- Pancake the braid. Gently pull the outer edges of the Dutch braid outward to expand it and create the thick, halo appearance. Work from one side to the other for even fullness.
- Set and finish. Mist with a flexible-hold hairspray to keep the braid secure and the waves defined. A touch of shine spray on the waves adds a healthy, polished finish.
Tips and tricks: The halo braid requires hair that's at least collarbone-length to create both the braid and have enough length for the waves below. For shorter hair, clip-in extensions can add the necessary length. The Dutch braid technique is essential — a French braid blends into the hair and doesn't create the raised, visible crown effect. A texturizing spray before braiding gives the strands enough grip to hold the braid shape throughout the day.
26.Chic High Ponytail with Voluminous Curls
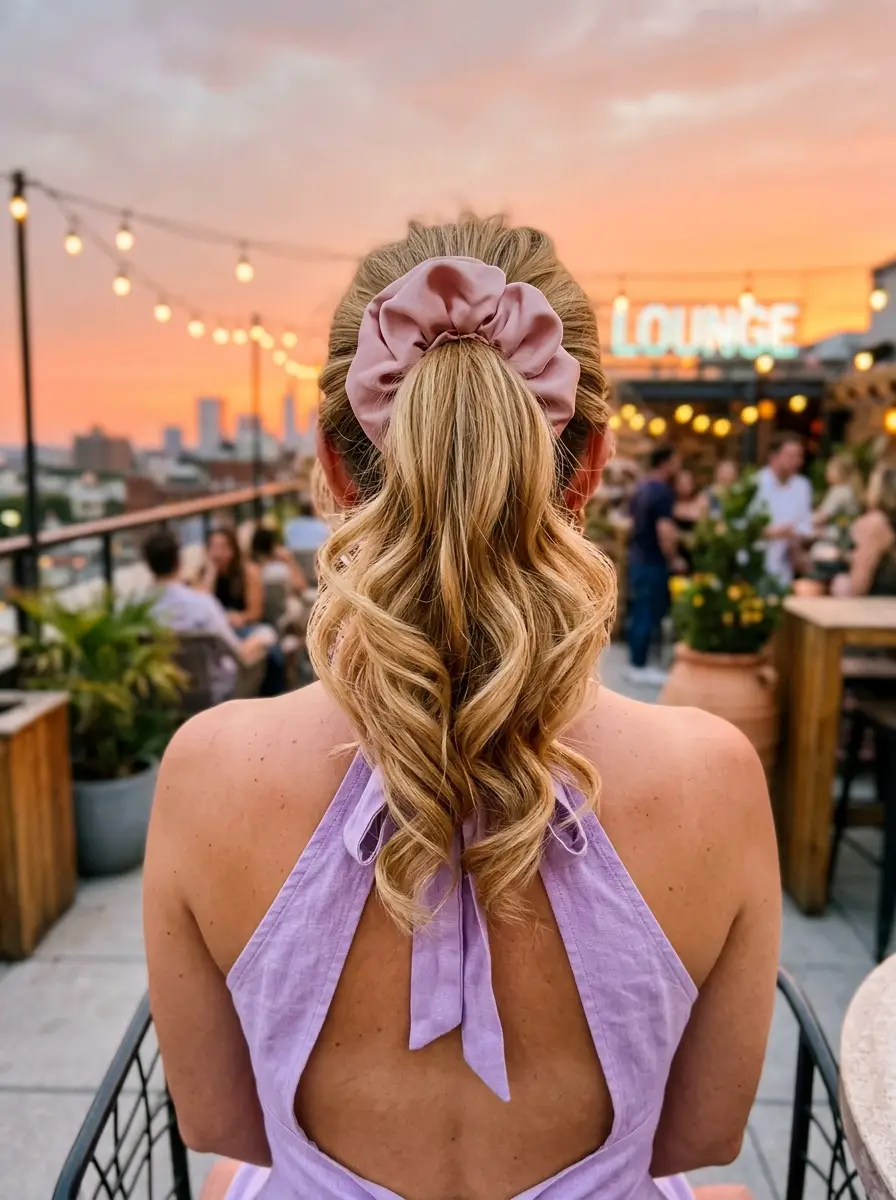
The overview: A high ponytail positioned at the crown features defined, bouncy barrel curls that cascade down the back. A large dusty rose satin scrunchie secures the base, adding a soft, romantic accent. The crown section is smoothed back for a polished appearance, while the curls provide volume and dramatic movement.
The high ponytail with curls is a power move — it elongates the neck, lifts the face, and creates an immediate visual impact. The satin scrunchie softens the effect, preventing it from reading as too aggressive for a first date.
Why this look is popular: The high ponytail with voluminous curls is one of the most photographed date-night styles because it creates instant drama. The curls catch light and add movement that draws the eye, while the high placement creates a lifted, youthful silhouette. The dusty rose scrunchie adds a romantic, on-trend accent.
Where this look is suitable: Rooftop bar dates, sunset cocktail evenings, upscale restaurant dinners, and any setting where the atmosphere leans glamorous and energetic. The voluminous curls make a statement without being overdone.
Step by step:
- Curl the ponytail. Before gathering the ponytail, curl the hair in two-inch sections using a 1.25-inch curling iron. Pin each curl to cool completely for maximum bounce and hold.
- Gather the high ponytail. Flip your head upside down and gather all hair into a high ponytail at the crown. Smooth the crown section with a boar bristle brush for a polished surface.
- Secure with the scrunchie. Tie the ponytail with the dusty rose satin scrunchie, positioning it at the crown. The scrunchie should be large enough to be visible as an accent.
- Release the curls. Remove any pin curls and gently separate the barrel curls with your fingers. Let them fall naturally down the back.
- Add volume. Gently lift the curls at the base with your fingers to create fullness. A light mist of volumizing spray at the crown adds height.
- Set with spray. Mist the curls with a medium-hold hairspray to maintain their shape without crunchiness. The curls should bounce naturally with movement.
Tips and tricks: The key to bouncy curls that last is pinning them to cool — this sets the curl pattern and prevents them from dropping. A 1.25-inch barrel creates the ideal barrel curl size; smaller barrels create tighter ringlets that read as more formal. The high ponytail placement should be at the crown, not at the back of the head — the crown position creates the lifted, dramatic silhouette. A satin scrunchie is gentler on hair than elastic alone and reduces breakage at the ponytail base.
27.Sleek High Ponytail with a Golden Twist

The overview: A pin-straight high ponytail at the crown is wrapped at the base with a gold metallic cord that coils upward in stacked layers. The ponytail itself falls sleek and straight, with a high-shine finish that mirrors the metallic glow of the cord. The gold wrapping transforms a basic ponytail into something with architectural precision and luxury appeal.
The stacked gold cord creates a focal point that's impossible to miss — it reads as jewelry for your hair. On a first date, this detail says you understand accessorizing at a level most people don't even consider.
Why this look is popular: The sleek high ponytail with gold cord wrapping has become a red-carpet favorite because it photographs with striking visual impact. The gold against dark hair creates contrast that reads clearly in photos, and the architectural quality of the stacked cord adds a modern, fashion-forward element to an otherwise classic silhouette.
Where this look is suitable: Rooftop garden evening dates, upscale restaurant dinners, cocktail bar dates, and any setting where the dress code is elevated. The gold cord pairs naturally with gold jewelry and metallic accents in your outfit.
Step by step:
- Straighten thoroughly. Flat-iron all hair in thin sections for a pin-straight finish. Apply a heat protectant and follow with a shine serum for the glass-hair effect.
- Gather the high ponytail. Brush all hair straight up to the crown and secure with a strong elastic. The surface should be perfectly smooth with no bumps or flyaways.
- Conceal the elastic. Wrap a small strand of hair around the elastic to conceal it, securing the end with a bobby pin underneath. This creates a clean base for the cord wrapping.
- Wrap the gold cord. Starting at the base, wind the gold metallic cord tightly around the ponytail base, stacking the coils upward. Each coil should sit directly above the previous one, creating a cylindrical stack roughly one to two inches tall.
- Secure the cord. Tuck the cord end underneath the stack and secure with a bobby pin hidden beneath the coils. The stack should sit firmly without unwinding.
- Final polish. Run the flat iron through the ponytail one more time for a perfectly straight finish. Mist with a shine spray to enhance the glass-hair effect.
Tips and tricks: Gold metallic cord is available at craft stores and fabric shops — choose a weight that's thin enough to coil tightly but thick enough to be visible. A cord roughly one-eighth inch in diameter works well. For very thick ponytails, the cord wrapping may need to be taller to maintain proportion. A small dot of fabric glue at the cord's starting and ending points adds security without being visible. The straight ponytail must be truly pin-straight for this style to work — any wave undermines the sleek effect.
28.Chic Claw Clip Updo with Loose Tendrils
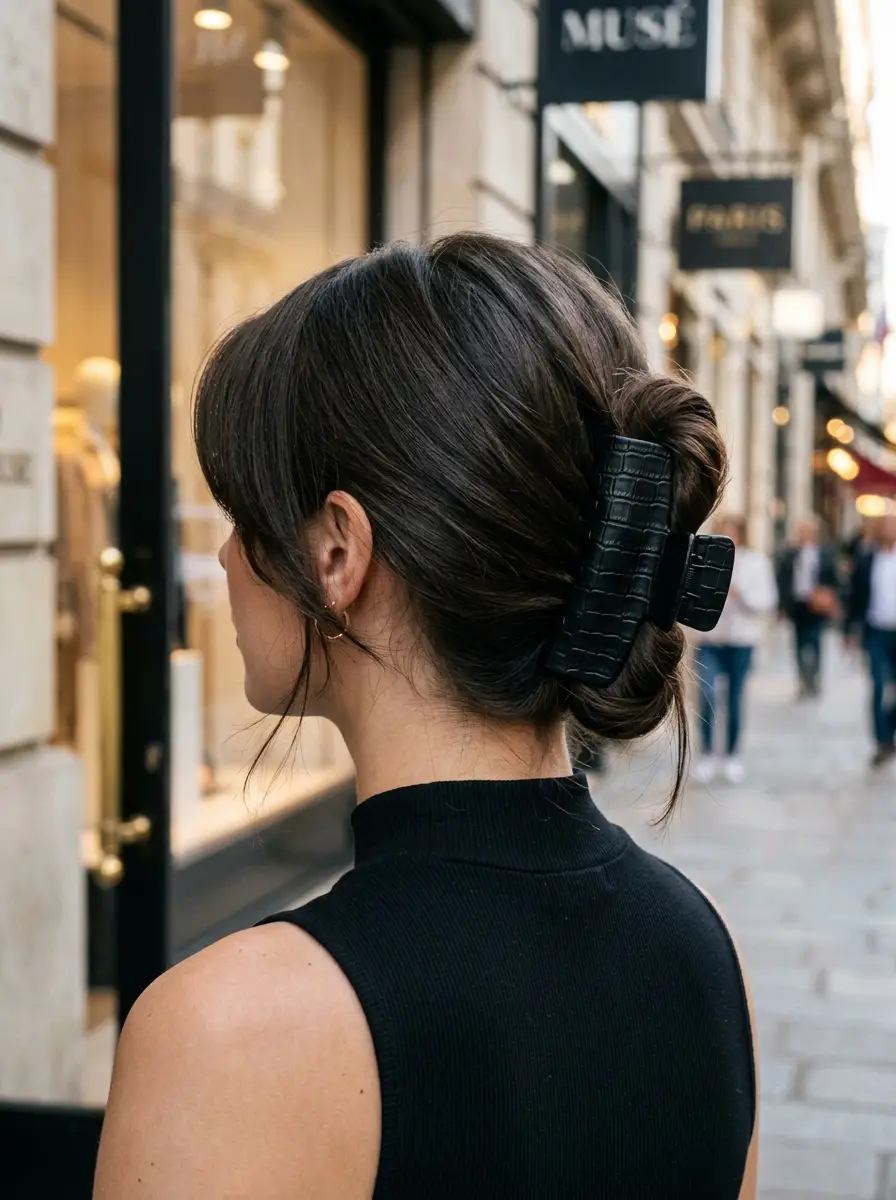
The overview: Hair is loosely gathered and twisted upward, secured with an oversized black croc-embossed claw clip at the back of the head. Wispy tendrils escape around the face and ears, adding softness and movement to the structured twist. The claw clip's textured surface catches light and adds a modern, fashion- forward accent.
This is the claw clip updo elevated — the croc-embossed texture transforms a functional accessory into a style statement. The loose tendrils ensure the look doesn't read as too casual, making it appropriate for a first date setting where you want to appear polished but not overdone.
Why this look is popular: The croc-embossed claw clip has become a street-style favorite because it adds texture and visual interest to a simple updo. The black finish works across hair colors, and the oversized size creates a bold focal point. The loose tendrils keep the overall look soft and approachable — essential for a first date where you want to appear approachable.
Where this look is suitable: City street dates, Parisian café dates, casual evening outings, and any setting where the vibe is effortlessly chic. The style pairs beautifully with tailored pieces and minimalist outfits.
Step by step:
- Add texture. Spray texturizing mist throughout dry hair for grip and volume. A quick scrunch with your hands enhances any natural movement.
- Separate the tendrils. Before gathering the rest, separate two thin sections at the temples and a few wispy pieces at the ears. Clip them aside temporarily.
- Gather and twist. Collect all remaining hair at the back of the head, twist it upward toward the crown, and fold it against the back of the head.
- Secure with the clip. Clamp the oversized claw clip over the twisted section, ensuring it grips both the twist and the hair against the scalp. The clip should sit horizontally at the back of the head.
- Release the tendrils. Let the separated pieces fall naturally around the face and ears. Use your fingers to direct them into soft, flowing shapes.
- Adjust and set. Pull a few sections loose from the twist for a more relaxed appearance. A light mist of flexible-hold hairspray keeps everything in place without stiffness.
Tips and tricks: The claw clip needs to be large enough to grip all your hair securely — oversized versions work best for this style. A croc- embossed texture adds grip compared to smooth plastic, which helps the clip stay in place. The tendrils should be genuinely thin and wispy — thick pieces change the character of the style. For extra hold, cross two bobby pins at the base of the twist before adding the clip.
29.Braided Half-Up Waves with a Touch of Boho
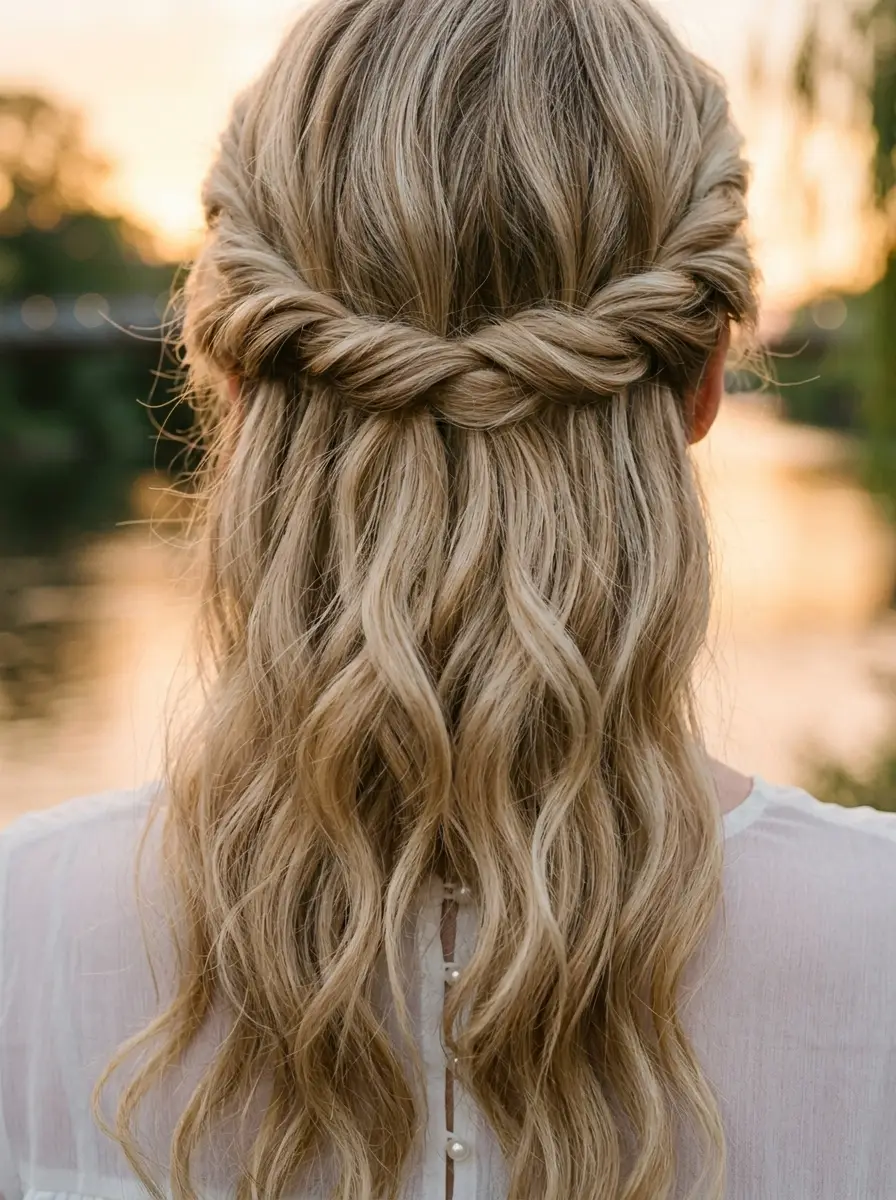
The overview: Two twisted sections from the temples are pulled to the back and secured in a half-up knot, with the remaining hair falling in loose, beachy waves. The knot sits at the back of the head, creating a focal point that's casual yet intentional. The waves have a wind-blown, sun-kissed quality that reads as natural and carefree.
The half-up knot with beachy waves is the hairstyle version of a really good hair day — it looks like the waves just happened and the knot was an afterthought. In reality, it requires just enough technique to look deliberate without appearing styled.
Why this look is popular: The combination of a structured half-up knot and loose beachy waves creates a look that's both polished and relaxed — the exact balance most people aim for on a first date. The bohemian quality of the waves adds warmth and approachability, while the knot keeps hair out of your face for easy conversation.
Where this look is suitable: Outdoor garden dates, sunset walks, beachside restaurant dinners, and any summer setting where the atmosphere is warm and natural. The bohemian quality pairs beautifully with sundresses and flowy fabrics.
Step by step:
- Create beachy waves. Apply sea salt spray to damp hair and let it air-dry, or use a 1.5-inch curling iron to add loose, irregular waves. The waves should look natural, not uniform.
- Twist the sections. At each temple, take a section roughly two inches wide and twist it away from the face toward the back of the head.
- Create the knot. Bring both twisted sections to the back of the head and tie them in a simple knot, as if you were tying a piece of string. Pull the ends through and let them blend with the loose waves.
- Secure the knot. If the knot feels loose, anchor it with a bobby pin hidden underneath. The knot should hold itself without being overly tight.
- Enhance the waves. Scrunch the loose waves with your fingers to add definition and texture. A small amount of texturizing cream on the ends enhances the beachy quality.
- Set lightly. A light mist of sea salt spray or flexible- hold hairspray maintains the natural, wind-blown quality without stiffness.
Tips and tricks: The key to beachy waves that look natural is irregularity — avoid curling every section in the same direction or holding each wrap for the same duration. Some pieces should be straighter than others. A sea salt spray like Bumble and Bumble Surf Spray creates the right texture without crunchiness. The knot should be loose enough to look casual — if it's too tight, it reads as a basic half-up style rather than a boho look.
30.Velvet Bow Accent Low Side Part
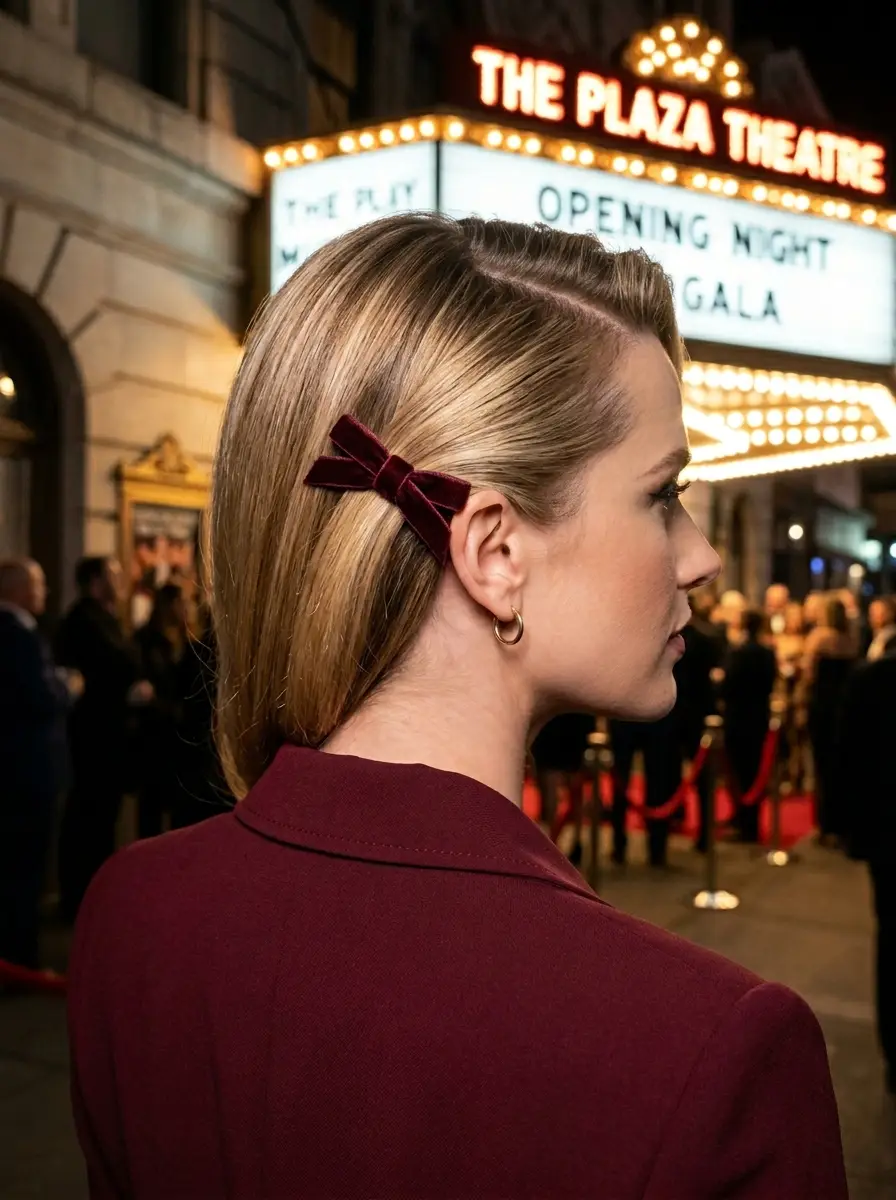
The overview: A precision blunt bob is styled with a deep side part, with the right side tucked neatly behind the ear and secured with a burgundy velvet bow clip. The left side falls cleanly across the forehead, creating an asymmetrical silhouette that's both polished and dramatic. The bow adds warmth and femininity to the sharp, architectural cut.
The deep side part with a tucked ear is one of the most universally flattering styling tricks — it opens up one side of the face while the other side gets the mysterious, partially hidden treatment. The velvet bow makes the tuck look intentional rather than accidental.
Why this look is popular: The blunt bob with a deep side part and velvet bow reads as sophisticated and editorial — it's the kind of style that makes people ask who your stylist is. The asymmetry creates visual interest, and the burgundy velvet bow adds a rich, tactile element that elevates the entire look. It also keeps hair out of your face on the tucked side, which is practical for dinner dates.
Where this look is suitable: Theater and performance dates, upscale restaurant dinners, evening gallery openings, and any setting where the atmosphere is refined and slightly dramatic. The style pairs beautifully with structured outfits and bold lip colors.
Step by step:
- Create the deep side part. Use a rat-tail comb to draw a precise deep side part, positioning it roughly two inches from the center. The part should be clean and straight.
- Straighten the bob. Flat-iron the entire head in thin sections for a sleek, polished finish. Apply a heat protectant and follow with a light shine serum.
- Tuck one side. Take the right side section and tuck it neatly behind the ear, smoothing it flat against the head. Hold it in place with your fingers.
- Add the bow. Clip the burgundy velvet bow just above the tucked section, positioned roughly at the top of the ear. The bow should secure the tuck in place while adding a decorative accent.
- Shape the opposite side. Use a round brush to sweep the left side across the forehead, creating a clean, angled line that partially covers one eye.
- Set with spray. A light mist of strong-hold hairspray locks the bob's shape and the deep side part in place. The sleek surface should remain smooth throughout the evening.
Tips and tricks: A blunt bob requires precision cutting — ask your stylist for a one-length cut with no layers for the cleanest silhouette. The deep side part works best when it follows the natural growth pattern of your hair; forcing a part against your cowlick creates maintenance headaches. The velvet bow clip should be small enough to sit discreetly above the ear — oversized bows overwhelm a bob. A light-hold hairspray like Kenra 13 maintains the shape without crunchiness.
31.Velvet Scrunchie Low Bun with Wispy Strands
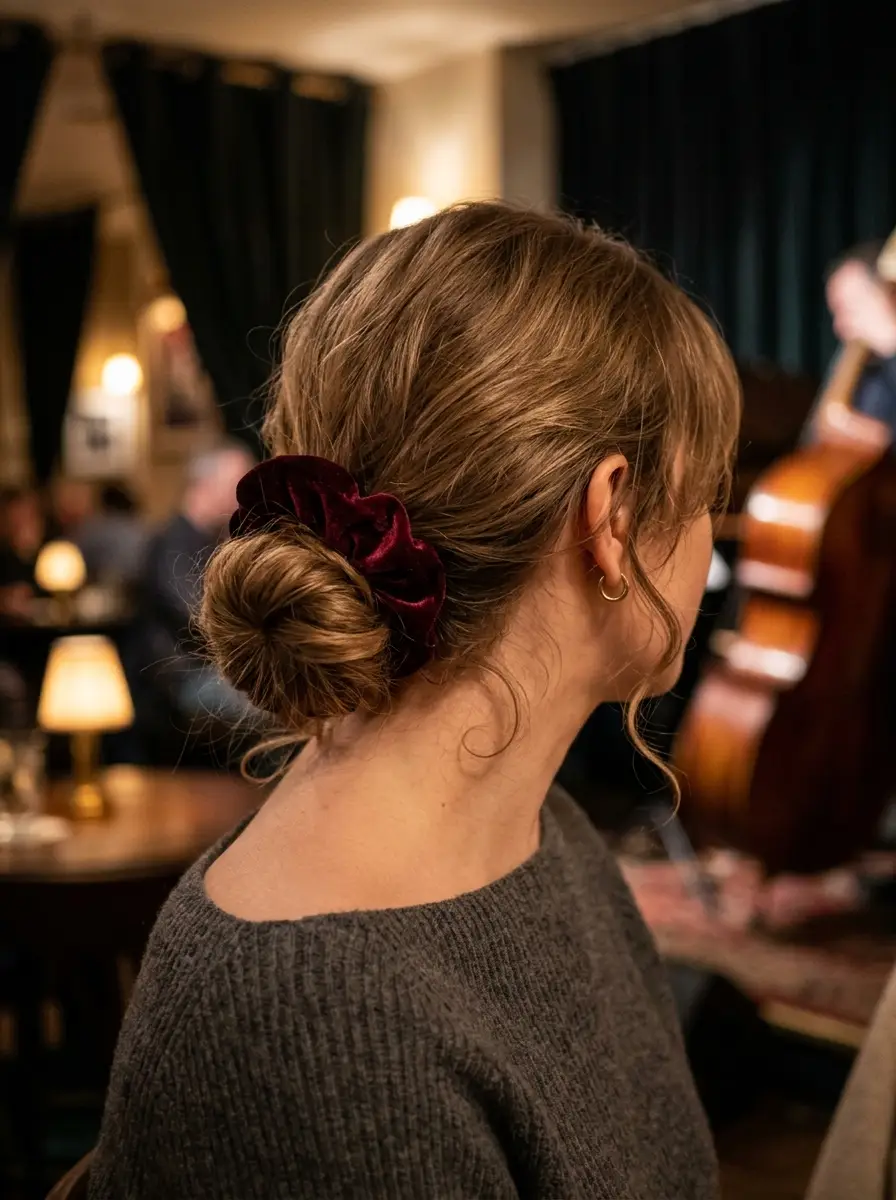
The overview: A low, relaxed bun at the nape is secured with a deep burgundy velvet scrunchie, with wispy curly tendrils left free around the face and ears. The bun itself is loose and organic — not tightly coiled — and the velvet scrunchie adds a rich, tactile accent that elevates the entire look from basic to considered.
The velvet scrunchie does more than hold your hair — it signals that you understand accessorizing at a level that separates intentional styling from simply throwing your hair up. The wispy tendrils keep everything soft and romantic, which is exactly the energy a first date calls for.
Why this look is popular: The velvet scrunchie low bun has become a go-to first-date style because it's genuinely comfortable while still looking polished. The deep burgundy color adds richness that works across seasons, and the low placement at the nape keeps the silhouette elegant rather than youthful. The wispy tendrils prevent the bun from reading as severe or matronly.
Where this look is suitable: Jazz club dates, intimate restaurant dinners, evening drinks at a cozy bar, and any setting where the atmosphere is warm and intimate. The velvet scrunchie adds enough visual interest to elevate the style beyond a basic bun.
Step by step:
- Add texture. Spray texturizing mist throughout dry hair for grip. A quick scrunch with your hands enhances any natural wave or curl pattern.
- Gather low. Brush hair back into a low ponytail at the nape. Keep the surface relaxed — a few bumps and flyaways add to the undone quality.
- Create the bun. Loop the ponytail through the velvet scrunchie, pulling it only halfway through on the final loop to create a messy bun shape. Let the ends tuck naturally.
- Pull and adjust. Gently tug at sections of the bun to expand it and create a more relaxed, organic shape. Pull out wispy pieces around the face and ears.
- Define the tendrils. If your face-framing pieces need more definition, use a small curling iron to add a quick bend. The tendrils should be thin and curly, not thick or uniform.
- Set lightly. A light mist of flexible-hold hairspray keeps the bun secure and the tendrils in place without stiffness. The goal is effortless movement.
Tips and tricks: Velvet scrunchies grip hair better than silk or satin versions, which is why they work particularly well for low buns. A scrunchie roughly three to four inches in diameter is the sweet spot — smaller ones disappear into the bun, larger ones overwhelm it. The tendrils should be genuinely wispy — thick pieces change the character of the style. For fine hair, a volumizing powder at the roots before gathering the bun adds necessary grip and volume.
32.Romantic Waterfall Braid with Loose Waves
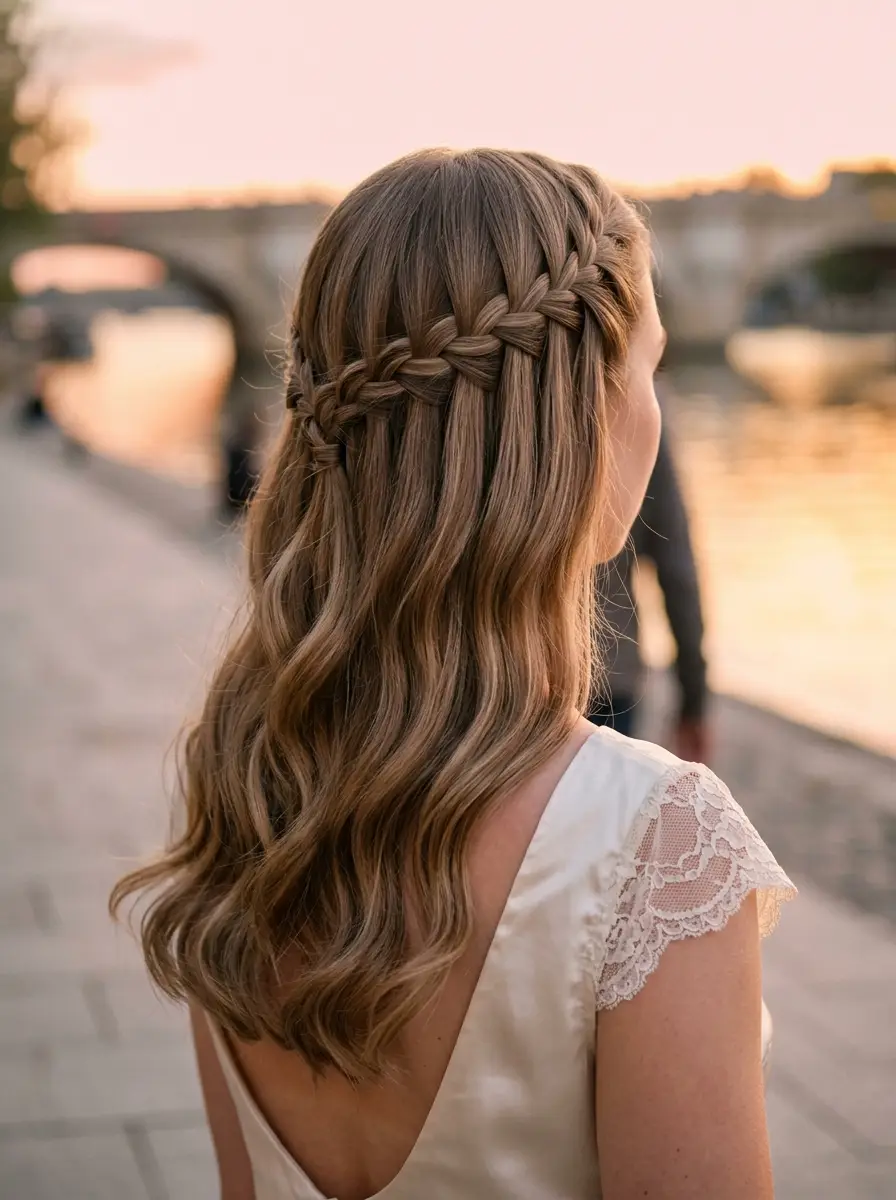
The overview: A waterfall braid curves diagonally across the back of the head, with sections dropped from the braid to create a cascading effect. The remaining hair falls in soft, flowing waves that blend with the dropped sections, creating a seamless transition from braid to loose hair. The effect is romantic and ethereal — like water flowing over stones.
The waterfall braid is one of those styles that looks impossibly complex but is actually achievable with practice. The dropped sections create the illusion of hair that's both braided and loose simultaneously, which is a visual trick that photographs beautifully from every angle.
Why this look is popular: The waterfall braid reads as effortlessly romantic — it's the hairstyle equivalent of a sunset. The cascading sections create movement and visual flow that draws the eye across the entire style, and the loose waves below provide softness and femininity. It photographs exceptionally well in natural light, especially during golden hour.
Where this look is suitable: Riverside sunset walks, outdoor restaurant dates, evening garden parties, and any setting where the atmosphere is romantic and slightly whimsical. The waterfall effect pairs beautifully with flowy dresses and natural settings.
Step by step:
- Add wave texture. Create soft waves throughout the hair using a 1.5-inch curling iron. The waves provide the foundation for the waterfall effect and add movement to the finished style.
- Start the braid. At one temple, pick up a section of hair and divide it into three strands. Begin a French braid, but instead of adding hair to the bottom strand, drop it and replace it with a new section from directly below.
- Continue the waterfall. Repeat the drop-and-replace technique as you braid diagonally across the back of the head. Each dropped section should fall naturally into the loose waves below.
- Secure at the opposite side. When you reach the opposite ear, stop the waterfall technique and braid the remaining section a few inches down. Secure with a clear elastic and tuck the tail under the braid.
- Adjust the drops. Gently separate and arrange the dropped sections so they blend seamlessly with the loose waves. The transition from braid to loose hair should appear natural.
- Set with spray. A light mist of flexible-hold hairspray keeps the braid secure while allowing the waves and dropped sections to move naturally.
Tips and tricks: The waterfall braid requires practice — try it a few days before your date to master the drop-and-replace technique. A rat-tail comb helps with clean sectioning. The dropped sections should be roughly the same size for a consistent cascading effect. If the braid feels loose, a texturizing spray before braiding adds grip. The loose waves below should be soft and flowing, not tight ringlets — the waterfall effect works best with relaxed texture.
33.Sleek High Ponytail with Luxe Gold Cuffs
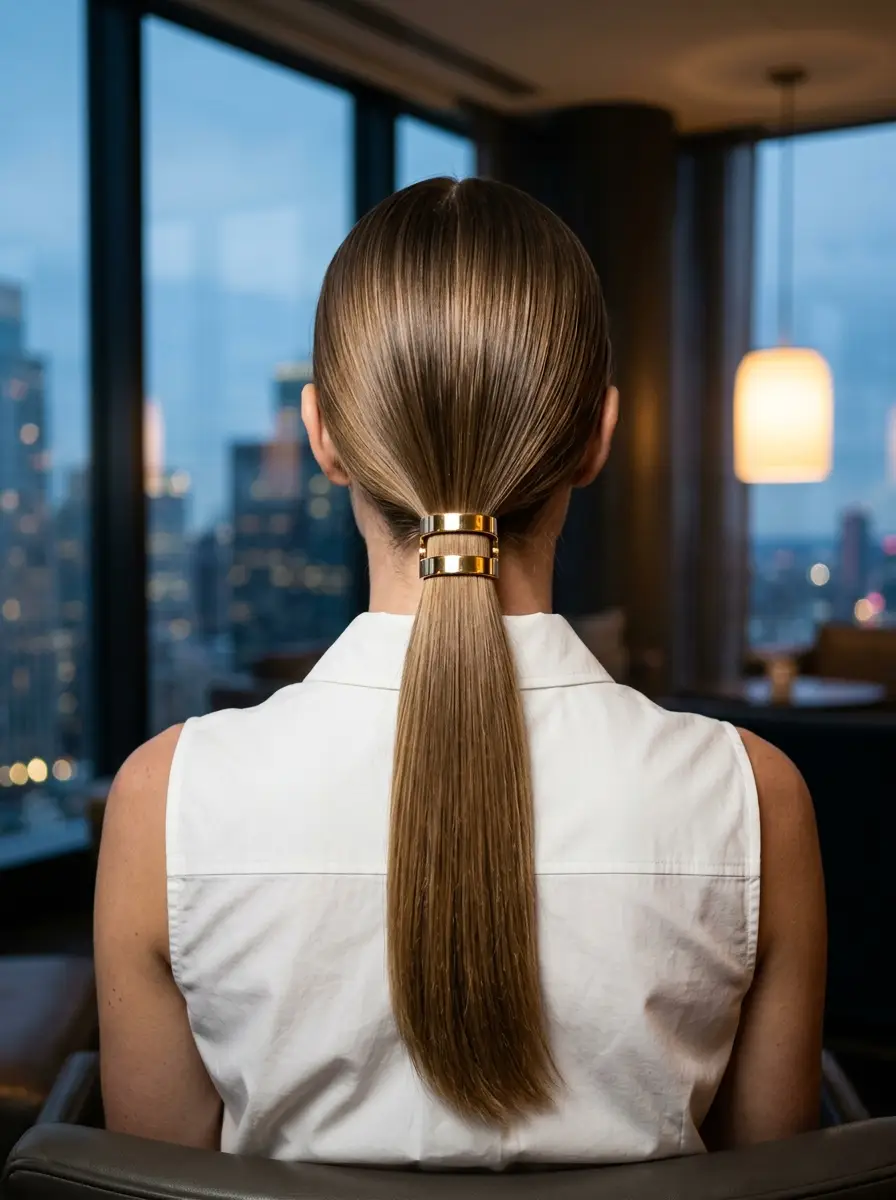
The overview: An ultra-sleek pin-straight ponytail at mid-height features double-stacked gold metallic cuffs positioned at the base, creating a bold, architectural accent. The ponytail itself falls pin-straight with a high-shine finish, and the gold cuffs catch light to create a focal point that reads as both luxurious and modern.
The double-stacked cuffs transform a basic sleek ponytail into something that looks like it belongs on a red carpet. The gold against the dark, polished hair creates contrast that photographs beautifully, and the mid-height placement balances sophistication with a slightly more relaxed feel than a crown-high ponytail.
Why this look is popular: The sleek ponytail with gold cuffs has become a celebrity favorite because it's simultaneously minimal and impactful. The cuffs do all the decorative work while the ponytail itself requires only a flat iron and some smoothing serum. It photographs with striking visual clarity, and the metallic accent pairs naturally with gold jewelry.
Where this look is suitable: Upscale city dinner dates, cocktail bar evenings, rooftop drinks, and any setting where the dress code is elevated. The gold cuffs pair beautifully with metallic accessories and structured outfits.
Step by step:
- Straighten thoroughly. Flat-iron all hair in thin sections for a pin-straight finish. Apply a heat protectant and follow with a shine serum like Olaplex No. 7 Bonding Oil.
- Gather the ponytail. Brush all hair into a sleek ponytail at mid-height — roughly at the level of your ears. Use a fine-tooth comb to eliminate every bump and flyaway.
- Secure tightly. Tie with a strong elastic that matches your hair color. Wrap a small strand of hair around the elastic to conceal it, securing the end with a bobby pin underneath.
- Add the cuffs. Slide the first gold metallic cuff over the ponytail base, positioning it directly over the concealed elastic. Stack the second cuff directly on top of the first, creating a double-stacked effect roughly one inch tall.
- Final straightening. Run the flat iron through the ponytail one more time for a perfectly straight, high-shine finish. The pins-straight texture is essential for this style.
- Set with spray. Mist with a shine spray to enhance the glass-hair effect and lock the sleek surface in place. Avoid matte-finish products that would undermine the high-shine aesthetic.
Tips and tricks: Gold metallic cuffs are available at beauty supply stores and online — choose ones that fit snugly around your ponytail base. If they feel loose, a small dot of hair glue on the inside holds them in place without damaging the hair. The mid-height placement is key — too high reads as athletic, too low reads as casual. The ponytail must be truly pin-straight for this style to work; any wave or bend undermines the sleek, polished effect.
34.Elegant Twisted Chignon with a Chic Hair Pin
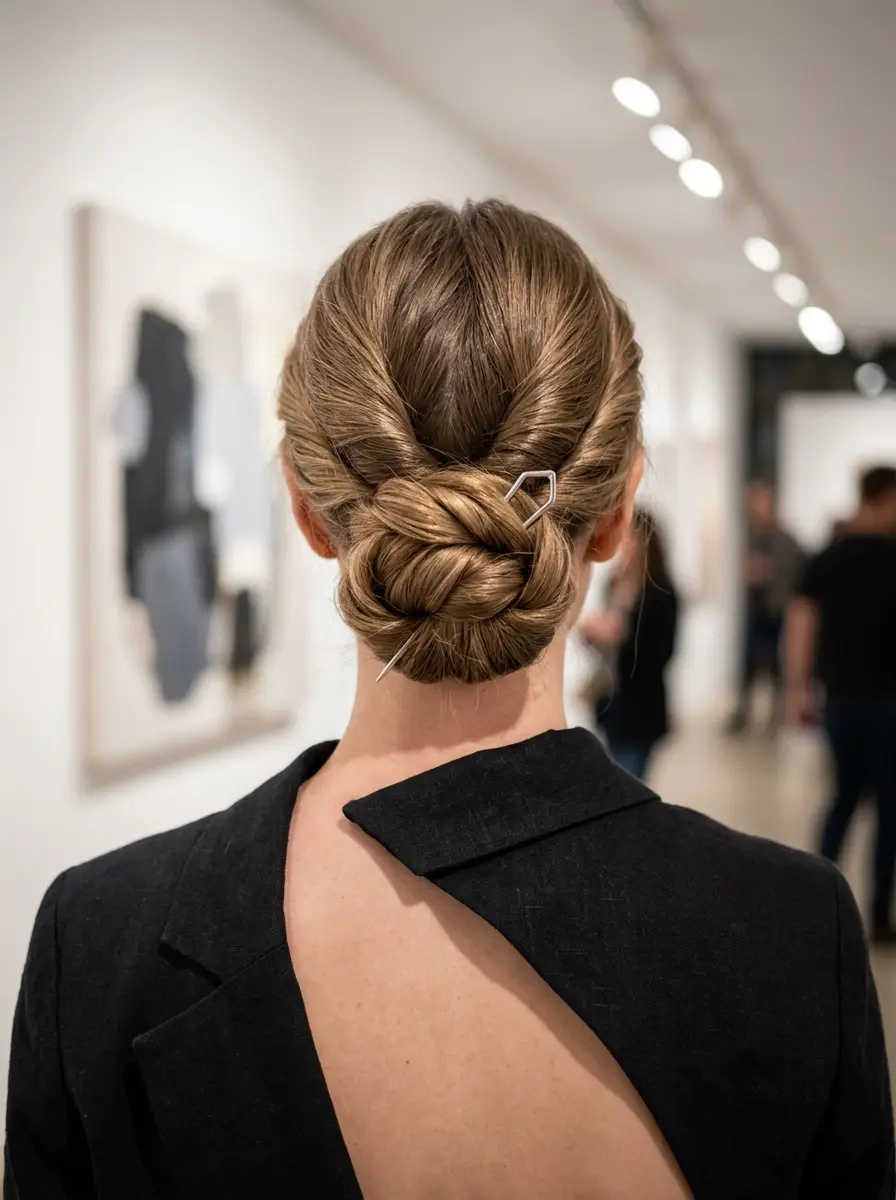
The overview: Twisted sections of hair are coiled and pinned into a low chignon at the nape, with a geometric gold hair pin inserted at an angle for a modern, editorial touch. The chignon has a structured, polished quality, while the hair pin adds a contemporary edge that prevents the style from reading as traditional or dated.
The geometric hair pin is the detail that makes this chignon feel current rather than classic. It's a small, deliberate choice that signals you understand modern styling — the kind of detail that separates a memorable first-date look from a forgettable one.
Why this look is popular: The twisted chignon with a geometric hair pin reads as sophisticated and fashion-forward — it's the kind of style that appears in editorial spreads and on runways. The gold pin adds a modern, architectural element that elevates the entire look, while the twisted chignon provides the classic foundation that keeps it grounded in elegance.
Where this look is suitable: Art gallery dates, museum outings, upscale restaurant dinners, and any setting where the atmosphere is refined and culturally engaged. The geometric pin pairs beautifully with minimalist jewelry and structured outfits.
Step by step:
- Smooth the hair back. Apply a smoothing serum and brush all hair straight back from the face, eliminating any part line. Use a boar bristle brush for a flat, polished surface.
- Create the ponytail base. Gather all hair into a low ponytail at the nape and secure with a clear elastic. Keep the crown smooth but not overly tight.
- Twist and coil. Divide the ponytail into two sections. Twist each section tightly, then coil them around each other and around the ponytail base, forming a compact chignon.
- Pin securely. Insert bobby pins diagonally through the chignon and into the base hair, hiding them within the folds. Use at least four pins for security, matching them to your hair color.
- Add the hair pin. Insert the geometric gold hair pin at an angle through the chignon, positioning it where it's visible from the front and side. The angle should feel deliberate and slightly off-center.
- Set with spray. Mist with a strong-hold hairspray to lock the chignon and hair pin in place. A light shine spray on the surface adds a polished, editorial finish.
Tips and tricks: Geometric hair pins are available from minimalist jewelry brands and Etsy sellers — look for ones with strong pin bases that can grip thick hair without bending. The chignon should be tight enough to anchor the pin securely — a loose bun won't hold it. For very thick hair, the twist-and-coil technique creates a more compact chignon than simply wrapping a ponytail. The pin angle matters — straight up reads as utilitarian, slightly angled reads as intentional and editorial.
The Date Activity Matching Guide
A coffee date hairstyle is different from a hiking date hairstyle, which is different from a fancy dinner. Most blogs treat all first dates the same, but your activity should dictate your style choice.
Active dates — hiking, walking, farmers market: French braids or a twisted half-up style keep hair off your face so you can focus on conversation instead of pushing strands back. A low ponytail with a scarf wrap is functional and stylish.
Dinner dates where you will be sitting: Soft loose waves, a low chignon, or a half-up style with face-framing pieces. These photograph well and let you focus on the person across the table.
Drinks or bar dates: A sleek high ponytail or a textured messy bun with face-framing tendrils works under dim lighting. Glossy waves with a deep side part catch bar lighting beautifully.
Outdoor or beach dates: A braided crown keeps hair secure in wind and looks romantic in golden hour photos. Textured waves with a headband manage wind while looking intentional. The key across all of these is choosing a style that will not distract you or require constant adjustment.