Nail Trends
22 Office Nail Designs That Are Professional But Never Boring
In This Guide
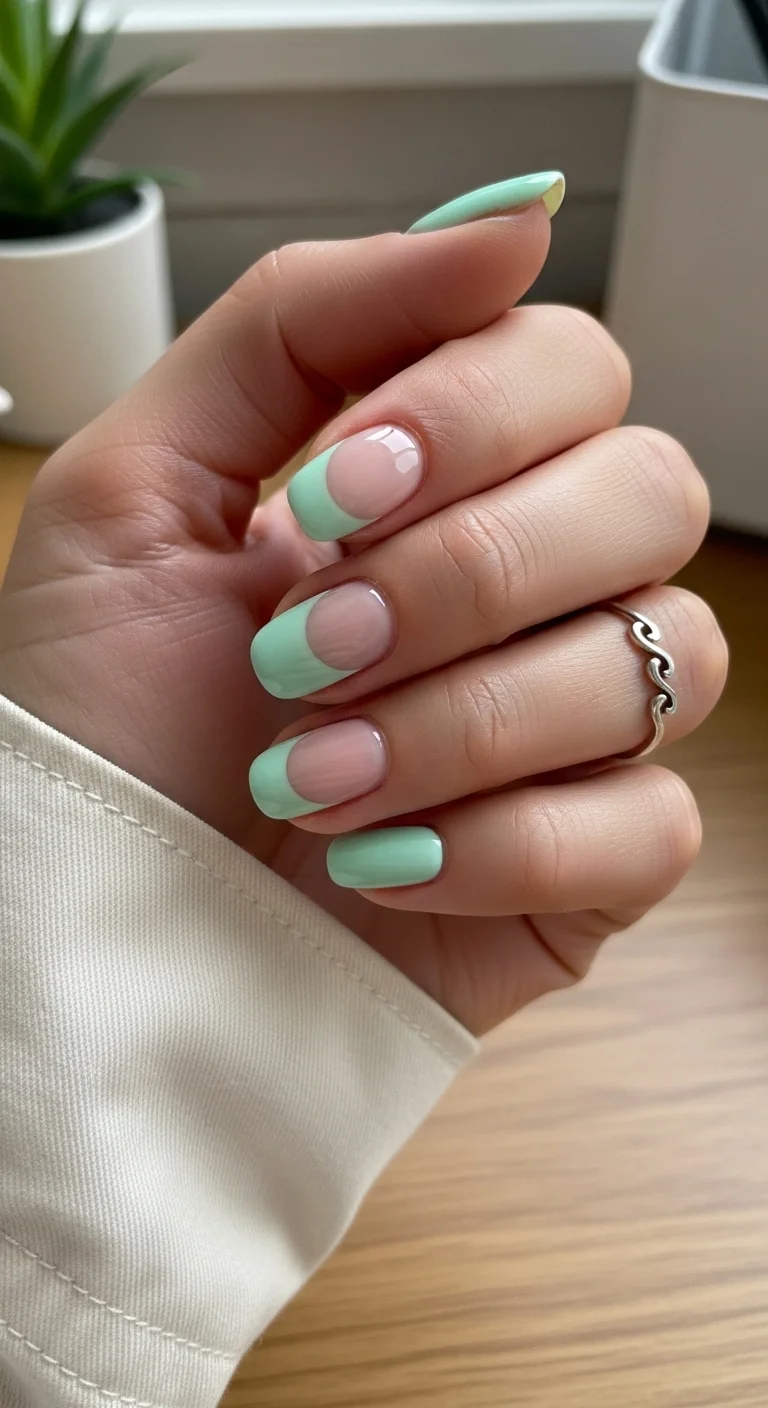
1.Mint Green with White French Tips
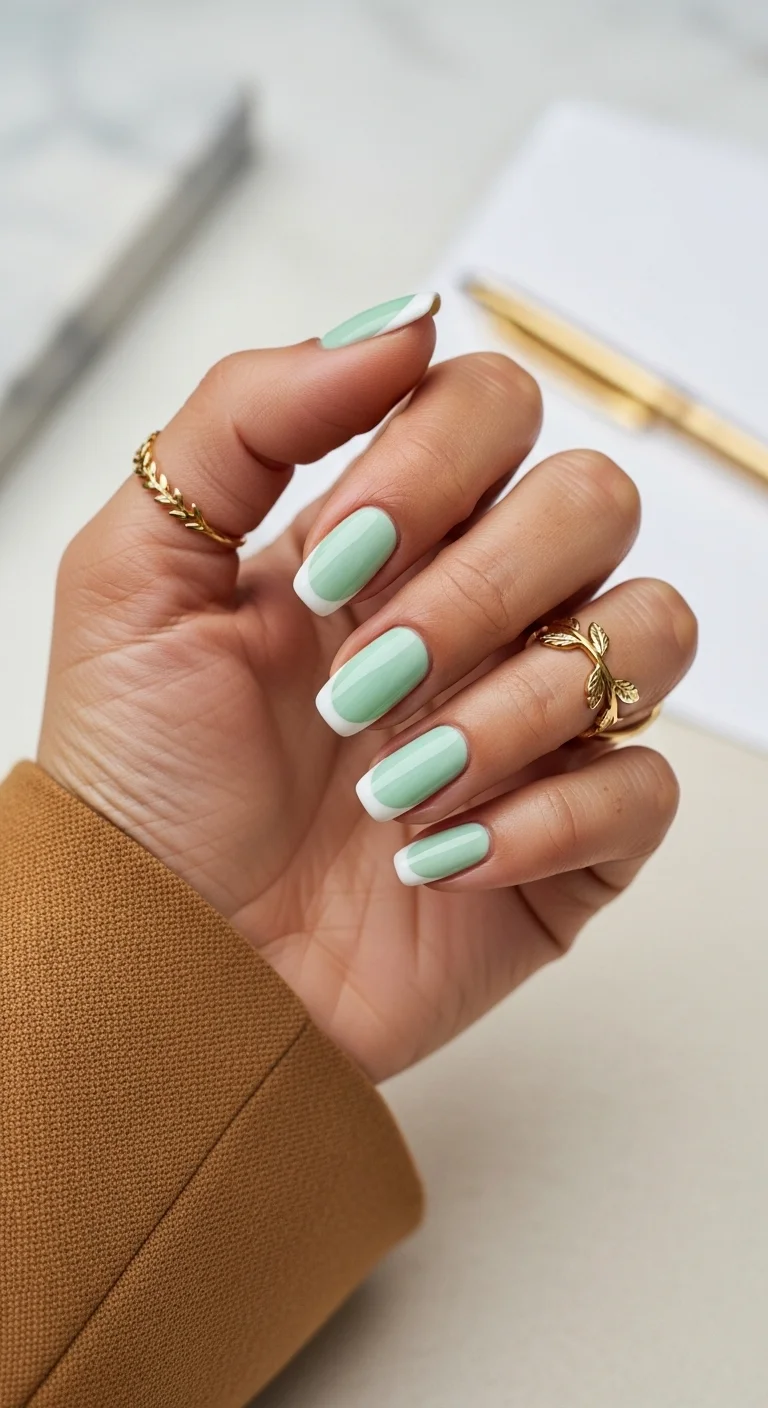
A fresh twist on the classic French using soft mint as the base and clean white tips.
Overview:
Traditional French manicures rely on a sheer pink or nude base, which is perfectly fine but can feel a bit predictable. Swapping that natural background for a soft mint green base instantly modernizes the look while maintaining its professional appeal. The pale green is muted enough to read as a clean pastel, while the crisp white tips provide the classic structure that keeps the manicure office-appropriate.
The short square shape is the perfect canvas for this design. Long nails with colored bases and French tips can look a bit too dramatic for the workplace. At a shorter length, the mint green base is a subtle pop of color that looks deliberate without being loud. The white smile lines frame the tips beautifully and give the entire set a structured, polished finish.
One application tip: make sure your mint green base is completely opaque and streak-free before attempting to paint the white tips. Pastel greens can sometimes apply unevenly, and any streaks will be highly visible under a clean white tip. Two to three thin coats of the mint base will give you the perfect foundation.
Design Breakdown:
A colorful twist on the classic French, featuring a soft pastel base and crisp white tips.
Base Color: A creamy, opaque mint green. Muted pastel finish rather than vibrant neon.
Nail Shape: Short square with slightly rounded corners. The flat edge provides a clean guideline for the French tips.
Design Element: Classic white French tips painted over the mint green base. The smile line follows the natural curve of the fingertip.
Finish: High-gloss top coat to unify the layers and give the nails a polished, glassy shine.
Get The Look at Home:
Build a solid base first, then focus on creating clean, symmetrical white tips.
- Prep and shape: Push back cuticles and file into a short square. Apply a base coat to ensure even color application.
- Mint base: Apply two to three thin coats of opaque mint green polish. Let each coat dry completely.
- White tips: Using a thin liner brush and opaque white polish, carefully paint the smile line across the tip of each nail.
- Refine lines: Use a flat brush dipped in acetone to clean up any smudges and sharpen the border where the white meets the mint.
- Seal: Apply two coats of high-gloss top coat, capping the free edge on every nail.

27 Elegant Wedding Guest Nail Designs for Family in 2026 💍
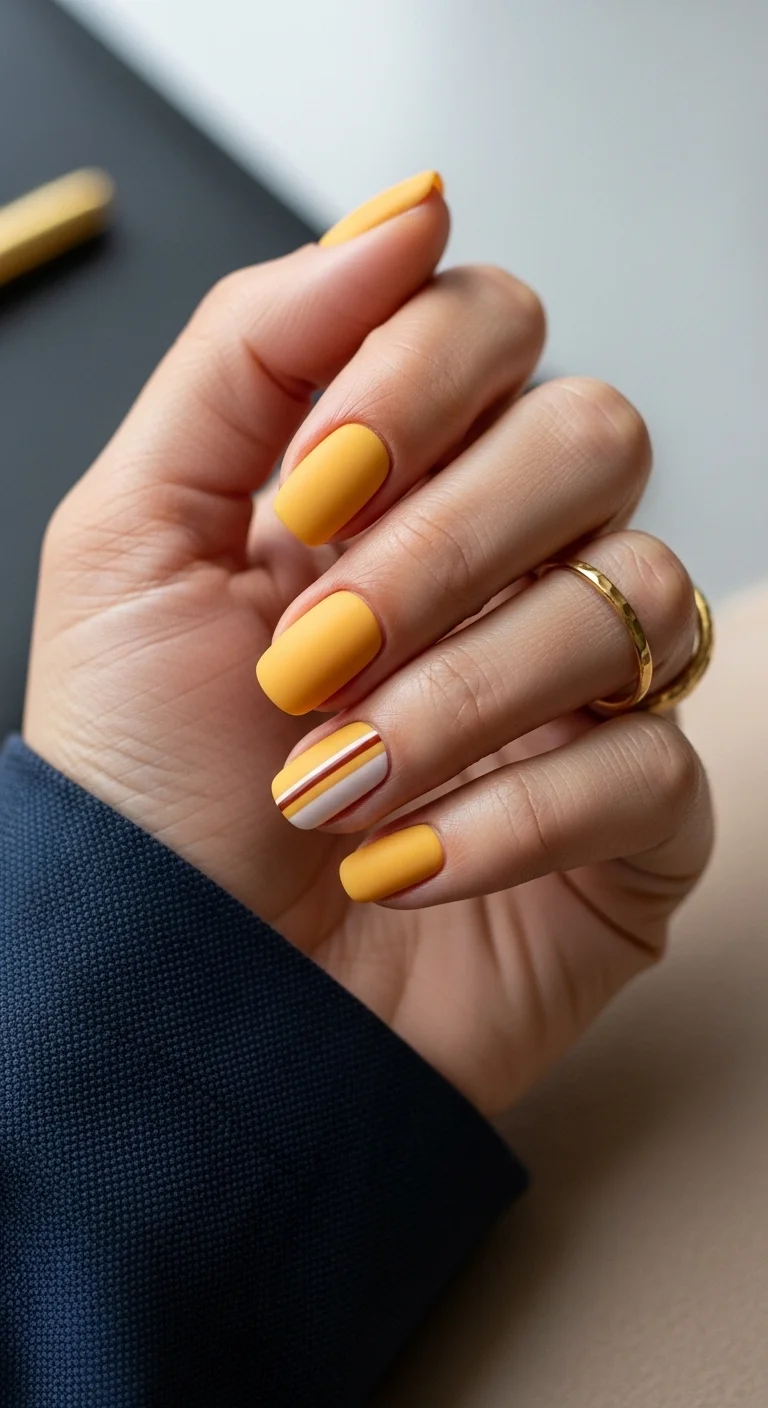
2.Burnt Orange with Gold Stripes
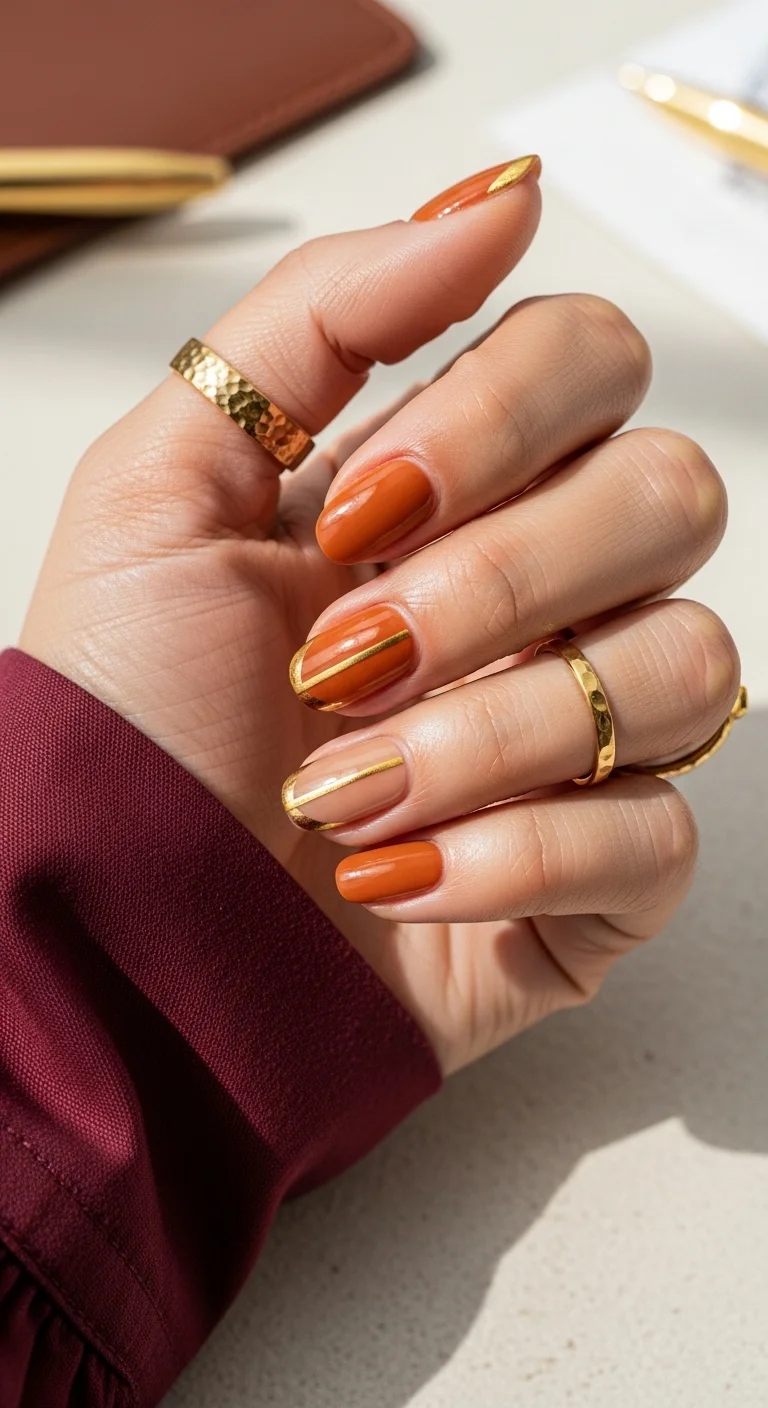
Warm terracotta orange elevated with thin gold metallic stripes.
Overview:
Burnt orange is one of those colors that looks terrible in the bottle and stunning on nails. The shade here sits somewhere between terracotta and rust, which gives it an earthy warmth that works across seasons. It's not quite fall-exclusive and not quite summer-vibrant, landing in a versatile middle ground.
The gold stripes are what take this from "nice solid color" to "intentional design." Two nails get the full treatment: one with vertical gold lines over the orange, and another with horizontal gold stripes over a nude base. The remaining nails stay solid orange. That asymmetry prevents the gold from overwhelming the design.
The real challenge here is getting the striping tape to adhere cleanly. If you're using tape instead of freehand metallic paint, press it down firmly from edge to edge. Any air bubbles or lifted corners will catch on things and peel off within a day.
Design Breakdown:
Solid warm tones with metallic geometric accents on two nails. The restraint keeps it office-appropriate.
Base Color: A warm burnt orange or terracotta. Avoid anything too bright or neon; the shade should lean earthy.
Nail Shape: Short oval or rounded. The soft shape balances the sharp geometry of the stripes.
Design Element: Thin gold metallic stripes on two accent nails. One nail gets vertical lines over orange; another gets horizontal lines over a nude base.
Finish: High-gloss top coat over everything to seal the tape and add depth to the orange.
Get The Look at Home:
Gold striping tape is easier to apply than freehand metallic paint, but it requires precision.
- Base prep: File into a short oval. Apply base coat.
- Orange nails: Two thin coats of burnt orange on all nails except one accent nail. Let dry fully.
- Nude accent: On one nail, apply two coats of sheer nude instead of orange.
- Stripe application: Cut thin lengths of gold striping tape. Press them vertically on one orange nail and horizontally on the nude nail. Smooth firmly from edge to edge.
- Trim and seal: Snip the tape about 0.5mm inside the nail border. Apply two coats of top coat to lock everything down.
3.Mint Green with White Swirls
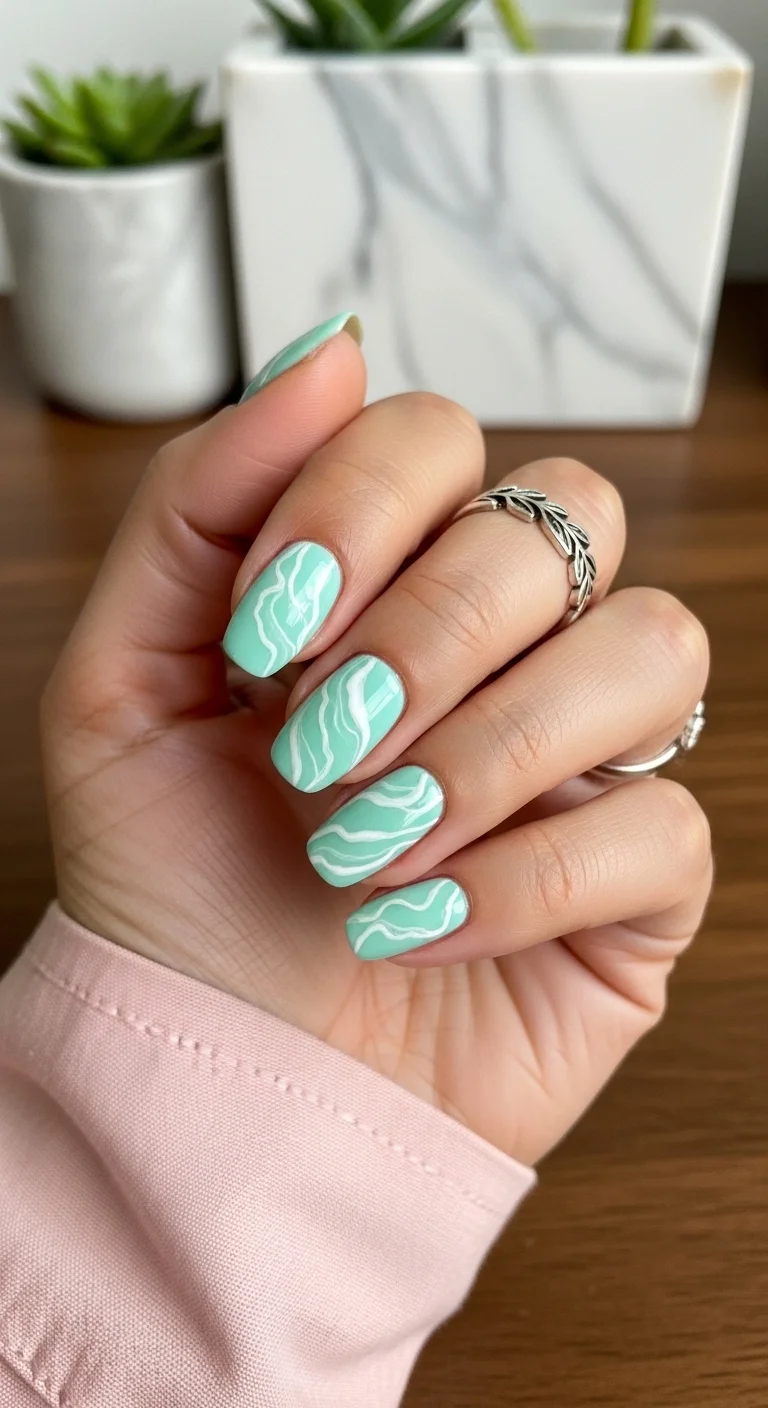
Organic white swirls over mint green for a relaxed, artistic feel.
Overview:
Swirl nails have been trending for a while now, and this version keeps things calm enough for professional settings. The mint green base is soft enough to read as a neutral, and the white swirls add movement without introducing a second bold color. The effect is more "abstract art" than "loud nail design."
What works here is the irregularity. The swirls aren't uniform or symmetrical, which gives each nail a slightly different look. That organic quality prevents the design from feeling rigid or overthought. It's the kind of manicure that looks like you relaxed and let it happen rather than measured every stroke.
The catch with swirl designs is that they can look muddy if the colors are too close in value. White against mint has enough contrast to keep the swirls visible, but if you chose a paler green or a cream instead of pure white, the pattern would disappear from a distance.
Design Breakdown:
Hand-painted swirls over a solid base. The beauty is in the imperfection.
Base Color: A soft, creamy mint green. Full opacity in two coats.
Nail Shape: Short square or squoval. The flat surface gives the swirls room to flow.
Design Element: White wavy lines painted freehand across each nail. The lines should vary in thickness and direction.
Finish: High-gloss top coat. The shine makes the white swirls pop against the green.
Get The Look at Home:
Freehand swirls look intimidating, but the looser your hand, the better they turn out.
- Base color: Two thin coats of mint green on all nails. Let dry completely.
- Swirl prep: Use a thin detailing brush or a toothpick dipped in white polish. Practice the wavy motion on paper first.
- Paint swirls: Drag the brush across the nail in a loose, wavy motion. Vary the direction and thickness on each nail. Don't try to make them match.
- Let set: Wait five minutes before applying top coat. White polish smears easily if it's still wet.
- Seal: Two coats of glossy top coat for a smooth, even surface.
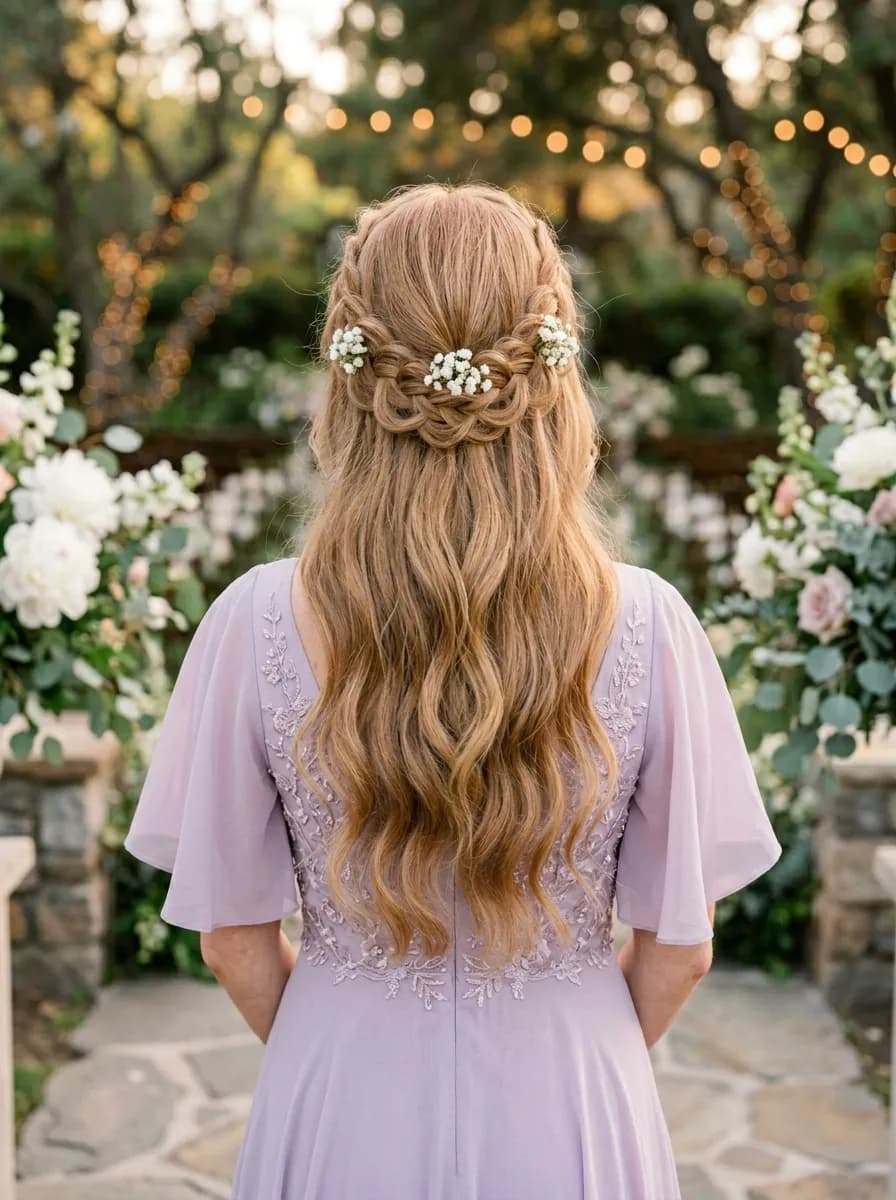
20 Stunning Half Up Half Down Hairstyles for Prom Night 2026 💃✨
4.Mint French Tips on Nude
A softer French variation where mint replaces the traditional white tip.
Overview:
This is the second mint French design in the collection, and the difference from design number one is subtle but real. The base here is noticeably sheerer, almost like a clear coat with a hint of pink. That transparency makes the mint tips feel lighter and more delicate, like they're floating at the edge of the nail.
The shape is slightly more tapered than a standard square, which elongates the fingers without going full almond. For anyone who types all day, this shape is practical: pointed enough to look polished, flat enough to not snag on keyboard keys.
One honest drawback: sheer bases show every flaw in your natural nail. If you have ridges, discoloration, or white spots, you'll need a ridge-filling base coat and possibly a color-correcting layer underneath the sheer pink. Skipping that step and going straight to the nude will make your nails look uneven rather than effortlessly natural.
Design Breakdown:
Ultra-sheer base with pastel mint tips. The transparency is the design.
Base Color: A barely-there pink or clear with a pink tint. You should be able to see your nail bed through it.
Nail Shape: Short to medium square with slightly tapered sides. The gentle taper adds elegance without sacrificing functionality.
Design Element: Pastel mint French tips. The smile line is thin and follows the natural curve of the fingertip.
Finish: High-gloss top coat. The gloss enhances the sheer base and keeps the mint looking crisp.
Get The Look at Home:
The sheer base requires more prep work than an opaque one. Invest the time upfront.
- Prep thoroughly: Push back cuticles. Buff ridges smooth. Apply a ridge-filling base coat and let it dry completely.
- Sheer base: One to two coats of sheer pink. Each coat should be almost transparent on its own.
- Mint tips: Using a French guide or liner brush, apply pastel mint to the tips. Two thin coats for even coverage.
- Clean the line: Use an angled brush dipped in acetone to refine the smile line. On a sheer base, this step is critical.
- Seal: One thick coat of high-shine top coat. Cap the free edge.
5.Chestnut Brown with Gold Chevron
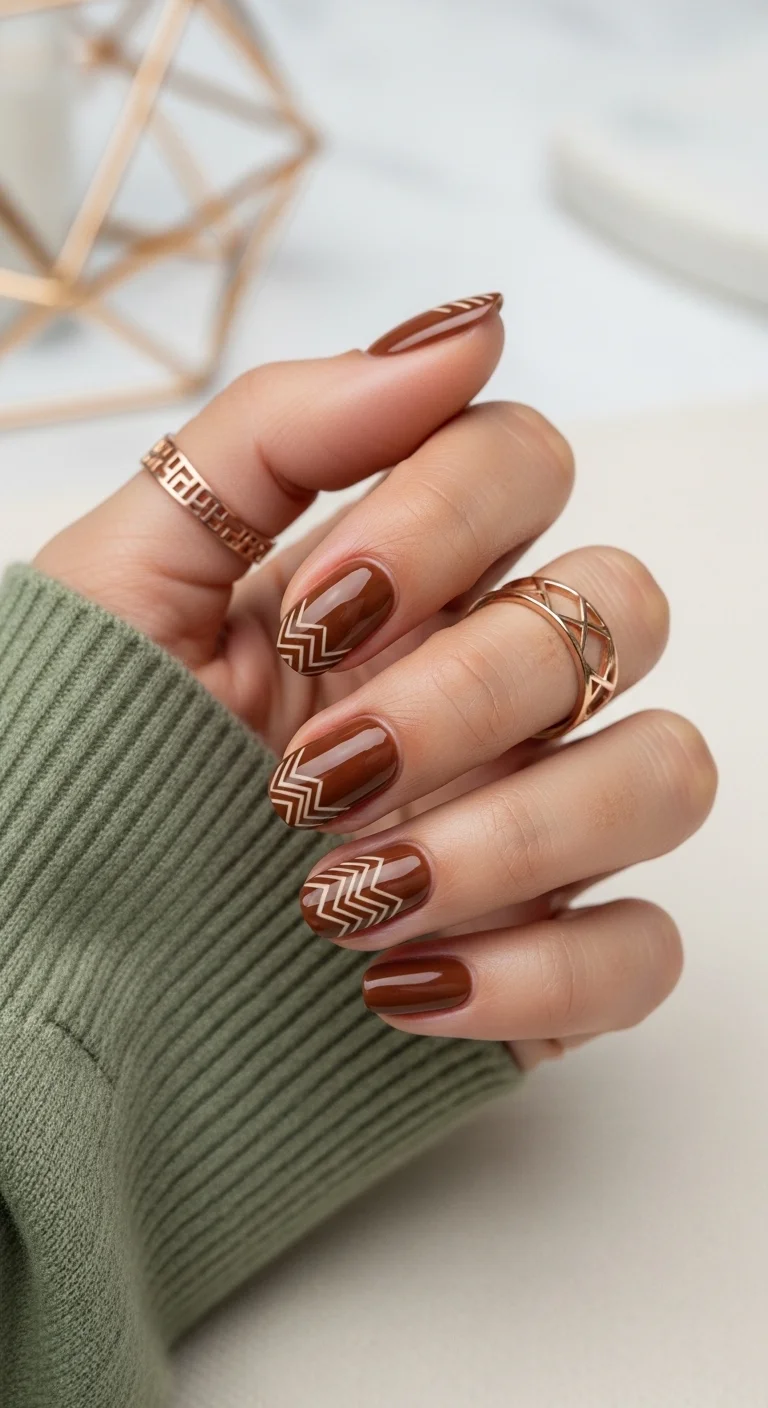
Rich chocolate brown elevated with metallic gold zigzag patterns.
Overview:
Brown nail polish occupies an awkward space. Too dark and it reads Halloween. Too light and it's just nude with ambition. This chestnut shade threads the needle, sitting at a depth that feels intentional without being costume-y. It pairs well with gold jewelry, which is probably why the metallic chevron accents work so naturally here.
The chevron pattern on the accent nails adds visual interest without introducing a new color. The gold lines create a geometric texture that catches light differently than the flat brown polish. On two nails per hand, that contrast is enough to make the design feel considered rather than plain.
One practical note: dark brown polish stains your nails if you don't use a base coat. Even one day without protection can leave a yellow tint that takes weeks to grow out. Always use a base coat with deeply pigmented colors.
Design Breakdown:
Solid dark brown with metallic geometric accents. The gold keeps it from feeling heavy.
Base Color: A deep chestnut or chocolate brown. Opaque in two coats.
Nail Shape: Short almond or oval. The rounded shape softens the dark color.
Design Element: Gold chevron or zigzag lines on 4 nails. The pattern is painted freehand or created with striping tape.
Finish: High-gloss top coat. The shine brings out the depth of the brown.
Get The Look at Home:
The chevron pattern requires a steady hand. If you're not confident freehand, use striping tape as a guide.
- Base coat: Always use a base coat with dark colors to prevent staining.
- Brown base: Two thin coats of chestnut brown on all nails. Let dry fully.
- Chevron guide: Place two pieces of striping tape in a V shape on the accent nails. Press firmly.
- Gold application: Paint gold polish over the taped area, or apply gold striping tape directly along the V lines.
- Remove tape: Peel the tape off while the polish is still slightly wet for the cleanest lines.
- Seal: Two coats of top coat to smooth the surface and lock in the design.
27 Gorgeous Mint Green Nails That Are Popular Right Now (2026)
6.Navy Blue with Mint Floral Accent
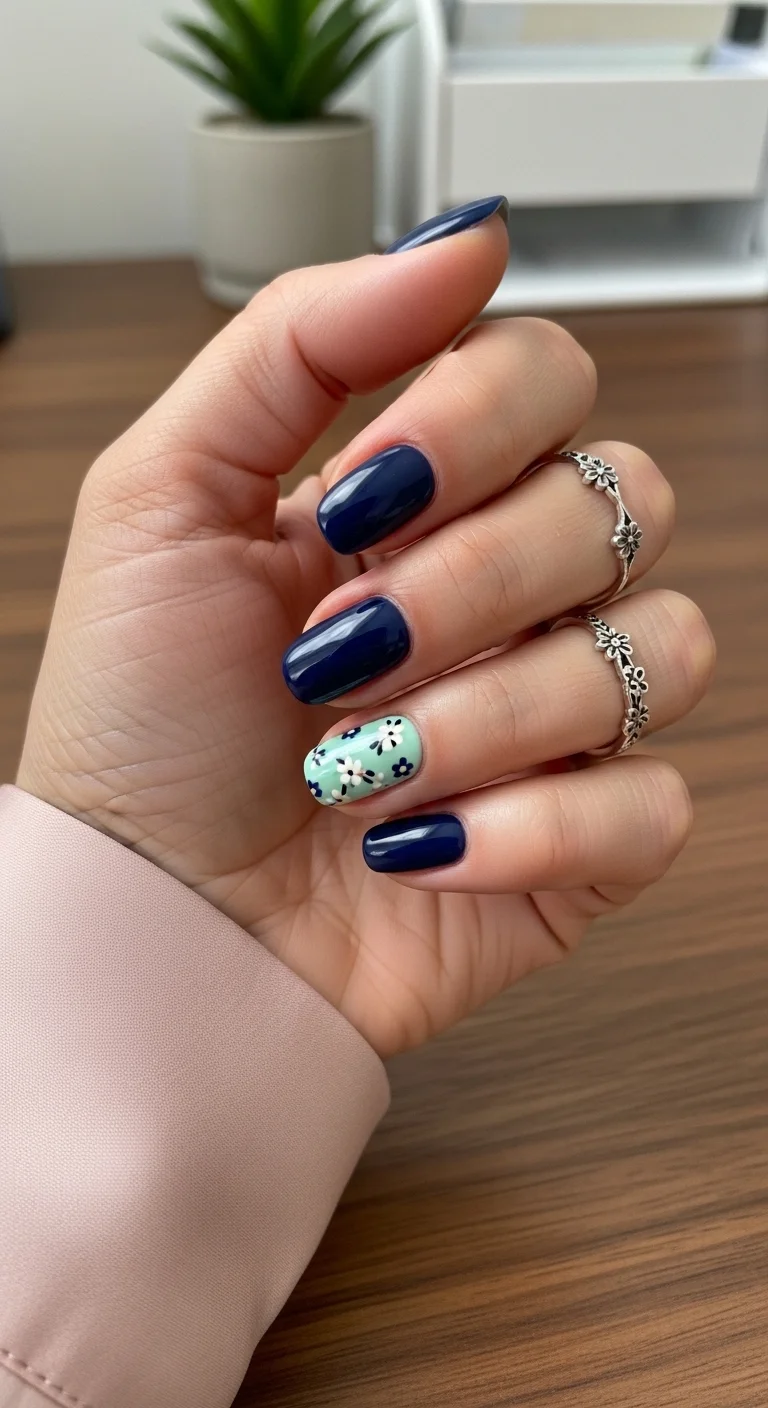
Deep navy paired with a single floral accent nail for subtle contrast.
Overview:
Navy blue is the power color of office nails. It's darker than any pastel, bolder than any nude, and it photographs beautifully in fluorescent lighting. The problem with solid navy is that it can feel heavy, almost severe, especially in winter. Adding a single accent nail in a different color breaks that monotony without undermining the sophistication.
The mint green accent nail with dark floral dots is a smart pairing. The cool undertone of the mint matches the cool undertone of the navy, so the colors feel related rather than random. The floral pattern is simple enough that it doesn't compete with the bold blue, just adds a small moment of visual complexity.
Navy polish is notoriously difficult to remove. It sinks into your cuticles and stains the skin around your nails. Use the foil method (wrap each nail in acetone-soaked cotton wrapped in aluminum foil) for five minutes to dissolve the color cleanly instead of scrubbing and irritating your skin.
Design Breakdown:
Solid navy with one floral accent nail. The contrast is tonal, not dramatic.
Base Color: A deep, true navy blue. Avoid anything with purple undertones; you want blue, not indigo.
Nail Shape: Short square. The flat tip gives the navy a clean, confident edge.
Design Element: One accent nail in mint green with small dark floral dots scattered across it.
Finish: High-gloss top coat. The shine prevents the navy from looking flat and lifeless.
Get The Look at Home:
The accent nail is the only part that requires artistic skill. The rest is straightforward solid color.
- Base coat: Essential with dark colors. Apply and let dry.
- Navy nails: Two thin coats on all nails except one accent nail per hand. Let dry fully.
- Mint accent: On one nail, apply two coats of mint green.
- Floral dots: Using a small dotting tool and dark navy or black polish, place small clusters of dots to form simple flower shapes across the mint nail.
- Seal: Two coats of top coat. The first locks the art; the second smooths the surface.
7.Chocolate Brown with Champagne Accent
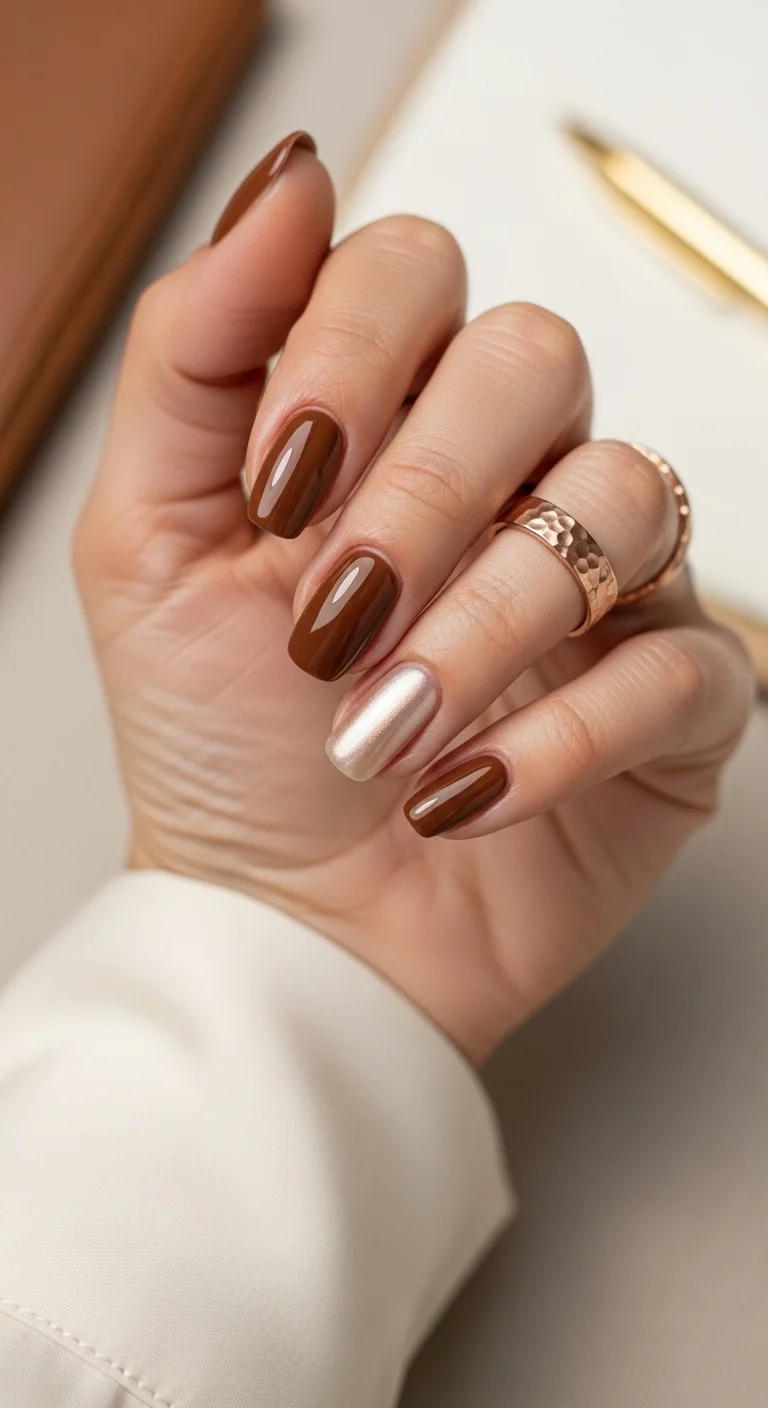
Warm chocolate brown paired with a single champagne metallic accent.
Overview:
There's a specific kind of brown that looks like melted chocolate rather than mud, and this design nails it. The shade is warm without being orange, deep without being black, and glossy enough to catch light in a way that makes your nails look like polished stone. On its own, it would be a perfectly good solid color manicure.
The metallic champagne accent nail is what elevates this from "nice brown nails" to "designed manicure." The champagne sits somewhere between gold and silver, which makes it versatile enough to pair with either metal jewelry. The metallic finish creates a texture contrast against the cream brown that catches light differently as you move your hands.
The risk with metallic accent nails is that they can look like a mistake if the surrounding colors don't relate to them. Here, the champagne's warm undertone matches the brown's warmth, so the accent feels intentional rather than random.
Design Breakdown:
Cream brown with a single metallic accent. The warmth ties everything together.
Base Color: A warm chocolate brown. Cream finish, not matte.
Nail Shape: Short oval. The rounded shape complements the warm, organic color.
Design Element: One accent nail painted in metallic champagne or rose gold.
Finish: High-gloss top coat over the brown. The metallic nail gets its own glossy top coat to enhance the shimmer.
Get The Look at Home:
This is one of the simpler designs in the collection. The skill is in choosing the right brown.
- Base coat: Apply and let dry.
- Brown nails: Two thin coats of chocolate brown on all nails except one per hand. Let dry fully.
- Metallic accent: On one nail, apply two coats of champagne metallic polish. The metallic may need a third coat for full opacity.
- Top coat: Two coats of glossy top coat over all nails. The metallic nail benefits from an extra-smooth top coat to enhance the reflective finish.
20 Stunning Mother of the Bride Hairstyle Ideas for 2026 💍
8.Matte Nude with Minimal Dots
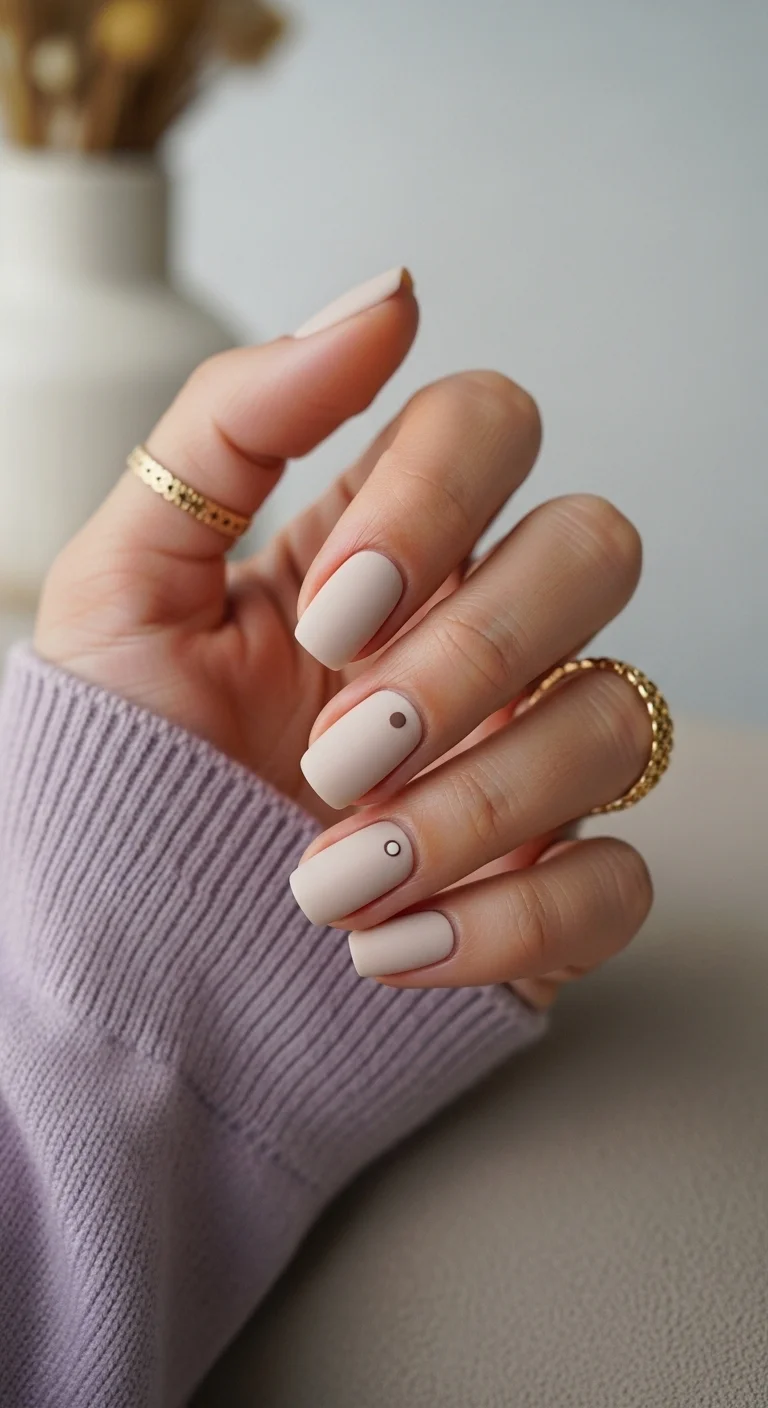
Matte nude nails with the subtlest dot detail for minimalist office style.
Overview:
Matte nude nails are the closest thing to "no nails" that still qualifies as a manicure. The velvety finish absorbs light instead of reflecting it, which makes the color look softer and more natural than a glossy nude. For anyone who works in a conservative office or simply doesn't want their nails to be a focal point, this is the design.
The dot accents on two nails are so minimal they're almost invisible from a distance. Up close, they add a tiny point of interest that prevents the design from feeling boring. The dots are placed near the cuticle area, which is an unusual choice that draws attention to the base of the nail rather than the tip.
The downside of matte top coats is that they show scratches and oils more visibly than glossy ones. Your phone screen, your pen, your keyboard, anything you touch throughout the day will leave marks on the matte surface. By the end of a workday, the finish may look worn in spots. A quick swipe of matte top coat can refresh it, but it's something to be aware of.
Design Breakdown:
All-matte with the smallest possible accent. Maximum subtlety.
Base Color: A warm nude that closely matches your skin tone. The closer the match, the more "invisible" the manicure reads.
Nail Shape: Short square with softened corners. The matte finish looks best on clean, geometric shapes.
Design Element: One or two tiny dots near the cuticle on two accent nails. Use a contrasting dark color for the dots.
Finish: Matte top coat over everything. The velvety texture is the entire point.
Get The Look at Home:
Matte polish shows every imperfection. Prep is more important than usual.
- Prep: Push back cuticles. Buff ridges smooth. Apply base coat.
- Nude base: Two thin coats of warm nude. Let dry fully.
- Dot accents: On two nails, use a small dotting tool to place one or two tiny dots near the cuticle area. Use a dark brown or black polish.
- Matte top coat: Apply one even coat of matte top coat over all nails. Avoid going over the same spot twice, as matte formulas can streak.
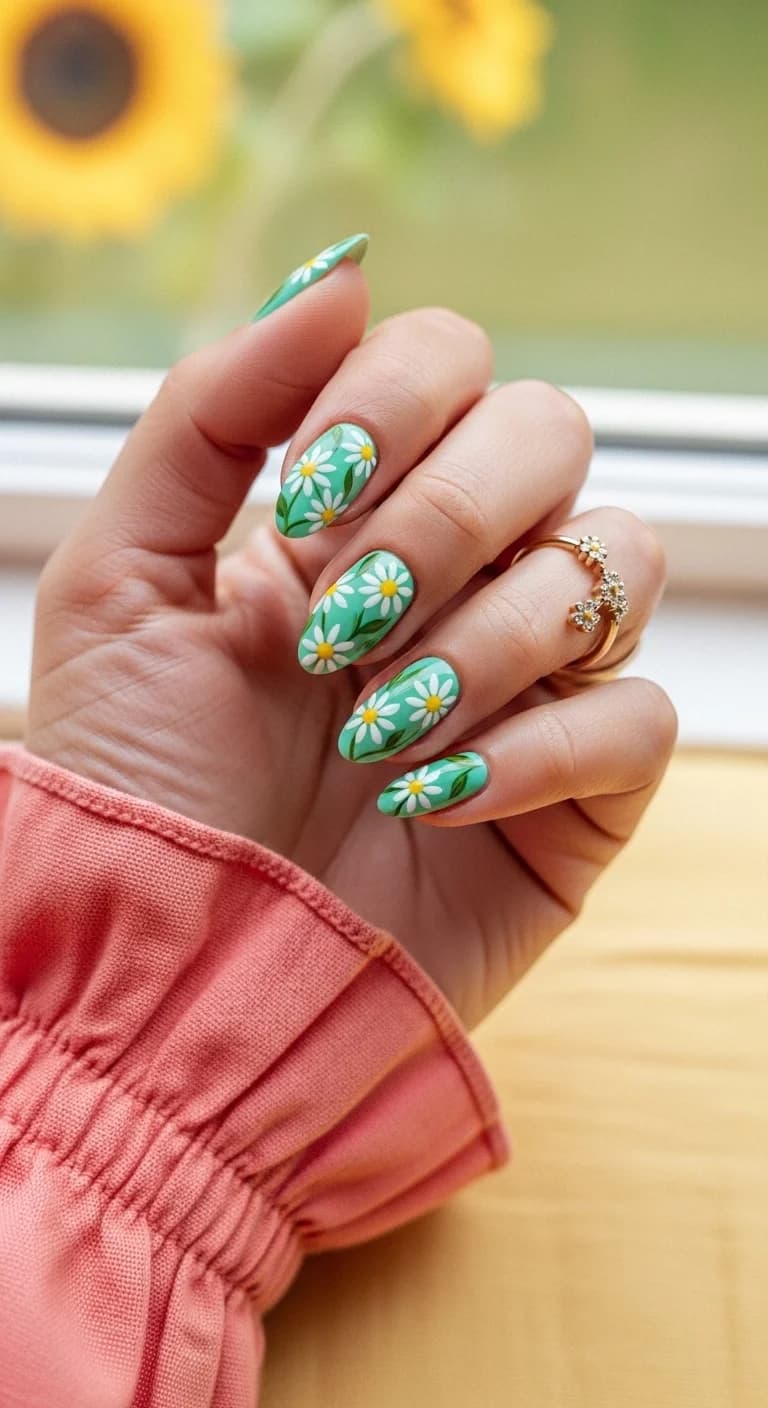
9.Mint Green with White and Pink Florals
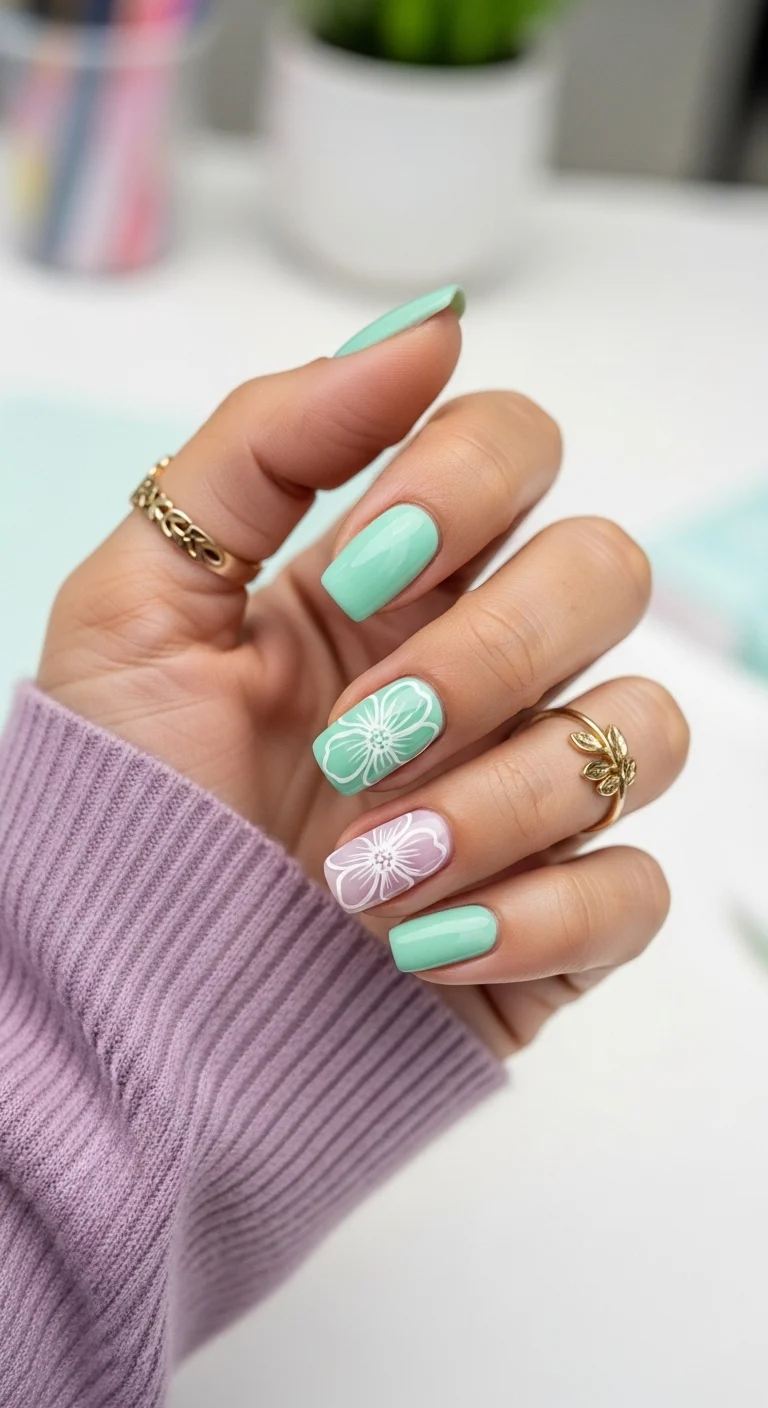
Fresh mint nails with delicate floral accents on two fingers.
Overview:
Floral nail art often looks cluttered, especially on shorter nails where there isn't much surface area to work with. This design avoids that problem by keeping the flowers large and simple. Each petal is a single brush stroke, and the centers are just tiny dots. The result looks hand-painted in the best way, not overworked.
The two accent nails use different color combinations: one white flower on mint, and one white flower on soft pink. That variation keeps the design from being too predictable while maintaining a cohesive color story. The pink nail acts as a bridge between the mint and your skin tone, softening the overall effect.
Floral designs like this work best when the background color is solid and opaque. If the mint base is streaky or sheer, the flowers will look like they're floating on an uneven surface. Take the time to build up full coverage before starting the art.
Design Breakdown:
Solid mint with large, simple floral accents on two nails. The simplicity is what makes it work.
Base Color: A creamy, fully opaque mint green.
Nail Shape: Short square. The flat surface is ideal for the flower placement.
Design Element: Two accent nails: one with a white flower on mint, one with a white flower on soft pink. The flowers are large, with five petals and a dotted center.
Finish: High-gloss top coat. The shine makes the floral details pop.
Get The Look at Home:
The flowers look complex but are built from simple brush strokes. Practice on paper first.
- Mint base: Two thin coats on all nails except one accent nail per hand. Let dry.
- Pink accent: On one nail per hand, apply two coats of soft pink instead of mint.
- Petals: Using a thin brush and white polish, paint five teardrop shapes in a circle to form each flower. One flower per accent nail.
- Center: Place a tiny dot of contrasting color (gold, green, or pink) in the center of each flower.
- Seal: Wait ten minutes for the art to dry, then apply two coats of top coat.

27 Stunning Graduation Day Nail Ideas for 2026 🎓
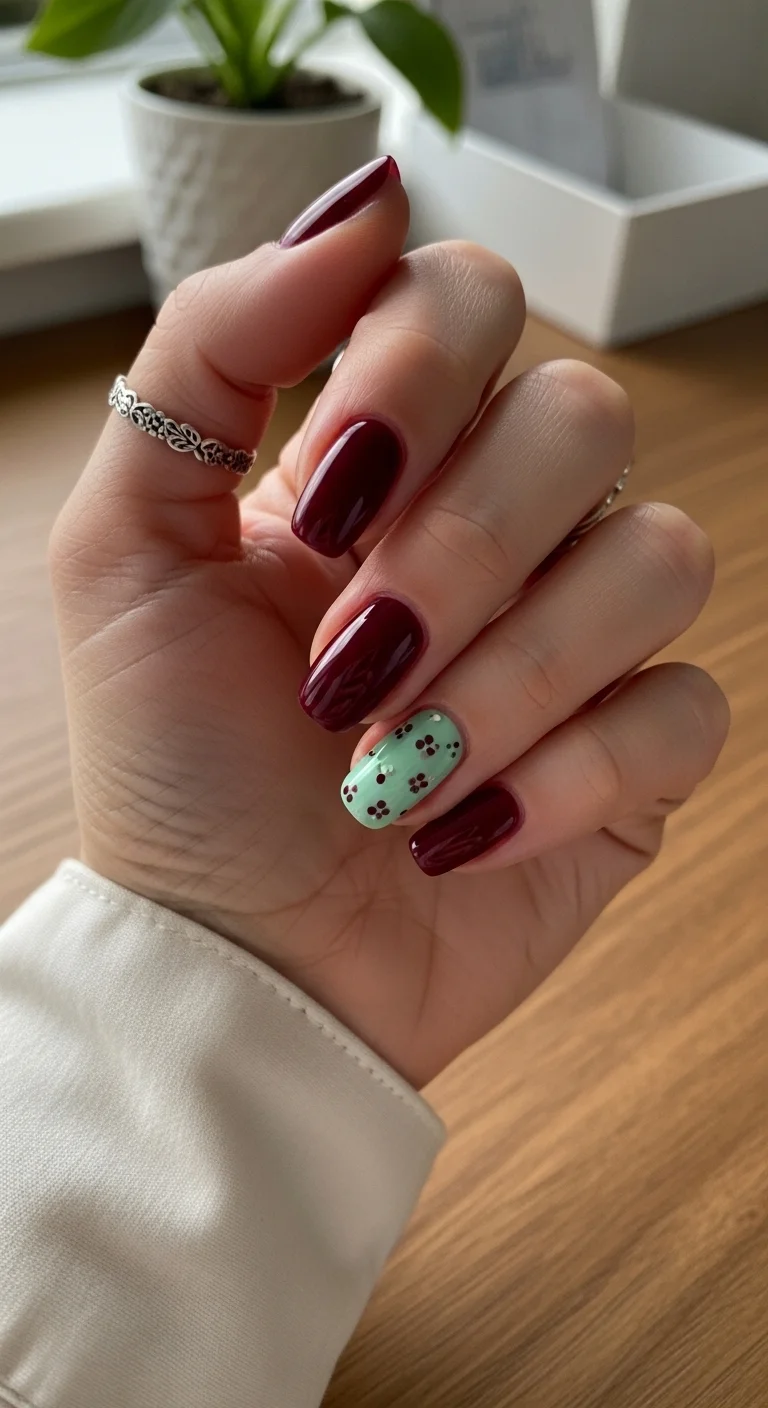
10.Burgundy with Mint Floral Accent
Dark burgundy nails with a contrasting mint floral accent for visual balance.
Overview:
Burgundy is the power color for fall and winter office nails. It's deep, it's rich, and it communicates confidence without being flashy. The challenge with burgundy is that it can feel heavy, especially on days when you're wearing dark clothing. The mint green accent nail here acts as a visual relief, breaking the darkness with a cool, fresh contrast.
The floral dots on the mint accent nail are simple, almost playful, which creates an interesting tension with the serious burgundy. It's like wearing a dark suit with a fun pocket square. The combination feels intentional and stylish without trying too hard.
One thing to note about burgundy polish: it tends to dry slightly darker than it looks in the bottle. If you're choosing between two shades, go with the lighter one. You can always build opacity with a third coat, but you can't lighten a color that's already on your nails.
Design Breakdown:
Deep burgundy with one contrasting mint floral accent. The color tension is the design.
Base Color: A deep burgundy or wine red. The shade should lean purple-red, not orange-red.
Nail Shape: Short square. The angular shape gives the dark color a modern edge.
Design Element: One accent nail in mint green with small burgundy or black floral dots scattered across it.
Finish: High-gloss top coat. The shine brings out the depth of the burgundy.
Get The Look at Home:
The contrast between burgundy and mint is striking, but the execution is straightforward.
- Base coat: Always use one with dark colors.
- Burgundy nails: Two thin coats on all nails except one per hand. Let dry fully.
- Mint accent: On one nail, apply two coats of mint green.
- Floral dots: Using a small dotting tool and burgundy polish, place clusters of dots in flower shapes across the mint nail.
- Seal: Two coats of glossy top coat.
11.Matte Brown with Glossy Accent
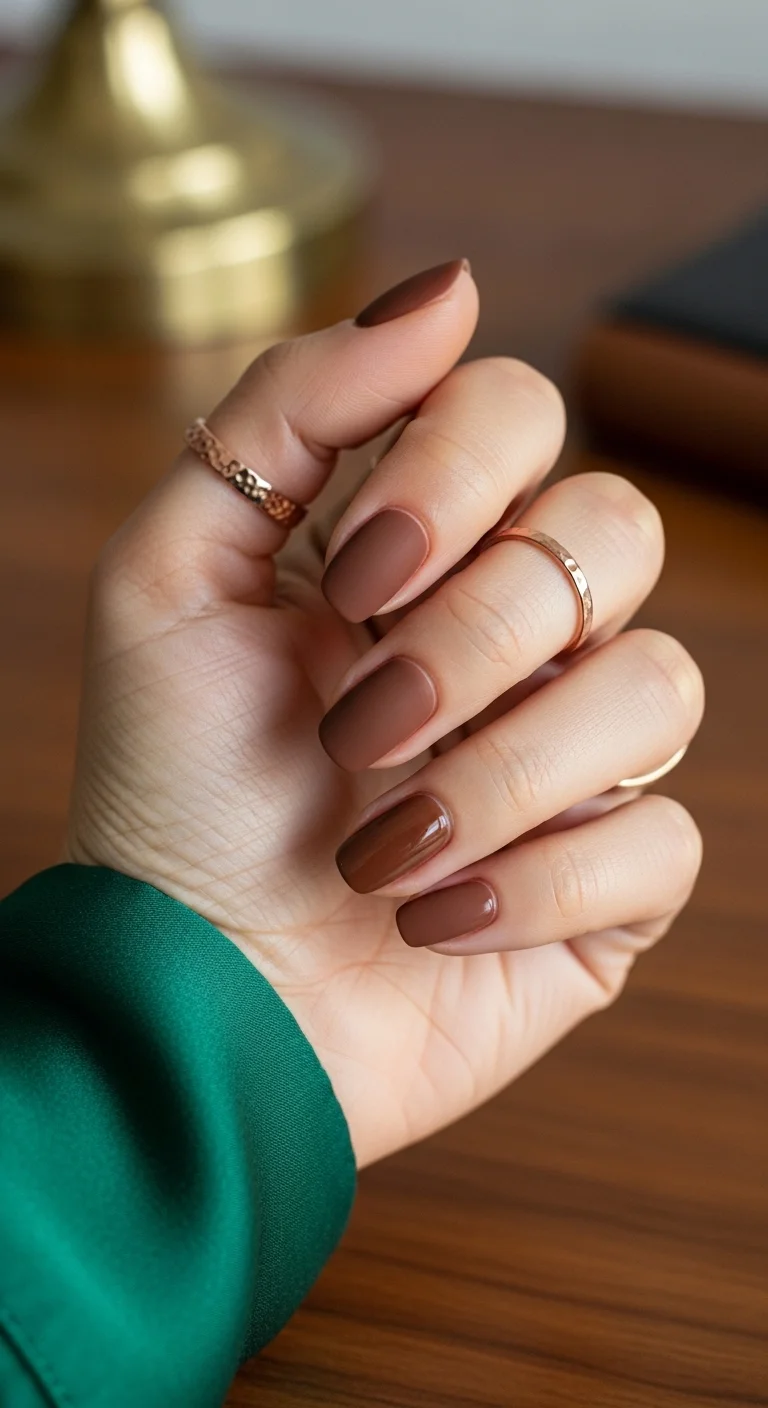
All-brown manicure with a texture contrast between matte and glossy finishes.
Overview:
This design uses texture instead of color to create visual interest. Every nail is the same shade of brown, but one nail per hand is glossy while the rest are matte. The difference is subtle from a distance, but up close, the glossy nail catches light while the matte nails absorb it. It's the kind of detail that makes someone look twice without being able to immediately explain why.
The brown itself is a warm, mid-tone shade, not too dark and not too light. It sits comfortably in the "coffee with cream" range, which makes it versatile across skin tones and seasons. The matte finish makes it look even more muted and understated.
The challenge with mixing finishes is that you need two different top coats and you need to apply them carefully. Getting matte top coat on the glossy accent nail, or vice versa, ruins the effect. Use a thin brush to apply the top coats precisely, and work on one nail at a time.
Design Breakdown:
Same color, different finishes. The texture contrast is the entire design.
Base Color: A warm, mid-tone brown. Think coffee with cream, not espresso.
Nail Shape: Short oval. The rounded shape softens the monochrome palette.
Design Element: One accent nail in glossy brown, remaining nails in matte brown. Same polish, different top coats.
Finish: Matte top coat on most nails, glossy top coat on one accent nail per hand.
Get The Look at Home:
The precision is in the top coat application. Keep the finishes separated.
- Base coat: Apply and let dry.
- Brown base: Two thin coats on all nails. Let dry fully.
- Matte first: Apply matte top coat to all nails except one accent nail per hand.
- Glossy accent: Once the matte is dry, apply glossy top coat to the accent nail. Use a thin brush to keep the edges clean.
- Let set: Wait ten minutes before touching anything. Matte top coats take longer to fully cure than glossy ones.
24 Stunning Bridesmaid Hairstyles for Weddings 2026 💍✨
12.Mint Green with Cherry Art
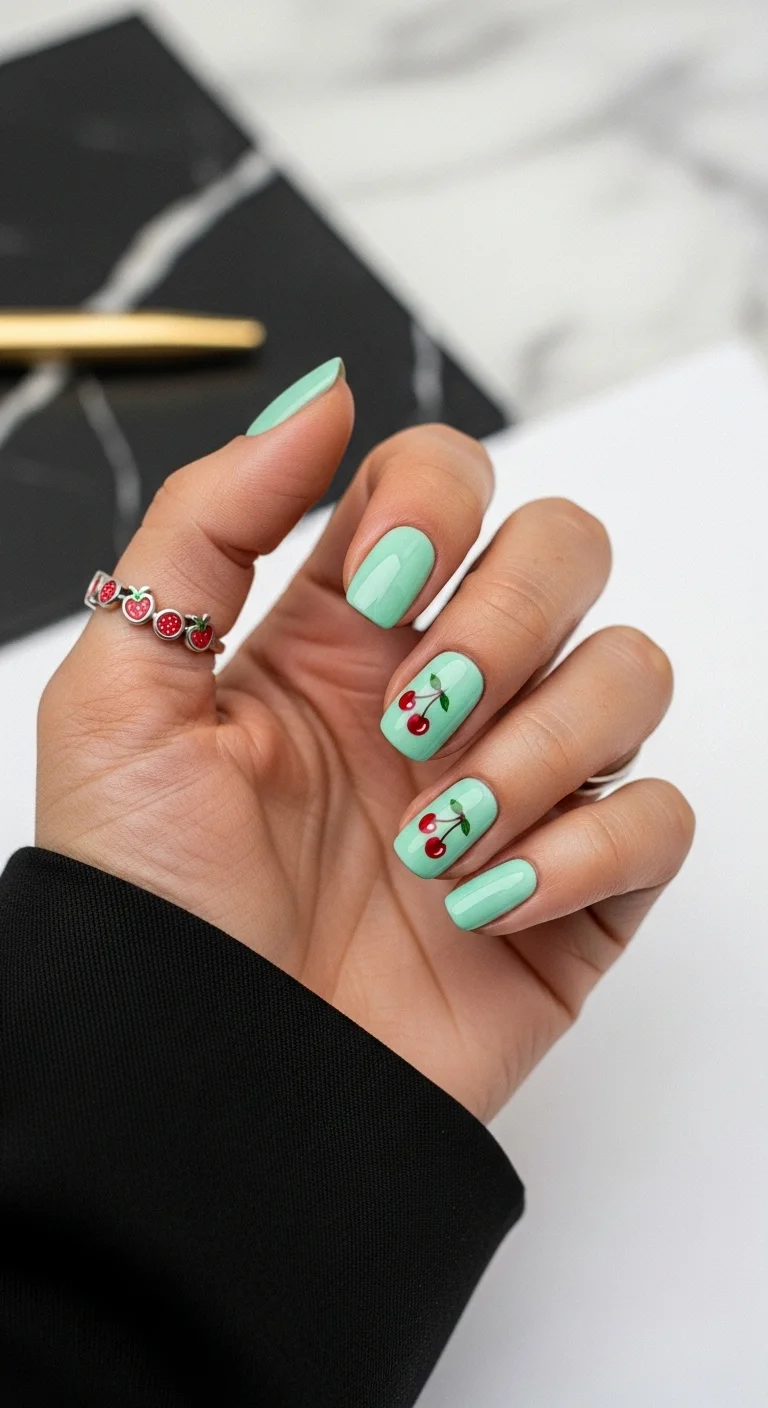
Playful cherry illustrations on mint green for a fun office-friendly look.
Overview:
Cherry nail art is having a moment, and this version keeps it appropriate for professional settings by limiting the illustrations to just two nails. The cherries are small, simple, and painted in red with green stems, which ties them back to the mint base color. The result looks intentional rather than random.
The mint green base is a smart choice for cherry art. It's light enough to let the red cherries stand out, and the green undertone matches the cherry stems. That color coordination makes the design feel cohesive instead of like a sticker placed on a random background.
Cherry art requires a steady hand for the stems, which are thin curved lines. If your hand isn't steady, try using a toothpick instead of a brush. The rigid point gives you more control over the line thickness, and the stems on this design are thin enough that a toothpick works fine.
Design Breakdown:
Solid mint with small cherry illustrations on two accent nails. The red-on-green contrast is the design.
Base Color: A bright, creamy mint green.
Nail Shape: Short square. The flat surface gives the cherry art room to breathe.
Design Element: Two accent nails with small red cherries (paired circles) and green curved stems.
Finish: High-gloss top coat. The shine makes the cherries look juicy and dimensional.
Get The Look at Home:
The cherries are built from simple shapes: circles and curved lines. Practice the proportions on paper first.
- Mint base: Two thin coats on all nails. Let dry fully.
- Cherry circles: Using a dotting tool and red polish, place two small circles side by side on each accent nail. These are the cherries.
- Stems: Using a toothpick or thin brush and dark green polish, draw two curved lines from the top of each cherry pair, meeting at a point above.
- Leaf (optional): Add a tiny green leaf at the stem junction for extra detail.
- Seal: Wait five minutes, then apply two coats of glossy top coat.
13.Caramel Orange with Polka Dot Accent
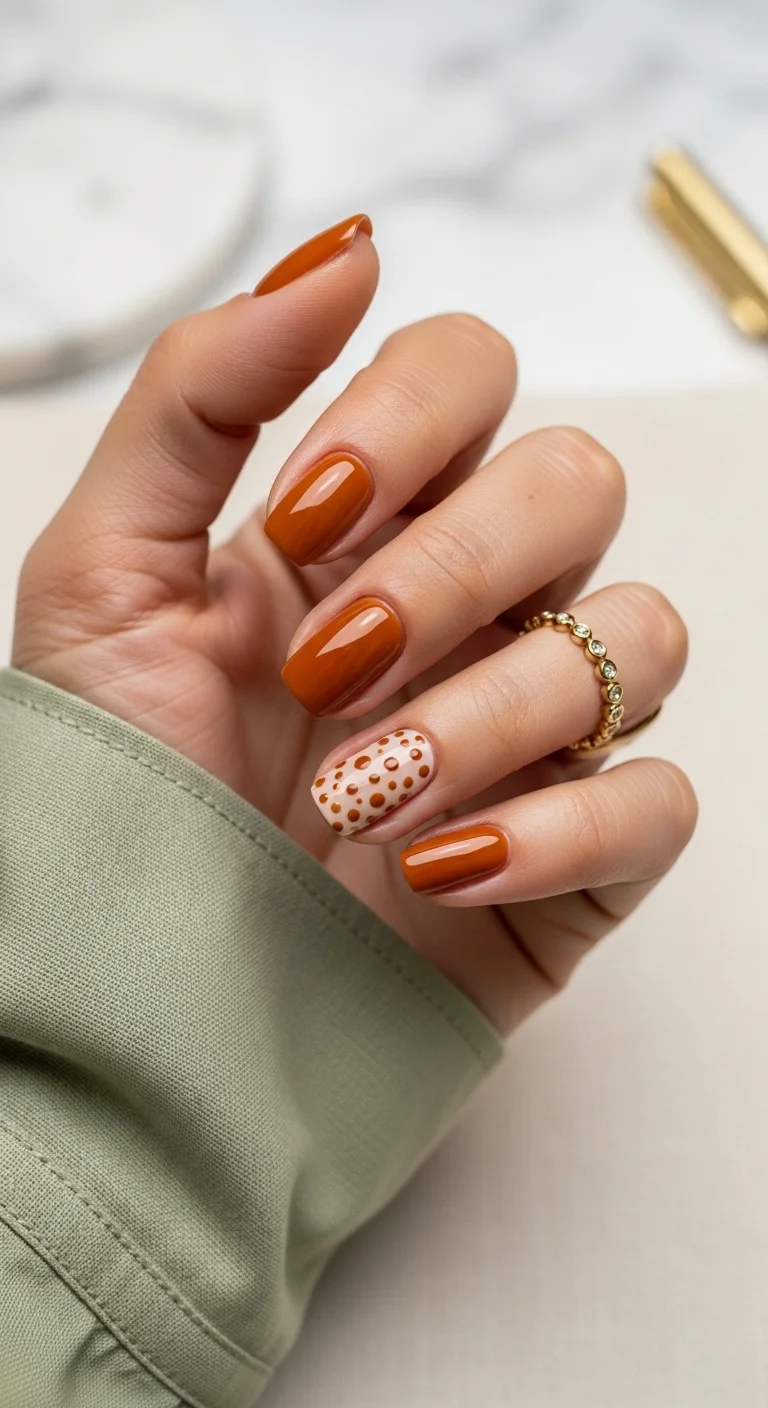
Warm caramel nails with a playful polka dot accent for personality.
Overview:
Caramel orange is a color that doesn't get enough credit. It's warmer than brown, less aggressive than bright orange, and it has a richness that makes it look expensive. On nails, it reads as autumnal without being themed, which makes it wearable well beyond fall.
The polka dot accent nail breaks up the solid color with a pattern that's easy to execute and universally recognizable. The dots are orange on a nude base, which inverts the color scheme of the other nails. That reversal creates a visual rhythm across your hand: solid, solid, pattern, solid, solid.
Polka dots are one of the most forgiving nail art techniques. They don't require a steady hand, they don't need to be symmetrical, and imperfect dots still look intentional. If you're new to nail art, this is a good starting point.
Design Breakdown:
Solid caramel with one polka dot accent nail. The pattern is simple and effective.
Base Color: A warm caramel or burnt orange. The shade should lean warm, not neon.
Nail Shape: Short square. The clean shape keeps the design modern.
Design Element: One accent nail with a nude base and scattered orange polka dots.
Finish: High-gloss top coat. The shine enhances the warm tones.
Get The Look at Home:
Polka dots are beginner-friendly nail art. A dotting tool or toothpick works equally well.
- Base coat: Apply and let dry.
- Orange nails: Two thin coats of caramel orange on all nails except one per hand.
- Nude accent: On one nail, apply two coats of warm nude.
- Dot application: Using a dotting tool or toothpick dipped in the orange polish, place dots randomly across the nude accent nail. Vary the spacing for a natural look.
- Seal: Two coats of glossy top coat.

29 Trendy Pink Summer Nails for 2026 💅
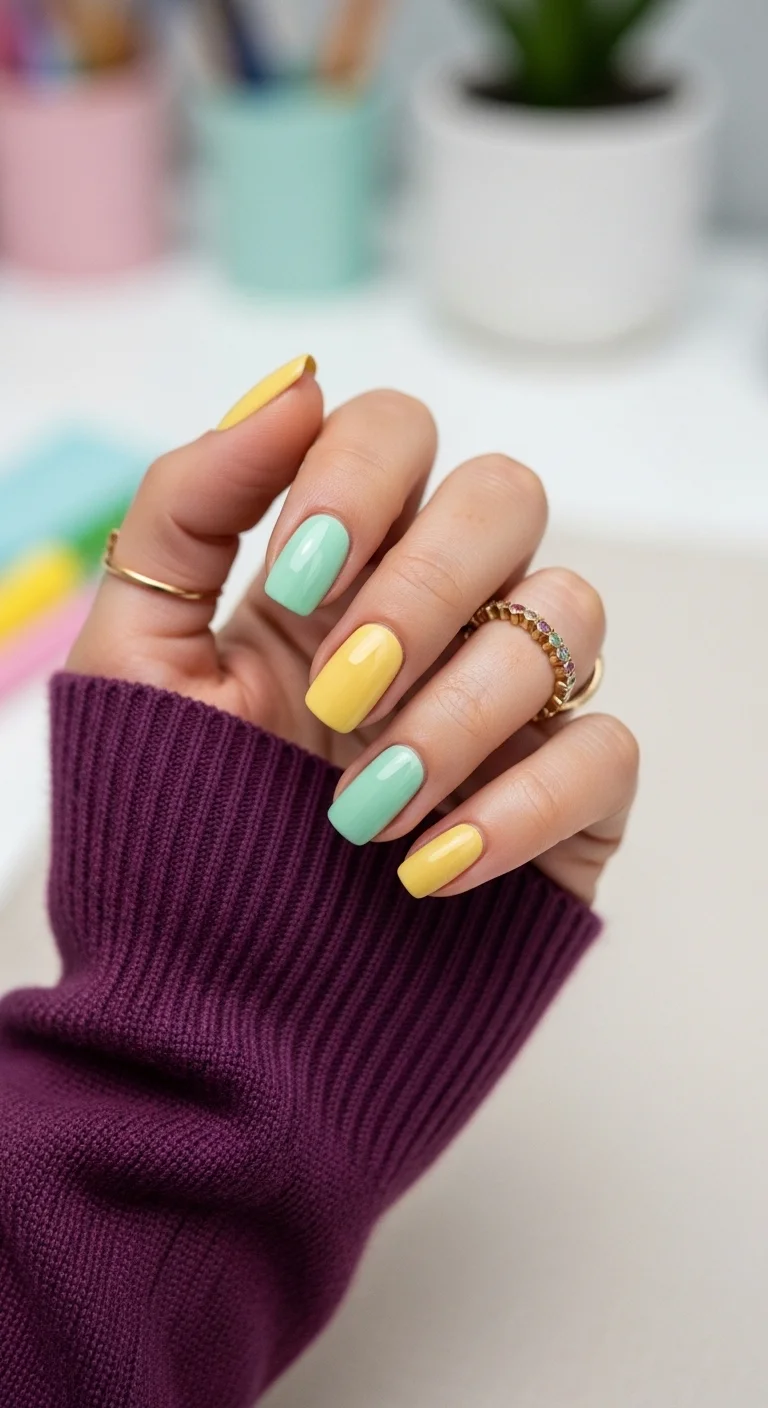
14.Alternating Mint and Yellow
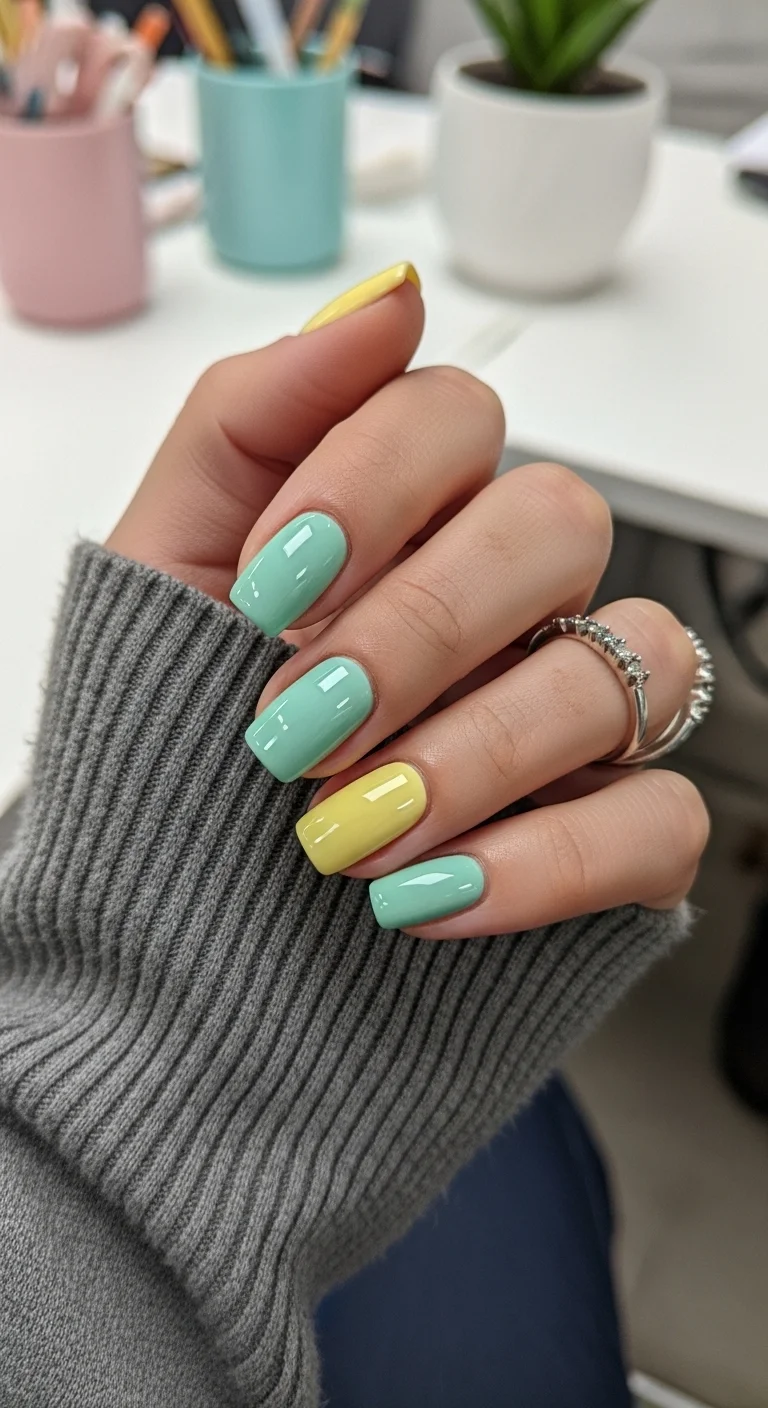
Two pastel colors alternating across the hand for a cheerful, balanced look.
Overview:
Alternating colors across your nails is the simplest way to make a two-tone manicure without any nail art skills. This design pairs mint green and pastel yellow, two colors that share a similar value and saturation level. That balance means neither color dominates, and the alternation feels rhythmic rather than random.
The pastel versions of both colors are important here. Bright yellow next to bright mint would feel chaotic and juvenile. The muted, milky versions of each color keep the design soft and professional. It's colorful without being loud.
The challenge with alternating solid colors is that you need both polishes to dry at the same rate. If one formula is thinner or dries faster than the other, you'll end up with uneven coverage across your hand. Test both polishes on a nail wheel first to make sure they behave similarly.
Design Breakdown:
Two solid colors alternating across the nails. Simple, effective, no art skills required.
Base Color: Two colors: a soft mint green and a pastel yellow. Both should be cream finish, no shimmer.
Nail Shape: Short square. The geometric shape suits the clean color blocking.
Design Element: Alternate the two colors across your nails. The pattern can be random or follow a specific order.
Finish: High-gloss top coat. The shine unifies the two colors under a consistent finish.
Get The Look at Home:
This is a solid-color manicure with a twist. The key is even coverage on both colors.
- Base coat: Apply and let dry.
- First color: Apply mint green to your chosen nails. Two thin coats. Let dry.
- Second color: Apply pastel yellow to the remaining nails. Two thin coats. Let dry.
- Cleanup: Check the edges where color meets skin. Use an angled brush dipped in acetone to clean any mistakes.
- Seal: Two coats of glossy top coat over all nails.
15.Mixed Metals with Yellow and Mint
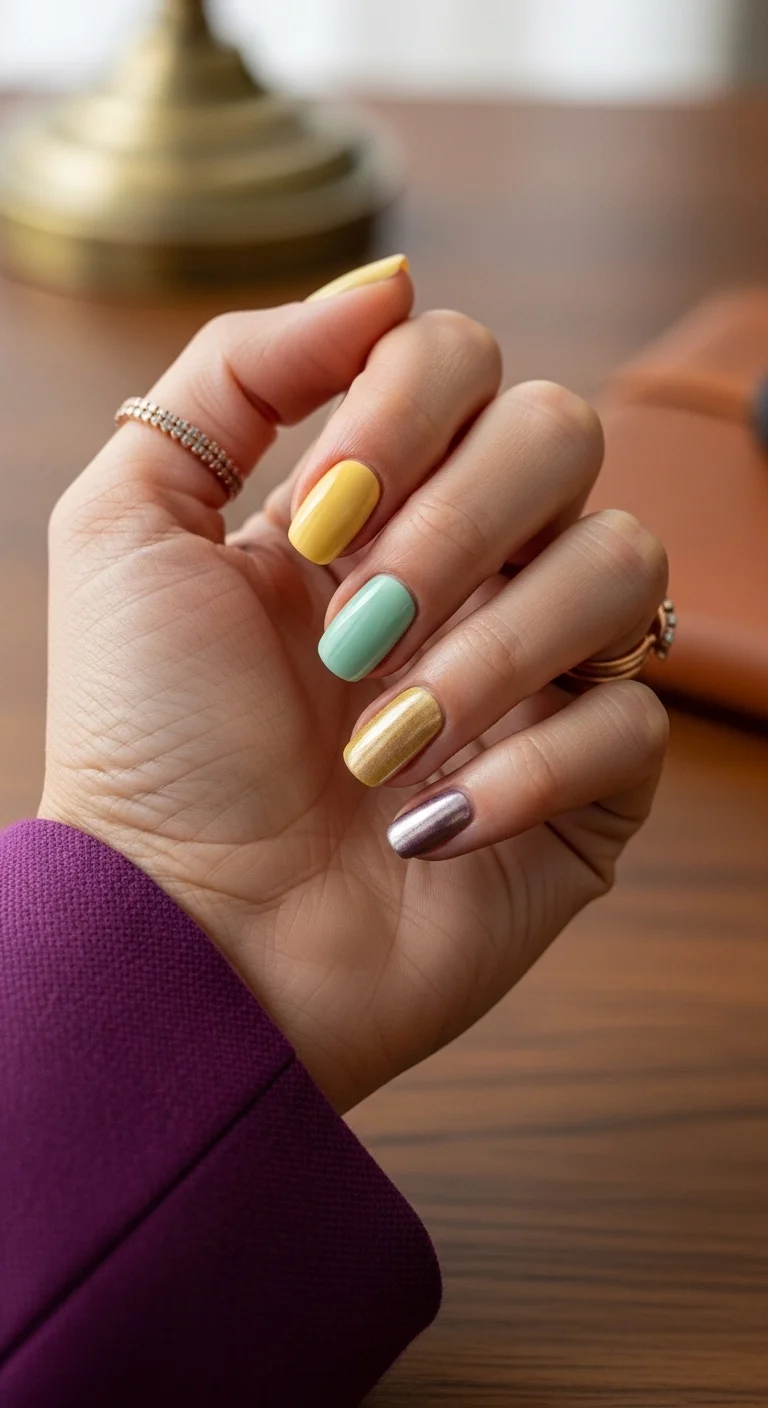
Four colors across the hand: yellow, mint, gold, and mauve metallic.
Overview:
This is the most eclectic design in the collection, and it works because the colors share a similar warmth. Yellow, mint, gold metallic, and mauve metallic could easily clash, but the versions chosen here all lean warm rather than cool. The gold and mauve metallics act as neutrals that tie the yellow and mint together.
The mix of cream and metallic finishes adds another layer of complexity. Your eye moves between the flat colors and the shimmering ones, creating visual movement across the hand. It's the nail equivalent of mixing textures in an outfit: the variety keeps things interesting.
Four different polishes means four different formulas, and that increases the chance of uneven drying times and coverage. Budget extra time for this manicure and let each nail dry completely before moving to the next.
Design Breakdown:
Four colors, two finishes. The warm undertone is the unifying factor.
Base Color: Four polishes: pastel yellow (cream), soft mint (cream), gold metallic, and mauve metallic.
Nail Shape: Short oval. The rounded shape softifies the busy color palette.
Design Element: One color per nail, distributed across the hand. The arrangement can be random or follow a pattern.
Finish: High-gloss top coat over everything. The uniform shine helps unify the different colors and finishes.
Get The Look at Home:
This design takes longer than most because you're working with four polishes. Be patient.
- Base coat: Apply and let dry.
- Color assignment: Decide which nail gets which color before you start. A balanced distribution is key.
- Apply colors: Two thin coats of each color on its assigned nail. Work one color at a time to avoid mixing.
- Metallic notes: Metallic polishes often need a third coat for full opacity. Build thin layers.
- Seal: Two coats of glossy top coat over all nails.

22 Best Graduation Day Hairstyles for 2026 🎓✨
16.Mint to Lavender Ombre
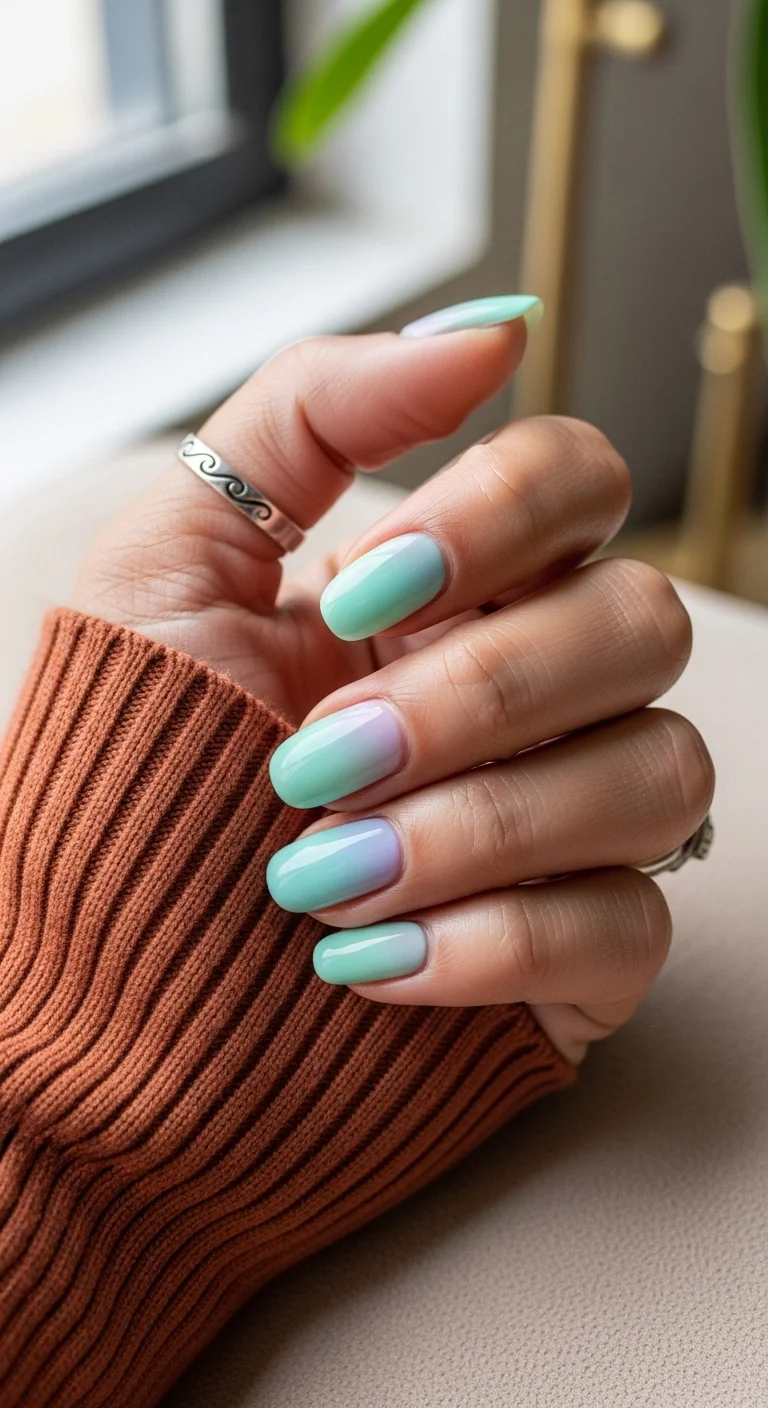
A dreamy two-tone gradient that blends cool mint into soft lavender.
Overview:
Gradient nails are notoriously difficult to execute cleanly, and this mint-to-lavender version is no exception. The transition zone where the two colors meet is the make-or-break point. Get it right and the nails look like they're lit from within. Get it wrong and you have muddy gray-green smudges in the middle of each nail.
The color pairing here is smart because both mint and lavender are cool-toned pastels with similar saturation levels. That means neither color overpowers the other during the blend. The result is a smooth, even gradient that looks like a sunset in reverse.
The practical reality of sponge gradients is that they take multiple passes to build opacity. Each sponge application deposits a thin layer of color, so you'll need three to four rounds to get full coverage. Budget at least 45 minutes for this design, not counting dry time.
Design Breakdown:
Two-color gradient using a sponge technique. The blend quality is everything.
Base Color: A sheer white or milky nude. The base should be light enough to let both gradient colors show clearly.
Nail Shape: Short oval or almond. Rounded shapes help the gradient transition look smoother.
Design Element: Sponge-applied ombre using mint green at the base and lavender at the tip, blending in the middle.
Finish: High-gloss top coat. The shine smooths out any texture left by the sponge.
Get The Look at Home:
Sponge gradients require patience and multiple thin applications. Don't try to build opacity in one pass.
- Base color: One coat of sheer white or milky nude. Let dry.
- Sponge setup: Paint stripes of mint and lavender side by side on a makeup sponge. Dab on paper first to remove excess.
- First pass: Press the sponge onto the nail with mint at the cuticle and lavender at the tip. Dab lightly.
- Build opacity: Repeat the sponge application three to four times, letting each layer dry for one minute before the next.
- Clean skin: Use a flat brush dipped in acetone to remove polish from the skin around each nail.
- Seal: Apply a thick, self-leveling top coat to smooth the gradient surface.
17.Solid Yellow
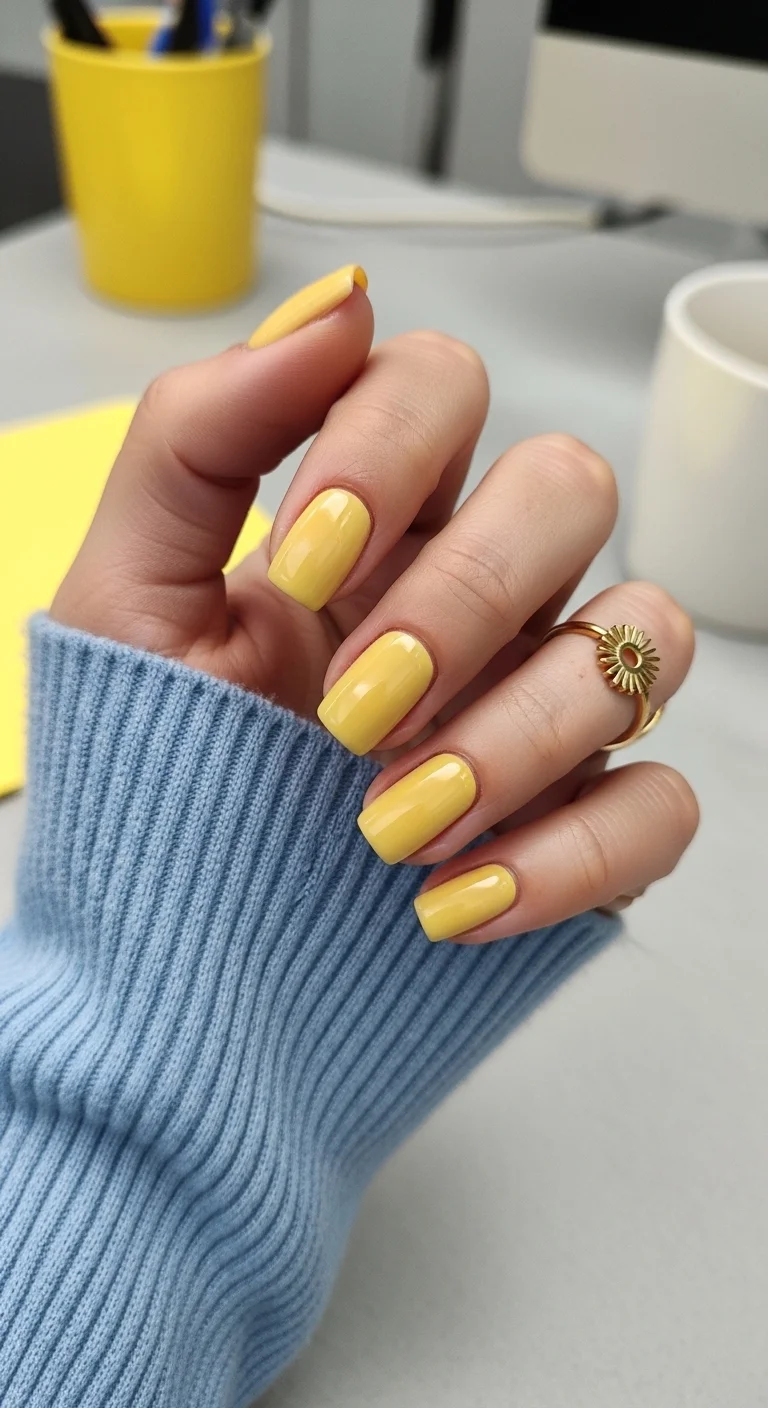
A clean, solid pastel yellow manicure with no additional design elements.
Overview:
Sometimes the simplest design is the boldest choice. Solid yellow nails, no accents, no art, no gradient. Just a clean, even application of pastel yellow across all ten nails. It's the kind of manicure that looks effortless but requires more skill than most decorated designs.
Yellow polish is notoriously difficult to apply evenly. It streaks, it patches, and it shows every brush stroke. Getting a smooth, opaque finish takes patience and thin coats. Most people give up after two coats and accept the streaks, but the design in the image shows full, even coverage, which means either three or four thin coats or a very high-quality formula.
The pastel shade chosen here is warm enough to complement most skin tones without washing anyone out. Bright neon yellow would be a different conversation entirely. This is the "I woke up looking this good" version of yellow nails.
Design Breakdown:
Single color, no design. The challenge is entirely in the application.
Base Color: A warm pastel yellow. Not neon, not mustard, not chartreuse. Think butter or banana.
Nail Shape: Short square. The clean geometric shape suits a bold solid color.
Design Element: None. The color is the design.
Finish: High-gloss top coat. The shine makes the yellow look creamy and intentional.
Get The Look at Home:
Yellow polish requires more coats than most colors. Be patient with the process.
- Buff and base: Smooth any ridges with a buffer. Apply a ridge-filling base coat. Yellow shows every imperfection.
- First coat: Apply a thin, almost translucent first coat. It will look streaky. That's normal.
- Second coat: Apply a second thin coat, brushing in the same direction each time. Still streaky? That's also normal.
- Third coat: A third thin coat should bring full opacity. If not, add a fourth.
- Seal: Two coats of glossy top coat. Cap the free edge to prevent tip chipping.

33 Trendy Polka Dot Nail Ideas for 2026 💅
18.Mint and Yellow Color Block
Two pastel colors in an alternating pattern for a playful, balanced manicure.
Overview:
This is essentially design number fourteen with a different arrangement. The colors are the same: mint green and pastel yellow. But the distribution across the hand is slightly different, and sometimes the pattern matters as much as the colors themselves.
The alternating pattern here feels more deliberate than random placement. When the colors alternate evenly (mint, yellow, mint, yellow, mint), your eye reads it as a pattern. When they're randomly scattered, it reads as indecision. Both approaches are valid, but the patterned version looks more polished for professional settings.
The pastel versions of both colors work because they have similar visual weight. A dark green next to a pastel yellow would feel unbalanced, with the dark color pulling all the attention. Pastels share a lightness that makes them easy neighbors.
Design Breakdown:
Two alternating pastel colors. The rhythm of the pattern creates the design.
Base Color: Two colors: soft mint green and pastel yellow, both cream finish.
Nail Shape: Short square. The geometric shape suits the alternating pattern.
Design Element: Alternate mint and yellow across the nails in a consistent pattern.
Finish: High-gloss top coat to unify the two colors.
Get The Look at Home:
A straightforward alternating manicure. The key is consistent coverage on both colors.
- Base coat: Apply and let dry.
- Plan the pattern: Decide which nails get which color before you start. An even alternation works best.
- First color: Apply mint to chosen nails. Two thin coats. Let dry.
- Second color: Apply yellow to remaining nails. Two thin coats. Let dry.
- Seal: Two coats of glossy top coat over all nails.
19.Yellow with White Polka Dots

Cheerful yellow nails with white polka dot accents for a playful touch.
Overview:
Yellow nails with white polka dots is the nail equivalent of a sundress: cheerful, uncomplicated, and reliably pleasant. The yellow here is soft enough to avoid looking garish, and the white dots add a pattern that's visible but not overwhelming. It's the kind of design that makes people smile when they notice it.
The dots on two accent nails create a rhythm across the hand: solid, solid, pattern, pattern, solid. That grouping of the patterned nails together (rather than spreading them out) makes the design feel intentional. Scattered polka dots on every other nail would feel more random.
White dots on yellow are more visible than colored dots on a dark background, which means the dot placement matters more. Uneven spacing or inconsistent dot sizes will be obvious. Use a dotting tool rather than a toothpick to get more consistent results.
Design Breakdown:
Solid yellow with white polka dots on two accent nails. The contrast makes the pattern pop.
Base Color: A warm pastel yellow. Cream finish, no shimmer.
Nail Shape: Short oval. The rounded shape softifies the bold color choice.
Design Element: Two accent nails with white polka dots scattered across the yellow base.
Finish: High-gloss top coat. The shine makes the dots look crisp.
Get The Look at Home:
Polka dots are forgiving, but consistent dot size makes the design look more polished.
- Base coat: Apply and let dry.
- Yellow base: Two to three thin coats on all nails. Let dry fully.
- Dot application: Using a medium dotting tool and white polish, place dots randomly on two accent nails. Vary the spacing but keep the dot size consistent.
- Let set: Wait five minutes before applying top coat. White dots smear easily when wet.
- Seal: Two coats of glossy top coat.
30 Stunning Mother of the Groom Hairstyle Ideas for 2026 💍✨
20.Sheer Pink with Soft French Tips
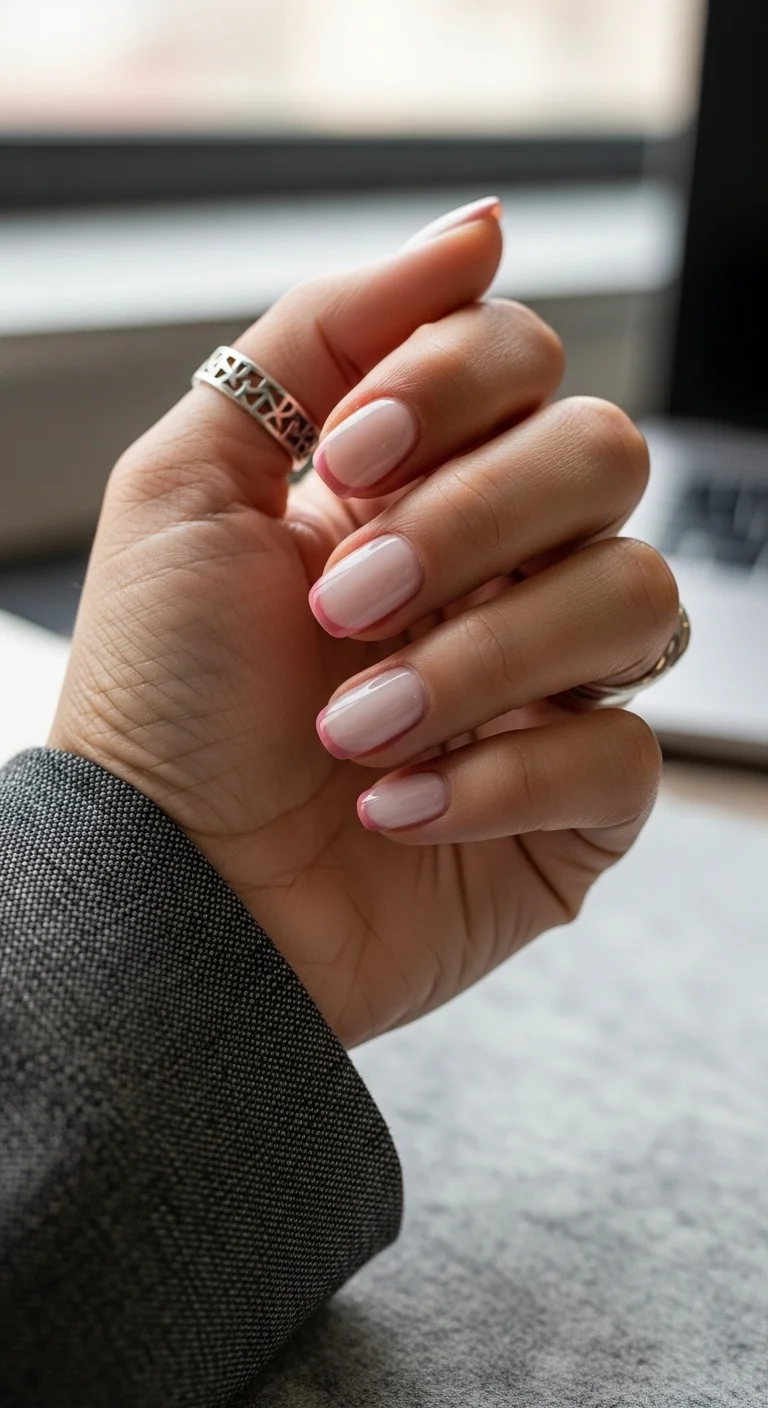
The most minimal French manicure: pink on pink with barely-there contrast.
Overview:
This is the most understated design in the entire collection. The base is a sheer, milky pink, and the tips are a slightly more opaque version of the same pink. The contrast between base and tip is so subtle that you have to look closely to notice it's a French manicure at all. From a distance, it just looks like healthy, well-groomed nails.
The appeal of a pink-on-pink French is that it eliminates the stark white tip that makes traditional French manicures look so "done." This version looks natural, almost like your nails grew this way. For professional environments where any nail art would be considered too much, this is the safest option that still qualifies as a manicure.
The trade-off is that the subtlety makes it hard to justify the cost if you're going to a salon. The technique is the same as a regular French, but the visual impact is a fraction of what you'd get with white tips. If you're doing this at home, the cost is minimal. If you're paying for it, know what you're getting.
Design Breakdown:
Pink-on-pink French. The subtlety is the entire point.
Base Color: A sheer, milky pink. The nail bed should be visible through the base.
Nail Shape: Short oval. The natural shape enhances the "these are just my nails" effect.
Design Element: Slightly more opaque pink French tips. The color difference between base and tip should be subtle.
Finish: High-gloss top coat. The shine makes the nails look healthy and hydrated.
Get The Look at Home:
The technique is identical to a traditional French, just with different colors. The subtlety requires a light hand.
- Prep: Push back cuticles. Buff ridges smooth. Apply base coat.
- Sheer pink base: Two thin coats of milky pink. Each coat should be almost transparent.
- Tip color: Using a slightly more opaque pink, paint the French tips. The contrast should be subtle.
- Cleanup: Use a flat brush dipped in acetone to refine the smile line. On a sheer base, precision matters.
- Seal: Two coats of glossy top coat for a glass-like finish.
21.Mustard Yellow with Stripe Accent
Matte mustard with a multi-color stripe accent for geometric interest.
Overview:
Mustard yellow is the grown-up version of pastel yellow. It's deeper, earthier, and it reads as autumnal rather than spring-like. The matte finish on most of the nails pushes the color even further into sophisticated territory, removing the shine that would make it look playful.
The striped accent nail is where this design gets interesting. White, brown, and gold stripes run horizontally across a nude base, creating a pattern that references the yellow of the other nails while introducing new colors. The stripes are thin and evenly spaced, which gives the accent nail a textile-like quality.
Matte mustard is one of those color-finish combinations that can look either very chic or very flat depending on the quality of the polish. Cheap matte formulas tend to chalk up and look dusty. Invest in a decent matte top coat, and apply it over a glossy base color for the smoothest result.
Design Breakdown:
Matte mustard with one geometric stripe accent. The matte finish is the design choice.
Base Color: A deep mustard yellow. The shade should lean warm and earthy.
Nail Shape: Short square. The angular shape complements the geometric stripe accent.
Design Element: One accent nail with horizontal stripes in white, brown, and gold over a nude base.
Finish: Matte top coat over the mustard nails. The accent nail gets glossy top coat to make the stripes pop.
Get The Look at Home:
The stripes require the most precision. Use striping tape or a thin liner brush.
- Base coat: Apply and let dry.
- Mustard nails: Two thin coats of mustard yellow on all nails except one per hand.
- Stripe accent: On one nail, apply two coats of nude. Then paint thin horizontal stripes using white, brown, and gold polish.
- Matte finish: Apply matte top coat to the mustard nails only.
- Glossy accent: Apply glossy top coat to the striped nail to enhance the colors.

34 Cutest Butter Yellow Nail Designs for 2026 🧈
22.Chocolate Brown with Silver French Tips

Rich brown nails finished with silver glitter tips for a subtle sparkle.
Overview:
Brown and silver is an unexpected combination that works better than it should. The warmth of the chocolate brown contrasts with the cool shimmer of the silver, creating a tension that makes both colors look more interesting than they would alone. It's the nail equivalent of mixing gold and silver jewelry.
The glitter in the silver tips adds a textural element that catches light differently than the cream brown base. Under office lighting, the silver tips will sparkle subtly as you type or gesture, creating small moments of visual interest without being distracting.
The downside of glitter tips is removal. Glitter polish clings to the nail in a way that cream polish doesn't, and scrubbing it off damages the nail surface. The foil method works here: wrap each nail in acetone-soaked cotton wrapped in foil for five minutes, then wipe the glitter away gently.
Design Breakdown:
Solid brown with silver glitter French tips. The texture contrast creates the design.
Base Color: A warm chocolate brown. Cream finish, fully opaque.
Nail Shape: Short oval. The rounded shape softifies the dark color and complements the glitter.
Design Element: Silver glitter French tips. The glitter should be fine, not chunky, for an office-appropriate sparkle.
Finish: High-gloss top coat over everything. The top coat smooths the glitter texture and adds depth to the brown.
Get The Look at Home:
Fine glitter is easier to work with than chunky glitter. It also looks more professional.
- Base coat: Always use one with dark colors.
- Brown base: Two thin coats of chocolate brown on all nails. Let dry fully.
- Silver tips: Using a French liner brush, apply fine silver glitter polish to the tips. Two thin coats for even coverage.
- Cleanup: Use an angled brush dipped in acetone to sharpen the smile line between brown and silver.
- Seal: Two thick coats of glossy top coat. The first locks the glitter; the second smooths the surface.
There you have it: 22 ways to keep your nails office-appropriate without sacrificing personality. The best office manicure is one that makes you feel confident every time you glance at your hands during a meeting, type an email, or reach for your coffee cup.
Whether you lean toward the subtlety of matte nude with minimal dots or the boldness of chocolate brown with silver glitter, the key is choosing a design that fits your work environment and your personal taste. Not every design works in every office, and that's fine.
Save your favorites to your Pinterest boards so you have them ready for your next appointment.