Hair Trends
35 Cute & Sporty Athletic Hairstyles for Women (2026)
Hair falling in your face mid-squat is not the vibe. Whether you're sprinting through intervals, holding a warrior pose, or diving for a volleyball, the last thing you need is a ponytail unraveling at the worst possible moment. The styles here are for movement, while protecting against sweat, wind, and high-impact workouts so you can focus on your reps instead of your hair.
Some of these take two minutes in the mirror before a gym session. Others are more involved braided looks that hold up through a full tournament day. Every single one is surely to stay where you put it, no matter how much you move. Find the one that matches your hair length, your workout intensity, and how much styling time you're willing to invest.
1.Sleek Low Ponytail with a Twist
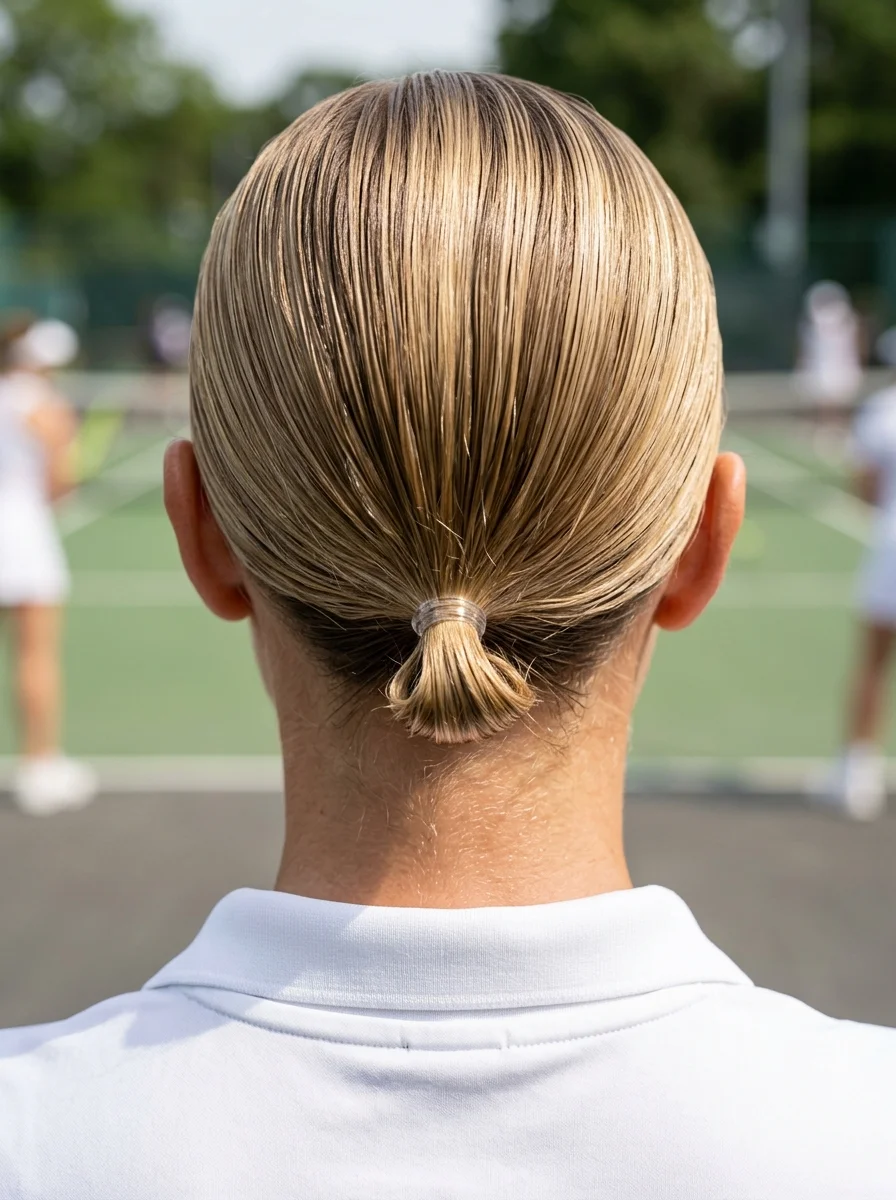
The overview: Sleek Short Hair gathered at the nape into a low ponytail with the tail folded back through the elastic for a looped, architectural finish. A smoothing gel eliminates flyaways before you even start moving.
The looped tail trick is what separates this from a basic gym pony. You pull the pony through the elastic one last time but stop halfway, creating a folded loop instead of a free-hanging tail. The result looks deliberate and polished while staying completely locked in through a full match.
Why this look is popular: The low nape placement eliminates the bounce that higher ponytails create during intense movement. The looped tail adds a design element that reads as styled without requiring any braiding skill. Works on short to medium-length hair — even a bob can pull this off if there's enough length to loop through.
Where this look is suitable: Tennis, pickleball, weight training, cycling, any sport with quick lateral movement. Also clean enough for a casual brunch after your match.
The look: Ultra-smooth ash blonde hair slicked back with gel, gathered into a low ponytail at the nape. The tail is folded back through the elastic to create a compact loop. No loose strands, no flyaways — the surface has a wet-look sheen from the smoothing product.
Step by step:
- Apply smoothing gel. Work a dime-sized amount of Eco Styler gel or similar through damp hair from roots to ends.
- Brush flat. Use a boar bristle brush to sweep all hair back toward the nape. No bumps, no ridges.
- Secure the ponytail. Tie with a strong elastic at the nape. Keep it tight — this is your anchor.
- Create the loop. Pull the ponytail through the elastic one final time, stopping halfway to leave a folded loop. Tuck the ends under.
- Smooth the surface. Run a fine-tooth comb over the crown and sides to flatten any stray hairs. Mist with strong-hold hairspray.
Tips and tricks: For extra hold, apply gel to towel-dried hair and let it air-dry before creating the ponytail. A 1-inch brush by kitsch helps eliminate flyaways along the hairline without disrupting the sleek surface. If your hair is fine, backcomb the ponytail base slightly before looping to add grip.
32 Stunning Summer Wedding Hairstyles for Brides ☀️💍
2.Dynamic Bubble Braid Ponytail
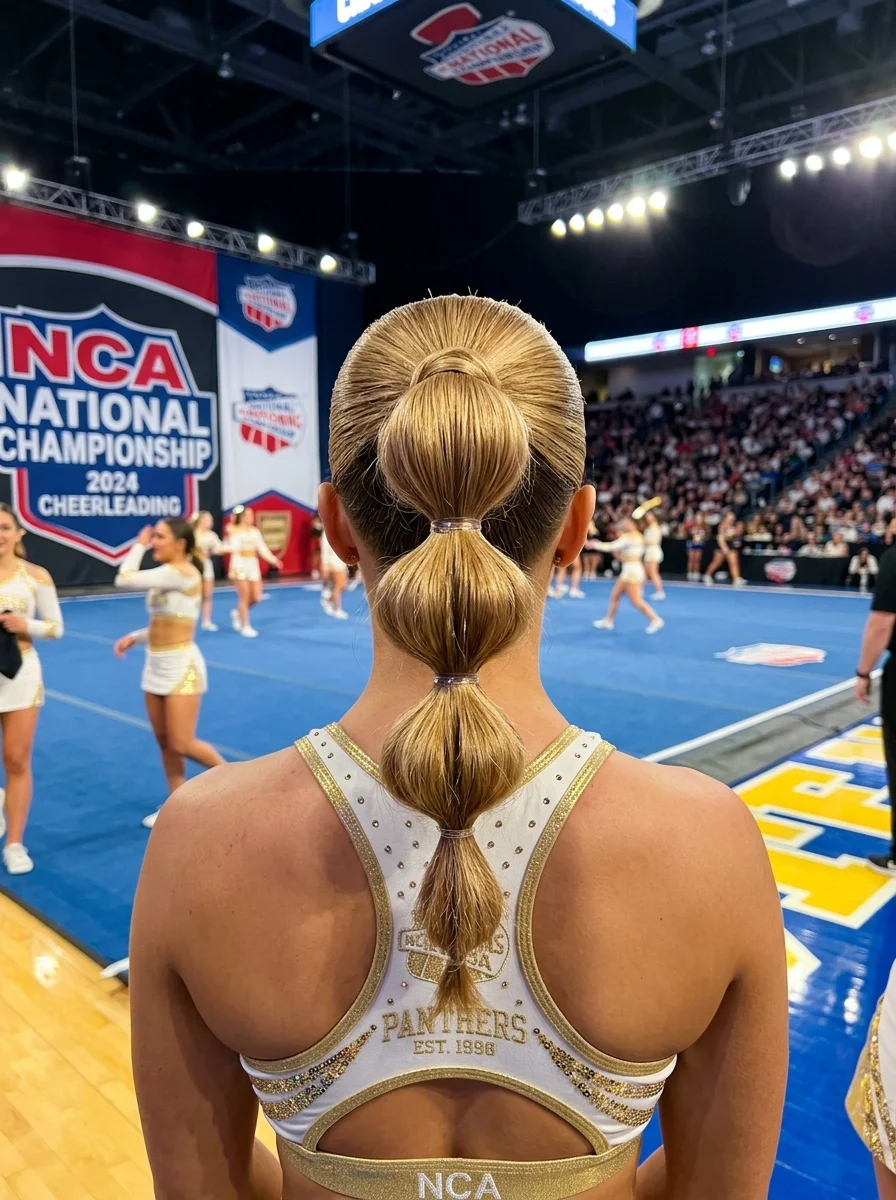
The overview: Medium to Long Hair pulled into a high ponytail at the crown, then segmented into rounded bubble shapes using four clear elastics down the length.
Multiple anchor points distribute tension across the entire ponytail instead of concentrating it at one elastic. That means less pulling at the scalp during long practices and a style that stays intact through back handsprings and basket tosses.
Why this look is popular: Bubble braids look more complex than they are — you're just tying elastics at intervals and puffing out the sections between them. The result has volume and texture that photographs well from a distance, which is exactly what you want during competition or performance.
Where this look is suitable: Cheerleading, dance competitions, spin classes, any cardio-heavy workout where a regular ponytail bounces too much. Also works for sports day events and team photos.
The look: High golden blonde ponytail at the crown with four evenly spaced clear elastics creating rounded bubble segments. Each bubble is puffed out for volume. The high placement keeps the neck exposed and allows full range of motion without interference.
Step by step:
- Gather into a high ponytail. Brush all hair to the crown. Secure tightly with a strong elastic.
- First elastic down. Tie a clear elastic about 2 inches below the base.
- Create the first bubble. Gently pull the hair between the two elastics outward to form a rounded, puffy shape.
- Repeat down the length. Add two more elastics at 2-inch intervals, puffing each section into a bubble.
- Final adjustment. Go back through and even out the bubble sizes. Make sure each one is pulled to the same width.
- Set it. Mist with flexible-hold hairspray to lock the bubbles in place without crunch.
Tips and tricks: Use clear polyband elastics — colored ones show unevenly and look less polished. If your hair is very silky, spray each section with dry texturizing spray before tying the elastic for extra grip. The bubbles hold better on second-day hair.
3.Intricate Fishtail Braid Ponytail
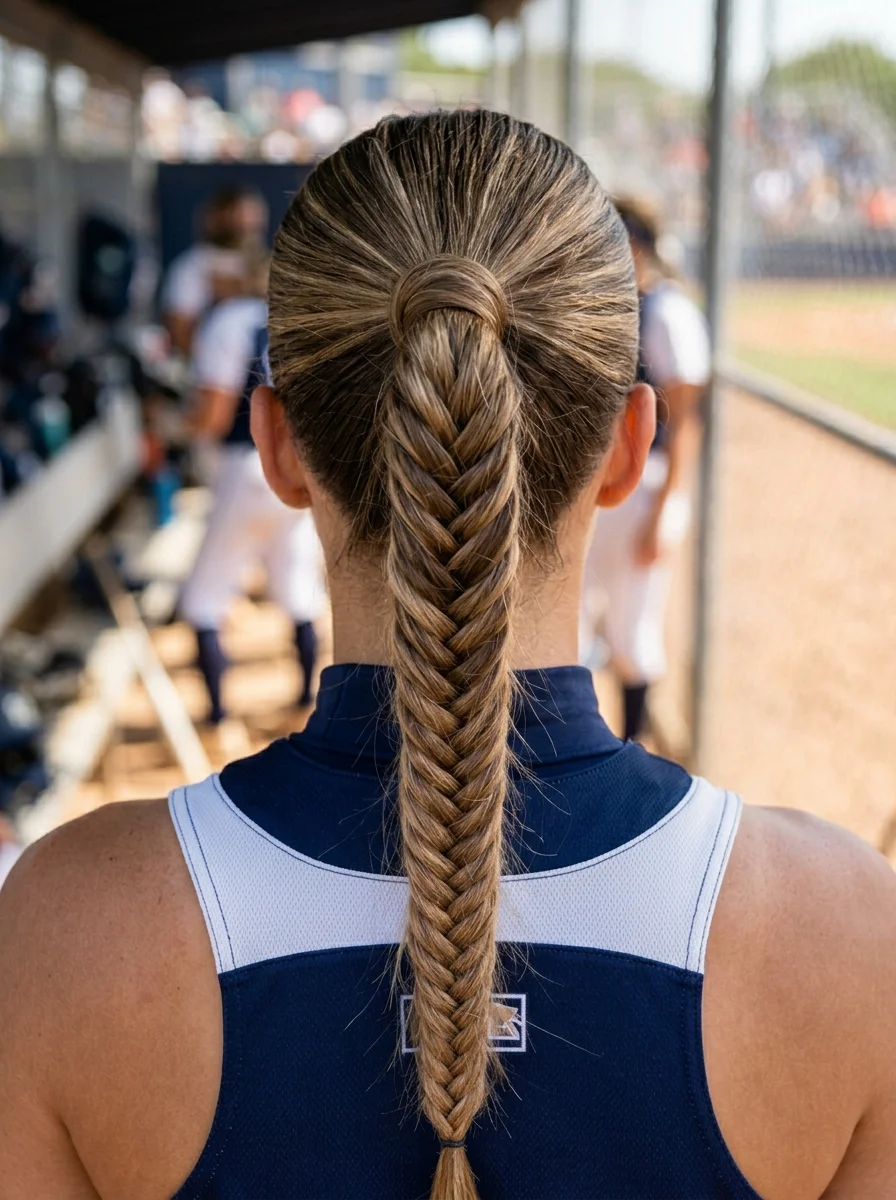
The overview: Medium to Long Hair woven into a fishtail braid starting at mid-height, with the base wrapped in a strand of hair to conceal the elastic. The fishtail pattern uses two sections crossing small pieces over, creating a braid that sits flatter against the head than a traditional three-strand.
That flat profile is the functional advantage. A standard braid tends to sit higher and catch wind during running. The fishtail compresses tighter and creates less wind resistance, which matters when you're sprinting the bases or chasing fly balls.
Why this look is popular: The fishtail pattern is more visually interesting than a standard three-strand braid — it reads as intricate without requiring advanced braiding skills. The hair-wrapped base adds a finished, polished detail that elevates the whole style beyond a basic ponytail.
Where this look is suitable: Baseball, softball, running, field hockey, outdoor team sports. Also works for post-game gatherings where you want to look put-together without changing your hair.
The look: Mid-height ponytail in your medium to long hair, braided into a fishtail pattern from the elastic down. A thin section of hair is wrapped around the elastic base and tucked under. The braid is secure but not overly tight, with a natural texture throughout.
Step by step:
- Gather and secure. Create a mid-height ponytail. Secure with a strong elastic that matches your hair color.
- Divide into two. Split the ponytail into two equal sections.
- Fishtail braid. Take a small piece from the outer edge of the left section and cross it over to the right. Then take a small piece from the outer edge of the right and cross to the left. Repeat.
- Secure the end. Tie off with a clear elastic about 2 inches from the bottom.
- Wrap the base. Take a thin section of hair from the ponytail, wrap it around the elastic to conceal it, and tuck the end under the elastic or pin it underneath.
- Pancake slightly. Gently pull the outer edges of the braid to widen it without flattening the pattern.
Tips and tricks: The smaller the pieces you cross, the more detailed the fishtail pattern looks. Keep tension even — if one side gets looser than the other, the braid will twist. A texturizing spray before braiding gives slippery hair enough grip to hold the pattern through activity.
27 Stunning June Nail Ideas for 2026 💅
4.Intricate Braided Top Knot
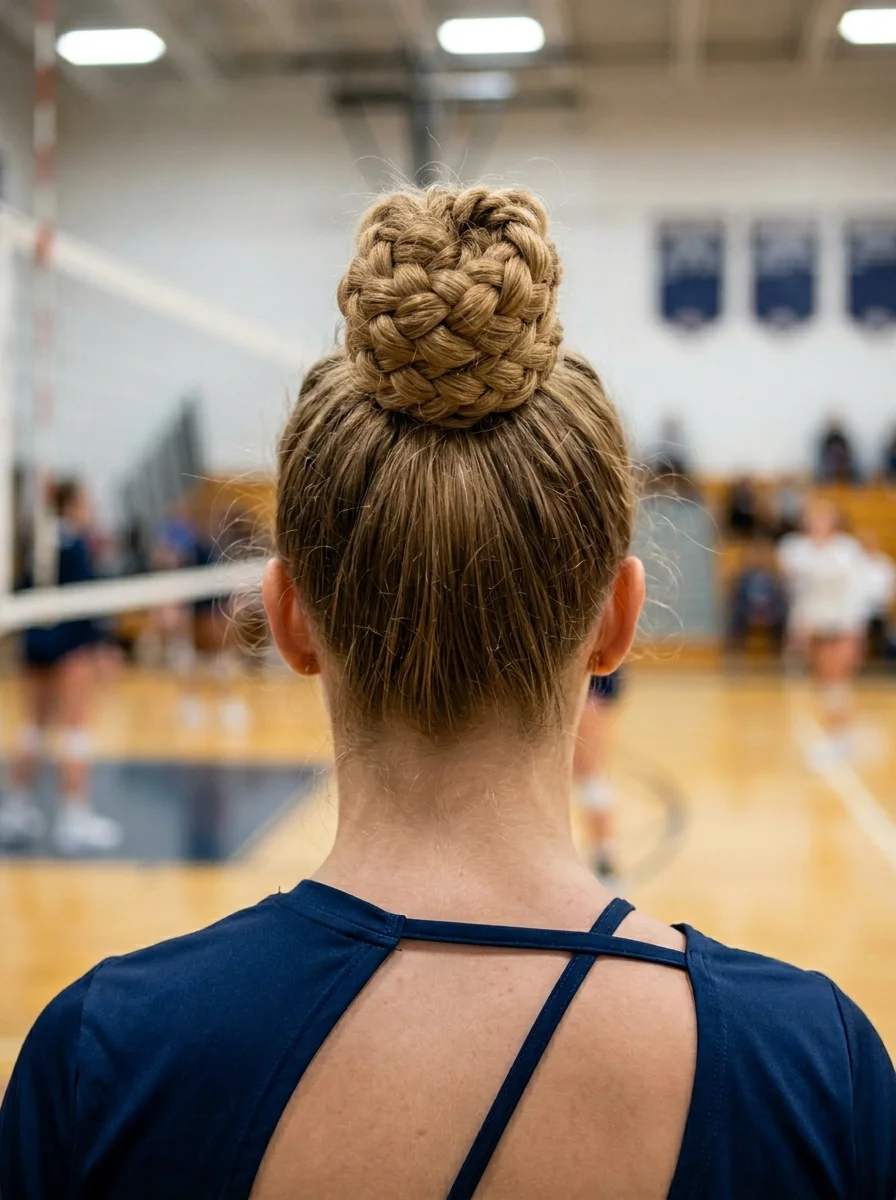
The overview: Long hair pulled into a high ponytail, braided into a three-strand plait, then coiled into a textured bun at the crown. This completely off-neck placement is ideal for sports that require looking up, like serving and blocking.
The braided texture within the bun creates friction against itself, which means it holds without as many pins as a smooth bun would. The braid essentially locks into place when coiled, giving you a more secure hold for the same amount of effort.
Why this look is popular: The braided bun sits higher and tighter than a standard messy bun, which means zero interference with neck movement. The texture of the braid catches light and creates visual interest from every angle — this is one of those rare athletic styles that actually looks better than its non-sporty counterpart.
Where this look is suitable: Volleyball, gymnastics, basketball, dance — any sport where you need full neck mobility and your head tilts back frequently. Also works for outdoor workouts where keeping hair off your neck helps with heat management.
The look: High ponytail braided into a three-strand plait, then twisted and coiled into a compact, textured bun positioned directly on top of the crown. The honey blonde color makes the braid pattern visible within the bun.
Step by step:
- Create a high ponytail. Gather all hair at the crown. Secure with a strong elastic. The higher the better for this one.
- Braid the ponytail. Work a standard three-strand braid from the elastic to the ends. Secure with a clear elastic.
- Coil into a bun. Wrap the braided ponytail around the elastic base in a clockwise spiral. Keep it tight against the head.
- Pin it down. Use 4-6 bobby pins matching your hair color, inserting them at the outer edge of the bun angled inward toward the center.
- Adjust and set. Tuck any loose ends under the bun. Mist with strong-hold hairspray for extra security.
Tips and tricks: For finer hair, backcomb the ponytail slightly before braiding to add volume and texture. The more textured the braid, the better it grips itself when coiled. Crisscross your bobby pins at the base of the bun for maximum hold — pins that cross each other are far harder to dislodge than pins placed in parallel.
5.Edgy Braided Mohawk with Frosted Beads
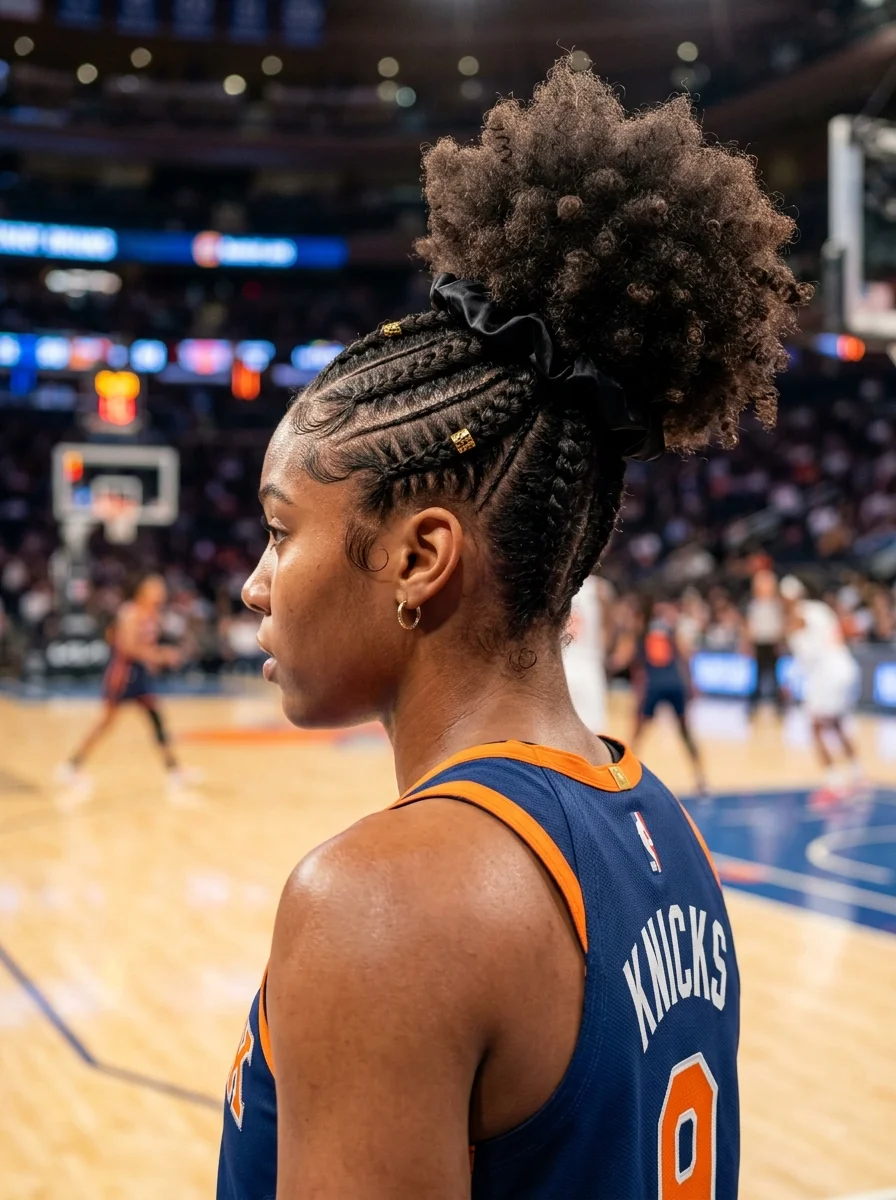
The overview: Naturally coily hair cornrowed on both sides leading up to a voluminous afro puff on top, with gold cuff beads clamped onto the cornrows for a metallic accent. This look is built for a sport that demands constant head movement, quick pivots, and zero peripheral interference.
The cornrow sides keep the profile flat and tight against the scalp, which means nothing obstructs your side vision during fast breaks and defensive slides. The afro puff on top concentrates the volume where it doesn't interfere with anything.
Why this look is popular: The gold cuff beads elevate cornrows from purely functional to genuinely stylish. The contrast between the tight sides and the voluminous top creates a bold silhouette that photographs well under arena lighting. This style celebrates natural coily texture while keeping every strand in its place.
Where this look is suitable: Basketball, volleyball, boxing, CrossFit, any sport where you need unobstructed peripheral vision. The beads also make this appropriate for casual outings and post-game events.
The look: Naturally coily hair cornrowed flat on both sides from the hairline back, with the center section gathered into a voluminous afro puff on top. Small gold cuff beads are clamped at intervals along the cornrows. The puff has defined, picked-out texture. This look is specially made for those with naturally coily hair.
Step by step:
- Section the hair. Part from ear to ear across the crown, separating the top section from the sides.
- Cornrow the left side. Starting at the hairline above the ear, braid flat against the scalp, adding hair as you go, working toward the back. Secure the end with a small elastic.
- Cornrow the right side. Mirror the same pattern and tension.
- Gather the top. Pull all remaining hair at the crown into a high puff. Secure with a strong elastic or puff cuff.
- Pick out the puff. Use an afro pick to lift and shape the puff into a rounded silhouette.
- Add cuff beads. Clamp gold cuff beads at 1-inch intervals along each cornrow. Press firmly to secure.
Tips and tricks: Moisturize cornrows with a lightweight oil like jojoba or argan before adding cuffs — this prevents friction damage to the hair shaft. The cuff beads should sit flat against the cornrow; if they rotate or slide, they're not clamped tightly enough. Use edge control gel along the hairline for a clean, polished finish.
34 Stunning Summer First Date Hairstyles for 2026 💕☀️
6.Twisted Half-Up Beach Waves
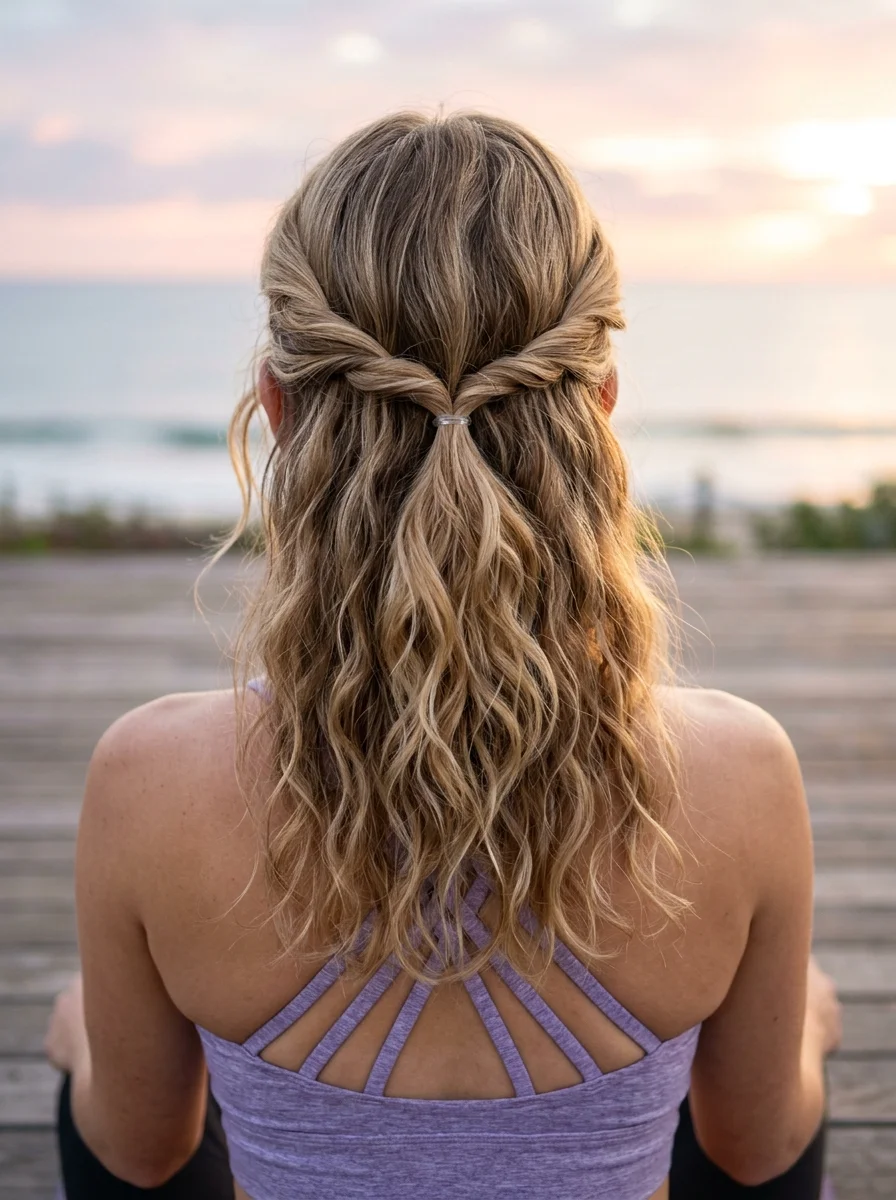
The overview: Long and Wavy Hair with two twisted sections from each temple meeting at the back of the head, secured with a clear elastic.
The twist technique is faster than braiding and creates a softer, more romantic silhouette. Each section is simply twisted away from the face and pinned or tied at the back, which means you can do this in under two minutes once you've got the motion down.
Why this look is popular: It solves the actual problem most people have with half-up styles — the pieces that fall forward and block your vision. The twisted sections act like a headband, pulling hair back from the face while the rest stays down. It's practical without looking like you tried too hard.
Where this look is suitable: Beach volleyball, outdoor yoga, hiking, casual fitness classes. Also works as an everyday style for warm weather.
The look: Long hair in natural beachy waves, with two twisted sections from the temples meeting at the back and secured with a clear elastic. The remaining hair flows freely past the shoulders. The twists create a soft crown effect without the structure of a full updo.
Step by step:
- Create waves. If hair is straight, mist with sea salt spray and scrunch. Air-dry or diffuse on low heat for natural-looking waves.
- Take the first section. Grab a 1-inch section from the left temple. Twist it away from your face, working toward the back of your head.
- Take the second section. Repeat on the right side, twisting away from the face.
- Meet in the middle. Bring both twisted sections to the back of your head. Tie them together with a clear elastic where they meet.
- Adjust the twists. Gently loosen each twist by tugging the outer edges for a fuller, softer appearance.
- Set the waves. Mist with a light-hold hairspray to keep the waves defined without stiffness.
Tips and tricks: If your twists unravel, twist each section tighter before securing — you want them to hold their shape even when you're moving. For finer hair, add a volumizing powder at the roots before twisting. A 1.25-inch curling wand can add defined waves if your natural texture is straight.
7.Protective Bandana Kerchief
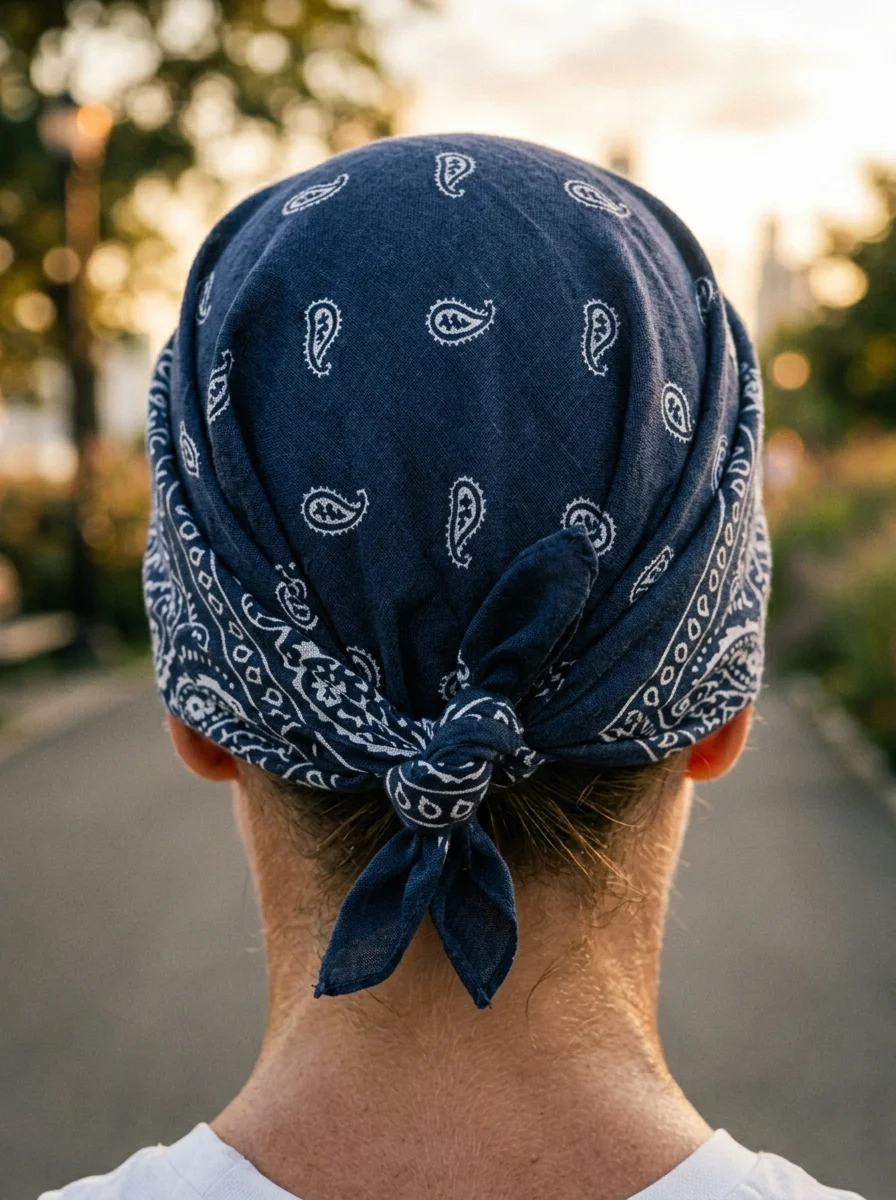
The overview: A functional, full-coverage style where the hair is pulled back flat and completely wrapped in a classic patterned bandana. The fabric is drawn smoothly over the crown and tied securely in a double knot at the nape of the neck.
This kerchief method is the ultimate utilitarian approach to athletic hair. By using a fabric barrier, you completely eliminate the problem of flyaways, sweat-soaked baby hairs, and sun exposure on the scalp. It acts as a sweatband and a hair tie all at once, locking down whatever low ponytail or bun is hidden underneath.
Why this look is popular: It is rugged, foolproof, and requires zero braiding skills. The cotton fabric absorbs perspiration before it can run down your face, while the full-head coverage provides essential UV protection during long outdoor sessions. Plus, it brings a cool, retro-athletic edge to any workout gear.
Where this look is suitable: Hiking, trail running, outdoor cycling (it fits beautifully under a helmet), beach volleyball, or intense outdoor boot camps. It is perfect for exceptionally windy or sunny days.
Step by step:
- Prep the base. Gather all your hair into a tight, flat low ponytail or a compact low bun at the very base of your neck. Secure it firmly.
- Fold the bandana. Lay a standard square cotton bandana flat, then fold it in half diagonally corner-to-corner to create a large triangle.
- Position the fabric. Place the long folded edge of the triangle across your forehead, near the hairline, letting the center point of the triangle drape down the back of your head.
- Tie the knot. Gather the two side corners, bring them around to the nape of your neck, and tie them snugly over the back draping point.
- Secure and tuck. Tie a second knot to lock it in place. Tuck any loose ends or the hanging back point of the triangle neatly underneath the knot to keep it out of the way.
Tips and tricks: Always opt for 100% cotton bandanas, as synthetic blends won't absorb sweat or breathe nearly as well. If you are doing high-impact cardio and worry about the bandana slipping backward, slide two bobby pins through the fabric and into your hair just above your ears to anchor it permanently in place.
22 Office Nail Designs That Are Professional But Never Boring
8.Textured Crown Braid Bun
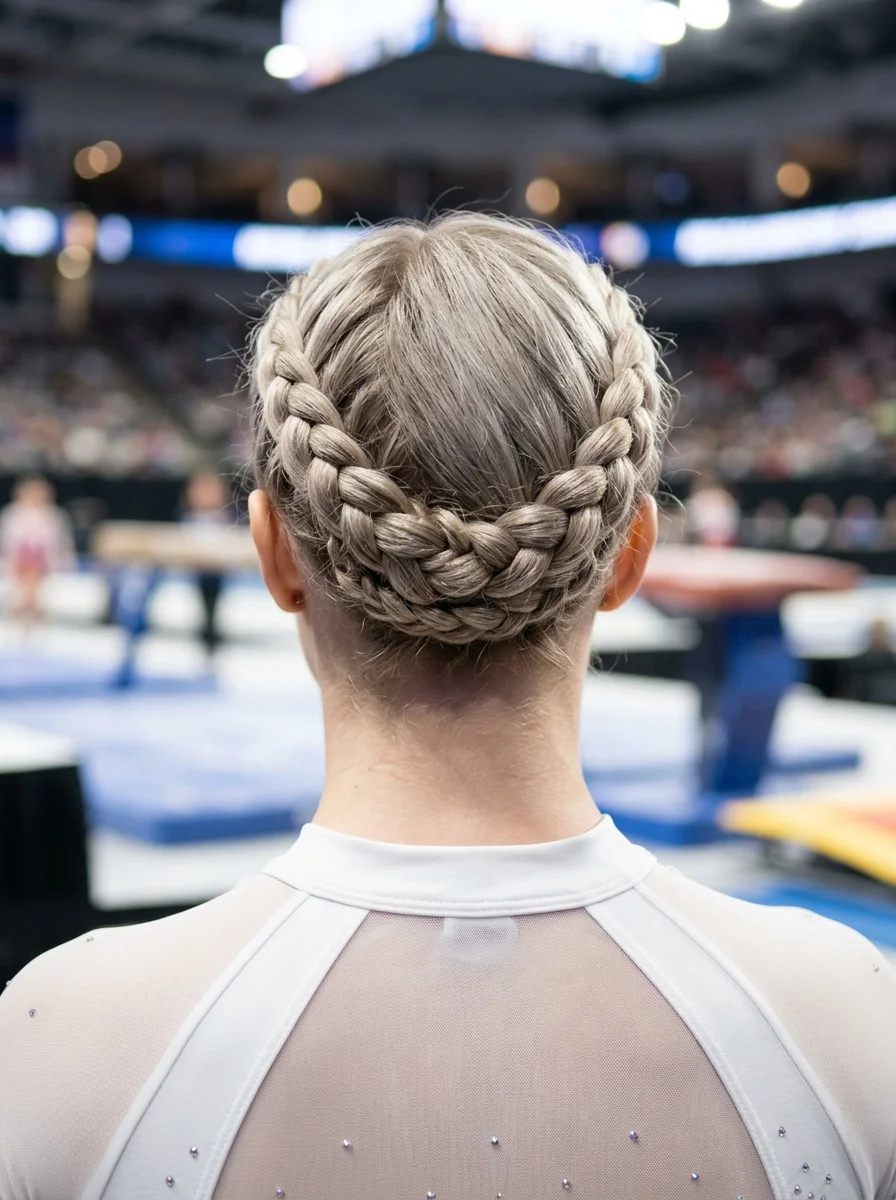
The overview: Medium to long hair parted into two sections, each Dutch-braided from the temples around the crown to meet at the nape, where they're gathered into a low braided bun. Crown braids distribute weight evenly around the head, which prevents the pulling sensation you'd get from a single high ponytail during flips and tumbling passes.
Two braids wrapping the head means no single point bears all the weight. During a back handspring, that distribution eliminates the whip-like pull a high ponytail creates when gravity reverses.
Why this look is popular: The braided crown has a romantic, almost regal quality that elevates it beyond typical gym hair. The two braids create a frame around the face that photographs beautifully, and the low bun at the nape keeps the overall silhouette compact and controlled.
Where this look is suitable: Gymnastics, figure skating, dance, martial arts — any sport involving inversions, flips, or rapid head movement. Also works for everyday wear when you want your hair completely secured.
The look: Two Dutch braids starting at each temple, wrapping around the crown of the head, and meeting at the nape where they're coiled into a textured low bun.
Step by step:
- Center part. Create a clean center part from forehead to nape. This is the foundation.
- Dutch braid the left side. Starting at the left temple, Dutch braid (cross strands under) along the hairline, curving around the crown toward the nape. Add hair from each side as you braid.
- Dutch braid the right side. Mirror the same pattern from the right temple.
- Combine at the nape. Join both braids at the nape. Braid the combined tail into a three-strand plait.
- Coil into a bun. Wrap the braided tail around itself at the nape to form a compact bun. Pin with 4-6 bobby pins.
- Smooth flyaways. Use a small amount of edge control gel along the hairline for a clean finish.
Tips and tricks: Keep consistent tension as you braid — if one braid is looser than the other, the bun will sit off-center. Second-day hair grips better for Dutch braiding than freshly washed hair. If your hair is very long, the braids may need to be wrapped twice around the bun base for a secure hold.
9.Chic Wavy Bob with Headband Accent
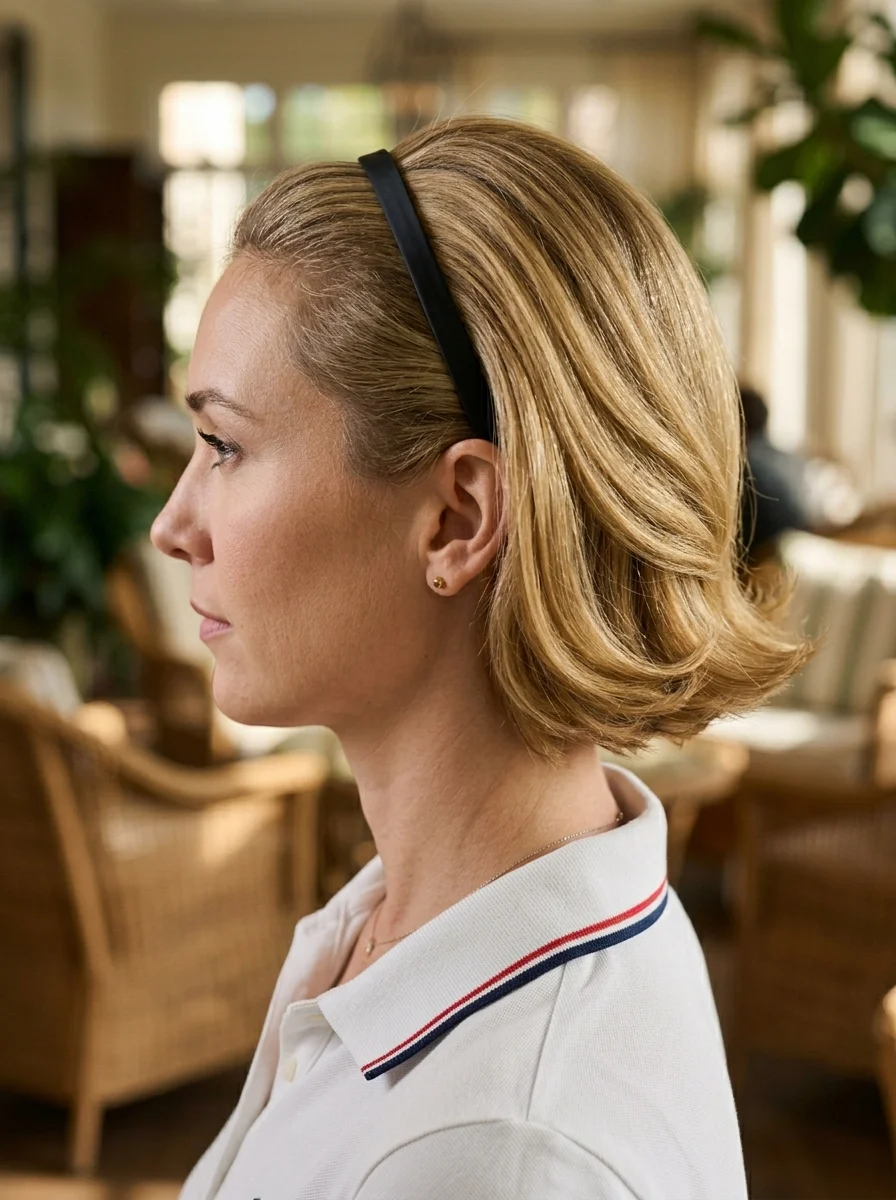
The overview: Short hair with a Bob cut at jawline length with gentle waves throughout, pushed back from the face with a thin black headband. The headband keeps hair off the face during play without requiring enough length for a ponytail.
This is the style that proves you don't need long hair to play sport with your hair managed. The thin headband creates enough separation between the face and the hair to prevent strands from falling forward during movement.
Why this look is popular: Bobs are having a major moment, and athletes aren't excluded from that trend. The headband is a simple, no-fuss solution that works on hair too short for ponytails. The waves add enough texture that the style looks intentional rather than "I just threw this on."
Where this look is suitable: Tennis, golf, cycling, Pilates, any activity where you want hair managed but not fully up. Also works as an everyday style for short-haired people.
The look: Bob cut at jawline length with soft, defined waves throughout. A thin black headband sits about an inch back from the hairline, pushing the top section of hair off the face. The waves create movement and body without looking overstyled.
Step by step:
- Create waves. Using a 1-inch curling wand, wrap 1-inch sections away from the face. Leave the ends out for a modern, undone finish.
- Break up the curls. Run your fingers through the waves to separate them. Don't brush — it kills the texture.
- Place the headband. Slide a thin headband about 1 inch back from the hairline. Push it gently to sweep hair away from the face.
- Adjust the waves. Pull a few face-framing pieces forward around the temples for softness.
- Set with spray. A light mist of flexible-hold hairspray locks the waves and keeps the headband from sliding.
Tips and tricks: A headband with silicone grips on the inside stays in place far better than a plain fabric one. If yours slides, a tiny bobby pin at each temple behind the ear anchors it securely. For extra volume at the crown, backcomb slightly before placing the headband.
35 Cute & Sporty Athletic Hairstyles for Women (2026)
10.Glamorous French Braid Ponytail with Ribbon
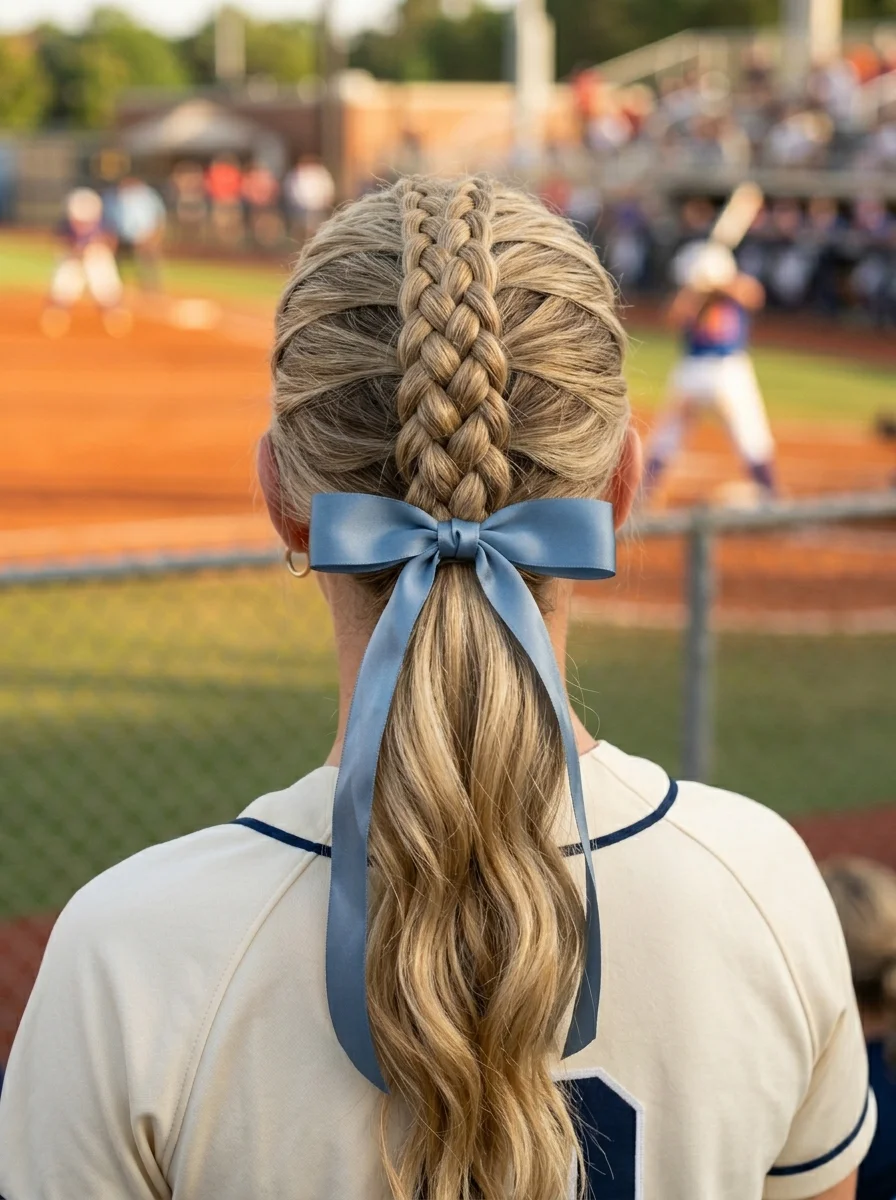
The overview: Medium to long hair with a Dutch braid starting at the crown and running down to the nape, transitioning into a low ponytail tied with a dusty blue satin ribbon bow. The braid keeps the top section completely secure while the ribbon adds a decorative finish that photographs well.
The Dutch braid (raised, not flat) creates more visual texture than a French braid, which means the braid pattern is visible even from a distance. Combined with the ribbon, this is one of the more photogenic athletic styles on the list.
Why this look is popular: The braid-to-ponytail transition gives you the security of a braid with the ease of a ponytail. The ribbon is a simple addition that makes the whole style feel more considered and feminine. Match the ribbon to your team colors for an instant game-day coordination.
Where this look is suitable: Baseball games, softball tournaments, outdoor team events, casual athletic outings. The ribbon makes it appropriate for post-game gatherings without changing your hair.
The look: Medium to long hair with a Dutch braid from the crown to the nape, transitioning into a low ponytail. A dusty blue satin ribbon is tied into a bow at the ponytail base. The braid is raised and defined, the ponytail falls naturally.
Step by step:
- Start the Dutch braid. At the crown, take a section of hair and begin Dutch braiding — crossing strands under to create a raised braid.
- Braid to the nape. Continue the Dutch braid down the center of the head, adding hair from each side as you go, until you reach the nape.
- Secure the ponytail. Gather the braid tail and any remaining hair into a low ponytail. Secure with a strong elastic.
- Tie the ribbon. Cut an 18-inch length of dusty blue satin ribbon. Tie it around the elastic into a neat bow with even tails.
- Adjust the braid. Gently pull the outer loops of the Dutch braid to widen it slightly for a fuller look.
Tips and tricks: Satin ribbon is slippery — tie a small knot behind the bow to lock it in place before tying the decorative bow on top. For added security during intense movement, use a small dot of fabric glue on the knot. The ribbon tails should be trimmed to the same length as the ponytail or slightly shorter for a balanced look.
11.Bubble Ponytail with Scrunchie
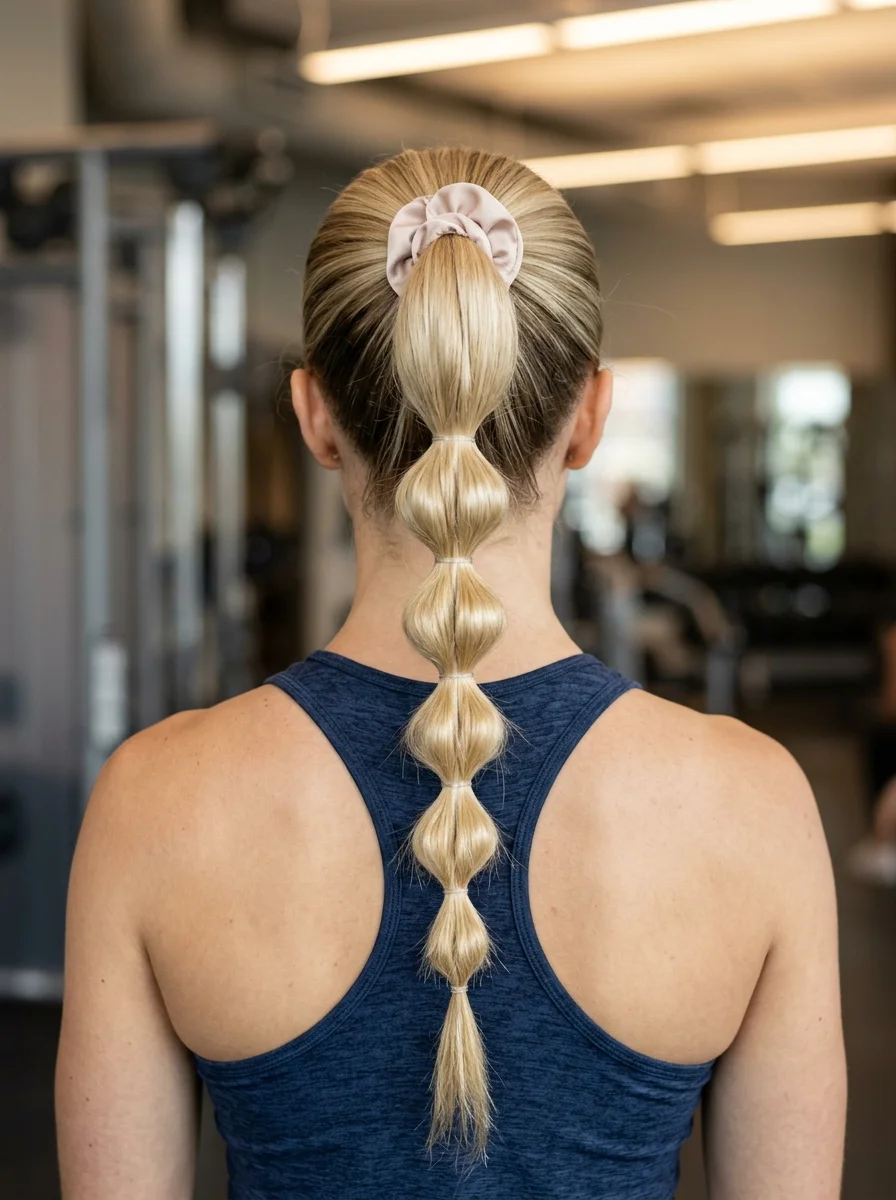
The look: Short or Medium or even long hair in a mid-height ponytail secured with a large pink satin scrunchie. Five or six clear elastics segment the ponytail into bubble shapes down the length. Each bubble is puffed out for volume.
Scrunchies distribute pressure across a wider area than thin elastics, which means less pulling at the scalp during long gym sessions. The bubble segments add structure so the ponytail doesn't swing as freely, reducing whip during exercises.
Why this look is popular: The scrunchie revival is real, and it's especially popular in gym settings where hair health matters. The satin fabric doesn't absorb moisture the way cotton does, so it stays cleaner and causes less friction. The bubble segments make a basic ponytail look styled without requiring braiding.
Where this look is suitable: Weight training, Pilates, cycling, gym workouts of any kind. The scrunchie makes it more comfortable for extended wear sessions.
Step by step:
- Gather into a ponytail. Brush all hair to a mid-height position. Secure with a pink satin scrunchie.
- First bubble elastic. Tie a clear polyband about 2 inches below the scrunchie.
- Puff the first section. Gently pull the hair between the scrunchie and the first elastic outward to form a rounded bubble.
- Repeat down the length. Add 4 more elastics at 2-inch intervals, puffing each section into a bubble.
- Even them out. Go back through and adjust each bubble to the same width and fullness.
- Set. Mist with light-hold hairspray to maintain the bubble shapes without stiffness.
Tips and tricks: Use a scrunchie with a strong elastic core — cheap satin scrunchies lose their grip quickly. Slippery hair benefits from a texturizing spray before styling. The clear elastics should be tight enough to hold but not so tight they indent the hair between bubbles.
32 Bright & Fun Summer Toe Nail Designs (2026)
12.Double Bubble Braids with Bows
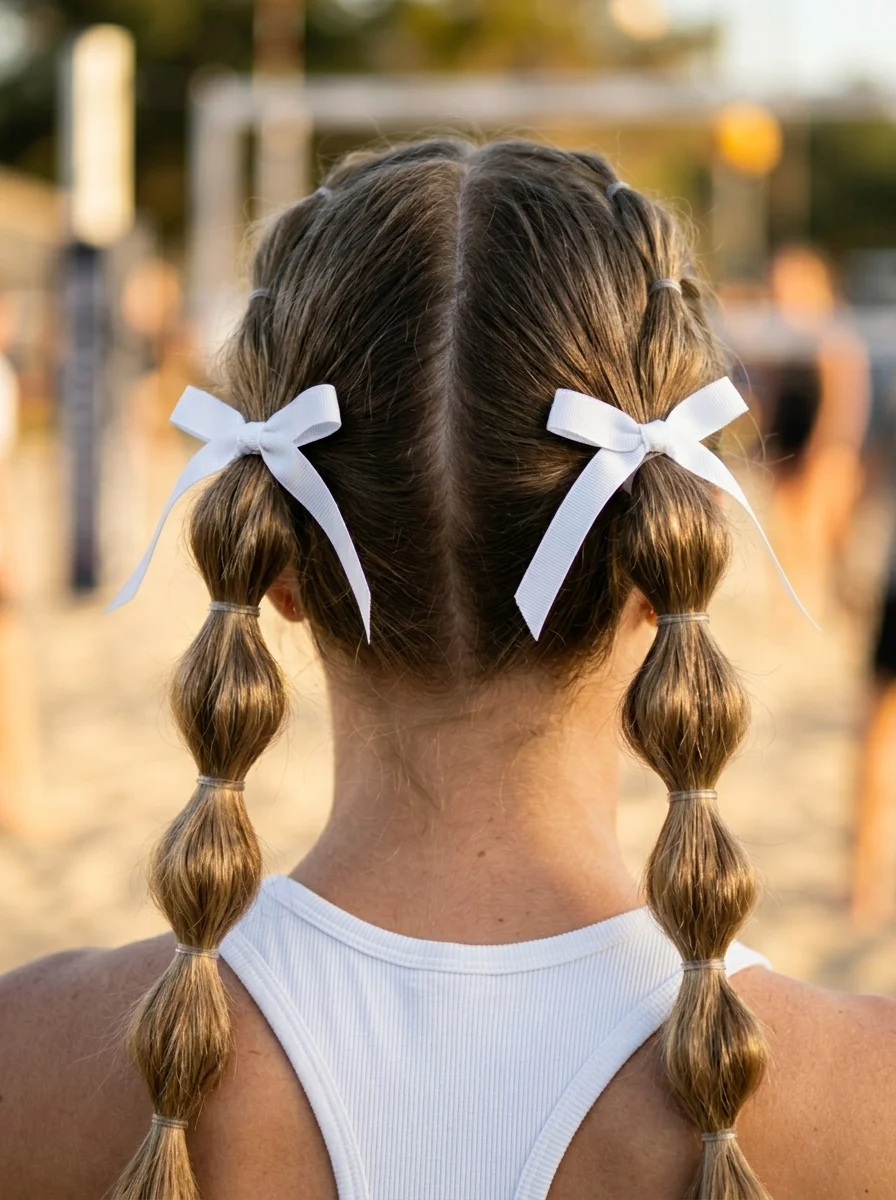
The overview: Short to long hair with a clean center part, divided into two low pigtails positioned behind each ear. Each pigtail has 3-4 bubble segments (depending on the hair length) created with clear elastics. White grosgrain ribbon bows are tied at the base of each pigtail. Double pigtails distribute weight on both sides of the head instead of concentrating it at one point.
The white grosgrain bows are a deliberate texture choice. Grosgrain has a ribbed surface that grips hair better than satin, so the bows stay tied through movement without slipping or coming undone.
Why this look is popular: Double pigtails feel youthful and playful, and the bubble technique adds volume that makes thin or fine hair look fuller. The matching bows create symmetry that photographs well, especially for team sports where you want a coordinated appearance.
Where this look is suitable: Beach volleyball, tennis doubles, cheerleading, team sports where matching hairstyles add to the visual. Also works for outdoor festivals and casual summer activities.
Step by step:
- Create a center part. From forehead to nape. Use a rat-tail comb for precision.
- Make two low pigtails. Gather each half behind the ear and secure with elastics at the same height on both sides.
- Bubble the first pigtail. Add clear elastics every 2 inches down the length, puffing each section into a bubble.
- Bubble the second pigtail. Match the spacing and bubble size for symmetry.
- Tie bows. Cut two lengths of white grosgrain ribbon. Tie a bow at the base of each pigtail, over the elastic.
- Adjust. Trim the ribbon tails to even lengths. Fluff the bubbles for maximum volume.
Tips and tricks: For the bubbles to hold their shape, each elastic needs to be tight enough to create a clear separation between sections. If the bubbles deflate, the elastics are too loose. A light hairspray on each section before tying helps the hair grip itself and maintain the puffed shape.
13.Chic Claw Clip Messy Bun
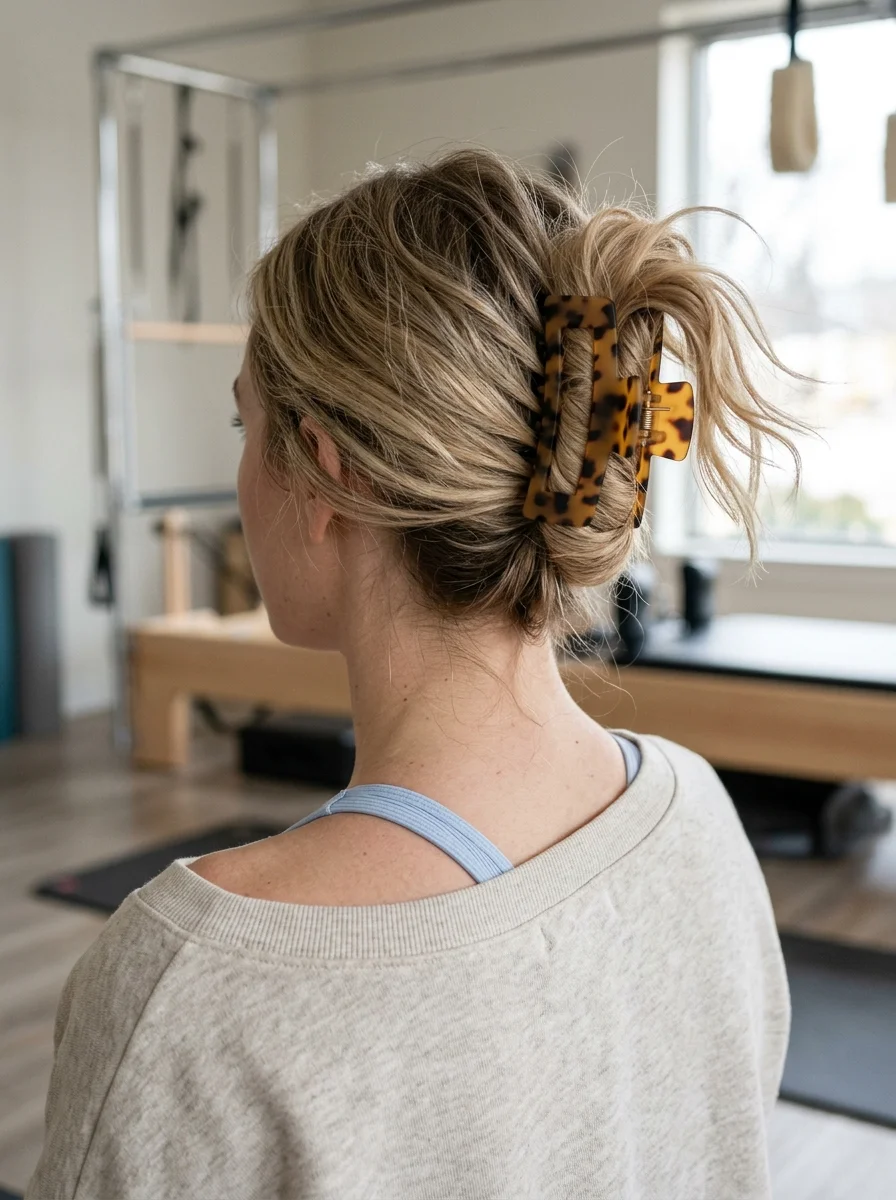
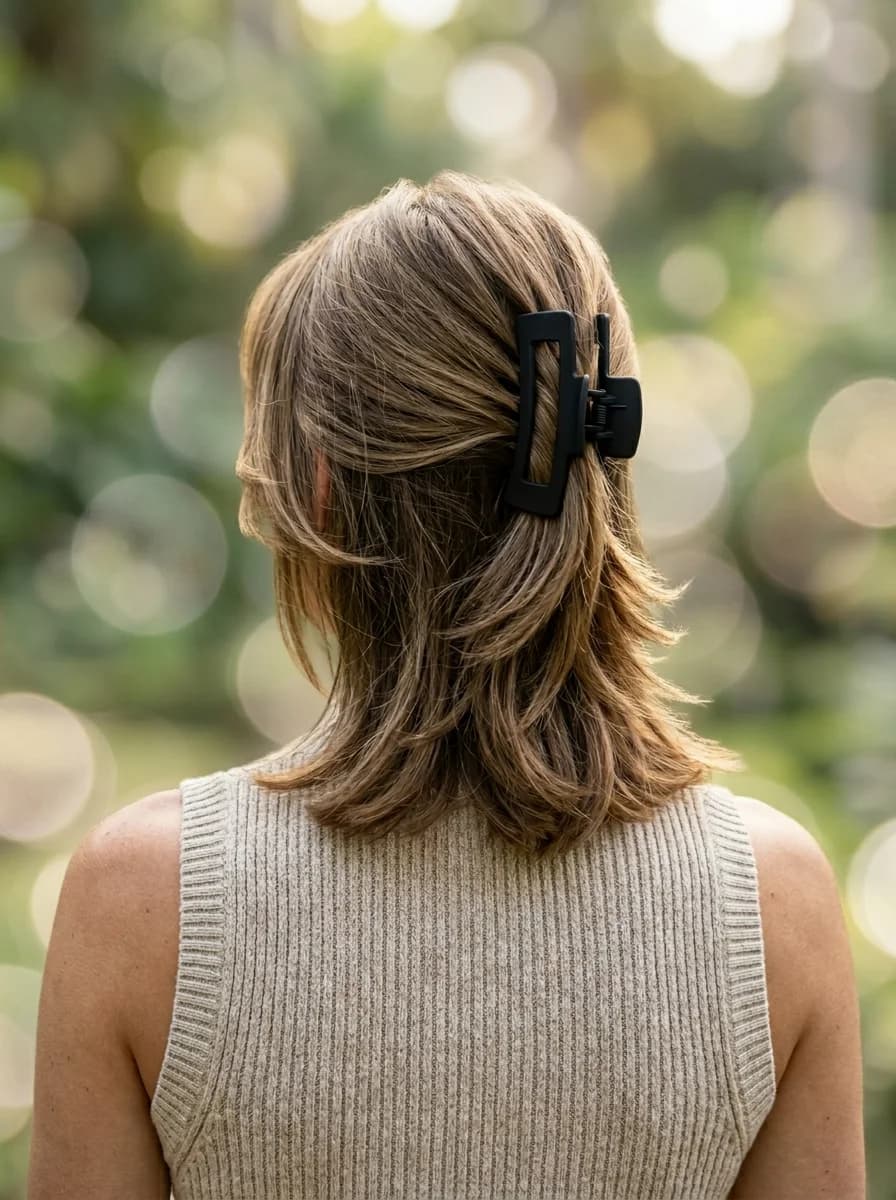
The overview: Medium to long hair loosely gathered upward and folded into a messy bun secured by a large tortoiseshell claw clip at the back of the head. A few face-framing pieces are left out for softness. The clip is the focal point. This look is built for low-tension workouts where you need your hair up fast and want it down just as quickly between exercises.
The claw clip's advantage is speed — you can have your hair up in one motion and release it just as fast. During Pilates or yoga, you might want your hair up for certain exercises and down for others. The claw clip lets you transition without re-doing your entire hairstyle.
Why this look is popular: The claw clip bun is the fastest updo that still looks intentional. Unlike a messy bun secured with a hair tie, the clip provides a visible design element that makes the style feel finished. The tortoiseshell pattern adds warmth to the dark blonde balayage.
Where this look is suitable: Pilates, yoga, barre, stretching sessions, any low-impact workout where you want hair up but don't need military-grade hold. Also works for running errands after your workout.
Step by step:
- Gather loosely. Pull all hair back and upward with your hands. Don't brush — the messy texture is the point.
- Fold the hair. Fold the gathered hair upward against the back of your head, creating a loose loop.
- Clamp the clip. Open the claw clip and clamp it over the folded section, gripping both the loop and the base hair against the scalp.
- Pull out pieces. Gently tug a few face-framing pieces loose around the temples and ears.
- Set. A light mist of flexible-hold hairspray keeps the loose texture in place without making it stiff.
Tips and tricks: The claw clip needs to be large enough to grip all the hair at once. If your hair is thick, look for jumbo clips with strong springs. For fine hair, backcomb the section before folding to give the clip more to grip. A clip with silicone teeth holds better than one with smooth plastic teeth.
30 Stunning Summer Hair Trends for 2026 ☀️🌊
14.Modern Matte Claw Clip Half-Up
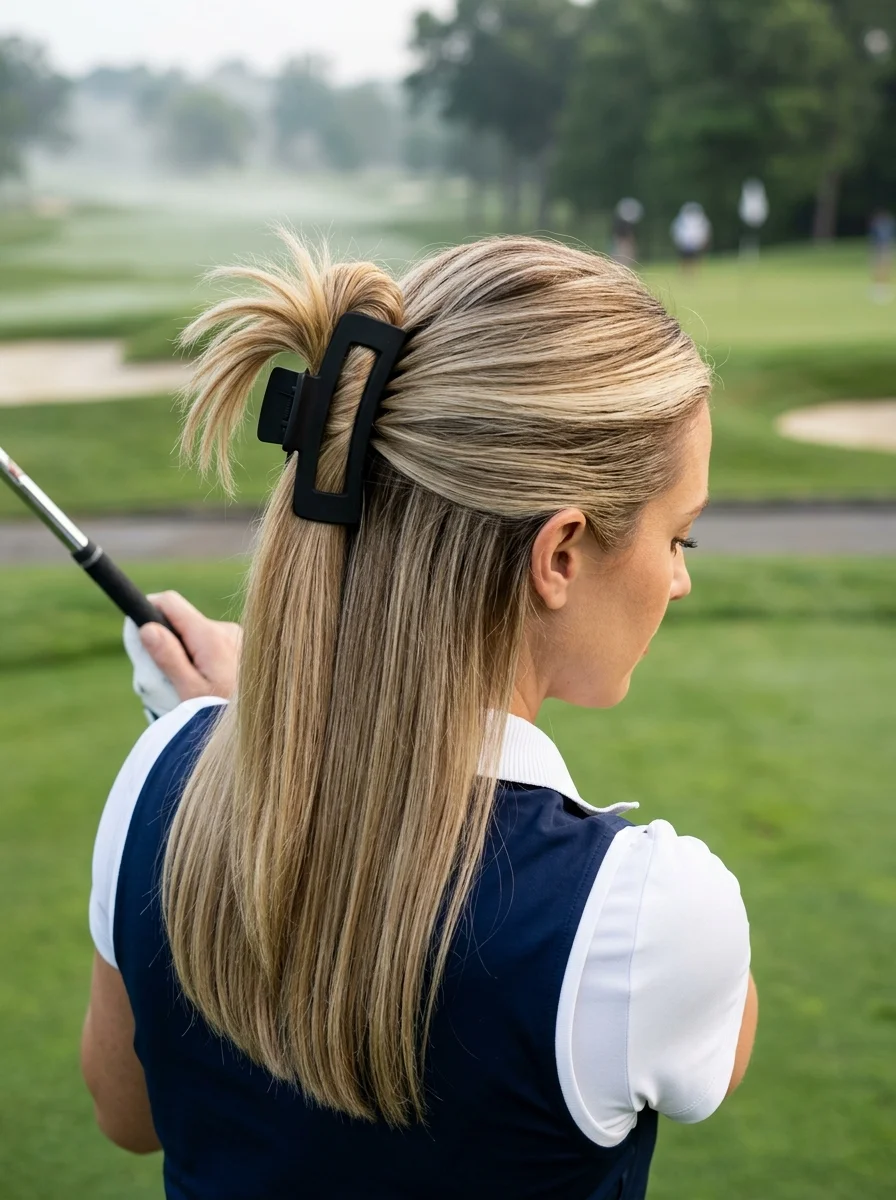
The overview: Any length of hair with the top section from temples to crown gathered, folded upward, and clamped with a matte black geometric claw clip. The remaining hair flows freely in its natural texture. Clean lines, modern contrast. The half-up style keeps hair completely off the face without the commitment of a full updo.
The matte black clip against the ash blonde creates a modern color contrast that reads as considered rather than thrown together. The geometric shape adds a design element that elevates the entire style beyond basic gym hair.
Why this look is popular: Half-up styles with claw clips solve the "hair in my face" problem while keeping length and movement in the lower section. The matte finish on the clip photographs without glare, which is a small detail that makes a big difference in outdoor settings with bright sunlight.
Where this look is suitable: Golf, tennis, cycling, hiking, any activity where clear forward vision is critical. Also works as an everyday style for warm weather.
Step by step:
- Section the top. From above each ear, draw a line back to the crown. Gather all hair above this line.
- Twist and fold. Twist the gathered section once, then fold it upward against the back of your head.
- Clip it. Clamp the matte claw clip over the folded section, making sure it grips both the twist and the base hair.
- Adjust the bottom section. Arrange the loose hair below the clip so it falls naturally.
- Smooth the hairline. Use a small amount of smoothing cream along the part to eliminate flyaways.
Tips and tricks: The fold direction matters — folding upward creates more volume at the crown, while folding downward creates a sleeker profile. For golf or tennis where you wear a cap or visor, fold downward to avoid interference with the brim. A matte clip won't show fingerprints the way glossy ones do.
15.Intricate Braided Updo with Pearl Accents
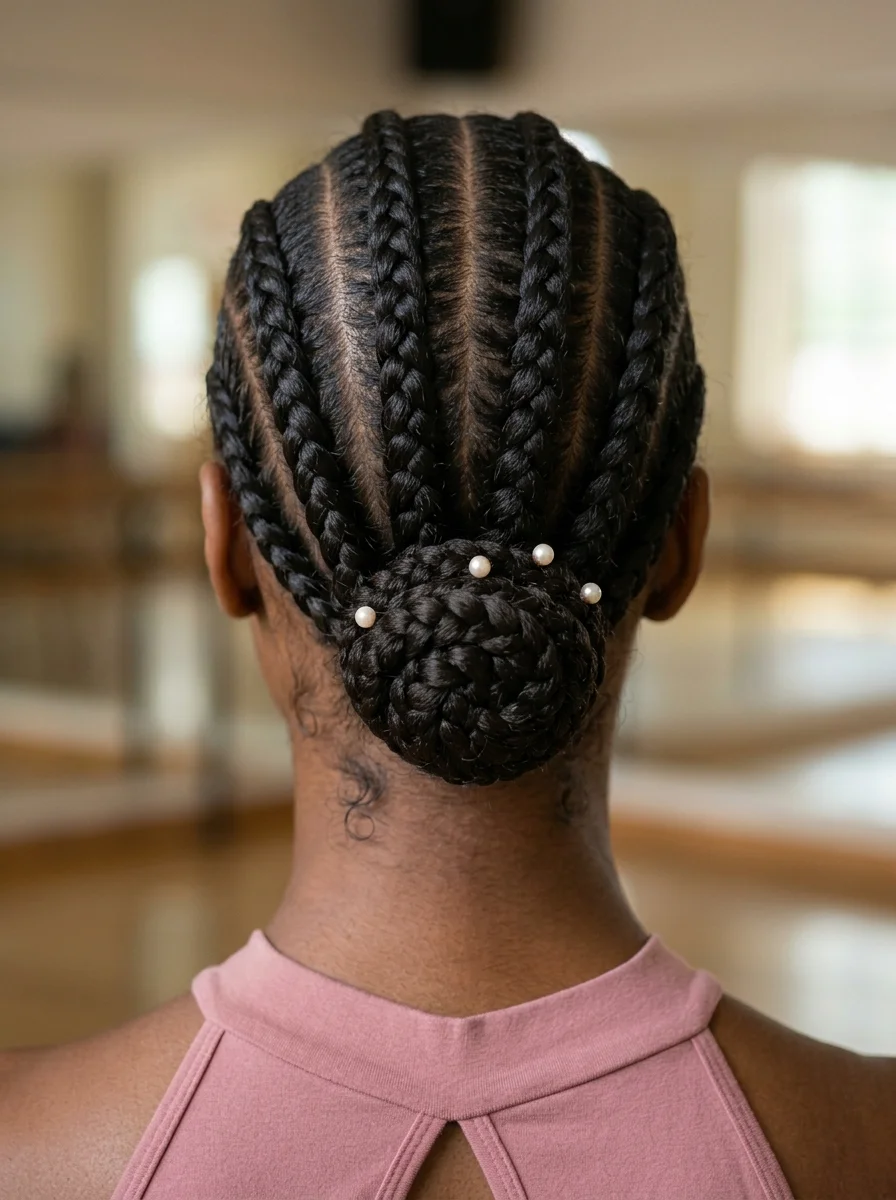
The overview: Natural black coily hair in feed-in cornrows from the front hairline to the nape, coiled into a compact braided bun at the low nape. Small white pearl pins are placed at intervals along the cornrow paths. Every strand is controlled and secured. Every single strand is locked into a cornrow with zero possibility of escape.
Feed-in cornrows start thin at the hairline and gradually thicken as they move back, creating a more natural, less bulky start than traditional cornrows. The technique reduces tension at the delicate front hairline while maintaining strength through the length.
Why this look is popular: The pearls add elegance to a style that's fundamentally about security. Without them, this is a purely functional competition hairstyle. With them, it becomes something you'd wear to a formal event. That duality is what makes it compelling.
Where this look is suitable: Dance competitions, gymnastics meets, figure skating, any high- intensity performance where hair absolutely cannot move. The pearl accents also make it appropriate for formal occasions.
Step by step:
- Moisturize and prep. Apply a lightweight braiding cream or edge control to the hair for smooth, clean parts.
- Create cornrow sections. Part the hair into 5-7 sections from the front hairline to the nape, depending on thickness.
- Feed-in cornrow each section. Start with a small amount of hair at the hairline and gradually add more as you braid toward the nape, keeping the braid flat against the scalp.
- Gather the ends. Combine all cornrow tails at the nape. Braid them together into a single plait.
- Coil into a bun. Wrap the braided tail into a compact bun at the low nape. Pin securely with bobby pins.
- Add pearls. Insert small pearl pins at irregular intervals along the cornrow paths. Odd numbers (5-7) look most natural.
Tips and tricks: Use a rat-tail comb for precision parting — the cleaner your parts, the more polished the final result. Edge control gel along the hairline and part lines keeps everything sharp. The pearl pins should be pushed in at an angle, not straight down, to grip the braid and resist falling out during movement.
27 Gorgeous Mint Green Nails That Are Popular Right Now (2026)
16.Double Dutch Braids into Low Buns
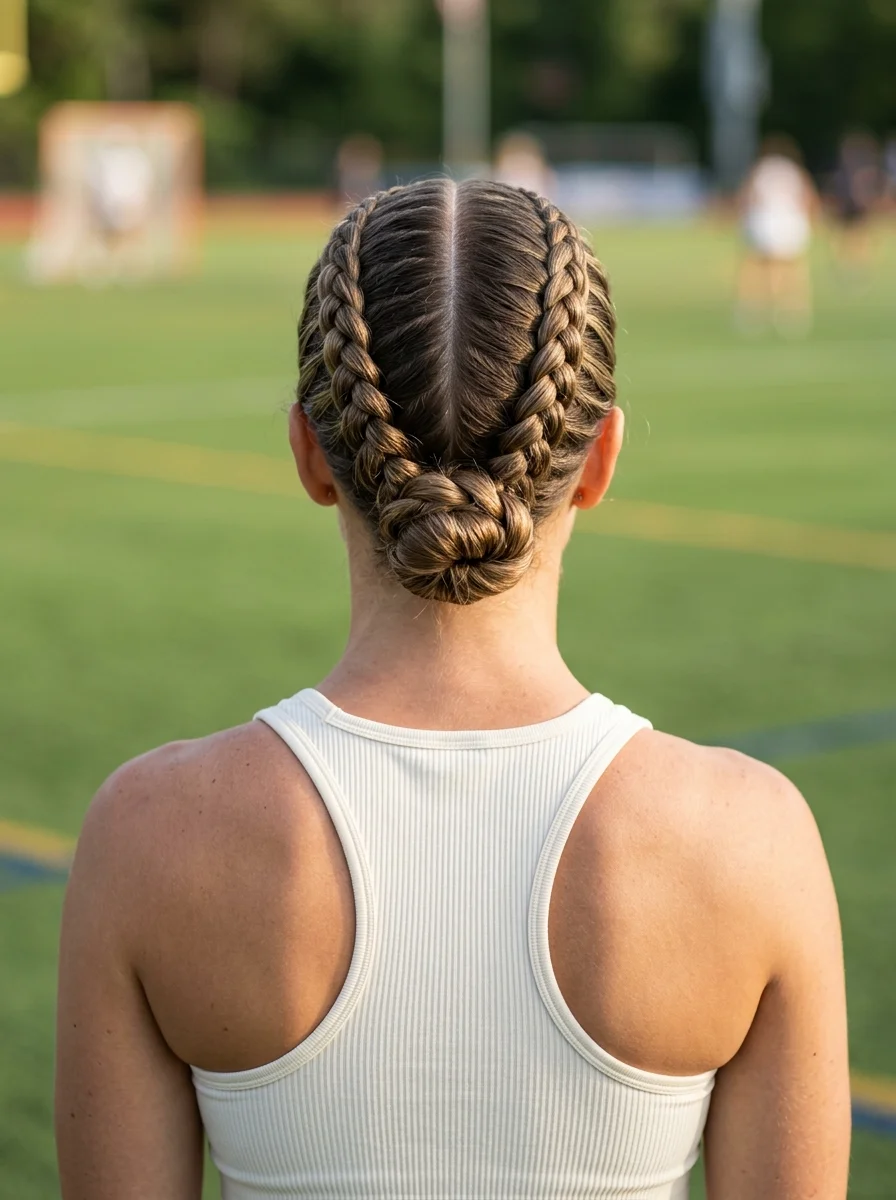
The overview: Medium to long hair, center-parted with Dutch braids on each side running from the temples to the nape. Each braid is coiled into a small, tight bun at the low nape. The braids lie flat against the head, creating a clean, controlled silhouette and to distribute tension evenly across the scalp.
Double low buns at the nape sit below the line where most sports headgear rests, which means they don't interfere with headbands, scrum caps, or helmet straps. The weight is split between both sides, eliminating the neck strain that a single heavy ponytail can cause.
Why this look is popular: The twin buns create a symmetrical, balanced silhouette that photographs cleanly from every angle. The Dutch braid texture is visible against the scalp, creating visual interest that a simple ponytail doesn't provide. The golden highlights make the braid pattern pop.
Where this look is suitable: Soccer, rugby, lacrosse, field hockey, any team sport involving running and contact. Also works for gym sessions and outdoor fitness classes.
Step by step:
- Center part. Clean line from forehead to nape.
- Dutch braid the left side. Starting at the temple, braid flat against the scalp (cross strands under), adding hair as you go toward the nape.
- Dutch braid the right side. Mirror the same pattern with matching tension.
- Coil each braid. At the nape, twist each braided tail around itself to form a compact bun. Secure with bobby pins.
- Adjust symmetry. Check both buns from the back — they should be the same size and at the same height.
- Smooth flyaways. Apply edge control gel along the hairline and part with a small brush or toothbrush.
Tips and tricks: The most common mistake is uneven parting. Check your center part in a mirror from multiple angles before braiding. For hair that's very thick or long, the buns may need additional bobby pins or a small elastic around each bun for extra hold. Golden highlights show braid texture better than solid colors — if your hair is one shade, consider adding a few face-framing highlights before attempting this style.
17.Double French Braids with a Twist
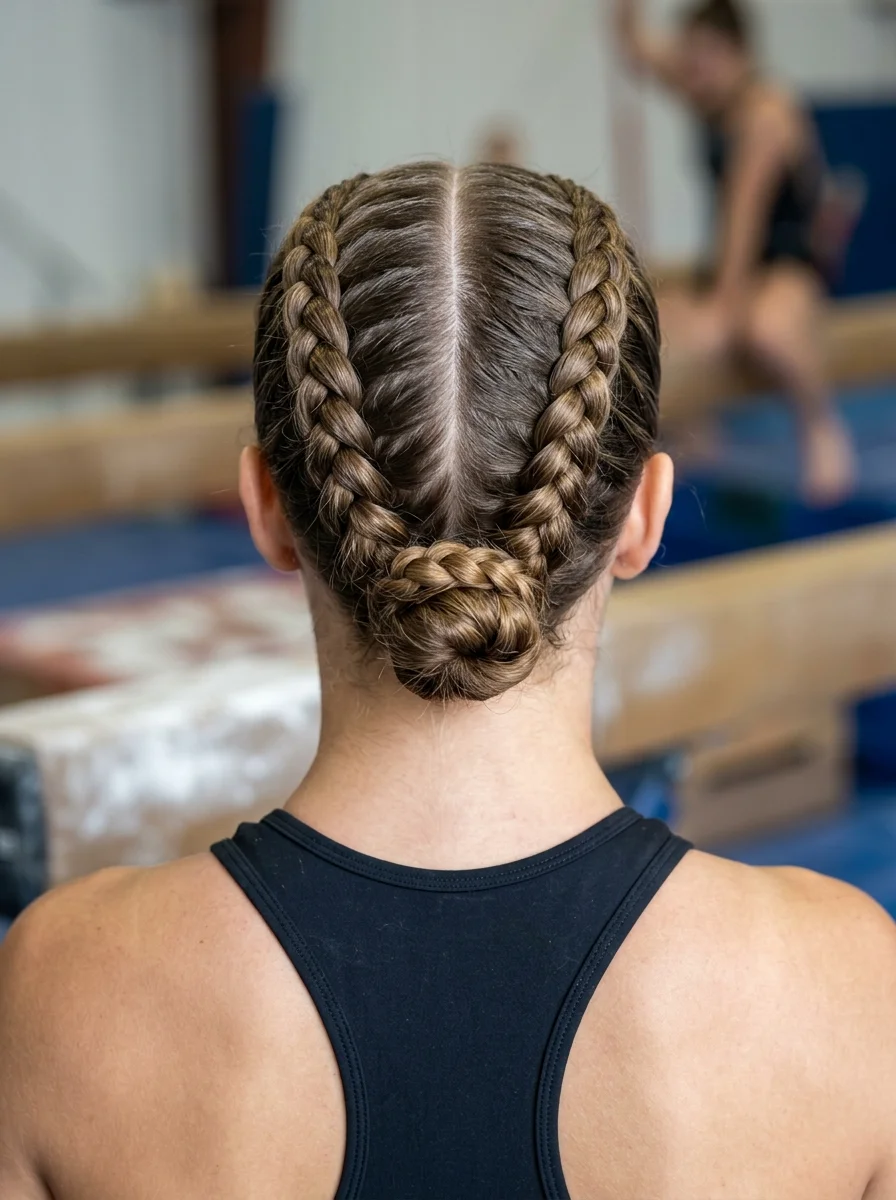
The overview: Medium to long hair with blonde highlights, center-parted with French braids on each side running flat from the hairline to the nape. Both braids merge at the nape into a single braided bun. The finish is smooth with no protrusions. French braids lie flatter than Dutch braids, which makes them ideal for sports where the back of your head contacts mats, bars, or other equipment.
The flat profile means nothing protrudes to catch or shift during back handsprings, back walkovers, or any skill where your head rolls across a surface. The merged bun at the nape concentrates all remaining hair into one compact, low-profile shape.
Why this look is popular: French braids are the original athletic braid — they've been used by gymnasts and dancers for decades because they work. The flat profile, the distributed tension, and the clean lines make them the most practical option for sports with head-to-equipment contact.
Where this look is suitable: Gymnastics, cheerleading, wrestling, martial arts, any sport where the back of the head contacts a surface. Also works for everyday workouts and running.
Step by step:
- Center part. Clean line from forehead to nape.
- French braid the left side. Starting at the hairline, cross strands over (not under) to create a flat braid that lies against the scalp. Add hair as you braid toward the nape.
- French braid the right side. Mirror the pattern with matching tension and placement.
- Merge at the nape. Combine both braids into a single three-strand braid using all remaining hair.
- Coil into a bun. Wrap the merged braid into a compact bun at the low nape. Pin securely with bobby pins.
- Smooth and set. Apply edge control along the hairline. Mist with strong-hold hairspray.
Tips and tricks: The difference between French and Dutch braids is direction: French crosses over (flat), Dutch crosses under (raised). For gymnastics, always choose French for the flattest profile. Keep the braids as close to the scalp as possible — any looseness creates a bump that will catch during movement.
24 Stunning Bridesmaid Hairstyles for Weddings 2026 💍✨
18.Sleek Low Braided Bun
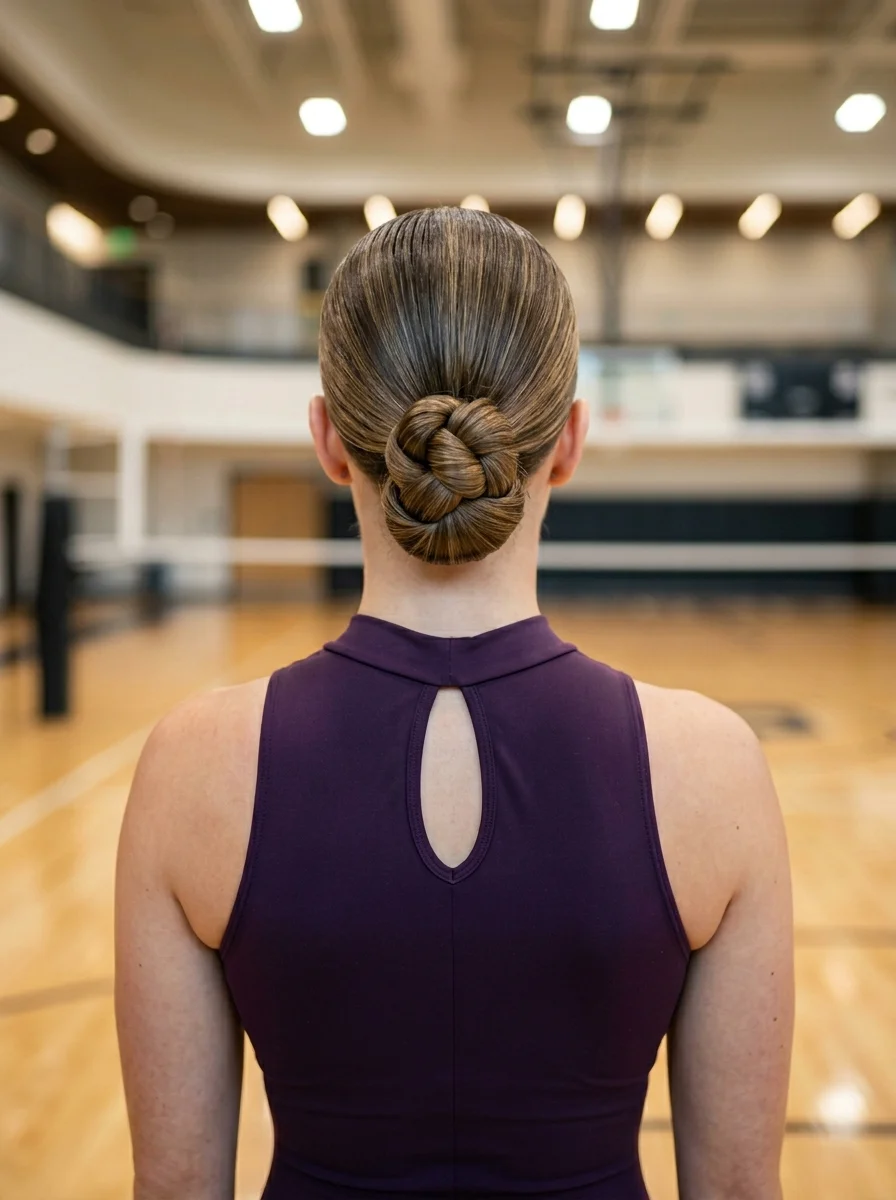
The overview: Medium to Long hair with a glass-smooth, gel-slicked surface pulled back to a low nape bun. The bun is braided before coiling for extra texture and security. The surface has a wet-look sheen with zero flyaways or loose strands.
The "glass hair" surface is achieved through multiple product layers: a smoothing cream first, then gel on top, then a boar bristle brush to flatten every strand. The result is a surface so smooth it reflects light like polished metal.
Why this look is popular: This is the most controlled athletic hairstyle on the list. Nothing moves, nothing falls, nothing shifts. For figure skaters who wear helmets during practice, or dancers who need their hair completely invisible during partnering work, this is the gold standard.
Where this look is suitable: Figure skating, ballet, ballroom dance, cycling (fits under a helmet), any activity where hair needs to be completely contained and streamlined.
Step by step:
- Apply smoothing cream. Work a generous amount through damp hair from roots to ends.
- Apply gel. Layer a wet-look gel over the smoothing cream, focusing on the surface and hairline.
- Brush flat. Use a boar bristle brush to sweep all hair to the low nape. Brush repeatedly until the surface is glass-smooth.
- Secure the ponytail. Tie tightly with a strong elastic at the nape.
- Braid and coil. Braid the ponytail into a three-strand plait, then coil it into a compact bun. Pin with bobby pins.
- Final surface check. Use a fine-tooth comb and additional gel to smooth any remaining ridges or bumps.
Tips and tricks: Layering products is the key — smoothing cream underneath gives slip, gel on top gives hold. Use a silk or satin scrunchie as the first elastic to prevent breakage, then layer a strong elastic over it. For the smoothest possible surface, dampen the hair slightly before applying product.
19.Elegant Braided Updo with Pearl Accents
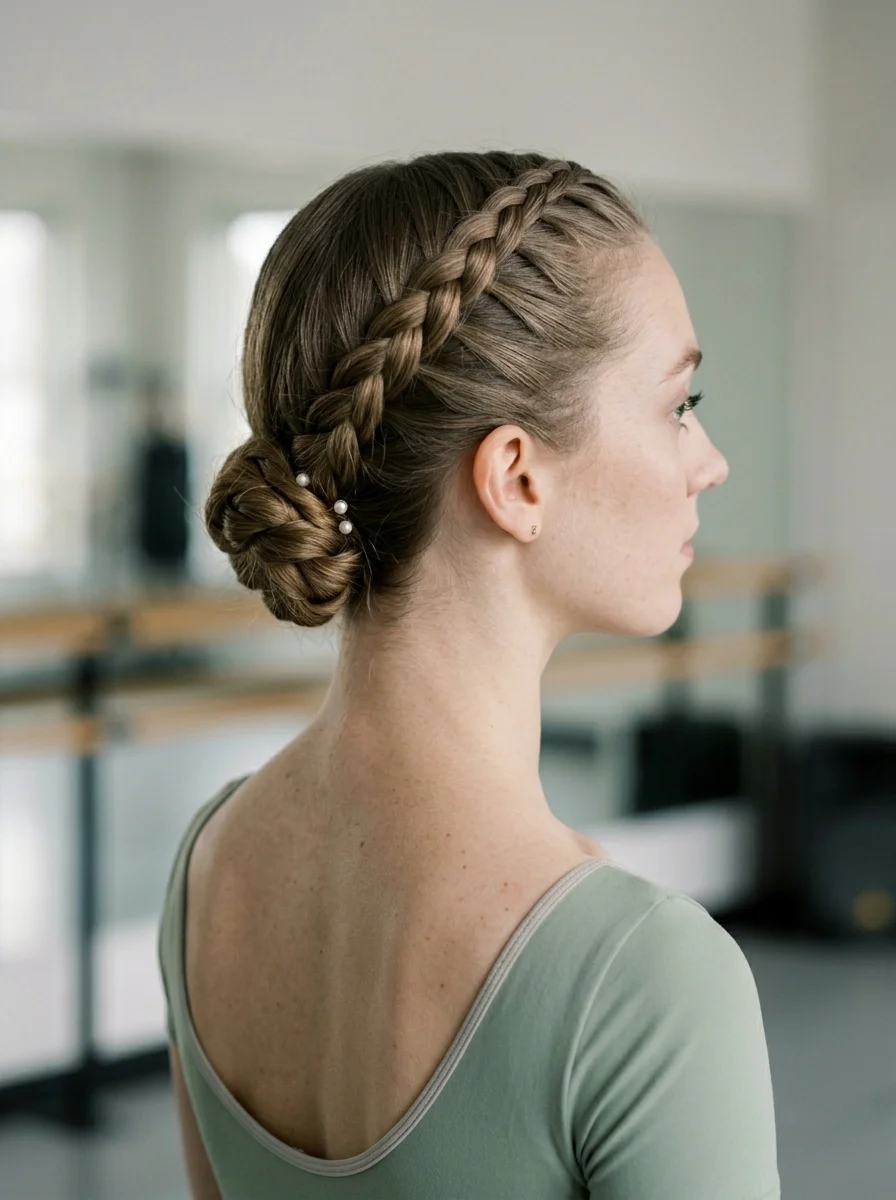
The overview: Medium to long hair with a Dutch braid starting at one temple, traveling diagonally across the crown to the opposite side, then feeding into a low textured bun. Pearl pins are scattered along the braid for a delicate accent. The finish is polished with natural texture.
The diagonal braid path distributes weight across the head instead of concentrating it on one side. During partnering work in ballet, where your head contacts a partner's shoulder or arm, the asymmetric placement avoids creating a pressure point on one side.
Why this look is popular: The asymmetry is what makes this visually striking. A diagonal braid is unexpected — most braids run straight back or straight down. The pearl pins add scattered points of light that catch stage lighting beautifully.
Where this look is suitable: Ballet performances, ballroom dance competitions, formal athletic events, any setting where the hairstyle needs to look elegant while functioning under physical stress.
Step by step:
- Start the braid. At one temple, take a section and begin a Dutch braid, angling it diagonally across the crown toward the opposite ear.
- Add hair as you braid. Incorporate sections from the hairline and crown as the braid travels across the head.
- Reach the opposite side. When the braid arrives at the opposite side near the ear, continue braiding the remaining hair into a regular three-strand plait.
- Gather into a bun. Coil the braided tail into a low textured bun at the nape, positioned slightly off-center toward the side where the braid ends.
- Add pearl pins. Insert pearl pins along the braid path at irregular intervals. Push them in at an angle to grip the braid.
- Smooth and set. Apply a light hairspray to maintain the style without stiffness.
Tips and tricks: The diagonal angle determines how dramatic the asymmetry looks. A steeper angle (from temple to opposite nape) is more visually striking. A shallower angle (from temple to opposite ear) is more subtle. Choose based on how bold you want the style to read. Pearl pins with a small hook or screw back hold better than straight pins during movement.
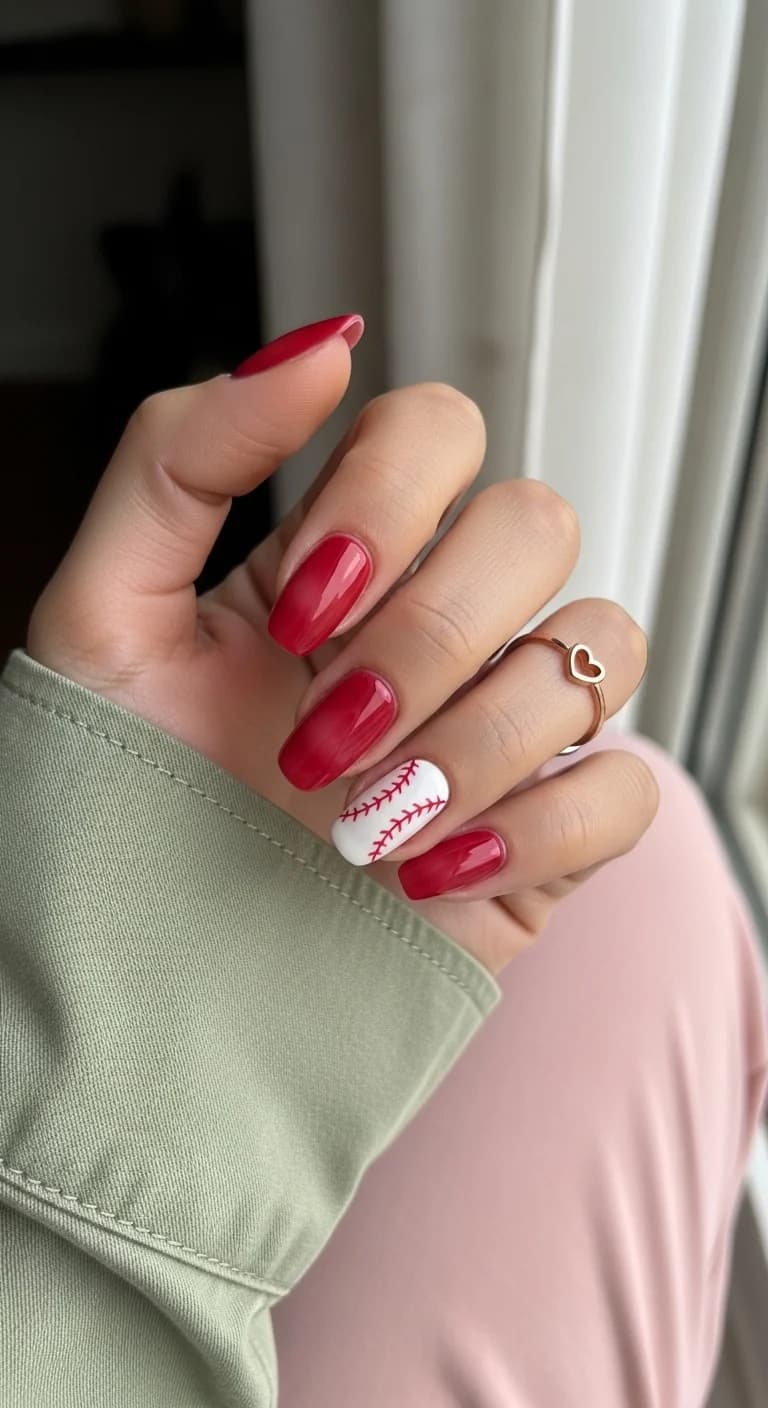
28 Cute & Sporty Baseball Game Nail Ideas for 2026 ⚾
20.Sporty Half-Up Braided Twist
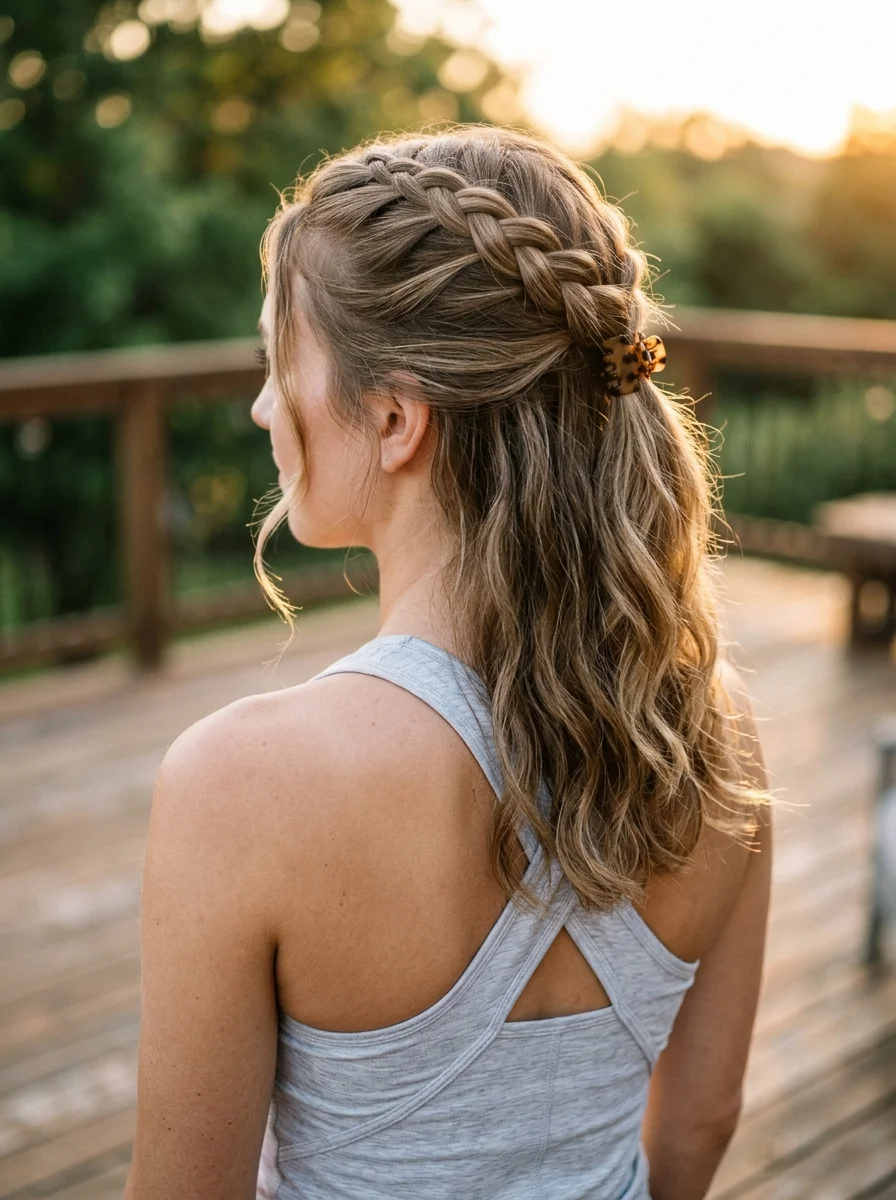
The overview: Medium to long hair with two Dutch braids from the hairline meeting at the back of the head, secured with a small tortoiseshell claw clip. The remaining hair below the clip falls in natural waves past the shoulders. Braids keep hair off your face while the open lower section lets your neck breathe.
The claw clip adds a visible design element that makes the transition from braid to loose hair look intentional. Without the clip, the braids just kind of stop. With it, the style reads as a considered half-up look rather than an afterthought.
Why this look is popular: Half-up styles with braids are having a moment because they solve the practical problem (hair in face) without the aesthetic cost (losing your length and movement). The claw clip is faster and easier than elastics, and it adds a design element in one step.
Where this look is suitable: Hiking, outdoor fitness classes, trail running, casual cycling, any activity where you need your face clear but want airflow through the lower section.
Step by step:
- Start the first braid. At one side of the hairline, begin a Dutch braid, working backward along the side of the head.
- Start the second braid. Mirror on the other side.
- Meet at the back. Bring both braids to the back of the head where they meet. Hold them together.
- Clip them. Secure the joined braids with a small claw clip. Position it so the clip sits as a focal point.
- Arrange the lower section. Arrange the loose hair below the clip so it falls naturally.
- Set. Mist with flexible-hold hairspray to keep the braids in place and the waves defined.
Tips and tricks: The braids don't need to be perfect — a slightly loose, imperfect braid looks more natural and effortless than a tight, precise one. For very long or heavy hair, add a small elastic to each braid before clipping for extra security. The claw clip should be large enough to grip both braids plus some of the base hair underneath.
21.Voluminous Braided Ponytail with Ribbon
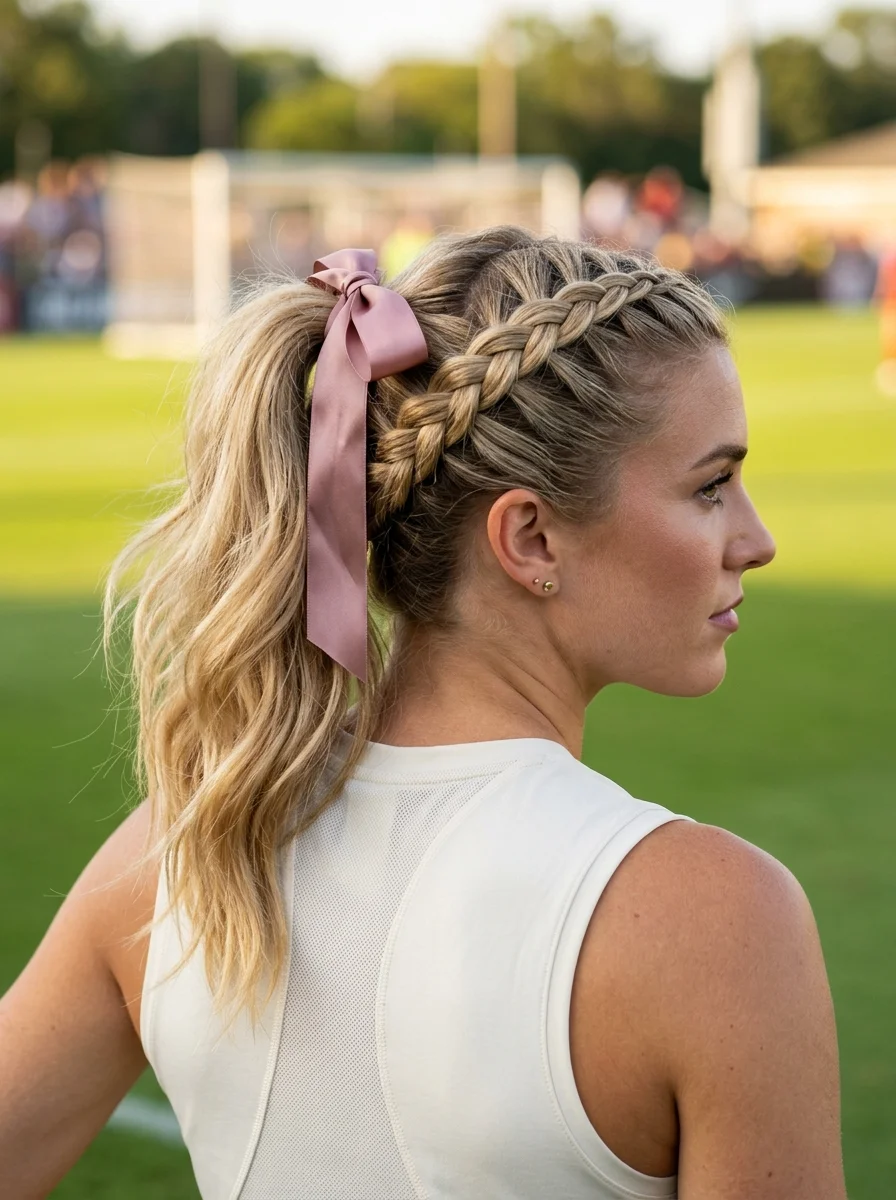
The overview: Medium to long hair with a Dutch braid from the side hairline feeding into a high ponytail at the crown. A dusty rose satin ribbon bow is tied at the ponytail base. The braid is raised and defined, the ponytail has natural movement.
The Dutch braid starting from the side instead of the center creates an asymmetrical detail that's more visually interesting than a standard center-parted braid. The raised profile of the Dutch technique adds volume even before you start puffing it out.
Why this look is popular: The side braid eliminates the need for a headband — it functions as one while adding more visual interest. The ribbon at the ponytail base is a quick decorative touch that elevates the entire style. This is one of the most photogenic athletic looks on the list.
Where this look is suitable: Tennis, pickleball, running, outdoor fitness, any activity where you need hair secured away from the face with a polished finish.
Step by step:
- Start the side braid. At one side of the hairline (above the ear), begin a Dutch braid, angling it upward toward the crown.
- Add hair as you go. Incorporate sections from the hairline and temple as the braid travels toward the crown.
- Gather the ponytail. Once the braid reaches the crown, gather all remaining hair into a high ponytail with the braid included.
- Secure tightly. Tie the ponytail with a strong elastic at the crown.
- Tie the ribbon. Cut an 18-inch length of dusty rose satin ribbon. Tie it around the elastic into a bow.
- Adjust the braid. Gently pull the outer loops to widen the Dutch braid for a fuller look.
Tips and tricks: Start the braid close to the hairline for maximum "headband" effect. If the braid is too far back, it won't hold the front sections securely. For very slippery hair, apply a texturizing spray before braiding for extra grip. The ribbon tails should be trimmed to about 4-6 inches for a balanced look.
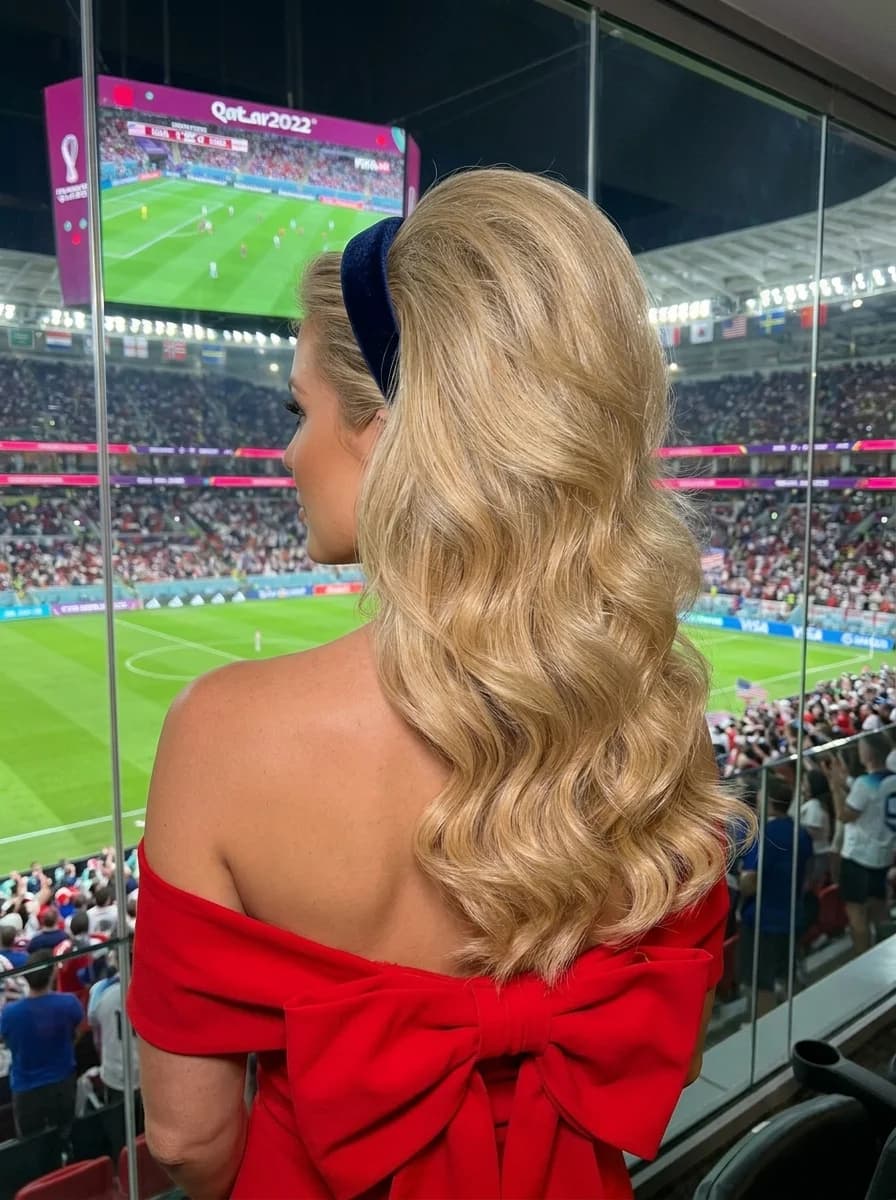
29 Fun FIFA World Cup Watch Party Hairstyles (2026)
22.French Braid Top Knot
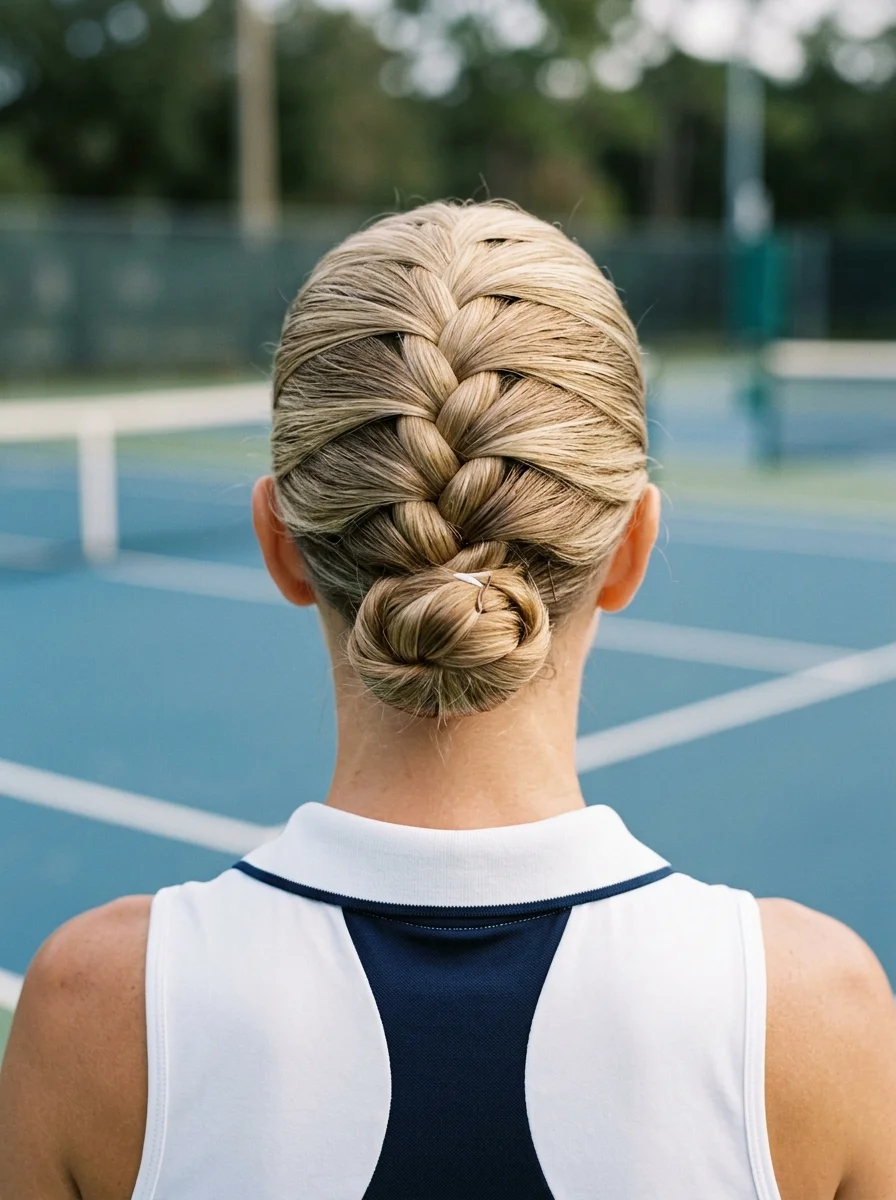
The overview: Medium to long hair, a single French braid running along the center of the head from the hairline to the crown, feeding into a compact braided bun positioned on top. The sides are smooth and pulled back cleanly.
The center-line French braid locks hair down along the entire top of the head before it even reaches the bun. That means less hair is left to move freely, which translates to significantly more hold than a standard bun without the braid foundation.
Why this look is popular: The French braid acts as an anchor track that secures the most vulnerable section of hair — the top — before it reaches the bun. This style stays put through running, jumping, and quick direction changes in a way that a simple top knot doesn't.
Where this look is suitable: Tennis, running, HIIT classes, CrossFit, any high-intensity workout where a standard top knot loosens during activity.
Step by step:
- Section the top. Create a rectangular section along the center of the head, about 3 inches wide, from the hairline to the crown.
- French braid the section. Braid the center section using French technique (cross over), adding hair from the section as you braid toward the crown.
- Gather the bun. At the crown, gather the braid tail and all remaining side hair into a high ponytail.
- Braid and coil. Braid the ponytail into a three-strand plait, then coil it into a compact bun. Pin with bobby pins.
- Smooth the sides. Use a boar bristle brush and light gel to smooth the sides and back toward the bun.
- Set. Mist with strong-hold hairspray for maximum security.
Tips and tricks: Keep the center section narrow — if it's too wide, the braid starts to lift off the scalp and loses its anchoring benefit. The French braid should feel snug against the scalp without being painfully tight. For hair with highlights, the braid pattern becomes more visible, adding natural visual texture to the style.
23.Playful Double Space Buns
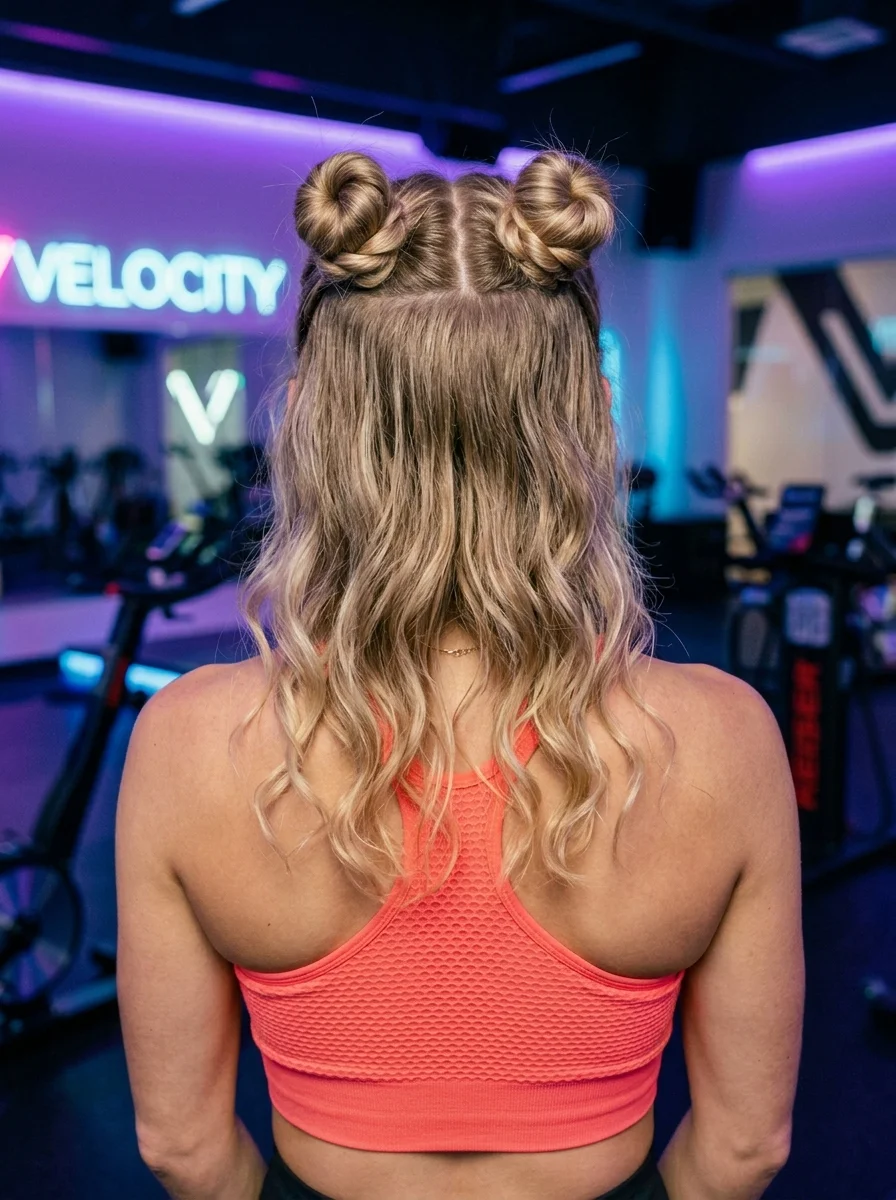
The overview: Medium to long hair with two high buns on the crown and the bottom section flowing in loose waves. The buns are compact and neatly twisted. The ombre creates a two-tone effect within each bun. The high double buns keep your neck completely exposed for maximum airflow during intense cardio sessions.
The half-down element adds a playful, relaxed quality that pure updos don't have. The ombre transition from dark roots to golden ends creates visible dimension within each bun, making them look more textured and interesting than solid- color hair would.
Why this look is popular: Space buns are fun without being juvenile, and the half-down version softens the look enough for everyday wear. The high placement creates a youthful, energetic silhouette, and the exposed neck is a practical benefit during sweaty workouts.
Where this look is suitable: Spin classes, cycling, dance cardio, outdoor runs, any high-heat activity where neck ventilation matters. Also works for festivals and casual outings.
Step by step:
- Section horizontally. Part the hair from ear to ear across the back of the head, separating the top half from the bottom.
- Center-part the top. Create a center part within the top section only.
- Make two high ponytails. Gather each side of the top section into a high ponytail at the crown. Secure tightly.
- Twist into buns. Twist each ponytail tightly, then coil it around the elastic base to form a bun. Pin with 3-4 bobby pins each.
- Style the bottom. Leave the lower section flowing in its natural waves, or add waves with a curling wand.
- Set. Mist the buns with strong-hold hairspray. Use a light spray on the waves to maintain definition.
Tips and tricks: The buns need to be at the same height and the same size for symmetry — check in a mirror from the front and sides. For very thick hair, the buns may need to be wrapped twice to stay compact. The ombre effect is more visible when the buns are twisted tightly enough to show the color transition.
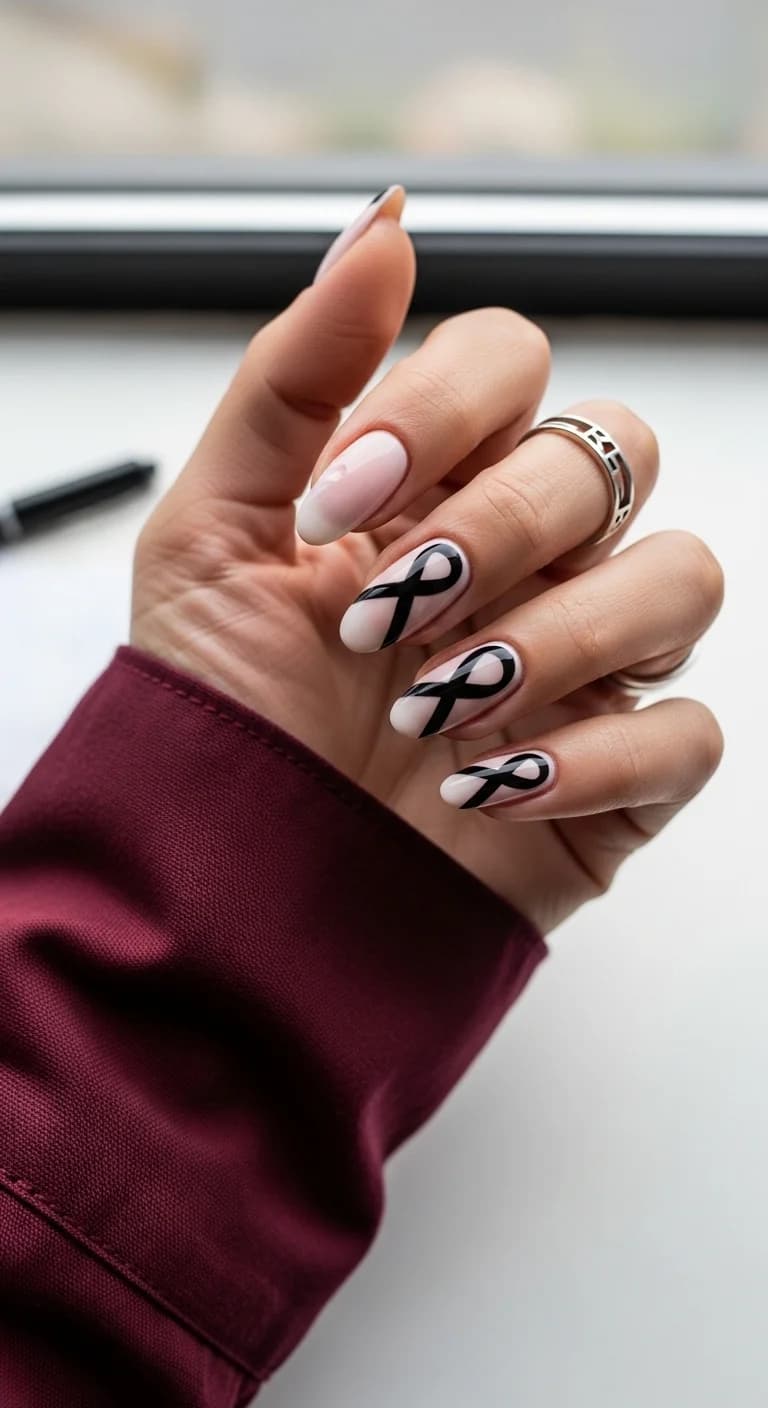
27 Stunning Graduation Day Nail Ideas for 2026 🎓
24.Sleek Dutch Braid Ponytail
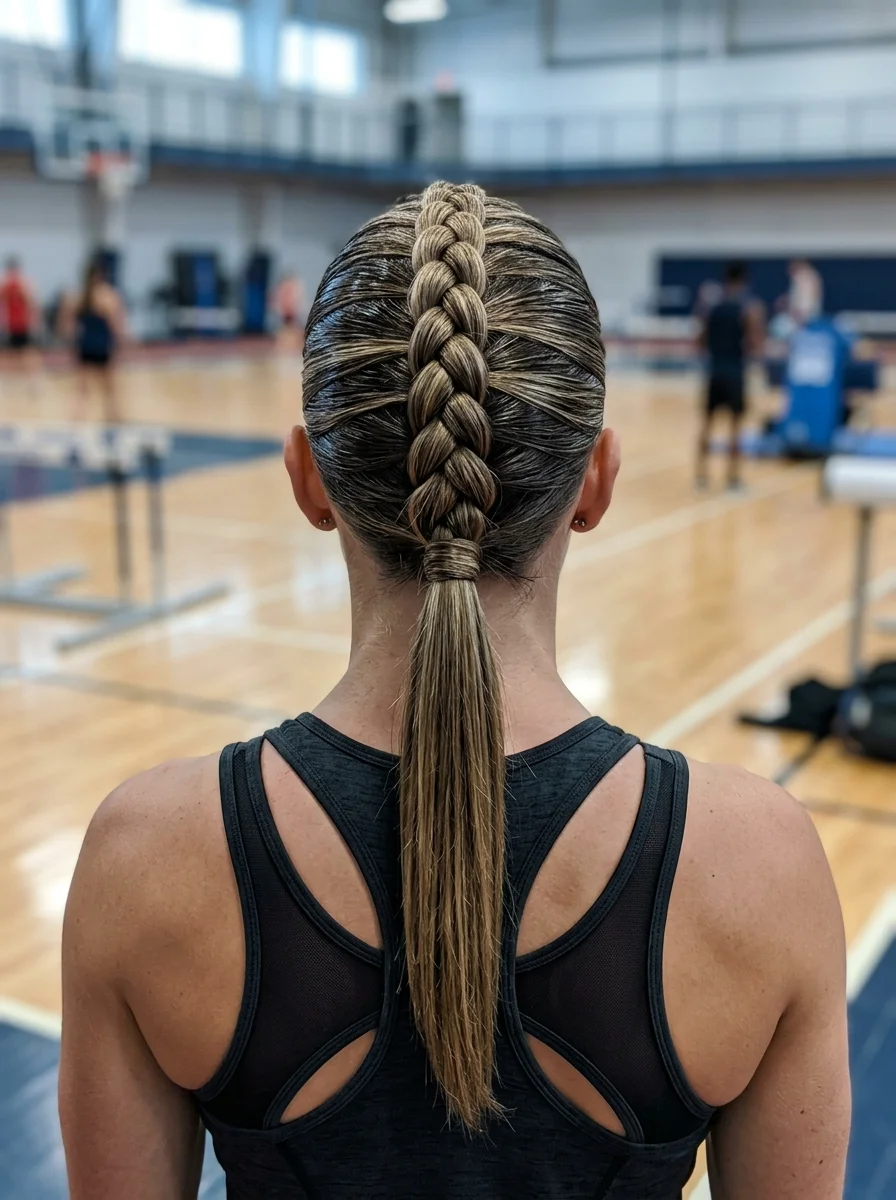
The overview: Medium to long hair with a single large Dutch braid running along the center crown from the hairline to the nape, transitioning into a sleek, straight low ponytail.
A single center-line Dutch braid creates the strongest possible anchor because it captures hair from both sides along the entire length of the head. No other single-braid technique provides this level of hold.
Why this look is popular: This is the go-to style for athletes who need zero-maintenance hold through an entire game or workout. Once the braid is in, you don't touch it again. The raised Dutch braid adds visual dimension that a flat French braid doesn't, making it more photogenic.
Where this look is suitable: Basketball, volleyball, soccer, running, any sport where you need maximum hold with zero maintenance mid-activity. This is the style athletes default to for a reason.
Step by step:
- Start the Dutch braid. At the center of the hairline, take a section and begin Dutch braiding — crossing strands under to create the raised effect.
- Braid along the crown. Continue the braid straight back along the center of the head, adding hair from both sides as you go. Keep the braid centered and the tension even.
- Reach the nape. Once all hair is incorporated, continue braiding the remaining tail as a regular three-strand plait for a few inches.
- Secure the ponytail. Tie the braid tail and any loose ends into a low ponytail at the nape with a strong elastic.
- Straighten the ponytail. If the ponytail has wave or curl, run a flat iron through it for a sleek finish.
- Smooth and set. Apply edge control along the hairline. Mist with strong-hold hairspray.
Tips and tricks: The most critical element is keeping the braid centered. If it drifts to one side, the whole look throws off. Check your positioning in a mirror before you start braiding. For the sleekest ponytail finish, apply a smoothing serum before straightening. The braid should feel firm against the scalp — if you can lift it, it's too loose.
25.Elegant Braided Bun with Metallic Pins
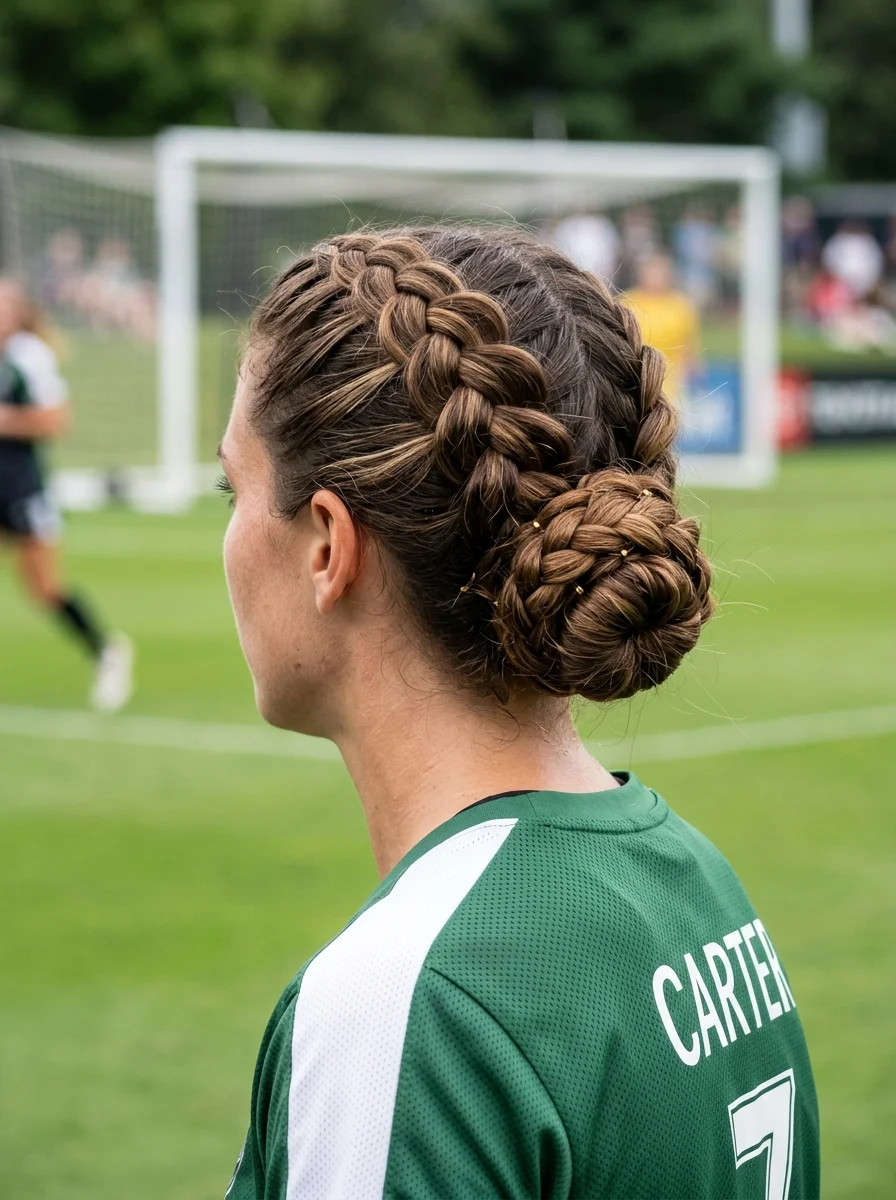
The overview: Medium to long hair with Dutch braids from each temple converging at the nape into a low braided bun. Gold metallic pins are placed at the point where the braids meet, adding a metallic accent against the hair.
The metallic pins aren't just decorative — they penetrate through multiple braid layers and anchor into the base hair underneath, providing a secondary hold mechanism beyond the elastic. That redundancy is what keeps this style intact through 90 minutes of play.
Why this look is popular: The gold pins add a luxurious detail to a fundamentally functional style. Two braids converging into one bun distribute weight more evenly than a single braid, making this comfortable for extended wear.
Where this look is suitable: Soccer, lacrosse, field hockey, rugby, any team sport involving sustained running. The gold pins make it appropriate for post-game events without changing your hair.
Step by step:
- Dutch braid the left side. Starting at the left temple, braid flat against the scalp toward the nape, adding hair as you go.
- Dutch braid the right side. Mirror the same pattern from the right temple.
- Converge at the nape. Combine both braids at the nape. Braid the combined tail into a three-strand plait.
- Coil into a bun. Wrap the braided tail into a compact bun at the low nape. Pin with bobby pins.
- Add metallic pins. Insert gold metallic pins at the point where the braids converge, angling them through the bun into the base hair.
- Smooth the hairline. Apply edge control gel along the part and hairline for a clean finish.
Tips and tricks: The metallic pins should be pushed in at different angles — crisscrossing them creates a more secure hold than placing them all in the same direction. For extra-long games or practices, add a light mist of strong-hold hairspray before inserting the pins. The bun should sit at or below the occipital bone — higher placement creates more bounce during running.
20 Stunning Mother of the Bride Hairstyle Ideas for 2026 💍
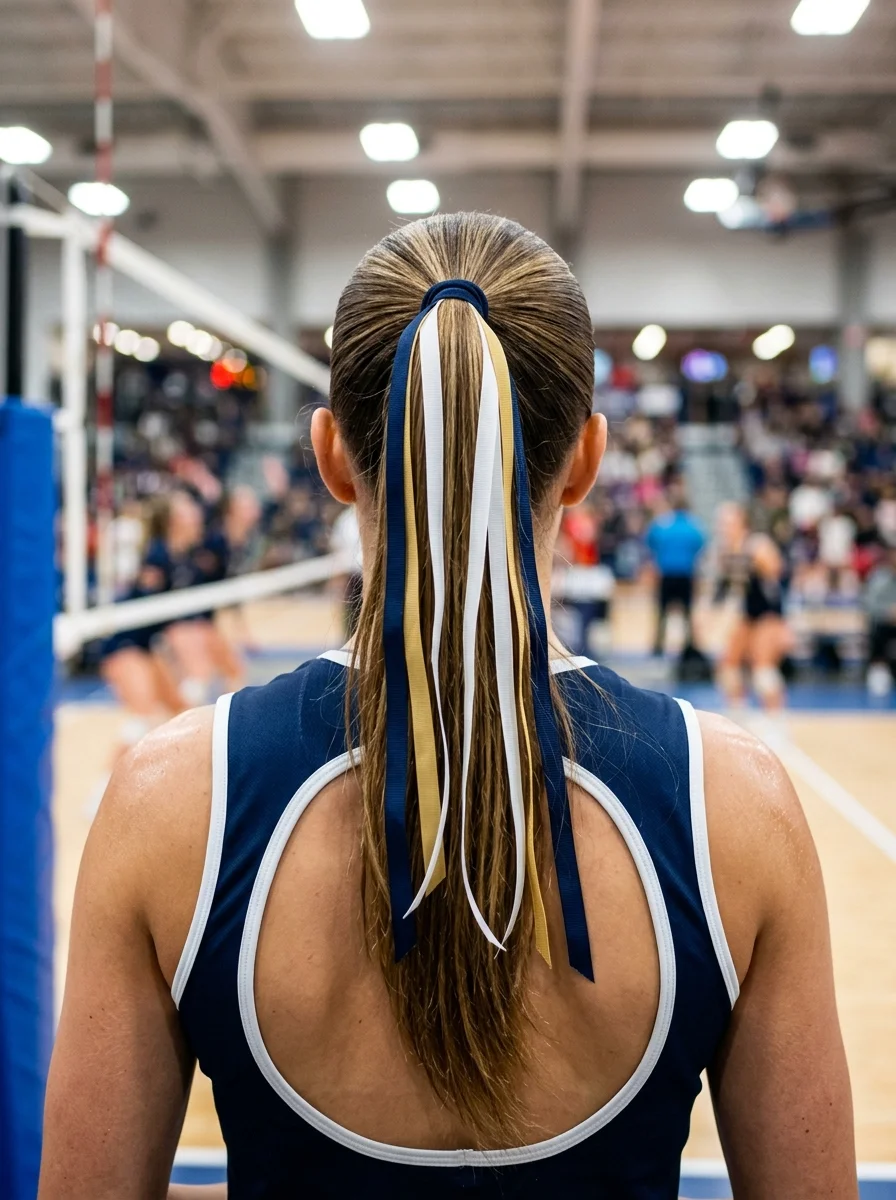
26.Team Spirit Ponytail with Ribbons
The overview: Any length of hair tied in a high ponytail at the crown with a navy elastic base. Navy, gold, and white ribbons are tied at the base and cascade down the ponytail length alongside the hair. The overall effect is festive, coordinated, and energetic. The ribbons are lightweight enough that they don't restrict movement or add weight.
The high ponytail placement keeps the neck exposed for cooling during intense play, while the ribbons add visual energy that matches the pace of the game. They move with you, creating dynamic visual interest during jumps and spikes.
Why this look is popular: Ribbon-adorned ponytails are the simplest way to show team spirit through your hair. The ribbons are inexpensive, customizable, and can be swapped for different team colors. The high placement is both functional and flattering.
Where this look is suitable: Volleyball, softball, cheerleading, any team sport where coordinating colors adds to the visual unity. Also works for fan sections and watch parties.
Step by step:
- Gather the ponytail. Brush all hair to the crown. Secure tightly with a navy elastic.
- Prepare the ribbons. Cut three lengths of ribbon (navy, gold, white) at roughly the same length as the ponytail.
- Tie the ribbons. Tie all three ribbons around the elastic base in a secure knot. Let them cascade down alongside the hair.
- Distribute the ribbons. Spread the ribbons so they fall evenly throughout the ponytail rather than clumping on one side.
- Set. A light mist of flexible-hold hairspray keeps everything in place without weighing down the ribbons.
Tips and tricks: Satin ribbons slide against hair — if yours won't stay distributed, tie each ribbon individually with a small knot around a section of ponytail hair to anchor it. Grosgrain ribbons grip better than satin but are slightly stiffer. Match ribbon width to ponytail thickness: thinner ponytails need thinner ribbons for proportion.
27.Chic Ponytail with Satin Bow
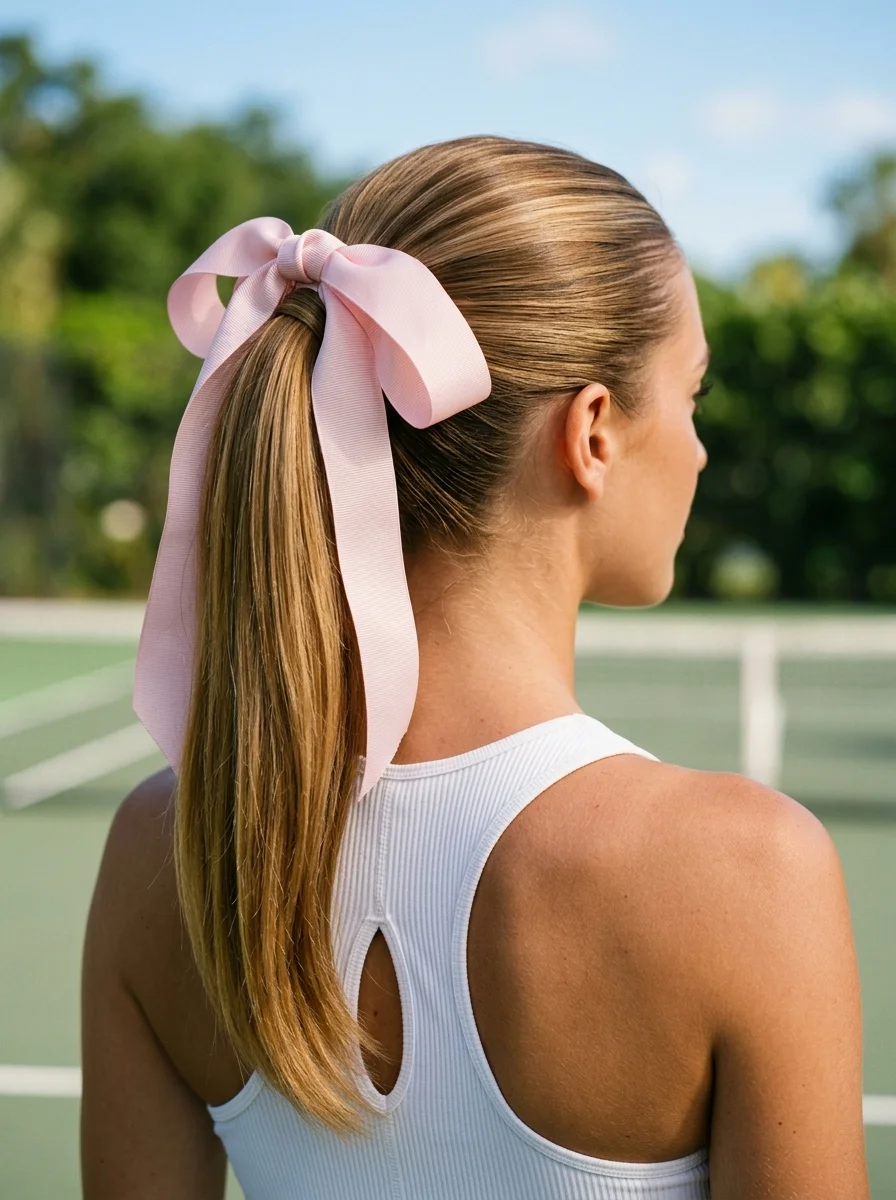
The overview: Any length of hair is to be pulled into a sleek mid-height ponytail with an oversized blush-pink grosgrain satin bow at the base. The tennis and country club setting tells you this is the "look put-together while still being athletic" style — the bow adds a decorative element that elevates a basic ponytail into something that reads as intentional.
The grosgrain texture of the bow prevents it from sliding against the hair, which keeps it positioned correctly through movement. The blush-pink color works because it's soft enough to complement golden blonde without competing for attention.
Why this look is popular: An oversized bow transforms the simplest hairstyle into a statement. The ponytail itself takes 30 seconds to create — the bow does all the styling work. This is the style that says "I'm here to play AND look good doing it."
Where this look is suitable: Tennis matches, country club events, golf, casual athletic outings, any setting where you want to look polished while still being sporty.
Step by step:
- Smooth the hair. Apply a smoothing serum and brush all hair back into a sleek ponytail at mid-height.
- Secure tightly. Use a strong elastic that matches your hair color.
- Create the bow. Take a long piece of blush-pink grosgrain ribbon (about 24 inches). Tie it around the elastic into a full bow with even loops and tails.
- Adjust the bow. Fluff the loops for fullness. Trim the tails to your desired length — mid-ponytail length works best.
- Final smoothing. Run a fine-tooth comb over the crown and sides to eliminate any flyaways. Mist with light-hold hairspray.
Tips and tricks: The bow needs to be oversized to make an impact — a small bow on a ponytail reads as an afterthought. Use at least 24 inches of ribbon for full-sized loops. To keep the bow from drooping, add a small bobby pin through the center knot and into the ponytail base. This anchors it in place without distorting the shape.
31 Patriotic Fourth of July Nail Ideas for 2026 🇺🇸
28.Classic Three-Strand Braid
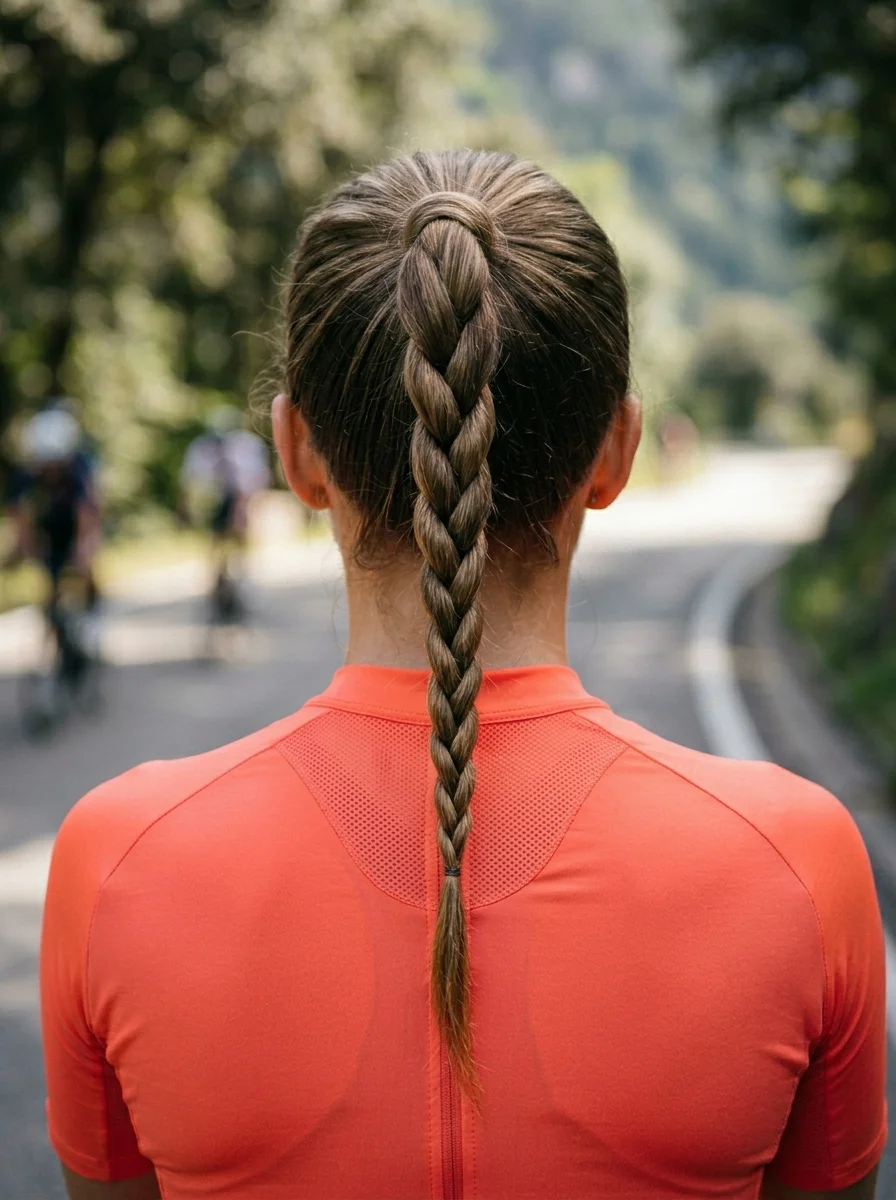
The overview: Any length of hair is to be pulled into a low ponytail at the nape and woven into a tight, uniform three-strand braid. The cycling setting tells you this is the most reliable athletic style in existence — the tight braid prevents tangling and whipping during high-speed movement, which matters when you're wearing a helmet and your hair is exposed at the back.
The three-strand braid is the hairstyle every other athletic braid is measured against. It's fast, it's secure, it works on every hair type, and it's been proven by athletes for generations. Nothing fancy, nothing complicated, nothing that fails.
Why this look is popular: Simplicity is the selling point. A three-strand braid takes under two minutes and holds through anything. There's no technique to learn, no pattern to follow — just braid and go. For cyclists, it's especially practical because the braid lies flat against the back and doesn't catch on helmet straps.
Where this look is suitable: Cycling, running, hiking, gym workouts, any activity where reliability matters more than aesthetics. This is the style you reach for when you need your hair to just work.
Step by step:
- Gather low. Brush all hair to the nape. Secure with an elastic.
- Divide into three. Split the ponytail into three equal sections.
- Braid tightly. Cross the right strand over the center, then the left over the center. Repeat with consistent tension from top to bottom.
- Secure the end. Tie off with a clear elastic about 2 inches from the bottom.
- Tighten. Hold the end and gently push the braid upward to compress it and make it tighter against the elastic.
Tips and tricks: Consistent tension is everything — if one strand is looser than the others, the braid will twist and look uneven. Braid on damp hair for the tightest, most controlled result. For very long hair, the braid can be coiled into a low bun at the nape for a more contained profile.
29.Sleek High Ponytail
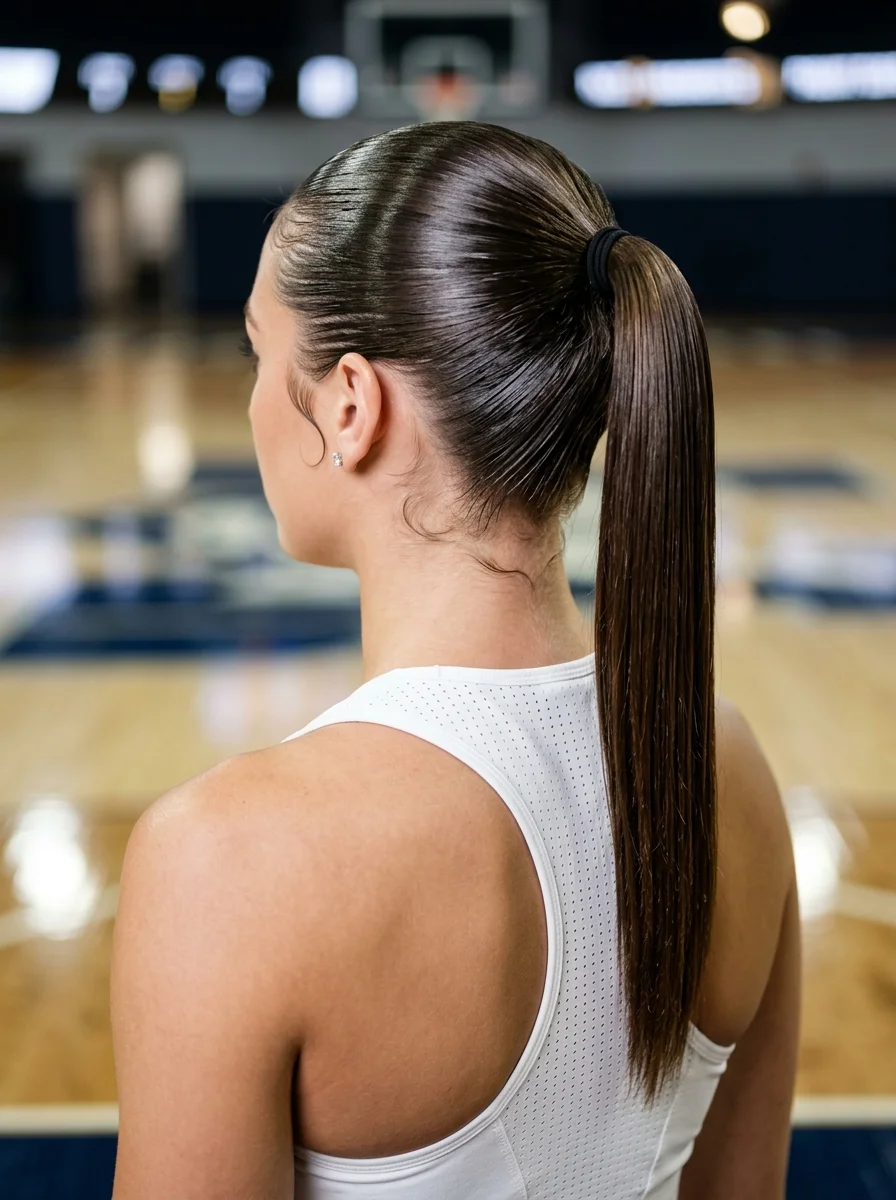
The overview: Any length of hair can be gel-slicked to a glass-hair finish, and gathered into a high ponytail at the crown with edges laid smooth. The basketball court setting tells you this is designed for maximum hold during the most intense movement — the gel eliminates 100% of flyaways even during heavy perspiration.
The high ponytail creates a whip-like movement that looks dynamic during fast-paced play. Combined with the glass-hair surface, it's one of the most polished athletic styles you can achieve with minimal effort.
Why this look is popular: The gel-slicked surface is what makes this more than a basic gym ponytail. The mirror-like shine catches light from every angle, creating a high-impact visual even from a distance. This style photographs beautifully under arena lighting.
Where this look is suitable: Basketball, volleyball, CrossFit, running, any high-intensity activity where you want a polished look that survives heavy sweating.
Step by step:
- Apply gel generously. Work a generous amount of wet-look gel through damp hair from roots to ends. Don't be shy with the product.
- Brush to the crown. Use a boar bristle brush to sweep all hair upward to the crown. Brush repeatedly for a smooth surface.
- Secure tightly. Tie with a strong elastic at the crown. Pull tight to eliminate any looseness.
- Lay edges. Use a small brush or toothbrush with edge control gel to smooth baby hairs along the hairline into swoops or waves.
- Smooth the surface. Run the boar bristle brush over the entire head one more time to eliminate any ridges or bumps.
- Set. Mist with strong-hold hairspray for maximum hold through activity.
Tips and tricks: The key is product quantity — you need more gel than you think for a truly glass-hair finish. Layer it on in two passes: first a light layer worked through all the hair, then a second focused on the surface. A boar bristle brush is essential — regular brushes leave visible track marks in gel-slicked hair.
27 Stunning Beach Wedding Hairstyles for Brides & Family 2026 🌊💍
30.Elegant Twisted Knot Bun
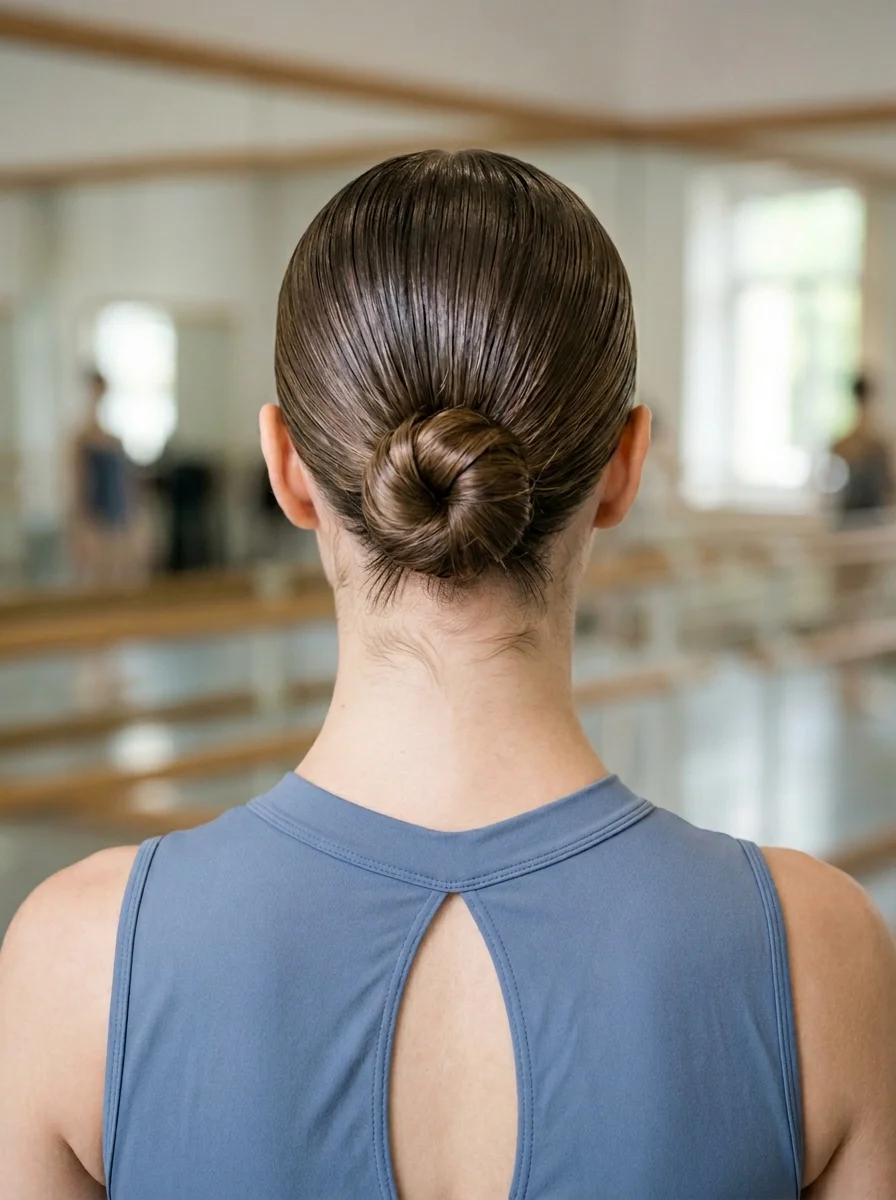
The overview: Any length of hair (short, long or medium), twisted into a tight rope and coiled into a compact, symmetrical knot bun at the low nape. The surface of the bun shows the twisted rope pattern. Zero flyaways, zero protrusions.
The twisted rope technique creates more internal friction within the bun than a smooth coil, which means it holds with fewer pins. The tight twist essentially locks the bun in place through tension alone.
Why this look is popular: This is the most elegant version of a simple bun. The twisted rope creates a visible pattern within the bun that catches light beautifully, especially under stage lighting. The compact shape and low placement make it the most versatile updo on the list.
Where this look is suitable: Ballet, ballroom dance, figure skating, any activity requiring a completely smooth, protrusion-free head profile. Also works for formal occasions and professional settings.
Step by step:
- Smooth the hair. Apply smoothing serum and blow-dry with a boar bristle brush for maximum smoothness.
- Gather into a low ponytail. Secure at the low nape with a strong elastic.
- Twist the ponytail. Twist the entire ponytail tightly in one direction until it starts to coil on itself.
- Coil into a bun. Wrap the twisted rope around the elastic base in a tight spiral. Keep it flat against the head.
- Pin securely. Insert bobby pins at the outer edge of the bun, angling them toward the center. Use 4-6 pins.
- Final smoothing. Use a fine-tooth comb and light gel to smooth any remaining flyaways. Mist with strong-hold hairspray.
Tips and tricks: The twist direction determines how the bun sits — twist clockwise for a right-leaning bun, counterclockwise for left-leaning. For maximum hold, apply a small amount of gel to the ponytail before twisting. The tighter the twist, the more the bun holds itself through tension. A hairnet matching your hair color over the bun adds invisible security for performance settings.
31.Twisted Half-Up with Flowing Waves
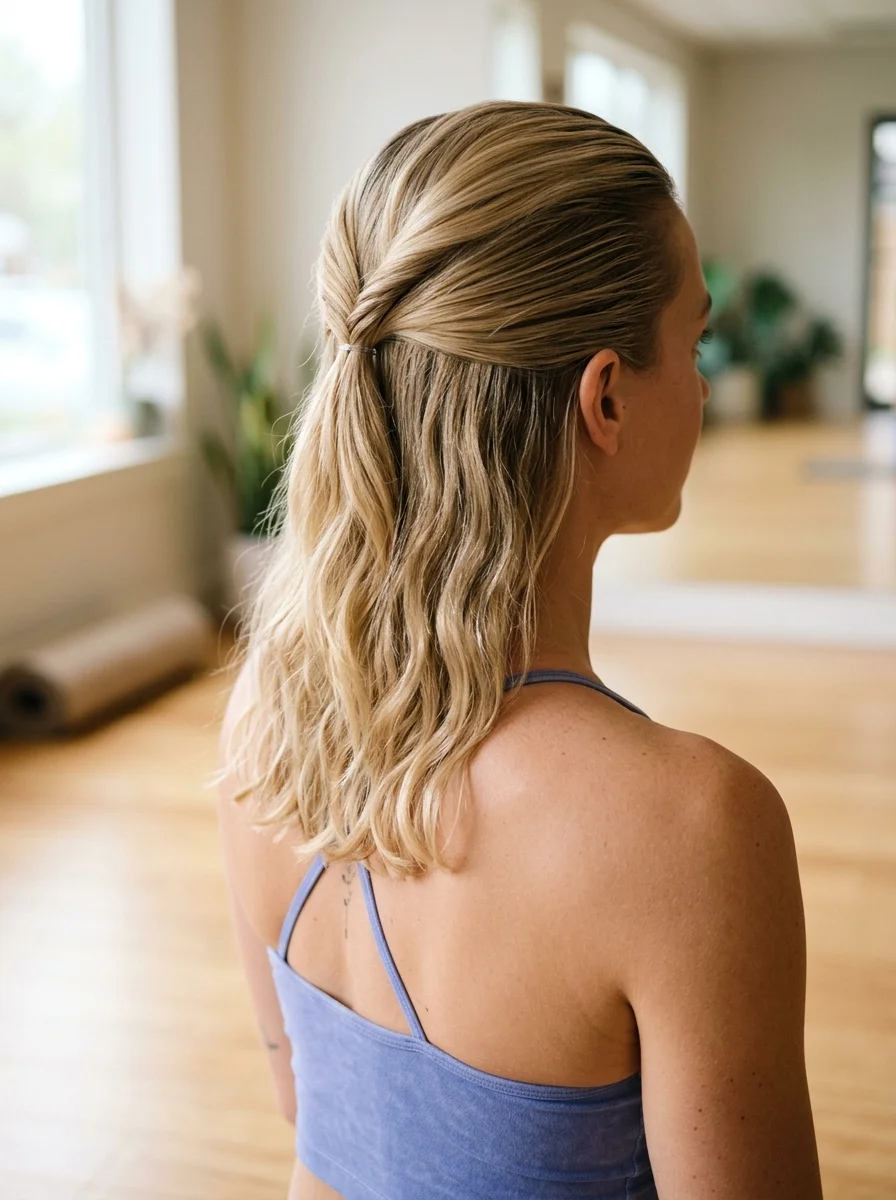
The overview: Medium-length hair styled in a half-up, half-down configuration. The front sections bordering the face are gathered, rolled inward toward the center back, and secured together, allowing the remaining hair to cascade down in relaxed, beachy waves.
This twisted back-pull is the perfect middle ground between a full updo and wearing your hair completely loose. By rolling the sides away from the face, you secure the pieces most likely to cause distraction or stick to sweat, while preserving a soft, flowing aesthetic down the back. It reads as effortlessly styled but holds up beautifully during moderate activity.
Why this look is popular: The inward twists offer a delicate, artistic detail that visually mimics a crown or headband without needing complex braiding techniques. It keeps your vision entirely unobstructed for workout routines while letting you show off the natural volume and texture of your hair's lower half. Plus, it relieves the tension of a heavy, full ponytail.
Where this look is suitable: Yoga, Pilates, barre, light stretching, or restorative gym sessions. It is also an excellent choice for a post-workout smoothie run or a casual athleisure outing where you want a blend of sporty and chic.
Step by step:
- Prep the texture. Enhance your natural wave or create loose bends with a curling wand. Spritz a light texturizing spray through the mid-lengths and ends.
- Section the front. Part your hair as desired, then isolate a medium-sized section on the left and right sides, right above the temples.
- Roll the sides. Take the left section and twist it inward, rolling it back toward the center of your head. Hold it in place while you repeat the inward twist on the right side.
- Secure the twists. Bring both rolled sections to meet at the back of the head. Tie them together firmly using a clear polyband or an elastic that matches your hair color.
- Invert for a seamless finish. Create a small hole just above the elastic where the two sections meet, flip the tail up, and pull it down through the gap to lock the twists inward and hide the hair tie.
- Fluff and set. Gently pinch and pull the edges of the twists to make them appear thicker. Finish with a light, flexible hairspray to tame any flyaways around the face.
Tips and tricks: If you have shorter layers framing your face that tend to escape the roll, rub a tiny amount of styling paste between your fingertips before twisting the sections back. For floor-based workouts where you lie on your back, position the securing elastic slightly higher towards the crown to avoid uncomfortable pressure against the mat.
30 Stunning July Nail Designs for Summer 2026 💅
32.Double Twisted Space Buns with Scrunchies
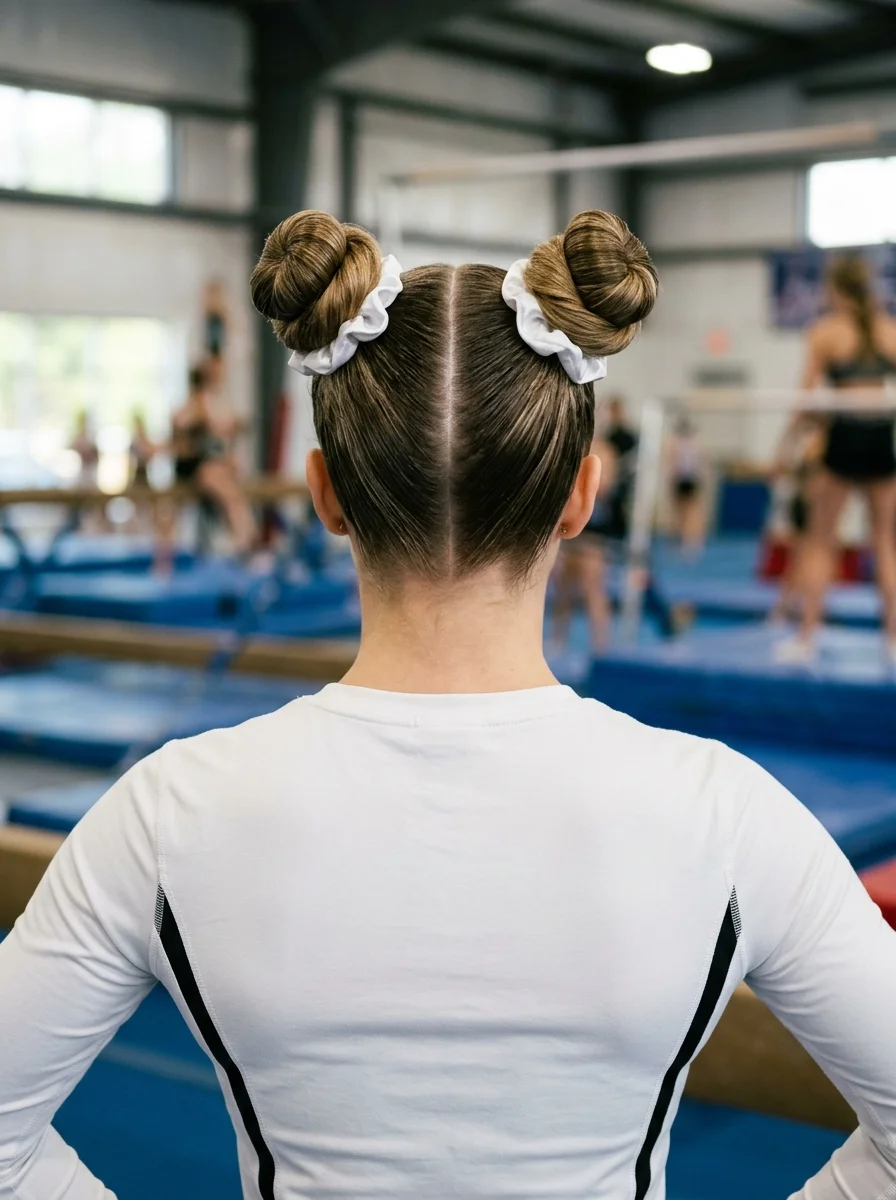
The overview: Medium hair, center-parted into two high twisted buns with white scrunchies at the base of each. This look is about balanced weight distribution — dual buns spread the weight of thick hair across both sides of the head instead of concentrating it at one point.
The scrunchies provide cushion between the elastic and the scalp, reducing pressure points during long training sessions. The caramel highlights make the twisted texture within each bun more visible.
Why this look is popular: Twisted buns are faster than braided buns and create a softer, more relaxed silhouette. The scrunchies add a retro '90s detail that feels current again. The white scrunchies contrast against the medium brown for a clean, graphic look.
Where this look is suitable: Gymnastics training, dance practice, casual gym sessions, any activity where you need both hands free and hair completely out of the way.
Step by step:
- Center part. Clean line from forehead to nape.
- Make two high ponytails. Gather each half at the crown. Secure with elastics.
- Twist each ponytail. Take one ponytail, twist it tightly in one direction until it begins to coil.
- Coil into a bun. Wrap the twisted ponytail around its elastic base to form a bun. Secure with bobby pins.
- Repeat on the other side. Match the size and placement.
- Add scrunchies. Place a white scrunchie around the base of each bun, over the elastic.
Tips and tricks: The twist direction matters — if you twist both buns in the same direction, they'll look symmetrical from the front. If you twist them in opposite directions (one clockwise, one counterclockwise), they'll mirror each other. Choose based on your preference. For very thick hair, the scrunchies may not stretch enough to go around the bun — use them at the base only, over the elastic.
33.Twisted Cornrow Half-Up Style
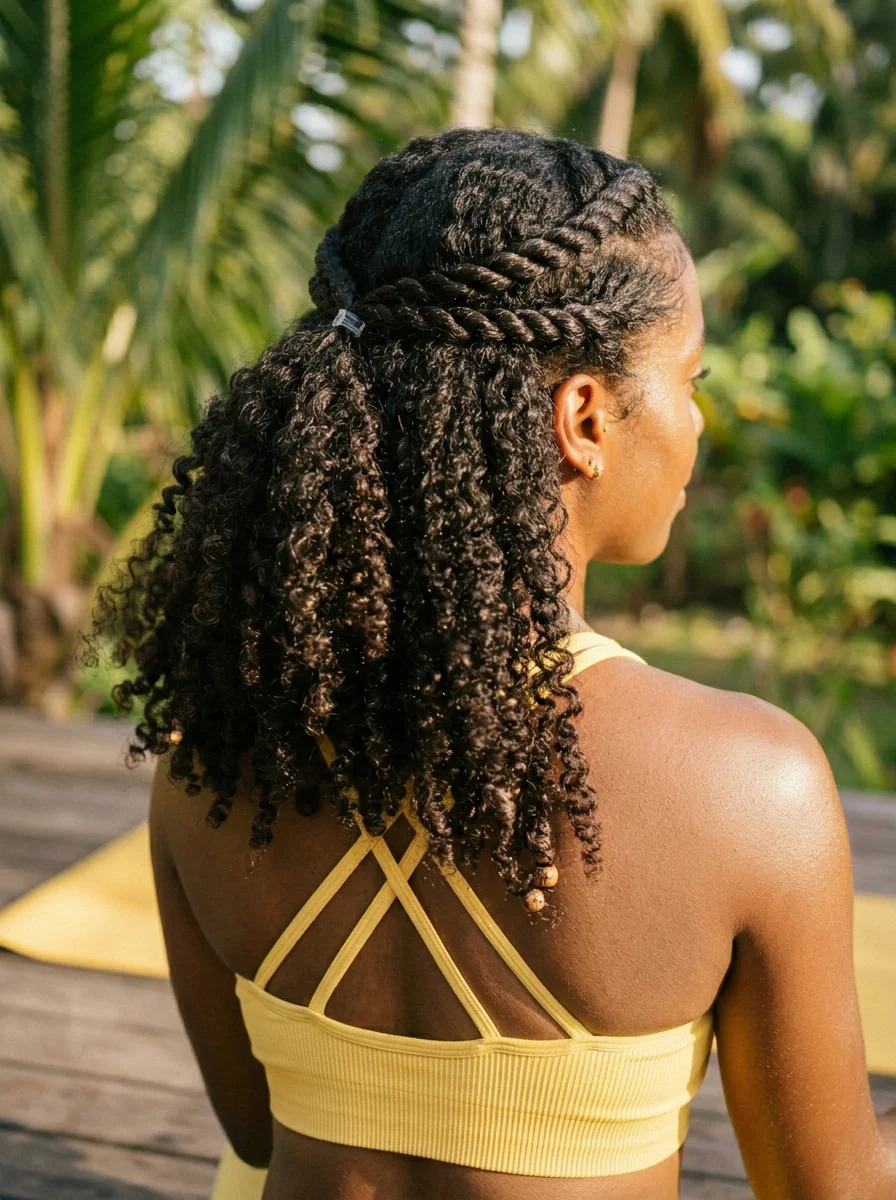
The overview: Natural coily hair with two flat twists from the front hairline curving to the center back, secured with an elastic. The remaining curls cascade freely in a half-up ponytail. This look is designed for heat and humidity — the cornrows keep the front secure while allowing the natural curls to breathe and move freely.
Flat twists are the twist equivalent of cornrows — they lie flat against the scalp using a two-strand twist technique instead of a three-strand braid. They're faster to execute than cornrows and create a softer, more rounded texture against the scalp.
Why this look is popular: The half-up structure keeps the face clear while celebrating natural curl texture in the lower section. The flat twists add a structured, architectural detail that contrasts beautifully with the free-flowing curls. This style works particularly well in humid climates where straight styles revert.
Where this look is suitable: Outdoor tropical workouts, beach fitness, trail running in warm weather, any activity where heat management and natural texture are priorities.
Step by step:
- Moisturize. Apply a curl-defining cream or leave-in conditioner to the hair for moisture and definition.
- Section the front. Part the hair from ear to ear across the crown, separating the front section from the back.
- Flat twist the left side. Starting at the left temple, two-strand twist the hair flat against the scalp, curving toward the center back. Add hair as you twist.
- Flat twist the right side. Mirror the same pattern from the right temple.
- Secure together. Join both flat twists at the center back with an elastic.
- Define the curls. Apply curl gel or mousse to the remaining loose hair and scrunch upward for definition.
Tips and tricks: Keep the flat twists tight against the scalp for maximum hold. If they're loose, they'll lift during movement. A lightweight gel applied to each section before twisting helps create clean, defined twists. For the curls in the back, a diffuser on low heat sets the curl pattern without causing frizz.
21 Hot Summer Buns Hairstyle Ideas for 2026 ☀️🔥
34.Elegant Hair-Wrapped Low Ponytail
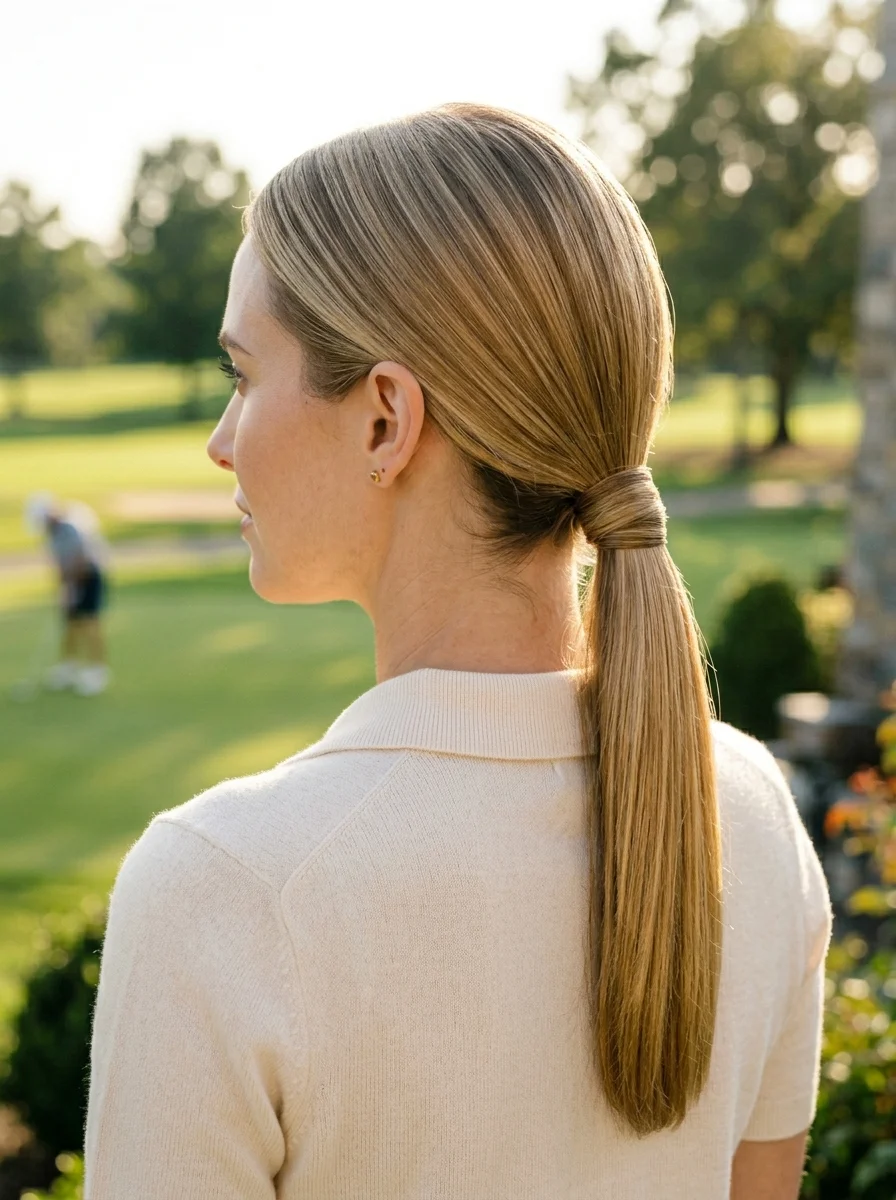
The overview: Smooth, straight hair gathered neatly at the nape of the neck into a sleek low ponytail. The defining feature is a thick strand of hair tightly wrapped around the base, completely concealing the elastic for a sophisticated, seamless finish.
This look proves that athletic hair doesn't have to look messy. By keeping the ponytail low and meticulously smooth, you eliminate the distraction of loose hair while maintaining a highly polished, country club aesthetic. The hidden elastic elevates the style from a basic gym quick-fix to a deliberate fashion choice.
Why this look is popular: It is the epitome of "quiet luxury" in athletic styling. The low placement is incredibly practical for outdoor sports because it accommodates sun visors and baseball caps perfectly without altering the style. The smooth finish also prevents tangling during a breezy day on the course or court.
Where this look is suitable: Golf, tennis, equestrian sports, sailing, or any low-to-medium impact activity where a polished appearance is preferred. It transitions flawlessly from the 18th hole or center court straight to the clubhouse lunch.
Step by step:
- Prep and smooth. Flat iron the hair for a pin-straight finish. Apply a lightweight smoothing serum from mid-lengths to ends to create a glass-like shine and block out humidity.
- Gather low. Using a fine-tooth comb or boar bristle brush, sweep all the hair smoothly back into a low ponytail exactly at the nape of the neck.
- Secure firmly. Tie the hair tightly with a strong, snag-free elastic. This forms the anchor for the wrap.
- Isolate the wrap section. Take a half-inch piece of hair from the very underside of the ponytail.
- Wrap and conceal. Wind this piece tightly and smoothly around the elastic band until the band is completely invisible.
- Pin and set. Tuck the very end of the wrapping piece underneath the ponytail and secure it upward into the base with a bobby pin. Mist the crown with a light-hold hairspray to lock down flyaways.
Tips and tricks: To get that completely flat, sleek crown, spray a clean toothbrush with strong-hold hairspray and gently glide it over any baby hairs around your hairline and part. If your freshly washed hair is too silky and the wrapped strand keeps slipping, spray a little dry shampoo or texturizing spray on that specific strand before wrapping it to give it necessary grip.
35.Textured Bubble Braid Ponytail
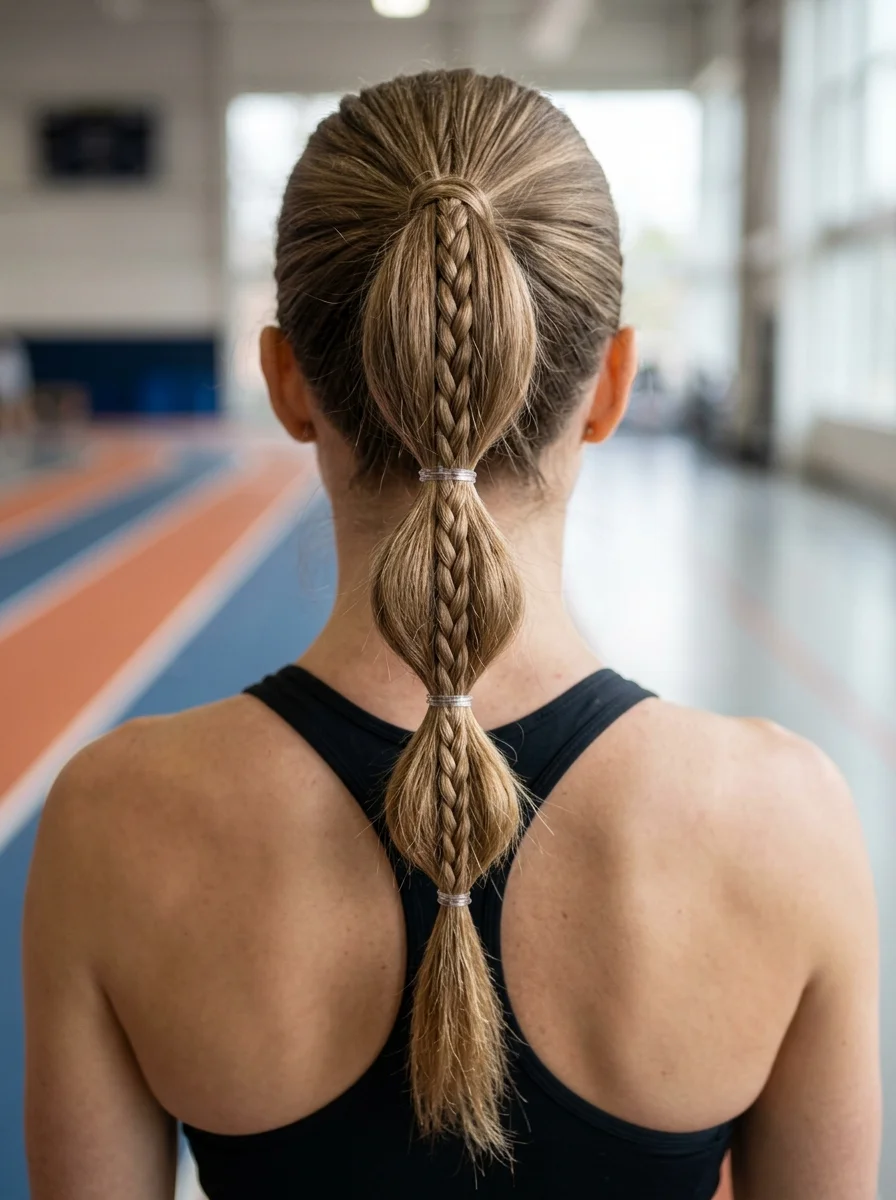
The overview: Medium to long hair in a high-to-mid ponytail with a thin braid running down the center as a decorative spine, with bubble segments created with clear elastics on either side. Multiple elastic anchor points create redundant security that holds through sprinting, jumping, and field events.
The central braid spine adds structural integrity to the bubble braid. Instead of relying solely on the elastics to hold the segments, the braid provides an internal skeleton that keeps the entire style locked in place even if one elastic loosens.
Why this look is popular: The braid-spine bubble braid is the most secure bubble variation on this list. The internal braid gives it structural integrity that standard bubble braids lack. The textured surface also photographs with more depth and dimension than a simple ponytail.
Where this look is suitable: Track and field, CrossFit competitions, high-intensity tournaments, any activity where maximum hold through explosive movement is the priority.
Step by step:
- Gather the ponytail. Brush all hair to a high-to-mid position. Secure tightly with a strong elastic.
- Create the center braid. Take a thin section from the center of the ponytail and braid it into a three-strand plait from the elastic to the ends. Secure with a clear elastic.
- First bubble elastic. Tie a clear elastic about 2 inches below the base, around the entire ponytail including the braid.
- Puff the first section. Gently pull the hair between the two elastics outward to form rounded bubble shapes on either side of the central braid.
- Repeat down the length. Add 3-4 more elastics at 2-inch intervals, puffing each section into bubbles. The braid runs through the center of every segment.
- Final adjustment. Even out the bubble sizes and make sure the central braid is visible as a spine down the middle.
Tips and tricks: The center braid should be thin — about 1/4 inch wide. Too thick, and it overwhelms the bubble segments. Too thin, and it disappears. Use clear polyband elastics for the bubbles — they're nearly invisible and hold better than larger elastics on individual sections. For maximum security during competition, add a light mist of strong-hold hairspray to each section before creating the next bubble.
30 Cute Ladybug Nail Trends That Are Taking Over (2026)
The Scalp Health for Athletes Guide
Your scalp is skin too, and it needs care when you are sweating daily. Constant sweat buildup can clog follicles, cause irritation, and contribute to hair thinning over time. A few simple habits make a significant difference for active women.
Before your workout: Apply a lightweight oil like jojoba or argan to your scalp before intense sessions. It creates a protective barrier that prevents sweat from sitting directly on your skin. This is especially helpful for curly and coily textures that are more prone to dryness.
After your workout: Rinse with lukewarm water if you cannot wash fully — this removes salt and sweat without stripping natural oils. When you do wash, use a gentle sulfate-free shampoo three to four times a week to avoid over-drying. Keep a travel-size dry shampoo in your gym bag for quick refreshes between washes.
The rule? Never sleep with sweat in your hair. A quick rinse before bed prevents buildup and keeps your scalp healthy through training season.
The Five-Minute Pre-Workout Reset
You rolled out of bed, grabbed your gym bag, and now you have five minutes before class starts. Here is how to get your hair workout-ready without stress.
Minute one: Spray dry shampoo or texturizing spray at the roots for instant grip and volume. This gives your style something to hold onto through movement and sweat.
Minutes two and three: Choose a low-maintenance option — a sleek ponytail, a quick braid, or a claw clip bun. Use a strong elastic or clip that will not slip during movement.
Minute four: Smooth flyaways with a tiny bit of edge control gel or a toothbrush dipped in hairspray. This small step makes the whole look feel intentional.
The gym bag kit? Keep one strong elastic, two to three bobby pins, a mini hairspray, and a texturizing spray in your bag. Those four items can save any bad hair day in under five minutes.
The Hair Breakage Prevention Strategy
Constant pulling, tight elastics, sweat, and friction from headgear can cause breakage and thinning if not addressed. With the right techniques, you can protect your hair while crushing your fitness goals.
Choose the right accessories: Swap thin elastics for satin scrunchies or spiral cords — they distribute pressure and reduce breakage at the ponytail base. Avoid metal clips that can snag and snap strands.
Rotate your styles: Do not wear the same tight ponytail every single day. Switch between low buns, braids, and loose styles to give your scalp and hairline a break. This simple habit prevents tension-related thinning.
The care rule? After heavy sweating, rinse your hair and apply a lightweight leave-in conditioner. Avoid heat styling on workout days — let your hair air-dry to minimize damage. Detangle with a wide-tooth comb starting from the ends and working upward.
Disclaimer: The advice and guidelines shared in this article are for informational purposes only and may not be suitable for all hair types or scalp conditions. Please consult a medical professional or dermatologist before following any routines or suggestions outlined above.