Hair Trends
28 Stunning Softball Hairstyle Ideas with Braids for 2026
Your ponytail flying apart mid-inning is not the look. Whether you're sliding into second, diving for a line drive, or sprinting the bases, the last thing you need is hair whipping across your face at the worst possible moment. The styles here are built for the diamond, perfect for the game, so that you can focus on your at-bat instead of fighting with your hair.
Some of these take two minutes in the mirror before warm-ups. Others are more involved braided looks that hold up through a doubleheader tournament day. Every single one is designed to stay where you put it, no matter how hard you're running. Find the one that matches your hair length, your game intensity, and how much styling time you're willing to invest.
The Helmet Hair Prevention Guide
Let us talk about the elephant in the helmet: constant friction, tight straps, and heat buildup can cause real scalp issues if you are not careful. Traction alopecia — hair loss caused by consistent pulling — is a genuine concern for athletes who wear helmets and tight hairstyles daily. The good news is that prevention is straightforward.
Before you suit up: Avoid tying your hair too tightly under helmets. Opt for looser braids or low ponytails that reduce tension on the scalp. If you wear the same tight style every game, your hairline will start to show the strain over time.
After the game: Wash your hair as soon as possible after playing. Sweat left sitting on your scalp can react with bacteria and cause irritation. Use a moisturizing conditioner to combat the drying effects of sweat and helmet friction. Also clean the inside of your helmet with an antibacterial spray weekly and let it dry in direct sunlight.
The long game? Rotate your hairstyles between games. A low braid one day, a high ponytail the next, a loose bun after that. Giving different parts of your scalp a break prevents the repetitive tension that leads to thinning.
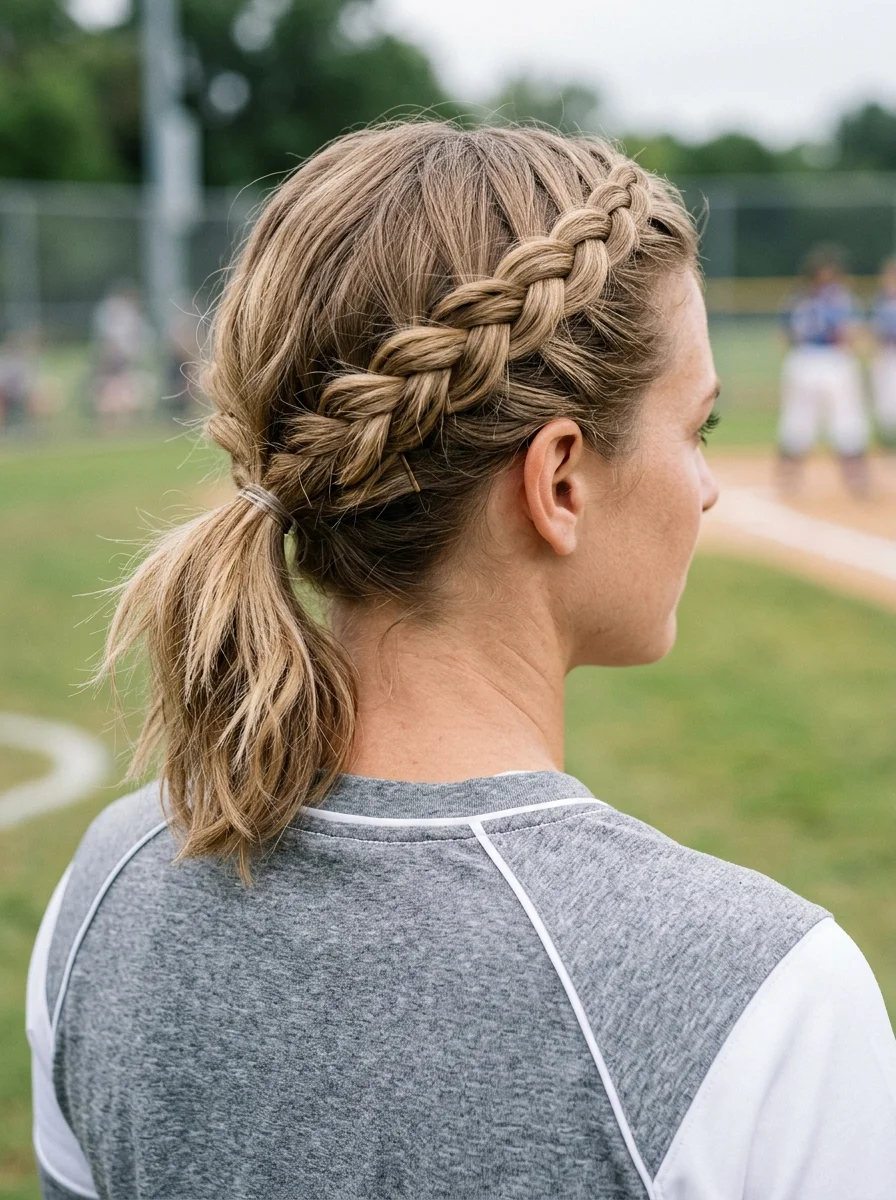
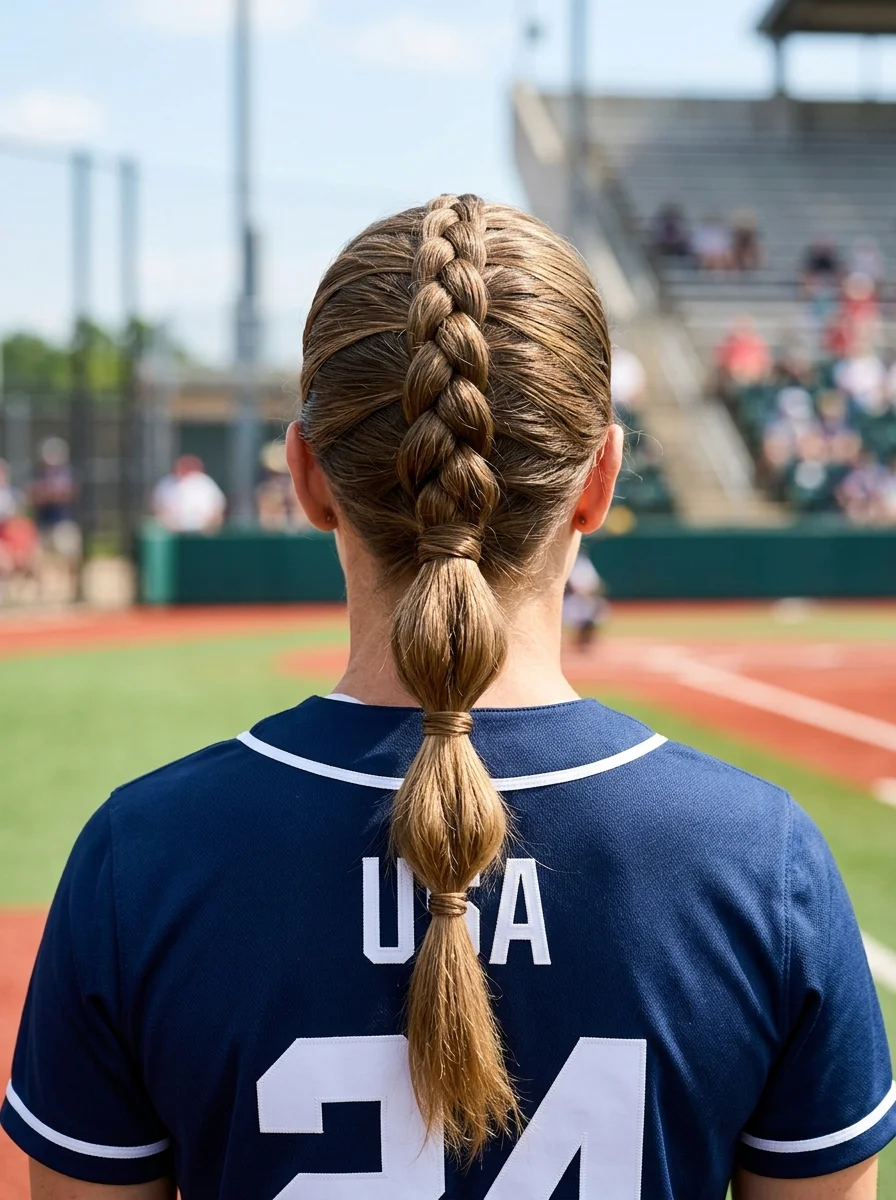
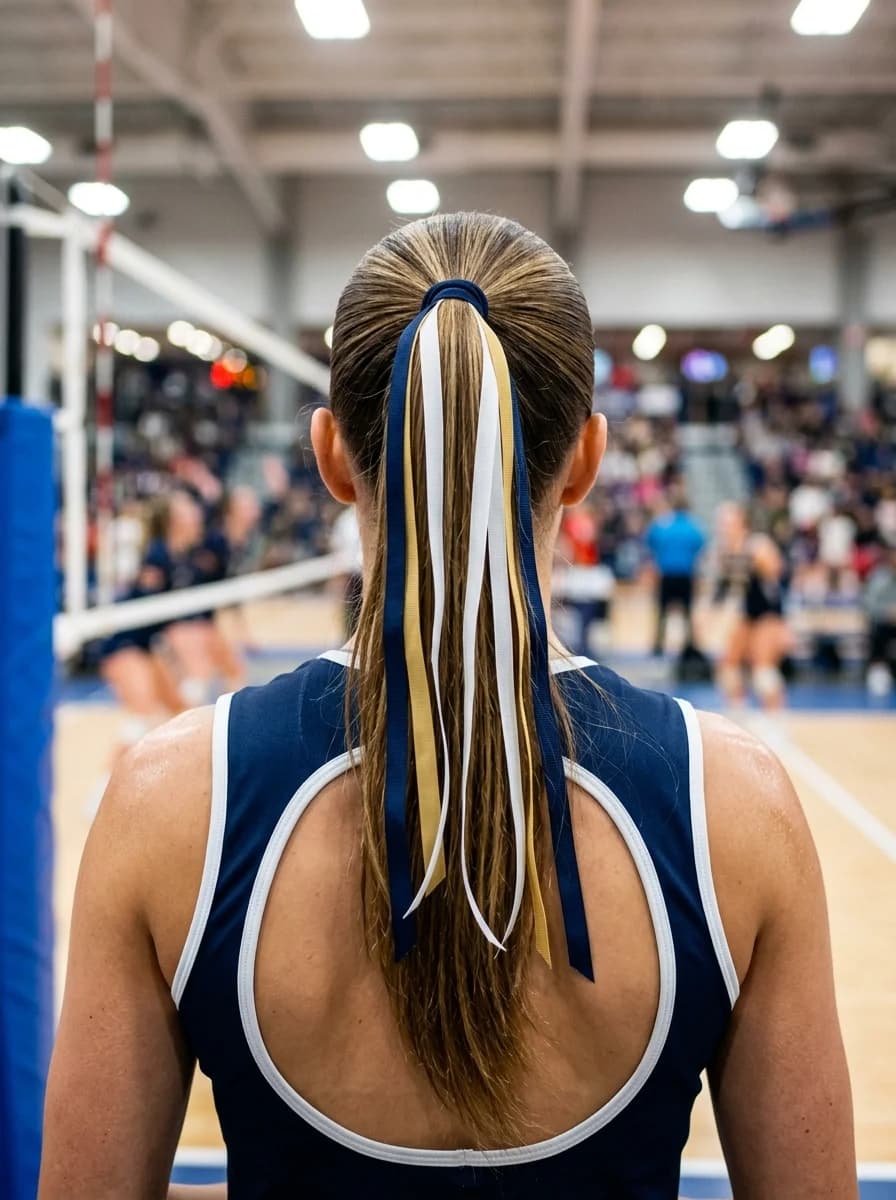
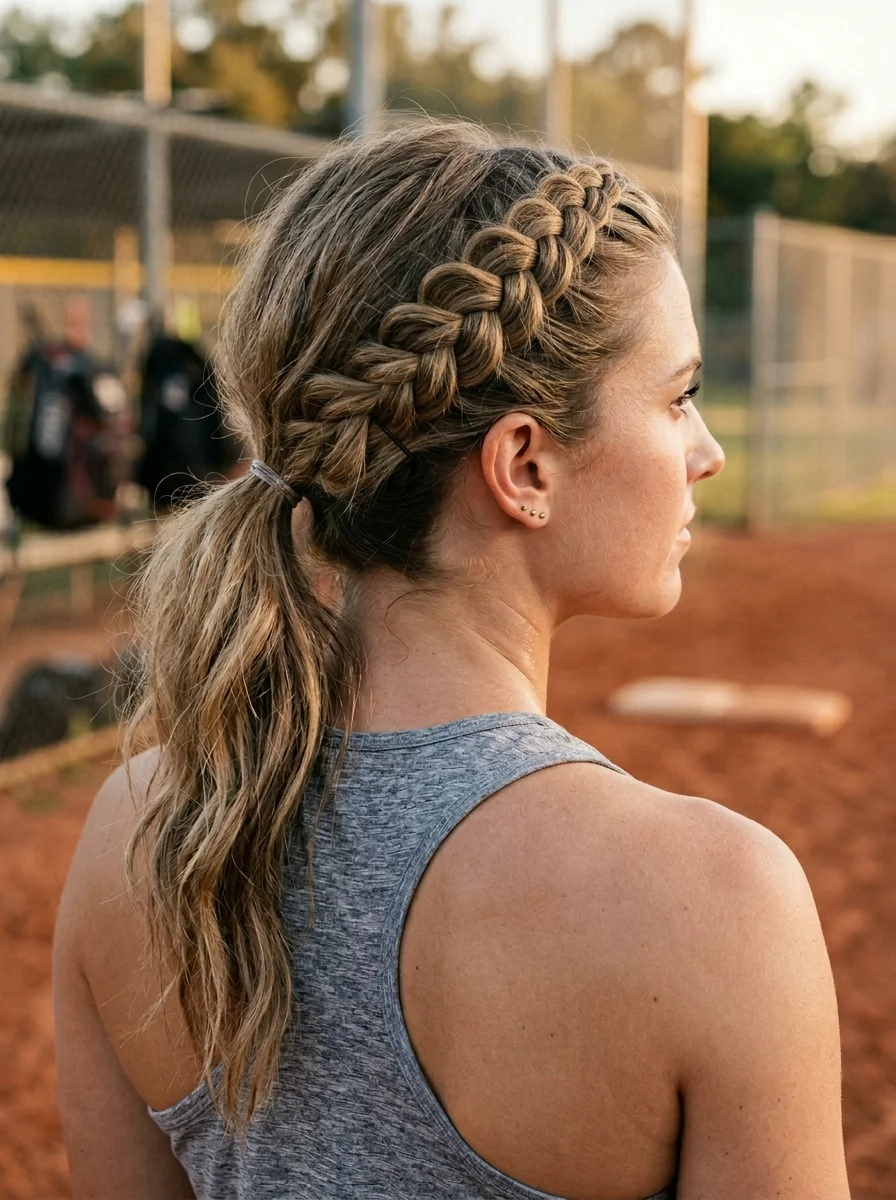
1.The Bubble Braid – Sleek and Sporty
The overview: Medium to long hair slicked back into a high ponytail at the crown, then segmented into rounded bubble shapes with clear elastics down the length. Bobby pins are placed at the temples to lock down any shorter face-framing pieces. The high placement keeps the neck exposed and the bubble segments distribute tension across the full ponytail.
The bubble technique is the cheat code for looking styled without spending half an hour in front of a mirror. You're just tying elastics at intervals and puffing out the sections between them. The result has volume and texture that holds up through sliding, diving, and sprinting — exactly what you need when the game gets intense.
Why this look is popular: Bubble braids look more complicated than they are. You get the visual payoff of a detailed hairstyle with the effort of a basic ponytail. The clear elastics disappear into the bronde hair, so the focus stays on the puffed-out shapes rather than visible hardware.
Where this look is suitable: Softball, baseball, cheerleading, running, any high-impact sport where a regular ponytail bounces too much. Also works for team photos and post-game gatherings.
Step by step:
- Apply smoothing gel. Work a dime-sized amount through damp hair from roots to ends to eliminate flyaways.
- Gather into a high ponytail. Brush all hair to the crown. Secure tightly with a strong elastic.
- First bubble elastic. Tie a clear elastic about 2 inches below the base.
- Create the first bubble. Gently pull the hair between the two elastics outward to form a rounded, puffy shape.
- Repeat down the length. Add 3-4 more elastics at 2-inch intervals, puffing each section into a bubble.
- Pin the temples. Use 2-3 bobby pins at each temple to lock down any shorter face-framing pieces.
- Set it. Mist with strong-hold hairspray to lock the bubbles in place.
Tips and tricks: Use clear polyband elastics — colored ones show unevenly and look less polished. If your hair is silky, spray each section with dry texturizing spray before tying the elastic for extra grip. The bubbles hold better on second-day hair.
31 Stunning Summer Birthday Party Hairstyles for 2026 🎂☀️
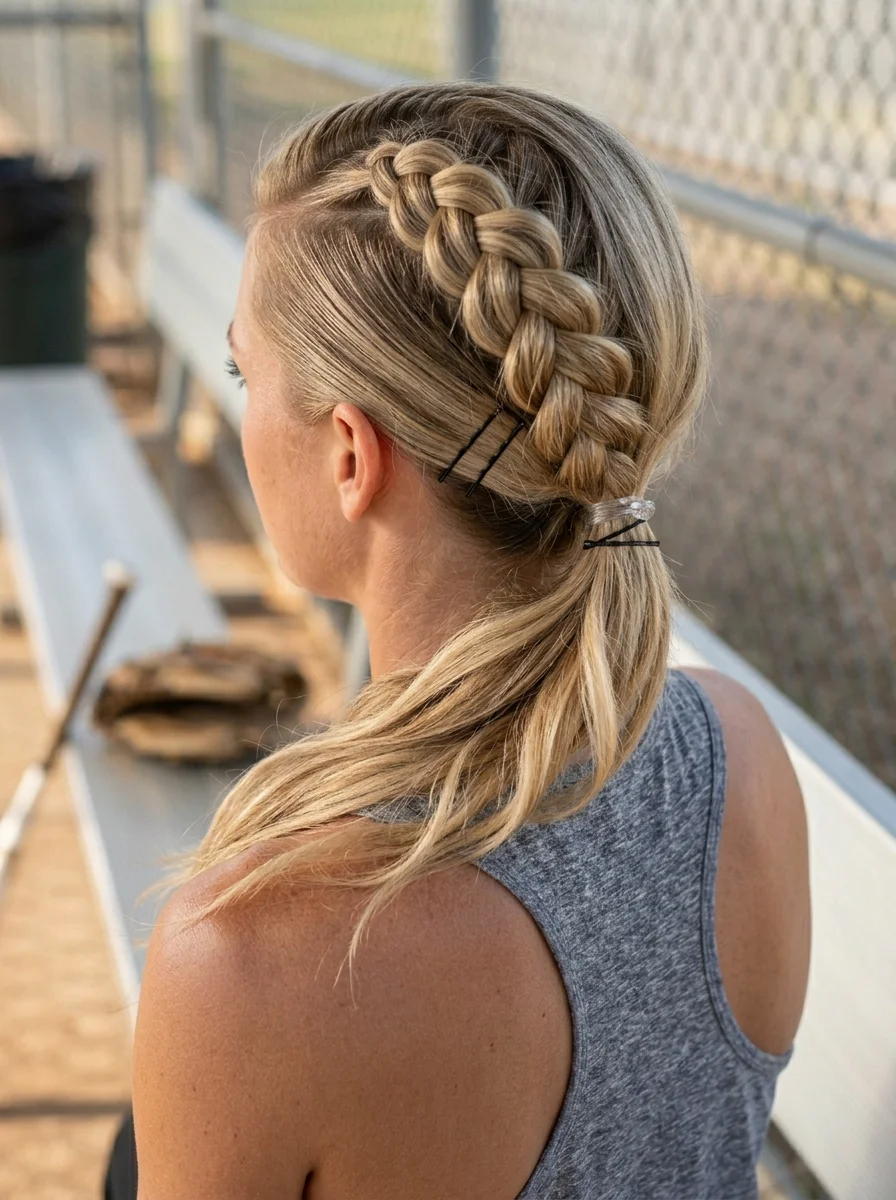
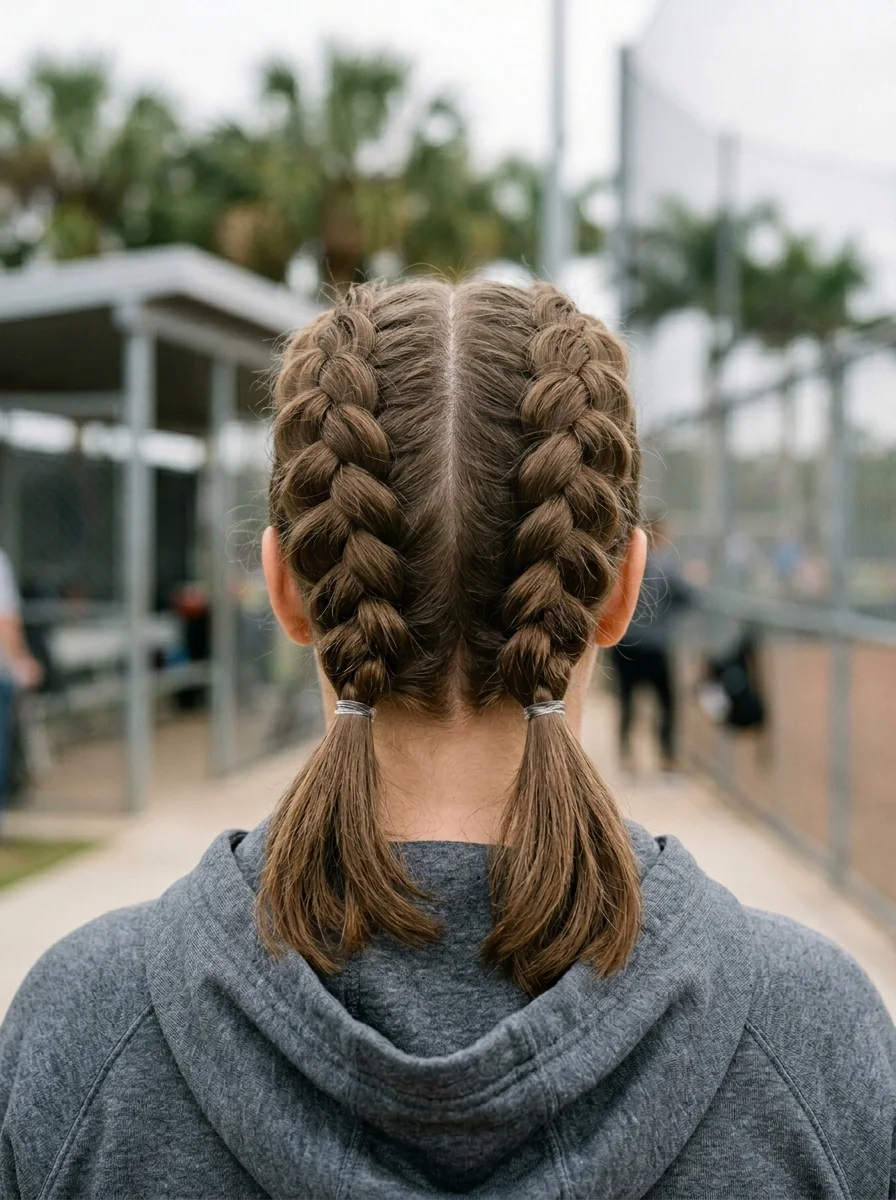
2.Double Dutch Braids with Hidden Bobby Pins
The overview: Medium-length hair center-parted into two Dutch braids running along each side of the head from the front hairline to the nape. The braid tails are tucked and pinned underneath at the nape with concealed bobby pins for a clean, compact finish. No loose ends hanging down — everything is tucked and hidden.
The hidden pin technique is what separates this from a basic double braid. Instead of letting the braid tails hang free, you coil them under at the nape and anchor them with pins that disappear into the hair. The result sits flat against your head, which means nothing catches on your helmet or flies out during a slide.
Why this look is popular: The tucked finish looks polished and intentional without the fuss of a full updo. The two-tone color makes the Dutch braid pattern pop — each raised ridge catches light differently, creating visual depth even from across the field.
Where this look is suitable: Softball, lacrosse, field hockey, any sport where loose braid tails would interfere with headgear. The compact finish also works for post-game events without needing a restyle.
Step by step:
- Create a center part. From forehead to nape. Use a rat-tail comb for precision.
- Dutch braid the left side. Starting at the left temple, Dutch braid along the hairline, curving around the head toward the nape. Add hair from each side as you go.
- Dutch braid the right side. Mirror the same pattern with matching tension.
- Coil the tails. Take each braid tail and coil it under at the nape, tucking the ends beneath the braid.
- Pin underneath. Insert bobby pins through the coiled tail into the base braid, hiding them completely.
- Smooth the surface. Run a fine-tooth comb over the braids to flatten any flyaways.
Tips and tricks: Use bobby pins that match your hair color exactly — they need to disappear. Second-day hair grips better for Dutch braiding than freshly washed hair. If your braids feel loose, add a small amount of texturizing spray at the roots before braiding for extra grip.
3.Sleek Braided Bun with Undercut Edge
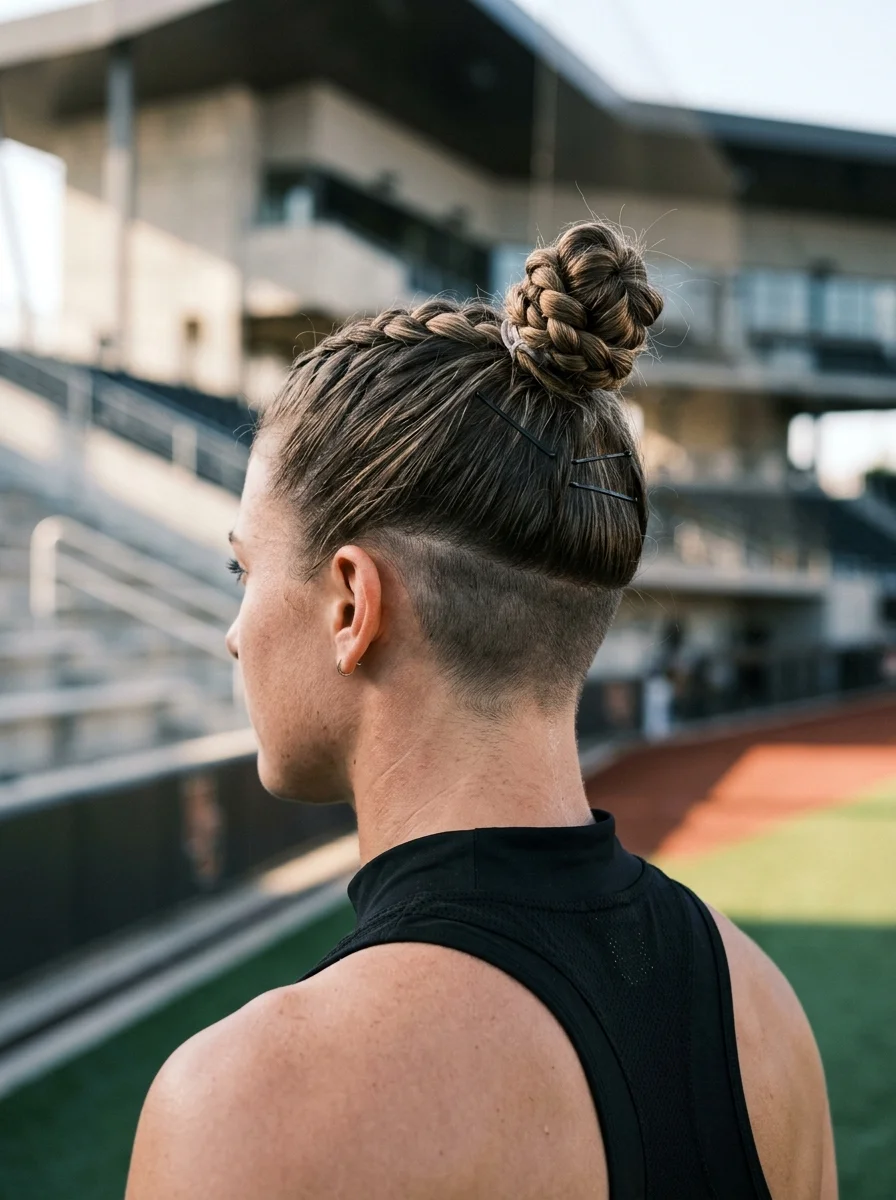
The overview: Medium-length hair with a Dutch braid starting at the crown and running back to the nape, where it transitions into a tight, sculpted bun. One side of the head features a closely shaved undercut section that creates an asymmetrical, edgy silhouette.
The undercut is the functional bonus here. Shaving one side eliminates half the hair you'd otherwise have to manage, reducing bulk and keeping the profile tight against the head on that side. During a game, that means less interference with your helmet and less hair to sweep out of your face.
Why this look is popular: The undercut adds edge to a classic braided bun in a way that feels intentional and modern rather than rebellious for its own sake. The dark chocolate color keeps the whole look grounded — it reads as sleek and serious, not costume-y.
Where this look is suitable: Softball, basketball, boxing, CrossFit, any sport where a bold aesthetic matches the intensity of play. The undercut also reduces heat buildup on hot game days.
Step by step:
- Section for the undercut. Part the hair on the left side from the temple to behind the ear. Clip the rest out of the way.
- Shave the section. Using clippers with a #2 or #3 guard, shave the parted section close to the scalp.
- Dutch braid the crown. Starting at the crown, Dutch braid straight back toward the nape, adding hair from the remaining sections.
- Secure the ponytail. Gather the braid tail and any loose hair at the nape into a ponytail.
- Coil into a bun. Twist the ponytail tightly and wrap it around the elastic base into a compact bun.
- Pin and smooth. Secure with bobby pins. Use edge control gel along the hairline for a polished finish.
Tips and tricks: The undercut needs regular maintenance — plan to re-shave every 2-3 weeks during the season. Use a moisturizing scalp treatment on the shaved section to prevent dryness and irritation from helmet friction.

27 Coral Nail Art Designs for a Warm, Tropical Manicure (2026)
4.Sleek Cornrow Pony with Chic Bead Accent
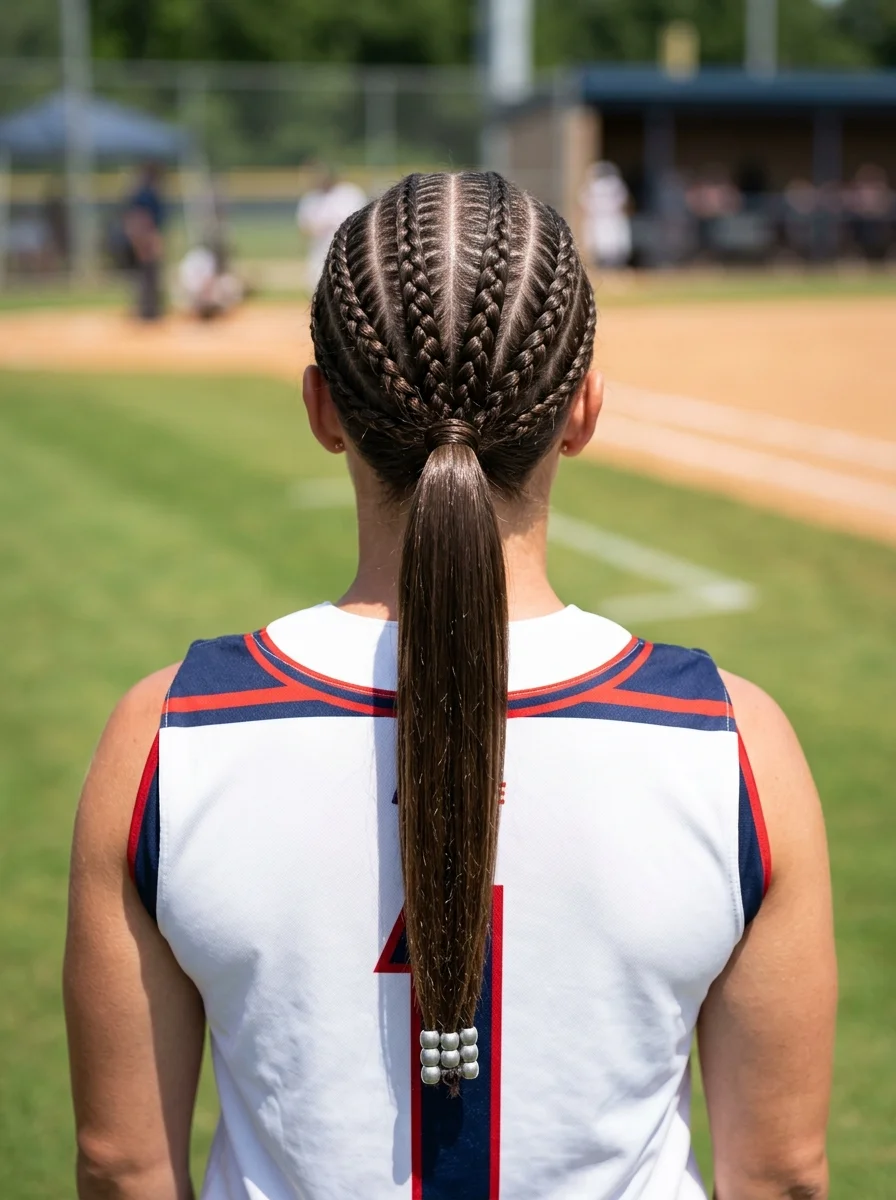
The overview: Medium-length hair cornrowed in 6-8 straight-back rows from the front hairline to the nape, where they converge into a low ponytail. Silver bead accents are threaded onto the last two cornrows on each side, clinking softly with movement. This is a style rooted in tradition — cornrows have protected Black hair through labor, sport, and daily life for centuries.
The straight-back cornrow pattern is one of the most protective styles you can wear during a game. Each braid lies flat against the scalp, eliminating any bulk that would interfere with a helmet. The low ponytail keeps the weight at the nape, preventing the pulling sensation that higher placements create during running.
Why this look is popular: The silver beads add a decorative element that elevates the style beyond pure function. Against the espresso brown hair, they catch light and create a subtle metallic contrast. The cornrow pattern itself is clean and graphic, with each row creating a precise line from hairline to nape.
Where this look is suitable: Softball, volleyball, track and field, any sport requiring a helmet or headgear. The flat profile makes it ideal for sports where head protection is mandatory.
Step by step:
- Moisturize and detangle. Apply a lightweight braiding cream or oil to make the hair pliable and smooth.
- Part the sections. Create 6-8 even vertical parts from the front hairline to the nape using a rat-tail comb.
- Cornrow each section. Starting at the hairline, braid each section flat against the scalp, adding hair as you move back toward the nape.
- Gather the tails. Collect all cornrow tails at the nape and secure into a low ponytail with a strong elastic.
- Add beads. Clamp silver bead cuffs onto the outer two cornrows on each side at 1-inch intervals.
- Smooth the hairline. Apply edge control gel along the hairline and part lines for a clean finish.
Tips and tricks: Keep the cornrow tension even across all rows — uneven tension causes pulling and discomfort during activity. The beads should be clamped firmly enough to resist falling out during running but not so tight they crush the braid. A lightweight oil along the parts prevents scalp dryness.
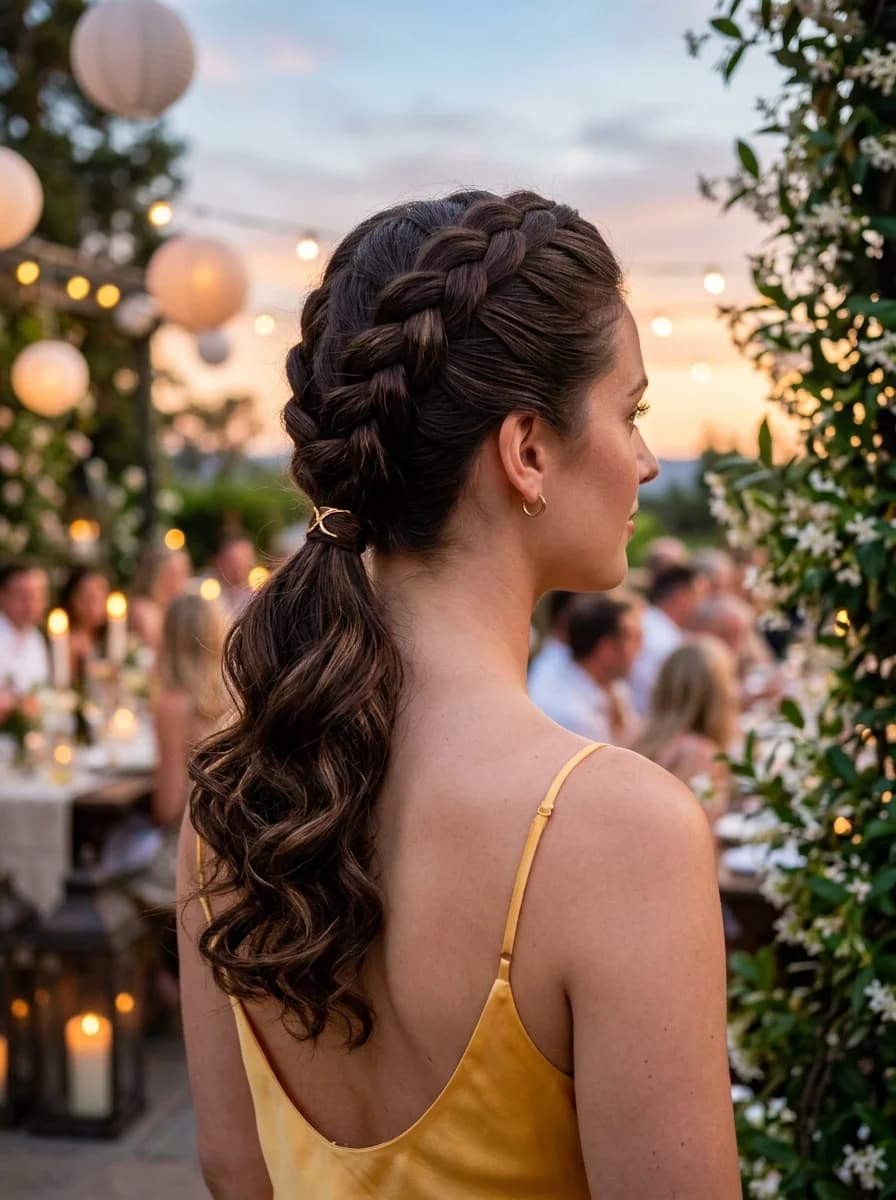
5.The Dutch Braid Crown Tuck
The overview: Medium to long hair with a single Dutch braid starting at one temple, wrapping across the crown of the head like a headband, and tucking into a side ponytail. The braid creates a natural crown effect that frames the face while keeping the top section completely controlled.
The side ponytail placement is the key detail. By dropping the remaining hair to one side, you eliminate the bounce that a centered ponytail creates during running. The weight sits asymmetrically, which stabilizes the style during lateral movement like fielding ground balls.
Why this look is popular: The crown braid looks elegant without being fussy — it's the kind of style that makes people ask how you did it, even though it's just one braid wrapped across the top. The golden blonde color makes every twist of the braid visible.
Where this look is suitable: Softball practice, casual games, fielding drills, any situation where you want your hair controlled but not overly structured. Works for warm-ups and light training sessions.
Step by step:
- Start the braid. At the left temple, take a 2-inch section and begin Dutch braiding — crossing strands under to create a raised braid.
- Braid across the crown. Continue the Dutch braid across the top of the head, adding hair from the front hairline only. Keep the braid tight against the scalp.
- Reach the right ear. Once you reach the right side, stop adding hair and braid the remaining section to the ends.
- Gather into a side ponytail. Combine the braid tail with all remaining hair into a ponytail positioned behind the right ear. Secure with an elastic.
- Tuck the end. Wrap the last inch of the braid tail around the elastic to conceal it. Pin underneath.
- Adjust. Gently pull the outer loops of the crown braid to widen it slightly for a fuller appearance.
Tips and tricks: Keep consistent tension as you braid across the crown — if the braid loosens, it will shift during movement. A light-hold hairspray on the finished braid keeps it in place without stiffness. For finer hair, backcomb the crown section slightly before braiding to add volume.

21 Stunning Concert Hairstyles for Women 2026 🎶✨
6.Double Braids with Bubble Ponytails
The overview: Medium to long hair center-parted into two Dutch braids that start at the temples and run back to the nape, where they transition into bubble ponytails secured with ribbon bows at the base. The combination of braided texture on top and puffed bubble segments below creates a layered look that photographs from any angle.
The braids-to-bubble transition is what makes this more than a standard pigtail look. The Dutch braids keep the scalp section completely flat and secure, while the bubble ponytails add volume and movement in the lower section. You get structure where you need it and personality where you can afford it.
Why this look is popular: The ribbon bows at the base of each ponytail add a spirited, team-ready detail. Match them to your jersey colors and the whole look becomes cohesive. The bubble technique also makes thin or fine hair look fuller than a standard ponytail.
Where this look is suitable: Softball games, tournament days, team photos, any situation where you want your hair to feel festive and functional at the same time. The braids provide the security, the bubbles and ribbons provide the personality.
Step by step:
- Create a center part. From forehead to nape. Use a rat-tail comb for a clean line.
- Dutch braid each side. Starting at each temple, Dutch braid along the hairline back to the nape. Secure each braid tail with a small elastic.
- Form the ponytails. Gather each braid tail with any remaining hair into a low pigtail behind each ear.
- Bubble the ponytails. Add clear elastics every 2 inches down each ponytail, puffing each section into a bubble.
- Tie the bows. Cut two lengths of ribbon. Tie a bow at the base of each ponytail, over the elastic.
- Adjust. Even out the bubble sizes and fluff them for maximum volume.
Tips and tricks: Grosgrain ribbon grips hair better than satin and stays tied through movement. If your bubbles deflate, the elastics are too loose — tighten them until each section holds its rounded shape. A light mist of hairspray on each bubble before the next elastic helps maintain the puff.
7.Double Dutch Braids with Team Color Ribbons
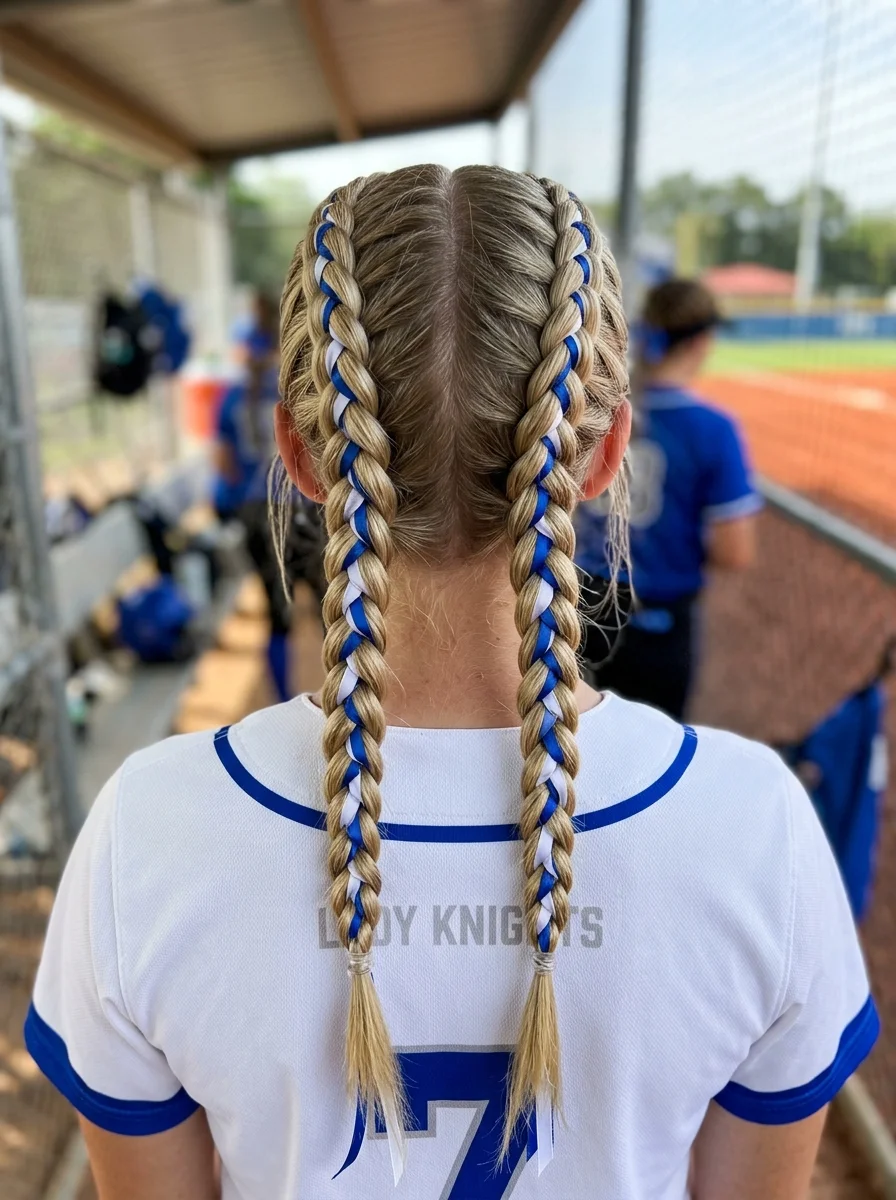
The overview: Medium to long hair center-parted into two Dutch braids that run from the front hairline to the nape, with team color ribbons woven through the braid sections as they're created. The ribbons become part of the braid itself rather than sitting on top of it, creating an integrated color effect.
Weaving the ribbons into the braid as you go — rather than threading them through afterward — locks them in place. They can't slide, shift, or fall out during a game because they're physically braided into the structure. This is the difference between a decorative afterthought and a built-in detail.
Why this look is popular: The team colors woven directly into the braid signal unity without requiring matching uniforms. The blue and white pop against the bright blonde, creating a high-contrast look that reads clearly from the stands. It's coordinated without being costumey.
Where this look is suitable: Softball games, team events, tournament days, spirit weeks. Any situation where showing team colors through your hairstyle adds to the collective energy.
Step by step:
- Cut the ribbons. Measure from the front hairline to the nape plus 6 inches. Cut two lengths of each color (4 total).
- Position the ribbons. Hold one blue and one white ribbon together at the starting point of the braid on the left side.
- Dutch braid with ribbons. Begin braiding, treating the ribbons as part of one strand. Cross them under as you would normal strands, adding hair from each side as you go.
- Continue to the nape. Maintain even tension on the ribbons so they lie flat within the braid. Secure at the nape.
- Repeat on the right side. Mirror the same pattern with matching ribbon placement.
- Trim the ends. Cut the ribbon tails to match the length of the braid tails. Seal cut ends with a lighter to prevent fraying.
Tips and tricks: Satin ribbon works best — it's slippery enough to braid smoothly but grips once woven tightly. Keep the ribbon tension equal to the hair tension, or the braid will twist. If the ribbons slip while you're braiding, tape them to the strand temporarily until the first few crosses lock them in.

27 Stunning Graduation Day Nail Ideas for 2026 🎓
8.Dutch Braids with Twisted Buns
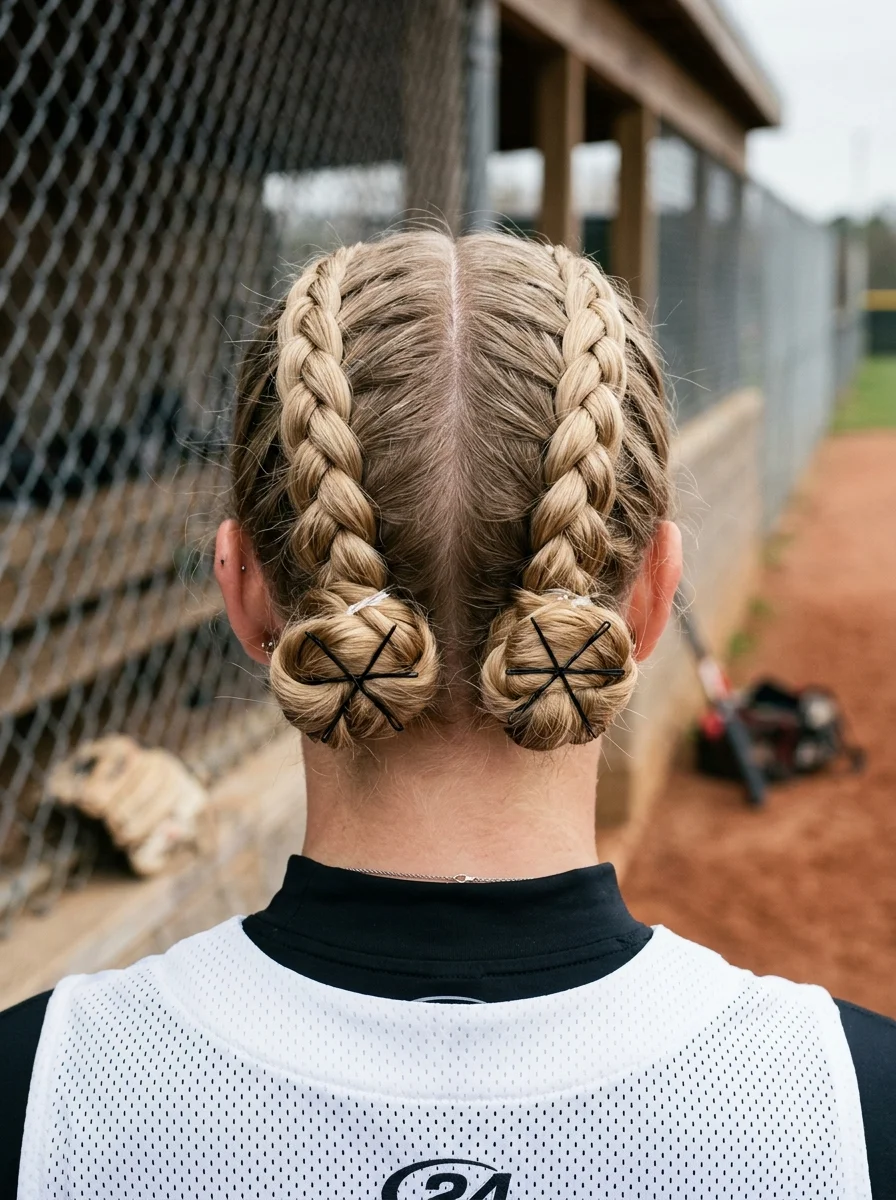
The overview: Medium-length hair center-parted into two Dutch braids that run from the temples to the nape, where each braid transitions into a tight, twisted bun secured with star-pattern bobby pins. The buns sit low behind each ear, creating a symmetrical, minimalist silhouette that's all clean lines and controlled texture.
The twisted bun technique is faster than coiling a braided tail. You simply twist the remaining hair until it kinks back on itself, then tuck the end under and pin. The result is compact and tight — it doesn't bounce, swing, or shift during a full game.
Why this look is popular: The star-pattern bobby pins are the quiet detail that makes the whole look. Against the platinum blonde, the dark pins create a small constellation effect that's visible up close but reads as clean texture from a distance. Minimalist without being boring.
Where this look is suitable: Softball, volleyball, martial arts, any sport where a compact, bounce-free style is the priority. The low buns don't interfere with helmets or headgear.
Step by step:
- Create a center part. From forehead to nape.
- Dutch braid each side. Starting at each temple, braid back to the nape. Secure each braid tail temporarily with a clip.
- Twist into buns. Take each braid tail and twist it until it coils back on itself. Tuck the end under the coiled section.
- Pin the buns. Insert 3-4 bobby pins at the outer edge of each bun, angling inward toward the center.
- Add star pins. Place star-pattern bobby pins at the top and side of each bun for decoration.
- Smooth the hairline. Apply edge control gel along the part and hairline for a clean finish.
Tips and tricks: Twist the hair in the same direction on both sides to maintain symmetry. If the buns feel loose, backcomb the braid tail slightly before twisting — the added texture grips better. Crisscross your bobby pins at the bun base for maximum hold.
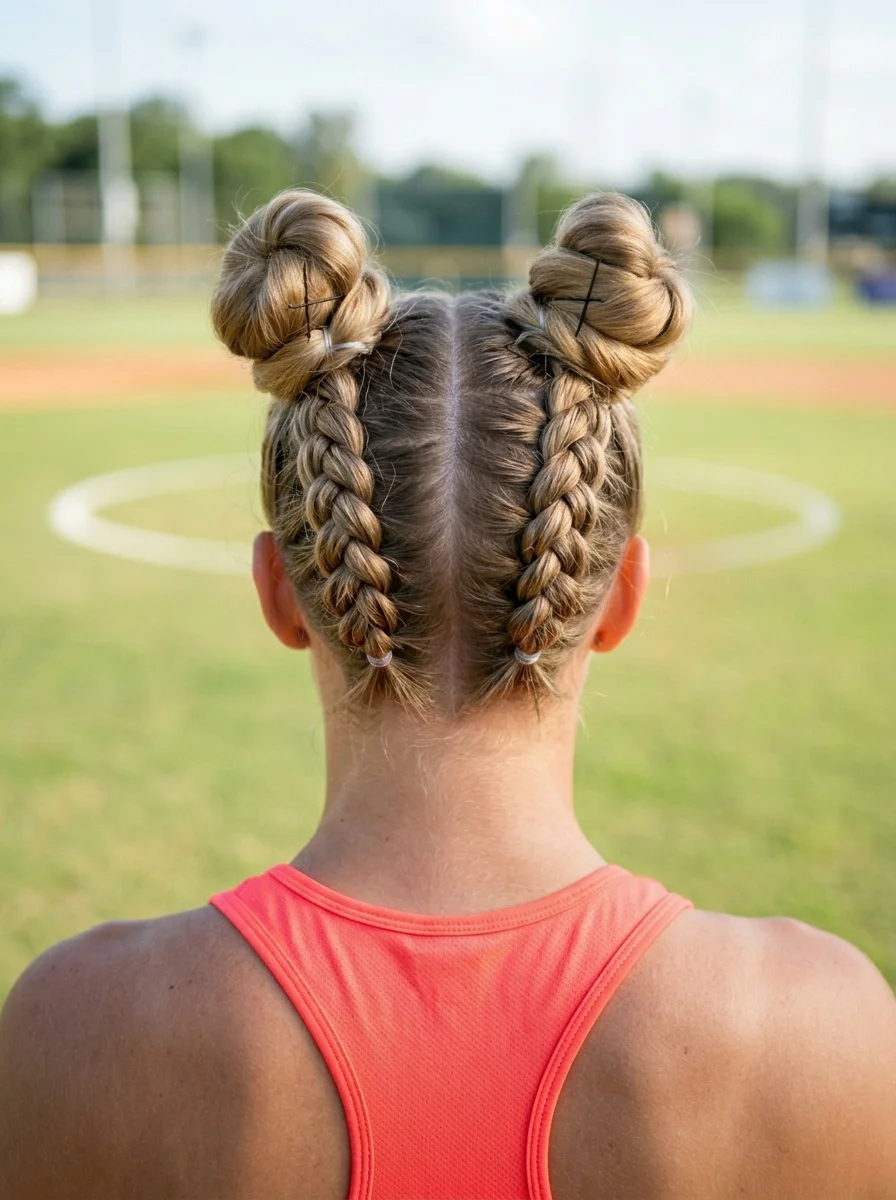
9.Double Dutch Braids into Space Buns
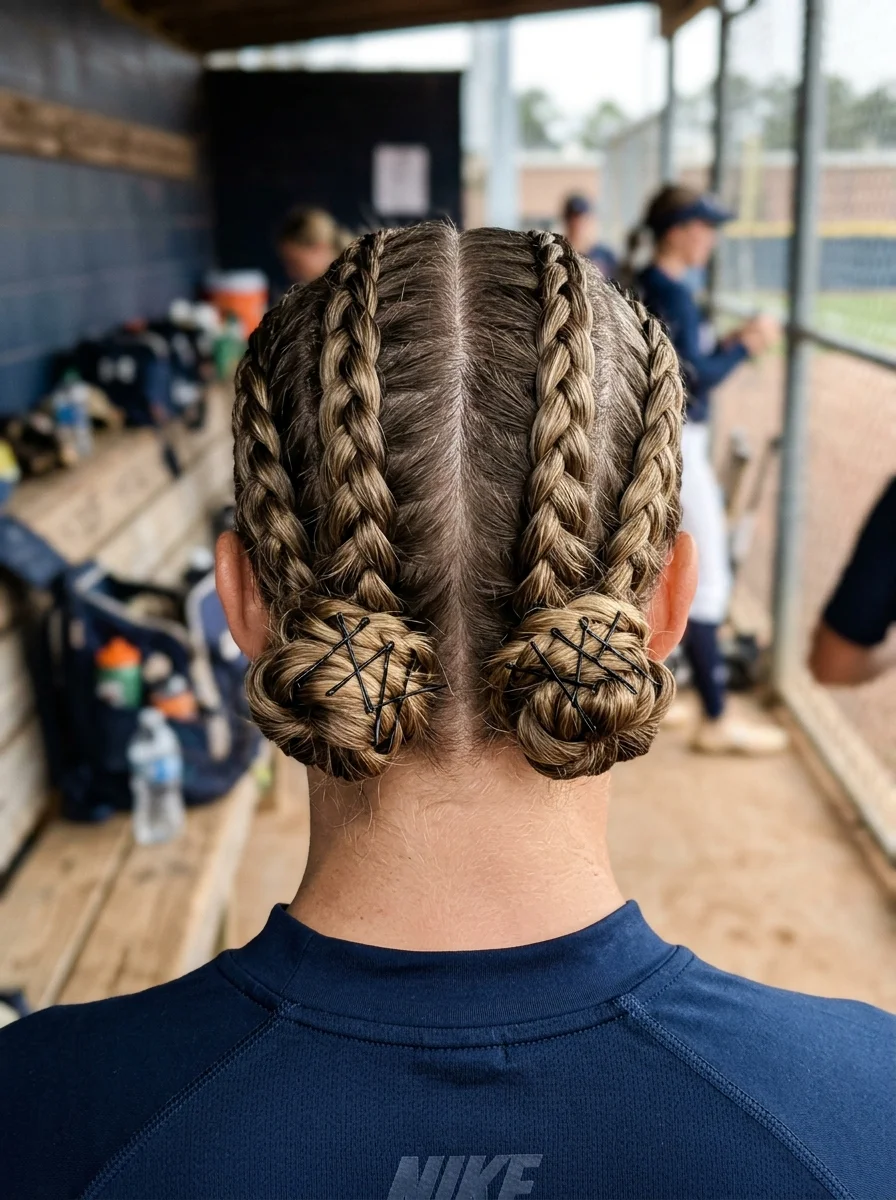
The overview: This one is different from the above one. It has two dutch braides on each side of the center-partition. Medium-length hair center-parted into two upward-traveling Dutch braids that start at the nape and work up toward the crown, where each braid coils into a high space bun. The upward braiding direction is what makes this distinctive — instead of gravity working against you, the braids travel with the natural upward pull of a high bun.
Space buns at the crown sit above the helmet line, which means they don't interfere with headgear the way mid-height buns do. The Dutch braids feeding into them lock the base hair flat against the scalp, eliminating the flyaways that standard space buns tend to create.
Why this look is popular: Space buns are playful and youthful, and the Dutch braid base gives them a structured foundation that holds up during activity. The ash blonde color keeps the look modern rather than juvenile. It's fun without being frivolous.
Where this look is suitable: Tournament days, doubleheaders, team celebrations, any situation where you want your hair to feel spirited and expressive. The braids provide the security for active play.
Step by step:
- Create a center part. From forehead to nape.
- Dutch braid upward. Starting at the nape on the left side, Dutch braid upward toward the crown, adding hair from each side as you go.
- Coil into a bun. Once you reach the crown, coil the braid tail into a tight bun. Secure with bobby pins.
- Repeat on the right side. Mirror the same upward braiding pattern and bun placement.
- Even out the buns. Adjust both buns to the same size and height. Pin any loose ends.
- Set. Mist with strong-hold hairspray to lock the braids and buns in place.
Tips and tricks: Upward braiding takes practice — the angle feels unnatural at first. Start with slightly damp hair for better grip. If the buns feel heavy, use a donut bun maker inside each one to distribute weight and reduce strain on the braids.
30 Stunning Mother of the Groom Hairstyle Ideas for 2026 💍✨
10.French Braid Bubble Pony
The overview: Long-length hair with a French braid starting at the crown and running down to the nape, where it transitions into a low ponytail segmented into bubble shapes. The French braid (flat, not raised) creates a smooth, embedded texture on top while the bubbles add volume and visual interest below.
The French braid-to-bubble combination is the athletic sweet spot. The braid section holds the top completely flat and secure — no flyaways, no lifting, no shifting. The bubble section below adds personality without sacrificing hold, because each elastic creates another anchor point.
Why this look is popular: It bridges the gap between a classic athletic braid and a more styled look. The French braid reads as traditional and sporty, while the bubble ponytail adds a modern, playful element. The dirty blonde color makes both textures visible without stark contrast.
Where this look is suitable: Softball, baseball, running, field hockey — any sport where you need the top locked down but want the ponytail to have some character. Also works for casual post-game outings.
Step by step:
- Start the French braid. At the crown, take a section of hair and begin French braiding — crossing strands over to create a flat, embedded braid.
- Braid to the nape. Continue down the center of the head, adding hair from each side as you go.
- Secure the ponytail. Gather the braid tail and any remaining hair into a low ponytail at the nape.
- Create bubbles. Add clear elastics every 2 inches down the ponytail, puffing each section into a rounded shape.
- Even them out. Go back through and adjust each bubble to the same width and fullness.
- Set. Mist with flexible-hold hairspray to maintain the bubble shapes without crunch.
Tips and tricks: French braids lie flatter than Dutch braids, which is exactly what you want under a helmet. Keep the tension even — if one side is looser, the braid will twist. For slippery hair, apply a texturizing spray before braiding for extra grip.
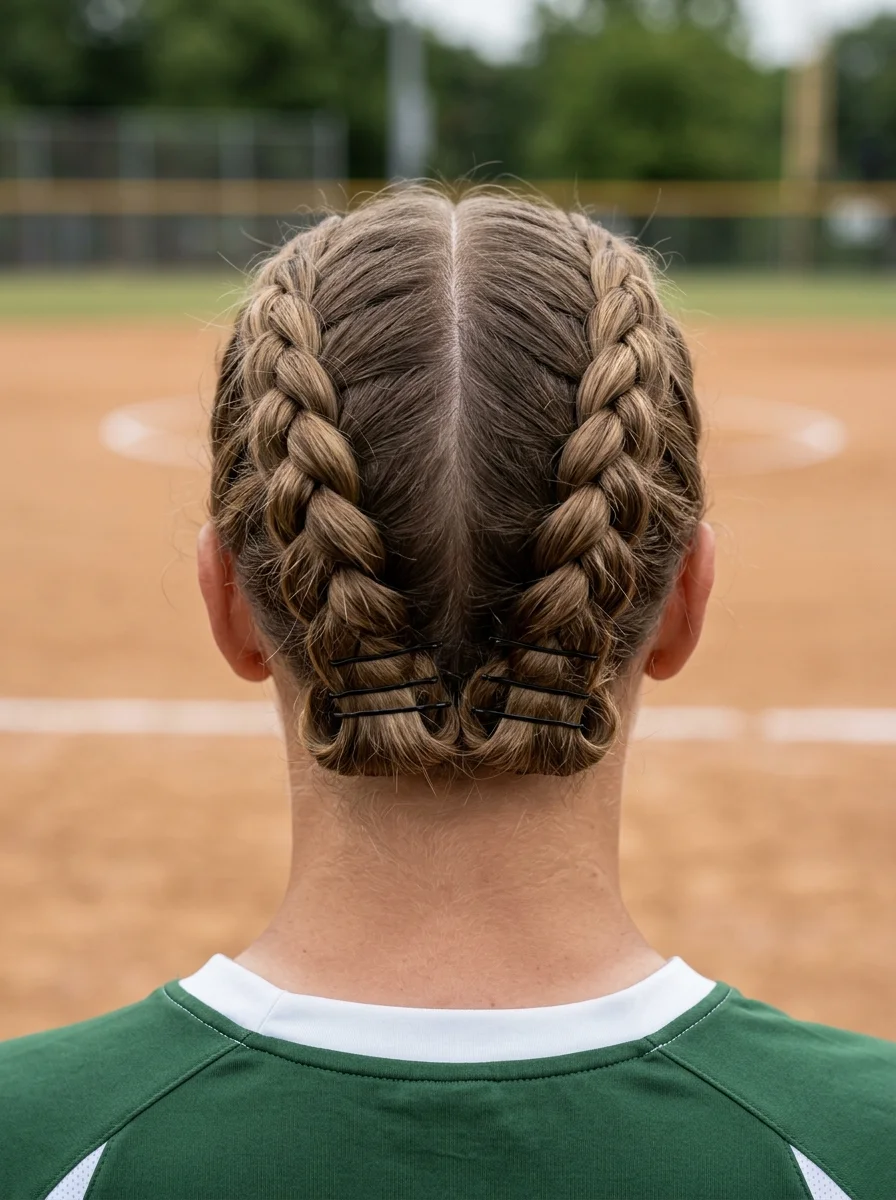
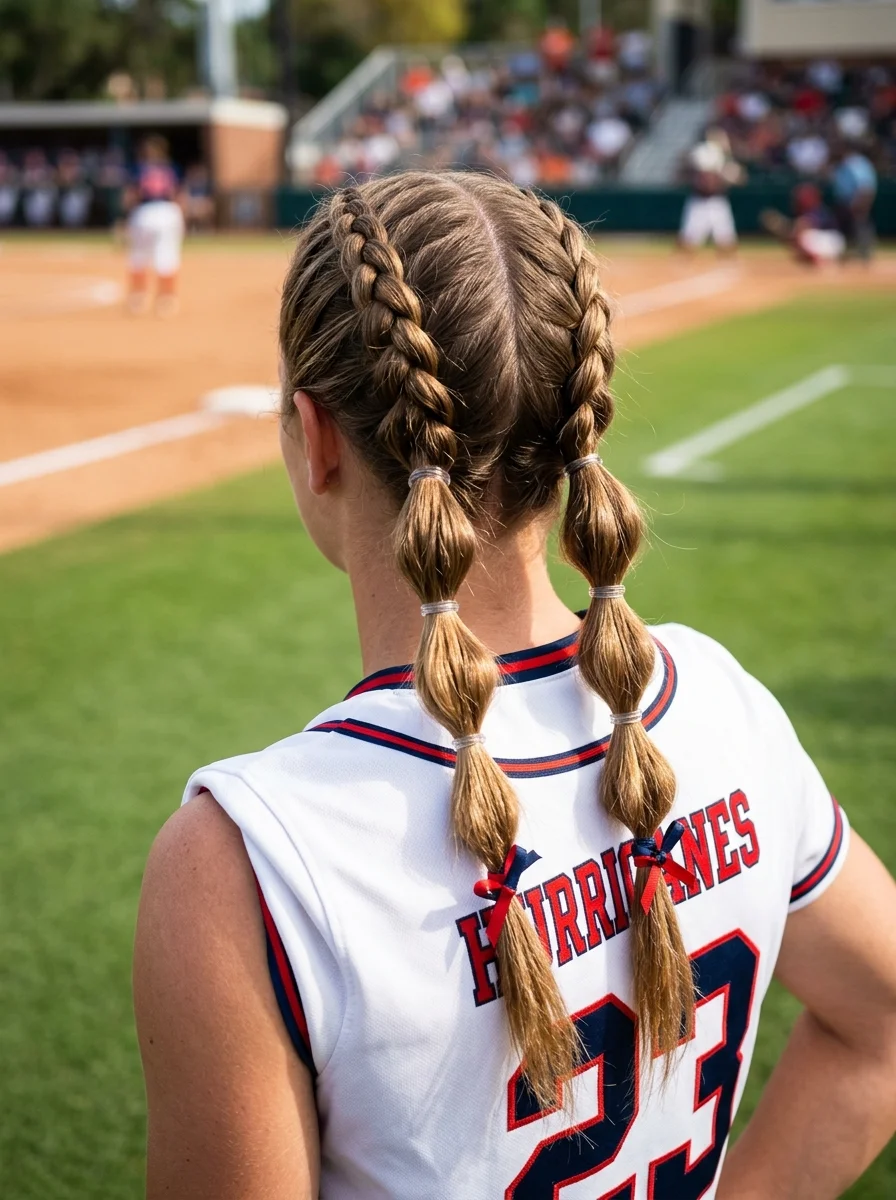
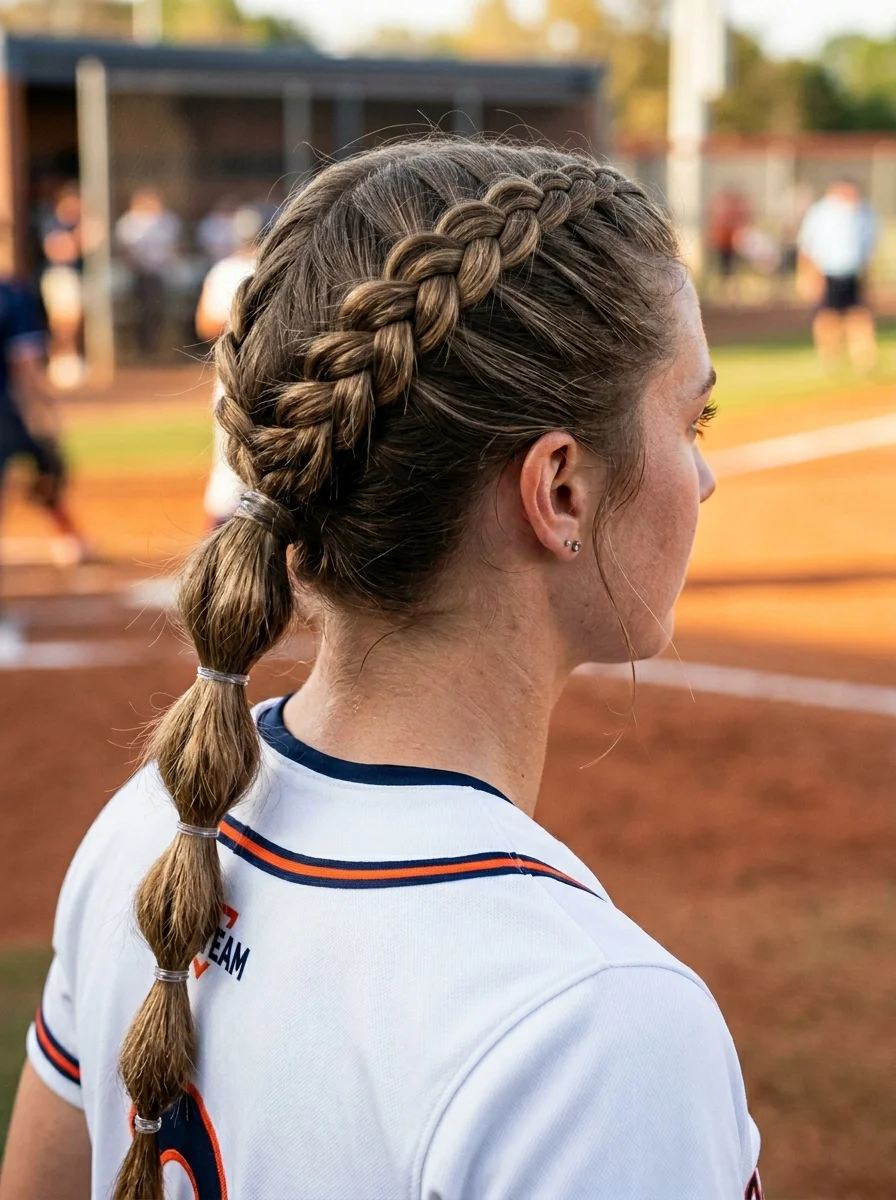
11.Classic Double Dutch Braids with a Casual Vibe
The overview: Short-length hair center-parted into two relaxed Dutch braids that hang loosely as short pigtails behind each ear. The tension is intentionally looser than a competition braid, creating a softer, more casual silhouette that still keeps hair managed during practice.
This is the "I'm here to work on my swing, not win a beauty pageant" braid. The relaxed tension means the braids don't pull at your scalp during extended wear, and the short pigtail tails don't whip around during drills. It's function first, style second — and the warm brown color makes even a loose braid look deliberate.
Why this look is popular: Not every day on the diamond requires a fully structured hairstyle. This is the throw-on-and-go option that still looks like you tried. The warm brown color adds richness to the simple braid pattern without requiring any accessories.
Where this look is suitable: Softball practice, batting cage sessions, fielding drills, casual training days. Any situation where you need your hair managed but don't need maximum-security hold.
Step by step:
- Center part. From forehead to nape.
- Dutch braid loosely. Starting at each temple, Dutch braid with relaxed tension — tight enough to hold, loose enough to look casual.
- Secure the ends. Tie off each braid with a small elastic about 3 inches from the bottom.
- Pull out pieces. Gently tug a few face-framing pieces loose around the temples for softness.
- Set lightly. A mist of flexible-hold hairspray keeps the braids in place without making them stiff.
Tips and tricks: Use a conditioning cream or light pomade instead of gel for this look — you want the braids to have movement and softness, not a slicked-down finish. The warm brown color looks best with a slight shine, so a lightweight oil mist works well.

31 Patriotic Fourth of July Nail Ideas for 2026 🇺🇸
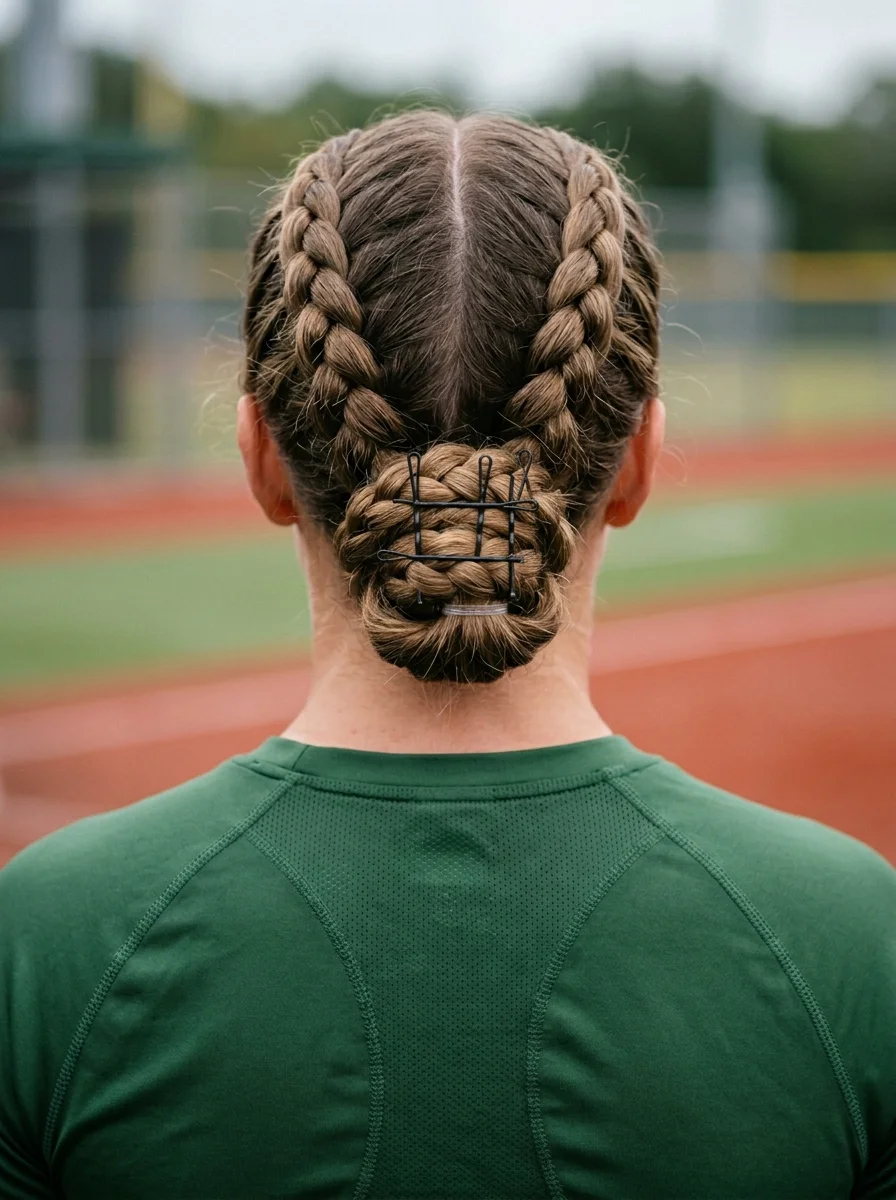
12.Double Dutch Braids with Space Buns
The overview: Medium-length hair center-parted into two Dutch braids that travel upward from the nape to the crown, where each transitions into a high, rounded space bun. The buns sit directly on top of the head, creating a playful, symmetrical silhouette that's equal parts sporty and fun.
The high placement is strategic. Space buns at the crown sit completely above the helmet line, so they don't create the uncomfortable pressure points that mid-height buns cause. The Dutch braids feeding into them keep the sides tight and controlled while the buns add height and personality.
Why this look is popular: Space buns have a youthful, energetic quality that matches the energy of tournament play. The warm blonde color gives them warmth without being overly styled. It's the kind of look that makes your teammates smile and the opposing team notice.
Where this look is suitable: Tournament play, team spirit events, doubleheaders, any day where you want your hair to feel fun and expressive. The braids provide the security for competitive play.
Step by step:
- Center part. From forehead to nape.
- Dutch braid upward. Starting at the nape on each side, braid upward toward the crown, adding hair as you go.
- Coil into buns. At the crown, twist each braid tail until it coils into a bun. Wrap the tail around the base.
- Pin securely. Use 4-5 bobby pins at the base of each bun, inserting them at an angle for maximum hold.
- Adjust symmetry. Make sure both buns are the same size and at the same height.
- Set. Strong-hold hairspray on the braids and buns for all-day security.
Tips and tricks: For the buns to hold their round shape, twist the hair tightly before coiling — the tighter the twist, the more defined the bun. If your hair is very long, wrap the tail twice around the base for a more compact bun that won't wobble during running.
13.French Braid to Fishtail Combo
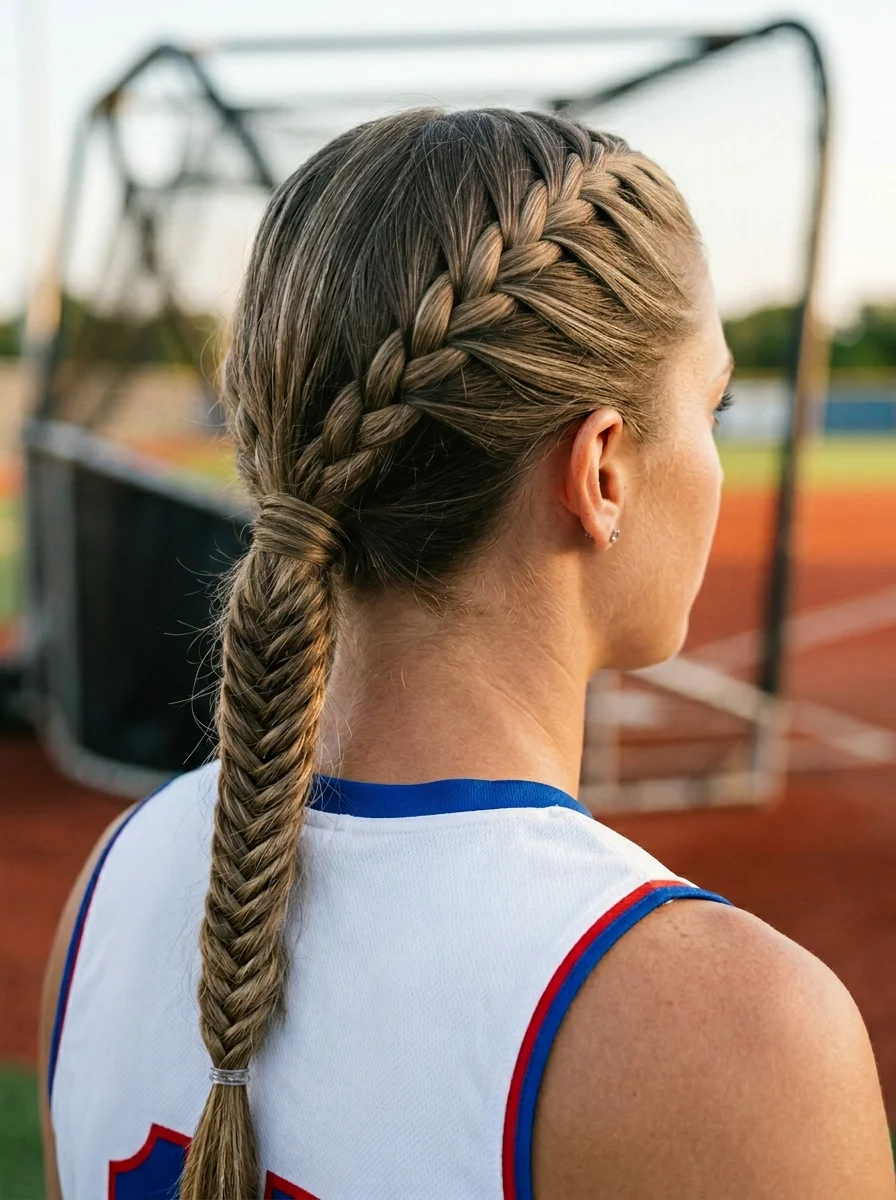
The overview: Medium to long-length hair with two French braid, each starting at the crown and upto the nape, where it transitions into a fishtail ponytail that falls over the shoulder. The braid-to-fishtail transition creates two distinct textures in one style — the smooth, embedded French braid on top and the detailed, woven fishtail below.
The braid path is what elevates this beyond a standard side braid. By starting from the top part of the hair from both the sides, you create a sweeping line that frames the face and keeps the top section completely beautiful. The fishtail braid below adds visual complexity without requiring additional braiding skill beyond the basic two-strand cross.
Why this look is popular: The combination of two braiding techniques in one style creates more visual interest than either technique alone. The fishtail pattern reads as intricate and detailed, while the French braid base keeps everything secure. It's the kind of style that looks like it took an hour but actually takes fifteen minutes.
Where this look is suitable: Showcase games, team photos, post-game events, any situation where you want your hair to stand out. The braid provides enough security for active play.
Step by step:
- Start the French braid. From both the sides of the head, take a section and begin French braiding backwards from the forehead to the nape.
- Add hair as you go. Continue the French braid, sweeping backward to the nape and adding hair from the front hairline and the crown.
- Braid to the ends. Once you reach the nape of your hair, continue the three-strand braid to the ends. Secure with a clear elastic.
- Transition to fishtail. Split the remaining hair into two sections. Cross small pieces from the outer edge of each section over to the other side.
- Braid to the ends. Continue the fishtail pattern to the ends. Secure with a clear elastic.
- Pancake the fishtail. Gently pull the outer edges of the fishtail to widen it without flattening the pattern.
Tips and tricks: The smaller the pieces you cross in the fishtail, the more detailed the pattern looks. Keep even tension — if one side gets looser, the braid will twist. A texturizing spray before braiding gives slippery hair enough grip to hold the pattern through activity.
35 Cute & Sporty Athletic Hairstyles for Women (2026)
14.Double French Braids with Messy Pony
The overview: This style is designed specifically for those with short hair. It features two French braids—one on each side starting near the temples—that run along the sides of the head and merge into a messy, textured low ponytail at the nape of the neck. The double French braid technique is highly functional for shorter lengths because it captures shorter layers that would normally slip out of a single ponytail, while the messy pony adds movement and volume.
The French braids keep the side sections flat and secured, preventing flyaways from getting in your eyes during play. Gathering them at the nape keeps the ponytail low and clear of helmet straps, offering a secure hold and a relaxed finish.
Why this look is popular: It solves the short hair problem of pieces constantly falling out during game play. By braiding both sides back into a single low pony, you get a clean, polished front with a textured, effortless look in the back.
Where this look is suitable: Softball games, heavy practice sessions, batting practice, and other active sports. Its low profile makes it exceptionally comfortable under a batting helmet.
Step by step:
- Part the hair. Create a clean center part from the forehead to the crown to divide the hair into two even sections.
- Braid the first side. Start a French braid on the left side near the temple, braiding backward toward the nape, adding sections as you go.
- Braid the second side. Repeat the same French braiding technique on the right side, maintaining even tension.
- Secure the ponytail. Gather the ends of both braids along with the rest of the hair at the nape and tie them into a low ponytail.
- Add messy texture. Gently pull at the ponytail and loosen a few strands around the face and ears to create a relaxed, sporty volume.
- Set it. Apply a quick mist of strong-hold hairspray to lock the braids in place and control any remaining flyaways.
Tips and tricks: For shorter layers that don't quite reach the elastic, use a small amount of texturizing paste or clay on your fingertips while braiding to keep the hair in place. You can also use color-matched bobby pins to pin down any stubborn pieces at the nape.
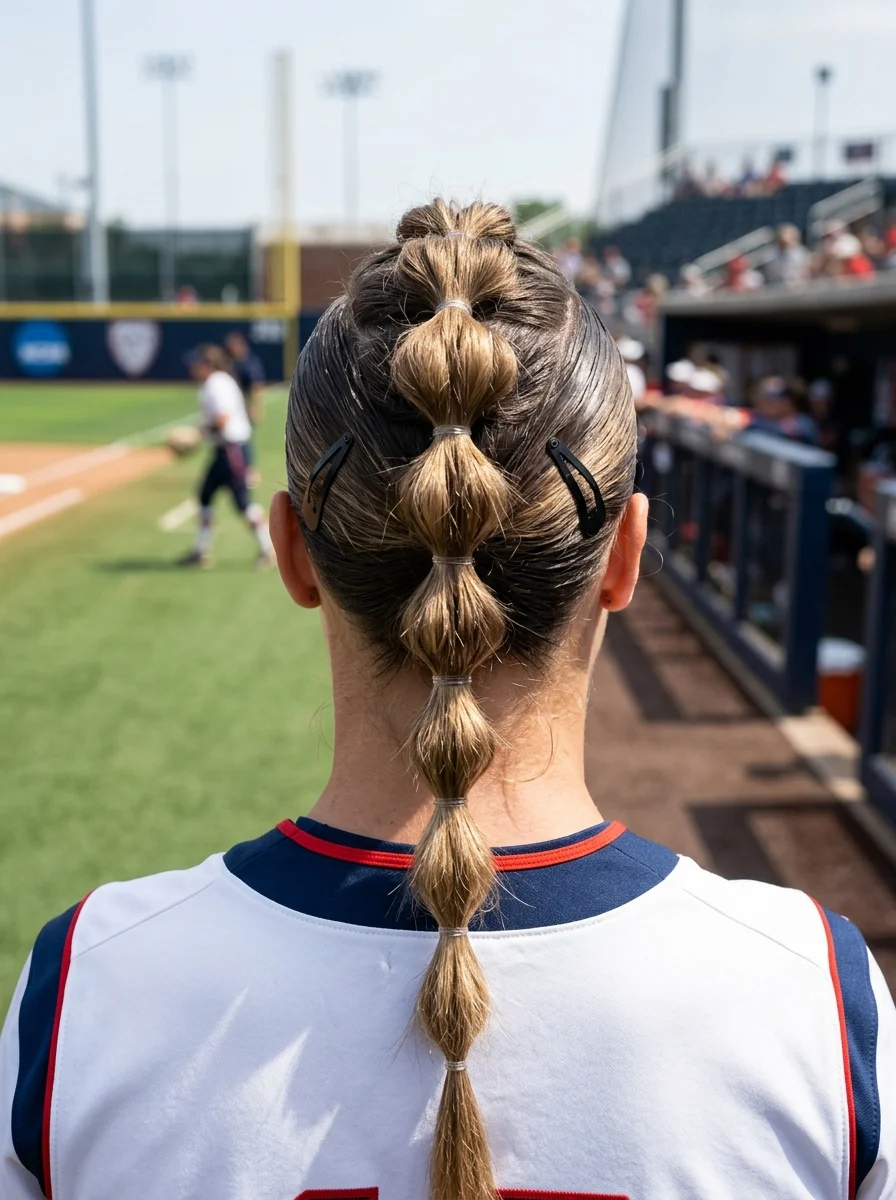
15.Game-Ready Braided Bubble Ponytail

The overview: Medium to long-length hair with four Dutch braids — two on each side — traveling from the front hairline to the nape, where they converge into a single bubble ponytail. The four-braid base creates maximum scalp coverage and grip, while the bubble ponytail adds controlled volume below.
Four braids feeding into one ponytail distribute the weight and tension across the entire scalp instead of concentrating it at a single point. That means less pulling, less headache, and a style that stays locked in through extra innings. The bubble segments add another layer of security — each elastic is another anchor point preventing the ponytail from swinging freely.
Why this look is popular: This is the heavy-duty option for players who need their hair to survive everything from diving catches to sliding into home. The four-braid base is as secure as it gets without resorting to a full cornrow. The bubble ponytail adds a styled element that keeps it from looking purely utilitarian.
Where this look is suitable: Competitive softball, tournament play, extra-inning games, any situation where your hair needs to survive maximum-intensity play. This is the style you trust when the game gets serious.
Step by step:
- Section into four. Part the hair into four equal vertical sections from the front hairline to the nape.
- Dutch braid each section. Starting at the hairline, braid each section flat against the scalp back to the nape.
- Gather the tails. Collect all four braid tails at the nape and secure into a single ponytail with a strong elastic.
- Create bubbles. Add clear elastics every 2 inches down the ponytail, puffing each section into a rounded shape.
- Even them out. Adjust each bubble to the same size and fullness.
- Set. Strong-hold hairspray on the braids and bubbles for all-day hold.
Tips and tricks: Keep the four braids at even tension — if one is tighter than the others, the ponytail will pull to one side. Use a rat-tail comb for precise sectioning. The bubbles hold better when you spray each section with texturizing spray before adding the elastic.
30 Trendy Summer French Tip Nail Designs for 2026 💅
16.Double Dutch Braid Crown with Bubble Ponytail
The overview: Medium hair with two Dutch braids starting at each temple, wrapping around the crown to meet at the back of the head, where they join into a low bubble ponytail. The crown braids create a natural frame around the face while the bubble ponytail adds a feminine, textured finish.
The crown braids meeting at the back create a secure anchor point that holds the top section completely flat. The bubble ponytail below distributes the remaining weight through multiple elastic points, reducing bounce during running. The medium brown color makes every section of the braid visible without harsh contrast.
Why this look is popular: The crown braids create a frame that flatters every face shape, while the bubble ponytail adds a soft, feminine finish. It's the rare style that manages to look both athletic and graceful at the same time. The medium brown color keeps everything warm and approachable.
Where this look is suitable: Softball games, team photos, post-game dinners, any situation where you want your hair to feel polished and put-together. The braids provide enough security for active play.
Step by step:
- Start the left braid. At the left temple, Dutch braid upward, curving around the crown toward the back of the head.
- Start the right braid. At the right temple, mirror the same pattern.
- Meet at the back. Both braids should meet at the center back of the head. Braid each tail a few inches past the meeting point.
- Combine into a ponytail. Gather both braid tails and any remaining hair into a low ponytail at the nape.
- Create bubbles. Add clear elastics every 2 inches, puffing each section into a bubble.
- Adjust and set. Even out the bubbles. Mist with hairspray for hold.
Tips and tricks: Start both braids at the same height to maintain symmetry. If one braid reaches the back before the other, adjust the starting point. The bubbles should be slightly smaller than a standard bubble ponytail to maintain proportion with the crown braids.
17.Double Dutch Braids into a Chic Braided Bun
The overview: Medium-length hair center-parted into two Dutch braids from the temples to the nape, where they combine into a braided bun secured with a fine hairnet. The hairnet is invisible against the hair color, creating a seamless, controlled finish that stays completely flat.
The hairnet is the secret weapon here. It compresses the braided bun into a tight, smooth dome that can't shift, wobble, or loosen during play. Unlike pins alone, which can work loose during running, the hairnet encases the entire bun in a mesh that holds every strand in place. You could do a full sprint test and the bun wouldn't move.
Why this look is popular: The hairnet creates a level of security that pins and elastics alone can't match. The invisible mesh means the bun looks smooth and natural — nobody can see the net, they just see a perfectly controlled braided bun. The dirty blonde color hides the mesh completely.
Where this look is suitable: Competitive softball, championship games, any high-stakes situation where your hair absolutely cannot move. This is the style you wear when losing a braid isn't an option.
Step by step:
- Center part. From forehead to nape.
- Dutch braid each side. From the temples to the nape. Match the tension on both sides.
- Combine and braid. Join both braid tails at the nape and braid the combined section into a three-strand plait to the ends.
- Coil into a bun. Wrap the braided plait around itself at the nape to form a compact bun.
- Apply the hairnet. Stretch a color-matched hairnet over the bun. Tuck the edges of the net underneath.
- Pin through the net. Insert bobby pins through the hairnet into the base bun for extra security.
Tips and tricks: Get a hairnet that matches your exact hair color — a shade too dark or too light will be visible. Wrap the net twice for extra compression. The pins should go through both the net and into the braids for maximum hold.

22 Best Graduation Day Hairstyles for 2026 🎓✨
18.Game-Ready Dutch Braids with Straight Pony
The overview: Medium-length hair with multiple Dutch braids — three on each side — traveling from the front hairline to the nape, where they converge into a straight, sleek low ponytail. The braids create a ribbed texture on the scalp while the ponytail falls smooth and straight below.
Multiple small braids create more grip and tension than two large ones, which means the style holds better during intense movement. The straight ponytail below provides a clean, polished contrast to the textured braid work above. It's controlled precision from hairline to ends.
Why this look is popular: The three-braid-per-side pattern creates a more detailed texture than standard double Dutch braids. The golden blonde color makes each braid ridge catch light differently, creating a dimensional, sculpted look. The straight ponytail keeps the overall silhouette clean and sporty.
Where this look is suitable: Elite-level softball, championship games, any high-competition setting where maximum hold meets polished presentation. This is the style that means business.
Step by step:
- Section into six. Part the hair into six even vertical sections — three on each side of the center part.
- Dutch braid each section. Starting at the hairline, braid each section flat against the scalp back to the nape.
- Gather into a ponytail. Collect all six braid tails at the nape into a single low ponytail.
- Straighten the ponytail. Use a flat iron on the ponytail section to create a sleek, straight finish.
- Smooth the base. Wrap a thin section of hair around the elastic to conceal it.
- Set. Mist the braids with strong-hold hairspray and the ponytail with a smoothing serum.
Tips and tricks: The smaller the braids, the more detailed the texture — but also the more time they take. Find the right balance for your styling window. Use a fine-tooth comb to keep each section clean while braiding. A heat protectant on the ponytail before flat-ironing prevents damage.
19.The Double-Wrapped Dutch Braid for Game Day
The overview: Medium-length hair with a single Dutch braid starting at the crown and running down to the ends. Sections of the braid are then wrapped back around the braid itself, creating layered loops that add dimension and security. The wrapped sections lock the braid in place by creating friction against itself.
The double-wrap technique turns a standard Dutch braid into something more sculptural. By taking small sections from the braid tail and wrapping them around the main braid at intervals, you create loops that catch light and add visual depth. Functionally, those wraps also prevent the braid from loosening during movement.
Why this look is popular: It's a standard Dutch braid elevated by a single technique that takes two extra minutes. The wrapped sections create a more finished, styled appearance without requiring any additional tools or accessories. The warm blonde color makes the wrapped texture clearly visible.
Where this look is suitable: Game day, tournament play, any situation where you want your braid to look considered without spending a lot of extra time. The wraps add security that holds through running and sliding.
Step by step:
- Dutch braid. Starting at the crown, Dutch braid straight back to the nape and continue to the ends. Secure with an elastic.
- Take the first wrap section. Separate a thin section from the braid tail, about 2 inches from the bottom.
- Wrap upward. Wrap this section around the braid at mid-height, tucking the end under the braid and pinning it underneath.
- Take the second wrap section. Separate another thin section from the remaining tail.
- Wrap at a different height. Wrap this section around the braid closer to the crown, creating a second layered loop.
- Pin and set. Secure both wrapped ends with bobby pins underneath the braid. Mist with strong-hold hairspray.
Tips and tricks: The wraps should be tight enough to stay but not so tight they compress the braid flat. Pin from underneath so the pins are invisible. If the wraps slip, a small dot of hair wax on the end before tucking helps them grip.

30 Stunning July Nail Designs for Summer 2026 💅
20.Classic Double Dutch Braids for Game Day
The overview: Medium-length hair center-parted into two classic Dutch braids that run from the front hairline to the ends, with the braid tails left loose and wavy. The center part is clean and precise, the braids are even in tension, and the loose ends add a natural, undone quality to an otherwise structured style.
This is the foundational softball hairstyle — the one that every other style on this list is a variation of. Two Dutch braids, center-parted, running the full length of the head. It's proven, reliable, and looks good on virtually everyone. The wavy tails are the small modern detail that keeps it from looking like a stock photo.
Why this look is popular: Simplicity is the point. You can braid this in your sleep, it holds through anything, and the dirty blonde color makes the raised Dutch braid pattern highly visible. It's the hairstyle equivalent of a well-worn glove — functional, familiar, and always ready.
Where this look is suitable: Any softball situation — practice, games, tournaments, warm-ups. This is the universal default that works everywhere. Also works for running, gym sessions, and everyday wear.
Step by step:
- Center part. From forehead to nape. Clean, straight line.
- Dutch braid the left side. Starting at the left temple, braid from the hairline back and down to the ends.
- Dutch braid the right side. Mirror the same pattern with matching tension and section size.
- Secure the ends. Tie off each braid with a clear elastic about 2 inches from the bottom.
- Wave the tails. If the tails are straight, twist them tightly and release to create a natural wave.
- Adjust. Gently pull the outer loops of each braid to widen them slightly for a fuller look.
Tips and tricks: Match the tension on both sides — uneven braids look sloppy. Use a rat-tail comb for the cleanest center part. If your hair layers stick out of the braid, tuck them in with a bobby pin or apply a small amount of smoothing cream before braiding.
21.Sleek Dutch Braids into a Low Ponytail

The overview: Medium-length hair with 5-6 precision Dutch braids running from the front hairline to the nape, converging into a sleek, straight low ponytail. Every braid is identical in width and tension, creating a uniform, almost architectural pattern across the scalp.
This is the precision player's style. The five-to-six braid count creates more grip and scalp coverage than double braids, which means the style holds through every slide, dive, and sprint without a single strand coming loose. The sleek ponytail below keeps the overall finish clean and controlled.
Why this look is popular: The precision braiding creates a graphic, almost geometric pattern that looks impressive in photos and from the stands. The deep chocolate brown color makes the braid ridges look sculpted and deliberate. It's the hairstyle that says you take both the game and your appearance seriously.
Where this look is suitable: High-level competitive softball, championship games, any setting where maximum hold meets polished presentation. The precision braiding also works for post-game events without needing a restyle.
Step by step:
- Section precisely. Part the hair into 5-6 even vertical sections from the front hairline to the nape using a rat-tail comb.
- Dutch braid each section. Braid each section flat against the scalp, maintaining identical tension and width.
- Gather into a ponytail. Collect all braid tails at the nape into a low ponytail. Secure with a strong elastic.
- Straighten the ponytail. Flat iron the ponytail for a sleek, straight finish.
- Wrap the base. Take a thin section of hair from the ponytail, wrap it around the elastic, and tuck the end under.
- Set. Strong-hold hairspray on the braids, smoothing serum on the ponytail.
Tips and tricks: The key to this style is precision in sectioning. Use a rat-tail comb and take your time with each part — uneven sections throw off the entire pattern. A light wax or pomade on each section before braiding helps keep the parts clean and the braids smooth.
25 Trendy Beach Day Hairstyles for Vacation 2026 ☀️🌊
22.Double Dutch Braids with Wavy Ends
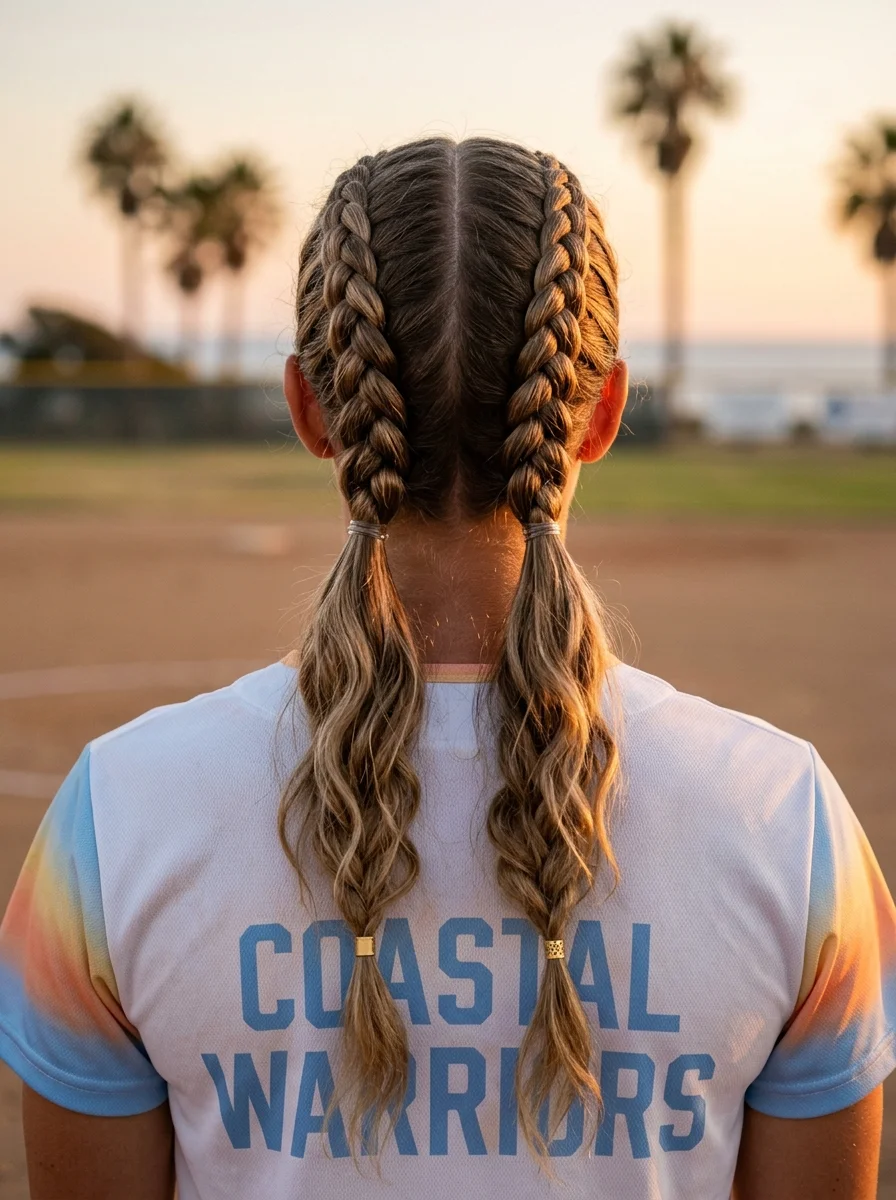
The overview: Medium-length hair center-parted into two Dutch braids from the temples to the nape, with the braid tails left to hang and curl naturally. Gold cuff beads are clamped at intervals along each braid for a metallic accent that catches light during movement.
The wavy ends are what soften this from a purely athletic style into something you'd wear to a coastal brunch after the game. The Dutch braids keep the top section secure and controlled, while the natural waves below add movement and femininity. The gold cuffs are the finishing detail that elevates the whole look.
Why this look is popular: The combination of structured braids and loose waves creates a balanced look that's neither too sporty nor too styled. The gold cuffs add warmth against the warm blonde hair and create a subtle glint that draws attention without being flashy.
Where this look is suitable: Coastal tournament play, outdoor games, any setting where the weather is warm and the vibe is relaxed. The wavy ends make this appropriate for beach gatherings and post-game social events.
Step by step:
- Center part. From forehead to nape.
- Dutch braid each side. From the temples to the nape. Secure each braid with an elastic about 3 inches from the ends to leave room for waves.
- Create waves. Twist each loose tail tightly and release. Or use a 1.25-inch curling wand on the loose sections.
- Add cuff beads. Clamp gold cuff beads at 1-inch intervals along each braid. Press firmly to secure.
- Adjust. Separate the waves gently with your fingers. Don't brush — it kills the texture.
- Set. Light-hold hairspray on the waves to maintain their shape without stiffness.
Tips and tricks: The cuffs should be clamped tightly enough to resist falling out during running but not so tight they crush the braid. Second-day hair holds waves better than freshly washed hair. If your natural texture is straight, a sea salt spray before styling adds the right amount of grit.
23.Classic Double Dutch Braids with Loose Curls
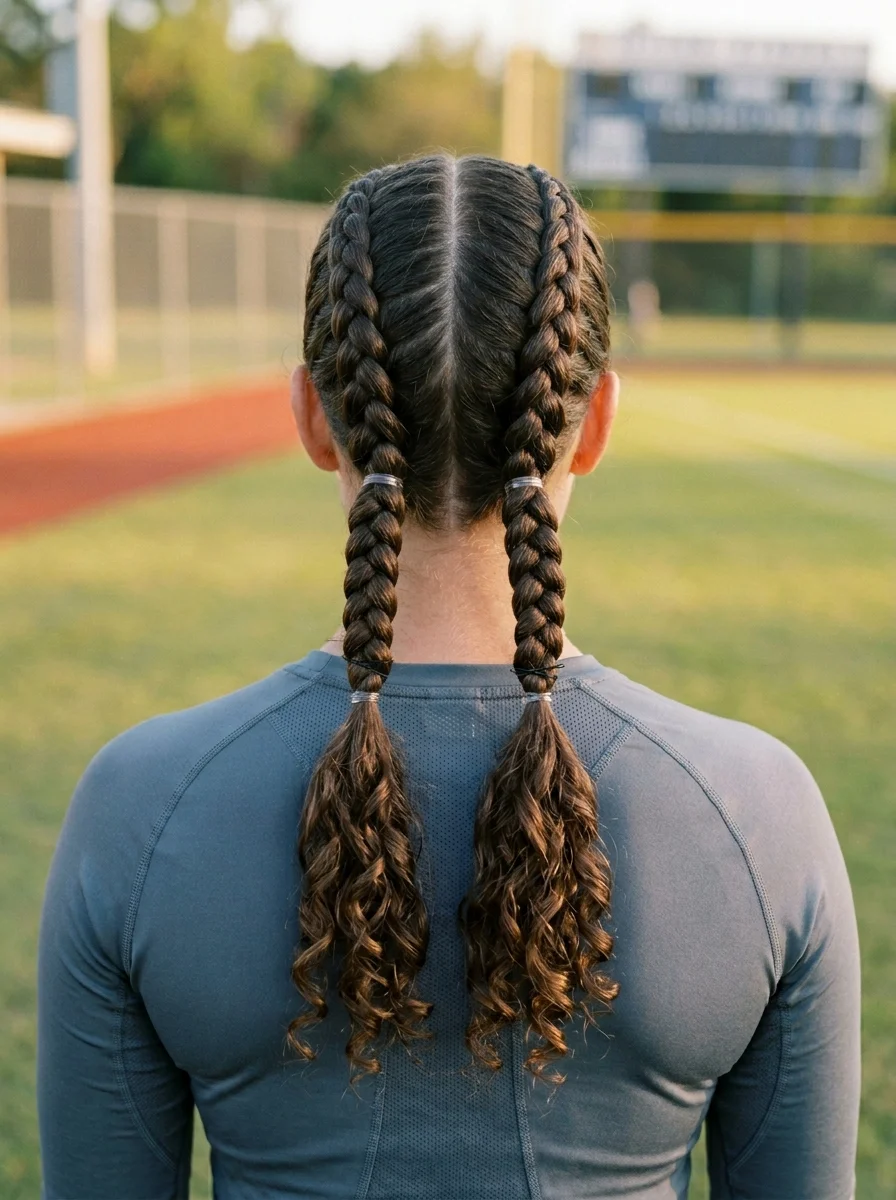
The overview: Medium-length hair center-parted into two Dutch braids from the temples to the nape, where the braids release into natural 3A-3B curls that cascade over the shoulders. The braids keep the top controlled while the curls provide volume and natural texture below.
This style works with your natural curl pattern instead of fighting it. The Dutch braids secure the top section where you need control, and the curls do their own thing below the nape. No heat styling required — the espresso tones make the curl definition pop naturally.
Why this look is popular: Natural curls are having their moment, and this style celebrates them within an athletic context. The contrast between the tight, structured braids and the free-flowing curls creates a dynamic silhouette that photographs beautifully. The dark brown and espresso tones add depth and richness.
The look: Dark brown and espresso hair in two Dutch braids from the temples to the nape, releasing into natural 3A-3B curls that fall past the shoulders. The braids are tight and controlled; the curls are loose and defined.
Step by step:
- Center part. From forehead to nape.
- Dutch braid each side. From the temples to the nape. Secure each braid with an elastic at the nape.
- Define the curls. Apply a curl-defining cream or gel to the loose sections. Scrunch upward to enhance the curl pattern.
- Dry naturally or diffuse. Let the curls air-dry or use a diffuser on low heat to maintain definition without frizz.
- Separate gently. Once dry, gently separate the curls with your fingers for volume.
- Set the braids. Mist the braid section with strong-hold hairspray while leaving the curls untouched.
Tips and tricks: Don't touch the curls while they're drying — it causes frizz. A microfiber towel or cotton t-shirt removes excess water without disrupting the curl pattern. The braids should be tight enough to stay but not so tight they pull at the scalp during activity.

27 Elegant Wedding Guest Nail Designs for Family in 2026 💍
24.The Braided Ballerina Bun with a Geometric Pin

The overview: Medium-length hair brushed smoothly into a high ponytail at the crown, braided into a three-strand plait, then coiled into a tight, sculpted ballerina bun. A black geometric lattice pin is inserted at the top of the bun for a modern, architectural accent.
The ballerina bun is the ultimate in controlled updos — nothing moves, nothing swings, nothing falls. The braided texture within the bun creates friction against itself, meaning it holds without as many pins as a smooth bun. The geometric pin adds a design element that keeps the look from reading as purely functional.
Why this look is popular: The black geometric pin against the ash blonde creates a striking contrast that draws the eye. The lattice pattern adds a modern, almost architectural detail to a classic bun shape. It's the kind of accessory that makes people ask where you found it.
Where this look is suitable: Warm-ups, practice sessions, light training, any situation where you want your hair completely up and controlled without the intensity of a full competition style.
Step by step:
- Gather high. Brush all hair to the crown. Smooth with a boar bristle brush for a bump-free surface.
- Secure the ponytail. Tie tightly with a strong elastic at the crown.
- Braid the ponytail. Work a standard three-strand braid from the elastic to the ends. Secure with a clear elastic.
- Coil into a bun. Wrap the braided tail around the elastic base in a clockwise spiral. Keep it tight against the head.
- Pin it down. Use 4-6 bobby pins at the outer edge of the bun, angling inward.
- Add the geometric pin. Insert the black lattice pin at the top of the bun, pushing it through the outer layer into the base.
Tips and tricks: Backcomb the ponytail slightly before braiding to add volume and texture — the more textured the braid, the better it grips when coiled. The geometric pin should be inserted at an angle, not straight down, to grip the bun securely.
25.Sleek French Braid Ponytail Combo
The overview: Medium-length hair with an asymmetrical side French braid starting at the left temple to the nape where it transitions into a low ponytail. The asymmetrical placement creates a diagonal line that frames the face while keeping the top section controlled.
The side French braid eliminates the center part, which means there's no line where wind can push hair into your face. The diagonal braid path covers more of the scalp than a center- parted style, providing more security with the same amount of braiding effort.
Why this look is popular: Asymmetry is inherently more interesting than symmetry in hairstyling. The diagonal braid creates a visual line that draws the eye across the head, while the low side ponytail adds a relaxed, approachable quality.
Where this look is suitable: Practice sessions, casual games, warm-ups, any situation where you want your hair managed but not overly structured. Also works for everyday wear.
Step by step:
- Start the French braid. At the left temple, take a section and begin French braiding.
- Add hair as you go. Continue the braid, adding hair from the front and crown.
- Reach the Nape. Once you reach the nape, tie off the braid with a hair elastic. So that it doesn't open-up while taking a ponytail.
- Gather the ponytail. Gather the remaining hair and the braid tail into a low ponytail.
- Smooth the surface. Use a fine-tooth comb to flatten any flyaways along the braid path.
- Set. Light-hold hairspray on the braid, smoothing serum on the ponytail.
Tips and tricks: Keep the braid tight against the scalp as you sweep across — a loose braid will shift during movement. The ponytail should be positioned directly behind the ear, not above or below it, for the most natural fall. A light pomade along the braid path keeps flyaways down.

30+ Chic Pool Party Hairstyles for Summer 2026 🌊👙
26.Braided Crown and Low Bun Combo
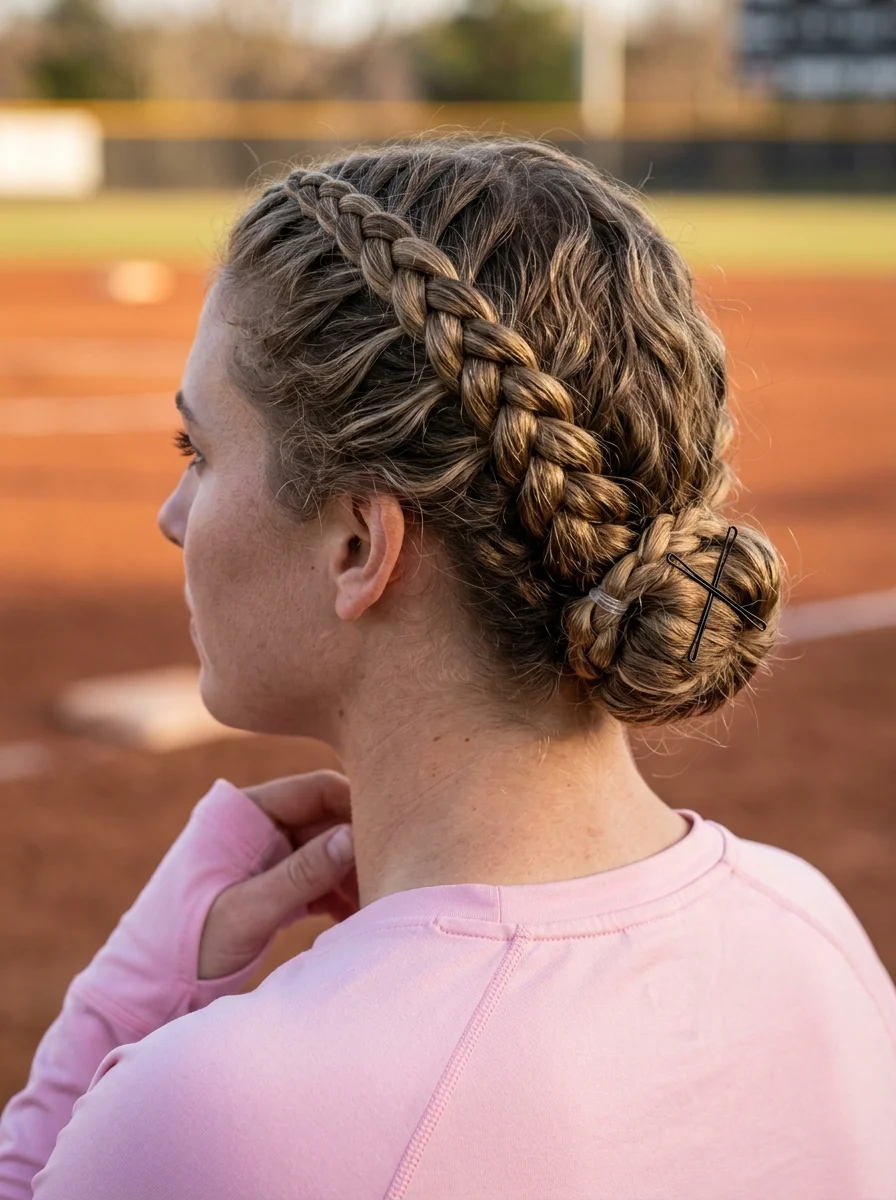
The overview: Medium-length hair with a Dutch braid crown wrapping from one ear across the top of the head to the other ear. The remaining hair, along with the braid tails, gathers into a low bun at the nape, secured with X-pattern bobby pins for maximum hold.
The X-pattern pinning technique is the functional detail that makes this style tournament-ready. When two bobby pins cross each other at the center of the bun, they create an anchor that's far harder to dislodge than pins placed in parallel. The braided crown handles the top; the X-pinned bun handles the bottom. Together, they create a style that can survive a full day of play.
Why this look is popular: The crown braid adds elegance while the low bun keeps everything grounded and practical. The light brown and blonde tones make both textures — the raised braid and the smooth bun — clearly visible. It's refined without being fussy.
Where this look is suitable: Game day, tournament play, team events, any situation where you need maximum hold with a polished finish. The X-pattern pins make this secure enough for competitive play.
Step by step:
- Start the crown braid. At the left ear, Dutch braid upward, curving across the crown toward the right ear.
- Add hair from the front. As you braid, add hair from the front hairline to keep the braid on top.
- Reach the right ear. Braid to the right side and continue the braid tail a few inches past the ear.
- Gather the bun. Collect the braid tail and all remaining hair at the nape into a low ponytail. Twist into a bun.
- X-pin the bun. Insert two bobby pins through the bun in an X pattern — one from top-left to bottom-right, one from top-right to bottom-left.
- Smooth and set. Apply edge control gel along the hairline. Mist with strong-hold hairspray.
Tips and tricks: The X-pattern works because the crossed pins create a mechanical lock — they can't slide out in the same direction. Use long bobby pins for the best grip. The bun should be as compact as possible; a loose bun shifts during movement.
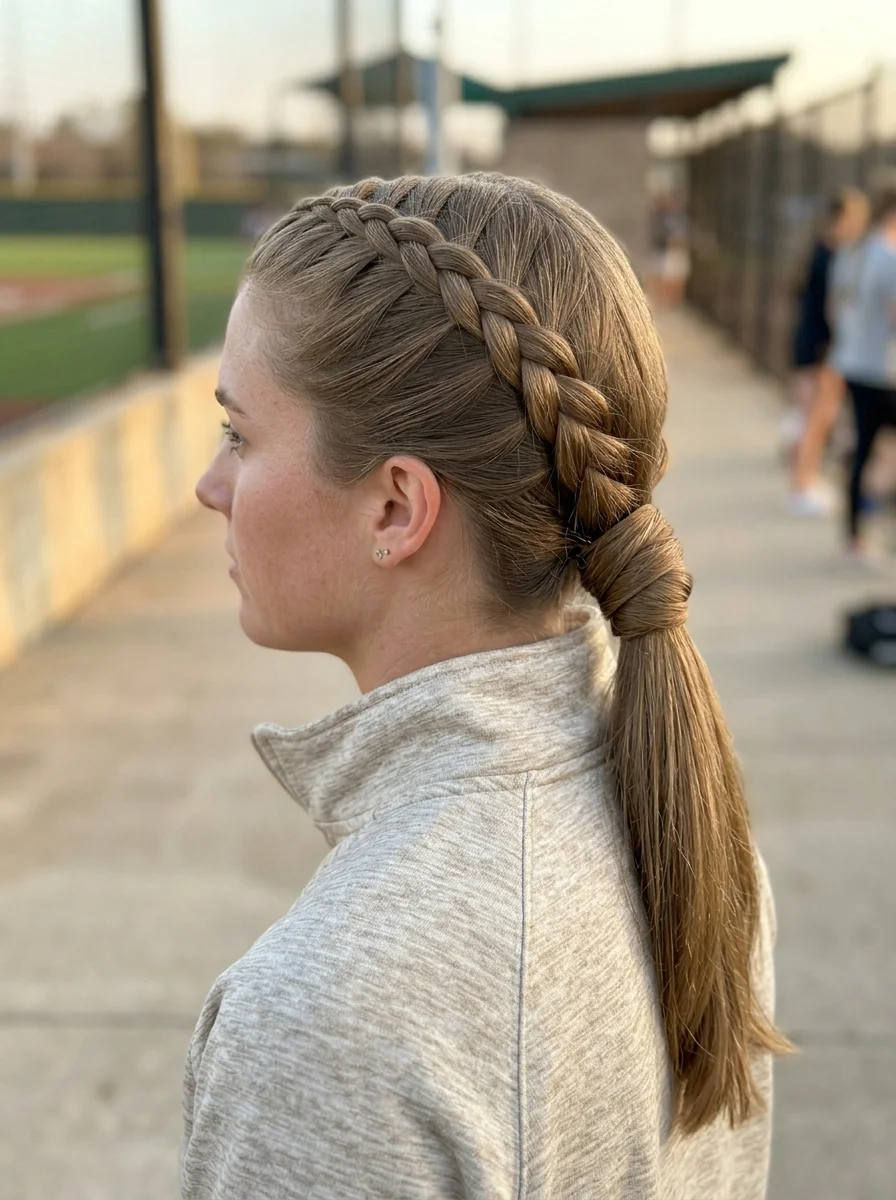
27.The French Braid Crown with Messy Ponytail
The overview: Medium-length hair with a French braid wrapping across the head from the temple to the nape, creating a smooth, embedded headband effect. The remaining hair gathers into a messy, textured ponytail at the nape. The French braid lies flat against the scalp — no raised ridges, just a smooth, woven texture.
The flat French braid is the key difference from a Dutch braid crown. Where a Dutch braid sits on top of the hair, a French braid is embedded within it, creating a smoother surface that won't catch on a helmet. The messy ponytail below provides the relaxed counterpoint to the controlled crown.
Why this look is popular: The French braid crown is less visible than a Dutch braid, which means the style looks more natural and effortless. The messy ponytail adds a lived-in quality that feels approachable rather than overly styled. It's the hairstyle you throw on before warm-ups that looks better than you expected.
Where this look is suitable: Practice, warm-ups, casual games, any day where you want your hair controlled but not structured. The flat French braid also works under helmets without creating pressure points.
Step by step:
- Start the French braid. At the right temple, take a section and begin French braiding from the temple to the nape where you will tie a ponytail.
- Add hair from the front. As you braid, add hair from the front hairline to keep the braid positioned on top.
- Reach the nape. Continue until you reach the nape. Braid the remaining section to the ends.
- Gather the ponytail. Collect all remaining hair at the nape into a ponytail. Secure with an elastic.
- Mess it up. Gently tug sections of the ponytail to add texture. Pull a few pieces loose around the ears.
- Set the crown. Light-hold hairspray on the French braid to keep it smooth. Leave the ponytail untouched.
Tips and tricks: French braids require consistent tension to lie flat — if you pull too loosely, the braid lifts off the scalp. Keep the sections thin for a more detailed weave pattern. The messy ponytail should look effortless — if it looks too neat, pull more pieces loose.
36 Trendy FIFA World Cup Nail Designs (2026)
28.Sleek Low Ponytail Braid for Game Day
The overview: Medium-length hair smoothed back into a low ponytail at the nape, then braided into a clean three-strand plait from the elastic to the ends. The base is wrapped with a section of hair to conceal the elastic. Minimalist, efficient, and completely controlled.
This is the simplest style on the list, and that's exactly why it works. No braiding along the scalp, no complicated sectioning — just a sleek ponytail turned into a braid. The low placement eliminates bounce, the braid eliminates swing, and the hair-wrapped base eliminates the visible elastic. It's the bare minimum that still looks polished.
Why this look is popular: Speed and reliability. You can do this in under three minutes, and it will hold through anything. The ash blonde color makes the braid pattern visible without requiring any accessories or embellishments. It's proof that simplicity, done well, is its own statement.
Where this look is suitable: Any softball situation — practice, games, tournaments. This is the default when you need your hair up fast and want it to stay. Also works for running, gym sessions, and any activity where function matters more than fashion.
Step by step:
- Smooth the hair. Apply a small amount of smoothing cream or gel. Brush all hair back toward the nape with a boar bristle brush.
- Gather into a low ponytail. Secure at the nape with a strong elastic. Keep it tight.
- Braid the ponytail. Work a standard three-strand braid from the elastic to the ends. Secure with a clear elastic.
- Wrap the base. Take a thin section of hair from the ponytail, wrap it around the elastic to conceal it, and tuck the end underneath.
- Smooth the surface. Run a fine-tooth comb over the crown and sides to flatten any stray hairs.
- Set. Mist with strong-hold hairspray for all-day security.
Tips and tricks: For extra hold, apply gel to towel-dried hair and let it air-dry before creating the ponytail. A boar bristle brush eliminates flyaways without disrupting the sleek surface. If your hair is fine, backcomb the ponytail base slightly before braiding to add grip.
The Hair Breakage Prevention Strategy
Sweat, constant pulling, improper hair ties, and helmets can cause breakage and thinning if not addressed. But with the right habits, you can protect your hair while dominating the diamond.
Choose the right accessories: Silk or fabric-covered elastics will not damage your hair. Avoid rubber bands or ultra-tight elastics that snap strands when you remove them. Braids actually help hair growth by preventing the ends from splitting and breaking off.
Rotate your styles: Do not wear the same tight style every single day. Switch between high ponytails, low braids, and loose buns to give your scalp a break. On practice days, opt for looser styles and save the tight competition looks for game day.
The detangle rule? Always detangle with a wide-tooth comb starting from the ends and working upward. Never yank through knots when your hair is wet and vulnerable — that is when breakage happens fastest.