Nail Trends
27 Elegant Wedding Guest Nail Designs for Family in 2026 💍

Attending a wedding is a wonderful occasion, but finding the right outfit and matching manicure can feel like a significant task. Whether preparing for a formal black-tie affair, a family ceremony, or a relaxed backyard event, the manicure should feel as celebratory and elegant as the day itself.
This curated collection features 27 elegant wedding guest nail designs for 2026 that balance understated sophistication with festive detail. From modern takes on the classic French manicure to soft iridescent pastels and refined metallic accents, these designs offer the perfect inspiration for the season.
Which Nail Design for Which Wedding Dress Code?
Here is the mistake most wedding guests make: they pick a nail design they saw on Pinterest and only afterwards try to find a dress that goes with it. The smarter order of operations is the reverse. Your invitation already tells you the formality level of the whole event, and your nails need to sit comfortably inside that register — not below it, and definitely not shouting above it.
For black-tie and formal evening weddings, deep jewel tones and minimalist finishes are your friends. Think midnight navy, rich burgundy, or the kind of sheer, buffed "naked" nail that reads elegant rather than bare. A design like "The Clean Girl French" exists specifically for this: it is polished without trying too hard, which is exactly the energy a formal wedding requires. For daytime garden and outdoor ceremonies, 2026 is all about soft butter yellows, sheer lavenders like "Sage Aura Tips," and pale roses — colors that catch the sunlight without competing with the florals.
The simplest formula: let your dress lead. If it has heavy embellishment or a busy pattern, keep your nails quiet — milky whites, sheer nudes, a delicate micro-French. If your dress is a solid block of color or a simple slip silhouette, your nails can take on more personality. A chrome finish or a subtle color like "Mauve Velvet Dreams" adds interest to a simple dress without looking like you tried to upstage anyone.
In This Guide
1.The Geometric Lavender Lattice
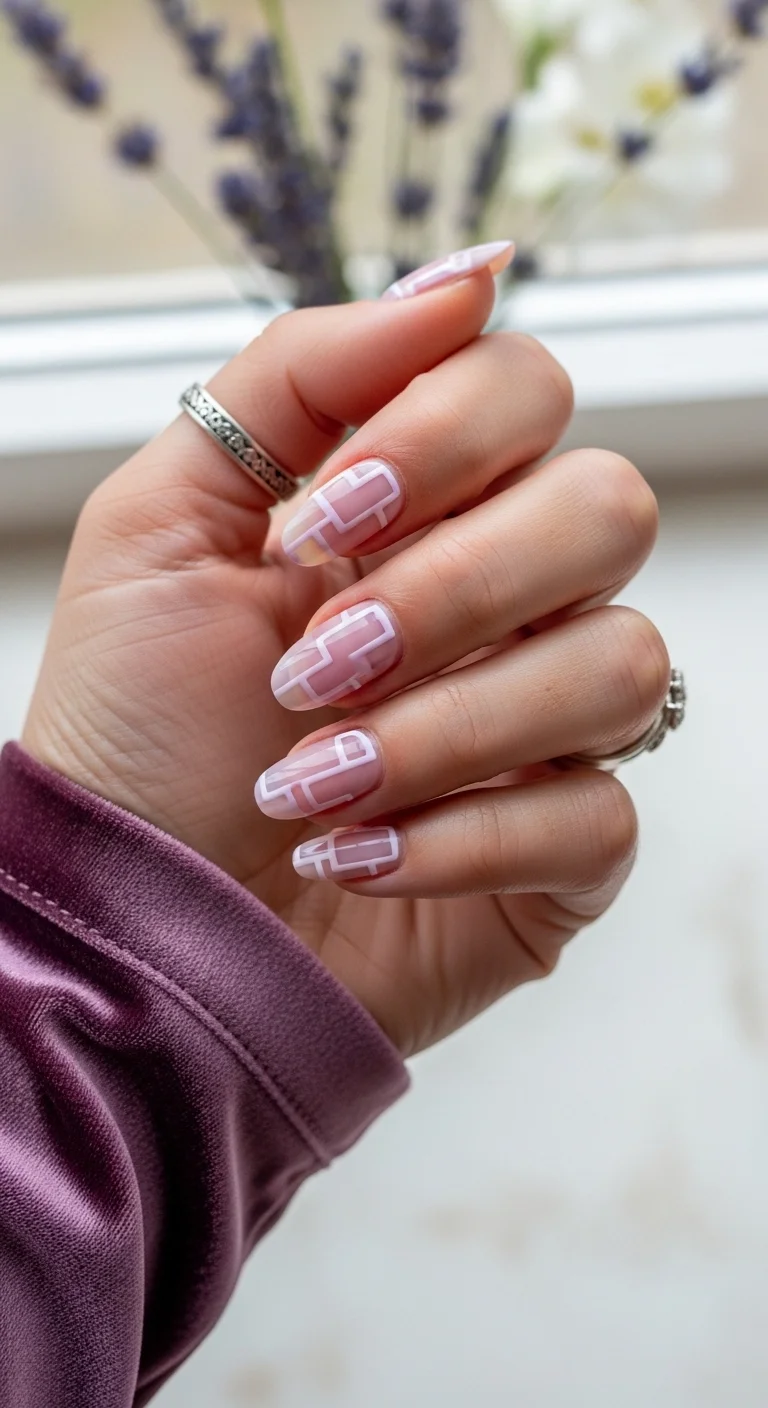
Architectural white lattice over a translucent dusty mauve.
Overview:
Geometric nail art is having a quiet resurgence, and this design is the reason. The interlocking rectangular lattice reads as intentional without crossing into costume territory — a balance most nail art fails to strike. The sheer dusty mauve base keeps the overall effect muted enough for a formal venue, while the white linework gives it just enough structure to hold its own next to a statement outfit.
The translucent base is a smart choice. It mimics the natural nail bed beneath, so regrowth is less obvious by day four or five. That's a genuine advantage for a multi-day wedding weekend where you won't have time for a salon visit. The trade-off is that sheer bases require more careful application — any streaking in the base coat shows through the lattice work.
Worth noting: the almond shape is doing most of the heavy lifting here. The curved edges of an almond nail give the geometric lines a softer landing than a square or coffin shape would. If you prefer a blunter nail, the lattice may read more severe than sophisticated.
Design Breakdown:
A translucent base with hand-painted geometric linework. The design relies on precision — messy lines kill the effect entirely.
Base Color: Sheer dusty mauve or pink-nude. Two thin coats for a milky, semi-translucent finish. OPI's "Bubble Bath" or a similar sheer formula works well.
Nail Shape: Medium-long almond. The tapered tip gives the geometric lines room to breathe without looking cramped.
Design Element: Interlocking rectangular lattice pattern in milky white, painted over the sheer base. The lines should be thin and evenly spaced — a striper brush is essential.
Finish: Glossy top coat. The shine enhances the translucent quality of the base and keeps the white lines looking crisp.
Get The Look at Home:
This design lives or dies by line precision. A long striper brush and a steady hand are non-negotiable. Practice the lattice on a paper towel before touching your nails.
- Prep: File into almond shape. Push back cuticles and buff any ridges — sheer base shows every imperfection.
- Sheer base: Apply two thin coats of a dusty mauve sheer. Let each coat dry completely before moving on.
- Vertical lines: Using a thin striper brush and opaque white polish, paint two to three evenly-spaced vertical lines across each nail.
- Horizontal lines: Add horizontal lines that intersect the verticals to form rectangular sections. Vary the spacing slightly for a more organic lattice feel.
- Cleanup: Dip a small angled brush in acetone and sharpen any wobbly edges before the white dries.
- Top coat: Apply a thick, self-leveling top coat to smooth the raised texture of the painted lines.
30 Stunning Summer Hair Trends for 2026 ☀️🌊
2.Sage Green & Gilded Foil

Earthy sage meets gilded luxe — gold leaf scattered over muted green.
Overview:
Sage green is the nail color equivalent of a linen blazer: it communicates taste without trying too hard. Paired with gold foil, the combination shifts from earthy-casual to earthy-luxe — a distinction that matters when you're standing next to someone in a floor-length gown. The gold leaf adds just enough warmth to keep the sage from reading flat or one-dimensional.
The organic placement of the foil is key. Unlike a structured gold stripe or geometric accent, scattered flakes look like they landed there naturally. This makes the design surprisingly forgiving — there's no "wrong" way to place a gold leaf fragment. Each nail ends up unique, which reads as bespoke rather than haphazard.
One consideration: sage green sits in a tricky color family. Against cool-toned skin, the olive undertone can wash out the hand prematurely. If your skin runs cool, request a sage with more grey than yellow in the mix. Cirque Colors "Succulent Garden" leans cooler than most drugstore greens.
Design Breakdown:
Solid muted green base with irregularly placed gold leaf fragments. The organic foil placement is what separates this from a standard metallic accent nail.
Base Color: Muted sage or olive green. Two coats for full opacity. Avoid anything too bright — the sage should look like it has dust on it.
Nail Shape: Medium-long almond. The elongated shape gives the gold foil room to scatter without looking crowded.
Design Element: Irregular gold leaf flakes pressed into the tacky layer of polish or applied with foil glue. Each nail gets a different arrangement.
Finish: Glossy top coat. The shine gives the gold foil a wet, molten appearance and locks the fragile flakes in place.
Get The Look at Home:
Gold leaf is fragile and static-prone. Work in a still room and keep a small bowl of water nearby to dampen your fingers — it reduces static and keeps flakes from flying off the brush.
- Prep: Shape into almond. Clean the nail plate thoroughly — oil residue prevents gold leaf from adhering.
- Sage base: Two coats of muted sage green gel or lacquer. Let the second coat get slightly tacky (about 60 seconds for gel, two minutes for regular polish).
- Foil application: Using tweezers or a dry brush, press small gold leaf fragments onto the tacky surface. Start near the cuticle on some nails, the tip on others. Less is more — three to five flakes per nail.
- Press and seal: Gently press each flake flat with a silicone tool or your fingertip. Any lifted edges will catch and peel off later.
- Top coat: Apply two layers of top coat. The first seals the foil; the second smooths the surface. Gold leaf creates texture that a single coat won't fully cover.
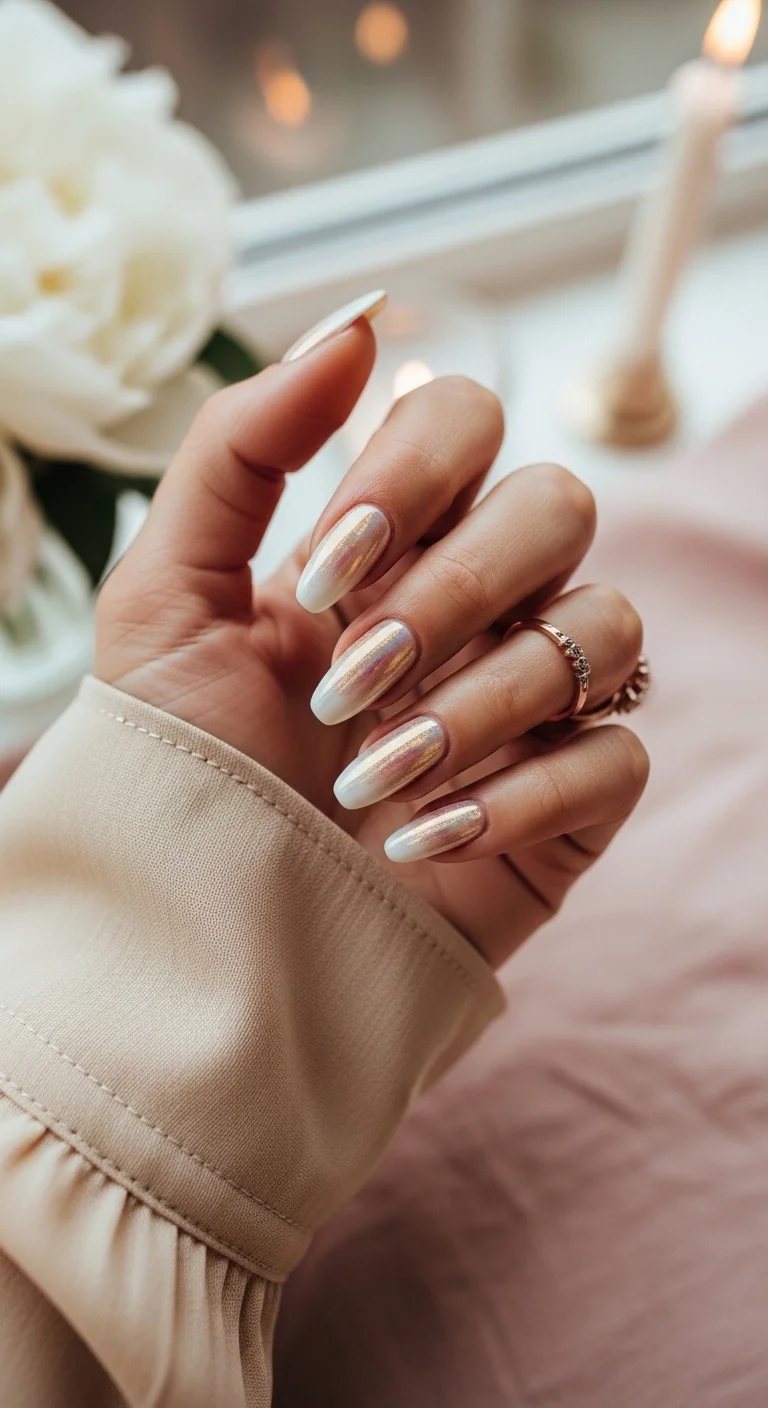
3.Iridescent Mauve Magic
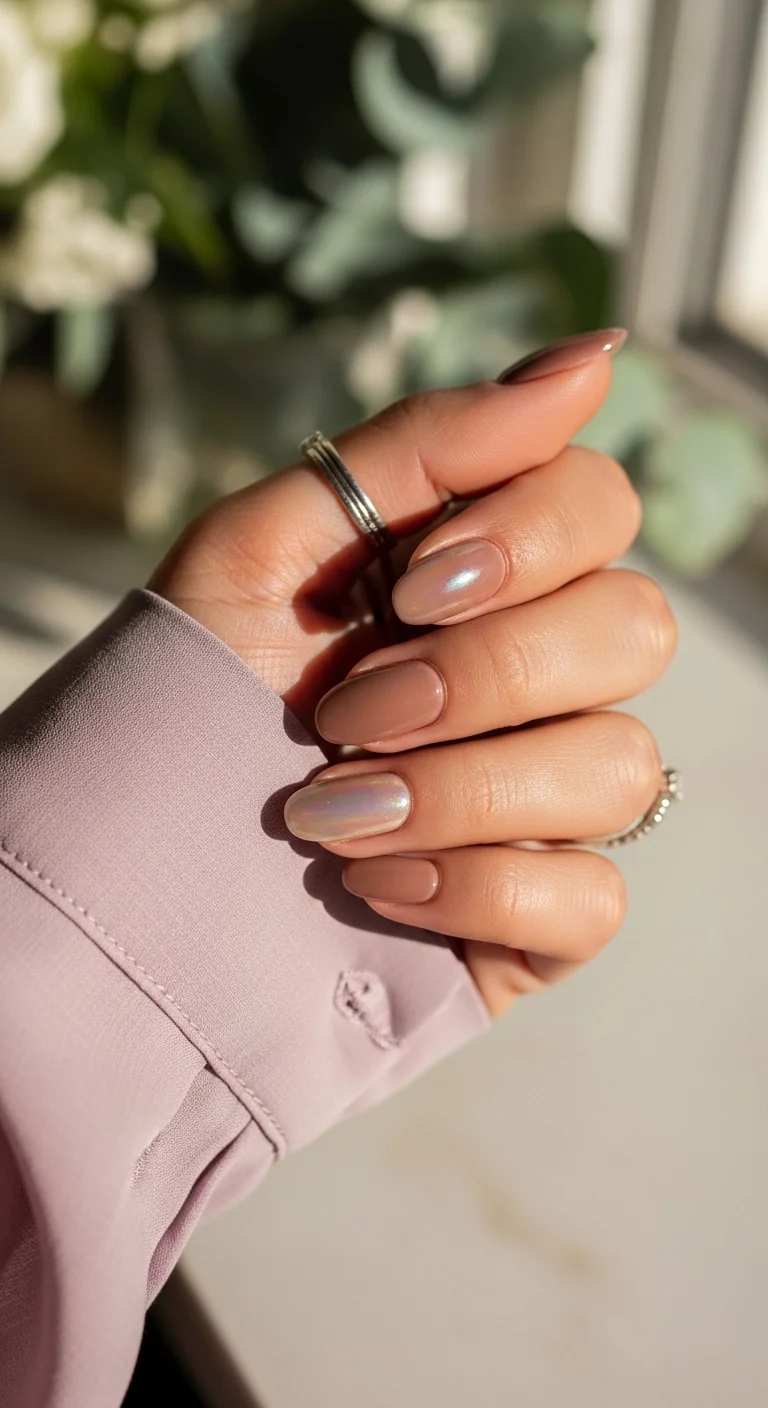
Two accent nails shift pink-gold-green over a warm mauve base.
Overview:
The chrome accent nail has a fundamental design problem: too many and the effect drowns; too few and it looks like an afterthought. This design solves it with exactly two accent nails — enough to catch light and draw the eye, not so many that the iridescence competes with your outfit. It's a restrained approach to a finish that often tips into excess.
The warm nude-mauve base is doing important work here. It anchors the design in something safe and wearable, which lets the iridescent nails feel like a deliberate accent rather than a cry for attention. The color shift — pink to gold to green — reads differently under every lighting condition, which means these nails look like a different manicure from cocktail hour to the dance floor.
The honest downside: iridescent chrome powder is notoriously inconsistent. The color shift depends heavily on the base color underneath and the angle of application. If you're doing this yourself, expect to re-buff the chrome two or three times before you get the shift you want. A salon visit with an experienced nail tech saves significant frustration.
Design Breakdown:
Warm nude-mauve base with iridescent chrome on two accent nails. The remaining nails stay solid for contrast.
Base Color: Warm nude-mauve for all nails. Two coats for even coverage. The accent nails will get an additional chrome layer.
Nail Shape: Medium almond. The classic shape keeps the design versatile across formal and semi-formal dress codes.
Design Element: Iridescent chrome or pearl powder buffed onto two accent nails (typically ring and middle fingers). The remaining nails stay solid mauve.
Finish: High-gloss top coat. The shine amplifies the iridescent shift and keeps the solid nails looking polished.
Get The Look at Home:
Chrome powder only adheres to a cured no-wipe top coat. If you skip this step or use a regular top coat, the powder will brush right off.
- Prep: Shape all nails into medium almond. Clean and buff.
- Mauve base: Apply two coats of warm nude-mauve to all nails. Cure fully.
- Accent nails only: On the ring and middle fingers, apply a no-wipe gel top coat. Cure for 30 seconds — the surface should feel slightly tacky.
- Chrome buff: Using a sponge eyeshadow applicator, rub iridescent chrome powder firmly into the tacky surface. The color shift should appear immediately. Re-buff if needed.
- Dust off: Use a soft brush to remove excess chrome from surrounding skin. Avoid touching the buffed surface — fingerprints dull the shift.
- Seal: Apply gel top coat over all nails. Cap the free edge on the chrome nails — the powder lifts from unsealed tips faster than any other part of the nail.

28 Cute & Sporty Baseball Game Nail Ideas for 2026 ⚾
4.The Sunset French
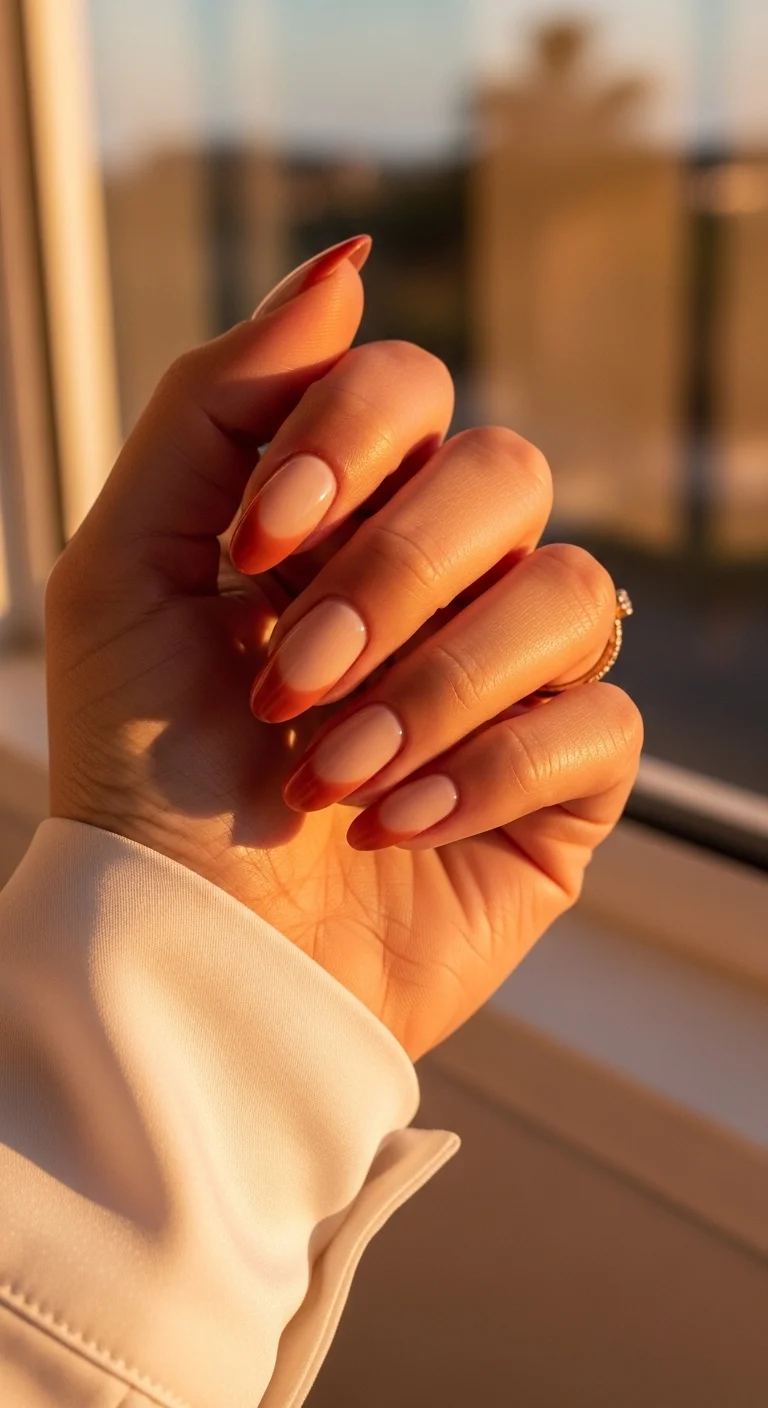
A terracotta French tip that reads autumnal without being seasonal.
Overview:
The classic French manicure is the most over-photographed nail design in existence, which makes reinventing it both a smart play and a risky one. Swap the white tip for burnt orange, and suddenly the French reads warm, autumnal, and distinctly non-generic. It's the same silhouette everyone knows, recontextualized through color.
The terracotta tip works because it sits in the same tonal family as the nude base — both are warm, both have depth. A stark white tip on a pink nude creates high contrast; a burnt orange tip creates a gradient effect that feels more organic. The transition from base to tip looks like a sunset fading into horizon, which is where the name earns its keep.
Practical note: burnt orange pigment is one of the hardest to get opaque in a single coat. You'll need two passes on the tips, and the second coat needs to be thin enough that it doesn't create a visible ridge where the tip meets the base. OPI's "Crawfishin' for a Compliment" covers well in two thin coats — most drugstore oranges require three.
Design Breakdown:
A French manicure with a warm terracotta tip instead of white. The tonal relationship between base and tip is what makes this work.
Base Color: Sheer nude or warm pink. One to two coats for a natural, slightly flushed look. The base should be nearly invisible.
Nail Shape: Medium-long almond. The tapered tip creates a clean canvas for the colored French line.
Design Element: Burnt orange or terracotta tips painted in a classic French curve. The smile line should follow the natural growth line of the nail.
Finish: Glossy top coat. The warm tone of the tip looks richest under a high-shine finish.
Get The Look at Home:
Freehanding a French tip is harder than it looks. If you don't have a steady hand, use French tip guide stickers — they create a clean smile line every time.
- Prep: Shape into almond. Push back cuticles and buff the nail plate smooth.
- Nude base: Apply one to two coats of sheer warm nude. Let dry completely — the French tip will drag through wet base.
- Guide placement: If using stickers, apply them just above the natural smile line. Press firmly to prevent polish from bleeding underneath.
- Tip color: Using a thin brush or the polish brush at an angle, paint the tip in burnt orange. Two thin coats — the first coat will look streaky, which is normal.
- Remove guide: Peel the sticker away while the second coat is still slightly wet. Pulling from a dry edge creates a jagged line.
- Top coat: Apply one thick coat over the entire nail to level the ridge between base and tip.
5.Champagne Splatter Shorties
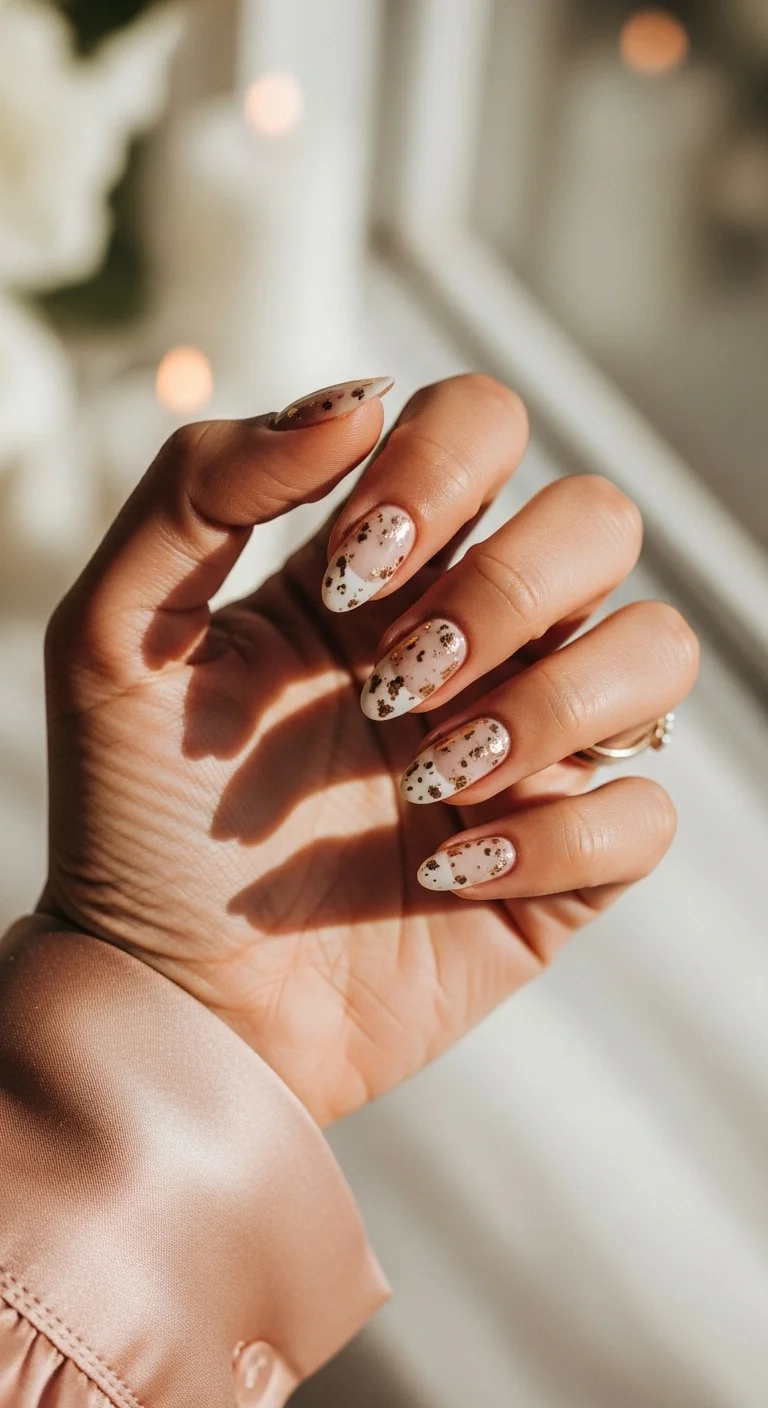
Fine glitter particles and larger flecks like champagne bubbles on short nails.
Overview:
Short nails are routinely dismissed as incapable of holding their own at formal events. This design exists specifically to prove that wrong. The champagne gold speckles read as celebratory without requiring length — the sparkle does the visual work that almond length usually handles. If you maintain short nails for practical reasons, this is your wedding guest design.
The milky nude base is critical. A fully opaque nude would make the glitter look like it was painted on top of something; a sheer base lets the glitter appear to float within the nail, like actual champagne bubbles suspended in liquid. That depth effect is what elevates this beyond a simple glitter top coat.
The downside: mixed glitter sizes are difficult to control. The fine particles spread easily, but the larger flecks tend to clump or land at odd angles. A dotting tool gives you more control than shaking glitter directly from the bottle. Essie's "A-List" mixed with a loose champagne glitter pigment gives the most balanced distribution.
Design Breakdown:
Semi-translucent milky base with a mix of fine and chunky glitter particles. The layered glitter creates depth without bulk.
Base Color: Sheer milky nude or cream. One to two coats for a translucent, "your nails but better" effect.
Nail Shape: Short-medium almond. The shorter length keeps the glitter from looking costume-y.
Design Element: Champagne gold and rose gold glitter speckled across all nails. A mix of fine shimmer and larger hex flecks creates the bubble effect.
Finish: Glossy top coat with a thick, self-leveling formula. Glitter creates texture that needs a heavy top coat to smooth.
Get The Look at Home:
Work with glitter over a paper towel — it gets everywhere. Seal the glitter with top coat before it migrates to your cuticles or clothing.
- Prep: Shape into short almond. Buff smooth and clean the nail plate — glitter adheres to oils and won't stay put on an unclean surface.
- Milky base: One to two coats of sheer milky nude. Let dry until tacky — the glitter needs something to grip.
- Fine glitter: Using a fan brush or the polish brush, dab fine champagne shimmer across the nail. Focus on the center and let it fade toward the edges.
- Larger flecks: With a dotting tool or tweezers, place individual larger gold flakes. Three to five per nail — scatter them unevenly for the bubble effect.
- Press flat: Use a silicone tool or finger to press any raised glitter flat. Protruding flecks catch on everything.
- Top coat: Two thick coats of a self-leveling top coat. The first fills the texture; the second smooths the surface.

30+ Chic Pool Party Hairstyles for Summer 2026 🌊👙
6.Modern Lilac & Silver Solder
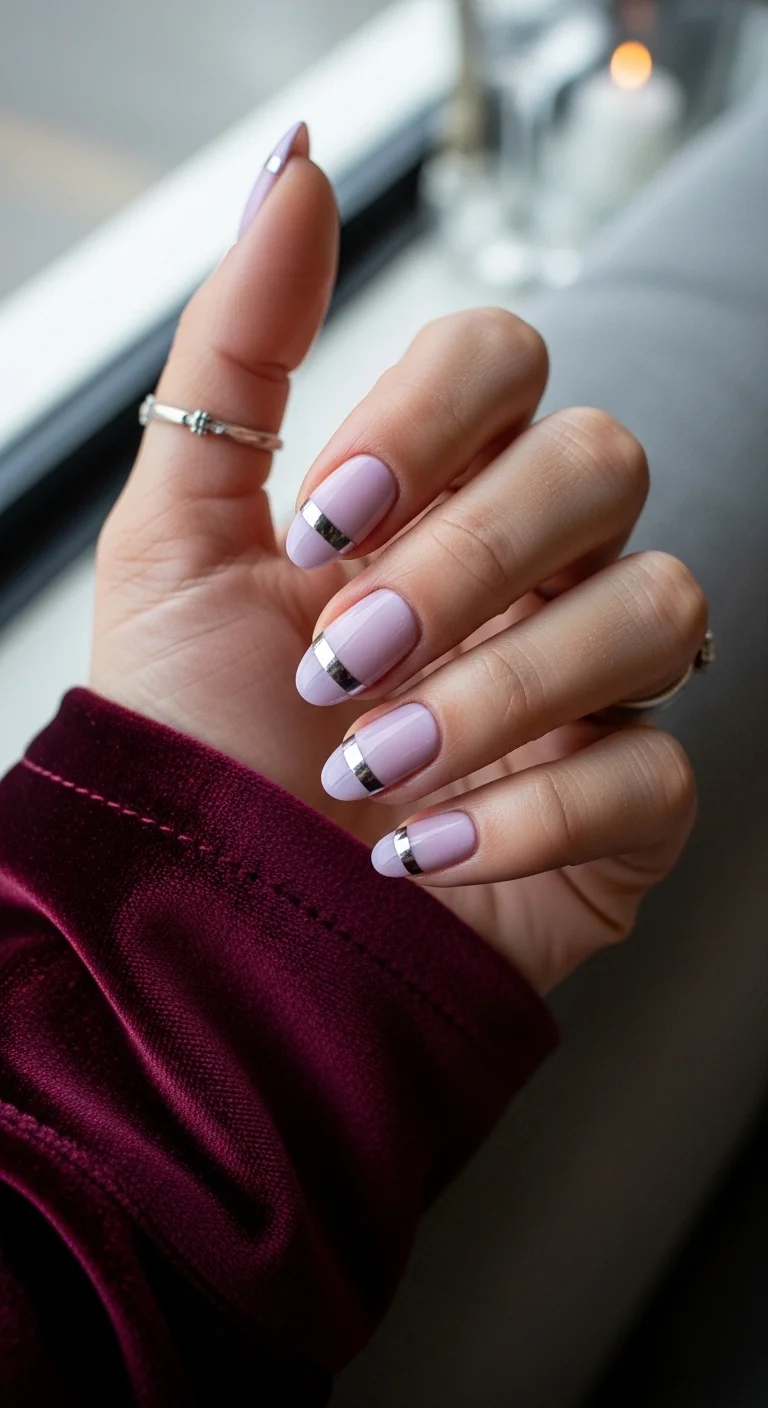
Soft lilac cream disrupted by a single silver chrome horizontal line.
Overview:
Pastel nails at weddings are expected. Pastel nails with a single metallic interruption are not. The silver stripe across a lilac base creates a visual break that stops the design from sliding into predictable territory — it's the nail equivalent of a minimalist belt on a flowing dress. One detail, completely changing the conversation.
The lilac itself needs to be the right weight. Too pastel and the silver stripe looks disconnected, like it belongs to a different nail. Too saturated and the purple competes with the chrome for attention. A mid-weight lilac — the color of actual lilac blooms, not candy — sits in the sweet spot where the silver reads as a deliberate accent.
The horizontal stripe placement is doing more than it appears. A stripe placed at the nail's midpoint visually shortens the nail; placed near the tip, it elongates. This design places it slightly above center, which keeps the proportions balanced on medium-length nails. On shorter nails, move the stripe lower to avoid the compressed look.
Design Breakdown:
Solid pastel lilac with a single thin horizontal silver chrome stripe. The restraint is the design — one accent, no more.
Base Color: Cream lilac or lavender. Two coats for full, even opacity. Zoya's "Robin" or a similar mid-weight purple.
Nail Shape: Medium-long almond. The length gives the stripe room to sit at the correct proportion.
Design Element: Thin horizontal silver chrome or metallic stripe near the nail's midpoint. Painted with a striper brush or created with striping tape.
Finish: Glossy top coat over the lilac base. The chrome stripe may need a separate no-wipe top coat to maintain its reflective quality.
Get The Look at Home:
Striping tape is the cheat code for perfectly straight lines. Free handing a horizontal stripe across a curved nail surface is significantly harder than it looks.
- Prep: Shape into almond. Clean and buff the nail surface.
- Lilac base: Two coats of cream lilac. Cure or dry fully before applying any tape or chrome — both will lift if the base isn't set.
- Stripe placement: Apply a thin strip of metallic silver striping tape horizontally across each nail, slightly above the midpoint. Press firmly along the entire length.
- Trim edges: Using small scissors or nippers, trim the tape at the nail edge. Leave a tiny overhang on each side — it will be sealed by top coat.
- Seal the tape: Apply top coat over the entire nail, focusing on the tape edges. The tape will peel within hours if the edges aren't fully encapsulated.
- Final coat: A second layer of top coat ensures the tape doesn't catch on fabric or hair.
7.Mauve Velvet Dreams
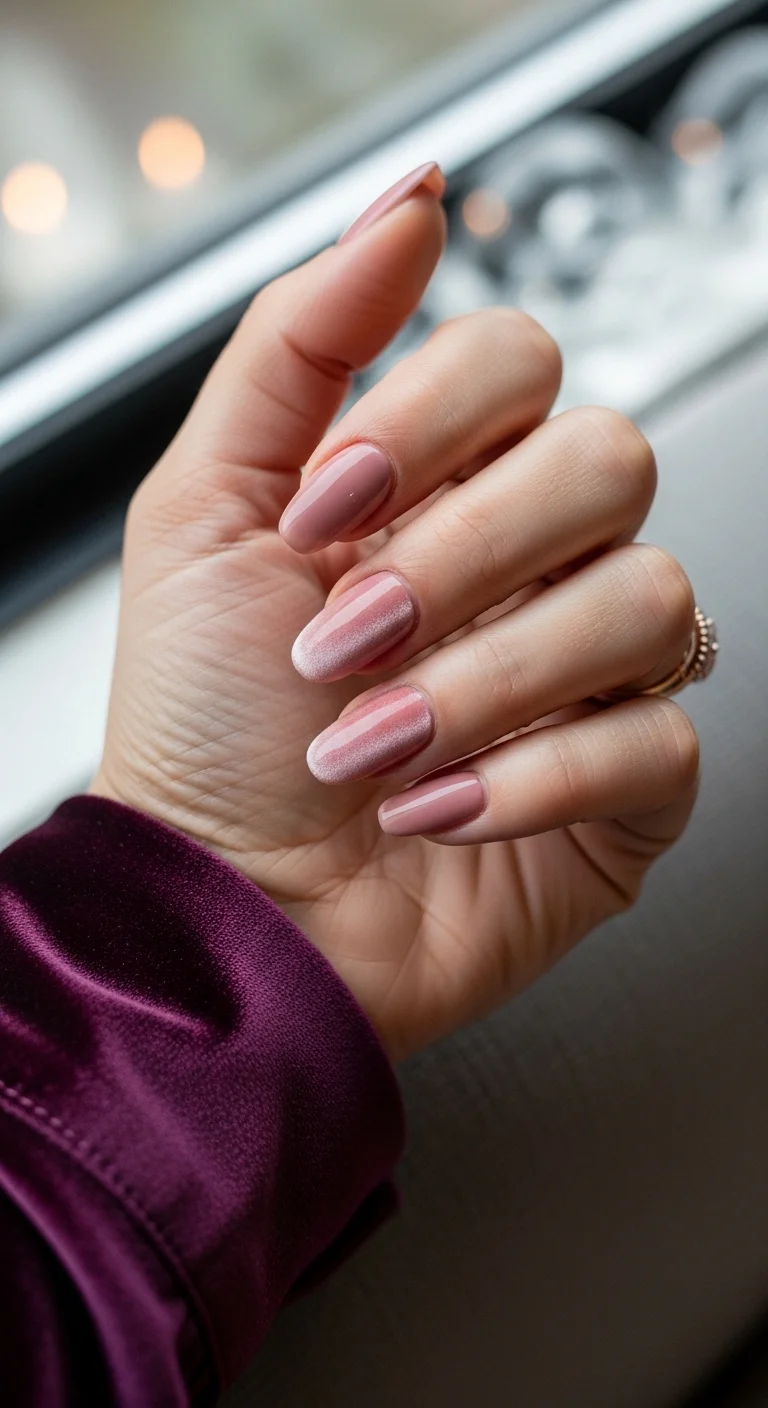
Cat-eye magnetic velvet shimmer on accent nails over dusty rose-mauve.
Overview:
Velvet nails — the magnetic polish effect that creates a shifting, dimensional shimmer — have moved from trend to staple. This design uses them strategically: velvet on the middle and ring fingers, solid mauve everywhere else. The restriction to two accent nails keeps the velvet effect from becoming visually overwhelming, which is a real risk with magnetic finishes.
The rose-gold shimmer over mauve creates a color depth that standard metallic polish can't replicate. The magnetic particles align under the magnet to form a concentrated light band — think of it as a cat-eye gemstone effect translated to nails. Under ambient wedding venue lighting, the shimmer catches and releases light as your hands move, which is exactly the kind of subtle drama that photographs well.
The learning curve here is real. Magnetic polish requires holding a magnet steady over wet polish for 15 to 30 seconds per nail. Move the magnet, and the effect scatters into a diffuse shimmer instead of the concentrated velvet band. The magnet needs to be close (about 5mm from the nail surface) and absolutely still. A nail tech with experience in magnetic formulas saves significant time and frustration.
Design Breakdown:
Solid mauve-pink on outer nails; magnetic velvet shimmer on the middle and ring fingers. The contrast between flat and dimensional finishes creates visual hierarchy.
Base Color: Dusty rose or mauve-pink. Two coats for full opacity on the solid nails. The accent nails get a magnetic velvet polish in a matching rose-gold tone.
Nail Shape: Medium-long almond. The curved surface catches the magnetic shimmer band from multiple angles.
Design Element: Rose-gold magnetic velvet polish on the middle and ring fingers, activated with a bar magnet to create the cat-eye velvet band effect.
Finish: Glossy top coat. The shine amplifies the depth of the magnetic shimmer and keeps the solid nails looking smooth.
Get The Look at Home:
The magnet is the make-or-break tool. Hold it too far away or at an angle, and the velvet effect dissipates into generic shimmer. Practice on a swatch stick first.
- Prep: Shape into medium-long almond. Clean and buff all nails.
- Solid nails: Apply two coats of dusty mauve-pink to the thumb, index, and pinky fingers. Cure or dry fully.
- Accent nails: On the middle and ring fingers, apply one coat of rose-gold magnetic velvet polish. Do not cure yet.
- Activate magnet: Hold the bar magnet 5mm above the wet nail surface. Keep it perfectly still for 20 to 30 seconds. A concentrated shimmer band should form down the center.
- Cure immediately: Once the band appears, cure the gel right away — the magnetic particles will slowly drift apart if left uncured.
- Second coat and re-magnet: Apply a second coat of magnetic polish and repeat the magnet step. The second pass deepens the velvet effect.
- Top coat: Apply glossy top coat to all nails. The encapsulation protects the magnetic particles from shifting over time.

30 Stunning Beach Nail Ideas for the Best Vacation in 2026 🌊
8.Gilded Milky Glass
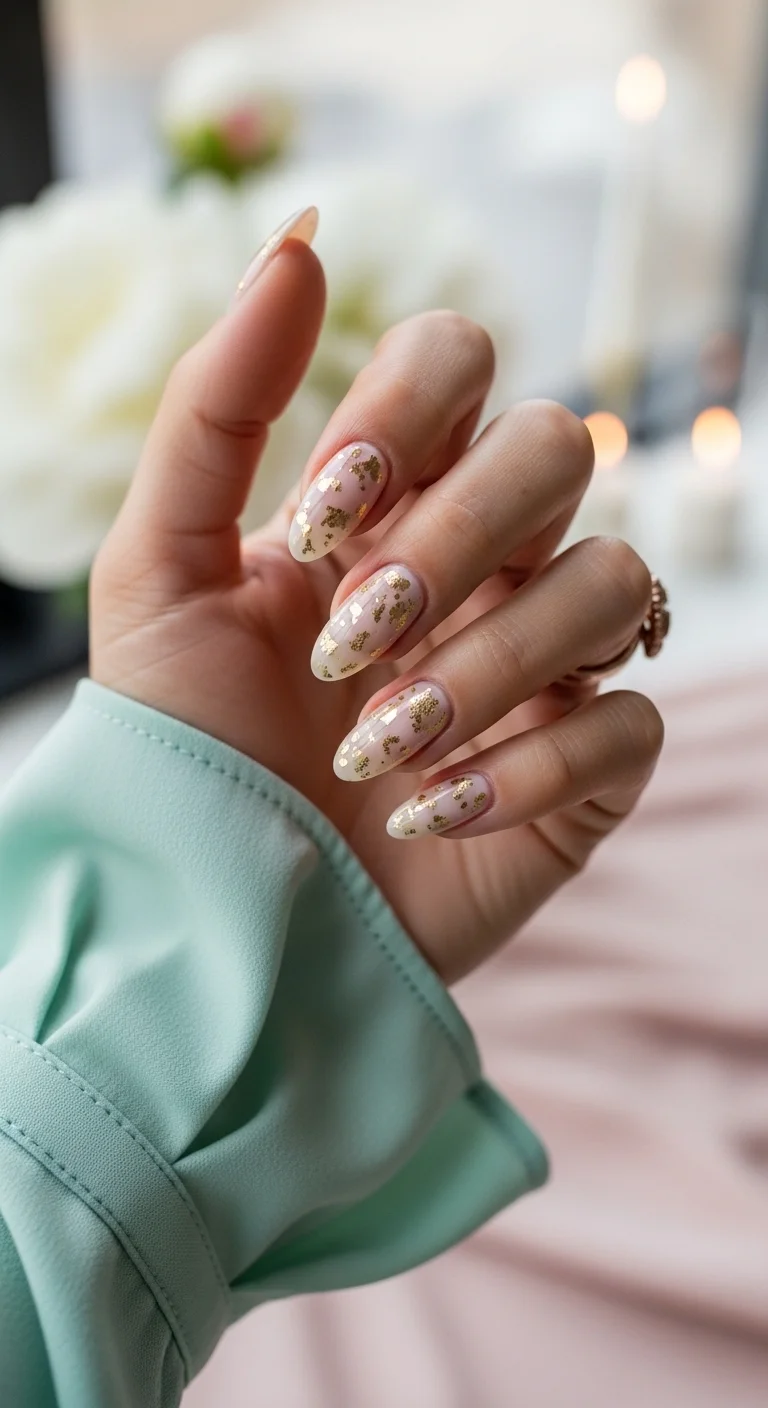
Sheer glass-like base with gold leaf fragments that catch light unpredictably.
Overview:
The "glass nail" trend — sheer, translucent bases that mimic the look of frosted glass — has been circling for seasons, but most iterations feel too editorial for real-world wear. Adding gold leaf to the milky base solves that problem. The foil fragments ground the design, giving the eye something to land on instead of floating in a sea of semi-sheer white.
The transparency of the base is what makes this work. You can see the natural nail underneath — the pink of the nail bed, the white of the free edge — which creates a depth that opaque polishes can't achieve. The gold leaf sits at a different visual layer than the base, creating a three-dimensional quality that photographs beautifully in natural light.
Honest drawback: milky white bases are unforgiving. Unlike sheer pinks that blend with the nail bed, milky white sits on top and shows every brush stroke. A self-leveling formula is essential — ILNP's "Undressed" or a similar jelly-style milky white performs better than standard cream whites. Thin coats, patience between layers.
Design Breakdown:
Sheer milky base with gold leaf scattered across every nail. The layered transparency creates visual depth.
Base Color: Milky white or translucent nude. Two thin coats for an even, semi-sheer wash. The nail bed should be visible beneath.
Nail Shape: Medium-long almond. The elongated shape maximizes the glass-like transparency effect.
Design Element: Gold leaf fragments scattered across each nail in irregular, organic placements. Two to six pieces per nail, depending on nail size.
Finish: Glossy top coat. The high-shine finish enhances the glass effect and gives the gold leaf a wet, embedded appearance.
Get The Look at Home:
Gold leaf is almost impossible to place precisely — and that's the point. Let the flakes land where they want. The irregularity is what makes the design look expensive rather than manufactured.
- Prep: Shape into almond. Buff smooth and dehydrate the nail plate — gold leaf won't stick to oily surfaces.
- Milky base: Two thin coats of milky white or translucent nude. Let each coat dry to a tacky finish.
- Gold leaf: Using tweezers, pick up small fragments of gold leaf and press them onto the tacky surface. Scatter across all nails — no two should look the same.
- Flatten: Press each fragment firmly with a silicone tool. Any raised edges will snag and lift within hours.
- First top coat: Apply one coat to seal the gold leaf in place. This coat absorbs into the foil edges.
- Second top coat: Apply a second thick coat for a smooth, glass-like surface. The dual layers are what create the embedded, floating-gold-in-glass effect.
9.The Architect's Nude
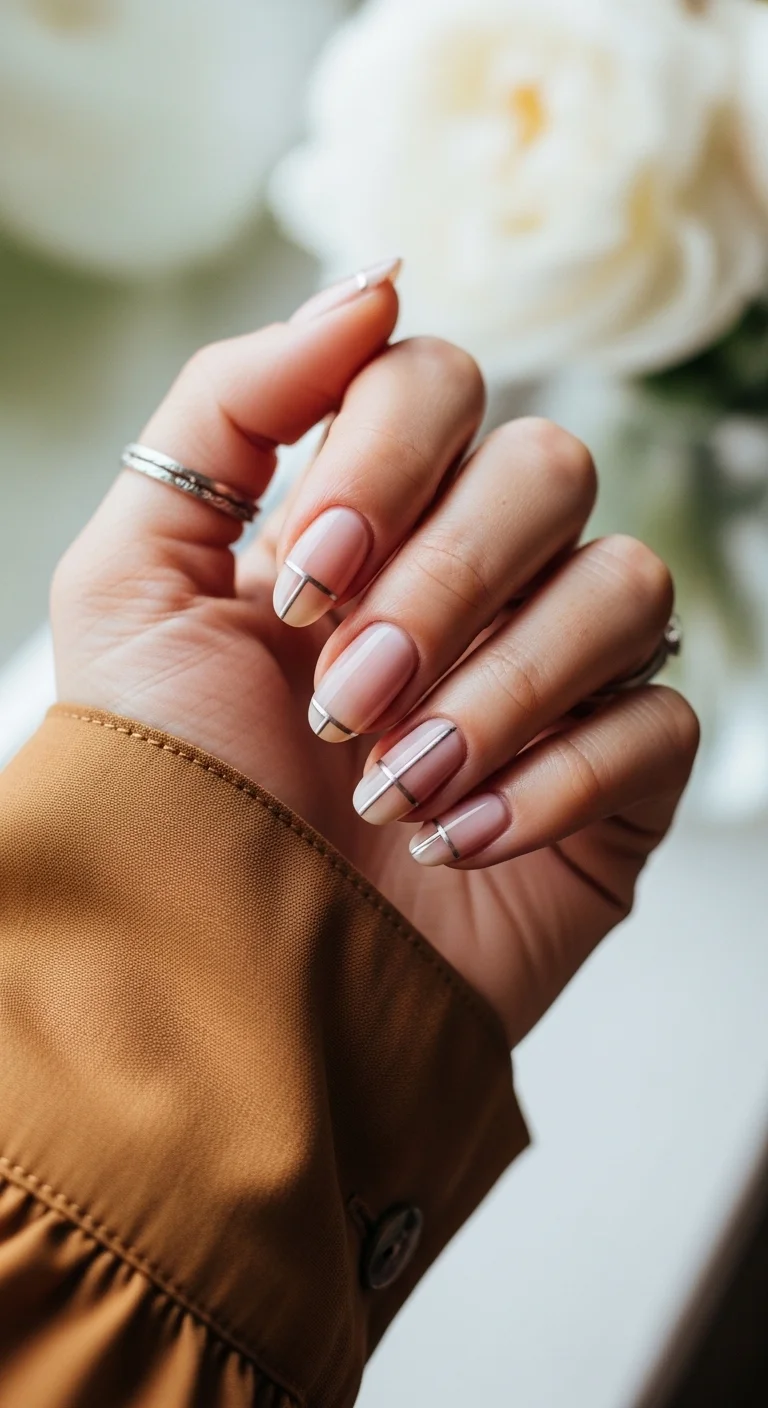
A modified French with silver chrome lines at varying heights.
Overview:
Most "nude nail" designs play it safe and add nothing — the result is clean but forgettable. This design takes the opposite approach: start with a nude base, then add enough structure to make it architectural. The milky-white tips and thin silver lines at varying heights create a composition that rewards a closer look. It's a nude nail with a point of view.
The varying silver line heights are the design's most clever detail. A single horizontal line at the same height on every nail would read as a French tip variation. Different heights on different nails create a staggered, rhythmic effect — almost like a minimalist art installation scaled down to ten fingers. It's subtle enough that most people won't register it consciously, but it elevates the entire composition.
The challenge with this design is proportion. Too-thick silver lines overwhelm the delicate nude base; too-thin lines disappear at conversational distance. The ideal width is approximately 0.5mm — thin enough to read as a line, not a stripe. A professional striper brush or pre-cut striping tape in 0.5mm width makes this achievable at home. Freehand with a standard brush is not recommended.
Design Breakdown:
A modified French with silver chrome lines at varying heights across the nails. The staggered placement creates rhythm without symmetry.
Base Color: Sheer nude or pink-nude. One to two coats for a natural, "your nails but better" base.
Nail Shape: Medium almond. The moderate length keeps the silver lines proportional to the nail surface.
Design Element: Milky-white tips in a soft French curve, plus thin silver chrome or metallic lines placed at different horizontal heights on each nail.
Finish: Glossy top coat. The shine keeps the nude base looking polished and the silver lines looking crisp.
Get The Look at Home:
Precision matters here more than in most designs. The silver lines need to be straight, thin, and at deliberate heights. Use striping tape or a 0mm striper brush.
- Prep: Shape into medium almond. Push back cuticles and buff the nail plate smooth.
- Nude base: One to two coats of sheer nude. Dry completely before adding tips or lines.
- Milky tips: Using a thin brush, paint soft milky-white tips in a classic French curve. The tip color should be translucent, not opaque — "milky" is the keyword.
- Line placement: Cut thin strips of silver striping tape or use a striper brush with metallic silver polish. Place each line at a different height — for example, one nail gets a line near the cuticle, another at mid-nail, another near the tip.
- Trim and press: Press tape firmly to the nail surface. Trim excess at the nail edge with small scissors.
- Top coat: Two layers to fully encapsulate the tape edges. Silver striping tape lifts faster than any other nail accessory — the double top coat is non-negotiable.

26 Stunning Summer Braided Hairstyles for Women 2026 ☀️💇♀️
10.Golden Solstice Sunshine
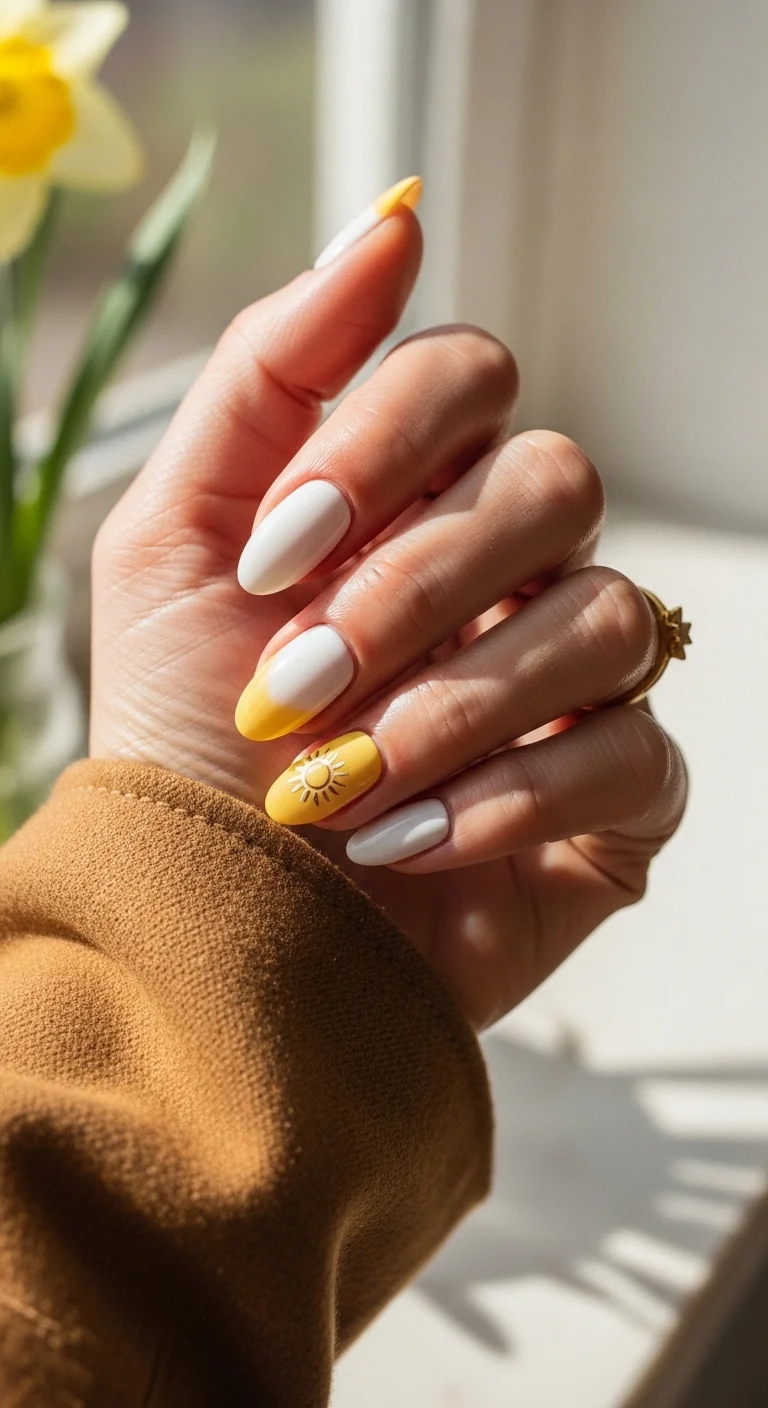
Sunshine on your fingertips.
Overview:
Yellow nail polish has historically been a minefield of streaky formula and unflattering undertones — this design sidesteps that entirely by making white the dominant note. The sunny yellow appears only on the accent nail and a single French tip, which is a smart compositional choice that keeps the look wedding-appropriate without tipping into novelty territory.
The 3D sun charm is the talking point here, but it's also the main liability. That kind of raised embellishment catches on fabric and hair, and removal requires patience. If you're not committed to the drama, skip the charm and lean into the color blocking — it reads just as cheerful without the snag factor.
Best suited for daytime outdoor celebrations. The yellow-white pairing photographs beautifully in natural light but can read flat under warm indoor lighting, where the white risks looking stark rather than crisp.
Design Breakdown:
A balanced split between neutral and statement that keeps the design grounded.
Base Color: Crisp opaque white on most nails; bright sunny yellow on accent nail.
Nail Shape: Medium-long almond. The length gives the charm and French tip room to coexist without crowding.
Design Element: 3D embossed sun charm in matching yellow on ring finger; single yellow French tip on another nail.
Finish: Glossy cream with dimensional embellishment.
Get The Look at Home:
The charm is where most people will struggle — here's how to keep it intact.
- Base Coat: Apply a strengthening base coat to all nails. Yellow pigment stains badly; this is non-negotiable.
- White Foundation: Paint two coats of opaque white (OPI "Alpine Snow" works reliably) on all nails except the ring finger. Let each coat dry fully.
- Yellow Accent: On the ring finger, apply two coats of bright sunny yellow (Essie "Lemon Chiffon" or similar). Build opacity slowly — yellow is unforgiving of thick coats.
- French Tip: On one nail, use a thin striping brush to paint a yellow French tip. Keep the line crisp by anchoring your painting hand.
- Charm Placement: Apply a small dot of nail glue or builder gel to the center of the yellow accent nail. Press the 3D sun charm into place and hold for 15 seconds.
- Seal: Apply top coat generously around (not over) the charm to lock edges. Worth noting: charms can lift after 3-4 days regardless of adhesive quality.
11.Slate & Silver Sparkle
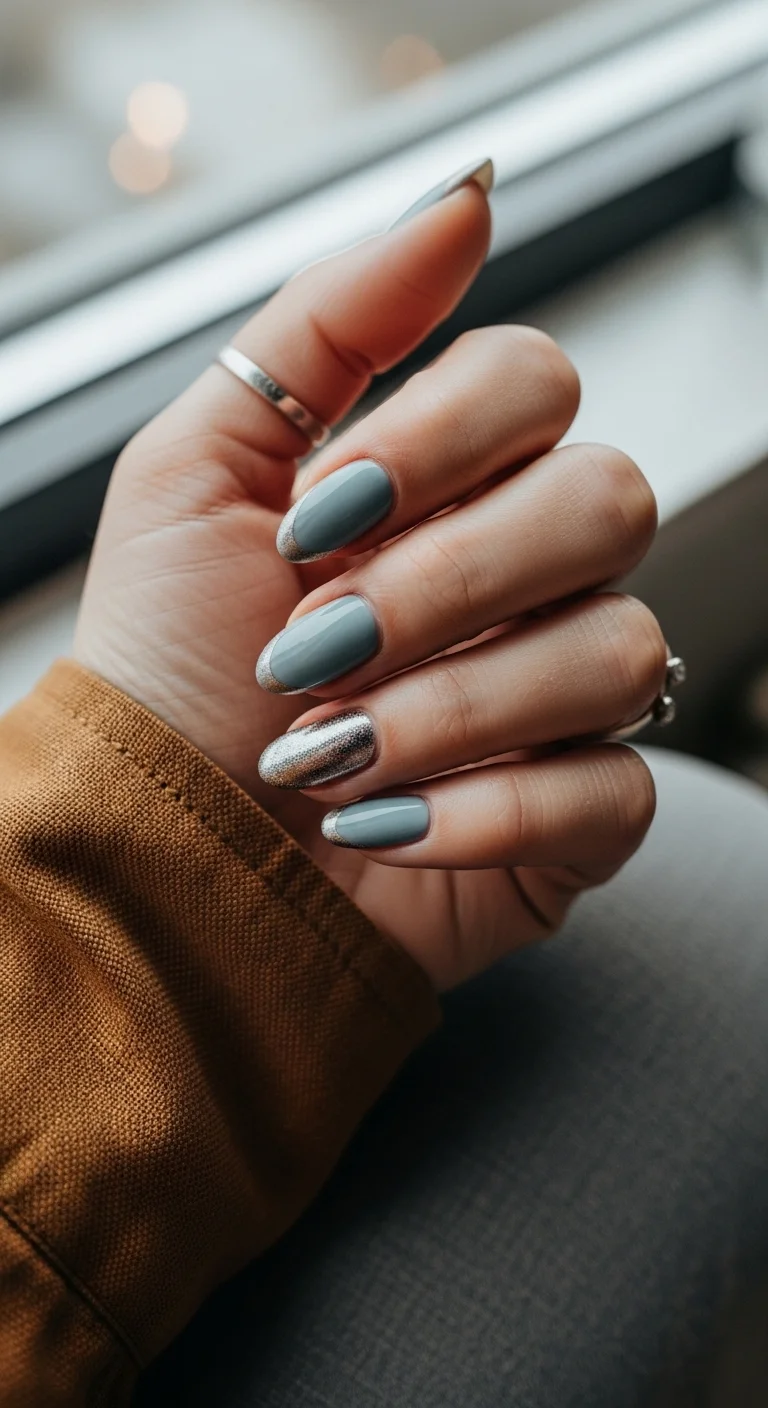
Cool glamour without the cold shoulder.
Overview:
The challenge with glitter at weddings is avoiding the "New Year's Eve" effect. This design solves it by grounding the sparkle in a muted, sophisticated base. The dusty slate blue-grey is the real hero — it's neutral enough to match most outfits but distinctive enough that your nails don't disappear into the background.
The glitter fade at the tips is a subtle detail that elevates this beyond a basic accent nail. It creates visual movement without competing with jewelry, which matters if you're wearing silver or white gold pieces. The dense glitter on the ring finger provides the statement moment.
Cool-toned palettes like this work best on fair to medium skin with pink or neutral undertones. On warmer complexions, the slate can read ashy — consider shifting the base toward a warmer grey-blue if that's your range.
Design Breakdown:
A restrained approach to sparkle that prioritizes sophistication over shimmer.
Base Color: Dusty slate blue-grey cream on most nails; dense silver/champagne glitter accent on ring finger.
Nail Shape: Medium-long almond.
Design Element: Full glitter accent on ring finger; thin glitter fade at tips on select nails.
Finish: Glossy cream base with high-density glitter accent.
Get The Look at Home:
The glitter gradient at the tips is easier than it looks — here's the controlled approach.
- Base Coat: Apply base coat to all nails. Essential for preventing grey-blue staining.
- Slate Foundation: Paint two coats of dusty slate blue-grey (Zoya "Tru" or similar muted blue-grey) on all nails. Keep coats thin for even coverage.
- Glitter Accent: On the ring finger, apply dense silver or champagne glitter polish (ILNP "Cityscape" or similar) in two coats for full opacity. This should be the most reflective nail.
- Tip Fade: On 2-3 other nails, sponge a small amount of glitter polish onto just the tips. Use a makeup sponge for a diffused gradient rather than a harsh line.
- Top Coat: Seal with a glossy top coat. The glitter nails will need an extra coat to smooth the texture — apply two passes if needed.

35 Fun Birthday Nail Designs for 2026 🎂
12.Rose Gold Marble Waves
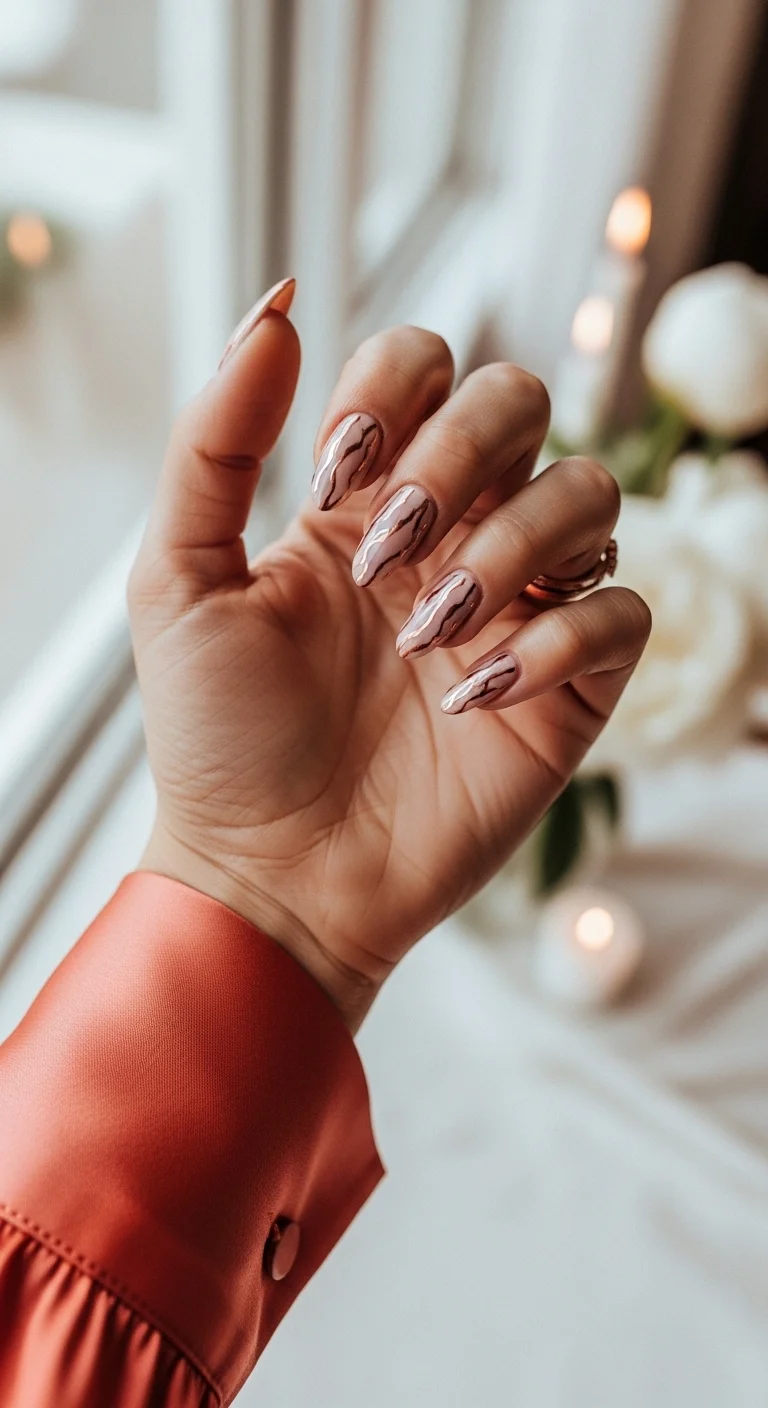
Molten metal meets organic stone.
Overview:
Chrome nails have dominated social media for two years straight, and the trend shows no signs of cooling. This design takes the chrome base further by layering organic marble veining over it, which solves the main criticism of chrome: that it looks one-dimensional. The dark mauve-brown veins create depth that flat metallic finishes can't achieve alone.
The technique here is demanding. Achieving fluid, natural-looking marble lines over a reflective chrome surface requires confidence with a fine brush and a willingness to work quickly before layers set. This is not a beginner design — it's closer to nail art territory than standard manicure territory.
Worth noting: chrome finishes are notoriously difficult to remove. Budget an extra 10-15 minutes for soak-off, or consider using chrome powder over a gel base for easier removal than traditional chrome polish.
Design Breakdown:
A high-impact design that merges industrial finish with organic pattern work.
Base Color: Rose gold chrome/metallic with darker mauve-brown veining.
Nail Shape: Medium-long almond.
Design Element: Organic marble-like dark veins with fluid wavy lines over full metallic base.
Finish: High-shine chrome with dimensional veining.
Get The Look at Home:
The marble veining is the crux of this design — take your time with it.
- Base Coat: Apply base coat. If using chrome powder, apply a no-wipe gel top coat as your base layer first.
- Chrome Layer: Apply rose gold chrome powder over a cured gel base, or use a metallic chrome polish (Cirque Colors "Rose Gold" or similar) in two coats. Buff or smooth for even reflectivity.
- Marble Veining: Using a fine liner brush dipped in dark mauve-brown polish, paint organic, slightly wavy lines across the nail. Vary the thickness — thicker lines at the center, thinner at the edges. Work one nail at a time.
- Wave Detail: While the veining is still wet, gently drag a clean brush through the lines to create fluid, molten movement. Don't overwork it — imperfection reads as organic.
- Top Coat: Seal with a high-shine top coat. Chrome is unforgiving of top coat bubbles, so apply in thin, even strokes.
13.Periwinkle Petal French
French tips, reimagined in blue.
Overview:
Color theory has been quietly reshaping French manicures for the past several seasons, and this periwinkle iteration is one of the more successful outcomes. The cool blue tips against the warm nude base create a subtle complementary contrast that's more visually interesting than the classic white tip without being distracting.
The slightly textured, petal-like quality of the tips is what sets this apart from a standard colored French. It softens the geometry and adds a handmade feel that photographs beautifully in close-up shots. The trade-off is that this texture requires careful application — thick, uneven tips will look clumsy rather than delicate.
This design is particularly well-suited to spring and early summer weddings where the cooler palette harmonizes with seasonal florals. It reads less formal than a stark white French, making it ideal for garden or outdoor venues.
Design Breakdown:
A delicate variation on the French manicure that trades precision for softness.
Base Color: Sheer nude or pink base. One coat for a translucent foundation.
Nail Shape: Medium-long almond.
Design Element: Soft periwinkle blue tips with slightly textured petal-like quality, achieved through stippling.
Finish: Semi-sheer glossy base with creamy tip detail.
Get The Look at Home:
The petal texture on the tips is achieved through layering, not carving — here's the method.
- Base Coat: Apply a sheer nude or pink base coat (Essie "Ballet Slippers" or similar) in one coat for a translucent foundation.
- Tip Mapping: Using a French tip guide or freehand, mark where the blue tip begins. Keep the smile line soft rather than sharply curved.
- First Blue Layer: Apply periwinkle blue polish (Zoya "Luanne" or similar) to the tip area. Keep the coat thin.
- Petal Texture: While the first coat is still slightly tacky, dab a second layer of the same blue onto the tips using a small sponge or brush stippling motion. This creates the mottled, petal-like dimension.
- Top Coat: Apply a glossy top coat to seal. The texture should be visible but smooth to the touch — if it feels rough, add a second top coat layer.
32 Stunning Summer Wedding Hairstyles for Brides ☀️💍
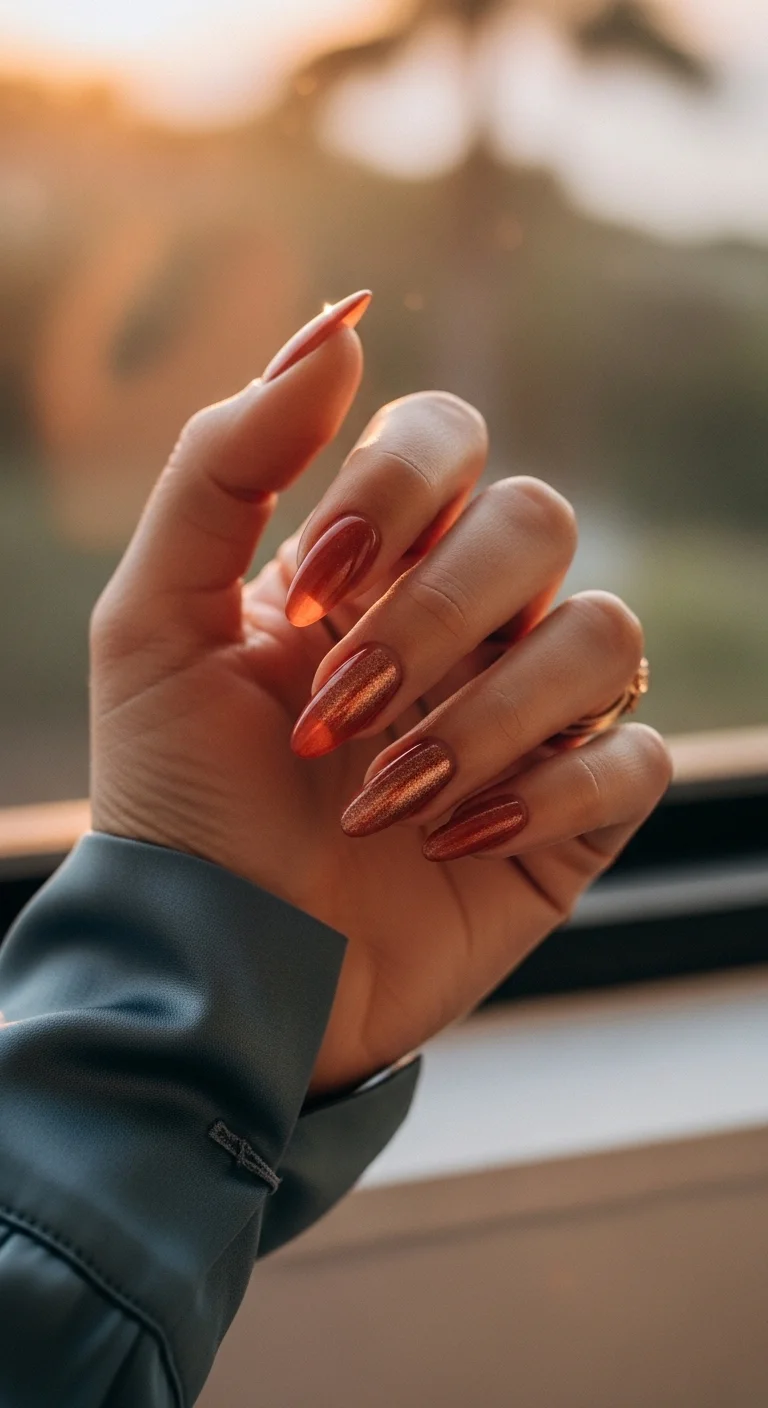
14.Ember Jelly Sparkle
Warm light, bottled.
Overview:
Jelly nails are having a moment, but the translucent finish has a real limitation: most jelly polishes require three or more coats to build enough color to register on camera. This burnt amber shade is a smart choice because the warm tone stays visible even when sheer — unlike cooler jellies that can disappear against skin.
The fine gold micro-glitter suspended in the translucent base creates a lit-from-within effect that's hard to replicate with opaque polish. It catches light differently at every angle, which makes these nails particularly dynamic in video and photography. The trade-off is that jelly finishes show every ridge and imperfection in the nail surface more prominently than cream finishes.
File and buff nails thoroughly before application. The translucent formula will telegraph any unevenness, so the base canvas matters more here than with opaque colors. Best reserved for autumn and winter celebrations where the warm tones feel seasonally intentional.
Design Breakdown:
A translucent design that relies on depth and warmth rather than opacity for impact.
Base Color: Translucent burnt amber/copper with fine golden micro-glitter.
Nail Shape: Medium-long almond.
Design Element: Jelly/translucent base with suspended gold shimmer throughout.
Finish: Semi-sheer glossy with internal sparkle dimension.
Get The Look at Home:
The sheer formula demands patience — rushing the layers will cause bubbling.
- Base Coat: Apply a ridge-filling base coat. Critical for jelly finishes, which amplify surface imperfections.
- First Jelly Coat: Apply a thin coat of translucent burnt amber polish (OPI "Is Mai Tai Crooked?" or similar warm copper) to all nails. It will look patchy — this is expected.
- Second Jelly Coat: Apply a second thin coat, allowing 2-3 minutes of drying time between layers. The color should deepen to a warm, glowing amber.
- Third Coat (Optional): If the color still looks uneven, apply a third coat. Three thin coats always beats two thick ones with jelly formulas.
- Gold Shimmer: If your amber polish doesn't include micro-glitter, layer a sheer gold shimmer topper (ILNP "Gold Rush" or similar) over the final coat.
- Top Coat: Apply a thick, glossy top coat to amplify the translucent depth. The shine is what makes the "lit from within" effect work.
15.Lilac Geometric Criss-Cross

Soft color, sharp lines.
Overview:
Pastel nail art walks a fine line between "sweet" and "juvenile," and the geometric criss-cross pattern here is what keeps this design firmly in sophisticated territory. The thin diagonal lines impose structure on the soft lilac, creating visual tension that flat pastels lack on their own.
The execution is deceptively difficult. Straight, evenly-spaced lines across a curved nail surface require either striping tape or a very steady hand with a liner brush. Most people will need 2-3 attempts to get the spacing consistent — practice on a swatch stick first. The darker purple against lilac is a tonal pairing, which is more forgiving than high-contrast color combinations.
This design works best when kept to short or medium lengths. On very long nails, the diamond pattern can distort and the visual weight shifts too far toward the tips. Keep the proportions balanced.
Design Breakdown:
A structured take on pastel that uses geometric lines to add maturity.
Base Color: Soft lilac/lavender cream.
Nail Shape: Medium-long almond.
Design Element: Thin dark purple/mauve diagonal lines crossing to form diamond lattice pattern.
Finish: Glossy cream with fine line detail.
Get The Look at Home:
Line work is the most error-prone step — here's how to maintain control.
- Base Coat: Apply base coat to all nails.
- Lilac Foundation: Paint two coats of soft lilac (Essie "Lilacism" or similar pastel lavender) on all nails. Ensure full opacity before proceeding.
- Line Preparation: Load a thin liner brush with dark purple polish (Zoya "Casey" or similar deeper mauve-purple). Wipe excess off the brush — the line needs to be thin.
- First Direction: Paint diagonal lines from bottom-left to top-right across the nail, spacing them approximately 3-4mm apart. Keep consistent pressure.
- Second Direction: Paint diagonal lines from bottom-right to top-left, crossing the first set to create diamond shapes. Each intersection should be clean.
- Top Coat: Apply top coat carefully. Heavy brush strokes can smudge the lines — float the brush rather than pressing it into the surface.

34 Cutest Butter Yellow Nail Designs for 2026 🧈
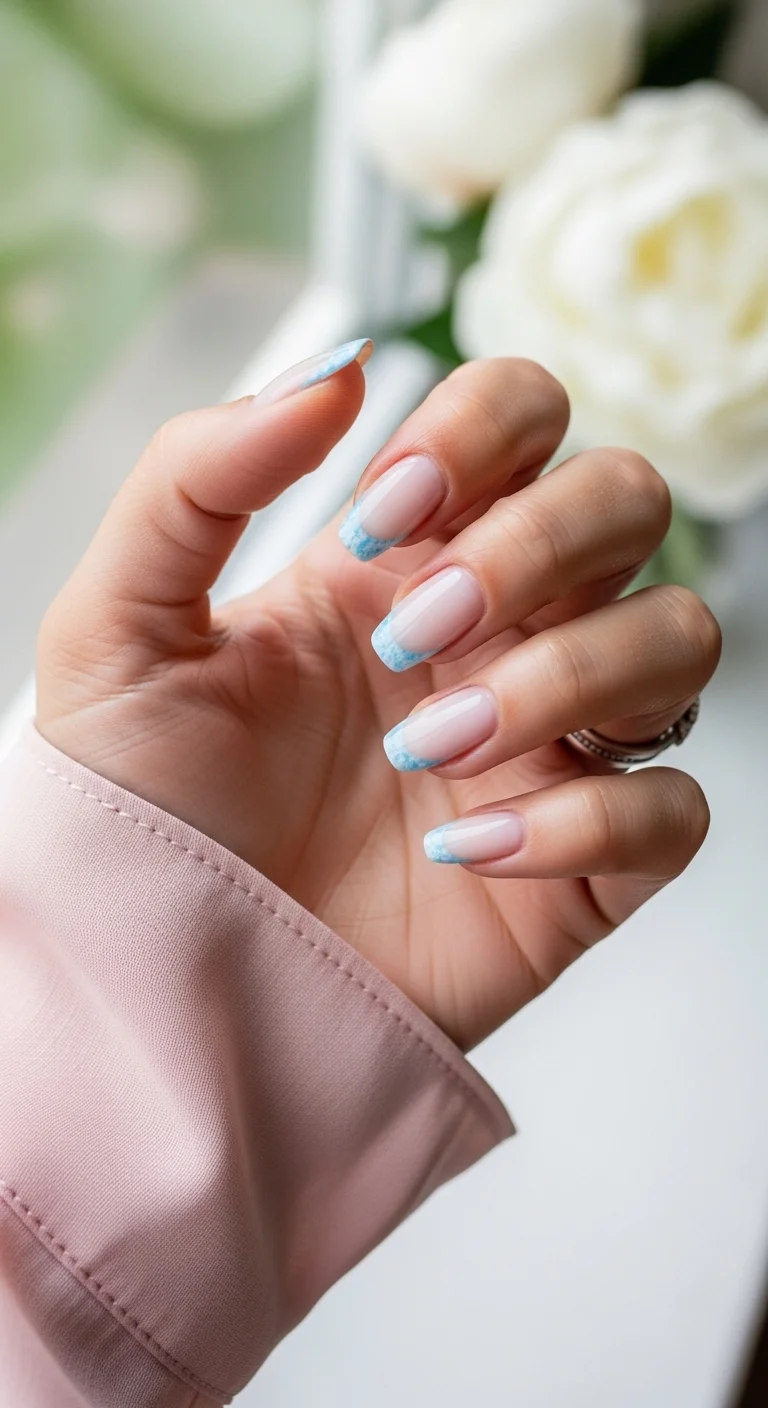
16.Blue Cloud Frenchies
Tips dipped in sky.
Overview:
The watercolor nail trend has been oversaturated online, but most iterations look muddy in person. This design takes the concept and refines it by limiting the effect to just the French tips, where the cloudy texture actually reads as intentional rather than accidental. The milky pink base provides a clean, neutral canvas that lets the blue tips breathe.
The mottled cloud texture is achieved through stippling or sponging, which gives it an organic, slightly unpredictable quality. No two nails will look identical, and that's the point — it reads as artisanal rather than mass-produced. The downside is that this inconsistency can bother people who prefer uniform results.
Color pairing matters here: the periwinkle blue against milky pink is a classic cool-warm combination that flatters most skin tones. Avoid shifting the blue toward turquoise or teal — it loses the cloud effect and starts looking like a standard colored French.
Design Breakdown:
A textural French design that uses watercolor technique for organic variation.
Base Color: Sheer milky pink base.
Nail Shape: Medium-long almond.
Design Element: Baby blue/cloud-textured tips with mottled, watercolor-like finish.
Finish: Semi-sheer base with soft, diffused tip detail.
Get The Look at Home:
The cloud effect depends on the sponging technique — here's how to keep it controlled.
- Base Coat: Apply base coat to all nails.
- Milky Base: Apply one coat of sheer milky pink (Essie "Mademoiselle" or similar) for a translucent, natural-looking foundation.
- Tip Mapping: Mark where the French tip begins using a thin brush or guide. Keep the smile line slightly deeper than a traditional French for more tip area.
- Cloud Texture: Dab baby blue polish (Zoya "Blu" or similar soft periwinkle) onto a small makeup sponge. Lightly press and lift the sponge onto the tip area, building the color gradually. The stippling creates the cloudy, mottled texture.
- Layering: Apply 2-3 passes with the sponge, concentrating more color at the tip edge and fading toward the smile line. Each pass adds density and variation.
- Top Coat: Seal with a glossy top coat to smooth the textured surface and unify the finish.
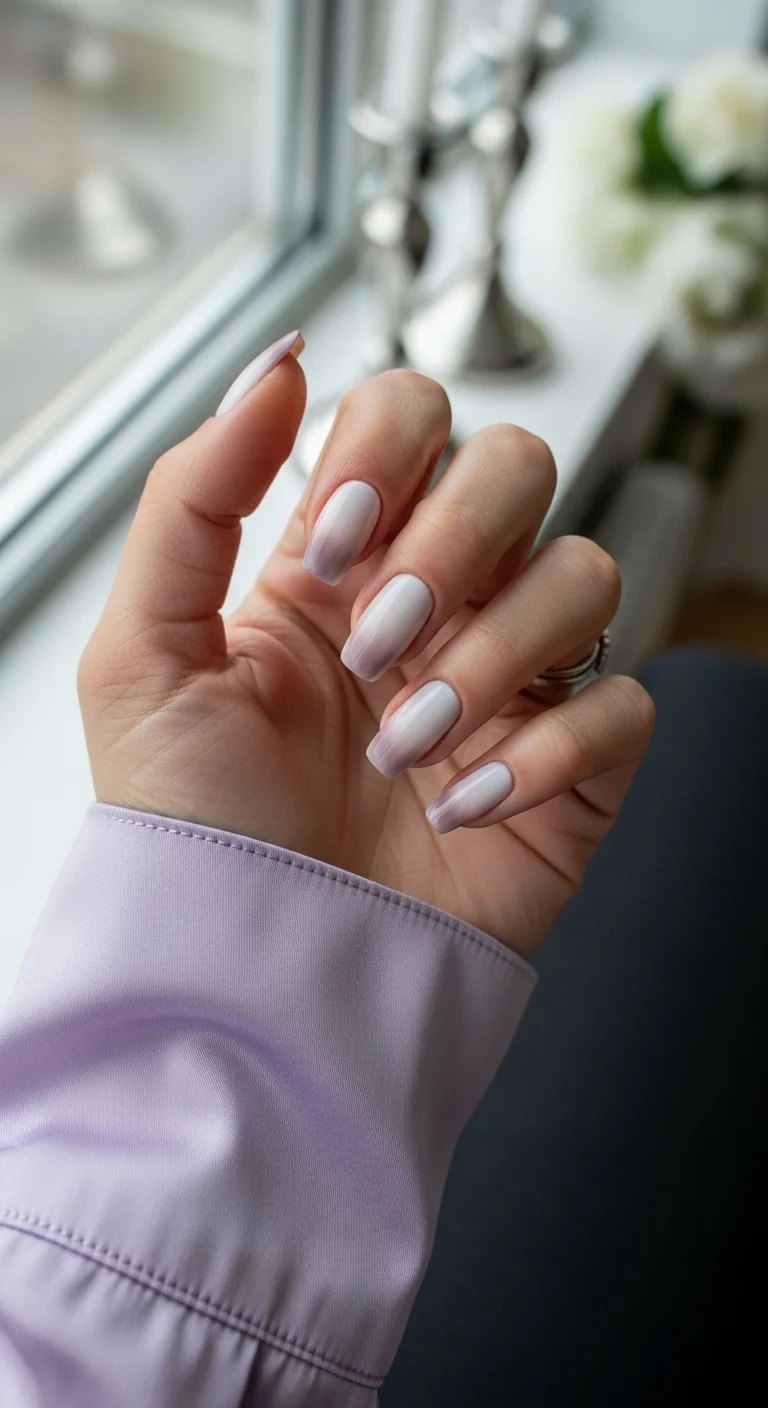
17.Twilight Vertical Ombre
Where day meets dusk.
Overview:
Gradient nails have a reputation for being either gorgeous or garish, with very little middle ground. This vertical ombre lands on the right side of that divide because the color range is narrow — milky white to soft lavender is a gentle enough transition that even imperfect blending still looks intentional.
The vertical orientation (light at cuticle, dark at tip) is more flattering than horizontal ombré on most nail shapes. It creates the illusion of length and keeps the color concentration at the tips, which is where nails naturally show the most wear. Practical and aesthetic in one choice.
Blending is the technical challenge here. A makeup sponge is the standard tool, but the key is minimizing the number of passes — over-sponging creates a muddy texture rather than a smooth gradient. Two to three gentle presses per nail is the sweet spot. The lavender should never overpower the white; it's a whisper, not a shout.
Design Breakdown:
A tonal gradient that uses vertical orientation for a more flattering, elongating effect.
Base Color: Milky white transitioning to soft lavender-lilac.
Nail Shape: Medium-long almond.
Design Element: Seamless vertical ombre from cuticle to tip.
Finish: Smooth glossy with blended gradient transition.
Get The Look at Home:
Sponging technique is everything here — light pressure yields the cleanest gradient.
- Base Coat: Apply base coat to all nails.
- White Foundation: Apply one coat of milky white (OPI "Funny Bunny" or similar) to all nails as a base. This gives the gradient a clean starting point.
- Sponge Setup: On a flat makeup sponge, paint a stripe of milky white at the top and soft lavender (Zoya "Robin" or similar) at the bottom, with a slight overlap in the middle where they'll blend.
- First Pass: Press the sponge onto the nail from cuticle to tip with a gentle rolling motion. Do not drag — press and lift. One clean pass.
- Second Pass: Reload the sponge and repeat. The second pass builds opacity and refines the blend. Stop here if the gradient looks smooth.
- Cleanup: Use a small brush dipped in acetone to clean the skin around the cuticle. Gradient work always extends past the nail edge.
- Top Coat: Apply a generous glossy top coat to smooth the sponged texture and deepen the color transition.

25 Stunning Summer Vacation Hairstyles for 2026 ☀️🌊
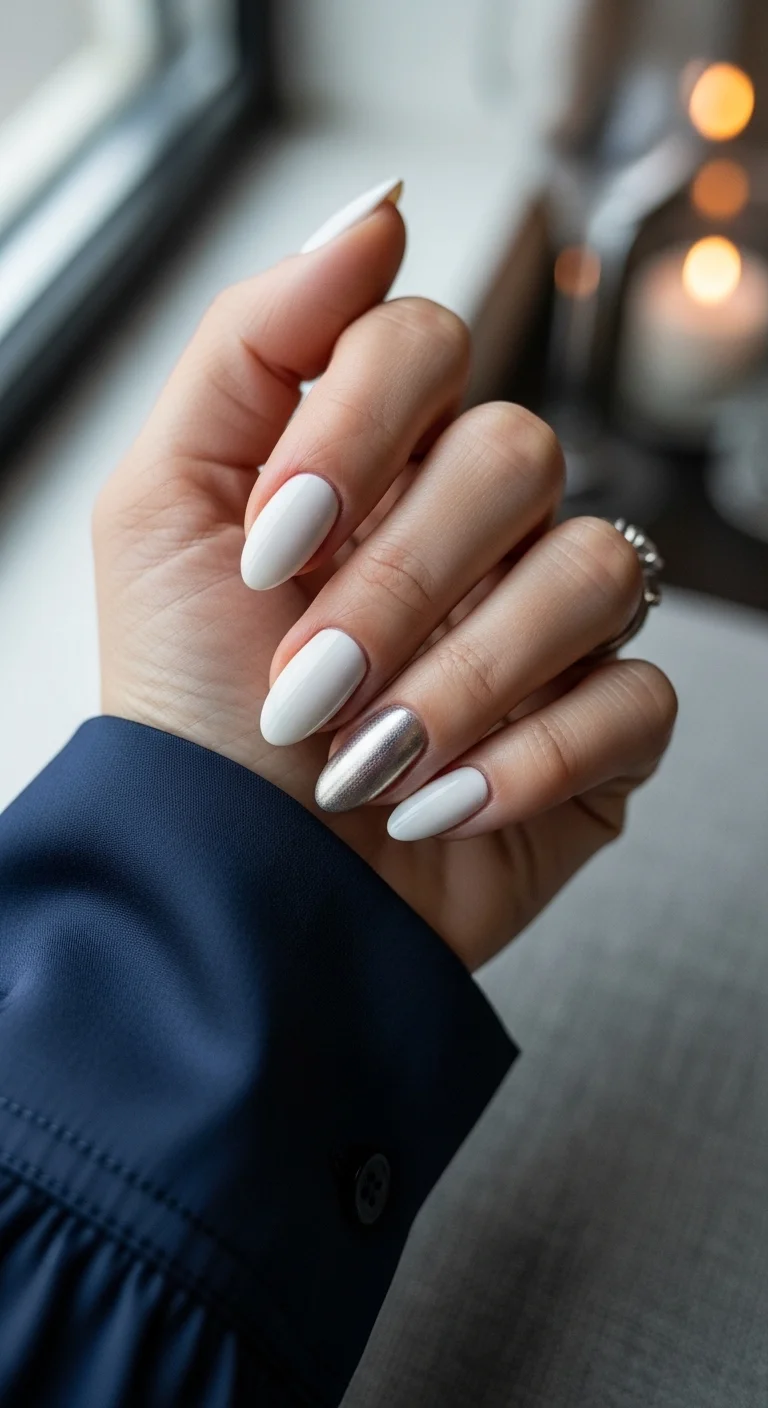
18.Silver Solder & Stark White
Precision over decoration.
Overview:
Minimalism in nail design is often code for "boring," but this combination of stark white with a single chrome accent proves otherwise. The high contrast between the matte-like opacity of the white and the mirror reflectivity of the silver creates a tension that's anything but safe. It's a deliberate, architectural choice.
The single accent nail strategy is the most wearable way to incorporate chrome without committing to a full set. The ring finger placement is traditional and intentional — it's the nail people notice first in photographs, and it creates a focal point that grounds the design. The white nails act as negative space, making the chrome feel even more striking by comparison.
The critical factor here is white opacity. Anything less than full, streak-free coverage in two coats will undermine the entire design. If your white polish is sheer or patchy, it reads as unfinished rather than clean. Invest in a reliable opaque white or use gel for guaranteed coverage.
Design Breakdown:
A high-contrast, low-ornament design that relies on precision and finish contrast.
Base Color: Bright opaque stark white on most nails; silver chrome metallic accent on ring finger.
Nail Shape: Medium-long almond.
Design Element: Full silver chrome/metallic accent on ring finger only.
Finish: Glossy opaque white with high-shine mirror chrome accent.
Get The Look at Home:
The white must be flawless — any streaking will be immediately visible against the chrome.
- Base Coat: Apply base coat to all nails. White polish stains more aggressively than most colors.
- White Application: Apply two coats of bright opaque white (OPI "Alpine Snow" or Cirque Colors "Snowblind") to all nails except the ring finger. Ensure full, even coverage with no visible brush strokes.
- Chrome Prep: On the ring finger, apply a no-wipe gel top coat and cure. The chrome powder adheres best to a smooth, cured surface.
- Chrome Powder: Using a small applicator, rub silver chrome powder onto the cured ring finger nail. Burnish until the surface is mirror-reflective. Brush away excess powder with a fluffy brush.
- Seal Chrome: Apply a thin top coat over the chrome nail to seal. Two thin coats are better than one thick coat — chrome can lift if the top coat is too heavy.
- Final Top Coat: Apply top coat to the white nails as well to unify the finish across all nails.
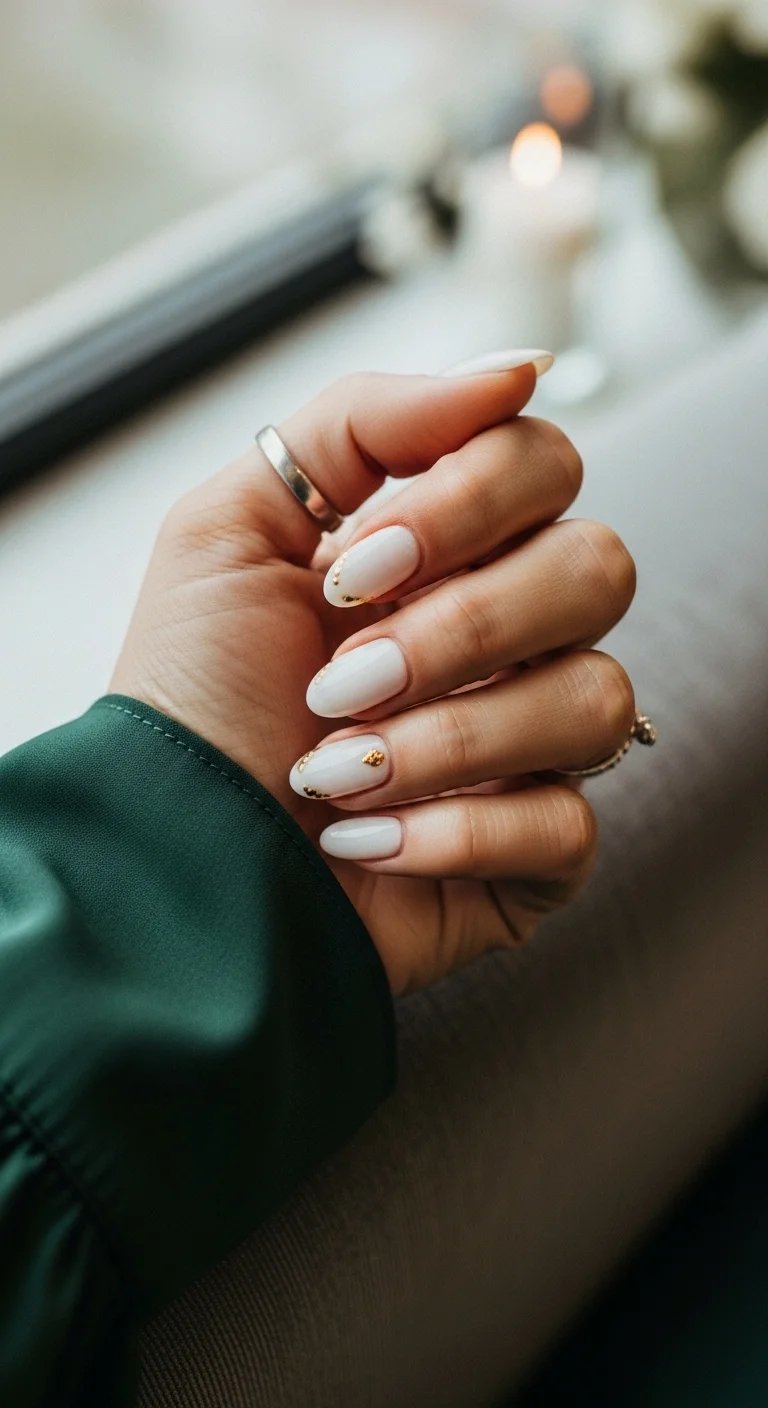
19.Gilded Cuticle Dots
Proof that restraint is the ultimate luxury.
Overview:
The quietest designs are often the hardest to execute well. These gilded cuticle dots look like someone just casually dropped gold leaf onto a milky white canvas — in reality, that deliberate placement takes a steady hand and a clear plan. This is minimalism with intent, not minimalism by default.
The milky white base reads clean on cooler complexions but can lean slightly stark on deeper warm tones — consider swapping for a soft cream or off-white if that's a concern. The gold leaf near the cuticle is forgiving during growth-out since it's already anchored at the base, making this a smart two-week manicure choice.
The trade-off: gold leaf is notoriously fussy. It folds, it crinkles, it refuses to lay flat. A UV topcoat is non-negotiable here — air-dry topcoats won't seal those edges properly and you'll be picking gold off your sweater by dinner.
Design Breakdown:
A study in strategic restraint — every element earns its place.
Base Color: Opaque milky white or off-white. Zoya's "Snow" or "Blanc" deliver the right density without looking chalky.
Nail Shape: Medium almond. The tapered tip gives those tiny gold dots room to breathe without crowding the design.
Design Element: Gold leaf fragments or metallic gold dots placed deliberately near the cuticle area on select nails — not every finger, which is the whole point.
Finish: High-shine glossy topcoat. The gold needs a smooth reflective surface to catch light properly.
Get The Look at Home:
Patience is the real tool here — the gold leaf won't cooperate if you rush.
- Prep: Push back cuticles cleanly — any ragged edges will throw off the precision of the gold placement. Apply a ridge-filling base coat for that smooth milky canvas.
- Base: Two coats of opaque milky white. Let each coat dry fully — gold leaf applied to tacky polish will tear and shift. Three coats if your polish is sheer.
- Gold Leaf: Using a dotting tool or a toothpick with a tiny dab of topcoat as adhesive, place gold leaf fragments near the cuticle on 3-4 nails per hand. Less is more — step back after each dot.
- Seal: One generous coat of UV topcoat. Make sure the edges of each gold fragment are completely encapsulated. Cure fully.
- Worth noting: If gold leaf fights you, metallic gold polish applied with a thin dotting tool gives a similar effect with far less frustration.

31 Patriotic Fourth of July Nail Ideas for 2026 🇺🇸
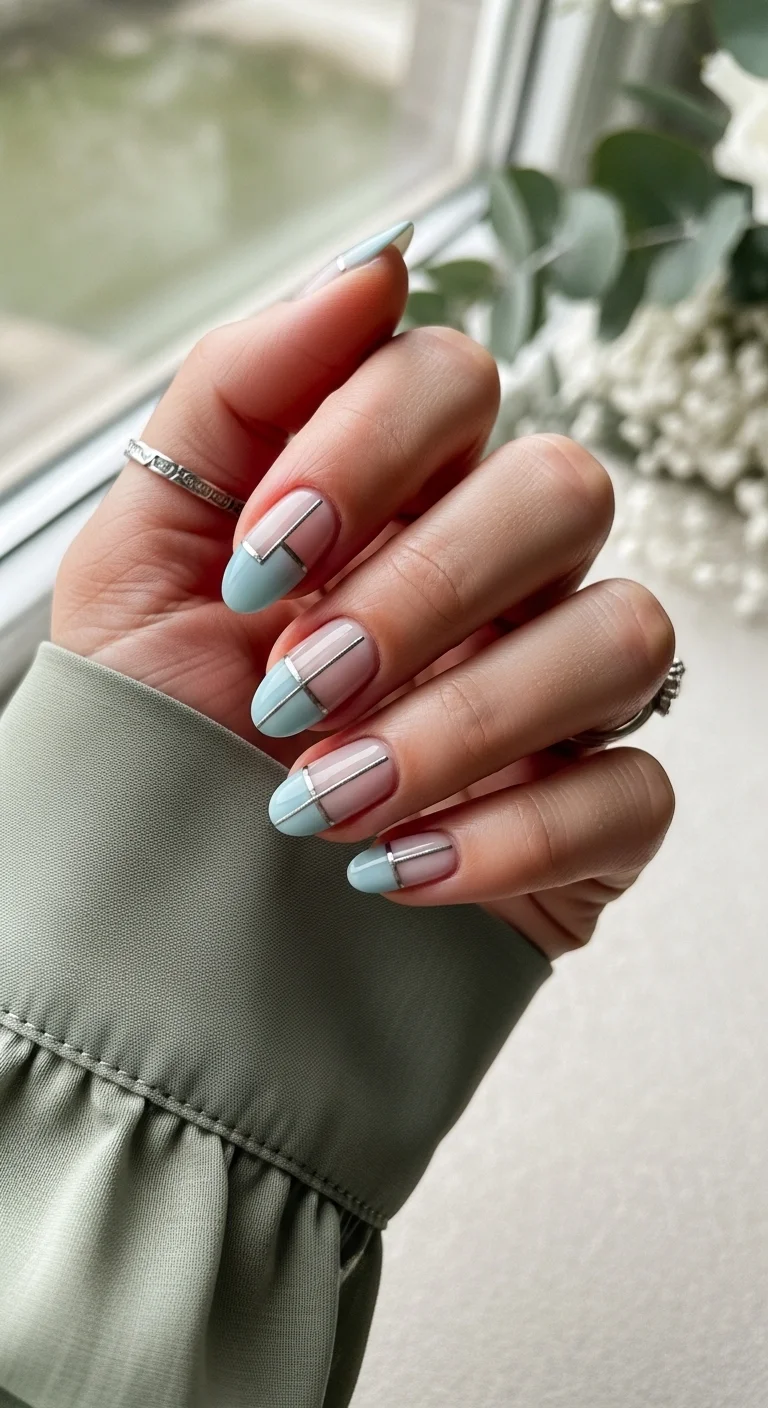
20.Geometric Sky Blue & Silver
Architectural precision meets pastel softness.
Overview:
Most wedding nail content assumes you want something safe. This design doesn't care about that assumption. The geometric color-blocking with baby blue and silver chrome is architectural without being aggressive — it reads modern, not manic. Each nail having a different angular arrangement keeps the set from looking too matchy-matchy, which is a trap most geometric nail art falls into.
The challenge here is symmetry — or the intentional lack of it. Striping tape demands clean, confident lines. Planning the angular layout on paper before touching a brush saved significant time and frustration. The sheer nude base is also strategically chosen: it masks imperfections in line work far better than an opaque base would.
One real concern: striping tape can peel at the edges over time, especially on nails that see a lot of hand-washing. A thick gel topcoat is worth the extra step — this isn't a design you want lifting after one day.
Design Breakdown:
Every line is a decision — that's what makes this design feel considered rather than decorative.
Base Color: Sheer nude or clear base — acts as negative space and gives the geometric sections visual breathing room.
Nail Shape: Medium-long almond. The elongated shape complements the angular lines and prevents the design from feeling cramped.
Design Element: Pastel sky blue color-blocked sections separated by thin silver metallic striping tape — each nail features a unique angular arrangement.
Finish: Glossy topcoat over the blue sections with the silver tape providing its own metallic contrast.
Get The Look at Home:
Invest in thin striping tape (0.5mm or less) — thicker tape will overwhelm the design on an almond shape.
- Plan: Sketch your angular layout on paper first. Decide which nails get which geometric arrangement. Having a reference prevents second-guessing mid-manicure.
- Base: One coat of sheer nude. Keep it thin — you want translucency, not opacity.
- Map Lines: Apply thin silver striping tape in your planned angular pattern. Press firmly at the edges. Leave tails hanging off the nail edge for now — you'll trim after sealing.
- Color Fill: Using a small brush, paint pastel sky blue into selected sections between the tape lines. Work slowly — ILNP's pastels are forgiving but still require clean edges.
- Trim & Seal: Trim the tape tails flush with the nail edge. Apply two coats of gel topcoat, making sure to fully encapsulate the tape edges. Cure thoroughly.
- Reality check: This design takes 45-60 minutes per hand. Budget your time accordingly — don't attempt this the night before an event.
21.Gold Dust Gradient
The gradient that actually looks expensive.
Overview:
Glitter gradients are everywhere and most of them look like craft projects. The difference between cheap and chic is entirely in the glitter particle size — chunky glitter reads festive, fine glitter reads refined. This design uses champagne gold micro-glitter so densely packed at the tips that it creates a true ombré fade, not just scattered sparkle.
The milky white base is doing more work than you'd think. It creates a soft, diffused backdrop that lets the gold gradient breathe — a stark white base would make the transition feel abrupt and harsh. On medium-length almond nails, the proportions work beautifully: enough free edge for the gradient to develop, enough nail bed for the milky base to establish itself.
Worth noting: fine glitter is harder to remove than chunky glitter. It clings to every ridge and crevice. Soaking in acetone for a full 10-15 minutes isn't optional here — it's necessary. Factor that into your removal plans.
Design Breakdown:
The gradient does the talking — everything else is quiet support.
Base Color: Opaque milky white. Two even coats to create that soft, slightly translucent quality.
Nail Shape: Medium almond. Provides the ideal canvas for a gradient that needs to develop over visible free edge.
Design Element: Champagne gold fine glitter concentrated at the tips, fading in density toward the cuticle — the densest sparkle sits at the free edge.
Finish: Glossy topcoat. The shine amplifies the champagne tones and smooths out any glitter texture.
Get The Look at Home:
The secret is building the gradient in thin layers rather than trying to achieve full density in one pass.
- Base: Apply two coats of milky white polish, allowing each coat to dry completely. A smooth base is essential — glitter will cling to any texture underneath.
- Prep Glitter: Pour fine champagne gold glitter onto a palette or foil. You'll be applying it with a cosmetic sponge, not a brush — sponges give you control over density.
- Build Gradient: Dab the sponge into glitter and press onto the nail tip, rolling slightly toward the center. Build in 3-4 passes, adding more glitter to the tip with each pass and working less toward the cuticle.
- Refine: Use a clean brush dipped in acetone to clean up any stray glitter near the cuticle or sidewalls. This step separates a professional finish from a messy one.
- Seal: Two coats of topcoat — the first coat locks the glitter in place, the second creates a smooth surface. Essie's "Gel Setter" works well for this dual-coat approach.

21 Hot Summer Buns Hairstyle Ideas for 2026 ☀️🔥
22.Molten Pearl Ombre
When your nails look like they're made of liquid metal.
Overview:
Most pearl-effect nails disappoint in person — they photograph beautifully but live as a subtle shimmer that barely registers. Not this one. The molten pearl ombré uses a pearlescent chrome pigment that creates genuine dimension — it shifts between champagne, gold, and soft pink depending on the light angle. This is not a shimmer topper; it's a full-coverage molten effect.
The French ombré structure is key to its sophistication. By concentrating the pearlescent champagne at the tips and letting milky white dominate near the cuticle, the design avoids the "full chrome nail" look that can veer into costume territory. It's the gradient that makes the chrome feel wearable rather than theatrical.
The trade-off: chrome pigments are unforgiving. They highlight every bump, ridge, and imperfection in the base coat. If your nails have texture issues, a smoothing base coat is mandatory — there's no faking a smooth canvas under chrome powder.
Design Breakdown:
Light does most of the work here — your job is just setting up the gradient correctly.
Base Color: Milky white fading into pearlescent champagne-gold. The ombré transition runs from cuticle to tip.
Nail Shape: Medium-long almond. The extended tip provides the ideal surface for the chrome gradient to develop.
Design Element: French ombré using pearlescent/champagne chrome pigment — concentrated at tips, diffused toward cuticle, creating a molten liquid effect.
Finish: High-shine chrome-like iridescence. The reflective quality is what elevates this beyond a standard ombré.
Get The Look at Home:
Chrome powder application is a technique that rewards precision and punishes impatience.
- Base Coat: Apply a smoothing base coat — Zoya's "Anchor" works well. Chrome amplifies every imperfection, so take the time to get this layer perfectly smooth.
- Color Foundation: Two coats of milky white, fully cured if using gel. The base color determines the depth of the pearl shift — too sheer and the chrome will look washed out.
- Chrome Application: Using an eyeshadow applicator or silicone tool, rub pearlescent champagne chrome pigment onto the tip of each nail, working upward toward the center. Use lighter pressure as you move toward the cuticle for a natural fade.
- Blend: With a clean applicator, gently buff the transition zone where chrome meets bare base. The gradient should feel seamless — no hard lines.
- Seal: Apply a no-wipe topcoat over the chrome. Chrome powder will dull and flake without proper sealing. Two coats for insurance.
- Caveat: If you're using regular polish instead of gel, the chrome pigment won't adhere the same way. A tacky base coat or dedicated chrome adhesive is necessary — regular polish dries too smooth for pigment to grab.
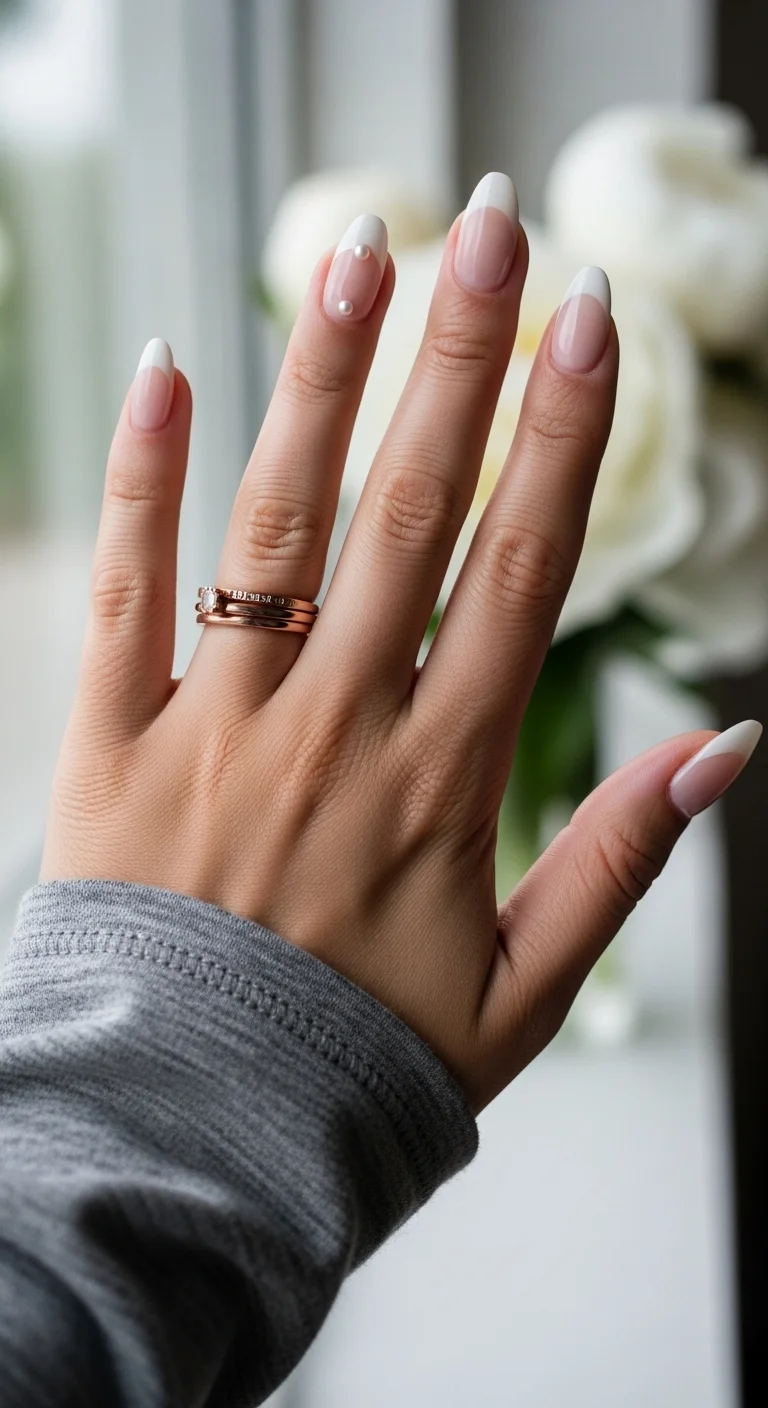
23.The Pearlized Frenchy
The French manicure, but with opinions.
Overview:
The French manicure has been declared dead so many times it's basically immortal. What keeps reinventing it is exactly this kind of subtle material shift — pearlescent chrome tips instead of flat white transform the most predictable nail design into something that actually catches attention. The difference is less about the shape and more about how light interacts with the tip.
The single pearl gem on the index finger is a smart restraint. A full set of gemmed French tips would look bridal in the most generic sense — one accent nail keeps the design grounded and modern. It's a detail that rewards close inspection rather than shouting from across the room.
One honest downside: French tips on almond nails are harder to keep crisp than on square shapes. The curved free edge means your tip line is constantly in motion, and any asymmetry is immediately visible. If your free hand isn't steady, French tip guides are your friend — no shame in using them.
Design Breakdown:
The classic French formula, updated with a material that actually justifies its existence.
Base Color: Sheer nude-pink — should look like your nail bed but slightly perfected, not painted.
Nail Shape: Medium-long almond. The curved tip creates a softer French line than square, which suits the pearlescent finish.
Design Element: Classic French tip shape with pearlescent/chrome white replacing flat white, plus one small pearl gem at the cuticle of the index finger.
Finish: Pearlescent chrome on tips, glossy base — the contrast between the two finishes is what makes this work.
Get The Look at Home:
The tip line is everything — take your time getting the curve right before committing to color.
- Base: Two coats of sheer nude-pink. ILNP's "Naked" or OPI's "Bubble Bath" hit the right balance between coverage and translucency.
- Map Tips: Apply French tip guides or use a thin brush to outline the smile line. On almond nails, follow the natural curve of your free edge — don't force a straight line onto a curved shape.
- Chrome Tips: Apply pearlescent white chrome polish or rub white chrome pigment into a gel topcoat on the tip section. Build opacity in thin layers.
- Accent Gem: On the index finger, apply a small pearl gem at the center of the cuticle area using nail adhesive or a dot of gel. Press and hold for 10 seconds.
- Seal: Apply topcoat over the entire nail, making sure to fully encapsulate the pearl gem. Any exposed edge will catch on hair and fabric — a real nuisance.
- Honest note: Pearl gems are the first thing to pop off. If you need this manicure to last, consider using gel adhesive rather than regular nail glue.

27 Stunning Graduation Day Nail Ideas for 2026 🎓
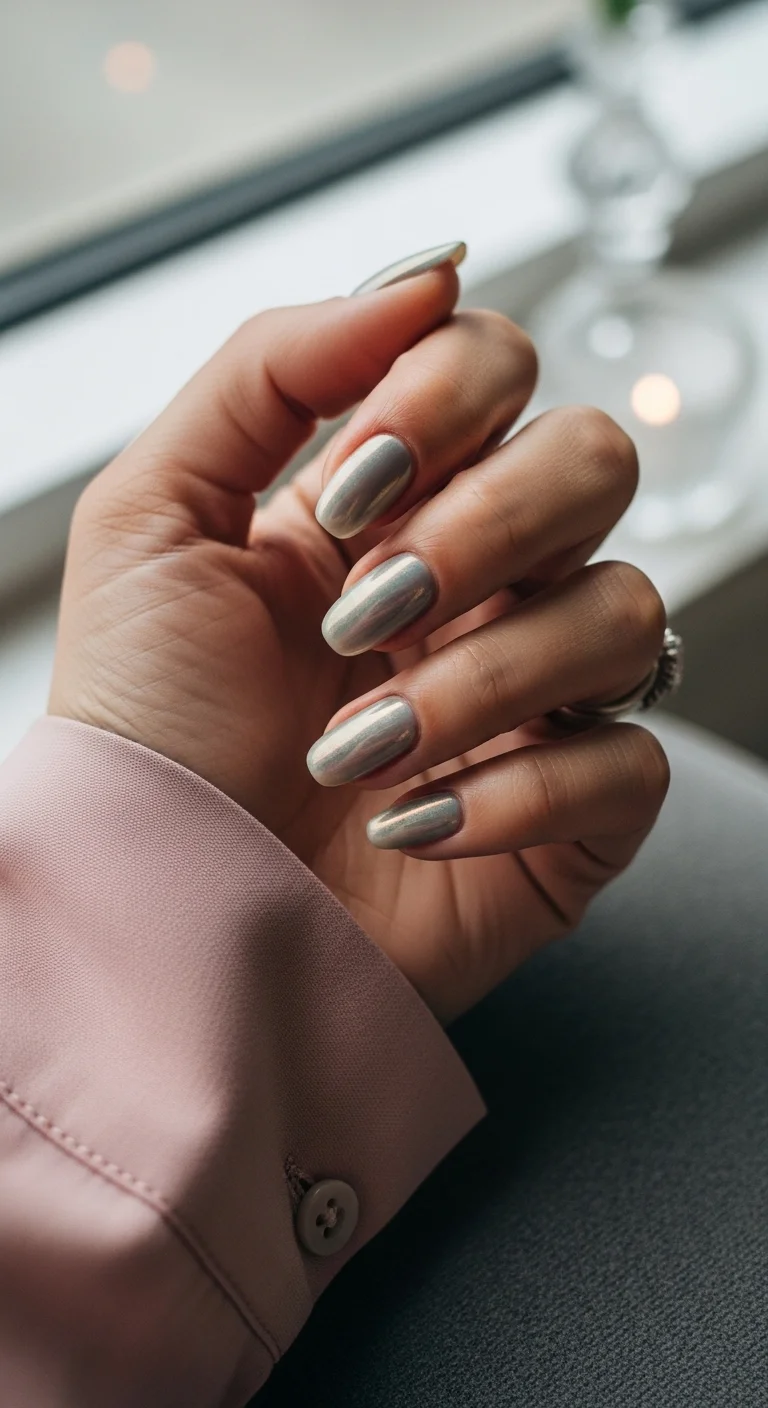
24.Mirror Chrome Slay
Maximum impact, zero subtlety.
Overview:
There's no hiding with mirror chrome nails. Every finger becomes a reflective surface, a conversation piece, and a lighting instrument all at once. This is the nail equivalent of wearing a sequin gown — it's not for blending in, and pretending otherwise misses the point entirely.
The silver-champagne tone is a deliberate choice over pure silver. Pure silver chrome reads cool and can look harsh against warm skin tones, while the champagne undertone adds warmth without sacrificing the mirror effect. On medium-length almond nails, the proportions prevent the chrome from looking costumey — longer lengths push this into territory that reads more editorial than wearable.
The reality of full chrome nails is maintenance. Chrome chips differently than regular polish — it doesn't fade gradually, it lifts in sheets. Once a corner catches, the whole nail can peel within hours. This is a design that demands gel or proper chrome adhesive, not a quick regular-polish approximation.
Design Breakdown:
No subtlety required — this design is about full, unapologetic coverage.
Base Color: None visible — full silver-champagne mirror chrome covers every nail completely.
Nail Shape: Medium almond. Keeps the chrome effect grounded and wearable rather than theatrical.
Design Element: Full mirror chrome coating on every nail — the liquid metal effect is the entire design.
Finish: High-shine mirror. The most reflective finish possible, creating a true liquid metal appearance.
Get The Look at Home:
Chrome powder on every nail means every nail has to be flawless — there's nowhere to hide imperfections.
- Base Coat: Apply a gel base coat and cure. Chrome needs a smooth, cured surface to develop its mirror finish. This is not a regular-polish-friendly design.
- Foundation: One coat of black or dark grey gel polish, cured. Dark base colors produce the most intense chrome reflection — white or nude bases will mute the effect significantly.
- Chrome Application: Using a silicone tool or eyeshadow applicator, rub champagne-silver chrome powder vigorously into the cured surface. The more pressure and passes, the more mirror-like the result. Work in small sections.
- Clean: Dust away excess powder with a fluffy brush. Any stray particles on the cuticle or sidewalls will be sealed in permanently by the topcoat.
- Seal: Two coats of no-wipe gel topcoat, curing between each. The chrome needs complete encapsulation — any exposed powder will oxidize and dull within a day.
- Reality check: Full chrome sets are loud. If you're attending a formal event, make sure the chrome tone complements your outfit's metal — mixing warm gold jewelry with cool silver chrome is a visible clash.
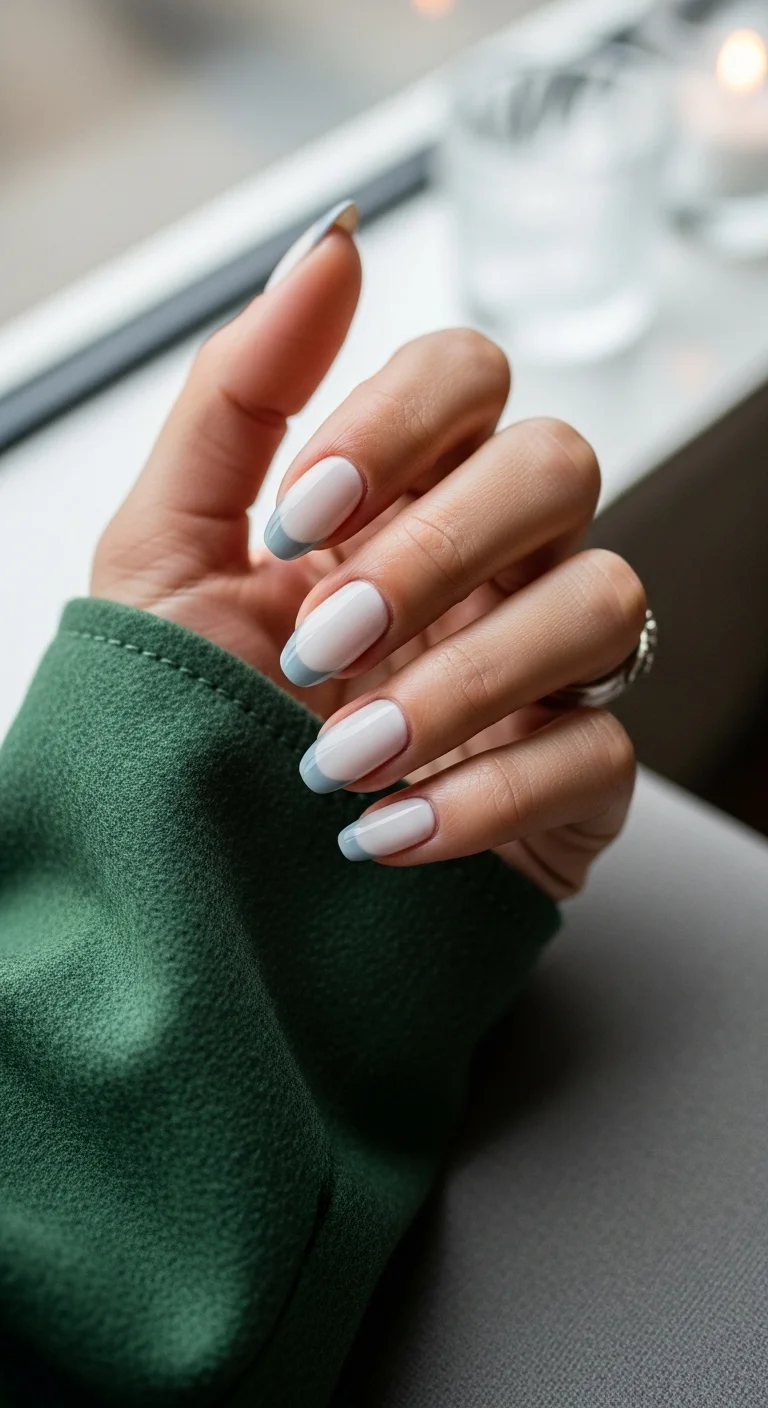
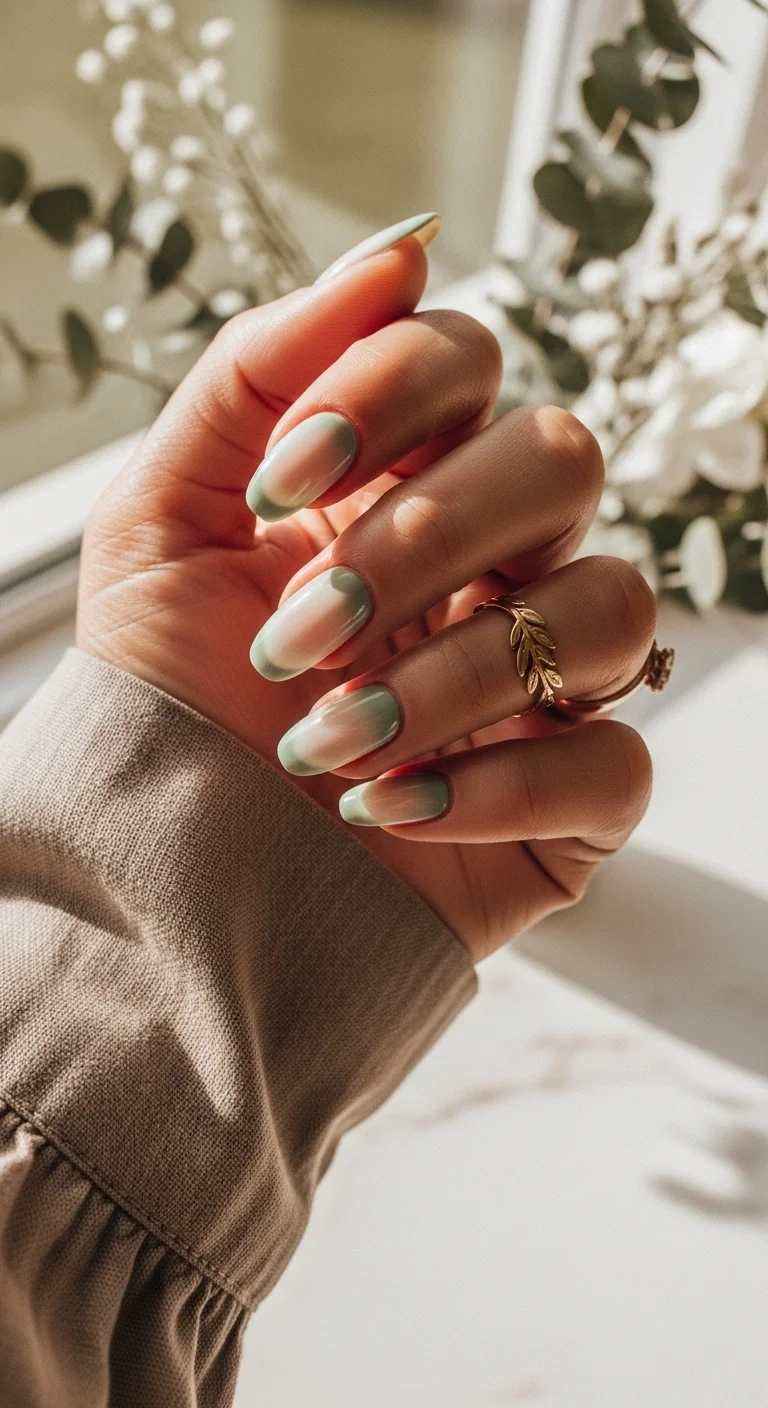
25.Sage Aura Tips
Earth tones just learned how to dress up.
Overview:
Sage green has had a moment in fashion and interiors for years now, but it's been conspicuously absent from nail art — largely because most greens look muddy or juvenile on nails. The sage aura tip solves this by keeping the green muted and diffusing it into a nude base rather than committing to full-coverage green. It's a gateway color for anyone who's never worn green nails before.
The aura-style gradient is what makes this feel romantic rather than utilitarian. Unlike a hard French tip, the diffused transition from nude-pink to sage creates a soft, organic edge that evokes botanical illustrations and dried flowers. It's nature-inspired without being literal — no leaf motifs or floral stamps required.
Worth noting: sage is a deceptively complex color. It reads differently in warm versus cool lighting, and the undertone of your base nude can shift the entire palette. Test the sage against your skin tone before committing — some sages pull grey, others pull yellow, and neither works equally well on every complexion.
Design Breakdown:
The gradient is doing the heavy lifting — the sage carries, the nude supports.
Base Color: Sheer nude-pink. The warmth of the base determines how the sage reads overall.
Nail Shape: Medium-long almond. The extended tip gives the aura gradient space to develop naturally.
Design Element: Soft ombré from nude-pink at cuticle into muted sage green at tips — the transition is diffused and aura-like, not a hard line.
Finish: Glossy. The shine enhances the softness of the gradient and prevents the sage from looking flat.
Get The Look at Home:
The aura effect is created with a sponge — brush strokes will leave visible lines that ruin the diffused look.
- Base: Two coats of sheer nude-pink, fully dried. The base should look like your natural nail but slightly perfected — don't overdo the coverage.
- Prep Sponge: Apply sage green polish to the corner of a makeup sponge. Zoya's sage tones or Cirque Colors' muted greens work well here — avoid anything too bright or too dark.
- Sponge Gradient: Dab the sponge onto the nail tip, rolling gently toward the center. Build in light passes — it's easier to add sage than to remove it. The transition should feel like a blush, not a stripe.
- Refine: Use a clean section of the sponge to soften the transition line between sage and nude. Dab repeatedly along the boundary until no hard edge remains.
- Seal: Two coats of glossy topcoat. The first coat will slightly blur the gradient further — this is actually desirable for the aura effect.
- Color warning: If your sage looks too grey after sponging, the base is likely too cool-toned. A warmer nude base will bring out the green.
28 Effortless Hot Weather Day Hairstyles for Women 2026 ☀️💇♀️
26.The Clean Girl French
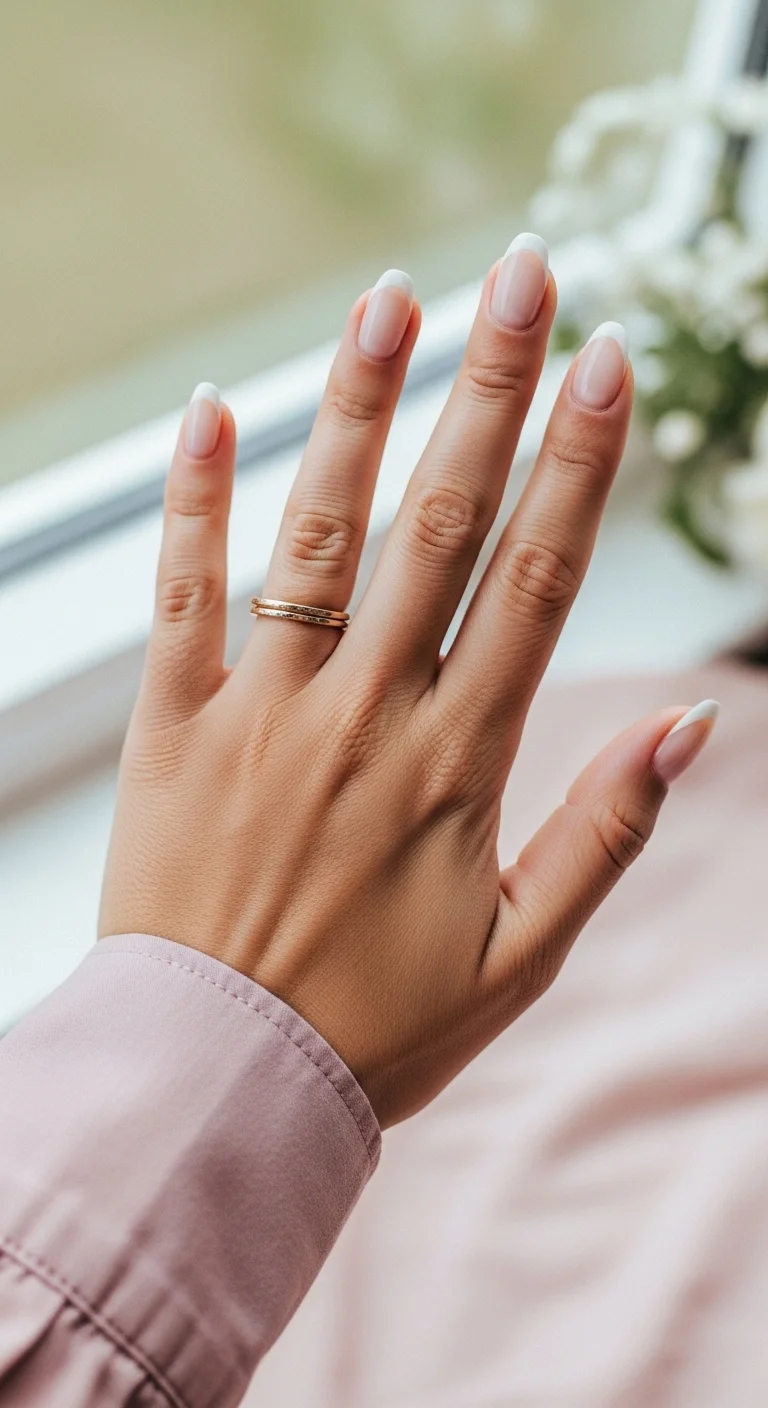
The original trend that keeps outliving its replacements.
Overview:
Every few months, someone declares the French manicure dead and hails a new minimalist alternative as the replacement. Then the "replacement" quietly fades and the French remains. There's a reason: it's structurally sound design. The contrast between sheer base and crisp tip creates visual interest without decoration, and that's genuinely hard to improve upon.
This version — the "clean girl" French — strips the design to its purest form. Short-medium almond nails, a base that barely looks painted, tips that are precise but not thick. There's no chrome, no shimmer, no accent nails. The restraint is the entire point.
The downside of simplicity is that every flaw is visible. There's no glitter or gem to distract from a wobbly tip line, no opaque base to mask cuticle work that wasn't quite clean enough. This is a design that rewards preparation and punishes shortcuts.
Design Breakdown:
The bare minimum, executed at the highest level — that's the entire brief.
Base Color: Sheer nude-pink. Just enough tint to even out the nail bed without looking painted.
Nail Shape: Short-medium almond. The shorter length keeps the French classic rather than dramatic.
Design Element: Crisp, thin white French tips — no embellishment, no variation, just clean lines.
Finish: High-shine glossy. The shine is what makes this look polished rather than plain.
Get The Look at Home:
The tip thickness makes or breaks this design — aim for 2-3mm maximum on short-medium nails.
- Prep: Clean cuticles thoroughly — push back, trim any hangnails, buff the nail surface. This design shows everything, so your canvas needs to be impeccable.
- Base: One or two coats of sheer nude-pink. OPI's "Funny Bunny" mixed with a sheer pink, or Essie's "Ballet Slippers" gives the right "your nails but better" effect.
- Tip Line: Using a thin brush or French tip guide, paint a thin white line along the free edge. Follow your natural smile line — on almond nails, this should be a gentle curve, not a straight line. Keep it narrow.
- Clean Up: Dip a small brush in acetone and clean the smile line from underneath. The curve should be symmetrical across all nails. This step takes longer than painting the tips.
- Seal: One coat of high-shine topcoat. Essie's gel couture topcoat delivers the glass-like finish this design needs.
- Pro tip: If your free edges are uneven, the French tips will amplify the asymmetry. File and shape your nails before starting — not after.
27.Strawberry Blush Tips
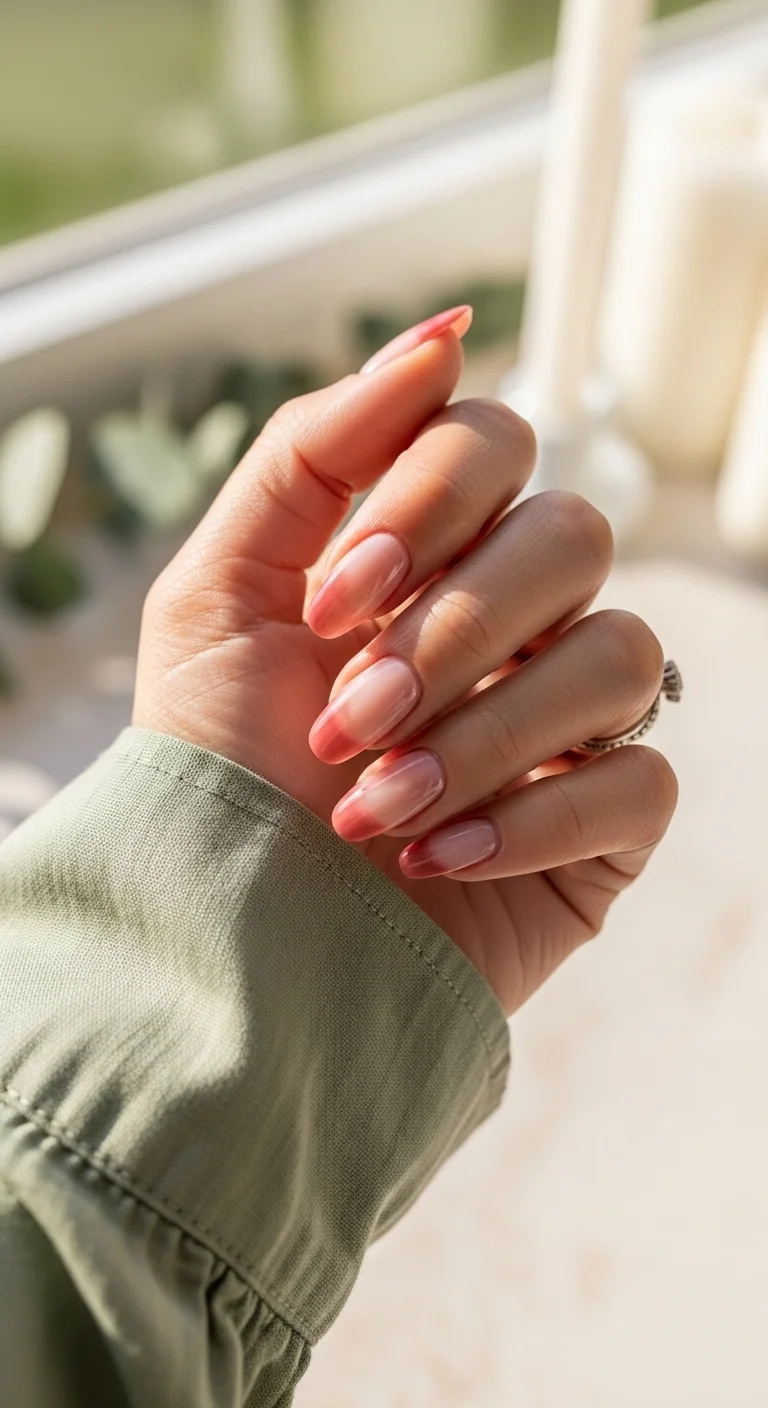
The French manicure's warmer, softer cousin.
Overview:
If the classic white French feels too stark for your taste, this strawberry blush version is the answer — it softens the entire concept by replacing the white tip with a warm, diffused rose gradient. The effect is what the internet calls "strawberry milk," but the reality is more nuanced than that. It's a French ombré that reads as naturally flushed rather than painted, which makes it significantly more versatile across skin tones.
The warmth of the strawberry tone is what sets this apart from cooler pink alternatives. Where baby pink can look juvenile and hot pink can look aggressive, this rose-strawberry shade hits a middle ground that reads sophisticated without trying too hard. On medium-long almond nails, the gradient has room to develop fully — the transition from nude to strawberry is the design, not the tip itself.
The main consideration here is color matching. Warm strawberry tones can clash with cool-toned outfits or jewelry — this design looks best alongside warm metals (gold, rose gold) and earth-toned or warm-palette clothing. If your event wardrobe leans cool, a cooler pink gradient would serve you better.
Design Breakdown:
The gradient tells the whole story — this design has no secondary elements and doesn't need them.
Base Color: Sheer nude-pink. Warm-toned to harmonize with the strawberry gradient.
Nail Shape: Medium-long almond. The extended canvas lets the blush gradient develop naturally.
Design Element: Soft French ombré from sheer nude base into warm strawberry-pink tips — the transition is diffused and blush-toned, not a hard French line.
Finish: Glossy. The warmth of the strawberry reads best under a high-shine finish that adds depth to the gradient.
Get The Look at Home:
The sponging technique is essential — brush application will create harsh lines that destroy the blush effect.
- Base: Two coats of warm-toned sheer nude-pink. The base color determines whether the gradient looks harmonious or disconnected — test against your skin before committing.
- Prep Sponge: Apply warm strawberry-pink or rose polish to a makeup sponge. Cirque Colors and OPI both make strawberry tones that aren't too cool or too neon.
- Sponge Gradient: Dab the sponge onto the nail tip, working upward. Build gradually in 3-4 passes, concentrating the most color at the free edge and lightening pressure toward the center.
- Soften: Use a clean section of the sponge to blend the transition zone. The boundary between nude and strawberry should be imperceptible — no visible line.
- Seal: Two coats of glossy topcoat. The second coat deepens the strawberry slightly, which is usually desirable — if it goes too dark, use a thinner topcoat layer.
- Warm-toned reality: This gradient photographs beautifully in warm lighting but can look washed out in cool fluorescent light. If you're photographing this manicure, natural or warm-toned lighting is essential.

28 Trendy May Nail Designs for 2026 💅
Choosing the Perfect
Wedding Shape
When you are attending a wedding, you want a shape that is both elegant and practical for a long day of festivities and dancing.
For the Bridal Party & Helper
Short oval or squoval shapes are nearly indestructible and won’t get in the way of helping with the dress, handling flowers, or participating in a busy ceremony.
For the Formal Guest
Medium almond and coffin shapes provide that high-fashion silhouette that makes every 'holding a champagne glass' photo look like a professional spread.
The Wedding Guest Maintenance Kit
Long days that start with morning ceremonies and end on the late-night dance floor can be tough on a manicure. Even the best gel set can benefit from extra care during a full weekend of celebrations. Keeping a tiny "Wedding SOS" kit in a purse or pocket is a highly recommended precaution.
Applying a fresh layer of high-gloss topcoat a day before the main event can significantly extend the life and shine of your design. Also, a pro-tip: be careful with highly pigmented floral arrangements or colorful cocktails—they can sometimes dull or stain a light-colored topcoat, so a quick rinse after the reception is always a good idea!
The White Nail Question: Is It Actually Off-Limits for Wedding Guests?
A common question that arises is whether wedding guests can wear white nails. The short answer is yes — the hands are a subtle enough detail that the manicure is unlikely to be confused with the bride's gown. Bridal experts agree that white nails do not break etiquette rules, especially when the finish is sheer or milky rather than opaque and stark.
That said, there is a line. A stark, opaque white with elaborate lace detailing crosses into bridal territory, and that is the energy you want to avoid entirely. The fix is simple: go for the 2026 trend of "milky glass" nails — sheer, translucent whites that read as clean and polished rather than bridal. A design like "Gilded Milky Glass" does exactly this. It gives you that fresh, bright look that photographs beautifully next to a champagne flute, while keeping you firmly in the "chic guest" category. If white still makes you nervous, a pale blush or soft champagne reads similarly but with zero ambiguity.
The 48-Hour Rule: What to Avoid Before the Ceremony
Wedding guest nails have a specific pressure that other manicures do not. You are not just wearing them for yourself — you are wearing them for group photos, dinner tables where hands rest next to place settings, and endless candid shots throughout the reception. One chipped tip at the reception can ruin the whole vibe. Here is how to make sure that does not happen.
Do not try a new shape the week of the wedding. If you usually wear short squoval and suddenly want stiletto for the event, that is a choice that needs at least two trial runs before the actual day. New shapes change how your hands look in photos, how you use your hands, and how likely you are to break a nail reaching for something. Stick with a silhouette you already know works with your lifestyle. There is a reason "The Clean Girl French" is a perennial favorite — it is a shape and finish that works with everything and surprises nobody.
Skip the heavy hand creams before your appointment. Oily nail beds prevent gel polish from adhering properly, which leads to premature chipping before the reception even starts. Moisturize your hands and cuticles in the days leading up to your salon visit, then go in with clean, oil-free nails on appointment day.
After the salon, stop using the nails as tools. Although it sounds basic, the 48 hours between the appointment and the ceremony are critical. Use finger pads to open things, and consider letting someone else handle champagne corks. Most chipped wedding guest nails occur while opening a beverage can or searching through a bag for keys.
💡 If you do notice a small chip or lifting edge the morning of the wedding, a tiny dab of clear top coat can buy you through the reception. It will not fix a large break, but it will stop a small one from getting worse.
Selecting a manicure is one of the most enjoyable details of wedding guest preparation. Hopefully, scrolling through these elegant designs has provided inspiration for the upcoming celebrations, and one of these sets will complement the wedding attire beautifully.
Consider pinning the favorite designs directly to a Pinterest board so they are easily accessible to show the nail technician during the appointment. This helps clarify expectations and ensures a smooth salon visit.