Nail Trends
27 Gorgeous Mint Green Nails That Are Popular Right Now (2026)
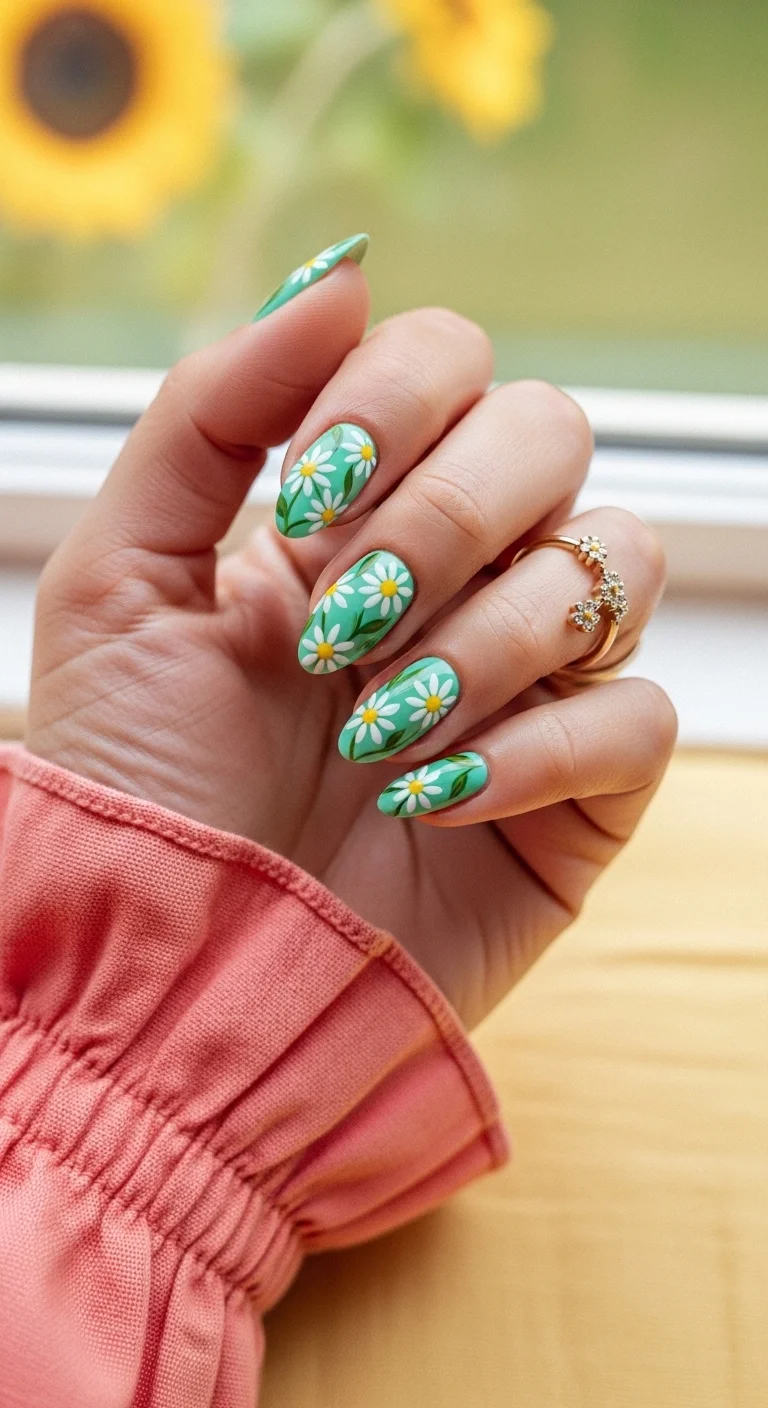
Hey beauties! If there is one color that is absolutely dominating Pinterest feeds right now, it is undeniably mint green. It's the perfect sweet-spot between a soft pastel and a vibrant pop of color, making it the ultimate transition shade for literally any season. With so many stunning cool-toned manicures trending, here is a roundup of the absolute best mint green nail designs that are going viral this year.
The "Dusty Mint" Shift: Why Muted Greens Are the New Neutrals for 2026
If you still think of mint green as Essie's "Mint Candy Apple" from 2012, you're about three refreshes behind. The mint that's trending for Spring/Summer 2026 isn't the bright, candy-colored pastel that dominated the early 2010s. It's dusty mint. Think of the green you see on sea glass after it's been tumbled smooth by the tide, or the inside of a sage leaf just before it dries. The color has shifted from "Easter basket" to "editorial mood board."
What makes dusty mint different is the grey or brown undertone mixed into the base. Where traditional mint is essentially blue plus yellow at full saturation, dusty mint pulls back on both and adds a neutralizer. The result is a green that reads as muted, almost weathered, rather than bright and perky. It lands closer to jade or celadon than to peppermint candy. And that subtle shift is exactly why it's being called the new neutral for 2026, a color that pairs with every outfit the way a nude does, but with just enough pigment to feel deliberate rather than default.
1.Metallic Mint French Glam
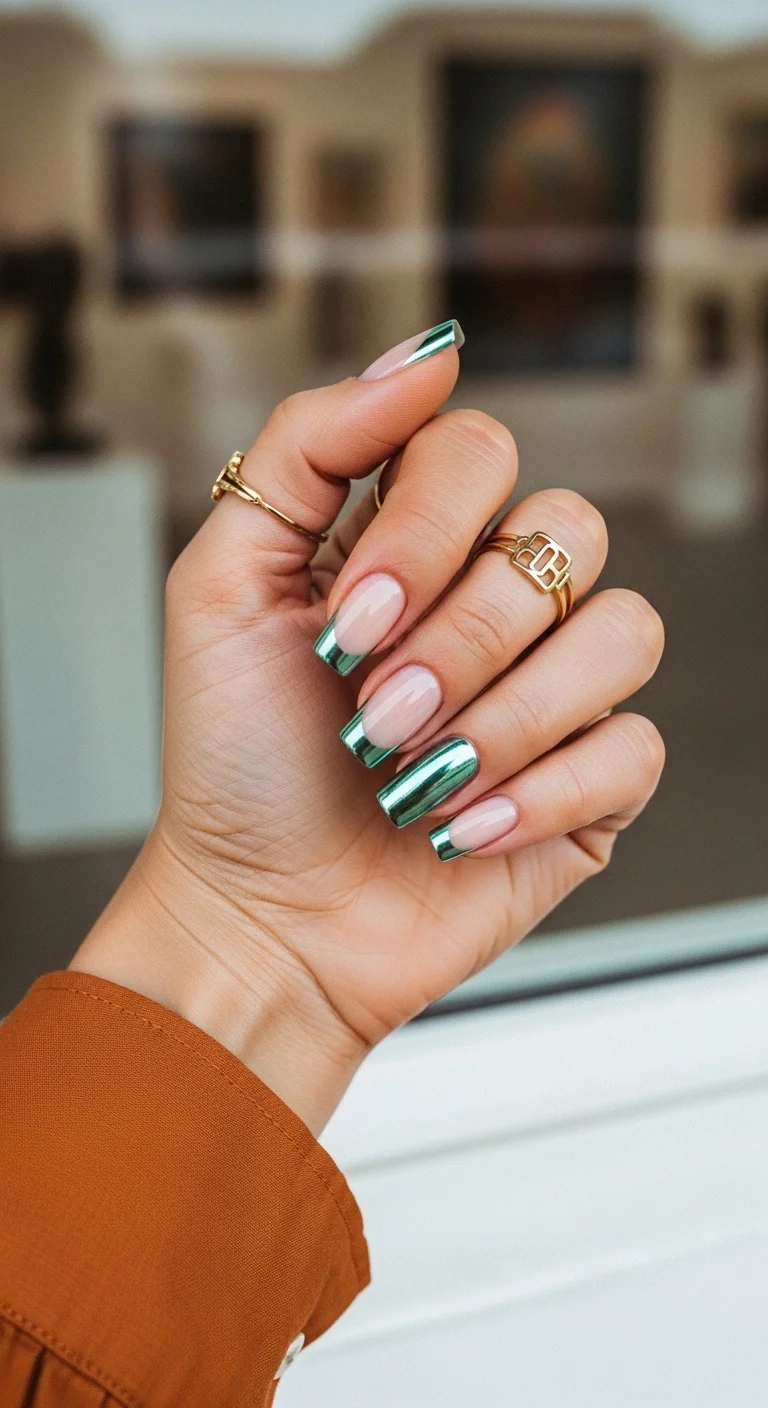
A modern French swap: emerald-chrome tips replace the classic white stripe with something far more reflective.
Overview:
Metallic chrome on a French tip is one of those ideas that sounds like it should look chaotic but lands somewhere unexpectedly polished. The sheer nude base does the heavy lifting here, keeping the overall look grounded while the chrome tips do all the talking. The ring finger going full metallic is a smart accent choice, giving the hand a focal point without tipping into full-blown accent-nail chaos.
The chrome finish on these tips catches light differently than standard metallic polish. Where regular metallic reflects in a flat, mirror-like way, chrome powder buffed over gel creates a deeper, more dimensional shine that shifts between green and teal depending on the angle. It reads expensive in a way that painted-on metallic stripes rarely achieve.
The practical reality: chrome powder application requires a no-wipe gel top coat and proper curing. Regular polish won't hold the powder, and skipping the cure step means the chrome will flake off within hours. Budget extra time for this one, or have it done at a salon where the UV lamp is available.
Design Breakdown:
A French variation that trades the classic white tip for reflective chrome. The contrast between the understated base and the high-shine tips is what makes the design work.
Base Color: A sheer, milky pink-nude that lets the natural nail bed show through. The sheerness is important, it keeps the chrome tips from looking disconnected from the rest of the nail.
Nail Shape: Long, crisp square. The sharp corners give the chrome tips a defined edge that would get lost on a rounded shape.
Design Element: Thick metallic emerald-chrome French tips on four nails, with the ring finger fully chromed from cuticle to tip.
Finish: High-gloss top coat over the nude areas. Chrome-sealing top coat over the metallic sections to prevent flaking.
Get The Look at Home:
This design requires gel products and a UV lamp. The chrome powder won't adhere properly to regular polish.
- Prep and shape: File into a clean long square. Push back cuticles and buff the nail surface lightly.
- Nude base: Apply two thin coats of sheer pink-nude gel. Cure between coats.
- Tip painting: Using a liner brush and green gel polish, paint a thick, straight-across French tip on each nail. The line needs to be crisp and even.
- Full accent nail: On the ring finger, paint the entire nail surface in the same green gel. Cure thoroughly.
- Chrome application: Apply a no-wipe gel top coat and cure. While the surface is still warm, use a sponge applicator to rub mint-green chrome powder firmly over all green areas.
- Seal: Brush off excess powder with a soft brush. Apply a chrome-sealing top coat and cure. This step is non-negotiable, chrome chips fast without it.

21 Hot Summer Buns Hairstyle Ideas for 2026 ☀️🔥
2.Iridescent Seafoam Glow
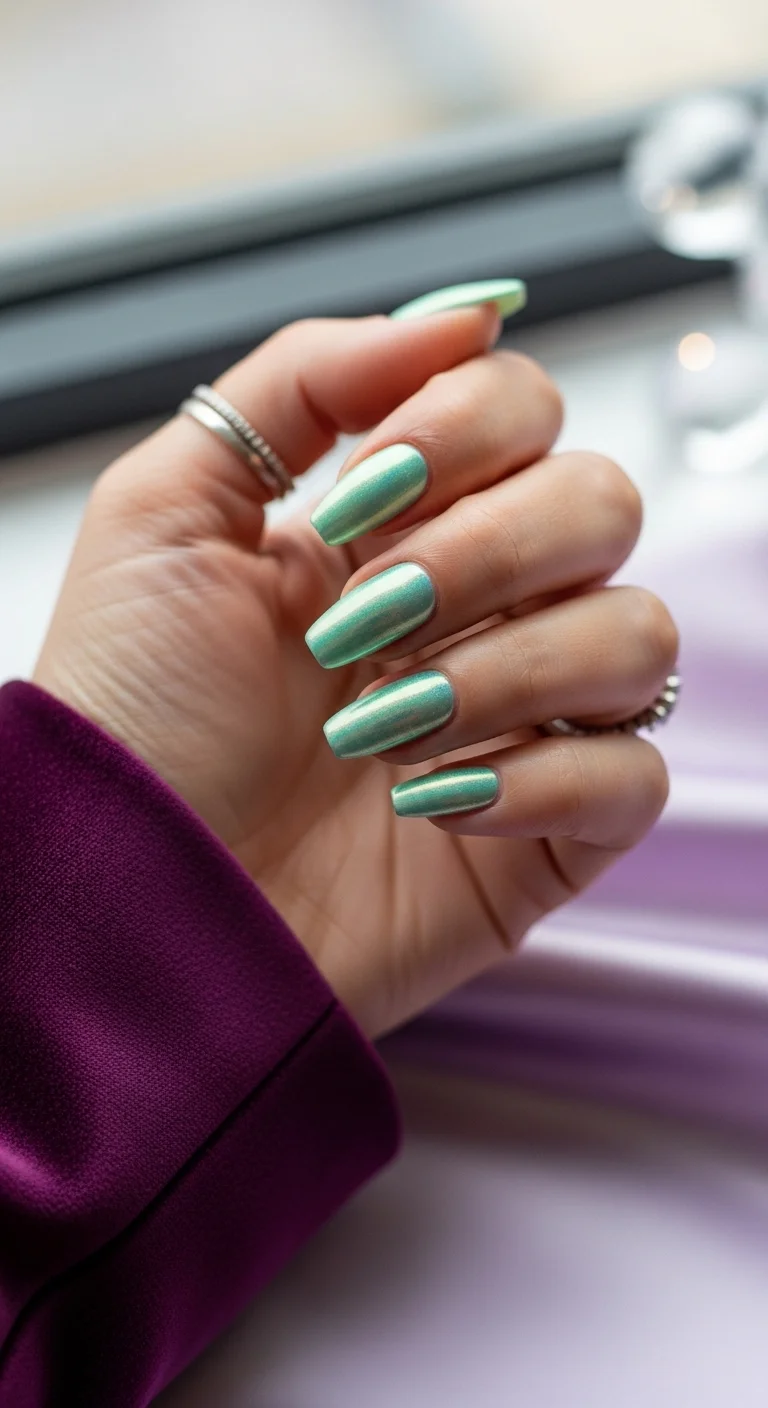
A pearlescent seafoam that shifts between green and silver depending on how the light hits it.
Overview:
Cat-eye and pearlescent finishes have taken over the gel nail world, and this seafoam version shows why. The shimmer sits inside the polish rather than on top of it, which creates a depth that standard glitter or metallic can't match. Tilt your hand and the light seems to move beneath the surface, like looking into shallow tropical water.
The coffin shape works well here because the tapered sides give the shimmer room to travel. On shorter nails, the cat-eye effect gets compressed and loses some of its dimensionality. The medium-long length also keeps the color from overwhelming the hand, which can happen with full-coverage pastels on wider nail beds.
One thing to note about pearlescent formulas: they tend to be thinner than cream polishes. Two coats may not give full opacity, and a third coat risks looking thick and lumpy. A ridge-filling base coat helps even out the surface before the color goes on.
Design Breakdown:
Full-coverage pearlescent with an internal shimmer that creates movement. The design is the finish itself.
Base Color: A creamy, cool-toned seafoam green with fine pearlescent shimmer particles embedded in the formula. Not chunky glitter, not matte cream, something in between.
Nail Shape: Medium-long coffin. The flat tip and tapered sides frame the shimmer nicely.
Design Element: None beyond the pearlescent finish. All nails are the same color and shape.
Finish: High-gloss top coat to amplify the iridescence. Matte would kill the shimmer effect entirely.
Get The Look at Home:
Pearlescent polish shows brush strokes more than cream formulas. Long, even strokes from cuticle to tip minimize visible lines.
- Shape and base: File into a medium-long coffin. Apply a ridge-filling base coat to smooth the surface.
- First coat: Apply a thin, even coat of pearlescent seafoam. Work quickly, the formula self-levels best when you don't go back over it.
- Second coat: Let the first coat dry for two minutes. Apply a second coat in long, continuous strokes. If coverage is still patchy, a third thin coat is acceptable.
- Shimmer placement (optional): For a stronger cat-eye effect, use a magnet held at a 45-degree angle over the wet polish for ten seconds before each coat dries. This concentrates the shimmer particles into a defined line.
- Top coat: One thick coat of glossy top coat. Cap the free edge to prevent tip wear.
3.Midnight Mint Chrome
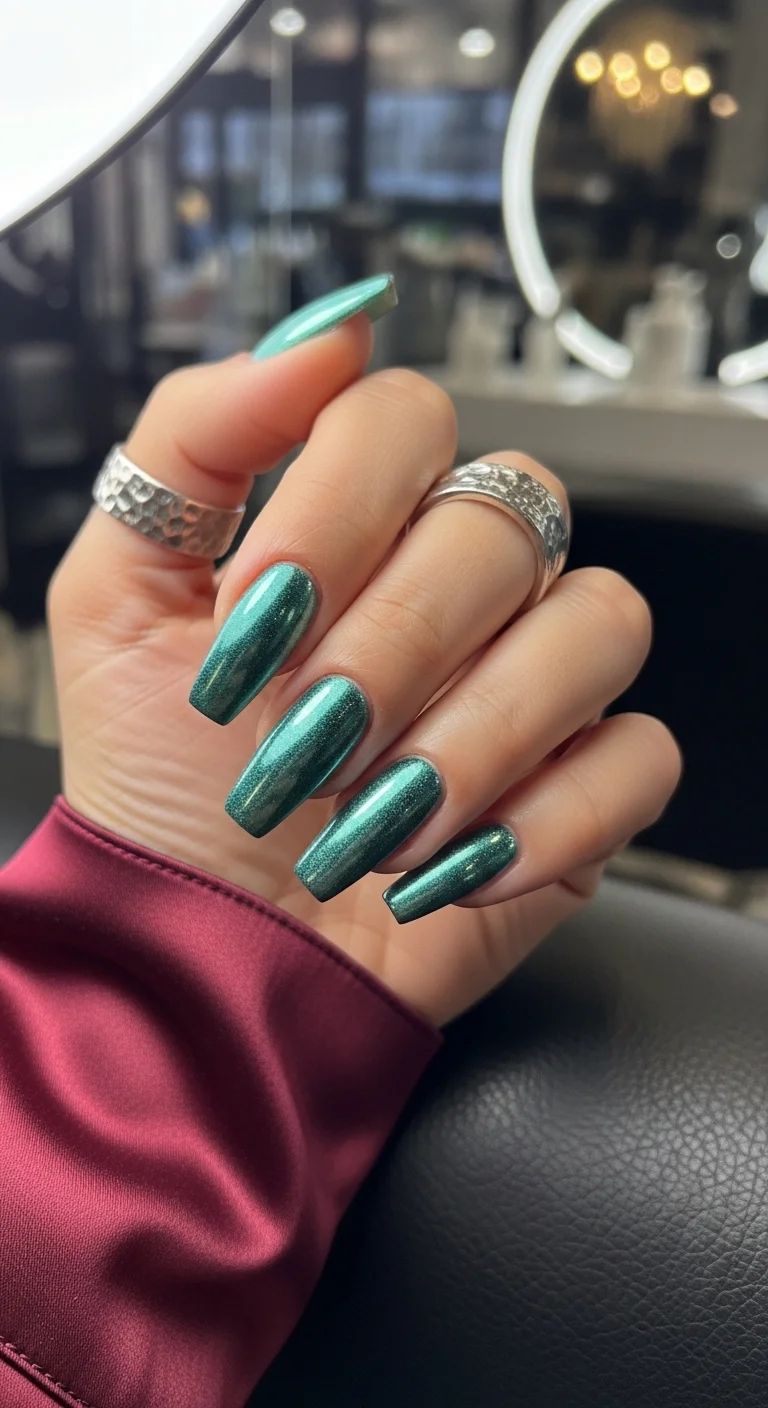
A darker, moodier take on mint that leans more emerald than pastel.
Overview:
This is mint green's evening-wear counterpart. The deep teal base pushed through a heavy chrome treatment creates a jewel-toned effect that has more in common with emerald gemstones than with the pastel mint most people picture. The glitter particles embedded in the chrome give the surface a textured sparkle that reads dimensional rather than flat.
The cat-eye magnet effect running through the center of each nail adds another layer of depth. Light catches the concentrated shimmer line and creates the illusion that the nail has a curved, polished-stone surface. It's the kind of finish that looks good in photos but looks better in motion, where the light can actually travel across the chrome.
The honest challenge with heavy chrome like this: it shows every imperfection in the nail surface underneath. Any bumps, ridges, or uneven gel application get amplified by the reflective coating. Proper prep work and a self-leveling base gel are worth the extra time.
Design Breakdown:
Deep jewel-toned chrome with magnetic cat-eye shimmer. The darkness of the base is what separates this from typical pastel mint designs.
Base Color: A saturated teal or deep emerald green. Much darker than standard mint. Think gemstone, not candy.
Nail Shape: Long coffin. The elongated surface area lets the chrome and cat-eye effects fully develop.
Design Element: Heavy glitter-chrome finish across all nails with a magnetic cat-eye shimmer line running down the center of each.
Finish: Ultra-glossy chrome-sealing top coat. The high shine is what creates the "polished gemstone" illusion.
Get The Look at Home:
This design requires gel products, chrome powder, and a cat-eye magnet. It's not achievable with regular polish.
- Base coat: Apply a self-leveling gel base coat and cure. This smooths out any surface texture that the chrome would otherwise highlight.
- Color coats: Apply two thin coats of deep teal gel polish, curing between each. The color needs to be fully opaque.
- Cat-eye step: Apply a thin layer of cat-eye gel polish. Before curing, hold a cat-eye magnet at a 45-degree angle over the nail for fifteen seconds. The shimmer particles will concentrate into a line. Cure immediately.
- Chrome powder: Apply a no-wipe top coat and cure. Rub emerald or teal chrome powder over the entire surface using a sponge applicator. Buff until mirror-smooth.
- Seal: Apply chrome-sealing top coat and cure. Two coats of sealant for extra durability on long nails.
35 Fun Birthday Nail Designs for 2026 🎂
4.Minty Fresh Daisy Field
Hand-painted daisies scattered across a bold green base for a spring-ready floral set.
Overview:
Floral nail art has a reputation for looking either effortlessly charming or fussy and overdone. This design lands on the right side because of the base color choice. A bright, saturated kelly green rather than a pale mint gives the white daisies something to pop against. The contrast is what makes each flower readable from a distance instead of blending into the background.
Every nail gets daisies, which is a commitment. Some are clustered near the cuticle, others sit at the tip, and a few are off-center. That varied placement prevents the pattern from looking stamped or mechanical. The yellow centers and small green leaf details add enough complexity to the flowers without turning each one into a miniature botanical illustration.
The almond shape is a practical match for this kind of scattered floral. The tapered tip gives each daisy a natural frame, and the curved edges echo the roundness of the petals. On square nails, the same flowers would look boxed in.
Design Breakdown:
Full-coverage floral with high-contrast colors. The boldness of the base is what keeps the daisies from looking delicate or precious.
Base Color: A bright, saturated kelly green or grass green. Not pastel, not mint, not sage. Full-throttle green with no grey or white mixed in.
Nail Shape: Medium almond. The soft point complements the rounded petal shapes.
Design Element: White daisies with yellow centers and small green leaves scattered across every nail. Varying placement per nail.
Finish: High-gloss top coat to protect the hand-painted detail and saturate the green base.
Get The Look at Home:
Paint all the daisy petals first across every nail, then go back and add centers and leaves. Working in rounds is faster than finishing one nail at a time.
- Green base: Two coats of kelly green, dried fully between coats. Green pigments can be streaky, so use thin layers.
- Petal placement: Using a small dotting tool or toothpick and white polish, place five or six small dots in a circle to form each daisy. Vary the flower count per nail, two or three flowers per nail looks balanced.
- Yellow centers: Switch to a smaller dotting tool and yellow polish. Place a single dot in the center of each white petal circle.
- Leaf details: With a liner brush and a darker green than the base, paint small curved leaf strokes near each flower. One or two leaves per daisy is enough.
- Dry time: Let the floral art sit for at least five minutes before top coating. The dotting tool leaves raised paint that smears easily.
- Top coat: Float a thick, self-leveling top coat over the art. Pressing the brush down drags the petals out of shape.
5.Neon Pop Mint Frenchies
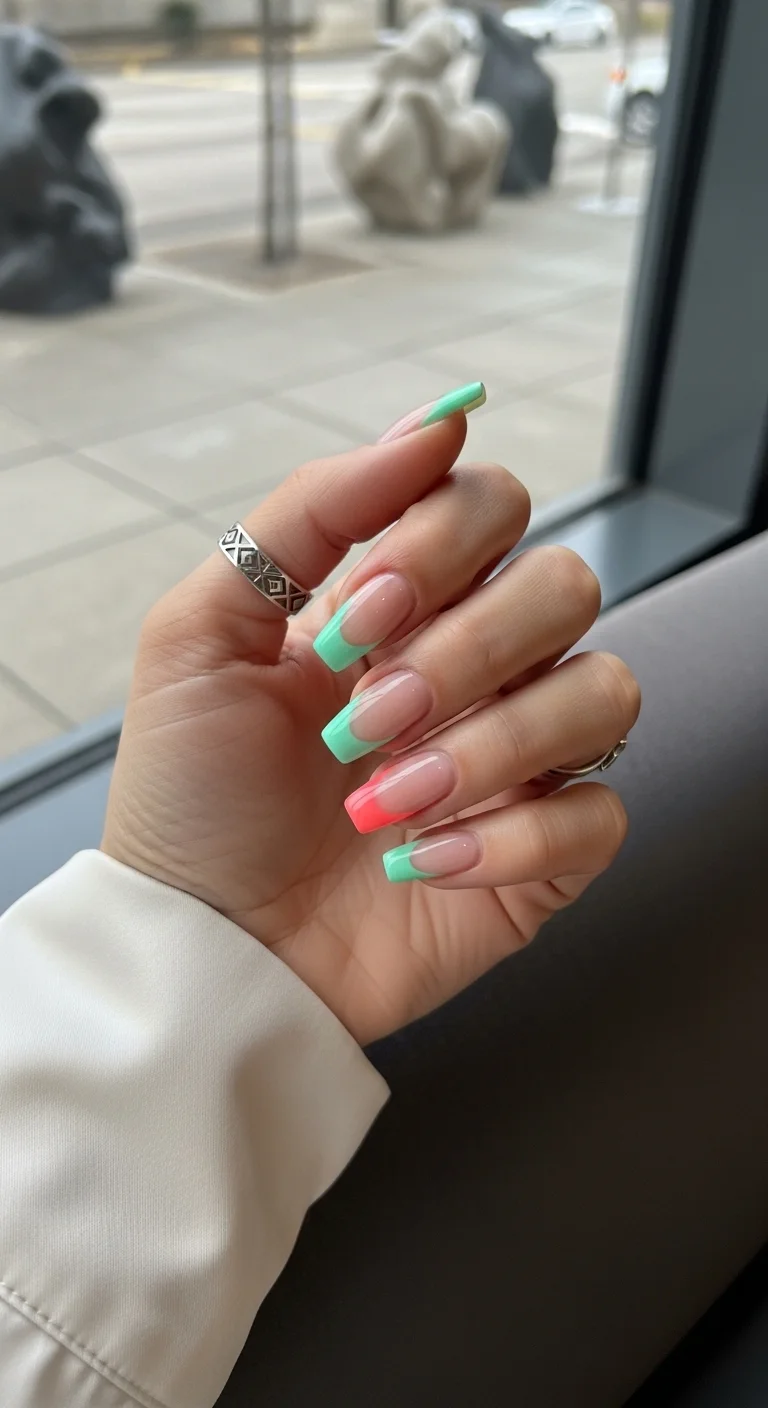
Neon mint French tips with a coral-pink accent that breaks the pattern at just the right moment.
Overview:
Colored French tips are nothing new, but the decision to make one nail a different color entirely changes how the hand reads. Four nails in neon mint and one in bright coral creates a visual interruption that draws the eye. It's the nail equivalent of wearing a matching suit with one mismatched sock, except it actually works.
The neon mint reads slightly warmer than a standard pastel mint, which is what allows it to pair well with the coral. Two cool-toned pastels might clash, but the neon quality of both colors puts them in the same temperature family. The sheer nude base underneath ties everything together and keeps the overall look from feeling too busy.
Neon polish formulas are tricky. Some are jelly-like and require four or five coats for opacity. Others are chalky and streak on the second coat. For French tips specifically, you want a formula that covers in one or two thin coats, because building up thickness on a tip creates bulk that chips faster.
Design Breakdown:
A two-color French tip with one accent nail breaking the pattern. The neon quality of both colors is what makes the pairing cohesive.
Base Color: Sheer milky pink-nude. The natural nail bed should be visible through the base.
Nail Shape: Long, straight square. The flat edge gives the neon tips a clean, defined line.
Design Element: Neon mint green French tips on index, middle, pinky, and thumb. Bright coral-pink French tip on the ring finger only.
Finish: High-gloss top coat. Neon colors look their most saturated under a shiny finish.
Get The Look at Home:
Practice the French tip curve on a piece of paper before touching the nail. Neon polish is harder to clean up because the pigment stains.
- Nude base: Two thin coats of sheer pink-nude. Let dry completely.
- Mint tips first: Using a French liner brush and neon mint polish, paint the tips on your four designated nails. Start from one side, sweep to the center, then repeat from the other side.
- Coral accent: Paint the ring finger tip in bright coral-pink. Match the thickness of the mint tips.
- Cleanup: Dip a flat, angled brush in pure acetone and run it along the smile line on each nail. Neon pigment stains skin, so work quickly before it sets.
- Second coat on tips: If the neon is sheer, apply a second thin coat to each tip. Keep it on the tip only, don't extend past the smile line.
- Seal: One thick coat of glossy top coat. Cap the free edge to prevent tip chipping.

30 Stunning Summer Hair Trends for 2026 ☀️🌊
6.Frosted Mint Sorbet Ombre
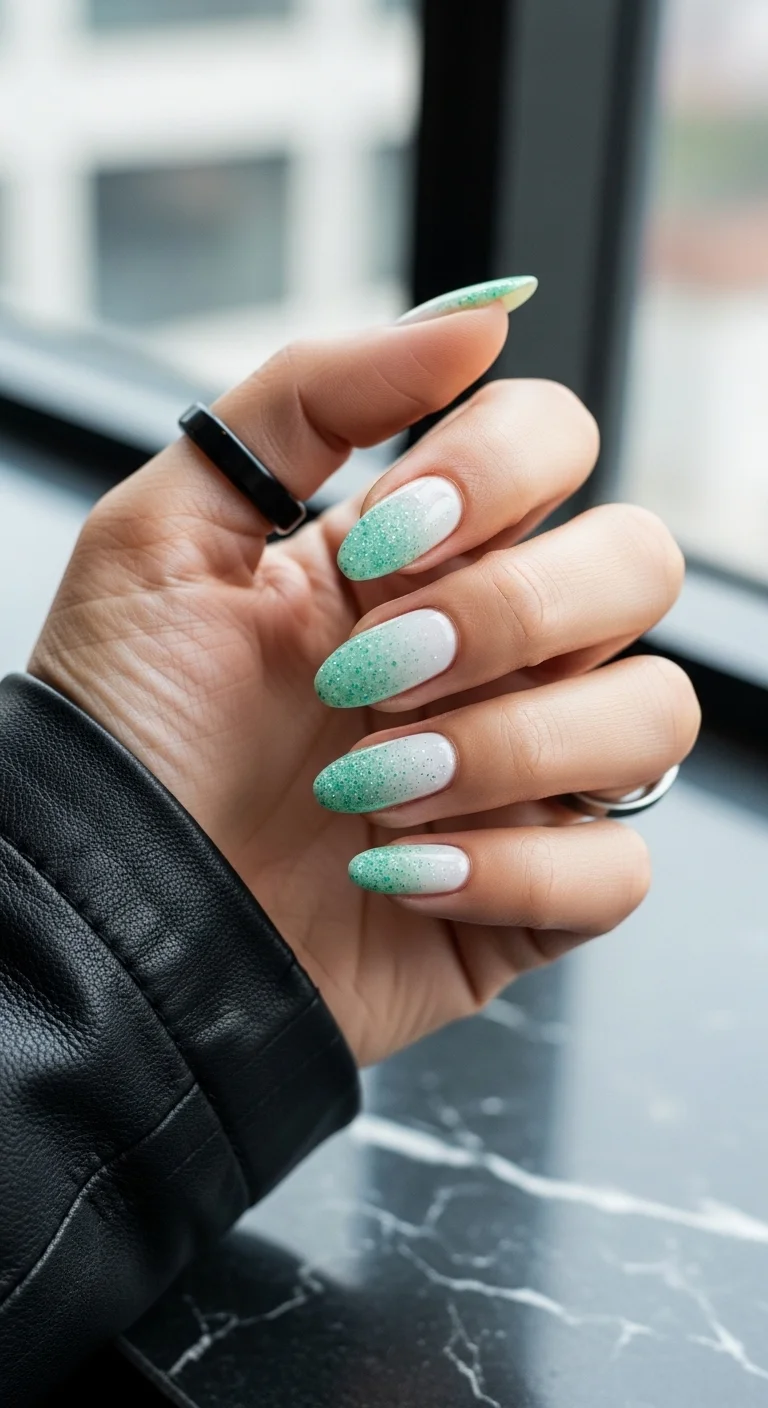
A glitter-tipped ombre where the sparkle hides imperfect blending at the transition line.
Overview:
Ombre nails are a solved design problem, sponge two colors, blend, done. So the question with any new ombre variation is always: what makes this one different? Here, the answer is the green glitter layer. It sits at the transition zone between white and mint, which turns the gradient's weakest point (the blending line) into its strongest feature. The glitter literally covers your mistakes.
The white-to-mint transition is forgiving across skin tones because both colors are cool-toned. Warm-toned ombres can look muddied on cooler skin, but this combination stays clean regardless. The almond shape also helps, the tapering sides make the gradient look like it's flowing toward the tip rather than sitting flat on the nail.
A word on the glitter: holographic mint glitter is specific. Regular silver glitter will look disconnected from the mint. You want something with a green shift that reads as part of the color story, not a separate element glued on top.
Design Breakdown:
A glitter-bridged gradient that hides imperfect blending behind sparkle. The white base keeps the mint looking fresh rather than heavy.
Base Color: Opaque white at the cuticle transitioning to translucent mint green at the tips. The white provides a clean starting point.
Nail Shape: Long almond. The tapering sides help the gradient look like it's flowing toward the tip.
Design Element: Fine green glitter concentrated at the tips, fading toward the center. The glitter sits on top of the gradient transition line.
Finish: Smooth high-gloss top coat. Two layers minimum, glitter toppers leave a bumpy surface that needs encapsulation.
Get The Look at Home:
Apply the glitter while the gradient is still slightly tacky so the particles embed into the surface rather than sitting on top.
- White base: Paint the lower two-thirds of each nail with opaque white. Let dry fully.
- Mint tips: Paint the upper third with mint green. These can overlap slightly where the sponge will blend them.
- Blend the line: Use a dry makeup sponge to tap where the two colors meet until the hard line disappears. Three to four passes usually does it.
- Glitter layer: While the polish is still slightly tacky, dab fine green glitter onto the top half of the nail, concentrating at the tip and fading toward the center.
- Encapsulate: Two coats of thick, self-leveling top coat. Run your finger over the nail after each coat, if you feel grit, add another layer.
7.Gilded Mint Marble
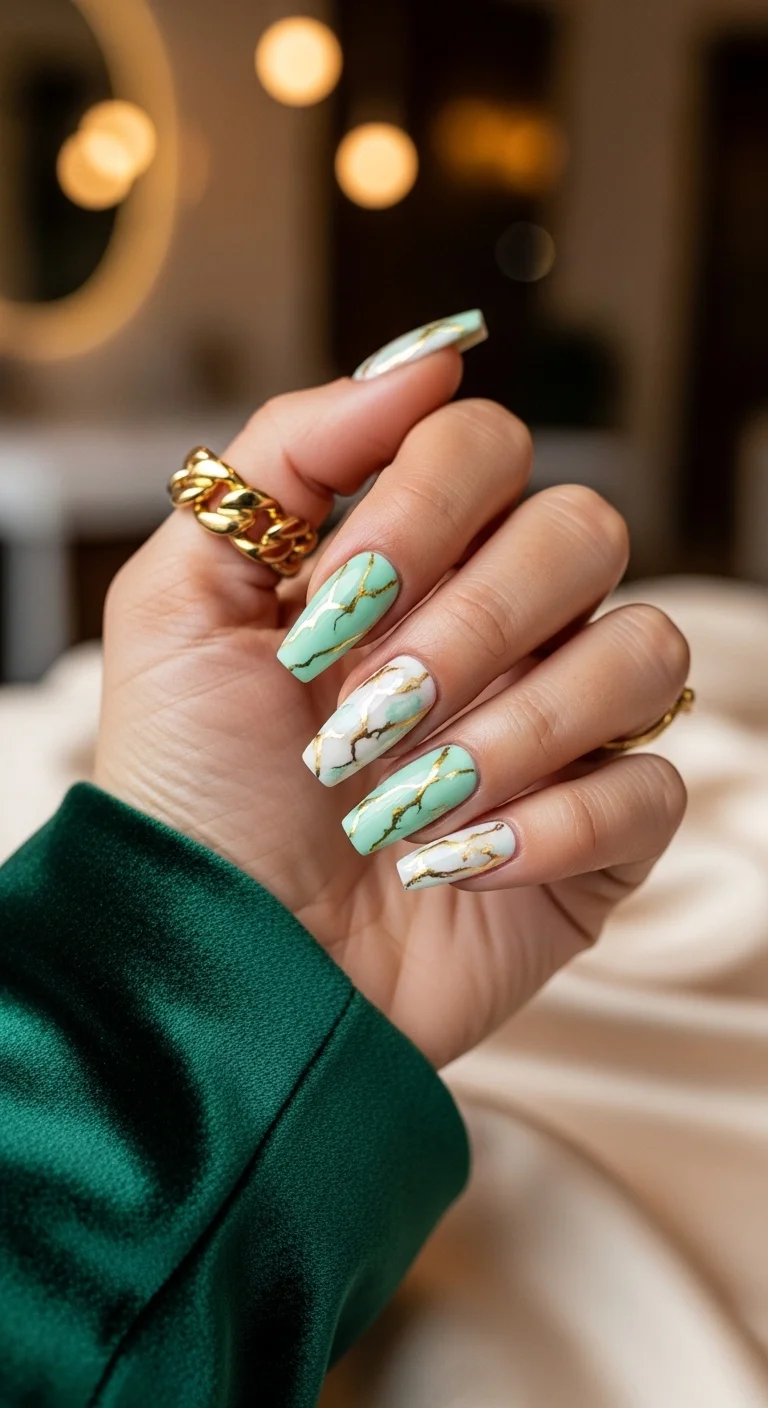
Alternating solid mint and gold-veined marble for a design that feels curated rather than chaotic.
Overview:
Marble nails usually commit to one look across all ten fingers. This design splits the difference: some nails are solid mint, others have a white base with mint and gold marble veining. The alternation prevents the marble from becoming visual noise, and the solid nails give the eye a place to rest between the detailed ones.
The gold veining is what elevates this from standard marble to something more intentional. Gold leaf or gold striping tape pressed into the marble pattern adds a metallic element that catches light and creates the impression of a natural stone surface. It's the difference between "I painted swirls on my nails" and "my nails look like they were cut from a slab of malachite."
The practical challenge: marble patterns are inherently random, which means each nail will look different. That's part of the appeal, but it also means you can't control the outcome precisely. If you're the type who needs symmetry across both hands, this design will test your patience.
Design Breakdown:
Alternating solid and patterned nails. The marble nails carry the detail; the solid nails provide balance.
Base Color: Creamy opaque mint green on the solid nails. White base on the marble nails, which serves as the canvas for the veining.
Nail Shape: Long coffin. The flat tip and straight sides give the marble pattern a defined frame.
Design Element: Mint and gold marble veining on the white nails. Thin, irregular lines that branch and intersect like natural stone.
Finish: High-gloss top coat to unify the alternating nails and enhance the marble's depth.
Get The Look at Home:
The marble lines should be thin and irregular. Thick, uniform lines look like stripes, not stone.
- Solid mint nails: Two coats of opaque mint green on the designated nails. Let dry fully.
- White base on marble nails: Two coats of opaque white on the alternating nails. Let dry.
- Marble veining: Using a very thin liner brush and mint green polish, paint thin, irregular lines across the white nails. Let the brush wobble slightly, perfectly straight lines don't look like marble.
- Gold accent: While the mint lines are still wet, use a toothpick or thin brush to drag thin lines of gold polish alongside and across the mint veins. The gold should intersect, not parallel.
- Blend edges: If the lines look too sharp, gently dab the surface with a makeup sponge dipped in acetone to soften the edges. The colors should blur at their borders.
- Top coat: One thick coat of glossy top coat across all nails. The top coat helps level out any texture from the layered marble lines.
29 Stunning Summer Almond Nails for Women in 2026 💅
8.Clean Girl Mint French
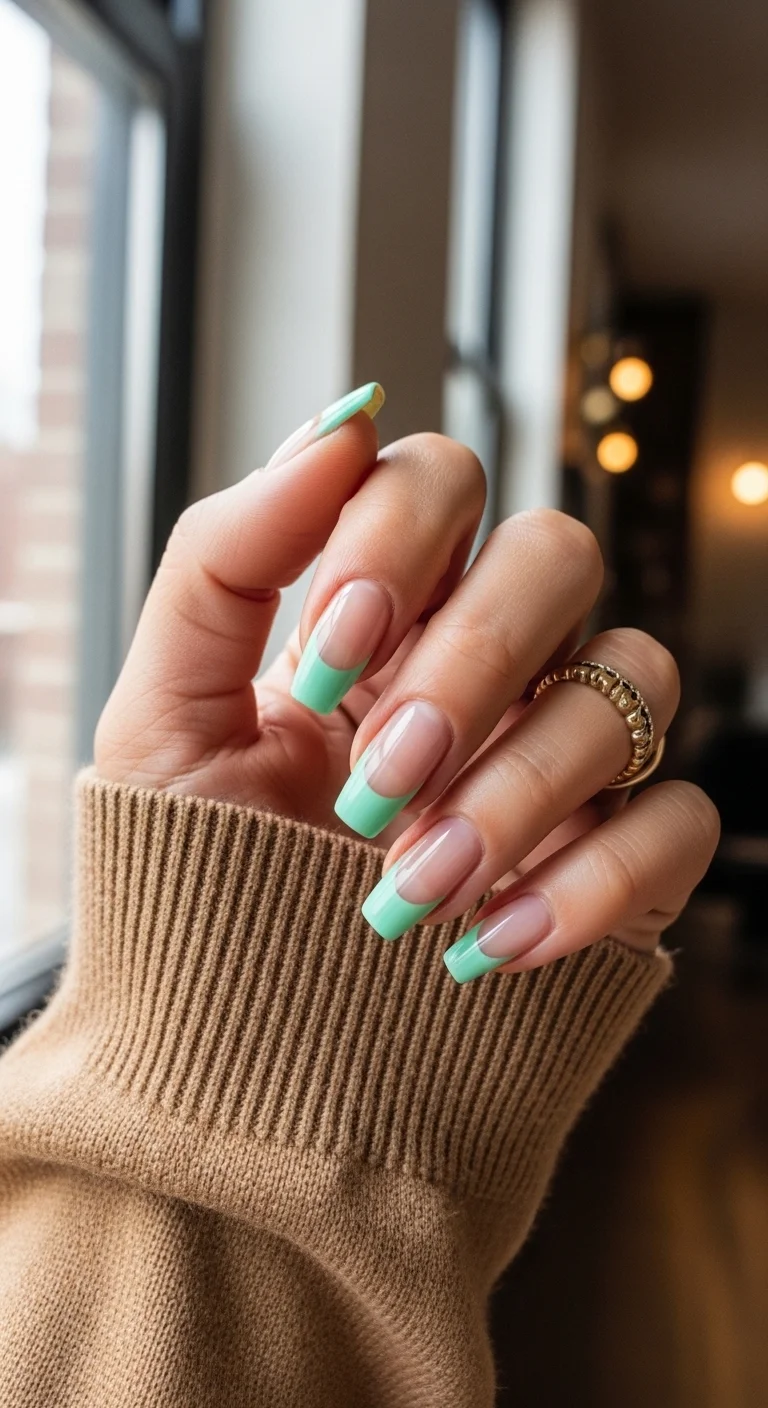
A minimal French in mint that keeps things simple and lets the color do the work.
Overview:
There's a specific category of nail design that works precisely because it doesn't try too hard. This thin mint French is that design. The tips are narrow enough that they read as a subtle color shift rather than a bold statement, and the sheer nude base keeps everything looking clean and intentional.
The mint used here sits right at the intersection of pastel and bright. It's saturated enough to register as green rather than looking like a faded or chalky version of the color. On a thin tip, that saturation matters, a pale or washed-out mint at this width would barely be visible against the nude base.
This is one of the more practical designs on this list for everyday wear. The thin tips grow out gracefully, meaning you can go three to four weeks before needing a fill or touchup. The tradeoff is that the thin line demands precision during application, wobbly edges are more visible on a narrow tip than on a thick one.
Design Breakdown:
Minimal French with a narrow colored tip. The design is about restraint and clean lines.
Base Color: Sheer, milky nude-pink that closely matches the natural nail bed color.
Nail Shape: Medium-long coffin. The tapered tip makes the thin French line look proportional rather than stubby.
Design Element: Thin, precise mint green French tips on every nail. The tip width is about two millimeters.
Finish: High-gloss top coat. The shine keeps the minimalist design from looking flat or unfinished.
Get The Look at Home:
Thin French tips require a steady hand or French tip guides. Freehand works if you have experience; stickers are faster for beginners.
- Nude base: Two thin coats of sheer nude-pink. The base should be barely there, not opaque.
- Tip guides or freehand: Place French tip sticker guides about two millimeters from the free edge, or use a thin liner brush if painting freehand.
- Mint tips: Apply mint green polish to the exposed tip in one thin coat. Two coats if the formula is sheer, but keep the line consistent across all nails.
- Remove guides: Peel off sticker guides while the polish is still wet for the cleanest edge. If painting freehand, clean the smile line with an angled brush dipped in acetone.
- Consistency check: Hold both hands side by side. All tips should be the same width. Adjust any that are noticeably thicker or thinner.
- Seal: One coat of glossy top coat. Cap the free edge to prevent tip wear on the narrow line.
9.Textured Mint Wave 3D
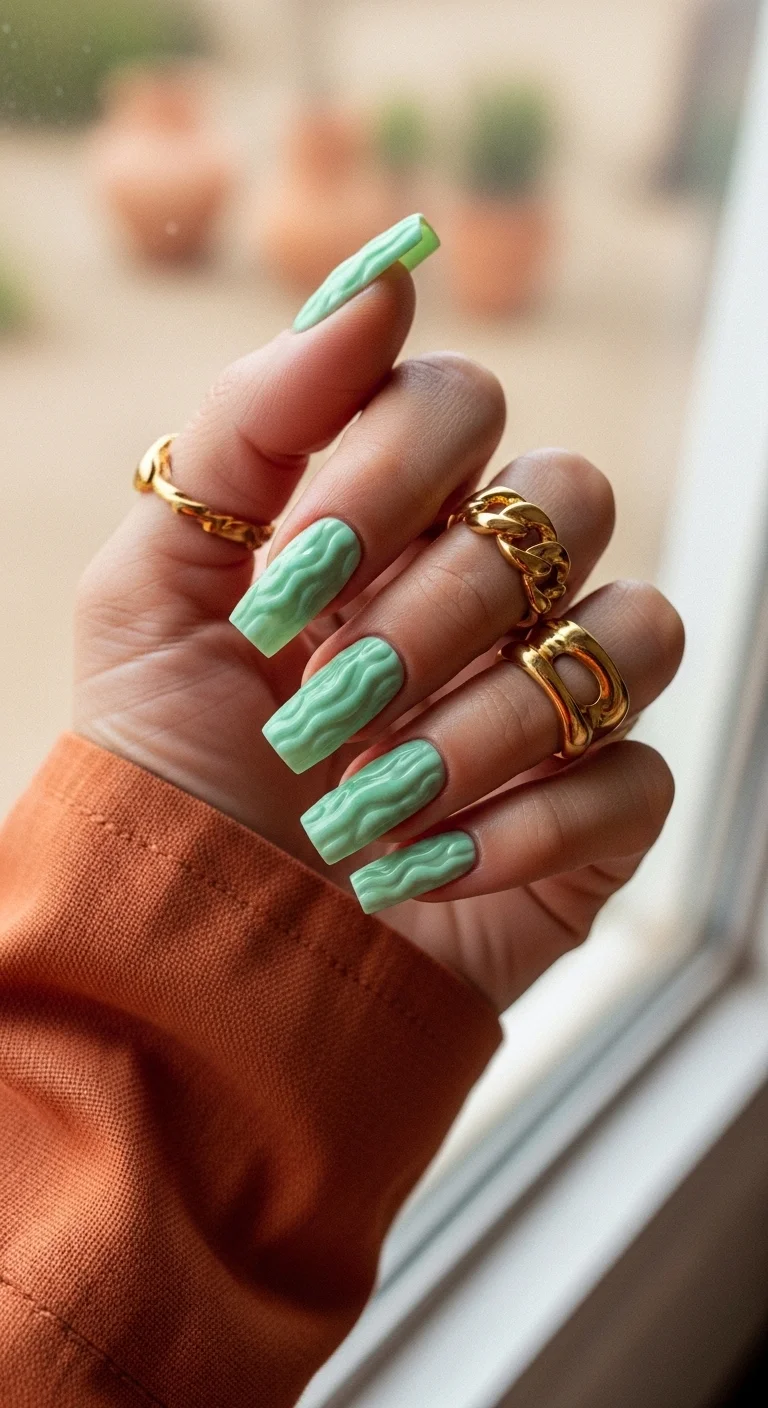
A tactile, sculptural take on mint where the texture itself is the design.
Overview:
Most nail art is visual. This one is tactile. The raised wave pattern across every nail creates a surface you can feel with your fingertips, which changes the relationship between the wearer and the manicure in a way flat art doesn't. It's closer to wearing jewelry than wearing polish.
The pastel mint color is a smart choice for textured nails because it's light enough to show the shadows and highlights that the 3D waves create. A dark color would absorb the shadows and flatten the effect. A neon would be too visually busy on top of the physical texture. Pastel mint hits the sweet spot where the color supports the design rather than competing with it.
The downside is practical: textured nails catch on everything. Hair, sweater fibers, pillowcases, the inside of your purse. The raised pattern creates hooks that grab onto soft materials. If you're used to smooth, snag-free nails, the adjustment period is real. Budget extra time for careful hand movements in the first few days.
Design Breakdown:
Sculptural 3D texture over a solid color. The waves create light and shadow play that makes the surface dynamic.
Base Color: Creamy, opaque pastel mint. The color needs to be light enough to show the shadow detail in the texture.
Nail Shape: Long coffin. The flat surface area gives the wave pattern room to develop across the full nail.
Design Element: Raised 3D wave or swirl pattern covering the entire nail surface. Created with builder gel or thick-viscosity gel applied over the base color.
Finish: Matte or satin. The matte finish emphasizes the texture by eliminating reflective highlights that would distract from the physical waves.
Get The Look at Home:
This design requires builder gel or a thick-viscosity gel specifically made for 3D nail art. Regular polish won't hold the raised shape.
- Mint base: Two coats of pastel mint gel polish, cured between coats.
- Builder gel prep: Load a thin liner brush with clear or mint-tinted builder gel. The gel should be thick enough to hold its shape when lifted from the brush.
- Wave pattern: Starting at one edge of the nail, paint a curved line of builder gel across the surface. Work in sections, building the wave pattern one ridge at a time. Each ridge should be about two millimeters wide.
- Cure between sections: Flash-cure each section for ten seconds before moving to the next. This prevents the gel from settling and losing its raised shape.
- Full cure: Once all waves are in place, do a full sixty-second cure under the UV lamp.
- Top coat: Apply a matte top coat over the textured surface. Use a brush that can get into the crevices between waves without pooling.
34 Stunning Summer First Date Hairstyles for 2026 💕☀️
10.Butterfly Dream Mint
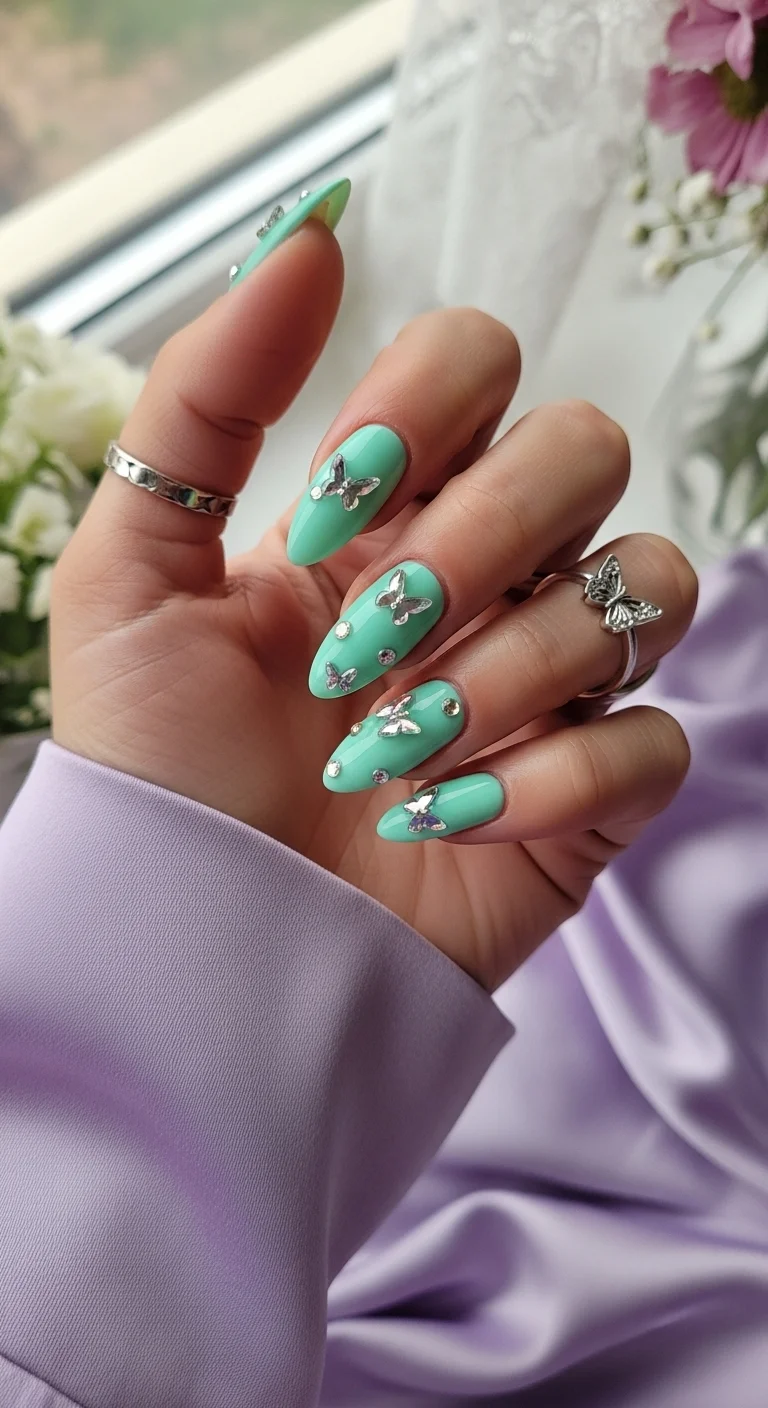
Silver butterfly charms on a bright mint base with scattered rhinestones for added sparkle.
Overview:
3D nail charms are polarizing. Done well, they look like jewelry for your hands. Done badly, they look like something fell off your craft supplies shelf and landed on your manicure. The difference is almost entirely about placement and restraint. This design gets it right by distributing the butterflies across multiple nails and keeping the remaining space clean.
The bright turquoise-mint base is more saturated than a typical pastel, which gives the silver butterflies something to contrast against. On a pale mint, the silver would wash out. On this brighter shade, each charm pops clearly against the background color. The scattered rhinestones near the butterflies create a "trailing sparkle" effect that suggests movement without actually adding more charms.
The practical reality of 3D charms: they snag on hair, knitwear, and pillowcases. Sealing the edges with a thick bead of gel or top coat around the base of each charm reduces this, but it doesn't eliminate it. Expect about a week of wear before something catches and either loosens or removes a charm entirely.
Design Breakdown:
Solid bright base with metallic 3D accents. The design lives or dies on charm placement and edge sealing.
Base Color: A bright, saturated turquoise-mint. More blue-leaning than a standard pastel mint. Full coverage in two coats.
Nail Shape: Medium almond. The curved shape echoes the wing forms of the butterfly charms.
Design Element: Silver butterfly charms placed on select nails. Small crystal rhinestones scattered near each butterfly as supporting sparkle.
Finish: High-gloss top coat on the base color. The matte metal against glossy polish creates an appealing texture contrast.
Get The Look at Home:
The charm attachment is the make-or-break step. Nail art gel or UV-cure jewelry gel works far better than regular nail glue.
- Color base: Two coats of turquoise-mint gel, cured between coats.
- Plan placement: Hold the butterflies over different nails before committing. Odd-numbered placements look more natural than symmetrical pairs.
- Attach charms: Apply a small bead of jewelry gel to the back of each charm. Press it onto the cured nail surface. Cure again under the UV lamp.
- Rhinestone trail: Place three to five tiny crystals in a loose arc near each butterfly using a wax picker tool.
- Edge seal: Using a detail brush, apply top coat around the base and edges of each charm. This prevents lifting and snagging on fabric.
- Full gloss: Top coat the remaining nail surface for a unified finish. Two coats over any area near the charms for extra durability.
11.Pastel Watercolor Swirl
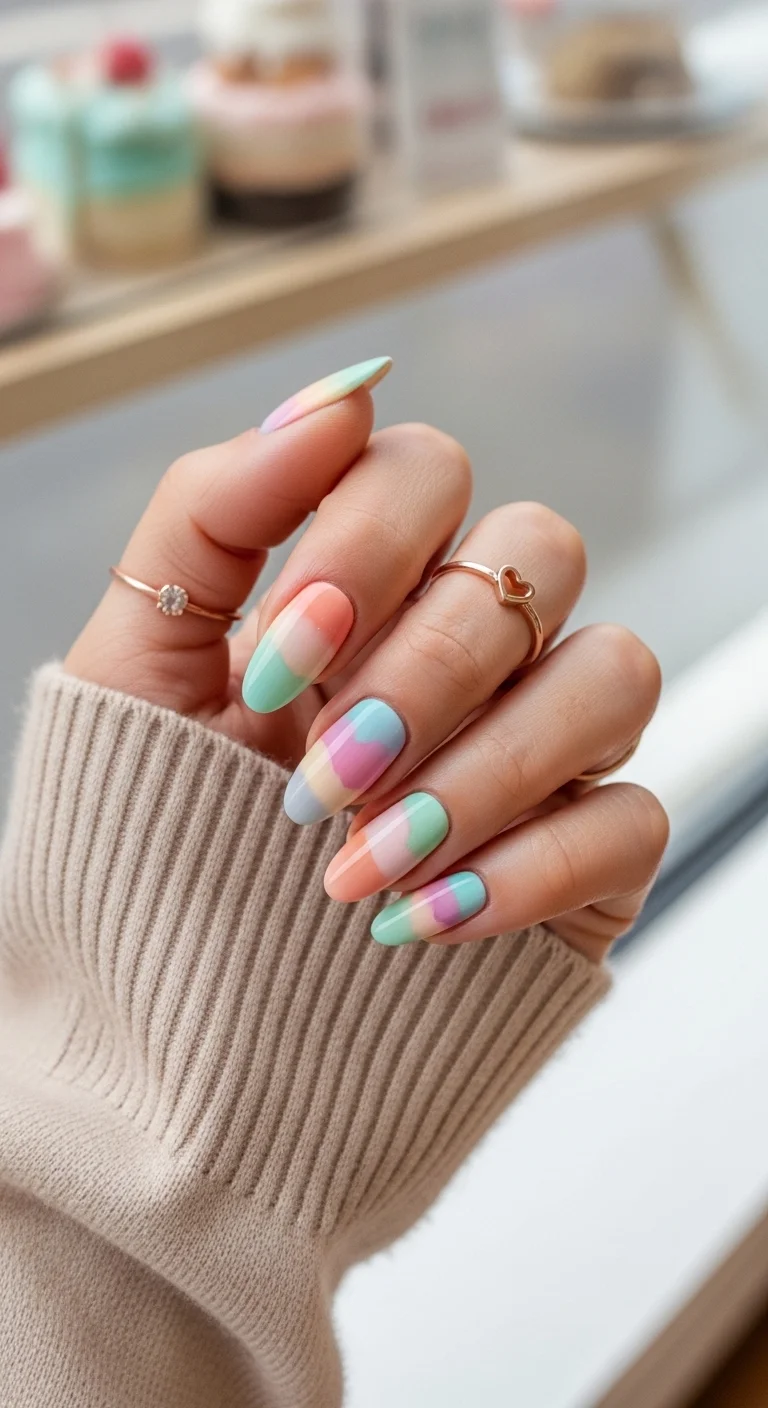
Soft watercolor patches of mint, peach, and lavender that look like a faded painting.
Overview:
Watercolor nails work best when you stop trying to control them. The blooming effect happens when colors spread and blur into each other on a wet surface, which means the loosest, most gestural application usually looks the most professional. Overworking it is the fastest way to end up with muddy brown smudges instead of distinct pastel patches.
The color palette here does the heavy lifting. Mint, peach, lavender, and soft pink all sit in the same value range, roughly the same lightness, which prevents any single color from dominating. The result looks like a faded photograph or a washed-out textile print. Deliberately soft rather than accidentally messy.
The technique requires either blooming gel or isopropyl alcohol as a spreading agent. Alcohol is cheaper and more accessible, but it works faster and gives you less adjustment time. If you're new to watercolor nails, blooming gel is more forgiving because it keeps the polish workable for longer.
Design Breakdown:
Abstract color-blending that uses blooming gel or alcohol to create soft, diffused edges between pastel patches.
Base Color: Milky white or very pale cream. This serves as the blank canvas that lets each pastel color read clearly.
Nail Shape: Medium almond. Soft curves complement the flowing, formless nature of the watercolor effect.
Design Element: Overlapping blobs of mint green, soft peach, lavender, and pink with deliberately blurred borders. No two nails look the same.
Finish: Thick glossy top coat to smooth the surface and intensify the color saturation.
Get The Look at Home:
Embrace randomness. The more you try to control the spread, the worse it looks.
- White canvas: Apply a milky white gel base and cure. This needs to be fully set before the next step.
- Blooming medium: Brush a thin layer of blooming gel over the cured white. Do not cure yet.
- Drop the colors: Using a detail brush, place small blobs of mint, peach, lavender, and pink gel polish directly onto the wet blooming surface. The colors will start spreading immediately.
- Alcohol method (alternative): If not using blooming gel, dip a clean brush in 70% isopropyl alcohol and gently tap it near each color blob. The alcohol thins the surrounding polish, causing the color to bleed outward.
- Stop early: Two to three blobs per nail is plenty. The white space between colors is part of the design. Continuing to add color creates mud.
- Cure and seal: Once satisfied, cure everything. Apply two coats of top coat to smooth any texture ridges.
34 Stunning Summer Butterfly Nails for Women in 2026 🦋
12.Mod Mint Polka Dots
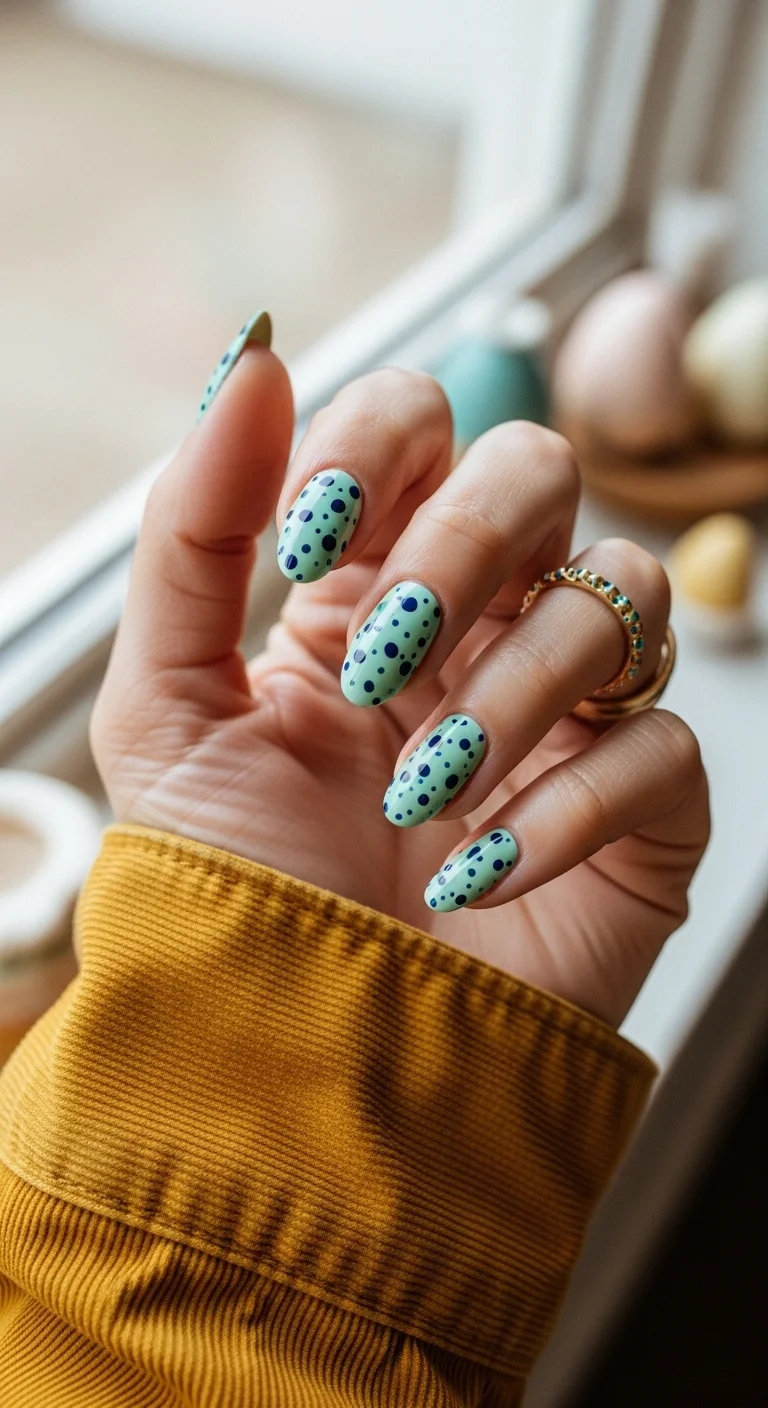
Navy polka dots on a mint base for a retro-modern pattern that's easy to execute.
Overview:
Polka dots are one of the most forgiving nail art patterns because irregularity reads as intentional. Uneven spacing, slightly different dot sizes, a few that are closer together than others, all of it looks like a deliberate design choice rather than a mistake. That makes this a strong option for anyone who wants patterned nails without needing a steady hand.
The navy-on-mint color combination works because the two colors sit on opposite ends of the saturation scale. The mint is soft and muted; the navy is deep and punchy. That contrast means even small dots register clearly against the background. A lighter dot color, like white or pale pink, would get lost on the mint.
One practical note: the dot size matters more than you'd think. Dots that are too large start to look like leopard print. Dots that are too small disappear into visual noise. The sweet spot is about two to three millimeters in diameter, with some variation for visual interest.
Design Breakdown:
A two-color pattern that depends on contrast and dot size for its impact.
Base Color: A soft, creamy mint green. Full coverage in two coats with no shimmer or pearl finish.
Nail Shape: Medium almond. The curved surface gives the dots a natural, scattered appearance.
Design Element: Navy blue polka dots in varying sizes scattered across every nail. No two nails have the same dot placement.
Finish: High-gloss top coat to unify the dots with the base and prevent the navy from looking raised.
Get The Look at Home:
The dotting tool is your best friend here. A toothpick works in a pinch, but the dots will be less uniform.
- Mint base: Two coats of creamy mint green. Let dry fully, the dots will sink into wet polish.
- Dot sizing: Dip a medium dotting tool in navy polish. Press firmly for larger dots, lightly for smaller ones. Vary the pressure across each nail.
- Placement strategy: Start with three to four larger dots spaced apart, then fill gaps with smaller dots. Avoid placing dots in straight lines or grids.
- Edge dots: Let some dots fall partially off the nail edge. This makes the pattern look like it continues beyond the nail rather than being contained within it.
- Dry time: Navy polish is pigmented and takes longer to dry than pastels. Wait at least five minutes before top coating.
- Seal: One thick coat of glossy top coat. Float the brush to avoid dragging the dots out of shape.
13.Wild Mint Leopard
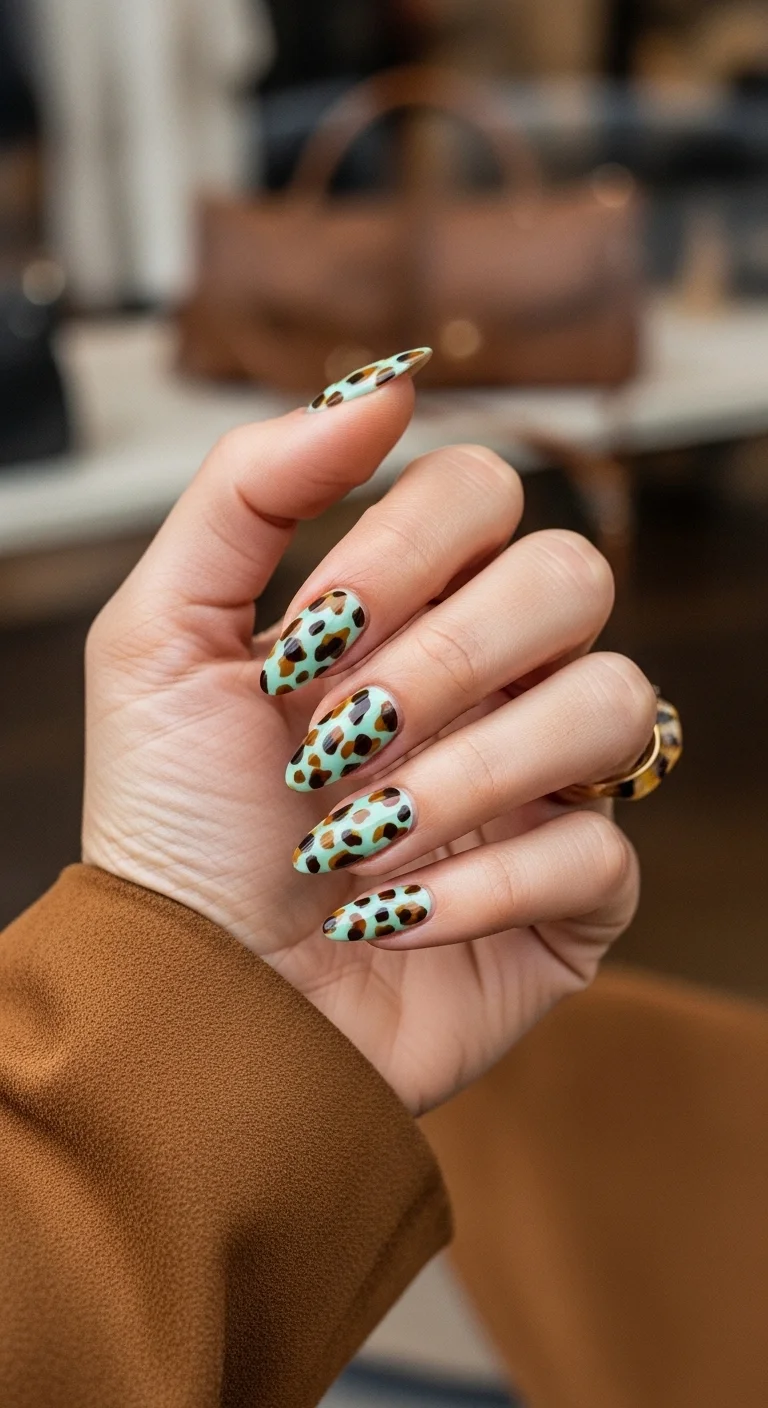
Leopard print gets a fresh treatment on a cool mint base instead of the usual warm nude.
Overview:
Leopard print on nails typically shows up on nude, brown, or black bases. Putting it on mint green is a deliberate subversion that changes the entire mood. The cool-toned background makes the warm brown spots pop in a way they don't on traditional neutral bases. It reads more fashion-forward than costume, which is the line all animal print has to walk.
The key to making leopard print look polished rather than chaotic is the spot structure. Each spot needs a lighter brown center partially enclosed by a darker brown outline. Skip the two-tone approach and the spots read as random blobs. Include it and they immediately register as leopard.
This design covers every nail, which is a commitment. If you want something more understated, doing leopard on just two or three accent nails with solid mint on the rest tones down the visual impact considerably.
Design Breakdown:
Full-coverage animal print using a two-tone spot technique on a contrasting cool base.
Base Color: A soft, creamy mint green. The cool undertone is what creates the interesting contrast with the warm brown spots.
Nail Shape: Medium almond. The tapered shape gives the spots a natural, organic canvas.
Design Element: Leopard spots in two shades of brown (lighter center, darker outline) scattered across every nail. Spots vary in size and spacing.
Finish: High-gloss top coat to unify the layered spot work and deepen the color contrast.
Get The Look at Home:
Work in two passes: all the light brown centers first, then all the dark outlines. It's faster than finishing each spot individually.
- Mint base: Two coats of mint green, dried fully.
- Light brown centers: Using a dotting tool and warm caramel brown, place irregular blobs across each nail. Not circles, not ovals, blobs. Vary the size from two to four millimeters.
- Dark outlines: Switch to a darker chocolate brown and a smaller dotting tool. Paint broken C-shapes and brackets around each light blob. Not every spot needs a full outline, partial wraps look more natural.
- Filler dots: Add tiny dark brown dots in the empty spaces between spots. This fills visual gaps and makes the pattern look cohesive.
- Dry thoroughly: The layered spots need time to set. Wait at least seven minutes before applying top coat.
- Top coat: Two coats of glossy top coat. The layered paint creates surface texture that needs smoothing.
26 Stunning Summer Braided Hairstyles for Women 2026 ☀️💇♀️
14.Mist Watercolor Mint
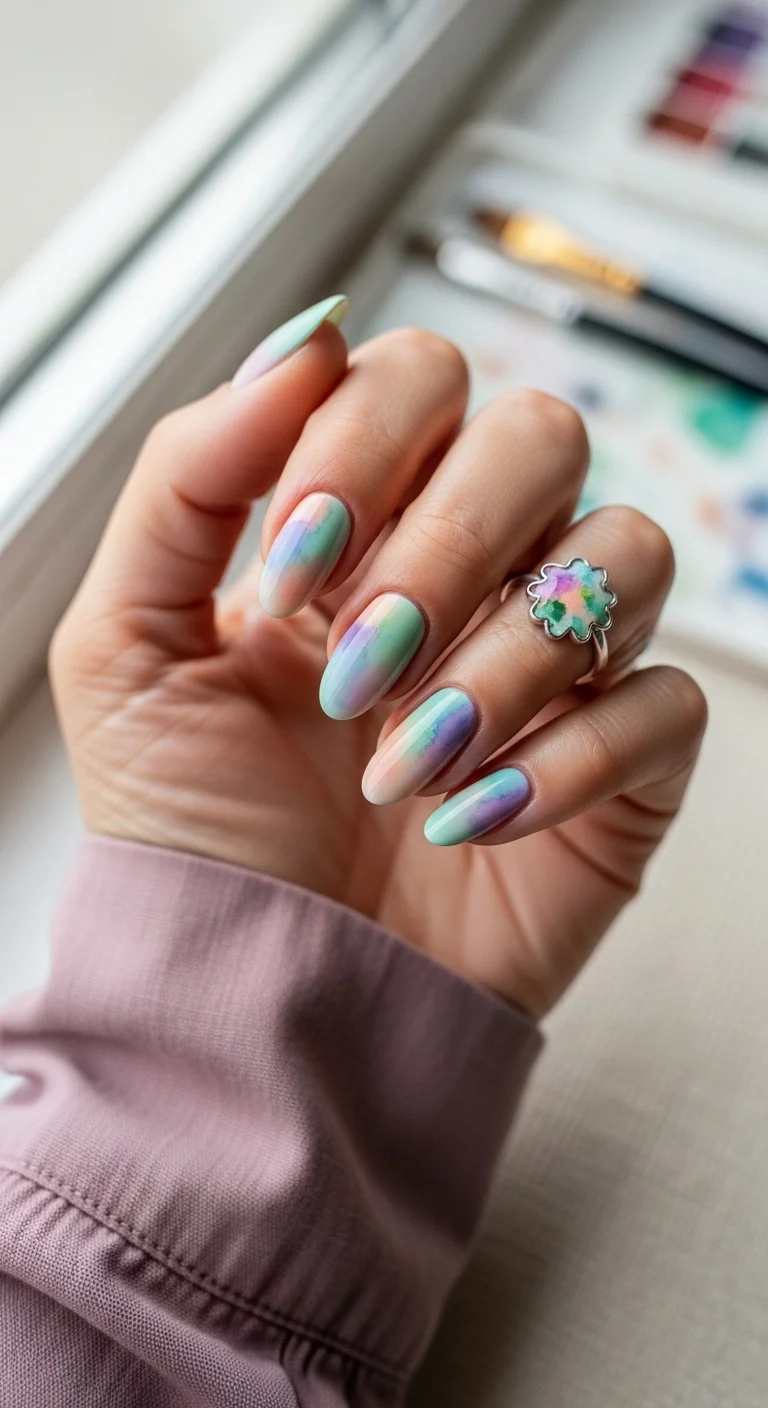
A pearlescent watercolor blend where mint, peach, and lavender melt into each other.
Overview:
Where the other watercolor design on this list uses distinct color blobs with visible boundaries, this version pushes the blending further. The colors overlap so heavily that some areas become entirely new shades, where peach meets lavender you get a warm mauve, where mint meets pink you get a hazy rose. The effect is more fog than paint.
The pearlescent shimmer running through the polish adds a dimension that flat watercolor can't achieve. Light catches the surface and creates a subtle iridescence that shifts between green, pink, and gold depending on the angle. It's the difference between a watercolor painting and a watercolor painting sealed behind glass.
The long almond shape is important for this design. The extra length gives the color blending room to develop fully. On short nails, the gradients get compressed and the individual patches become too obvious, losing the misty, diffused quality that makes this design work.
Design Breakdown:
Heavily blended watercolor with pearlescent shimmer. The colors merge to the point where individual patches are hard to identify.
Base Color: Milky white or iridescent pearl. The base should contribute to the shimmer rather than sitting as a flat backdrop.
Nail Shape: Long almond. The extended surface area lets the color blending develop properly.
Design Element: Overlapping washes of mint, peach, lavender, and pink with heavy blending. Individual colors are barely distinguishable in the final result.
Finish: High-gloss top coat with pearlescent or iridescent properties to enhance the internal shimmer.
Get The Look at Home:
This design uses more blending than the standard watercolor technique. You're pushing the colors into each other, not letting them spread naturally.
- Pearl base: Apply a milky or pearlescent white gel base and cure fully.
- Blooming layer: Apply a thin coat of blooming gel. Do not cure.
- Color drops: Place small drops of mint, peach, lavender, and pink gel onto the wet surface. Use less polish than you think you need.
- Active blending: Using a clean detail brush, gently drag through the color boundaries to encourage mixing. Don't swirl, drag in one direction only.
- Shimmer enhancement (optional): While the surface is still wet, dust a fine iridescent shimmer powder over the top. It will embed into the wet gel.
- Cure and seal: Cure once the blending looks right. Two coats of glossy top coat to smooth the surface.
15.Deep Foliage Mint
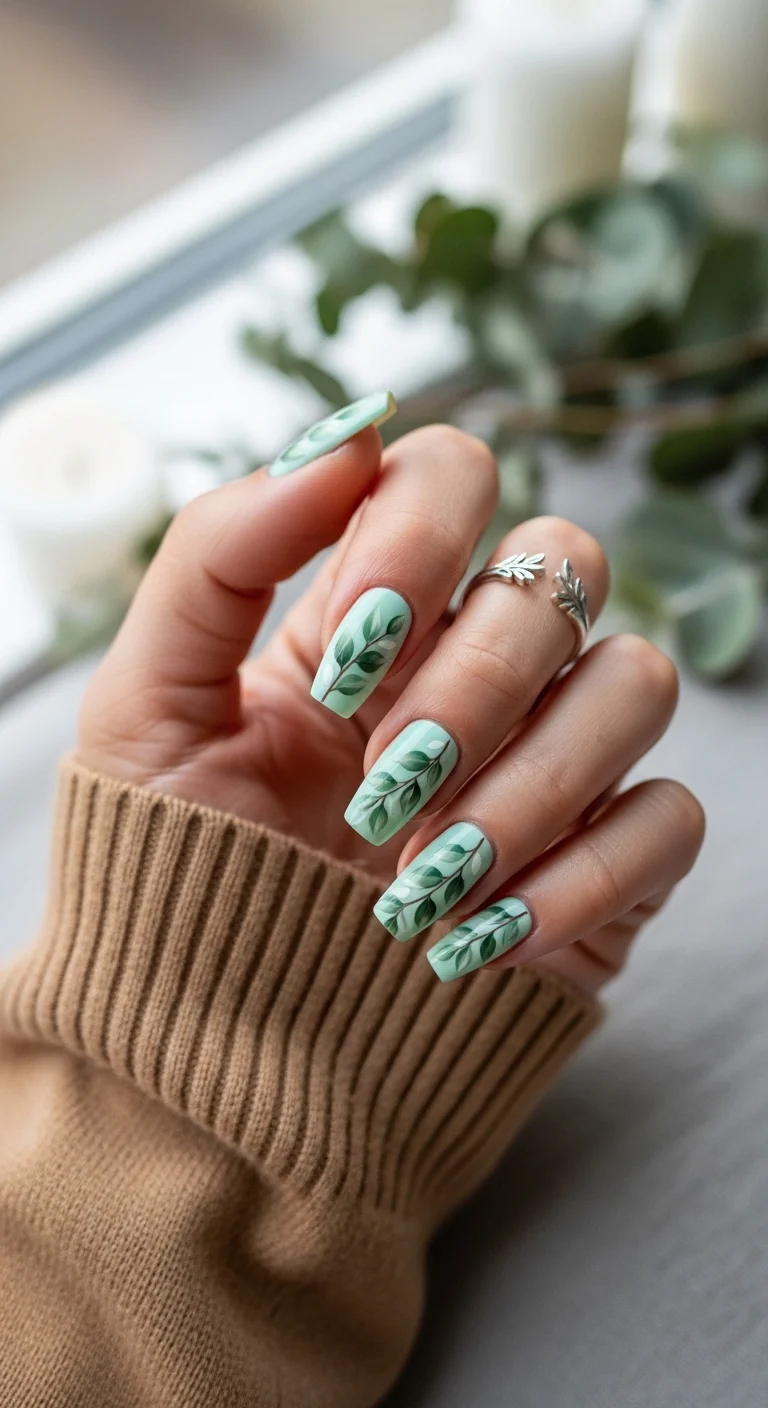
Botanical leaf art in deep green over a soft mint base for an earthy, organic feel.
Overview:
Leaf and vine art on nails occupies a specific space between botanical illustration and abstract pattern. This design leans toward the illustrative side, with recognizable leaf shapes connected by thin stems. The dark green on light green color scheme keeps the palette tight and prevents the design from looking busy despite covering every nail.
The monochromatic approach, green on green, is what makes this feel cohesive rather than chaotic. A multi-color botanical with flowers, stems, leaves, and berries in different hues would read as a completely different design. Sticking to one color family with varying saturation levels gives the eye a clear hierarchy: light background, dark foreground.
The hand-painted quality is part of the appeal, but it's also the biggest challenge. Leaves that are too uniform look stamped. Leaves that are too varied look messy. The sweet spot is consistent leaf shapes with slight variations in angle and size, like actual foliage on a real plant where no two leaves are identical but they all clearly belong to the same species.
Design Breakdown:
Monochromatic botanical art using two shades of green for a layered, organic effect.
Base Color: A soft, creamy mint green. Light enough to provide contrast for the darker leaf art.
Nail Shape: Long coffin. The flat surface gives the vine pattern room to trail naturally from cuticle to tip.
Design Element: Hand-painted dark green leaves and thin vine stems on every nail. Leaves vary in angle and size but maintain consistent shape.
Finish: High-gloss top coat to protect the detail work and deepen the green contrast.
Get The Look at Home:
Paint all the stems first across every nail, then go back and add leaves. Stems anchor the design and give you a roadmap for leaf placement.
- Mint base: Two coats of light mint green. Let dry completely.
- Stems: Using a very thin liner brush and dark forest green, paint curved lines trailing from one edge of the nail toward the other. Let the lines wobble slightly, perfectly straight stems look artificial.
- Leaf shapes: With the same dark green, paint small almond-shaped leaves along each stem. Press the brush down at the base of each leaf and lift as you pull outward to create a pointed tip.
- Layered depth: Mix a drop of the dark green into the mint base on a foil palette. Use this mid-tone green to add a second layer of leaves behind the first, slightly offset. This creates the illusion of depth.
- Consistency check: Hold both hands side by side. The leaf density should be roughly even across all nails.
- Top coat: Float a thick, self-leveling top coat over the art. Pressing the brush down drags the thin stem lines.
28 Cute & Sporty Baseball Game Nail Ideas for 2026 ⚾
16.Vintage Rose Mint
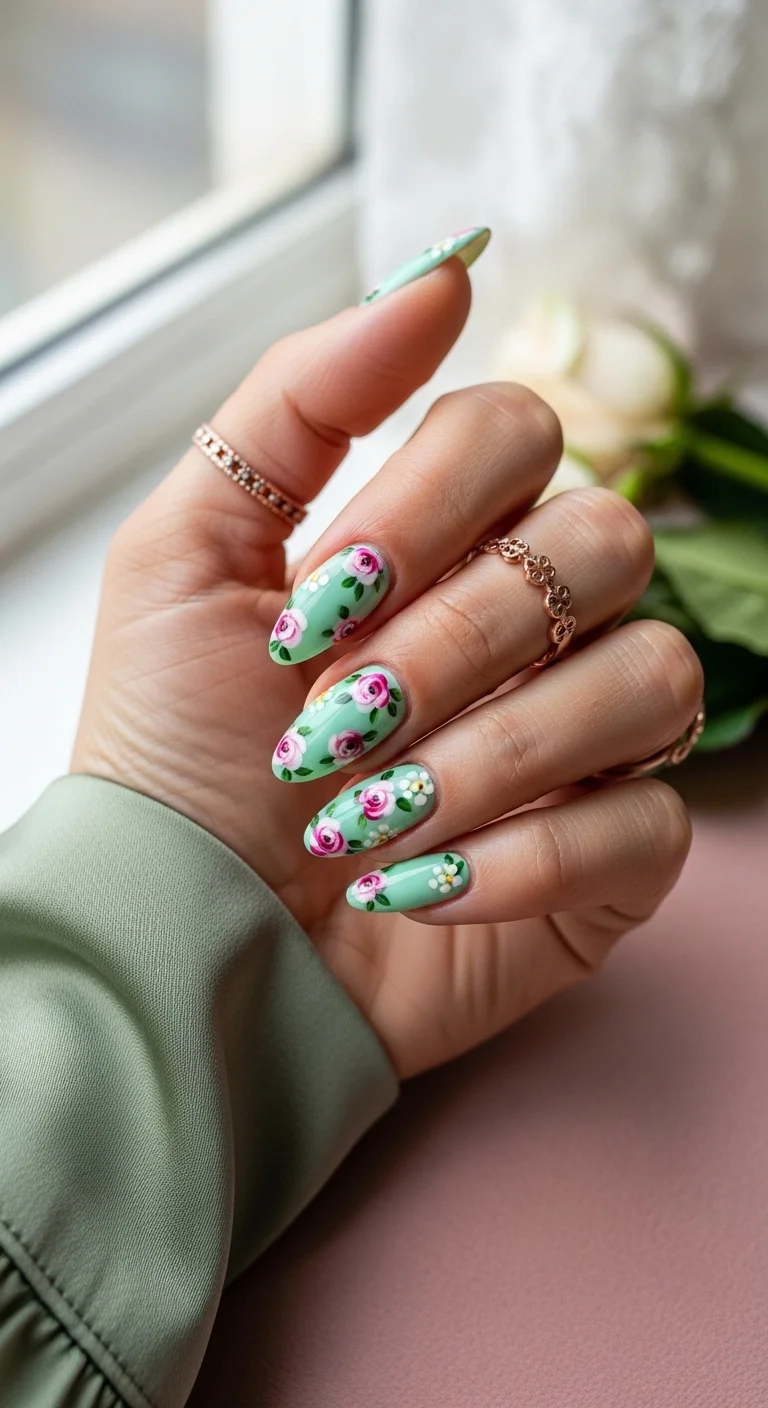
Pink roses and small white filler flowers on a mint base for a vintage botanical feel.
Overview:
Floral nail art that leans vintage rather than trendy has a specific charm. The pink roses here are painted in a loose, painterly style rather than as tight, precise illustrations. That looseness gives them a hand-done quality that reads as artisan rather than mass-produced. The addition of small white filler flowers prevents the roses from floating in empty space.
The mint base is a smart pairing for pink roses because both colors share a cool undertone. On a warm nude or cream base, the same pink roses would read as distinctly separate from the background. On mint, they feel integrated into the color story, like they belong there rather than being placed on top.
The practical challenge with this design is the layering. Each rose needs at least two tones of pink, a lighter center and a darker outer petal, plus the green leaves and white filler flowers. That's four colors per nail, minimum. Budget extra time and keep your workspace organized with each color in its own small puddle on a foil palette.
Design Breakdown:
Vintage-style floral using layered brush strokes to create painterly roses with supporting filler flowers.
Base Color: A soft, creamy mint green with no shimmer. The flat base lets the layered floral art stand out.
Nail Shape: Long almond. The tapered shape echoes the organic forms of the roses and leaves.
Design Element: Hand-painted pink roses with two-tone petals, small white filler flowers with yellow centers, and dark green leaves.
Finish: High-gloss top coat to seal the layered paint and add depth to the colors.
Get The Look at Home:
Each rose is built from the center outward. Start with the lightest pink in the middle and add darker petals around it.
- Mint base: Two coats of light mint green, dried fully.
- Rose centers: Using a small dotting tool and light pink, place a small dot where each rose will go. Two or three roses per nail, varying placement.
- Petal layers: Switch to a deeper rose pink and a detail brush. Paint curved C-shaped strokes around each light pink center. Three to four petals per rose.
- White filler: With a small dotting tool and white polish, place clusters of three to five tiny dots in the spaces between roses. Add a yellow dot in the center of each cluster.
- Leaves: Using dark green and a liner brush, paint small almond-shaped leaves tucked around the roses and filler flowers.
- Dry and seal: Wait at least seven minutes for the layered art to set. Apply two coats of top coat to smooth the surface.
17.Geometric Gold Grid Mint
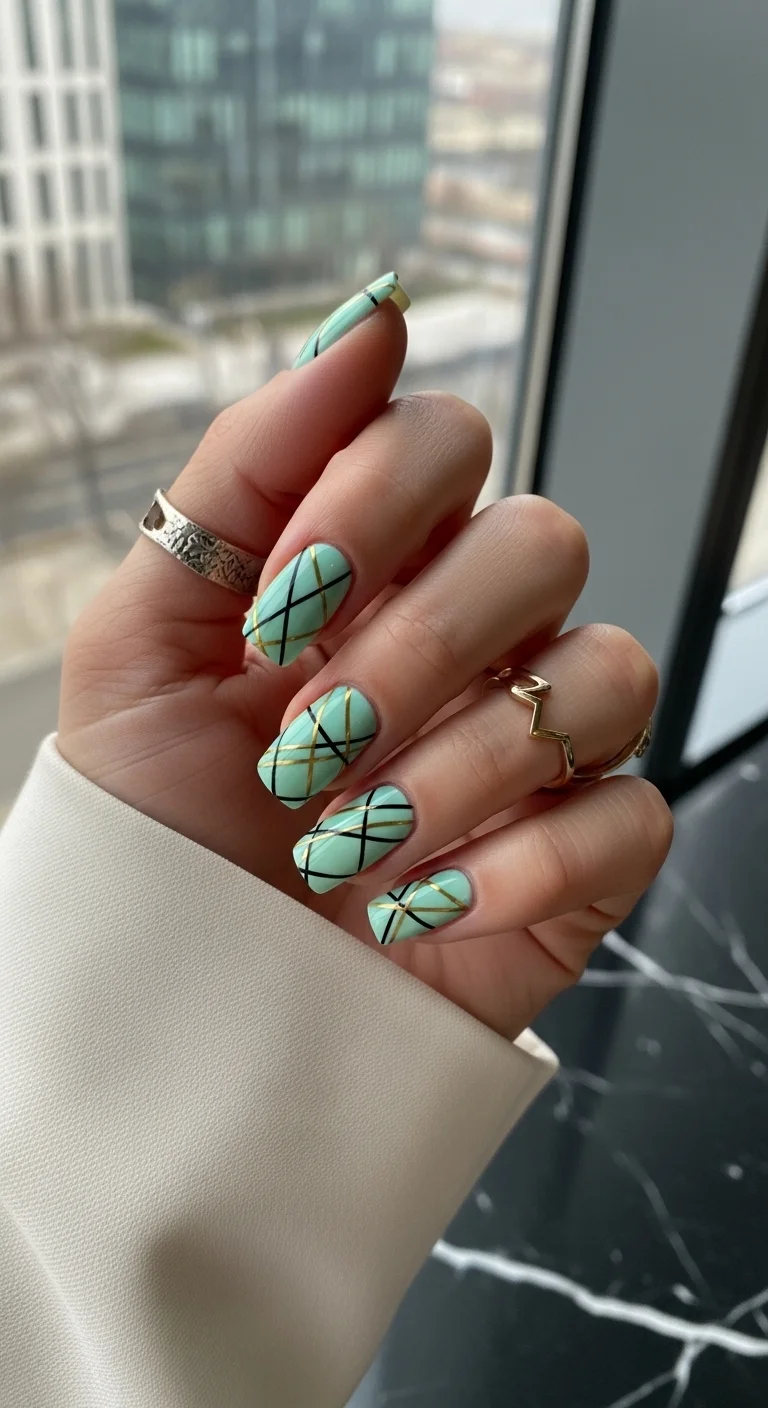
A sharp geometric grid in black and gold that transforms mint from soft to structured.
Overview:
Mint green is usually treated as a soft, feminine color. This design deliberately undermines that expectation. The intersecting black and gold lines create a rigid geometric grid that sits in direct opposition to the pastel base. The tension between the soft color and the hard pattern is what makes the design interesting.
The gold lines add a metallic element that prevents the grid from looking flat. Black lines alone would read as purely graphic, almost industrial. The gold warms the pattern and ties it to the warmth in the mint's undertone. It's a small addition that changes the entire character of the design.
Line precision is everything here. Crooked grid lines on a geometric pattern are immediately obvious, more so than on organic designs where irregularity is expected. Using striping tape instead of freehand painting eliminates most of the wobble risk, though it adds time to the process.
Design Breakdown:
Hard geometric pattern using intersecting diagonal lines. The contrast between the rigid grid and soft base color is the design concept.
Base Color: A soft, creamy mint green. Full coverage with a smooth, self-leveled surface.
Nail Shape: Long coffin. The flat, angular shape mirrors the geometry of the grid pattern.
Design Element: Thin black and gold diagonal lines intersecting to form a diamond grid pattern across every nail.
Finish: High-gloss top coat to seal the tape or painted lines and create a unified surface.
Get The Look at Home:
Striping tape gives cleaner lines than freehand painting. Cut all your tape lengths before you start.
- Mint base: Two coats of mint green, dried completely. The surface needs to be fully hard or the tape will pull up the polish.
- Black diagonal lines: Cut thin strips of black striping tape. Press them diagonally across the nail from one corner to the opposite side, spaced about three millimeters apart.
- Gold crossing lines: Cut gold striping tape and press it diagonally in the opposite direction, crossing over the black lines to form a diamond grid.
- Trim edges: Use cuticle nippers to trim the tape ends flush with the nail edge. Tape that extends past the nail will peel.
- Press firmly: Use a rubber cuticle pusher to press all tape lines firmly onto the nail surface. Any lifted sections will catch on things and peel off.
- Top coat: Apply two coats of thick top coat to encapsulate the tape and prevent lifting.
29 Fun FIFA World Cup Watch Party Hairstyles (2026)
18.Creamy Sage Mint Gloss
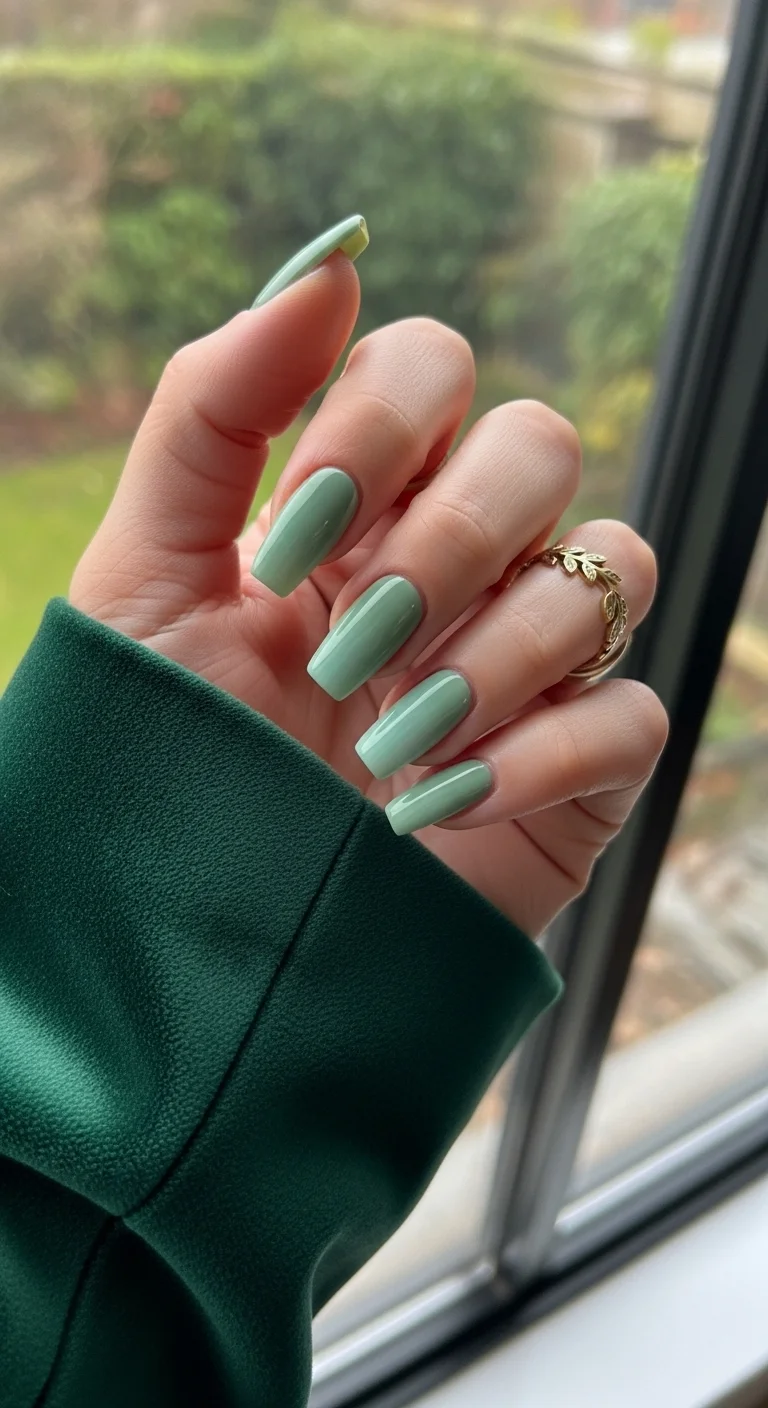
Sometimes the best design is no design at all. Solid sage with a mirror-like gloss.
Overview:
There's a category of nail design that works precisely because it doesn't try to be anything other than a well-executed solid color. This creamy sage is that design. The color sits right between mint and sage, leaning slightly muted with a hint of grey in its undertone. It's more sophisticated than a bright mint and more interesting than a standard sage.
The ultra-glossy finish is what elevates this from "I painted my nails" to "I made a considered choice." A high-shine top coat over a solid cream color creates a mirror-like surface that catches light across the entire nail. The effect is almost liquid, like the nails are dipped in colored glass.
The practical advantage of a solid color with no art is maintenance. There's nothing to chip, no detail work to wear away, no accent nails that age differently from the rest. The manicure ages gracefully, and touchups are as simple as adding another coat of top coat.
Design Breakdown:
Single-color, no art. The finish IS the design. This is about execution, not creativity.
Base Color: A creamy, muted sage-mint. Not too bright, not too grey. The undertone should lean cool without going full grey-green.
Nail Shape: Long coffin. The flat, modern shape suits the clean simplicity of a solid color.
Design Element: None. Solid, even coverage across all nails.
Finish: Ultra-glossy. Multiple coats of top coat to build a thick, glass-like surface.
Get The Look at Home:
The difference between "nice nails" and "salon-quality nails" is surface prep and top coat thickness.
- Buff and smooth: Lightly buff any ridges on the natural nail. Every imperfection shows through a solid cream color.
- Ridge-filling base coat: Apply a smoothing base coat and let it dry completely.
- First coat: Apply a thin, even coat of sage-mint. Work in long strokes from cuticle to tip. Don't go back over the same area.
- Second coat: Let the first coat dry for three minutes. Apply a second coat for full opacity. If the formula is streaky, a third thin coat is acceptable.
- Top coat layering: Apply three coats of high-gloss top coat, letting each dry for two minutes. The layered top coat creates the glass-like depth.
- Final check: Run a finger over the surface. If it feels perfectly smooth, you're done. If you feel any texture, add another top coat layer.
19.Minty Cherry Bomb
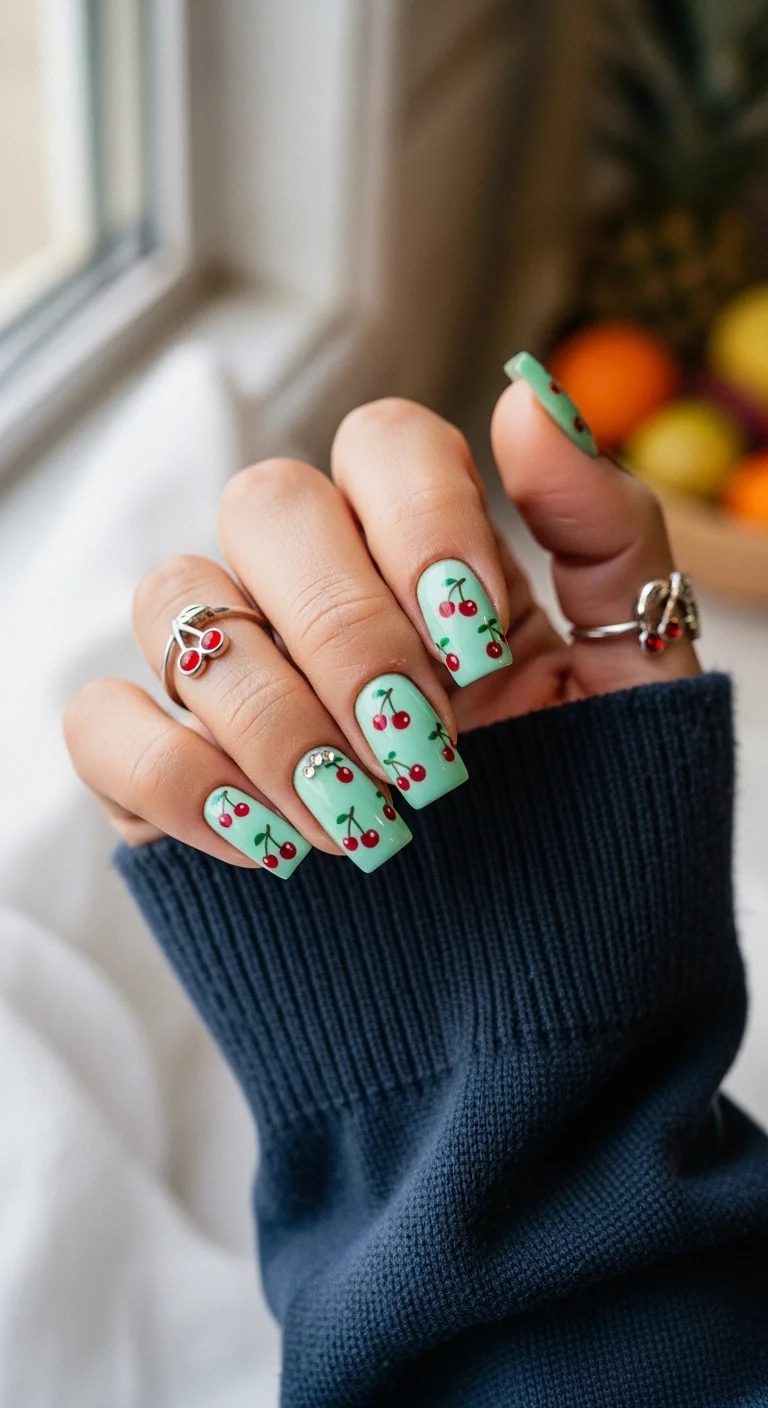
Red cherry pairs scattered across a mint base for a playful, retro-fruit set.
Overview:
Fruit nail art walks a thin line between charming and childish. The cherry motif lands on the right side of that line because of the color contrast and the short square shape. The bright red cherries against the cool mint base create a visual punch that reads as deliberate rather than decorative. The square shape adds a structural edge that keeps the fruit from looking precious.
The cherry pairs are graphically simple: two red dots, two curved green stems, and a small leaf. That simplicity means even slightly imperfect hand-painting looks recognizable. This is a good design for people who want to try freehand nail art without needing advanced brush skills.
Short nails are the right call for this design. On long nails, the cherry motif would need to be scaled up, and larger fruit illustrations start to look cartoonish. At this size, the cherries read as a pattern rather than a picture, which keeps the design feeling polished.
Design Breakdown:
Simple fruit art on a short, practical shape. The design relies on color contrast and graphic simplicity.
Base Color: A soft, creamy mint green. Full coverage in two coats with no shimmer.
Nail Shape: Short square. Clean, practical, and keeps the fruit art proportional.
Design Element: Hand-painted red cherry pairs connected by curved green stems. Small green leaf accents. Cherries scattered across every nail.
Finish: High-gloss top coat to protect the art and make the red and green pop.
Get The Look at Home:
Paint all the cherry pairs first across every nail, then go back and add stems and leaves. Working in rounds is faster.
- Mint base: Two coats of mint green, dried fully between coats.
- Cherry dots: Using a medium dotting tool and bright red polish, place pairs of dots on each nail. Two to three cherry pairs per nail, varying placement.
- Stems: With a thin liner brush and green polish, paint two curved lines from each cherry pair meeting at a point above. The stems should curve naturally, not look like straight lines.
- Leaves: Add a small green leaf stroke at the point where each pair of stems meets.
- Dry time: The dotting tool leaves raised paint. Wait at least five minutes before top coating to prevent smearing.
- Top coat: One thick coat of glossy top coat, floating the brush over the art without pressing down.
31 Patriotic Fourth of July Nail Ideas for 2026 🇺🇸
20.Sunny Daisy Mint French
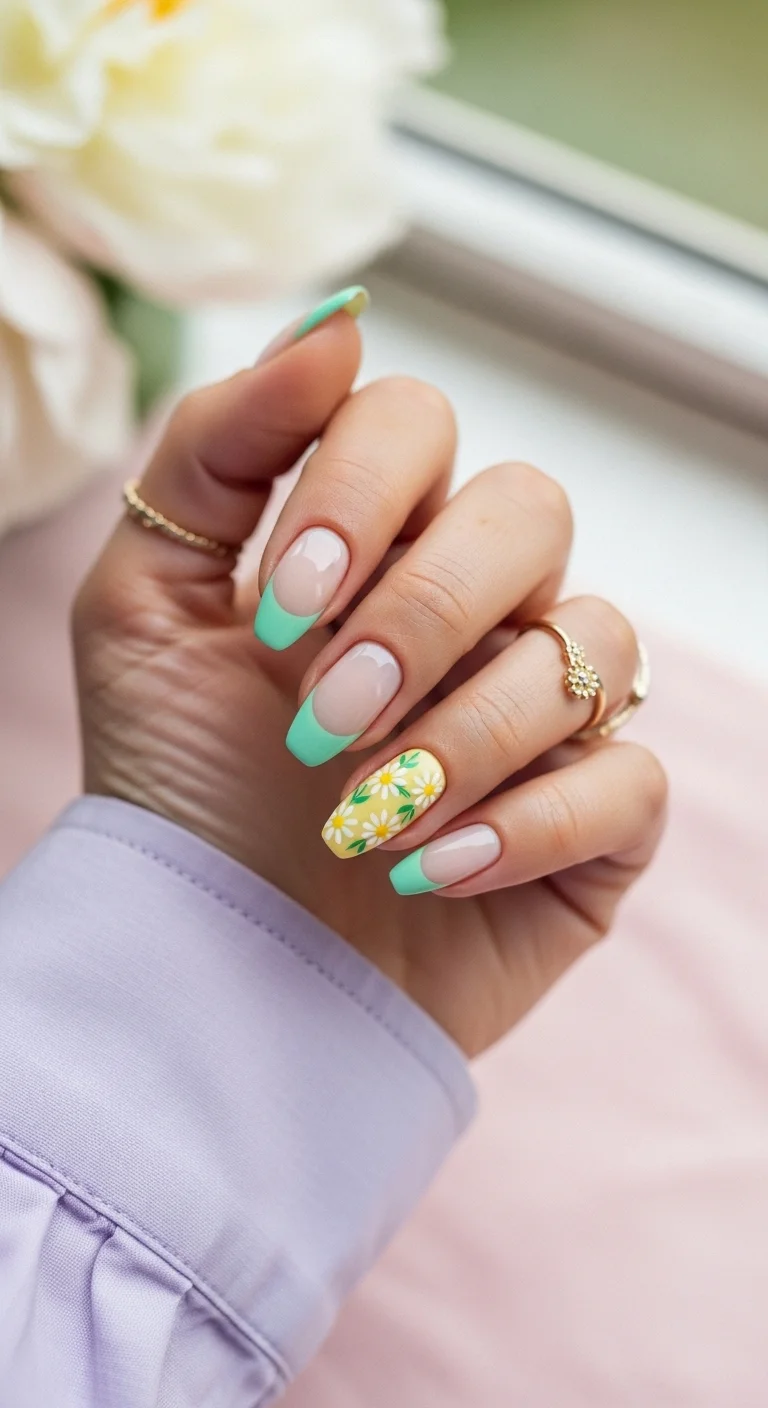
Mint French tips paired with a sunny daisy accent nail for a spring-forward combination.
Overview:
French tips are the backbone of nail design, but they can feel predictable. The fix here is the accent nail: a yellow base with white daisies that breaks the French pattern and introduces a second color story. The mint and yellow sit next to each other on the color wheel, which creates a harmonious pairing that feels fresh without clashing.
The sheer nude base underneath the mint tips keeps the overall look clean and wearable. Without it, the mint and yellow together might feel heavy. The nude acts as breathing room between the two colors, letting each one register independently rather than blending into a single impression.
The ring finger accent nail is the hardest part of this design because it involves the most steps: yellow base, white petals, yellow centers, green leaves. Everything else is just a French tip. If you're short on time, do the French nails first and save the accent nail for when you have more patience.
Design Breakdown:
A French tip design with one accent nail that introduces a complementary color and floral art.
Base Color: Sheer milky pink-nude on the French nails. Opaque sunny yellow on the ring finger accent nail.
Nail Shape: Medium-long coffin. The flat tip gives the French line a clean, defined edge.
Design Element: Mint green French tips on four nails. White daisies with yellow centers and green leaves on the yellow accent nail.
Finish: High-gloss top coat to unify the different finishes and protect the detail work on the accent nail.
Get The Look at Home:
Do the French nails and the accent nail in separate rounds. Switching between techniques mid-process slows you down.
- Nude base on French nails: Two thin coats of sheer pink-nude on four nails. Let dry.
- Yellow base on accent: Two coats of sunny yellow on the ring finger. Let dry.
- Mint French tips: Using a French liner brush, paint mint green tips on the four nude nails. Match the tip width across all four.
- Daisy petals: On the yellow accent nail, use a small dotting tool and white polish to place five dots in a circle for each daisy. Two to three daisies per nail.
- Daisy centers: Switch to yellow polish and a smaller dotting tool. Place a dot in the center of each white petal circle.
- Leaves: With green polish and a liner brush, add tiny leaf strokes near each daisy.
- Seal everything: One thick coat of glossy top coat across all nails. Cap the free edge on the French tips to prevent chipping.
21.Milky Mint Glow
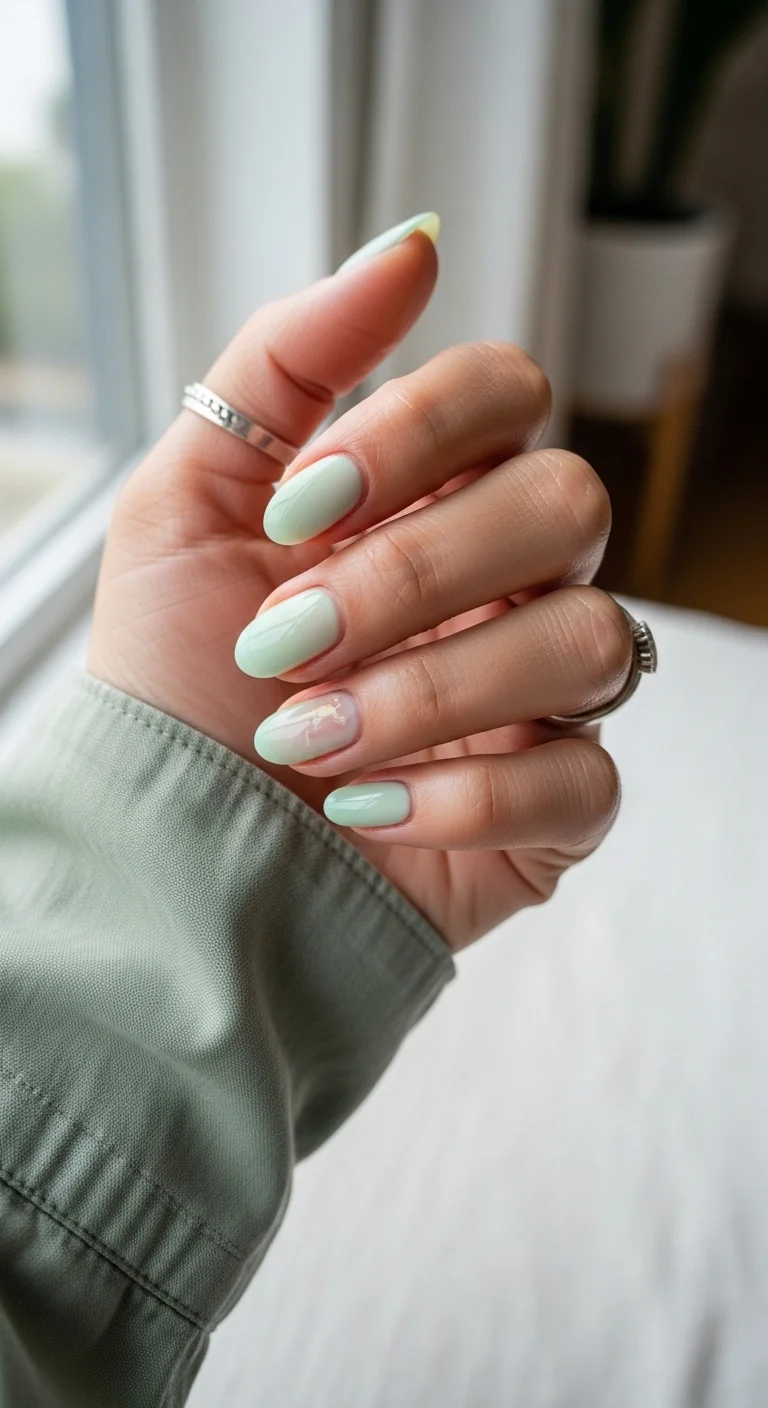
A milky, translucent mint with soft watercolor washes of lavender and peach underneath a pearlescent glaze.
Overview:
Milky nails have dominated social media feeds for a reason: the semi-sheer finish makes every color look like it's been filtered through frosted glass. This version takes the milky concept further by layering soft watercolor patches of lavender and peach beneath the translucent mint surface. The result looks like you're viewing a watercolor painting through a pane of sea glass.
The pearlescent shimmer woven through the polish adds movement that flat milky nails lack. Tilt your hand and the surface shifts between green, pink, and gold, depending on the angle. Under natural light, the effect is subtle and almost invisible. Under direct artificial light, the shimmer activates and the nails practically glow.
The downside of milky, translucent formulas is streakiness. Because the polish is semi-sheer, brush marks and uneven application show through more than they would with an opaque formula. Three thin coats, fully dried between each, produces the smoothest result. Rushing the dry time is the most common mistake.
Design Breakdown:
A layered, translucent design where watercolor patches sit beneath a milky, pearlescent surface.
Base Color: Milky, semi-translucent mint with pearlescent shimmer particles. The sheerness is intentional, it lets the watercolor patches show through.
Nail Shape: Long almond. The tapered shape enhances the "glowing from within" quality of the translucent layers.
Design Element: Soft watercolor patches of lavender, peach, and pink visible beneath the milky mint surface. No hard edges, everything bleeds into everything.
Finish: High-gloss top coat to amplify the pearlescent shimmer and create depth between the layers.
Get The Look at Home:
Layer the watercolor patches first, then seal them under the milky top layer. The order of operations matters.
- White base: One thin coat of opaque white. This creates a bright canvas that makes the pastel watercolors pop.
- Watercolor patches: Using a detail brush, place small blobs of lavender, peach, and pink gel polish onto the white. Use blooming gel or alcohol to blur the edges.
- Cure: Once the watercolor blending looks right, cure fully.
- Milky overlay: Apply two to three thin coats of the milky translucent mint over the cured watercolor. Each coat should be slightly translucent on its own.
- Pearl enhancement (optional): Dust a fine pearlescent shimmer powder over the last wet coat for extra glow.
- Top coat: One thick coat of glossy top coat to seal everything and create a smooth, glass-like surface.
24 Stunning Bridesmaid Hairstyles for Weddings 2026 💍✨
22.Matte Mint Velvet
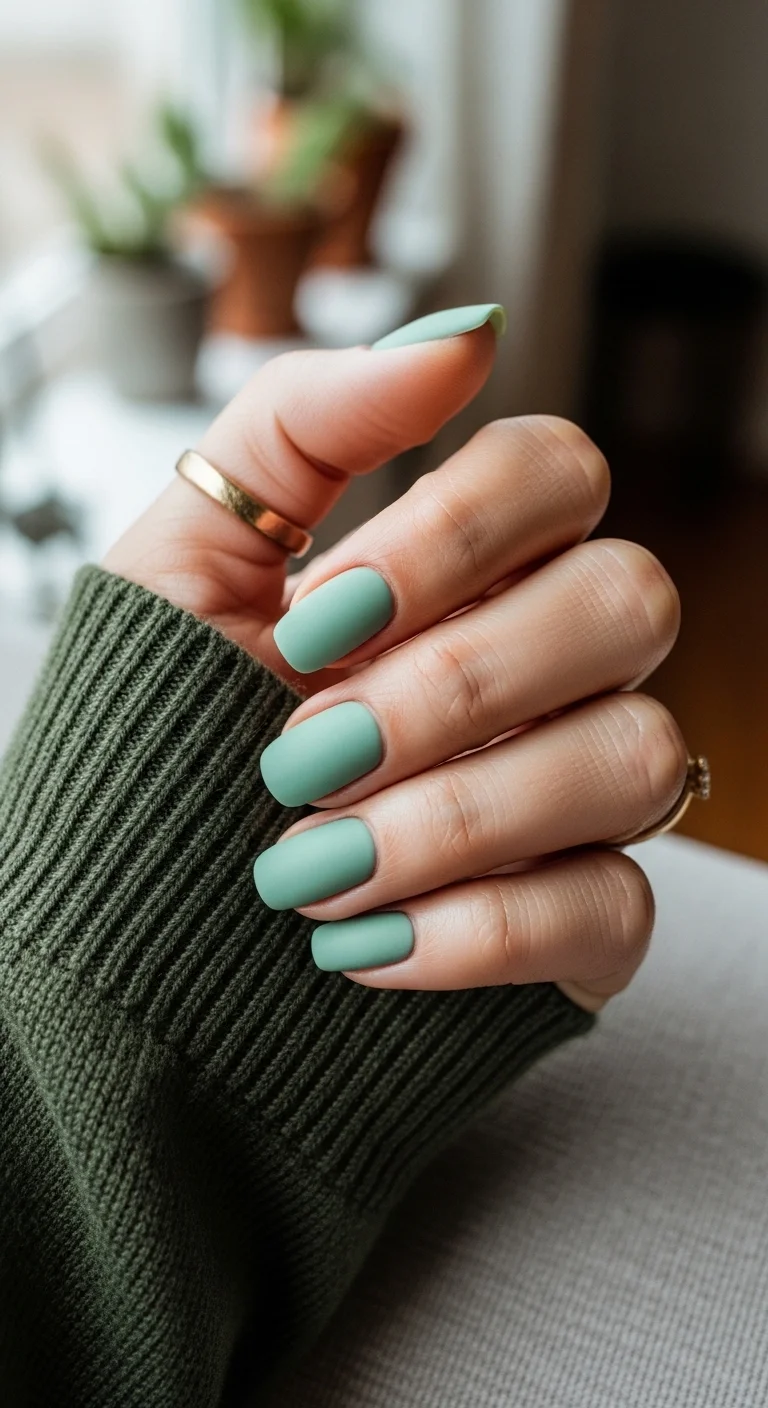
Sometimes the best design is no design at all. Solid mint with a flat, velvety matte finish.
Overview:
A solid matte mint occupies a specific space in the nail design spectrum: it's clearly intentional, it required effort, but it doesn't announce itself. The matte finish transforms what would be a perfectly ordinary pastel into something that looks like sea glass or frosted ceramic. It feels considered rather than effortless, which is a harder line to walk than it sounds.
Matte top coats amplify every flaw in the base coat application. Streaks, brush marks, and uneven thickness that high-gloss hides are fully visible under a flat finish. This means the application needs to be more precise than usual. Three thin coats, fully dried between each, with a self-leveling formula is the minimum standard.
The practical advantage of matte over gloss is fingerprint resistance. Glossy nails show every smudge and fingerprint within hours of application. Matte finishes stay looking fresh longer, which makes them a strong choice for anyone who works with their hands or types extensively throughout the day.
Design Breakdown:
Single-color, no art. The matte finish IS the design. Surface preparation matters more here than with any other finish.
Base Color: A creamy, pigment-dense pastel mint. Avoid anything with shimmer or pearl particles, they fight the matte finish.
Nail Shape: Long almond. The curved shape adds visual interest to what is otherwise a completely plain design.
Design Element: None. Solid, even coverage across all nails.
Finish: True matte top coat. Not satin, not "velvet matte," fully flat with zero sheen.
Get The Look at Home:
Surface prep matters more for matte nails than any other finish. Every ridge, every brush mark shows.
- Buff the surface: Lightly buff any ridges on your natural nail. Every ridge shows through matte polish.
- Ridge-filling base coat: Apply a smoothing base coat and let it dry completely.
- Three thin coats: Apply the mint polish in three thin coats rather than two normal ones. Each coat should look slightly translucent on its own.
- Dry time between coats: Wait at least three minutes between coats. Matte top coat on undried polish causes bubbling.
- Matte top coat: Apply in one confident stroke per nail. Don't go back over the same area, it creates visible texture differences.
- Edge cleanup: Clean the edges with a small angled brush and acetone. Matte polish against skin is more visible than glossy polish because there's no reflection to distract the eye.
23.Retro Mint Swirls
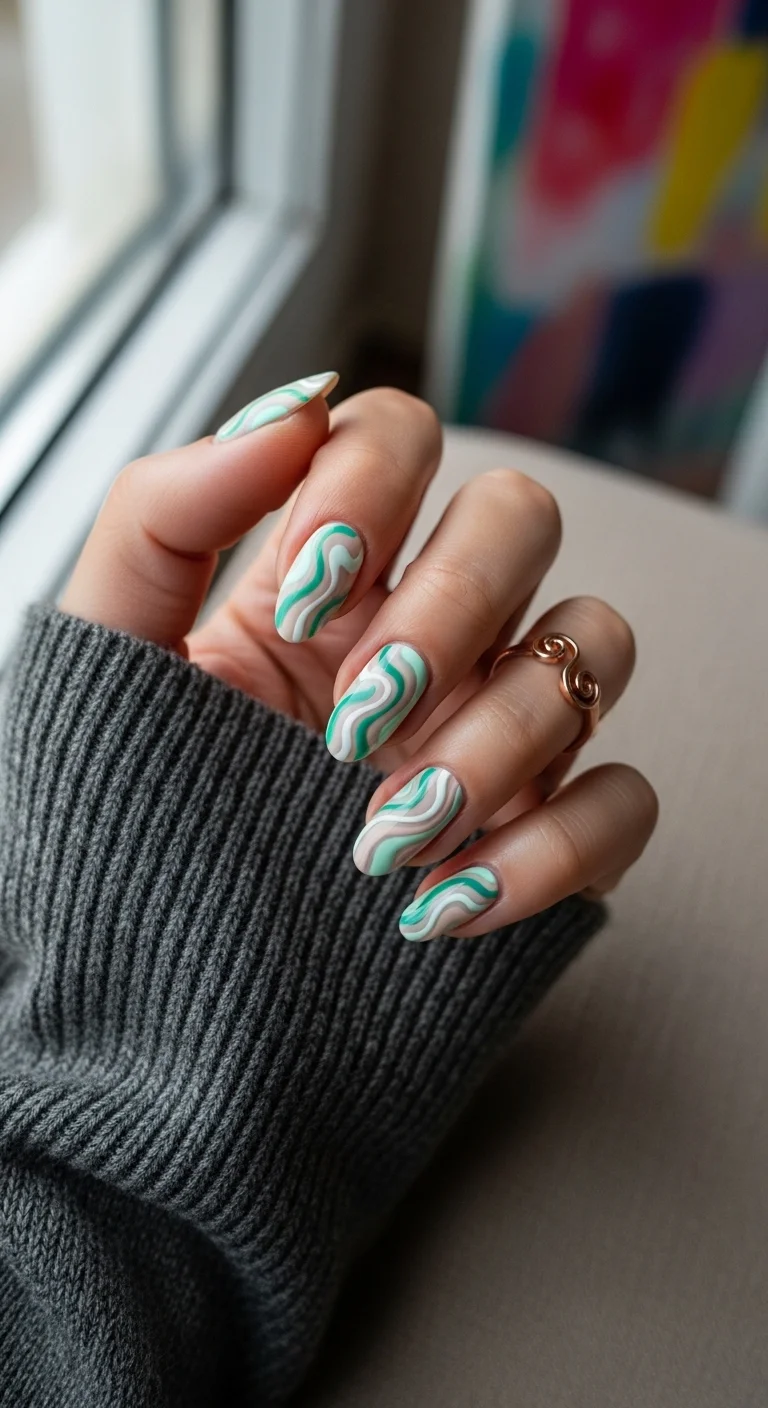
Leafy green patterns on a mint base that lean more botanical than retro.
Overview:
The name suggests retro swirls, but the actual design is closer to a botanical print. Green leaves and thin vine-like stems trail across each nail on a light mint base. The effect is more "pressed flowers in a vintage journal" than "1970s wallpaper," which works in the design's favor. It feels timeless rather than trend-dependent.
The monochromatic green-on-green approach keeps the design cohesive. A multi-color version with different leaf shades and colored flowers would create a completely different mood. Sticking to one color family with varying saturation levels gives the pattern depth without visual clutter.
The vine trails are the key technique here. Each stem needs to curve naturally from one edge of the nail to the other, with leaves branching off at irregular intervals. Perfectly symmetrical leaf placement looks stamped, not painted. The slight randomness of hand-done work is what gives this design its organic character.
Design Breakdown:
Monochromatic botanical pattern using two shades of green for a layered, organic effect.
Base Color: A soft, creamy mint green. Light enough to contrast with the darker leaf art.
Nail Shape: Long coffin. The flat surface gives the vine pattern room to trail across the full nail.
Design Element: Hand-painted dark green leaves and thin vine stems trailing across every nail. Leaves vary in angle and spacing.
Finish: High-gloss top coat to protect the detail work and deepen the green contrast.
Get The Look at Home:
Paint all the stems first across every nail, then add leaves. Stems create the framework that guides leaf placement.
- Mint base: Two coats of light mint green, dried fully.
- Vine stems: Using a very thin liner brush and dark forest green, paint curved lines trailing from one edge of the nail to the other. Let the lines wobble slightly.
- Leaf shapes: With the same dark green, paint small almond-shaped leaves along each stem. Press the brush down at the base and lift as you pull outward to create a pointed tip.
- Mid-tone layer: Mix a drop of dark green into the mint base. Use this mid-tone to add a second layer of leaves behind the first, creating depth.
- Consistency check: Hold both hands side by side. The leaf density should be roughly even across all nails.
- Top coat: Float a thick, self-leveling top coat over the art. Pressing the brush down drags the thin stem lines.
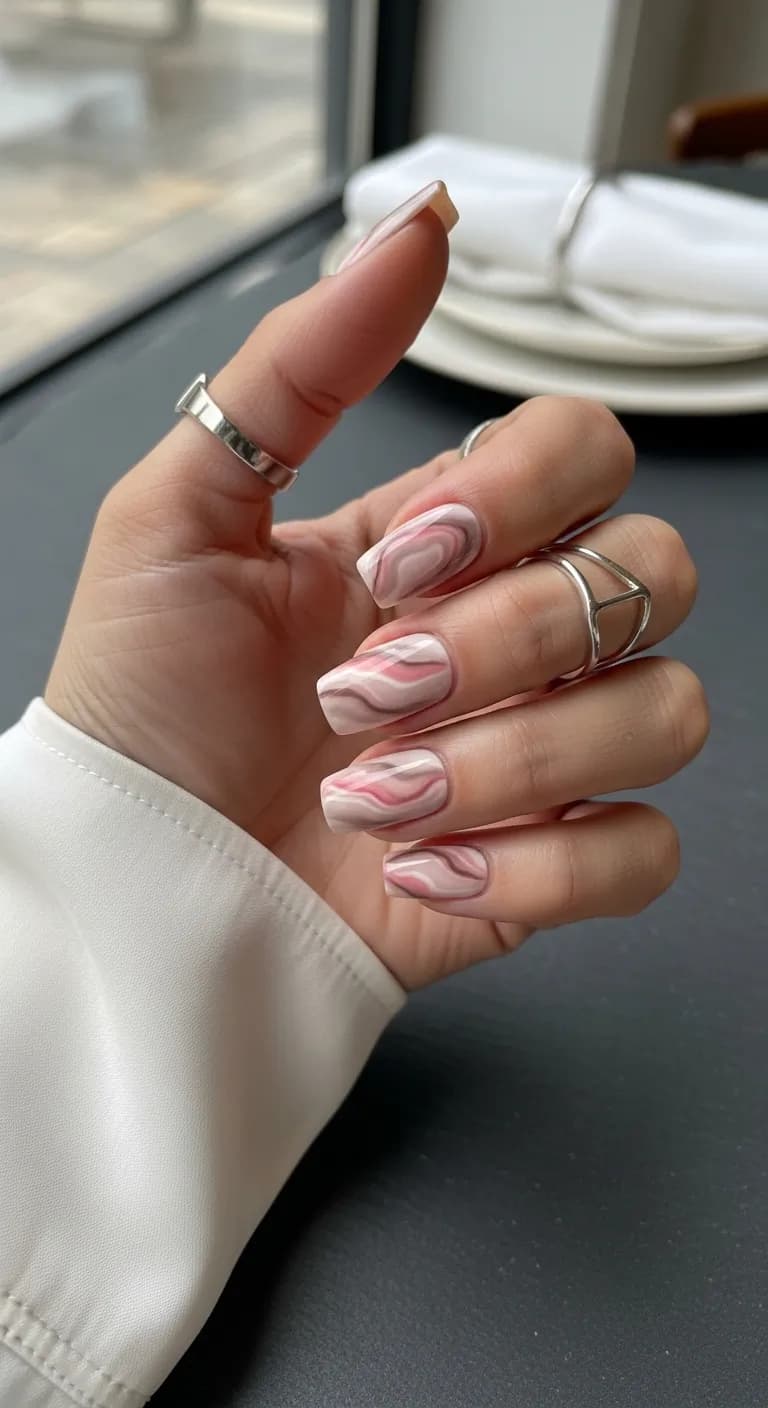
28 Trendy May Nail Designs for 2026 💅
24.Silver Mirror Mint
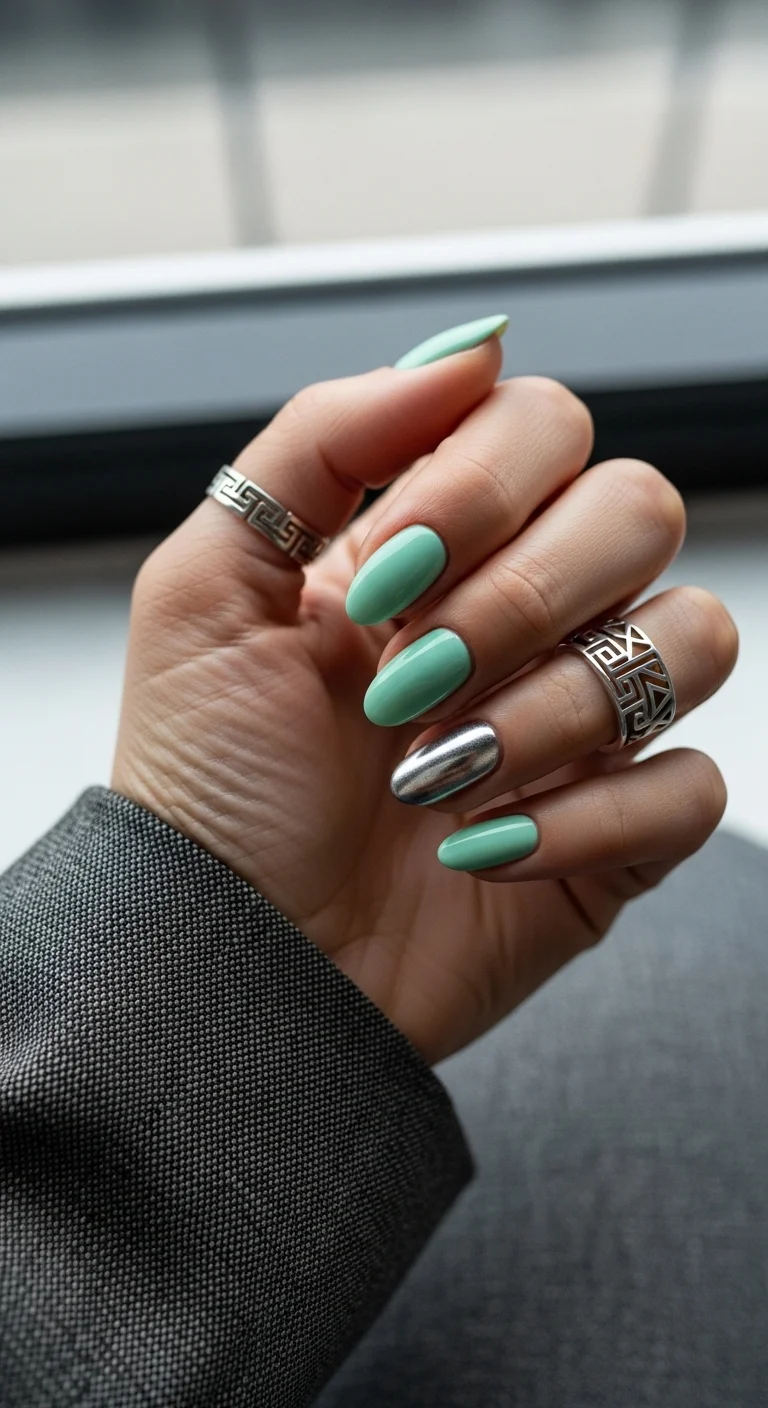
Pink roses and white filler flowers scattered across a mint base for a vintage floral feel.
Overview:
Floral nail art can lean either illustrative or abstract. This design commits to the illustrative side, with recognizable pink rose shapes, small white filler flowers, and green leaves painted on every nail. The density of the floral pattern varies from nail to nail, which prevents the design from looking like identical stickers repeated across the hand.
The pink-and-mint pairing works because both colors share a cool undertone. On a warm nude base, the same roses would read as separate from the background. On mint, they feel integrated into the color story. The white filler flowers add brightness and fill visual gaps between the roses without competing for attention.
The practical challenge is the layering. Each rose needs at least two tones of pink, the lighter center and the darker outer petals, plus the green leaves and white filler. That's four colors minimum per nail. Keeping a foil palette organized with each color in its own puddle saves significant time during the painting process.
Design Breakdown:
Full-coverage floral with layered, painterly roses and supporting filler flowers.
Base Color: A soft, creamy mint green. Full coverage with no shimmer to compete with the detailed floral art.
Nail Shape: Long almond. The tapered shape complements the organic forms of the roses and leaves.
Design Element: Hand-painted pink roses with two-tone petals, small white filler flowers with yellow centers, and green leaves. Every nail gets flowers.
Finish: High-gloss top coat to seal the layered paint and add depth to the colors.
Get The Look at Home:
Build each rose from the center outward. Start with the lightest pink in the middle and add darker petals around it.
- Mint base: Two coats of light mint green, dried fully.
- Rose centers: Using a small dotting tool and light pink, place dots where each rose will go. Two to three roses per nail.
- Petal layers: Switch to a deeper rose pink and a detail brush. Paint curved C-shaped strokes around each light pink center. Three to four petals per rose.
- White filler: With a small dotting tool and white polish, place clusters of three to five tiny dots between the roses. Add a yellow dot in each cluster center.
- Leaves: Using dark green and a liner brush, paint small leaf shapes tucked around the roses.
- Dry and seal: Wait at least seven minutes for the layered art to set. Two coats of top coat to smooth the surface.
25.Sunset Beach Mint French
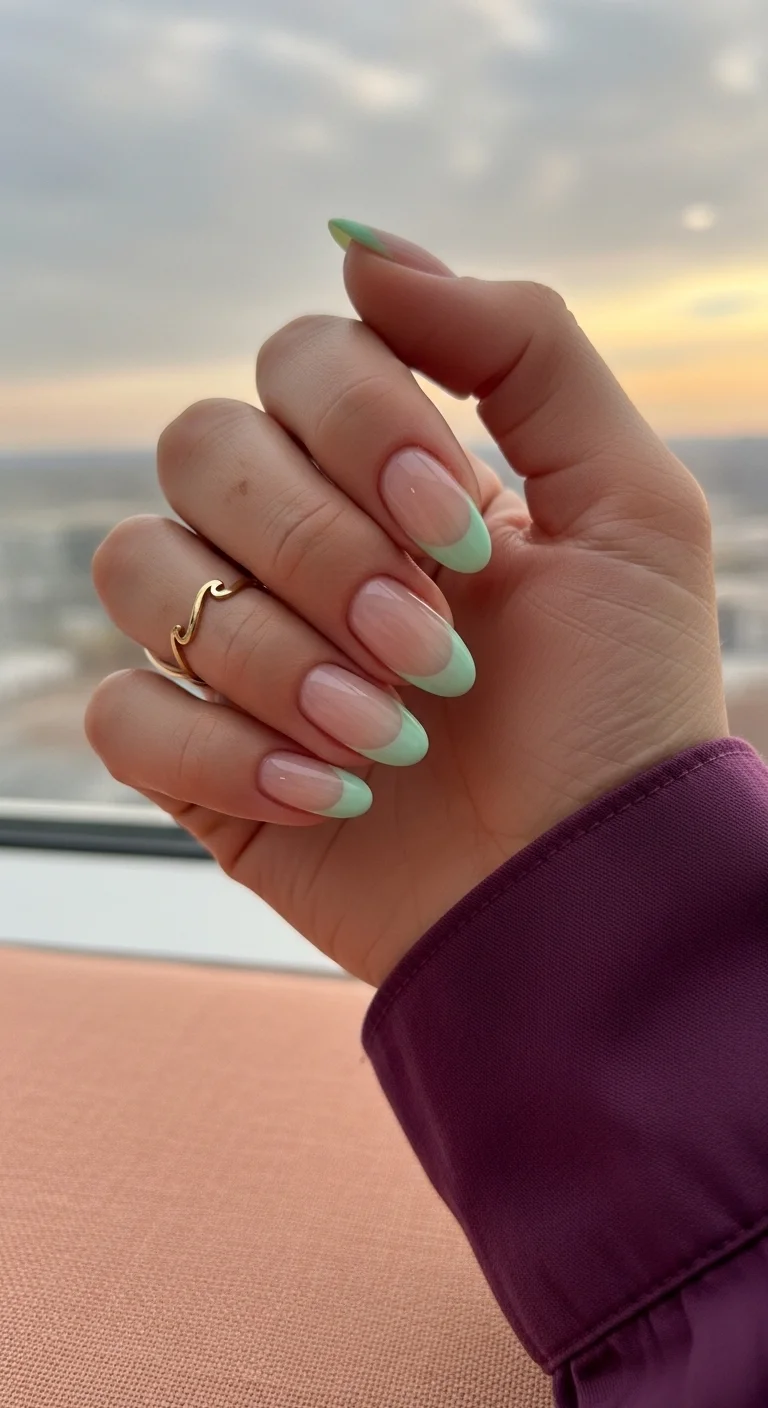
A clean, minimal French in mint that keeps things simple and lets the color speak for itself.
Overview:
There's a specific strength in designs that don't try to be more than they are. This thin mint French is that design. The tips are narrow, the base is sheer, and the whole thing works because neither element overpowers the other. It's the kind of manicure that looks equally appropriate at a desk, at dinner, or at the beach.
The mint used here sits at the intersection of pastel and bright. It has enough saturation to read as clearly green against the nude base, but not so much that it dominates the hand. At this tip width, about two millimeters, that balance is critical. A paler mint would disappear. A brighter one would overpower the sheer base.
Thin French tips grow out more gracefully than thick ones. The gap between the polish edge and the cuticle takes longer to become noticeable, which means you can stretch this manicure to three or four weeks before needing maintenance. The tradeoff is that the narrow line demands precision during application. Wobbly edges are more visible on a thin tip than on a wide one.
Design Breakdown:
Minimal French with a narrow colored tip. The design relies on clean lines and proportion.
Base Color: Sheer, milky nude-pink that closely matches the natural nail bed color.
Nail Shape: Long almond. The curved tip makes the smile line easier to paint than on a square shape.
Design Element: Thin, precise mint green French tips on every nail. Tip width is about two millimeters.
Finish: High-gloss top coat. The shine keeps the minimalist design from looking flat.
Get The Look at Home:
French tip guides are faster than freehand for beginners. If you trust your hand, a liner brush works too.
- Nude base: Two thin coats of sheer nude-pink. The base should be barely there, not opaque.
- Tip guides: Place French tip sticker guides about two millimeters from the free edge on each nail.
- Mint tips: Apply mint green polish to the exposed tip. One thin coat if the formula is opaque, two if it's sheer.
- Remove guides: Peel off sticker guides while the polish is still wet for the cleanest edge.
- Smile line cleanup: Dip an angled brush in pure acetone and run it along the border between nude and mint to sharpen the curve.
- Seal: One coat of glossy top coat. Cap the free edge to prevent tip wear on the narrow line.

20 Stunning Half Up Half Down Hairstyles for Prom Night 2026 💃✨
26.Deep Sea Ombre
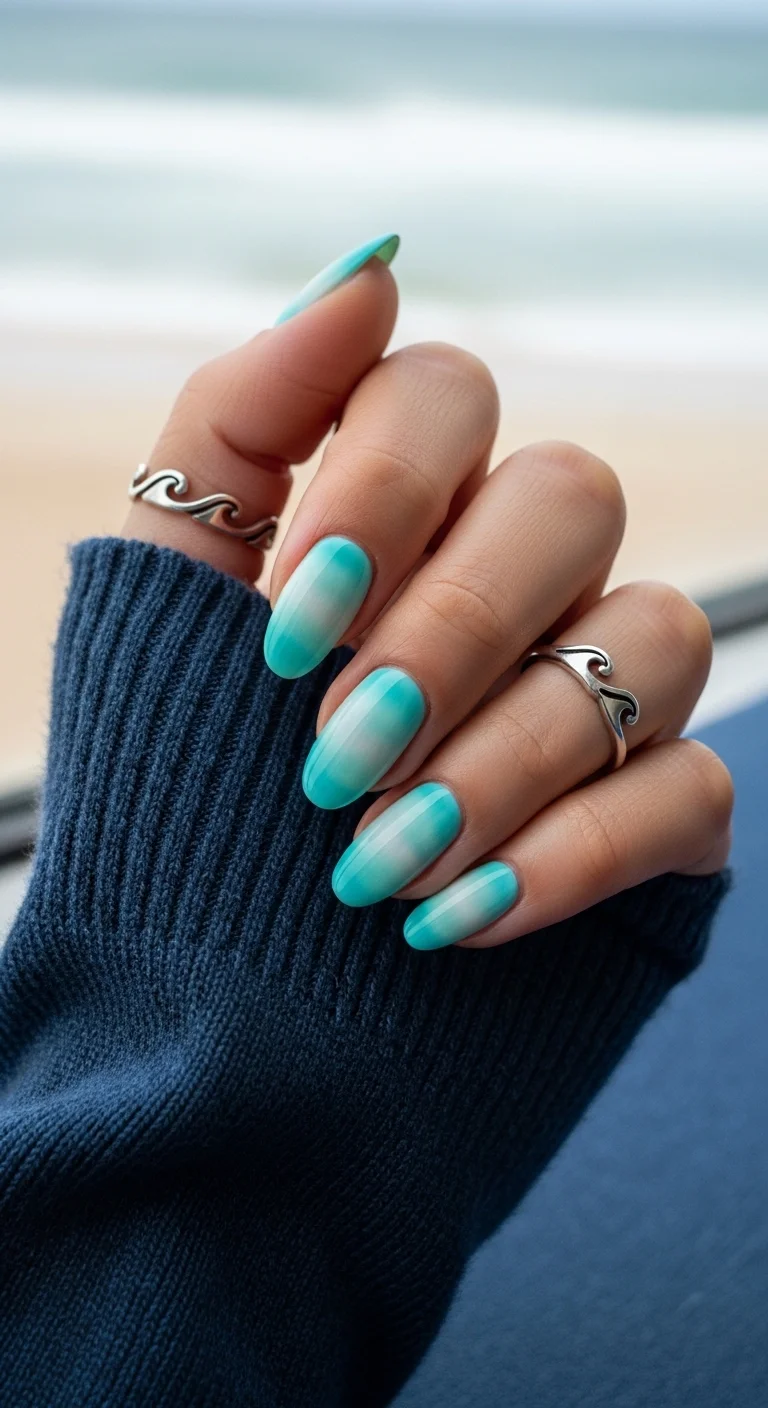
A horizontal turquoise-to-white gradient that mimics the color of shallow tropical water.
Overview:
Gradient nails typically run vertical, color at the tip fading toward the cuticle. This version flips the orientation horizontally, with turquoise concentrated at the cuticle and white at the free edge. The reversed direction changes how the eye reads the design. Instead of the color "growing out" from the nail, it looks like it's receding, like looking into deeper water from the shore.
The turquoise-to-white transition is one of the cleaner gradient combinations because both colors share a cool undertone. There's no warm-to-cool clash at the blending line, which means the transition stays smooth even if the sponge technique isn't perfect. The almond shape helps, the tapering sides create a natural frame for the horizontal color shift.
The sponge technique matters more here than with darker gradient combinations. Turquoise and white are both light colors that require multiple passes to build opacity. Each pass with the sponge risks lifting the previous layer if it's not fully dry. Patience between dabs is the difference between a smooth fade and a patchy, uneven blend.
Design Breakdown:
Horizontal gradient using a sponge technique. The reversed orientation (color at cuticle, white at tip) is the distinguishing feature.
Base Color: Opaque white at the tip transitioning to saturated turquoise at the cuticle. Both colors need to be fully opaque for the blend to look clean.
Nail Shape: Long almond. The tapered shape emphasizes the horizontal color flow.
Design Element: Sponge-applied gradient with turquoise concentrated at the cuticle and white at the tip. The blend zone sits in the middle third of the nail.
Finish: High-gloss top coat to smooth the sponge texture and intensify the color transition.
Get The Look at Home:
Build the gradient in thin, repeated dabs rather than one heavy press. Multiple light passes create a smoother blend.
- White base: Apply one coat of opaque white across the entire nail. Let dry fully.
- Sponge setup: Paint a stripe of turquoise and a stripe of white side by side on a dry makeup sponge. Dab the sponge on paper first to remove excess.
- First pass: Press the sponge onto the nail with turquoise at the cuticle and white at the tip. Use light, repeated dabs rather than one firm press.
- Build opacity: Repeat the sponge process three to four times, letting each pass dry for thirty seconds. The gradient will gradually intensify.
- Cuticle cleanup: Use a flat brush dipped in acetone to clean any turquoise off the skin around the cuticle.
- Top coat: Two coats of thick, self-leveling top coat. The sponge leaves a slightly bumpy texture that needs smoothing.
27.Tropical Leaf Mixed Mani
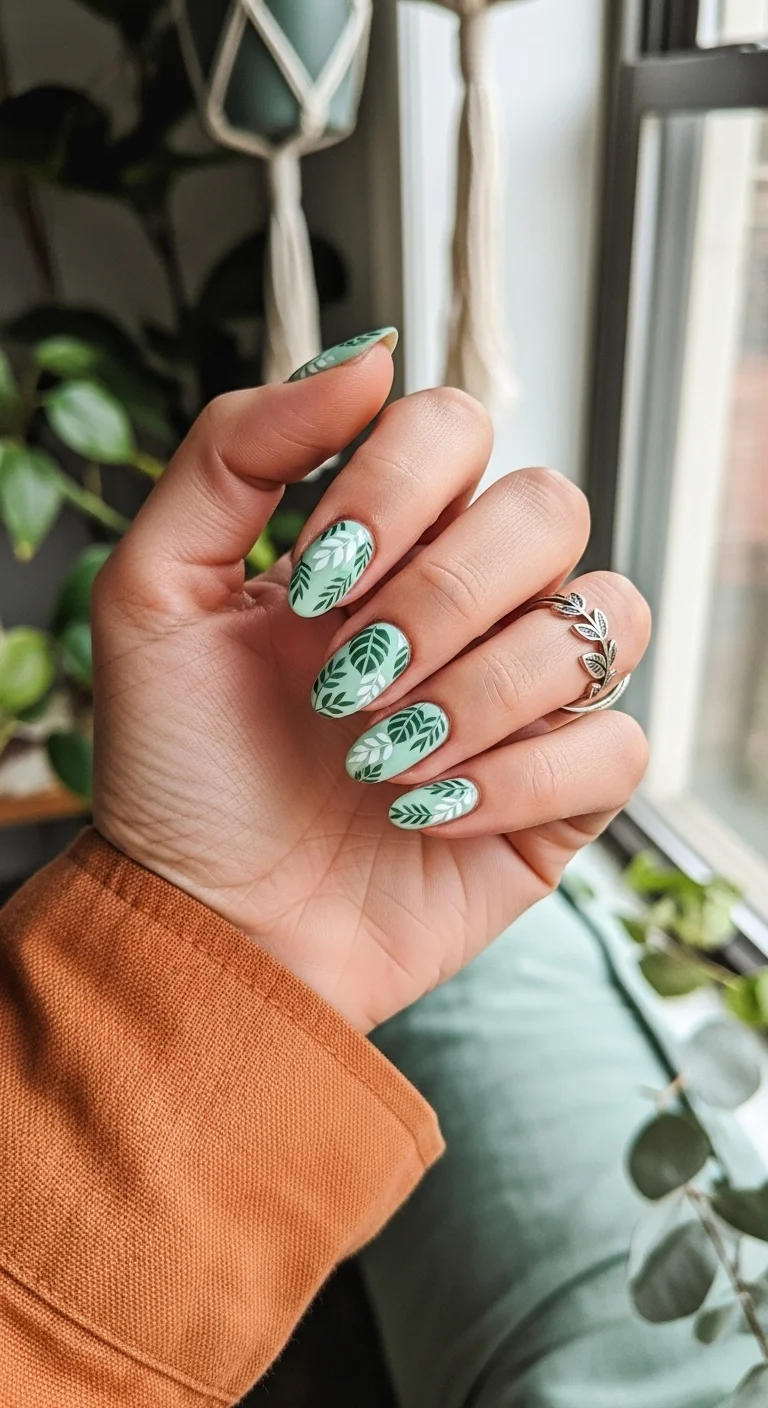
Tropical leaf silhouettes in dark green over a soft mint base for a botanical, vacation-ready look.
Overview:
Tropical leaf art on nails usually shows up on white or nude bases, which creates a high-contrast, graphic look. Moving the same leaf pattern onto a mint base softens the contrast and makes the design feel more integrated. The dark green leaves don't compete with the background, they blend into it, creating a tone-on-tone effect that reads as lush rather than bold.
The leaf shapes here lean tropical, broad, fan-like silhouettes rather than the thin, trailing vines of a standard botanical design. That shape choice matters because it changes the density of the pattern. Broad leaves cover more surface area per stroke, which means fewer individual elements per nail. The design feels less busy than a fine-line botanical even though the coverage is similar.
The mixed mani aspect means different nails have slightly different leaf arrangements. Some might have a single large leaf filling most of the surface. Others might have two or three smaller leaves clustered together. That variation prevents the pattern from looking stamped or mechanical, which is the risk with any all-over botanical print.
Design Breakdown:
Tonal botanical using broad tropical leaf shapes. The dark-on-light green palette keeps the design cohesive.
Base Color: A soft, creamy mint green. Light enough to provide contrast for the darker leaf silhouettes.
Nail Shape: Medium almond. The curved shape echoes the organic curves of tropical leaves.
Design Element: Hand-painted dark green tropical leaf silhouettes. Broad, fan-like shapes with visible vein details. Different leaf arrangements per nail.
Finish: High-gloss top coat to protect the art and deepen the green-on-green contrast.
Get The Look at Home:
Paint the leaf outline first, then fill it in. Starting with the shape prevents the leaves from looking blobby.
- Mint base: Two coats of light mint green, dried fully.
- Leaf outlines: Using a thin liner brush and dark green, paint the outline of each leaf shape. Tropical leaves are broad with curved edges, think monstera or palm frond silhouettes.
- Fill the shapes: Switch to a slightly thicker brush and fill in each leaf outline with the same dark green. Stay within the lines.
- Vein details: With a very thin brush and a lighter green (mix dark green into the mint base), paint thin lines radiating from the center of each leaf to represent veins.
- Vary the density: Put one large leaf on some nails, two or three smaller leaves on others. The variation keeps the pattern looking hand-done.
- Top coat: One thick coat of glossy top coat, floating the brush over the art without pressing down.
30 Cute Ladybug Nail Trends That Are Taking Over (2026)
How to Choose the Right Mint for Your Skin Tone (Cool vs. Warm vs. Olive)
Here's the thing nobody says out loud: mint green is genuinely tricky to pull off if you pick the wrong undertone. A blue-based mint that looks ethereal on fair skin can make olive complexions look ashy. A yellow-leaning mint that warms up deeper skin tones can read as sallow on cool-toned hands. This isn't a "one shade fits all" color, and pretending otherwise is why so many people try mint once, hate it, and never go back. The fix is knowing which mint belongs to your undertone.
Cool mint has a crisp, bluish tint that reads like alpine water or wintergreen. This is the best match for fair skin with pink or blue undertones, because the blue in the green harmonizes with the blue in your skin rather than fighting it. On warmer skin, this same shade can create a greyish cast that looks like you've been in cold water too long.
Warm mint leans toward the yellow side of the spectrum, closer to chartreuse than to seafoam. This is your go-to for golden or deeper skin tones. The yellow undertone in the polish reflects warmth back into the skin, which prevents the washed-out effect that cooler mint shades can produce on melanin-rich complexions.
Olive skin is the wildcard. Olive undertones sit somewhere between warm and cool, which means either extreme will clash. The trick is to look for mints with a neutral base, enough warmth to avoid the grey cast, but not so much yellow that the green starts looking muddy. If you're olive and unsure, a dusty mint like the ones described above is your safest bet, because the grey undertone in dusty mint acts as a buffer between your neutral skin and the green pigment.
If you're still uncertain, a "neutral" mint, balanced between blue and yellow with no obvious lean, works across the widest range of complexions. Brands typically label these as "true mint" or "balanced mint." When in doubt, test a swipe on your bare nail before committing to a full set.
Texture Over Color: 3D Ridges, Jade Effects, and "Lip Gloss" Finishes
If 2025 was the year of finding the perfect mint shade, 2026 is the year of doing something with it. The biggest shift in the mint green conversation right now isn't about the color itself, it's about the finish and texture you pair it with. A flat glossy mint is fine. A mint with dimensionality, texture, and surface interest is editorial.
The most visible example is the 3D textured wave trend. Clear builder gel is sculpted into ridges, waves, or organic ripples over a glossy dusty mint base, creating a manicure that you can actually feel. Design #9 in this list, "Textured Mint Wave 3D," is a perfect reference. The translucent gel catches light differently at every angle, which means the same nail looks different in morning sunlight versus evening candlelight. It's a simple technique in terms of execution, but the visual payoff is disproportionately high.
Jade effects are another major direction. By layering a magnetic cat-eye polish over a dusty mint base, you get the depth and vein-like movement of polished jade stone rather than flat green polish. The magnet pulls the metallic particles into a shifting band that creates the illusion of internal structure. Pair that with the muted, greyed-out mint tones, and the result looks closer to a gemstone than a nail polish.
Then there's the "lip gloss" finish, which sounds like marketing language until you see it in person. Ultra-thick, glass-like top coats applied over dusty mint create a surface so reflective it reads as wet. The trick is the thickness. Standard top coats level out to a thin layer. Lip gloss finishes use high-viscosity formulas that stay thick and rounded, almost like a gel top coat that's been intentionally over-applied. On a muted mint base, that high-shine creates a contrast between the subdued color and the bouncy, juicy surface that feels unexpectedly modern.
And there you have it, beauties! Hopefully, these stunning mint green nail designs have given you all the inspiration you need for your next salon visit. It's so amazing how this one refreshing color can be styled in so many unique and gorgeous ways!
Don't forget to save your favorite pictures straight to your Pinterest board or camera roll so you have them ready to show your nail tech. Drop a comment below and share which minty design is your favorite!