Nail Trends
34 Cutest Butter Yellow Nail Designs for 2026 🧈

If you've been scrolling through Pinterest or TikTok lately, you already know—butter yellow is completely taking over! It’s the ultimate soft, happy shade that instantly makes hands look so chic and sun-kissed. It is officially the shade of the season! Whether you're sipping an iced latte, heading to a spring picnic, or just want to add a little 'sunshine' to your daily aesthetic, this pastel dream is exactly what you need. From delicate daisy art to that ultra-trendy glazed donut finish, here are 34 of the absolute cutest butter yellow nail designs to show a nail tech ASAP. Get ready to dive in! ✨
Why Butter Yellow Is the Color of the Season?
If you have scrolled through Instagram or TikTok recently, you have noticed that butter yellow nails are everywhere. Searches for the shade are up nearly 3,000 percent on booking platforms heading into this season. That is not a blip, it is a full-blown movement.
What makes this iteration different from past years is the shift in tone. The creamy pastel of previous seasons is giving way to a lemon yellow that is bolder but still soft enough to wear as a neutral. It is being called the new neutral for good reason: bright enough to feel fresh, soft enough to work with everything in your closet, and flattering across skin tones, especially with a bit of summer color.
If you want to take butter yellow beyond a solid polish, a chrome top coat is the easiest upgrade. The metallic finish adds a dimension that flat yellow cannot achieve on its own, catching light in a way that reads as more intentional and more expensive. It is the difference between a casual summer color and a manicure that looks curated.
In This Guide
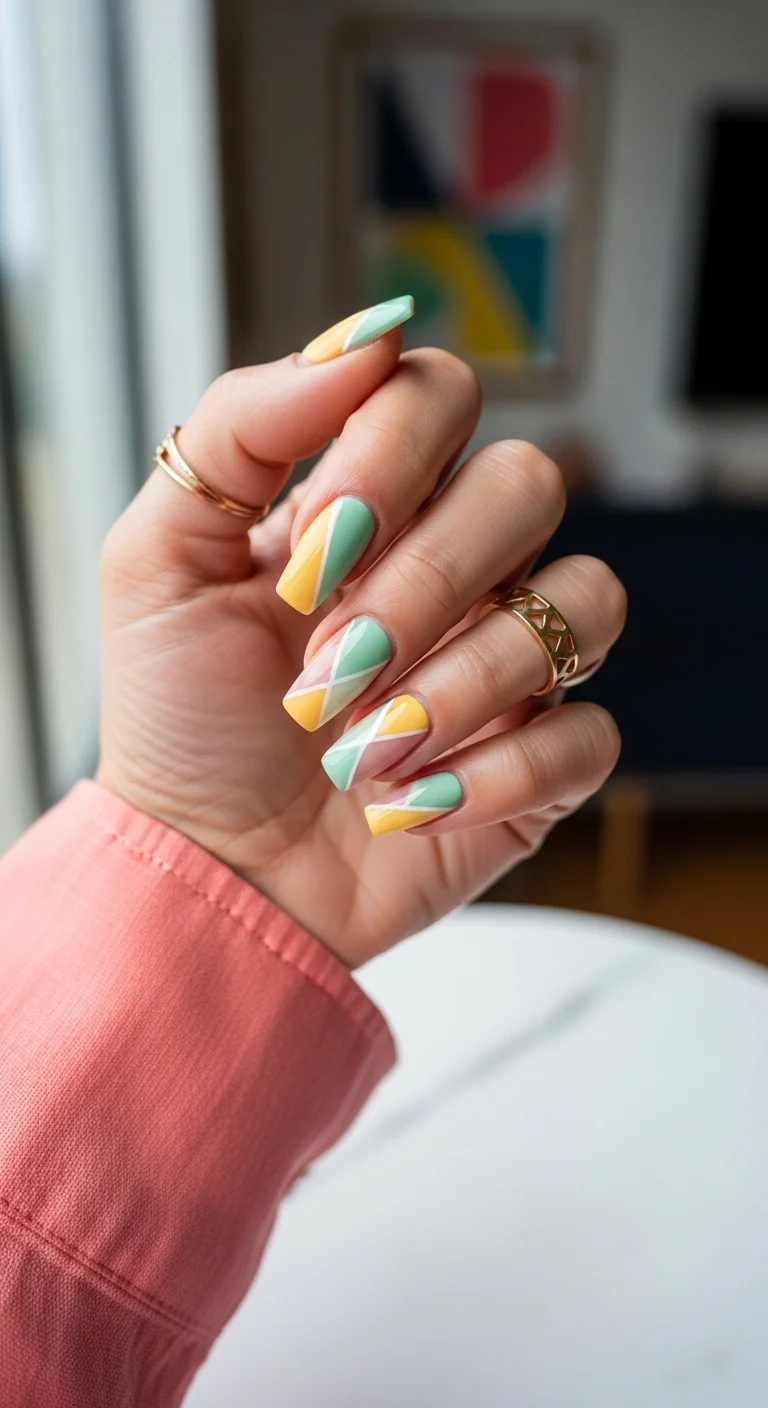
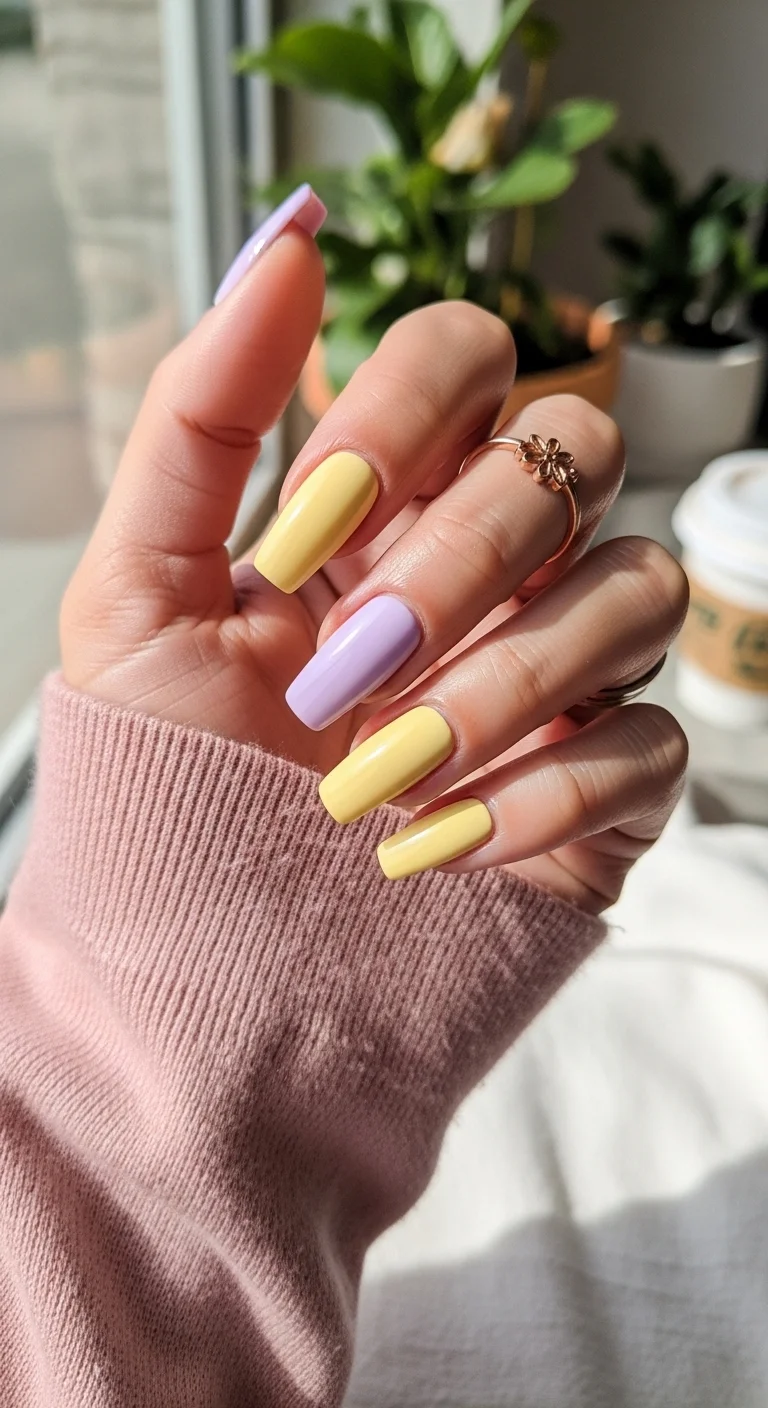
1.Lavender Dipped Buttercream
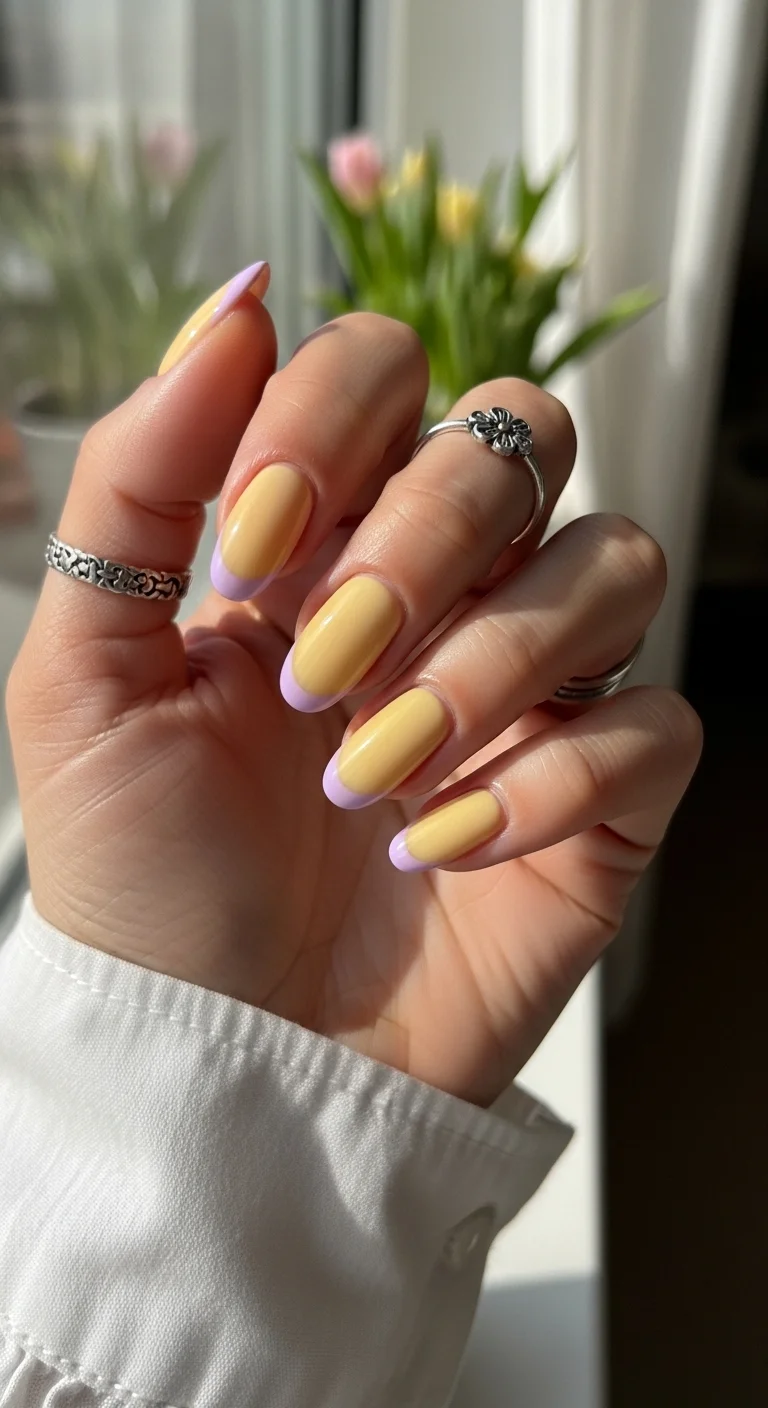
Butter yellow base with soft lavender French tips.
Overview:
Yellow and purple sit opposite each other on the color wheel, which means this pairing creates maximum contrast without either color looking muddy. The butter yellow base is warm and creamy; the lavender tips are cool and soft. That temperature clash is what makes the design visually interesting.
The French format keeps the two-color combination from feeling overwhelming. If the entire nail were split between yellow and purple, the contrast might feel aggressive. The French tip confines the lavender to a small area, letting the yellow dominate while the purple provides a subtle accent.
The almond shape complements this color pairing because the curved tip echoes the softness of both pastel tones. On square nails, the same design would feel more graphic and less organic.
Design Breakdown:
Two-color French with complementary contrast. The lavender is the accent; the yellow is the star.
Base Color: Opaque, creamy butter yellow. Not neon, not pastel. A warm, saturated yellow that looks like butter.
Nail Shape: Medium almond. The curved shape suits the soft, pastel color palette.
Design Element: Lavender French tips on all nails. The tips are a soft, dusty purple that contrasts with the warm yellow.
Finish: High-gloss top coat to make both colors look creamy and saturated.
Get The Look at Home:
The yellow base needs to be fully dry before the lavender goes on. Any tackiness will cause the tip color to bleed.
- Yellow base: Two coats of butter yellow on all nails. Let dry fully.
- Lavender tips: Using a French liner brush, paint lavender tips on all nails. Two coats for opacity.
- Smile line: Use a flat brush dipped in acetone to sharpen the curve where the lavender meets the yellow.
- Consistency: The tip thickness should be the same across all nails.
- Seal: One thick coat of top coat over all nails.
30 Stunning Summer Hair Trends for 2026 ☀️🌊
2.Gold Speckled Lemon Curd
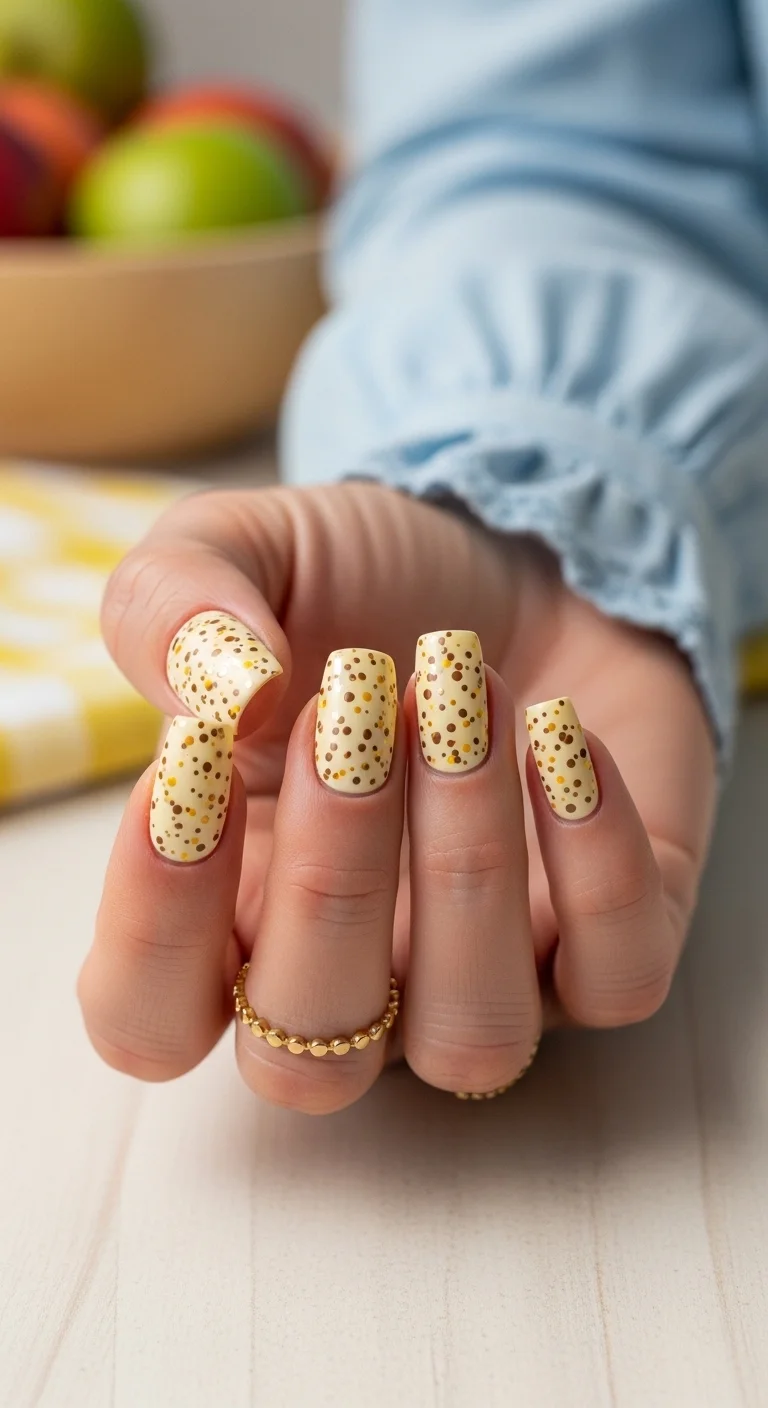
Pale yellow with gold and brown speckles for an organic, textured look.
Overview:
Speckled nails reference natural textures: bird eggs, vanilla bean, stone surfaces. The random placement of the speckles creates an organic quality that intentional patterns can't replicate. No two nails look identical, which is the point.
The pale yellow base is muted enough that the gold and brown speckles don't compete with it. On a brighter yellow, the speckles would look like dirt on a clean surface. On this creamy, almost off-white yellow, they look like a deliberate texture choice.
The speckle size variation is important. Uniform dots would read as polka dots, not speckles. The mix of tiny and medium dots creates the natural, scattered quality that makes the design work.
Design Breakdown:
Speckled texture on a pale base. The random placement is the design principle.
Base Color: Pale, milky lemon yellow. Almost off-white with a yellow undertone.
Nail Shape: Medium coffin. The flat surface provides a clean canvas for the speckles.
Design Element: Multi-sized speckles in gold and brown scattered across all nails. The placement should be random and organic.
Finish: High-gloss top coat to seal the speckles and make the yellow look creamy.
Get The Look at Home:
A toothpick or bobby pin works as well as a proper dotting tool for creating speckles.
- Yellow base: Two coats of pale lemon yellow. Let dry fully.
- Gold speckles: Using a toothpick dipped in gold polish, place random dots of varying sizes across each nail.
- Brown speckles: Repeat with brown polish, placing dots in the gaps between the gold ones.
- Vary the density: Some areas should have more speckles than others. Don't aim for even coverage.
- Seal: One thick coat of top coat to smooth the surface and lock in the speckles.
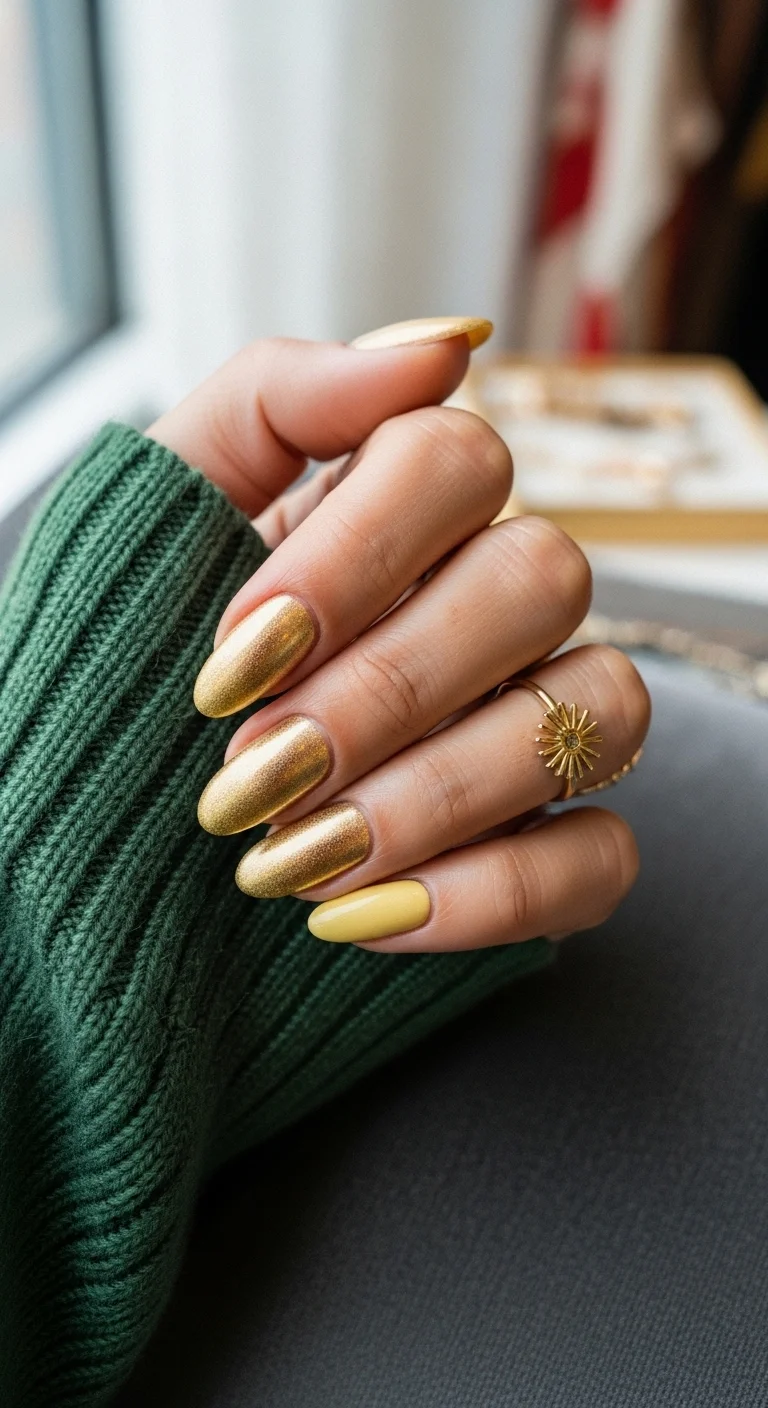
3.Gilded Butter Cream Mani
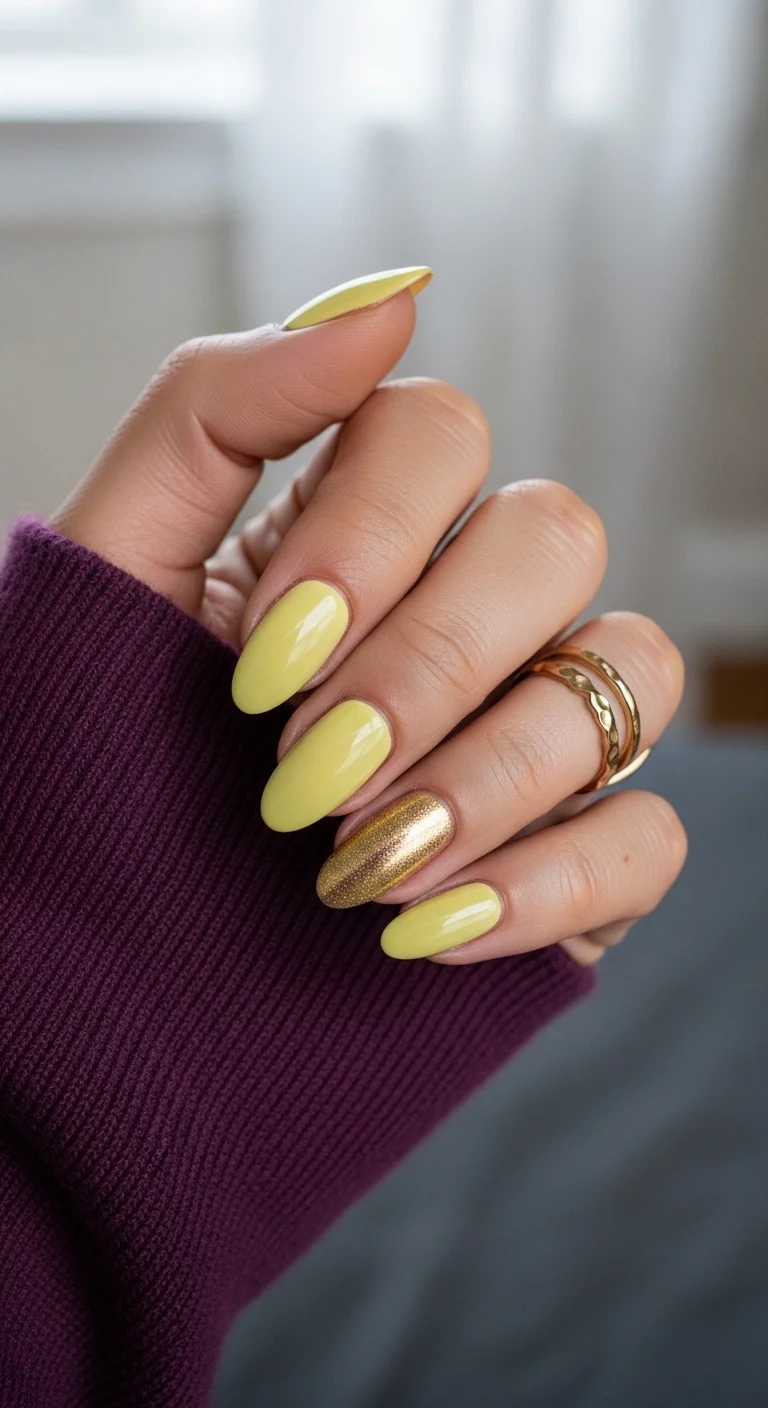
Butter yellow with a single gold glitter accent nail.
Overview:
Butter yellow with a gold accent is a tonal pairing where both colors share the same warm undertone. The gold doesn't fight the yellow. It elevates it. The result is a set that reads as "yellow but make it luxury."
The single accent nail on the ring finger is the most common placement for metallic accents. It provides a focal point without overwhelming the set. Four nails of solid yellow establish the color story; one nail of gold glitter adds the punctuation.
The fine glitter particles in the gold accent create a dense, uniform sparkle that catches light differently than the flat yellow polish. That textural contrast is what makes the design interesting despite being only two elements.
Design Breakdown:
Solid color with a single metallic accent. The tonal harmony is the design principle.
Base Color: Creamy, opaque butter yellow on four nails. Dense gold glitter on the ring finger.
Nail Shape: Medium almond. The curved shape complements the warm color palette.
Design Element: Solid butter yellow on index, middle, pinky, and thumb. Gold glitter accent on the ring finger.
Finish: High-gloss on the yellow; dense metallic on the gold accent.
Get The Look at Home:
The yellow needs to be fully dry before you apply the gold accent to avoid color transfer.
- Yellow nails: Two to three coats of butter yellow on four nails. Let dry fully.
- Gold accent: On the ring finger, apply two to three coats of gold glitter polish for dense coverage.
- Cleanup: Use a small brush dipped in acetone to clean the edges on both the yellow and gold nails.
- Seal: One thick coat of top coat over all nails. The gold accent may need a second coat of top coat to smooth the glitter texture.

28 Cute & Sporty Baseball Game Nail Ideas for 2026 ⚾
4.Liquid Sunshine Chrome
Gold chrome with a single butter yellow accent nail.
Overview:
This is the reverse of item 3: gold chrome dominates the set, and butter yellow appears on a single accent nail. The reversal changes the entire dynamic. Where item 3 reads as "yellow with a gold accent," this reads as "gold with a yellow break."
The chrome finish creates a mirror-like surface that reflects light from every angle. It's a high-impact, attention-grabbing texture that flat polish can't replicate. The single yellow nail provides visual rest from the intensity of the chrome.
Chrome powder requires a no-wipe gel top coat as the base layer. Regular polish won't give the powder anything to adhere to. If you're working with regular polish, a metallic gold like Essie "Good as Gold" is a more forgiving alternative.
Design Breakdown:
Full chrome with a single matte accent. The texture contrast is the design.
Base Color: Gold chrome on four nails. Solid butter yellow on the pinky.
Nail Shape: Medium almond. The curved shape enhances the reflective quality of the chrome.
Design Element: Solid gold chrome on index, middle, ring, and thumb. Solid butter yellow on the pinky finger.
Finish: Mirror-chrome on the gold nails; high-gloss on the yellow accent.
Get The Look at Home:
Chrome powder requires specific products. Budget extra time for the preparation steps.
- Yellow accent: On the pinky, apply two coats of butter yellow. Let dry fully.
- Chrome prep: On the other nails, apply a dark base coat. Then apply a no-wipe gel top coat and cure.
- Rub the chrome: Using a sponge applicator, rub gold chrome powder over the cured top coat until mirror-smooth.
- Dust off: Use a soft brush to remove excess powder from cuticles.
- Final seal: Apply glossy top coat to all nails, capping the chrome edges to prevent flaking.
5.Wild Tiger Lily Swirls
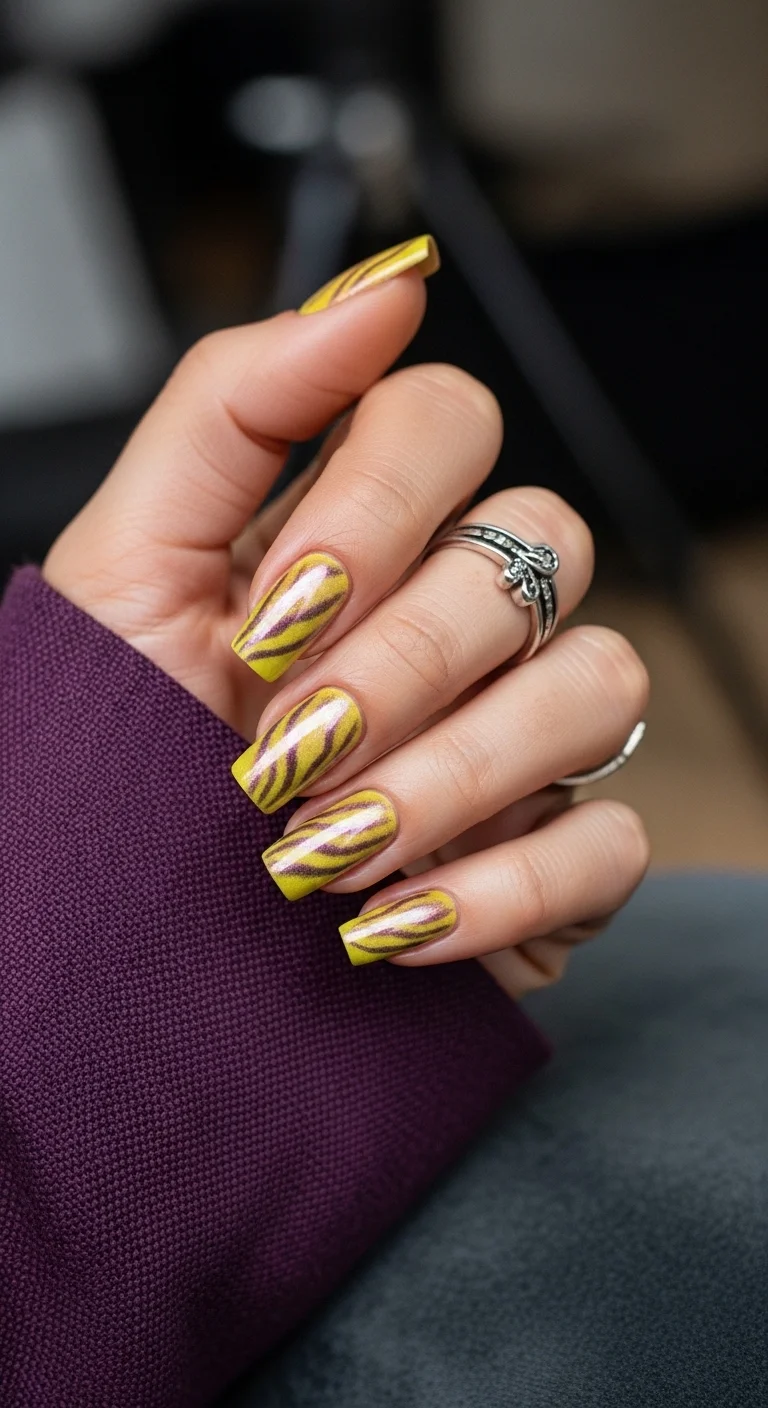
Yellow-gold metallic with dark swirl patterns for a bold, retro look.
Overview:
Swirl patterns on a metallic base create a design that shifts with the light. The yellow-gold chrome reflects light through the dark swirl lines, creating a dimensional quality that flat polish can't achieve. It looks different from every angle.
The dark purple-brown swirls contrast sharply with the bright gold base, which makes the pattern highly visible. The organic, flowing shapes of the swirls reference 1970s textile patterns, which connects to the retro aesthetic that's been trending.
The swirl technique requires working wet-on-wet. The dark lines need to be drawn while the gold base is still fluid enough to allow some blending at the borders. Too dry and the lines sit on top like stickers.
Design Breakdown:
Metallic base with dark swirl overlay. The light play between the two layers is the design.
Base Color: Yellow-gold chrome or metallic. The reflective quality is essential.
Nail Shape: Medium coffin. The flat surface provides space for the swirl patterns.
Design Element: Dark purple-brown organic swirl lines over the gold base. Each nail has a different swirl pattern.
Finish: High-gloss top coat to seal the swirls and amplify the metallic base.
Get The Look at Home:
Work the swirls while the base is still slightly tacky for the best blend at the borders.
- Gold base: Apply gold chrome or metallic polish. If using chrome, apply no-wipe top coat, cure, and rub chrome powder.
- Swirl lines: Using a thin liner brush and dark purple-brown polish, draw loose, organic swirl lines across each nail.
- Vary the pattern: Each nail should have a different swirl arrangement. No two nails should match.
- Don't over-blend: Let the dark lines sit on top of the gold without fully mixing.
- Seal: Wait five minutes, then apply a generous top coat to smooth the surface.

30+ Chic Pool Party Hairstyles for Summer 2026 🌊👙
6.Turquoise Polka Dot Party
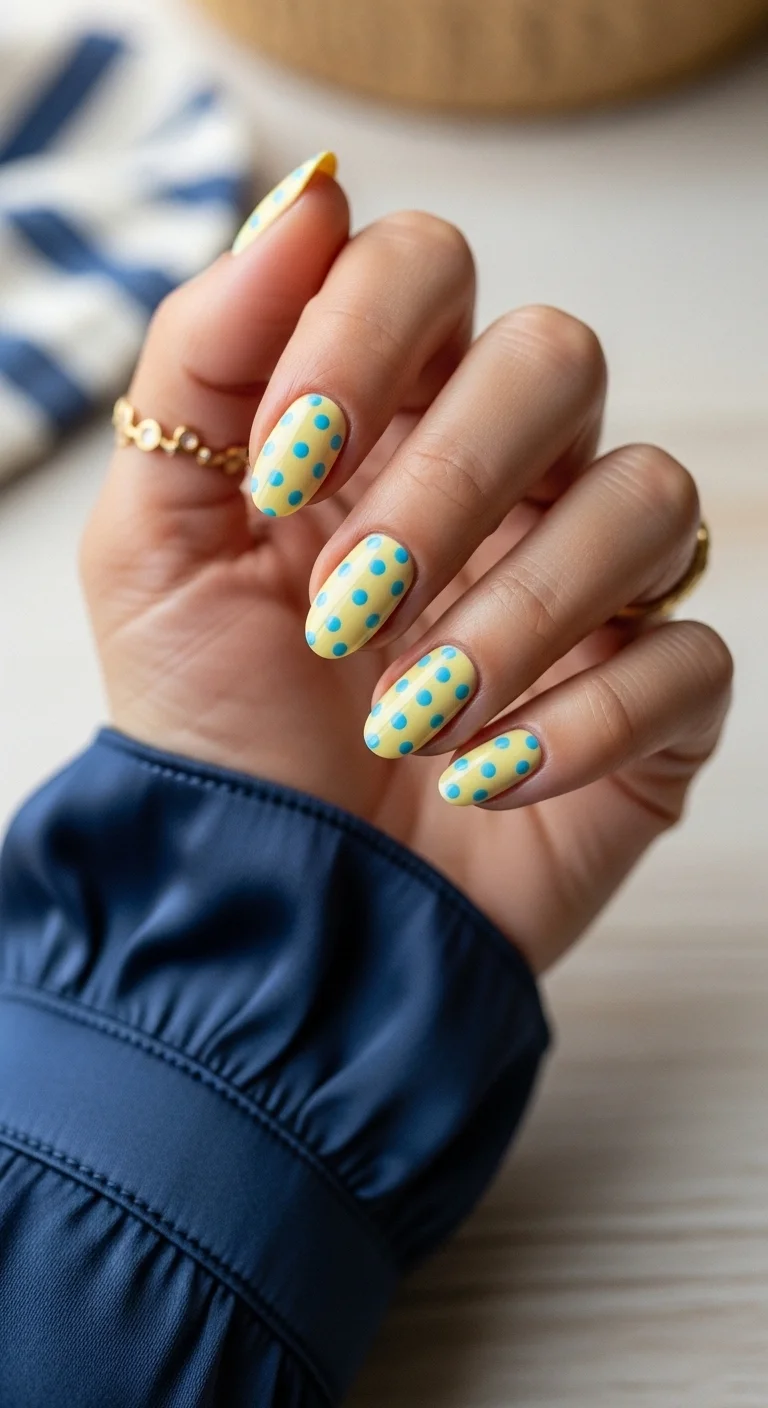
Butter yellow with turquoise polka dots for a playful, retro look.
Overview:
Yellow and turquoise is a high-contrast pairing that feels cheerful and retro. The warm yellow and the cool turquoise sit on opposite sides of the color temperature spectrum, which creates a visual vibration that's energetic without being loud.
Polka dots are one of the most forgiving nail art techniques. The dots don't need to be perfectly round or evenly spaced. Slight irregularities read as handmade rather than mistakes. A dotting tool, bobby pin, or toothpick all work.
The dot size matters for the overall feel. Medium dots, about 2mm, read as playful and retro. Smaller dots read as texture. Larger dots read as bold and graphic. This set uses medium dots, which keeps the mood light and fun.
Design Breakdown:
Two-color polka dot pattern. The contrast between warm and cool is the design principle.
Base Color: Creamy, opaque butter yellow.
Nail Shape: Medium almond. The curved shape softens the graphic dot pattern.
Design Element: Turquoise blue polka dots evenly spaced across all nails. Medium dot size.
Finish: High-gloss top coat to make both colors look saturated.
Get The Look at Home:
If you can make a dot, you can do this design. It's one of the fastest nail art options.
- Yellow base: Two coats of butter yellow. Let dry fully.
- Dotting: Using a medium dotting tool dipped in turquoise polish, place evenly spaced dots across each nail.
- Spacing: Aim for consistent spacing between dots. A staggered pattern, where each row is offset, looks more natural than a grid.
- Don't rush: Let the dots dry slightly before moving to the next nail to avoid smearing.
- Seal: Float a thick top coat over the dots without pressing. Dragging through wet dots smears them.
7.70s Espresso Swirls
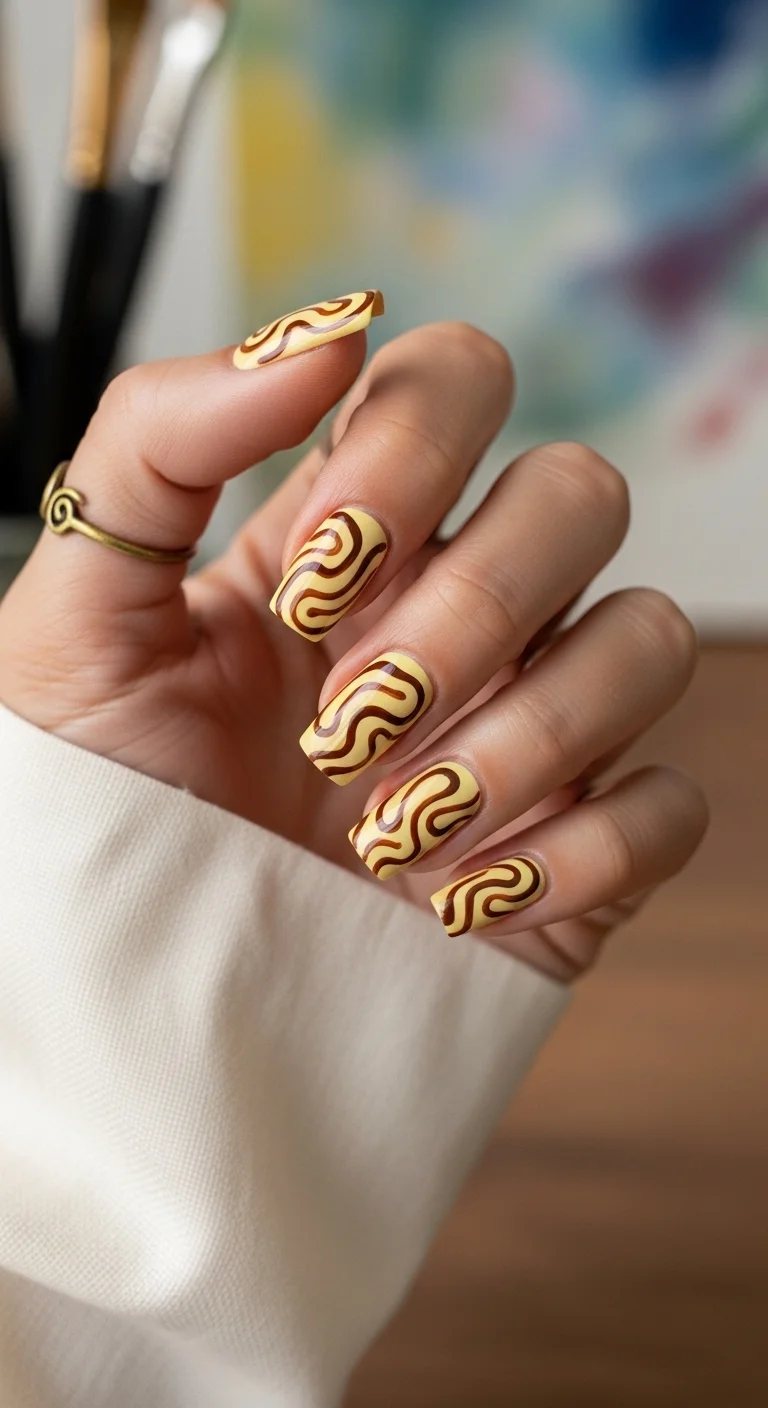
Butter yellow with dark brown 70s-inspired swirl patterns.
Overview:
The 1970s color palette, harvest gold, burnt sienna, chocolate brown, is so strongly associated with that era that you can evoke it through color combination alone. This design uses butter yellow and dark brown to reference the decade's aesthetic without being literal about it.
The swirl shapes are what sell the 70s reference. Straight lines or geometric shapes would read as modern or art deco. The soft, rounded curves of these swirls reference the organic forms of 70s textile and wallpaper patterns.
The swirl technique is forgiving because every nail is supposed to look different. The inconsistency between nails reads as intentional variation rather than mistakes. It's one of the more approachable freehand designs.
Design Breakdown:
Retro swirl pattern using warm brown tones. The organic shapes are the design.
Base Color: Creamy butter yellow.
Nail Shape: Medium coffin. The flat surface provides space for the swirl patterns.
Design Element: Dark brown organic swirl lines over the yellow base. Each nail has a different swirl arrangement.
Finish: High-gloss top coat to make the yellow look creamy and the brown look rich.
Get The Look at Home:
The swirls don't need to be precise. Organic shapes look more authentic than perfect curves.
- Yellow base: Two coats of butter yellow. Let dry fully.
- Swirl lines: Using a thin liner brush and dark brown polish, draw loose, curved lines across each nail.
- Vary the pattern: Each nail should have a different swirl arrangement. Some nails can have more lines than others.
- Line weight: Keep the swirls consistent in thickness. Too thin and they disappear; too thick and they overwhelm.
- Seal: One thick coat of top coat to smooth the surface and protect the art.

30 Stunning Beach Nail Ideas for the Best Vacation in 2026 🌊
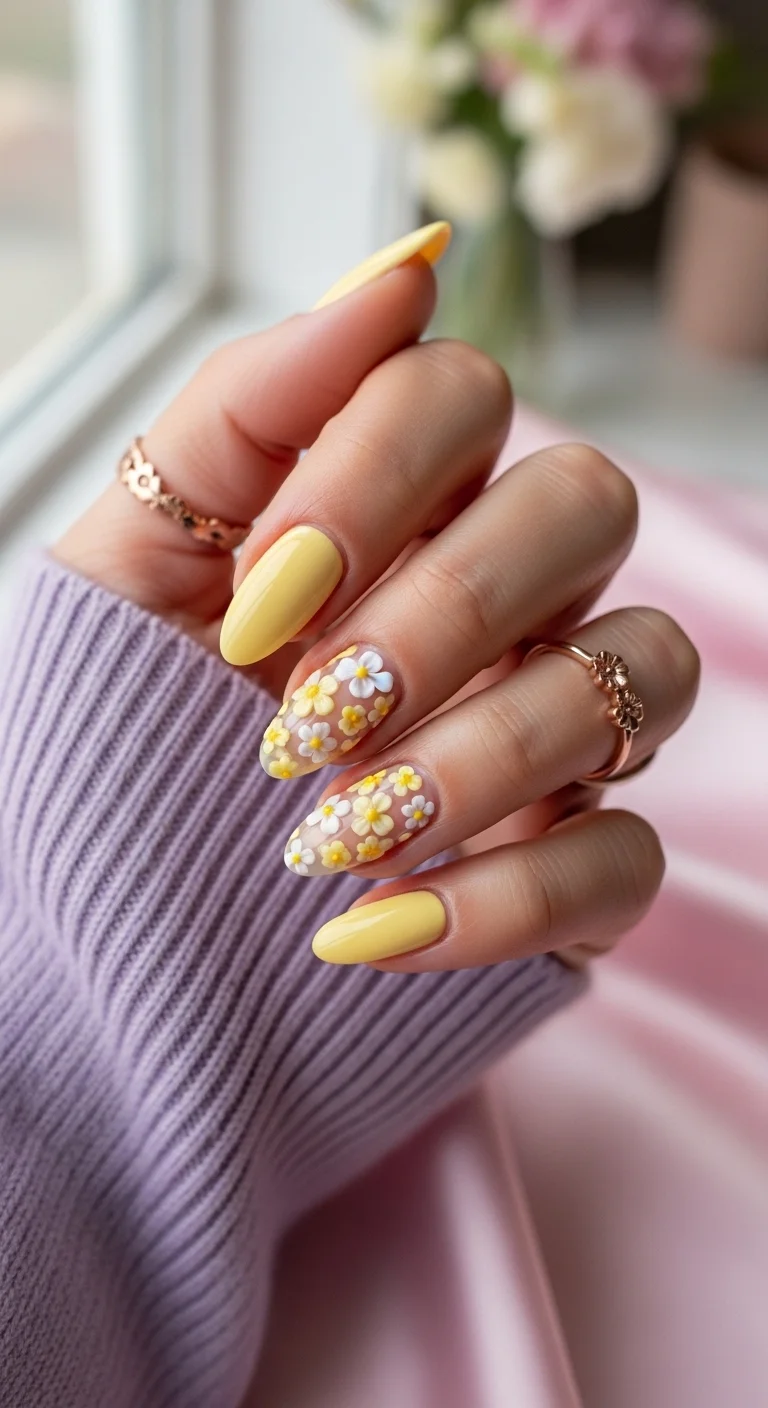
8.Daisy Meadow Nudes
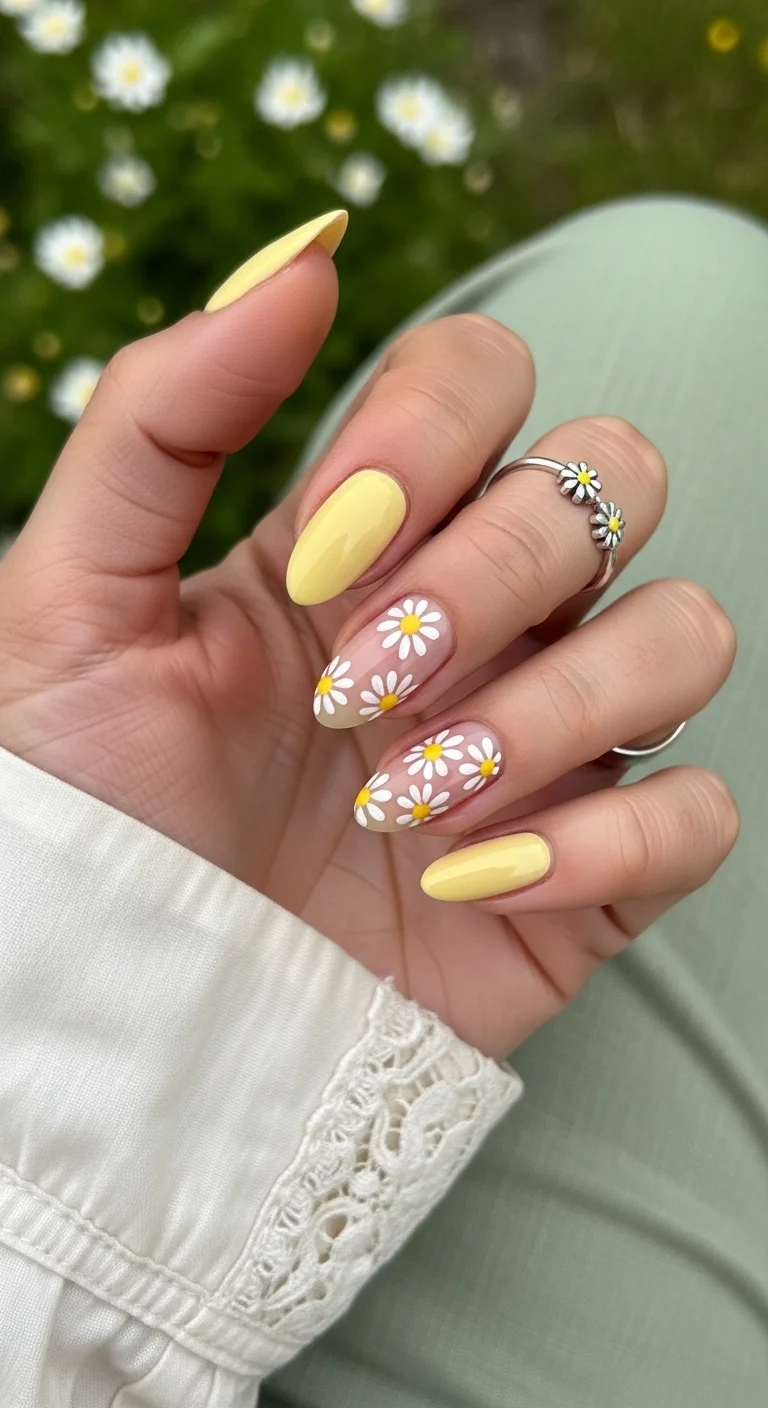
Solid butter yellow alternating with sheer nude and white daisy art.
Overview:
Alternating between solid color and art nails creates visual rhythm across the hand. The solid yellow nails establish the color story, while the daisy art nails add detail and variety. That alternation keeps the design from feeling repetitive.
The sheer nude base under the daisies is what makes the flowers look like they're floating. On an opaque base, the daisies would sit on top of the color. On sheer nude, they look like they're embedded in the nail surface. The transparency adds depth.
Daisies are one of the most forgiving floral designs because the technique is simple: five white dots in a circle, one yellow dot in the center. The flowers don't need to be identical or perfectly placed. The casual quality is what makes them feel organic.
Design Breakdown:
Alternating solid and art nails. The daisies add a floral element to the yellow color story.
Base Color: Butter yellow on solid nails. Sheer nude on daisy art nails.
Nail Shape: Medium-long almond. The curved shape suits both the solid color and the floral art.
Design Element: Alternating solid yellow and sheer nude with white daisies. The daisies have white petals and yellow centers.
Finish: High-gloss top coat to unify both nail types.
Get The Look at Home:
Decide which nails get solid color and which get daisies before you start painting.
- Solid nails: Two coats of butter yellow on alternating nails. Let dry fully.
- Daisy nails: Two coats of sheer nude on the remaining nails. Let dry.
- Petal dots: Using a small dotting tool and white polish, place five dots in a circle for each daisy.
- Yellow centers: Using a smaller dotting tool, place a yellow dot in the center of each daisy.
- Placement: Scatter two to three daisies per nail. Leave visible nude between them.
- Seal: One thick coat of top coat over all nails.
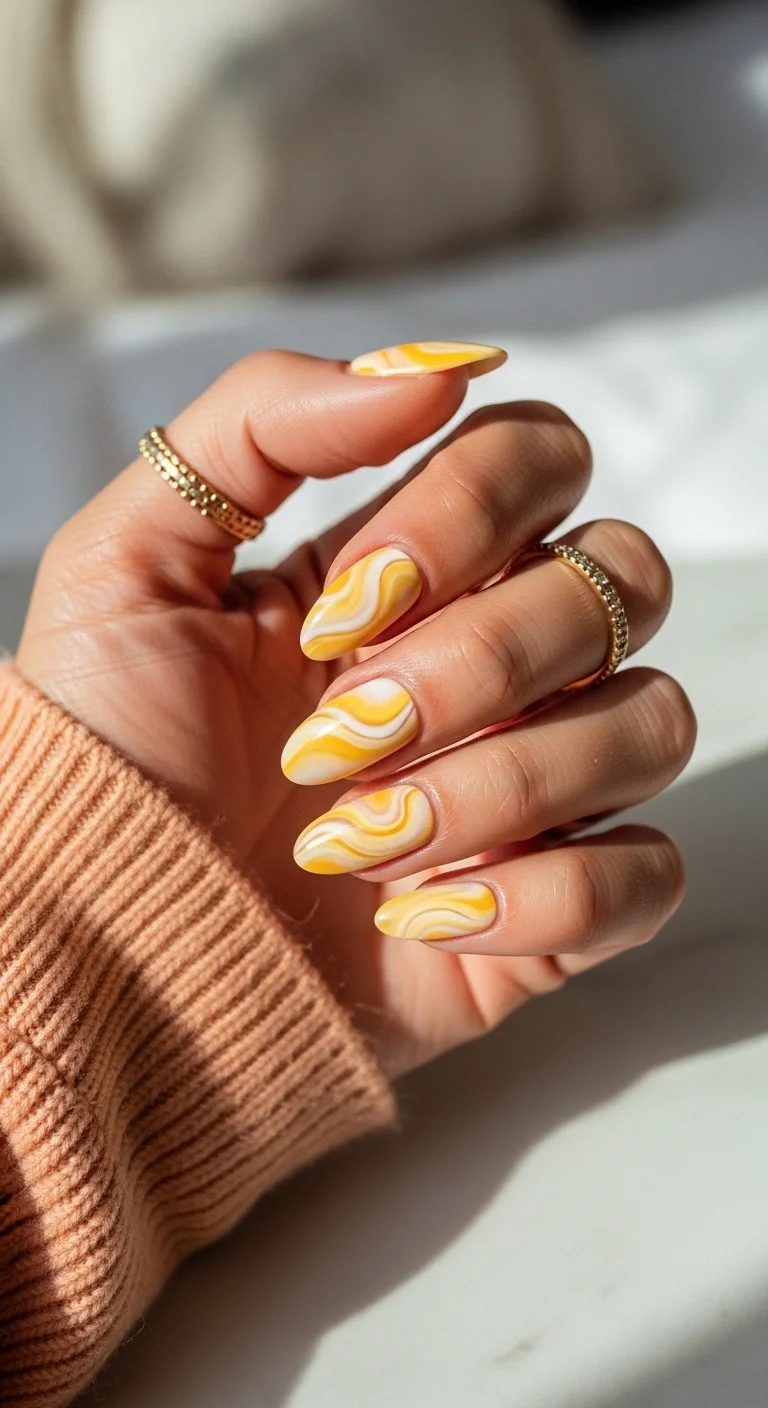
9.Caramel Butter Swirls
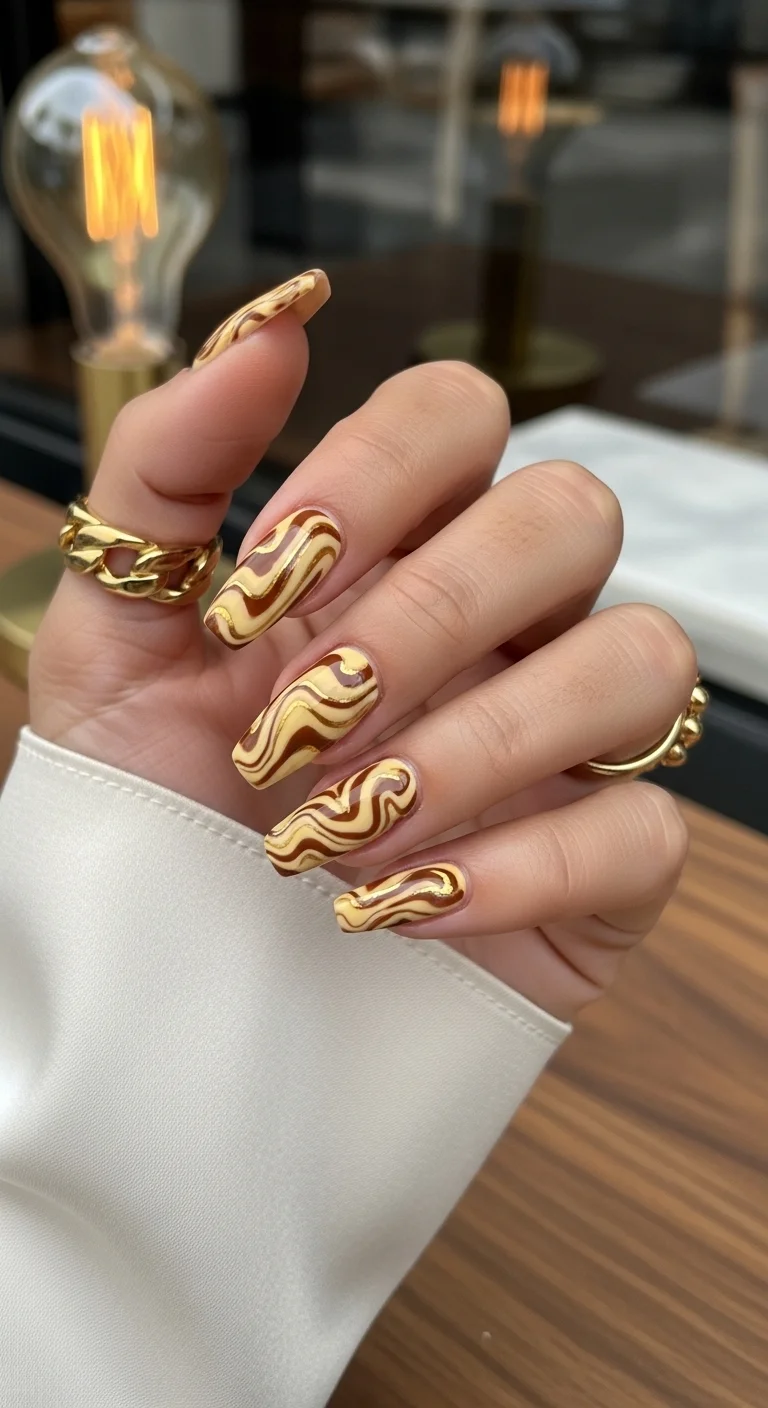
Butter yellow with rich caramel-brown swirls for a warm, luxe look.
Overview:
This is a warmer, more luxurious version of the swirl concept from item 7. Where that design used dark brown for high contrast, this uses caramel tones that blend more softly with the yellow base. The result is a tonal, harmonious design rather than a high-contrast one.
The caramel swirls reference coffee art, the kind of pattern you see in a latte or a cappuccino. That association gives the design a warm, cozy quality that connects to comfort and indulgence.
The swirl density varies across the nails. Some have tighter, more complex patterns, while others have looser, simpler swirls. That variation prevents the design from feeling repetitive despite covering all nails.
Design Breakdown:
Tonal swirl pattern using warm browns. The soft contrast is the design principle.
Base Color: Creamy butter yellow.
Nail Shape: Medium-long coffin. The flat surface provides space for the detailed swirl patterns.
Design Element: Caramel-brown swirl lines over the yellow base. The swirls are organic and vary in density across nails.
Finish: High-gloss top coat to make the yellow look creamy and the caramel look rich.
Get The Look at Home:
The tonal approach means you can be looser with the swirl placement because the colors blend more forgivingly.
- Yellow base: Two coats of butter yellow. Let dry fully.
- Caramel swirls: Using a thin liner brush and caramel brown polish, draw organic swirl lines across each nail.
- Vary density: Some nails can have tight, complex swirls. Others can have loose, simple curves.
- Don't over-blend: The caramel should sit on top of the yellow without fully mixing.
- Seal: One thick coat of top coat to smooth the surface.

26 Stunning Summer Braided Hairstyles for Women 2026 ☀️💇♀️
10.Bumblebee Polka Dots
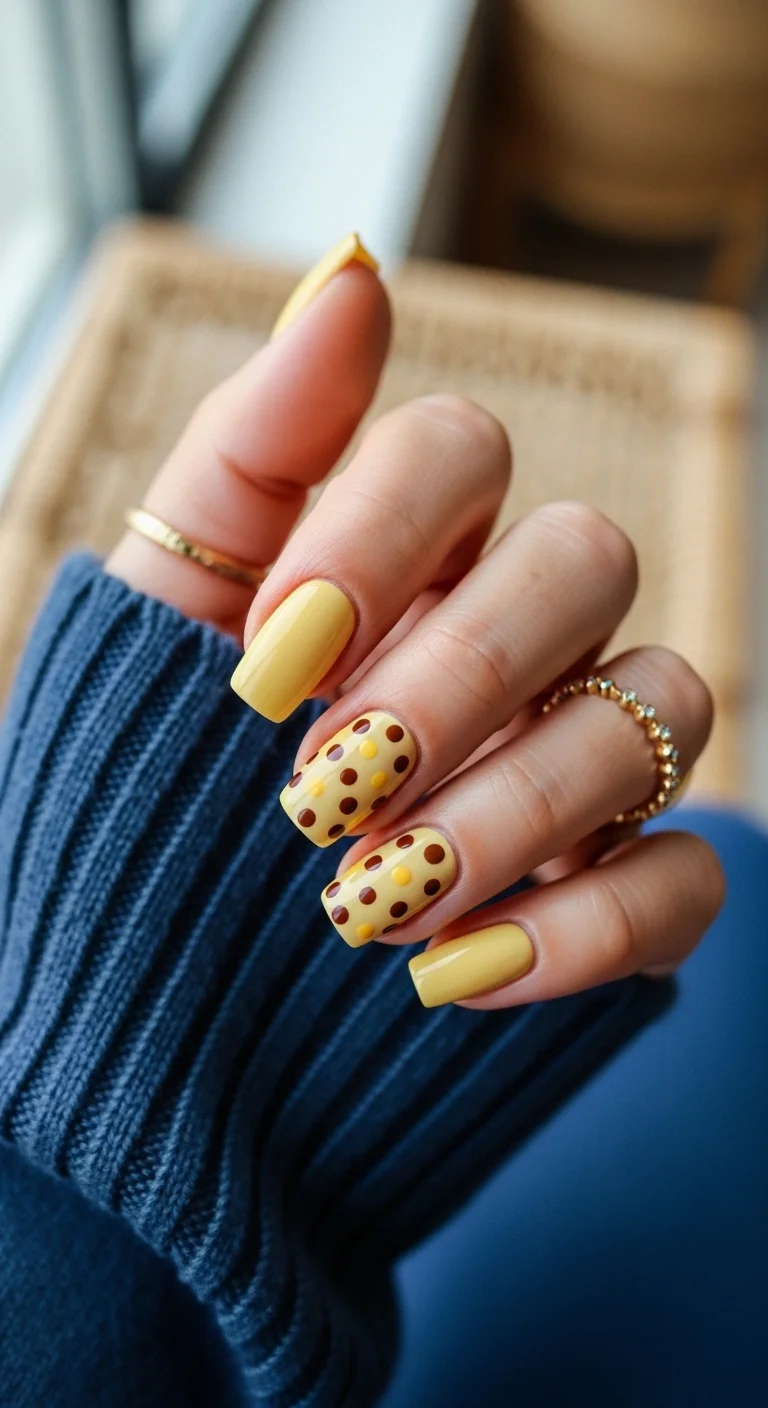
Solid butter yellow alternating with brown polka dot accent nails.
Overview:
Brown dots on yellow reference the bumblebee without painting an actual bee. The color association is enough to suggest the theme. It's a more subtle approach than literal insect art.
The alternating pattern, solid yellow on some nails, dotted yellow on others, creates visual variety without needing multiple colors or techniques. The same yellow base appears on every nail; the only difference is whether dots are added.
The dot size and spacing matter for the bumblebee reference. Medium dots, about 2mm, with consistent spacing read as "polka dot." Smaller, more random dots would read as texture. The structured placement here is what keeps the design clean.
Design Breakdown:
Alternating solid and dotted nails. The bumblebee color association is the theme.
Base Color: Butter yellow on all nails.
Nail Shape: Medium coffin. The flat surface suits the simple dot pattern.
Design Element: Alternating solid butter yellow and butter yellow with brown polka dots.
Finish: High-gloss top coat to make the yellow look saturated and the dots look crisp.
Get The Look at Home:
The dots are the fast part. The yellow base needs proper dry time for clean results.
- Yellow base: Two coats of butter yellow on all nails. Let dry fully.
- Dotting: On alternating nails, use a medium dotting tool dipped in brown polish to place evenly spaced dots.
- Spacing: Aim for consistent spacing. A staggered pattern looks more natural than a grid.
- Leave some solid: Keep the remaining nails as solid yellow without dots.
- Seal: One thick coat of top coat over all nails.
11.The Sky Sun Skittle
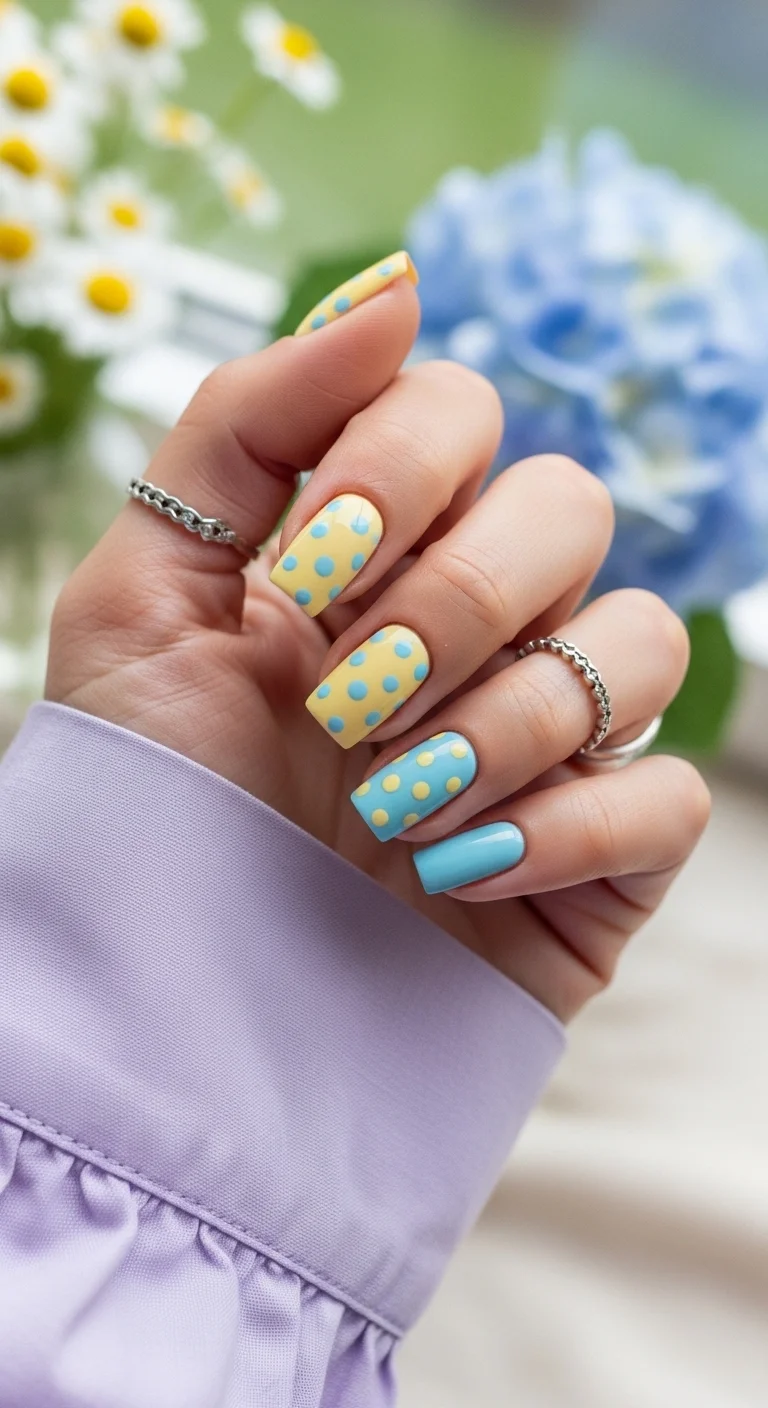
A playful skittle mix of yellow and blue with polka dots.
Overview:
Skittle nails, where each nail is a different color or pattern, have been trending for several seasons. This version uses two colors, butter yellow and sky blue, and alternates between solid blocks and polka dot patterns. The variety across the hand creates visual rhythm that a single-color set can't achieve.
The polka dots flip between the two colors: yellow nails get blue dots, blue nails get yellow dots. That reversal creates a visual conversation between the colors, like they're talking to each other across the hand.
The sky blue is a cool-toned pastel that contrasts with the warm butter yellow. That temperature difference is what makes the two colors feel distinct rather than like variations of the same shade.
Design Breakdown:
Multi-color skittle with flipped polka dots. The variety is the design.
Base Color: Butter yellow and sky blue in alternating nails.
Nail Shape: Medium coffin. The flat surface suits both the solid colors and the dot patterns.
Design Element: Alternating yellow-with-blue-dots and blue-with-yellow-dots, plus one solid blue accent nail.
Finish: High-gloss top coat to unify the different colors and patterns.
Get The Look at Home:
Plan your color layout before you start. The alternation should feel intentional.
- Color layout: Paint two nails yellow, two nails blue, and leave one for a solid accent.
- Solid nails: Apply two coats of each color. Let dry fully.
- Yellow dots on blue: Using a dotting tool, place yellow dots on the blue nails.
- Blue dots on yellow: Using a dotting tool, place blue dots on the yellow nails.
- Consistency: The dot size should be the same across all dotted nails.
- Seal: One thick coat of top coat over everything.

35 Fun Birthday Nail Designs for 2026 🎂
12.The Minimalist Mix Up
A mismatched solid color mix in brown, yellow, and blue.
Overview:
Mismatched solid colors, no patterns, no art, just different colors on each nail, are the most minimal version of the skittle trend. The design relies entirely on the color story to create interest. There's nothing else to look at.
The color palette here, brown, yellow, blue, is a warm, earthy combination that feels grounded and intentional. The brown dominates, appearing on three nails, while the yellow and blue each get one nail. That imbalance creates a hierarchy where the brown is the anchor and the other colors are accents.
The simplicity is the point. There's no technique to master, no art to execute. Just pick three colors that work together and paint each nail a different one. It's the fastest nail art design that exists.
Design Breakdown:
Solid color blocks with no patterns. The color story is the entire design.
Base Color: Brown on three nails, butter yellow on one, light blue on one.
Nail Shape: Medium coffin. The flat surface showcases the solid colors.
Design Element: Alternating solid colors. No patterns or art.
Finish: High-gloss top coat to make each color look saturated.
Get The Look at Home:
This is the fastest design on this list. Pick three colors and paint.
- Color layout: Decide which nails get which color before you start.
- Paint each nail: Apply two coats of each color to its designated nail. Let each dry fully.
- Cleanup: Use a small brush dipped in acetone to clean the edges on each nail.
- Seal: One thick coat of top coat over all nails.
13.The Double Layered French
White French tips with a yellow accent line along the smile line.
Overview:
This design layers two elements on the classic French: white tips and a thin yellow line that traces the smile line. The yellow adds a subtle pop of color that transforms a standard French into something more considered and intentional.
The yellow line is the detail that makes the design. Without it, this is a plain white French. With it, the design becomes a two-color composition that references the butter yellow theme through a single, deliberate accent.
The thinness of the yellow line matters. It needs to be visible but not dominant. A liner brush is essential for consistent line weight. Too thick and it overwhelms the white tip; too thin and it disappears.
Design Breakdown:
Classic French with a single accent line. The yellow detail is the design.
Base Color: Sheer nude or natural nail.
Nail Shape: Medium-long coffin. The flat tip gives the French a clean edge.
Design Element: White French tips on all nails. Thin yellow line tracing the smile line on all nails.
Finish: High-gloss top coat to seal both the white and yellow.
Get The Look at Home:
The white tips come first, then the yellow line. Each layer needs to dry before the next.
- Nude base: Two coats of sheer nude. Let dry fully.
- White tips: Paint white French tips on all nails. Two coats for opacity.
- Yellow line: Using a very thin liner brush and yellow polish, trace a single line along the smile line.
- Consistency: The yellow line should be the same thickness across all nails.
- Cleanup: Use a flat brush dipped in acetone to sharpen all lines.
- Seal: One thick coat of top coat to protect the art.
32 Stunning Summer Wedding Hairstyles for Brides ☀️💍
14.3D Flower Garden
Solid yellow with 3D raised flower art on accent nails.
Overview:
3D flowers are raised above the nail surface using builder gel or thick polish. They catch light differently than flat painted flowers, creating shadows and highlights that add dimension. The effect is closer to sculpted art than traditional nail painting.
The sheer nude base under the flowers is what makes them look like they're floating. On an opaque base, the 3D elements would sit on top of the color. On sheer nude, they appear to emerge from the nail surface itself.
The practical downside of 3D art: it catches on everything. Hair, clothing, bag linings. The raised texture is visually striking but functionally challenging. Budget for a week of careful wear before something catches.
Design Breakdown:
Solid color with 3D textured accent nails. The raised flowers are the design.
Base Color: Butter yellow on solid nails. Sheer nude on 3D accent nails.
Nail Shape: Medium-long almond. The curved surface suits the organic flower shapes.
Design Element: Solid yellow on two nails. 3D raised white and yellow flowers on two accent nails over sheer nude.
Finish: High-gloss top coat to seal the 3D art and make the yellow look creamy.
Get The Look at Home:
3D builder gel is required for the raised flowers. Regular polish won't hold the shape.
- Solid nails: Two coats of butter yellow on two nails. Let dry fully.
- Accent base: On two nails, apply two coats of sheer nude.
- 3D flowers: Using a dotting tool and white 3D builder gel, place five dots in a circle for each flower. Build height by going over the dots twice.
- Yellow centers: Add a tiny yellow dot to the center of each flower.
- Cure or dry: If using gel, cure in a lamp. If using thick polish, wait fifteen to twenty minutes.
- Seal: Carefully apply top coat over the 3D art without flattening the raised flowers.
15.Matte Velvet Butter
Solid matte butter yellow for a velvety, understated look.
Overview:
Matte yellow is a different proposition than glossy yellow. The flat finish drains the shine and leaves behind a chalky, almost ceramic quality that feels more editorial than playful. It's the difference between a lemon drop and a lemon macaron.
The matte finish amplifies the warmth of the butter yellow. Without the reflective quality of gloss, the color appears more muted and grounded. It reads as sophisticated rather than bright, which makes it wearable in more contexts than a glossy version.
Matte yellow needs a flawless base application. The flat finish shows every brush stroke, streak, and bubble that high-gloss hides. Three thin coats with proper dry time between each is the minimum requirement for an even, professional-looking result.
Design Breakdown:
Solid color, no art. The matte finish IS the design.
Base Color: Creamy butter yellow. The warmth is essential for the matte to work.
Nail Shape: Medium-long almond. The classic shape suits the understated matte finish.
Design Element: None. Solid coverage on every nail.
Finish: True matte top coat. Flat, not satin.
Get The Look at Home:
Surface prep matters more for matte than gloss. Every ridge is amplified under a flat finish.
- Buff: Lightly buff any ridges on the natural nail. Apply a ridge-filling base coat.
- Yellow base: Three thin coats of butter yellow. Let each coat dry fully. Matte top coat on undried polish causes bubbling.
- Matte seal: Apply matte top coat in one confident stroke per nail. Don't go back over the same area.
- Cuticle cleanup: Clean the edges with a small brush and acetone. Matte against skin is highly visible.

35 Palm Tree Nail Art Ideas that are the Most Iconic Nail Art Designs 🌴✨
16.Minty Yellow Frenchie
Mint green French tips with a solid yellow accent nail.
Overview:
Mint and yellow is a fresh, spring-like combination that feels cool and warm at the same time. The mint tips provide a cool contrast to the warm yellow accent, creating a temperature push-pull that keeps the design interesting.
The single solid yellow accent nail breaks the pattern of mint French tips. Without it, the set would be a standard colored French. The yellow nail adds a focal point that ties the design back to the butter yellow theme.
The sheer nude base under the mint tips keeps the design light and airy. The natural nail shows through, which creates a "barely there" quality that opaque bases can't achieve.
Design Breakdown:
Mint French with a single yellow accent. The temperature contrast is the design principle.
Base Color: Sheer nude on French nails. Solid butter yellow on the accent nail.
Nail Shape: Medium-long coffin. The flat surface suits the French format.
Design Element: Mint green French tips on four nails. Solid butter yellow on the ring finger.
Finish: High-gloss top coat to unify both colors.
Get The Look at Home:
The mint tips and yellow accent are painted separately. Complete one before starting the other.
- Nude base: Two coats of sheer nude on four nails. Let dry fully.
- Mint tips: Paint mint green French tips on the nude nails. Two coats for opacity.
- Yellow accent: On the ring finger, apply two coats of butter yellow.
- Cleanup: Use a flat brush dipped in acetone to sharpen the French smile lines.
- Seal: One thick coat of top coat over all nails.
17.Lemon Sorbet Almonds
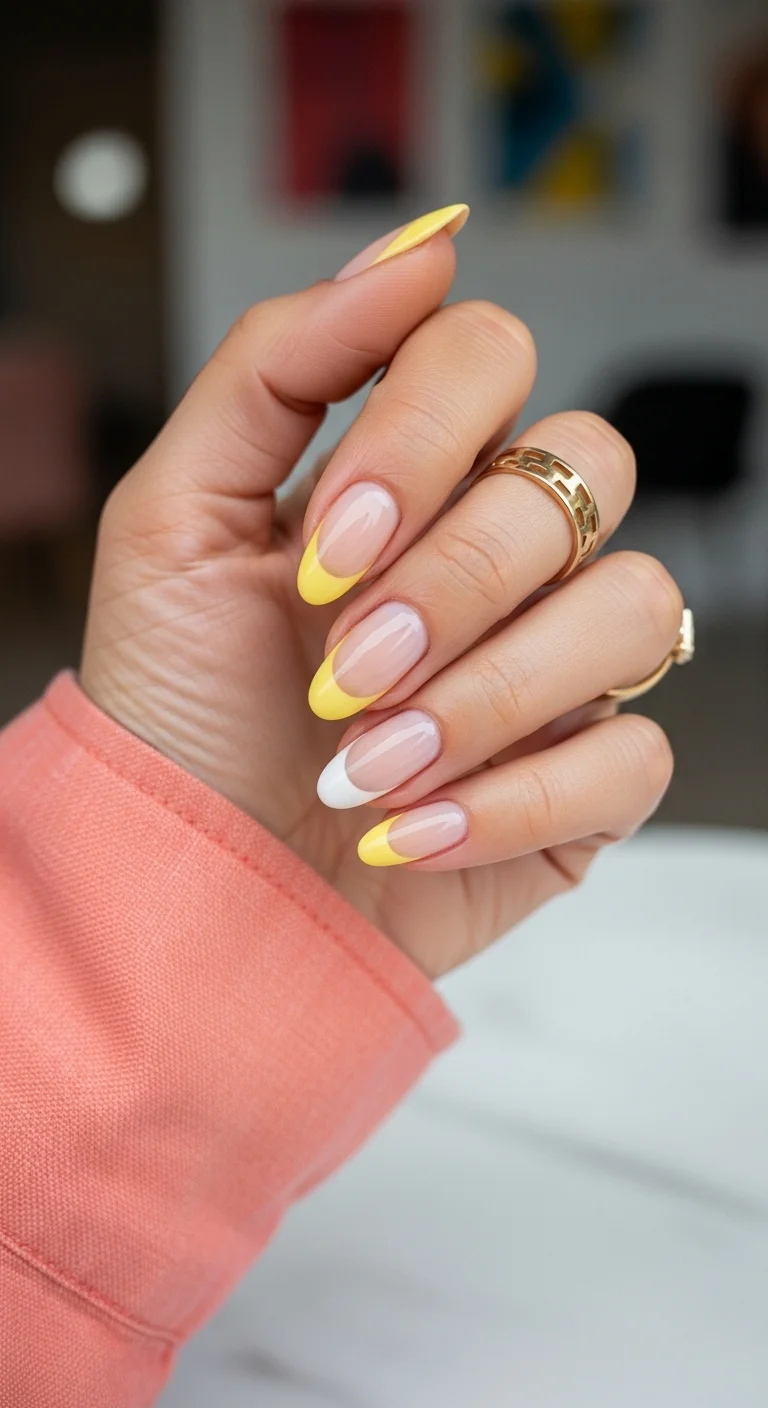
Yellow French tips with a single white French tip accent.
Overview:
This design plays with the French tip format by using two different tip colors: yellow on most nails and white on one. The variation is subtle enough that it reads as a cohesive set rather than a mismatched one.
The white accent nail serves as a visual reference point. It shows what a classic French looks like next to the yellow version, which highlights how the color change transforms the design. The white makes the yellow look warmer by comparison.
The sheer nude base is the same across all nails, which creates continuity despite the different tip colors. The base is the unifying element that ties the yellow and white together.
Design Breakdown:
Two-color French with a single accent variation. The white reference point is the design principle.
Base Color: Sheer nude on all nails.
Nail Shape: Medium-long almond. The curved tip suits both the yellow and white French formats.
Design Element: Yellow French tips on four nails. White French tip on the ring finger.
Finish: High-gloss top coat to make both tip colors look crisp.
Get The Look at Home:
The yellow tips and white tip are painted separately. The white goes on last as the accent.
- Nude base: Two coats of sheer nude on all nails. Let dry fully.
- Yellow tips: Paint yellow French tips on four nails. Two to three coats for opacity.
- White tip: On the ring finger, paint a white French tip. Two coats for opacity.
- Smile lines: Use a flat brush dipped in acetone to sharpen all French lines.
- Seal: One thick coat of top coat over all nails.

25 Stunning Summer Vacation Hairstyles for 2026 ☀️🌊
18.The Mini Sunflower Set
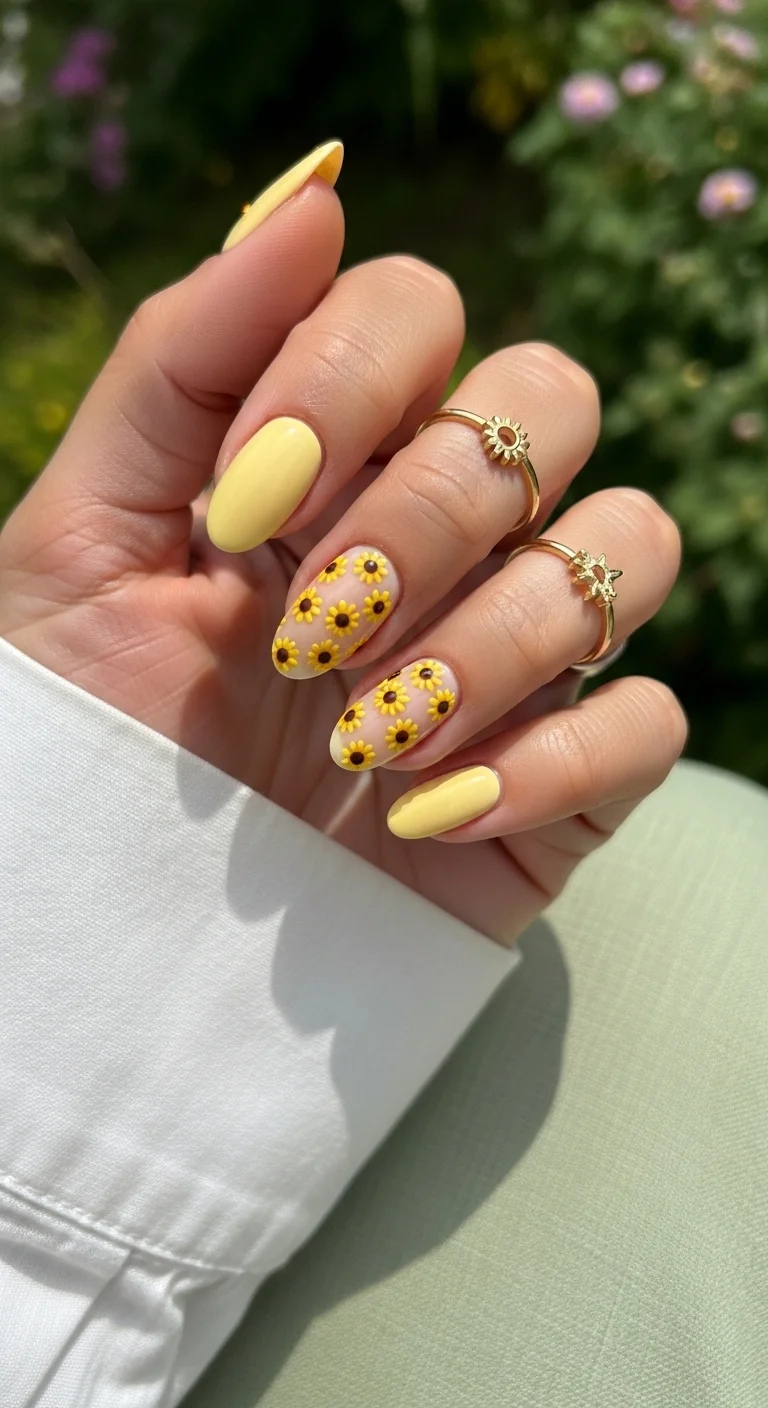
Solid butter yellow with mini sunflower accents on sheer nude.
Overview:
Mini sunflowers on a sheer base create a floral design that feels light and airy rather than dense and busy. The small scale of the flowers means they read as texture from a distance and reveal their detail up close.
The sheer nude base under the sunflowers is what makes them look like they're floating. On an opaque base, the flowers would sit on top of the color. On sheer nude, they appear to be embedded in the nail surface.
The solid yellow nails flank the floral accent nails, which creates a frame effect. The yellow establishes the color story, and the sunflower art adds the thematic detail within that frame.
Design Breakdown:
Solid color with floral accent nails. The sunflowers add the theme.
Base Color: Butter yellow on solid nails. Sheer nude on sunflower accent nails.
Nail Shape: Medium-long almond. The curved shape suits the organic flower shapes.
Design Element: Solid yellow on two nails. Small yellow sunflowers with brown centers on sheer nude on two accent nails.
Finish: High-gloss top coat to seal the sunflower art.
Get The Look at Home:
The sunflowers are smaller than typical sunflower nail art. Use a small dotting tool for the petals.
- Solid nails: Two coats of butter yellow on two nails. Let dry fully.
- Accent base: On two nails, apply two coats of sheer nude.
- Sunflower petals: Using a small dotting tool and yellow polish, place five dots in a circle for each flower.
- Brown centers: Using a smaller dotting tool, place a brown dot in the center of each flower.
- Placement: Scatter two to three sunflowers per accent nail. Leave visible nude between them.
- Seal: One thick coat of top coat over all nails.
19.Botanical Buttercream
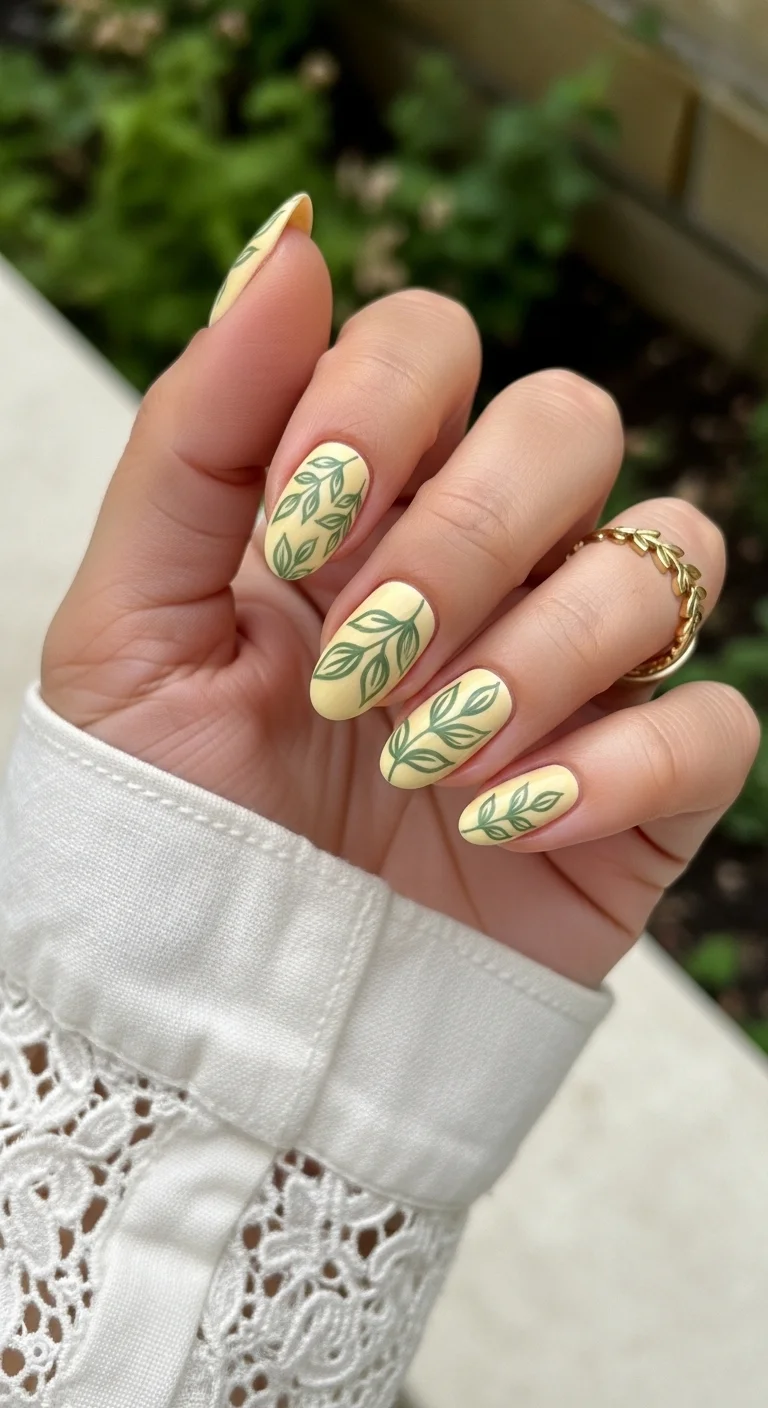
Butter yellow with green botanical leaf line art.
Overview:
Green leaves on yellow create a botanical reference that feels natural and organic. The leaf outlines are simple and graphic, which keeps the design clean despite covering every nail.
The yellow-and-green palette references nature directly: sunshine and foliage, flowers and stems. It's a color story that doesn't need literal flower art to communicate its theme. The leaves alone do the work.
The line art style, thin outlines rather than filled shapes, keeps the design lightweight. Filled green leaves would overwhelm the yellow base. The outlined approach lets the yellow show through, maintaining the color's dominance.
Design Breakdown:
Botanical line art on a yellow base. The leaf outlines are the design.
Base Color: Creamy butter yellow.
Nail Shape: Medium coffin. The flat surface provides a canvas for the leaf art.
Design Element: Green leaf outlines painted across all nails. The leaves are simple, graphic line drawings.
Finish: High-gloss top coat to seal the line art and make the yellow look creamy.
Get The Look at Home:
A fine liner brush is essential for the thin leaf outlines.
- Yellow base: Two coats of butter yellow. Let dry fully.
- Leaf outlines: Using a thin liner brush and green polish, draw simple leaf shapes on each nail. Two to three leaves per nail.
- Vary placement: Position the leaves at different angles on each nail for an organic feel.
- Line weight: Keep the outlines thin and consistent. Don't fill in the leaves.
- Seal: One thick coat of top coat to protect the line art.

29 Trendy Pink Summer Nails for 2026 💅
20.The Neon Sunset Pop
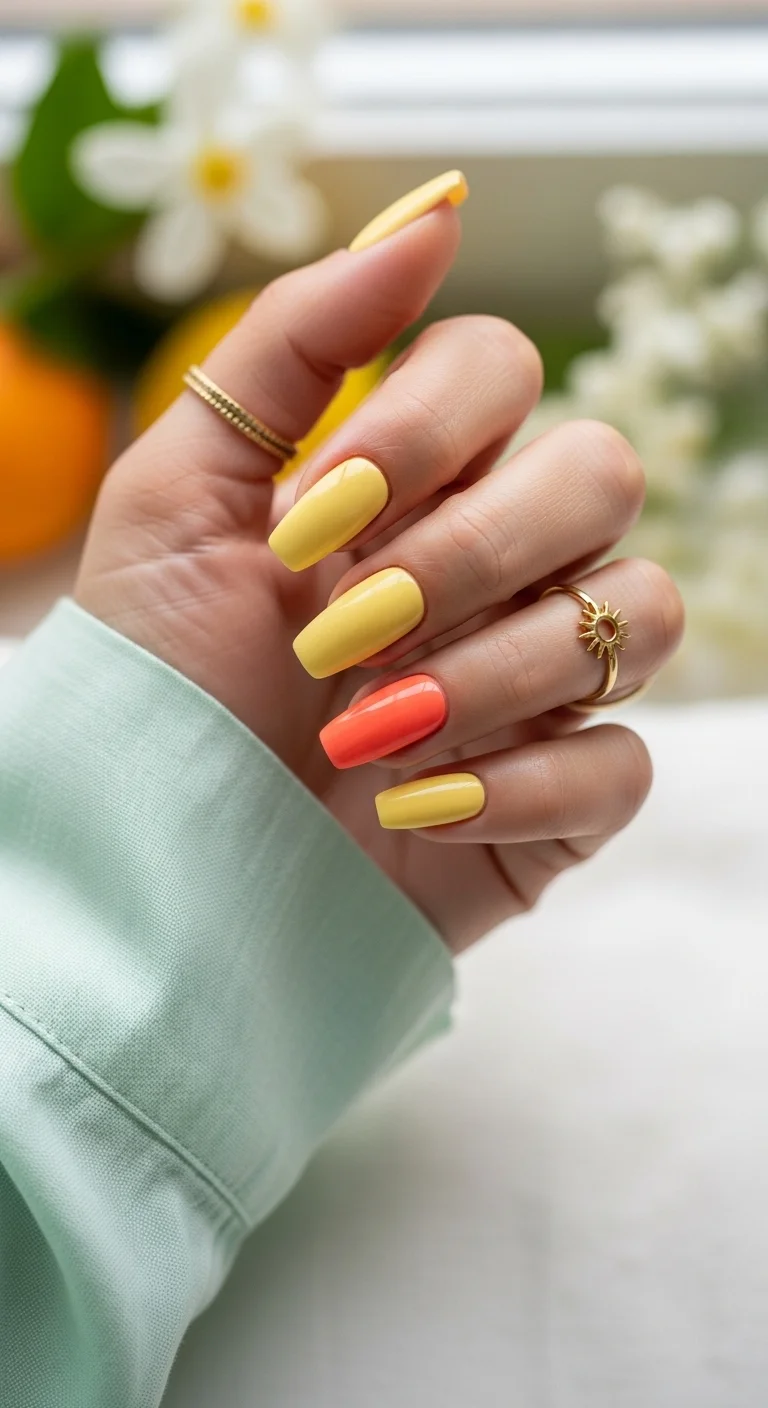
Butter yellow with a single coral-orange accent nail.
Overview:
A single coral accent on a yellow set creates a warm-on-warm contrast that references sunsets and summer heat. The coral is close enough to the yellow that they feel harmonious, but different enough to create a visual break.
The accent nail on the ring finger is the most common placement for color pops. It provides a focal point without disrupting the overall yellow story. Four nails of solid yellow establish the theme; one nail of coral adds the surprise.
Coral and yellow share warm undertones, which is why the pairing feels natural rather than jarring. On a cool-toned set, a coral accent would look disconnected. On this warm yellow, it looks like it belongs.
Design Breakdown:
Solid color with a single warm accent. The tonal connection is the design principle.
Base Color: Butter yellow on four nails. Coral-orange on the ring finger.
Nail Shape: Medium coffin. The flat surface showcases the solid colors.
Design Element: Solid butter yellow on index, middle, pinky, and thumb. Solid coral-orange on the ring finger.
Finish: High-gloss top coat to make both colors look saturated.
Get The Look at Home:
This is one of the fastest designs. The accent nail takes minutes.
- Yellow nails: Two coats of butter yellow on four nails. Let dry fully.
- Coral accent: On the ring finger, apply two coats of coral-orange.
- Cleanup: Use a small brush dipped in acetone to clean the edges on both colors.
- Seal: One thick coat of top coat over all nails.
21.The Ladybug Picnic
Solid yellow with ladybug and grass art on accent nails.
Overview:
Ladybugs on yellow create an immediate garden-party reference. The red bugs against the warm yellow base are high-contrast enough to be visible from a distance, while the green grass details add a third color that grounds the design in nature.
The ladybug technique is simpler than it looks: a red dot for the body, a smaller black dot for the head, and tiny black dots on the red for the spots. The legs are what separate "red dot" from "ladybug," but at this scale, they're optional.
The solid yellow nails provide visual rest between the detailed accent nails. Without them, the ladybug art would feel overwhelming across all five fingers. The alternation is what makes the set wearable.
Design Breakdown:
Solid color with themed accent nails. The ladybugs are the focal point.
Base Color: Butter yellow on solid nails. Yellow on accent nails with ladybug art.
Nail Shape: Medium coffin. The flat surface provides a canvas for the ladybug art.
Design Element: Solid yellow on three nails. Ladybug art with red bodies, black spots, and green grass on two accent nails.
Finish: High-gloss top coat to seal the art and make the yellow look creamy.
Get The Look at Home:
The ladybugs are small, so a dotting tool is essential for consistent sizing.
- Yellow base: Two coats of butter yellow on all nails. Let dry fully.
- Grass: On two accent nails, use a thin brush and green polish to paint grass blades at the base.
- Ladybug bodies: Using a medium dotting tool and red polish, place dots on the grass area.
- Ladybug heads: Using a smaller dotting tool, add a black dot at the top of each red dot.
- Spots: Add tiny black dots on the red bodies.
- Seal: One thick coat of top coat over everything.

21 Hot Summer Buns Hairstyle Ideas for 2026 ☀️🔥
22.Butterfly Wing Dreams
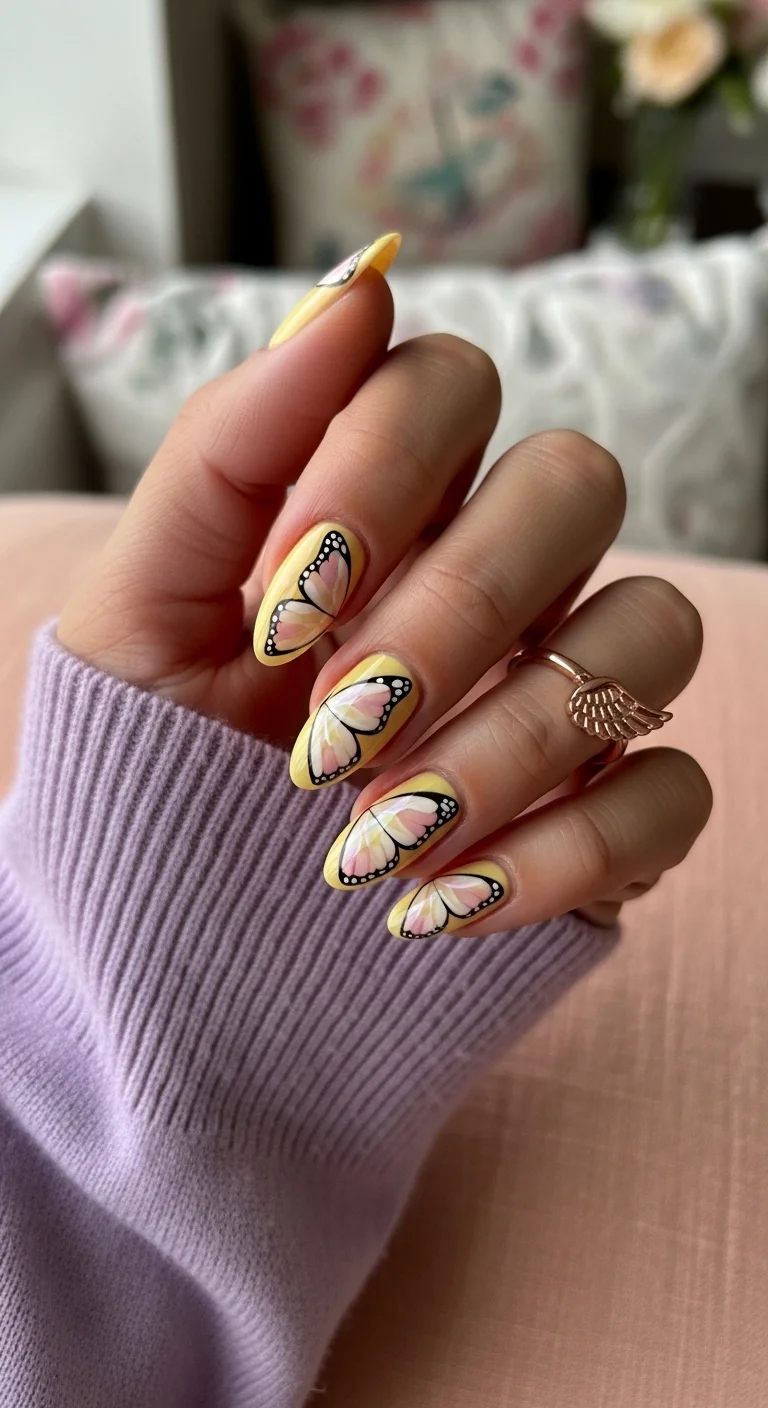
Yellow base with detailed butterfly wing patterns on all nails.
Overview:
Butterfly wing art on yellow creates a design that's both graphic and organic. The black outlines define the wing shape, while the pink and white fill creates the delicate, translucent quality of actual butterfly wings.
Covering every nail with the same pattern commits fully to the theme. There's no accent nail, no variation. Just butterfly wings from cuticle to tip on every finger. That level of commitment reads as deliberate and editorial.
The wing placement varies slightly from nail to nail, which prevents the pattern from looking stamped or manufactured. The slight inconsistency is what makes each nail feel like a unique composition.
Design Breakdown:
Full-coverage illustrated art. The butterfly wings are the entire design.
Base Color: Butter yellow.
Nail Shape: Medium-long almond. The curved shape complements the organic wing forms.
Design Element: Butterfly wing patterns on every nail. Pink and white fill with black outlines. Each nail shows a different section of the wing.
Finish: High-gloss top coat to seal the illustration and make the yellow look creamy.
Get The Look at Home:
A nail art pen is essential for the thin black outlines. Practice the wing shape on paper first.
- Yellow base: Two coats of butter yellow. Let dry fully.
- Wing outlines: Using a fine nail art pen and black polish, draw the butterfly wing outlines on each nail.
- Pink fill: Using a small brush, fill in sections of the wings with pink polish.
- White accents: Add white details within the wings for a translucent effect.
- Vary placement: Position the wings at slightly different angles on each nail.
- Seal: One thick coat of top coat to protect the illustration.
23.Iridescent Butter Chrome
Solid butter yellow with iridescent chrome accent nails.
Overview:
Iridescent chrome creates a color-shifting effect that changes depending on the angle of light. On some nails it reads as pink, on others as blue or green. That unpredictability is what makes the design interesting despite being only two elements.
The solid yellow nails establish the color story, while the iridescent accents add a futuristic, otherworldly quality. The contrast between flat cream polish and shifting chrome is what makes the set visually dynamic.
Iridescent chrome powder requires a no-wipe gel top coat as the base. Regular polish won't give the powder anything to adhere to. If you're working with regular polish, an iridescent top coat over yellow produces a similar but less dramatic effect.
Design Breakdown:
Solid color with chrome accent nails. The texture contrast is the design.
Base Color: Butter yellow on solid nails. Iridescent chrome on accent nails.
Nail Shape: Medium coffin. The flat surface showcases both the solid color and the chrome.
Design Element: Solid butter yellow on three nails. Iridescent holographic chrome on two accent nails.
Finish: High-gloss on yellow; mirror-chrome on accents.
Get The Look at Home:
Chrome powder requires specific products. The yellow nails are straightforward; the chrome nails need preparation.
- Yellow nails: Two coats of butter yellow on three nails. Let dry fully.
- Chrome prep: On accent nails, apply a light base color, then no-wipe gel top coat. Cure.
- Rub the chrome: Using a sponge applicator, rub iridescent chrome powder over the cured top coat.
- Dust off: Use a soft brush to remove excess powder.
- Final seal: Apply glossy top coat to all nails, capping the chrome edges.

33 Trendy Polka Dot Nail Ideas for 2026 💅
24.Lemon Swirl Marble
Yellow and white marble swirls for a citrus-inspired look.
Overview:
Yellow and white marble creates a design that references lemon sorbet or citrus fruit without being literal about it. The organic swirls look like cream being stirred into lemon curd.
The swirl technique produces a different pattern on every nail, which is what makes marble work as a design. If you try to match the swirls across all ten fingers, you'll overwork the pattern and end up with muddy grey instead of clean, distinct swirls.
The two-color palette, yellow and white, keeps the marble from feeling busy. More colors would create a more complex marble, but the simplicity of two tones makes this design feel clean and wearable.
Design Breakdown:
Two-color marble. The organic swirls are the design.
Base Color: Butter yellow and white swirled together.
Nail Shape: Medium-long almond. The curved surface lets the marble swirls follow an organic path.
Design Element: Yellow and white marble swirls on every nail. Each nail has a unique pattern.
Finish: High-gloss top coat to make the marble look like polished stone.
Get The Look at Home:
The marble technique is wet-on-wet. The colors need to be swirled while still fluid.
- White base: One coat of white. Let it dry slightly but stay tacky.
- Drop the yellow: Place dots of yellow polish onto the tacky white base.
- Swirl: Using a toothpick or fine brush, drag the yellow into the white in S-shapes. Three to four drags maximum.
- Don't over-blend: The individual colors need to remain visible. Stop before they merge into grey.
- Vary each nail: Every nail should have a different swirl pattern.
- Seal: Wait five minutes, then apply a generous top coat to smooth the surface.
25.Lavender Lemon Daisies
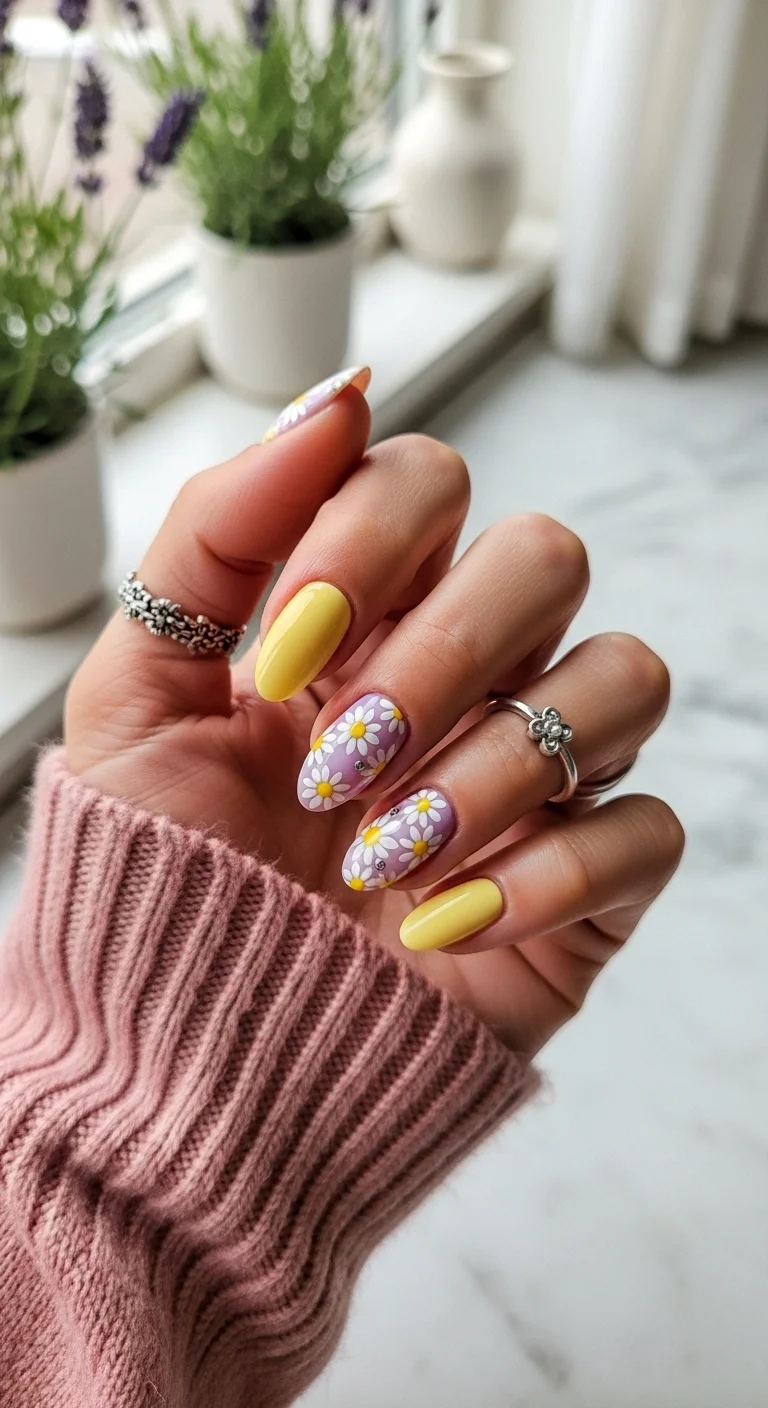
Solid yellow with lavender and daisy accent nails.
Overview:
Yellow and lavender is a complementary pairing that creates maximum contrast. Adding white daisies on the lavender nails introduces a third element that softens the contrast and adds a floral, garden-party quality.
The alternating pattern, solid yellow and lavender-with-daisies, creates visual rhythm. Your eye moves from the warm yellow to the cool lavender, following the color story across the hand.
Daisies are one of the most accessible floral designs because the technique is simple: five white dots in a circle, one yellow dot in the center. The flowers don't need to be perfect or identical. The casual quality is what makes them feel organic.
Design Breakdown:
Two-color skittle with floral accents. The complementary palette is the design.
Base Color: Butter yellow on solid nails. Lavender on daisy accent nails.
Nail Shape: Medium-long almond. The curved shape suits both the solid colors and the floral art.
Design Element: Alternating solid yellow and lavender with white daisies on the lavender nails.
Finish: High-gloss top coat to unify both colors.
Get The Look at Home:
The daisies go on the lavender nails only. The yellow nails are straightforward solid color.
- Yellow nails: Two coats of butter yellow on alternating nails. Let dry.
- Lavender nails: Two coats of lavender on the remaining nails. Let dry.
- Daisy petals: Using a small dotting tool and white polish, place five dots in a circle on the lavender nails.
- Yellow centers: Using a smaller dotting tool, add a yellow dot in the center of each daisy.
- Placement: Scatter two to three daisies per lavender nail.
- Seal: One thick coat of top coat over all nails.
28 Effortless Hot Weather Day Hairstyles for Women 2026 ☀️💇♀️
26.The Picasso Line Art
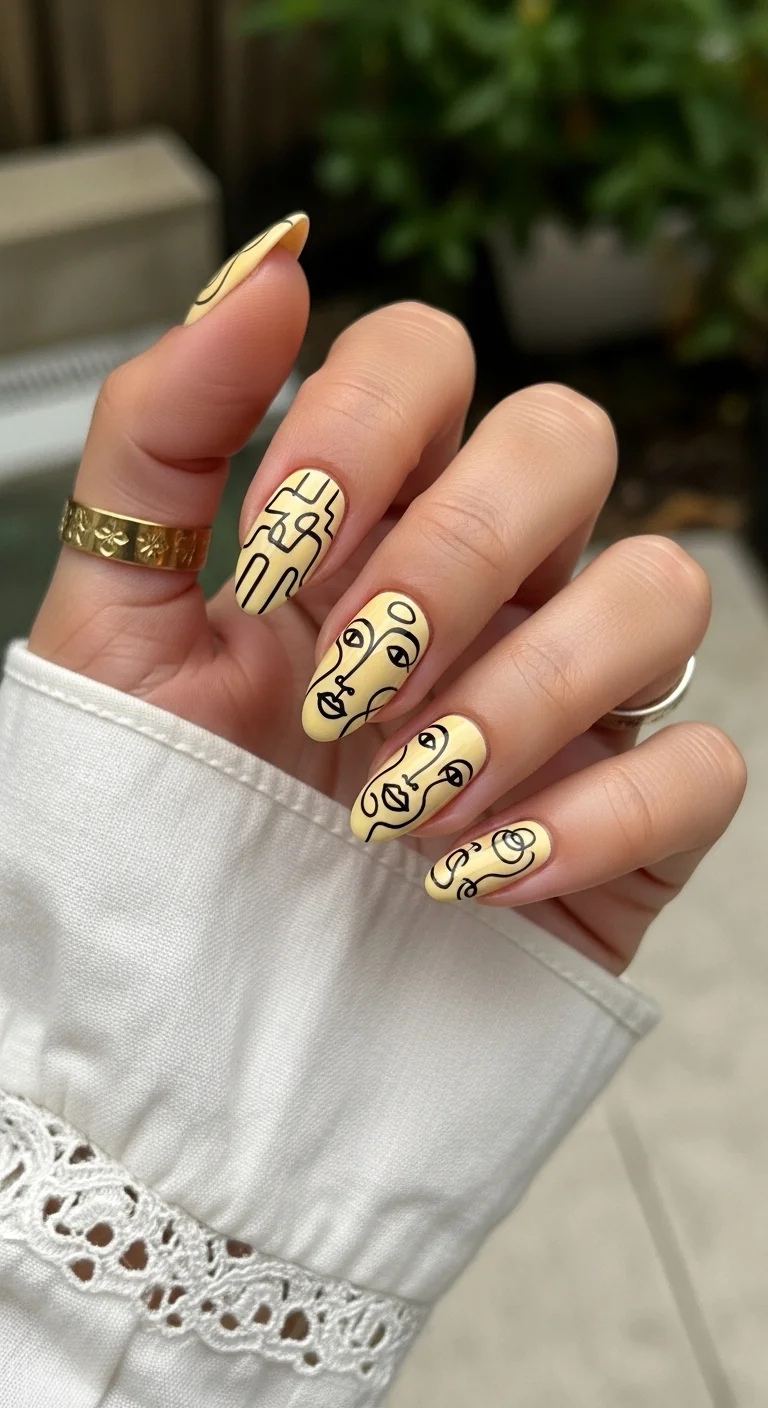
Butter yellow with abstract black line art inspired by Picasso.
Overview:
Abstract line art on yellow creates a design that references fine art without being literal about it. The continuous black lines look like they were drawn in a single, unbroken stroke, which gives the design a spontaneous, artistic quality.
The face-like shapes in the line work reference Picasso's continuous line drawings, but the abstraction is loose enough that the design works as pure pattern rather than portraiture. You see faces if you look for them, but the lines work as abstract art regardless.
The yellow base is essential because it provides enough contrast for the black lines to read clearly. On a white base, the lines would look stark. On yellow, they look warmer and more organic.
Design Breakdown:
Abstract line art on a colored base. The artistic quality is the design.
Base Color: Creamy butter yellow.
Nail Shape: Medium coffin. The flat surface provides a canvas for the line art.
Design Element: Black continuous line art on every nail. Abstract face-like shapes and flowing curves.
Finish: High-gloss top coat to seal the line art and make the yellow look creamy.
Get The Look at Home:
A nail art pen gives the most consistent line weight. Practice the continuous line technique on paper first.
- Yellow base: Two coats of butter yellow. Let dry fully.
- Line art: Using a fine nail art pen and black polish, draw continuous, flowing lines on each nail. Don't lift the pen between strokes.
- Vary the pattern: Each nail should have a different arrangement of lines and shapes.
- Line weight: Keep the lines thin and consistent.
- Seal: One thick coat of top coat to protect the art.
27.Geometric Mint Block
Geometric color blocking in mint, yellow, and white.
Overview:
Color blocking uses geometric shapes to divide the nail into distinct zones of color. This design uses three colors, mint green, yellow, and white, arranged in angular blocks that create a modern, graphic look.
The three-color palette is held together by the shared pastel quality of each shade. All three are soft enough that they feel harmonious despite being different hues. The white acts as a neutral buffer between the mint and yellow.
The geometric shapes need clean edges to look intentional. Using striping tape to mask each color block before painting creates sharp, precise boundaries. Freehand edges can work, but they need to be very deliberate to read as design rather than mistake.
Design Breakdown:
Three-color geometric blocking. The angular shapes are the design.
Base Color: Mint green, butter yellow, and white in geometric blocks.
Nail Shape: Medium-long almond. The curved surface creates interesting shape interactions with the geometric blocks.
Design Element: Angular color blocks in mint, yellow, and white on each nail. The block arrangement varies per nail.
Finish: High-gloss top coat to make all three colors look saturated.
Get The Look at Home:
Striping tape is essential for clean geometric edges between color blocks.
- Base color: Apply one color (e.g., white) over the entire nail. Let dry fully.
- Tape mask: Apply striping tape to mask off the areas that should stay the first color.
- Second color: Paint mint green over the exposed areas.
- Third color: Remove some tape, apply new tape, and paint yellow in the remaining exposed areas.
- Peel while wet: Remove all tape before the final color sets.
- Seal: One thick coat of top coat over everything.

31 Stunning Prom Nails for Women in 2026 💃
28.Gold Gilded Frenchie
Mixed French tips with gold metallic line accents.
Overview:
This design layers three elements: white tips, yellow tips, and gold metallic line accents. The variety across nails creates a curated, intentionally mismatched quality that feels more considered than a uniform French.
The gold metallic lines are the detail that elevates the set. They trace the smile lines and add a luxury quality that separates this from a standard colored French. The gold acts as a frame, sharpening the border between the tip and the nude.
Mixing white and yellow tips across different nails creates visual variety within the same color family. The white provides a classic reference point, while the yellow adds warmth and personality.
Design Breakdown:
Mixed French with metallic accents. The gold lines are the unifying element.
Base Color: Sheer nude on all nails.
Nail Shape: Medium coffin. The flat surface suits the French format.
Design Element: Alternating white and yellow French tips. Gold metallic lines tracing the smile lines on select nails.
Finish: High-gloss top coat to seal the tips and gold lines.
Get The Look at Home:
The French tips go on first, then the gold lines. Each layer needs to dry before the next.
- Nude base: Two coats of sheer nude on all nails. Let dry fully.
- Mixed tips: Paint white French tips on some nails, yellow on others. Two coats for opacity.
- Gold lines: Using a very thin liner brush and gold metallic polish, trace the smile lines on select nails.
- Cleanup: Use a flat brush dipped in acetone to sharpen all lines.
- Seal: One thick coat of top coat over everything.
29.Gold Swirl Wire Art
Mixed French tips with a gold swirl accent on the ring finger.
Overview:
This design builds on the mixed French concept by adding a gold metallic swirl on the ring finger. The swirl is a single, continuous line that curves across the nail, creating a wire-art effect that references jewelry.
The ring finger is the natural focal point for the most detailed element. The other nails carry simpler French tips, which provides context for the accent nail's complexity. The contrast between simple and detailed is what makes the design interesting.
The gold swirl needs to be genuinely thin to read as wire art rather than a thick stripe. A liner brush or nail art pen is essential for consistent line weight.
Design Breakdown:
Mixed French with a single wire-art accent. The gold swirl is the focal point.
Base Color: Sheer nude on all nails.
Nail Shape: Medium-long almond. The curved shape complements the organic swirl.
Design Element: White and yellow French tips on four nails. Gold metallic swirl on the ring finger.
Finish: High-gloss top coat to seal everything.
Get The Look at Home:
The gold swirl is the detail work. Complete all French tips first, then add the accent.
- Nude base: Two coats of sheer nude on all nails. Let dry fully.
- Mixed tips: Paint white and yellow French tips on four nails.
- Gold swirl: On the ring finger, using a thin liner brush and gold metallic polish, draw a single continuous swirl line across the nail.
- Line weight: Keep the swirl thin and consistent.
- Cleanup: Use a small brush dipped in acetone to sharpen the swirl edges.
- Seal: One thick coat of top coat over all nails.
28 Stunning Softball Hairstyle Ideas with Braids for 2026 🥎✨
30.Lavender Butter Cream Skittle
Alternating solid yellow and lavender for a skittle effect.
Overview:
This is the simplest version of the yellow-and-lavender combination: solid blocks of each color, alternating across the hand. No patterns, no art, just two colors and a clean alternation.
The complementary contrast between yellow and lavender is what makes this work. The warm yellow and the cool lavender sit on opposite sides of the color wheel, which creates a visual vibration that's energetic but not aggressive.
The alternation pattern can be symmetric, yellow-lavender- yellow-lavender-yellow, or clustered, yellow-yellow-lavender- lavender-yellow. Both approaches work; the choice depends on which color you want to dominate.
Design Breakdown:
Two-color alternating solids. The complementary contrast is the design.
Base Color: Alternating solid butter yellow and lavender.
Nail Shape: Medium coffin. The flat surface showcases the solid colors.
Design Element: Alternating yellow and lavender solids. No patterns or art.
Finish: High-gloss top coat to make both colors look saturated.
Get The Look at Home:
This is one of the fastest designs. Pick two colors and alternate.
- Layout: Decide which nails get yellow and which get lavender.
- Paint each nail: Apply two coats of each color to its designated nail. Let each dry fully.
- Cleanup: Use a small brush dipped in acetone to clean the edges.
- Seal: One thick coat of top coat over all nails.
31.The Fruit Salad Mani

Yellow base with cherry and strawberry fruit art.
Overview:
Fruit art on yellow creates a cohesive, summery theme. The cherries and strawberries are recognizable at a glance, and the red fruit against the yellow base is high-contrast enough to be visible from a distance.
The fruit variety, cherries on some nails, strawberries on others, prevents the design from feeling repetitive. Each nail tells a slightly different story within the same theme.
The green stems and leaves on the fruit add a third color that grounds the design in nature. Without the green, the red and yellow would feel abstract. The stems make the fruit readable.
Design Breakdown:
Fruit illustration on a yellow base. The variety of fruit is the design.
Base Color: Butter yellow on all nails.
Nail Shape: Medium almond. The curved shape suits the organic fruit shapes.
Design Element: Hand-painted cherries and strawberries scattered across the yellow nails. Green stems and leaves.
Finish: High-gloss top coat to seal the fruit art and make the yellow look juicy.
Get The Look at Home:
The fruit is simpler than it looks because at this scale, imperfection reads as organic.
- Yellow base: Two coats of butter yellow. Let dry fully.
- Cherries: Using a dotting tool and red polish, place two dots close together for each cherry pair.
- Strawberries: Paint small red heart shapes with green leaf caps on select nails.
- Stems: Using a thin brush and green polish, add stems connecting the fruit.
- Seeds: Add tiny white dots on the strawberries for seed detail.
- Seal: One thick coat of top coat to protect the art.

29 Best Tropical Vacation Nails for Women in 2026 🌴
32.Leafy French Coffin
Mixed French tips with a leafy botanical accent nail.
Overview:
This design combines three different approaches: yellow French tips, white French tips, and a botanical accent nail. The variety across nails creates a curated, mixed-media quality that feels more interesting than any single technique.
The green leaf art on the white accent nail provides a botanical reference that connects to the yellow's warmth. The leaves look like they could be growing from the French tips, creating a visual narrative across the hand.
The white accent nail serves as a clean canvas for the leaf art. On a yellow or nude base, the green leaves would have less contrast. On white, every leaf detail is visible.
Design Breakdown:
Mixed French with a botanical accent. The variety is the design.
Base Color: Sheer nude on French nails. White on the botanical accent nail.
Nail Shape: Medium coffin. The flat surface suits both the French and the leaf art.
Design Element: Yellow and white French tips on four nails. Green leaf art on a white accent nail.
Finish: High-gloss top coat to unify all the elements.
Get The Look at Home:
Do the French tips first, then the accent nail art.
- Nude base: Two coats of sheer nude on four nails. Let dry.
- White accent: Two coats of white on one nail.
- Mixed tips: Paint yellow and white French tips on the nude nails.
- Leaf art: On the white accent nail, use a thin brush and green polish to draw leaf shapes.
- Cleanup: Use a flat brush dipped in acetone to sharpen all lines.
- Seal: One thick coat of top coat over everything.
33.Gilded Marble Coffins
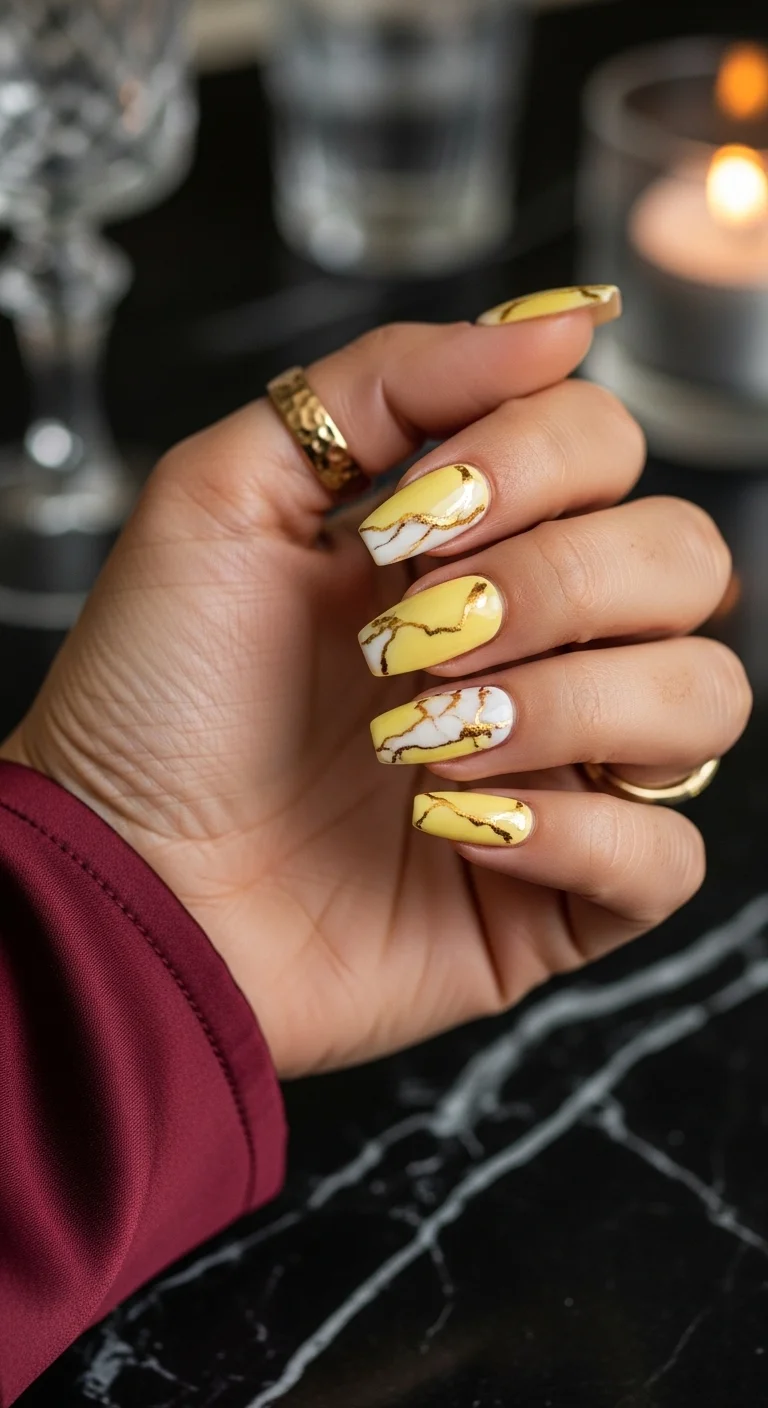
Yellow and white marble with gold metallic veining.
Overview:
Gold veining on marble adds a third dimension that standard marble can't achieve. The metallic lines catch light differently than the white and yellow swirls, creating a layered, multi-textured quality.
The gold veining needs to be thin and organic to look like real stone. Thick, straight gold lines would look like stripes rather than mineral deposits. The irregularity is what sells the marble illusion.
The yellow-and-white marble base provides a warm, citrusy foundation that the gold veining complements. The gold shares the same warm undertone as the yellow, which creates tonal harmony despite the different materials.
Design Breakdown:
Marble with metallic veining. The gold accents are the design.
Base Color: Yellow and white marble swirls.
Nail Shape: Medium coffin. The flat surface showcases the marble and gold detail.
Design Element: Yellow and white marble base with thin gold metallic veins running through the swirls.
Finish: High-gloss top coat to make the marble look polished and the gold look reflective.
Get The Look at Home:
Create the marble first, let it dry, then add the gold veins.
- Marble base: Create a yellow and white swirl marble using the wet-on-wet technique. Let dry fully.
- Gold veins: Using a thin liner brush and gold metallic polish, draw thin, organic lines through the marble.
- Vary thickness: Some veins should be thin and delicate, others slightly thicker.
- Don't overwork: Three to five gold veins per nail is enough. More would overwhelm.
- Seal: One thick coat of top coat to smooth the surface and seal the gold.
34.The Vertical Ombre Fade
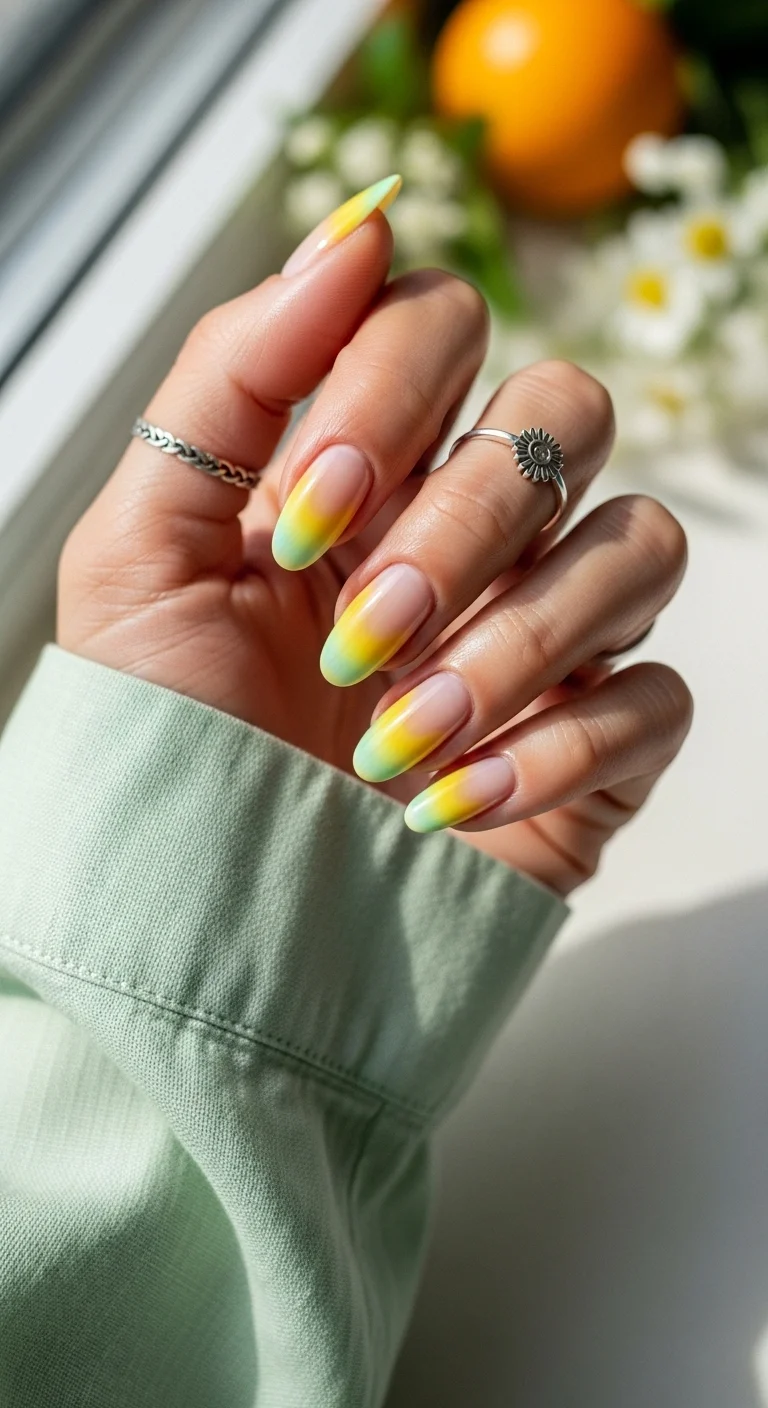
Sheer nude with a yellow-green gradient fading from the tips.
Overview:
A vertical ombre that starts with color at the tips and fades toward the nude base creates a dipped effect. The color appears to be concentrated at the free edge and dissolves into transparency toward the cuticle.
The yellow-to-green transition within the ombre adds a citrus quality that connects to the butter yellow theme. The green at the very tips creates a subtle contrast that makes the gradient more interesting than a single-color fade.
The sheer quality of the gradient means regrowth is nearly invisible. The natural nail showing through the nude base means there's no harsh line where the polish ends and new growth begins. This extends the manicure's useful life.
Design Breakdown:
Tip-focused gradient with a color transition. The sheer quality is the design.
Base Color: Sheer nude fading to yellow, then green at the tips.
Nail Shape: Medium-long almond. The curved shape emphasizes the gradient flow.
Design Element: Vertical sponge-applied ombre using nude, yellow, and green. Color concentrates at the tips.
Finish: High-gloss top coat to make the gradient look seamless and luminous.
Get The Look at Home:
Three-color gradients require patience. Build the blend in multiple light passes.
- Nude base: One coat of sheer nude over the entire nail.
- Sponge setup: Paint stripes of nude, yellow, and green side by side on a makeup sponge. Dab on paper first.
- Dab the gradient: Press the sponge onto the nail with green at the tip, yellow in the middle, nude at the base.
- Build layers: Let each pass dry, then repeat. Three to four layers builds better opacity.
- Clean edges: Use a brush dipped in acetone to remove polish from the skin.
- Seal: Apply a thick top coat while the last layer is still slightly wet to help the colors blend.
Why Feel-Good Finishes Are Defining Summer Nails?
What makes butter yellow click right now is not just the color itself, it is that it belongs to a bigger shift in how people want their nails to feel. Summer nail trends are moving toward textured, tactile finishes, 3D details, glossy depth, and surfaces that look good from every angle. Flat color is giving way to manicures that feel dimensional.
Butter yellow fits naturally into this soft glam aesthetic. Unlike harsh neons or heavily structured designs, it reads as warm, wearable, and effortless. It works with chrome accents, floral details, polka dots, or subtle 3D textures without feeling busy. The yellow acts as a neutral canvas that lets other elements shine without competing.
The most common application mistake with butter yellow is applying it in thick coats, which leads to streaking and uneven coverage. Yellow pigment is notoriously sheer, so the instinct is to compensate with heavier layers. The correct approach is the opposite: three to four ultra-thin coats, each fully dried before the next. The result is smooth, creamy, and streak-free, the difference between a polish that looks painted on and one that looks like it belongs there.
Why Butter Yellow is
The "IT" Color
We are officially moving away from stark white and heavy neutrals. Butter yellow is the perfect palate cleanser—it’s light, airy, and adds just enough color without overwhelming your look.
Universally Flattering
Because butter yellow has a soft, warm undertone, it beautifully complements every single skin tone—from porcelain to deep melanin.
The Perfect Base
It’s subtle enough to act as a neutral base for delicate nail art, like tiny daisies or gold chrome accents.
Keeping That Yellow Bright
Lighter polishes, especially yellows and whites, have a tendency to stain or dull over time if you're not careful. I always recommend adding a fresh layer of top coat every few days to keep that buttery shade looking incredibly glossy and crisp!
Also, a little pro-tip: be careful when applying self-tanner, using turmeric-heavy skincare, or applying mineral sunscreens, as these can easily transfer onto light polish. Just be sure to wipe your nails off immediately after application!
And there you have it! Hopefully, scrolling through these gorgeous butter yellow designs inspired you to try something a little brighter and sweeter for your next manicure. It’s truly the ultimate mood-boosting color, and it is guaranteed to look absolutely stunning on you.
Don't forget to pin your favorite photos straight to your Pinterest boards right now, so you have them ready to show your nail tech! Pinning them early is a great way to avoid panicking when sitting down in the salon chair. Share in the comments below which butter yellow set you are claiming for yourself!