Nail Trends
27 Graduation Day Nail Ideas for 2026
Your nails will be in every close-up photo from the ceremony — the diploma shot, the cap toss, the family group picture. Choosing the right design matters more than most people realize.
This list covers 27 graduation nail designs across the full spectrum: solid colors that rely on perfect application, French variations that update a classic, chrome and magnetic effects that demand specialized tools, and hand-painted art that requires patience. Every entry includes the honest challenges — staining, chipping, maintenance demands, and technique difficulty — so you can match the design to your actual skill level and timeline, not just your Pinterest board.
In This Guide
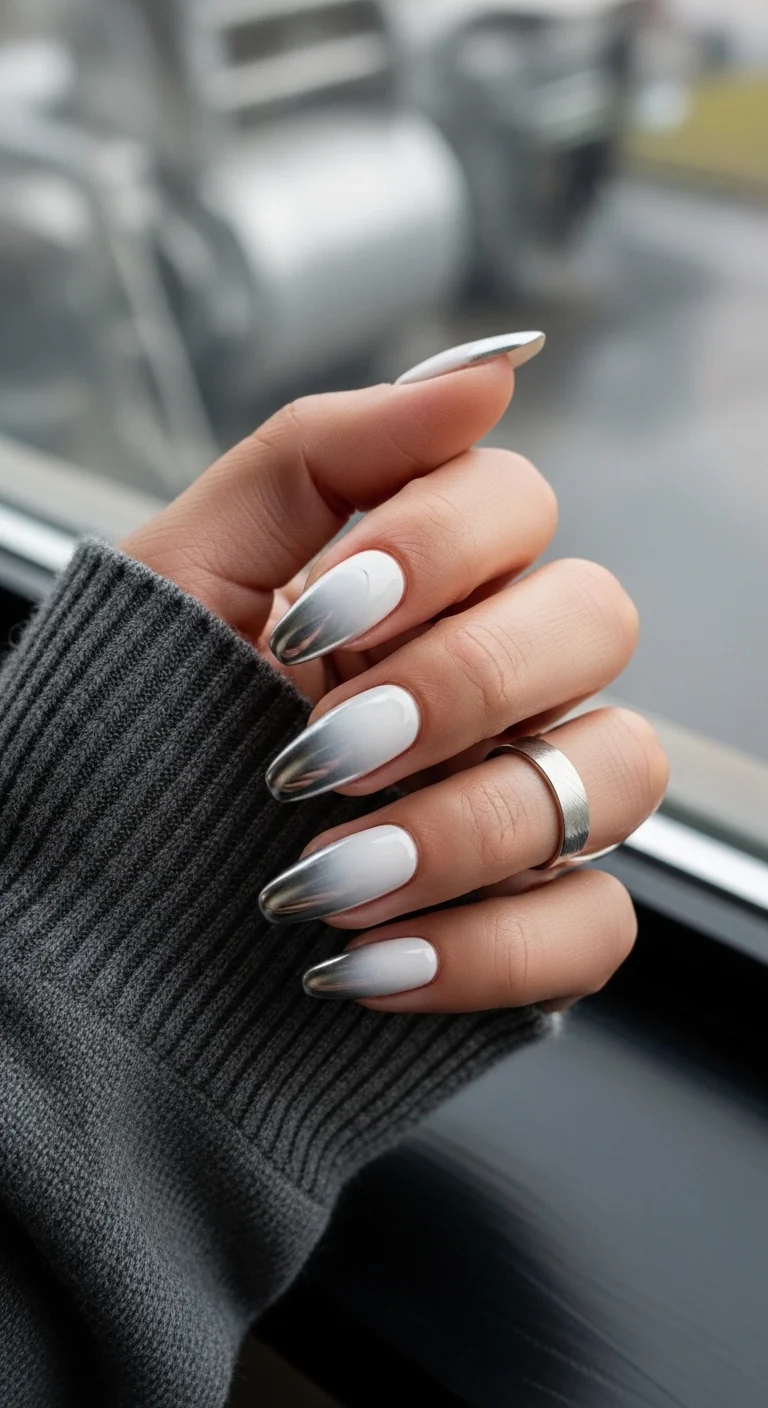
1.The Silver-Lined Porcelain Set

Cool-toned porcelain white with a single silver chrome accent — less is more.
Overview:
White polish reveals everything. Every ridge, every cuticle imperfection, every slightly uneven stroke — opaque white is the harshest critic in your nail collection. That's exactly why this design works: the porcelain base is applied with such deliberate smoothness that it reads as intentionally flawless rather than simply white. The cool blue undertone in the base pulls it away from "correction fluid" territory and into something closer to fine china.
The silver chrome line is the design's entire argument. One thin curved stripe near the cuticle on each nail, creating a crescent that catches light without shouting about it. There's no glitter, no texture, no secondary accent — just a single metallic line on a clean field. That restraint is what makes it editorial rather than decorative. Most nail art tries to add more. This one knows when to stop.
The square-coffin hybrid shape holds the minimalist concept together. A rounder shape would soften the geometry; a sharper coffin would make the silver line look lost. Medium-long is the right call — short enough that the single accent doesn't feel sparse, long enough that the white base has room to breathe. If your gown is black, navy, or any dark solid, this set disappears into formality and lets the silver do the talking.
Design Breakdown:
Surgical precision on a blank canvas. Every flaw in the base coat becomes visible, so the application has to be clean from the first stroke.
Base Color: A crisp porcelain white with cool blue undertones. Two coats minimum — you need full opacity with zero streaking. Essie "Blanc" or OPI "Alpine Snow" both deliver the right coverage without pulling warm.
Nail Shape: Square-coffin hybrid at medium-long length. The flat edges frame the silver crescent without competing with it.
Design Element: A razor-thin silver chrome line curved along the cuticle area, creating a "silver lining" crescent shape. Striping tape or a fine liner brush with chrome paint both work — tape holds longer.
Finish: High-gloss top coat over the entire nail. The mirror-like shine on the silver is the payoff; a matte or satin finish would kill the metallic reflectivity.
Get The Look at Home:
This design is 90% base coat quality and 10% chrome placement. Don't rush the foundation.
- Prep surface: Buff out every ridge on the nail. White polish magnifies texture more than any other color — a ridge-filling base coat is worth the extra step.
- White coats: Apply two thin, even coats of porcelain white. Let each coat dry fully. Thick coats bubble and streak.
- Silver crescent: Using a long, thin liner brush and silver chrome paint (or a striping tape cut to curve), trace a thin line along the cuticle and sidewall curve. Keep the line consistent across all ten nails.
- Trim and seal: If using tape, snip the ends about 0.5mm inside the nail border. Apply a thick, self-leveling top coat in one stroke over the entire nail.
30 Stunning Summer Hair Trends for 2026 ☀️🌊
2.Champagne Sparkle Frenchies
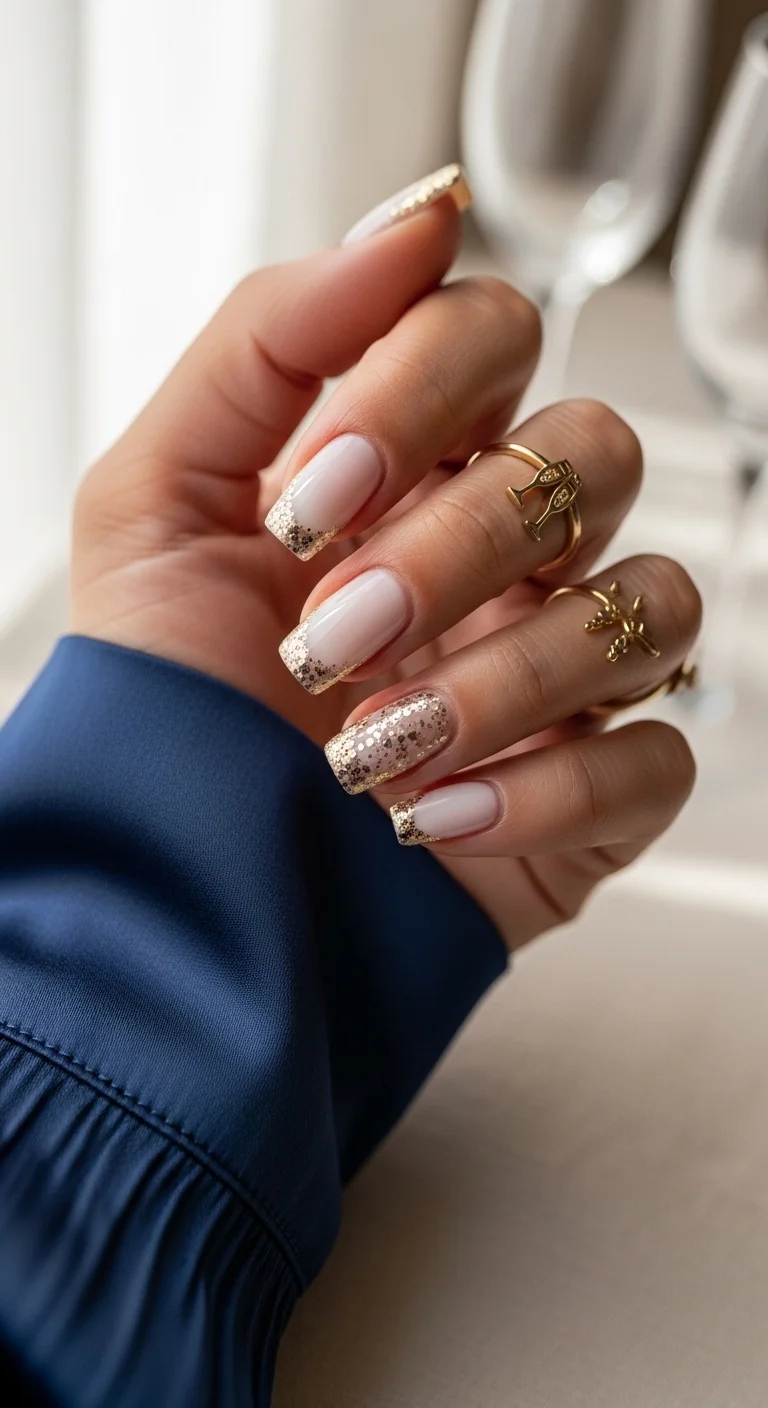
Champagne gold glitter gradient tips with a full accent nail — celebration without the clutter.
Overview:
A glitter French tip is a fundamentally different design from a glitter accent nail. The gradient approach — densest at the free edge, fading toward the nude base — creates a transition zone that looks intentional rather than like someone dumped glitter on the tip and called it a day. The champagne gold skews warm without going full yellow-gold, which keeps the set from reading "costume jewelry."
The mix of micro-glitter and larger hexagonal sequins is what gives these dimension. Flat, single-size glitter reflects light uniformly and looks flat. Varying the particle size creates depth — the micro-glitter provides a base shimmer while the hexagonal pieces catch light at different angles. The ring finger accent nail, fully covered in champagne gold, acts as a visual anchor that ties the gradient tips together across the hand.
The practical downside is texture. Chunky hexagonal glitter doesn't lay flat under top coat the way fine shimmer does. Even with two layers of top coat, you'll feel slight bumps if you run your thumb across the surface. It's manageable but worth knowing before you commit. The warm gold tones also tend to pull slightly yellowish on cool or olive skin tones — test a single nail first if your complexion runs cool.
Design Breakdown:
Texture meets gradient. The challenge is keeping the glitter transition smooth while layering different particle sizes.
Base Color: A sheer pink-nude with warm peachy undertones. The base should be translucent enough to show the natural nail moon — full opacity fights the gradient effect. Try OPI "Put It in Neutral" or Essie "Barefoot in Rosé."
Nail Shape: Square with slightly rounded corners at medium length. The flat surface area gives the glitter room to fade gradually rather than hitting a hard line.
Design Element: Champagne gold and holographic silver glitter applied as a gradient tip — densest at the free edge, diffusing toward the cuticle. Ring finger gets full-coverage glitter as an accent.
Finish: High-gloss with a thick top coat (two layers minimum) to smooth the dimensional glitter texture.
Get The Look at Home:
A makeup sponge is your best tool for the gradient. Brushing glitter polish directly creates uneven distribution.
- Nude base: Two coats of sheer pink-nude. Let dry completely — the sponge will pull up wet polish.
- Sponge gradient: Paint a stripe of champagne gold glitter polish along the edge of a makeup sponge. Press it onto the nail tip, rolling slightly to concentrate glitter at the free edge.
- Build density: Dab additional glitter onto just the tip for two to three passes. Each pass adds opacity without thickening the transition zone.
- Accent nail: On the ring finger, apply full-coverage glitter with the sponge from base to tip.
- Double top coat: First layer fills the gaps between glitter particles. Second layer creates a smooth, glass-like surface over the texture.
3.The Ultimate Academic Frenchie
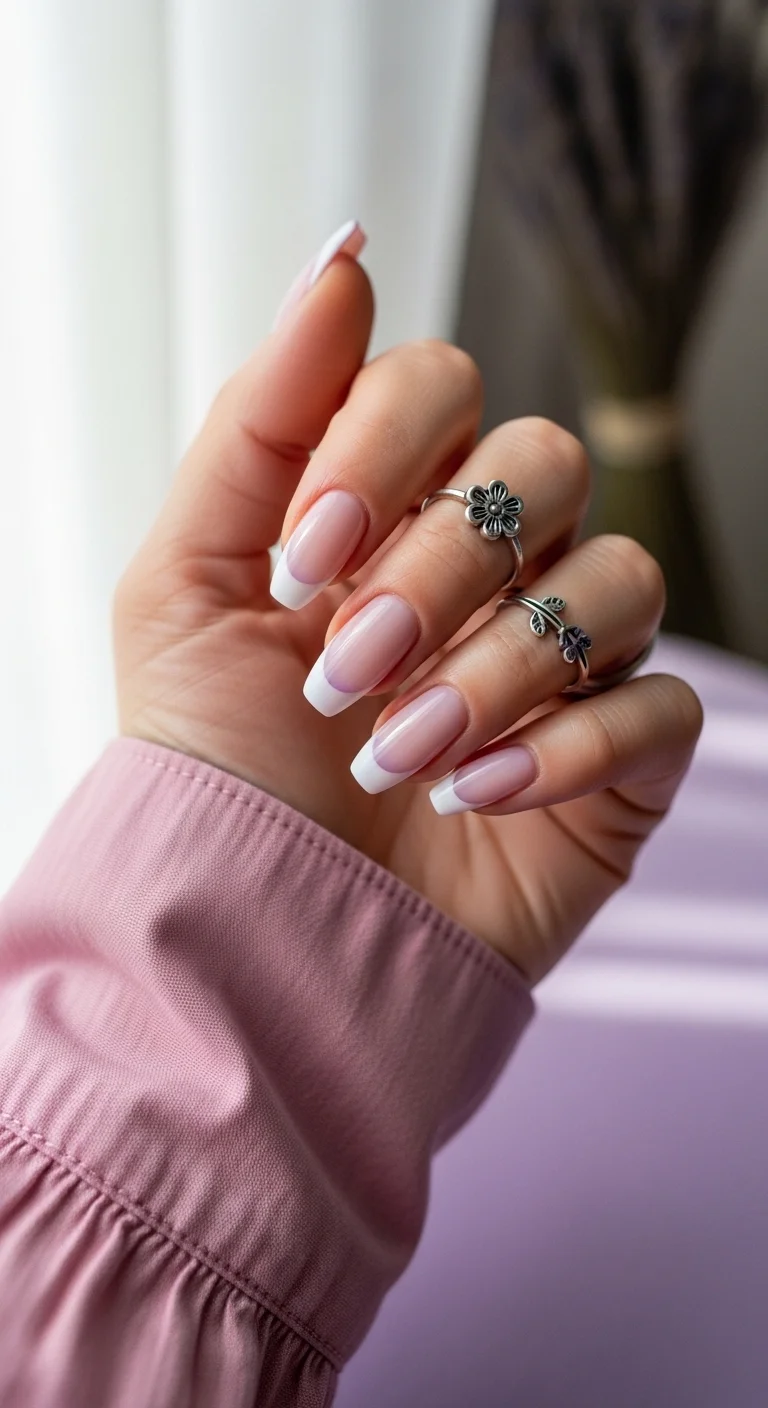
The French manicure that needs no explanation — updated in a modern coffin shape.
Overview:
The most predictable choice in any graduation nail listicle is also the most reliable. A classic French manicure on a coffin shape works because the coffin's tapered edges modernize what might otherwise read as a 2004 throwback. The deep smile line and uniform white tip width across all ten nails — no embellishments, no accent art, no color variation — is the point. This is a design that doesn't need to justify itself.
The base leans toward a cool rose with a faint lavender cast, which matters more than people realize. A warm pink base under white tips reads casual; a cool-toned base reads formal. For a ceremony, cool is the right call. The white tips need to be fully opaque in two coats — anything translucent under white creates a grayish, tired appearance that fights the crispness the design depends on.
The honest challenge: white tips stain. Coffee, tea, turmeric-based food, even certain hand soaps will yellow the white within a few days. The smile line growth-out becomes noticeable in one to two weeks, which means this design has a shorter wear window than most. If your graduation is on a Saturday, get them done Thursday at the latest.
Design Breakdown:
No tricks, no shortcuts — just a precise French on a modern shape. The coffin silhouette is what keeps this from feeling dated.
Base Color: Sheer milky pink with cool rose undertones. One coat should be enough for a healthy, translucent look. Try OPI "Bubble Bath" or Essie "Mademoiselle."
Nail Shape: Coffin/ballerina at medium-long length. The tapered tip updates the classic French and keeps the proportions balanced.
Design Element: Traditional deep smile line with uniform white tip width. No variation across nails — consistency is the design.
Finish: High-gloss gel-like shine. A plump top coat adds the "fresh from the salon" dimension that makes the white tips look intentional rather than painted on.
Get The Look at Home:
French tips are where wobbly lines are most visible. Take your time with the smile line — a cleanup brush is essential, not optional.
- Shape and prep: File into a uniform coffin shape. Push back cuticles and buff the nail surface smooth.
- Sheer base: One or two thin coats of milky pink. The base should look like your nail but healthier, not like a color.
- White tips: Use a French tip guide or a steady liner brush. Paint the tips in two thin coats of opaque white. Let each coat dry before the next.
- Sharpen the smile line: Dip a small angled brush in pure acetone and run it along the curve where white meets pink. This is the step that separates a home manicure from a professional one.
- Top coat: One thick, self-leveling coat. Cap the free edge to slow the staining.

28 Cute & Sporty Baseball Game Nail Ideas for 2026 ⚾
4.Sunset Blush Aura Glow
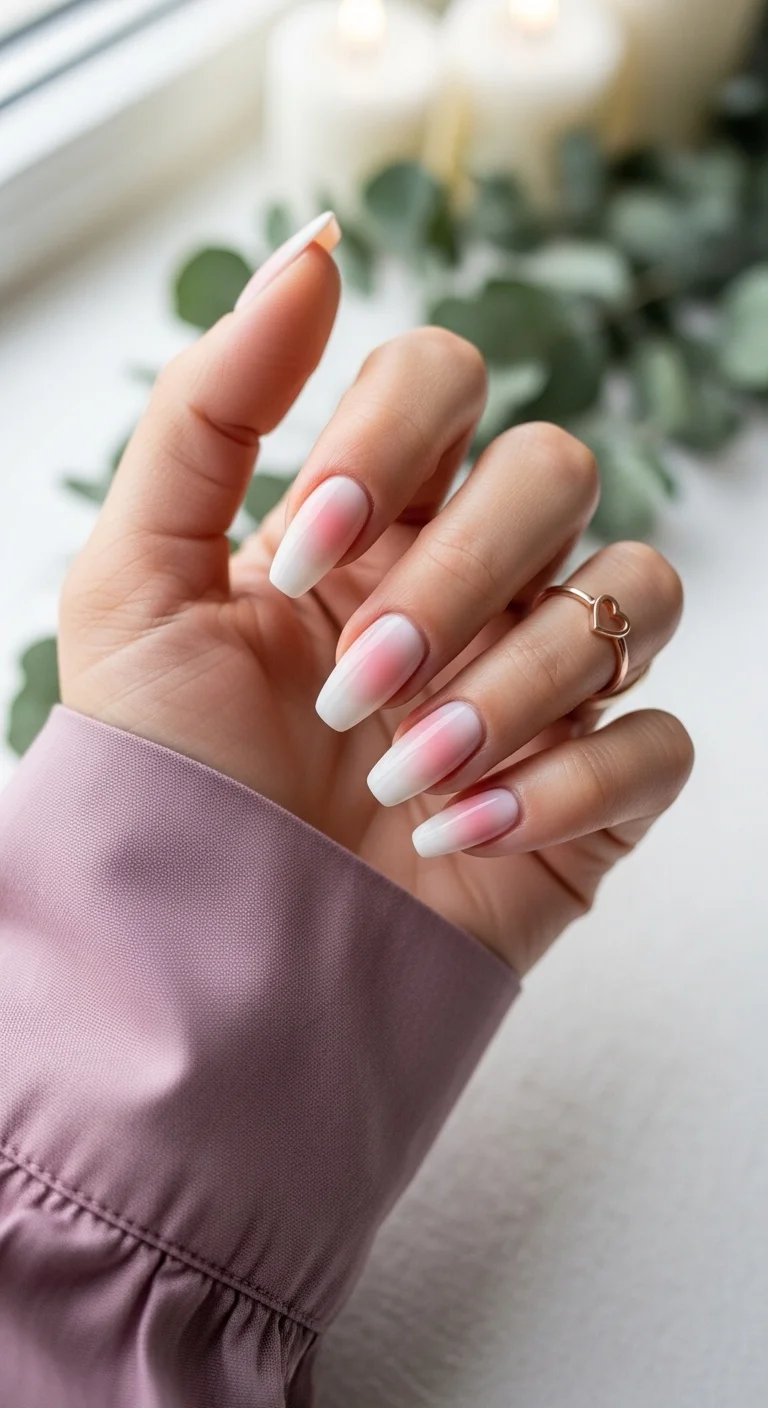
Aura technique blending warm blush pink into soft white — no glitter, no chrome, pure color.
Overview:
What makes aura nails different from standard ombre? The gradient radiates from a center point rather than transitioning top-to-bottom or side-to-side. In this version, the rosy pink sits at the nail's center and diffuses outward toward white edges, mimicking the effect of a natural flush — like blood rushing beneath skin. That biological quality is why aura nails photograph better than most gradient designs; the blend reads as organic rather than mechanical.
The warm coral undertone in the pink is doing more work than the design credits it for. A cool-toned pink against white would read as graphic and deliberate. The warm blush reads as soft and diffused, which is the entire aesthetic. The color itself doesn't shout — it glows.
This is a technique-dependent design. A skilled technician using an airbrush or careful sponge method produces a seamless blend; an uneven application creates visible banding that reads more like a stripe than an aura. On deeper skin tones, the white edges can wash out the contrast — consider swapping the white for a deeper cream or soft nude to maintain the gradient's visibility. Expect tip wear to show faster than solid-color designs because the lightest point of the gradient sits right at the free edge.
Design Breakdown:
Pure color technique with no embellishments. The gradient is the entire design, which means the blend has to be seamless.
Base Color: Milky white serving as the outer "frame." Two coats for soft opacity — you want the white to be visible but not stark.
Nail Shape: Coffin/ballerina at medium-long length. The flat surface provides the best canvas for showing the vertical color diffusion.
Design Element: Warm rosy pink concentrated at the center of each nail, blending seamlessly into white at the edges. The pink has coral undertones — avoid anything with blue or mauve, which kills the "flush" effect.
Finish: Satin-to-glossy. A slightly softened gloss enhances the dreamy, diffused quality. Mirror-shine top coat can make the gradient look too sharp.
Get The Look at Home:
The sponge technique works, but the key is building the blend in thin layers rather than pressing hard once.
- White frame: Apply two coats of milky white across the entire nail. Let it dry to a tacky (not wet) state.
- Sponge setup: On a makeup sponge, place a small dot of rosy pink in the center, surrounded by white. Dab the sponge on paper once to remove the initial excess.
- Center placement: Press the sponge onto the nail so the pink lands at the center. Use three to four light dabs rather than one firm press — the layering builds opacity gradually.
- Blend edges: While the polish is still slightly tacky, use a clean section of the sponge to dab the transition zone between pink and white. This softens any hard lines.
- Seal immediately: Apply top coat while the gradient is still slightly wet. The moisture helps the colors bleed into each other one final time.
5.Stardust Silver Sparkle
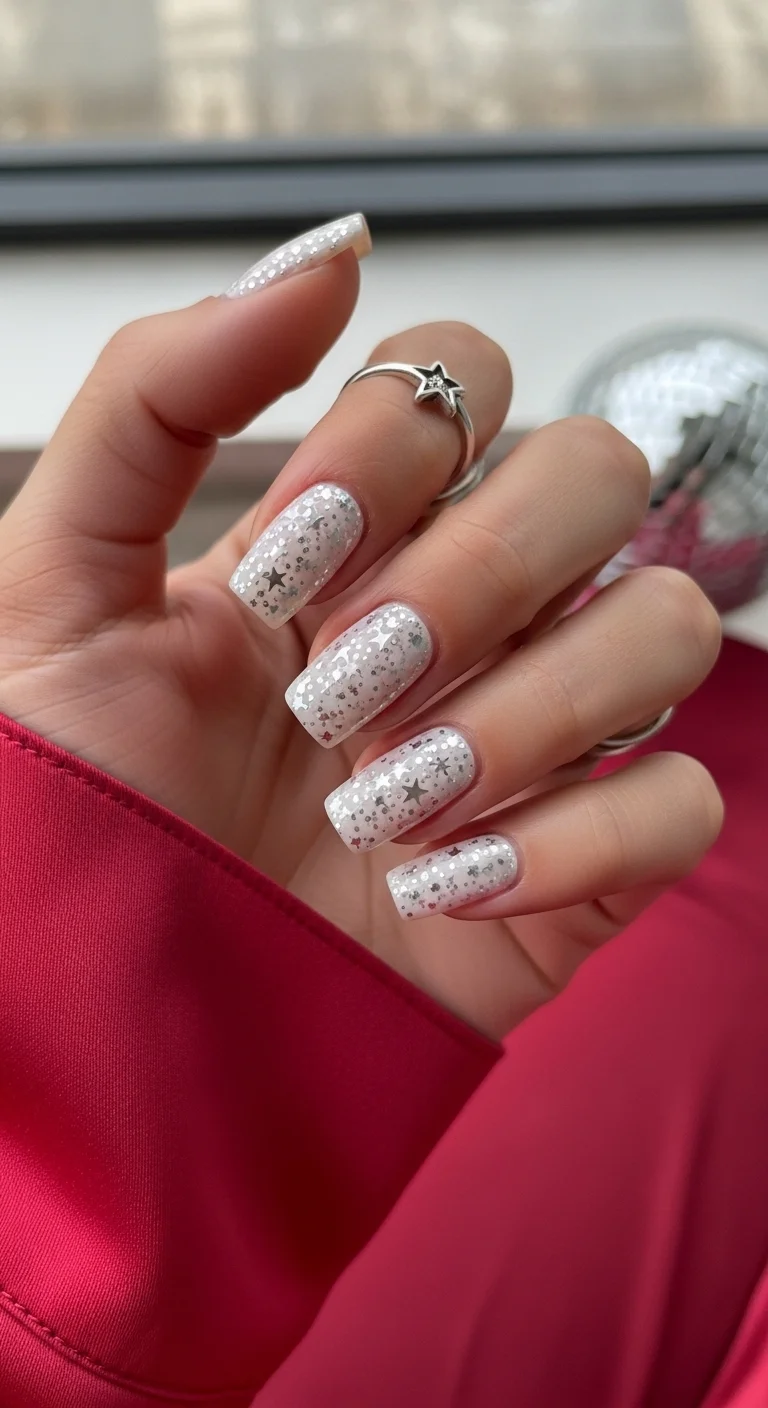
Star-shaped confetti on a silver glitter field — maximum celebration energy.
Overview:
This is the loudest design on the list, and it knows it. Full-coverage silver glitter with star-shaped confetti scattered across every nail isn't subtle, and it isn't trying to be. The white-milky base underneath the glitter creates depth — you're looking through layers of sparkle rather than at a flat glitter surface. The holographic silver catches pink and gold reflections depending on the light angle, which gives the set a shifting, alive quality that photographs well.
The star-shaped confetti pieces are what tie the design to the graduation theme without being literal about it. No caps, no diplomas, no "class of" text — just stars. It reads as celebratory and slightly whimsical, which is the right energy for a ceremony that's equal parts formal and personal. A dainty star necklace or silver stacking rings pair naturally with this without looking overdone.
The practical reality: star-shaped glitter snags on everything. Hair, knitwear, pillowcases, the inside of your graduation gown — the points on the confetti catch on fabric. A thick top coat helps but doesn't eliminate it. Removal is also a project; chunky glitter adheres more stubbornly than fine shimmer, so budget extra time and foil wraps at the end of the night. This is more "after-party" energy than "ceremony" energy for anyone who plans to be hands-on during the celebration.
Design Breakdown:
Maximum sparkle with a layered approach. The base provides depth, the glitter provides shimmer, and the stars provide the narrative.
Base Color: Semi-opaque milky white with cool silver undertones. The slight translucency lets light pass through the glitter layers. Try Zoya "Snow White" or a milky white jelly polish.
Nail Shape: Square with sharp corners at medium length. The angular shape contains the visual chaos of full-coverage glitter.
Design Element: Dense silver holographic micro-glitter across all nails with star-shaped confetti pieces scattered randomly. The stars should be sparse — three to five per nail maximum.
Finish: High-gloss with two layers of thick top coat to encapsulate the confetti points and smooth the glitter texture.
Get The Look at Home:
The layering order matters: base, glitter, stars, top coat. Skipping the sheer base layer makes the glitter sit flat against the nail instead of looking embedded.
- Milky base: One coat of semi-opaque white. Let it get tacky but not fully dry.
- Glitter layer: Dab silver holographic glitter polish over the tacky base, concentrating density at the center of the nail. Two to three passes builds the coverage.
- Star placement: Use a wax picker or damp toothpick to place star confetti pieces onto the wet glitter. Press them flat — raised stars catch more.
- Sheer overlay: Brush a very thin coat of the milky white over the glitter and stars. This "buries" them slightly and creates depth.
- Heavy top coat: Two thick coats of self-leveling top coat, letting each dry fully. Run your finger over the surface — if you feel any raised points, add another layer.

30+ Chic Pool Party Hairstyles for Summer 2026 🌊👙
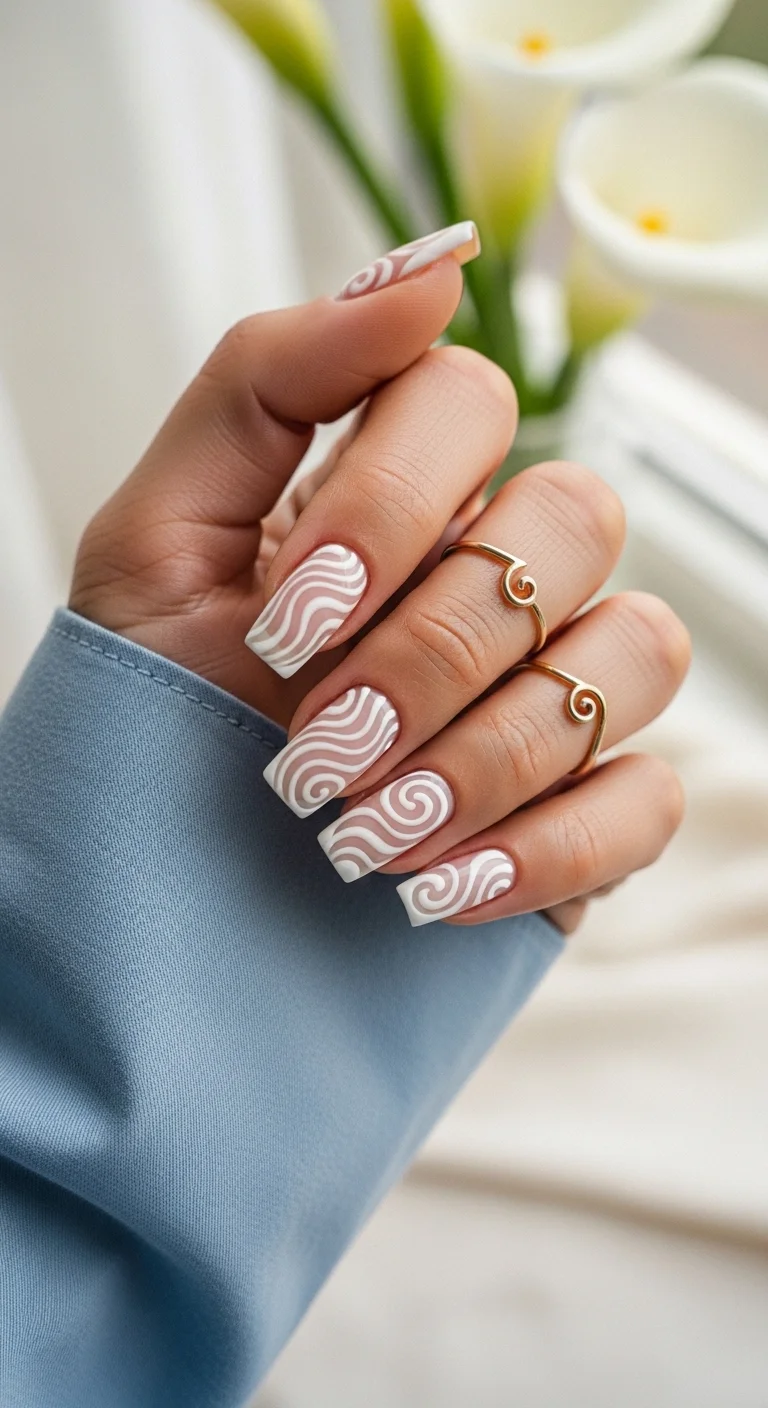
6.Milky Way Swirl French

Organic white swirls layered over a rosy pink base with a clean French edge.
Overview:
The wavy French takes the classic manicure's structure and introduces controlled chaos. Instead of a single crisp smile line, two to three organic curved lines in white flow across each nail, creating a pattern that sits between nail art and abstract illustration. The classic white French tip grounds the design — without it, the swirls would float aimlessly. With it, the swirls read as an artistic layer between the base color and the French edge.
Every nail will look slightly different, and that's the point. The organic curves aren't meant to be identical from nail to nail. Some will have wider swirls, some tighter. The variation gives the set a hand-done quality that stamped or sticker-based designs can't replicate. The rosy pink base — warm, slightly mauve in certain light — provides enough color to make the white swirls visible without creating a stark two-tone contrast.
Two things to know before committing: the swirls add thickness to the nail surface, which means the top coat needs to be applied generously to level everything out. And the design takes longer to execute than any other French variation on this list because each swirl is hand-painted. Budget an extra twenty minutes at the salon. The pink base can also clash with warm-toned dresses in the red-orange family — if your graduation outfit runs warm, consider swapping the base for a cooler mauve.
Design Breakdown:
A layered French with organic line art. The design lives in the tension between the structured French tip and the freeform swirls.
Base Color: Soft rosy pink with warm mauve undertones. The base should look like a healthy, flushed nail bed — not a flat pastel. Try Essie "Mademoiselle" or Zoya "Bela."
Nail Shape: Coffin/ballerina at medium-long length. The tapered tip provides enough space for the swirl lines to flow without hitting a hard edge.
Design Element: Two to three white wavy lines per nail creating an organic swirl pattern over the pink base. A classic white French tip sits at the free edge as the design's anchor.
Finish: High-gloss. The shine unifies the swirl layers and the French tip into one cohesive surface rather than stacked layers.
Get The Look at Home:
The swirls don't need to be perfect. Slightly irregular lines look more natural and more expensive than mathematically precise curves.
- Pink base: Two coats of rosy pink. Let dry completely before adding any white detail.
- First swirl: Using a thin liner brush and white polish, draw a slow, curving S-shaped line across the nail — roughly one-third from the cuticle.
- Second swirl: Add a second white curve slightly below or above the first. Let the two lines run parallel for a stretch, then diverge.
- French tip: Paint a clean white French tip at the free edge. The smile line should sit below the lowest swirl.
- Level and seal: Apply a thick, plump top coat to smooth the raised swirl lines. Two layers if the texture still feels uneven.
7.Electric Blue Horizon Tips
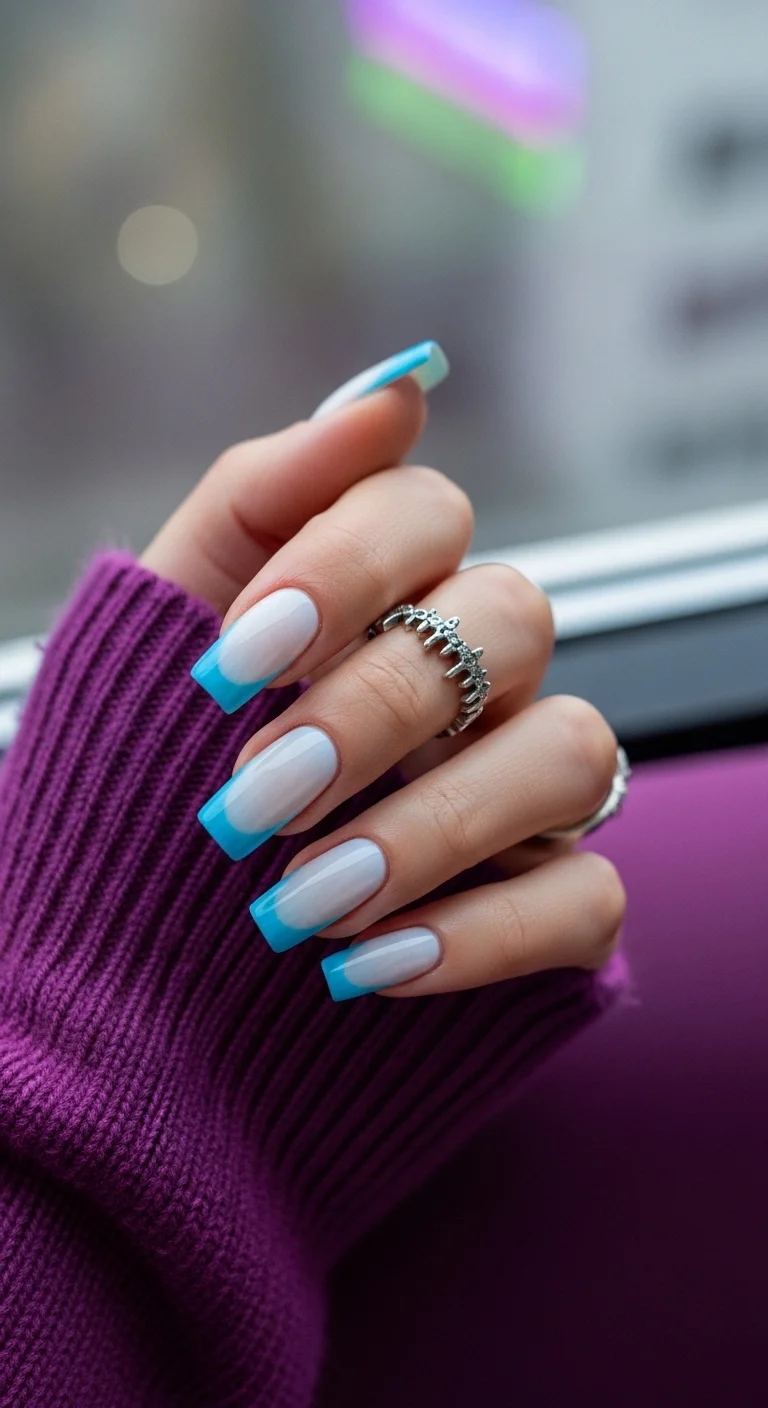
Bold blue tips on a milky base — a modern French that refuses to be quiet.
Overview:
A colored French tip only works when the base color creates enough contrast to make the tip register as a deliberate choice. The milky semi-sheer white here — with its faint blue-gray undertone — does exactly that. It's not opaque enough to compete with the blue, not sheer enough to disappear. The result is a French manicure that reads as fresh and graphic rather than traditional.
The sky/cyan blue tips are pure color blocking with no chrome, no glitter, no gradient. That simplicity is the design's strength. A sharp clean smile line against a soft base creates a visual snap that catches the eye immediately. If your school colors include blue, this is the most sophisticated way to incorporate them without resorting to decals or themed nail art.
Two practical concerns: bright blue pigments chip faster than neutrals because the color difference between the polish and the nail underneath is so visible. A chip at the tip shows white nail against blue polish within a day. The coffin corners are also structurally weaker than rounded or almond shapes — the pointed edges take the brunt of daily impact. If you're rough on your hands, consider a slightly more tapered shape to reduce breakage risk.
Design Breakdown:
High contrast, zero embellishment. The design's success depends entirely on the clean line between the milky base and the saturated blue.
Base Color: Milky semi-sheer white with a cool blue-gray undertone. One to two coats for a soft, diffused look. The translucency is intentional — fully opaque white would fight the blue.
Nail Shape: Medium-length coffin/ballerina. The tapered tip keeps the bold blue from overwhelming the hand.
Design Element: Bold sky-blue French tips with a sharp, clean smile line. No gradient, no fade — straight color blocking. The blue should be fully opaque in one or two coats.
Finish: High-gloss. The shine saturates the blue and makes the milky base look intentional rather than unfinished.
Get The Look at Home:
One coat of highly pigmented blue is ideal for the tips. Going back for a second pass is where wobbly lines happen.
- Milky base: One or two coats of semi-sheer white. Let each coat dry fully.
- Map the tips: Hold a French tip guide or a piece of tape across each nail at the desired smile line height. Press the edges firmly to prevent bleeding.
- Blue application: Paint the exposed tip with a single, confident stroke of opaque sky blue. Don't go back over it — the first pass is the cleanest.
- Peel and clean: Remove the guide while the blue is still slightly wet for the sharpest line. Use an angled brush with acetone to fix any micro-bleeds.
- Protect the tips: Apply top coat with a deliberate cap over the free edge. Blue chips show immediately, so the extra seal matters.

30 Stunning Beach Nail Ideas for the Best Vacation in 2026 🌊
8.Molten Silver Lava Waves
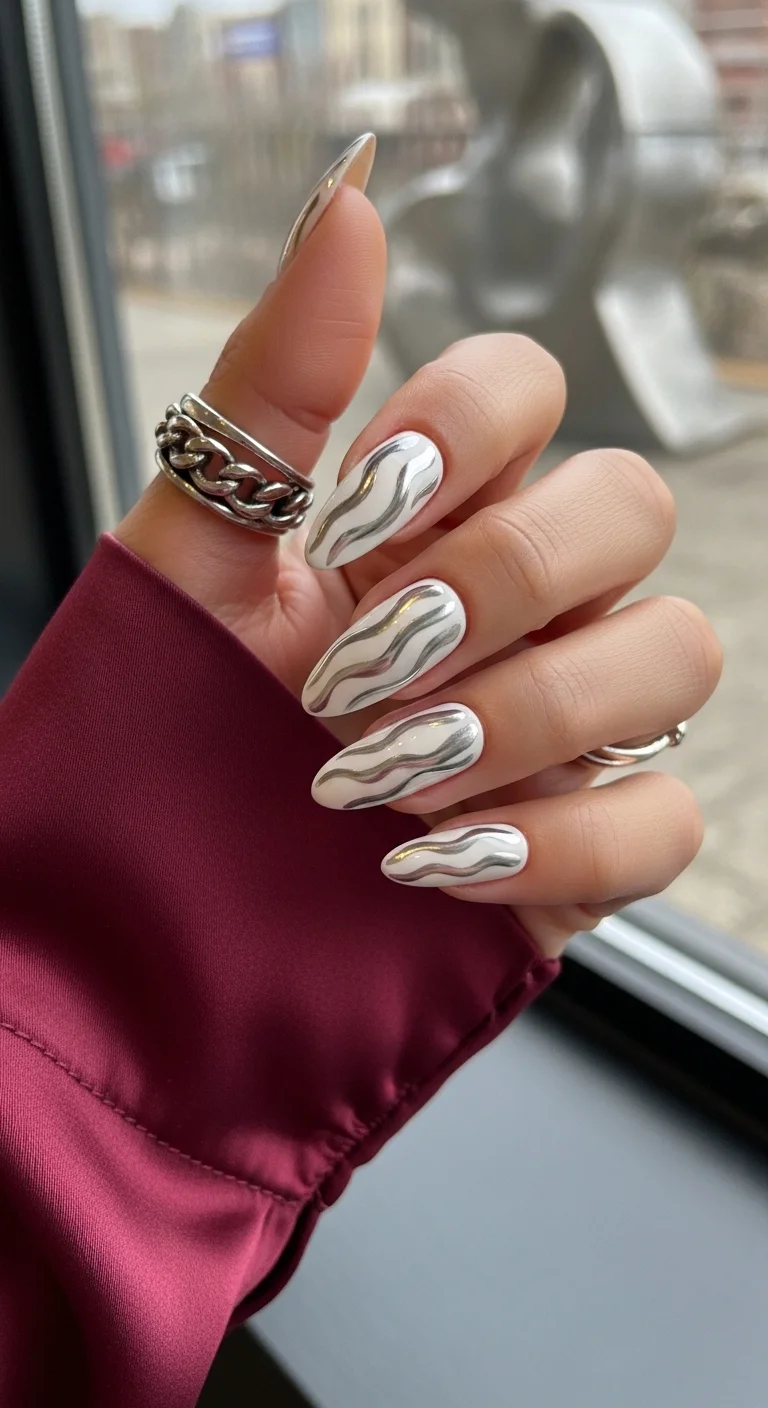
Mirror-like silver chrome waves on a creamy white base — each nail one-of-a-kind.
Overview:
The chrome swirl on this design isn't painted in the traditional sense — it's applied as powder over cured gel, then sealed, creating a surface that reflects light like actual liquid metal. The mirror finish shifts between pure silver and a cooler gunmetal depending on the angle, which gives the nails a quality that flat metallic polish can't replicate. The effect is closer to mercury pooling on a surface than to silver paint.
The organic, free-form shape of each wave is what separates this from geometric chrome designs. No two nails are symmetrical. One might have a thick stream running diagonally; another might have a thin tendril curling from cuticle to tip. That asymmetry reads as hand-crafted and artistic rather than manufactured. The creamy warm-white base — not stark, not cool — provides enough warmth to keep the chrome from looking clinical.
This is a salon-only design for most people. Chrome powder requires a no-wipe gel top coat as a base layer, precise curing times, and a silicone applicator for even distribution. Attempting it at home with regular polish produces a smudgy silver streak, not a mirror finish. The raised texture of the chrome swirls can also snag on fine fabrics, and the chrome tends to peel at the edges after a week of wear. Budget the design for an event with a defined end date rather than everyday use.
Design Breakdown:
A two-texture design: smooth glossy base with raised, mirror-finish chrome waves. The contrast between the two surfaces is the entire point.
Base Color: Creamy warm-white with a slight ivory undertone. Two coats for full opacity. Avoid cool-toned whites — they make the chrome look disconnected.
Nail Shape: Medium-long almond with an elegant taper. The curved surface amplifies the chrome's reflectivity because light bends across the shape.
Design Element: Free-form silver chrome waves applied over cured gel. Each nail gets a unique, asymmetrical pattern — no two should match. The chrome is highly reflective and mirror-like.
Finish: Glossy top coat over the chrome sections. The base stays glossy as well — the design relies on both surfaces sharing the same sheen level with different reflective qualities.
Get The Look at Home:
This requires gel polish, chrome powder, and a UV/LED lamp. Regular polish won't hold the chrome in place.
- White gel base: Apply two coats of warm-white gel polish, curing each coat under the lamp. The base must be fully cured before chrome application.
- No-wipe top coat: Apply a no-wipe gel top coat over the white and cure. This is the surface the chrome adheres to.
- Chrome waves: Using a thin liner brush, paint free-form wavy lines with clear gel over the cured top coat. Don't cure yet.
- Rub the chrome: While the gel lines are uncured, use a silicone applicator to rub silver chrome powder into them. The powder sticks only to the wet gel, creating mirror-finish waves.
- Cure and seal: Cure the chrome lines under the lamp, then brush off excess powder with a fluffy brush. Seal everything with a final coat of gel top coat.
9.Chrome Ombre Fade
Chrome powder gradient — dense silver at the tips diffusing into pearl-white at the base.
Overview:
A chrome ombre is a gradient that changes character depending on movement. Static, it reads as a silver-to-white fade. In motion, the chrome tips shift between pure silver and gunmetal as the light angle changes, while the milky base stays consistently pale. That dynamic quality — the nail looks different from every direction — is what makes this design feel more expensive than a standard glitter gradient or metallic tip.
The technique is the differentiator. Chrome powder applied densely at the tips and gradually diffused toward the cuticle creates a seamless transition that looks airbrushed. Poorly blended chrome reads as patchy — visible streaks where the powder was applied too heavily in one spot and too thinly in another. This is a design where the quality of execution is immediately obvious. A good blend looks like the nail is slowly turning into liquid silver. A bad blend looks like someone smeared glitter inconsistently.
Long almond is the right shape because the elongated surface gives the gradient room to develop gradually. On short nails, the transition from full chrome to bare base happens over too small a distance and looks rushed. The maintenance commitment is real: long almond requires regular shaping, and the chrome tips show wear first because they're the highest impact zone. Expect to touch up the tips or get a full redo within ten days.
Design Breakdown:
A technique-driven gradient that blends chrome powder into a sheer base. The transition zone is where this design succeeds or fails.
Base Color: Cool-toned milky white, semi-sheer. Two coats for soft opacity — the base needs to be visible between the chrome particles at the blend zone.
Nail Shape: Long almond, elongated and pointed. The extended surface area allows the gradient to develop over a longer transition zone.
Design Element: Silver chrome powder applied densely at the tips, gradually diffusing toward the cuticle. The chrome shifts between pure silver and gunmetal depending on light angle.
Finish: High-gloss with mirror chrome reflectivity. A no-wipe gel top coat underneath the chrome powder is required for proper adhesion.
Get The Look at Home:
The sponge application determines the blend quality. Work in thin layers and build density gradually rather than pressing hard once.
- Milky base: Apply two coats of cool-toned milky white gel polish and cure. The base must be fully set before chrome work begins.
- No-wipe top coat: Apply a no-wipe gel top coat and cure. This gives the chrome powder a surface to grip.
- Sponge chrome: Load a small makeup sponge with silver chrome powder. Press it onto the nail tip and dab upward toward the cuticle, stopping about halfway. Each dab deposits less powder, creating the natural fade.
- Build the transition: Reload the sponge with less powder and dab the middle zone of the nail. This fills in the blend area without creating a hard line.
- Buff and seal: Use a silicone tool to buff the chrome smooth, then apply a final gel top coat over everything. The buffing step removes any loose particles that would dull the mirror finish.

26 Stunning Summer Braided Hairstyles for Women 2026 ☀️💇♀️
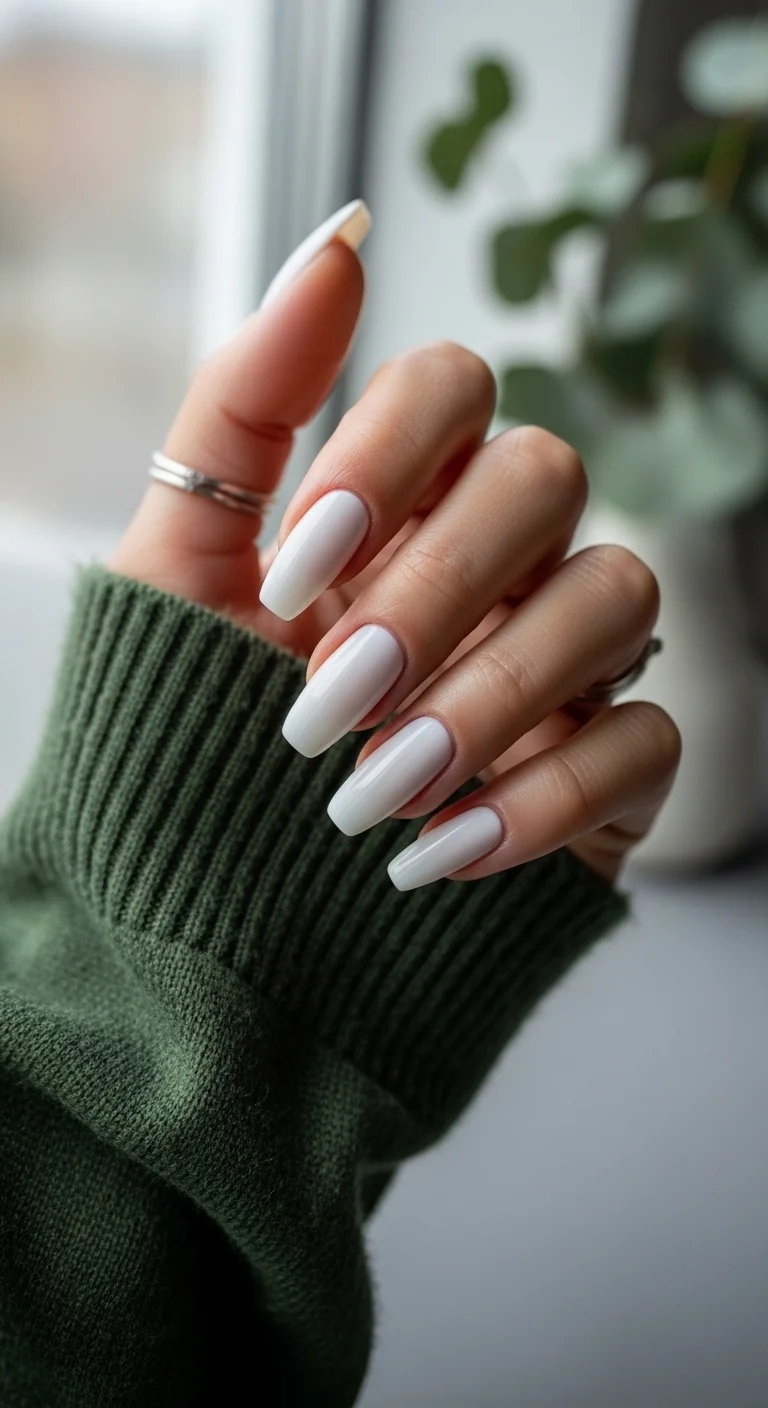
10.The Clean Girl Milky White
Minimalist, effortless, and perfectly polished milky white.
Overview:
Sometimes the hardest design to pull off is the one with nothing on it. A solid milky white sounds like the safest choice in this list, but it's deceptively difficult to execute well. The warmth in this shade is what separates it from stark, chalky white — there's a faint pink undertone that gives it depth, almost like looking through frosted glass. OPI's "Funny Bunny" or Essie's "Marshmallow" hit this tone better than a pure optic white, which reads clinical under most lighting.
The long coffin shape elevates what could otherwise be a forgettable manicure into something that looks intentional. There's a reason the "clean girl" aesthetic keeps circling back to milky white: it pairs with everything from denim to a graduation gown without competing for attention. The trade-off is maintenance. Every ridge in your natural nail, every cuticle that isn't perfectly pushed back, shows through this color. And the coffin shape? High-maintenance by nature. You're looking at regular touch-ups every ten to twelve days, especially at those squared tips.
Worth knowing before you commit: dark polishes worn previously will stain your nails underneath milky white. A good ridge-filling base coat is non-negotiable here. Without it, you'll see every imperfection magnified under that glossy surface.
Design Breakdown:
A single-tone look that lives or dies on application precision and nail condition.
Base Color: A warm, semi-translucent milky white. Two to three coats for the right opacity — too sheer and it looks like clear coat, too opaque and you lose the "milky" quality.
Nail Shape: Long coffin or ballerina. The flat squared tip is what gives this design its modern edge. On short nails, milky white reads as basic rather than intentional.
Design Element: None. Pure solid color. The restraint IS the design.
Finish: Ultra-glossy, wet-look top coat. The depth of the milky translucency depends on the shine.
Get The Look at Home:
The secret is thin, even coats and patience between layers. Thick coats trap bubbles that are visible through the translucent finish.
- Prep thoroughly: Buff the nail surface smooth. Milky white reveals every ridge and bump that darker colors hide.
- Ridge-filling base coat: Apply a smoothing base coat and let it dry completely. This step is load-bearing for the whole look.
- First coat: One thin layer of milky white. It will look streaky and uneven — that's normal at this stage.
- Second coat: Apply in the opposite direction of the first coat (if you brushed left-to-right first, go right-to-left now). This evens out streaks.
- Third coat if needed: Check under direct light. If you can still see your nail line clearly, add a third thin coat.
- Top coat: One thick, self-leveling layer of high-gloss top coat. Cap the free edge to prevent tip wear, which shows immediately on white.
11.Lavender Butterfly Dream
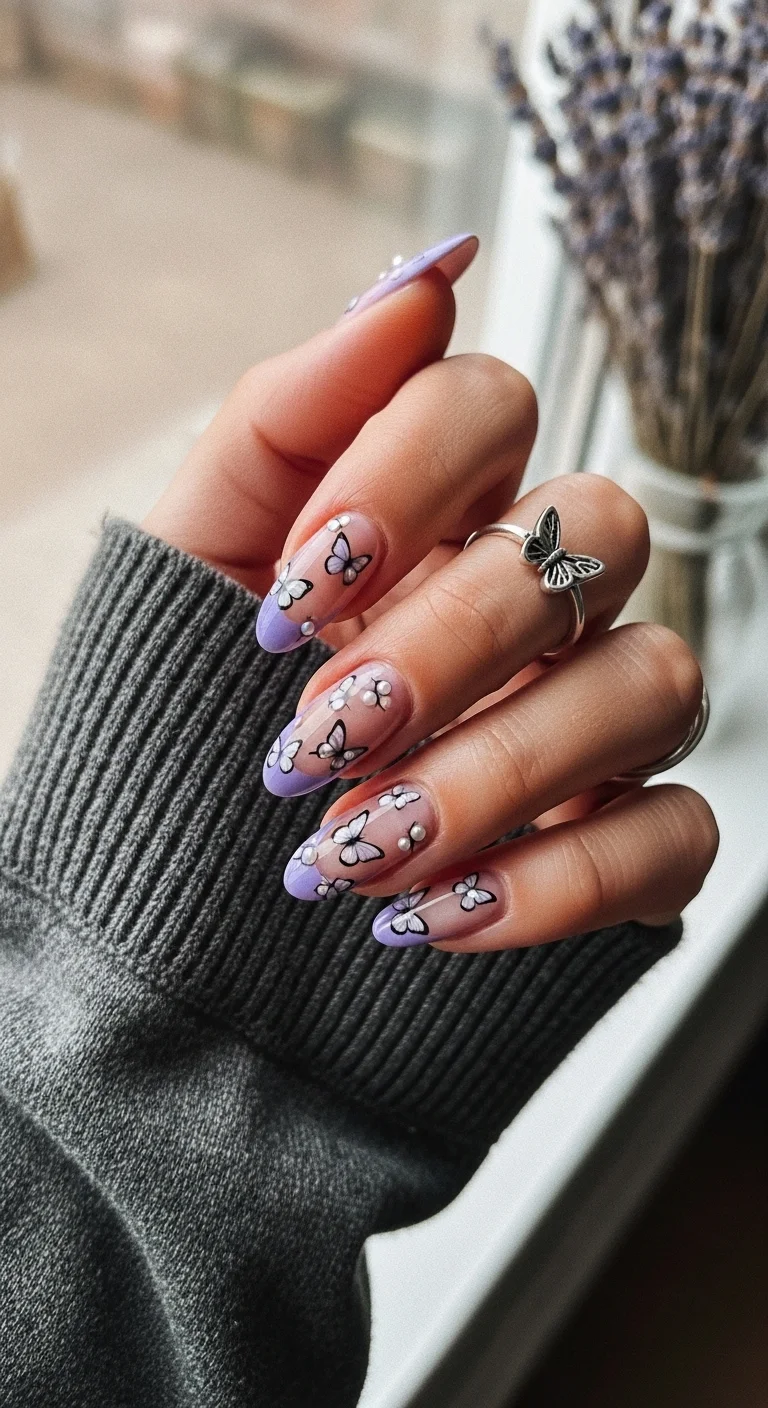
Whimsical butterfly art for a playful and feminine grad look.
Overview:
This is the most labor-intensive design on this list, and that's not a casual warning. The hand-painted butterfly silhouettes, the lavender French tips, the pearl placements — you're looking at two and a half to three hours minimum, even with experience. The payoff is real: the combination of techniques creates a layered, dimensional look that photographs differently from every angle.
The butterfly art itself walks a line between delicate and cluttered. Black outlines with white-filled wings keep the silhouettes readable against the sheer nude-pink base. On nails with more surface area (long almond is ideal), the wings have room to breathe. On shorter nails, the same design gets compressed and loses its airy quality. The lavender French tips on some nails anchor the color story without overwhelming the butterfly detail on the others.
Practical concern: those tiny pearl and rhinestone accents catch on everything. Hair, knit sweaters, pillowcases. They typically last one to two weeks before one pops off, and reattaching them mid-wear cycle is awkward. If you're doing this for graduation day, schedule the appointment two to three days before the ceremony so you're not dealing with a loose pearl during the photo session.
Design Breakdown:
A multi-technique design combining French tips, hand-painted art, and 3D embellishments.
Base Color: Sheer nude-pink that lets the natural nail bed show through. The translucency is what makes the butterfly wings look like they're floating rather than painted on.
Nail Shape: Long almond. The tapered point echoes the wing shapes and gives enough surface area for the butterfly detail.
Design Element: Hand-painted butterfly silhouettes in black outlines with white-filled wings. Lavender French tips on select nails. Small pearl or rhinestone accents near cuticles.
Finish: High-gloss over the painted areas; the pearls create their own dimension against the glossy surface.
Get The Look at Home:
Set aside a full afternoon. The butterfly art alone takes thirty to forty minutes per hand.
- Nude base: Two coats of a sheer pink-nude. Let each coat dry fully — the lavender tips need a stable surface.
- Lavender tips: On alternating nails, paint a soft cool-toned lavender French tip. A thin liner brush gives you the precision this needs.
- Butterfly outlines: Using a fine detail brush and black polish, draw the butterfly wing outlines on the remaining nails. Start with the center body line, then sweep outward for each wing.
- Fill the wings: White polish inside the black outlines. One coat is usually enough for opacity over the sheer base.
- Pearl placement: A tiny dot of nail glue or builder gel at each cuticle area. Press the pearl into it with tweezers. Three to five pearls total, not more — restraint is key.
- Seal everything: Top coat over the painted areas, around the pearls. Don't paint over the pearls directly — it dulls their luster.

35 Fun Birthday Nail Designs for 2026 🎂
12.Velvet Cherry Cola Cat-Eye
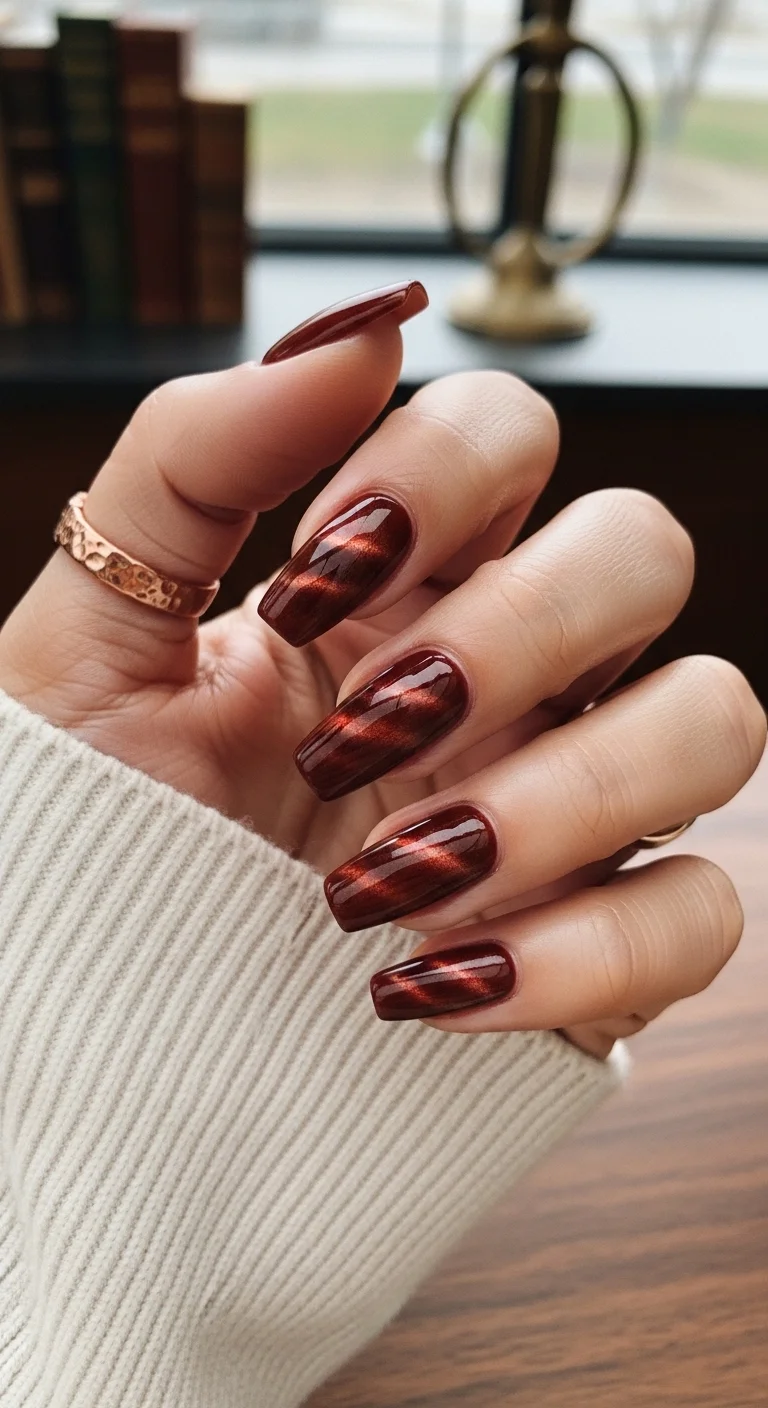
Moody, magnetic, and incredibly chic cherry cola nails.
Overview:
What happens when you combine a deep burgundy-cherry base with magnetic particles? You get a color that shifts from near-black cherry to warm copper-rust depending on how the light hits it. The cat-eye technique creates a diagonal velvet streak across each nail that looks like liquid gemstone — and it's one of the few nail effects that genuinely looks better in person than in photos.
The depth here is extraordinary. Standard burgundy polish sits flat on the nail. This magnetic version has visible layers: a dark cherry-black base, a lighter copper-rust mid-tone pulled by the magnet, and a high-gloss surface that reflects light like wet lacquer. The effect changes as you move your hands, which makes it oddly captivating to watch. It's the kind of manicure that makes people ask what color you're wearing, then ask again because they can't quite figure it out.
Two things to know before committing. First, this requires specialized tools — a magnetic polish plus the accompanying magnet wand. You can't replicate the effect with regular polish and a kitchen magnet. Second, dark burgundy polishes are among the hardest to remove. Budget ten to fifteen minutes of soaking in acetone rather than scraping, which damages the nail plate. The color also tends to stain, so a base coat is mandatory.
Design Breakdown:
A magnetic gel technique that creates a multi-dimensional, shifting light effect through metallic particles.
Base Color: Deep burgundy-cherry with brown cola undertones. The magnetic particles create the lighter copper-rust areas, so the base polish itself should be dark.
Nail Shape: Medium-long coffin or ballerina. The flat surface gives the cat-eye streak room to display its full range of color shift.
Design Element: Cat-eye magnetic effect — a diagonal velvet streak pulled by a magnet through wet magnetic polish. The streak shifts between copper-rust and dark cherry depending on angle.
Finish: High-gloss, ultra-shiny top coat. The gloss is what makes the depth visible; matte would flatten the entire effect.
Get The Look at Home:
You need magnetic polish and the corresponding magnet for this. No substitutes work.
- Base coat: Apply a strong base coat to prevent staining. Dark reds are notorious for it.
- Dark base (optional): One coat of a solid dark burgundy or black. This deepens the magnetic effect.
- Magnetic polish: Apply one thick coat of the cherry cola magnetic polish. Work one nail at a time — the polish needs to stay wet for the magnet.
- The magnet: Hold the magnet 3-5mm above the wet nail for 10-15 seconds. You'll see the metallic particles shift into the diagonal streak. Don't move the magnet during this time.
- Repeat per nail: Do each nail individually. If the polish dries before the magnet is applied, the effect won't form.
- Top coat: After all nails are cured/dried, apply a thick glossy top coat to seal and enhance the dimensional shift.
13.Cloud Marble & Gold Foil
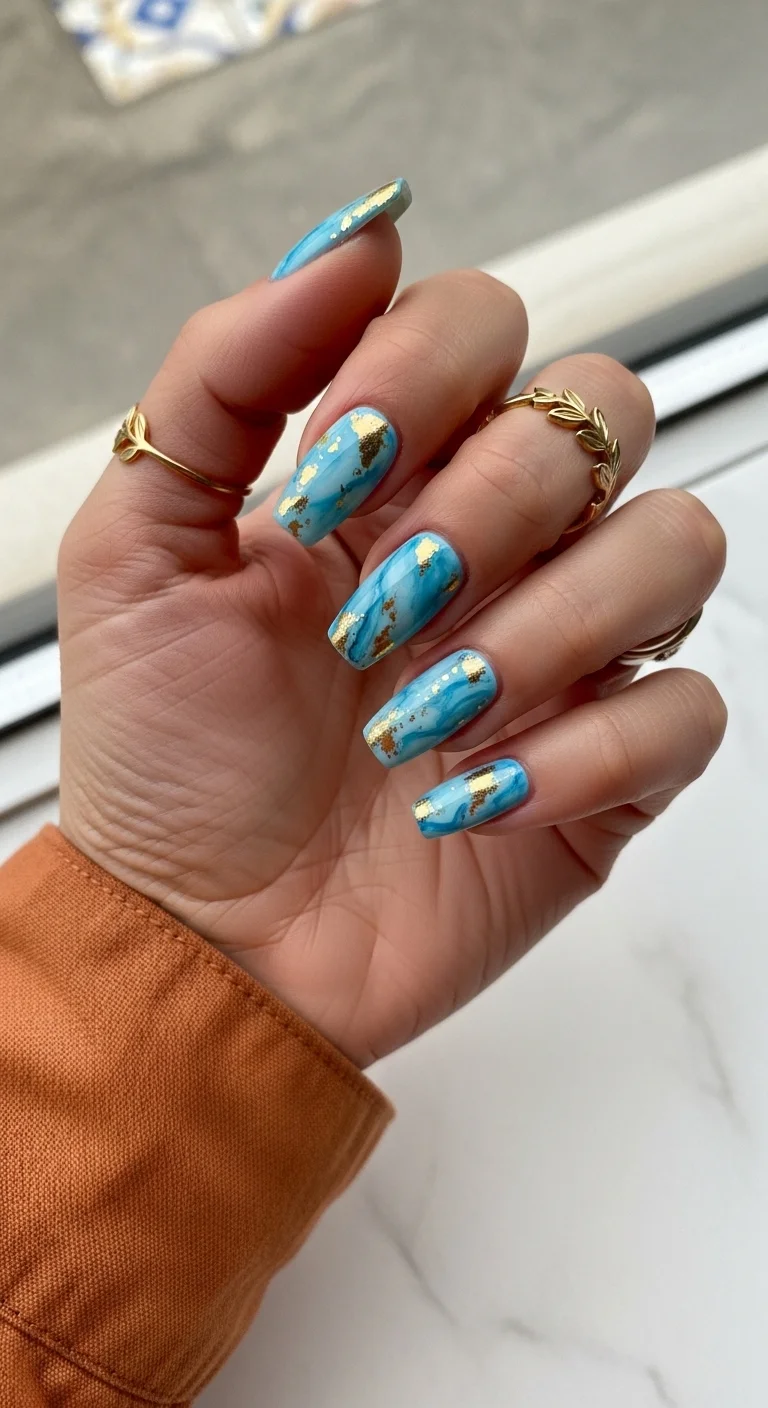
Dreamy sky-blue marble with a touch of graduation gold.
Overview:
Blue marble on nails is harder to control than black-and-white marble, and that's what makes it interesting. The sky-blue base mixed with milky white veins creates a pattern that looks like polished turquoise or a cloud formation — organic, fluid, and impossible to replicate exactly from nail to nail. Every nail becomes a unique piece.
The gold foil is the element that elevates this from "beach nails" to "occasion nails." Without it, blue-and-white marble reads casual. With the foil, it reads as a deliberate luxury choice. The warm yellow-gold against the cool blue creates a color temperature contrast that catches the eye without clashing. Place the foil irregularly — some nails densely covered, others with just one or two fragments — for the most natural look.
The honest challenge: blue marbling is notoriously difficult to make uniform across all ten nails. The wet-on-wet technique that creates those soft, blended veins is also inherently unpredictable. Some nails will turn out dramatically, others more subtly. If you're the type who needs every nail to match, this design will test your patience. Embrace the variation — it's what makes it look like real stone rather than a stamped pattern.
Design Breakdown:
Wet-on-wet marble technique with metallic foil accents layered on top.
Base Color: Bright sky blue mixed with warm milky white for the marble veins. The blue should be vivid but not neon — think cerulean, not electric.
Nail Shape: Almond, medium-long. The curved shape enhances the flowing, organic quality of the marble veins.
Design Element: Blue-and-white marble swirl pattern created wet-on-wet, with irregular gold leaf foil pieces pressed into the surface after the marble dries.
Finish: High-gloss top coat. The shine mimics polished stone and seals the foil edges.
Get The Look at Home:
This is a wet-on-wet technique — speed matters more than precision.
- Blue base: Apply one coat of sky blue and let it dry.
- Wet layer: Apply a second thin coat of blue. Do NOT let it dry. Work into this wet surface.
- White veins: Drop small amounts of milky white polish onto the wet blue. Use a toothpick to drag thin, irregular lines through the white — these become the marble veins.
- Swirl lightly: Two to three gentle drags per nail. Over-blending turns the pattern into muddy light blue instead of distinct veins.
- Dry completely: Let the marble set for at least ten minutes. Gold foil applied to wet marble will sink and lose its metallic edge.
- Foil placement: Press small, irregular pieces of gold leaf onto the dry surface using tweezers. Seal with a thick top coat to prevent foil edges from lifting.
32 Stunning Summer Wedding Hairstyles for Brides ☀️💍
14.Minimalist Carrara Marble
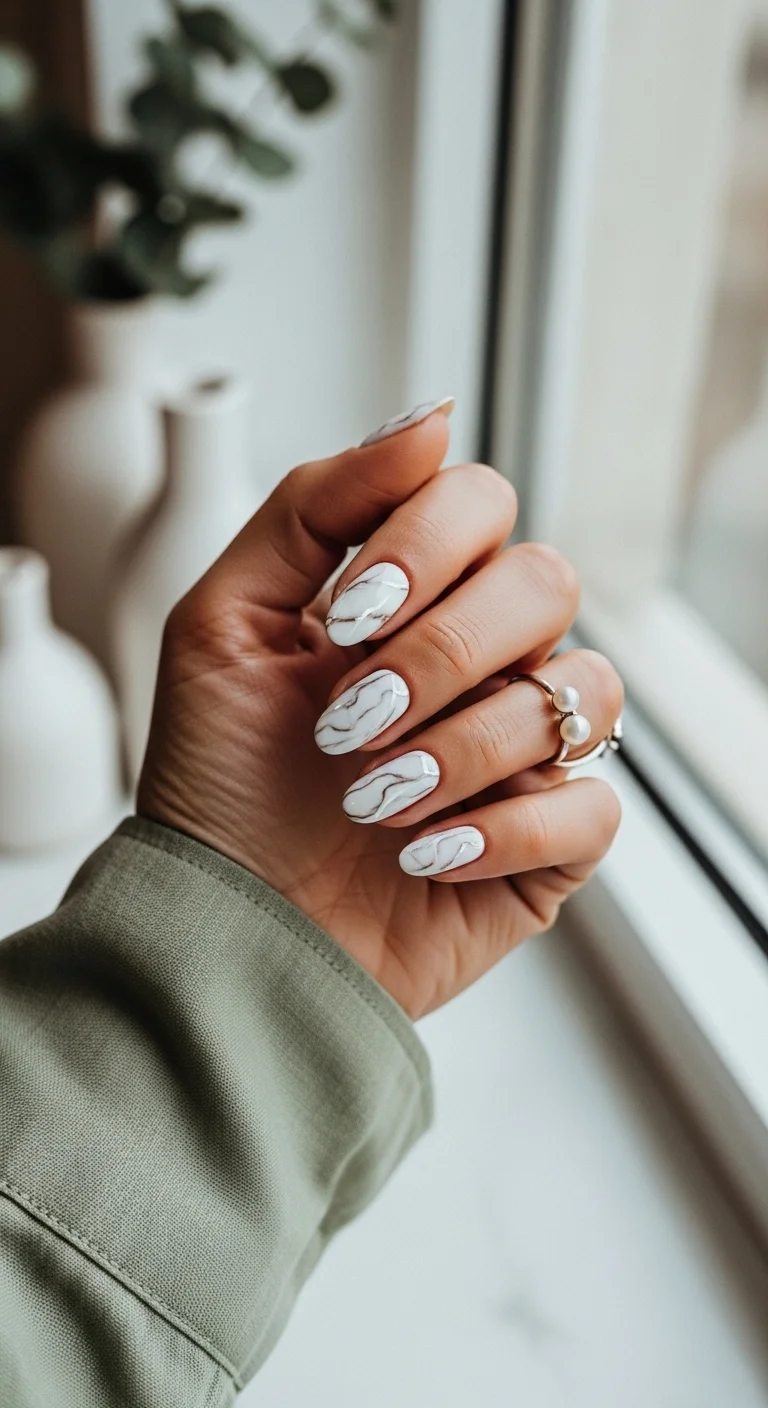
Clean, classic, and high-end white marble nail art.
Overview:
Quiet luxury on a nail. This Carrara marble effect reads as sophisticated from arm's length and reveals its detail up close — the thin grey and taupe-brown veins that crisscross over a clean white base. It's the nail equivalent of a marble countertop in a well-designed kitchen: material-driven, understated, and expensive-looking without trying.
The short-to-medium almond length is the right call for this design. Long nails would give the marble veins too much territory and dilute the effect. At this length, each vein feels deliberate and the white space between them reads as breathing room, not emptiness. The taupe-brown hints in some of the veins add warmth that pure grey-on-white lacks — it prevents the design from reading as cold or sterile.
Real talk about execution: the veining requires a steady hand and a very thin liner brush. Shaky lines actually work in your favor here (real marble has jagged, unpredictable veins), but thick or blobby lines kill the realism. If freehand isn't your strength, practice the Y-shaped vein pattern on a piece of foil first. White also shows cuticle imperfections more than any other color, so push those cuticles back before you start.
Design Breakdown:
Hand-painted marble veining that mimics natural Carrara stone. Precision is the entire game.
Base Color: Clean, opaque white. Two coats minimum — streaky white underneath ruins the marble illusion. Essie "Blanc" or OPI "Alpine Snow" are reliable.
Nail Shape: Short-to-medium almond. The wearable length keeps the design proportional and elegant rather than dramatic.
Design Element: Thin, intersecting grey and taupe-brown veins painted over the white base. No embellishments, no glitter, no chrome. The veining alone carries the design.
Finish: Glossy with a slight satin quality — luminous rather than mirror-like. This mimics the natural sheen of polished marble.
Get The Look at Home:
A thin liner brush and diluted polish are the secrets to realistic marble veins.
- White base: Two coats of opaque white. Let each dry completely before the next step.
- Thin the grey: On a piece of foil, mix a drop of grey polish with a drop of top coat. You want a sheer, watery consistency — the veins should be translucent, not solid.
- First veins: Using a long liner brush, draw very thin, slightly jagged lines across the nail in a Y or X pattern. Don't press hard — let the brush barely touch the surface.
- Add taupe: Mix a tiny amount of warm taupe-brown into your grey. Draw a few additional veins in this warmer tone for depth.
- Softening: While the veins are still wet, use a clean brush dipped in a tiny amount of acetone to blur some edges. Not all of them — sharp veins next to blurred ones create the most realistic effect.
- Finish: Seal with a glossy top coat. One coat is sufficient over the thin veining.
15.Midnight Navy High-Gloss
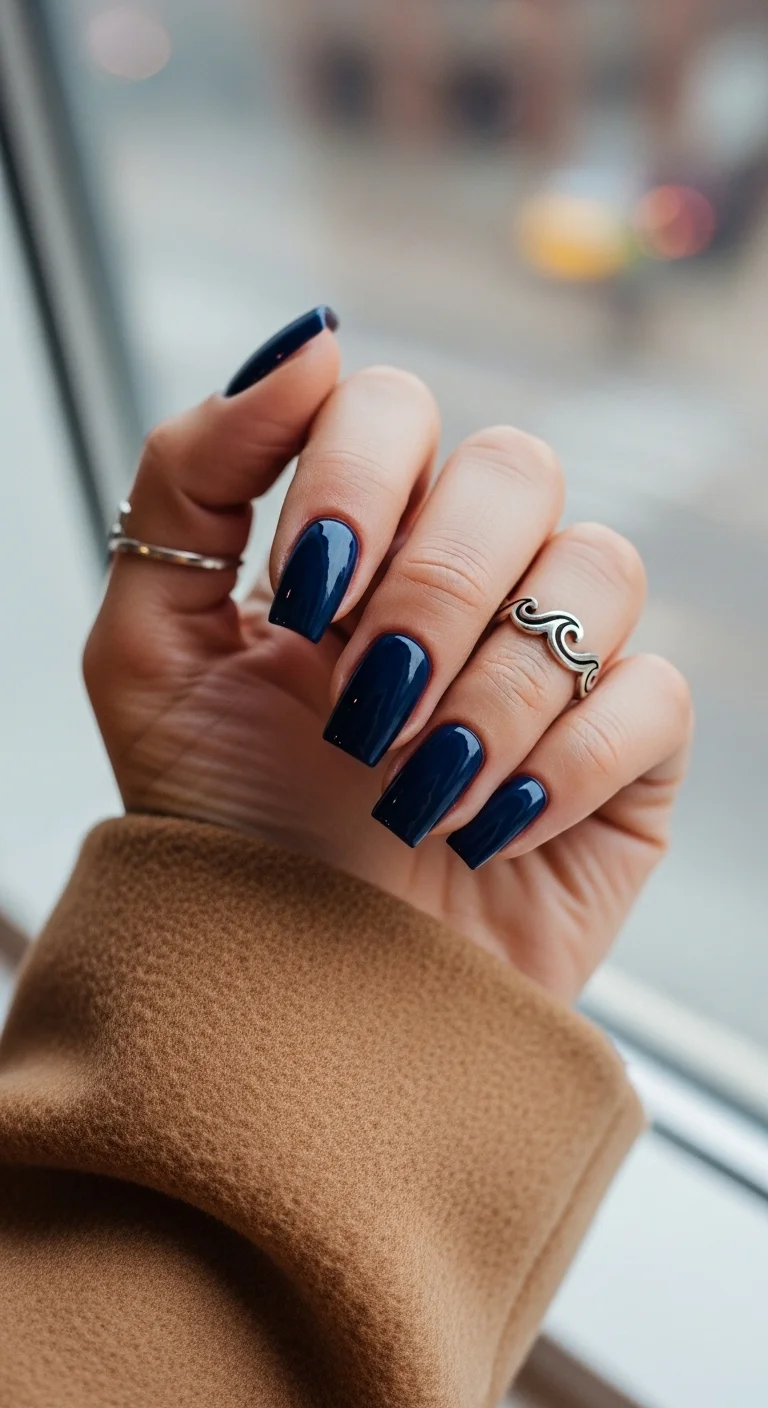
Deep, dramatic navy for a sophisticated graduation look.
Overview:
A deep navy reads differently than black — there's a subtle blue-black undertone that shifts in direct light, sometimes revealing a dark teal dimension. It's the kind of color that looks like one thing under office fluorescents and something entirely different in sunlight. That duality is what makes navy more interesting than black for a solid-color manicure.
The mirror-like high-gloss finish on this set is what sells it. Without the shine, navy can read as flat and one-dimensional. With it, the color looks wet, almost like liquid ink. The coffin shape with flat squared tips reinforces the clean, monochrome approach — no embellishments, no art, just a deeply saturated color with maximum reflectivity. It's a power move.
Two practical notes: dark navy shows tip wear almost immediately. By day three or four, the squared tips will reveal white nail edges unless you've capped the free edge with top coat. And removal is a project — dark blues stain, and you'll need to soak in acetone rather than scrape. Budget extra time at the end of the wear cycle.
Design Breakdown:
Pure solid color. The finish does all the heavy lifting.
Base Color: Deep midnight navy with cool blue-black undertones. The polish should be fully opaque in two coats — sheer navy looks uneven.
Nail Shape: Coffin or ballerina, medium-long with flat squared tips. The angular shape matches the boldness of the color.
Design Element: None. Ultra-clean monochrome. No art, no accents, no texture.
Finish: Mirror-like high gloss. Apply two layers of top coat for the wet, glass-like reflectivity this design needs.
Get The Look at Home:
Dark polish application is unforgiving. Prep and precision matter more than with lighter colors.
- Prep: Shape into coffin. Push back cuticles and clean the nail edge — dark polish on skin is immediately visible.
- Base coat: A stain-preventing base coat is mandatory. Navy blue will tint your natural nails yellow without it.
- First coat: Thin, even layer of navy. Work slowly around the cuticle area — mistakes here are hard to fix without smearing.
- Second coat: Apply in the opposite direction of the first for even coverage. Two coats should achieve full opacity.
- Cleanup: Dip a small angled brush in acetone and run it along the cuticle line and sidewalls for a crisp, professional edge.
- Double top coat: Two layers of high-gloss top coat, capping the free edge both times. The extra layer extends wear and amplifies the mirror finish.

34 Cutest Butter Yellow Nail Designs for 2026 🧈
16.Abstract White Smoke Swirls
Artistic and ethereal white swirls on a translucent base.
Overview:
These look like wisps of smoke trapped under glass. The white swirl patterns sit on a warm nude-mauve base with a slightly translucent quality, creating a sense of depth — the patterns appear to float rather than sit flat on the surface. Each nail becomes a small abstract composition, with wave-like or concentric spiral motifs that vary from finger to finger.
The dimensional quality of the white patterns is what sets this apart from flat nail art. The swirls have a raised, textured feel that catches light differently than the smooth base beneath. The mixed finish — satin-matte on the white patterns with a soft sheen on the nude base — reinforces this contrast. It's subtle enough for everyday wear but interesting enough to draw a second look.
The long coffin shape is high-maintenance by any standard. The squared tips are prone to chipping, and the raised patterns can catch on hair and knitwear. Budget five to seven days of comfortable wear before something catches or chips. The white-on-nude palette may also yellow slightly over time, especially with exposure to sunlight or dark clothing dyes — a common issue with white polish that no top coat fully prevents.
Design Breakdown:
A dimensional abstract design using raised white patterns over a warm translucent base.
Base Color: Warm nude or mauve-pink with a slightly translucent, jelly-like quality. The base should be sheer enough to show depth but pigmented enough to read as a deliberate color.
Nail Shape: Long coffin or ballerina with squared tips. The flat surface gives the swirl patterns room to develop.
Design Element: Raised or 3D-effect white swirl patterns — wave-like and concentric spiral motifs. The patterns have a textured, dimensional quality that sits above the base.
Finish: Mixed — satin-matte on the white patterns, soft sheen on the base. This dual finish is what creates the "smoke behind glass" illusion.
Get The Look at Home:
A builder gel or thick top coat is what gives the swirls their raised, dimensional quality.
- Nude base: Two coats of a warm mauve-pink. Let dry completely.
- Map the swirls: Using a thin liner brush and white polish, draw the basic swirl shapes — wavy lines, concentric arcs, or spiral motifs. Don't fill them in yet.
- Build dimension: Apply a thin layer of clear builder gel or thick top coat directly over the white lines. This is what creates the raised effect.
- Cure or dry: If using gel, cure under UV. If using regular polish, let the builder layer dry for at least fifteen minutes.
- Matte the white: Apply a matte top coat only over the raised white areas using a small brush. Leave the nude base glossy.
- Seal the base: One coat of glossy top coat on the nude areas, carefully avoiding the matte white swirls.
17.Gilded Pearl Abstract
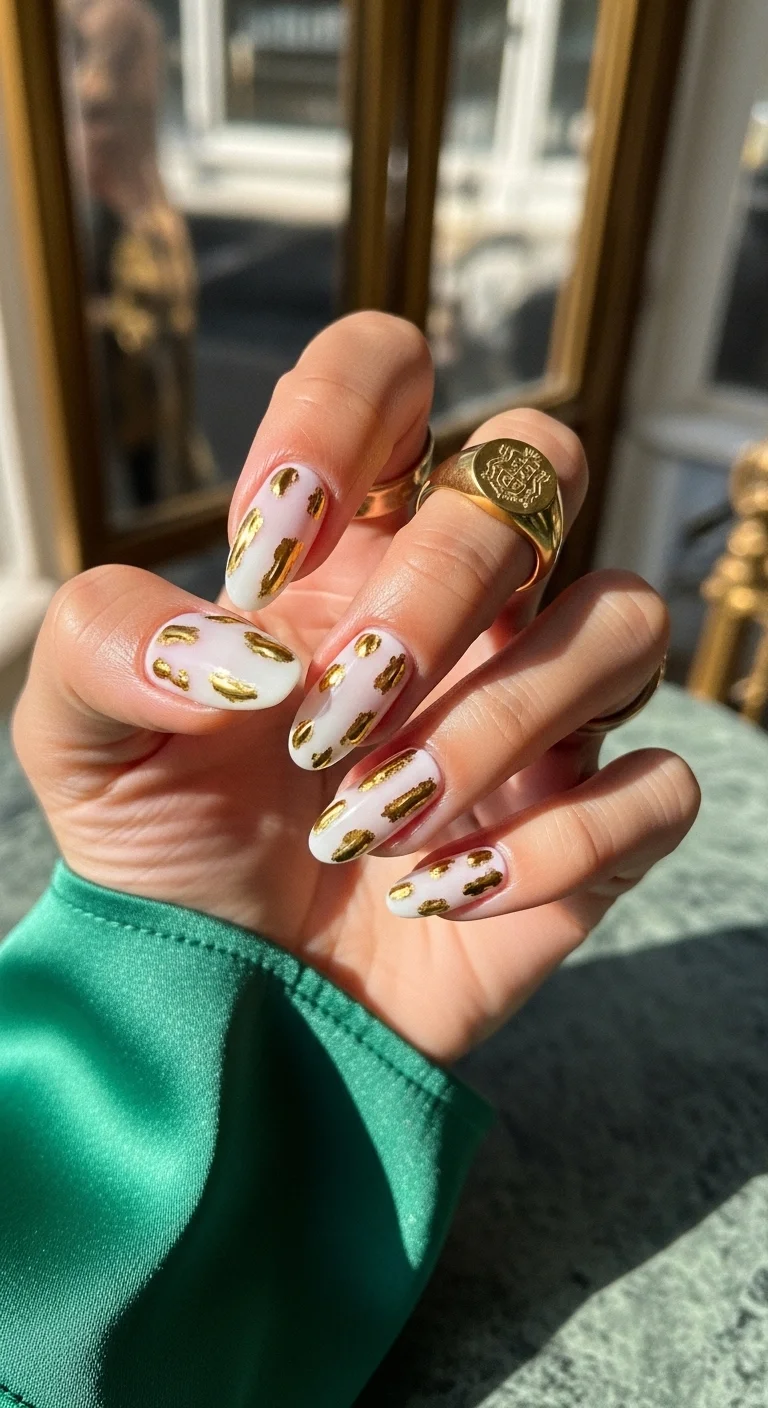
Luxurious gold leaf accents on a soft milky background.
Overview:
Metallic gold foil over milky pearl is a contrast that works on a visceral level — the delicate, translucent base against bold, opaque gold creates visual tension that reads as expensive. Each nail gets a different foil placement: some densely gilded with overlapping pieces, others with just a single fragment. The irregularity is what makes it feel like abstract art rather than a stamped pattern.
The torn edges on the foil pieces matter more than you'd think. Clean-cut gold squares look like stickers. Irregular, organic edges — the kind you get when you pull gold leaf apart with tweezers — look like something from a gallery. The gold used here should be warm-yellow, not rose gold or champagne, because the warmth creates a stronger contrast against the cool milky base.
Downsides to know about: gold foil edges lift and peel over time, especially at the tips. The milky base shows your visible nail line as your nails grow out, which means this design has a shorter wear window before it starts looking grown-out. And the random foil placement can look unbalanced if you're not deliberate about distributing density across the hand — one heavily gilded nail next to a sparse one reads as uneven rather than artistic.
Design Breakdown:
Abstract foil placement over a translucent pearl base. Randomness is the design principle — but controlled randomness.
Base Color: Sheer milky white or pearl with a warm ivory undertone. Two coats for the right balance between translucency and coverage.
Nail Shape: Medium almond. The curved, feminine shape balances the boldness of the gold and keeps the overall look elegant.
Design Element: Abstract gold foil pieces in organic, painterly placements. Some nails densely covered, others sparse. Irregular torn edges on all foil fragments.
Finish: High-gloss with a subtle pearlescent shimmer in the base. The gold should look like it's embedded in the polish, not sitting on top.
Get The Look at Home:
Gold leaf is forgiving to work with but requires patience during placement.
- Milky base: Two coats of sheer milky white. Let dry until the surface is tacky but not wet — this is the adhesion window.
- Foil prep: Pull gold leaf apart with tweezers into irregular fragments. Vary the sizes — some large, some tiny.
- Place the foil: Press fragments onto the tacky surface. Start with one or two pieces per nail, then build density on select nails. Press firmly with a silicone tool or fingertip.
- Distribution check: Hold both hands up. If one hand is significantly more gilded than the other, rebalance before the polish fully sets.
- Flatten: Press all foil edges firmly. Any lifted edge will catch and peel within a day.
- Seal: Two coats of top coat. The first seals the foil; the second smooths the surface and adds depth to the pearlescent base.

25 Stunning Summer Vacation Hairstyles for 2026 ☀️🌊
18.The Merlot Frenchie
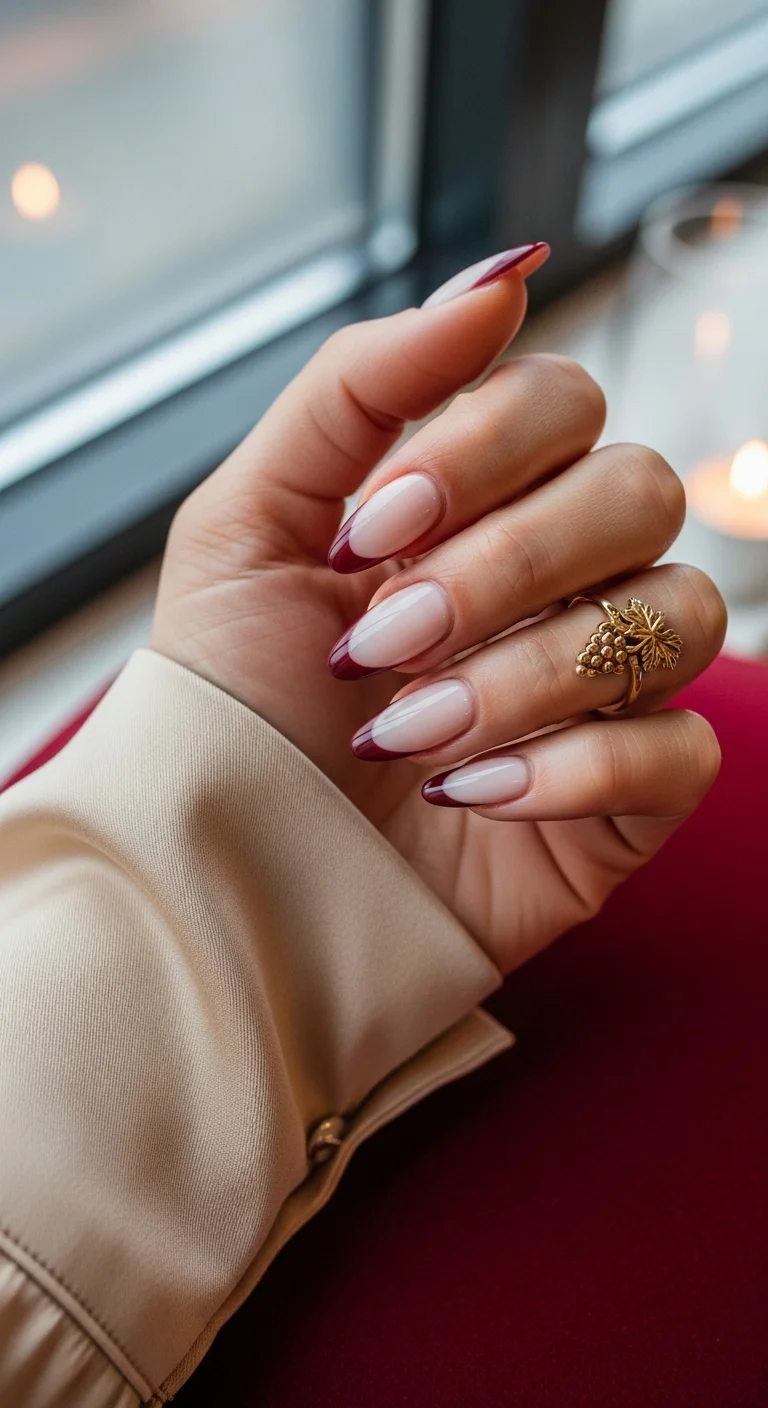
A moody and sophisticated twist on the classic French tip.
Overview:
The classic French manicure with a deep wine-red tip instead of white. It's a small swap that completely changes the energy — from "clean and safe" to "confident and mature." The merlot shade has cool blue-red undertones that keep it from looking like a warm Christmas red, which is what makes it work year-round and across skin tones.
The ultra-thin smile line is what makes or breaks this design. A thick merlot tip looks heavy and unbalanced against the sheer nude-pink base. A thin, precise line looks elegant and intentional. The medium oval-almond hybrid shape reinforces this — the softly rounded tips keep the dark color from reading too harsh, and the length is short enough that the deep red doesn't dominate the hand.
Two things to manage: the sheer base shows your natural nail imperfections, so nail prep (cuticle work, buffing) matters more than it would with an opaque base. And the dark tip shows chips prominently — more so than white French tips because the contrast between merlot and nude is starker than white and nude. Expect touch-ups by day five or six if you're hard on your hands.
Design Breakdown:
A classic French structure with a deep wine-red replacing the traditional white tip.
Base Color: Sheer nude-pink with a warm pink undertone. One to two coats — the natural nail bed should be visible underneath.
Nail Shape: Medium oval-almond hybrid with softly rounded tips. The gentle shape prevents the dark color from looking aggressive.
Design Element: Ultra-thin merlot French tips with a precise, curved smile line. No embellishments, no accent nails. The simplicity is the point.
Finish: High-gloss, glass-like top coat. The shine makes the merlot look "jammy" and deep rather than flat.
Get The Look at Home:
The smile line demands patience. This is not a design you rush.
- Nude base: Two coats of sheer nude-pink. Let dry completely — the dark tip polish will drag if the base is even slightly tacky.
- Prep the tip color: Roll the merlot polish bottle between your hands for thirty seconds. Dark polishes separate quickly and the pigment needs to be evenly distributed.
- The smile line: Using a thin liner brush, start from one sidewall and sweep a thin, curved line across to the other side. Two strokes — one from each side meeting in the center — is more forgiving than one continuous pass.
- Fill the tip: Paint the area between your smile line and the free edge with merlot. One thin coat should be enough over the nude base.
- Cleanup: A flat brush dipped in acetone, run along the smile line border. This sharpens any wobbles and creates that crisp, professional edge.
- Seal: High-shine top coat. Cap the free edge to extend the wear on the dark tip, which chips visibly.
19.Liquid Gold Sculpture

Futuristic 3D gold accents for a high-fashion grad statement.
Overview:
Gold chrome on white is one of the highest-contrast combinations in nail design. The stark white base acts as a gallery wall, and the gold chrome drips are the art hanging on it. The chrome here isn't flat — it's built up in 3D with builder gel underneath, creating raised "drip" shapes that look like actual liquid gold was poured onto the nail and frozen mid-flow. The mirror-like finish on the chrome shifts between pure gold and a warmer copper depending on the angle.
The long coffin shape is doing structural work here. The flat, squared tip provides a stable canvas for the 3D elements, and the length gives the drip shapes room to cascade naturally from tip toward cuticle. Some nails get full-coverage gold chrome; others get thin micro-French lines in gold. That variation across the hand prevents the design from looking like a single technique repeated ten times.
This is a high-maintenance, event-specific design. The 3D chrome drips can snag on clothing, and the raised texture catches on everything from seatbelts to hair. The white base shows staining within days if the top coat chips. Budget this for graduation day itself and the immediate celebrations — it's not built for a two-week wear cycle. Chrome peeling at the edges typically starts around day five.
Design Breakdown:
A high-fashion design combining a flat white base with raised 3D chrome elements. The dimensionality IS the design.
Base Color: True neutral stark white with no blue or pink undertone. Opaque in two coats. Essie "Blanc" or OPI "Alpine Snow" both work.
Nail Shape: Long coffin/ballerina with straight sidewalls. The length and flat tip are essential for the 3D drip placement.
Design Element: 3D gold chrome "drip" or "molten" shapes concentrated at the tips, with some nails featuring thin gold micro-French lines instead. The chrome is deeply warm yellow-copper — not rose gold.
Finish: High-gloss over both the white base and chrome elements. The chrome itself has a mirror-like wet-look metallic finish.
Get The Look at Home:
This requires builder gel, chrome powder, and a UV/LED lamp. The 3D element can't be achieved with regular polish.
- White gel base: Two coats of stark white gel, cured between coats. The base must be flawless — chrome highlights every imperfection underneath.
- Build the drips: Using a thick 3D builder gel, create raised "drip" or "blob" shapes at the tips of select nails. Cure under the lamp.
- No-wipe top coat: Apply over the cured 3D shapes and cure. This is the surface the chrome adheres to.
- Chrome application: Rub gold chrome powder into the cured 3D shapes using a silicone applicator. The powder sticks only to the no-wipe surface, creating mirror-finish drips.
- Clean the white: Brush off any gold dust that landed on the white base with a fluffy brush. Stray chrome particles are visible against white.
- Seal: Apply gel top coat carefully around and over the chrome drips to lock them in. Avoid flooding the 3D shapes — excess top coat fills in the dimension.

35 Palm Tree Nail Art Ideas that are the Most Iconic Nail Art Designs 🌴✨
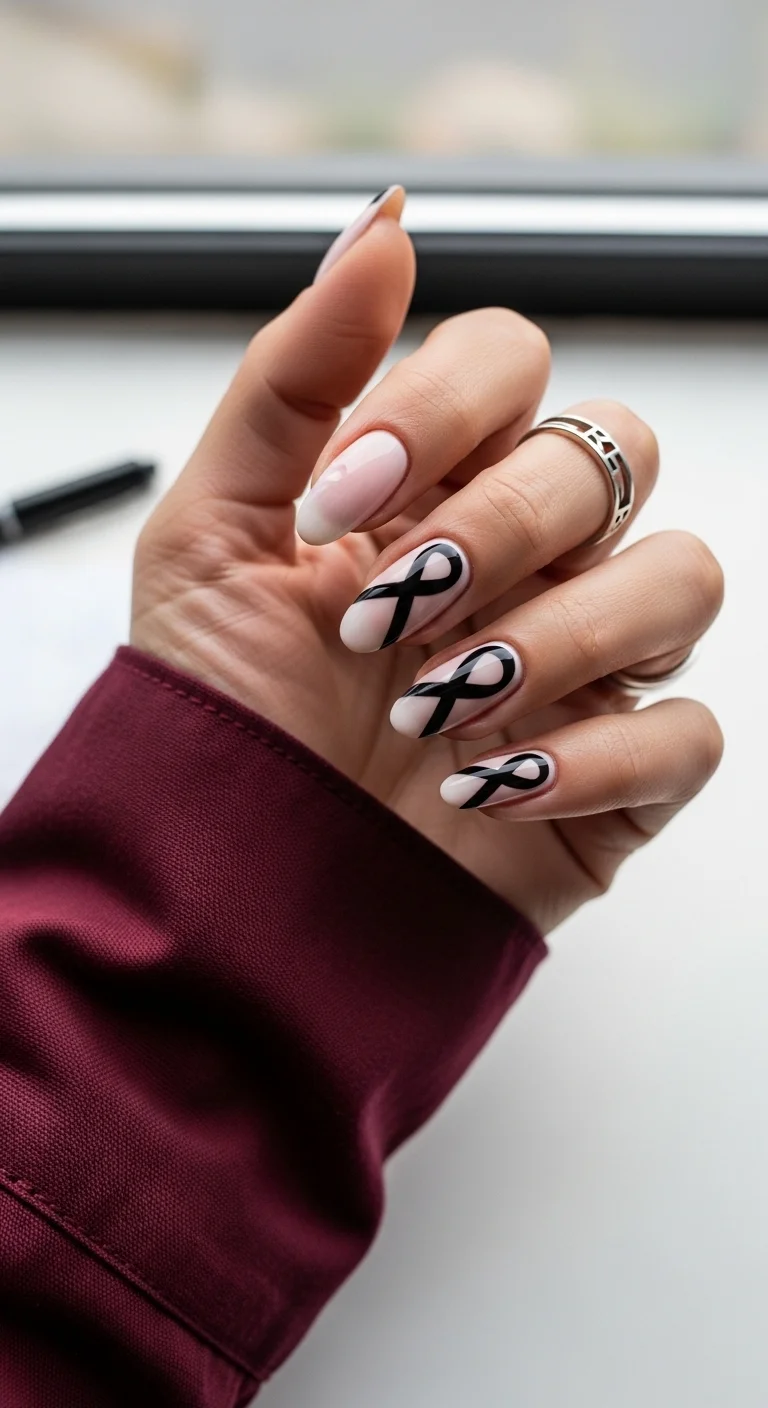
20.Chic Black Ribbon Bows
Sweet and sophisticated black ribbon art for a 'coquette' vibe.
Overview:
Black line work on a sheer base is one of those designs that looks simple until you try to execute it. The ribbon motifs here — thin, flowing lines that loop into bows with trailing tails — require a steady hand and a brush that holds enough polish to draw a full line without re-dipping. The infinity-loop bow shape on each nail has subtle width variation that creates a 3D ribbon illusion, and a fine shadow edge gives the bows dimension against the translucent base.
The restraint of leaving one nail completely plain is what keeps the set from feeling busy. Four nails with ribbon art, one without — that asymmetry is more visually interesting than all five matching. The sheer milky pink base has a jelly-like translucency that makes the black line work pop without creating a stark two-tone contrast. It's the "gift-wrapping" effect — feminine but not precious, graphic but not heavy.
The fine line work is unforgiving. Any wobble in the brush stroke shows immediately against the sheer base — there's no texture or pattern to hide behind. This is not a beginner-friendly DIY. And the sheer base means regrowth at the cuticle becomes visible within a week, so the timing of your appointment relative to graduation day matters.
Design Breakdown:
A two-color design that lives and dies on line precision. The sheer base is both the canvas and the challenge.
Base Color: Sheer milky pink with cool undertones and jelly-like translucency. Two coats for the right balance — visible nail line is acceptable and even desirable.
Nail Shape: Medium almond. The rounded, tapered shape complements the flowing ribbon curves without competing.
Design Element: Hand-painted black ribbon/bow motifs in an infinity-loop style. Four nails get the art; one is left plain for balance. Fine shadow lines give the bows dimension.
Finish: High-gloss glass-like top coat. The jelly translucency of the base deepens under the shine.
Get The Look at Home:
A super-fine liner brush is non-negotiable for these thin, precise lines. Standard nail art brushes are too thick.
- Sheer base: Two coats of milky pink jelly polish. Let dry completely — black polish on a tacky surface will bleed.
- The bow loop: Using a fine liner brush and black polish, draw a small infinity symbol (figure-8 on its side) near the cuticle or center of the nail. This is the bow's knot.
- The tails: From the bottom of the infinity loop, pull two thin lines downward and slightly outward. Let them trail off naturally — no hard stops.
- Shadow detail: With an even thinner brush, add a faint grey line alongside one edge of each black line. This creates the 3D ribbon illusion.
- Leave one plain: Skip the art on one nail (ring finger works well) to give the eye a resting point.
- Seal: One coat of glossy top coat, floated over the line work without pressing. Dragging through wet black polish smears the design.
21.Mediterranean Blue Abstract
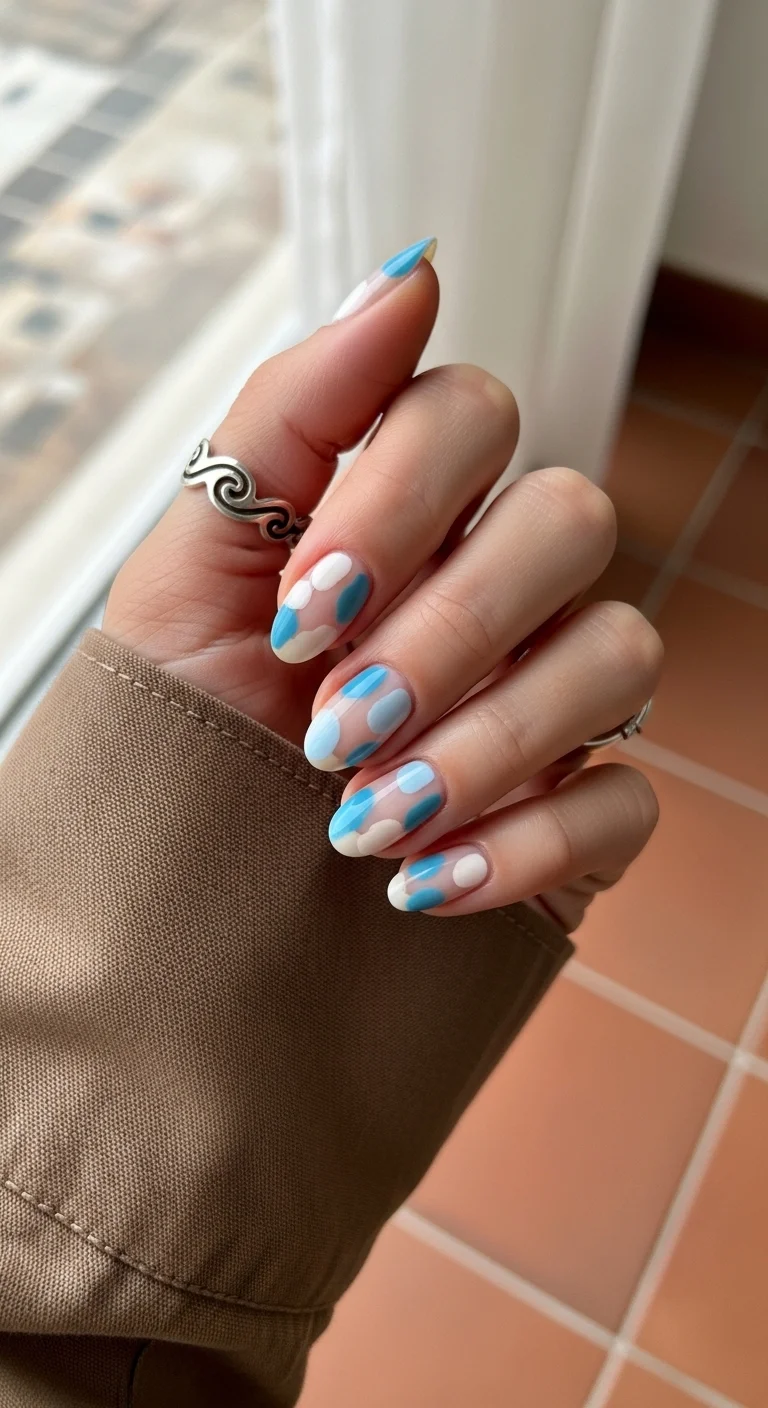
Fresh, artistic blue and white abstract shapes for a summer grad vibe.
Overview:
Matisse cut-outs translated to nails. The abstract shapes — rounded blobs, curved forms, organic patches of color — sit on a sheer nude base with negative space between them. The three-tone blue palette (cerulean, dusty denim, creamy off-white) stays within the cool temperature range, which keeps the design from reading chaotic. Each nail gets a unique arrangement, so the hand looks curated rather than stamped.
The short-to-medium almond length is the practical choice here. These shapes need enough surface area to breathe, but the negative space between them is part of the design. On long nails, the gaps become too large and the shapes start to look isolated. On very short nails, the shapes get cramped and lose their organic flow. This length — roughly half a centimeter past the fingertip — hits the sweet spot.
Abstract designs are polarizing because they look effortless but require intentionality. Randomly placed blobs look messy. The shapes need to relate to each other across the hand — similar density, complementary curves, balanced distribution of the three colors. A skilled nail artist will plan the layout before painting. If you're doing this at home, sketch the shapes on paper first to establish the visual rhythm.
Design Breakdown:
Gallery-quality wearable art. The negative space is as important as the colored shapes.
Base Color: Sheer nude or natural nail showing through. The negative space IS part of the design — don't cover it with a full base coat.
Nail Shape: Short-to-medium almond. The organic shape echoes the organic forms in the design.
Design Element: Abstract organic shapes in three tones: soft cerulean blue, muted dusty denim blue, and creamy off-white. Shapes are rounded and curved — no hard angles or geometric precision.
Finish: High-gloss. The shine unifies the layered colors and creates a smooth surface over the slightly raised painted areas.
Get The Look at Home:
Plan the layout before you paint. The difference between "abstract art" and "random blobs" is intentionality.
- Prep only: Shape and buff the nails. Apply a clear base coat for protection but skip any colored base — you need the nude showing through.
- First color, largest shapes: Start with the cerulean blue. Using a medium dotting tool or brush, place two to three rounded shapes per nail. Leave generous gaps between them.
- Second color: Dusty denim blue. Add one to two shapes per nail, positioned to fill some gaps but not all. Let some nude space remain.
- Third color: Creamy off-white. Small accent shapes — one per nail maximum. These should sit adjacent to or slightly overlapping the blue shapes.
- Balance check: Hold both hands at arm's length. If any nail has significantly more or less coverage than the others, adjust before the polish sets.
- Seal: One thick coat of glossy top coat. The shapes create slight texture ridges that need smoothing.

21 Hot Summer Buns Hairstyle Ideas for 2026 ☀️🔥
22.Galactic Silver Chrome Swirls

Edgy, high-shine silver chrome with black abstract swirls.
Overview:
Full silver chrome is already a statement. Adding black swirl lines over it turns the statement into a conversation. The chrome base reflects light like a mirror — pure, cold, almost blue-silver — and the black lines painted on top create a graphic contrast that reads as hypnotic and slightly disorienting. The swirls resemble sound waves, topographic maps, or galactic patterns, depending on how your eye interprets the organic curves.
The long stiletto-almond shape amplifies the drama. The pointed tip extends the chrome surface area, which means more reflection, more light play, and more space for the swirl patterns to develop. As your hand moves, the chrome shifts between pure silver and darker gunmetal in the curves, creating an almost animated quality. This is the most visually striking design on the list — it doesn't whisper, it announces.
Practical reality check: chrome surfaces show fingerprints instantly. Within minutes of putting these on, your thumb pad will leave smudges on every nail you touch. The stiletto point is also the most fragile nail shape — the sharp tip takes the brunt of daily impact and snaps easily under pressure. And the black lines over chrome require a double-layered removal process that's harsh on the nail plate. This is a special-occasion design, not a two-week wear.
Design Breakdown:
Full chrome base with graphic line overlay. The chrome is the star; the black lines are the supporting cast.
Base Color: Black gel polish underneath the chrome — chrome pops most dramatically over dark bases. The black base deepens the silver reflectivity.
Nail Shape: Long stiletto/almond hybrid. The elongated point maximizes the chrome surface and adds visual drama.
Design Element: Full silver chrome base on every nail with abstract black swirl/wave lines painted over the chrome. Each nail gets a unique pattern — organic and flowing, not geometric.
Finish: Ultra-high-gloss chrome mirror finish. The chrome is the primary surface; the black lines sit on top without changing the reflectivity.
Get The Look at Home:
Chrome over black gel is the technique. Regular polish won't produce the mirror effect.
- Black gel base: Two coats of black gel polish, cured between coats. The black needs to be fully opaque — any patchiness shows through the chrome.
- No-wipe top coat: Apply and cure. This is the chrome adhesion surface.
- Chrome application: Using a silicone applicator, rub silver chrome powder over the entire nail until it's a uniform mirror. Buff until smooth.
- Seal the chrome: Apply a thin gel top coat over the chrome and cure. This locks the chrome in before you add the black lines.
- Black swirls: Using a thin liner brush and black gel polish, draw organic swirl lines over the sealed chrome. Cure after each nail to prevent the lines from spreading.
- Final seal: One more coat of gel top coat over everything to encapsulate the black lines and protect the chrome surface.
23.Strawberry Milk Polka Dots
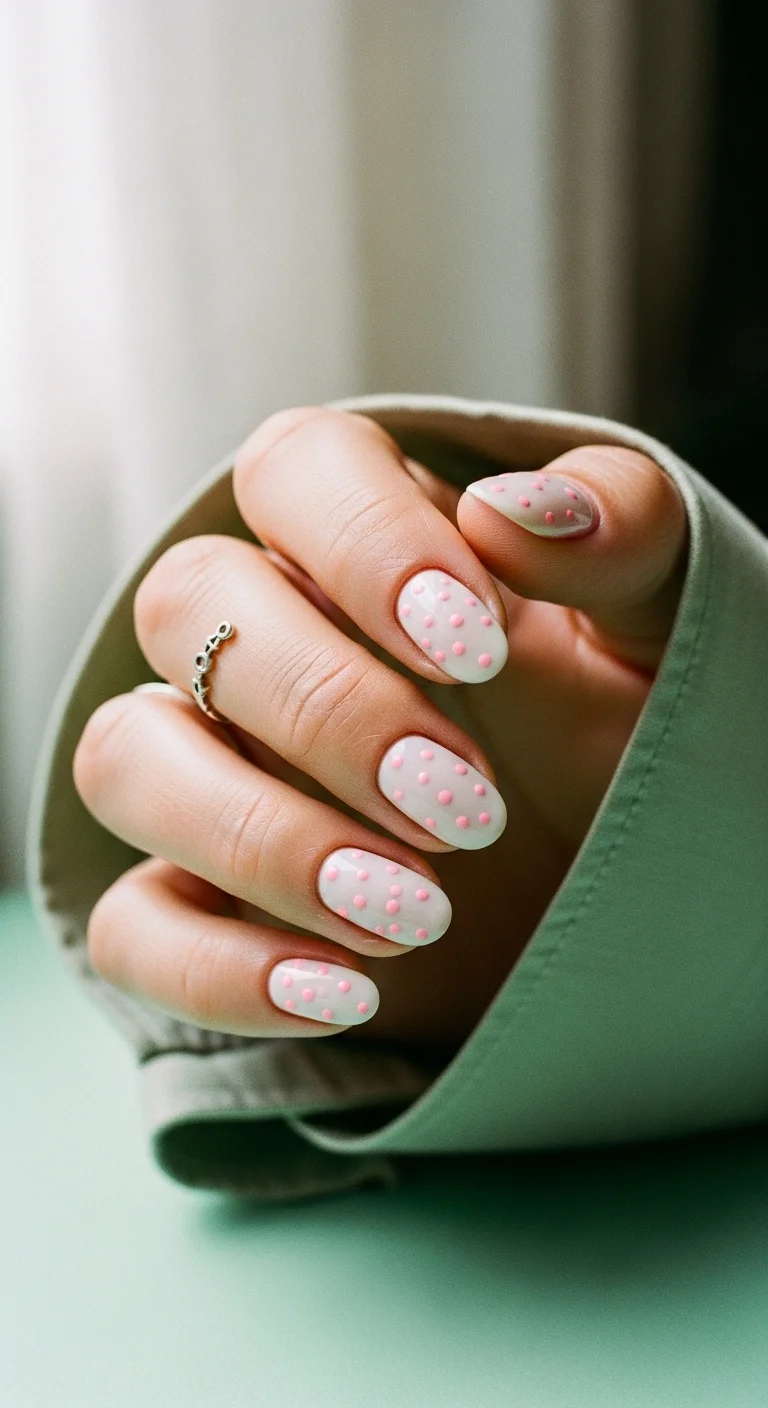
Sweet and nostalgic pink polka dots on a milky white base.
Overview:
Polka dots are one of the oldest nail art techniques, and their popularity hasn't budged in decades because the execution is nearly foolproof: dip, press, lift. This version updates the classic by making the dots three-dimensional — raised slightly above the surface, creating a tactile texture that catches light differently than flat painted dots would. The "strawberry milk" color story — warm milky white with muted dusty rose dots — keeps it current without trying too hard.
The short oval shape is the most practical choice for everyday wear, and it happens to be the right proportion for scattered polka dots. On longer nails, the same dot density looks sparse; on shorter nails, it looks cluttered. This length — barely past the fingertip — lets three to five dots per nail feel balanced. The slightly raised quality of the dots creates subtle shadows that give the design depth you don't get from flat nail art.
Two things to consider: 3D elements catch on fabric, hair, and basically everything your hands touch. The dots may flatten or pop off with frequent hand washing. And the milky white base shows every stain — coffee, turmeric, even some hand soaps will tint it over time. This is a design that looks its best in the first three to four days of wear.
Design Breakdown:
Raised dot texture on a translucent base. The 3D quality is what separates this from standard polka dot nails.
Base Color: Milky translucent white with warm pink-cream warmth. Not stark white — the warmth is what creates the "strawberry milk" effect.
Nail Shape: Short oval or round. The organic shape matches the organic dot placement and keeps the design casual and wearable.
Design Element: Raised 3D polka dots in muted dusty rose or salmon pink. Scattered in a non-grid pattern with consistent dot sizing. Not hot pink, not bubblegum — a sophisticated, muted tone.
Finish: Satin-to-glossy on the base. The dots themselves have a slightly raised, bead-like quality that creates shadow and dimension.
Get The Look at Home:
The raised dot effect comes from building up layers of polish on each dot rather than pressing once.
- Milky base: Two coats of warm milky white. Let dry completely — the dots need a stable surface.
- First dot layer: Using a medium dotting tool dipped in dusty rose polish, press and lift straight down. Place three to five dots per nail in a scattered, non-grid pattern.
- Build dimension: Wait sixty seconds for the first layer to set. Then re-dip and press a second dot directly on top of each first-layer dot. This builds the raised effect.
- Check consistency: Make sure all dots are roughly the same height. Uneven dots look accidental rather than intentional.
- Dry fully: Let the dots dry for at least five minutes before top coating. Rushing this step flattens the 3D effect.
- Float the top coat: Apply top coat in one stroke per nail, floating the brush over the dots without pressing down. Pressing squishes the raised texture flat.

29 Trendy Pink Summer Nails for 2026 💅
24.The Espresso Glaze Square
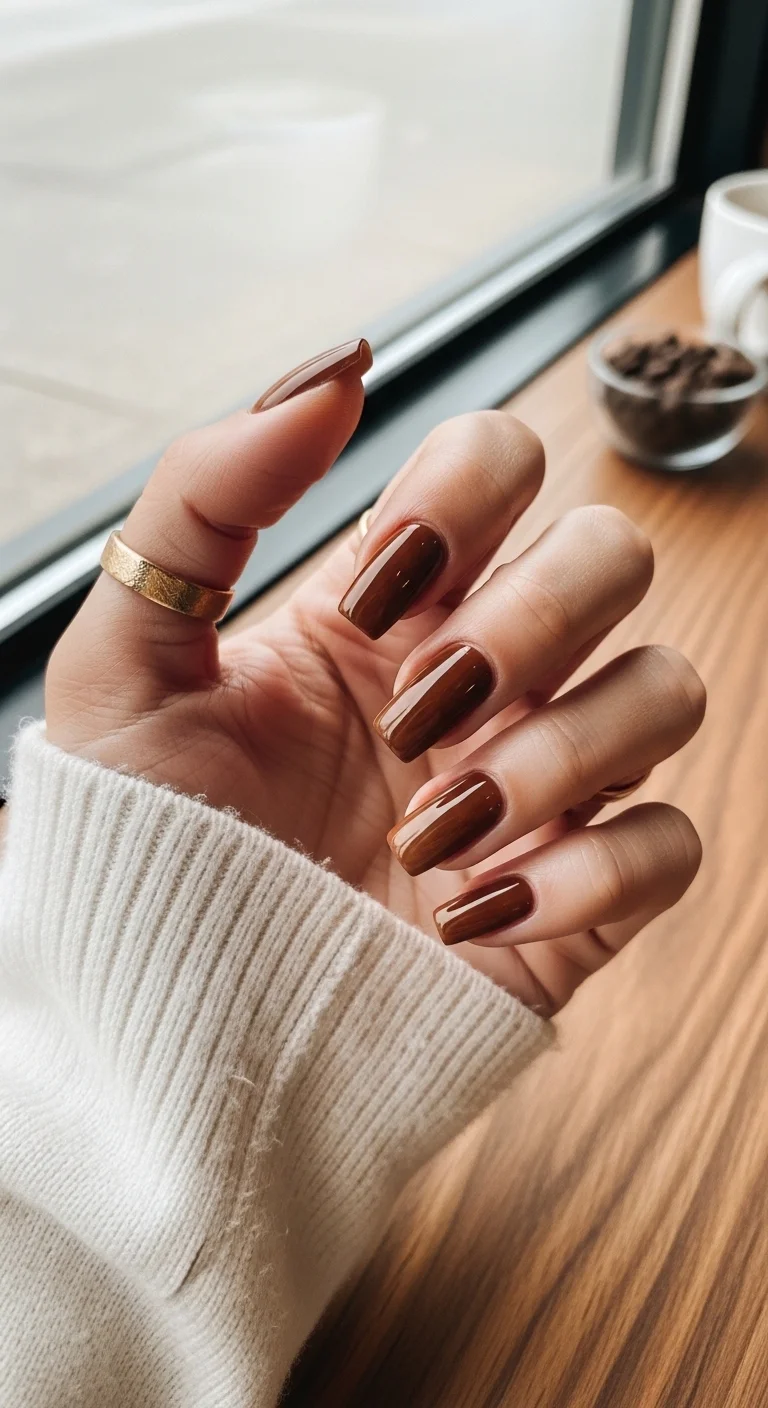
Rich, glossy, and incredibly chic chocolate brown nails.
Overview:
Proof that a single perfect color can outshine elaborate nail art. This espresso brown has warm chocolate-mahogany undertones with a slight reddish-amber warmth where the light hits. It's not a flat, one-note brown — the depth in the pigment gives it a dimensional quality that looks like polished mahogany or freshly poured espresso crema.
The square shape with crisp, sharp corners is what gives this design its edge. A rounded shape would soften the brown into something safe; the angular square keeps it modern and deliberate. The ultra-glossy gel finish is what elevates it from "brown nails" to "quiet luxury" — the lacquered shine makes the color look wet and expensive. It's the "I don't need to try hard" power move, and it pairs naturally with gold jewelry and warm-toned outfits.
The downside of single-color minimalism: there's nowhere to hide. Streaks, uneven coverage, cuticle flooding — all visible against the deep, uniform pigment. The square corners are also structurally weaker than rounded shapes and chip more easily. And in certain lighting, this brown reads as almost black, which may not be the "warm" look you're going for. Test it in natural daylight before committing.
Design Breakdown:
Single-color perfection. The richness of the pigment and the quality of the application carry the entire design.
Base Color: Rich espresso brown with warm chocolate-mahogany undertones. Opaque in two coats. Try OPI "Squeaker of the House" or Essie "Mink Muffs."
Nail Shape: Medium-long square with sharp corners and straight sidewalls. The angular shape modernizes the deep color.
Design Element: None. Pure solid color. The design is the color and the shape.
Finish: Ultra-glossy gel-like top coat. Two layers for maximum depth and that "fresh from the salon" lacquered look.
Get The Look at Home:
Dark brown polish application is as unforgiving as navy or black. Prep is everything.
- Prep: File into a uniform square shape. Buff the surface smooth — any ridges show through dark, glossy polish.
- Base coat: A stain-preventing base coat. Dark browns stain nails more than you'd expect.
- First coat: Thin, even layer of espresso brown. Work slowly around the cuticle — brown polish on skin is immediately visible.
- Second coat: Apply in the opposite direction for even coverage. Two coats should achieve full, streak-free opacity.
- Cleanup: Angled brush dipped in acetone, run along the cuticle line and sidewalls for a crisp edge.
- Gloss: Two layers of high-shine top coat, capping the free edge. The double coat extends wear and amplifies the glass-like finish.
25.Futuristic Silver Chevron Tips
Edgy and modern silver chevron tips on a clean white base.
Overview:
A chevron tip replaces the traditional curved French smile line with a sharp V-shape, and that single geometric change transforms the entire energy of the design. Where a classic French reads as soft and timeless, the chevron reads as architectural and modern. The silver chrome on the tips amplifies this — the mirror finish catches light in a way that flat white never could, creating a visual snap every time your hand moves.
The milky white base with cool gray undertones is a deliberate choice over stark white. A warm base under cool chrome creates a disconnect that reads as two separate designs stacked on top of each other. The cool-toned base and cool-toned chrome share the same temperature family, which makes the transition from base to tip feel cohesive rather than jarring.
Precision is the make-or-break factor. The V-shaped lines need to be razor-sharp — any wobble in the angle is immediately visible because geometric shapes amplify imperfections. Using tape or stencils to mask the chevron is strongly recommended over freehand. The chrome tips also chip and peel at the edges faster than standard polish because the metallic particles don't bond as flexibly to the nail surface.
Design Breakdown:
Geometric precision meets metallic shine. The sharp V-line is the entire design.
Base Color: Milky white with cool gray undertones. Two coats for soft opacity. The cool tone matches the chrome temperature.
Nail Shape: Long coffin/ballerina. The flat, squared tip provides the ideal canvas for the sharp V-shaped chevron.
Design Element: Sharp V-shaped chevron chrome tips on every nail. Clean geometric lines separating the white base from the silver tip. The chrome is mirror-like and highly reflective.
Finish: High-gloss on the base, mirror-chrome metallic on the tips. Both surfaces share a high sheen with different reflective qualities.
Get The Look at Home:
Tape or nail stencils are essential for the sharp V-shape. Freehand geometric lines are a recipe for frustration.
- Milky base: Two coats of cool-toned milky white. Let dry completely — tape on wet polish pulls up the base.
- Tape the chevron: Place two pieces of thin tape on each nail to form a V-shape at the tip. The exposed area is where the chrome goes. Press the tape edges firmly to prevent bleeding.
- Chrome application: If using chrome powder, apply a no-wipe top coat to the exposed V, cure, then rub chrome powder in. If using chrome polish, paint it directly into the V-shape.
- Peel carefully: Remove the tape while the chrome is still slightly wet for the sharpest line. Pull slowly at a 45-degree angle.
- Clean the line: Use a small brush dipped in acetone to sharpen any micro-bleeds along the V-edge.
- Seal: Glossy top coat over everything, capping the free edge to protect the chrome tips from premature chipping.
28 Effortless Hot Weather Day Hairstyles for Women 2026 ☀️💇♀️
26.Pearlized Ombre Shine
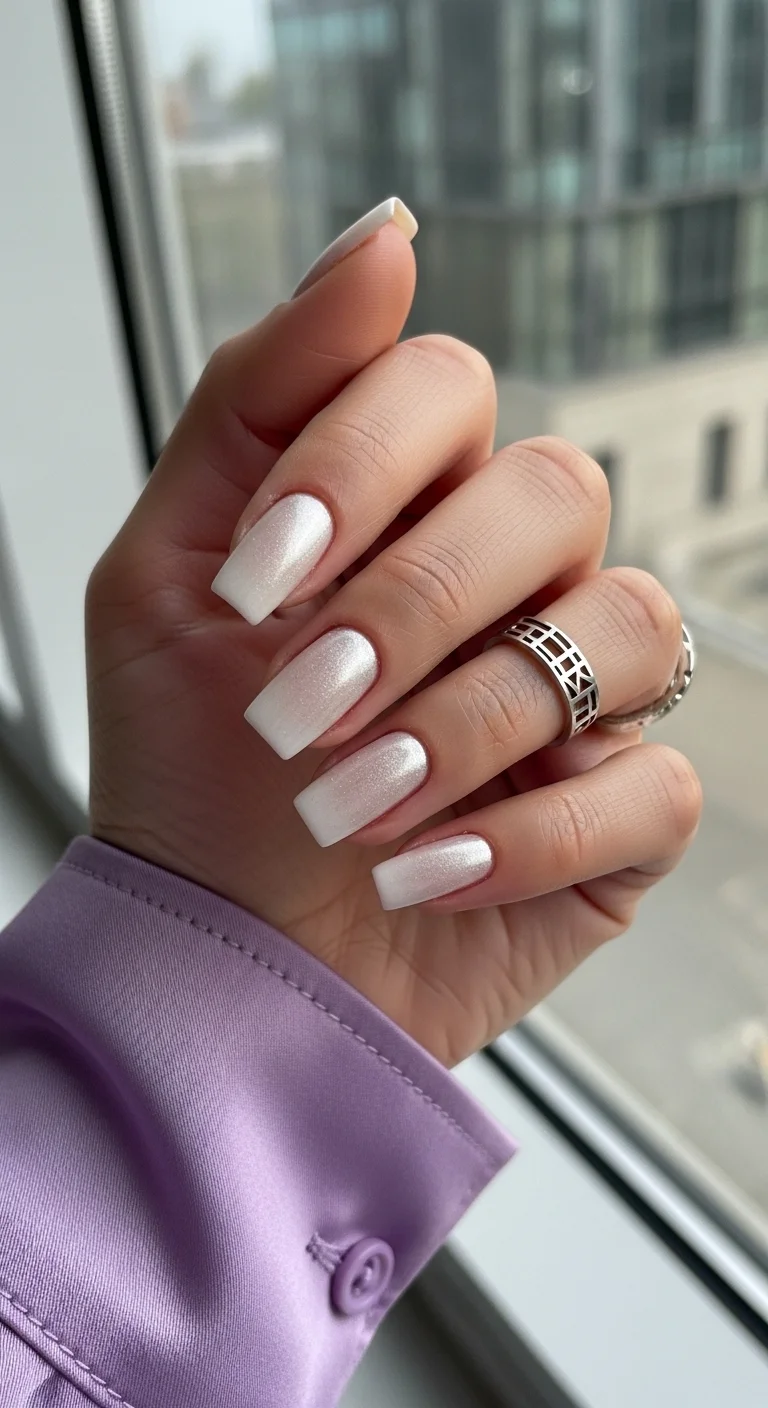
A soft, ethereal pearlescent glow for a classic grad look.
Overview:
Pearl shimmer is a different animal from glitter or chrome. Where glitter reflects light in discrete sparks and chrome reflects it in a mirror sheet, pearl shimmer diffuses light softly across the surface — the effect is luminous rather than reflective. This design uses dense pearl micro-shimmer distributed across a milky white base, with slightly higher concentration near the cuticle fading toward more translucent tips. The result reads as a soft, warm glow rather than a sparkle.
The pink-to-champagne iridescence in the shimmer is what prevents this from looking like plain white nails. In direct light, the pearl particles shift between pink, champagne, and soft gold depending on the angle. It's subtle enough that someone across a room sees "white nails"; someone sitting next to you sees a complex, shifting shimmer. That dual reading — simple from far, detailed up close — is exactly what graduation nails should do.
The limitation: pearl shimmer can look flat in low-light or indoor fluorescent settings. The effect depends on light hitting the particles at various angles, which means office lighting or dim event spaces diminish the impact. If your ceremony is outdoors or in a well-lit venue, this design thrives. In a dark auditoratory, it may read as plain white from the audience.
Design Breakdown:
Pearl shimmer gradient over milky white. The iridescence is the entire design — subtle, warm, and light-dependent.
Base Color: Milky white with warm ivory/cream undertones. Two coats for soft opacity. The warmth in the base complements the pearl shimmer's pink-champagne shift.
Nail Shape: Coffin/ballerina at medium-long length. The flat surface provides room for the shimmer gradient to develop.
Design Element: Dense pearl micro-shimmer with pink-to-champagne iridescence. Slightly denser near the cuticle, more translucent at the tips — a subtle ombre within the shimmer itself.
Finish: Pearlescent glossy — a luminous satin-shimmer hybrid. Not flat matte, not full chrome, but a soft glow.
Get The Look at Home:
A pearl top coat or fine pearl chrome powder creates this effect. The application technique determines whether it looks like a gradient or a flat wash.
- Milky base: Two coats of warm-toned milky white. Let dry fully.
- Pearl shimmer: If using a pearl shimmer polish, apply it over the base with heavier concentration near the cuticle, feathering toward the tip. If using pearl chrome powder, rub it into a no-wipe top coat with a silicone applicator.
- Gradient check: The shimmer should be visibly denser near the cuticle and fade toward the free edge. If it looks uniform, use a clean sponge to dab the tip area and lift some shimmer off.
- Blend: Use a clean makeup sponge to soften the transition zone between dense shimmer and bare tips.
- Seal: One coat of glossy top coat over everything. The shine amplifies the pearl's light-diffusing quality.
27.Emerald Leaf Marble
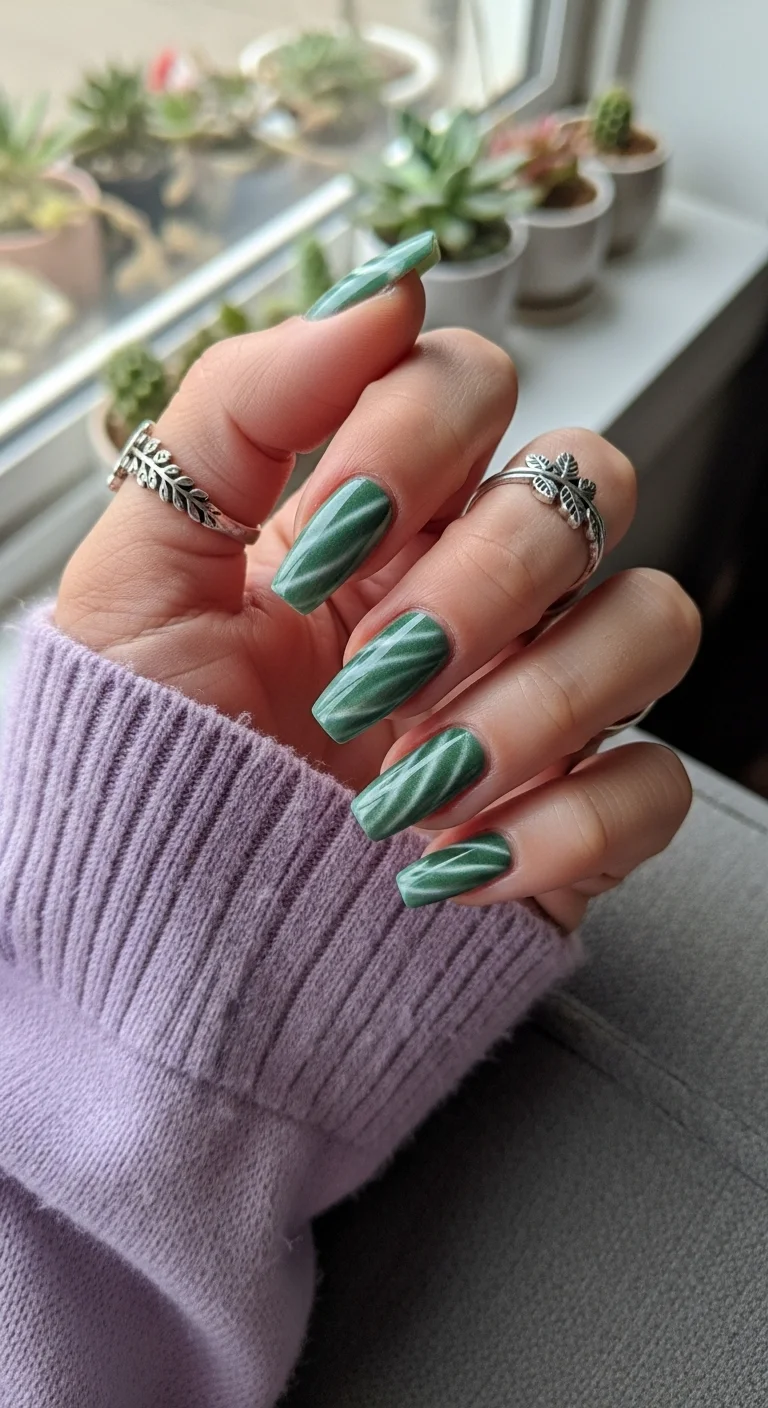
Rich forest green with a magnetic cat-eye depth that shifts with every movement.
Overview:
Emerald green cat-eye polish creates a color that doesn't sit still. The magnetic particles pulled by the wand form diagonal light-refracting streaks through the deep green base, producing a marble-like veining effect that shifts between dark emerald, lighter sage, and faint blue-green depending on the angle. It's less a color and more a living surface — the same nail looks different under every light source.
Green is an unusual choice for graduation nails, and that's precisely why it works. While everyone else reaches for nudes, whites, and pinks, emerald stands out dramatically against a cap and gown. The cat-eye effect adds a dimension that flat green polish can't achieve — the magnetic streak creates depth that makes the nail look almost three-dimensional, like polished gemstone rather than paint.
The magnetic technique requires specific tools and timing. The polish must stay wet while the magnet is applied, which means working one nail at a time and curing each individually. If the polish starts to set before the magnet is positioned, the effect won't form properly. Dark green also shows tip wear and chips more visibly than lighter shades, and the bold color may clash with certain outfit choices. It's a statement design — make sure the statement matches the occasion.
Design Breakdown:
Magnetic cat-eye technique creating marble-like depth in a jewel-tone green. The magnet is the design tool.
Base Color: Deep emerald green with cool blue-green undertones. The magnetic particles create the lighter sage and blue-green areas, so the base polish should be dark and fully saturated.
Nail Shape: Long coffin/ballerina. The flat surface gives the cat-eye streak room to display its full range of color shift.
Design Element: Cat-eye magnetic effect — diagonal light-refracting streaks that create marble-like veining. The green shifts between dark emerald, lighter sage, and faint blue-green.
Finish: Ultra-glossy with optical depth from the magnetic particles. The high shine is what makes the gemstone illusion work — matte would flatten the entire effect.
Get The Look at Home:
Magnetic polish and the corresponding magnet are required. The one-nail-at-a-time approach is mandatory — don't try to magnetize multiple nails simultaneously.
- Base coat: Apply a stain-preventing base coat. Deep greens can tint the nail plate.
- First nail: Apply one thick coat of emerald magnetic polish to a single nail. Work quickly — the polish needs to stay wet for the magnet.
- Magnet placement: Hold the magnet 3-5mm above the wet nail for 10-15 seconds. You'll see the metallic particles shift into diagonal streaks. Don't move the magnet.
- Cure or set: If using gel, cure immediately after magnetizing. If using regular polish, move to the next nail and return to cure/set later.
- Repeat all nails: Do each nail individually. The polish must be wet when the magnet is applied — if it dries first, the effect won't form.
- Top coat: After all nails are set, apply a thick glossy top coat to seal and amplify the dimensional depth of the magnetic particles.
The best graduation nails are the ones that make you feel like yourself — just a more polished version. Whether you went with the minimalist porcelain chrome or the full editorial emerald cat-eye, the design should complement the day, not compete with it.
Pin your favorites to a board now so you have them ready when you sit down in the salon chair. Show your nail tech the actual image, not a description — visual references produce better results than words every time.