Hair Trends
30 Stunning Summer Hair Trends for 2026
Summer 2026 is shaping up to be the season of effortless texture, lived-in color, and accessories that actually do something. The days of spending an hour with a curling iron are fading — this year, it's about working with your hair's natural movement, choosing cuts that air-dry beautifully, and adding pieces that elevate without overcomplicating.
Whether you're growing out a pixie, committed to your bob, or letting your length run wild, these 30 summer hair trends cover cuts, colors, styles, and accessories worth trying. We've pulled together the looks that actually made sense for real life — from beach days to dinner dates and everything in between.
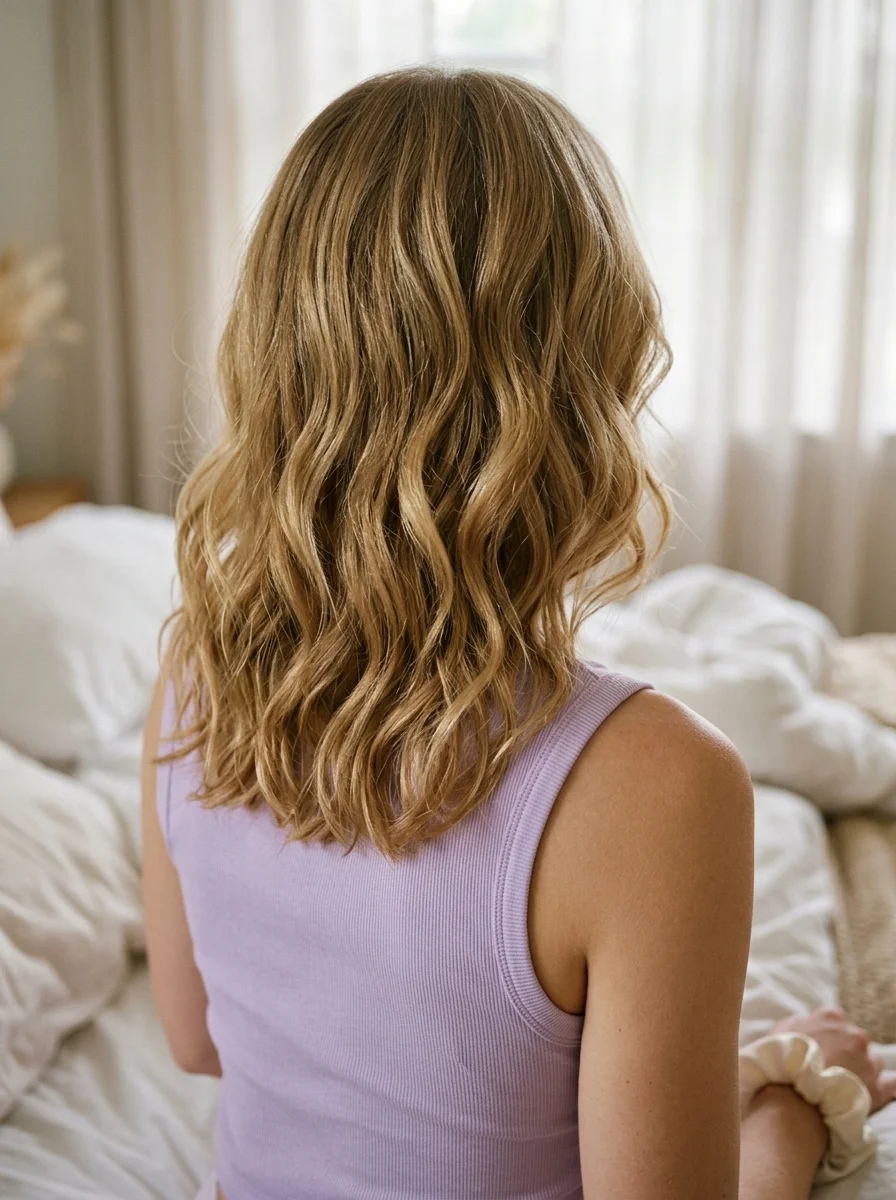
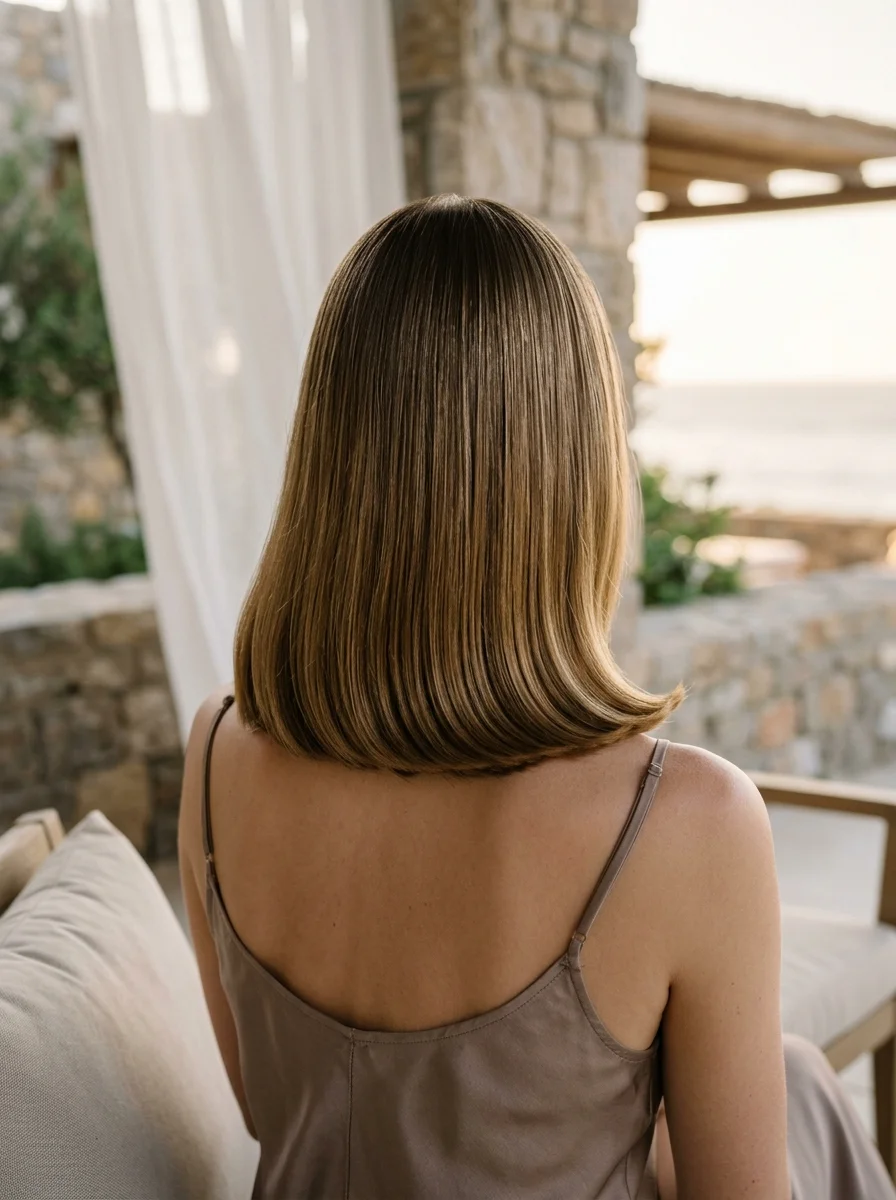
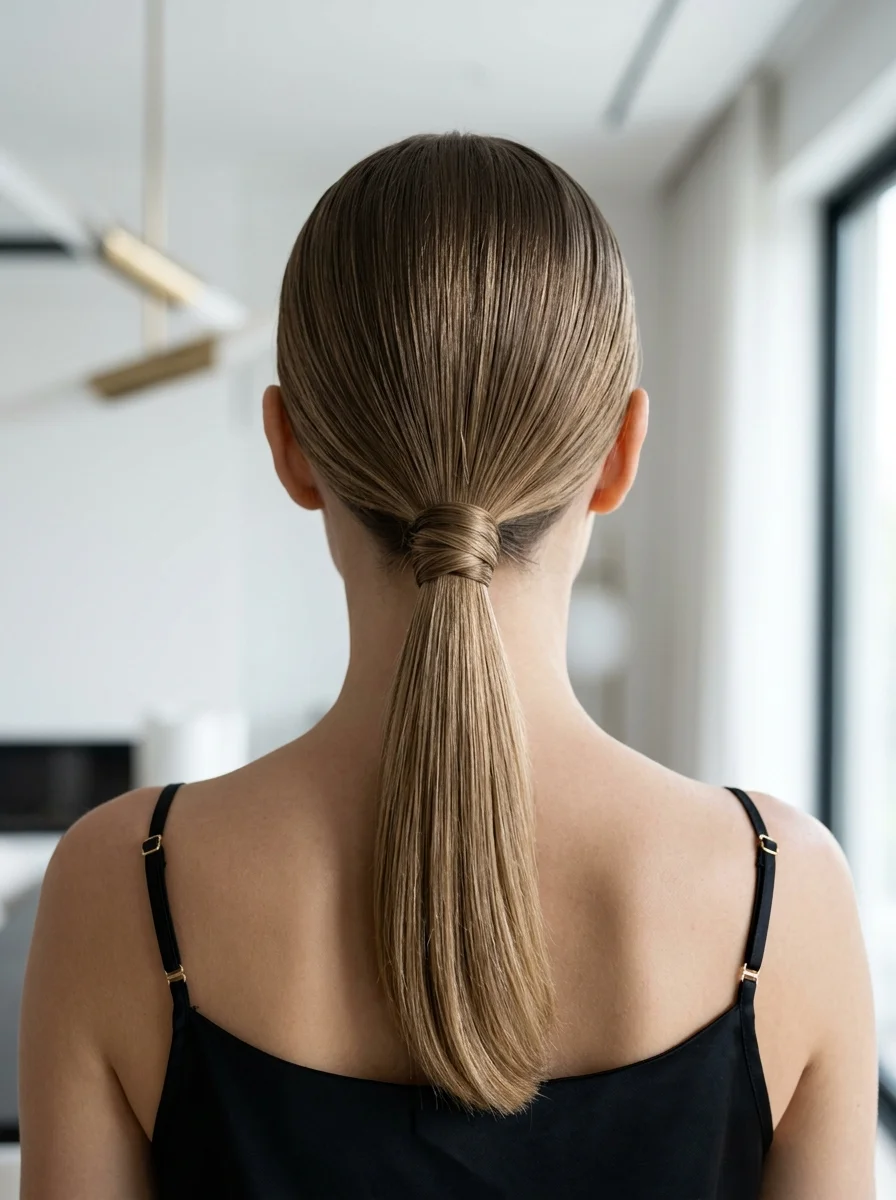
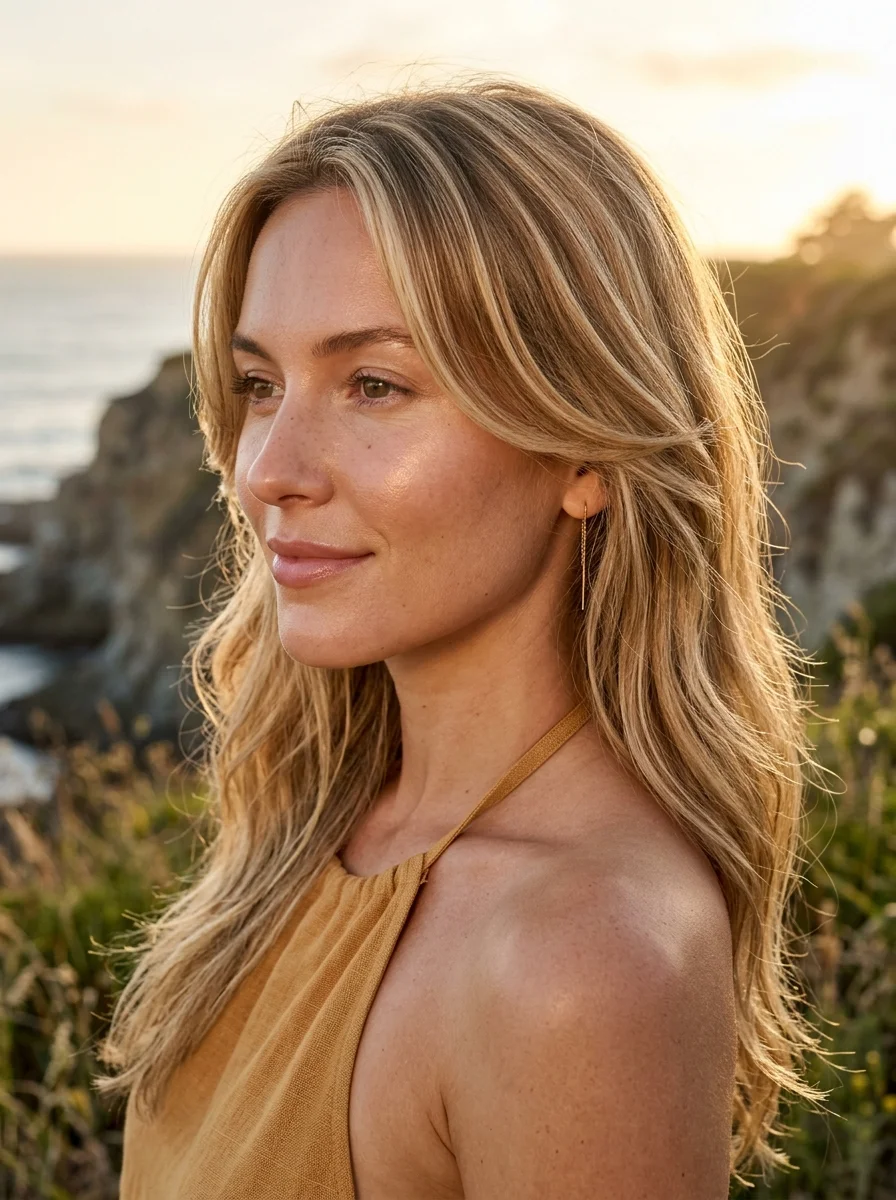
1.Beachy Waves with Subtle Ash Blonde Highlights
The overview: Long, sun-bleached waves with an ash undertone and highlights that catch light without screaming for attention. This is the color that makes you look like you just got back from a coastal holiday, even if you've been at your desk all week. The ash tones keep the blonde from going brassy in summer humidity.
These waves are loose and effortless, the kind you get from twisting damp hair and forgetting about it. The cut is layered enough to add movement but heavy enough to avoid that over-layered, feathery look that dates itself. Ideal for shoulder-length to long hair.
Why this look is popular: Ash blonde has been building momentum for a few seasons now, and it hit its stride in 2026. It works because it neutralizes warmth without washing you out, and it grows out gracefully. The highlights are placed strategically around the face and through the mid-lengths, so you don't need touch-ups every six weeks.
Where this look is suitable: Everyday wear, desk to dinner, weekends away. Casual enough for the farmer's market but polished enough for a nice evening out.
Step by step:
- Start with damp, second-day hair. If hair is clean, spritz with a volumizing spray at the roots.
- Divide into four sections. Twist each section away from your face and let it air-dry about 80 percent.
- Finish with a diffuser. Focus on roots first, then the twisted sections, using low heat.
- Break apart the twists. Shake them loose with your fingers once fully dry.
- Add a lightweight oil. Warm a drop of Moroccanoil Treatment or similar in your palms and smooth through the ends. Avoid the roots.
Tips and tricks: The ash tone needs a purple shampoo once a week to stay cool — skip it for a month and you'll notice the warmth creeping in. For the waves, the twist method works best on hair that's at least shoulder-length; shorter cuts are better off with a 1-inch barrel and a quick wrap.

24 Stunning Festival Hairstyle Ideas for Music Concert Nights 2026 🎶✨
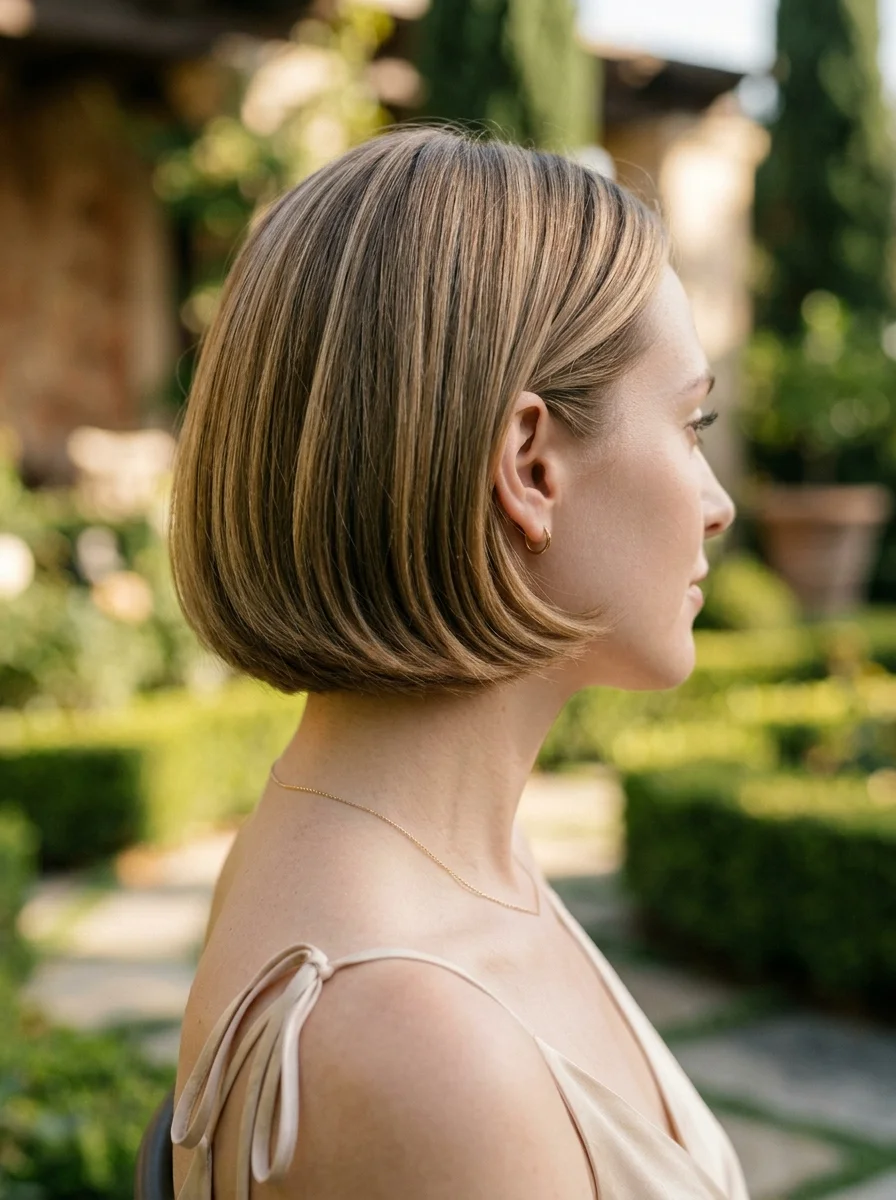
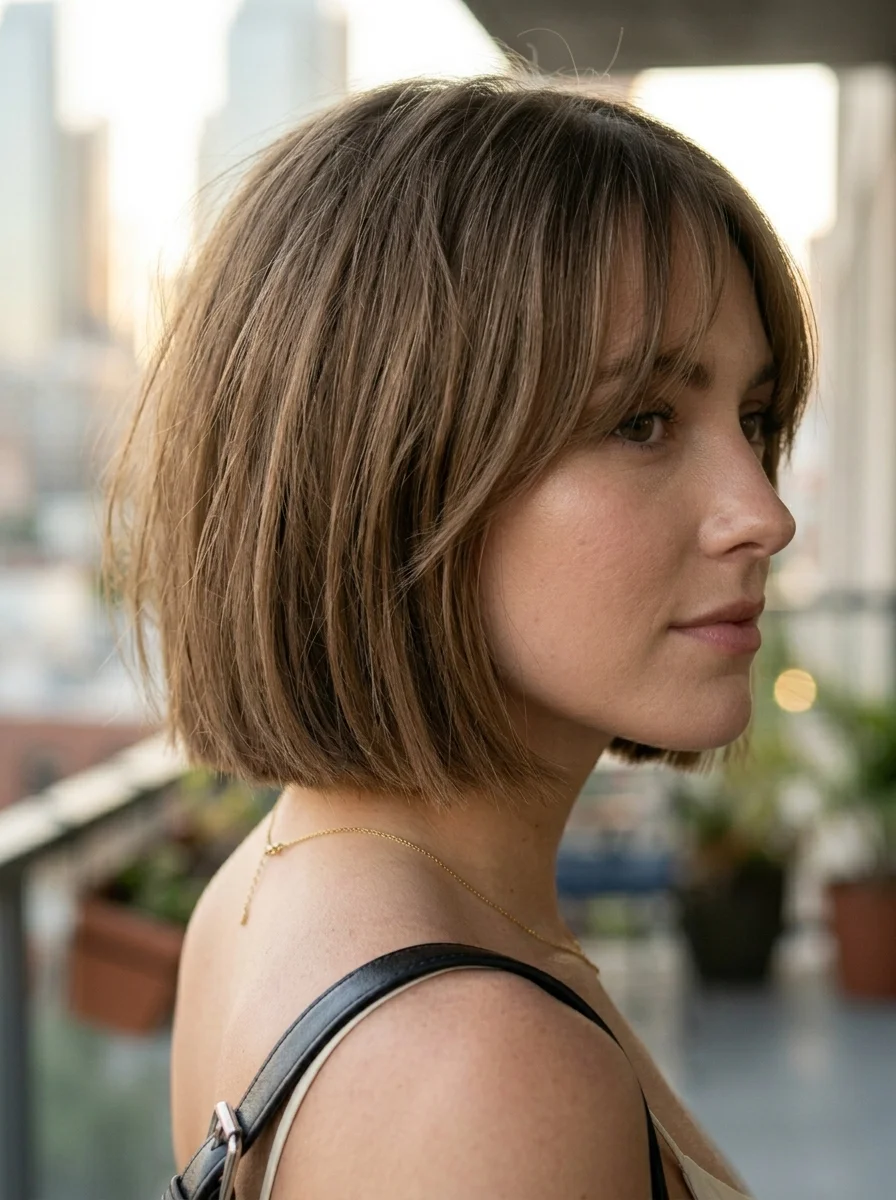
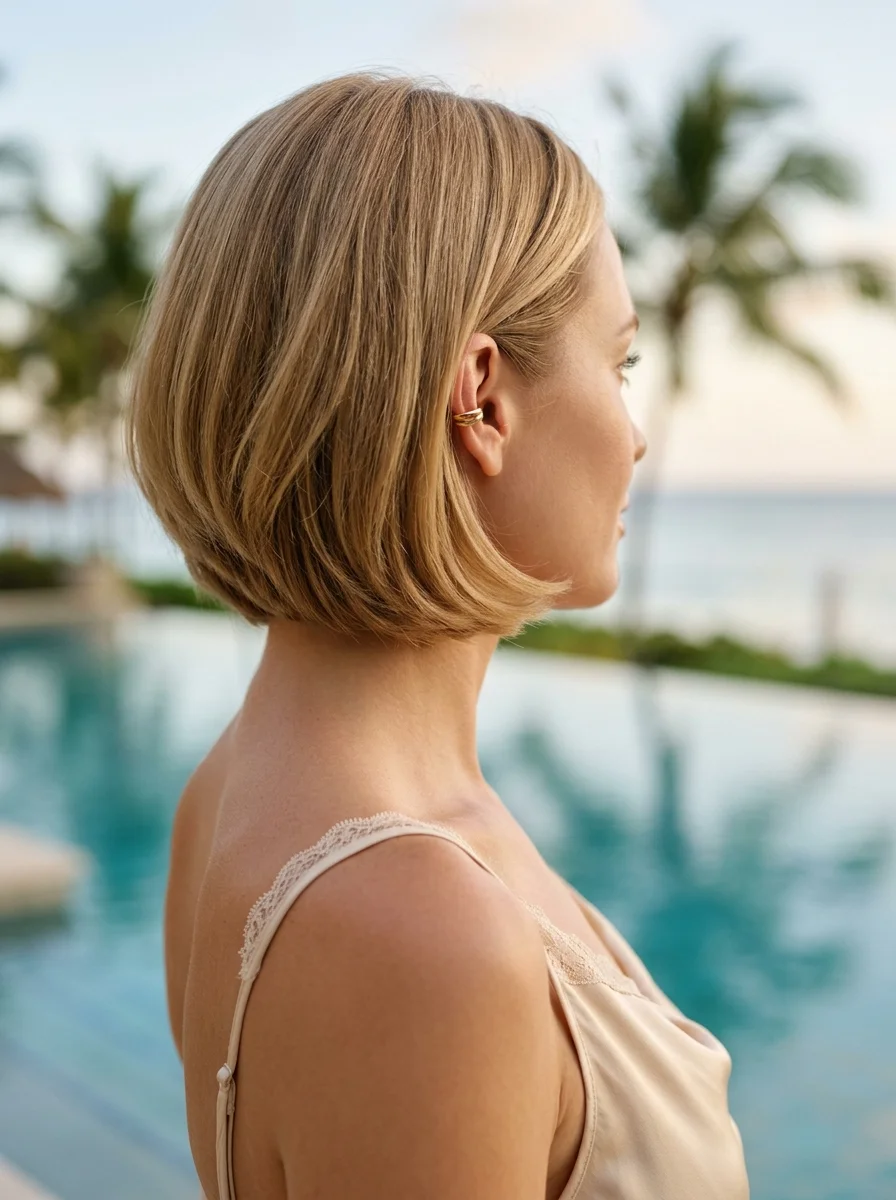
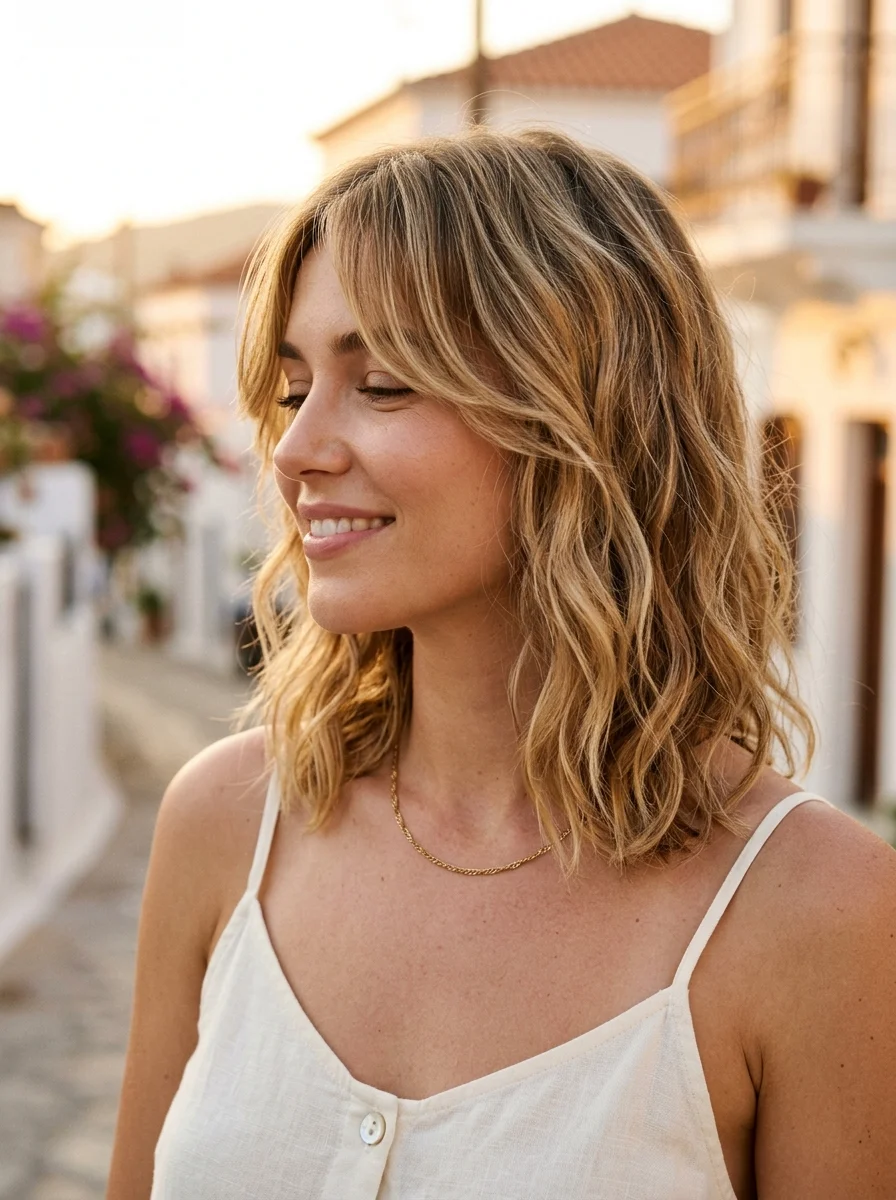
2.Beachy Wavy Bob with Sun-Kissed Highlights
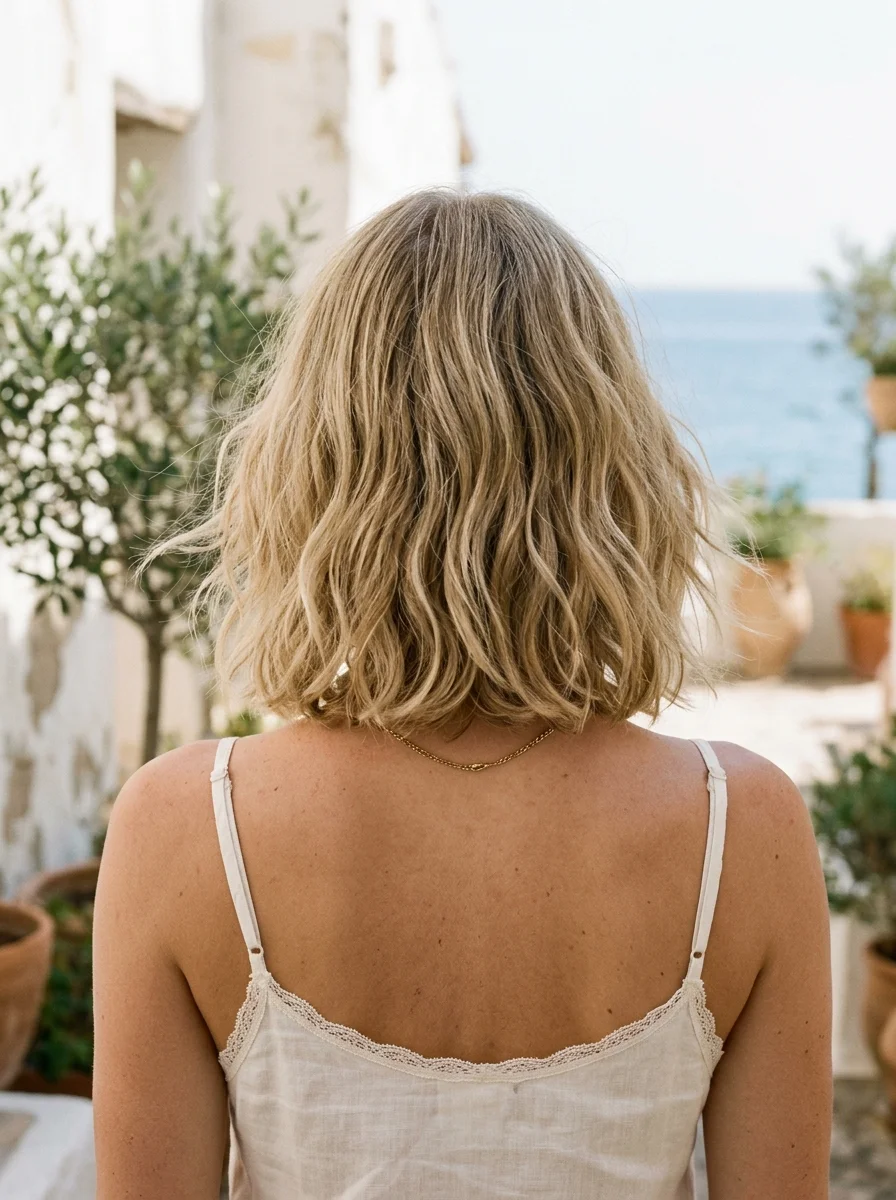
The overview: A chin-skimming bob with subtle wave and highlights that mimic natural sun bleaching. This is the bob for people who want movement without committing to layers. The sun-kissed effect is concentrated on the top and front sections, where the sun hits naturally, giving the whole thing an effortless, I-just-came-from-the-beach feel.
The cut works with hair's natural texture rather than against it. If your hair has a slight wave, this cut will encourage it. If it's straight, a quick texturizing spray and scrunch will get you there. The highlights are painted freehand, so the grow-out is seamless.
Why this look is popular: The bob is a summer staple, and this version solves the two biggest problems: it doesn't require daily heat styling, and the color grows out beautifully. The sun-kissed placement means you can go three to four months between appointments without a harsh line.
Where this look is suitable: Casual to smart-casual settings. Works beautifully for brunches, shopping trips, or anything where you want minimal effort with maximum impact.
Step by step:
- Apply a salt spray to damp hair, concentrating on mid-lengths to ends.
- Scrunch upward from the ends toward the roots, using a microfiber towel.
- Air-dry or diffuseon low heat. Don't touch it while it dries.
- Break the cast once fully dry by scrunching again with dry hands.
- Add a shine spray for a glossy finish without weighing the wave down.
Tips and tricks: This cut is low-maintenance, but it does need a trim every eight weeks to keep the line clean. If you're between colors, a toning gloss can refresh the sun-kissed effect without permanent dye. Bumble and bumble's Surf Spray gives the best texture-to-hold ratio for this length.
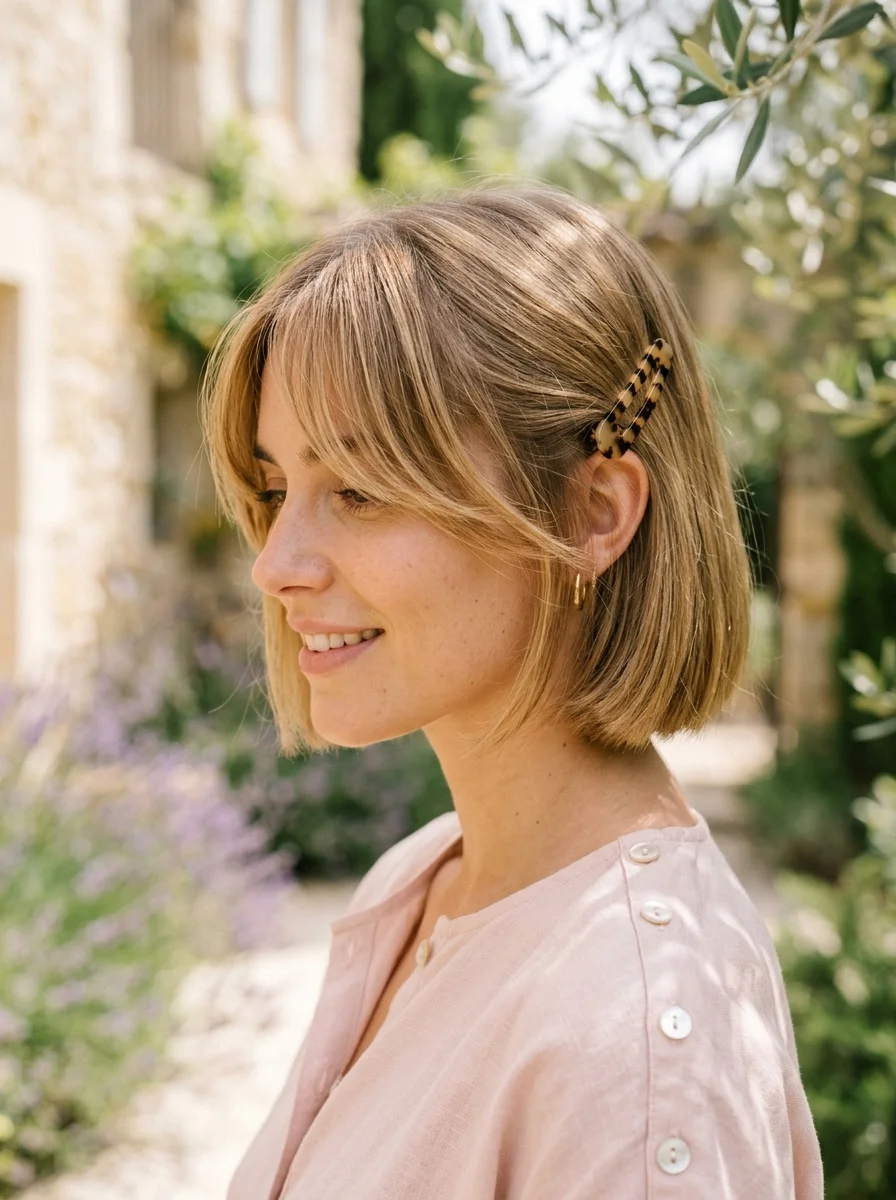
3.Effortless Layered Cut with a Chic Claw Clip
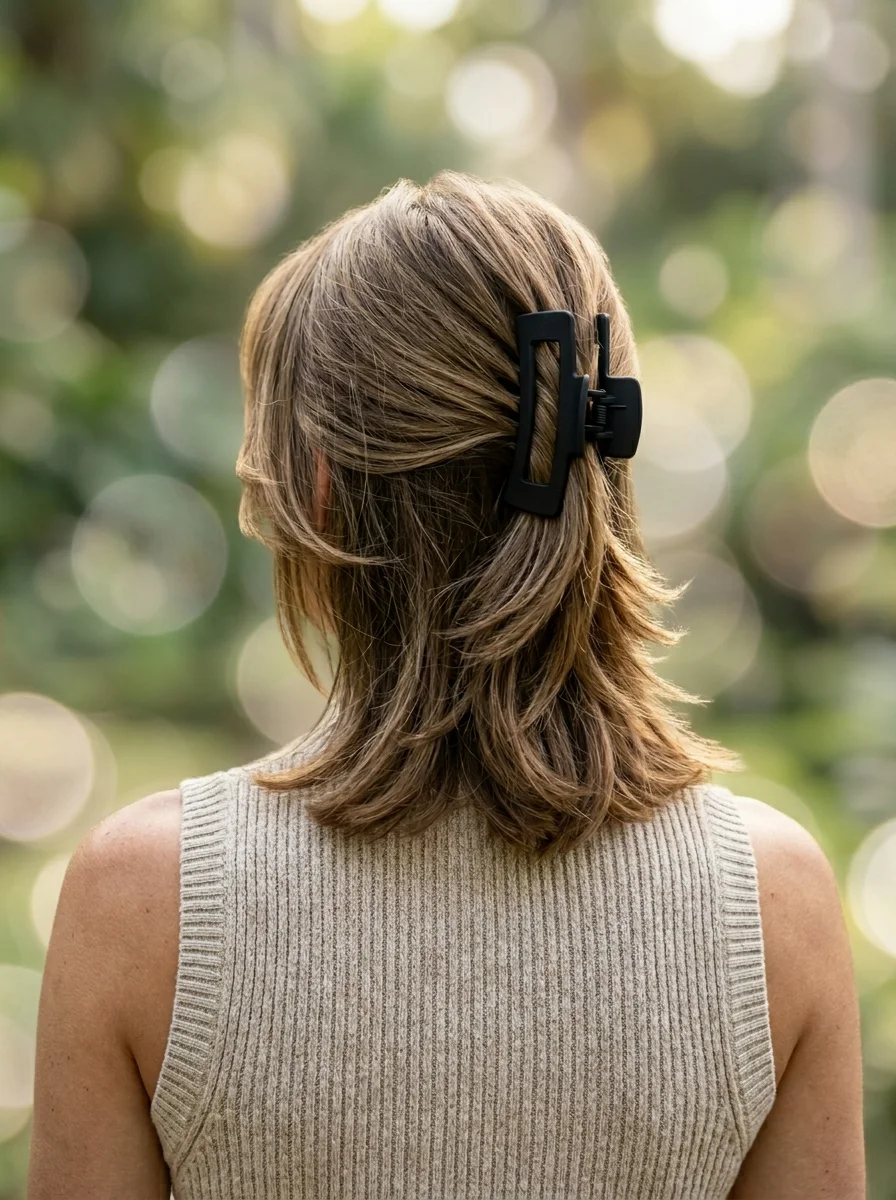
The overview: Soft, face-framing layers paired with a tortoiseshell or matte black claw clip. This is the summer uniform for anyone who wants their hair off their neck without looking like they're going to the gym. The layers provide movement when the hair is down, and texture that keeps a claw clip from slipping.
The claw clip isn't just an accessory here — it's doing real work. A good clip holds the whole weight of the hair, and the layers naturally create a more interesting silhouette than a blunt twist would. The look works equally well for straight, wavy, and curly textures.
Why this look is popular: Claw clips have been trending for a while, but 2026 is the year they became an intentional style choice rather than a rushed, bad-hair-day solution. The right clip with the right cut creates a silhouette that reads as effortless rather than unkempt.
Where this look is suitable: Works for everything from coffee runs to casual dinners. It's the kind of style you can wear to the supermarket and then to drinks without changing anything.
Step by step:
- Start with textured hair. Second-day hair or hair spritzed with dry shampoo holds the clip best.
- Gather at the crown.Use your fingers to pull hair back to the desired height. Don't use a brush — the finger-combed look is intentional here.
- Twist loosely. One or two twists, not tight. The twist should be relaxed enough that the layers still have movement.
- Secure with the clip. Open the claw clip and clamp it over the twist. Angle it slightly upward for more hold.
- Pull out face-framing pieces.Deliberately leave a few thin sections loose around the temples and ears.
Tips and tricks: Not all claw clips are equal. You want one with strong spring tension and teeth that grip. For medium-length hair, a 3-to-4-inch clip works well. For longer or thicker hair, go up to 5 inches. Emi Jay makes excellent clips that hold without pulling.

30 Stunning Beach Nail Ideas for the Best Vacation in 2026 🌊
4.Tousled Blonde Bob with Effortless Fringe
The overview: A chin-length bob with wispy fringe and the kind of messy texture that looks intentional. The blonde is a warm, buttery shade that brightens the face without needing constant toning. The fringe is cut to blend into the layers, so it doesn't look like an afterthought.
What makes this bob different from previous years is the texture. It's not sleek, not perfectly waved — it's tousled, slightly imperfect, and full of movement.
Why this look is popular: The texture-first approach to bobs is defining summer 2026. People are rejecting the polished, blow-dried look in favor of something that moves naturally. The wispy fringe also works as a softening element for stronger jawlines and square face shapes.
Where this look is suitable: Everyday summer styling. Ideal for those who want a short cut but aren't ready for a pixie. Works in both professional and social settings.
Step by step:
- Apply a heat protectant to damp hair, then rough-dry with a hairdryer and your fingers.
- Use a flat iron to create bends, not curls. Clamp and twist away from the face at random sections.
- Run your fingers through to break up the bends and create that tousled effect.
- Work a matte paste through the ends for separation and texture.
- Move the fringe back and forth slightly to soften the line.
Tips and tricks: The fringe is the make-or-break element. Ask your stylist for a fringe that's slightly heavier in the middle and thins toward the edges — it creates a softer frame and grows out better. Oribe Dry Texturizing Spray is perfect for refreshing the texture on day two.
5.Textured Pixie Bob with a Golden Geometric Pin
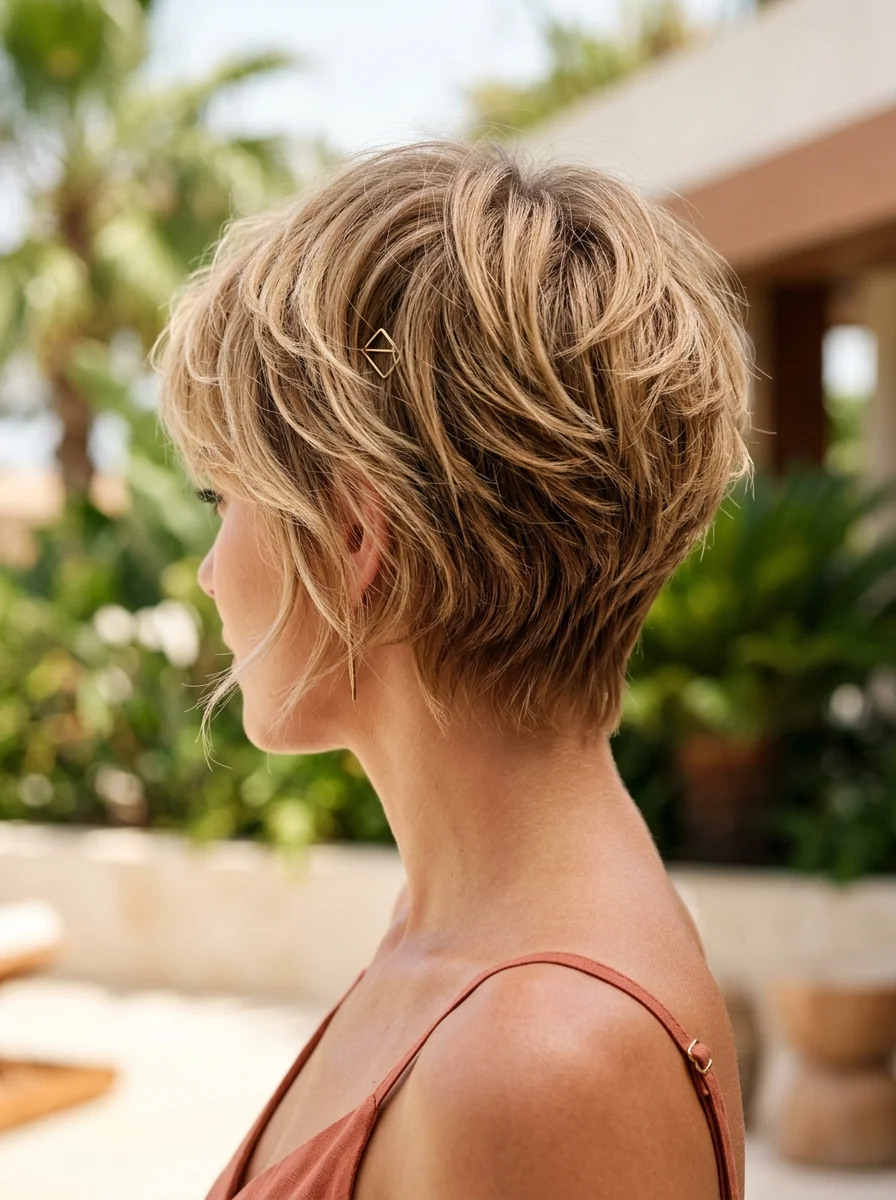
The overview: A short, textured cut that sits between a pixie and a bob, with longer layers on top and a shorter nape. The piece that makes it summer-ready is the golden geometric pin — a sharp, architectural accent that catches light and adds a deliberate focal point to an otherwise undone cut.
The pixie bob is one of those cuts that looks great on almost everyone if the proportions are right. The longer top allows for styling versatility — you can sweep it forward, push it back, or add height at the crown. The pin is the finishing move that says you thought about this.
Why this look is popular: Short hair is having a real moment in 2026, and the pixie bob is the gateway cut. It's short enough to keep you cool but long enough to style. The geometric hair pin trend started on the runways and has filtered into everyday wear as people look for ways to elevate simple cuts.
Where this look is suitable: This reads edgy and polished simultaneously. Great for creative workplaces, nights out, and summer events where you want a striking, minimal look.
Step by step:
- Work a volumizing mousse through damp hair, focusing on the crown.
- Blow-dry with a round brush to add lift at the roots and smooth the top layers.
- Apply a small amount of pomade to your fingertips and pinch through the ends for texture.
- Decide the side placement. Sweep the longer section to one side.
- Secure with the geometric pin at the temple, angling it slightly backward for a modern look.
Tips and tricks: The cut needs maintenance every four to six weeks to keep the shape clean. For the pin, look for gold-tone metals that won't tarnish in summer heat — Jennifer Behr and Lelet NY make excellent options that double as jewelry.
27 Stunning Beach Wedding Hairstyles for Brides & Family 2026 🌊💍
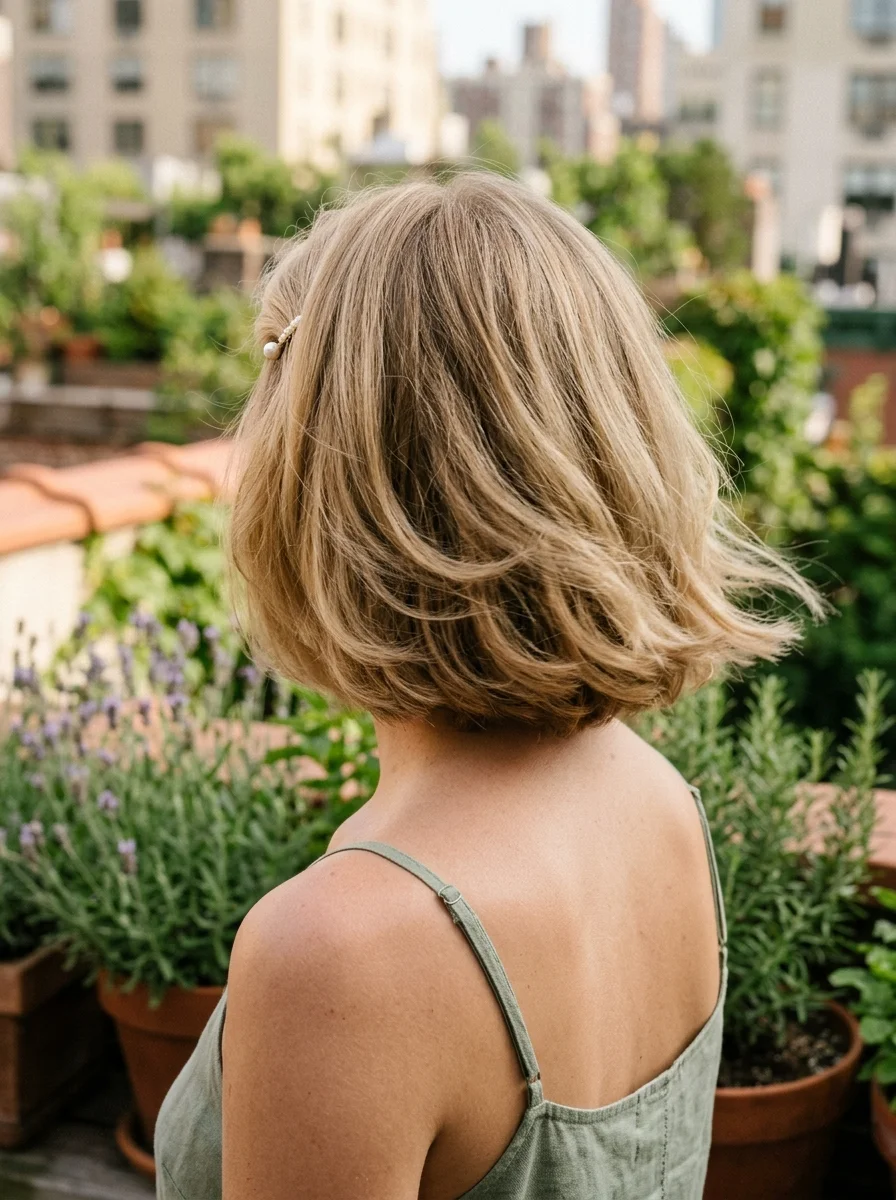
6.Golden Hour Waves with a Pearl Accent
The overview: Warm, golden-toned waves that catch the light the way water does at sunset. The color here is everything — a honey-gold base with subtle copper undertones that bring warmth to the skin. A single pearl clip or pin adds the finishing touch, giving the whole look a polished, understated elegance.
The waves are created with a larger barrel — 1.5 inches or more — so they sweep rather than spiral. This avoids the ringlet effect and creates a more sophisticated, Old Hollywood-meets-modern finish. The pearl accent is placed at the side or back, wherever it catches the most light.
Why this look is popular: Golden hair colors with warm undertones are the counterpoint to the ash-blonde trend, and they're perfect for summer when skin has more warmth. Pearl accessories are trending because they add a subtle, organic luxury without the flash of crystal or rhinestone.
Where this look is suitable: Garden parties, summer weddings, evening dinners. The polished wave reads as formal-adjacent without being stiff — it works for dressy occasions that don't require an updo.
Step by step:
- Prep with a heat protectant and a volumizing mousse at the roots.
- Section hair horizontally. Working from the bottom up, wrap 2-inch sections around a 1.5-inch curling iron, leaving the ends out for a more modern finish.
- Allow curls to cool completely in the clamped position before releasing.
- Brush through with a wide-tooth comb or paddle brush to soften into waves.
- Set with a light-hold hairspray,then place the pearl accent at the desired spot.
Tips and tricks: The key to this look is the cool-down period. If you release the curl while it's still hot, it drops within minutes. Let each section cool in your palm for 10 seconds before releasing. For the pearl accent, make sure the backing is secure — real mother-of-pearl pieces are heavier than they look.
7.The Sunset Wave Bob
The overview: A shoulder-length bob with soft, cascading waves and a color gradient that lives up to its name. The base is a deep brunette that transitions into warm copper and honey tones through the ends, mimicking the colors of a sunset. The waves are uniform enough to look intentional but loose enough to move freely.
This is a dimensional color technique that works best on medium to thick hair. The waves catch each shade differently, creating a shifting effect that changes as you move. It's a statement look without being loud — the color does the talking while the cut stays simple and elegant.
Why this look is popular: Dimensional color is replacing single-process dye as the preferred summer hair treatment. The sunset effect — dark at the roots, warm through the mid-lengths — creates depth and movement. It also means less frequent touch-ups since the roots are intentionally darker.
Where this look is suitable: Evening events, dinner dates, summer parties. The sunset effect photographs beautifully and works well in warm, golden lighting.
Step by step:
- Apply a heat protectant and blow-dry hair smooth with a round brush.
- Use a 1.25-inch curling iron. Curl sections away from the face, holding for 8 seconds each.
- After all sections are curled, run your fingers through to break the curls into waves.
- Smooth a shine serum over the surface for gloss.
- Finish with a flexible-hold hairspray that allows movement.
Tips and tricks: The sunset color is best achieved with a balayage-to-foil transition. Ask your colorist for a shadow root that melts into copper babylights, then softens into honey at the ends. This prevents the stripe effect that can happen with three distinct colors. Oribe Apres Beach Wave and Shine Spray enhances both the wave and the color dimension.

34 Stunning Summer Butterfly Nails for Women in 2026 🦋
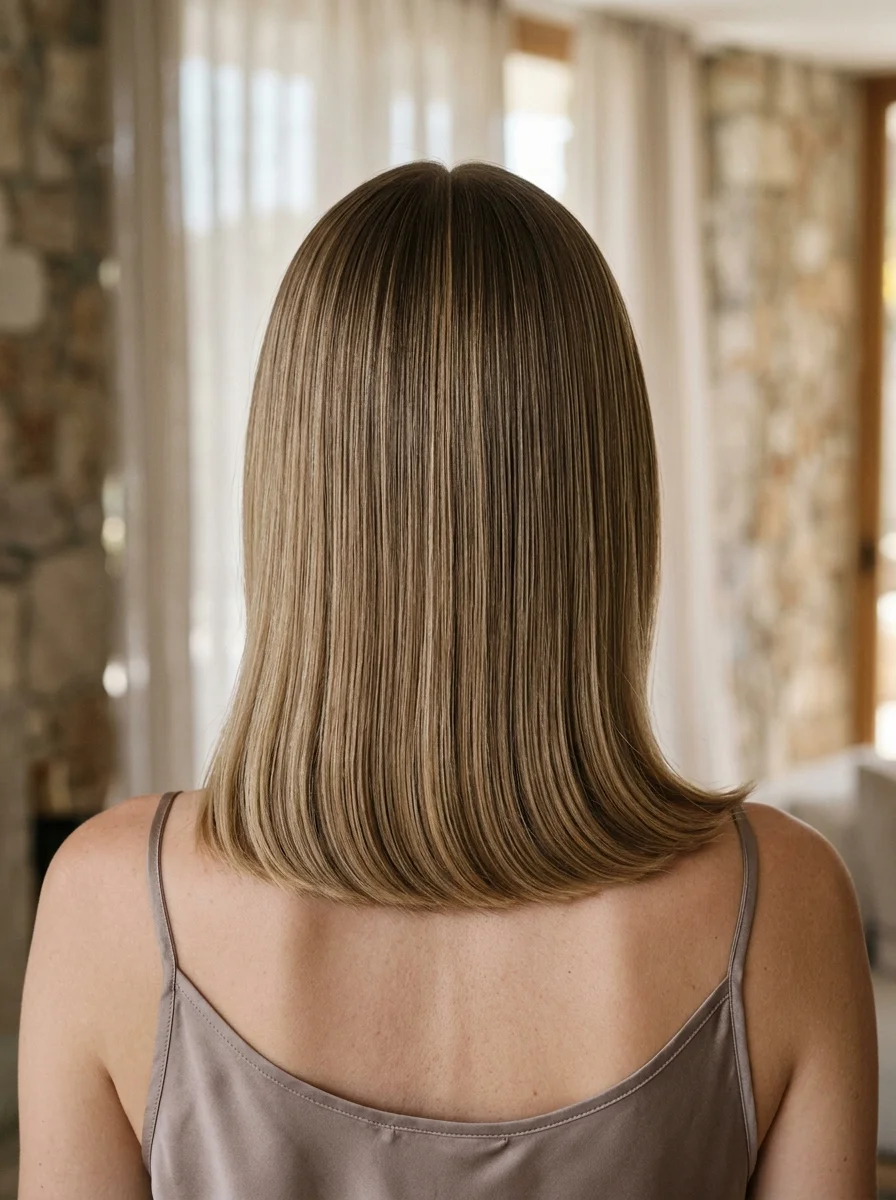
8.Sleek Chin-Length Bob with Subtle Honey Highlights
The overview: A precision-cut bob that hits exactly at the chin, worn pin-straight with a glass-like finish. The honey highlights are so subtle they almost blend in — they catch the light rather than announce themselves. This is the anti-messy hair trend: clean lines, sharp edges, and minimalist polish.
The chin-length bob requires commitment. It's short enough that any asymmetry in the cut is immediately visible, so the execution has to be perfect. The payoff is a silhouette that looks expensive, intentional, and incredibly chic. The honey highlights add just enough warmth to prevent the look from feeling severe.
Why this look is popular: The sleek bob re-emerged in 2026 as a response to two years of undone, textured hair. It's a deliberate departure from the beachy wave dominance. For people who prefer structure and precision, this is the summer cut.
Where this look is suitable: Corporate environments, formal events, presentations — anywhere you want to communicate polish and competence. Also works beautifully for evening occasions where you want a sleek, minimal silhouette.
Step by step:
- Start with clean, damp hair. Apply a smoothing cream and heat protectant from roots to ends.
- Blow-dry with a paddle brush,directing the hair downward. Use a nozzle attachment on your dryer for concentrated airflow.
- Section carefully. Work in thin, horizontal sections starting from the nape.
- Flat iron each section in one smooth pass. Use a high-quality flat iron with adjustable heat — 350°F for fine hair, 400°F for thicker textures.
- Finish with a shine spray and a drop of hair oil smoothed over the surface for that glass-like finish.
Tips and tricks: The sleek bob is punishing on damaged ends. If you have split ends or breakage, this cut will highlight every single one. Get a fresh trim before debuting this look. For humidity resistance, Living Proof No Frizz Humidity Shield is worth the investment — it keeps the line crisp even on sticky summer days.
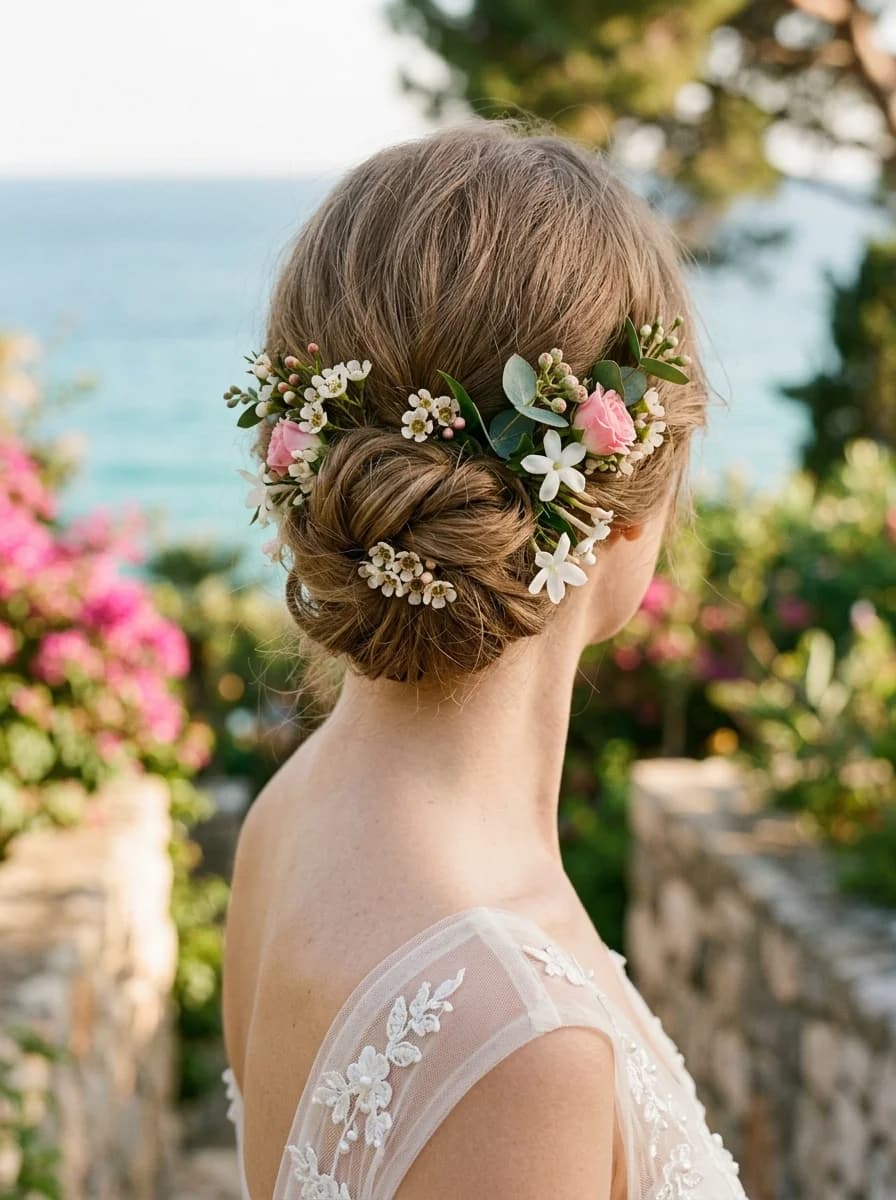
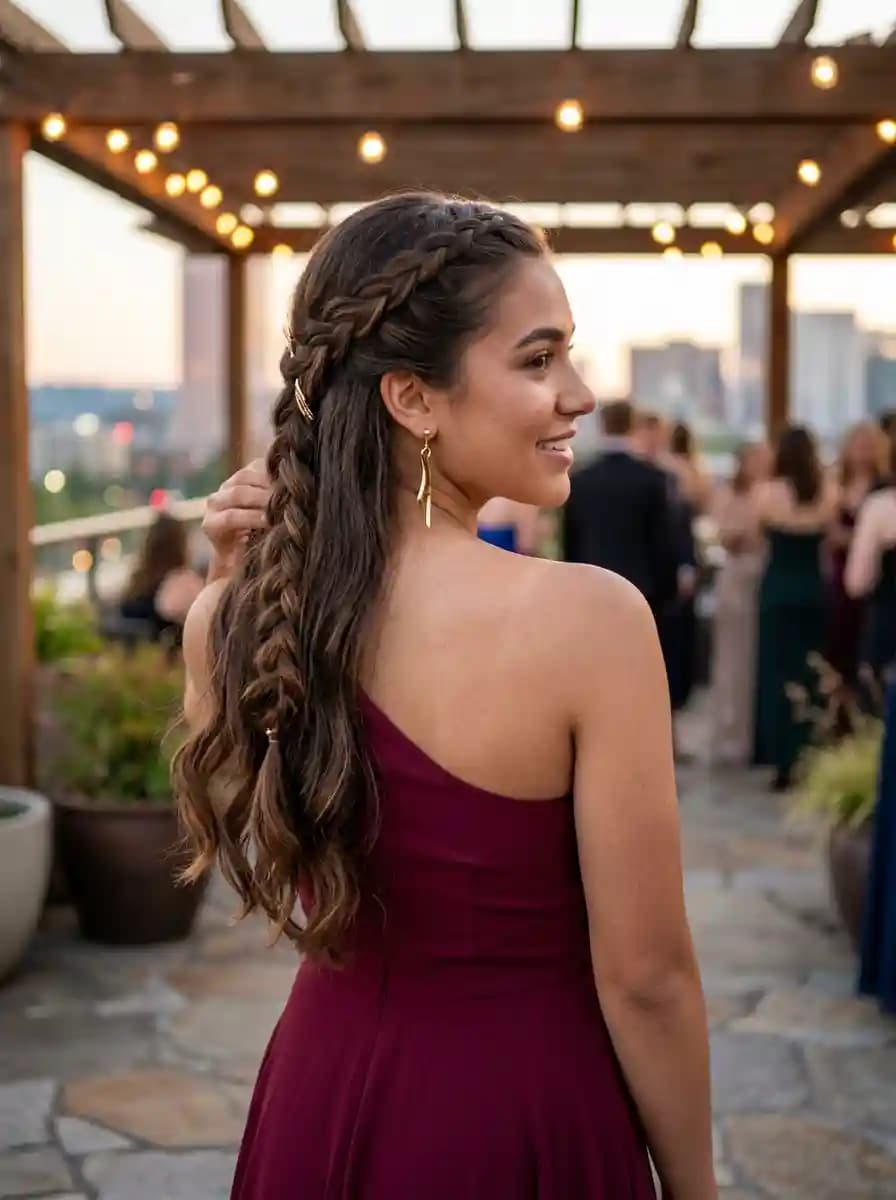
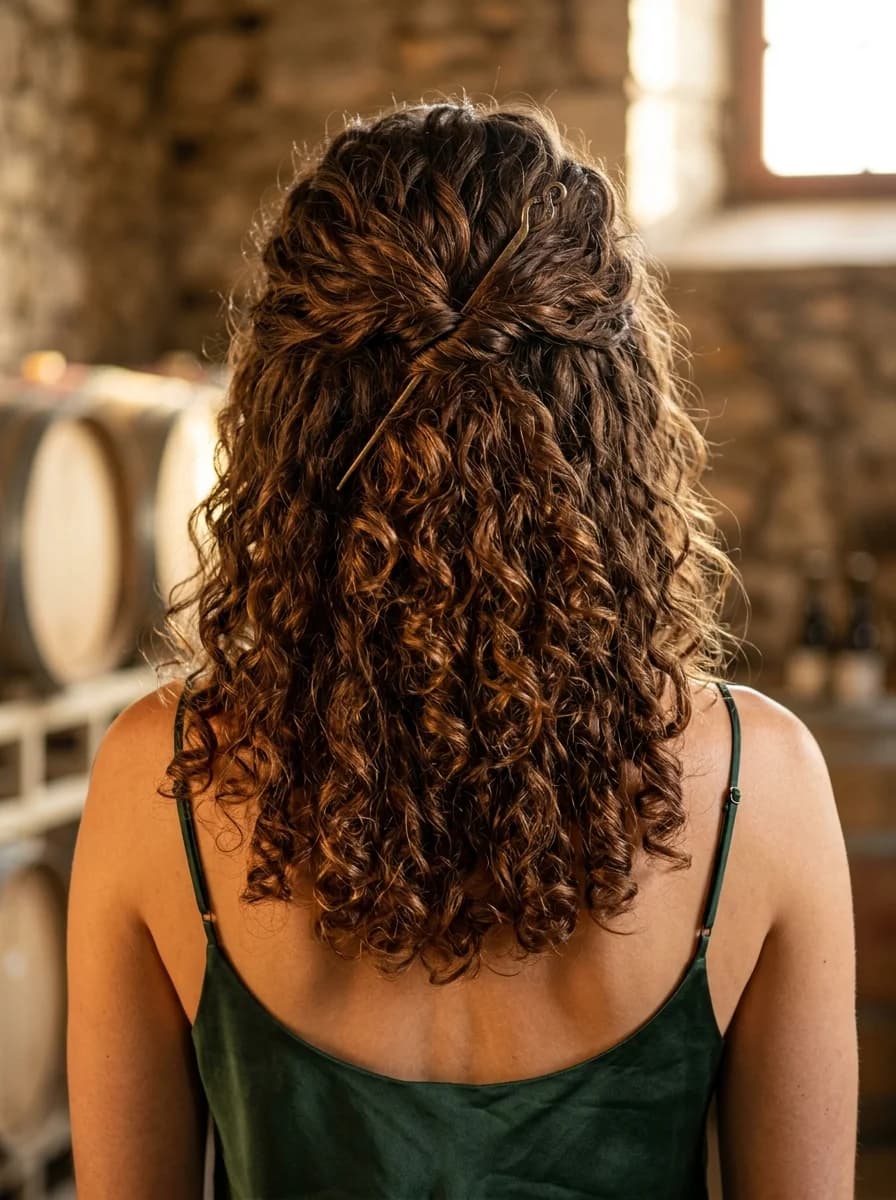
9.Romantic Braided Half-Up with Pearl Accent

The overview: A half-up style woven with a delicate three-strand braid that crowns the head, finished with a pearl accent at the join. The rest of the hair flows freely in soft waves. It's romantic but not fussy, the kind of style that works equally well for a garden wedding and a summer date.
The braid acts as a functional headband, keeping the hair off the face while allowing the length to stay down. The pearl accent draws the eye to the braid's endpoint and adds a touch of vintage elegance. The overall effect is soft, feminine, and deliberately undone.
Why this look is popular: Half-up styles are consistently popular because they solve the problem of keeping hair out of your face without committing to a full updo. The braided version adds structural interest that a simple gathering can't achieve. Pearls continue their resurgence as the summer accessory of choice.
Where this look is suitable: Weddings, garden parties, bridal showers, romantic dinners. It hits the sweet spot between casual and formal.
Step by step:
- Prep with a texturizing spray for grip. Braids hold better on day-old or textured hair.
- Choose your starting point.Typically one temple, about two inches above the ear.
- Dutch braid across the crown. Cross strands under instead of over for a raised effect. Add sections from the hairline as you go.
- Continue past the opposite ear, then finish the braid as a standard three-strand braid for the last few inches.
- Pin the end behind the opposite ear,tucking it under the rest of the hair. Secure with bobby pins, then add the pearl accent at the meeting point.
Tips and tricks: This style works best on hair with some natural wave or texture — stick-straight hair tends to let braids slip. If your hair is fine, backcomb the section where you'll place the pin to give the pearl accent something to grip. For the waves, use a 1-inch barrel and brush out after cooling.
20 Stunning Half Up Half Down Hairstyles for Prom Night 2026 💃✨
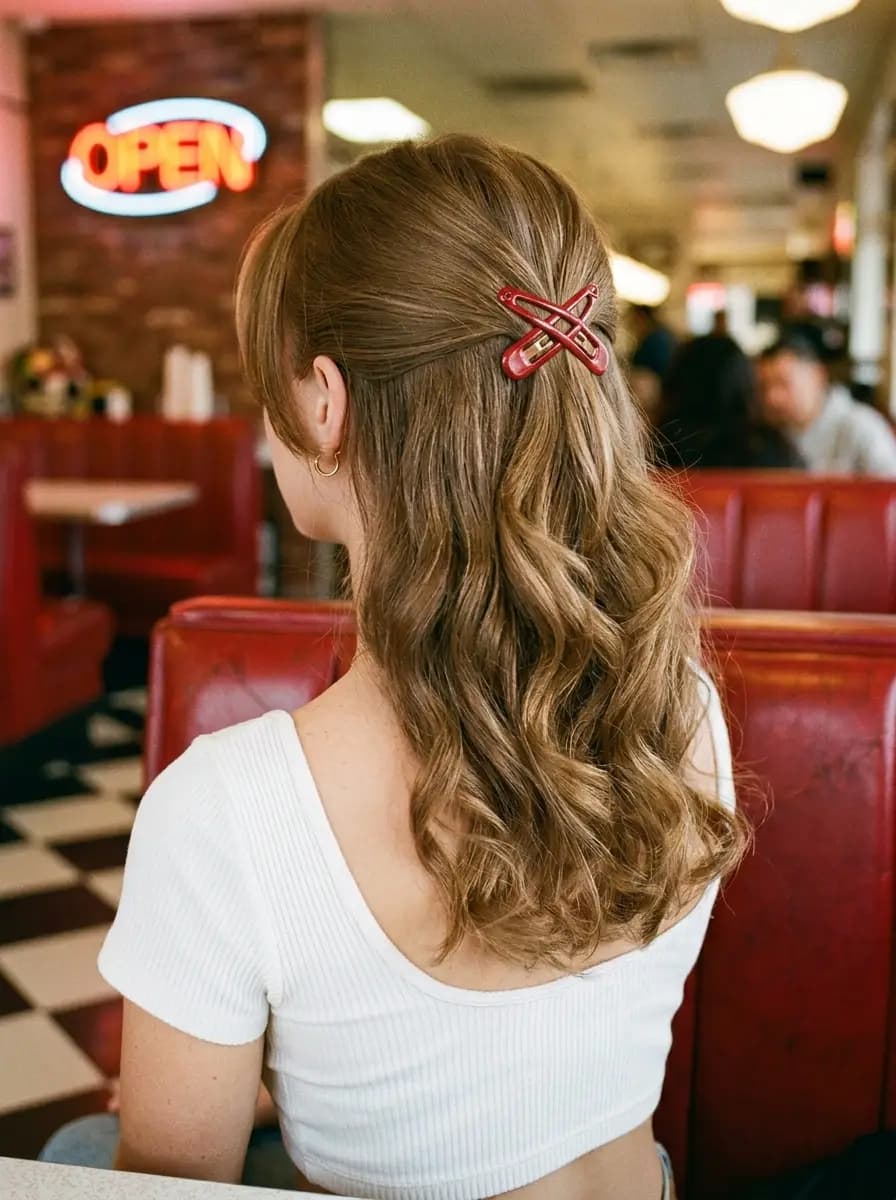
10.Braided Band Low Ponytail with Face-Framing Tendrils
The overview: A low ponytail wrapped with a thin braid at the base, with soft tendrils left out to frame the face. The braided band element elevates what would otherwise be a simple ponytail, adding texture and detail where the elastic would normally sit. The tendrils soften the whole silhouette.
The braid is a small section of hair taken from underneath the ponytail, braided, and wrapped around the elastic. It's a small detail that makes a significant visual impact. The face-framing pieces are intentionally varied in length — some at the cheekbones, some at the jaw — for a relaxed, organic feel.
Why this look is popular: The ponytail is summer's most practical style, but 2026 demands that practicality come with intention. The braided band adds artisanal detail without requiring an elaborate braid technique. It's also a great way to hide a hair tie that doesn't quite match your hair color.
Where this look is suitable: Daily wear, casual work settings, summer festivals, travel. It's practical enough for active days but detailed enough to feel dressed up.
Step by step:
- Smooth hair into a low ponytail at the nape. Secure with a clear elastic.
- Take a small section from the underside of the ponytail, about half an inch wide.
- Braid that section into a standard three-strand braid, securing the end with a small clear elastic.
- Wrap the braid around the ponytail elastic, covering it completely. Tuck the end underneath and pin with a bobby pin.
- Pull out face-framing tendrils.Choose sections that fall naturally and vary the lengths. Curl them loosely with a 1-inch iron if desired.
Tips and tricks: For the braid wrap, use a matching hair elastic so if the braid end peeks out, it won't be obvious. The tendrils should be cut deliberately — not just the baby hairs that were already there. If you have layers, they naturally serve as tendrils.
11.Boho Crown Braid with Lavender Accents
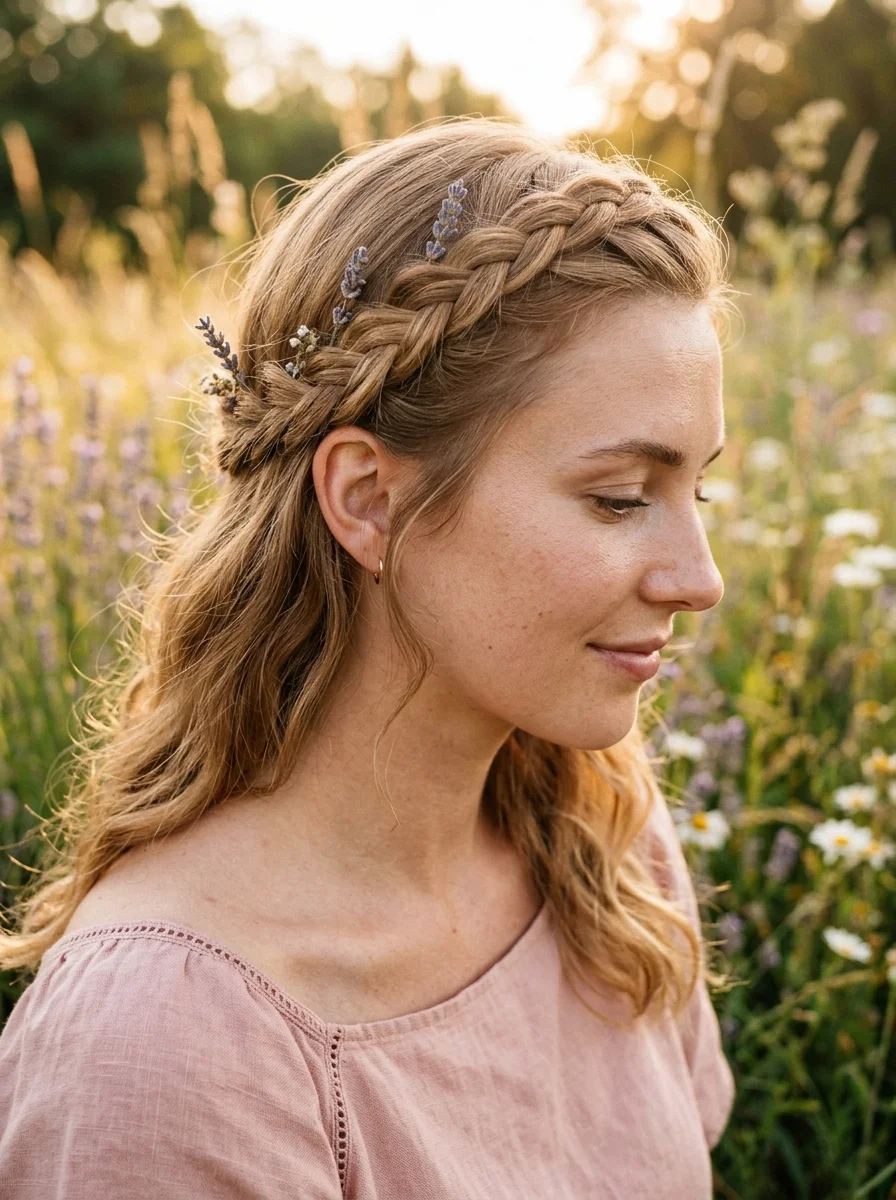
The overview: A crown braid woven with small sprigs of dried lavender throughout. The braid wraps around the head like a headband, with the rest of the hair loose or in a low bun. The lavender adds a subtle purple hue and a natural, aromatic element that feels authentically boho rather than costume-y.
Crown braids have been around forever, but what makes this version feel fresh is the integration of botanicals. Dried lavender holds up better than fresh flowers, won't wilt in heat, and adds a subtle color contrast against light or medium hair tones.
Why this look is popular: The botanical braid trend gained momentum in 2026 as festival and wedding hair moved toward more natural, organic elements. Lavender specifically works because it's visually subtle but distinctive, and the dried stems are durable enough to last through a full day or night.
Where this look is suitable: Music festivals, outdoor weddings, bohemian-themed events, garden parties. It would feel out of place in a corporate setting, but anywhere relaxed and creative is ideal.
Step by step:
- Start with textured hair. Apply a dry texturizing spray throughout for grip.
- Part hair behind one ear and divide it into three sections.
- Dutch braid backward across the crown, adding sections from the hairline as you go. Keep the tension loose.
- As you braid, place dried lavender stems along the outer edge of the braid, weaving them into the sections.
- Pin the end behind the opposite ear,tucking it into the base of the braid.
Tips and tricks: Dried lavender is available at most craft stores and online. Trim the stems to about 2 inches before using. If you have very dark hair, use lighter purple or even white lavender for contrast. On blonde or light brown hair, the natural purple tone shows up well. A flexible-hold hairspray will keep the braid intact without stiffening the lavender.
29 Bright Lemon Nail Art Designs for Summer & Spring (2026)
12.Effortless Beachy Curls with a Hint of Sunshine
The overview: Loose, voluminous curls with subtle golden highlights that catch sunlight. This isn't the tight, uniform curl you'd get from a small-barrel iron — it's a looser wave-curl hybrid that moves freely and looks naturally tousled. The highlights are painted around the crown and face, creating a halo effect that reads as sun-kissed.
The technique combines two barrel sizes for a more organic curl pattern. Larger sections get a looser wave, smaller sections get a tighter curl, and the mix creates that effortless, beachy texture that looks like it happened on its own. The golden highlights add depth and dimension.
Why this look is popular: Mixed-size curl patterns are replacing uniform curls because they look more natural and less styled. The "hint of sunshine" highlight placement — concentrated on the top and front — mimics how the sun naturally lightens hair, making the color look effortless.
Where this look is suitable: Versatile enough for daily wear but elevated enough for evenings. Works for everything from supermarket runs to rooftop cocktails.
Step by step:
- Apply a heat protectant and a light mousse to damp hair.
- Section hair into four quadrants.Leave the bottom sections for last.
- Use alternating barrel sizes. A 1-inch iron for smaller sections, a 1.5-inch iron for looser sections. Alternate randomly.
- Coil each section around the barrel,leave the ends out for a more relaxed finish, and hold for 8-10 seconds.
- Release and pin the curl to your scalp to cool completely before moving to the next section. Shake out once all pins are removed.
Tips and tricks: Pinning each curl to the scalp while it cools is the difference between curls that last five minutes and curls that last all day. Let them sit for at least 10 minutes before releasing. For the golden highlights, ask your colorist for babylights — ultra-fine highlights that mimic natural lightening.
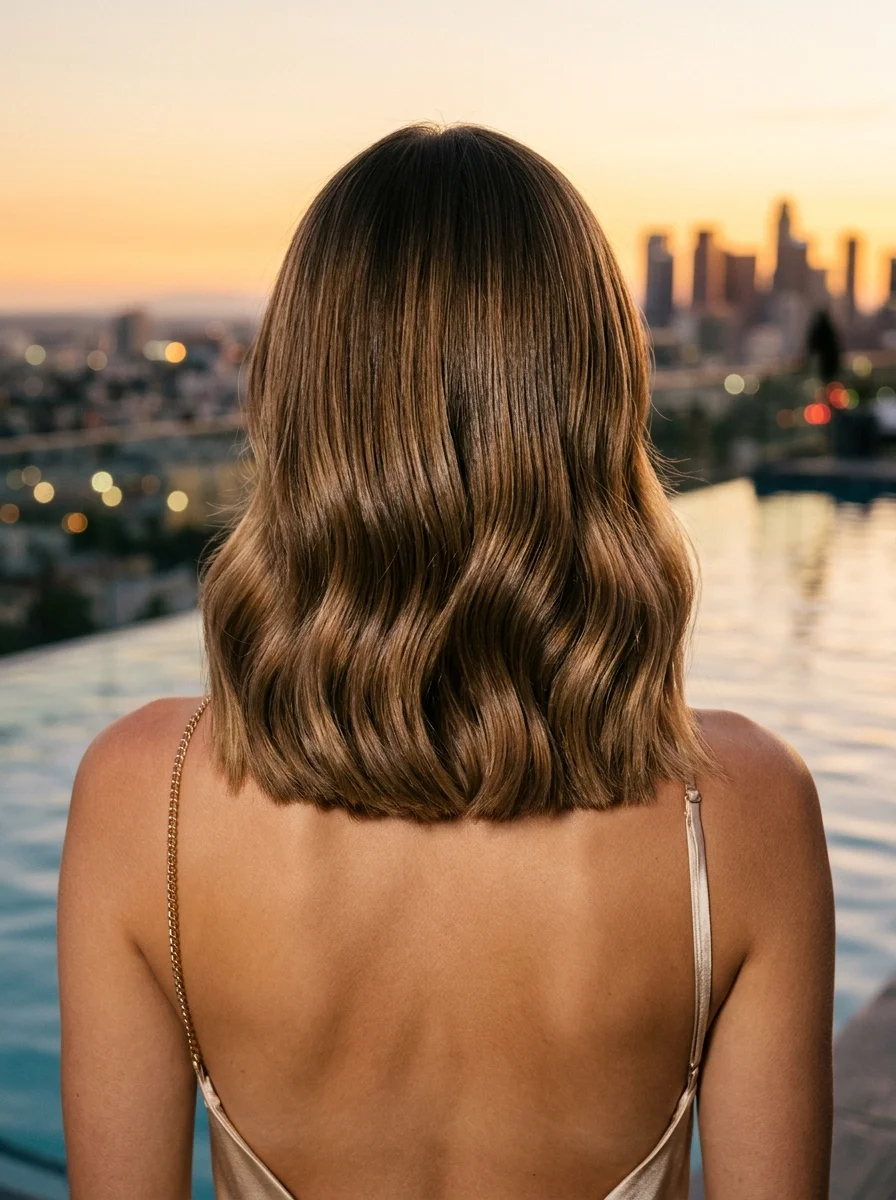
13.Sleek Bronde Lob with Subtle Highlights
The overview: A long bob in "bronde" — the brown-blonde hybrid that sits somewhere between the two — with ribbon-thin highlights that add dimension without contrast. The cut is blunt with minimal layering, worn smooth and straight. It's the color that does the work here, with the highlights spaced irregularly for a natural, sun-baked effect.
Bronde continues to dominate summer hair because it bridges the gap between people who want to be blonde and those who want to stay low-maintenance. The subtle highlights lift the overall color without requiring the root maintenance of full blonde. The lob length adds modernity without committing to a drastic short cut.
Why this look is popular: Bronde is the compromise color that actually works. It brightens the face like blonde does but grows out like brown. The subtle highlights add texture without obvious striping. It's the most requested hair color service for 2026 for good reason.
Where this look is suitable: Any setting. It's the ultimate low-maintenance elevated look. Works in corporate environments, social settings, and everything in between.
Step by step:
- Apply a smoothing shampoo and conditioner to create the sleek base.
- Towel-dry and apply a heat protectant and straightening balm.
- Blow-dry using a round brush,directing hair downward and forward for a smooth finish.
- Flat iron in small sections, moving from nape to crown. Use one smooth pass per section.
- Finish with a shine spray and a lightweight hair oil on the ends.
Tips and tricks: The bronde color needs occasional gloss treatments to keep the tones balanced — too much warmth and it reads brassy, too cool and it loses the bronde effect. A clear gloss at the salon every 6-8 weeks keeps everything harmonious. At home, alternate between a purple shampoo and a color-depositing mask.
34 Stunning Summer First Date Hairstyles for 2026 💕☀️
14.Effortless Wavy Bob with a Pearl Accent
The overview: A chin-to-shoulder bob with soft, unstructured waves and a single pearl-accented barrette holding back one side. This is the style for people who want short hair without the sharp lines of a blunt bob. The waves are barely-there bends rather than full curls, and the pearl adds a touch of polish.
The unstructured wave pattern works with the bob length by adding visual width at the sides — flattering for longer face shapes. The barrette is placed at the temple or just above the ear, holding a small section back while the rest falls freely. The pearl element ties the whole thing together without dominating.
Why this look is popular: Pearl accessories have become the defining hair jewelry of 2026. They offer the same finishing effect as sparkly pieces but with a softer, more organic feel. The wavy bob remains popular because it requires almost no styling skill — the wave pattern is forgiving and doesn't need to be perfect.
Where this look is suitable: Day-to-night versatility. Equal at home in a casual cafe and a cocktail bar. The pearl accent dresses it up slightly, so it leans toward smart-casual.
Step by step:
- Apply a sea salt spray to damp hair and scrunch.
- Diffuse on low heat without touching the hair — let the air do the work.
- Once dry, use a flat ironto create random bends in different directions. Don't make them uniform.
- Run fingers through to break up the bends into loose waves.
- Clip the pearl barrette on one side,positioned to hold back the front section.
Tips and tricks: For the flat iron bends, work quickly and don't hold the iron in one spot — the goal is movement, not creases. The pearl barrette should match the tone of your hair: warm-toned pearls for warm hair, white pearls for cooler tones. Jennifer Behr makes exceptional pearl hair clips.
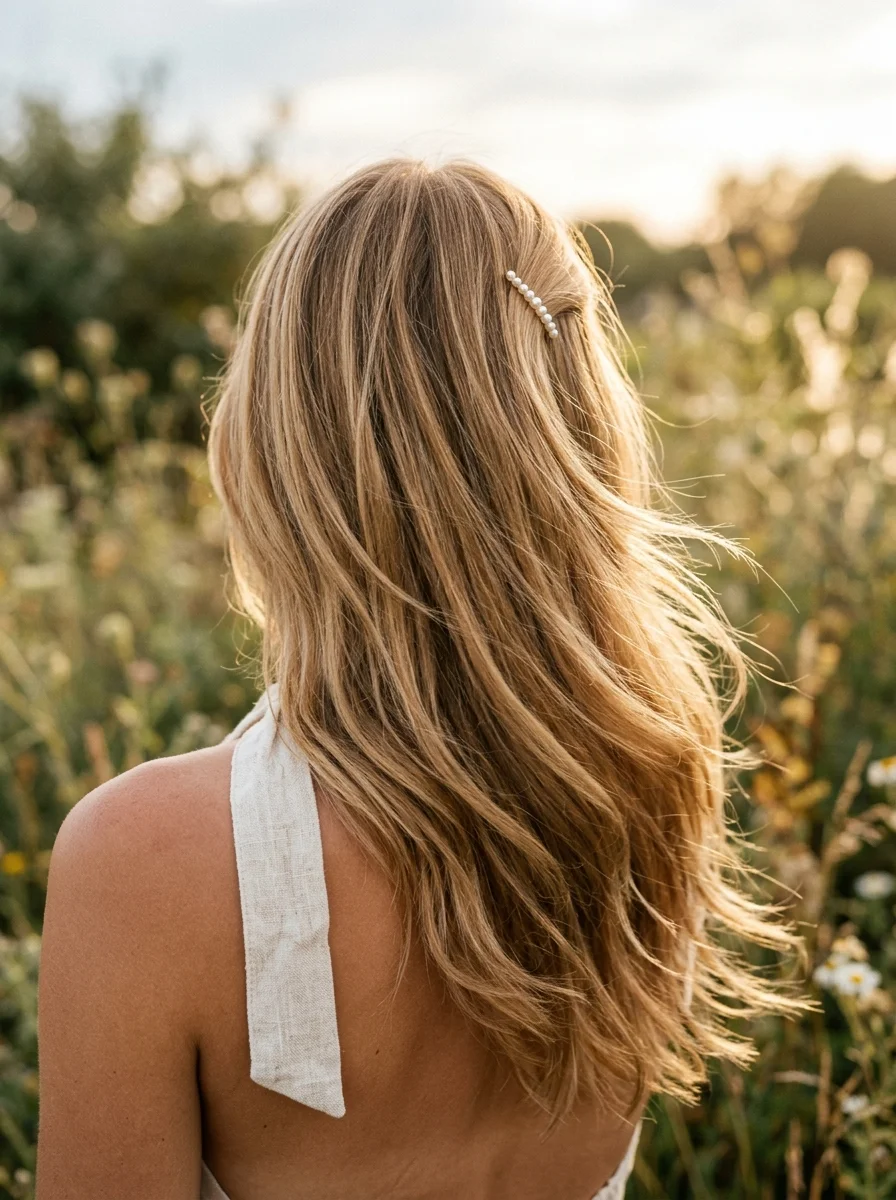
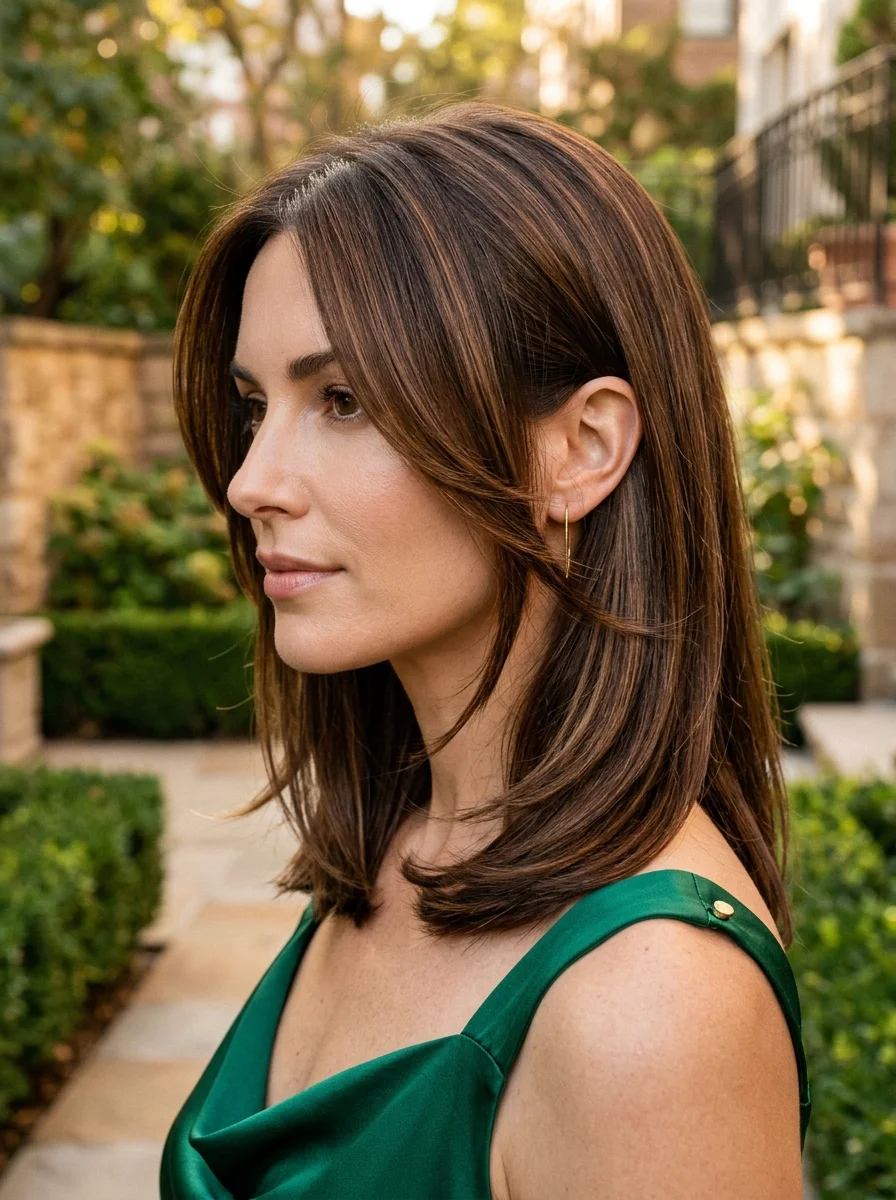
15.Effortless Beachy Layers with Subtle Blonde Highlights
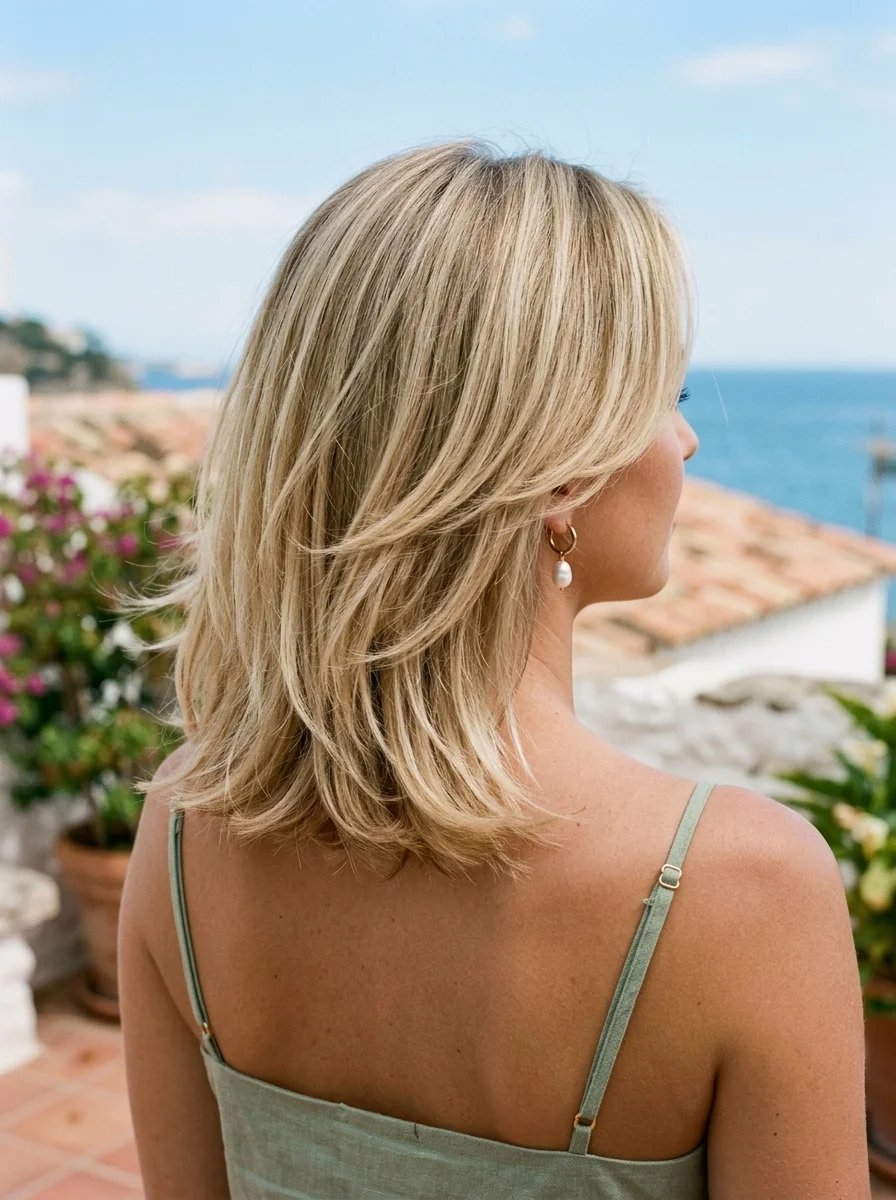
The overview: Long, layered hair with a lived-in texture and subtle blonde highlights that brighten without shouting. This is the hair equivalent of a white linen shirt — classic, comfortable, and appropriate everywhere. The layers add movement and volume, reducing bulk while maintaining length.
The beauty of this look is in the details that look like they took no effort. The layers are cut to enhance natural wave patterns. The highlights are painted in a way that mimics how the sun would naturally lighten your hair if you spent all summer outdoors. The overall effect is healthy, bouncy, and glowing.
Why this look is popular: Long layers with subtle color is the most requested combination at salons for summer 2026. It's the "I want to look better but I don't want to look different" request. The subtle highlights add dimension without changing the base color dramatically.
Where this look is suitable: Universally appropriate. Office, beach, wedding, weekend — there isn't a setting where this looks wrong.
Step by step:
- Apply a volumizing mousse to damp hair from roots to ends.
- Blow-dry upside down for root lift, then flip over and finish drying with a round brush for smoothness.
- Use a 1.25-inch curling iron on random sections, alternating directions. Skip the ends for a modern finish.
- Brush through completely with a paddle brush to blend curls into waves.
- Apply a lightweight oil to the mid-lengths and ends, then a texturizing spray for grip.
Tips and tricks: The key to natural-looking highlights is variation — not all ribbons should be the same thickness or placed at the same distance from the root. A good colorist will vary the placement for a truly organic effect. For styling, Davines This Is A Texturizing Spray adds beachy grit without stickiness.

28 Cute & Sporty Baseball Game Nail Ideas for 2026 ⚾
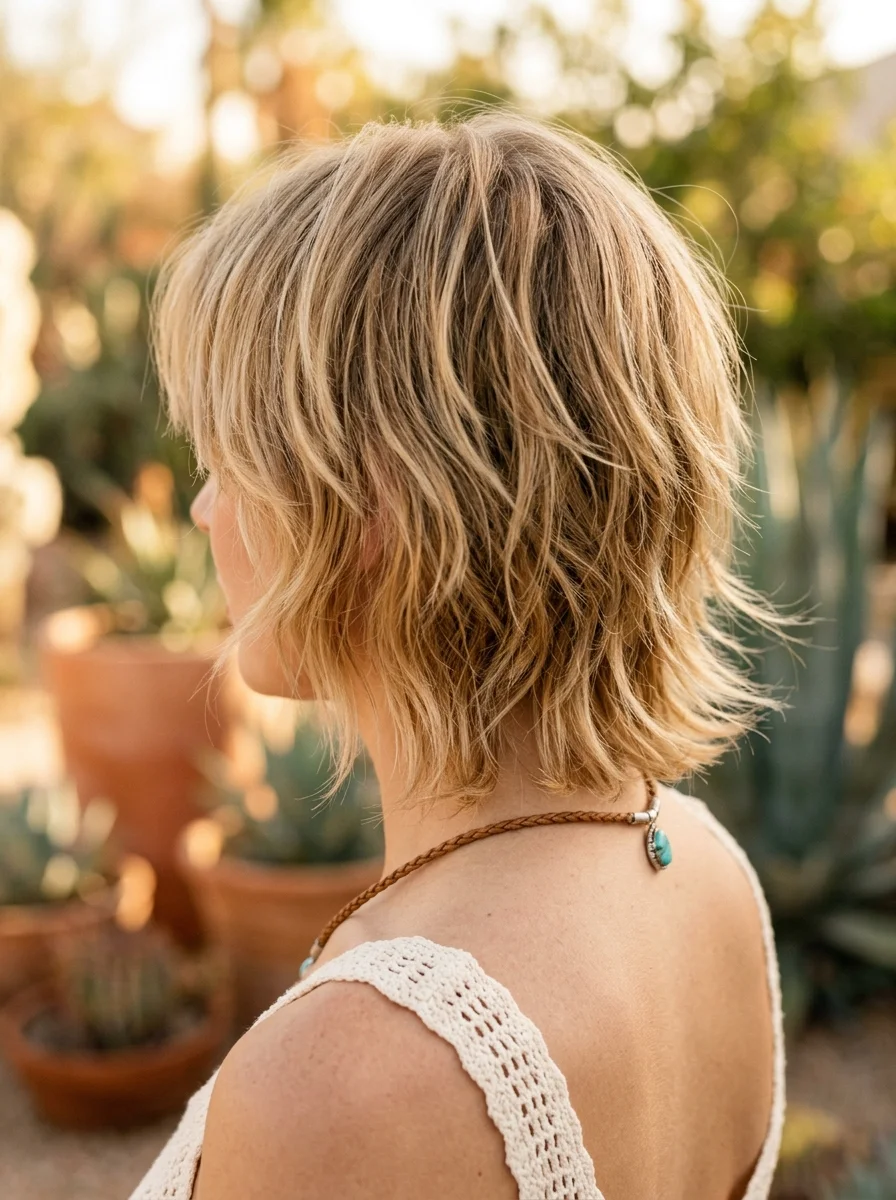
16.Copper Shag with Textured Layers and Wispy Bangs
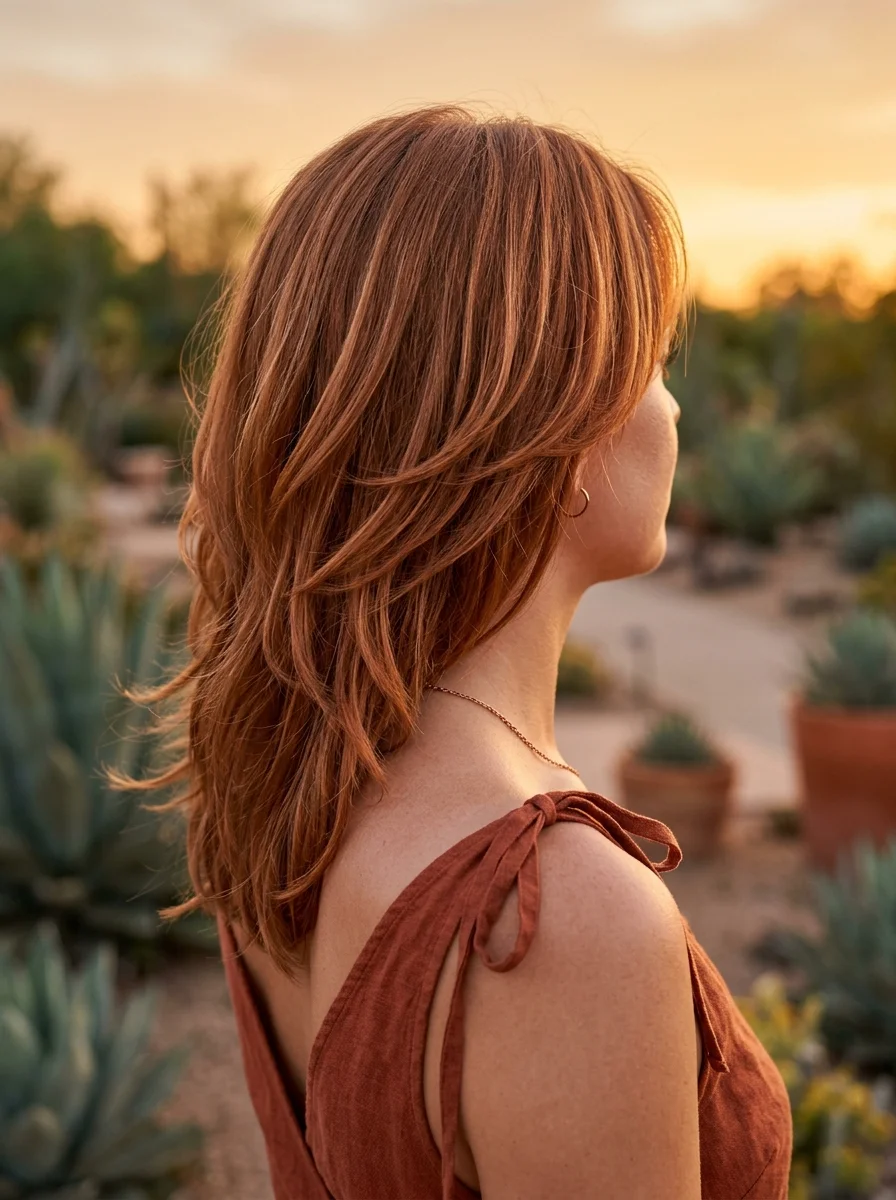
The overview: A full-shag haircut in a rich copper shade, with heavily textured layers throughout and wispy bangs that graze the brow. The shag is the most expressive haircut in this lineup — it's messy, voluminous, and unapologetically retro. The copper color adds warmth that flatters most skin tones.
The shag relies on texture and movement. The layers are cut short at the crown and lengthen toward the perimeter, creating a shape that's wider in the middle and tapered at the ends. The bangs are choppy and uneven, blending into the face-framing layers. It's a wash-and-wear cut that actually looks better when it's not perfectly styled.
Why this look is popular: The shag has been building momentum for several seasons, and 2026 is the year it fully arrived. It appeals to people who want maximum style with minimum effort — the shag's natural state is messy, so there's no pressure to keep it polished. Copper is the defining hair color of the year across all cuts.
Where this look is suitable: Creative industries, casual settings, music venues. The shag carries a certain energy that doesn't quite fit conservative environments. It's for people who want their hair to express personality.
Step by step:
- Apply a volumizing spray at the roots and a texture cream through the lengths.
- Scrunch and air-dry or diffuse gently — the shag does not want to be perfectly blown out.
- Use a small flat iron to add bend and movement to individual sections. Twist and kink rather than curl.
- Work a matte paste through the layers with fingertips for separation.
- Piece out the bangs individually,twisting some sections away from the face and leaving others straight.
Tips and tricks: Copper fades fast — use a color-depositing conditioner in copper tones once a week to keep it vibrant. The shag needs a trim every six weeks to maintain the shape; the layers grow out quickly and lose their structure. For styling, Ouai Matte Pomade gives the separation and grit this cut needs.
17.Effortless French Bob with Wispy Bangs
The overview: A short bob cut between the chin and jaw with wispy, texturized bangs that have that effortless French-girl quality. The cut is minimally layered — it relies on the blunt perimeter and the bangs for its impact. It's understated, quiet, and undeniably chic.
The French bob is shorter than most bobs, typically hitting at the jawline or just above. The wispy bangs are light and airy, cut with texture rather than a solid line. The overall finish is matte rather than glossy, with a slightly undone texture that makes it look like you didn't try — even though you absolutely did.
Why this look is popular: The French bob has become the unofficial haircut of 2026 for women who want short hair without the maintenance of a pixie. It works on most face shapes, particularly well on heart and oval shapes. The wispy bangs add softness that keeps the short length from feeling severe.
Where this look is suitable: From the office to the gallery opening. The French bob projects confidence and style without trying hard. It works beautifully for summer because it keeps hair off the neck.
Step by step:
- Apply a light mousse to damp hair and rough-dry.
- Use a flat iron to add subtle bends— nothing uniform. Bend some sections outward, some inward.
- Apply a dry texturizing spray and work through with fingers.
- Blow the bangs with a round brush,directing them forward and slightly side-swept.
- Set everything with a light mist of flexible-hold hairspray.
Tips and tricks: This cut is unforgiving with damaged ends — the blunt line makes every split visible. Keep up with trims every 6-8 weeks. For the bangs, tell your stylist you want them "wispy with no defined line" — this prevents the heavy, solid bang look. Bumble and bumble's Thickening Dryspun Finish is perfect for the matte texture.

25 Stunning Summer Vacation Hairstyles for 2026 ☀️🌊
18.Effortless Shag Bob with Wispy Bangs
The overview: A hybrid of the shag and the bob — shorter in length than a classic shag but with the same textured layering and wispy bangs. This is the perfect cut for someone who wants a bob but craves more movement and volume. The shag bob gives you the best of both: the structure of a bob and the personality of a shag.
The shag bob works because it creates volume at the crown and lighter texture at the ends, giving the illusion of thicker, fuller hair. The wispy bangs tie the whole look together, softening the forehead and framing the eyes. It's a cut that looks equally good with wavy texture or blown straight.
Why this look is popular: The shag bob has become 2026's answer to "I want a change but I don't know what." It's dramatic enough to feel like a new haircut but practical enough for daily wear. It works on fine hair by adding the illusion of density and on thick hair by removing bulk.
Where this look is suitable: Best for creative or casual environments. It can be dressed up for evening but has an inherently laid-back energy. Great for active summers when you don't want to spend time styling.
Step by step:
- Apply a root-lifting spray to damp hair and blow-dry with a diffuser, focusing on the crown.
- Use a 1-inch curling iron to add loose bends throughout, alternating directions.
- Run a matte pomade through your fingers and piece out the layers individually.
- Use a round brush on the bangs to give them a slight curve, then separate with fingers.
- Finish with a light salt spray for added texture and hold.
Tips and tricks: The shag bob is one of those rare cuts that actually gets better as it grows out — the layers settle into a softer version of themselves. If you're nervous about going short, start with a longer shag bob that hits the shoulders, then go shorter at your next appointment.
19.Chocolate Layered Lob with Face-Framing Wisps
The overview: A luscious chocolate-brown lob with soft, rounded layers and wispy pieces that frame the face. The color is warm and rich — think dark chocolate with subtle variations — and the lob hits somewhere between the collarbone and shoulder. The face-framing wisps are cut to blend into the layers, softening the jawline.
This is the color and cut for people who prefer classic elegance over trend-chasing. Chocolate brown is timeless, but the lob length keeps it modern. The layers add volume and movement without losing the blunt perimeter that defines the lob silhouette. The face-framing pieces prevent the heavy feeling that can sometimes come with darker hair.
Why this look is popular: Chocolate brown with dimension has overtaken plain brunette as the go-to color for 2026. The lob remains the most requested length because it's long enough to pull back but short enough to air-dry quickly. The face-framing wisps are the detail that makes this specific version stand out from a standard lob.
Where this look is suitable: Universally flattering and appropriate. Works in every professional and social setting. Particularly flattering for those with warm or neutral skin tones.
Step by step:
- Apply a volumizing mousse and blow-dry with a round brush, lifting at the roots.
- Section and curl with a 1.25-inch iron. Curl the face-framing pieces away from the face.
- Brush through with a wide-tooth combfor soft, blended waves.
- Smooth a glossing serum over the surface for a healthy, reflective shine.
- Separate the face-framing piecesfrom the rest and add a tiny amount of texturizing paste to the ends.
Tips and tricks: Chocolate brown can look flat without dimension. Ask your colorist for subtle caramel balayage pieces around the face and through the ends — it makes a significant difference. To maintain the rich tone, use a color-depositing shampoo in a warm brown shade once a week.

30 Cute Ladybug Nail Trends That Are Taking Over (2026)
20.Chic Twisted Low Bun with Loose Waves
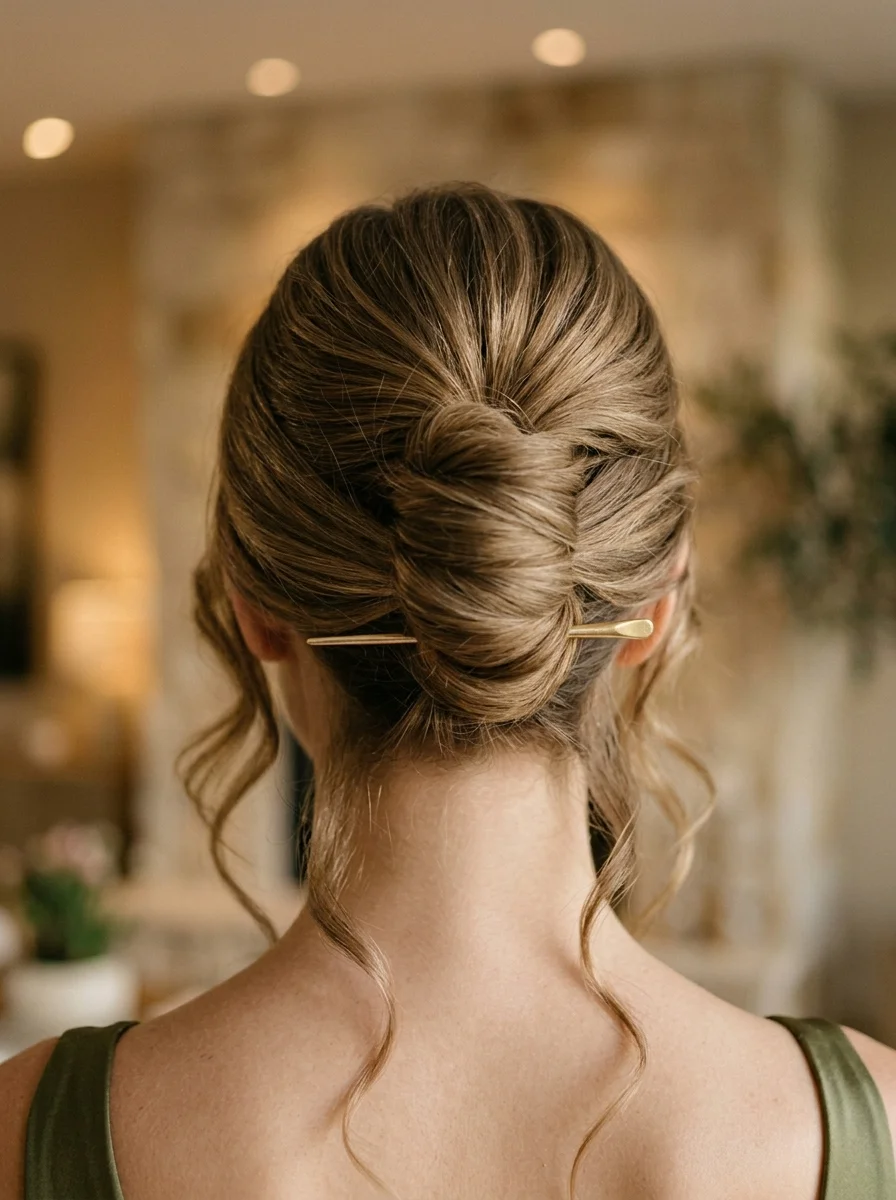
The overview: A low bun constructed from twisted sections rather than the traditional wrapped method, with soft waves left loose in the front. The twist technique creates a more textured, organic bun than the smooth ballerina style. It looks intricate but comes together quickly.
The loose waves in the front keep the look from feeling too severe or formal. They're brushed-out curls that soften the hairline and frame the face. The contrast between the structured bun and the soft waves is what makes this style feel current — it's polished without being stiff.
Why this look is popular: The twisted bun is having a moment because it offers more visual interest than a standard bun without requiring the skill of a braided style. It reads as elegant but takes about five minutes. The loose waves in the front add the romantic touch that keeps it from looking corporate.
Where this look is suitable: Weddings, dinners, formal events, and professional settings. It can be dressed up or down depending on the accessories and waves.
Step by step:
- Curll the front sections with a 1-inch iron, curling away from the face. Pin each curl to cool.
- Gather the back sectioninto a low ponytail at the nape. Don't include the front curls.
- Divide the ponytail into two sections. Twist each section individually until they naturally coil.
- Wrap the two twisted sections around each other and pin the bun into place with bobby pins.
- Release the front curls and arrange them around the face. Pin back any pieces that fall too far forward.
Tips and tricks: The bun holds better on second-day hair. If your hair is freshly washed, spray with dry shampoo for texture. Bobby pins should match your hair color — slide them in at upward angles for the most secure hold. A flexible-hold hairspray keeps the front waves intact without making them crunchy.
21.Textured Platinum Pixie Shag

The overview: A short pixie cut with shag-inspired texturizing and a platinum blonde finish. The cut has longer layers on top that can be styled forward, back, or to the side, with shorter, tapered sides and nape. The platinum color is striking, almost white, making the texture of the cut highly visible.
This is a bold, high-impact look. The pixie shag combines the edginess of a pixie with the texture and movement of a shag, resulting in a cut that's soft and piecey rather than severe. The platinum color requires commitment and maintenance, but the payoff is a look that stands out in any crowd.
Why this look is popular: Short hair is having a renaissance, and the textured pixie is leading the charge. The shag elements soften the pixie's traditional hard lines, making it more approachable. Platinum has become the default bold color choice for 2026, replacing pastels and fashion colors.
Where this look is suitable: This is an expressive, fashion-forward cut. It works best in creative environments and social settings where personal style is celebrated. It requires confidence to pull off, and that confidence tends to read well in any setting.
Step by step:
- Work a volumizing foam through damp hair and blow-dry, focusing on lifting the roots.
- Apply a matte clay or pomade to your fingertips and work through the top layers, piece by piece.
- Direct the pieces where you want them — forward for a softer look, upward for more edge.
- Use a small flat iron to add subtle bends to individual sections if desired.
- Set with a flexible-hold spraythat won't weigh down the texture.
Tips and tricks: Platinum requires weekly purple shampoo treatments to stay cool-toned and avoid yellowing. The pixie shag needs trims every 3-4 weeks to maintain the shape. For product, Kevin Murphy's Rough Rider gives the matte texture and grip that short shags need without looking greasy.
31 Flattering Summer Hairstyles for Women Over 40 (2026)
22.Sleek Asymmetrical Bob with Subtle Highlights
The overview: An asymmetrical bob — shorter in the back, longer in the front — with a sleek, glass-like finish and barely-there highlights. The sharp angle of the cut creates a modern, architectural silhouette. The subtle highlights add depth without distracting from the bold shape.
The asymmetrical bob is having a resurgence because it flatters a wide range of face shapes. The longer front pieces draw the eye downward, creating a lengthening effect that works particularly well for round and square faces. The sleek finish requires a quality flat iron and the right products, but the result is worth the effort.
Why this look is popular: Precision cuts are making a comeback after years of texture-heavy styles. The asymmetrical bob offers a clean, graphic alternative that still feels modern. The subtle highlights prevent the solid-color bob from feeling heavy or flat.
Where this look is suitable: Professional settings, formal events, presentations. The architectural shape communicates confidence and attention to detail. It's a power haircut.
Step by step:
- Apply a straightening balm and heat protectant to damp hair.
- Blow-dry with a paddle brush,directing the hair downward and forward.
- Section carefully. Work in thin sections from nape to crown.
- Flat iron each section in one smooth pass. Use 380-400°F for the sleekest finish.
- Finish with a shine spray and a drop of argan oil smoothed over the surface.
Tips and tricks: The asymmetrical cut is not forgiving — any unevenness in the line is immediately visible. Choose a stylist who specializes in precision cutting. For humidity resistance, layer an anti-frizz cream under your straightening balm. Living Proof Straight Perfect is excellent for maintaining the sleek finish in summer.
23.Chic Textured Bob with Subtle Layers
The overview: A shoulder-length bob with gentle, barely-there layers that add movement without changing the overall shape. The texture is slightly tousled, the finish is matte, and the overall effect is unstudied elegance. The subtle layers work with your natural texture rather than fighting it.
This is the bob for people who want the look of a styled cut without the maintenance of heavy layering. The layers are internal — you don't see them from the outside, but they remove bulk and add bounce. The bob sits at that sweet spot where it can be worn straight, wavy, or curled depending on your mood.
Why this look is popular: The textured bob is essentially the no-fuss answer to "what should I do with my hair this summer?" It requires minimal styling, air-dries well, and works with most hair textures. The subtle layers are the secret ingredient that prevents the bob from looking like a bowl cut.
Where this look is suitable: Everywhere. This is the most versatile cut in the lineup — equally at home in a boardroom, a beach bar, or a brunch spot.
Step by step:
- Apply a texturizing spray to damp hair and scrunch.
- Air-dry or diffuse on low heat. The less you touch it, the better the texture.
- Once dry, use your fingers to separate sections and add pieceyness.
- If using heat, a flat iron with random bends in different directions creates the best lived-in texture.
- Finish with a dry texture spray for grip and separation.
Tips and tricks: This cut highlights natural texture — if your hair is stick-straight, you may need to add some wave with a curling iron or braids overnight. If your hair is naturally wavy, this cut will encourage those waves beautifully. The subtle layers mean less frequent trims — every 8-10 weeks is sufficient.
27 Gorgeous Mint Green Nails That Are Popular Right Now (2026)
24.Sleek High Ponytail with Wispy Face-Framing Pieces
The overview: A high, smooth ponytail with deliberate wispy pieces left out around the face. The ponytail is sleek and polished, sitting at the crown height, while the face-framing wisps soften the otherwise severe look. The contrast between the slicked-back hair and the loose tendrils creates a balanced, modern silhouette.
The high ponytail is summer's most practical style — it gets hair off the neck and face entirely. The sleek finish requires a bit of product and precision, but the result lasts all day. The wispy pieces are the key detail that keeps this from looking like a gym ponytail.
Why this look is popular: The sleek high ponytail has been adopted by celebrities and influencers, making it the go-to red-carpet-but-make-it-casual style for 2026. The face-framing wisps are a deliberate softener that keeps the look from reading as harsh or severe.
Where this look is suitable: Active days, hot weather, evening events. It transitions from day to night seamlessly — wear it to the farmer's market, then to dinner.
Step by step:
- Apply a gel or strong-hold styling cream to damp hair, smoothing from roots to ends.
- Blow-dry straight while pulling the hair back with a brush to create tension.
- Section out the face-framing piecesbefore securing the ponytail.
- Secure the ponytail at the crownwith a strong elastic. Wrap a small section of hair around the elastic to hide it.
- Curll the face-framing pieces with a 1-inch iron for soft, romantic bends.
Tips and tricks: For the sleekest finish, use a boar bristle brush to smooth the hair back before securing. A tiny amount of hair wax on your fingertips can tame any remaining flyaways without stiffening the whole style. Gotham City's Sleek & Shine Gel gives the hold needed without the crunch.
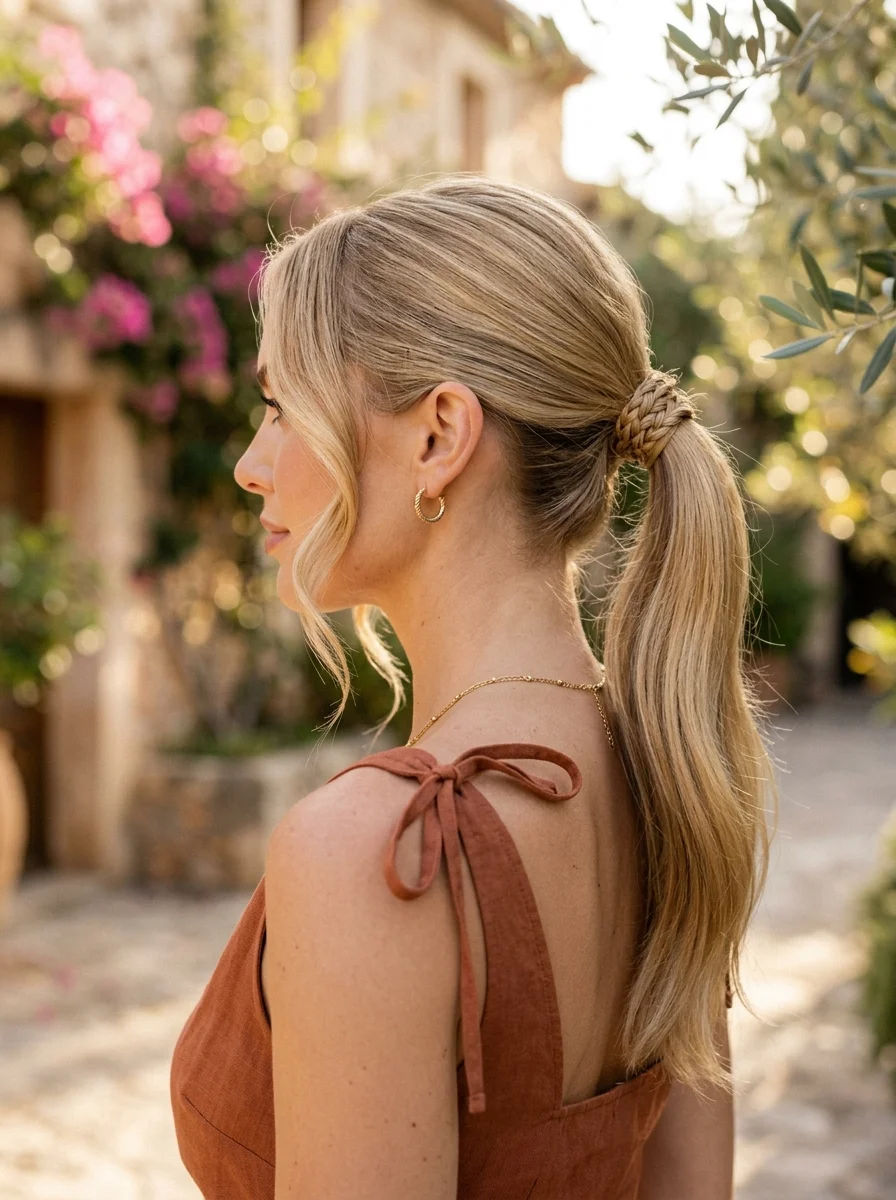
25.Sleek Sculpted Low Ponytail with Wrapped Detail
The overview: A low ponytail that's sculpted and smooth, with a section of hair wrapped around the base to conceal the elastic. The ponytail sits at the nape and is perfectly centered. The wrapped detail adds a touch of sophistication that transforms a basic ponytail into something intentionally styled.
This is the more polished cousin of the casual low ponytail. The sculpted quality comes from careful blow-drying and the right products — the hair is smooth all the way from the hairline to the elastic. The wrapped detail echoes the braided-band concept but with a sleeker, more refined finish.
Why this look is popular: The sculpted ponytail is the 2026 evolution of the slicked-back trend. It's clean, minimal, and projects intentionality. The wrapped detail adds artisan-level finishing that bloggers and stylists have latched onto as the defining ponytail detail of the year.
Where this look is suitable: Formal events, professional settings, dinner dates. It's too polished for casual weekends but perfect for situations where you want to look put-together.
Step by step:
- Apply a smoothing cream to damp hair and blow-dry straight with a paddle brush.
- Smooth product through the hair and gather it low at the nape. Use a fine-tooth comb for precision.
- Secure with a clear or matching elastic. Position the ponytail exactly in the center.
- Take a half-inch section from the underside of the ponytail. Wrap it tightly around the elastic.
- Tuck the end under and pin with a bobby pin. Smooth any bumps with a bit of hair wax.
Tips and tricks: The wrapped detail requires the section to be long enough to go around the elastic at least once. If your hair is short, use a small piece of hair from the side or top of the ponytail instead. A spritz of shine spray on the finished look adds the glass-like finish that makes this style stand out.
25 Top Curly Hairstyle Trends for 2026 ➰✨
26.Effortless Textured Bob with Wispy Bangs
The overview: A bob with visible texture and light, airy bangs that sit somewhere between curtain bangs and wispy fringe. The cut is layered enough to remove bulk and create movement, but the perimeter is still defined enough to read as a bob. The wispy bangs soften the forehead and draw attention to the eyes.
This version of the bob sits in the sweet spot between the textured bob and the French bob — more movement than a blunt cut, more structure than a shag. The wispy bangs are cut with point-cutting to create softness, and they blend naturally into the face-framing layers.
Why this look is popular: Bobs with bangs are the number one requested cut for 2026. The combination offers the structure of a bob with the softness of bangs. Wispy bangs specifically are preferred over heavy, blunt bangs because they're more forgiving to style and grow out more gracefully.
Where this look is suitable: Versatile enough for daily professional wear and casual weekends. The wispy bangs can be swept to the side or styled forward for different looks.
Step by step:
- Apply a sea salt spray to damp hair and scrunch.
- Diffuse or air-dry — this cut is designed to work with natural texture.
- Use a flat iron to add random bendsthrough the lengths, alternating directions.
- Blow the bangs with a small round brush, directing them forward and slightly separated.
- Apply a dry texture spray and work through with fingers for piecey separation.
Tips and tricks: The bangs are the element that needs the most maintenance — plan for trims every 3-4 weeks. Between cuts, you can train them to sweep to the side as they grow. For texture, Sachajuan Ocean Mist is the best salt spray for creating grip without the crunchy, stiff feeling that cheaper salt sprays leave behind.
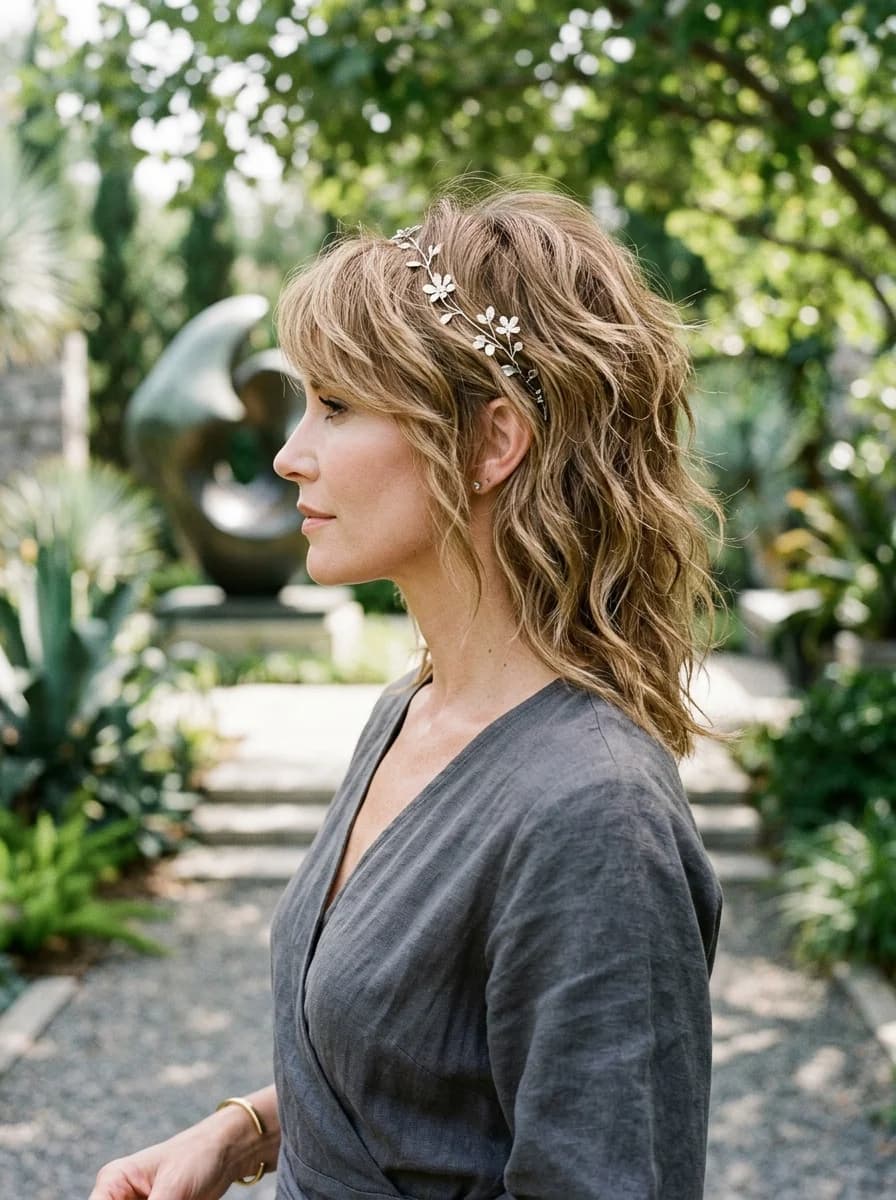
27.Tousled Textured Shag with Sun-Kissed Highlights
The overview: A classic shag cut — heavy on the layers, light at the ends — with sun-kissed highlights that add dimension and warmth. The tousled texture is the defining feature: messy, voluminous, and deliberately imperfect. The highlights follow the layers, creating a multi-tonal effect that shifts with movement.
The shag is the cut for people who refuse to spend more than 10 minutes on their hair. The layers do all the work — they create volume at the crown, texture through the middle, and lightness at the ends. The sun-kissed highlights are painted freehand onto the top sections, where natural light would hit.
Why this look is popular: The shag continues to dominate 2026 because it solves the volume problem. Fine hair looks thicker, thick hair looks less heavy, and everyone looks like they have effortless texture. The sun-kissed highlights add the color dimension that a solid shade can't achieve with this cut.
Where this look is suitable: Casual and creative settings. The shag has a built-in cool factor that works for music venues, art openings, and everyday wear. It can be dressed up, but it's inherently relaxed.
Step by step:
- Apply a root-lifting spray and rough-dry, focusing on the crown.
- Use a small flat ironto create kinks and bends throughout the layers. Don't make them uniform.
- Work a volumizing powder or dry shampoo into the roots for lift.
- Apply a matte paste to the ends for separation and texture.
- Finish with a flexible-hold sprayand shake everything out with your fingers.
Tips and tricks: The shag reveals any asymmetry in the cut — if the layers aren't balanced, it shows. Go to a stylist who specifically has shag experience, not just layering experience. The sun-kissed highlights need regular toning to stay bright; a purple shampoo once a week prevents brassiness.

27 Elegant Wedding Guest Nail Designs for Family in 2026 💍
28.Beachy Waves with Face-Framing Layers
The overview: Long, loose beach waves with layers specifically cut to frame the face. The layers start at the cheekbone and gradually blend into the longer length. The waves are soft and tousled, the kind you get from air-drying with a bit of product and some strategic twisting.
The face-framing layers are what distinguish this from standard beach waves. They're cut to hit at flattering points — cheekbones, jawline, collarbone — which draws attention to your best features. The rest of the hair maintains long, flowing waves that move naturally.
Why this look is popular: Long hair with face-framing layers is the most universally flattering combination. It adds movement and shape to long hair without losing the length. The beach wave texture is the default summer style because it works with natural texture and requires minimal heat styling.
Where this look is suitable: Universally appropriate. Works for every occasion, from the beach to the office to evening events. It's the longest-reigning summer style for good reason.
Step by step:
- Apply a sea salt spray and a lightweight leave-in conditioner to damp hair.
- Divide hair into four sections.Twist each section away from the face and secure with a clip.
- Air-dry or diffuse until 90 percent dry.
- Release the twists and separate the waves with fingers.
- Focus a small amount of texturizing paste on the face-framing layers to define them.
Tips and tricks: The face-framing layers need to be cut with intention — tell your stylist which features you want to highlight. If you love your cheekbones, the shortest layer should hit at cheekbone level. For a softer look, keep the layers longer and more blended. A glossing spray on the long sections adds healthy shine without weighing down the layers.
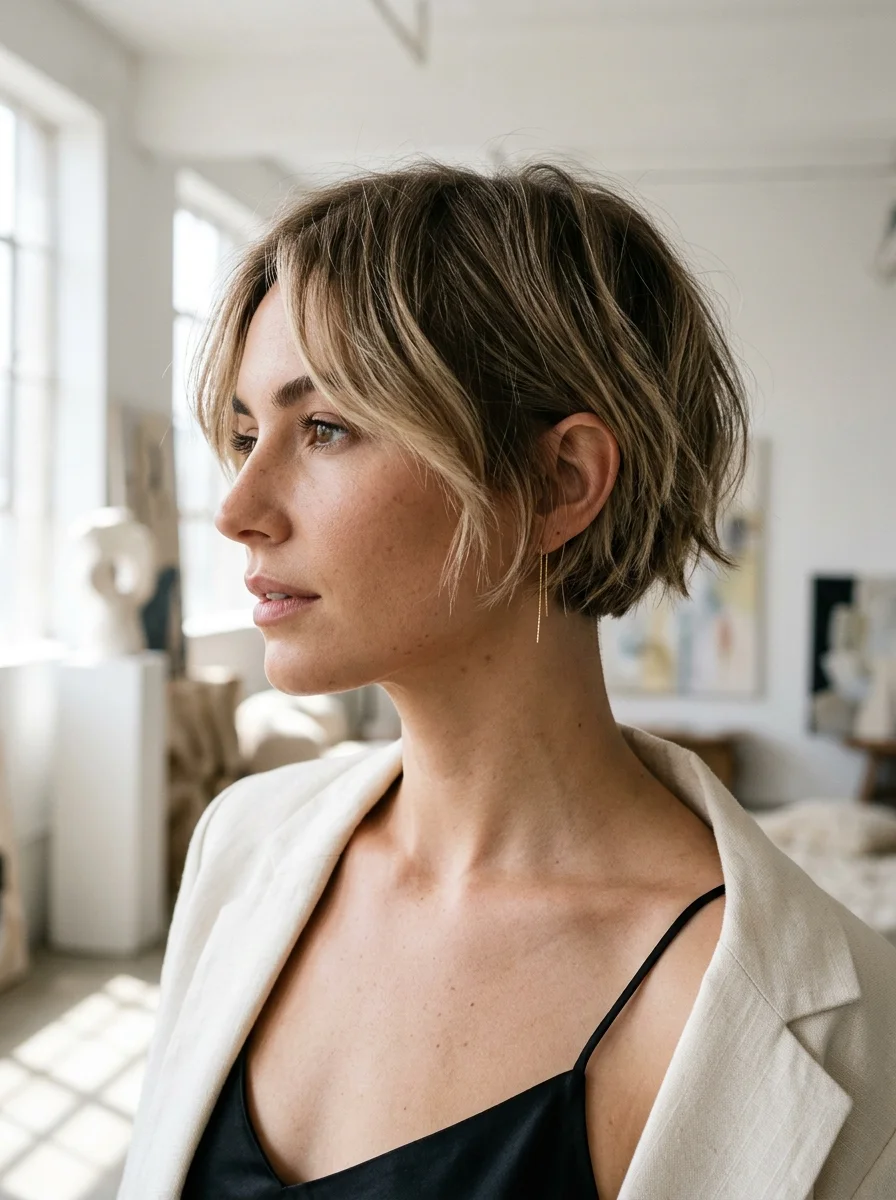
29.Chic Textured Pixie with Subtle Ash Tones

The overview: A short, textured pixie in an ash-toned blonde or brown shade. The cut has visible texture through the top and softer, tapered sides. The ash tone keeps the color cool and modern — think mushroom blonde or ash beige rather than warm or golden shades.
The textured pixie is the shortest option in this roundup, and it's for the person who truly wants wash-and-go hair. The layers on top can be styled in multiple directions — forward for softness, back for edge, or piecey for texture. The ash tones are subtle enough to be office-appropriate but distinctive enough to read as intentional.
Why this look is popular: The pixie is being reclaimed as a stylish, feminine option rather than a "I gave up" cut. The textured version with ash tones feels sophisticated and modern. It's particularly popular among women who want low maintenance without sacrificing style.
Where this look is suitable: Professional settings, hot climates, active lifestyles. The pixie keeps you cool in summer and requires almost no daily styling time.
Step by step:
- Work a small amount of styling creamthrough damp hair for texture.
- Blow-dry with fingers, directing the top layers where you want them to sit.
- Apply a matte clay to fingertips and piece through the top sections individually.
- Use a tiny amount of hair wax to define specific pieces if desired.
- Set with a light mist of hairspray— don't overspray or you'll lose the matte finish.
Tips and tricks: Ash tones require maintenance to stay cool — use a purple shampoo weekly and avoid over-washing, which can strip the tone faster. The cut needs trims every 4 weeks to maintain the shape. For product, Davines This Is A Strong Hold Cream provides the texture and control this cut needs without looking greasy.

21 Stunning Concert Hairstyles for Women 2026 🎶✨
30.Beachy Waves Bob with Textured Bangs
The overview: A bob with beachy, tousled waves and textured bangs that blend into the face-framing layers. The bangs are the defining feature — they're not the traditional soft, feminine kind. They're cut with texture and worn with a slight separation that gives the whole look an undone, rock-and-roll energy.
The beachy waves in the bob length are created with a wide barrel and a twisting technique that avoids uniform ringlets. The waves are loose and irregular, falling at different angles. The textured bangs are piecey and separated, hitting at brow level and blending naturally into the side layers.
Why this look is popular: The textured bang on a bob is the defining haircut detail of 2026. It takes the bob from classic to current. The beachy wave texture keeps the whole look from feeling too precious — it's undone, a little messy, and completely intentional.
Where this look is suitable: This is an expressive, personal style. It works best in casual and creative settings but can be adapted for more formal occasions by smoothing the texture slightly.
Step by step:
- Apply a volumizing spray to damp hair and rough-dry.
- Use a 1.25-inch curling iron on random sections, leaving the ends straight for a more natural wave.
- Run fingers through to break up the curl pattern.
- Apply a matte paste to the bangs and separate them into individual pieces.
- Finish with a dry texture spray and tousle everything with your hands.
Tips and tricks: The textured bangs are the focal point, but they need to be balanced — if the rest of the hair is too polished, the bangs look disconnected. Keep the whole look in the same texture family. For the bangs, use a tiny amount of Bumble and bumble Sumo Clay for piecey separation that holds all day.
What the Celebrities Are Wearing
When celebrities with entire styling teams choose low-maintenance looks for red carpets, it tells you something: these trends are not just convenient — they are genuinely chic. Kaia Gerber, Shay Mitchell, and Zara Larsson were all spotted wearing soft, tousled beachy waves at the 2026 Grammys, making it one of the biggest effortless hair trends of the season.
Top salons in New York City report that clients are asking for glossy color, intentional cuts, and styles that do not require hours of styling. The bob in particular is having a defining year — sharper, softer, and more versatile than ever. The consensus from stylists is that choppy, floaty, relaxed, undone cuts share one thing in common: they look better the less you try.
The takeaway? When A-listers and editorial stylists are choosing wash-and-wear textures over polished blowouts for red carpets, you can feel confident embracing the same approach for your everyday summer style.
Five Summer Hair Mistakes
Even the best summer trend will fall flat if you are making these common mistakes. Here is what to avoid and how to fix it.
Skipping UV protection: UV rays dull color and dry out ends. A lightweight UV-defense spray forms an invisible screen against the sun without weighing hair down.
Over-washing in humidity: Washing more strips natural oils that protect against humidity damage. Use dry shampoo at the roots and rinse with water between washes.
Using heavy products to fight frizz: Heavy serums weigh down the effortless texture these trends require. Apply lightweight products to soaking wet hair, then scrunch.
Pulling wet hair tight and skipping trims: Wet hair is vulnerable and breaks easily — let it air-dry to 80 percent before putting it up. And even low-maintenance cuts need trims every eight to ten weeks to keep the shape. Split ends make the trendiest cut look dated.