Hair Trends
29 FIFA World Cup Watch Party Hairstyles for Game Day Glam
The FIFA World Cup turns every living room, sports bar, and backyard into a fan zone — and your hairstyle should match that energy. The ultimate fan flex is styling your hair to match your team's jersey. Not just wearing the colors — becoming a walking tribute to your squad. From red-white-and-blue waves for the US to sky-blue streaks for Argentina, fans are getting creative with temporary color sprays, clip-in extensions, and even intricate designs that reference team patterns.
The best part is that none of it requires permanent dye. Temporary color sprays wash out in one shower. Clip-in extensions come out after the final whistle. Hair chalk lets you test a bold color without the commitment. Stylists in host cities report that requests for geometric, design-heavy fan looks have jumped significantly this year — everything from subtle team-color highlights framing the face to full ombres in national flag colors.
The approach? For something subtle, do face-framing pieces in your team's accent color. For maximum impact, go for a full ombre with flag colors blended through the lengths. Always use a heat protectant before applying any temporary color, and do a patch test the day before game day to rule out any reactions.
1.Half-Up Waves with a Chic Claw Clip
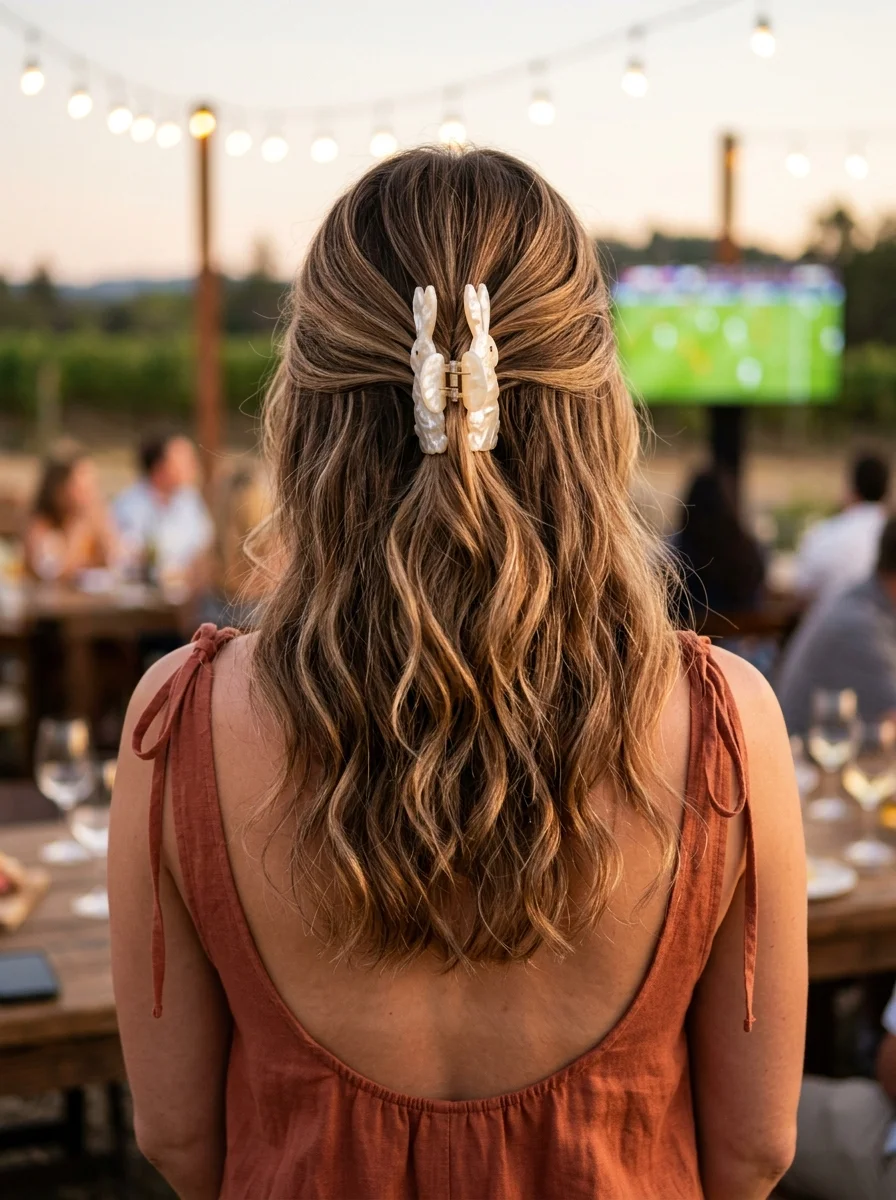
The overview: The claw clip had its renaissance a few years ago, and it's not going anywhere — especially not at watch parties. The half-up wave is the laziest-looking style that actually looks intentional. You pull the top section back, clip it, and the rest falls in soft, loose waves around your shoulders. The large marbled clip does the heavy lifting: it turns a basic half-up into something that looks styled.
What makes this work for game day specifically is the combination of polish and practicality. The hair stays off your face during intense moments, but the waves keep it feminine and relaxed enough for an outdoor evening setting with string lights.
Why this look is popular: It bridges the gap between "I tried" and "I'm not trying too hard." The claw clip adds a decorative element that reads as put-together without the commitment of a full updo. Medium to long hair with natural wave holds this best — if your hair is pin-straight, a quick pass with a 1.25-inch curling iron and some texturizing spray gets you there.
Where this look is suitable: Outdoor watch parties, casual bar gatherings, backyard tailgates. Too relaxed for a formal VIP stadium event, but perfect for most game-day settings.
Step by step:
- Prep with texture. If hair is freshly washed, mist with a texturizing spray (Oribe Dry Texturizing Spray or similar) from roots to ends. Second-day hair works fine here.
- Create the waves. Using a 1.25-inch curling wand, wrap 1-inch sections around the barrel, leaving the last inch out for a modern, undone finish. Alternate curl direction — one toward the face, one away.
- Break up the waves. Run your fingers through the hair to separate the curls into softer, more natural waves. Don't use a brush — it kills the texture.
- Gather the top section. From your temples up, pull the top third of your hair back. Keep it loose; tight gathering defeats the purpose.
- Clip it. Secure the gathered section with your claw clip at the back of your head. Position it so it sits as a focal point but doesn't stick out awkwardly.
- Set it. A light mist of flexible-hold hairspray locks the waves in place without making them crunchy.
Tips and tricks: Tease the crown area slightly before clipping for a softer, more lifted silhouette. For finer hair, clip a small backcombed section underneath the gathered hair to create the illusion of volume. The clip itself matters — a flat, barrette-style clip won't grip as well as one with teeth.
32 Stunning Summer Wedding Hairstyles for Brides ☀️💍
2.Glamorous Voluminous Layers
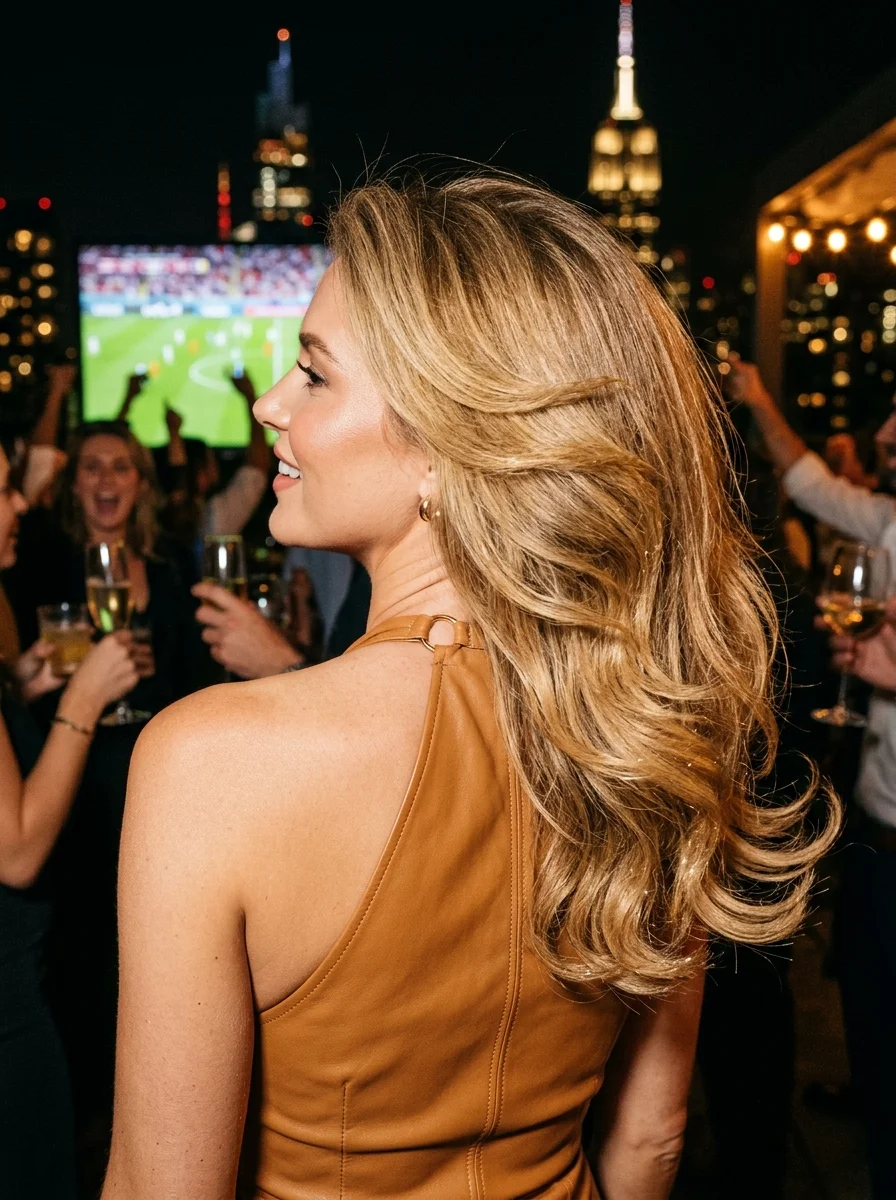
The overview: Long, layered hair with bouncy, defined curls throughout. Volume concentrated at the crown and around the face. Each curl has a soft, rounded shape with a glossy finish. The layers create a cascading silhouette where shorter pieces frame the face and longer pieces fall past the shoulders. This is the "I came to watch the game but I'm also the main event" hairstyle. Big, bouncy curls are the kind of hair that catches light from every angle at a nighttime rooftop party.
When you're jumping up to celebrate a goal, your hair moves with you in a way that flat, straight styles just don't. The key is the layering — the shorter pieces at the crown create lift, while the longer pieces at the bottom give the curls room to bounce.
Why this look is popular: It's the hairstyle that photographs best in a crowd. The volume reads on camera, and the dimension from the highlights makes every curl distinct. Works best on medium to thick hair that holds a curl — fine hair needs volumizing mousse applied to damp hair before blow-drying.
Where this look is suitable: Rooftop parties, upscale watch events, any occasion where you want your hair to be part of the conversation. Not ideal for hot outdoor settings where humidity will frizz the volume flat.
Step by step:
- Start damp with product. Apply volumizing mousse from roots to ends. Use a heat protectant spray before any hot tools.
- Blow-dry with lift. Using a large round brush, dry section by section, lifting at the roots. Focus on the top layers and face-framing pieces — this is where the volume starts.
- Curl with a large barrel. Use a 1.5-2 inch curling iron. Wrap large sections away from the face. Hold each for 5-8 seconds.
- Let it cool completely. This is non-negotiable. Hot curls fall flat within an hour. Let them cool for at least 10 minutes before touching them.
- Brush through gently. Use a wide-tooth comb or your fingers to blend the curls into soft waves. Don't over-brush — you want definition, not frizz.
- Shine and set. Mist with a shine spray for that glossy finish, then a flexible-hold hairspray to maintain the shape without stiffness.
Tips and tricks: Sleep on a silk pillowcase to preserve the volume overnight. Pin each curl up as you release it from the iron and let it cool in a coiled shape — this doubles the hold time. For finer hair, a root -lifting powder applied before blow-drying makes a measurable difference.
3.Side Braids with Loose Waves
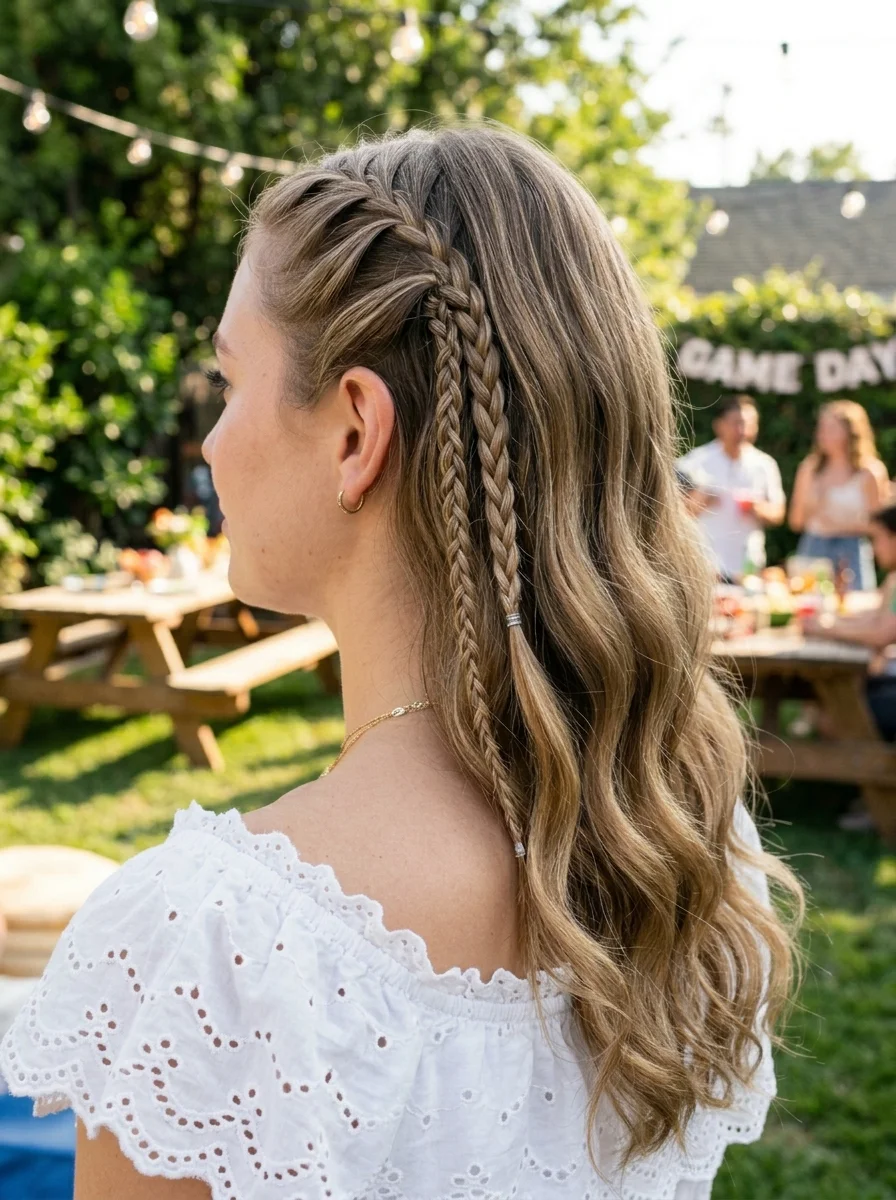
The overview: Two fishtail braids starting from the temple area on one side, running along the hairline and hanging down. The remaining hair falls in loose, natural-looking waves with a slightly tousled, beachy texture. This is the hairstyle that says "I'm here for the game AND the vibes."
Fishtail braids have a specific advantage over three-strand braids for game day: the pattern creates more visual texture, which means even a loose, imperfect braid looks intentional. You don't need to be a braiding expert to make this work.
Why this look is popular: The asymmetry makes it more interesting than symmetrical braids. Having both braids on one side creates an editorial quality that reads well in photos. The loose waves add softness that keeps it from looking too athletic.
Where this look is suitable: Outdoor watch parties, tailgates, casual bar settings. It's relaxed enough for daytime but polished enough for evening.
Step by step:
- Texturize first. If hair is freshly washed, spray with dry shampoo or texturizing spray for grip. Fishtails on slippery hair unravel.
- Create loose waves. Use a large barrel curling wand on 1-inch sections, leaving the ends out. Break up with fingers.
- Section for braids. Take a 2-inch section from the hairline on one side. Divide it into two for the fishtail.
- Fishtail braid. Cross a small piece from the outer edge of one section over to the other side. Repeat. Keep the tension loose — you'll pull it apart later.
- Second braid. Take another section directly below the first and repeat the fishtail technique. Secure both with small clear elastics.
- Pancake the braids. Gently pull the outer loops of each braid to widen them. This is what creates the full, relaxed look.
- Add accessories. Small hair rings or beads at the braid ends add a festive touch.
Tips and tricks: The "pancake" technique is everything here. Without it, the braids look thin and unfinished. Pull gently — you want width, not a completely flat braid. If your hair is fine, the fishtail actually creates more visual texture than a standard braid, making it a better choice for thinner hair types.
34 Cutest Butter Yellow Nail Designs for 2026 🧈
4.Braided Crown Updo with Pearls
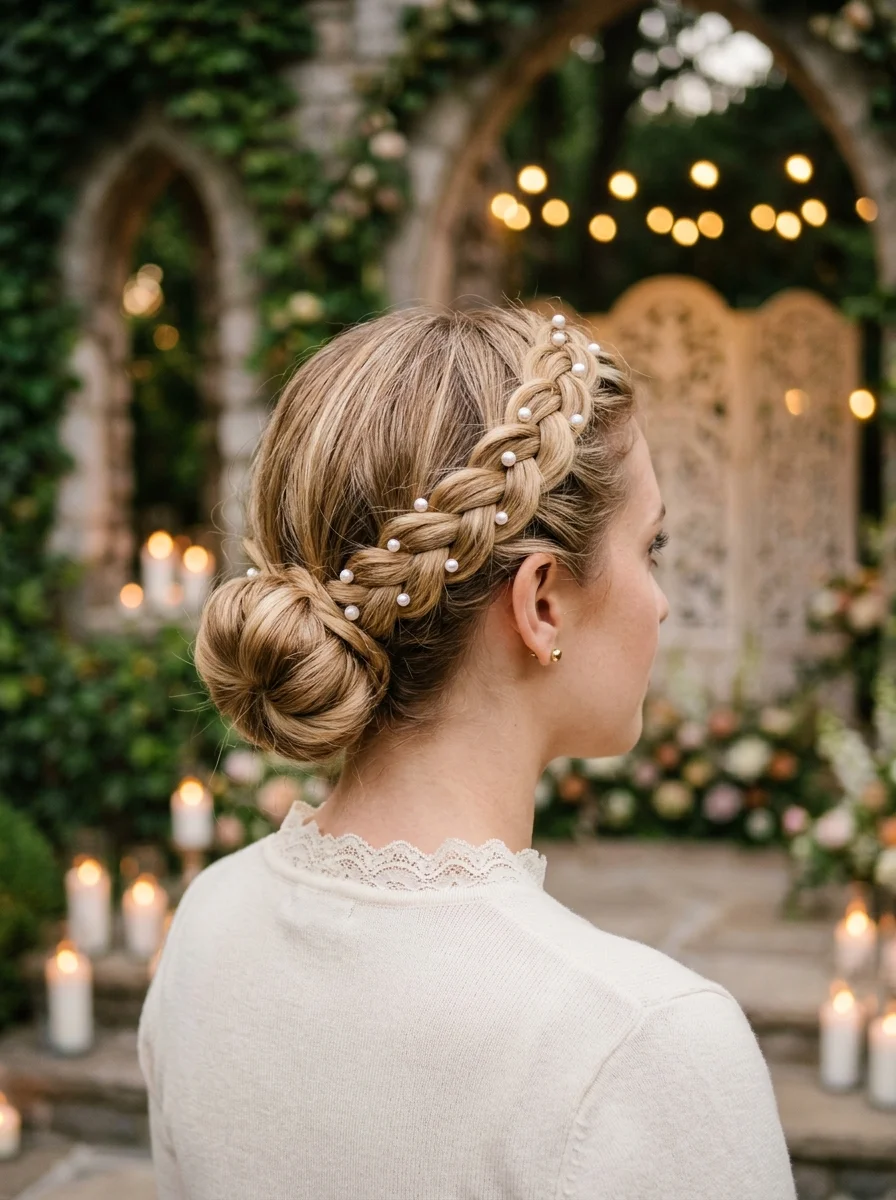
The overview: A Dutch braid (raised from the scalp) wrapping around the head like a crown, with all remaining hair gathered into a neat low chignon at the nape. Small white pearls are pinned into the braid at irregular intervals. This is the hairstyle you wear when the watch party is at a garden venue with ivy-covered stone arches and candlelight. It's formal, it's romantic, and it photographs like a dream from every angle.
The braided crown works for watch parties because it's completely contained — nothing hangs in your face, nothing falls forward when you lean in to watch a replay. The pearls add a luxurious texture that elevates the whole look beyond "sporty" into "occasion." This is for the person who treats World Cup night as an event, not just a casual hangout.
Why this look is popular: The braided crown is one of the few updos that looks good from every angle — front, side, and back. Adding pearls along the braid creates scattered points of light that catch attention without overwhelming the design. Works best on smooth, straight to wavy hair that holds a braid without slipping.
Where this look is suitable: Upscale watch parties, garden venues, formal viewing events. This is not a "throw it up and go" style — it's for when you want the hair to be as considered as the outfit.
Step by step:
- Smooth the hair. Apply a smoothing serum or light styling cream to damp hair. Blow-dry with a boar bristle brush for maximum smoothness.
- Part and section. Create a side part or center part. Brush all hair back from the face.
- Dutch braid the crown. Starting at one temple, Dutch braid (cross strands under) along the hairline, adding hair as you go. Continue around the head until you reach the nape.
- Gather the bun. Collect all remaining hair at the nape. Twist into a low chignon and secure with bobby pins that match your hair color.
- Tuck the braid tail. Tuck the end of the braid into the bun and pin it securely. Use a fine-tooth comb to smooth any flyaways.
- Add pearls. Pin small pearl accessories into the braid at irregular intervals. Odd numbers (5 or 7) look more natural than even.
- Set with spray. A strong-hold hairspray ensures this stays put all night.
Tips and tricks: Second-day hair holds this style better than freshly washed hair. If your hair is slippery, work a texturizing mousse through before braiding. For the smoothest finish, use a boar bristle brush when blow-drying — it distributes natural oils and creates shine that makes the braid pattern pop.
5.Double Braids with a Ribbon Tie
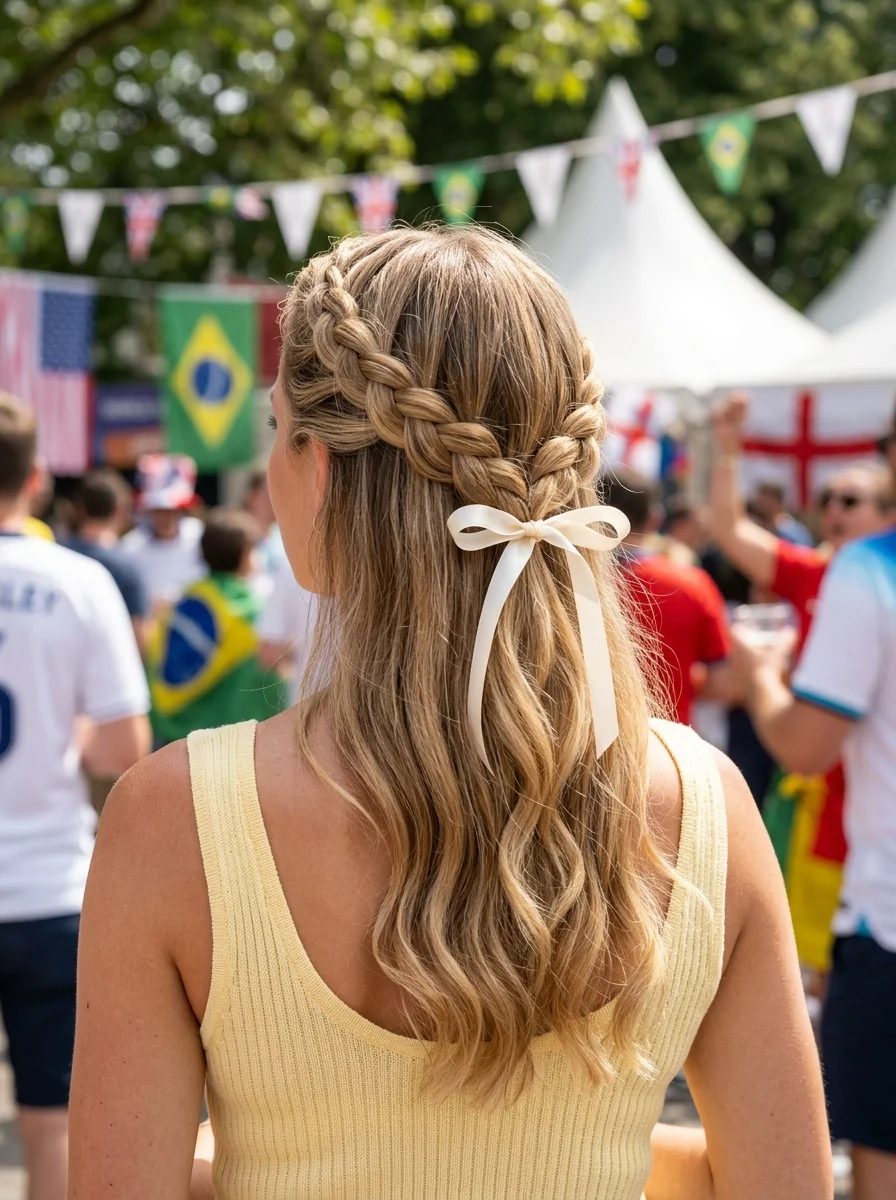
The overview: Two symmetrical Dutch braids starting at the crown, running along the sides of the head, and meeting at the back where they're secured with a white satin ribbon tied in a bow. The remaining length falls in loose waves past the shoulders. The ribbon adds a feminine touch to a sporty foundation, and the loose waves falling from the braids keep it soft rather than athletic.
Ribbon-woven braids are one of the easiest ways to show team spirit through your hair. Match the ribbon to your jersey color, and you've got a coordinated look without any complicated styling. The white satin works because it contrasts against the blonde hair without competing with the braid texture.
Why this look is popular: Dutch braids (the ones that pop outward) create a 3D texture that photographs better than flat French braids. Adding a ribbon through the braid or tied at the back turns a basic braid into a statement. Works on all hair types — curly hair actually holds the braids better.
Where this look is suitable: Any watch party setting — casual or dressed up. The ribbon color determines the formality: satin reads dressy, grosgrain reads casual, velvet reads winter.
Step by step:
- Create a center part. Use the pointed end of a rat-tail comb for precision. A crooked part throws off the symmetry.
- Dutch braid each side. Starting at the hairline, cross strands under (not over) to create the raised braid effect. Add small sections from each side as you braid backward.
- Stop at the nape. Once you've gathered all the hair on each side, continue as a regular three-strand braid for a few inches.
- Tie with ribbon. Cut a 12-inch length of white satin ribbon. Tie it around the end of each braid, just above the elastic, forming a neat bow.
- Loosen the waves. The remaining hair below the braids should fall in soft waves. If it's straight, a quick pass with a curling wand adds movement.
Tips and tricks: Match the ribbon to your team's colors for instant game-day coordination. Satin ribbons photograph well but can be slippery — tie them securely and consider adding a small dot of fabric glue to the knot if you're worried about them coming undone during an exciting match.
28 Stunning Baddie Summer Hairstyles for 2026 🔥☀️
6.Double Dutch Braids with Metallic Thread
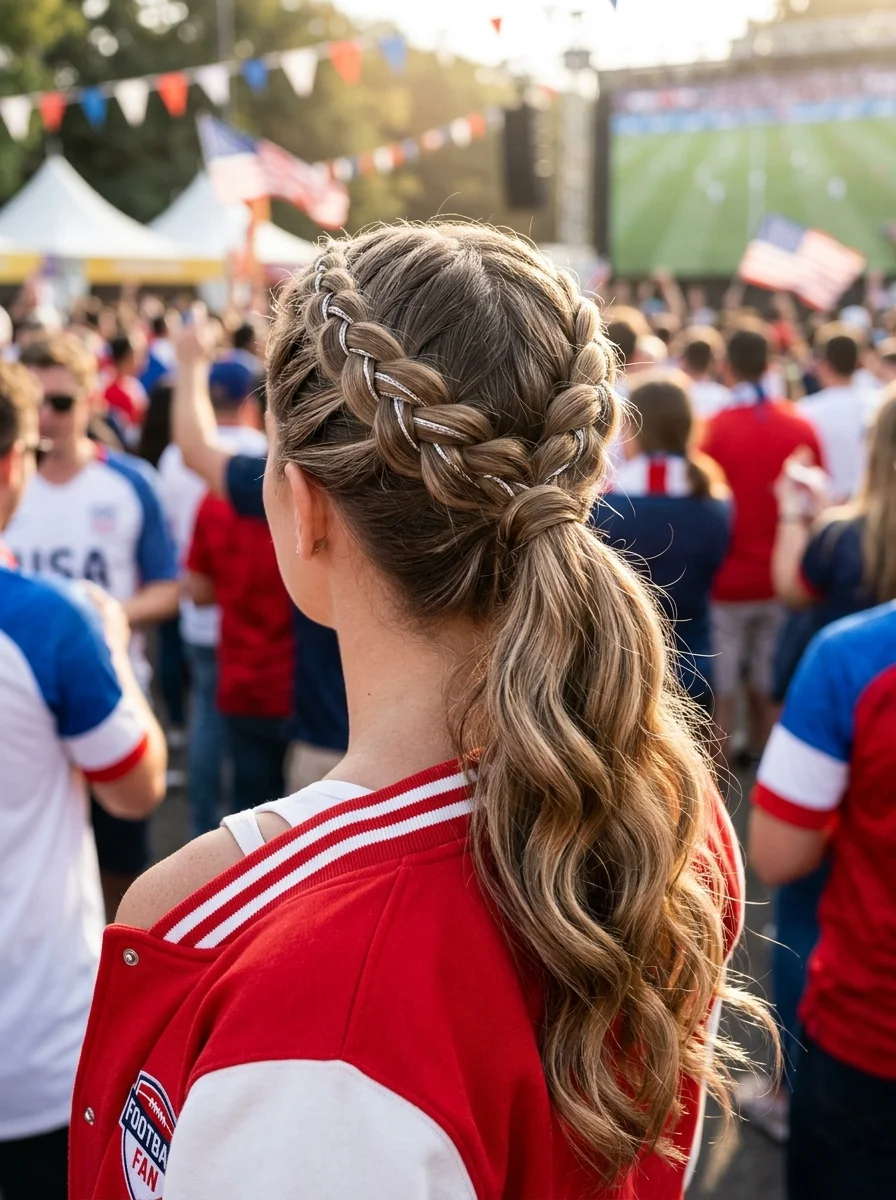
The overview: Two tight, clean Dutch braids running from the front hairline to the nape, with silver metallic thread woven through each braid. The braids meet at the back and transition into a loose ponytail with natural waves. The metallic thread catches light throughout the braids, creating a subtle shimmer effect.
The pull-through ponytail at the end is a practical choice: it keeps the braids secure while allowing the remaining hair to flow. You get the structure of braids with the movement of a ponytail.
Why this look is popular: Metallic thread transforms basic braids into something that catches light on camera — perfect for game-day selfies and social posts. The Dutch braid technique creates a raised, 3D pattern that the thread follows, making the sparkle visible from every angle.
Where this look is suitable: Patriotic-themed watch parties, outdoor tailgates, fan zones. The silver thread pairs particularly well with blue, red, and white team colors.
Step by step:
- Start smooth. Brush hair thoroughly. Apply a smoothing cream to keep flyaways down — the metallic thread shows every imperfection.
- Center part precisely. This look demands symmetry. Use a rat-tail comb for a razor-sharp line.
- Thread placement. Cut two lengths of thin silver metallic thread (lurex or similar). Lay one strand alongside the first section of your Dutch braid.
- Braid with thread. As you Dutch braid, weave the thread with one of the three strands, keeping it flat against the hair. The thread should follow the braid pattern naturally.
- Secure at the nape. Once all hair is gathered, tie off with a clear elastic. The remaining length can be left as a ponytail with waves.
- Mirror on the other side. Repeat, ensuring the second braid matches the first in tightness, placement, and thread visibility.
Tips and tricks: Keep the thread taut against the hair section as you braid — if it's loose, it wraps around the outside instead of integrating into the braid pattern. A small amount of smoothing cream applied before braiding helps keep everything sleek and makes the thread lay flat.
7.Double Bubble Braids with Charms
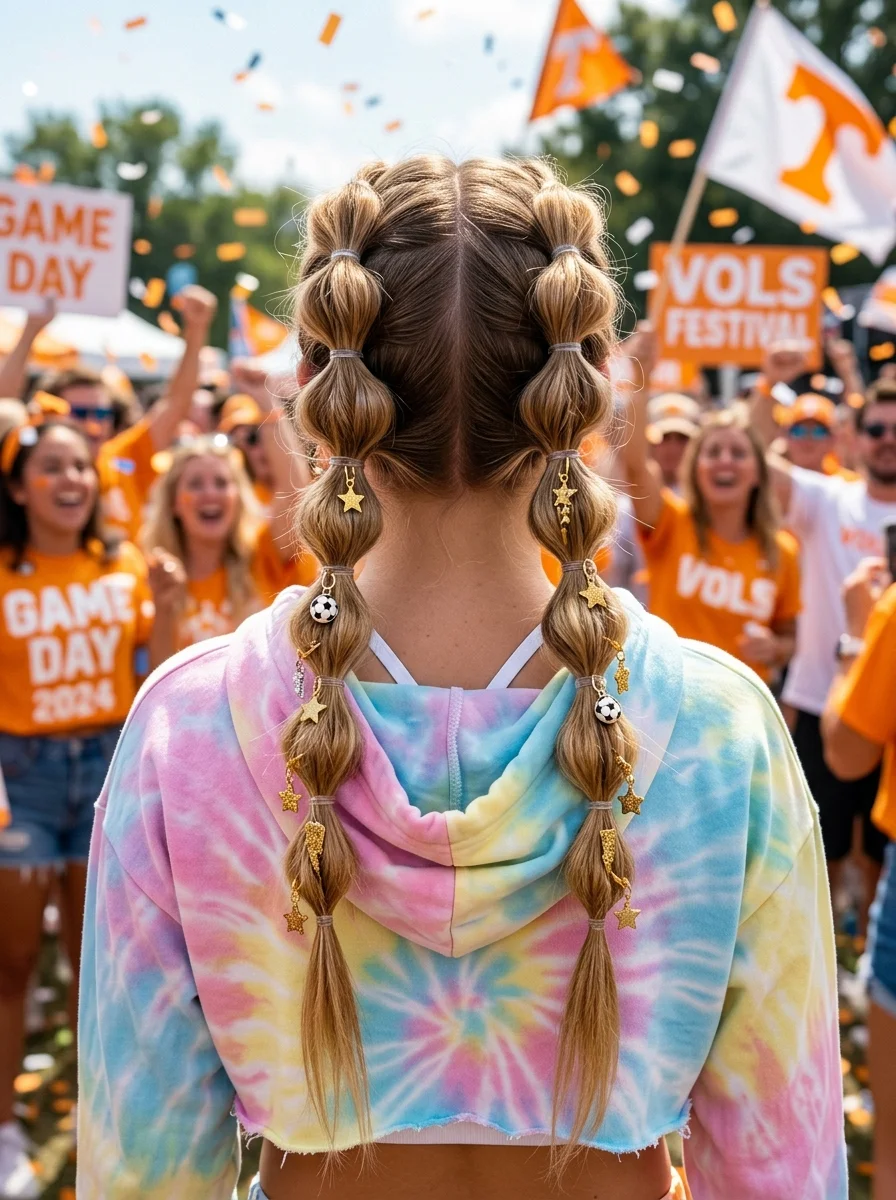
The overview: Bubble braids are the hairstyle equivalent of a party hat — they announce that you're here to have fun. Clean center part dividing the hair into two equal sections. Each section is styled into a bubble braid — ponytails secured at intervals with elastics, then pulled apart to create rounded, puffy shapes. Gold star and soccer ball charms are clipped to the hair between the bubbles.
The charm detail is what elevates this from "cute pigtails" to "intentional game-day hairstyle." The stars and soccer balls are thematic without being costume-y, and the gold tone works with the light brown hair color. These are the kind of details that people notice up close and comment on.
Why this look is popular: Bubble braids are easier than actual braiding — you're just tying elastics at intervals and pulling the sections apart. The result looks more complex than it is. Adding themed charms makes them feel custom and personal.
Where this look is suitable: High-energy watch parties, outdoor festivals, casual gatherings where you want your hair to be a conversation starter. Not for formal settings.
Step by step:
- Smooth the base. Brush hair thoroughly and apply a light smoothing serum if needed.
- Create the center part. From forehead to nape. Symmetry is key.
- Make two high ponytails. Gather each side into a ponytail at the crown. Secure tightly.
- Bubble the first ponytail. Tie an elastic 2 inches down from the base. Gently pull the section between the two elastics to create a rounded bubble. Repeat down the length.
- Repeat on the other side. Match the spacing and bubble size for symmetry.
- Add charms. Clip gold star and soccer ball charms between the bubbles or at the ends.
- Set with spray. A light mist of flexible-hold hairspray keeps the bubbles defined without crunch.
Tips and tricks: For more defined bubbles, make sure each section is pulled tight before gently puffing it out. If you don't have themed charms, wrapping colored ribbon or string around each elastic adds the same visual interest. Works on shoulder-length to very long hair — shorter hair gets smaller, tighter bubbles that are equally cute.
27 Stunning Graduation Day Nail Ideas for 2026 🎓
8.Neon Bubble Braids with Pink & Green Elastics
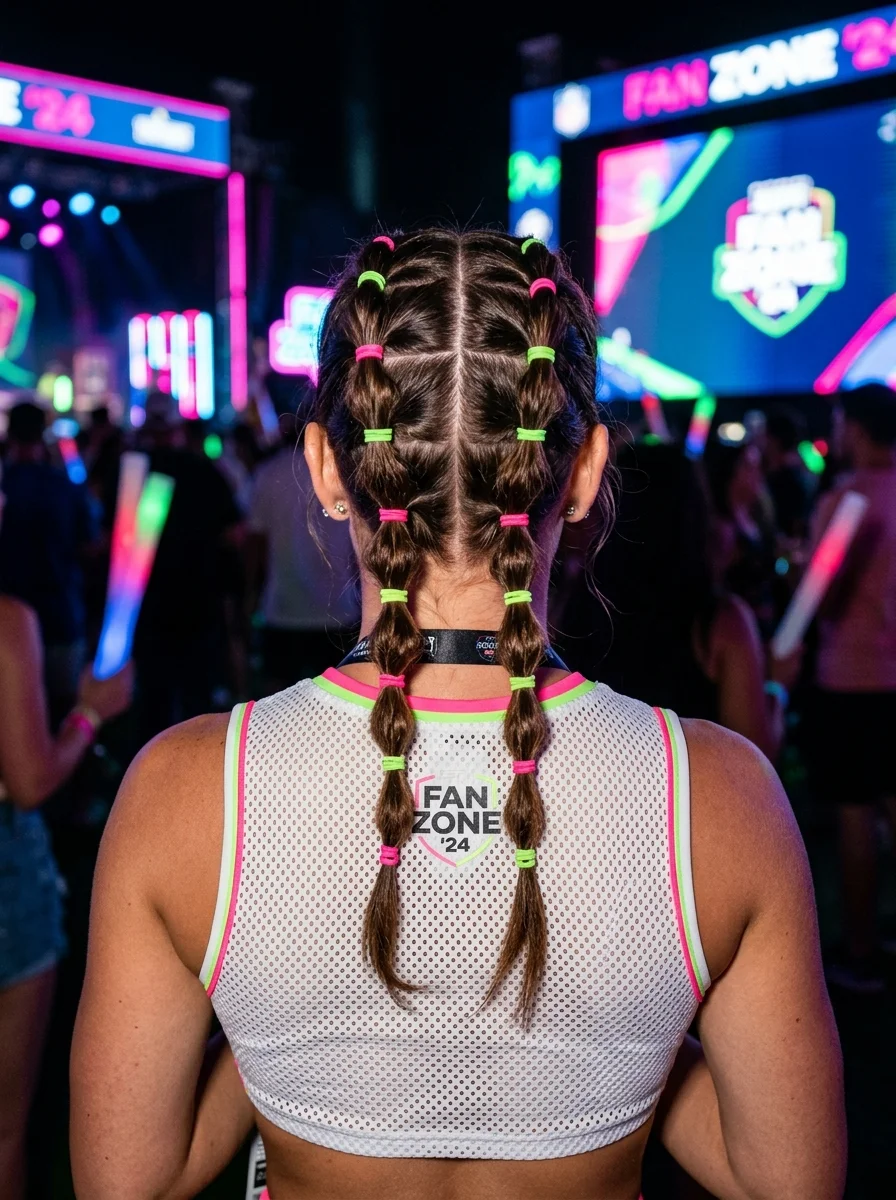
The overview: Dark brown hair sectioned into a grid pattern at the top of the head, transitioning into two bubble braids down the back. Each bubble is secured with alternating neon pink and neon green elastics. The bubbles are evenly spaced and pulled apart for maximum volume. This is the hairstyle for the person who wants their hair to match the energy of a stadium at night — loud, bright, and impossible to miss. The grid-pattern sectioning at the top adds an architectural element that elevates the look beyond simple bubble braids.
The color contrast is what makes this work. Dark hair provides the perfect backdrop for neon elastics — they pop against the dark canvas in a way they wouldn't on lighter hair. The pink and green together read as retro-80s, which is a specific aesthetic that photographs incredibly well under neon lighting.
Why this look is popular: The grid sectioning at the top creates a visual pattern that's more interesting than a standard center part. The neon elastics provide color without requiring colored hair. And the bubble technique itself is fast — you can do both sides in under 15 minutes.
Where this look is suitable: Nighttime fan zones, neon-lit bars, festival-style watch parties. The neon colors are designed for dark environments where they'll actually glow.
Step by step:
- Create the grid. Part hair into a center line, then add a horizontal part across the crown to create four sections.
- Gather into two ponytails. Combine the top two sections on each side into high ponytails. Secure tightly.
- Bubble with alternating colors. Tie an elastic a few inches down from the base, using neon pink. Pull the section apart to create a bubble. Move down and use neon green for the next elastic. Alternate all the way down.
- Repeat on the other side. Match the bubble size and elastic spacing.
- Adjust the bubbles. Gently pull the edges of each bubble to make them fuller and rounder.
Tips and tricks: Use clear elastics as a base first, then wrap the neon ones over them for extra hold. The neon elastics alone can slip on fine hair. A texturizing spray before styling gives the hair more grip and helps the bubbles hold their shape through a long match.
9.Intricate Cornrow Braids with Two Pigtails
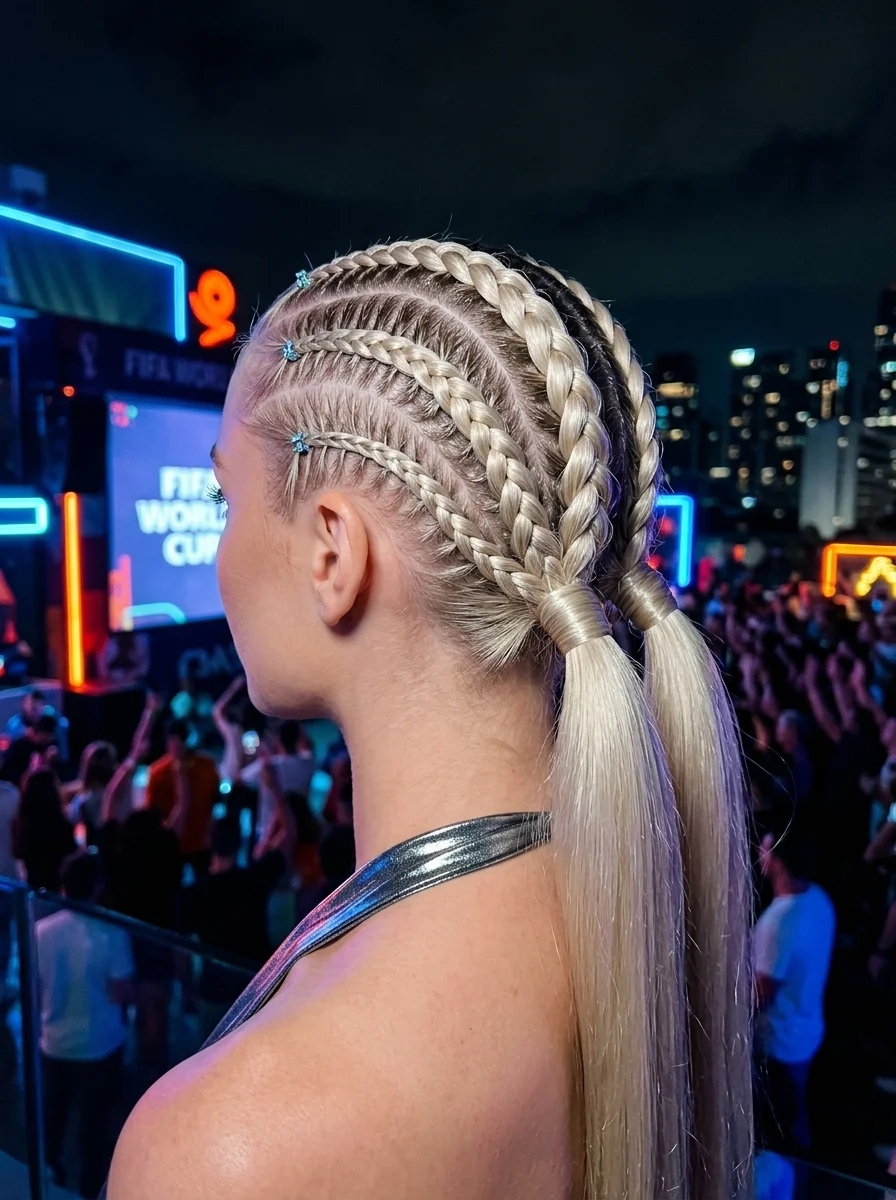
The overview: Multiple tight cornrows running from the front hairline along the sides of the head, feeding into two braided pigtails that hang down. Small blue star-shaped clips are placed along the hairline as decorative accents. The platinum blonde color creates high contrast between the braids and the scalp, making the pattern highly visible.
Cornrows are one of the most practical watch-party braids because they stay completely flat against the head. No volume to collapse, no loose pieces to fall in your face, nothing to adjust during a tense penalty shootout. The star clips add a subtle decorative element without compromising the clean lines.
Why this look is popular: The precision of cornrows communicates intentionality. Every line is deliberate, every braid is symmetrical, and the result looks polished from every angle. On platinum blonde hair, the scalp contrast makes the braid pattern even more visible and dramatic.
Where this look is suitable: Any setting — this is one of the most versatile styles on the list. It works at casual bars, formal events, outdoor tailgates, and indoor watch parties. The star clips can be swapped for different accessories depending on the occasion.
Step by step:
- Start with clean, dry hair. Day-old hair holds cornrows better than freshly washed hair. Detangle thoroughly.
- Create a sharp center part. From forehead to nape. This line is the foundation for the entire look.
- Cornrow one side. Starting at the hairline, braid tightly against the scalp, adding hair from each side as you go. Keep the tension consistent — uneven tension creates visible lumps.
- Continue to the pigtail. Once you reach ear level, gather all the cornrowed hair into a pigtail. You can continue braiding or leave it as a ponytail.
- Repeat on the other side. Mirror the pattern and placement exactly.
- Add star clips. Place small blue star-shaped clips along the hairline for decoration.
- Edge control. Use a small amount of edge control gel and a toothbrush to smooth any flyaways along the hairline.
Tips and tricks: The most common mistake is uneven parting. Use the pointed end of a rat-tail comb and check your parts in a mirror from multiple angles before you start braiding. Applying a small amount of styling gel to each section before braiding helps create clean, defined lines and prevents frizz.
35 Cute & Sporty Athletic Hairstyles for Women (2026)
10.Voluminous Curly Top Knot
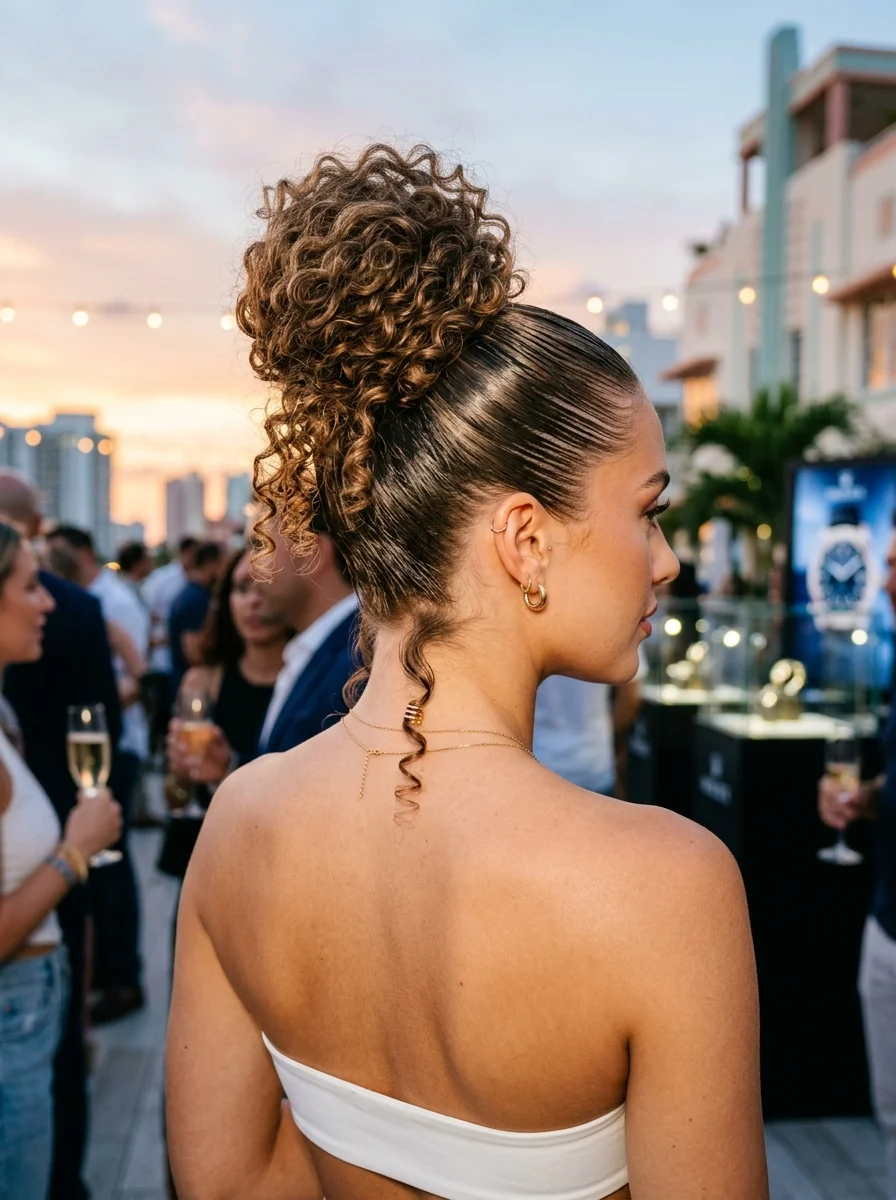
The overview: Hair slicked back from the face with a wet-look gel finish on the sides, gathering into a high ponytail at the crown. The ponytail is styled into a large, voluminous bun showcasing defined, bouncy curls.
The contrast between the sleek sides and the voluminous curls is the design. The sides are smoothed down with gel or pomade, creating a polished base that makes the curly bun look even more dramatic by comparison. It's structured but not stiff — the curls within the bun are bouncy and defined, not crushed.
Why this look is popular: It celebrates natural texture instead of fighting it. The curly top knot is a statement that says "my hair is the accessory." The sleek sides keep it from looking messy, and the height at the crown creates a commanding silhouette that photographs beautifully.
Where this look is suitable: Upscale rooftop parties, evening events, any setting where you want your hair to be a focal point. The height and volume make it too dramatic for truly casual settings — this is for when you want to make an entrance.
Step by step:
- Define curls first. On damp hair, apply curl-defining cream section by section. Scrunch upward and air-dry or diffuse on low heat.
- Slick the sides. Apply a wet-look gel or pomade to the sides and back. Use a boar bristle brush to smooth the hair back toward the crown.
- Create a high ponytail. Gather all hair at the crown. Secure tightly with a strong elastic.
- Form the bun. Twist the curly ponytail around the base, arranging the curls so they show. Pin with bobby pins that match your hair color.
- Refine the sides. Go back over the sides with gel and a fine-tooth comb to ensure every strand is smooth and glossy.
- Set and shine. Mist with strong-hold hairspray on the sides. Apply a light shine spray to the curls for extra gloss.
Tips and tricks: A boar bristle brush is essential for achieving the sleek sides — it distributes product evenly and creates a smoother finish than a regular brush. If your curls are fine, use a volumizing mousse before defining them to add more body. Don't be afraid to load up on product for the sides — that's what creates the contrast.
11.Double French Braids into a Bun
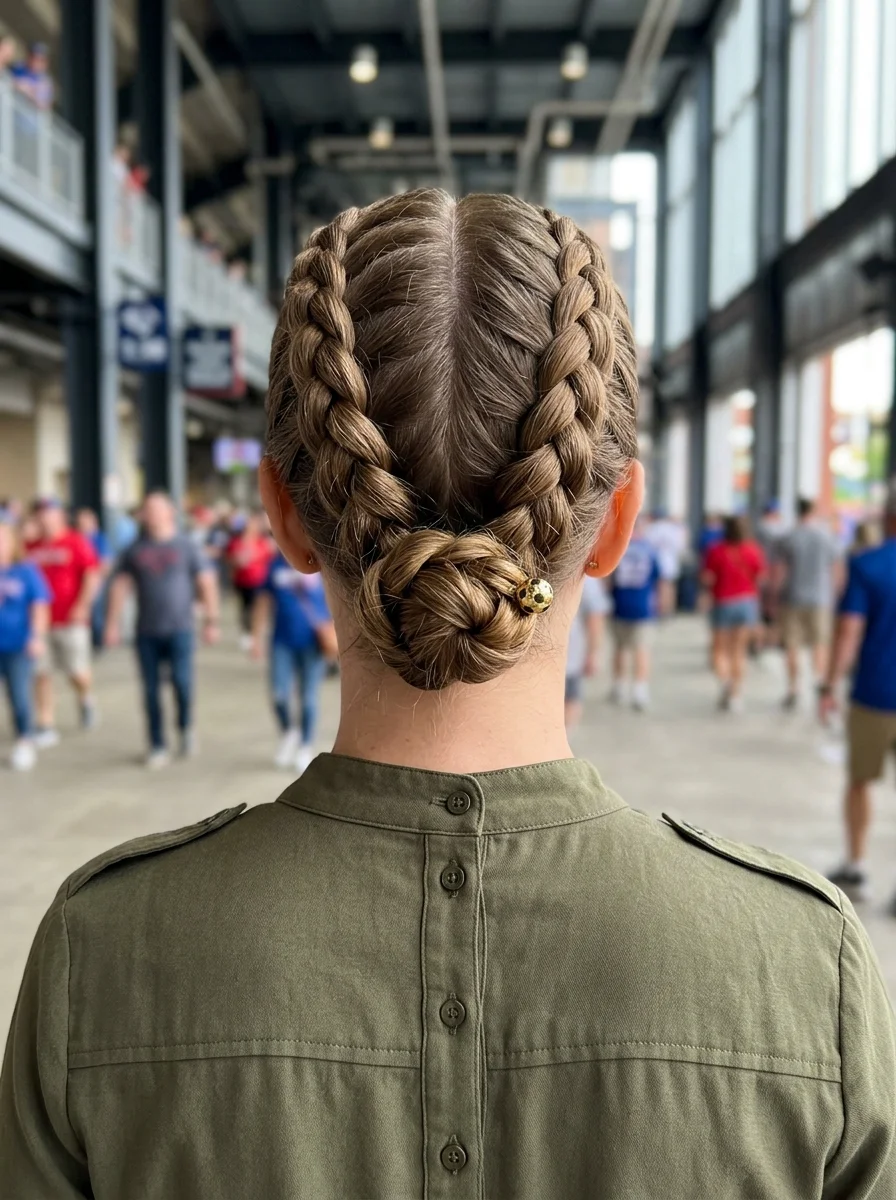
The overview: Two Dutch braids starting at the front hairline, running along the sides of the head, and meeting at the nape where they're gathered into a smooth, compact low bun. You can place a small decorative gold and black pin on the right side of the bun.
The decorative gold and black pin on the bun is a small detail that makes a big difference. Without it, this is a solid but unremarkable updo. With it, the style reads as considered and intentional. One accessory changed the entire context.
Why this look is popular: Double braids feeding into a bun distribute hair weight evenly, which means less tension on any single point. This makes it more comfortable to wear for hours than a single high ponytail or top knot. The bun at the nape sits below the cap line if you're wearing a hat.
Where this look is suitable: Stadium viewing, casual to semi-formal watch parties, any setting where you want your hair completely controlled and out of the way. The decorative pin elevates it enough for evening events.
Step by step:
- Prep with texture. Second-day hair or dry shampoo gives the braids something to grip. Freshly washed hair tends to slip.
- Center part. Clean line from forehead to nape.
- Dutch braid each side. Start at the temple, braid along the hairline, incorporating all hair on that side until you reach the nape.
- Gather into a bun. Combine both braids at the nape, twist into a compact bun, and secure with bobby pins.
- Add the decorative pin. Place it on the side of the bun for a subtle accent.
- Smooth flyaways. Use a bit of smoothing cream or edge control along the hairline.
Tips and tricks: A boar bristle brush helps smooth the hair as you braid, distributing natural oils for extra shine. If your bun feels loose, twist it tighter and use crisscrossed bobby pins for extra hold. The pin isn't just decorative — it can also help secure the bun if placed strategically.
27 Gorgeous Mint Green Nails That Are Popular Right Now (2026)
12.Double Space Buns with Sparkly Ties
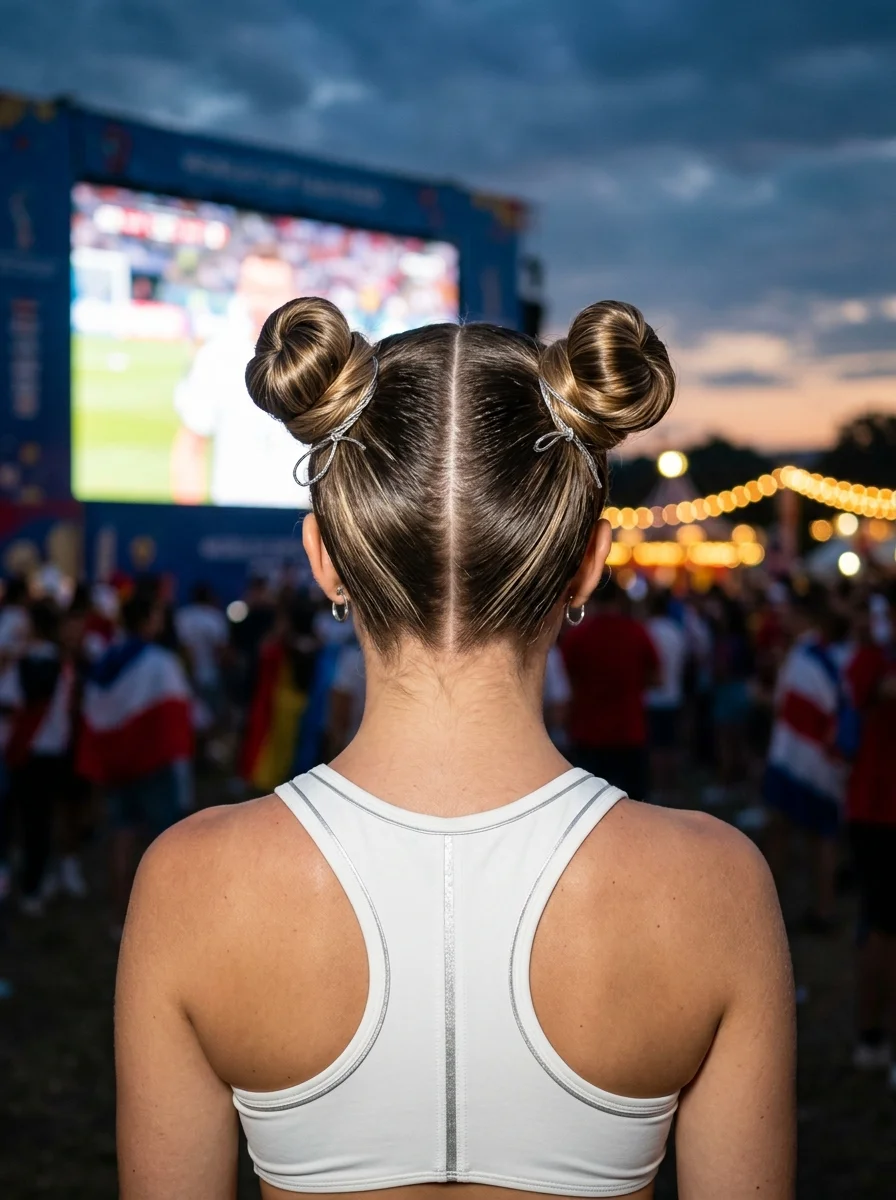
The overview: Clean center part with two symmetrical space buns positioned high on the crown, above and behind each ear. The buns are compact and neatly twisted. Sparkly silver hair ties are wrapped around the base of each bun, adding a festive shimmer. The sleek hairline contrasts with the textured buns.
Space buns are one of those styles that look complicated but are actually fast. The hardest part is getting the symmetry right — the buns need to be at the same height and the same size, or the whole thing looks off. The sparkly ties do the decorating work so you don't need additional accessories.
Why this look is popular: The high placement creates a youthful, energetic silhouette. The sparkly ties catch light during nighttime events, adding movement and visual interest. Works on straight to wavy hair that's long enough to form two distinct buns.
Where this look is suitable: Fun, high-energy watch parties, outdoor evening events, festivals. The sparkly ties make it more festive than formal — this is for when you want your hair to match the party atmosphere.
Step by step:
- Create a precise center part. From forehead to nape. The symmetry of the part determines the symmetry of the buns.
- Make two high ponytails. Gather each half at the crown, positioned above each ear. Secure with strong elastics. Check the height in a mirror — both must match.
- Twist and coil. Take one ponytail, twist it tightly, and wrap it around the elastic base to form a bun. Pin with 3-4 bobby pins.
- Repeat on the other side. Match the bun size and placement.
- Add sparkly ties. Wrap glittery elastics around the base of each bun. Tie securely.
- Smooth the hairline. Use a bit of gel or hairspray to tame any flyaways around the part and hairline.
Tips and tricks: Spray each section with strong-hold hairspray before twisting and wrapping — this gives the hair extra grip and makes the bun easier to shape. If one bun is larger than the other, gently pull sections of the smaller one outward to match. Symmetry is what separates intentional space buns from "my ponytail fell apart."
13.Soft Beach Waves with a Gold Bobby Pin Accent
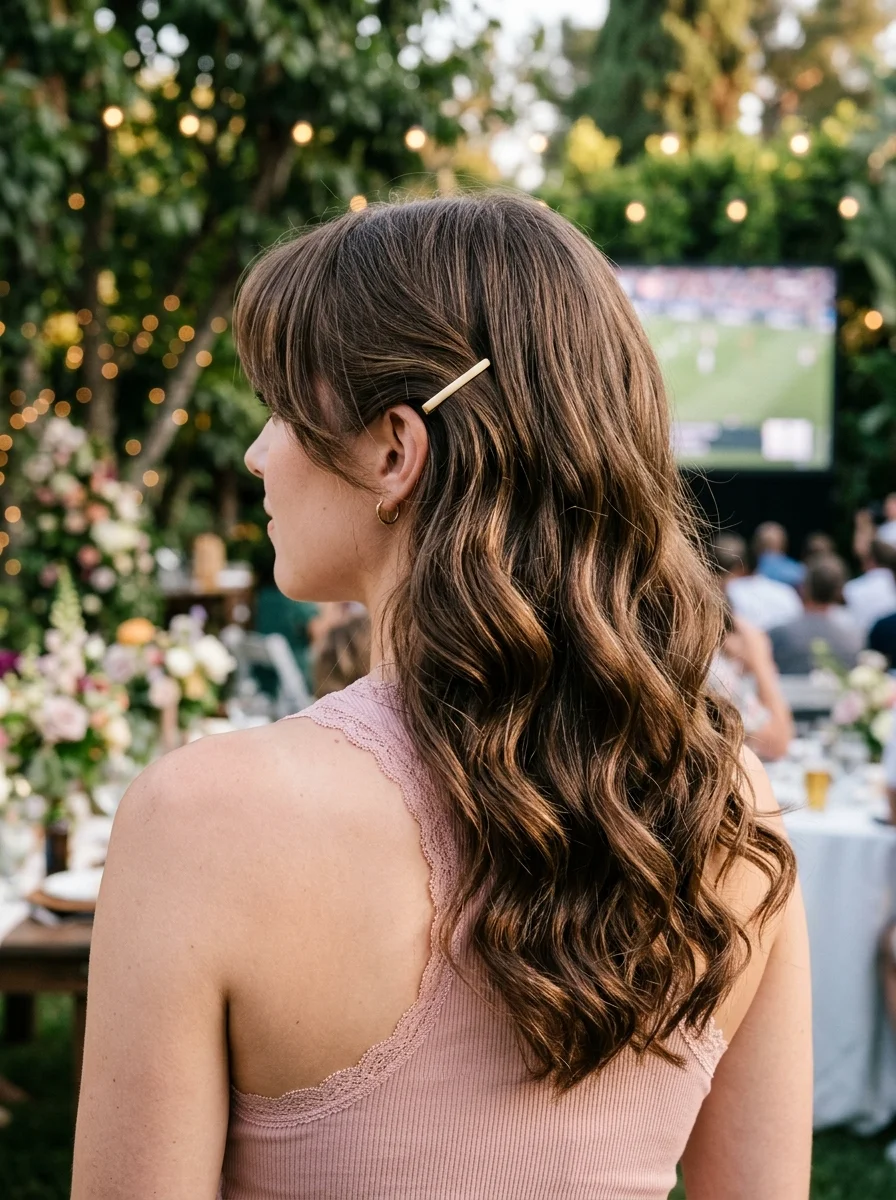
The overview: The "I woke up like this" hairstyle that actually takes about 20 minutes to execute. Soft, loose waves with a side part, face-framing curtain bangs, and along with this you can tuck a single gold bobby pin behind the ear.
The gold bobby pin is doing more work than it appears. Without it, this is nice hair. With it, the style reads as intentional — like you chose to be this effortless. It's a small signal that says "I put thought into this" without screaming "I spent an hour on my hair." The dusty pink tank top and gold hoop earrings complete the look.
Why this look is popular: It's the most wearable style on this list. Beach waves work on virtually every hair type, the gold accent is subtle enough for any setting, and the face-framing layers make it flattering from every angle. It's also one of the few styles that looks better after a few hours of wear.
Where this look is suitable: Everywhere. Outdoor parties, indoor bars, casual dinners, date nights. This is the Swiss Army knife of watch-party hairstyles.
Step by step:
- Start with damp hair. Apply a volumizing mousse at the roots and a heat protectant through the lengths.
- Diffuse or air-dry. For natural waves, scrunch as it dries. For straighter hair, use a diffuser on low heat.
- Add waves with a wand. Wrap 1-inch sections around a large barrel curling wand, leaving the ends out. Alternate direction.
- Break up the waves. Run your fingers through to separate them into softer, more natural shapes.
- Style the bangs. Sweep them gently to the side, blending them into the rest of the waves.
- Add the gold pin. Slide a gold bobby pin behind your ear, securing a small section of hair from the front.
- Set lightly. A mist of flexible-hold hairspray keeps everything in place without looking stiff.
Tips and tricks: Sleep on a silk pillowcase to preserve the waves overnight. A texturizing sea salt spray enhances the beachy texture on finer hair. The key is restraint — don't over-curl or over-spray. This style works because it looks undone, not because it looks perfect.
38 Trending Bandana Hairstyles for Women (2026)
14.Double Plaits with Ribbon Bows
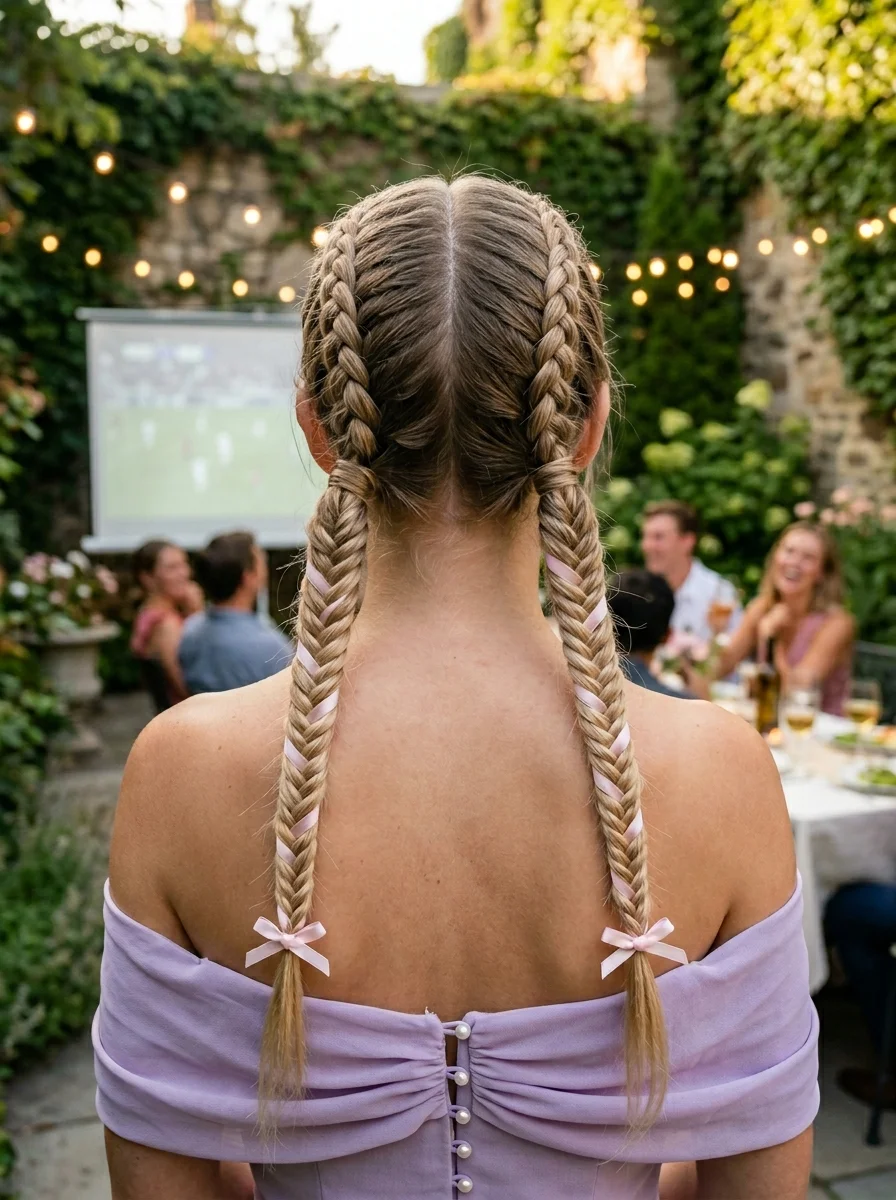
The overview: Clean center part with two Dutch braids running from the hairline to the nape, continuing as three-strand braids down the back. You can tie light pink ribbons into delicate bows at the end of each braid, just above the elastic.
Ribbon bows at the ends of braids are a small detail that changes the entire character of the style. Without them, these are standard double braids. With them, the look becomes sweet, festive, and distinctly personal. The ribbon color is the variable — swap pink for your team's colors and the same technique creates a completely different vibe.
Why this look is popular: The coquette aesthetic (feminine, bow-adorned, soft) has been trending across fashion and beauty. Applying it to game-day hair through ribbon-adorned braids is a natural extension. The braids themselves are practical, and the bows add personality.
Where this look is suitable: Garden parties, outdoor daytime events, casual settings where the feminine aesthetic fits. The pink ribbons specifically lean toward daytime — darker ribbon colors would work better for evening.
Step by step:
- Part precisely. Center part from forehead to nape.
- Dutch braid each side. Start at the hairline, cross strands under for the raised effect, and braid to the nape. Continue as a regular three-strand braid to the ends.
- Secure with clear elastics. Tie off each braid about 2 inches from the ends.
- Tie the ribbons. Cut two lengths of light pink ribbon. Tie each around the end of a braid, just above the elastic, forming a neat bow. Trim the ribbon tails to equal length.
- Optional pancake. Gently pull the outer loops of each braid to widen them for a fuller look.
Tips and tricks: Grosgrain ribbon has more grip than satin, so it stays tied better during active moments. For extra staying power, mist each braid with flexible-hold hairspray after tying the ribbons. You can also weave the ribbon through the braid itself rather than just tying it at the end for a more integrated look.
15.Half-Up Fishtail Braid with Daisy Accents
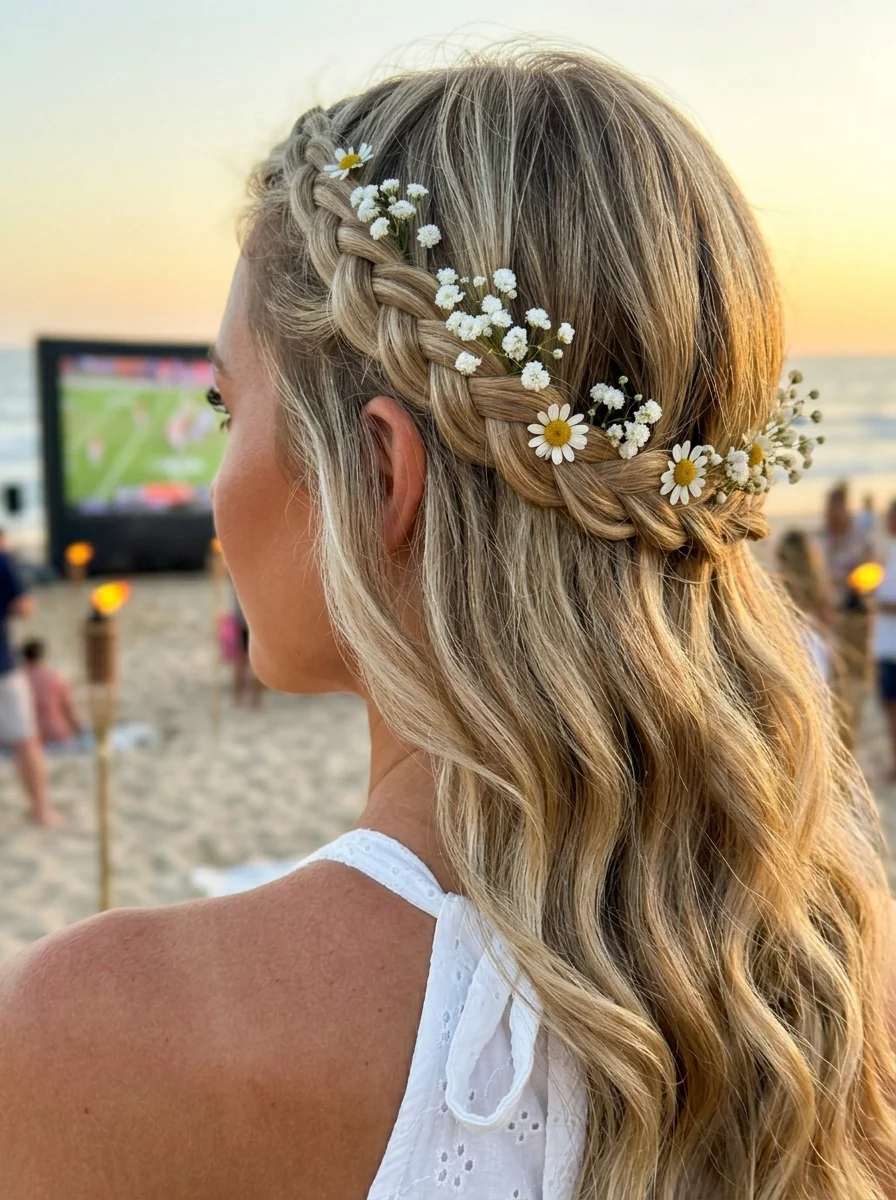
The overview: Loose, natural waves with a fishtail braid wrapping from one side around the head like a halo or crown. Small white daisy flowers and baby's breath are woven into the braid at intervals. The rest of the hair falls in soft, flowing waves past the shoulders.
Floral accents in braids are having a moment, and for good reason: they transform a simple braid into something that looks like it belongs in a magazine editorial. The daisies here are small enough to look natural, not costume-y, and the baby's breath fills the gaps between them.
Why this look is popular: The half-up fishtail crown is one of those styles that looks incredibly complex but is actually achievable at home. The daisy accents add a romantic, whimsical quality that elevates the entire look. Works especially well on wavy or curly hair that holds the braid without slipping.
Where this look is suitable: Beach watch parties, outdoor summer events, sunset gatherings. The floral elements lean feminine and romantic — ideal for settings where the aesthetic matches. Less practical for high-energy sports bars.
Step by step:
- Create texture. Use a texturizing spray or curling wand to add loose waves throughout the hair.
- Section for the braid. Take a 2-inch section from the temple area on one side.
- Fishtail braid. Cross small pieces from the outer edges to the opposite side. Keep the tension loose.
- Wrap around the head. Continue the braid along the hairline, incorporating more hair as you go, until it reaches the other side.
- Secure and pancake. Pin the braid end behind the ear. Pull the outer loops to widen the braid.
- Add flowers. Tuck small daisies and baby's breath into the braid loops. Use bobby pins to secure if needed.
Tips and tricks: Start with day-old hair — it has more grip and holds the braid better. The beauty of this style is its imperfection; don't worry about making the braid too neat. Pulling it apart is what creates the full, bohemian look. If using real flowers, add them just before you leave to prevent wilting.
32 Bright & Fun Summer Toe Nail Designs (2026)
16.Twisted Heart Half-Up Style
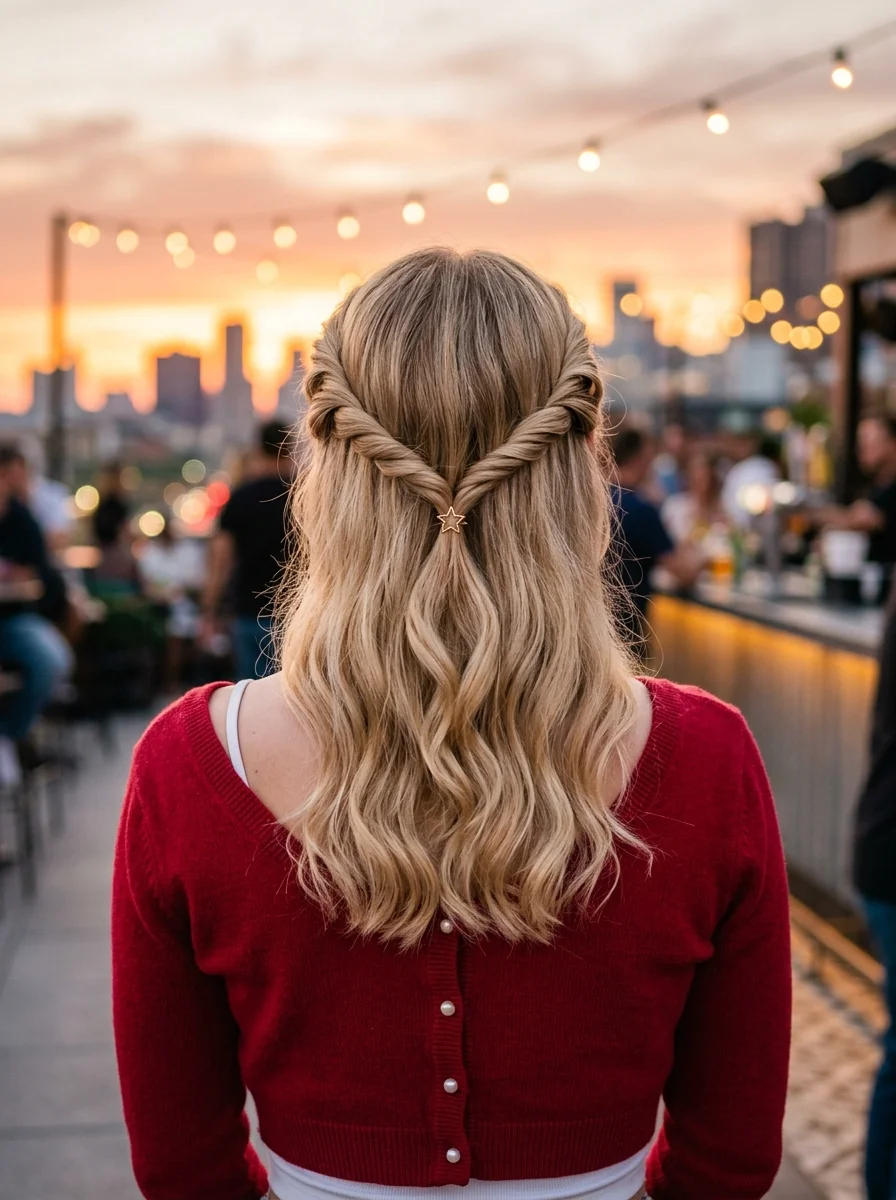
The overview: Long blonde hair with soft, loose waves. Two sections from near your temples are twisted and brought to the back of your head, meeting in a V-shape secured with a gold star clip. The rest of the hair falls naturally in waves.
The star clip at the junction where the two twists meet is doing important structural work — it's holding the twists together while also adding a decorative element. Without it, you'd need bobby pins, which wouldn't look as intentional. One accessory handles both function and aesthetics.
Why this look is popular: The twisted half-up style is faster than braiding but creates a similar visual interest. The V-shape at the back draws the eye downward, elongating the appearance of the face. The star clip adds a touch of sparkle that catches light during golden hour.
Where this look is suitable: Rooftop parties, sunset events, date-night watch parties. The romantic aesthetic works in intimate settings. Less suited for high-energy sports bars where you'll be jumping up and down.
Step by step:
- Create waves. Use a curling wand on 1-inch sections, leaving the ends loose. Break up with fingers.
- Twist the first section. Take a section from one temple and twist it gently toward the back of the head. Keep it loose — tight twists look stiff.
- Twist the second section. Repeat on the other side, creating a matching twist.
- Position the twists. Bring both twisted sections to the back of the head. Adjust them so they meet in the center and form a clean V-shape.
- Secure with the star clip. Place the gold star clip right at the junction point, catching both twists and the hair beneath.
- Adjust the waves. Let the remaining hair fall naturally. Touch up any waves that got disrupted during twisting.
Tips and tricks: The key to a clear heart/V shape is having the twists meet precisely in the middle. Use a mirror to check the back while positioning. A small amount of smoothing serum on the twists before pinning keeps them looking neat and defined.
17.Sleek Classic Double Dutch Braids
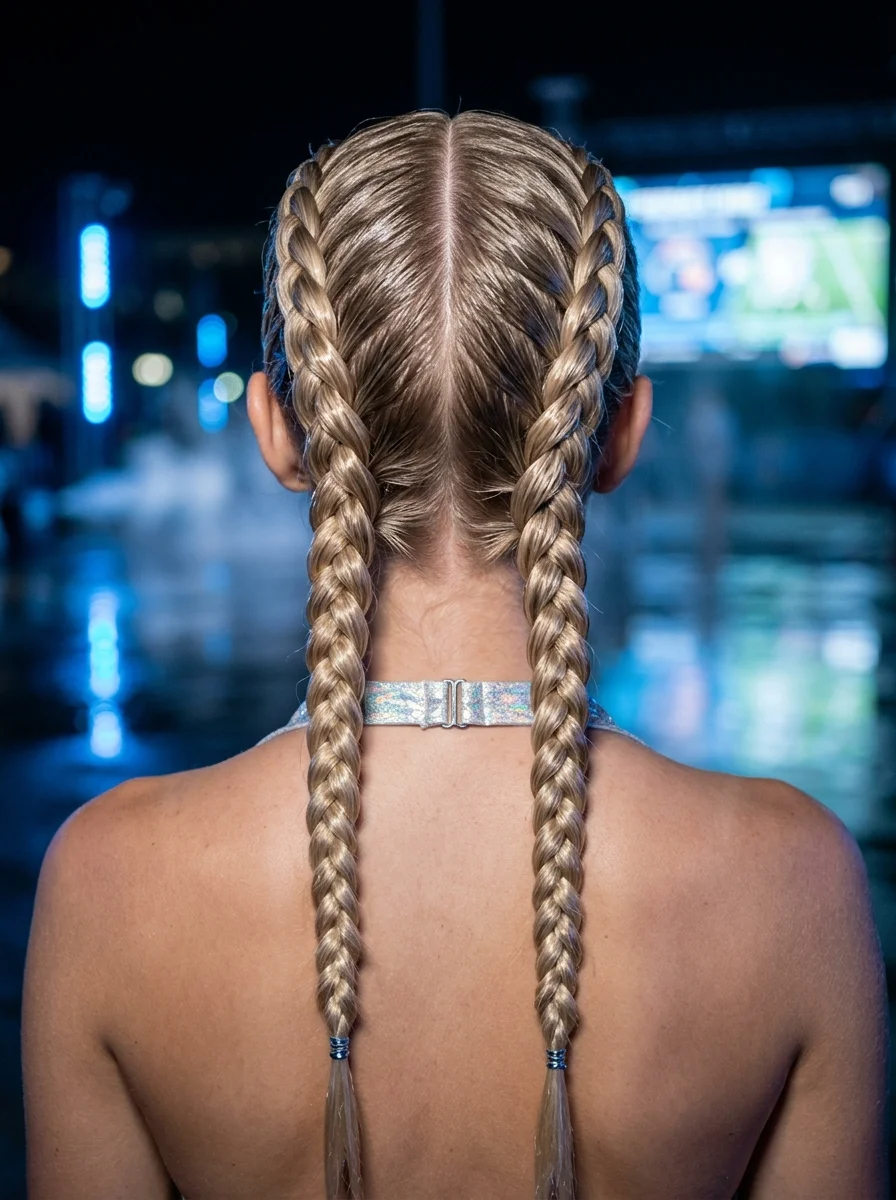
The overview: Two symmetrical Dutch braids starting at your front hairline, running along the sides of your head, and continuing as three-strand braids to your ends. The braids are tight, neat, and raised from the scalp. Every strand is controlled with no flyaways.
This is the purest version of double Dutch braids on the list. No ribbons, no charms, no thread — just precise braiding technique. The beauty is in the execution: clean parts, even tension, and consistent strand thickness throughout. It's a masterclass in braid fundamentals.
Why this look is popular: Dutch braids sit raised from the scalp, creating a 3D texture that photographs better than flat French braids. The clean, graphic lines give them a sporty, editorial quality. They're also one of the most durable styles on this list — properly executed Dutch braids can last 8+ hours without loosening.
Where this look is suitable: Any setting. Sports bars, fan zones, clubs, formal events. The minimalism of the style makes it adaptable — dress it up with accessories or keep it clean and sharp.
Step by step:
- Start with day-old hair. Freshly washed hair is too slippery for tight Dutch braids. Brush thoroughly.
- Create a razor-sharp center part. From forehead to nape. This precision is non-negotiable for the graphic look.
- Dutch braid one side. Start at the hairline. Cross strands under the middle strand (not over). Add small sections from each side as you braid backward.
- Maintain consistent tension. Each new section should be pulled snugly against the scalp. If the braid feels loose, redo the last two crosses.
- Braid to the ends. Once all hair is incorporated, continue as a standard three-strand braid. Secure with a clear elastic.
- Mirror on the other side. Match the braid thickness, tightness, and placement exactly.
- Edge control. Apply gel along the hairline with a toothbrush for the cleanest finish.
Tips and tricks: Apply a little gel or pomade along your part and hairline before you start braiding. It tames flyaways and makes the braid significantly cleaner. For finer hair, a volumizing spray or mousse before braiding adds texture and grip.
20 Stunning Half Up Half Down Hairstyles for Prom Night 2026 💃✨
18.Chic Messy Low Ponytail with Gold Spiral Accent
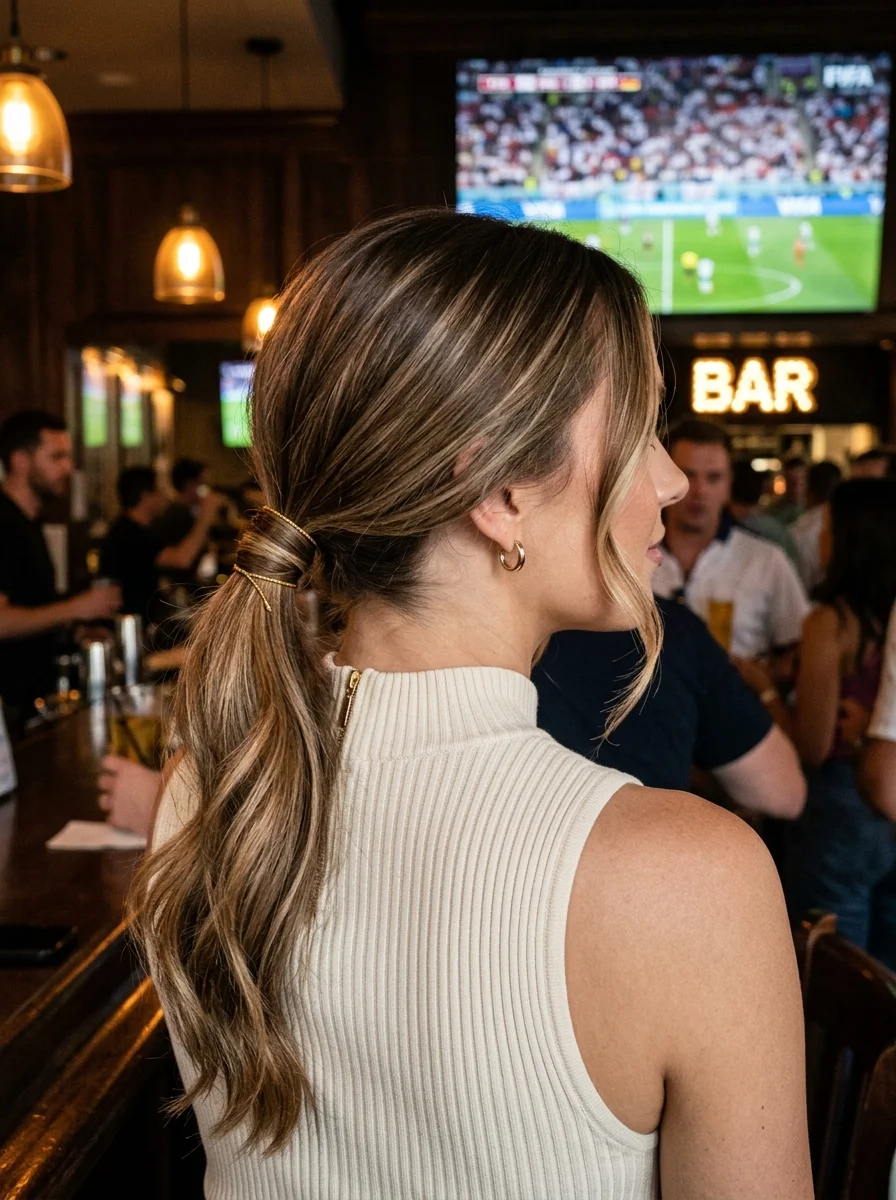
The overview: Textured, slightly messy hair gathered into a low ponytail at the nape. The ponytail has loose, separated waves with body and movement. Face-framing pieces are left out around the temples. A gold spiral cord is wrapped around the ponytail base, replacing the elastic. The finish is polished but not overly neat.
The gold spiral is the move here. It replaces the standard hair elastic with something decorative, turning a basic ponytail into an accessory-driven style. The spiral shape catches light differently than a flat barrette or clip — it adds movement and a slightly artisanal quality.
Why this look is popular: The messy low ponytail is one of the most universally flattering styles. It works on every hair type, every face shape, and every occasion. The texture in the ponytail itself prevents it from looking flat or boring, and the gold accent adds just enough sparkle to make it feel special.
Where this look is suitable: Bars, casual watch parties, date nights. The "effortlessly chic" quality makes it work in almost any setting except truly formal events.
Step by step:
- Create texture. Use a curling wand or flat iron to add loose, messy waves throughout. Don't aim for perfection — the messier, the better.
- Gather loosely at the nape. Don't pull tight. Leave a slight bump or volume at the crown by gently teasing before gathering.
- Leave face-framers out. Pull a few pieces from the hairline around the temples. Curl them if desired.
- Secure with an elastic. Use a clear or hair-colored elastic. Then wrap the gold spiral around the base, covering the elastic completely.
- Tousle the ponytail. Use your fingers to enhance the texture and make it look fuller.
- Set lightly. A mist of flexible-hold hairspray keeps everything in place.
Tips and tricks: This is the ultimate second-day hairstyle — the texture is already there. If you have fine hair, a texturizing spray or dry shampoo before styling adds volume and grip. Backcombing the base of the ponytail before adding the spiral gives it something to grip onto.
19.Layered Waves with a Delicate Hair Vine
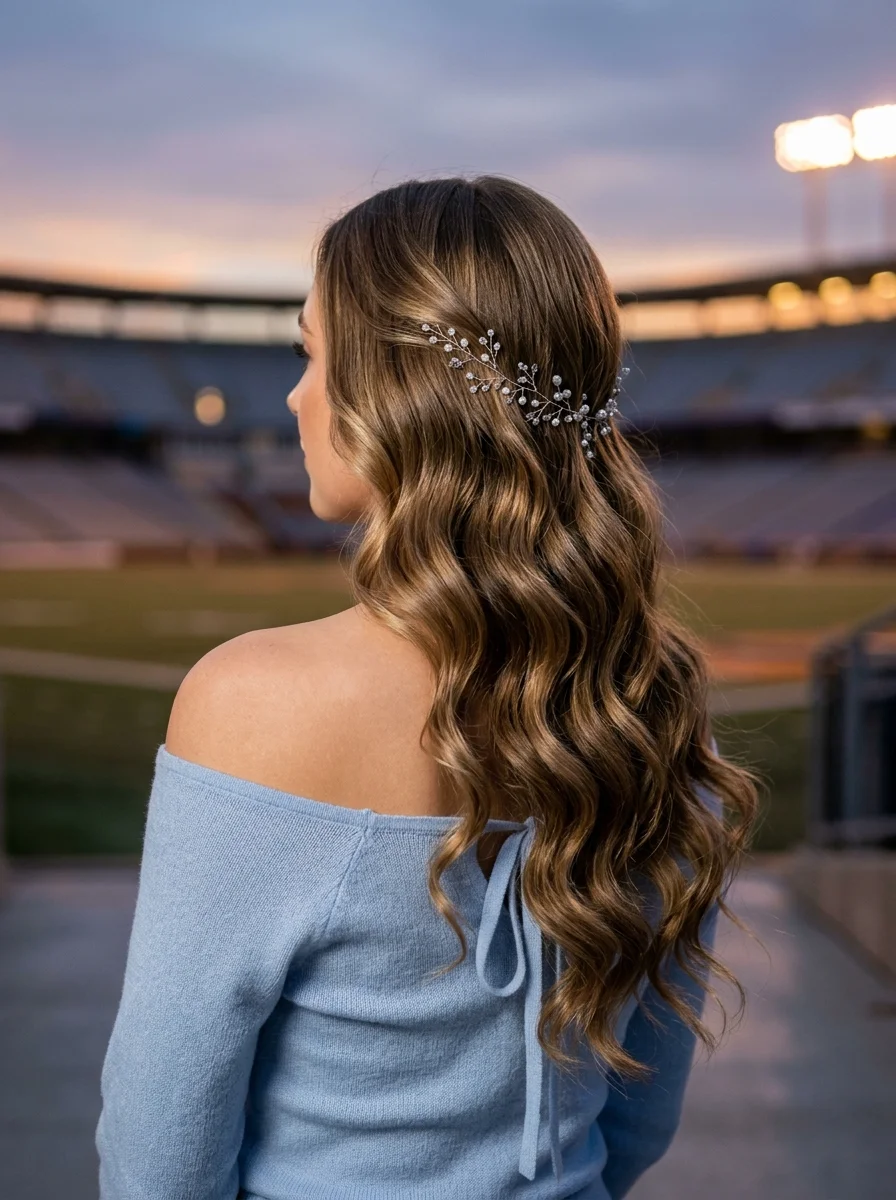
The overview: Long, layered hair, styled in soft, defined waves with a side part. A delicate silver crystal hair vine is woven along the left side of the head, above the ear, adding subtle sparkle. The waves have natural movement and a glossy finish.
Hair vines are one of those accessories that look like they require professional styling but actually just clip in and pin. The vine is positioned along the side of the head, above the ear, where it catches light and adds sparkle without overwhelming the waves.
Why this look is popular: The hair vine transforms simple waves into something occasion-worthy. It's a single accessory that does all the decorating work. The delicate design means it adds sparkle without looking heavy or overdone.
Where this look is suitable: Formal watch parties, stadium VIP sections, evening events. The hair vine is dressy enough for upscale settings but delicate enough not to look out of place at a nice bar.
Step by step:
- Create waves. Use a large barrel curling iron on 1-inch sections. Leave the ends slightly straighter for a modern look.
- Break up the curls. Run fingers through to create soft, flowing waves.
- Create a side part. Allow hair to fall naturally to one side.
- Position the vine. Place the hair vine along the side of the head, above the ear, weaving it gently through sections of hair.
- Secure with pins. Use small bobby pins that match your hair color to hold the vine in place. Pin at 2-3 points along its length.
- Blend. Arrange waves over and around the vine so it looks naturally integrated, not just placed on top.
Tips and tricks: Think about how the vine flows with your hair's natural movement. Don't force it into a shape that looks unnatural. Weaving it through the hair (over one section, under the next) creates a more seamless integration than laying it on top. A volumizing mousse before curling gives the waves more body and helps the vine stay anchored.
27 Stunning June Nail Ideas for 2026 💅
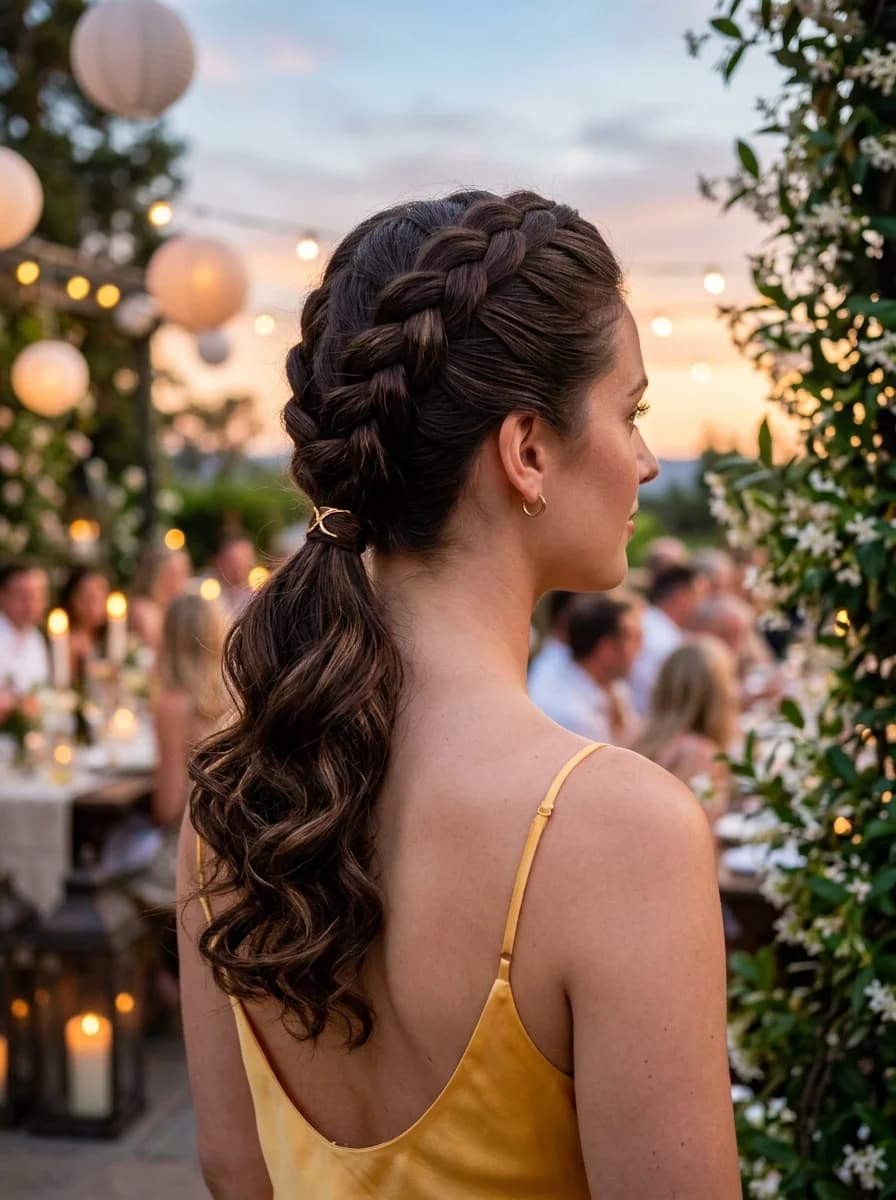
20.Layered Lob with Soft Bangs and a Pearl Pin
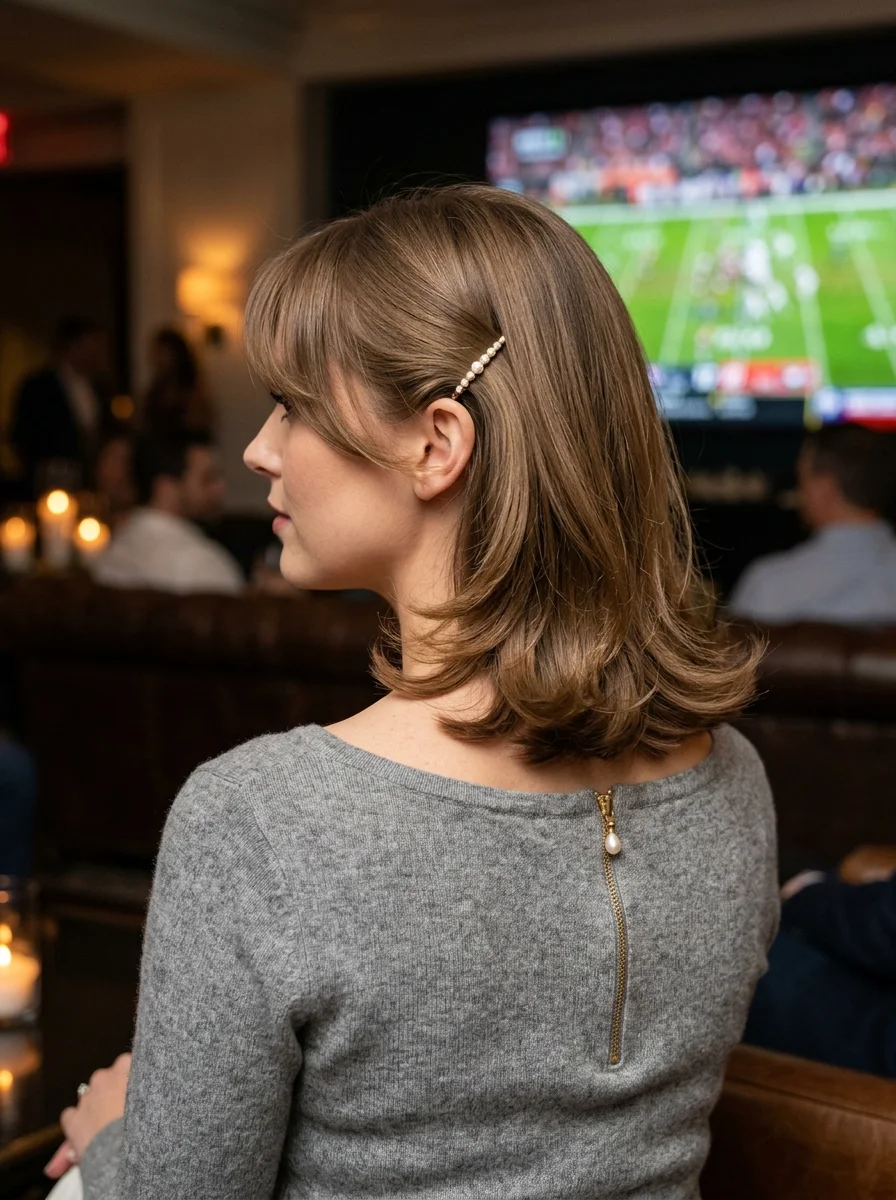
The overview: Shoulder-length lob with subtle layers that create movement. Soft, wispy bangs sweep across the forehead. The hair has a smooth finish with a slight bend at the ends. A small pearl hair pin is placed above the left ear, tucking back a section of hair.
The lob is having a持久 moment because it's the sweet spot between short and long — long enough to style in multiple ways, short enough to look intentional rather than "I just haven't cut it in a while." The pearl pin adds a quiet accent that says "I pay attention to details."
Why this look is popular: The layered lob works on virtually every face shape and hair type. The soft bangs add a youthful quality without the commitment of full fringe. The pearl pin is subtle enough for professional settings but distinctive enough to notice.
Where this look is suitable: Restaurant watch parties, semi-formal gatherings, date nights. The polished, understated quality makes it work in settings where a bold braid or bubble style would feel out of place.
Step by step:
- Blow-dry with a round brush. Lift the roots for volume and direct the ends slightly inward. Use a medium-sized round brush (2-inch barrel).
- Style the bangs. Use a small round brush to blow-dry them forward, then sweep gently to the side.
- Add the bend. Use a flat iron or curling iron to create a soft bend at the ends. Not a full curl — just a slight movement.
- Place the pearl pin. Take a small section of hair from above the left ear, twist it back, and secure with the pearl pin.
- Finish with shine. A light mist of shine spray enhances the glossiness. Flexible-hold hairspray on the bangs keeps them in place.
Tips and tricks: Regular trims are key to maintaining the lob's shape — every 6-8 weeks. For the perfect soft bend at the ends, curl them for just 2-3 seconds with a large barrel iron. The pearl pin works best when it's catching light from the side, so position it where overhead lighting will hit it.
21.Low Twisted Bun with a Flower Accent
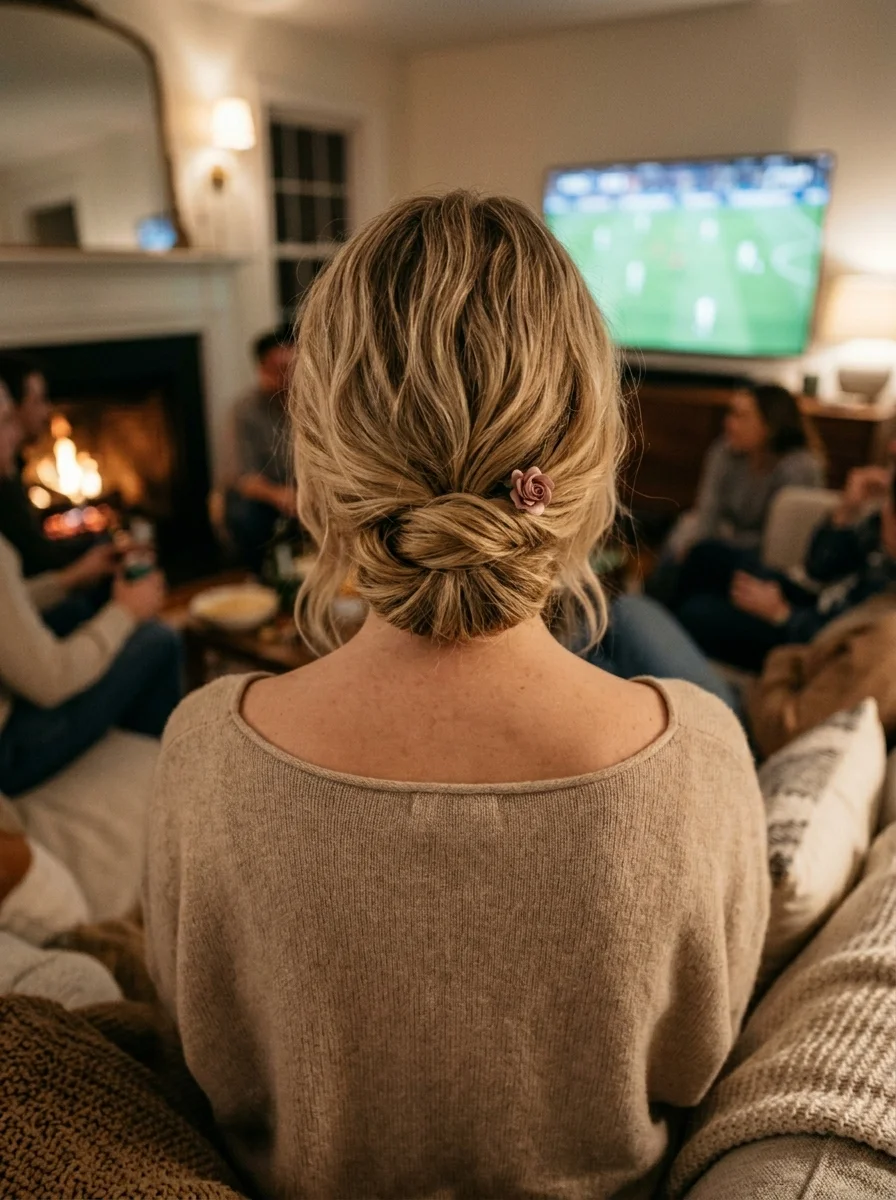
The overview: All hair swept back and twisted into a low, textured bun at the nape. A few loose, curled tendrils frame the face. You can tuck any small flower into the right side of the bun. The twists create visible texture within the bun.
This is technically a full updo, not a half-up style, despite what the filename suggests. All the hair is gathered into the low bun with a few loose face-framing pieces left out. The flower accent adds a natural, organic touch that fits the cozy, homey setting.
Why this look is popular: The low twisted bun is one of the fastest updos you can do — it takes about five minutes once you get the hang of it. The flower accent elevates it from "threw my hair up" to "styled my hair." The loose face-framing pieces keep it soft and approachable.
Where this look is suitable: Home watch parties, casual gatherings, cozy indoor settings. The relaxed aesthetic fits environments where you want to look nice but not overly done.
Step by step:
- Add texture. If hair is straight, create loose waves with a curling wand. Texture helps the bun hold its shape.
- Leave face-framers out. Pull 2-3 small sections from around the temples.
- Gather and twist. Collect all remaining hair at the nape. Twist sections loosely and pin them into a bun shape, layering the twists.
- Secure with bobby pins. Use pins that match your hair color. Tuck in any loose ends.
- Add the flower pin. Tuck it into the side of the bun, making sure it's secure.
- Curl the face-framers. Use a small curling iron to add soft curls to the loose pieces around your face.
Tips and tricks: The key is "controlled softness" — don't aim for perfection. Pull apart the twists after pinning to add texture and fullness. A light touch with hairspray is better than a heavy hand; you want it to look natural and touchable.
31 Stunning Summer Birthday Party Hairstyles for 2026 🎂☀️
22.Edgy Pixie Cut with Textured Layers
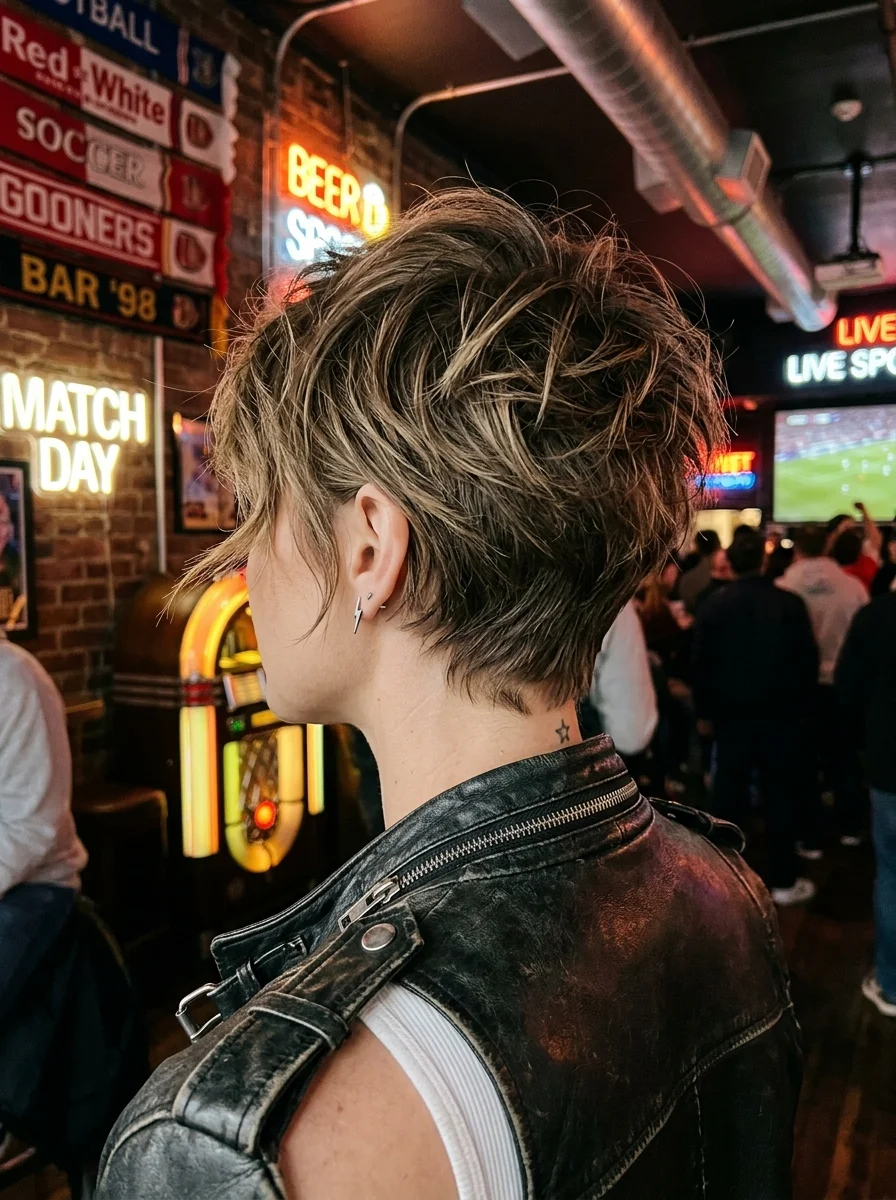
The overview: This hairstyle is more of a hair cut. Short, choppy pixie cut with longer layers on top and tapered sides/back. The layers are piece-y and textured with a windswept, undone finish. Volume at the crown.
This is the only short style on the list, and it stands out because of it. While everyone else is braiding and curling, the pixie cut person is spending about three minutes with a texturizing paste and walking out the door. The low-maintenance factor is the selling point.
Why this look is popular: The pixie cut is the ultimate "I don't have time for hair" hairstyle that somehow looks more intentional than any of the elaborate styles. The textured layers create movement and dimension without requiring any heat styling. It's bold, it's editorial, and it photographs incredibly well.
Where this look is suitable: Sports bars, casual settings, anywhere the edgy aesthetic fits. The pixie cut is inherently statement-making, so it works best in environments where boldness is welcome.
Step by step:
- Start with damp hair. Apply a small amount of texturizing paste or wax to your hands and rub until almost invisible.
- Work through the hair. Focus on lifting the roots and creating separation. Really work the product in to define the texture.
- Shape with your fingers. Lift the front sections up and out. Sweep the bangs to the side or let them fall forward.
- Tousle aggressively. The more texture, the better. This isn't a style that benefits from being gentle.
- Add dry shampoo if needed. At the roots for extra grit and volume if the hair feels too soft.
Tips and tricks: Invest in a good quality texturizing paste or wax — it's the secret weapon. Look for matte finish products with strong hold that don't make hair stiff. Rubbing the product between your palms until it's almost invisible before applying ensures even distribution. The pixie requires regular trims (every 4-6 weeks) to maintain its shape.
23.Football Braids with Light Blue Ribbons
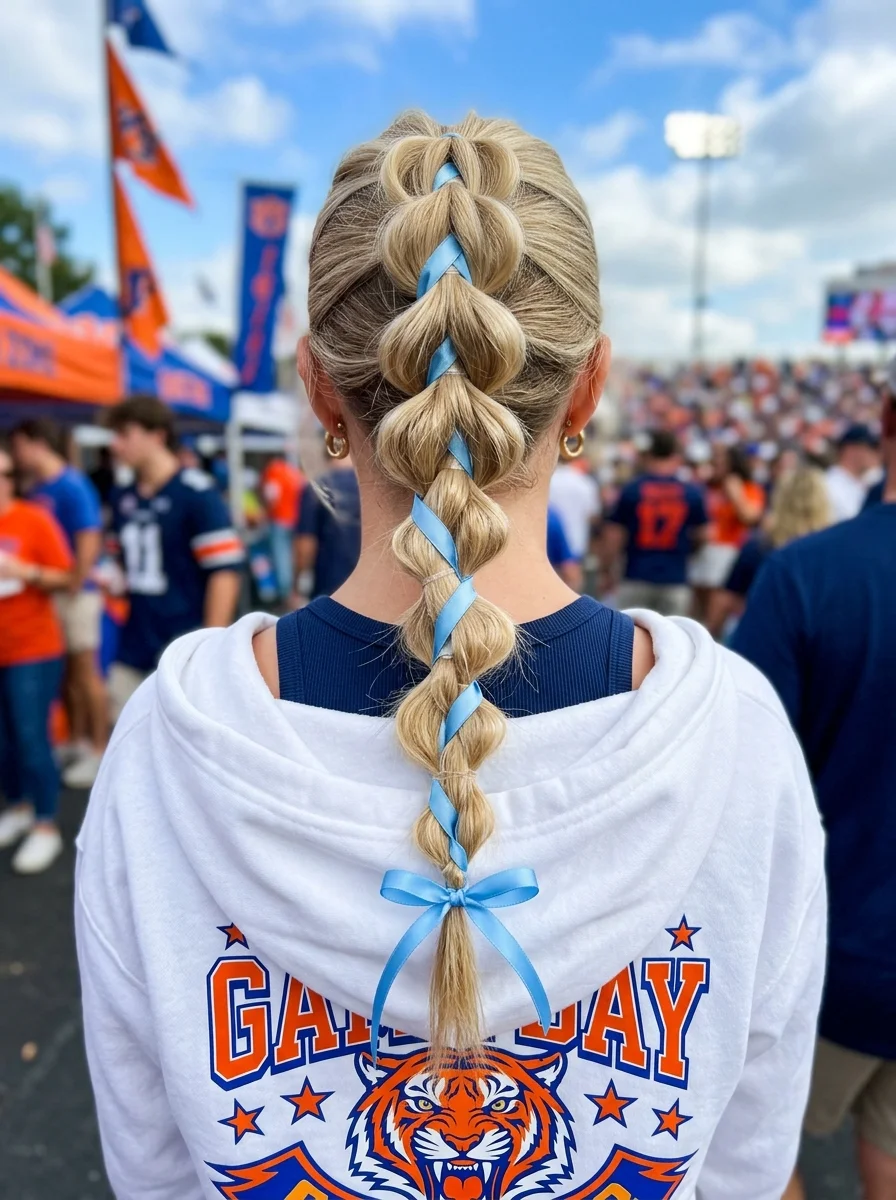
The overview: Hair pulled back from the crown into a voluminous pull-through braid running down the center back. Light blue satin ribbon is woven through the braid in a criss-cross pattern, ending in a small bow at the tail. The braid has distinct, puffy segments with visible texture.
Pull-through braids look like they take hours but actually take about 10 minutes. The technique involves creating a series of small ponytails, splitting each one, and pulling the next ponytail through the split. The result is a voluminous, textured braid that's easier than actual braiding.
Why this look is popular: The pull-through braid creates more volume than a standard three-strand braid, making it look fuller and more dramatic. Weaving ribbon through the braid adds color and visual interest. The light blue ribbon specifically pairs well with warm blonde hair and reads as fresh and summery.
Where this look is suitable: Outdoor tailgates, stadium events, high-energy watch parties. The ribbon color can be matched to team colors for maximum spirit.
Step by step:
- Start smooth. Brush hair thoroughly. A light mist of texturizing spray adds grip for the ribbon.
- Create the first ponytail. Gather a section at the crown and secure with an elastic.
- Split and pull through. Split the ponytail into two. Create a second ponytail directly below using one of the split sections plus loose hair from the sides. Pull the second ponytail through the split of the first.
- Repeat down the length. Continue splitting and pulling through, adding loose hair as you go.
- Weave the ribbon. Thread the light blue ribbon through the braid sections in a criss-cross pattern as you go, or thread it through after the braid is complete.
- Tie the bow. At the tail of the braid, tie the ribbon into a small, neat bow.
Tips and tricks: For the fullest pull-through braid, pancake each section after you secure it — gently pull the edges outward to widen the bubble. The ribbon should be taut against the hair, not loose and floppy. Match the ribbon color to your team's colors for instant coordination.
30 Stunning Beach Nail Ideas for the Best Vacation in 2026 🌊
24.Sleek High Ponytail with a Ribbon Tie
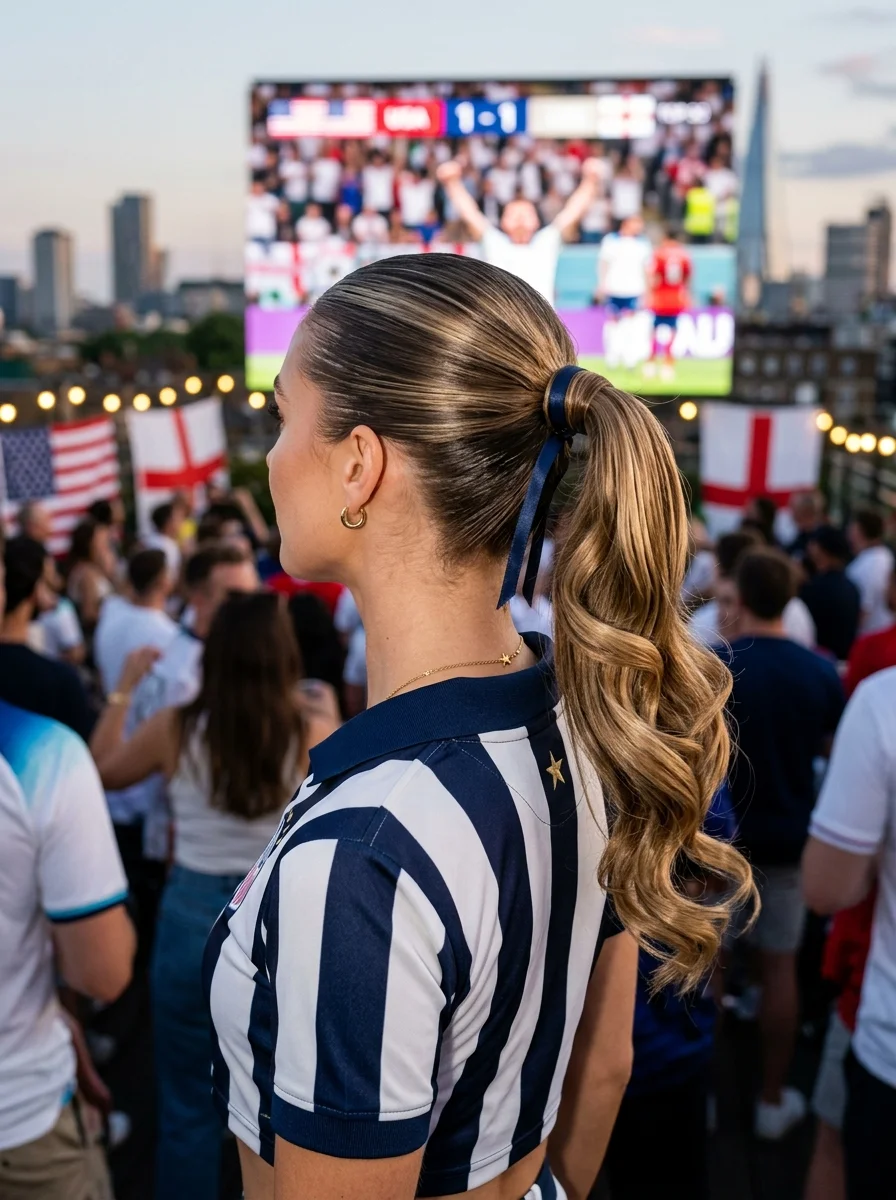
The overview: Hair pulled back extremely smoothly into a very high ponytail at the crown. Zero flyaways — the sides are slicked with gel or pomade for a glass-like finish. A navy blue satin ribbon wraps the base, covering the elastic. The ponytail itself has loose, bouncy curls at the ends that add movement.
The navy ribbon is doing double duty: it conceals the elastic and adds a pop of color that coordinates with the referee-style striped polo shirt. The contrast between the sleek, controlled base and the bouncy, curled ponytail creates visual tension that makes the style interesting from every angle.
Why this look is popular: The high ponytail is one of the most universally flattering styles — it lifts the face, creates a clean silhouette, and photographs well from every angle. The ribbon adds personality without complicating the technique. The curled ends prevent the ponytail from looking flat or limp.
Where this look is suitable: Rooftop parties, upscale watch events, any setting where polished and sporty need to coexist. The sleekness reads as dressy, while the high placement reads as energetic.
Step by step:
- Smooth the hair. Apply smoothing serum to damp hair. Blow-dry with a paddle brush, directing the nozzle downward.
- Gather high. Brush all hair toward the crown. Use a boar bristle brush to eliminate every bump.
- Secure tightly. Use a strong elastic. Wrap it multiple times for a firm hold.
- Slick the sides. Apply gel or pomade to the sides and back. Smooth with a fine-tooth comb or boar bristle brush.
- Curl the ends. Use a large barrel curling iron on the ponytail ends. Hold for 5-8 seconds each section.
- Wrap the ribbon. Take a 12-inch navy ribbon, wrap it around the base of the ponytail, covering the elastic. Tie in a bow or knot.
- Set with spray. Strong-hold hairspray on the sides, shine spray on the ponytail.
Tips and tricks: A boar bristle brush is essential for the sleek finish — it distributes product evenly and creates a smoother surface than a regular brush. For extra staying power, apply hairspray to your brush before smoothing the sides. The ribbon should be tied tightly enough that it won't slip during excited jumping.
25.Elegant Low Bun with a Patriotic Scarf Wrap
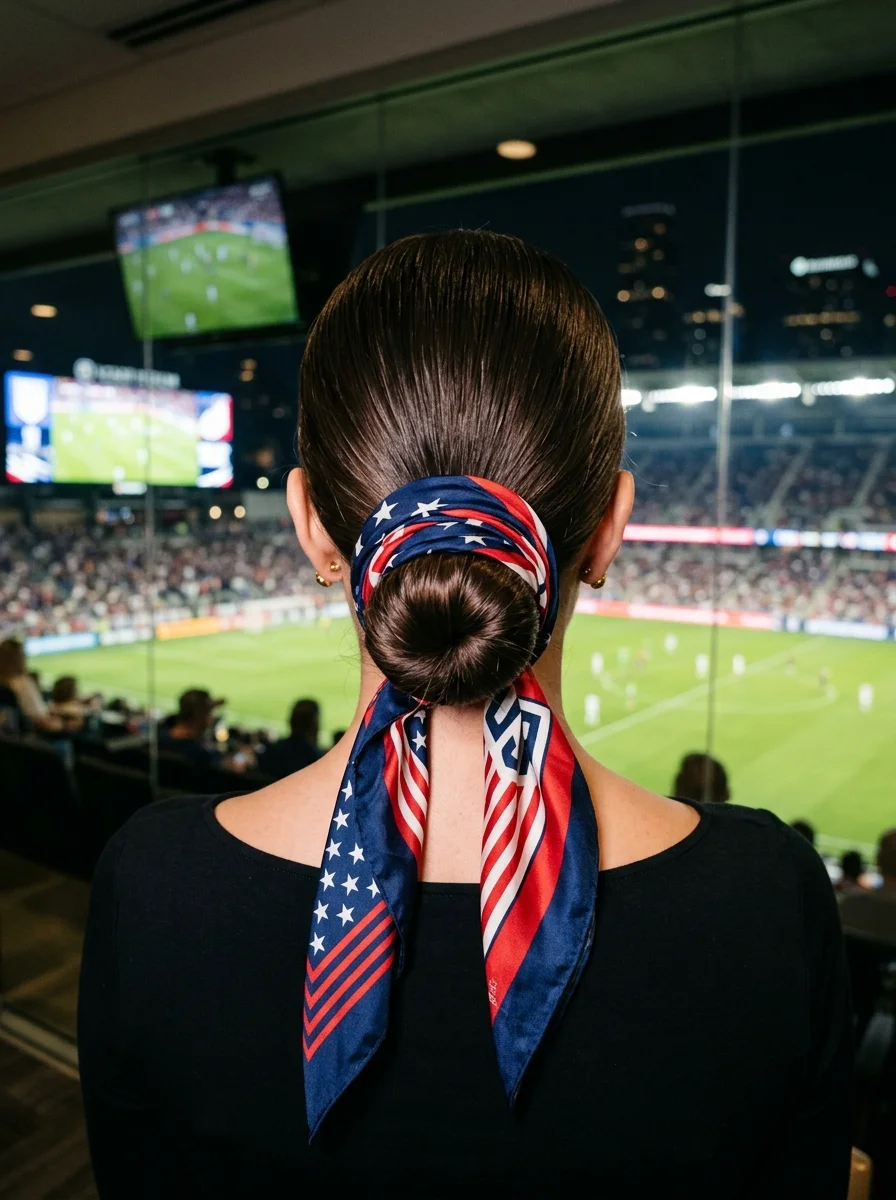
The overview: Hair slicked back into a perfectly smooth, glossy low bun at the nape. The bun is compact and rounded with zero flyaways. An American flag-patterned silk scarf (red, white, and blue with stars and stripes) wraps around the bun base and is tied so the tails hang down the back.
The scarf wrap technique is practical as well as decorative: it conceals the elastic and bobby pins while adding color and personality. Wrapping it around the bun base and tying it so the tails hang down creates movement that a static bun doesn't have.
Why this look is popular: The sleek low bun is one of the most universally flattering updos — it elongates the neck, looks polished from every angle, and works on most hair types. The scarf wrap transforms it from a standard bun into a statement piece. The patriotic theme is specific but widely applicable across team colors.
Where this look is suitable: VIP stadium sections, upscale watch parties, formal events. The sleekness and the silk scarf elevate this beyond casual settings.
Step by step:
- Smooth the hair. Apply smoothing serum to damp hair. Blow-dry straight with a paddle brush.
- Gather into a low ponytail. Brush hair into a smooth ponytail at the nape. Secure firmly with an elastic.
- Form the bun. Twist the ponytail tightly and wrap it around the base. Pin with bobby pins that match your hair color. The bun should sit flat against the neck.
- Smooth the surface. Go over the bun and the hair leading to it with a fine-tooth comb and a bit more smoothing cream.
- Fold the scarf. Fold the silk scarf into a strip about 1.5-2 inches wide.
- Wrap the bun. Center the scarf at the front of the bun base. Wrap the ends around the back, cross them, and tie a knot or bow below the bun. Let the tails hang.
- Set with spray. Strong-hold hairspray over the entire style. Light hairspray on the scarf itself helps it stay in place.
Tips and tricks: A boar bristle brush is essential for achieving the glass-like smoothness. For extra security, you can hairspray the scarf after tying it. The scarf should be silk or high-quality satin — cheap polyester won't drape as well and looks flat against the hair.
20 Stunning Mother of the Bride Hairstyle Ideas for 2026 💍
26.Soft Twisted Updo with a Decorative Pin
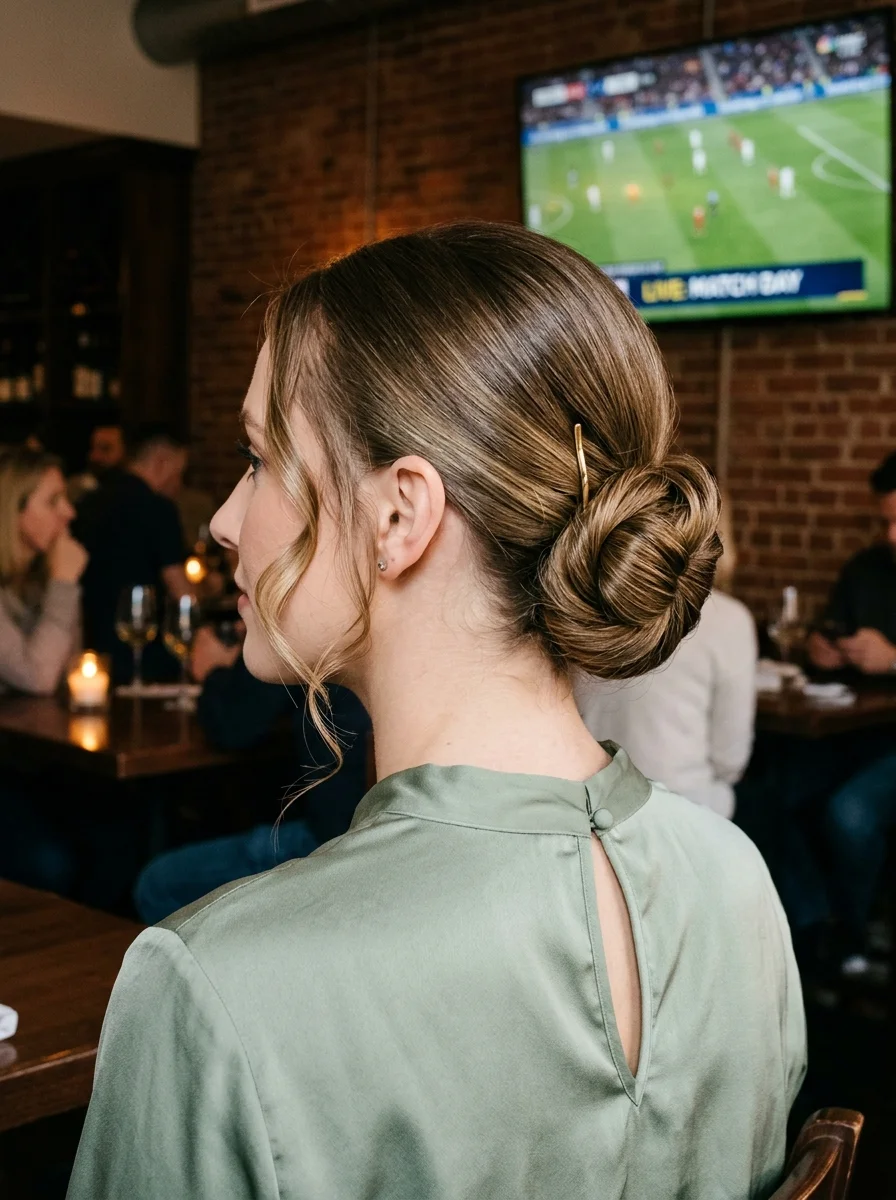
The overview: Hair swept back from the face into a soft, low twisted bun at the nape. Sections are twisted loosely and layered to create the bun shape. Loose, curled tendrils frame the face on the left side. A single gold bobby pin is inserted horizontally through the top of the bun.
This is the "controlled softness" style — it looks thrown together but actually takes about 15 minutes of careful twisting and pinning. The loose face-framing tendrils on the left side soften the updo and add a romantic quality that works in intimate settings.
Why this look is popular: The twisted updo is more forgiving than a sleek bun — imperfections in the twists actually improve the look rather than detracting from it. The decorative pin adds a focal point without requiring multiple accessories. Works best on hair with some natural wave or texture.
Where this look is suitable: Restaurant watch parties, date nights, semi-formal gatherings. The understated elegance fits settings where you want to look polished but not overdone.
Step by step:
- Start with texture. Create soft waves with a curling iron. The texture helps the twists hold and adds body.
- Leave face-framers out. Pull a few wispy strands from around the temples.
- Twist sections. Take sections from the sides and back, twist them loosely, and pin them at the nape to build up the bun shape.
- Layer and tuck. Continue adding twisted sections, layering them to create the bun. Tuck in loose ends and pin.
- Place the pin. Insert a gold bobby pin horizontally through the top of the bun for decoration and extra hold.
- Style the face-framers. Curl the loose pieces with a small iron if needed.
- Set lightly. Flexible-hold hairspray keeps everything in place without stiffness.
Tips and tricks: Don't aim for perfection — the slightly undone, effortless vibe is the point. After pinning, gently pull apart the twists to add texture and fullness. A light touch with hairspray is better than a heavy hand; you want it to look natural and touchable.
27.High Sleek Ponytail with Red, White & Blue Scarf
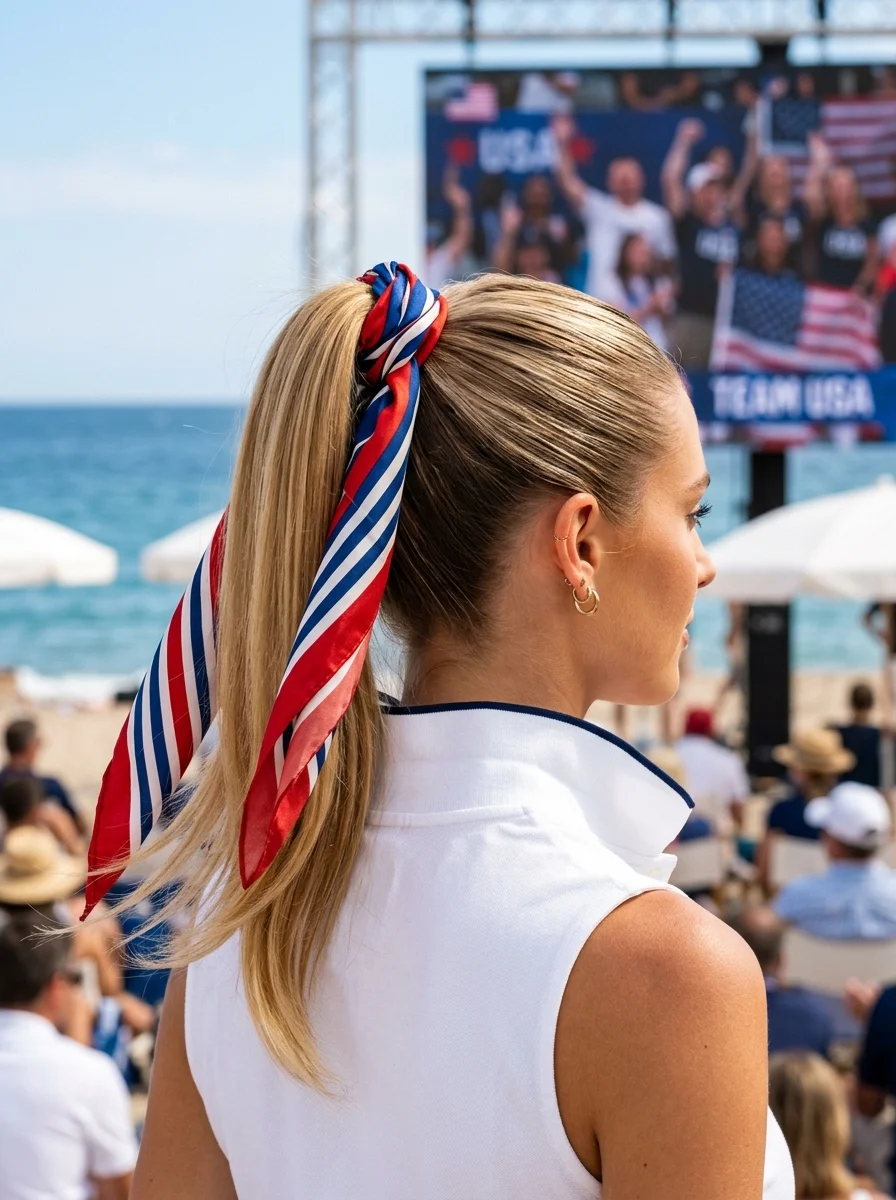
The overview: Hair pulled back extremely smoothly into a high ponytail. The ponytail is straight with natural texture. A red, white, and blue striped ribbon/scarf wraps around the base with long tails hanging down alongside the hair.
The scarf tails streaming down alongside the ponytail create movement that matches the beach setting. This is one of those styles where the accessory IS the hairstyle — the ponytail itself is simple, but the scarf makes it festive and photogenic.
Why this look is popular: The high ponytail is practical for outdoor settings — it keeps hair off the neck in heat and stays secure through movement. The patriotic scarf adds color and theme without requiring a costume. The stacked gold earrings add a personal touch.
Where this look is suitable: Beach watch parties, outdoor daytime events, patriotic celebrations. The scarf color can be swapped for any team's colors.
Step by step:
- Smooth thoroughly. If hair isn't naturally straight, a flat iron pass creates the sleek base this style needs.
- Gather high. Brush all hair toward the crown, using a boar bristle brush to eliminate bumps.
- Secure firmly. Use a strong elastic. Wrap it multiple times.
- Slick the sides. Apply gel or smoothing pomade around the hairline and sides for a polished finish.
- Wrap the scarf. Fold the scarf into a strip. Wrap it around the ponytail base, covering the elastic. Tie securely and let the tails hang.
- Set with spray. Strong-hold hairspray over the entire style for lasting smoothness.
Tips and tricks: A little gel or smoothing pomade on the brush before smoothing the sides creates an extra-polished finish. The scarf needs to be tied tightly enough to stay put during excited cheering — a double knot is more secure than a single one.
27 Elegant Wedding Guest Nail Designs for Family in 2026 💍
28.Boho Half-Up Top Knot
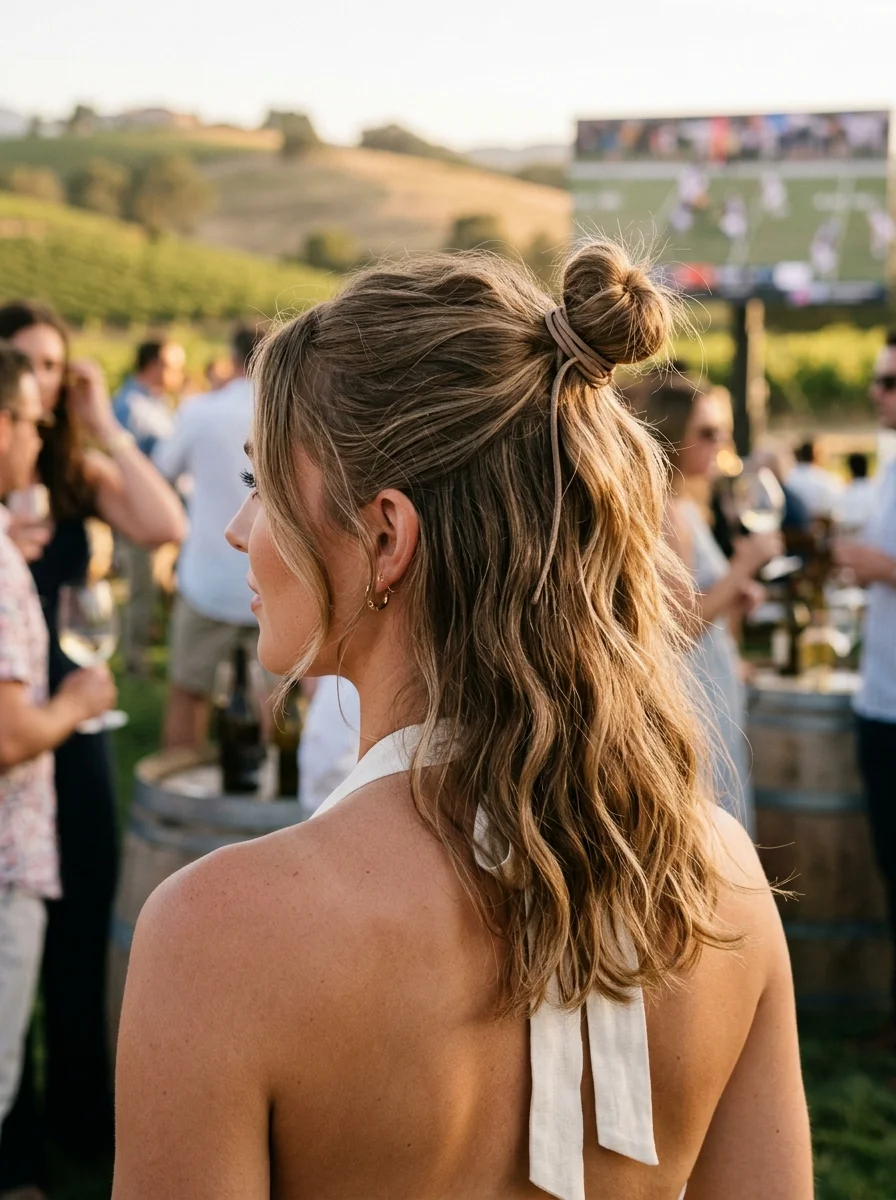
The overview: Top section pulled into a small, messy bun at the crown, secured with an elastic. Remaining hair falls in loose, tousled waves past the shoulders. Face-framing pieces are left out at the sides.
Despite the filename mentioning "braided crown" and "baby's breath," the actual image shows a simple half-up top knot with no braid or flowers. The style's strength is its simplicity — it's the fastest look on this list, taking about three minutes to execute.
Why this look is popular: The half-up top knot is the ultimate "I have somewhere to be but I'm not going to stress about it" hairstyle. It takes the top section out of your face while leaving the length down for movement and softness. The tousled waves add texture that makes it look styled rather than just pulled back.
Where this look is suitable: Outdoor vineyard settings, casual daytime watch parties, beach events. The bohemian quality fits relaxed, sun-drenched environments.
Step by step:
- Add texture. Spray with texturizing spray or scrunch in sea salt spray for that beachy quality.
- Gather the top section. From the temples up, pull the top third of your hair to the crown.
- Create the bun. Twist the gathered section and wrap it around itself to form a small, messy bun. Secure with a brown elastic or bobby pins.
- Pull out face-framers. Release a few pieces around the hairline for softness.
- Tousle the remaining hair. Use your fingers to enhance the wave pattern and add volume.
Tips and tricks: This style works best on second-day hair when natural oils and texture have already built up. If hair is freshly washed, a dry shampoo at the roots adds grip and volume. The bun doesn't need to be perfect — the messier it is, the more bohemian it looks.
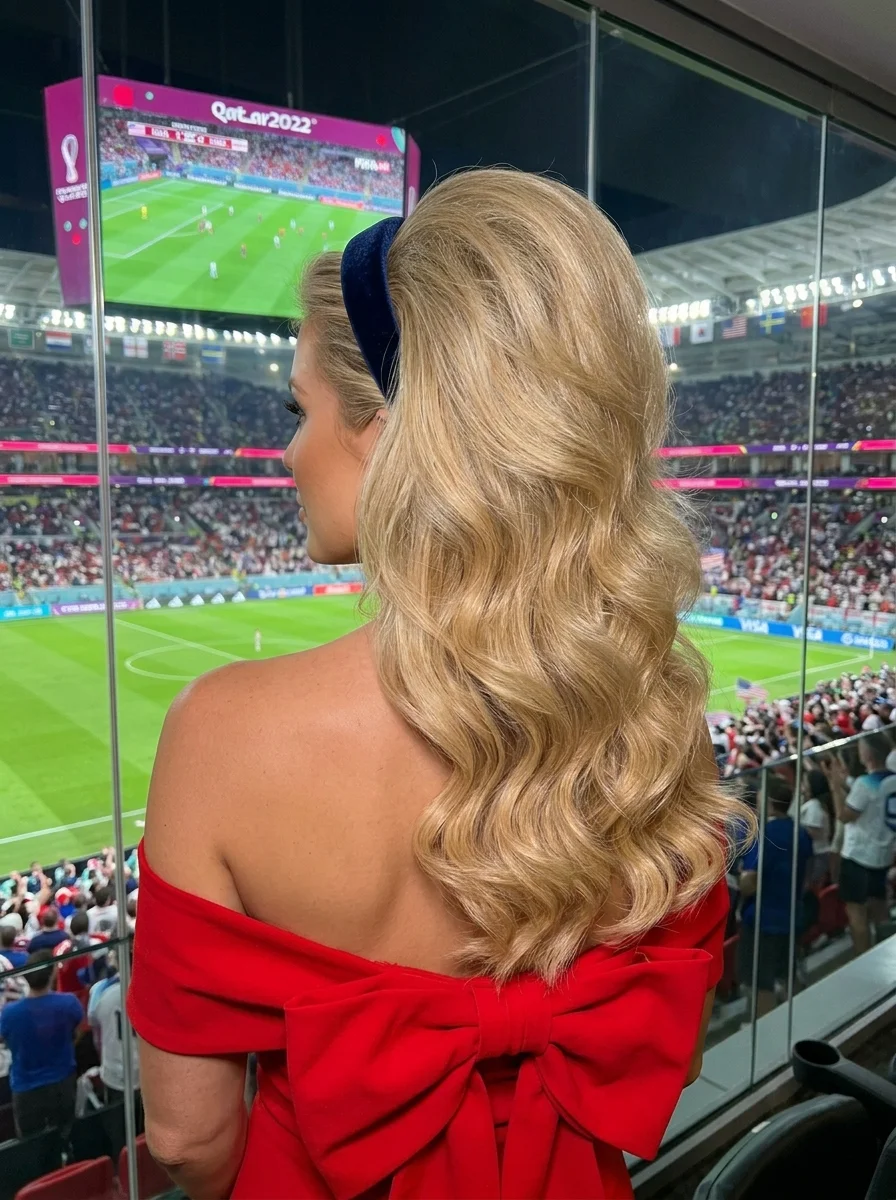
29.Glamorous Voluminous Waves with a Deep Side Part
The overview: Old Hollywood glamour meets FIFA World Cup. Long, creamy platinum blonde hair styled in large, structured waves with a consistent S-pattern. Deep side part with all volume swept to one side. A navy velvet headband sits at the crown, pushing hair back from the deeper side. The waves cascade past the shoulders with incredible body and a glossy finish.
The deep side part is the structural foundation. It shifts all the volume to one side, creating an asymmetrical silhouette that's inherently dramatic. The velvet headband pushes the hair back from the face on the deeper side while the waves cascade over the lighter side. Every element is working together toward maximum impact.
Why this look is popular: The Hollywood wave is one of the most photogenic hairstyles that exists. The structured S-pattern catches light uniformly, creating a glossy, dimensional effect that looks incredible on camera. The deep side part is universally flattering — it adds instant sophistication to any look.
Where this look is suitable: VIP stadium sections, formal watch parties, upscale events. This is the most dressed-up style on the list — it's for when the World Cup final is treated as the event it actually is.
Step by step:
- Prep with volume. Apply volumizing mousse to damp hair. Use a heat protectant spray.
- Create a deep side part. Use a comb for a clean, precise line. The deeper the part, the more dramatic the volume.
- Blow-dry with lift. Using a large round brush, dry section by section, lifting at the roots on the heavier side of the part.
- Curl with a large barrel. Use a 1.5-2 inch curling iron. Wrap large sections away from the face. Hold for 5-8 seconds.
- Pin and cool. Pin each curl in a coiled shape as you release it from the iron. Let all curls cool completely in their pinned shape.
- Release and brush. Remove the pins. Use a wide-tooth comb to gently brush through the waves, blending them into soft, connected S-patterns. Don't over-brush.
- Place the headband. Set the navy velvet headband just behind the hairline on the deeper side of the part.
- Set with spray. Generous mist of strong-hold hairspray for volume and wave definition. Shine spray for the glossy finish.
Tips and tricks: Pinning each curl to cool in its shape is the difference between waves that last 2 hours and waves that last 8. The deep side part is the most important step — without it, the waves lack the asymmetrical drama that makes this look iconic. For finer hair, setting the waves with velcro rollers after curling doubles the hold time.
21 Stunning Concert Hairstyles for Women 2026 🎶✨
The Five-Minute Glow-Up
Kickoff is in thirty minutes, you just got off work, and you want to look put-together for the watch party without spending an hour on your hair. The fastest styles actually make the biggest impact here — second-day hair has more texture and grip than freshly washed hair, making it perfect for quick updos, messy buns, and textured ponytails.
Add a team-color scrunchie, a decorative headband in your country's flag colors, or a quick spritz of temporary color spray at the ends. That is enough to transform a five-second ponytail into a game-day look. Keep a small kit in your bag: team-color hair ties, bobby pins that match your hair color, a travel texturizing spray, and a mini edge control. Those four items can elevate any hairstyle in under five minutes.
The instant volume trick? Flip your head upside down, spray texturizing spray at the roots, and massage for thirty seconds. That gives you immediate lift without a blow dryer. Gather into a high ponytail or messy bun, wrap the base with a team-color scrunchie, and you are out the door.
Beyond the Ponytail
Most fan accessories are either too flimsy to survive a full match or so heavy they cause a headache by halftime. The 2026 World Cup has inspired a new generation of hair accessories that actually work — sparkly tinsel headbands with flag patterns, metallic cuff beads in team colors, and temporary hair tattoos that last through sweat and celebration.
The key is choosing accessories that complement your hairstyle rather than fight it. Clip-in accessories work best with hair worn down; woven accessories hold better in updos. Look for pieces with silicone grips or velvet lining on the inner edge — those will not slide on smooth hair. If you use hair chalk or temporary color, set it with a light mist of hairspray before adding anything on top.
The fan flex? Some stylists in host cities are offering custom hair designs — geometric patterns inspired by team logos, or World Cup ball designs shaved into the side of the head. If you want that level of commitment, book your appointment at least two weeks ahead. The best ones fill up fast during tournament season.
Ready, Set, Score Your Best Hair Day!
Whether you went with sporty double braids, a sleek high ponytail, or those glamorous Hollywood waves, the best watch-party hairstyle is the one that makes you feel confident when the camera pans to the crowd. Every style on this list was designed to survive heat, excitement, and hours of wear — so pick your match, grab your team colors, and let your hair do some of the cheering for you.