Hair Trends
30+ Chic Pool Party Hairstyles for Summer 2026

Pool season is here, and your hair deserves a game plan. You want something that holds up to chlorine, sun, and humidity without looking like you tried too hard — or worse, didn't try at all. Whether you're hosting a backyard pool party, crashing a friend's rooftop cabana, or just lounging with a drink in hand, the right hairstyle ties the whole look together.
This guide pulled together 32 pool party hairstyles that actually deliver. Braids that stay put underwater. Ponytails that look better after a swim. Buns that keep you cool without sacrificing style. Some are low-key. Some are editorial. All of them are designed to work with the elements, not against them.
The Chlorine Defense Guide
Let us talk about the elephant in the pool: chlorine damage. It is not just about keeping your hair looking good during the party — it is about protecting it from turning brittle, losing shine, or developing that green tint that blonde hair is notorious for. The good news is that a few simple steps before and after swimming make a significant difference.
Before you dive in: Wet your hair with clean water first. This simple step means your hair absorbs less chlorinated water because the cuticle is already saturated. Then apply a protective layer — coconut oil, a leave-in conditioner, or a dedicated swim hair product creates a barrier between your strands and the chemicals.
After swimming: Rinse immediately with fresh water, then use a clarifying or dechlorinating shampoo to remove chlorine buildup. Follow with a deep conditioner to restore moisture. If you swim regularly, a vitamin-C spray can help neutralize chlorine residue between washes.
The pool bag staple? Keep travel-size hair care products in your pool bag. A small bottle of leave-in conditioner and a mini clarifying shampoo are enough to protect your hair through an entire afternoon of swimming.
1.Braided Crown with Loose Waves & Bee Detail
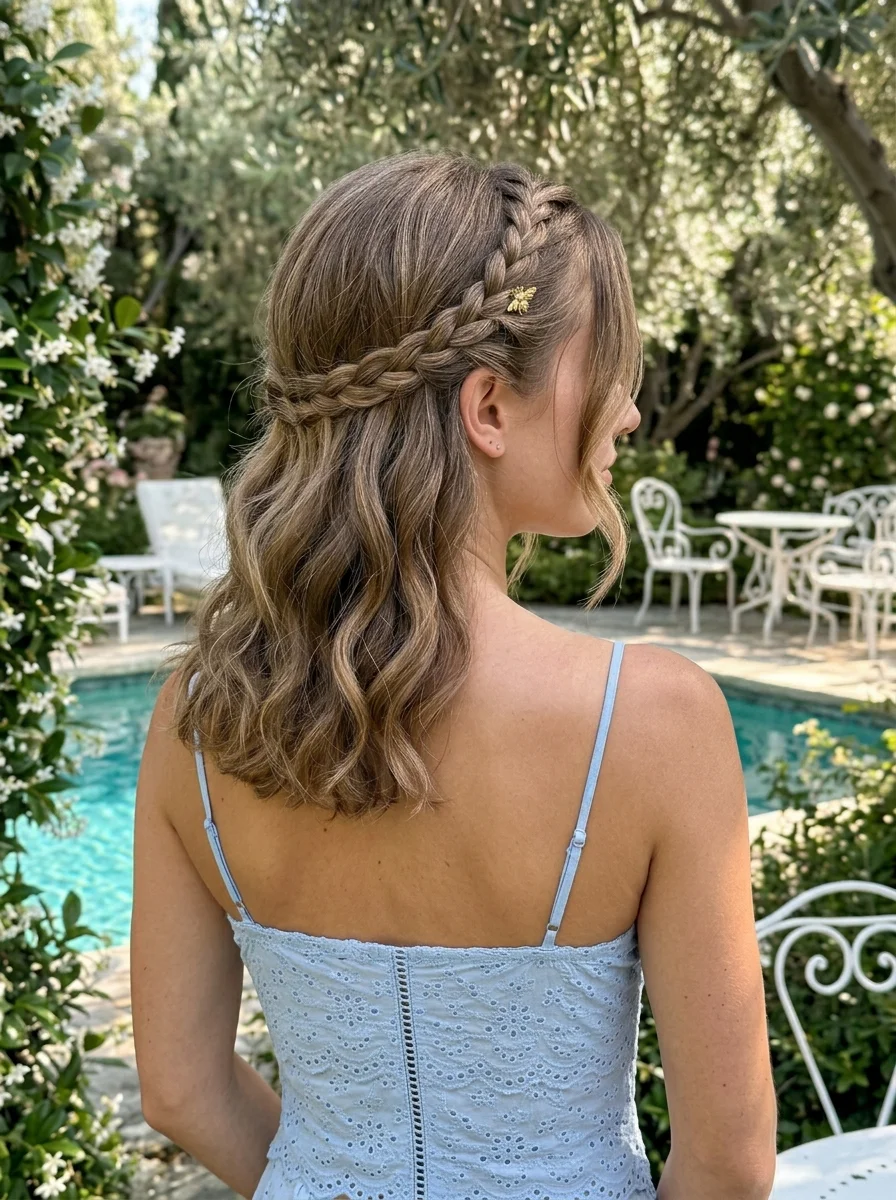
The overview: A Dutch braid wraps around the head like a crown, feeding into loose waves that fall past the shoulders. A gold bee clip marks where the braid ends, adding a romantic, garden-party detail. It's the kind of style that looks like it took an hour but takes twenty minutes.
Why this works poolside: The braid keeps the top section secure while the loose waves give you movement and volume. The gold bee clip won't rust or tarnish near water, so you can swim without worrying about your accessory.
Step by step:
- Start with texture. Work sea salt spray through damp hair and scrunch for natural wave.
- Dutch braid the crown. Starting at one temple, Dutch braid along the hairline, picking up sections as you go.
- Secure the braid. Pin the braid end behind the opposite ear.
- Wave the rest. Use a large-barrel iron to add loose waves through the remaining hair.
- Add the bee clip. Clip the gold bee detail where the braid ends for a romantic finish.
Tips: Pancake the braid by gently pulling at each section to make it look wider. It gives the crown braid that lush, full appearance without extra effort.
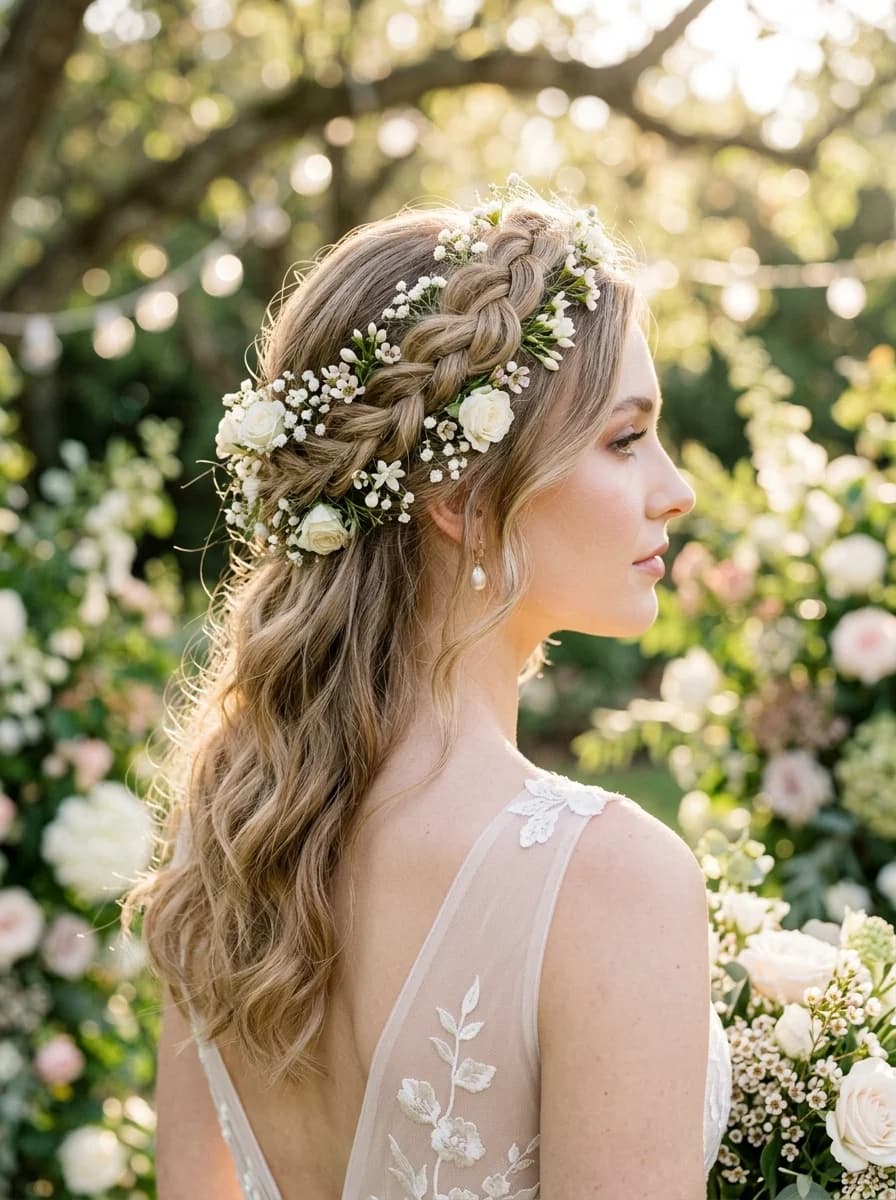
32 Stunning Summer Wedding Hairstyles for Brides ☀️💍
2.Effortless Beachy Waves Ponytail with Silk Scarf

The overview: Short to long-length hair pulled into a low ponytail at the nape, with a silk scarf tied into a bow over the elastic. The ponytail falls in soft, undone waves that look like you just walked off the beach. It's casual, it's chic, and it works whether you're poolside or headed to lunch.
Why this works poolside: The low ponytail keeps your hair off your neck in the heat, and the silk scarf protects against sun damage at the tie point. Plus, the bow adds a polished detail that elevates the whole look.
Step by step:
- Create waves. Braid damp hair overnight or use a curling wand for loose, natural-looking waves.
- Gather low. Pull your hair into a low ponytail at the nape, securing with a clear elastic.
- Wrap the scarf. Fold the silk scarf into a strip, wrap it over the elastic, and tie into a bow.
- Adjust the drape. Let the scarf tails trail down one side for a relaxed finish.
Tips: Choose a silk or satin scarf — it glides against the hair without causing friction or tangles, and it holds its shape better in humidity than cotton.
3.Wavy Lob with a Colorful Headscarf
The overview: Short hair cut just above the shoulders, styled with soft, lived-in waves. A colorful Mediterranean-print headscarf covers the crown and ties at the nape, keeping hair in place while adding a European beach club vibe. It's the hairstyle that makes a white bikini look like a full outfit.
Why this works poolside: The headscarf shields your scalp from sun exposure, keeps flyaways contained, and means you don't have to worry about your hair looking flat after hours in the heat. The lob length is short enough to dry quickly but long enough to style.
Step by step:
- Wave the lob. Use a flat iron or curling wand to create loose, beachy waves through the mid-lengths.
- Fold the scarf. Fold your headscarf into a wide band.
- Position and tie. Place the scarf over the crown and tie it at the nape, underneath the hair.
- Pull out pieces. Tug a few wavy pieces out around the face and ears for a relaxed finish.
Tips: A silk scarf stays in place better than a cotton one, especially around a pool. Tie it with a firm knot and tuck the ends under for a clean look.

28 Cute & Sporty Baseball Game Nail Ideas for 2026 ⚾
4.Beachy Waves with Tortoiseshell Headband
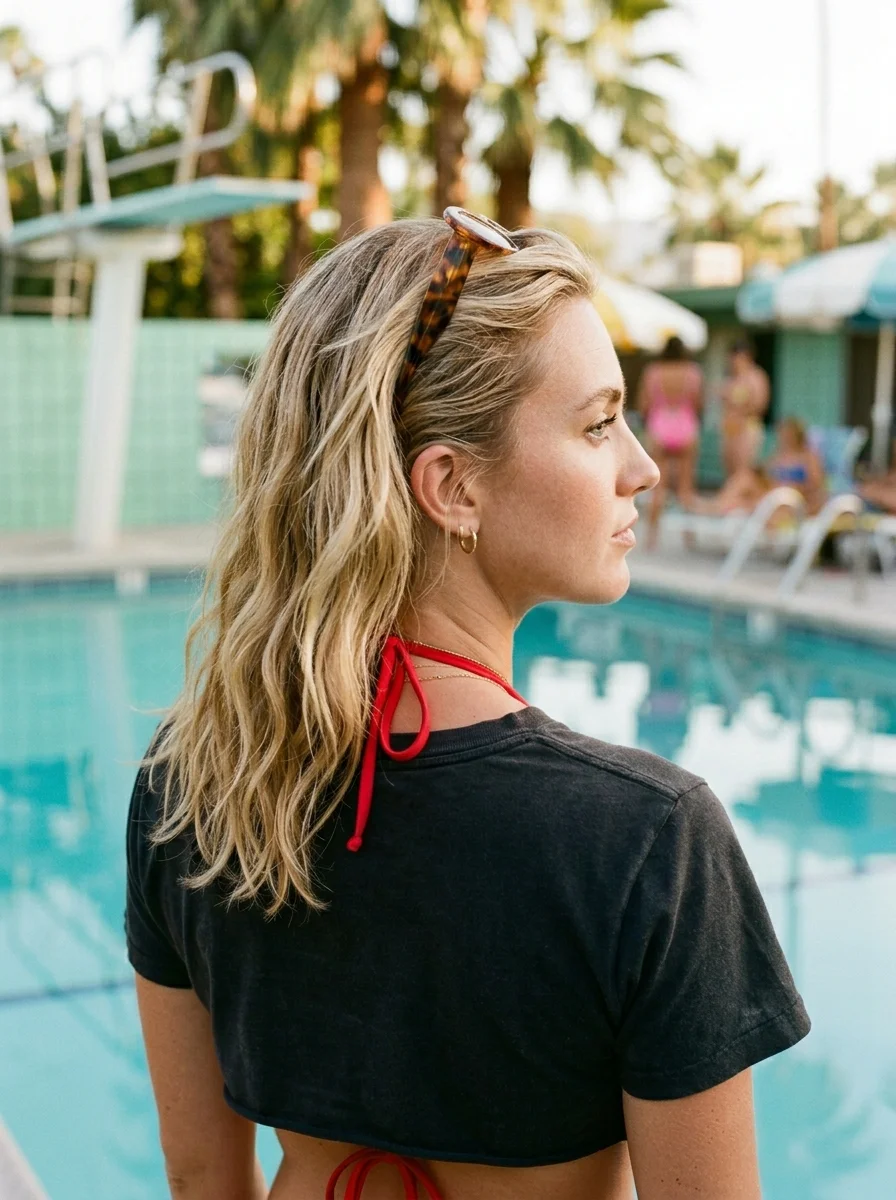
The overview: Short to medium-length hair styled in soft, undone waves with a thick tortoiseshell headband (alternatively you can try tortoiseshell sunglasses for the similar effect) pushing the front sections back. It's cool-girl poolside without the effort — the headband does all the work while your waves look like they just happened.
Why this works poolside: The headband keeps hair off your face without the commitment of an updo. It's also one of the easiest ways to look styled when you've been in the water — just push the headband back into place and you're done.
Step by step:
- Create texture. Spritz dry shampoo or texturizing spray through roots for volume and grip.
- Add waves. Use a large-barrel iron or air-dry with mousse for natural-looking waves.
- Place the headband. Slide the tortoiseshell headband into position, pushing hair back from the face.
- Adjust. Pull a few wispy pieces around the temples for softness.
Tips: Choose a padded headband for comfort — hard plastic ones dig in after a few hours. A tortoiseshell pattern works with virtually every hair color.
5.Double Dutch Braids to a Chic Bun
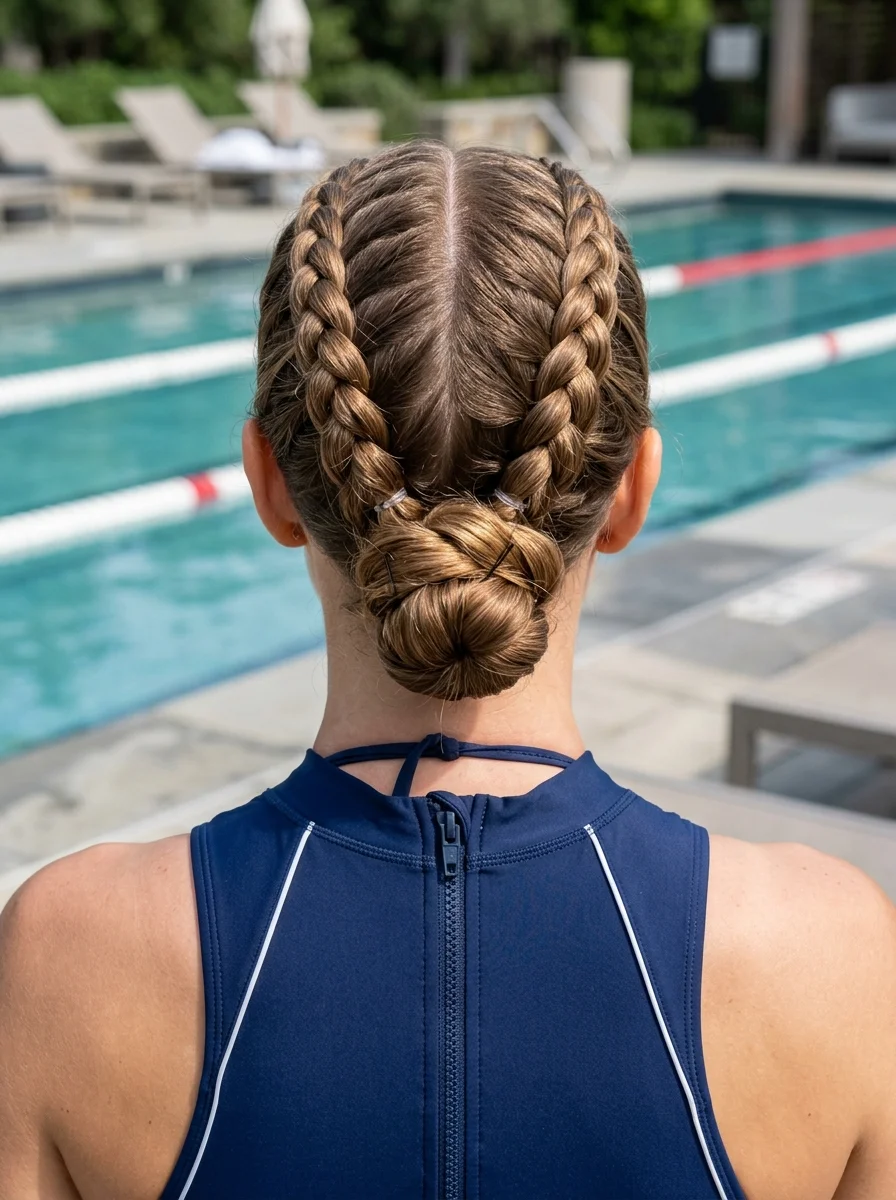
The overview: Medium to long hair sectioned into two Dutch braids that run from the hairline to the nape, where they merge into a single low bun. It's athletic-chic at its best — secure enough for a water volleyball game, polished enough for poolside cocktails after.
Why this works poolside: Dutch braids lock everything in place, so your hair won't frizz or fall apart in humidity. The low bun keeps the bulk off your neck, and the whole style dries faster than wearing your hair down.
Step by step:
- Part down the center. Create a clean part from forehead to nape.
- Dutch braid each side. Starting at the hairline, Dutch braid each section to the nape, keeping tension even.
- Merge into a bun. Combine both braids at the nape and twist into a low bun, securing with pins.
- Pancake the braids. Gently pull at each braid section for a fuller, more relaxed look.
Tips: Use a strong-hold gel on the braids before you start — it keeps flyaways down and makes the braids look cleaner, especially in humid weather.
35 Cute & Sporty Athletic Hairstyles for Women (2026)
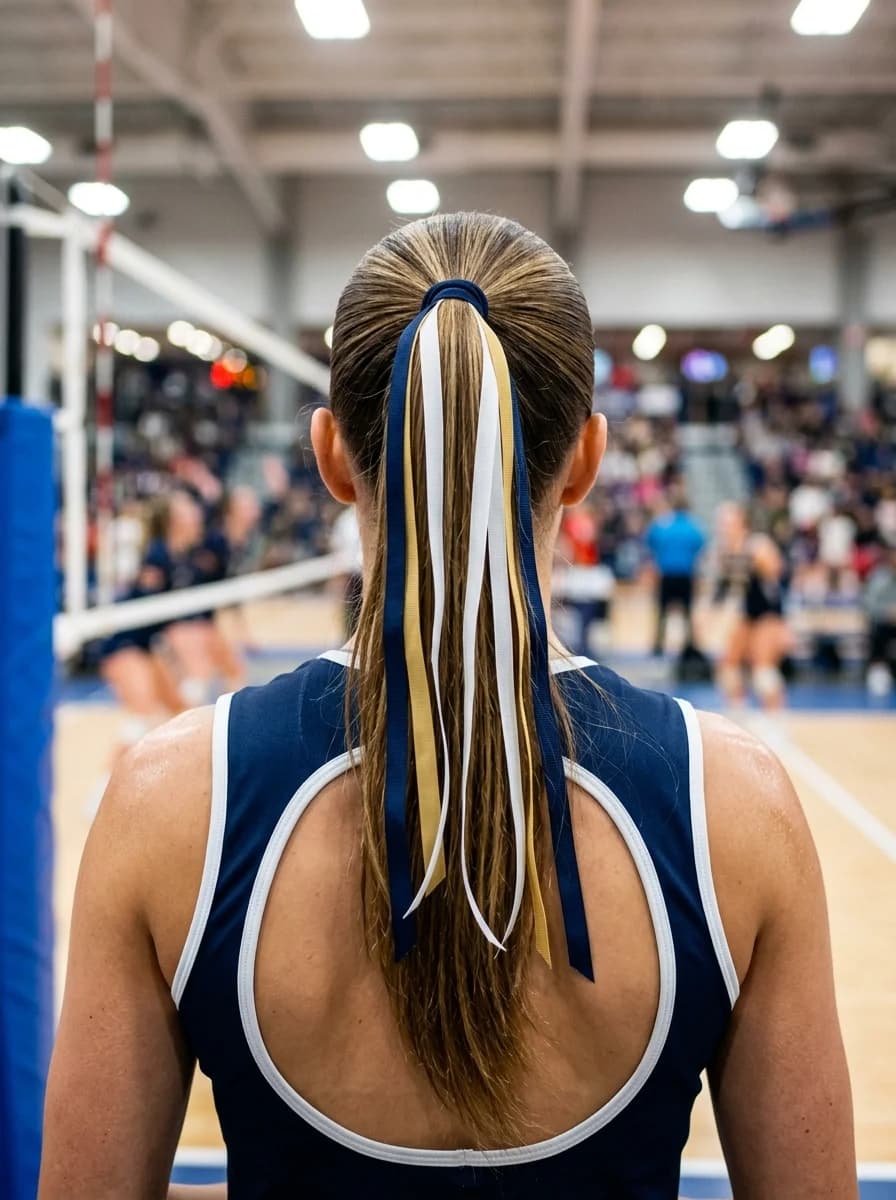
6.High Mighty Chunky But Simple Braid
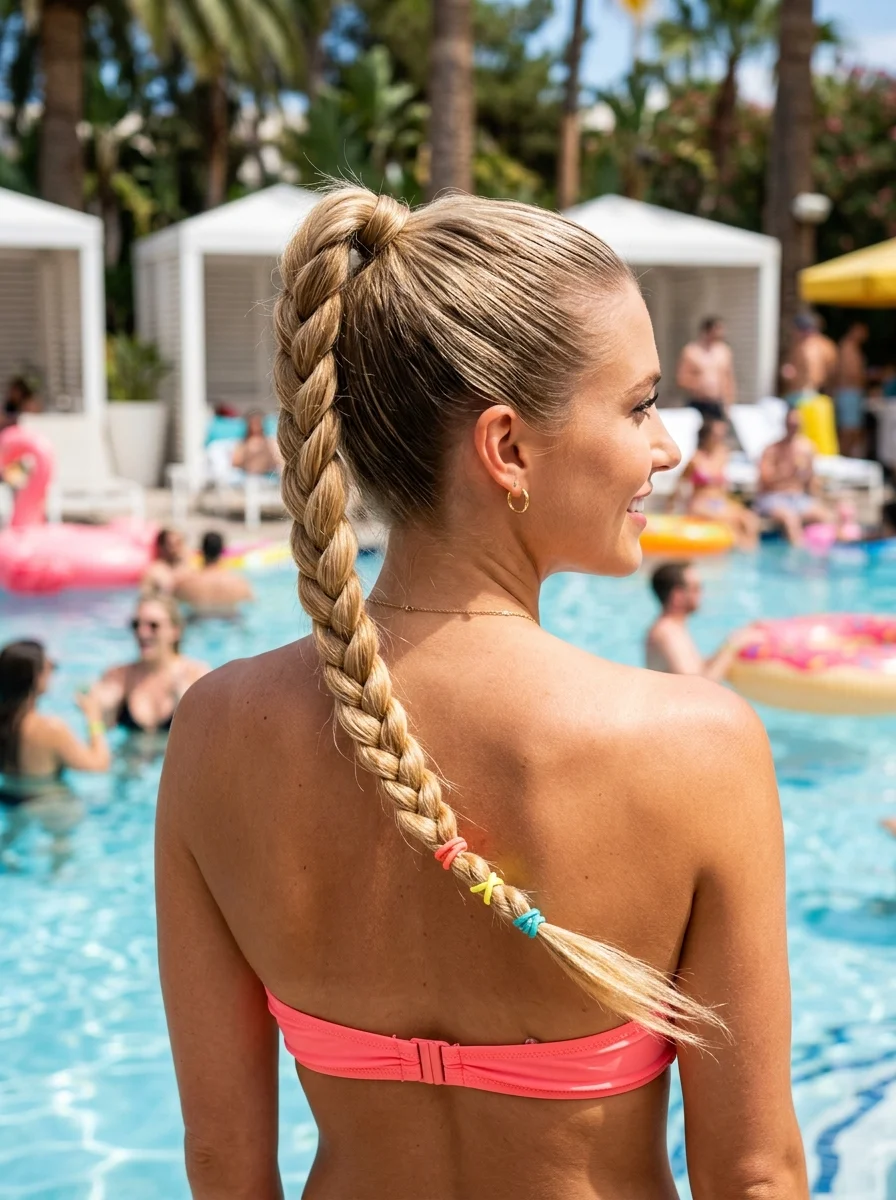
The overview: Platinum blonde ombré hair pulled into a high ponytail, then simple three-plaited braid into a thick, chunky braid that hangs down the back. This braided ponytail is secured with three-colored elastics for a more party look. This is the braid that gets second looks.
Why this works poolside: The high ponytail keeps everything off your neck and shoulders, while the simple braid structure means your hair stays neat even after swimming. The elastics adds a pop of color touch without being fragile near water.
Step by step:
- Smooth into a high ponytail. Gather hair at the crown and secure with a strong elastic.
- Braid the length. Simple three-plaited braid the ponytail from base to ends, keeping sections even.
- Add the elastics. Add three-colored elastics to the braid to secure it and for a more party look.
Tips: The chunkier the sections, the bolder the braid. Don't be afraid to pancake aggressively — this style is about making a statement.
7.Bubble Braid Ponytail with Butterfly Charm
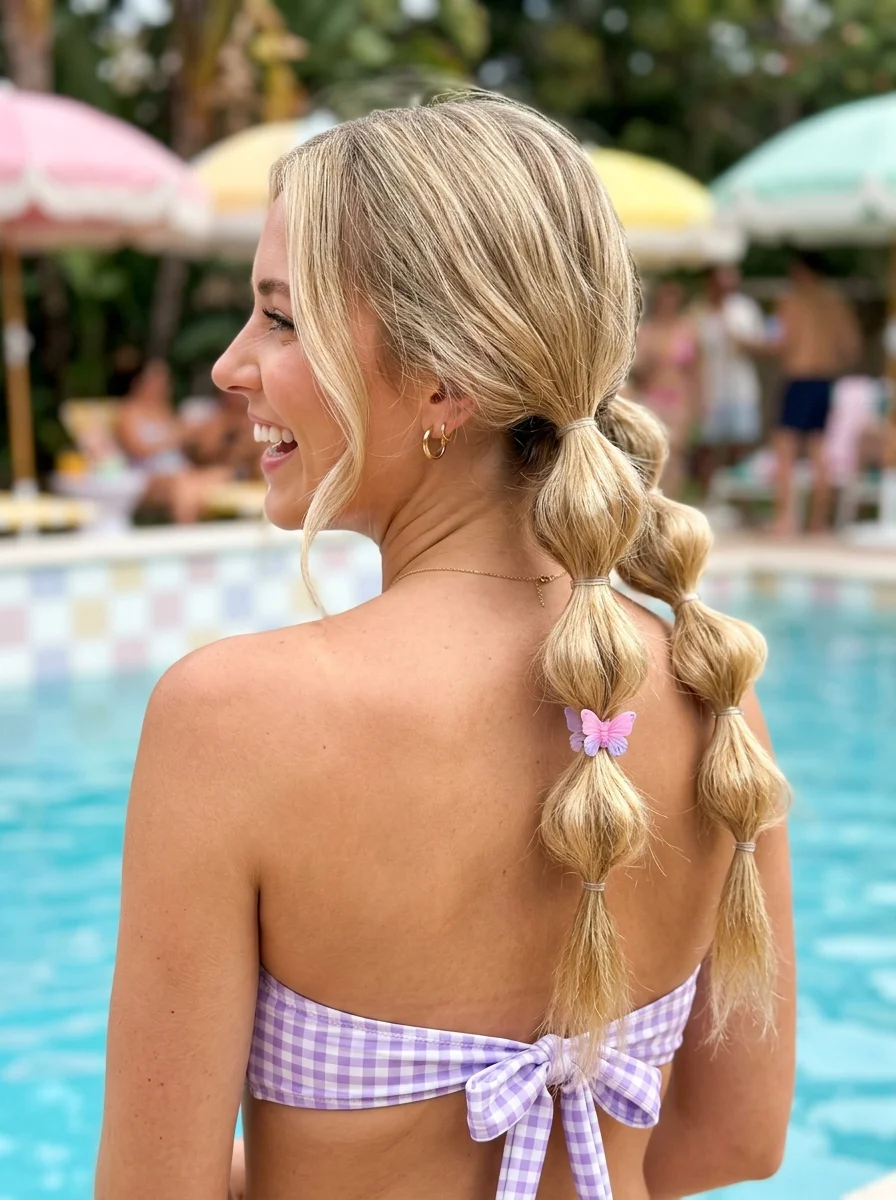
The overview: Medium to long hair in a high ponytail, sectioned into bubbles with elastics at regular intervals. A small butterfly charm clips onto one of the middle bubbles for a Y2K-inspired, playful touch. It's nostalgic, it's fun, and it photographs like a dream.
Why this works poolside: Bubble braids hold up remarkably well in water because each section is independently secured. The butterfly charm is lightweight and won't drag the style down, even when wet.
Step by step:
- Secure a high ponytail. Pull hair to the crown and secure with an elastic.
- Add elastics. Place small clear elastics every two inches down the ponytail.
- Create the bubbles. Gently pull apart each section between the elastics to form round bubbles.
- Clip the charm. Attach the butterfly charm to one of the middle bubbles.
Tips: Use a toothpick to even out the bubble shapes. If one side is flatter than the other, slide the toothpick in and gently pull to round it out.

27 Stunning Graduation Day Nail Ideas for 2026 🎓
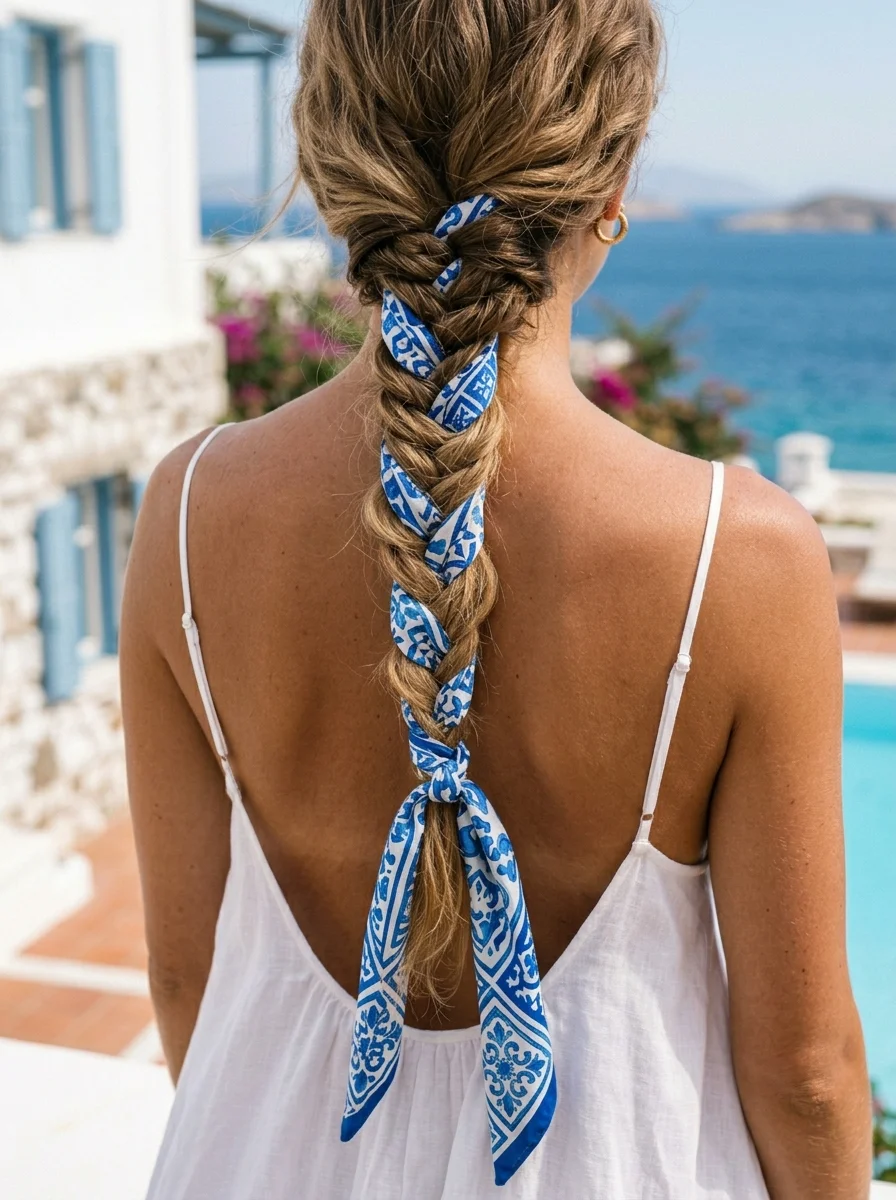
8.Boho Chain-Woven Fishtail Braid
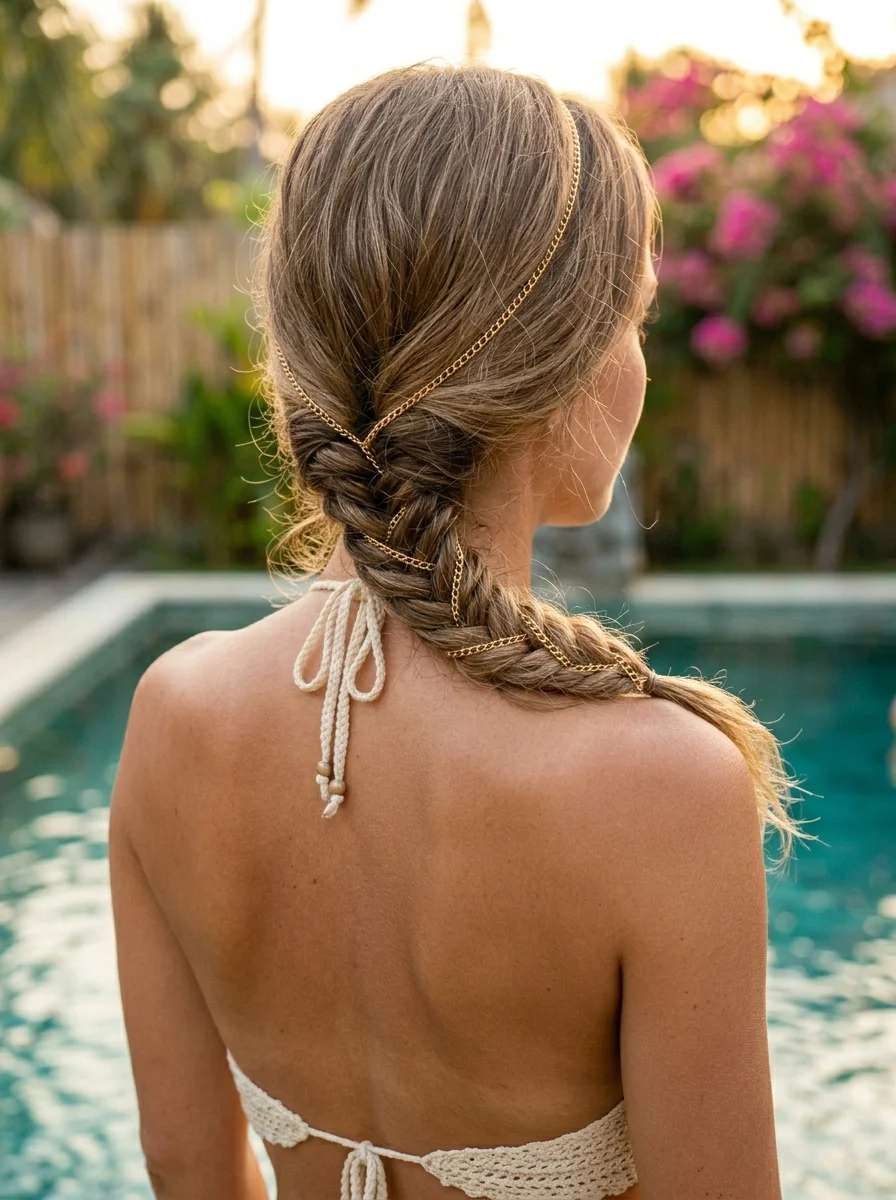
The overview: Medium to long-length hair gathered into a side fishtail braid, with a thin gold chain woven through the sections. It's boho-festival energy adapted for poolside — relaxed, textured, and just fancy enough to feel special.
Why this works poolside: The fishtail braid is one of the most secure braid styles because the small sections lock together. The gold chain stays put once woven in, and the side placement keeps it off your back when you're lounging on a towel.
Step by step:
- Start the fishtail. Divide hair into two sections and cross small pieces from each side to the opposite section.
- Weave in the chain. Lay the gold chain along one section at the start, incorporating it into the braid as you go.
- Secure the end. Tie off with a clear elastic once you reach the desired length.
- Pancake for fullness. Gently pull at each side of the braid to widen it and reveal the chain.
Tips: Choose a chain that's lightweight and won't snag on the braid sections. A fine curb chain works best — it bends easily and catches light without adding weight.
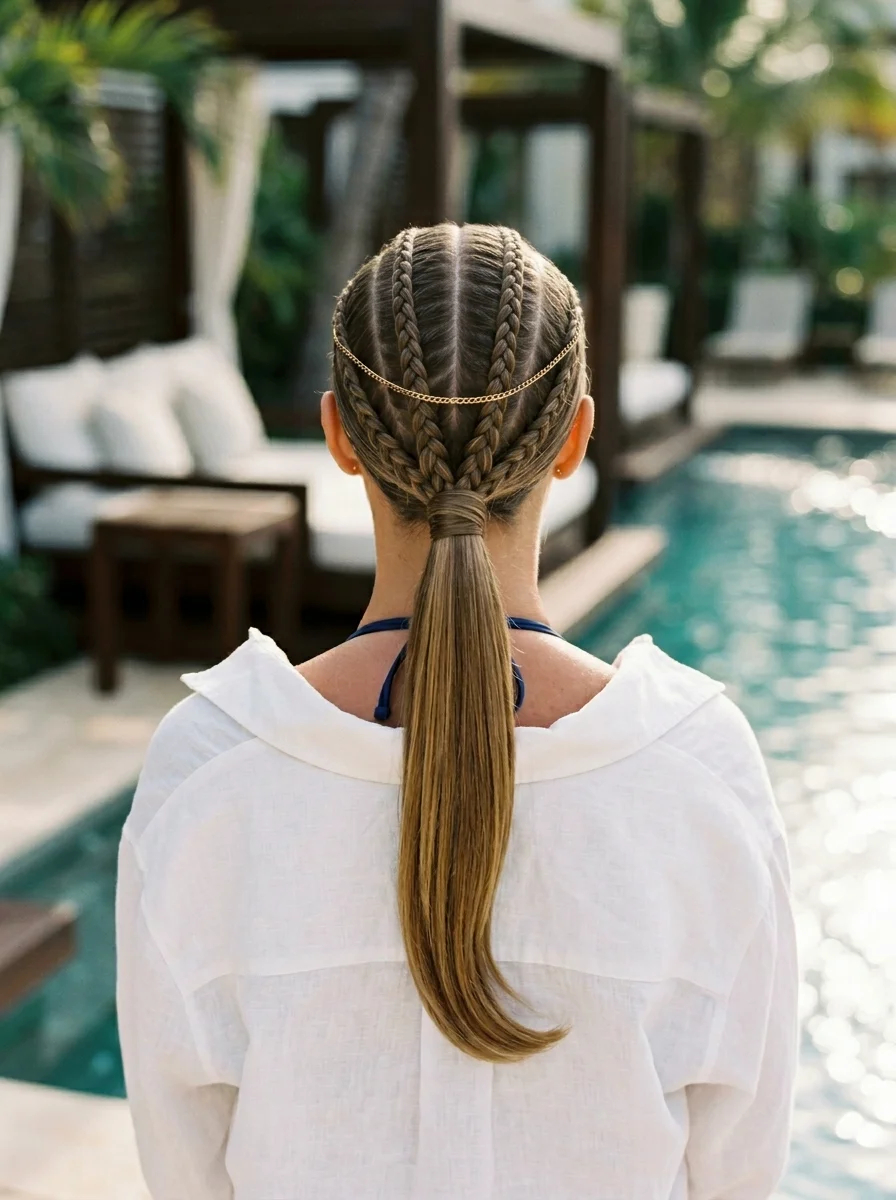
9.Sleek Braided Crown with High Ponytail
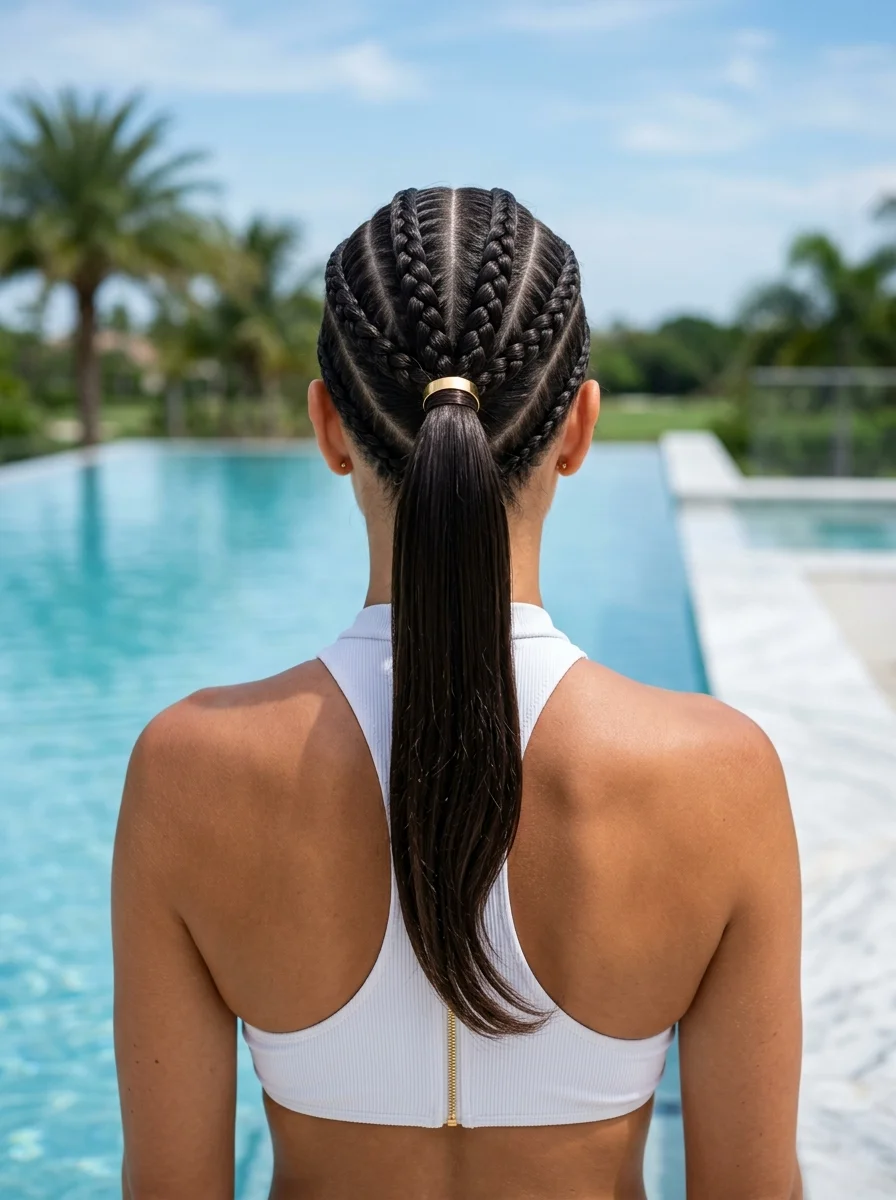
The overview: Medium to long hair styled into tight cornrows that wrap around the crown, feeding into a high ponytail secured with a gold cuff. It's editorial, it's sharp, and it's the kind of hairstyle that makes people ask who did your hair.
Why this works poolside: Cornrows are one of the most water-resistant styles out there — they stay flat, they dry fast, and they won't frizz in humidity. The high ponytail adds movement and keeps the style from reading too severe.
Step by step:
- Section the hair. Create even sections from the hairline back to the crown.
- Cornrow each section. Braid each section flat against the scalp, maintaining consistent tension.
- Gather the ponytail. Combine all braid ends at the crown into a high ponytail.
- Add the gold cuff. Wrap a gold cuff around the base for a polished finish.
Tips: Apply edge control along the partings for a cleaner, more defined look. It makes the cornrows look sharper and keeps baby hairs in place.

28 Stunning Baddie Summer Hairstyles for 2026 🔥☀️
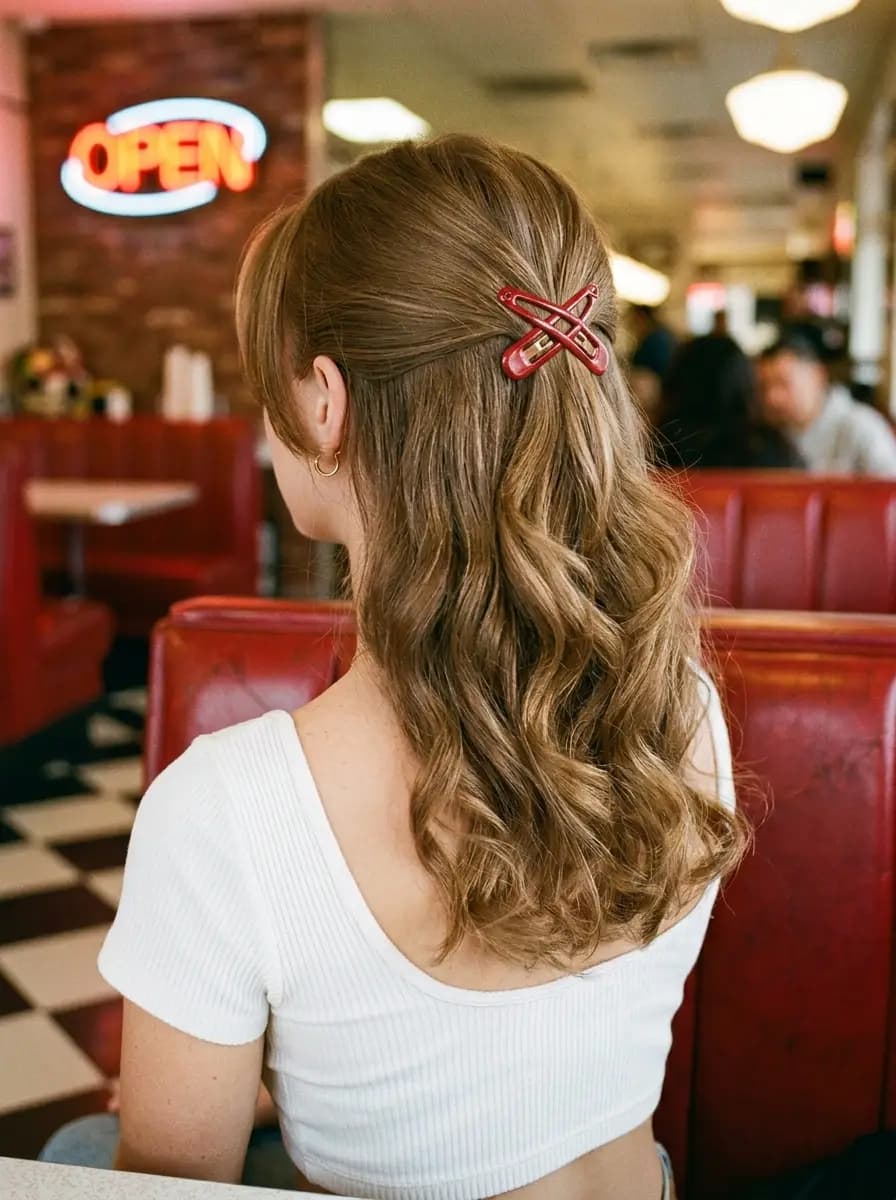
10.Crinkle-Cut Half-Up with Pastel Snap Clips
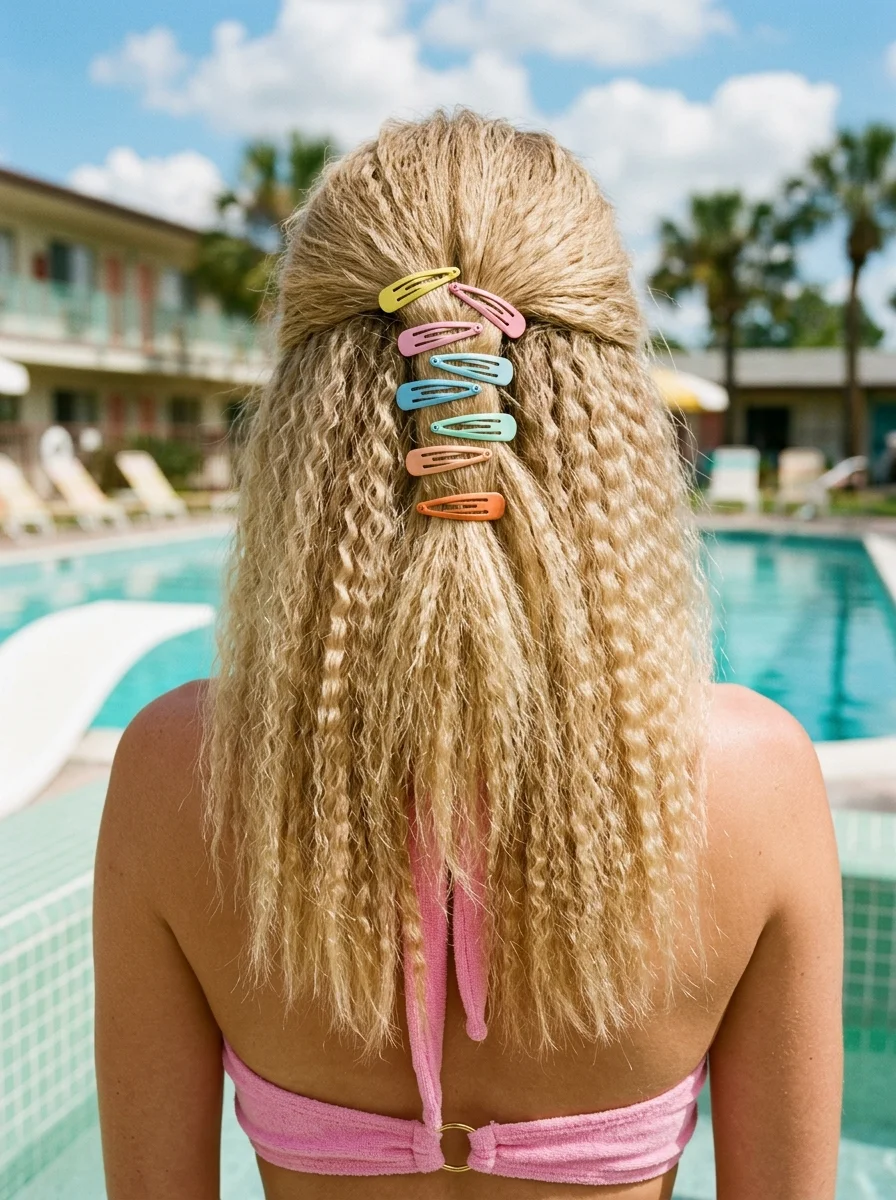
The overview: Any length hair crimped from root to tip, with the top section pulled back and secured with pastel-colored snap clips. It's retro '90s energy — playful, a little nostalgic, and perfect for a pool party where the dress code leans fun.
Why this works poolside: Crimped hair has natural volume and texture that hides post-swim flatness. The snap clips are quick to adjust if the wind picks up, and the half-up style keeps hair out of your face while still showing off the crimped texture.
Step by step:
- Crimp the hair. Use a crimping iron from root to tip, working in small sections for even texture.
- Section the top. Gather the top layer from above the ears and pull it back.
- Secure with clips. Place pastel snap clips in a row across the back of the head, holding the section in place.
- Fluff the crimps. Gently separate the crimped sections for maximum volume.
Tips: Don't brush crimped hair — it flattens the texture. Use your fingers to separate sections instead.
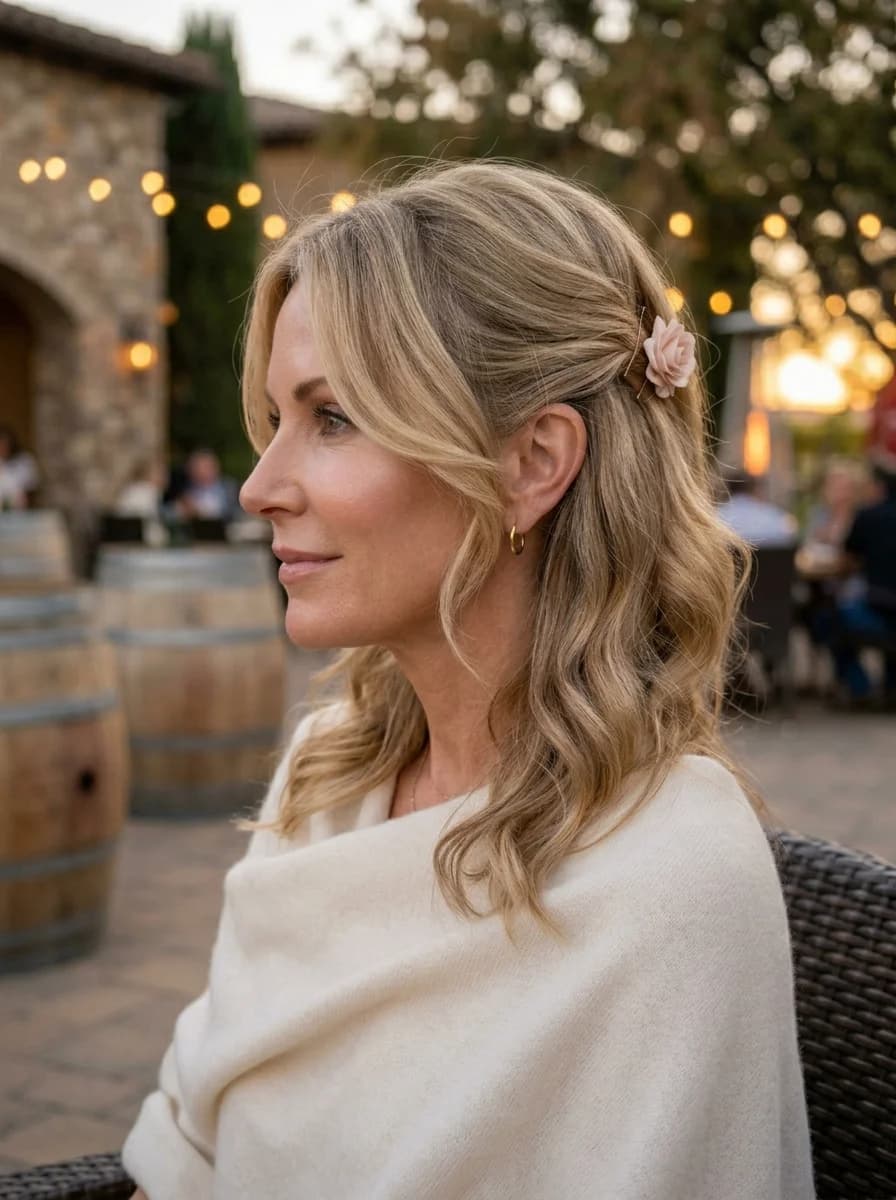
11.Effortless Waves with a Chic Gold Barrette

The overview: This one is the quickest hairstyle. If you have medium to long hair, and you already have some natural waves, this style works wonders. The waves are swept to one side and secured with a gold barrette. It's the kind of hairstyle that says you woke up looking this good — even if you spent twenty minutes with a curling iron. The barrette adds just enough shine to elevate the whole thing.
Why this works poolside: The side-swept style keeps hair off one shoulder for sunbathing, while the barrette holds everything in place if a breeze picks up. It's effortless but not careless.
Step by step:
- Add waves. Use a curling iron or air-dry with mousse for soft, natural waves.
- Sweep to one side. Brush all hair over one shoulder.
- Pin with the barrette. Secure the hair above the ear with a gold barrette, catching enough hair to hold the style in place.
- Adjust. Pull a few face-framing pieces loose for softness.
Tips: A gold barrette with a matte finish looks more modern than a shiny one. It catches light without looking flashy.

30 Stunning July Nail Designs for Summer 2026 💅
12.Daisy Double Buns
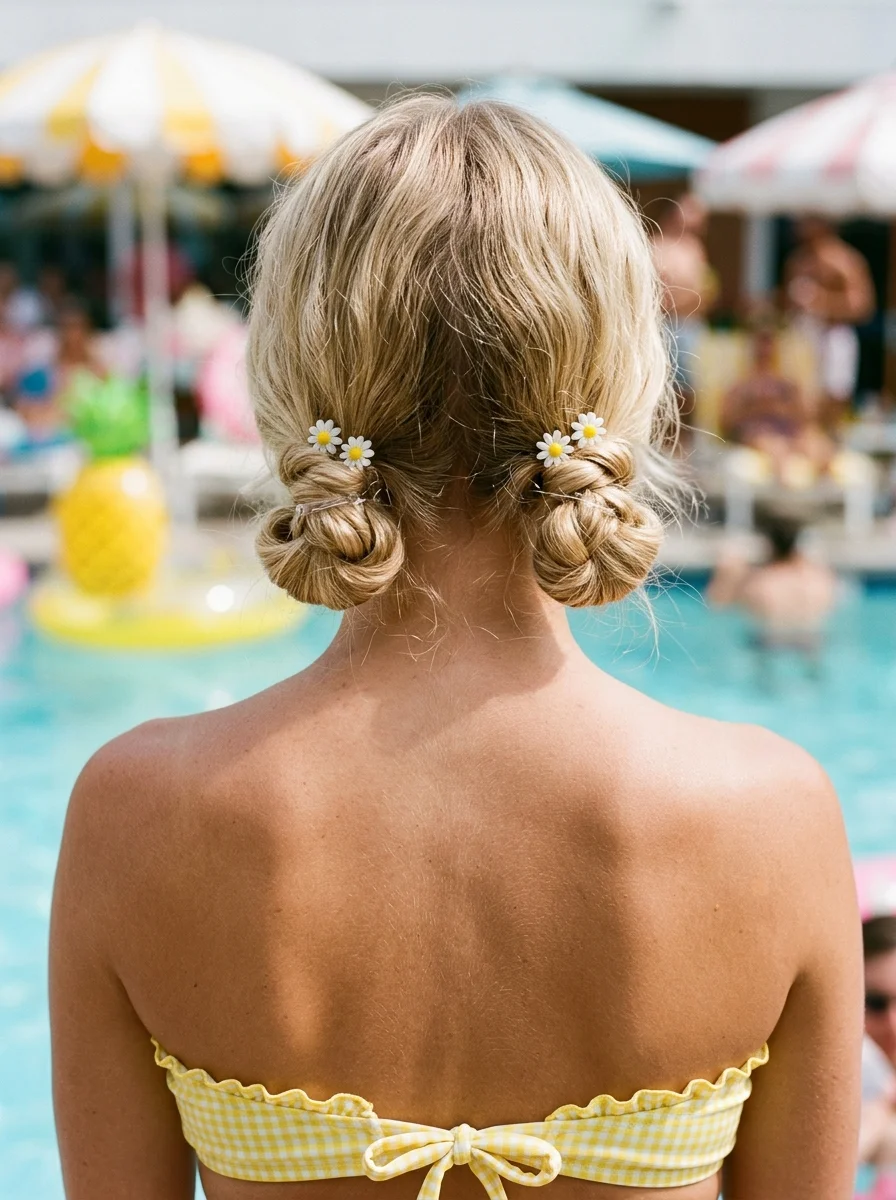
The overview: Short to long-length hair parted down the center and pulled into two low buns at the nape, each decorated with small daisy clips. It's cottagecore meets pool party — sweet, a little unexpected, and guaranteed to make people smile.
Why this works poolside: Double buns keep all your hair off your neck and shoulders, which is ideal for hot days. The daisy clips are lightweight and won't pull on wet hair, and the low placement at the nape means the style stays secure even during active pool time.
Step by step:
- Part the hair. Create a clean center part from forehead to nape.
- Section into two. Divide the hair into two equal sections.
- Form the buns. Twist each section into a low bun at the nape, securing with pins.
- Add daisy clips. Scatter small daisy clips around each bun for a playful finish.
Tips: Keep the buns slightly messy — overly polished double buns can look costume-y. A few loose pieces around the face keep the look natural.
13.Sleek Low Chignon with a Golden Bloom
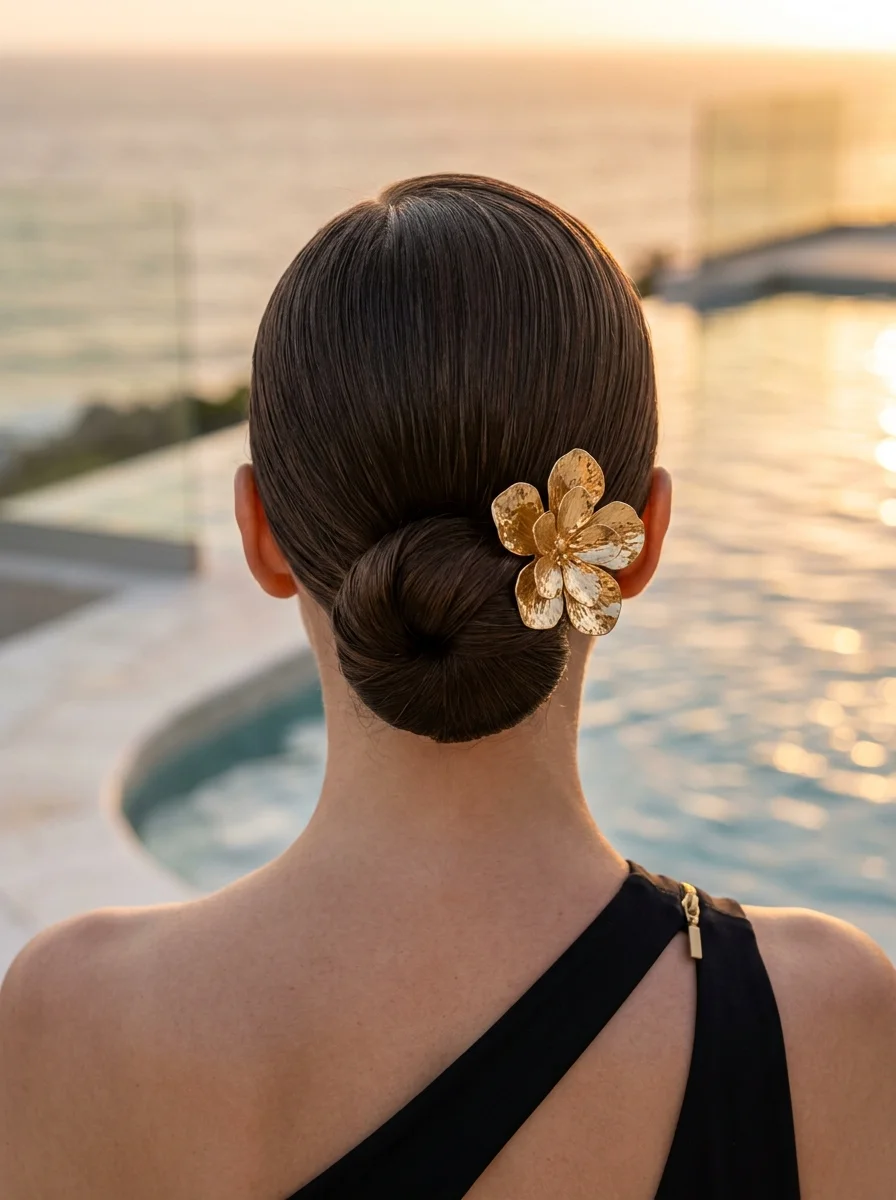
The overview: Medium to long hair smoothed into a sleek low chignon at the nape, with a gold flower clip tucked into the side. It's sophisticated without being stuffy — the kind of hairstyle that works at an upscale pool party where the cocktails cost more than the entrance fee.
Why this works poolside: The sleek finish resists humidity frizz, and the chignon keeps everything contained and off your neck. The gold flower clip won't tarnish near water, so you can transition from pool to dinner without changing your hair.
Step by step:
- Sleek the hair back. Apply smoothing serum and brush all hair straight back from the hairline.
- Gather into a low ponytail. Secure at the nape with a clear elastic.
- Twist into a chignon. Twist the ponytail into a tight coil, wrap it around the base, and pin securely.
- Add the gold bloom. Tuck the gold flower clip into the side of the chignon.
Tips: Use a fine-tooth comb and hairspray to smooth any flyaways along the hairline. The sleeker the base, the more polished the final look.
25 Top Curly Hairstyle Trends for 2026 ➰✨
14.Boho Beach Bun with a Pop of Pink
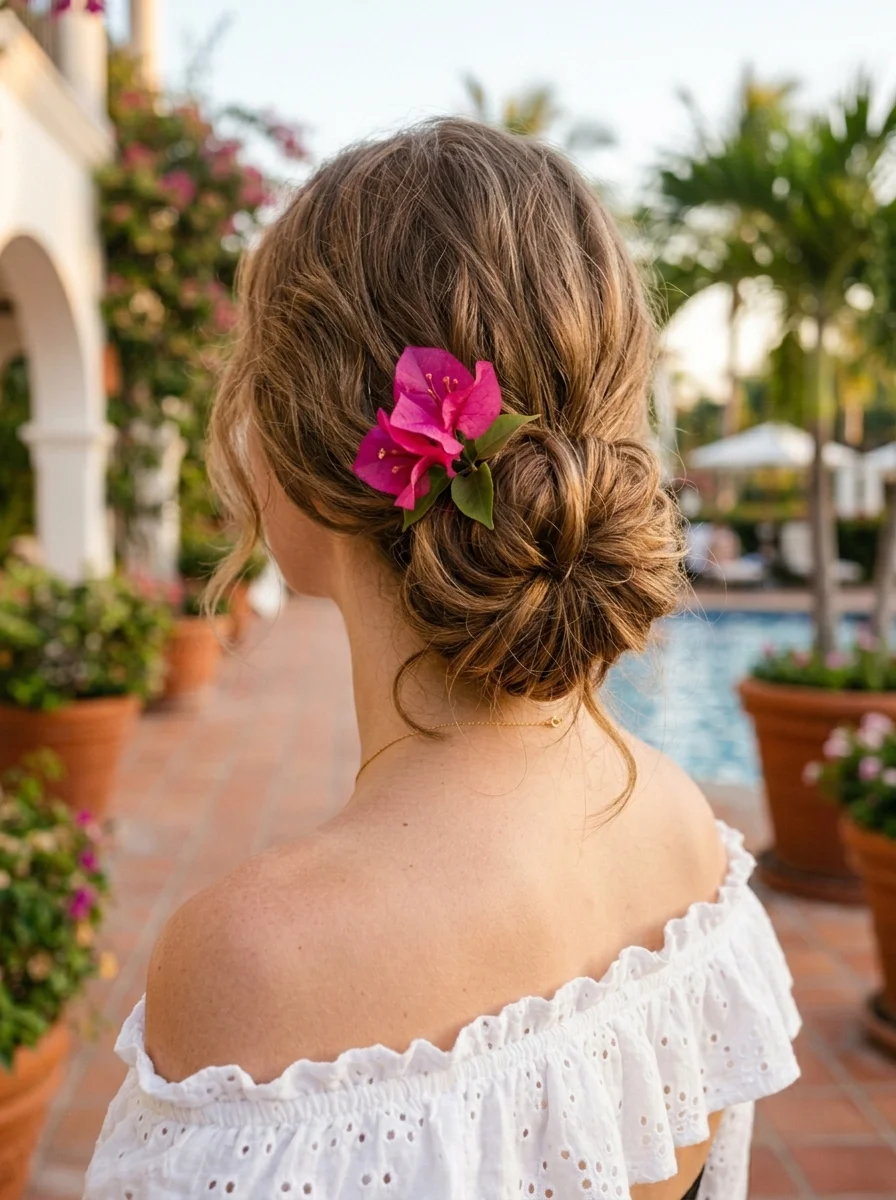
The overview: Medium to long hair pulled into a messy bun at the crown, decorated with pink bougainvillea flowers tucked around the base. It's Mediterranean energy in a hairstyle — the kind of look that makes you want to book a flight to Santorini immediately.
Why this works poolside: The messy bun is forgiving in wind and humidity — the messier it gets, the better it looks. The bougainvillea adds color without weight, and the high placement keeps your neck cool.
Step by step:
- Add texture. Spritz texturizing spray through your hair for grip and volume.
- Gather into a high bun. Pull hair to the crown and twist into a messy bun, securing with pins.
- Loosen it up. Pull sections outward to create volume and imperfection.
- Tuck in the flowers. Place bougainvillea blooms around the base of the bun.
Tips: Use fresh bougainvillea if you can — it lasts several hours without water and adds natural fragrance. Faux flowers work too, but fresh blooms look more organic.
15.Sleek High Ponytail with Golden Strands
The overview: If you have gold highlights, then you can pull that into a sleek, high ponytail. Gold tinsel strands are woven through the ponytail, catching light with every movement. It's luxe-pool energy — the hairstyle equivalent of a champagne tower.
Why this works poolside: The sleek ponytail is one of the most chlorine-resistant styles because the hair is tightly secured and smoothed down. The gold tinsel catches sunlight beautifully and won't be damaged by water.
Step by step:
- Sleek the hair. Apply gel or pomade and brush hair upward into a smooth, tight ponytail.
- Secure at the crown. Use a strong elastic to hold the ponytail in place.
- Add gold tinsel. Thread gold tinsel strands through the ponytail, distributing them evenly.
- Smooth flyaways. Use a toothbrush with hairspray to flatten any baby hairs along the hairline.
Tips: Wrap a small section of hair around the elastic to hide it — it makes the whole style look more polished and intentional.

31 Stunning Prom Nails for Women in 2026 💃
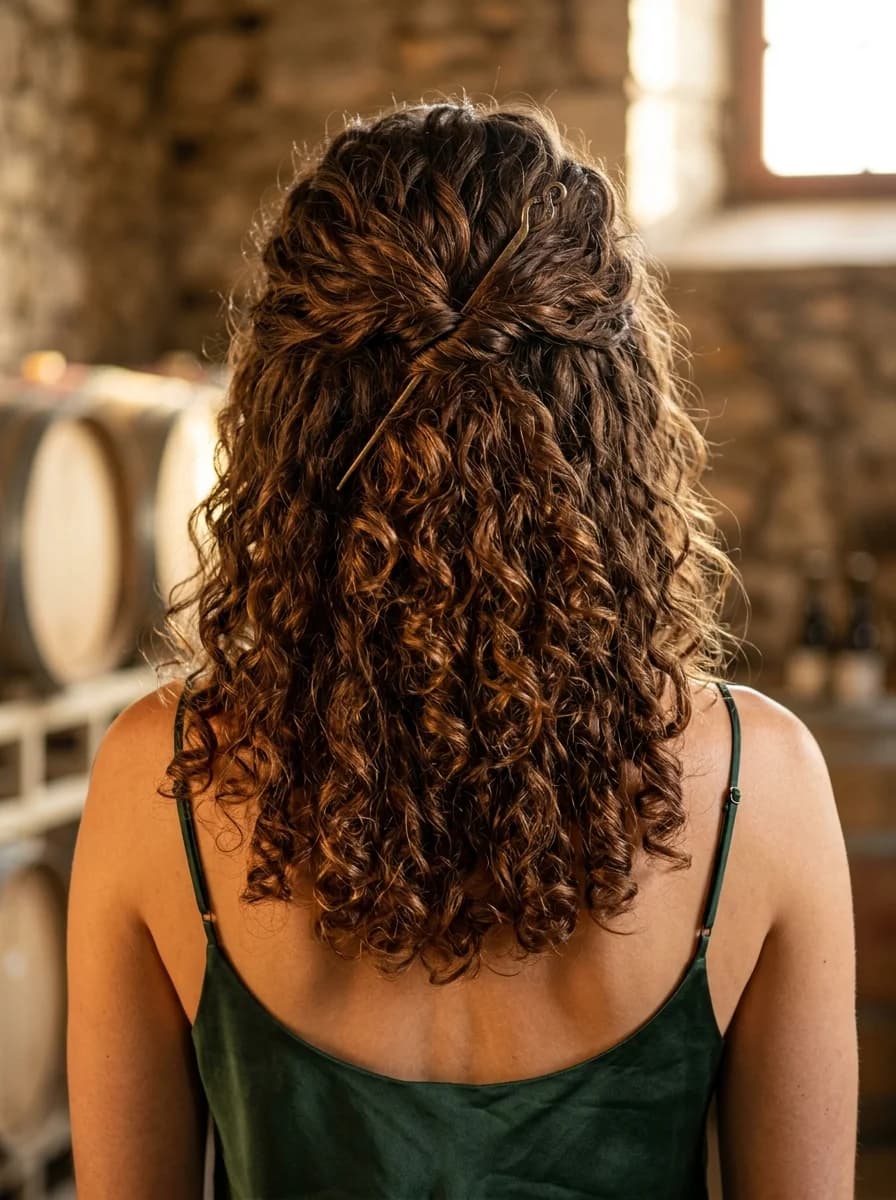
16.Sleek High Ponytail with Defined Curls
The overview: Short to long hair slicked smooth at the crown and secured into a high ponytail, with the length falling in defined, springy curls. It's the contrast that makes it work — the sleek top against the voluminous curls creates a look that's both controlled and free.
Why this works poolside: The sleek crown resists frizz while the curls hold their shape even after a dip. The high ponytail keeps the curls off your shoulders, preventing them from getting crushed when you're lounging.
Step by step:
- Curl the hair. Use a small-barrel curling iron to create defined curls throughout the hair.
- Slick the crown. Apply gel or pomade to the top section and brush smooth.
- Gather into a high ponytail. Secure the sleek section at the crown, leaving the curls to cascade.
- Define the curls. Separate the curls with your fingers and add a curl-enhancing cream for definition.
Tips: Don't brush the curls after securing the ponytail — finger-separate only. Brushing turns curls into frizz.
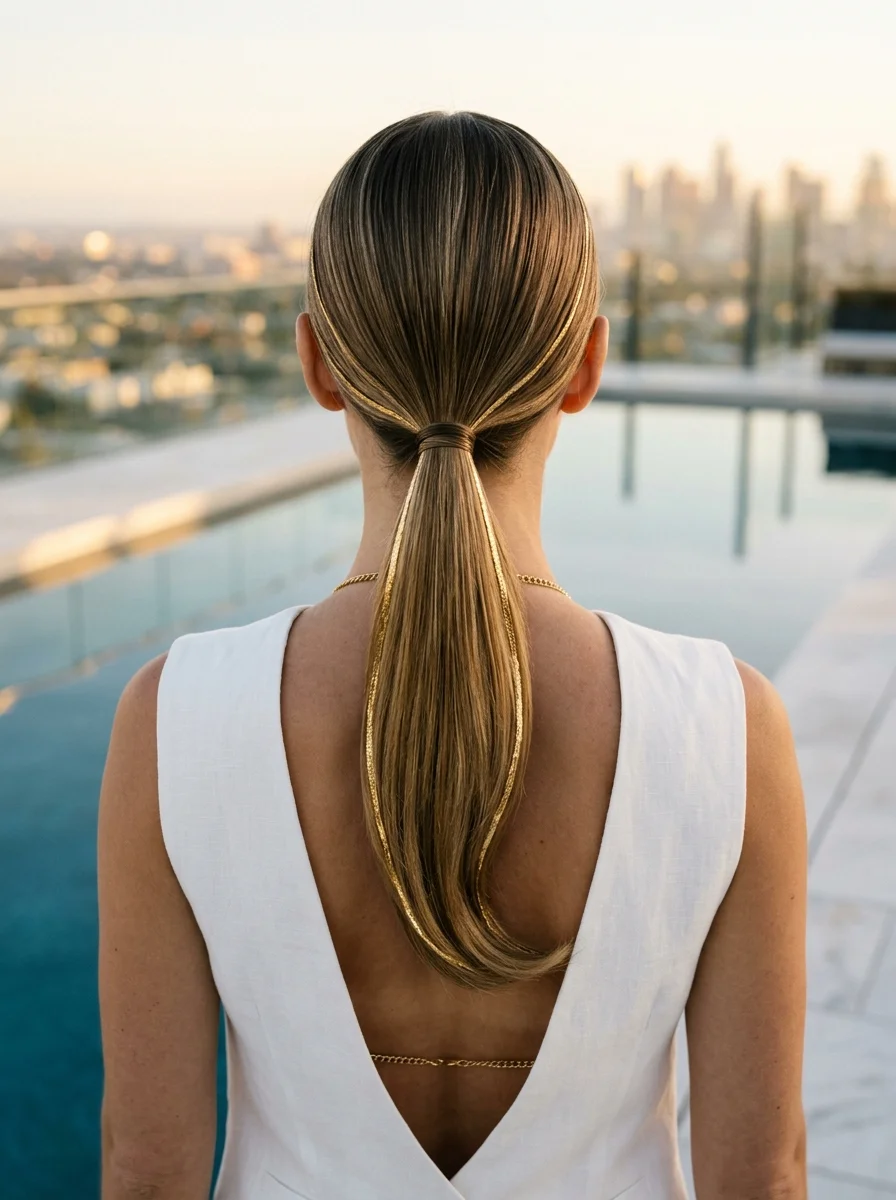
17.Sleek Low Ponytail with a Chic Gold Cuff
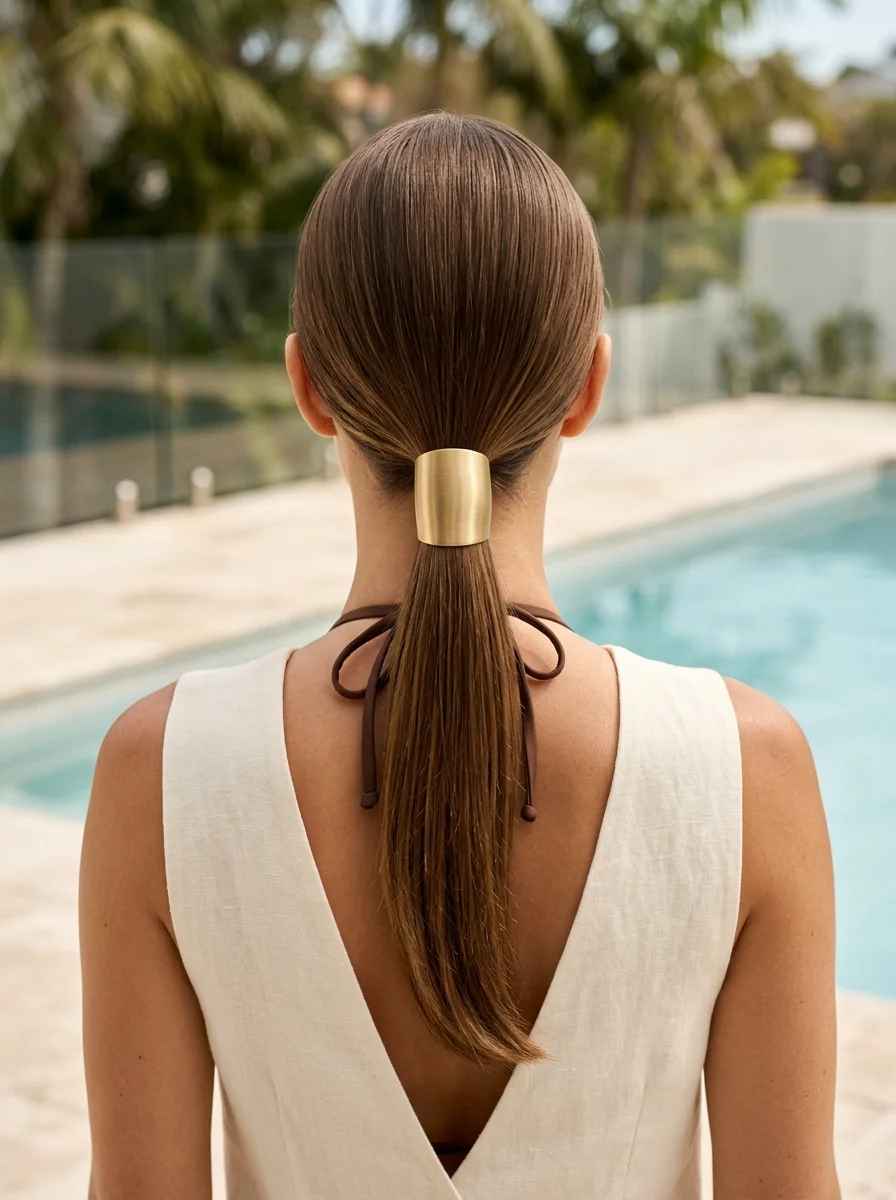
The overview: Medium-length hair pulled into a tight, low ponytail at the nape, with a wide gold cuff wrapping the base. It's minimalist sophistication — the hairstyle that proves you don't need volume or accessories to look expensive.
Why this works poolside: The low ponytail is the most practical pool hairstyle because it keeps hair off your face without adding height or bulk. The gold cuff is the only accessory you need, and it won't get damaged by chlorine or salt water.
Step by step:
- Sleek the hair. Apply smoothing cream and brush all hair straight back.
- Secure at the nape. Tie a low ponytail with a clear elastic.
- Add the gold cuff. Slide the gold cuff over the elastic, positioning it to sit flat.
- Polish. Run a flat iron through the ponytail for a pin-straight finish.
Tips: A cuff with a hinge closure is easier to put on and more secure than one that slides on. It stays in place even during active pool time.
27 Stunning Beach Wedding Hairstyles for Brides & Family 2026 🌊💍
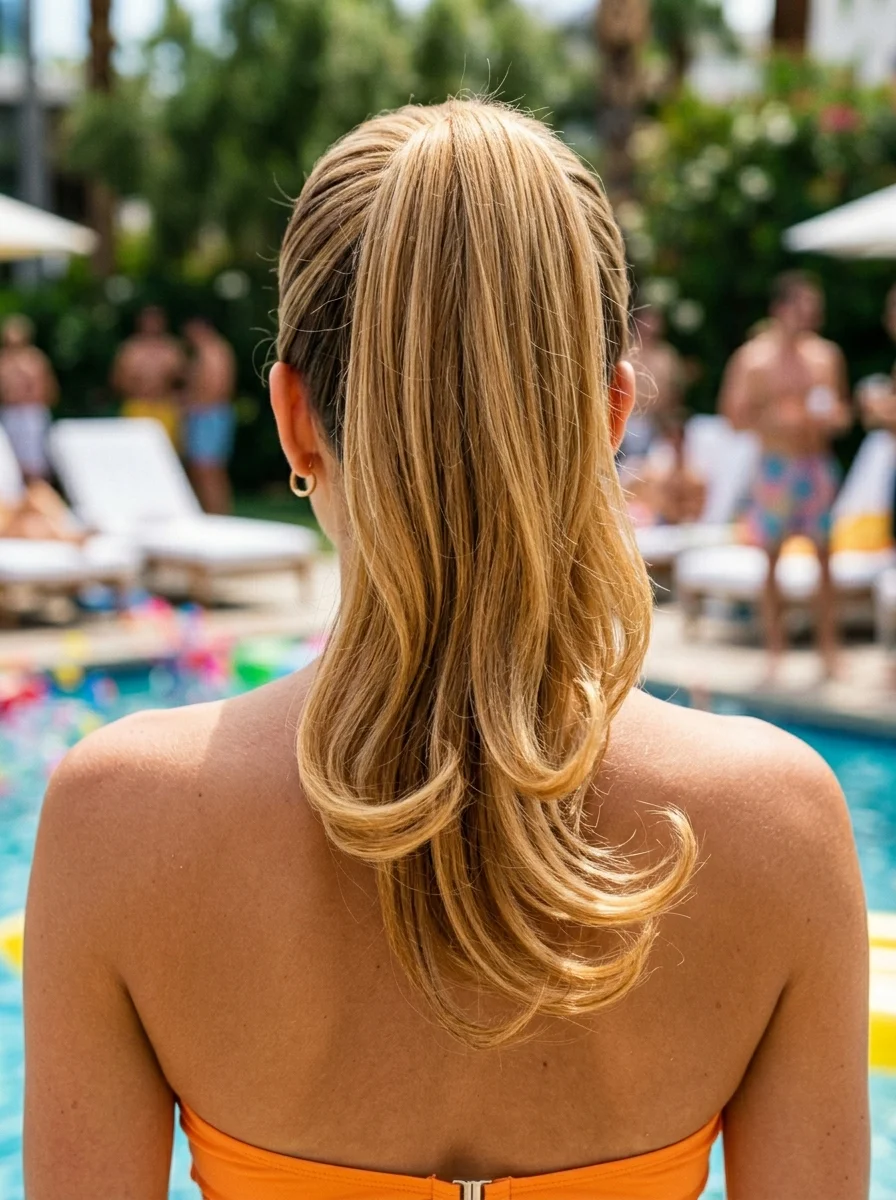
18.Beachy Curls with Sun-Kissed Highlights
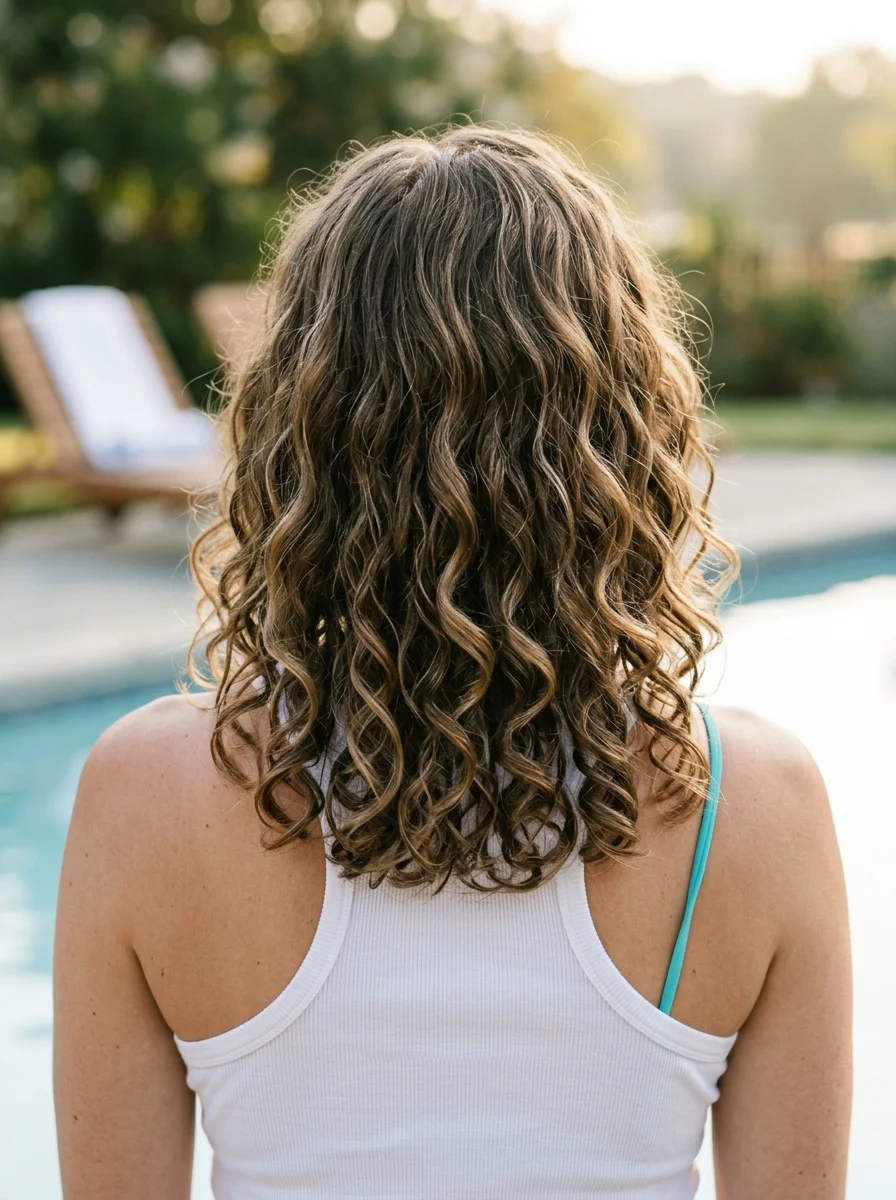
The overview: Short hair with blonde sun-kissed highlights, worn in natural, defined curls that fall just past the shoulders. No accessories, no fuss — just great curls doing their thing. It's California beach energy at its most authentic.
Why this works poolside: Natural curls thrive in humidity, which means this style actually looks better as the day goes on. The highlights add dimension that catches sunlight, and the shoulder-length cut keeps the curls bouncy without weighing them down.
Step by step:
- Define the curls. Apply a curl-enhancing cream to damp hair and scrunch upward.
- Diffuse or air-dry. Use a diffuser on low heat or let curls air-dry for natural definition.
- Break the cast. Once dry, scrunch out any crunchiness with a light oil.
- Shape. Use your fingers to separate and shape individual curls for a natural look.
Tips: Don't touch your curls while they're drying — it causes frizz. Once they're completely dry, then you can separate and shape.
19.Double Space Buns with a Fun Twist
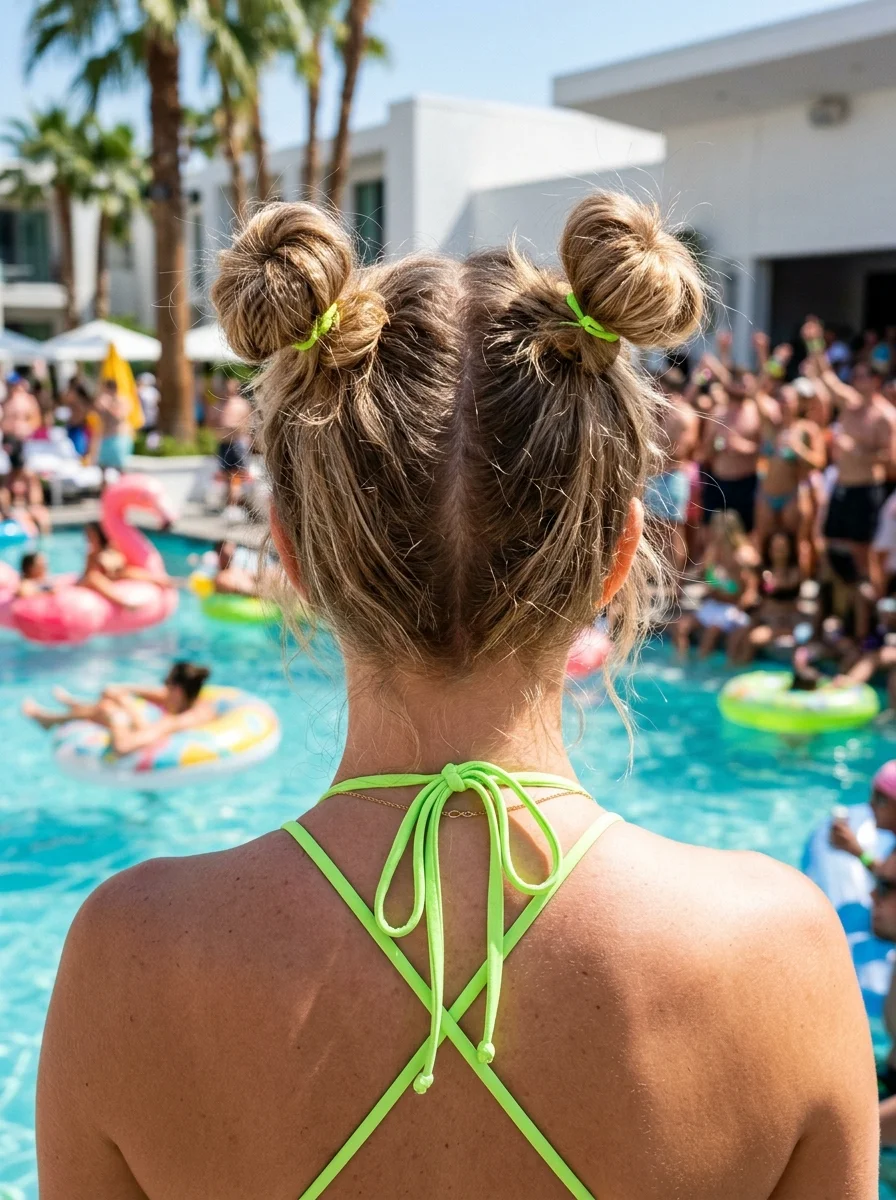
The overview: Medium to long hair parted down the center and pulled into two high buns, one on each side of the crown, secured with neon elastics. It's playful, it's bold, and it's the kind of hairstyle that says you're here to have a good time.
Why this works poolside: Space buns keep all your hair contained and off your face, which is ideal for active pool days. The neon elastics add a pop of color that shows up in photos, and the high placement keeps your neck cool.
Step by step:
- Part the hair. Create a clean center part from forehead to crown.
- Gather each side. Pull each section into a high ponytail on either side of the crown.
- Twist into buns. Twist each ponytail into a bun, securing with neon elastics.
- Adjust for symmetry. Make sure both buns are the same size and height.
Tips: Wrap the elastic twice around each bun for extra security. Neon elastics can stick out in photos, so position them where they add color without looking like an afterthought.

33 Trendy Polka Dot Nail Ideas for 2026 💅
20.Pearl-Adorned Side Braid for a Chic Summer Vibe
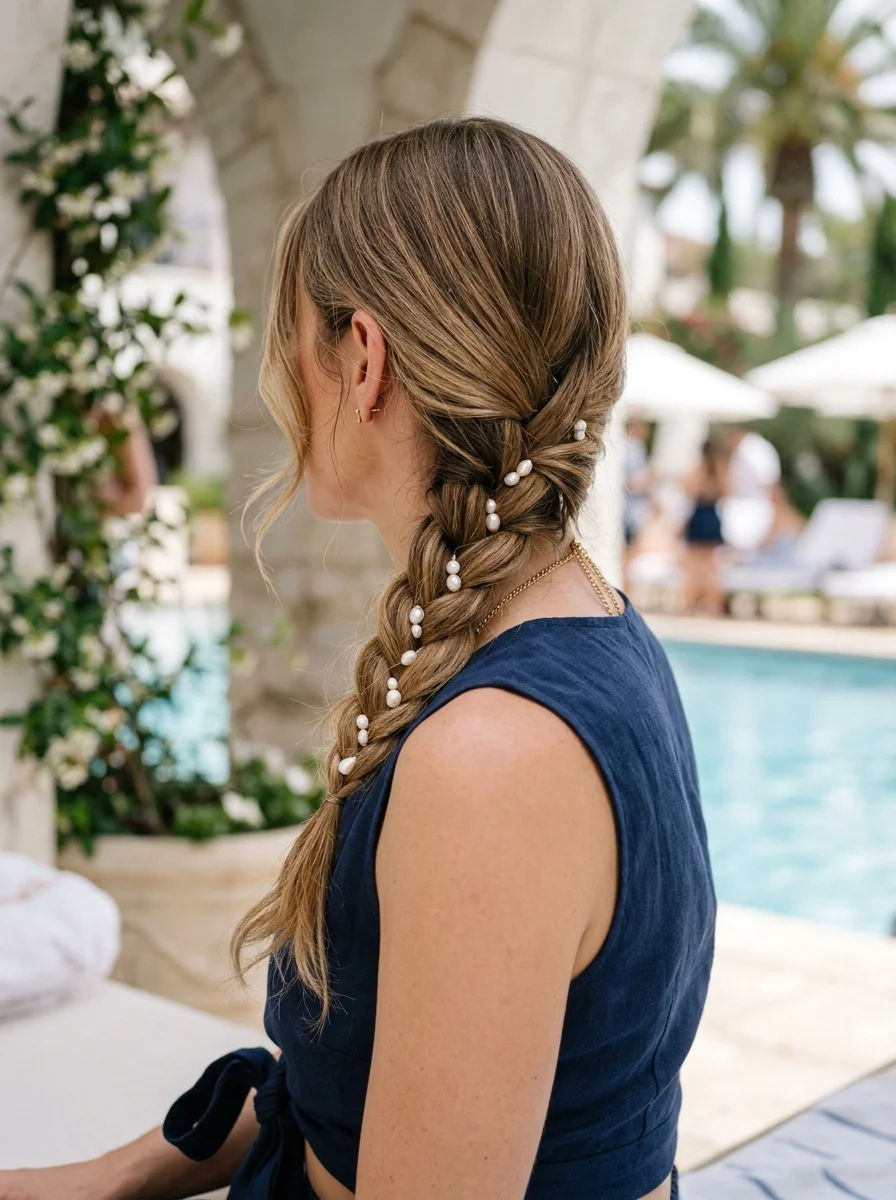
The overview: Medium to long hair gathered into a loose side braid, with small pearls scattered along the braid sections. It's elegant garden-party energy adapted for the pool — refined enough for a champagne lunch, relaxed enough for lounging.
Why this works poolside: The side braid keeps your hair secure and off one shoulder, which is great for sunbathing. The pearls add a luminous detail that catches light beautifully in outdoor settings.
Step by step:
- Create a side part. Sweep all hair to one side.
- Braid loosely. Create a standard three-strand braid, keeping tension relaxed.
- Pancake for fullness. Gently pull at each section to widen the braid.
- Add pearl pins. Insert small pearl-tipped bobby pins along the braid at random intervals.
Tips: Use pearl pins with a small claw base — they grip better than standard bobby pins and won't slide out of the braid in humid weather.
21.Beachy Half-Up Top Knot with Loose Waves
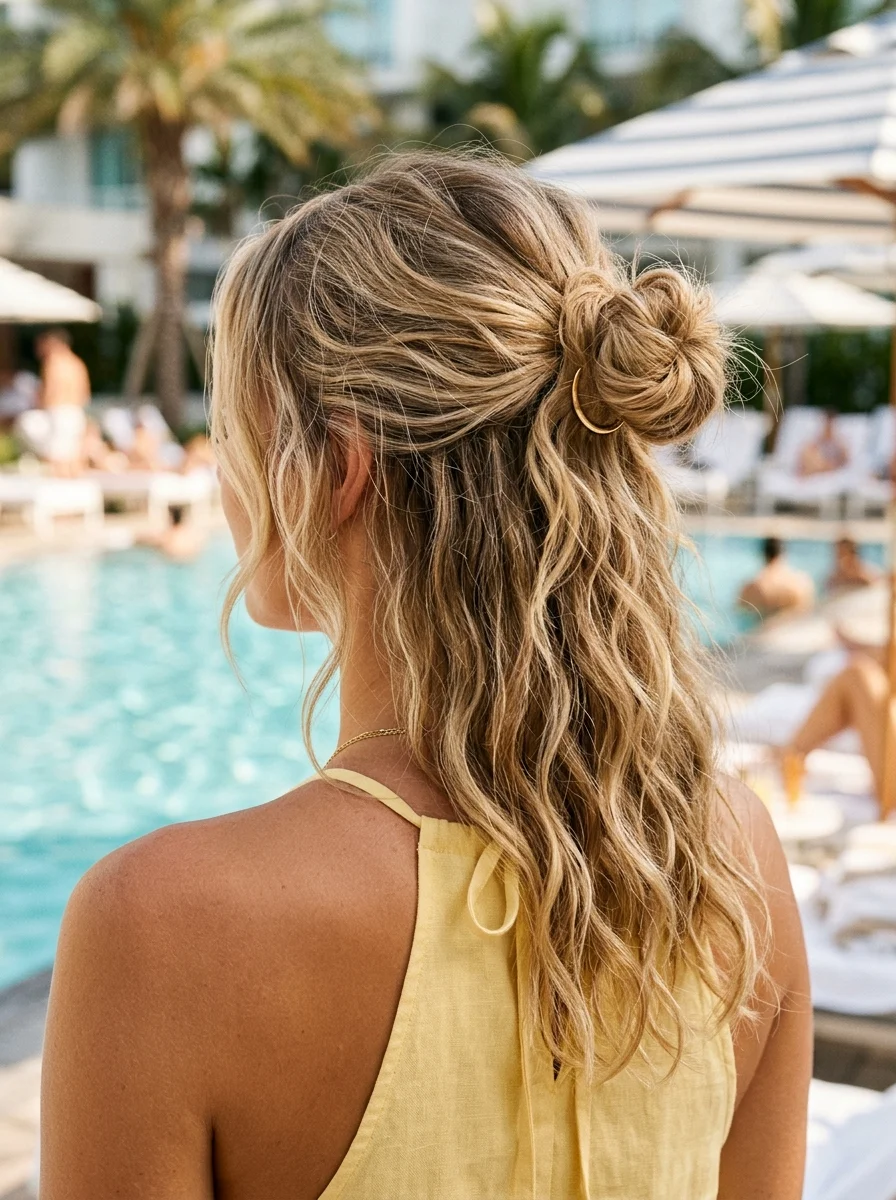
The overview: Medium hair pulled into a half-up top knot, with the remaining length falling in loose, beachy waves. It's the best of both worlds — your hair is out of your face but still flowing. The kind of style that looks like it just happened.
Why this works poolside: The half-up style keeps the top section secure while the waves below give you movement. It's casual enough for lounging but styled enough for poolside photos.
Step by step:
- Create waves. Use a curling iron or braid damp hair overnight for natural waves.
- Section the top half. Gather hair from above the ears to the crown.
- Twist into a top knot. Twist the top section into a bun and secure with pins.
- Pull for volume. Gently tug at the bun to loosen it and add fullness.
Tips: Curl the bottom section before pulling the top half up. It's much easier to style the waves first than to curl around an existing bun.

24 Stunning Festival Hairstyle Ideas for Music Concert Nights 2026 🎶✨
22.Retro Starlet Ponytail with Crown Volume
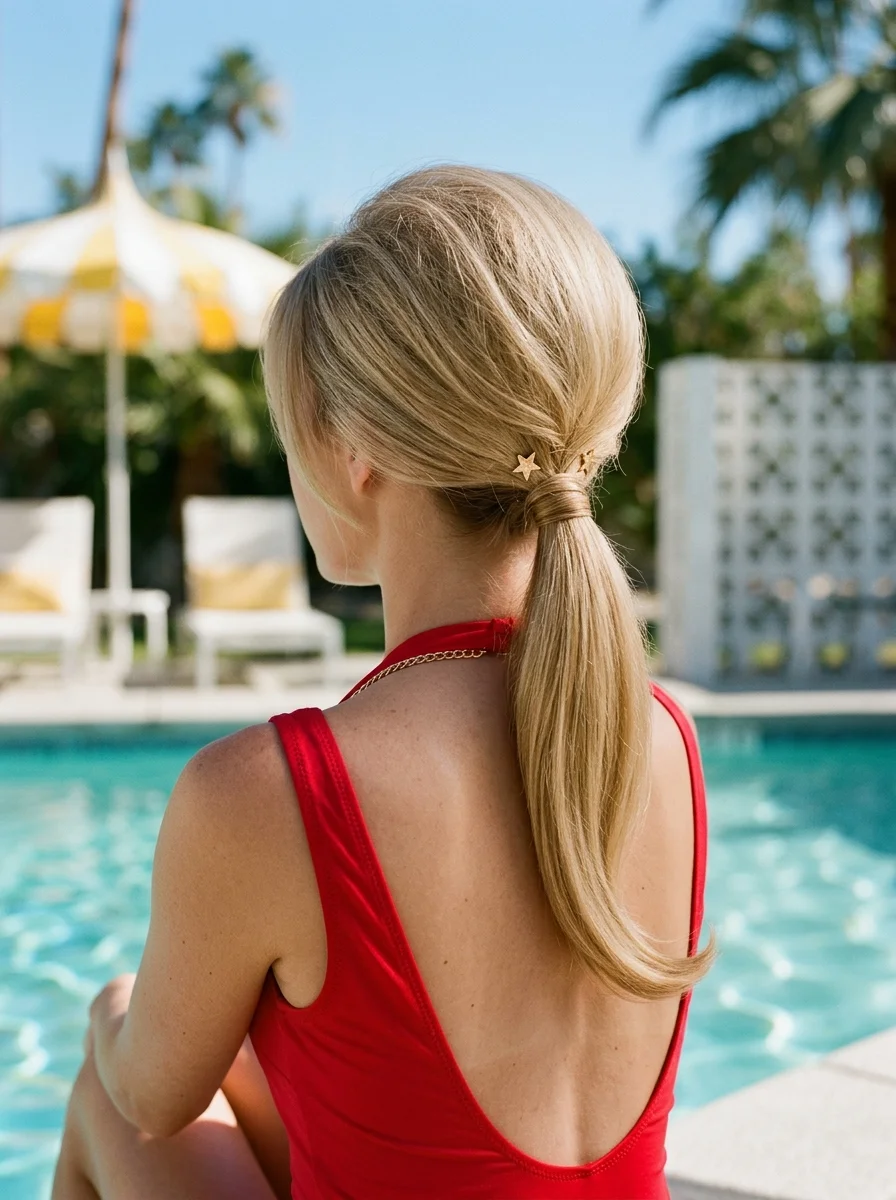
The overview: Short to long hair backcombed at the crown for volume, then gathered into a mid-height ponytail. Gold star pins are scattered across the backcombed section for a retro-glamour finish. It's Old Hollywood meets pool party.
Why this works poolside: The backcombed crown adds height and drama without requiring your hair to be down. The gold star pins are secure and waterproof, so they won't shift or tarnish in pool conditions.
Step by step:
- Backcom the crown. Lift sections at the crown and backcomb the roots for volume.
- Smooth the top layer. Gently brush over the backcombed section to smooth the surface.
- Gather into a ponytail. Secure at mid-height with an elastic.
- Add star pins. Place gold star pins across the backcombed section.
Tips: Tease in small sections for more controlled volume. One big section will look uneven.
23.Braided Crown with Cascading Fishtails
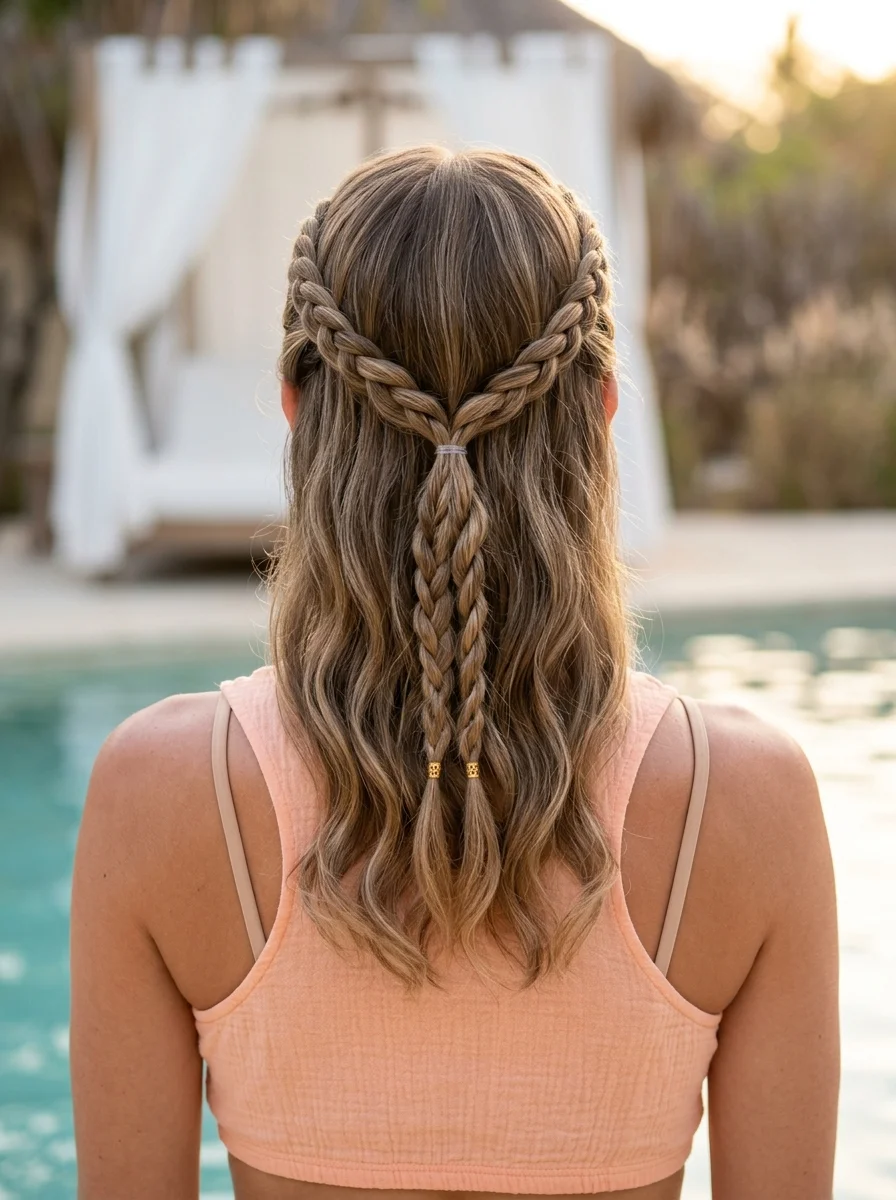
The overview: Medium to long hair with Dutch braids running along the hairline from both sides, meeting at the back where they transition into cascading fishtail braids. Gold cuffs mark the transition points. It's romantic boho at its most elaborate.
Why this works poolside: The double braid structure keeps everything secure and organized, while the fishtail ends add movement and visual interest. The gold cuffs stay in place through swimming and won't corrode in chlorine.
Step by step:
- Start the Dutch braids. Braid from each temple along the hairline, picking up sections as you go.
- Meet at the back. Secure each braid where they meet at the back of the head.
- Transition to fishtails. Continue each braid as a fishtail from the meeting point downward.
- Add gold cuffs. Place cuffs where the Dutch braids transition to fishtails.
Tips: Pancake the Dutch braids more than the fishtails — it creates a nice contrast between the structured crown and the softer cascading ends.

30 Stunning Vacation Nail Ideas for Your Next Getaway in 2026 💅
24.Boho Scarf Braid with Mediterranean Chic
The overview: Medium to long hair braided to one side, with a Mediterranean-print scarf woven through the braid sections. It's the hairstyle that makes a simple cover-up look like a curated vacation wardrobe.
Why this works poolside: The scarf woven through the braid adds color and pattern without needing additional accessories. It also helps the braid hold together in wind, and the side placement keeps it off your back.
Step by step:
- Fold the scarf. Fold the scarf into a long, thin strip.
- Anchor one end. Secure one end of the scarf to a bobby pin at the base of your ponytail.
- Braid with the scarf. Incorporate the scarf as one of the three strands in a side braid.
- Secure the end. Tie the scarf around the elastic at the braid's end, or tuck it into the braid.
Tips: Use a silk scarf — it braids more smoothly than cotton and adds a subtle sheen to the finished look.
25.Effortless Beachy Waves Ponytail with Seashell Accent
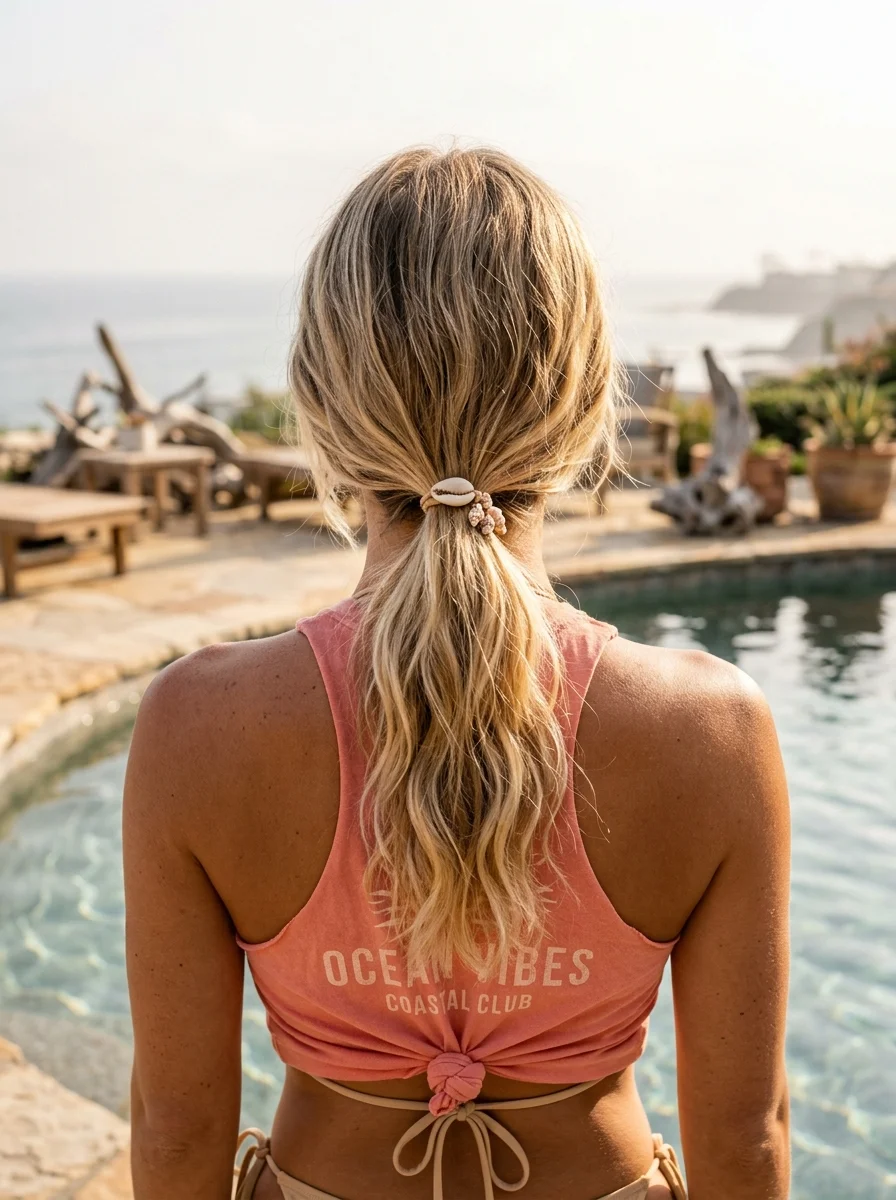
The overview: Short to long hair pulled into a low ponytail with loose waves, secured with a seashell-embellished hair tie. It's coastal boho in its purest form — the kind of hairstyle that makes you feel like you're permanently on vacation.
Why this works poolside: The seashell tie is the kind of detail that ties a beach look together without being costume-y. The low ponytail keeps things manageable, and the balayage highlights catch light beautifully in water.
Step by step:
- Add waves. Create loose, beachy waves with a curling iron or by air-drying with sea salt spray.
- Gather low. Pull hair into a low ponytail at the nape.
- Secure with the seashell tie. Wrap the seashell hair tie around the base.
- Pull out pieces. Tug a few face-framing strands loose for softness.
Tips: Look for a seashell tie with a snag-free lining — the embellishments can catch on hair if the elastic isn't properly covered.
34 Stunning Summer First Date Hairstyles for 2026 💕☀️
26.Twisted Crown Half-Up with Starry Sparkle
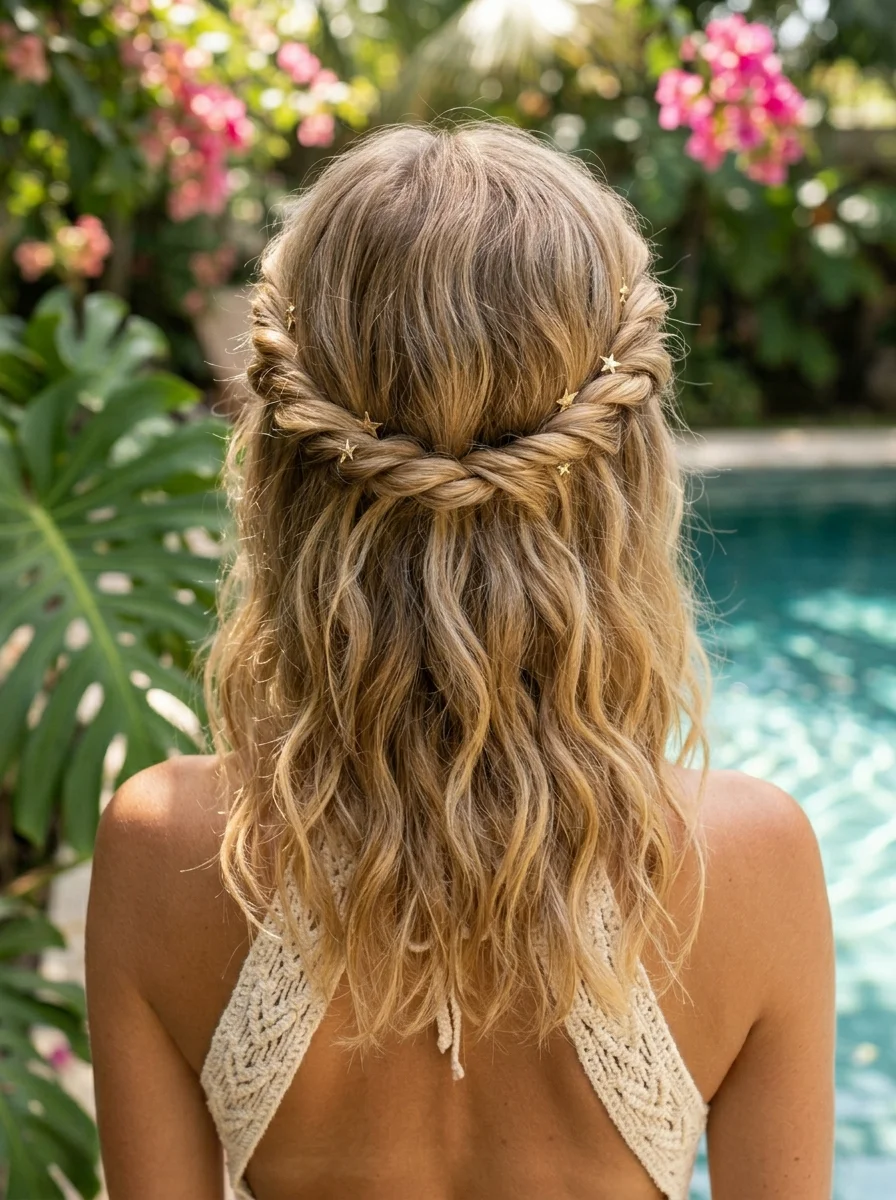
The overview: Medium to long-length hair twisted from each temple and pinned at the back of the head, with the remaining length falling in soft waves. Gold star pins are scattered across the twisted section. It's enchanted-garden energy adapted for the pool.
Why this works poolside: The half-up twist keeps the front sections secure while leaving the back flowing. The gold star pins are lightweight and waterproof, so they won't shift or tarnish during a full day poolside.
Step by step:
- Twist each side. Take a section from each temple and twist it back toward the center of the head.
- Pin at the back. Cross the two twisted sections and pin them in place.
- Add waves below. Curl the remaining loose hair for soft waves.
- Scatter star pins. Place gold star pins across the twisted section.
Tips: Twist tightly at the temples and let the twist loosen as it travels back — it creates a more natural, less rigid look.
27.Grecian Goddess Braids with Sleek Ponytail
The overview: Medium to long hair styled into tight cornrows that feed into a sleek, high ponytail. A gold chain is woven through the cornrows for a high-fashion, Grecian-goddess effect. It's editorial poolside — the kind of look that belongs on a magazine cover.
Why this works poolside: Cornrows are the most water-resistant braided style because they sit flat against the scalp. The sleek ponytail dries fast, and the gold chain won't be damaged by chlorine or salt water.
Step by step:
- Section the hair. Create even sections from the hairline to the crown.
- Cornrow each section. Braid each section flat against the scalp, incorporating the gold chain into one or two braids.
- Gather the ponytail. Combine all braid ends at the crown into a tight, sleek ponytail.
- Smooth the ponytail. Apply smoothing cream and brush the ponytail straight.
Tips: Use edge control along the partings for a cleaner, more defined look. It makes the cornrows appear sharper and more intentional.

30 Stunning Beach Nail Ideas for the Best Vacation in 2026 🌊
28.Effortless Messy Bun with Tortoise Shell Clip
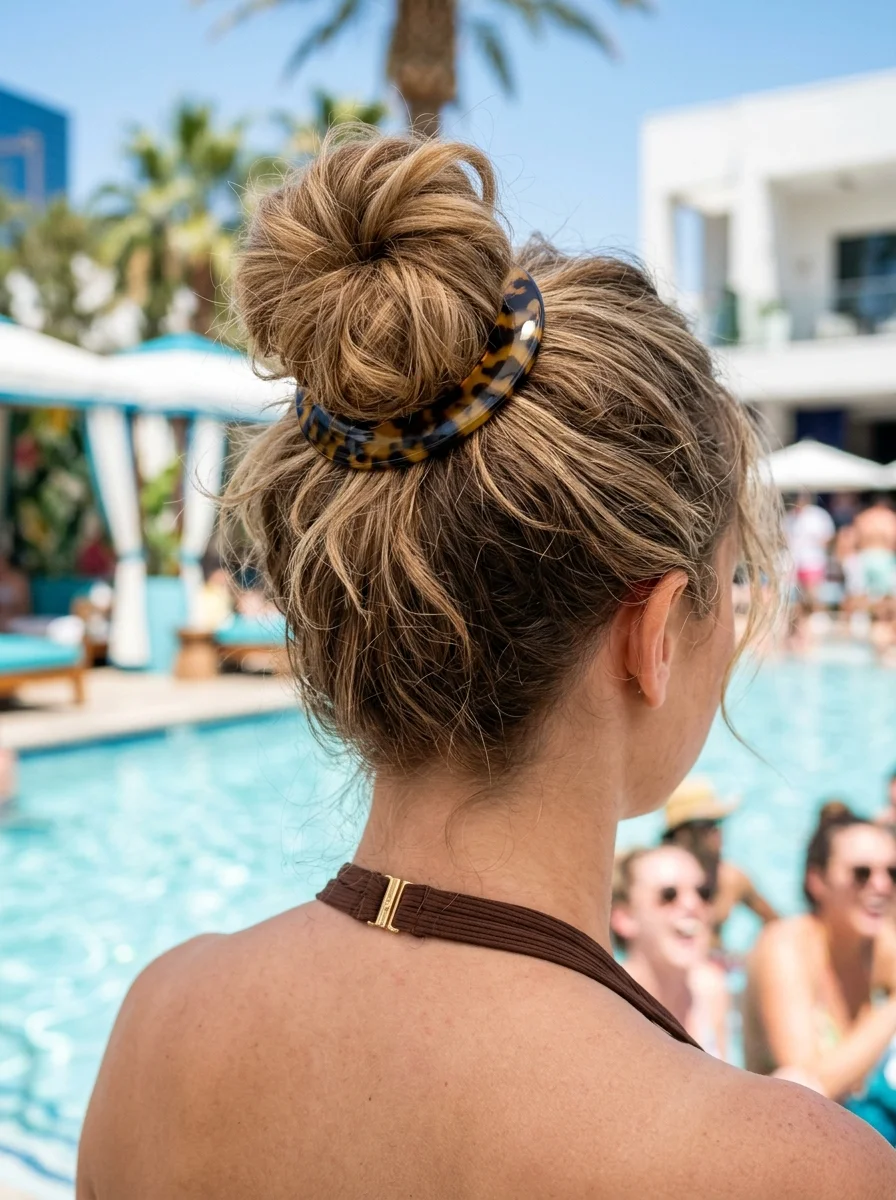
The overview: Medium to long hair gathered into a messy bun at the crown, secured with a large tortoiseshell claw clip. It's the most low-maintenance look on this list — the kind of hairstyle you do in thirty seconds and it looks better than styles that took an hour.
Why this works poolside: The claw clip holds thicker hair more securely than pins, and the messy bun gets better as the day goes on. It's quick to redo after swimming and looks intentionally undone.
Step by step:
- Gather the hair. Pull all your hair up to the crown.
- Twist and fold. Twist the ponytail and fold it against your head.
- Clamp with the clip. Open the claw clip and clamp it over the folded hair.
- Pull out pieces. Tug a few wispy pieces around the face for an effortless finish.
Tips: Choose a clip that's slightly larger than you think you need — it'll grip better and hold more securely, especially on wet or damp hair.
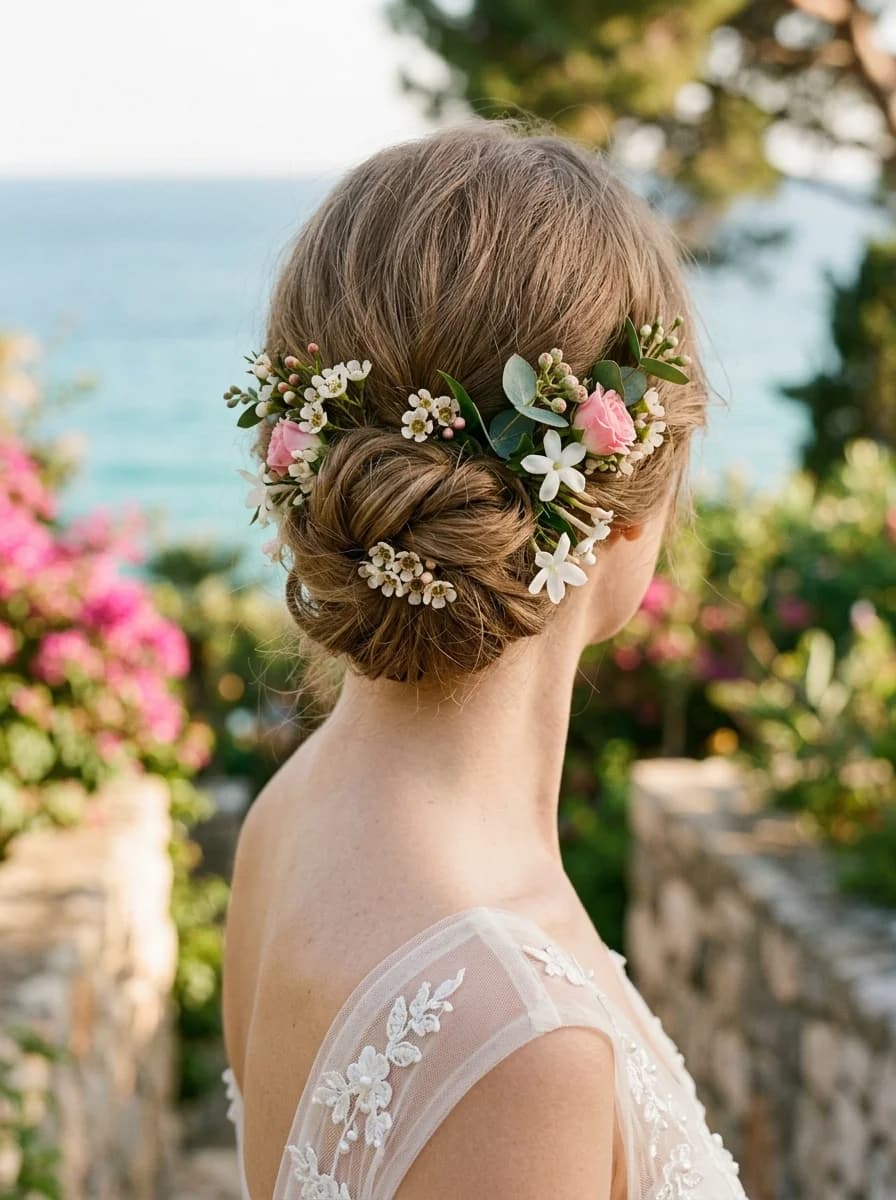
29.Twisted Low Bun with Lavender Sprigs
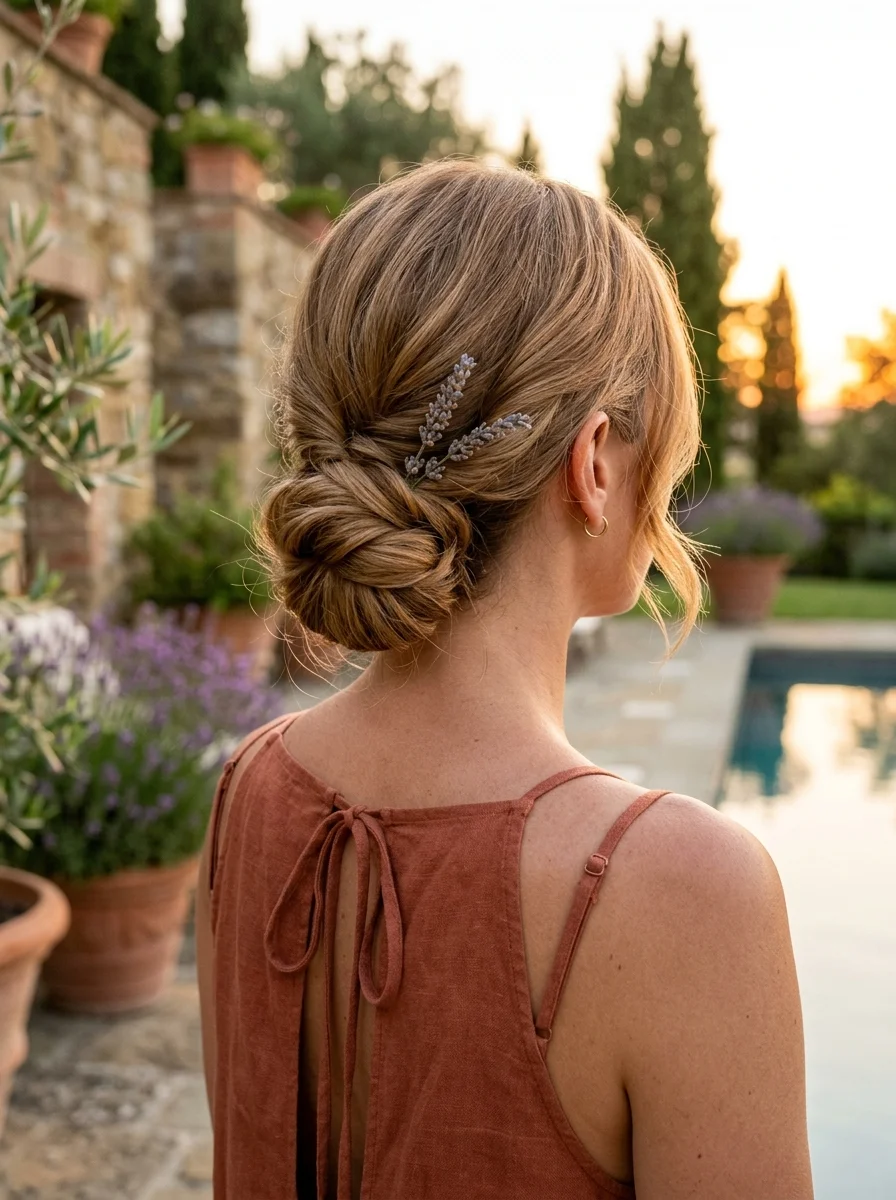
The overview: Medium hair twisted into a low bun at the nape, with fresh lavender sprigs tucked into the twist. It's Tuscan-romantic energy — the hairstyle that makes you want to drink rosé and eat pasta by a pool in Italy.
Why this works poolside: The low bun keeps everything off your neck, and the lavender adds a natural fragrance that's more pleasant than any perfume in the heat. The sprigs last several hours without water.
Step by step:
- Gather into a low ponytail. Secure all hair at the nape with a clear elastic.
- Twist into a bun. Twist the ponytail and coil it into a low bun, pinning as you go.
- Tuck in lavender. Slide fresh lavender sprigs into the bun at random intervals.
- Adjust. Position the lavender so the blooms are visible but not overwhelming.
Tips: Mist the lavender with a light coat of hairspray before tucking it in. It extends the flower's life and keeps the petals from wilting in the heat.
30 Stunning Mother of the Groom Hairstyle Ideas for 2026 💍✨
30.Twisted Low Bun with Starfish Accent
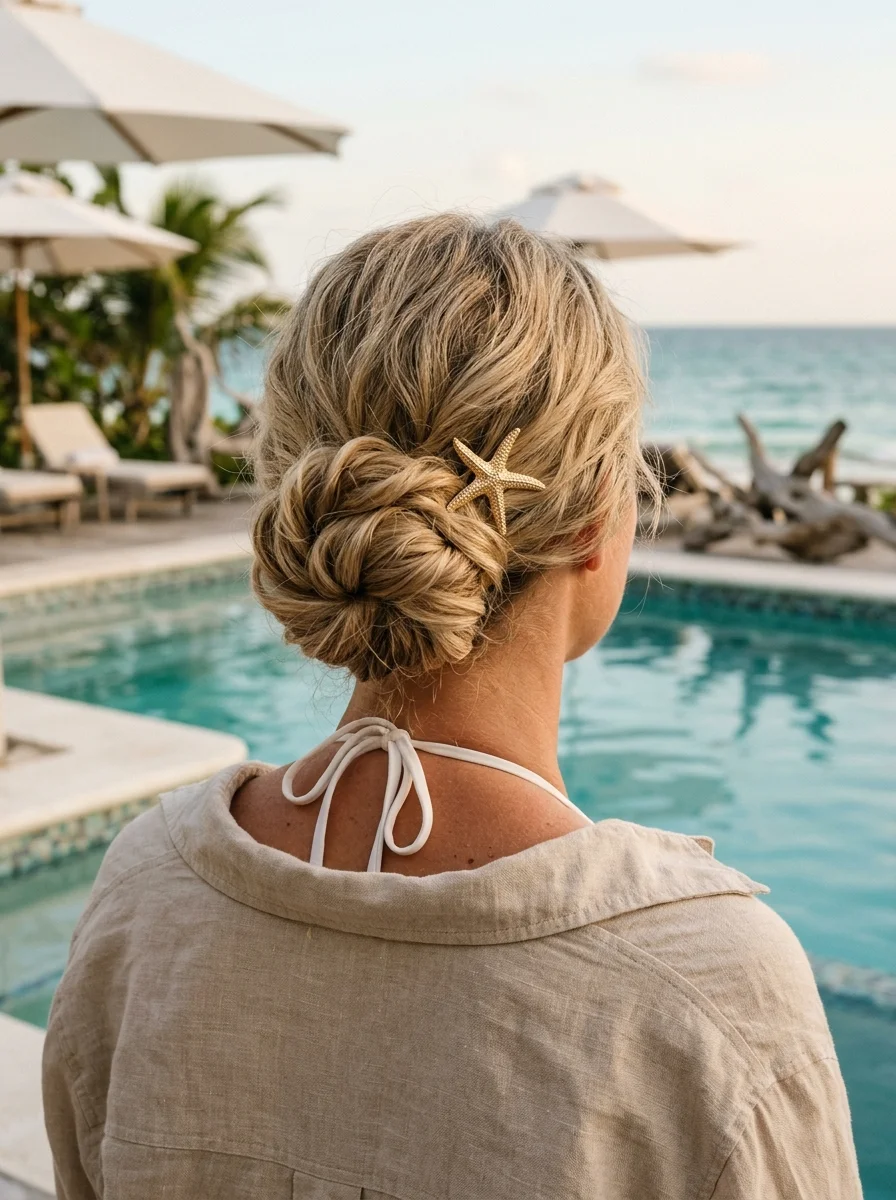
The overview: Medium to long hair twisted into a textured low bun at the nape, with a gold starfish pin tucked into the side. It's tropical-resort energy — the kind of hairstyle that makes you look like you belong on a private island.
Why this works poolside: The starfish pin is the perfect pool accessory because it's on-theme without being cheesy. The textured bun holds up well in humidity, and the low placement keeps everything cool and comfortable.
Step by step:
- Add texture. Work texturizing spray through your hair for grip and body.
- Gather low. Pull hair to the nape and secure with an elastic.
- Twist and coil. Twist the ponytail and wrap it into a textured bun, pinning as you go.
- Add the starfish pin. Tuck the gold starfish pin into the side of the bun.
Tips: Look for a starfish pin with a sturdy backing — cheap versions bend easily. A well-made one becomes a keepsake you'll wear every summer.
31.Twisted Crown Half-Up with Pearl Accent
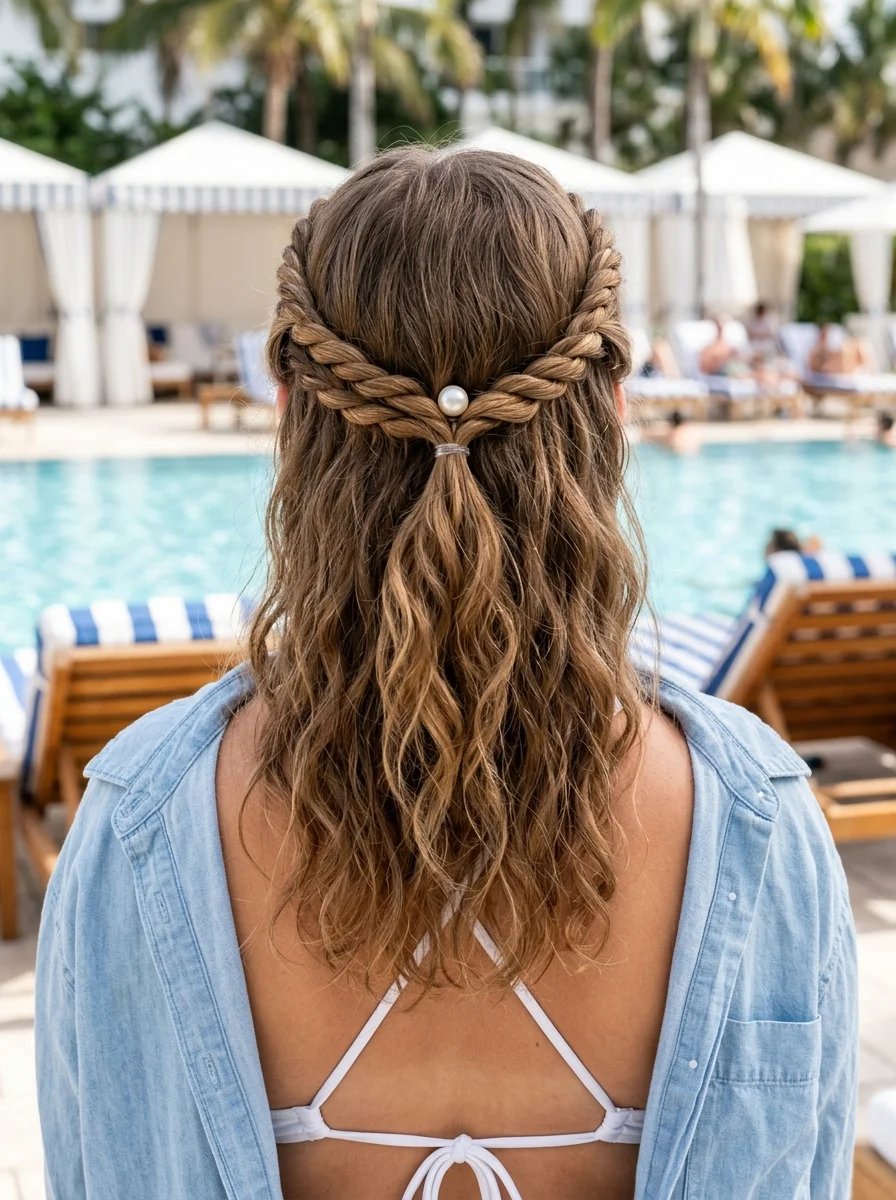
The overview: Medium to long hair twisted from each temple and pinned at the back, with a large pearl pin securing the join. The remaining hair falls in soft waves. It's polished-casual — the hairstyle that works at a pool party and a dinner reservation afterward.
Why this works poolside: The half-up twist keeps the front sections secure while leaving length to move freely. The pearl pin is a single, strong accent that doesn't clutter the style, and it won't be damaged by water.
Step by step:
- Twist each side. Take a section from each temple and twist it back toward the center.
- Pin at the back. Cross the twisted sections and pin them together.
- Add the pearl pin. Insert a large pearl pin at the point where the twists meet.
- Wave the rest. Use a curling iron to add soft waves to the loose hair below.
Tips: One large pearl pin makes more impact than several small ones. It's a statement detail that doesn't need backup.

30 Cute Ladybug Nail Trends That Are Taking Over (2026)
32.Twisted Crown with Waterfall Braid
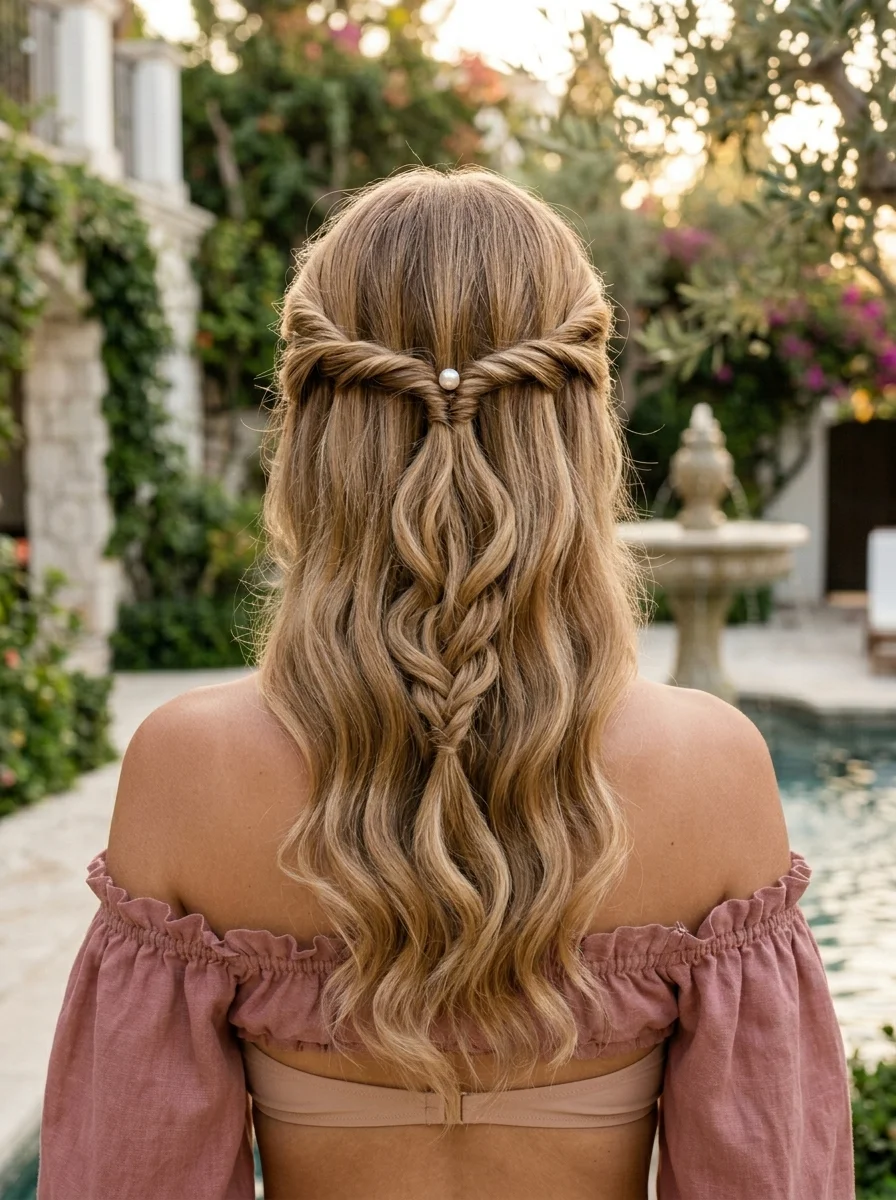
The overview: Medium to long hair with a twisted crown section that transitions into a waterfall braid along one side. A pearl pin secures the end of the braid. It's fairy-tale garden energy — romantic, intricate, and the kind of hairstyle that stops people mid-conversation.
Why this works poolside: The waterfall braid keeps the top section organized while letting the dropped strands flow freely. The pearl pin is waterproof and won't shift, and the crown twist adds structure that survives humidity.
Step by step:
- Start the twist. Take a section from one temple and twist it along the hairline toward the back.
- Transition to waterfall. At the back of the head, switch to a waterfall braid, dropping a strand with each section.
- Continue along the side. Braid along the opposite side, keeping the waterfall pattern consistent.
- Secure with a pearl pin. Pin the end of the braid with a pearl-tipped bobby pin.
Tips: Drop the same amount of hair with each section — consistency is what makes a waterfall braid look intentional rather than messy.
The Pool-Proof Accessories
Summer 2026 belongs to hair accessories, but for pool parties specifically, you need pieces that will not slip, tarnish, or fall apart in water. The right accessory can elevate a simple ponytail into a look, but the wrong one will leave you picking up broken pieces by the pool edge.
Large jaw clips in resin or acetate are both fashionable and functional near water. They hold hair securely and will not corrode like metal clips. Tassel scarves, striped fabric headbands, and crochet pieces are dominating summer trends, and they work with wet or dry hair. Swim scrunchies are the ultimate pool party accessory — they are waterproof, come in fun colors, and hold hair without damage. Choose matte finishes over shiny ones; they look more modern and will not show water spots.
The buying rule? Look for accessories with silicone grips or velvet lining on the inner edge. They stay put on wet, slippery hair when everything else slides out.
The Pool-to-Party Transformation
You are going from the pool to dinner and you have five minutes to look presentable. These quick fixes will get you there without a full restyle.
The towel-dry refresh: Gently squeeze excess water from your hair with a microfiber towel. Regular towels cause frizz — do not rub, just blot and squeeze.
The volume fix: Spray texturizing spray or dry shampoo at the roots for instant grip and lift. This is especially helpful if your hair went flat in the water.
The accessory upgrade: Swap your basic elastic for a decorative claw clip, add a silk scarf, or pop in a few statement pins. Suddenly you look styled, not stranded.
The pool bag kit? Keep dry shampoo, a spare claw clip, a small hair oil, and a silk scarf in your bag. Those four items can transform any pool hair into party-ready hair in under five minutes.