Hair Trends
24 Stunning Festival Hairstyle Ideas for Music Concert Nights 2026
Festival season doesn't care about your morning routine. You'll be dancing for hours, sweating through whatever product you loaded in, and sleeping in a tent — all while wanting your hair to look intentional in every candid photo someone takes of you from a bad angle. The styles here are built for that exact contradiction: hair that holds up against movement, heat, and zero access to a blowdryer, but still photographs like you planned it.
Some of these take two minutes with your hands and a few elastics. Others involve braiding techniques worth practicing the night before your first set. Every single one is designed to survive a full day outdoors — dust, wind, sweat, and all — without falling apart by sunset. Pick the one that matches your hair length, your festival genre, and how much effort you actually want to invest.
The Hardware Upgrade
You do not need to know how to execute a flawless Dutch braid to have the best hair at the festival. The biggest secret behind those editorial looks that seem to take no effort? It is the hardware. Metallic hair cuffs, leather cords, and woven ribbons can turn a basic ponytail or a messy bun into something that looks like it took an hour.
A simple ponytail wrapped with a studded leather cord reads like a rockstar accessory. A basic bubble braid threaded with gold metallic cuffs looks intricate even though the braid itself took thirty seconds. The hardware does the heavy lifting while your actual hairstyle stays minimal. The key is investing in pieces with some weight to them — lightweight accessories slide out halfway through the day, but properly weighted cuffs stay put and add that editorial edge.
The investment? Skip the flimsy craft-store packs and buy two or three high-quality metallic hair cuffs and a velvet ribbon. The weight helps hold your hair in place, and the quality difference shows in photos. Wrap a single gold cuff around the base of a low ponytail and you have a look that reads expensive without looking like you tried.
1.Boho Fishtail Braid with Velvet Ribbons & Feathers
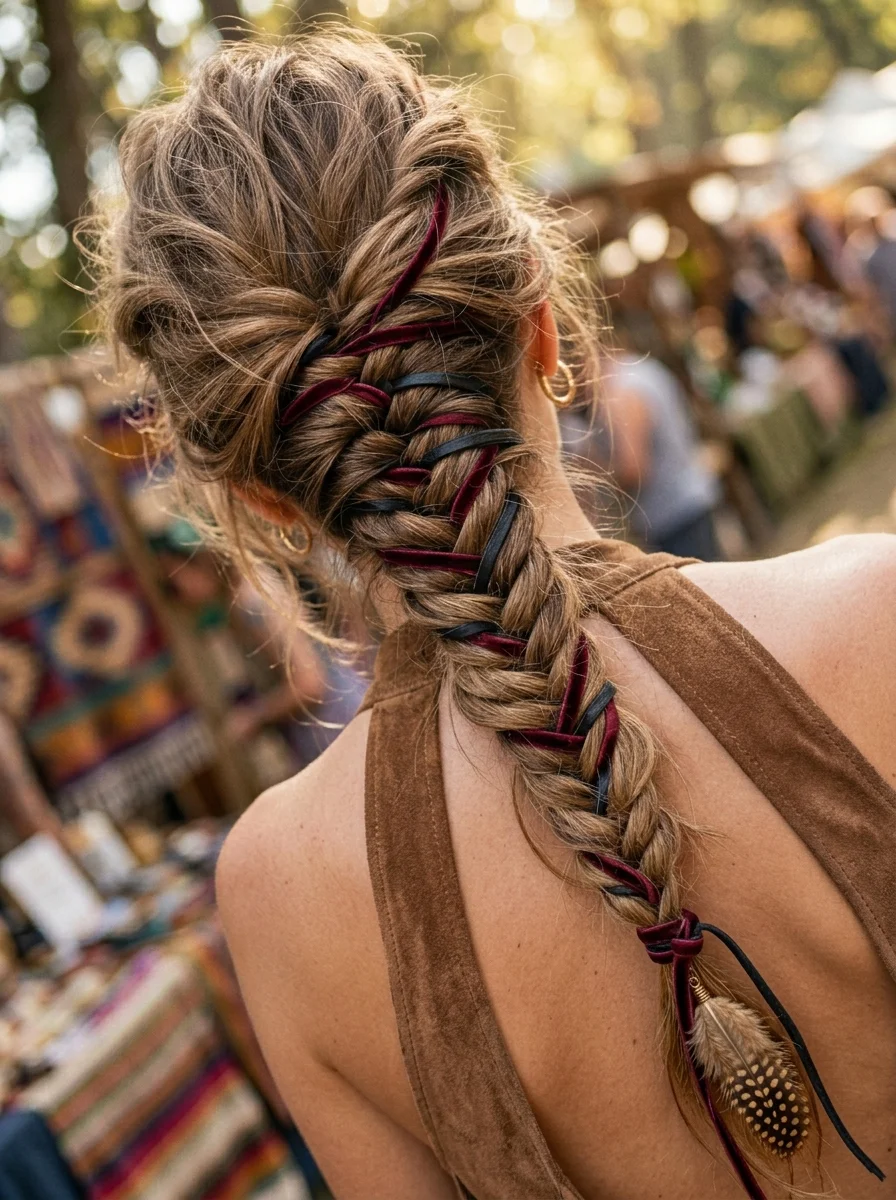
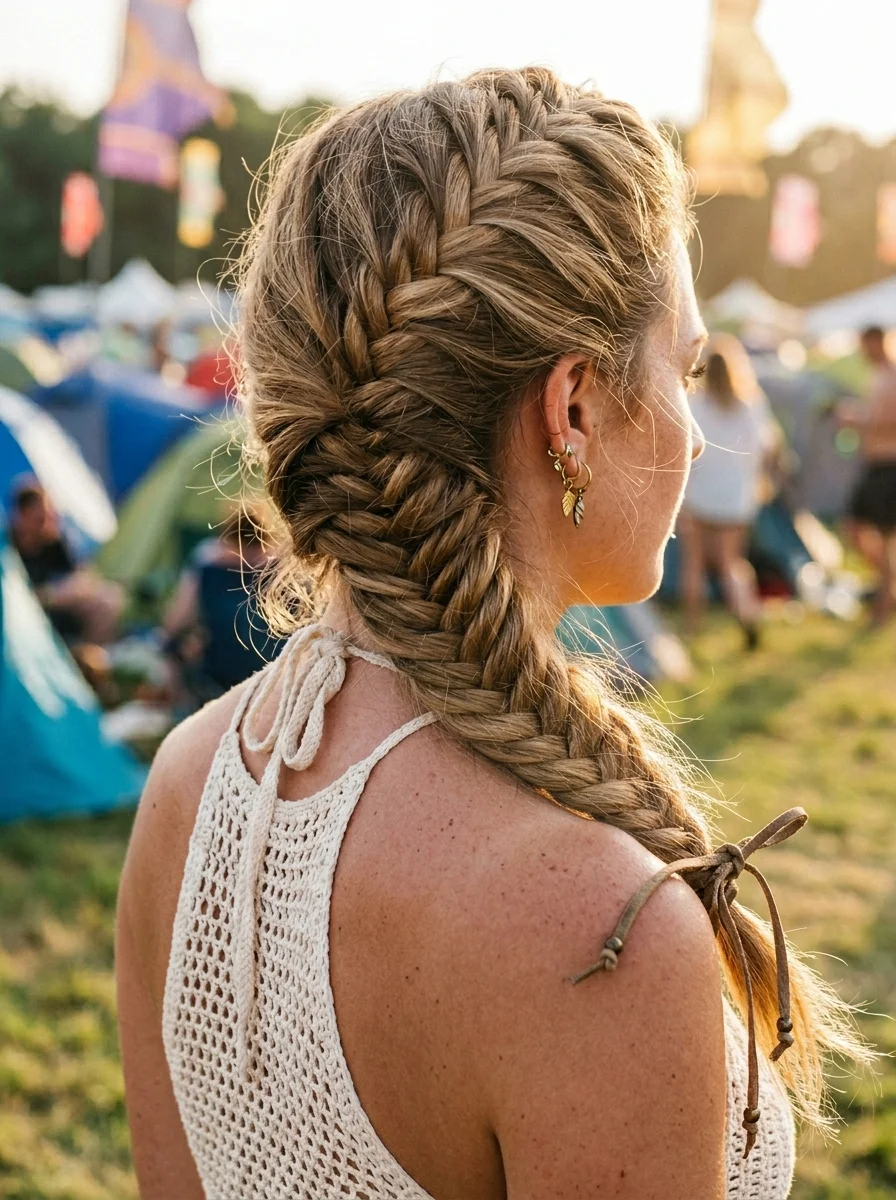
The overview: Medium to long hair woven into a loose fishtail braid that drapes over one shoulder, threaded with burgundy and navy velvet ribbons and accented with a few feathers dangling from the braid's tail. The fishtail pattern uses two sections crossing small pieces over, creating a braid that sits flatter and more intricate than a standard three-strand. The velvet ribbons add rich, tactile contrast against the hair's natural texture.
This is pure desert boho — the kind of look that pairs naturally with crochet tops, suede boots, and the golden light that hits right before sunset. The feathers and ribbons move as you move, which means this style comes alive in photos rather than sitting static. The fishtail's flat profile also means it won't catch wind the way bulkier braids do during outdoor sets.
Why this look is popular: The fishtail braid has a woven texture that reads as far more complex than it actually is — two sections, small crosses, done. Adding velvet ribbons and feathers transforms it from a everyday braid into something that feels occasion-specific without being costume-y. The mixed materials create visual depth that photographs beautifully, especially in natural outdoor lighting.
Where this look is suitable: Desert festivals, outdoor folk or indie concerts, bohemian- themed events, and any daytime festival where the dress code leans earthy and relaxed. Also works for garden parties and outdoor weddings with a boho aesthetic.
Step by step:
- Prep with texture. Spray texturizing spray through damp or dry hair to add grip. A light sea salt spray works well for creating a lived-in foundation.
- Create the fishtail. Pull all hair to one side. Split into two sections. Cross small pieces from the outer edge of each section over to the other. Continue from elastic to ends.
- Secure the end. Tie off with a clear elastic about two inches from the bottom.
- Pancake the braid. Gently pull the outer edges of each section to widen the braid and create a fuller, more relaxed shape.
- Thread the ribbons. Weave burgundy and navy velvet ribbons through the braid at random intervals, leaving the tails to hang naturally.
- Add feathers. Secure two or three feathers near the braid's tail using small clear elastics or by tying them directly onto the braid sections.
Tips and tricks: Use ribbon widths no wider than half an inch — wider ribbon overwhelms the fishtail pattern and looks bulky. Secure feathers with a dab of clear hair glue if the elastics slip. Second-day hair grips better for fishtailing than freshly washed hair, and the natural oils help the ribbons stay woven without sliding out.
2.Festival-Ready French Braids Bun with Silver Charms
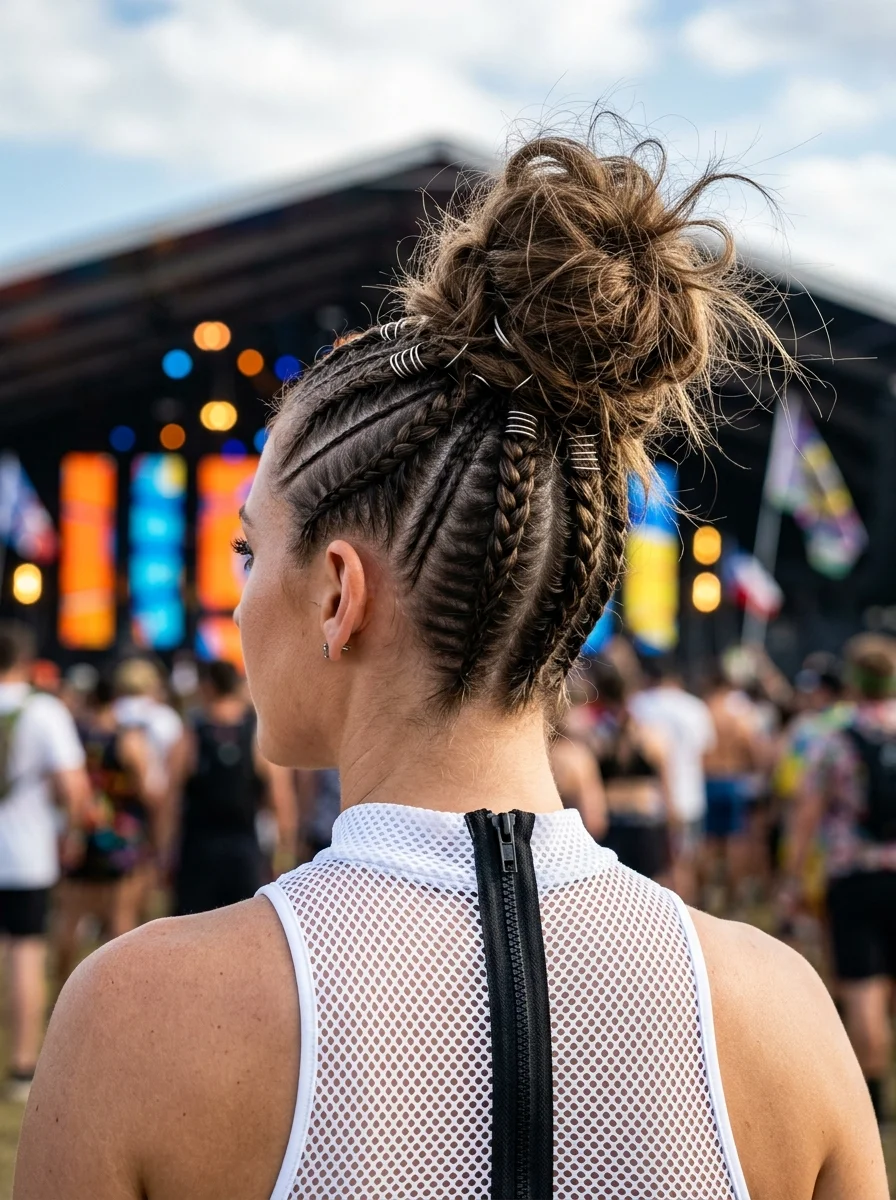
The overview: Medium hair is sectioned into five or six Dutch braids that travel from the hairline up to the crown, where they converge into a messy topknot. Small silver cuff beads are clamped onto each braid at intervals, creating a metallic rhythm that catches stage lighting. The Dutch braid technique — crossing strands under — raises each braid off the scalp for maximum visibility.
This is the electronic music festival uniform for a reason. The multiple braids distribute tension across the entire scalp instead of concentrating it at one point, so you can headbang for three hours without developing a tension headache. The silver beads add just enough shine to read as styled under venue lighting without looking overdone in daylight.
Why this look is popular: The Dutch braid-and-bun combination is essentially indestructible once secured. The silver cuff beads elevate what would be a purely functional style into something that feels deliberate and decorated. The messy topknot at the crown keeps hair completely off the neck, which matters when you're packed into a crowd generating body heat.
Where this look is suitable: EDM festivals, warehouse raves, multi-day outdoor electronic music events, and any concert where you'll be dancing intensely for extended periods. The silver beads make it appropriate for nighttime events with dramatic lighting.
Step by step:
- Section the hair. Create five or six even sections from the hairline to the crown using a rat-tail comb. Clip each section out of the way.
- Dutch braid each section. Starting at the hairline, Dutch braid each section upward toward the crown. Cross strands under to create raised braids. Secure each with a small elastic at the crown.
- Gather into a topknot. Collect all braid tails at the crown. Twist and coil them into a messy bun. Secure with bobby pins matching your hair color.
- Add cuff beads. Clamp silver cuff beads at one-inch intervals along each braid. Press firmly to ensure they don't slide during movement.
- Adjust the bun. Pull gently at the topknot to loosen it and create texture. Leave a few wispy pieces around the hairline if desired.
Tips and tricks: Keep consistent tension across all braids — if one is looser than the others, the topknot will sit off-center. Use a boar bristle brush to smooth each section before braiding to eliminate bumps along the scalp. The cuff beads should sit flat; if they rotate, they need to be pressed tighter. A light-hold hairspray along the scalp braids prevents flyaways without creating stiffness.
3.Sleek Low Bun with Chainmail Headpiece
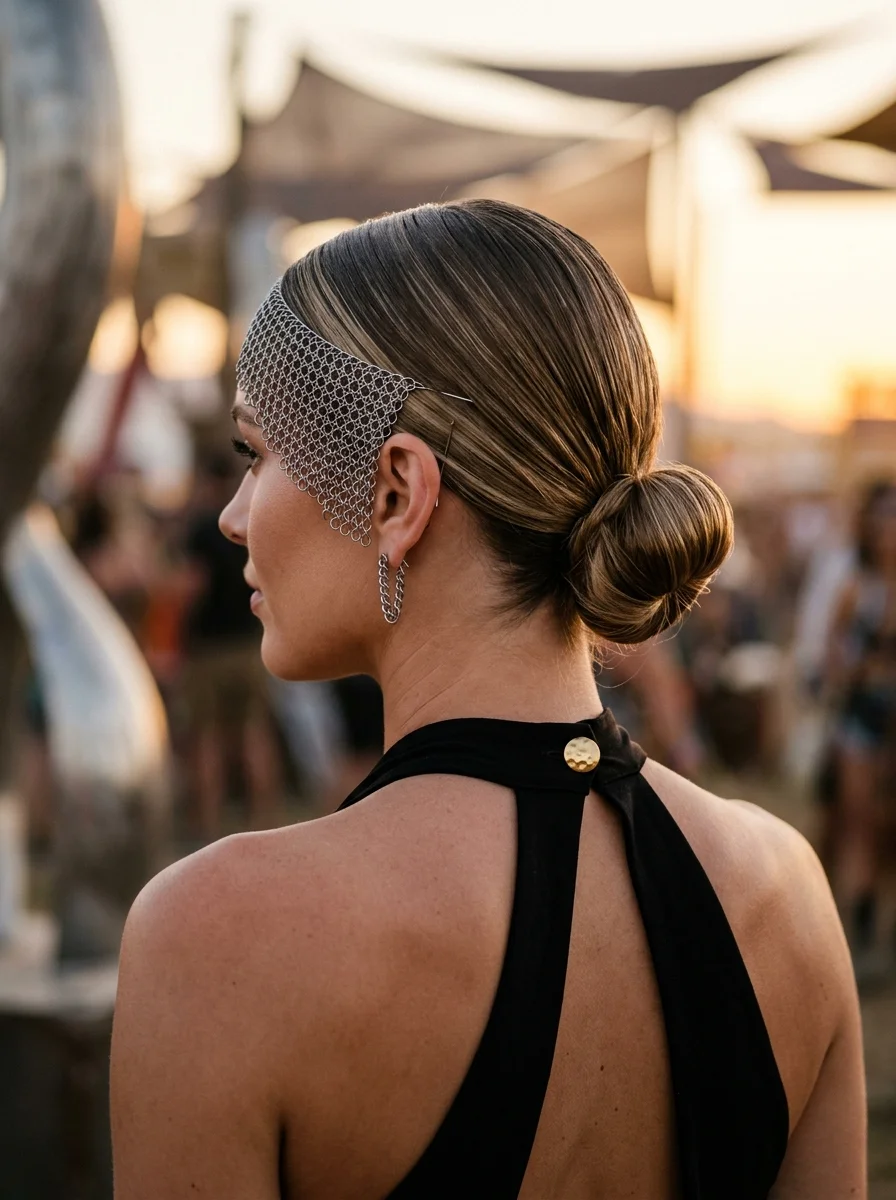
The overview: Medium to long hair is smoothed into an ultra-sleek low bun at the nape, paired with a silver chainmail headpiece draped across the temple and forehead. Every strand is flattened with gel or pomade for a lacquered, wet-look finish. The chainmail piece adds armor-like edge to an otherwise minimal silhouette.
This is high-fashion territory — the kind of look that works when the festival doubles as a style event. The sleek bun creates a clean canvas that lets the chainmail headpiece do all the talking. This look add dimension beneath the metallic accessory, preventing the combination from reading too flat or one-dimensional.
Why this look is popular: The contrast between the polished, controlled bun and the raw metallic headpiece creates visual tension that photographs with editorial quality. The sleek surface resists humidity and wind better than any loose style, which means this looks the same at midnight as it did when you left the house.
Where this look is suitable: High-fashion festivals, art-music crossover events, evening outdoor concerts, and any setting where the dress code leans toward avant-garde or editorial. The chainmail headpiece pairs naturally with metallic or monochrome outfits.
Step by step:
- Sleek the hair. Apply a generous amount of smoothing gel or high-shine pomade from roots to ends. Brush everything straight back with a boar bristle brush.
- Secure the bun. Gather hair into a low ponytail at the nape. Twist tightly and coil into a compact bun. Secure with bobby pins inserted diagonally.
- Smooth the surface. Use a fine-tooth comb and a small amount of additional product to flatten any bumps or ridges along the crown and sides.
- Position the headpiece. Drape the chainmail headpiece across the temple, securing it at the ear with the built-in comb or additional bobby pins hidden beneath the chain.
- Set the style. Mist with a strong-hold hairspray to lock the sleek surface in place. Avoid spraying the chainmail directly.
Tips and tricks: This style works best on second-day hair when natural oils help the product adhere. Fine hair benefits from a volumizing powder at the roots before smoothing back — it prevents the bun from looking flat. If the chainmail headpiece slides, anchor it with two crossed bobby pins at each temple. A silk or satin pillowcase protects the sleek finish if you're sleeping in a tent.
4.Crinkle Ponytail with Butterfly Charms
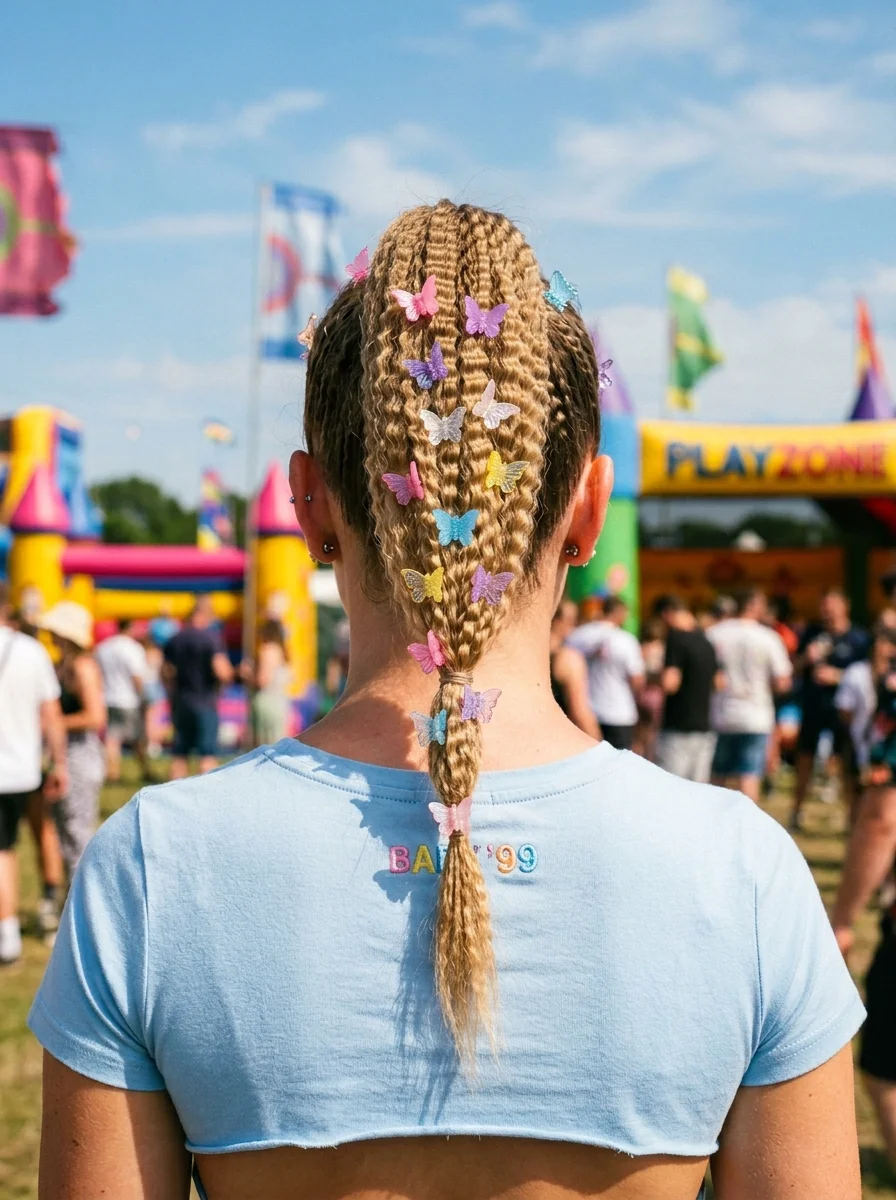
The overview: Honey blonde hair is crimped for textured volume, then tied to the ponytail at the nape. Colorful butterfly clips are scattered along the entire ponytail at random intervals. The crimped texture adds width and dimension that a smooth ponytail simply can't achieve, and the butterfly charms bring the whole thing into Y2K nostalgia territory.
The crimping does two things simultaneously: it creates the appearance of thicker, more voluminous hair, and it gives the ponytail a rougher texture that grips itself better. That means this style holds through hours of dancing without the ponytail loosening or sliding apart — a practical advantage disguised as a purely aesthetic choice.
Why this look is popular: Crimped texture is having a full revival, and festival settings are its natural habitat. The butterfly clips add playful, nostalgic energy without looking juvenile — the key is scattering them randomly rather than placing them in a rigid pattern. The ponytail keeps things manageable while maintaining the textured detail.
Where this look is suitable: Y2K-themed events, pop music festivals, retro-themed parties, and any daytime festival where the vibe leans fun and colorful. Also works for music festivals with a nostalgic or throwback theme.
Step by step:
- Crimp the hair. Use a crimping iron on small sections throughout the entire head. Work from roots to ends for consistent texture.
- Tie to the ponytail. Once crimpled, gather all hair into a single ponytail at the nape. Secure with an elastic. And puff the sections of the ponytail to give voluminous effect. And divide it into 2-3 sections.
- Add butterfly clips. Scatter colorful butterfly clips along both braids at random intervals. Vary the sizes and colors for a more organic, playful appearance.
Tips and tricks: Crimping works on all hair types but shows most dramatically on fine to medium hair. Use a heat protectant before crimping to prevent damage. The butterfly clips should be lightweight — heavy clips pull the ponytail down and create sagging. Secure any clips that feel loose with a tiny dot of hair glue. The crimped texture will loosen slightly throughout the day, which actually enhances the lived-in festival look.
5.Golden Hour Waves with a Deep Side Part
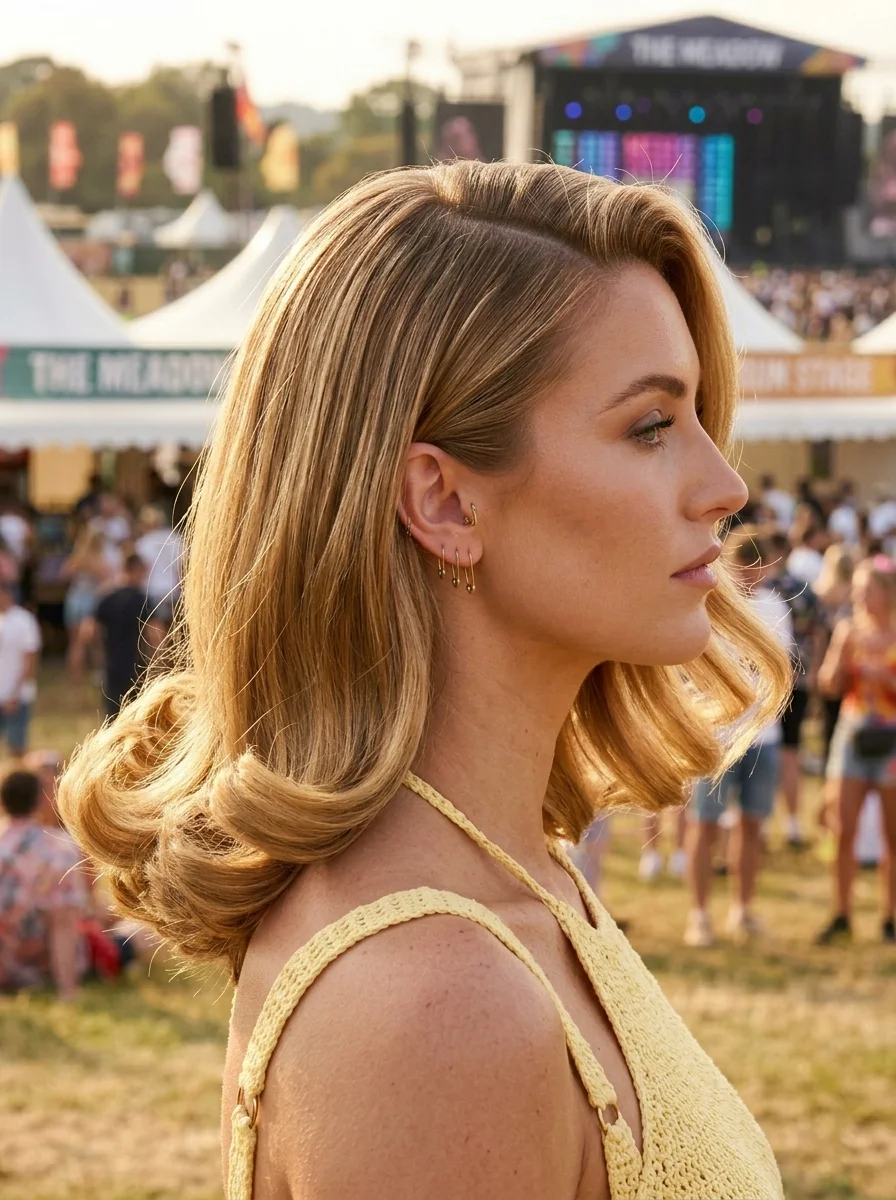
The overview: Golden blonde hair with a deep side part, styled into bouncy barrel curls that are brushed out into soft, flowing waves. The deep side part creates asymmetric volume that frames one side of the face while the other side sweeps back.
This is golden hour distilled into a hairstyle. The deep side part creates dramatic volume on one side that catches warm sunset light beautifully, and the brushed-out barrel curls have a movement quality that photographs with effortless glamour.
Why this look is popular: The deep side part is one of the most universally flattering adjustments you can make — it adds instant drama and asymmetry that suits nearly every face shape. The brushed- out waves have a Hollywood quality that feels elevated without being formal, and the golden tones glow under festival lighting as the sun goes down.
Where this look is suitable: Outdoor festivals during golden hour, sunset concerts, garden parties, and any daytime-to-evening transition where the warm lighting will enhance the golden tones. Also works for formal festival events and VIP sections.
Step by step:
- Create a deep side part. Use a rat-tail comb to draw a clean part about two inches off-center. This is the foundation for the asymmetric volume.
- Curl in sections. Using a 1.25-inch barrel curling iron, wrap two-inch sections away from the face. Hold each for 8-10 seconds, then release into your palm to cool.
- Brush through. Once all curls are completely cool, use a paddle brush to break them into soft, unified waves. The waves should flow together rather than sit as separate ringlets.
- Shape the side part. Use your fingers to direct the hair on the heavier side forward and away from the face, creating volume and sweep. The lighter side should tuck behind the ear.
- Set with spray. Mist with a medium-hold hairspray to maintain the wave pattern without stiffness. Focus on the roots of the heavy side for lasting volume.
Tips and tricks: A heat protectant is non-negotiable before curling. For hair that doesn't hold curl well, spritz each section with a light-hold hairspray before wrapping it around the barrel. The deep side part tends to fall flat over time — a dry shampoo at the roots of the heavy side adds lift that lasts.
6.Effortless Beachy Curls for Festival Vibes
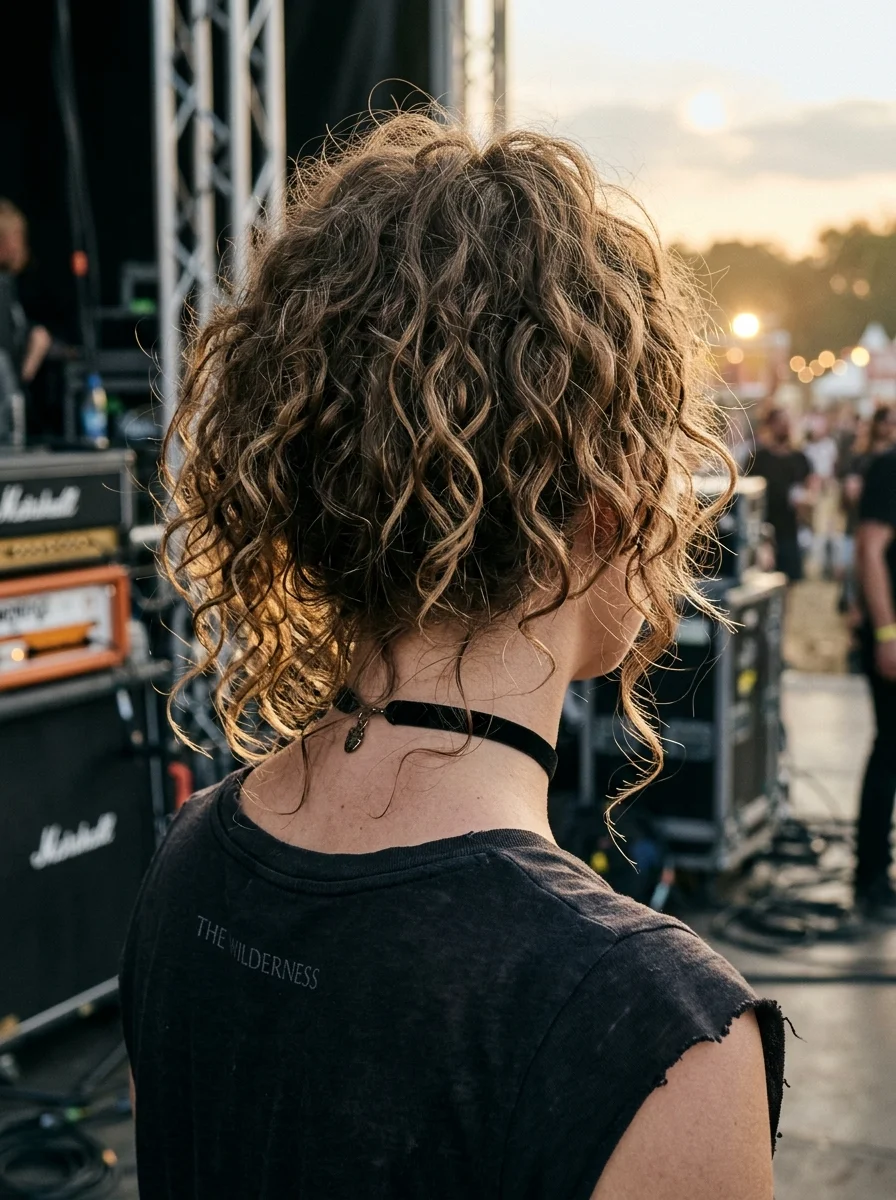
The overview: Medium hair with 3B natural curls worn in a textured bob or shag that embraces the curl pattern rather than fighting it. Minimal manipulation is the entire strategy — the curls are defined with a curl cream or mousse, then left to air-dry into their natural shape. No heat tools, no elaborate styling, just curls doing what curls do.
This is the anti-effort festival style, and it works because it leans into what your hair already wants to do. Natural curls have built-in volume and texture that straight-haired people spend forty minutes with a curling iron trying to replicate. At a festival, where dust and heat work against any polished style, natural curls actually improve as the day goes on — they gain volume and character rather than falling apart.
Why this look is popular: The curly bob or shag has a carefree, indie-rock energy that fits perfectly into festival culture. It requires virtually no maintenance once styled, which means more time watching sets and less time in a portable bathroom mirror. The natural texture photographs with authenticity that polished styles can't match.
Where this look is suitable: Indie rock festivals, outdoor concerts with a laid-back vibe, any daytime festival where the aesthetic leans casual and authentic. Also works for multi-day festivals where daily styling isn't practical.
Step by step:
- Wash and condition. Use a sulfate-free shampoo and a moisturizing conditioner designed for curly hair. Detangle with a wide-tooth comb while the conditioner is in.
- Apply curl cream. On soaking wet hair, scrunch a curl-defining cream or mousse from roots to ends. Use the praying hands method to smooth product through without disrupting the curl pattern.
- Scrunch and shape. Flip your head upside down and scrunch upward to encourage curl formation. Shake the roots gently for volume.
- Air-dry or diffuse. Let the curls air-dry naturally or use a diffuser on low heat and low speed. Don't touch the curls while they dry — touching creates frizz.
- Break the cast. Once completely dry, scrunch out any product cast with a few drops of lightweight oil on your palms.
Tips and tricks: A satin or silk pillowcase the night before prevents frizz and preserves curl definition. A microfiber towel absorbs excess water without roughing up the cuticle — regular terry cloth towels create frizz on contact. For humidity-heavy festivals, a gel applied over the curl cream creates a stronger cast that lasts longer. A refresh spray in a travel bottle revives curls that flatten during the day.
7.Shaggy Waves with Textured Bangs
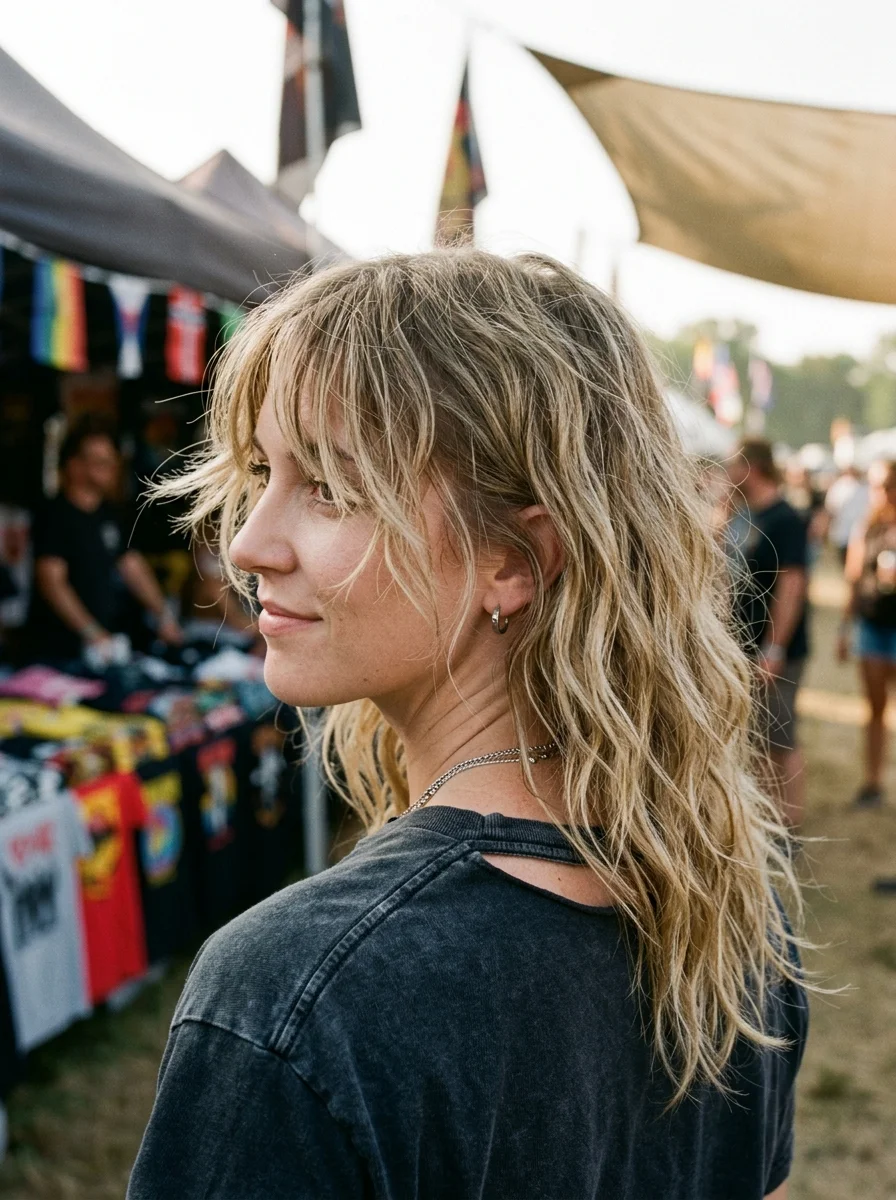
The overview: Short to long hair cut into a modern shag or mullet with choppy, textured bangs that fall just above the eyebrows. The styling is deliberately undone — air-dried or rough-dried with minimal product, creating a tousled, lived-in texture that looks like you woke up exactly like this. The shag's layered structure creates natural volume and movement without requiring any heat tools.
The modern shag is a festival haircut in the truest sense. It requires almost no styling, gets better as it gets messier, and has a rock-and-roll energy that matches the environment perfectly. The textured bangs frame the face and add definition even when the rest of the hair is doing its own thing.
Why this look is popular: The shag is low-maintenance by design — the layers and texture are built into the cut itself, which means the hairstyle does the work regardless of how much effort you put in. The 90s grunge revival has made this silhouette one of the most requested cuts in salons, and festival settings are where it looks most at home.
Where this look is suitable: 90s revival festivals, rock and indie concerts, grunge- themed events, and any festival where the aesthetic leans toward vintage cool. The cut works across seasons but peaks during summer when air-drying is practical.
Step by step:
- Wash and towel-dry. Shampoo and condition, then squeeze out excess water with a microfiber towel. Don't rub — it creates frizz and disrupts the natural texture.
- Apply texturizing product. Work a small amount of sea salt spray or texturizing cream through the mid-lengths and ends. Avoid the roots to prevent greasiness.
- Scrunch and shape. Scrunch sections upward to encourage wave formation. Use your fingers to separate and define the bangs.
- Air-dry. Let the hair dry naturally. Avoid touching it while it dries — hands create frizz and flatten volume.
- Final adjustment. Once dry, shake the roots with your fingers for lift. Pull a few pieces forward around the face for definition.
Tips and tricks: This cut requires a skilled stylist who understands layering and point-cutting — ask for "invisible layers" or "ghost layers" if your stylist knows the technique. Maintenance trims every 8-10 weeks keep the bangs at the right length. A dry shampoo at the roots adds volume on day two. For straighter hair types, a 1.25-inch curling wand can add quick bends to random sections for a similar effect without the commitment of the cut.
8.Boho Fishtail Braid with Textured Volume
The overview: Medium to long hair woven into a loose, pancaked fishtail braid that starts at the crown and drapes over one shoulder. A leather cord replaces the traditional elastic at the tail, tying the braid off with a bohemian detail. The crown area is teased slightly for textured volume before braiding, creating a lifted, full silhouette that reads as effortlessly voluminous.
This is the classic Coachella boho braid — the one you've seen in every festival street-style roundup for the past decade. The pancaking technique pulls the braid's outer edges wide, transforming a tight plait into something that looks loose and organic. The leather cord at the tail adds a rustic, handmade quality that elevates the entire style.
Why this look is popular: The fishtail braid's woven texture is more visually interesting than a standard three-strand, and the pancaked width creates a statement silhouette that holds its own against festival outfits and accessories. The leather cord finish is a small detail that separates this from a basic braid — it signals intention without looking overdone.
Where this look is suitable: Classic Coachella-style outdoor festivals, desert concerts, bohemian-themed events, and any daytime festival where the aesthetic leans earthy and relaxed. The braid photographs beautifully from every angle.
Step by step:
- Tease the crown. Backcombing the crown area with a fine-tooth comb to create textured volume. Smooth the top layer over the teased section for a natural finish.
- Gather to one side. Pull all hair over one shoulder. Split into two sections for the fishtail.
- Fishtail braid. Cross small pieces from the outer edge of each section to the other. Work from crown to ends, maintaining even tension throughout.
- Secure with leather cord. Tie a leather cord around the tail about two inches from the bottom. Knot securely and let the cord ends hang.
- Pancake the braid. Starting from the top, gently pull the outer edges of each section outward to widen the braid. Work down the entire length for consistent volume.
Tips and tricks: Texturizing spray before braiding gives the hair enough grip to hold the pancaked shape without unraveling. The leather cord should be supple, not stiff — stiff cord pulls and creates discomfort over time. For finer hair, the teasing at the crown is essential for creating the voluminous silhouette that makes this style read as boho rather than basic. A light mist of hairspray on the finished braid prevents flyaways without killing the movement.
9.Boho Braided Updo with Floral Crown
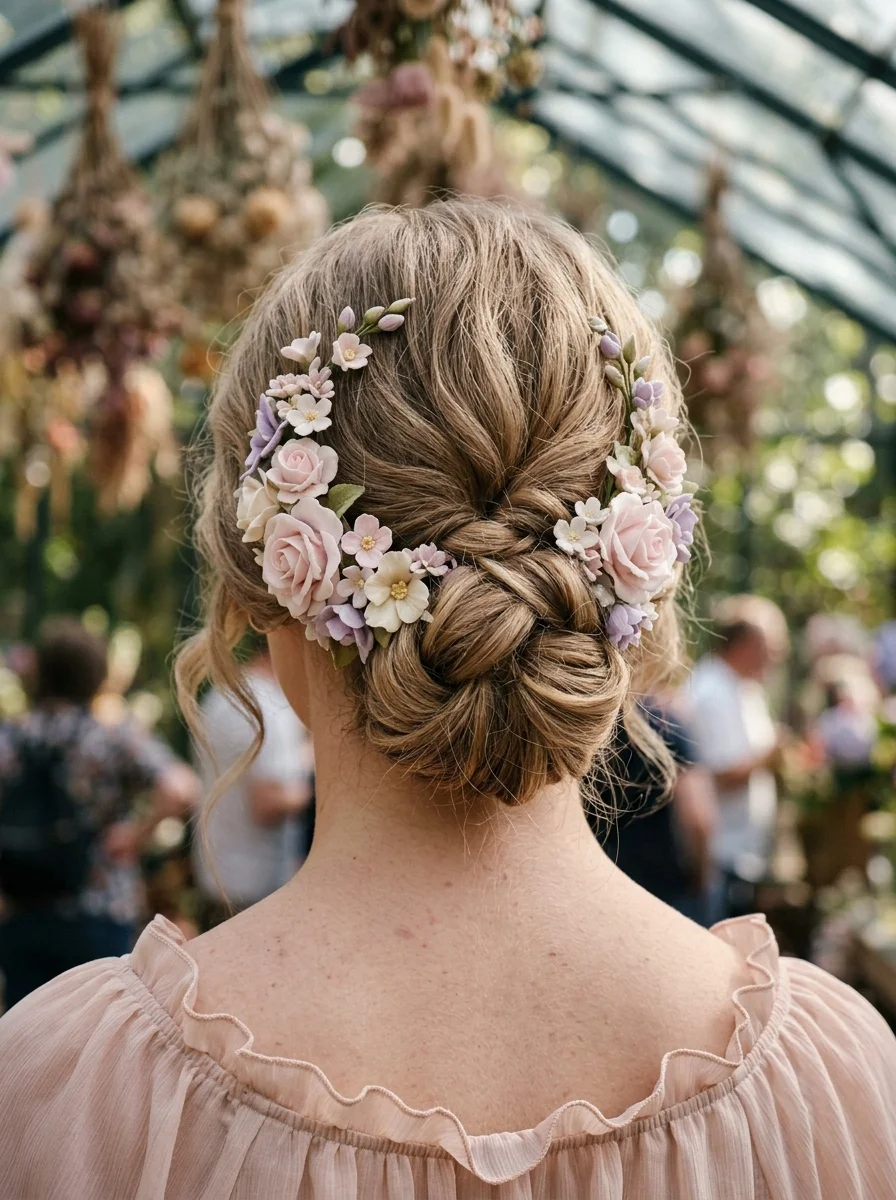
The overview: Medium to long hair twisted into a relaxed braided chignon at the nape, crowned with a half-crown of handmade polymer clay flowers. The chignon isn't tight or ballet- perfect — it's a soft, organic coil with texture and movement that looks like it was assembled by hand rather than constructed. The floral crown sits across the top of the head like a half-halo.
The polymer clay flowers are the detail that separates this from a standard braided updo. They're lighter than fresh flowers, won't wilt in festival heat, and come in custom color combinations that let you match the crown to your outfit. The half-crown placement — rather than a full circlet — keeps the look from reading too bridal.
Why this look is popular: The braided updo with a floral crown has a whimsical, fairy-tale quality that photographs like a dream, especially in natural outdoor settings. The relaxed construction means it improves throughout the day — as the chignon loosens slightly, it gains character rather than falling apart. The polymer clay flowers add a handmade, artisanal touch that feels personal.
Where this look is suitable: Garden festivals, whimsical outdoor concerts, fantasy-themed events, and any festival where the aesthetic leans romantic and nature-inspired. The floral crown pairs beautifully with flowing dresses and earthy accessories.
Step by step:
- Prep with texture. Spray texturizing spray throughout the hair to add grip. Create two loose braids throughout the length for the foundation of the chignon.
- Form the chignon. Twist both braids together and coil them at the nape into a relaxed bun. Secure with bobby pins, hiding them within the folds.
- Loosen for softness. Gently pull at sections of the chignon to create texture and volume. Leave a few face- framing tendrils free around the hairline.
- Position the floral crown. Place the half-crown of polymer clay flowers across the top of the head, sitting just behind the hairline. Secure with bobby pins hidden beneath the flowers.
- Adjust and set. Ensure the floral crown sits evenly and doesn't shift. Mist lightly with flexible-hold hairspray to lock the chignon in place.
Tips and tricks: Polymer clay flowers are significantly lighter than fresh or silk flowers, which means the crown won't pull or cause headaches over a full festival day. Make or purchase the crown in advance and test the weight and placement. If the chignon feels too loose, use spin pins instead of standard bobby pins — they grip more securely in textured hair. A lightweight oil on the face-framing tendrils adds shine without weighing them down.
10.Shimmering Tinsel Ponytail
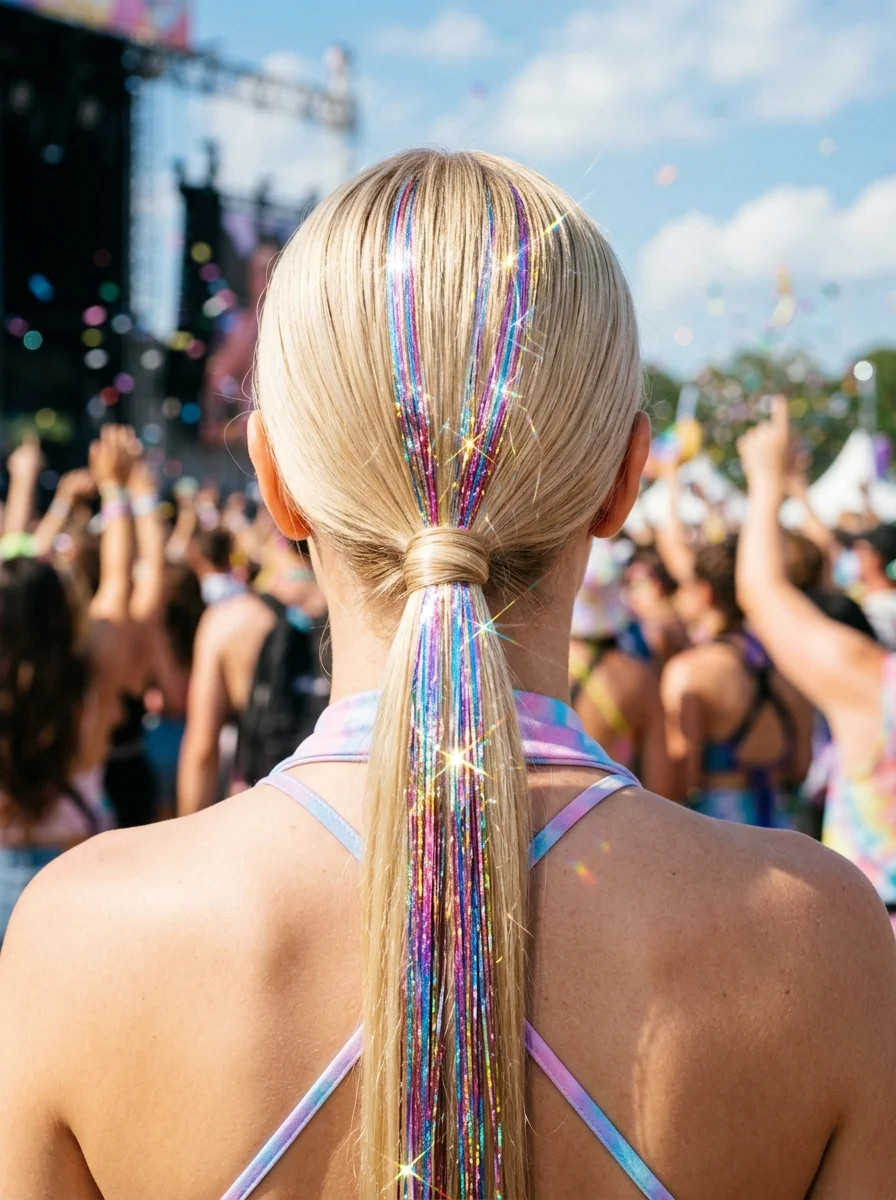
The overview: Short to long hair pulled into a sleek, low ponytail at the nape, with holographic hair tinsel threaded throughout the lengths. The tinsel catches light from every angle, creating a shimmering, almost liquid-metal effect as you move. The sleek crown keeps the focus on the tinsel's reflective quality rather than competing with it.
Hair tinsel is one of those accessories that sounds juvenile in theory and looks undeniably stunning in practice — especially at EDM festivals and Pride events where the lighting is designed to make reflective materials pop. The low ponytail placement keeps the tinsel concentrated in one area rather than scattered randomly through loose hair, which creates a more intentional, styled effect.
Why this look is popular: The tinsel adds a dimension of light and movement that no other accessory can replicate. Under stage lighting, it transforms a simple ponytail into something that looks like it belongs in a music video. The sleek ponytail foundation keeps the overall look polished rather than chaotic, which is the difference between "festival chic" and "costume."
Where this look is suitable: EDM festivals, Pride celebrations, nighttime outdoor concerts, and any event with dramatic lighting that will catch the tinsel's reflective surface. Also works for New Year's Eve and holiday parties.
Step by step:
- Prep the hair. Apply smoothing serum to dry hair and brush flat with a boar bristle brush. The goal is a sleek, bump-free surface.
- Gather the ponytail. Brush all hair to the nape and secure with a strong elastic. Keep the surface as smooth as possible.
- Add the tinsel. Thread holographic tinsel strands through the ponytail at the base, tying them to the elastic or braiding them into small sections for security.
- Distribute evenly. Spread the tinsel strands throughout the ponytail so they catch light from multiple angles. Avoid clustering them in one spot.
- Smooth the crown. Apply a small amount of edge control or pomade along the hairline and crown for a glass-like finish. Mist with strong-hold hairspray.
Tips and tricks: Tinsel can be tied directly to the hair elastic before you secure the ponytail for the most secure hold. Fire-retardant tinsel is the safe choice — avoid cheap craft-store tinsel that can melt near heat sources. The tinsel adds minimal weight, but too many strands can make the ponytail feel heavy. Twenty to thirty strands is the sweet spot for most hair densities. A comb helps separate tinsel strands that tangle during the day.
11.Neon Pop Stroke Lob
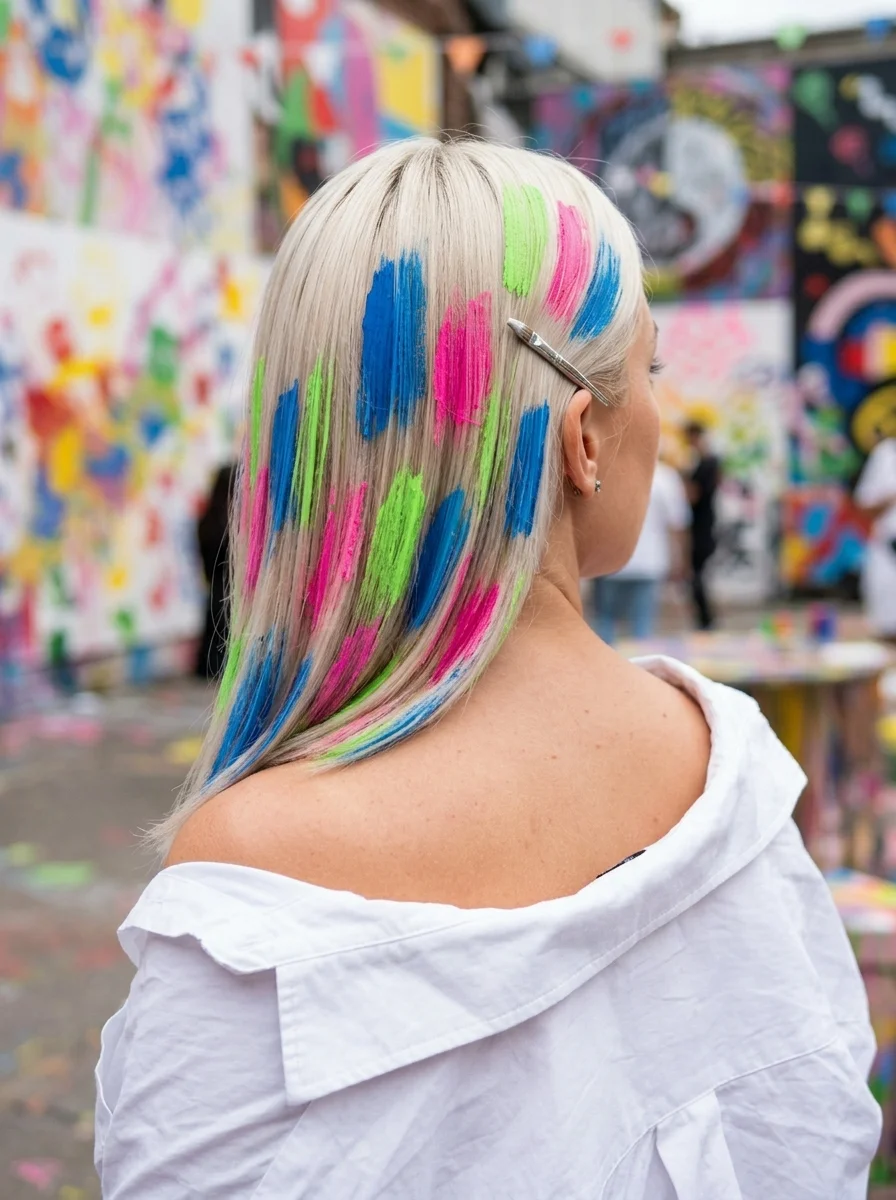
The overview: Icy platinum hair cut into a blunt lob with neon paint strokes in blue, pink, green, and teal applied at random intervals throughout the lengths. A silver barrette clips back one side, keeping the neon sections visible and adding a metallic counterpoint to the bold color. The blunt cut creates a clean canvas that lets the neon strokes command full attention.
This is festival hair as wearable art — the kind of look that makes people stop and ask what product you used. The paint-stroke technique applies color in deliberate, visible sweeps rather than blended gradients, which gives the whole thing a hand-painted, artisanal quality. The icy platinum base makes every neon tone pop with maximum intensity.
Why this look is popular: The paint-stroke approach to color is more forgiving and artistic than traditional highlights or balayage — imperfection is the point. The neon tones are bold without being overwhelming because they're applied in controlled strokes rather than full-head coverage. The silver barrette adds a small structural element that grounds the color chaos.
Where this look is suitable: Urban arts festivals, street art events, creative industry gatherings, and any festival where the aesthetic leans bold and experimental. The neon strokes photograph exceptionally well against concrete and graffiti backdrops.
Step by step:
- Prep clean, dry hair. Ensure the hair is freshly washed and completely dry before applying color. Clip-in neon streaks or temporary color spray both work for this look.
- Apply neon strokes. Using temporary color spray or clip-in neon streaks, apply color in deliberate, visible strokes. Vary the length and placement for an organic, hand-painted effect.
- Style the lob. Flat-iron the hair for a sleek, blunt finish, or air-dry for a more natural texture. The blunt cut should be the foundation.
- Clip one side back. Use the silver barrette to secure one side behind the ear, keeping the neon sections visible and adding asymmetry.
- Set the style. Mist with a light-hold hairspray to keep the hair in place without dulling the neon color. Avoid heavy products that could smudge temporary color.
Tips and tricks: Temporary color spray is the festival-friendly option — it washes out in one shower and doesn't damage the hair. Apply it in a well-ventilated area and let each stroke dry before adding the next to prevent bleeding. Clip-in neon streaks are reusable and allow you to customize placement. The silver barrette should contrast with the neon tones, not match them — the metallic neutrality balances the color intensity.
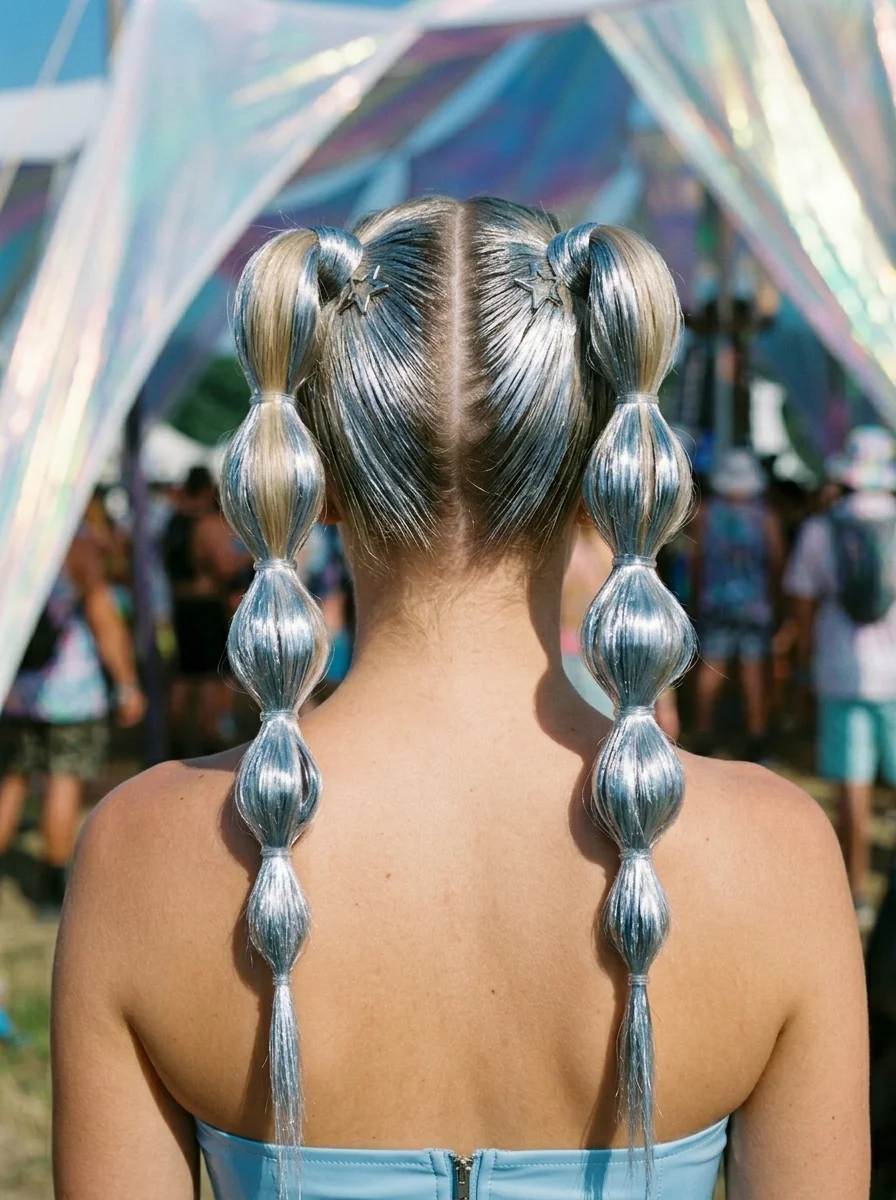
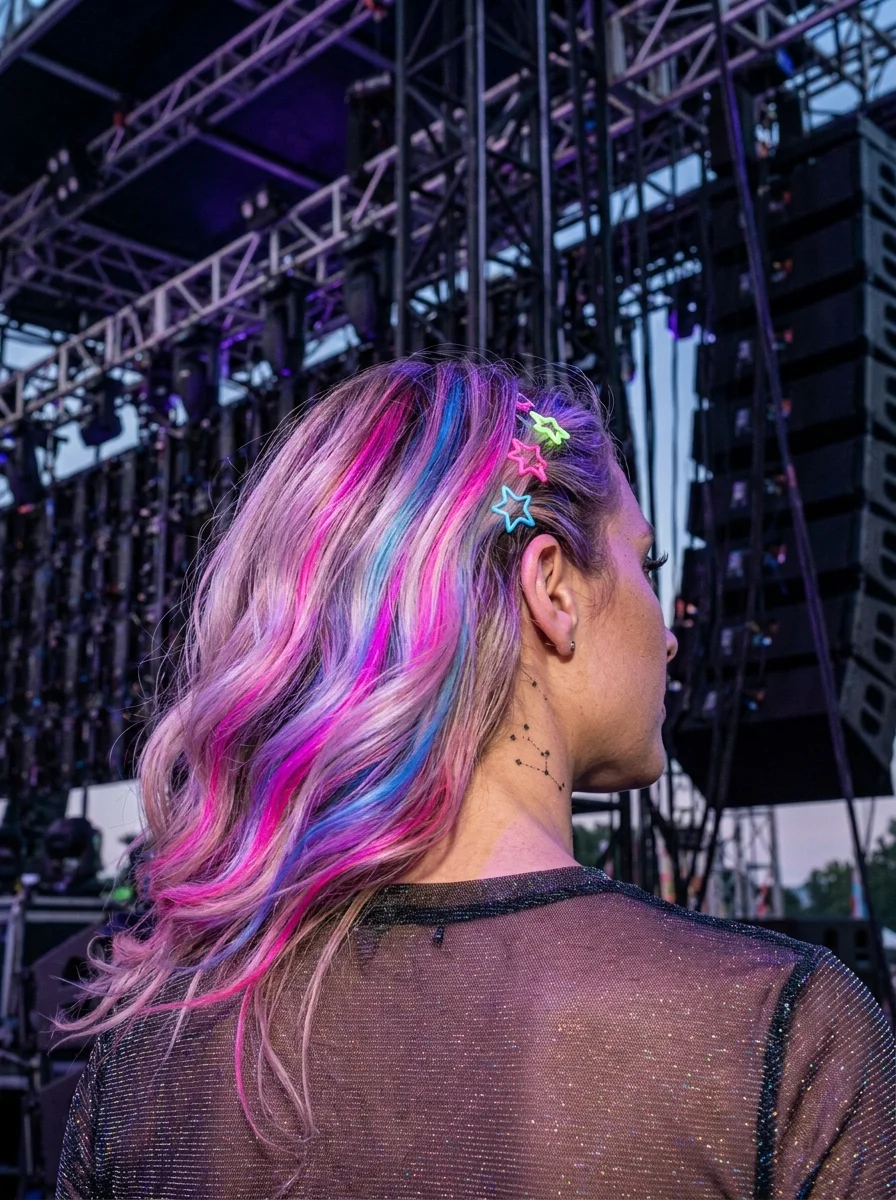
12.Cosmic Bubble Braids with Star Sparkle
The overview: Icy silver-blue metallic hair center-parted into two high bubble braids that sit on either side of the head. Each braid is segmented into rounded bubble shapes using clear elastics, and iridescent star-shaped clips are scattered throughout both braids. The metallic base color catches light from every direction, while the stars add a cosmic, celestial quality.
The bubble braid technique creates a silhouette that's more architectural than a standard braid — the rounded segments have a sculptural quality that photographs with strong visual rhythm. The icy metallic color pushes the whole thing into cosmic territory, and the star clips complete the theme without tipping into costume.
Why this look is popular: The double bubble braid is one of the most photogenic festival styles — the symmetrical placement and repeating rounded shapes create a pattern that draws the eye immediately. The metallic color transforms what would be a playful children's style into something genuinely editorial. The star clips add whimsy without undermining the sophistication.
Where this look is suitable: Cosmic-themed EDM festivals, space-themed events, nighttime outdoor concerts, and any festival where the aesthetic leans futuristic or celestial. The metallic tones work especially well under stage lighting and UV.
Step by step:
- Center part. Create a clean center part from forehead to nape. This is the foundation for symmetrical placement.
- Create the first bubble braid. On one side, gather hair into a high ponytail. Secure with a clear elastic. Add elastics at two-inch intervals down the length, puffing each section into a rounded bubble.
- Create the second bubble braid. Repeat on the other side, matching the height and bubble count for symmetry.
- Add star clips. Scatter iridescent star-shaped clips throughout both braids at random intervals. Vary the placement for an organic, celestial effect.
- Adjust bubbles. Go back through both braids and even out the bubble sizes. Each bubble should be pulled to the same width for clean, rhythmic symmetry.
Tips and tricks: The metallic hair color is the foundation that makes this look work — without it, the bubble braids read as casual rather than cosmic. Temporary metallic color spray or clip-in metallic extensions both achieve the effect. Clear elastics are essential for maintaining the clean, futuristic aesthetic. The star clips should be lightweight to avoid weighing down the bubbles. A texturizing spray before styling helps the bubbles hold their shape.
13.Boho Braids with Golden Accents
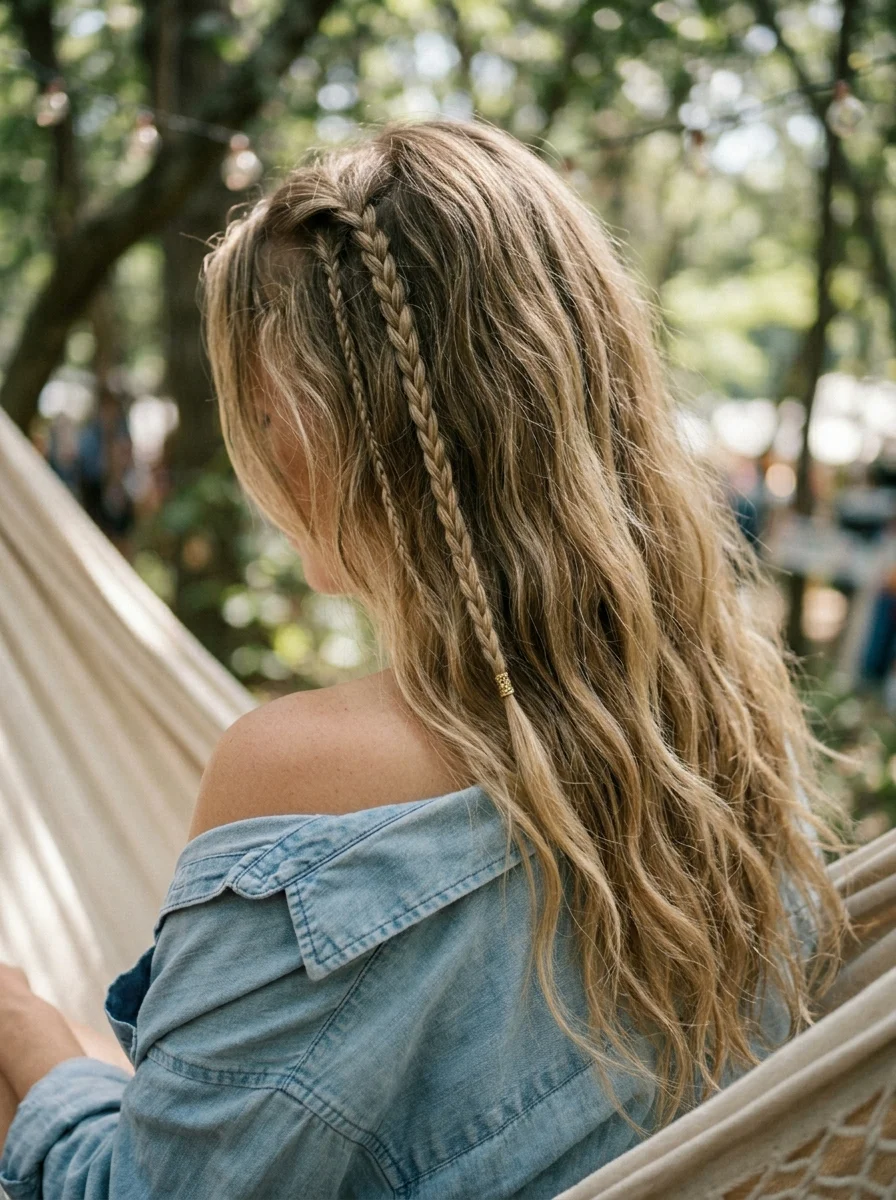
The overview: Short to long hair with natural beachy waves and two small accent braids framing the face, each threaded with gold cuff beads at ends. The rest of the hair flows freely in loose, lived-in waves that look air-dried rather than heat-styled. The accent braids add structure and metallic detail without pulling all the hair up or back.
This is the laid-back outdoor festival style — the one that says you care about your appearance but aren't about to spend an hour in front of a mirror. The gold cuff beads on the accent braids are the single detail that elevates this from "I just left my hair down" to "I styled this." The natural waves do most of the visual work.
Why this look is popular: The accent braids keep hair off your face — a practical benefit in dusty, windy festival conditions — while the free-flowing waves maintain a relaxed, feminine silhouette. The gold cuff beads add warmth and shine that complements the golden blonde base without creating a stark metallic contrast.
Where this look is suitable: Laid-back outdoor festivals, daytime concerts, folk and acoustic music events, and any festival where the aesthetic leans relaxed and natural. The gold accents pair well with earthy, warm-toned outfits.
Step by step:
- Create waves. Mist damp hair with sea salt spray and scrunch. Air-dry or diffuse on low heat for natural-looking waves.
- Section the accent braids. On each side of the face, take a small section from the hairline near the temple. Braid each section into a simple three-strand plait.
- Secure the braids. Tie each accent braid with a small clear elastic about three inches from the end.
- Add gold cuff beads. Clamp gold cuff beads at at the end of the braid. Press firmly to secure.
- Arrange and finish. Position the accent braids to frame the face. Let the remaining waves flow freely. A light mist of texturizing spray adds definition without stiffness.
Tips and tricks: The accent braids should be small — roughly half an inch wide. Larger braids overwhelm the free-flowing waves and change the silhouette from relaxed to structured. The gold cuff beads work best on second-day hair when natural oils help them grip. A leave-in conditioner applied to the ends before air-drying prevents frizz and adds the natural shine that makes this style read as healthy and effortless.
14.Sleek High Ponytail with a Pop of Pink
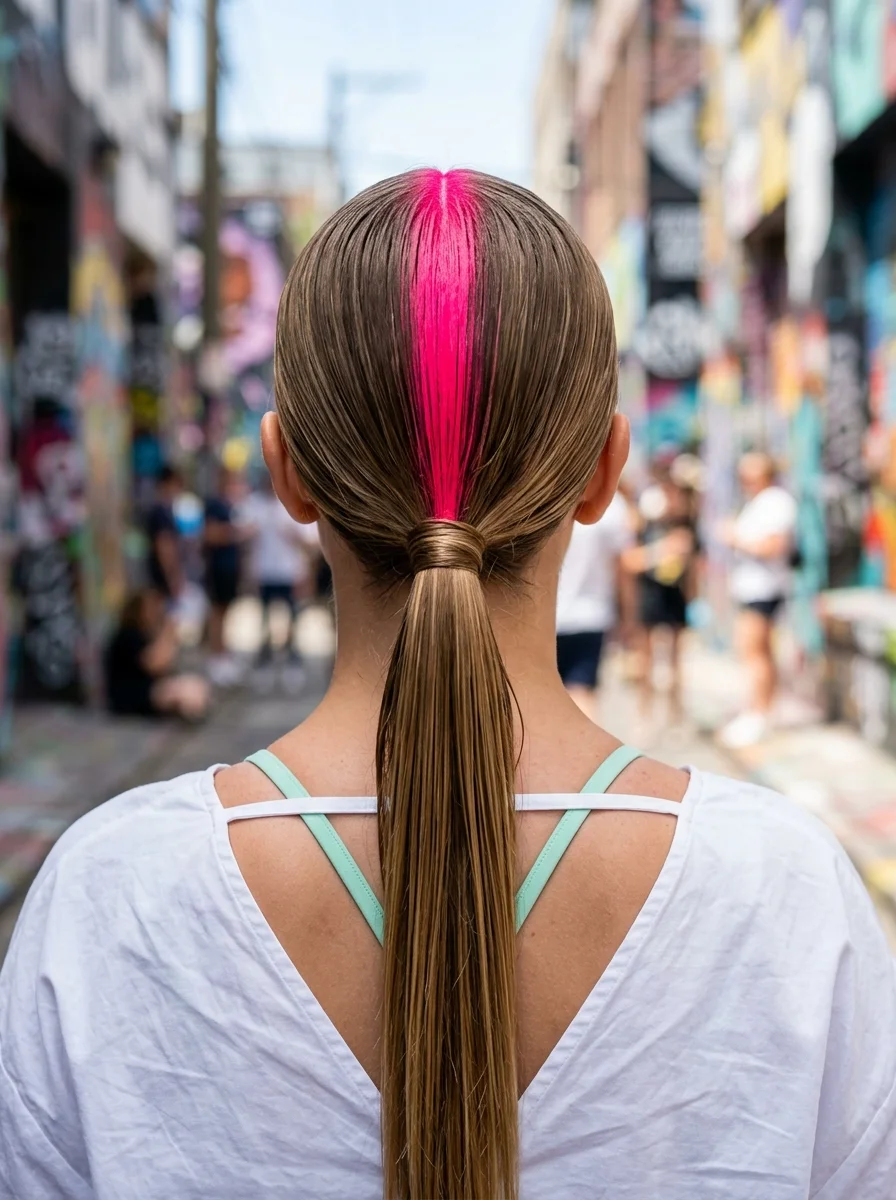
The overview: Short to long hair with a neon hot pink streak dyed through the center part, slicked into an ultra-sleek high ponytail at the crown. The pink section starts at the root and runs through the ponytail's length, creating a vivid stripe of color against the natural brown base. Every other strand is smoothed flat with gel for a lacquered, controlled finish.
The pop of pink is surgically precise — one concentrated section of color rather than scattered highlights or an all-over dye job. That precision is what makes this look feel urban and intentional rather than whimsical. The sleek ponytail provides the clean, minimal backdrop that lets the single neon stripe command attention.
Why this look is popular: The single-streak approach to color is less commitment than a full dye job but delivers the same visual impact. The sleek high ponytail is one of the most universally flattering silhouettes — it lifts the face, elongates the neck, and reads as polished regardless of the setting. The neon pink adds a punk edge that prevents the sleek ponytail from reading too corporate.
Where this look is suitable: Urban street-style festivals, pop music concerts, neon- themed events, and any festival where the aesthetic leans bold and modern. The pink streak photographs with strong contrast against dark backgrounds.
Step by step:
- Color the streak. Apply temporary neon pink color spray or clip-in pink extension to a center section of hair. Ensure the color runs from root to mid-length for maximum visibility.
- Slick the hair. Apply smoothing gel from roots to ends. Use a boar bristle brush to sweep all hair upward toward the crown. Eliminate any bumps or ridges.
- Secure the ponytail. Gather at the crown and tie with a strong elastic. The ponytail should sit high enough to create a visible lift at the face.
- Smooth the surface. Apply edge control along the hairline and crown for a glass-like finish. Use a fine- tooth comb for precision.
- Position the pink. Ensure the pink streak is visible and centered in the ponytail. Adjust by gently pulling the colored section to the surface if needed.
Tips and tricks: Temporary color spray is the festival-friendly option — it delivers vibrant color without commitment and washes out in one shower. Apply it to dry hair and let it set for five minutes before touching. The sleek ponytail requires strong- hold gel to maintain its lacquered finish throughout the day. If flyaways appear, a small amount of edge control on a toothbrush smooths them instantly. The high placement should be tested before the event — a ponytail that's too high can cause headaches over extended wear.
15.Effortless Wavy High Ponytail with Velvet Ribbon
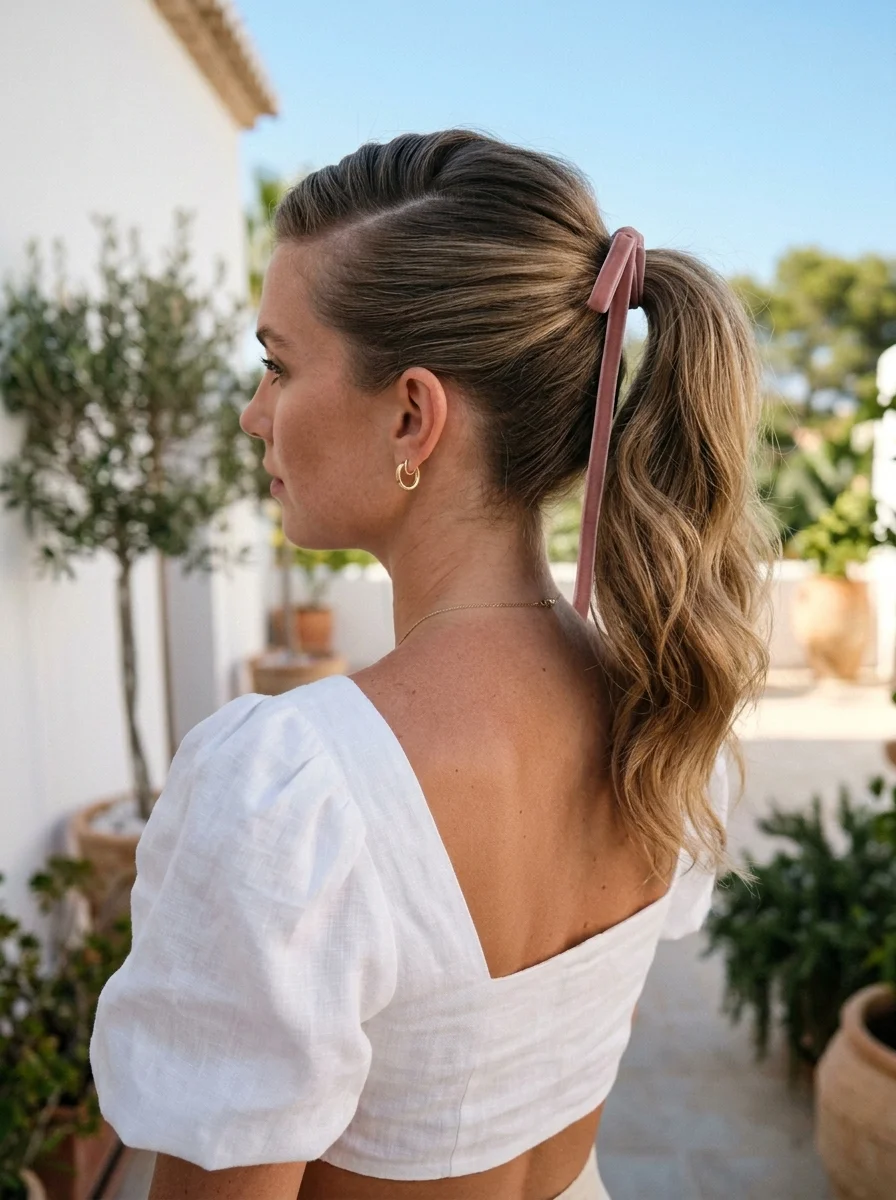
The overview: Short to long hair pulled into a high ponytail at the crown, with loose, tousled waves cascading down the back. A dusty rose velvet ribbon is tied around the base in a bow, adding a soft, romantic accent to the energetic ponytail silhouette. The waves aren't polished or overly styled — they have a natural, wind-swept quality that reads as effortless.
The velvet ribbon does two things: it conceals the elastic for a more finished appearance, and it adds a touch of romance that softens the high ponytail's sporty energy. The dusty rose tone works with the medium blonde base to create a warm, Mediterranean palette that feels sun-drenched and feminine.
Why this look is popular: The high ponytail with waves is one of those styles that looks good on virtually everyone — the height lifts the face while the waves add movement and softness. The velvet ribbon elevates it from gym hair to festival hair with a single accessory. It's the kind of detail that makes people ask where you got the ribbon.
Where this look is suitable: Mediterranean daytime festivals, outdoor summer concerts, garden parties, and any warm-weather event where the dress code leans romantic and relaxed. The dusty rose ribbon pairs naturally with sundresses and earthy tones.
Step by step:
- Create waves. Using a 1.25-inch curling wand, wrap medium-sized sections of hair away from the face. Leave the ends out for an undone, natural finish. Let each curl cool completely.
- Break up the curls. Run your fingers through the waves to separate them into soft, tousled texture. Don't brush — it kills the natural movement.
- Gather the ponytail. Flip your head upside down and gather all hair at the crown. Secure with a strong elastic. The height should create visible lift at the face.
- Tie the ribbon. Cut an 18-inch length of dusty rose velvet ribbon. Tie it around the elastic into a neat bow with even tails. Adjust the tails to hang naturally.
- Final adjustments. Pull a few face-framing pieces free around the temples for softness. Mist with a light- hold hairspray to maintain the wave pattern.
Tips and tricks: Velvet ribbon is slippery — tie a small knot behind the decorative bow to lock it in place before tying the bow on top. The ribbon tails should be trimmed to roughly the same length as the ponytail or slightly shorter. For hair that doesn't hold curl well, spritz each section with light-hold hairspray before wrapping it around the barrel. A texturizing spray at the crown before gathering the ponytail adds volume that prevents the style from looking flat at the top.
16.Rainbow Swirl Bun with Starry Accents

The overview: Long hair slicked back into a low bun at the nape, with sections of rainbow pastel color — pink, blue, yellow, lavender — swirled through the coil. Small star- shaped hair clips are placed around the bun's perimeter, creating a celestial border around the colorful center. The slicked-back crown keeps the focus entirely on the bun's color and detail.
The rainbow swirl effect works because the colors are applied in distinct sections rather than blended into a muddy gradient. Each pastel tone maintains its identity within the coil, creating a pinwheel effect that looks like abstract art. The star clips around the perimeter frame the color like a cosmic border, tying the whole thing into a cohesive theme.
Why this look is popular: The low bun is one of the most practical festival styles — it keeps hair completely off the neck and requires minimal maintenance once secured. Adding rainbow pastel sections transforms it from purely functional into something that feels celebratory and creative. The star clips add a finishing detail that photographs with charm.
Where this look is suitable: Fantasy-themed festivals, Pride events, cosplay-adjacent gatherings, and any festival where the aesthetic leans playful and colorful. The pastel rainbow reads as joyful without being aggressively bright.
Step by step:
- Apply pastel color. Use temporary color spray or clip-in colored extensions to create distinct pastel sections throughout the hair. Keep each color in its own section for clean separation.
- Slick the hair back. Apply smoothing gel and brush all hair backward toward the nape. Eliminate any bumps for a sleek crown.
- Create the bun. Gather hair into a low ponytail at the nape. Twist tightly and coil into a compact bun. Secure with bobby pins.
- Arrange the colors. Gently adjust the bun so the pastel sections are visible and swirled throughout the coil. Pull slightly at colored sections to bring them to the surface.
- Add star clips. Place small star-shaped clips evenly around the bun's perimeter, creating a celestial border. Space them roughly one inch apart.
Tips and tricks: Temporary color spray gives you the most control over placement — apply it to sections before gathering the ponytail for clean color separation. The star clips should be lightweight to avoid weighing down the bun. A strong- hold hairspray on the slicked-back crown ensures the surface stays smooth throughout the day. For very thick hair, the bun may need extra pins — use spin pins for a secure hold without visible metal.
17.Double Bubble Braids with Electric Green Accents
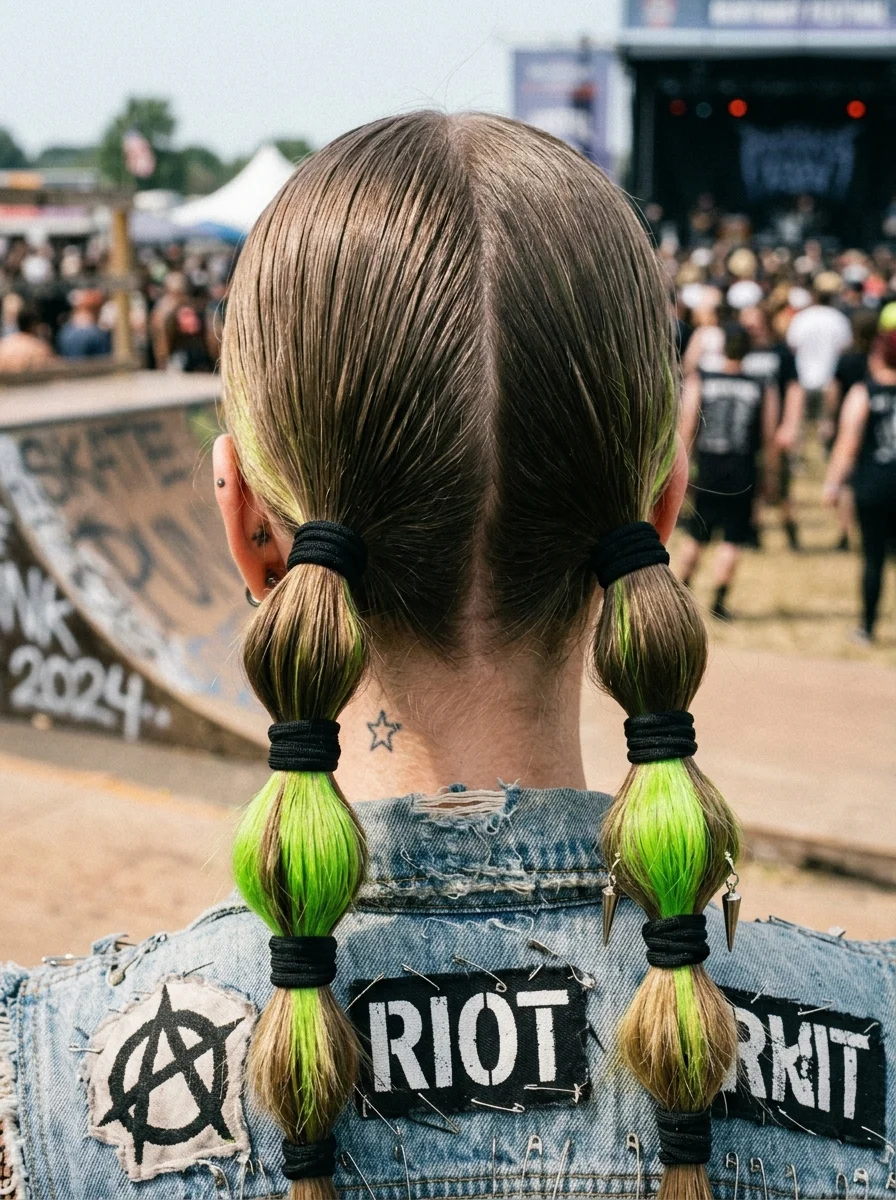
The overview: Medium to long hair with neon green ombre ends, center-parted into two bubble braids that sit behind the ears. Each braid is segmented into rounded bubble shapes using clear elastics, and metallic spike charms are attached at intervals for an edgy, punk-inspired detail. The green ombre intensifies toward the ends, creating a gradient that draws the eye downward.
The metallic spike charms are what push this from playful to punk. They catch light and add a sharp, aggressive edge that contrasts with the soft, rounded bubble shapes — that tension between hard and soft is what makes the style feel genuinely interesting rather than just cute.
Why this look is popular: The neon green ombre adds bold color without full-head commitment, and the bubble braid structure gives the color a canvas to show off its gradient. The spike charms add attitude that elevates the style beyond standard festival fare. The double braid placement distributes weight evenly, making this comfortable for extended wear.
Where this look is suitable: Punk and rock festivals, edgy outdoor concerts, alternative music events, and any festival where the aesthetic leans rebellious and bold. The green ombre and spike charms pair naturally with leather and dark tones.
Step by step:
- Color the ends. Apply temporary neon green color spray or clip-in green extensions to the lower half of the hair. Focus the intensity toward the ends for a clean ombre gradient.
- Center part. Create a clean center part from forehead to nape. This ensures symmetrical braid placement.
- Create the first bubble braid. On one side, gather hair behind the ear into a ponytail. Add clear elastics at two-inch intervals, puffing each section into a rounded bubble.
- Create the second bubble braid. Repeat on the other side, matching the height and bubble count for symmetry.
- Add spike charms. Attach metallic spike charms at one-inch intervals along both braids. Ensure they're securely fastened before moving.
Tips and tricks: The ombre effect is most convincing when the green starts subtly at mid-length and intensifies toward the ends — avoid a harsh line where the color begins. Metallic spike charms can be purchased as hair clips or cuffs; clip-on versions are easier to secure and remove. A texturizing spray before creating the bubbles helps them hold their shape on silky hair. The bubble braids behind the ears create a silhouette that works with headphones or earbuds, which is practical for long festival days.
18.Sleek High Ponytail with a Chic Band Accent
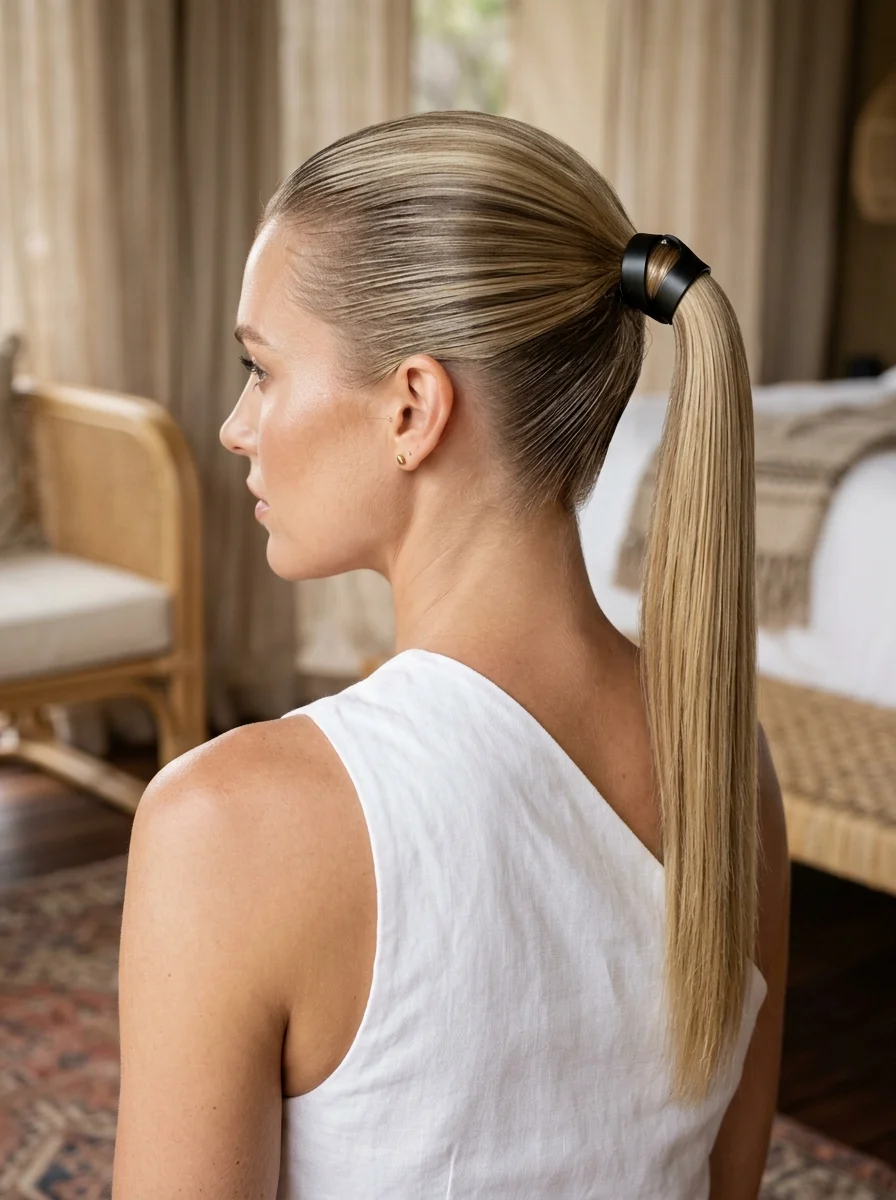
The overview: Medium to long hair polished into a high ponytail at the crown, with a black leather or metallic cuff band wrapped around the base. The ponytail itself falls straight and sleek, with no waves or curls — just clean, controlled lines. The band accessory replaces the exposed elastic, creating a more intentional, styled finish.
This is minimalist festival styling at its most refined. The high ponytail provides the drama through height and silhouette alone, while the band accessory adds a single point of visual interest that prevents the look from reading too plain.
Why this look is popular: The sleek high ponytail is one of the most versatile festival styles — it works with everything from boho sundresses to leather jackets. The band accessory is a small addition that completely changes the look's character, elevating it from basic gym pony to intentional style choice. The clean lines photograph with editorial simplicity.
Where this look is suitable: Any festival setting, from minimalist daytime events to nighttime concerts. The clean silhouette works across genres and dress codes. Particularly strong for fashion- forward festivals where less is more.
Step by step:
- Sleek the hair. Apply smoothing serum from roots to ends. Brush all hair upward toward the crown with a boar bristle brush. Eliminate every bump and ridge.
- Secure the ponytail. Tie with a strong elastic at the crown. The placement should be high enough to create visible lift at the face.
- Add the band accent. Wrap the black leather or metallic cuff band around the elastic base. Secure with the built-in closure or additional bobby pins hidden beneath.
- Smooth the surface. Apply a small amount of edge control along the hairline and crown. Use a fine-tooth comb for a glass-like finish.
- Finish with spray. Mist with strong-hold hairspray to lock the sleek surface in place. Avoid spraying the band directly.
Tips and tricks: The band should be proportionate to the ponytail's thickness — an oversized cuff on a thin ponytail looks unbalanced. Black leather bands work with virtually every outfit, while metallic cuffs add more visual interest. A heat protectant and flat iron on the ponytail's length creates the pin- straight finish that makes this style read as polished. The high placement should be tested for comfort — a ponytail that's too high causes headaches over extended wear.
19.Effortless Romantic Low Updo with Loose Tendrils
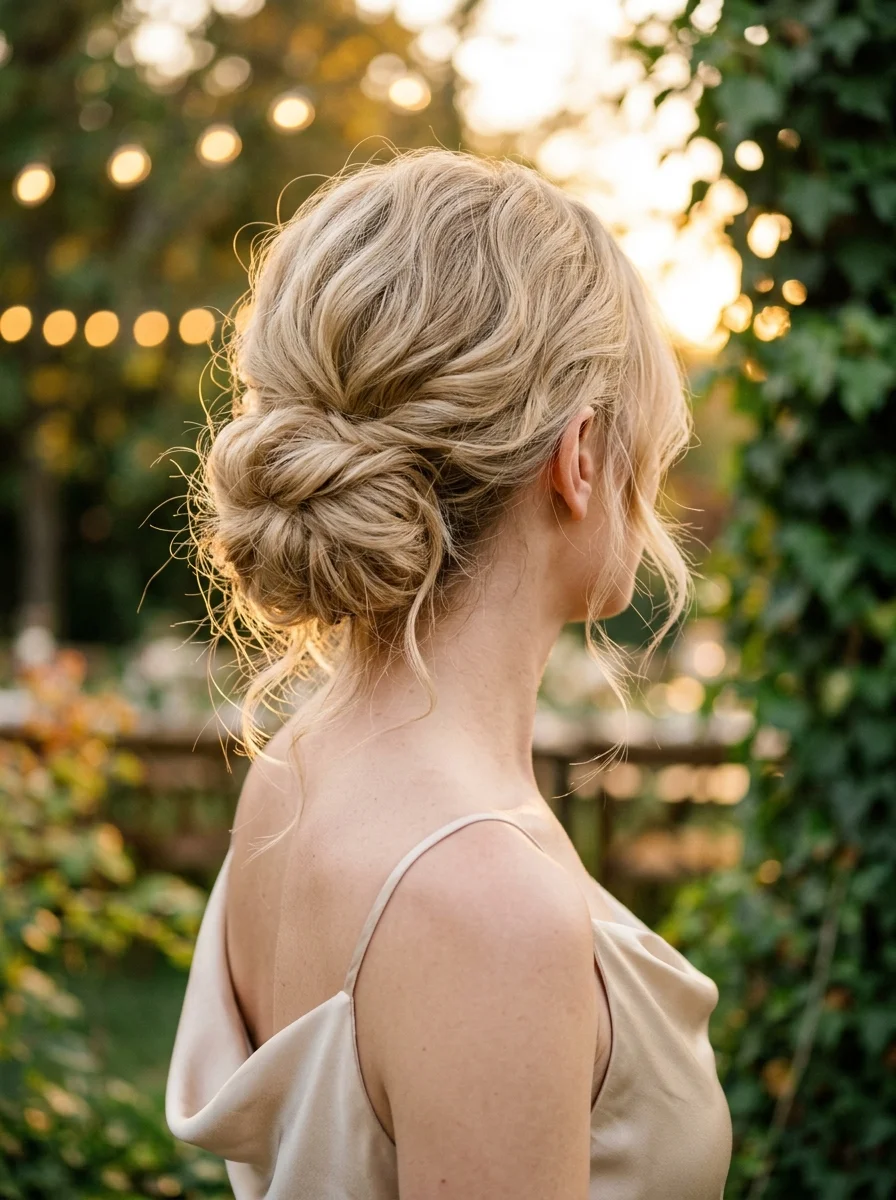
The overview: Medium to long hair gathered into a messy low bun at the nape, with face-framing tendrils left loose around the hairline and ears. The bun is deliberately undone — loops pulled loose, strands escaping — creating a soft, romantic silhouette that looks like it came together naturally. The tendrils add movement and softness that a fully secured updo can't achieve.
This is the romantic bohemian style that works when you want your hair up but don't want to look rigid or overdone. The loose tendrils do the important work: they soften the face, add movement, and prevent the updo from reading as severe. At a festival, they'll catch the breeze and create the kind of candid, wind-tousled moments that make for the best photos.
Why this look is popular: The messy low updo strikes the balance between "hair up" and "hair down" that flatters most face shapes — the bun keeps things off the neck while the tendrils frame the face. It's one of those rare styles that works on second-day hair, third-day hair, and everything in between. The romantic quality pairs naturally with the flowing fabrics and earthy accessories common at festivals.
Where this look is suitable: Romantic bohemian festivals, outdoor acoustic concerts, sunset events, and any festival where the aesthetic leans soft and feminine. The loose tendrils pair beautifully with floral prints and delicate jewelry.
Step by step:
- Prep with texture. Spray texturizing spray throughout the hair to add grip and volume. Second-day hair works particularly well for this style.
- Gather loosely. Pull hair to the nape, keeping the surface relaxed and slightly messy. Don't brush it flat — the texture is intentional.
- Create the bun. Loop the ponytail through the elastic only halfway on the final pull-through, creating a looped bun. Leave the tail hanging loose or tuck it partially under.
- Pull and loosen. Gently tug at sections of the bun to expand it and create texture. Pull out face-framing tendrils around the hairline and ears.
- Adjust the tendrils. Use your fingers to separate and arrange the loose tendrils so they frame the face naturally. A quick pass with a 1.25-inch curling wand adds soft bends if the tendrils are too straight.
- Set lightly. Mist with a flexible-hold hairspray to keep the bun in place without killing the movement. Avoid over-spraying — the tendrils should move freely.
Tips and tricks: The messier the bun, the better it looks — don't try to make it perfect. A texturizing powder like Bumble and Bumble Prêt-à-Powder at the roots adds instant volume and grip. The face-framing tendrils should be fine and wispy, not thick chunks — pull out small sections for the most flattering effect. For hair that's too clean and slippery, a dry shampoo at the roots provides the texture this style needs to hold its shape.
20.Sparkle Space Buns with Holographic Hair Tinsel
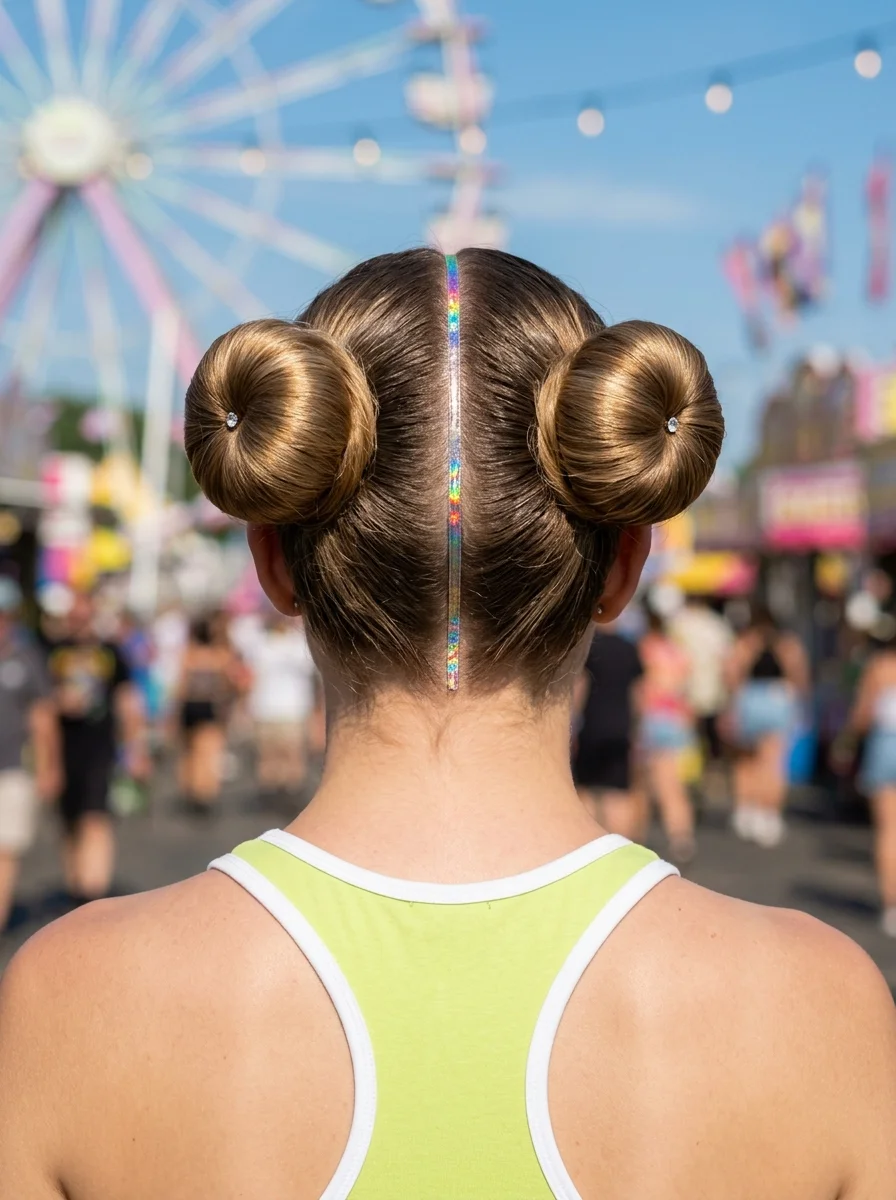
The overview: Long hair pulled into two symmetrical high buns positioned on either side of the crown. Holographic rainbow hair tinsel is threaded throughout both buns and the surrounding hair, catching light with every movement. Small rhinestone accents are placed at the center of each bun and scattered along the part line for additional sparkle.
Space buns are the festival hairstyle that never really goes away — they're too fun, too photogenic, and too easy to execute to ever fall completely out of favor. The holographic tinsel adds a futuristic dimension that keeps the look current, while the rhinestone accents provide focal points that catch stage lighting beautifully.
Why this look is popular: Space buns are symmetrical, which means they photograph well from the front — the most common angle for festival selfies and candids. The holographic tinsel transforms them from playful to genuinely dazzling under the right lighting. The caramel highlights in the base hair add warmth and dimension that prevents the tinsel from looking like it's floating on a flat surface.
Where this look is suitable: Playful retro-futuristic festivals, EDM events, 90s-themed parties, and any festival where the aesthetic leans fun and nostalgic. The holographic tinsel works especially well under UV and neon lighting.
Step by step:
- Center part. Create a clean center part from forehead to nape. This ensures symmetrical bun placement.
- Create the first bun. On one side, gather hair into a high ponytail. Twist tightly and coil into a bun. Secure with bobby pins. Repeat on the other side.
- Add tinsel. Thread holographic tinsel strands throughout both buns and the surrounding hair. Tie them to the bun bases or weave them into the hair for security.
- Add rhinestones. Place a rhinestone accent at the center of each bun. Scatter additional rhinestones along the part line for a continuous sparkle effect.
- Adjust symmetry. Step back and check that both buns are even in size, height, and tinsel distribution. Adjust as needed.
Tips and tricks: The buns should be positioned high enough to be visible from the front — too far back and they disappear. Use a strong elastic at each bun's base before coiling for extra security. The tinsel can be pre-attached to small clips for easier placement. Rhinestones with adhesive backing stay in place better than those inserted with pins. A texturizing spray before gathering the buns adds grip that prevents them from loosening during dancing.
21.Boho Braid with Baby's Breath Accents
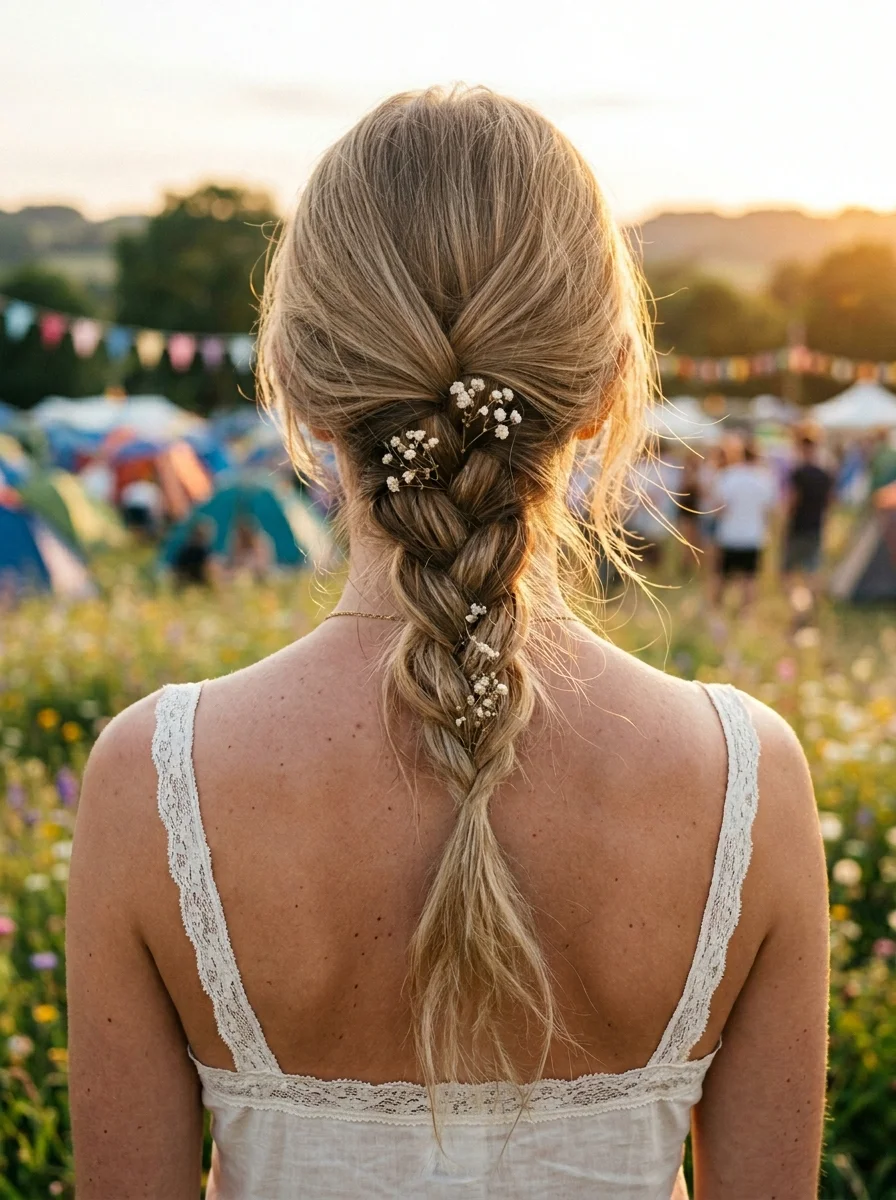
The overview: Medium to long hair woven into a loose, relaxed braid that drapes over one shoulder, with small clusters of baby's breath flowers woven through the braid's length. The braid isn't tight or structured — it's a soft, organic plait with pancaked edges that look like they were gently pulled apart by hand. The baby's breath adds delicate, airy texture that blends with the braid's relaxed quality.
This is the quintessential boho festival braid — the one that immediately signals "I'm at a music festival and I know exactly what I'm doing." The baby's breath is the defining detail: small, white, and cloud-like, it softens the braid and adds a romantic, almost ethereal quality that photographs beautifully in natural light.
Why this look is popular: The combination of a loose braid and baby's breath is one of those pairings that just works — the flowers' delicate texture mirrors the braid's relaxed structure. Baby's breath is also one of the most resilient cut flowers, which means it holds up through a full festival day without wilting the way roses or peonies would. The white flowers pop against most hair colors.
Where this look is suitable: Classic boho festivals, outdoor folk concerts, garden parties, and any event where the aesthetic leans romantic and natural. The baby's breath pairs beautifully with flowing dresses and minimal jewelry.
Step by step:
- Prep the hair. Spray texturizing spray throughout for grip. A light sea salt spray adds the lived-in texture that makes the braid look effortless.
- Braid loosely. Pull all hair to one side. Create a standard three-strand braid, keeping the tension loose and relaxed. Secure with a clear elastic at the end.
- Pancake the braid. Gently pull the outer edges of each section to widen the braid and create a fuller, more organic shape.
- Weave in baby's breath. Tuck small clusters of baby's breath into the braid at random intervals. Use the braid's folds to anchor the stems naturally.
- Adjust and finish. Step back and check that the flowers are distributed evenly. Pull a few face-framing pieces free for softness. Mist with a light-hold hairspray.
Tips and tricks: Fresh baby's breath should be misted with water and stored in the refrigerator until you're ready to place it — this keeps it fresh through the festival day. High-quality silk baby's breath is a reliable alternative that holds up indefinitely. The braid should be loose enough that you can tuck flower stems into the folds without them falling out. A clear elastic at the end keeps the focus on the braid and flowers rather than a visible hair tie.
22.Cosmic Candy Waves with Starry Accents
The overview: Multi-tonal hair blending pink, blue, purple, and blonde into a dreamy, cotton-candy palette, styled into tousled waves that cascade past the shoulders. Star-shaped hair clips are clustered at one temple, creating a constellation effect against the colorful backdrop. The waves are soft and slightly undone, letting the color do the heavy visual lifting.
The multi-tonal color is what makes this style cosmic — the blend of pink, blue, purple, and blonde creates a palette that looks like a sunset filtered through a nebula. The tousled waves allow the colors to blend and shift naturally, which means the look changes depending on how the light hits it. The star clips at the temple complete the celestial theme with a focused, artistic detail.
Why this look is popular: The cotton-candy color palette is one of the most photogenic combinations in hair color — it catches light from every angle and creates a soft, ethereal quality that's hard to achieve with single-tone color. The star clips add a thematic anchor that ties the cosmic color to a specific concept, preventing the look from reading as randomly colorful.
Where this look is suitable: Cosmic or space-themed festivals, nighttime outdoor concerts, fantasy-themed events, and any festival where the aesthetic leans dreamy and otherworldly. The multi-tonal color works especially well under UV and stage lighting.
Step by step:
- Apply multi-tonal color. Use temporary color spray or clip-in colored extensions in pink, blue, purple, and blonde. Apply each color to separate sections, blending the edges where they meet.
- Create waves. Using a 1.25-inch curling wand, wrap medium-sized sections away from the face. Leave the ends out for an undone finish. Let each curl cool completely.
- Break up the waves. Run your fingers through the curls to separate them into soft, tousled texture. The colors should blend and shift as the waves intermingle.
- Add star clips. Cluster star-shaped hair clips at one temple in a constellation-like arrangement. Vary the sizes and angles for an organic, cosmic effect.
- Set the style. Mist with a light-hold hairspray to maintain the wave pattern without stiffness. Avoid over- spraying — the waves should move and the colors should shift.
Tips and tricks: The multi-tonal color effect is most convincing when each color has its own distinct section rather than being randomly scattered. Temporary color spray gives you the most control over placement. The star clips should cluster tightly at the temple rather than spreading across the entire head — the concentrated placement creates a stronger focal point. A heat protectant before curling is essential, as multi-toned hair is often more processed and vulnerable to heat damage.
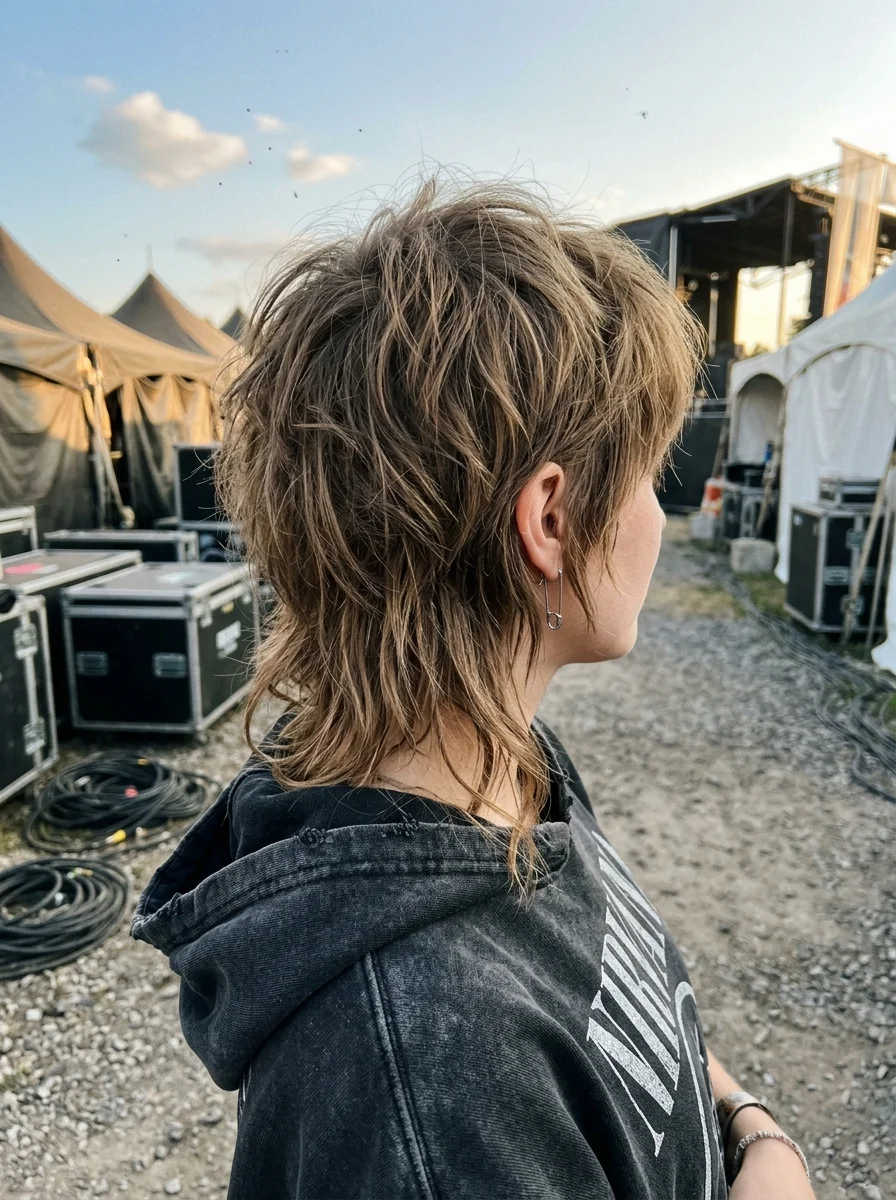
23.Effortless Textured Shag with a Modern Twist
The overview: Short hair cut into a modern shag or mullet with piece-y textured styling that emphasizes the layers' movement. A silver sword earring climbs one ear, adding an edgy metallic accent that complements the cut's rock-and-roll energy. The styling is deliberately undone — rough-dried with texturizing product, no flat iron, no curling iron, just fingers and product.
The modern shag is a haircut that styles itself — the layers and texture are built into the cut, which means the hairstyle does the work regardless of how much effort you put in. The silver sword earring adds a sharp, editorial detail that elevates the cut from casual to intentionally edgy. Together, they create a look that feels like it belongs in a festival editorial.
Why this look is popular: The textured shag has a lived-in, rock-and-roll quality that matches festival energy perfectly. It requires minimal styling — a fact that becomes increasingly valuable as festival days get longer and your motivation to stand in front of a mirror decreases. The silver sword earring adds a specific, personal detail that gives the style character.
Where this look is suitable: Rock and indie festivals, alternative music events, edgy outdoor concerts, and any festival where the aesthetic leans cool and effortless. The cut works across seasons but peaks during summer when air-drying is practical.
Step by step:
- Wash and towel-dry. Shampoo and condition, then squeeze out excess water with a microfiber towel. Don't rub — it disrupts the texture.
- Apply texturizing product. Work a sea salt spray or texturizing cream through the mid-lengths and ends. Use your fingers to distribute evenly.
- Rough-dry. Blow-dry on medium heat with your fingers, lifting the roots for volume and directing the layers in different directions for piece-y texture.
- Shape with fingers. Once dry, use your fingers to separate and define the layers. Pull pieces forward around the face and arrange the texture for a deliberately undone finish.
- Add the earring. Position the silver sword earring on one ear, climbing the cartilage. Ensure it's secure and comfortable before heading out.
Tips and tricks: This cut requires a skilled stylist who understands modern shag technique — ask for "invisible layers" or "ghost layers" if your stylist is familiar. Maintenance trims every 8-10 weeks keep the layers at the right length. A volumizing powder at the roots adds lift that lasts throughout the day. The sword earring should be lightweight and properly fitted — heavy cartilage earrings cause discomfort over extended wear.
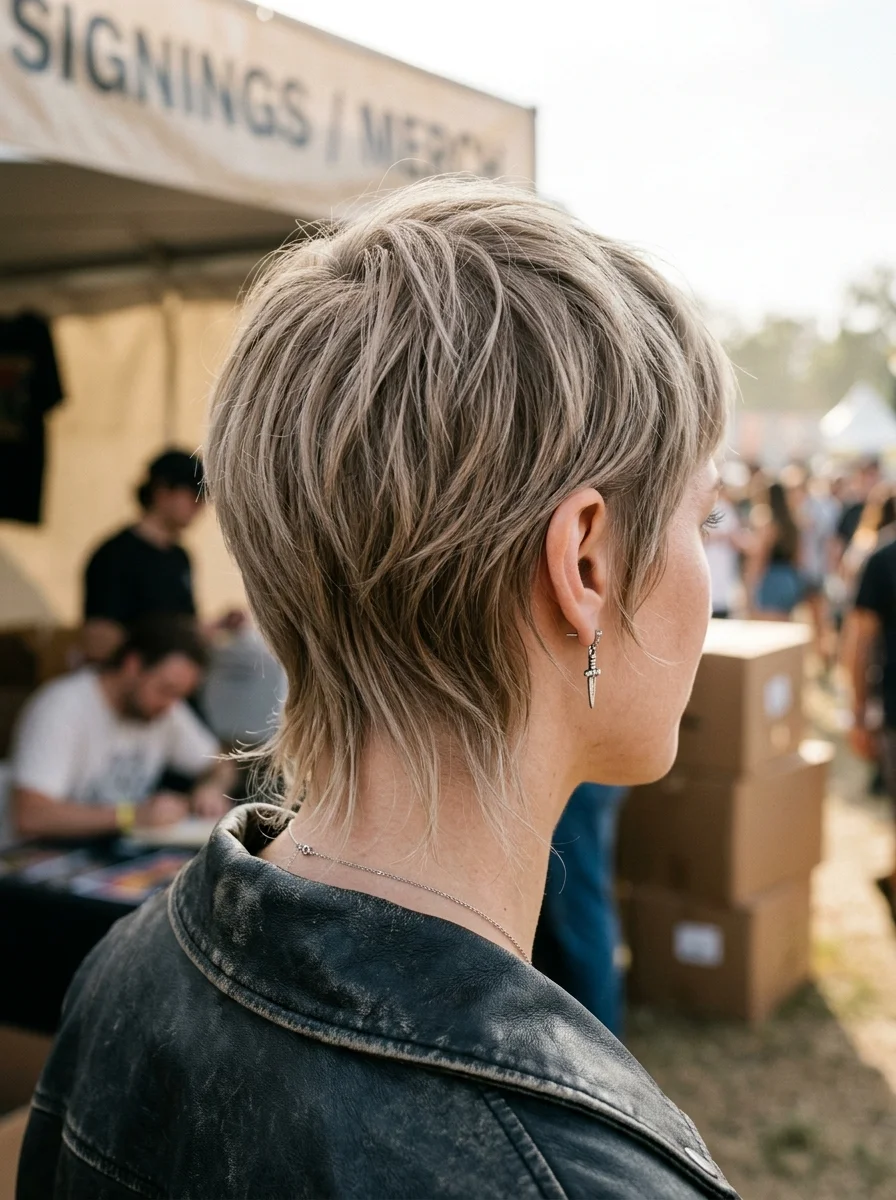
24.Shaggy Textured Mullet with Choppy Layers
The overview: Short hair cut into a modern mullet with choppy layers throughout — shorter and textured on top, longer and flowing at the back. The styling is entirely air-dried, creating a tousled, lived-in texture that looks like you rolled out of a van at a desert campground and headed straight to the stage. No heat tools, no product overload, just the cut doing its job.
The modern mullet is the festival haircut that keeps coming back because it fundamentally makes sense for the environment: short enough on top to stay cool, long enough in the back to catch the breeze and create movement. The choppy layers add built-in texture that eliminates the need for any styling beyond towel-drying and walking out the door.
Why this look is popular: The mullet's revival is driven by its practicality — it's one of the lowest-maintenance cuts that still reads as intentional and styled. The choppy layers create visual interest and movement without requiring any product or heat styling. The retro rock-and-roll energy matches festival culture perfectly, and the dirty blonde tone keeps the whole thing grounded in natural, sun-kissed territory.
Where this look is suitable: Retro rock festivals, vintage-themed events, outdoor concerts with a classic rock vibe, and any festival where the aesthetic leans rebellious and unpolished. The cut works across genres but feels most at home at rock and punk-adjacent events.
Step by step:
- Wash and towel-dry. Shampoo and condition, then squeeze out excess water with a microfiber towel. The hair should be damp, not dripping.
- Apply minimal product. Work a small amount of sea salt spray or light texturizing cream through the hair. Focus on the mid-lengths and ends — avoid the roots.
- Air-dry. Let the hair dry naturally. Shake the roots occasionally as it dries to encourage volume and prevent the top from lying flat.
- Shape with fingers. Once dry, use your fingers to separate the choppy layers and arrange the texture. Pull pieces forward around the face and direct the back sections for movement.
- Final adjustment. Check the silhouette from all angles. The top should be textured and lifted, the back should flow naturally. A tiny amount of texturizing powder at the roots adds grip that lasts.
Tips and tricks: The modern mullet requires a specific cut — bring reference photos to your stylist and make sure they understand the difference between a retro mullet and a modern textured version. Maintenance trims every 6-8 weeks keep the layers sharp and the silhouette clean. For hair that lies too flat, a volumizing powder at the roots adds lift without weighing the style down. The air-dried texture actually improves as the day goes on — by evening, the natural oils and movement create an even more lived-in, rock-and-roll quality.