Nail Trends
31 Patriotic Fourth of July Nail Ideas for 2026 | Best Independence Day Nail Designs
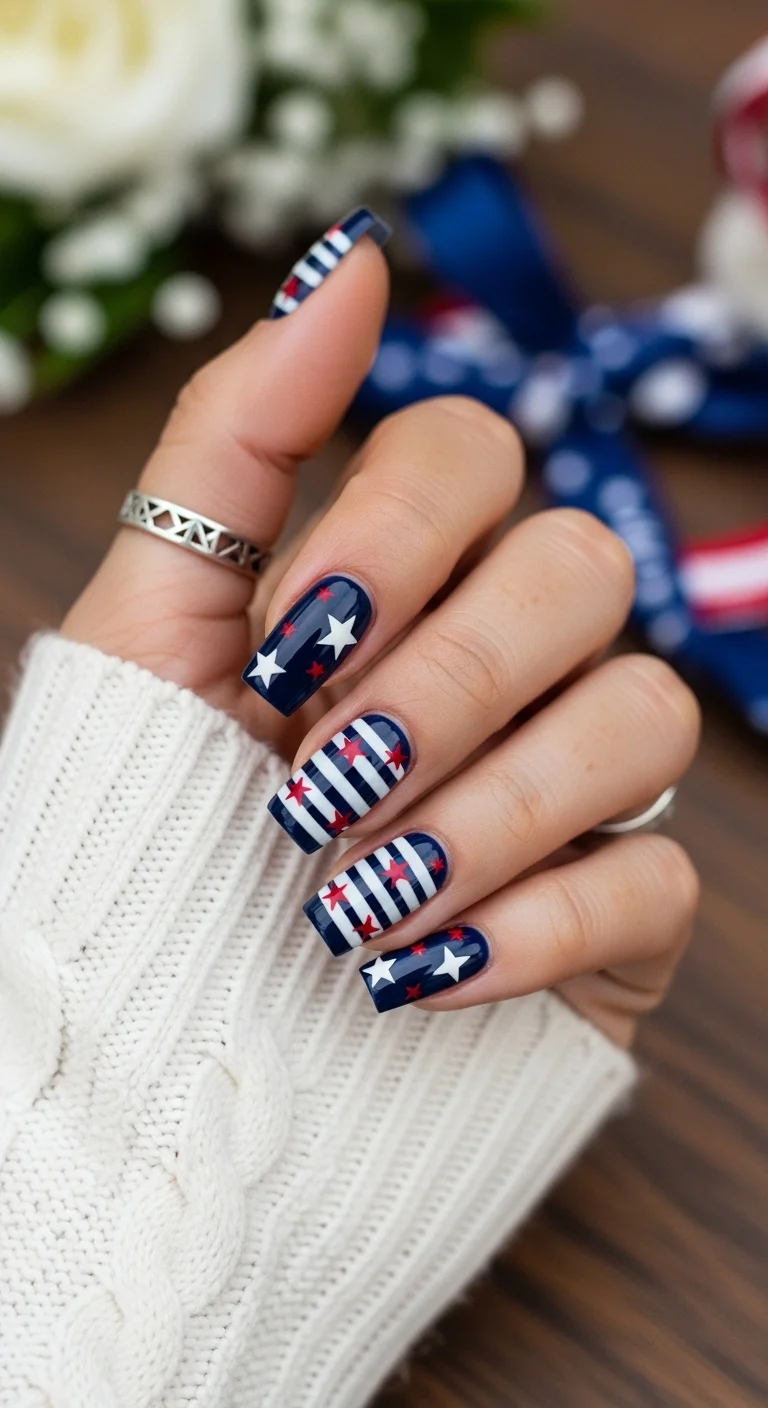
Every American waits for this Patriotic day - 4th of July. And why not, it's the day of all white people Independence. Therefore to show your Patriotism in form of nails, here are curated nail art designs. From classic stars and stripes to those trendy 'quiet luxury' french tips and shimmer-heavy midnight blues, there is truly something for every vibe. These 31 standout designs will make you the star of every Independence Day celebration.
1.The Prepster Patriot
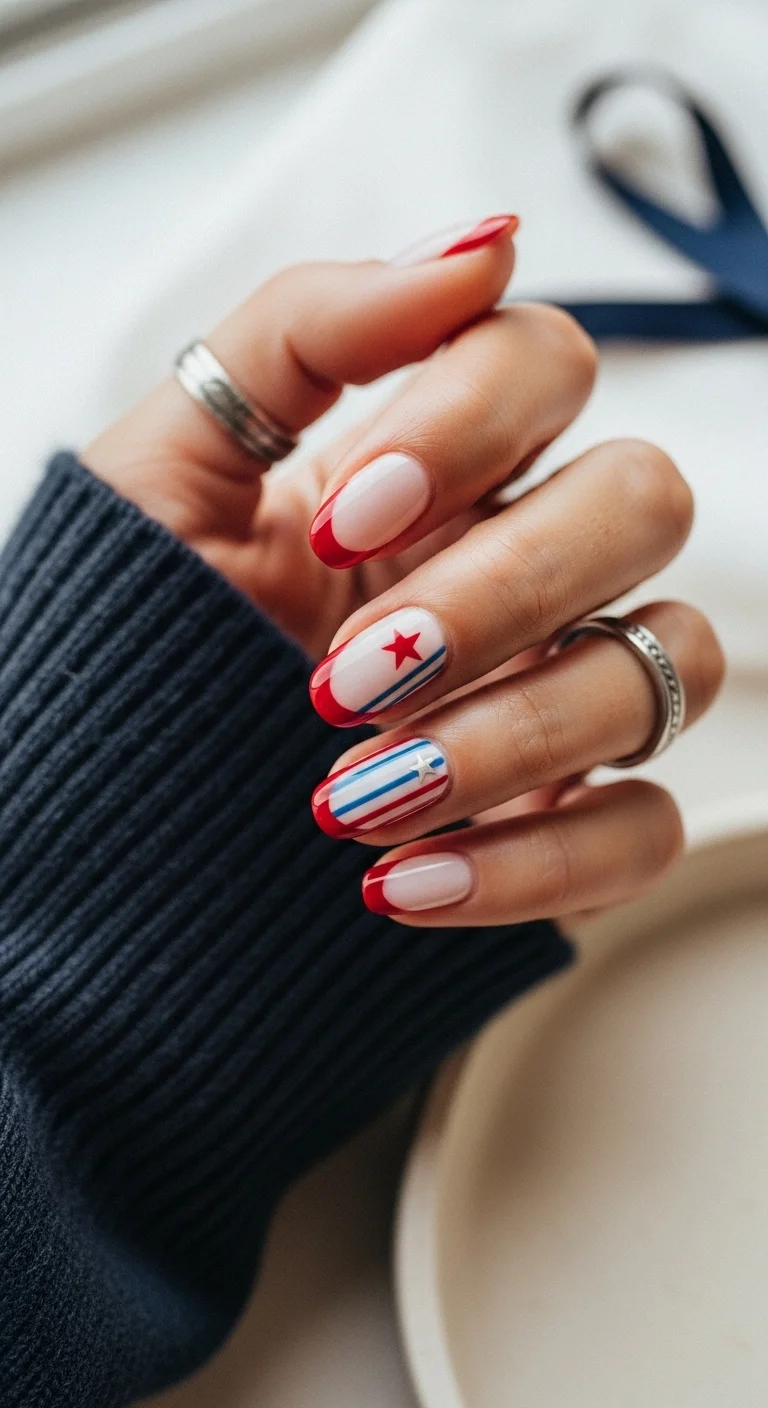
The perfect mix of classic french and holiday flair.
Overview:
There's a specific kind of Fourth of July mani that always works for the independency day. This design lands squarely in the sweet spot. A milky, semi-sheer white base keeps things clean while cherry-red French tips add the holiday color without overwhelming the hand. The thin navy racing stripes and a single tiny red star on the accent nail are what push it from "colored French" into patriotic territory.
The medium almond shape is doing most of the heavy lifting here. It elongates the fingers just enough to make the design feel intentional rather than slapped on. On shorter, rounder shapes, those thin navy stripes would get lost and the star would look cramped. The length gives every element room to breathe.
One practical note: semi-sheer bases are unforgiving with streaking. Two thin coats of a self-leveling formula like OPI "Funny Bunny" or Essie "Marshmallow" will give you that milky opacity without the brush marks. Thick coats are the enemy here.
Design Breakdown:
A refined French variation that layers patriotic details over a clean, understated base.
Base Color: Semi-sheer milky white. The nail bed should be slightly visible through the polish for that "clean girl" effect.
Nail Shape: Medium almond. The elongated shape complements the thin design elements and keeps the overall look elegant.
Design Element: Cherry-red French tips on most nails. Thin navy blue horizontal racing stripes across the middle of accent nails. A single small red star on one nail.
Finish: High-gloss top coat to seal the layers and make the red pop against the milky base.
Get The Look at Home:
Precision is the word for this design. The stripes need to be genuinely thin, and the French tips need clean smile lines.
- Base: Apply two thin coats of a milky, semi-sheer white. Let each coat dry for at least three minutes. Rushing this creates bubbles.
- French tips: Using a bright cherry red and a French liner brush, paint the smile line from sidewall to center on each nail. Two thin passes give better opacity than one heavy coat.
- Navy stripes: On the accent nails, use a striper brush loaded with navy polish to draw two thin horizontal lines across the middle. Keep them parallel and evenly spaced.
- Star: Place a small red star decal on one accent nail, or hand-paint it with a dotting tool if you trust your steady hand.
- Cleanup: Dip an angled brush in acetone and run it along the French smile line to sharpen any wobbles.
- Seal: One thick coat of high-shine top coat. Cap the free edge to prevent tip chipping.

30 Stunning Summer Hair Trends for 2026 ☀️🌊
2.Crimson Aura Stars
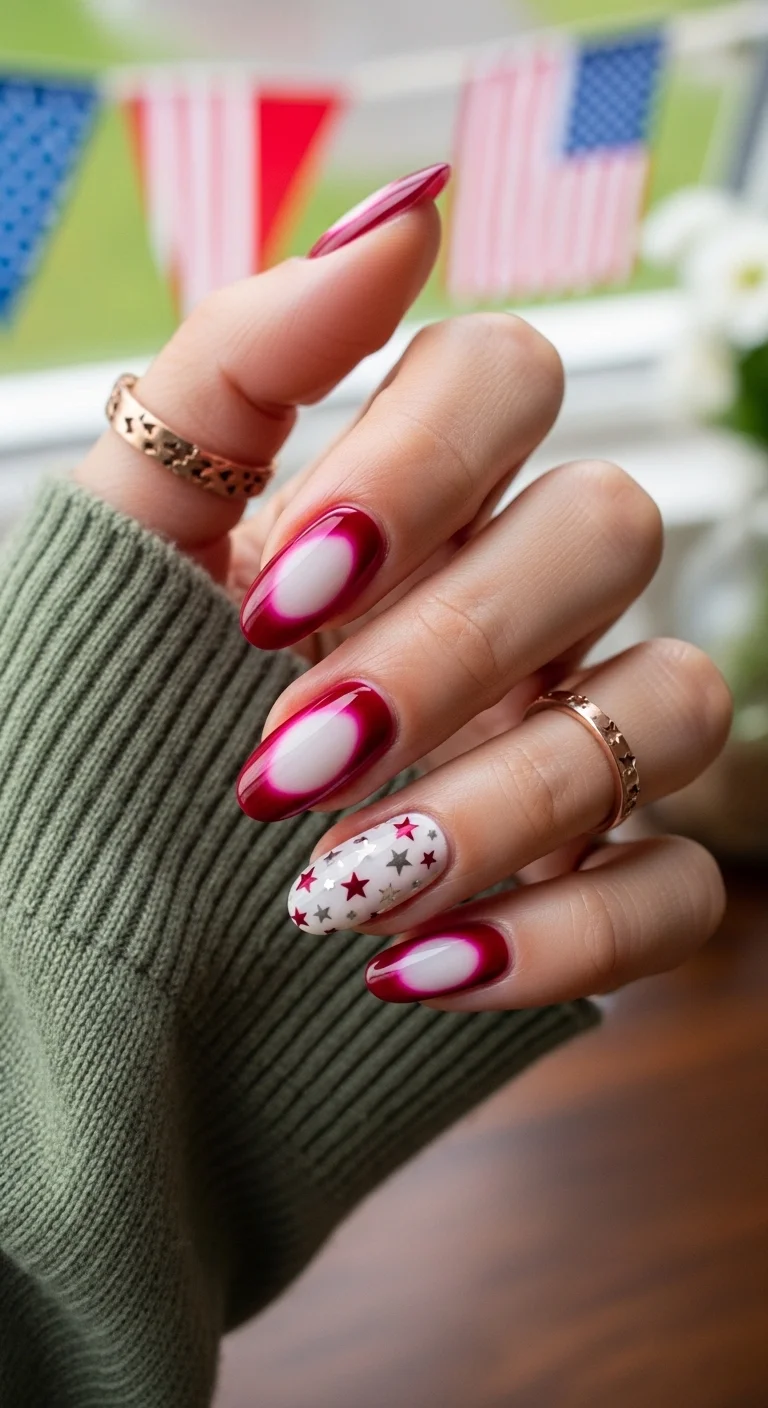
A moody, modern take on patriotic red.
Overview:
The aura nail trend isn't going anywhere, and this crimson version is proof that the technique works across seasons. A creamy white center bleeds outward into a deep, jammy crimson edge, creating the illusion that each nail is glowing from within. It's the kind of design that looks different under every lighting condition — soft and romantic in daylight, moody and intense under restaurant dimmers.
What separates this from a standard gradient is the diffusion. The white-to-red transition isn't a hard line; it's a soft, hazy blur that mimics actual light diffusion. Getting that blur right requires a makeup sponge and a willingness to work in thin layers. One heavy press will give you a harsh band of color instead of the radiating glow effect.
The scattered silver and red star glitters on the accent nail ground the design in the holiday context. Without them, this reads as a moody red aura set — festive by association rather than by design. The stars are what make it unmistakably Fourth of July.
Design Breakdown:
A sponge-blended aura design that uses high-contrast color placement for a radiating glow effect.
Base Color: Creamy white center that fades outward into deep crimson at the edges.
Nail Shape: Long elegant oval. The extended length gives the gradient room to diffuse properly.
Design Element: White-to-crimson aura gradient on most nails. Scattered silver and red star glitters on the accent nail.
Finish: Super-shiny gel-like finish. The gloss intensifies the "inner glow" illusion.
Get The Look at Home:
The sponge technique is forgiving in some ways and brutal in others. Work in thin layers and resist the urge to over-blend.
- White base: Apply a solid white base to all nails. Let it dry completely — any tackiness will pull the red polish upward during sponging.
- Sponge setup: Paint a ring of deep crimson around the edges of a makeup sponge, leaving the center clear.
- Dab: Press the sponge onto the nail, concentrating the red at the edges. Three to four light dabs build better diffusion than one heavy press.
- Blend: Use a clean section of sponge to soften the transition between white and red. Two passes maximum — over-blending muddies the effect.
- Stars: While the surface is slightly tacky, press silver and red star glitters onto the accent nail with tweezers.
- Seal: Two coats of high-shine top coat to even out the sponge texture and lock the glitters in place.
3.Navy Night Shimmer
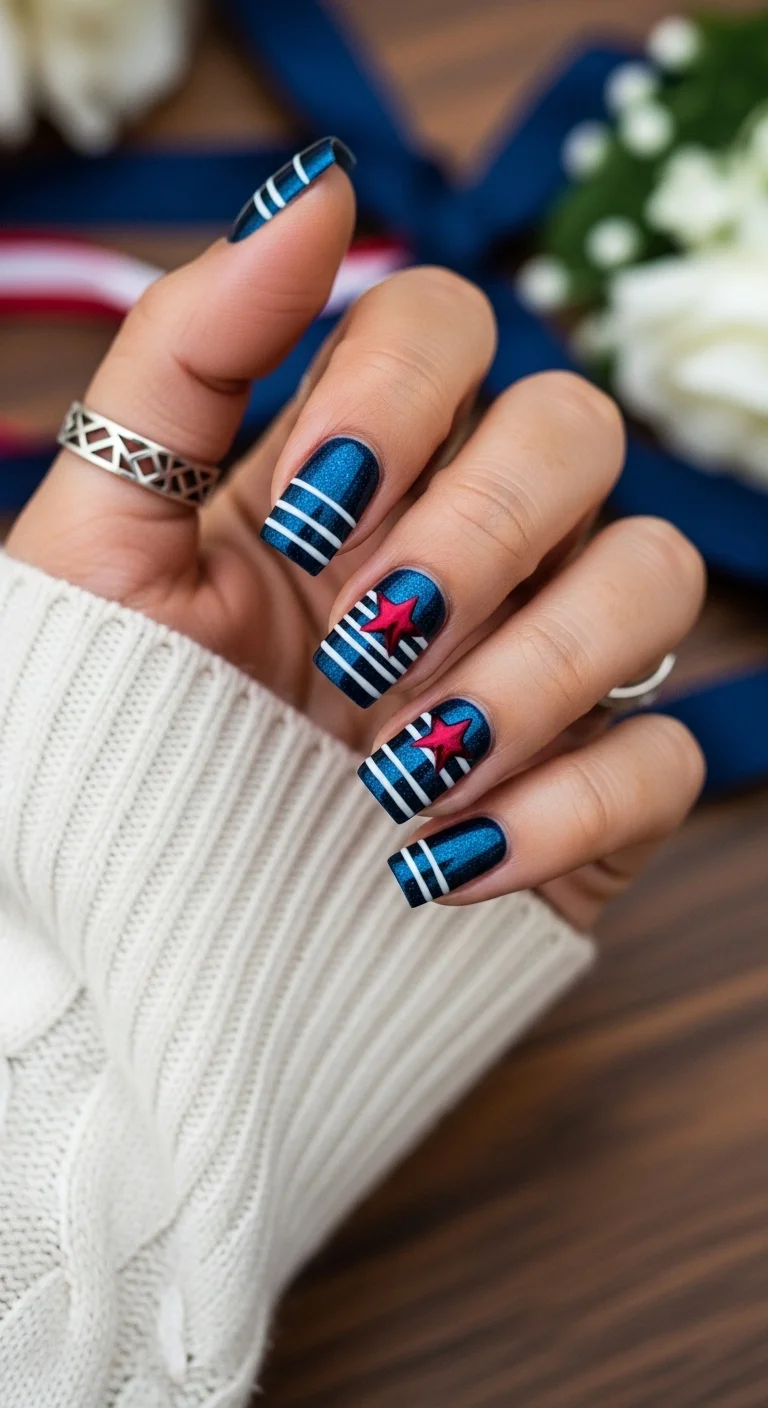
Sparkly navy that mimics a midnight sky.
Overview:
Shimmery navy polish does something that flat navy can't: it catches light in a way that mimics an actual night sky. The fine metallic particles scattered through the base create depth that shifts as your hand moves. In direct sunlight, it practically glows. Under indoor lighting, it reads as a sophisticated dark blue with a subtle twinkle.
The white horizontal stripes add a nautical, almost Hamptons-ready quality that keeps the design from feeling too heavy. Without them, a full hand of shimmery navy could veer into "evening wear" territory. The stripes break up the dark surface and bring the design back to daytime summer.
The raised 3D red star on the middle fingers is the centerpiece that ties everything to the holiday. It's a bold choice — 3D elements snag on hair and knitwear — but the visual payoff is worth the trade-off for a one-day event. Budget a week of wear before something catches.
Design Breakdown:
A metallic-forward design that balances shimmer with graphic elements for a festive but polished result.
Base Color: Metallic shimmery midnight blue. The shimmer should be fine-grained, not chunky glitter.
Nail Shape: Sharp modern square. The angular shape complements the geometric stripe pattern.
Design Element: Crisp white horizontal stripes across the navy base. A raised 3D red star on the middle fingers.
Finish: Glossy light-reflecting coat to maximize the shimmer effect.
Get The Look at Home:
Striping tape is your best friend for those crisp white lines. Freehand stripes on a shimmer base show every wobble.
- Navy base: Apply two coats of your shimmery navy polish. Let dry fully — white polish over tacky navy will turn grey.
- Tape: Place thin strips of nail tape horizontally across each nail at even intervals. Press firmly to prevent bleed.
- White stripes: Paint over the taped area with a one-coat white polish. One confident pass — going back over it shifts the tape.
- Peel: Remove the tape immediately while the white is still wet. Pull at a 45-degree angle for the cleanest edge.
- 3D star: Apply a 3D star charm or build a star shape using thick red builder gel. Cure if using gel.
- Seal: Heavy-duty top coat over everything. Two coats minimum to encapsulate the 3D element and prevent snagging.
28 Cute & Sporty Baseball Game Nail Ideas for 2026 ⚾
4.Midnight Starry Night
The ultimate festive flag-inspired mani.
Overview:
Some Fourth of July designs are subtle. This one isn't, and that's entirely the point. A solid creamy midnight blue base serves as the night sky for a scattered constellation of red and white star decals, while white horizontal stripes on alternating nails reference the flag without being a literal reproduction. It's busy, but deliberately so.
The dark navy base is what keeps this from looking costumey. On a bright blue or red base, the same star-and-stripe combination would tip into territory better suited for a child's birthday party. The midnight tone adds enough sophistication that the design reads as intentional rather than excessive.
Decals are doing most of the work here, which is good news for anyone who doesn't have a steady enough hand for hand-painted stars. The key is pressing them firmly onto a slightly tacky surface so they don't lift at the edges. Two thin layers of top coat will encapsulate them properly.
Design Breakdown:
A maximalist star-and-stripe design that uses a dark base to keep the busy pattern grounded.
Base Color: Solid creamy midnight blue across all nails.
Nail Shape: Medium-length square. The flat surface gives the star decals and stripes enough room to read clearly.
Design Element: White horizontal stripes on middle nails. Scattered red and white star decals in various sizes on remaining nails.
Finish: Smooth glossy top coat to seal the decals and create a unified surface.
Get The Look at Home:
This design takes patience. Let each layer dry before adding the next, or the stars will smear into the stripes.
- Base: Apply navy base to all nails. Two coats for full opacity. Let dry completely.
- Stripes: On the middle nails, use a liner brush or striping tape to paint white horizontal lines. Space them evenly.
- Stars: On the remaining nails, use tweezers to place star decals in different sizes. Vary the density — cluster some together, leave others isolated.
- Press: Smooth each decal with a silicone tool or your fingertip to ensure full contact with the nail surface.
- Seal: Apply two thin layers of top coat to create a smooth, chip-resistant surface over the decals.
5.Nautical Star Contrast
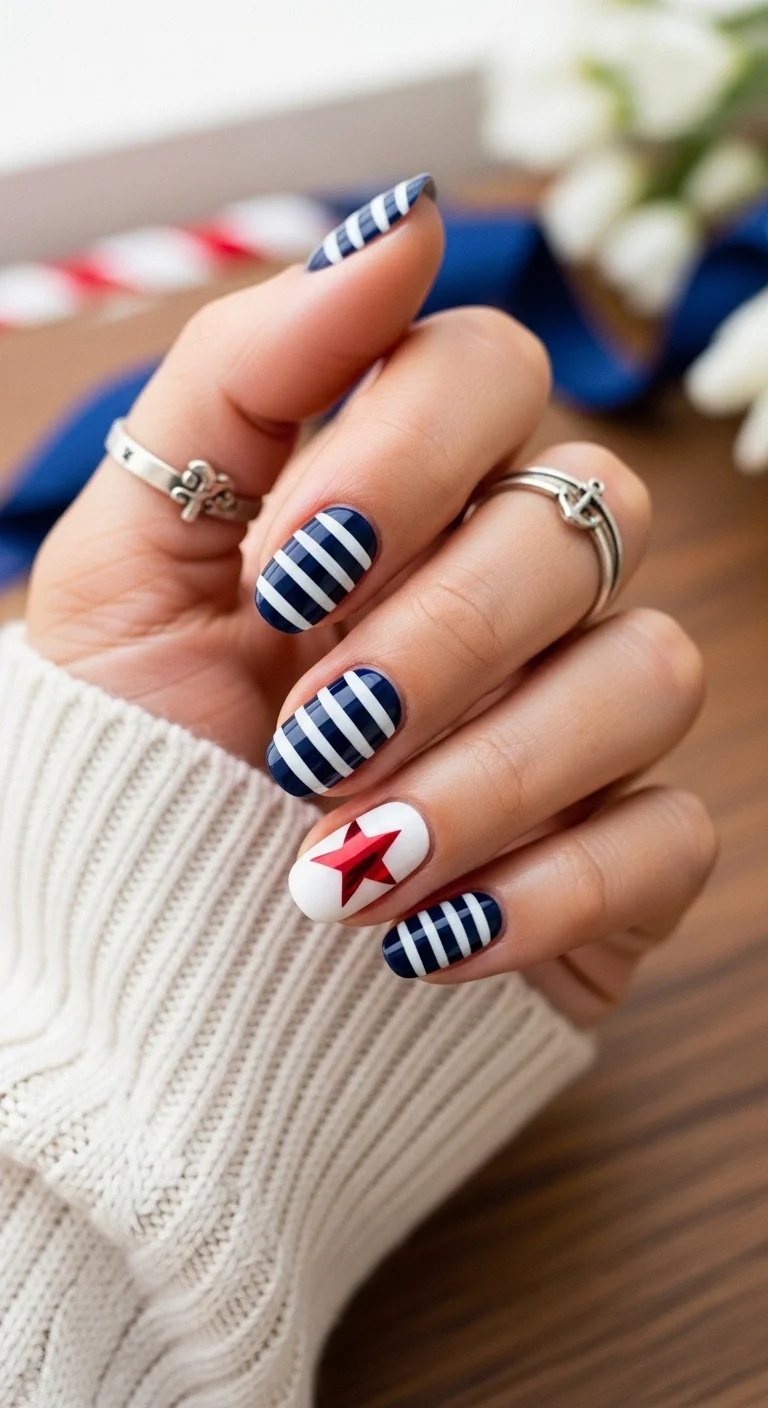
Bold stripes with a statement accent.
Overview:
There's something deeply satisfying about a crisp navy-and-white stripe. It's a pattern that works on sailboats, on picnic blankets, and apparently on nails. This version keeps the stripes thick and bold rather than pinstriped, which gives the design a modern, graphic quality that feels very current.
The large red star on the white accent nail is what transforms this from "nautical summer mani" into "Fourth of July mani." It's a single, concentrated burst of holiday color against a neutral background, and the contrast is immediate. Your eye goes straight to it.
The round nail shape softens the boldness of the thick stripes. On a square or coffin shape, this same design would feel more aggressive. The rounded edges keep it playful and wearable for everyday summer activities, not just holiday events.
Design Breakdown:
A high-contrast graphic design that uses a single accent nail to anchor the patriotic theme.
Base Color: Stark white and deep navy, used in bold blocks.
Nail Shape: Classic round. The curved edges soften the graphic stripe pattern.
Design Element: Thick horizontal navy stripes on a white base across most nails. A large singular red star on the ring finger accent nail.
Finish: High-gloss protective coat to seal the layers and add shine.
Get The Look at Home:
Vinyl stencils or a very steady hand — pick one. The thick stripes are more forgiving than thin ones, but wobbles still show.
- Accent nail: Paint the ring finger solid white. Two coats for full coverage.
- Remaining nails: Paint all other nails navy blue.
- Stripes: Using white acrylic paint or a striper brush, add thick horizontal bands over the navy nails. Space them evenly.
- Star: Place a large red star sticker in the center of the white accent nail. Press firmly.
- Seal: Glossy top coat over everything to blend the layers and prevent the sticker edges from lifting.
30+ Chic Pool Party Hairstyles for Summer 2026 🌊👙
6.The Minimalist Starlet
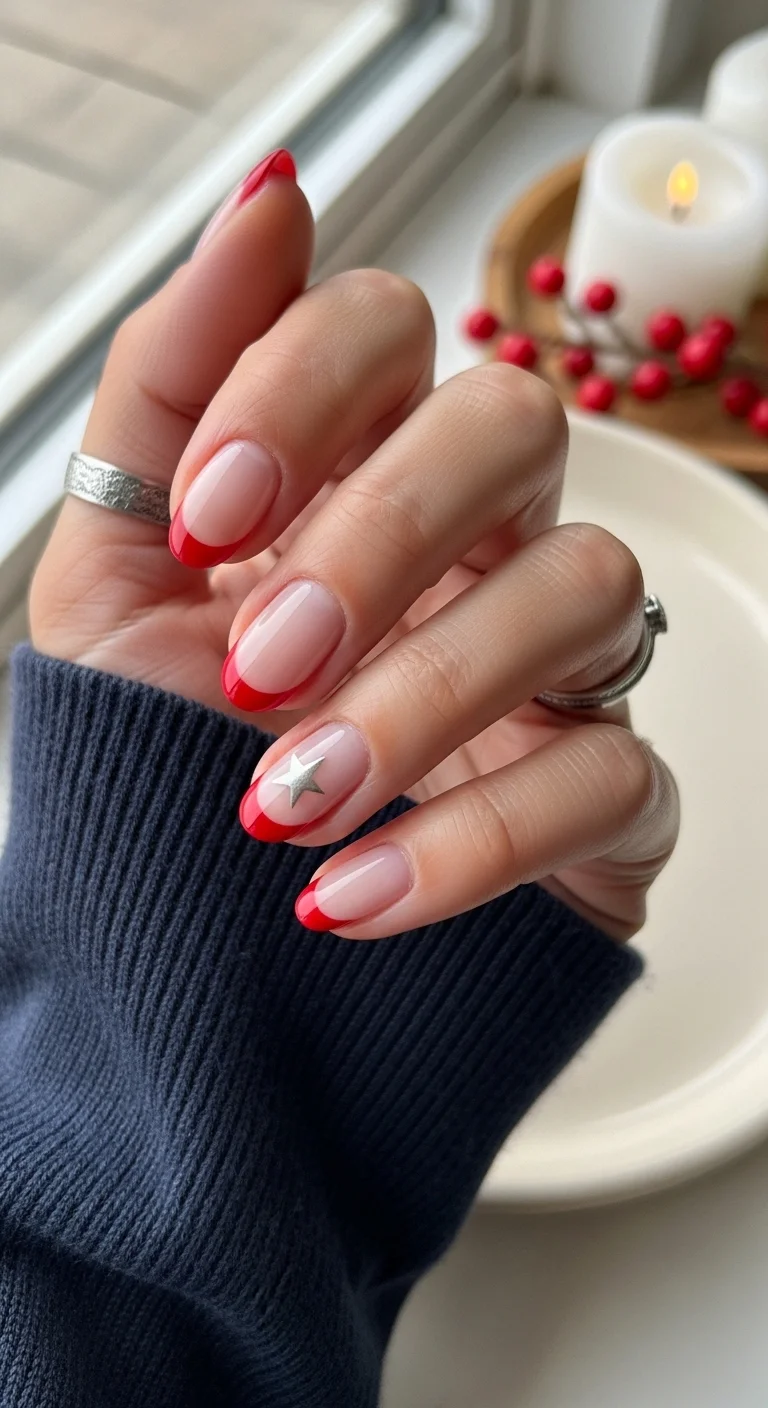
Quiet luxury meets holiday spirit.
Overview:
Quiet luxury in nail form means knowing exactly how much to add and when to stop. This design is a masterclass in restraint. A sheer, jelly-like nude base that nearly matches the natural nail bed, a thin line of bright red at the tip, and one silver star decal on the ring finger. That's it. Three elements, zero clutter.
The challenge is execution, not concept. Sheer polishes dry fast and show every brush stroke. The red French tip needs a clean smile line — on a sheer base, there's nowhere to hide uneven edges. And the star decal needs to sit flat against the nail without lifting at the points, which means pressing it into slightly tacky polish rather than dry.
This is the design for someone who wants to acknowledge the holiday without broadcasting it from across the room. It works at a board meeting at 9 AM and a rooftop fireworks viewing at 9 PM without needing a change.
Design Breakdown:
A minimal French variation that uses a single accent to signal the holiday theme.
Base Color: Sheer, jelly-like nude that blends with the natural nail bed.
Nail Shape: Medium almond. The classic French manicure silhouette.
Design Element: Thin bright red French tip on all nails. A single silver metallic star decal on the ring finger.
Finish: Clean glossy finish.
Get The Look at Home:
The smile line is everything on a sheer base. Take your time with it.
- Base: Apply one coat of a sheer pinky-nude. Let dry. A second coat if you want more coverage, but sheer is the goal.
- Red tips: Using a bright red and a French liner brush, paint a thin curve at the very edge of the nail. Start from one sidewall, sweep to center, repeat from the other side.
- Cleanup: Dip a flat, stiff brush in pure acetone and run it along the smile line to sharpen any uneven edges.
- Star: Place one silver star decal on the ring finger. Press gently with a silicone tool.
- Seal: High-shine top coat to lock everything down.
7.Watercolor Sparklers
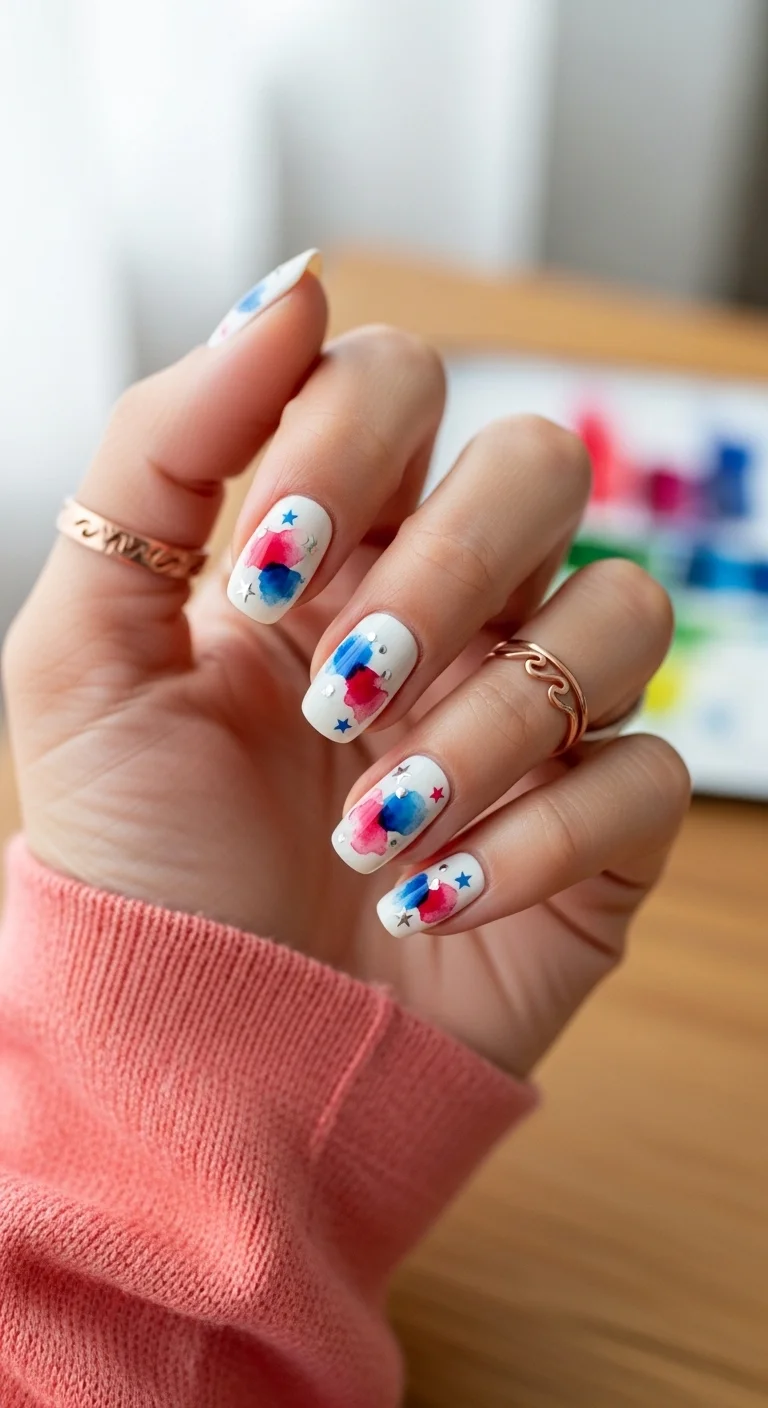
Artistic and airy holiday vibes.
Overview:
Watercolor nail art is one of the few techniques where less control actually produces better results. The "blooming" effect happens when you intentionally let colors bleed into each other on a wet surface, which means the loosest application usually looks the most professional. This design leans into that principle with red and blue ink-wash splotches over a crisp white base.
The key is thinning your polish. Straight-from-the-bottle opacity will give you solid blobs rather than the translucent, painterly effect this design requires. A drop of acetone or clear top coat mixed with the color on a palette does the trick. You want the consistency of watercolor paint, not regular nail polish.
The tiny silver star glitters scattered through the wet color are what make this Fourth of July rather than abstract art. They need to go into the polish while it's still wet so they embed into the surface rather than sitting on top. Once the watercolor layer dries, the stars won't adhere properly.
Design Breakdown:
An abstract, painterly design that uses diluted polish to create soft, diffused color washes.
Base Color: Crisp, opaque white as the canvas.
Nail Shape: Soft square. The straight edges contrast nicely with the organic, flowing watercolor shapes.
Design Element: Blurred blobs of red and blue diluted polish, with tiny silver star glitters embedded in the wet color.
Finish: Smooth satiny gloss to level the surface and intensify the watercolor saturation.
Get The Look at Home:
This is a "work messy, clean up later" technique. The chaos is part of the aesthetic.
- White base: Two coats of opaque white. Let dry completely.
- Thin the colors: On a palette, mix a drop of red polish with a drop of acetone. Repeat with blue. The consistency should be watery.
- Dab the color: Using a small sponge or brush, dab the thinned red and blue randomly onto the nail. Let them bleed into each other at the edges.
- Stars: While the color is still wet, drop tiny silver stars into the splotches. They'll embed into the surface.
- Dry: Wait at least five minutes before touching anything. The watercolor layer needs to set fully.
- Seal: One coat of glossy top coat to smooth the surface and lock the stars in place.
30 Stunning Beach Nail Ideas for the Best Vacation in 2026 🌊
8.Midnight Polka Dot Star
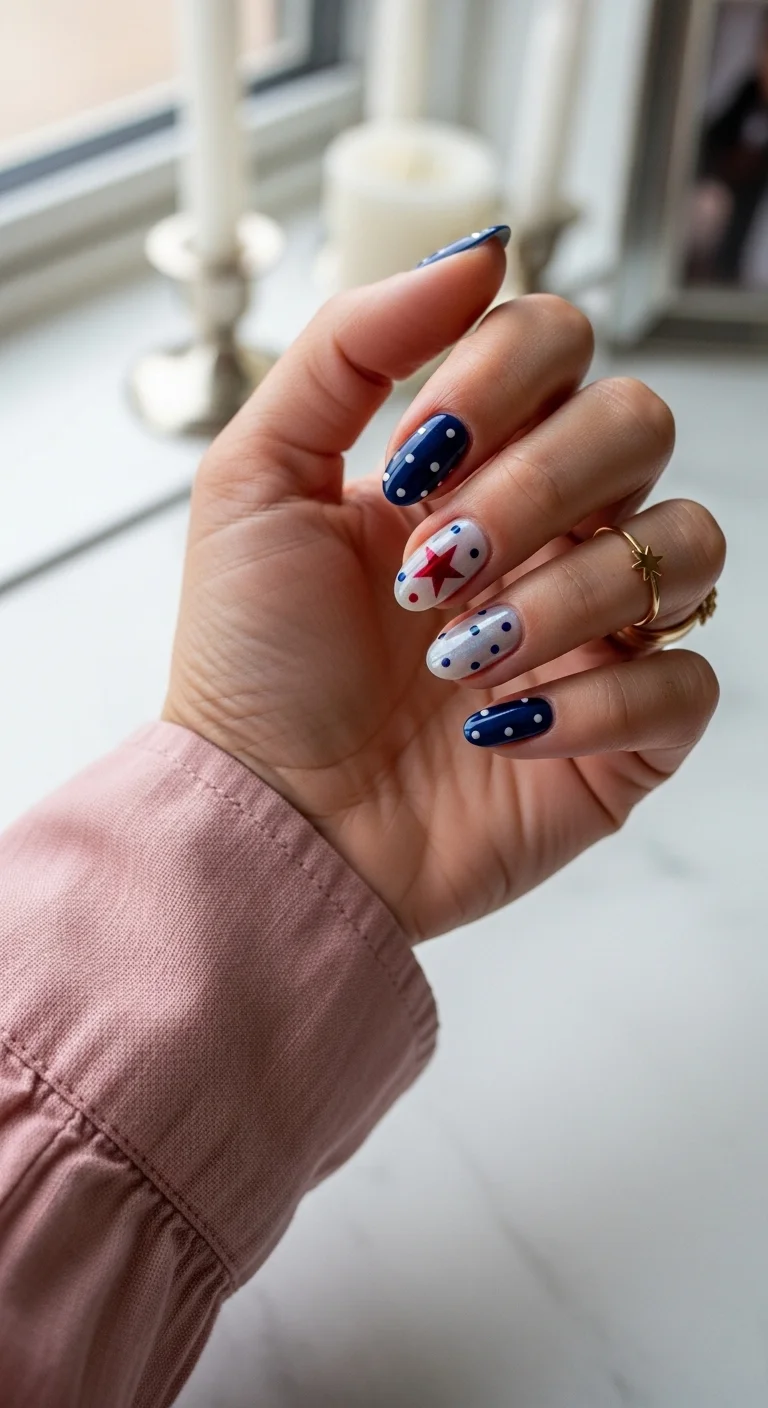
Playful dots for a festive touch.
Overview:
Polka dots on nails are one of those designs that look simple but carry a surprising amount of retro charm. The uniform white dots over a creamy navy base evoke 1950s Americana — think picnic tablecloths and vintage diner booths. It's nostalgic without being costume-y.
The accent nail is what pulls the design into holiday territory. Without the white nail featuring a large red star, this is just a navy polka dot mani. With it, the entire set reads as deliberately patriotic. The star is the punctuation mark that completes the sentence.
Short oval is the right call for this design. The dots need even spacing to look clean, and shorter nails require fewer dots per surface, which means less room for inconsistency. The rounded shape also softens the overall look and keeps it playful.
Design Breakdown:
A retro-inspired dot pattern with a single accent nail that anchors the holiday theme.
Base Color: Creamy solid navy blue.
Nail Shape: Short practical oval. Compact and clean.
Design Element: Uniform white polka dots on navy nails. One white accent nail with a large metallic red star.
Finish: High-gloss gel finish.
Get The Look at Home:
A dotting tool is essential — even the end of a bobby pin works in a pinch. Consistency is the goal.
- Base: Paint most nails navy and one nail white. Two coats each.
- Dots: Dip your dotting tool in white polish. Press lightly onto the navy nails in an even grid pattern. Reload the tool every three to four dots for consistent size.
- Star: On the white nail, place a red star decal in the center. Press firmly with a silicone tool.
- Dry: Let the dots set for at least five minutes. They need to be fully dry before top coating or they'll smear.
- Seal: Glossy top coat to encapsulate the dots and prevent them from chipping.
9.Sky Blue Firework Dots
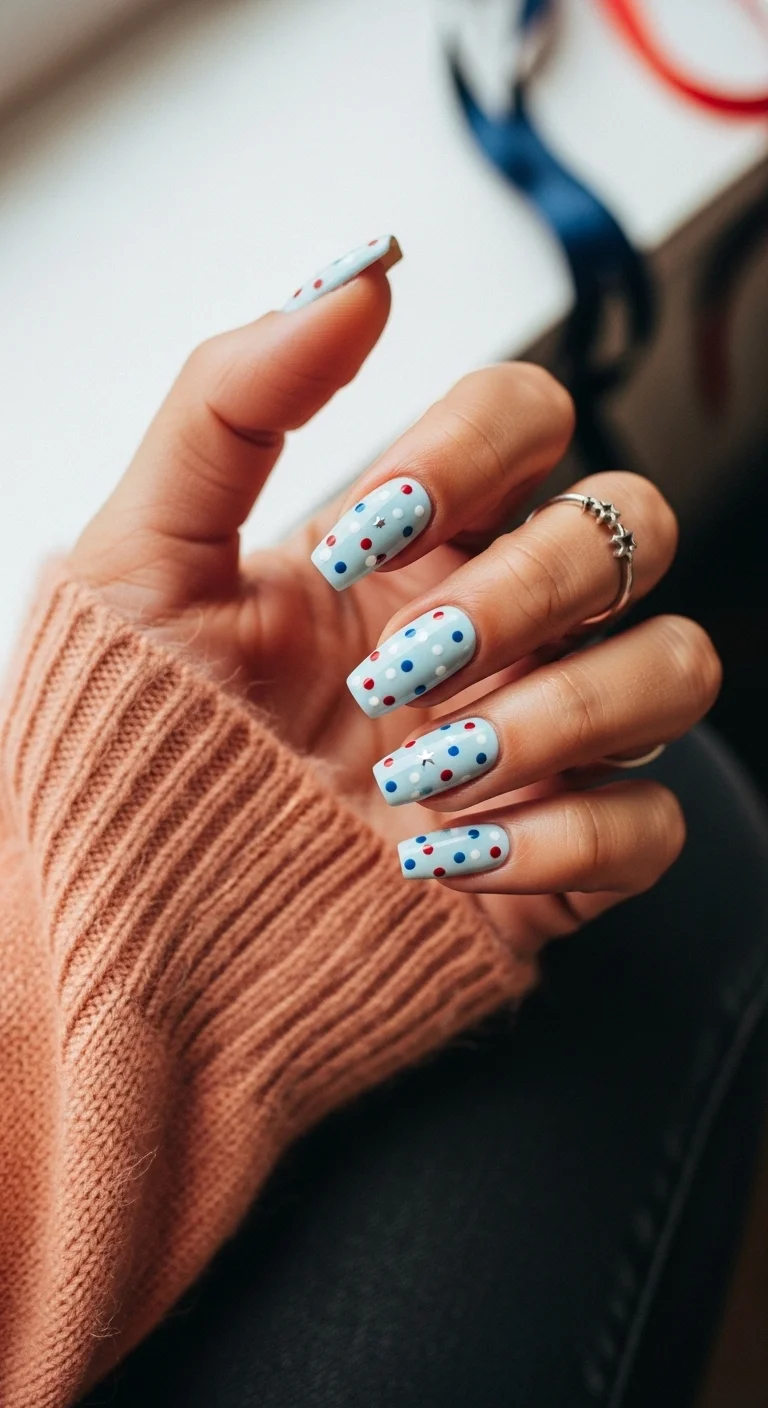
A softer, lighter blue for summer.
Overview:
Navy is the default for patriotic nail designs, but sky blue offers something different: a lighter, airier canvas that feels more like a July afternoon than a July evening. The pale blue base is soft enough to work as an everyday summer color, while the scattered red and navy dots add just enough holiday reference to make it thematic.
The dots are intentionally varied in size and spacing, which gives the design a confetti-like quality rather than a rigid polka dot pattern. Some are larger, some are smaller, and they're placed randomly rather than in a grid. This looseness is what makes it feel playful rather than precise.
The long coffin shape gives the dots room to scatter naturally. On shorter nails, the same pattern would feel compressed and busy. The length lets each dot breathe and keeps the overall effect light and festive.
Design Breakdown:
A relaxed dot pattern on a soft blue base that favors organic placement over rigid spacing.
Base Color: Creamy pale sky blue. Avoid anything with shimmer — the dots are the visual focus.
Nail Shape: Long tapered coffin. The extended canvas lets the dots scatter naturally.
Design Element: Scattered navy and red polka dots in varying sizes across all nails.
Finish: Smooth high-shine gloss.
Get The Look at Home:
Let the base dry for at least ten minutes before dotting. Wet base plus dotting tool equals smeared mess.
- Base: Two coats of sky blue polish. Let dry fully.
- Navy dots: Using a larger dotting tool, place navy dots randomly across the nails. Space them generously.
- Red dots: Switch to a smaller dotting tool and add red dots in the gaps between the navy ones. Vary the sizes.
- Don't overthink: Random placement looks better than planned spacing for this design. Embrace the chaos.
- Seal: Fast-drying top coat to prevent smudging your work.
26 Stunning Summer Braided Hairstyles for Women 2026 ☀️💇♀️
10.The Crimson Crescent
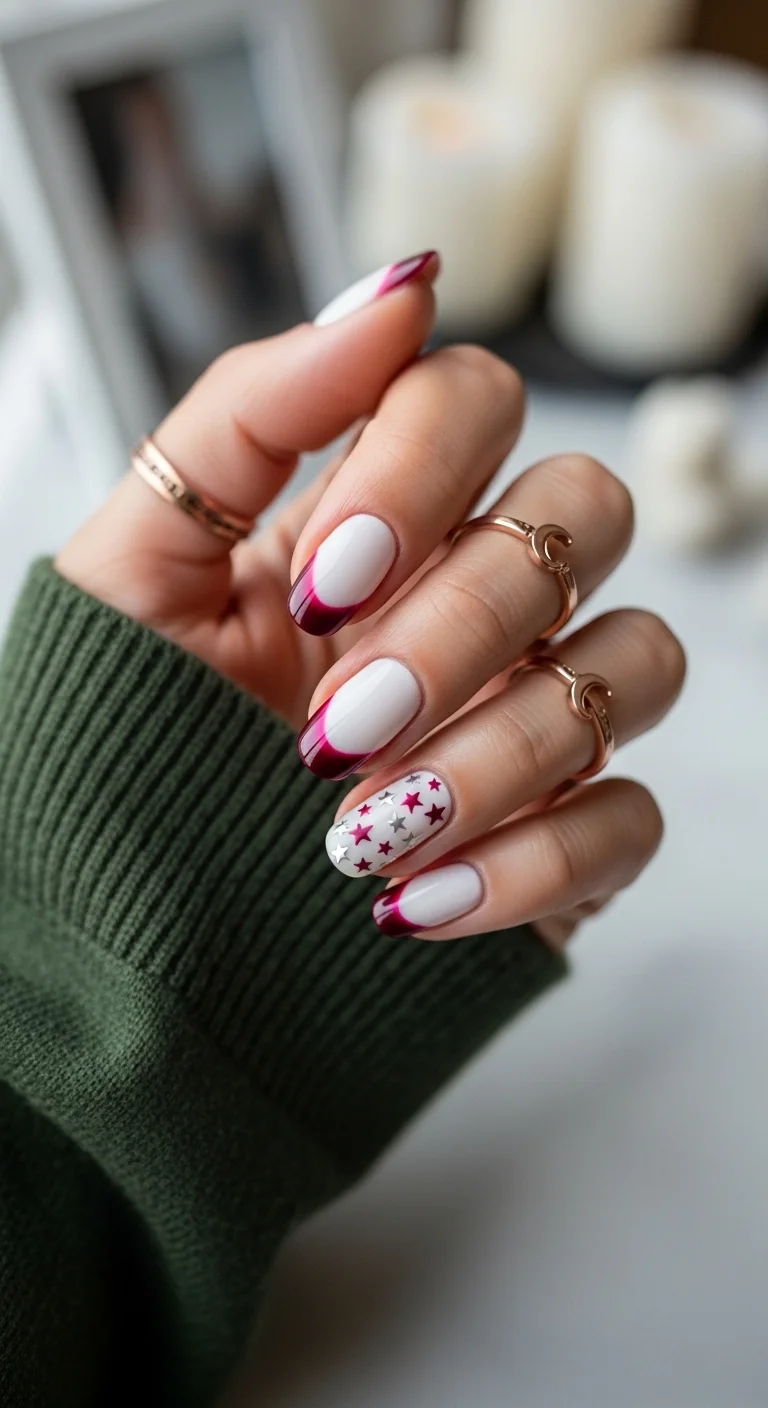
Sophisticated deep red for the holiday.
Overview:
Not every Fourth of July red needs to be bright. This deep burgundy-crimson occupies a more sophisticated space — it's the difference between a candy apple and a glass of cabernet. On a crisp white base, the dark tips look incredibly sharp and modern, the kind of contrast that photographs beautifully in any lighting.
The white base is doing more than providing contrast. It makes the burgundy tips look cleaner and more deliberate than they would on a nude or sheer base. There's a crispness to the white-against-dark-red boundary that reads as polished and intentional.
Tiny silver star decals scattered sparingly across a few nails add the holiday context without overpowering the design's elegance. This is a mani that works at a summer wedding, a high-end dinner, or a garden party — anywhere you want your nails to complement rather than dominate.
Design Breakdown:
A high-contrast French that swaps traditional red for a deeper, more complex crimson tone.
Base Color: Solid bright opaque white. Two coats for full coverage.
Nail Shape: Soft medium almond. The curved tip follows the natural nail line.
Design Element: Deep burgundy-red French tips on most nails. Scattered tiny silver star decals on select nails.
Finish: High-shine glossy top coat.
Get The Look at Home:
Follow the natural curve of your nail for the smile line — fighting your nail shape is how you get wobbly French tips.
- White base: Two coats of opaque white. Let dry completely.
- Burgundy tips: Using a deep red and a French liner brush, paint a curved tip on each nail. Two thin layers for full opacity over the white.
- Cleanup: An angled brush dipped in acetone sharpens the smile line. This step is non-negotiable on a white base.
- Stars: Place a few tiny silver stars on the ring finger. Less is more here.
- Seal: Glossy top coat over everything.
11.The Starry Frenchie
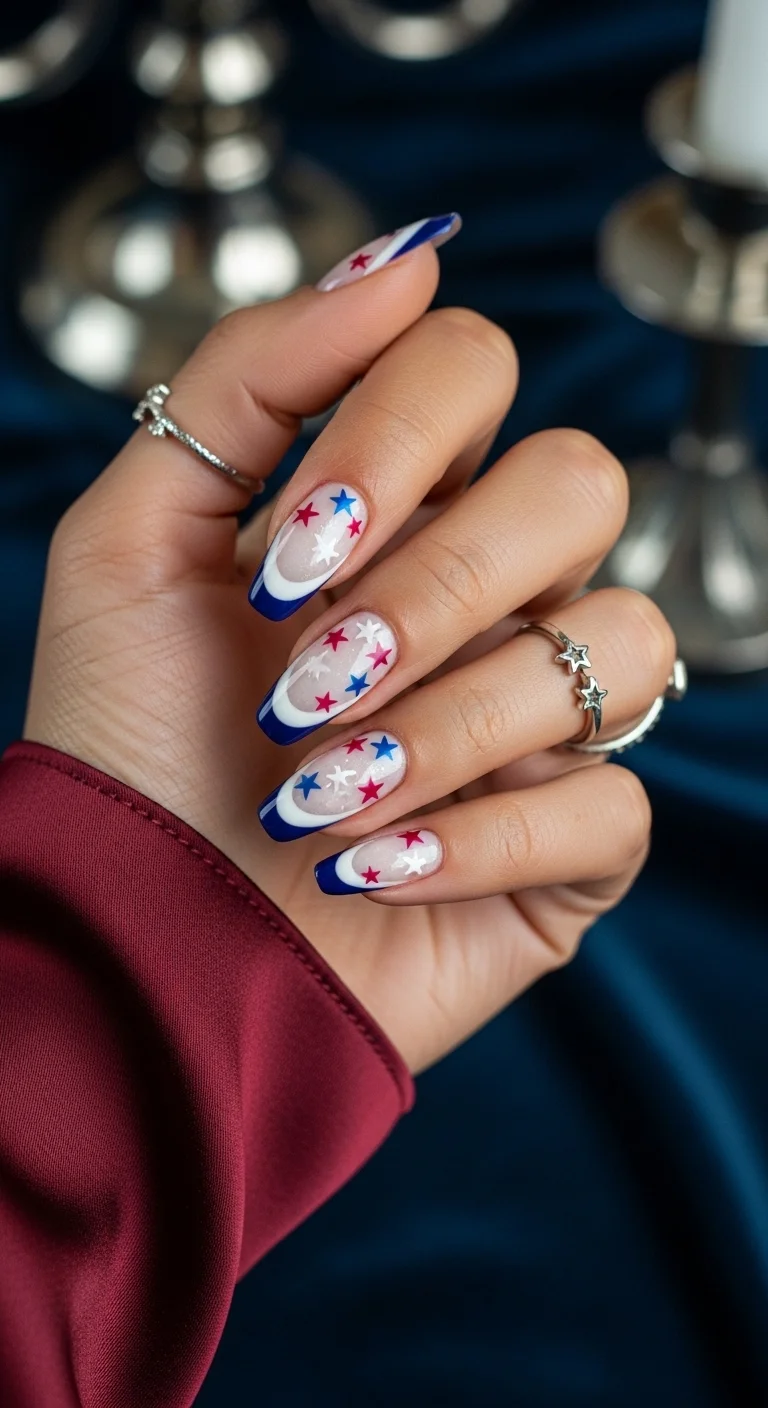
A fun, multi-colored star party.
Overview:
A French tip with a cobalt blue swooping edge instead of the usual white is already a departure. Adding scattered red, white, and blue stars across the nude nail bed turns it into something closer to a celebration on canvas. The stars are different sizes and colors, which gives the design a kinetic, almost confetti-in-motion quality.
The clear or very sheer nude base is critical. It lets the French tip and the stars coexist without competing for attention. On an opaque base, the star details would fight with the background color and the design would lose its airy, open quality.
This is a long-coffin design, which is the right call. The extended nail bed gives the scattered stars enough room to feel like a deliberate pattern rather than random stickers. The length also gives the French tip a more dramatic curve.
Design Breakdown:
A French variation that layers multi-colored star details over a natural, sheer base.
Base Color: Clear or very sheer natural nail. The natural nail bed should be visible.
Nail Shape: Long coffin. The flat tip provides a clean edge for the French curve.
Design Element: White French tips with a thin cobalt blue border along the edge. Scattered red, blue, and white star decals across the nail bed.
Finish: High-gloss finish.
Get The Look at Home:
A clear base coat lets your natural nail show through, which is the whole point of this design.
- Base: Apply a clear base coat or a very sheer nude.
- White tip: Paint a thick white French tip. Two coats for full coverage.
- Blue border: Using a thin liner brush, add a navy blue line along the top edge of the white tip. Keep it thin and even.
- Stars: Place star decals in red and blue across the nail bed. Vary the sizes and spacing.
- Seal: Thick top coat to smooth out the decal edges and create a unified surface.
35 Fun Birthday Nail Designs for 2026 🎂
12.Midnight Glimmer Tips
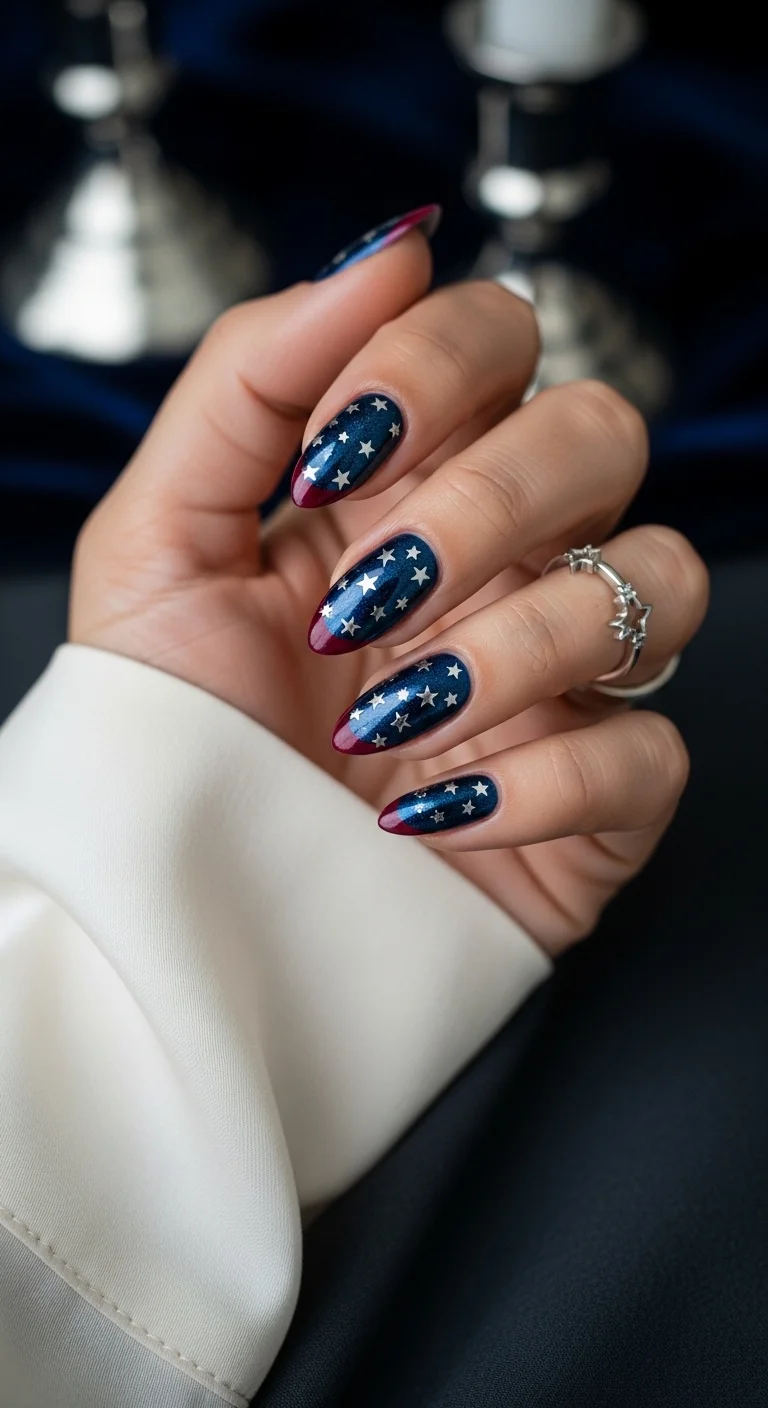
Moody shimmer for a starry night.
Overview:
Fine silver shimmer suspended in a deep navy base creates an effect that's closer to an actual night sky than any flat color can achieve. The particles catch light at different angles, shifting between subtle twinkle and full-on sparkle depending on your hand position. It's the kind of polish that makes people ask what you're wearing.
The dark red micro-French tips are almost invisible at a distance, which is the design's secret weapon. Up close, they reveal themselves as a thin line of deep crimson at the free edge — a subtle holiday reference that doesn't announce itself. This is patriotism for people who don't want to wear their patriotism on their sleeve (or their nails).
The scattered silver star glitters are the finishing touch that ties the navy shimmer to the Fourth of July theme. They're small enough to blend with the base shimmer but distinct enough to register as stars rather than random glitter.
Design Breakdown:
A shimmer-forward design that uses micro-details for a subtle holiday reference.
Base Color: Shimmery galaxy-like midnight blue with fine silver particles.
Nail Shape: Sleek almond. The tapered shape complements the celestial shimmer effect.
Design Element: Deep red micro-French tips at the free edge. Scattered silver star glitters across the navy base.
Finish: Super-shiny reflective top coat to maximize the shimmer.
Get The Look at Home:
The shimmer in the blue does most of the visual work. Keep the other elements thin and precise.
- Base: Two coats of shimmery navy blue. Let dry fully.
- Micro tips: Using a deep red and the thinnest liner brush you have, paint the thinnest possible line at the tips. One pass per nail.
- Stars: While the polish is still slightly tacky, press small silver star glitters onto the nails. Use tweezers for precision.
- Press: Smooth the stars gently so they don't snag on fabric.
- Seal: Two layers of top coat for a glass-like finish that encapsulates the stars.
13.Confetti Star White
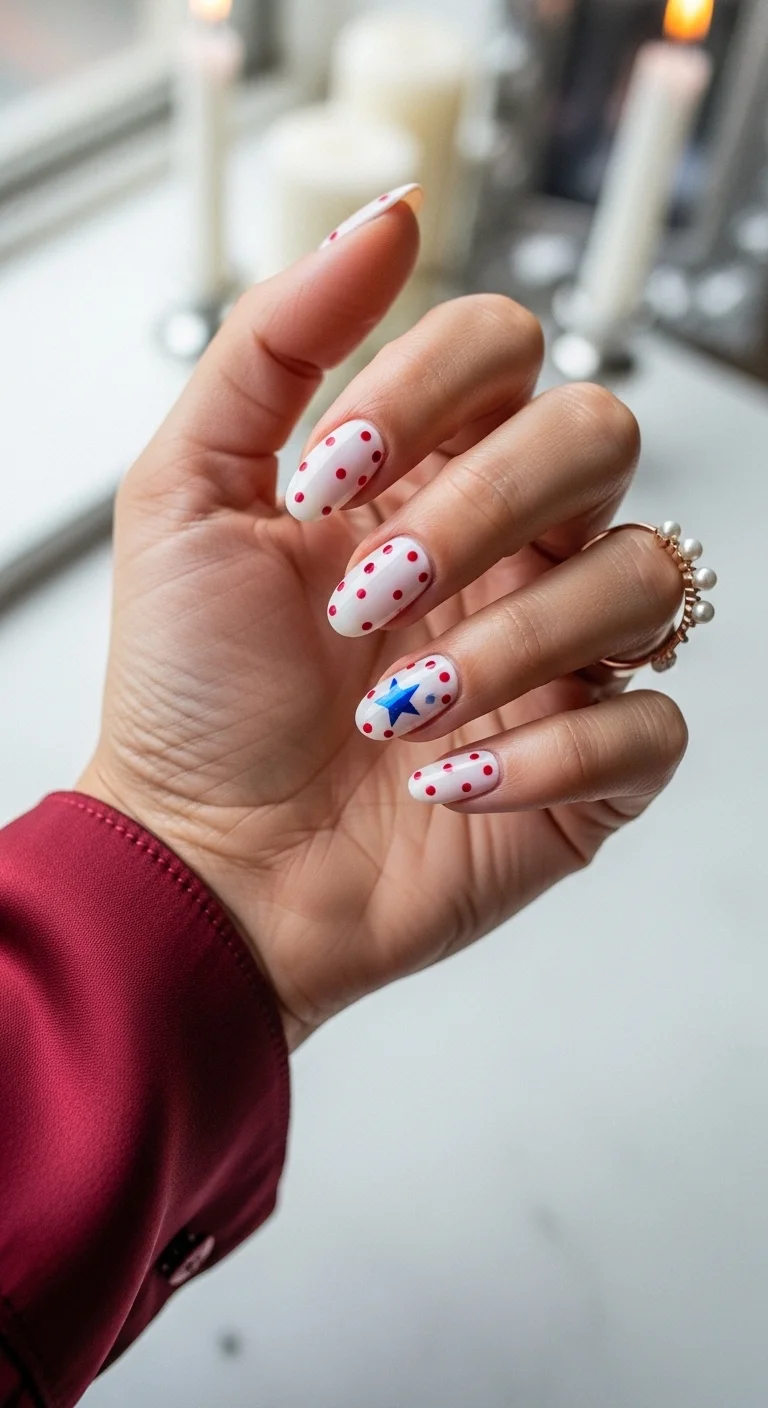
Bright white with a patriotic pop.
Overview:
A crisp white mani is a summer staple on its own. Adding tiny red dots across most nails and one large blue star on the ring finger transforms it from "clean girl aesthetic" into something with holiday personality. The red dots read as confetti — scattered, celebratory, and light.
The blue star is the anchor. It's the one element that stops the design from being "white nails with red dots" and makes it unmistakably patriotic. Its size and color create a focal point that your eye returns to repeatedly.
White polish is notoriously difficult to apply cleanly. It streaks, it bubbles, it shows every ridge in the nail surface. Three thin coats instead of two gives better opacity with less thickness, and a ridge-filling base coat is essential. Skip these steps and you'll spend the whole day staring at brush marks.
Design Breakdown:
A clean white base with minimal red accents and a single bold star statement.
Base Color: Crisp opaque white. Full coverage with no streaking.
Nail Shape: Medium oval. Practical and clean.
Design Element: Tiny red polka dots scattered across most nails. A large metallic blue star on the ring finger.
Finish: Smooth high-shine gloss.
Get The Look at Home:
Three thin coats of white beats two thick ones every time. Patience with the base determines the quality of the final result.
- Base: Apply a ridge-filling base coat. Let dry.
- White: Three thin coats of opaque white polish. Let each coat dry for at least three minutes.
- Dots: Using a small dotting tool and red polish, place tiny dots randomly across the nails. Keep them sparse.
- Star: Place a large blue star decal on the ring finger. Center it carefully.
- Seal: Thick top coat to smooth the surface and prevent the star decal from lifting.
32 Stunning Summer Wedding Hairstyles for Brides ☀️💍
14.Textured Navy Galactic
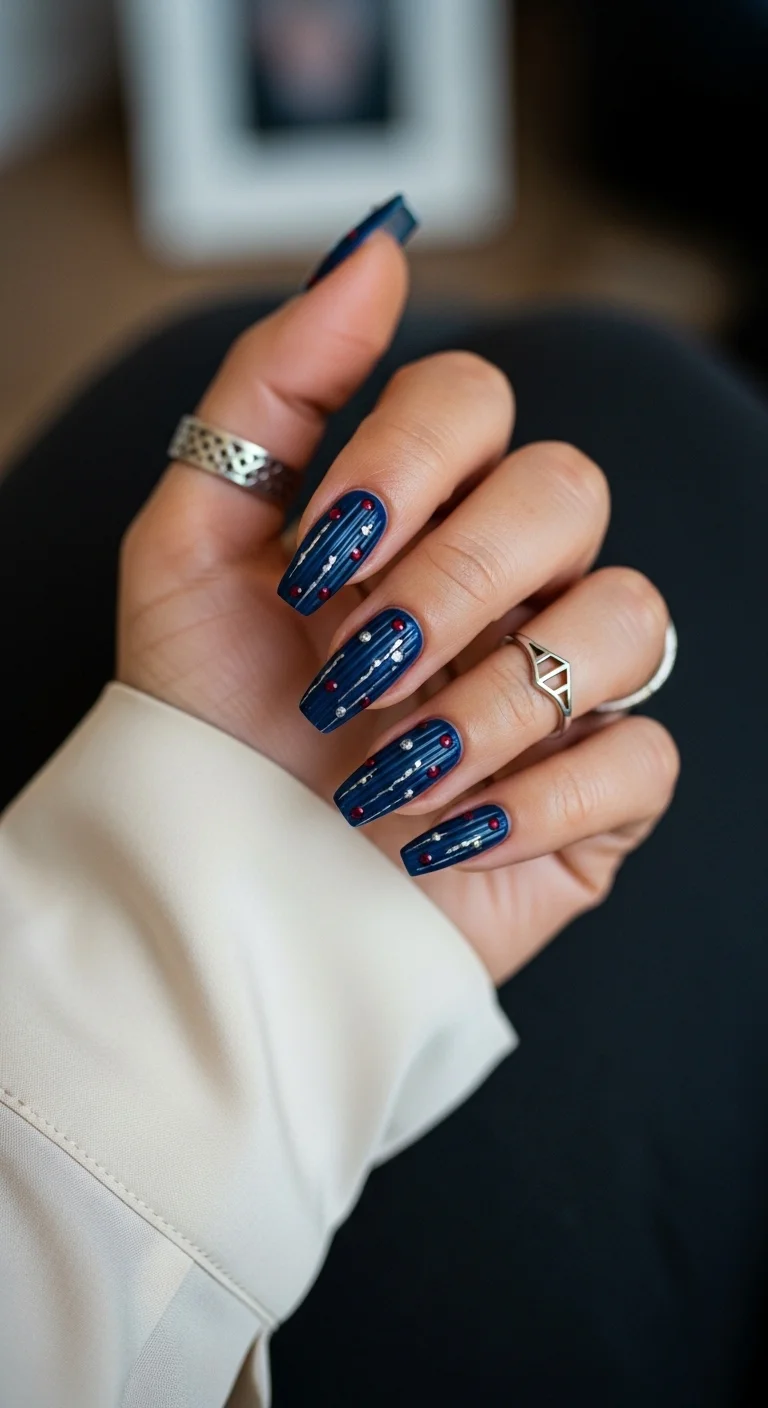
A modern, textured take on holiday nails.
Overview:
Texture in nail art is having a moment, and this design exploits it well. A solid navy base with fine vertical silver pinstripe lines creates a structured, almost architectural foundation. The raised red and silver dots placed along those lines add a three-dimensional quality that you can feel as much as see.
The vertical lines do something interesting visually: they elongate the nail and create a sense of upward movement that flat polish can't achieve. The 3D dots sitting on top of those lines interrupt the vertical flow in a way that draws the eye to each individual element. It's wearable art that rewards close inspection.
The semi-matte navy base with glossy dots creates a texture contrast that's subtle in photos but obvious in person. Your eye reads the velvety matte surface, then catches the glossy dot, then returns to the matte. It's a push-pull that keeps the design from being one-note.
Design Breakdown:
A textured, dimensional design that uses raised elements for a tactile, high-fashion effect.
Base Color: Solid navy blue with textured vertical ridges.
Nail Shape: Long coffin. The flat surface showcases the vertical texture pattern.
Design Element: Fine vertical silver pinstripe lines. Raised 3D red and silver dots placed along the ridges.
Finish: Semi-matte or velvet navy base with glossy dots.
Get The Look at Home:
Builder gel or a specialized texture polish creates the raised ridges. Regular polish won't hold the 3D shape.
- Base: Apply a solid navy base to all nails. Let dry.
- Ridges: Using a liner brush and navy builder gel, draw vertical lines across each nail. Cure if using gel.
- Dots: Using a dotting tool, place small dots of red and silver polish along the ridges. Build them up in two layers for height.
- Matte: Apply matte top coat over the navy base only. Avoid the dots.
- Gloss the dots: Using a thin brush, apply glossy top coat only on the raised dots for contrast.
15.Ombre Starry Gradient
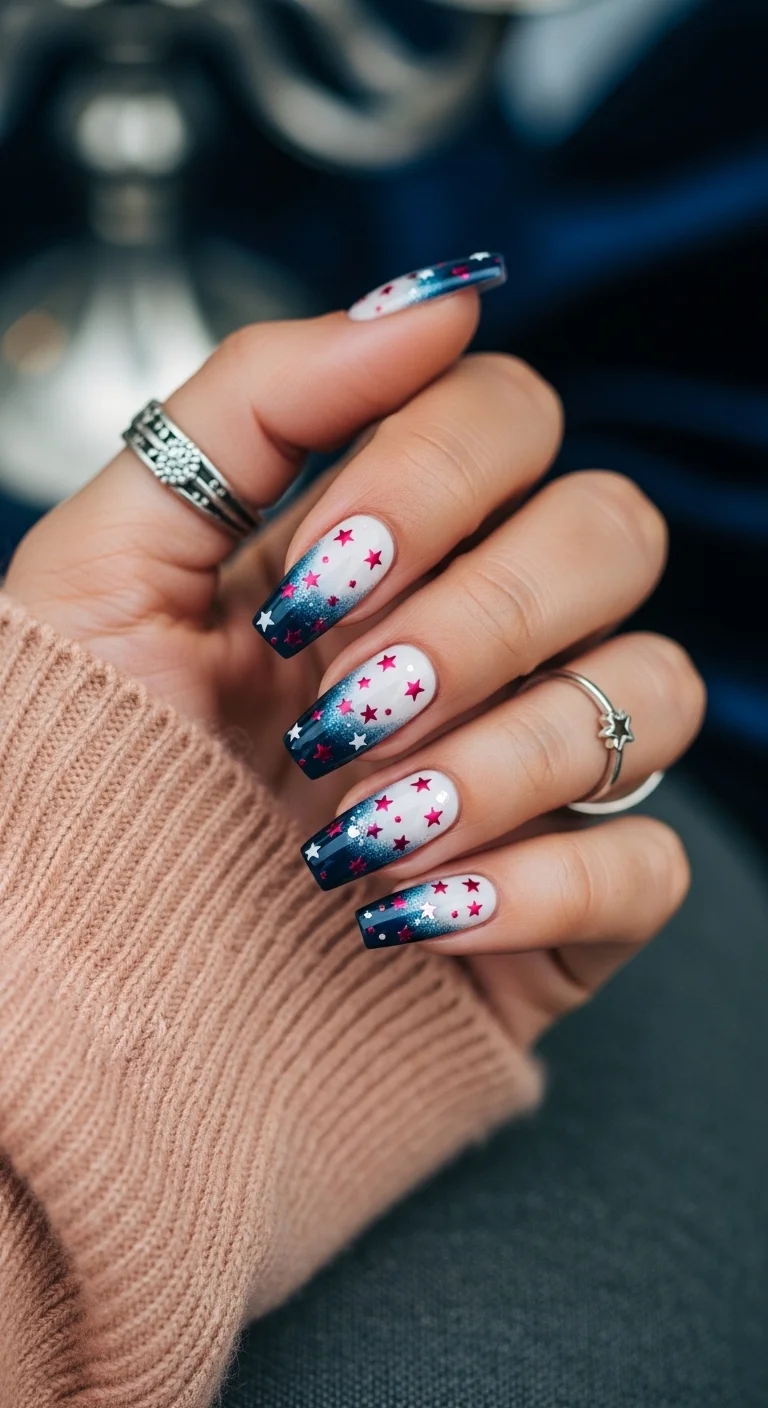
A beautiful gradient for summer nights.
Overview:
An ombre that transitions from white at the cuticle to deep navy at the tips creates a visual effect similar to dusk settling over a summer sky. The gradient is smooth and seamless, which means the sponge work needs to be precise — any harsh transition line will break the illusion.
The bright pinkish-red star decals scattered across the gradient add a modern twist to the traditional holiday palette. They're not classic flag red; they lean slightly toward magenta, which gives the design a more youthful, fashion-forward quality. Against the navy-to-white gradient, they pop with high contrast.
A subtle teal shimmer in the blue section adds dimension that doesn't show in photos but catches light beautifully in person. It's the kind of detail that makes people lean in for a closer look.
Design Breakdown:
A sponge-blended gradient that transitions from light to dark, accented with high-contrast star decals.
Base Color: White at the cuticle fading to deep navy at the tips. Subtle shimmer in the blue section.
Nail Shape: Square or coffin. The flat tip gives the gradient a clean, defined edge.
Design Element: Pinkish-red star decals scattered across the gradient in varying sizes.
Finish: Glossy with subtle shimmer in the blue section.
Get The Look at Home:
A makeup sponge is the only way to get a seamless gradient. Brush application will leave hard lines.
- White base: Apply a solid white base to all nails. Let dry fully.
- Sponge: Paint strips of white and navy side by side on a makeup sponge. Dab onto the nail, concentrating blue at the tip.
- Blend: Repeat two to three times, using a fresh section of sponge each time, until the gradient is smooth.
- Stars: While the surface is slightly tacky, press pinkish-red star decals onto each nail. Use tweezers.
- Seal: Two coats of top coat to smooth the sponge texture and lock the stars in place.
34 Cutest Butter Yellow Nail Designs for 2026 🧈
16.The Silver Star Minimalist
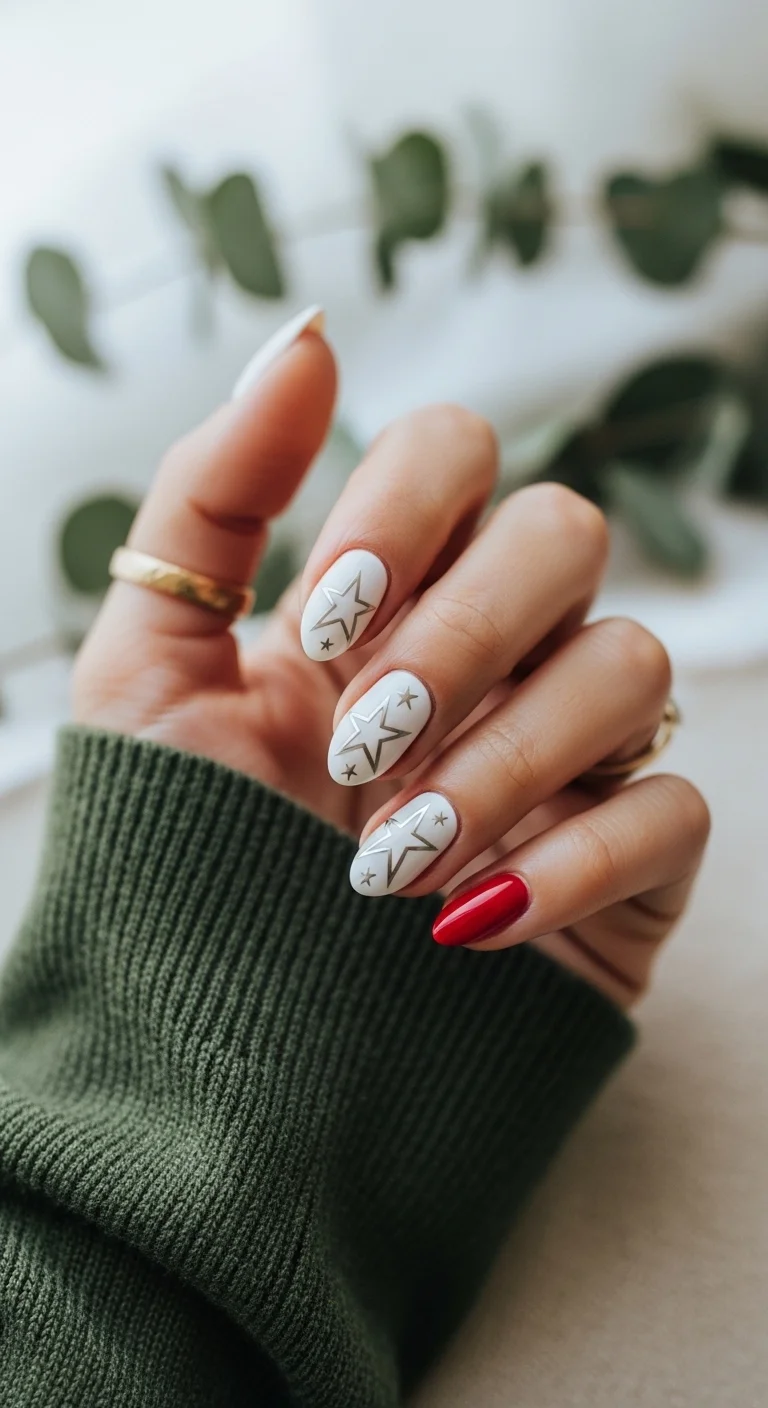
Clean, white, and effortlessly chic.
Overview:
White nails are a summer uniform for a reason — they're clean, bright, and go with everything. This design adds just enough detail to differentiate itself from a plain white mani without losing any of that versatility. Silver star outlines on the white nails are delicate enough to read as texture from a distance and reveal themselves as stars up close.
The single red accent nail is the holiday anchor. It's the one element that prevents the design from being "white nails with silver stars" and pushes it into Fourth of July territory. The red is bright and glossy — a statement color that contrasts sharply with the white without clashing.
Star decals or stamps are the practical choice here. Hand- painting star outlines at this scale requires a liner brush and steady hands that most people don't have. Stamps give you perfect, consistent outlines every time.
Design Breakdown:
A minimal white set with metallic star details and a single red accent for holiday context.
Base Color: Crisp opaque white on most nails. Solid bright red on the pinky accent nail.
Nail Shape: Classic almond. Clean and modern.
Design Element: Delicate silver metallic star outlines on the white nails. One solid red accent nail.
Finish: High-gloss clean finish.
Get The Look at Home:
Stamping plates with star patterns give you perfect outlines without the hand-painting stress.
- White base: Two to three thin coats of opaque white on all nails except the pinky.
- Red accent: Two coats of bright red on the pinky nail.
- Stars: Apply silver star outline stickers or use a nail stamping plate with a star pattern. Place at different angles across the white nails.
- Press: Smooth each star firmly so edges don't lift.
- Seal: High-gloss top coat to lock the stars in place and add shine.
17.Natural Star Outlines
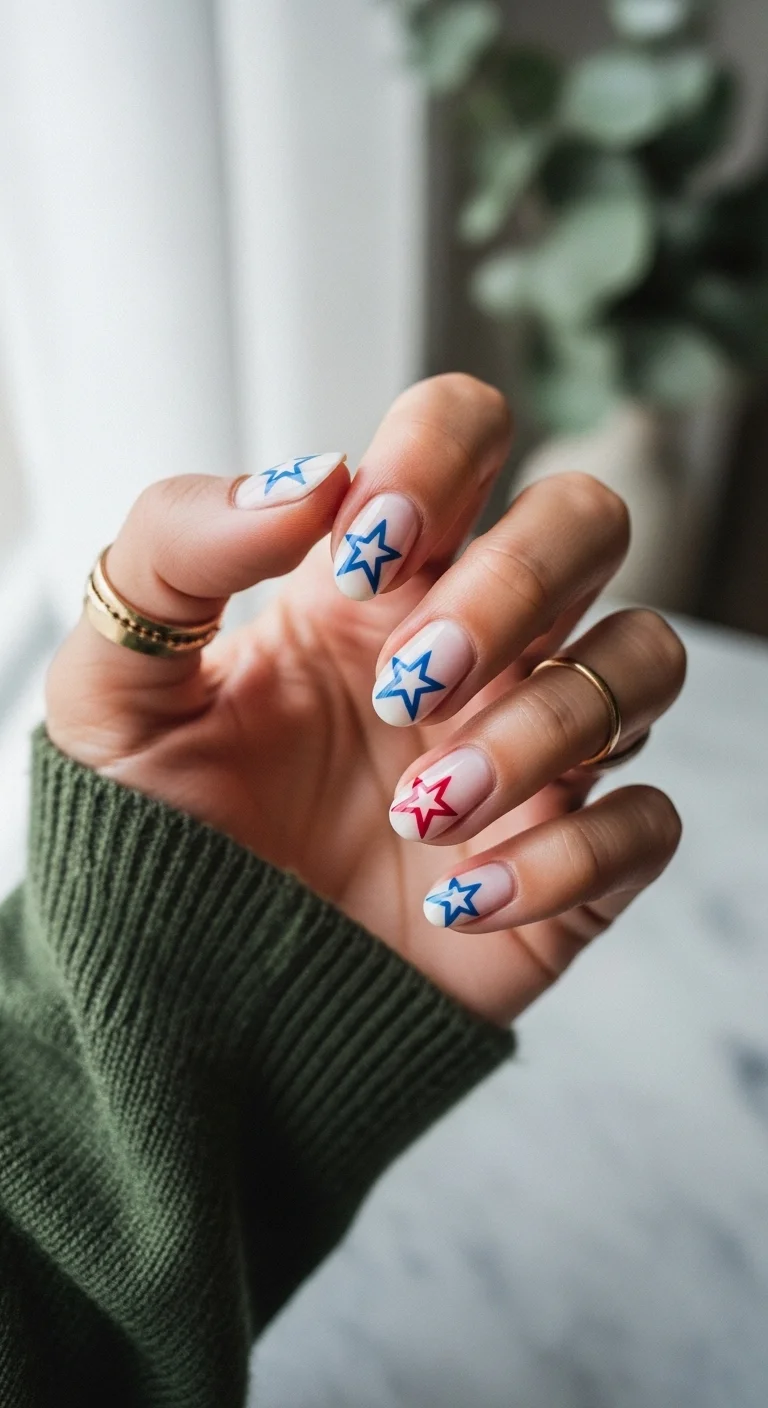
A minimal, negative-space star look.
Overview:
Negative space nail art uses the natural nail as a design element rather than covering it up. Here, a sheer nude or clear base lets the natural nail show through while thin hand-painted star outlines in navy and red sit near the tips. The effect is light, modern, and barely-there — the "no-makeup makeup" of nail art.
The star outlines are deliberately imperfect. They're thin, slightly wobbly, and have that hand-drawn quality that makes them feel personal rather than manufactured. This isn't a stamped or decal look; it's freehand, and the slight irregularities are part of the charm.
Short oval nails are the ideal canvas. The design is so minimal that long nails would make the star outlines look sparse and unfinished. On short nails, the same outlines look intentional and complete.
Design Breakdown:
A bare-bones negative space design that uses thin outlines instead of filled shapes.
Base Color: Clear or very sheer nude. The natural nail is the background.
Nail Shape: Short natural oval.
Design Element: Thin hand-painted star outlines in navy and red, concentrated near the tips.
Finish: Glossy natural-look finish.
Get The Look at Home:
A very fine liner brush is non-negotiable for these delicate outlines. Thick brushes will produce blobs, not stars.
- Base: Apply a clear base coat or a sheer nude. One coat only.
- Navy stars: Using a liner brush and navy polish, draw thin star outlines near the tips of most nails. Five-pointed, slightly imperfect.
- Red accents: Switch to red polish and add a few star outlines on the ring finger or alternating nails.
- Stencil option: If freehand stars feel too intimidating, use star-shaped stencils and paint inside them.
- Seal: Glossy top coat to protect the delicate outlines.
25 Stunning Summer Vacation Hairstyles for 2026 ☀️🌊
18.Tie-Dye Star Burst
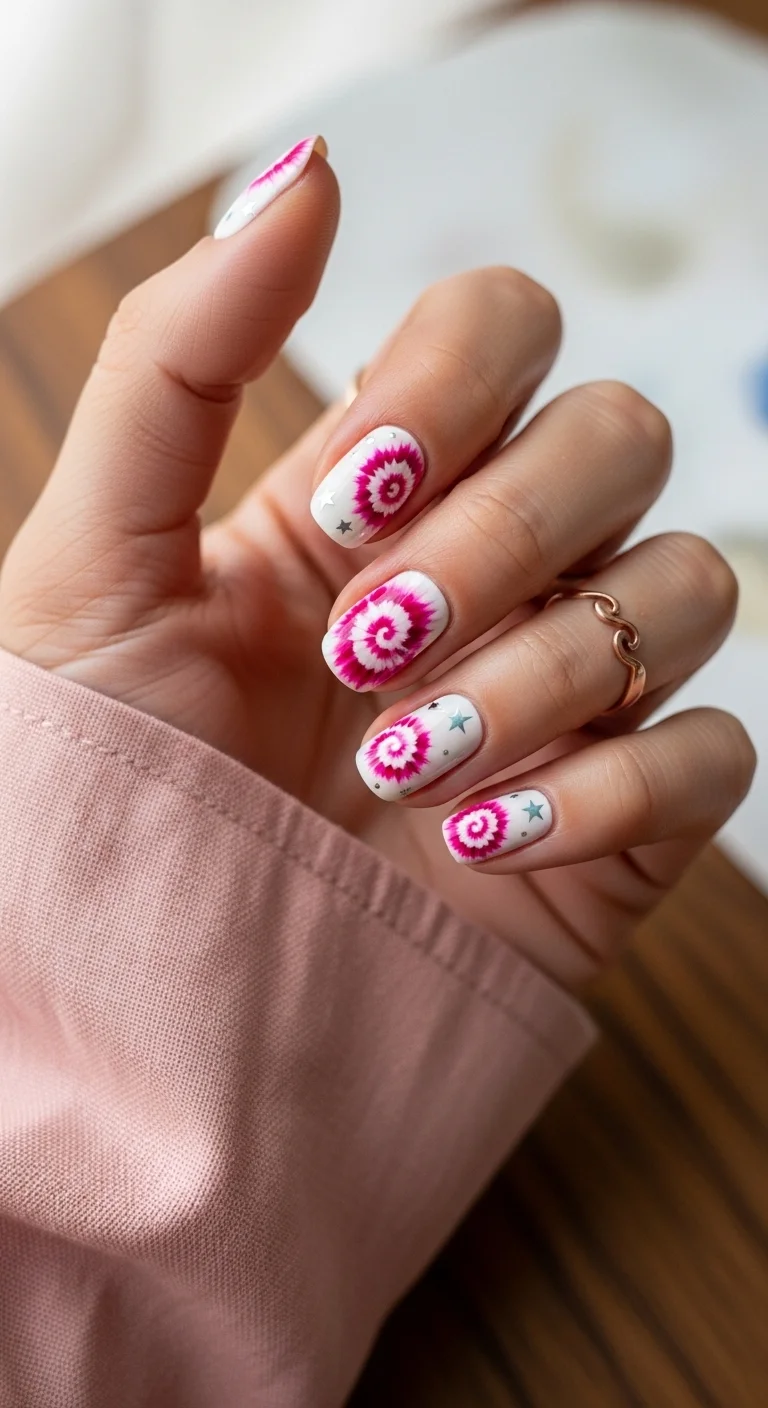
Fun, retro tie-dye for a festive day.
Overview:
Tie-dye on nails works because the swirl pattern is inherently organic — no two nails will look identical, and that's the point. This version uses pinkish-red and magenta swirls on a white base, creating a pattern that reads as retro and psychedelic rather than patriotic at first glance.
The small teal-blue and silver stars scattered on the remaining nails are what pull the design back toward the Fourth of July. They're the contextual clue that transforms "tie-dye nails" into "holiday tie-dye nails." Without them, you'd need to explain the theme. With them, the connection is immediate.
The technique involves dropping wet polish into wet polish and dragging a needle or toothpick through the dots to create the spiral effect. It's fast, forgiving, and genuinely fun to do. The hardest part is stopping before you overwork the swirls into muddy smudges.
Design Breakdown:
A wet-on-wet swirl technique that creates organic, psychedelic patterns with a holiday color palette.
Base Color: Opaque creamy white.
Nail Shape: Short soft square. The compact shape keeps the busy pattern from overwhelming the hand.
Design Element: Circular tie-dye swirls in pink and red on accent nails. Small teal-blue and silver star glitters on remaining nails.
Finish: Smooth high-gloss top coat.
Get The Look at Home:
Work on one nail at a time — the wet-on-wet technique requires speed before the polish sets.
- White base: Apply a solid white base to all nails. Let dry fully.
- Wet layer: On the accent nails, apply a second thin coat of white. Do NOT let it dry.
- Dots: While the white is wet, place dots of pink and red polish in a rough circle on the nail.
- Swirl: Use a toothpick or needle to drag through the dots in a spiral motion. Three to four drags per nail.
- Stars: On the remaining nails, place tiny silver and blue star glitters while the base is slightly tacky.
- Dry: Wait at least ten minutes before top coating. Wet tie-dye smears instantly under a brush.
- Seal: One coat of glossy top coat, applied gently.
19.Picnic Party Cherries
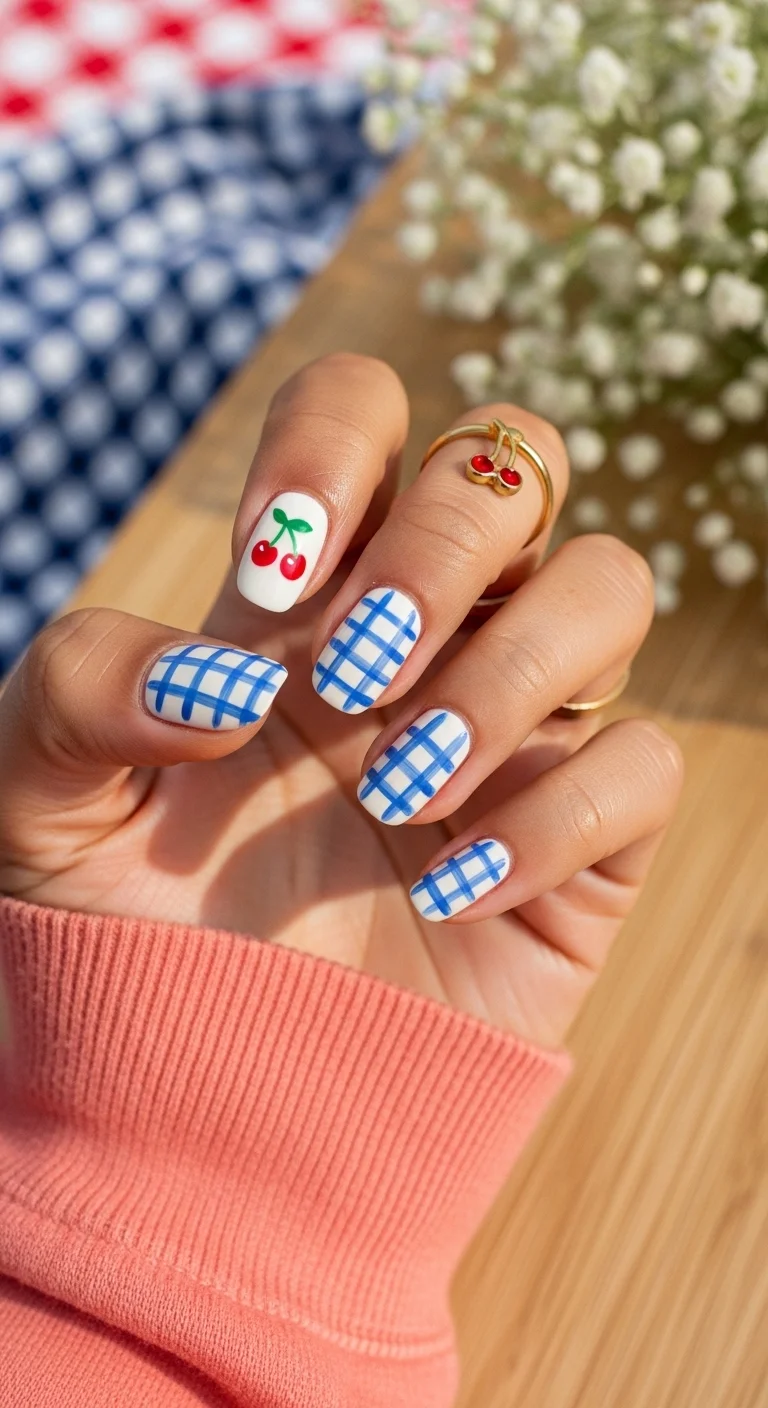
The cutest picnic-ready holiday mani.
Overview:
Gingham and cherries together create a visual story that's more specific than "Fourth of July" — it's summer in general. The blue-and-white checkered pattern on most nails evokes picnic tablecloths and country store awnings, while the cherry accent on the ring finger adds a playful, fruit-stand detail that softens the geometric grid.
Hand-painting gingham requires patience you might not expect. You're essentially drawing a grid, then filling alternating squares with a deeper blue to create the woven effect. Using two slightly different blue tones is what sells the illusion — skip that step and it looks like a basic checkerboard.
Short oval nails keep the pattern proportional. Gingham on long nails requires more grid intersections, which means more room for inconsistency. Short nails let you keep the pattern tight and charming.
Design Breakdown:
A two-pattern design unified by a blue-and-white color story with a fruit accent.
Base Color: Solid white, which serves as the "light" squares in the gingham weave.
Nail Shape: Short oval or rounded. Keeps the pattern compact.
Design Element: Blue gingham pattern on most nails. Ring finger features hand-painted red cherries with green leaves on a white base.
Finish: High-gloss juicy finish.
Get The Look at Home:
A striping brush and a dotting tool — that's all you need for this design. The gingham takes patience; the cherries take creativity.
- White base: Paint all nails white. Two coats minimum.
- Gingham grid: Using a thin liner brush and light blue polish, draw thin horizontal and vertical lines evenly spaced across each nail.
- Depth: With a darker blue, fill in the small squares where the lines intersect. This creates the woven effect.
- Cherries: On the index finger, use a dotting tool to place two red cherry circles. Add a tiny green stem and leaf with a fine brush.
- Seal: Two coats of top coat — the grid lines sit on the surface and need extra protection.
35 Palm Tree Nail Art Ideas that are the Most Iconic Nail Art Designs 🌴✨
20.Midnight Gold Stars
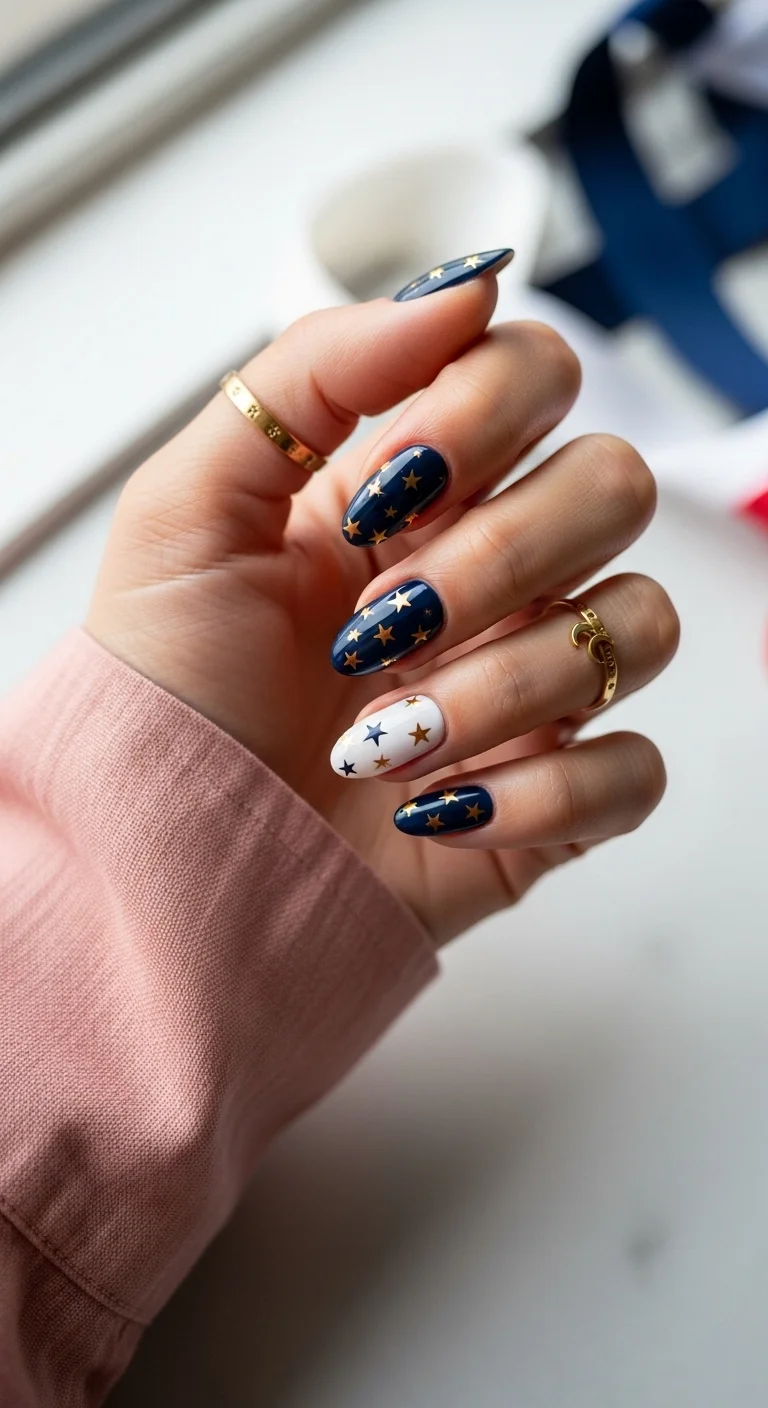
Elegant navy and gold for the night.
Overview:
Navy and gold is one of those color combinations that looks expensive regardless of what you paid for the polish. The deep midnight blue creates a rich, velvety backdrop that makes the gold stars pop with metallic intensity. It's the kind of design that looks like it belongs on someone who has their life together.
The gold stars come in varying sizes, which is important. If they were all the same size, the design would look stamped and manufactured. The size variation creates a sense of depth, as if some stars are closer and others are farther away — a miniaturized night sky on each nail.
The white accent nail on the ring finger breaks the navy monotony and adds a resting point for the eye. Navy and gold on every single nail would feel heavy. The white interruption keeps the design balanced and wearable.
Design Breakdown:
A classic navy-and-gold pairing that uses size variation for depth and a white accent for balance.
Base Color: Deep creamy midnight blue on most nails. One white accent nail.
Nail Shape: Medium almond. Elegant and timeless.
Design Element: Scattered metallic gold star decals in varying sizes across all nails.
Finish: High-gloss glass-like top coat.
Get The Look at Home:
Gold stars on navy is one of the easiest ways to look like you had a professional mani. Decals do the work; you do the placement.
- Base: Two coats of deep navy on most nails, white on the ring finger. Let dry fully.
- Tacky surface: Wait for the polish to be dry to the touch but slightly "grabby." This is the sweet spot for decal adhesion.
- Stars: Press gold star decals firmly onto the nails. Mix and match sizes for a more organic look.
- Arrange: Cluster a few together, leave some isolated. Avoid rigid patterns.
- Seal: Generous layer of top coat to ensure the decals stay flat and don't catch on fabric.
21.The Sunset Sparkler
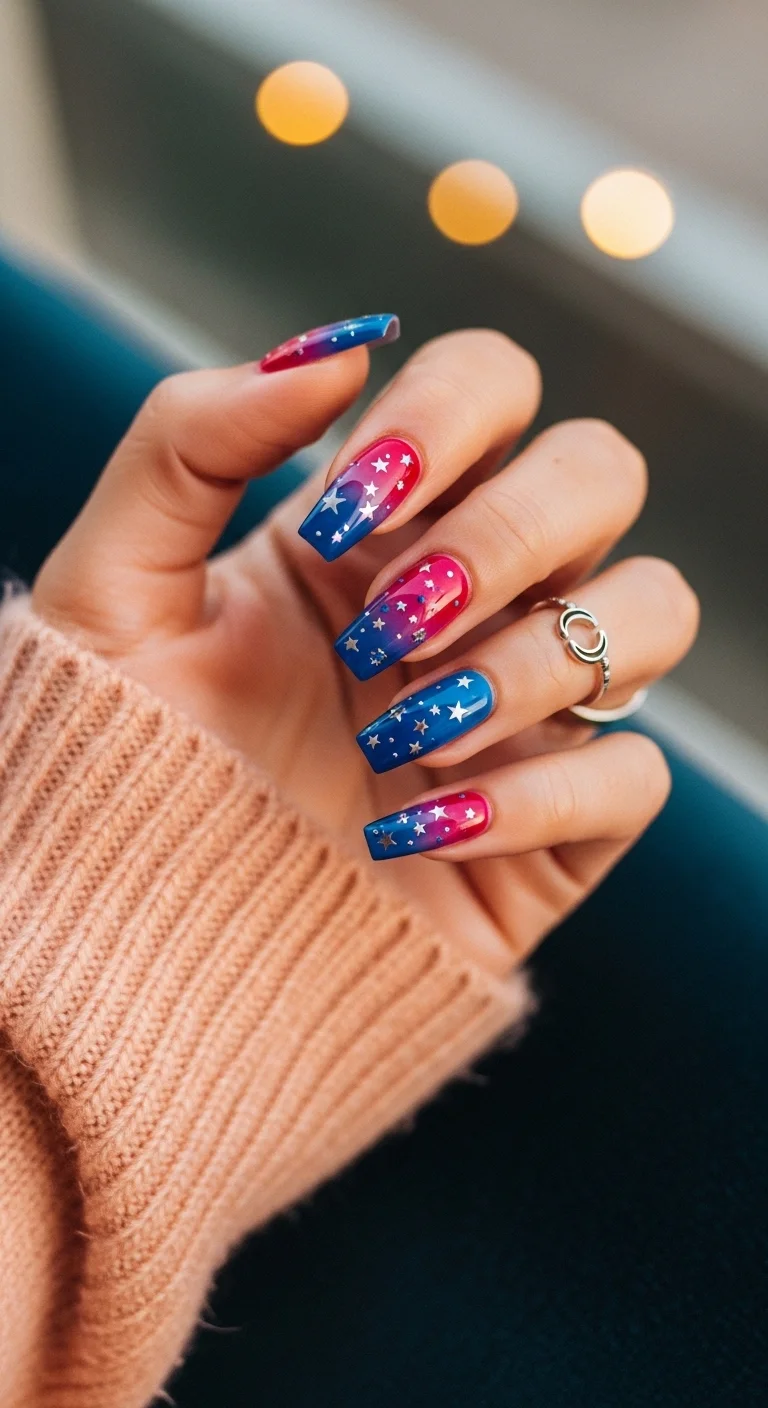
A trendy pink and blue gradient.
Overview:
A pink-to-blue vertical ombre creates something that looks less like a nail design and more like a sunset captured on ten small canvases. The hot pink at the base transitions into deep navy at the tips, and the gradient between them is smooth enough that your eye can't identify where one color ends and the other begins.
The scattered silver and holographic star decals are what make this Fourth of July rather than just a pretty gradient. They're placed at varying densities across the nails — some clustered, some isolated — which gives the impression of stars appearing in the evening sky as the sun sets. It's a poetic concept that translates surprisingly well to nail art.
The coffin shape provides the flat canvas this design needs. The gradient has a lot of surface area to cover, and the tapered tip gives the blue a natural endpoint. On rounded shapes, the ombre would lose its directional flow.
Design Breakdown:
A vertical gradient that transitions from warm pink to cool navy, accented with celestial details.
Base Color: Bright fuchsia-to-navy vertical ombre on every nail.
Nail Shape: Medium-long coffin or ballerina.
Design Element: White and silver holographic star decals scattered across the gradient in varying sizes.
Finish: Glossy top coat.
Get The Look at Home:
A vertical ombre is best achieved with a sponge. Brush application will leave hard lines between the colors.
- Sponge setup: Paint half the sponge pink and the other half navy. Dab on paper first to test the blend.
- Dab: Press the sponge onto the nail vertically, pink at the cuticle, navy at the tip. Three to four passes build opacity.
- Blend: Use a clean section of sponge to soften the transition zone. Two passes maximum.
- Stars: While the surface is slightly tacky, press silver and holographic star decals onto the nails.
- Seal: Two coats of top coat to smooth the sponge texture.
21 Hot Summer Buns Hairstyle Ideas for 2026 ☀️🔥
22.Festive Dot Confetti
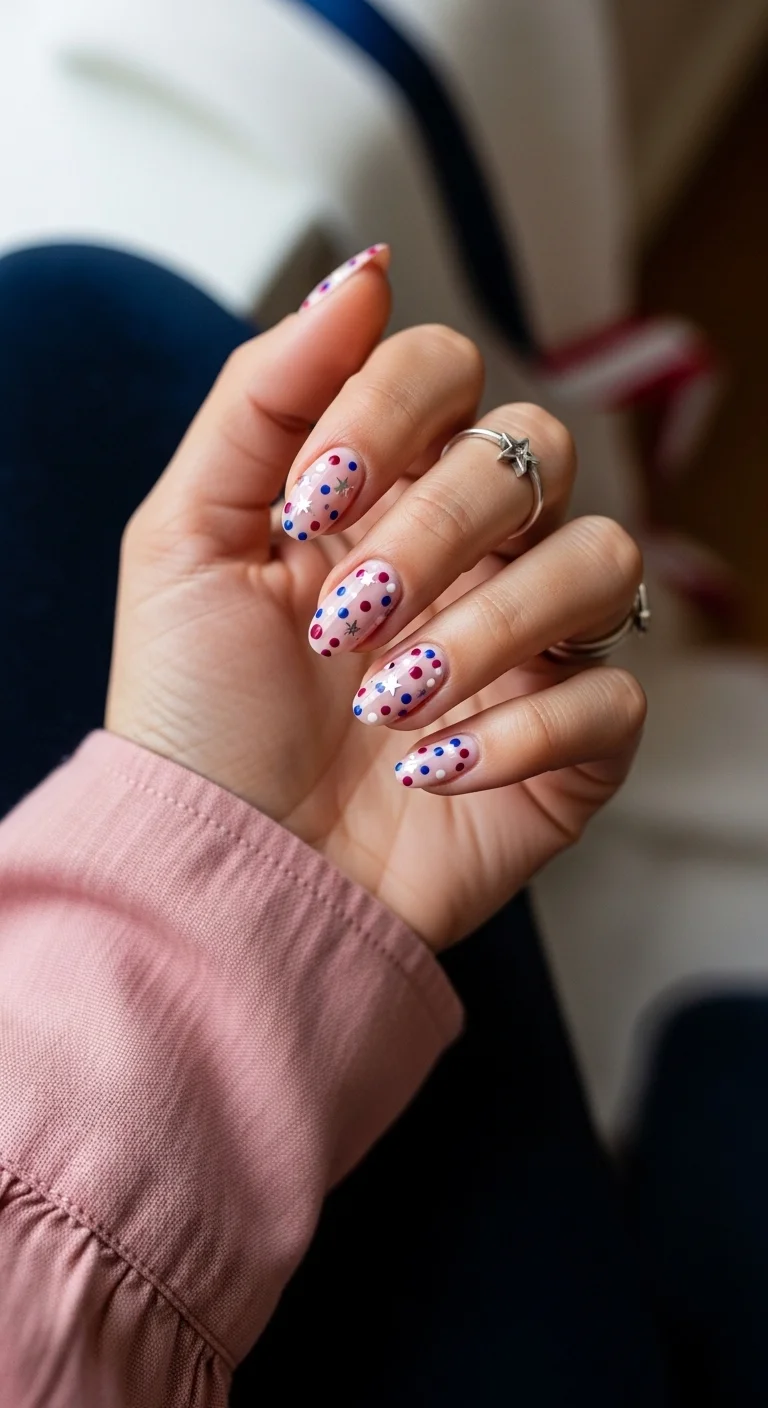
A fun, light confetti holiday look.
Overview:
Confetti nails are exactly what they sound like: tiny dots of color scattered across a bare or sheer base, mimicking the look of actual confetti thrown in the air. The sheer nude base here keeps the design light and understated — this is holiday nail art for someone who doesn't want full-coverage color.
The mix of red, white, and blue dots with a few silver star accents creates a festive palette without being heavy-handed. The dots are different sizes, which gives the design an organic, tossed-rather-than-placed quality. It looks spontaneous, which is harder to achieve than it looks.
This is a low-maintenance design in every sense. The sheer base means growth lines don't show as quickly, the dot pattern doesn't require precision, and the overall effect is casual enough for everyday summer wear. It's the kind of mani you can keep for two weeks without it looking dated.
Design Breakdown:
A light, confetti-style dot pattern on a sheer base that prioritizes playfulness over precision.
Base Color: Sheer natural nude. The natural nail should be visible.
Nail Shape: Medium oval. Casual and wearable.
Design Element: Scattered red, blue, and white dots in varying sizes. A few tiny silver star accents.
Finish: Glossy natural-look finish.
Get The Look at Home:
Less is more with confetti — overcrowding the nail defeats the purpose of the sheer base.
- Base: One coat of clear base coat or a very sheer nude.
- Dots: Using different-sized dotting tools, place red, white, and blue dots randomly across each nail. Space them generously.
- Stars: Add a few tiny silver star decals or hand-paint small stars in the gaps between dots.
- Breathing room: Leave enough bare nail visible between elements. The negative space is part of the design.
- Seal: Thick juicy top coat to encapsulate the dots and prevent chipping.
23.The Magenta Galaxy
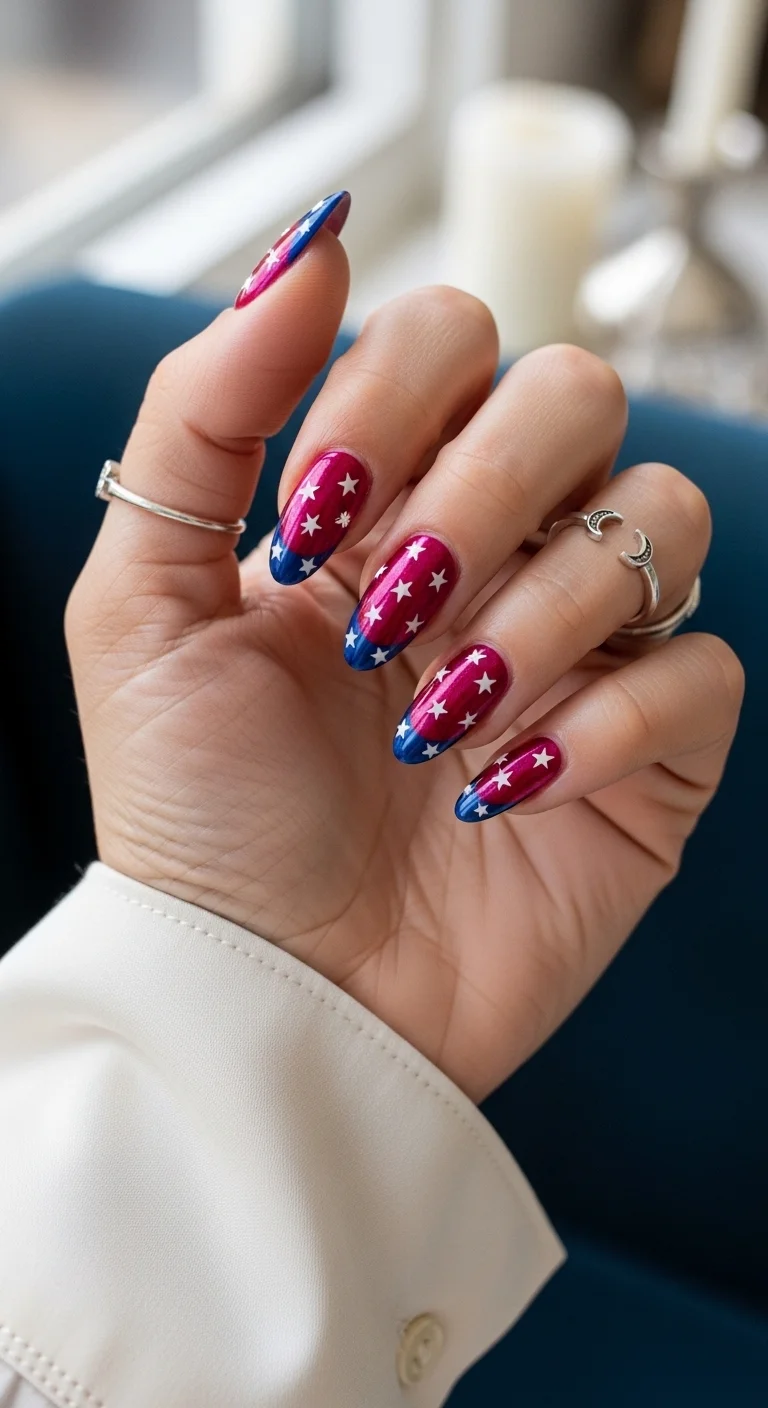
Deep magenta and cobalt—your new holiday power couple.
Overview:
Red is the default for the Fourth, but deep magenta? That's a power move. This design pairs a rich magenta base with cobalt blue French tips and white star confetti, and the combination reads more fashion editorial than flag-waving. It's bold without being costume-y — the kind of mani that makes people ask what salon you go to.
The trade-off is real: deep magenta stains. You'll need two coats of a quality base coat — OPI Nail Envy works — and patience during removal. The cobalt tips are surprisingly forgiving since they follow the natural smile line, but the star confetti demands precision placement or you'll end up with a cluster that looks accidental rather than intentional.
This is a night-out design, not a daytime picnic look. Wear it to a rooftop party, a holiday dinner, or anywhere you want your hands to do the talking. The cosmic vibe pairs beautifully with silver jewelry and dark denim.
Design Breakdown:
A moody, high-contrast design that leans into cool tones rather than traditional patriotic warmth.
Base Color: Deep magenta/burgundy, opaque in two coats.
Nail Shape: Long almond, which elongates the fingers and gives the French tips room to breathe.
Design Element: Cobalt blue French tips at the free edge; white star confetti in varying sizes scattered across all nails.
Finish: High-gloss top coat to unify the layers and add depth to the magenta base.
Get The Look at Home:
Star placement matters more than you think — vary the density across nails for a more organic, cosmic feel.
- Prep: Apply a ridge-filling base coat to prevent magenta pigment from staining the nail plate.
- Base: Paint two coats of deep magenta, letting each coat dry fully.
- Tips: Using a thin brush or a French tip guide, paint cobalt blue curved tips. Keep the smile line clean — use acetone on an angled brush to sharpen if needed.
- Stars: With tweezers, place white star confetti across the magenta base. Cluster 2–3 near the cuticle on some nails, leave others sparse.
- Seal: Two coats of high-shine top coat to lock everything down and prevent snagging.
29 Trendy Pink Summer Nails for 2026 💅
24.Blue Skies & Stars
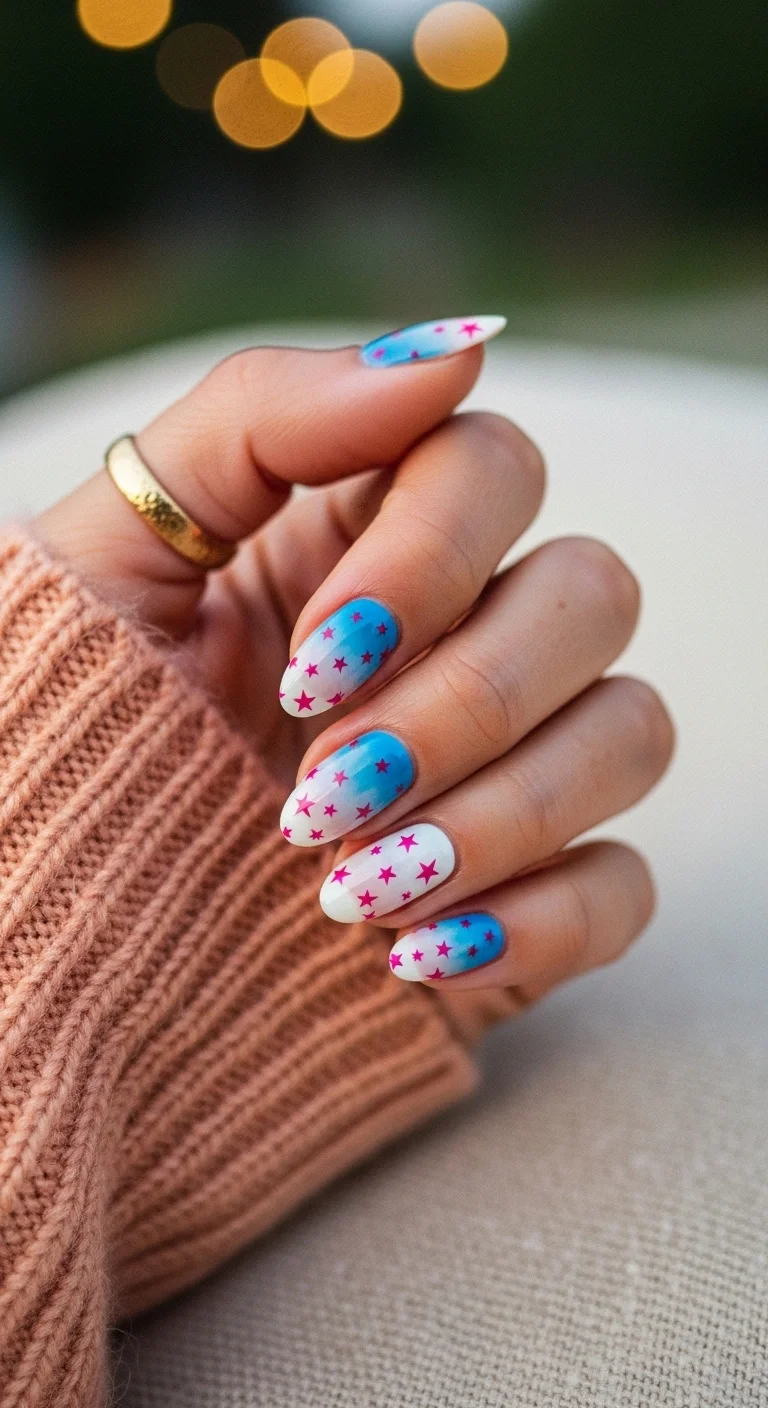
Cotton-candy skies with a hot pink star shower.
Overview:
Most patriotic ombres play it safe with red and blue — this one throws hot pink into the mix and the result is genuinely unexpected. The blue-to-white gradient evokes a summer sky, and the magenta star confetti scattered across every nail turns it into something dreamier than your standard holiday fare. The ring finger breaks the pattern with a white base and pink stars, which gives the eye a place to rest.
The sponge-blended ombre is medium difficulty. You'll need to work quickly before the polish dries on the sponge, and expect two to three rounds of dabbing to get the gradient smooth. The hot pink stars are the kind of detail that photographs beautifully but can look muddy if the ombre underneath isn't crisp. Patience with the blending is non-negotiable here.
This design works best at medium length — long enough to show off the gradient but short enough that the stars don't overwhelm the nail real estate. It's a weekend brunch or outdoor concert mani.
Design Breakdown:
A soft, gradient-driven design that trades literal patriotism for a dreamy, cotton-candy interpretation.
Base Color: Vertical ombre from sky blue at the cuticle to white at the tip; accent nail is solid white.
Nail Shape: Medium almond, the ideal canvas for gradient work.
Design Element: Hot pink/magenta star confetti scattered across all nails; ring finger features white base with pink stars only.
Finish: Smooth glossy top coat to even out the sponge texture from the ombre.
Get The Look at Home:
The sponge technique is your only option for a seamless gradient — don't try painting the ombre freehand.
- Base: Apply two coats of white to all nails. Let dry completely.
- Sponge: Paint strips of sky blue and white side by side on a makeup sponge. Dab onto the nail from cuticle to tip, concentrating blue at the base.
- Blend: Repeat the sponging two to three times, using a fresh section of sponge each time, until the gradient is smooth with no harsh lines.
- Stars: While the surface is still slightly tacky, press hot pink star confetti onto each nail. Use tweezers for precision.
- Accent: On the ring finger, place stars on a clean white base for contrast.
- Seal: Two coats of top coat to smooth the textured surface left by the sponge.
25.The Matte Commander
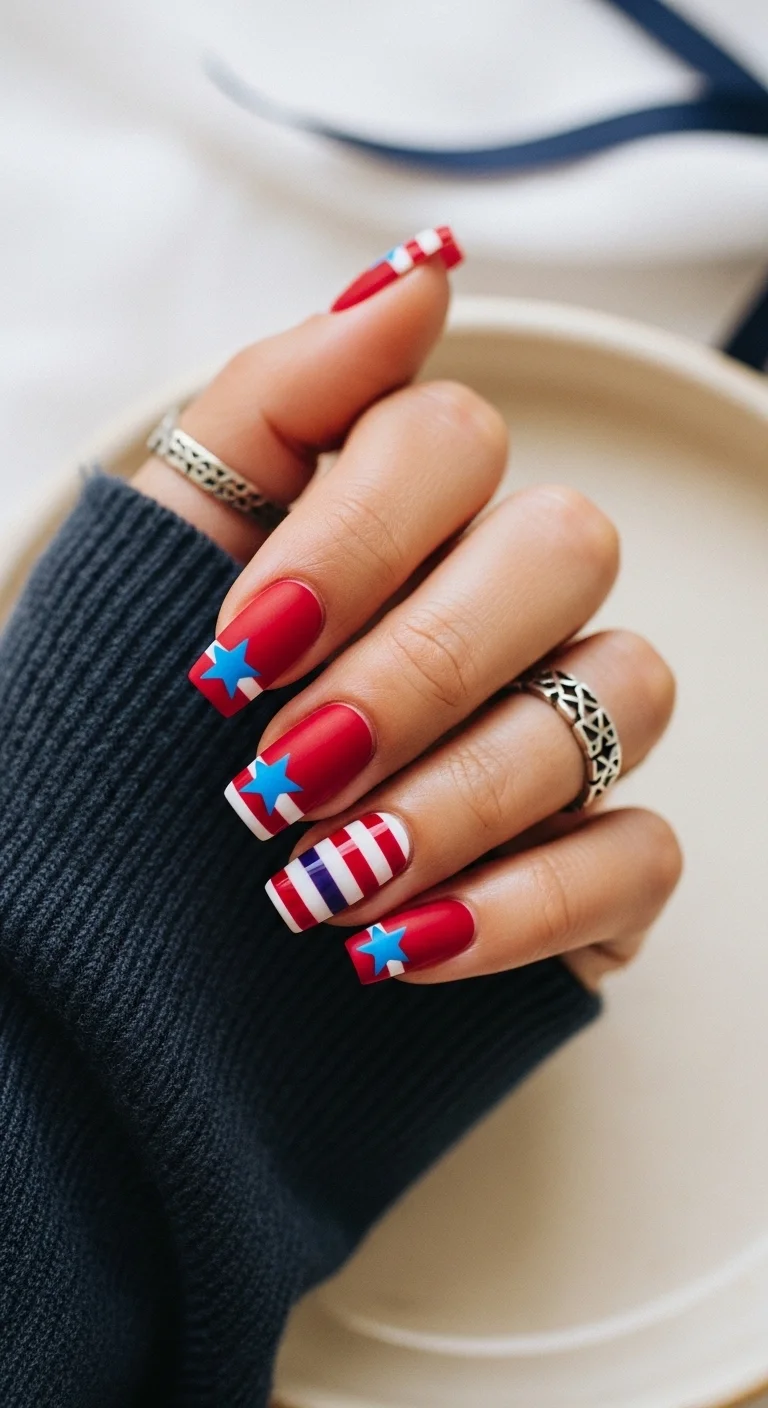
Matte red with graphic punch—no gloss required.
Overview:
Matte finishes divide people, and that's exactly why this design works. The flat cherry red base absorbs light instead of reflecting it, which makes the blue star and white stripe detail at the cuticle area hit harder than it would on a glossy surface. The ring finger commits fully to the patriotic theme with bold horizontal stripes, and the contrast between matte and graphic elements gives the whole set an editorial edge.
The downside of matte is maintenance. It shows every scratch, every chip, every imperfection in application. You need a perfectly smooth base coat because matte top coat won't hide bumps the way gloss does. The striped accent nail is the hardest part — clean lines require striping tape or a very steady hand, and any bleed between colors shows up more under a matte finish.
This is a statement mani for someone who doesn't want sparkle. It's structured, graphic, and reads more high-fashion than holiday costume. Pair it with architectural jewelry and a monochrome outfit.
Design Breakdown:
A structured, matte-forward design that uses graphic elements instead of glitter for its patriotic punch.
Base Color: Matte cherry red across most nails; ring finger features bold red, white, and blue horizontal stripes.
Nail Shape: Coffin or square, medium to long — the angular shape complements the graphic design.
Design Element: Blue star on white stripe detail positioned at the base of each red nail; full striped accent on ring finger.
Finish: Matte top coat on red nails; glossy top coat over the striped accent nail for contrast.
Get The Look at Home:
The matte-to-gloss contrast is what makes this design sharp — don't matte everything uniformly.
- Base: Apply two coats of bright cherry red to most nails and white to the ring finger.
- Stripes: On the ring finger, use striping tape to mask off horizontal bands. Paint alternating red and blue stripes, removing tape immediately after each pass.
- Detail: On the red nails, paint a thin white horizontal stripe near the cuticle. Add a small blue star on top using a dotting tool or decal.
- Matte: Apply matte top coat to the red nails only.
- Gloss: Apply glossy top coat to the striped accent nail to make the colors pop against the matte neighbors.
28 Effortless Hot Weather Day Hairstyles for Women 2026 ☀️💇♀️
26.Red Gingham & Blue Stars
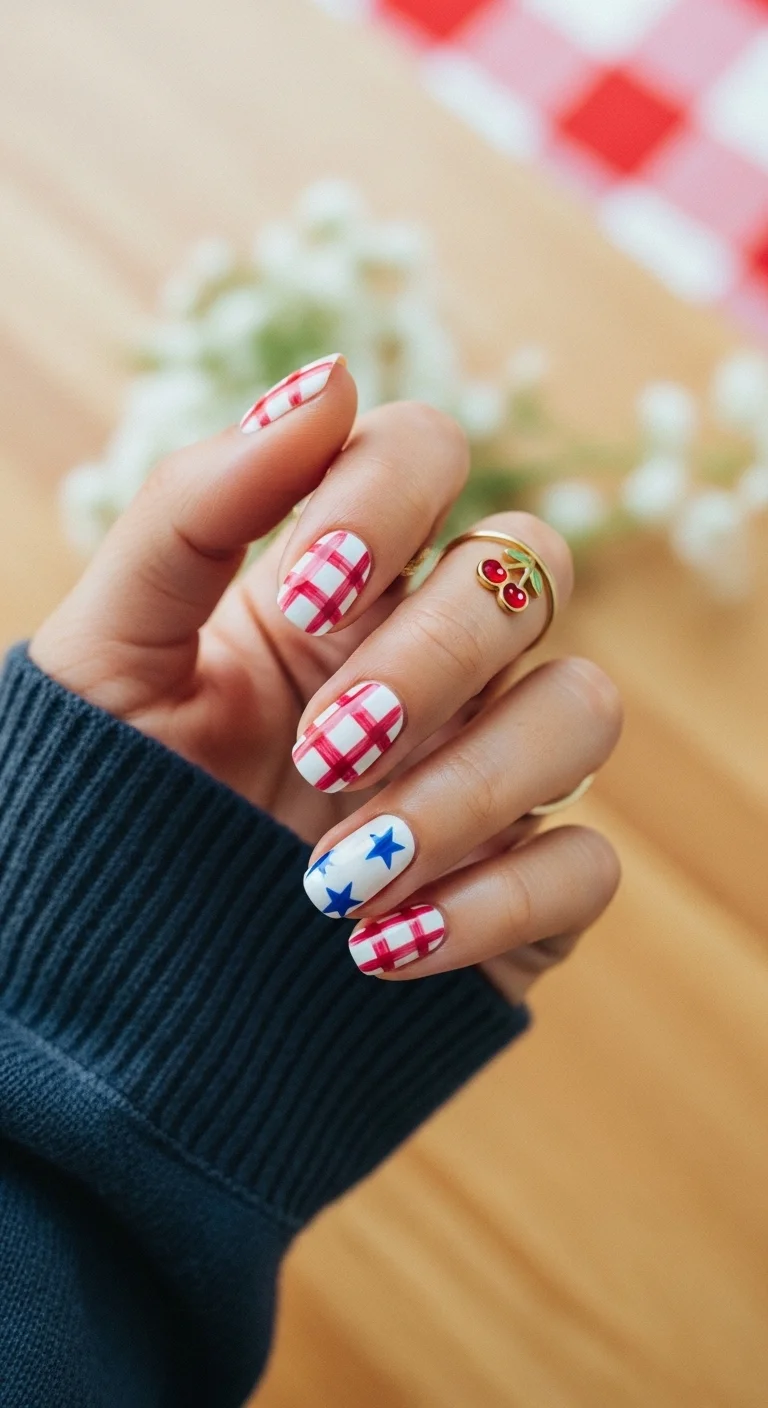
Picnic-table charm on ten tiny canvases.
Overview:
Gingham is having a moment that shows no signs of slowing, and this red-and-white version is the most literal way to channel that country-picnic energy for the Fourth. The pattern is charming without being childish, and the blue-star accent nail on the ring finger anchors it firmly in holiday territory. Short nails are the right call here — gingham on long talons would look busy rather than cute.
The catch is that hand-painting gingham requires genuine patience. You're drawing a grid, then filling alternating squares with a deeper red to create the woven effect. It's meditative if you're in the mood, frustrating if you're rushed. Using two slightly different red tones is what sells the illusion — skip that step and it just looks like a basic checkerboard.
This is a backyard BBQ, family reunion, or farmers' market mani. It pairs effortlessly with white sundresses, denim overalls, and anything with an Americana print. Not the design for a formal event.
Design Breakdown:
A playful, cottagecore-adjacent design that relies on pattern precision for its charm.
Base Color: Solid white, which serves as the "light" squares in the gingham weave.
Nail Shape: Short rounded or squoval — keeps the pattern compact and proportionate.
Design Element: Red and white gingham on most nails; ring finger features white base with scattered blue stars.
Finish: High-gloss top coat to seal the painted grid lines.
Get The Look at Home:
Two shades of red are what separate gingham from a simple grid pattern — don't skip the tonal variation.
- Base: Paint all nails opaque white. Two coats minimum.
- Grid: Using a thin liner brush and a light, slightly sheer red, paint vertical and horizontal lines evenly spaced across each nail.
- Depth: With a darker, more opaque red, fill in the small squares where the lines intersect. This creates the woven effect.
- Accent: On the ring finger, use a dotting tool or star decals to place blue stars on the white base.
- Seal: Two coats of top coat — the grid lines sit on the surface and need extra protection.
27.Golden Star French
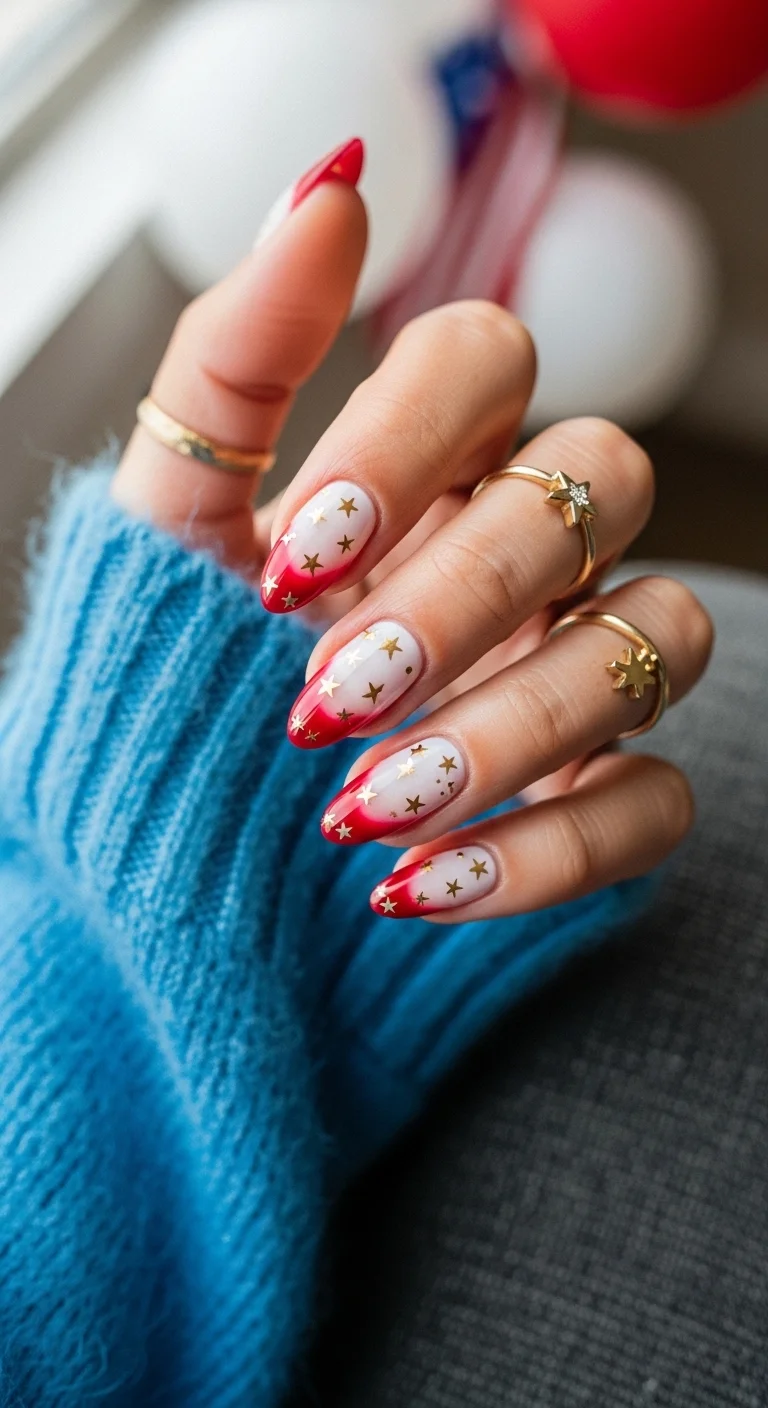
Red French tips meet gold star confetti—quiet luxury, loud holiday.
Overview:
The French tip is the most resilient nail trend in history for a reason — it flatters every hand, every skin tone, every occasion. This version upgrades the classic with red tips instead of white and scatters gold star confetti across the sheer nude base. The result is sophisticated enough for a holiday wedding but festive enough for a Fourth of July cocktail party.
The sheer nude base is both a blessing and a curse. It looks incredibly natural and expensive when done well, but it also reveals every ridge, every imperfection in the nail surface. A ridge-filling base coat is essential here, and you'll want to make sure the nude shade matches your skin tone closely — too pink and it reads clinical, too peach and it looks orange.
The gold stars are easy to apply but tricky to distribute evenly. Aim for a scattered, organic placement rather than a rigid pattern. The varying sizes create depth and keep the design from looking manufactured.
Design Breakdown:
An elevated take on the French manicure that uses metallic accents for a refined holiday finish.
Base Color: Sheer nude or milky white that blends with the natural nail bed; red French tips.
Nail Shape: Medium-to-long almond, the classic French manicure silhouette.
Design Element: Gold metallic star confetti scattered across the nude base area, concentrated near the cuticle and thinning toward the tip.
Finish: High-gloss top coat to protect the metallic stars and add a glass-like sheen.
Get The Look at Home:
The smile line of the French tip defines the entire design — take your time getting it clean and symmetrical.
- Base: Apply a ridge-filling base coat, then two coats of a sheer nude that matches your skin tone.
- Tips: Using a thin brush or French guide stickers, paint red tips along the free edge. Follow the natural curve of your nail.
- Clean: Dip an angled brush in acetone and swipe along the smile line to sharpen any uneven edges.
- Stars: With tweezers, place gold star confetti across the nude base. Use varying sizes and keep placement irregular.
- Seal: Two coats of top coat, pressing gently over each star to ensure it lies flat against the nail.
33 Trendy Polka Dot Nail Ideas for 2026 💅
28.Pink & Blue Wave Stars
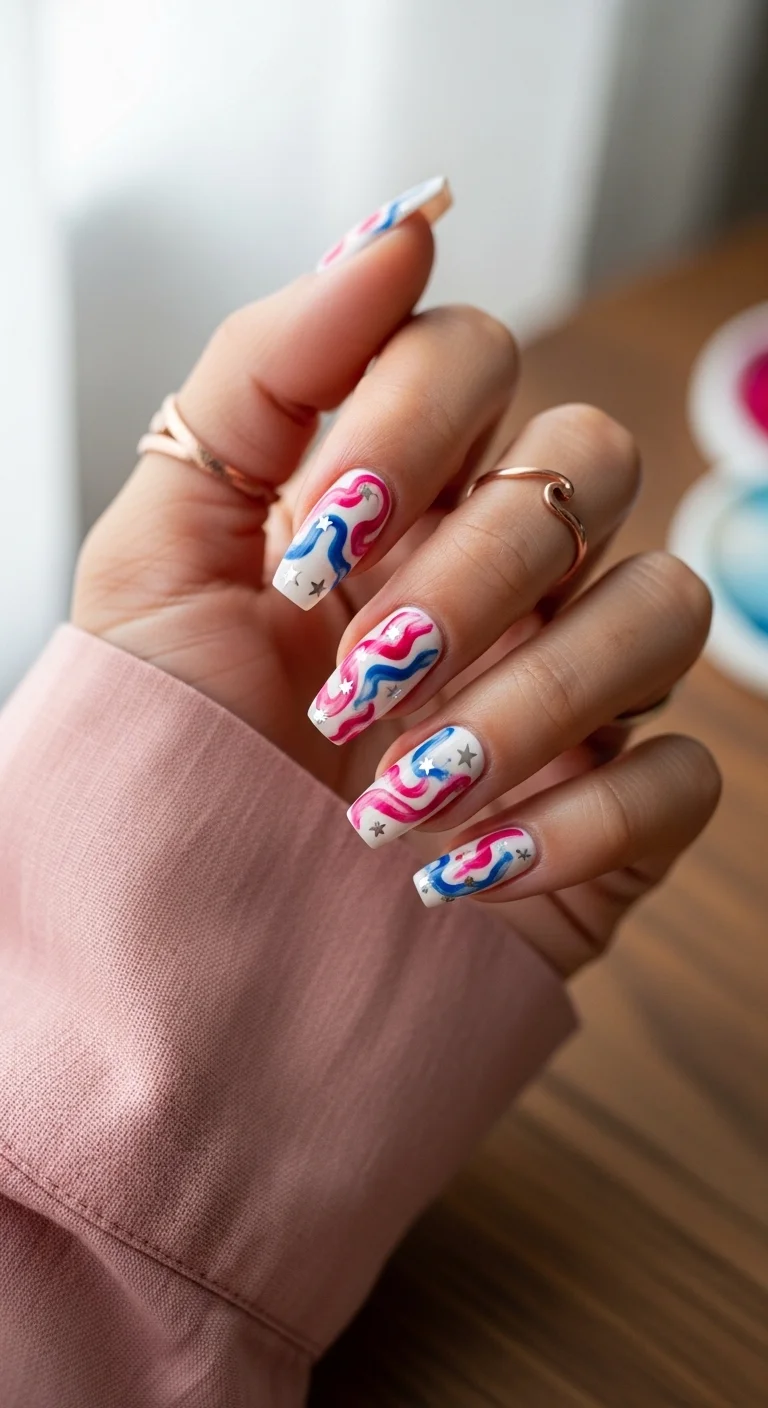
Retro-modern waves with a patriotic color palette.
Overview:
Abstract nail art has dominated runways for two seasons now, and this design translates that trend into a holiday context without losing its artistic edge. The white base keeps things clean while the wavy hot pink and blue lines add movement and energy. Small silver star accents peppered throughout tie it back to the Fourth without hammering the theme over your head.
The freehand waves are forgiving by nature — no two will look identical, and that's the point. A liner brush is essential, and the key is committing to each stroke rather than going back over wet polish. The silver stars are the finishing touch that elevates this from "artsy abstract" to "patriotic abstract."
Medium-length coffin or squoval nails are the right canvas here. Too short and the waves get cramped; too long and they start to look busy. This is a music festival, gallery opening, or creative-workplace mani — anywhere that appreciates a point of view.
Design Breakdown:
An artsy, retro-modern design that uses organic lines and a restrained color palette for a holiday look with personality.
Base Color: Opaque creamy white, applied in two even coats.
Nail Shape: Medium coffin or squoval — both work, avoid going too long.
Design Element: Hand-painted abstract wavy lines in hot pink and cobalt blue across each nail; small silver star accents placed in the negative space.
Finish: Smooth high-gloss top coat to level the raised brushstrokes.
Get The Look at Home:
The waves are meant to look effortless — overworking them is the most common mistake.
- Base: Apply two coats of opaque white polish. Let dry fully.
- Pink waves: Using a long liner brush loaded with hot pink, draw one or two wavy lines across each nail. Vary the thickness and direction per nail.
- Blue waves: Repeat with cobalt blue, overlapping or weaving alongside the pink waves. Don't aim for symmetry.
- Stars: Place tiny silver star decals in the white negative spaces between waves.
- Seal: Apply a thick top coat to smooth the brushstroke texture and lock down the decals.
29.Pastel Star Confetti
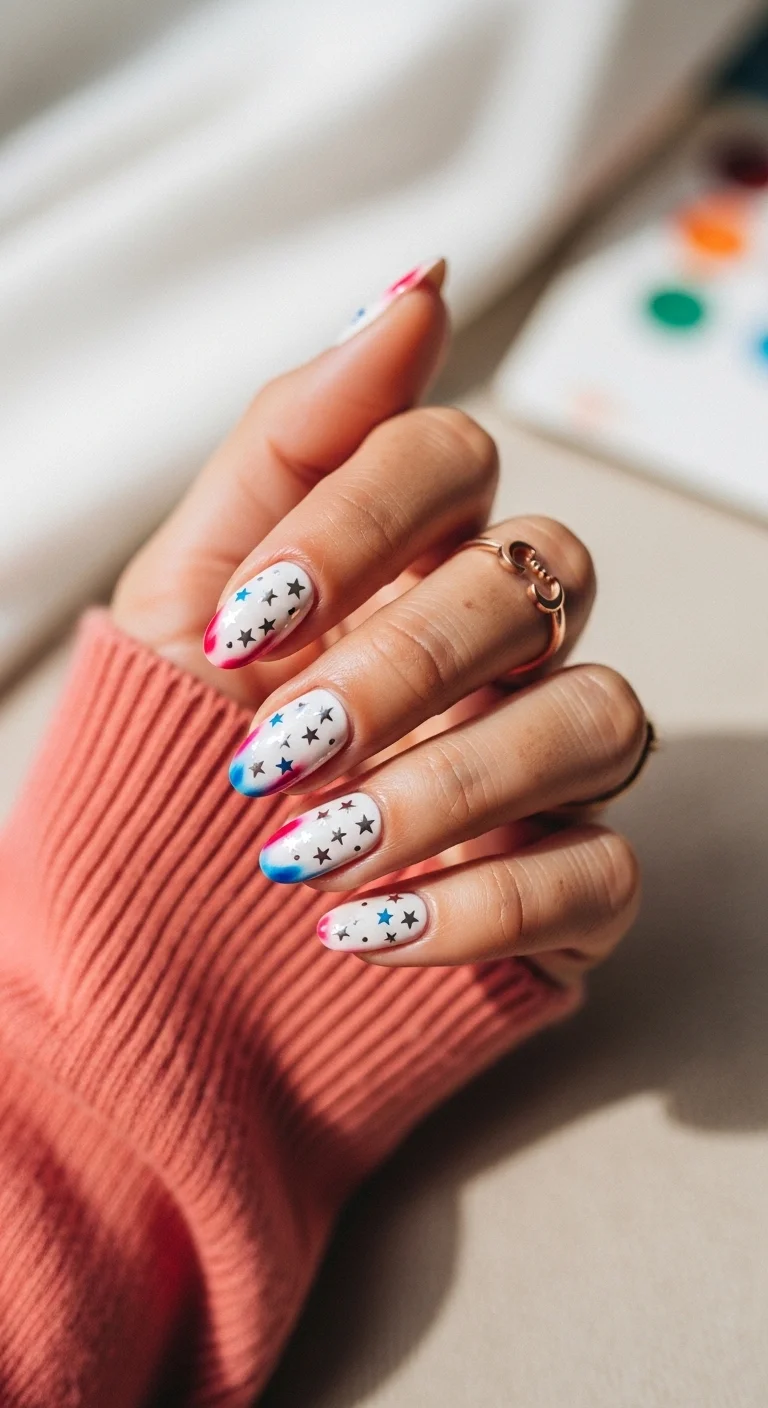
Pastel patriotism for the soft-spoken holiday lover.
Overview:
Not every Fourth of July mani needs to shout. This design uses pastel pink and blue watercolor washes at the tips of a white base, with silver-gray star confetti scattered throughout. It's the nail equivalent of a linen tablecloth at a garden party — festive, but quietly so. If you find traditional red-white-and-blue too aggressive for your aesthetic, this is your off-ramp.
The watercolor technique is deceptively simple but requires a light touch. Thinning your polish with acetone or using a sheer jelly formula gives that diffused, painterly effect, but too much thinning and the color disappears entirely. The silver stars are the anchor that keeps the design from veering into generic spring territory.
Short-to-medium nails are ideal. The design is delicate and gets lost on very long nails. This is a baby shower, spring wedding, or low-key brunch mani — anywhere you want your nails to complement rather than dominate.
Design Breakdown:
A muted, painterly design that trades bold patriotic color for soft pastels and subtle metallic accents.
Base Color: Opaque white, applied in two to three thin coats for full coverage.
Nail Shape: Short-to-medium oval or almond, which suits the soft, rounded aesthetic.
Design Element: Pastel pink and blue watercolor/ombre accents diffused at the tips; silver or gray star confetti scattered across the entire nail.
Finish: Satin or light gloss top coat to maintain the soft, diffused quality.
Get The Look at Home:
The watercolor effect depends on thinning your polish — straight-from-the-bottle opacity will ruin the diffused look.
- Base: Apply two to three thin coats of white polish until fully opaque.
- Thin: On a palette, mix a drop of pastel pink polish with a drop of acetone or clear top coat to sheer it out. Repeat with pastel blue.
- Dab: Using a small sponge or a brush, dab the thinned colors onto the tips of each nail. Let them bleed slightly into each other.
- Stars: Once the tips are dry to the touch, place silver or gray star confetti across the nails with tweezers.
- Seal: One coat of satin or light gloss top coat — avoid heavy, high-shine formulas that can blur the watercolor detail.
28 Stunning Softball Hairstyle Ideas with Braids for 2026 🥎✨
30.The Magenta Starlet
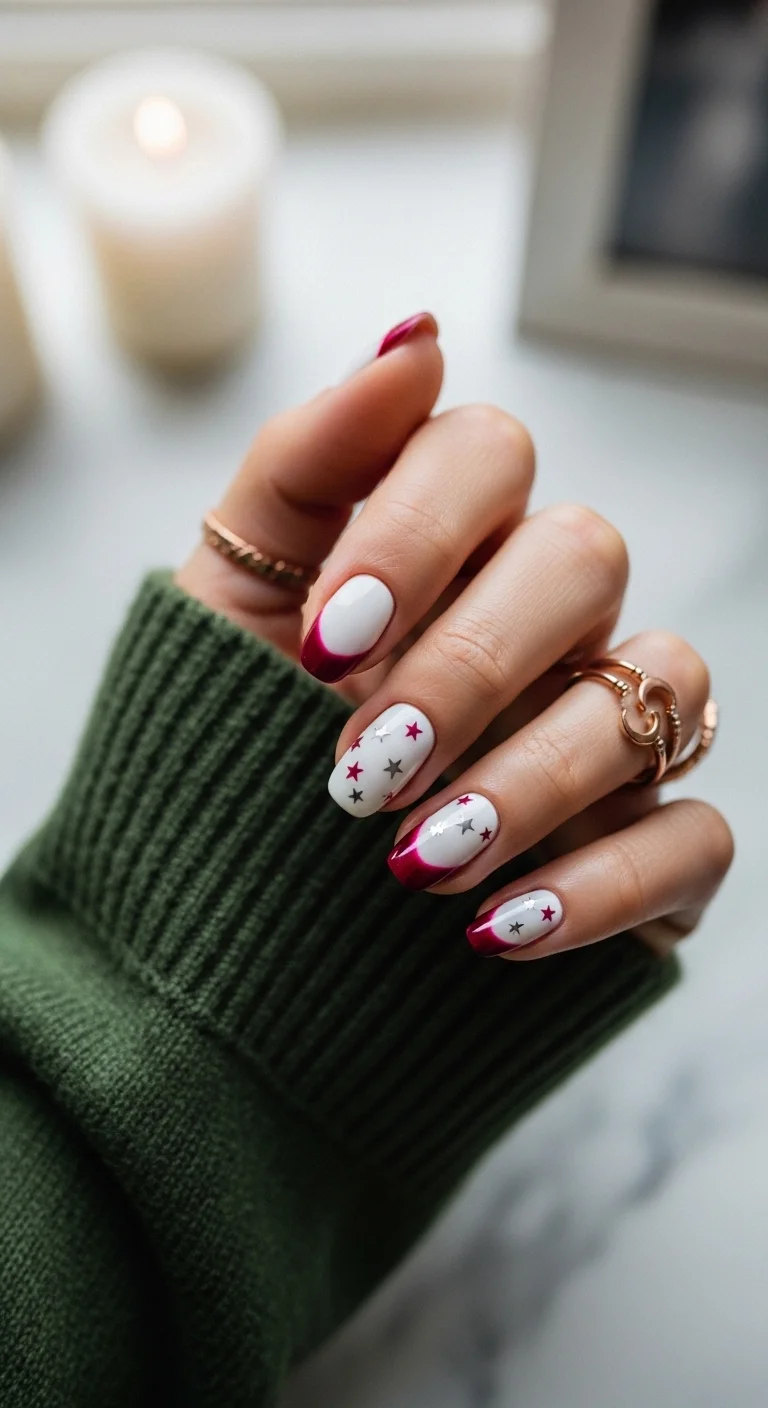
Mocha mauve tips with a side of starlight.
Overview:
Deep magenta occupies an interesting space between red and purple — it's warm enough to feel holiday-appropriate but cool enough to avoid reading as Christmas. This design uses it for French tips on a sheer nude or white base, with matching magenta and silver star confetti on the remaining nails. The effect is romantic rather than patriotic, which is either a selling point or a drawback depending on how literal you want your Fourth of July mani to be.
The sheer base is the right choice here. It lets the magenta tips and star confetti take center stage without competing for attention. The trade-off is that sheer polishes show brush strokes more readily, so you'll want to apply in thin, even layers and resist the urge to go back over a coat that's already setting.
This is an evening design. The deep magenta reads moody and romantic under artificial light, and the silver stars catch candlelight beautifully. Ideal for a holiday dinner, a summer night out, or a date where you want your hands to make an impression.
Design Breakdown:
A moody, romantic take on the French manicure that uses deep berry tones and mixed-metal confetti.
Base Color: Sheer nude or milky white, one to two coats for a natural, translucent finish.
Nail Shape: Short-to-medium oval or almond, keeping the design refined and wearable.
Design Element: Deep magenta/burgundy French tips on select nails; magenta and silver star confetti scattered on remaining nails.
Finish: High-gloss top coat to protect the confetti and add depth to the sheer base.
Get The Look at Home:
Work on one nail at a time — the sheer base dries faster than you think, and you need it slightly tacky for the confetti to adhere.
- Base: Apply one to two coats of sheer nude or milky white. Let dry between coats.
- Tips: On accent nails, use a thin brush to paint deep magenta French tips. Keep the smile line crisp — use an angled brush dipped in acetone to clean edges.
- Stars: On the remaining nails, place magenta and silver star confetti while the base is still slightly tacky. Press gently with a silicone tool.
- Arrange: Mix star sizes and colors for visual interest — cluster a few together, leave some isolated.
- Seal: Two coats of high-shine top coat to encapsulate the confetti and prevent lifting.
31.The Star-Spangled Coffin
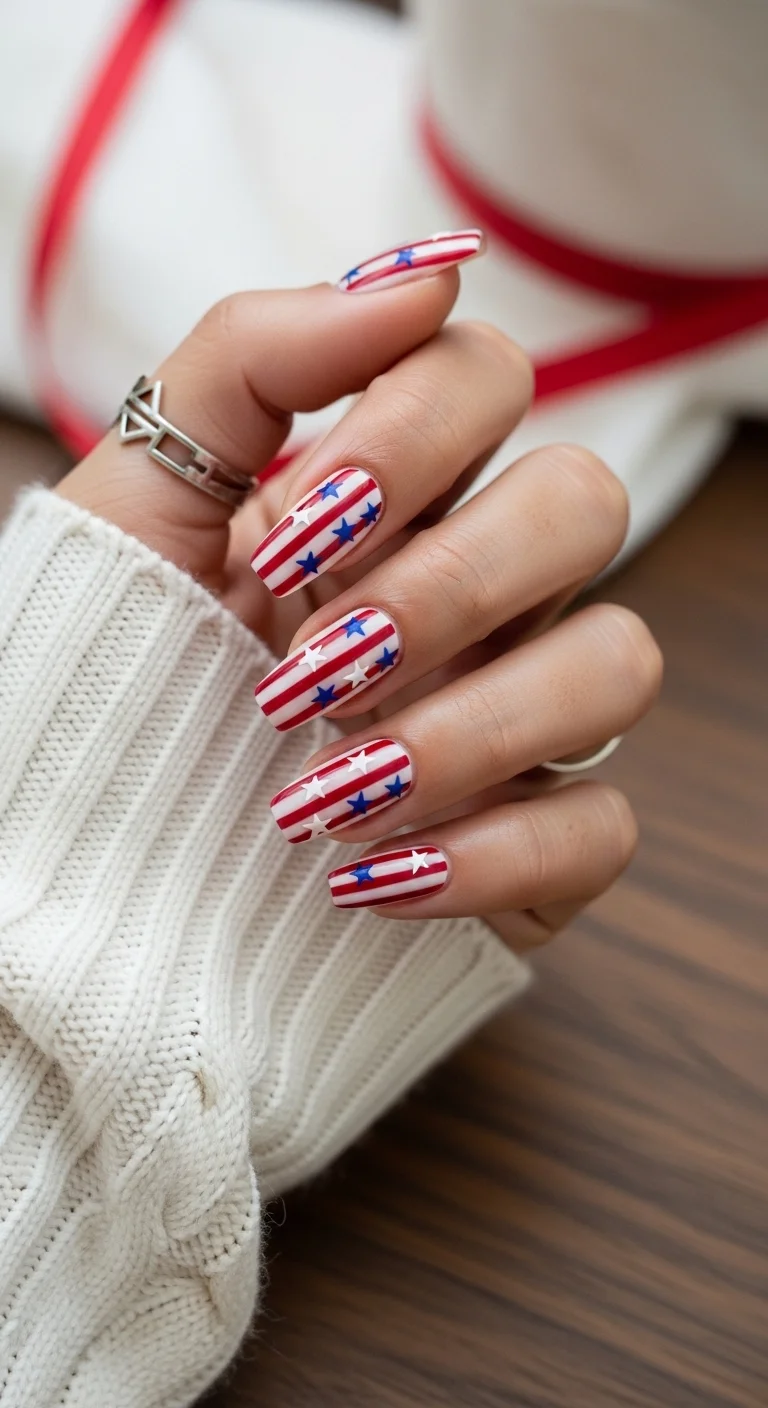
Full flag, no apologies—the American mani.
Overview:
This is the design for someone who wants their nails to be a conversation piece at every single gathering. Red and white horizontal stripes cover the nail, blue stars are scattered throughout, and the overall effect is an unapologetically literal American flag. There is nothing subtle about it, and that's entirely the point.
The execution difficulty is higher than it looks. Horizontal stripes require either striping tape or an extremely steady hand, and any wobble in the lines is immediately visible against the white base. The blue stars need to sit cleanly on top of the stripes without smearing the red, which means the stripes must be fully dry before you add the stars. Budget extra time for this one.
Despite the title, this works beautifully on oval or almond shapes rather than coffin. The rounded tip softens the geometric stripes and prevents the design from looking too aggressive. Wear it to a parade, a fireworks show, or anywhere you plan to be the most patriotic person in the room.
Design Breakdown:
A maximalist, flag-inspired design that commits fully to the red-white-and-blue theme.
Base Color: Opaque white, which doubles as the "white stripes" in the flag pattern.
Nail Shape: Long oval or almond — the rounded shape balances the rigid geometry of the stripes.
Design Element: Red and white horizontal stripes across the entire nail; blue stars scattered throughout, overlapping the stripes.
Finish: Thick, high-gloss top coat to level the raised stripe edges and seal the star decals.
Get The Look at Home:
Let each stripe dry completely before adding the next layer — rushing this is how you end up with pink stripes.
- Base: Apply two coats of opaque white polish. Let dry fully.
- Tape: Apply thin striping tape horizontally across each nail at even intervals, leaving gaps where you want the white stripes to show.
- Paint: Paint over the entire nail with bright red polish, covering both the exposed nail and the tape.
- Peel: Remove the tape immediately while the red is still wet, pulling at a 45-degree angle for the cleanest lines.
- Dry: Let the stripes dry completely — at least 15 minutes — before adding stars.
- Stars: Place blue star decals (or hand-paint with a dotting tool) scattered across the striped surface.
- Seal: Two coats of thick top coat to smooth the texture created by the layered polish and decals.
The Holiday Survival Guide: Why Your Patriotic Mani Chips by the Fireworks
Fourth of July is arguably the hardest day of the year on a manicure. You are dealing with sunscreen sprays, tanning oils, pool chlorine, burger grease, cooler condensation, and sparkler ash — all in a single afternoon. The finishes that survive your regular work week are not built for this level of chemical and physical assault.
The number one culprit for premature chipping on July 4th is sunscreen. The chemical formulations in spray SPFs and lotions can break down the top layer of regular polish, leaving it cloudy or soft. A good UV gel top coat creates a physical barrier that the sunscreen cannot penetrate. If you are wearing regular lacquer, apply an extra layer of quick-dry top coat the morning of and let it cure fully before you step outside.
The other hidden enemy is dry hands. Sun exposure dehydrates the nail bed, causing the nail plate to contract slightly and the polish to lift at the edges. Cuticle oil every few hours is not optional on a holiday spent outdoors — it keeps the surrounding skin and nail bed flexible so the polish stays adhered.
These 31 patriotic designs might have provided all the inspiration you had ever needed for a stunning holiday set. Whether opting for a literal flag design or a subtle shimmer, these nails are sure to be the talk of the BBQ.
Be sure to pin the favorite photos straight to a Pinterest board, so they are ready to show the nail tech.