Nail Trends
30 Trendy Summer French Tip Nail Designs for 2026
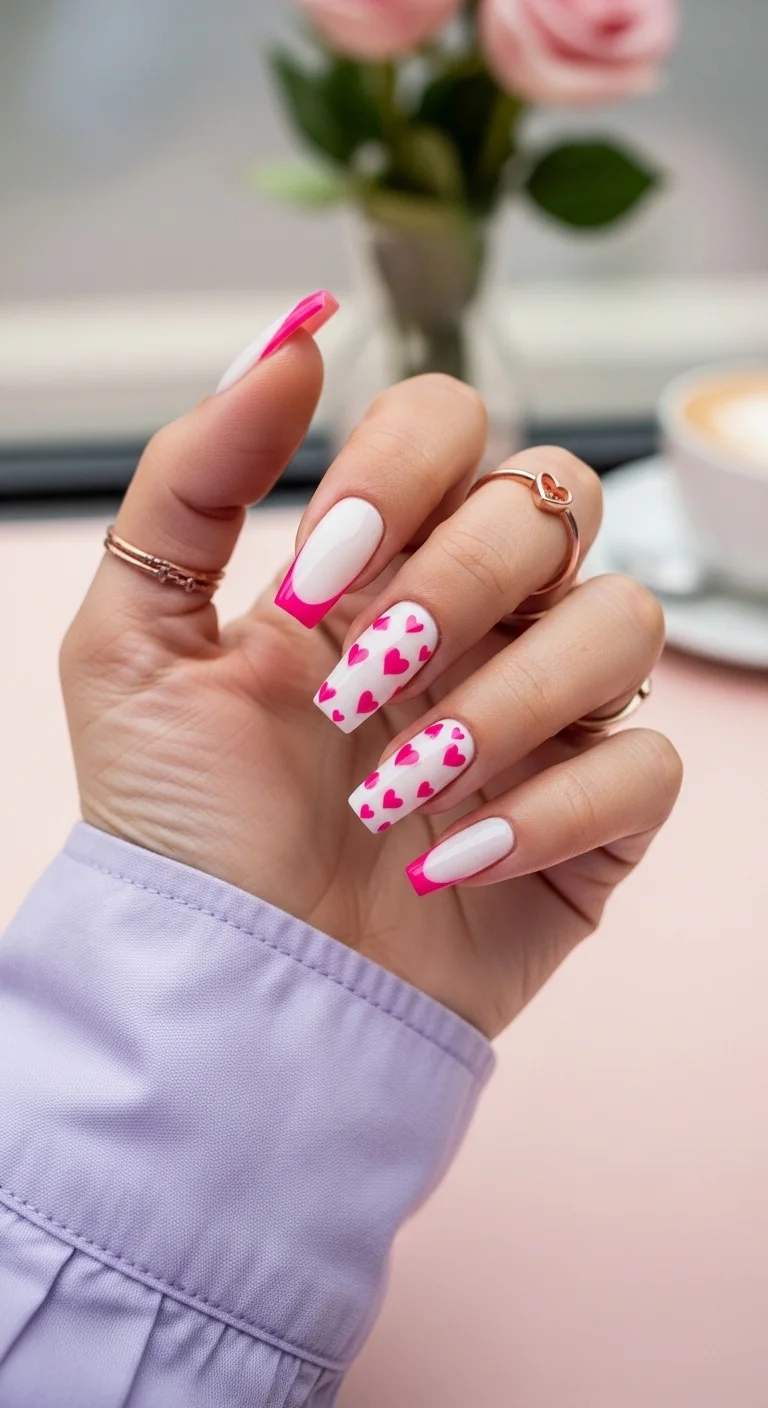
Is it even summer if you haven’t refreshed your French manicure with a pop of color? This season, it's all about ditching the basic white tips for something a little more adventurous, and the results are absolutely stunning! From playful neon swirls to sophisticated pastel ombres, the 2026 summer French tip trends are all about self-expression and having a little fun. Below are 30 of the absolute best designs that are guaranteed to make you feel like the main character all summer long.
How to Get The Thinner, Softer French Tip Nails?
French tips spent years getting thicker, bolder, more Instagram-graphic. Then the pendulum swung hard in the other direction. The defining French manicure trend of 2026 is the micro-French; a tip so thin it sits closer to a single hair of white polish tracing the free edge than to anything you'd call a "stripe." Pinterest data backs this up: searches for micro-French nails are up over 500% this year, and the number keeps climbing.
What's driving it is a broader shift in what people want from a manicure. The "quiet luxury" thing isn't just about bags and blazers anymore. In nails, it translates to tips that don't scream for attention. A thick white French says "look at my nails." A micro-French says "look at my hands." The difference is subtle but real, and it changes how people perceive the whole set.
The other half of this trend is the milky base. Instead of opaque white or bright nude, the 2026 base is a sheer, translucent white that blurs the natural nail bed without fully covering it. Think of it as a "your nails but better" filter. It grows out without that harsh demarcation line that makes a regular French look grown-out after four days, and it makes even a drugstore polish look expensive. Mix a drop of white creme into your clear base coat and you've got it in one step.
1.Sun-Kissed Bronze Velvet
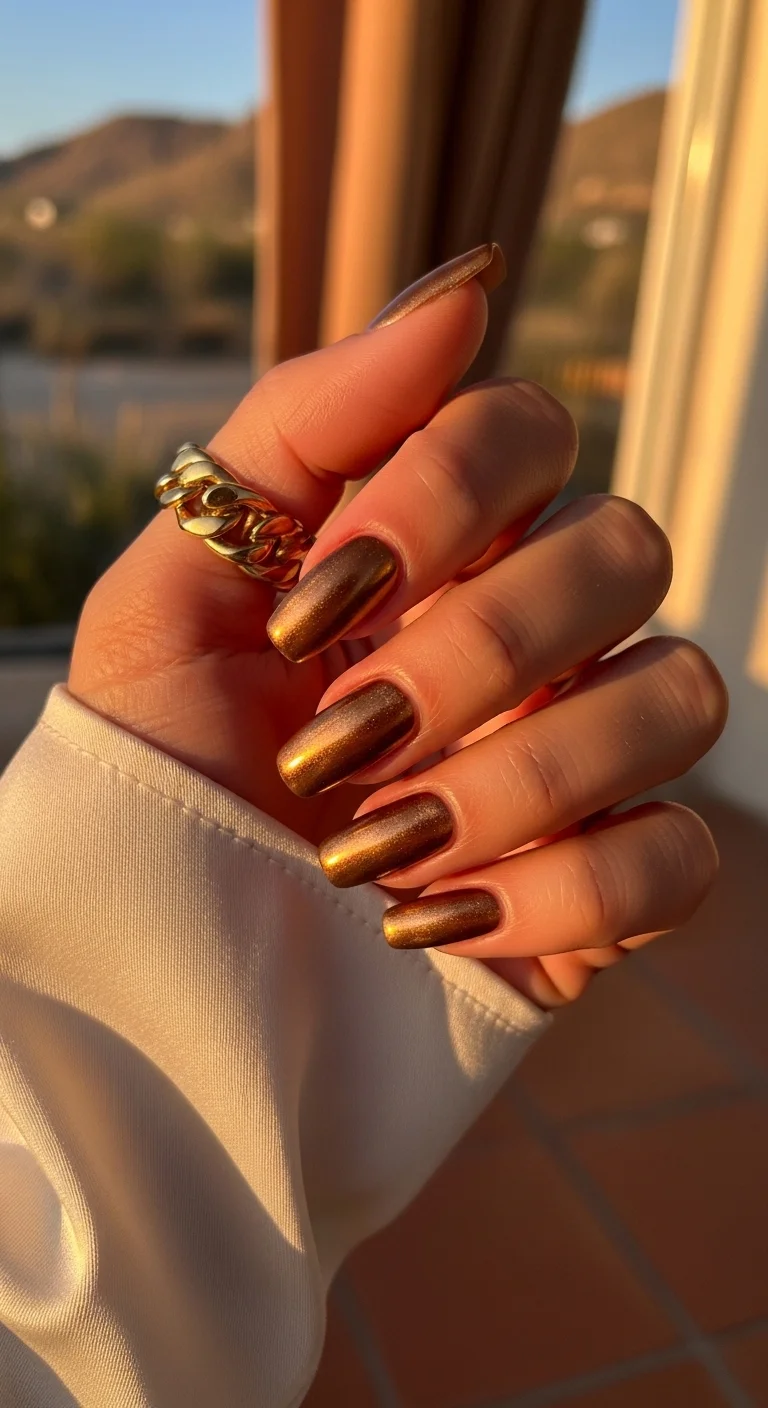
A rich, metallic bronze that catches every ray of sunlight.
Overview:
A deep bronze-brown with warm golden shimmer particles that shift between dark chocolate and molten gold depending on the light angle. The magnetic cat-eye effect creates a dense, fine golden shimmer concentrated down the center of each nail, giving a dimensional, velvet-like depth. Full coverage on every nail — no French tip, no accent art. The color and the finish are the entire design.
Short square is the right shape for this. The bold metallic reads as sophisticated rather than overwhelming on shorter nails, and the practical length means the velvet effect is visible in everyday lighting, not just under restaurant spotlights. Cat-eye gel requires the standard magnetic technique: apply the polish, hold the magnet 0.5 inches from the nail for 5-10 seconds, then flash-cure immediately. The brown base underneath is what makes the bronze pop — without it, the shimmer particles look washed out against bare nail.
Design Breakdown:
The finish does the heavy lifting. The magnetic effect is what separates this from a standard metallic brown.
Base Color: A deep, creamy chocolate brown as the foundation for the magnetic effect.
Nail Shape: Clean, short square. Keeps the bold metallic from looking overwhelming.
Design Element: Bronze magnetic "cat-eye" polish that creates the signature velvet movement.
Finish: High-gloss top coat to maximize the light reflection.
Get The Look at Home:
You'll need a magnet for this one, but the technique is straightforward.
- Prep: Shape nails into a tight square. Clear oils with alcohol.
- Dark base: One coat of dark brown gel, cured. This makes the bronze pop more.
- Magnetic layer: Thick coat of bronze magnetic polish. Do NOT cure yet.
- The magnet: Hold near the nail edges for 5-10 seconds to pull the shimmer into a velvet pattern.
- Quick cure: Immediately into the lamp so the particles don't move back.
- Seal: Thick, glass-like top coat.
30 Stunning Summer Hair Trends for 2026 ☀️🌊
2.Electric Peach Ombre French
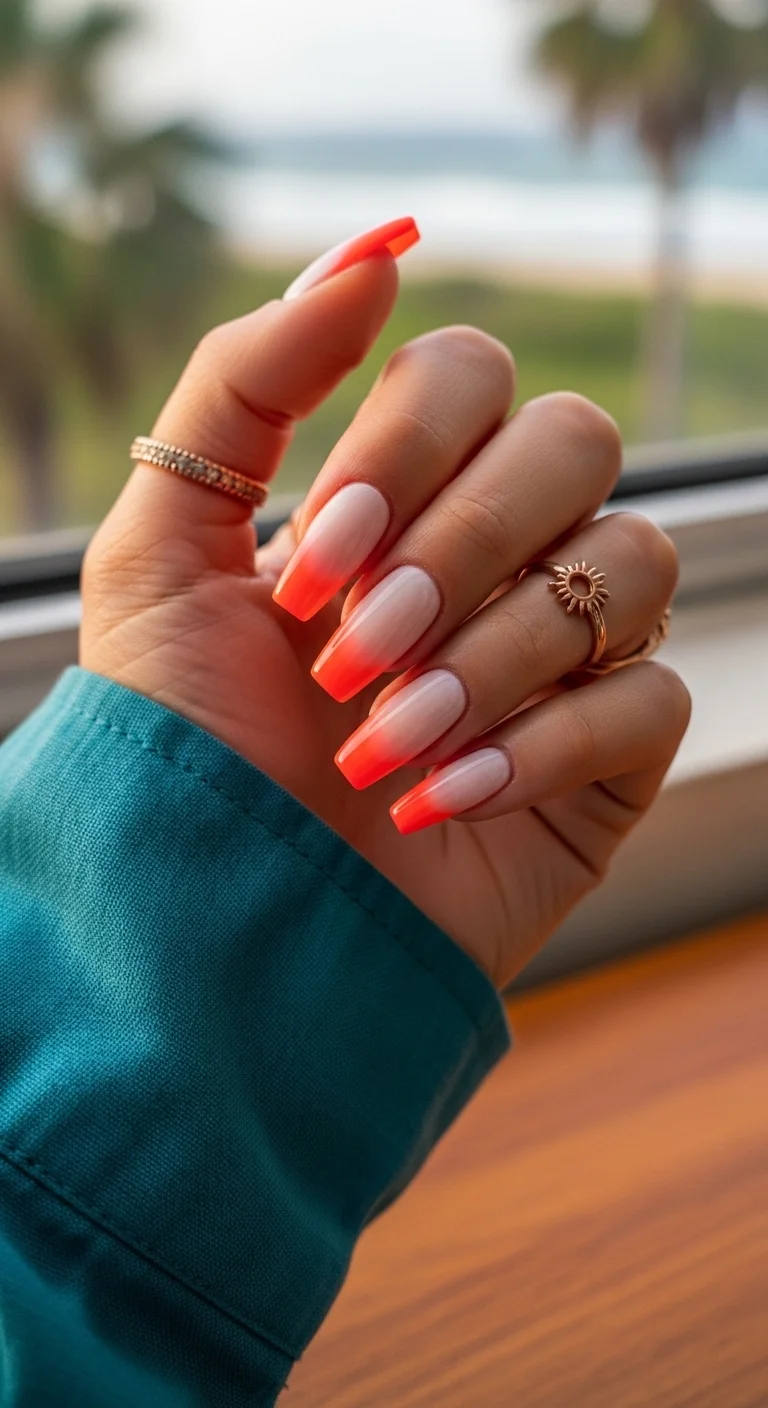
A blindingly bright neon gradient that screams summer vacation.
Overview:
A seamless ombré transition from milky nude at the cuticle to electric neon peach-orange at the tips. No hard French line — the peach color diffuses into the nude base like a watercolor wash. The gradient is smooth with no visible demarcation, and the peach intensifies right at the free edge.
The ombre French is harder than it looks. The blend zone between the nude and the peach needs to be truly seamless — any visible line breaks the illusion. A makeup sponge with light, repeated dabs produces a smoother transition than one heavy press. The long coffin shape gives the gradient enough room to breathe; on shorter nails, the peach-to-nude transition gets compressed. A white base coat underneath makes the neon peach significantly more vibrant than applying it directly over bare nail.
Design Breakdown:
Sponge-applied gradient with the most saturated color at the tip. The blend zone is everything.
Base Color: A milky, semi-sheer nude that blends into the natural cuticle area.
Nail Shape: Long, tapered coffin for maximum gradient surface area.
Design Element: Vertical ombre from soft peach to deep neon orange at the very tips.
Finish: High-gloss finish that makes the neon look almost wet.
Get The Look at Home:
A makeup sponge with light, repeated dabs — not one heavy press.
- Foundation: Two coats of milky nude gel polish. Cure.
- Sponge setup: Paint a strip of light peach and a strip of neon orange onto a small makeup sponge.
- Dab: Lightly tap the sponge onto the tips, moving slightly up and down to blur the line.
- Second layer: Repeat once the first layer is dry to make the neon truly blinding.
- Cleanup: Brush dipped in acetone to remove polish from skin.
- Seal: Generous top coat to smooth out sponge texture.
3.Wavy Coral Reef Frenchies
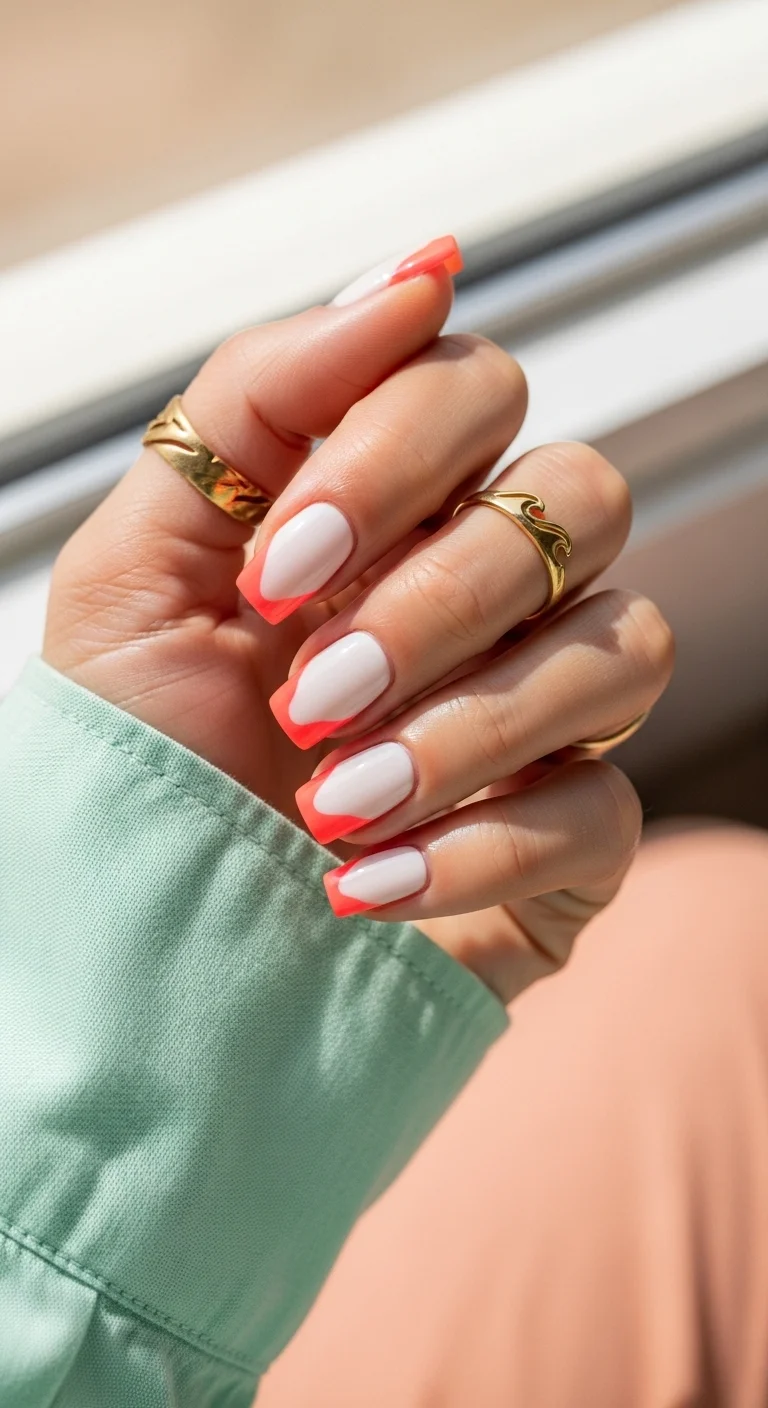
A playful, curvy take on the traditional French manicure.
Overview:
Abstract wavy tips in a punchy coral-orange over a milky white base. The coral tip curves and varies in thickness across each nail — no two nails have the same wave pattern. The effect looks like ocean waves frozen at the crest, or a coral reef viewed from above.
Wavy French tips are more forgiving than straight ones for at-home application. The organic shape means slight imperfections read as intentional variation rather than mistakes. A thin liner brush is still necessary for the initial wave outline, but the bar for "good enough" is significantly lower. The milky white base is about 70% opaque — enough to provide a clean canvas but sheer enough to let some natural nail show through, which keeps the overall look light.
Design Breakdown:
Negative space and organic shapes reinvent the French. The wave pattern is more forgiving than straight lines.
Base Color: A soft, creamy marshmallow white at about 70% opacity.
Nail Shape: Classic medium square with slightly softened corners.
Design Element: Abstract, wavy tips in coral-orange that follow a swirl pattern.
Finish: Glossy and smooth, with a seamless transition between base and waves.
Get The Look at Home:
A thin liner brush gives you control over the wave peaks and valleys.
- Base coat: Two thin layers of milky white polish. Cure.
- Map the wave: Liner brush and coral polish to draw a curvy S-shape across the top third of the nail.
- Fill: Polish brush to fill in the space from the line to the tip.
- Refine: Liner brush to make the peaks and valleys crisp.
- Dimension: Optional — a second wave in a lighter orange just below the first.
- Top it off: High-shine top coat to protect the art.
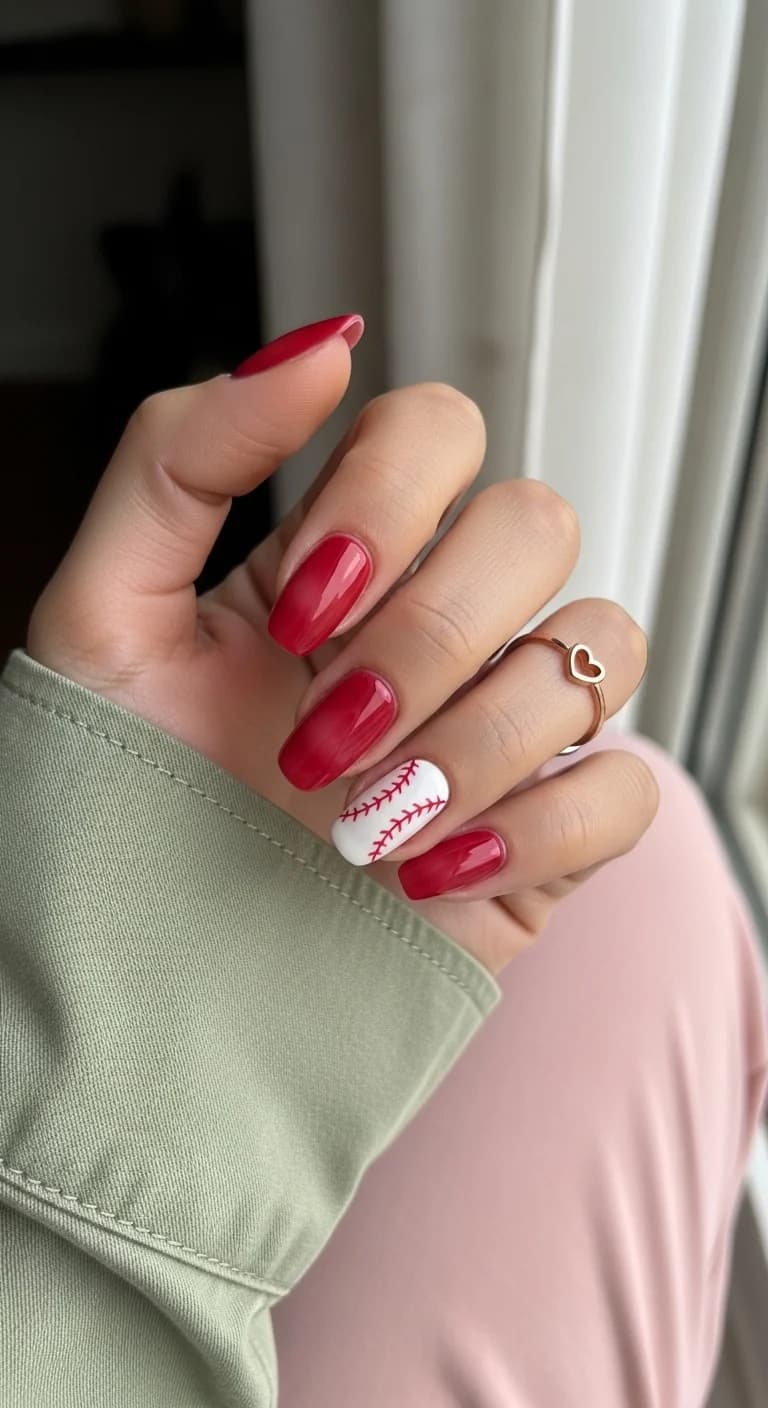
28 Cute & Sporty Baseball Game Nail Ideas for 2026 ⚾
4.Electric Blue Sky Tips
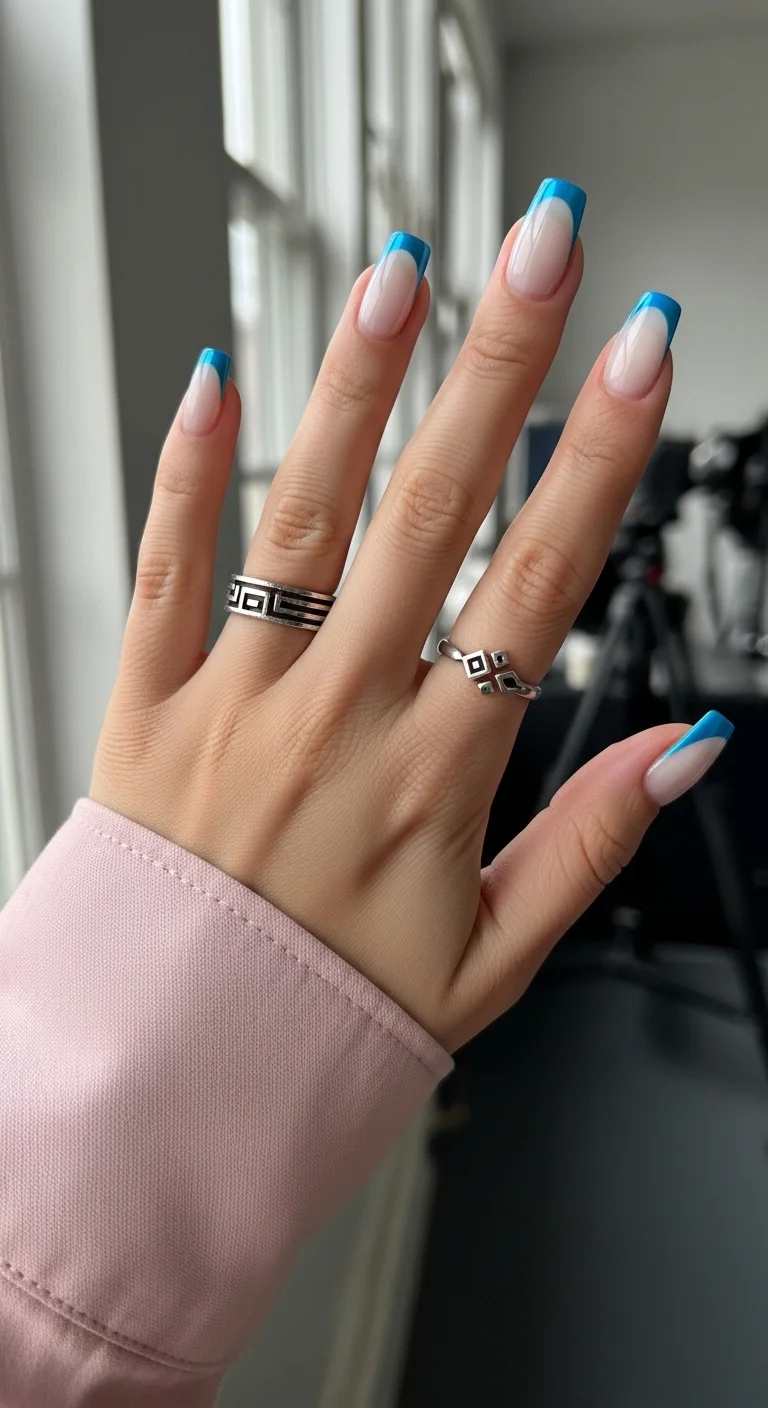
Classic French elegance meets a blindingly bright pop of blue.
Overview:
A sheer, warm-toned nude base with bright cerulean/cobalt blue French tips. The smile line is clean and precise — a crisp horizontal curve separating the nude from the blue. The blue is medium-width, creating balanced proportions across the long square shape.
Blue and nude is one of the cleanest color combinations in the French tip category. The nude base does important work: it matches the natural nail bed, which means grow-out is less visible and the manicure looks fresh longer. The blue needs to be high-pigment and opaque in one or two coats — sheer blue over nude reads as patchy rather than intentional. An angled brush dipped in acetone is essential for sharpening the smile line after application.
Design Breakdown:
High-contrast French with a deep smile line. The cleanup brush is what separates amateur from professional.
Base Color: A sheer, warm-toned nude that mimics the natural nail bed.
Nail Shape: Long, sharp square. Straight edges make the blue tips look modern.
Design Element: Thick, saturated sky blue French tip with a deep, dramatic curve.
Finish: Glass-like shine that makes the blue look punchy.
Get The Look at Home:
The smile line technique: dot the center, draw the wings, then fill.
- Prep base: Sheer nude, cured twice for a smooth canvas.
- Center point: Tiny dot of blue polish where the smile line starts.
- The wings: Two curved lines from the nail sides to meet the center dot.
- Fill: Blue polish for the rest of the tip, ensuring opacity.
- Cleanup: Flat brush with cleanser to sharpen the smile line.
- Seal: Top coat, capping the free edge to prevent chipping.
5.Emerald Chrome Goddess
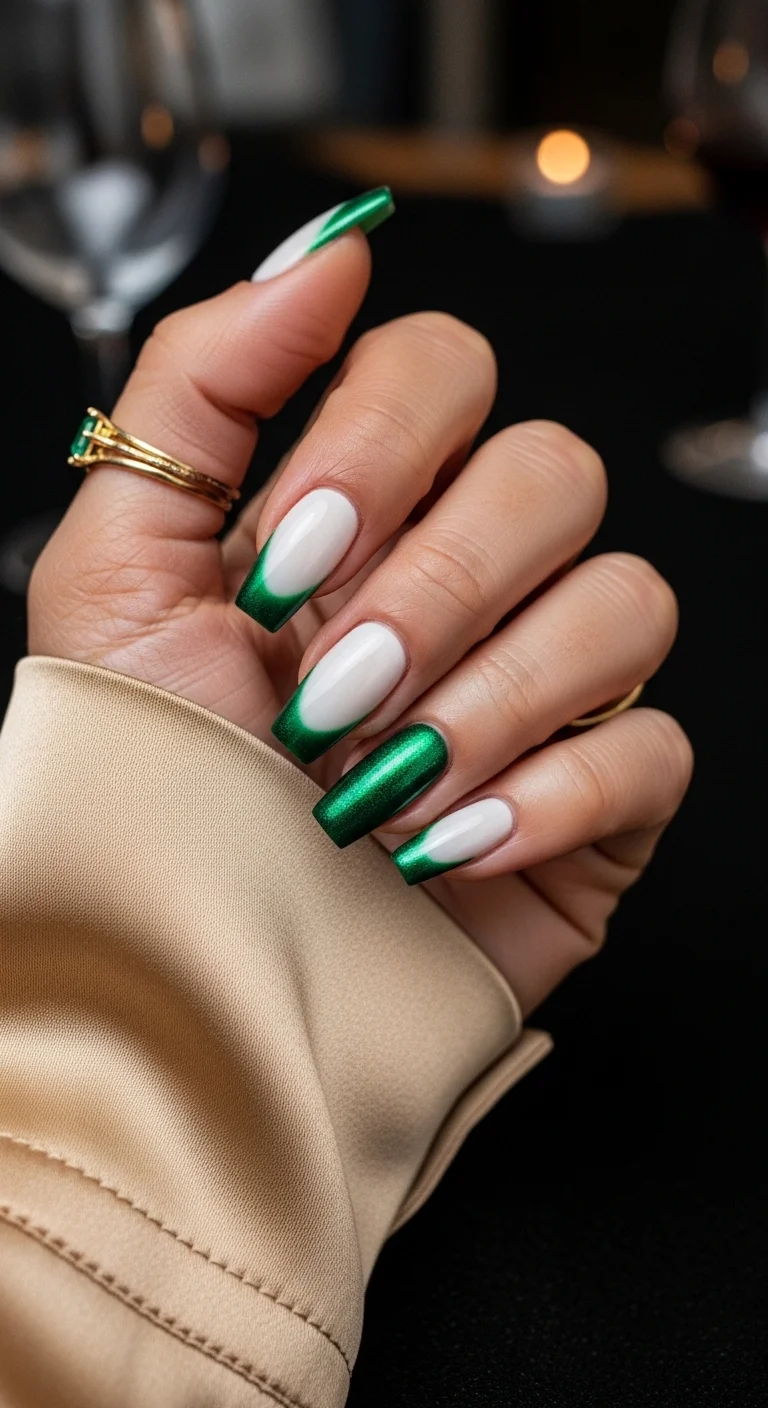
A luxurious mix of crisp white and jewel-toned green chrome.
Overview:
Opaque white base with metallic emerald green chrome French tips on most nails, plus a full chrome accent nail on the ring finger. The green has a mirror-like reflective quality — you can see candlelight bouncing off the surface. The chrome powder adheres only to the no-wipe top coat sections, which is how you get the crisp separation between white and green.
Chrome-on-white is one of the highest-contrast French variations. The white base makes the green look deeper and more saturated than it would over a nude or clear base. The chrome application requires a specific sequence: paint the white, cure it, apply no-wipe top coat only to the tip areas, cure for 30 seconds, then rub the green chrome powder onto those sections. The powder won't stick to the cured white — it only adheres to the fresh top coat. Dusting off excess powder before the final seal is critical, otherwise stray green specks contaminate the white base.
Design Breakdown:
Chrome powder applied selectively to French tips. The white base amplifies the green's depth.
Base Color: Opaque, creamy white. Needs to be super solid to provide the best contrast.
Nail Shape: Medium square with crisp, straight edges.
Design Element: Metallic emerald chrome French tips plus a full chrome accent nail.
Finish: Mix of creamy gloss and mirror-like chrome shine.
Get The Look at Home:
Chrome powder is the key. The white base makes the green look richer than any other base color.
- Base white: Two coats of opaque white gel. Cure.
- French outline: No-wipe top coat painted onto the French tips. Cure for 30 seconds.
- The rub: Silicone tool or eyeshadow sponge to rub green chrome powder over the cured top coat sections.
- Dust off: Soft brush to remove excess powder from the white base.
- Full nail: For the accent, no-wipe top coat over the whole nail, cure, chrome it.
- Lock it in: Final top coat layer over everything. Cure well.
30+ Chic Pool Party Hairstyles for Summer 2026 🌊👙
6.Wild Night Leopard French
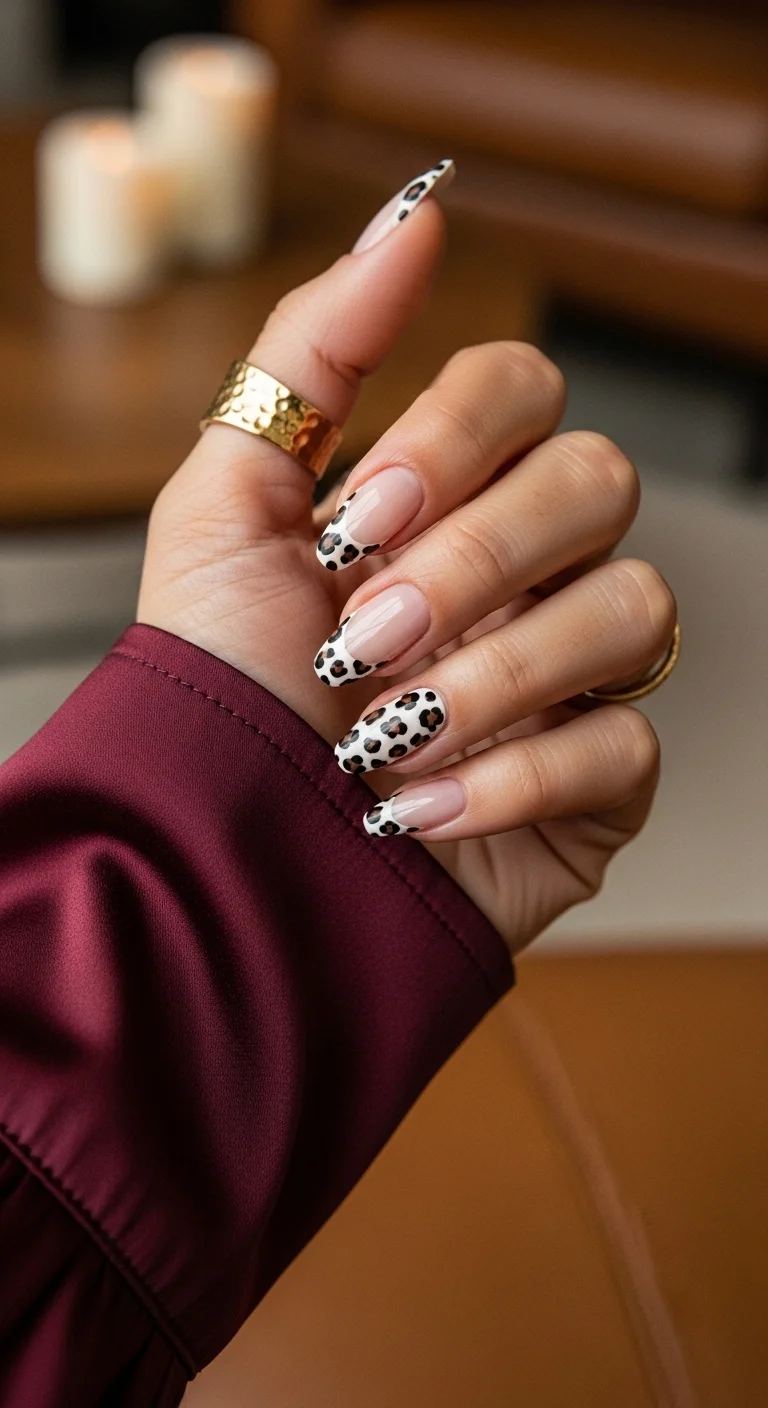
A sassy, animal-print twist on a classic almond Frenchie.
Overview:
Leopard print French tips on a sheer nude base. The tips feature classic leopard rosettes — irregular rounded forms with black outlines and warm brown centers. Each nail has a unique, hand-painted pattern. The ring finger is a full accent nail, entirely covered in the leopard print over a white base.
Leopard spots are supposed to be irregular, which makes this design more forgiving than geometric or stripe patterns. The rosettes are built in three steps: tan or caramel blobs first, then black C-shaped brackets around each blob, then a few tiny black dots in the empty spaces. The almond shape keeps the animal print from looking too aggressive — on square or coffin shapes, leopard tips can read as costume-y. The nude base is the right call: it grounds the busy pattern and keeps the overall look wearable.
Design Breakdown:
Precision matters with animal prints, but the spots are supposed to be imperfect. That's what makes them look organic.
Base Color: Sheer, pink-toned nude that makes the nail bed look healthy.
Nail Shape: Soft, elegant almond. Elongates the fingers.
Design Element: Hand-painted leopard spots in chocolate brown and black, clustered at the tips.
Finish: High-gloss, ultra-reflective top coat.
Get The Look at Home:
Don't worry about perfection — leopard spots are irregular by nature.
- Prep: Almond shape filed. Sheer nude base applied.
- Tan blobs: Dotting tool to place irregular blobs of light tan or caramel along the tip.
- The outline: Fine liner brush and black polish for two or three C-shapes around each blob.
- Fill gaps: Tiny black dots in the empty spaces to complete the pattern.
- Balance: Keep the pattern within the French tip area for a clean look.
- Seal: Top coat carefully to avoid smudging the black dots.
7.Barbiecore Hot Pink Tips
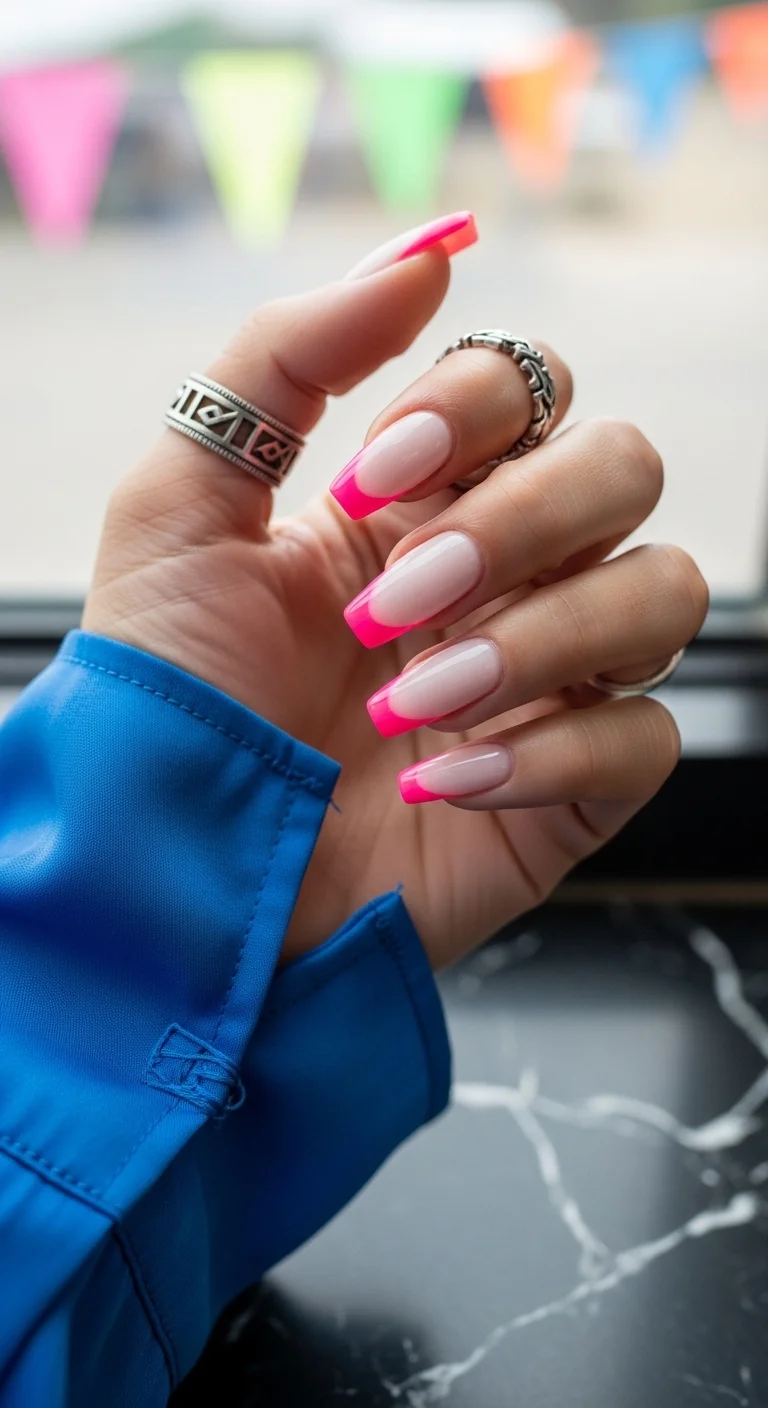
The ultimate pink mani for the girl who loves all things bright.
Overview:
A sheer nude-pink base with thick, perfectly symmetrical neon hot pink French tips. The pink is vivid and saturated — close to fuchsia or magenta — and the smile line is crisp and uniform across all nails. The long square shape gives the design a bold, powerful silhouette.
Neon pink polish formulas vary wildly. Some are chalky, some are jelly-like, some are nearly opaque in one coat. For French tips, you want a formula that's opaque in one or two coats — going back for additional passes on a tip is where wobbly lines happen. French tip stickers or guides are worth using if you struggle with freehand curves. The pink needs a white base coat underneath to reach full vibrancy; without it, the neon looks muted against the nude.
Design Breakdown:
A classic long-form French with a neon twist. The smile line precision is everything.
Base Color: Creamy, semi-opaque petal pink that blends into the cuticle.
Nail Shape: Long, sharp square. A total power move.
Design Element: Thick, symmetrical French tip in neon "highlighter" pink.
Finish: Ultra-glossy for a plastic-chic Barbie aesthetic.
Get The Look at Home:
French tip stickers help if freehanding the curve is a challenge.
- Base layer: Two coats of soft pink nude. Cure.
- Smile line: French tip stickers placed across the nail for a perfect curve.
- Pink power: Neon pink polish on the tips. Two coats for opacity.
- Peel and perfect: Remove stickers while polish is slightly wet for the cleanest line.
- Cleanup: Brush with acetone to fix tiny wobbles.
- Final gloss: Thick top coat to level the transition line.
30 Stunning Beach Nail Ideas for the Best Vacation in 2026 🌊
8.Pastel Skittle Frenchie
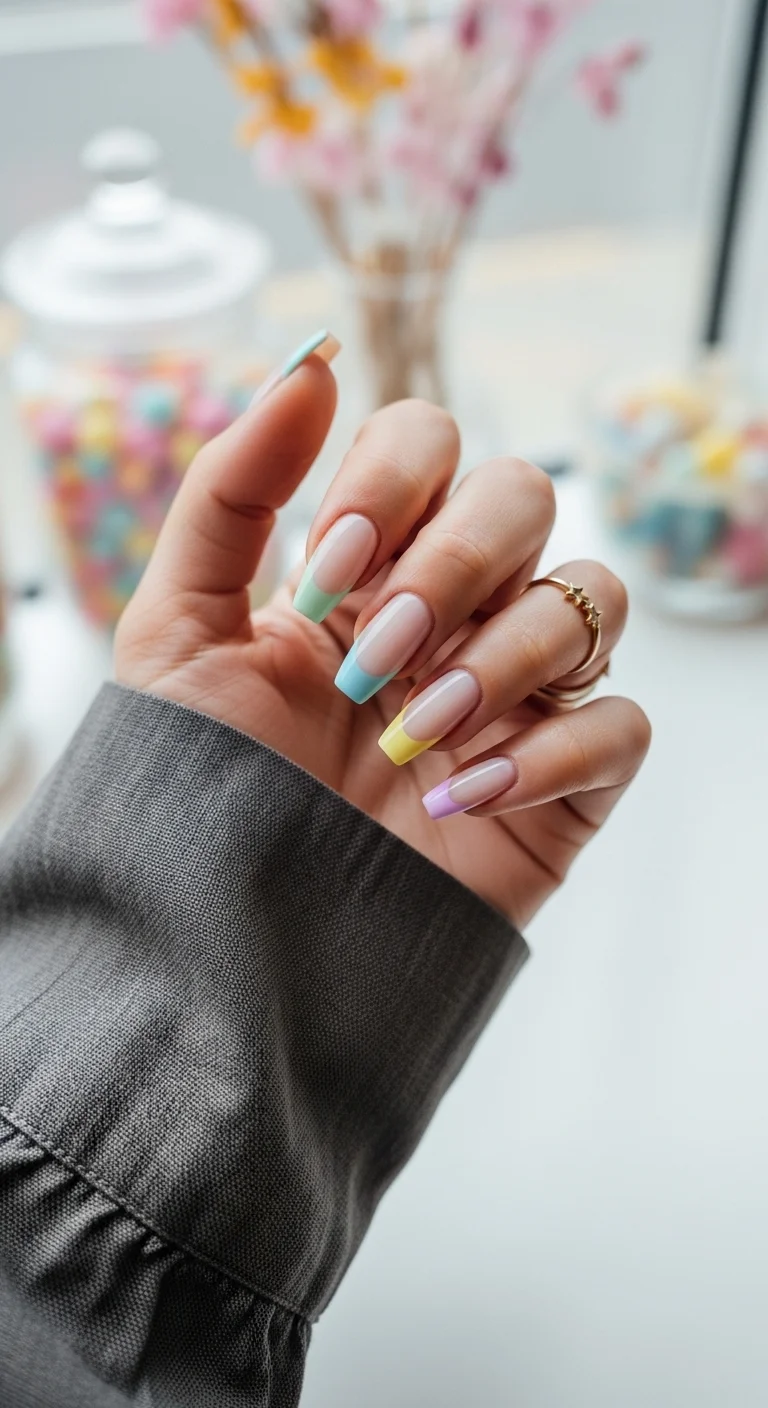
A rainbow of soft pastels for a playful, candy-coated vibe.
Overview:
Each nail has a different pastel-colored French tip — mint green, baby blue, soft lavender, butter yellow, and peach-coral. The base is a sheer pinky-nude that keeps the focus on the colorful tips. The pastels have a creamy, milky quality that makes them look like candy coatings.
The key to a successful skittle French is choosing pastels that have the same "weight" — all cream finish, all roughly the same saturation level. Mixing shimmers with creams, or brights with muted tones, creates visual imbalance where one finger dominates. The coffin shape gives each color enough surface area to register clearly. Keeping the tip thickness consistent across all ten nails is the hardest part — uneven tips make the hand look lopsided regardless of how good the individual colors are.
Design Breakdown:
Multi-colored tips that stay cohesive because all the pastels share the same creamy intensity.
Base Color: Clear or very sheer pink nude to keep focus on the tips.
Nail Shape: Long coffin for a trendy, elongated look.
Design Element: Rainbow of pastels: mint green, baby blue, lemon yellow, soft lilac, peach.
Finish: High-shine finish that makes the colors look creamy and edible.
Get The Look at Home:
The key is choosing colors with the same "weight" so no single finger looks darker.
- Foundation: One coat of a sheer base color.
- Color selection: Five pastel shades that look good together.
- The tip: Start with the thumb, paint a medium-thick French tip on each finger.
- Uniformity: Keep tip thickness consistent across all ten nails.
- Cure: Cure each hand individually to avoid smudging different colors.
- Seal: Generous top coat to make the colors pop.
9.Glitter Mist French Almond
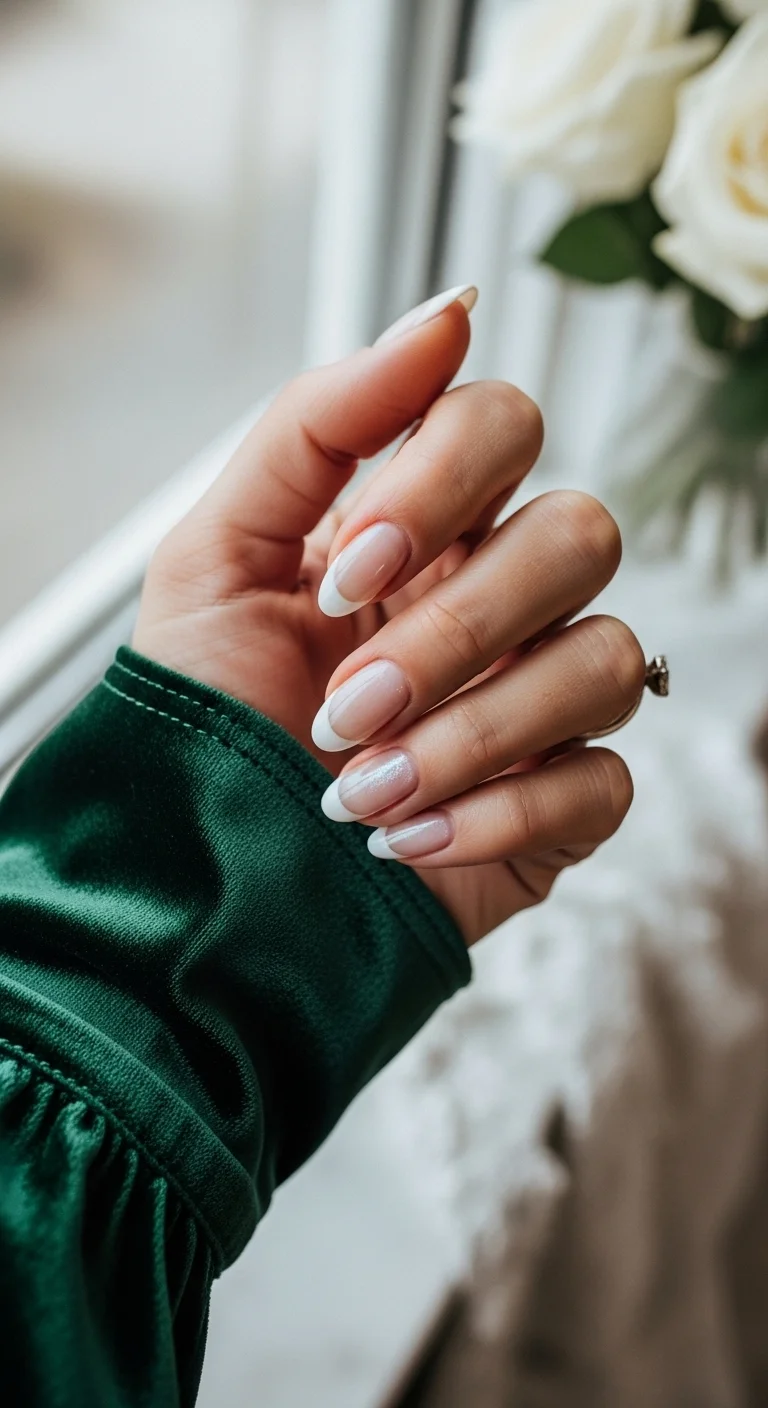
A timeless white French with a microscopic hint of sparkle.
Overview:
Classic white French tips on an almond shape with a fine silver shimmer overlay on the ring finger. The shimmer is subtle — more of a "glitter mist" than a full glitter nail. It catches light only when the hand moves, which makes it feel sophisticated rather than flashy. The other nails are clean white tips on a sheer milky pink base.
This is the bridal-favorite French for a reason. The almond shape's soft curves complement the clean white tips, and the one glitter accent adds just enough interest without disrupting the minimalist aesthetic. The shimmer needs to be applied thinly — a heavy hand turns "diamond dust" into "craft store glitter." One thin layer over the ring finger is all that's needed. The white tips require a steady hand; cleanup with an angled brush and acetone is what creates the professional-looking smile line.
Design Breakdown:
A bridal-favorite look focused on soft edges and one subtle sparkle detail.
Base Color: Sheer, milky pink that hides nail bed imperfections.
Nail Shape: Soft, feminine almond.
Design Element: Crisp, thin white French tips with fine silver shimmer on the ring finger.
Finish: High-gloss, glass-like top coat.
Get The Look at Home:
The smile line and that one subtle glitter detail are what make this design.
- Base layer: Two coats of sheer, milky pink. Cure.
- White tips: Thin brush for a delicate white curve on each nail.
- The shimmer: Very fine glitter topper, one thin layer only on the ring finger.
- Cleanup: Ensure white lines are perfectly symmetrical with a cleanup brush.
- Gradient: Optional — a tiny bit of shimmer over the white tip of the middle finger.
- Seal: High-shine top coat over everything for that bridal glow.
26 Stunning Summer Braided Hairstyles for Women 2026 ☀️💇♀️
10.Midnight Plum Ombre French
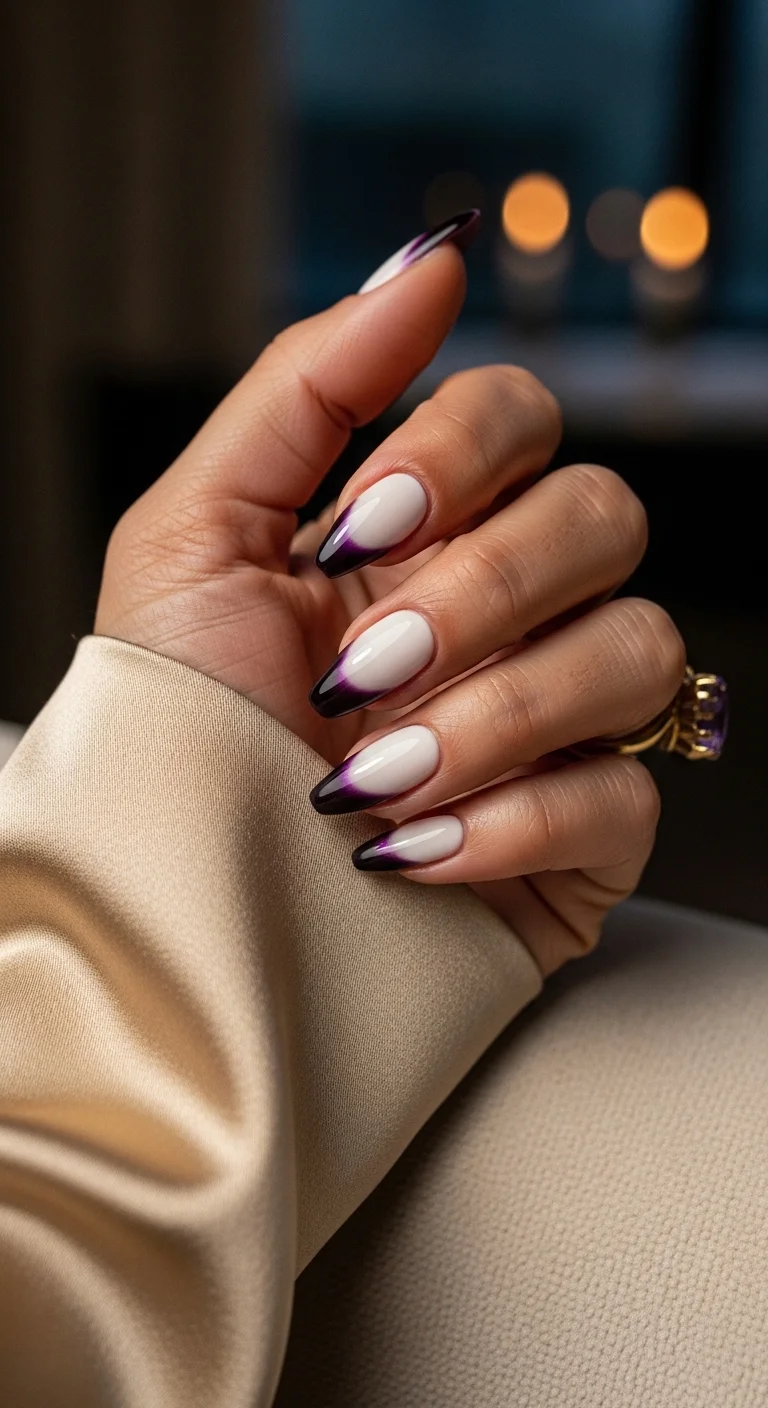
A moody, sophisticated gradient for sultry summer nights.
Overview:
Deep plum purple that gradients into near-black at the very tips, fading smoothly into a milky white base. No hard French line — the plum color bleeds downward into the white, creating a "smoked" effect. The gradient is seamless with no visible demarcation.
Dark-on-dark gradients are tricky because any imperfection in the blend is immediately visible against the lighter base. The sponge technique works here, but the blend zone needs to be wide enough that the plum-to-white transition feels gradual rather than abrupt. The milky white base (not sheer nude) provides better contrast for the dark tips. Almond shape is essential — the rounded tip makes the dark gradient look graceful rather than heavy. On square shapes, dark ombre tips can look blocky.
Design Breakdown:
Dark-on-dark gradient that creates depth and a "smoked" effect. The blend zone width determines the quality.
Base Color: A very sheer, cool-toned nude base.
Nail Shape: Long, elegant almond. Helps dark tips look graceful.
Design Element: French tip that gradients from deep grape purple to solid black at the edge.
Finish: Ultra-shiny top coat that makes the dark colors look like liquid ink.
Get The Look at Home:
A small sponge creates the gradient. The blend needs to be wide enough to look gradual.
- Foundation: Sheer nude base, cured.
- Base tip: Deep purple polish on the nail tips.
- The gradient: While purple is tacky, small sponge to dab black onto the very edge.
- Blend: Lightly tap the sponge where the two colors meet for a smooth transition.
- Clean lines: Brush with acetone to keep the bottom smile line crisp.
- Seal: Thick top coat to blend sponge texture and add deep shine.
11.Turquoise 'V' Cut Frenchie
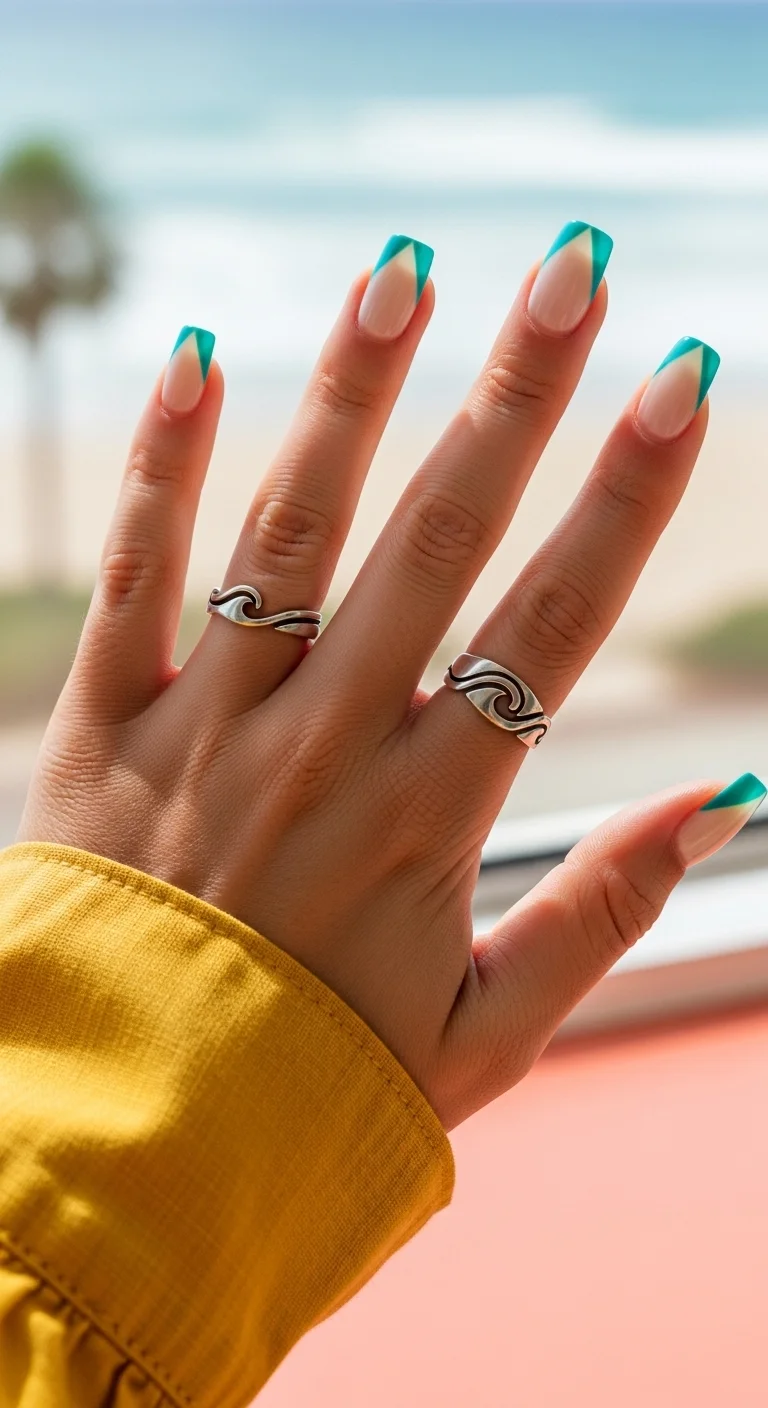
A geometric, modern take on the French tip in a punchy ocean blue.
Overview:
Two diagonal lines of bright turquoise meeting at a sharp V-point at the center of each tip. The V-cut is angular and geometric — a deliberate departure from the classic curved smile line. The nude base is very close to the skin tone, making the turquoise pop by contrast.
Striping tape is almost mandatory for getting clean V-cut lines. Place two small pieces diagonally from the nail sides so they meet at a V in the center, then paint inside the taped area. The tape needs to be pressed down firmly at the edges — any lifting creates bleed that ruins the sharp point. The square shape complements the geometric nature of the V-cut. On almond shapes, the angular design fights against the curved nail edge.
Design Breakdown:
Perfect symmetry and sharp angles are the focus. Tape does most of the work.
Base Color: Clean, matte-adjacent sheer nude.
Nail Shape: Crisp, medium square with sharp corners.
Design Element: Two diagonal lines meeting in a sharp V at the tip, in bright turquoise.
Finish: High-gloss top coat to make the blue pop.
Get The Look at Home:
Striping tape creates the sharp geometric lines. Remove while polish is wet.
- Prep: Sheer nude base, cured completely.
- Tape it off: Two pieces of striping tape placed diagonally from the sides to meet in a V at the center.
- Paint: Fill in the tip area with turquoise polish.
- The reveal: Peel tape off while polish is still wet for perfectly straight lines.
- Cleanup: Tiny brush with acetone to crisp up the V-point.
- Seal: Top coat, swiping base to tip to avoid dragging the blue.
35 Fun Birthday Nail Designs for 2026 🎂
12.Mixed Metal Chrome French
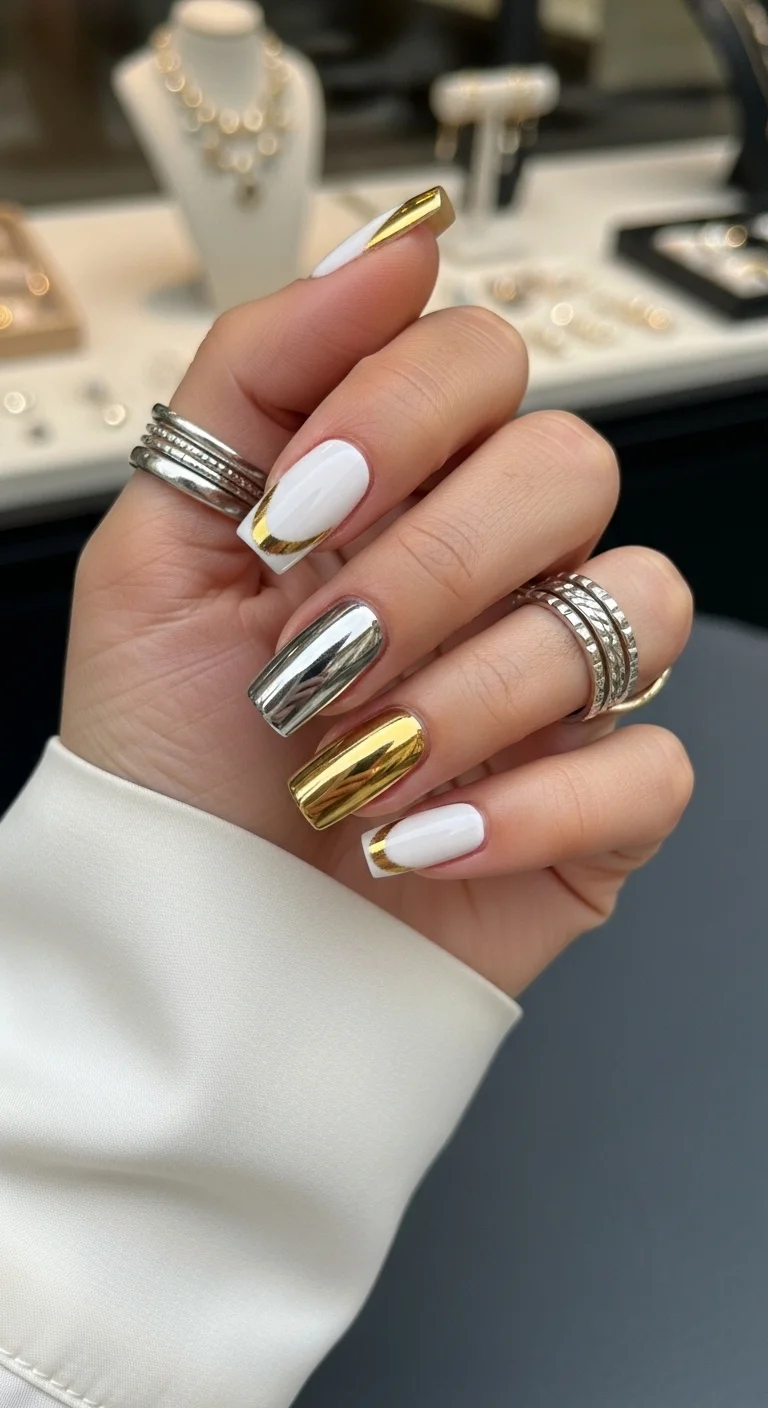
A high-fashion blend of classic white and molten metal finishes.
Overview:
A mixed-manicure approach combining white French tips with gold chrome diagonal tips, plus full silver and gold chrome accent nails. The chrome is intensely reflective — mirror-finish gold and silver that catch light like actual jewelry. The white base provides a clean backdrop that prevents the metals from competing visually.
Mixing metals is intentional here, not accidental. The gold chrome appears as angled or diagonal tips on some nails, while the silver and gold each get their own full accent nail. The chrome powder application requires separate no-wipe top coat sections for each metal color — if they overlap, you get a muddy bronze instead of distinct gold and silver. Black base underneath the chrome nails makes the metallic look more mirror-like than white or clear. Two layers of top coat over chrome nails are critical — chrome peels faster than standard polish.
Design Breakdown:
Chrome powder over different base colors for maximum shine. Separate top coat sections for each metal.
Base Color: Mix of opaque white and specialized chrome-base gel.
Nail Shape: Long, tapered square for a sleek silhouette.
Design Element: White French tips with gold chrome, plus full silver and gold chrome accent nails.
Finish: Combination of creamy white and mirror-like metallic shine.
Get The Look at Home:
Both gold and silver chrome powders are needed. Black base makes chrome more mirror-like.
- White base: White gel on French nails. Black base on chrome nails.
- French tips: White French tips painted and cured.
- Metal accents: No-wipe top coat on accent nails and gold tip areas. Cure 30 seconds.
- Rub it in: Silver chrome on one accent, gold on the other, plus gold details on white nails.
- Dust: Thoroughly brush off loose chrome to avoid top coat contamination.
- Final seal: Two layers of top coat over chrome nails to prevent peeling.
13.Peach Fuzz Gradient Glow
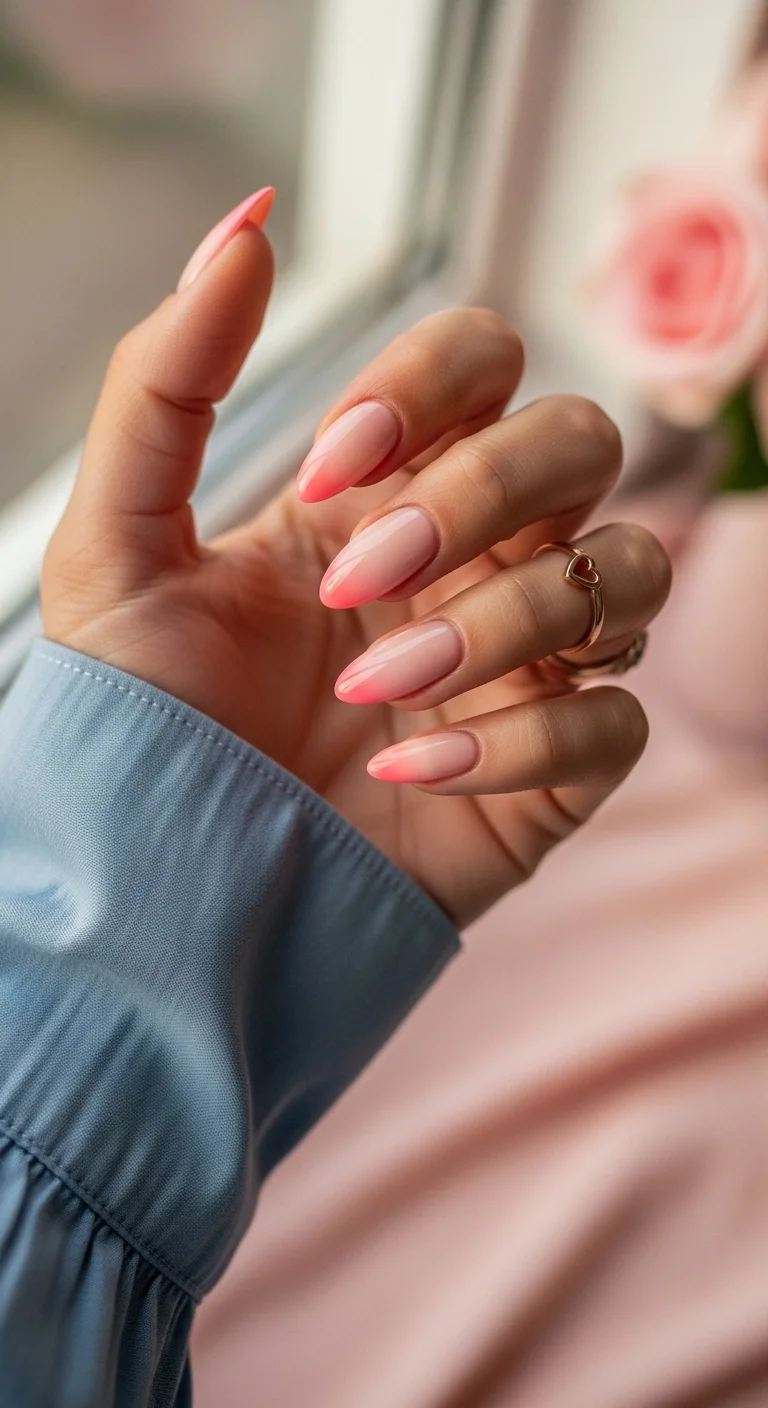
Soft, romantic, and perfectly peachy for a summer glow.
Overview:
A smooth vertical ombré from warm nude at the cuticle to saturated peach-coral at the free edge. No hard French line — the blend is airbrushed-smooth with no visible demarcation. The peach intensifies right at the tip, creating a "lit from within" glow effect.
This is one of the most universally flattering French variations. The warm peach complements virtually every skin tone because it sits in the middle of the warm-cool spectrum. The sponge technique for the gradient requires patience: multiple light dabs build a smoother transition than one heavy press. The almond shape's soft curves help the gradient look organic rather than structured. A plumping or "gel-effect" top coat smooths out any remaining sponge texture and gives the finish a professional, salon-quality look.
Design Breakdown:
Seamless blend with soft, diffused edges. The gradient zone needs to be wide enough to look natural.
Base Color: Warm, sheer nude that matches the natural nail bed.
Nail Shape: Elegant, slim almond.
Design Element: Soft airbrushed gradient from nude base into creamy peach at the tips.
Finish: High-gloss, "wet-look" top coat.
Get The Look at Home:
An ombre sponge or gradient brush is essential. Build the color gradually.
- Base: Two coats of sheer nude. Cure.
- Color: Dot peach polish on a makeup sponge.
- Dab: Lightly press onto the tips, moving up about a third of the way.
- Blend: Clean part of the sponge to soften the peach-to-nude line.
- Build: Second, lighter layer on just the very tips to deepen the peach.
- Seal: Plumping top coat to smooth sponge texture.
32 Stunning Summer Wedding Hairstyles for Brides ☀️💍
14.Varsity Blue Double-Stripe
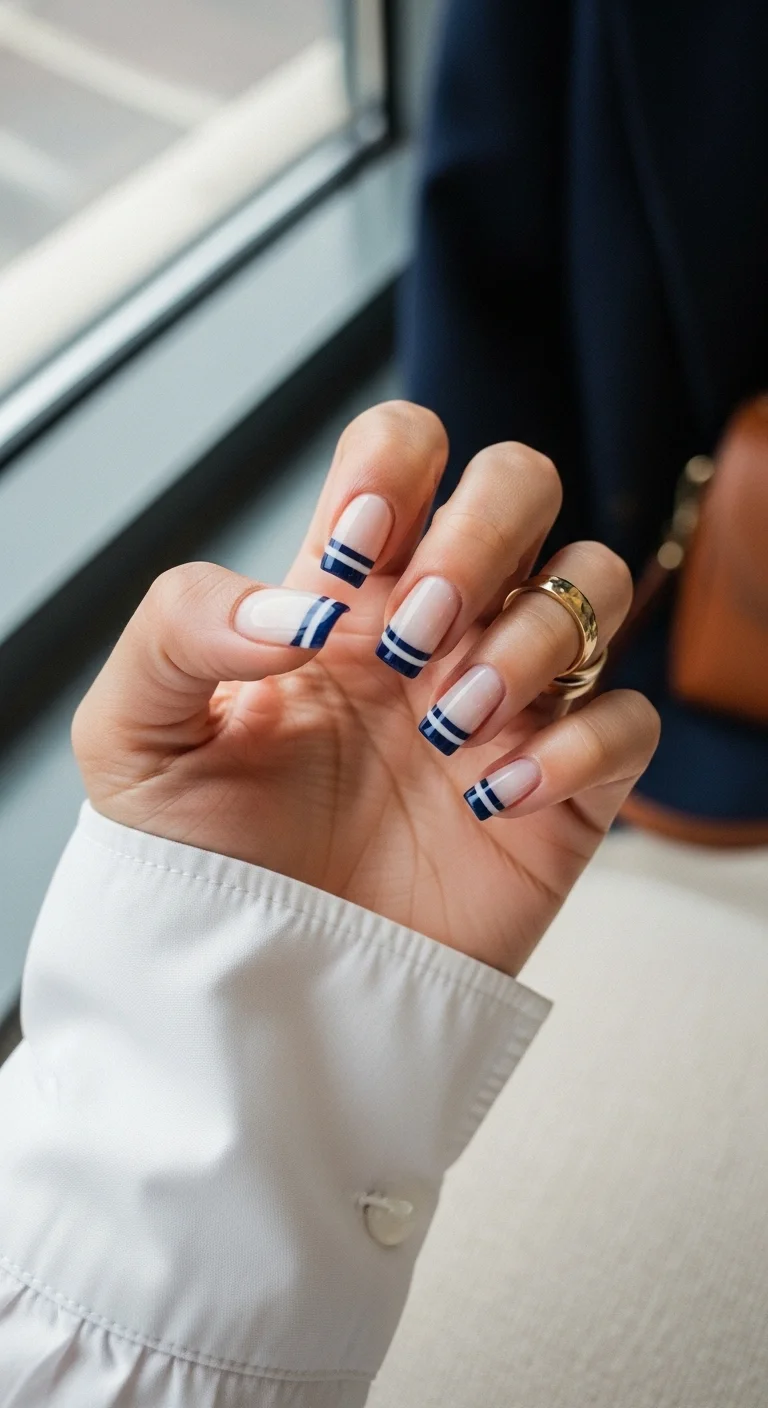
A sporty, preppy take on the classic French with a double-stripe twist.
Overview:
A navy blue French tip with a second, thinner navy line about 2 millimeters below it, leaving a small gap of the nude base between the two lines. The effect is preppy and graphic — like a varsity stripe translated onto nails. The navy is rich and opaque, and the white accent stripes within the navy add additional detail.
The double-stripe technique requires a long-haired liner brush and a very steady hand. The gap between the two lines needs to be even across all ten nails — inconsistent spacing makes the design look sloppy regardless of how clean the individual lines are. Resting your pinky on a flat surface while drawing the second line helps enormously. The medium square shape provides enough surface area for the two lines without looking cramped. Navy is a softer alternative to black that still provides high contrast against nude.
Design Breakdown:
Clean, graphic lines with a deep navy palette. The gap between lines must be consistent.
Base Color: Very sheer, milky nude base.
Nail Shape: Classic medium square with straight edges.
Design Element: Thick navy French tip with a thinner navy line below, separated by a nude gap.
Finish: Classic high-gloss finish.
Get The Look at Home:
A long-haired liner brush is essential for straight, parallel lines.
- Foundation: Sheer nude base, cured.
- The tip: Standard navy French tip on each nail. Cure.
- The stripe: Thin liner brush, fine line of navy about 2mm below the tip.
- Steady hand: Rest pinky on the table for stability while drawing.
- Refine: Cleanup brush with acetone to ensure even gap width.
- Seal: Top coat carefully to avoid dragging navy into the nude section.
15.Electric Blue Aura Tips
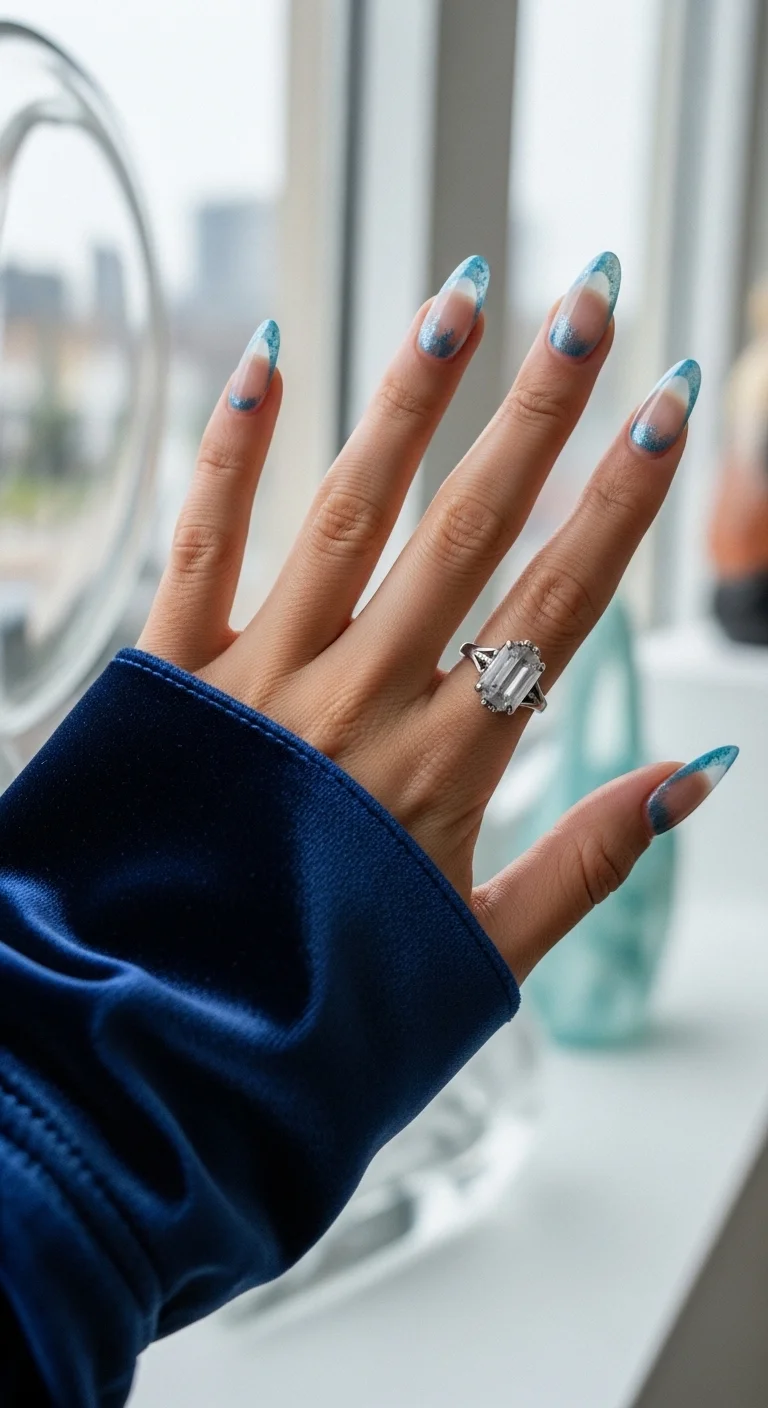
A magical, shimmering blue gradient that looks like a summer sky.
Overview:
A diffused aura-style French tip — the blue isn't a hard line but a cloud-like gradient of shimmer particles. Icy blue-to-teal shimmer concentrated at the tips with silvery sparkle throughout. The blue has a duochrome quality, shifting between sky blue, teal, and silver depending on the angle.
The aura technique creates an ethereal, mystical effect that's fundamentally different from a standard French. You're building up layers of shimmer rather than painting a defined shape. A fine blue glitter polish over a soft blue gel base creates the foundation, then a dry brush pulls some glitter down toward the base for the "aura" diffusion. Iridescent shimmer in the center of the blue adds depth. Two coats of top coat are necessary to smooth the glitter texture — the first locks the particles, the second levels the surface.
Design Breakdown:
Fine glitter and a gradient technique create an "aura" effect. The duochrome quality is what makes it special.
Base Color: Sheer, almost-clear base with a hint of pink.
Nail Shape: Long, slender almond for a delicate, elongated look.
Design Element: Diffused blue glitter gradient at the tips with iridescent shimmer.
Finish: High-shine, "glassy" finish that adds depth to the glitter.
Get The Look at Home:
Building up layers of shimmer creates the glow. Each layer adds dimension.
- Base: Clear or very sheer pink base. Cure.
- Color base: Tiny bit of blue gel on a sponge for a soft "cloud" at the tip.
- Glitter layer: Fine blue glitter polish over the blue gel, concentrated at the edge.
- Blend: Dry brush to pull glitter down toward the base for the "aura" effect.
- The shimmer: Iridescent shimmer in the center of the blue for depth.
- Seal: Two coats of top coat for completely smooth glitter.
34 Cutest Butter Yellow Nail Designs for 2026 🧈
16.Sweetheart Pink Frenchie
A romantic and playful set featuring bold pink hearts.
Overview:
Two design elements split across different nails: hot pink French tips on some nails, and fully white nails with scattered hand-painted pink hearts on others. The hearts are small, uniformly sized, and randomly scattered — not in a grid. The pink is vivid and saturated, close to fuchsia. The white base on the heart nails is clean and opaque.
Hearts are built from two dots and a V-shape. Place two dots side side by side with a dotting tool, then use a thin liner brush to pull a small V down from the bottom of the dots. The V is what transforms "two blobs" into "heart." The technique is simple but the result looks impressive. Keeping the hearts small and randomly scattered prevents the design from looking like wrapping paper. The contrast between clean French tips and busy heart patterns creates visual variety across the hand.
Design Breakdown:
High-contrast pink-and-white mixing traditional French with hand-painted art. Hearts are easier than they look.
Base Color: Crisp, opaque white on heart nails. Nude on French nails.
Nail Shape: Long square, providing a canvas for the heart pattern.
Design Element: Hot pink French tips plus full-pattern hand-painted pink hearts on accent nails.
Finish: Super-glossy top coat for a plastic-chic vibe.
Get The Look at Home:
Dotting tools make hearts fast. Two dots plus a V equals heart.
- Base: Opaque white on heart nails, nude on French nails.
- French tips: Hot pink tips on nude nails. Cure.
- Heart prep: Dotting tool dipped in hot pink polish.
- The heart: Two dots side by side on the white nails.
- Connect: Thin liner brush pulls a small V from the bottom of the dots.
- Seal: Top coat carefully over hearts to prevent pink bleeding into white.
17.Molten Silver French
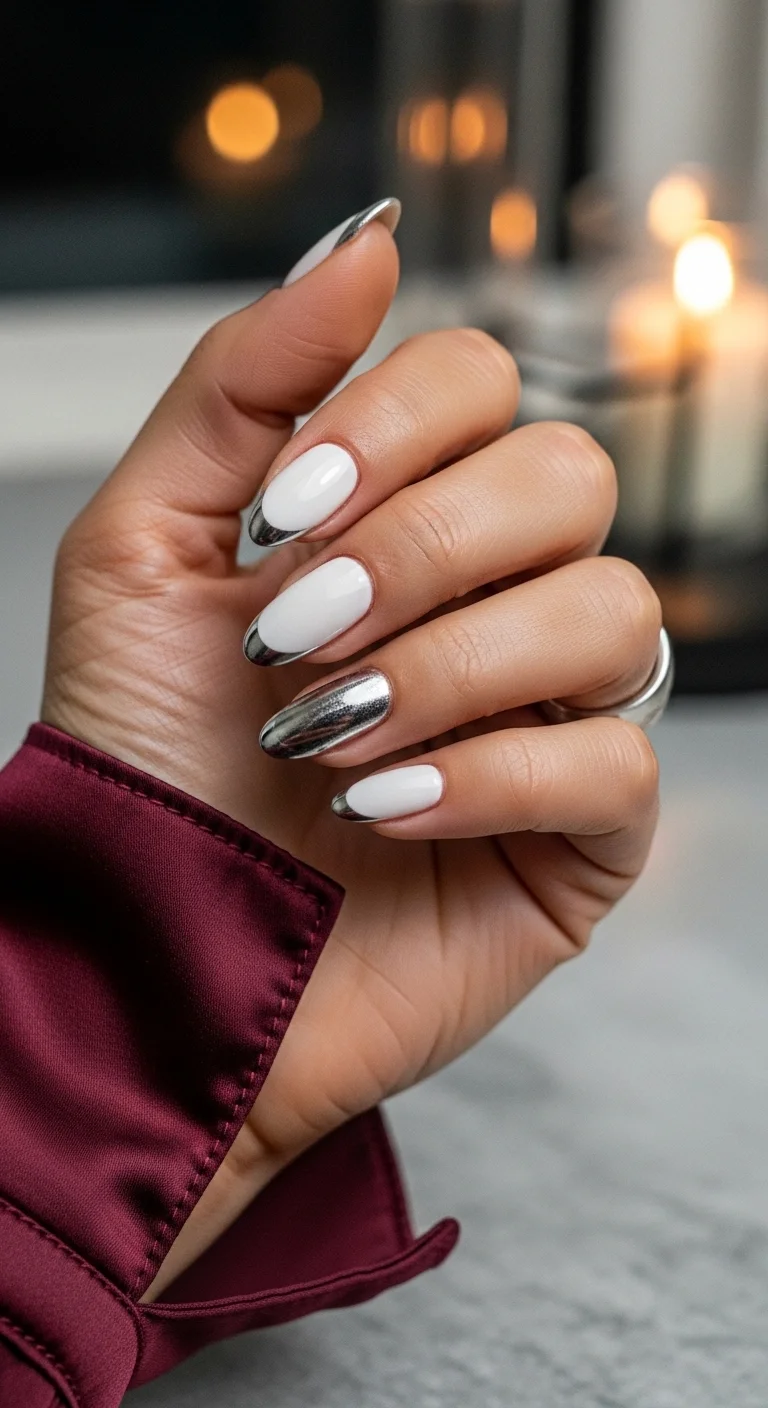
A futuristic and clean look featuring high-shine silver chrome.
Overview:
Mirror-finish silver chrome French tips on a clean white base, with a full chrome accent nail on the ring finger. The chrome is extremely reflective — you can see candlelight and room details bouncing off the surface. The silver has a slightly warm, pewter undertone rather than a cool blue-silver, which gives it a more sophisticated, less "robotic" feel.
Chrome-on-white is one of the highest-contrast metallic French variations. The white base makes the silver look deeper and more reflective than it would over nude or clear. The application sequence is critical: white base cured, no-wipe top coat only on the tip areas, cure for 30 seconds, rub chrome powder, dust excess, final seal. The ring finger accent nail gets full no-wipe top coat over the entire surface, then full chrome coverage. Skipping the "dust off" step contaminates the white base with stray silver particles.
Design Breakdown:
Mirror-like chrome finish over white. The application sequence determines success.
Base Color: Clean, semi-opaque white base.
Nail Shape: Soft almond, which elongates the fingers.
Design Element: Thick, mirror-finish silver chrome French tip plus full chrome accent nail.
Finish: High-shine, "wet-look" top coat maximizing the chrome effect.
Get The Look at Home:
A smooth base and no-wipe top coat are the secrets to perfect chrome.
- Base: Two coats of white gel. Cure.
- French outline: Liner brush with no-wipe top coat for French tips. Cure.
- Chrome: Silver chrome powder rubbed over cured top coat with a silicone tool.
- Clean: Wipe stray silver dust from the white base.
- Accent: No-wipe top coat over the whole ring finger. Cure. Chrome it.
- Seal: Final top coat layer over everything. Cure well.
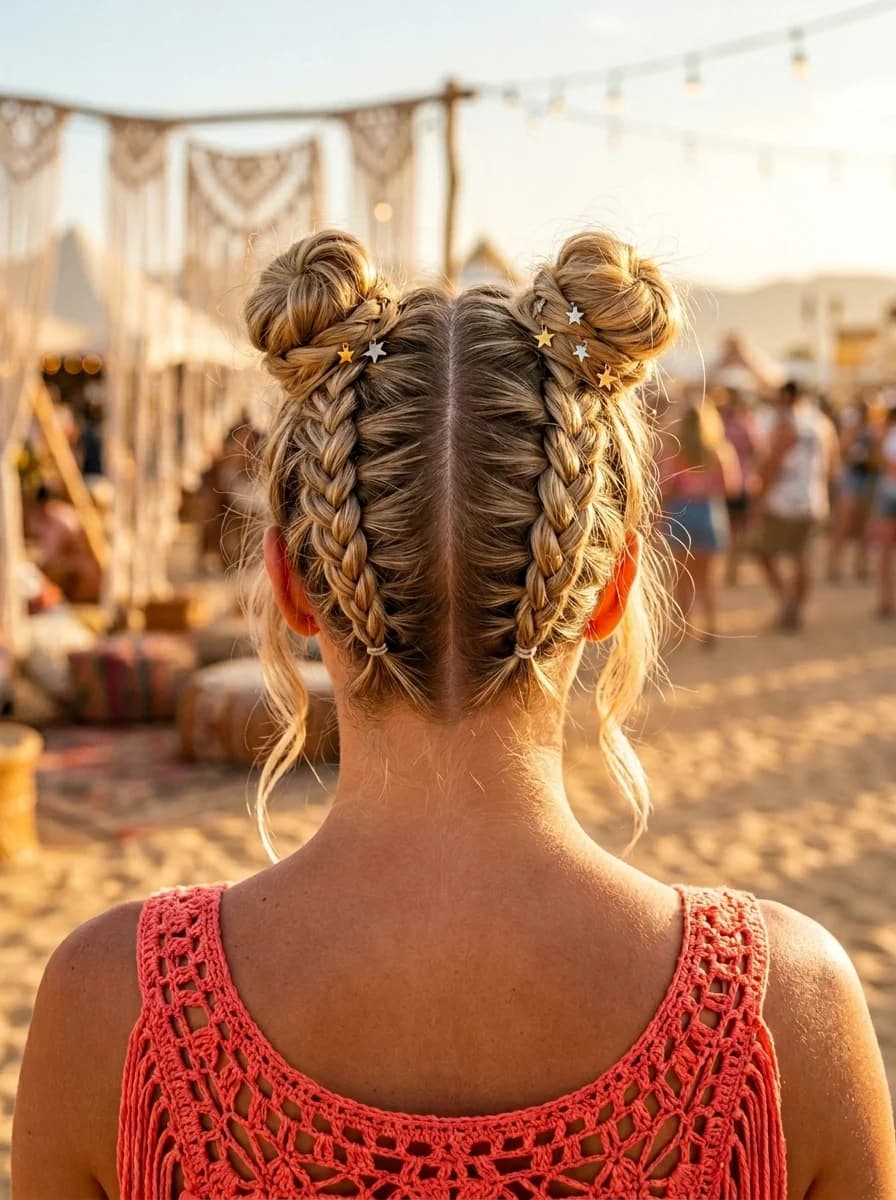
25 Stunning Summer Vacation Hairstyles for 2026 ☀️🌊
18.Electric Blue Micro-French
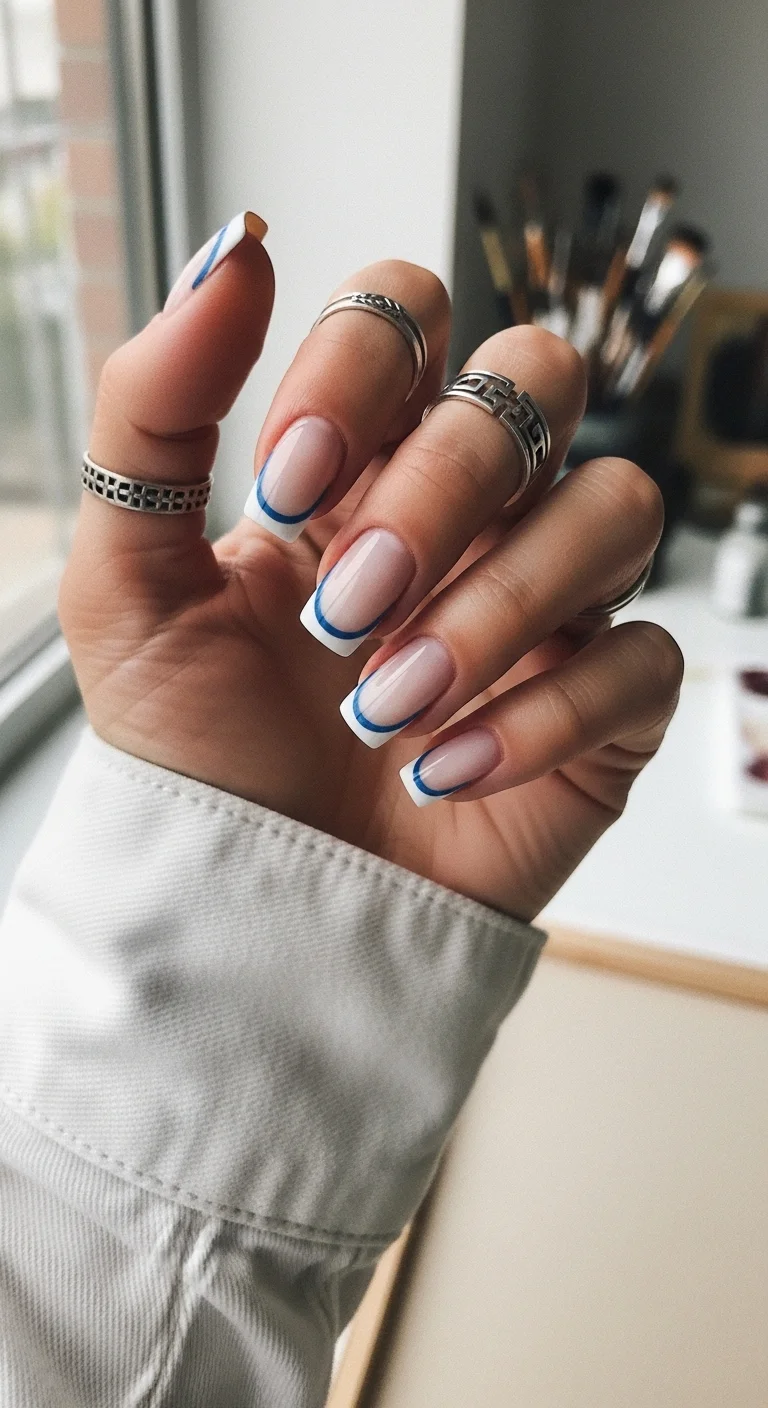
Minimalist and punchy—the ultimate micro-French in a bold blue.
Overview:
Two-tone French: a white tip block with a thin electric blue line tracing just below the smile line, between the white tip and nude base. The blue line is razor-thin and follows the exact curve of the French smile line. The white tip is opaque and evenly applied.
The micro-French trend is about restraint — the thinner the line, the more sophisticated it reads. This two-tone version adds a second layer of complexity: the white tip needs to be painted first, cured, then the blue line drawn directly beneath it. The blue line's thickness should be about one-third of the white tip's thickness. Any thicker and it competes with the white; any thinner and it disappears. The nude base is warm and natural-looking, which prevents the blue-and-white combination from reading too cold.
Design Breakdown:
Extreme precision with two concentric lines. The blue line thickness relative to the white tip is critical.
Base Color: Sheer, pinkish nude that lets the natural nail show through.
Nail Shape: Short, crisp square. Sharp edges contrast with the thin lines.
Design Element: Ultra-thin micro French tip in white, with a royal blue accent line below.
Finish: High-gloss top coat to make the blue pop against the nude.
Get The Look at Home:
Your finest liner brush and a very steady hand are required for this level of precision.
- Prep: One coat of sheer base color. Cure.
- White tip: Thin brush for a classic white curve on each nail.
- Blue line: Even thinner brush, electric blue, tracing just below the white smile line.
- Corner work: Pull the blue down slightly into the corners for a smile effect.
- Consistency: Check all nails for uniform line thickness.
- Seal: Thin top coat layer, being careful not to drag the blue polish.
19.Green Apple Double-French
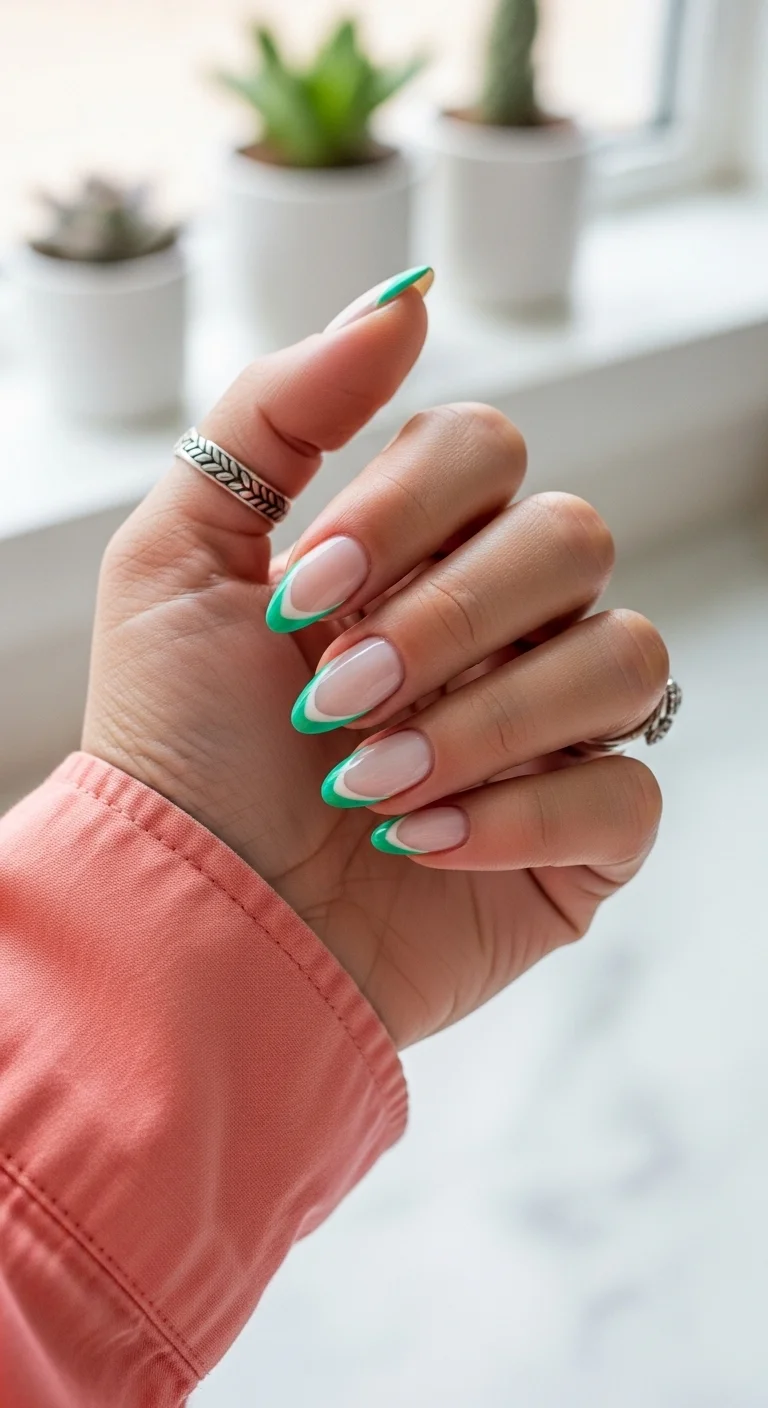
A fresh and fruity take on the double-French mani.
Overview:
A double-French design: a thin white line sits just above a bold kelly green tip, creating a layered effect. The white accent line is delicate and thin, separating the green tip from the nude base. The green is vivid and saturated — think Granny Smith apple.
The double-French requires painting two parallel lines with consistent spacing. The white line goes down first, cured, then the green tip is painted above it, leaving a sliver of white visible. The challenge is keeping the two lines perfectly parallel — any deviation makes the design look wobbly. Resting your elbow on a flat surface while drawing the second line helps enormously. The almond shape's soft curves complement the clean lines through contrast.
Design Breakdown:
Layered color-blocking for a high-contrast look. The two lines must be perfectly parallel.
Base Color: Sheer, warm-toned nude base.
Nail Shape: Soft, elegant almond.
Design Element: Bright grass-green French tip with a secondary white "inner" line beneath it.
Finish: High-gloss finish that makes the colors look creamy and saturated.
Get The Look at Home:
Precision is everything with this layered look. The white line goes down first.
- Base: Two coats of sheer nude. Cure.
- White line: Liner brush for a thin white French smile line. Cure.
- Green tip: Green polish above the white line, leaving a sliver of white showing.
- Refine: Liner brush to make green and white lines perfectly parallel.
- Steady hand: Elbow on a flat surface to prevent shaking.
- Seal: Top coat carefully over the whole design. Cure well.
31 Patriotic Fourth of July Nail Ideas for 2026 🇺🇸
20.Summer Cloud Dreamscape
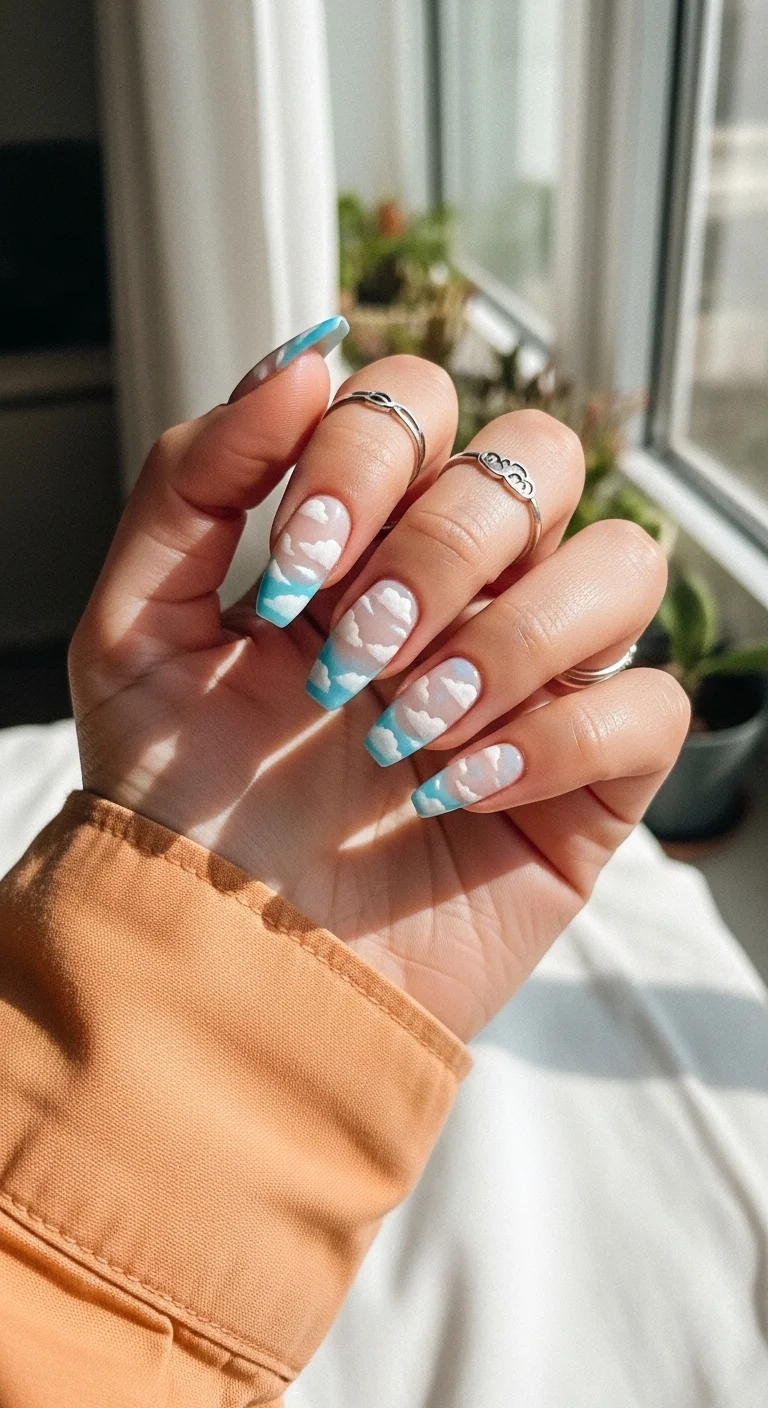
Dreamy and ethereal cloud art for a whimsical summer vibe.
Overview:
Full-nail hand-painted cloud art — fluffy white clouds scattered across a blue sky gradient on every nail. The blue transitions from deeper cerulean at the tips to lighter toward the cuticle. Each nail features a different cloud formation. The clouds have soft, puffy edges that look like actual cumulus clouds.
This design treats the nail as a canvas for a complete landscape rather than a modified French tip. The blue sky gradient provides the foundation, and the clouds are built from clustered dots that are then softened with a small brush. The key technique is keeping the cloud edges irregular — perfectly round dots look like polka dots, not clouds. A dotting tool creates the initial clusters, then a small brush lightly pulls the edges to make them fluffy. The long coffin shape provides enough surface area for each cloud formation to be recognizable.
Design Breakdown:
A "blurring" technique creates the soft, fluffy texture of clouds. Irregularity is the goal.
Base Color: Very sheer, almost-translucent pink base.
Nail Shape: Long coffin for plenty of cloud-painting room.
Design Element: Sky-blue gradient at the tip with hand-painted white clouds layered on top.
Finish: High-gloss top coat to make the "sky" look clear and bright.
Get The Look at Home:
A tiny piece of sponge and a dotting tool are all you need for these clouds.
- Base: Sheer pink base. Cure.
- Sky: Sponge to dab a soft sky-blue gradient onto the tips.
- Cloud base: Dotting tool dipped in opaque white polish.
- Dab-dab-dab: 3-4 tiny dots in a cluster to form the cloud base.
- Softening: Small brush to lightly pull the dot edges into fluffy, irregular shapes.
- Seal: Generous top coat to protect your dreamscape.
21.Sparkling Diamond French
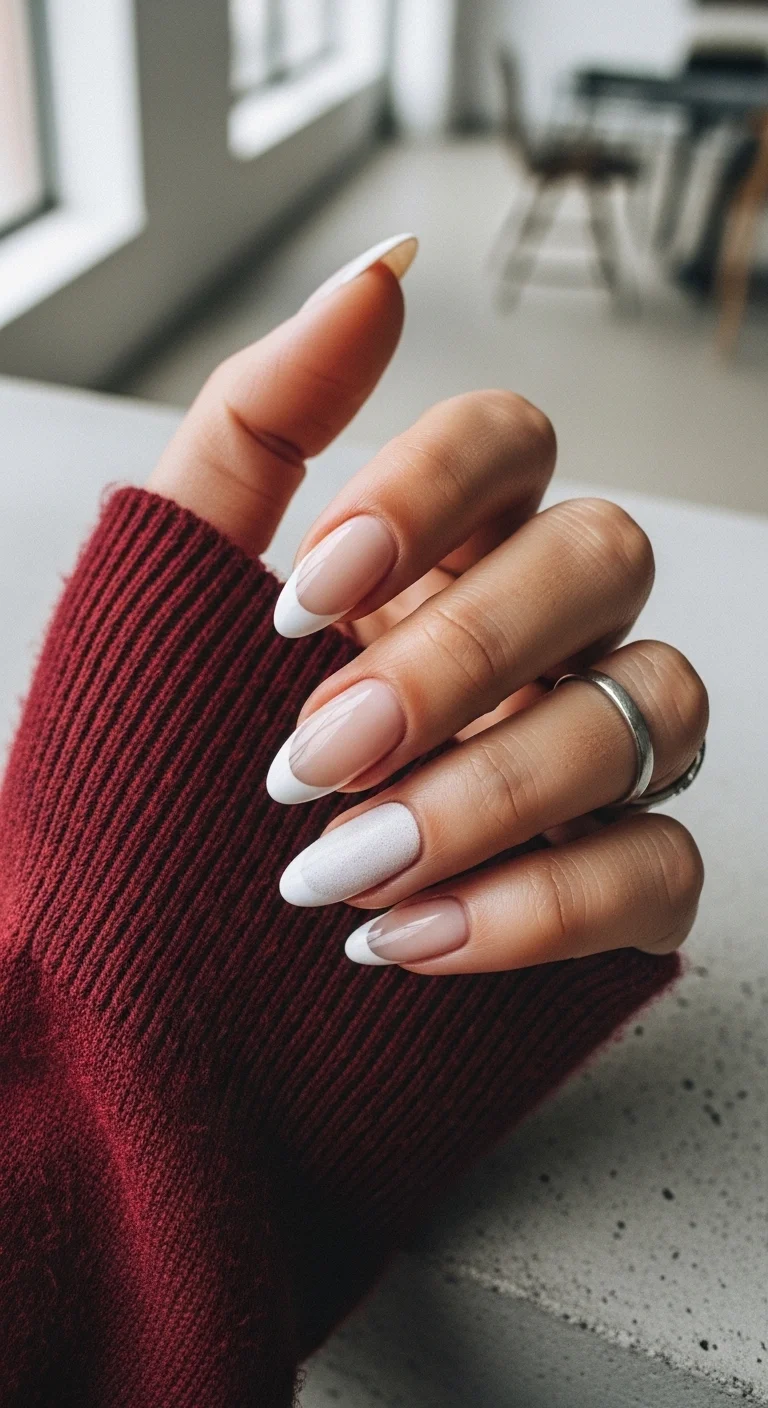
A luxury white French with a hidden 'diamond' glow.
Overview:
A clean, classic white French on almond-shaped nails with one distinct variation: the ring finger is a full accent nail covered in fine silver glitter. The glitter isn't chunky or craft-store obvious — it reads more like a dusting of powdered diamond, catching light only when the hand moves at certain angles. The other nails are straightforward white tips on a sheer, milky pink base.
The almond shape is well-suited to this kind of understated French. The tapered tip gives the white a clean, pointed finish that looks more refined than a square edge. The sheer pink base does important work here — it masks the natural nail's free edge line, which means the white tip reads as a deliberate design choice rather than grown-out polish. The glitter accent works because it's isolated to one nail. Spread across the whole hand, the shimmer would compete with the white tips. Contained to the ring finger, it acts as a focal point that elevates the entire set from "basic French" to something with a point of difference.
Design Breakdown:
The design is mostly restraint — one glitter accent nail against a sea of clean white tips.
Base Color: Sheer, milky pink that softens the nail bed and hides the natural free edge line.
Nail Shape: Soft almond. The tapered tip gives the white French a refined, elongated finish.
Design Element: Crisp white French tips on four nails, with the ring finger fully coated in fine silver glitter.
Finish: High-gloss top coat. The shine keeps the white tips looking fresh and the glitter dimensional.
Get The Look at Home:
The glitter accent needs to be applied thinly — one heavy coat turns "diamond dust" into something less refined.
- Base layer: Two coats of sheer milky pink. Cure between coats.
- White tips: Thin brush for a classic white curve on each nail. Keep the smile line consistent.
- Glitter accent: On the ring finger only, apply one thin coat of fine silver glitter polish over the cured base.
- Second glitter coat (optional): If the first coat looks patchy, add a second thin layer. Don't overload the brush.
- Cleanup: Angled brush with acetone to sharpen the white smile lines.
- Seal: High-shine top coat over everything. Cap the free edge on the glitter nail to prevent flaking.
21 Hot Summer Buns Hairstyle Ideas for 2026 ☀️🔥
22.Sunset Gradient Frenchie
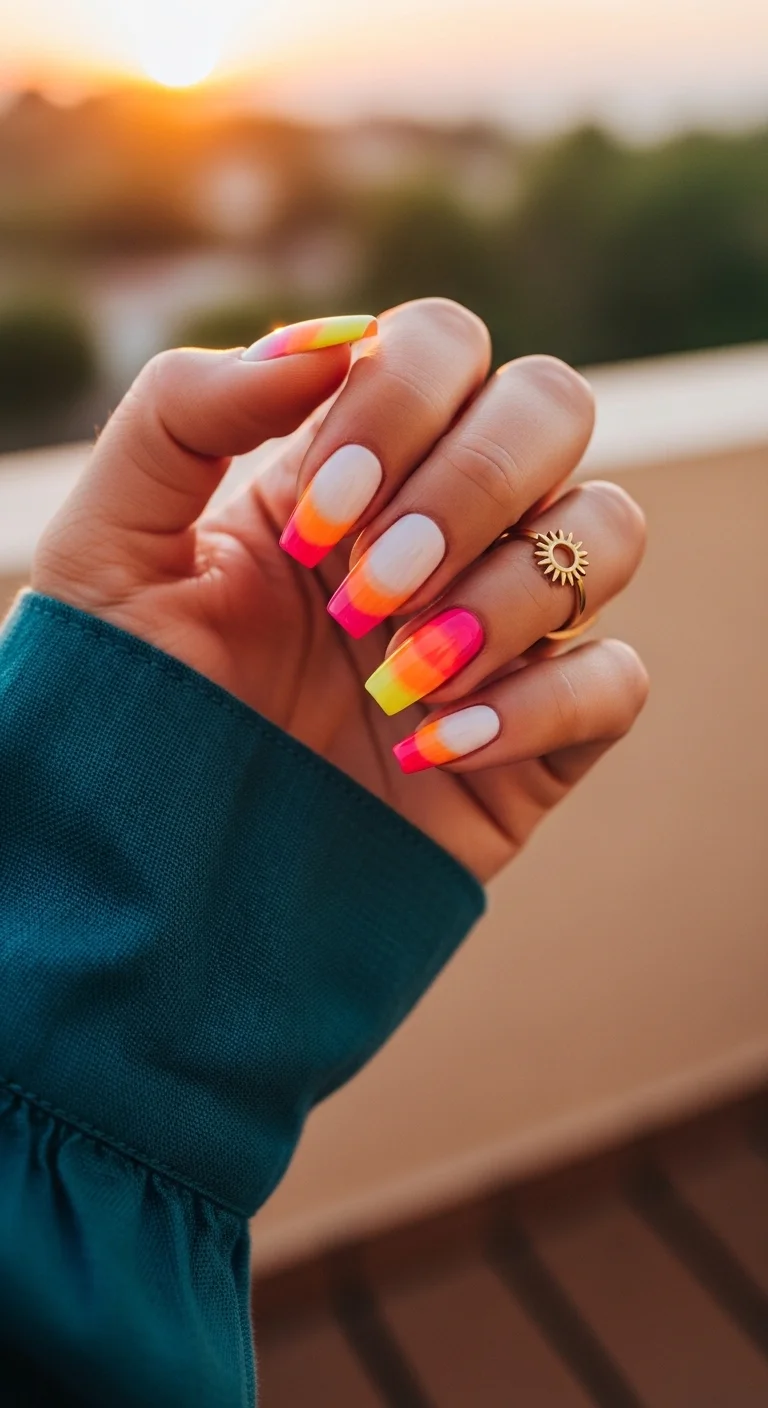
A tropical sunset on your fingertips with a blindingly bright neon gradient.
Overview:
A three-color horizontal gradient packed into the French tip area: hot pink at the bottom edge of the tip, transitioning through neon orange in the middle, and ending in bright lemon yellow at the very free edge. The base is milky white, semi-opaque, which gives the neon colors something bright to pop against. Each nail has a slightly different gradient proportion — the ring finger leans more pink, the middle finger shows more yellow — which prevents the set from looking mechanically uniform.
Sponge blending three neon colors in a small tip area requires patience. The colors need to be applied to the sponge in thin, adjacent strips, then dabbed onto the nail with light, repeated presses. One heavy push smears the colors together into a muddy orange. The milky white base is important — applying neons directly over bare nail or a sheer nude mutes the vibrancy significantly. Two passes with the sponge build the opacity needed for the colors to read as neon rather than pastel.
Design Breakdown:
Three neon colors blended in a horizontal gradient within the tip. The sponge technique determines whether the blend looks seamless or striped.
Base Color: Semi-opaque milky white that provides a bright canvas for the neon gradient.
Nail Shape: Long square with slightly softened corners. The flat edge gives the gradient a defined frame.
Design Element: Horizontal ombre French tip transitioning from hot pink to neon orange to lemon yellow.
Finish: High-gloss top coat that makes the neons look saturated and wet.
Get The Look at Home:
A makeup sponge with three color strips is the standard approach. Work in thin layers.
- Base: Two coats of milky white gel. Cure between coats.
- Sponge setup: Paint thin strips of hot pink, neon orange, and yellow side by side on a makeup sponge.
- First pass: Dab the sponge onto the tip area, keeping the colors aligned. Light, repeated presses — not one heavy push.
- Second pass: Repeat once the first layer is dry. The neons need two coats to reach full saturation.
- Cleanup: Brush with acetone to remove neon polish from the skin. Neon pigment stains, so work quickly.
- Seal: Generous top coat to smooth the sponge texture and intensify the colors.
23.Electric Blue Drip French
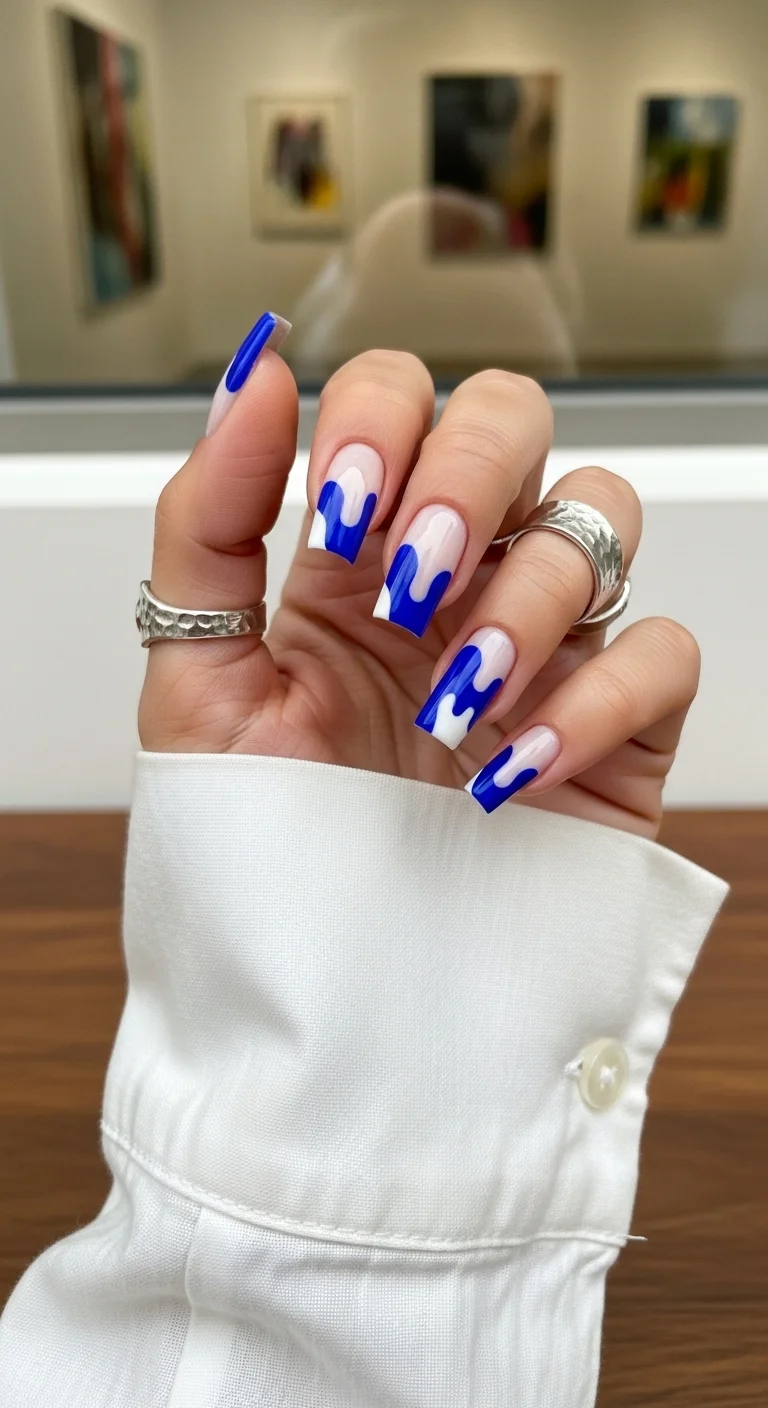
An edgy, 'drip' take on the traditional French in a punchy blue.
Overview:
Royal blue tips that aren't tips at all — they're drips. The blue polish extends downward from the free edge in uneven, organic rivulets that vary in length from nail to nail. Some drips reach barely a millimeter past the tip, others stretch halfway down the nail plate. Underneath each blue drip, a thin white outline follows the same irregular shape, creating a layered effect that gives the drips dimension. The base is sheer nude-pink, which makes the blue and white pop by contrast.
This is a design that benefits from a deliberate lack of precision. Perfectly uniform drips would look like a stamp or a sticker. The variation in drip length and width across the hand is what makes it look hand-painted and organic. A dotting tool creates the rounded bottom of each drip, then a liner brush connects the dot back to the tip with a slightly uneven line. The white outline underneath is optional but adds a layer of visual complexity that makes the design look more finished. The long square shape provides enough surface area for the drips to have real length.
Design Breakdown:
An organic, drip-style French that uses varied line widths and lengths for a "liquid paint" effect.
Base Color: Clean, sheer nude-pink that lets the natural nail show through.
Nail Shape: Long, sharp square. The flat edge is where the drips originate.
Design Element: Royal blue drips extending from the tip with a thin white outline following each drip's contour.
Finish: High-gloss top coat that makes the blue look like wet paint.
Get The Look at Home:
A dotting tool and liner brush are the core tools. Embrace the irregularity — uniform drips look less convincing.
- Base: Sheer nude-pink base. Cure.
- Map the drips: Use a dotting tool to place blue dots at different heights below the tip — these are the drip endpoints.
- Connect: Liner brush to pull a line of blue from the tip down to each dot. Vary the line thickness slightly.
- White outline: Optional — use a thin brush and white polish to trace just inside each blue drip's edge.
- Refine: Thicken the blue where it meets the tip so the drip looks like it's flowing from the free edge.
- Seal: Generous top coat to level the surface and lock in the drip shapes.
27 Stunning Graduation Day Nail Ideas for 2026 🎓
24.Neon Clementine French
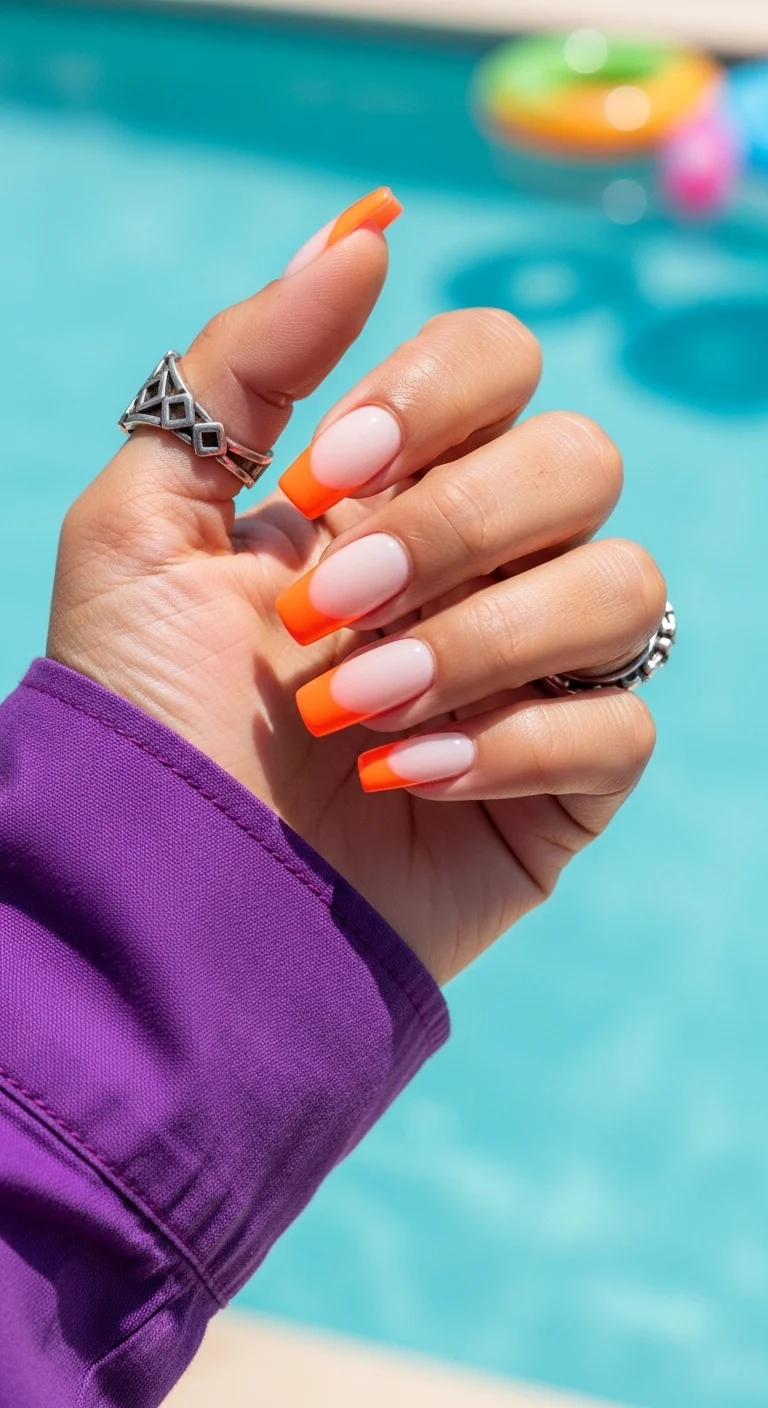
A blindingly bright neon orange for the ultimate summer statement.
Overview:
Thick, fully saturated neon orange French tips on a milky pink nude base. The smile line is clean and slightly curved — not a deep dramatic arch, but a gentle, modern curve that sits roughly at the midpoint of the nail. The orange is opaque and punchy, close to a traffic-cone or safety-vest orange. The tips are wide, covering roughly 40% of the nail plate, which gives the color maximum impact.
Neon orange polish behaves differently than standard cream formulas. Some brands produce a jelly-like consistency that requires three or four coats for opacity; others are chalky and streak on the second coat. For French tips, the ideal formula is one that covers fully in two thin coats. Building up thickness on the tip — which is already the highest-wear zone of the nail — accelerates chipping. A white base coat underneath the orange is worth the extra step: it makes the neon read as truly neon rather than a muted, warm-toned orange. The square shape with slightly rounded corners is practical and modern.
Design Breakdown:
Bold, wide neon tips on a clean base. The smile line's gentle curve keeps it modern rather than retro.
Base Color: Milky pink-nude that blends with the natural nail bed.
Nail Shape: Medium-long square with slightly softened corners.
Design Element: Wide, thick French tip in high-saturation neon orange.
Finish: High-gloss top coat that makes the orange look juicy and vibrant.
Get The Look at Home:
A white base coat under the neon orange is the difference between "bright" and "blinding."
- Nude base: Two coats of milky pink-nude. Cure.
- White undercoat: One thin coat of white on the tip area only. This makes the orange pop significantly more.
- First orange coat: Liner brush to outline the smile line, then fill in the tip. Thin and even.
- Second orange coat: Second layer for full opacity. Keep it on the tip — don't extend past the smile line.
- Cleanup: Angled brush with acetone to sharpen the smile line. Work quickly, neon pigment stains.
- Seal: Plumping top coat for a smooth, gel-like finish.
25.Juicy Watermelon Frenchie
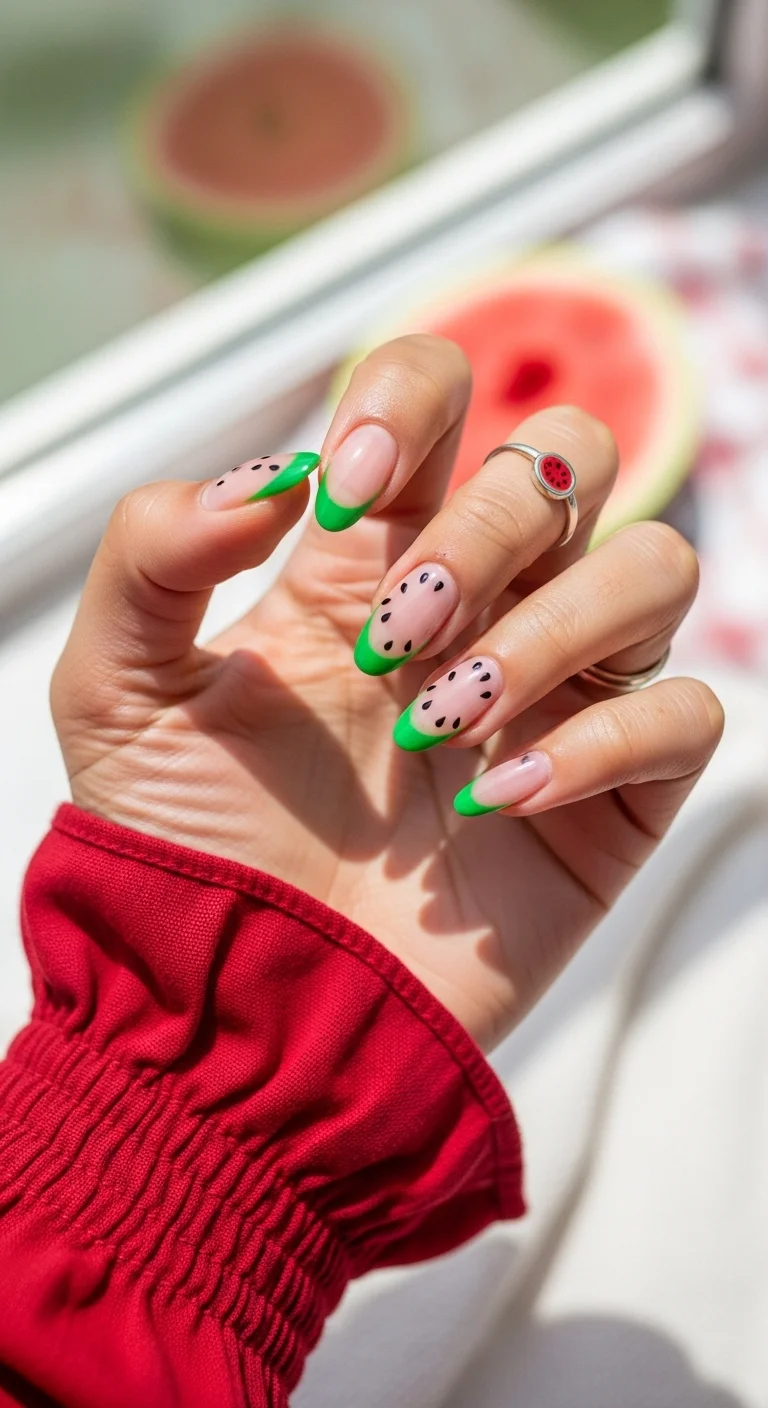
A cute and kitschy watermelon motif for the ultimate summer BBQ.
Overview:
A watermelon French manicure split across two design approaches. Some nails have bright green French tips on a nude-pink base, with tiny black teardrop "seeds" scattered across the pink area. Other nails skip the tip entirely and feature only the seed pattern over the full nude-pink base. The green is a true grass green, not mint or sage — it matches the rind of an actual watermelon. The seeds are small, irregularly placed, and slightly elongated into teardrop shapes rather than perfect circles.
The split approach — some nails with tips, some without — prevents the design from looking too costume-y. If every nail had the green tip plus seeds, the set would read as novelty. By alternating, the seed-only nails act as a quieter companion that lets the French tip nails stand out. The almond shape suits the organic, rounded nature of the watermelon theme. Black polish for the seeds needs to be genuinely black, not dark brown — the contrast against the pink base is what makes them readable as seeds rather than random dots.
Design Breakdown:
A themed French that alternates between tipped and full-coverage seed-pattern nails. The green needs to match actual watermelon rind.
Base Color: Sheer, creamy pink that mimics the inside of a watermelon.
Nail Shape: Soft almond. The rounded shape complements the organic watermelon motif.
Design Element: Bright green French tips on some nails, with black teardrop "seeds" scattered on the pink base across all nails.
Finish: High-gloss top coat to make the "fruit" look fresh and juicy.
Get The Look at Home:
The seeds are built from a single dot that's elongated into a teardrop with a liner brush. Simple but effective.
- Base: Two coats of sheer pink gel. Cure.
- Green tips: Bright green polish on the tip of designated nails. Medium thickness, clean smile line.
- Seed placement: Smallest dotting tool dipped in black polish. Place 3-5 dots randomly on the pink area of each nail.
- Teardrop shape: Liner brush to pull each black dot into a slight teardrop — one direction only, not both ways.
- Vary the seeds: Some nails get more seeds, some fewer. Random placement looks more natural than a grid.
- Seal: Generous top coat. The seed dots are slightly raised and need encapsulation.
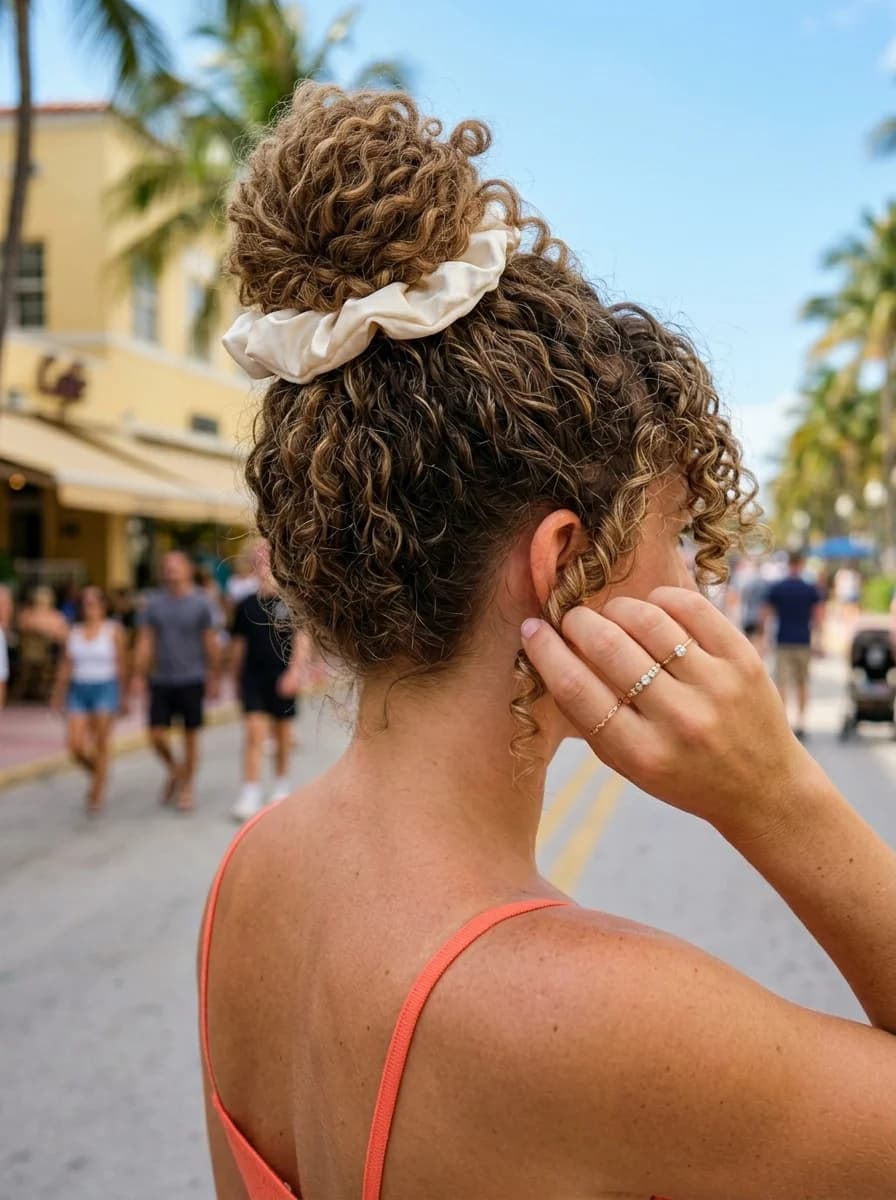
28 Effortless Hot Weather Day Hairstyles for Women 2026 ☀️💇♀️
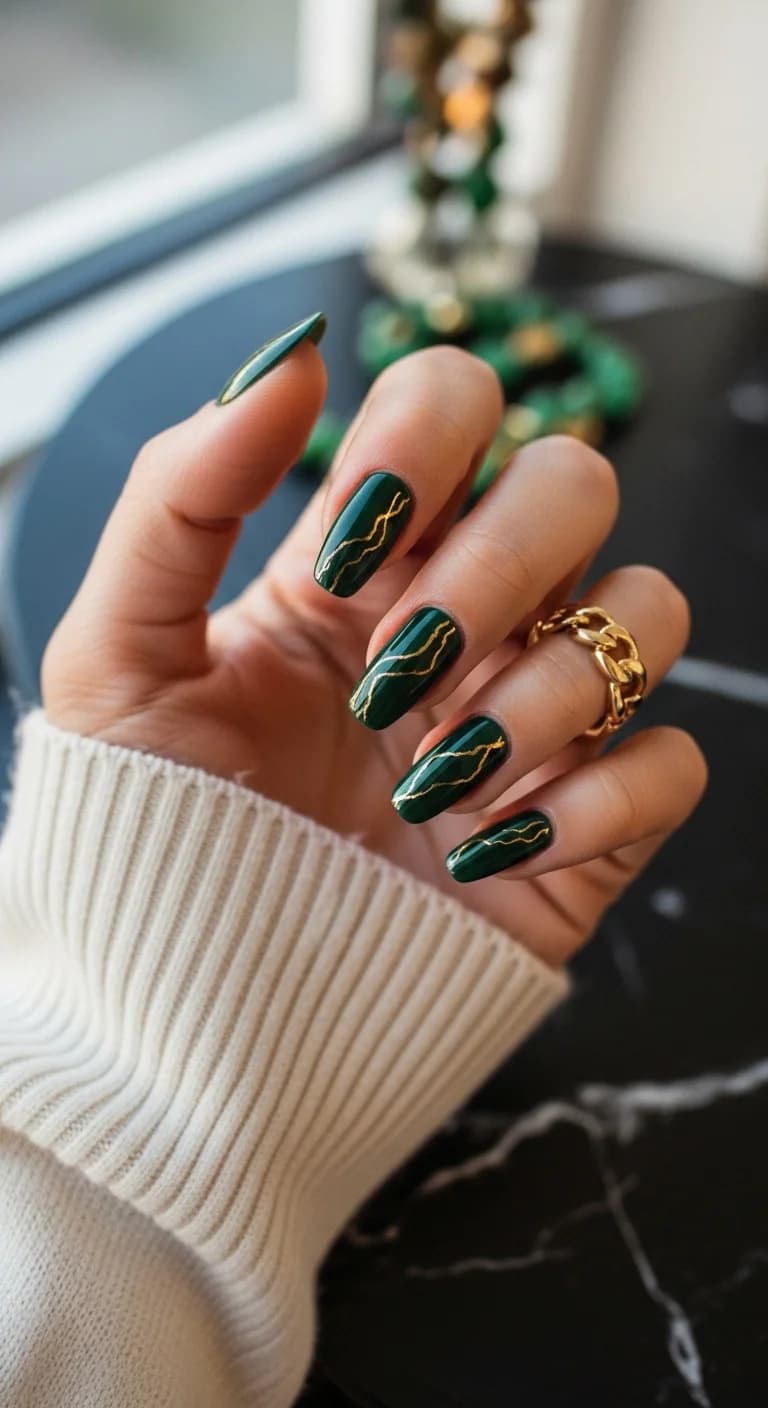
26.Forest Green Ombre Coffin
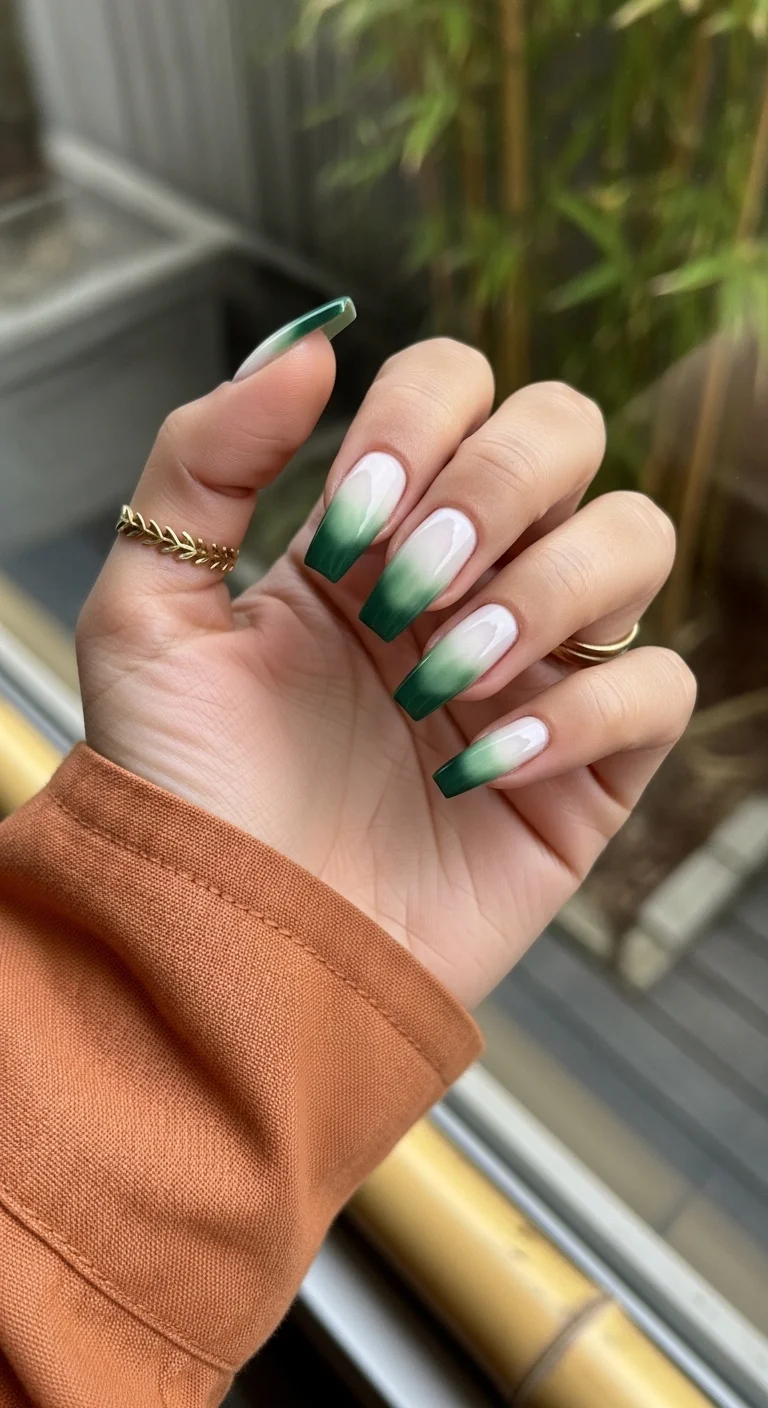
A moody, sophisticated green gradient for an earthy summer vibe.
Overview:
A vertical ombre that transitions from milky white at the cuticle to deep forest green at the free edge. The blend is smooth — no hard French line, just a gradual darkening toward the tip. The green is rich and saturated, close to pine needle or emerald rather than mint or sage. On the longest nails, the gradient has room to develop fully, with the transition zone sitting roughly at the midpoint of the nail plate.
Dark green ombre tips are a strong choice for anyone who finds pastel or neon French tips too playful for their style. The forest green reads as sophisticated and grounded — it pairs naturally with earth tones, gold jewelry, and neutral clothing. The coffin shape is essential here. The tapered, flat tip gives the dark green a defined edge that would get lost on a rounded shape. The sponge technique for the gradient needs multiple light passes. One heavy application creates a stripe rather than a fade. The milky white base (not sheer nude) provides better contrast for the green because it's opaque enough to read as a distinct starting color rather than bare nail.
Design Breakdown:
A dark-on-light gradient where the blend zone width determines whether it looks like a fade or a stripe.
Base Color: Semi-opaque milky white. Provides a clean, visible starting point for the gradient.
Nail Shape: Long coffin. The tapered flat tip frames the dark green nicely.
Design Element: Vertical ombre from milky white into deep forest green at the tips.
Finish: High-gloss top coat that adds depth to the dark green.
Get The Look at Home:
Multiple light sponge passes build a smoother gradient than one heavy application. Patience is the main ingredient.
- Base: Two coats of milky white. Cure.
- Sponge prep: Paint strips of white and forest green on a makeup sponge. The white strip should be wider.
- First pass: Dab the sponge onto the tip, letting the green concentrate at the edge and fade toward the center.
- Build depth: Second pass focusing only on the very tip with more green. This creates the deep-to-light gradient.
- Cleanup: Brush with acetone to remove green from the skin and sharpen the cuticle line.
- Seal: Thick, plumping top coat to smooth the sponge texture and deepen the green.
27.Midnight Cherry French
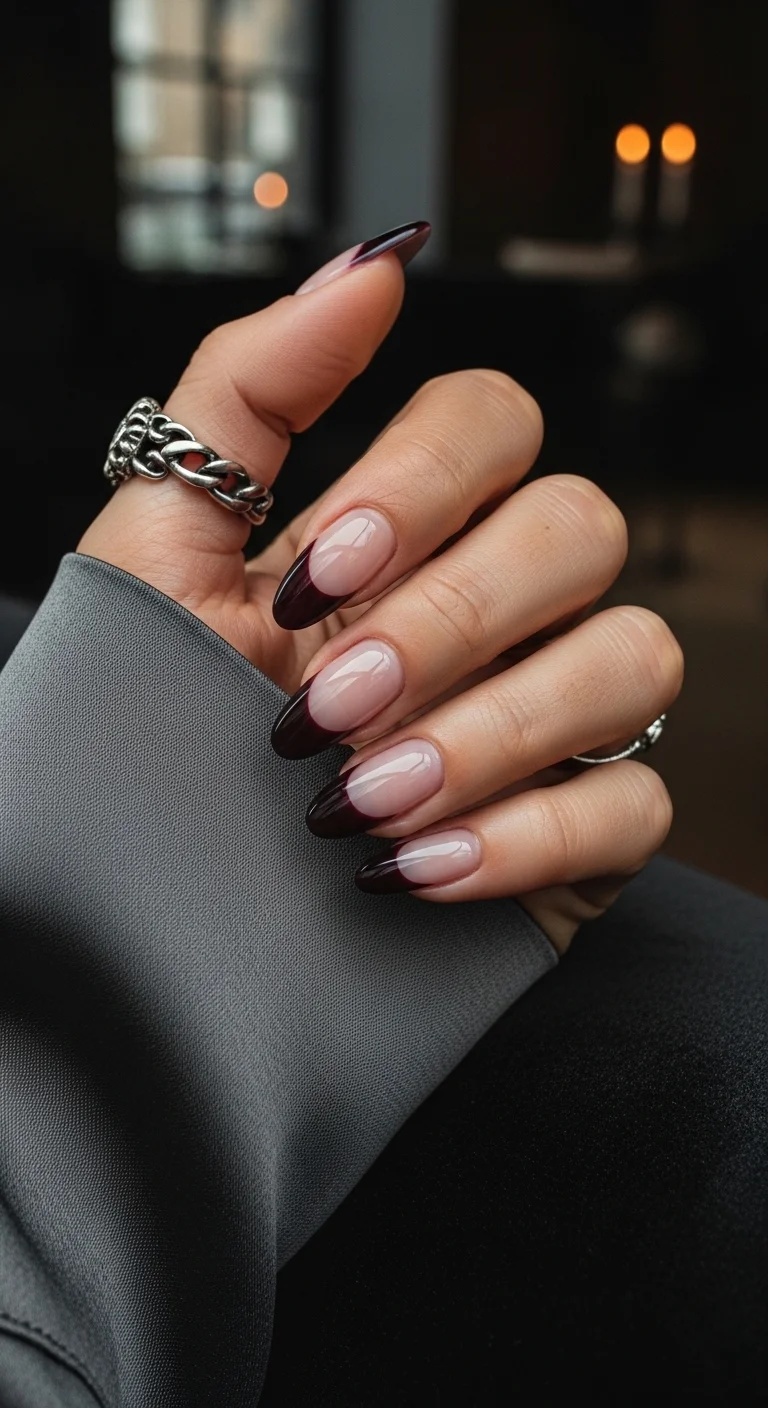
A sultry and sophisticated dark French for summer nights out.
Overview:
Deep burgundy-cherry French tips on an almond-shaped nail with a sheer nude base. The tips are so dark they read as near-black in low lighting, but in direct light the undertone reveals itself as a rich, jammy wine red. The smile line is deep and curved — more of an arch than a gentle slope — which gives the dark tips a dramatic, elongated proportion. The finish is ultra-glossy, almost glass-like, which amplifies the color depth.
Dark French tips on almond nails occupy a specific aesthetic space between classic and moody. The almond shape softens what would otherwise be an aggressive color choice — on square nails, the same burgundy reads as more severe. The deep smile line is worth practicing. A shallow curve on a dark tip looks like you ran out of nail. A deep, dramatic arch makes the dark color feel intentional and elegant. The sheer nude base is critical: it needs to be truly sheer, not opaque, so the natural nail bed shows through. An opaque nude defeats the purpose by creating a hard color break that competes with the tip.
Design Breakdown:
A deep, dramatic smile line on a dark tip. The arch's depth is what separates this from a standard French.
Base Color: Sheer, cool-toned nude that lets the natural nail bed show through.
Nail Shape: Elegant almond. The curved shape softens the dark color.
Design Element: Deep burgundy-cherry French tip with a dramatic, high-arched smile line.
Finish: Ultra-shiny top coat that makes the color look like liquid ink.
Get The Look at Home:
The smile line's depth is the design's defining feature. Practice the arch on paper first if you're new to deep-curve Frenchies.
- Base: Two coats of sheer nude. Cure.
- Outline the arch: Liner brush to draw the "wings" of the French from the sidewalls, curving upward to meet at a high center point.
- Fill: Burgundy polish to fill the entire tip area above the smile line.
- Refine the curve: Angled brush with acetone to sharpen the arch. This step is non-negotiable with dark polish.
- Second coat: Thin second layer of burgundy for full opacity and depth.
- Seal: Ultra-shine top coat. The gloss is what gives the dark color its liquid quality.
28 Trendy May Nail Designs for 2026 💅
28.Lush Lemon Slice French
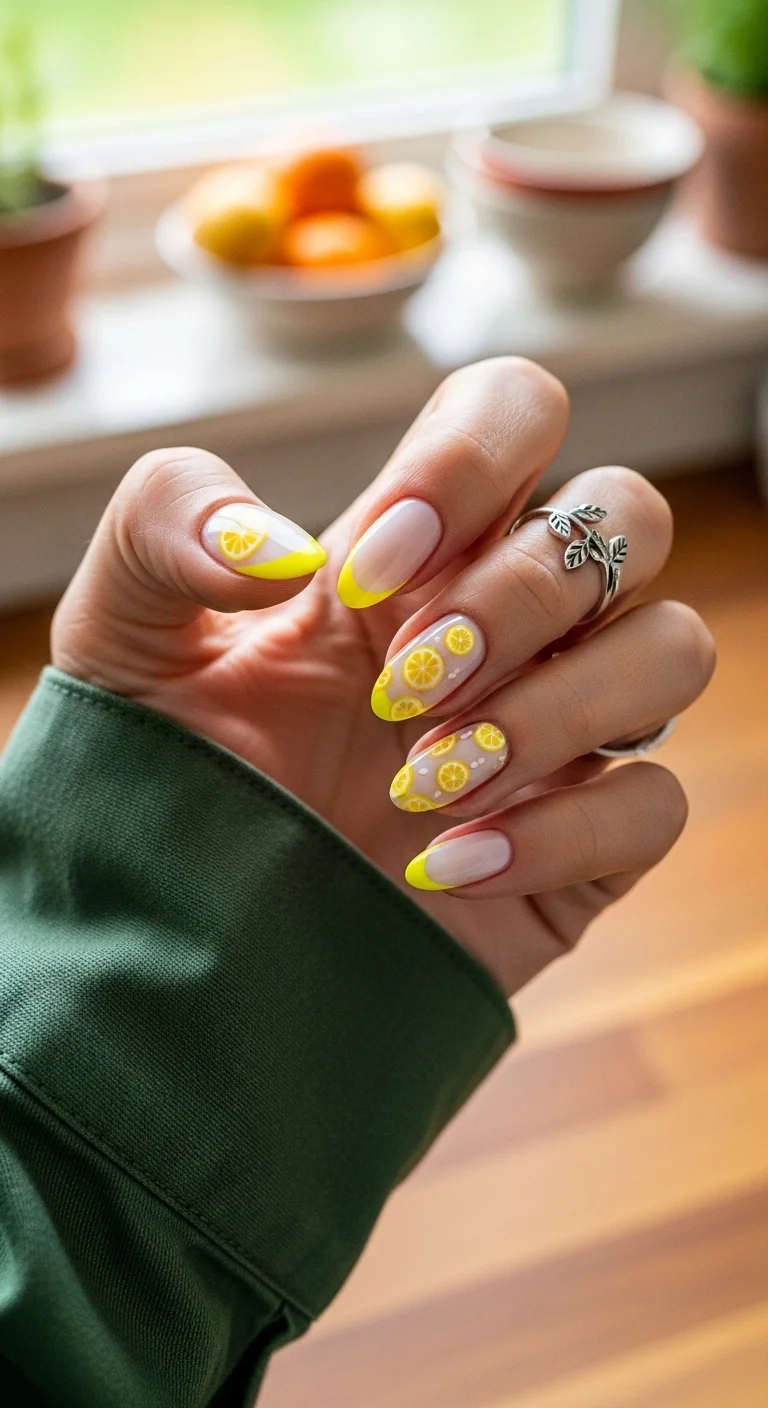
A zesty and cheerful lemon-themed mani for a sunshine-filled day.
Overview:
A split-design lemon set. Some nails have bright yellow French tips on a sheer nude base. Other nails feature hand-painted lemon cross-sections — yellow circles with white radial lines creating the segment pattern, plus tiny white dots for seeds. The lemons vary in size and placement: some are full circles, others are half-circles cut off by the nail edge. The yellow is warm and saturated, closer to lemon curd than highlighter.
The combination of clean French tips and detailed fruit art creates visual variety without losing cohesion. Both elements use the same yellow, which ties the set together. The lemon cross-sections are simpler to paint than they appear: a yellow circle, five or six white lines radiating from the center to the edge, and a few white dots near the center for seeds. The technique is forgiving because real lemon slices aren't perfectly symmetrical either. The almond shape provides a natural frame for both the tips and the circular fruit shapes. A high-gloss top coat is essential — it makes the lemons look juicy rather than flat.
Design Breakdown:
A two-part design mixing clean French tips with hand-painted fruit art. The shared yellow palette keeps everything cohesive.
Base Color: Sheer, warm-toned nude that lets the yellow pop without competing.
Nail Shape: Soft almond. The curves complement both the French tips and the circular lemon shapes.
Design Element: Bright yellow French tips on some nails, with hand-painted lemon slice cross-sections on accent nails.
Finish: High-gloss top coat that makes the fruit look fresh and juicy.
Get The Look at Home:
The lemon slices are circles plus lines. The imperfection is part of the charm — don't aim for geometric precision.
- Base: Sheer nude on all nails. Cure.
- Yellow tips: Bright yellow French tips on half the nails. Clean smile line.
- Lemon circles: On accent nails, use a dotting tool or brush to paint yellow circles or half-circles.
- Segment lines: Fine liner brush with white polish to draw 5-6 radial lines from the center of each circle to the edge.
- Seeds: Tiny white dots near the center of each lemon slice.
- Seal: Generous top coat to protect the art and add a juicy, wet-look finish.
29.Gold Dust Inner French
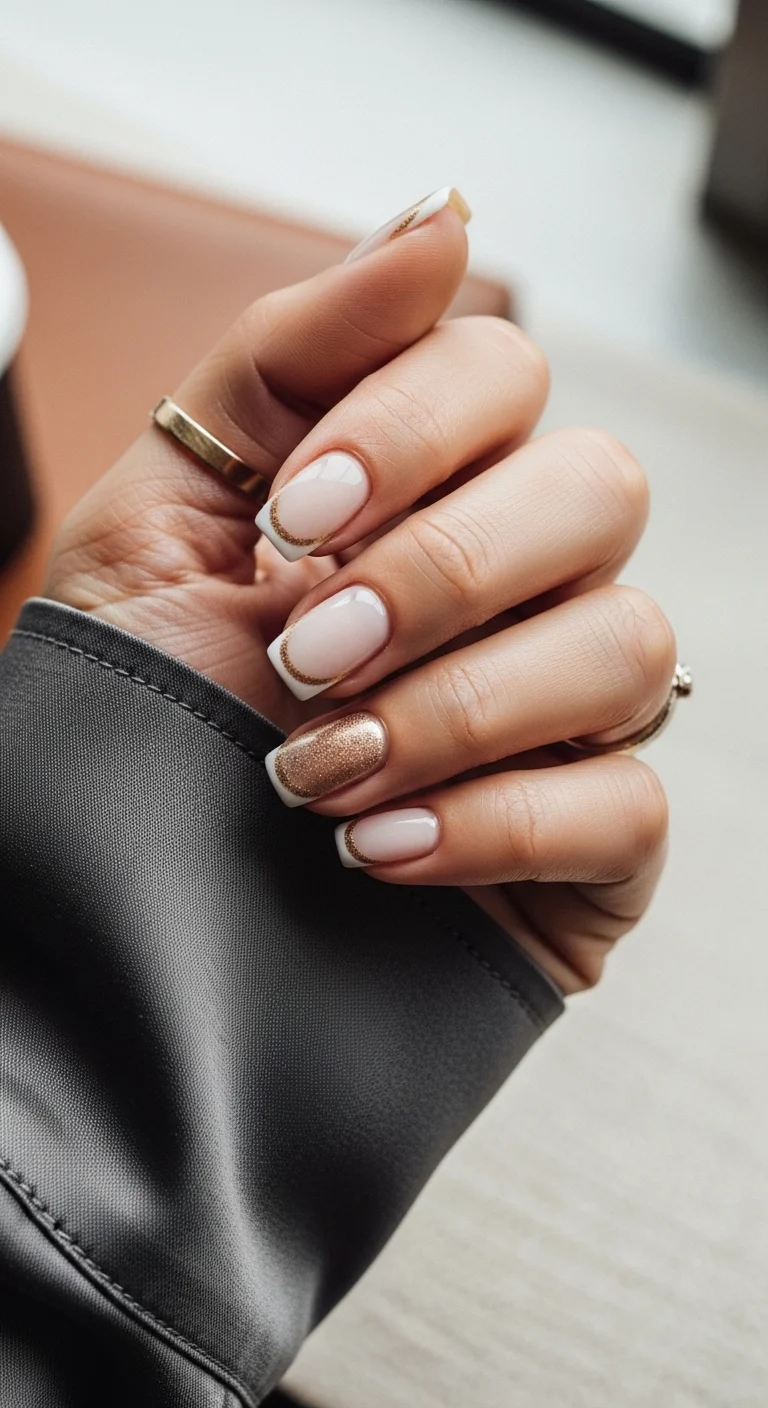
A sophisticated white Frenchie with a hidden pop of gold glitter.
Overview:
A white French tip with a thin gold glitter line running along the inner smile line — the boundary between the white tip and the nude base. The gold line is narrow, roughly one millimeter wide, and follows the exact curve of the smile line. The ring finger breaks the pattern with a full gold glitter accent nail. The remaining nails are white tips with the gold inner line. The base is a milky, semi-sheer nude.
The "inner French" technique adds a metallic detail without replacing the classic white tip. The gold glitter line needs to be painted after the white tip is cured but before the final top coat — the sequence matters because glitter polish over wet white will bleed. A liner brush with a thin, loaded stroke creates the line in one pass. Going back over the same area drags the glitter and creates uneven thickness. The full gold accent nail on the ring finger is the bold counterpoint to the subtle inner lines on the other nails. It gives the eye a place to land and signals that the gold is intentional, not an afterthought.
Design Breakdown:
A precision design where the gold line sits exactly at the smile line boundary. The ring finger accent anchors the gold theme.
Base Color: Milky, semi-sheer pinkish-nude.
Nail Shape: Clean square with straight edges. The flat tip suits the linear precision of the design.
Design Element: White French tip with a thin gold glitter line along the inner smile line, plus a full gold glitter accent nail.
Finish: High-gloss, plumping top coat that smooths the glitter texture.
Get The Look at Home:
The gold line must be painted in one clean pass — going back over it creates uneven glitter distribution.
- Base: Two coats of milky nude. Cure.
- White tip: Classic white French tip on each nail. Cure fully.
- Gold line: Liner brush loaded with gold glitter polish. Draw a single, continuous curve along the inner edge of the white tip.
- Full accent: On the ring finger, apply two coats of gold glitter polish over the entire nail.
- Steady hand: Rest your pinky on a flat surface while drawing the gold line to keep the width consistent.
- Seal: Top coat carefully — floating the brush prevents dragging glitter into the white.
28 Stunning Softball Hairstyle Ideas with Braids for 2026 🥎✨
30.Hibiscus Tropical French
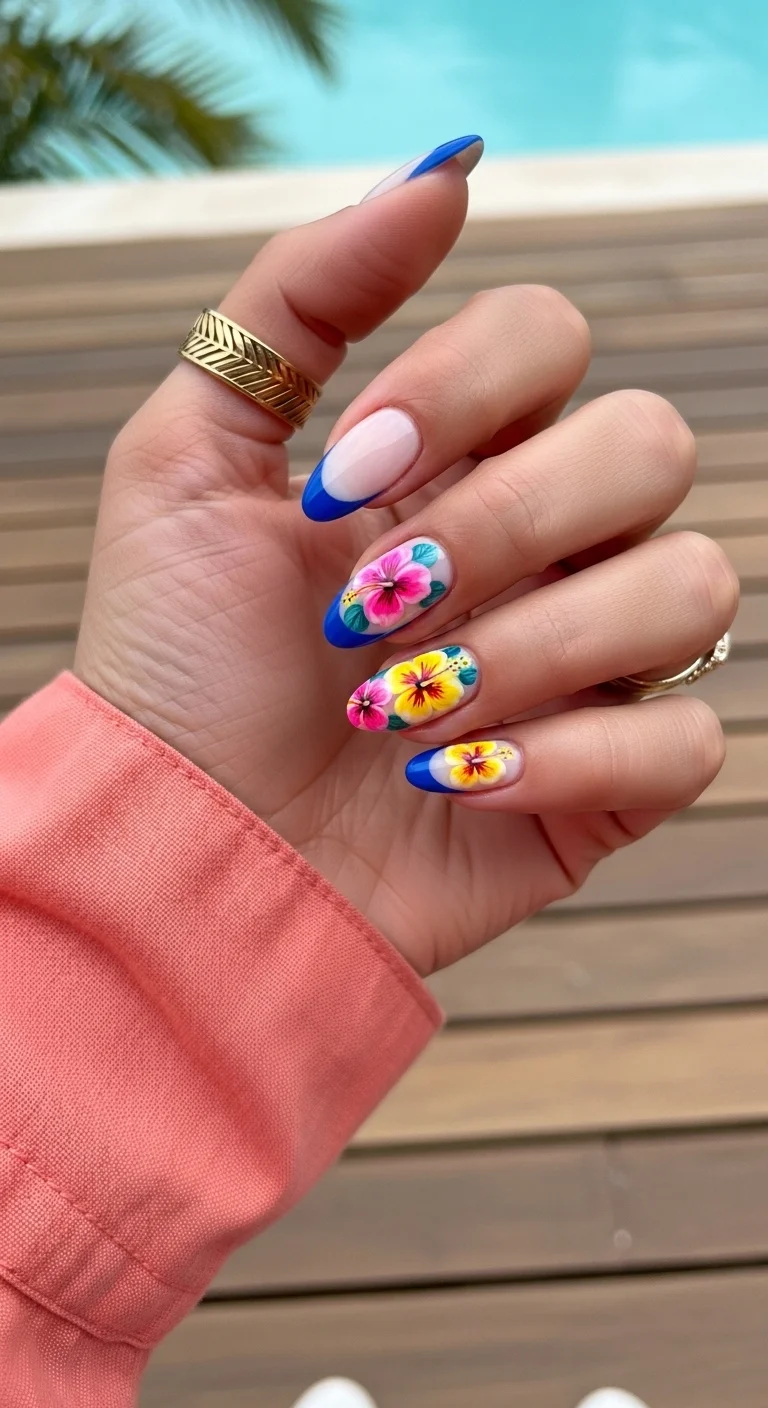
The ultimate vacation mani featuring bold blue tips and floral art.
Overview:
A two-part tropical set: some nails have solid royal blue French tips on a sheer nude base, while others feature full-nail hand- painted hibiscus flowers. The flowers are multicolored — pink petals with yellow centers and red accents, plus small green leaves tucked between the petals. Each hibiscus is slightly different in color proportion and petal arrangement, which makes them look hand-painted rather than stamped.
The blue French tips and the floral nails share the same sheer nude base, which creates visual continuity across the two different designs. The royal blue is saturated and clean — it provides a bold, simple counterpoint to the detailed, multicolored flowers. The hibiscus painting technique is approachable: five or six petal shapes radiating from a center point, built up in layers of color. Pink petals with a yellow wash near the center, red stamen details, and one or two small green leaves per flower. The almond shape is ideal for this kind of detailed art — the tapered tip gives each flower a natural frame. This is a design that rewards patience but doesn't require professional-level skill.
Design Breakdown:
A split design pairing bold blue French tips with multicolored hand-painted floral art. The nude base ties both elements together.
Base Color: Very sheer, almost-clear nude that lets the natural nail show through.
Nail Shape: Medium-long almond. The curves complement the organic flower shapes.
Design Element: Royal blue French tips on some nails, with hand-painted hibiscus flowers in pink, yellow, and red on accent nails.
Finish: High-gloss top coat that makes the tropical colors pop and the flowers look vivid.
Get The Look at Home:
Build the flowers in layers: petals first, then centers, then leaves. Working in rounds across all nails is faster than finishing one at a time.
- Base: Sheer nude on all nails. Cure.
- Blue tips: Royal blue French tips on half the nails. Clean smile line.
- Petal base: On accent nails, dot five or six pink blobs in a circle using a dotting tool. These are the petal foundations.
- Petal shape: Liner brush to pull each blob outward into a petal shape. Don't aim for symmetry — real hibiscus petals vary.
- Center detail: Yellow wash near the flower center, plus tiny red dots for stamen.
- Leaves: One or two small green leaf strokes near each flower for color depth.
- Seal: Generous top coat to protect the layered art and smooth any texture ridges.
Summer-Proofing Your French to Stop the Chipping
Let's be honest: summer is brutal on nail polish. Heat makes the polish expand, pools and oceans lift the edges, and hand creams (applied constantly) break down the bond. French tips take the worst of it because the tip is already the highest-wear zone on your nail. The quicker you accept that reality, the better your manicure will hold up.
The single most effective change you can make is switching to gel. Gel polish handles heat better than lacquer because it's cured under a lamp rather than air-dried. The molecular bond is tighter, which means pool water and sunscreen oils have fewer entry points. That's not a marketing line — it's chemistry.
Prep discipline matters more than the polish itself. If you apply anything oily (hand cream, cuticle oil, sunscreen) within an hour of your application, that residue sits between the base coat and the nail plate. The polish will lift within days. Wipe every nail with alcohol before you start, even if you think they're clean.
The French-specific hack is capping the free edge. After your final top coat, swipe the brush horizontally across the tip of the nail — the very edge, where the nail ends and the air begins. That thin seal prevents water from seeping under the polish at the tip, which is exactly where French tips fail first. Do this on every nail and your manicure gains three to four days of life.
Choosing the Perfect
Summer Shape
When you are out enjoying the sun, the last thing you want is a broken nail or a set that interferes with your activities. Functional elegance is the name of the game for 2026.
For the Active Soul
Short oval or squoval shapes are nearly indestructible and won’t get in the way of hiking, swimming, or luggage handling.
For the Photo Op
Medium almond and coffin shapes provide that high-fashion silhouette that makes every cocktail photo look like a magazine spread.
The Summer Maintenance Kit
UV rays, chlorine, and saltwater can be surprisingly tough on your manicure. Even the best gel set can use a little love after a few days of fun. Traveling to the beach is much easier with a tiny "Mani-SOS" kit in hand.
Applying a fresh layer of high-gloss topcoat every 3-4 days can significantly extend the life and shine of your design. Also, a pro-tip for 2026: mineral sunscreens can sometimes dull the finish of certain topcoats, so try to wash your palms after applying your SPF to keep your nails sparkling!
And there you have it—30 stunning reasons to embrace the French tip trend this summer! Hopefully, scrolling through these gorgeous designs has provided plenty of excitement for the next salon visit. Choosing a summer look should be fun and stress-free, and one of these sets is sure to look absolutely stunning.
Be sure to pin any favorite photos straight to a Pinterest board, so they are ready to show the nail tech. This simple trick prevents last-minute panic when sitting down in the salon chair.