Nail Trends
35 Stunning Palm Tree Nail Art Ideas for 2026 🌴 | Best Tropical Vacation Nails
If there is one thing that instantly sets an out-of-office mindset, it’s swapping a standard manicure for something tropical and fun. This season, palm tree nail art is having a massive moment, and it’s not just the classic sunset silhouettes anymore. Designs range from chic, minimalist fronds to textured sand effects and blinding neons that scream "resort life." Whether you’re sipping coconuts in Cabo or just want to bring a little island energy to your daily routine, here is a collection of 35 absolute must-try palm tree designs that will have you booking a flight immediately. Get ready to embrace the island vibes! 🌴✨
Why Palm Tree Nails Are the Tropical Neutral Everyone Is Wearing Right Now
Searches for palm tree nail art have jumped over 4,500 percent on booking platforms heading into this season, which makes sense when you look at what is actually driving the trend. It is not the neon-heavy tropical look of previous years. The 2026 version leans into delicate silhouettes, sunset gradients, and minimalist botanical art that works beyond the beach.
The shift is toward what is being called the tropical neutral. Palm silhouettes have moved from statement design to wearable accent, something that reads as vacation-ready but does not look out of place at a casual dinner or a coffee run. The key is keeping the line work thin and the base tones soft rather than saturated.
A sunset gradient base with black palm silhouettes on top is the combination that is dominating right now. The warm-to-cool fade creates a natural backdrop that makes the dark fronds pop without needing heavy contrast. It looks like a postcard compressed onto a nail, and it photographs better than any other palm tree layout.
In This Guide
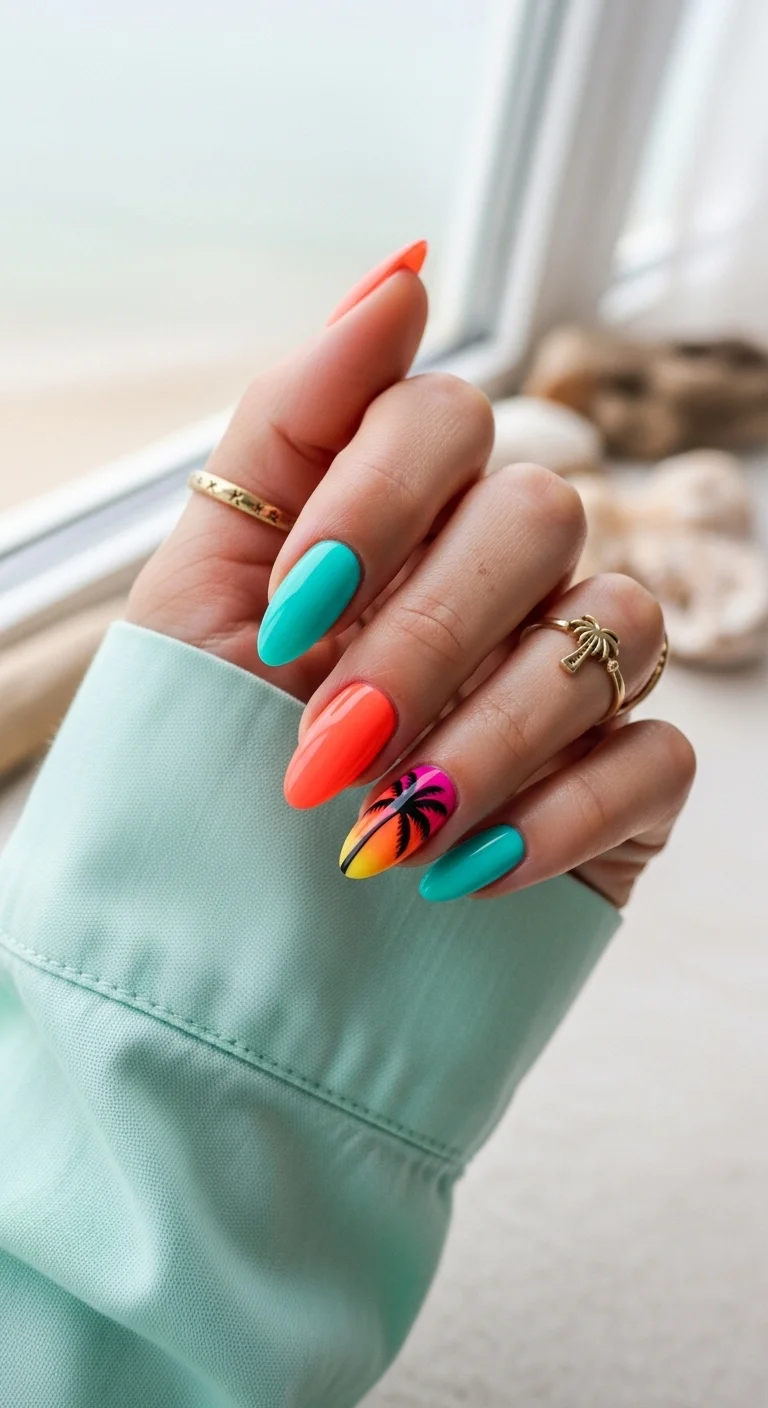
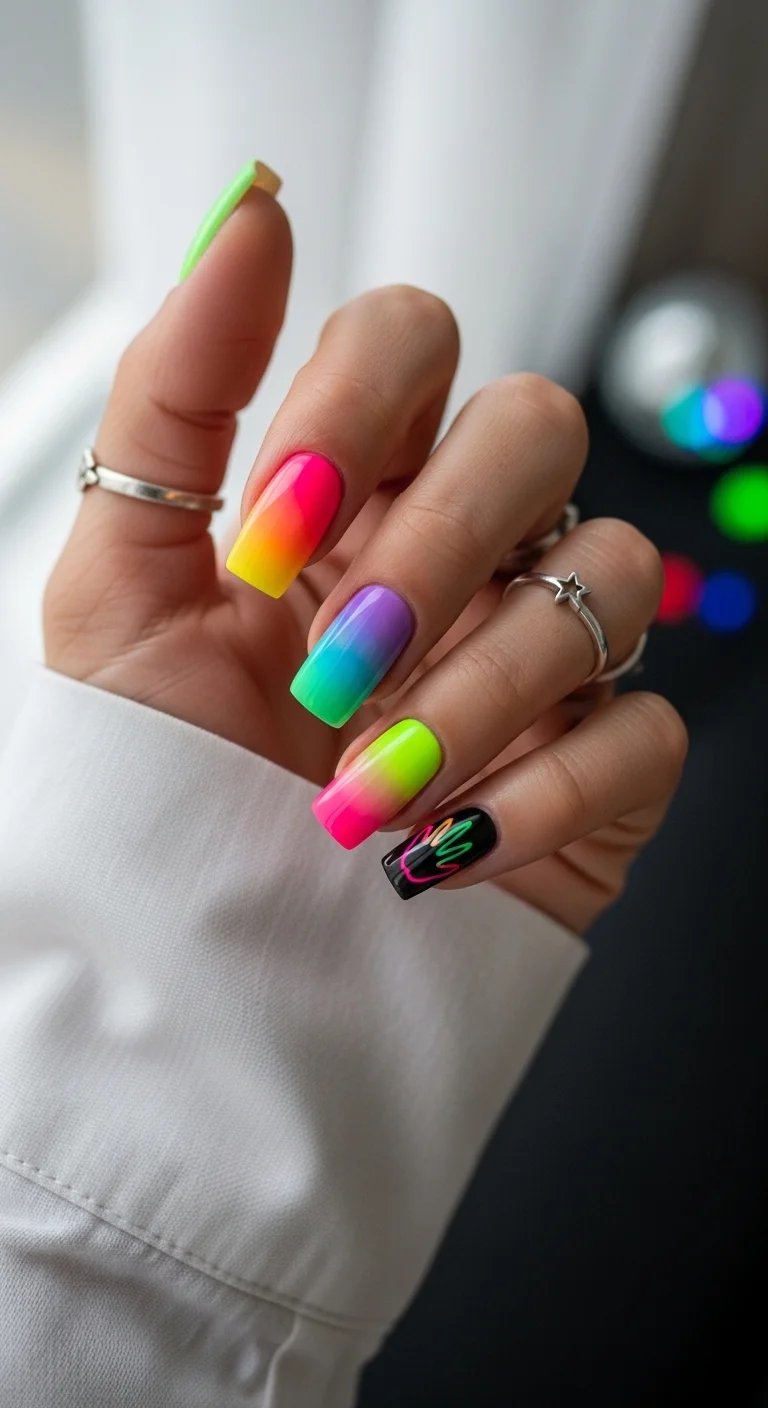
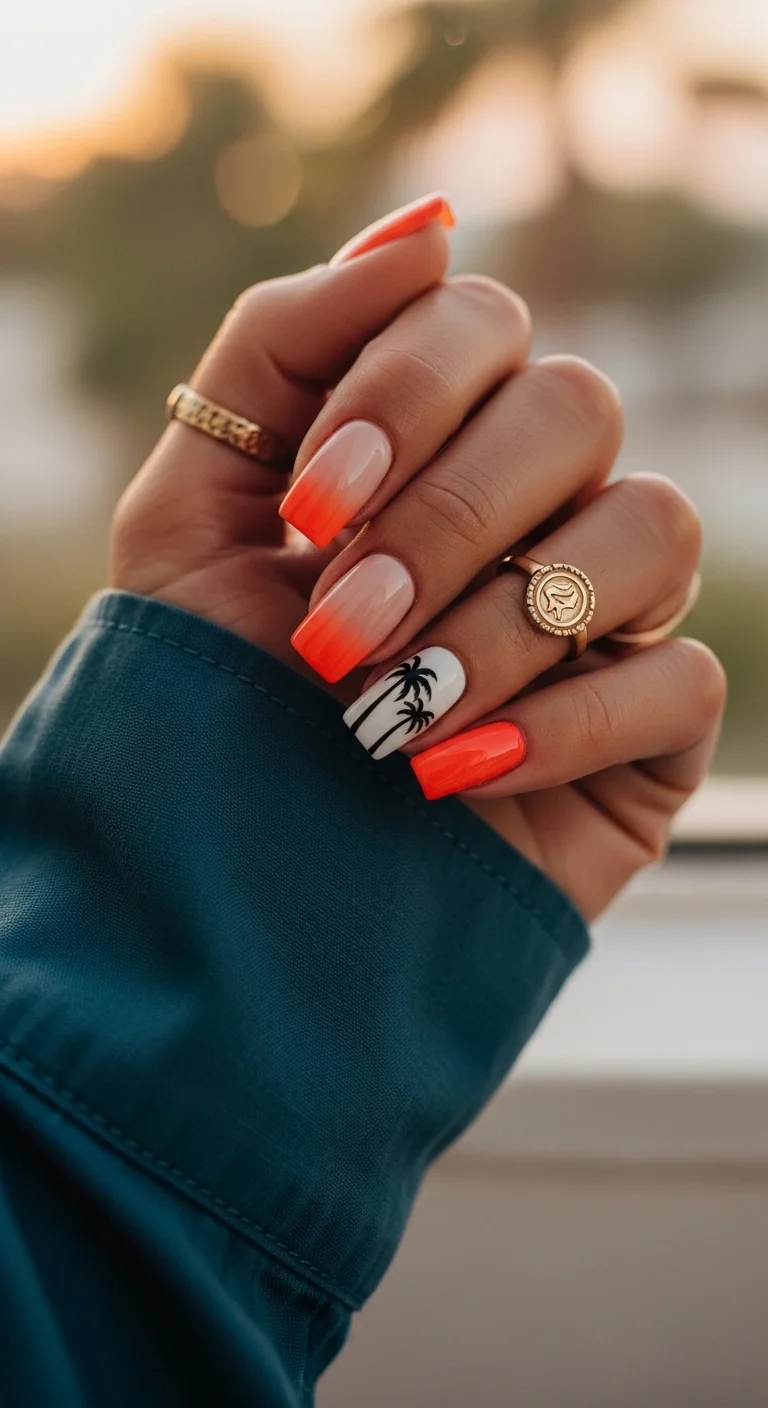
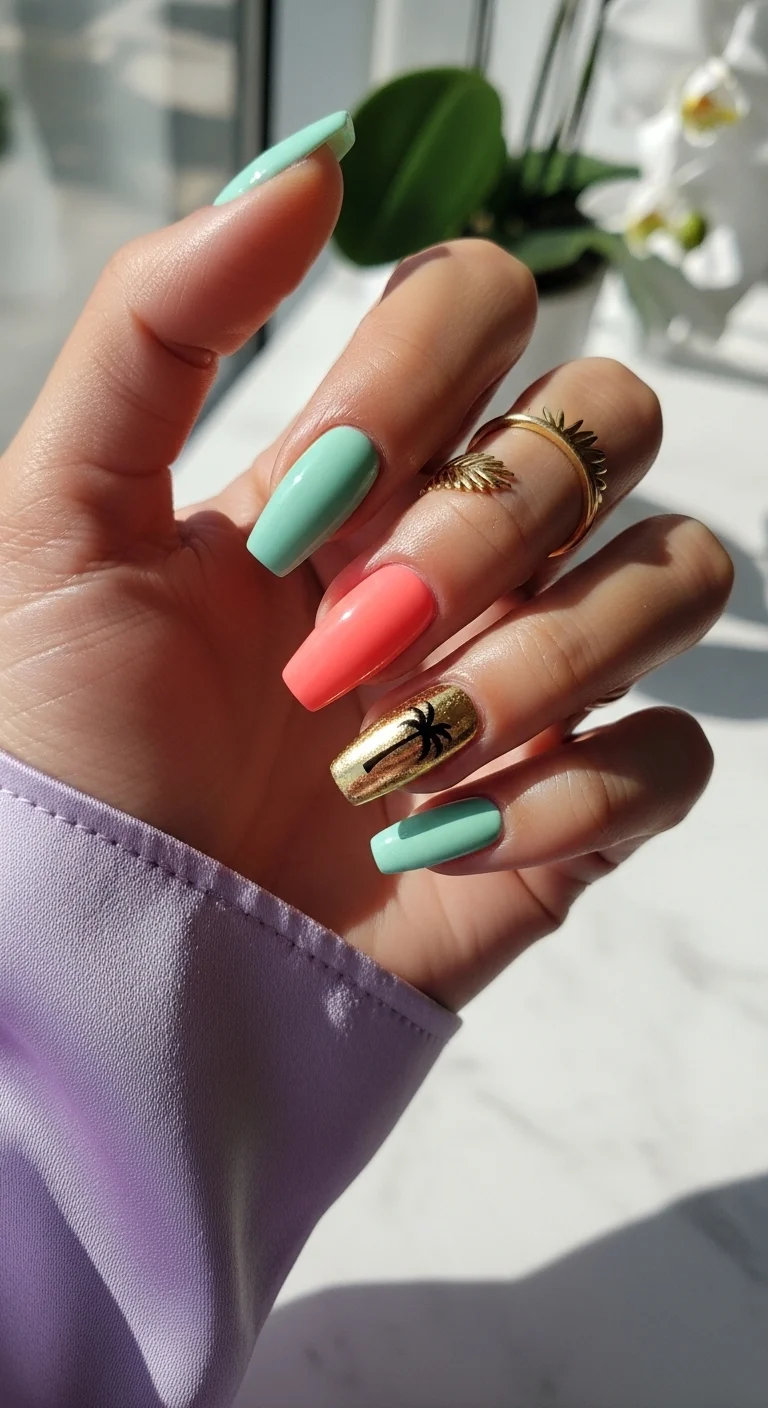
1.Neon Sunset & Tropical Teal Mix
Teal and neon coral with a sunset gradient palm accent.
Overview:
The pairing of teal and neon coral is one of those combinations that looks accidental but is actually perfectly balanced. The cool teal grounds the set while the neon coral provides the energy. Adding a sunset gradient accent with a palm tree silhouette ties the two colors into a single, cohesive tropical story.
The gradient on the ring finger is the focal point. It blends yellow, orange, and pink into a seamless sunset that looks like it was airbrushed. The black palm tree silhouette on top creates a sharp contrast that makes the gradient pop even harder.
Neon polishes dry matte, which means they need a glossy top coat to reach their full intensity. Without the top coat, the colors look flat and chalky. With it, they glow.
Design Breakdown:
Multi-color solid with a gradient accent nail. The sunset and palm complete the tropical theme.
Base Color: Creamy teal on thumb and pinky. Neon coral on middle finger. Sunset gradient (yellow, orange, pink) on the ring finger.
Nail Shape: Medium almond. The curved shape complements the organic palm silhouette.
Design Element: Black palm tree silhouette on the sunset gradient accent nail.
Finish: High-gloss top coat to make the neons look electric and the gradient look seamless.
Get The Look at Home:
The gradient accent is the technical challenge. The solid nails are straightforward.
- Color blocking: Paint thumb and pinky teal, middle finger coral. Let dry fully.
- Sponge the sunset: On the ring finger, sponge yellow, orange, and pink stripes onto the nail. Two to three passes for full opacity.
- Paint the palm: Using a thin liner brush and black polish, draw a vertical trunk line, then flick curved lines outward for the fronds.
- Frond details: Add tiny hair-like strokes to each frond line for texture.
- Seal: One thick coat of top coat over everything.
30 Stunning Summer Hair Trends for 2026 ☀️🌊
2.Peachy Beach Ombre Palms
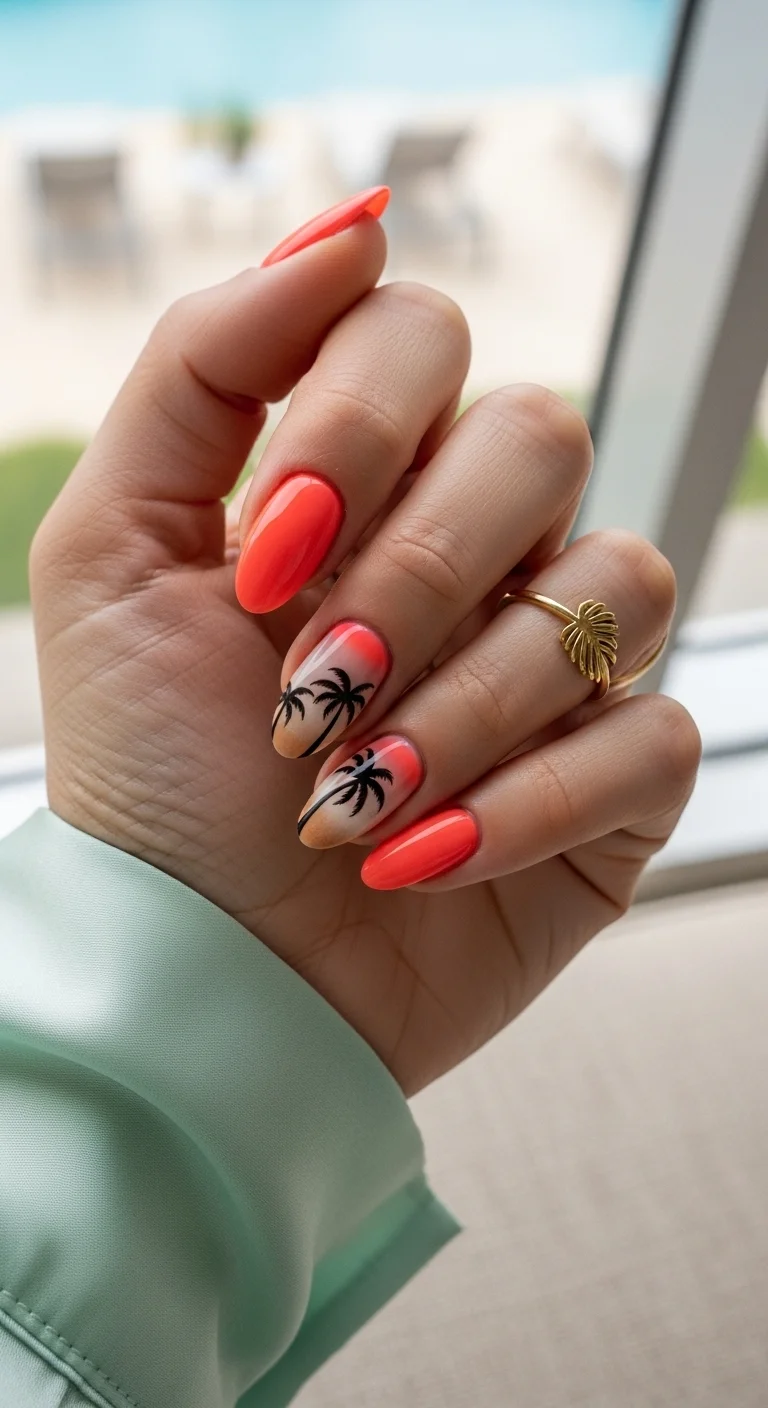
Coral-peach solids with sunset gradient palm accents.
Overview:
Coral-peach is a shade that works across skin tones because it contains both warm and cool undertones. On warmer skin, the orange notes come forward. On cooler skin, the pink dominates. That adaptability is what makes it a reliable choice for a multi-nail set.
The two accent nails on the middle and ring fingers carry the tropical theme through sunset gradients and palm silhouettes. The remaining nails stay solid, which provides visual rest and keeps the design from feeling busy.
The palm trees on the accent nails are positioned at different heights, which creates a sense of depth. One tree is taller, one is shorter, suggesting a natural grove rather than identical stamps.
Design Breakdown:
Solid coral-peach with two gradient palm accent nails. The sunset gradients are the design focal points.
Base Color: Creamy coral-peach on thumb, index, and pinky. Sunset gradient (coral, pink, nude) on middle and ring fingers.
Nail Shape: Medium almond. The curved shape suits the soft, warm palette.
Design Element: Black palm tree silhouettes on both gradient accent nails. Two trees per nail at different heights.
Finish: High-gloss top coat to make the coral look jammy and the gradient look seamless.
Get The Look at Home:
The gradient technique is the same as item 1. The solid coral nails are the easy part.
- Coral nails: Two coats of coral-peach on three nails. Let dry fully.
- Sponge the gradient: On two nails, sponge coral, pink, and nude stripes to create a sunset effect.
- Paint the palms: Using a thin liner brush and black polish, draw palm trees at different heights on each accent nail.
- Frond details: Add small curved strokes for the fronds. Vary the size per tree.
- Seal: One thick coat of top coat over everything.
3.Lavender Frond Elegance
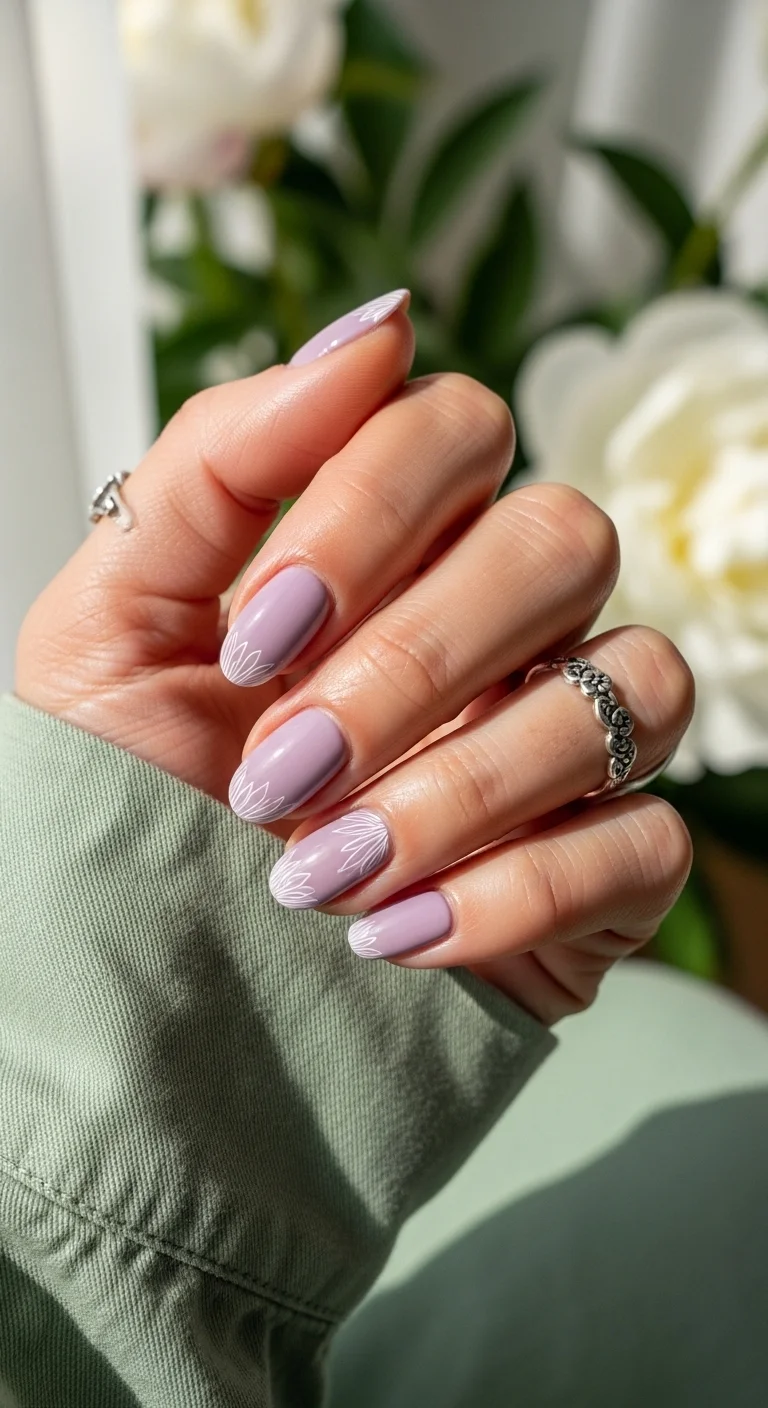
Soft lavender with delicate white palm frond line art.
Overview:
Lavender is an unexpected choice for palm tree nails, and the unusual quality is what makes this design interesting. The soft purple reads as elegant and sophisticated rather than tropical, which broadens the occasions where this design works. It's a palm tree set for someone who wouldn't normally wear palm tree nails.
The white fronds are rendered as thin line art rather than solid silhouettes. That delicacy matches the softness of the lavender base. Bold, filled palm trees would look heavy against this pastel background. The outlined approach keeps everything light and airy.
The fronds are positioned at the tips of each nail, which creates a consistent pattern across the hand. The uniformity is what makes the design feel intentional and curated rather than random.
Design Breakdown:
Pastel base with white line art. The delicacy is the design principle.
Base Color: Soft, creamy lavender.
Nail Shape: Medium almond. The curved shape complements the organic frond shapes.
Design Element: White palm frond line art on every nail. The fronds are positioned at the tips.
Finish: High-gloss top coat to seal the line art and make the lavender look creamy.
Get The Look at Home:
A fine liner brush is essential for the thin white frond lines.
- Lavender base: Two coats of lavender. Let dry fully.
- Frond lines: Using a thin liner brush and white polish, draw palm frond shapes at the tip of each nail. Fan outward from a central point.
- Consistency: The frond size and position should be similar across all nails.
- Line weight: Keep the lines thin and delicate. Thick lines would overwhelm the lavender.
- Seal: One thick coat of top coat to protect the art.

28 Cute & Sporty Baseball Game Nail Ideas for 2026 ⚾
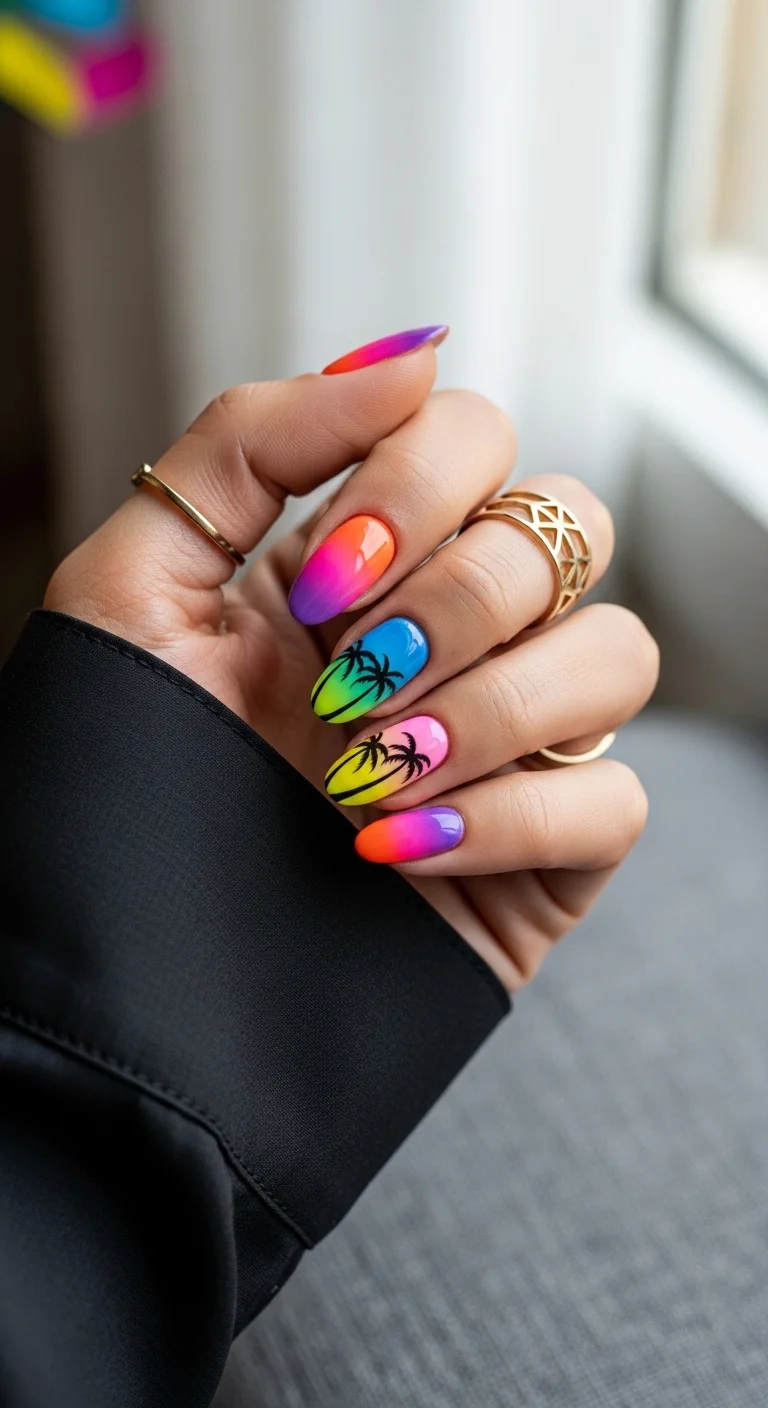
4.Midnight Neon Rainbow Palms
Neon rainbow gradients with a black palm tree accent nail.
Overview:
Every nail gets a different neon gradient, creating a rainbow effect across the hand. The pinky breaks the pattern with a black base and a neon-outlined palm tree, which serves as both a color anchor and a thematic reference.
The gradient variety is what makes this set visually dynamic. Green-to-yellow on one nail, pink-to-orange on another, purple-to-teal on a third. Each gradient is a different color story that contributes to the overall rainbow effect.
The black accent nail is essential because it provides contrast. Without it, the neon gradients would blend into each other. The black creates a visual pause that makes the surrounding colors appear even brighter.
Design Breakdown:
Multi-gradient set with a single dark accent. The rainbow effect is the design.
Base Color: Different neon gradients on each nail: green-yellow, pink-orange, blue-purple, yellow-pink. Black on the pinky.
Nail Shape: Medium coffin. The flat surface showcases the gradients.
Design Element: Neon-outlined palm tree on the black accent nail.
Finish: High-gloss top coat to make the neons look electric.
Get The Look at Home:
Sponge each gradient separately. The neon colors need to be built up in layers.
- Gradient nails: On four nails, sponge different neon color combinations. Two to three passes per nail.
- Black accent: On the pinky, apply two coats of opaque black.
- Neon palm: Using a thin liner brush and neon polishes, draw a palm tree outline on the black nail.
- Neon selection: Use the brightest neons you have. Essie "Serial Cheater" or OPI "Can't Hardly Wait" are good options.
- Seal: One thick coat of top coat over everything.
5.Teal Peach Island Dream
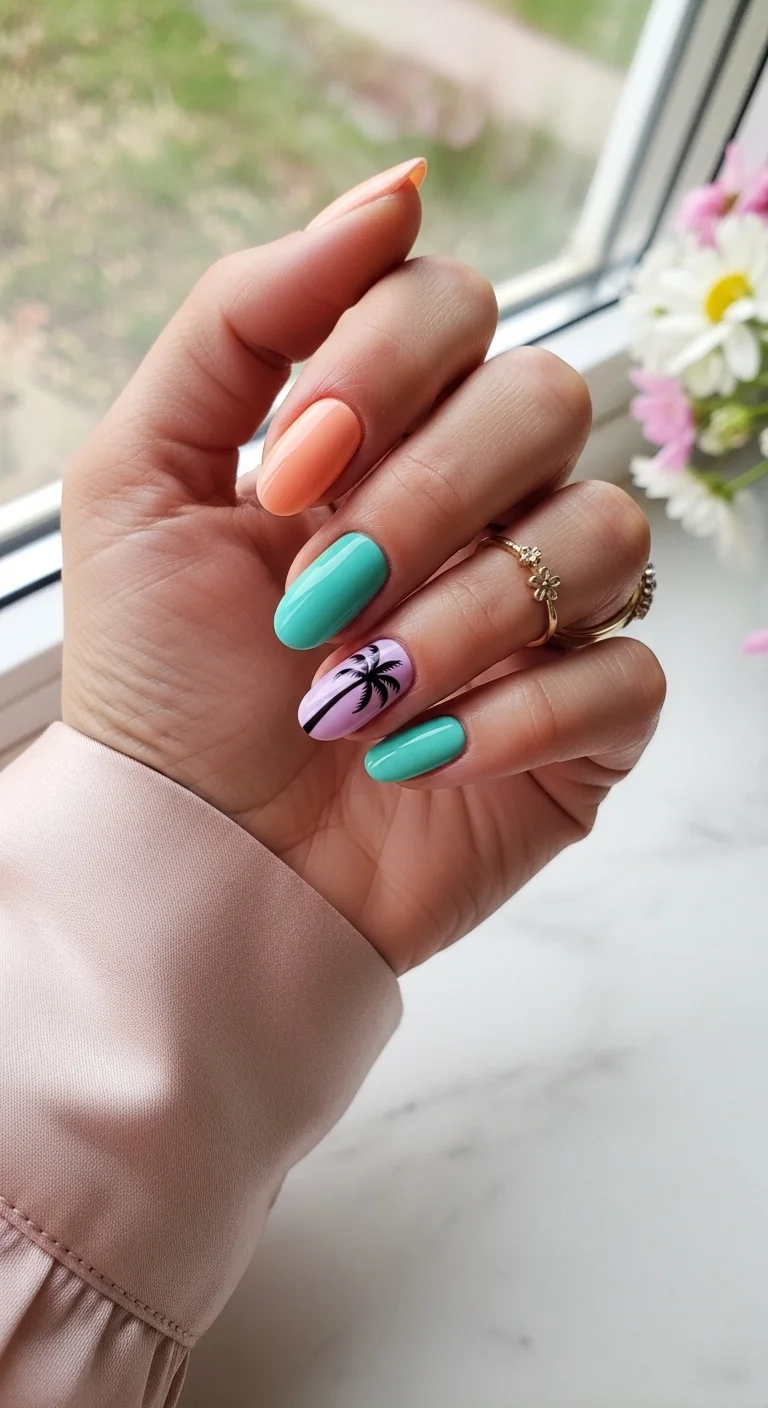
Teal, peach, and lilac mix with a palm tree accent.
Overview:
Three solid colors, teal, peach, lilac, plus a palm tree accent, create a set that feels like a curated paint palette. Each color is distinct but they share a similar pastel saturation level, which creates visual harmony despite the variety.
The palm tree on the lilac accent nail is the only illustrative element in the set. The rest is pure color. That restraint is what keeps the design wearable. One nail carries the theme; the others carry the mood.
The lilac base under the palm tree creates an unusual backdrop for the black silhouette. It's not a sunset, not a sky, just a color. That abstraction is what makes the design feel modern rather than literal.
Design Breakdown:
Multi-color solids with a single palm accent. The color story is the design.
Base Color: Teal on two nails, peach on two nails, lilac with palm tree on the ring finger.
Nail Shape: Medium almond. The curved shape suits the soft color palette.
Design Element: Black palm tree silhouette on the lilac accent nail.
Finish: High-gloss top coat to unify the different colors.
Get The Look at Home:
This is one of the fastest designs. The solid nails are straightforward; only one nail needs art.
- Color layout: Paint two nails teal, two nails peach, and one lilac.
- Solid nails: Two coats of each color. Let dry fully.
- Palm art: On the lilac nail, use a thin liner brush and black polish to draw a palm tree silhouette.
- Frond details: Add small curved strokes for the fronds. Keep the silhouette simple.
- Seal: One thick coat of top coat over all nails.

30+ Chic Pool Party Hairstyles for Summer 2026 🌊👙
6.Summer Heat Gradient
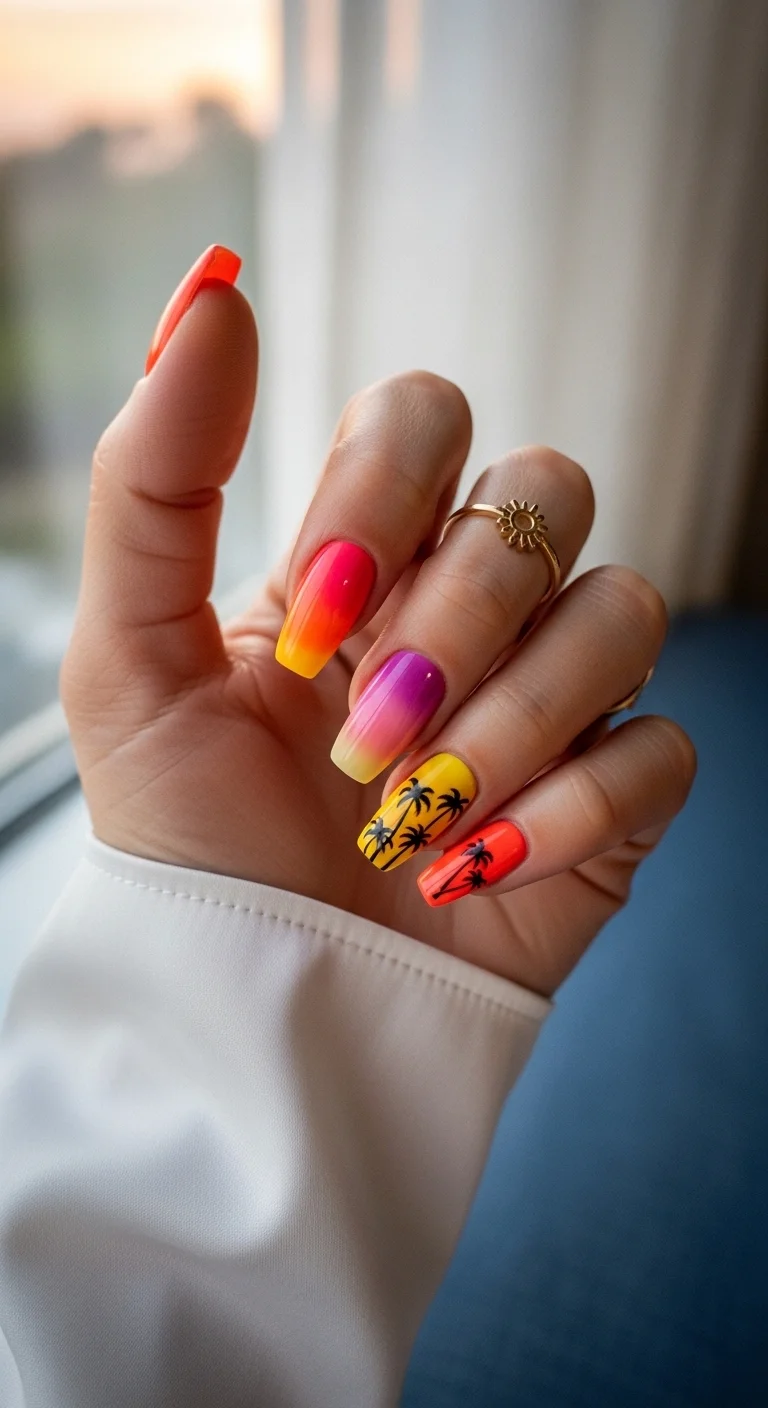
Neon gradient mix with black palm tree accents.
Overview:
Each nail gets a different gradient, creating a sunset effect that changes from finger to finger. The gradients transition through warm tones: orange to pink, pink to purple, yellow to orange. The variety is what makes the hand look like a continuous color story rather than individual nails.
The palm trees appear on the two nails with the most yellow in their gradients, which is a deliberate choice. Yellow is the brightest color in the set, and the black palms on yellow create the highest contrast. That's where the eye naturally goes.
Neon gradients require patience. The colors are sheer, which means you need multiple sponge passes to build opacity. Three to four layers per nail is normal. Rushing the process produces patchy, uneven results.
Design Breakdown:
Multi-gradient set with palm tree accents on the brightest nails. The gradient variety is the design.
Base Color: Different neon gradients on each nail. Orange-pink on thumb and pinky, pink-purple on middle, yellow with palm trees on ring finger, coral with palm on pinky.
Nail Shape: Medium-long coffin. The flat surface provides space for the gradients and art.
Design Element: Black palm tree silhouettes on two accent nails.
Finish: High-gloss top coat to make the neons glow.
Get The Look at Home:
Sponge each gradient individually. The neon colors need to be built up in multiple thin layers.
- Gradient nails: On each nail, sponge the appropriate neon color combination. Two to four passes per nail.
- Build opacity: Let each sponged layer dry before the next. The colors should be fully saturated.
- Paint the palms: On two accent nails, use a thin liner brush and black polish to draw palm tree silhouettes.
- Frond details: Add curved strokes for the fronds. Vary the tree sizes.
- Seal: One thick coat of top coat over everything.
7.Terracotta Gold Palm Luxe
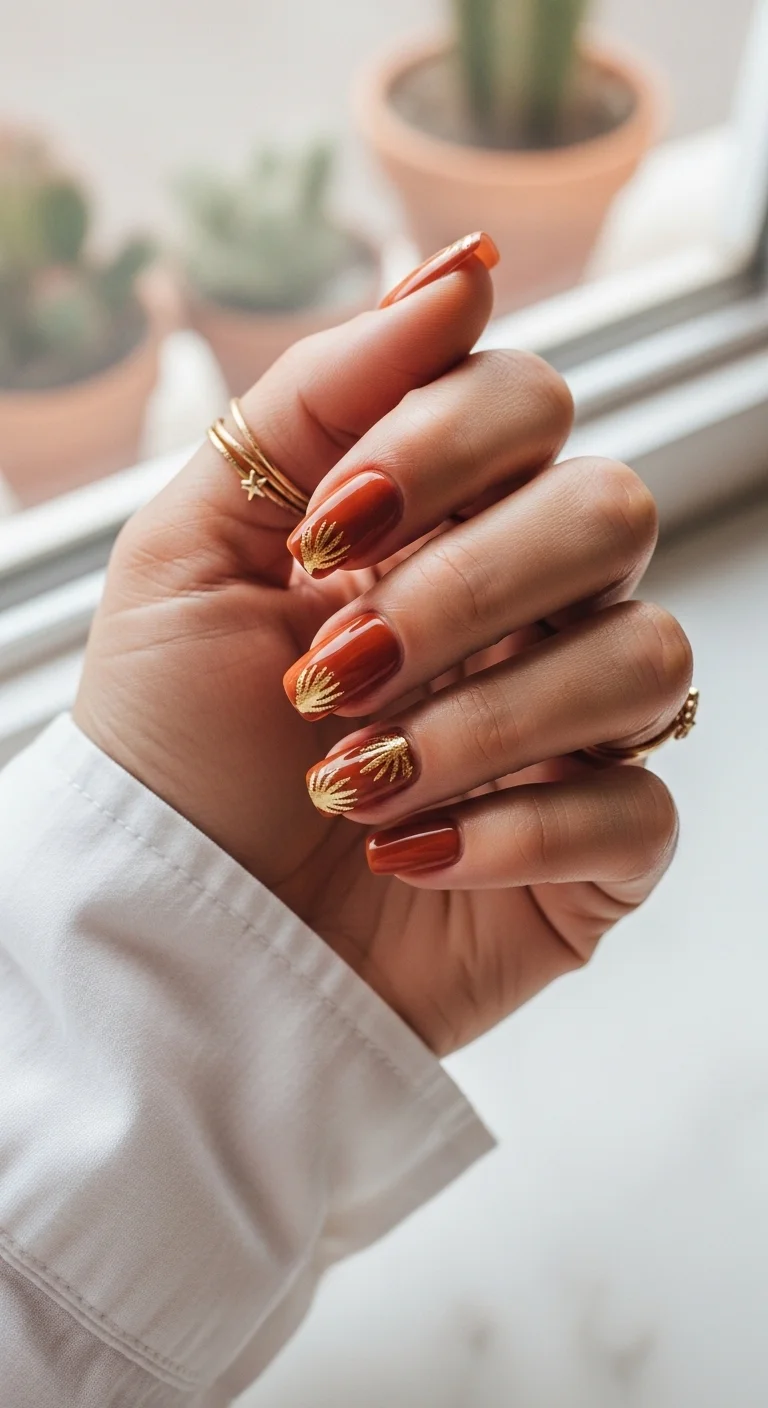
Terracotta base with gold metallic palm frond accents.
Overview:
Gold on terracotta is a warm-on-warm combination that feels luxurious without being flashy. The terracotta provides an earthy, grounded base, and the gold fronds add a metallic accent that catches light without overwhelming the set.
The palm fronds are rendered as gold metallic art rather than black silhouettes, which transforms the tropical reference into something more refined. It's a palm tree set for someone who prefers jewelry over illustration.
The gold metallic polish needs to be applied in thin, deliberate strokes. Thick gold lines look like stripes rather than fronds. The delicacy of the line work is what makes the design feel expensive.
Design Breakdown:
Earthy base with metallic botanical art. The gold-on-terracotta palette is the design.
Base Color: Rich terracotta or burnt orange.
Nail Shape: Medium coffin. The flat surface provides a canvas for the gold art.
Design Element: Gold metallic palm frond art on every nail. The fronds fan outward from the base.
Finish: High-gloss top coat to seal the gold and make the terracotta look rich.
Get The Look at Home:
Gold metallic polish settles quickly. Roll the bottle between your hands before each application.
- Terracotta base: Two coats of terracotta. Let dry fully.
- Gold fronds: Using a thin liner brush and gold metallic polish, draw palm frond shapes on each nail. Fan outward from the base.
- Line weight: Keep the frond lines thin. Thick gold lines look like stripes.
- Consistency: The frond size and position should be similar across all nails.
- Seal: One thick coat of top coat to lock in the gold.

30 Stunning Beach Nail Ideas for the Best Vacation in 2026 🌊
8.Orange Sorbet Ombre
Neon orange with gradient nails and a white palm accent.
Overview:
Neon orange is one of the most high-visibility colors in this list. It demands attention from every angle. Pairing it with softer gradients and a clean white accent creates a set that balances intensity with restraint.
The white accent nail with black palm trees is the thematic anchor. Without it, the set would be a solid orange with some gradients. The palm trees provide the tropical context that connects the colors to a specific mood.
The gradient nails transition from neon orange at the tips to a softer nude at the cuticle. That fade creates a "dipped" effect that's more interesting than solid orange on every nail.
Design Breakdown:
Neon solid, gradient, and palm accent. The orange is the star; the palm provides the theme.
Base Color: Neon orange on thumb and pinky. Orange-to- nude gradient on index and middle. White with palm trees on the ring finger.
Nail Shape: Medium-long coffin. The flat surface suits both the gradients and the art.
Design Element: Black palm tree silhouettes on the white accent nail. Two trees side by side.
Finish: High-gloss top coat to make the neon look electric.
Get The Look at Home:
The gradient nails need sponge work. The solid and accent nails are straightforward.
- Orange nails: Two to three coats of neon orange on two nails. Let dry fully.
- Gradient nails: On two nails, sponge orange at the tips fading to nude at the cuticle.
- White accent: On the ring finger, apply two coats of opaque white.
- Paint the palms: On the white accent, use a thin liner brush and black polish to draw two palm trees side by side.
- Seal: One thick coat of top coat over everything.
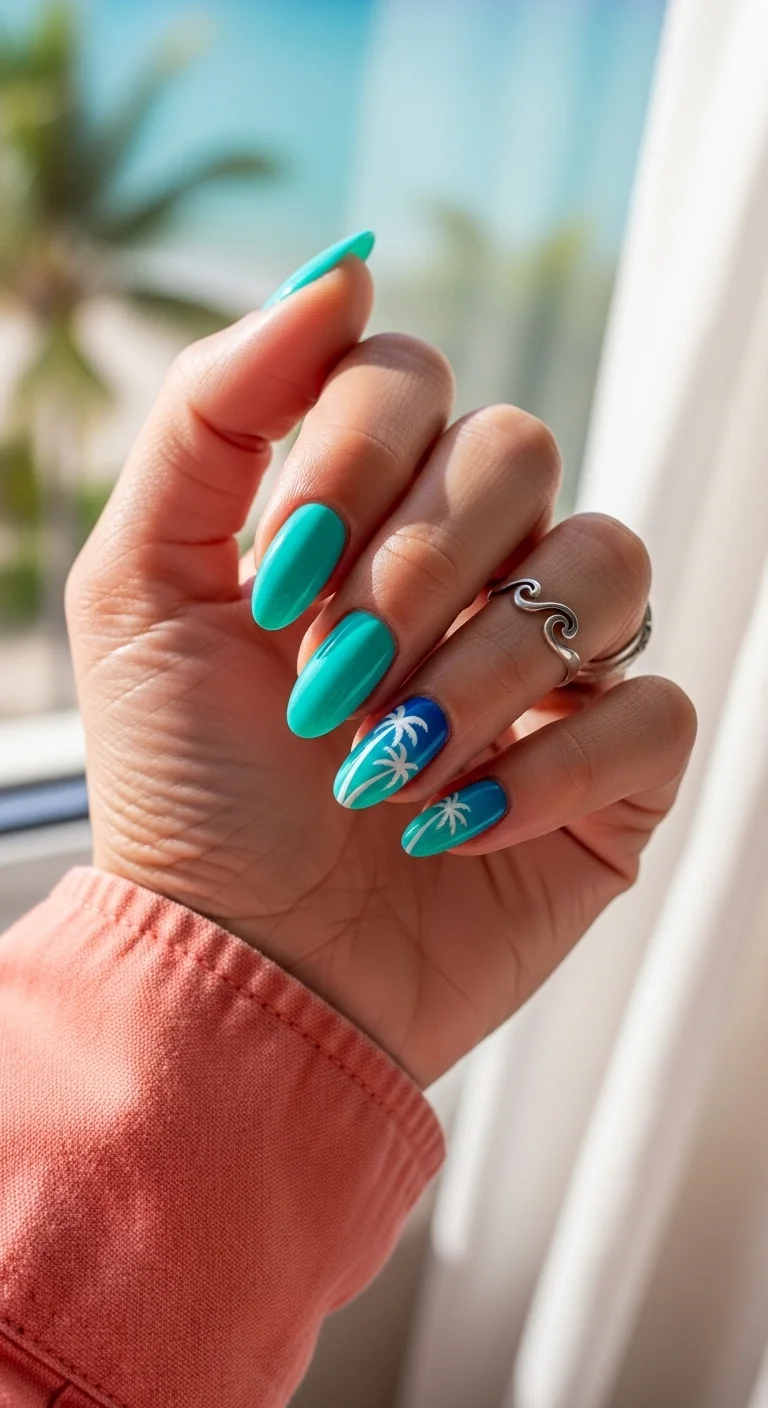
9.Ocean Blue White Palms
Teal solids with blue gradient and white palm accents.
Overview:
White palm trees on a blue gradient are the reverse of the typical black-on-sunset approach. The white silhouettes against the blue create a cleaner, cooler aesthetic that references ocean waves rather than sunset skies.
The teal base on the solid nails establishes the ocean color story, while the blue gradient accent nails add depth and variation. The white palms on the gradient create a focal point that ties the solid and gradient nails together.
The white palm trees need to be opaque enough to read against the blue gradient. A single coat of white over a dark gradient will look translucent. Two coats of a pigment-dense white like OPI "Alpine Snow" ensures the silhouettes are crisp.
Design Breakdown:
Ocean-toned solids with gradient palm accents. The white palms on blue create a cool, clean tropical look.
Base Color: Solid teal on thumb, index, and pinky. Blue gradient on middle and ring fingers.
Nail Shape: Medium almond. The curved shape suits the oceanic color palette.
Design Element: White palm tree silhouettes on both gradient accent nails.
Finish: High-gloss top coat to make the teal look deep and the gradient look seamless.
Get The Look at Home:
White over dark colors needs two coats for opacity. Don't rush the palm art.
- Teal nails: Two coats of teal on three nails. Let dry fully.
- Gradient nails: On two nails, sponge a blue gradient, darker at the tips, lighter toward the cuticle.
- White palms: Using a thin liner brush and white polish, draw palm tree silhouettes on the gradient nails. Two coats of white for opacity.
- Frond details: Add curved strokes for the fronds. Keep the silhouettes simple.
- Seal: One thick coat of top coat over everything.

26 Stunning Summer Braided Hairstyles for Women 2026 ☀️💇♀️
10.Glitz Sunset Paradise
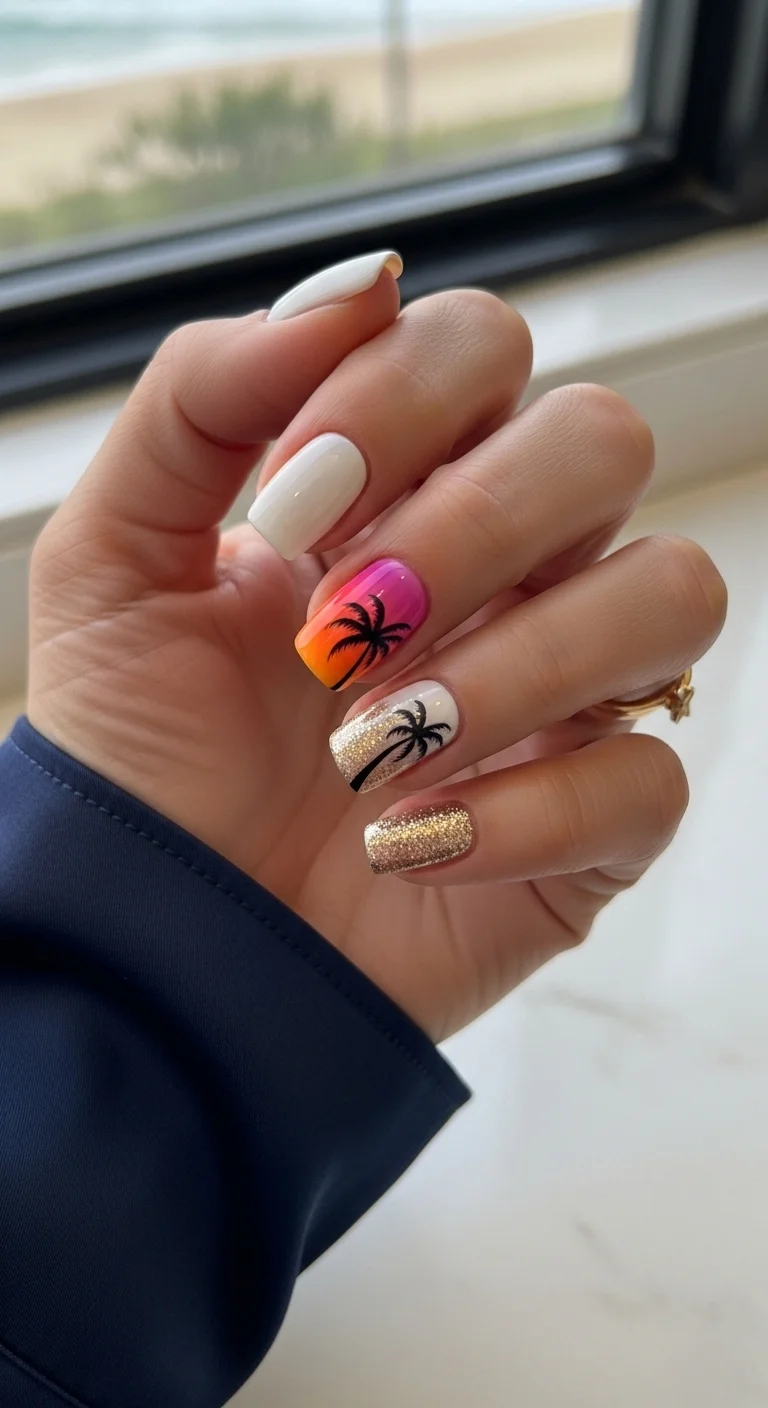
White, sunset gradient, gold glitter, and palm art mix.
Overview:
This design mixes four different approaches on one hand: solid white, sunset gradient with palm, white with palm, and gold glitter. The variety is the point. It's a collection of tropical references unified by a warm color palette.
The gold glitter nail adds a texture that flat polish can't replicate. The sparkle catches light from every angle, creating a dimension that makes the set feel festive and celebratory.
The white nails provide visual rest between the busier accent nails. Without them, the gradient, palm, and glitter would compete for attention. The white acts as a neutral buffer.
Design Breakdown:
Mixed-technique set with multiple accent types. The variety is the design.
Base Color: White on thumb and index. Sunset gradient on middle. White with palm on ring finger. Gold glitter on pinky.
Nail Shape: Medium coffin. The flat surface suits the different techniques.
Design Element: Black palm tree silhouettes on the sunset gradient and white accent nails.
Finish: High-gloss top coat to seal everything and make the glitter sparkle.
Get The Look at Home:
This set requires multiple techniques. Plan your layout before you start.
- White nails: Two coats of opaque white on two nails. Let dry fully.
- Sunset gradient: On one nail, sponge pink, orange, and yellow for a sunset effect.
- White palm: On one nail, apply white and paint black palm trees.
- Gold glitter: On the pinky, apply two to three coats of gold glitter polish.
- Seal: One thick coat of top coat over everything.
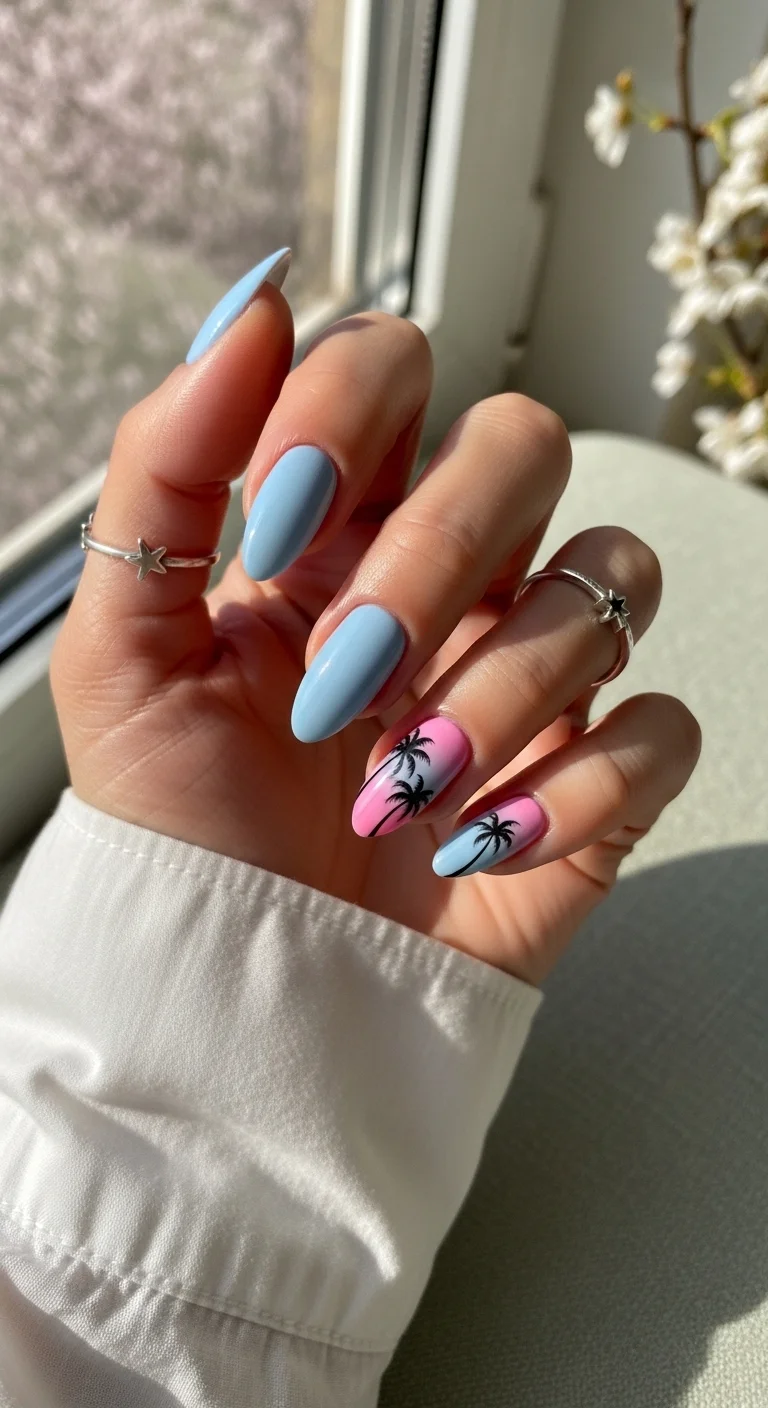
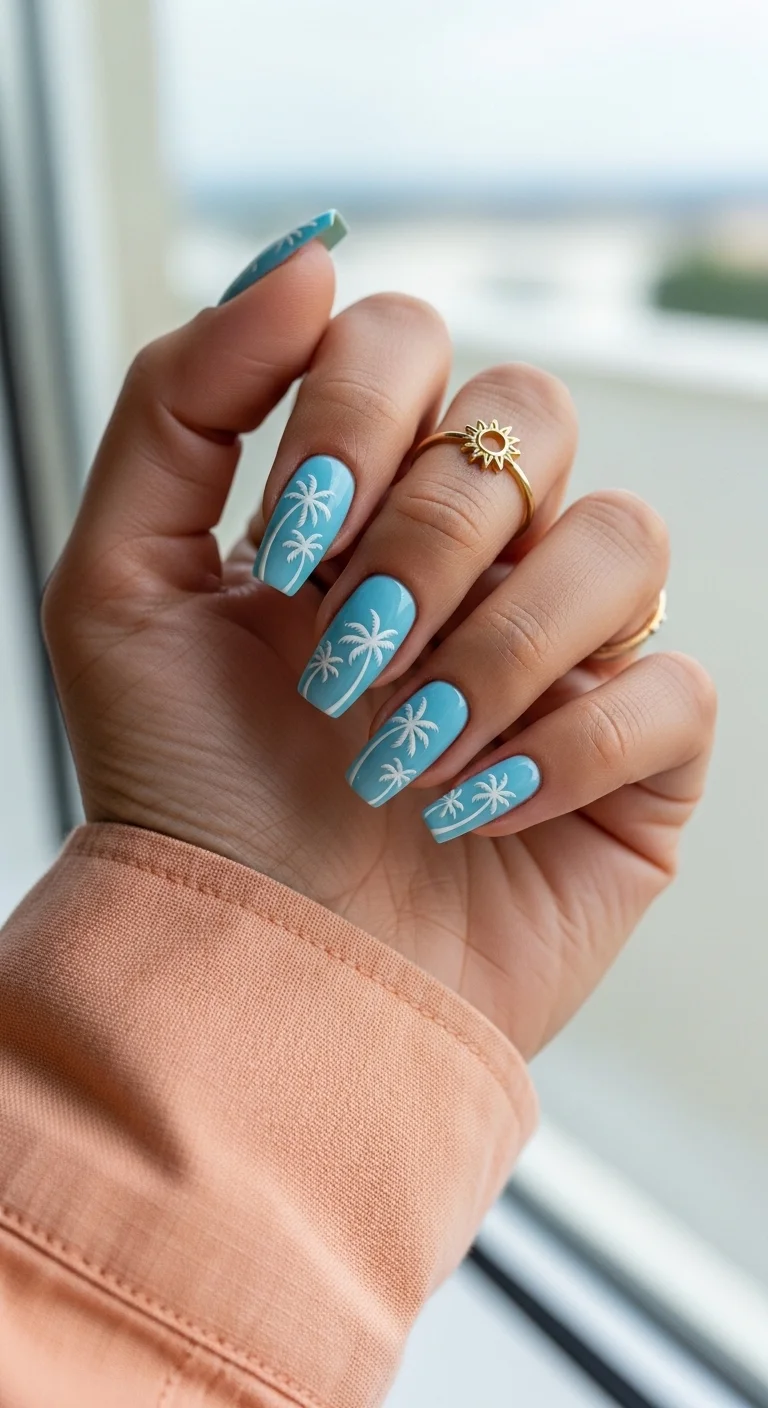
11.Sky Blue Pink Dusk Palms
Sky blue solids with pink-blue gradient palm accents.
Overview:
Sky blue and pink is a dusk-inspired palette that references the moment when the sky transitions from day to night. The blue represents the fading daylight; the pink represents the last traces of sunset. Adding palm trees ties the color story to a specific tropical setting.
The gradient on the accent nails blends pink at the tips into blue toward the cuticle, creating a seamless color transition that looks like an actual sky. The black palm silhouettes on top create the contrast needed to make the gradient pop.
The solid blue nails provide visual rest between the busier gradient accents. Without them, the pink-blue gradients would feel overwhelming. The blue acts as an anchor that grounds the design.
Design Breakdown:
Solid blue with gradient palm accents. The dusk color story is the design principle.
Base Color: Sky blue on thumb, index, and pinky. Pink- to-blue gradient on middle and ring fingers.
Nail Shape: Medium-long almond. The curved shape suits the soft gradient.
Design Element: Black palm tree silhouettes on both gradient accent nails.
Finish: High-gloss top coat to make the blue look deep and the gradient look seamless.
Get The Look at Home:
The gradient nails need sponge work. The solid blue nails are straightforward.
- Blue nails: Two coats of sky blue on three nails. Let dry fully.
- Sponge the gradient: On two nails, sponge pink at the tips fading to blue at the cuticle.
- Paint the palms: Using a thin liner brush and black polish, draw palm tree silhouettes on the gradient nails.
- Frond details: Add curved strokes for the fronds. Vary the tree sizes.
- Seal: One thick coat of top coat over everything.

35 Fun Birthday Nail Designs for 2026 🎂
12.Minty Fresh Gold Foil Palms
Mint, coral, and gold metallic mix with a palm accent.
Overview:
Three different finishes, cream mint, cream coral, and gold metallic, create a set that's visually rich despite having only three colors. The gold metallic nail with the palm tree is the focal point, while the mint and coral provide supporting color.
The gold metallic base under the black palm tree creates a luxury tropical effect. It's the difference between a beach bar and a beach resort. The metallic quality elevates the entire set.
The color distribution, two mint nails, one coral, one gold, creates an asymmetric balance that feels more natural than equal distribution. The mint dominates, the coral provides contrast, and the gold anchors the design.
Design Breakdown:
Three-color solid mix with a metallic palm accent. The gold nail is the focal point.
Base Color: Mint green on two nails, coral on one, gold metallic on one.
Nail Shape: Medium coffin. The flat surface showcases the different finishes.
Design Element: Black palm tree silhouette on the gold metallic accent nail.
Finish: High-gloss on mint and coral; metallic on gold.
Get The Look at Home:
The solid nails are fast. The gold accent needs metallic polish or chrome powder.
- Mint nails: Two coats of mint green on two nails. Let dry.
- Coral nail: Two coats of coral on one nail.
- Gold accent: On the ring finger, apply gold metallic polish or chrome powder.
- Palm art: On the gold nail, use a thin liner brush and black polish to draw a palm tree silhouette.
- Seal: One thick coat of top coat over all nails.
13.Neon Punch Palm Party
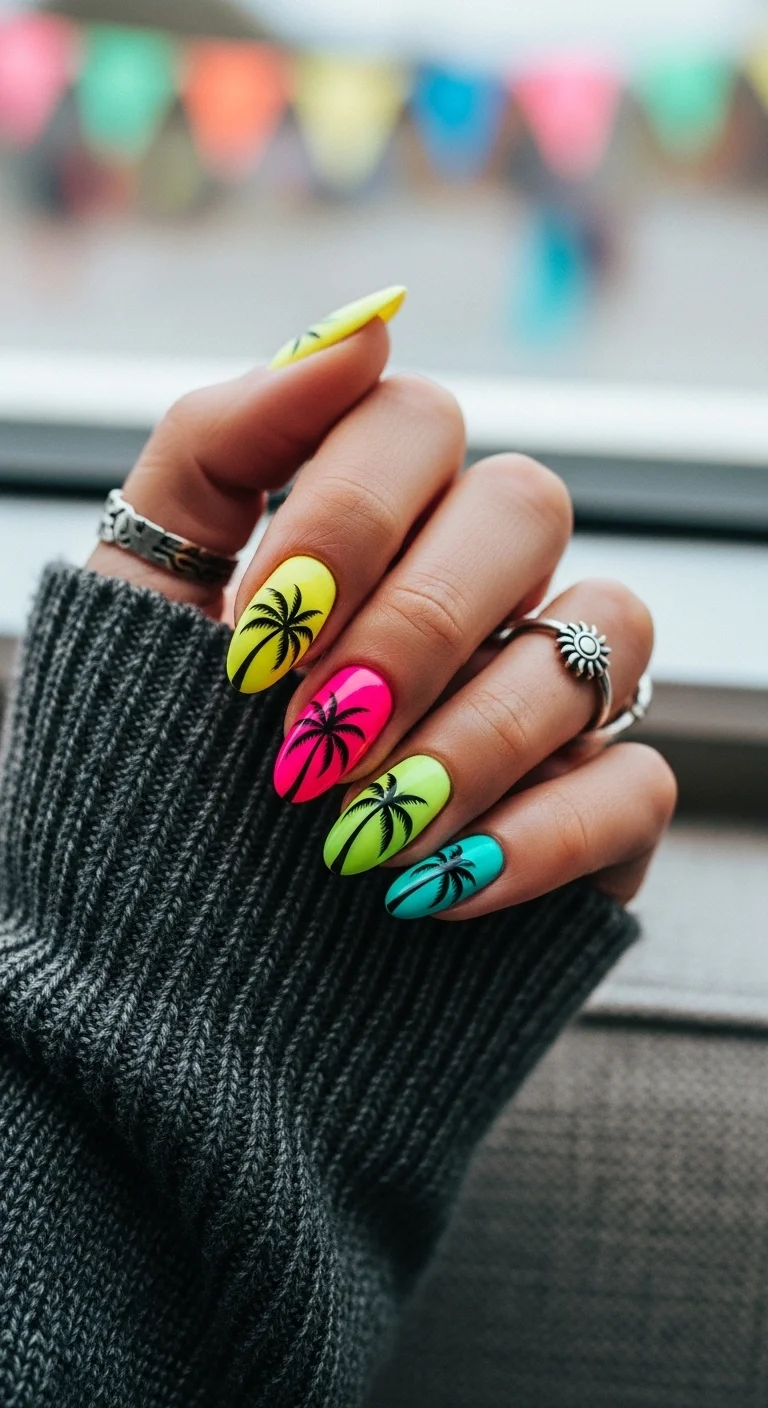
Multi-color neon with black palm trees on every nail.
Overview:
Every nail is a different neon color, and every nail gets a palm tree. The combination of maximum color and maximum theme creates a set that's unapologetically tropical. There's no subtlety here. It's a full-commitment design.
The neon variety, yellow, pink, green, teal, creates a rainbow effect that's festive and celebratory. Each color is distinct enough to read individually, but they share the same saturation level, which creates visual cohesion.
The palm trees on every nail reinforce the theme at every opportunity. From across a room, the set reads as "neon tropical." Up close, each nail reveals a different color combination. That dual reading is what makes the design interesting at every scale.
Design Breakdown:
Multi-color neon with universal palm art. The variety is the design.
Base Color: Different neon color on each nail: yellow, pink, green, teal.
Nail Shape: Medium almond. The curved shape complements the palm silhouettes.
Design Element: Black palm tree silhouettes on every nail.
Finish: High-gloss top coat to make the neons look electric.
Get The Look at Home:
Paint each nail a different neon color first, then add the palm trees.
- Color layout: Paint each nail a different neon color. Two coats each. Let dry fully.
- Palm art: Using a thin liner brush and black polish, draw a palm tree on each nail.
- Vary placement: Position the palms at different heights and angles on each nail.
- Frond details: Add curved strokes for the fronds. Keep the silhouettes simple.
- Seal: One thick coat of top coat over everything.
32 Stunning Summer Wedding Hairstyles for Brides ☀️💍
14.Matte Sage Sand Palms
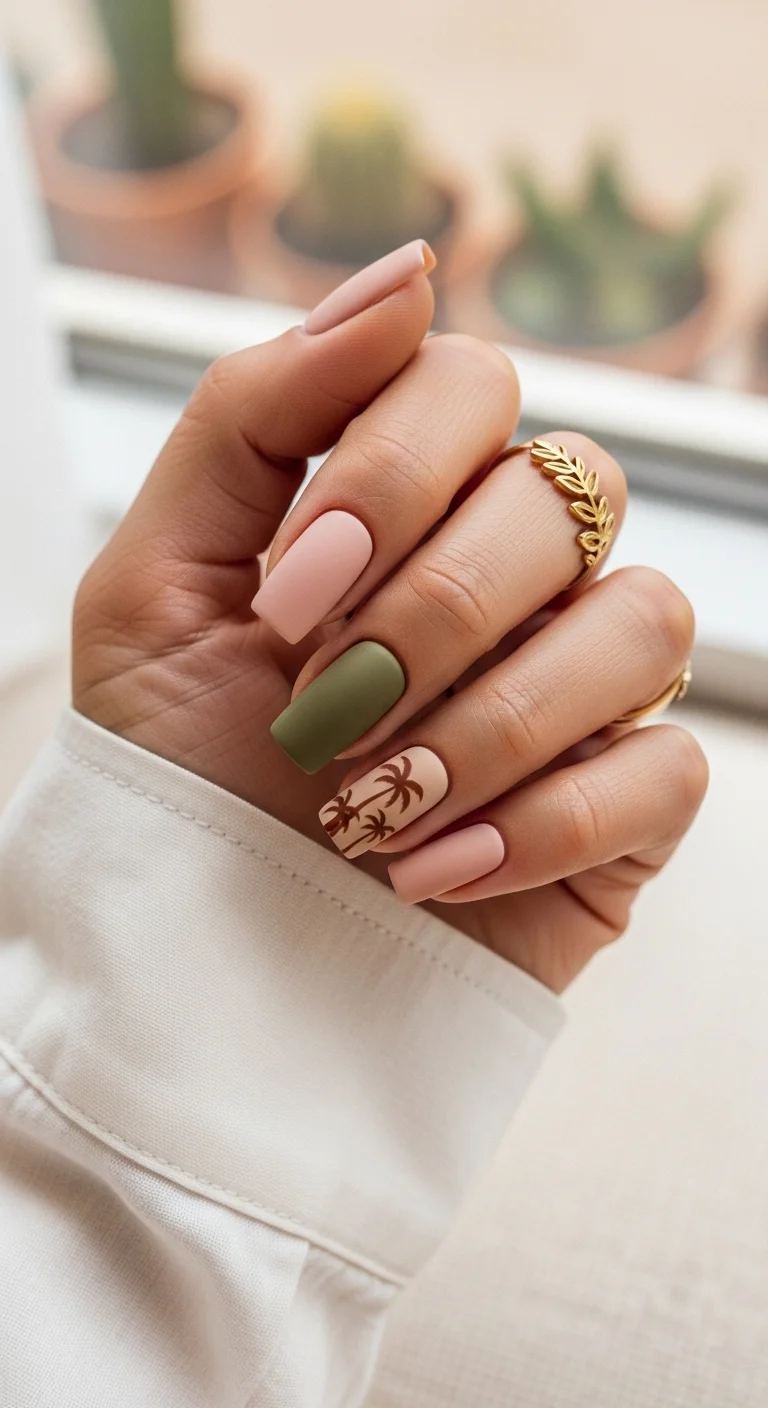
Matte earthy tones with brown palm tree art.
Overview:
Matte earth tones, sage, nude, olive, create a set that references nature without being tropical about it. The brown palm trees on the nude accent nail are the only explicit reference to palm trees, and even they feel organic rather than themed.
The matte finish is what sells the earthy quality. Glossy versions of these colors would look more like standard manicures. Matte drains the shine and leaves behind a velvety, almost ceramic texture that feels grounded and natural.
The multi-color matte approach creates a skittle effect that's more sophisticated than bright skittles. The colors are muted enough that they feel harmonious despite being different.
Design Breakdown:
Matte earth-tone skittle with a single palm accent. The muted palette is the design.
Base Color: Matte sage on two nails, matte nude on two nails, matte olive on one nail with brown palm art.
Nail Shape: Medium coffin. The flat surface showcases the matte textures.
Design Element: Brown palm tree art on the olive accent nail.
Finish: Matte top coat on all nails.
Get The Look at Home:
Matte polish shows every brush stroke. Apply thin, even coats with adequate dry time.
- Color layout: Paint each nail its designated matte color. Two coats each.
- Palm art: On the olive nail, use a thin liner brush and brown polish to draw palm trees.
- Matte seal: Apply matte top coat to all nails. Let each coat dry fully.
- Cleanup: Clean the edges carefully. Matte against skin is highly visible.
15.Matte Noir Nude Palm
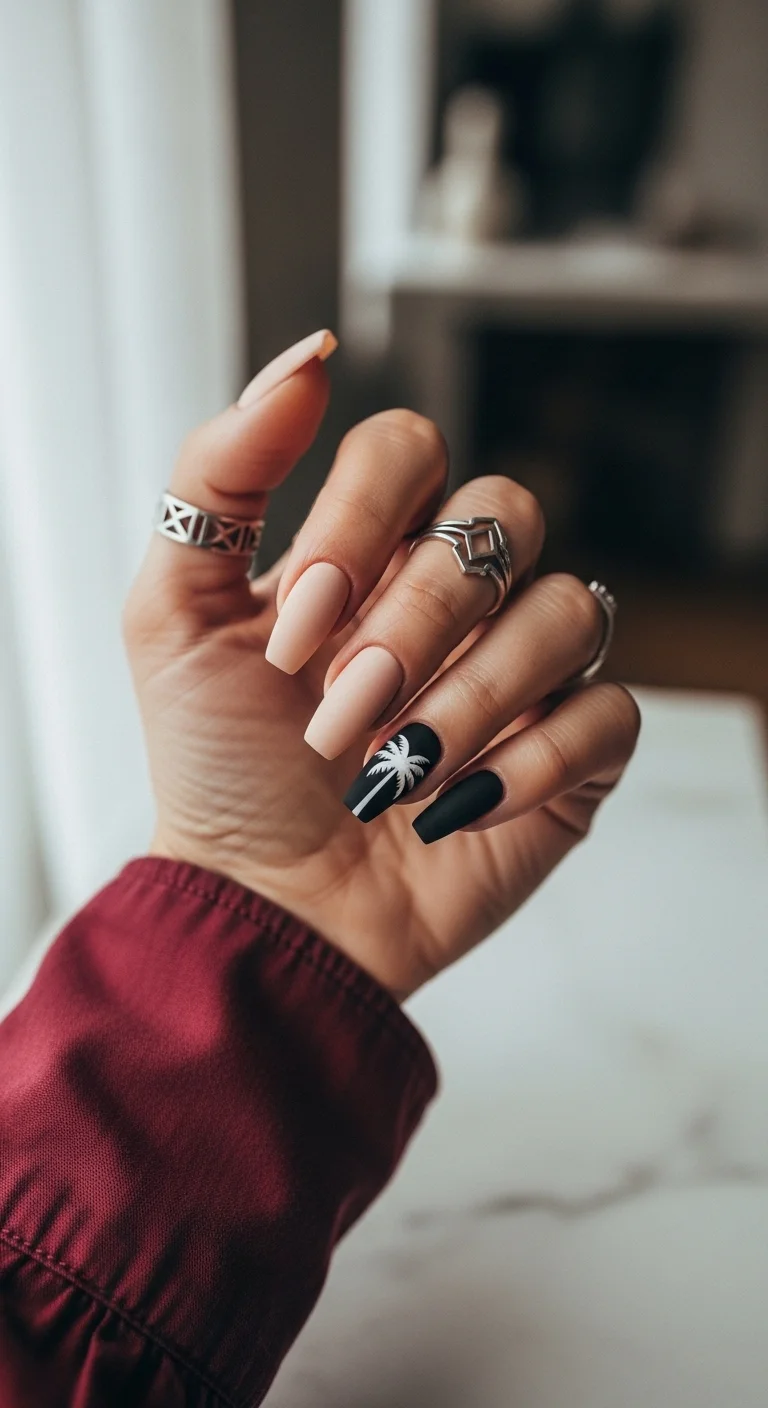
Matte nude and black with a white palm accent.
Overview:
Matte nude and matte black is a high-contrast pairing that feels editorial and modern. The nude provides warmth and softness; the black provides drama and edge. The white palm tree on the black accent is the only decorative element, and it's enough.
The matte finish on both colors creates a unified texture across the set. If the nude were glossy and the black matte, or vice versa, the texture mismatch would create visual tension. Matching finishes keeps the focus on the color contrast.
The white palm tree on matte black is a striking combination. The matte surface absorbs light, which makes the white silhouette appear even brighter by contrast. It's the highest-contrast element in the entire set.
Design Breakdown:
Matte two-tone with a single white palm accent. The texture and contrast are the design.
Base Color: Matte nude on three nails, matte black on two nails.
Nail Shape: Medium-long coffin. The flat surface emphasizes the matte quality.
Design Element: White palm tree silhouette on the black accent nail.
Finish: Matte top coat on all nails.
Get The Look at Home:
Matte top coat needs a flawless base. Every ridge and imperfection is amplified under a flat finish.
- Nude nails: Two to three thin coats of nude. Let dry fully.
- Black nails: Two coats of black on two nails. Let dry.
- Palm art: On one black nail, use a thin liner brush and white polish to draw a palm tree silhouette.
- Matte seal: Apply matte top coat to all nails. One confident stroke per nail.
- Cleanup: Clean the edges carefully. Matte against skin is highly visible.

34 Cutest Butter Yellow Nail Designs for 2026 🧈
16.Frosted Seafoam Single Palm
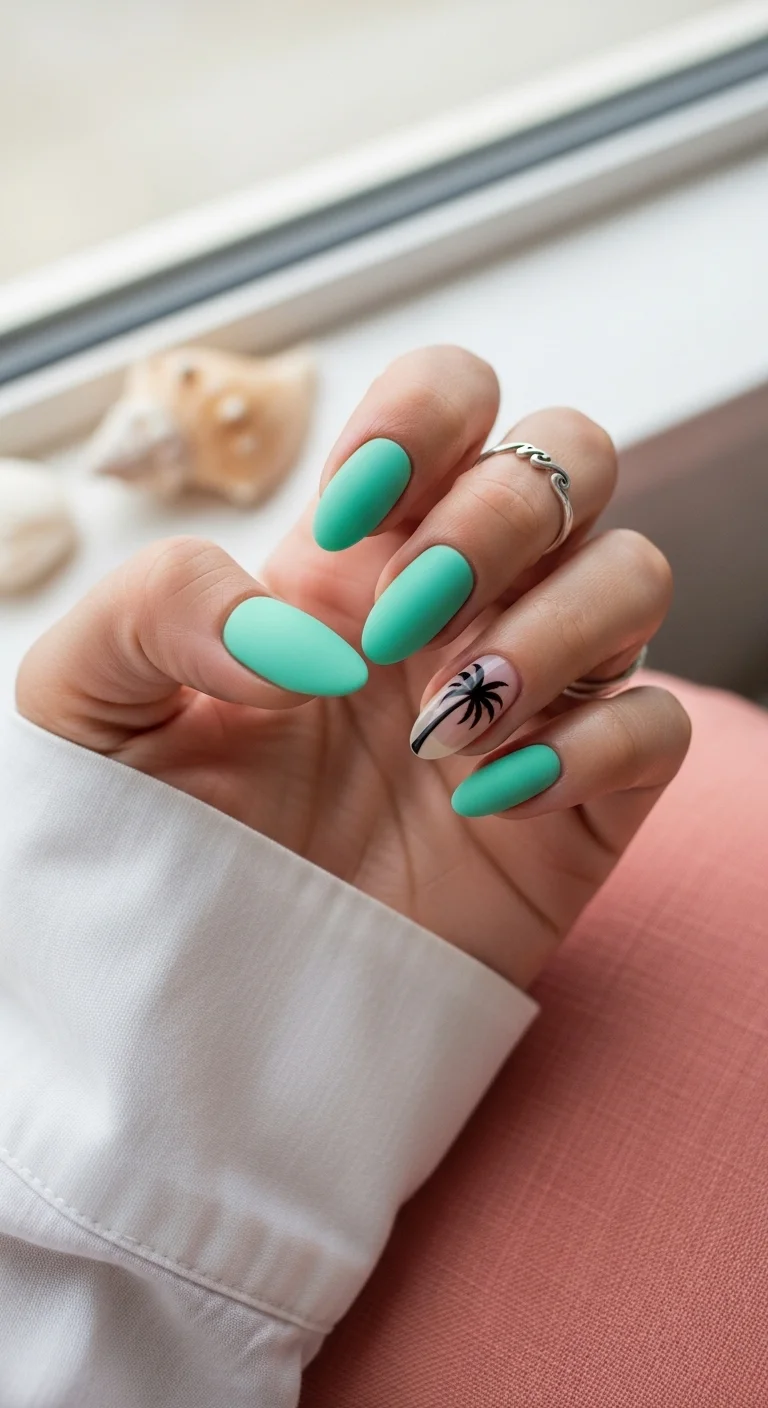
Matte seafoam with a single palm accent on nude.
Overview:
Seafoam green with a matte or frosted finish creates a cool, aquatic quality that references ocean water rather than tropical foliage. The palm tree on the nude accent nail adds the tropical context without overwhelming the serene color story.
The single accent nail approach is the most restrained way to add palm tree art. Four nails of solid seafoam establish the mood, and one nail of nude with a palm provides the theme. The restraint is what makes the design feel sophisticated.
The matte finish on the seafoam is what gives it the frosted quality. Glossy seafoam would look more like a standard pastel. Matte transforms it into something more editorial and textured.
Design Breakdown:
Matte solid with a single palm accent. The frosted texture is the design principle.
Base Color: Matte seafoam green on four nails. Nude with black palm on the ring finger.
Nail Shape: Medium almond. The curved shape suits the cool, aquatic color.
Design Element: Black palm tree silhouette on the nude accent nail.
Finish: Matte top coat on the seafoam nails. The accent nail can be glossy or matte.
Get The Look at Home:
The seafoam needs thin, even coats for a smooth matte finish.
- Seafoam nails: Two to three thin coats of seafoam green on four nails. Let dry fully.
- Accent base: On the ring finger, apply two coats of nude.
- Palm art: On the nude accent, use a thin liner brush and black polish to draw a palm tree.
- Matte seal: Apply matte top coat to the seafoam nails.
- Accent finish: The accent nail can be glossy for contrast or matte for uniformity.
17.Neon French Palm Fusion
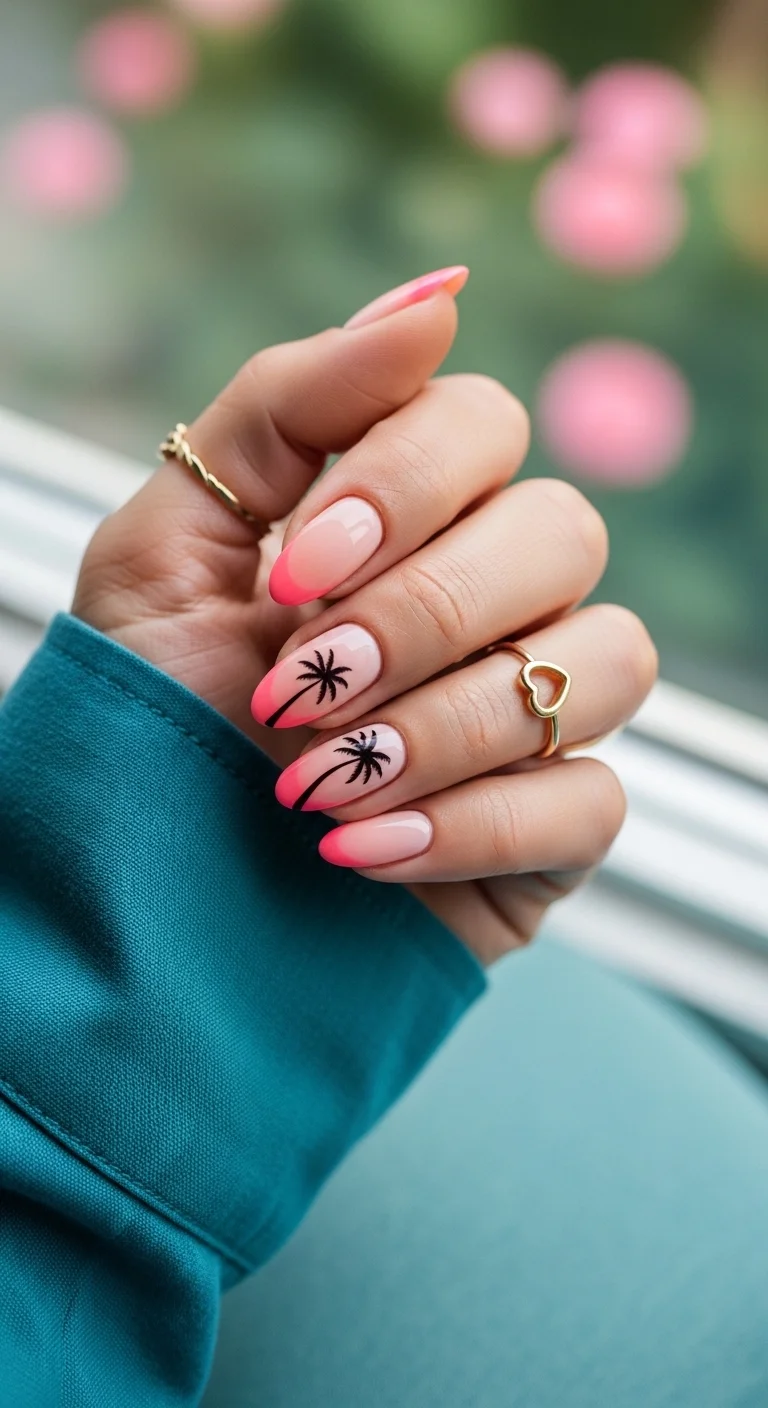
Neon pink French tips with gradient palm accents.
Overview:
Neon pink French tips combined with gradient palm accents creates a design that's both structured and organic. The French format provides the geometric framework; the gradients and palms provide the tropical narrative.
The gradient on the accent nails blends neon pink at the tips into a softer nude at the cuticle. That transition creates a "dipped" effect that's more interesting than a solid French tip. The palms on top complete the sunset reference.
Neon pink is one of the most high-visibility colors available. It demands attention from every angle. The sheer nude base under the French tips provides the visual rest that keeps the neon from feeling overwhelming.
Design Breakdown:
Neon French with gradient palm accents. The French format provides structure; the gradients add depth.
Base Color: Sheer nude with neon pink French tips on three nails. Pink-to-nude gradient with palms on two accent nails.
Nail Shape: Medium-long almond. The curved tip suits the neon pink.
Design Element: Black palm tree silhouettes on both gradient accent nails.
Finish: High-gloss top coat to make the neon look electric.
Get The Look at Home:
The French tips and gradient nails use different techniques. Complete the French first, then the gradients.
- Nude base: Two coats of sheer nude on all nails. Let dry fully.
- Neon French tips: Paint neon pink French tips on three nails. Two coats for opacity.
- Gradient nails: On two nails, sponge neon pink at the tips fading to nude at the cuticle.
- Paint the palms: On the gradient nails, use a thin liner brush and black polish to draw palm trees.
- Seal: One thick coat of top coat over everything.

25 Stunning Summer Vacation Hairstyles for 2026 ☀️🌊
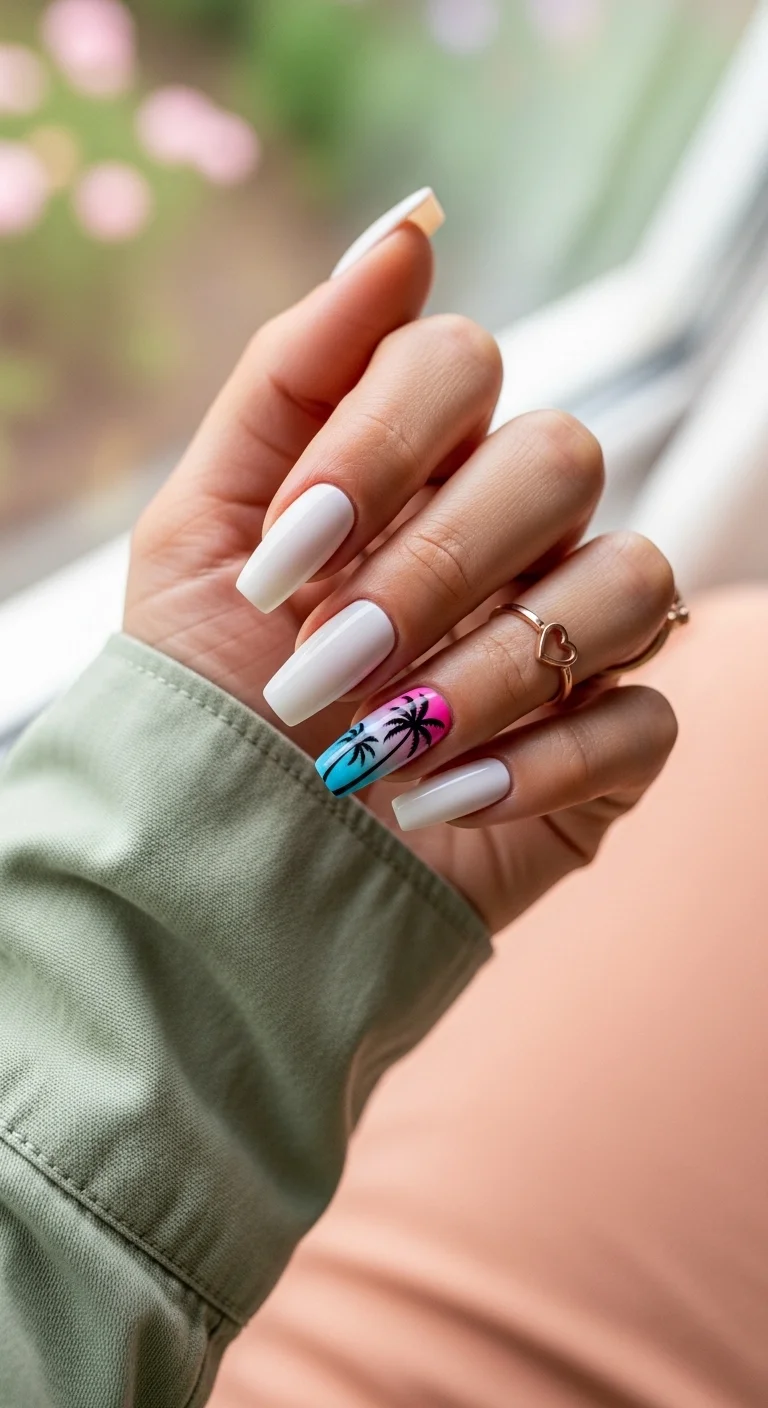
18.Modern Classic Palm French
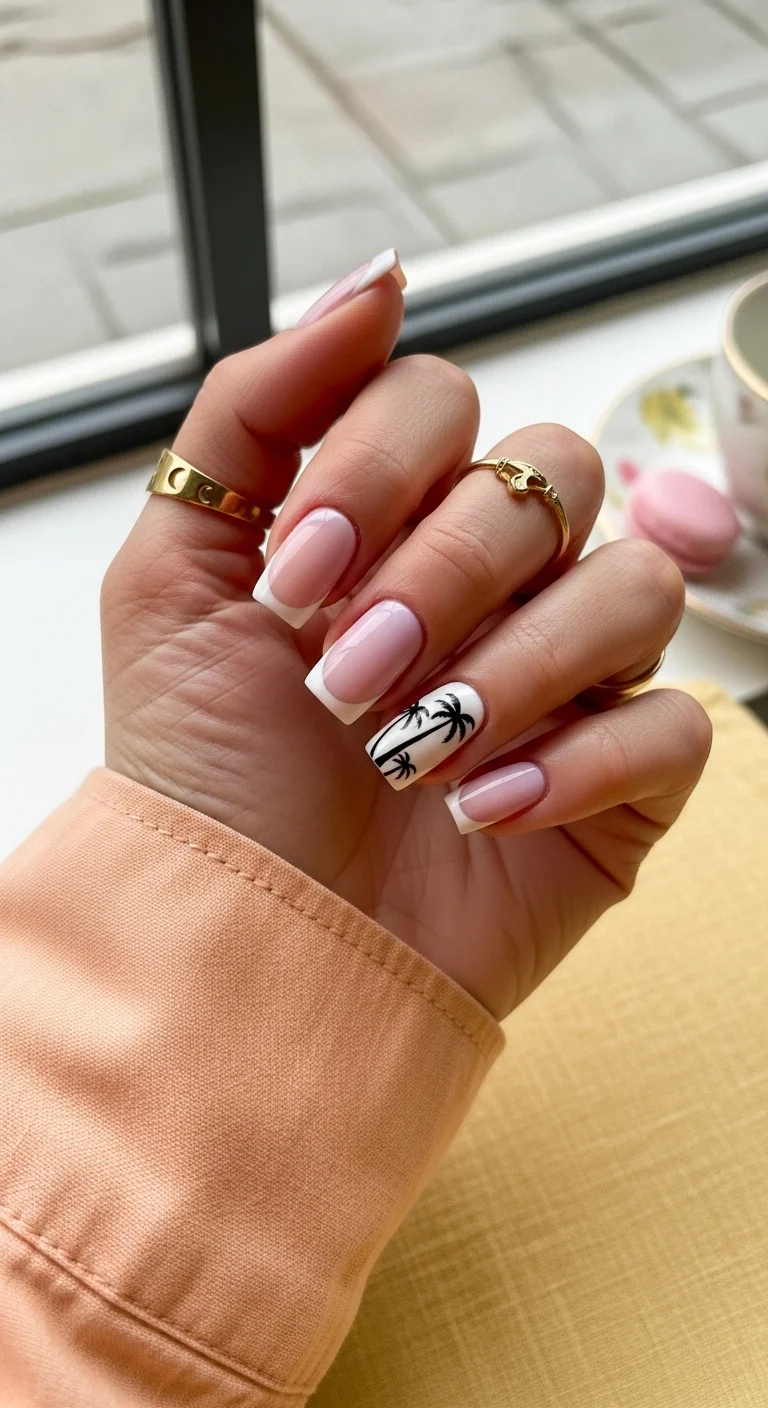
Classic white French with a palm accent nail.
Overview:
A classic French manicure with a palm tree accent is the most wearable version of tropical nails. The white French is universally appropriate, and the single palm accent adds the theme without disrupting the set's professionalism.
The white accent nail with palm trees serves as the focal point. Without it, this would be a standard French. The palm art transforms the design from "classic" to "classic with a twist."
The white base on the accent nail matches the white French tips on the other nails, which creates visual continuity. The palm trees are the only element that differentiates the accent from the rest.
Design Breakdown:
Classic French with a single palm accent. The French provides the framework; the palm adds the theme.
Base Color: Sheer nude with white French tips on four nails. White with black palm trees on the ring finger.
Nail Shape: Medium coffin. The flat tip gives the French a clean edge.
Design Element: Black palm tree silhouettes on the white accent nail. Two trees side by side.
Finish: High-gloss top coat to make the French look crisp.
Get The Look at Home:
The French tips are the fast part. The palm accent is the only detail work.
- Nude base: Two coats of sheer nude on all nails. Let dry fully.
- White French tips: Paint white French tips on four nails. Two coats for opacity.
- White accent: On the ring finger, apply two coats of opaque white.
- Palm art: On the white accent, use a thin liner brush and black polish to draw two palm trees.
- Seal: One thick coat of top coat over all nails.
19.Botanical Palm Leaves
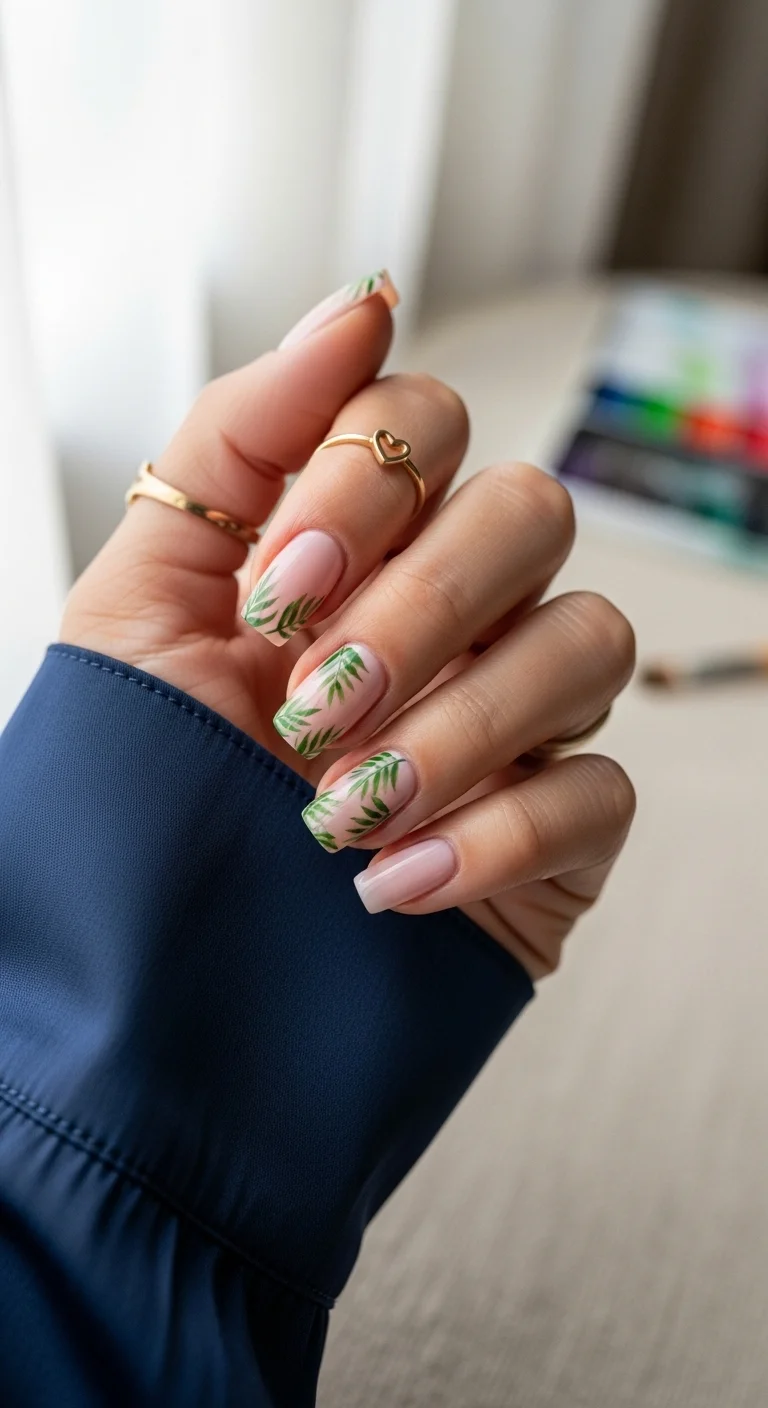
Sheer nude with green botanical palm leaf art.
Overview:
Palm leaves rendered as botanical illustrations rather than silhouettes create a design that feels more like fine art than nail art. The green leaves in multiple shades look like they were painted with watercolors.
The sheer nude base is essential for the botanical effect. It lets the leaves appear to grow from the natural nail rather than sit on top of a colored surface. The transparency creates a sense of depth that opaque bases can't achieve.
The leaf placement varies across the nails, which prevents the pattern from looking stamped or manufactured. Some nails have more leaves, others have fewer. The inconsistency is what makes the design feel organic and natural.
Design Breakdown:
Botanical illustration on a transparent base. The green leaves are the entire design.
Base Color: Sheer nude or natural nail. The transparency lets the leaves look like they're growing from the nail.
Nail Shape: Medium coffin. The flat surface provides a canvas for the leaf art.
Design Element: Green palm leaves painted across all nails. Multiple shades of green for depth. Placement varies per nail.
Finish: High-gloss top coat to seal the botanical art and make the sheer base look luminous.
Get The Look at Home:
A fine liner brush is essential for the thin leaf strokes. Use multiple green shades for depth.
- Nude base: One to two coats of sheer nude. Let dry fully.
- Leaf outlines: Using a thin liner brush and dark green polish, draw palm leaf shapes on each nail.
- Fill with lighter green: Using a lighter green, fill in some of the leaf areas for depth.
- Vary placement: Some nails should have more leaves than others. The inconsistency is organic.
- Seal: One thick coat of top coat to protect the art.

31 Patriotic Fourth of July Nail Ideas for 2026 🇺🇸
20.Golden Hour Glitter Palms
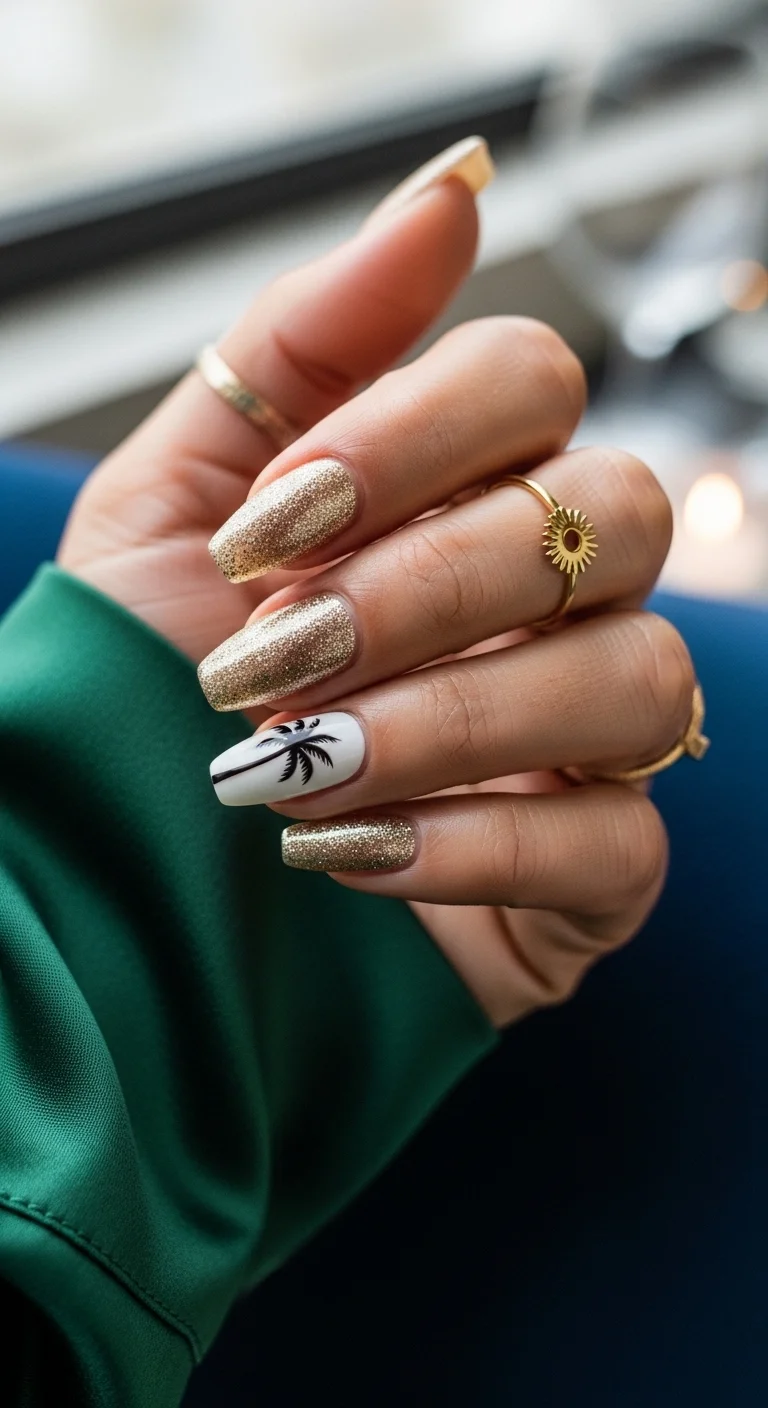
Gold glitter with a white palm accent nail.
Overview:
Gold glitter is the texture that most closely references the quality of golden hour light. The dense sparkle catches light from every angle, creating a warm, glowing effect that flat polish can't replicate. The palm tree accent ties the glitter to a specific tropical setting.
The white accent nail with the black palm tree provides a clean, high-contrast focal point that balances the busy texture of the gold glitter. Without it, the set would feel like pure sparkle with no visual anchor.
Glitter polishes are notoriously difficult to remove. The particles bond to the nail surface and resist standard acetone. Wrapping each nail in foil with acetone-soaked cotton for ten minutes is the most effective removal method.
Design Breakdown:
Full glitter with a single palm accent. The sparkle is the texture; the palm is the theme.
Base Color: Dense gold glitter on four nails. White with black palm on the ring finger.
Nail Shape: Medium coffin. The flat surface maximizes the glitter's sparkle.
Design Element: Black palm tree silhouette on the white accent nail.
Finish: High-gloss top coat to smooth the glitter surface and amplify the sparkle.
Get The Look at Home:
Glitter polish needs multiple coats for full, dense coverage. Thin coats build better than thick ones.
- Glitter nails: Two to three coats of gold glitter on four nails. Let each coat dry fully.
- White accent: On the ring finger, apply two coats of opaque white.
- Palm art: On the white accent, use a thin liner brush and black polish to draw a palm tree.
- Smooth the glitter: Apply an extra coat of top coat over the glitter nails to fill in the texture.
- Final seal: One thick coat of top coat over all nails.
21.Gilded Jungle Foil
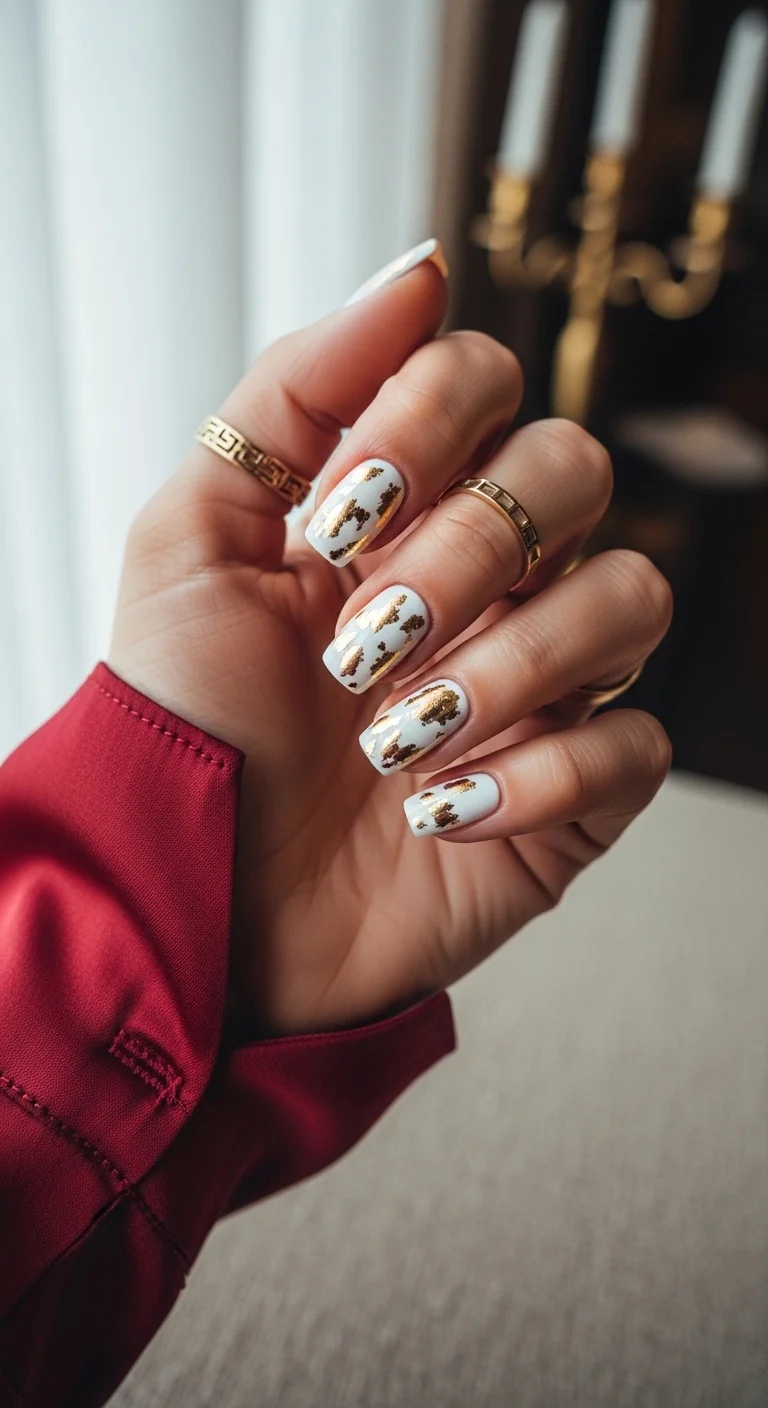
White base with gold foil accents for a luxe jungle feel.
Overview:
Gold foil on white creates a design that's more texture than pattern. The irregular shapes of the foil pieces catch light from different angles, creating a dimensional quality that flat metallic polish can't replicate. It looks like gold leaf applied to a gallery wall.
The white base provides a clean, gallery-like backdrop that lets the gold foil dominate visually. On a colored base, the foil would compete with the background. On white, it's the undeniable focal point.
The jungle reference comes through the organic, irregular shapes of the foil. They look like sunlight filtering through leaves, which connects the gold to a tropical setting without literal palm trees.
Design Breakdown:
White base with gold foil texture. The organic shapes are the design.
Base Color: Crisp, opaque white.
Nail Shape: Medium coffin. The flat surface provides a canvas for the foil.
Design Element: Irregular gold foil pieces scattered across each nail. No two nails should have the same foil placement.
Finish: High-gloss top coat to seal the foil and make the white look crisp.
Get The Look at Home:
Gold leaf or foil sheets work better than foil polish for authentic texture.
- White base: Two coats of opaque white. Let dry fully.
- Foil application: While the top coat is still tacky, press small pieces of gold foil onto the nail. Don't try to flatten them perfectly.
- Vary placement: Some nails should have more foil than others. The randomness is the design.
- Press flat: Use a silicone tool to gently press the foil edges down.
- Seal: Two coats of top coat to fully encapsulate the foil.

21 Hot Summer Buns Hairstyle Ideas for 2026 ☀️🔥
22.Double Sunset Ombre

Multi-color mix with sunset gradient and green palm accents.
Overview:
This set mixes multiple techniques on one hand: solid coral, blue-to-white gradient, solid neon coral, and a sunset gradient with palm trees. The variety is the point. It's a collection of tropical references unified by a warm color palette.
The green palm trees, rather than black, are an unusual choice that references the actual color of palm fronds. It's a more literal interpretation that works because the green harmonizes with the blue gradient on the adjacent nail.
The blue-to-white gradient adds a cool element to an otherwise warm set. Without it, the coral and sunset would feel monotonous. The blue provides the temperature contrast that keeps the design interesting.
Design Breakdown:
Multi-technique set with multiple accent types. The variety is the design.
Base Color: Coral on thumb and ring finger. Blue-to-white gradient on index. Neon coral on middle. Sunset gradient with green palms on pinky.
Nail Shape: Medium coffin. The flat surface suits the different techniques.
Design Element: Green palm tree silhouettes on the sunset gradient accent nail.
Finish: High-gloss top coat to seal everything.
Get The Look at Home:
Plan your layout before you start. Each nail needs a different approach.
- Solid nails: Two coats of coral and neon coral on designated nails. Let dry.
- Blue gradient: On one nail, sponge blue at the tip fading to white at the cuticle.
- Sunset accent: On the pinky, sponge pink, orange, and yellow for a sunset effect.
- Green palms: On the sunset nail, use a thin liner brush and green polish to draw palm trees.
- Seal: One thick coat of top coat over everything.
23.Coconut Milk Sunset
Clean white with a sunset gradient palm accent.
Overview:
White nails are the cleanest possible backdrop for a sunset accent. The solid white provides maximum contrast, which makes the gradient and palm trees on the accent nail pop from every angle.
The sunset gradient on the ring finger blends pink, blue, and coral into a tropical palette that references dusk over the ocean. The black palm silhouettes on top create the sharp contrast needed to make the gradient read as a scene rather than just colors.
White nails show every imperfection in application. Streaks, brush marks, and uneven coverage are all visible. Three thin coats with proper dry time between each produces the best result for opaque, even coverage.
Design Breakdown:
Solid white with a single sunset accent. The contrast is the design principle.
Base Color: Crisp white on four nails. Sunset gradient on the ring finger.
Nail Shape: Medium coffin. The flat surface showcases both the white and the gradient.
Design Element: Black palm tree silhouettes on the sunset accent nail. Two trees side by side.
Finish: High-gloss top coat to make the white look crisp and the gradient look seamless.
Get The Look at Home:
White needs thin, even coats for full coverage. The gradient accent is the only detail work.
- White nails: Three thin coats of opaque white on four nails. Let each coat dry fully.
- Sunset gradient: On the ring finger, sponge pink, blue, and coral for a sunset effect.
- Paint the palms: On the gradient nail, use a thin liner brush and black polish to draw two palm trees.
- Frond details: Add curved strokes for the fronds.
- Seal: One thick coat of top coat over everything.

27 Stunning Graduation Day Nail Ideas for 2026 🎓
24.Neon Horizon Ombre
Neon rainbow gradients with black palm accents.
Overview:
Every nail gets a different neon gradient, creating a sunset effect that changes from finger to finger. The gradients transition through warm and cool tones: orange-to-pink, purple-to-orange, blue-to-yellow, pink-to-orange. The variety is what makes the hand look like a continuous color story.
The palm trees appear on the two nails with the most vibrant gradients, which creates focal points within the already-bright set. The black silhouettes provide the contrast needed to make the neon colors appear even more saturated.
Neon gradients require patience. The colors are sheer, which means you need multiple sponge passes to build opacity. Three to four layers per nail is normal.
Design Breakdown:
Multi-gradient set with palm accents on the brightest nails. The gradient variety is the design.
Base Color: Different neon gradients on each nail. Orange-pink, purple-orange, blue-yellow, pink-orange.
Nail Shape: Medium-long almond. The curved shape complements the gradient flow.
Design Element: Black palm tree silhouettes on two accent nails.
Finish: High-gloss top coat to make the neons glow.
Get The Look at Home:
Sponge each gradient individually. Build opacity in multiple thin layers.
- Gradient nails: On each nail, sponge the appropriate neon color combination. Two to four passes per nail.
- Build opacity: Let each sponged layer dry before the next. The colors should be fully saturated.
- Paint the palms: On two accent nails, use a thin liner brush and black polish to draw palm tree silhouettes.
- Frond details: Add curved strokes for the fronds. Vary the tree sizes.
- Seal: One thick coat of top coat over everything.
25.Emerald Chrome Frond
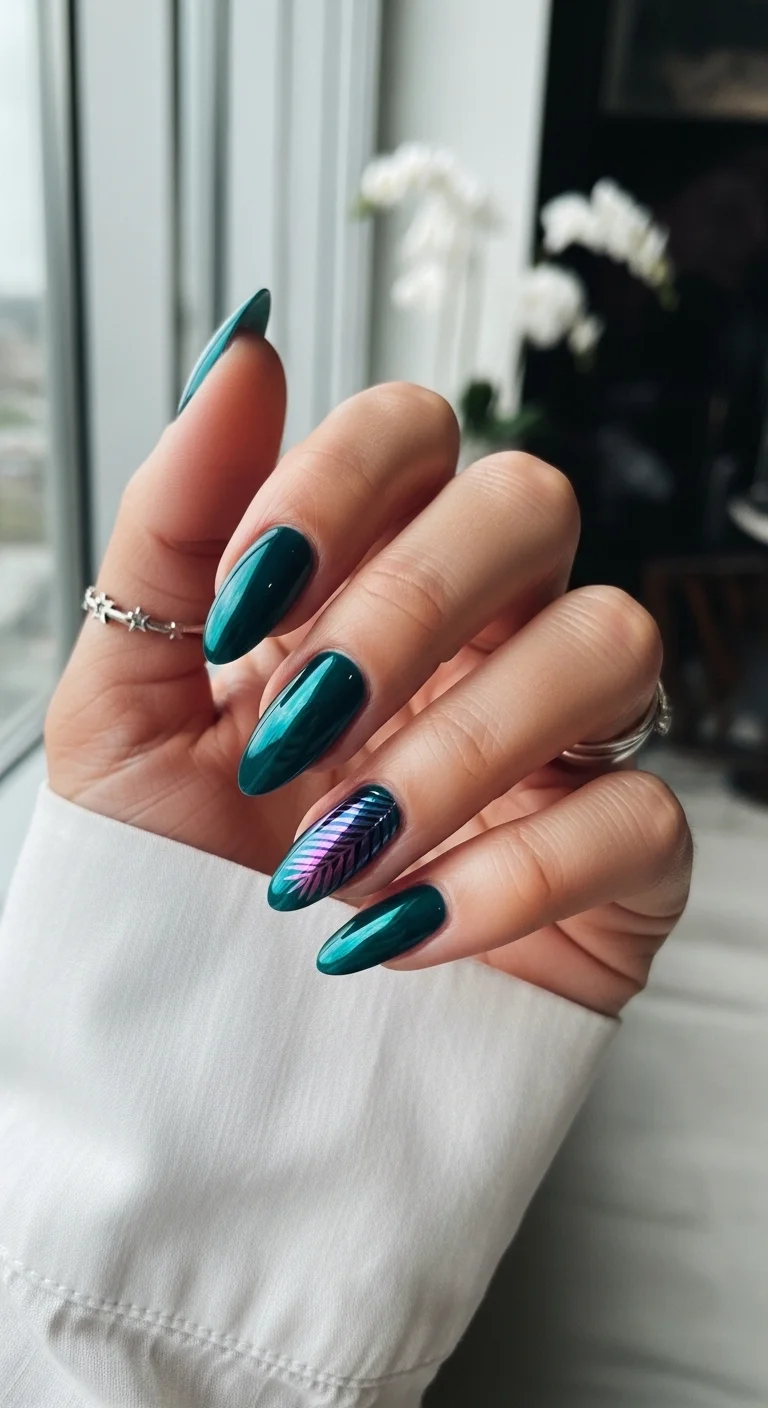
Emerald chrome with an iridescent palm frond accent.
Overview:
Emerald green chrome is a rich, jewel-toned metallic that references the deep green of tropical foliage. The mirror-like finish catches light from every angle, creating a dimensional quality that flat green polish can't achieve.
The iridescent palm frond on the ring finger is the design's twist. Instead of a black silhouette, the frond is rendered in shifting metallic colors that change depending on the angle. It's a palm tree made of light rather than ink.
Chrome powder requires a no-wipe gel top coat as the base layer. Regular polish won't give the powder anything to adhere to. If you're working with regular polish, a metallic emerald like Essie "Off Tropic" with a shimmer topper produces a similar effect.
Design Breakdown:
Full chrome with a single metallic art accent. The emerald base is the design foundation.
Base Color: Emerald green chrome on four nails. Iridescent metallic on the ring finger accent.
Nail Shape: Medium-long almond. The curved shape enhances the reflective quality of the chrome.
Design Element: Iridescent palm frond art on the ring finger accent nail.
Finish: Mirror-chrome on the emerald nails; metallic iridescent on the accent.
Get The Look at Home:
Chrome powder requires specific products. Budget extra time for the preparation steps.
- Emerald nails: Apply dark green base, then no-wipe gel top coat. Cure. Rub emerald chrome powder until mirror-smooth.
- Accent nail: On the ring finger, apply a metallic or iridescent base color.
- Palm frond: Using a thin liner brush and contrasting metallic polish, draw a palm frond shape on the accent nail.
- Dust off: Remove excess chrome powder from all nails.
- Final seal: Apply glossy top coat, capping the chrome edges.
28 Effortless Hot Weather Day Hairstyles for Women 2026 ☀️💇♀️
26.Ocean Ripple Sunset Mix
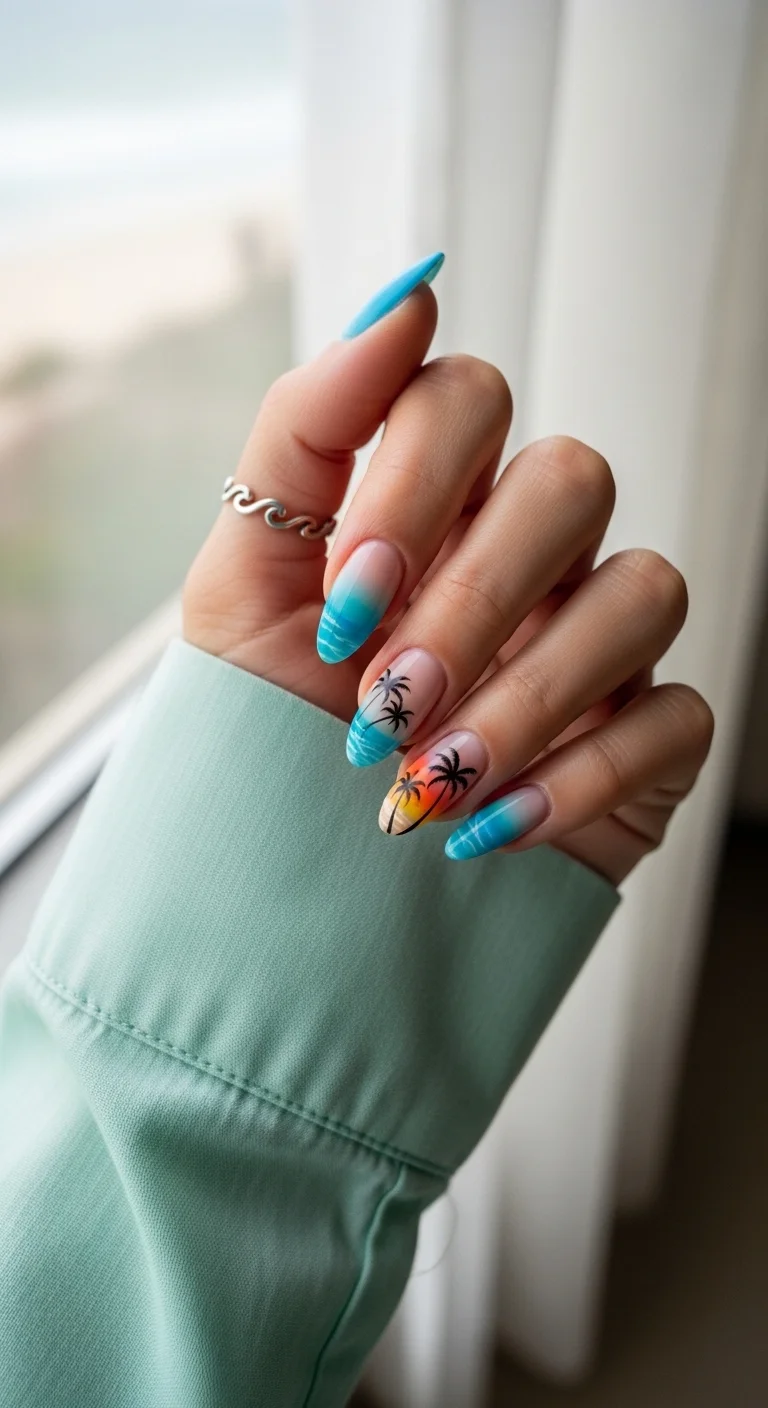
Teal, ocean gradients, and sunset palm mix.
Overview:
This set references the ocean through multiple visual languages: solid teal for deep water, blue-to-nude gradient with wave patterns for the shoreline, and a sunset gradient with palm trees for the horizon. Each nail tells a different part of the same story.
The wave patterns on the gradient nails add a textural element that flat gradients don't have. The curved white lines suggest water movement, which reinforces the ocean theme without being literal about it.
The sunset accent on the ring finger is the focal point. It combines the warmest colors in the set with the most detailed art, creating a natural resting place for the eye.
Design Breakdown:
Multi-technique ocean-themed set. Each nail references a different aspect of the sea.
Base Color: Solid teal on thumb and pinky. Blue-to-nude gradient with waves on index and middle. Sunset gradient on ring finger.
Nail Shape: Medium-long almond. The curved shape suits the organic wave and palm shapes.
Design Element: White wave lines on the gradient nails. Black palm trees on the sunset accent.
Finish: High-gloss top coat to make the ocean colors look deep and saturated.
Get The Look at Home:
Each nail needs a different technique. Plan your approach before you start painting.
- Solid teal: Two coats on two nails. Let dry.
- Blue gradient: On two nails, sponge blue at the tips fading to nude. Add white wave lines with a thin brush.
- Sunset accent: On the ring finger, sponge pink, orange, and yellow for a sunset effect.
- Paint the palms: On the sunset nail, use a thin liner brush and black polish to draw palm trees.
- Seal: One thick coat of top coat over everything.
27.Matte White Minimalist Palms
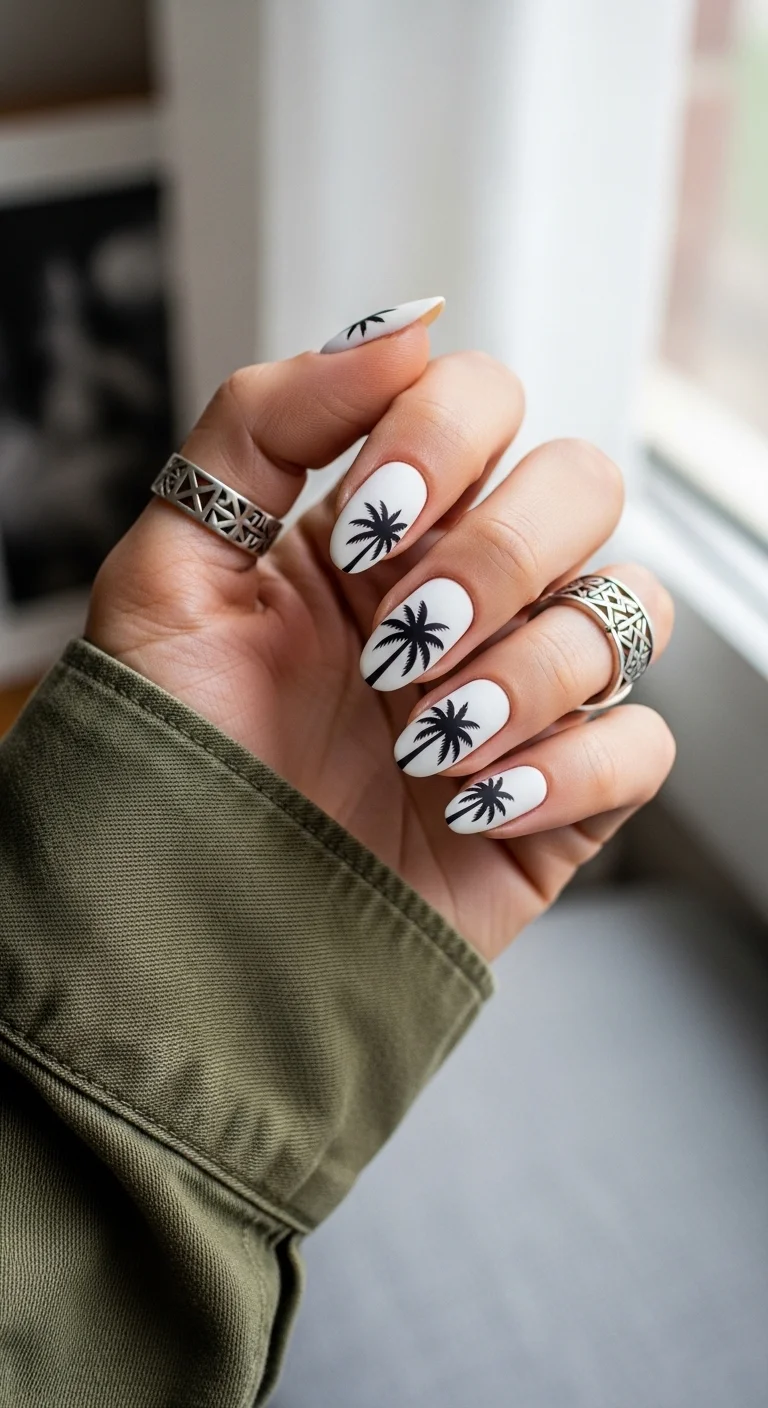
White base with black palm trees on every nail.
Overview:
White with black palm trees is the most literal interpretation of tropical nails. Every nail carries the same design, which creates a uniform, graphic quality that's bold without being colorful.
The simplicity of two colors, white and black, keeps the design clean and modern despite covering every nail in art. More colors would make it busy. Fewer colors would make it stark. The two-color palette is the sweet spot.
The palm trees vary slightly in size and position from nail to nail, which prevents the pattern from looking stamped or manufactured. The inconsistency is what makes each nail feel like an individual composition.
Design Breakdown:
Two-color palm art on every nail. The graphic simplicity is the design.
Base Color: Crisp, opaque white.
Nail Shape: Medium almond. The curved shape softens the graphic black-and-white contrast.
Design Element: Black palm tree silhouettes on every nail. Each tree varies slightly in size and position.
Finish: High-gloss top coat to make the white look crisp and the black look deep.
Get The Look at Home:
A nail art pen gives the most consistent line weight for the palm silhouettes.
- White base: Two to three coats of opaque white. Let dry fully.
- Palm art: Using a thin liner brush and black polish, draw a palm tree on each nail.
- Vary placement: Position the palms at different heights and angles on each nail.
- Frond details: Add curved strokes for the fronds. Keep the silhouettes simple.
- Seal: One thick coat of top coat over everything.

28 Trendy May Nail Designs for 2026 💅
28.Neon Lime Magenta Tropics
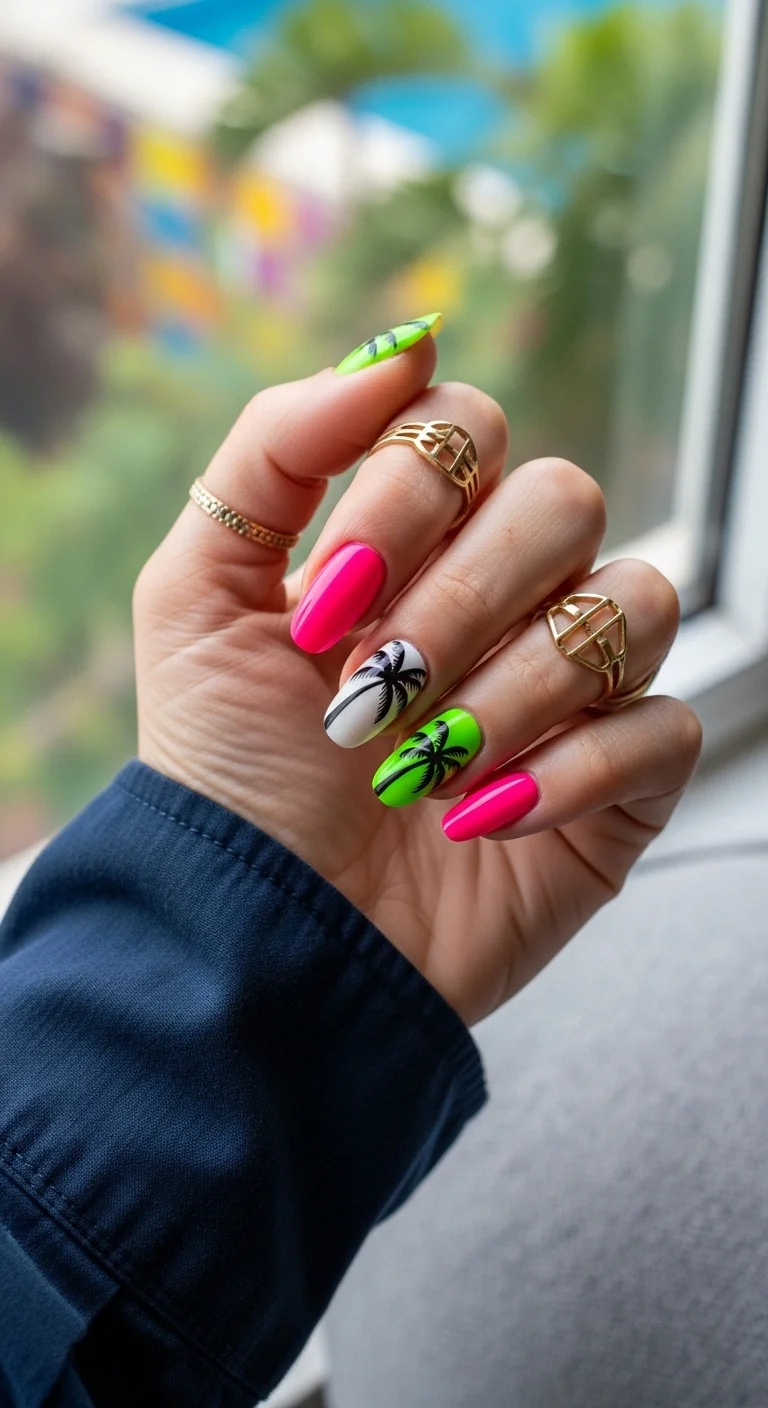
Neon lime and magenta with palm accent nails.
Overview:
Neon lime and neon magenta are two of the most high-visibility colors available. Together, they create a set that demands attention from every angle. Adding palm trees on accent nails ties the neon intensity to a specific tropical theme.
The palm trees appear on two different accent nails, one white and one green, which creates variety within the theme. The white accent provides maximum contrast for the black palms; the green accent creates a tonal connection to the lime nails.
Neon polishes dry matte, which means they need a glossy top coat to reach their full intensity. Without the top coat, the colors look flat and chalky. With it, they glow.
Design Breakdown:
Two-color neon solid with palm accent nails. The high- visibility colors are the design.
Base Color: Neon lime on two nails, neon magenta on two nails, white with palm on one, green with palm on one.
Nail Shape: Medium-long almond. The curved shape suits the organic palm shapes.
Design Element: Black palm tree silhouettes on both accent nails.
Finish: High-gloss top coat to make the neons look electric.
Get The Look at Home:
Paint the solid neon nails first, then the accent nails with palm art.
- Neon nails: Two coats of neon lime on two nails, neon magenta on two nails. Let dry fully.
- Accent bases: White on one nail, green on another.
- Palm art: On both accent nails, use a thin liner brush and black polish to draw palm trees.
- Frond details: Add curved strokes for the fronds.
- Seal: One thick coat of top coat over everything.
29.Nude to Teal Island Sunset
Nude and teal with a gradient palm accent featuring white trees.
Overview:
White palm trees on a teal-to-coral gradient are the reverse of the typical black-on-sunset approach. The white silhouettes against the gradient create a cleaner, more modern aesthetic that references ocean foam rather than ink.
The nude nails provide warmth and softness, while the teal nails add depth and coolness. The gradient accent combines both temperatures into a single composition. The white palms on top tie the gradient to a tropical setting.
The white palm trees need to be opaque enough to read against the gradient. Two coats of a pigment-dense white like OPI "Alpine Snow" ensures the silhouettes are crisp and visible.
Design Breakdown:
Nude and teal solids with a gradient palm accent. The white palms create a modern, clean look.
Base Color: Nude on two nails, teal on one, gradient on one.
Nail Shape: Medium coffin. The flat surface showcases the different colors.
Design Element: White palm tree silhouettes on the gradient accent nail.
Finish: High-gloss top coat to seal everything.
Get The Look at Home:
The gradient accent is the focal point. The solid nails are straightforward.
- Solid nails: Two coats of nude on two nails, teal on one. Let dry fully.
- Gradient accent: On the ring finger, sponge teal at the tip fading to coral at the cuticle.
- White palms: Using a thin liner brush and white polish, draw palm trees on the gradient accent. Two coats for opacity.
- Seal: One thick coat of top coat over everything.
28 Stunning Softball Hairstyle Ideas with Braids for 2026 🥎✨
30.Tropical Baby Blue Dream
Baby blue with white palm trees on every nail.
Overview:
White palm trees on baby blue create a design that's both tropical and serene. The soft blue reads as sky or shallow water, while the white palms add the botanical reference. The combination is clean and airy without being loud.
Covering every nail with the same design commits fully to the theme. There's no accent nail, no variation. Just white palms on blue from cuticle to tip on every finger. The uniformity is what makes it feel graphic and intentional.
The baby blue is a cool-toned pastel that works across skin tones. It's not so pale that it washes out, and not so saturated that it clashes with the white palms. The balance is what makes the design wearable.
Design Breakdown:
Two-color palm art on every nail. The clean palette is the design.
Base Color: Soft, opaque baby blue.
Nail Shape: Medium coffin. The flat surface provides a canvas for the palm art.
Design Element: White palm tree silhouettes on every nail. Each tree varies slightly in size.
Finish: High-gloss top coat to make the blue look creamy and the white look crisp.
Get The Look at Home:
White over blue needs two coats for opacity. Don't rush the palm art.
- Blue base: Two to three coats of baby blue. Let dry fully.
- White palms: Using a thin liner brush and white polish, draw palm trees on each nail. Two coats of white for opacity.
- Vary placement: Position the palms at different heights on each nail.
- Frond details: Add curved strokes for the fronds.
- Seal: One thick coat of top coat over everything.
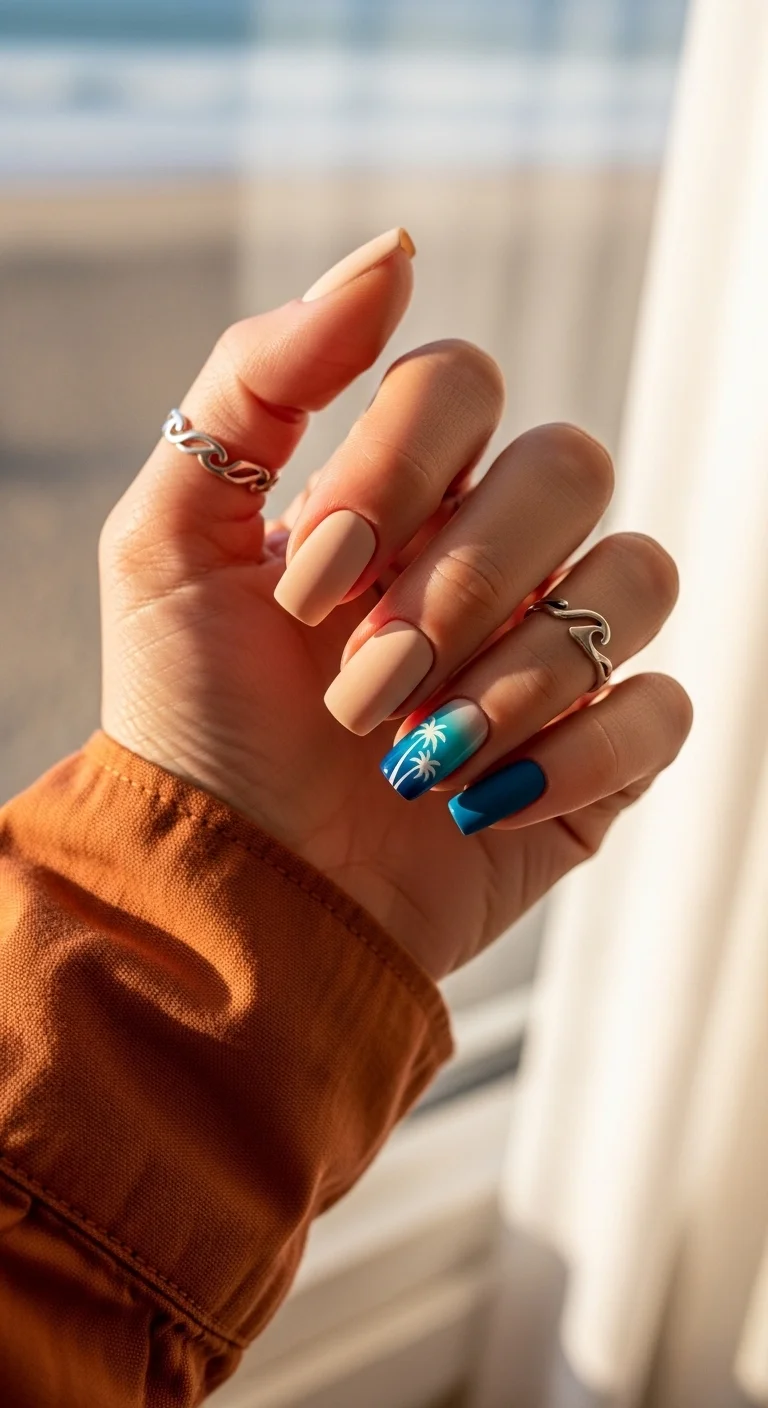
31.Midnight Beach Sunset
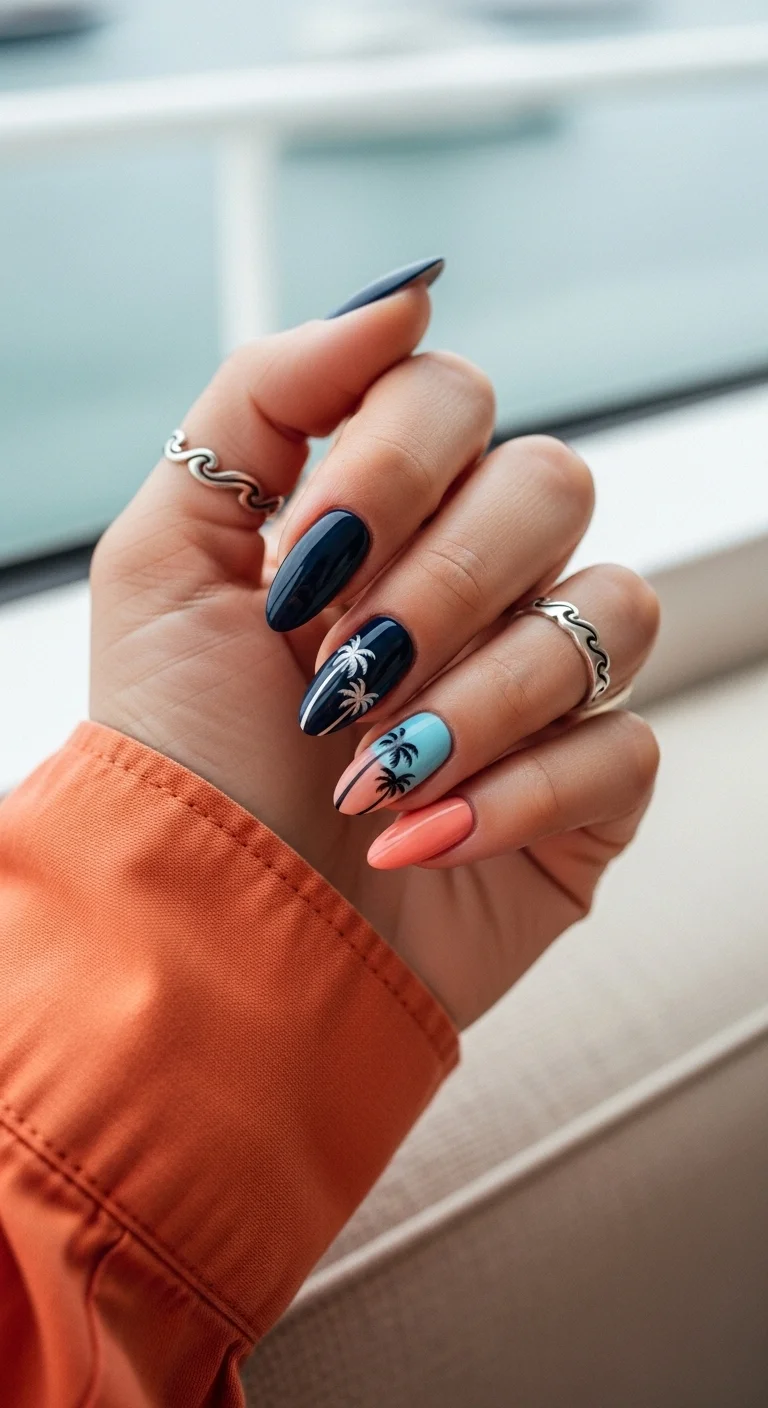
Dark navy and coral with a sunset palm accent.
Overview:
Dark navy and coral is a high-contrast pairing that references night falling over a tropical beach. The navy represents the darkening sky; the coral represents the last traces of sunset. The gradient accent with palm trees ties the two into a cohesive narrative.
The navy nails dominate the set, appearing on three of five fingers. That darkness makes the coral accent and the sunset gradient feel like bright spots in a dark landscape. The contrast is what makes the design dramatic.
The gradient on the ring finger blends the navy into coral through a sunset transition, which creates a visual bridge between the two solid colors. The palm trees on top complete the scene.
Design Breakdown:
Dark solids with a sunset accent. The navy-to-coral transition is the design.
Base Color: Dark navy on three nails, coral on one, sunset gradient with palms on the ring finger.
Nail Shape: Medium almond. The curved shape complements the organic sunset.
Design Element: Black palm tree silhouettes on the sunset gradient accent nail.
Finish: High-gloss top coat to make the navy look deep and the coral look bright.
Get The Look at Home:
The dark navy needs full opacity. The sunset accent is the detail work.
- Navy nails: Two to three coats of dark navy on three nails. Let dry fully.
- Coral nail: Two coats of coral on one nail.
- Sunset accent: On the ring finger, sponge navy blending into coral for a sunset transition.
- Paint the palms: On the gradient nail, use a thin liner brush and black polish to draw palm trees.
- Seal: One thick coat of top coat over everything.

29 Trendy Pink Summer Nails for 2026 💅
32.Peach Fizz Sunset Palms

Peach-to-white gradient with a sunset palm accent.
Overview:
The peach-to-white gradient on most nails creates a soft, diffused quality that looks like a faded photograph. The sunset accent on the ring finger intensifies the colors, creating a focal point that draws the eye.
The gradient is subtle enough that it reads as a single color from a distance. Up close, the transition from peach at the tips to white at the cuticle becomes visible, revealing the design's complexity. That dual reading makes the set interesting at every scale.
The sunset accent on the ring finger uses the same warm palette as the gradient but with more saturation and detail. The palm trees on top complete the tropical reference.
Design Breakdown:
Gradient nails with a single sunset accent. The soft transition is the design.
Base Color: Peach-to-white gradient on four nails. Sunset gradient with palms on the ring finger.
Nail Shape: Medium-long coffin. The flat surface showcases the gradient.
Design Element: Black palm tree silhouettes on the sunset accent nail. Two trees side by side.
Finish: High-gloss top coat to make the gradient look seamless.
Get The Look at Home:
The gradient nails need sponge work. The accent nail is the only detail work.
- Gradient nails: On four nails, sponge peach at the tips fading to white at the cuticle. Two to three passes.
- Sunset accent: On the ring finger, sponge a more saturated sunset gradient with pink, orange, and yellow.
- Paint the palms: On the sunset nail, use a thin liner brush and black polish to draw two palm trees.
- Frond details: Add curved strokes for the fronds.
- Seal: One thick coat of top coat over everything.
33.Matte Seafoam Palm Grove
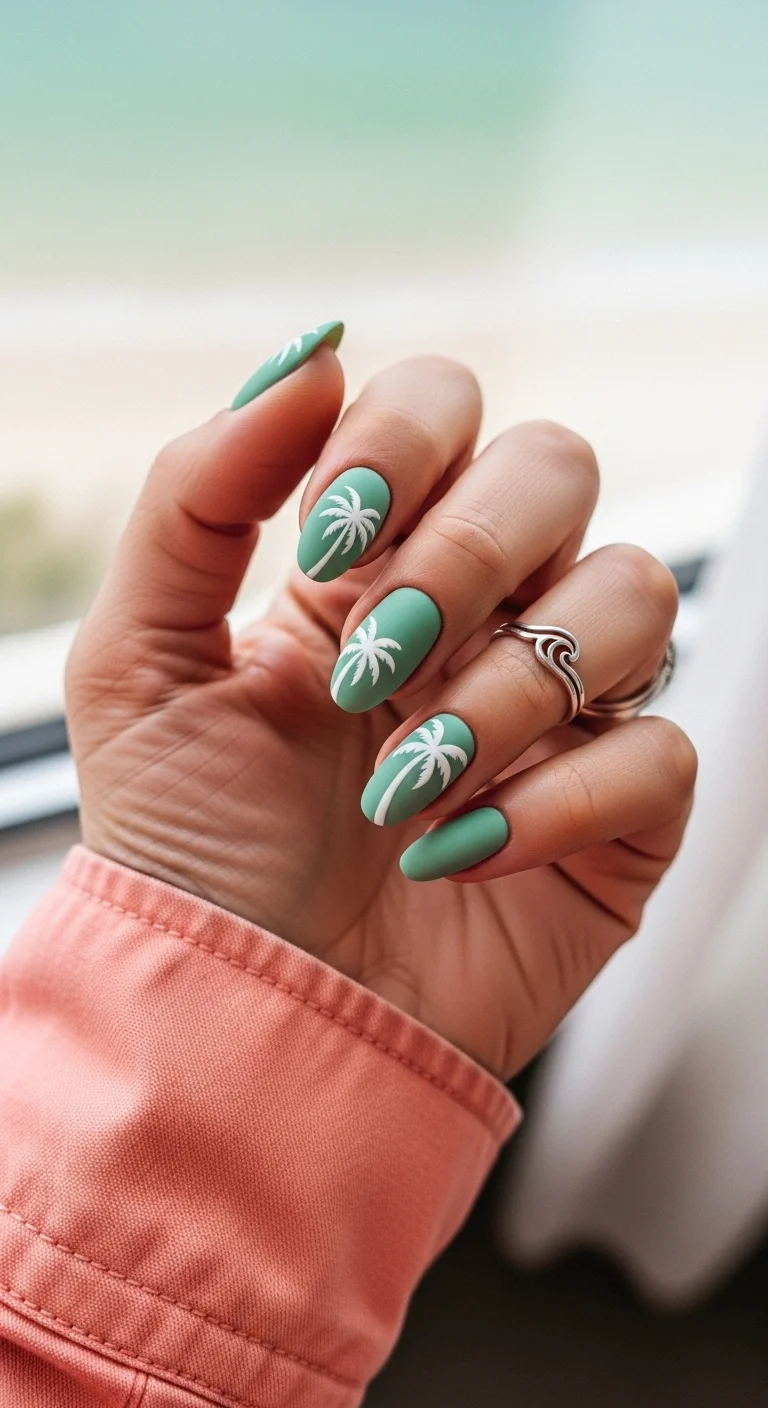
Matte seafoam with white palm trees on every nail.
Overview:
White palm trees on matte seafoam create a design that's both tropical and understated. The matte finish drains the shine and leaves behind a velvety, almost ceramic quality that feels more editorial than playful.
The white palms against the matte green create a soft contrast that's less stark than black on green. The result is a design that reads as botanical illustration rather than graphic art. It's a palm tree set for someone who prefers watercolors over ink.
Matte top coats need a flawless base application. Every brush stroke and imperfection is amplified under a flat finish. Three thin coats with proper dry time between each produces the best result.
Design Breakdown:
Matte color with white palm art on every nail. The soft contrast is the design principle.
Base Color: Matte seafoam green.
Nail Shape: Medium almond. The curved shape complements the organic palm shapes.
Design Element: White palm tree silhouettes on every nail. Each tree varies slightly in size.
Finish: Matte top coat over everything.
Get The Look at Home:
White over matte green needs careful application. The matte finish amplifies any inconsistency.
- Green base: Three thin coats of seafoam green. Let each coat dry fully.
- White palms: Using a thin liner brush and white polish, draw palm trees on each nail. Two coats of white for opacity.
- Matte seal: Apply matte top coat over everything. One confident stroke per nail.
- Cleanup: Clean the edges carefully. Matte against skin is highly visible.
34.Neon Sunset Gradient Palms
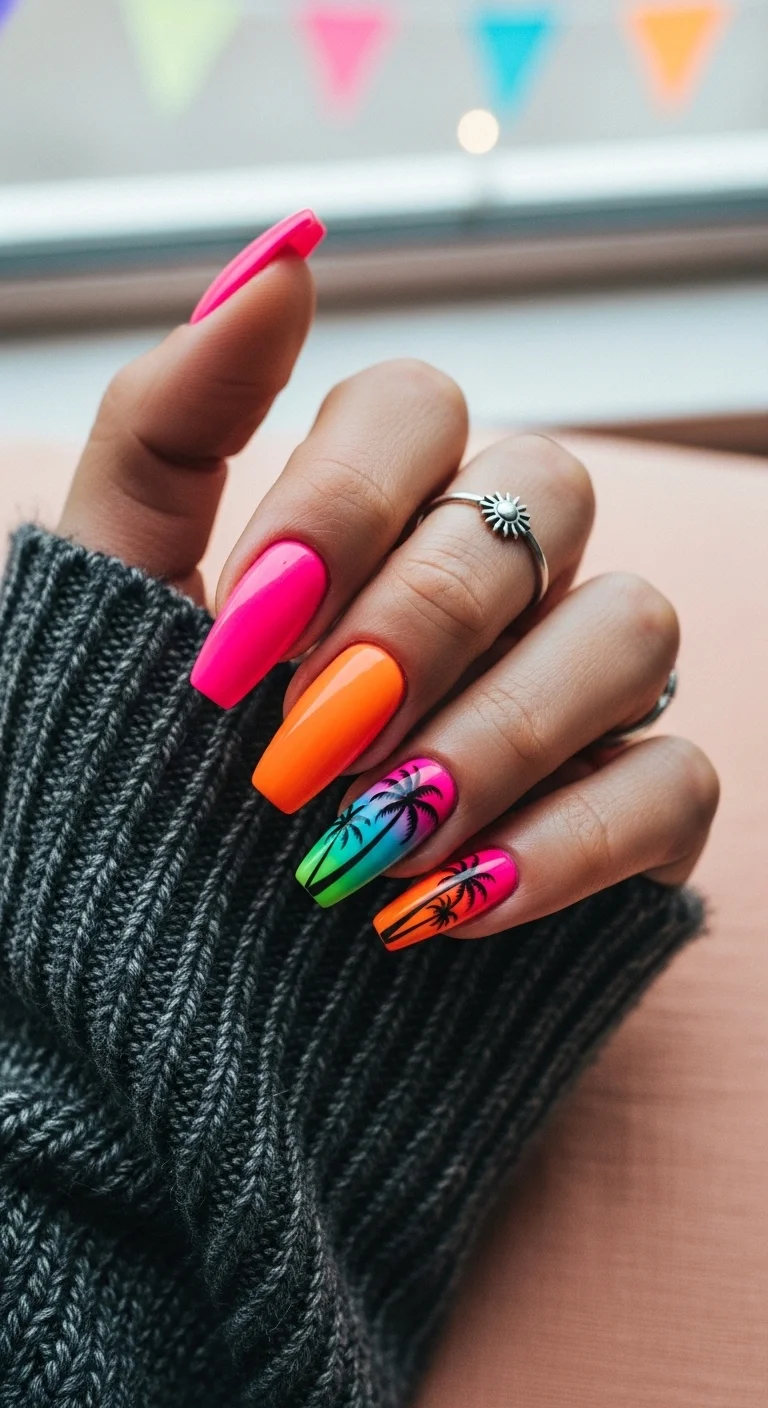
Neon pink and orange with sunset gradient palm accents.
Overview:
Neon pink and orange are two of the warmest, most high-energy colors in the neon spectrum. Combining them with sunset gradients and palm trees creates a set that's unapologetically tropical and celebratory.
The solid neon nails establish the color story, while the gradient accents add depth and detail. The palm trees on the gradients complete the tropical reference, turning abstract color into a specific scene.
The gradient technique blends the two neon colors into each other, creating a transition zone that's more interesting than either color alone. That transition is where the magic happens.
Design Breakdown:
Neon solids with sunset gradient palm accents. The warm palette is the design.
Base Color: Neon pink on two nails, neon orange on one, sunset gradient on two accent nails.
Nail Shape: Medium coffin. The flat surface showcases the neons.
Design Element: Black palm tree silhouettes on both gradient accent nails.
Finish: High-gloss top coat to make the neons look electric.
Get The Look at Home:
Neon gradients need multiple sponge passes for full opacity. Be patient.
- Neon nails: Two to three coats of neon pink on two nails, neon orange on one. Let dry fully.
- Gradient accents: On two nails, sponge pink and orange together for a sunset blend.
- Paint the palms: On the gradient nails, use a thin liner brush and black polish to draw palm trees.
- Frond details: Add curved strokes for the fronds. Vary the tree sizes.
- Seal: One thick coat of top coat over everything.
35.Sand Textured Palms
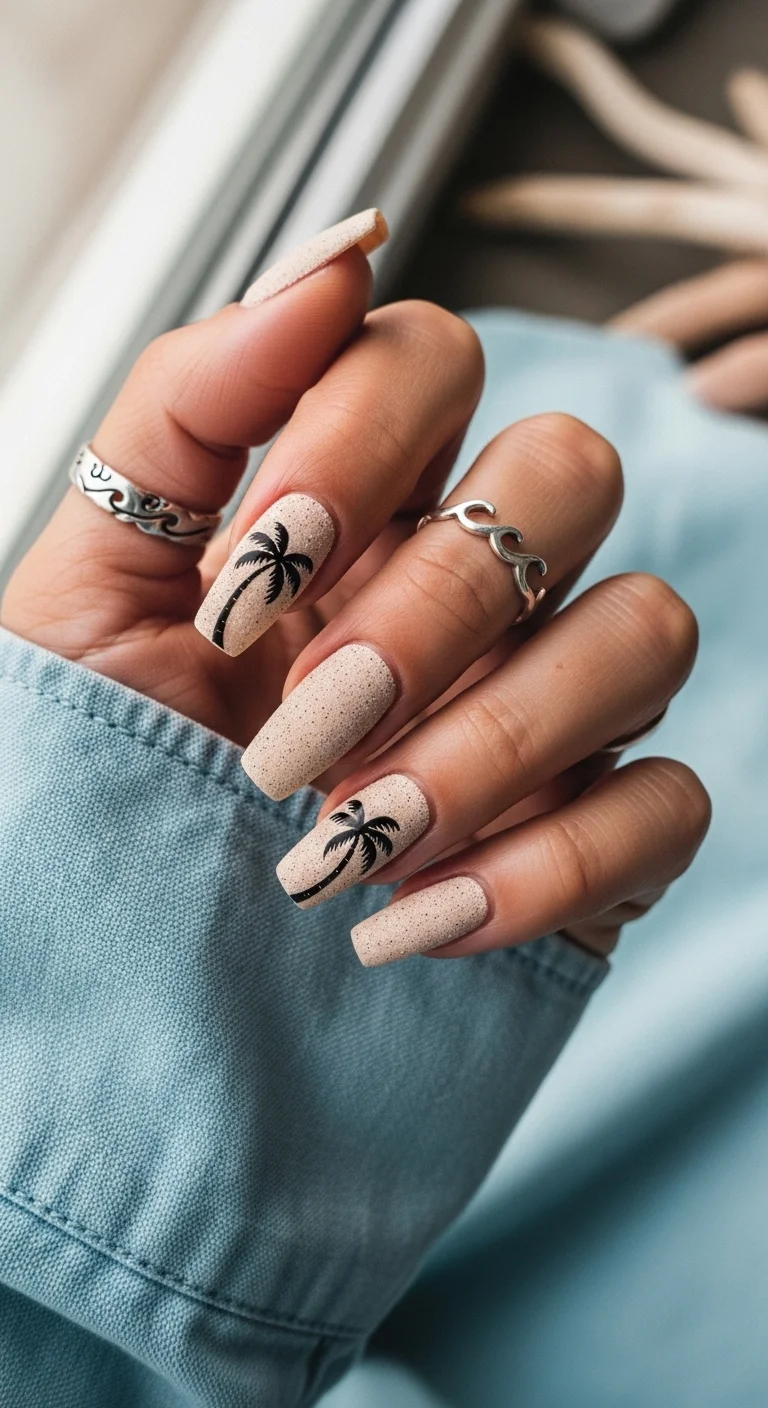
Sand-speckled nude with black palm tree accents.
Overview:
The sand-textured base creates a design that references the beach through texture rather than color. The speckled pattern looks like actual sand, which gives the palm trees a natural context without literal ocean or sunset imagery.
The speckles are irregular in size and spacing, which is what makes them look like sand rather than polka dots. The randomness is the design. Two accent nails with palm trees provide the tropical reference that ties the texture to a specific setting.
The sand nude base is warm enough to reference beach sand but neutral enough to work in non-beach contexts. It's a wearable neutral with a textural twist.
Design Breakdown:
Textured neutral with palm accents. The sand texture is the design foundation.
Base Color: Sand-speckled nude on all nails.
Nail Shape: Medium coffin. The flat surface showcases the speckled texture.
Design Element: Black palm tree silhouettes on two accent nails.
Finish: High-gloss top coat to seal the texture and make the speckles visible.
Get The Look at Home:
The sand texture requires either a specialty polish or a DIY speckling technique.
- Sand base: Apply two coats of sand-speckled nude polish. If DIY speckling, apply nude base, then flick thinned brown polish with a toothbrush.
- Let dry: The speckled base needs to be fully dry before adding palm art.
- Palm art: On two accent nails, use a thin liner brush and black polish to draw palm trees.
- Frond details: Add curved strokes for the fronds.
- Seal: One thick coat of top coat to smooth the texture and protect the art.
Why Palm Tree Nails Are About Texture Now
What is making palm tree nails feel current right now goes beyond the silhouette itself. The bigger trend driving the category is a move toward textured, tactile finishes. 3D gel palm fronds, chrome accents, water droplet effects, and dimensional details that catch light differently at every angle. Flat illustration is giving way to manicures that feel as interesting as they look.
The most common technical mistake is painting thick, blocky silhouettes that read as stickers rather than hand-painted art. The fix is thin, delicate line work using a fine liner brush with light, flowing strokes. The palm frond should look like it is bending in a breeze, not cut from construction paper. If the line weight varies slightly along the stroke, that is a feature, not a flaw. It mimics how real palm leaves taper at the tips.
Palm trees pair naturally with chrome accents and gold foil details because the metallic finish contrasts with the organic shape of the fronds. A single chrome accent nail in a warm gold or rose tone against a matte palm tree set creates the kind of texture push-pull that makes a manicure look curated rather than slapped together.
These stunning palm tree designs are sure to provide all the tropical inspiration needed for the next salon visit. Honestly, choosing just one is the hardest part, but you seriously can’t go wrong with any of these island-inspired looks.
Don't forget to pin your favorites to your summer aesthetic boards so you have them ready to show a nail tech! Pinning early is a great way to save ideas before heading to the salon.