Hair Trends
31 Chic & Easy Summer Hairstyles for Women Over 40
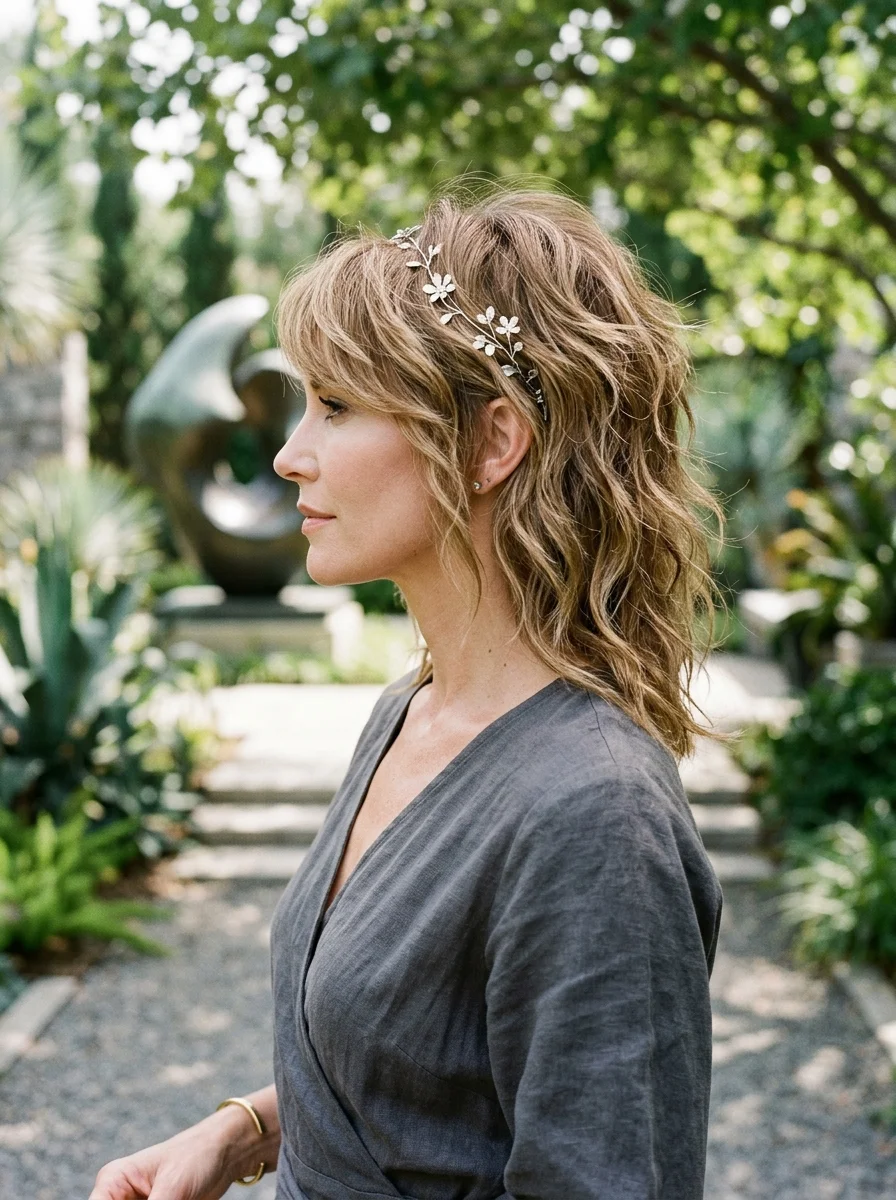
Summer heat doesn't care about your plans — it will frizz your blowout, flatten your volume, and make you regret wearing your hair down by noon. The hairstyles in this guide are built for that reality. Each one addresses the specific problems summer creates for women over 40: hair that thins with age, texture that changes through menopause, and the need for styles that survive humidity without requiring a salon visit every week.
These styles are curated from real summer settings — outdoor weddings, vacation dinners, poolside brunches, and everyday errands in 90-degree heat. Every style here is tested against sweat, wind, and the kind of busy schedule that doesn't leave time for a second-day blowout. Find the one that matches your hair type, your lifestyle, and how much effort you actually want to put in on a Tuesday morning.
The Three-Minute Morning Rule
Summer mornings are short, and heat plus humidity means less patience for long styling routines. The biggest shift in 2026 is cuts designed to look great air-dried — no blow dryer, no curling iron, just wash and go. Before you book your next cut, ask your stylist: if I wash this and let it air-dry with just my fingers, will it still look intentional? If the answer is not a confident yes, keep looking.
The cuts passing this test right now include the Italian bob — chin-to-neck length with chunky textured ends that bounce naturally. The soft shag with curtain bangs, where layers do the work and texture equals volume without effort. And the layered lob at collarbone length, long enough to tuck behind ears but short enough to dry fast. You do not need ten products for any of these. A lightweight leave-in conditioner applied to damp hair, followed by a texturizing spray scrunched in, is enough to make your hair look healthy and styled.
The reality check? If your cut requires heat to work, it is not the right cut for your summer life.
The Three-Shade Color Rule
Salon visits add up, and summer sun fades color fast. The 2026 fix is color that looks better as it grows out — not worse. When adding dimension, keep the difference between your base color and highlights within three shades. This creates soft, natural-looking dimension with no harsh root line panic, and it complements gray blending beautifully if you are embracing your silver.
Ask your colorist about demi-permanent gloss treatments instead of full permanent color for summer. They are gentler on mature hair, add shine and subtle tone refresh without commitment, and fade gracefully over four to six weeks. If you are going gray or already there, ask for soft balayage or lived-in highlights around your face. This brightens your complexion, makes gray hairs look like a deliberate style choice, and pairs perfectly with the air-dried cuts that are trending.
The rule? Your color should work with your life, not against it. If you are scheduling touch-ups every three weeks, it is time to simplify.
1.Softly Layered Mid-Length Cut with Face-Framing Layers
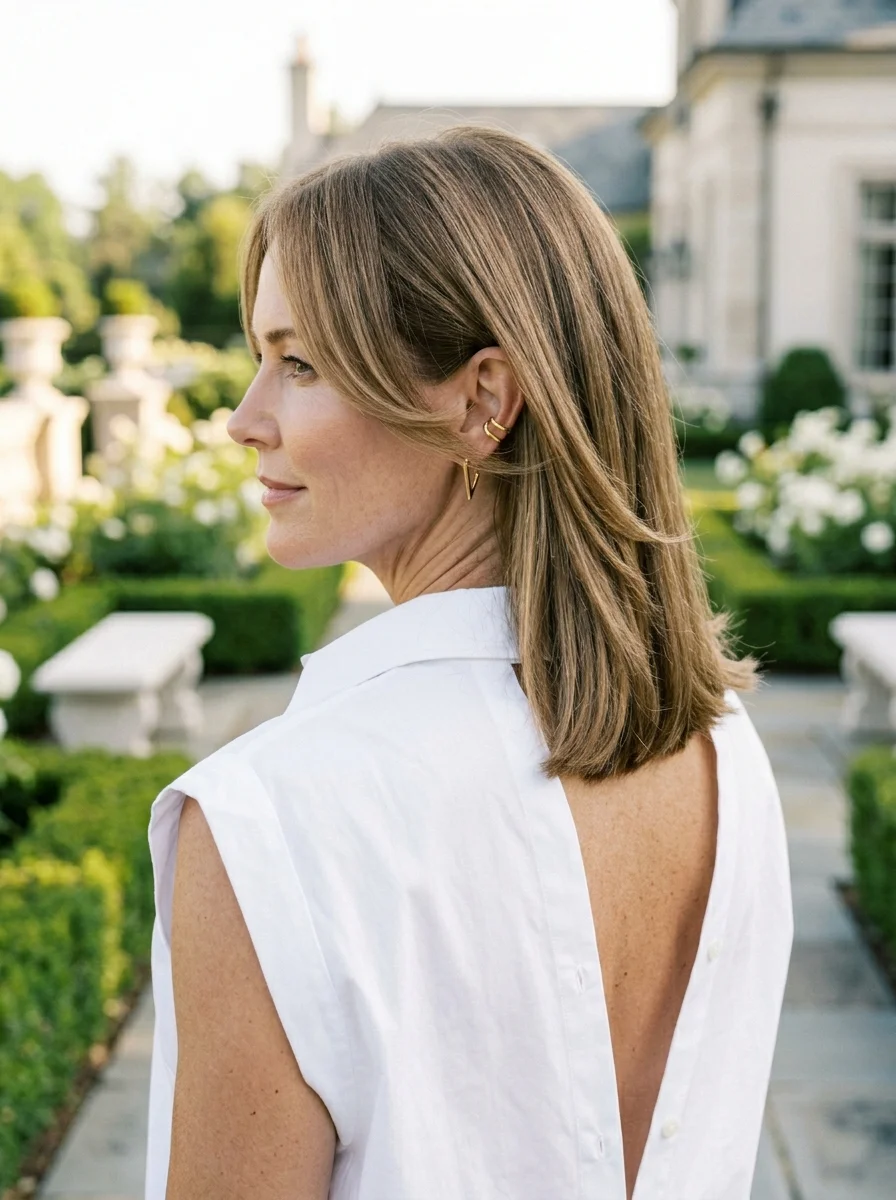
The overview: This is the haircut equivalent of a reliable linen dress — it works across occasions, flatters most face shapes, and gets better with age. The mid-length hitting right at the collarbone gives you enough hair to feel feminine without the weight that makes summer miserable. The face-framing layers start at the cheekbone and sweep away from the face, which is a detail that matters more than most people realize: those pieces are what soften jawlines and draw attention to eyes instead of nasolabial folds.
Why this look is popular: The soft layering creates movement without looking "done," which is exactly what women over 40 gravitate toward. It's polished enough for a wedding but casual enough for a farmers market. The face-framing pieces do the heavy lifting — they contour the face without makeup.
Where this look is suitable: Everywhere. This is one of the most versatile cuts on the list. It works for brunch, office settings, outdoor events, and vacation dinners. The collarbone length also means you can pull it into a ponytail on the hottest days without losing the shape.
Step by step:
- Prep damp hair. Apply a smoothing cream or heat protectant from roots to ends. This gives the hair slip and protects it from blow-dryer damage.
- Blow-dry with a round brush. Lift at the roots for volume, then roll the ends under gently as you pull the brush through. Pay extra attention to the face-framing pieces — use the brush to direct them away from your face.
- Add a gentle wave if needed. If your hair doesn't hold a bend naturally, use a large barrel curling iron on the mid-lengths and ends. Wrap sections around the barrel, hold for a few seconds, then let cool completely before touching.
- Break up the waves. Once cool, shake out the curls with your fingers. Use your hands to separate the layers and enhance the movement.
- Set lightly. A light-hold hairspray keeps everything in place without stiffness. A small amount of shine serum on the ends adds gloss.
Tips and tricks: Ask your stylist to cut this when your hair is dry, or at least do a dry-cut check. Wet hair stretches, and layers that look perfect in the salon can end up shorter than expected once they dry. Regular trims every 6-8 weeks keep the face-framing pieces sharp. For wavy or curly hair, this cut works beautifully when air-dried — the layers prevent the "triangle" shape.
28 Effortless Hot Weather Day Hairstyles for Women 2026 ☀️💇♀️
2.Effortless Beachy Updo with Claw Clip
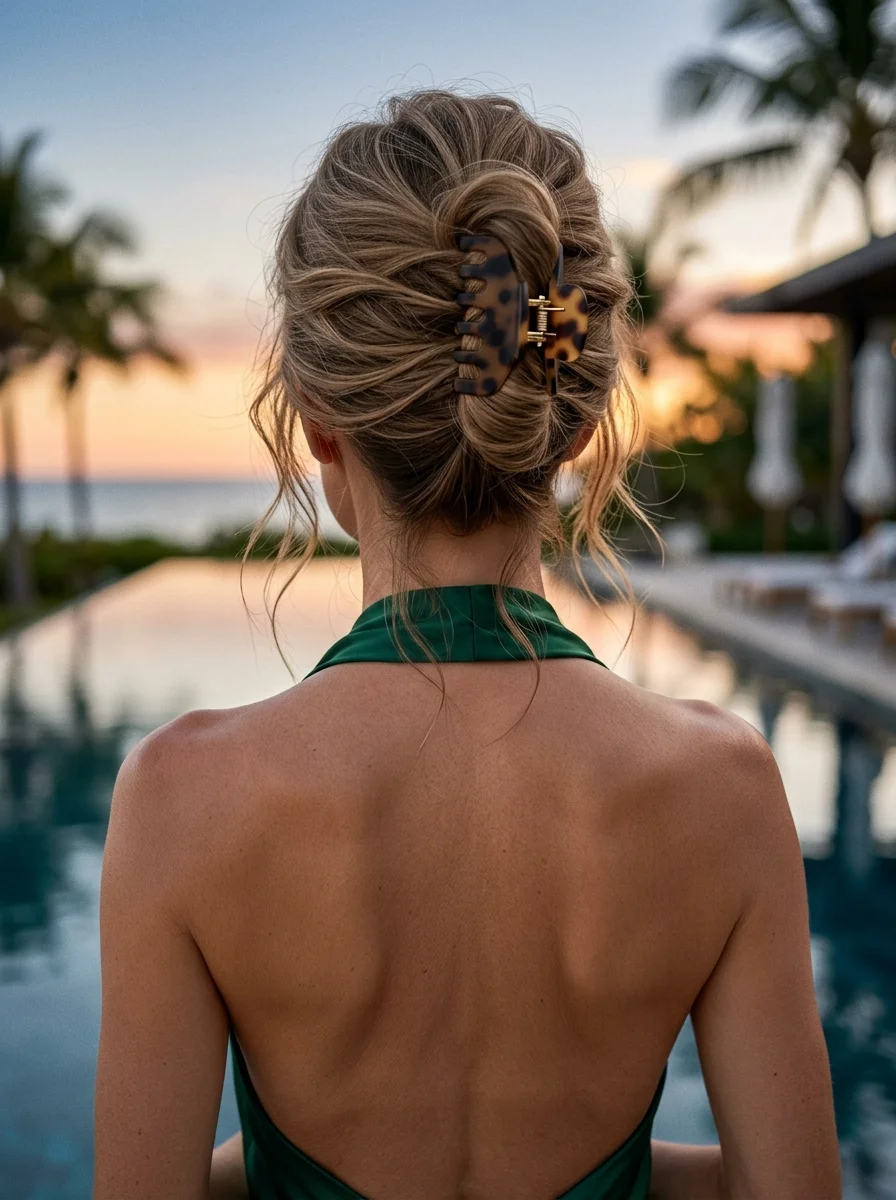
The overview: The claw clip updo solved a problem that elastic bands never could: getting all your hair off your neck without creating tension headaches and breakage at the hairline. This version leans into intentional messiness — loose tendrils around the face, a twisted bun that looks thrown-together in the best way, and a large tortoiseshell clip that does the structural work of six bobby pins.
The texturizing spray before styling is non-negotiable. Freshly washed hair slips right out of a claw clip. Day-two hair with some grit holds everything in place without constant readjustment. If your hair is freshly washed, mist it with dry shampoo or texturizing spray and let it sit for two minutes before styling.
Why this look is popular: It takes under two minutes and looks intentional. The claw clip is gentler on hair than elastics — less breakage, less tension at the roots. The loose pieces around the face soften the look and prevent it from reading "I just gave up." For women over 40 dealing with thinning at the crown, the volume created by the twisted bun disguises sparse areas.
Where this look is suitable: Beach vacations, poolside dinners, casual brunches, and any day when the heat index makes wearing your hair down unbearable. Too relaxed for formal events, but perfect for everything else summer throws at you.
Step by step:
- Texturize first. If hair is freshly washed, spray with texturizing spray or dry shampoo from roots to ends. Second-day hair works fine as-is.
- Gather at the nape. Collect all hair as if making a low ponytail. Don't pull tight — you want it relaxed.
- Twist upward. Begin twisting the hair upward, creating a loose, messy bun shape. Tuck the ends loosely around the base. It doesn't need to be perfectly formed.
- Pull out face-framing pieces. Gently tug a few strands around your hairline, temples, and the nape of your neck. These wisps are crucial for the soft, romantic feel.
- Clip it. Secure the bun with your claw clip. Adjust the bun slightly so the clip holds everything but still looks artfully undone.
- Set it. A quick spritz of texturizing spray or light hairspray holds everything in place. Gently pull apart any sections that look too neat.
Tips and tricks: A clip with teeth grips significantly better than a flat barrette style. For fine hair, tease the crown slightly before clipping to create the illusion of more volume. Don't aim for perfection — the beauty is in the imperfection. A little wind only enhances it.
3.Glamorous Voluminous Waves with Deep Side Part
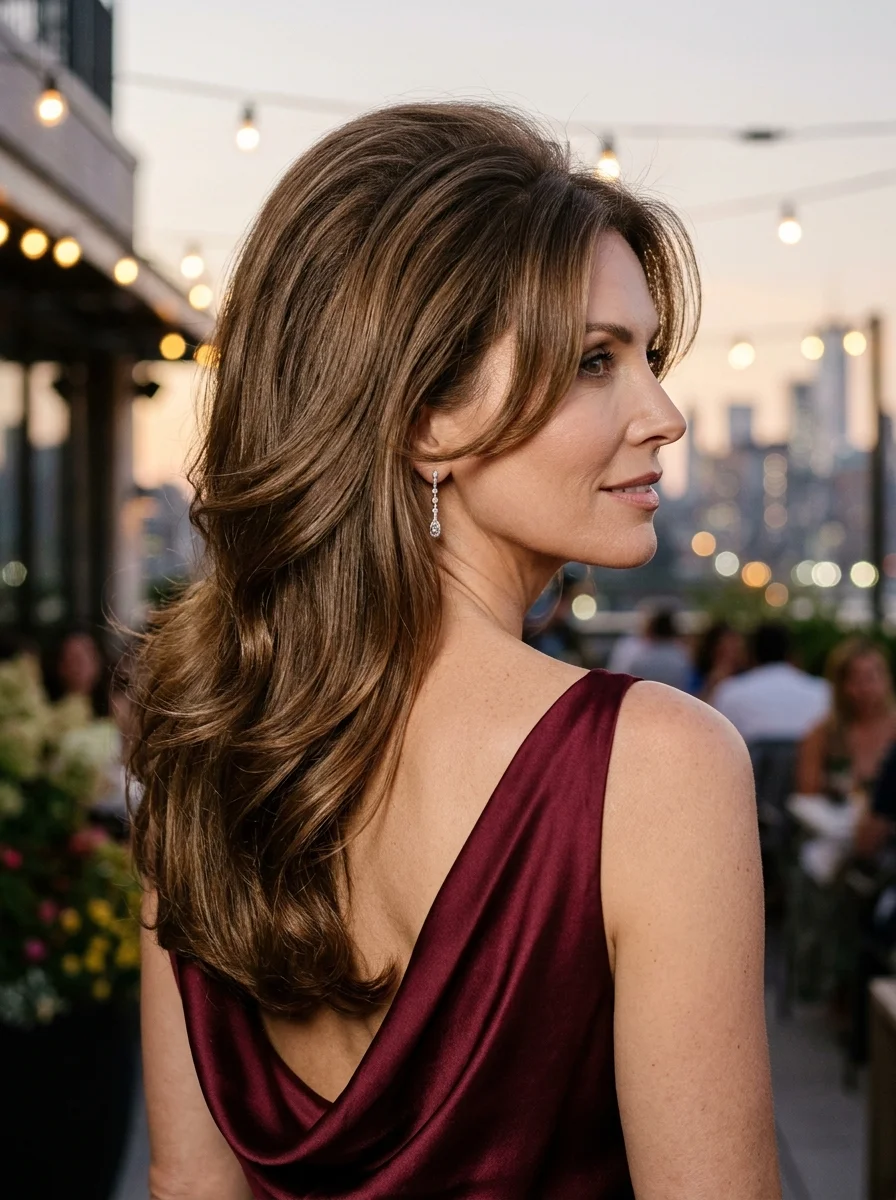
The overview: Long, layered hair with bouncy, defined curls throughout. Deep side part creates dramatic volume at the crown. Each curl has a soft, rounded shape with a glossy finish. Warm brunette base with caramel and golden-brown highlights creates multi-tonal depth. The layers create a cascading silhouette with shorter pieces framing the face.
This is the hairstyle that makes people ask "who does your hair?" at summer evening events. Big, bouncy waves with a deep side part create the kind of volume that photographs beautifully in warm lighting — rooftop dinners, outdoor weddings, any setting where golden hour light hits hair at an angle. The deep side part is doing more than adding drama: it's creating the illusion of thicker hair at the crown, which matters more as hair density decreases with age.
The key technical detail is the cooling process. Hot curls fall flat within an hour, especially in summer humidity. Pinning each curl up as you release it from the iron and letting it cool completely in a coiled shape doubles the hold time. It's an extra 10 minutes of work that makes the difference between waves that last through dinner and waves that droop by appetizers.
Why this look is popular: It photographs better than any other style on this list. The volume reads on camera, and the dimensional highlights make every curl distinct. The deep side part adds instant glamour without requiring a full updo. Works best on medium to thick hair that holds a curl — fine hair needs volumizing mousse applied before blow-drying.
Where this look is suitable: Evening events, rooftop parties, summer weddings, date nights, and any occasion where you want your hair to be part of the conversation. Not ideal for hot outdoor daytime settings where humidity will frizz the volume flat.
Step by step:
- Start damp with product. Apply volumizing mousse from roots to ends. Use heat protectant before any hot tools.
- Blow-dry with lift. Using a large round brush, dry section by section, lifting at the roots. Focus on the crown and face-framing pieces.
- Create the deep side part. Sweep hair to one side, exaggerating the part to build height at the crown.
- Curl with a large barrel. Use a 1.5-2 inch curling iron. Wrap 1-1.5 inch sections away from the face. Hold each for 10-15 seconds.
- Let it cool completely. Pin each curl up as you release it. Let them cool for at least 10 minutes before touching. This step is non-negotiable.
- Brush through gently. Use a soft-bristled brush or your fingers to blend the curls into soft, glamorous waves. Don't over-brush — you want definition, not frizz.
- Set with spray. A strong-hold hairspray locks in the volume. A touch of shine spray adds the finishing gloss.
Tips and tricks: For extra hold, use velcro rollers on the crown area while the hair cools after curling. A good root booster applied before blow-drying is a game-changer for volume. Tuck the smaller side of the part behind your ear to showcase the dramatic part and earrings. Sleep on a silk pillowcase to preserve the volume overnight.
35 Cute & Sporty Athletic Hairstyles for Women (2026)
4.Chic Blunt Bob with Soft Bangs
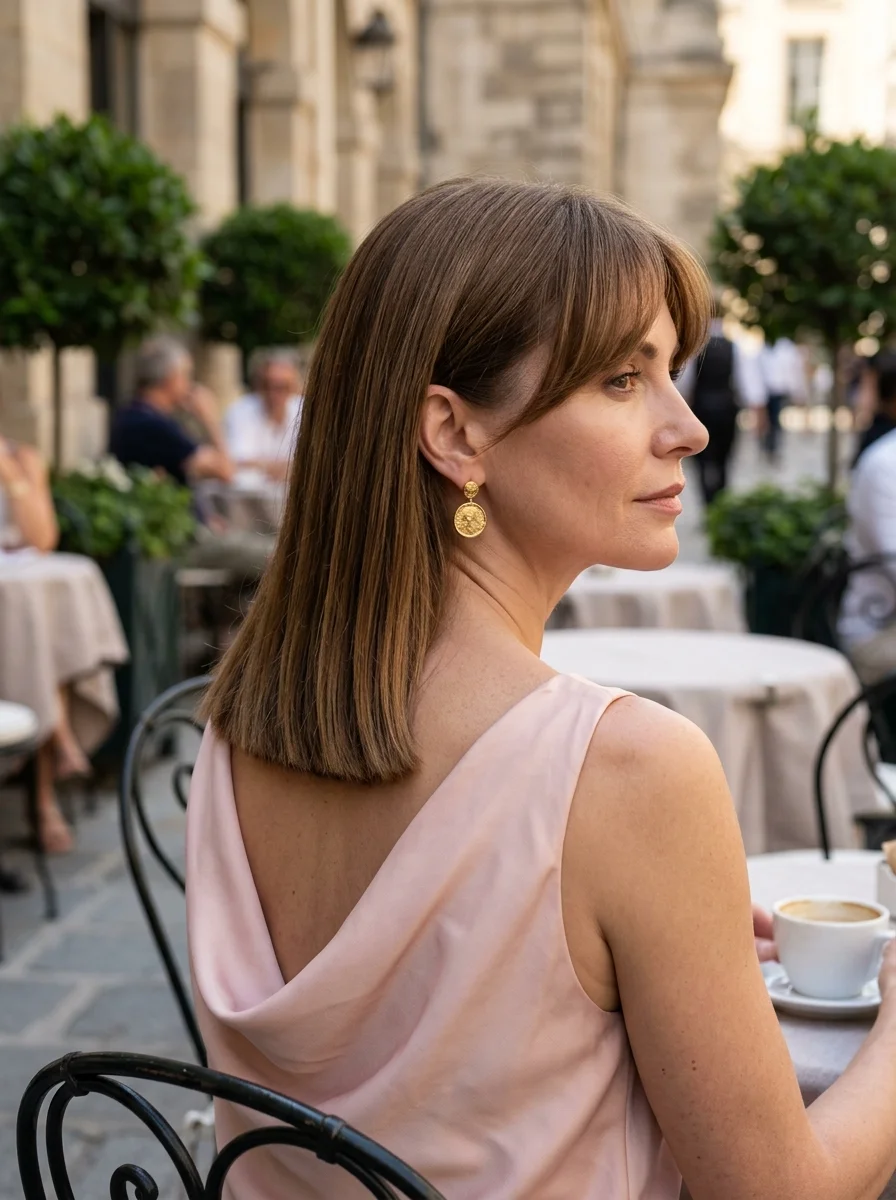
The overview: The blunt bob with soft bangs is the haircut that makes people think you've had a major life upgrade. It's clean, modern, and the kind of low-maintenance style that actually delivers on the "low-maintenance" promise. The blunt cut at the jawline makes hair appear thicker and healthier — a real advantage when age-related thinning starts showing. The soft, wispy bangs conceal forehead lines while drawing attention to the eyes.
The honest challenge: yellow polish isn't the only thing that's streaky. Bangs require regular trimming — every 4-6 weeks — to maintain that soft, piecey quality. Let them grow out too long and they become curtain bangs, which is a different style entirely. Budget for maintenance when you commit to this cut.
Why this look is popular: The blunt perimeter creates the illusion of density, which is exactly what fine or thinning hair needs. Bangs are having a resurgence because they're one of the few cuts that genuinely take years off your appearance. The bob itself is incredibly versatile — straight, wavy, or tucked behind the ears, it always looks intentional.
Where this look is suitable: Professional settings, city errands, casual business meetings, and everyday wear. The bob is too structured for truly casual beach settings but works across most summer occasions. Quick to wash and dry — ideal for busy mornings.
Step by step:
- Prep and smooth. Apply smoothing serum or heat protectant evenly through damp hair.
- Blow-dry with a paddle brush. Direct the airflow downward to create a smooth, sleek finish. Use a small round brush for the bangs, directing them straight down and slightly forward.
- Flat iron for extra smoothness. A light pass with a flat iron removes any remaining texture. Keep the iron moving to avoid kinks.
- Polish the ends. Use a small amount of smoothing cream or serum on the ends to prevent flyaways and add polish.
- Add shine. A light mist of shine spray creates the luxurious, glossy finish. For the bangs, a tiny bit of anti-frizz serum keeps them in place all day.
Tips and tricks: Regular trims every 4-6 weeks are essential to keep the blunt line sharp and the bangs at the right length. Invest in a good flat iron and smoothing serum — they're your best friends for this cut. A slight shift in your part can change the whole look, so play with it. For very thick hair, ask your stylist to slightly texturize the internal layers so the bob doesn't become too heavy or wide.
5.Sleek and Chic Inverted Bob
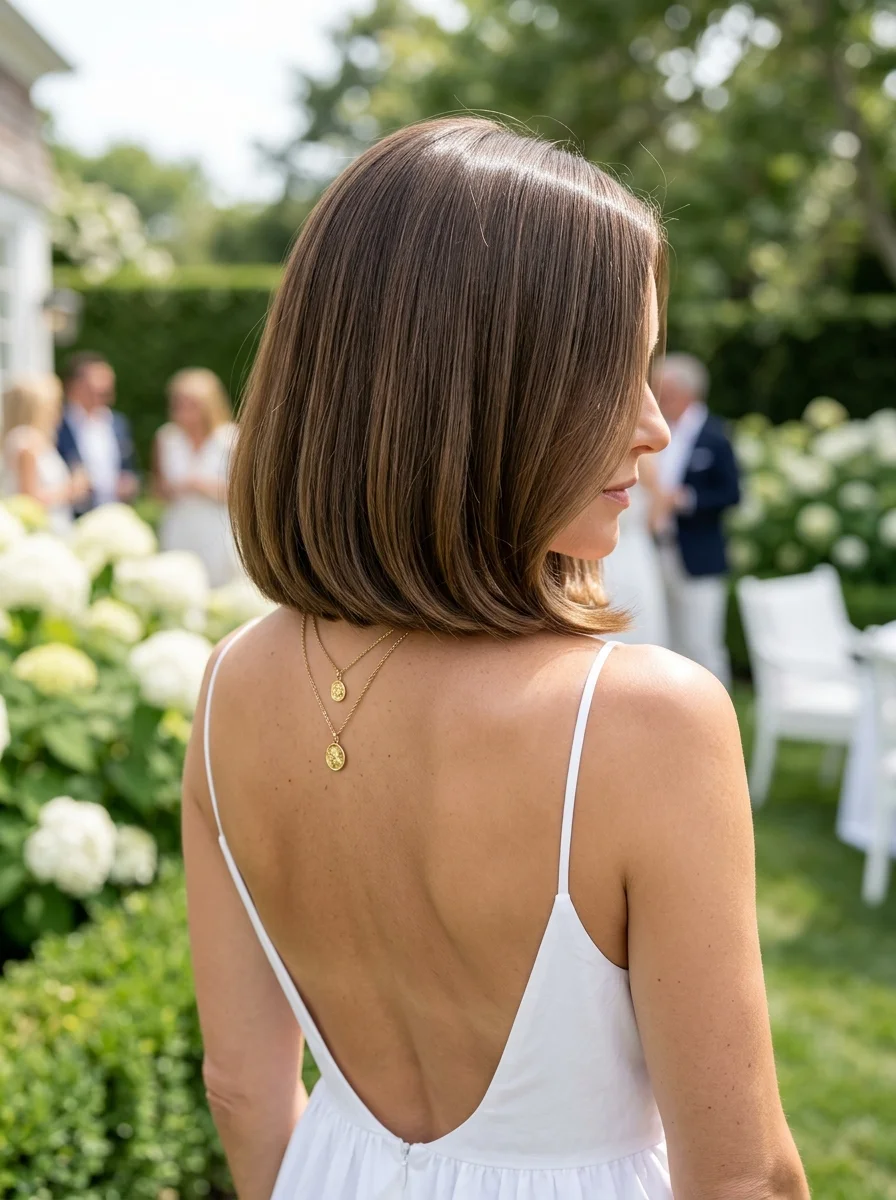
The overview: The inverted bob is architectural hair — shorter at the nape, angled longer toward the front, creating a sharp A-line silhouette that screams confidence. This is the cut for women who want their hair to make a statement without saying a word. The graduated nape keeps your neck completely cool in summer, and the sleek finish looks incredibly polished with minimal daily effort once the precision cut is in place.
The deep side part adds asymmetry and drama. Without it, the inverted bob can look too symmetrical and severe. With it, the style gains movement and a modern, editorial quality that works equally well at a garden party or a business lunch.
Why this look is popular: The graduated nape creates built-in volume where age-related thinning is most noticeable — at the crown and vertex. The sharp lines convey modernity and confidence. It's one of the few short cuts that looks equally good with glasses or without, with earrings or without.
Where this look is suitable: Professional settings, upscale dining, garden parties, gallery openings, and any time you want to project sophistication. The structured shape holds up well in humidity compared to loose styles.
Step by step:
- Smooth prep. Apply smoothing cream or serum from roots to ends on damp hair. This is crucial for the sleek finish.
- Blow-dry downward. Use a paddle brush or medium round brush, directing the airflow downward to smooth the hair. Get the back section as flat and smooth as possible.
- Create the inward turn. As you dry the ends, use a round brush to slightly turn them under. A flat iron can refine this afterward.
- Flat iron for glass finish. Pass the flat iron through each section for the pin-straight, high-gloss result. Keep the iron moving to avoid heat damage.
- Anti-frizz insurance. Apply a small amount of anti-frizz serum to the ends to keep the style pristine throughout the day, especially in humidity.
- Add shine. A light mist of shine spray makes the hair look healthy and polished.
Tips and tricks: Invest in a high-quality flat iron — it's the single most important tool for this cut. Don't over-wash your hair; this style looks best with a little natural texture. Use dry shampoo between washes to maintain freshness without losing the shape. Regular trims are a must to maintain the precise angle — every 4-6 weeks.
20 Stunning Mother of the Bride Hairstyle Ideas for 2026 💍
6.Razor-Cut Straight Lob
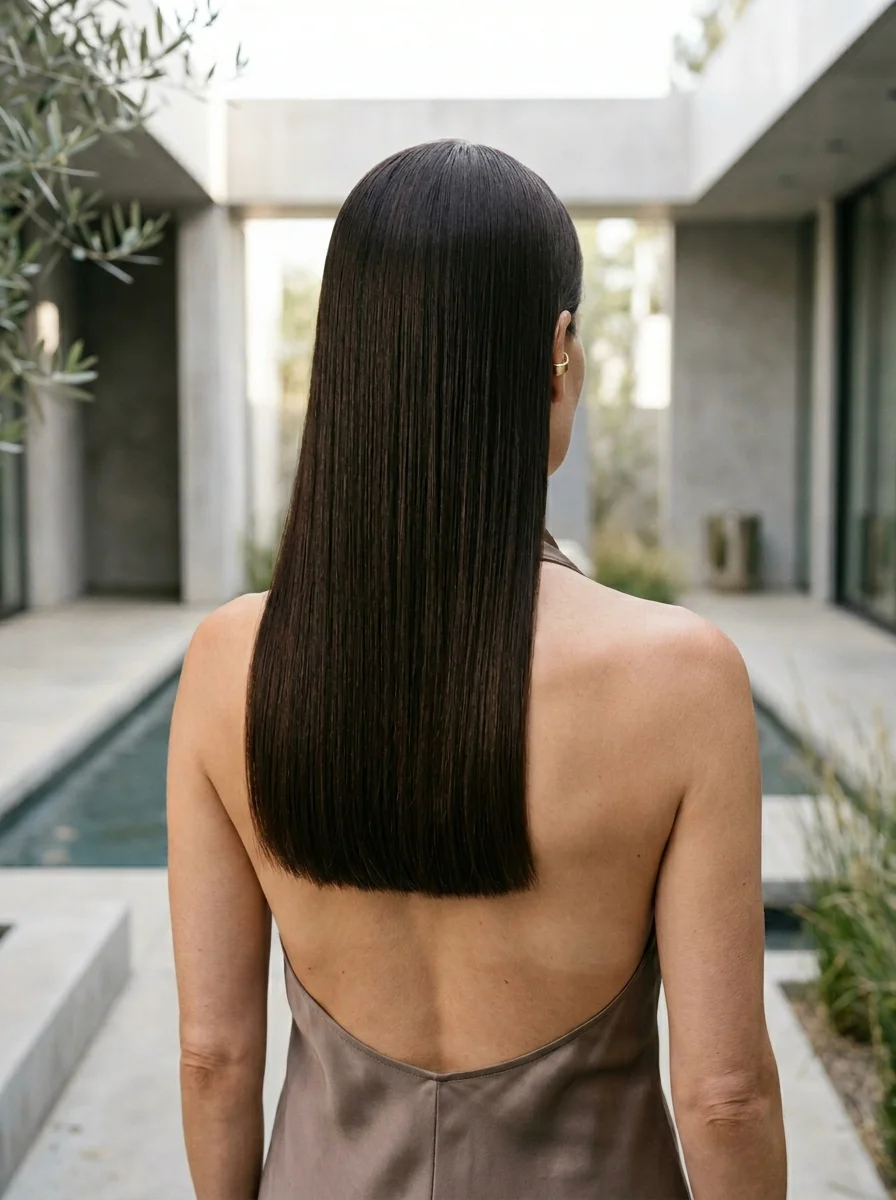
The overview: The razor-cut lob is what happens when a modern edge meets a classic shape. The razor technique creates softer, more diffused ends than scissors — a slightly piecey, lived-in texture that looks like you just rolled out of bed looking incredible. The deep espresso brown color with its high-gloss finish makes the hair look almost liquid, catching light in a way that reads expensive and healthy.
The razor cut specifically benefits thicker hair by removing weight without creating visible layers. If your hair tends toward bulkiness at the ends, this technique solves that problem while maintaining the one-length silhouette. The result is a cut with natural movement that doesn't need styling to look intentional.
Why this look is popular: The razor technique creates texture that looks effortless rather than styled. The straight, sleek finish makes hair appear incredibly healthy — counteracting dullness that can come with age. The length allows for quick ponytails on extremely hot days while looking stunning when worn down.
Where this look is suitable: Gallery openings, minimalist weddings, modern outdoor settings, and high-fashion editorial moments. The sleek texture resists humidity better than curly styles, making it practical for summer while looking editorial.
Step by step:
- Texturize before drying. Apply texturizing spray or sea salt spray to damp hair for grit and definition.
- Rough dry or diffuse. Blow-dry with fingers to enhance natural texture, or use a diffuser if you have waves you want to enhance. For the sleek look, use a paddle brush.
- Define with product. Work a small amount of pomade or wax through the mid-lengths and ends, twisting pieces to separate them and add texture.
- Optional flat iron pass. For a sleeker look, go over the ends with a flat iron while keeping them piecey rather than perfectly straight.
- Set with texture spray. A light mist of texturizing hairspray holds the style and keeps the piecey texture fresh all day.
Tips and tricks: Talk to your stylist about where you want the texture to be most prominent — the razor allows for very specific texturizing. If you have very fine hair, a razor cut might make it look too thin; a scissor cut with strategic layering would be a better bet. Don't be afraid of messiness — that's the beauty of this cut. It's meant to look slightly undone.
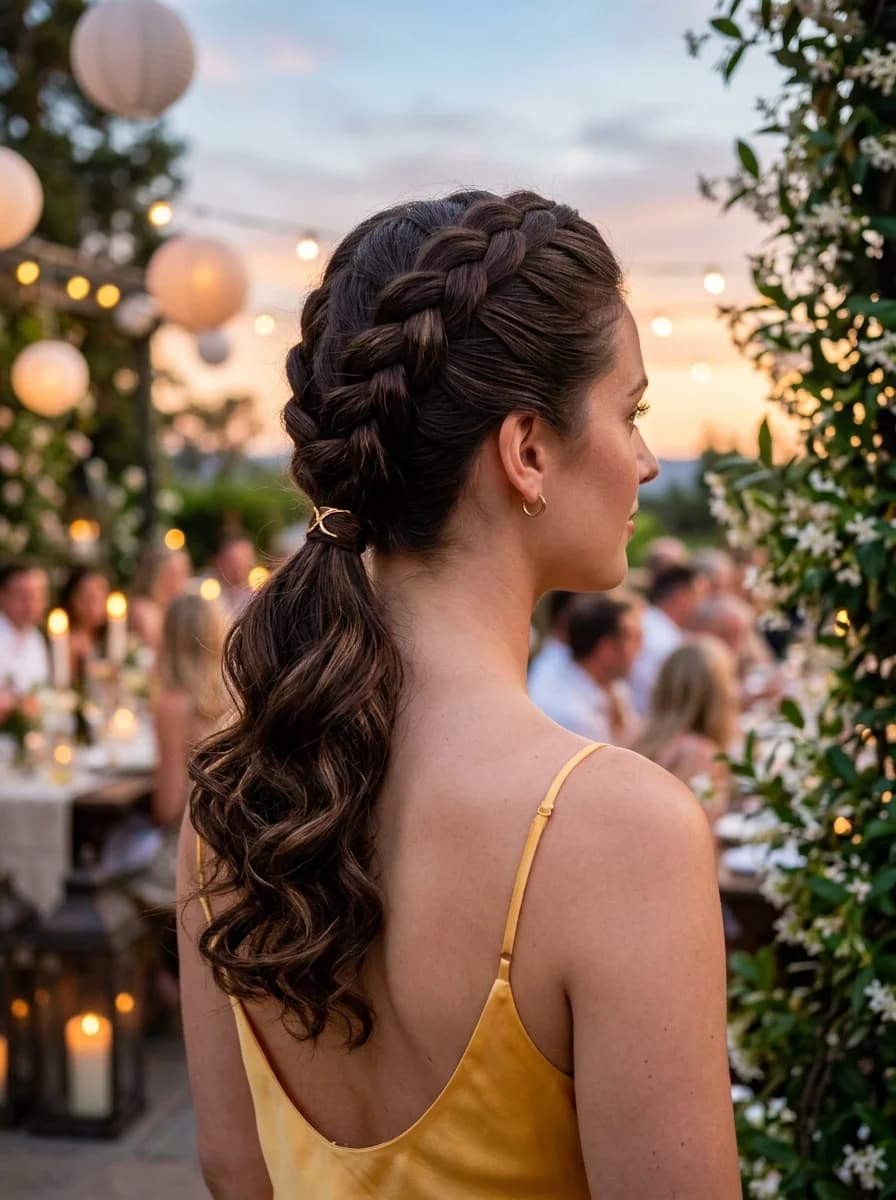
7.Romantic Side-Swept Braid with Pearls
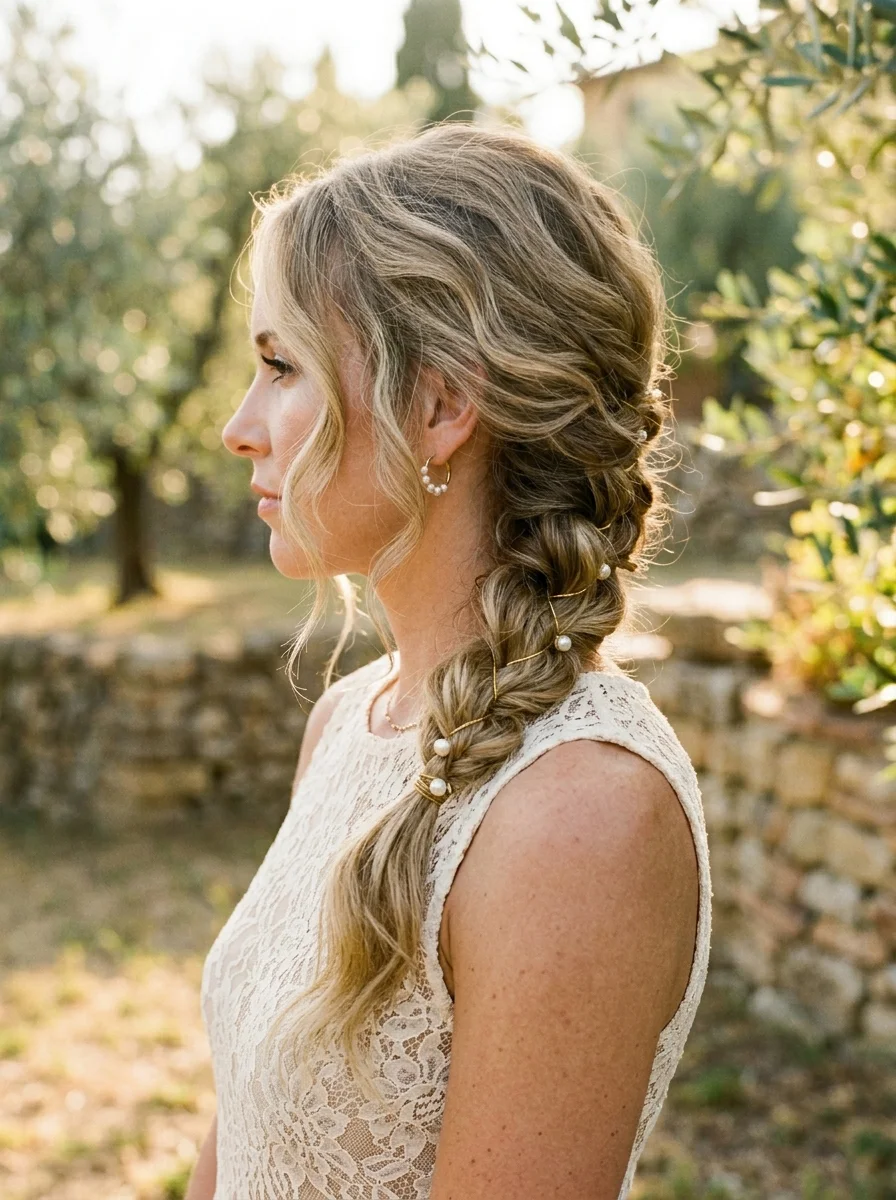
The overview: Loose, deconstructed side braid swept over one shoulder. Sun-lightened blonde with golden and platinum highlights. Freshwater pearls (5-7 visible) scattered throughout the braid, secured with small pins. Face-framing tendrils left loose around the hairline and temples.
The technique of pancaking the braid is everything here. Without it, the braid looks thin and tight. With it, the braid becomes wide, soft, and editorial. Pull gently from the outer loops — you want width, not a completely flattened braid. The face-framing tendrils left loose around the hairline complete the romantic effect.
Why this look is popular: The braid keeps hair controlled and cool while looking romantic rather than juvenile. Pearls are having a major resurgence in hair accessories, and they pair naturally with the soft texture of a deconstructed braid. Works beautifully for outdoor events where wind could disrupt loose hair.
Where this look is suitable: Outdoor summer weddings, romantic dinners, garden parties, and Mediterranean-vacation energy. The braid survives wind and humidity better than loose styles, making it practical for beach or garden settings.
Step by step:
- Texturize first. If hair is freshly washed, spray with texturizing spray or dry shampoo for grip. Fishtails and loose braids on slippery hair unravel.
- Part deeply to one side. Pull out a few strands around your face before you start braiding.
- Braid loosely. Create a three-strand or Dutch braid, starting from the side where most hair is gathered. Keep tension deliberately slack — tight braids create a thin, rope-like result.
- Pancake the braid. Before securing, gently pull the outer loops of each section to widen them. Start from the top and work down. This is what creates the soft, voluminous look.
- Add face-framing pieces. Take those tendrils you left out and loosen them around your face and temples. A slight wave with a curling wand adds extra softness.
- Place the pearls. Insert pearl-adorned hairpins into the braid, spacing them evenly or clustered in key areas. They should look nestled within the braid, not sitting on top.
- Set lightly. A light mist of flexible-hold hairspray keeps everything in place without making it stiff. You want it soft and touchable.
Tips and tricks: Practice pulling the braid apart — it's the secret to making it look effortlessly romantic instead of tight and severe. Use clear elastics at the end before pancaking for extra security. Don't overdo the hairspray; you want soft and touchable, not helmet-like. For extra body, curl the hair lightly before braiding.
24 Stunning Bridesmaid Hairstyles for Weddings 2026 💍✨
8.Intricate Crown Braid Updo with Pearls
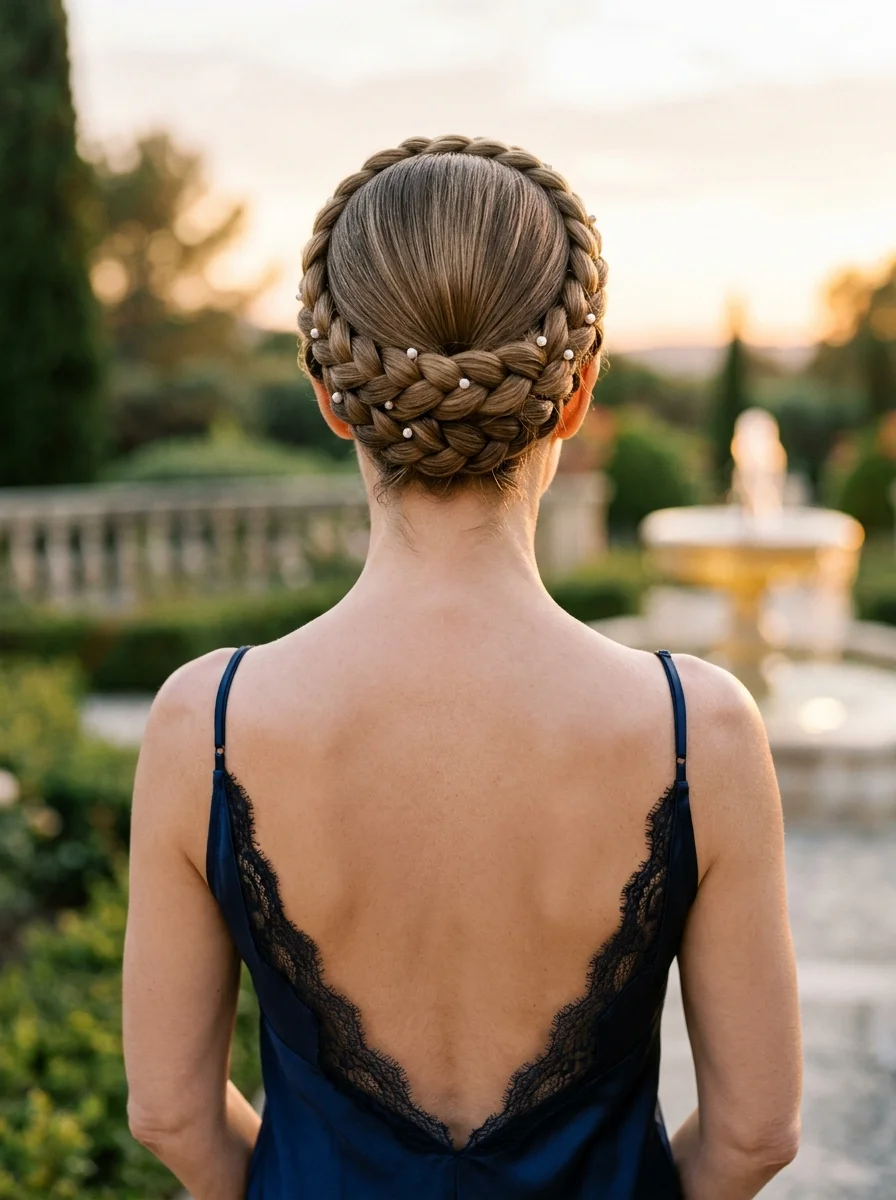
The overview: The braided crown is one of the few updos that looks good from every angle — front, side, and back. This makes it ideal for events with lots of photography where you can't control which angle the camera catches. Dutch braids (raised from the scalp) wrapping around the head like a crown, with all remaining hair gathered into a neat low chignon at the nape. Small white pearls (8-10 visible) scattered along the braids at irregular intervals. Warm ash-brown with subtle tonal variation visible in the braid pattern. Smooth, polished finish with no flyaways.
This is a technically demanding style — if you're not comfortable braiding your own hair, book a trial run with your stylist before the event. The structure needs to be secure enough to survive hours of wear, and uneven braid tension is the most common failure point.
Why this look is popular: It's completely contained — nothing hangs in your face, nothing falls forward when you lean in. The pearls add a luxurious texture that elevates the whole look. It photographs beautifully from every angle, which matters at weddings and formal events.
Where this look is suitable: Formal garden parties, black-tie summer events, elegant evening affairs, weddings (brides, bridesmaids, or guests). This is not a "throw it up and go" style — it's for when you want the hair to be as considered as the outfit.
Step by step:
- Prep for grip. Apply strong-hold mousse or braid gel from roots to ends. Second-day hair holds this style better than freshly washed hair.
- Part and section. Create a side or center part. Brush all hair back from the face.
- Dutch braid the crown. Starting at one temple, Dutch braid (cross strands under) along the hairline, adding hair as you go. Continue around the head until you reach the nape. Keep tension consistent — uneven tension creates visible lumps.
- Gather the bun. Collect all remaining hair at the nape. Twist into a low chignon and secure with color-matched bobby pins.
- Tuck the braid tail. Tuck the end of the braid into the bun and pin securely. Use a fine-tooth comb to smooth flyaways.
- Add pearls. Pin pearl accessories into the braid at irregular intervals. Odd numbers (5 or 7) look more natural than even.
- Set with spray. Strong-hold hairspray ensures this stays put all day or evening.
Tips and tricks: If you're not a braiding pro, book a trial run. This style takes time and skill to perfect. Ensure your stylist uses pins that match your hair color for a seamless finish. Consider your dress neckline when deciding on updo placement — this pairs beautifully with open backs or elegant V-necks.
9.Sleek High Ponytail with Braided Accent
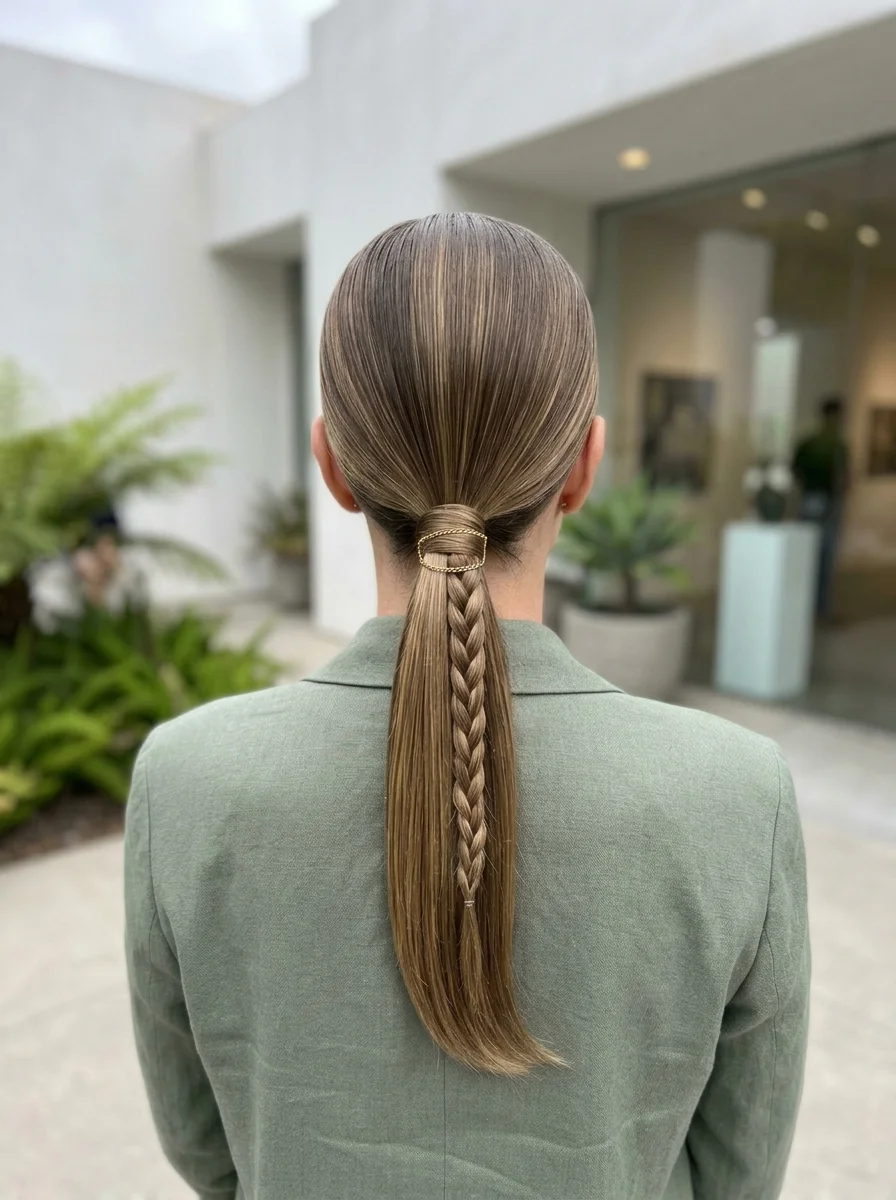
The overview: The high ponytail creates a natural "lifted" effect on the face — visually counteracting sagging at the jawline and temples. It's the closest thing to a non-surgical facelift that hairstyling offers. Adding a fishtail braid down the center of the ponytail prevents it from looking too basic or "gym-like," and the gold rope-chain cuffs at the base elevate the whole thing into something that looks intentional and fashion-forward.
The slicked-back crown requires product — gel or pomade — to achieve that bump-free, mirror-smooth finish. A boar bristle brush and fine-tooth comb are essential tools here. The effortlessness of the ponytail tail contrasts with the precision of the crown, and that tension is what makes the style interesting.
Why this look is popular: It keeps all hair off the neck — maximum cooling in summer heat. The high placement creates a visual lift on the face. The braided accent adds visual interest and prevents the ponytail from looking too simple. The sleek finish reads as polished and youthful.
Where this look is suitable: Modern art gallery openings, minimalist fashion events, sophisticated daytime occasions, and any setting where you want to look sharp and confident. The gold accessories make it too dressy for truly casual settings.
Step by step:
- Slick the crown. Apply styling gel or pomade to damp hair. Use a boar bristle brush to smooth hair back toward the crown, eliminating every bump.
- Gather high. Collect all hair at the crown. Secure tightly with a strong elastic.
- Add the gold cuffs. Place the rope-chain cuffs over the elastic. They should sit as a stacked pair at the ponytail base.
- Create the fishtail braid. Take a section from the center of the ponytail. Divide it into two and fishtail braid for 4-5 inches, then secure with a small elastic.
- Smooth the tail. Flat iron the remaining loose hair on either side of the braid for the sleek finish.
- Lay the edges. Use edge control gel and a toothbrush to smooth any baby hairs along the hairline.
Tips and tricks: A boar bristle brush is essential for the sleek crown — it distributes product evenly and creates a smoother finish than a regular brush. For finer hair, backcomb a small section at the crown before gathering to create the illusion of more volume under the ponytail. The gold cuffs can be swapped for different accessories depending on the occasion.
31 Stunning Summer Birthday Party Hairstyles for 2026 🎂☀️
10.Textured Shag with Layers and Side Bangs
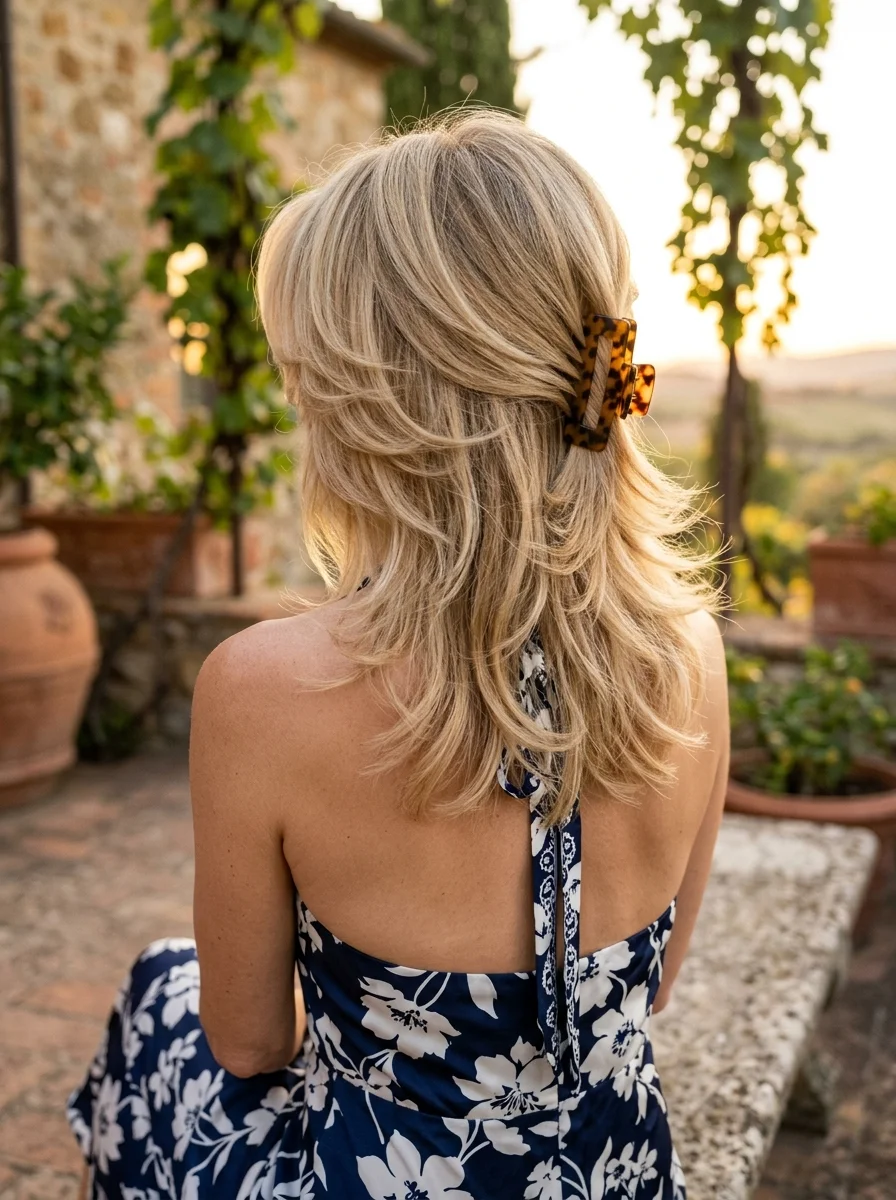
The overview: The modern shag is what happens when a haircut does the styling for you. Heavy, choppy layers throughout create built-in volume at the crown — exactly where age-related flatness shows up first. The side-swept bangs conceal forehead lines while drawing attention to the eyes, and the razor-cut ends give the whole thing a textured, lived-in quality that looks better the messier it gets.
This is one of the most wash-and-wear friendly cuts on the list. Air-dry with a texturizing spray and you're done. The ash-blonde with a shadow root means you can stretch color appointments, and the claw clip half-up option keeps hair off your face while maintaining the relaxed vibe.
Why this look is popular: The shag's built-in texture means zero "bad hair days" — the messier it looks, the better. Heavy layers create volume at the crown, combating age-related flatness. Side bangs are one of the few cuts that genuinely conceal forehead lines. The cut is low-maintenance and looks intentionally effortless.
Where this look is suitable: Casual outdoor lunches, vineyard visits, Italian-holiday energy, weekend errands, and any setting where relaxed sophistication is the goal. The claw clip option makes it versatile enough for both hair-down and half-up styling.
Step by step:
- Apply product to damp hair. Work a texturizing spray, sea salt spray, or mousse through from roots to ends.
- Air-dry or diffuse. Let the natural wave pattern emerge. Scrunch the hair as it dries to encourage texture. If using a diffuser, use low heat.
- Blow-dry the bangs. Use a round brush to direct the side bangs across the forehead. This is the one section that benefits from intentional styling.
- Define the ends. Work a small amount of pomade or wax through the mid-lengths and ends, twisting pieces to separate them.
- Half-up option. Take the right side section and pin it back with a tortoiseshell claw clip. Leave the left side and back flowing naturally.
- Set lightly. A light mist of texturizing hairspray holds the style without stiffness.
Tips and tricks: For curly or wavy hair, this cut works beautifully when diffused — the layers prevent the "triangle" shape. If your hair is very fine, ask your stylist to keep the layers slightly longer to avoid a thinned-out look. The ash-blonde tone is youthful without being flashy, but works best on cool skin tones — warm skin tones should opt for a golden or honey blonde instead.
11.Soft Beachy Waves with Face-Framing Layers
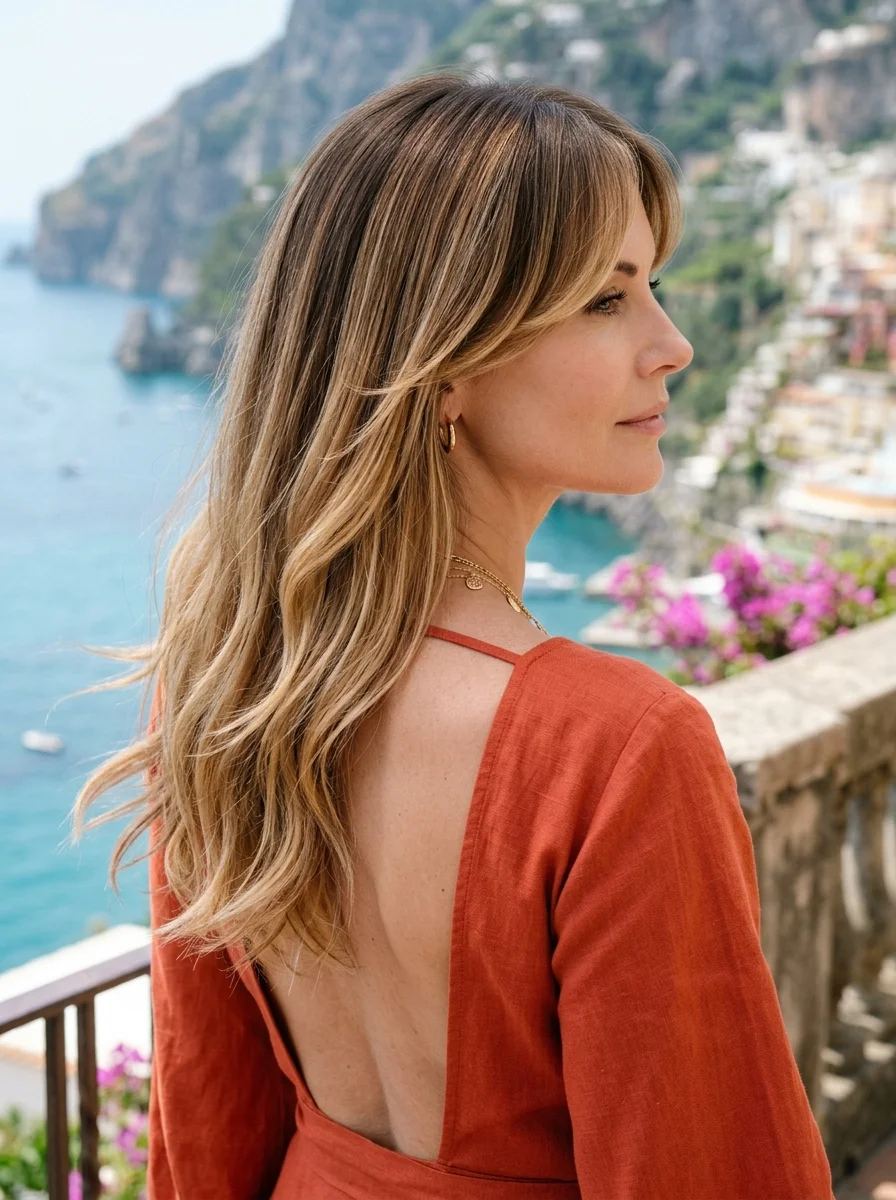
The overview: Beachy waves are the default summer hairstyle, and for good reason — they're flattering, versatile, and survive humidity better than almost any other style. This version adds face-framing layers that start at the cheekbone, which is the detail that elevates it from "generic waves" to "this person knows what they're doing." The layers soften the jawline and create a curtain effect that draws attention to the face.
The technique is straightforward: curl sections away from the face with a 1.25-inch wand, leave the last inch out for a modern undone finish, then break up the curls with your fingers. The key is alternating curl direction — toward the face on one section, away on the next — for a more natural, less uniform result.
Why this look is popular: It's the most universally flattering wave style. The face-framing layers add softness without requiring a full commitment to bangs. The lived-in texture adds volume without stiffness, and the length is long enough to feel feminine but not so long it becomes high-maintenance in heat.
Where this look is suitable: Brunch, outdoor events, vacation dining, casual Fridays, and everyday summer wear. Polished enough for most settings but casual enough that you don't feel overdone at a farmers market.
Step by step:
- Prep with spray. Apply sea salt spray or texturizing mist to damp hair from roots to ends.
- Curl with a wand. Using a 1.25-inch curling wand, wrap 1-inch sections away from the face, leaving the last inch out for a modern, undone end.
- Cool shot. Let each curl cool completely before touching it. A cool shot from the dryer helps set the shape.
- Break up with fingers. Run your fingers through the hair to separate curls into softer, more natural waves. Don't use a brush — it kills the texture.
- Add texture. Shake out the style with your hands. Apply a pea-sized amount of lightweight texture cream to the ends only. Avoid the roots.
- Set lightly. A light mist of flexible-hold hairspray locks the waves in place without making them crunchy.
Tips and tricks: For finer hair, a root-lifting powder applied before blow-drying makes a measurable difference. The face-framing pieces get extra attention — blow them backward and upward off the face using a round brush for the signature "curtain" sweep. If your hair doesn't hold curls well, try pinning each curl up as you release it and letting them cool in a coiled shape.
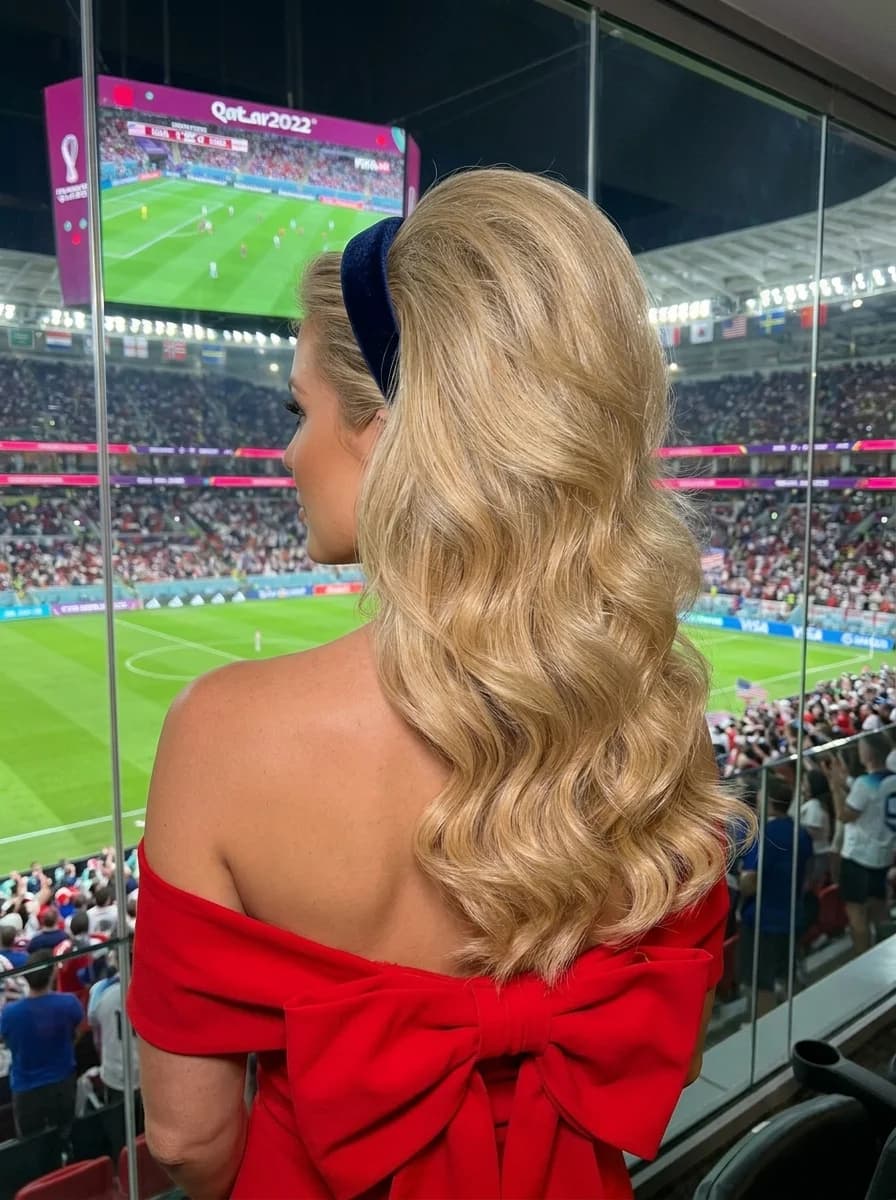
29 Fun FIFA World Cup Watch Party Hairstyles (2026)
12.Tousled Medium-Length Waves with Subtle Layers
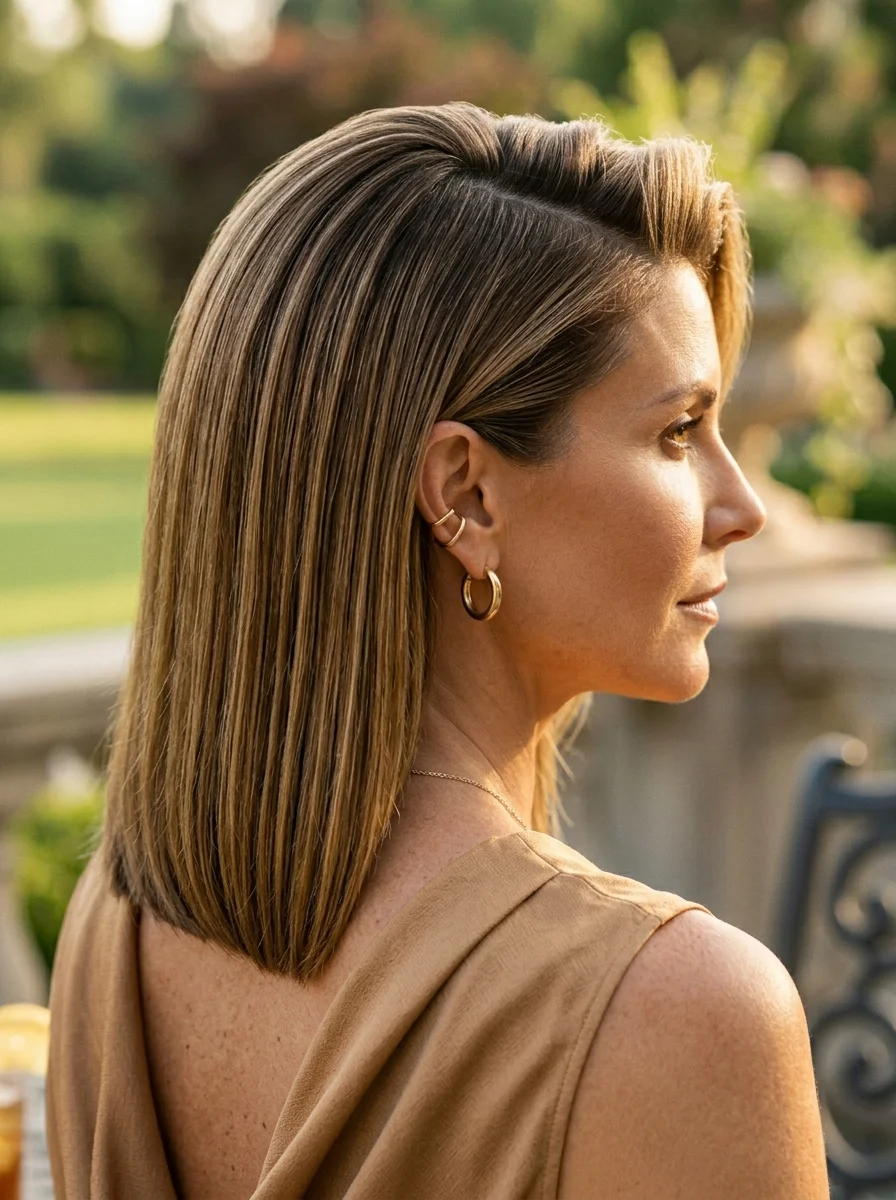
The overview: This is the hairstyle for women who don't want to think about their hair. The tousled texture is forgiving — it hides thinning at the crown, disguises uneven density, and looks better the second day. The subtle, internal layers prevent the "triangle" shape that one-length hair develops as density decreases with age, while maintaining enough weight to keep the hair looking full.
The medium length is strategic: long enough for updos on the hottest days, short enough that it doesn't become a tangled mess in wind. The warm chestnut with micro-highlights adds dimension without looking obviously colored — it catches light in a way that reads natural and sun-kissed.
Why this look is popular: The undone texture is the point — it looks intentional without requiring any technical styling skill. Air-dry with mousse and go. The subtle layers add movement without creating visible "steps" in the hair. This is one of the most requested cuts in salons right now because it bridges the gap between "I have a haircut" and "my hair just looks like this."
Where this look is suitable: Weekend outings, farmers markets, casual date nights, resort wear, and everyday summer life. The versatility of this length means it transitions easily from daytime errands to evening dinners.
Step by step:
- Apply mousse to damp hair. Work a lightweight mousse through from roots to ends for natural wave enhancement.
- Air-dry or diffuse. Let the natural wave pattern emerge. Scrunch as it dries. If using a diffuser, use low heat and hover near the curls without touching them.
- Flat iron wave (optional). For a more defined wave, use the S-bend technique with a flat iron: bend the hair in alternating directions at 2-inch intervals.
- Add texture. Scrunch texturizing paste or sea salt spray into the mid-lengths and ends for piecey, lived-in definition.
- Shape with hands. Use your hands to arrange the waves and create the tousled, effortless finish. Don't over-style — the messiness is intentional.
Tips and tricks: This style works on straight to wavy hair. If your hair is naturally straight, the flat iron wave technique is faster and more reliable than a curling iron for creating this specific undone texture. For curly hair, this cut works beautifully when diffused — the layers prevent bulkiness while maintaining shape. The key is minimal manipulation — the less you touch it, the better it looks.
13.Elegant Twisted Updo with Pearl Pins
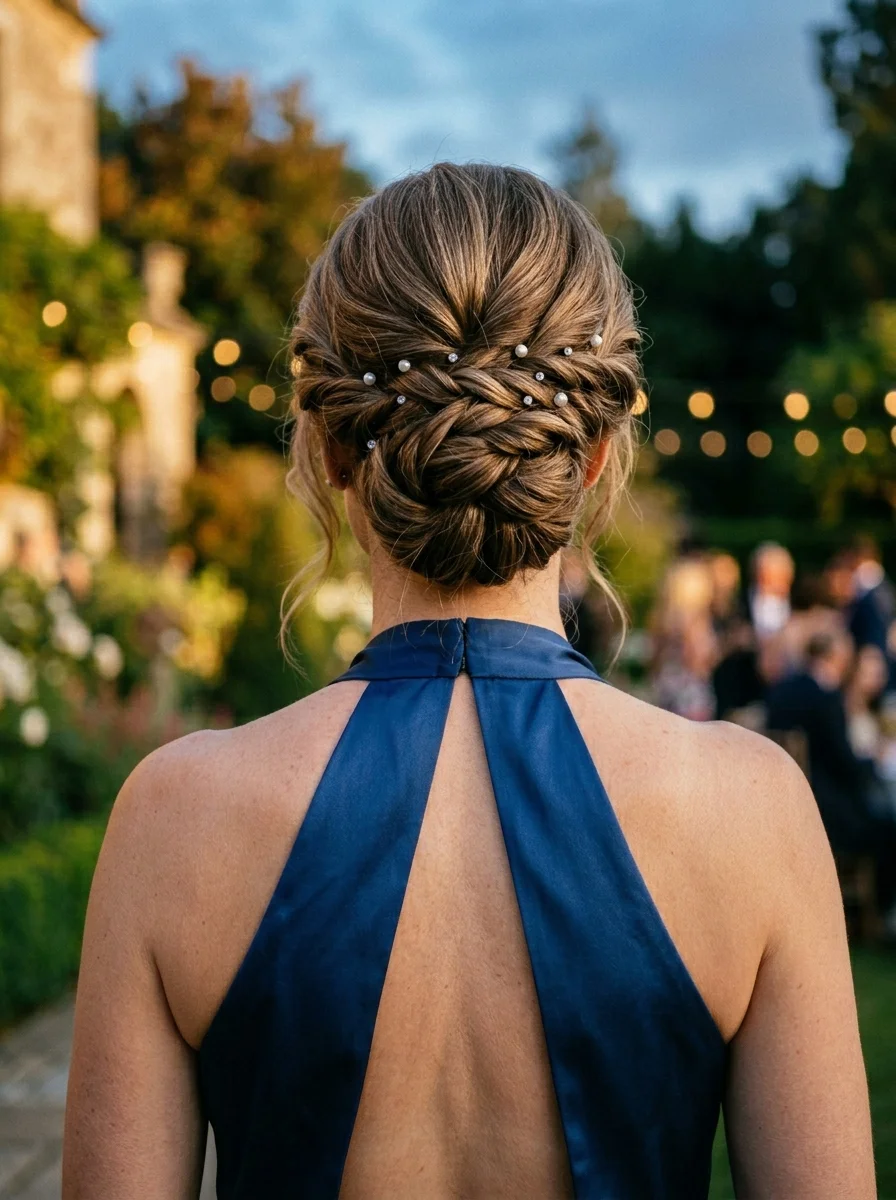
The overview: Hair sectioned into 2-3 sections, each loosely twisted and pinned at the nape or mid-back of the head. Pearl pins placed at twist junctions as both decoration and structural reinforcement. Soft face-framing tendrils left out and gently curled. Cool or warm blonde, light mushroom brown, or silver — pearl accessories pair best with cooler or neutral tones.
A twisted updo is less formal than a French twist but more polished than a messy bun — it occupies the sweet spot that makes it appropriate for everything from summer weddings to anniversary dinners. The pearl pins do double duty: they add elegant points of light while reinforcing the structure of each twist junction. Without the pins, this is a nice updo. With them, it's a styled updo.
The soft tendrils left around the face are essential, not optional. A twisted updo without face-framing pieces can look severe and aging. The loose strands soften the forehead and jawline, creating a romantic frame that keeps the style feeling fresh and feminine.
Why this look is popular: It keeps hair off the neck and shoulders in heat while creating the illusion of volume. Twisted (rather than pulled-tight) construction is gentle on thinning hair. Pearl pins add sophistication without looking juvenile, and the style is extremely secure — it survives hours of wear through heat and humidity.
Where this look is suitable: Summer weddings, garden parties, anniversary dinners, cocktail events, and any occasion where you want to look refined without being overly formal. The pearls make it dressy enough for evening events while remaining soft enough for daytime.
Step by step:
- Prep and smooth. Apply smoothing cream to damp hair and blow-dry lightly. You want the hair smooth but not freshly washed — second-day hair holds twists better.
- Section the hair. Divide into 2-3 sections depending on thickness. Clip each section separately.
- Twist each section. Loosely twist each section, then pin it against the head at the nape or mid-back. Don't pull tight — the looseness creates the romantic quality.
- Leave face-framing pieces. Pull out 2-3 small sections around the hairline and temples. Gently curl these with a small barrel iron.
- Add pearl pins. Insert pearl pins at each twist junction and scatter a few along the gathered sections. They should look nestled within the twists.
- Set lightly. Light-hold hairspray to set without crunchiness. You want it to look soft and touchable.
Tips and tricks: The pearl pins are available from most beauty supply stores in packs of 12-24. Place them strategically at points where the twists need extra reinforcement — they're doing structural work as well as decorative work. For very fine hair, backcomb the roots slightly before twisting to add grip and the illusion of more volume.
30 Stunning Summer Hair Trends for 2026 ☀️🌊
14.Chic Graduated Bob with Deep Side Part
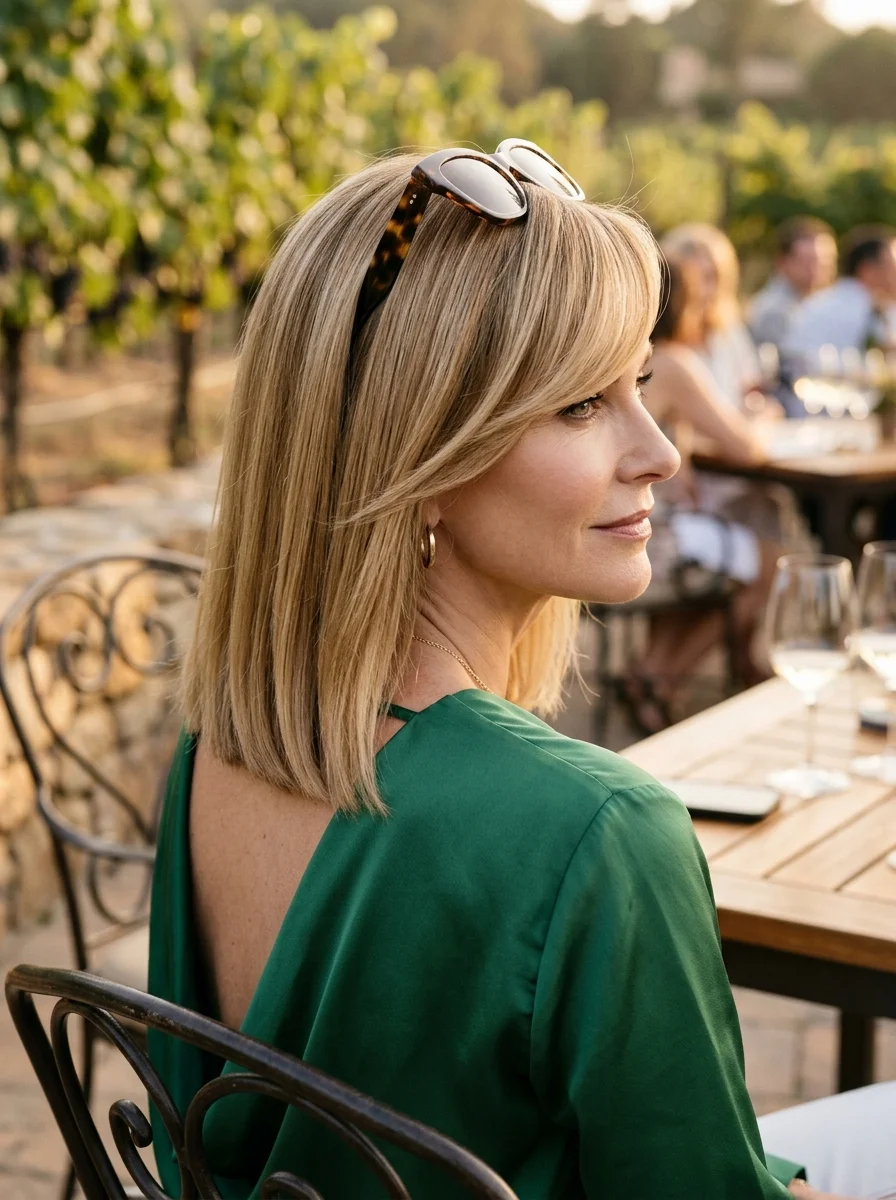
The overview: The graduated bob is the ultimate power cut for women over 40. The stacked back creates built-in volume at the crown — exactly where age-related thinning shows up first — without requiring backcombing or product. The deep side part adds instant drama and asymmetry that transforms a classic bob into something editorial. This is the cut that makes people think you have your life together.
The angled front pieces frame the jawline beautifully, and the graduated nape keeps your neck completely cool. In summer, this is one of the most practical short cuts because it requires minimal daily styling — the precision cut does the work. A quick flat iron pass and you're done.
Why this look is popular: The graduation creates volume where you need it most. The deep side part adds drama without requiring a full restyle. It works beautifully with glasses and without, with earrings and without. The structured shape holds up in humidity better than loose styles.
Where this look is suitable: Professional settings, upscale dining, gallery openings, and any time you want to project confidence and sophistication. The sharp lines convey modernity and intentionality.
Step by step:
- Blow-dry smooth. Use a round brush to direct hair from the deep side part across the forehead. Focus on getting the back section smooth and flat.
- Root-lift spray. Apply a root-lifting spray at the part line for added volume at the crown.
- Flat iron the ends. A quick pass with a flat iron creates the sleek, polished finish. Turn the ends slightly under for a refined look.
- Smoothing serum. Apply a dab of smoothing serum to the surface to eliminate flyaways and add shine.
- Tuck behind one ear. For added sleekness, tuck one side behind the ear. This also showcases earrings.
Tips and tricks: The graduated bob grows out gracefully — one of its underappreciated qualities. You can stretch salon visits to 6-8 weeks instead of the standard 4-6. For very thick hair, ask your stylist to slightly texturize the internal weight line so the bob doesn't become too heavy at the back. The deep side part can be flipped to the other side for an instant refresh when the style starts to feel stale.
15.Loose Textured Waves with a Delicate Hair Clip
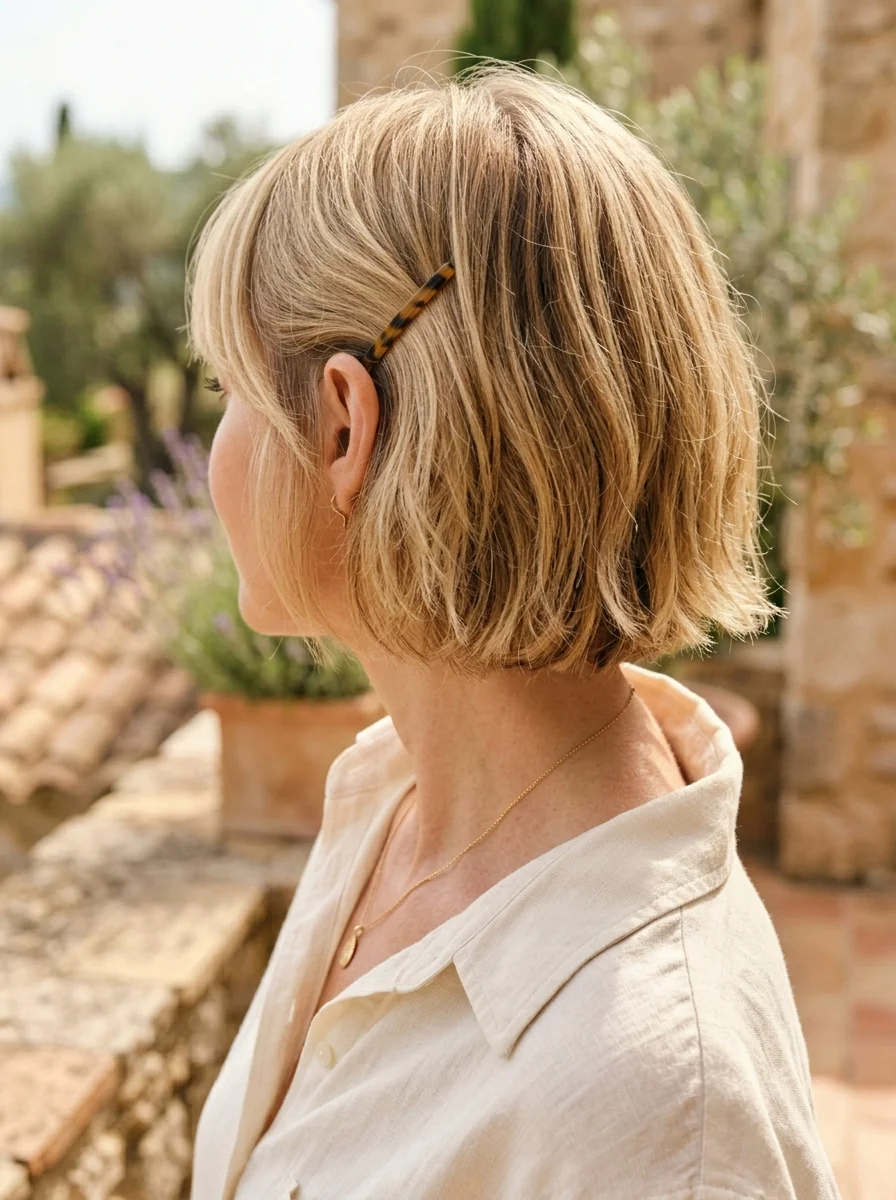
The overview: The delicate hair clip is doing more work than you think. Pulling one side back with a clip creates an asymmetrical sweep that opens up the face and keeps hair from falling forward in humidity. It's a small addition that transforms loose waves from "I didn't do my hair" to "I chose this specific look." The gold or pearl barrette sits at the temple, catching light and drawing attention to the eyes.
The waves themselves are created with a 1.5-inch curling iron, alternating directions for natural variation, then brushed through to break up into soft, romantic movement. The key is not over-curling — you want bends, not ringlets.
Why this look is popular: The asymmetric clip pull-back opens up the face and keeps hair controlled without a full updo. Loose waves add body to hair that may be thinning. The delicate accessory adds a youthful touch without looking like you're trying too hard. It's a 30-second adjustment that makes a significant difference.
Where this look is suitable: Romantic daytime dates, bridal showers, outdoor concerts, Easter brunch, and any setting where feminine and approachable is the goal. The clip makes it feel more considered than plain loose waves.
Step by step:
- Create waves. Using a 1.5-inch curling iron or flat iron, create loose waves throughout. Alternate curl direction for natural variation.
- Brush through. Use a paddle brush or your fingers to break up the waves into softer, more natural movement.
- Add texture. Apply texturizing spray for grip and volume. Focus on the mid-lengths and ends.
- Place the clip. Sweep one side back and secure with a delicate hair clip at the temple or above the ear. The clip should sit flat against the head.
- Adjust the waves. Use your hands to arrange the waves around the clip and face. The goal is effortless, not perfect.
Tips and tricks: The clip style matters — a minimalist gold barrette or pearl slide reads sophisticated. Avoid oversized clips or novelty shapes; they compete with the soft waves rather than complementing them. For finer hair, tease the section slightly before clipping to create a more secure hold and add a bit of volume at the clip placement.
30+ Chic Pool Party Hairstyles for Summer 2026 🌊👙
16.Classic Short Bob with Subtle Layers
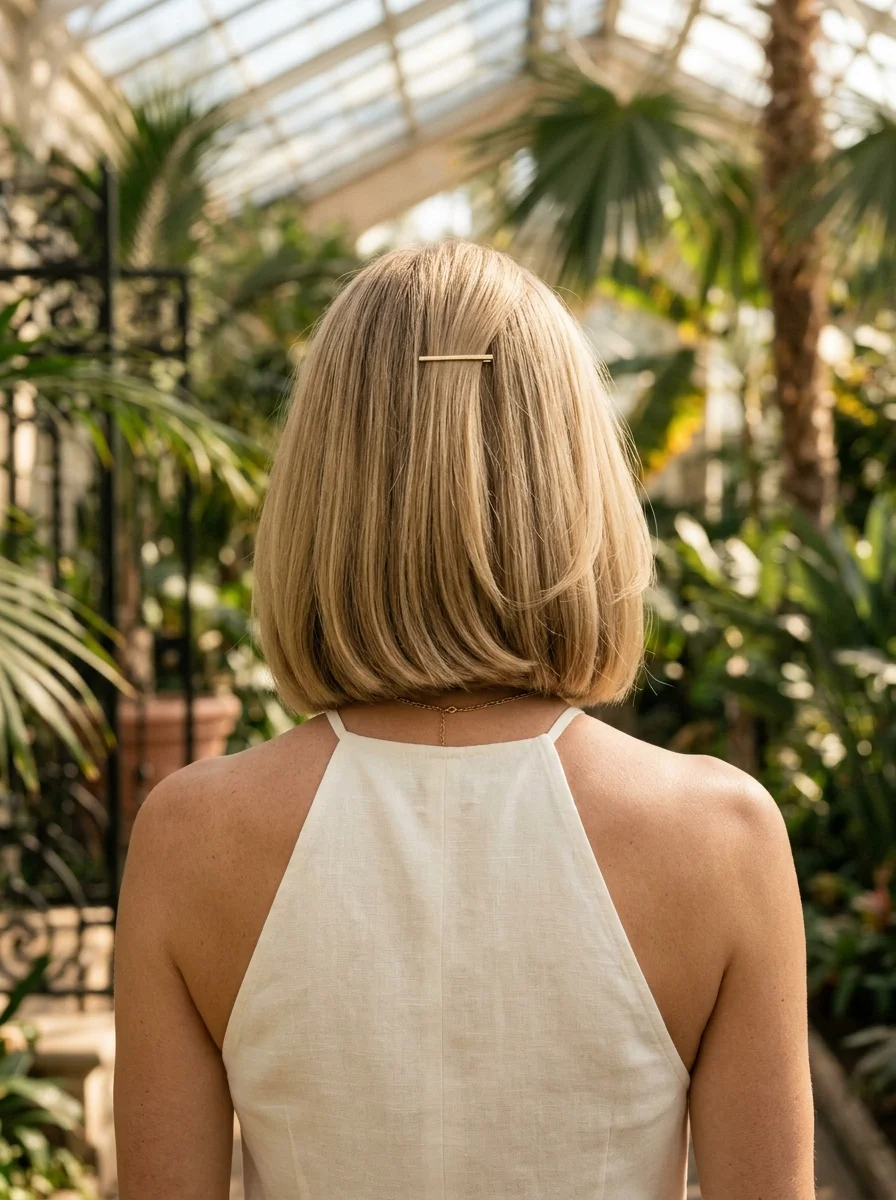
The overview: Sometimes the best haircut is the one that doesn't announce itself. The classic short bob is the most heat-friendly cut on this list — nothing on the neck, minimal styling time, and it grows out gracefully between salon visits. The subtle internal layers prevent bulkiness while maintaining the illusion of thickness, which is exactly what you want when hair density starts decreasing.
This is the cut designed to air-dry well. Blow-dry with a round brush for a polished finish, or let it dry naturally for a more relaxed look. Either way, the classic shape holds up. The warm brunette or soft caramel tones are universally flattering and hide gray regrowth better than lighter colors.
Why this look is popular: It's the ultimate "I woke up like this" cut. Minimal styling required, maximum polish delivered. The subtle layers add movement without creating visible "steps." The chin-length keeps everything off the neck — essential for summer comfort. It's ageless and projects put-togetherness with zero effort.
Where this look is suitable: Office settings, lunch meetings, church, everyday errands, and any occasion where understated elegance is the goal. This is the haircut equivalent of a white button-down — it works everywhere.
Step by step:
- Blow-dry with a round brush. Create a smooth, polished finish with a slight inward curve at the ends. This takes 5-10 minutes on chin-length hair.
- Lightweight smoothing serum. Apply a small amount to the surface to control flyaways and add shine.
- Flexible-hold hairspray. A light mist keeps the shape without stiffness.
- Air-dry option. Apply a curl-enhancing cream to damp hair and let it dry naturally for a more relaxed version of the same cut.
Tips and tricks: The classic bob grows out more gracefully than most cuts — you can stretch salon visits to 6-8 weeks. Invest in a good round brush (boar bristle is best) for the smoothest blow-dry. For very thick hair, ask your stylist to thin the internal layers slightly so the bob doesn't become too wide. For very fine hair, keep the layers minimal to maintain the illusion of thickness.
17.Voluminous Hollywood Waves with Deep Side Part
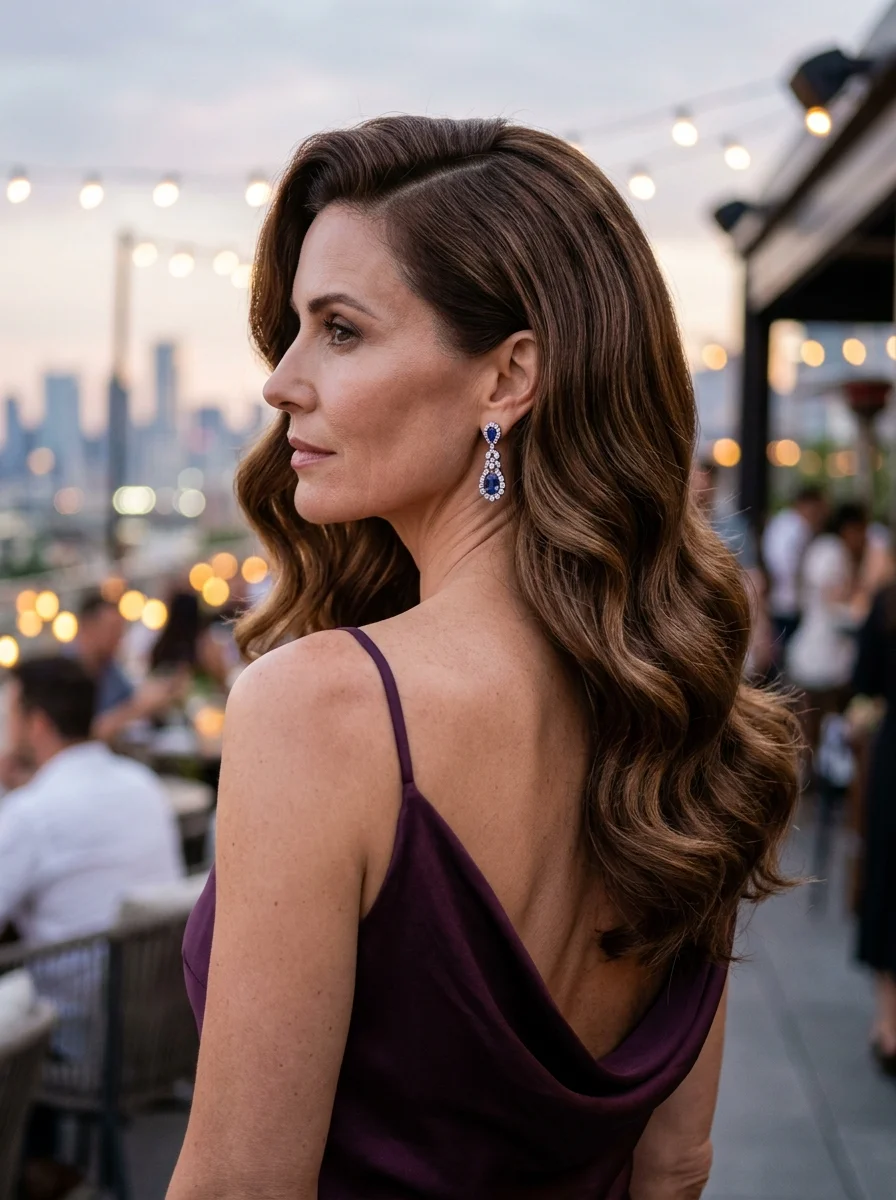
The overview: Hollywood waves are the most formal style on this list, and they earn that distinction through technique. Every curl travels in the same direction, creating continuous, cascading S-waves that look like they belong on a red carpet. The deep side part swept dramatically across the forehead adds the kind of volume that makes hair look twice as thick.
The boar bristle brush is the secret weapon here. After curling, brushing through with a boar bristle brush blends individual curls into uniform waves without creating frizz. A regular brush would destroy the wave pattern. This is a technique-driven style — the tools matter as much as the method.
Why this look is popular: The structured waves add incredible body and volume, which is especially flattering as hair thins with age. The high-shine finish reflects light, making hair look healthy and youthful. The deep side part creates the illusion of thicker hair. This is the hairstyle that makes people ask "who does your hair?"
Where this look is suitable: Red carpet events, formal summer evening events, black-tie weddings, holiday parties, and any occasion where maximum glamour is the goal. Too formal for casual settings — this is for when you want to make an entrance.
Step by step:
- Set in pin curls or rollers. Using a 1.25-inch curling iron, curl all sections in the same direction (away from the face). Pin each curl to cool in a coiled shape.
- Let cool completely. Wait at least 15 minutes. Hot curls collapse into shapeless waves within an hour.
- Brush with boar bristle. Using a boar bristle brush, brush through all the curls in the same direction. The waves should start to connect and form uniform S-patterns.
- Create the deep side part. Use the pointed end of a rat-tail comb to create a precise, deep side part. Sweep the hair dramatically across the forehead.
- Set with spray. A strong-hold hairspray locks the wave pattern. Apply shine spray for the glossy, red-carpet finish.
Tips and tricks: The wave direction must be consistent — if some curls go toward the face and others go away, you get frizz instead of waves. Practice the boar bristle brush technique on a small section first; too much brushing destroys the pattern, too little leaves individual curls visible. For extra hold, use a setting lotion before curling. This style photographs best from the side where the waves cascade.
28 Stunning Baddie Summer Hairstyles for 2026 🔥☀️
18.Soft Beachy Waves with a Glamorous Ear Cuff
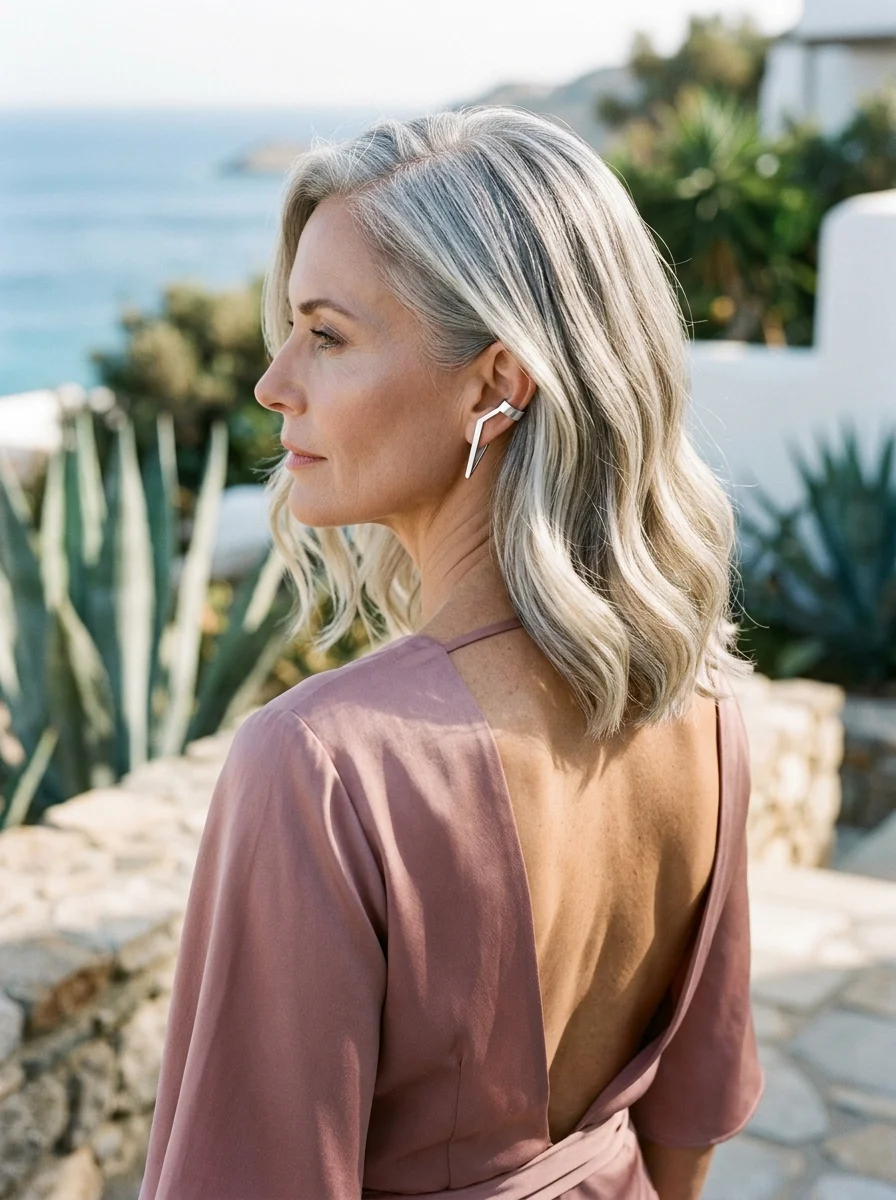
The overview: The ear cuff is the unexpected detail that makes people look twice. One side of the hair is tucked behind the ear to showcase a statement ear cuff — gold, crystal-encrusted, or both — while the other side falls in soft, undone waves. The asymmetry is the design: one side controlled and editorial, the other relaxed and romantic. It's bohemian glamour that works for rooftop bars, outdoor concerts, and beach weddings.
The waves themselves are intentionally imperfect — created with a flat iron or large-barrel wand, leaving the ends straight for a modern, undone finish. The sun-bleached blonde color with a root melt reinforces the effortless, vacation-energy aesthetic. This is the style that says "I just came from the beach but I also have excellent taste in jewelry."
Why this look is popular: The ear cuff draws attention upward toward the face and eyes, distracting from neck or jawline concerns. The one-side-tucked styling keeps hair off the face in breeze and humidity while looking intentional. The beachy waves are effortlessly flattering and heat-appropriate.
Where this look is suitable: Festival chic, rooftop bars, outdoor concerts, vacation dinners, beach weddings, and any setting where bohemian glamour is the goal. The ear cuff elevates it beyond casual but keeps it from being formal.
Step by step:
- Create waves. Use a flat iron or large-barrel wand, wrapping sections loosely and leaving ends straight for a modern finish.
- Add texture. Apply sea salt spray or texturizing mist for grit and separation. Shake out with your hands.
- Tuck one side. Sweep the hair on one side behind the ear. Secure with a small bobby pin hidden underneath if needed.
- Place the ear cuff. Slide the ear cuff onto the exposed ear's helix (upper cartilage). Adjust for comfort and security.
- Shape the waves. Use your hands to arrange the loose side so it falls naturally. The goal is effortless, not perfect.
Tips and tricks: If you don't have a cartilage piercing, most ear cuffs are clip-on and don't require one. The cuff should sit flat against the ear without pinching. For finer hair, the tuck behind the ear may need a small bobby pin to stay put — hide it under the hair just above the ear. The waves look best when they're not too defined; the looser, the better for this particular style.
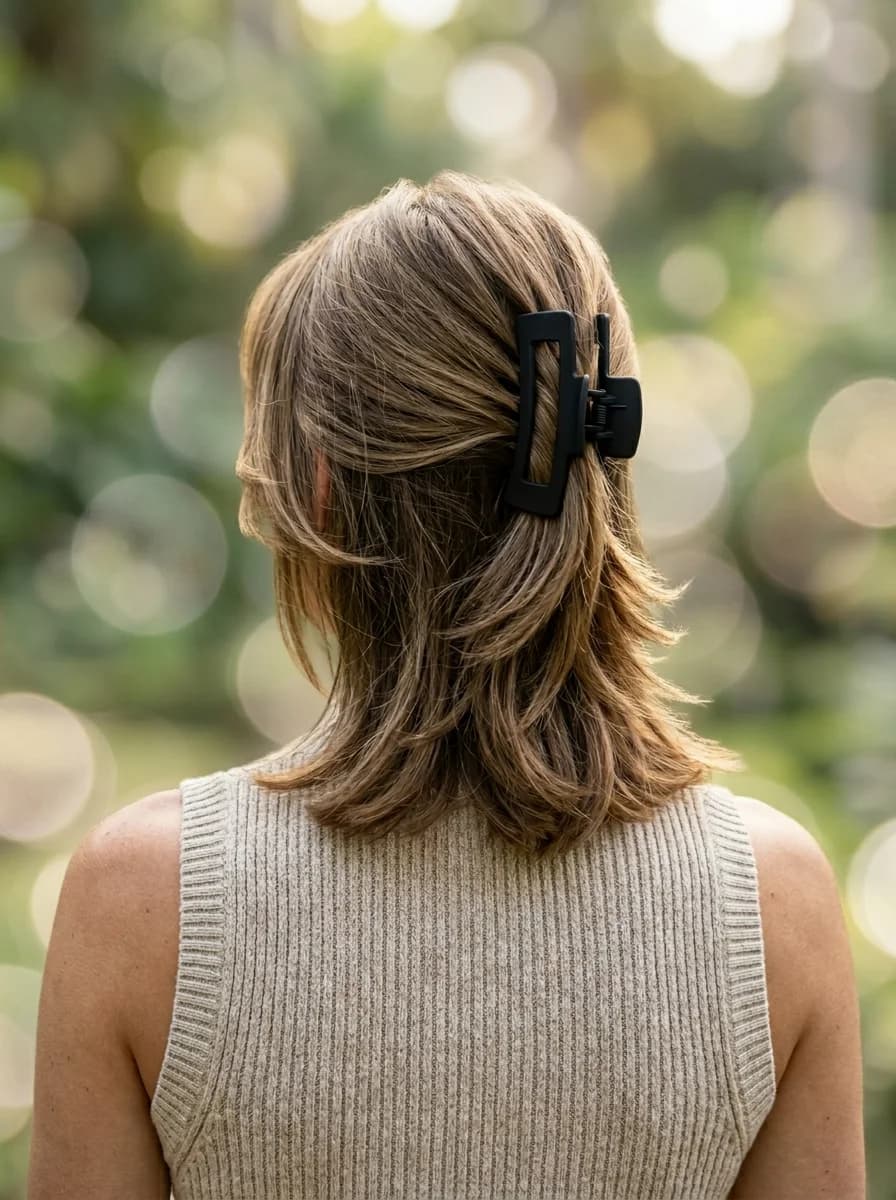
19.Half-Up Style with a Chic Claw Clip
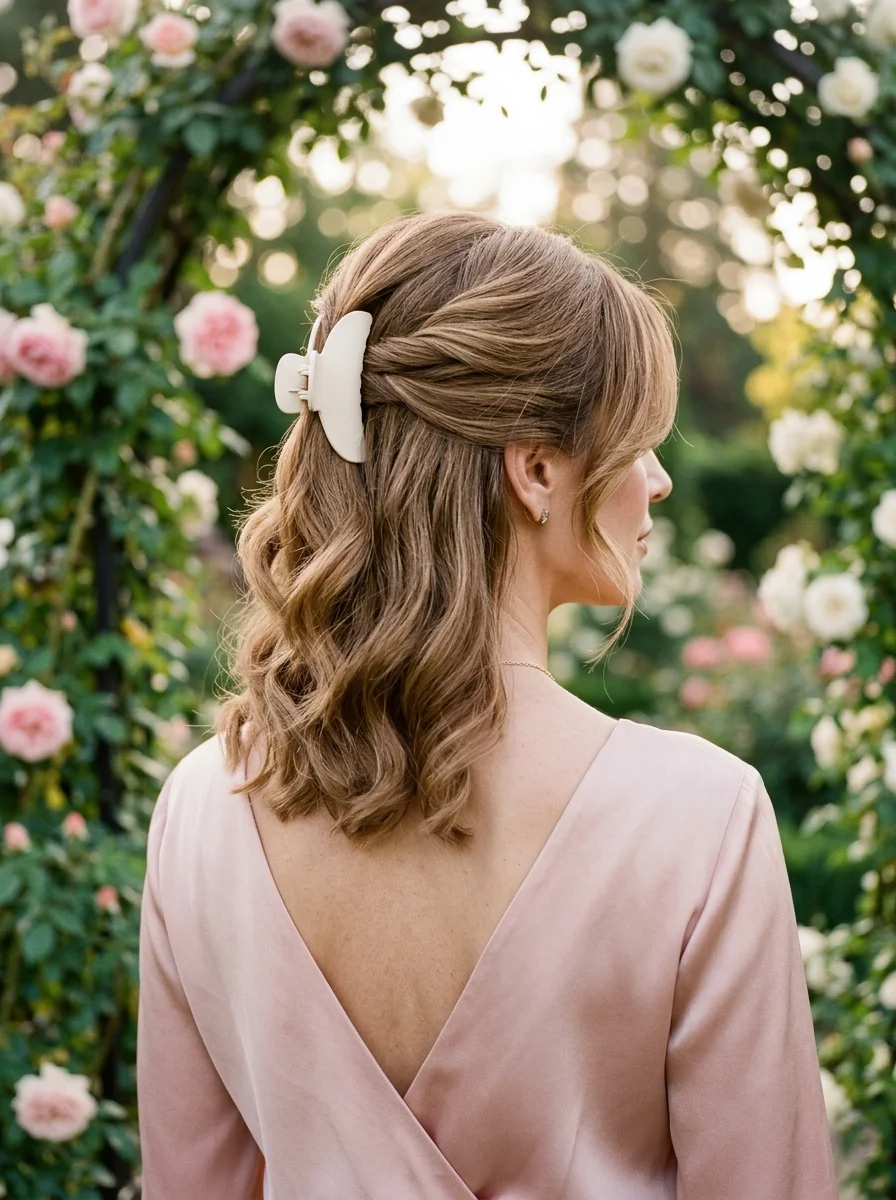
The overview: The half-up claw clip is the laziest-looking style that actually looks intentional. You pull the top section back, clip it, and the rest falls around your shoulders. The claw clip does the heavy lifting — it turns a basic half-up into something that looks styled. It's the 30-second hairstyle that looks like it took 15 minutes.
What makes this work for summer specifically is the combination of polish and practicality. The hair stays off your face during active moments, but the loose section keeps it feminine and relaxed. The volume created at the crown by the clip lift is flattering for thinning hair — it creates the illusion of more density exactly where you need it.
Why this look is popular: It bridges the gap between "I tried" and "I'm not trying too hard." The claw clip is gentle on hair — no tension headaches, no breakage from tight elastics. Medium to long hair with natural wave holds this best. The style works in 30 seconds and looks intentional all day.
Where this look is suitable: Work-from-home days, casual Fridays, weekend errands, coffee dates, and everyday summer wear. Practical yet stylish — the definition of effortless.
Step by step:
- Prep with texture. If hair is freshly washed, mist with texturizing spray from roots to ends. Second-day hair works fine.
- Create waves (optional). If your hair is straight, a quick pass with a 1.25-inch curling wand adds movement. Leave the ends out for a modern finish.
- Gather the top section. From your temples up, pull the top third of your hair back. Keep it loose — tight gathering defeats the purpose.
- Clip it. Secure the gathered section with your claw clip at the back of your head. Position it so it sits as a focal point.
- Adjust the volume. Gently lift the hair at the crown above the clip for a softer, more lifted silhouette.
- Set it. A light mist of flexible-hold hairspray locks the waves in place without making them crunchy.
Tips and tricks: Tease the crown area slightly before clipping for a softer, more lifted silhouette. For finer hair, clip a small backcombed section underneath the gathered hair to create the illusion of volume. The clip itself matters — a flat, barrette-style clip won't grip as well as one with teeth. Position the clip so it sits as a focal point but doesn't stick out awkwardly from the back of the head.
27 Stunning Beach Wedding Hairstyles for Brides & Family 2026 🌊💍
20.Sleek High Ponytail with Gold Hair Cuff
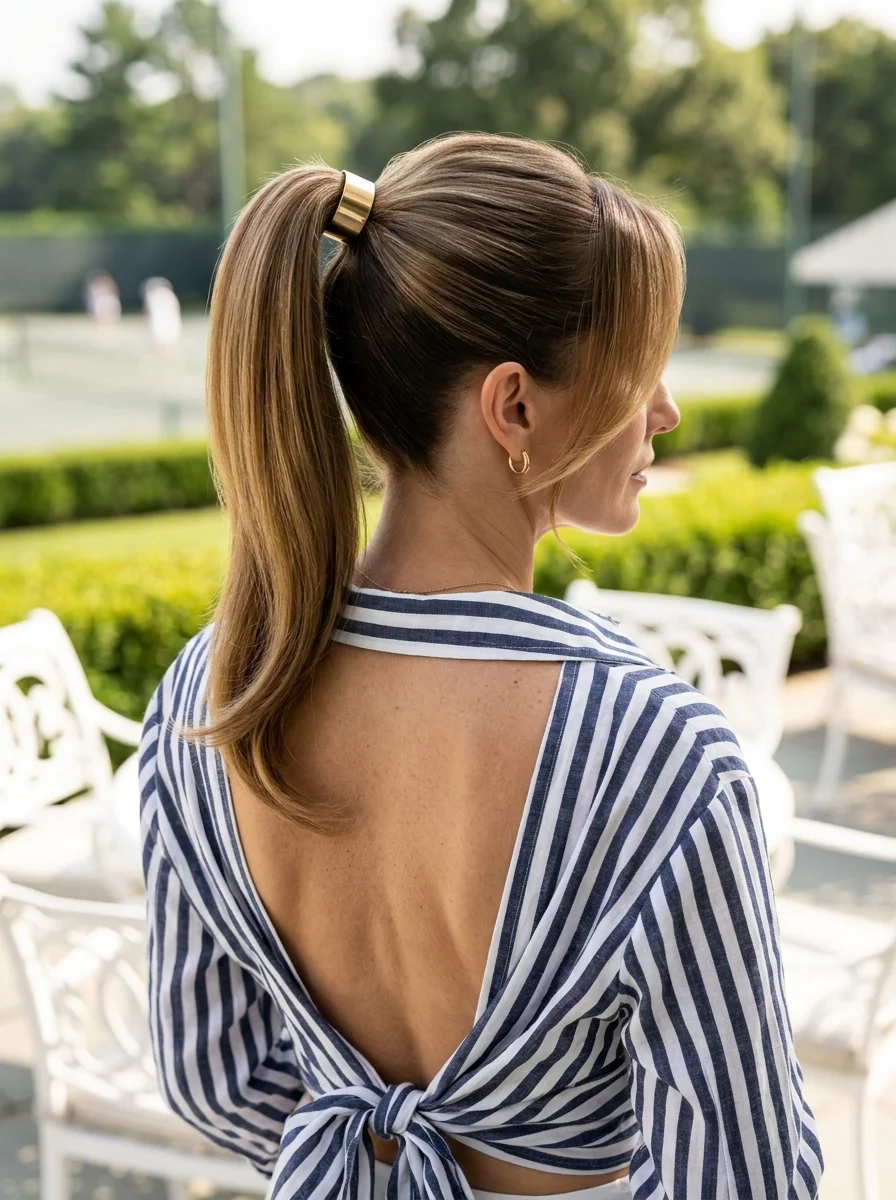
The overview: The sleek high ponytail with a gold cuff is the hairstyle equivalent of a power suit — it means business. The high placement lifts the face visually, creating a subtle facelift effect by pulling skin taut at the temples and jawline. The gold cuff transforms a basic ponytail into a luxury statement. It's the "I mean business" hairstyle that works equally well in boardrooms and at rooftop cocktail parties.
The sleek finish requires product — gel or pomade at the crown, edge control along the hairline — but the result is worth the effort. Every strand is controlled, every surface is smooth, and the gold cuff catches light at the ponytail base, drawing attention to the clean lines of the style.
Why this look is popular: The high ponytail lifts the face and creates a commanding silhouette. It keeps all hair off the neck — maximum cooling in summer heat. The sleek finish reads as polished and youthful, and the gold cuff adds a luxe detail that prevents the style from looking gym-ready.
Where this look is suitable: Business meetings, gym-to-brunch transitions, evening cocktails, and any setting where you want to look sharp and confident. The gold cuff makes it too dressy for truly casual settings.
Step by step:
- Blow-dry smooth. Use a paddle brush and smoothing serum to get the hair as smooth as possible before gathering.
- Gather high. Collect all hair at the crown (above the occipital bone). Secure tightly with a strong elastic.
- Add the gold cuff. Slide the cuff over the elastic. It should sit snugly and cover the elastic completely.
- Straighten the tail. Flat-iron the ponytail length for the pin-straight, high-shine finish. Work in small sections.
- Lay the edges. Use edge control gel and a toothbrush to smooth any baby hairs along the hairline. This creates the polished, clean finish.
- Set and shine. Mist with strong-hold hairspray on the crown. Apply a light shine spray to the ponytail for extra gloss.
Tips and tricks: A boar bristle brush is essential for achieving the sleek crown — it distributes product evenly and creates a smoother finish than a regular brush. For finer hair, use a volumizing mousse before blow-drying to add body. Don't be afraid to load up on product for the crown — that's what creates the contrast between the sleek base and the flowing tail. The gold cuff can be swapped for silver or crystal depending on your jewelry.
21.Chic Ponytail with a Silky Scarf Bow
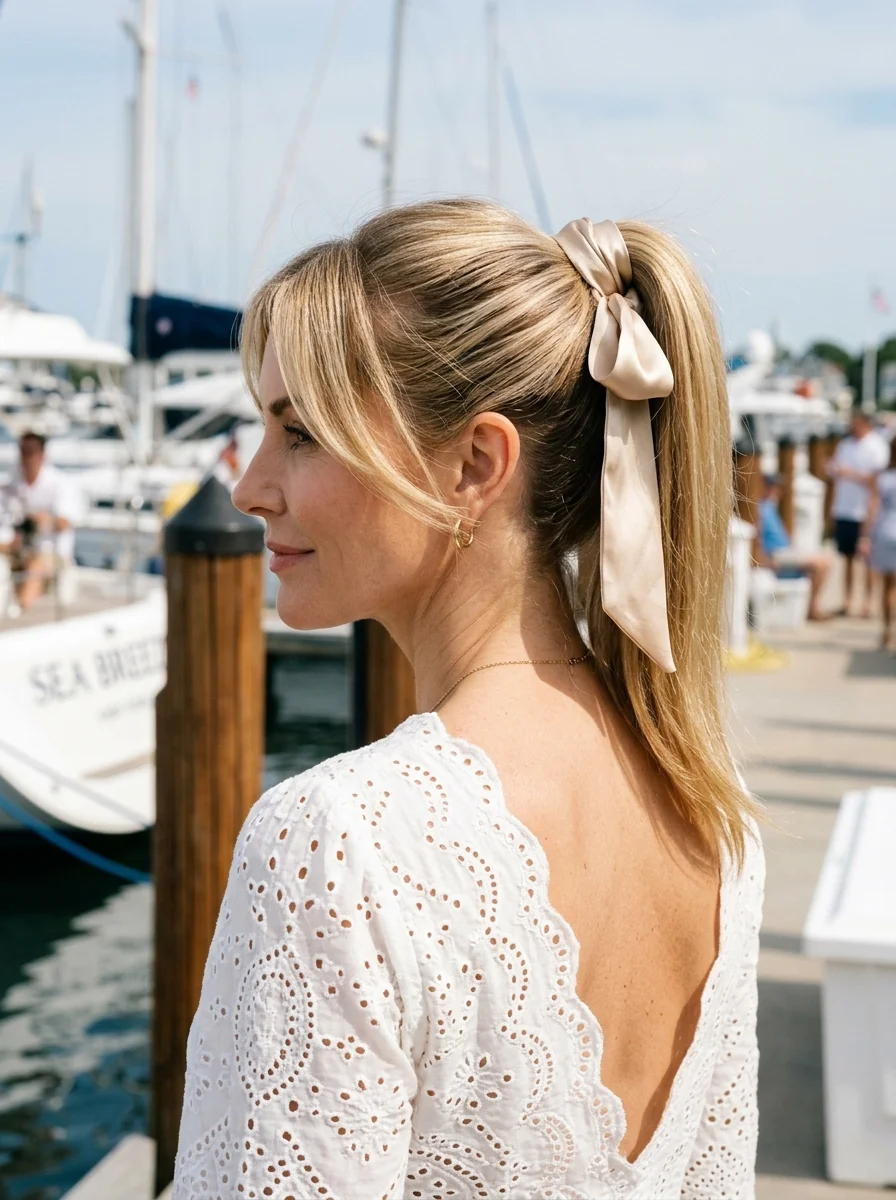
The overview: A silky scarf tied into a bow at the ponytail base is one of the easiest ways to make a simple hairstyle look expensive. The scarf adds color, texture, and a polished, intentional element that transforms "I put my hair in a ponytail" into "I chose this specific look." The bow introduces femininity without looking juvenile — especially when the scarf is a quality silk or satin in a sophisticated color or subtle print.
This works on second-day hair, which is a significant advantage in summer when daily washing isn't always practical. The scarf holds everything in place and hides the elastic, making the style look more considered than it actually is. Match the scarf color to your outfit for a coordinated look, or go bold with a contrasting print.
Why this look is popular: The scarf adds a polished accessory element without requiring heat styling. The ponytail lifts hair off the neck for cooling comfort. It works on second-day hair and accommodates humidity well since the scarf holds everything in place. The bow is a small detail that makes a disproportionate impact.
Where this look is suitable: Brunch, garden parties, outdoor weddings, vacation strolls, and any daytime setting where effortlessly chic is the goal. The scarf color determines the formality — silk reads dressy, cotton reads casual.
Step by step:
- Gather the ponytail. Brush hair into a smooth ponytail at the mid-crown. Secure with a thin elastic that matches your hair color.
- Fold the scarf. Fold a square silk scarf into a long band approximately 2 inches wide.
- Wrap and tie. Wrap the scarf around the elastic, tying it into a structured or floppy bow. Position the bow at the back or slightly to one side.
- Adjust the tails. Let the scarf tails hang alongside the ponytail or tuck them into the wrapped section for a cleaner look.
- Smooth the ponytail. Flat-iron or blow-dry the ponytail length for a glossy finish. A light shine spray adds extra polish.
Tips and tricks: Silk or satin scarves photograph better than polyester — the fabric has a natural sheen that reads luxury. The scarf width matters: 2 inches is the sweet spot. Narrower looks like a headband, wider overwhelms the ponytail. For fine hair, tease the crown slightly before gathering to create a more substantial silhouette.
28 Stunning Softball Hairstyle Ideas with Braids for 2026 🥎✨
22.Soft Beach Waves with a Grecian Leaf Headband
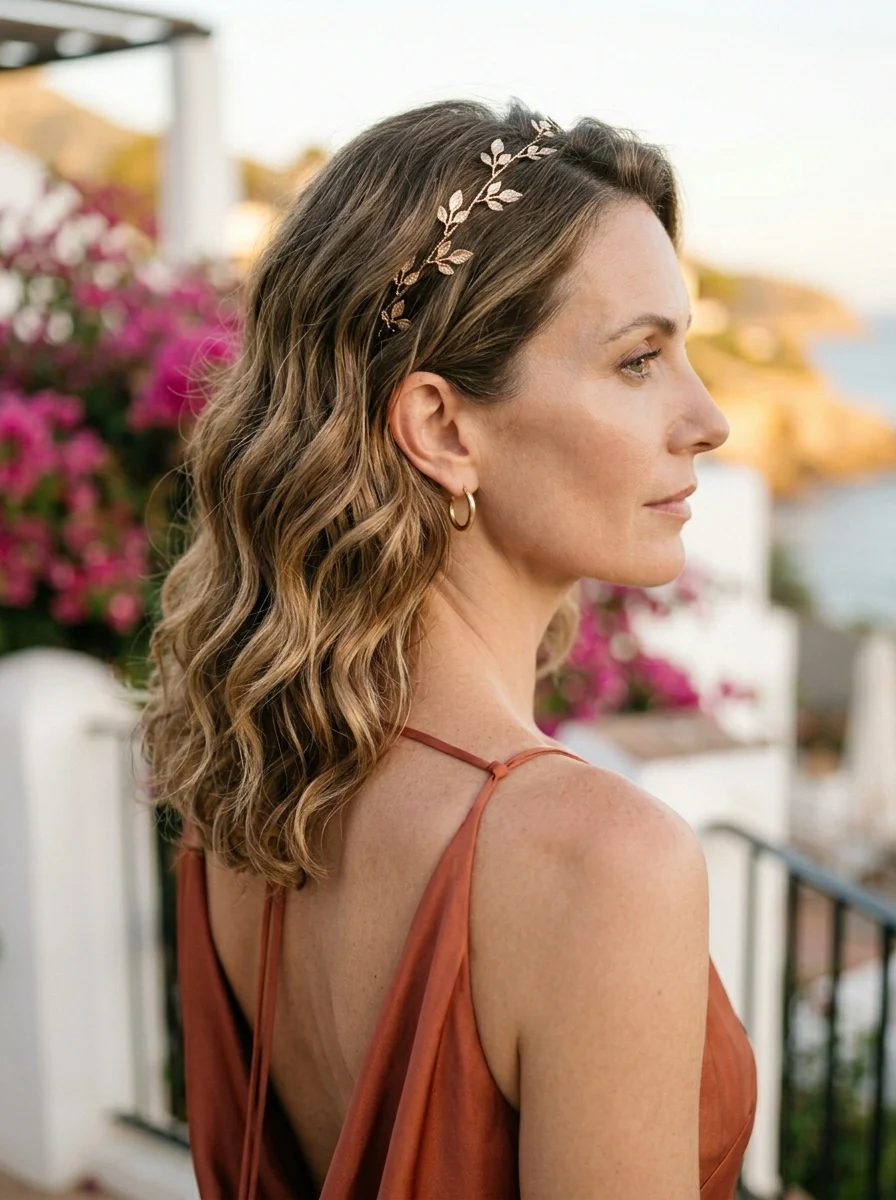
The overview: The Grecian leaf headband is the accessory that makes beach waves look like a deliberate style choice rather than "I didn't do my hair." The metallic gold or silver leaf motifs catch light beautifully in golden hour, and the headband pushes hair back from the face while adding height at the crown. It's the hairstyle equivalent of adding a statement necklace to a white t-shirt — the foundation is simple, but the accessory elevates everything.
The waves underneath are intentionally relaxed — created with a curling wand and shaken out for that tousled, Mediterranean vacation energy. The headband does the structural work of keeping hair off your face, which is especially useful in summer breeze and humidity.
Why this look is popular: The headband keeps hair off the face while adding a statement accessory that reads sophisticated rather than youthful. The soft waves add volume and movement without looking overdone. The metallic headband catches light beautifully in golden hour — perfect for summer evening events.
Where this look is suitable: Romantic outdoor date nights, summer solstice celebrations, wine country tours, Mediterranean vacations, and any setting where bohemian elegance is the goal. The headband makes it feel considered without being formal.
Step by step:
- Create waves. Use a 1.25-inch or 1.5-inch curling wand, wrapping sections away from the face and leaving ends straight.
- Texturize. Shake out the waves and apply sea salt spray or dry texture spray for grit and separation.
- Place the headband. Position the Grecian headband at the crown, pushing hair back from the face. The headband should sit about 2 inches back from the hairline.
- Adjust the waves. Pull a few pieces forward around the face for softness. The headband should frame the face, not compress it.
- Set lightly. A light mist of flexible-hold hairspray keeps the waves in place without stiffness.
Tips and tricks: The headband placement matters — too far forward and it slides toward the forehead; too far back and it gets lost in the hair. Two inches back from the hairline is the sweet spot. For finer hair, the headband helps create the illusion of volume at the crown. The metallic finish pairs best with warm-toned hair colors; silver headbands work better with cool-toned hair.
23.Cascading Hollywood Waves with a Gold Leaf Clip
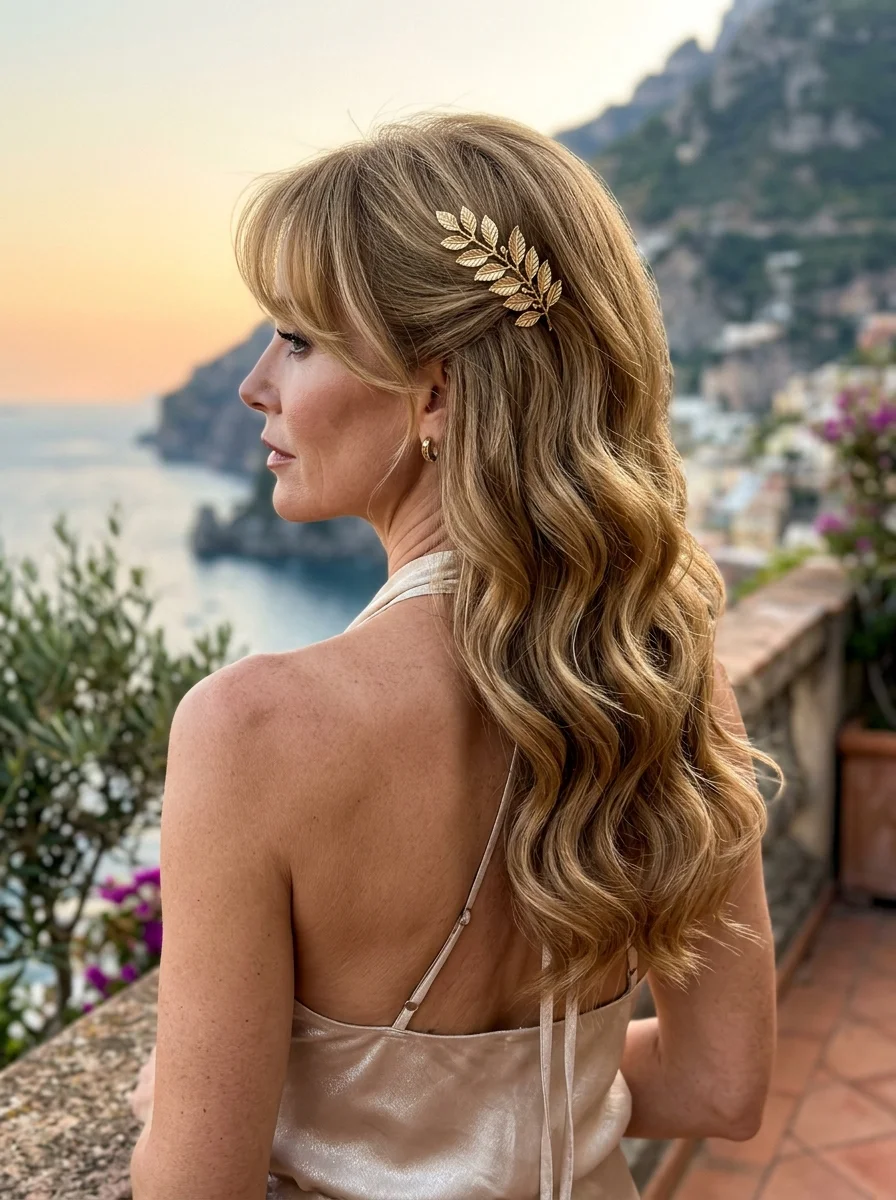
The overview: This is the most formal style on the list, and it's not close. Hollywood waves with a gold leaf clip pinned at the temple is the hairstyle you wear to black-tie summer weddings, milestone birthday celebrations, and any event where you want your hair to be the most memorable thing in the room. The gold leaf clip adds warmth near the face and catches light throughout the evening.
The technique here is specific: all curls must travel in the same direction to create continuous, cascading wave ridges. A boar bristle brush blends individual curls into uniform waves — a regular brush would destroy the pattern. This is a style that requires patience and the right tools, but the result is worth every minute.
Why this look is popular: Hollywood waves exude timeless glamour that flatters mature features by framing the face with structured movement. The gold leaf clip adds warmth and catches light near the face, creating a radiant effect. The swept-back side keeps hair cool and off the neck while looking red-carpet ready.
Where this look is suitable: Red carpet events, formal summer evening events, black-tie garden parties, milestone birthday celebrations, and summer galas. This is not a casual style — it's for when you want maximum impact.
Step by step:
- Set the waves. Using a 1.5-inch curling iron or Marcel iron, curl all sections in the same direction. Pin each curl to cool in a coiled shape.
- Cool completely. Wait at least 15 minutes. This is non-negotiable for lasting waves.
- Brush with boar bristle. Brush through all curls in the same direction, creating continuous wave ridges. Work slowly — the waves need to connect.
- Sweep one side back. Pin one side behind the ear or at the temple. This is where the clip will go.
- Place the gold leaf clip. Secure the swept-back side with the clip. Position it so the leaf motif catches light.
- Set with spray. Strong-hold hairspray locks the wave pattern. Shine spray adds the red-carpet gloss.
Tips and tricks: The curl direction must be consistent across all sections. If some curls go toward the face and others go away, the waves won't connect. Use a setting lotion before curling for extra hold. The gold leaf clip works best positioned where light will hit it directly — avoid placing it in shadow at the back of the head.
32 Stunning Summer Wedding Hairstyles for Brides ☀️💍
24.Sleek High Bun with a Chic Scarf Wrap
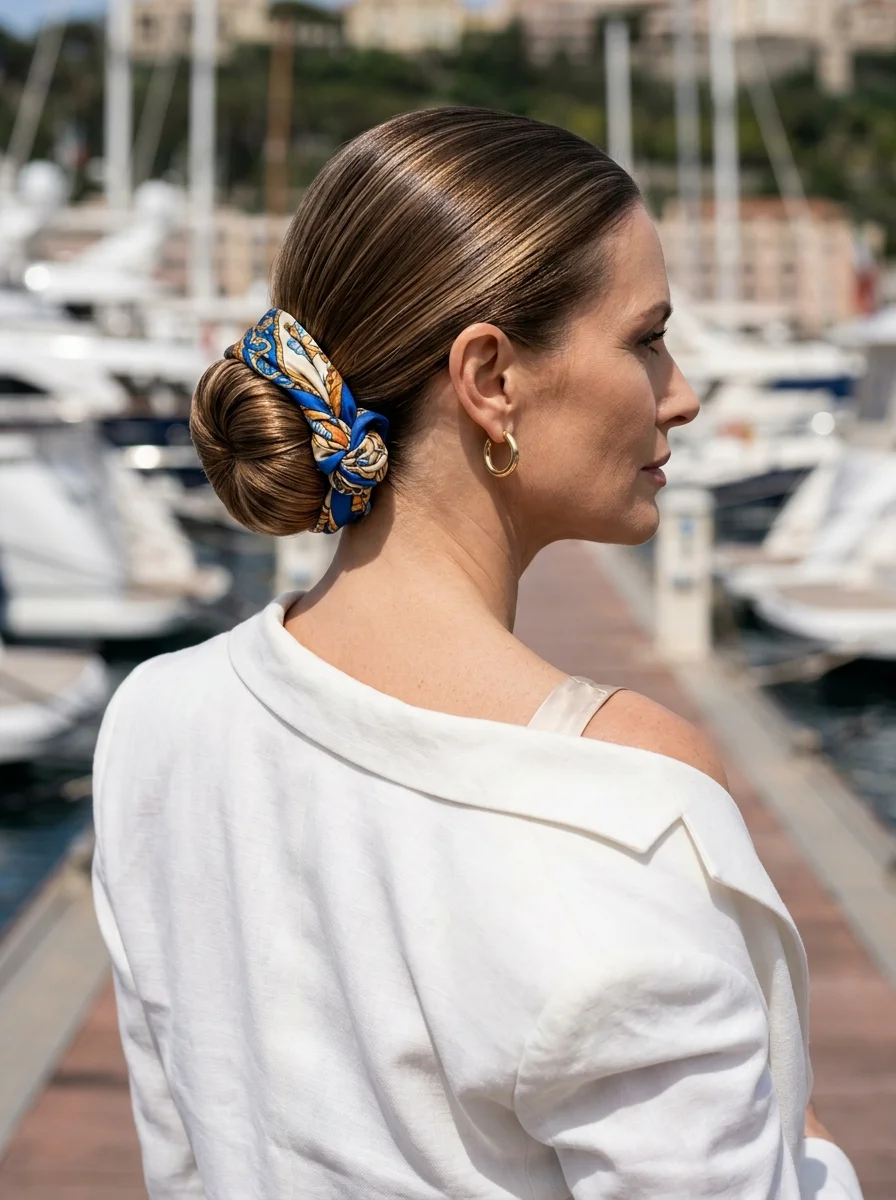
The overview: The sleek high bun with a scarf wrap is the editorial version of a topknot. The bun sits at the crown, completely lifting hair off the neck and shoulders. The scarf wrapped around the base adds a fashion-forward element and hides any imperfections at the bun's base — the place where bobby pins tend to show and hair tends to slip. The scarf does the concealing work while adding color and texture.
The sleek finish requires smoothing serum and possibly a flat iron, but the result is worth the effort. The contrast between the lacquered-smooth crown and the printed or textured scarf creates visual interest that a plain bun can't achieve. This style elongates the neck and highlights cheekbones — a universally flattering effect.
Why this look is popular: The high bun completely lifts hair off the neck — maximum cooling. The sleek finish looks intentional and polished, countering frizz from humidity. The scarf wrap adds a fashion-forward element and hides the structural mechanics of the bun. The style elongates the neck and highlights cheekbones.
Where this look is suitable: Sophisticated city outings, rooftop cocktails, art gallery openings, upscale brunch, and any setting where editorial polish is the goal. The scarf makes it feel considered without being formal.
Step by step:
- Smooth the hair. Blow-dry with a round brush and flat iron if needed. Apply smoothing serum for a polished, lacquered finish.
- Gather high. Collect all hair at the crown into a high ponytail. Secure tightly.
- Form the bun. Twist the ponytail and wrap it around the base. Secure with color-matched bobby pins at 12, 3, 6, and 9 o'clock positions.
- Wrap the scarf. Fold the scarf into a band. Wrap it around the bun base, tying it in a flat knot or bow. Tuck the ends or let them trail.
- Refine the crown. Go back over the crown with gel and a fine-tooth comb to ensure every strand is smooth and glossy.
- Edge control. Use a small amount of edge control gel along the hairline for a clean, polished finish.
Tips and tricks: A silk or satin scarf grips better than polyester and adds a natural sheen that photographs well. The scarf width should be 2-3 inches — narrower looks like a headband, wider overwhelms the bun. For curly or coily hair, the natural texture adds beautiful dimension to the bun — smooth the crown but let the bun showcase your curl pattern.
25.Romantic Messy Updo with Tortoiseshell Claw Clip
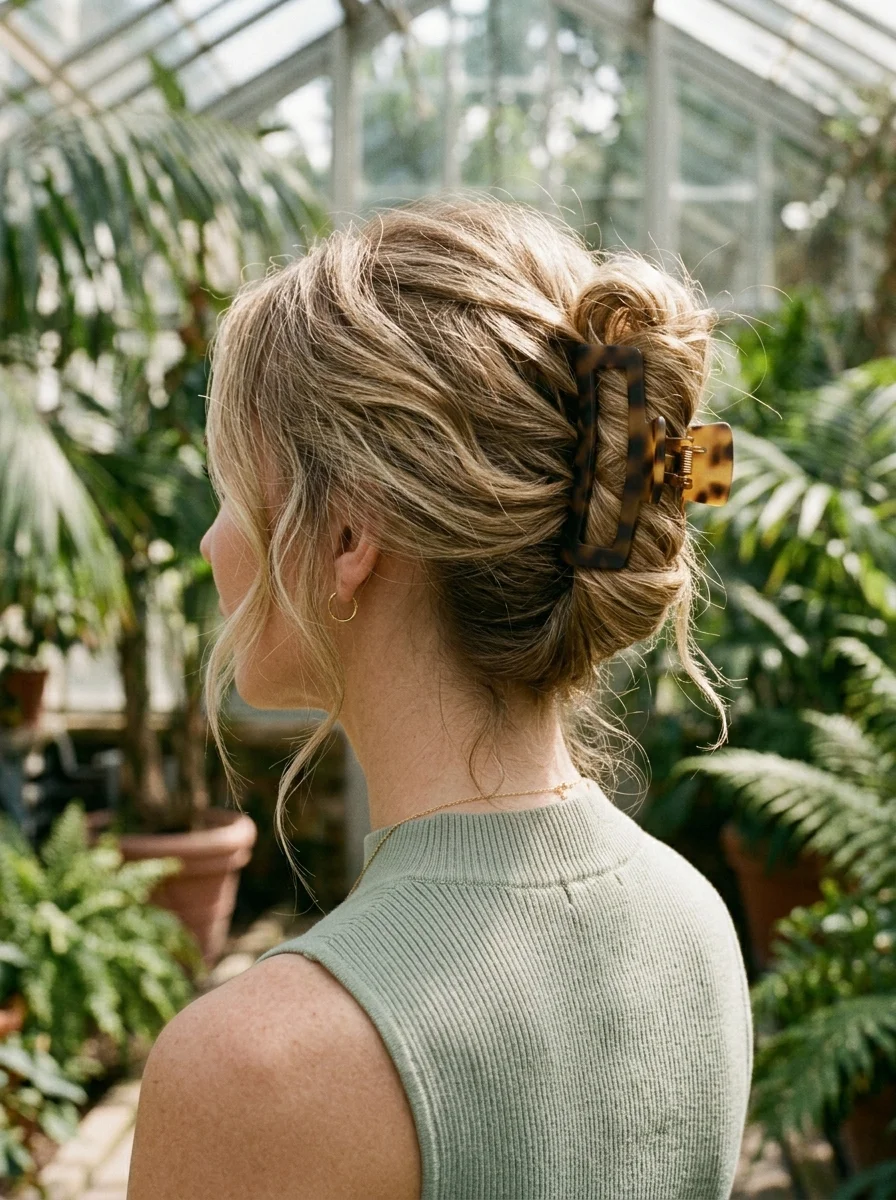
The overview: The tortoiseshell claw clip had a renaissance a few years ago, and it's not going anywhere — especially in summer. This version leans into the romantic side of the claw clip trend: loose waves twisted upward, the clip holding everything in place while shorter layers and face-framing pieces fall naturally. The amber-brown tortoiseshell pattern adds an organic, warm-toned accent that complements summer skin tones beautifully.
The claw clip is gentler on hair than elastic bands — less breakage, less tension at the roots, and no headache from tight pulling. For women over 40 dealing with hair that's thinner or more fragile, this is a practical advantage that doesn't sacrifice style. The messy texture is forgiving and low-maintenance, requiring no precision.
Why this look is popular: The claw clip holds securely without tension headaches. The messy texture is forgiving and low-maintenance. Keeping hair up ventilates the neck while the loose pieces soften the face. The tortoiseshell pattern adds warmth that complements summer skin tones.
Where this look is suitable: Casual dates, weekend farmers markets, outdoor concerts, wine tasting, and any setting where effortless romance is the goal. Too relaxed for formal events, but perfect for everyday summer life.
Step by step:
- Add texture. Create loose waves or bends with a curling iron, or air-dry with mousse for natural wave enhancement.
- Gather loosely. Collect hair at the back of the head. Don't pull tightly — you want it relaxed and romantic.
- Twist upward. Twist the gathered section upward, creating a loose, messy shape. Tuck the ends around the base.
- Clip it. Secure with the tortoiseshell claw clip. Adjust the bun so the clip holds everything but still looks artfully undone.
- Pull out pieces. Gently tug strands around the ears and temples to create the soft, face-framing effect. These wisps are essential for the romantic feel.
- Set lightly. Light-hold hairspray or texture spray holds everything without stiffness.
Tips and tricks: A large clip (3-4 inches) holds more hair and creates a more dramatic silhouette than a small one. For finer hair, backcomb the crown slightly before clipping to add volume. The tortoiseshell pattern is warm-toned — it pairs best with warm hair colors (honey, caramel, warm brown). For cool-toned hair (ash blonde, platinum), consider a solid black or clear acrylic clip instead.
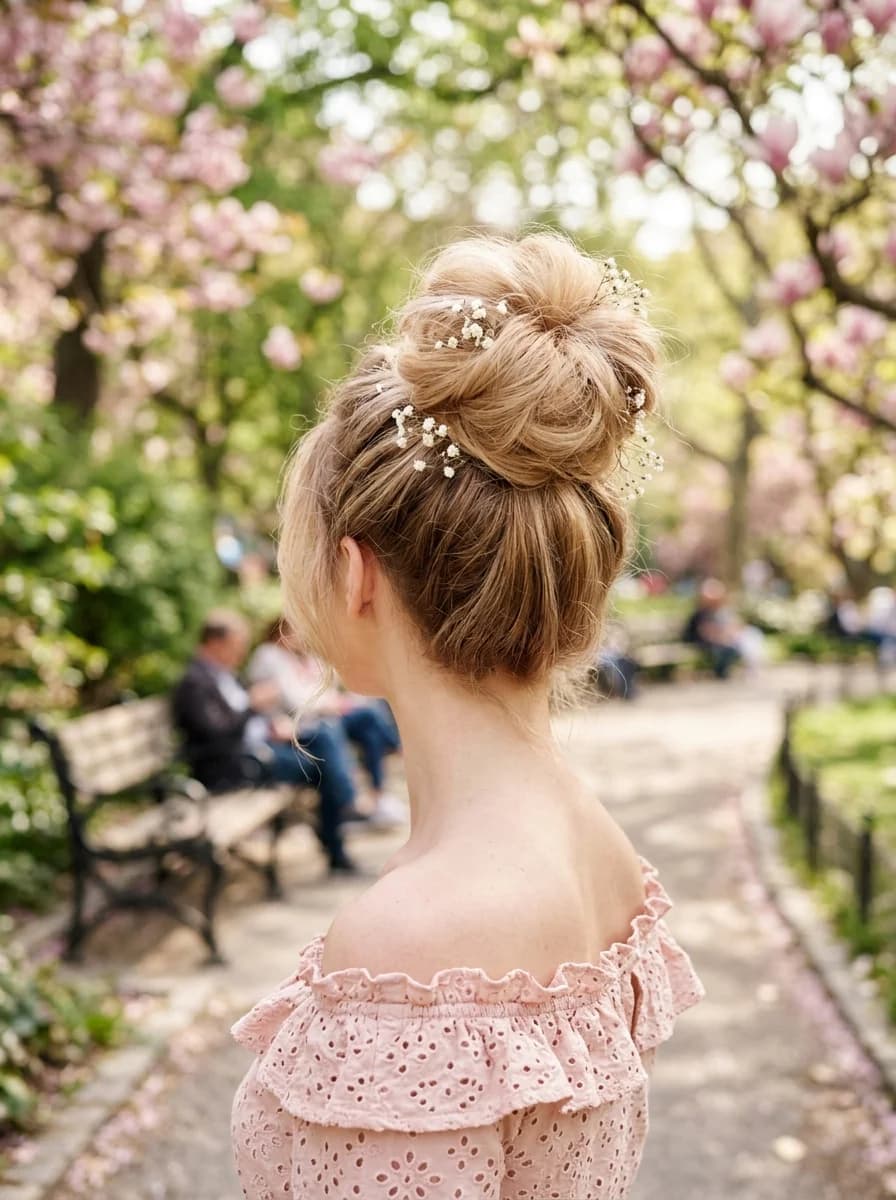
21 Hot Summer Buns Hairstyle Ideas for 2026 ☀️🔥
26.Textured Bob with Subtle Layers and Pearl Pins
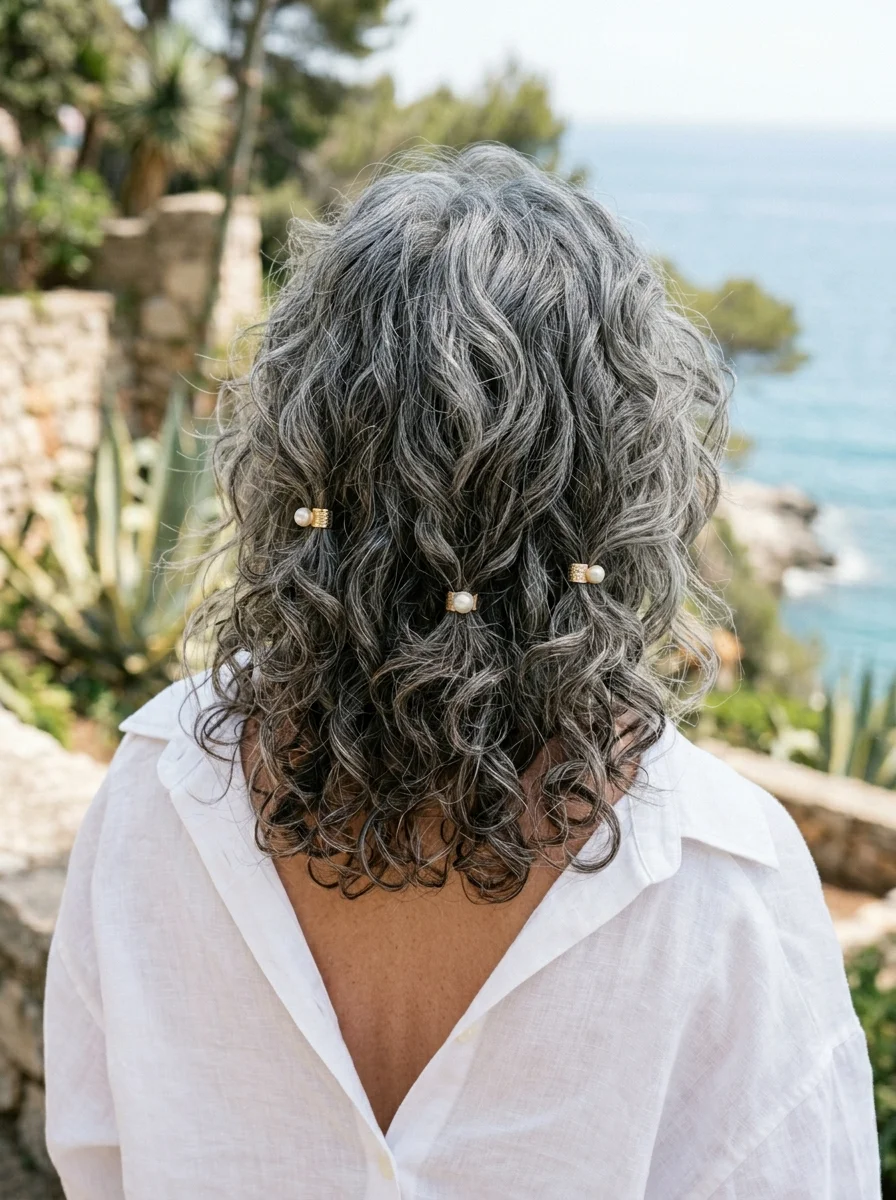
The overview: The textured bob with pearl pins is the hairstyle that looks like it took a professional 45 minutes but actually takes 10. The bob itself is cut with internal texture — point-cutting or slide-cutting — that creates piecey, lived-in movement without visible layering. The pearl pins scattered along one side add elegant points of light that catch attention without overwhelming the clean lines of the cut.
The pearl pins are having a major moment in hair accessories, and they work particularly well with bobs because the short length means the pins don't get lost in a mass of hair. Three to five pins clustered at the temple or along one side create an asymmetric accent that elevates the whole look from "nice haircut" to "styled look."
Why this look is popular: The bob is a timeless, low-fuss length that doesn't trap heat against the neck. Subtle layers add volume and movement without requiring extensive styling. Pearl pins add elegance and light reflection near the face without being over-the-top. The cut grows out gracefully, reducing salon visit frequency.
Where this look is suitable: Office-to-dinner transitions, cocktail parties, wedding guest appearances, and holiday summer evenings. The pearls make it feel special without being formal. Works across professional and social settings.
Step by step:
- Blow-dry smooth. Use a flat paddle brush for a smooth foundation. Focus on getting the hair straight without killing all texture.
- Add texture. Work a texturizing spray or pomade through the mid-lengths and ends, twisting pieces to create the lived-in definition.
- Place the pearl pins. Cluster 3-5 pearl pins along one side, starting at the temple and working backward. Space them unevenly for an organic look.
- Shape with hands. Use your hands to arrange the texture around the pins and face. The goal is effortless, not perfect.
- Set lightly. A light mist of flexible-hold hairspray keeps the texture defined without crunch.
Tips and tricks: The pearl pins are available from most beauty supply stores. Place them where light will hit them — the temple area catches light naturally. For very fine hair, backcomb the root area slightly before placing the pins to create a more secure hold. The pins can be repositioned throughout the day without damaging the style — a practical advantage over固定 accessories.
27.Beachy Waves with Relaxed Bangs and Sunglasses
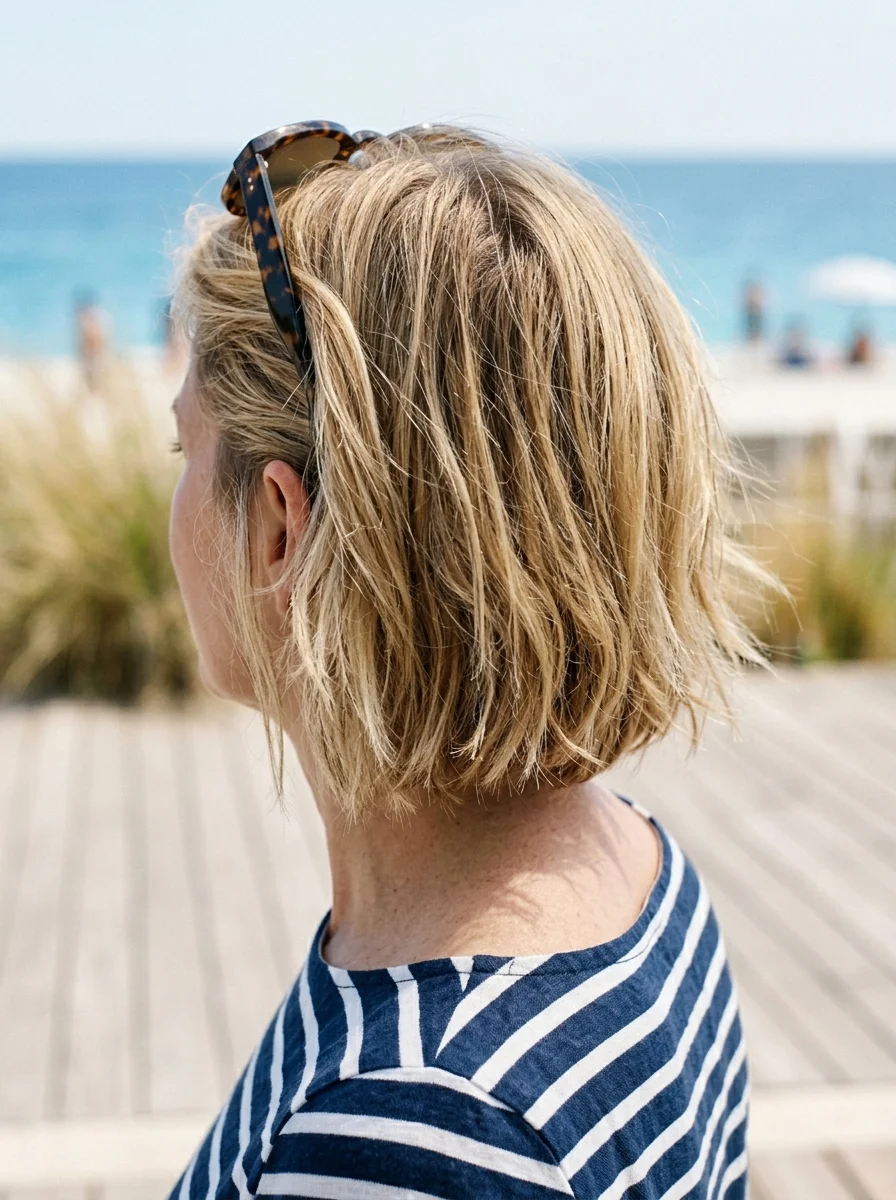
The overview: Bangs and sunglasses are a practical pairing that happens to look incredibly cool. The sunglasses pushed up on the head hold the bangs back slightly, creating a relaxed, lived-in effect that says "I woke up like this" while being intentionally styled. The beachy waves are airy and textured — the kind of hair that looks better after a day at the beach than it did before.
The wispy, piecey bangs are the key detail. They're not blunt or heavy — they're light enough to see through, which softens the forehead and draws attention to the eyes. The sunglasses-as-accessory is practical and chic, serving double duty as both sun protection and hair accessory.
Why this look is popular: Bangs camouflage forehead lines and draw attention to the eyes, creating a youthful frame. The beachy texture requires minimal heat styling, protecting hair from further damage. Sunglasses-as-accessory is practical and stylish — it holds the bangs back while adding a cool-girl element. The overall look is relaxed and age-appropriate.
Where this look is suitable: Beach days, poolside lounging, weekend errands, road trips, and outdoor festivals. This is the most casual style on the list — it's designed for when you want to look good without trying.
Step by step:
- Texturize damp hair. Apply texturizing spray or mousse from roots to ends.
- Air-dry or diffuse. Let the natural wave pattern emerge. Scrunch as it dries. Avoid touching it too much while wet.
- Blow-dry the bangs. Use a small round brush to direct the bangs forward and slightly to one side. This is the one section that benefits from intentional styling.
- Add definition. Work a small amount of texturizing paste through the ends for piecey definition.
- Add the sunglasses. Push oversized sunglasses up onto the head, allowing the bangs to fall naturally around them.
Tips and tricks: The bangs need regular trimming — every 4-6 weeks — to maintain that wispy, piecey quality. Letting them grow out too long turns them into curtain bangs, which is a different style. For very straight hair, a quick flat iron pass on the mid-lengths creates the beachy wave effect. The sunglasses should sit comfortably without pressing the bangs flat — adjust the placement until it feels natural.
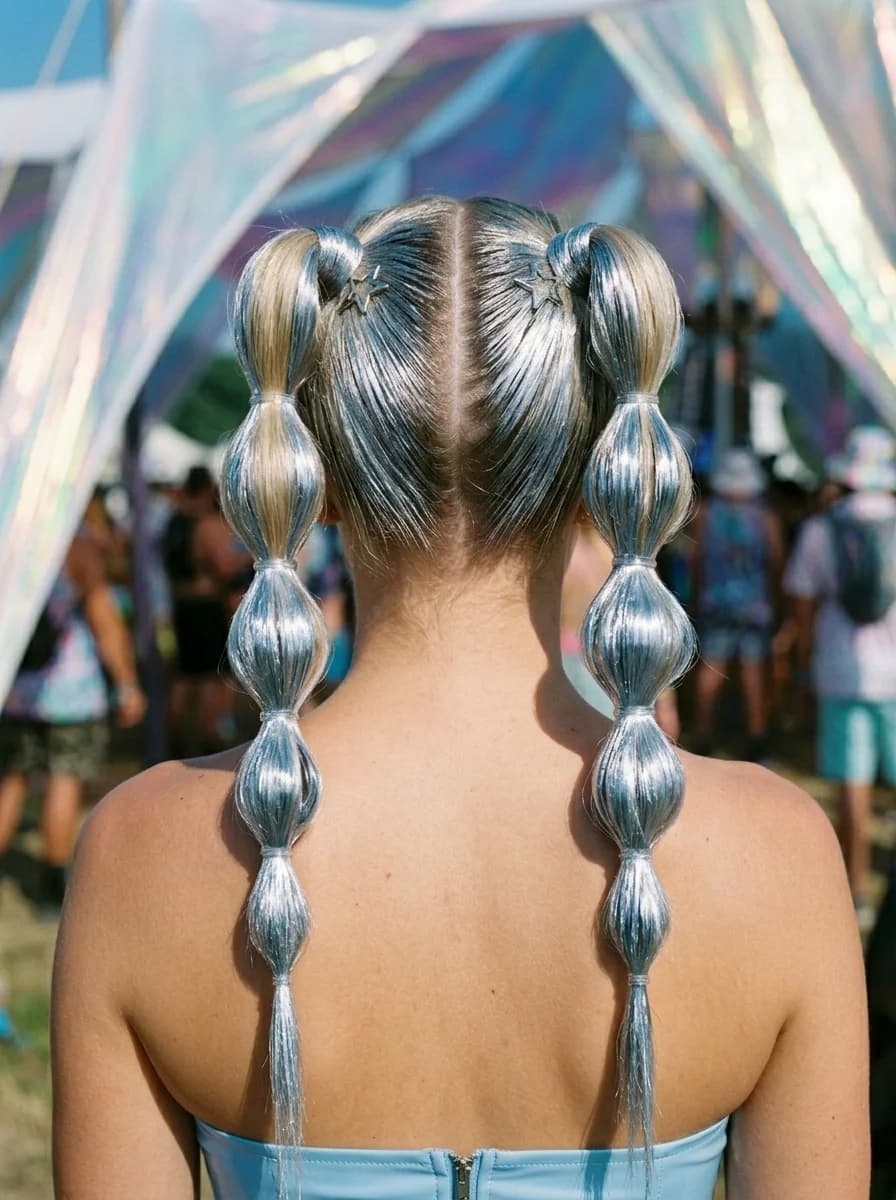
24 Stunning Festival Hairstyle Ideas for Music Concert Nights 2026 🎶✨
28.Sleek and Chic Chin-Length Bob
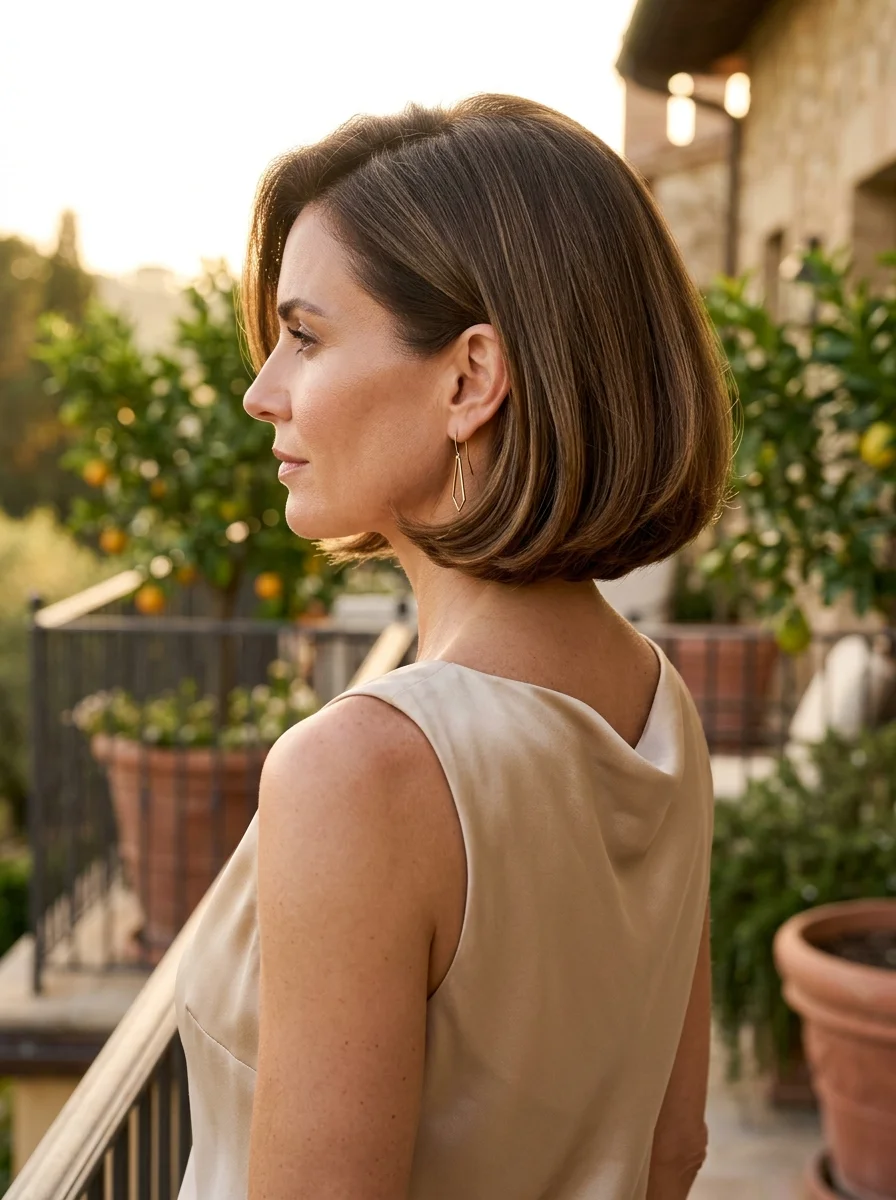
The overview: The chin-length bob is the most minimalist style on this list — no layers, no texture, no accessories. Just a precision cut with razor-sharp edges and a glass-like finish. It's the haircut that says "I don't need to try hard because the cut does everything." The sharp jawline cut draws attention to the jaw and neck — features that often remain elegant with age.
The sleek finish requires a flat iron and smoothing serum, but the daily styling time is minimal once the precision cut is in place. This is a wash-and-go style that looks better the second day. The bold, rich color — jet black, deep espresso, or striking copper — makes a statement without any additional styling.
Why this look is popular: The chin-length bob is incredibly cooling — all hair off the neck and shoulders. The sleek finish looks polished and intentional, projecting confidence and sophistication. The sharp lines convey modernity. It's low-maintenance daily styling with high-impact results.
Where this look is suitable: High-fashion moments, business meetings, cocktail events, date nights, and any setting where minimalist chic is the goal. The precision cut makes it feel dressy without being formal.
Step by step:
- Blow-dry for smoothness. Use a paddle brush to get the hair as smooth as possible. Direct the airflow downward.
- Flat-iron section by section. Work through the hair in small, even sections for a glass-like finish. Keep the iron moving to avoid heat damage.
- Add shine. Apply a shine spray or serum for high gloss. The finish should be reflective.
- Create the part. Use the pointed end of a rat-tail comb for a precise center or deep side part.
- Edge control. A small amount of anti-frizz serum along the hairline keeps everything pristine.
Tips and tricks: The precision cut is everything here — invest in a skilled stylist who can deliver razor-sharp lines. Between salon visits, the style holds its shape well. For very thick hair, ask your stylist to thin the internal weight slightly so the bob doesn't become too heavy. The chin-length bob pairs beautifully with statement earrings that frame the jawline.
29.Wavy Lob with a Floral Headband
The overview: The lob is widely considered the most universally flattering length — long enough to pull back, short enough to stay cool. Adding a floral headband transforms it from everyday to celebratory without requiring a full restyle. The fabric or silk flowers in soft pastels or vibrant summer hues push hair back from the face while adding natural volume at the crown. It's romantic, feminine, and unmistakably seasonal.
The soft waves are created with a 1.25-inch curling iron or by air-drying with curl-enhancing cream. They don't need to be perfect — the floral headband adds enough visual interest that minor wave imperfections disappear into the overall effect. This is the hairstyle for garden parties, bridal showers, and Mother's Day brunch.
Why this look is popular: The floral headband adds a celebratory, seasonal touch that feels festive without being costume-like. The soft waves create volume that counters thinning hair. The headband hides any root concerns and pushes hair off the face. The lob length is universally flattering and versatile.
Where this look is suitable: Outdoor weddings, bridal showers, Mother's Day brunch, spring and summer festivals, and any feminine, celebratory occasion. The floral headband makes it feel special without being formal.
Step by step:
- Create waves. Use a 1.25-inch curling iron or air-dry with curl-enhancing cream. Wrap sections loosely for soft, romantic waves.
- Add body. Apply a lightweight mousse or wave-enhancing spray for gentle volume and movement.
- Place the headband. Position the floral headband across the crown, about 2 inches back from the hairline. Push it gently into the hair so it sits naturally.
- Adjust the waves. Pull a few pieces forward around the face for softness. The headband should frame, not compress.
- Set lightly. A light mist of flexible-hold hairspray keeps the waves in place without stiffness.
Tips and tricks: The headband style matters — fabric or silk flowers read sophisticated, plastic flowers read costume. Invest in a quality headband. For finer hair, the headband helps create the illusion of volume at the crown. The lob grows out gracefully — you can stretch salon visits to 6-8 weeks. This style works equally well with or without the headband, making it versatile for transitioning from daytime to evening.
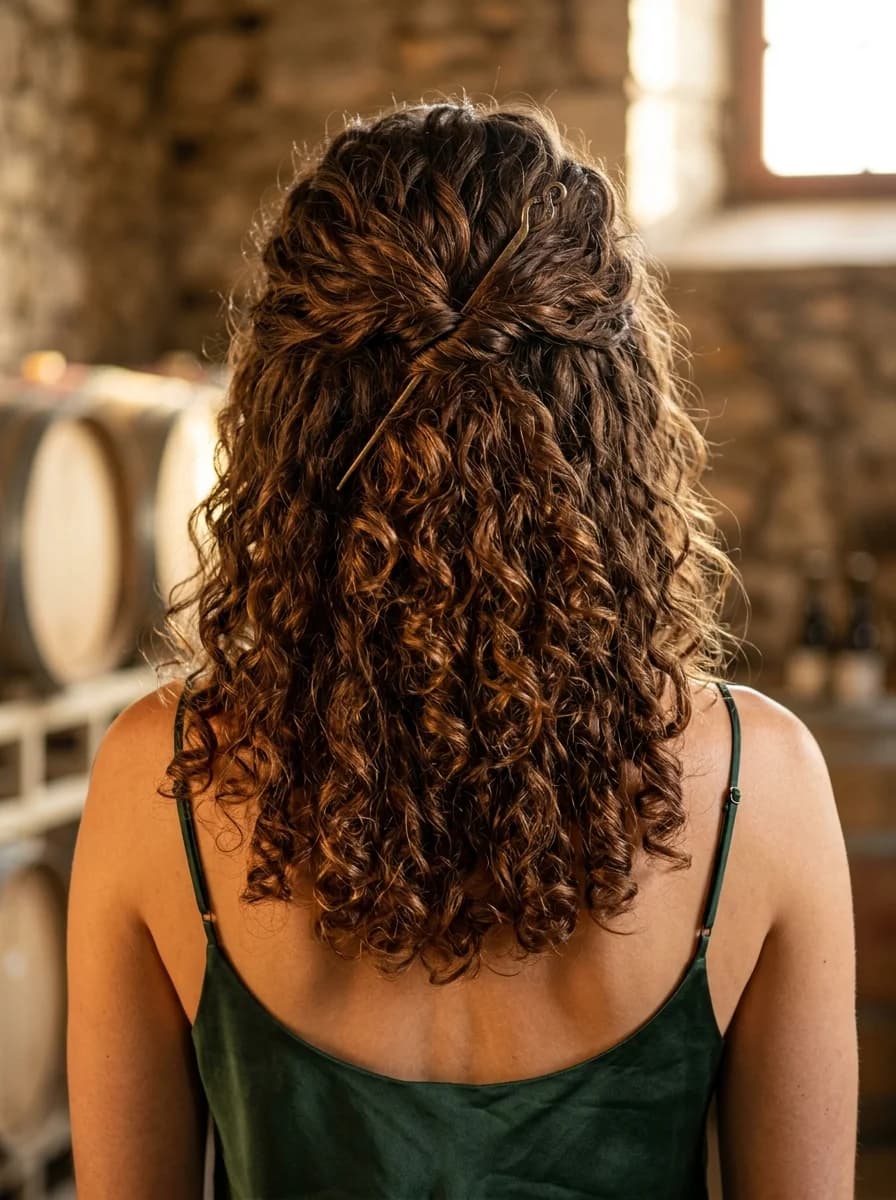
25 Top Curly Hairstyle Trends for 2026 ➰✨
30.Textured Pixie Cut with Piecey Styling
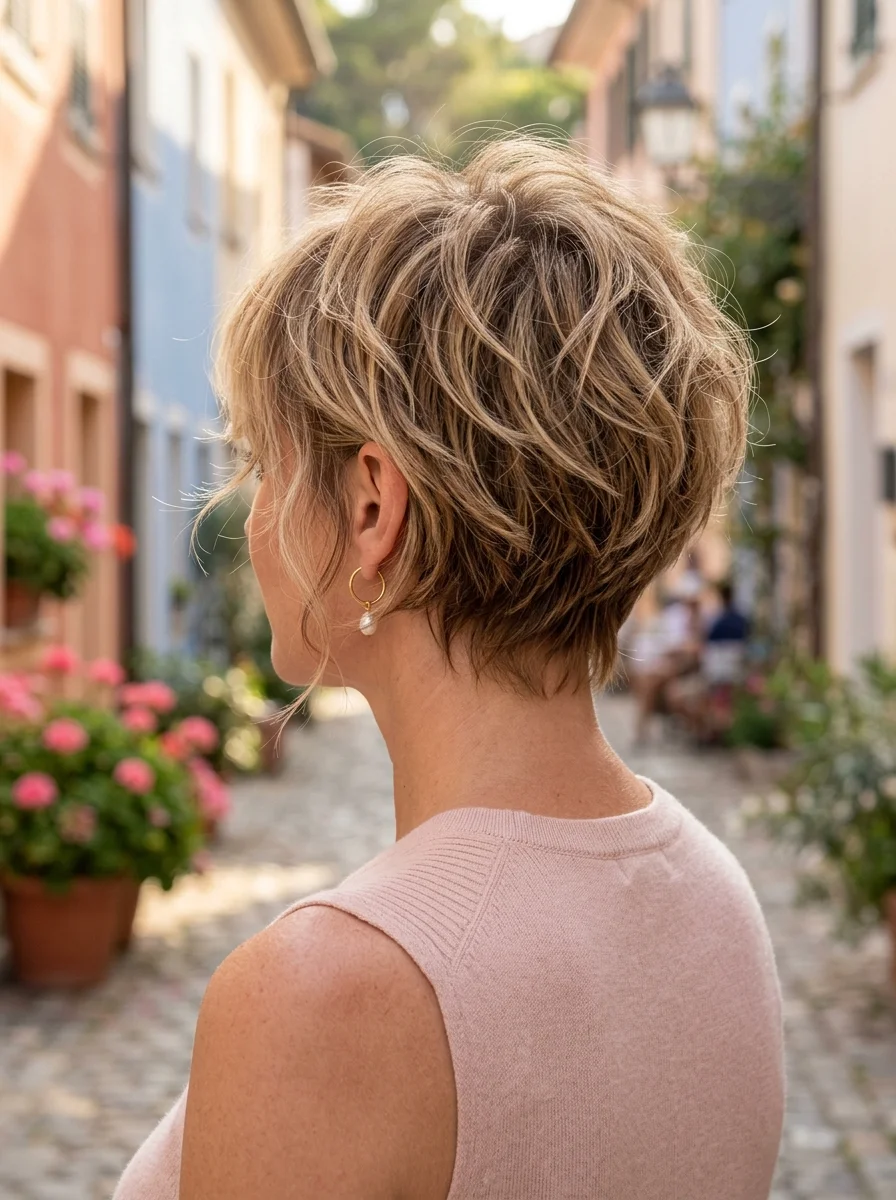
The overview: The pixie is the ultimate summer cut — zero heat retention, minimal styling time, and maximum cool comfort. This version uses texturizing shears or razor cutting to create piecey, defined movement throughout the top sections. The result is controlled chaos: structured enough to look intentional, messy enough to look effortless. For women embracing natural gray or silver, the pixie showcases that color beautifully.
The styling product is everything here. A matte pomade, wax, or texturizing paste worked through the top sections creates the piecey definition that separates a styled pixie from a "I just got out of the shower" pixie. Two minutes of twisting and pulling sections upward and forward, and you're done. It's the most low-maintenance option on this list.
Why this look is popular: The pixie is the most heat-friendly cut — nothing on the neck, minimal styling time. The textured piecey styling adds dimension and prevents the "flat" look that can age the face. Short hair draws attention to bone structure, eyes, and jawline. It's also the most low-maintenance option, requiring only a dab of product and 2 minutes of styling.
Where this look is suitable: Any occasion from casual to formal — this is a power style. It works at the office, at dinner, at outdoor events, and everywhere in between. The versatility is unmatched.
Step by step:
- Towel-dry. Start with towel-dried hair — not soaking wet, not fully dry.
- Apply product. Work a matte pomade, wax, or texturizing paste through the top sections. Use a pea-sized amount to start; you can always add more.
- Create piecey texture. Twist and pull sections upward and forward for definition and height. The goal is controlled chaos — structured pieceyness that looks effortless.
- Smooth the sides. Use a small amount of product to smooth the sides flat or tuck them behind the ears.
- Set lightly. A light-hold hairspray locks the style without stiffness.
Tips and tricks: The product choice matters — matte formulas create a modern, editorial finish. Glossy products can make the pixie look greasy. Start with less product than you think you need; you can always add more. For very fine hair, a volumizing mousse applied before styling adds body to the top sections. Regular trims every 4-6 weeks keep the shape sharp — the pixie grows out faster than longer cuts.
31.Wavy Mid-Length Hair with Pearl Embellishments
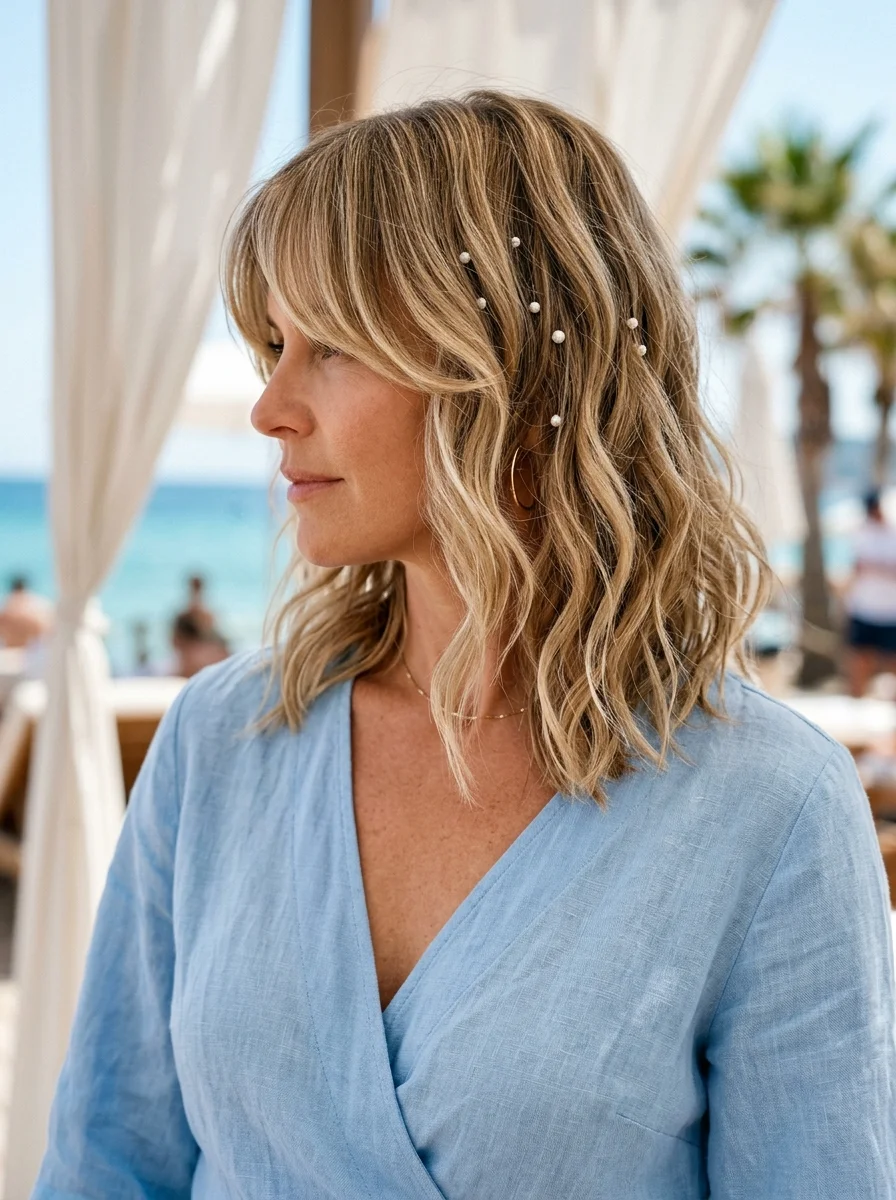
The overview: Pearls in hair are having the biggest moment of any accessory trend right now, and this style shows why. The pearl embellishments — pins, clips, or adhesive pearls — scattered through wavy mid-length hair create an ethereal, almost otherworldly effect. They catch light beautifully and add visual interest without being over-the-top. It's the hairstyle that makes people lean in and ask "are those real pearls in your hair?"
The mid-length cut offers versatility without the weight of long hair — important in summer when heavy hair becomes uncomfortable. Soft waves add romance and movement while remaining effortless. The pearls bridge casual and formal, making this perfect for summer events where you want to look polished but not overdressed.
Why this look is popular: Pearls are a timeless, ageless accessory that add luminosity and sophistication. The mid-length cut offers versatility without heat retention. Soft waves add romance and movement. The pearl details catch light beautifully and add visual interest without being over-the-top. This style works for both casual and formal settings.
Where this look is suitable: Summer weddings, formal garden parties, anniversary dinners, and upscale events. The pearls make it feel special without being overly formal. Bridges casual and formal beautifully.
Step by step:
- Create waves. Use a 1.25-inch curling wand or scrunch with wave-enhancing mousse and diffuse. The waves should be soft and defined, not tight.
- Add texture. Apply a light texturizing spray for grip and separation. The waves should feel airy, not stiff.
- Plan pearl placement. Decide where the pearls will go — along the part, at the temple, or scattered through one section. Odd numbers look more natural.
- Place the pearls. Insert pearl pins or clip pearl accessories into the hair. If using adhesive pearls, press them gently into the hair at the chosen locations.
- Adjust the waves. Use your hands to arrange the waves around the pearls. The pearls should look nestled in the hair, not sitting on top.
- Set lightly. A light mist of flexible-hold hairspray keeps everything in place without stiffness.
Tips and tricks: Adhesive pearls are the easiest option for beginners — they press into the hair without requiring any pinning skill. Pearl pins give more control over placement but require a steady hand. For finer hair, place the pearls where they'll catch the most light — the part line and temple area are naturally highlighted. The pearls can be reused if removed carefully — pull them straight out rather than twisting.
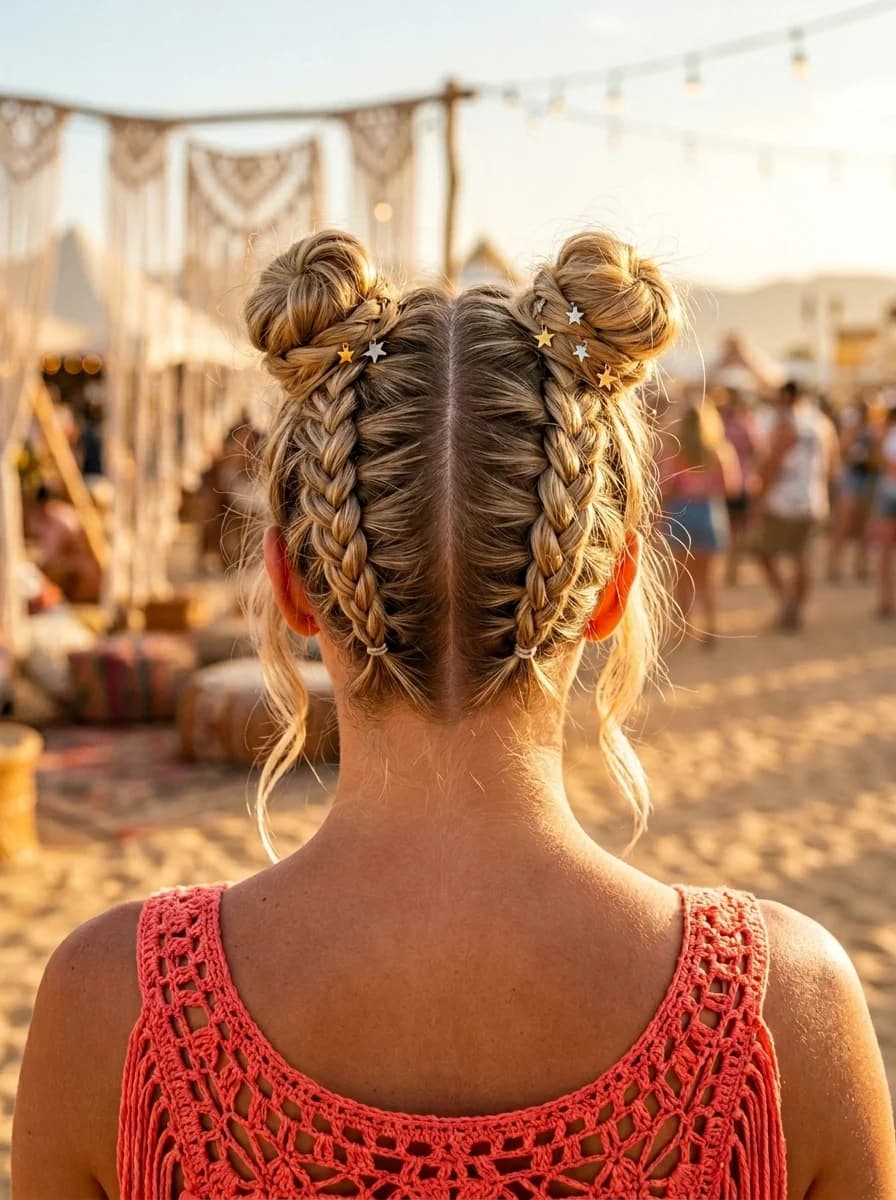
25 Stunning Summer Vacation Hairstyles for 2026 ☀️🌊
The Scalp-First Summer Strategy
As hair naturally changes with age, scalp health becomes more visible and more important. A healthy scalp means shinier, stronger hair that holds style better — and that is the real secret behind effortless summer hair.
The weekly refresh: Use a gentle clarifying shampoo once a week to remove sunscreen, sweat, and product buildup that can clog follicles. Follow with a lightweight scalp serum containing ingredients like niacinamide or rosemary to support circulation. Apply it to dry scalp in sections, massage for sixty seconds, and leave it in. No rinsing needed.
Sun protection for your scalp: Thinning hair means more scalp exposure and higher sunburn risk. Wear a wide-brim hat outdoors, use a hair mist with UV filters on part lines, or try a dry shampoo with SPF for quick touch-ups.
What to skip? Heavy oils and thick creams on your scalp. They clog follicles, trap sweat, and make fine hair look greasy faster. Stick to lightweight water-based serums that absorb quickly. Healthy hair starts at the root — if your scalp feels tight or itchy, no amount of styling product will fix the look.