Hair Inspiration
27 Dreamy Beach Wedding Hairstyles
Salt air does strange things to hair — and not always in a good way. The humidity swells every strand, the wind has opinions about your part, and that "effortless" look takes about forty-five minutes and three bobby pins you'll never find again. But here's the thing: a beach wedding doesn't have to mean fighting your hair. It means working with it.
Whether you're walking down a sandy aisle in Maui or saying your vows on a cliffside in the Hamptons, these 27 hairstyles were built for ocean breezes and golden hour light. Some are polished, some are undone, and all of them understand that the beach is not the place for a stiff, lacquered updo. Let the wind do its thing — your hair will look better for it.
The Structured Wave Shift
Let's clear something up right now: if you are getting married on the beach, you do not have to default to messy beach waves. The idea that coastal hair has to look like you just rolled out of the ocean is outdated. The 2026 bridal trend data tells a different story — voluminous, structured Hollywood waves and sleek low buns are dominating this season's real weddings, and for good reason.
Unstructured beach waves cross the line from "effortless" to "frizzy" the second ocean humidity hits. The current shift is toward soft, structured silhouettes that photograph with intention — think polished S-waves that hold their shape against coastal breezes, or braided low buns that stay intact through sunset photos and wind gusts alike. These styles give you the romantic coastal energy without the unpredictability.
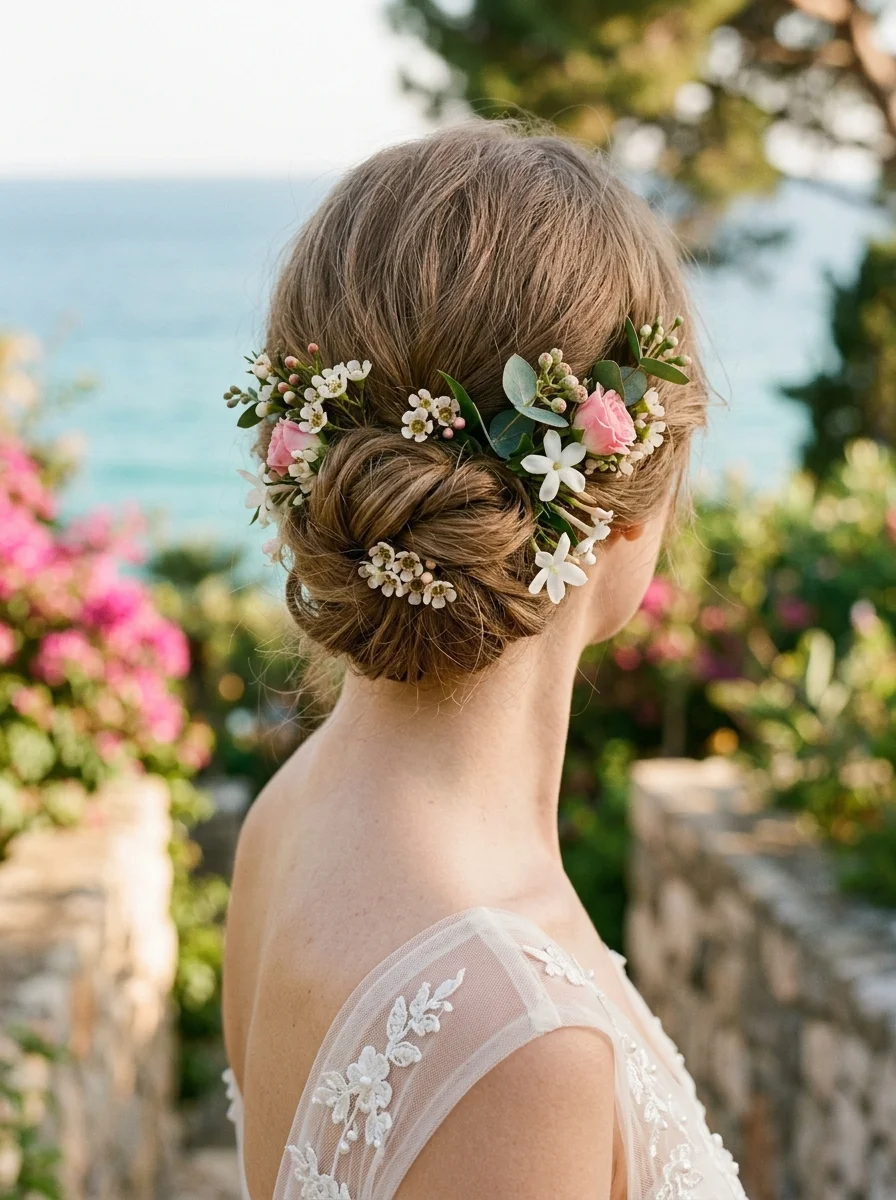
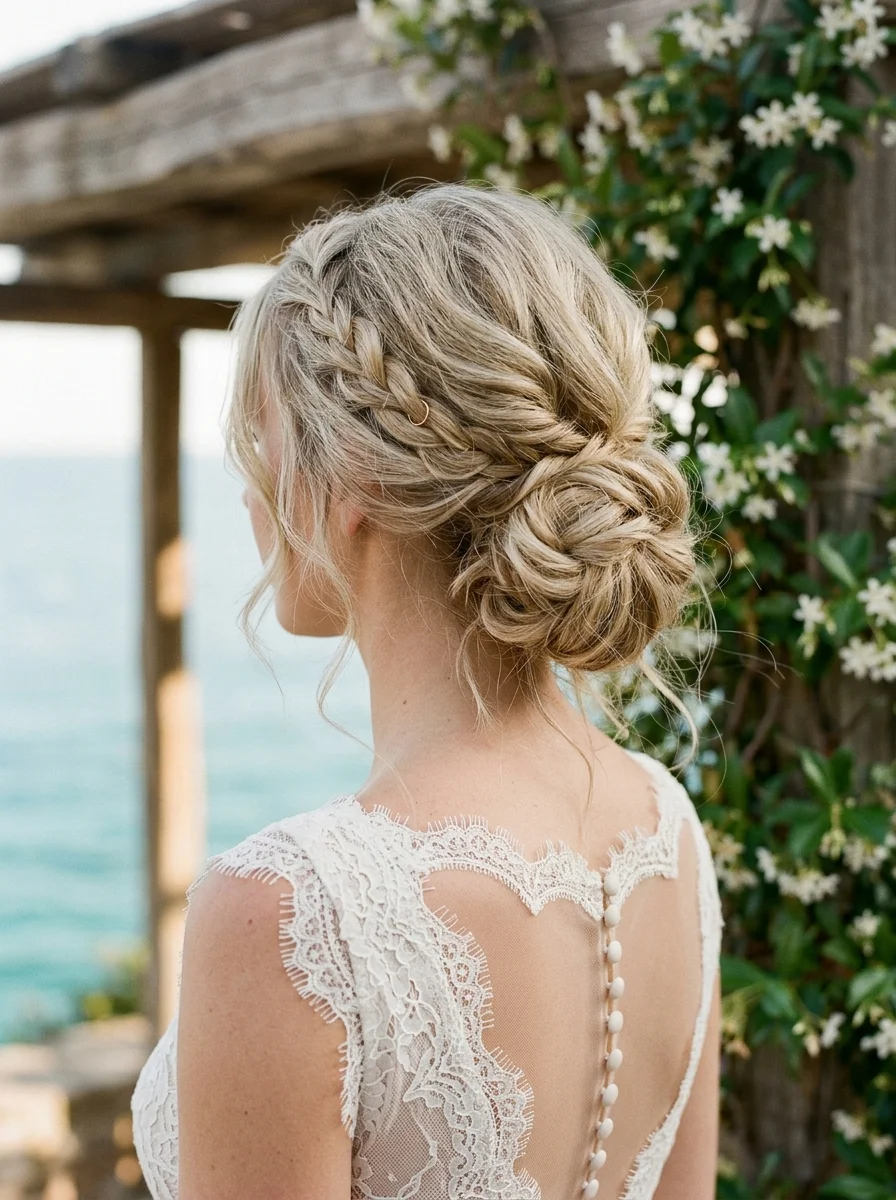
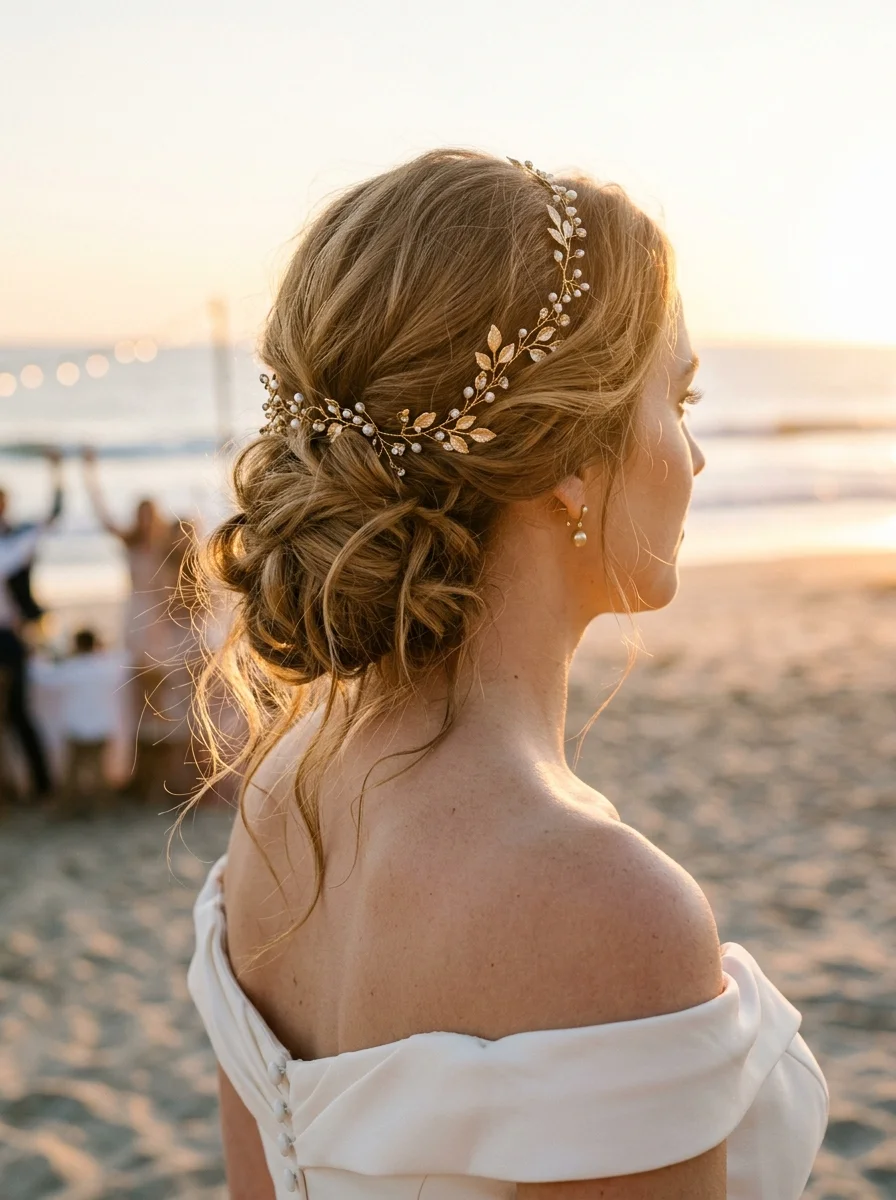
1.Intricate Braided Updo with Golden Accents

The overview: Dirty blonde hair woven into Dutch braids that collapse into a low, romantic updo, finished with delicate gold butterfly pins scattered through the weave. The braids create texture and dimension while the gold butterflies catch the sunset light in a way that feels intentional without being overdone. This is romantic bohemian energy without the cliché — structure with a wild edge.
The low updo keeps things practical for a beach setting — nothing hangs in your face during the ceremony, and the braided foundation holds up against ocean breeze. The gold accents elevate it from "pretty" to "bridal" without competing with the natural beauty of the surroundings.
Why this look is popular: Dutch braids create a raised, three-dimensional texture that photographs beautifully from every angle. The gold butterfly pins add scattered points of light that catch attention without overwhelming the design. Works best on medium to long hair with enough length to form a full updo — braids need substance to collapse properly into a chignon.
Where this look is suitable: Romantic bohemian beach weddings, sunset ceremonies, outdoor venues with natural greenery. This is formal enough for a sit-down reception but relaxed enough for a barefoot ceremony in the sand.
Step by step:
- Prep with texture. Second-day hair or dry shampoo gives the braids something to grip. Freshly washed hair tends to slip and won't hold the Dutch braid pattern.
- Create side sections. Part hair on one side or down the center. Section off the front pieces from temple to temple for the braids.
- Dutch braid each side. Starting at the hairline, cross strands under (not over) to create the raised braid effect. Add small sections from each side as you braid toward the back.
- Gather at the nape. Once both braids reach the back, combine them with the remaining hair at the nape. Twist into a low chignon and secure with bobby pins that match your hair color.
- Softly deconstruct. Gently pull at the edges of the chignon to loosen it. Tug at the braid loops slightly for a more relaxed, romantic finish.
- Add gold butterfly pins. Place them at irregular intervals throughout the braids. Odd numbers look more natural than even.
- Set with spray. A medium-hold hairspray locks everything in place without making the braids look stiff or crunchy.
Tips and tricks: For hair that won't cooperate, spritz each section with a light texturizing spray before braiding — it adds grip and makes the Dutch braid pattern more defined. If your hair is very long, you can tuck the braid ends under the chignon for a cleaner finish. The gold butterfly pins can double as securing pins if placed at the right angles.

24 Stunning Festival Hairstyle Ideas for Music Concert Nights 2026 🎶✨
2.Intricate Braided Flower Updo

The overview: Honey blonde hair sculpted into an architectural masterpiece — braids shaped into floral rosettes that bloom across the back of the head. It's modern, it's editorial, and it photographs like a dream from every angle. This isn't your grandmother's wedding updo. It's structural, deliberate, and proves that braids can be high fashion when they're done right.
The rosette technique transforms standard braids into something sculptural. Each "flower" is a braid coiled into a spiral and pinned flat against the head, creating a surface that looks like a garden of woven petals. Perfect for a bride who wants her hair to be the conversation piece.
Why this look is popular: The floral rosette pattern is one of the most visually striking updo techniques — it reads as intricate and high-effort, which makes it feel appropriately special for a wedding. Honey blonde hair shows the braid definition more clearly than darker shades, making each "petal" visible. Best on medium to thick hair that can hold the coiled shapes without unraveling.
Where this look is suitable: Modern architectural beach weddings, editorial-style ceremonies, venues with clean lines and contemporary design. This is statement hair — it works when the whole wedding has a curated, intentional aesthetic.
Step by step:
- Smooth and prep. Apply a smoothing cream to damp hair and blow-dry straight. The rosettes need clean, smooth braids to look defined.
- Create multiple braids. Section hair into 5-7 parts and braid each into a tight three-strand braid. Secure each with a small clear elastic.
- Form rosettes. Take one braid, coil it into a flat spiral against the head, and pin it in place with bobby pins. The center of the spiral should sit flat.
- Arrange the pattern. Place rosettes across the back of the head, starting from the crown and working down. Vary the sizes slightly for a more organic look.
- Secure everything. Use additional bobby pins to lock each rosette in place. Push pins under the braid coils so they're hidden.
- Smooth the front. Pull any remaining front hair back smoothly. Use a fine-tooth comb and a light mist of hairspray to eliminate flyaways.
Tips and tricks: Use a rat-tail comb to tuck loose ends under each rosette — visible elastic bands or braid tails break the illusion. If your hair is slippery, work a texturizing mousse through before braiding. This style takes practice — do a trial run at least once before the wedding day to get the rosette placement right.
3.Romantic Beach Waves with a Twinkle
The overview: Dirty blonde hair with natural 3A-3B curls, left to do their thing in a half-up style that lets the texture breathe. A single gold crystal hairpin sits at the crown like a tiny constellation. This is the hairstyle for the bride who's barefoot at sunset, toes in the sand, and doesn't need anything more than a twinkle to finish the look.
The beauty of this style is its restraint. One accessory. No fussy structure. Just natural curls doing what they do best, with a single point of light at the crown that catches the golden hour glow. Let the curls be the star — the hairpin is just the supporting act.
Why this look is popular: Natural curls are having their moment, and this style celebrates them instead of hiding them. The half-up format keeps hair off the face while preserving the volume and bounce of the curls. The single gold crystal hairpin adds bridal polish without overwhelming the natural texture. Works on any curl pattern from loose waves to tight coils.
Where this look is suitable: Barefoot sunset ceremonies, intimate beach elopements, casual coastal weddings. This is the anti-fuss hairstyle — it's for brides who want to feel like themselves, not like they're wearing a costume.
Step by step:
- Define the curls. On damp hair, apply a curl-defining cream section by section. Scrunch upward and air-dry or diffuse on low heat to preserve the natural pattern.
- Separate the top section. From your temples up, gather the top third of your hair. Keep it loose — tight gathering will flatten the curls at the crown.
- Secure loosely. Use a small clear elastic or a few bobby pins to hold the half-up section at the back of the crown. Don't pull tight; let the curls maintain their shape.
- Add the hairpin. Place the gold crystal hairpin directly over the securing point. This hides the elastic and adds the single twinkle of light.
- Shape the curls. Gently separate any curls that are clumped together. Use your fingers, not a brush — brushes create frizz on curly hair.
- Light hold. Mist with a flexible-hold curl spray. Avoid heavy hairspray — it will crunch the curls and kill the natural bounce.
Tips and tricks: Plop your curls in a microfiber towel after defining them — it reduces frizz and speeds up drying time without disrupting the curl pattern. If your hair frizzes in humidity, a light anti-humid spray is worth its weight in gold. The hairpin should be the only accessory — adding earrings or a necklace that competes with it dilutes the impact.

30 Stunning Beach Nail Ideas for the Best Vacation in 2026 🌊
4.Twisted Half-Up Half-Down Waves
The overview: Dirty blonde balayage with sections twisted back from the face and meeting at the crown, while the rest falls in loose, sun-kissed waves. This is the hairstyle equivalent of a deep exhale — easy, balanced, and universally flattering. The balayage adds dimension that catches light beautifully, and the twisted sections keep hair out of your face without looking fussy.
The half-up format is the most practical choice for a beach wedding. You get the romance of flowing hair with the practicality of having your face clear for vows, photos, and whatever the wind decides to do. Tropical garden wedding? This is your hair.
Why this look is popular: The twisted sections create visual interest without requiring actual braiding skills. The balayage color does a lot of the heavy lifting — the dimension between light and dark makes even simple waves look expensive. This style works on almost every hair type and length past the shoulders.
Where this look is suitable: Tropical garden beach weddings, daytime ceremonies, outdoor venues with lush greenery. This is versatile enough for casual or semi-formal settings — the level of wave definition determines the formality.
Step by step:
- Create waves. Using a 1.25-inch curling wand, wrap 1-inch sections around the barrel, leaving the last two inches out for a modern, undone finish. Alternate curl direction.
- Break up the waves. Run your fingers through the curls to separate them into softer waves. Don't use a brush.
- Take the twist sections. Grab a 2-inch section from each temple. Twist each section away from the face, keeping the twist loose and organic.
- Meet at the back. Bring both twisted sections to the back of the crown and secure them together with bobby pins. Overlap them slightly for a seamless look.
- Adjust volume. Gently pull at the crown area above the twists to add a bit of lift. This prevents the style from looking flat on top.
- Set with spray. A light mist of flexible-hold hairspray keeps the waves defined and the twists in place.
Tips and tricks: Twist the sections loosely — tight twists look rigid and formal, which contradicts the beachy vibe. If your waves fall flat quickly, spritz with a sea salt spray before curling for extra grip and texture. The balayage does the work here, so if your color is solid, consider adding a few clip-in highlights for dimension.
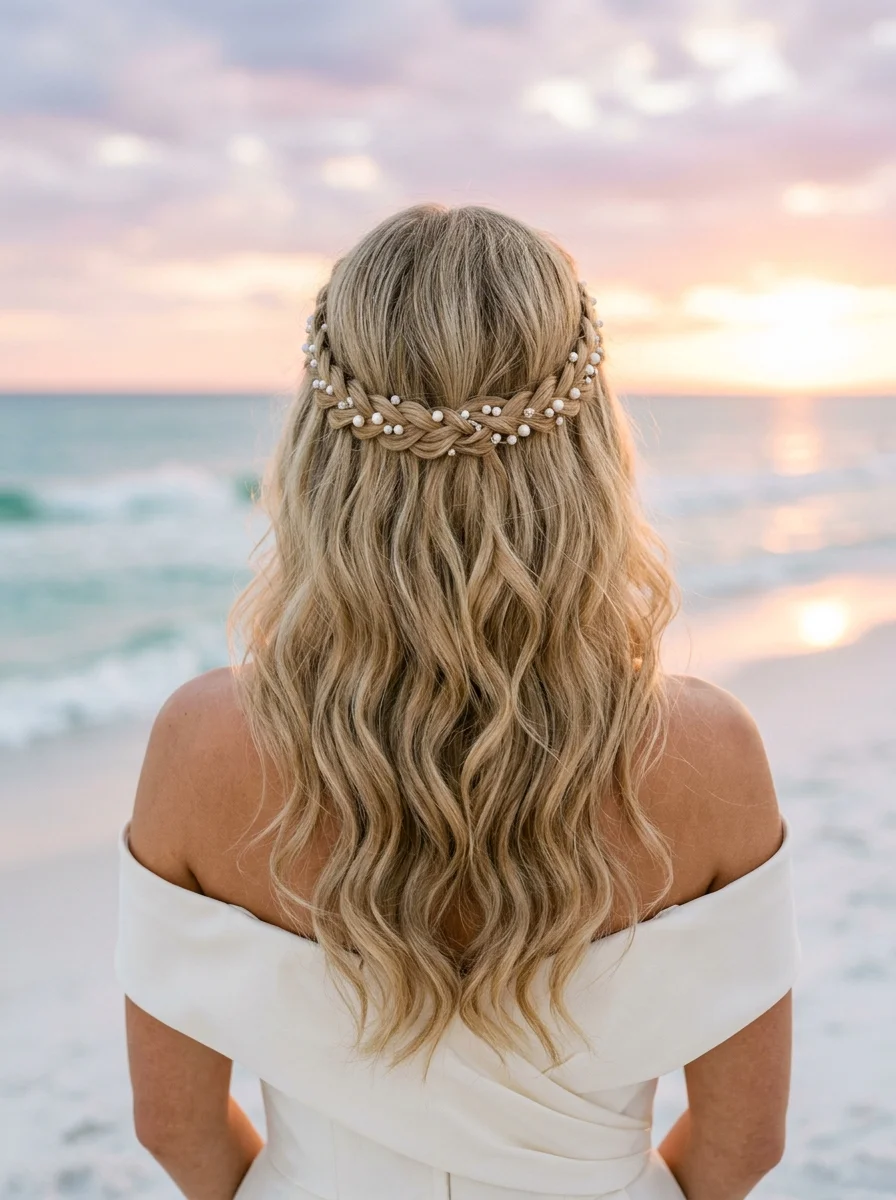
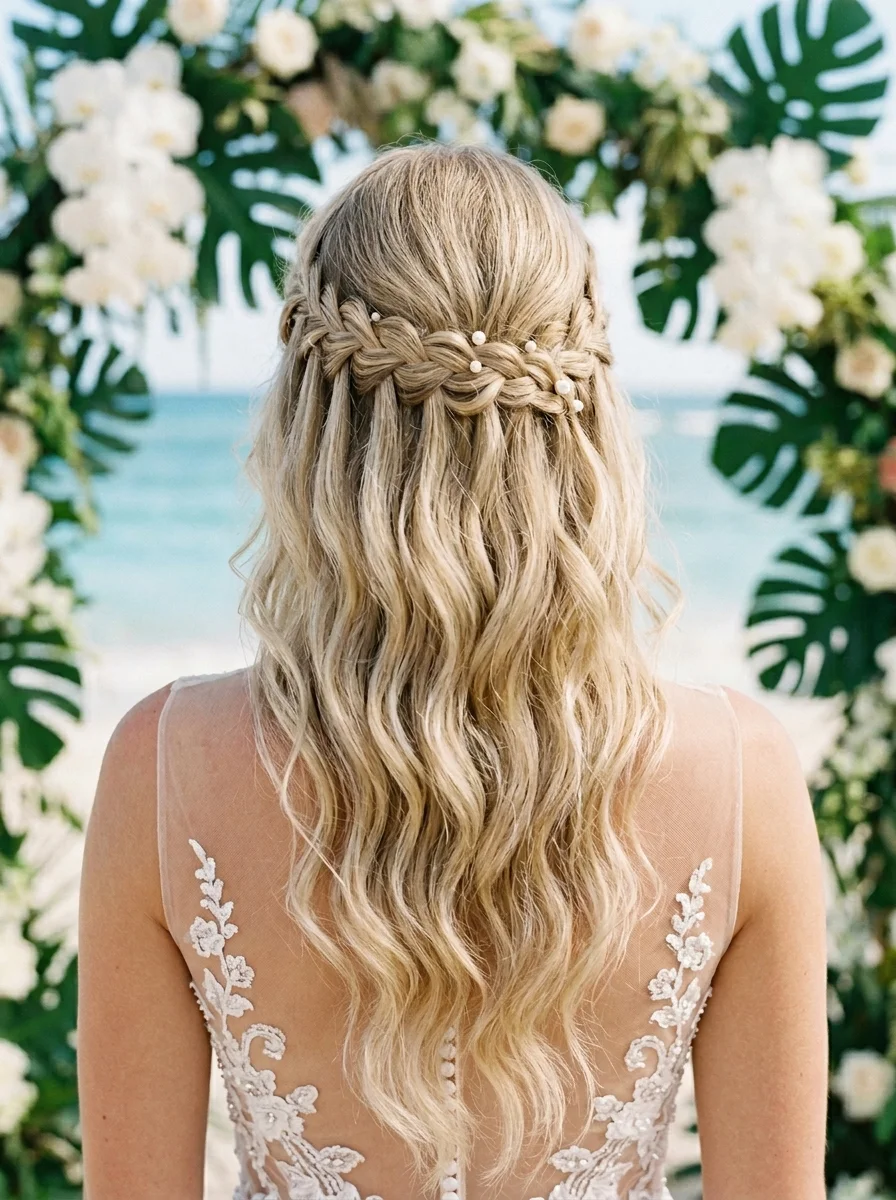
5.Twisted Half-Up with Pearls
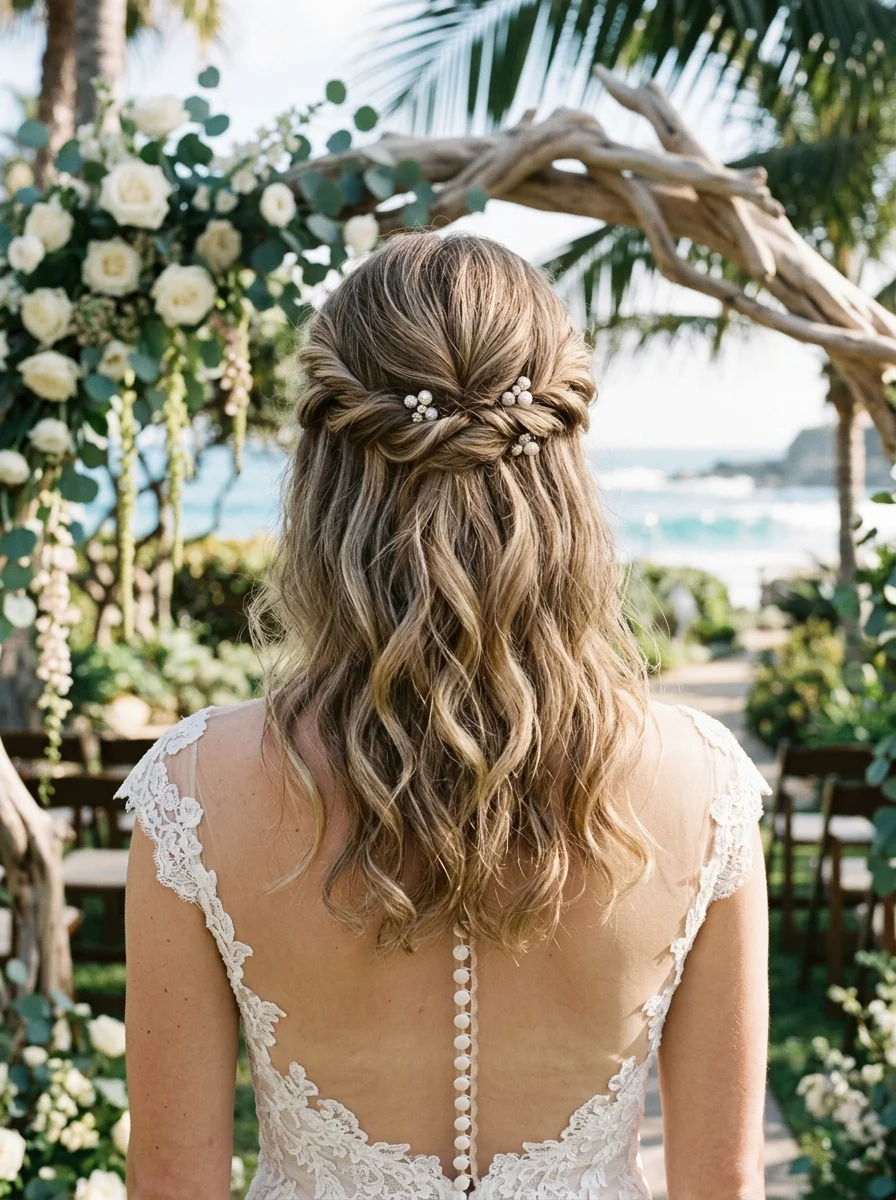
The overview: Cool blonde hair twisted back in soft sections that gather at the crown, accented with a cluster of pearl pins that look like they washed ashore. The rest of the hair falls in relaxed waves that move with the breeze. Pearls on the beach make sense — they come from the ocean, after all. This is bohemian coastal done right: organic, slightly imperfect, and effortlessly elegant.
The pearl cluster is the kind of detail that photographs incredibly well up close but also reads as a soft shimmer from a distance. The cool blonde tone makes the pearls pop — they don't get lost in the hair the way they might on darker shades.
Why this look is popular: Pearls are the quintessential coastal accessory — they tie the hairstyle to the beach setting without being literal like seashells or starfish. The twisted half-up format is forgiving and fast, and the pearl cluster adds a focal point that elevates the entire look. Cool blonde hair makes the pearls stand out as a deliberate design element.
Where this look is suitable: Bohemian coastal ceremonies, sunset beach weddings, outdoor venues with ocean views. This bridges casual and formal — dress it up with a flowing gown or keep it relaxed with a simple slip dress.
Step by step:
- Prep for waves. Apply a lightweight mousse to damp hair and blow-dry with a diffuser or let it air-dry for natural texture.
- Create the waves. Use a 1.25-inch curling wand on 1-inch sections. Leave the ends out for a relaxed, undone finish. Alternate curl direction for natural-looking waves.
- Take the twist sections. Grab a 2-inch section from each side of the face. Twist each section loosely away from the face.
- Secure at the crown. Bring both twisted sections to the back and pin them together. Use crisscrossed bobby pins for secure hold.
- Add the pearl cluster. Place 5-7 pearl pins in a tight cluster over the securing point. Arrange them in an organic, slightly irregular grouping — don't line them up in a row.
- Final adjustments. Gently pull at the twists to loosen them. Separate the waves with your fingers for a more natural finish. Set with a flexible-hold spray.
Tips and tricks: The pearl cluster should look like it belongs there, not like it was placed with tweezers. Slightly irregular placement reads more natural. If your hair is fine, backcomb the crown area slightly before twisting for added volume. Pearl pins with sharp points grip better than round-headed ones — worth the upgrade.
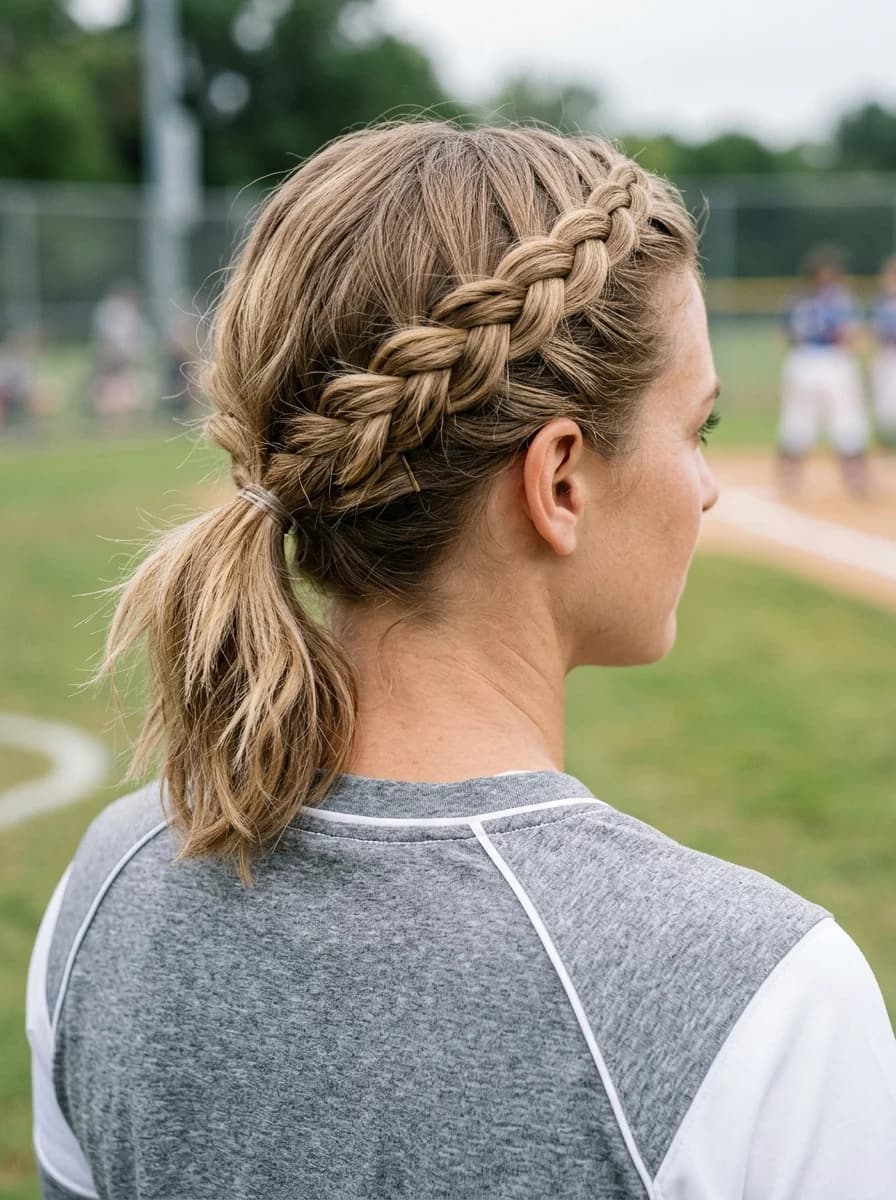
28 Stunning Softball Hairstyle Ideas with Braids for 2026 🥎✨
6.Braided Crown with Loose Waves and Pearls
The overview: Golden blonde hair woven into a crown braid that wraps around the head like a halo, with pearls threaded through the plaits for a soft, luminous effect. The remaining hair falls in loose waves that frame the face. This is the hairstyle for the bride who wants to look like she stepped out of a Renaissance painting — but on a beach, not in a cathedral.
The crown braid is one of the few styles that looks good from every angle — front, side, and back — which matters when you're walking down an aisle and the camera is on you from all directions. The pearls threaded through the braid create scattered points of light that catch the sunset beautifully.
Why this look is popular: The braided crown is a classic for a reason — it's elegant, practical, and photographs well from every angle. Adding pearls through the braid creates scattered highlights that catch light without overwhelming the design. Golden blonde hair shows the braid pattern and the pearls equally well. Works best on smooth, wavy to straight hair that holds a braid without slipping.
Where this look is suitable: Sunset beach ceremonies, romantic coastal weddings, venues with candlelight or warm-toned lighting. This is formal enough for a traditional ceremony but romantic enough for an intimate beach exchange of vows.
Step by step:
- Smooth the hair. Apply a smoothing serum to damp hair and blow-dry with a boar bristle brush for maximum smoothness. The braid pattern shows best on smooth hair.
- Create a deep side part. This determines where the braid starts and gives the crown an asymmetrical, more modern feel.
- Dutch braid the crown. Starting at the deeper side of the part, braid along the hairline, adding hair as you go. Continue around the head until you reach the starting point.
- Tuck and secure. Tuck the braid tail under the starting point and pin it in place. The crown should look seamless — no visible start or end.
- Add pearls. Thread small pearl-headed pins into the braid at irregular intervals. Odd numbers (7-11) look most natural.
- Wave the remaining hair. Use a curling wand on the loose sections below the crown. Break up the curls with your fingers for soft, natural waves.
Tips and tricks: Second-day hair holds this style better than freshly washed hair. The braid needs grip to stay in place, and slippery clean hair will loosen throughout the day. For the smoothest finish, use a boar bristle brush when blow-drying — it distributes natural oils and creates shine that makes the braid pattern pop. Check the crown from multiple angles in a mirror before setting with spray.
7.Effortless Beachy Twist Updo with Pearl Accent

The overview: Dirty blonde hair twisted into a deconstructed low chignon that looks like you just gathered it up with your hands — and that's exactly the point. A single pearl pins the style in place, adding just enough refinement to say "wedding" without saying "trying too hard."
This is the updo for an intimate beach ceremony where the vibe is relaxed but you still want to look like the most beautiful person in the room. Or on the sand. The single pearl is a quiet luxury detail — it doesn't shout, it whispers.
Why this look is popular: The "I just threw it up" aesthetic is harder to achieve than it looks, and this style nails it. The deconstructed chignon reads as effortlessly chic, and the single pearl adds a bridal element without over-accessorizing. Works best on medium-length hair with some natural texture — pin-straight hair will need wave added first to get the right grip and visual softness.
Where this look is suitable: Intimate beach ceremonies, elopements, small coastal weddings. This is not for a 200-person formal reception — it's for the bride who wants understated elegance in a quiet, beautiful setting.
Step by step:
- Add texture. If hair is freshly washed, spray with dry shampoo or texturizing spray. You need some grit for the chignon to hold.
- Loosely wave the hair. Use a large barrel curling wand on random sections. Don't aim for uniform curls — the imperfection is the point.
- Gather at the nape. Pull all the hair back loosely into a low ponytail. Don't smooth it — let the texture show.
- Twist and wrap. Twist the ponytail loosely and wrap it around the base to form a chignon. Don't tuck the ends in too neatly.
- Pin and deconstruct. Secure with bobby pins, then gently pull at sections of the chignon to loosen it further. Pull a few tendrils free around the face.
- Add the single pearl. Place one pearl pin at the center of the chignon. Just one — more would change the entire aesthetic.
Tips and tricks: The key word is "deconstructed." If the chignon looks too perfect, pull it apart gently until it looks like you did it without looking in a mirror. Bobby pins should match your hair color exactly — on dirty blonde, use a medium brown pin. Pull the face framing pieces out before you set with spray so they look natural, not accidentally escaped.

28 Cute & Sporty Baseball Game Nail Ideas for 2026 ⚾
8.Elegant Braided Updo with Pearls
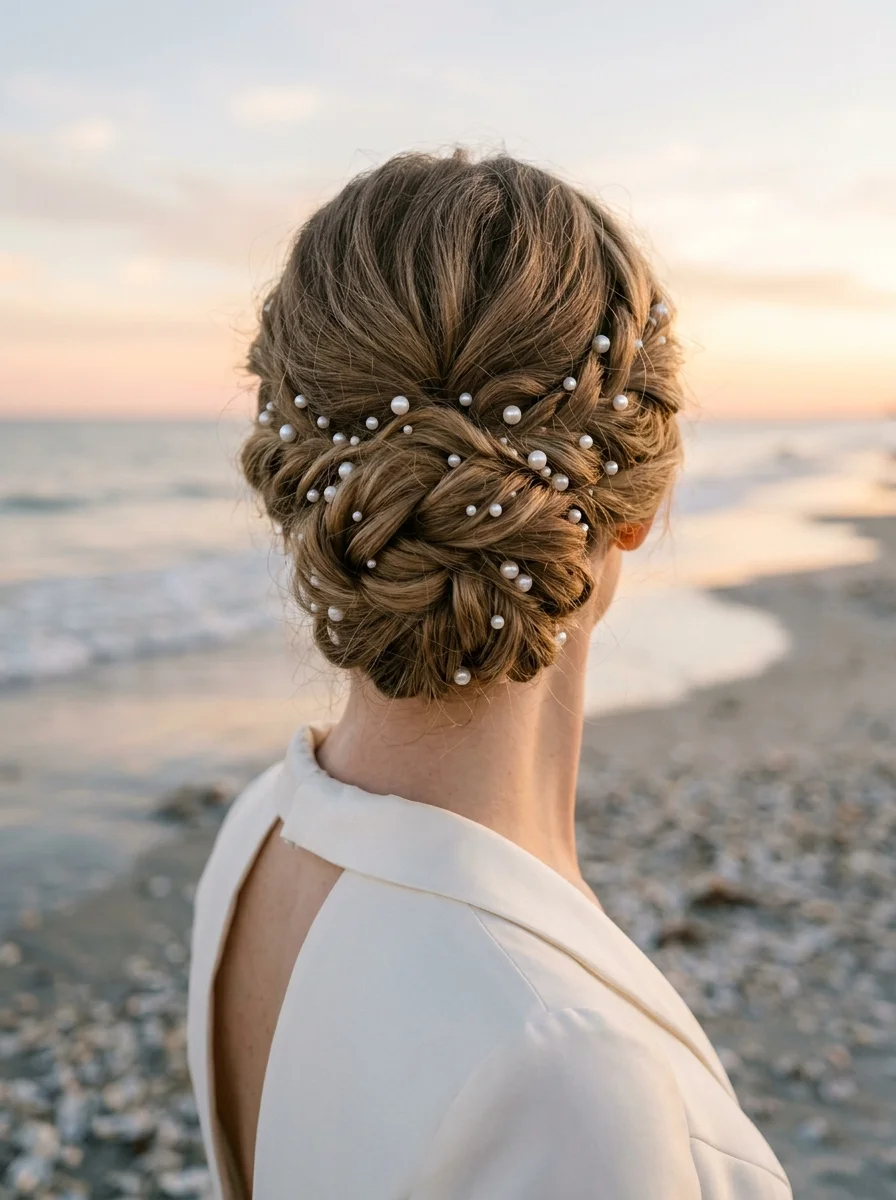
The overview: Dirty blonde hair woven into multiple braids — some tight, some loose — that coil into a structured updo at the nape. Fifteen to twenty small pearls are scattered throughout, catching light like tiny moons. This is formal coastal at its best: polished enough for a sit-down reception but relaxed enough that it won't look out of place next to driftwood centerpieces.
The variety of braid textures is what makes this updo visually rich. Mixing tight and loose braids creates depth and dimension that a single braid type can't achieve. The pearls scattered throughout tie it to the coastal setting without being too literal.
Why this look is popular: Multiple braid textures in a single updo create visual complexity that photographs with incredible depth. The scattered pearls add luminous highlights that catch candlelight and sunset glow equally well. This style holds up for hours — braided updos are among the most secure formal styles, which matters for a long wedding day.
Where this look is suitable: Formal coastal ceremonies, sit-down receptions, venues with elegant coastal décor. This bridges the gap between black-tie formal and beachy relaxed — it's dressy without being stiff.
Step by step:
- Section the hair. Divide hair into 4-6 sections of varying sizes. Different sizes create different braid widths, which adds visual interest.
- Braid each section differently. Do two tight Dutch braids, two loose three-strand braids, and one or two fishtail braids. Secure each with a small clear elastic.
- Pancake selectively. Pull apart only the loose braids to widen them. Leave the tight braids structured — the contrast is the design.
- Gather at the nape. Collect all braids at the nape and coil them into a low updo, arranging them so the different textures are visible.
- Pin securely. Use bobby pins that match your hair color to lock the braids in place. Push pins under the braid coils so they're hidden.
- Add pearls. Scatter 15-20 small pearl pins throughout the braided structure. Place them at irregular intervals for a natural, organic feel.
Tips and tricks: Braid each section at a different tension level before styling — it's easier to create the variety during braiding than to adjust afterward. Use a rat-tail comb to tuck loose ends under the coiled braids. The pearls should catch light when you move, so place a few near the outer edges where they'll be most visible.
9.Chic Twisted Low Chignon with Elegant Hair Pin
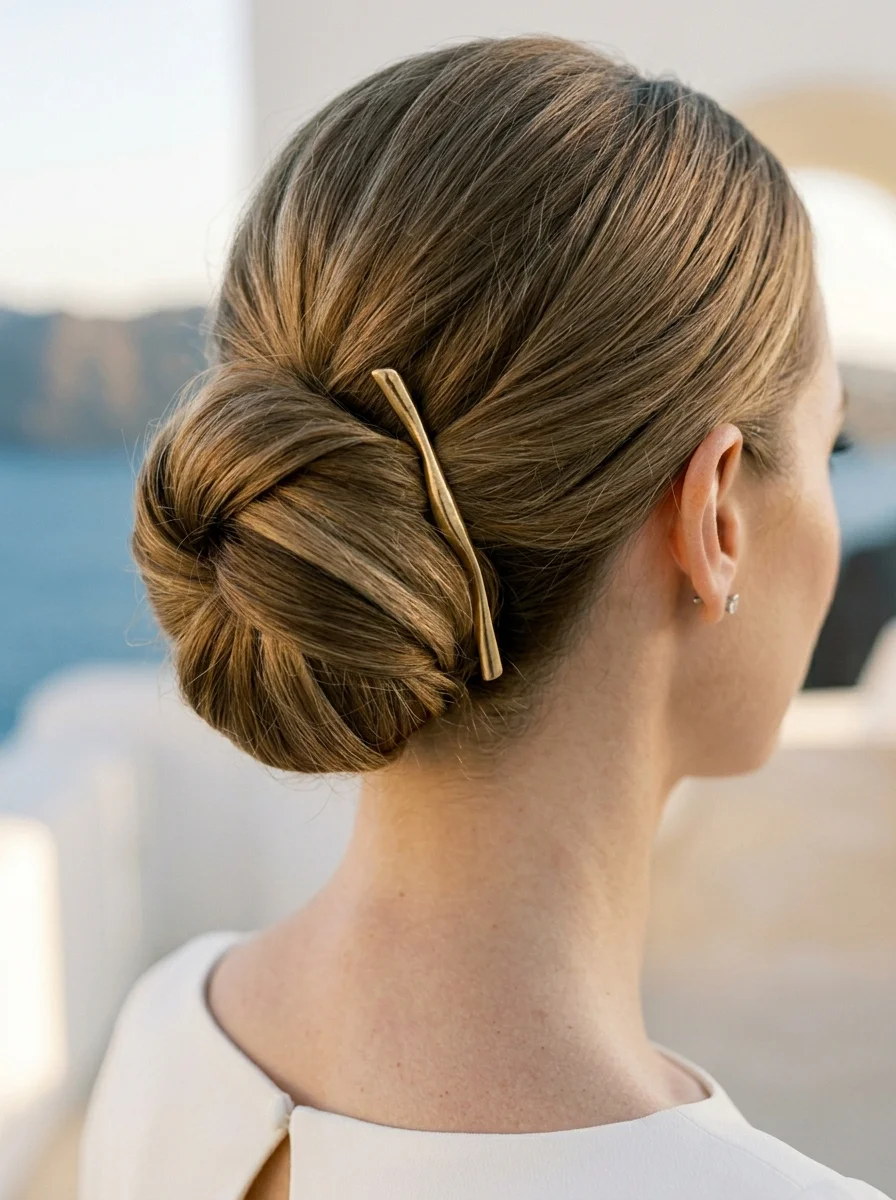
The overview: Light brown hair with golden blonde highlights, swept into a sleek low chignon that sits right at the nape. A gold barrette holds everything in place with architectural precision. This is the hairstyle for the bride who's having her reception at a resort and wants to look like she belongs there.
Sophisticated, clean, and completely modern — no beachy texture needed. Sometimes the best beach wedding hair is the one that contrasts with the setting. The gold barrette adds a warm metallic accent that picks up golden hour light without being flashy.
Why this look is popular: The sleek chignon is the most universally flattering updo — it works on every face shape and every hair type. The gold barrette adds a single statement accessory that elevates the entire look without competing with the dress or the venue. This style also survives wind better than most because it sits low and tight against the head.
Where this look is suitable: Sophisticated resort weddings, elegant coastal receptions, venues with a modern, minimalist aesthetic. This is the anti-boho beach bride — clean lines, polished finish, zero frizz.
Step by step:
- Smooth thoroughly. Apply a smoothing serum to damp hair and blow-dry straight with a boar bristle brush. Every strand needs to lie flat.
- Part precisely. A clean center part or deep side part — either works, but the line must be sharp. Use a rat-tail comb.
- Gather low. Pull all the hair back into a low ponytail at the nape. Smooth with the brush as you gather to eliminate bumps.
- Twist and coil. Twist the ponytail tightly and wrap it around the base to form a compact chignon. Pin with bobby pins pushed horizontally through the base.
- Smooth the surface. Use a fine-tooth comb and a light mist of hairspray to smooth any flyaways over the chignon and hairline.
- Add the gold barrette. Clip it over the base of the chignon to secure and decorate simultaneously.
Tips and tricks: A boar bristle brush is essential for achieving the sleek finish — it distributes product evenly and creates a smoother surface than a regular brush. For extra hold, apply a light gel before blow-drying. The chignon should sit right at the nape, not higher — placing it too high changes the silhouette from sleek to casual.
20 Stunning Half Up Half Down Hairstyles for Prom Night 2026 💃✨
10.Bubble Braid with Pearl Pin Accent
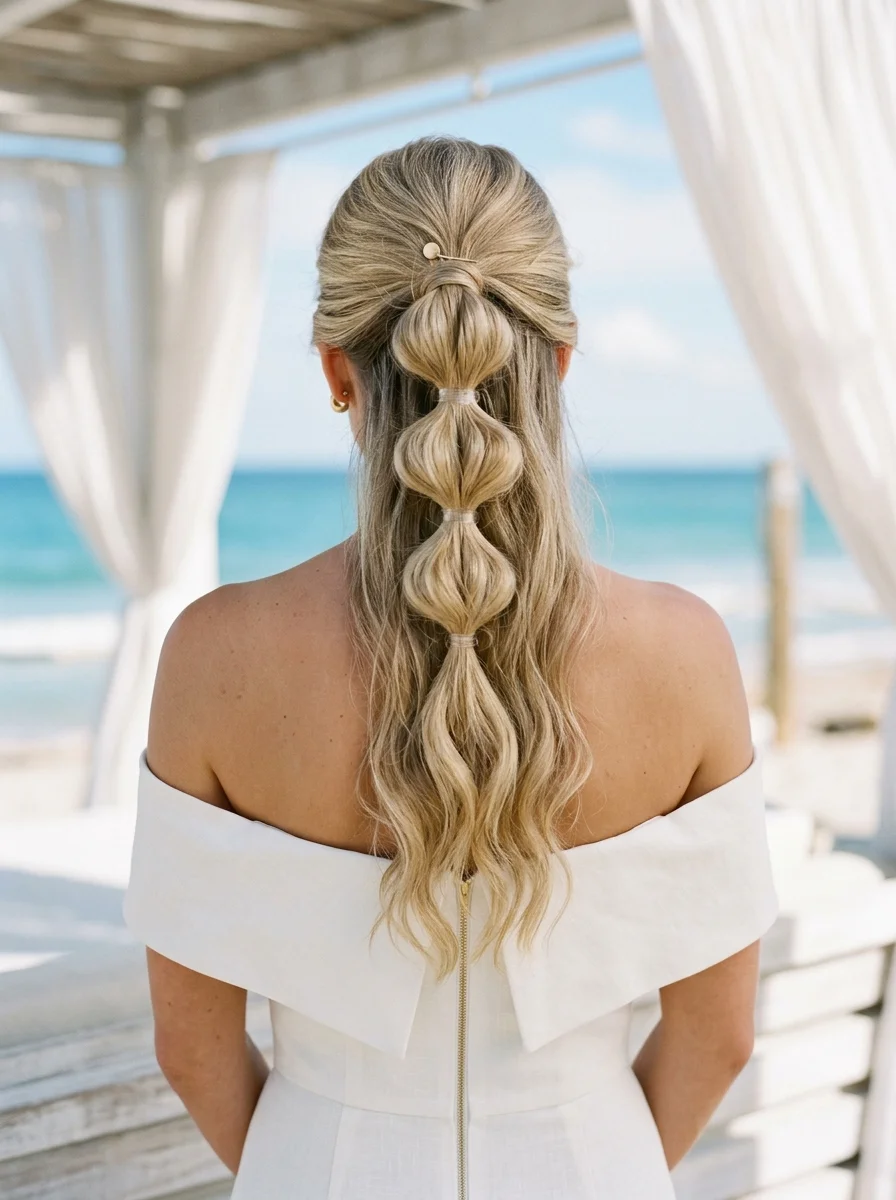
The overview: Blonde hair pulled into a half-up bubble ponytail — those rounded, voluminous sections that look like they defy gravity. A pearl pin at the base adds just enough bridal polish to the modern silhouette. This is not your mother's wedding hair.
The bubble braid is playful, youthful, and photographs with a graphic quality that stands out in a sea of waves and curls. The pearl pin at the base grounds the modern shape in classic bridal tradition. Modern brides, this one's for you.
Why this look is popular: Bubble braids are easier than actual braiding — you're just tying elastics at intervals and pulling the sections apart. The result looks more complex than it is. Adding a pearl pin turns it from trendy to bridal. Works best on medium to long hair with enough length for at least 3-4 bubbles.
Where this look is suitable: Modern bridal beach weddings, youthful ceremonies, venues with a contemporary or artistic aesthetic. This is statement hair — it's for the bride who wants something different from the classic waves-and-curls formula.
Step by step:
- Create the base. Gather the top section of hair into a half-up ponytail at the crown. Secure with a strong elastic. Smooth the surface with a brush.
- First bubble. Tie an elastic 2 inches down from the base. Gently pull the section between the two elastics apart to create a rounded bubble shape.
- Continue the bubbles. Tie another elastic 2 inches below the first. Pull apart to create the second bubble. Repeat for 3-4 bubbles total, depending on hair length.
- Even out the bubbles. Adjust each bubble so they're roughly the same size. The bottom one can be slightly larger for a tapered effect.
- Add the pearl pin. Place a single pearl pin at the base of the ponytail, directly over the first elastic.
- Wave the remaining hair. Use a curling wand on the loose sections below. Break up with fingers for natural waves. Set with light-hold spray.
Tips and tricks: For more defined bubbles, spray each section with texturizing spray before pulling it apart. The texture helps the bubble hold its shape. If your hair is very silky, use clear elastics as a base first — the bubbles won't slide. For finer hair, backcomb each section slightly before tying the elastic to add volume inside the bubble.
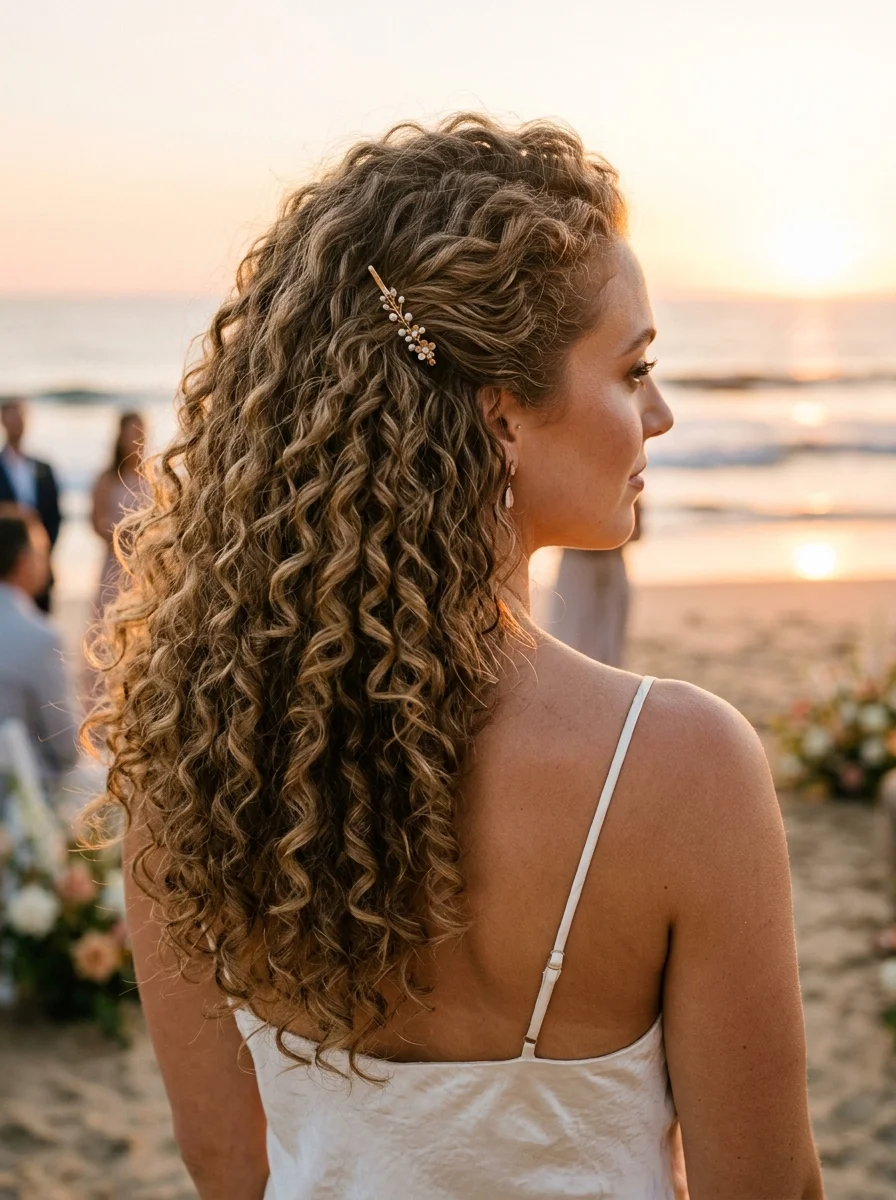
11.Golden Hour Curls with Starfish Accent
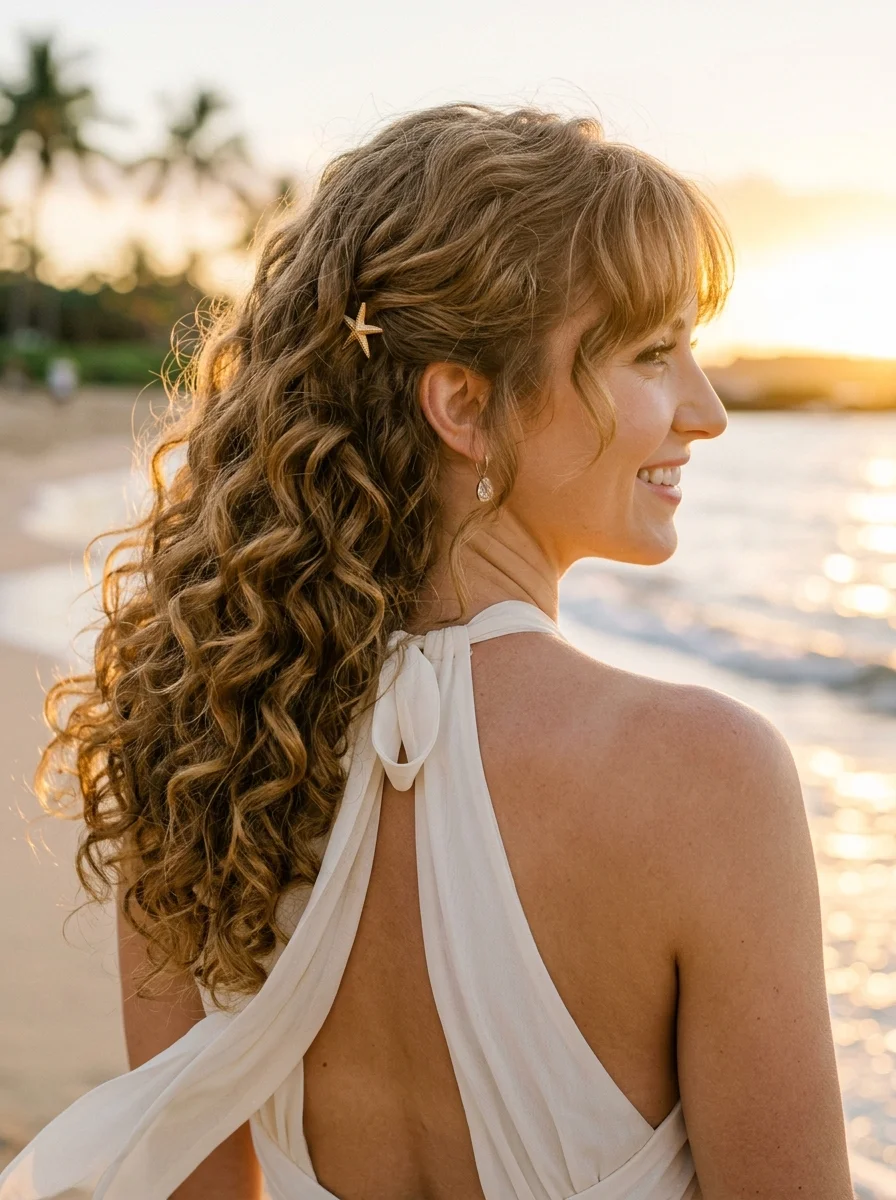
The overview: Light brown hair with caramel tones, natural 3A-3B curls left to bounce and shine in their full glory. A gold starfish clip holds back one side, adding a coastal touch without veering into costume territory. This is the hairstyle for the tropical bride who wants her natural texture to be the centerpiece.
The starfish clip is a subtle nod to the setting — you're on a beach, you might as well own it. Golden hour light on these curls is absolutely unfair. The caramel tones in the hair catch the warm light and create depth that makes every curl distinct.
Why this look is popular: Natural curls are visually stunning in golden hour light — the dimension and bounce of the curl pattern catches warm light in a way that straight hair can't replicate. The asymmetrical starfish clip adds a coastal element that feels intentional rather than novelty. Works on any natural curl pattern from 3A to 3C.
Where this look is suitable: Tropical bride beach weddings, destination ceremonies, outdoor venues with warm-toned lighting. This is for the bride who wants her natural hair to be the focal point of her bridal look.
Step by step:
- Define curls on damp hair. Apply a curl-defining cream section by section, scrunching upward. Use a wide-tooth comb to distribute product without disrupting the curl pattern.
- Diffuse or air-dry. If diffusing, use low heat and low speed. Hold the diffuser under each section and scrunch upward. Don't touch the curls while they dry.
- Add shine. Once completely dry, scrunch a few drops of lightweight hair oil through the ends. This adds gloss without weighing the curls down.
- Pin one side. Take a section from above one ear and sweep it back. Secure with the gold starfish clip just behind the ear.
- Shape the curls. Gently separate any curls that are clumped together. Use your fingers to lift the roots for extra volume.
- Set lightly. Mist with a lightweight curl-hold spray. Avoid heavy products — they'll crush the volume.
Tips and tricks: Never touch curly hair while it's drying — it causes frizz that no product can fix. Pineapple your curls at night with a silk scrunchie to preserve them for the next day. If humidity is high, an anti-humidity spray applied before the curl cream creates a barrier that fights frizz all day.

33 Trendy Polka Dot Nail Ideas for 2026 💅
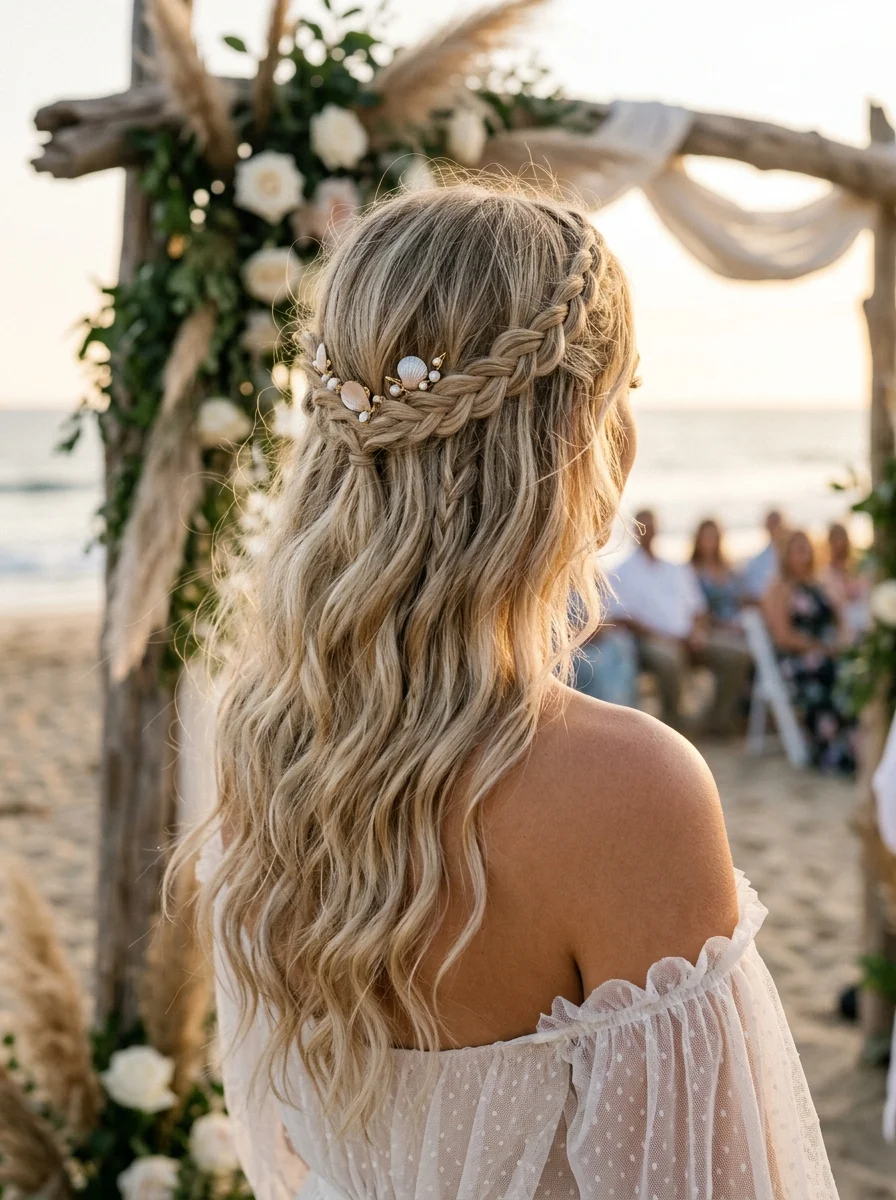
12.Boho Beach Braid with Seashell Accents
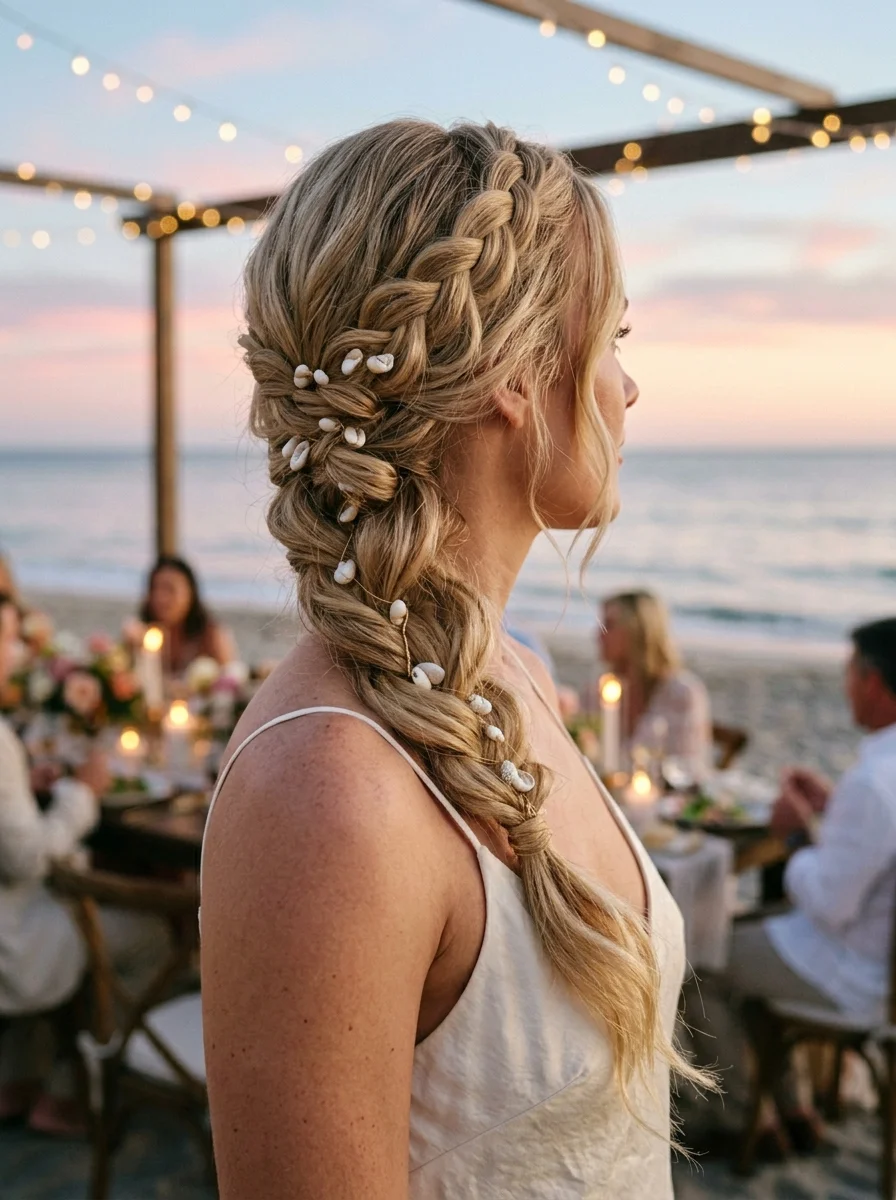
The overview: Golden blonde hair pancaked into a loose side braid that drapes over one shoulder, threaded with actual seashells and tiny starfish. This is the hairstyle that commits fully to the beach theme — and it works because the braid itself is so beautifully undone. The pancaking technique pulls the braid apart for volume and texture, making it look like it took hours when it really just needs a few pulls and some well-placed shells.
Bohemian beach bride energy at its finest. The seashells add texture and a tactile quality that makes people want to lean in and look closer. The side braid placement keeps everything visible from the front — important for ceremony photos.
Why this look is popular: The pancaked side braid is one of the most photogenic bridal hairstyles — it creates a dramatic, voluminous silhouette that fills the frame. Seashell accents tie the look directly to the beach setting in a way that feels curated rather than costume-y. Works best on medium to long hair with enough length for the braid to drape over the shoulder.
Where this look is suitable: Bohemian beach ceremonies, barefoot weddings, coastal venues with natural, organic décor. This is for the bride who wants her hairstyle to be part of the environment, not separate from it.
Step by step:
- Prep with texture. Spray dry shampoo or texturizing spray through the hair for grip. Slippery hair won't hold a pancaked braid.
- Sweep to one side. Brush all the hair over one shoulder. The braid should start at the nape on the opposite side and drape forward.
- Braid loosely. Create a three-strand braid, keeping the tension loose. Leave the top section near the nape slightly slack for an undone feel.
- Pancake the braid. Starting from the bottom, gently pull the outer loops of each section outward. Work your way up, making each section wider. The braid should nearly double in width.
- Secure the end. Tie with a clear elastic that blends into the hair color.
- Add seashells. Thread small seashells and tiny starfish into the braid at irregular intervals. Use bobby pins to secure larger shells from behind.
Tips and tricks: The pancaking technique is everything here. Pull gently and gradually — yanking creates uneven sections. Start from the bottom and work up for more control. If shells feel heavy, use mini shells or shell-shaped charms instead. The weight of real shells can pull the braid to one side by the end of the day.
13.Braided Crown Updo with Textured Bun
The overview: Ash blonde hair woven into Dutch braids that travel from the temples to the back of the head, where they dissolve into a deconstructed bun held with a gold cuff. The contrast between the structured braids and the messy bun creates visual tension that's absolutely magnetic.
This is elegant coastal with edge — the kind of hairstyle that works equally well with a minimalist slip dress or a dramatic ballgown. The gold cuff on the bun adds a modern metallic element that catches light without being ornate.
Why this look is popular: The structured-to-deconstructed transition creates visual interest that a single texture can't achieve. The Dutch braids frame the face and add a polished element, while the textured bun keeps things relaxed. The gold cuff is a modern alternative to a traditional hair accessory. Ash blonde shows the braid pattern beautifully.
Where this look is suitable: Elegant coastal ceremonies, venues with modern coastal design, any setting where you want structured hair with a relaxed finish. This works for both daytime and evening ceremonies.
Step by step:
- Smooth the front. Apply a smoothing cream to damp hair and blow-dry the front sections straight. The braids need a clean, smooth base.
- Create the part. A center part or deep side part — either works. The part determines where the braids begin.
- Dutch braid each side. Starting at the temple, braid tightly against the scalp, adding hair as you go. Continue to the nape on each side.
- Form the deconstructed bun. Gather the remaining hair and the braid tails at the nape. Twist loosely and wrap into a messy bun. Don't aim for perfection — texture is the goal.
- Pin and arrange. Secure with bobby pins, then gently pull at sections of the bun to create volume and texture.
- Add the gold cuff. Wrap a gold cuff or hair ring around the base of the bun. It should sit visibly as a focal point.
Tips and tricks: Keep the Dutch braids tight and the bun loose — reversing this (loose braids, tight bun) changes the entire aesthetic. The gold cuff should be the only accessory; adding pearls or clips would compete with it. For hair that won't hold a bun, twist it tighter and use crisscrossed bobby pins for extra grip.
24 Stunning Bridesmaid Hairstyles for Weddings 2026 💍✨
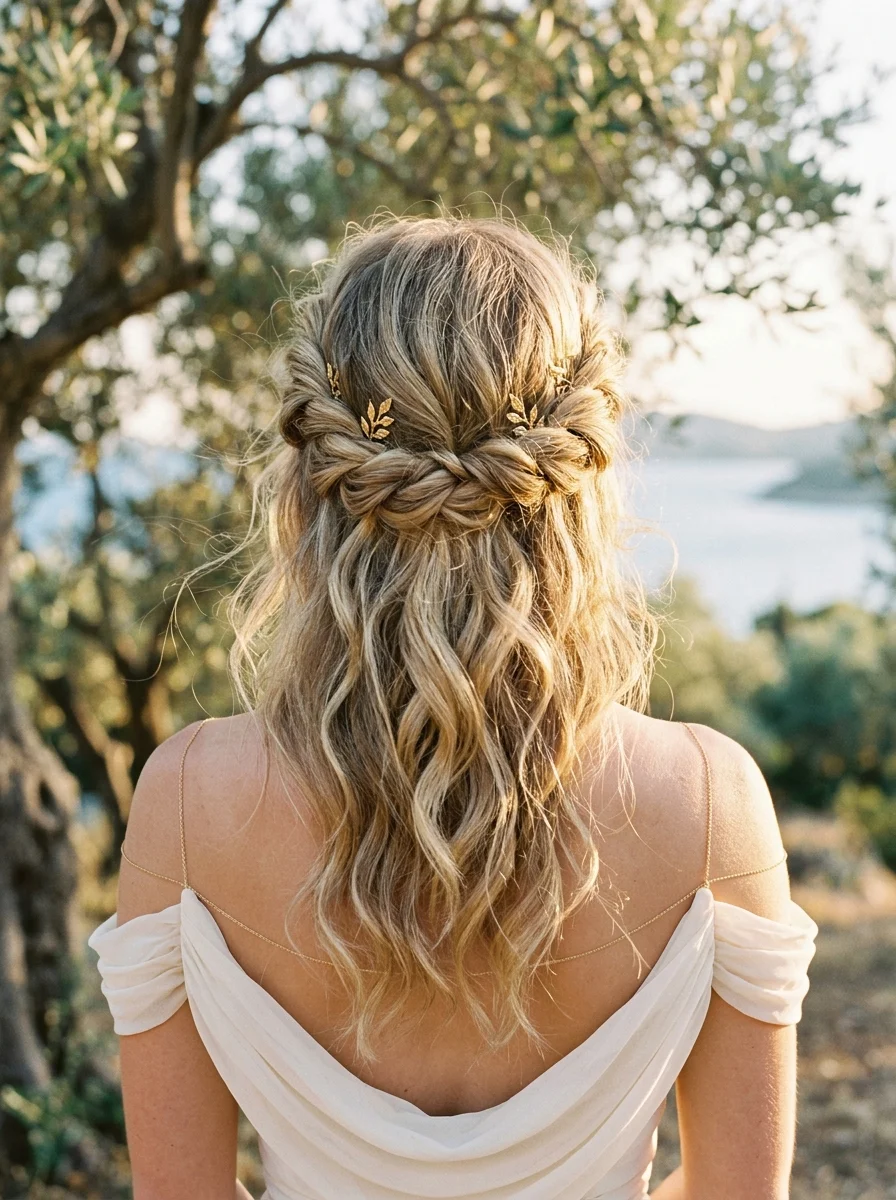
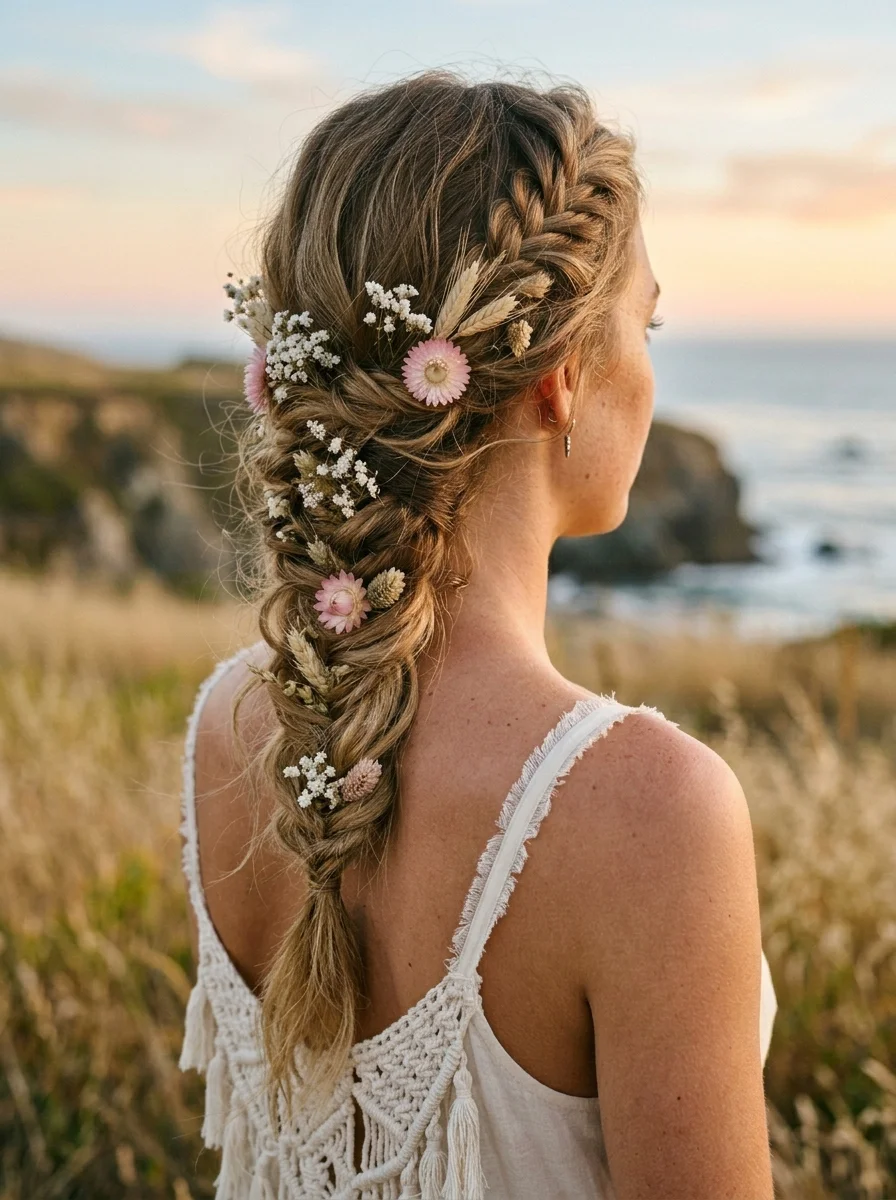
14.Bohemian Crown Braid with Baby's Breath
The overview: Dirty blonde hair braided on both side of the temples, that frames the face, with baby's breath tucked into the plaits for a soft, cloud-like effect. The rest of the hair cascades in loose waves that move with the ocean breeze. Baby's breath is having a moment — and on a beach, it makes perfect sense.
The tiny white flowers echo sea foam, and the crown braid keeps everything in place when the wind picks up. Free-spirited and completely romantic. This is for the bride who wants her hair to feel like a garden she's wearing.
Why this look is popular: Baby's breath is inexpensive, widely available, and lasts all day without wilting — practical advantages that matter on a wedding day. The crown braid is wind-proof, which is a genuine concern for beach ceremonies. The combination of structured braids, delicate flowers, and loose waves hits all three notes: polished, romantic, and relaxed.
Where this look is suitable: Free-spirited beach ceremonies, outdoor garden-beach venues, bohemian weddings with natural floral arrangements. The baby's breath ties into floral décor without requiring a matching bouquet.
Step by step:
- Prep for grip. Second-day hair or texturizing spray gives the braid something to hold. Slippery hair will loosen the crown within hours.
- Create a side part. A deep side part gives the crown braid an asymmetrical, more modern feel than a center part.
- Dutch Braid. Start at first temple, and weave your hair into a Dutch braid upto the crown part and secure with an elastic band. Now, repeat the same on the other side of the head such that you have two Dutch braids on both sides of the head meeting at the back.
- Secure pigtail. Merge both the pigtails, and secure with an elastic band while remaining hair remains open freely.
- Add baby's breath. Tuck small sprigs into the braid at irregular intervals. Use short stems (2-3 inches) so they don't fall out.
- Add texture. Use a curling wand on the remaining hair below the braids. Break up with fingers for natural waves.
Tips and tricks: Mist the baby's breath with water before tucking it in — fresh flowers last longer when they're hydrated. Keep the sprigs small; large pieces weigh down the braid and fall out. If you're worried about the flowers lasting, use high-quality silk baby's breath — they look identical in photos and won't wilt in heat.
15.Romantic Twisted Updo with Fresh Blooms
The overview: Light brown hair with honey blonde highlights, twisted into a low chignon at the nape and adorned with fresh roses and eucalyptus sprigs. This is the hairstyle that bridges the gap between garden and beach — the fresh flowers bring organic warmth while the twisted updo keeps things bridal.
The eucalyptus adds a subtle sage tone that complements the ocean backdrop. This is for the bride who wants her hair to smell as good as it looks. The fresh blooms make a statement that dried flowers can't replicate — there's a richness and vibrancy to real roses that photographs beautifully.
Why this look is popular: Fresh flowers in hair are timeless for a reason — they add color, texture, and fragrance that no accessory can match. The low chignon is practical for wind, and the twist technique creates a romantic, slightly undone texture. The honey blonde highlights show the twist definition beautifully. Works best on medium to long hair.
Where this look is suitable: Romantic garden-beach ceremonies, venues with floral arrangements, outdoor settings with natural greenery. The fresh flowers tie the hairstyle into the overall wedding floral design.
Step by step:
- Prep with texture. Apply a texturizing mousse to damp hair and blow-dry. The twists need grip to hold their shape.
- Create loose waves. Use a large barrel curling wand on random sections. The waves add movement and help the twists look more organic.
- Twist the sides. Take 2-inch sections from each temple and twist them back, away from the face. Secure temporarily with clips.
- Gather the chignon. Collect all the hair at the nape. Twist it loosely and wrap into a low chignon. Pin with bobby pins.
- Add the side twists. Bring the twisted side sections to the back and pin them into the chignon, blending them into the overall shape.
- Arrange fresh flowers. Tuck roses and eucalyptus sprigs into the chignon. Start with the eucalyptus as a base, then add roses as focal points.
Tips and tricks: Prep the flowers by cutting stems to 2-3 inches and wrapping the cut ends in floral tape to prevent moisture from damaging the hair. Place the heaviest blooms closest to the head for support. If the wedding is in hot weather, mist the flowers lightly with water throughout the day. Keep spare blooms in a cool place for a ceremony-to-reception refresh.
36 Trendy FIFA World Cup Nail Designs (2026)
16.Romantic Beachy Updo with Golden Leaf Crown
The overview: Honey blonde hair gathered into a low bun that's soft and slightly undone, crowned with a gold leaf vine headband that winds through the hair like ivy. The gold leaf catches the light in a way that feels ethereal without being costume-y. This is the hairstyle for the bride who wants to look like a goddess walking out of the sea.
The combination of the relaxed bun and the structured crown creates a balance that's pure magic. The gold leaf vine adds a mythological quality — you're not just a bride, you're a figure from a coastal legend. The warm gold tone complements honey blonde hair beautifully.
Why this look is popular: The gold leaf vine headband is a single accessory that transforms a simple low bun into something ethereal. It's easier than scattering individual pins, and the vine shape creates a continuous line of gold that catches light from every angle. The relaxed bun keeps the look from feeling overdone.
Where this look is suitable: Ethereal beach ceremonies, venues with natural beauty, outdoor settings with warm-toned lighting. This is for the bride who wants to feel like a goddess — not a princess, not a queen, a goddess.
Step by step:
- Add soft waves. Use a large barrel curling wand on 1-inch sections. You want movement and texture, not perfect curls. Leave the ends out for a modern finish.
- Place the vine headband. Position the gold leaf vine along the hairline, with the ends meeting at the back of the head. Pin in place with small bobby pins that match your hair color.
- Gather the bun. Collect all the hair — including the vine ends — at the nape. Twist loosely and wrap into a low bun.
- Secure and deconstruct. Pin the bun with bobby pins, then gently pull at sections to loosen it. The bun should look organic, not rigid.
- Adjust the vine. Make sure the gold leaves are visible along the hairline and around the bun. Bend the wire slightly to position leaves where they catch the most light.
- Face-framing pieces. Pull a few soft tendrils free around the face and ears. These should be the most undone part of the entire style.
Tips and tricks: Secure the vine headband before gathering the bun — trying to thread it through afterward risks disrupting the style. If the vine feels loose, use extra bobby pins along the wire, hidden under the gold leaves. For fine hair, backcomb the crown area slightly before placing the vine for added volume at the top.
17.Boho Braided Crown with Wavy Tresses
The overview: Dirty blonde hair with pancaked braids woven into a crown and accented with gold leaf pins that catch the sunset light. The remaining hair falls in loose, effortless waves that frame the face and shoulders. This is bohemian bridal at its peak.
The braids provide structure while the waves keep everything soft and approachable. The gold leaf pins are the kind of detail that makes people lean in closer during the ceremony to get a better look. They're small, warm-toned, and catch light in a way that feels organic rather than flashy.
Why this look is popular: The combination of braided crown and loose waves is the most requested bohemian bridal style — it balances structure and softness in a way that flatters virtually everyone. The gold leaf pins add warmth without the formality of pearls or crystals. Pancaked braids show more texture and volume than tight braids, which keeps the look relaxed.
Where this look is suitable: Bohemian bridal ceremonies, outdoor beach venues, settings with natural, earthy décor. This is for the bride who wants her hair to look like it belongs in nature — wind-moved, sun-kissed, and adorned with gold.
Step by step:
- Create texture. Apply sea salt spray to damp hair and air-dry or diffuse. You want natural-looking texture, not polished curls.
- Braid the crown. Take two sections from behind each ear and braid them into three-strand braids. Pancake each braid gently, pulling the outer loops wider.
- Wrap and pin. Bring each braid up and over the head, crossing them at the crown. Pin the ends under the opposite braid, hiding the tails.
- Add gold leaf pins. Place small gold leaf pins along the crown braid at irregular intervals. Scatter them — don't cluster them.
- Enhance the waves. Use a curling wand on any sections that need more definition. Keep the waves loose and slightly imperfect.
- Adjust and set. Pull a few face-framing pieces free. Set with a flexible-hold spray that doesn't crunch the waves.
Tips and tricks: The pancaking should be subtle — pull gently and evenly to avoid creating flat spots. If the braids feel too loose, secure them with additional pins hidden under the gold leaf accessories. The waves should look wind-moved, not salon-perfect. Embrace the imperfection — it's what makes this style feel alive.
35 Cute & Sporty Athletic Hairstyles for Women (2026)
18.Sun-Kissed Beach Waves Half-Updo

The overview: Platinum blonde balayage with sun-kissed highlights, pulled into a half-up style that lets the natural waves cascade freely. This is the classic coastal look — the one that looks effortless but requires the right cut, the right color, and the right amount of sea salt spray.
The platinum balayage adds dimension that catches light like a reflection off the water. Sometimes the simplest styles are the hardest to nail, and this one is worth every minute in the styling chair. It's the hair equivalent of a white linen dress — timeless, universally flattering, and perfectly at home by the ocean.
Why this look is popular: The half-up format with waves is the most requested bridal hairstyle for a reason — it works on every face shape and every venue. The platinum balayage adds a modern edge to a classic formula, and the waves create movement that photographs beautifully in outdoor light. This style survives wind better than most because the half-up section keeps the top anchored.
Where this look is suitable: Classic coastal bride settings, beach ceremonies, oceanfront receptions. This is the safe choice that never looks boring — it's timeless for a reason.
Step by step:
- Start with volume. Apply volumizing mousse to damp hair and blow-dry with a round brush, lifting at the roots. Volume at the crown is essential for this style.
- Create the waves. Use a 1.25-inch curling wand on 1-inch sections, leaving the last two inches out. Alternate curl direction for a natural finish.
- Break up the waves. Run your fingers through the curls to separate them. Apply a light sea salt spray for texture.
- Gather the half-up section. From your temples up, pull the top third of your hair back. Secure at the crown with pins or a small elastic.
- Boost the crown. Gently pull at the hair above the secured section to add lift and volume. This prevents the top from looking flat.
- Set with spray. Use a flexible-hold hairspray that maintains the wave pattern without making it stiff. A final mist of shine spray adds gloss.
Tips and tricks: The balayage does most of the work here — if your color is solid, the waves won't have the same dimension. Invest in a good colorist before investing in styling tools. For fine hair, a root-lifting powder applied before blow-drying makes a measurable difference in volume. The last two inches of each section should be left straight — it's what makes the waves look modern rather than prom-night.
19.Braided Crown with Loose Waves and Seashell Accents
The overview: Blonde balayage hair braided into a crown that circles the head, adorned with tiny seashells and pearls that look like they were collected on a morning beach walk. The rest of the hair falls in loose waves that catch the light beautifully.
This is the hairstyle that brings the beach to your hair — not in a tacky way, but in a way that feels curated and intentional. The seashells add texture and interest without overwhelming the braid's beauty. The pearls scattered among the shells create a tonal contrast that elevates the entire arrangement.
Why this look is popular: Mixing seashells with pearls creates a coastal arrangement that's more sophisticated than shells alone. The braided crown provides a secure base for the accessories, and the loose waves below add softness. The blonde balayage shows both the braid texture and the accessories clearly. Works best on medium to long hair.
Where this look is suitable: Bohemian romantic ceremonies, coastal venues with natural shell and pearl décor, beach weddings where the ocean is literally the backdrop. This style ties directly to the setting.
Step by step:
- Prep for texture. Apply sea salt spray to damp hair and let it air-dry for natural texture. The braid and the waves both benefit from some grit.
- Create the crown braid. Start at one temple and Dutch braid along the hairline, adding hair as you go. Continue around the head until you reach the starting point.
- Tuck and secure. Hide the braid tail under the starting point and pin in place. The crown should look seamless.
- Add seashells and pearls. Thread tiny seashells and pearls into the braid at irregular intervals. Use a mix of sizes for a more organic, collected feel.
- Wave the loose hair. Use a curling wand on the remaining sections below the crown. Break up with fingers for soft, natural waves.
- Set with spray. A medium-hold spray keeps the braid and waves in place without stiffness.
Tips and tricks: Use mini shells — large shells weigh down the braid and create visible bumps. If you can't find tiny shells, shell-shaped charms from a craft store work equally well and attach more securely. The pearls should be scattered among the shells, not clustered together, for the most natural arrangement.

28 Trendy May Nail Designs for 2026 💅
20.Chic Braided Updo with Romantic Wisps
The overview: Dirty blonde hair braided into a low bun at the nape, secured with a pearl comb that adds just enough sparkle. Soft wisps of hair are pulled free around the face and ears, softening the updo and creating movement.
This is the hairstyle that says "I woke up like this" while secretly being meticulously planned. The wisps are the key — they transform a structured updo into something romantic and approachable. Sophisticated coastal with a soft edge.
Why this look is popular: The contrast between the structured braid and the soft wisps is what makes this updo work — neither too formal nor too casual. The pearl comb adds a classic bridal element without the fuss of scattered pins. The wisps soften the jawline and create a romantic frame for the face. Works on most hair types and lengths past the shoulders.
Where this look is suitable: Sophisticated coastal ceremonies, elegant beach receptions, venues with a refined aesthetic. This is polished enough for a formal event but relaxed enough to feel appropriate by the water.
Step by step:
- Smooth the base. Apply a smoothing cream to damp hair and blow-dry straight. The braid needs a clean base to look defined.
- Braid the hair. Create a loose three-strand braid or French braid, starting at the crown and gathering all the hair. Secure the end with a clear elastic.
- Form the bun. Twist the braid into a compact bun at the nape. Pin with bobby pins that match your hair color.
- Insert the pearl comb. Slide the pearl comb into the top of the bun, pushing it firmly against the scalp for secure hold.
- Pull the wisps. Gently pull soft strands free around the face, ears, and nape. Keep them thin — heavy sections change the silhouette.
- Set and soften. Mist with a flexible-hold spray. Use a fine-tooth comb to smooth the braid surface without flattening the wisps.
Tips and tricks: The wisps should be the thinnest sections you pull free — think tendril, not chunk. Pull them from different points along the hairline for a more natural distribution. The pearl comb should sit flat against the head; if it sticks out, the angle is wrong. Push it in at a slight downward angle for the most secure hold.
21.Beachy Waves with Seashell Accents
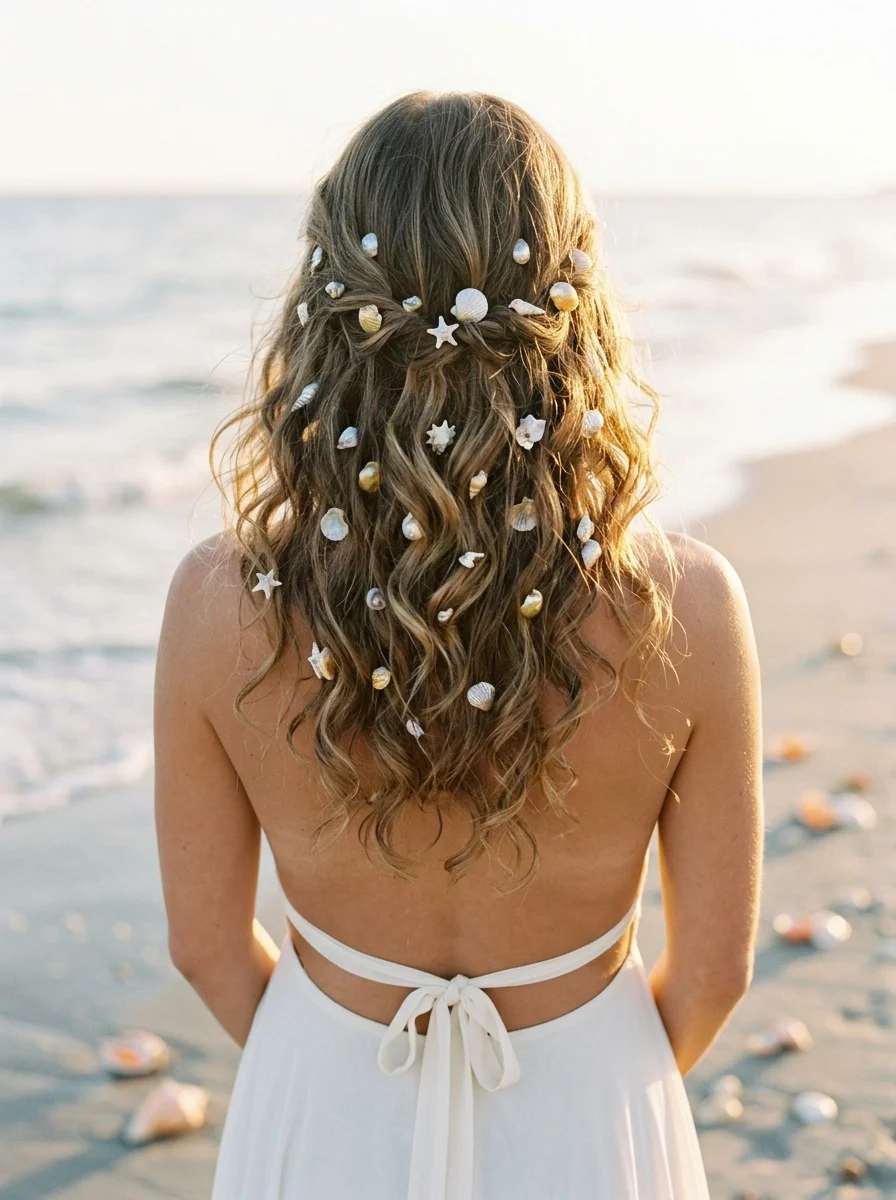
The overview: Light brown hair with dark blonde highlights, tousled into beachy waves that look like they were styled by the ocean itself. Small seashells and starfish are scattered throughout, adding a whimsical mermaid quality. This is the most on-the-nose beach wedding hairstyle on this list — and it works because the waves are so naturally beautiful.
The seashells aren't fighting the hair; they're celebrating it. Whimsical, romantic, and completely at home by the water. This is for the bride who wants to lean fully into the beach theme without apology.
Why this look is popular: Beachy waves are the most requested casual bridal style — they're forgiving, photogenic, and work on almost every hair type. Adding seashells takes it from "nice waves" to "themed bridal style" without much extra effort. The scattered placement creates a curated, collected feel rather than a costume effect.
Where this look is suitable: Whimsical mermaid beach ceremonies, destination weddings, venues where the ocean is the primary backdrop. This is for the bride who wants her hair to be part of the landscape.
Step by step:
- Apply sea salt spray. Spray generously through damp hair and scrunch upward. This is the foundation of the beachy wave texture.
- Air-dry or diffuse. Let the waves form naturally or use a diffuser on low heat. Avoid touching the hair while it dries — it causes frizz.
- Define select waves. Once dry, use a curling wand on any sections that need more definition. Leave the ends out for a modern, undone look.
- Break up the waves. Run your fingers through the hair to separate and soften the waves. Shake the roots gently for added volume.
- Add seashells. Thread small seashells and starfish onto bobby pins and slide them into the waves at random points. Vary the sizes and placement.
- Set lightly. Mist with a lightweight, flexible-hold spray. Avoid heavy products that would weigh down the waves or make them crunchy.
Tips and tricks: The sea salt spray is the product that makes or breaks this style. Apply it to soaking wet hair for the most natural wave pattern. If your hair is very straight, create the waves with a curling wand first, then spray with sea salt for texture. Use mini shells — large ones pull the waves flat and fall out by midday.

28 Stunning Baddie Summer Hairstyles for 2026 🔥☀️
22.Bohemian Mermaid Braid with Dried Flowers
The overview: Dirty blonde hair pancaked into a loose mermaid braid that drapes over one shoulder, woven with dried flowers in muted earth tones. This is the free-spirited bride's dream — the dried flowers won't wilt in the heat, and the pancaked braid has that effortlessly voluminous quality that makes it look like you gathered your hair up while walking through a meadow.
Earthy, romantic, and built to last through a full day of celebration. The muted tones of dried flowers complement the dirty blonde hair without competing for attention. This braid gets better as the day goes on — a little looseness and movement only adds to the bohemian effect.
Why this look is popular: Dried flowers are the practical choice for a wedding day — they won't wilt, bruise, or drop petals. The mermaid braid is one of the most photogenic braid styles, creating a dramatic, voluminous silhouette that fills the frame. The muted earth tones of dried flowers complement virtually any wedding color palette.
Where this look is suitable: Free-spirited boho ceremonies, outdoor beach weddings, venues with rustic or natural décor. This is for the bride who wants her hair to feel like part of the landscape — gathered, organic, and beautifully imperfect.
Step by step:
- Add texture. Spray texturizing spray or dry shampoo through the hair for grip. Slippery hair won't hold a pancaked braid.
- Sweep to one side. Brush all the hair over one shoulder. The braid should start at the nape on the opposite side.
- Create a loose braid. Braid a three-strand or Dutch braid, keeping tension loose. A tight braid won't pancake well.
- Pancake thoroughly. Starting from the bottom, pull the outer loops outward gently and evenly. Work your way up until the braid is nearly double its original width.
- Weave in dried flowers. Tuck dried flower stems into the braid at irregular intervals. Use the braid loops to hold the stems in place.
- Secure and adjust. Tie the end with a clear elastic. Pull a few face-framing pieces free and adjust the braid's position over the shoulder.
Tips and tricks: The pancaking technique is what separates a basic braid from a mermaid braid. Pull gently and gradually — starting from the bottom and working up gives you the most control. If dried flowers feel heavy, use fewer but place them strategically at focal points. The braid will loosen slightly throughout the day, which only enhances the bohemian effect.
23.Romantic Braided Ponytail with Ribbon Detail
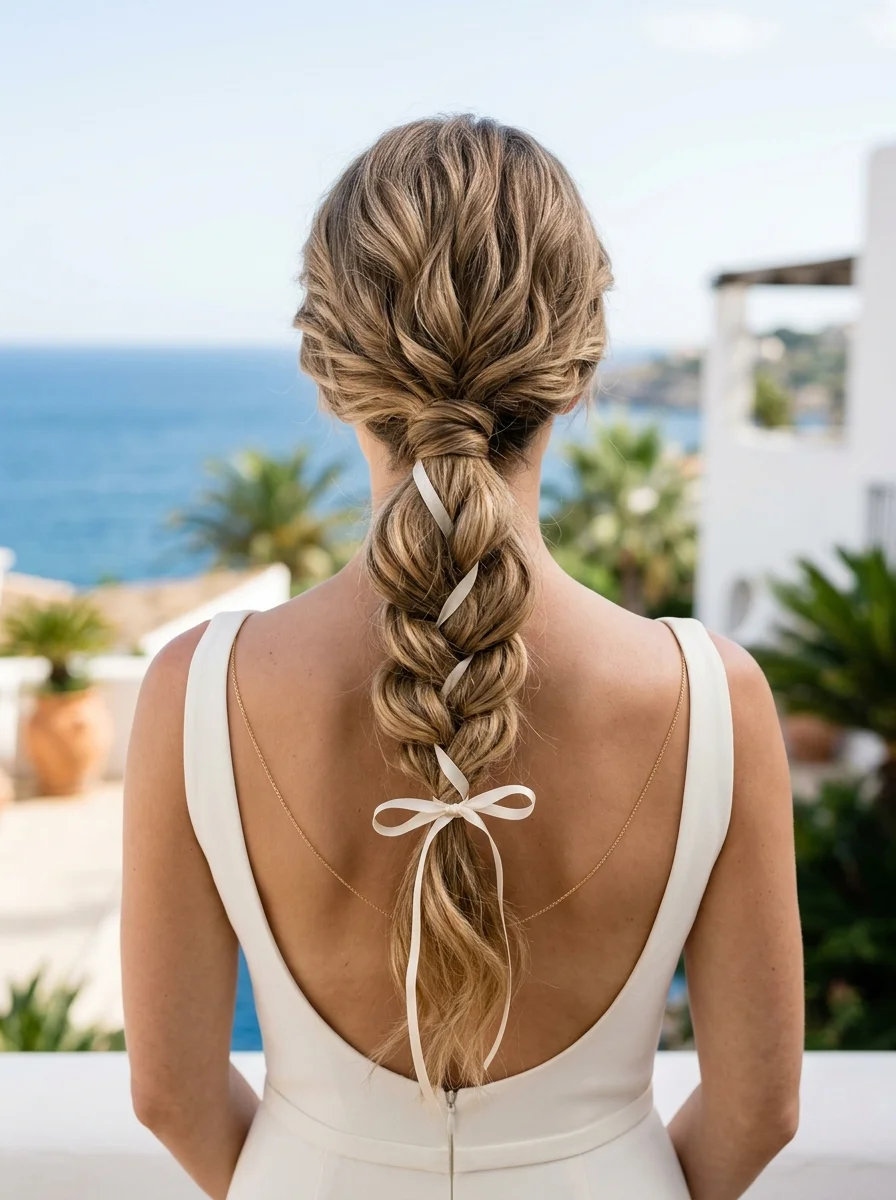
The overview: Ash blonde with honey tones, woven into a pancaked ponytail braid that starts at the crown and cascades down the back. A cream ribbon is threaded through the braid, adding a romantic softness that catches the wind beautifully. This is Mediterranean energy — the kind of hairstyle you'd see on a Greek island or the Amalfi Coast.
The ribbon adds movement and visual interest, and the pancaked braid provides the volume that makes it feel special rather than everyday. The cream tone of the ribbon complements the ash blonde hair without creating harsh contrast.
Why this look is popular: The braided ponytail is a modern alternative to the traditional bridal updo — it's less formal but still clearly intentional. Threading a ribbon through the braid adds a romantic, editorial quality that elevates the entire look. The pancaked volume makes the braid look thick and luxurious. Works best on medium to long hair.
Where this look is suitable: Mediterranean-style beach ceremonies, coastal venues with old-world charm, outdoor settings with warm, golden light. This is for the bride who wants romantic drama without the weight of a full updo.
Step by step:
- Create a high ponytail. Gather all the hair at the crown and secure tightly with a strong elastic. Smooth the surface with a boar bristle brush.
- Braid the ponytail. Create a three-strand braid down the full length of the ponytail. Keep tension moderate — too tight and the pancaking won't work.
- Pancake the braid. Starting from the bottom, gently pull the outer loops outward. Work up to the base, making the braid as wide as possible.
- Thread the ribbon. Weave a cream ribbon through the braid sections, starting from the base. Leave a few inches of ribbon trailing at the end.
- Secure the end. Tie the ribbon around the elastic at the bottom of the braid, forming a small bow or knot.
- Adjust and set. Position the braid over one shoulder or let it hang straight down. Set with a flexible-hold spray.
Tips and tricks: Use a ribbon that's at least 1.5 inches wide — thin ribbon gets lost in the braid. The cream tone works better than bright white on ash blonde hair because it doesn't create harsh contrast. If the ribbon slips, secure it with a few stitches of thread at the base before you start braiding. Wind will move the ribbon beautifully.

31 Stunning Prom Nails for Women in 2026 💃
24.Braided Waterfall Waves with Pearls
The overview: Ash blonde hair braided into a waterfall braid that wraps around the crown, with each dropped section falling into soft waves. Pearls are placed at each "drop" point, creating a luminous cascade effect. This is the kind of hairstyle that makes people stop mid-conversation to stare.
It's ethereal, it's elegant, and it photographs like a work of art. The waterfall braid is technically demanding — find a stylist who knows what they're doing — but the result is absolutely worth it. The pearls at each drop point add a luminous quality that catches light from every direction.
Why this look is popular: The waterfall braid is one of the most visually striking braid techniques — it creates a cascading effect that looks like hair flowing through a woven frame. Adding pearls at each drop point emphasizes the waterfall pattern and adds bridal elegance. Ash blonde shows the braid definition beautifully. This style is best executed by a professional stylist.
Where this look is suitable: Ethereal, elegant beach ceremonies, venues with romantic coastal design, outdoor settings with soft, diffused lighting. This is for the bride who wants her hair to be a genuine showstopper.
Step by step:
- Prep the hair. Apply a smoothing serum to damp hair and blow-dry straight. The waterfall braid needs smooth, tangle-free hair to look clean.
- Start the waterfall braid. At one temple, begin a three-strand braid. As you braid along the hairline, drop the bottom strand each time and replace it with a new section from above.
- Continue around the crown. Keep the braid moving along the hairline, dropping and replacing strands. The dropped sections should fall in even, consistent lengths.
- Secure at the end. When you reach the opposite temple, braid the remaining strands normally and secure with a clear elastic. Tuck the tail under the hair.
- Add pearls. Place a small pearl pin at each point where a section was dropped from the braid. The pearls should sit right at the "drop" point.
- Wave the dropped sections. Use a curling wand on each dropped section to create soft, defined waves that cascade down.
Tips and tricks: The waterfall braid requires practice — watch tutorials and try it at least twice before the wedding day. Keep the braid tension consistent; uneven tension creates visible gaps. The pearls should be small enough to sit at the drop point without pulling the braid out of shape. If you can't master it yourself, a professional stylist who specializes in braids is worth the investment.
25.Boho Braid with a Waterfall Twist
The overview: Dark blonde hair woven into chunky braids from both the temples and merging to form a plait at the back of the head, with dried wildflowers tucked into the plaits for an earthy, foraged feel. The back of the style transitions into a beautiful braided plaits. This is the hairstyle for the bride who wants to look like she just wandered in from a wildflower meadow.
Even if she spent two hours in a salon chair. The dried flowers add color and texture without the fragility of fresh blooms — they won't wilt, drop petals, or lose their shape throughout the day. The chunky braid width creates a bold, graphic pattern that reads well from a distance.
Why this look is popular: Chunky braids are easier to execute than fine braids and create a bolder visual impact. Dried wildflowers are the most practical floral accessory — they're lightweight, won't wilt, and come in beautiful muted tones. The crown-plus-flowing-back combination gives you the best of both worlds: structured front, free-flowing back.
Where this look is suitable: Earthy coastal ceremonies, outdoor beach venues with wildflower arrangements, settings with natural, unmanicured beauty. This is for the bride who wants her hair to feel foraged, not styled.
Step by step:
- Add texture. Spray texturizing spray through the hair for grip. Chunky braids need texture to hold their shape and show the pattern.
- Create two braids. Part the hair down the center. Braid each side into a loose, chunky three-strand braid. Don't braid too tightly — you'll pancake them.
- Pancake the braids. Pull the outer loops outward gently to widen each braid. Chunky braids should look full and bold.
- Merge into a braided plait. Bring both the braided pigtails, one by one, into a single braided plait, at the center back of the head.
- Add dried wildflowers. Tuck small bunches of dried wildflowers into the braid plaits. Distribute them evenly around the braids.
Tips and tricks: Choose dried flowers that match your wedding color palette — the muted tones should complement, not clash. Secure larger flower bunches with bobby pins hidden under the braid loops. If the crown feels loose, use extra pins along the braid, hidden under the flowers. The loose back should look wind-moved, not styled — avoid over-defining the waves.

21 Hot Summer Buns Hairstyle Ideas for 2026 ☀️🔥
26.Effortless Waves Half-Up with Chic Wooden Barrette
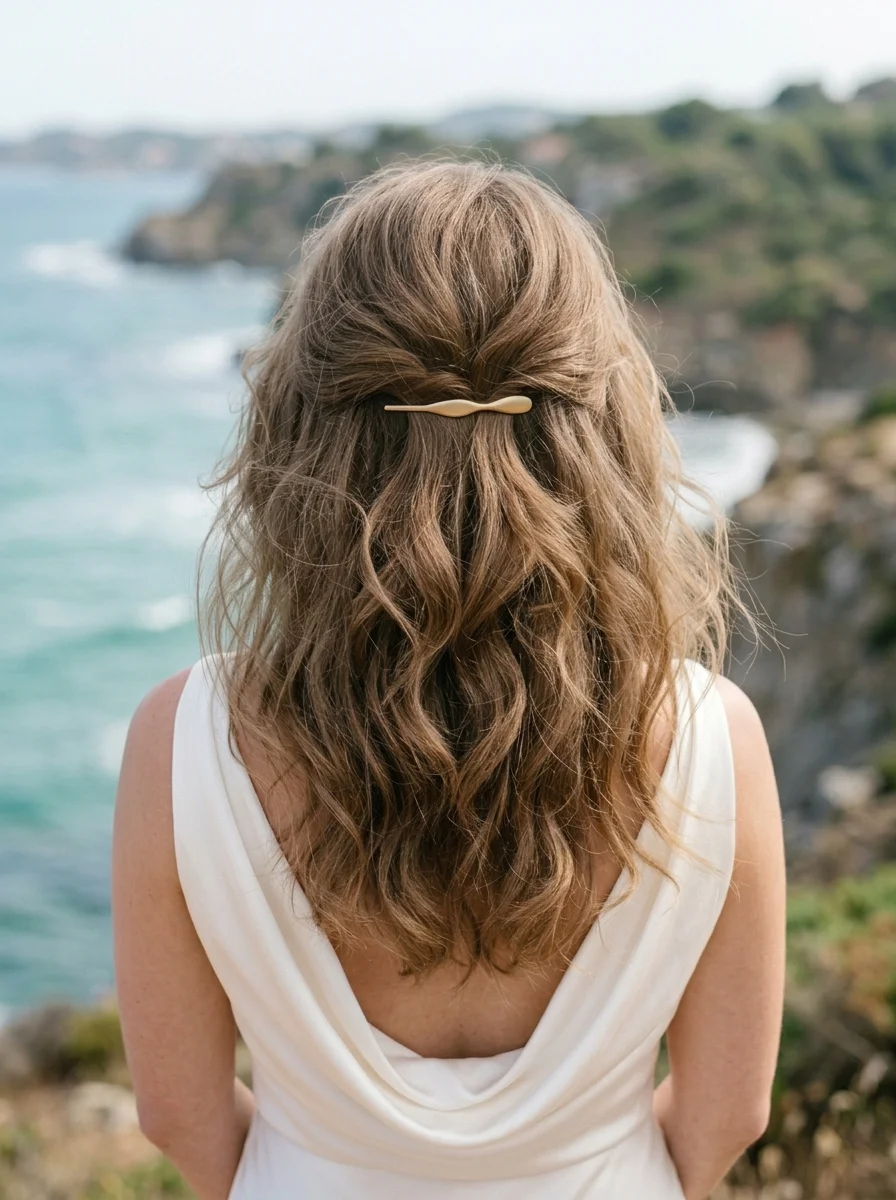
The overview: Ash blonde hair styled into tousled waves that look like they've been dried by the ocean air, pulled back in a half-up style secured with a wooden barrette. This is modern understated — the kind of hairstyle that doesn't try to impress but does anyway.
The wooden barrette is a subtle choice that adds warmth and texture without competing with the hair itself. Minimalist brides, this is your go-to. Less really is more when the "less" is this well executed. The natural wood tone complements ash blonde without creating harsh contrast.
Why this look is popular: The wooden barrette is a modern, organic alternative to traditional bridal accessories — it adds warmth without sparkle and texture without shine. The tousled waves are universally flattering, and the half-up format is practical for wind and weather. This style is fast, forgiving, and looks intentional with minimal effort.
Where this look is suitable: Modern understated ceremonies, minimalist beach weddings, venues with clean, contemporary design. This is for the bride who wants her hair to be simple, beautiful, and completely without fuss.
Step by step:
- Create tousled waves. Apply sea salt spray to damp hair and scrunch. Let air-dry or use a diffuser. The waves should look naturally textured, not salon-created.
- Add definition. Once dry, use a curling wand on random sections that need more shape. Leave the ends straight for a modern finish.
- Break up the waves. Run your fingers through the hair to separate and soften. Shake the roots for volume.
- Gather the half-up section. From the temples, pull the top section back loosely. Don't smooth it too much — texture is the point.
- Secure with the wooden barrette. Clip the gathered section at the back of the crown. Position it as a focal point.
- Final adjustments. Pull a few face-framing pieces free. Set with a light mist of flexible-hold spray.
Tips and tricks: The wooden barrette should have a matte or satin finish — glossy wood reads as costume jewelry. If your waves fall flat, a second application of sea salt spray revives the texture without re-styling. The half-up section should be loose enough to look effortless but tight enough to survive wind. Test it outside before the ceremony.
27.Tropical Beach Waves with a Hibiscus Bloom
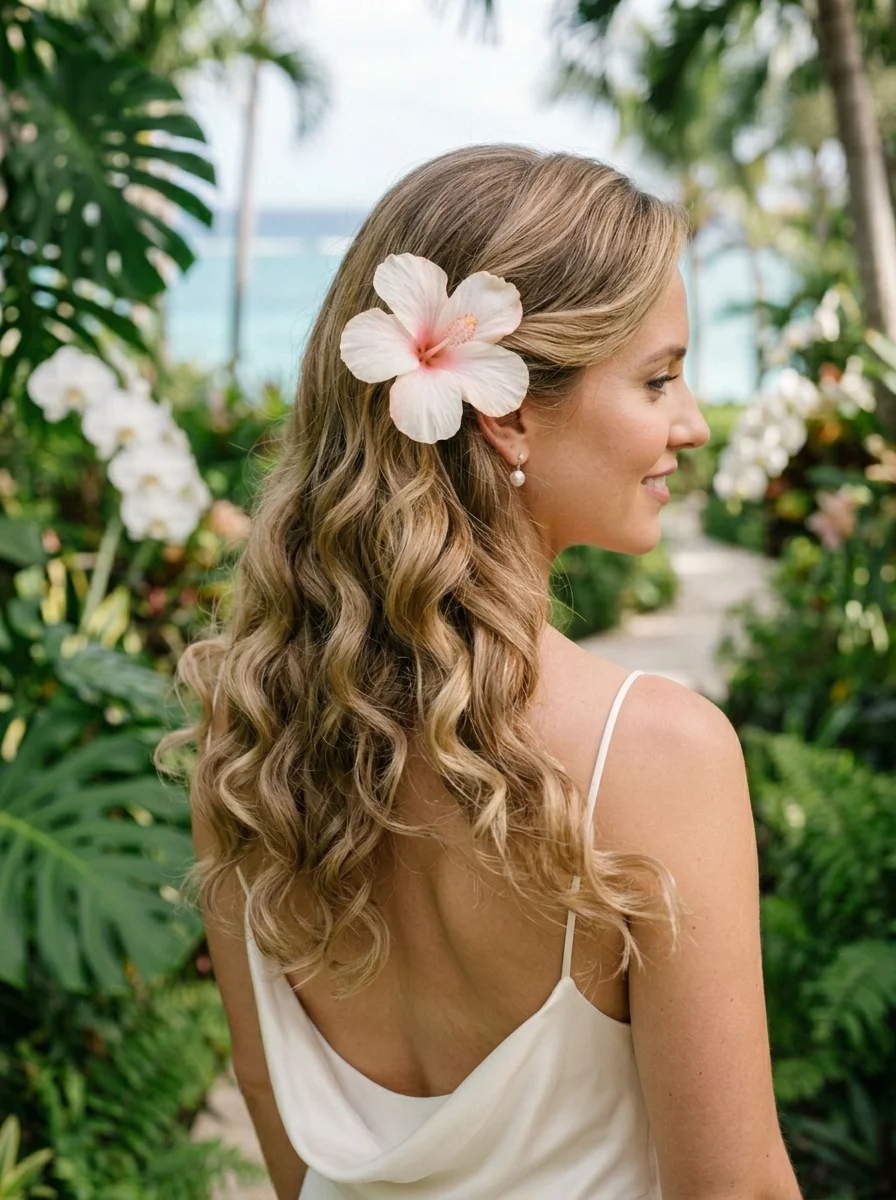
The overview: Honey blonde hair defined into natural curls that bounce and shine, with a fresh hibiscus flower tucked behind one ear. This is the tropical destination bride at her best — the curls are the main event, and the hibiscus is the exclamation point.
The flower brings a pop of color that complements the ocean blues and greens of a tropical backdrop. This hairstyle says "I'm getting married on a beach and I'm not apologizing for it." Bold, beautiful, and completely unapologetic. The hibiscus is a statement — it says you're here, you're tropical, and you're owning every bit of it.
Why this look is popular: A single fresh flower behind the ear is the most iconic tropical bridal look — it's simple, striking, and immediately communicates "destination wedding." The natural curls provide volume and texture that hold the flower securely without pins. Honey blonde hair with warm tones complements the vibrant hibiscus color beautifully.
Where this look is suitable: Tropical destination ceremonies, beach venues with lush floral surroundings, outdoor settings with warm, saturated colors. This is for the bride who wants to match the energy of her tropical surroundings.
Step by step:
- Define curls on damp hair. Apply curl-defining cream section by section, scrunching upward. Use a wide-tooth comb to distribute product evenly.
- Diffuse on low heat. Hold the diffuser under each section and scrunch upward. Keep the heat low to prevent frizz. Don't touch the curls while they dry.
- Add shine. Once completely dry, scrunch a few drops of lightweight hair oil through the ends. This adds tropical gloss without weight.
- Shape the curls. Gently separate any clumped curls with your fingers. Lift the roots for extra volume at the crown.
- Add the hibiscus. Tuck a fresh hibiscus flower behind one ear, nestled into the curls. The curls should hold it in place without additional pins.
- Set lightly. Mist with a lightweight, flexible-hold spray. Avoid heavy products that would crunch the curls.
Tips and tricks: Cut the hibiscus stem to 2-3 inches and wrap the cut end in floral tape before tucking it in — this prevents the stem from scratching your scalp. If fresh hibiscus isn't available, a high-quality silk hibiscus looks identical in photos. Keep the flower away from your ear if you're wearing earrings — they can compete for attention. A tropical hair oil (coconut or monoi) adds scent and shine that completes the island bride aesthetic.

29 Best Tropical Vacation Nails for Women in 2026 🌴
The Humidity-Proof Updo Hack
The biggest enemy of a beach wedding hairstyle is not the dress, the veil, or the bouquet toss. It is the ocean breeze and the humidity that comes with it. Stylists who specialize in coastal weddings agree: the preparation you do the day before matters more than anything that happens in the styling chair on the morning of.
The most persistent myth in bridal hair is that dirty hair holds an updo better. In reality, showing up with product-heavy, day-three hair can actually cause your updo to slip and feel heavy. The better approach is to wash your hair the night before and apply a humidity-blocking spray while it is still damp. Products like Color Wow Dream Coat or Oribe Impermeable Anti-Humidity Spray create a barrier that keeps ocean moisture from swelling the hair shaft and destroying your style.
The prep? Skip heavy oils and waxes on your wedding morning. A lightweight smoothing serum applied to damp hair before blow-drying gives you enough control without weighing anything down. Bring a travel-sized humidity spray in your getting-ready kit for a refresh layer right before the ceremony.
Three Pre-Wedding Hair Mistakes
You have the dress, the venue, and the flowers. But a preventable hair mistake can still throw off your entire bridal look. After watching enough beach weddings go sideways, here are the three errors that brides make most often — and how to sidestep every single one.
1. Skipping the trial run. A beach wedding introduces variables — wind, humidity, salt spray — that your standard salon trial cannot replicate unless you specifically test for them. Book your trial on a day when the coastal forecast matches your wedding conditions, or at least practice with a humidifier in the room. You need to know how your hair texture reacts before the actual ceremony.
2. Fighting your natural texture. High humidity will always win against a flat iron if your hair has any natural wave or curl. Work with your pattern rather than against it. A bride with 2C-3B curls will spend the entire day fighting frizz if she insists on pin-straight hair. A defined curl pattern, properly set with anti-humidity products, will look intentional and gorgeous.
3. Ignoring the weather report. This sounds obvious, but brides planning coastal ceremonies often check the forecast for rain and forget to check for wind speed. If sustained winds above 15 mph are predicted, a sleek low bun or a secure braided updo will save you from constantly fixing your hair during your vows and photos. Loose styles become distraction in strong wind.
The insurance? Pack an emergency kit with extra bobby pins, a small humidity spray, and a foldable compact mirror. Hand it to your maid of honor before the ceremony. You will not need it — but if you do, you will be grateful it is there.