Hair Trends
31 Stunning Summer Birthday Party Hairstyles for 2026

Your birthday might be coming up, and you already know the outfit, the venue, and the cake. But your hair? That's the part that ties the whole look together. Whether you're heading to a rooftop at sunset, a garden brunch, or a nightclub with your closest friends, the right hairstyle can make you feel like the main character you already are.
We've pulled together 31 summer birthday hairstyles that range from effortlessly undone to full-on glamour. Some take five minutes with dry shampoo and a scrunchie. Others deserve a slow-motion entrance. Either way, there's something here that'll make you feel like the birthday girl you are.
The Photo-Ready Checklist
Your birthday means photos — lots of them. From group shots to the friend who documents everything, the last thing you want is hair that looks great in person but falls flat on camera.
The shine factor: Glossy hair photographs better than matte hair, every time. Run a drop of shine serum through your mid-lengths and ends before heading out. The light catches it beautifully in flash photos, making your hair look healthier than it actually is.
Volume at the crown: Flat hair disappears in photos. Tease the crown section lightly or use a volumizing powder at the roots before styling. That extra height creates dimension that reads on camera, especially in group shots where you want to stand out.
The photo rule? Avoid heavy hairspray right before photos — it makes hair look stiff and unnatural. Use flexible-hold spray instead and apply it ten minutes before you need to be photo-ready so it settles.
The Party Touch-Up Kit
You spent time getting your hair right, but birthday parties involve dancing, hugging, and general chaos. A small kit in your bag keeps your style celebration-ready from the first toast to the last slice of cake.
Mini dry shampoo: Your best friend for absorbing oil and reviving flat hair mid-party. A quick spritz at the crown and a finger massage takes thirty seconds.
Spare pins and elastics: Match them to your hair color. When a pin pops out or an elastic snaps, you will be glad you packed backups. Keep them in a small ziplock so they do not get lost.
The clutch kit? Mini dry shampoo, four bobby pins, a travel-size pump hairspray, and a foldable brush. That is enough to handle anything from flat roots to a slipped pin, and it fits in even the smallest bag.
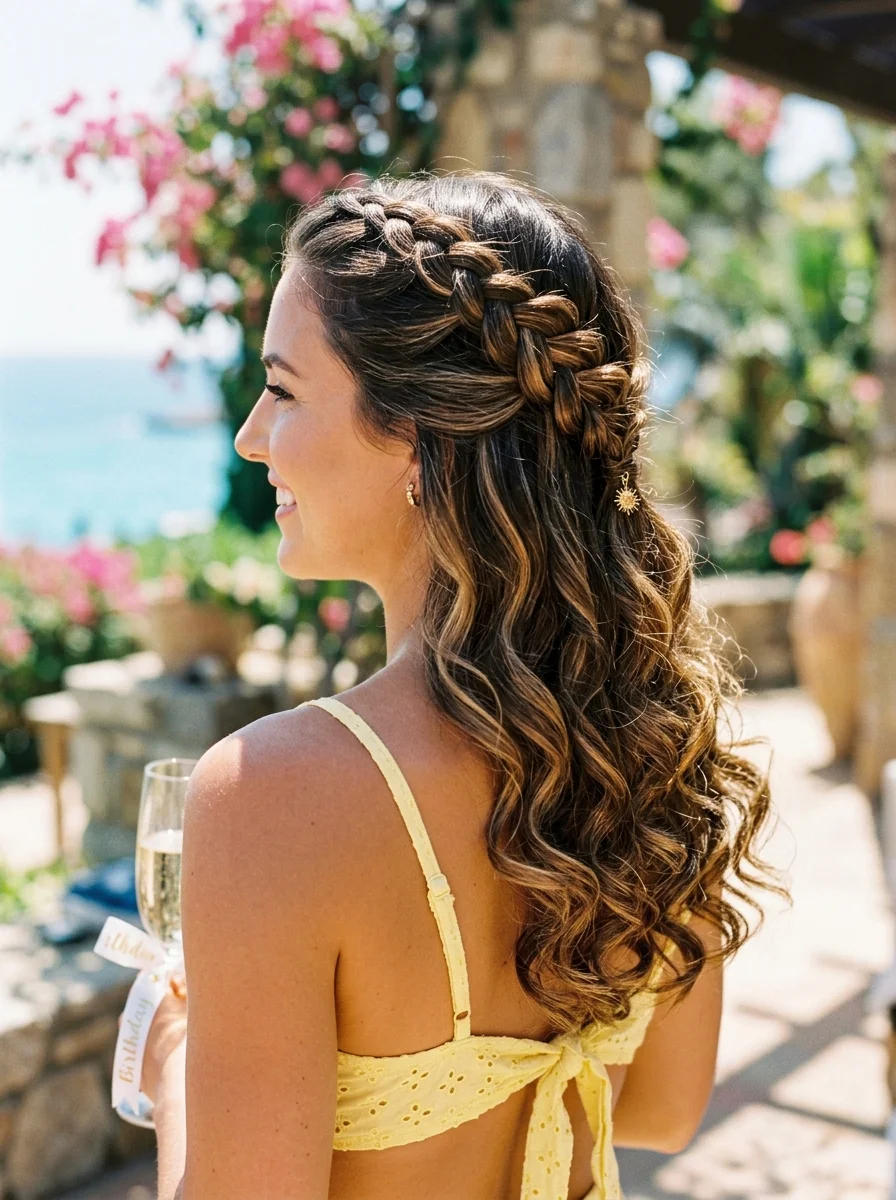
1.Sparkling Bubble Ponytail
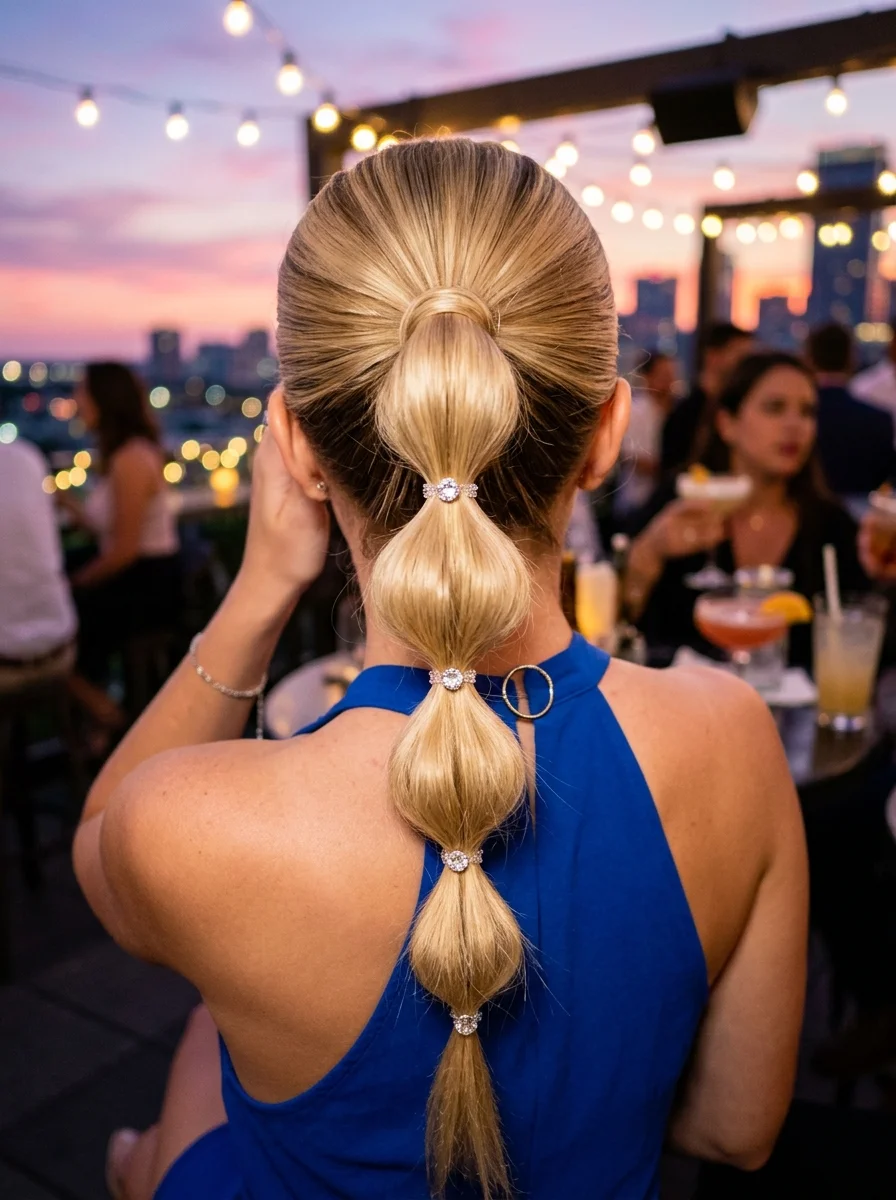
The overview: A sleek high ponytail with four distinct bubbles, each secured with elastics and adorned with crystal cuffs. The bubbles graduate in size, creating a cascading effect that moves beautifully. It's playful enough for a rooftop sunset party but polished enough to hold its own in photos.
Why this look is popular: Bubble ponytails have been everywhere since 2024, and they're not slowing down. The crystal cuffs elevate a fun style into something that feels intentional and party-ready without requiring a professional stylist.
Where this look is suitable: Rooftop parties, outdoor birthday dinners, casual celebrations where you still want to look put-together.
Step by step:
- Start with smooth hair. Apply a smoothing serum and blow-dry your hair straight, or use a flat iron for extra sleekness.
- Secure a high ponytail. Gather all your hair at the crown and tie it with a strong elastic.
- Create the first bubble. Place another elastic about three inches down from the base. Gently pull the hair between the elastics outward to create volume.
- Repeat down the length. Continue adding elastics and fluffing each section, making each bubble slightly smaller than the one above.
- Add crystal cuffs. Clip a jeweled cuff onto each elastic for that sparkling finish.
Tips and tricks: Use texturizing spray on each section before pulling it apart. The grit helps the bubbles hold their shape and keeps them from flattening out by the end of the night.
2.Golden Hour Curls with Sparkle

The overview: Natural 3B curls defined with product and styled into tight, bouncy corkscrews. Gold cuffs and beads are threaded randomly through the curls for an effortless sparkle. This style feel like it was designed for golden hour photos at a tropical garden party.
Why this look is popular: Curly hair is having its moment, and adding gold accessories gives it a celebratory edge. It's a style that says you didn't try too hard, even though the result is absolutely stunning.
Where this look is suitable: Tropical garden parties, poolside birthdays, outdoor celebrations where the sun hits just right.
Step by step:
- Define your curls. Apply curl cream to damp hair and scrunch upward to encourage natural curl pattern.
- Dry with a diffuser. Use a diffuser on low heat to set curls without creating frizz.
- Pick out curls. Use a hair pick at the roots for extra volume without disturbing the curl definition.
- Add accessories. Thread gold cuffs and beads through random sections, focusing on pieces that frame your face.
Tips and tricks: Don't overwork the curls once they're dry. Touching them too much creates frizz and kills the definition. Let them be.
3.Messy Top Knot with Floral Silk Scarf
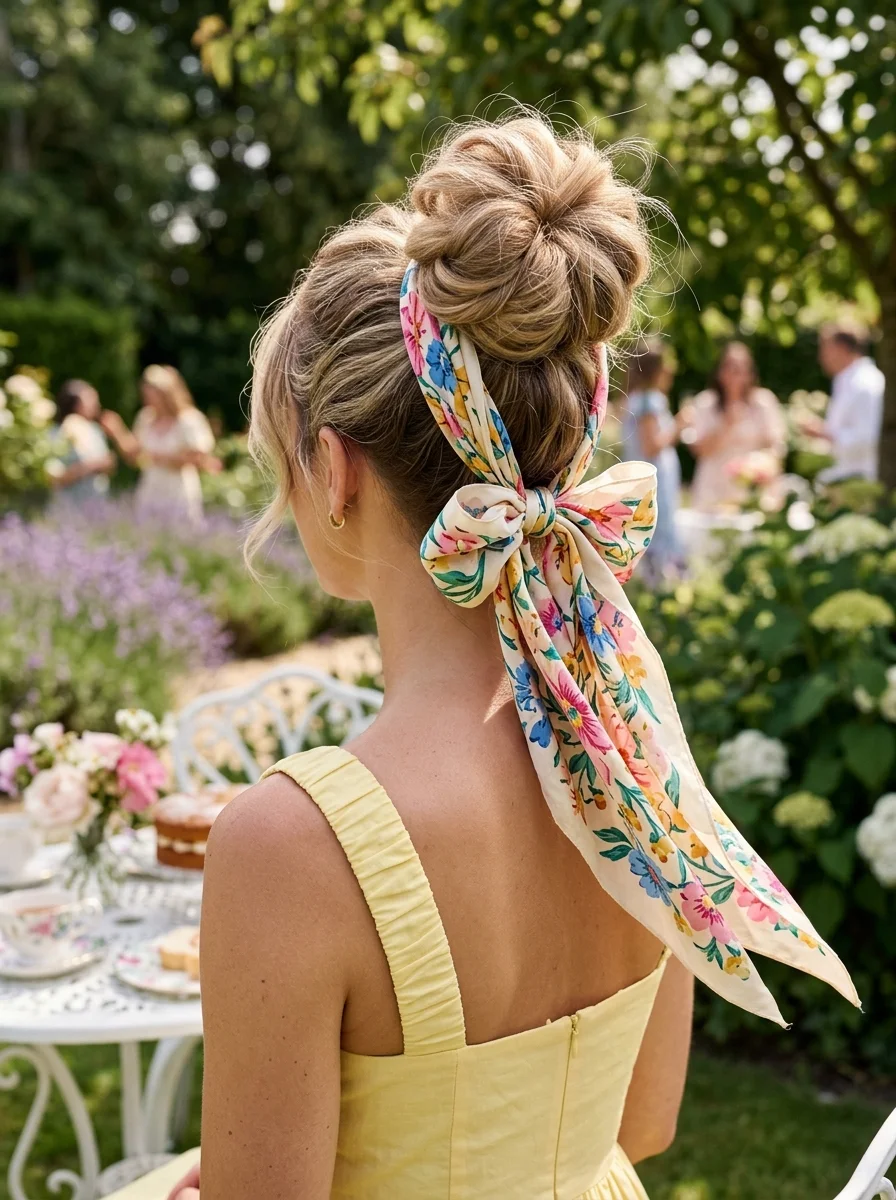
The overview: A loose, textured top knot positioned at the crown with face-framing pieces left out. A cream floral silk scarf is wrapped around the base of the bun with the ends left to trail down one side. It looks effortless but clearly someone thought about it. The cream floral silk scarf adds a romantic touch that elevates the whole thing.
Why this look is popular: The messy top knot is a classic for a reason, but adding a silk scarf takes it from "I just threw this up" to "I'm the birthday girl and I know it." It works on almost every hair type and takes about ten minutes.
Where this look is suitable: Garden parties, daytime brunches, casual outdoor celebrations, anywhere you want to look chic without trying too hard.
Step by step:
- Add texture. Spritz dry shampoo or texturizing spray throughout your hair for grip and volume.
- Gather loosely. Pull your hair into a high ponytail, keeping it loose and relaxed.
- Twist into a bun. Wrap the ponytail around its base and tuck the ends under, securing with bobby pins.
- Pull out pieces. Gently tug at sections of the bun and pull out a few face-framing strands.
- Add the scarf. Tie the silk scarf around the base of the bun and let the ends trail down one side.
Tips and tricks: Use a donut bun maker if your hair is fine — it gives the knot more body without requiring extensions. The scarf hides the form completely.
4.Braided Updo with Loose Curls and Pearl Accent
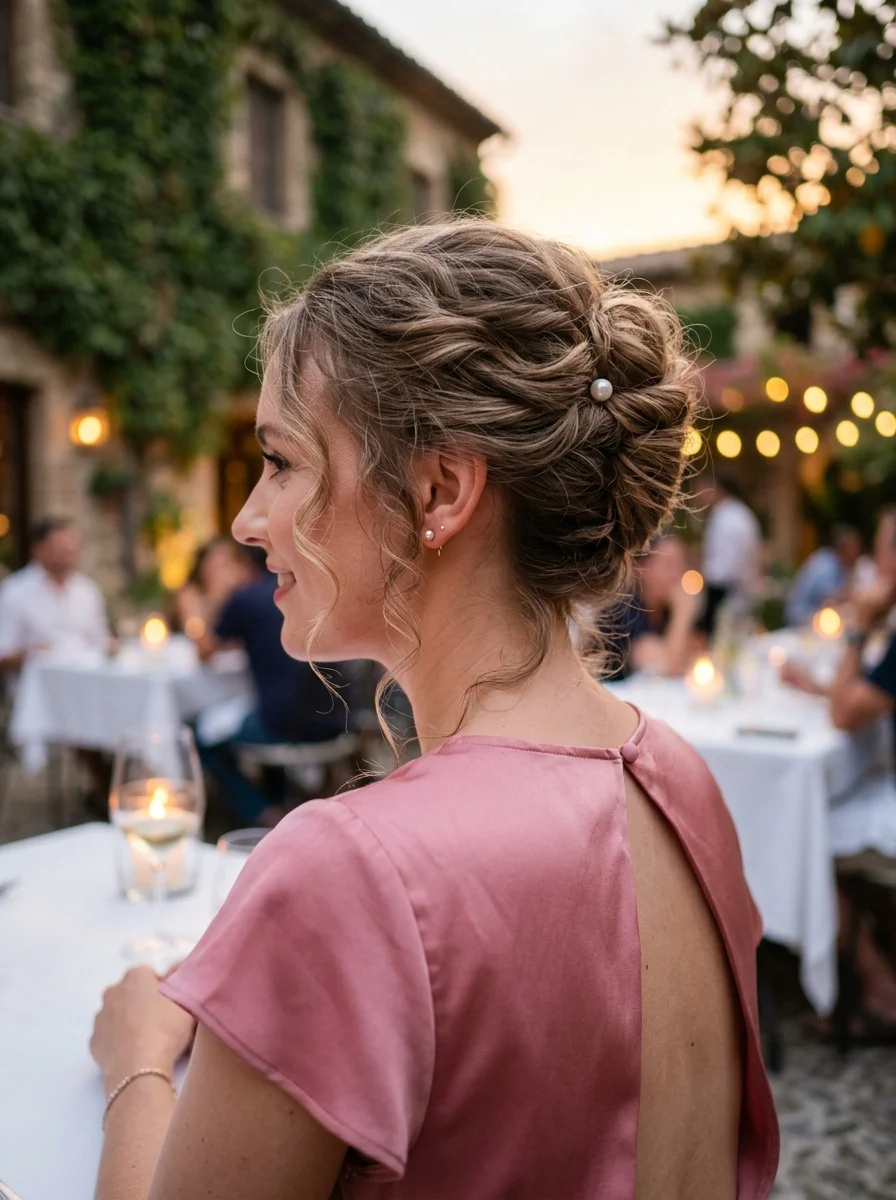
The overview: A loose three-strand braid that wraps into a low chignon at the nape. Curled tendrils frame the face, and a single pearl pin sits where the braid meets the bun. The single pearl pin tucked into the braid is the kind of detail that makes someone lean in and say "wait, let me see your hair." It's Mediterranean dinner energy — refined without being stiff.
Why this look is popular: Braids and updos are a natural pairing, but this version feels modern because it's deliberately undone. The pearl accent adds a touch of elegance that makes it feel special without being overdone.
Where this look is suitable: Mediterranean-style dinners, rooftop celebrations, intimate birthday gatherings where you want to look polished but not formal.
Step by step:
- Curl your hair. Use a large-barrel iron to create loose waves throughout your hair.
- Create a loose side braid. Braid a section from one side, keeping it relaxed and pulling at the edges to make it fuller.
- Wrap into a chignon. Gather all your hair at the nape, incorporating the braid, and twist into a low bun.
- Secure and adjust. Pin the bun in place, then pull out a few curled pieces to frame your face.
- Add the pearl. Insert a single pearl pin into the braid where it meets the bun.
Tips and tricks: Don't braid too tightly. The relaxed quality of the braid is what makes this look work — it should look like it took two minutes even if it took twenty.
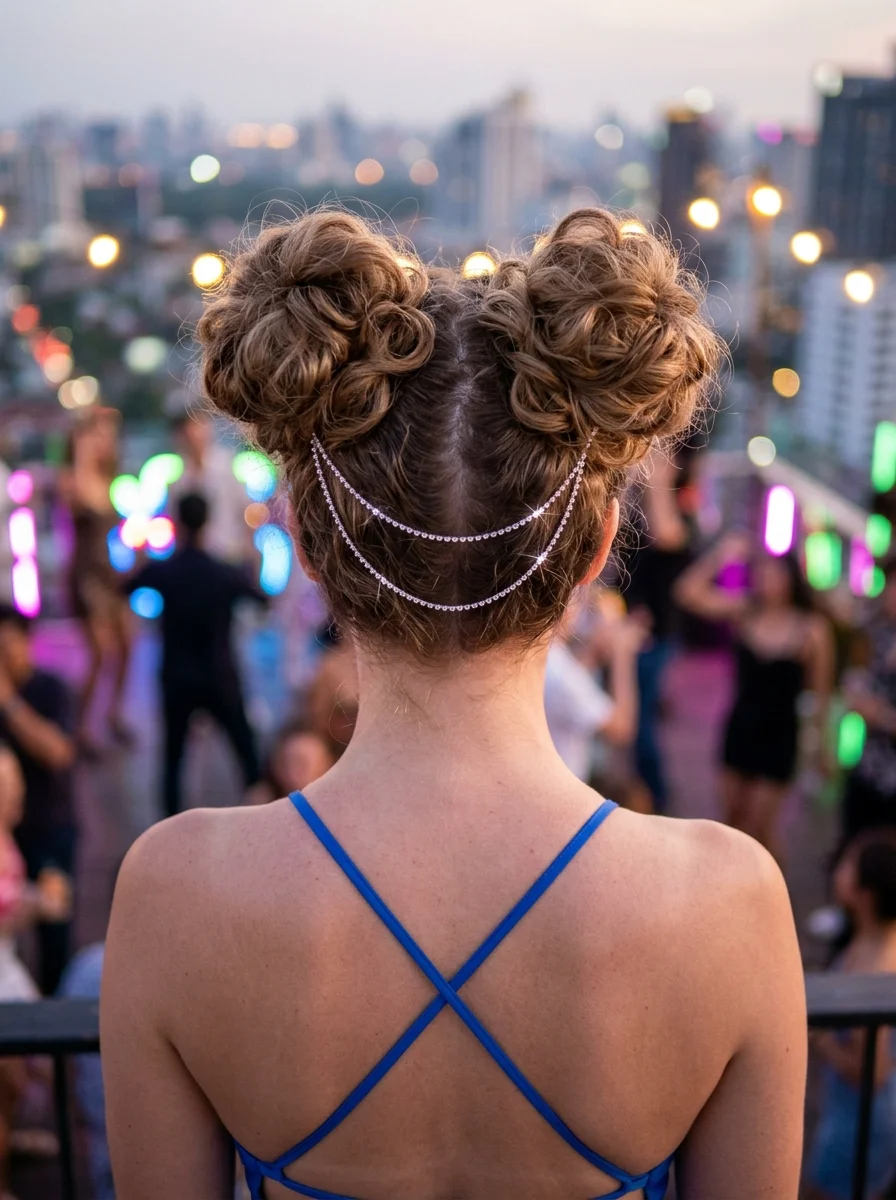
5.Sparkly Double Space Buns with Star & Pearl Accents
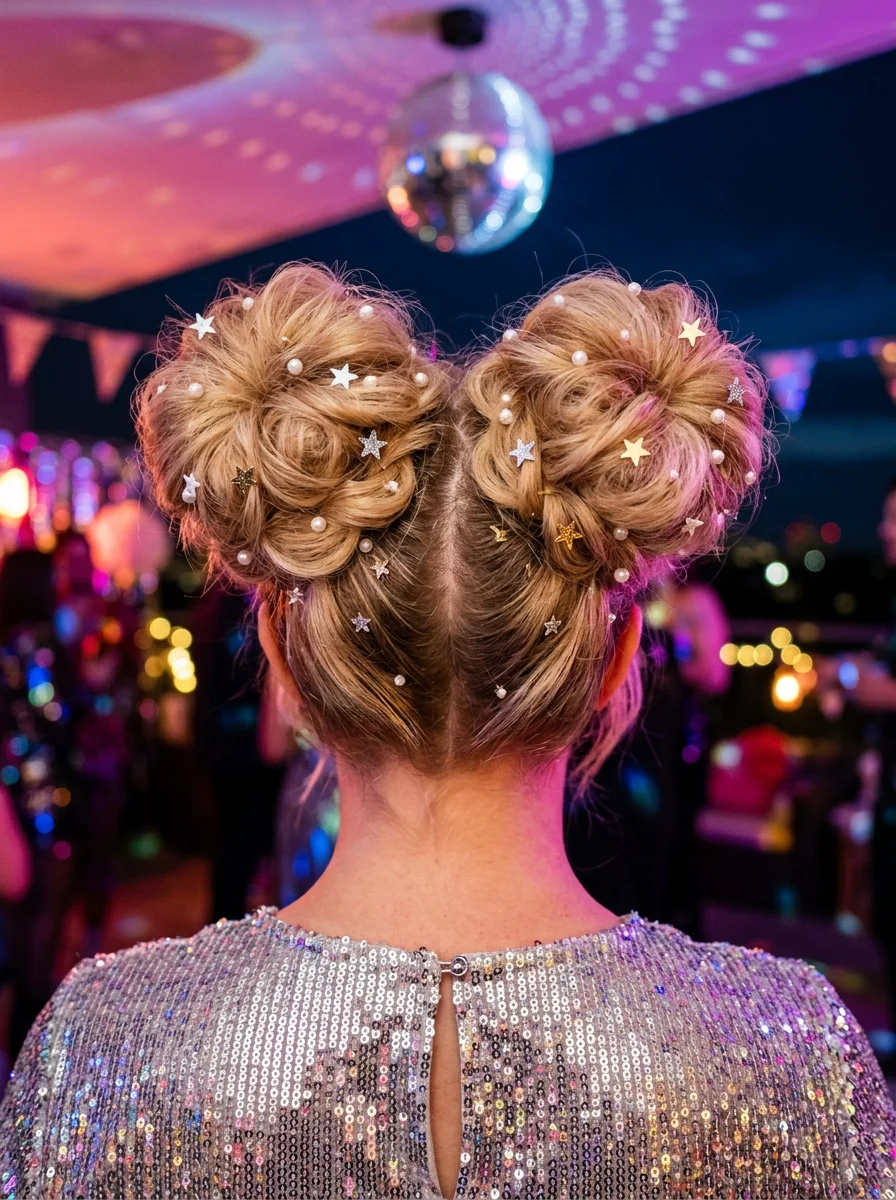
The overview: Two high buns positioned symmetrically on either side of a center part. Small star and pearl pins are scattered across both buns for a celestial sparkle. It's playful, it's a little bit 90s, and it's perfect for a night out where the dress code is "fun." This is the hairstyle that says you're here to celebrate, not just attend.
Why this look is popular: Space buns are the ultimate party hairstyle. They're youthful without being juvenile, and the star and pearl accents give them a celestial quality that photographs beautifully under club lighting.
Where this look is suitable: Nightclubs, disco-themed parties, any evening celebration where you want to dance without worrying about your hair.
Step by step:
- Create a center part. Use a comb to make a clean part down the middle of your head.
- Section and secure. Divide your hair into two equal sections and tie each into a high ponytail.
- Twist into buns. Twist each ponytail around its base and secure with pins, keeping them full and rounded.
- Add pins. Scatter star and pearl pins across both buns, placing them randomly for an organic look.
Tips and tricks: Tease each ponytail lightly before twisting it into a bun. This adds volume and keeps the buns looking full instead of tight and small.
6.Romantic Curly Updo with Fresh Flower Accent
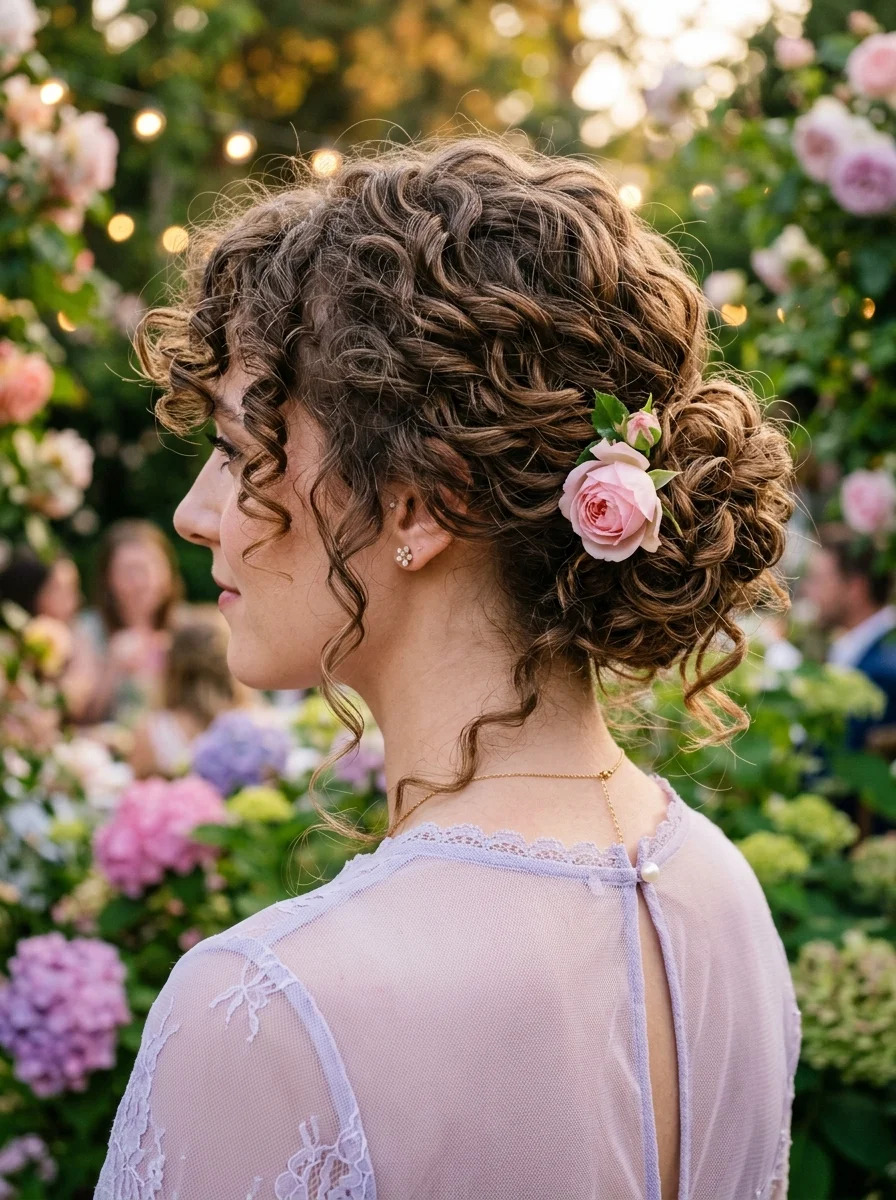
The overview: Natural curls pinned loosely at the nape into a textured chignon, with fresh pink roses placed along one side of the bun. Face-framing curls are left loose. It looks like something out of a painting — romantic, organic, and completely alive. For a garden party birthday, this is the hairstyle that makes people say "you look like a garden yourself."
Why this look is popular: Fresh flowers in hair never go out of style, but pairing them with natural curls and caramel highlights creates something that feels current rather than costumey. It's garden-party perfection.
Where this look is suitable: Garden parties, outdoor weddings, daytime birthday celebrations surrounded by nature.
Step by step:
- Define your curls. Apply curl-enhancing cream and let your natural texture dry or diffuse it.
- Gather at the nape. Loosely gather your curls and pin them into a low chignon, leaving pieces out around your face.
- Add the flowers. Tuck small fresh roses into one side of the bun, securing them with bobby pins hidden underneath.
Tips and tricks: Choose flowers that match your outfit's color palette. Fresh roses work best because their stems are sturdy enough to pin in place without wilting quickly.
7.Retro Chic Bob with Understated Volume
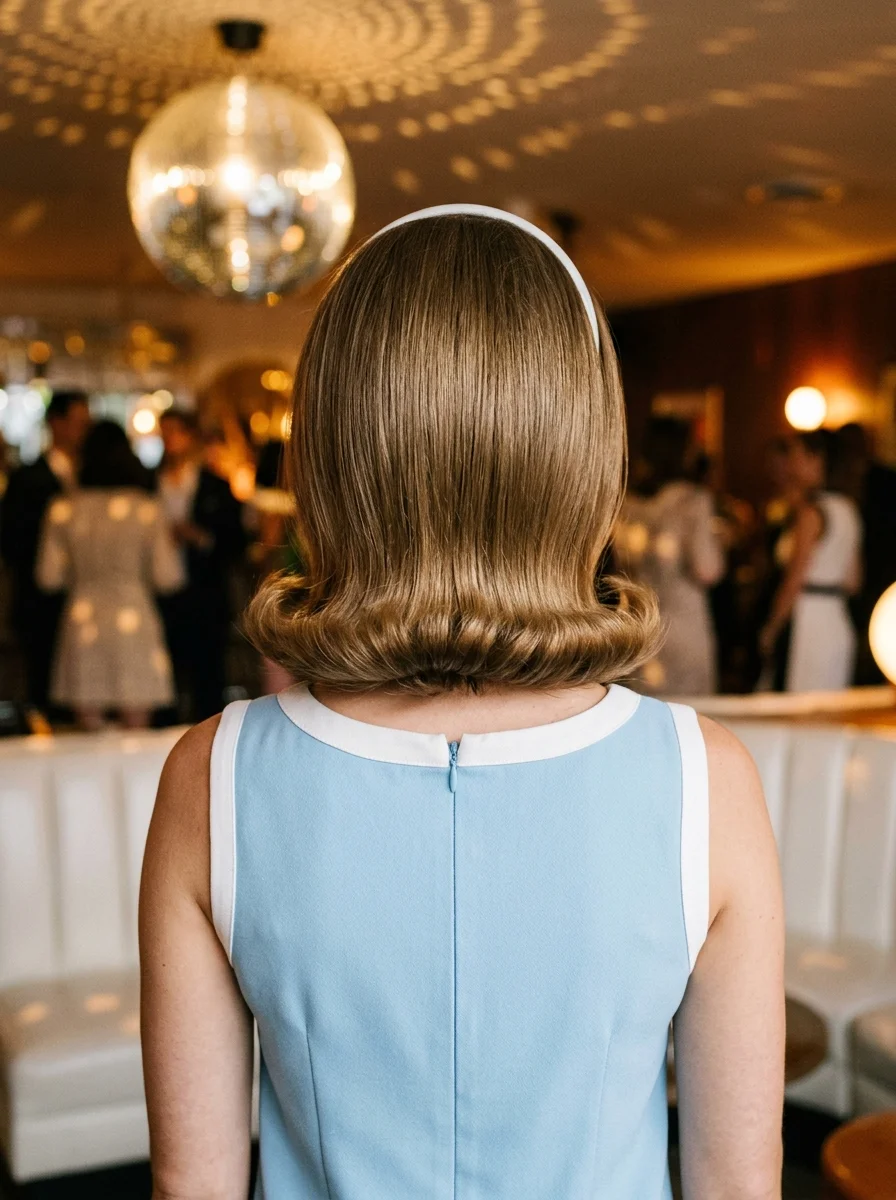
The overview: A chin-length bob with volume concentrated at the crown. A thin white headband sits about two inches back from the hairline, pushing the front sections up and back. This bob channels a 1960s silhouette with understated volume at the crown and a thin white headband keeping everything in place. It's the kind of hairstyle that makes you look like you have a personal assistant and a very clean apartment. For a cocktail lounge birthday, it's absolutely perfect.
Why this look is popular: Retro bobs are timeless, but the modern twist here is the restraint. No massive bouffant, no exaggerated flip — just enough volume to feel intentional and a headband that ties it all together.
Where this look is suitable: Cocktail lounges, sophisticated indoor celebrations, any birthday where the vibe is "elegant but not formal."
Step by step:
- Blow-dry for volume. Use a round brush and lift at the roots while blow-drying, focusing volume at the crown.
- Add the headband. Place a thin headband about two inches back from your hairline and push the front sections up slightly.
- Smooth the ends. Use a flat iron to slightly curve the ends of the bob inward for that classic 1960s shape.
Tips and tricks: A little dry shampoo at the roots gives the crown extra lift without making it look stiff. You want movement, not helmet hair.
8.Elegant Half-Up Waves with Chic Barrette
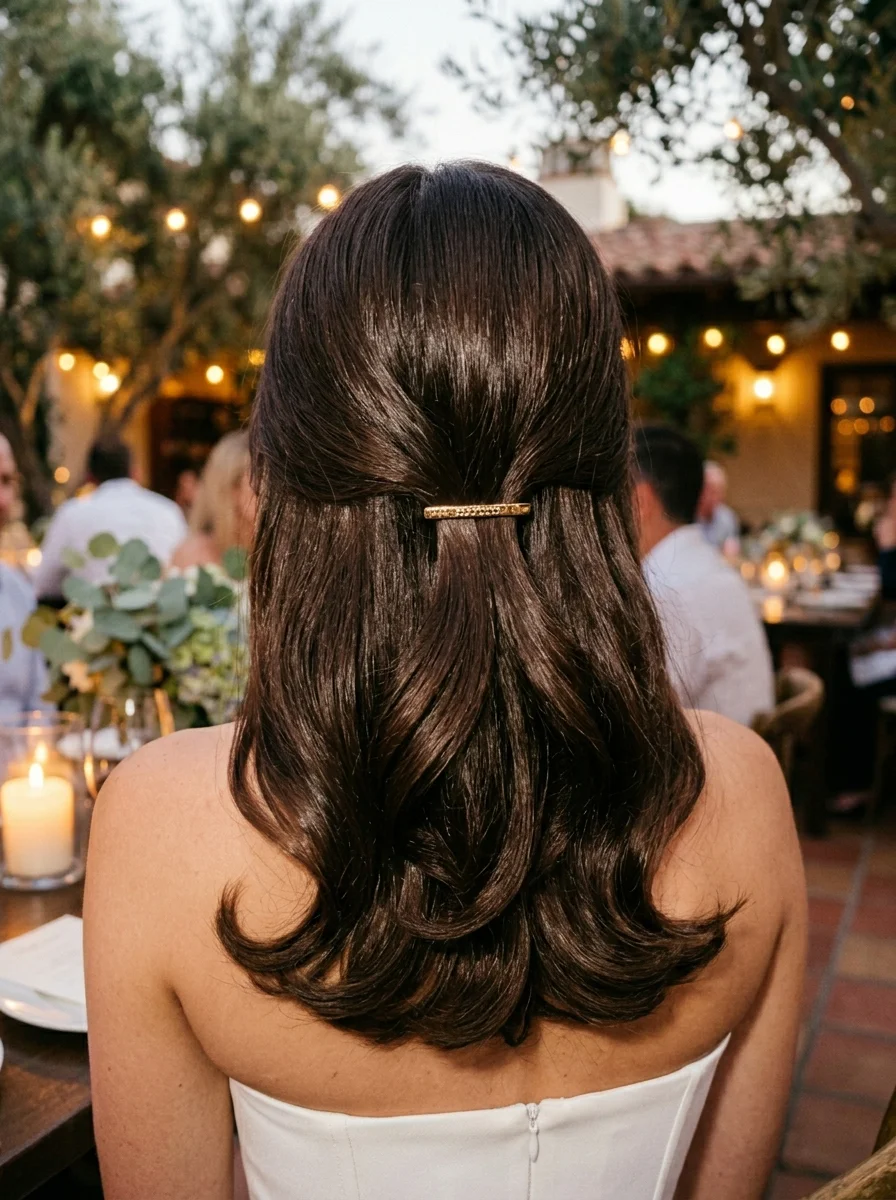
The overview: Large-barrel waves through the lengths with the top half pulled back and secured with a sleek gold barrette at the back of the head. The remaining hair falls in soft waves over the shoulders. It's the hairstyle you see on women who always look put-together at candlelit dinners — effortless from a distance, but clearly someone understood proportion and balance.
Why this look is popular: Half-up styles give you the best of both worlds: the elegance of an updo with the softness of wearing your hair down. The gold barrette adds a focal point that elevates the whole look.
Where this look is suitable: Candlelit dinners, intimate birthday celebrations, any occasion where you want to look refined without going full formal.
Step by step:
- Create waves. Use a 1.5-inch barrel curling iron to create large, loose waves throughout your hair.
- Section the top half. Gather the hair from above your ears and pull it back smoothly.
- Secure with barrette. Clip the gathered section at the back of your head with a gold barrette.
- Blend and finish. Gently brush through the waves to soften them and apply a light-hold hairspray.
Tips and tricks: Don't curl too tightly — these waves should look like they naturally fall this way. Let the curls cool completely before brushing them out.
9.Elegant Swirl Updo with Golden Accent

The overview: Medium to long hair sculpted into an architectural low bun with a swirl detail at the center. A single sculptural gold hair pin holds everything in place. This is fine-dining hair — the kind that matches the crystal glasses and the tasting menu. It's precise, it's intentional, and it commands a certain kind of respect.
Why this look is popular: Sculptural updos feel modern because they reject the "undone" trend that's dominated for years. There's something refreshing about a hairstyle that's deliberately polished and architectural.
Where this look is suitable: Fine dining restaurants, upscale birthday celebrations, any formal evening where precision matters.
Step by step:
- Smooth the hair. Apply a smoothing cream and blow-dry your hair flat, ensuring there are no flyaways.
- Create a low ponytail. Gather your hair at the nape and secure tightly with an elastic.
- Twist into a swirl. Twist the ponytail around its base in a spiral pattern, keeping it flat against your head.
- Pin and sculpt. Secure with bobby pins as you go, using a tail comb to clean up the swirl shape.
- Add the accent. Insert a sculptural gold pin at the top of the bun.
Tips and tricks: Use a fine-tooth comb and a little pomade to keep every strand in place. This look relies on smoothness — any frizz breaks the illusion.
10.Pixie with Braids and Star Accessory
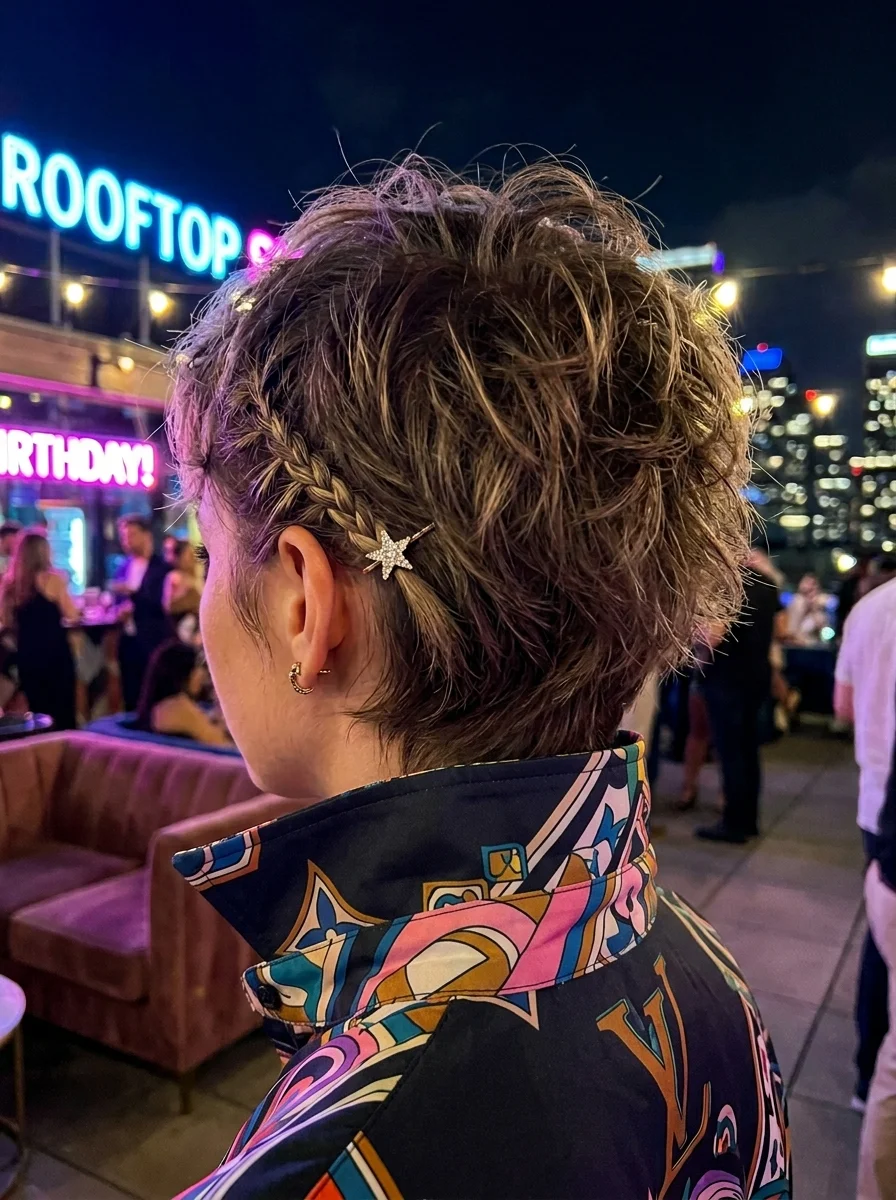
The overview: This dark pixie with blonde highlights proves you don't need long hair to make a statement at a birthday party. A small braid runs along one side, and a crystal star clip sits at the temple like a constellation. It's short, it's bold, and it's the kind of look that makes people rethink their assumptions about pixie cuts.
Why this look is popular: Short hair at parties is underrated. It's low-maintenance, it shows off your face and jewelry, and a single well-placed accessory can transform the entire look.
Where this look is suitable: Rooftop parties, casual birthday gatherings, any celebration where you want to look edgy but approachable.
Step by step:
- Add texture. Work a small amount of styling wax through your pixie for definition and movement.
- Create the braid. Take a small section along one side and braid it tightly, securing with a tiny elastic.
- Place the clip. Position a crystal star clip at your temple, just above the braid.
Tips and tricks: Keep the braid tight and close to your head. On short hair, a loose braid can look messy rather than intentional.
11.Hollywood Glam Waves with Sparkly Hair Clip
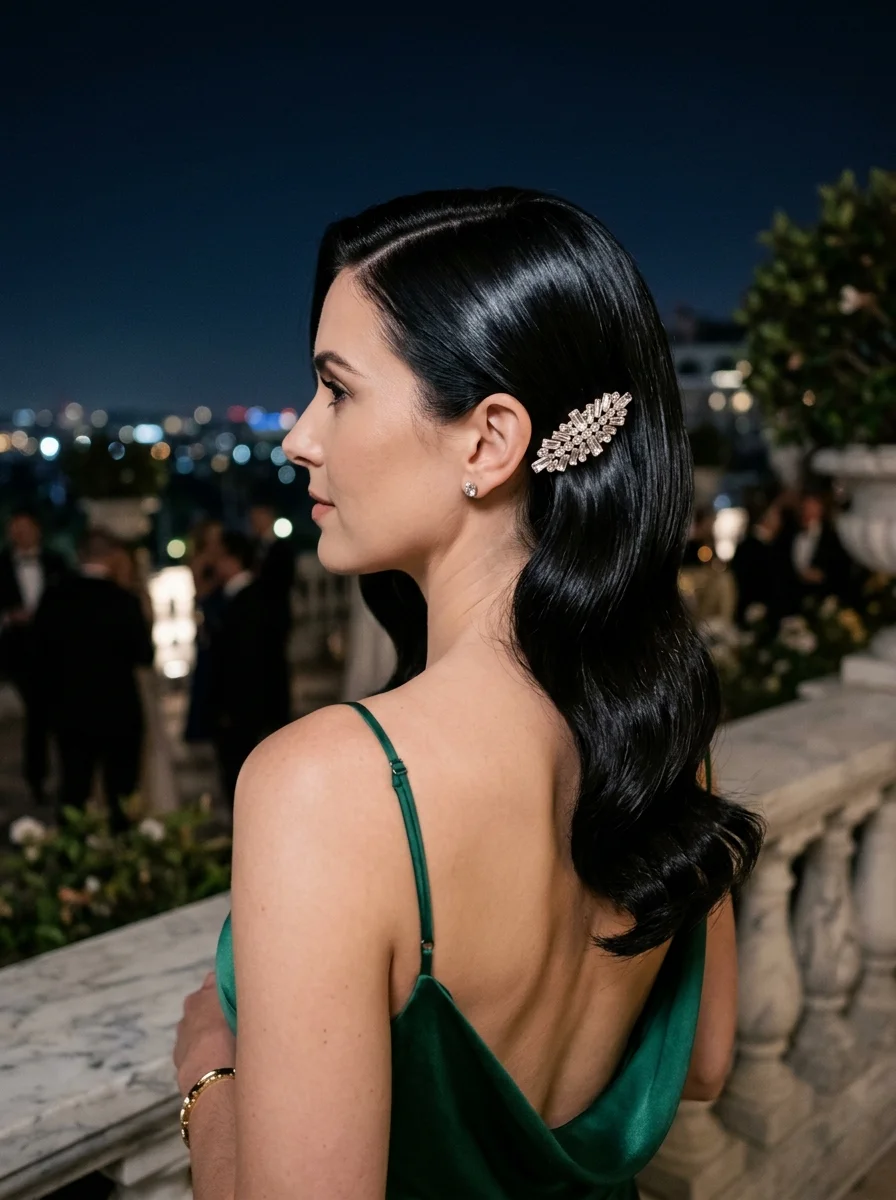
The overview: Jet black hair swept into deep side-part Old Hollywood S-waves, with a crystal leaf hair clip pinned at the temple. This is black-tie birthday energy — the kind of look that pairs with a floor-length dress and a champagne glass. It's dramatic, it's polished, and it makes an entrance.
Why this look is popular: Old Hollywood waves are perpetually relevant because they flatter nearly every face shape and hair texture. The crystal leaf clip adds a modern sparkle to a vintage silhouette.
Where this look is suitable: Black-tie events, formal birthday galas, upscale evening celebrations where you want to channel old-money elegance.
Step by step:
- Create a deep side part. Use a comb to make a dramatic part on one side of your head.
- Set waves with rollers or iron. Use hot rollers or a flat iron to create structured S-waves, working in sections.
- Brush and shape. Once cooled, brush through the waves gently and use your fingers to define the S-shape.
- Add the clip. Pin a crystal leaf clip at the temple on the lighter side of the part.
Tips and tricks: Use a strong-hold hairspray on each wave section before it cools. Hollywood waves need structure to last the night.
12.Beachy Waves with Subtle Layers & Pearl Accent
The overview: Any type of hairs styled into loose beach waves with a pearl-studded barrette holding back one side. The layers add movement that looks effortless but actually required someone who understands how to cut hair for texture. This is garden brunch birthday energy — relaxed, refined, and perfectly suited to a late-morning celebration.
Why this look is popular: Beachy waves are the default summer hairstyle for a reason — they work. The pearl barrette elevates them from everyday to special occasion without any extra effort.
Where this look is suitable: Garden brunches, daytime birthday celebrations, casual outdoor gatherings.
Step by step:
- Spray with salt water. Mist your damp hair with a sea salt spray for texture and grit.
- Scrunch and air dry. Scrunch sections upward and let your hair air dry, or use a diffuser on low.
- Pin one side. Take a section from the heavier side of your part and pin it back with a pearl barrette.
Tips and tricks: If your hair is naturally straight, use a flat iron to create slight bends rather than curls. Beachy waves should look like wind, not a curling iron.
13.Sleek High Ponytail with Gold Accents
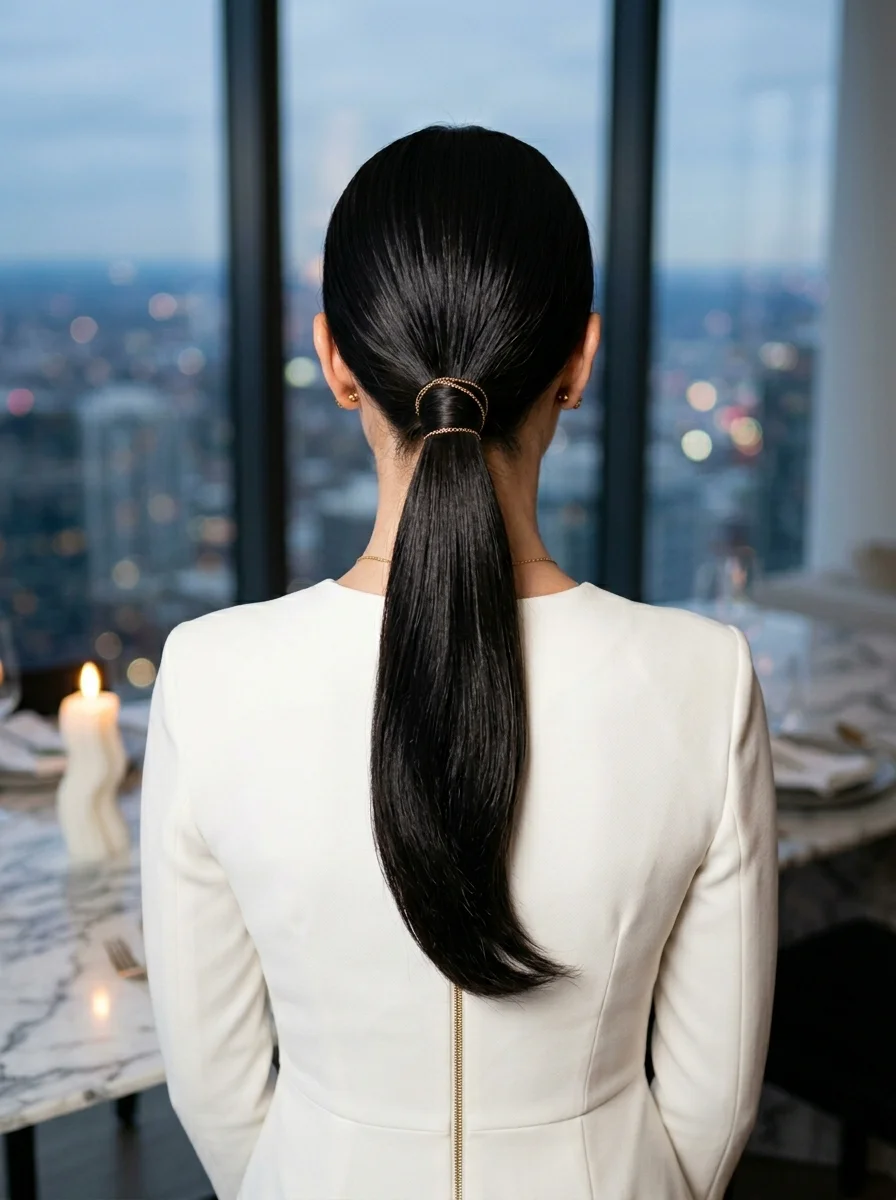
The overview: This jet black ultra-sleek ponytail sits high on the crown, with gold chain-wire wraps coiled around the base. It's sharp, it's powerful, and it's the kind of hairstyle that makes you look like you run things. For a rooftop dinner birthday, this is the power move.
Why this look is popular: A sleek high ponytail is the ultimate power hairstyle. The gold wraps add a luxe detail that transforms it from gym-ready to celebration-ready in seconds.
Where this look is suitable: Rooftop dinners, upscale evening celebrations, any birthday where you want to feel like the most powerful person in the room.
Step by step:
- Smooth thoroughly. Apply gel or pomade and brush your hair flat, eliminating every bump.
- Secure high. Gather your hair at the crown and tie it tightly with a strong elastic.
- Wrap the base. Wind gold chain-wire around the base of the ponytail several times, securing the ends underneath.
- Polish the length. Run a flat iron through the ponytail for a pin-straight finish.
Tips and tricks: Use a boar bristle brush to get the hair flat against your head. A regular brush will leave ridges and bumps that break the sleek illusion.
14.Golden Chain Crown Braid with Soft Waves
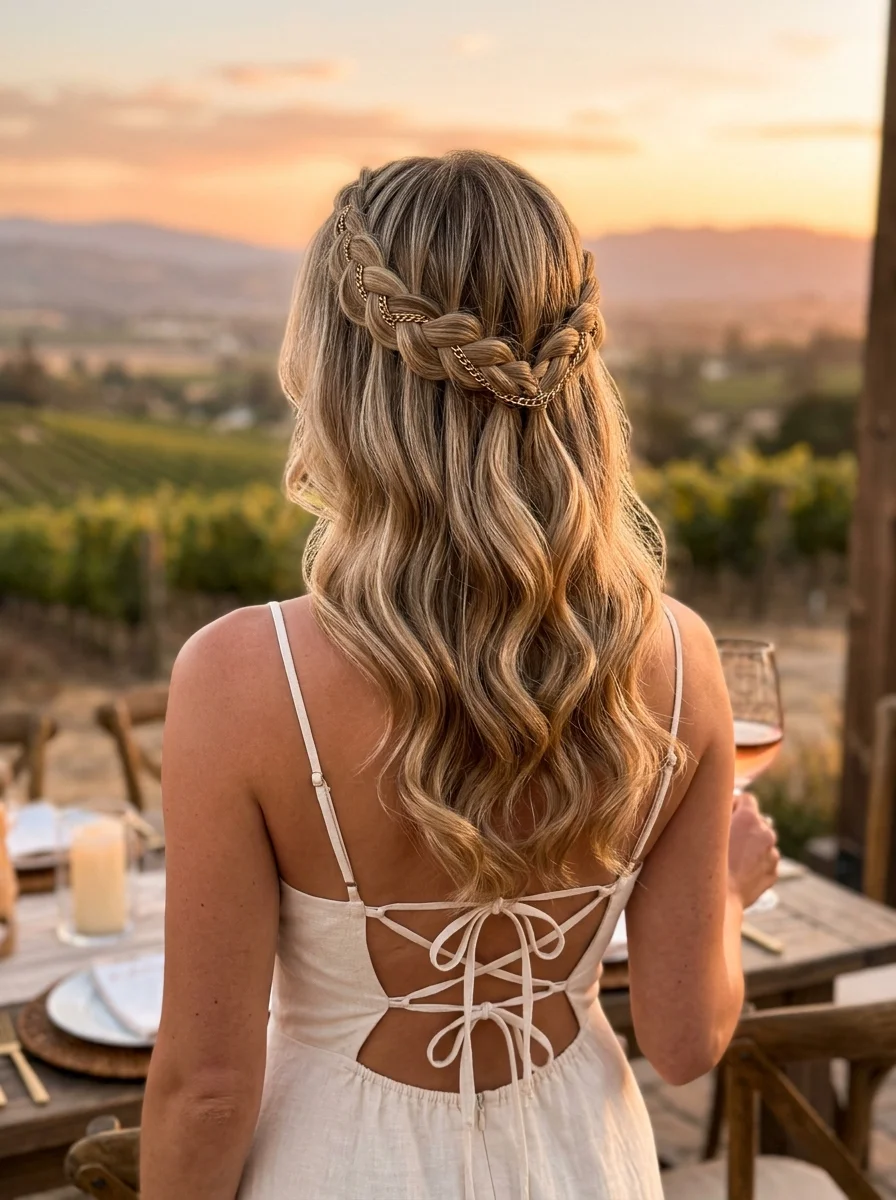
The overview: Medium to long hair braided into a Dutch braid that wraps across the crown like a halo, with a delicate gold chain woven through the braid. The rest of the hair falls in soft waves. It's the kind of look that makes a sunset vineyard dinner feel like a scene from a movie — romantic, warm, and completely unforgettable.
Why this look is popular: Crown braids have a regal quality that makes any celebration feel more significant. Adding a gold chain through the braid is a modern touch that keeps it from looking too medieval.
Where this look is suitable: Sunset vineyard dinners, outdoor evening celebrations, romantic birthday gatherings.
Step by step:
- Start the braid. Begin a Dutch braid at one side of your head, just above the ear.
- Braid across the crown. Continue the braid across the top of your head, adding sections as you go.
- Weave in the chain. As you braid, lay a thin gold chain along the braid path, incorporating it into the sections.
- Secure and wave. Pin the braid end behind the opposite ear, then curl the remaining hair into soft waves.
Tips and tricks: Braid slightly loosely so you can pancake the sections and make the braid look fuller. A tight braid will look thin and flat against your head.
15.Boho Braid Half-Up with Loose Waves
The overview: A Dutch braid starting at the crown and running down the back, with the remaining hair falling in loose, natural waves. A small gold sun charm is attached to the end of the braid. It's coastal celebration energy — free-spirited but with enough detail to feel special for your birthday.
Why this look is popular: Boho braids are the hairstyle that goes with everything — jeans and a tee, a flowy dress, or a swimsuit cover-up. The charm detail gives it a personal, talismanic quality.
Where this look is suitable: Coastal celebrations, beach parties, casual outdoor birthday gatherings.
Step by step:
- Create the braid. Take a section from the crown and Dutch braid it down the center back of your head.
- Secure the braid. Tie off the braid where it meets the loose hair and attach a small gold charm to the elastic.
- Wave the rest. Use a curling wand to create loose waves through the remaining hair.
Tips and tricks: Pull the braid edges gently to pancake them — this makes the braid look thicker and more relaxed, which is the whole point of the boho aesthetic.
16.Subtle Braided Accent on Brunette Waves
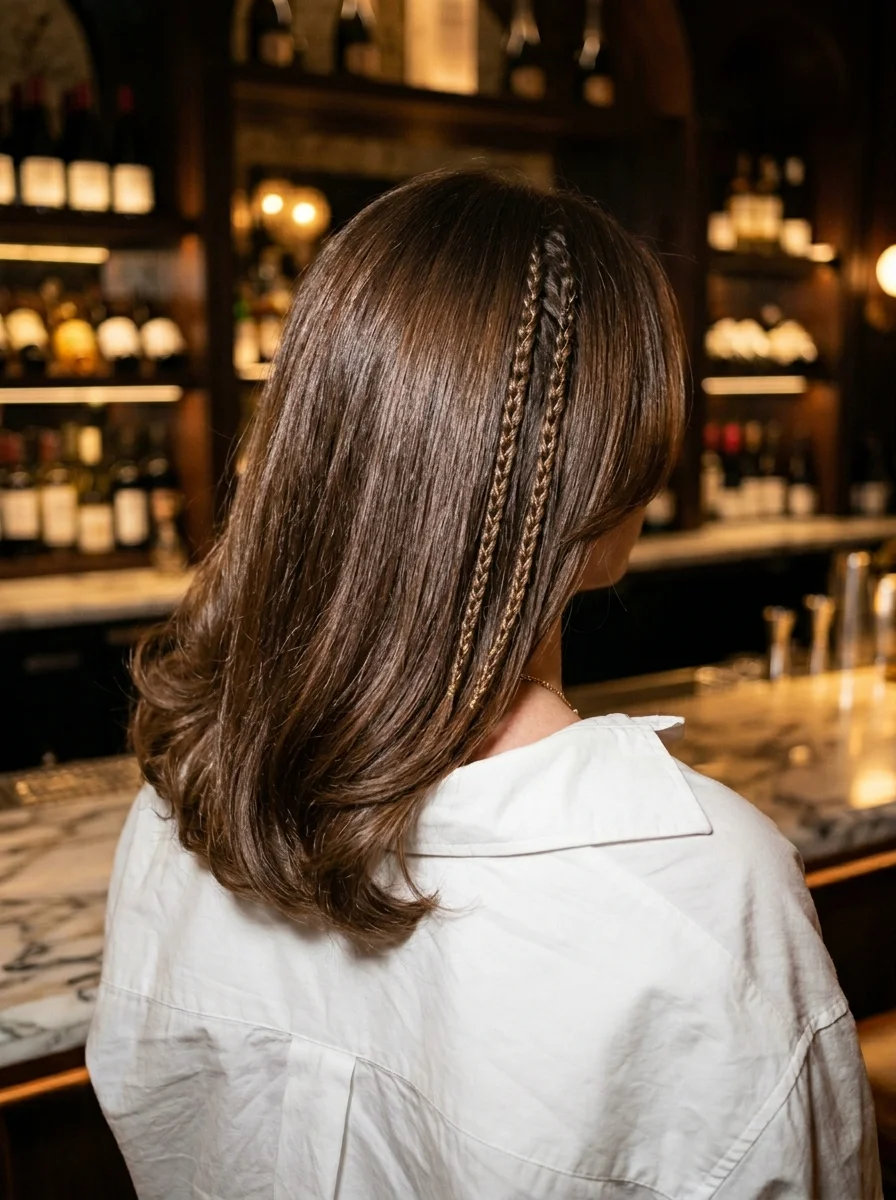
The overview: Medium to long hair styled into loose waves, with two micro braids running alongside the face. It's the hairstyle equivalent of a quiet luxury handbag — you have to look closely to see what makes it special, and that's exactly the point. For a cocktail bar birthday, it's understated perfection.
Why this look is popular: Micro braids are having a quiet resurgence because they add interest without overwhelming a look. Paired with relaxed waves, they create a style that feels modern and low-key.
Where this look is suitable: Cocktail bars, intimate birthday dinners, any evening where you want to look polished without being flashy.
Step by step:
- Create waves. Use a large-barrel iron to create soft, loose waves throughout your hair.
- Braid the accents. Take a small section on each side of your face and create a simple three-strand braid.
- Secure and blend. Tie off the braids with tiny clear elastics and let them blend into the waves.
Tips and tricks: Keep the braids thin — about a quarter inch wide. Any thicker and they stop being subtle accents and start being a different hairstyle entirely.
17.Elegant Braided Crown with a Voluminous Low Ponytail
The overview: Medium to long hair woven into a Dutch braid crown that wraps around the head, with the remaining hair gathered into a voluminous low ponytail full of bouncy curls. It's the hairstyle that works for a sunset dinner where the table is set with candles and the menu is five courses long. Elegant, structured, and impossible to ignore.
Why this look is popular: The braided crown adds structure and visual interest to what would otherwise be a simple low ponytail. It's a style that looks complicated but is actually just a braid and a ponytail — two things most people already know how to do.
Where this look is suitable: Sunset dinners, formal birthday celebrations, any evening where you want to look refined but not stiff.
Step by step:
- Braid the crown. Dutch braid around the perimeter of your head, incorporating hair as you go.
- Secure the braid. Pin the braid end behind your ear and tuck it under the existing braid.
- Curl the ponytail. Gather the remaining hair at the nape and curl it with a large-barrel iron.
- Fluff and finish. Gently pull at the curls to add volume and apply a light-hold spray.
Tips and tricks: Start the braid with slightly damp hair for better grip. Dry hair can be slippery and makes it harder to keep the braid tight and even.
18.Voluminous Updo with a Chic Velvet Headband
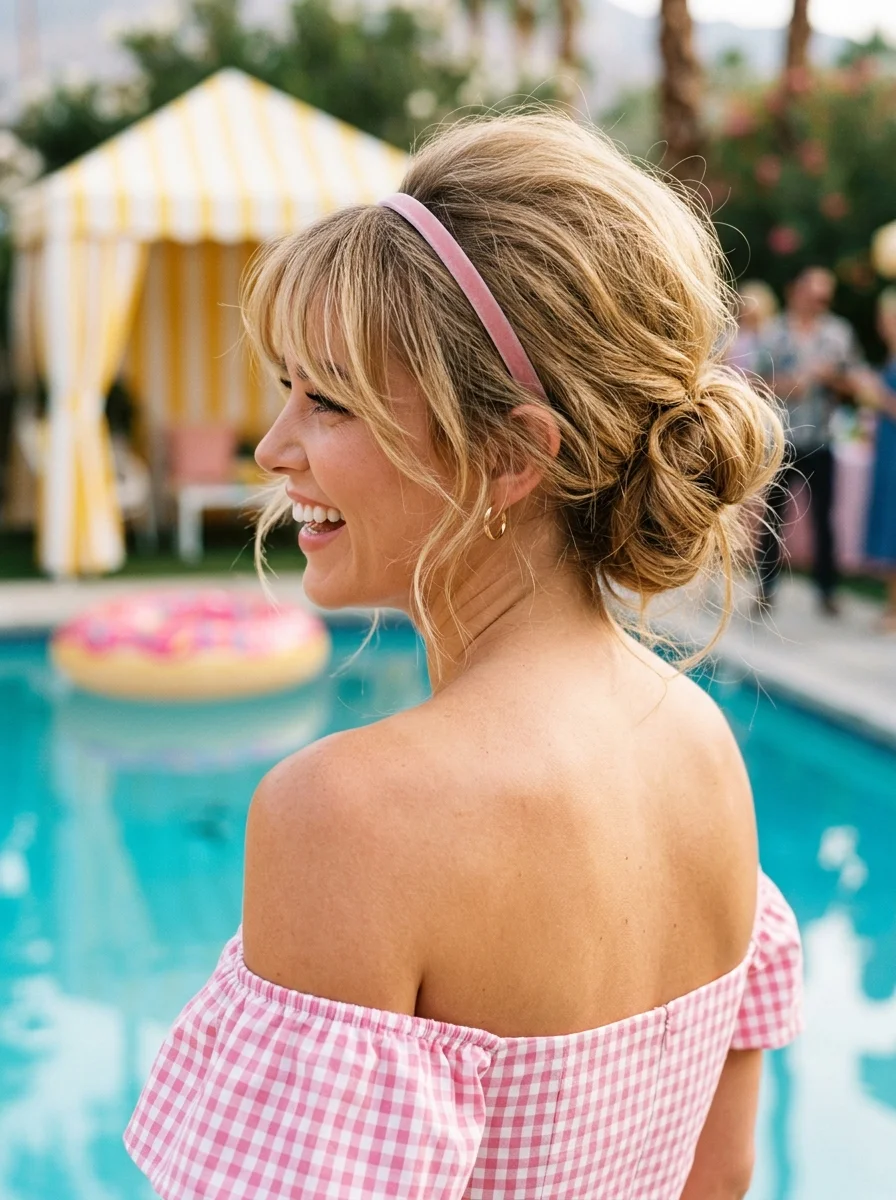
The overview: Medium to long hair swept into a textured low bun with a blush pink velvet headband pushing everything back from the face. It's poolside party perfection — the kind of look that says you came to celebrate but you're not going to stress about your hair getting wet if someone pushes you in.
Why this look is popular: Velvet headbands are the accessory that makes any updo look intentional. They add color, texture, and a polished finish without requiring any skill beyond placing it on your head.
Where this look is suitable: Poolside parties, daytime birthday celebrations, outdoor gatherings where you want to look put-together but relaxed.
Step by step:
- Add volume. Tease the crown section lightly for lift and texture.
- Place the headband. Set a blush pink velvet headband about two inches back from your hairline.
- Gather into a bun. Pull the remaining hair into a low, loose bun at the nape, tucking the ends under.
- Adjust and finish. Pull out a few face-framing pieces and set with light hairspray.
Tips and tricks: Choose a headband that complements your outfit's color palette. Blush pink works with almost everything, but don't be afraid to go bold with emerald or navy.
19.Glamorous Hollywood Waves with a Sparkly Hairpiece
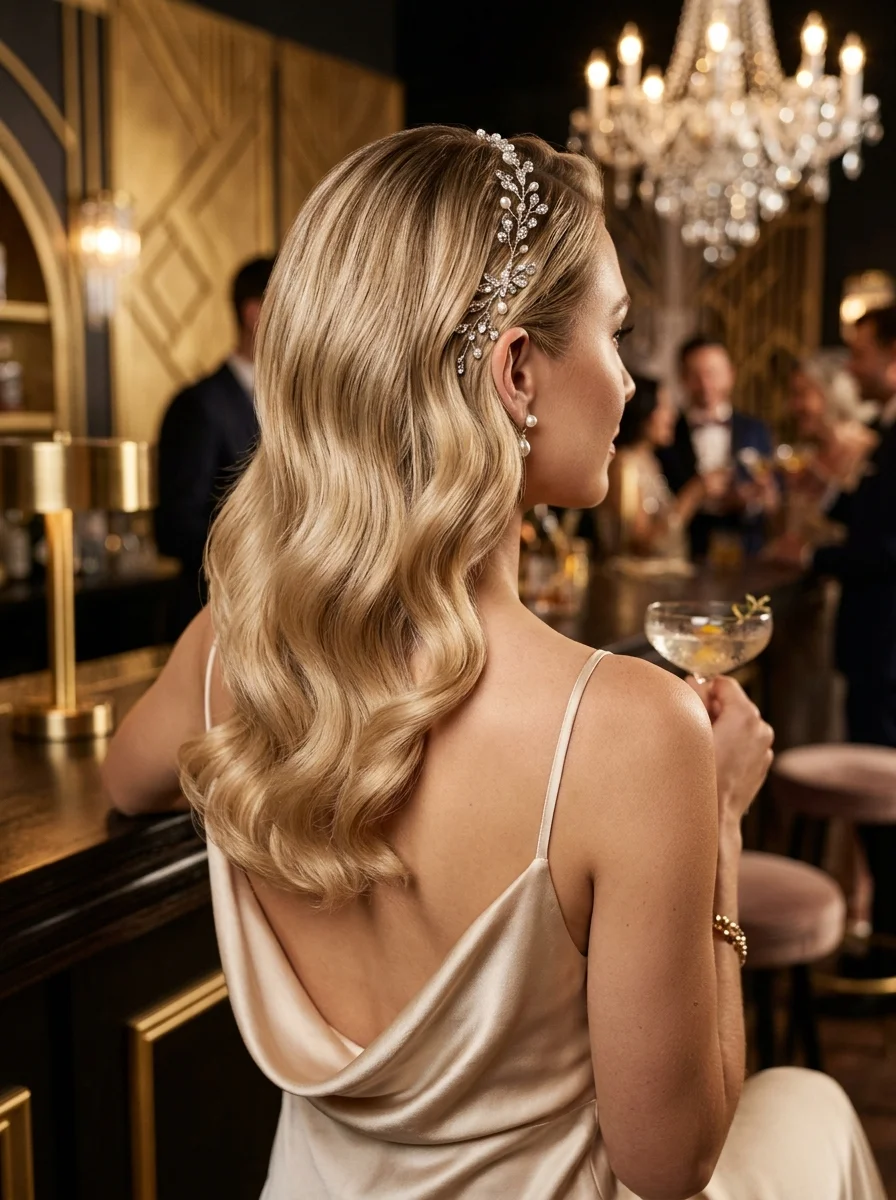
The overview: Medium to long hair styled into beachy waves sculpted into perfect retro waves, with a crystal and pearl hair vine woven through one side. This is the birthday hairstyle for someone who wants to feel like they're walking a red carpet — even if the carpet in question is the aisle of their local wine bar. Old Hollywood glamour, updated.
Why this look is popular: Finger waves are making a comeback because they photograph beautifully and they're inherently dramatic. The hair vine adds sparkle without looking like costume jewelry.
Where this look is suitable: Black-tie celebrations, formal birthday galas, any evening where you want to channel vintage glamour.
Step by step:
- Set the waves. Use a finger wave technique with setting lotion and clips to create structured S-waves.
- Dry completely. Allow the waves to dry fully before removing the clips — this can take several hours or use a hood dryer.
- Add the vine. Weave a crystal and pearl hair vine through one side, following the curve of the waves.
Tips and tricks: Finger waves require patience. If you're not confident doing them yourself, this is one hairstyle worth getting professional help for. The result is worth it.
20.Sparkling Double Space Buns with Crystal Chains
The overview: Medium hair, parted in the middle and twisted into two high buns. Crystal chains drape from one bun to the other across the top of the head, catching light like a chandelier you can dance in. This is nightclub birthday energy — bold, sparkly, and completely unapologetic.
Why this look is popular: Space buns with crystal chains take a playful style and make it editorial. The chains add a draping element that creates movement and catches light from every angle.
Where this look is suitable: Nightclubs, dance parties, any evening birthday celebration where you plan to be on the dance floor.
Step by step:
- Create a center part. Part your hair cleanly down the middle.
- Make two high ponytails. Secure each side into a high ponytail at equal height.
- Twist into buns. Twist each ponytail into a full bun and pin securely.
- Attach crystal chains. Drape crystal chains from one bun to the other, securing the ends inside each bun with bobby pins.
Tips and tricks: Make sure the chains are secured tightly enough that they won't slide off during dancing. A few extra bobby pins at the attachment points are worth the peace of mind.
21.Romantic Crown Braid with Pearl & Crystal Accents
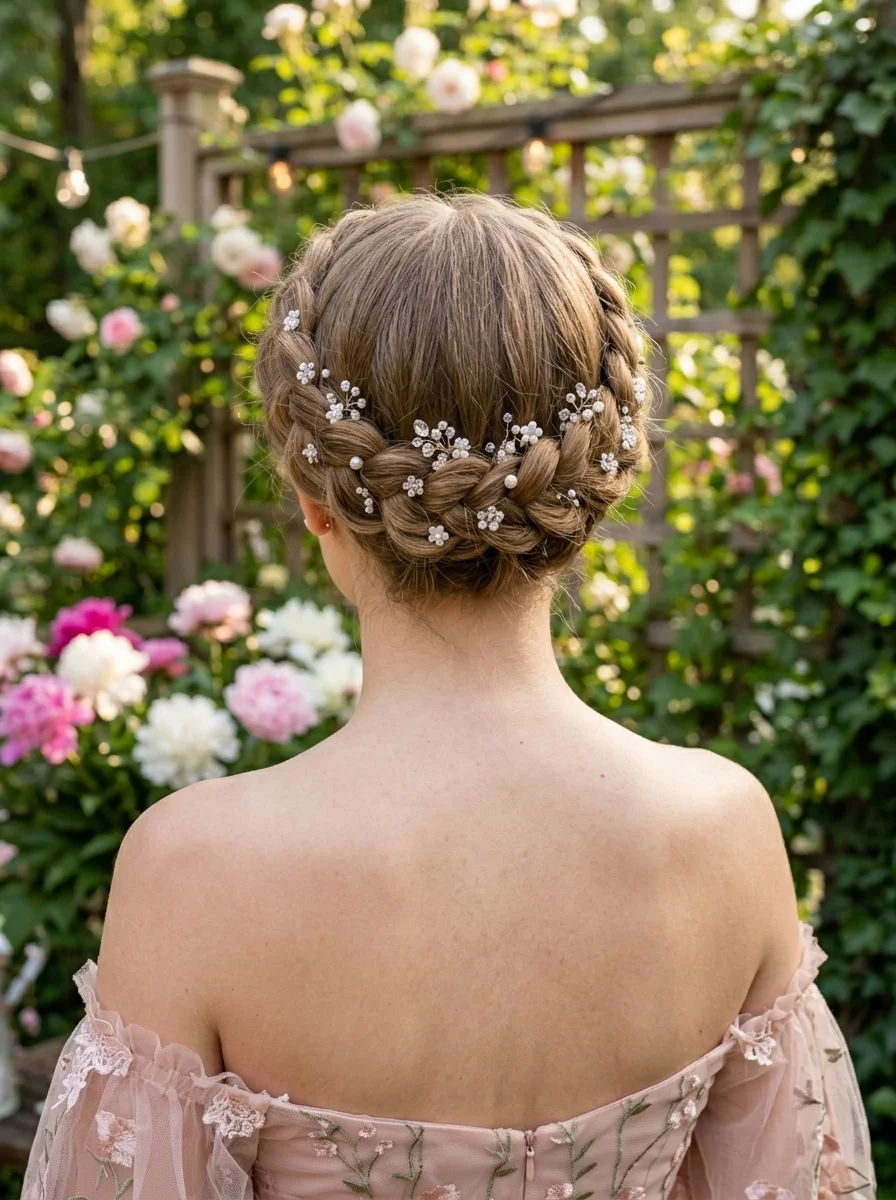
The overview: Medium to long hair braided into a wide pancaked crown braid, with scattered pearl and crystal pins dotted throughout. It's romantic without being saccharine, and the pancaking technique gives the braid a fullness that looks like it belongs in a period drama. For a garden party birthday, this is the hairstyle that makes the flowers jealous.
Why this look is popular: Pancaked braids are the secret to making thin or medium hair look incredibly full. Adding pearls and crystals gives the braid a jeweled quality that feels celebratory.
Where this look is suitable: Garden parties, romantic birthday celebrations, any outdoor event where you want to look like a walking fairy tale.
Step by step:
- Braid the crown. Create a Dutch braid around the perimeter of your head.
- Pancake the braid. Gently pull at each section of the braid to widen it and create volume.
- Add pins. Scatter pearl and crystal pins throughout the braid, placing them randomly for an organic look.
Tips and tricks: Pancake the braid after it's fully secured. Doing it too early can cause the braid to loosen and fall apart.
22.Effortless Beachy Waves with Starry Accents
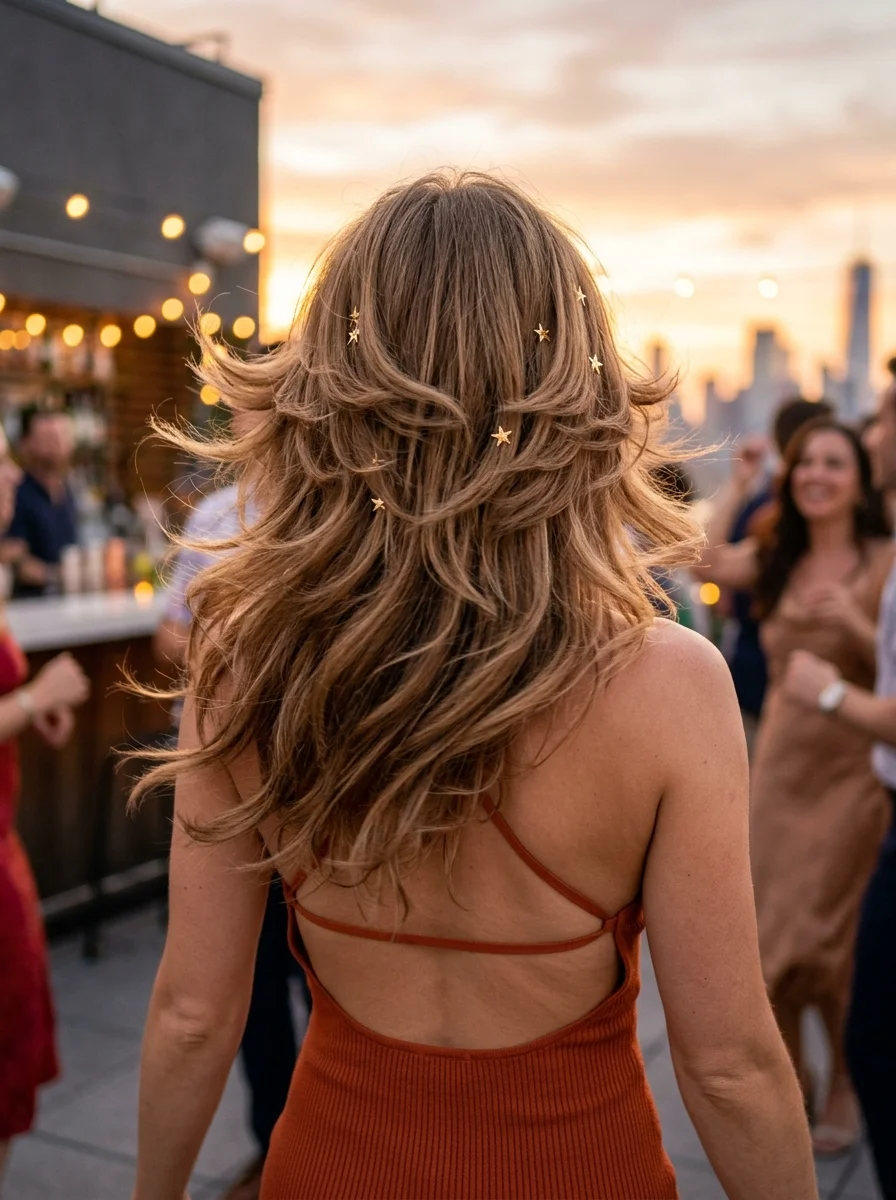
The overview: Any length of hair is tousled into loose beach waves, with gold star pins scattered throughout like a constellation map. It's the rooftop sunset birthday hairstyle — the kind that looks like the wind did most of the work, but someone quietly placed those stars with intention.
Why this look is popular: Beach waves are the universal summer hairstyle, and adding star pins transforms them from everyday to celebratory. It's a simple upgrade that makes a huge impact.
Where this look is suitable: Rooftop sunsets, casual birthday gatherings, any outdoor evening celebration.
Step by step:
- Create texture. Apply sea salt spray and scrunch your hair to create natural-looking waves.
- Let it dry. Air dry or diffuse on low heat — you want movement, not perfection.
- Add stars. Scatter gold star pins throughout your hair, focusing on the sections that frame your face.
Tips and tricks: Don't over-curl. These waves should look like they came from a day at the beach, not a salon appointment. Less heat is more here.
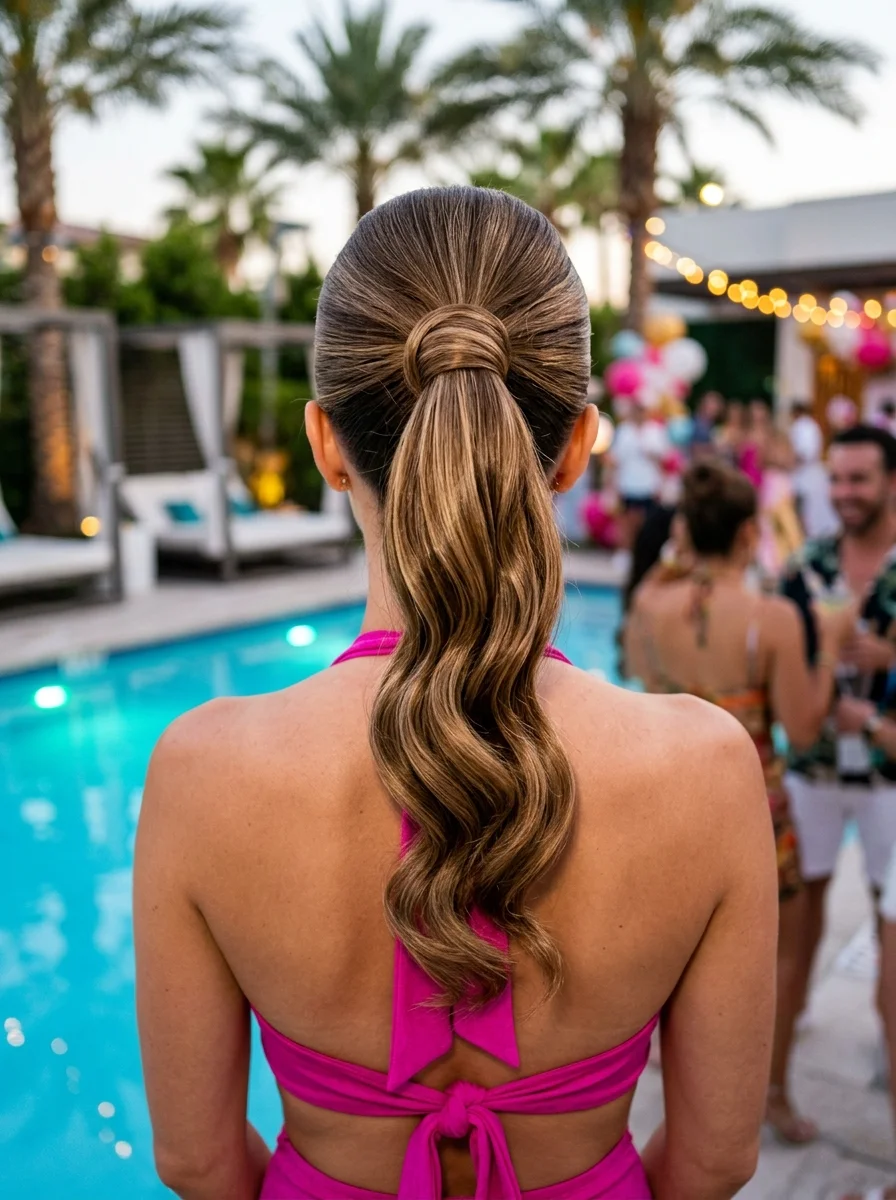
23.High-Volume Textured Pony with Starry Sparkle
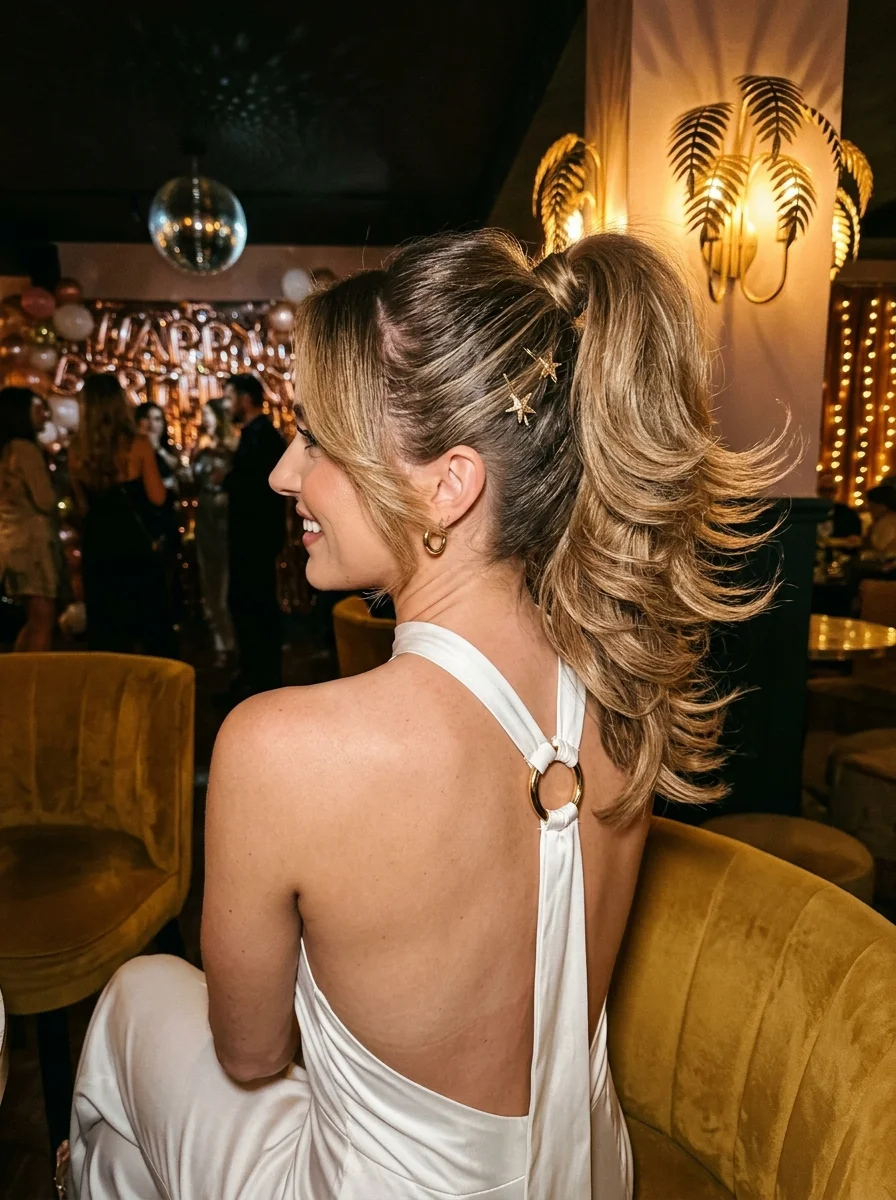
The overview: Short to long hair pulled into a high ponytail with serious volume and texture, dotted with gold star pins. It's the kind of hairstyle that works at an upscale lounge — polished enough to look expensive, but loose enough to suggest you didn't spend two hours getting ready. The volume is the statement here.
Why this look is popular: A voluminous ponytail is universally flattering because it lifts your features and creates a focal point. The star pins add a celebratory touch without overcomplicating things.
Where this look is suitable: Upscale lounges, cocktail-hour birthdays, evening celebrations where you want to look effortlessly glamorous.
Step by step:
- Add volume. Apply volumizing mousse and blow-dry your hair upside down for maximum lift.
- Create the ponytail. Gather your hair high on the crown and secure with a strong elastic.
- Tease and texturize. Back-comb sections of the ponytail for volume and spray with texturizing spray.
- Add stars. Place gold star pins at the base and throughout the ponytail.
Tips and tricks: Pull a small section of hair from the ponytail and wrap it around the elastic to hide it. It's a tiny detail that makes the whole thing look more polished.
24.Chic Velvet Bow Ponytail
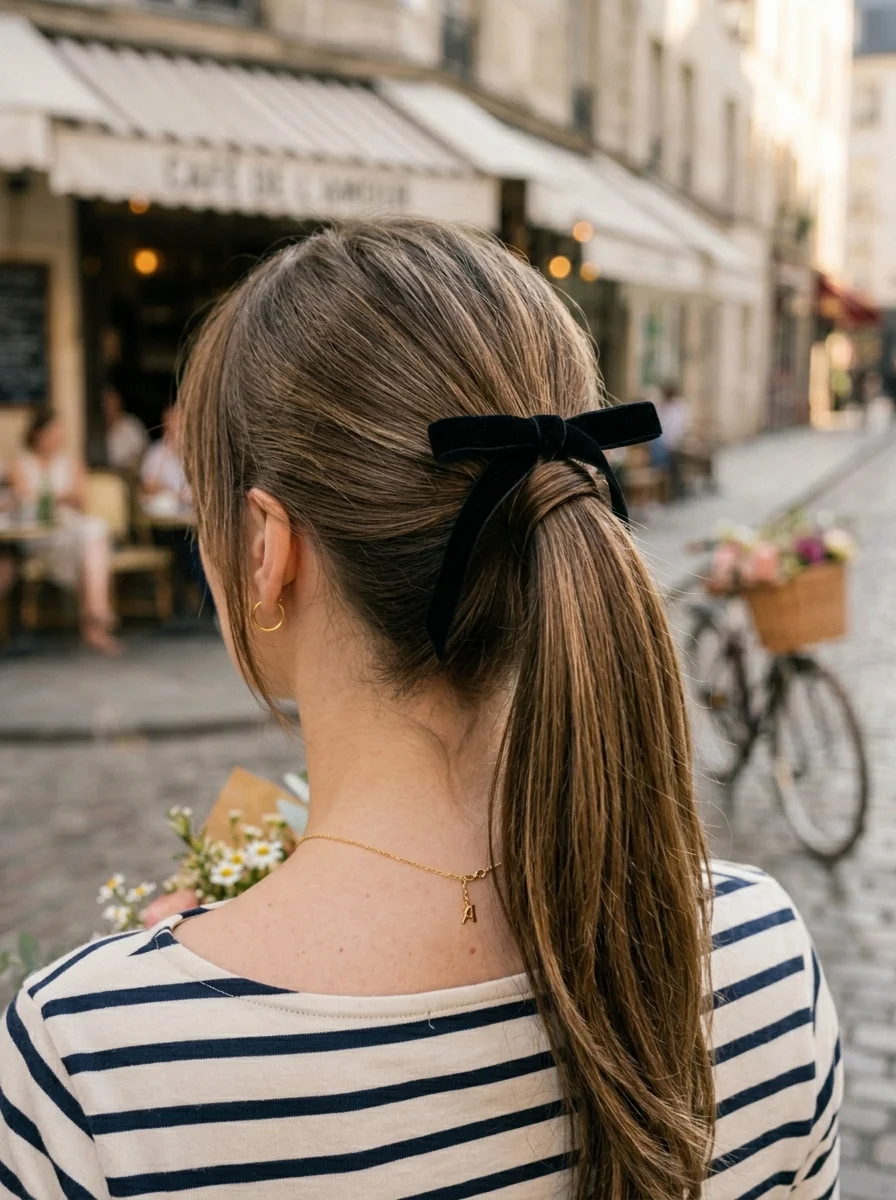
The overview: Short to long hair gathered into a relaxed low ponytail, topped with a large black velvet bow. It's Parisian daytime energy — the kind of look that suggests you to buy croissants from the same place every morning and the baker knows your order. Simple, chic, and completely timeless.
Why this look is popular: Velvet bows are having a moment because they add instant polish to any hairstyle. A low ponytail is the perfect canvas — it's simple enough that the bow becomes the star.
Where this look is suitable: Parisian-style daytime celebrations, elegant brunches, any birthday where the dress code is "classic."
Step by step:
- Smooth your hair. Apply a smoothing serum and blow-dry for a sleek finish.
- Gather low. Pull your hair into a low ponytail at the nape.
- Add the bow. Tie a large black velvet bow around the elastic, letting the tails hang down.
Tips and tricks: Make sure the bow is proportional to your hair length. On shorter hair, use a slightly smaller bow so it doesn't overwhelm the ponytail.
25.Chic Wrapped Bun Ponytail with S-Waves
The overview: Short to long hair with golden balayage, sleek at the crown and flowing into a sculptural wrapped base with S-waves cascading down. It's poolside party sophistication — the hairstyle that works with both a sundress and a swimsuit, and somehow looks appropriate for both.
Why this look is popular: The wrapped bun ponytail hybrid gives you the structure of an updo with the movement of a ponytail. The S-waves add a retro touch that feels current.
Where this look is suitable: Poolside parties, daytime birthday celebrations, any outdoor event where you need your hair to stay put but still look good.
Step by step:
- Sleek the crown. Apply smoothing cream and flat-iron the top section for a polished crown.
- Create the base. Gather your hair at the back and wrap a section around the base to create a sculptural effect.
- Wave the lengths. Use a flat iron to create S-waves through the remaining hair.
Tips and tricks: Use a shine spray on the crown section for that glass-like finish. The contrast between the sleek crown and the wavy lengths is what makes this look work.
26.Elegant Emerald Twist Half-Up Style
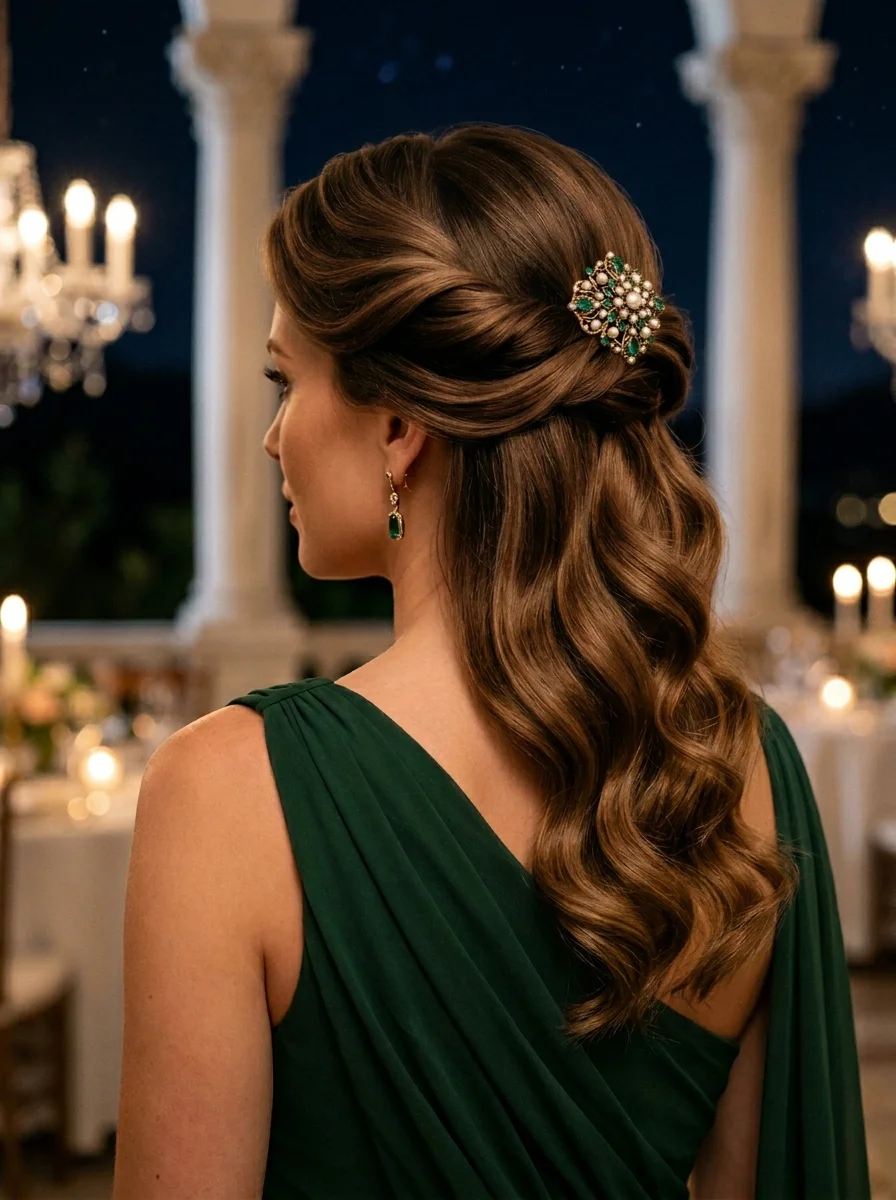
The overview: Medium to long hair, twisted into a half-up style and secured with an emerald and pearl brooch. It's formal evening energy — the kind of hairstyle that says you understand the assignment and you showed up dressed appropriately. The emerald brooch is the unexpected detail that makes people take a second look.
Why this look is popular: Half-up twists are a modern alternative to traditional updos. The emerald brooch adds a pop of color that works particularly well with warm brown and honey tones.
Where this look is suitable: Formal evening celebrations, upscale birthday dinners, any event where the dress code leans elegant.
Step by step:
- Create soft waves. Use a large-barrel iron to add gentle waves throughout your hair.
- Twist sections. Take sections from each side and twist them toward the back of your head.
- Secure with brooch. Overlap the twists at the back and secure with an emerald and pearl brooch.
Tips and tricks: Position the brooch where it catches the light. It's the centerpiece of this style, so make sure it's visible and well-placed.
27.Wavy Low Ponytail with Braided Wrap
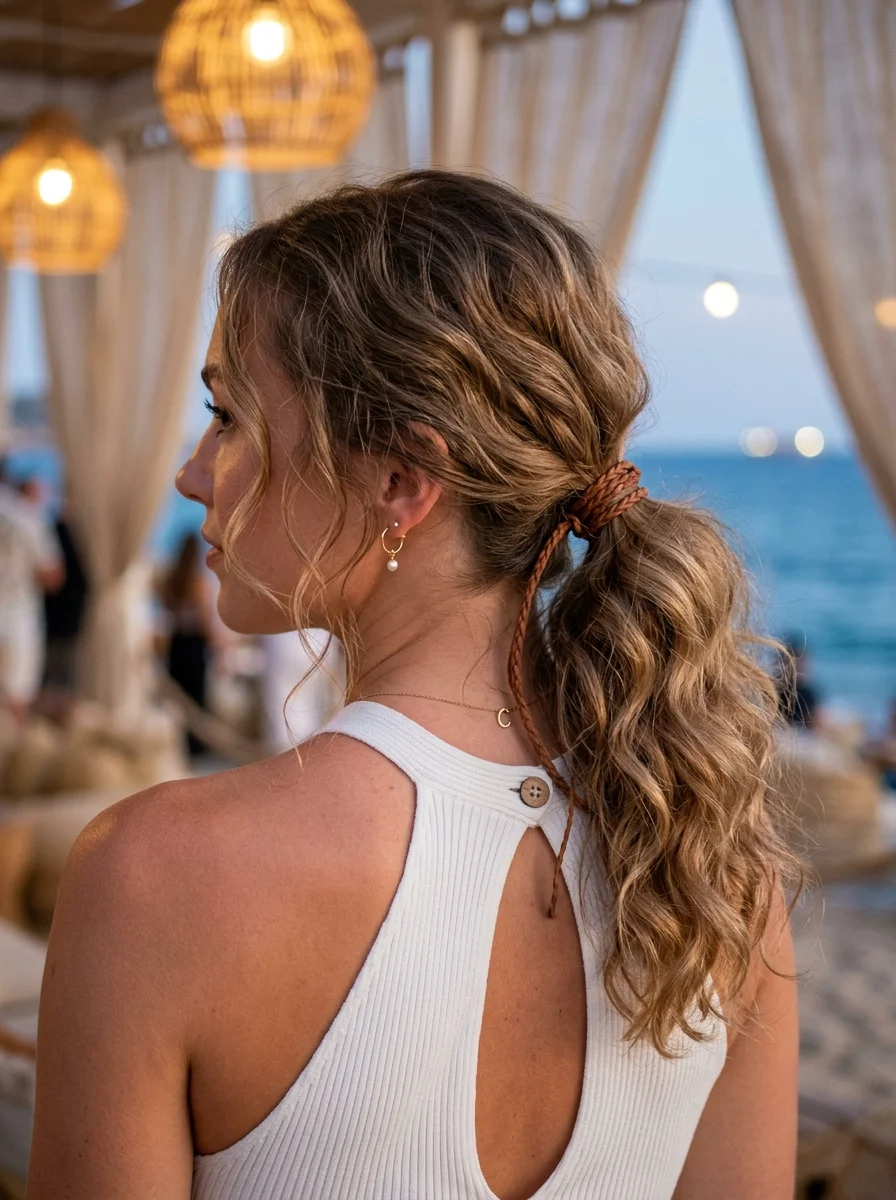
The overview: Short to long hair falling in relaxed low ponytail, with a braided leather cord wrapped around the base. It's beachside dinner energy — casual enough for barefoot dining but polished enough to feel like a celebration. The leather cord adds an earthy detail that keeps the whole thing grounded.
Why this look is popular: A low ponytail with a braided wrap is the kind of hairstyle that goes with everything. The leather cord adds texture and interest without requiring any actual braiding skill.
Where this look is suitable: Beachside dinners, casual birthday celebrations, outdoor gatherings where the vibe is relaxed and earthy.
Step by step:
- Create waves. Apply a light mousse and scrunch your hair to create natural-looking waves.
- Gather low. Pull your hair into a loose ponytail at the nape.
- Wrap the cord. Wind a braided leather cord around the base several times and tie it off underneath.
Tips and tricks: Use a cord that's thin enough to wrap multiple times without creating bulk. About three to four wraps looks best.
28.Sunny Day Ponytail with Chic Bow Accents
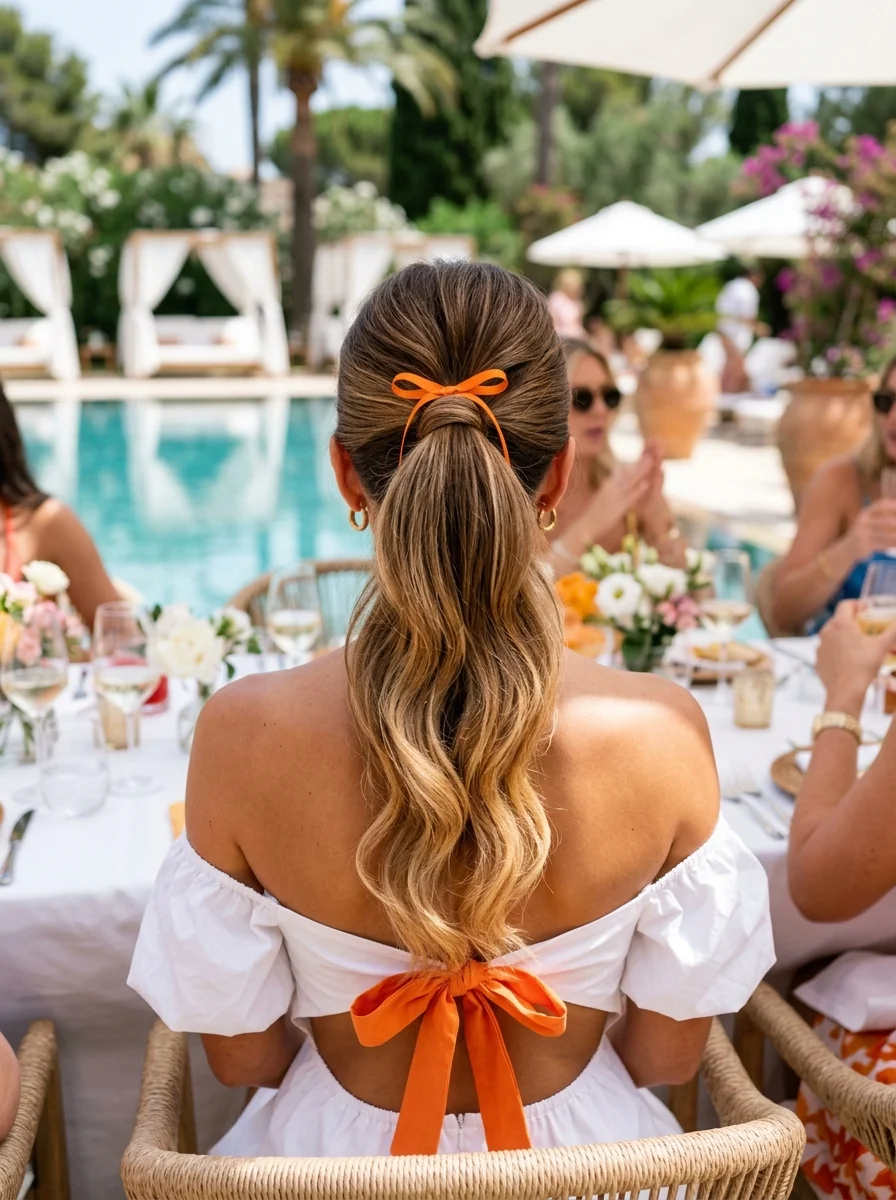
The overview: Short to long hair pulled into a mid-height ponytail with soft waves, topped with an orange ribbon bow. It's poolside lunch birthday energy — bright, cheerful, and perfectly suited to a sunny afternoon celebration. The orange bow is the pop of color that makes the whole look feel festive.
Why this look is popular: Colored ribbon bows are the quickest way to make a simple ponytail feel like a party. Orange works particularly well with brown-blonde balayage because it picks up the warm tones.
Where this look is suitable: Poolside lunches, daytime birthday celebrations, any sunny outdoor gathering.
Step by step:
- Add waves. Use a large-barrel iron to create soft, bouncy waves throughout your hair.
- Gather at mid-height. Pull your hair into a ponytail positioned at the middle back of your head.
- Tie the bow. Tie an orange ribbon into a bow around the base, letting the tails hang down.
Tips and tricks: Use a wired ribbon so you can shape the bow and keep it looking perky throughout the day. Non-wired ribbons tend to droop.
29.Retro Curls with a Polka-Dot Bandana
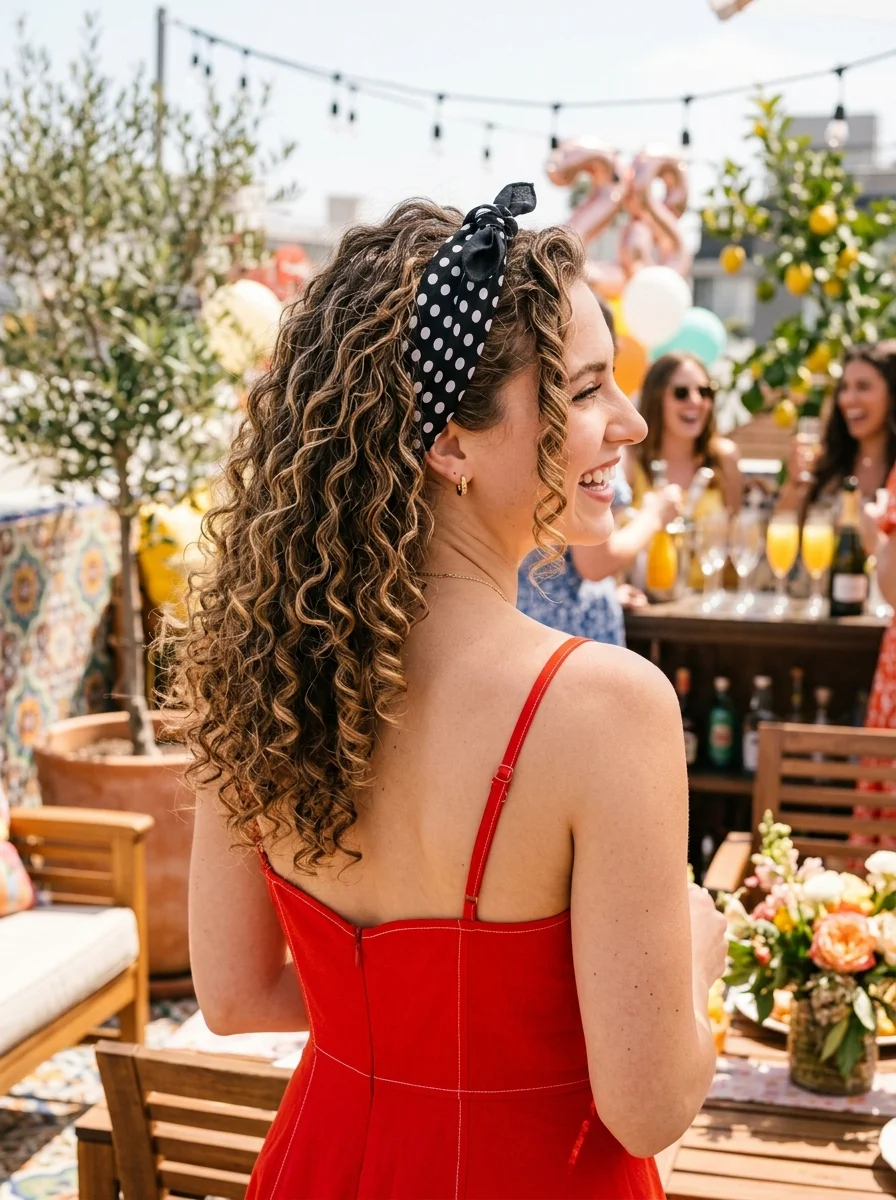
The overview: Any length of hair curls with a black and white polka-dot bandana tied at the top of the head. It's rooftop party retro — the kind of look that channels 1950s pin-up without feeling like a costume. The bandana keeps the curls controlled while adding a graphic punch that photographs beautifully.
Why this look is popular: Polka-dot bandanas are timeless because they add instant personality to any hairstyle. On natural curls, they create a contrast between structured pattern and organic texture that's visually compelling.
Where this look is suitable: Rooftop parties, retro-themed birthdays, casual celebrations where you want to make a statement.
Step by step:
- Define curls. Apply curl cream and let your natural curls air dry or diffuse.
- Fold the bandana. Fold a square bandana into a triangle, then roll it into a strip.
- Tie at the crown. Place the bandana at the nape, bring it up to the crown, and tie the ends in a knot.
Tips and tricks: Make sure the bandana is tight enough to stay in place but not so tight it gives you a headache. You're celebrating, not suffering.
30.Elegant Pearl-Adorned Low Ponytail with a Velvet Bow
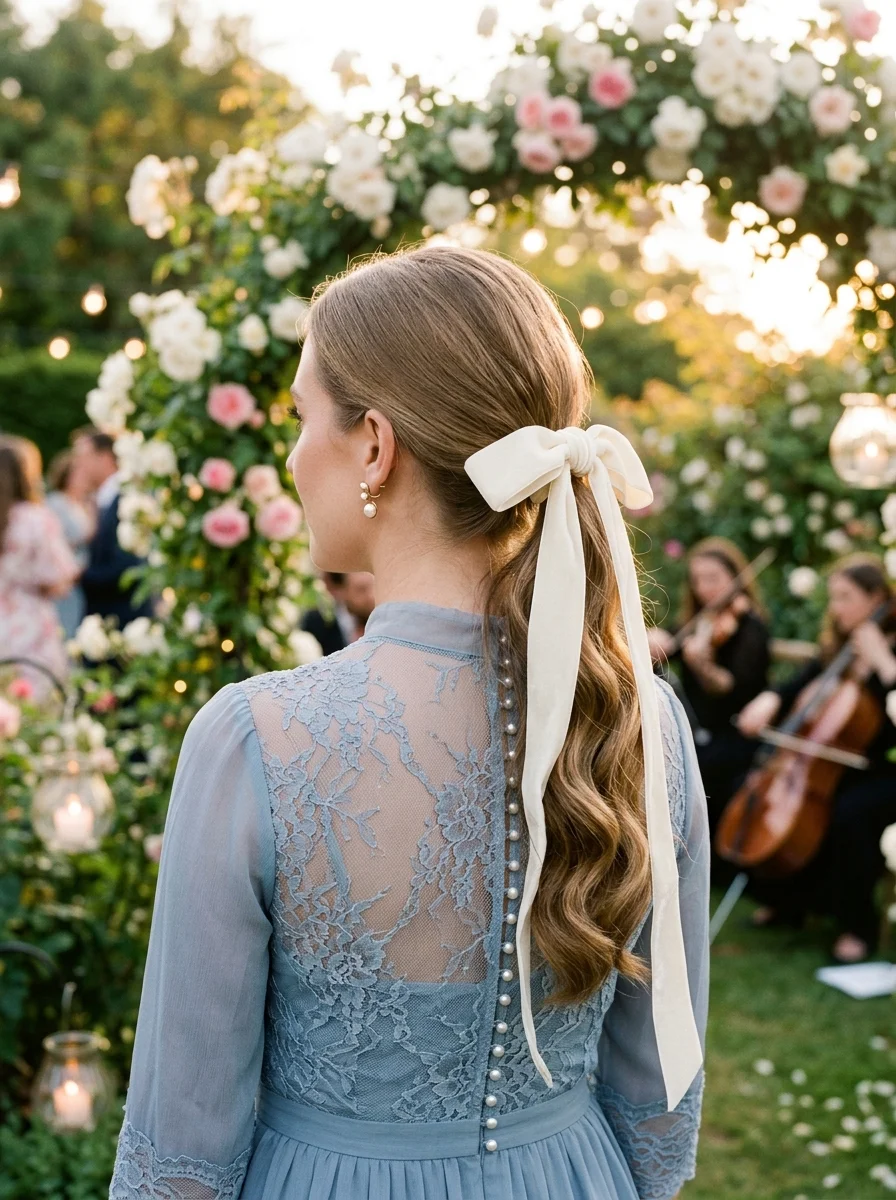
The overview: Short to long hair styled into soft waves and gathered into a low ponytail, topped with an ivory satin bow and complemented by pearl earrings. It's garden celebration elegance — the kind of look that pairs beautifully with afternoon tea and a tiered cake. The pearls and bow together create a look that's feminine without being precious.
Why this look is popular: The combination of pearls and velvet is a classic pairing that always looks refined. A low ponytail is the perfect canvas because it's simple enough to let the accessories shine.
Where this look is suitable: Garden celebrations, afternoon tea birthdays, any daytime event where elegance is the goal.
Step by step:
- Create soft waves. Use a large-barrel iron to create gentle waves throughout your hair.
- Gather low. Pull your hair into a loose ponytail at the nape.
- Add the bow. Tie an ivory satin bow around the base, adjusting the loops for symmetry.
- Add pearl earrings. Complete the look with pearl drop earrings that echo the bow's elegance.
Tips and tricks: Match the bow's color to your earrings or outfit. Ivory works with almost everything, but white can feel too stark against ash brown tones.
31.Deep Red Ribbon Accent French Braid
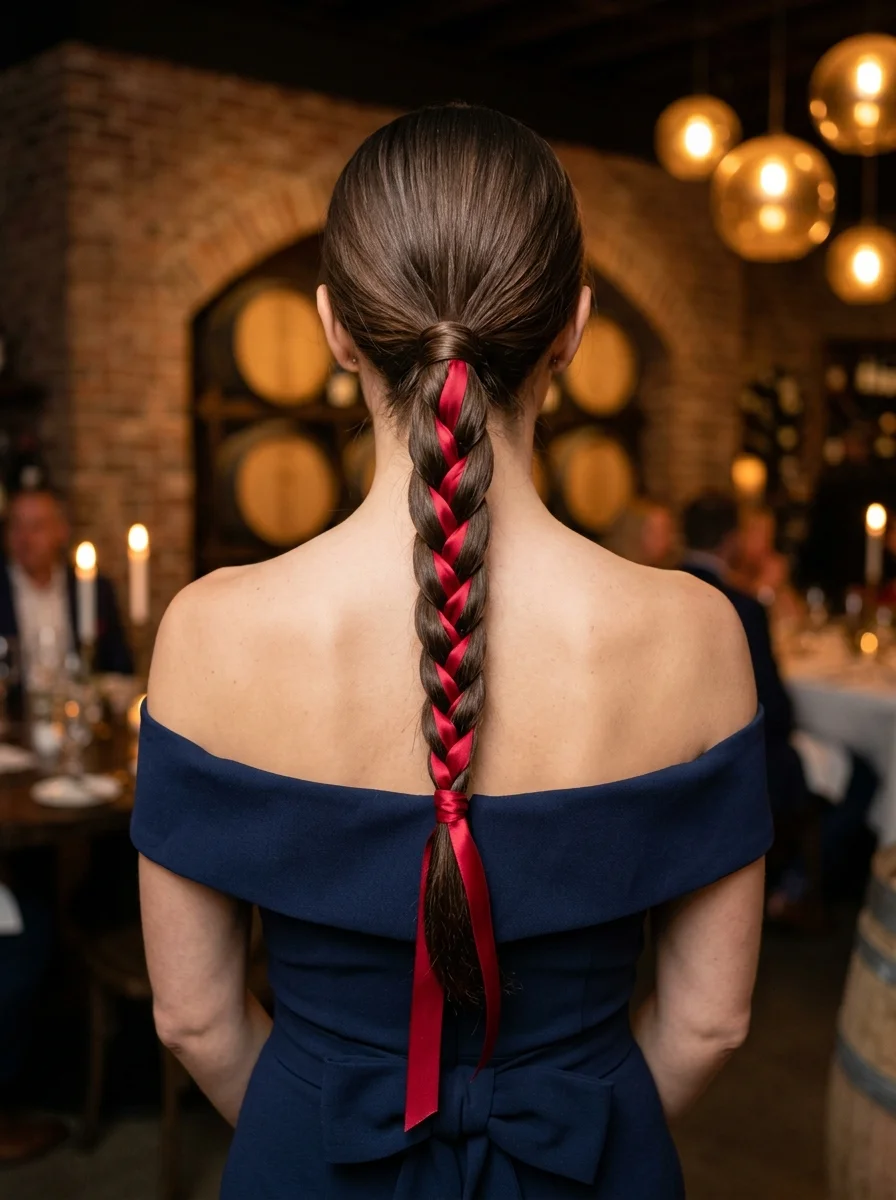
The overview: Short to long hair braided into a sleek low ponytail, with a deep red ribbon woven through the braid. It's wine cellar dinner energy — rich, warm, and sophisticated. The red ribbon adds a dramatic color accent that makes the whole braid feel like a piece of woven art.
Why this look is popular: Weaving ribbon through a braid is an old technique that's new again. The deep red color adds warmth and drama without the commitment of dye, and it photographs beautifully against dark hair.
Where this look is suitable: Wine cellar dinners, intimate evening celebrations, any birthday where the mood is warm and sophisticated.
Step by step:
- Gather into a low ponytail. Pull your hair smoothly into a low ponytail at the nape.
- Add the ribbon. Attach a deep red ribbon to the elastic at the base of the ponytail.
- Braid with ribbon. Incorporate the ribbon into a three-strand braid, treating it as one of the three sections.
- Secure the end. Tie off the braid with a small elastic and adjust the ribbon placement for even distribution.
Tips and tricks: Choose a ribbon that's about half an inch wide — thin enough to braid comfortably but wide enough to be visible against your hair. Satin works best for a subtle sheen.
The Venue Matching Guide
Not every hairstyle works for every party. A sleek updo might be perfect for a rooftop dinner but feel out of place at a beach bonfire. Choosing the right style for your specific venue makes all the difference.
Rooftop or outdoor: Wind is your enemy. Secure styles with plenty of pins — braids, buns, or ponytails. Loose waves turn into tangles fast when the breeze picks up. Texturizing spray helps hold without looking stiff.
Restaurant or indoor dinner: Go polished. Sleek ponytails, Hollywood waves, or elegant updos all work. The controlled environment means your style will last, so you can choose something with more precision.
Beach or poolside: Embrace texture and keep it simple. Beachy waves, messy buns, or braided styles look right at home. Salt spray and texturizing products are your go-to.
The club rule? Your hair needs to survive movement. High ponytails, space buns, or secure braids are ideal. Add sparkly accessories for the lights, but make sure they are pinned tight.