Nail Trends
32 Bright & Fun Summer Toe Nail Designs (2026)
Sandal season is officially here, making it the perfect time to focus on foot care and pedicure aesthetics. Whether planning a beach trip, lounging by the pool, or wearing summer slides, a fresh and vibrant pedicure serves as a key seasonal accessory.
With numerous pedicure trends circulating on social platforms, identifying the best designs can be time-consuming. This guide simplifies the selection by rounding up 32 of the top summer toe nail designs for 2026. These ideas offer plenty of inspiration for the next salon visit or at-home pedicure session.
Three Pedicure Colors That Cover Everything
Here is the thing about summer toes: the temptation is to grab the brightest neon on the rack and call it done, but that approach rarely looks as considered as you want it to. If you narrow your pedicure palette to three core colors, you can cover every summer scenario from beach days to evening weddings without overthinking it.
The three that keep showing up across 2026 editorial coverage are creamy milky nudes, deep cherry reds, and butter yellows. A milky nude — think almond milk or the sheer pink of a strawberry milk — blurs toe imperfections and makes your skin look instantly more tan. A glossy cherry red is the classic "expensive" choice that works with every sandal you own, from flat slides to heeled straps. And butter yellow is the 2026 wildcard that reads fresh and intentional without the aggression of a full neon. Each of these can be worn as a solid or as a base for art, which makes them the most versatile three shades you can own.
The practical consideration for toes specifically: dark neons stain. Cherry red is fine because the pigment is rich enough to come off clean, but electric blues and purples can leave a tint on your nail bed that takes weeks to grow out. If you are going from pedi to pedi quickly this summer, stick with the milky and bright options that remove clean.
1.Sweet Seeded Watermelon Slices
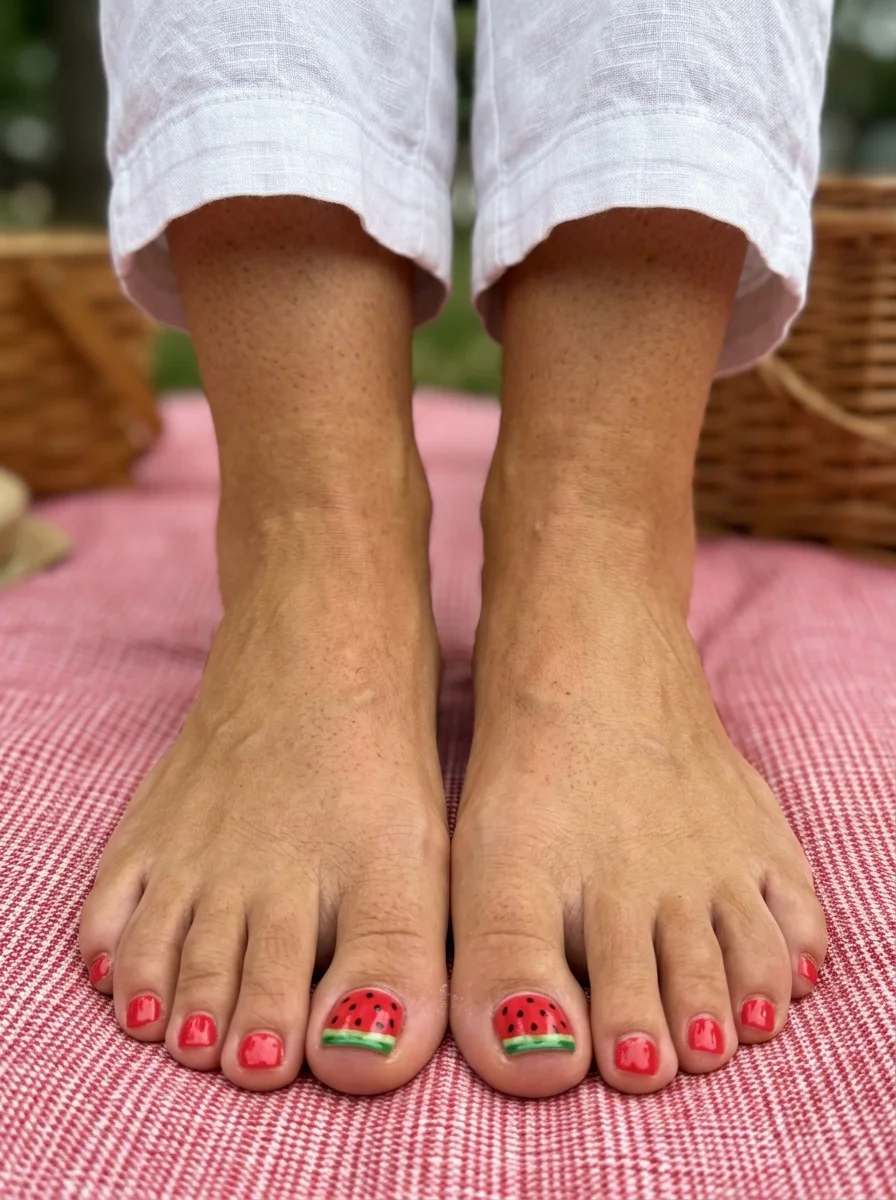
A juicy summer treat for your feet.
Overview:
Watermelon nail art has been circulating on social media for years, but this version actually feels fresh. The big toes carry the full illustration — green rind, red flesh, scattered black seeds — while the remaining toes stay in a matching solid coral-red. It's a deliberate contrast that keeps the whole set from tipping into costume territory.
The short soft square shape is doing a lot of work here. A longer stiletto or almond would make the watermelon rind look busy, but on a compact canvas it reads as playful and intentional. The glossy top coat seals the deal — it gives the red a wet, almost juicy appearance that reinforces the theme without saying a word.
Practical note: the black seed dots are the trickiest part. A toothpick dipped in black polish works better than most dotting tools for getting that tapered, organic seed shape. And if you mess one up, just wipe it with a cleanup brush before it dries — red polish stains, so speed matters.
Design Breakdown:
The focal-point approach — art on the big toe only — keeps this wearable for everyday summer.
Base Color: Bright coral-red cream with full opacity in two coats.
Nail Shape: Short soft square. Clean edges, slightly rounded corners.
Design Element: Hand-painted watermelon slice on the big toe with green rind, red flesh, and black seed dots.
Finish: High-gloss top coat for a wet-fruit look.
Get The Look at Home:
A steady hand and a toothpick are the only tools you really need.
- Red base: Apply two coats of coral-red to all toes. Let the second coat dry for at least five minutes.
- Rind line: On the big toe only, use a thin brush to paint a curved white line near the tip, followed by a slightly thicker green line beneath it.
- Seeds: Dip a toothpick in black polish and place five or six tiny dots scattered across the red area. Vary the spacing — real watermelon seeds aren't perfectly even.
- Cleanup: Use a small brush dipped in acetone to sharpen the rind edges and fix any wobbles.
- Seal: Apply a thick glossy top coat over all nails to protect the art and boost the juiciness.
31 Stunning Summer Birthday Party Hairstyles for 2026 🎂☀️
2.Coastal Mint Wave Swirls
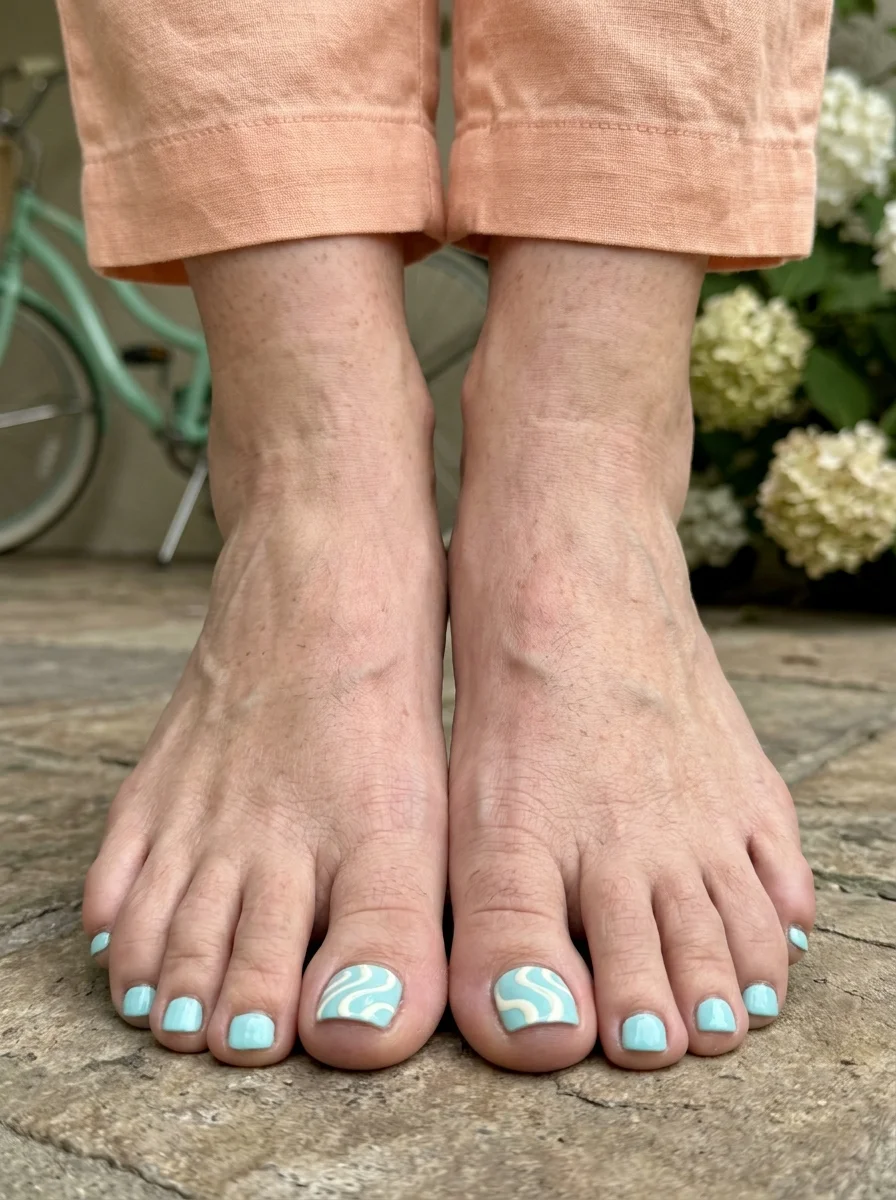
Refreshing minty waves for a coastal vibe.
Overview:
Mint and white is a combination that never fails in warm weather, and these swirls take it somewhere more interesting than a standard solid. The big toes get the abstract wave treatment — loose, organic curves in white and a slightly deeper teal — while the rest stay in a clean, creamy mint. The effect is calm without being boring.
What makes this work is the restraint. A lot of swirl designs try to fill every millimeter of the nail, but leaving negative space around the waves lets the mint breathe. It looks like something you'd see on a ceramic tile in a coastal boutique — the kind of detail that makes you want to reach out and touch it.
One thing worth noting: mint polishes can streak on the first coat. Resist the urge to load on a thick second layer. Two thin coats with proper dry time between them will give you a much smoother, more even result.
Design Breakdown:
The wave pattern is freehand, which means no two sets will look exactly alike — that's part of the charm.
Base Color: Opaque creamy mint green with a cool undertone.
Nail Shape: Short soft square. The compact shape keeps the waves from looking cluttered.
Design Element: Abstract white and teal-mint swirls on the big toes, with flowing organic curves.
Finish: Glossy top coat to mimic the look of ocean water.
Get The Look at Home:
You don't need a lot of precision — the beauty is in the loose, flowing movement of the lines.
- Mint base: Apply two thin coats of mint green to all toes. Let dry fully.
- White waves: Using a long-haired detail brush, draw two or three lazy "S" curves across the big toe nail.
- Teal accent: Clean the brush and repeat with a slightly deeper teal or blue-green, placing the lines adjacent to the white ones for depth.
- Solid smaller toes: Keep the remaining toes in solid mint to anchor the look.
- Gloss: Finish with a plumping top coat to level out the slight ridges from the layered paint.
3.Grecian Blue Evil Eye Protection
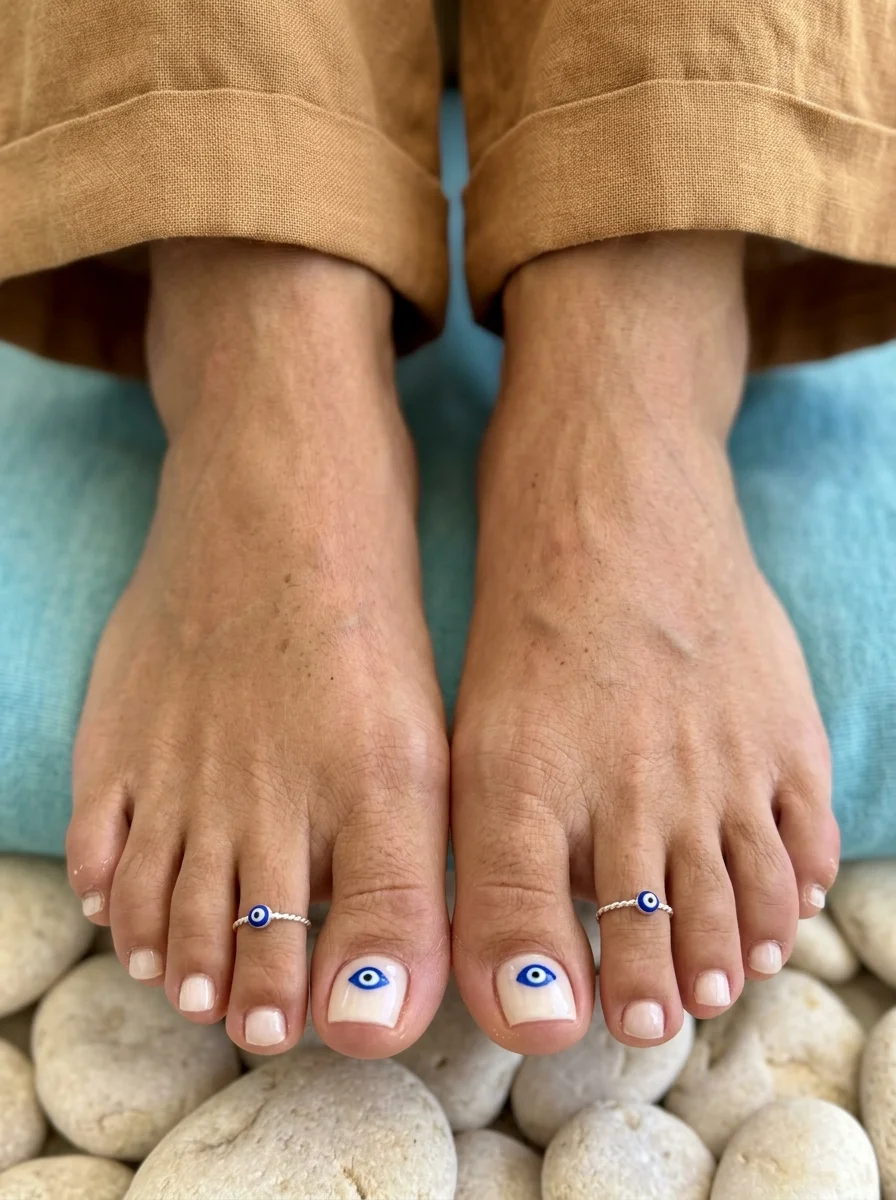
Good vibes only with this symbolic set.
Overview:
The nazar — or evil eye — is one of those motifs that works on everything from jewelry to ceramics, so translating it to nails makes sense. Here it sits on a sheer nude base, the concentric circles of blue, white, and black reading almost like a protective amulet against a clean, warm backdrop. The smaller toes stay nude, letting the big toe do all the talking.
Choosing sheer nude over stark white was a smart move. It gives the whole set a more organic, lived-in feel — like the eye emerged naturally from the skin rather than sitting on top of a painted surface. The glossy finish also helps the blue tones in the eye catch light and appear more vivid.
If you've never attempted a concentric circle design, the evil eye is a surprisingly forgiving place to start. The circles don't have to be perfectly round — a slightly irregular shape actually looks more authentic, more like the hand-painted ceramics that inspired it.
Design Breakdown:
The contrast between the graphic eye and the natural nude base is what gives this design its character.
Base Color: Sheer nude or natural pink with a translucent, skin-like finish.
Nail Shape: Short soft square. A flat, compact surface for the eye detail.
Design Element: Centered evil eye on the big toe using royal blue, white, and black concentric circles.
Finish: High-shine glossy top coat to make the blue pop.
Get The Look at Home:
Dotting tools are your best friend here — the circles practically make themselves.
- Nude base: Apply two coats of sheer nude polish. Let each coat dry completely before moving on.
- Outer circle: Use a large dotting tool with royal blue to create a horizontal oval in the center of the big toe.
- Iris: Once the blue is dry, use a medium dotting tool with white to place a smaller circle inside the blue.
- Pupil: Use your smallest dotting tool or a toothpick with black polish to add a tiny dot in the center.
- Top coat: Swipe on a glossy top coat to lock the design in place and add dimension.
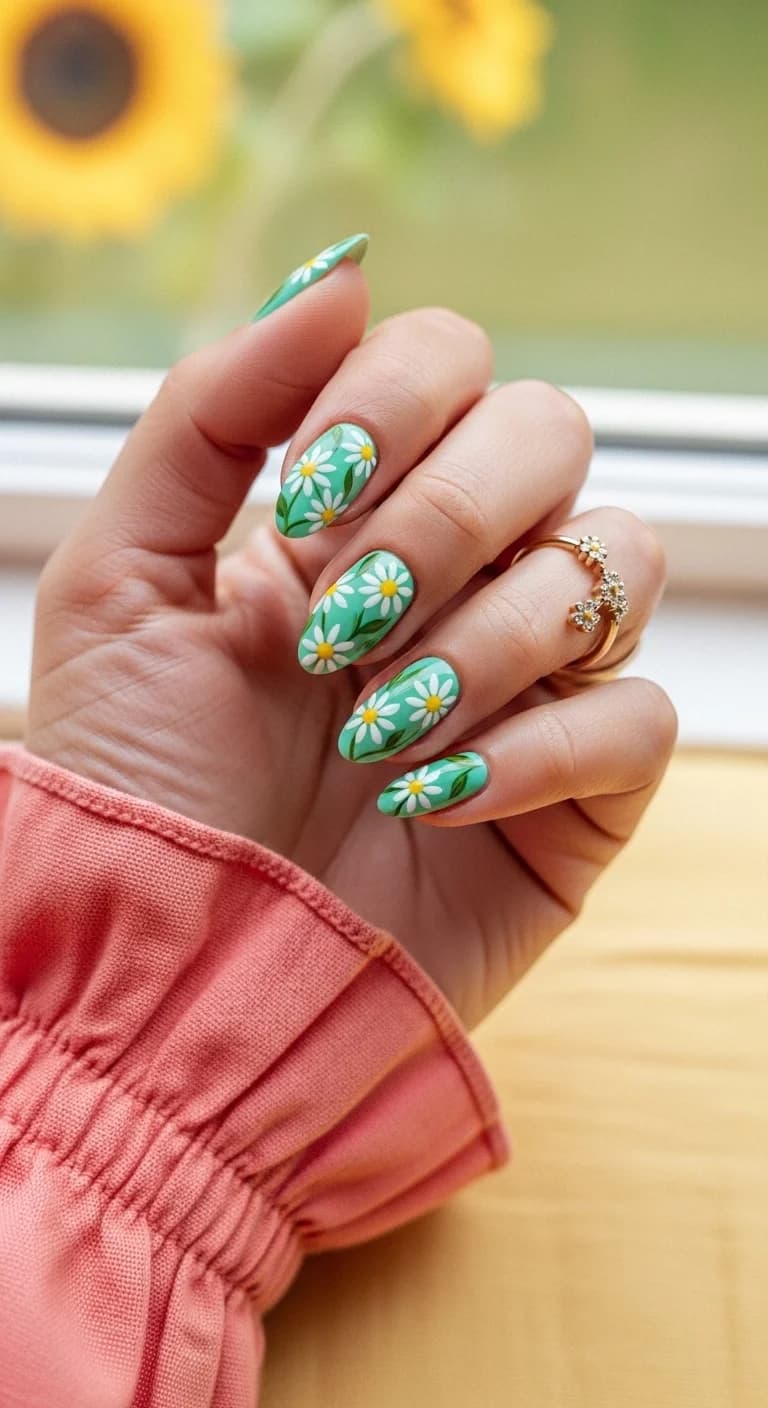
27 Gorgeous Mint Green Nails That Are Popular Right Now (2026)
4.Island Girl Hibiscus Blooms
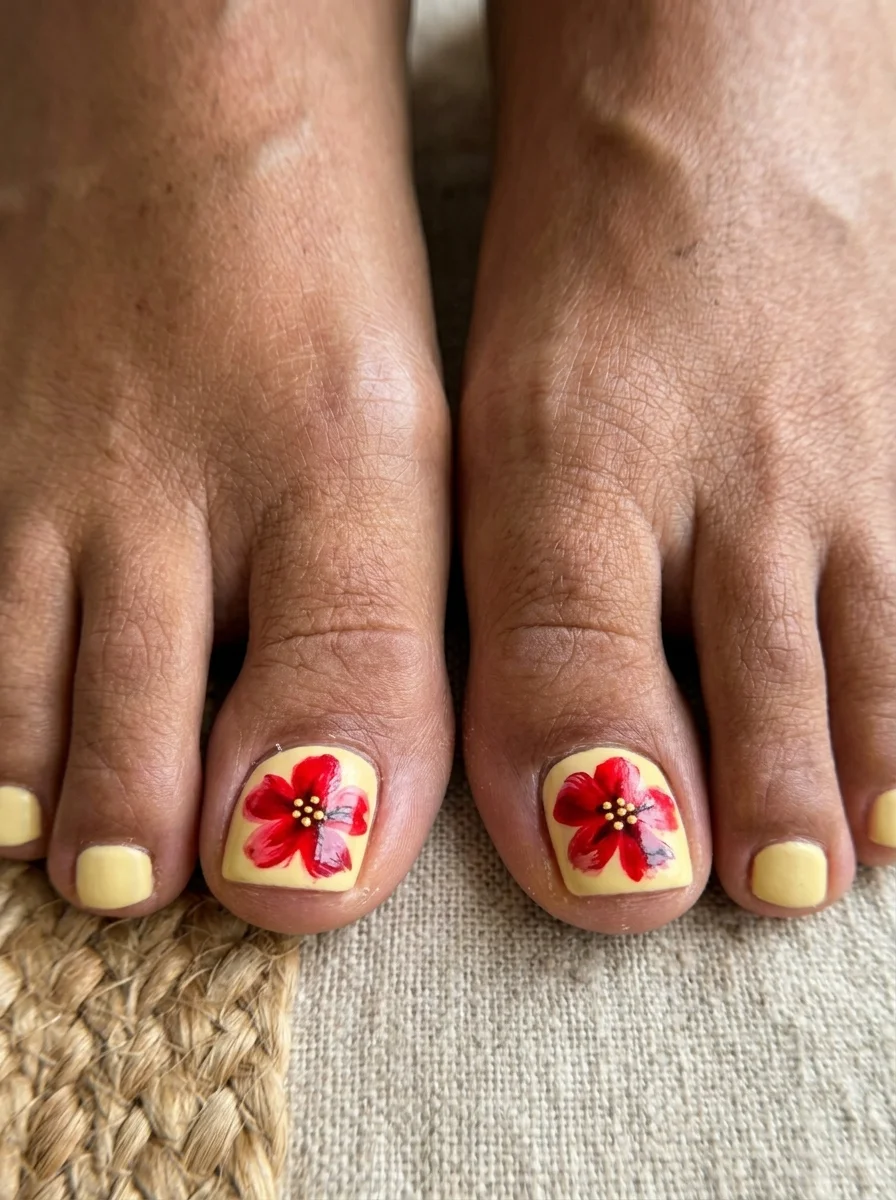
A tropical vacation in a bottle.
Overview:
Pale buttercream yellow is one of those colors that feels like it belongs in a tropical setting. It's warm without being aggressive, bright without veering into highlighter territory. And when you place a large red hibiscus on the big toe, the whole thing snaps into place — it's unmistakably island-inspired without being kitschy.
The hibiscus here is hand-painted, which gives it an organic, imperfect quality that printed decals just can't replicate. You can see the slight variations in petal shape, the way the red sits against the yellow. It looks like something an artist did freehand, which is exactly the point.
Design Breakdown:
The single-flower accent keeps this from feeling overwhelming while still making a clear statement.
Base Color: Creamy, opaque pastel yellow — avoid anything shimmery for a modern finish.
Nail Shape: Short soft square. The straight edges balance the organic curves of the flower.
Design Element: Large five-petal hibiscus in red on the big toe, with smaller solid yellow toes.
Finish: Glossy top coat for a fresh, juicy appearance.
Get The Look at Home:
The hibiscus is all about building five simple petal shapes into something that reads as a flower.
- Yellow base: Apply two coats of buttercream yellow to all toes. Let dry.
- Petal layout: Use a small detail brush with red polish to paint five teardrop shapes that meet in the center of the big toe.
- Fill in: Fill each petal with red. For dimension, add a tiny touch of darker red or maroon at the very center.
- Stamen dots: Use a toothpick dipped in the yellow base color to add tiny dots trailing out from the flower's center.
- Protect: Apply a thick top coat to seal the red and prevent it from chipping off the yellow.
5.Neon Sunset Frenchies
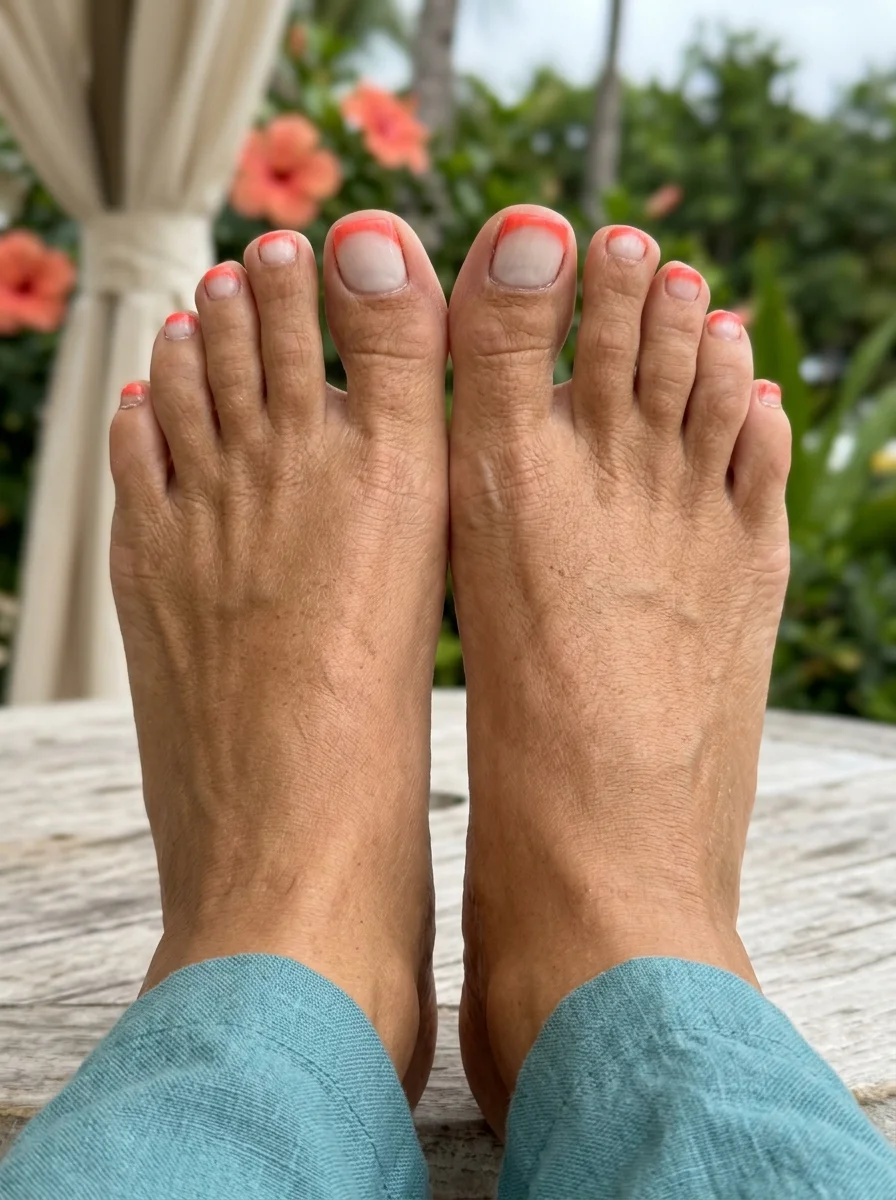
A fiery twist on a classic French.
Overview:
The French tip has been around long enough that any fresh variation feels welcome. This one swaps the traditional white for a neon coral-orange gradient that deepens slightly at the very edge — like a sunset compressed into the last few millimeters of nail. All five toes carry the same French line, which gives the set a cohesive, intentional feel.
On a sheer natural base, the neon tips almost appear to glow. The translucency of the base lets your real nail bed show through, which grounds the brightness and keeps the overall look from feeling heavy. It's a smart balance — bold enough to notice, restrained enough to wear every day.
The gradient within the tip itself is subtle but important. A flat neon orange would look fine, but the slight shift from coral to deeper orange at the free edge adds a dimensionality that elevates the whole design. A makeup sponge is the easiest way to achieve this blend.
Design Breakdown:
The ombre technique within the French tip is the detail that sets this apart from a standard colored French.
Base Color: Sheer, translucent natural or soft pinkish nude.
Nail Shape: Short soft square. Mimics the natural nail shape and provides a clean French line.
Design Element: Neon coral-to-orange gradient French tip on all toes.
Finish: Ultra-glossy top coat for a seamless, glass-like gradient.
Get The Look at Home:
A small makeup sponge is the secret weapon for getting that smooth sunset blend.
- Sheer base: Apply one or two coats of sheer nude polish. Let dry.
- Sponge setup: Paint a stripe of neon coral and a stripe of deeper orange side-by-side on a makeup sponge.
- Dab the tips: Gently tap the sponge onto the tips of each nail, concentrating the darker orange at the very edge.
- Build color: Repeat the sponge process once the first layer is dry to intensify the neon pigment.
- Clean and seal: Use a brush dipped in acetone to tidy the edges, then apply a generous glossy top coat to smooth the texture.
35 Cute & Sporty Athletic Hairstyles for Women (2026)
6.Desert Dreamer Matte Olive
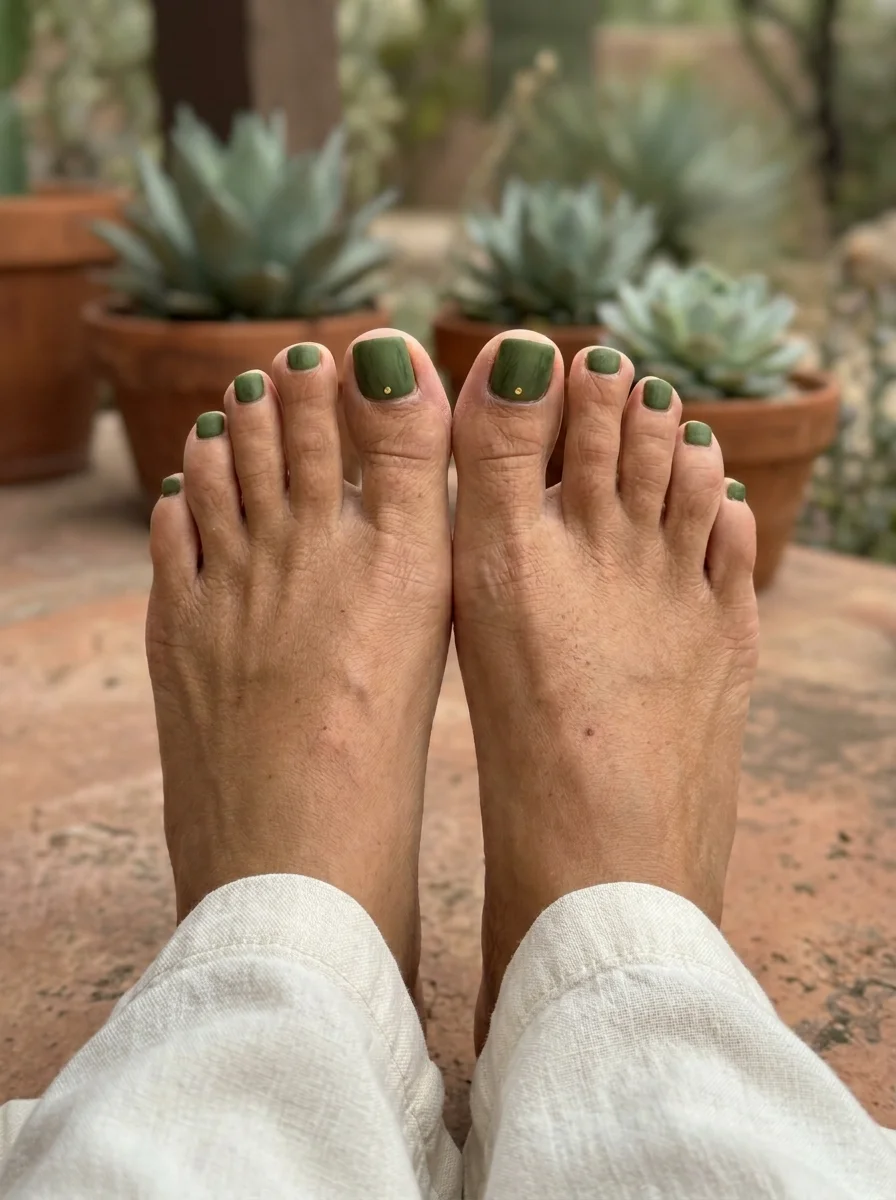
Earthy, cool-girl vibes for the desert heat.
Overview:
Deep olive green with a matte finish is one of those combinations that reads as effortless and expensive. The lack of shine forces your eye to focus on the color itself — it's rich, earthy, and surprisingly versatile. A single tiny gold stud on each big toe is the only embellishment, and that's exactly why it works.
Matte polishes have a reputation for being difficult, and that's not entirely unfair. They show every ridge and imperfection in the nail, so prep work matters more here than with a glossy formula. Buffing the nail surface smooth before application makes a real difference in the final result.
The gold stud sits near the cuticle of the big toe — a small, precise detail that catches light just enough to break up the matte field. It's the kind of subtle hardware that makes people lean in to get a closer look rather than noticing it from across the room.
Design Breakdown:
Texture does the heavy lifting here. The matte finish makes the olive look deeper and more saturated than it would with gloss.
Base Color: Pigment-rich olive or army green. Needs to be fully opaque.
Nail Shape: Short soft square. Clean edges complement the modern matte texture.
Design Element: Single tiny 3D gold stud placed near the cuticle of each big toe.
Finish: Velvet matte top coat. Choose a quality formula to avoid streaking.
Get The Look at Home:
The key is meticulous prep — matte polish reveals everything, so smooth nails are non-negotiable.
- Buff and smooth: Use a fine-grit buffer to remove ridges from the nail surface. Wipe clean with alcohol.
- Olive base: Apply two coats of olive green polish, letting each coat dry fully.
- Place the stud: Add a tiny dot of nail glue or thick top coat near the cuticle of the big toe. Use a wax pencil or tweezers to position the gold stud.
- Matte top coat: Apply the matte top coat carefully, painting around the stud rather than over it to keep the gold shiny.
- Dry time: Give matte top coats extra drying time — they're slower to set than glossy formulas.
7.Creamsicle Gradient Glow
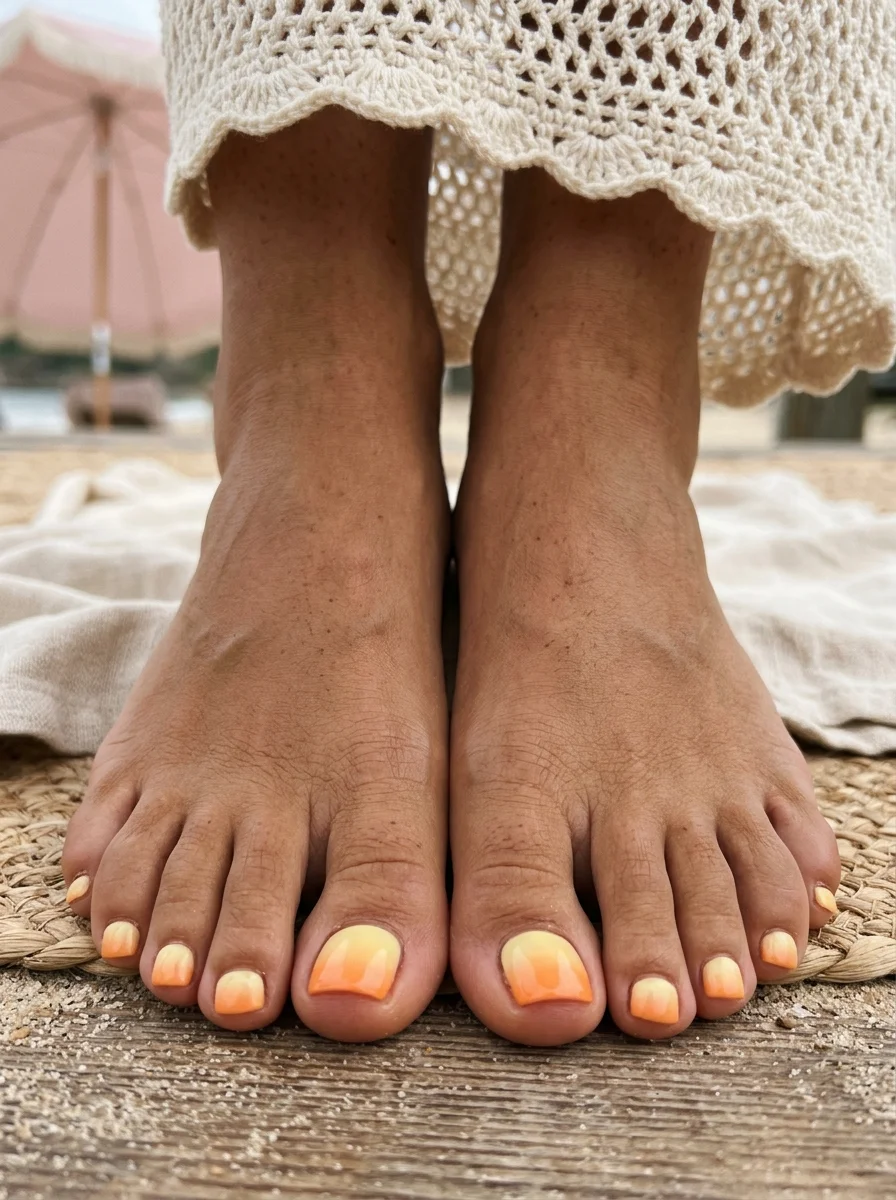
Refreshing citrus colors blended to perfection.
Overview:
An orange-to-yellow gradient that looks exactly like a melting creamsicle. The colors blend smoothly from a lighter cuticle area into a deeper peach-orange at the tips, creating a vertical ombre that feels warm and organic. It's the kind of design that looks complicated but is actually one of the more approachable gradient techniques to execute at home.
What makes this gradient successful is the transition zone. There's no harsh line where orange becomes yellow — it's a genuine blend, which is what gives it that "glow from within" quality. The glossy top coat amplifies this, making the surface look almost lit from underneath.
One practical consideration: bright orange and yellow polishes are notoriously sheer. A white base coat underneath makes both colors significantly more vibrant and reduces the number of coats needed to reach opacity.
Design Breakdown:
The vertical ombre technique creates a smooth, seamless transition that reads as one continuous color.
Base Color: White base coat to boost the brightness of the gradient colors.
Nail Shape: Short soft square. Maximum surface area for the gradient to show.
Design Element: Vertical gradient from pale yellow at the cuticle to deeper peach-orange at the tips.
Finish: High-gloss top coat to enhance the blended, glowing effect.
Get The Look at Home:
Sponging is the most reliable way to get a smooth gradient without visible brush strokes.
- White primer: Apply one coat of white polish to all toes. Let dry completely.
- Sponge setup: On a makeup sponge, paint a stripe of pale yellow and a stripe of peach-orange side-by-side.
- Dab and blend: Lightly bounce the sponge onto the nail, shifting it slightly up and down to blur the line between colors.
- Build opacity: Repeat the sponging process two or three times until the gradient looks smooth and saturated.
- Seal: Apply a thick top coat while the polish is still slightly tacky to help the colors blend further.
35 Cute & Trendy Short Summer Nails for 2026 ☀️
8.Peach & Tangerine Aura Blur
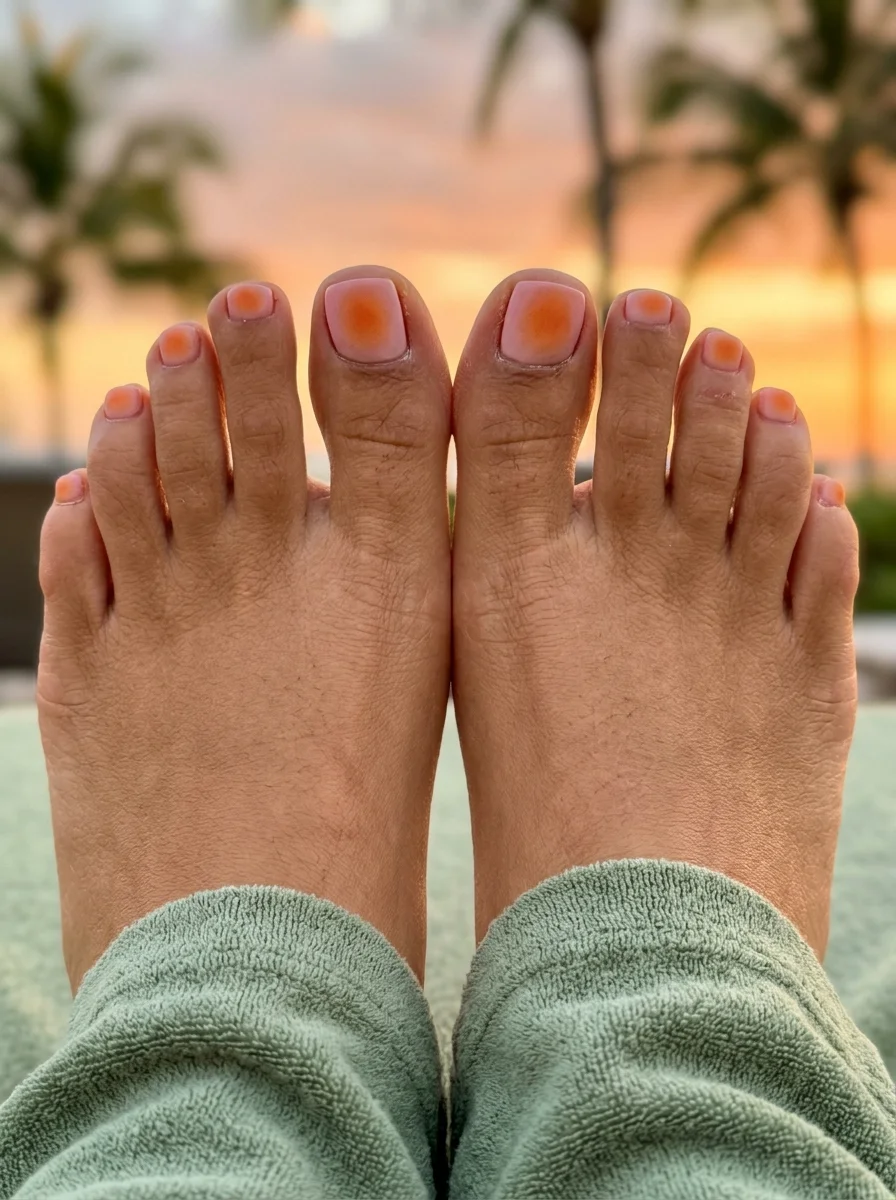
Mystical energy meets summer brights.
Overview:
Aura nails have been one of the defining trends of the past year, and bringing the concept to toes makes a surprising amount of sense. The big toe gets the full treatment — a sheer milky pink base with a soft, diffused circle of peach-tangerine in the center. The smaller toes echo the effect more subtly, the blur fading into a softer lavender-tinged pink.
The illusion here is that the color is radiating outward from within the nail rather than sitting on top of it. That's what the aura technique does best — it creates a sense of depth and warmth that flat, solid color can't match. The glossy finish amplifies this, making the nails look almost translucent, like frosted glass with light behind it.
Design Breakdown:
The centered placement of the bright color against the milky base creates that signature "glow" effect.
Base Color: Sheer milky pink or translucent nude.
Nail Shape: Short soft square. The compact shape keeps the aura effect contained and focused.
Design Element: Diffused peach-tangerine aura circle in the center of the big toe, softer on smaller toes.
Finish: Super glossy top coat to enhance the glowing, translucent appearance.
Get The Look at Home:
A small sponge or eyeshadow applicator gives you the control needed for this soft-focus effect.
- Milky base: Apply two coats of sheer milky pink. Let dry fully.
- Aura color: Place a small amount of peach-tangerine polish on a tiny sponge or eyeshadow sponge.
- Tap the center: Lightly tap the sponge in the middle of the nail, keeping the edges soft and feathered.
- Intensify: Add a second layer of color in the very center of the circle to build depth.
- Seal: Apply top coat carefully to avoid dragging the orange pigment outside the aura zone.
9.Confetti Candy Polka Dots
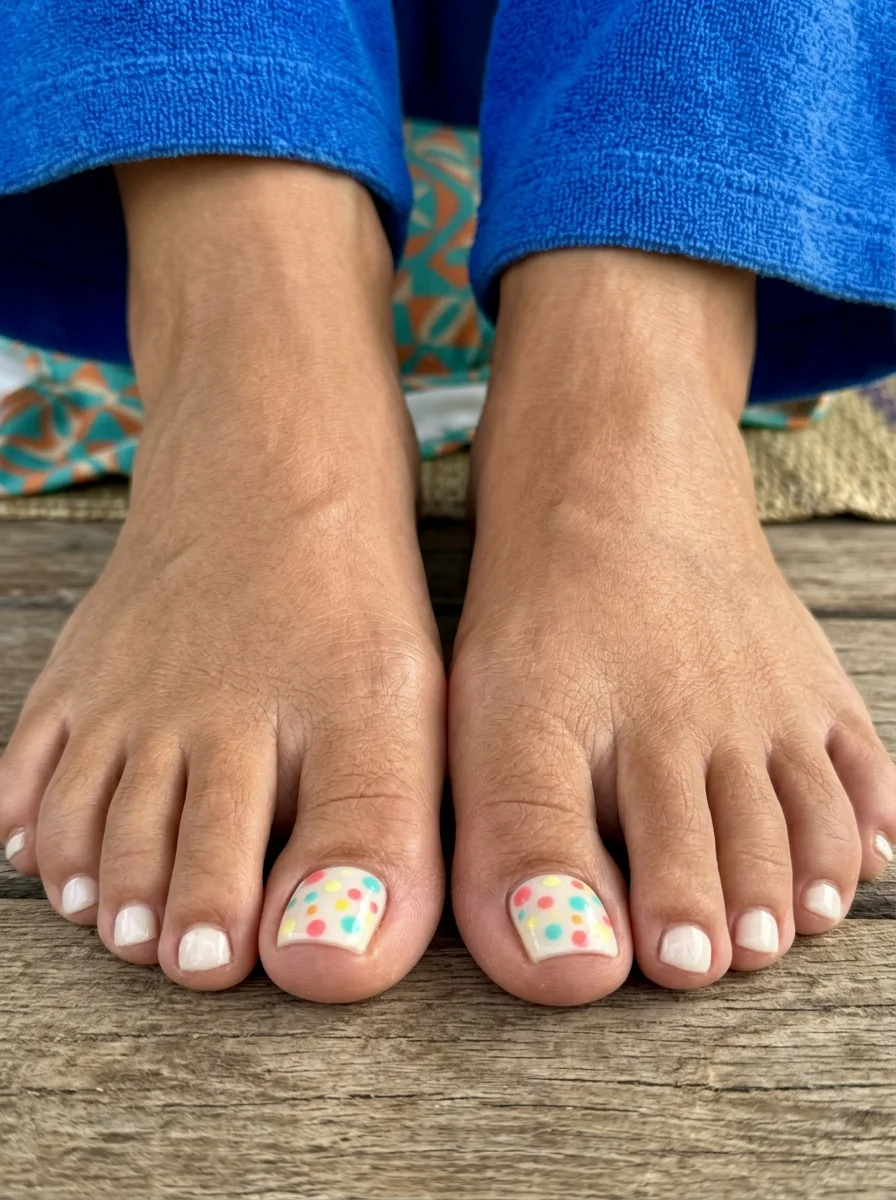
A celebratory splash of color for pool days.
Overview:
Multi-colored dots on a white base look like confetti scattered across the nail — playful, random, and undeniably happy. The big toe gets the full polka dot treatment, the second toe carries a sparser version, and the remaining toes stay solid white. That gradient of detail across the foot gives the set a sense of intention rather than randomness.
The milky white base is crucial. A stark, chalky white would make the dots feel disconnected, but the slightly translucent quality of milky white softens the whole picture. It lets the dots feel like they're floating rather than stamped on.
This is also one of the more forgiving designs to do yourself. Polka dots don't require straight lines or precise shapes — if a dot comes out slightly larger or smaller than the others, it just adds to the organic, confetti-like feel.
Design Breakdown:
The graduated detail across the toes — heavy on the big toe, lighter on the second, solid on the rest — creates visual flow.
Base Color: Creamy, opaque milky white.
Nail Shape: Short soft square. The flat surface makes dotting easy and uniform.
Design Element: Multicolor polka dots in teal, coral, yellow, and pink scattered across the big toe.
Finish: Thick glossy top coat to give the dots a glass-like, dimensional appearance.
Get The Look at Home:
Different-sized dotting tools give the pattern depth and keep it from looking too uniform.
- White base: Paint all nails with two coats of milky white. Let dry.
- Color palette: Choose four to five bright polishes and place a drop of each on a piece of foil.
- Dot the big toe: Use a dotting tool to place random dots across the big toe. Clean the tool between each color.
- Second toe: Add just a few sparse dots to the second toe for a lighter echo of the pattern.
- Wait and seal: Let the dots dry for at least ten minutes before applying top coat to prevent smearing.
27 Stunning Beach Wedding Hairstyles for Brides & Family 2026 🌊💍
10.Lucky Ladybug Garden Pedi
A whimsical and lucky garden-themed design.
Overview:
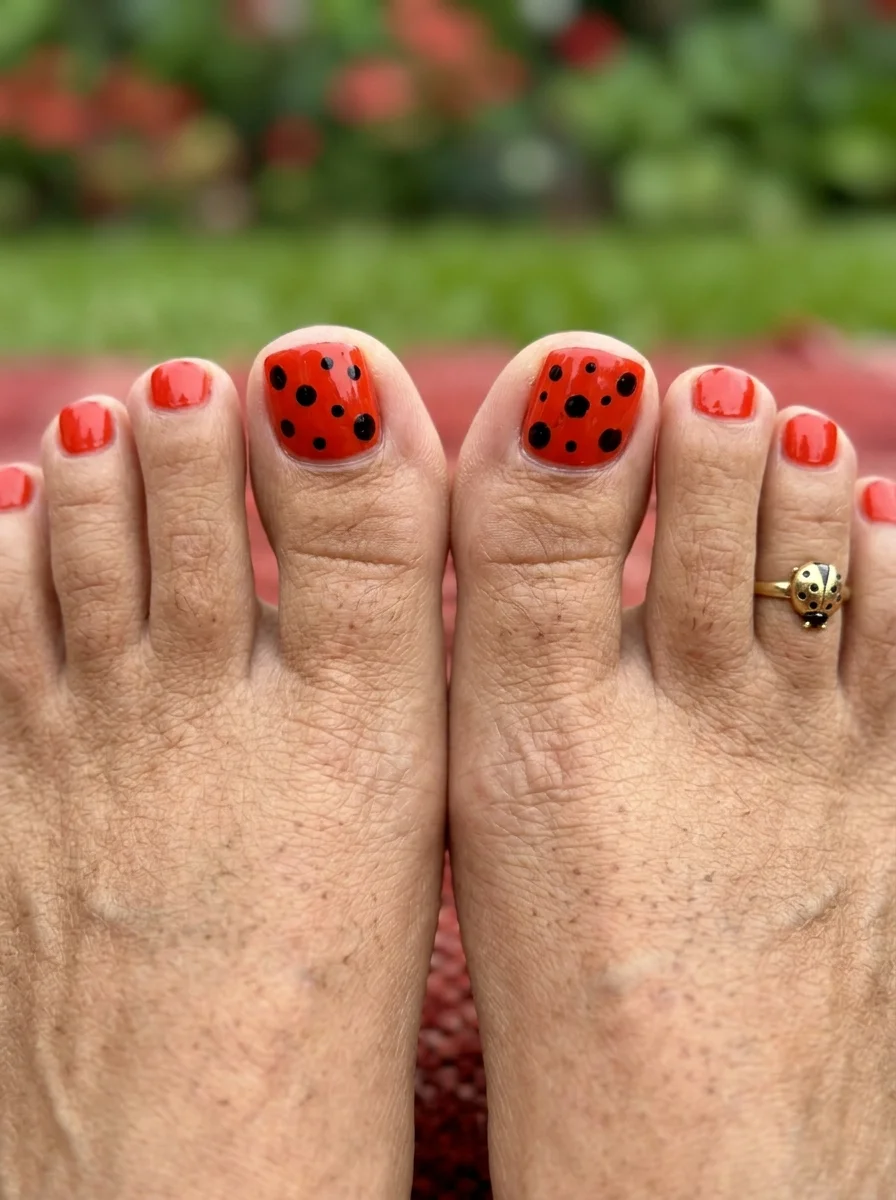
A ladybug's wing pattern translates remarkably well to a big toenail. The bright cherry red base covers all the toes, but it's the big toe that gets the black polka dots — spaced to suggest the split of a ladybug's shell. The effect is whimsical without being juvenile, mostly because the color palette is kept tight: red and black, nothing else.
Cherry red is one of the most universally flattering polish colors for toes, and adding the ladybug detail doesn't change that — it just gives the color a narrative. The glossy finish is essential here; it mimics the natural sheen of a ladybug's exoskeleton and makes the red feel richer.
If you're doing this at home, the dots are the easy part. The harder part is making sure the red base is truly opaque and even, because any streakiness shows through the black spots. Two thin coats, properly dried, will save you frustration.
Design Breakdown:
The red-and-black color combination is graphic, classic, and instantly recognizable.
Base Color: Bright cherry red cream. Full opacity in two coats.
Nail Shape: Short soft square. Rounded edges echo the roundness of the ladybug spots.
Design Element: Oversized black dots on the big toe suggesting a ladybug's wing pattern.
Finish: Ultra-glossy top coat for that shiny, beetle-like sheen.
Get The Look at Home:
This is one of the most accessible nail art designs — if you can make a dot, you can do this.
- Red base: Apply two coats of cherry red to all toes. Let dry completely.
- Black dots: Use a medium dotting tool or bobby pin end dipped in black polish.
- Spot placement: Place five to seven dots on the big toe. Keep them slightly irregular for a natural look.
- Optional accent: Add a single dot to one or two smaller toes for a subtle continuation of the theme.
- Lock it in: Swipe a generous layer of top coat over all nails to prevent the black from chipping.
11.Pastel Boardwalk Stripes
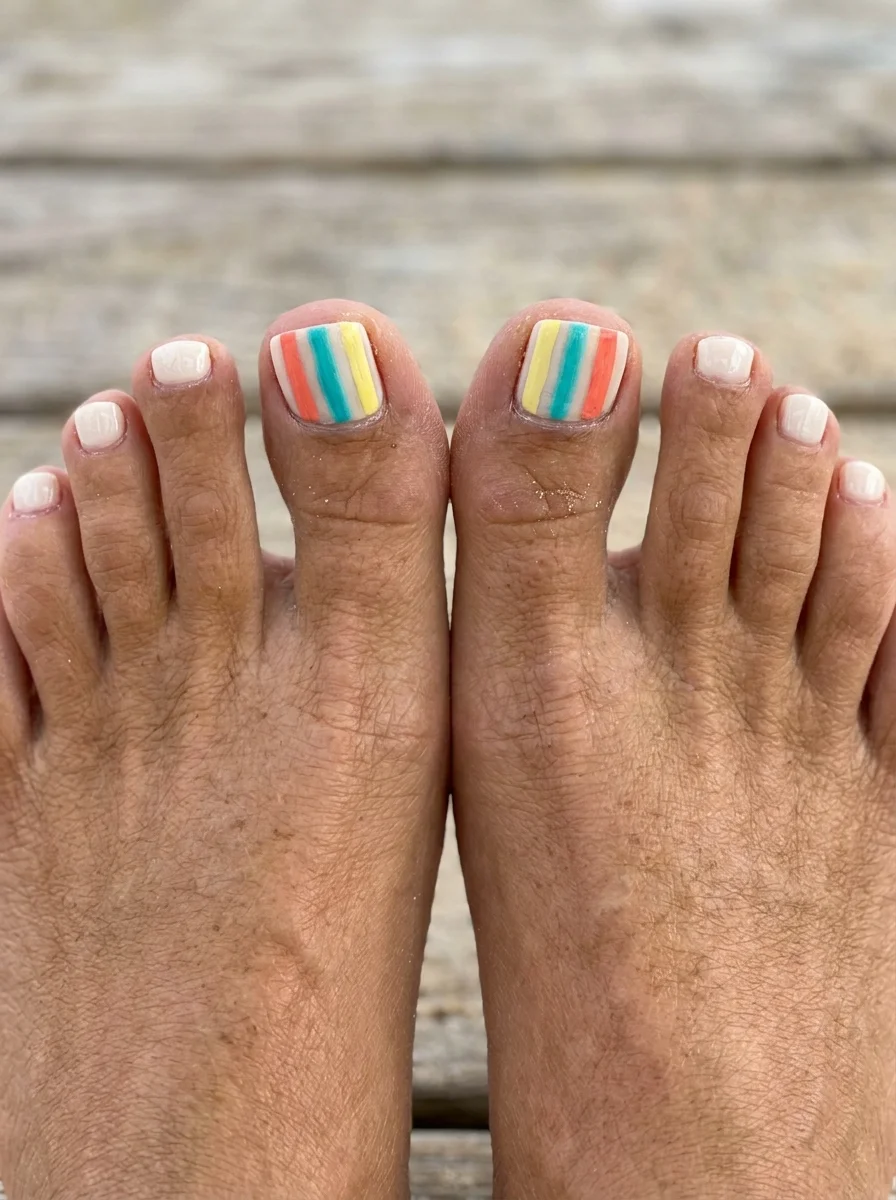
Beachy stripes reminiscent of summer umbrellas.
Overview:
Vertical candy stripes in coral, teal, and yellow on a white base immediately call to mind beach umbrellas and boardwalk concessions. The stripes are confined to the big toe, while the remaining toes stay in solid milky white — a smart design choice that keeps the set wearable rather than busy.
Beyond the visual appeal, vertical stripes serve a practical purpose: they visually elongate the nail, which is especially helpful on shorter toes where space is limited. The clean, geometric lines feel organized and intentional, even with the playful pastel palette.
Striping tape makes this design dramatically easier than freehand, but if you prefer the organic look of hand-painted lines, a long thin liner brush gives you more control over the thickness and spacing of each stripe.
Design Breakdown:
The vertical alignment creates a neat, organized pattern that looks more complex than it actually is.
Base Color: Opaque white to ensure the pastel stripes appear bright and true.
Nail Shape: Short soft square. Straight tips make vertical stripes easier to line up.
Design Element: Thin vertical stripes in coral, teal, and yellow on the big toe.
Finish: Smooth glossy top coat to level the slight texture from the stripes.
Get The Look at Home:
Striping tape or a very steady hand — pick your method based on your patience level.
- White base: Apply two coats of white polish. Let dry completely — this step is crucial for clean lines.
- Tape or freehand: Apply thin strips of tape vertically across the big toe, or use a liner brush to paint the stripes directly.
- Fill the gaps: Paint the exposed spaces with coral, teal, and yellow polishes in alternating order.
- Remove tape: Peel the tape away while the polish is still slightly wet for the crispest edges.
- Seal: Once fully dry, apply a thick top coat to protect the stripes and smooth the surface.
30 Trendy Summer French Tip Nail Designs for 2026 💅
12.Electric Lime Matte Punch
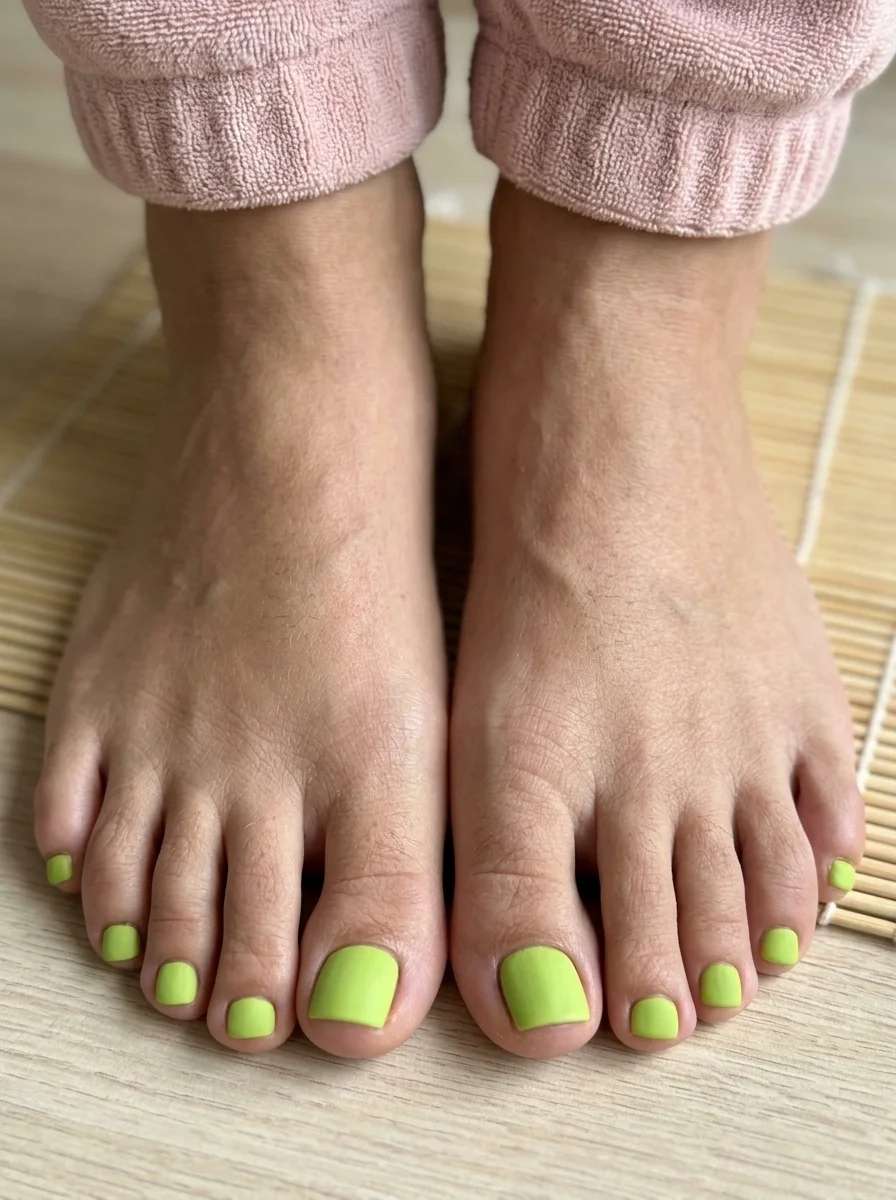
A blindingly bright neon for the bold.
Overview:
Electric lime in a matte finish is a statement that doesn't need any embellishment. The color alone is loud enough — a vibrant chartreuse that borders on fluorescent — and the matte texture gives it a modern, almost architectural quality. It looks like something you'd see on a designer sneaker rather than a typical summer pedicure.
Neons are notoriously tricky to work with. They tend to be sheer, streaky, and unforgiving on uneven nail surfaces. A white base coat underneath the first layer of lime makes a significant difference in both opacity and vibrancy. Without it, you'd need three or four coats to get the same intensity.
Design Breakdown:
One high-impact color with a specific texture — the simplicity is the entire design.
Base Color: True neon lime or chartreuse green. Must be highly pigmented.
Nail Shape: Short soft square. The sharp shape matches the modern, industrial feel of the neon.
Design Element: Solid, flawless color on all ten toes.
Finish: Flat matte top coat for a velvet, chalk-like appearance.
Get The Look at Home:
The white base coat trick is non-negotiable for getting neons to look their best.
- White primer: Apply one coat of opaque white polish and let it dry fully.
- First neon coat: Apply the lime green in three quick strokes. Don't worry about full opacity yet.
- Second coat: Apply a slightly thicker second coat for complete coverage.
- Matte top coat: Apply the matte finish while the second coat is just barely dry for better bonding.
- Hands off: Keep your feet still until fully set — matte formulas show every smudge and fingerprint.
13.Midnight Ocean Aura Blur
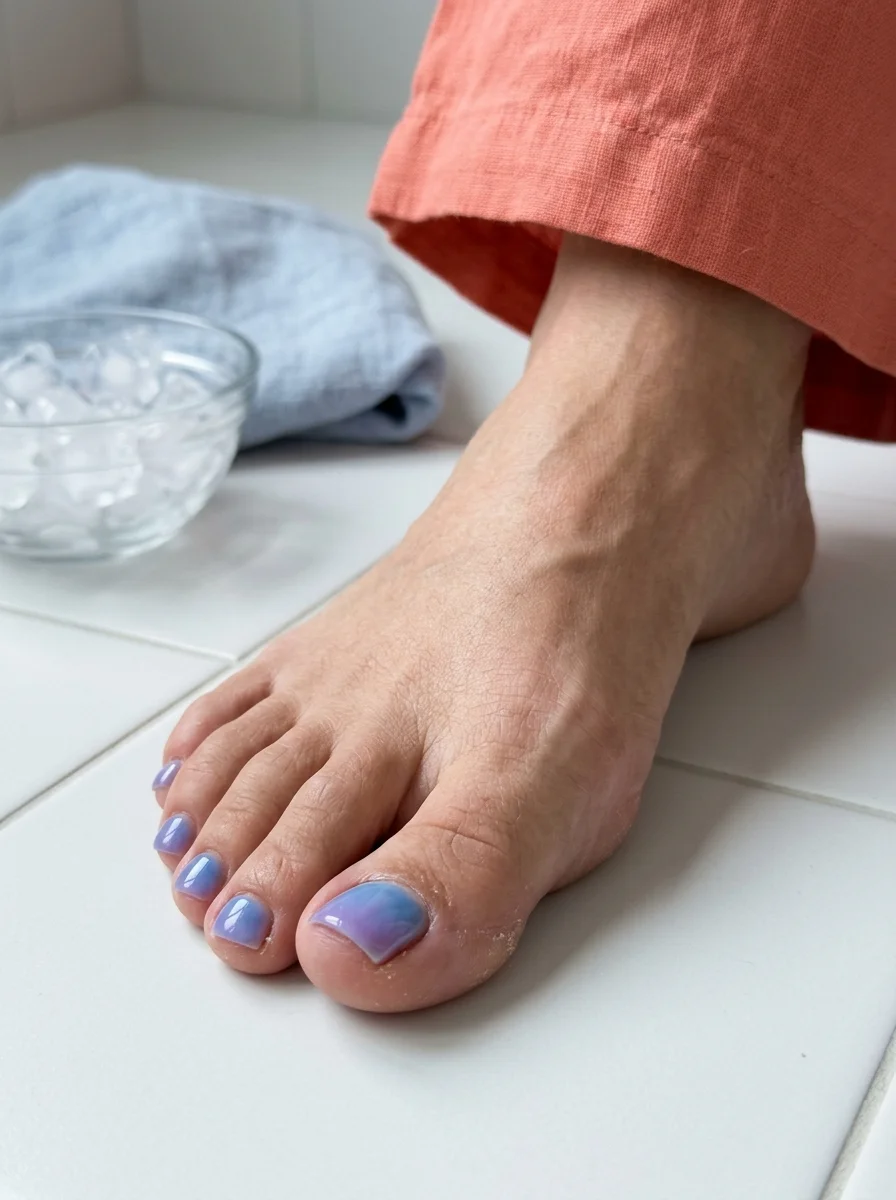
Cool tones blended for a zen, spa-like feel.
Overview:
A blue-purple aura blur that looks like the ocean at dusk. The big toe carries the most saturated version — a diffused circle of deep blue-purple fading outward into a softer lavender base. The smaller toes echo the effect in a lighter, more diluted form, creating a gradient of intensity across the foot.
The cool-toned palette is an interesting choice for summer. While most seasonal pedicures lean warm — corals, yellows, oranges — this reads as refreshing and calm, like a glass of cold water on a hot day. It's the kind of design that doesn't compete with your outfit but quietly enhances it.
Achieving the aura effect is simpler than it looks. A small sponge or even a dense blending brush works for tapping the color into the center and feathering the edges outward. The key is building up slowly — one thin layer at a time rather than loading on a thick blob of purple.
Design Breakdown:
The cool-toned gradient creates a calming, almost meditative visual effect.
Base Color: Soft lavender or lilac cream.
Nail Shape: Short soft square. The soft edges complement the diffused, blurry nature of the art.
Design Element: Diffused blue-purple aura circle in the center of the big toe, softer on smaller toes.
Finish: High-shine, plumping top coat for glass-like depth.
Get The Look at Home:
A small makeup sponge or dense blending brush gives you the control needed for this soft-focus technique.
- Lavender base: Apply two coats of soft lavender polish. Let dry 100%.
- Purple center: Place a small amount of deeper purple on a sponge and tap it into the center of the nail.
- Feather edges: Use a clean section of the sponge to softly blur the edges of the purple outward.
- Build intensity: If you want more depth, add a second small dab of purple in the very center.
- Seal: Apply a generous top coat to blend the colors and add a glossy, dimensional finish.
24 Stunning Bridesmaid Hairstyles for Weddings 2026 💍✨
14.Cloud Nine Blue Frenchies
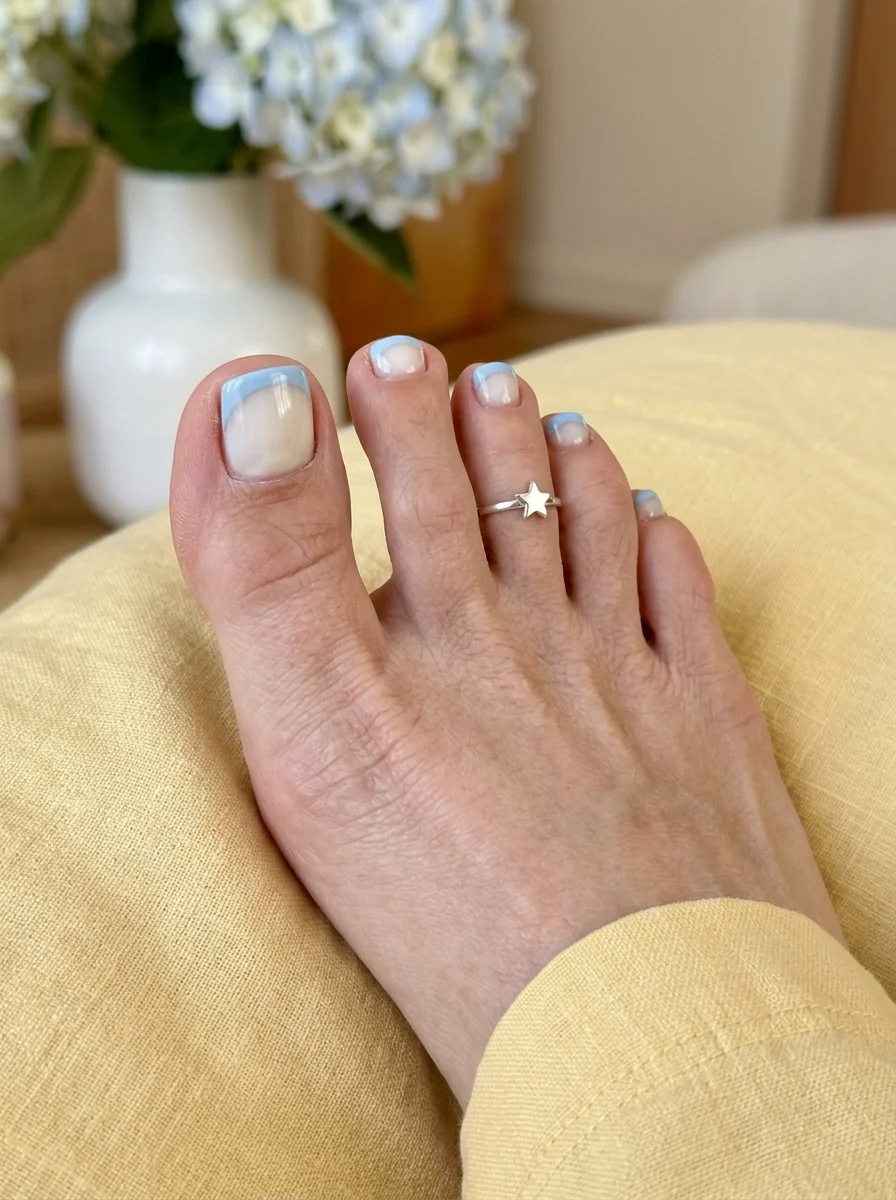
Heavenly blue tips for a polished look.
Overview:
Baby blue French tips on a milky nude base — it's a combination that feels clean, fresh, and quietly confident. The blue is soft enough to read as a neutral from a distance, but up close it has that unmistakable pop of sky-blue that makes it feel intentional. The cloud-like quality of the color against the milky base gives the whole design an airy, weightless feel.
French tips on toes are practical in a way that nail art sometimes isn't. They're less likely to chip in visible areas, they grow out gracefully, and they complement almost any outfit. Adding blue instead of white makes the classic French feel seasonal without sacrificing any of that versatility.
Design Breakdown:
A fresh color swap on the classic French — the technique is identical, the result is entirely different.
Base Color: Milky, semi-sheer nude or pale translucent pink.
Nail Shape: Short soft square. The flat top makes drawing the French line straightforward.
Design Element: Thin, crisp baby blue French tip on all toes.
Finish: Glossy, protective top coat to prevent the blue tips from wearing.
Get The Look at Home:
A silicone nail stamper can speed this up dramatically if freehand French lines aren't your strength.
- Milky base: Apply two thin coats of milky white or sheer nude. Let dry.
- Blue tips: Using a fine brush or stamper, paint a thin line of baby blue across the tip of each nail.
- Clean edges: Use a small brush dipped in acetone to sharpen the French line and tidy the sides.
- Consistency: Repeat across all toes, keeping the thickness of the blue line as uniform as possible.
- Top coat: Apply a glossy top coat to seal the tips and keep the whole design looking fresh.
15.Iridescent Butterfly Wings
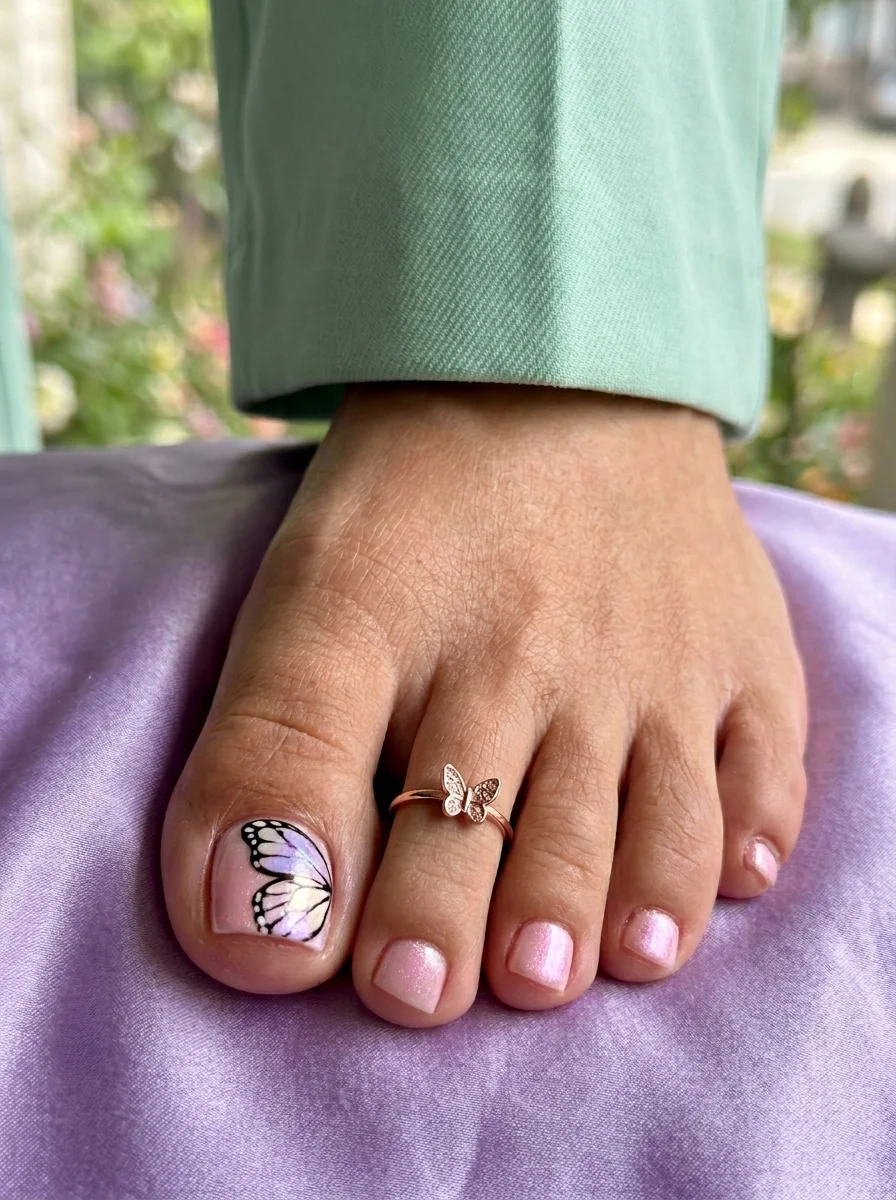
Magical, shimmering wings for your summer steps.
Overview:
An iridescent pink-nude base that shifts between pink, purple, and silver depending on the light — and then a monarch-style butterfly wing painted across the big toe in purple-blue with iridescent fill. The smaller toes stay in a solid shimmer pink, creating a gradient of intensity from the detailed big toe outward.
The iridescent chrome finish is what makes this design feel more like jewelry than nail art. In direct sunlight, the surface catches and fractures light in a way that makes the butterfly wing appear to move. It's a subtle kinetic quality that flat polish can't replicate.
Working with iridescent formulas requires patience — they tend to be thinner than cream polishes, and brush strokes can show if you're not careful. Applying in thin, even layers and letting each coat dry fully prevents the streaking that plagues many chrome finishes.
Design Breakdown:
The combination of shimmer base and detailed line work creates a design that's both ethereal and graphic.
Base Color: Sheer pink-nude with iridescent purple-blue shift.
Nail Shape: Short square with slightly rounded corners.
Design Element: Butterfly wing on the big toe using black outline with iridescent purple-blue fill.
Finish: Iridescent chrome top coat for a multi-tonal, light-catching effect.
Get The Look at Home:
The wing outline doesn't need to be perfect — organic curves look more realistic than rigid geometry.
- Iridescent base: Apply two coats of the iridescent pink-nude, letting each coat dry fully.
- Wing outline: Use a fine liner brush with black polish to draw a curved scalloped edge along the side of the big toe.
- Wing fill: Inside the outline, paint sections with an iridescent purple-blue polish for the wing membrane effect.
- Solid toes: Leave the smaller toes in solid shimmer pink for a cohesive gradient.
- Chrome seal: Apply a chrome or iridescent top coat over all nails to unify the finish.
29 Best Tropical Vacation Nails for Women in 2026 🌴
16.Zesty Lemon French Tips
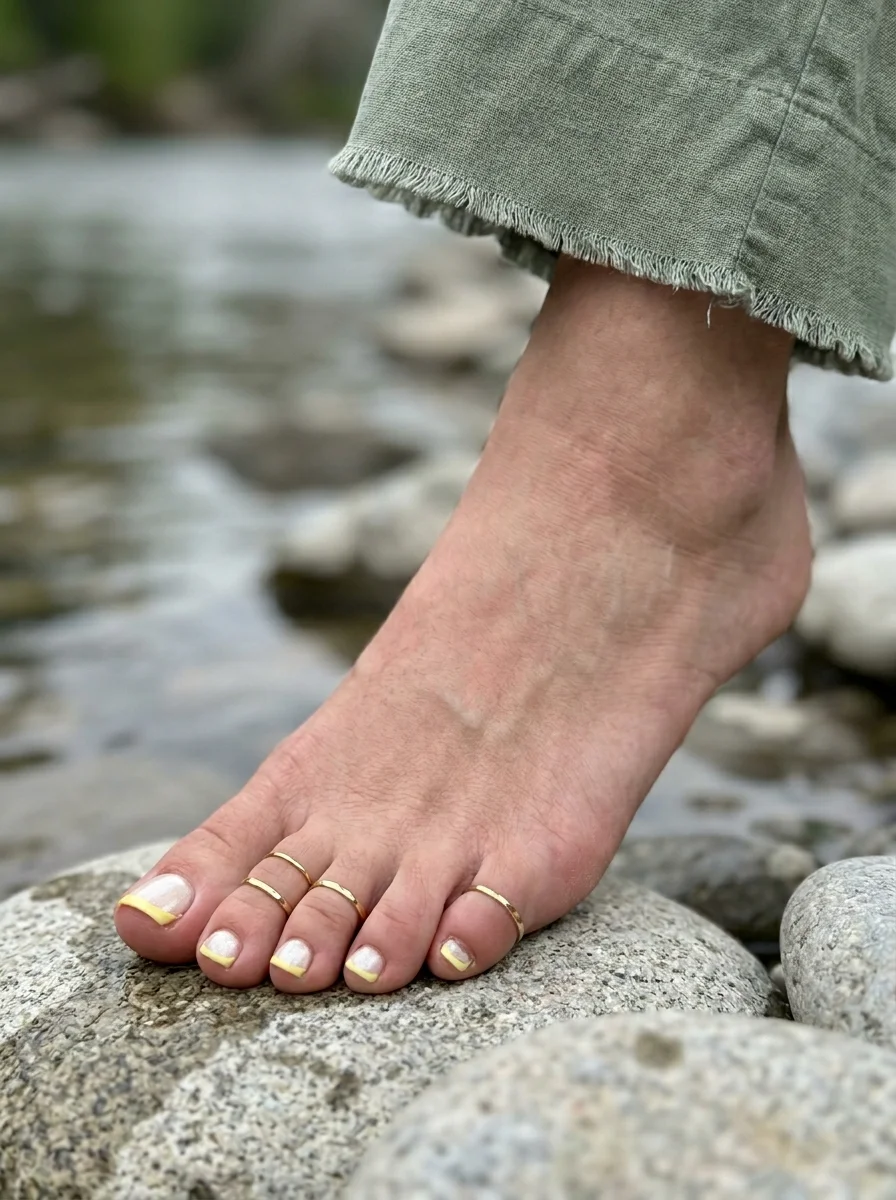
A zesty, citrus twist on the classic French pedi.
Overview:
Thin lemon-yellow chrome micro French tips on a milky nude base — the metallic finish on the tips is what elevates this from a simple colored French to something with real presence. In direct light, the yellow tips catch and reflect with a warm, almost liquid-metal quality that catches the eye without overwhelming the foot.
Micro tips — meaning very thin French lines — are having a moment because they look modern and precise. On shorter nails, a thick French tip can eat up half the visible nail bed, but a micro tip preserves the proportions and keeps the overall look delicate.
The challenge with metallic French tips is getting the line clean. Chrome and metallic polishes tend to be thinner and more prone to bleeding at the edges. French tip guides or striping tape help enormously here — they give you a crisp boundary that freehand sometimes can't achieve.
Design Breakdown:
The chrome finish on the tips transforms a basic French into something with real metallic presence.
Base Color: Milky nude or semi-sheer clear with a natural pink tint.
Nail Shape: Short square with slightly rounded corners.
Design Element: Thin lemon-yellow chrome micro French tip on all toes.
Finish: Glossy top coat to seal the metallic tips and add shine.
Get The Look at Home:
French tip guides or tape make the micro line much easier to keep straight and consistent.
- Milky base: Apply two coats of milky nude or clear pink. Let dry.
- Tape guides: Apply French tip guides or thin tape to mask off everything but the very edge of each nail.
- Chrome tips: Paint the exposed tip with the lemon-yellow chrome polish. One coat is usually sufficient for metallic formulas.
- Peel and clean: Remove the tape while the polish is still wet. Use a cleanup brush for any bleeds.
- Seal: Finish with a glossy top coat to protect the metallic tips from scratching.
17.Pink Ribbon Coquette Pedi
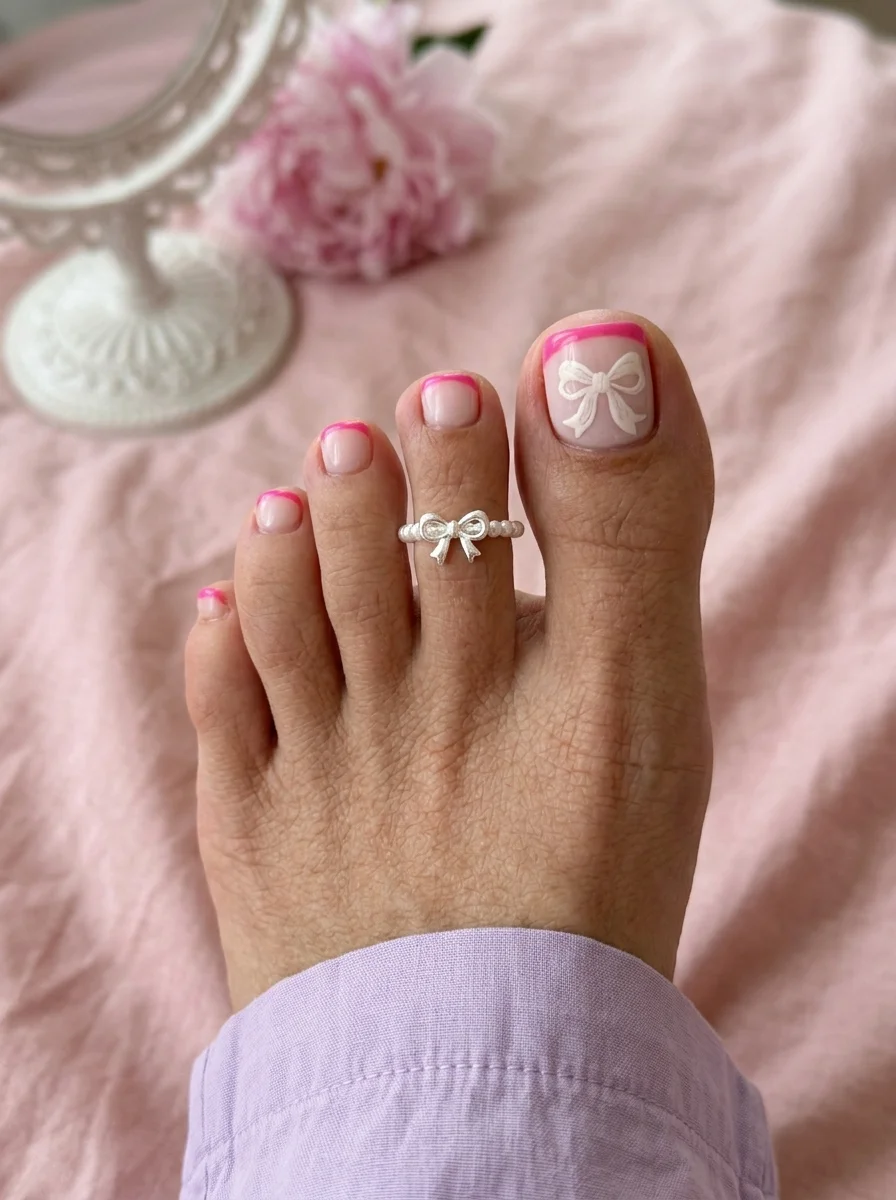
Adorably chic coquette vibes with ribbons and bows.
Overview:
A 3D white bow charm sitting on the big toe over a hot pink French line — this is the coquette aesthetic distilled to its purest form. The remaining toes follow a gradient: the second toe gets a hot pink French tip, while the rest carry a subtler pale pink French. It's a cascading intensity that keeps the set balanced rather than overwhelming.
The 3D element is what makes this design polarizing and exciting in equal measure. A bow charm on toes sounds impractical, and honestly, it can be — but with strong nail glue and a willingness to be careful, it stays put for days. The key is using a thin layer of jewelry-grade adhesive rather than regular top coat.
The contrast between the matte white bow and the glossy French tips is a subtle detail that adds visual depth. It makes the bow feel like a separate object sitting on the nail rather than part of the polish, which is exactly the illusion you want.
Design Breakdown:
A mix of 2D painting and 3D embellishment creates a textured, high-fashion finish.
Base Color: Sheer nude or milky pink.
Nail Shape: Short-medium soft square.
Design Element: Hot pink French tips with a 3D matte white bow charm on the big toe.
Finish: Glossy top coat on polish, matte finish on the bow for contrast.
Get The Look at Home:
Strong nail glue is non-negotiable for keeping the 3D charm in place.
- Base: Apply sheer nude or milky pink to all toes. Let dry.
- Hot pink tips: Paint a hot pink French line on the big and second toes. Use a thinner, paler pink on the remaining toes.
- Glue prep: Place a small drop of jewelry glue or nail adhesive on the center of the big toe.
- Place the bow: Use tweezers to set the 3D bow charm into the glue. Press gently and hold for ten seconds.
- Seal around: Apply top coat to all nails, carefully painting around the bow to maintain its matte texture.

30 Stunning Summer Hair Trends for 2026 ☀️🌊
18.Earthy Sage French Tips
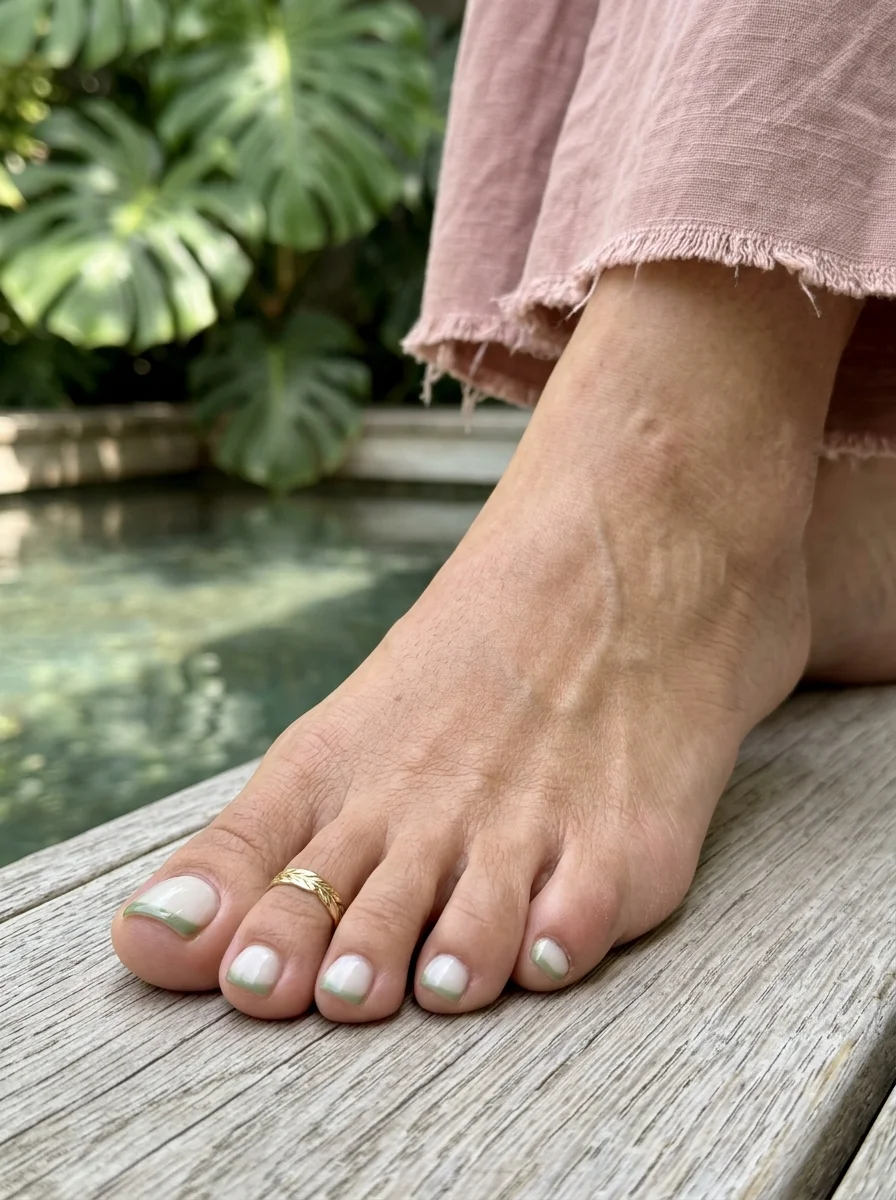
Quiet luxury in the form of a sage green pedi.
Overview:
Thin sage green French tips on a milky white base — it's the kind of design that whispers rather than shouts. The muted green reads as sophisticated and grounded, especially against the clean milky background. Every toe carries the same thin French line, creating a uniform, polished appearance that pairs well with virtually anything in your summer wardrobe.
Sage green has earned its place in the "quiet luxury" conversation for good reason. It's a color that feels natural and considered, not trendy or loud. On a French tip, it provides just enough color to be interesting without committing to a full nail of green, which can sometimes feel heavy on shorter nails.
The thinness of the line matters here. A thick sage tip would shift the look from "quiet luxury" to "bold statement." Keeping it narrow — roughly one-eighth of the nail — preserves the understated quality that makes this design work.
Design Breakdown:
The muted sage tone makes this a wearable, everyday version of a colored French.
Base Color: Milky, translucent white.
Nail Shape: Short soft square. Clean edges for a modern French line.
Design Element: Thin sage green French tip on all toes.
Finish: High-shine top coat for a professional, salon finish.
Get The Look at Home:
Thinness is everything — the narrower the line, the more sophisticated the result.
- Milky base: Apply two coats of milky white. Let dry fully.
- Sage tips: Using a very fine liner brush, draw a thin sage green line across the tip of each nail.
- Keep it narrow: Resist the urge to go wide — the thin line is what gives this the "quiet luxury" look.
- Clean up: Use a brush dipped in acetone to fix any wobbles or uneven edges.
- Seal: Finish with a glossy top coat to protect the sage tips and add shine.
19.Hot Pink Tropical Punch
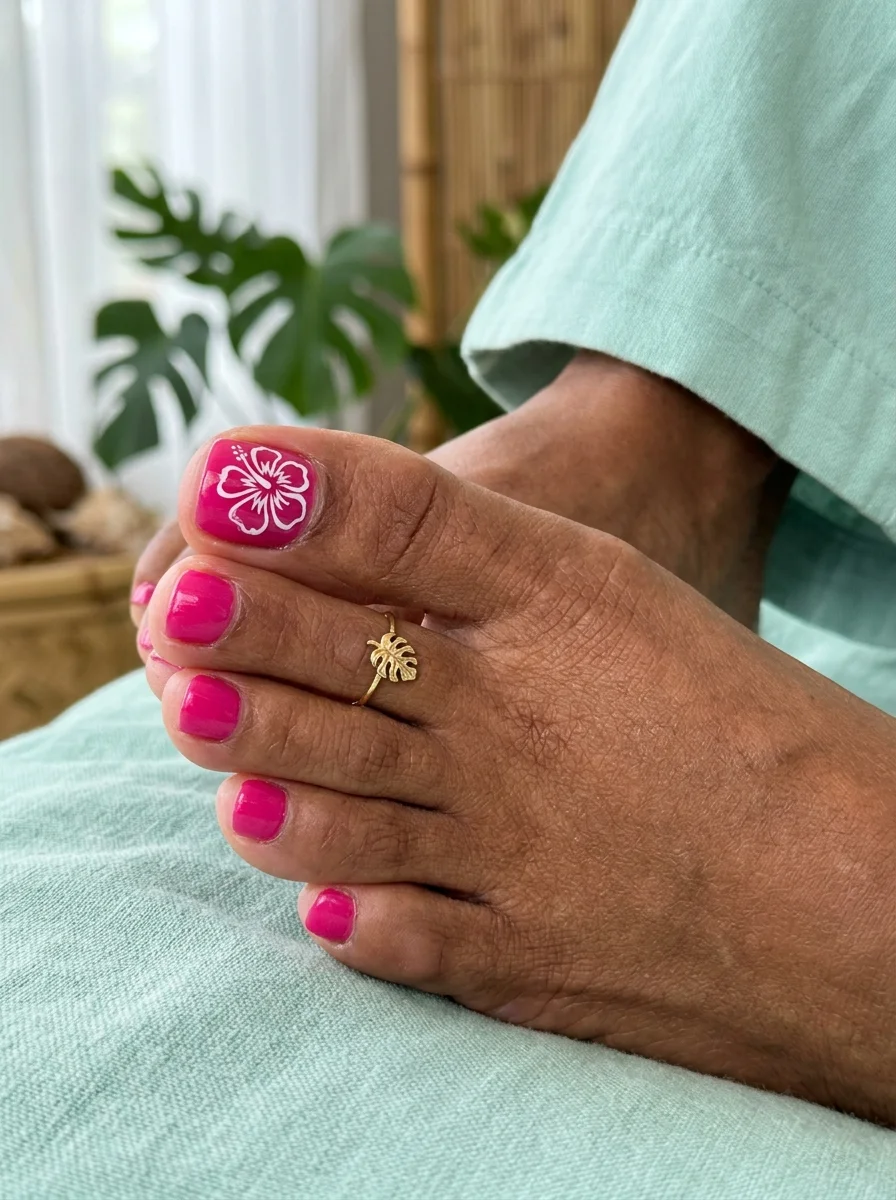
A bold and juicy pink for tropical adventures.
Overview:
Hot pink is a color that doesn't need an introduction — it's bold, saturated, and looks incredible against sun-kissed skin. Here, the big toe gets a white hand-painted hibiscus outline over the pink, while the remaining toes stay in solid magenta. The white line work against the deep pink creates a graphic contrast that reads as both tropical and clean.
The hibiscus outline approach is smarter than a filled-in flower. An outline lets the pink show through, which means the design feels integrated with the base color rather than sitting on top of it. It also takes less time and requires less precision than a fully painted floral, which makes it more achievable for at-home execution.
Hot pink polish does have a tendency to stain nails, so a good base coat is essential here. It also tends to look best in two thin coats rather than one thick one — thick applications of bright pink are more prone to bubbling and uneven drying.
Design Breakdown:
White line art over a saturated base creates a graphic, clean look that's unmistakably tropical.
Base Color: Vibrant hot pink or magenta cream. Full opacity in two coats.
Nail Shape: Short soft square.
Design Element: White hand-painted hibiscus outline on the big toe.
Finish: Glossy top coat to keep the pink looking fresh and wet.
Get The Look at Home:
An outline flower is significantly easier to draw than a filled-in one — the pink base does the heavy lifting.
- Pink base: Apply two coats of hot pink to all toes. Let dry.
- Flower outline: Use a fine liner brush with white polish to draw five simple petal loops on the big toe.
- Stamen line: Draw a single curved line from the center of the flower outward, with a few tiny dots at the end.
- Solid accents: Keep the remaining toes solid pink to let the art be the focal point.
- Protect: Apply a thick top coat to keep the white outlines from wearing or chipping.
27 Stunning June Nail Ideas for 2026 💅
20.Velvet Emerald Cat Eye
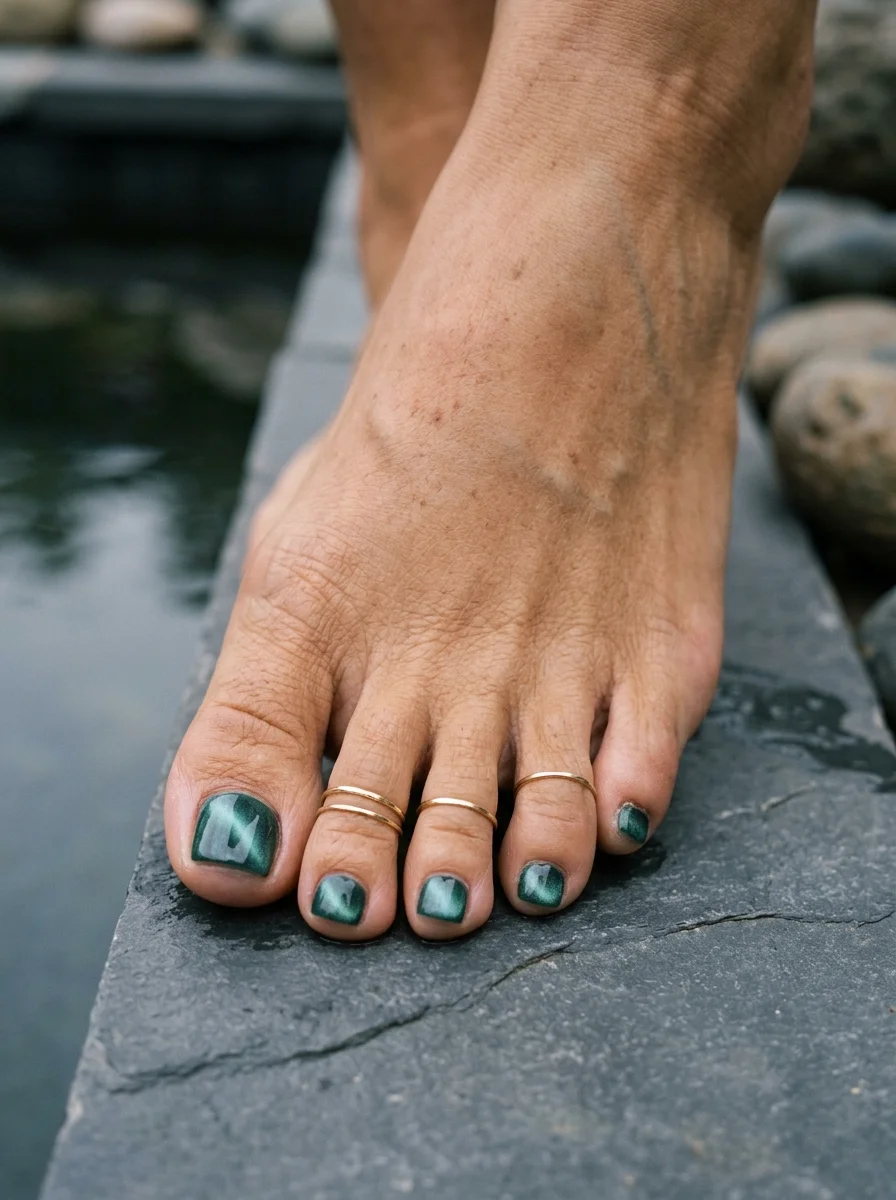
Deep, mysterious, and shimmering like the sea.
Overview:
Magnetic "cat-eye" polish in deep emerald green creates a velvet-like shimmer that shifts and moves with the light. The effect looks like a band of luminous green floating over a darker base — dimensional, rich, and almost jewel-like. All five toes carry the magnetic effect, which means the entire foot catches light from every angle.
Cat-eye polish requires a specific technique: apply the magnetic layer, hold a magnet near the wet polish for several seconds to pull the metallic particles into position, then cure or dry immediately. The timing matters — if the polish starts to set before you've held the magnet long enough, the particles won't shift and you'll lose the effect.
This is a moodier choice for summer, but that's part of its appeal. When everyone else is wearing coral and yellow, a deep emerald with magnetic shimmer stands out by being different. It pairs particularly well with gold jewelry and warm metallic accessories.
Design Breakdown:
Magnetic particles create the signature velvet movement that makes this look three-dimensional.
Base Color: Deep emerald green magnetic polish.
Nail Shape: Short square with rounded corners. Flat surface maximizes the visible shimmer.
Design Element: Magnetic cat-eye velvet shimmer on all toes, created with a nail magnet.
Finish: High-gloss top coat to add depth to the shimmer.
Get The Look at Home:
You'll need magnetic polish and a magnet — the technique is simple but timing-sensitive.
- Dark base: Apply one coat of black or very dark green polish. Let dry. This intensifies the magnetic effect.
- Magnetic coat: Apply a thick layer of the emerald magnetic polish. Do not let it dry.
- The magnet: Hold the magnet approximately one-quarter inch above the nail for ten seconds. Keep it steady.
- Work fast: Do one nail at a time so the polish stays wet while you use the magnet.
- Seal: Apply a glossy top coat and hold the magnet over the nail one final time to sharpen the line.
21.Positano Lemon Orchard Art
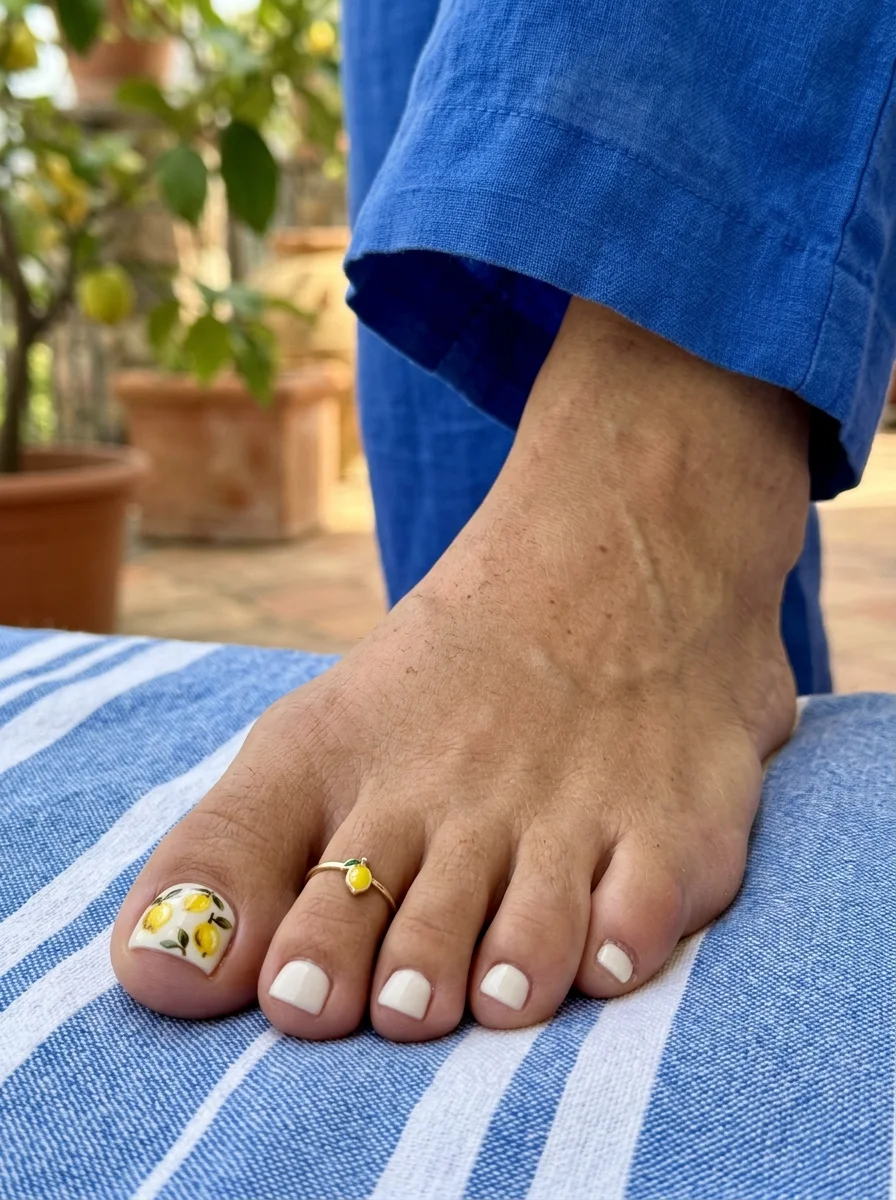
Freshly squeezed summer style from the Amalfi Coast.
Overview:
Hand-painted lemons with green leaves scattered across a white base — it looks like a tile from a Positano ceramic shop translated directly onto the nail. The big toe carries the full orchard scene while the remaining toes stay solid white, which keeps the design from feeling too busy.
What makes this read as sophisticated rather than costume-y is the detail work. The lemons aren't just yellow dots — they have visible shape, dimension, and tiny green leaves attached. The white background gives the artwork room to breathe and makes the yellow and green colors appear brighter and more vivid.
This is a design that benefits from a thin, high-quality detail brush. The leaf shapes in particular require a brush that can hold a fine point without splaying — a cheap brush will give you blobby, undefined shapes instead of clean botanical detail.
Design Breakdown:
The layered approach — yellow fruit, green leaves, brown stems — creates a design that looks more like illustration than polish.
Base Color: Crisp, opaque white.
Nail Shape: Short square with rounded corners. A clean canvas for the detailed art.
Design Element: Hand-painted lemons with green leaves and tiny stems on the big toe.
Finish: Glossy top coat for a polished, professional look.
Get The Look at Home:
Layering is what gives the lemons their three-dimensional quality — each element builds on the last.
- White base: Apply two coats of opaque white to all toes. Let dry.
- Lemon shapes: Use a medium dotting tool to place small yellow ovals on the big toe. Two or three lemons per nail.
- Leaf detail: With a tiny brush and green polish, add one or two small leaves to each lemon.
- Stems: Add a tiny brown or dark green dot where the leaf meets the lemon for the stem connection.
- Seal: Apply a generous top coat to blend the layers and protect the detailed art.
25 Top Curly Hairstyle Trends for 2026 ➰✨
22.Neutral Safari Leopard Print
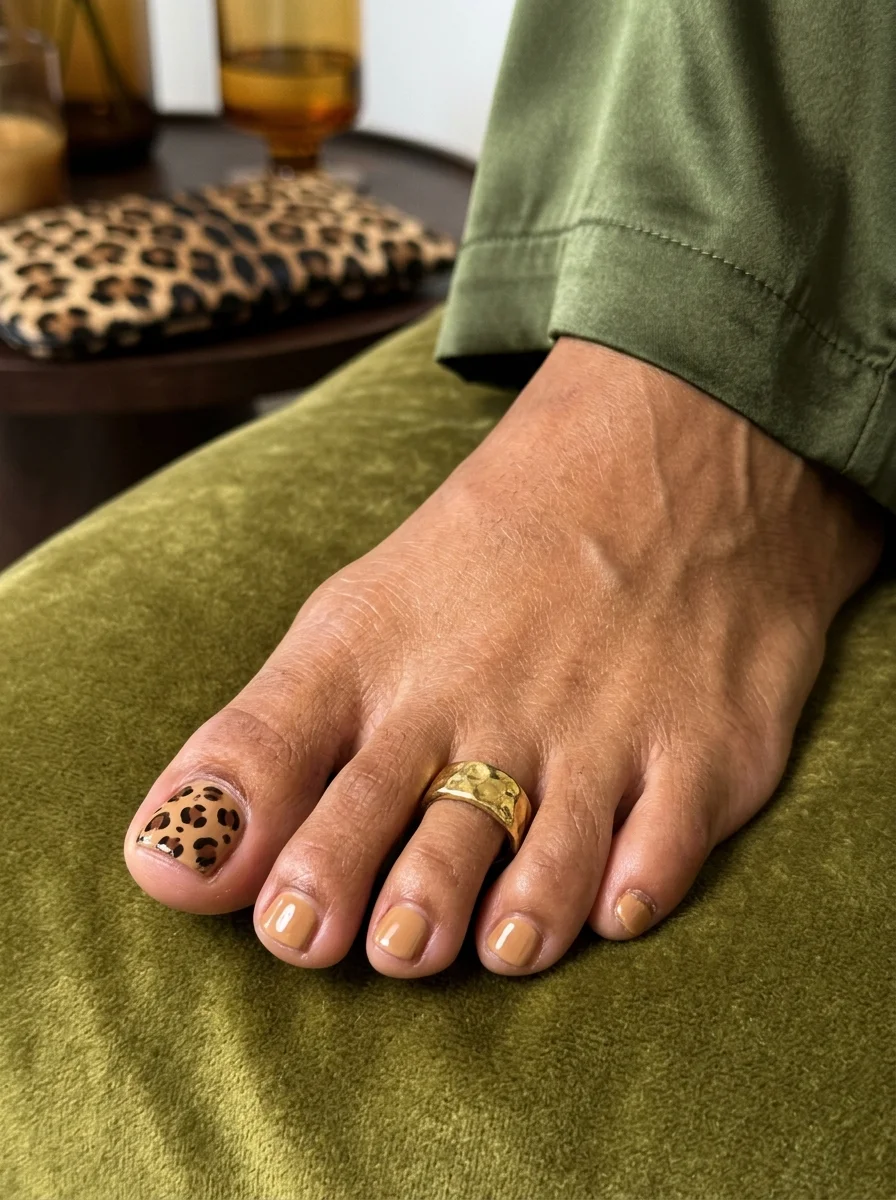
A wild but neutral look for summer nights.
Overview:
Leopard print on a warm nude base — it's a combination that works because both the base and the print live in the same neutral family. The camel-toned background keeps the leopard spots from reading as aggressive or loud. Instead, the effect is textured and sophisticated, like a safari jacket translated to a pedicure.
The big toe carries the full leopard pattern while the rest stay solid nude, which is the right call. A full foot of leopard can veer into costume territory quickly, but confining it to one toe keeps it editorial. The glossy finish on the nude makes the warm base color look rich and creamy.
Leopard spots are actually one of the easier patterns to freehand. The brown blobs don't need to be any particular shape, and the black "C" marks around them are intentionally irregular. The more organic and imperfect the spots look, the more authentic the pattern reads.
Design Breakdown:
The neutral color palette keeps the animal print feeling high-end rather than costumey.
Base Color: Warm nude, camel, or soft latte tone.
Nail Shape: Short soft square.
Design Element: Hand-painted leopard print on the big toe using dark brown and black.
Finish: High-shine top coat to make the neutrals look rich and dimensional.
Get The Look at Home:
Leopard spots are forgiving by nature — imperfection is what makes them look authentic.
- Nude base: Apply two coats of warm nude polish. Let dry.
- Brown spots: Use a dotting tool with dark brown to place random organic "blobs" on the big toe.
- Black framing: Use a smaller tool with black polish to draw partial "C" shapes and short lines around each brown blob.
- Filler dots: Add a few random tiny black dots in the empty spaces between spots.
- Seal: Apply a thick top coat to smooth the texture and unify the finish.
23.Abstract Mint Marble Waves
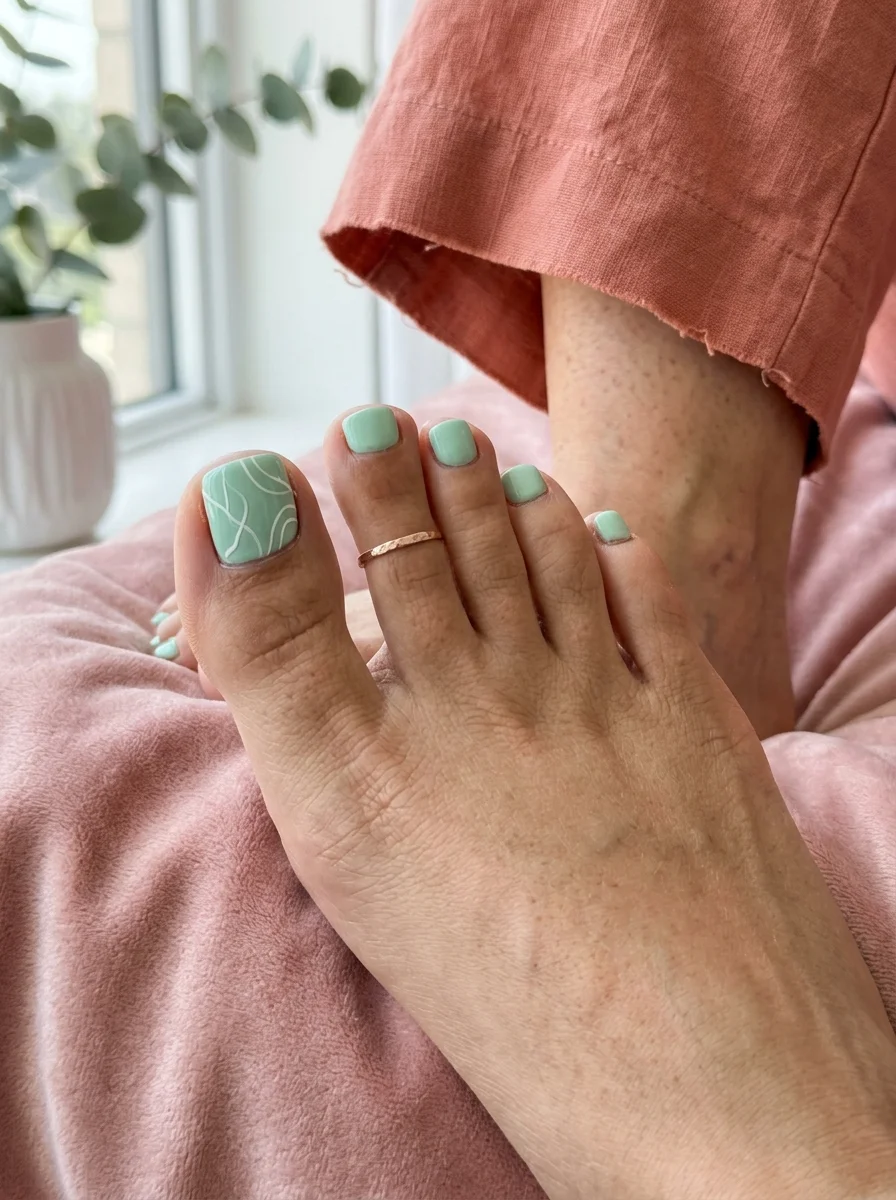
Modern art for your toes in refreshing mint.
Overview:
White abstract wave lines flowing across a soft mint green base — the effect is like marble veining or a topographic map rendered in pastel. The big toe gets the full wave treatment while the smaller toes stay in solid mint, keeping the overall look grounded.
Abstract line work is one of those designs that looks high-effort but is actually one of the more forgiving nail art techniques. The lines don't need to follow a specific pattern or symmetry. As long as they flow organically across the nail, the result reads as intentional and artistic.
A long, thin liner brush makes a significant difference in the quality of the lines. Shorter brushes tend to create jerky, uneven strokes, while a longer brush allows you to pull smooth, continuous curves in a single motion. It's worth the investment if you plan to do abstract line work regularly.
Design Breakdown:
The contrast between the structured mint base and the organic white lines creates visual tension that makes the design interesting.
Base Color: Soft mint or sage green with a creamy, opaque finish.
Nail Shape: Short soft square.
Design Element: Thin, abstract white wave lines flowing across the big toe.
Finish: Glossy top coat for a smooth, glass-like surface.
Get The Look at Home:
A long, thin liner brush is the single most important tool for clean, flowing lines.
- Mint base: Apply two coats of mint green. Let dry fully.
- Line work: Dip your long liner brush in white polish and drag it slowly across the nail in a wavy, organic motion.
- Vary thickness: Make some lines thicker and some thinner for a more natural, artistic look.
- Solid toes: Keep the smaller toes in solid mint to anchor the design.
- Seal: Apply a generous top coat to level out the slight ridges from the painted lines.
28 Trendy May Nail Designs for 2026 💅
24.Seafoam Mint Solid Gloss
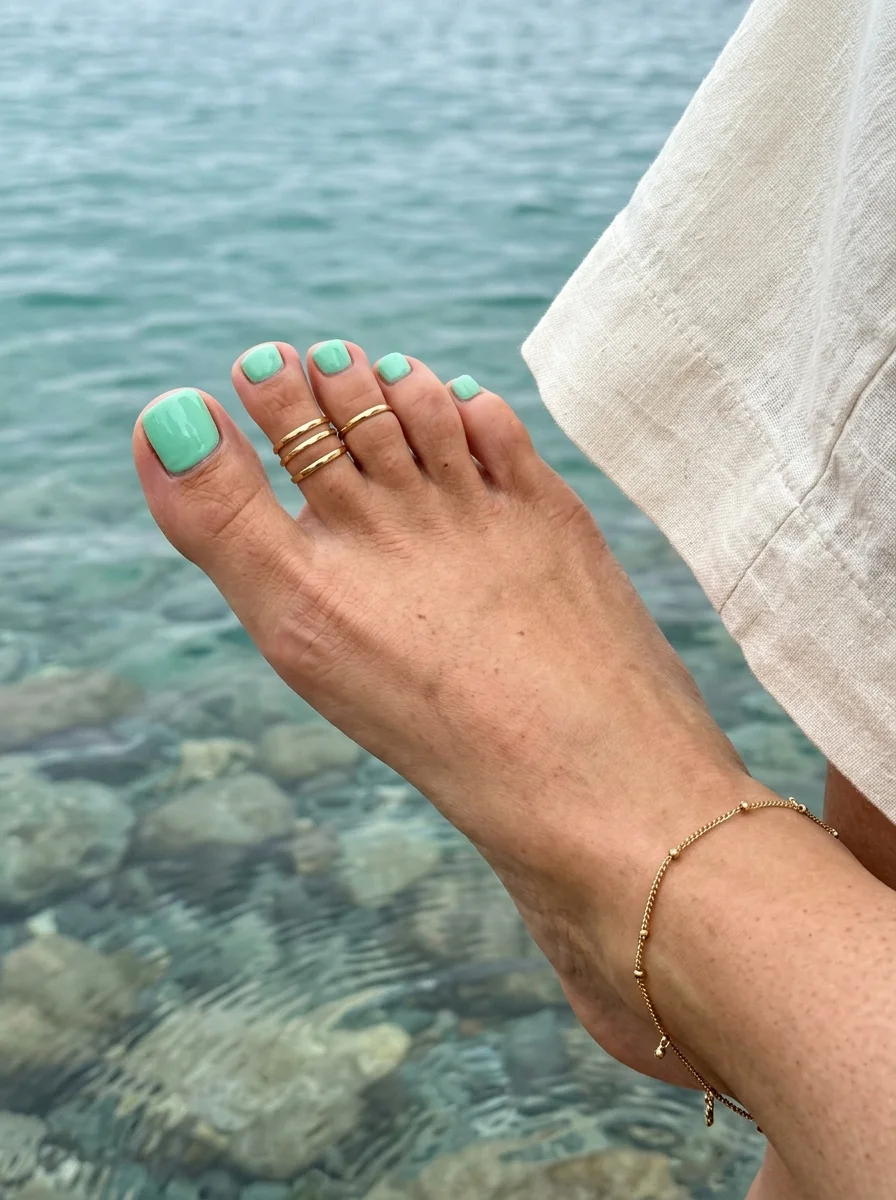
Clean, simple, and perfectly beachy.
Overview:
A single, perfectly applied color — that's the entire design, and that's exactly why it works. Bright seafoam mint across all ten toes, high-gloss finish, no art, no embellishment. The color does all the work: it's saturated enough to be a statement, clean enough to read as polished, and the kind of shade that looks incredible against blue water and white sand.
Solid-color pedicures rely entirely on application quality. There's no art to distract from uneven coats, streaky brush strokes, or messy cuticle lines. That means prep work — buffing, cleaning, pushing back cuticles — matters more here than in almost any other design. The payoff is a result that looks effortlessly expensive.
Design Breakdown:
One color, zero art — the confidence of a flawless solid application.
Base Color: Bright seafoam, turquoise, or mint green cream.
Nail Shape: Short soft square. A clean, uniform shape makes solid colors look more refined.
Design Element: Solid, even color on all ten toes.
Finish: Ultra-glossy, plumping top coat for a professional finish.
Get The Look at Home:
Prep work is everything — smooth nails and clean cuticle lines make or break a solid color.
- Prep: Buff nails to remove ridges. Push back cuticles and wipe the nail surface with alcohol.
- Thin coats: Apply two thin coats rather than one thick one. Thin layers dry faster and look smoother.
- Cuticle cleanup: Use a small brush dipped in acetone to create crisp, clean edges around the cuticle.
- Let dry: Allow extra drying time before putting on socks or shoes — solid colors show every smudge.
- Top coat: Use a non-yellowing top coat to keep the mint looking bright and true.
25.Terracotta Sunset Solid
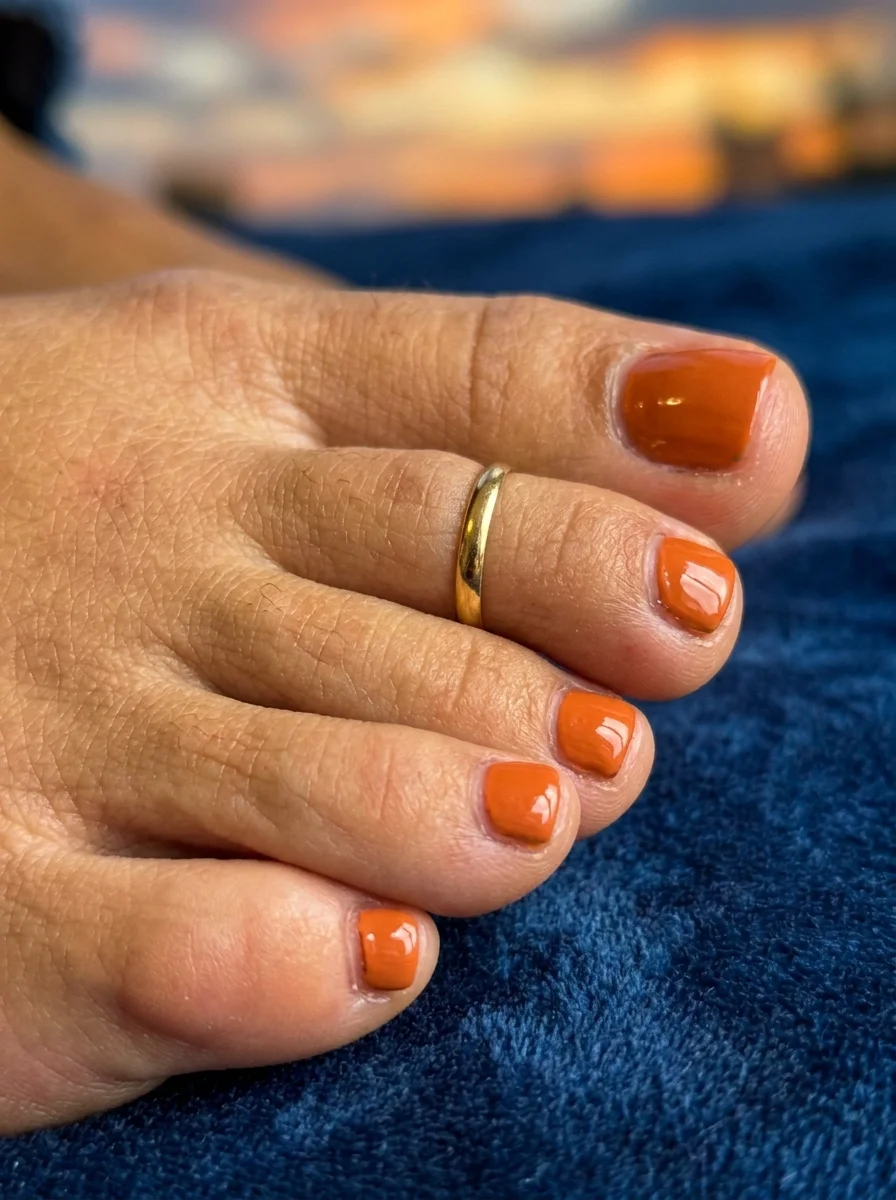
A warm, earthy tone that loves the sun.
Overview:
Rich terracotta on all ten toes — a burnt orange that sits somewhere between clay and sunset. The color is warm without being orangey in a neon way, earthy without being dull. It looks like something you'd find in a Moroccan pottery market, which is exactly the energy it brings to a pedicure.
Terracotta is a surprisingly versatile color for summer. It works with warm skin tones beautifully, but it also provides a grounding contrast on cooler complexions. The high-gloss finish here is important — it prevents the brown undertones from looking flat and gives the color a dimensional, almost lacquered quality.
The solid application across all toes creates a cohesive, confident look. There's no art to distract, no accent toe to draw attention — just a single, well-chosen color doing its job. Sometimes that's exactly what a pedicure needs.
Design Breakdown:
The warm earth tone transitions seamlessly from late summer into early autumn.
Base Color: Deep terracotta, burnt sienna, or rich burnt orange cream.
Nail Shape: Short soft square.
Design Element: Solid, even application on all toes.
Finish: High-gloss top coat to make the earthy tone look rich and expensive.
Get The Look at Home:
An opaque, high-quality formula is key — terracotta that goes on streaky loses all its warmth.
- Buff: Smooth the nail surface for a flawless finish.
- Base coat: Apply a clear base coat to protect against staining — terracotta pigments are strong.
- Paint: Apply two even coats of terracotta polish, letting each coat dry between applications.
- Clean edges: Ensure cuticle lines are crisp and clean for that professional, put-together look.
- Seal: Finish with a long-wearing top coat to prevent chipping and maintain the gloss.
34 Stunning Summer First Date Hairstyles for 2026 💕☀️
26.Dreamy Lavender Aura Glow
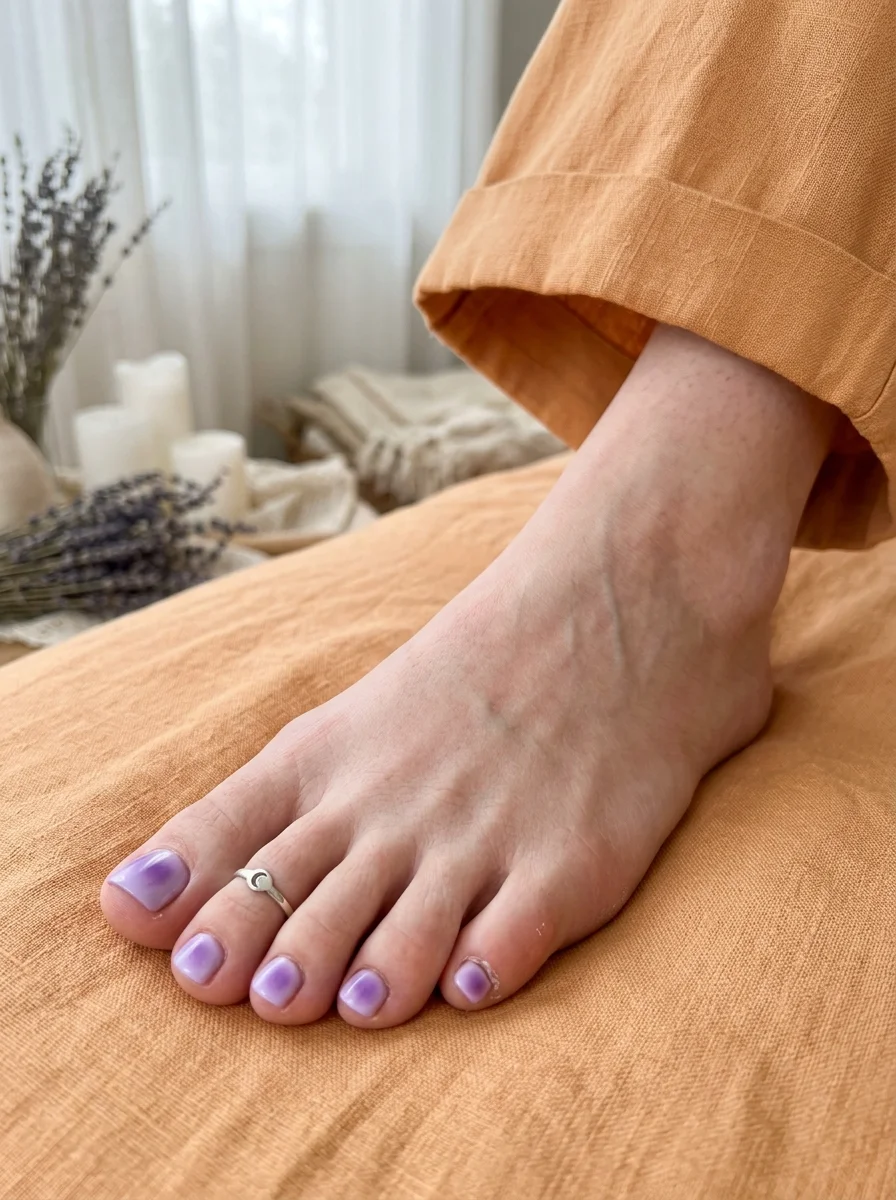
Soft and mystical purple glow for your feet.
Overview:
A soft lilac base with a pearlescent aura glow that lightens toward the center — the effect is less "nail art" and more "atmospheric phenomenon." The big toe carries the most visible glow, while the smaller toes echo it in softer, more diluted lavender tones. The overall impression is gentle and ethereal, like morning light through sheer curtains.
The pearlescent sheen layered over the aura gradient adds a second dimension of light play. It's not just a color transition — it's a shift in how the surface reflects light, creating a subtle iridescence that makes the nails look almost three-dimensional.
Lavender is one of those colors that reads as calming in almost any context, and on toes it has the added benefit of looking intentional without being loud. The aura technique — lighter center fading to deeper edges — gives it a softness that a solid lavender wouldn't achieve on its own.
Design Breakdown:
The combination of aura gradient and pearlescent sheen creates a multi-layered light effect.
Base Color: Soft lilac or lavender cream.
Nail Shape: Short soft square.
Design Element: Aura glow — lighter center fading outward to deeper lavender edges, with a pearlescent overlay.
Finish: Pearlescent or iridescent glossy top coat.
Get The Look at Home:
The aura effect is built through soft blending — sponge work is gentler than brush work for this technique.
- Lavender base: Apply two coats of soft lavender polish. Let dry fully.
- Lighter center: Using a small sponge, tap a lighter lavender or white polish into the center of the nail.
- Blend edges: Use a clean section of the sponge to feather the edges outward, creating a smooth transition.
- Pearlescent layer: Once dry, apply a thin coat of pearlescent or iridescent top coat over the entire nail.
- Final seal: Apply a glossy top coat to smooth the surface and enhance the glow.
27.Champagne Sparkle Gradient
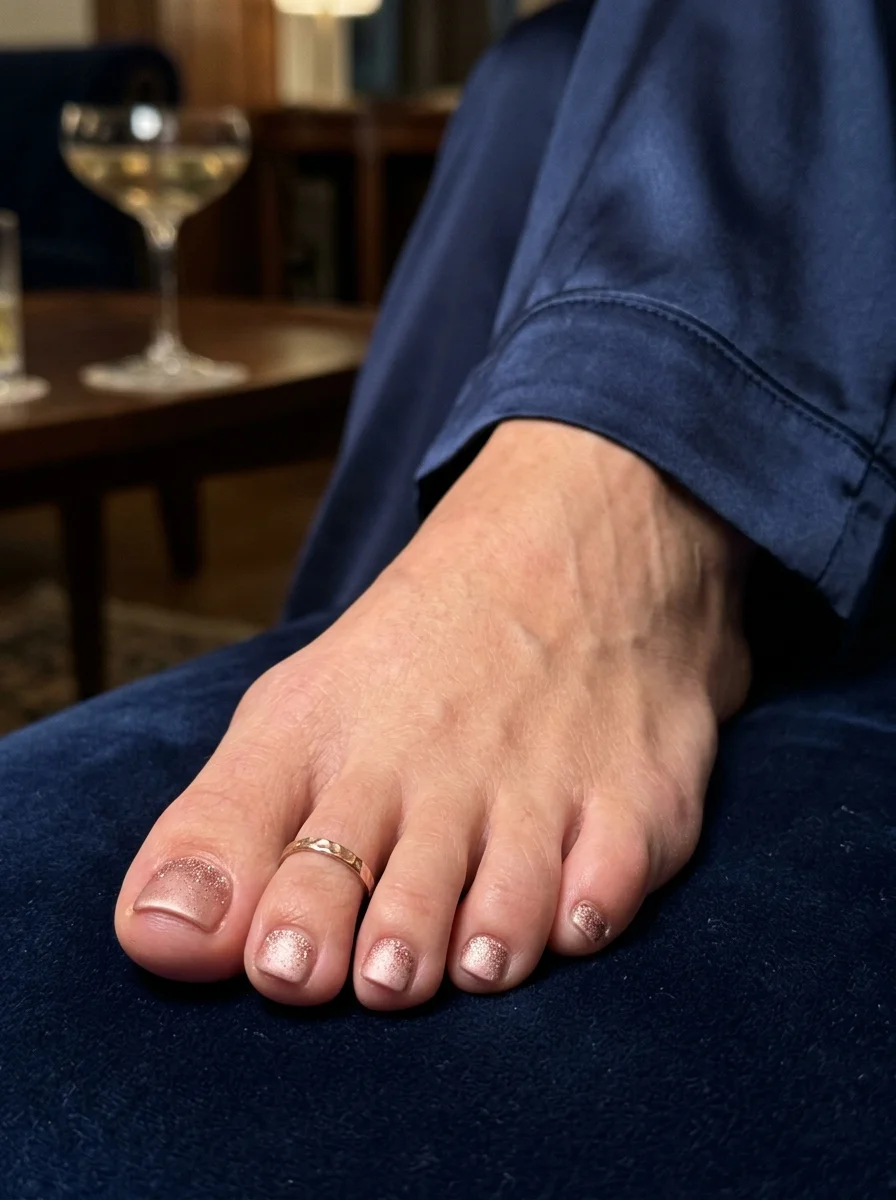
Glamorous sparkle for high-end summer nights.
Overview:
Fine rose gold glitter concentrated at the tips and fading toward the cuticle — a champagne-colored gradient that looks like effervescence caught on the nail. The base is a sheer, natural nude that lets the glitter do the talking. The density builds gradually, with the most concentrated sparkle sitting right at the free edge.
Glitter gradients work best when applied with a sponge rather than a brush. Sponging absorbs the excess clear base and deposits a denser layer of glitter particles, which is exactly what you need for that concentrated-tip effect. Brushing glitter polish directly tends to drag the particles toward the cuticle and creates an uneven, patchy distribution.
The multiple layers of top coat required for this design aren't optional — they're structural. Glitter particles create a rough texture that catches on socks and fabric. A thick top coat (or two) fills the gaps between particles and creates a smooth, glassy surface that's actually wearable.
Design Breakdown:
The gradient density is what separates this from a simple glitter nail — the fade toward the cuticle is everything.
Base Color: Sheer nude or natural pink.
Nail Shape: Short soft square.
Design Element: Fine rose gold glitter gradient, densest at the tips, fading toward the cuticle.
Finish: Multiple layers of top coat for a smooth, snag-free glitter surface.
Get The Look at Home:
Sponging is the only way to get the glitter density needed at the tips without it looking patchy.
- Nude base: Apply one or two coats of sheer nude polish. Let dry.
- Sponge load: Paint dense rose gold glitter polish directly onto a small makeup sponge.
- Dab tips: Tap the sponge onto the tips of the nails, concentrating the most glitter at the very edge.
- Fade inward: Lightly tap what remains on the sponge a little further down the nail to create the gradient.
- Smooth: Apply two thick coats of top coat to fill the glitter texture and create a smooth surface.
36 Trendy FIFA World Cup Nail Designs (2026)
28.Stargazing Nude & Teal
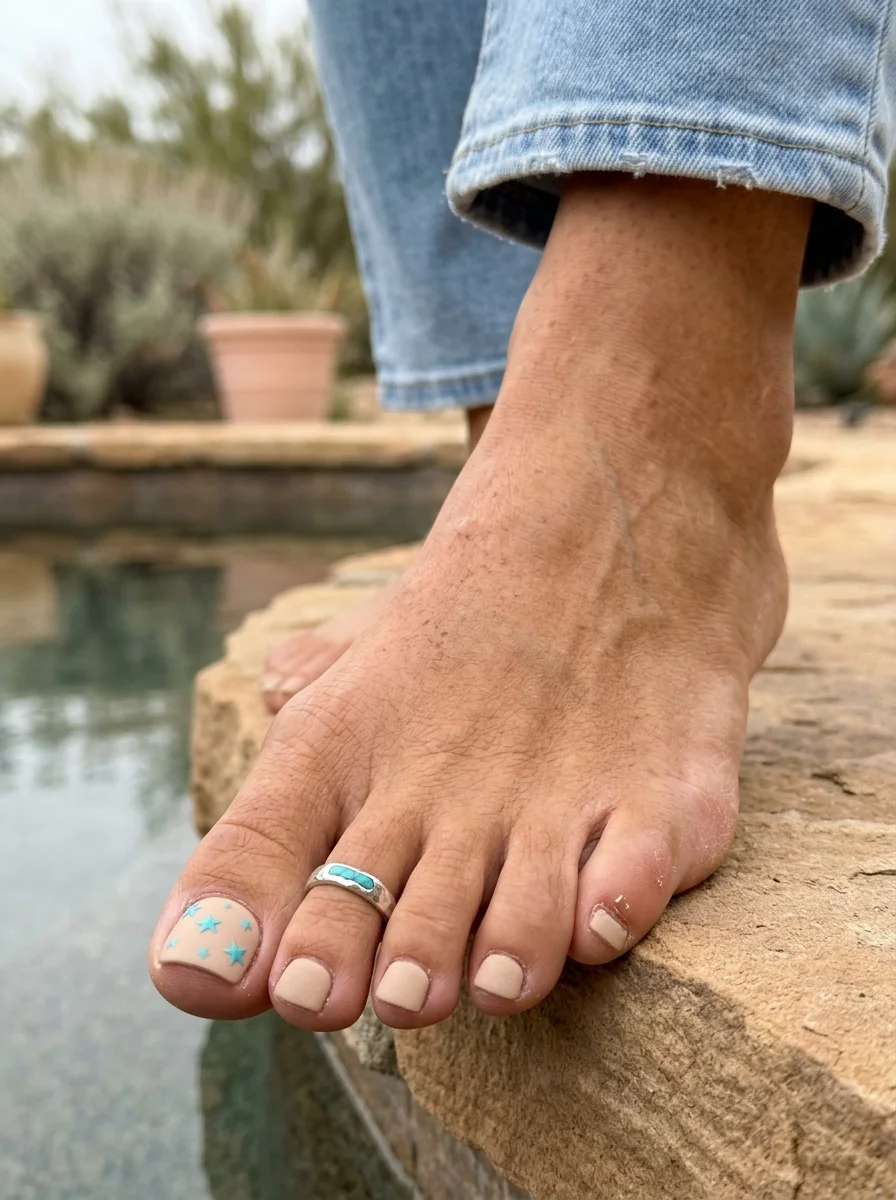
Tiny celestial details for a whimsical touch.
Overview:
Small teal star shapes scattered across a warm beige-nude base — three or four stars on the big toe, none on the rest. The stars are hand-painted or stamped in a bright turquoise that pops against the muted background, creating a contrast between the quiet base and the vivid celestial accents.
Keeping the stars small and few is what prevents this from looking like a children's nail art kit. The restraint — only the big toe, only three or four shapes — reads as editorial and intentional. It's the difference between "I decorated my nails" and "I designed a look."
Nude polishes can sometimes read as patchy or uneven, especially in lighter shades. Using a ridge-filling base coat before application smooths the nail surface and helps the nude color appear more uniform and opaque.
Design Breakdown:
Minimalist placement — stars on the big toe only — keeps the design clean and sophisticated.
Base Color: Warm beige or sandy nude.
Nail Shape: Short soft square.
Design Element: Three to four small turquoise star shapes on the big toe.
Finish: Glossy top coat, or matte on the nude with glossy stars for contrast.
Get The Look at Home:
A tiny star stamp or a very fine detail brush will give you the cleanest star shapes.
- Nude base: Apply two coats of warm nude polish. Let dry.
- Optional matte: For extra dimension, apply a matte top coat over the nude first.
- Star placement: Use a tiny brush or nail stamp to place three or four turquoise stars on the big toe.
- Size variation: Make some stars slightly larger and some smaller for a natural scattered look.
- Seal: Apply top coat carefully — if you used a matte base, paint only over the stars to keep them glossy.
29.Deep Sea Teal Sparkle
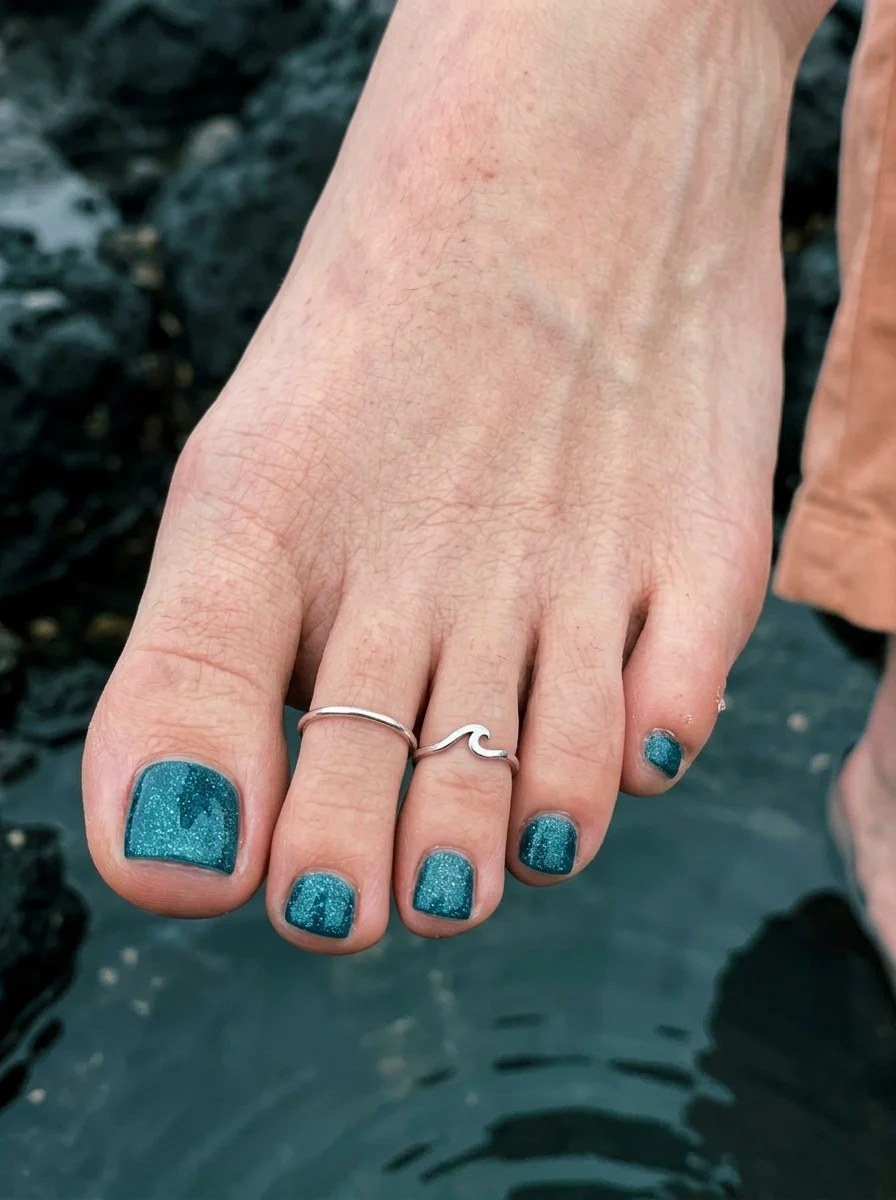
A blindingly bright shimmer that mimics deep ocean water.
Overview:
Deep teal packed with uniform glitter — this is the kind of color that looks like a handful of crushed gemstones. The glitter is fine and dense enough to create full opacity, which means the base color and the sparkle are essentially one. All ten toes carry the same finish, creating a cohesive, jewel-toned foot that catches light from every angle.
The challenge with heavy-glitter polishes is texture. Each layer of glitter adds microscopic bumps to the surface, and without enough top coat, the result feels rough and catches on everything. Two to three layers of a thick, glossy top coat smooths this out and creates that "underwater" depth that makes the glitter look like it's floating beneath glass.
Dark glitter polishes are also harder to clean up than cream formulas — once the tiny particles dry on your skin, they're stubborn. Applying liquid latex or peel-off barrier around the cuticles before painting saves significant cleanup time.
Design Breakdown:
The dense glitter creates a multi-dimensional, jewel-like finish that works as both color and texture.
Base Color: Deep teal or dark sea-green with high-density micro-glitter.
Nail Shape: Short soft square. Clean edges keep the heavy glitter from looking unruly.
Design Element: Uniform glitter application across all toes.
Finish: Thick, glossy top coat to create a smooth, underwater-glass effect.
Get The Look at Home:
Patience between coats is the only real secret — rushing the drying time ruins the finish.
- Barrier: Apply liquid latex or peel-off barrier around the cuticles for easy cleanup.
- First coat: Apply a thin layer of teal glitter polish. Let dry fully.
- Build: Apply a second and possibly third coat to reach full opacity and maximum sparkle density.
- Cleanup: Peel off the barrier. Use a brush with acetone to clean any remaining edges.
- Smooth seal: Apply two layers of thick top coat to fill the glitter texture and create a glassy surface.

20 Stunning Half Up Half Down Hairstyles for Prom Night 2026 💃✨
30.Golden Shoreline Teal
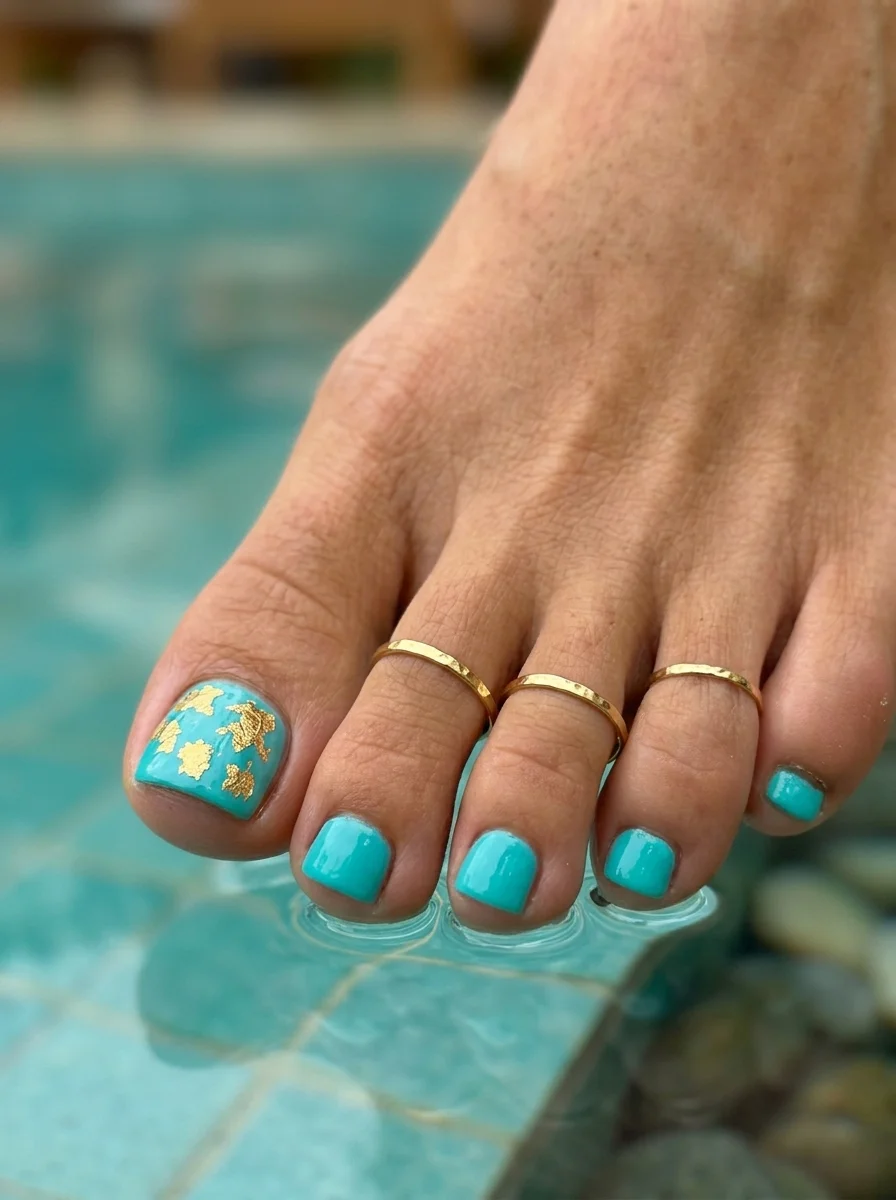
Luxury meets the ocean with these gold-flecked toes.
Overview:
Bright turquoise with gold leaf foil on the big toe — it's the combination that makes this design feel more expensive than it is. The turquoise alone would be pretty; adding the gold foil elevates it to something that looks like it belongs on a luxury resort mood board. The remaining toes stay in solid turquoise, letting the foil be the focal point.
Gold leaf foil is delicate, unpredictable, and slightly difficult to work with — and that's exactly what makes it look good. The irregular shapes and random placement create an organic, weathered quality that no printed decal can replicate. It looks like actual fragments of gold that happened to land on the nail.
The key to working with foil is timing. The polish needs to be tacky — not wet, not dry — for the foil to adhere properly. If you apply it too early, the foil sinks into the wet polish and disappears. Too late, and it won't stick at all. A window of about one to two minutes after application is the sweet spot.
Design Breakdown:
The metallic foil against the bright turquoise creates a high-contrast, high-luxury effect.
Base Color: Bright turquoise or cyan cream.
Nail Shape: Short soft square.
Design Element: Irregular gold leaf foil fragments on the big toe.
Finish: High-gloss top coat to seal the foil and unify the surface.
Get The Look at Home:
Gold foil is fragile — use tweezers, work gently, and don't try to make it perfect.
- Turquoise base: Apply two coats of turquoise to all toes. Let dry until tacky — roughly one to two minutes.
- Foil placement: Use tweezers to pick up small bits of gold leaf and press them onto the big toe nail.
- Random is best: Don't try to arrange the foil into a pattern. Irregular, scattered placement looks more natural.
- Flatten: Use a soft brush or your fingertip to gently press the foil flat against the nail surface.
- Double seal: Apply two coats of top coat to ensure the foil edges don't lift or catch.
31.Ultra Violet Neon Pop
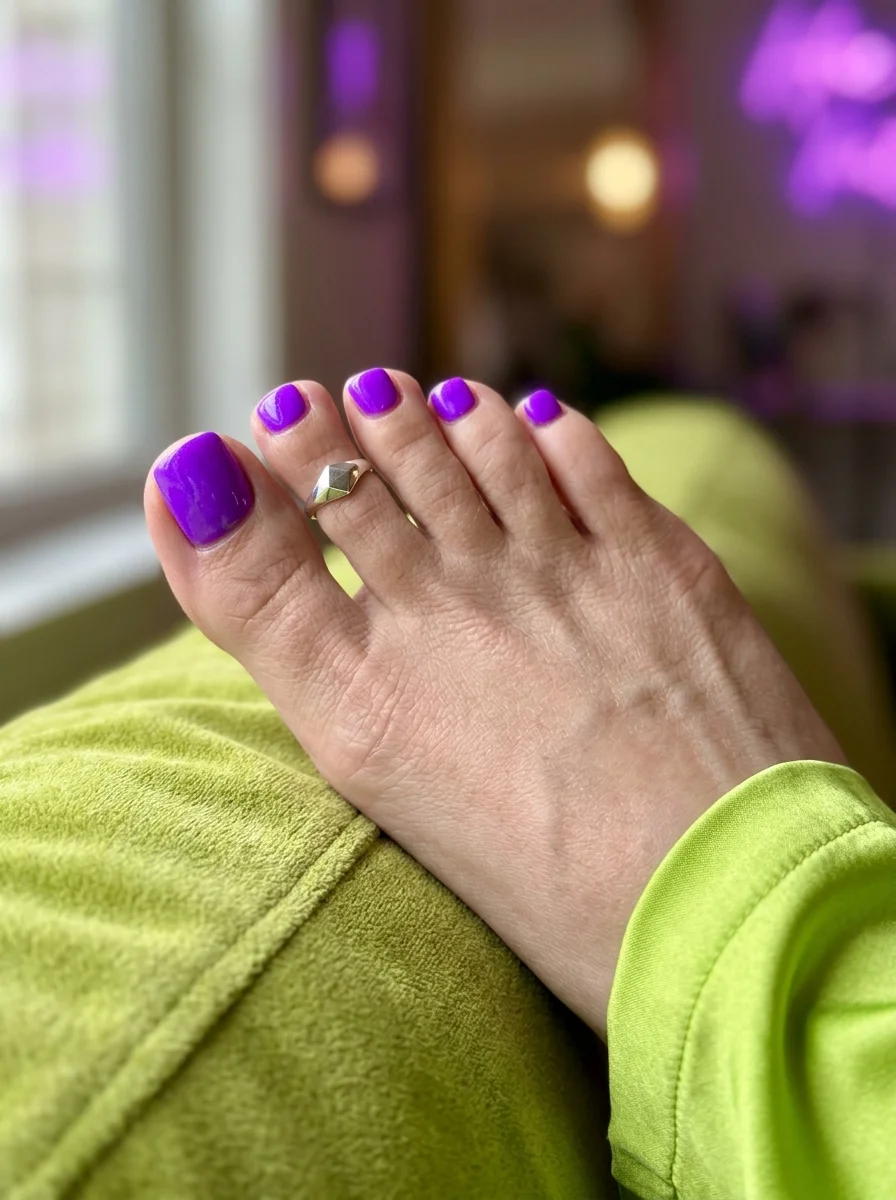
A high-energy neon that stands out from the crowd.
Overview:
Vivid electric purple that's impossible to ignore — this is a neon that leans more violet than pink, giving it a cooler, more unusual personality than the typical summer brights. The high-gloss finish makes the color look almost liquid, like it's been dipped in purple glass.
Neon purple is harder to find in a truly opaque formula than neon pink or orange, which tend to be more pigmented. A white base coat underneath is essential for getting the full electric intensity — without it, the purple reads as washed-out and uneven. With the white primer, the color is unapologetically bold.
The solid application on all toes is the right choice here. Neon purple this saturated doesn't need art to justify its existence — it is the art. The simplicity of the application lets the color speak for itself, which is exactly what a statement shade should do.
Design Breakdown:
Maximum pigment, maximum gloss — the color is the entire statement.
Base Color: Vivid electric purple or neon violet cream.
Nail Shape: Short soft square. Clean and modern.
Design Element: Solid, flawless application on all toes.
Finish: Ultra-glossy, wet-look top coat to amplify the neon intensity.
Get The Look at Home:
The white base coat makes the difference between a mediocre neon and a truly electric one.
- White primer: Apply one coat of opaque white polish to all toes. Let dry fully.
- First neon coat: Apply the purple in thin, even strokes. It will look streaky — that's normal.
- Second coat: Apply a second, more generous coat for full opacity and true neon intensity.
- Edge cleanup: Use a brush dipped in acetone to create clean, crisp lines around the cuticle.
- Seal the glow: Apply a high-shine top coat to lock in the color and maximize the neon effect.
35 Fun Birthday Nail Designs for 2026 🎂
32.Sunny Daisy & Silver Sparkle
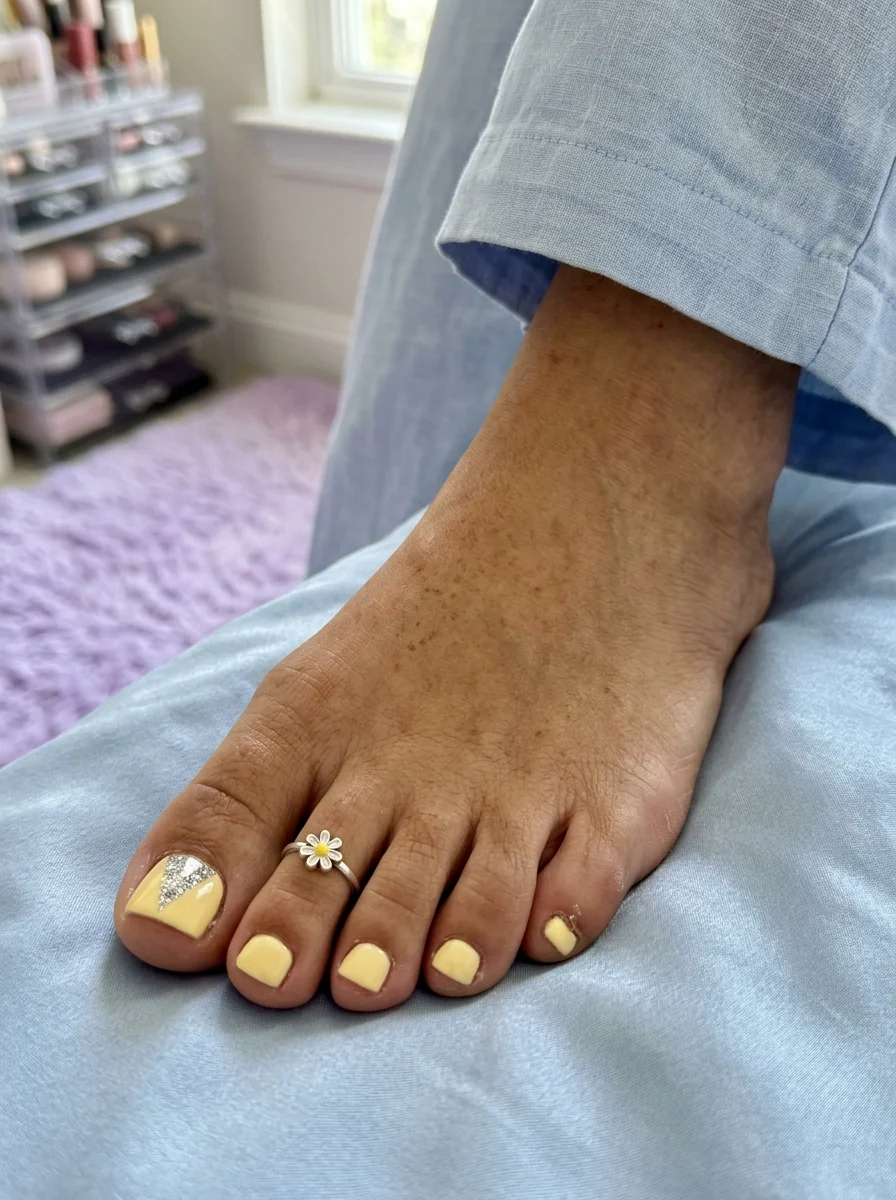
A whimsical mix of glitter and florals for happy feet.
Overview:
Soft pastel butter yellow with a diagonal silver glitter accent on the big toe — the remaining toes stay in solid yellow. It's a clean, cheerful combination that pairs two different textures (cream and glitter) in a way that feels intentional rather than thrown together. The diagonal placement of the glitter gives the big toe a geometric quality that contrasts nicely with the softness of the pastel base.
Pastel yellows can be one of the more challenging colors to apply evenly. They tend toward streakiness on the first coat, which discourages people from using them. The solution is patience: two thin coats with adequate dry time between them, applied over a ridge-filling base coat, will give you the smooth, creamy finish that makes this color worth the effort.
The silver glitter adds just enough sparkle to keep the design from reading as too sweet. It introduces a cooler, harder element that balances the warmth of the yellow and keeps the overall look grounded and modern rather than purely whimsical.
Design Breakdown:
The cream-and-glitter texture contrast on the big toe gives this design its visual interest.
Base Color: Soft pastel butter yellow with a creamy, opaque finish.
Nail Shape: Short square with soft rounded edges.
Design Element: Diagonal silver glitter accent on the big toe. Remaining toes solid yellow.
Finish: Glossy top coat to unify the cream and glitter surfaces.
Get The Look at Home:
Thin coats and patience are the only real requirements — pastel yellow punishes rushed application.
- Base coat: Apply a ridge-filling base coat to smooth the nail surface.
- Yellow layers: Apply two thin coats of pastel yellow to all toes. Let each coat dry fully.
- Glitter diagonal: On the big toe, use a thin brush or striping tape to paint a diagonal section in silver glitter polish.
- Clean lines: Use a cleanup brush to sharpen the diagonal edge where glitter meets yellow.
- Seal: Apply a thick top coat to smooth the glitter texture and give the entire set a unified, glossy finish.
How to Keep Your Pedi Intact Past Day Three?
Toe nails face a different set of enemies than fingernails. The friction from sandal straps, the constant exposure to pool chlorine and salt water, and the fact that your toes spend more time in enclosed, sweaty situations all work against your pedicure's lifespan. A fingernail manicure might last a week with careful treatment. A pedicure in summer active wear often struggles to make it to day four.
The single most effective technique is capping the free edge on your big toes. After the final color coat, swipe the top coat brush horizontally across the tip of each toe, sealing the layers together. This creates a physical barrier that prevents sandal straps from catching the edge of the polish and peeling it upward. Most salon techs skip this on toes because they are focused on the fingernail application, so explicitly asking for it makes a noticeable difference.
The other common mistake is rushing the dry time. Toe nails are thicker than fingernails and take significantly longer to dry to the core. Even under a dryer, the layers beneath the surface remain soft for hours. Waiting a full twelve hours before putting on closed-toe shoes or tight sandals is the difference between a pedi that lasts a week and one that shows mysterious dents by morning.
💡 If you are doing your own pedicure at home, apply your top coat in two thin layers rather than one thick one. Two thin layers cure more consistently and create a harder surface than a single thick layer that remains slightly soft underneath.
This collection of 32 bright and fun summer toe nail designs highlights the top trends for the season. Finding the right pedicure style can be a fun way to prepare for summer, and these ideas offer options that suit various personal preferences.
Saving preferred options to a Pinterest board or taking screenshots helps streamline the process for the next salon visit. Feel free to leave a comment below sharing which design stands out the most and what summer plans are on the horizon.