Hair Trends
26 Waitress Hairstyle Ideas That Survive a Full Shift
Working a shift means your hair needs to survive heat from the kitchen, humidity from the dining room, and hours of movement without falling apart. The difference between a hairstyle that holds up and one that disintegrates by hour three comes down to two things: the foundation you build and the products you use before you start. A ponytail thrown together with a basic elastic won't cut it when you're carrying plates and turning quickly between tables.
We gathered twenty-six hairstyles that actually work for service industry shifts. Some take five minutes before clocking in. Others give you a reason to slow down on your day off. Every single one is built to stay put through real working conditions, not just look good in a photo.
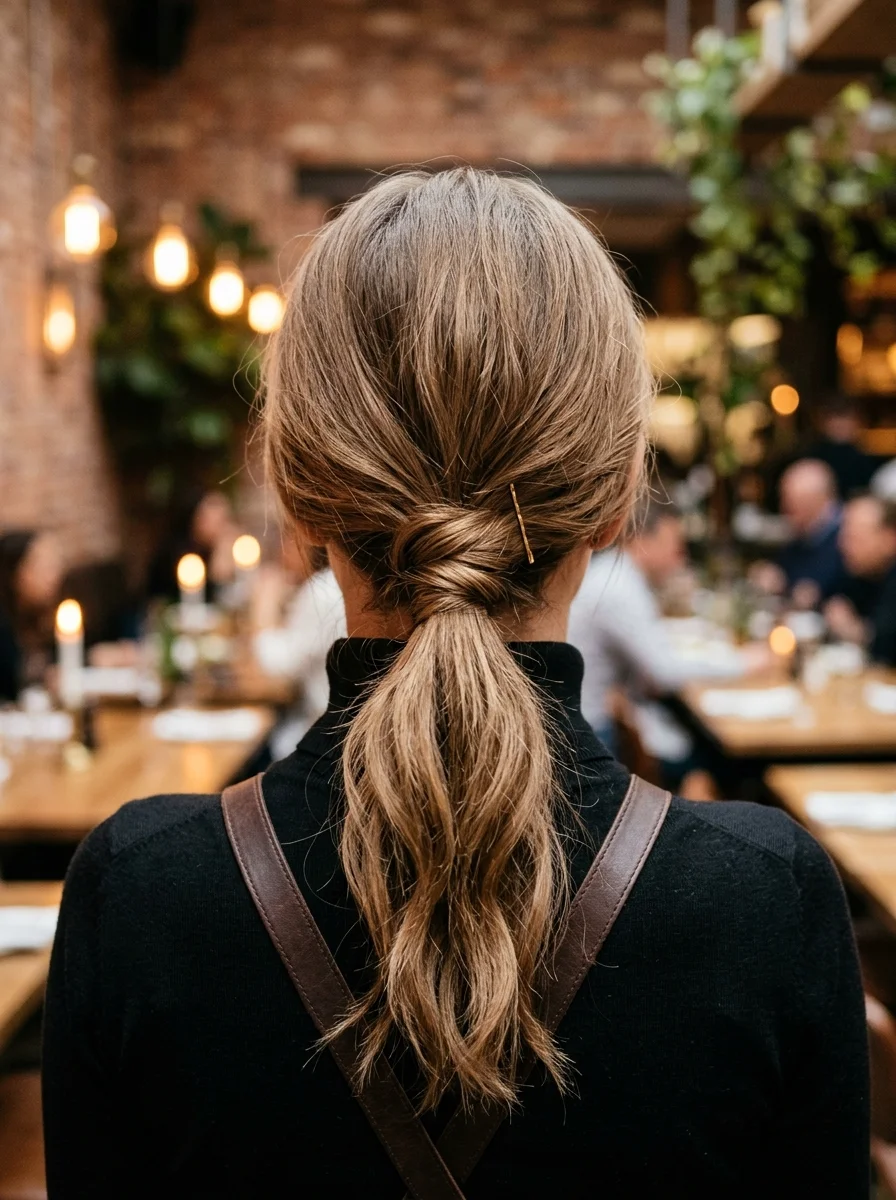
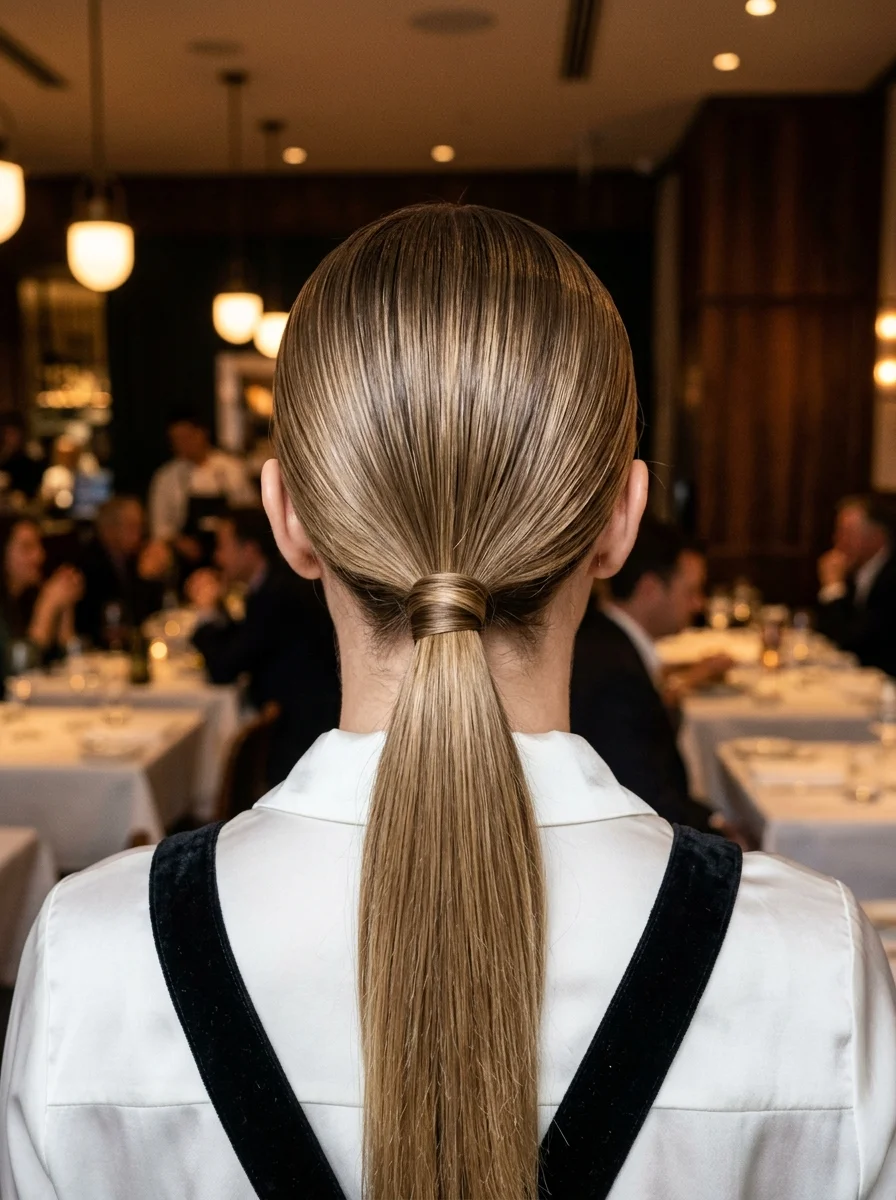
1.Twisted Low Ponytail
The overview: Two sections of hair twisted inward from the temples, meeting at the nape where they merge into a smooth ponytail. The twist adds structure that a standard ponytail lacks, keeping the crown controlled without pulling too tight against the scalp.
Why this look is popular: The twisted sections eliminate flyaways better than brushing alone, which means less re-touching during a shift. It reads as polished without looking overdone, making it appropriate for both casual cafés and mid-range restaurants.
Where this look is suitable: Casual dining, brunch spots, bistros, and any setting where you want to look put-together without competing with the food for attention.
Step by step:
- Prep with smoothing cream. Work a small amount of smoothing cream through your hair from roots to ends. This gives the twists something to grip.
- Section the crown. Take a 2-inch section from each temple, leaving the rest of the hair down.
- Twist each section inward. Rotate each section toward the center of your head, keeping tension consistent.
- Gather at the nape. Combine both twisted sections with the remaining hair into a low ponytail. Secure with a strong elastic.
- Wrap the elastic. Take a thin strand from the ponytail and wrap it around the elastic to conceal it. Pin underneath.
Tips and tricks: Use a texturizing spray on day-old hair for better grip. If your hair is very silky, the twists may loosen over time, so set them with a light-hold hairspray before gathering into the ponytail.

26 Stunning Summer Braided Hairstyles for Women 2026 ☀️💇♀️
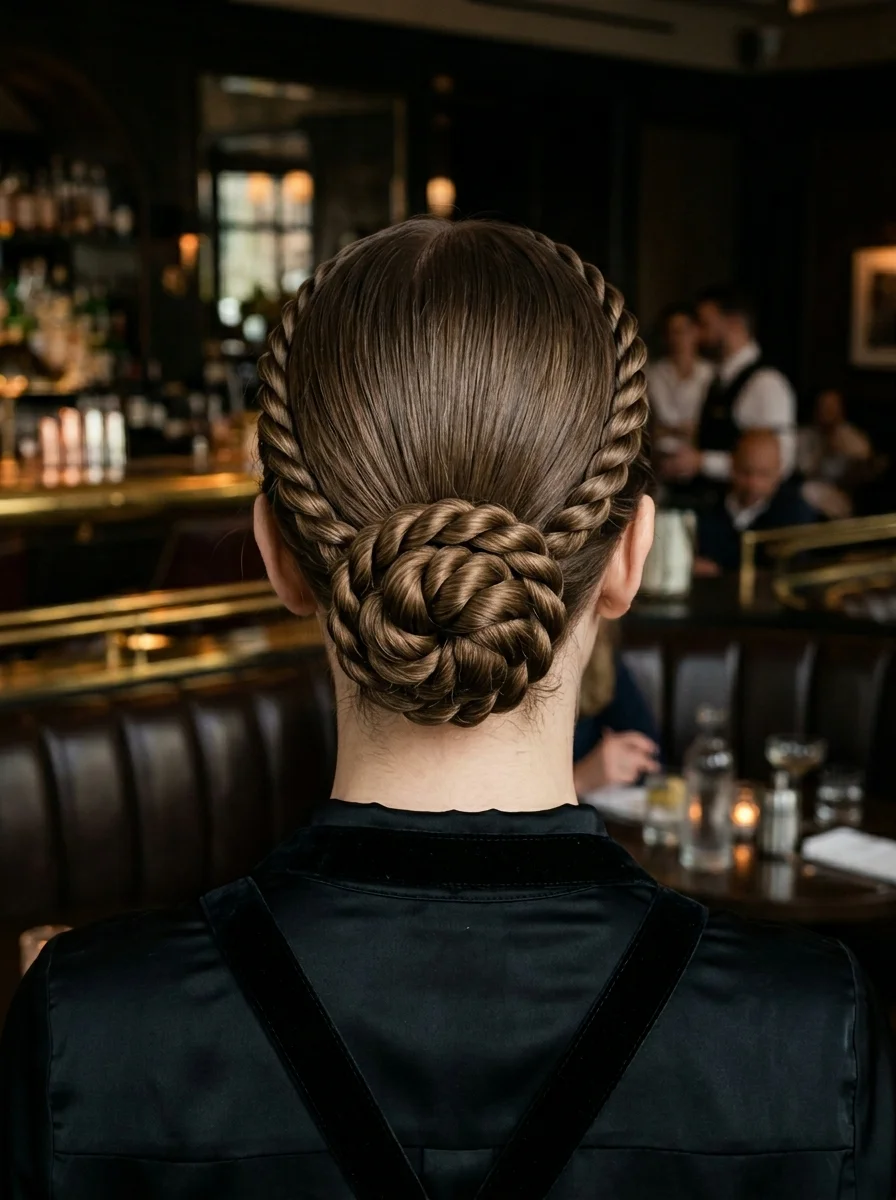
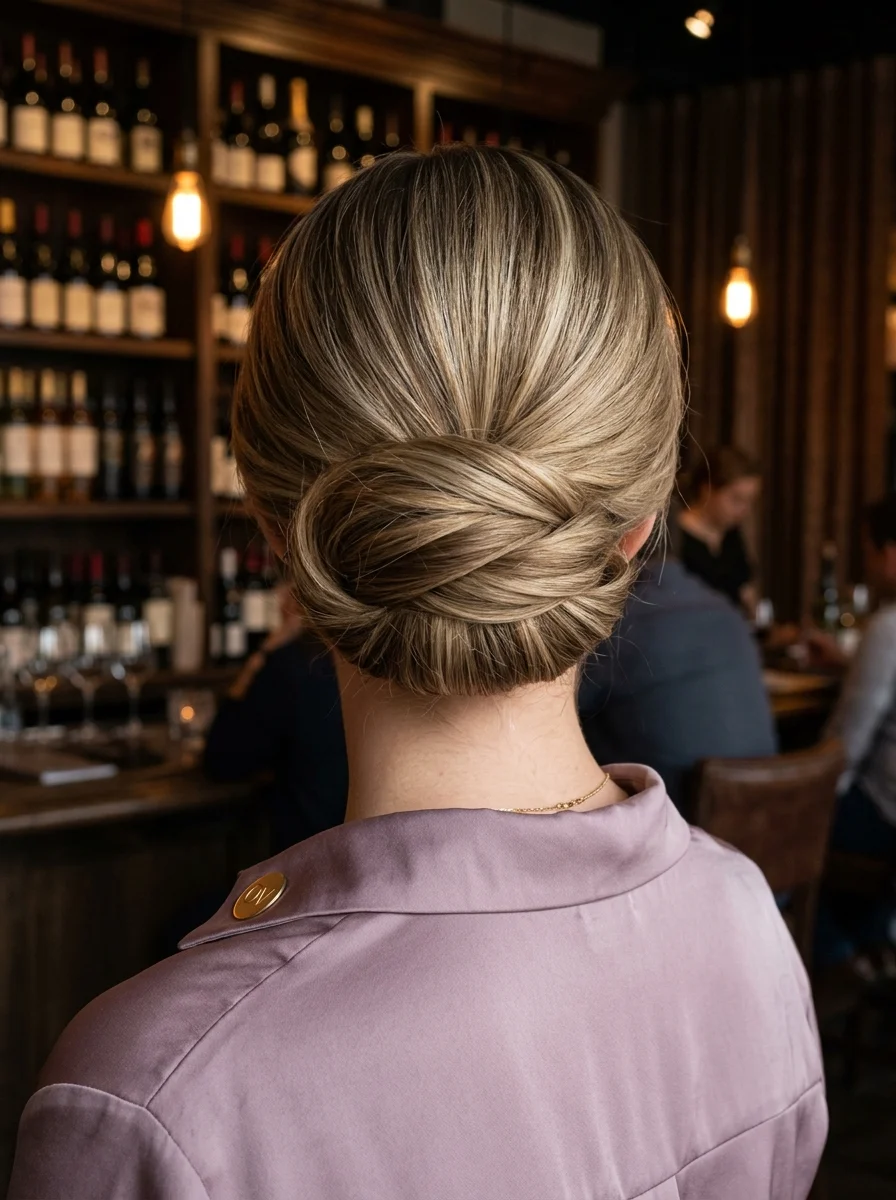
2.Elegant Twisted Chignon
The overview: Hair gathered at the nape and twisted into a sculpted chignon with visible fold lines. The twist technique creates dimension that a simple bun can't achieve, and the low placement keeps the style grounded and professional.
Why this look is popular: The chignon reads as intentional without being fussy. It works on second-day hair and actually improves as natural oils add grip. Fine dining establishments favor this style because it looks refined but doesn't read as trying too hard.
Where this look is suitable: Upscale restaurants, wine bars, steak houses, and any venue where the dress code leans toward polished.
The look: A low twisted bun sitting at the nape, with visible texture from the twisting technique. The crown is smooth and controlled. No loose pieces.
Step by step:
- Smooth the base. Apply a lightweight smoothing serum and brush hair into a low ponytail at the nape.
- Twist the ponytail. Rotate the entire ponytail into a tight rope. The tighter the twist, the more defined the final folds.
- Coil into a bun. Wrap the twisted rope around the elastic base, tucking the ends underneath.
- Pin in an X pattern. Use four bobby pins in crossing pairs to lock the bun against the head.
- Set with spray. A medium-hold hairspray keeps the twists defined without making them stiff.
3.Curly Bun with Hairnet
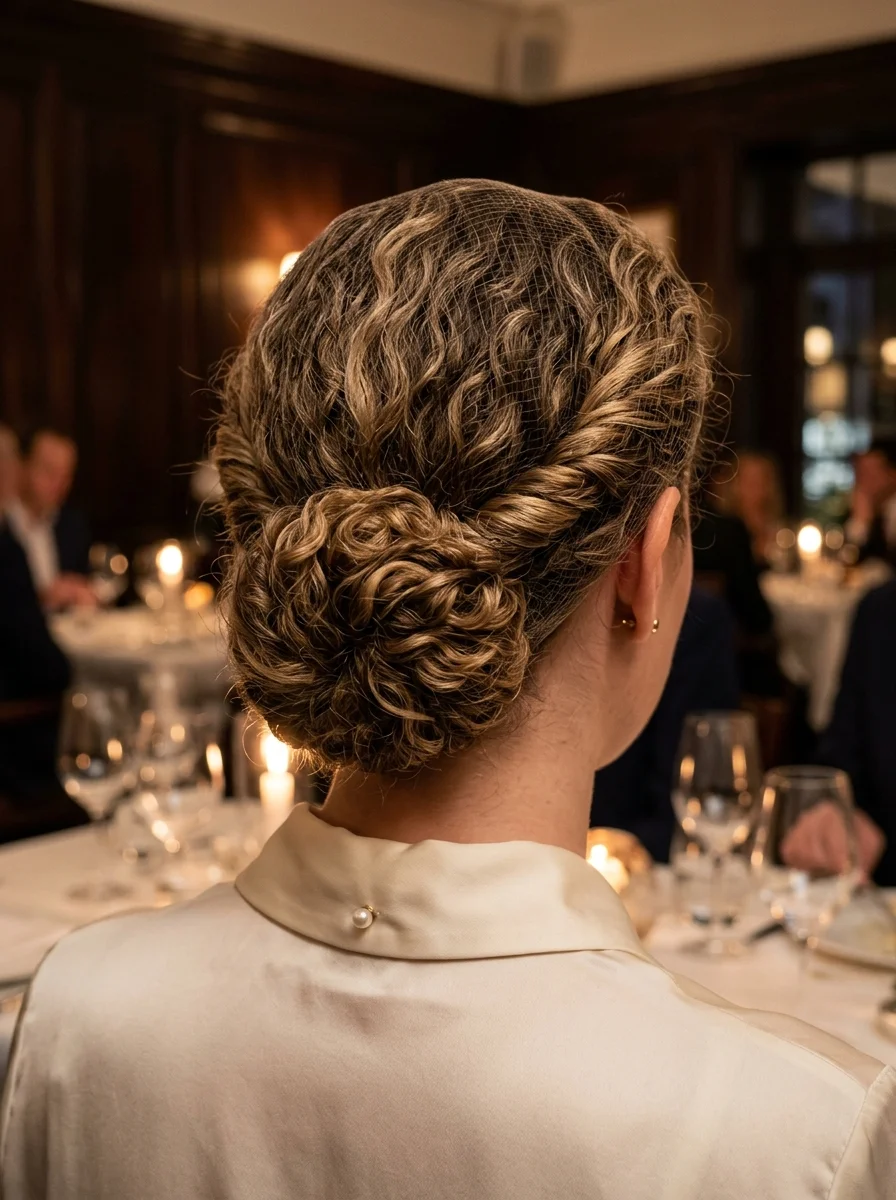
The overview: Natural curls gathered into a low bun and secured with a fine mesh hairnet that blends with the hair color. The net keeps every curl contained without flattening the texture, which is the whole point. You get the structure of an updo with the personality of curly hair.
Why this look is popular: Hairnets have made a genuine comeback in the service industry. They solve a real problem: keeping curly and textured hair controlled during long shifts without requiring constant re-pinning. The fine mesh is nearly invisible once placed correctly.
Where this look is suitable: Upscale dining, hotel restaurants, and any venue with strict hair policies. The hairnet signals compliance while the curls underneath signal personality.
Step by step:
- Define curls first. Apply curl cream to damp hair and let it dry completely before gathering. Wet curls will frizz under the net.
- Gather low. Collect curls at the nape without pulling too tight. You want volume in the bun, not a flattened pancake.
- Place the net. Open the hairnet and wrap it around the bun twice. Tuck the edges under the bun and pin.
- Adjust curl visibility. Gently pull a few curls through the net at the top for a more natural look, or keep everything contained for a sleeker finish.
Tips and tricks: Match the net color to your hair, not your roots. If you're between shades, go darker. A light-hold gel applied before the net helps curls maintain their shape through humidity.

30 Stunning Vacation Nail Ideas for Your Next Getaway in 2026 💅
4.Low Space Buns
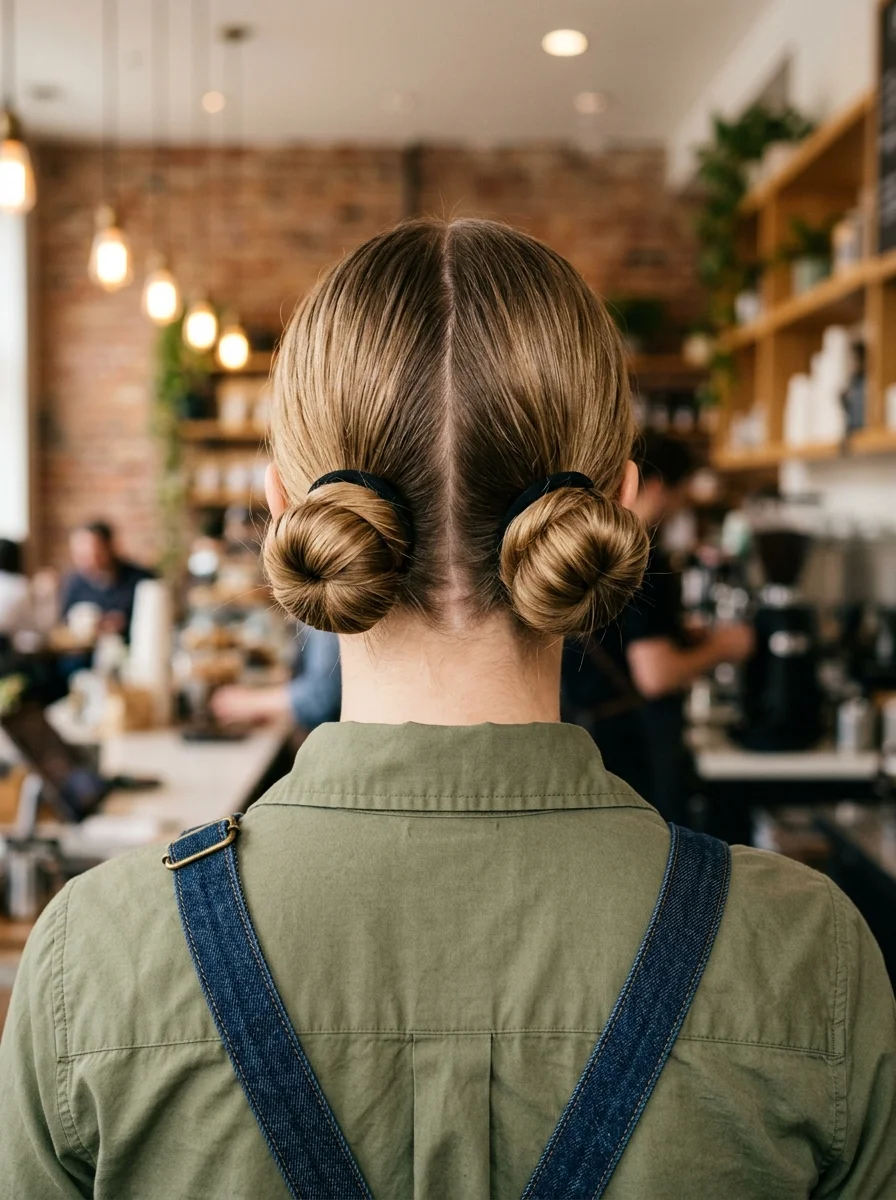
The overview: Hair parted down the center and gathered into two low buns sitting just behind each ear. The symmetry is clean, the placement is practical, and the style holds because each bun is independently secured.
Why this look is popular: Space buns distribute hair weight evenly across both sides of the head, which reduces the pulling and tension that a single high ponytail creates over a long shift. They also read as playful without being unprofessional, which makes them popular in casual dining environments.
Where this look is suitable: Cafés, casual restaurants, brunch spots, food trucks, and any environment where the vibe is relaxed and the uniform allows for personality.
Step by step:
- Create a center part. Use a rat-tail comb to draw a straight line from your forehead to the nape. Precision matters here.
- Gather each side. Brush each half into a low ponytail behind the ear. Secure with matching elastics.
- Form the buns. Twist each ponytail and coil it around its base. Pin with bobby pins at 12, 3, 6, and 9 o'clock positions.
- Check symmetry. Stand in front of a mirror and verify that both buns sit at the same height and distance from the center part.
5.High Curly Bun with Satin Scrunchie
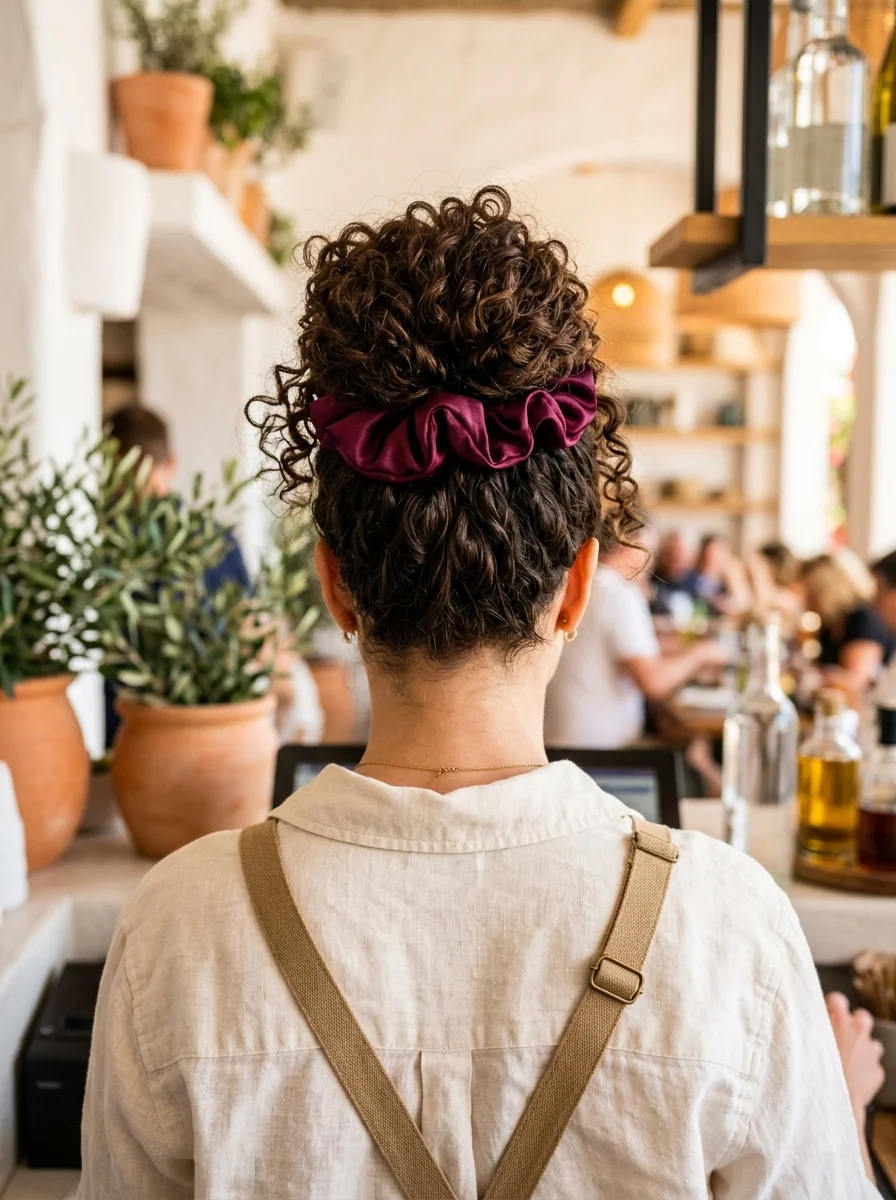
The overview: Natural curls gathered into a high bun at the crown, secured with a wide satin scrunchie in a rich burgundy tone. The scrunchie does double duty: it holds the bun in place without creating the dents and headaches that thin elastics cause, and it adds a pop of color that reads as intentional.
Why this look is popular: Satin scrunchies have become the standard for textured hair in service environments. They don't absorb moisture like cotton, they don't create friction that leads to breakage, and they grip without pulling. The burgundy tone pairs well with most uniform colors.
Where this look is suitable: Italian restaurants, Mediterranean cafés, bistros, and any setting where the aesthetic leans warm and approachable.
Step by step:
- Define curls on day-old hair. Freshly washed curls are too slippery. Day-old hair has the natural grip needed for a secure bun.
- Gather high. Flip your head forward and gather all curls at the crown. The forward tilt creates more volume at the top.
- Secure with the scrunchie. Wrap the scrunchie twice around the base. Don't pull curls through on the second wrap, which leaves the bun sitting on top.
- Shape the bun. Arrange the curls so they fall naturally over the scrunchie, partially concealing it.
Tips and tricks: Keep a second scrunchie in your apron pocket. If the first one loosens during a busy shift, swapping it takes thirty seconds versus re-doing the entire style.

28 Stunning Baddie Summer Hairstyles for 2026 🔥☀️
6.French Braid Ponytail with Velvet Scrunchie
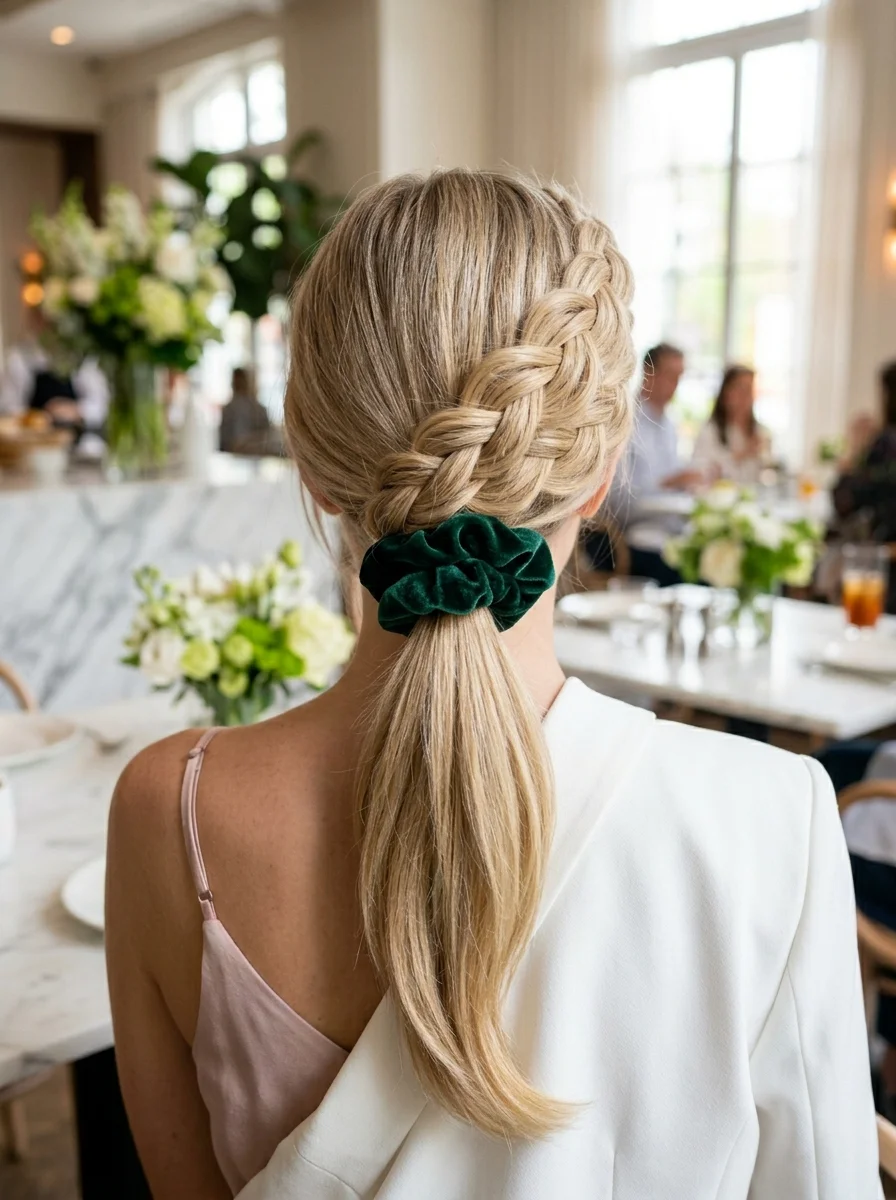
The overview: A single French braid running from the crown to the nape, where it transitions into a low ponytail secured with a dark green velvet scrunchie. The braid keeps the crown completely controlled, while the ponytail adds movement that a full updo doesn't.
Why this look is popular: The braid-to-ponytail combination solves two problems at once: it eliminates flyaways on top and keeps the length contained without the heaviness of a bun. The velvet scrunchie adds texture and a subtle color accent.
Where this look is suitable: Upscale brunch restaurants, garden cafés, and any venue where the atmosphere is polished but not stiff.
Step by step:
- Begin the French braid at the crown. Take a 2-inch section and divide into three strands. Cross strands over each other, adding small sections from each side as you braid downward.
- Braid to the nape. Continue until all hair is incorporated. Maintain even tension, which prevents the braid from loosening.
- Secure with the scrunchie. Gather the braid tail and remaining hair into a ponytail. Wrap the velvet scrunchie around the base twice.
- Pancake the braid (optional). Gently pull the outer edges of each braid section for a wider, softer appearance.
7.Sleek Low Bun with Floral Bow
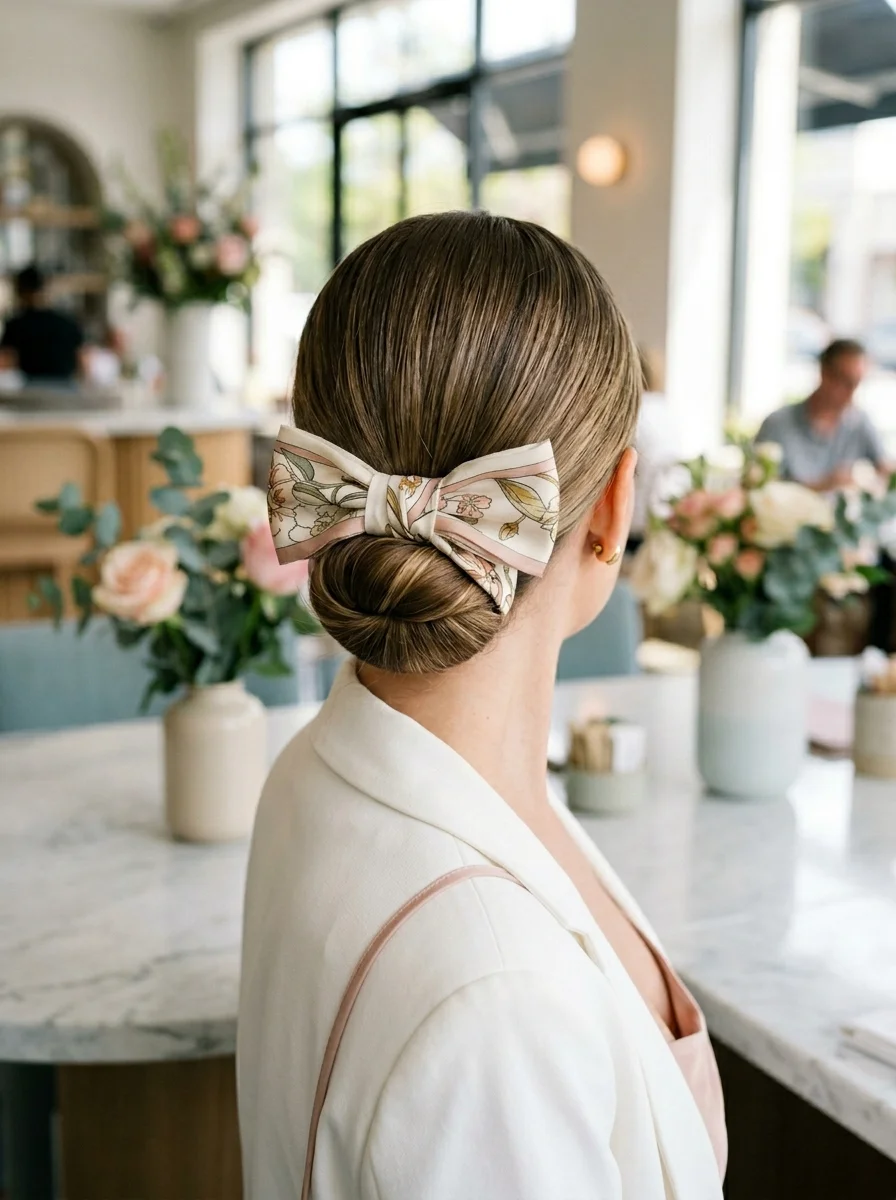
The overview: A polished low bun at the nape with a wide fabric bow positioned directly above it. The bow's soft, floral print contrasts with the sleekness of the bun, creating a look that's refined but not severe.
Why this look is popular: The bow elevates a basic low bun into something that feels styled. It's the simplest upgrade for anyone who can do a bun in their sleep but wants to look like they put in more effort. Floral prints work particularly well in spring and summer dining settings.
Where this look is suitable: Bright cafés, brunch restaurants, floral-themed venues, and any setting where the aesthetic is light and inviting.
Step by step:
- Smooth the hair. Apply a lightweight serum and brush into a low ponytail at the nape.
- Form a bun. Twist the ponytail and coil it around the base. Pin securely with bobby pins.
- Position the bow. Clip or tie the bow directly above the bun, centered at the back of the head.
- Adjust the tails. Let the bow tails drape naturally or tuck them behind the bun for a cleaner line.
Tips and tricks: Choose a bow with a built-in clip rather than a tie-on version. Clips hold better during movement and take seconds to adjust.

30 Cute Ladybug Nail Trends That Are Taking Over (2026)
8.Curly Hair with Leopard Claw Clip
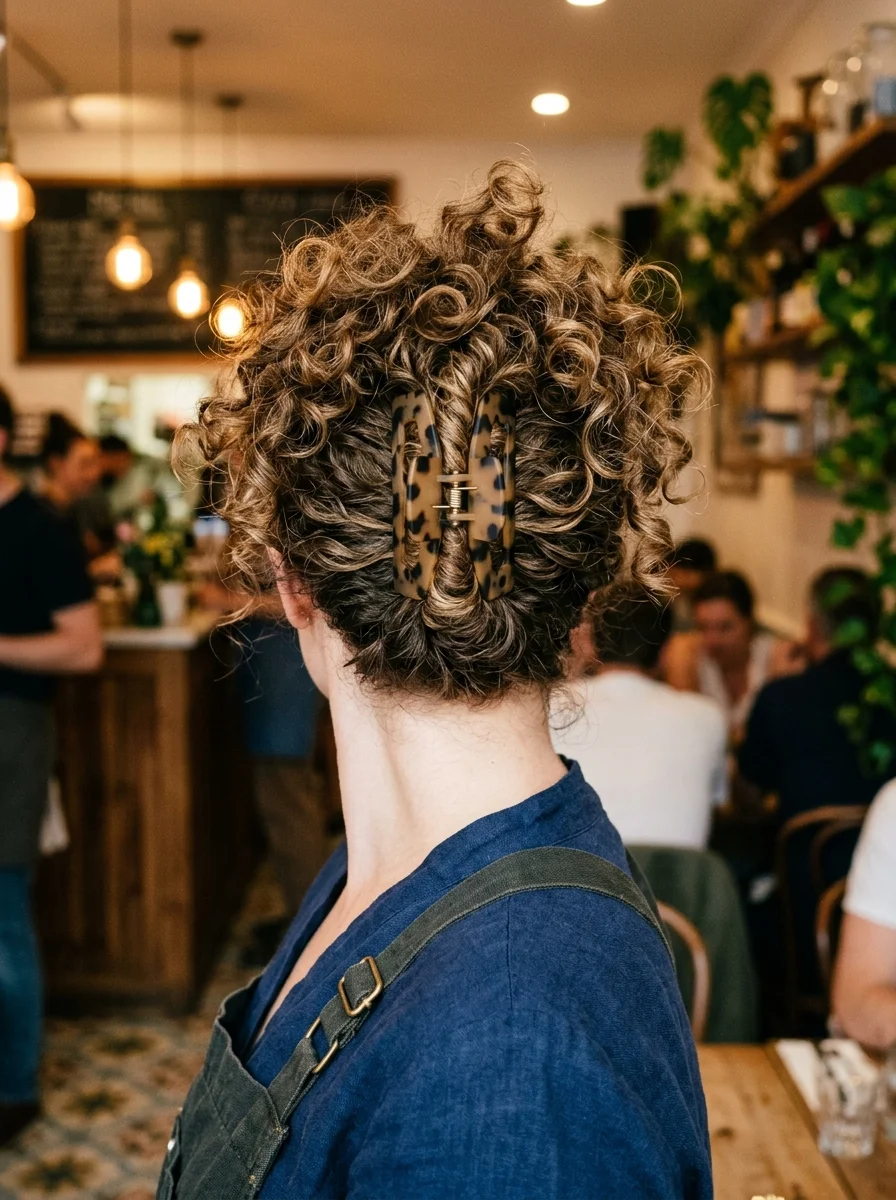
The overview: Natural curls swept up and secured with a large tortoiseshell claw clip. The curls spill over the top of the clip, creating volume and movement while the clip handles the structural work underneath.
Why this look is popular: Claw clips are the fastest way to get curly hair off your neck without losing the texture that makes curly hair interesting. The tortoiseshell pattern is neutral enough to match most uniforms while still adding visual interest.
Where this look is suitable: Casual cafés, coffee shops, and relaxed dining environments where natural texture is appreciated.
Step by step:
- Gather the hair. Flip your head forward and gather all curls toward the crown.
- Twist once. Give the gathered section a single twist at the base to create a foundation for the clip.
- Clamp the clip. Open the claw clip and clamp it over the twisted base, making sure the teeth grip hair from both sides.
- Arrange the curls. Let the top curls fall naturally over and around the clip.
Tips and tricks: Use a clip with strong spring tension. Weak clips lose their grip by mid-shift, especially on thick curly hair. Look for metal springs rather than plastic.
9.Braided Crown Updo
The overview: Two symmetrical braids running from the temples along the sides of the head, meeting at the nape where they coil into a braided bun. The structure is architectural, with the side braids framing the head and the bun anchoring everything at the back.
Why this look is popular: This style stays put better than almost any other updo because the braids create multiple anchor points against the scalp. Every section is mechanically locked in place through the braiding, which means less reliance on pins and clips that can loosen.
Where this look is suitable: Upscale bars, cocktail lounges, fine dining restaurants, and any venue where the atmosphere is sophisticated.
Step by step:
- Create a center part. Draw a straight line from forehead to crown. This determines the symmetry of both braids.
- Dutch braid each side. Starting at the hairline, cross strands under to create the raised braid effect. Follow the hairline down to the nape on each side.
- Combine at the nape. Gather both braid tails and any remaining hair into a single section.
- Coil into a bun. Twist the combined section and wrap it into a tight bun at the nape. Pin with crossing bobby pins.
31 Stunning Summer Birthday Party Hairstyles for 2026 🎂☀️
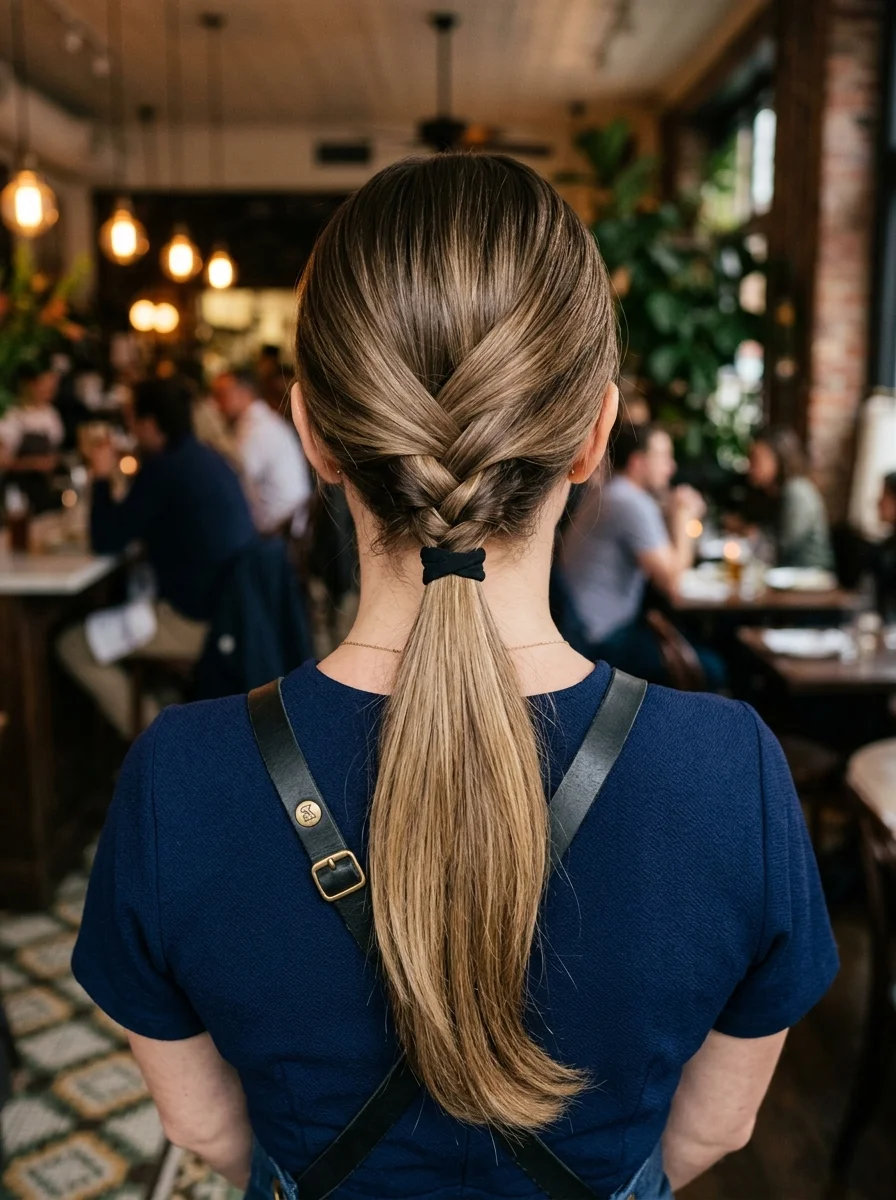
10.Dutch Braid into Low Ponytail
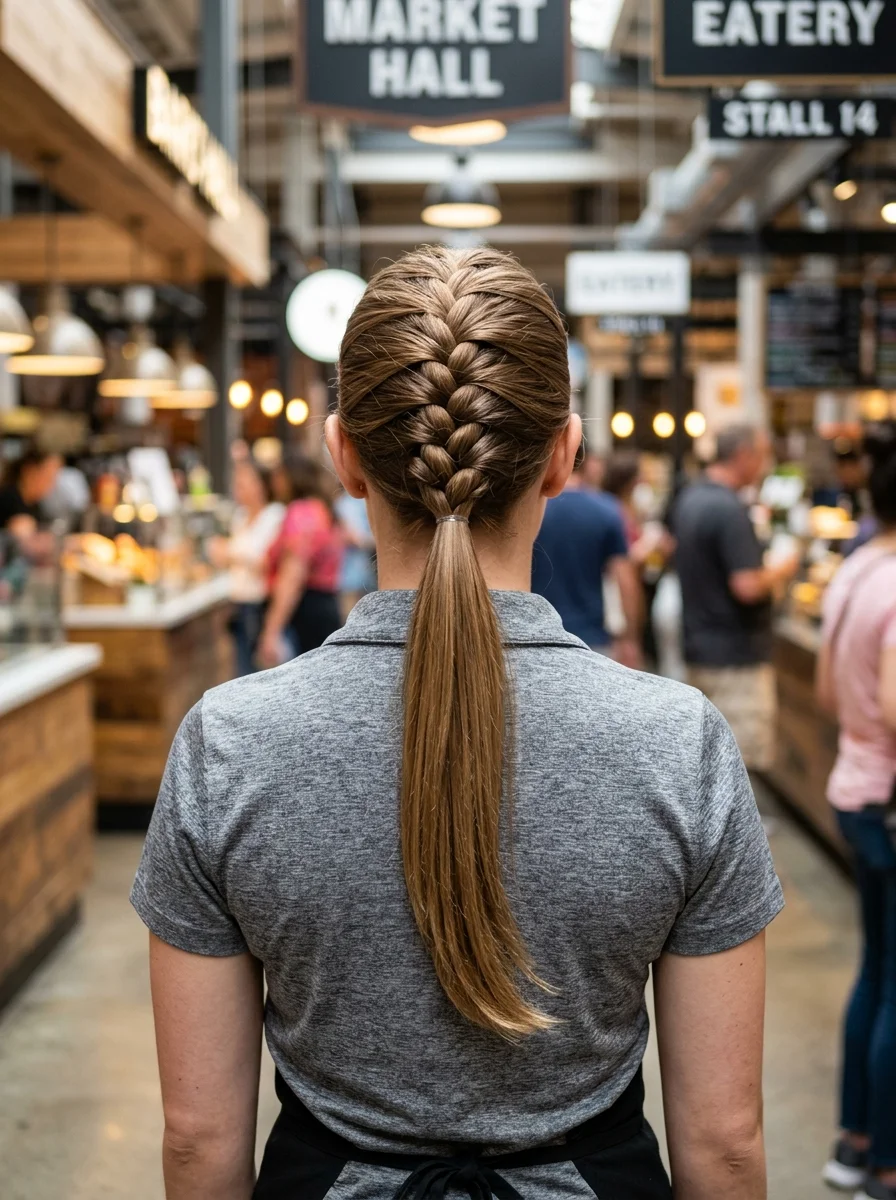
The overview: A single Dutch braid running down the center of the head from the crown to the nape, where it transitions into a smooth low ponytail. The braid creates a raised ridge that adds visual interest from behind, while the ponytail keeps the length contained.
Why this look is popular: The Dutch braid is more visible than a French braid because the strands cross under rather than over, creating a braid that sits on top of the hair. This makes even a simple ponytail look considered and deliberate.
Where this look is suitable: Market halls, food courts, casual dining, and any busy environment where you need your hair completely off your face.
Step by step:
- Start at the crown. Take a section at the top of your head and divide into three strands.
- Dutch braid downward. Cross strands under, adding sections from each side as you braid toward the nape. Keep the braid centered.
- Secure the braid. Once you reach the nape and all hair is incorporated, tie off with a clear elastic.
- Create the ponytail. Gather the braid tail with any remaining loose hair and secure with a second elastic.
Tips and tricks: Pull slightly tighter than you think you need to at the nape. This is the area most likely to loosen during movement. A dab of edge control gel along the hairline keeps baby hairs contained.
11.Wavy Bob with Stacked Barrettes
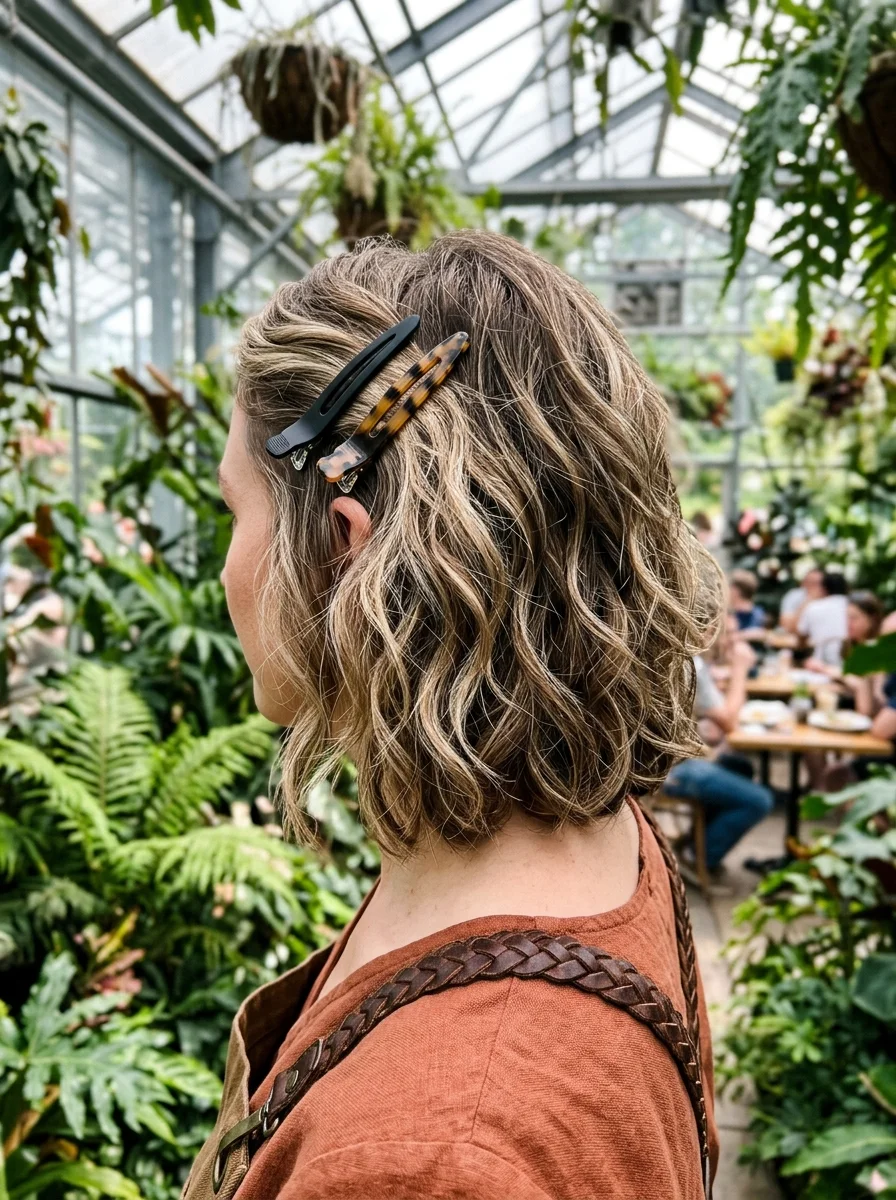
The overview: A chin-length wavy bob with two barrettes stacked on one side, holding the front section back from the face. The waves add texture and movement, while the barrettes serve a functional purpose: keeping hair from falling into your eyes during a shift.
Why this look is popular: This is the go-to for anyone whose hair is too short for a ponytail or bun. The stacked barrette technique is more secure than a single clip, and the asymmetrical placement looks intentional rather than utilitarian.
Where this look is suitable: Garden cafés, greenhouse restaurants, brunch spots, and any setting where the aesthetic is relaxed and natural.
Step by step:
- Texture the bob. Apply a sea salt spray or texturizing mousse to damp hair and air-dry for natural waves.
- Sweep one side back. Take the front section from the heavier side of your part and smooth it behind the ear.
- Stack the barrettes. Place the first barrette horizontally, then angle the second one slightly below it. The stacked placement creates more grip than side-by-side.
Tips and tricks: Choose barrettes with strong spring mechanisms. Decorative clips that prioritize aesthetics over function will slide out by mid-shift.

28 Trendy May Nail Designs for 2026 💅
12.Bubble Braid Crown
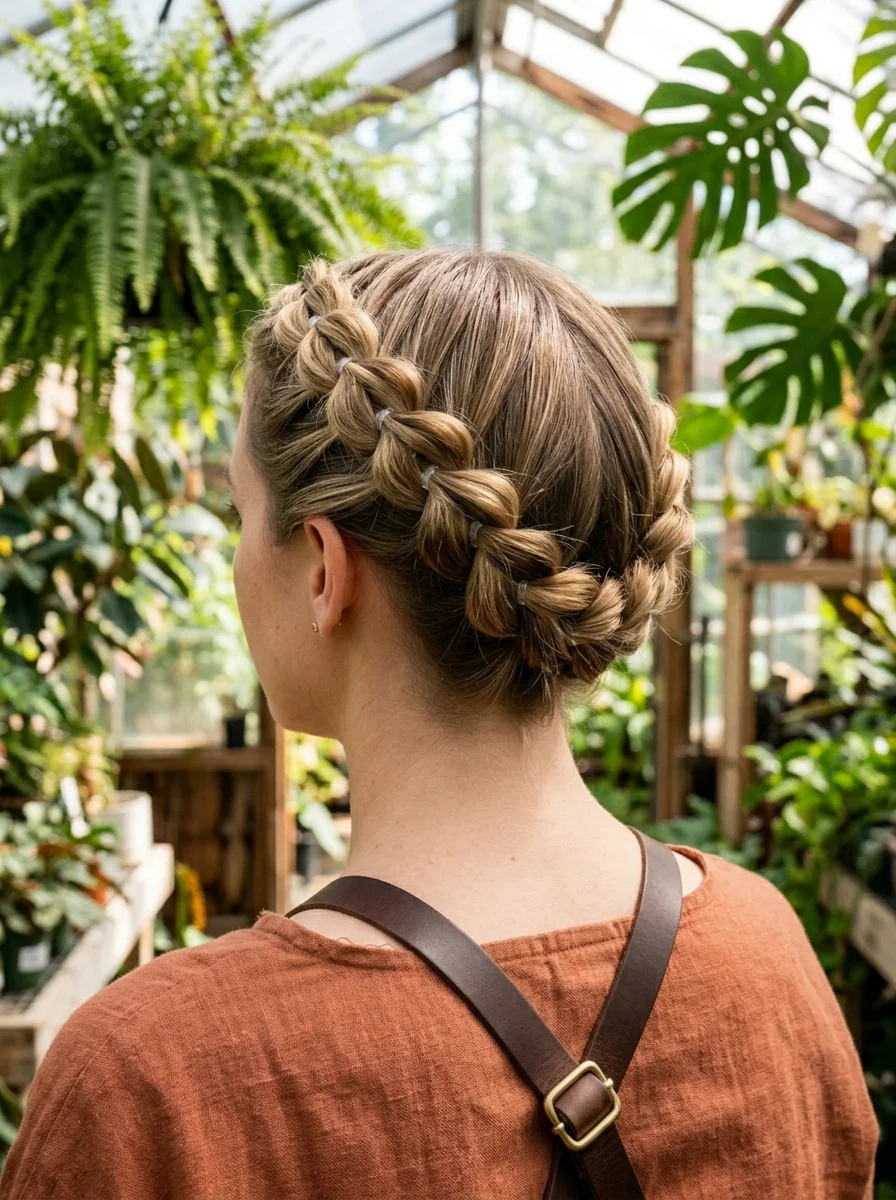
The overview: A bubble braid that wraps around the head like a crown, with small elastics creating evenly spaced "bubbles" along the length. The braid sits high enough to be visible from the front, framing the face with a structured halo effect.
Why this look is popular: The bubble braid is easier to execute than a traditional crown braid and creates more volume. Each bubble can be gently pulled wider for a fuller appearance, which makes this style work well on fine to medium hair that might look thin in a standard braid.
Where this look is suitable: Garden restaurants, greenhouse cafés, botanical venues, and any setting where the atmosphere is natural and inviting.
Step by step:
- Start above one ear. Take a section of hair and secure it with a small elastic.
- Create bubbles. Add a new section of hair to the tail every 2 inches and secure with another elastic. Gently pull the section between elastics to create the bubble shape.
- Wrap around the head. Continue the bubble braid along the hairline, following the crown from one ear to the other.
- Tuck the tail. Once the braid reaches the opposite ear, tuck the remaining length underneath the beginning of the braid and pin.
13.Braided Low Bun with Twisted Sides
The overview: Twisted sections from each side of the head feeding into a low braided bun at the nape. The twists add texture along the sides, while the braided bun creates a compact, secure anchor point that won't shift during movement.
Why this look is popular: Combining twists and braids in one style creates visual complexity that looks more difficult than it is. The twisted sides are faster to execute than braids, and the braided bun holds better than a simple twisted bun.
Where this look is suitable: Pubs, ale houses, casual bars, and any venue with a relaxed but put-together atmosphere.
Step by step:
- Section the sides. Take a 2-inch section from each temple, leaving the center section down.
- Twist each side. Rotate each section toward the back of the head, keeping them at the same height.
- Gather at the nape. Combine the twisted sections with the remaining hair into a low ponytail.
- Braid and coil. Create a three-strand braid from the ponytail, then coil it into a bun. Pin with crossing bobby pins.
24 Stunning Bridesmaid Hairstyles for Weddings 2026 💍✨
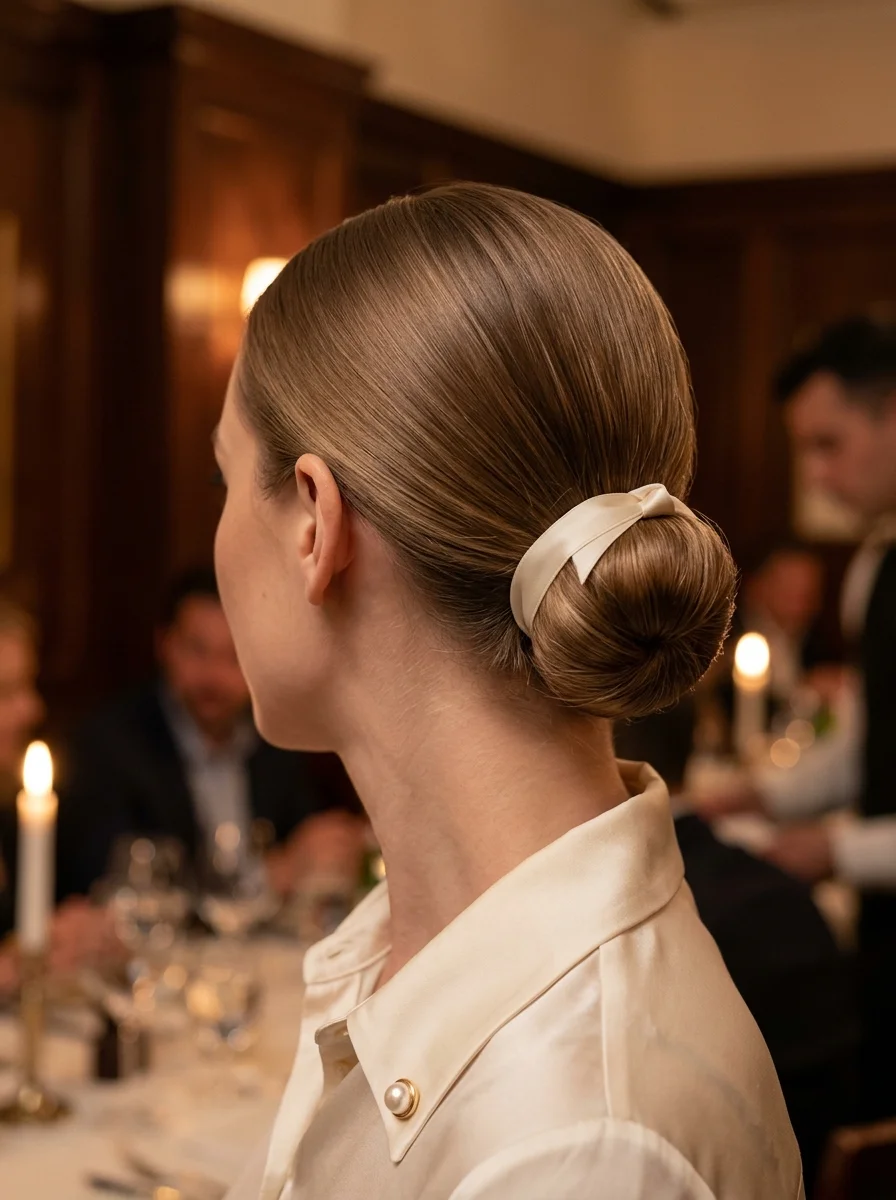
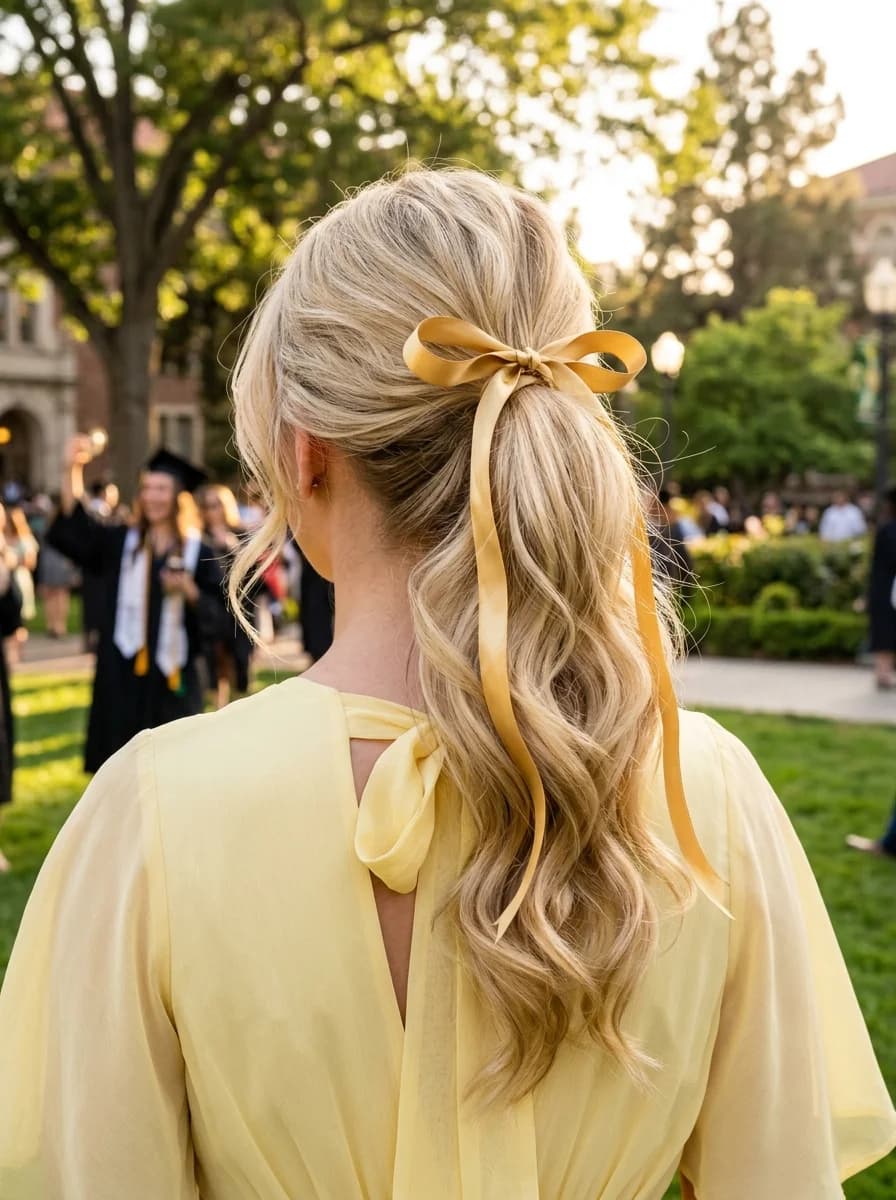
14.Low Bun with Cream Ribbon

The overview: A soft, twisted low bun with a cream-colored ribbon wrapped around the base. Face-framing pieces are left loose at the front, softening the overall look. The ribbon adds a clean, uniform-appropriate accent that elevates the basic bun.
Why this look is popular: The ribbon is a simple addition that transforms a bun from "threw it up" to "styled it." Cream and ivory ribbons pair well with most uniform colors, especially in fine dining where the aesthetic tends toward neutral tones.
Where this look is suitable: Fine dining restaurants, upscale bistros, hotel dining rooms, and any venue where the presentation extends to staff appearance.
Step by step:
- Leave face-framers out. Before gathering your hair, pull two thin sections forward at the temples.
- Gather into a low bun. Collect the remaining hair at the nape and twist into a bun. Pin securely.
- Wrap the ribbon. Tie the ribbon around the bun base, finishing with a flat knot or small bow at the back.
- Adjust the face-framers. Let them hang naturally or curl them loosely with a small iron.
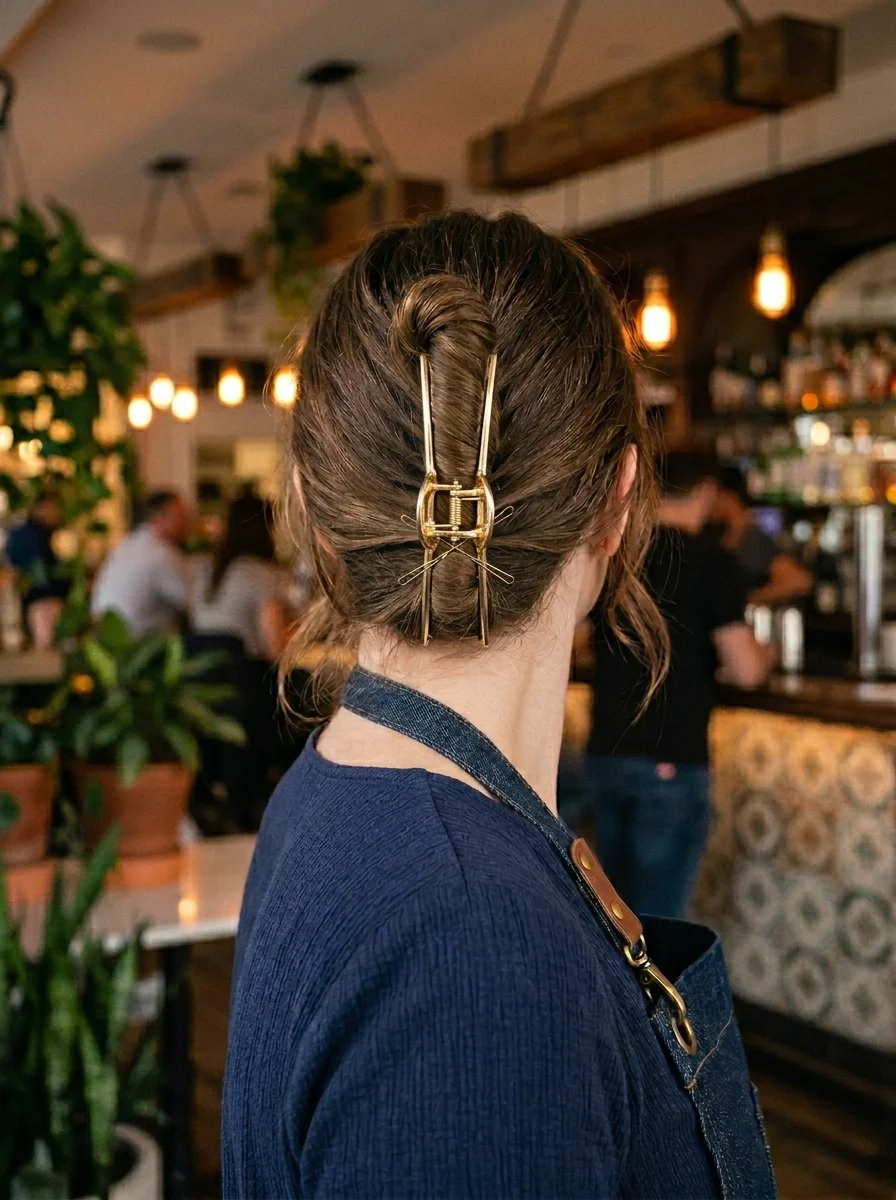
15.French Twist with Matte Black Claw Clip
The overview: Hair swept into a classic French twist, secured with a large matte black claw clip instead of traditional pins. The clip is visible and intentional, functioning as both hardware and accessory.
Why this look is popular: The French twist is one of the fastest updos to execute, and the claw clip version eliminates the fiddly pinning that makes the traditional version time-consuming. Matte black clips read as modern rather than retro.
Where this look is suitable: Fine dining restaurants, steakhouses, and upscale venues where the staff aesthetic is polished and contemporary.
Step by step:
- Gather to one side. Sweep all hair to the left side of the head. Hold at the center back.
- Roll upward. Fold the hair over itself and roll it inward toward the head, creating a vertical cylinder.
- Clamp the clip. Open the claw clip and clamp it over the rolled twist, making sure the teeth grip hair from both the twist and the underlying layer.
- Tuck the ends. Fold any remaining hair ends downward and tuck them inside the twist.
Tips and tricks: The clip needs to be large enough to grip the full thickness of your twist. If your hair is thick, look for jumbo clips with at least 4-inch teeth.

28 Cute & Sporty Baseball Game Nail Ideas for 2026 ⚾
16.Sleek Center-Part French Braid
The overview: A single, tightly woven French braid running from the forehead hairline straight down the center of the head. The braid is smooth and controlled, with every strand pulled taut against the scalp for a glass-like finish.
Why this look is popular: This is the most secure braid variation because it incorporates every strand from both sides equally. There's no loose hair to fall out, no sections to re-tuck. When it's done, it's done.
Where this look is suitable: Any restaurant environment. This is the universal workhorse of waitress hairstyles.
Step by step:
- Start at the forehead. Take a triangular section and divide into three equal strands.
- Braid with consistent tension. Cross strands over each other, adding thin sections from each side. Pull each cross snugly against the scalp.
- Continue to the nape. Once all hair is incorporated, braid the remaining tail as a standard three-strand and secure with an elastic.
- Smooth flyaways. Apply a small amount of gel or pomade along the braid surface with your fingertips.
Tips and tricks: Use a boar bristle brush to gather sections as you braid. This keeps the surface smooth and prevents bubbles or loops from forming between sections.
17.Textured Low Ponytail with Gold Pin
The overview: A low ponytail with natural texture and a single gold hairpin positioned at the elastic. The ponytail isn't slicked or smoothed; it has a lived-in quality that looks better as the shift progresses. The gold pin is the detail that elevates it from casual to intentional.
Why this look is popular: The textured ponytail is forgiving. It doesn't demand the precision of a sleek style, which means it takes less time to execute and looks better as it ages through a shift. The gold pin adds just enough polish to signal effort.
Where this look is suitable: Casual restaurants, wine bars, farm-to-table spots, and any venue where the aesthetic is relaxed but considered.
Step by step:
- Texturize first. Spray dry shampoo or texturizing spray through your roots and mid-lengths for grip.
- Gather loosely. Collect hair at the nape without pulling tight. Let some volume remain at the crown.
- Secure and pin. Tie with an elastic, then insert the gold pin at an angle through the elastic and into the hair beneath.
34 Stunning Summer First Date Hairstyles for 2026 💕☀️
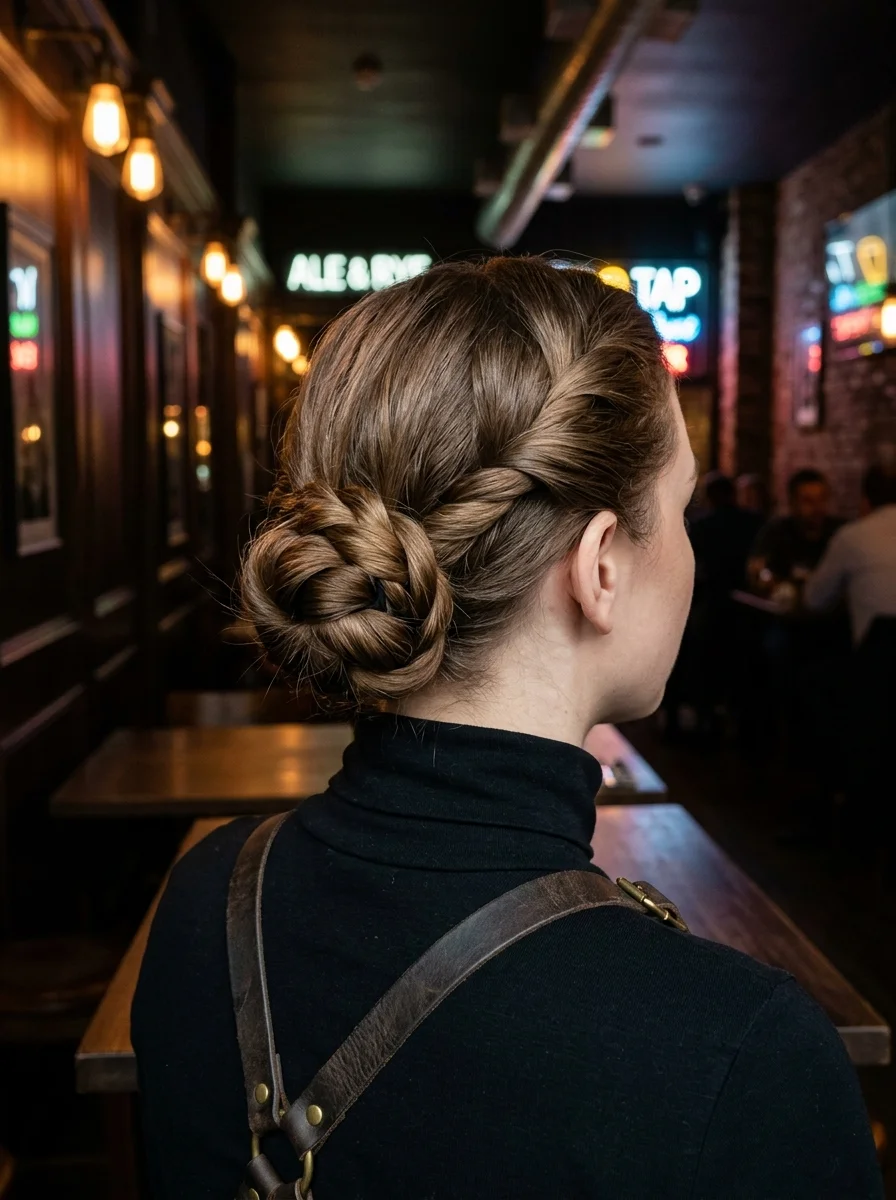
18.Double Dutch Braids into Low Bun
The overview: Two Dutch braids running from the hairline down each side of the head, meeting at the nape where they merge into a single low bun. The raised braid texture creates visual depth, and the double-braid foundation makes this one of the most secure styles on this list.
Why this look is popular: Double braids distribute tension evenly across the scalp, which reduces headaches during long shifts. The braids also contain every strand, so there's nothing to re-tuck or re-pin. This is the style you choose when you don't want to think about your hair for the rest of the night.
Where this look is suitable: Street food markets, food trucks, casual restaurants, and any busy environment where you need maximum security.
Step by step:
- Part down the center. Create a clean line from forehead to nape.
- Dutch braid each side. Starting at the hairline, cross strands under to create the raised effect. Braid to the nape on each side.
- Combine into a bun. Gather both braid tails at the nape and twist them together. Coil into a bun and pin.
Tips and tricks: Braid on damp hair for the tightest, most controlled result. If your hair is dry, mist it with water from a spray bottle before you start.
19.Sleek Twisted Low Bun
The overview: A perfectly smooth, twisted low bun with no visible pins or accessories. The finish is editorial-level sleek, with every strand controlled and the twist creating a sculptural knot at the nape.
Why this look is popular: This is the hairstyle that makes people assume you have a professional doing your hair. The reality is that it takes about eight minutes once you have the technique down. The sleek finish signals competence and attention to detail, which translates well to customer-facing roles.
Where this look is suitable: Wine bars, upscale restaurants, cocktail lounges, and any venue where the staff presentation is part of the brand.
Step by step:
- Smooth with product. Apply a smoothing serum from roots to ends. Use a boar bristle brush to eliminate every bump.
- Gather at the nape. Collect hair into a low ponytail. Secure with an elastic that matches your hair color.
- Twist tightly. Rotate the ponytail into a compact rope.
- Coil and tuck. Wrap the twisted rope around the base, tucking the end underneath. Pin with U-shaped hairpins, which grip better than bobby pins for this style.
30 Trendy Summer French Tip Nail Designs for 2026 💅
20.Sleek Ponytail with Hair-Wrapped Elastic
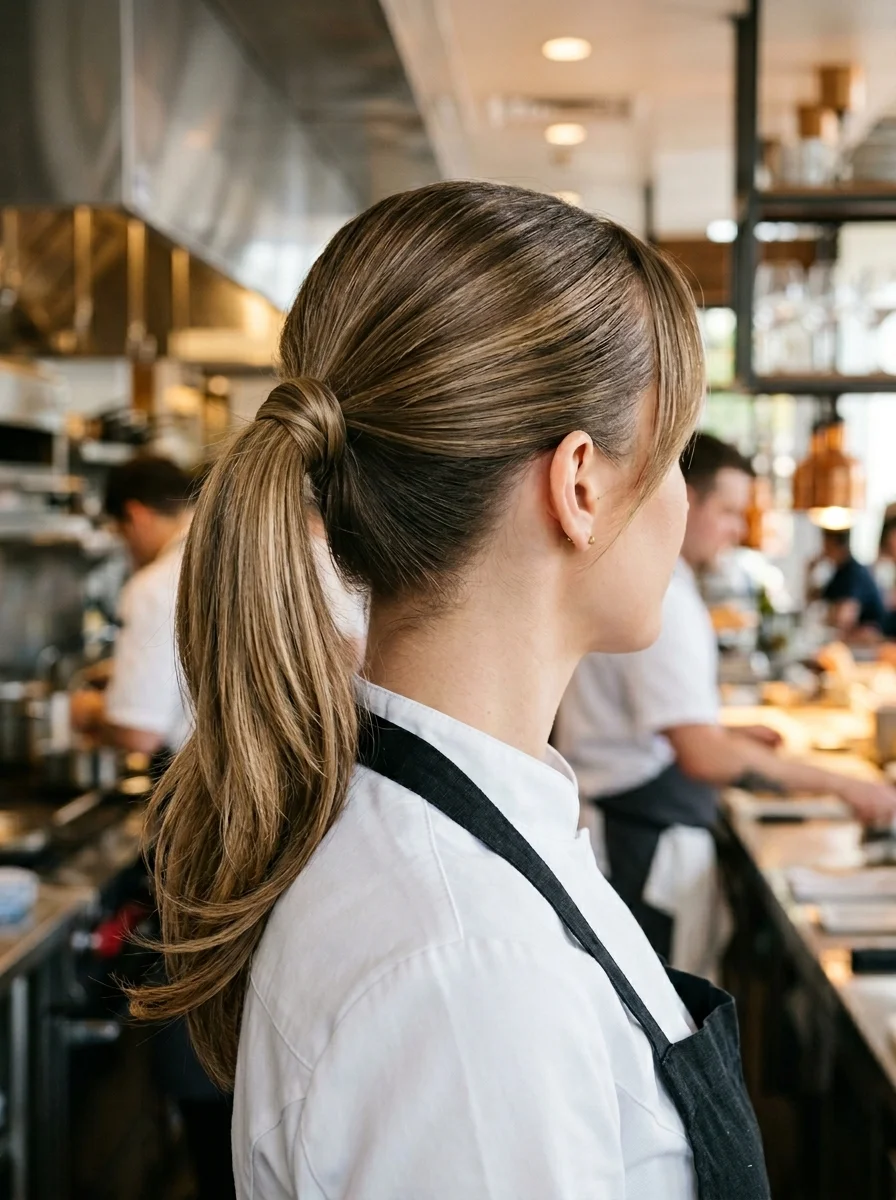
The overview: A mid-height ponytail pulled so smooth it looks almost liquid, with a strand of hair wrapped around the elastic to conceal it completely. The finish is polished to the point where you can see comb lines in the surface.
Why this look is popular: The hair-wrapped elastic is the single most effective upgrade you can make to a basic ponytail. It takes ten extra seconds and transforms "I threw my hair back" into "I styled my hair." This is the ponytail that works in professional kitchens and front-of-house equally.
Where this look is suitable: Professional kitchens, restaurant floors, catering events, and any environment where functionality and polish need to coexist.
Step by step:
- Apply smoothing gel. Work a quarter-sized amount through your hair from roots to ends.
- Brush into a ponytail. Use a boar bristle brush to gather hair at the desired height. Eliminate every bump.
- Secure tightly. Wrap the elastic three times for maximum hold.
- Wrap with hair. Take a thin strand from the underside of the ponytail, wrap it around the elastic, and secure the end underneath with a bobby pin.
Tips and tricks: Spritz the wrapped strand with hairspray before wrapping. This keeps it smooth and prevents it from unraveling during the shift.
21.Sleek Low Bun with Satin Ribbon
The overview: A tightly controlled low bun with a white satin ribbon wrapped around the base. The finish is ultra-smooth, with the ribbon adding a clean horizontal line that contrasts with the bun's circular shape.
Why this look is popular: Satin ribbon against sleek hair creates a look that reads as both classic and current. The white ribbon is particularly popular in fine dining because it matches white tablecloths and crisp shirts, creating a cohesive visual between staff and setting.
Where this look is suitable: Fine dining restaurants, hotel dining rooms, and any venue where the staff presentation is part of the overall experience.
Step by step:
- Smooth thoroughly. Apply anti-frizz serum and blow-dry or flat-iron for a pin-straight base.
- Gather into a low bun. Secure at the nape and form a tight, compact bun. Pin with U-shaped hairpins.
- Wrap the ribbon. Tie the satin ribbon around the bun base. Finish with a flat knot rather than a bow for the sleekest appearance.
22 Best Graduation Day Hairstyles for 2026 🎓✨
22.Bubble Ponytail
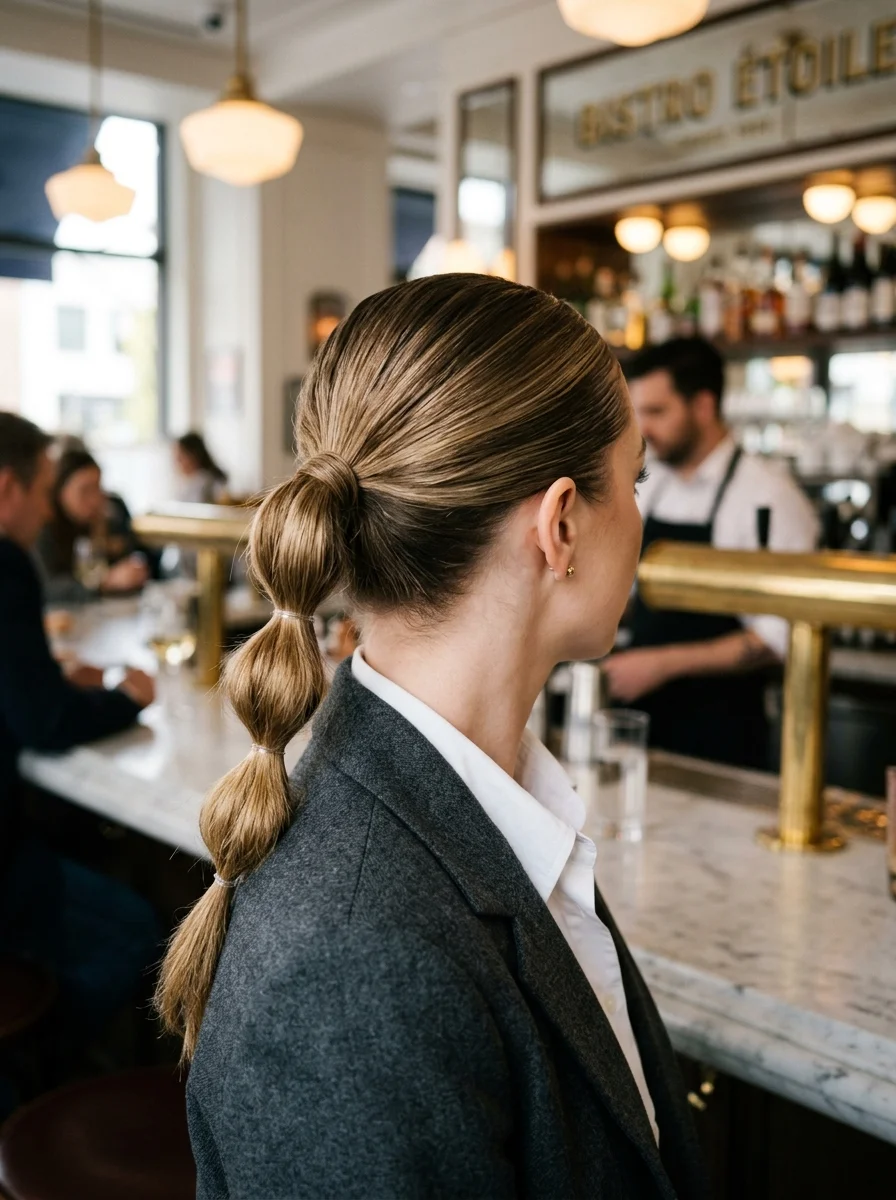
The overview: A sleek, mid-height ponytail sectioned with clear elastics to create uniform bubbles down the length. The crown is smooth and controlled, and each bubble is gently pulled wider for volume.
Why this look is popular: The bubble ponytail is more secure than a standard ponytail because the multiple elastics distribute hold along the entire length. If one elastic loosens, the others maintain the structure. The visual effect is more interesting than a plain ponytail without requiring any braiding skill.
Where this look is suitable: Bistros, wine bars, and any venue where the aesthetic is modern and polished.
Step by step:
- Sleek the base. Brush hair into a smooth ponytail at the desired height. Use gel for a glass-like finish.
- Add elastics down the length. Place clear elastics every 2-3 inches along the ponytail.
- Bubble each section. Gently pull the hair between each pair of elastics to create a rounded bubble shape.
- Balance the bubbles. Adjust each bubble so they're roughly the same size. Slightly larger bubbles at the top tapering toward the end look most natural.
Tips and tricks: Use clear elastics that match your hair color, not generic transparent ones. On dark hair, black micro-elastics blend better than clear.
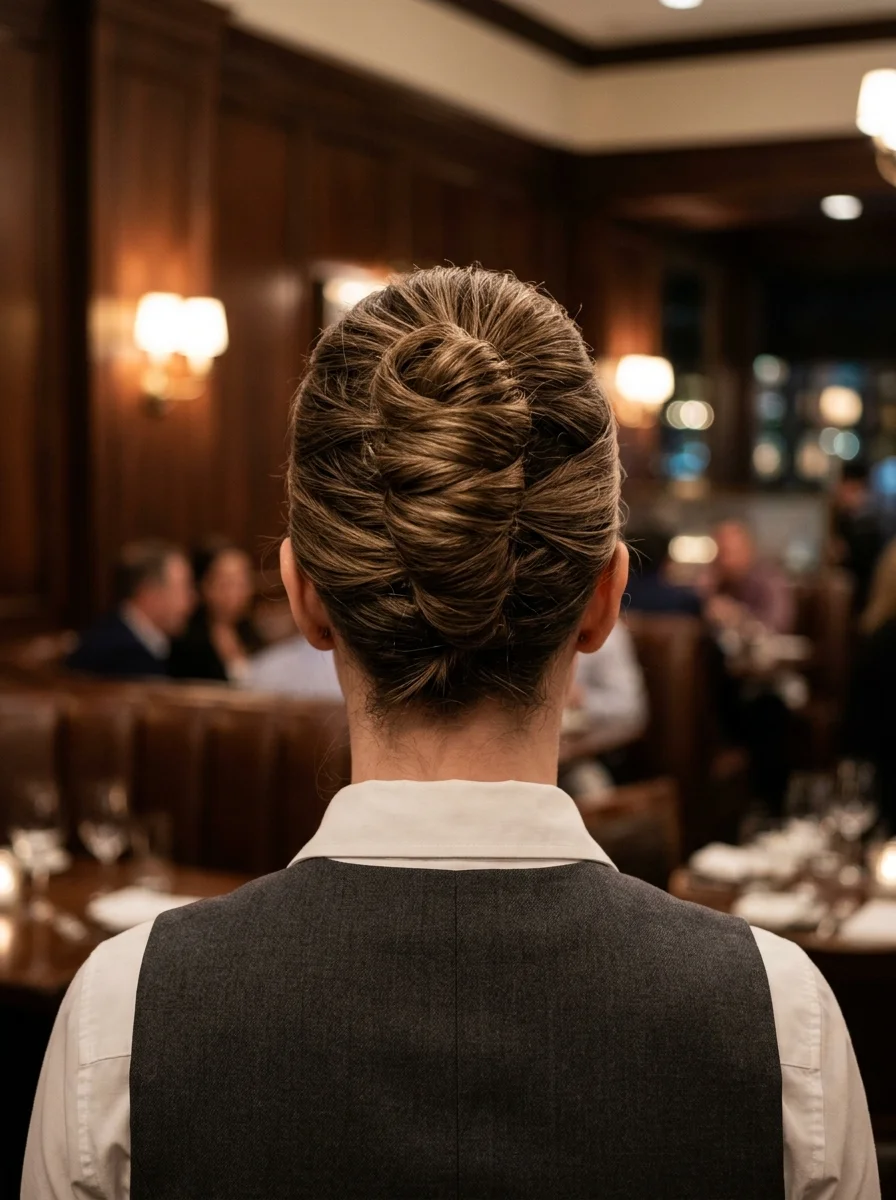
23.Sleek Twisted Top Knot
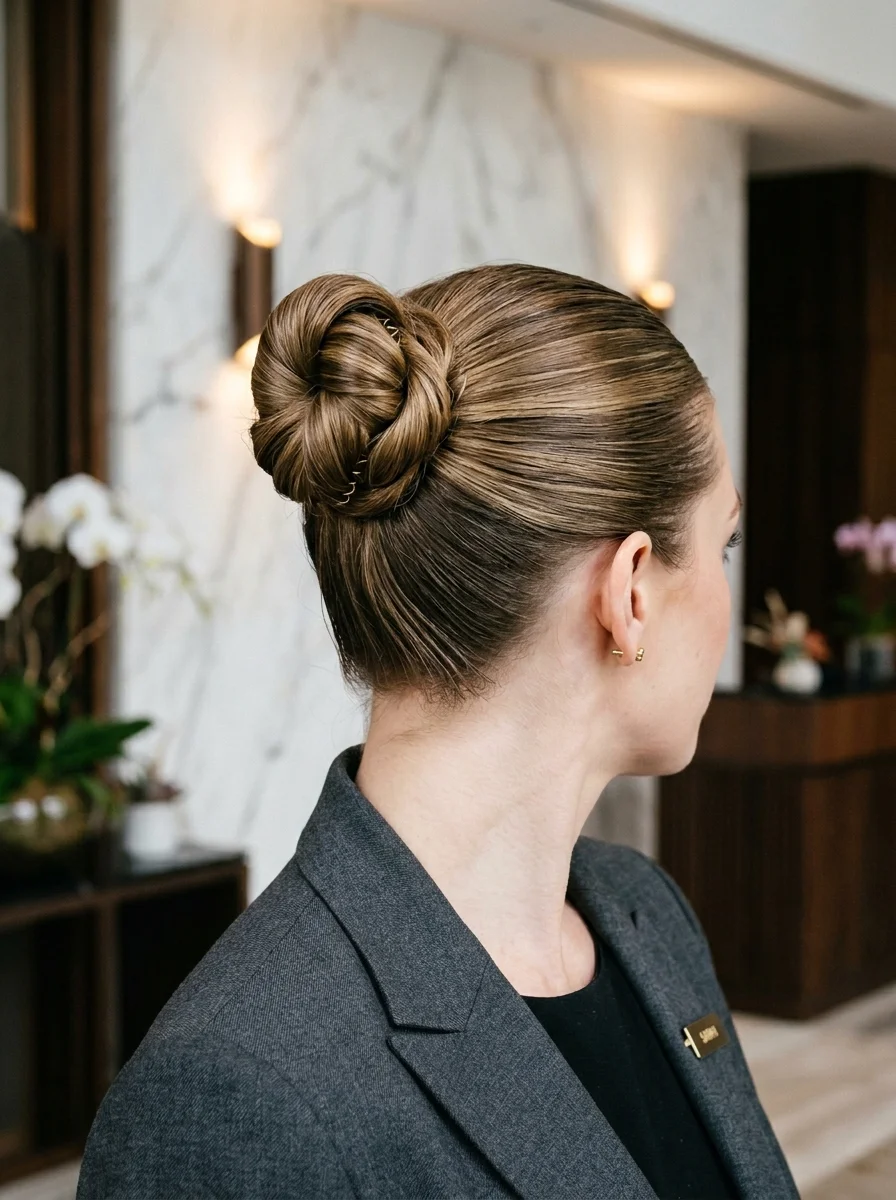
The overview: Hair pulled into a high, tight bun at the crown, twisted into a sculptural knot. The surface is completely smooth, with visible comb lines radiating from the base. This is a power bun.
Why this look is popular: The high twisted bun elongates the neck and creates a commanding presence. It's the hairstyle that says you're in charge of your section. The sleek finish also photographs extremely well, which matters for staff photos and social media.
Where this look is suitable: Hotel lobbies, upscale restaurants, and any venue where the staff aesthetic is sharp and authoritative.
Step by step:
- Gather high. Brush all hair to the crown. Use gel and a boar bristle brush for a smooth surface.
- Secure tightly. Wrap the elastic three times. The base needs to be rock-solid.
- Twist into a knot. Rotate the ponytail into a tight rope, then coil it around the base. Tuck the end underneath.
- Pin and set. Use four bobby pins around the perimeter. Finish with strong-hold hairspray.
Tips and tricks: If your hair is too short or fine for a substantial bun, use a foam donut underneath. The donut adds volume and gives the twist something to grip.

30 Stunning Beach Nail Ideas for the Best Vacation in 2026 🌊
24.Low Ponytail with Patterned Scarf
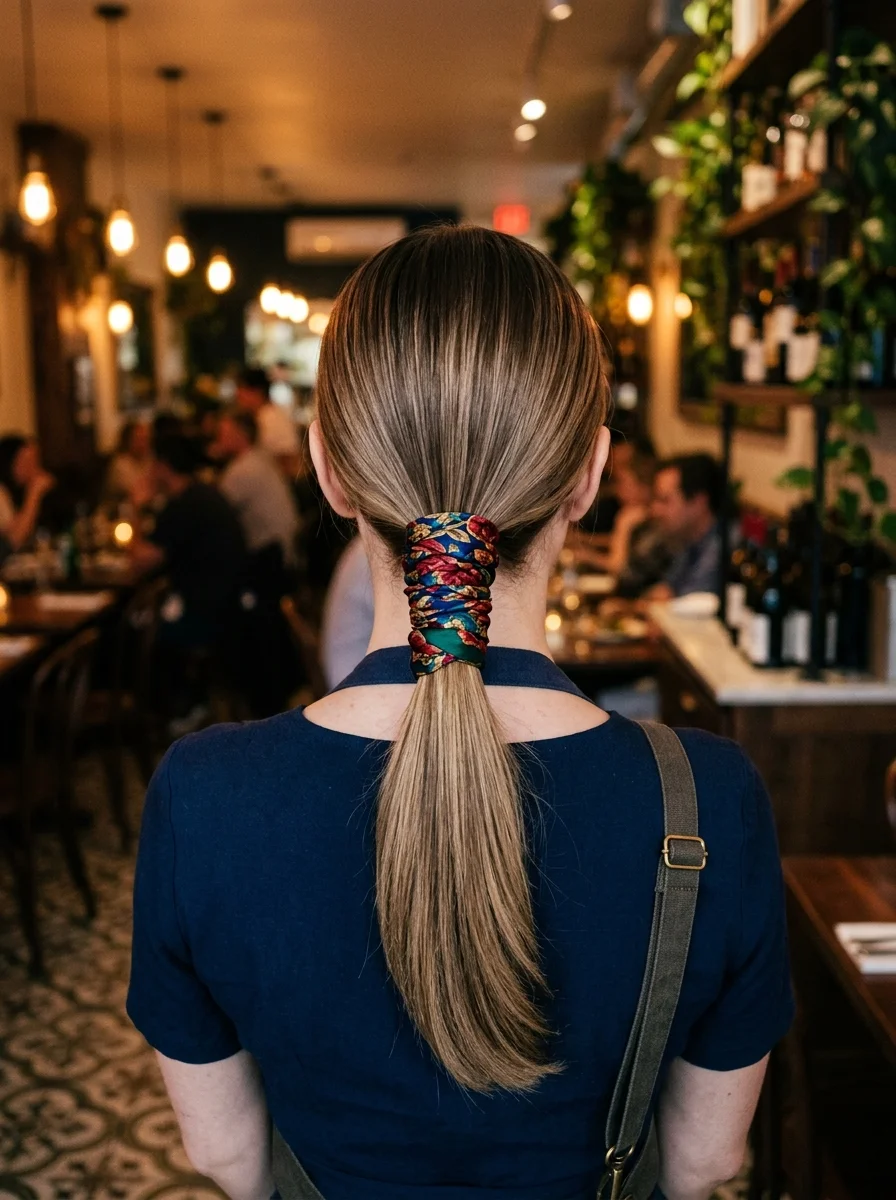
The overview: A smooth low ponytail with a colorful, patterned scarf wrapped around the elastic. The scarf adds a statement accent without requiring any complicated styling. The ponytail itself is simple and functional.
Why this look is popular: The scarf is the fastest way to add personality to a basic ponytail. Choose a print that picks up colors from your uniform or the restaurant's brand palette, and suddenly the scarf looks like part of the dress code rather than an afterthought.
Where this look is suitable: Casual dining, Mediterranean restaurants, and any venue where the atmosphere is warm and inviting.
Step by step:
- Create a smooth ponytail. Brush hair into a low ponytail and secure with an elastic.
- Fold the scarf. Fold a square scarf into a band approximately 2 inches wide.
- Wrap around the elastic. Center the scarf at the front of the ponytail base, then wrap the ends around to the back and tie a flat knot.
- Adjust the tails. Let the scarf tails hang alongside the ponytail or tuck them in for a cleaner finish.
25.Super Sleek Low Ponytail
The overview: The most controlled ponytail on this list. Every strand is brushed flat against the scalp, the elastic is concealed with a hair wrap, and the tail falls in a perfectly straight line. The finish is so smooth it reflects light.
Why this look is popular: This is the power move. The super sleek ponytail communicates precision and discipline, which are exactly the traits you want customers to associate with your service. It also photographs beautifully from every angle.
Where this look is suitable: Fine dining, corporate dining rooms, and any venue where the staff presentation is meticulously curated.
Step by step:
- Apply gel generously. Work a strong-hold gel through your hair from roots to ends. The surface should look wet.
- Brush with a boar bristle brush. Gather hair into a low ponytail, brushing repeatedly until every bump is eliminated.
- Secure with a strong elastic. Wrap three times. Pull tight.
- Wrap the elastic. Take a thin strand and wrap it around the base. Pin underneath.
- Flat-iron the tail. Pass a flat iron through the ponytail for a pin-straight finish.
Tips and tricks: Wrap a silk scarf around the crown for 10 minutes after styling. This sets the gel and eliminates any remaining texture at the surface.
31 Flattering Summer Hairstyles for Women Over 40 (2026)
26.French Twist with Gold Metal Clip
The overview: A relaxed French twist secured with a large gold metal claw clip. Unlike the matte black version, the gold clip is a deliberate accessory choice that adds warmth and a hint of luxury to the style.
Why this look is popular: Gold hardware against dark or warm-toned hair creates a visual anchor that draws the eye. The clip does all the work, which means this style takes under three minutes to execute. The French twist itself is slightly looser than the black clip version, giving it a more relaxed, approachable feel.
Where this look is suitable: Wine bars, cocktail lounges, and any venue where the atmosphere is warm and the lighting is low.
Step by step:
- Gather loosely. Sweep hair to one side with your hands rather than a brush for a softer surface.
- Roll into a twist. Fold the hair inward and roll it toward the head, creating a loose vertical cylinder.
- Clip it. Open the gold claw clip and clamp it over the twist, gripping both the rolled hair and the base layer beneath.
- Pull out face-framers. Gently pull a few pieces loose at the front for a softer silhouette.
Tips and tricks: Gold clips tarnish over time. Wipe yours with a jewelry cloth once a week to maintain the shine. A dull clip defeats the purpose.
How to Make Any Hairstyle Survive a Full Shift
The style you choose matters less than the foundation you build underneath. These principles apply to every hairstyle on this list.
Start with day-old hair. Freshly washed hair is too slippery for most updos. The natural oils that accumulate overnight create the grip that keeps braids tight and buns anchored. If you washed your hair that morning, compensate with dry shampoo or texturizing spray at the roots.
Use the right elastic. Standard rubber elastics lose tension by hour two. Switch to spiral coil elastics or fabric-covered bands with internal grip. For extra security, double up: one elastic to create the ponytail, a second to reinforce it.
Pin strategically, not excessively. Ten bobby pins placed randomly won't hold as well as four pins placed in an X pattern. Cross your pins to create anchor points that grip from two directions.
Set with spray before and after. A light mist of flexible-hold hairspray before styling adds grip to the hair shaft. A second application after the style is complete locks everything in place. Avoid strong-hold sprays for everyday shifts; they create buildup that requires thorough washing, which accelerates the cycle of clean-slippery hair.