Nail Trends
30 Adorable Ladybug Nail Designs for a Magical Spring Look
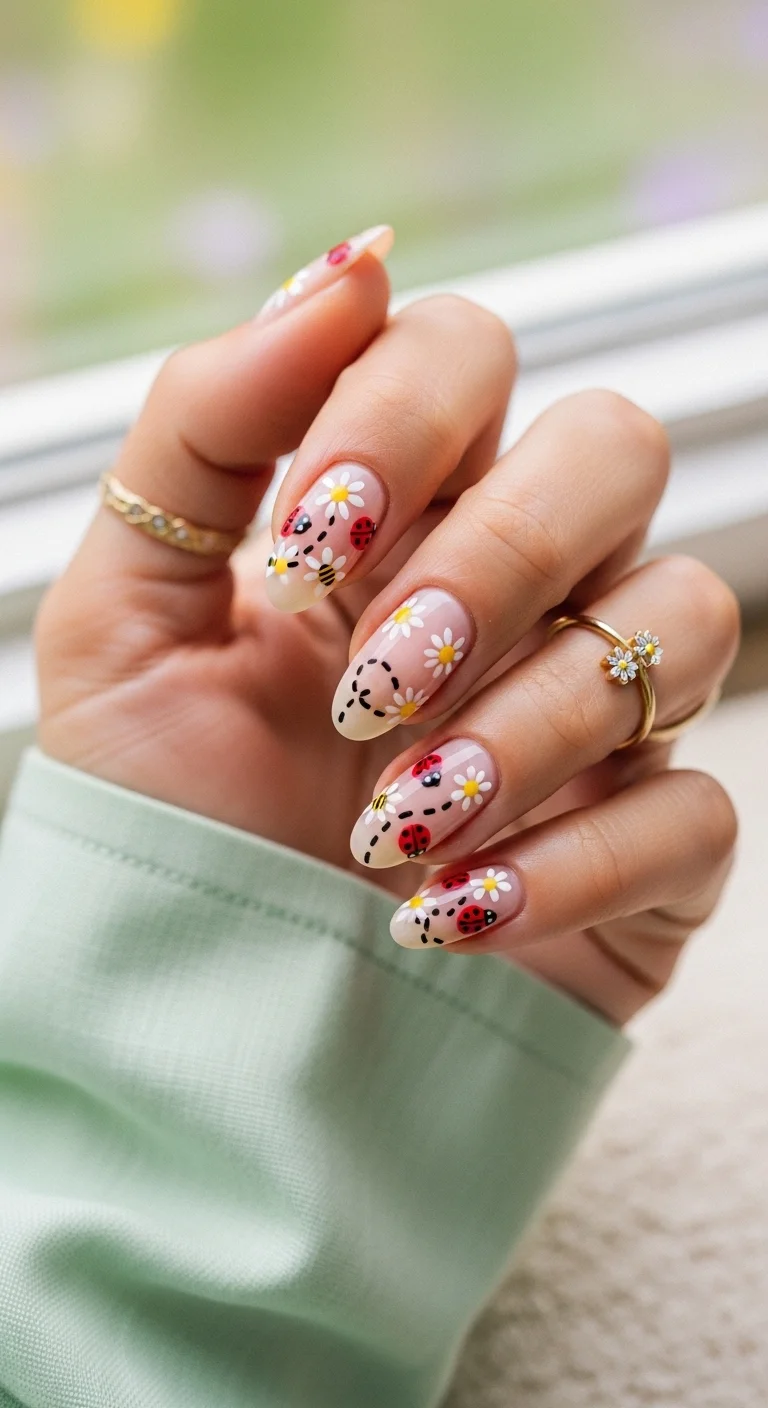
Right now, ladybug nails are taking over, and it's easy to see why! There is just something so incredibly cheerful and sweet about these little lucky charms. After searching to find the absolute best inspiration, trust that these aren't basic polka dots. From chic minimalist ladybug accents on a French tip to full-on whimsical garden scenes featuring tiny red beetles, here are 30 stunning designs to screenshot immediately. Grab your favorite matcha latte, get cozy, and dive into these ridiculously adorable ladybug manicures!
Why Ladybugs? The Luck & Meaning Behind This Whimsical Trend
Ladybugs have carried symbolic weight across cultures for centuries. In European folklore, spotting a ladybug meant a good harvest was coming. In Scandinavian traditions, a ladybug landing on a young woman signaled she'd be married soon. The common thread across all of them is luck. So when people ask why ladybug nails keep showing up on every spring feed, the answer isn't just that they're cute, it's that we all want a little extra fortune painted on our fingertips.
There's also a nostalgia factor at play. Ladybugs are one of those childhood touchstones that survive into adulthood without feeling childish. Puffy stickers, garden explorations in grandma's backyard, the first time you let one crawl across your hand. Tapping into that memory through nail art creates a connection that a generic floral pattern can't replicate. It's why a set of ladybug nails gets more comments than the same design done with abstract dots.
The spring connection is the clincher. Ladybugs emerge in warmer months, which means the trend is naturally tied to the season in a way that feels organic rather than manufactured.
When you wear ladybug nails in April or May, you're not just wearing a pattern. You're signaling that winter is over, that sunshine is coming, and that you're ready for the good part of the year. That seasonal alignment gives the design an emotional lift that carries through every time you catch a glimpse of your own hands.
1.Ladybug Frenchie Fusion
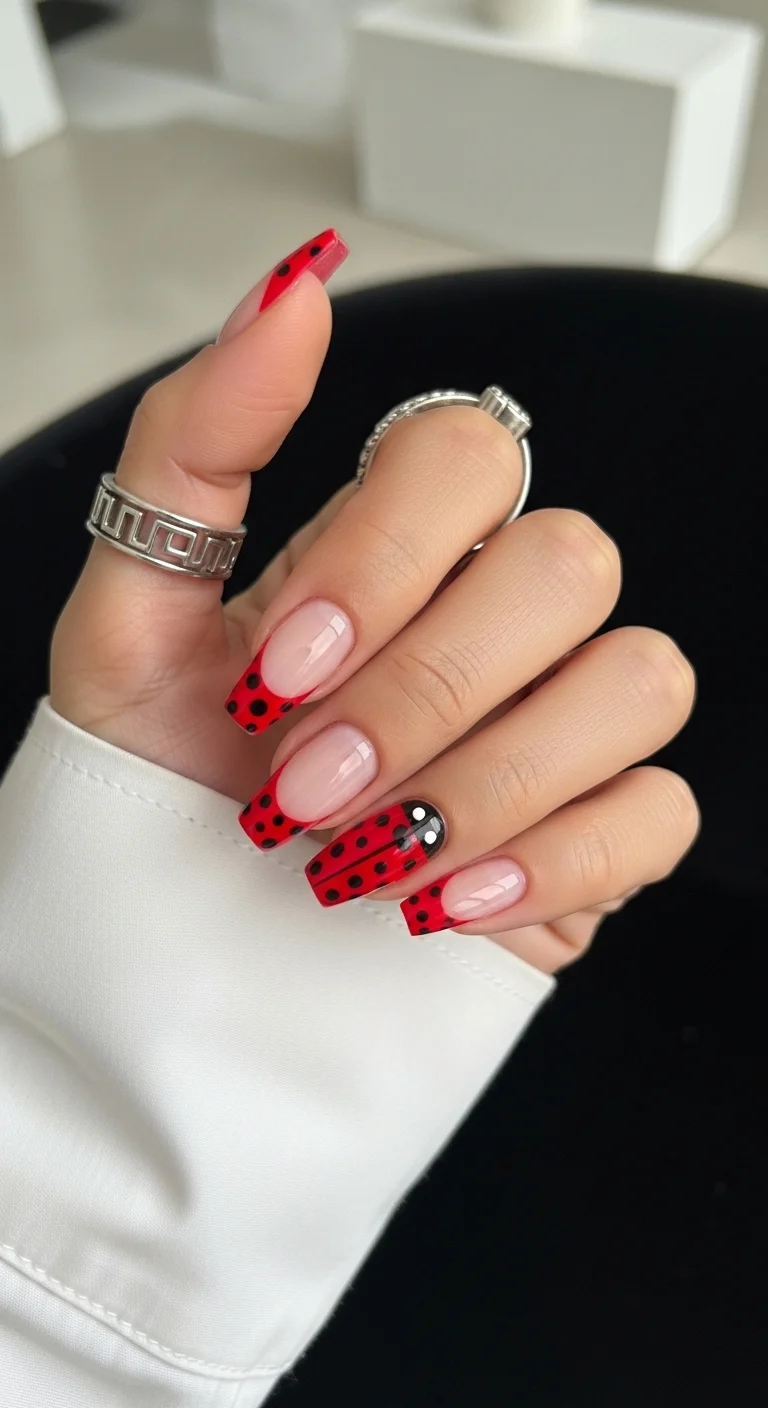
A spicy twist on the classic French tip featuring ladybug dots.
Overview:
Red French tips are already a step beyond the classic white. Adding black polka dots to the red section turns them from "colored French" into a deliberate ladybug reference without committing to a full-nail illustration on every finger.
The ring finger is where the design reveals its full concept. The entire nail is painted as a ladybug shell: red base, black dots, black head at the cuticle with two tiny white eyes. It transforms the set from "red French tips with dots" into a themed design that rewards closer inspection. Without that accent nail, the ladybug reference would be too subtle to register.
The sheer nude base is doing important work. It keeps the overall look from feeling heavy and lets the red tips dominate visually. On a colored or opaque base, the French line would lose its crispness and the ladybug theme would compete with the background.
Design Breakdown:
Classic French structure with themed accents on specific nails.
Base Color: Sheer milky nude or pink. The natural nail should be visible through the base.
Nail Shape: Long coffin. The flat tip gives the red French line a clean, geometric edge.
Design Element: Red French tips with black polka dots on four nails. Full ladybug shell (red with black dots, black head, white eyes) on the ring finger.
Finish: High-gloss top coat.
Get The Look at Home:
The French tips and the accent nail use different techniques. Do the tips first, then the accent.
- Sheer base: Two coats on all nails. Let dry fully.
- Red tips: Using a French liner brush and bright red polish, paint the smile line from sidewall to center on each nail. Two thin coats for full opacity.
- Dot the tips: Using a small dotting tool and black polish, place three to five dots on each red tip. Space them randomly.
- Accent nail: On the ring finger, paint the entire nail red. Add a black semi-circle at the cuticle for the head. Place black dots across the red shell. Add two tiny white dots on the black head for eyes.
- Cleanup: An angled brush dipped in acetone sharpens the French smile line. This step is non-negotiable on a sheer base.
- Seal: Two coats of top coat. The first locks the art; the second smooths the surface.
26 Stunning Summer Braided Hairstyles for Women 2026 ☀️💇♀️
2.Minty Meadow Magic
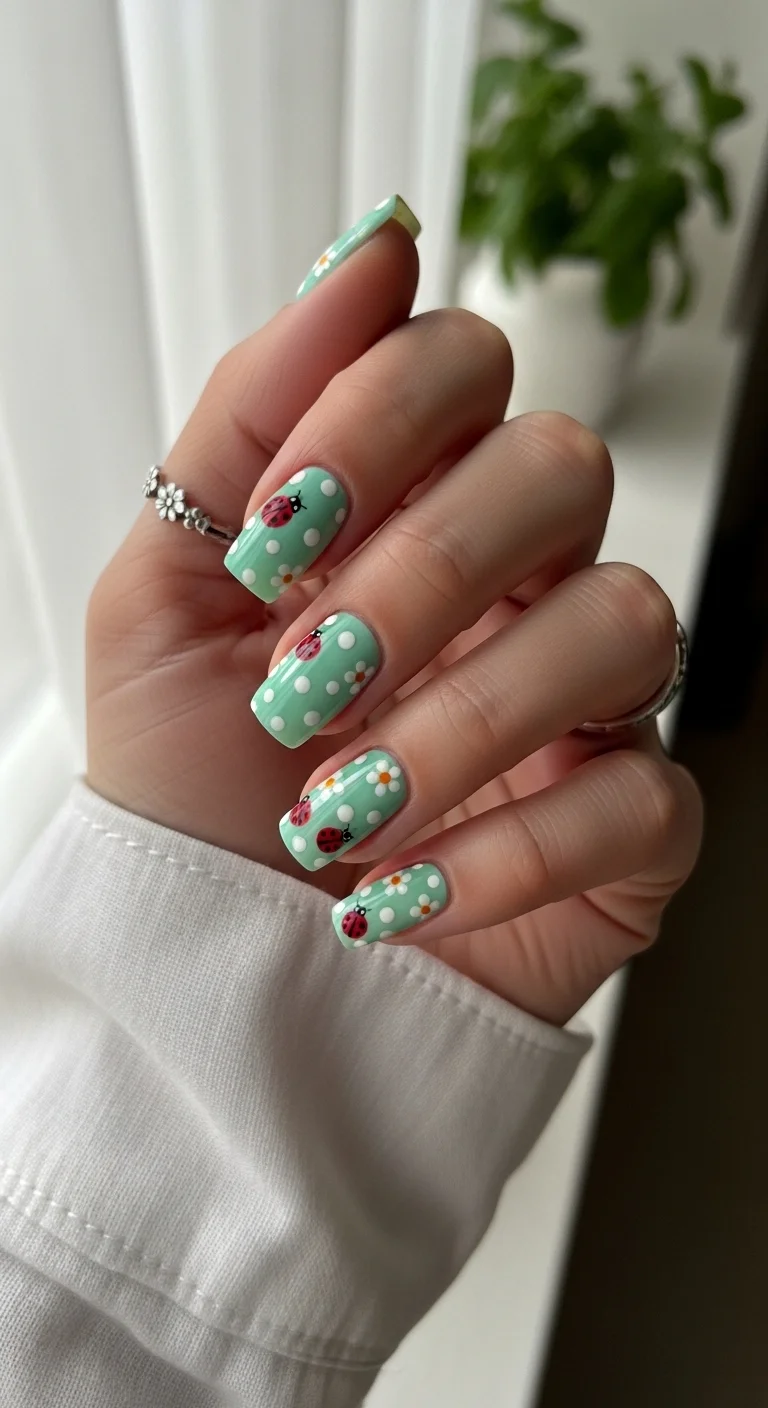
Soft mint meets garden-party realness.
Overview:
Mint green with white polka dots is already a complete design. Adding daisies and tiny ladybugs on top creates a layered composition where each element has a distinct role: the mint is the field, the dots are texture, the daisies are flora, and the ladybugs are the focal point.
The challenge with this many elements is avoiding visual clutter. The design works because the color palette stays limited: mint, white, yellow, red, and black. Every element uses only these five colors, which creates cohesion despite the busy pattern. If any element introduced a sixth color, the design would tip into chaos.
The ladybugs need to be small enough to read as insects rather than red dots. A dotting tool creates the body, a smaller dot creates the head, and a toothpick adds the legs. The legs are the detail that separates "red dot" from "ladybug." Without them, the bugs are invisible at conversational distance.
Design Breakdown:
Multiple motifs on a single base, unified by a five-color palette.
Base Color: Creamy opaque mint green. Needs to be fully coverage so the white dots and art sit cleanly on top.
Nail Shape: Short to medium square. The flat surface provides stable ground for the scattered art.
Design Element: White polka dots, hand-painted daisies (white petals, yellow centers), and tiny red ladybugs with black details scattered across all nails.
Finish: High-gloss top coat to smooth the layered art.
Get The Look at Home:
Work in color layers rather than finishing one motif at a time. All whites first, then yellows, then reds, then blacks.
- Mint base: Two coats of opaque mint green. Let dry fully.
- White layer: Using a dotting tool, place white polka dots in the open spaces. On two or three nails, paint daisy petals (five dots in a circle) instead of single dots.
- Yellow centers: Add a tiny yellow dot to the center of each daisy using a smaller dotting tool.
- Ladybug bodies: Place small red dots where you want the ladybugs. Two or three per nail, not every nail needs them.
- Ladybug details: Using a toothpick and black polish, add a tiny head dot, a center line down the back, and two or three small legs on each side.
- Seal: One thick coat of top coat to encapsulate all the layered art.
3.Zesty Lime & Striped Ladybugs
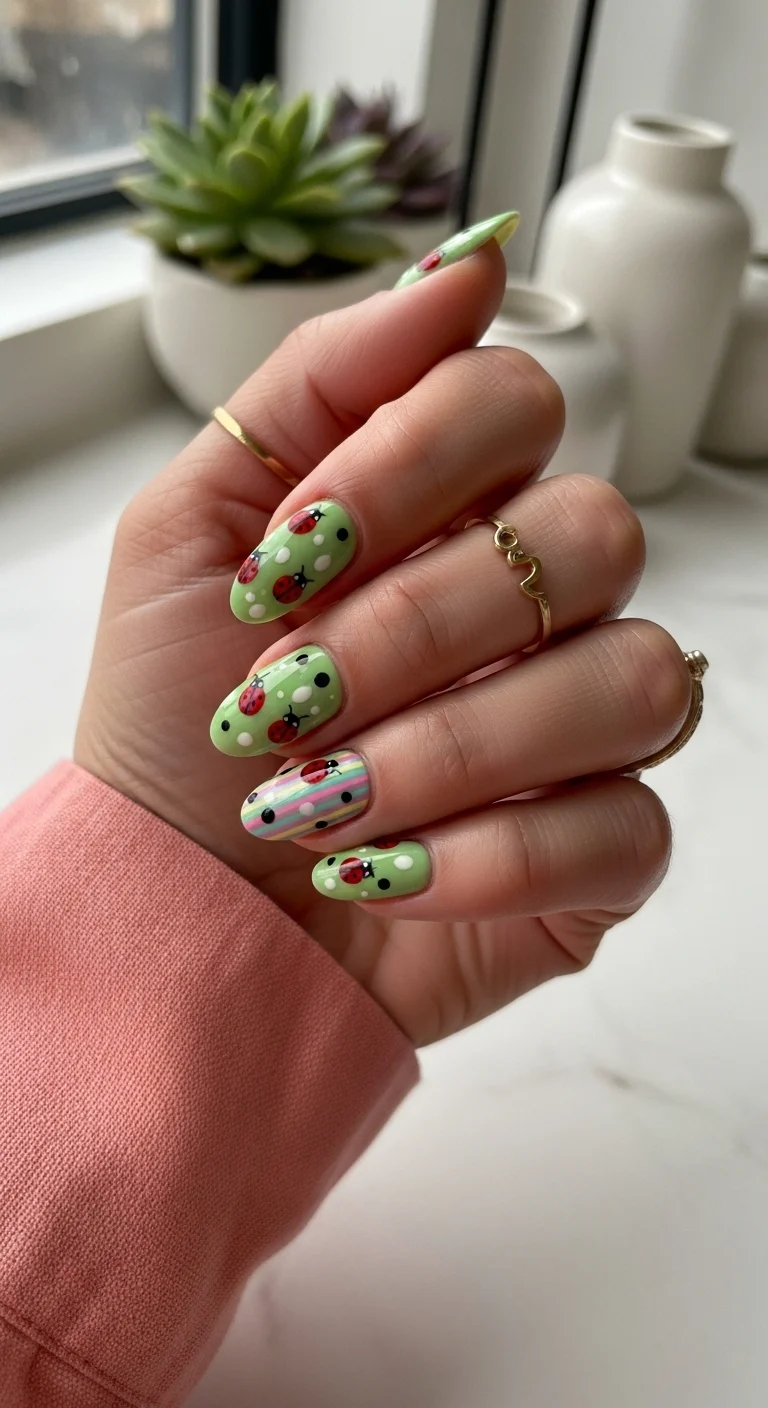
A quirky mix of garden greens and playful stripes.
Overview:
Lime green and red shouldn't work together on paper. They sit on opposite sides of the color wheel, which usually creates visual tension. But the specific shades here are both muted enough that the tension becomes complementary energy rather than clashing. The green reads as sage rather than neon, and the red of the ladybugs is warm rather than primary.
The striped accent nail is the design's secret weapon. Without it, you have ladybug nails on a green base, which is perfectly fine but unremarkable. The horizontal stripes in pink, green, and white break the pattern and introduce a retro, almost vintage quality that elevates the entire set. It's the nail people notice second, after the ladybugs, and it changes the read from "cute" to "curated."
The white and black dots scattered across the green nails serve as visual filler between the ladybugs. Without them, the green space between bugs would feel empty. With them, every nail looks complete regardless of how many ladybugs it carries.
Design Breakdown:
Green base with scattered art plus one pattern-breaker accent.
Base Color: Sage or muted lime green on most nails. Multi-colored pastel horizontal stripes on the accent nail.
Nail Shape: Medium almond. The curved shape softens the geometric stripes and complements the organic bug shapes.
Design Element: Red ladybugs with black heads, legs, and dots. White and black polka dots as background texture. One accent nail with horizontal stripes in pink, green, and white.
Finish: High-gloss top coat.
Get The Look at Home:
The striped accent is the hardest part. Use striping tape for clean lines.
- Green base: Two coats of sage or lime green on most nails. Let dry fully.
- Stripe accent: On one nail, use striping tape to mask horizontal lines. Paint alternating pink, green, and white. Peel the tape while the polish is still tacky.
- Dot background: Using a small dotting tool, scatter white and black dots across the green nails. Keep them irregular.
- Ladybug bodies: Place small red ovals where you want the bugs. Two or three per nail.
- Bug details: Black head, center line, legs on each side, and tiny black dots on the red shell. Use a toothpick for the finest lines.
- Seal: Two coats of top coat to smooth the raised texture of the layered art.
28 Cute & Sporty Baseball Game Nail Ideas for 2026 ⚾
4.Polka Dot Perfection
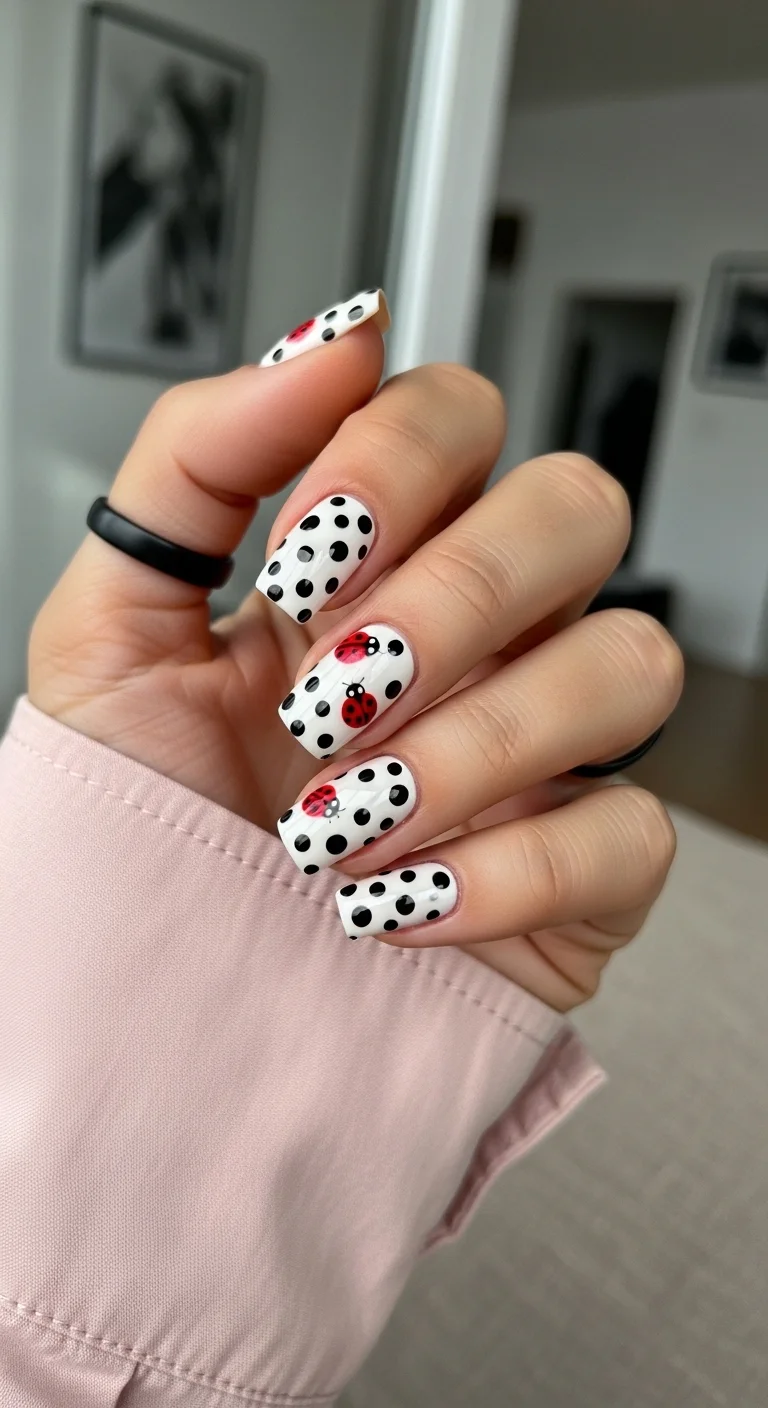
Graphic black and white meets a pop of red.
Overview:
Black polka dots on a white base is a design that needs nothing else to work. The contrast is high, the pattern is graphic, and the execution is straightforward. Adding ladybugs on two accent nails is a risk, because you're introducing a third color and a detailed illustration into a design that thrives on simplicity.
The risk pays off because the ladybugs share the black-and-white palette. The red bodies are the only new color, and they're small enough to function as punctuation rather than a competing element. The middle and ring fingers carry the ladybug art while the remaining nails stay as pure polka dot. This separation keeps each pattern readable.
White polish is unforgiving. Every ridge, brush mark, and unevenness shows through. A ridge-filling base coat and thin, self-leveling white formula are worth the extra prep time. Three thin coats rather than two thick ones prevents the streaking that plagues white polish applications.
Design Breakdown:
Monochrome polka dots with red accent illustration. High contrast, clean geometry.
Base Color: Bright, opaque white. Needs to be fully streak-free.
Nail Shape: Short square. Clean edges complement the graphic pattern.
Design Element: Uniform black polka dots on most nails. Red ladybugs with black heads, center lines, and dots on two accent nails.
Finish: High-gloss top coat.
Get The Look at Home:
White needs to be fully dry before the black dots go on. Any tackiness drags the dotting tool and smears the black into the white.
- White base: Three thin coats of opaque white. Let each coat dry fully.
- Polka dots: Using a medium dotting tool and black polish, press straight down and lift straight up. Don't twist. Space the dots roughly 3mm apart in a staggered pattern.
- Ladybug accent: On two nails, paint a red circle for the body. Add a black head at the top, a center line down the middle, and black dots on either side.
- White eyes: Two tiny white dots on the black head of each ladybug. This small detail makes them look alive rather than like abstract shapes.
- Dry check: Wait at least five minutes before top coating. Black polish on white smears instantly if the surface is even slightly tacky.
- Seal: One coat of top coat, applied in a single stroke per nail. Going back over the same area drags the black into the white.
5.Crimson Ladybug Coffin
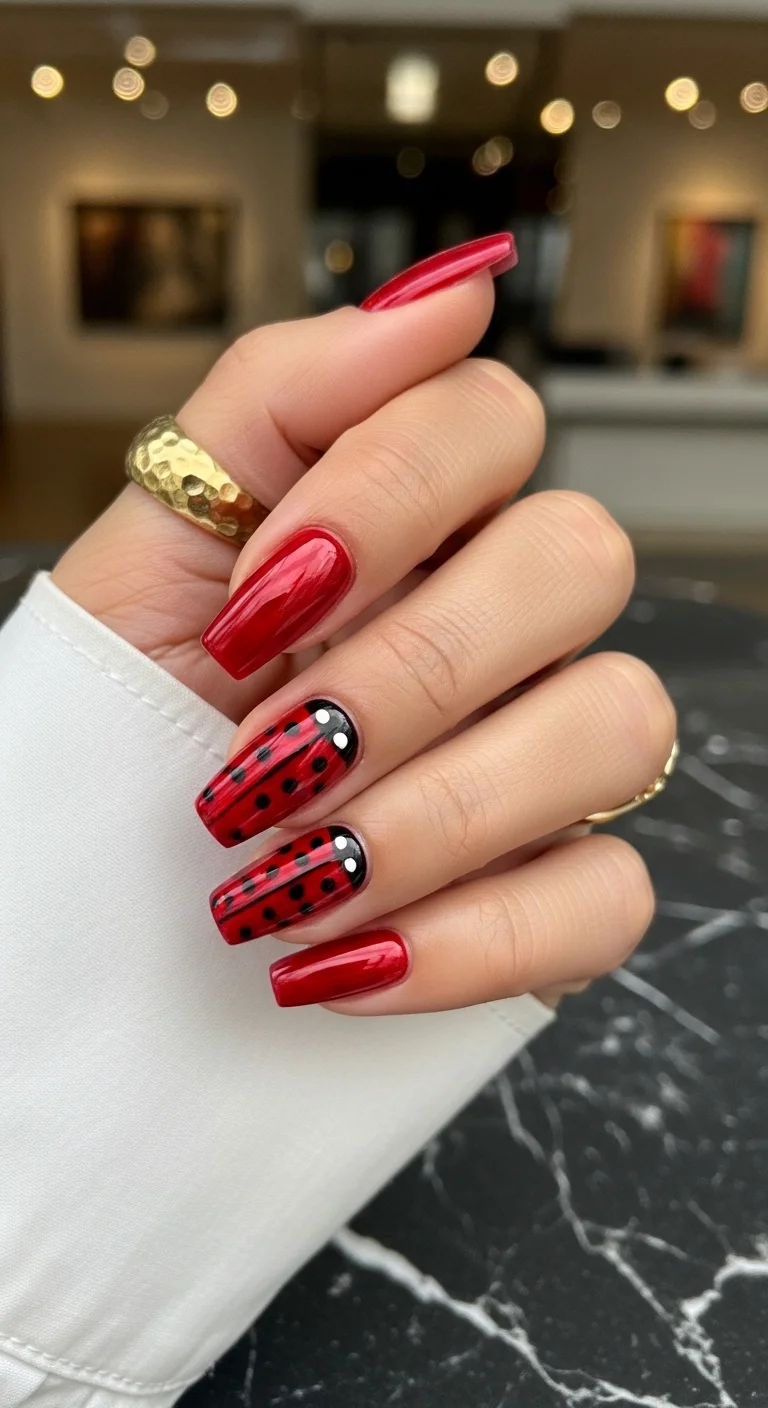
Sultry red nails with a cute secret.
Overview:
Deep crimson red reads as sophisticated on its own. Adding ladybug details to two accent nails doesn't make the set "cute" in the traditional sense. Instead, it creates a tonal design where the red base does double duty as both a solid color and the background for the insect illustration. The ladybugs emerge from the red rather than sitting on top of it.
The accent nails use a specific construction: a black semi-circle at the cuticle for the head, a black center line from head to tip, and black dots arranged symmetrically on either side. Two white dots on the black head suggest eyes. The technique is simple, but the symmetry of the dot placement is what makes it look like a deliberate design rather than a random pattern.
The deep red works better here than a bright primary red would. Bright red ladybug nails read as costume-like. Crimson reads as a color choice that happens to reference a ladybug. The difference is the undertone: crimson has enough depth to feel like a fashion color, while primary red feels like a theme.
Design Breakdown:
Monochromatic red with tonal illustration on accent nails.
Base Color: Deep, rich crimson red. Opaque in two coats. Slightly jelly-like finish adds depth.
Nail Shape: Long coffin. The flat surface and tapered sides frame the accent nail art.
Design Element: Solid crimson on most nails. Two accent nails with ladybug shell pattern: black head at cuticle, black center line, black dots, white eyes.
Finish: Ultra-glossy top coat. The shine makes the crimson look wet and the black details look sharp.
Get The Look at Home:
The accent nails are symmetrical, so take your time with the center line. It's the axis everything else aligns to.
- Crimson base: Two coats on all nails. Let dry fully.
- Black head: On the accent nails, paint a black semi-circle at the cuticle. Keep the curve smooth.
- Center line: Using a thin liner brush, draw a straight black line from the head to the tip. This line divides the "wings."
- Dots: Place black dots symmetrically on either side of the center line. Three to four per side, evenly spaced.
- Eyes: Two tiny white dots on the black head. Use the smallest dotting tool you have.
- Seal: Two coats of top coat to smooth the raised texture of the black art.
28 Stunning Softball Hairstyle Ideas with Braids for 2026 🥎✨
6.Summer Sunset Stripes
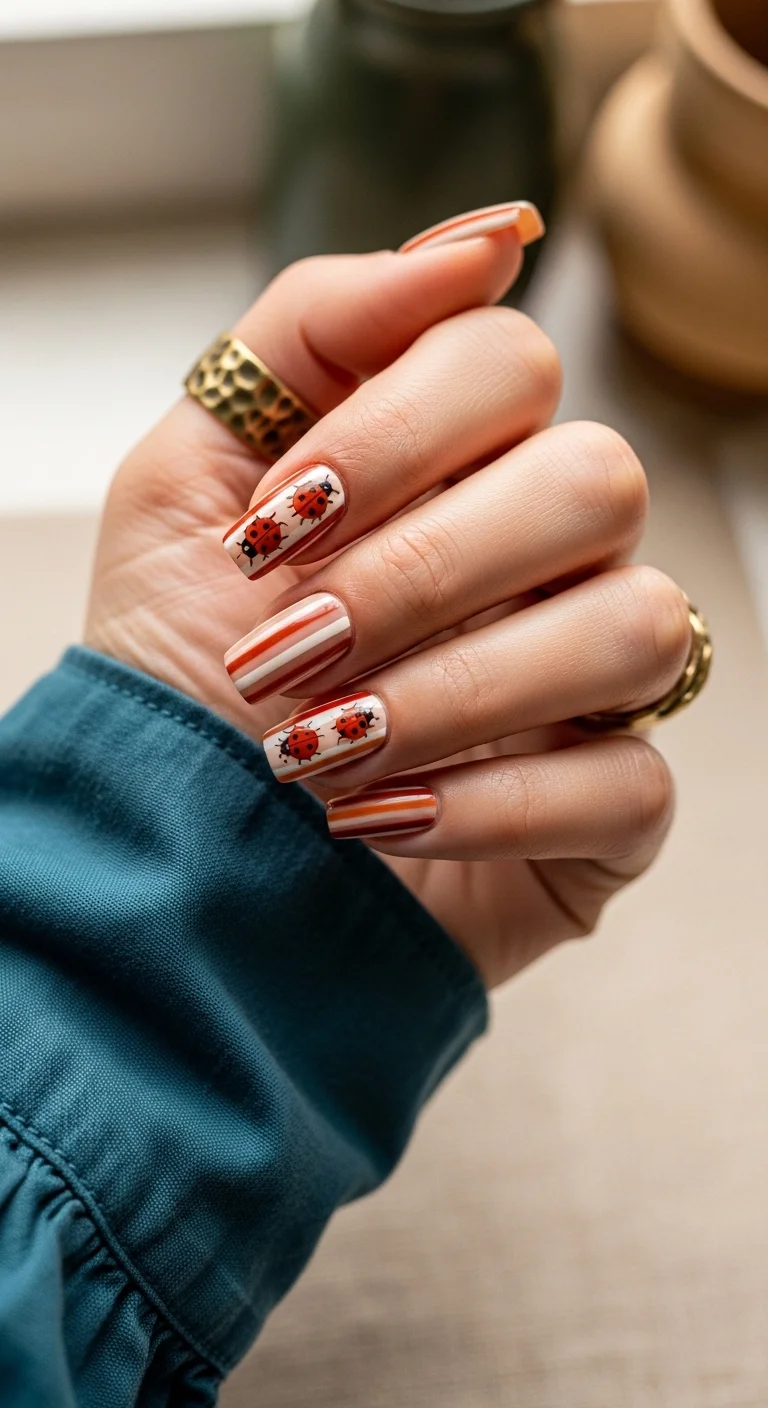
Retro stripes meet garden bugs for the ultimate summer vibe.
Overview:
Horizontal stripes in orange, white, and brown create a retro palette that feels like a 1970s beach towel or a vintage camping blanket. The warm tones are unusual for ladybug nails, which typically lean red and black. This shift in palette gives the design a distinct personality that separates it from every other ladybug set.
The ladybugs sit on top of the stripes rather than being integrated into them. This creates a layered effect where the bugs read as figures against a patterned ground. The stripes provide structure; the ladybugs provide organic movement. The contrast between geometric and natural is what makes the design visually interesting.
The stripe thickness matters. Thin, uniform stripes read as refined. Thick, uneven stripes read as retro and handmade. This design goes for the latter, which is why it works with the hand-painted ladybugs rather than looking like two unrelated designs forced onto the same nail.
Design Breakdown:
Pattern-on-pattern with a warm, retro palette.
Base Color: Alternating horizontal stripes of white, orange, and brown.
Nail Shape: Short square. The flat shape reinforces the retro, sporty aesthetic.
Design Element: Horizontal stripes across all nails with small red ladybugs scattered on top, crawling at various angles.
Finish: High-gloss top coat to smooth the stripe ridges and make the colors look saturated.
Get The Look at Home:
Striping tape gives you the cleanest lines. Freehand works if you accept a more handmade look.
- White base: Two coats of opaque white. Let dry completely.
- Stripe taping: Apply thin striping tape horizontally across each nail, spacing lines roughly 3mm apart.
- Orange coat: Paint orange over the entire nail, covering both the tape and the exposed white.
- Peel while wet: Remove the tape immediately. Pull at a low angle to keep the stripe edges clean.
- Brown accents: Once the orange is dry, add thin brown stripes in the remaining white gaps for a three-tone effect.
- Ladybugs: Using a dotting tool, place red bodies with black heads and dots on top of the stripes. Angle them in different directions.
- Seal: Two coats of top coat to smooth the raised stripe texture.
7.Sky High Ladybugs
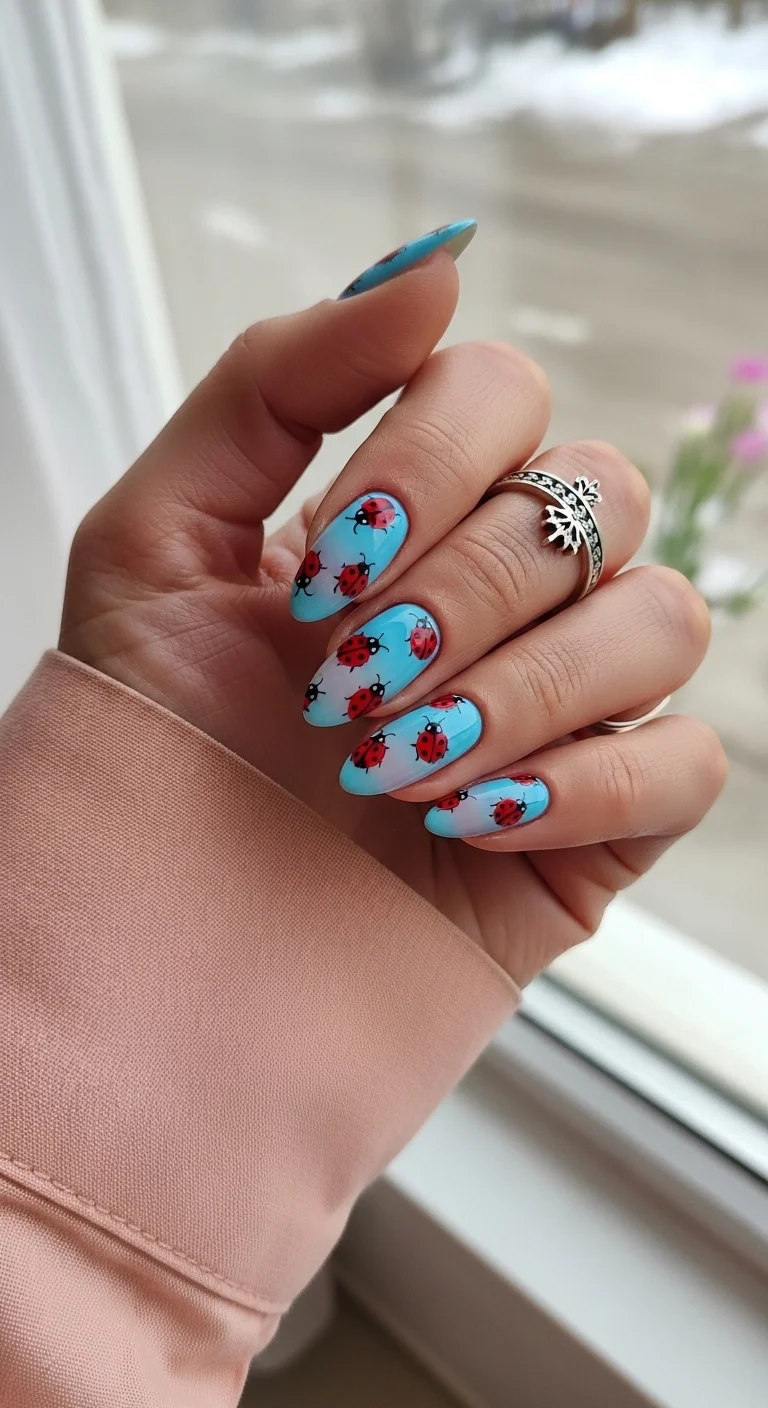
A literal breath of fresh air for your fingertips.
Overview:
A blue-to-white gradient that mimics a clear sky is one of those designs that sounds simple but depends entirely on the blend. The transition from white at the cuticle to sky blue at the tip needs to be seamless, with no visible line where the two colors meet. A makeup sponge creates that blend, but each layer needs to dry before the next goes on, or the colors mix into a muddy blue-grey instead of a clean gradient.
The ladybugs scattered across the gradient are what make the design more than "blue ombre nails." They're painted at different angles and sizes, which creates the illusion of movement across the sky. Some fly toward the tip, others toward the cuticle. The red bodies against the blue background create a complementary color contrast that makes the bugs pop without either color overpowering the other.
White undercoat is essential. Without it, the blue pigment sheers out against the natural nail tone and the gradient reads as washed-out. Two thin coats of white, fully dried, give the sponge something opaque to work against.
Design Breakdown:
Gradient atmosphere with scattered illustration on top. Two distinct techniques serving different purposes.
Base Color: White undercoat. The gradient itself transitions from white at the cuticle to sky blue at the tip.
Nail Shape: Medium almond. The curved shape echoes the organic movement of the flying ladybugs.
Design Element: Sponge-applied blue-to-white vertical ombre. Multiple red ladybugs with black details painted at different angles across the gradient.
Finish: High-gloss top coat to blend the gradient and saturate the colors.
Get The Look at Home:
The gradient needs to be fully dry before the ladybugs go on. Painting on a tacky surface drags the blue into the red.
- White base: Two coats of opaque white. Let dry fully.
- Sponge setup: Paint a stripe of white and a stripe of sky blue side by side on a makeup sponge. Dab on paper first.
- Build the gradient: Press the sponge onto the nail with white at the cuticle and blue at the tip. Three to four passes builds opacity. Let each pass dry for thirty seconds.
- Dry completely: Wait at least ten minutes. The sponge leaves a slightly textured surface that needs time to level.
- Ladybugs: Paint red ovals at various angles across the gradient. Add black heads, center lines, and dots. Vary the sizes for depth.
- Seal: Two coats of top coat to smooth the sponge texture and protect the art.
30 Trendy Summer French Tip Nail Designs for 2026 💅
8.Butterfly Beetle Garden
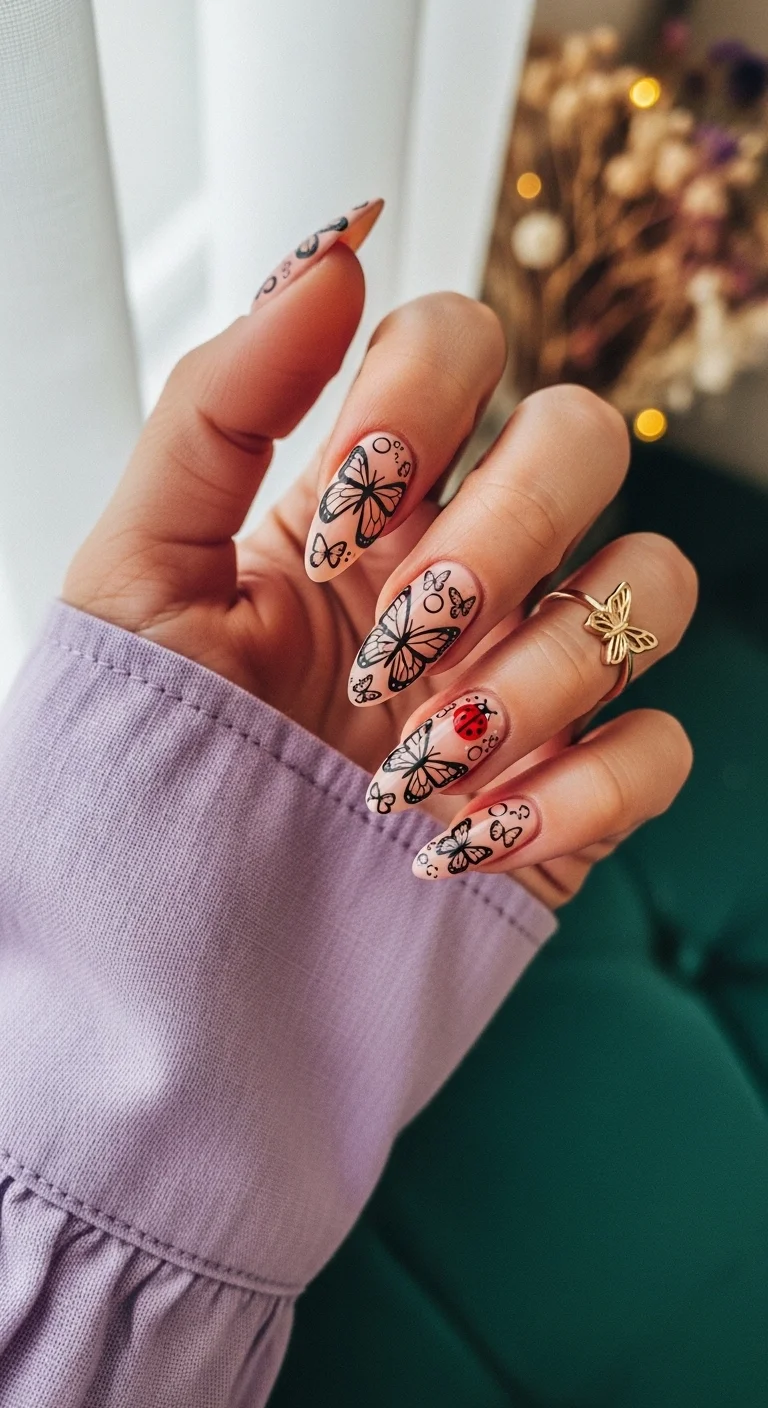
Delicate ink-drawn wings meet a pop of red.
Overview:
Mixing butterflies and ladybugs on the same hand is a design choice that could easily feel scattered. It works here because both insects are rendered in the same illustrative style: black line art on a sheer base, with only the ladybug introducing color. The butterflies stay monochrome; the ladybug gets the red. That single pop of color on one nail creates a focal point that anchors the entire set.
The sheer nude base is essential to the design's success. It creates the illusion that the insects are resting on bare skin rather than painted onto a colored surface. The transparency also means growth-out is nearly invisible for the first two weeks, making this one of the most maintenance-friendly designs in the ladybug category.
The black line work needs a very thin liner brush. Thick lines overpower the negative space and make the butterflies look heavy. The goal is delicacy, and that requires a brush that holds enough polish to draw a complete wing outline without re-dipping.
Design Breakdown:
Illustrative line art on a transparent base, with one color accent.
Base Color: Sheer nude or clear base coat. The natural nail should be visible.
Nail Shape: Long almond. The tapered shape echoes the wing forms of the butterflies.
Design Element: Black line-art butterflies on most nails. One accent nail with a red ladybug (black head, black dots, white eyes). Small white dots scattered as decorative filler.
Finish: High-gloss top coat to protect the fine line work.
Get The Look at Home:
Draw the butterfly outlines first across all nails, then go back and add the wing details. This is faster than finishing one butterfly at a time.
- Sheer base: One or two coats of milky nude. Let dry fully.
- Butterfly outlines: Using a thin liner brush and black polish, draw the outer contour of each butterfly wing. Keep the lines thin and consistent.
- Wing details: Add interior lines for the wing veins. These should be thinner than the outlines.
- Ladybug accent: On one nail, paint a red oval for the body. Add a black head, center line, dots, and white eyes.
- White dots: Scatter a few tiny white dots near the butterflies for decorative texture.
- Seal carefully: One coat of top coat, applied in a single stroke per nail to avoid smearing the black lines.
9.Strawberry Picnic Gingham
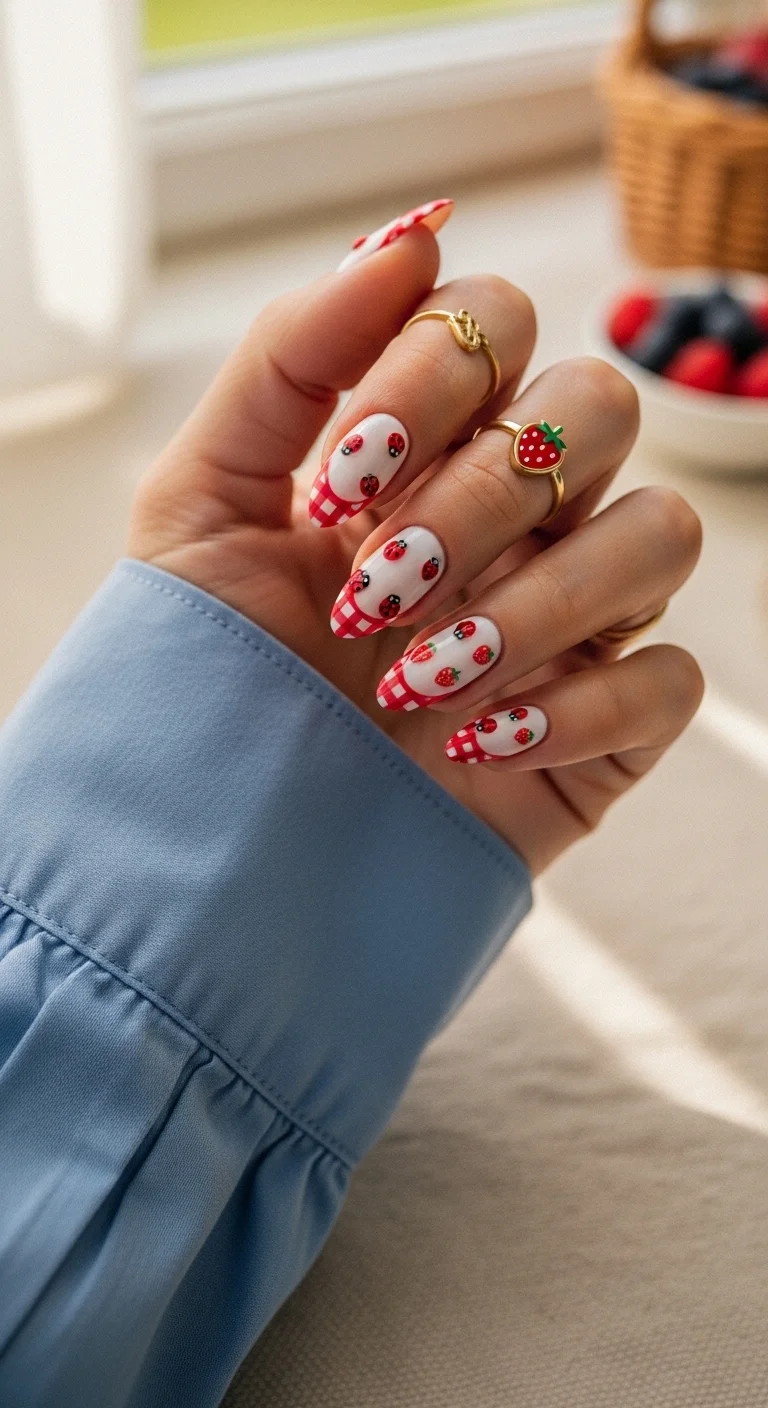
A picnic-ready design mixing gingham, fruit, and bugs.
Overview:
Three different motifs, one nail: gingham, strawberries, and ladybugs. Most designers would avoid combining this many elements on a single set, because the risk of visual overload is high. This design survives the combination because all three motifs share the same color story: red, white, and green. Every element uses only these three colors (plus black for the ladybug details), which creates cohesion across the busy pattern.
The gingham appears only on the tips, functioning as a modified French rather than an all-over pattern. This is a smart structural choice. Full gingham on every nail would compete with the strawberries and ladybugs for attention. Limiting it to the tips keeps it as an accent rather than a dominant pattern.
The white base does double duty: it's the background for the ladybug art and the foundation color for the gingham grid. This means the entire design builds from a single base color, which simplifies the application process considerably.
Design Breakdown:
Three motifs sharing a three-color palette. The white base unifies everything.
Base Color: Bright, opaque white on all nails.
Nail Shape: Medium almond. The curved shape softens the gingham's geometric grid.
Design Element: Red gingham tips (grid lines on white), hand-painted strawberries with green leaves, and red ladybugs with black details. Each nail carries a different combination of these three motifs.
Finish: High-gloss top coat to unify the layered art.
Get The Look at Home:
Do the gingham tips first, then add the fruit and bug art on the remaining white space.
- White base: Two coats of opaque white on all nails. Let dry fully.
- Gingham tips: Using a striper brush and red polish, paint thin horizontal lines on the tip area, then vertical lines to create a grid. Keep the gingham confined to the upper third of the nail.
- Strawberries: On the white sections, paint small red heart shapes. Add green leaf caps and tiny white seed dots.
- Ladybugs: Place small red bodies with black heads and dots in the remaining white space.
- Dry time: Wait at least five minutes before top coating. The layered art is thick and needs time to set.
- Seal: Two coats of top coat to smooth the surface texture.
29 Fun FIFA World Cup Watch Party Hairstyles (2026)
10.Bumblebee Ladybug Meadow
A wildflower meadow scene across all ten nails.
Overview:
This design tells a story across the hand: daisies growing from the cuticle, ladybugs crawling between the petals, and bumblebees flying along dashed black trails. The sheer nude base makes it look like the entire scene is painted directly on bare nail, which gives it an illustrated, editorial quality that a colored base would undermine.
The dashed flight paths are the design's most distinctive detail. Without them, you have daisies, ladybugs, and bees on separate nails with no visual connection. The black dotted lines tie everything together by creating movement across the hand. Your eye follows the trails from one nail to the next, which makes the ten nails read as a single composition rather than ten individual designs.
The sheer base is also the most forgiving option for this level of detail. A colored base would require perfect opacity to avoid showing brush marks beneath the art. The sheer nude hides imperfections in the base application because the natural nail color shows through anyway. It's one of the rare cases where "less base" actually produces a better result.
Design Breakdown:
Scattered botanical and insect illustration on a transparent canvas, connected by decorative trails.
Base Color: Sheer nude or milky pink. The natural nail should be visible.
Nail Shape: Medium almond. The curved shape complements the organic forms of flowers and insects.
Design Element: White daisies with yellow centers, red ladybugs with black details, small yellow-and-black bees, and black dashed flight paths connecting the elements across nails.
Finish: High-gloss top coat to protect the fine detail work.
Get The Look at Home:
The dashed flight paths should be the last step. They connect elements that are already placed, so they need to be drawn after the flowers and insects are positioned.
- Sheer base: One or two coats of milky nude. Let dry fully.
- Daisies: Using a dotting tool and white polish, paint five-petal flowers scattered across the nails. Add yellow centers with a smaller dotting tool.
- Ladybugs: Place small red bodies with black heads and dots between the daisies.
- Bees: Paint tiny yellow ovals with black stripes. Add small white wing shapes on either side.
- Flight paths: Using a toothpick and black polish, draw dashed curved lines that connect the insects to the flowers across different nails. The dashes should be small and evenly spaced.
- Seal: One coat of top coat, applied carefully to avoid smearing the fine dashed lines.
11.Whimsical Swirl Garden
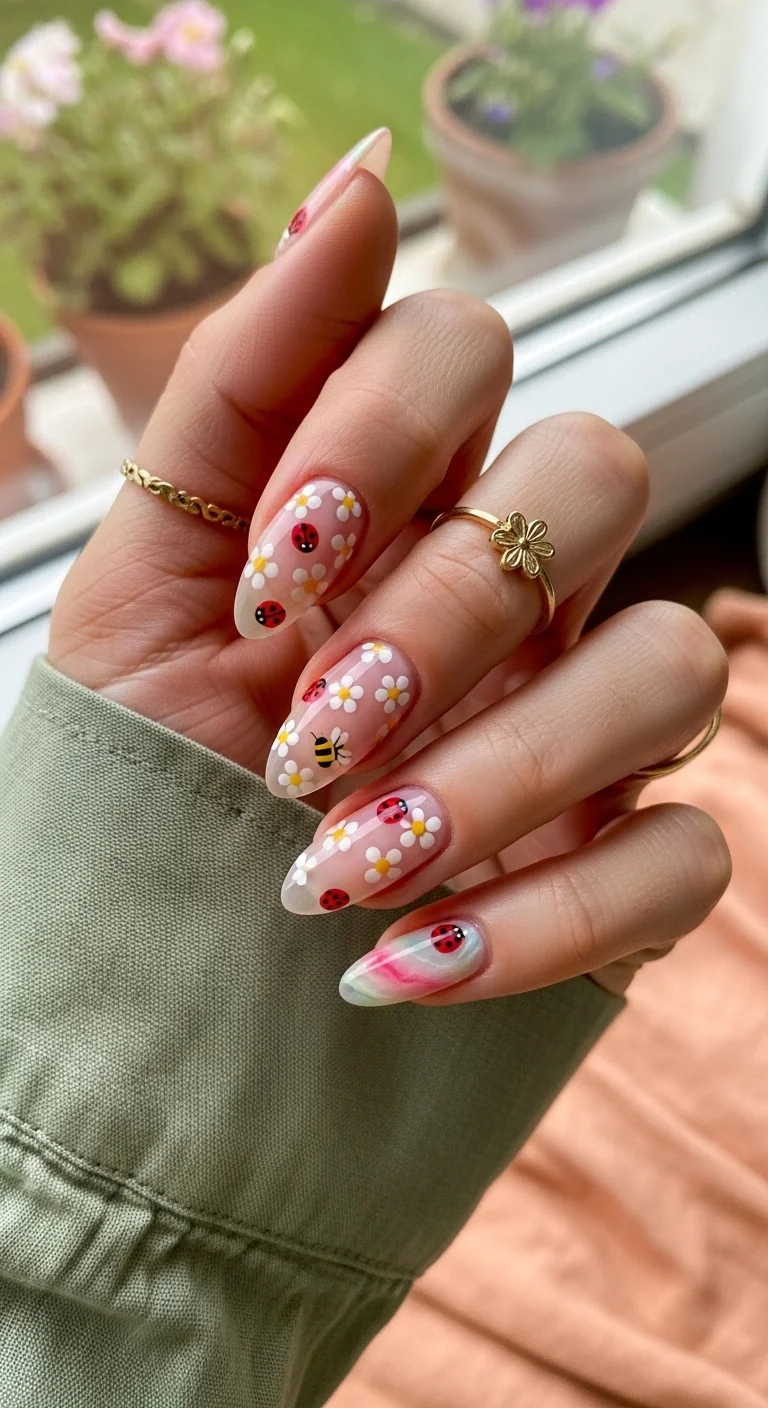
A playful mix of retro swirls and spring florals.
Overview:
Most ladybug nails commit fully to the bug theme. This design splits its attention between daisies, ladybugs, a bumblebee, and a pink-green swirl accent nail. The variety is the point. Each nail tells a slightly different part of the same garden story, and the sheer nude base keeps every element from competing for attention.
The swirl accent on the pinky is the design's curveball. It has nothing to do with the garden theme, which is exactly why it works. It breaks the pattern and adds a retro, almost psychedelic quality that elevates the set from "cute spring nails" to something with genuine personality. Without it, the design would feel safe.
The bee is easy to miss among the daisies and ladybugs, which makes finding it feel like a small reward. That kind of layered discovery is what separates a memorable design from a forgettable one. Not every element needs to be immediately visible.
Design Breakdown:
Multiple garden motifs on a sheer base, plus one abstract accent.
Base Color: Sheer nude or milky pink on most nails. Pink-green swirl on the pinky accent.
Nail Shape: Medium almond. The curved shape complements the organic flower and insect forms.
Design Element: White daisies with yellow centers, red ladybugs with black details, one yellow-and-black bee, and a pink-green marble swirl accent on the pinky.
Finish: High-gloss top coat.
Get The Look at Home:
The swirl accent is the trickiest part. Practice the wet-on-wet technique on a piece of paper first.
- Nude base: Two coats of milky nude on most nails. Let dry fully.
- Swirl accent: On the pinky, apply a wet coat of pink. While still wet, drop green and white polish onto the surface. Use a toothpick to drag the colors into swirls. Let dry completely.
- Daisies: On the nude nails, paint white five-petal flowers with yellow centers. Scatter them at different angles.
- Ladybugs: Place small red bodies with black heads and dots between the daisies.
- Bee: On one nail, paint a tiny yellow oval with black stripes and small white wing shapes.
- Seal: Two coats of top coat to smooth the swirl texture and protect the art.
30 Stunning Vacation Nail Ideas for Your Next Getaway in 2026 💅
12.Lavender Fields & Ladybugs
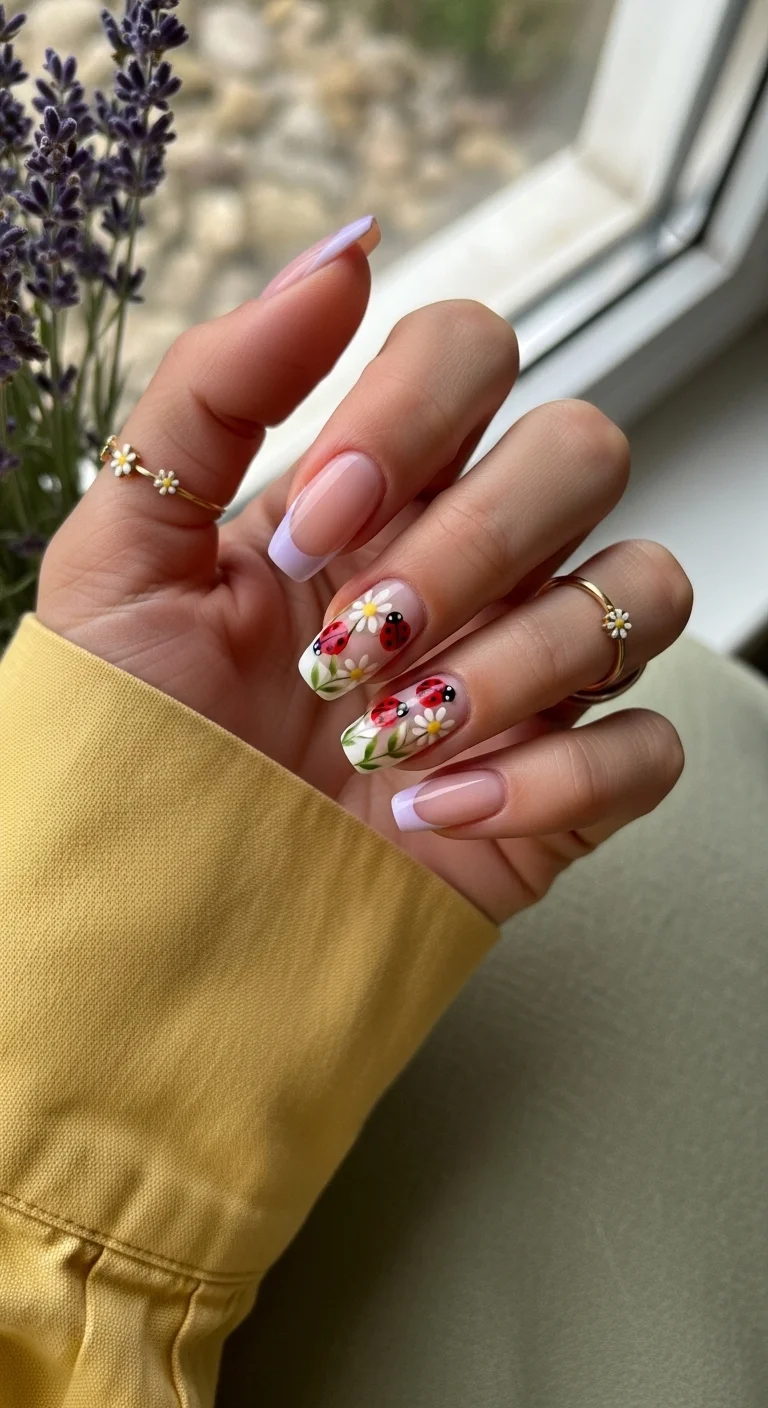
Soft lavender meets bright red for a gorgeous contrast.
Overview:
Lavender and red is a pairing that shouldn't work on paper. Cool purple against warm red creates visual tension. But the lavender here is used only on the French tips, which keeps it confined to a small area. The accent nails carry the red ladybugs on a sheer nude base, so the two colors never directly touch. The green leaves and white daisies on the accent nails provide a neutral bridge between the purple and the red.
The coffin shape gives the French tips a clean, modern edge that a rounded shape would soften. The flat tip also provides a wider canvas for the lavender, which matters because pastel tips need more surface area to register as a deliberate color choice rather than a tint.
This design works well for people who want ladybug art but find red-on-red or red-on-white too expected. The lavender shifts the entire palette into unfamiliar territory while still keeping the ladybugs as the focal point.
Design Breakdown:
Lavender French tips with botanical ladybug accent nails. Cool and warm tones separated by negative space.
Base Color: Sheer nude for the French base and accent nails. Lavender for the tips.
Nail Shape: Long coffin. The flat tip gives the pastel French line a modern, geometric edge.
Design Element: Lavender French tips on three nails. Two accent nails with white daisies, green leaves, and red ladybugs on sheer nude.
Finish: High-gloss top coat.
Get The Look at Home:
The French tips and accent art are separate rounds. Do the tips first.
- Nude base: Two coats on all nails. Let dry fully.
- Lavender tips: Using a French liner brush, paint lavender smile lines. Two thin coats for opacity.
- Accent art: On two nails, paint white daisy petals with yellow centers. Add green leaves along the edges.
- Ladybugs: Place red bodies with black heads and dots among the daisies and leaves.
- Cleanup: An angled brush dipped in acetone sharpens the French smile line.
- Seal: Two coats of top coat to smooth the raised art.
13.Pink Picnic Gingham Bees
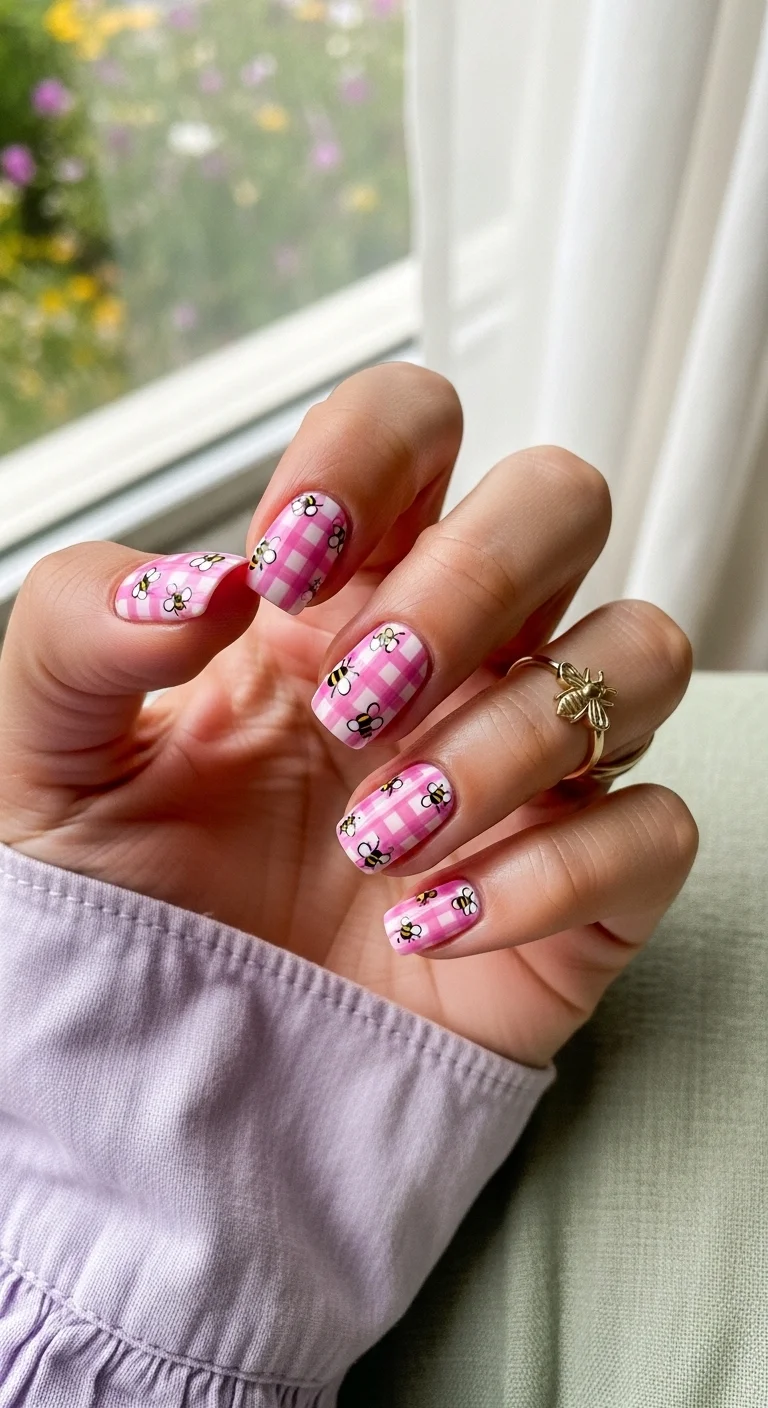
Sweet pink gingham paired with adorable little honeybees.
Overview:
Pink gingham is one of those patterns that immediately reads as "picnic." It's the fabric reference that does the heavy lifting. Without the gingham grid, pink nails with bees would be a perfectly nice design. With the gingham, it becomes a specific scene: a checkered blanket, warm weather, something sweet to eat.
The bees are small enough to function as texture rather than illustration. From arm's length, they read as dark specks scattered across the pink grid. Up close, the yellow bodies and white wings reveal themselves. This dual reading is what makes the design interesting at multiple distances.
The gingham technique is straightforward but requires patience. White base, pink horizontal stripes, pink vertical stripes, darker pink at the intersections. The overlap squares should be visibly darker than the single-layer stripes. If they're the same shade, the grid reads as a flat pattern rather than woven fabric.
Design Breakdown:
Full-coverage gingham pattern with scattered insect detail.
Base Color: White base with pink gingham grid across all nails.
Nail Shape: Medium square. The flat shape reinforces the textile, fabric-like quality.
Design Element: Pink and white gingham pattern on every nail. Small bees with yellow bodies, black stripes, and white wings scattered on top.
Finish: High-gloss top coat.
Get The Look at Home:
The gingham grid is the foundation. Get it right before adding the bees.
- White base: Two coats of opaque white. Let dry fully.
- Pink stripes: Using a striper brush and semi-sheer pink, paint horizontal lines spaced 2-3mm apart. Let dry.
- Vertical stripes: Paint vertical lines at the same spacing. Where they cross, the doubled pink creates darker squares.
- Deepen intersections: Optionally, use a slightly darker pink to paint small squares where the lines overlap. This makes the gingham look more like woven fabric.
- Bees: Using a dotting tool, place small yellow ovals. Add black stripes with a toothpick and tiny white wing dots on either side.
- Seal: One coat of top coat to smooth the grid texture.
21 Stunning Concert Hairstyles for Women 2026 🎶✨
14.Elegant Ladybug Frenchie
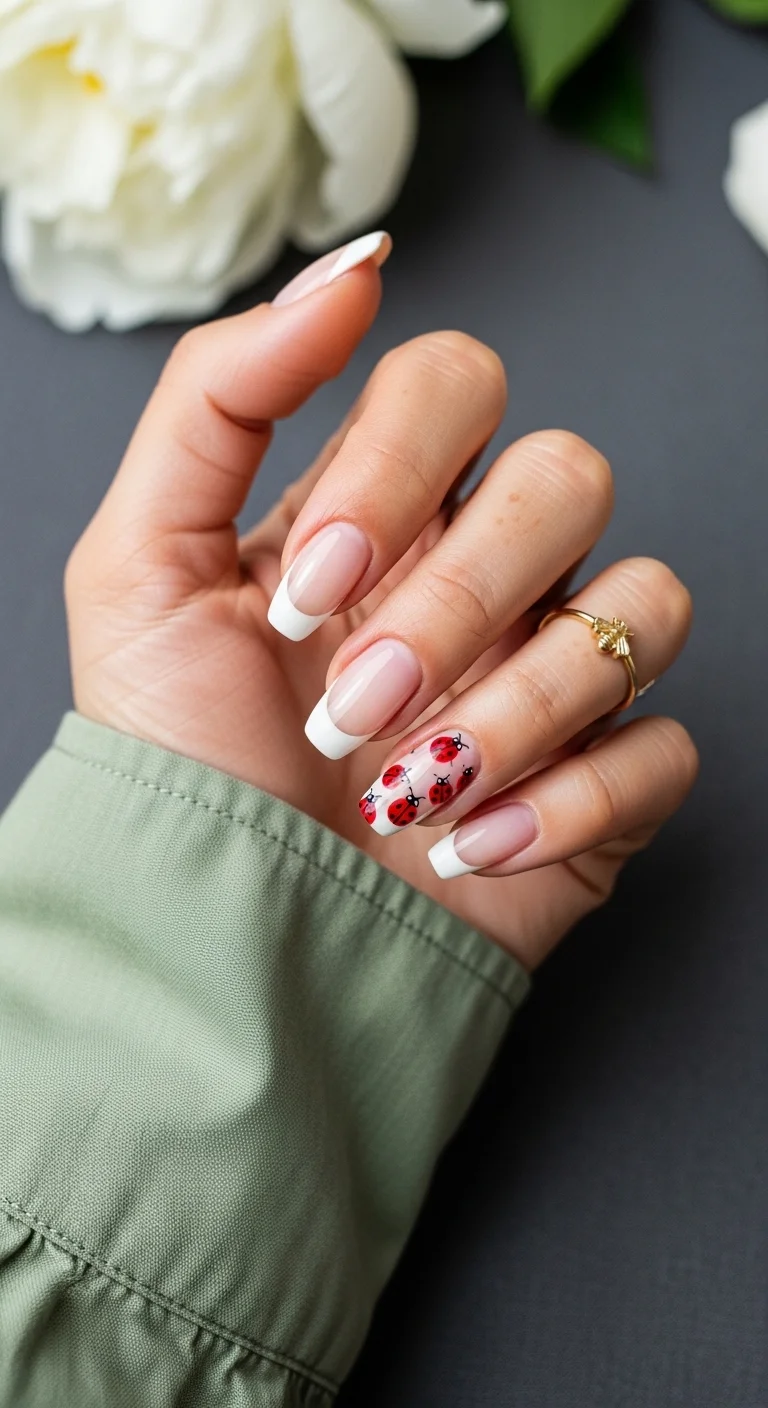
A classic French mani with a buggy twist.
Overview:
A classic white French manicure is the most universally recognized nail design in the world. Adding ladybugs to one accent nail doesn't change that foundation. It just adds a single point of interest that transforms the set from "default manicure" to "designed set." The restraint is the point.
The ring finger carries all the ladybug art while the remaining four nails stay as pure French. This asymmetry is more effective than scattering small bugs across every nail, because it creates a clear hierarchy: four nails establish the pattern, one nail breaks it. The break is what people remember.
White French tips on long coffin nails require a steady hand for the smile line. The curve needs to be consistent across all fingers, and the white needs to be fully opaque in one or two coats. Streaky white tips on a sheer base are immediately visible and difficult to correct without starting over.
Design Breakdown:
Classic French structure with a single illustrated accent.
Base Color: Sheer nude or milky pink. The natural nail should be visible.
Nail Shape: Long coffin. The flat tip gives the white French line a clean, modern edge.
Design Element: White French tips on four nails. One accent nail (ring finger) with multiple red ladybugs, black heads, and black dots on sheer nude.
Finish: High-gloss top coat.
Get The Look at Home:
The French tips are the foundation. Get the smile line clean before adding any art.
- Nude base: Two coats on all nails. Let dry fully.
- White tips: Using a French liner brush, paint the smile line from sidewall to center. Two-stroke method is more forgiving than one continuous curve.
- Accent nail: On the ring finger, paint three to five small red bodies with black heads, center lines, and dots. Vary the sizes and angles.
- Cleanup: An angled brush dipped in acetone sharpens every smile line. This step is non-negotiable.
- Seal: Two coats of top coat. The first locks the art; the second smooths the surface.
15.Leafy Ladybug Sanctuary
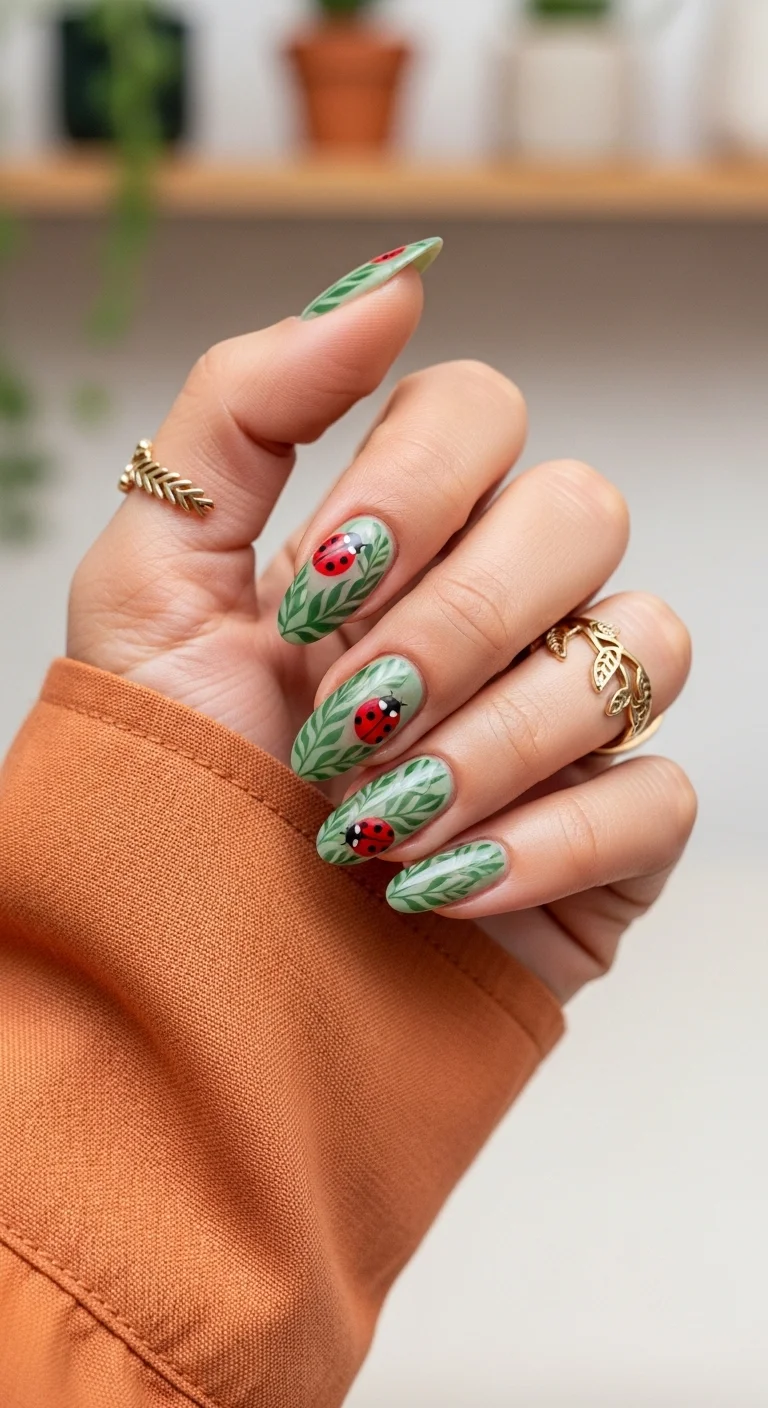
A lush, leafy escape for the nature lover.
Overview:
Full-coverage leaf art on a green base creates a design where the ladybugs feel like they belong. Instead of sitting on a neutral background, the bugs are nestled among leaves in multiple shades of green. The effect is closer to a botanical illustration than typical nail art.
The leaf work uses at least three distinct greens: a pale sage for the base, a medium forest green for the primary leaves, and a darker emerald for depth. This layering creates visual density without adding new colors. Every element stays within the green-to-red spectrum, which keeps the design cohesive despite the busy pattern.
Long almond is the right shape. The tapered tip extends the leaf patterns and gives the ladybugs room to sit at natural angles among the foliage. On shorter nails, the leaves would need to shrink, and at that scale, the individual leaf shapes become illegible.
Design Breakdown:
Botanical illustration with insect accents. Green-on-green layering creates depth.
Base Color: Sage or muted green. Slightly lighter than the leaf art.
Nail Shape: Long almond. The extended length gives the leaf patterns room to develop.
Design Element: Hand-painted leaves in multiple greens covering most of each nail. Red ladybugs with black details placed among the leaves.
Finish: High-gloss top coat to saturate the greens.
Get The Look at Home:
Work from the background forward: base, then leaves, then bugs.
- Green base: Two coats of sage green. Let dry fully.
- Leaf layer 1: Using a medium green, paint almond-shaped leaves scattered across the nail. Point them in different directions.
- Leaf layer 2: Using a darker green, add leaves that overlap or sit behind the first layer. This creates depth.
- Ladybugs: Place red bodies with black heads and dots in the gaps between leaves. One or two per nail.
- Leaf veins: Optional: add thin darker lines inside a few leaves for realism.
- Seal: Two coats of top coat to smooth the layered texture.
27 Stunning June Nail Ideas for 2026 💅
16.Dainty Daisy Ladybugs
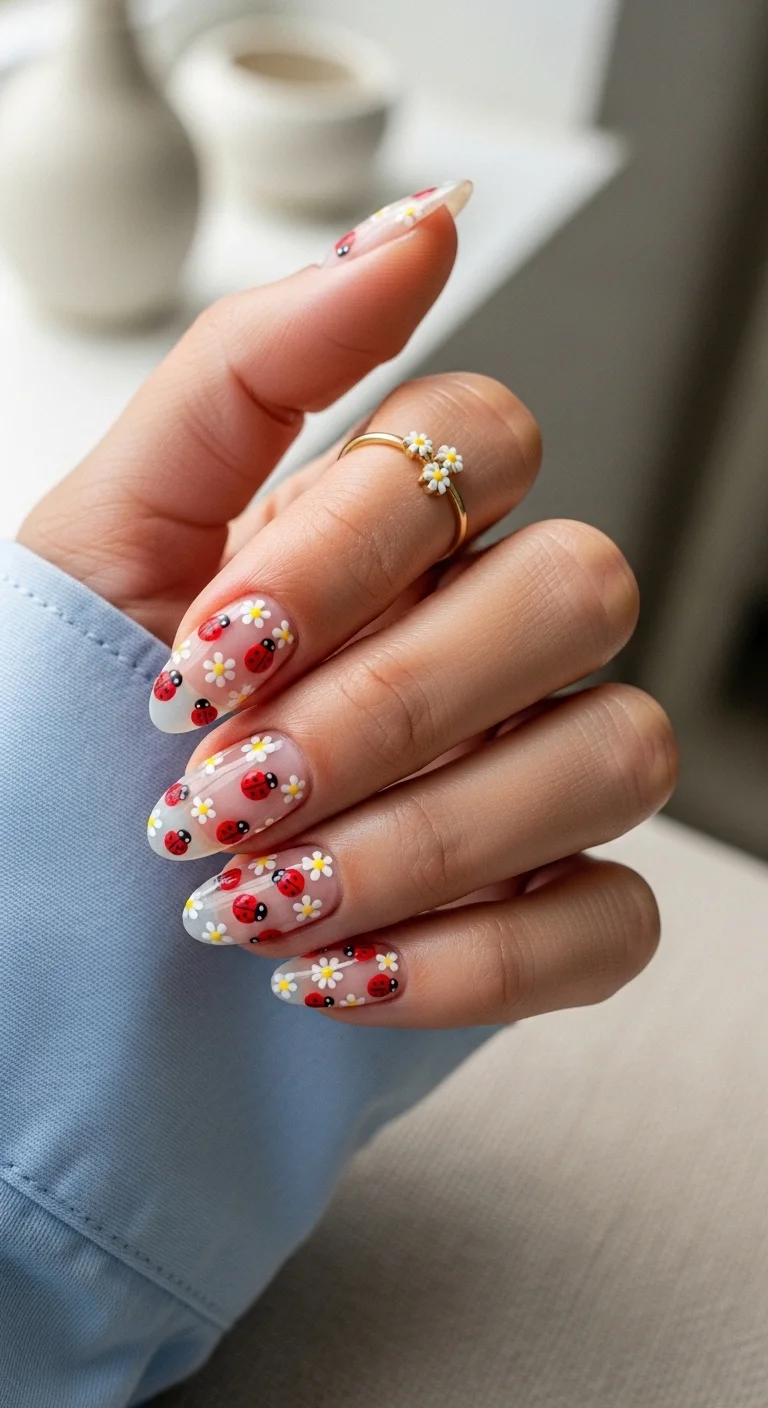
Sheer, delicate, and perfectly imperfect.
Overview:
Sheer nude base with scattered daisies and ladybugs is one of the most wearable combinations in the ladybug category. The transparency of the base means the design looks painted on bare skin rather than on a colored surface. That quality gives it an illustrated, editorial feel that opaque bases can't replicate.
The daisies and ladybugs share the same scale. Neither motif dominates the other, which creates a balanced composition where your eye moves freely across the nail. If the ladybugs were larger than the daisies, they'd read as the subject and the flowers as background. Keeping them similar in size makes the design feel like a pattern rather than an illustration.
The sheer base is also the most growth-friendly option. Because the natural nail shows through, the grow-out line at the cuticle is nearly invisible for the first two weeks. This makes the design practical for people who can't get to the salon every ten days.
Design Breakdown:
Scattered daisies and ladybugs on a transparent canvas.
Base Color: Sheer nude or milky pink. The natural nail should be visible.
Nail Shape: Medium almond. The curved shape complements the organic forms.
Design Element: Small white daisies with yellow centers and red ladybugs with black details, scattered across all nails at varying densities.
Finish: High-gloss top coat.
Get The Look at Home:
The scattered placement should feel random but balanced. Step back and check coverage before top coating.
- Sheer base: One or two coats of milky nude. Let dry fully.
- Daisies: Using a dotting tool, paint white five-petal flowers scattered across each nail. Add yellow centers with a smaller dot.
- Ladybugs: Place red bodies in the gaps between daisies. Two to four per nail, depending on the nail's surface area.
- Bug details: Black heads, center lines, and dots on each ladybug. Use a toothpick for the finest lines.
- Check balance: Hold both hands at arm's length. If any nail looks significantly more or less crowded, adjust before top coating.
- Seal: One coat of top coat, applied carefully to avoid smearing the small details.
17.Velvet Cherry Ladybugs
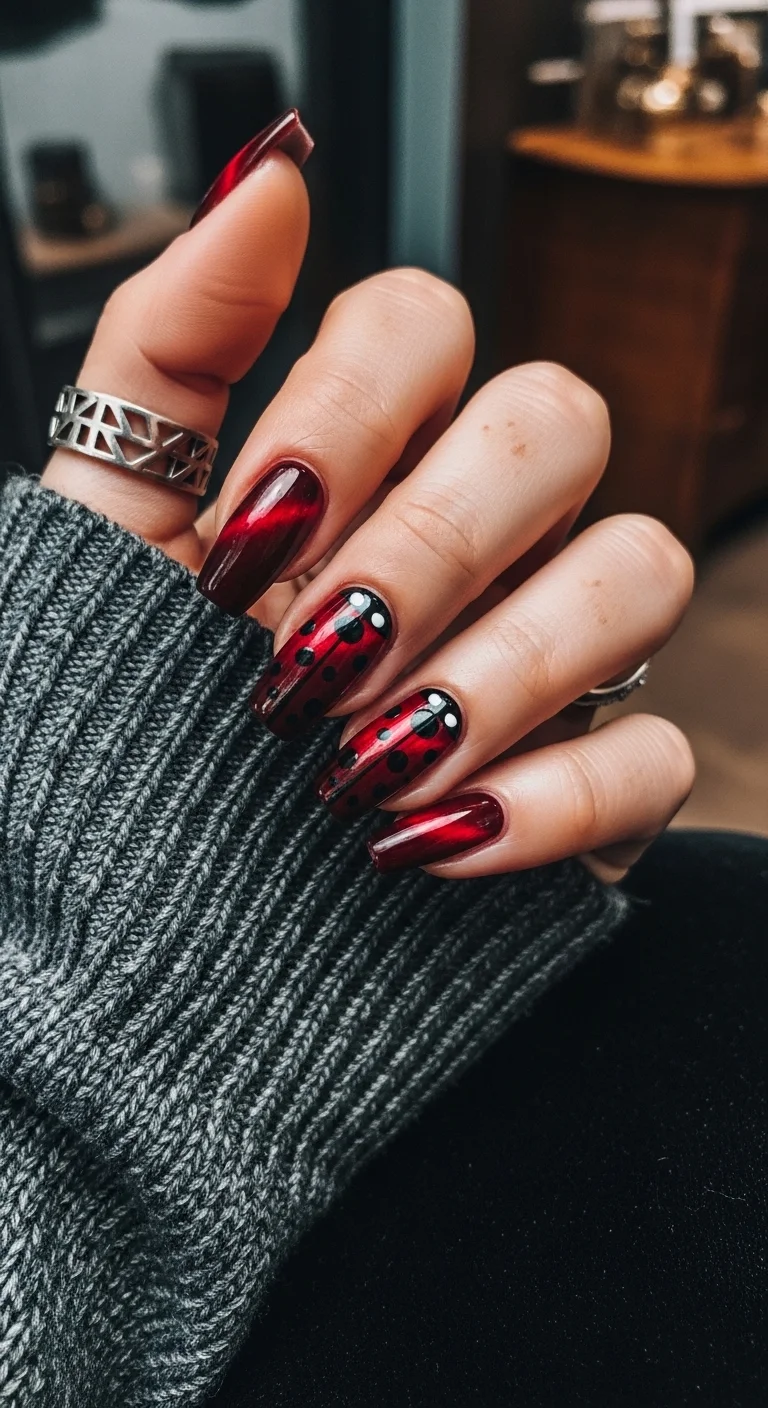
Dark, magnetic, and dangerously pretty.
Overview:
Cat-eye or velvet nail polish uses magnetic particles suspended in the formula. When a magnet is held over the wet polish, the particles align and create a shimmering, dimensional effect that shifts as your hand moves. On a deep red base, this creates something closer to polished gemstone than standard nail polish.
The ladybug accents on two nails use a different technique than the magnetic base. The bugs are painted with standard polish over the cured velvet layer, which means they sit flat against the dimensional background. This contrast between the shifting shimmer and the static illustration adds visual depth that you'd get from a single-technique design.
The deep red works better here than a bright primary red would. Bright red with magnetic particles reads as festive. Deep red with magnetic particles reads as jewel-toned and expensive. The undertone matters: this red leans toward oxblood, which gives it a sophistication that cherry red can't match.
Design Breakdown:
Magnetic velvet base with painted accent illustration. Two different techniques on the same nail.
Base Color: Deep red cat-eye or velvet magnetic polish. The shimmer should shift from dark cherry to bright red as the hand moves.
Nail Shape: Long coffin. The flat surface maximizes the magnetic shimmer's visibility.
Design Element: Solid velvet red on most nails. Two accent nails with ladybug shell pattern: black head, center line, black dots, white eyes.
Finish: High-gloss top coat to enhance the magnetic shimmer.
Get The Look at Home:
The magnet must be held over the wet polish for 10-15 seconds per nail. Moving too fast weakens the effect.
- Dark base: One coat of black or very dark red. Let dry. This deepens the velvet effect.
- Magnetic coat: Apply a thick coat of red cat-eye polish. Immediately hold the magnet 3-5mm above the nail for 10-15 seconds. Do not touch the polish with the magnet.
- Repeat: Apply a second magnetic coat and repeat the magnet step for a more intense shimmer.
- Cure or dry: If using gel, cure between coats. If regular polish, wait at least five minutes between magnetic coats.
- Accent nails: On two nails, paint the ladybug shell pattern over the cured velvet base: black head, center line, dots, white eyes.
- Seal: Two coats of top coat to protect the magnetic particles and the painted art.
25 Stunning Summer Vacation Hairstyles for 2026 ☀️🌊
18.Modern Ladybug French
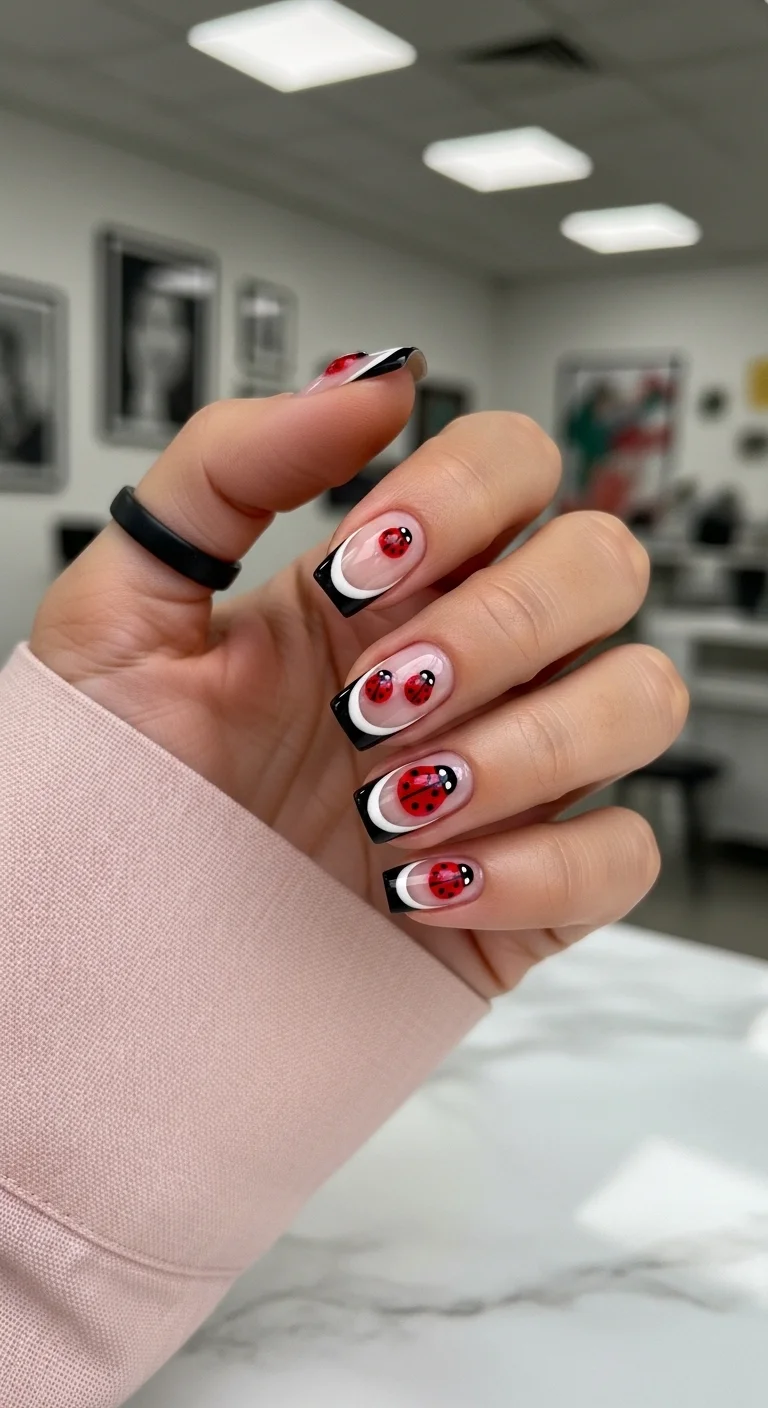
A bold, graphic twist on the ladybug theme.
Overview:
Black French tips are already a step beyond the classic white. Adding a thin white line between the black tip and the nude base creates a double-border effect that makes the design feel more architectural than a standard French. The white line functions as a visual separator, preventing the black from looking like it was painted directly onto the nude.
The ladybugs on the nude section of each nail are what tie the design to the ladybug theme. Without them, this is a black French manicure with a white accent line. With them, the red bugs become the only source of color in an otherwise monochromatic design, which makes them pop harder than they would on a colorful base.
The three-element structure (nude base, white separator, black tip) requires precise layering. Each element needs to be fully dry before the next goes on, or the colors bleed into each other. The white line especially needs to be thin and consistent across all nails.
Design Breakdown:
Triple-layer French with ladybug accents. Precision layering is everything.
Base Color: Sheer nude or milky pink.
Nail Shape: Long coffin. The flat tip gives each layer (nude, white, black) a clean, geometric edge.
Design Element: Black French tips with a thin white line at the smile line. Red ladybugs with black details on the nude section of each nail.
Finish: High-gloss top coat.
Get The Look at Home:
Each layer must be fully dry before the next. Rushing this design produces muddy borders.
- Nude base: Two coats on all nails. Let dry fully.
- White line: Using a thin liner brush, paint a narrow white line across the nail where the smile line will be. This line should be 1-2mm thick and perfectly straight.
- Black tips: Once the white is dry, paint black polish on the tip area below the white line. The black should cover the free edge completely.
- Ladybugs: On the nude section above the white line, paint small red bodies with black heads and dots.
- Check consistency: Compare all ten nails. The white line should be the same thickness and in the same position on every nail.
- Seal: Two coats of top coat to smooth the layered texture.
19.Gilded Ladybug Garden
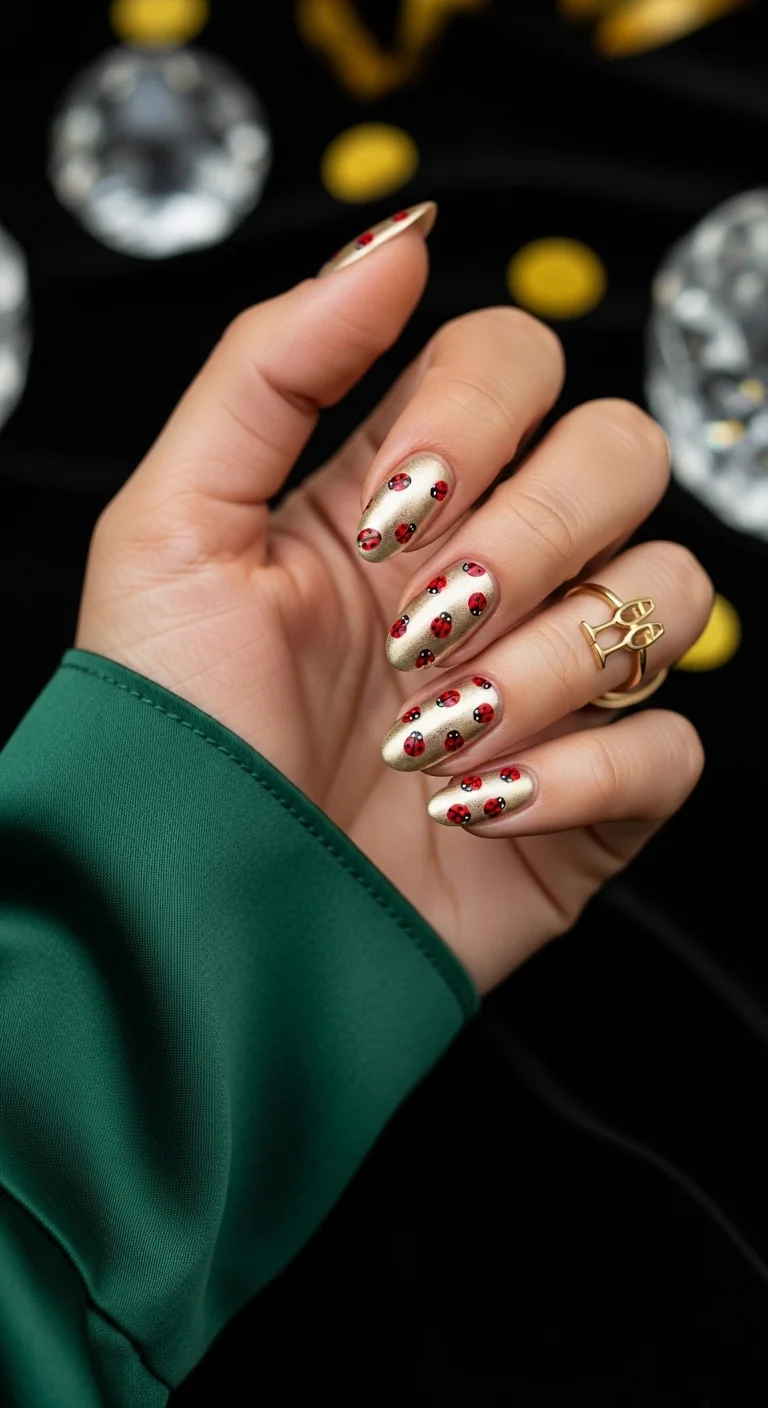
Metallic meets garden for an unexpectedly luxe combo.
Overview:
Gold chrome and red ladybugs is a pairing that sounds like it should look like a holiday ornament. In practice, the gold functions as a warm neutral that makes the red of the ladybugs appear more saturated. The metallic surface catches light in ways that flat polish can't, which gives the design a dimensional quality even without the ladybug art.
The ladybugs are scattered at different angles and sizes across the gold surface. Some face the tip, some face the cuticle, some sit at diagonal angles. This controlled randomness is what makes the bugs look like they're crawling across a gilded surface rather than stamped in a uniform pattern.
Chrome powder requires a no-wipe gel top coat underneath to adhere properly. Regular polish won't give the powder anything to stick to, and you'll end up brushing gold dust off your hands for the rest of the day. If working with regular polish, a metallic gold polish like OPI's "Champagne for Breakfast" gives a similar effect without the powder step.
Design Breakdown:
Metallic base with scattered organic illustration. The gold does the heavy lifting.
Base Color: Gold chrome or metallic gold. The finish should be smooth and reflective.
Nail Shape: Medium almond. The curved shape complements the organic bug forms against the rigid metallic surface.
Design Element: Small red ladybugs with black details scattered across all nails at varying angles and sizes.
Finish: High-gloss top coat to seal the chrome and protect the painted bugs.
Get The Look at Home:
The chrome base needs to be fully cured before the ladybugs go on. Painting on uncured chrome creates muddy red.
- Gel base: Apply a gel base coat and cure.
- Color coat: Apply a dark base (black or deep red) and cure. This deepens the chrome effect.
- No-wipe top coat: Apply and cure. This is the surface the chrome adheres to.
- Chrome application: Using a silicone applicator, rub gold chrome powder onto the cured surface. Buff until mirror-smooth. Dust off excess.
- Seal the chrome: Apply another coat of no-wipe top coat and cure. This locks the chrome in place.
- Ladybugs: Using red and black polish, paint small ladybugs scattered across the gold surface. Vary the angles and sizes.
- Final seal: One coat of top coat over the ladybugs to protect the painted art.
35 Cute & Trendy Short Summer Nails for 2026 ☀️
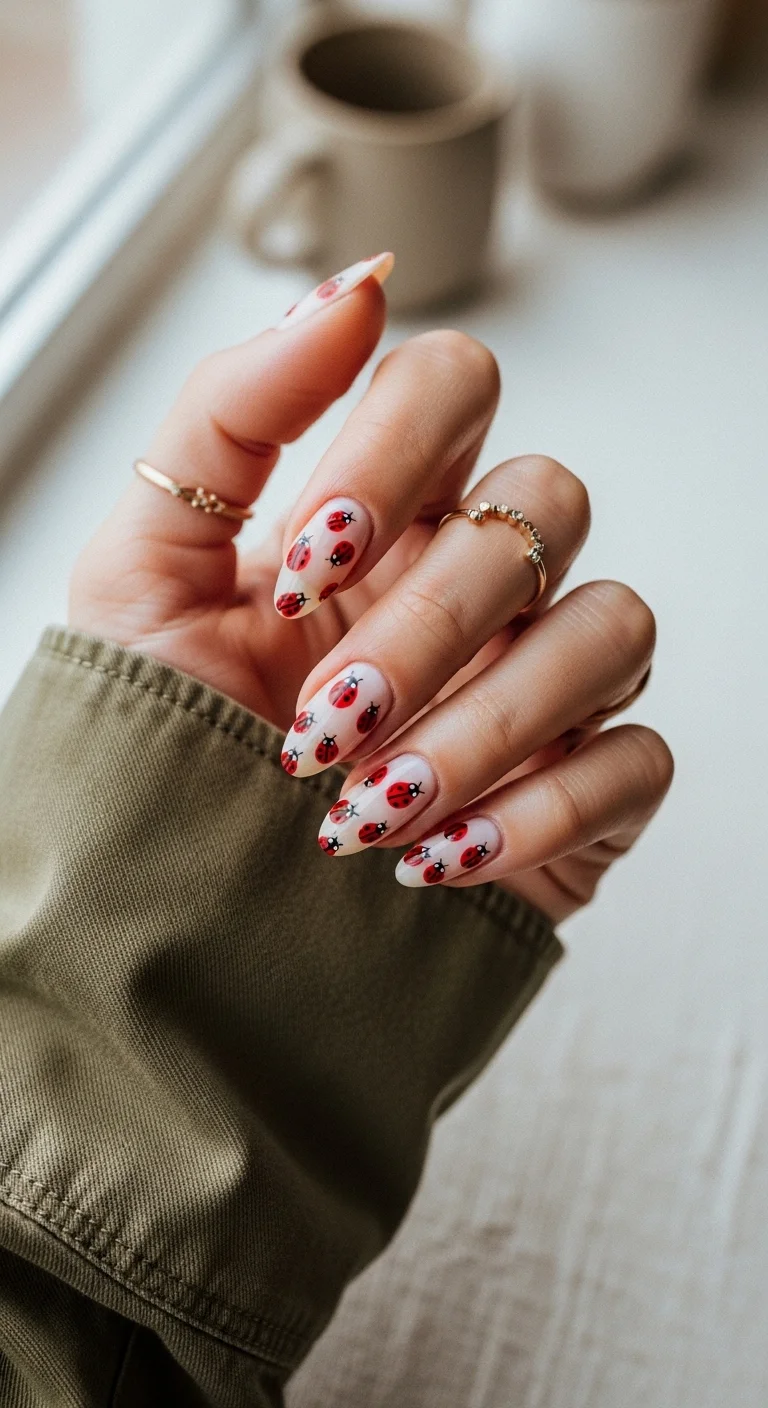
20.Nude Ladybug Cluster
Minimal base, maximum bugs.
Overview:
A sheer nude base with nothing but ladybugs scattered across it is the most direct expression of the ladybug theme. There are no flowers, no leaves, no secondary motifs. Just bugs on bare nail. The simplicity is the design.
The bugs vary in size and orientation across each nail, which creates organic movement. Some are large and face the tip; others are small and sit at angles. This variation prevents the design from reading as a repeating stamp. Each nail looks like a snapshot of a different moment in the same scene.
The sheer base means the design grows out gracefully. The natural nail color shows through between the bugs, so the transition from manicure to bare nail is gradual rather than a hard line. This makes the design practical for people who want ladybug art without committing to weekly salon visits.
Design Breakdown:
Scattered ladybugs on a transparent canvas. Nothing else.
Base Color: Sheer nude or milky pink. The natural nail should be clearly visible.
Nail Shape: Medium almond. The curved shape gives the bugs natural surfaces to crawl across.
Design Element: Red ladybugs with black heads, center lines, dots, and white eyes. Multiple sizes per nail, scattered at different angles.
Finish: High-gloss top coat.
Get The Look at Home:
Size variation is what makes this design work. Use two different dotting tools for the bug bodies.
- Sheer base: One or two coats of milky nude. Let dry fully.
- Large bugs: Using a medium dotting tool, place red bodies across each nail. Two to three per nail, facing different directions.
- Small bugs: Using a smaller dotting tool, add tiny red bodies in the gaps between the larger ones.
- Black details: On every red body, add a black head dot, a center line, and two to three side dots. Use a toothpick for the finest lines.
- White eyes: Two tiny white dots on each black head. This makes the bugs look alive.
- Seal: One coat of top coat, applied in a single stroke per nail to avoid dragging the small details.
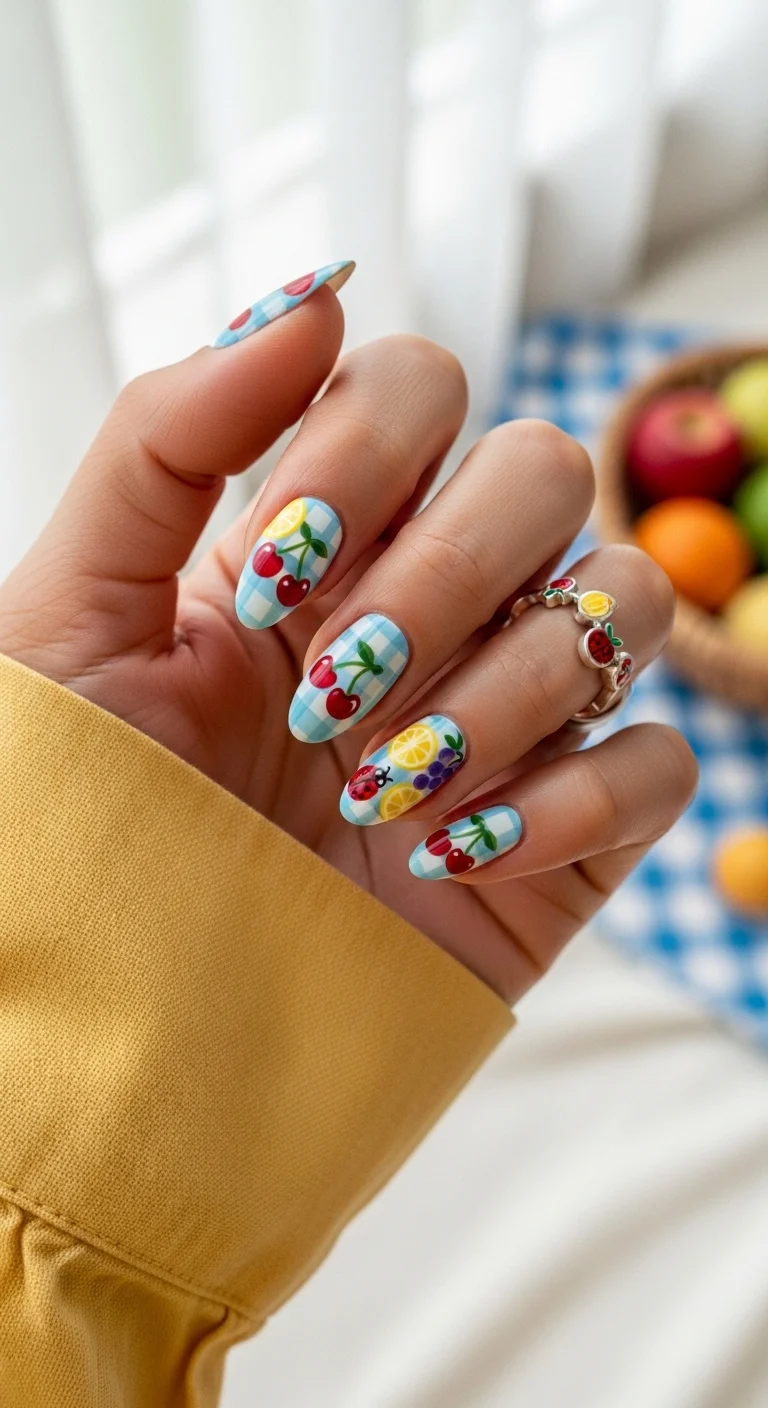
21.Picnic Basket Medley
A fruit-filled picnic scene on every nail.
Overview:
Blue gingham is already a pattern that reads "picnic." Adding fruit art on top of it transforms the design from "fabric reference" to "complete scene." The cherries, lemons, and grapes sit on the gingham like items laid out on a checkered blanket. The ladybug on the accent nail ties the fruit theme back to the insect motif that defines this article.
The blue-and-white gingham works better here than pink or red would because blue is a cool tone that recedes visually. The warm-colored fruit (red cherries, yellow lemons, purple grapes) advances against the cool background, creating natural depth without any shading tricks.
Each nail carries a different fruit combination, which prevents the design from reading as a repeating pattern. The variety means your eye has something new to discover on every finger. That kind of detail rewards close inspection, which is exactly what a good nail design should do.
Design Breakdown:
Gingham background with scattered fruit illustration. Each nail is a different composition.
Base Color: Blue and white gingham pattern across all nails.
Nail Shape: Medium almond. The curved shape softens the gingham's geometric grid.
Design Element: Hand-painted cherries with green stems, lemon slices, grapes, and a red ladybug on one accent nail, scattered over the gingham background.
Finish: High-gloss top coat.
Get The Look at Home:
Do the gingham first across all nails, then add the fruit art on top once the grid is dry.
- White base: Two coats of opaque white. Let dry fully.
- Blue gingham: Using a striper brush and light blue, paint horizontal and vertical lines to create a grid. Let dry completely before adding art.
- Cherries: On two or three nails, paint pairs of red circles connected by curved green stems with small leaves.
- Lemons and grapes: On one accent nail, paint yellow lemon slices and small purple grape clusters.
- Ladybug: On the accent nail, add a small red ladybug with black details among the fruit.
- Seal: Two coats of top coat to smooth the layered texture.
24 Stunning Bridesmaid Hairstyles for Weddings 2026 💍✨
22.Lacy Ladybug Elegance
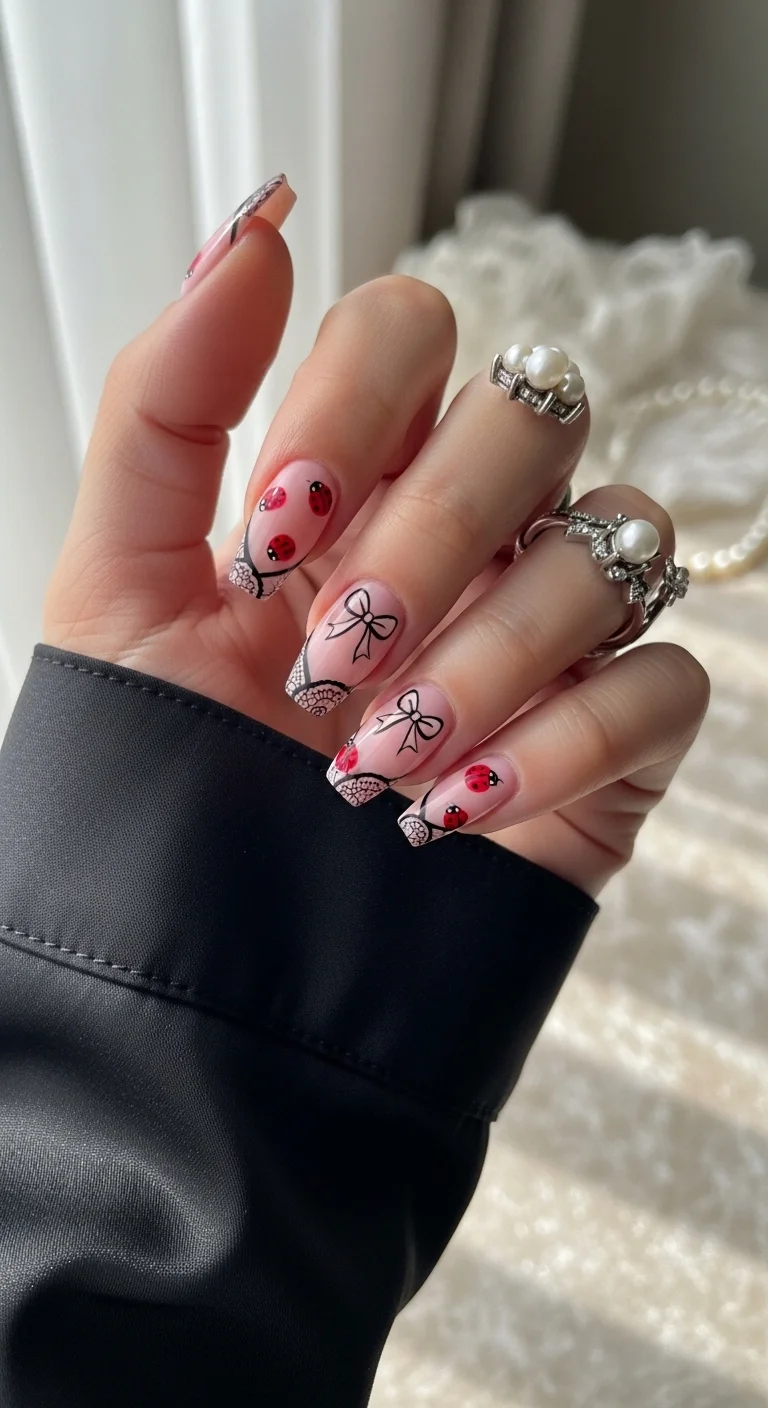
Lace, bows, and bugs for a dark romantic look.
Overview:
Black lace at the tips of a sheer nude nail creates a "lingerie for your fingers" effect. It's simultaneously delicate and dramatic, which is a hard balance to strike. The lace pattern does the heavy lifting visually, while the bows add a second layer of femininity that prevents the black from reading as too severe.
The ladybugs are the design's curveball. In a set that's otherwise about lace and bows, the red bugs feel almost rebellious. They break the monochrome palette and add a single source of saturated color that draws the eye immediately. The contrast between the ornate black patterns and the simple, graphic ladybugs is what makes the design memorable.
The lace technique requires either a very fine liner brush or a stamping plate. Freehand lace is one of the hardest nail art techniques to execute cleanly, because the pattern needs consistent line weight across all nails. If your hand isn't steady enough for freehand, stamping plates produce identical lace patterns every time.
Design Breakdown:
Black lace and bows on a sheer base, with red ladybug accents. Ornate meets organic.
Base Color: Sheer nude or milky pink. The transparency keeps the black lace from looking heavy.
Nail Shape: Long coffin. The flat surface gives the lace pattern room to develop.
Design Element: Black lace patterns at the tips, black bows on two nails, and red ladybugs with black details on the nude section.
Finish: High-gloss top coat to make the black lines look sharp.
Get The Look at Home:
The lace is the hardest part. A stamping plate saves time and produces cleaner results than freehand.
- Nude base: Two coats on all nails. Let dry fully.
- Lace tips: Using a fine liner brush or stamping plate, create black lace patterns on the tip area of each nail. Keep the lace confined to the upper third.
- Bows: On two nails, paint small black bow shapes in the center of the nail. The bow should be simple: two loops and two trailing ribbons.
- Ladybugs: On the nude section of two or three nails, paint red bodies with black heads and dots.
- Check consistency: Compare the lace patterns across all nails. The line weight should feel uniform.
- Seal: Two coats of top coat to protect the fine line work.
23.Pink Ombre Ladybugs
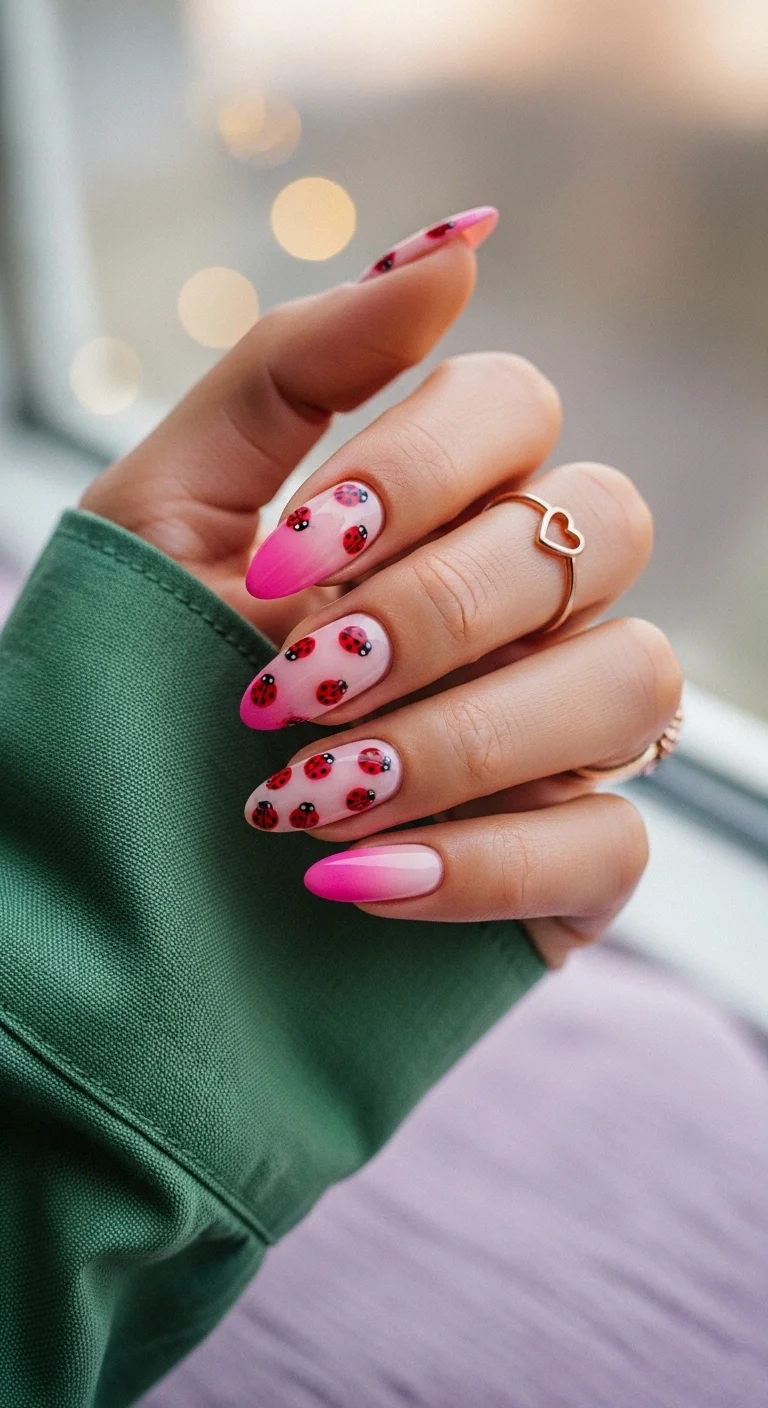
A girly, gradient dream with a side of garden fun.
Overview:
A pink-to-nude gradient is one of the most flattering ombre combinations because both tones share a warm undertone. The transition from soft nude at the cuticle to bright pink at the tip creates a natural flush effect that mimics healthy, well-circulated nails. It's the ombre equivalent of a good blush.
The ladybugs scattered across the gradient add a playful element that prevents the design from reading as a standard ombre. The red of the bugs is several shades warmer than the pink of the gradient, which creates a subtle color contrast that keeps the eye moving across the nail. The bugs don't fight the gradient. They punctuate it.
The sponge technique for the gradient needs to be applied in thin, repeated layers rather than one heavy press. Thick sponge applications create a textured, bumpy surface that shows through the top coat. Three to four thin dabs, each allowed to dry for thirty seconds between passes, produces a smoother blend.
Design Breakdown:
Warm gradient with scattered insect illustration. The bugs add a second focal point to the gradient.
Base Color: Nude at the cuticle transitioning to bright pink at the tips.
Nail Shape: Medium almond. The tapered shape enhances the gradient's flow.
Design Element: Sponge-applied pink-to-nude ombre with red ladybugs scattered at various angles across the gradient.
Finish: High-gloss top coat to blend the gradient and saturate the colors.
Get The Look at Home:
Each sponge layer should be thin. Building gradually produces a smoother gradient than one heavy application.
- Nude base: Two coats of nude. Let dry fully.
- Sponge setup: Paint a stripe of nude and a stripe of pink side by side on a makeup sponge. Dab on paper first.
- Build the gradient: Press the sponge onto the nail with pink at the tip. Three to four dabs per layer, letting each dry for thirty seconds. Repeat three to four times.
- Dry completely: Wait at least ten minutes before adding the ladybugs. The sponge texture needs time to level.
- Ladybugs: Paint red bodies at various angles across the gradient. Add black heads, center lines, and dots.
- Seal: Two coats of top coat to smooth the sponge texture and protect the art.
28 Trendy May Nail Designs for 2026 💅
24.Midnight Ladybug Glow
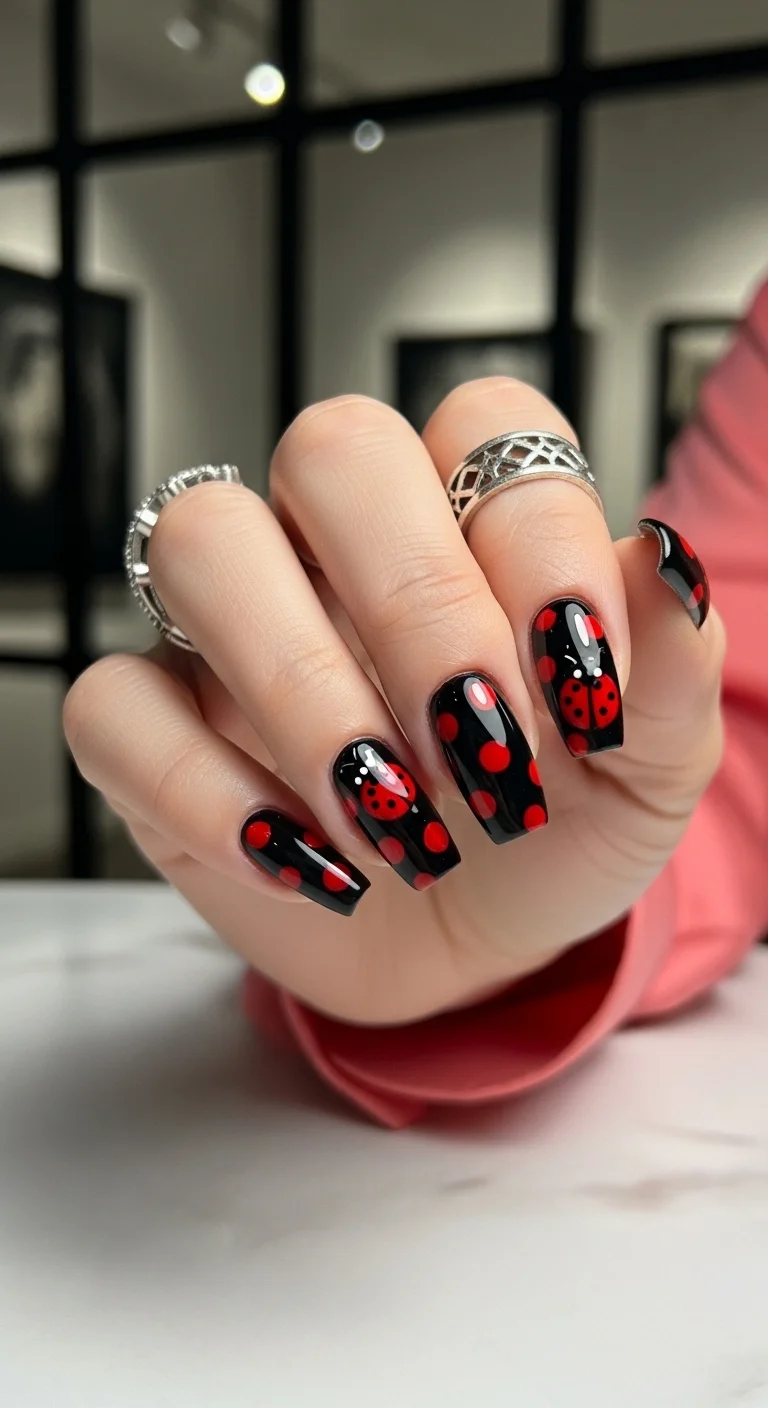
Moody black nails with a bright, bug-themed pop.
Overview:
Black nail polish absorbs light. Red nail polish reflects it. Putting red ladybugs on a black base creates a contrast where the bugs seem to glow against the dark background, especially under warm or low lighting. The effect is closer to neon signs at night than to garden insects in sunlight.
The design mixes full ladybugs with abstract red dots, which creates visual variety without introducing new elements. The dots echo the shape of the ladybug bodies, so the two motifs feel related even though one is detailed and the other is minimal. This kind of visual echo is what makes a design feel cohesive.
Black polish is notoriously difficult to remove. It stains cuticles, lifts poorly, and leaves a dark residue that requires extra acetone and patience. A peel-off base coat underneath saves significant cleanup time when the manicure comes off.
Design Breakdown:
Dark background with high-contrast red accents. The black makes the red look luminous.
Base Color: Deep, opaque glossy black. Two coats for full coverage.
Nail Shape: Long coffin. The flat surface maximizes the contrast between black and red.
Design Element: Red ladybugs with black heads and dots on some nails. Large red dots on others. The two motifs share the same red, creating unity.
Finish: Ultra-glossy top coat. The shine makes the black look deeper and the red look brighter.
Get The Look at Home:
Red polish over black needs to be fully opaque. Use a highly pigmented red or apply two coats.
- Black base: Two coats of opaque black. Let dry fully.
- Red dots: On some nails, paint large red circles using a dotting tool. These function as abstract ladybug references.
- Full ladybugs: On other nails, paint red bodies with black heads, center lines, and dots. Add white eyes for visibility against the black.
- Check contrast: The red should be vivid against the black. If it looks muted, apply a second coat of red.
- Seal: Two coats of top coat to deepen the black and protect the red art.
25.Futuristic Chrome Beetle
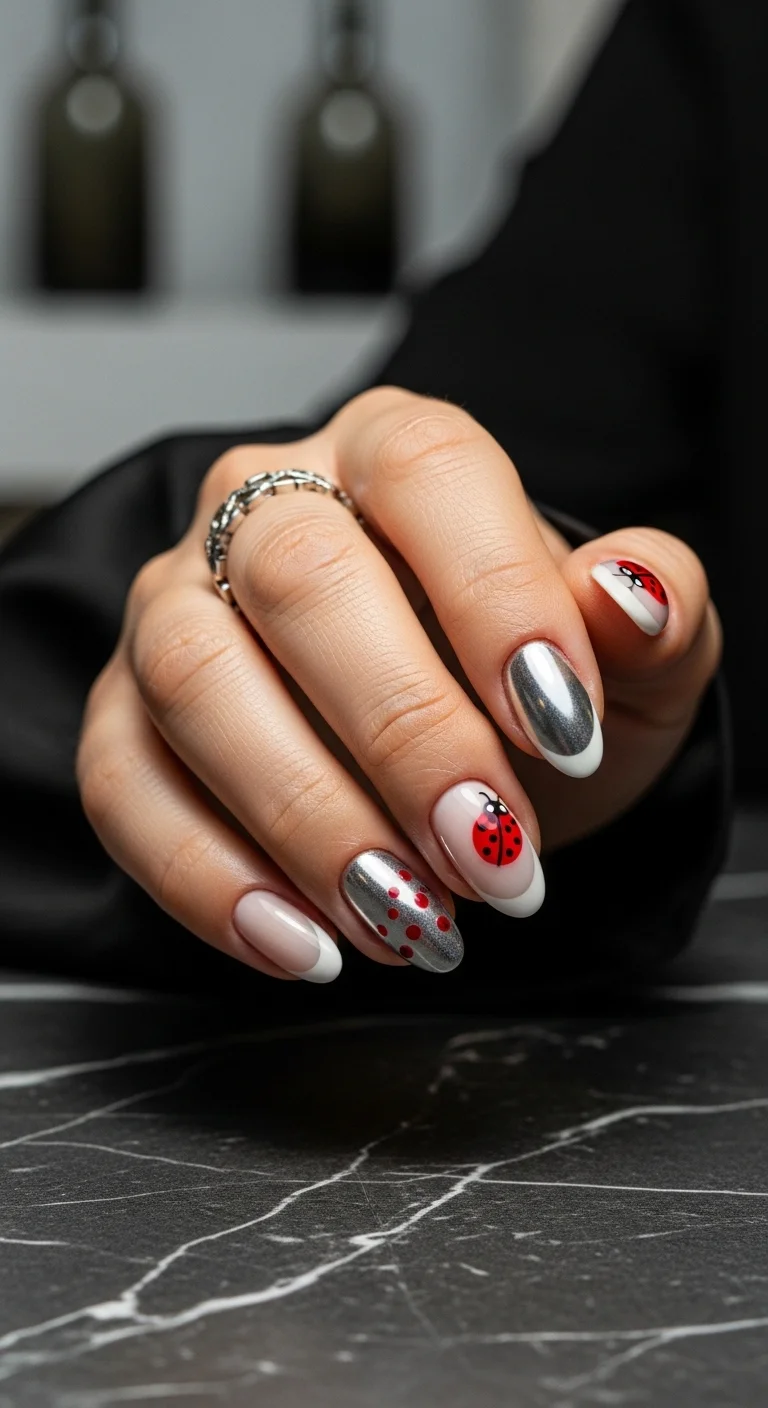
A high-tech, metallic take on the classic garden theme.
Overview:
Silver chrome and white French tips on the same hand creates a design that splits between two aesthetics: futuristic metallic and classic manicure. Neither dominates the other because they alternate across the hand rather than competing on the same nail. The chrome nails catch light; the French nails stay clean and traditional.
The red dots on the chrome nails are a simplified ladybug reference that works because the chrome surface is so reflective that detailed illustration would get lost in the shimmer. Red dots read clearly against silver in a way that full ladybugs wouldn't. On the French nails, the ladybugs get more detail because the matte white tip provides a stable background.
Chrome powder requires a specific application sequence: gel base, color coat, no-wipe top coat, cure, then powder. Skipping the no-wipe top coat means the powder has nothing to adhere to. The powder also needs to be sealed with another top coat layer, otherwise it rubs off within hours.
Design Breakdown:
Two alternating finishes: silver chrome and white French. Red accents tie them together.
Base Color: Silver chrome on some nails, sheer nude with white French tips on others.
Nail Shape: Medium almond. The curved shape complements both the metallic and the French aesthetics.
Design Element: Red dots on chrome nails. Full ladybug illustration on French tip nails. The red connects the two styles.
Finish: High-gloss top coat over everything. Chrome nails need a chrome-safe top coat that won't dull the mirror finish.
Get The Look at Home:
The chrome and French nails use completely different techniques. Do them in separate rounds.
- Chrome nails: Apply gel base, black color coat, and no-wipe top coat. Cure each step. Rub silver chrome powder onto the cured surface. Seal with another no-wipe top coat.
- French nails: On the remaining nails, apply sheer nude base. Paint white French tips. Two thin coats for opacity.
- Red dots on chrome: Using a dotting tool, place red dots on the chrome nails. The dots need to be pigmented enough to show against the reflective surface.
- Ladybugs on French: Paint full ladybug illustrations on the white tip section of the French nails.
- Final seal: One coat of top coat over the red art to protect it.
21 Hot Summer Buns Hairstyle Ideas for 2026 ☀️🔥
26.Cloudy Day Ladybugs
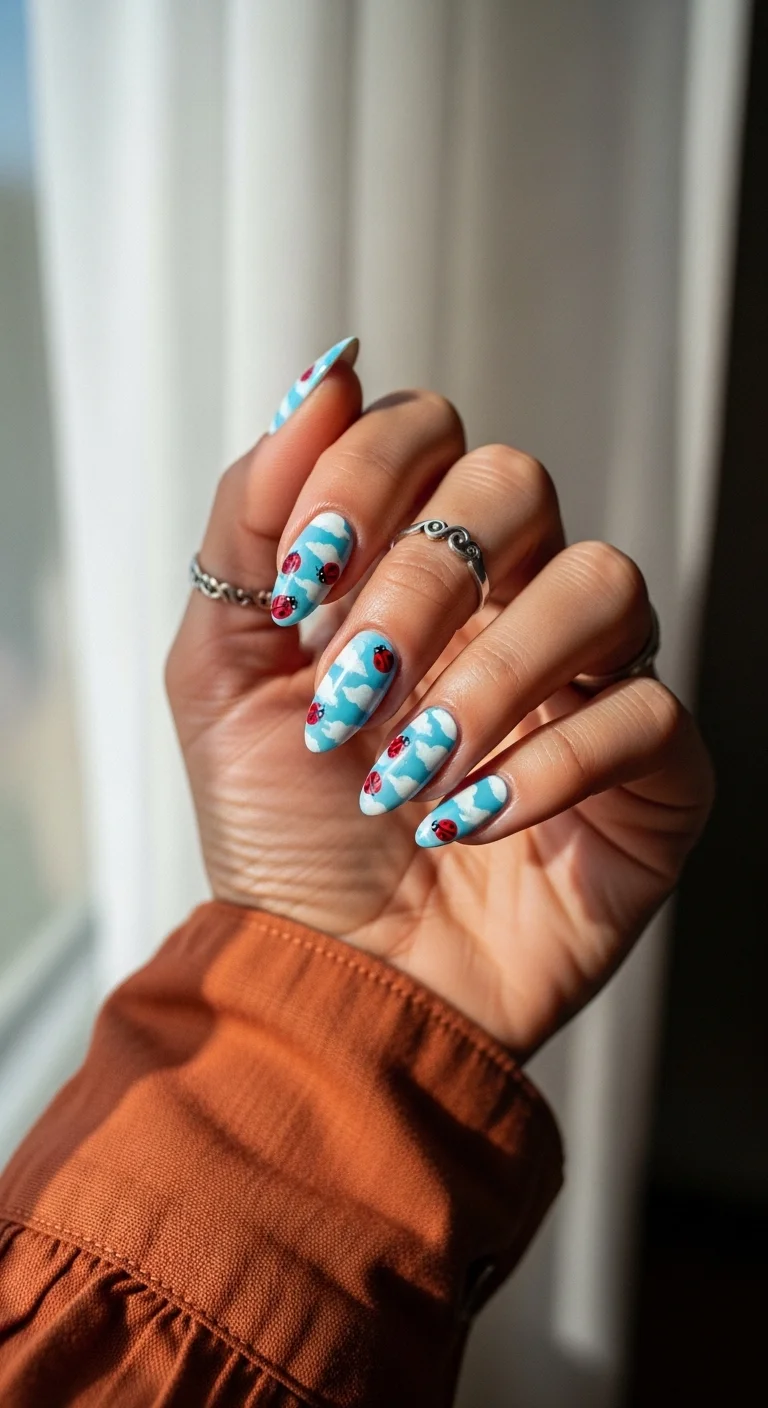
Dreamy blue clouds with tiny ladybugs flying through.
Overview:
A sky-blue base with white clouds is a design that leans heavily on the blending technique. The clouds need soft, diffused edges to look fluffy rather than like white paint blobs. A dry brush or a slightly damp sponge creates that softness by lifting and redistributing the white polish before it fully sets.
The ladybugs scattered among the clouds work because red and blue sit on opposite sides of the color wheel. The complementary contrast makes the bugs pop against the sky without either color overpowering the other. It's the same principle that makes the American flag visually striking: red, white, and blue together create natural visual tension.
The cloud placement should feel random but balanced. Two to three clouds per nail, at different heights and sizes, prevents the pattern from looking stamped. Every cloud should be a slightly different shape. Perfectly uniform clouds look like stickers.
Design Breakdown:
Illustrated sky scene with scattered insect accents. The clouds provide atmosphere; the bugs provide focal points.
Base Color: Bright sky blue across all nails.
Nail Shape: Long almond. The extended length gives the sky scene room to develop.
Design Element: Hand-painted white clouds with soft, diffused edges. Red ladybugs with black details scattered in the open blue spaces between clouds.
Finish: High-gloss top coat to blend the cloud edges and saturate the blue.
Get The Look at Home:
The clouds need soft edges. A dry brush technique produces better results than a loaded brush.
- Blue base: Two coats of sky blue. Let dry fully.
- Cloud technique: Dip a small brush in white polish, then dab most of it off on a paper towel. Use the nearly dry brush to dab cloud shapes onto the blue. The dry brush creates soft, diffused edges.
- Layer clouds: Add a second layer of white to the centers of the clouds for density. The edges should stay soft and translucent.
- Dry completely: Wait at least five minutes before adding the ladybugs.
- Ladybugs: Paint red bodies in the blue spaces between clouds. Add black heads, center lines, and dots.
- Seal: One coat of top coat to smooth the cloud texture and protect the bugs.
27.Berry & Daisy Garden
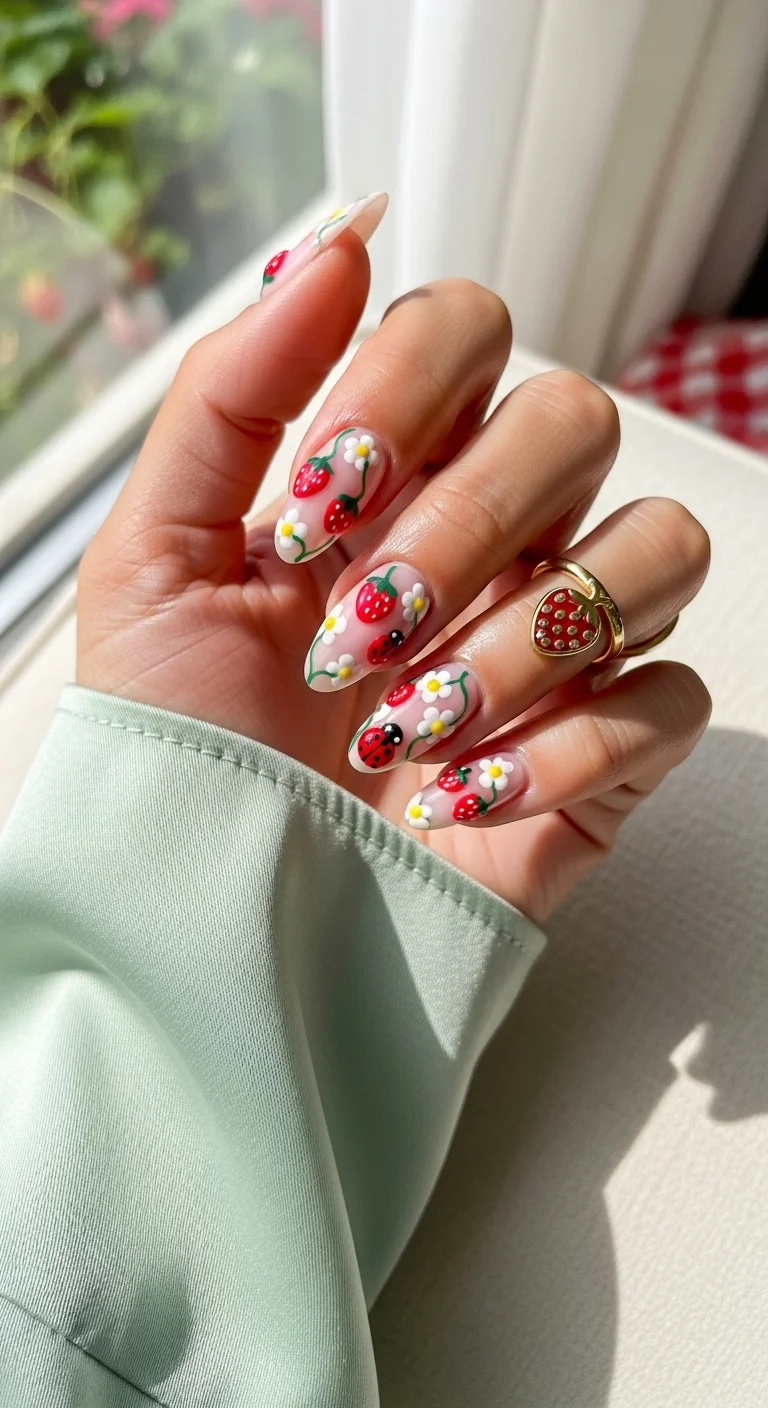
A lush, jammy garden full of berries and bugs.
Overview:
Three red-toned motifs, strawberries, ladybugs, and the red centers of some daisies, share a color family that keeps the design cohesive despite the variety. The sheer nude base lets every element sit on a neutral canvas that doesn't compete for attention. The white daisies provide a visual break between the denser red elements.
The strawberries and ladybugs are similar in size and shape, which creates an interesting visual ambiguity. From a distance, both read as small red ovals. Up close, the green leaf caps and white seeds distinguish the strawberries from the black-headed ladybugs. That layered discovery is what makes the design engaging.
The green leaves and stems serve a structural purpose beyond decoration. They connect the isolated motifs into a unified composition. Without the green, the red elements would float independently on the nude base. With the green, they feel like part of the same garden scene.
Design Breakdown:
Dense botanical illustration on a transparent canvas. Red motifs unified by green connective tissue.
Base Color: Sheer nude or milky pink. The natural nail should be visible.
Nail Shape: Medium almond. The curved shape complements the organic forms.
Design Element: Hand-painted strawberries with green caps, white daisies with yellow centers, red ladybugs with black details, and green leaves and stems connecting the elements.
Finish: High-gloss top coat to smooth the layered art.
Get The Look at Home:
Work in color layers: all reds first, then whites, then greens, then blacks. This is faster than finishing one motif at a time.
- Sheer base: One or two coats of milky nude. Let dry fully.
- Red layer: Paint strawberry shapes and ladybug bodies across all nails using red polish.
- White layer: Add daisy petals and white seeds on the strawberries.
- Green layer: Add strawberry caps, leaves, and stems connecting the motifs.
- Black details: Add ladybug heads, center lines, and dots. Add yellow centers to the daisies.
- Seal: Two coats of top coat to smooth the raised texture of the layered art.
30 Stunning Beach Nail Ideas for the Best Vacation in 2026 🌊
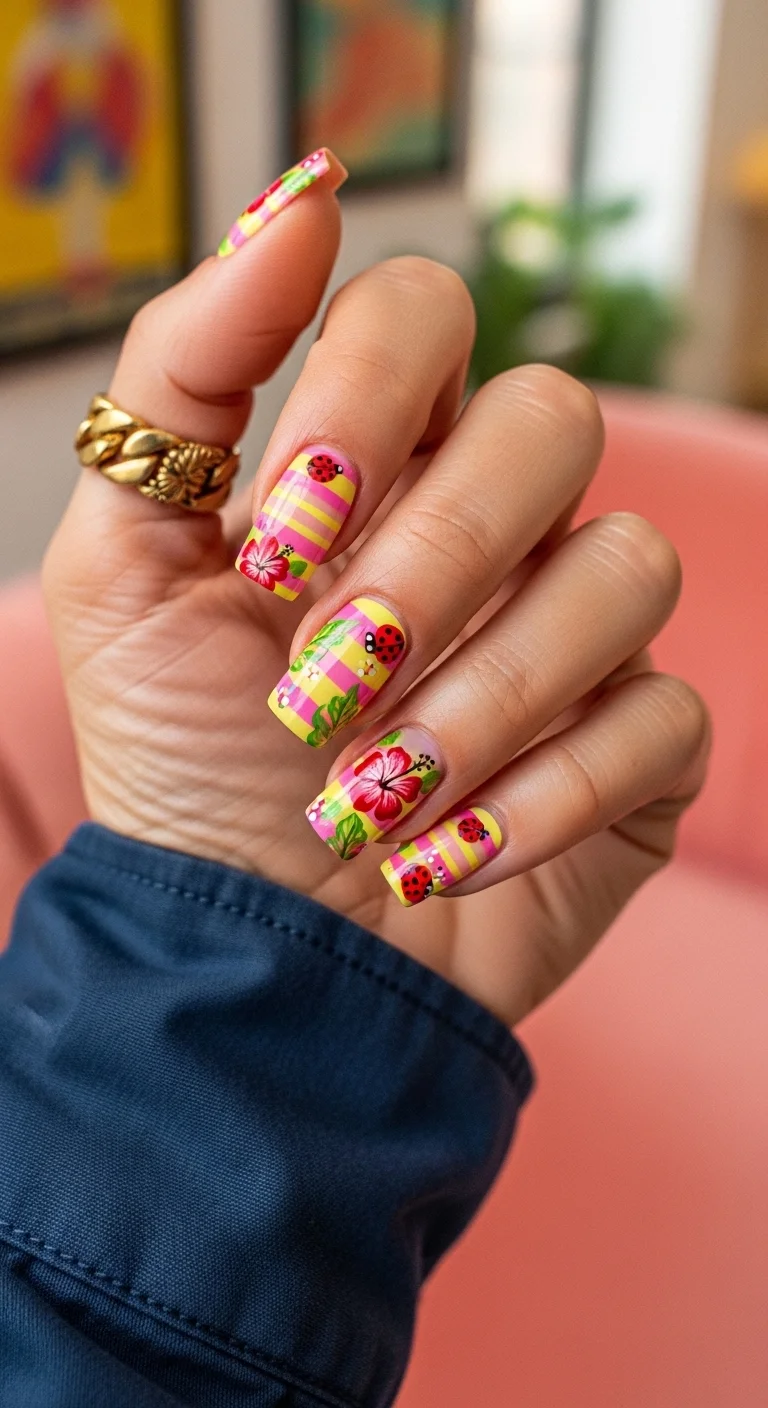
28.Hibiscus Striped Ladybugs
A tropical, sunny set that feels like a vacation in Hawaii.
Overview:
Pink and yellow horizontal stripes create a warm, tropical palette that feels like a sunset or a beach towel. Adding hibiscus flowers on top of the stripes shifts the design from "retro pattern" to "tropical scene." The flowers are large enough to dominate the visual field, with the stripes serving as a textured background rather than the primary design element.
The hibiscus flowers use pink, red, and green, which ties them to the stripe colors while adding depth through the green leaves. The ladybugs are the smallest element in the design, functioning as accent details rather than focal points. Their red bodies blend with the hibiscus petals, making them feel like part of the floral arrangement rather than a separate motif.
The stripe thickness needs to be consistent across all nails. Uneven stripes make the design look sloppy rather than intentional. Striping tape ensures uniform width, but freehand works if you accept a more handmade quality.
Design Breakdown:
Striped background with large floral illustration and small insect accents.
Base Color: Alternating horizontal stripes of pink and yellow across all nails.
Nail Shape: Long coffin. The flat surface provides a stable canvas for the large hibiscus flowers.
Design Element: Hand-painted hibiscus flowers in pink and red with green leaves. Small red ladybugs with black details scattered among the flowers.
Finish: High-gloss top coat to saturate the colors.
Get The Look at Home:
Do the stripes first, let them dry completely, then paint the flowers on top.
- Stripe base: Using striping tape, create horizontal pink and yellow stripes across all nails. Peel the tape while the polish is still tacky.
- Hibiscus petals: On two or three nails, paint large five-petal flower shapes using pink and red. The petals should overlap the stripes.
- Flower centers: Add darker red or brown centers to each hibiscus.
- Leaves: Paint green leaf shapes around the flowers. The green breaks up the warm palette.
- Ladybugs: Place small red bodies with black details in the gaps between flowers.
- Seal: Two coats of top coat to smooth the layered texture.
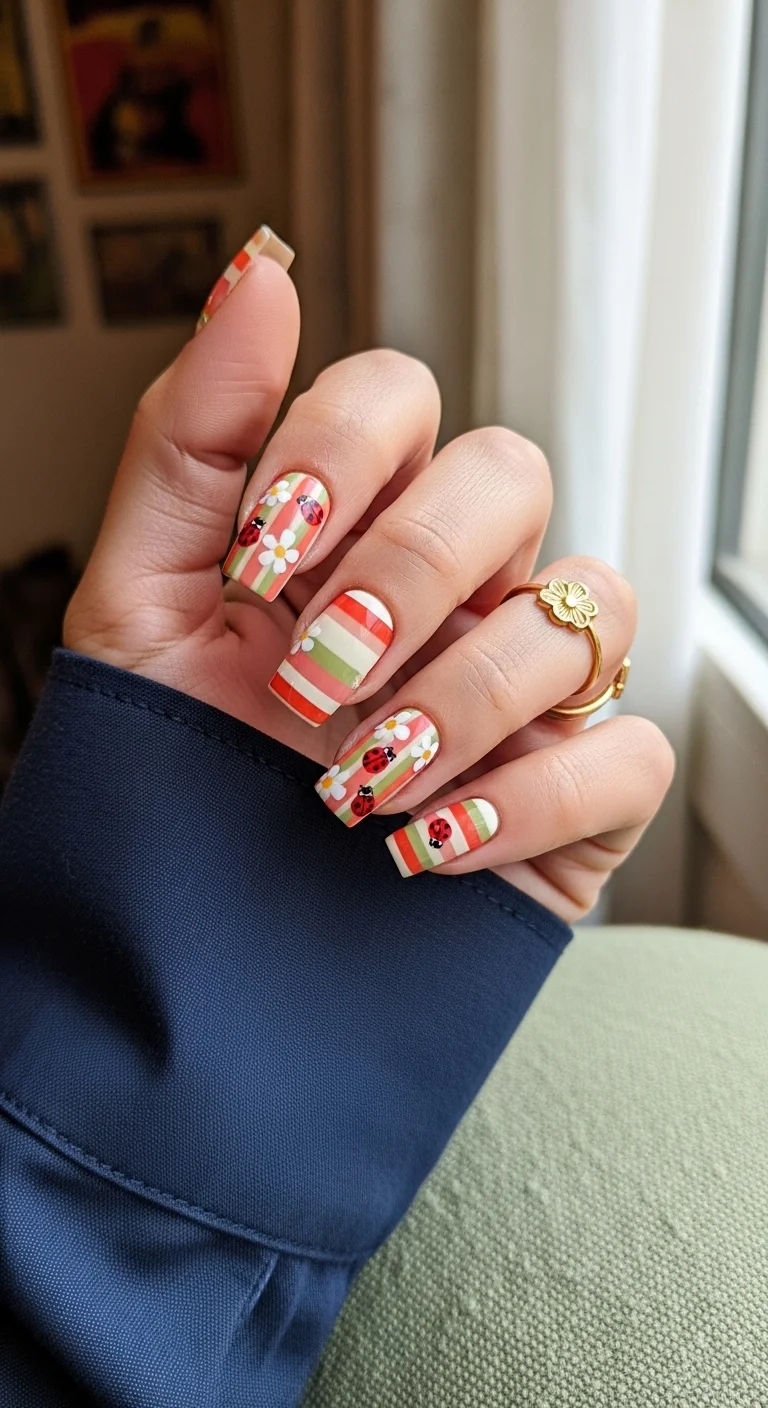
29.Retro Striped Meadow
Vintage stripes meet a wildflower garden.
Overview:
Vertical stripes in orange, green, and white create a retro palette that feels like a 1970s sundress or a vintage wallpaper print. The warm tones are unusual for ladybug nails, which typically lean red and black. This shift in palette gives the design a distinct personality.
The daisies and ladybugs painted over the stripes function as a second visual layer. The stripes provide structure and color; the flowers and bugs provide organic movement. The contrast between the rigid vertical lines and the loose, hand-painted botanicals is what makes the design visually interesting.
The stripe colors need to share a similar saturation level. If the orange is vivid and the green is muted, the two colors won't feel like they belong together. Aim for warm, equally saturated tones that read as a cohesive palette rather than three separate colors.
Design Breakdown:
Vertical striped background with scattered botanical illustration.
Base Color: Vertical stripes in orange, green, and white across all nails.
Nail Shape: Medium square. The flat shape reinforces the retro, graphic quality.
Design Element: White daisies with yellow centers and red ladybugs with black details scattered over the striped background.
Finish: High-gloss top coat.
Get The Look at Home:
Vertical stripes are harder than horizontal ones because the nail curves. Striping tape helps maintain straight lines.
- White base: Two coats of opaque white. Let dry fully.
- Stripe taping: Apply thin striping tape vertically across each nail, spacing lines roughly 3mm apart.
- Color application: Paint orange and green in alternating sections between the tape. Peel the tape while the polish is still tacky.
- Daisies: Paint white five-petal flowers with yellow centers scattered across the striped background.
- Ladybugs: Place small red bodies with black details among the daisies.
- Seal: Two coats of top coat to smooth the stripe ridges and protect the art.
20 Stunning Mother of the Bride Hairstyle Ideas for 2026 💍
30.Matte Maroon Menagerie
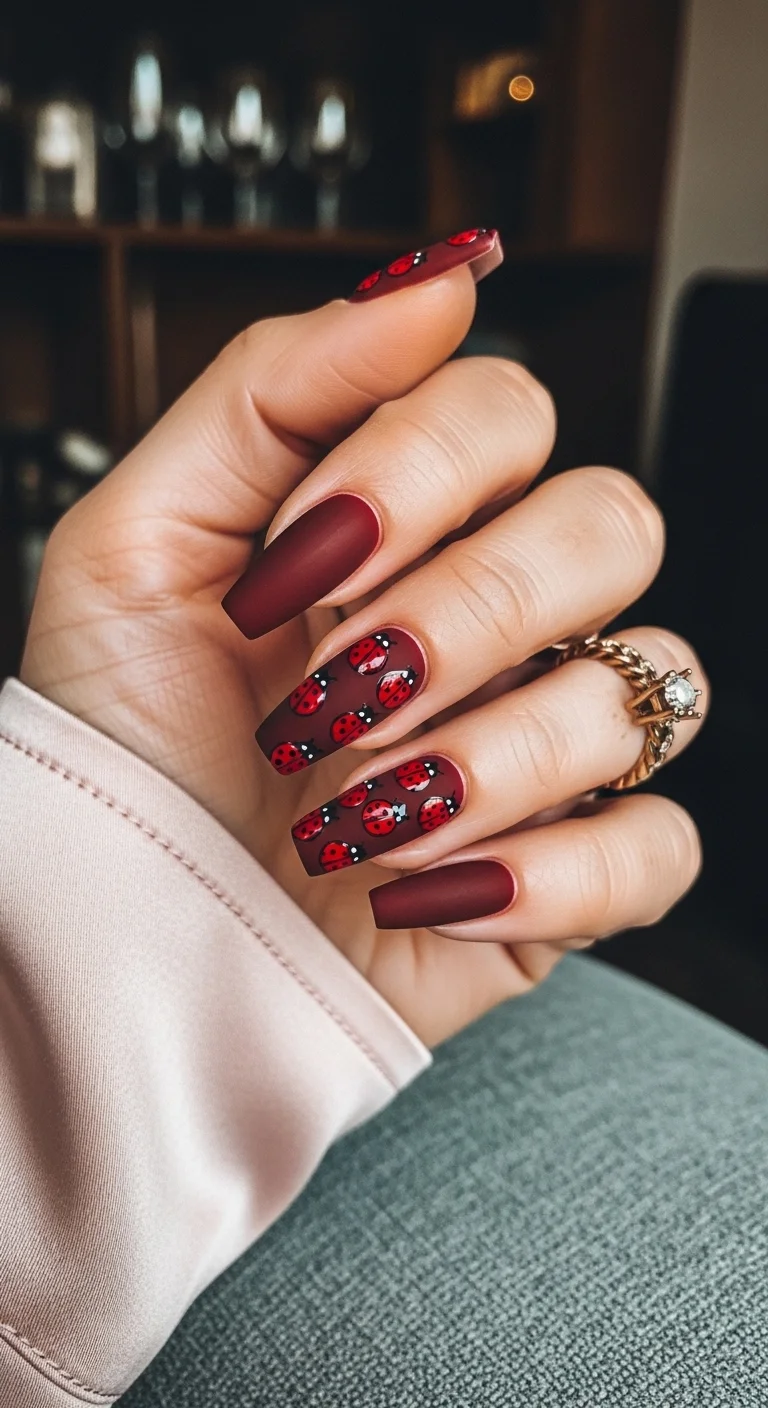
Dark, matte, and unexpectedly delicate.
Overview:
Matte maroon is a finish that absorbs light rather than reflecting it, which gives the color a velvety, almost fabric-like quality. On long coffin nails, this flat finish reads as sophisticated and intentional. The ladybug accents on two nails break the matte uniformity with a glossy, illustrated section that draws the eye immediately.
The texture contrast between the matte solid nails and the glossy accent nails is the design's most distinctive feature. The matte nails recede visually; the glossy accent nails advance. This push-pull dynamic creates depth that a uniform finish across all nails wouldn't achieve.
Matte top coats amplify every flaw in the base coat application. Streaks, brush marks, and uneven thickness that glossy top coats hide are fully visible under a flat finish. The base needs to be applied with more precision than usual: thin, self-leveling formula, fully dried between coats.
Design Breakdown:
Matte solid nails with glossy illustrated accents. Texture contrast is the primary design element.
Base Color: Deep maroon or burgundy. Matte on most nails, glossy on two accent nails.
Nail Shape: Long coffin. The flat surface maximizes the matte finish's velvety quality.
Design Element: Solid matte maroon on most nails. Two accent nails with clustered red ladybugs on a glossy maroon or sheer base.
Finish: Matte top coat on solid nails. High-gloss top coat on accent nails. The contrast between the two finishes is the design.
Get The Look at Home:
The matte and glossy nails use different top coats. Apply matte to the solid nails first, then gloss to the accents.
- Maroon base: Two coats on all nails. Let dry fully.
- Accent nail art: On two nails, paint clustered red ladybugs with black heads, center lines, dots, and white eyes. Vary the sizes and angles.
- Matte the solids: Apply matte top coat to all non-accent nails. Let dry completely.
- Gloss the accents: Apply high-gloss top coat to the ladybug nails only.
- Check the contrast: Hold both hands under light. The matte nails should look flat and velvety; the accent nails should look wet and reflective.
Skill Level Guide: What You'll Need for Each Look
🌱 Beginner-Friendly
Not every ladybug design requires a professional kit. If you're new to nail art, start with the simpler motifs where imperfection reads as charm rather than error. Polka dot interpretations (red dots on a white or nude base with a tiny black head) are forgiving because ladybugs aren't perfectly symmetrical anyway. A basic dotting tool or even a toothpick is enough to create recognizable bugs. The Lemon Sorbet Frenchies or Polka Dot Perfection are ideal starting points.
Tools: Basic dotting tool (or toothpick), orangewood stick, one red polish, one black polish, a sheer or white base. Time: 30 to 45 minutes for a full set. Technique: Simple dots and single-stroke bodies. No fine-detail brushes needed.
🌿 Intermediate
Once you're comfortable with dotting, level up to designs that combine multiple motifs on the same nail. The Ladybug Frenchie Fusion and Pink Picnic Gingham Bees both require French tip guides or a steady freehand for the smile line, plus careful layering of gingham grids and bug illustrations. The difference between "cute" and "salon-worthy" at this level comes down to precision in the details, the white eyes on the ladybugs, the spacing of the dots, the crispness of the French curve.
Tools: Fine detail brushes (size 0 or 00), French tip guides or striping tape, three to four polish shades per design. Time: 1 to 2 hours. Technique: Hand-painted motifs, gingham grids, alternating patterns across nails.
🌺 Advanced / Professional
The maximalist sets in this list, think the Picnic Basket Medley or the Bumblebee Ladybug Meadow, require multiple techniques layered on a single nail. You're not just painting ladybugs. You're painting fruit, flowers, gingham, dashed flight paths, and sometimes all of the above on one hand. The 3D sculpted elements (raised gel ladybugs, textured flower petals, resin droplets) push even further, demanding a UV/LED lamp and builder gel. These designs are best suited for experienced hobbyists or salon visits.
Tools: UV/LED lamp, builder gel, 3D sculpting gel, gel glue, rhinestones and charms, multiple fine brushes. Time: 2 to 3 hours. Technique: 3D sculpting, multi-layered compositions, chrome application, mixed media (gel + regular polish).
When & How to Style Ladybug Nails: From Garden Parties to Everyday Wear
Ladybug nails are versatile enough to work across a surprising range of occasions, but the styling changes depending on where you're going. For casual everyday wear, keep it restrained: one or two accent nails with ladybugs, the rest in a solid complementary color like sage green, butter yellow, or matte nude. That version reads as thoughtful rather than costume-like. For garden parties, spring brunches, or picnic dates, go all in. Full garden scenes with gingham, daisies, and bugs at every angle match the energy of outdoor gatherings.
The outfit pairing matters more than you'd think. Ladybug nails pop against solid color clothing, especially white, butter yellow, and sage green, because the nail art doesn't compete with a busy fabric. Gingham and floral dresses work too, but the patterns should echo each other rather than stack. If your dress has large florals, your nails should lean simpler. Denim is the safest bet: it's a neutral backdrop that lets any ladybug design take center stage without clashing.
Seasonally, ladybug nails peak from April through September when the actual bugs are visible outside. But the look isn't strictly summer-only. Deeper red bases like the Crimson Ladybug Coffin transition well into early fall, and minimalist versions on sheer nude work year-round without feeling out of place in colder months.
Maintenance note for 3D elements: If your design includes sculpted ladybugs, rhinestones, or textured accents, seal the edges with a thick bead of top coat or gel to reduce snagging on hair and knitwear. Glossy top coat over hand-painted details prevents chipping. Wear gloves for cleaning, and keep a tube of gel glue handy for any 3D pieces that start lifting around week two.
And there you have it, lovelies! Hopefully, scrolling through these adorable designs got you super excited to try out some ladybug accents for your next manicure. It's amazing how a little pop of red and some dainty spots can completely transform your nails into a whimsical masterpiece.
Don't forget to save those favorite pictures straight to a Pinterest board or camera roll to have them ready for the next salon appointment! Pinning them early is a great way to avoid panicking when sitting down in the salon chair. Share which lucky ladybug design you are going to try out first!