Nail Trends
30 Stunning Beach Nail Ideas for the Best Vacation in 2026 🌊
Whether you're planning on sipping margaritas in Cabo, lounging under the Amalfi sun, or catching waves in Bali, your nails should be just as vibrant and carefree as your vacation mood. This year, trends showcase everything from 'sirencore' magnetic blues to zesty citrus art and sophisticated 'sea glass' ombres that look like they were plucked straight from the shoreline.
Here is a curated list of 30 stunning beach nail ideas, gathered from hours of scrolling through the latest runway trends and salon favorites. These sets aren't just pretty—they're designed to make you feel like the ultimate beach goddess from morning beach walks to sunset dinners.
The Beach Nail Shift of 2026: Why Mermaid Chrome and 3D Seashells Are Everywhere
Here is the thing about beach nails in 2026: the simple wave decals and flat palm trees that defined summer manicures for years have been officially dethroned. The biggest shift this season is texture — literal, physical texture that you can feel as much as see. We are talking mermaid chrome finishes that shift from teal to violet depending on the light, 3D seashell appliqués that sit raised off the nail bed, and iridescent finishes that look like light filtering through shallow water.
According to the 2026 trend roundups, the keywords dominating beach nail content right now are "mermaid chrome," "sea glass," and "3D seashell." What that means in practice is that flat stamping patterns are out, and anything that catches light from multiple angles is in. The Zoe Report has been calling out "neutral chrome, soft pastels, and butter yellow" as the defining summer palette, and Allure is explicitly naming "texture—including 3D gel flowers, water droplets, and realistic seashell designs" as the story of the season.
The practical upside is that these finishes photograph better than flat designs. A mermaid chrome nail reads like liquid metal in a photo, which is why they are dominating Instagram and Pinterest feeds this summer. The downside? Chrome powder requires a no-wipe gel top coat, and 3D elements need proper encapsulation or they will pop off before your vacation ends.
💡 If you want the 2026 beach look without full commitment: ask your tech for mermaid chrome on all nails with a single 3D shell accent on the ring finger. You get the dimensional trend and the statement piece without ten delicate charms begging to be snagged on your beach towel.
In This Guide
1.Neon Lime Palm Paradise
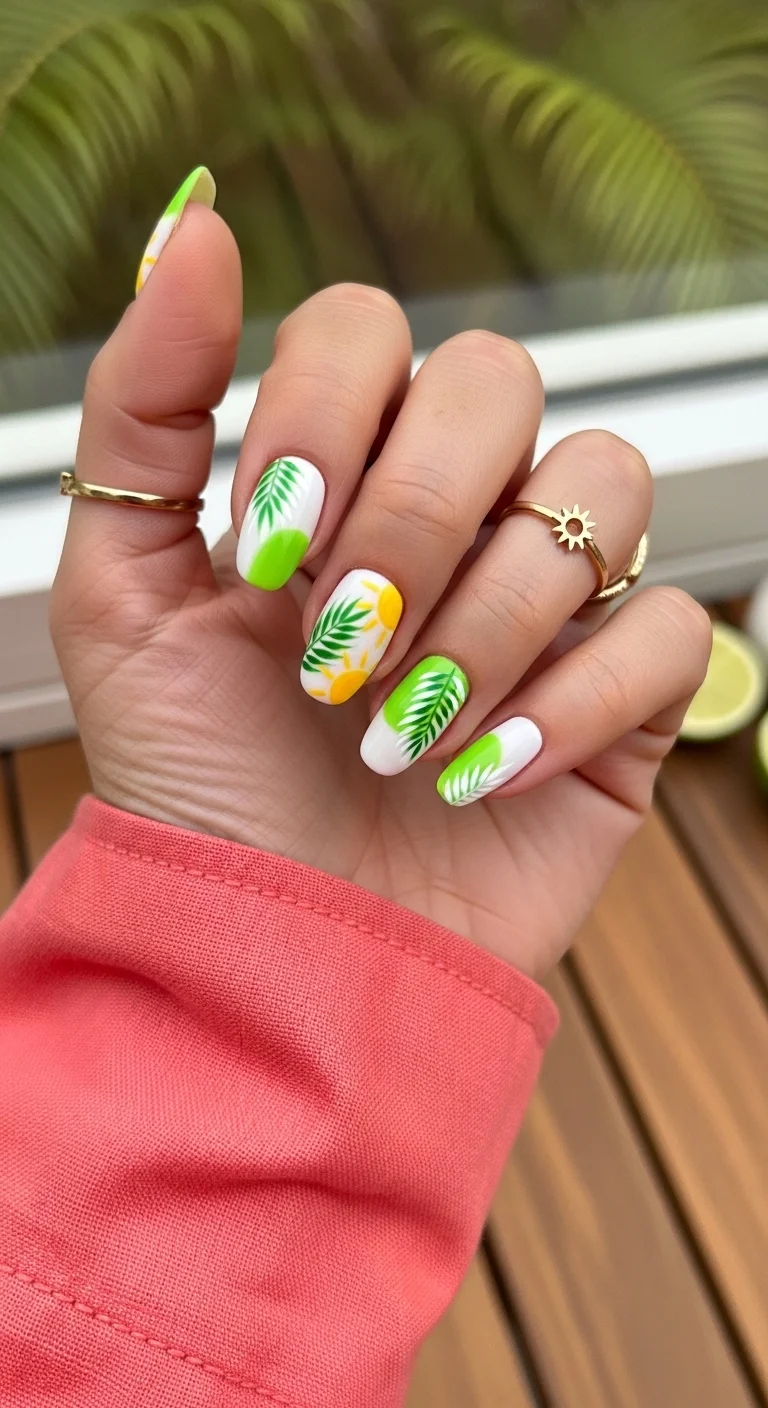
Neon lime and hand-painted palm fronds on almond nails.
Overview:
Neon lime polish divides people. Some see highlighter, others see vacation in a bottle. The difference comes down to what you pair it with. On these nails, the white base does the heavy lifting — it cools the neon down just enough that the green reads tropical rather than tacky.
The palm frond art is where this design earns its keep. Dark green hand-painted leaves over white give each nail enough visual weight that the neon tips feel like an accent, not the whole show. The yellow sunburst on the middle finger is a small addition that anchors the tropical theme without turning every nail into a mural.
Fair warning: neon pigment stains bare nails. A proper base coat isn't optional here — it's the difference between a clean removal and three days of tinted nail beds.
Design Breakdown:
High-contrast color blocking with freehand botanical art. The white prevents the neon from overwhelming the hand.
Base Color: Opaque white on most nails, neon lime green on the thumb and pinky. Two coats minimum for the white — neon over sheer base looks washed out.
Nail Shape: Medium almond. Long enough to give the palm art room, short enough for everyday wear.
Design Element: Hand-painted dark green palm fronds and a yellow sunburst. The fronds use a thin liner brush; the sunburst uses a dotting tool for the center and a striper for the rays.
Finish: High-gloss top coat. Neon polish dries slightly chalky without gloss — the top coat is what makes it pop.
Get The Look at Home:
Budget 40 minutes. The palm frond art takes patience, but the individual strokes are simple once you get the rhythm.
- Base coat: Apply a ridge-filling base coat. Neon pigment settles into ridges and creates uneven color.
- Color blocking: Paint all the fingers with 2 coats of opaque white. Let each coat dry fully before the next.
- Palm fronds: For the palm trees on the nails, dip a thin liner brush in dark forest green. Draw a center line from cuticle toward the tip, then flick outward on both sides for the leaflets. Keep the strokes quick — hesitant lines look stiff.
- Sunburst: To create a sun art, start with the middle finger. Place a yellow half-circle at the cuticle with a dotting tool. Pull thin rays outward with a striper brush. This will be in both Thumb and middle finger only.
- Clean edges: Run a flat brush dipped in acetone along the cuticle line and sidewalls before the art dries.
- Top coat: One thick coat, floating the brush over the art. Pressing down drags the frond lines.
30 Stunning Summer Hair Trends for 2026 ☀️🌊
2.Midnight Ocean Velvet Ombre
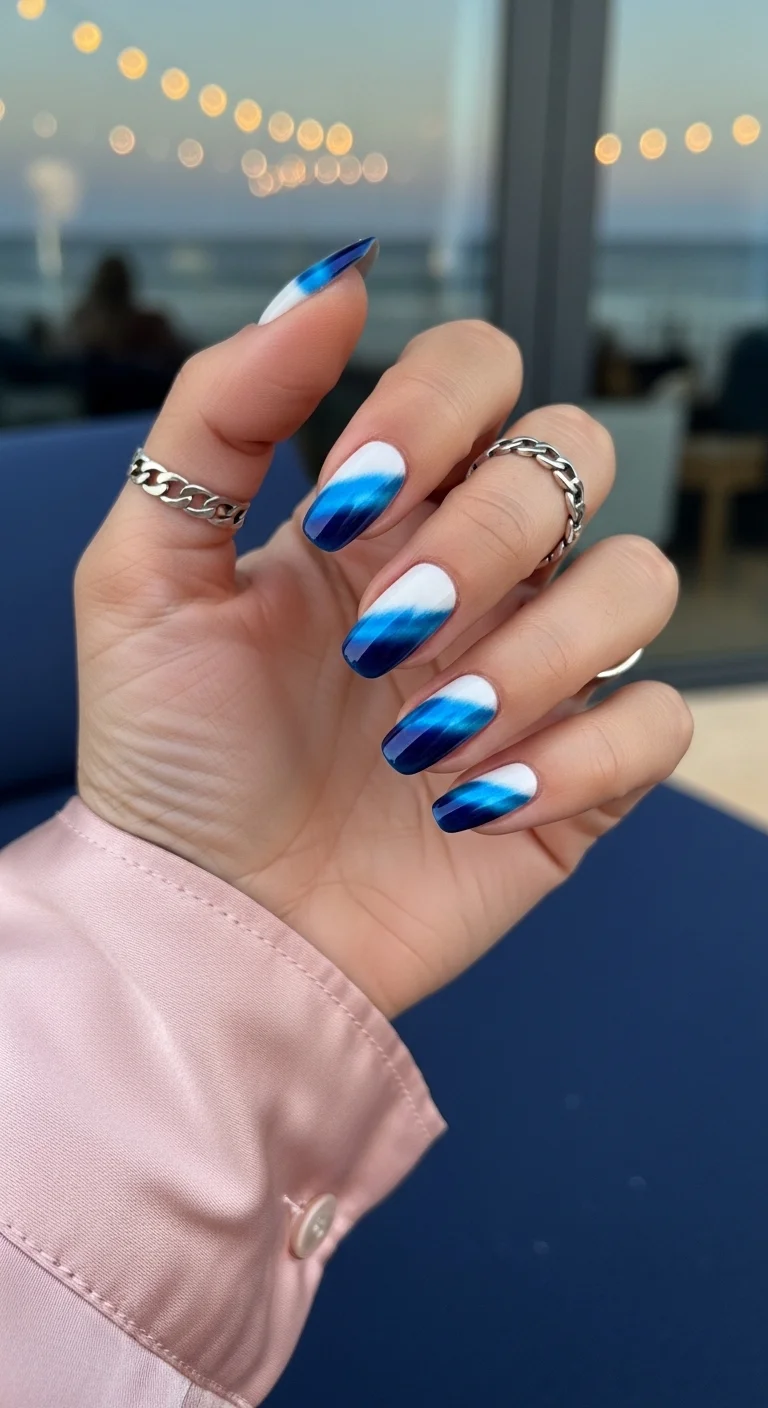
Navy-to-white diagonal ombre with magnetic velvet shimmer.
Overview:
Magnetic cat-eye polish looks best when it has somewhere to go. Here, the diagonal sweep from white cuticle to navy tip gives the shimmer a direction — the light catches differently across each nail depending on the angle, and that movement is the whole point.
The white-to-navy gradient isn't blended into a seamless middle blue. Instead, each nail keeps its own diagonal split, with the colors meeting in a soft, slightly irregular line. That irregularity is what makes it look hand-done rather than printed. Too-perfect ombre with cat-eye reads as factory-made.
This is the kind of design that changes character depending on lighting. Under warm indoor light, the navy looks almost black and the shimmer turns bronze. In daylight, the blue is vivid and the white stays clean. Both versions work, but they're different moods entirely.
Design Breakdown:
Magnetic polish over a two-tone base. The magnet tool is what creates the velvet depth — without it, you just have blue shimmer.
Base Color: Milky white at the cuticle third, deep navy at the tip two-thirds. The overlap zone should be soft, not a hard line.
Nail Shape: Long almond or coffin. The extra length gives the magnetic shimmer more surface to play across.
Design Element: Blue magnetic cat-eye polish applied over the navy section while it's still wet. The magnet pulls the metallic particles into a concentrated line of shimmer.
Finish: Thick, glass-like top coat. The layered depth needs a high-gloss seal to look like polished stone rather than flat paint.
Get The Look at Home:
The magnet is the star here. If you don't own a nail magnet, a refrigerator magnet works in a pinch — the stronger the magnet, the sharper the velvet line.
- White base: Apply milky white to the bottom third of each nail. Blur the upper edge upward with a sponge or brush while it's wet.
- Navy layer: Paint deep navy over the top two-thirds, slightly overlapping the white. Don't blend — let them meet naturally.
- Magnetic polish: While the navy is still tacky, brush on a thin layer of blue magnetic shimmer polish.
- Magnetize: Hold the magnet 5mm above the nail for 10 seconds. Don't touch the surface — the magnet works through the air.
- Let it set: Wait two full minutes before touching the nail. The magnetic particles shift if disturbed before the polish firms up.
- Top coat: Apply in one stroke. Going back over magnetic polish pulls the shimmer line out of alignment.
3.Amalfi Lemon Spritz Shorties
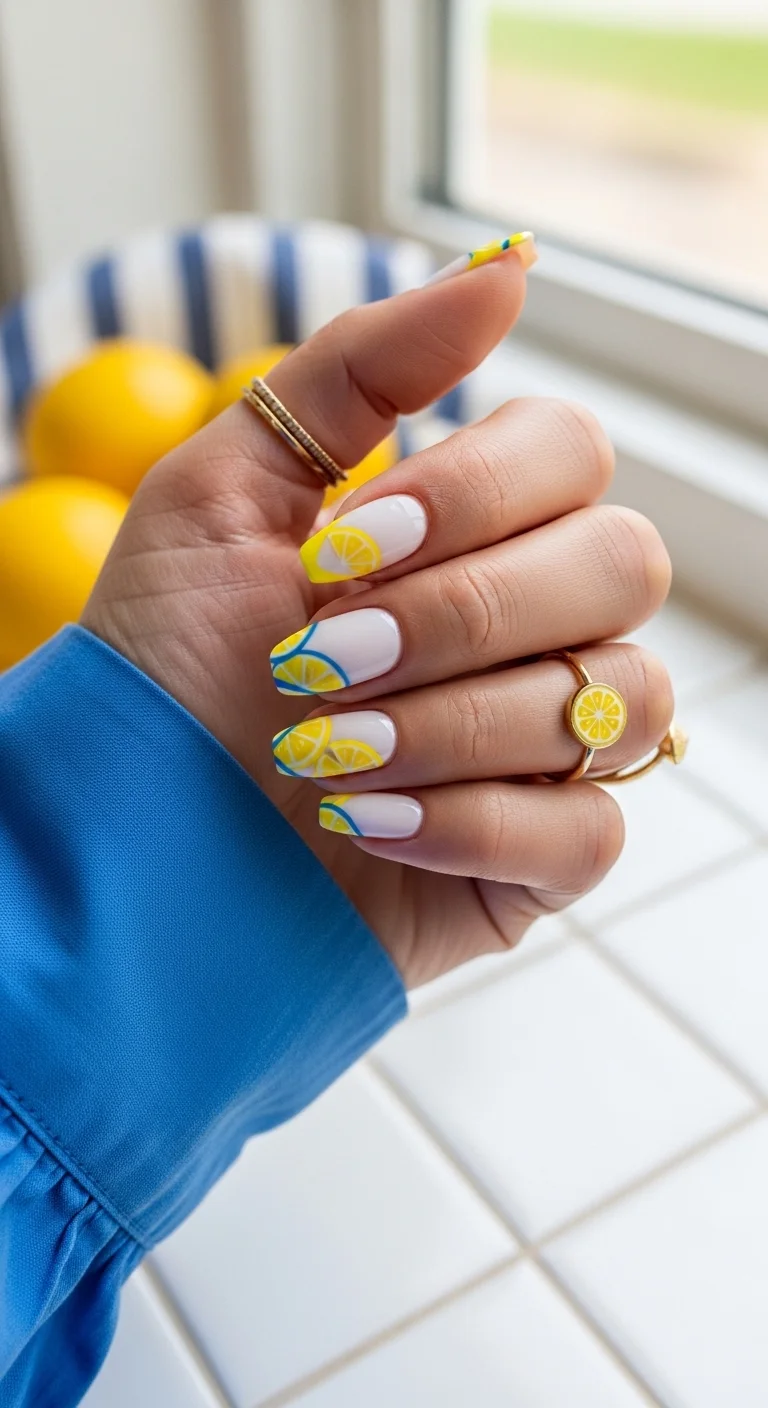
Hand-painted lemon slices with cobalt blue accent lines.
Overview:
Short nails with hand-painted fruit art walk a fine line between "charming" and "cluttered." These stay on the right side because of the color restraint: white base, yellow lemon, one shade of blue for the accent lines. Three colors total. That discipline keeps the design from reading as a craft project.
The cobalt blue curved lines are doing more work than they appear to. Without them, the lemon slices float on white without context — they could be stickers. The blue lines frame the fruit and give the eye a path to follow across the hand. It's the difference between "nail art" and "a designed set."
Yellow polish over white is forgiving. If the lemon slices aren't perfectly round, the white pith lines hide the imperfections. This is one of the more beginner-friendly fruit designs to attempt at home.
Design Breakdown:
Illustrative fruit art on a clean base. The blue accent lines provide structure that prevents the design from floating.
Base Color: Opaque milky white. Two coats. The white needs to be fully opaque — any streakiness shows through the lemon art.
Nail Shape: Short rounded or squoval. The compact shape keeps the lemon motifs proportional.
Design Element: Half and full lemon slice motifs in bright yellow with white pith details, plus curved cobalt blue accent lines near the cuticles or framing the fruit.
Finish: High-gloss. The shine makes the yellow look juicy and the white look crisp.
Get The Look at Home:
The lemons don't need to be symmetrical. Real lemons aren't perfectly round, and the slight irregularity makes them look hand-painted rather than stamped.
- White base: Two thin coats of opaque white. Let dry fully — any tackiness will drag the yellow.
- Lemon shapes: Using a medium dotting tool or small brush, place yellow half-circles and full circles on each nail. Vary the placement: tip, center, cuticle area.
- Pith lines: With a fine liner brush and white polish, draw thin radiating lines inside each lemon circle to suggest the segmented interior.
- Blue accents: Dip a thin striper in cobalt blue and draw one curved line per nail — near the cuticle, along the side, or framing the lemon. Keep the curves confident and single-stroke.
- Cleanup: A flat brush in acetone sharpens any wobbly blue lines before they dry.
- Seal: One generous coat of glossy top coat, capping the free edge.

28 Cute & Sporty Baseball Game Nail Ideas for 2026 ⚾
4.Golden Nautilus Goddess
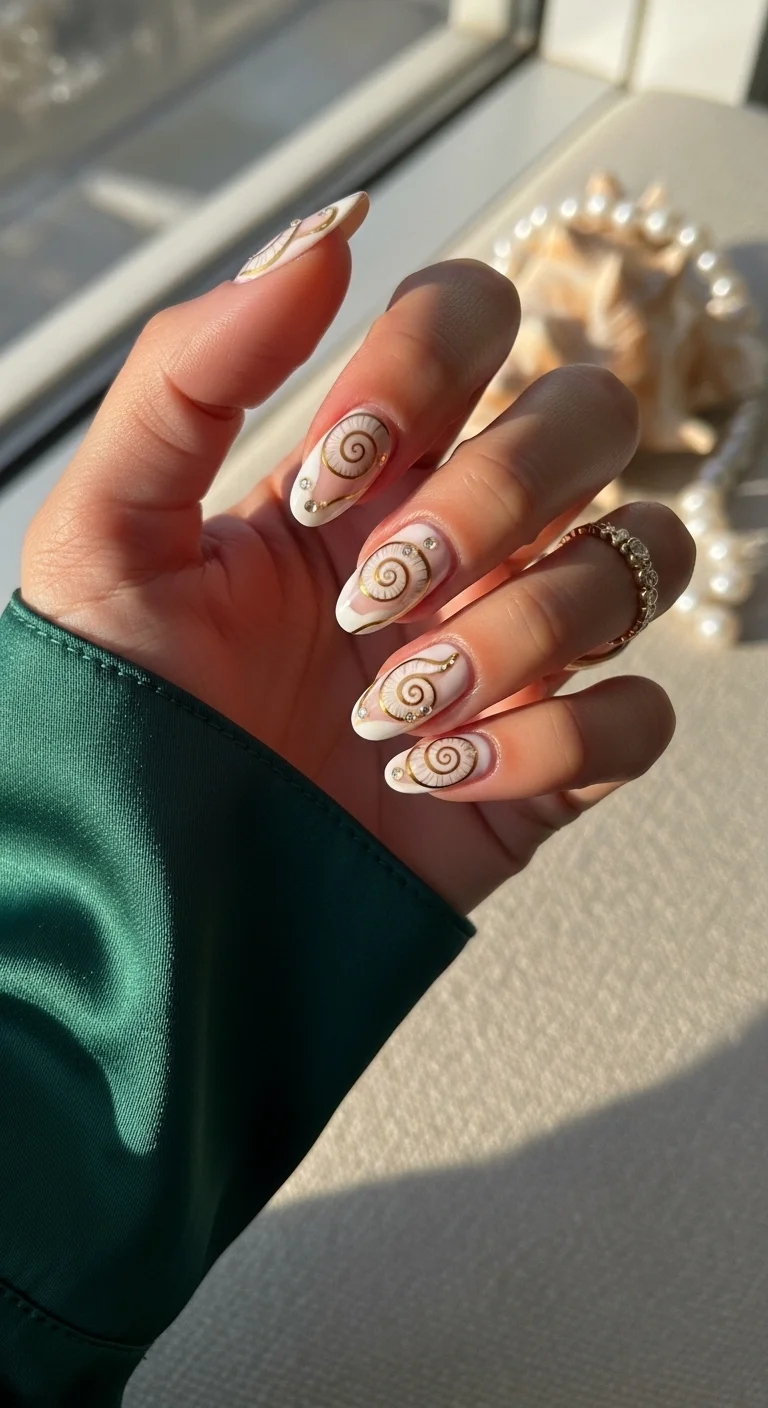
Raised gold chrome nautilus spirals with crystal embellishments.
Overview:
3D nail charms are the difference between "nice nails" and "where did you get those done?" The sculpted nautilus shells on this set have actual texture — you can feel the spiral ridges when you run a fingertip across them. That tactile quality is something flat nail art can't replicate.
The milky nude base is the right call. A colored base would compete with the gold chrome for attention. The sheer white background lets the shells sit like jewelry on a display stand — they're the focal point and everything else recedes.
The practical reality: 3D chrome elements snag on everything. Hair, knitwear, seatbelts, pillowcases. Sealing the edges with extra top coat around the base of each shell helps, but budget about a week of wear before something catches. Worth it for the visual impact, but not for a low-maintenance two-week set.
Design Breakdown:
3D chrome embellishments on a sheer base. The shells are pre-sculpted or applied as charms, not hand-painted flat.
Base Color: Sheer milky white or pale nude. The base should be nearly invisible — it's a canvas, not a feature.
Nail Shape: Medium-long almond. The tapered shape complements the organic spiral of the nautilus without making the nails look stubby.
Design Element: 3D gold chrome nautilus shell charms with tiny gold caviar beads and clear crystal accents scattered around them.
Finish: High-gloss base with the 3D elements sealed separately. The chrome needs its own top coat layer to prevent tarnishing.
Get The Look at Home:
This requires jewelry gel or UV-cure charm adhesive. Regular nail glue won't hold 3D elements for more than a day.
- Sheer base: Two coats of milky white or pale nude gel. Cure fully between coats.
- Plan placement: Hold the shell charms over different nails before committing. Odd-numbered placements (one per hand, or three across both hands) look more natural.
- Attach charms: Apply a small bead of jewelry gel to the back of each shell. Press firmly onto the cured nail surface. Cure again under UV lamp.
- Bead accents: Using a wax picker tool, place 3-5 tiny gold caviar beads around each shell in a loose scatter.
- Crystal placement: Add one or two clear rhinestones near each shell cluster for sparkle.
- Edge seal: Using a detail brush, apply top coat around the base of each 3D element. This is what prevents lifting and snagging.
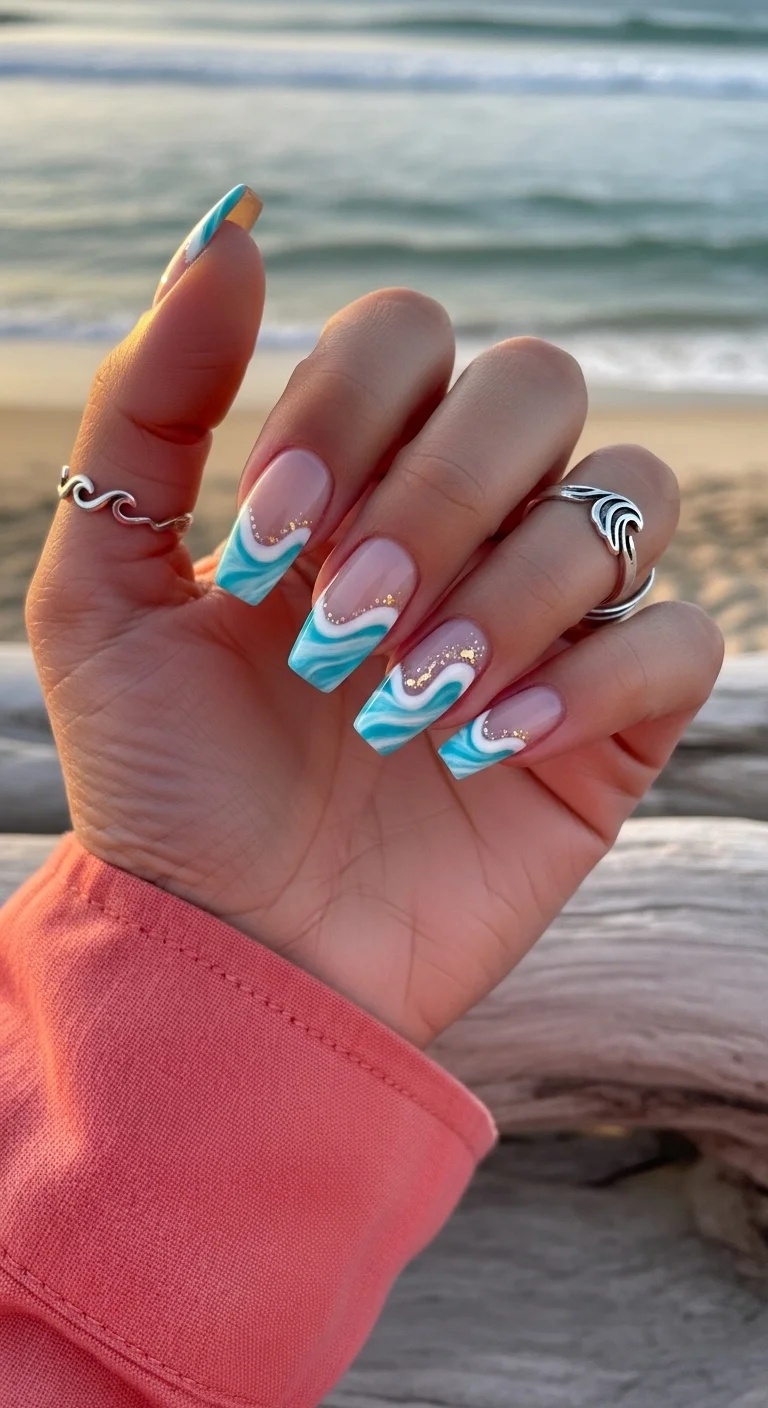
5.Midnight Stargazer Waves
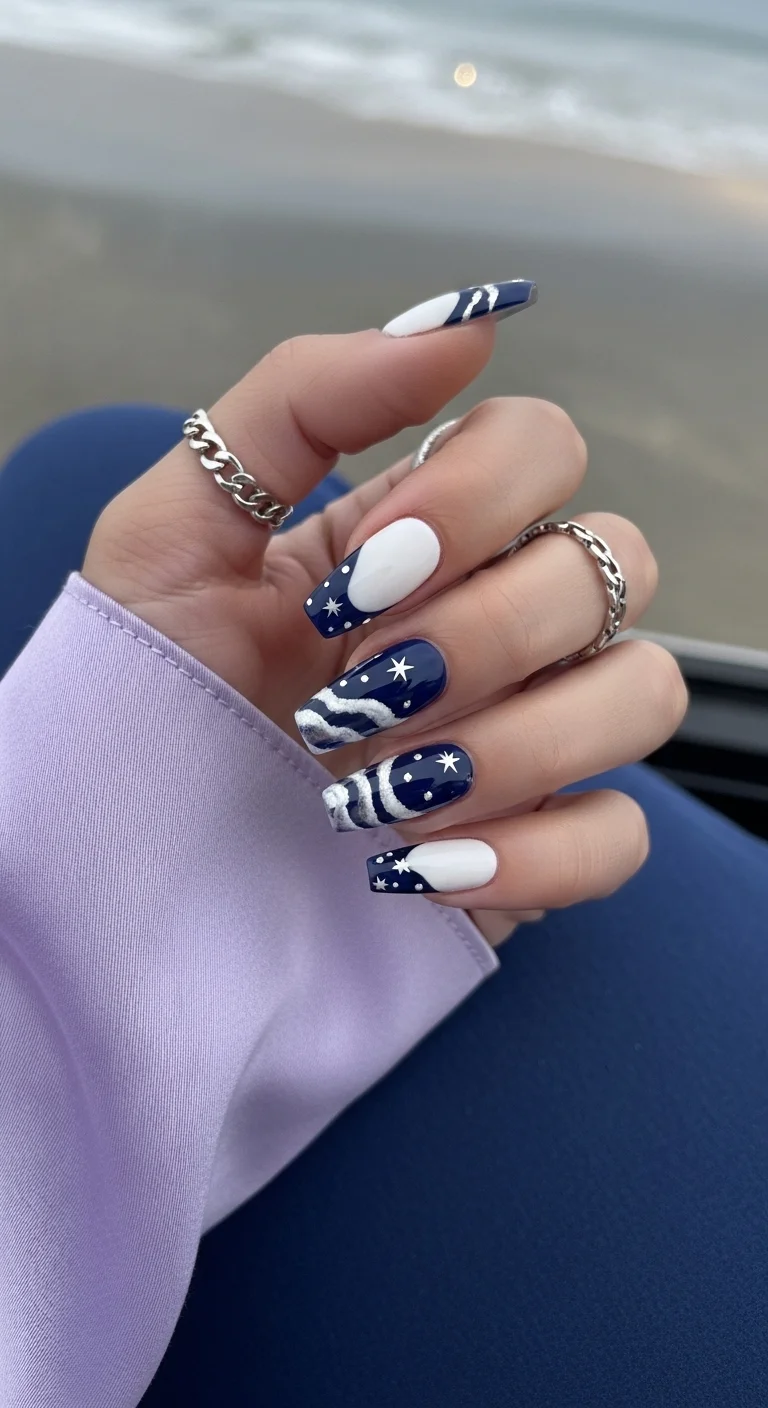
Hand-painted ocean waves and celestial stars on navy and white.
Overview:
Mixing two motifs — waves and stars — on one set is a gamble. Both are visually busy. The reason this works is the strict two-color palette: navy and white, nothing else. When you limit the colors, you can push the pattern complexity without the set looking chaotic.
The alternating base colors (some nails navy, some white) create rhythm across the hand. Every other nail flips the color relationship, which keeps your eye moving. If every nail were navy with white art, the set would feel heavy. The white nails provide breathing room.
The star shapes vary from four-point to six-point across nails. That variation matters — uniform stars look stamped. Slightly different star forms on each nail signal hand-painted work, which is what gives the set its character.
Design Breakdown:
Two alternating base colors with layered celestial and wave patterns. The navy-white restriction is what holds everything together.
Base Color: Alternating deep navy and crisp white. The navy should be dark enough to read as midnight — think OPI "Russian Navy" or Essie "Booties Brown" (which reads dark navy).
Nail Shape: Medium-long coffin. The flat tip provides a stable frame for the wave and star patterns.
Design Element: White wave/swirl patterns on navy nails, navy starbursts on white nails, with scattered dot accents suggesting constellations.
Finish: Glossy top coat. The shine makes the navy look deeper and the white look brighter.
Get The Look at Home:
Work in rounds: all base colors first, then all wave patterns, then all stars. This is faster than finishing one nail at a time.
- Alternating base: Paint middle and ring finger navy; thumb, index and pinky white. Two coats each. Let dry completely.
- Waves on navy: Using a thin liner brush and white polish, draw flowing S-curves across each navy nail. Vary the number and placement — two to three waves maximum on each nail.
- Stars on Navy: Using the same liner brush and white polish, draw small star shapes. Pull four or six thin lines outward from a center point.
- Dot accents: With a small dotting tool, scatter tiny white dots on navy nails to fill empty space.
- Consistency check: Hold both hands at arm's length. The visual weight should feel roughly even across all nails.
- Top coat: One thick layer. Float the brush to avoid dragging the fine line work.

30+ Chic Pool Party Hairstyles for Summer 2026 🌊👙
6.Sunset Coral Bubbles
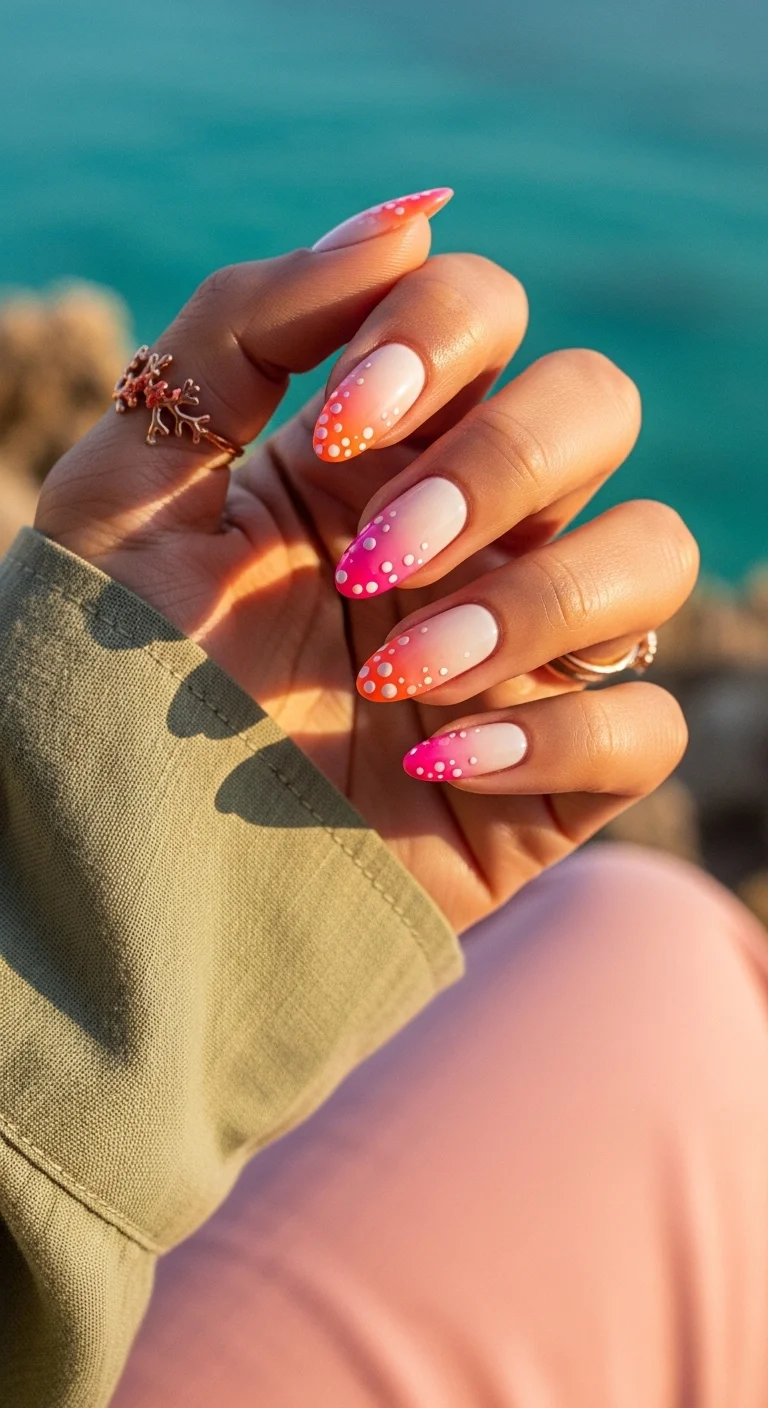
Warm coral-to-pink gradient with scattered white bubble dots.
Overview:
Coral-to-pink ombre is one of those gradients that flatters virtually every skin tone. The warmth of the coral anchors the transition near the cuticle, while the hot pink at the tip adds enough contrast that the gradient doesn't fade into a single mushy color. That two-tone warmth is what makes it read as "sunset" rather than just "pink nails."
The white bubble dots are a small addition that changes the entire character of the design. Without them, this is a nice ombre. With them, it becomes sea foam, or champagne bubbles, or light reflecting off water — the dots give the viewer's imagination something to latch onto. The key is varying the dot sizes. Uniform dots look like polka dots. Mixed sizes look like bubbles.
One thing to know about coral polish: it chips faster at the tips than most colors. Wrapping the top coat over the free edge — painting along the very tip of the nail — extends wear time noticeably.
Design Breakdown:
Sponge-applied warm gradient with scattered dot accents. The gradient is forgiving; the dots are where precision matters.
Base Color: Warm coral near the cuticle fading to vivid hot pink at the tips. The transition zone should be soft, not a hard line.
Nail Shape: Medium-long almond. The curved shape enhances the organic, flowing quality of the gradient.
Design Element: White dot accents in varying sizes, concentrated near the tip and the ombre transition zone. Think sea foam, not polka dots.
Finish: High-gloss. The shine makes the coral look warm and the pink look saturated.
Get The Look at Home:
The sponge technique for ombre is well-established. The trick is building opacity gradually rather than pressing hard once.
- Base coat: Apply a ridge-filling base coat and let it dry completely.
- Sponge setup: Paint a stripe of coral and a stripe of hot pink side by side on a dry makeup sponge. Dab on paper first to remove the initial excess.
- Build the gradient: Press the sponge onto the nail with coral at the cuticle and pink at the tip. Three to four gentle dabs per nail. Re-load the sponge every two nails.
- Repeat for opacity: Let each layer dry for one minute, then repeat the sponging. Two to three rounds builds full coverage.
- Bubble dots: Using a small dotting tool and white polish, place scattered dots near the tips. Vary the sizes — press lightly for small dots, harder for larger ones.
- Top coat: Two coats. The sponge texture needs smoothing, and the dots need encapsulating.
7.Minty Seafoam Dream
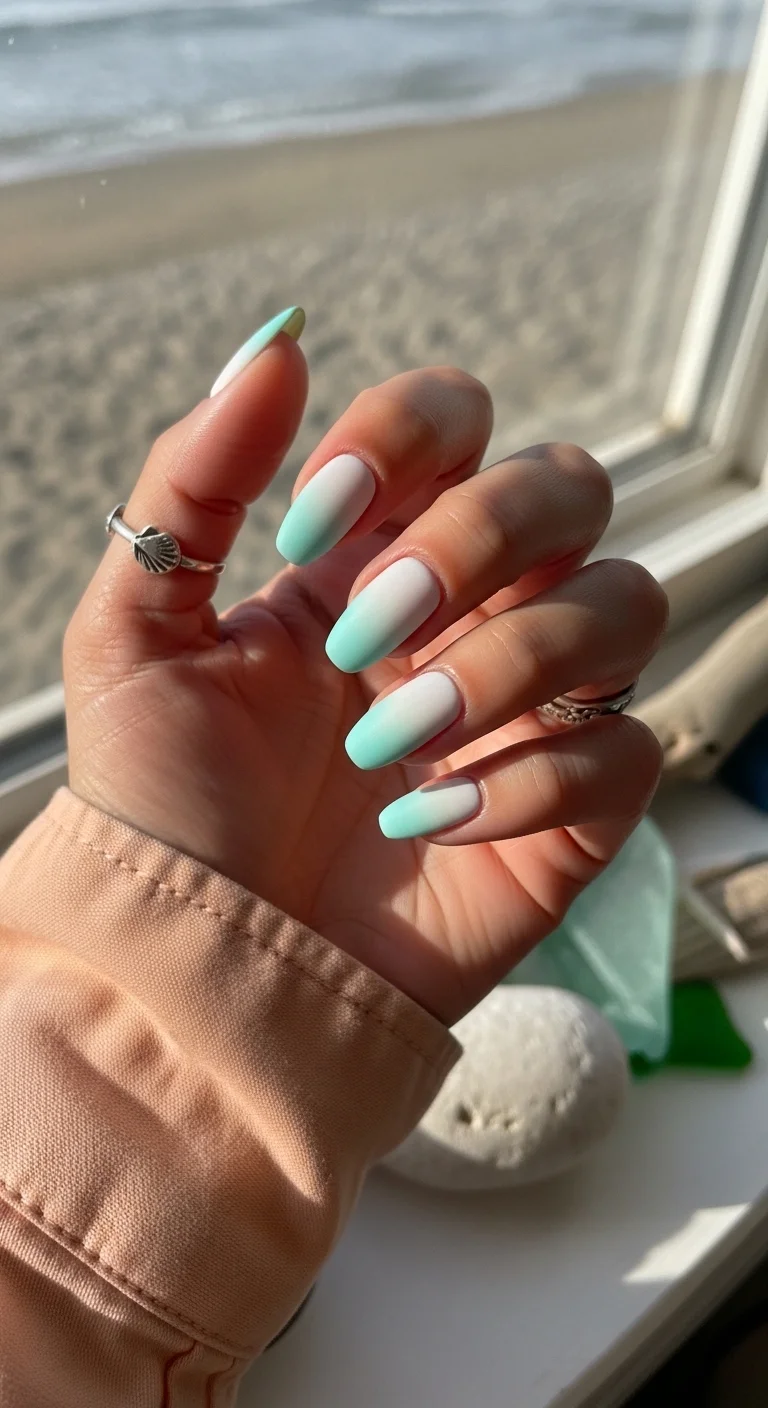
Smooth mint-to-white reverse ombre on coffin nails.
Overview:
Minimalist nail art is hardest to execute well. There's nowhere to hide mistakes when the entire design is a two-color gradient with no embellishments. The blending on this set is seamless — no harsh lines, no muddied middle zone, just white melting into mint with the patience of tide going out.
The reverse ombre placement (white at cuticle, color at tip) grows out more gracefully than the traditional tip-to-cuticle gradient. As your natural nail shows, the white base blends with it rather than creating a visible demarcation line. This extends the wearable life of the manicure by several days.
Mint green on coffin nails is a specific look. The squared-off tip gives the pastel a modern, architectural quality that rounded shapes don't. On round or almond nails, mint reads softer and more traditional. On coffin, it reads clean and current.
Design Breakdown:
Two-color gradient, no art, no embellishment. The execution is everything.
Base Color: Clean opaque white at the cuticle, cool-toned seafoam mint at the tips. Both colors need to be fully opaque — sheer formulas create a patchy transition.
Nail Shape: Coffin or ballerina. The flat tip and tapered sides give the gradient a structured, modern frame.
Design Element: None. Pure gradient. The beauty is in the blend.
Finish: Glossy with a soft, creamy sheen. Not mirror-reflective — more like polished sea glass.
Get The Look at Home:
The sponge is your best friend here. A brush-blended gradient almost always leaves streaks.
- White base: Two coats of opaque white on all nails. Let dry fully.
- Sponge setup: Paint white on one side of a makeup sponge, mint on the other. They should meet in the middle without overlapping.
- First pass: Press the sponge onto the nail with white at the cuticle and mint at the tip. Dab gently 3-4 times.
- Build opacity: Let each layer dry one minute, then repeat. Three rounds usually achieves full coverage without muddiness.
- Cuticle cleanup: Use a small brush dipped in acetone to clean any sponge overflow from the skin before it sets.
- Top coat: Two coats of self-leveling glossy top coat. The sponge leaves a slightly pebbled texture that needs smoothing.

35 Fun Birthday Nail Designs for 2026 🎂
8.Crashing Wave Frenchie
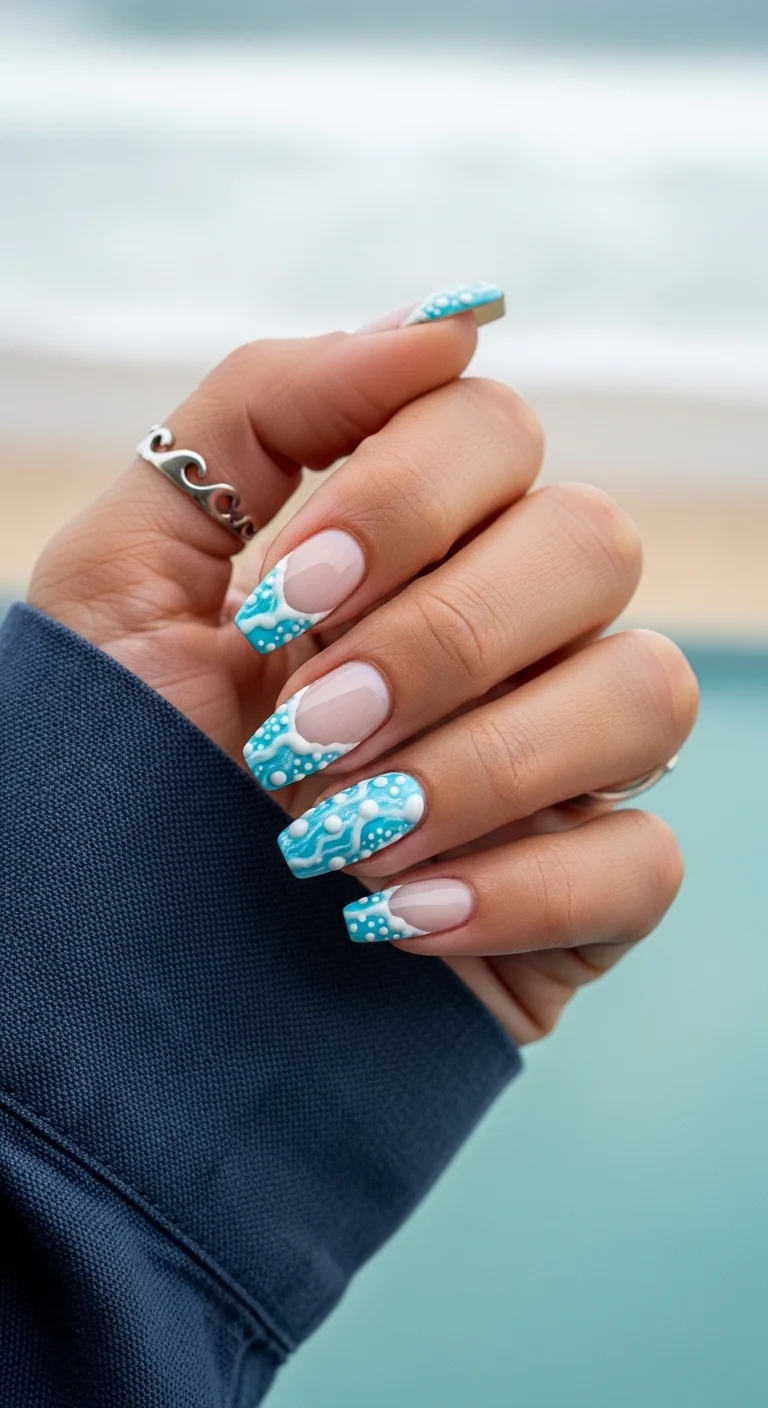
Sculpted 3D wave crests in white and blue over French tips.
Overview:
French tips are the safety blanket of nail design. They work everywhere, with everything, on every nail length. So when someone adds a twist to the French formula, it either elevates the concept or overcomplicates it. The 3D wave crests here land firmly in the "elevated" category.
The raised white texture on the wave crests is what sells the illusion. Flat-painted waves look like illustrations. Raised waves catch actual light and cast tiny shadows, which makes the water look like it's moving. That dimensional quality turns a good French into a conversation piece.
The ring finger accent nail — fully covered in the wave pattern with no visible nude base — is the anchor of the set. It gives the eye a place to land. Without a full accent nail, the French tips with wave art would compete for attention across every finger. The accent nail says "this is the statement; the rest are supporting players."
Design Breakdown:
French tip foundation with sculpted 3D wave art. The texture is what differentiates this from a standard painted French.
Base Color: Clear or sheer nude on four nails, serving as the "water" beneath the wave crests. The ring finger has no visible base — it's fully covered in wave art.
Nail Shape: Coffin or ballerina, medium-long. The flat tip gives the wave pattern a defined horizon line.
Design Element: Sculpted white wave crests using builder gel or thick acrylic, with bright cyan-turquoise blue painted underneath. Small white bubble dots scattered in the foam.
Finish: Glossy top coat over the entire design. The shine makes the blue water look wet and the white foam look fresh.
Get The Look at Home:
The 3D texture requires builder gel or a thick acrylic paste. Regular polish won't hold the raised shape.
- Nude base: Apply one coat of sheer nude on all nails except the ring finger. Let dry.
- Blue water: Using a thin brush, paint turquoise-blue along the tip zone of each nail in an organic, wavy line (not a straight French smile line).
- Wave crests: Using a dotting tool or thin brush loaded with builder gel, create raised white ridges along the top edge of the blue. The gel should sit above the nail surface.
- Ring finger accent: Cover the entire nail in the wave pattern — blue base with white sculpted crests across the full surface.
- Bubble dots: While the builder gel is still wet, add tiny white dots in the foam area for realism.
- Cure and seal: Cure the builder gel under UV lamp. Apply two coats of glossy top coat to smooth the transition between raised and flat areas.
9.Starfish Sands Almonds
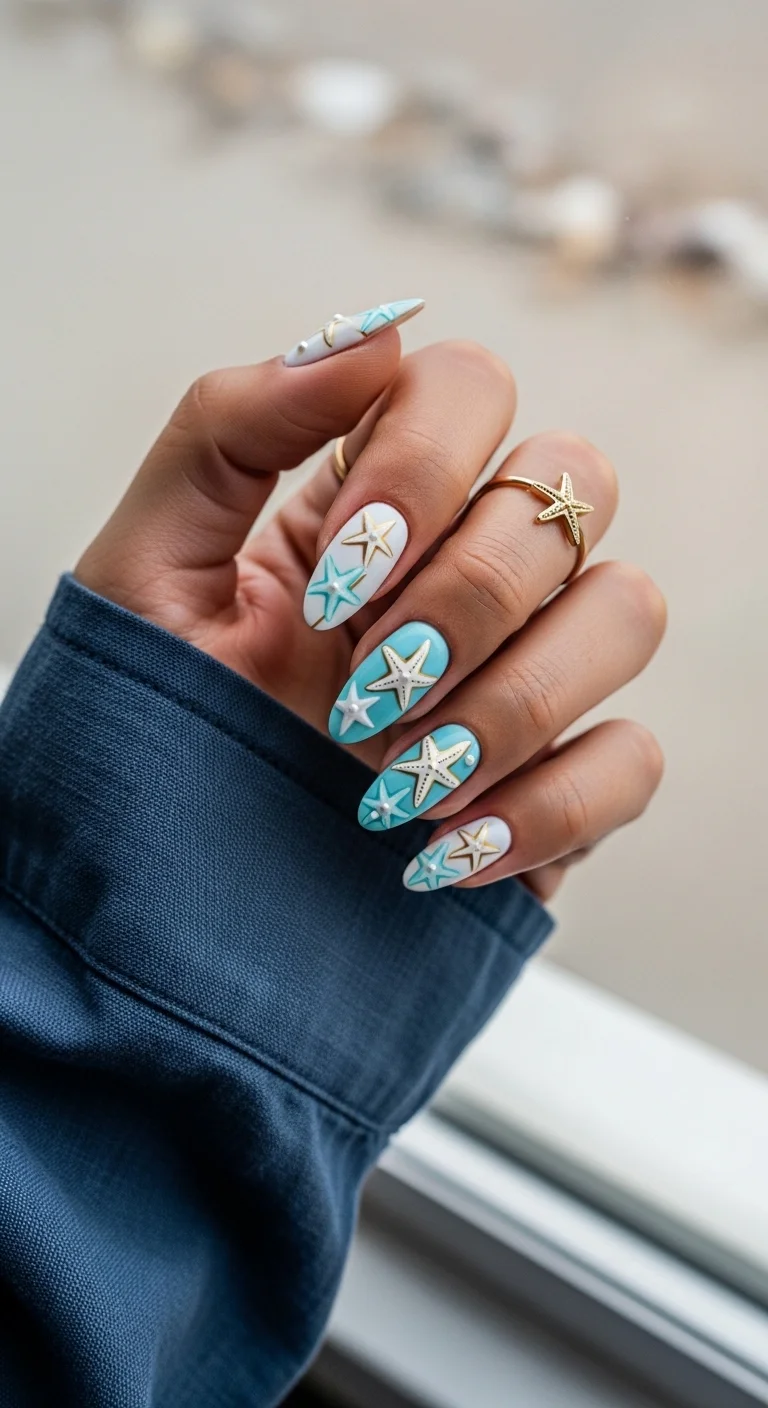
Hand-painted starfish on alternating blue and sand nude bases.
Overview:
Beach nail art that doesn't look like a souvenir shop requires restraint with the theme. Starfish motifs are fine — they're recognizable without being cartoonish — but scattering them across every nail in the same size and position would push the design into novelty territory. Varying the placement and sizing across nails keeps each one feeling like an individual composition rather than a repeated stamp.
The alternating base colors (sky blue on some nails, sand nude on others) create a natural push-pull that mimics the shoreline — water meeting sand. That color story is more sophisticated than doing every nail blue or every nail nude. The hand reads as a unified landscape rather than a single color with art on top.
The gold starfish charm on the ring finger is the luxury touch. Without it, this is a charming hand-painted set. With it, the design crosses into jewelry territory. One charm per hand is enough — more would tip the balance from elegant to overloaded.
Design Breakdown:
Alternating base colors with hand-painted motifs and one 3D accent. The gold charm is the focal point.
Base Color: Soft sky blue on middle and ring fingers nails. Warm sand nude on thumb, index and pinky fingers. Both fully opaque in two coats.
Nail Shape: Medium almond. The gentle taper echoes the organic curves of the starfish.
Design Element: White starfish with gold outline detailing, pearl and bead accents scattered around the motifs. One 3D gold starfish charm on the ring finger.
Finish: Glossy top coat. The shine makes the blue look like shallow water and the gold accents catch light.
Get The Look at Home:
Hand-painting the starfish takes patience. The five-arm shape is simple, but getting the proportions right on a small surface requires a few practice runs.
- Alternating base: Paint middle and ring finger in sky blue; thumb, index and pinky in sand nude. Two coats each. Let dry fully.
- Starfish shapes: Using a thin liner brush and white polish, draw five arms radiating from a center point. Fill them in. Vary the size: larger on the blue nails, smaller on the nude.
- Gold outline: Using a fine brush and gold metallic polish, trace the edges of each starfish. The outline doesn't need to be continuous — broken lines look more natural.
- Bead accents: Place 2-3 tiny pearl or gold beads near each starfish using a wax picker tool.
- 3D charm: Apply jewelry gel to the back of a gold starfish charm and press it onto the ring finger. Cure.
- Seal: Top coat everything, paying extra attention to sealing around the 3D charm edges.

26 Stunning Summer Braided Hairstyles for Women 2026 ☀️💇♀️
10.Holographic Mermaid Scales
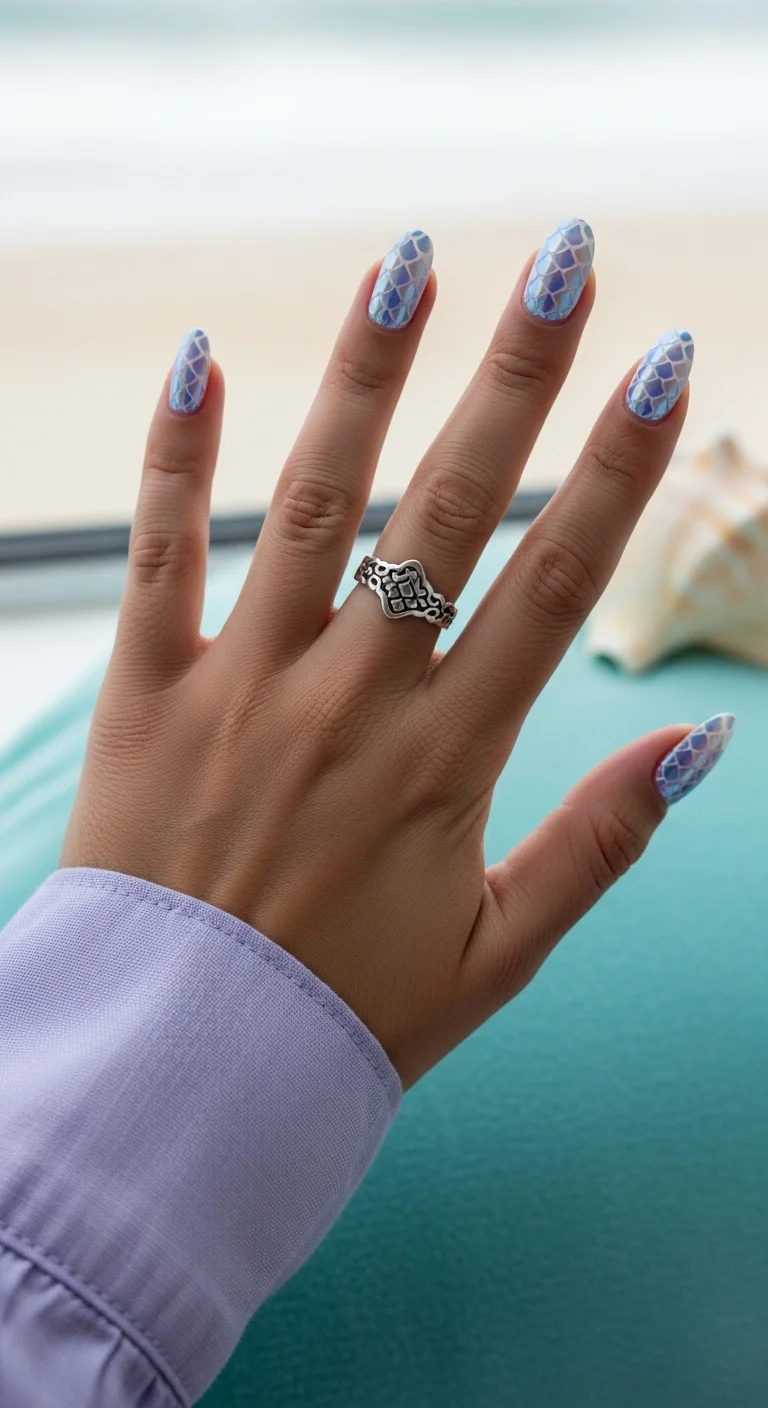
Prismatic holographic scales with color-shifting lavender and blue.
Overview:
Holographic nail wraps or stamped scales have one clear advantage over hand-painted nail art: precision. The repeating scallop pattern here is perfectly uniform across every nail — the same spacing, the same curvature, the same depth. Freehand can't match that consistency, and with this design, inconsistency would be noticeable. Mermaid scales are a geometric pattern; geometric patterns look wrong when they're wobbly.
The holographic finish is what makes the design more than just a pattern. Under direct light, the scales shift between lavender, icy blue, and soft pink depending on the angle. In low light, the whole set reads as a muted periwinkle. That dual personality — dramatic in daylight, subtle indoors — makes it more wearable than a flat, single-color scale pattern would be.
One caveat: holographic surfaces show scratches easily. Avoid abrasive cleaning or typing on rough surfaces for the first few hours after application. The chrome layer is delicate until the top coat fully cures.
Design Breakdown:
Full-coverage holographic scale pattern. The color shift is the design — no additional art needed.
Base Color: Iridescent lavender-blue holographic. The base shifts between cool lavender and icy blue depending on light angle.
Nail Shape: Medium-long almond. The curved shape complements the rounded scallop pattern of the scales.
Design Element: Repeating mermaid scale grid in a slightly deeper blue-purple over the holographic base. Likely achieved with stamping or wraps for precision.
Finish: Holographic chrome — highly reflective with prismatic color-shifting properties. The finish IS the design.
Get The Look at Home:
This is one of the rare designs where wraps or stamping plates produce better results than freehand. The geometric precision matters too much for amateur execution.
- Base coat: Apply a smoothing base coat. Holographic products amplify any surface texture underneath.
- Holographic base: Apply two coats of holographic lavender-blue polish. Let dry fully.
- Scale stamping: Apply a mermaid scale stamping plate with a slightly darker blue-purple polish. Press the stamper firmly and evenly across each nail.
- Alignment: Center the scale pattern so it flows naturally from cuticle to tip. The pattern should look like it continues beyond the nail edge.
- Top coat: Apply a non-wipe top coat over the stamped design. Regular top coat can smear holographic stamping polish.
- Cure: If using gel top coat, cure fully. The holographic layer needs a hard seal to prevent scratching.
11.Yacht Club Captain French
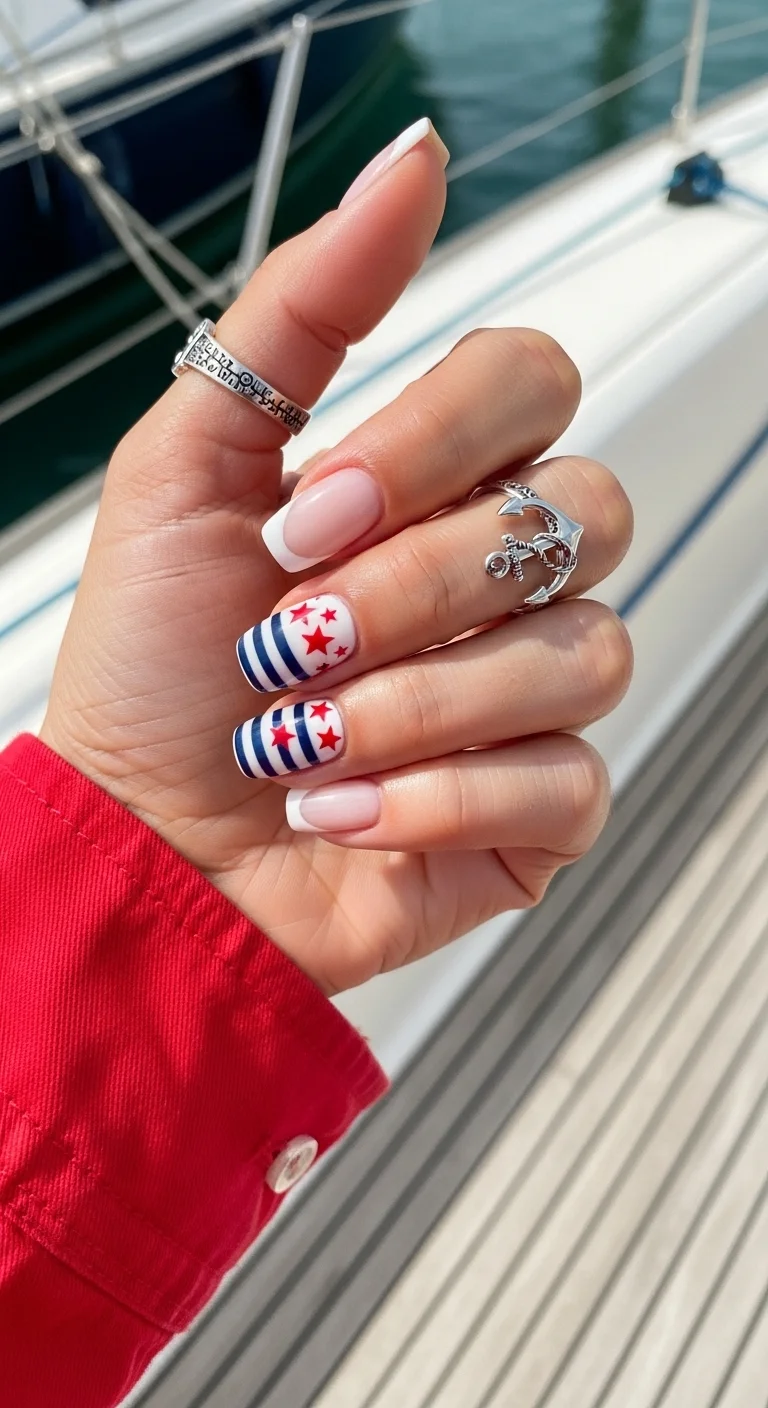
Navy nautical stripes with red star accents on French-tip nails.
Overview:
Nautical nail art has a preppy reputation that can veer into costume territory if every nail is covered in anchors and stripes. This set avoids that by splitting the hand into two distinct zones: clean French tips on three nails, bold nautical pattern on two. The French nails keep the set grounded in reality. The striped nails are the statement. Separating them prevents the overall look from reading as a themed outfit.
The red star accents are a smart color choice. Navy and white stripes alone read as "sailor costume." Adding cherry-red stars pulls the palette toward Americana rather than literal nautical. The color temperature shifts — the warm red prevents the cool navy from feeling one-note.
Crisp stripe lines require patience and a steady hand. If your striper brush is old and splayed, the lines will bleed into each other. A fresh, thin striper is worth the investment for this design.
Design Breakdown:
Split design: classic French on some nails, nautical stripes on others. The contrast between the two styles is the point.
Base Color: Sheer pink nude for the French nails; opaque white for the striped accent nails. The French base should match your natural nail bed tone.
Nail Shape: Medium almond. The classic shape reinforces the refined, preppy energy.
Design Element: Horizontal navy-and-white stripes on the middle and ring fingers, scattered cherry-red five-pointed stars. Clean white French tips on the remaining nails.
Finish: High-gloss top coat. The shine makes the French look polished and the stripes look sharp.
Get The Look at Home:
Paint the stripes first — they take the most concentration. Do the French tips after, when your hand is warmed up.
- French base: Apply two coats of sheer pink nude on thumb, index, and pinky. Let dry.
- White accent base: Apply two coats of opaque white on middle and ring fingers. Let dry fully.
- Navy stripes: Using a thin striper brush and navy polish, draw horizontal lines spaced about 2mm apart across each white nail. Let each line dry before adding the next.
- Red stars: With a small dotting tool and cherry red, place a center dot, then pull five tiny arms outward with a toothpick. Two or three stars per striped nail.
- French tips: Paint white French tips on the nude nails using a liner brush or French guides.
- Top coat: One generous coat, floating the brush over the stripe work.

34 Cutest Butter Yellow Nail Designs for 2026 🧈
12.Turquoise Bubble Pool Party
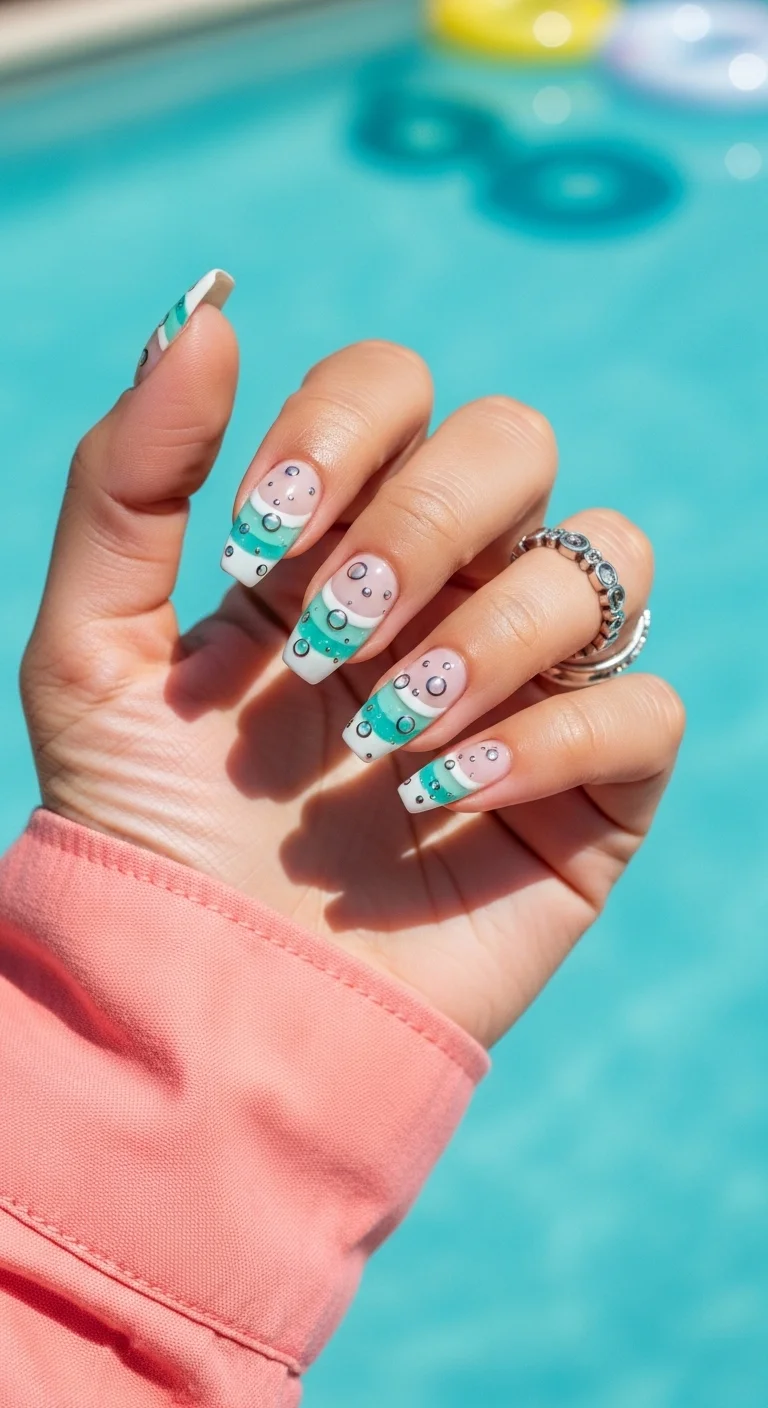
Raised 3D bubble motifs in turquoise, white, and silver.
Overview:
3D nail art that actually looks like something rather than abstract blobs is rare. The bubble motifs here — varying sizes of raised circles in turquoise, white, and silver — genuinely resemble water droplets caught mid-splash. The dimensionality is what sells it: each bubble casts its own tiny shadow, creating a sense of depth that flat polka dots can't achieve.
The mix of French-tip nails and full bubble-art nails creates visual variety without chaos. The French tips provide negative space where the eye can rest between the busier accent nails. Without that breathing room, the bubble art would feel overwhelming across all five fingers.
The silver accents in the bubble clusters add a metallic flash that changes the design's character in different lighting. Under fluorescent office lights, the silver barely registers. In sunlight or flash photography, it becomes the dominant visual element. The set transforms depending on where you are.
Design Breakdown:
Mixed mani with French tips and 3D bubble art. The raised texture is the hero element.
Base Color: Bright turquoise on French-tip nails with white tips; sheer pink on bubble-art nails where the bubbles sit directly on the nail bed.
Nail Shape: Coffin or ballerina, medium-long. The flat tip provides a stable canvas for the bubble clusters.
Design Element: Raised 3D bubble/circle motifs in varying sizes using builder gel or thick acrylic. Colors: turquoise, white, and silver. Concentrated near the cuticle and mid-nail.
Finish: Glossy over the French nails; the bubble accents have their own dimensional shine.
Get The Look at Home:
The 3D bubbles require builder gel or a thick gel paste. Regular polish won't hold the raised shape long enough to cure.
- French nails: Apply sheer pink base on all nails. Paint white French tips. Let dry.
- Bubble building: Using a dotting tool dipped in builder gel, place circles of varying sizes on the all nails. Alternate between turquoise, white, and silver gel.
- Layer for dimension: Add a second layer of gel on top of some bubbles to increase the height difference.
- Cure: Cure each nail under UV lamp before moving to the next. The gel shifts if not fully set.
- Top coat: Apply top coat around the bubble bases, not over them. Coating the tops flattens the 3D effect.
13.Classic Pearl Beach French

Timeless French tips with a subtle pearl-like luminosity.
Overview:
There's a reason the French manicure has survived every trend cycle since the 1970s: it works. The pink-nude base mimics a healthy nail bed, the white tip creates a clean edge, and the combination flatters every hand. It's the little black dress of nail design — boring to talk about, impossible to argue against.
What elevates this version beyond a standard salon French is the finish. There's a subtle pearl-like sheen on the pink base that catches light differently than a flat gloss. It's not chrome, it's not shimmer — it's somewhere between the two, creating a luminosity that reads as expensive without being flashy. The kind of detail that makes someone look twice without knowing why.
Short to medium oval is the ideal shape for a clean French. The rounded edges complement the curved smile line. Square tips with a French can look harsh unless the proportions are perfect — the oval is more forgiving and universally flattering.
Design Breakdown:
Classic French with a pearlescent finish twist. Minimal components, maximum refinement.
Base Color: Sheer soft pink that matches the natural nail bed. The pearl finish adds dimension without changing the color.
Nail Shape: Medium oval. The soft curve mirrors the French smile line.
Design Element: Clean, crisp white French tips. Medium thickness — not too thin (which looks unfinished) and not too thick (which looks heavy).
Finish: Pearl or satin-gloss top coat. The subtle iridescence is what separates this from a basic French.
Get The Look at Home:
The French tip is the hardest part. Two-stroke method: curve from one sidewall to center, then from the other side to meet it.
- Prep: Push back cuticles. File into a clean oval. Buff out ridges — they show through sheer polish.
- Pink base: Two coats of sheer pearlescent pink. Let each coat dry fully.
- French tips: Using a thin liner brush and opaque white, paint the tip in two strokes — one from each sidewall meeting at the center. Keep the smile line curve consistent across all nails.
- Cleanup: Dip a flat brush in acetone and run it along the smile line to sharpen the curve. This step makes or breaks the French.
- Top coat: One coat of pearl-finish top coat. The iridescence should be visible but not overpowering.
32 Stunning Summer Wedding Hairstyles for Brides ☀️💍
14.Sage Green Shoreline Abstract
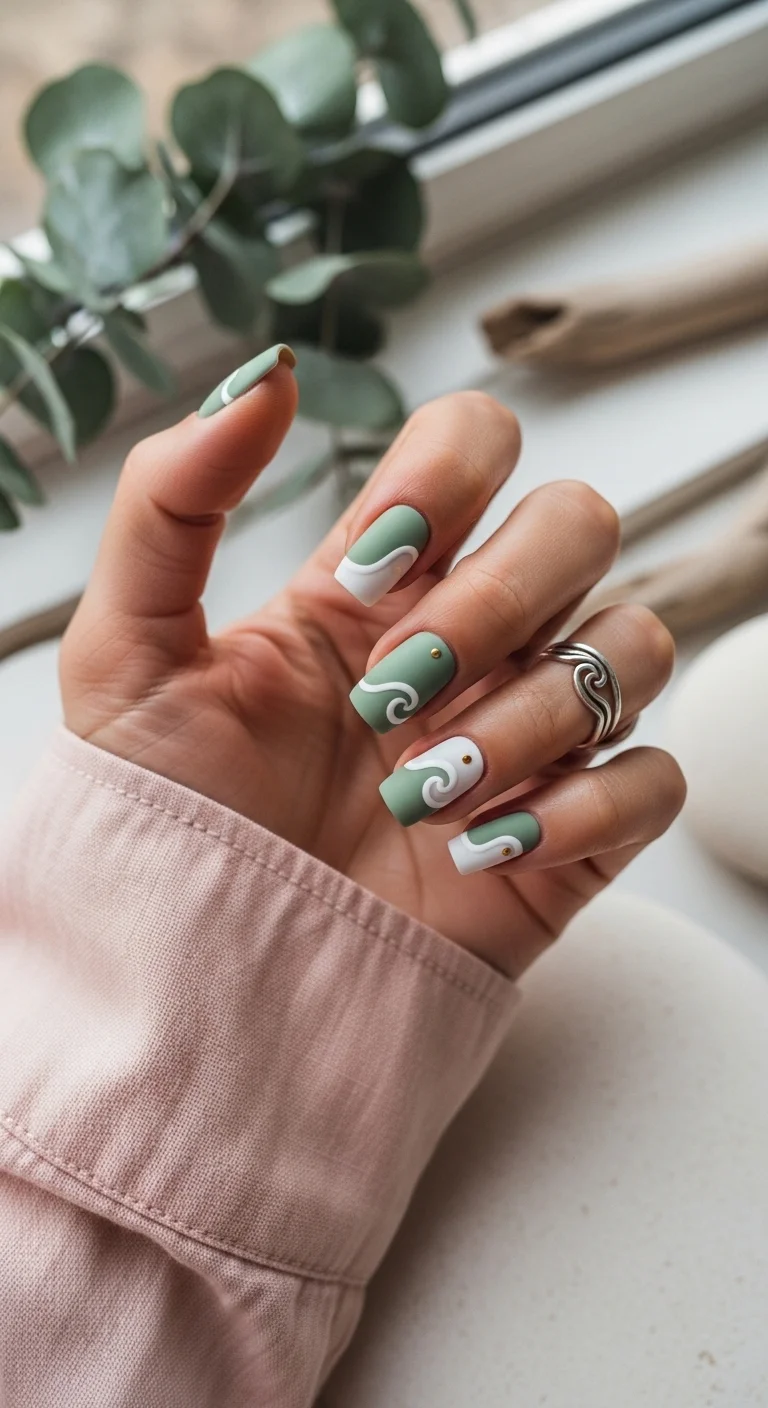
Organic white wave patterns over muted sage green with gold studs.
Overview:
Sage green is having a moment in interior design and fashion, so it was inevitable that nail art would follow. The appeal is straightforward: sage reads as a neutral that has personality. It's not boring like beige, but it doesn't demand attention like coral or cobalt. On nails, it functions as a sophisticated backdrop for almost any art style.
The abstract white wave patterns here borrow from Japanese aesthetics — they look like stylized ocean currents or calligraphy strokes rather than literal wave illustrations. That abstraction is what keeps the design from reading as "beach themed" in a kitschy way. The wave shapes are organic and varied, with each nail having its own composition.
The gold dot studs at the endpoints of some swirls are a small addition that changes the design's register. Without them, this is a zen, naturalistic set. With them, the gold introduces a subtle luxury element — like finding a coin in the sand. The contrast between the earthy sage and the refined gold is what makes the design feel considered rather than improvised.
Design Breakdown:
Abstract freehand art on a muted base. The organic shapes are forgiving — imperfection adds character.
Base Color: Creamy opaque sage green. A self-leveling formula prevents brush marks that would show under the white art. Think Zoya "Sage" or Essie "Sew Psyched."
Nail Shape: Square or squoval. The geometric edges contrast with the organic wave shapes, creating visual tension.
Design Element: White abstract wave/swirl patterns with small gold metallic dot studs placed at swirl endpoints.
Finish: Glossy top coat. The shine makes the sage look richer and the gold studs catch light.
Get The Look at Home:
The wave patterns don't need to follow a specific template. Draw what feels organic — flowing curves, not geometric angles.
- Sage base: Two coats of sage green. Sage formulas can be slightly chalky — use thin layers and let each dry completely.
- White swirls: Using a thin liner brush and white polish, draw flowing S-curves and wave shapes across each nail. Vary the pattern on every nail.
- Layering: Some swirls can overlap or cross each other. The layered effect creates depth.
- Gold studs: While the white is still slightly wet, press tiny gold metallic dots at the endpoints of two or three swirls per nail.
- Consistency check: Hold both hands at arm's length. The white pattern should feel balanced — not too dense on some nails and too sparse on others.
- Top coat: One thick coat to seal the studs and smooth the surface.
15.Minty Silver Surf Swirls
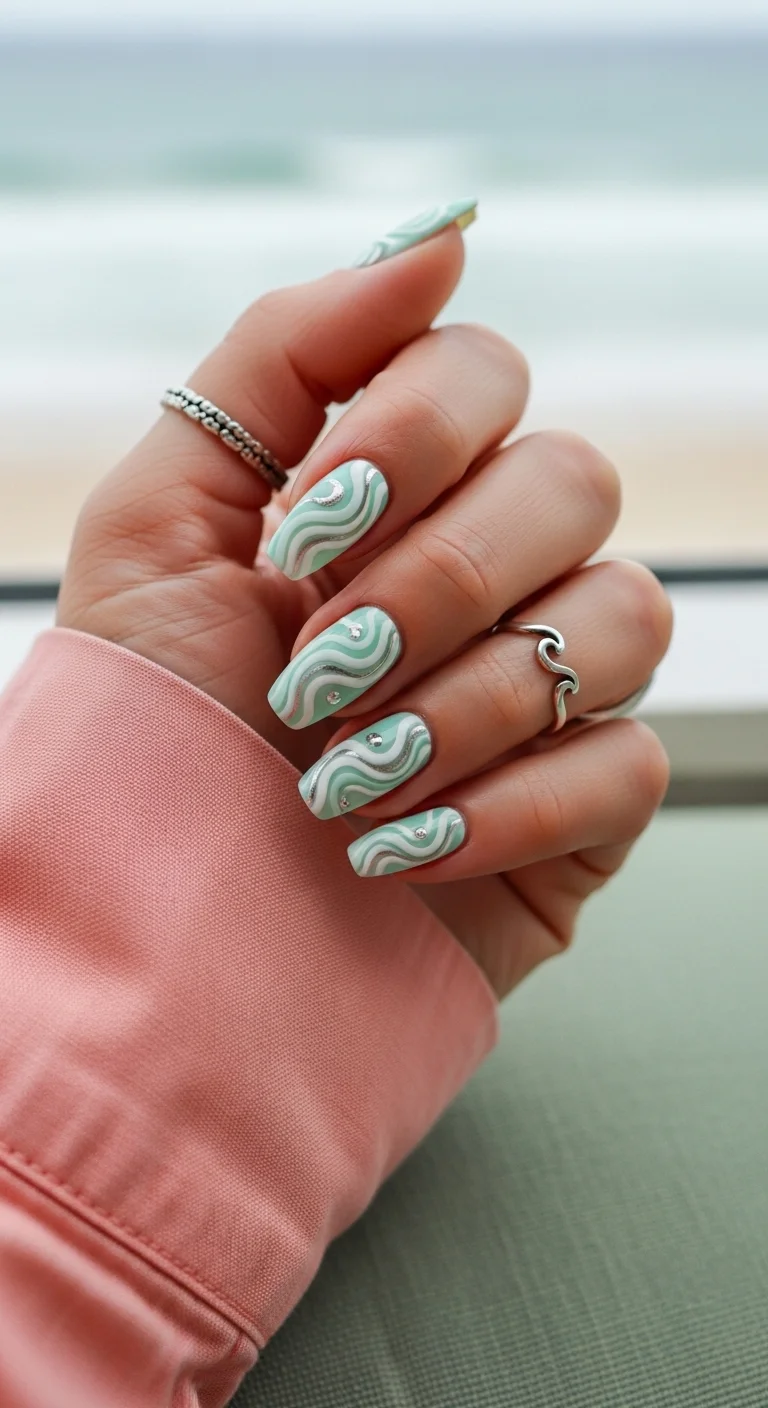
Dense layered swirls in mint, white, and silver with crystal accents.
Overview:
Every nail covered in dense, overlapping swirl patterns is a bold choice. There's no negative space, no resting point — your eye is constantly moving across layers of mint, white, and silver lines. That visual density is the design's strength and its risk. Done well, it looks like churning surf. Done poorly, it looks like a coloring book that went off the rails.
The silver metallic lines running through the swirls are what elevate this from "busy" to "intentional." The silver catches light at different angles, creating a shimmer that sits on top of the matte mint and white layers. That dimensionality — matte underneath, metallic on top — gives the design a depth that flat swirls can't achieve.
The scattered crystal accents are minimal enough that they don't compete with the swirl pattern. They catch light as tiny sparkle points, punctuating the flow of the lines rather than interrupting it. This is one of the few designs where rhinestones enhance rather than clutter.
Design Breakdown:
Full-coverage layered swirl art with metallic accents. The density of the pattern is the design.
Base Color: Soft mint green or pastel seafoam as the foundation layer. White and silver are layered on top.
Nail Shape: Medium-long almond. The curved shape complements the flowing swirl lines.
Design Element: Multi-layered wave/swirl patterns in mint, white, and silver metallic. Small clear crystal accents scattered across the nails.
Finish: Glossy with metallic silver shimmer within the swirl lines. The interplay of matte and metallic is what gives the design its character.
Get The Look at Home:
Work in layers: mint swirls first, then white, then silver. Each layer should be dry before the next to prevent muddying.
- Mint base: Two coats of pastel mint. Let dry fully.
- Mint swirls: Using a thin liner brush and a slightly darker mint, draw flowing wave lines across each nail.
- White swirls: Let the mint dry, then layer white swirl lines over and alongside the mint ones. The layers should overlap in places.
- Silver accents: Using silver metallic polish and a striper brush, add thin metallic lines that follow the curvature of the existing swirls.
- Crystal placement: Using a wax picker, place 2-3 tiny clear crystals per nail in the spaces between swirls.
- Top coat: Two coats. The layered texture needs smoothing, and the crystals need encapsulating.

35 Palm Tree Nail Art Ideas that are the Most Iconic Nail Art Designs 🌴✨
16.Miami Sunset Palm Silhouette
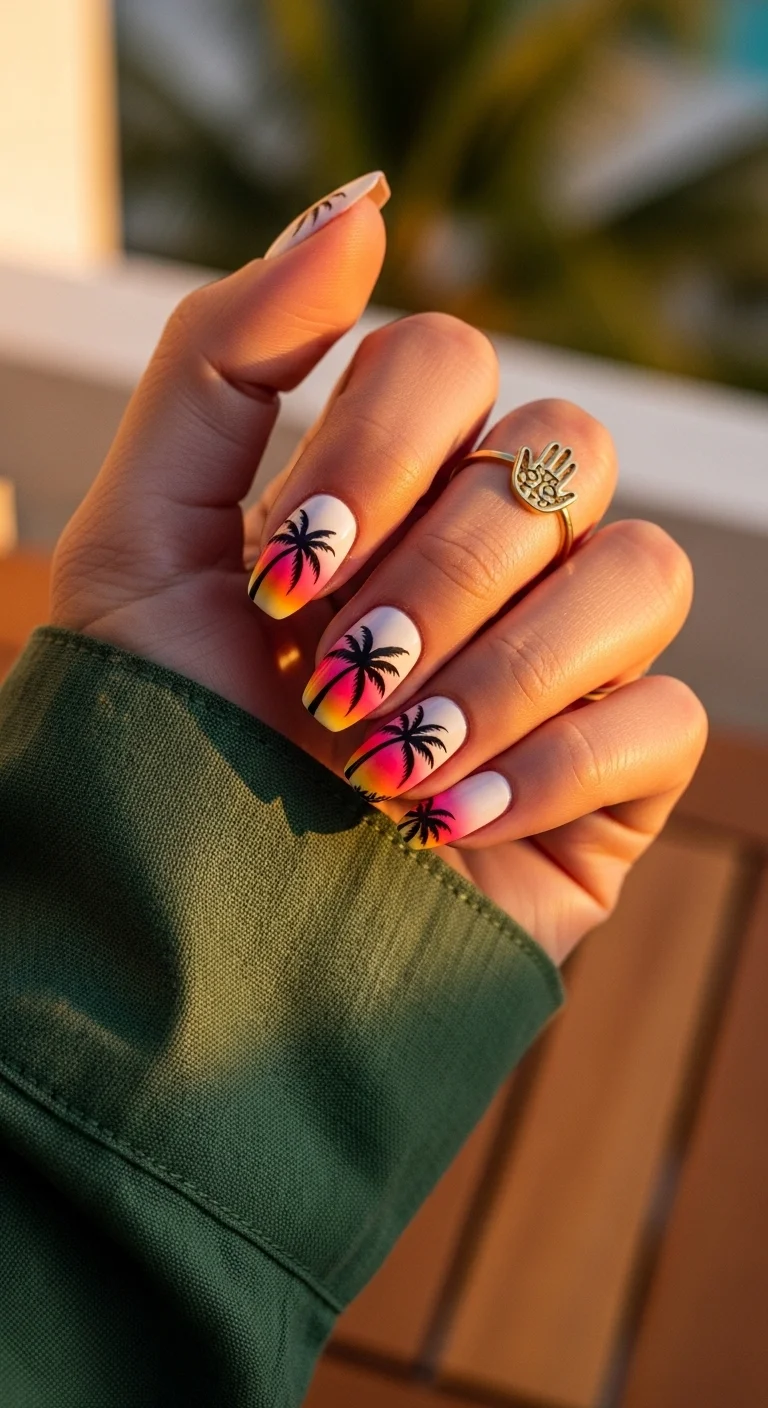
Hand-painted palm silhouettes over a warm sunset ombre.
Overview:
Sunset gradient nails are common. Black palm tree silhouettes layered on top are what give this set its specific identity. The gradient alone — coral, pink, orange, yellow — is a nice ombre. The palm silhouettes turn it into a scene. That narrative quality (these nails tell a story rather than just showing a color palette) is what makes the design memorable.
The vertical gradient direction matters. Running from white at the cuticle through warm tones toward the tip mimics the actual sunset sky — lighter near the horizon, deeper overhead. A horizontal gradient wouldn't read as "sunset" in the same way. Directional choices like this are subtle but they're what separate a considered design from a generic one.
Each palm tree is slightly different — single trunks, clustered groups, varying heights. That variation is essential. Identical palm trees stamped across every nail would look manufactured. The slight differences in each silhouette signal hand-painted work, which gives the set its warmth.
Design Breakdown:
Vertical sunset gradient with layered silhouette art. The gradient is the background; the palms are the foreground.
Base Color: White at the cuticle transitioning through warm coral, hot pink, golden yellow, and burnt orange at the tips. The gradient runs vertically.
Nail Shape: Medium almond. The curved shape echoes the organic curves of palm fronds.
Design Element: Hand-painted black palm tree silhouettes. Each nail has a slightly different composition — single trees, clusters, varying heights.
Finish: High-gloss top coat. The shine makes the sunset colors look saturated and the black silhouettes look crisp.
Get The Look at Home:
The gradient is built with a sponge. The palm silhouettes are painted after the gradient is fully dry — wet gradient + black polish = muddy disaster.
- Gradient base: Using a makeup sponge, layer white, coral, pink, yellow, and orange in vertical stripes. Dab onto each nail, building opacity over 2-3 rounds.
- Dry completely: Wait at least 5 minutes. The gradient needs to be fully set before painting black over it.
- Trunk lines: Using a thin liner brush and black polish, draw a single vertical line from the tip toward the cuticle. Vary the thickness and angle on each nail.
- Fronds: From the top of each trunk, flick short, tapered strokes outward on both sides. Three to five fronds per tree.
- Cluster variation: On some nails, paint two or three smaller trees near the larger one. The variation in scale creates depth.
- Top coat: One thick coat, floating the brush to avoid dragging the black silhouettes.
17.Iridescent Sea Marble
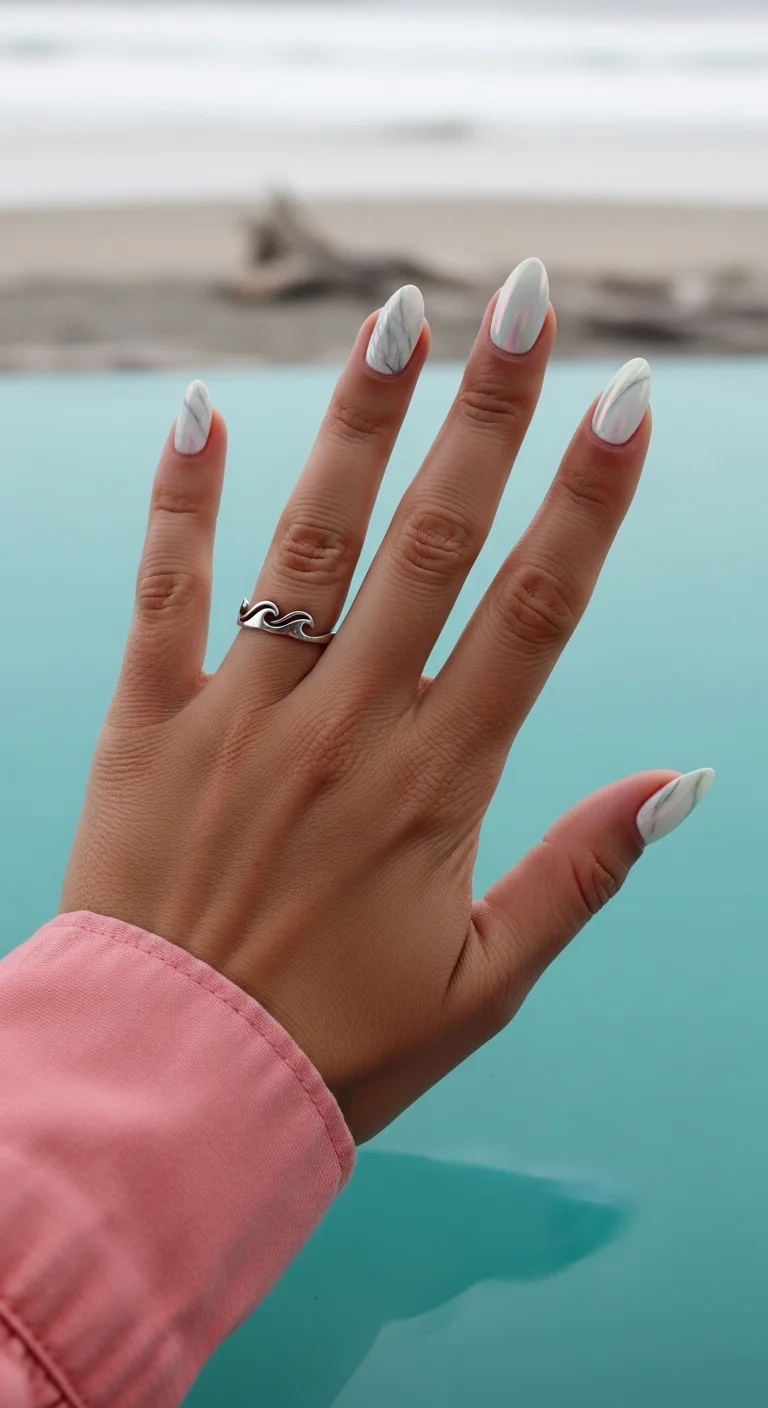
Soft marble veining with pearlescent iridescent color shift.
Overview:
Marble nails usually default to black-and-white, which reads dramatic but also reads a bit harsh. This version — pale lavender and grey veins over a cream base — takes marble in a softer direction. The effect is less "polished onyx" and more "sea-washed stone." It's marble that looks like it's been sitting on a beach, not in a jewelry store.
The iridescent overlay is what makes this design unusual. The marble veining alone would be a competent set. The pearlescent shimmer on top — shifting between blue and pink depending on the angle — adds a second layer of visual information that reveals itself gradually. You notice the marble first, then the color shift. That staggered discovery keeps the design interesting beyond the first glance.
Every nail looks different, and that's the point. Marble veining is inherently organic — attempting to make each nail match defeats the purpose. The variety across the hand is what makes the set look natural rather than stamped.
Design Breakdown:
Organic marble veining with an iridescent overlay. The two elements (veining + shimmer) work independently but look best together.
Base Color: Soft cream or warm white. The base needs to be warm-toned — cool white makes the lavender veins look muddy instead of delicate.
Nail Shape: Medium almond. The curved shape complements the flowing marble lines.
Design Element: Wispy veins of pale lavender and light grey, created with a wet-on-wet dragging technique. No two nails should match.
Finish: Iridescent or pearlescent top coat. The color shift (blue to pink) adds depth to the marble without obscuring it.
Get The Look at Home:
Work wet-on-wet. The marble effect happens when colors are dragged through each other before drying.
- Cream base: Two coats of warm cream or off-white. Let dry fully.
- Wet layer: Apply a second thin coat of cream. Do NOT let it dry — this is your working surface.
- Drop colors: Place small dots of lavender and light grey directly onto the wet nail. Space them randomly.
- Drag: Using a toothpick or fine brush, pull the dots in one direction. Three or four drags per nail. Don't over-mix — sharp contrast is better than muddy blending.
- Dry fully: Wait at least 10 minutes before the next step.
- Iridescent overlay: Apply one coat of pearlescent or iridescent top coat. The blue-pink shift should be visible but not overpowering.

25 Stunning Summer Vacation Hairstyles for 2026 ☀️🌊
18.Sandy Daisy Field Almonds
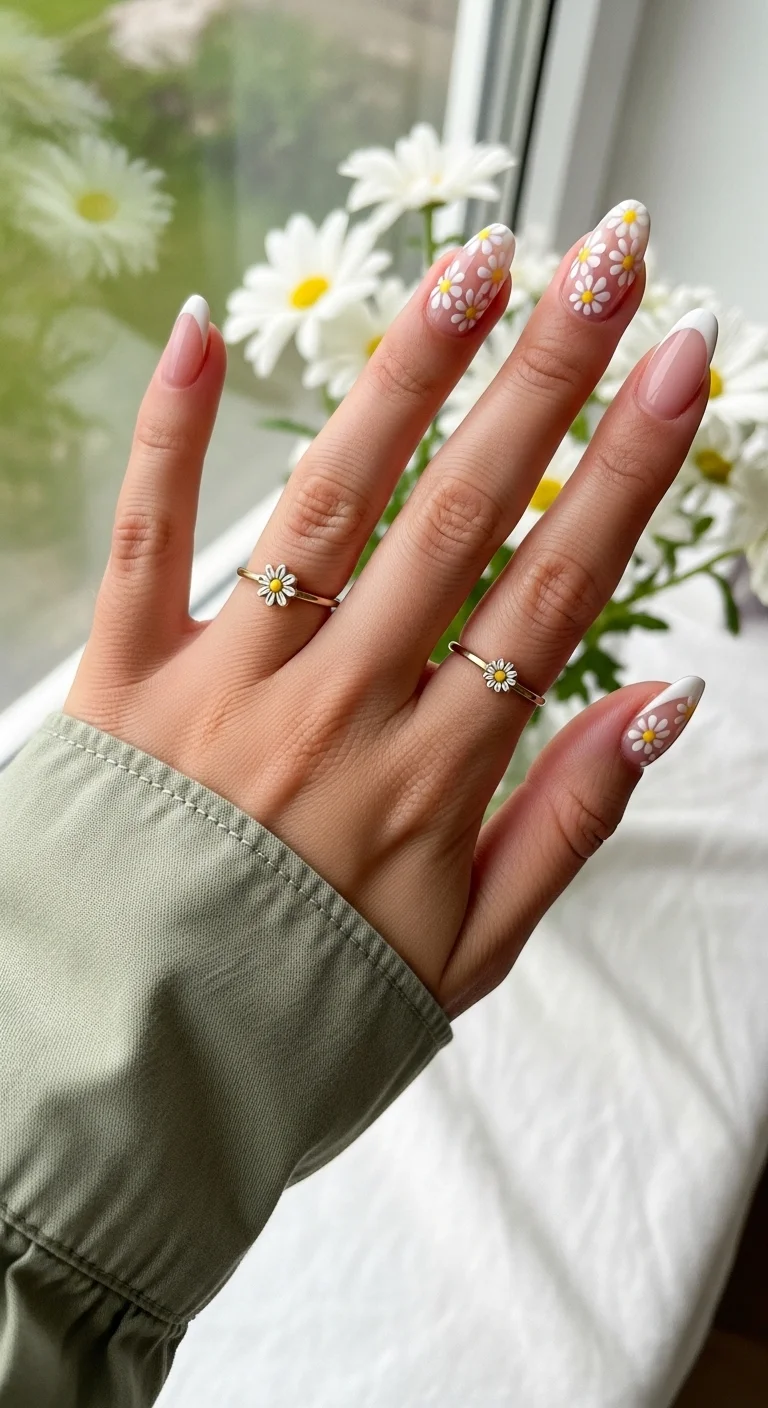
White daisy flowers on nude nails with warm sand-colored French tips.
Overview:
Daisy nail art is one of the few designs that looks genuinely good when done at home. Five dots in a circle, one dot in the center, done. You can paint a daisy with a bobby pin and two colors. The technique is nearly foolproof, which is why daisy nails have survived every trend cycle since the '90s.
The warm sand-colored French tips on the other nails are what keep this set from feeling too juvenile. Without them — if every nail had daisies — the design would tilt toward "cute" and stay there. The French tips add a refined counterpoint that matures the overall look. It's the difference between a garden-party manicure and a children's birthday party manicure.
The almond shape is the right call for this design. On square nails, the daisies near the edges get truncated by the straight borders, creating awkward partial petals. On almond, the curved edges let the flowers sit naturally without clipping.
Design Breakdown:
Two-style set: daisy art nails and warm French tips. The contrast between playful and refined is deliberate.
Base Color: Nude or soft pink on daisy nails; warm sand champagne nude on French tip nails. The two nudes should be in the same color family but not identical.
Nail Shape: Medium-to-long almond. The curved edges complement both the floral art and the French smile line.
Design Element: Hand-painted white five-petal daisies with yellow dot centers on three nails. Warm sand-colored French tips on the remaining two nails.
Finish: Glossy top coat. The shine makes the white petals look crisp and the yellow centers look bright.
Get The Look at Home:
The daisies are fast — budget 20 minutes for both hands. The French tips take more precision.
- Nude base: Two coats of nude on all nails. Let dry.
- Petal dots: Using a medium dotting tool and opaque white, press five dots in a loose circle on each daisy nail. Two to three daisies per nail, randomly placed.
- Yellow centers: Wait 60 seconds for white to set. Use a smaller dotting tool and mustard yellow to place one dot in each daisy center.
- French tips: On the remaining nails, paint warm sand French tips using a liner brush. Match the smile line curve across both nails.
- Consistency: Hold both hands side by side. The daisy density should feel roughly even — not crowded on one hand and sparse on the other.
- Top coat: Float the brush over the daisy nails to avoid smearing the yellow centers.
19.Pink Flamingo Float
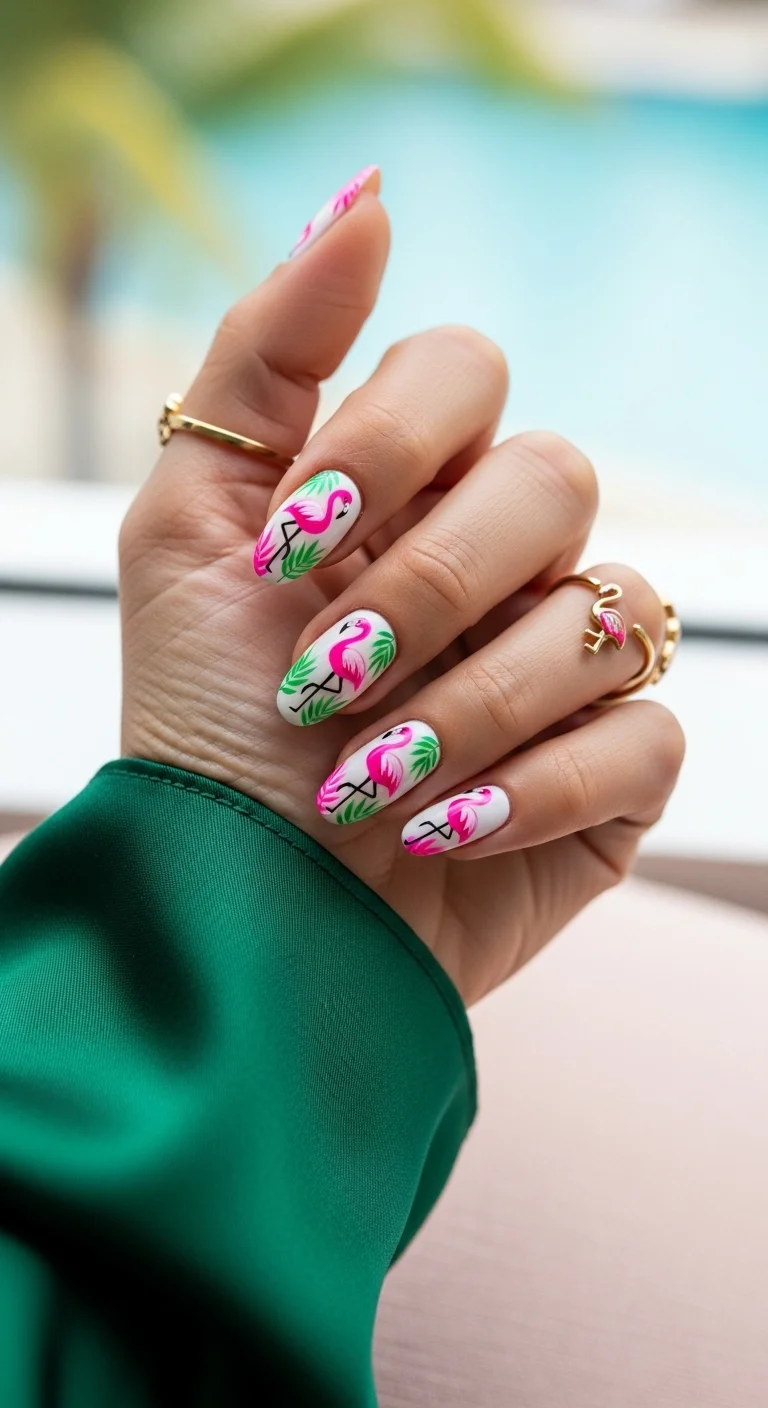
Detailed flamingo illustrations with tropical palm fronds.
Overview:
Flamingo nail art either looks like a vacation souvenir or a serious illustration. The difference is linework. These flamingos have defined outlines, visible legs, and articulated neck curves — they're drawn, not stamped. That level of detail is what keeps the design from reading as a novelty sticker applied to the nail.
The green palm fronds framing each flamingo are doing more than adding a tropical accent. They provide a dark color anchor that prevents the pink-and-white palette from floating into "bubblegum" territory. The green has visual weight — it grounds the composition and gives the eye a place to rest between the detailed bird illustrations.
Each flamingo is in a slightly different pose — some with curved necks, some standing straight. That variation is essential. Identical flamingos on every nail would look like a copy-paste job. Different poses on each nail signal that someone actually sat down and painted these individually.
Design Breakdown:
Detailed illustrative art on a clean white base. The linework is what makes or breaks the flamingo shapes.
Base Color: Clean, opaque white on all nails. The white background makes the pink flamingos and green fronds pop.
Nail Shape: Medium-to-long almond. The extended length provides enough canvas for detailed flamingo illustrations.
Design Element: Hand-painted flamingos in hot pink with black leg and outline details, framed by bright green tropical palm fronds.
Finish: High-gloss top coat to protect the detailed art and keep colors saturated.
Get The Look at Home:
Paint the flamingo bodies first (the pink shapes), then add the black outlines and legs after the pink dries. The outlines are what define the form.
- White base: Two coats of opaque white. Let dry fully — detailed art on tacky base will smear.
- Flamingo bodies: Using a small round brush and hot pink, paint the body shapes — oval torso, curved neck, small head. Don't worry about outlines yet.
- Outlines and legs: Once the pink is dry, use a thin liner brush and black polish to outline the body, add the beak, and draw thin legs.
- Green fronds: Using forest green and a striper brush, paint palm leaf strokes framing each flamingo. Three to four fronds per nail.
- Vary the poses: On each nail, slightly change the flamingo's neck angle or leg position. The variation is what makes the set look hand-painted.
- Top coat: One thick coat, floating the brush over the art.

29 Trendy Pink Summer Nails for 2026 💅
20.Deep Sea Abalone Foil
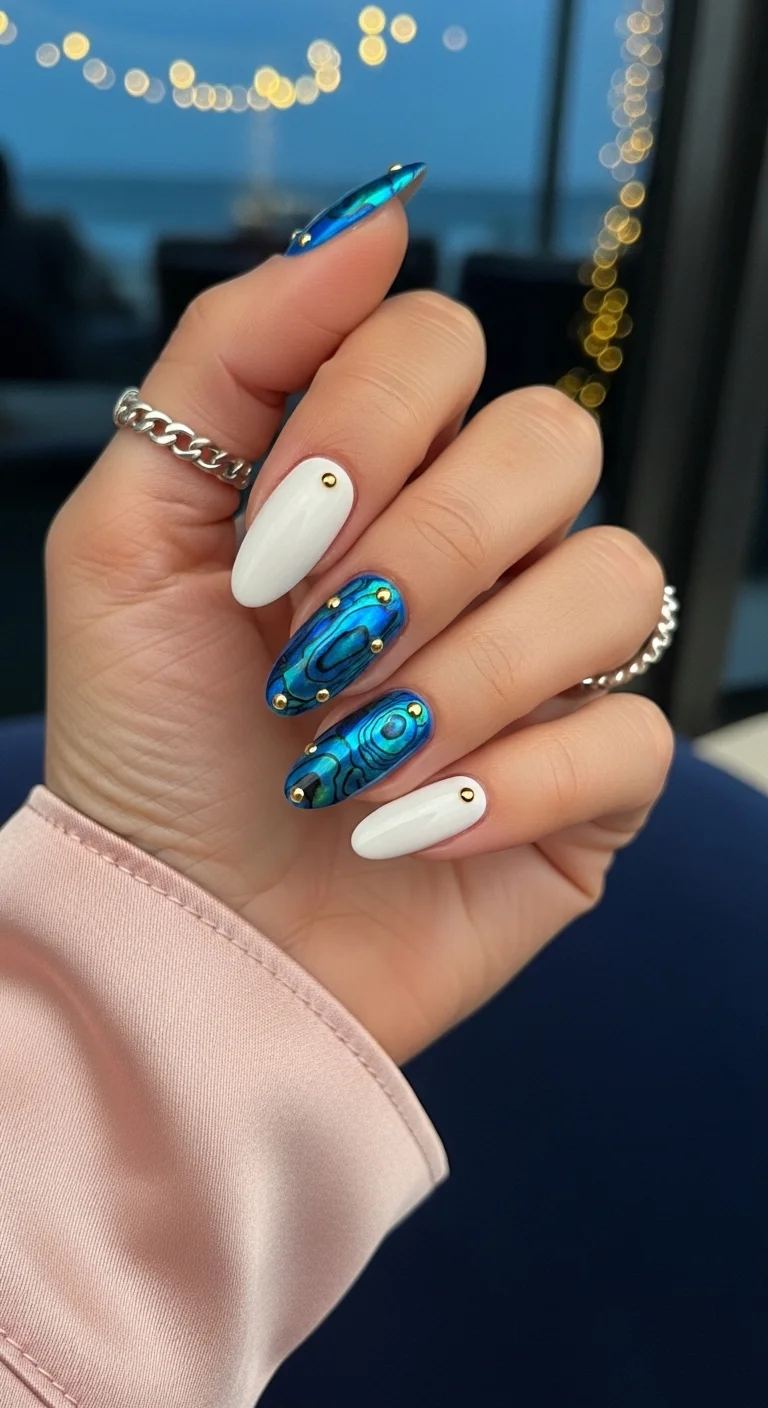
Swirling abalone shell patterns in chrome blue with gold micro-beads.
Overview:
The interior of an abalone shell is one of nature's most mesmerizing color displays — swirling blues, greens, and blacks that shift with the viewing angle. Replicating that on a fingernail is ambitious. These nails pull it off by using chrome and foil techniques that create genuine color-shift, not just painted approximation.
The mixed mani approach — chrome blue abalone on two nails, clean white accent nails, full chrome thumb — is what keeps the design from overwhelming the hand. All five nails in full abalone chrome would be visually exhausting. The white nails act as palate cleansers between the high-impact chrome nails.
The gold micro-beads scattered across both the white and chrome nails are the unifying element. They appear on every nail, tying the different styles together into a cohesive set. Without the beads, the chrome nails and white nails would feel like two separate designs sharing a hand.
Design Breakdown:
Mixed mani combining chrome, foil, and 3D embellishments. The most complex design in this collection.
Base Color: Deep teal-ocean blue chrome on two middle nails; opaque white on index and pinky; full metallic chrome blue on thumb.
Nail Shape: Medium-long almond. The curved shape enhances the swirling abalone pattern.
Design Element: Concentric oval/swirl patterns in iridescent foil creating the abalone shell effect. Gold micro-beads scattered across all nails as 3D accents.
Finish: Chrome/metallic on blue nails with strong color shift (teal to blue to green); glossy cream on white nails.
Get The Look at Home:
The abalone effect requires foil or chrome powder applied over a dark base. This isn't a freehand design.
- Blue base: Apply two coats of deep teal-blue on the middle and ring fingers. Let cure or dry fully.
- White accent: Apply two coats of opaque white on index and pinky fingers.
- Chrome application: On the blue nails, apply a no-wipe gel top coat, cure, then rub iridescent blue-green chrome powder with a silicone tool.
- Foil swirls: Using a thin brush and nail foil adhesive, draw concentric oval shapes on the chrome nails. Press iridescent foil onto the adhesive. Peel to reveal the abalone pattern.
- Gold bead accents: Using a wax picker and jewelry gel, place 3-5 gold micro-beads on each nail — both white and blue.
- Seal everything: Apply top coat around the beads and over the chrome. Two coats on the chrome nails to prevent the powder from rubbing off.
21.Scallop Shell Chains
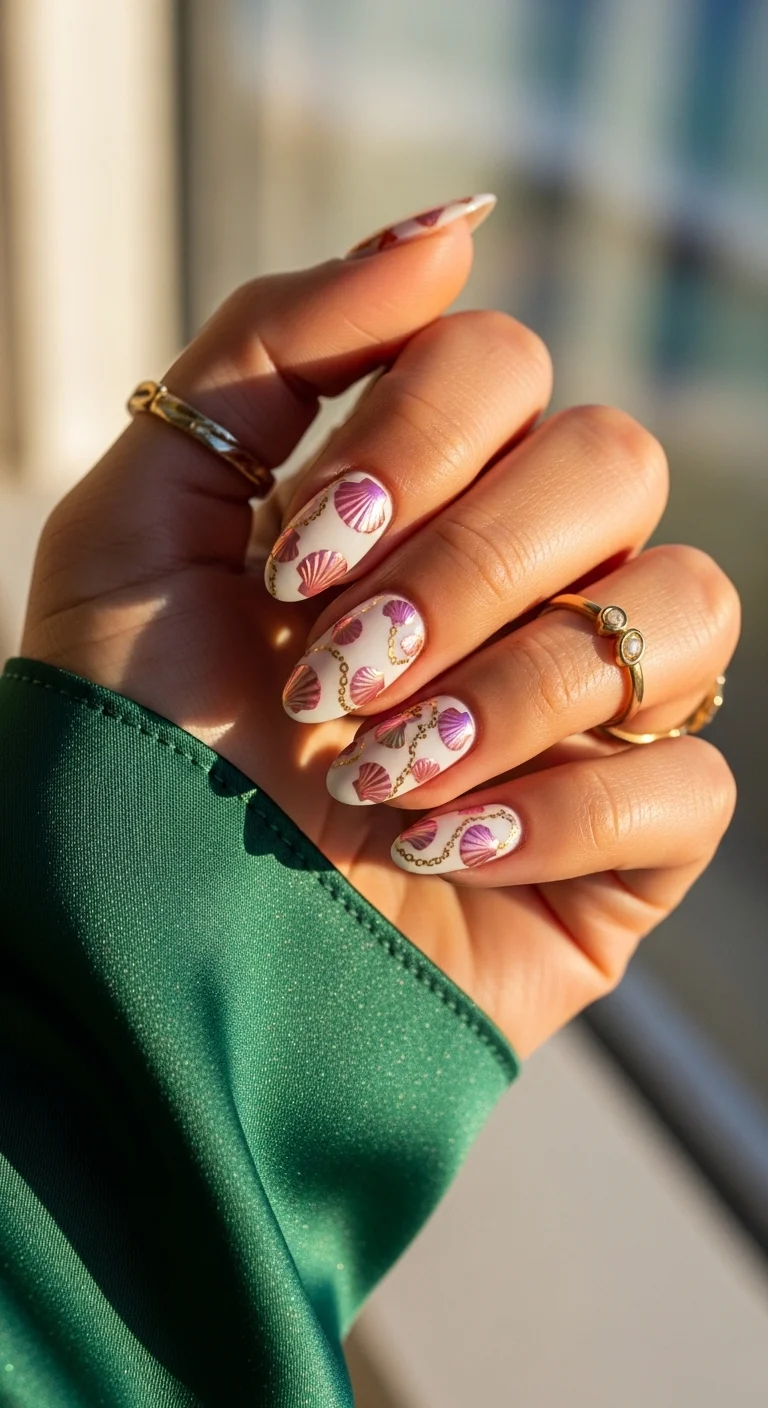
Hand-painted scallop shells with delicate gold chain draping.
Overview:
Seashell nail art has a tendency to look crafty — like something from a beach-town souvenir shop. The gold chain detailing on this set is what pushes it into jewelry territory. The chains create visual continuity across the hand: when you hold your fingers together, the gold lines connect from nail to nail, forming a continuous draped pattern. That connected quality turns each nail from an individual design into part of a larger composition.
The dusty mauve shells against the milky white base keep the palette muted and sophisticated. Brighter shell colors — coral, turquoise — would push the design toward tropical novelty. The mauve reads as a natural shell tone, which is more realistic and more refined.
The fan-shaped ridges on each shell are created with fine line work in a slightly darker mauve. That textural detail is what makes the shells recognizable. Without the ridge lines, the shapes would read as abstract fans rather than scallop shells.
Design Breakdown:
Illustrative shell art with metallic chain accents. The chains are what elevate this from "beach art" to "coastal luxury."
Base Color: Milky white or sheer nude. The base should be neutral enough that both the mauve shells and gold chains are clearly visible.
Nail Shape: Medium almond. The rounded shape echoes the fan curves of the scallop shells.
Design Element: Hand-painted dusty mauve scallop shells with darker mauve ridge lines, plus gold metallic chain links drawn in looping swags across the nails.
Finish: High-gloss top coat. The shine makes the gold chains look metallic and the shells look polished.
Get The Look at Home:
Paint all the shells first, then add the chains. The chains need to flow naturally between shells, so knowing where the shells sit first makes the chain placement easier.
- White base: Two coats of milky white. Let dry fully.
- Shell shapes: Using a small brush and dusty mauve, paint half-circle fan shapes with the flat edge near the cuticle. Two to three shells per nail.
- Ridge lines: With a fine liner brush and slightly darker mauve, draw thin radiating lines from the flat edge to the curved edge of each shell.
- Chain links: Using gold metallic polish and a thin striper, draw small connected oval shapes in a draped swag pattern between the shells.
- Flow check: Hold your hand together and verify the chains appear to connect from nail to nail.
- Top coat: One generous coat to seal both the painted art and the metallic lines.

21 Hot Summer Buns Hairstyle Ideas for 2026 ☀️🔥
22.Coral Tip Floral Elegance

Warm coral French tips paired with clustered white blossom art.
Overview:
Coral French tips are a warmer, more interesting alternative to classic white. The salmon-coral shade reads as summery without being neon — it sits in a tone range that works from May through September without feeling out of place. On a sheer nude base, the coral tips look like a natural extension of the nail bed, just with more intention.
The floral accent nails — clustered white blossoms with green foliage — are placed on the middle and ring fingers, leaving the French tips on the remaining three nails. That layout follows the standard "accent nail" formula, but the execution is elevated. The flowers have slightly transparent bases, letting the natural nail bed peek through between petals. That translucency gives the florals a delicate, watercolor quality rather than a heavy, opaque look.
Small red dots at the center of each flower are a tiny addition that changes the entire color story. Without the red, this is a pink-and-green design. With it, a third warm tone enters the palette, creating a triadic harmony that feels more complete.
Design Breakdown:
Two-part design: colored French tips and floral accent art. The coral and the flowers share warm undertones that unify the set.
Base Color: Sheer nude-pink for the French nails; slightly more opaque nude for the floral accent nails where the flowers sit on a visible base.
Nail Shape: Medium almond. The classic shape works for both the French tips and the floral art.
Design Element: Warm coral French tips on three nails; clustered white five-petal blossoms with green leaves and red dot centers on two accent nails.
Finish: Glossy top coat. The shine unifies the two styles.
Get The Look at Home:
Do the French tips first — they require the most concentration. The flowers are more forgiving.
- Nude base: Two coats of sheer nude-pink on all nails. Let dry.
- Coral tips: Using a thin liner brush and warm coral/salmon polish, paint French tips on thumb, index, and pinky. Two strokes per tip — one from each sidewall.
- Cleanup: Run a flat brush in acetone along the smile line to sharpen the coral edge.
- Flower petals: On middle and ring fingers, use a small dotting tool and white polish to place five-dot flower clusters. Three to four flowers per nail.
- Greenery: With a toothpick and forest green, add tiny leaf strokes between the flower clusters.
- Red centers: Place one tiny red dot in the center of each flower with the smallest dotting tool you have.
- Top coat: One thick coat, floating the brush over the floral art.
23.Tropical Hibiscus Punch
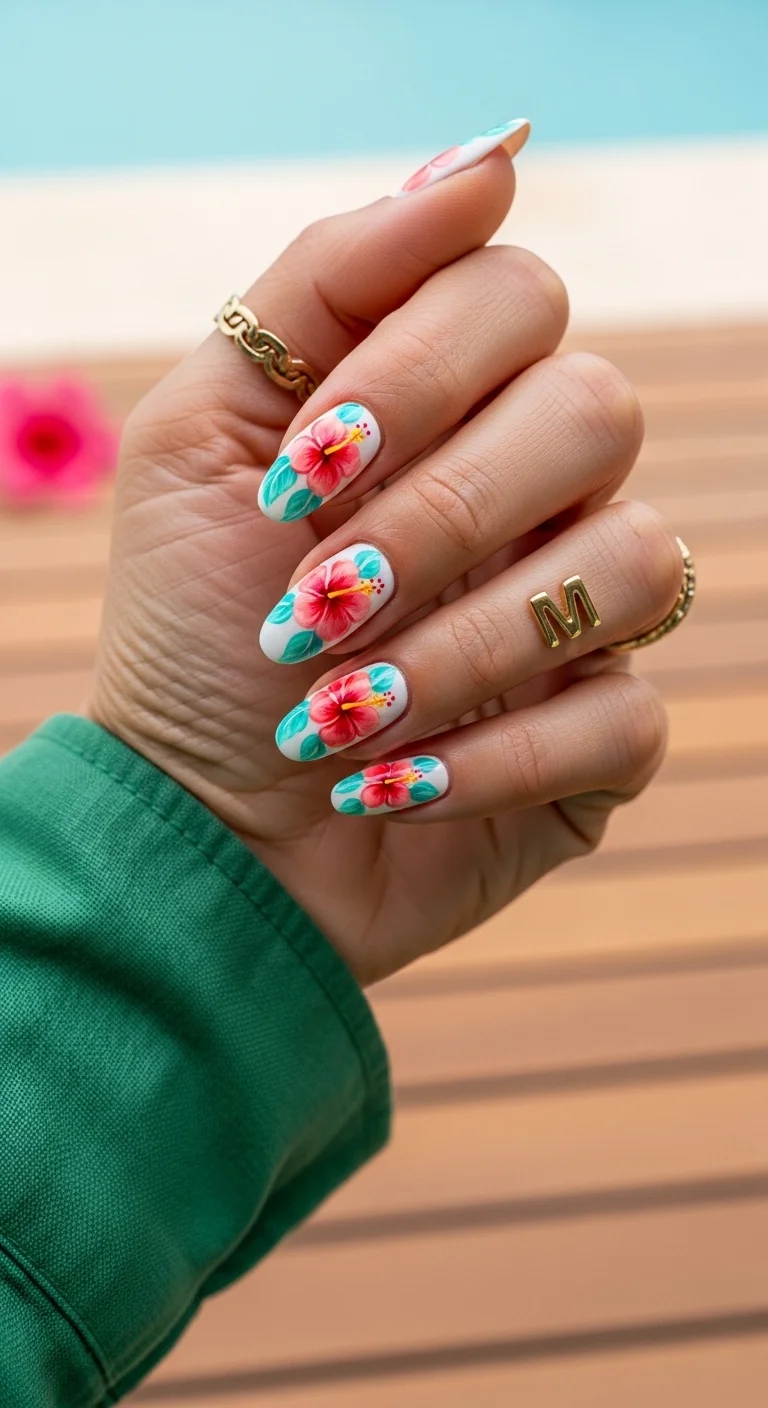
Bold hand-painted hibiscus blooms with teal tropical foliage.
Overview:
Hibiscus flowers are larger and more complex than daisies or cherry blossoms, which means they need more nail surface to look right. On short nails, hibiscus art gets compressed and loses the petal detail that makes the flower recognizable. These medium-length almond nails give each bloom enough room to show its layered petal structure — you can see the color gradient within each petal, from deep coral at the center to softer pink at the edges.
The teal foliage is an unusual color choice that works better than the expected dark green. Teal has blue in its undertone, which creates a complementary contrast against the warm coral petals. Standard green would blend more with the flower; teal pops against it. The color temperature difference is what makes each element distinct.
Every nail features a hibiscus, but each one is slightly different — different angle, different petal spread, different amount of foliage. That variation is what makes the set feel hand-crafted rather than stamped. If every flower were identical, the design would look like wallpaper.
Design Breakdown:
Full-coverage floral art on every nail. The hibiscus is the hero — the foliage supports it.
Base Color: Clean, opaque white. The white background makes the coral petals and teal leaves appear more vivid.
Nail Shape: Medium almond. The tapered shape frames each flower without truncating the petals.
Design Element: Large hand-painted hibiscus flowers with layered coral-red petals, yellow stamen dots, and teal tropical foliage. Each nail has a slightly different composition.
Finish: High-gloss top coat. The shine saturates the coral and makes the teal look deep.
Get The Look at Home:
Paint the flower petals first across all nails, then go back and add foliage to each. Working in rounds is faster than finishing one nail at a time.
- White base: Two coats of opaque white. Let dry fully.
- Petal shapes: Using a small round brush and coral-red polish, paint large rounded petal shapes radiating from a center point. Five to six petals per flower. Vary the placement on each nail.
- Petal shading: Mix a dot of pink into your coral. Apply this lighter shade to the outer edges of each petal while the base coral is still wet. The colors will blend slightly.
- Yellow stamens: Place 2-3 tiny yellow dots at the center of each flower using a dotting tool.
- Teal foliage: Using teal polish and a thin brush, paint almond-shaped leaf strokes around each flower. Two to three leaves per nail.
- Top coat: One thick coat, floating the brush to avoid dragging the layered petals.

33 Trendy Polka Dot Nail Ideas for 2026 💅
24.Golden Hour Cloud Almonds
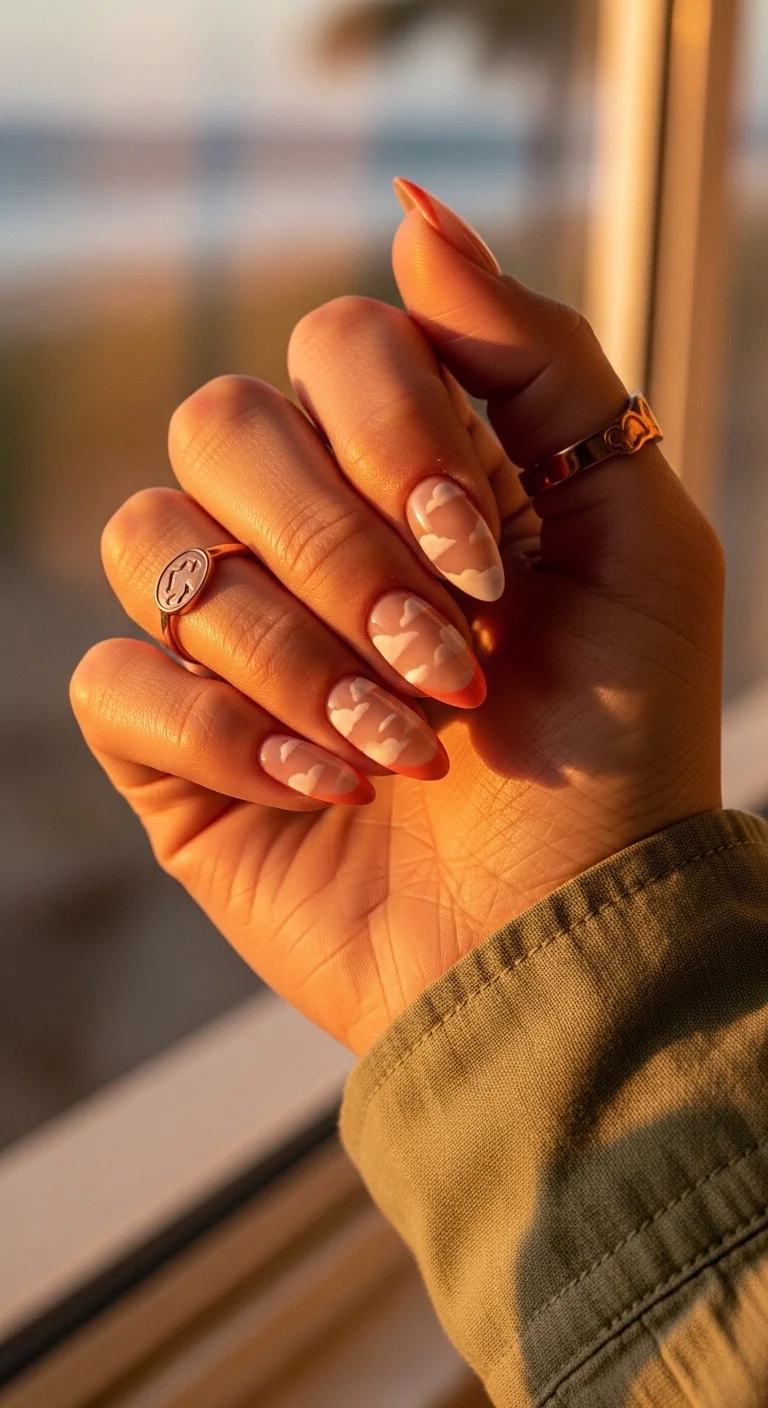
Peach-to-coral sunset gradient with cloud silhouettes.
Overview:
Cloud nail art can look juvenile — white puffy shapes on a blue background is the standard formula, and it reads like a children's book illustration. This design subverts that by pairing the clouds with a warm sunset gradient instead of blue sky. The peach-to-coral ombre changes the context entirely: these aren't daytime clouds, they're golden-hour clouds, which feels more romantic and more adult.
The "sky window" effect — where the clouds sit on a nearly bare nail, letting the natural nail bed show through — is what makes the design feel light and airy. Full-coverage cloud art on every nail would be heavy. The translucent base between clouds provides negative space that keeps the design breathing.
The gradient only appears at the tips, fading from warm peach to deeper coral. The rest of the nail stays natural or sheer. That restraint — gradient on the tips only, not the full nail — keeps the design from looking like a standard ombre with stickers on top. The clouds and the gradient feel integrated, not layered.
Design Breakdown:
Minimalist sunset gradient with illustrative cloud art. The warm palette is what makes this different from standard cloud nails.
Base Color: Warm peach transitioning to deeper coral at the tips. The mid-nail and cuticle area can be sheer or bare, letting the natural nail show.
Nail Shape: Medium almond. The curved shape echoes the organic curves of the cloud silhouettes.
Design Element: White cloud shapes painted on a translucent or sheer base, positioned to look like they're floating in the warm gradient sky.
Finish: Glossy with warm, golden-hour luminosity. The shine makes the gradient look like actual sunset light.
Get The Look at Home:
The gradient is subtle — a sponge technique with light pressure builds the color gradually.
- Sheer base: One coat of sheer nude or bare nail. The natural nail bed should be slightly visible.
- Gradient tips: On a makeup sponge, paint a thin stripe of peach and a thin stripe of coral. Dab gently on the nail tip only, fading upward toward the center. Two to three passes builds the color.
- Dry fully: Wait at least three minutes before painting the clouds. Wet gradient + white polish = pink clouds.
- Cloud shapes: Using a small brush and opaque white, paint organic cloud silhouettes — rounded, irregular shapes with soft edges. One to two clouds per nail.
- Placement: Position clouds so they partially overlap the gradient zone. The overlap creates the "sky window" effect.
- Top coat: One coat to seal the gradient and the cloud art into a unified surface.
25.Celestial Blue Gradient
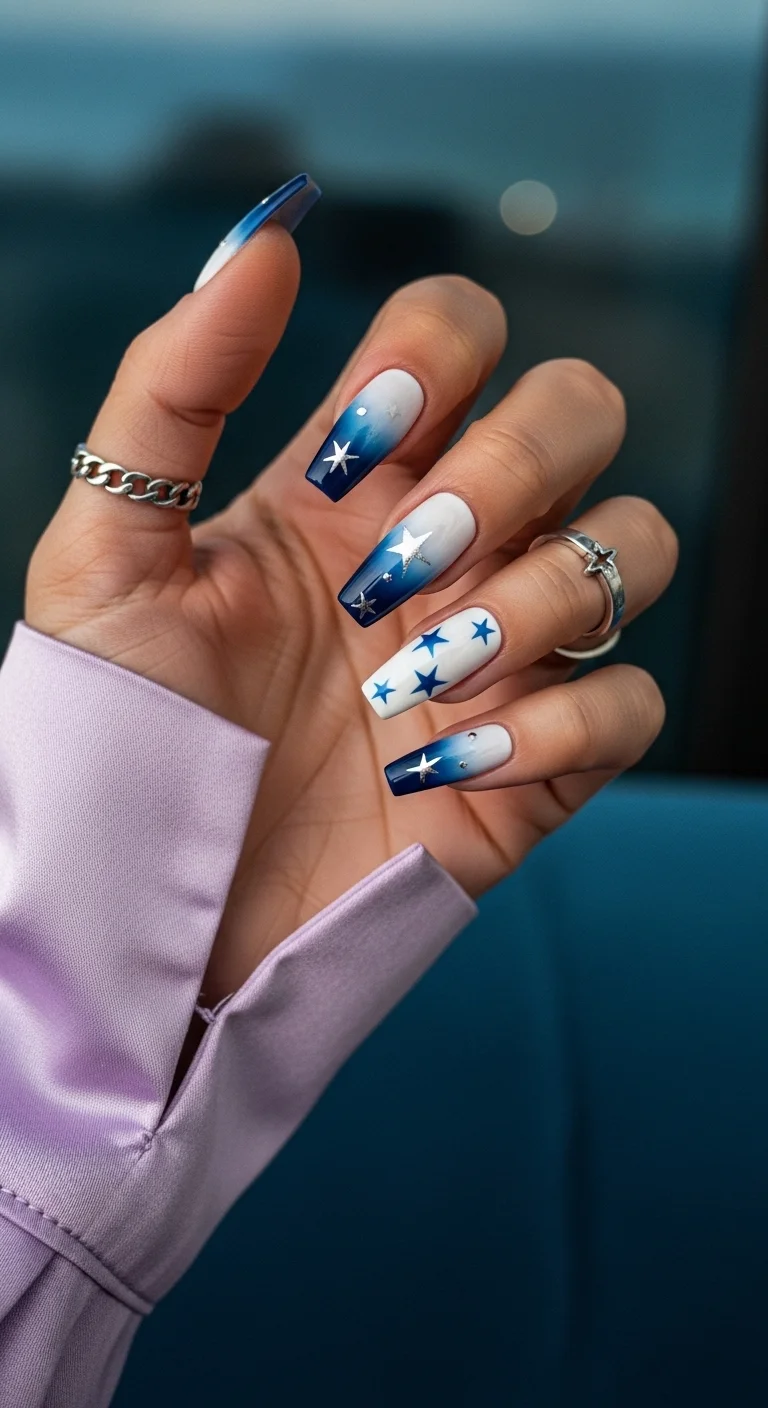
Navy-to-white gradient with scattered stars and silver accents.
Overview:
Star nail art works best when the stars aren't all the same size. This set uses a mix of large statement stars, medium starbursts, and tiny dot clusters that suggest constellations. That size variation creates a sense of depth — the big stars read as close, the small dots read as distant. It turns a flat nail surface into a night sky with perspective.
The ring finger reversal — white base with blue stars instead of blue base with white stars — is the design's cleverest move. That single nail breaks the pattern just enough to keep the eye interested. Without it, the set would be gradient-plus-stars on every nail, which is pleasant but predictable. The reversal adds a beat of surprise.
Blue-to-white gradients can look patriotic if the blue is too royal and the white is too stark. Keeping the blue on the navy side and the white slightly warm prevents the red-white-blue association. The color temperature is what separates "celestial" from "flag."
Design Breakdown:
Gradient base with layered star art. The ring finger reversal is the design's structural hook.
Base Color: Deep navy blue fading to white. Most nails are blue at the cuticle fading to white at the tip; the ring finger reverses this.
Nail Shape: Coffin or ballerina, medium length. The flat tip provides a stable frame for the star patterns.
Design Element: White starbursts in varying sizes on blue nails; navy stars on the white ring finger. Silver dot accents scattered as constellation details.
Finish: Glossy with subtle shimmer in the blue gradient areas.
Get The Look at Home:
Build the gradient first, let it dry, then add stars. Painting stars onto wet gradient creates grey smudges, not crisp shapes.
- Gradient base: Using a sponge, blend navy at the cuticle into white at the tip. Build opacity over 2-3 rounds.
- Ring finger reversal: On the ring finger only, sponge white at the cuticle into navy at the tip.
- Dry fully: Wait at least 5 minutes. The gradient needs to be completely set before the star work begins.
- Large stars: Using a thin liner brush and white polish, draw a center point and pull four or six lines outward. One large star per nail.
- Small stars and dots: Using a smaller brush, add medium starbursts and tiny dot clusters around the large stars. Scatter them like constellations.
- Silver accents: Place 2-3 tiny silver metallic dots per nail with a small dotting tool.
- Top coat: One thick coat, floating the brush over the star art.
28 Effortless Hot Weather Day Hairstyles for Women 2026 ☀️💇♀️
26.Sea Salt Marble Square
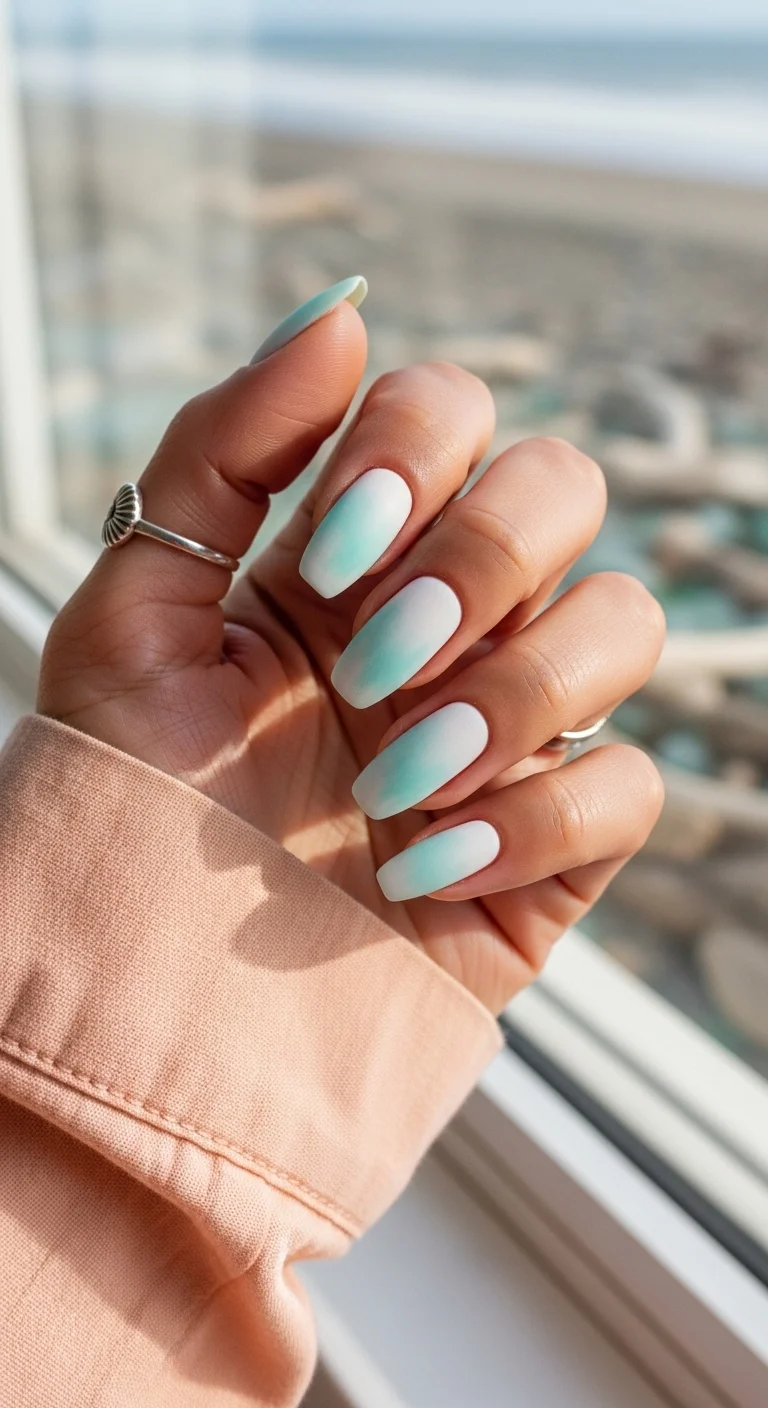
Seamless seafoam-to-white gradient with watercolor-like blending.
Overview:
Sometimes the best nail design is a perfect gradient with nothing else. No art, no charms, no embellishment — just two colors blended so smoothly that the transition line disappears. This set is that exercise in restraint, and the execution is seamless. The seafoam mint melts into white with no visible boundary.
The gradient direction varies slightly from nail to nail — some fade green-at-tip to white-at-cuticle, others reverse. That variation sounds minor, but it makes a difference. Uniform gradient direction across all nails looks manufactured. Slightly varied directions look organic, like watercolors bleeding into each other.
Square nails with this palette read as "coastal grandmother" — clean, understated, and quietly expensive. The same colors on almond nails would read as more traditional and feminine. The square shape adds a modern, architectural quality that the rounded shape doesn't.
Design Breakdown:
Pure gradient, no art. The technical execution of the blend is the entire design.
Base Color: Cool-toned seafoam mint and clean opaque white. Both need to be fully opaque — sheer formulas create patchy transitions.
Nail Shape: Short-to-medium square with softly rounded corners. Practical, modern, and clean.
Design Element: None. Pure color gradient. The variation in gradient direction across nails adds organic character.
Finish: High-gloss, wet-look finish. The smooth reflective surface enhances the watery, sea-salt aesthetic.
Get The Look at Home:
The sponge technique is the only reliable method for a seamless gradient. Brush blending leaves streaks every time.
- White base: Two coats of opaque white on all nails. Let dry.
- Sponge setup: Paint mint and white side by side on a makeup sponge. The overlap zone is where the blend happens.
- First pass: Press the sponge onto the nail, varying the direction on different nails. Dab gently 3-4 times.
- Build opacity: Let each layer dry one minute, then repeat. Three rounds achieves full coverage without muddiness.
- Cuticle cleanup: Use a small brush dipped in acetone to clean any sponge overflow from the skin.
- Top coat: Two coats of self-leveling glossy top coat. The sponge leaves a slightly pebbled texture that needs smoothing.
27.Retro Surf Wave Squares
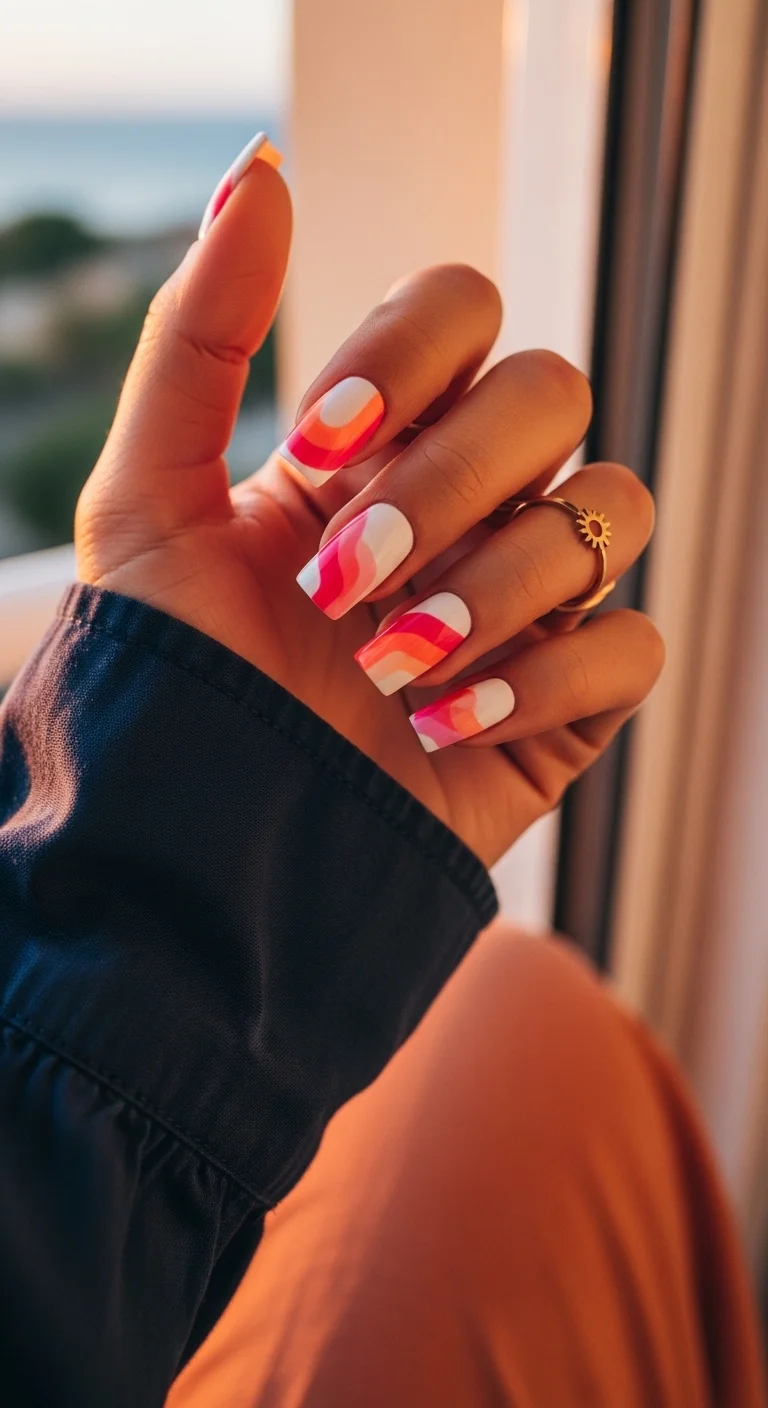
Bold abstract wave stripes in retro coral, orange, and pink.
Overview:
The 70s surf aesthetic is having a revival in fashion, and these nails lean into it hard. The warm palette — coral, tangerine, blush pink, and white — is straight out of a vintage surf poster. What makes it work on nails rather than just looking like a print pattern is the variation: each nail has a unique wave arrangement, so the set feels dynamic rather than repetitive.
The overlapping translucent layers where colors intersect are a happy accident of the technique. Where the coral overlaps the orange, a deeper warm tone appears. Where the pink crosses the coral, a softer shade emerges. Those accidental secondary colors add complexity that wasn't deliberately painted — the layering does the mixing for you.
Square nails are the right shape for this graphic design. The straight edges give the organic wave patterns a structured frame. On almond nails, the curves would compete with the wave curves. On square, the contrast between geometric shape and organic art creates visual tension that makes both elements more interesting.
Design Breakdown:
Bold graphic art on a white base. The retro palette is what gives the design its specific character.
Base Color: Bright, fully opaque white. The white background makes the warm colors appear more vivid and the wave boundaries look crisp.
Nail Shape: Medium-length square with sharp, crisp edges. The geometric shape complements the graphic art style.
Design Element: Bold curved wave/swirl stripes in coral, tangerine orange, and blush pink layered over the white base. Each nail has a unique wave arrangement.
Finish: Creamy gloss. The white base is fully opaque, giving the colored waves a crisp, almost sticker-like quality.
Get The Look at Home:
Paint the largest waves first, then fill in with smaller accent curves. Working from big to small is more efficient than the reverse.
- White base: Two coats of opaque white. Let dry fully.
- First wave color: Using a striper brush and coral polish, paint one or two large curved bands across each nail. Vary the direction — diagonal, horizontal, S-curve.
- Second wave color: Let coral dry, then add tangerine orange waves alongside or overlapping the coral. The overlap creates secondary warm tones.
- Third wave color: Add blush pink accent curves in the remaining white spaces.
- White gaps: Leave some white visible between the waves. The negative space is part of the design.
- Top coat: One thick coat to smooth the layered texture and seal the colors.

31 Stunning Prom Nails for Women in 2026 💃
28.Translucent Jellyfish Glow
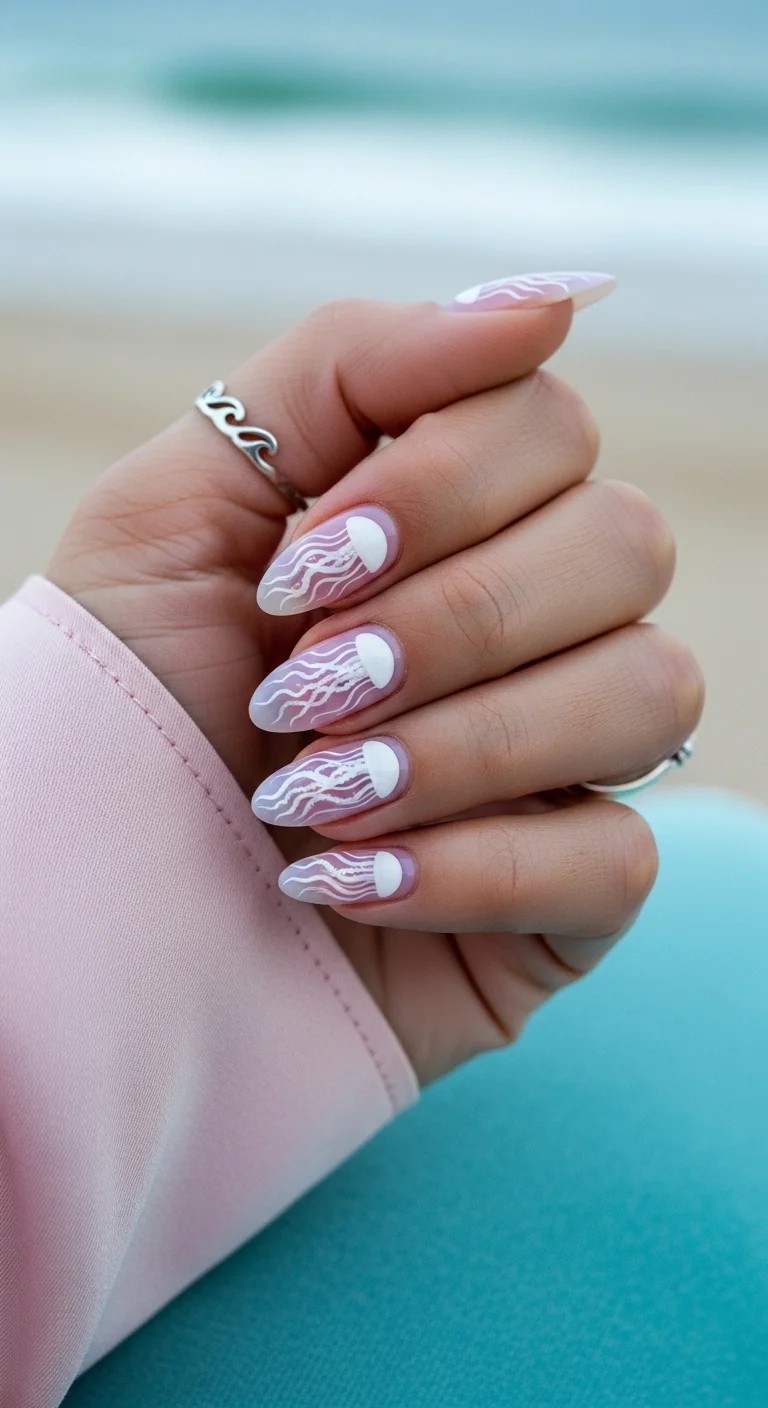
Detailed white jellyfish on a translucent milky mauve base.
Overview:
Jellyfish nail art is uncommon, which is partly why this design stands out. Everyone does shells, starfish, and waves. Jellyfish are weirder, more specific, and — when executed well — more visually arresting. The trailing tentacle lines here create a sense of downward motion, as if the jellyfish are drifting through the nail surface.
The translucent base is what sells the underwater illusion. You can see slight warmth from the natural nail bed showing through the milky mauve, which creates the impression of looking through water. An opaque base would flatten the effect — the jellyfish would look painted ON the nail rather than floating IN it.
These are long nails, and the design benefits from the length. The jellyfish dome sits near the cuticle, and the tentacles need vertical space to trail downward. On short nails, the tentacles would be compressed into stubby lines that lose the drifting quality. This is a design that requires at least 15mm of free edge to work properly.
Design Breakdown:
Illustrative art on a translucent base. The "jelly" quality of the background is as important as the jellyfish themselves.
Base Color: Sheer dusty mauve-pink with a translucent, jelly-like finish. You should be able to see slight nail bed warmth through it.
Nail Shape: Long almond or stiletto. The extended length provides vertical space for the tentacle trails.
Design Element: Hand-painted white jellyfish with rounded domes near the cuticle and thin, wavy trailing tentacles extending toward the tip. Each jellyfish is slightly different.
Finish: Glossy with a jelly/translucent quality. The finish should look like glass or water, not plastic.
Get The Look at Home:
The tentacles require a very thin liner brush and a steady hand. If your brush is too thick, the lines will bleed into each other.
- Jelly base: Two coats of sheer mauve-pink. The first coat will look patchy — that's normal for sheer formulas. The second coat evens it out while maintaining translucency.
- Jellyfish dome: Using a small brush and opaque white, paint a rounded half-circle near the cuticle area of each nail. Vary the size slightly.
- Tentacles: Using the thinnest liner brush you have and white polish, draw three to five thin, wavy lines trailing from the dome toward the tip. Each line should be a different length.
- Tentacle detail: Add tiny dots along some tentacles using the tip of a toothpick. The dots suggest the trailing texture of real jellyfish tentacles.
- Dry time: Wait at least 5 minutes before top coating. Thin white lines smear instantly under a brush.
- Top coat: One coat, floating the brush. Don't press down — the tentacle lines are delicate.
29.Sunset Chrome Glaze
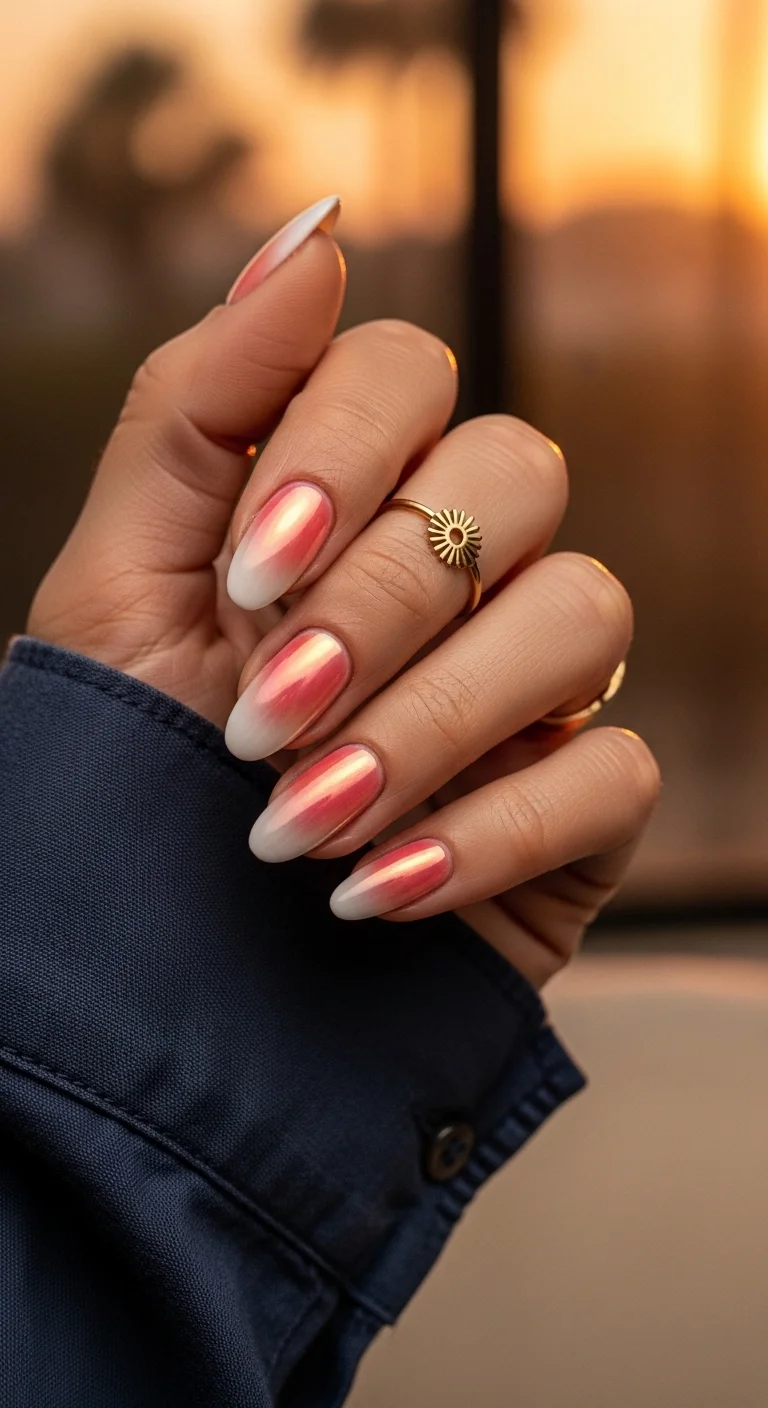
Warm coral-to-white ombre with pearlescent aurora chrome overlay.
Overview:
Chrome powder over a simple ombre is one of the highest-impact, lowest-technique upgrades in nail design. The gradient itself — white tips melting into rosy coral — is a standard French fade. The chrome powder transforms it into something that looks expensive. The iridescent overlay reflects rose gold, peach, and copper depending on the angle, turning two colors into an entire spectrum.
The warm color temperature is what makes this chrome work. Silver chrome over the same gradient would look cold and icy. The rose-gold aurora powder keeps everything warm, which reinforces the sunset association. Color temperature matters more than most people realize — the same design in warm vs. cool tones reads as completely different moods.
Chrome powder requires a no-wipe gel top coat underneath. The powder adheres to the cured gel surface, not to regular polish. If you try this over regular polish, the powder won't stick and you'll end up brushing shimmer off your nails for the rest of the day. This is a gel-only technique.
Design Breakdown:
Standard ombre elevated by chrome powder. The chrome is the design; the gradient is the foundation.
Base Color: Warm rosy coral at the cuticle fading to milky white at the tips. The transition should be seamless.
Nail Shape: Medium-long almond. The curved shape maximizes the chrome's light-catching surface area.
Design Element: Rose-gold or aurora pearlescent chrome powder rubbed over the entire nail. The powder creates a mirror-like color shift that overlays the gradient.
Finish: Chrome mirror glaze. The reflective, liquid-metal quality is the hero element.
Get The Look at Home:
This technique requires gel polish and a UV/LED lamp. Regular polish won't give the chrome powder anything to adhere to.
- Gel base: Apply gel base coat and cure.
- Gradient: Using a sponge, blend coral gel at the cuticle into white gel at the tip. Cure between layers.
- No-wipe top coat: Apply a no-wipe gel top coat over the gradient. Cure fully — the chrome adheres to this layer.
- Chrome application: Using a silicone applicator or eyeshadow sponge, rub rose-gold aurora powder onto the cured surface. Buff until the surface is mirror-smooth.
- Dust off: Use a fluffy brush to remove excess powder from the skin and cuticles.
- Seal: Apply one coat of gel top coat over the chrome to prevent flaking. Cure fully.
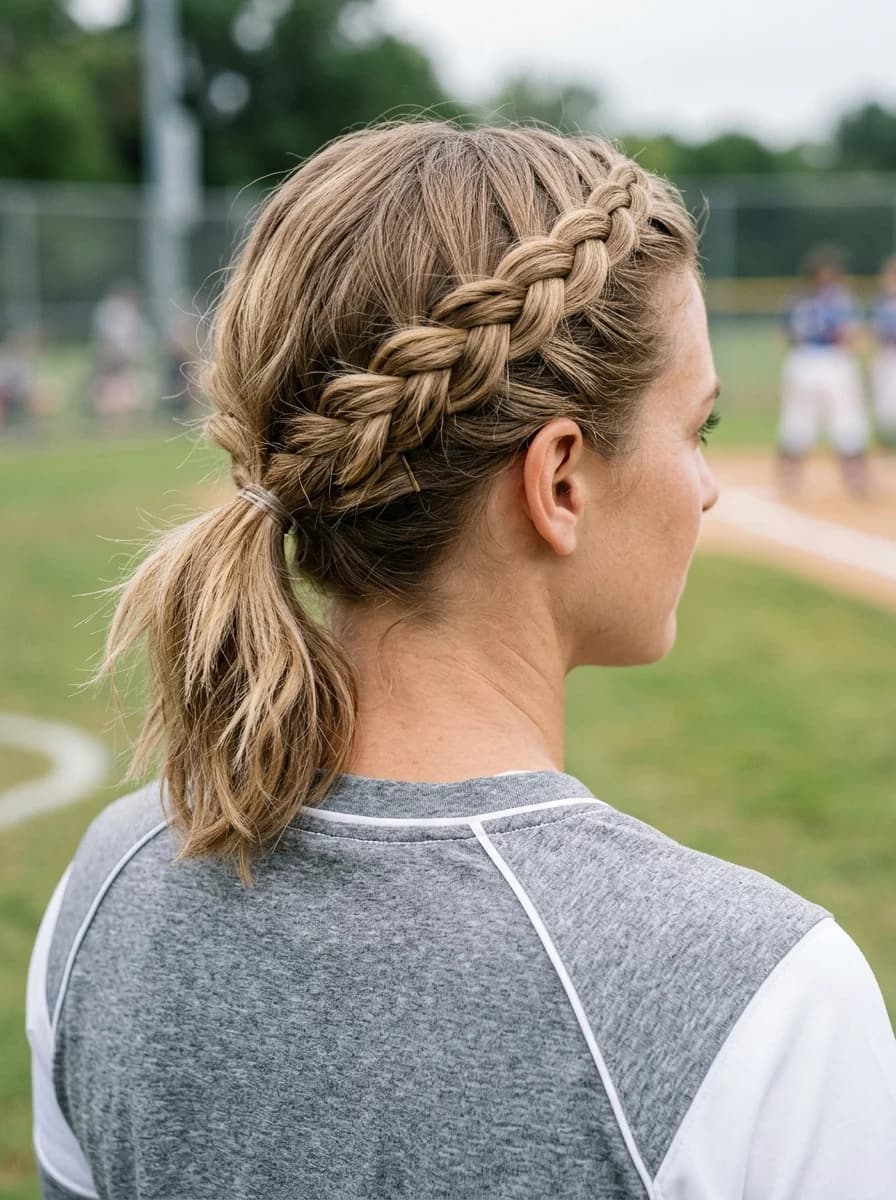
28 Stunning Softball Hairstyle Ideas with Braids for 2026 🥎✨
30.Blue Lagoon Gold Leaf
Layered ocean wave art in turquoise with gold leaf highlights.
Overview:
Turquoise and gold is a combination that works on a nearly instinctive level — it's the ocean and the sun. The design leans into that association with layered wave patterns in turquoise and white over a sheer nude base, creating the effect of looking down at tropical water from above.
The gold leaf is what separates this from a standard wave design. Without it, this is a nice ocean-themed set. With the gold flakes scattered along the wave crests, the design crosses into luxury territory. The gold catches light differently than the glossy polish — it has a warmer, more textured quality that creates a visual contrast between the "water" (smooth, cool blue) and the "sunlight" (warm, textured gold).
These are long coffin nails, and the length serves the design. The wave patterns need vertical space to show their flow. On short nails, the waves would be compressed and lose the sweeping quality that makes them look like actual water movement. The coffin shape's flat tip also provides a defined "horizon line" that frames each wave composition.
Design Breakdown:
Layered wave art with gold leaf accents. The gold is placed along wave crests to simulate sunlight hitting water.
Base Color: Vibrant turquoise and white waves over a sheer nude or pink base. The nude peeks through between wave layers, creating depth.
Nail Shape: Long coffin or ballerina. The flat tip and tapered sides frame the wave compositions.
Design Element: Layered swirling wave patterns in turquoise and white. Gold leaf flakes scattered along wave crests and transition zones.
Finish: High-gloss gel finish with metallic gold leaf textural contrast.
Get The Look at Home:
The gold leaf is applied while the top coat is still wet/tacky — it needs something to adhere to. Press, don't brush.
- Nude base: One coat of sheer nude or pink. Let dry.
- First wave layer: Using a thin brush and turquoise polish, paint flowing wave shapes across each nail. Let dry.
- White wave layer: Add white wave lines alongside or overlapping the turquoise. The layering creates depth.
- Second turquoise layer: Add more turquoise waves over the white. Three layers total creates the "looking through water" effect.
- Gold leaf: While the final layer is still slightly tacky, press small gold leaf flakes along the wave crests and transition zones using tweezers.
- Press flat: Use a silicone tool to gently press the gold leaf flat against the nail surface.
- Top coat: Two coats. The gold leaf needs encapsulating to prevent lifting.
The Beach Nail Cheat Sheet: Matching Your Mani to Your Summer Plans
Your beach nails need to work for what you are actually doing, not just for the photo you post on arrival. A full-coverage 3D shell set is a terrible idea for a snorkeling trip, just like a minimalist sheer pink is going to feel underwhelming at a sunset beach party. The trick is matching the complexity of the design to the reality of your itinerary.
For actual beach and pool days: Keep it simple. Milky pastels with a single chrome or iridescent accent nail. Butter yellow, soft coral, and milky white are the 2026 summer shades that read expensive and hold up to sunscreen, sand, and salt water. A chrome finish on one or two nails gives you the trend without the stress of maintaining ten identical chrome surfaces (which show every fingerprint, by the way).
For sunset dinners and beachside events: This is where you bring out the mermaid chrome and sea glass finishes. The lighting at golden hour makes iridescent and metallic nails look like they are lit from within. Pair a chrome base with delicate wave line art or a single shell decal — enough to catch the candlelight, but not so much that you look like you wandered off a carnival float.
For destination weddings and bachelorettes: Go for the 3D seashells and pearl accents — but limit them to accent nails. A full set of raised shells reads costume-y in wedding photos. One or two accent nails with dimensional details against a clean milky or nude base keeps it bridal-appropriate while still giving the vacation energy.
For travel days and airports: Flat art only. No 3D elements, no raised charms. The combination of hand luggage, seatbelts, hotel check-in counters, and airport bathroom lighting will destroy any dimensional nail art within hours. Stick with hand-painted waves, starfish decals, or a simple chrome finish that can survive the journey and still look fresh when you arrive.
And there you have it! Hopefully, scrolling through these gorgeous designs has built excitement for the upcoming getaway. Choosing vacation nails should be fun and stress-free, and one of these sets is sure to look absolutely stunning on you.
Be sure to pin your favorite photos straight to your Pinterest boards right now, so they are ready to show the nail tech! This simple step prevents last-minute panic when sitting down in the salon chair.