Nail Trends
36 FIFA World Cup Nail Designs to Show Your Team Spirit
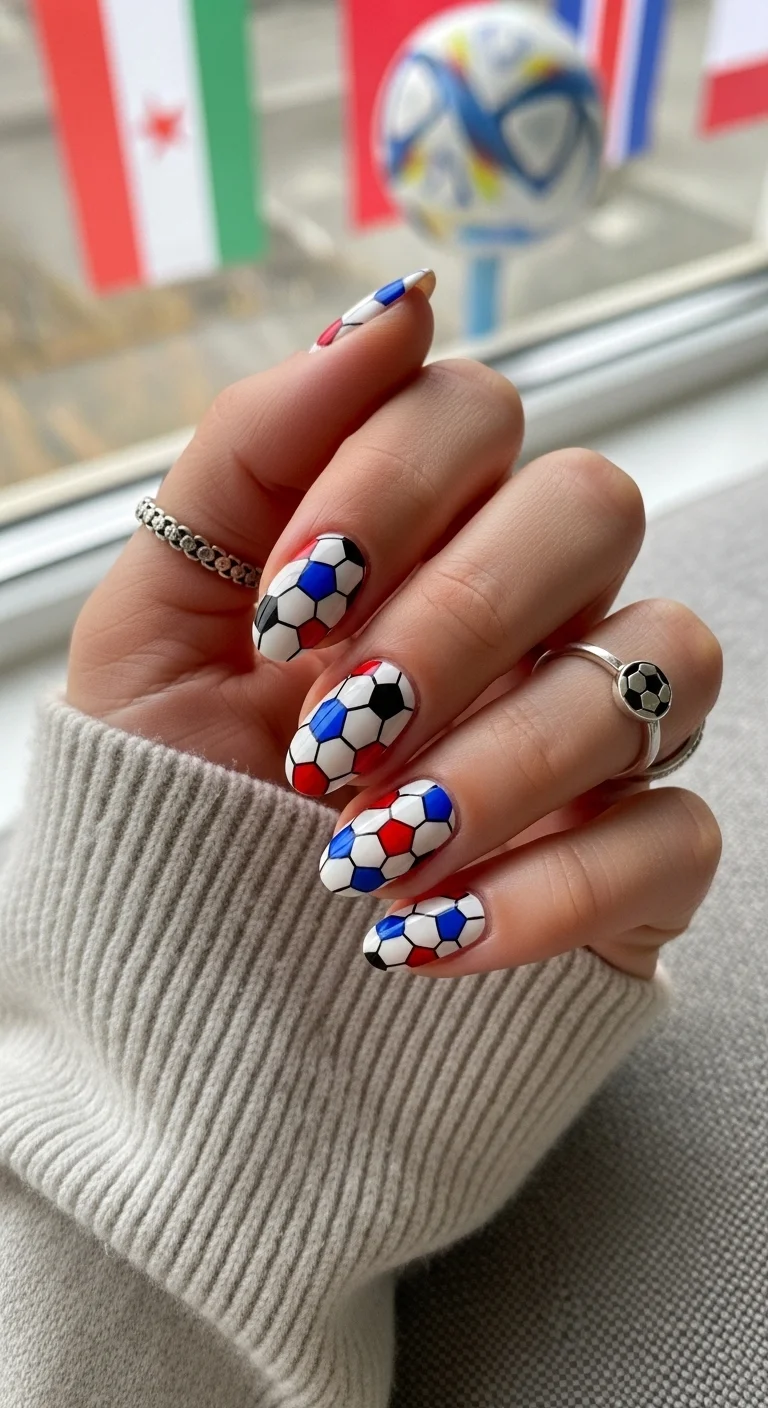
The FIFA World Cup is finally here, and that means it's time to bring a complete A-game to every single watch party! While everyone else is just throwing on a jersey, game day glam can be taken to the next level. Whether a die-hard football fan or just there for the watch party snacks and the vibes (with zero judgment), sporting team-spirited nails is the ultimate way to celebrate the tournament.
With sports-chic aesthetics dominating the scene, the absolute best World Cup nail inspiration is ready to explore. Forget boring manicures—this features chic country flags, trendy minimalist pitch lines, glamorous golden trophy chromes, and cool referee-inspired stripes.
The 2026 Host Nation Effect: Why Red, Green, and Blue Are Dominating the Pitch
The 2026 World Cup is structurally different from every previous tournament. For the first time, three nations are hosting: the United States, Mexico, and Canada. That tri-nation dynamic has fundamentally shifted the visual language of fan nail art away from single-flag tributes and toward a unified, multi-national color story built around red, green, and blue.
The official Adidas match ball, called the "Trionda," features three distinct waves in exactly these colors, chosen to represent the three host countries. Major tournaments consistently push nail trends toward these coordinated, abstract color stories rather than literal flag reproductions. The result is a palette that reads as "World Cup" without needing a single star or stripe.
For tournament season, minimalism gives way to louder colors, brighter finishes, and extra energy. Fans are leaning into bold color-blocking using this exact red, green, and blue triad, or mixing metallic chrome finishes with these vibrant hues to capture the stadium atmosphere. The approach makes a stronger statement and photographs better under stadium lights.
1.The Referee Stripe Moment
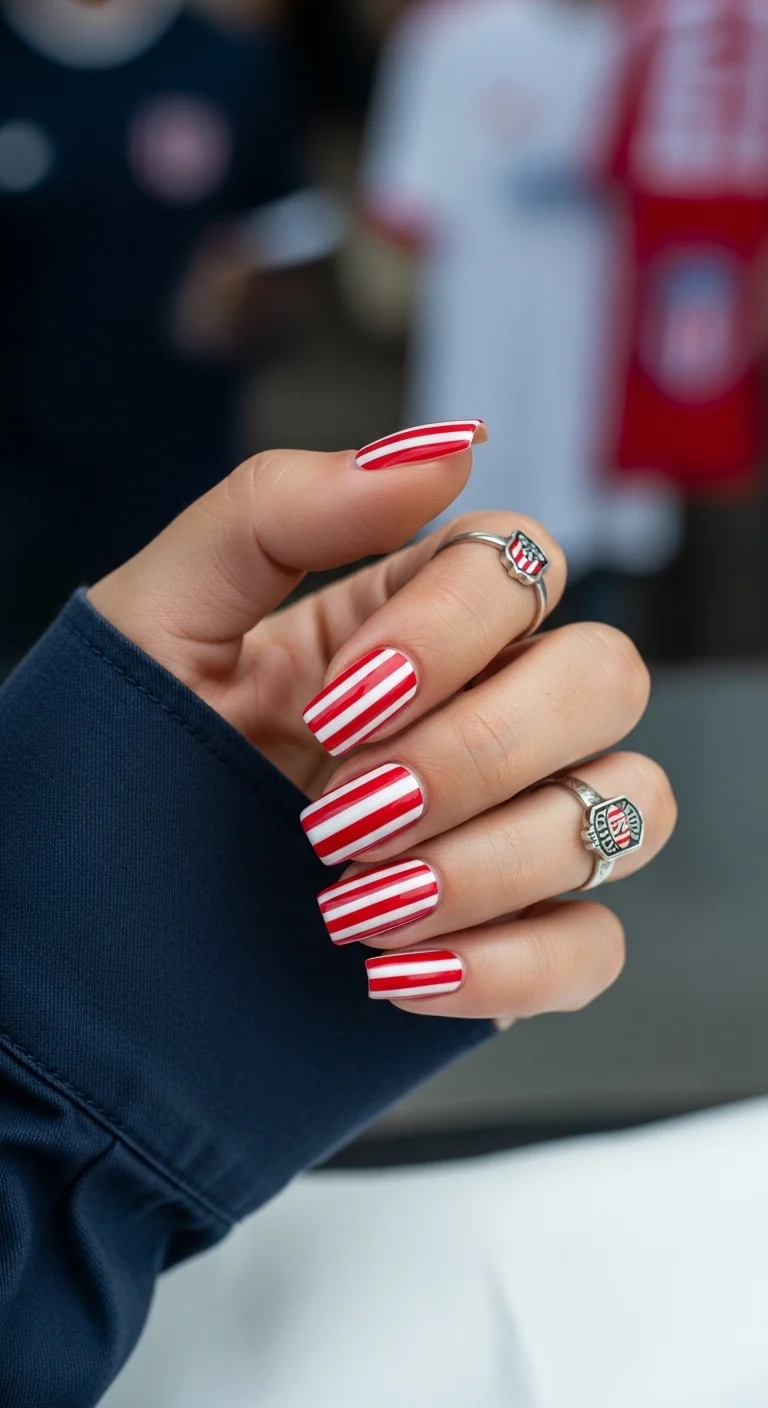
Red and white vertical stripes inspired by classic team jerseys.
Overview:
Red and white vertical stripes are the most literal reference to soccer in this entire list. They evoke referee jerseys, team kits, and the classic visual language of the sport. The design commits fully to the theme, which is what makes it read as intentional rather than random.
The short square shape is the right call for this pattern. The straight edges of the nail complement the verticality of the stripes, creating a cohesive geometry. On almond or oval nails, the stripes would curve with the nail shape, which would soften the graphic quality that makes this design work.
The practical challenge is keeping the stripes uniform. If the spacing varies between nails, the set looks uneven. Striping tape is almost mandatory for consistent results. Freehand stripes that are truly parallel across all ten nails is an unrealistic expectation.
Design Breakdown:
Full-coverage vertical striping. The repetition across all nails is what creates the jersey effect.
Base Color: Crisp, opaque white. Two coats for full coverage so the red doesn't bleed through.
Nail Shape: Short square. The straight edges complement the vertical stripe pattern.
Design Element: Alternating red and white vertical stripes on every nail. Even spacing is critical.
Finish: High-gloss top coat to make the colors look saturated and the lines look sharp.
Get The Look at Home:
Striping tape is essential for consistent, parallel lines. Budget time for the tape placement.
- White base: Two coats of opaque white. Let dry fully. Tape on tacky polish pulls up the base.
- Tape placement: Apply vertical strips of nail tape down each nail, spacing them evenly. Press firmly at the edges.
- Paint the red: Swipe bold red polish over the entire nail, covering the tape.
- Peel while wet: Remove the tape immediately before the red sets. Pull at a low angle.
- Touch-ups: Use a small brush to fix any bleeding between stripes.
- Seal: One thick coat of top coat to protect the stripes.

22 Best Graduation Day Hairstyles for 2026 🎓✨
2.Sunset Goal Ombre
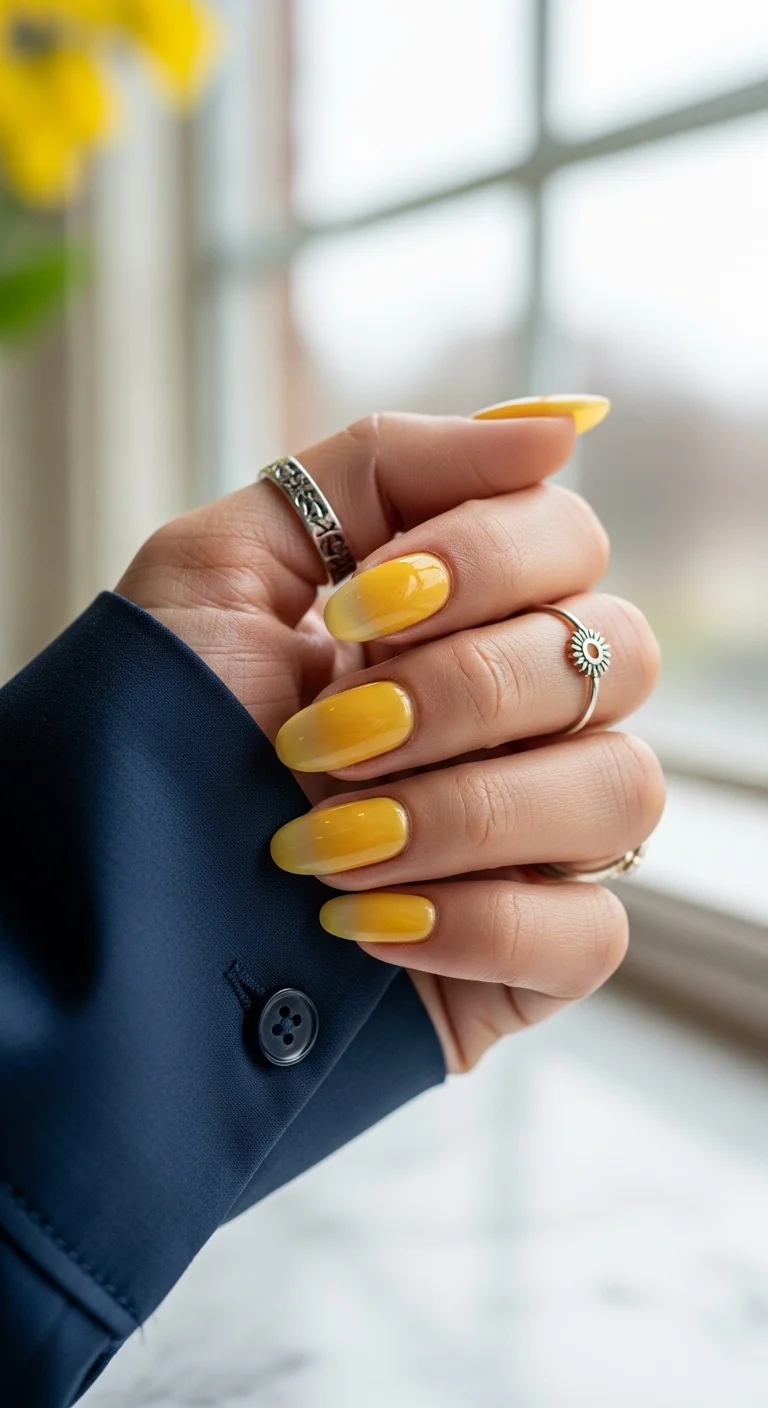
A warm yellow gradient that evokes sunset and summer energy.
Overview:
This ombre stays within the yellow family, transitioning from a brighter lemon yellow at the cuticle to a deeper, more golden tone at the tips. The gradient is subtle enough that it reads as a single color from a distance, revealing its complexity only up close.
The warmth of the palette connects to summer, sunshine, and the golden tones associated with victory trophies. It's a thematic reference that works through color rather than literal imagery. The design doesn't need a soccer ball or a flag to suggest the sport.
Yellow polish is notoriously streaky. The pigment particles tend to separate in the bottle, creating uneven coverage. Three thin coats with proper dry time between each produces the best result. A ridge-filling base coat underneath helps smooth the surface.
Design Breakdown:
Tonal yellow gradient. The subtlety of the blend is the design principle.
Base Color: Bright lemon yellow at the cuticle fading to a deeper golden yellow at the tips.
Nail Shape: Medium oval. The curved shape complements the smooth gradient transition.
Design Element: Sponge-applied vertical ombre using two shades of yellow. The transition should be seamless.
Finish: High-gloss top coat to make the yellow look juicy and saturated.
Get The Look at Home:
The sponge technique is the same as any ombre. The challenge is getting the yellow to build opacity.
- Base coat: Apply a ridge-filling base coat. Yellow polish highlights every surface imperfection.
- Sponge setup: Paint stripes of bright yellow and golden yellow side by side on a makeup sponge. Dab on paper first.
- Dab the gradient: Press the sponge onto the nail with the brighter yellow at the cuticle. Move slightly up and down to blend.
- Build layers: Let each pass dry, then repeat. Three to four layers builds better opacity.
- Clean edges: Use a brush dipped in acetone to remove polish from the skin.
- Seal: Apply a thick top coat while the last layer is still slightly wet to help the colors blend.
3.The Pitch Side Checkerboard
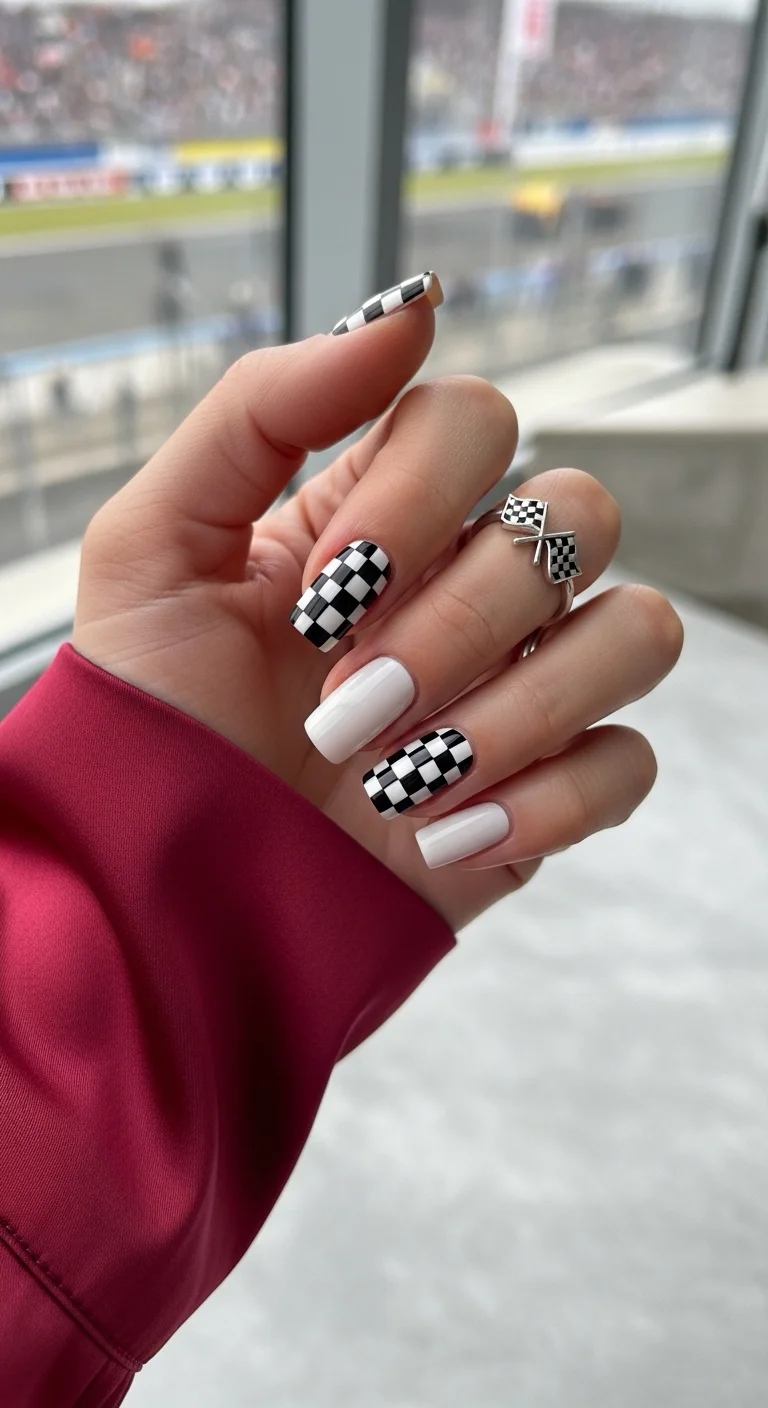
Black and white checkerboard alternating with solid white.
Overview:
Checkerboard patterns are associated with racing flags, but the black and white palette also references the classic soccer ball pattern. This design uses the checkerboard selectively, placing it on some nails while keeping others solid white. The alternation creates visual rhythm without overwhelming the hand.
The solid white nails serve as visual rest between the busy checkerboard nails. Without them, the pattern would cover every finger and feel repetitive. The alternating approach lets each pattern breathe.
The checkerboard requires consistent square sizing to look convincing. If the squares are different sizes across nails, the pattern looks sloppy. Using striping tape in both directions creates clean, uniform squares.
Design Breakdown:
Two-pattern alternation. The checkerboard provides graphic energy; the solid white provides balance.
Base Color: Opaque white on all nails. The checkerboard nails get black squares painted on top.
Nail Shape: Medium coffin. The flat surface provides a clean canvas for the geometric pattern.
Design Element: Alternating nails between black and white checkerboard and solid white.
Finish: High-gloss top coat to make the black look deep and the white look crisp.
Get The Look at Home:
Do the checkerboard nails and the solid nails in separate rounds. The checkerboard requires more time and precision.
- White base: Two coats of opaque white on all nails. Let dry fully.
- Grid tape: On alternating nails, apply thin striping tape vertically and horizontally to create a grid of squares.
- Paint the black: Carefully fill in alternating squares with black polish.
- Peel while wet: Remove the tape before the black polish sets.
- Solid nails: Leave the remaining nails as solid white.
- Seal: One thick coat of top coat over everything.
30 Stunning Beach Nail Ideas for the Best Vacation in 2026 🌊
4.Liquid Silver Trophy Shine
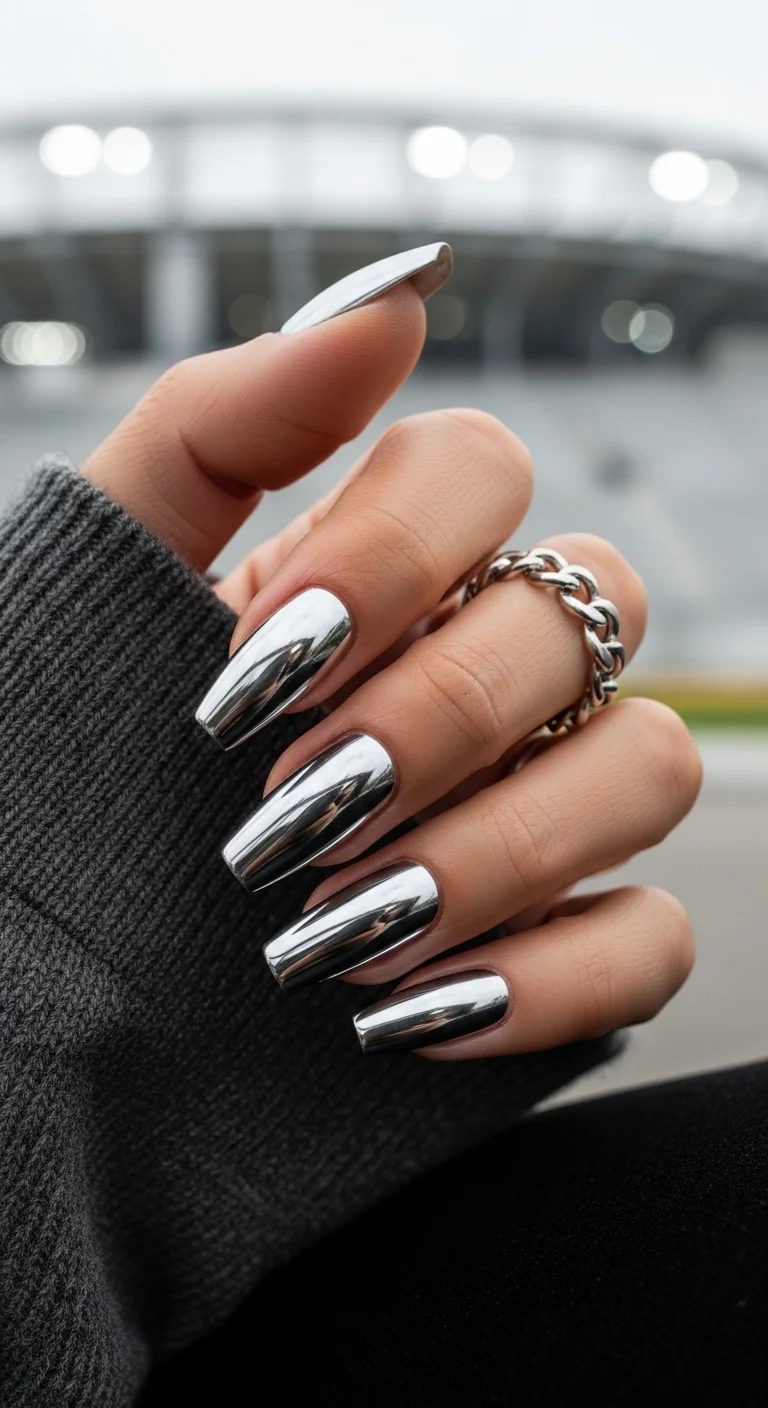
Mirror-finish silver chrome inspired by the World Cup trophy.
Overview:
Silver chrome is the most direct reference to a trophy in this list. The mirror-like finish catches light from every angle, creating a reflective surface that looks like polished metal. It's the nail equivalent of holding a silver cup.
The all-chrome approach commits fully to the metallic theme. There's no color variation, no accent nails, no art. Just pure, reflective silver on every finger. The restraint is what makes it feel luxurious rather than costume-y.
Chrome powder application is the technical hurdle. It requires a no-wipe gel top coat as the base layer. Regular polish won't give the powder anything to adhere to. If you're working with regular polish, a metallic silver like Essie "No Place Like Chrome" is a more forgiving alternative.
Design Breakdown:
Full-coverage chrome. The mirror finish is the entire design.
Base Color: Black or dark base coat under the chrome powder. The dark base makes the silver more reflective.
Nail Shape: Medium-long coffin. The flat surface maximizes the reflective area.
Design Element: Solid silver chrome on every nail. No additional art or accents.
Finish: Mirror-chrome powder buffed to a reflective shine, sealed with a glossy top coat.
Get The Look at Home:
Chrome powder requires specific products. Budget extra time for the preparation steps.
- Dark base: Apply black polish to all nails. Let dry fully.
- No-wipe top: Apply a no-wipe gel top coat over the black. Cure under UV or LED lamp.
- Rub the chrome: Using a sponge applicator, rub silver chrome powder over the cured top coat until the surface is mirror-smooth.
- Dust off: Use a soft brush to remove excess powder from the cuticles.
- Edge check: Make sure the chrome extends to the nail edges. Chrome that stops short will chip within a day.
- Final seal: Apply glossy top coat to all nails, capping the edges to prevent flaking.
5.Bronzed Victory Shimmer
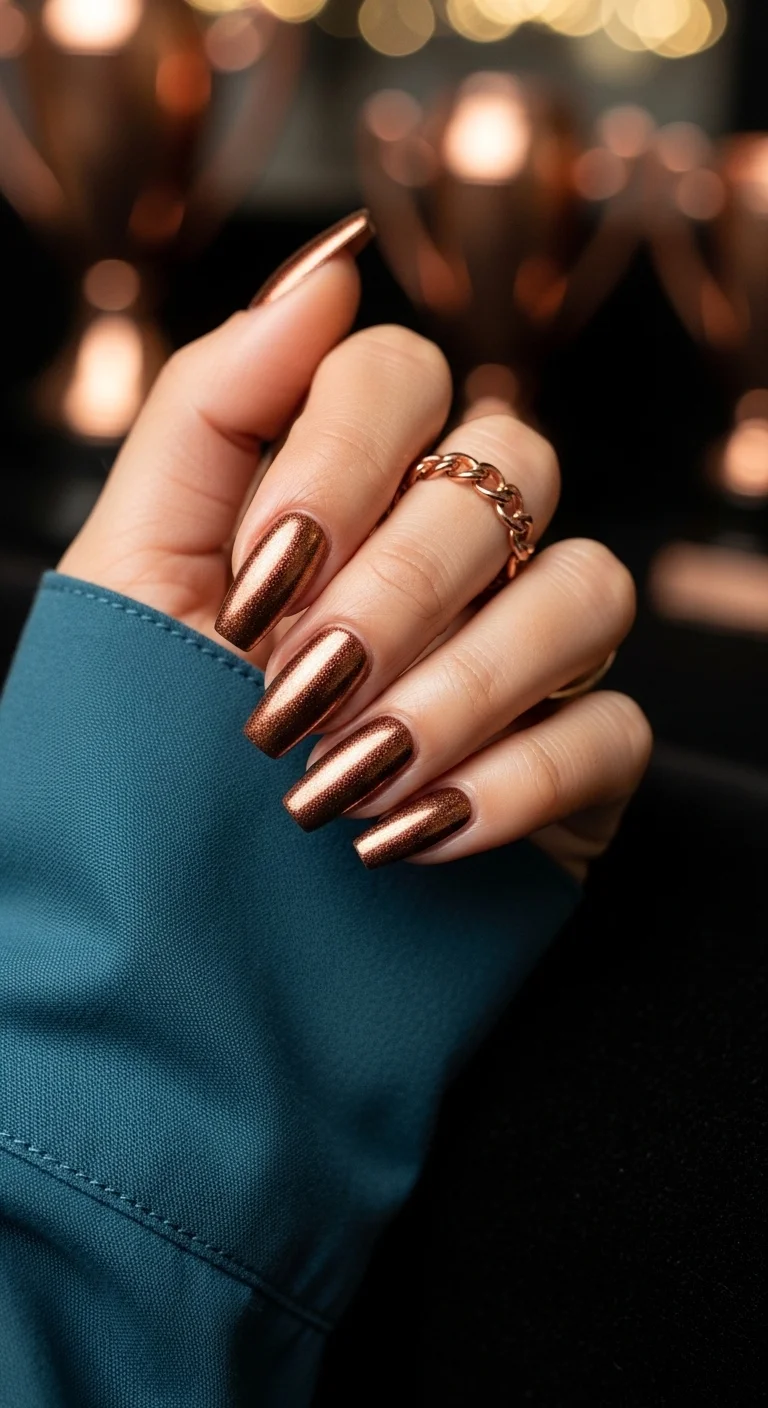
Warm bronze metallic shimmer inspired by championship medals.
Overview:
Bronze sits between gold and copper on the metallic spectrum, and that in-between quality is what makes it interesting. It's warm enough to feel like a trophy reference but earthy enough to work as a standalone color. The result is a set that reads as "championship metallic" without being explicitly gold.
The fine shimmer particles in this polish create a dimensional quality that flat metallics can't achieve. As the hand moves, the light catches different particles, creating a shifting, living surface. It's the difference between a flat metallic paint and actual metal.
Bronze and copper polishes tend to be more forgiving than pure gold, which can look cheap if the formula isn't right. The brown undertone in bronze grounds the metallic quality and keeps it looking expensive.
Design Breakdown:
Full-coverage metallic. The shimmer quality is the design.
Base Color: Warm bronze or copper with fine metallic shimmer particles.
Nail Shape: Medium coffin. The flat surface showcases the metallic finish.
Design Element: Solid bronze metallic on every nail. No additional art.
Finish: High-gloss top coat to amplify the shimmer and make the metallic look wet.
Get The Look at Home:
Metallic polishes settle quickly. Roll the bottle between your hands before each coat.
- Base coat: Apply a ridge-filling base coat. Metallic polish highlights every surface imperfection.
- First coat: Apply one thin coat of bronze metallic. Let dry fully.
- Second coat: Apply a second coat for full opacity. The shimmer should be evenly distributed.
- Cleanup: Metallic polish against skin is very visible. Clean the edges carefully with a brush and acetone.
- Seal: One thick coat of top coat to lock in the shimmer and add depth.
31 Stunning Summer Birthday Party Hairstyles for 2026 🎂☀️
6.The Field Strategy Grid
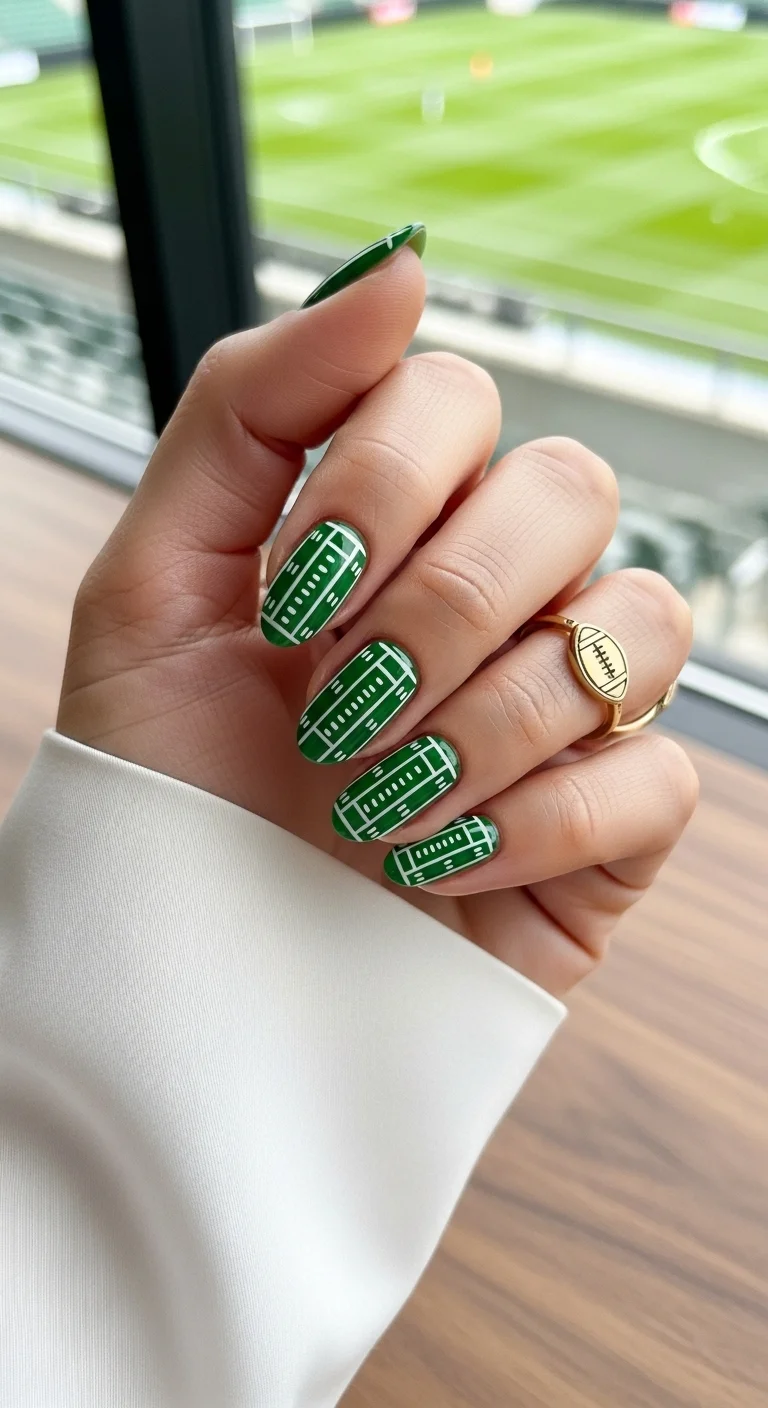
Green base with white field lines creating a tactical soccer diagram.
Overview:
This is the most literal soccer reference in the list: a green field with white lines that mimic a soccer pitch layout. The yard lines, hash marks, and grid patterns on each nail look like a coach's tactical diagram drawn on a clipboard.
The green base is the right shade: deep enough to read as grass, bright enough to provide contrast for the white lines. A darker green would look more like forest; a lighter green would look more like mint. This mid-tone grass green is the most accurate field reference.
The line work requires a very steady hand or striping tape. The lines need to be thin and consistent to read as field markings rather than random stripes. The smaller details, hash marks and dotted lines, add the tactical quality that separates this from a simple green-and-white stripe design.
Design Breakdown:
Green base with white field markings. The line work is the design.
Base Color: Mid-tone grass green. Opaque and glossy.
Nail Shape: Medium coffin. The flat surface provides a clean canvas for the field diagram.
Design Element: White lines forming a soccer field diagram: horizontal yard lines, vertical hash marks, and dotted tactical lines.
Finish: High-gloss top coat to make the green look lush and the white lines look crisp.
Get The Look at Home:
A very fine liner brush is essential for the thin field lines. Striping tape helps with the longer horizontal lines.
- Green base: Two coats of grass green. Let dry fully.
- Horizontal lines: Using striping tape or a liner brush, paint thin horizontal white lines across each nail. Space them evenly.
- Hash marks: Add short vertical white lines along the horizontal lines, like yard markers.
- Tactical details: Add dotted lines or small arrows in white for a coaching diagram effect.
- Consistency: The line spacing should be similar across all nails.
- Seal: One thick coat of top coat to protect the line work.
7.The Golden Trophy Gala
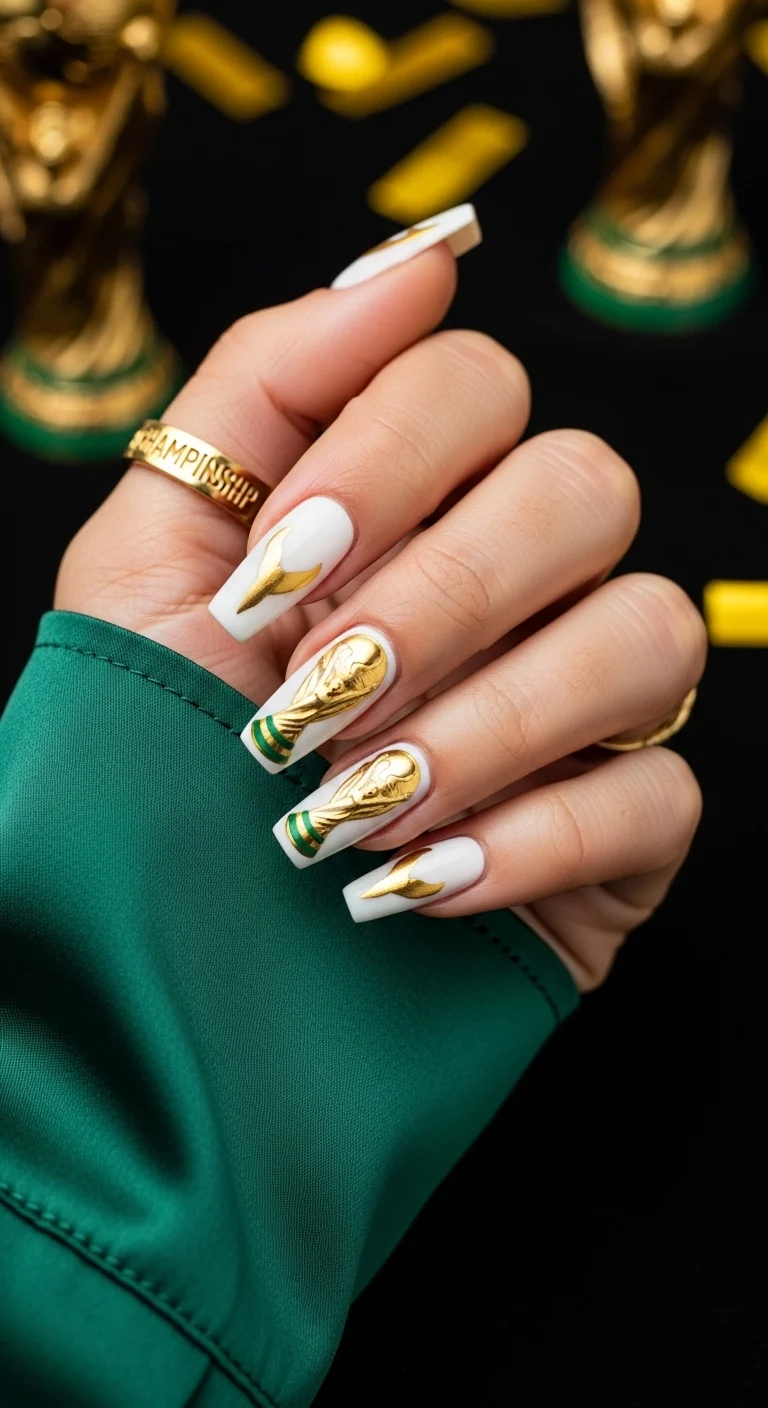
White base with raised gold World Cup trophy charms.
Overview:
This is the most elaborate design in the list. The 3D gold trophy charms are actual raised elements attached to the nail surface, not painted art. They catch light differently than polish, creating a metallic quality that hand-painted gold can't replicate.
The white base provides a clean, neutral backdrop that lets the gold trophies dominate visually. On a colored base, the trophies would compete with the background. On white, they're the undeniable focal point.
The practical reality of 3D charms: they snag on hair, clothing, and bag linings. Sealing the edges with a thick bead of gel or top coat around the base of each charm reduces this, but doesn't eliminate it. Budget about a week of wear before something catches.
Design Breakdown:
White base with 3D metallic accents. The trophy charms are the entire design.
Base Color: Crisp, opaque white. Two coats for full coverage.
Nail Shape: Medium-long coffin. The flat surface provides a stable base for the 3D charms.
Design Element: Solid white on most nails. Gold 3D trophy charms or gold metallic art on two to three accent nails.
Finish: High-gloss top coat to seal the charms and make the white look crisp.
Get The Look at Home:
3D charms need nail art gel or jewelry gel for proper adhesion. Regular nail glue won't hold long-term.
- White base: Two coats of opaque white on all nails. Let dry fully.
- Plan placement: Hold the trophies over different nails before committing. Odd-numbered placements look more natural.
- Attach charms: Apply a small bead of jewelry gel to the back of each charm. Press onto the nail and hold for ten seconds.
- Seal edges: Using a detail brush, apply top coat around the base of each charm to prevent lifting.
- Gold accents: On other nails, paint gold swoosh or leaf designs to complement the trophies.
- Final coat: Apply top coat to all nails, being careful not to cover the top of the charms.
35 Fun Birthday Nail Designs for 2026 🎂
8.Emerald Marble Energy
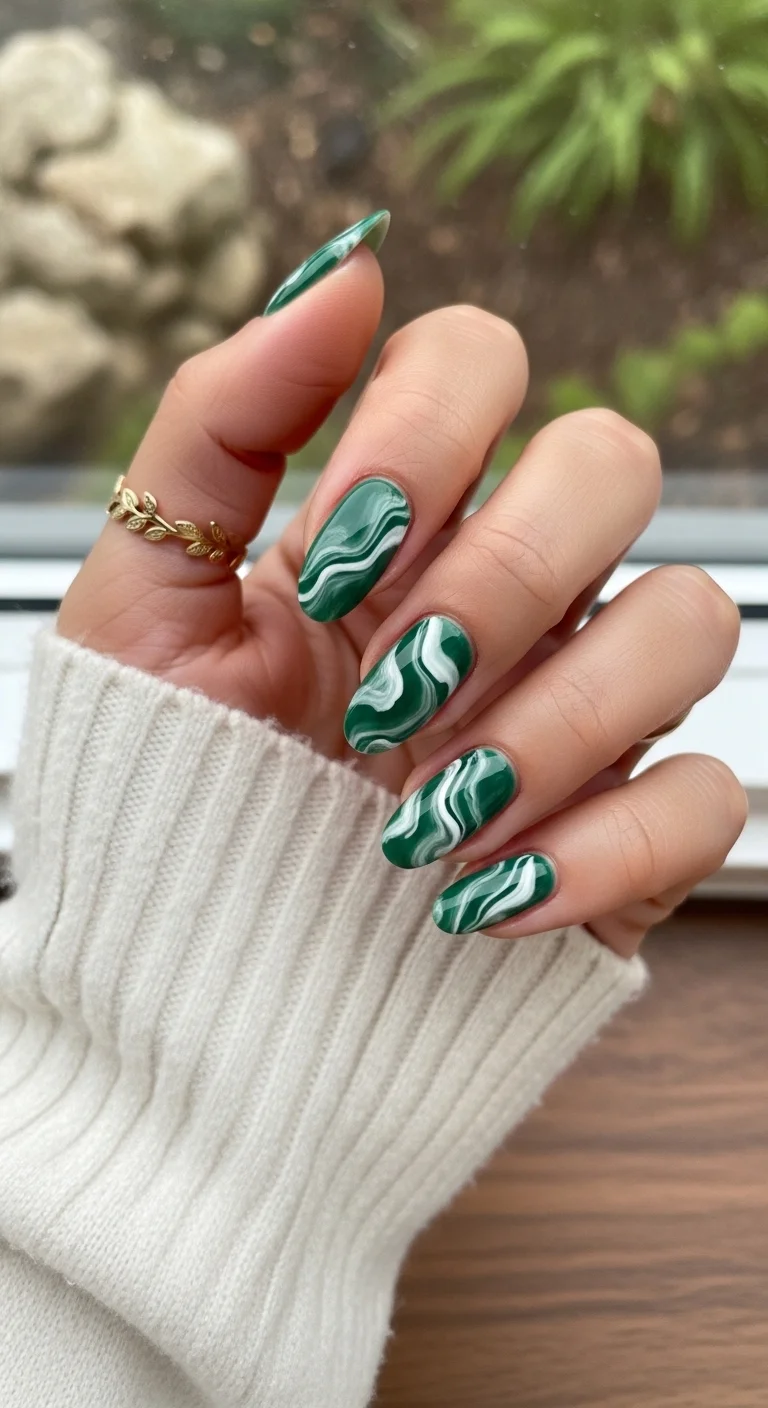
Deep emerald green with white marble veining for a luxe stone effect.
Overview:
Green marble is an unusual choice for soccer nails, and the unusual quality is what makes it interesting. The deep emerald base references the green of a soccer pitch, while the white marble swirls add an organic, geological quality. The result is a set that reads as "luxury stone" rather than "sports fan."
The marble technique creates a different pattern on every nail, which means the design never looks repetitive. Each nail develops its own organic swirl pattern, and the inconsistency is what makes it look like real marble rather than a printed design.
The green here is deep and saturated, not muted or sage. That intensity is what makes the white swirls pop. On a lighter or more muted green, the marble effect would be less visible.
Design Breakdown:
Green marble with white veining. The organic swirls are the design.
Base Color: Deep, saturated emerald green. The intensity provides contrast for the white swirls.
Nail Shape: Medium-long almond. The curved surface lets the marble swirls follow an organic path.
Design Element: White marble veining over the green base. The swirls should vary from nail to nail.
Finish: Ultra-glossy top coat to mimic the polished surface of real marble.
Get The Look at Home:
The marble technique is wet-on-wet. The white needs to be applied while the green is still fluid.
- Green base: Two coats of emerald green. Let dry completely.
- Blooming layer: Apply a clear blooming gel or a wet top coat. Do NOT cure.
- Drop the white: Using a thin brush, drop small amounts of white polish into the wet blooming layer.
- Guide the swirls: Use the brush tip to gently pull the spreading white into thin, vein-like lines. Three to four drags per nail.
- Vary intensity: Some veins should be dark and defined, others faint and diffused.
- Seal: Wait ten minutes, then apply a generous top coat to smooth the surface.
9.Midnight Matte Velvet
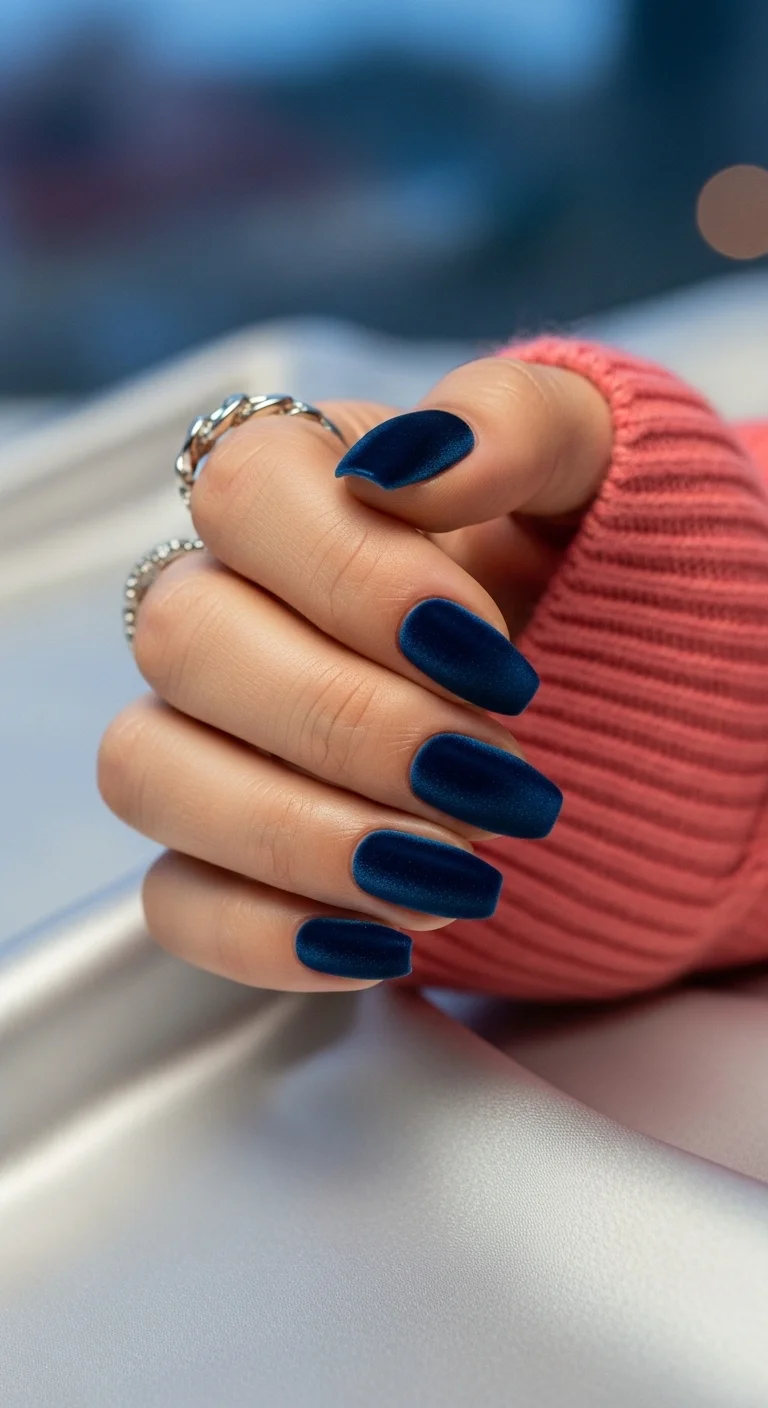
Deep navy matte with a velvet shimmer that shifts in the light.
Overview:
Matte navy is a sophisticated choice for soccer nails. The deep blue references many national team colors, but the matte finish drains the sportiness and leaves behind a more editorial quality. The result is a set that works at the stadium and at a dinner party.
The velvet or cat-eye shimmer effect is what elevates this beyond a standard matte navy. The subtle metallic particles catch light at different angles, creating a dimensional quality that flat matte can't achieve. It's the difference between a matte paint and a matte fabric with a slight sheen.
The practical advantage of matte: it hides minor application imperfections better than gloss. Brush strokes, slight unevenness, and small bubbles are less visible under a flat finish.
Design Breakdown:
Matte dark color with subtle shimmer. The texture is the design.
Base Color: Deep navy blue with a matte velvet or cat-eye shimmer finish.
Nail Shape: Medium coffin. The flat surface emphasizes the matte texture.
Design Element: Solid matte navy on every nail. No additional art. The shimmer is the design.
Finish: Matte top coat with built-in shimmer, or matte top coat over a cat-eye magnetic polish.
Get The Look at Home:
If using cat-eye polish, magnetize before applying the matte top coat. The matte finish dulls the magnetic effect slightly.
- Navy base: Two coats of deep navy. Let dry fully.
- Cat-eye effect (optional): If using magnetic polish, apply a thick second coat and hold the magnet above for ten seconds.
- Matte seal: Apply matte top coat over all nails. The matte finish transforms the navy into a velvet texture.
- Cleanup: Clean the edges carefully. Matte polish against skin is more visible than glossy.
28 Stunning Softball Hairstyle Ideas with Braids for 2026 🥎✨
10.The Referees Red Card
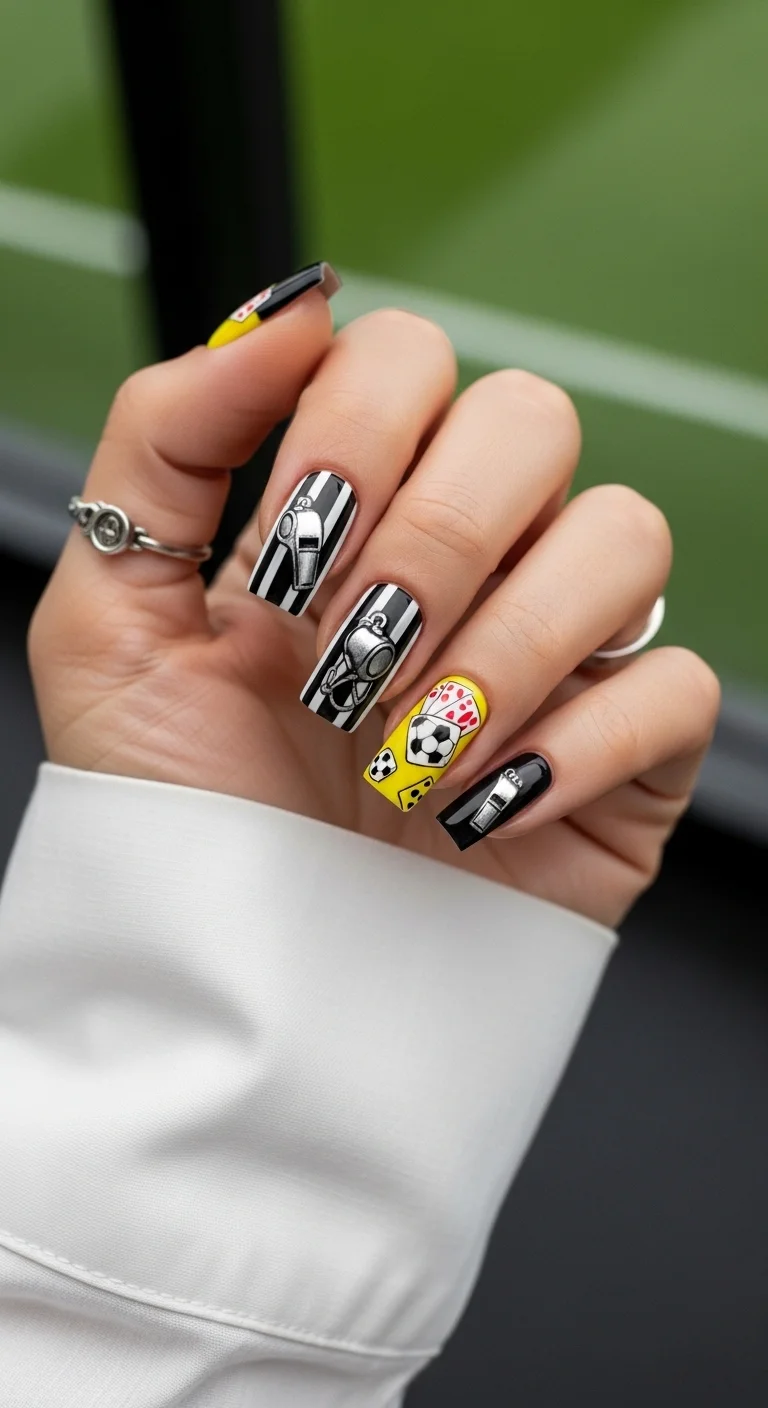
Multi-motif soccer design with referee stripes, balls, and penalty cards.
Overview:
This is the most complex design in the entire list. Every nail tells a different story: referee stripes on some, soccer balls and cards on others, a yellow accent with multiple soccer motifs. The variety is the point. It's a collection of soccer references unified by a black, white, and yellow color palette.
The multi-motif approach works because each element is clearly rendered and distinct. The referee stripes are crisp, the soccer balls are recognizable, and the yellow card accent is eye-catching. Nothing blurs into anything else. Every reference is legible.
The technical difficulty here is high. You're executing multiple different techniques across one hand: striping, detailed illustration, and color blocking. This is a design for someone who's comfortable with nail art or who's willing to use stamps and stickers for the detailed elements.
Design Breakdown:
Multi-motif design. Each nail is a different soccer reference.
Base Color: Black, white, and yellow on different nails. Each nail has its own base color.
Nail Shape: Medium coffin. The flat surface provides space for the detailed art.
Design Element: Black and white vertical stripes on some nails. Soccer balls and penalty cards on the ring finger. Whistle or referee details on other nails.
Finish: High-gloss top coat to seal all the different art elements.
Get The Look at Home:
Plan your layout across all ten nails before you start. Decide which nails get which design.
- Referee nails: On two to three nails, paint black and white vertical stripes using striping tape.
- Yellow accent: On the ring finger, apply a yellow base and paint small soccer balls and red/yellow cards.
- Black accent: On one nail, paint a black base with a white whistle or referee equipment detail.
- Soccer balls: Using a dotting tool, place black and white circles on the yellow nail for soccer ball shapes.
- Card details: Paint small red and yellow rectangles on the yellow nail for penalty cards.
- Seal: Two coats of top coat to protect all the layered art.
11.The Strikers Cleat
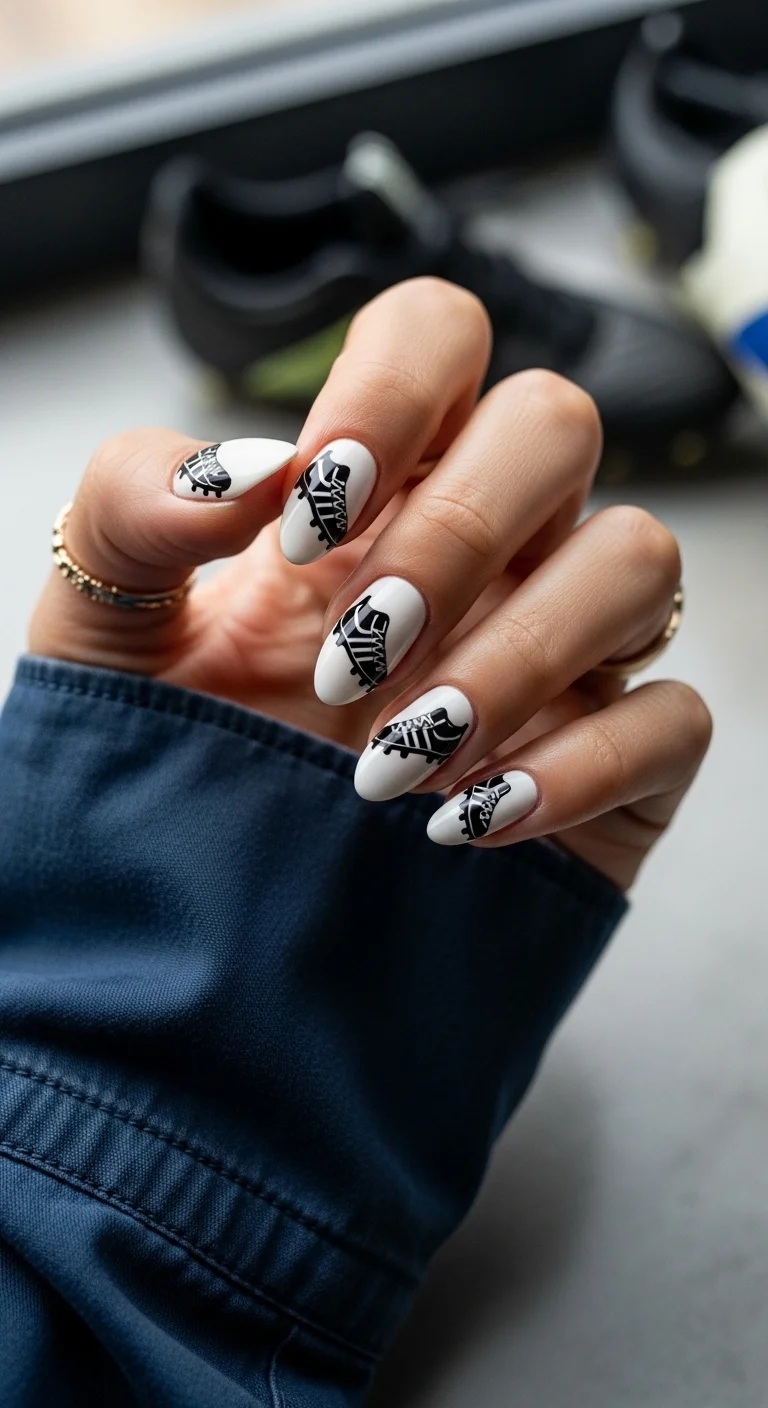
White nails with detailed black soccer cleat art.
Overview:
Soccer cleats are one of the most recognizable pieces of equipment in the sport, and painting them on nails creates an immediate, unmistakable connection to the game. The black illustrations on white are clean, graphic, and easy to read from a distance.
Each nail features a different angle or style of cleat, which prevents the design from feeling repetitive. The variety is what makes the set interesting: some show the side profile, others show the front view, and a few include visible studs and laces. That detail level rewards closer inspection.
The illustration quality is the technical hurdle here. The cleats need to be recognizable as soccer shoes, not generic sneakers. The studs, the lacing pattern, and the streamlined shape are the details that sell the reference. If freehand illustration feels intimidating, nail stamps or water-slide decals are a reliable alternative.
Design Breakdown:
Illustrated art on a clean white base. The black-and-white contrast keeps the design graphic and readable.
Base Color: Crisp, opaque white. Two coats for full coverage.
Nail Shape: Medium almond. The curved shape provides a natural canvas for the cleat illustrations.
Design Element: Black soccer cleat illustrations on every nail. Each nail shows a different angle or detail of the shoe.
Finish: High-gloss top coat to seal the illustrations and make the white look crisp.
Get The Look at Home:
A very fine nail art pen or liner brush is essential for the cleat details.
- White base: Two coats of opaque white. Let dry fully.
- Outline the shape: Using a fine nail art pen and black polish, draw the outline of a soccer cleat on each nail.
- Add details: Draw the studs on the sole, the lacing pattern on the top, and any brand-like stripe details.
- Vary the angle: Show different perspectives on different nails for visual variety.
- Cleanup: Use a small brush dipped in acetone to sharpen any shaky lines.
- Seal: One thick coat of top coat to protect the illustrations.
29 Stunning Summer Almond Nails for Women in 2026 💅
12.Global Fan Hexagons
Multi-colored hexagons inspired by a soccer ball and international flags.
Overview:
The hexagonal pattern of a soccer ball is one of the most iconic shapes in sports. This design takes that pattern and fills each hexagon with a different color, red, blue, black, white, creating a multi-national, international fan aesthetic. It's a soccer ball that celebrates the global nature of the World Cup.
The color variety across the hexagons means the design reads as festive and celebratory rather than team-specific. It doesn't support one country over another. It supports the tournament itself. That neutrality is what makes it wearable regardless of which team you follow.
The hexagonal pattern requires consistent sizing to look convincing. If the hexagons are different sizes, the pattern collapses into abstract shapes. Using thin outlines first, then filling in the colors, creates more uniform results than trying to paint each hexagon freehand.
Design Breakdown:
Multi-colored hexagonal pattern. The soccer ball reference is the design foundation.
Base Color: White base with hexagonal outlines in black.
Nail Shape: Medium almond. The curved surface gives the hexagons room to flow.
Design Element: Hexagonal grid pattern filled with red, blue, black, and white. Each hexagon is a different color.
Finish: High-gloss top coat to make the colors look saturated and the outlines look sharp.
Get The Look at Home:
Draw the hexagon outlines first, then fill in the colors. This two-step approach creates cleaner results.
- White base: Two coats of opaque white. Let dry fully.
- Hexagon outlines: Using a fine liner brush and black polish, draw hexagonal outlines across each nail. Keep them roughly the same size.
- Fill the colors: Using a small brush, fill in each hexagon with a different color: red, blue, black, or white.
- Vary the distribution: Don't put the same color next to itself. Spread the colors evenly.
- Cleanup: Use a small brush dipped in acetone to sharpen any hexagon edges.
- Seal: One thick coat of top coat over everything.
13.The Unity Pride Grid
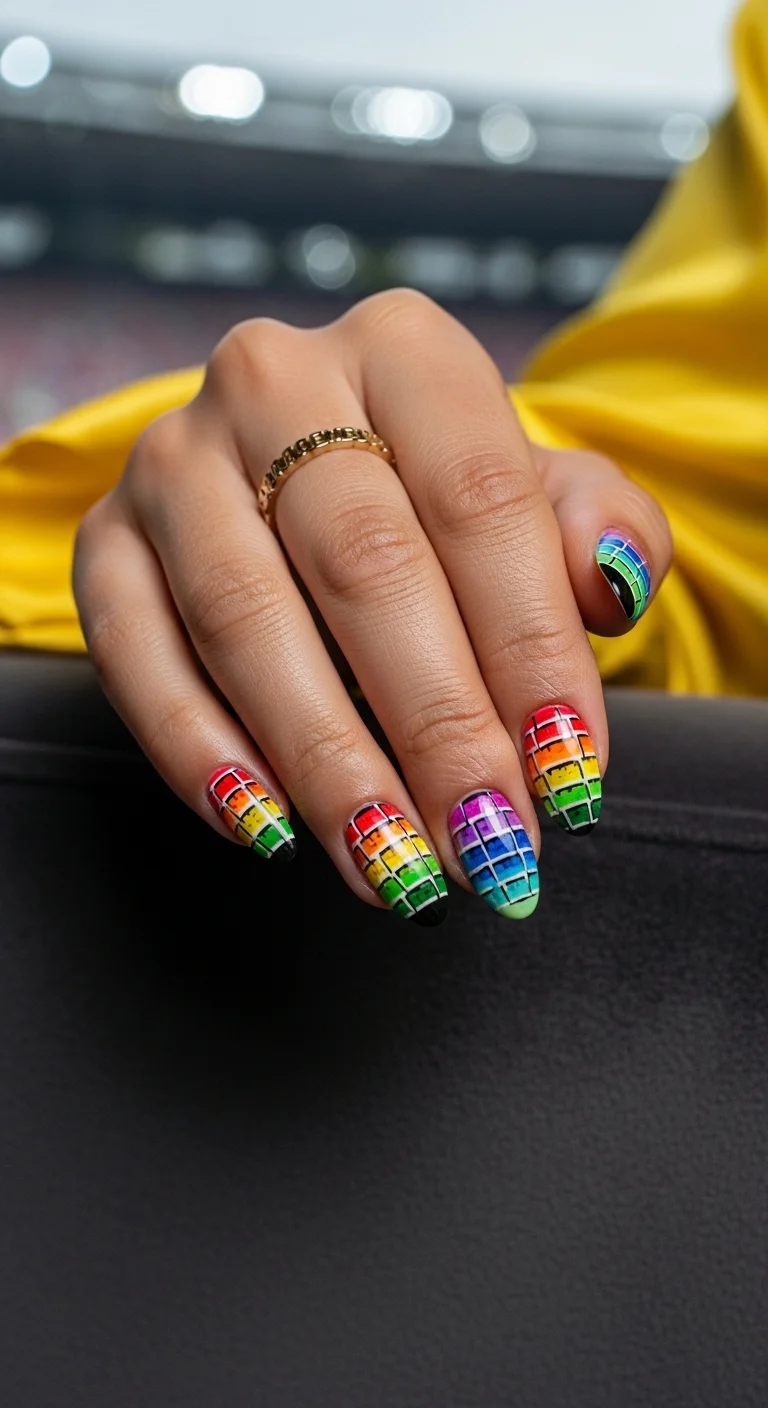
Rainbow grid pattern over black for a bold, inclusive statement.
Overview:
A rainbow grid over black is a bold, high-visibility design that references both the diversity of nations at the World Cup and the inclusive spirit of the tournament. The rainbow colors against the dark background create maximum contrast, making every line visible from arm's length.
The grid structure keeps the rainbow from looking chaotic. Without the black lines creating order, the colors would bleed into each other. The grid acts as a framework that contains the rainbow, creating a plaid-like pattern that feels structured rather than random.
The technical challenge is keeping the grid lines straight and the color fillings clean. Each square in the grid needs to be a single, solid color without bleeding into adjacent squares. Patience and a steady hand are mandatory.
Design Breakdown:
Rainbow grid on black. The framework is the design principle.
Base Color: Black. The dark base makes the rainbow colors pop.
Nail Shape: Medium coffin. The flat surface provides a stable canvas for the grid.
Design Element: Grid of squares in rainbow colors (red, orange, yellow, green, blue, purple) over a black base. Black lines separate each colored square.
Finish: High-gloss top coat to make the colors look saturated and the grid look sharp.
Get The Look at Home:
Draw the black grid first, then fill in the colored squares. This approach keeps the lines clean.
- Black base: Two coats of opaque black. Let dry fully.
- Grid lines: Using a thin liner brush and white or light grey polish, draw a grid of horizontal and vertical lines.
- Fill the squares: Using a small brush, fill each square with a different rainbow color.
- Re-outline: Once the colors are dry, go over the grid lines with black to clean up any color that bled.
- Cleanup: Use a small brush dipped in acetone to sharpen the edges.
- Seal: One thick coat of top coat over everything.
28 Stunning Baddie Summer Hairstyles for 2026 🔥☀️
14.Emerald Trophy Chrome
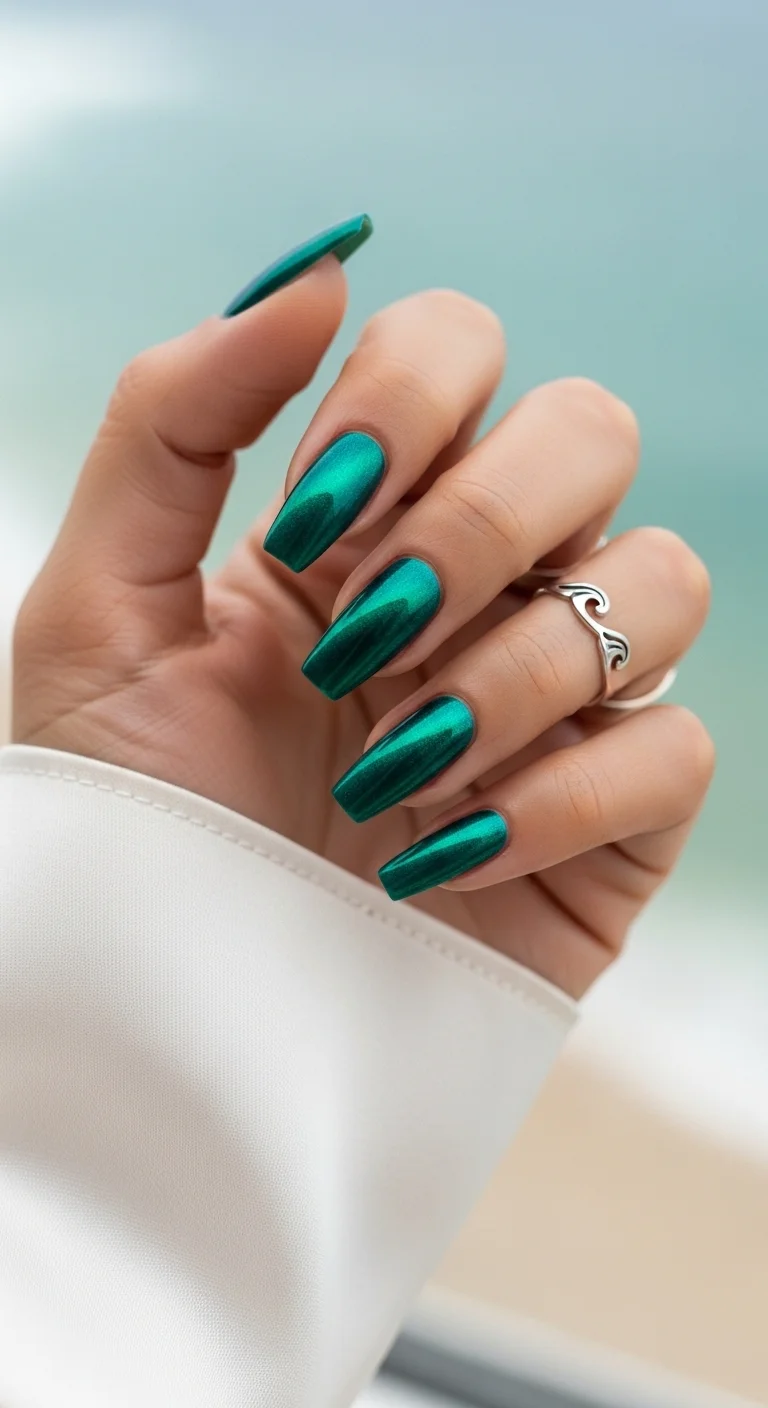
Metallic emerald green chrome inspired by the World Cup trophy's base.
Overview:
Green chrome is a less common metallic than silver or gold, which is what makes this set distinctive. The emerald green references the green base of the World Cup trophy while the chrome finish adds the metallic quality that suggests victory and celebration.
The all-chrome approach commits fully to the metallic theme. There's no accent nail, no variation, just pure reflective green on every finger. The restraint is what makes it feel luxurious rather than busy.
Green chrome powder is harder to find than silver or gold. If you can't find a green chrome powder, a metallic emerald polish applied in two thick coats produces a similar effect with less technical difficulty.
Design Breakdown:
Full-coverage green chrome. The metallic finish is the entire design.
Base Color: Black or dark green base under the chrome powder.
Nail Shape: Medium-long coffin. The flat surface maximizes the reflective area.
Design Element: Solid emerald green chrome on every nail. No additional art.
Finish: Mirror-chrome powder buffed to a reflective shine, sealed with a glossy top coat.
Get The Look at Home:
Green chrome powder requires a no-wipe gel top coat as the base. The powder won't adhere to regular polish.
- Dark base: Apply black or dark green polish. Let dry fully.
- No-wipe top: Apply a no-wipe gel top coat. Cure under UV or LED lamp.
- Rub the chrome: Using a sponge applicator, rub green chrome powder over the cured top coat until mirror-smooth.
- Dust off: Use a soft brush to remove excess powder from cuticles.
- Edge check: Ensure the chrome extends to all nail edges.
- Final seal: Apply glossy top coat, capping the edges to prevent flaking.
15.The Modern Ball Geometric
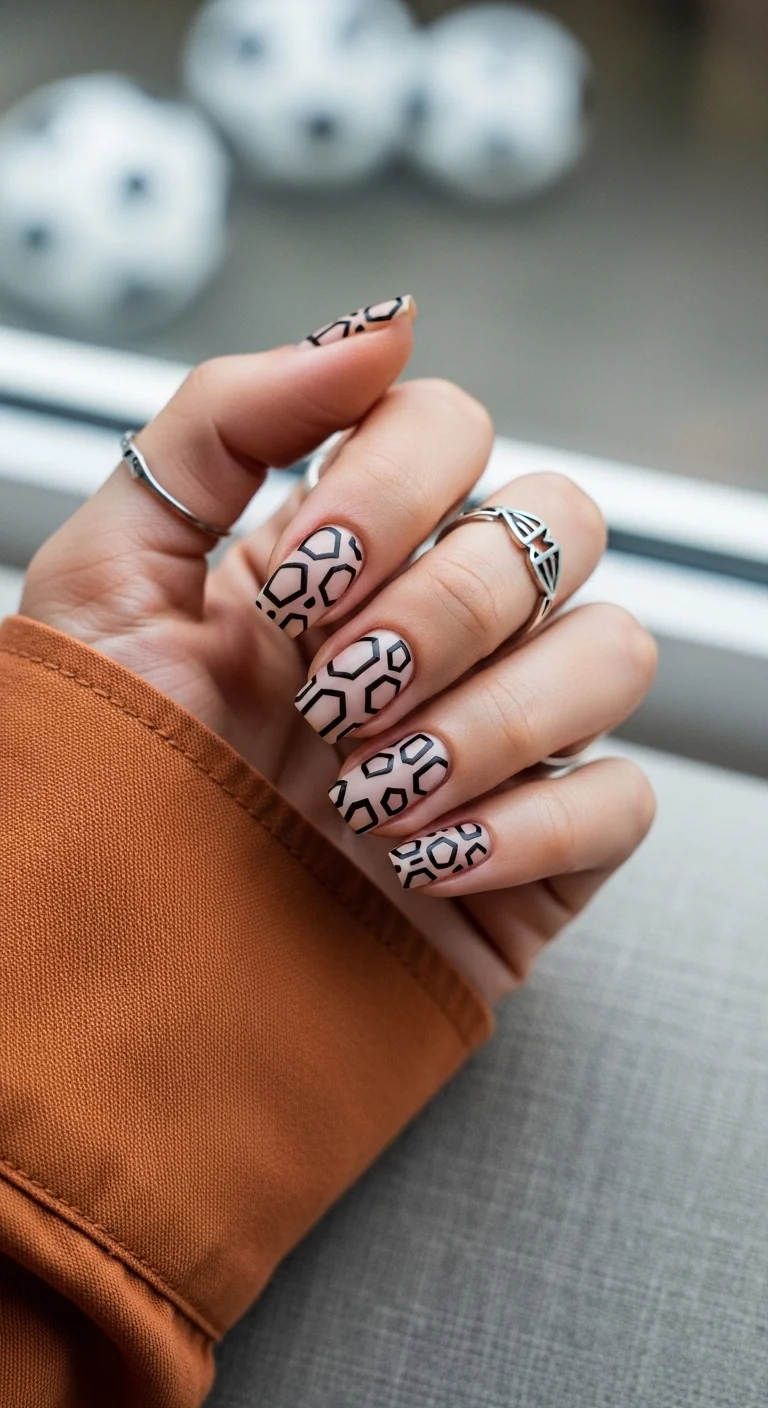
Nude base with black geometric soccer ball panel outlines.
Overview:
This design deconstructs the soccer ball into its geometric components. Instead of painting a literal ball, it extracts the hexagonal and pentagonal panel pattern and spreads it across the nail surface. The result is abstract enough to work as standalone geometric art while still referencing the sport.
The nude base is what keeps the design wearable. On a white base, the black outlines would look stark and graphic. On nude, they look more organic, like a pattern etched into the nail surface. The transparency of the base softens the geometric precision.
The line work needs to be thin and consistent. Thick outlines would overwhelm the nude base and make the design look heavy. The beauty is in the delicacy of the lines against the skin-tone background.
Design Breakdown:
Abstract geometric on a nude base. The soccer ball reference is subtle and interpretive.
Base Color: Sheer nude or natural nail. The transparency keeps the design light.
Nail Shape: Medium coffin. The flat surface provides a clean canvas for the geometric lines.
Design Element: Black hexagonal and pentagonal outlines arranged in a soccer ball panel pattern. The lines are thin and delicate.
Finish: High-gloss top coat to make the nude look polished and the lines look sharp.
Get The Look at Home:
A very fine nail art pen is essential for the thin geometric outlines.
- Nude base: Two coats of sheer nude. Let dry fully.
- Outline shapes: Using a fine nail art pen and black polish, draw hexagonal and pentagonal shapes across each nail.
- Connect the shapes: Ensure the shapes share edges, like panels on a soccer ball.
- Line weight: Keep the lines thin and consistent. Don't go over the same line twice.
- Cleanup: Use a small brush dipped in acetone to sharpen any wobbly lines.
- Seal: One thick coat of top coat to protect the line work.
28 Cute & Sporty Baseball Game Nail Ideas for 2026 ⚾
16.Frosty Mint Championship
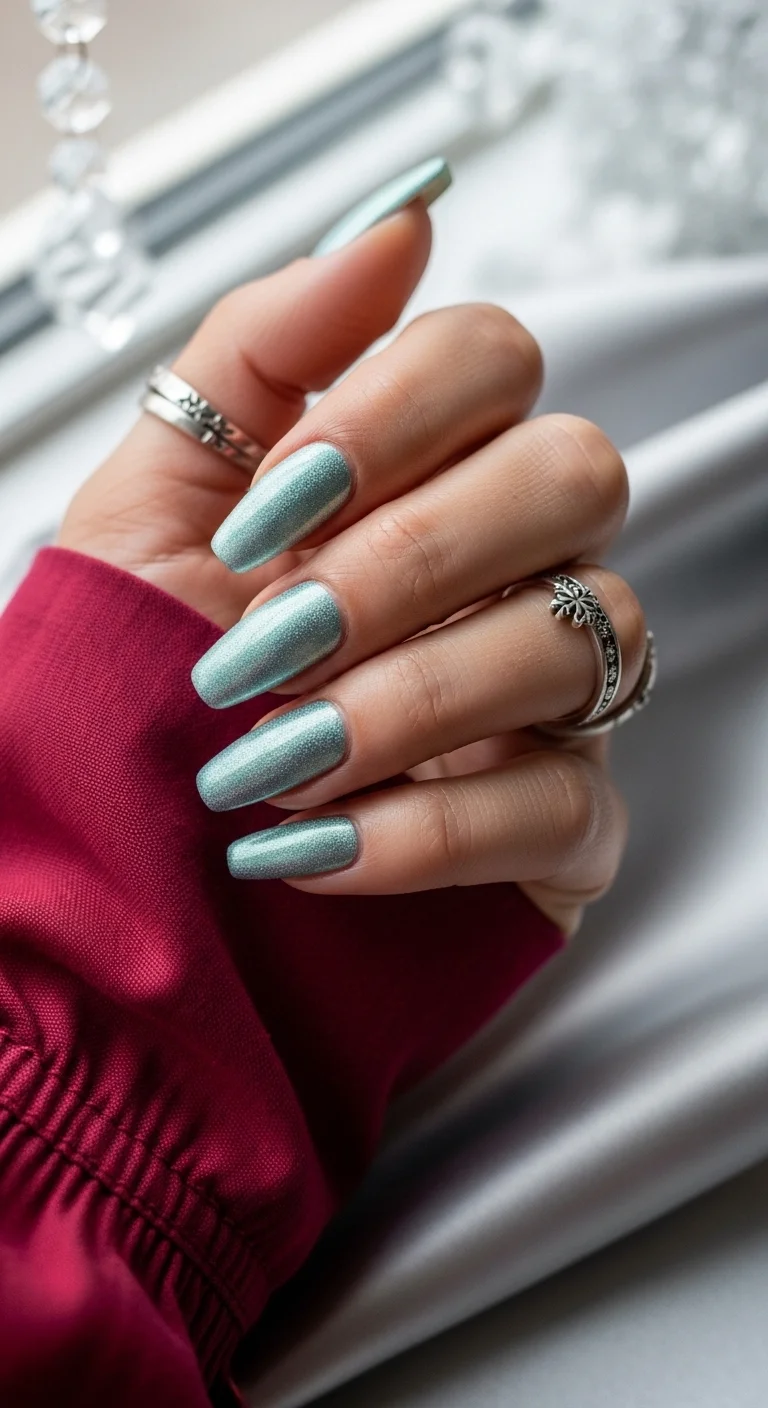
Frosty mint metallic shimmer for a cool, championship-worthy look.
Overview:
Mint green with a frosty metallic shimmer is an unusual choice for soccer nails, and the unusual quality is what makes it interesting. The cool, icy quality of the shimmer reads as fresh and modern, while the green connects to the color of the pitch.
The metallic shimmer creates a dimensional quality that flat mint can't achieve. As the hand moves, the light catches different particles, creating a shifting, living surface. It's more interesting than a solid mint but less busy than a multi-color design.
Mint metallics tend to be more forgiving than warm metallics. The cool undertone hides minor application imperfections better than gold or copper, which show every brush stroke.
Design Breakdown:
Full-coverage frosty metallic. The shimmer quality is the design.
Base Color: Cool-toned mint green with a frosty or icy metallic shimmer.
Nail Shape: Medium coffin. The flat surface showcases the metallic finish.
Design Element: Solid mint metallic on every nail. No additional art.
Finish: High-gloss top coat to amplify the shimmer and make the mint look frosty.
Get The Look at Home:
Metallic polishes settle quickly. Roll the bottle between your hands before each coat.
- Base coat: Apply a ridge-filling base coat. Metallic polish highlights imperfections.
- First coat: Apply one thin coat of mint metallic. Let dry fully.
- Second coat: Apply a second coat for full opacity. The shimmer should be evenly distributed.
- Cleanup: Clean the edges carefully with a brush and acetone.
- Seal: One thick coat of top coat to lock in the shimmer.
17.Teal Velvet Cat Eye
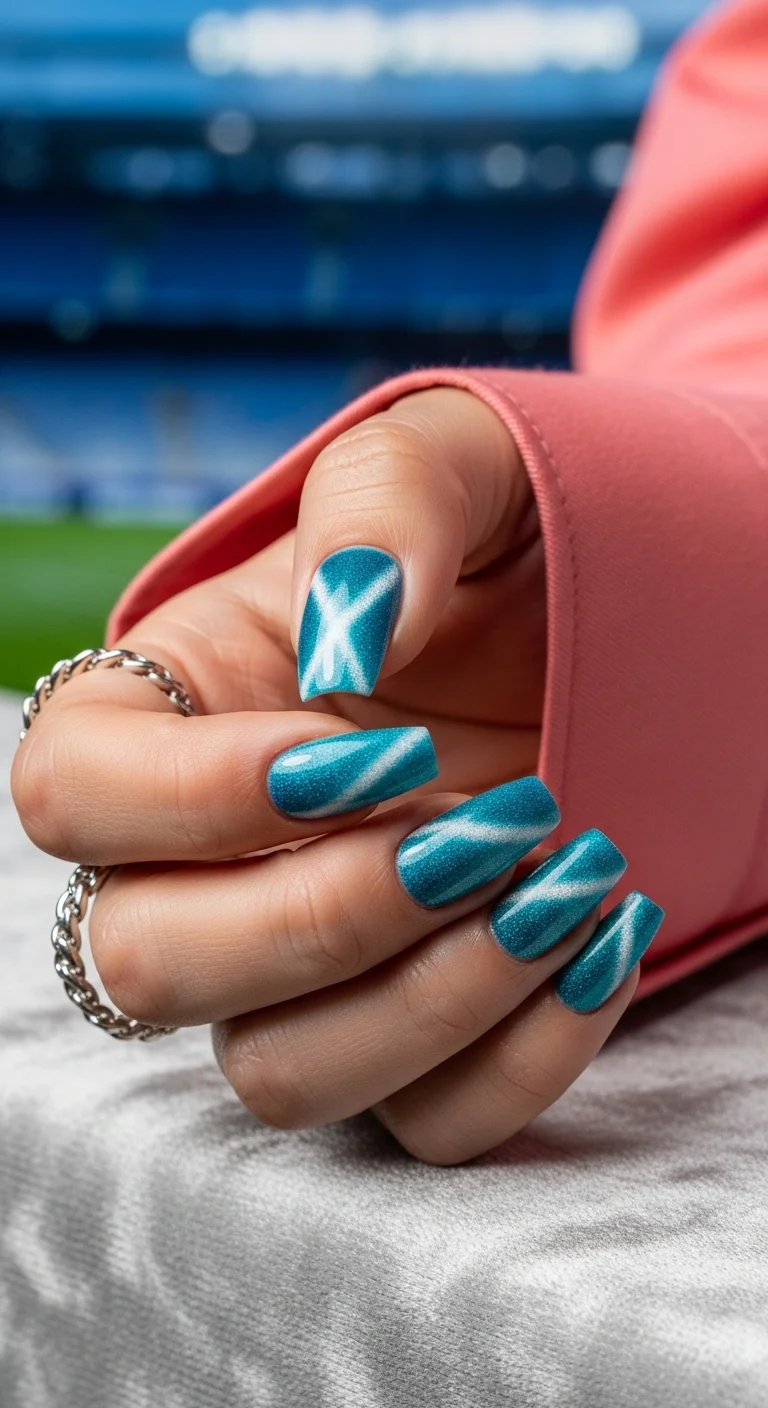
Teal cat-eye magnetic with lighter shimmer streaks across each nail.
Overview:
Cat-eye magnetic polish creates a lighter band of shimmer that shifts as you move your hand. On this teal base, the shimmer lines look like light reflecting off water or a flag waving in the wind. The movement is what makes the design feel alive.
The teal color is deep enough to provide contrast for the lighter shimmer band. On a lighter base, the cat-eye effect would be less visible. The depth of the teal is what makes the magnetic line register clearly.
The magnetic technique requires practice. Hold the magnet too close and the line becomes too narrow. Too far away and the effect barely registers. The sweet spot is about 5mm above the wet polish, held still for 10 to 15 seconds.
Design Breakdown:
Magnetic cat-eye polish. The shimmer line is the design.
Base Color: Deep teal blue-green with magnetic shimmer particles.
Nail Shape: Medium-long coffin. The flat surface shows the cat-eye line clearly.
Design Element: A diagonal or curved band of lighter shimmer across each nail. The band shifts position as the hand moves.
Finish: High-gloss top coat to amplify the magnetic effect and make the teal look deep.
Get The Look at Home:
You need magnetic polish and the magnet that comes with it. The magnet positioning is everything.
- Teal base: Two coats of deep teal. Let dry fully.
- Magnetic coat: Apply a thick coat of teal cat-eye magnetic polish. Do NOT cure yet.
- Position the magnet: Hold the magnet about 5mm above the wet polish. Keep it still for 10 to 15 seconds. You'll see the shimmer form a line.
- Cure: Cure under UV or LED lamp immediately after removing the magnet.
- Repeat: Do each nail one at a time. The magnetic effect fades if you wait too long before curing.
- Seal: One thick coat of top coat to protect the magnetic effect.
28 Effortless Hot Weather Day Hairstyles for Women 2026 ☀️💇♀️
18.Champagne Victory Glitter
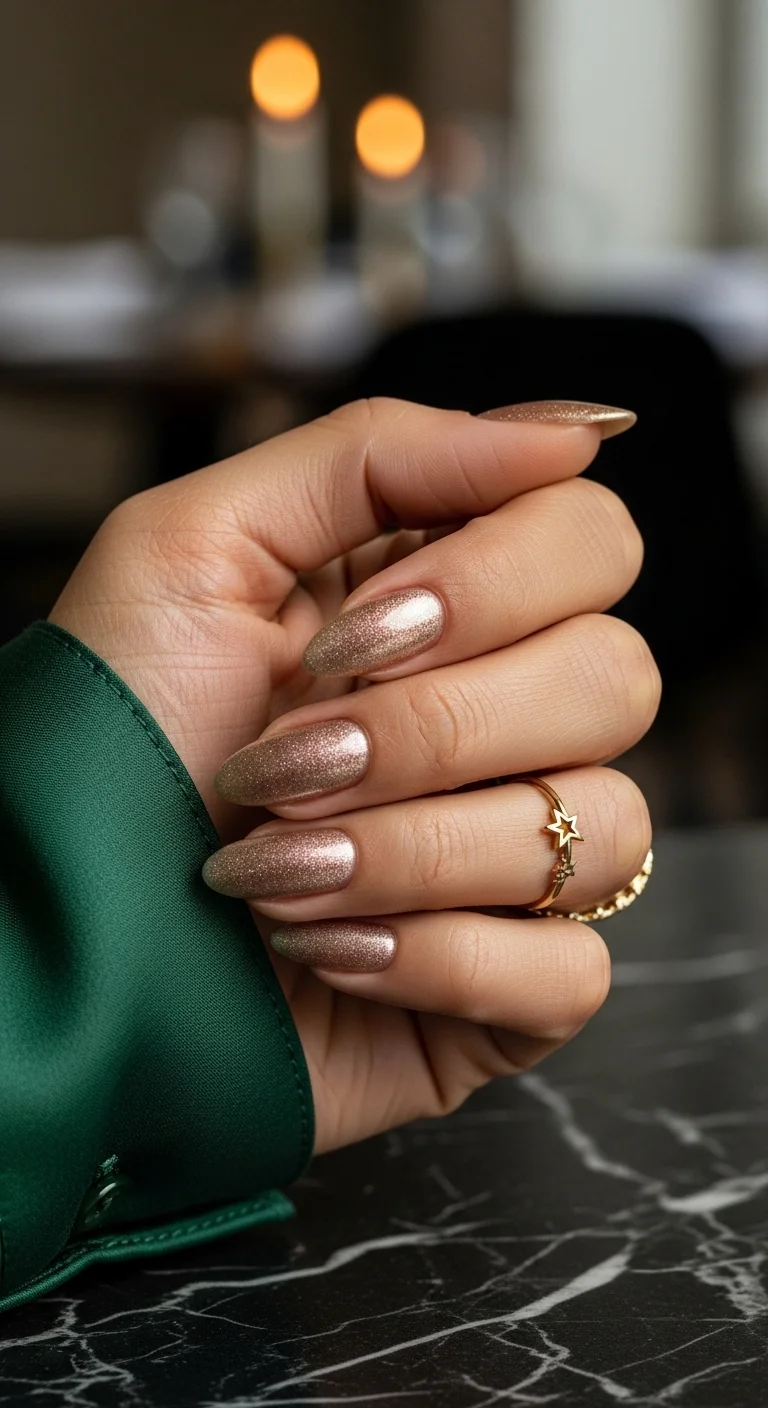
Dense champagne glitter for a celebratory victory look.
Overview:
Dense champagne glitter covering every nail is the most celebratory design in this list. The warm rose-gold tone reads as champagne, celebration, and victory without needing any literal imagery. It's the nail equivalent of popping a bottle after the final whistle.
The fine glitter particles create a uniform, dense sparkle that covers the nail completely. There's no base color visible — just pure, packed shimmer. The effect is festive and glamorous in a way that works for both the stadium and the after-party.
Glitter polish is notoriously difficult to remove. The particles cling to the nail and resist standard remover. The foil soak-off method works best: soak a cotton ball in acetone, place it on the nail, wrap with foil, and wait five minutes. The glitter will slide off.
Design Breakdown:
Full-coverage glitter. The sparkle density is the design.
Base Color: Champagne or rose gold with dense fine glitter particles.
Nail Shape: Medium-long almond or stiletto. The pointed shape amplifies the glamorous quality.
Design Element: Solid glitter on every nail. No additional art. The density of the sparkle is the statement.
Finish: High-gloss top coat to smooth the glitter texture and add depth.
Get The Look at Home:
The sponge technique deposits more glitter per coat than brushing directly. It's worth the extra step.
- Base coat: Apply a ridge-filling base coat. Glitter polish highlights texture.
- First coat: Apply one thin coat of glitter polish. Let dry fully.
- Sponge technique: Paint glitter polish onto a makeup sponge. The sponge absorbs the clear base, leaving only glitter.
- Dab on: Press the glitter-loaded sponge onto each nail for dense coverage.
- Build density: Repeat the sponge technique two to three times for full opacity.
- Seal: Two coats of top coat to smooth the glitter texture and prevent snagging.
19.Metallic Flag Waves
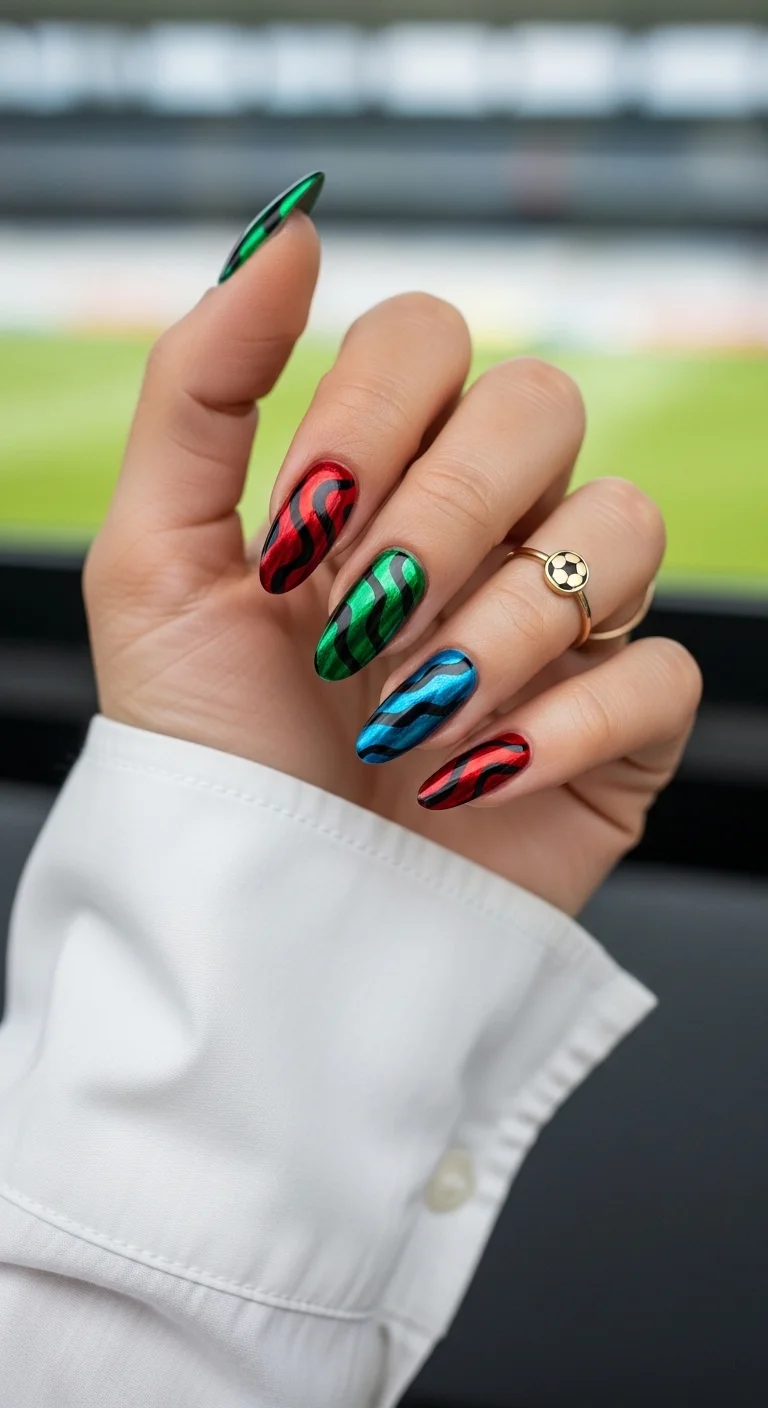
Multi-color metallic with black wave patterns for a flag-inspired look.
Overview:
Each nail gets a different metallic color — red, emerald green, cerulean blue — with black wavy lines painted over the top. The metallic base colors reference national flags without painting them literally, and the black waves add movement and energy that makes the design feel dynamic rather than static.
The wavy lines serve a dual purpose: they evoke flags waving in the wind, and they break up the solid metallic color so the design doesn't read as a simple color-block. The organic curves contrast with the hard metallic surface, creating visual tension.
The variety of metallic colors across the hand means you need three different polishes, which is more products than most designs require. But the result is worth it — each nail catches light differently, creating a shifting, multi-dimensional effect as the hand moves.
Design Breakdown:
Multi-color metallic with black wave overlay. The flag reference is abstract and color-based.
Base Color: Metallic red on one nail, metallic emerald green on another, metallic cerulean blue on a third. Different colors on different nails.
Nail Shape: Medium-long almond. The curved surface lets the metallic colors catch light from multiple angles.
Design Element: Black wavy or zigzag lines painted over each metallic base. The waves should be loose and organic.
Finish: High-gloss top coat to make the metallic colors look saturated and the black lines look sharp.
Get The Look at Home:
Paint all the metallic bases first, let them dry, then add the black waves in a second round.
- Metallic bases: Paint each nail a different metallic color: red, green, blue. Two coats each. Let dry fully.
- Black waves: Using a thin liner brush and black polish, paint loose, wavy lines across each nail. Vary the wave pattern on each nail.
- Line weight: Keep the lines thin and flowing. Press harder for thicker sections, lift for thin tails.
- Vary direction: Some waves should flow horizontally, others diagonally, for visual variety.
- Cleanup: Use a small brush dipped in acetone to sharpen any shaky lines.
- Seal: One thick coat of top coat over everything.
31 Patriotic Fourth of July Nail Ideas for 2026 🇺🇸
20.The Global Flag Mix
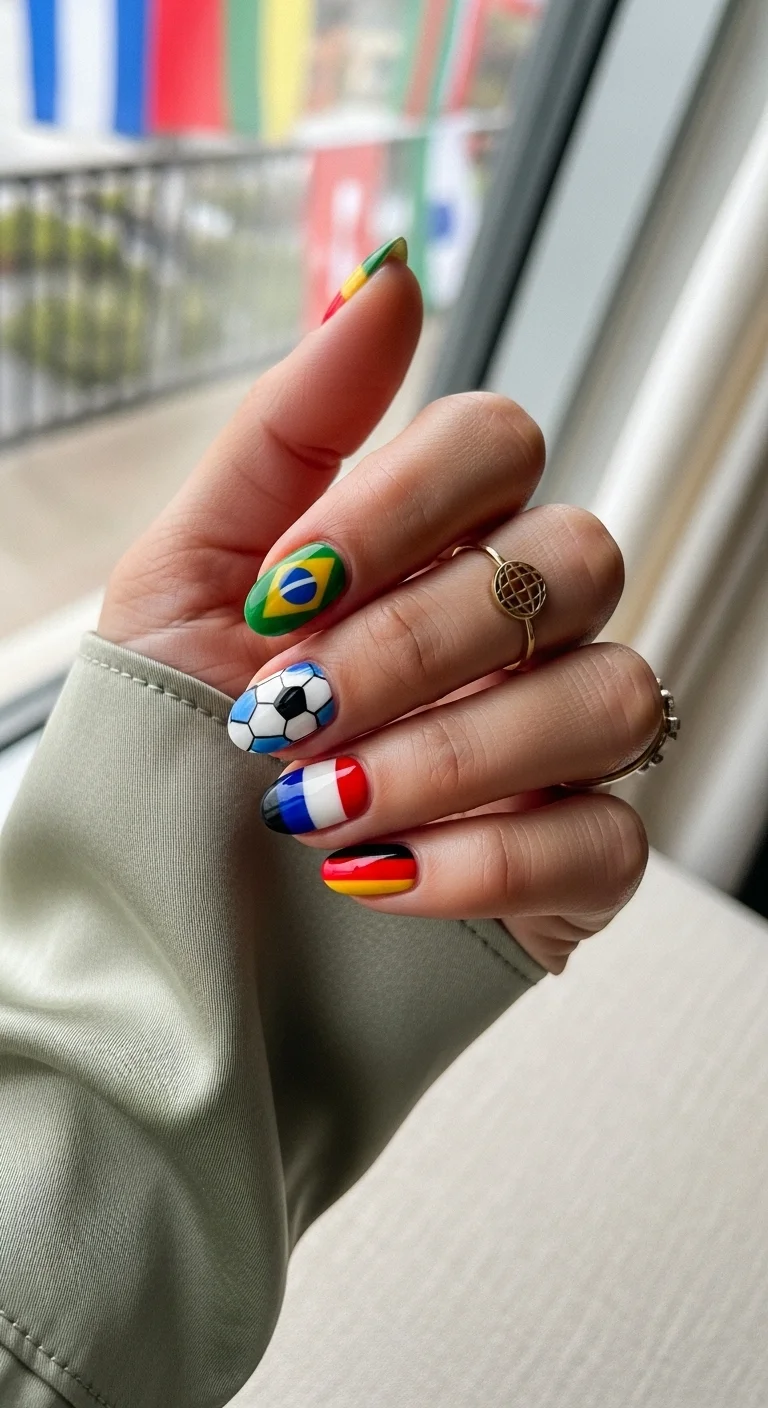
Miniature country flags celebrating the international spirit.
Overview:
Each nail features a different national flag, painted in miniature with remarkable detail. Brazil's green and yellow, France's tricolor, Germany's black-red-gold — every nail represents a different country. It's the most literal World Cup tribute in the collection.
The variety is the point. This design doesn't pick a team to support — it celebrates the tournament itself. Every flag is rendered with enough detail to be recognizable, which rewards close inspection. From a distance, the set reads as colorful and festive.
The technical difficulty is high. Painting recognizable flags at nail scale requires either exceptional freehand skill or the use of nail stamps and water-slide decals. The flag proportions need to be roughly correct for the reference to register. If you're not confident in your illustration abilities, decals are the way to go.
Design Breakdown:
Miniature flag illustrations. Each nail is a different country's flag.
Base Color: White or the lightest color in each flag. The other colors are painted on top.
Nail Shape: Medium almond. The curved surface provides a canvas for the detailed flag art.
Design Element: Different national flags on each nail. Each flag should be recognizable from its colors and pattern.
Finish: High-gloss top coat to seal the detailed art and make the colors look vibrant.
Get The Look at Home:
Nail stamps or water-slide decals are the most reliable way to get recognizable flags at this scale.
- Base coat: Two coats of white or the lightest flag color on each nail. Let dry fully.
- Plan your flags: Decide which countries' flags go on which nails. Choose flags with bold, simple color schemes.
- Paint or stamp: Using a fine liner brush or nail stamps, paint each flag's colors and patterns onto the corresponding nail.
- Details: Add any small details — stars, crests, emblems — using a very fine brush or dotting tool.
- Cleanup: Use a small brush dipped in acetone to sharpen any flag edges.
- Seal: Two coats of top coat to protect all the detailed art.
21.The Ball Stitch Minimalist
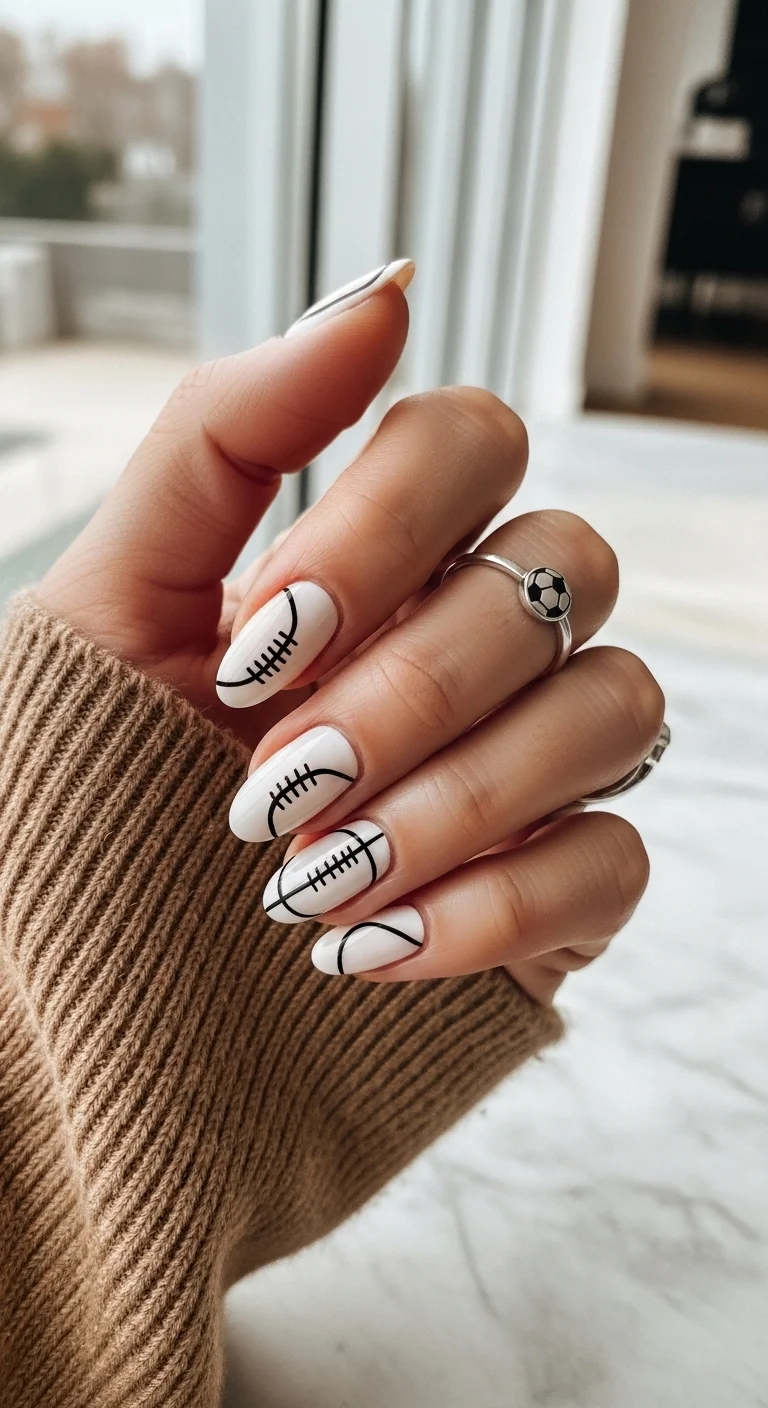
Clean minimalist soccer ball seam design.
Overview:
The curved seam lines of a soccer ball are instantly recognizable, even when abstracted onto nails. This design uses black curved lines with perpendicular stitch marks on a white base, evoking the classic ball construction without painting a literal ball.
The minimalist approach works because the seam pattern is so universally known. You don't need to see the whole ball to know what the lines represent. The white space between the lines is as important as the lines themselves — it creates the "ball surface" that the seams sit on.
The stitch marks are the detail that sells the reference. Without them, the curved lines could be abstract art. With them, the connection to soccer is immediate and unmistakable.
Design Breakdown:
Minimalist seam lines on white. The soccer ball reference is abstracted into its most essential element.
Base Color: Crisp, opaque white. Two coats for full coverage.
Nail Shape: Medium almond. The curved shape echoes the curved seam lines.
Design Element: Black curved lines with perpendicular stitch marks. Each nail shows a different section of the seam pattern.
Finish: High-gloss top coat to make the white look pristine and the black lines look sharp.
Get The Look at Home:
A very fine liner brush is essential for the thin seam lines and stitch marks.
- White base: Two coats of opaque white. Let dry fully.
- Curved lines: Using a thin liner brush and black polish, paint curved lines across each nail. Vary the curve direction on different nails.
- Stitch marks: Add short perpendicular lines along each curved line to mimic the stitching on a soccer ball.
- Spacing: Keep the stitch marks roughly equidistant along each line.
- Cleanup: Use a small brush dipped in acetone to sharpen any shaky lines.
- Seal: One thick coat of top coat over everything.
25 Trendy Beach Day Hairstyles for Vacation 2026 ☀️🌊
22.Primary Color Cross Lines
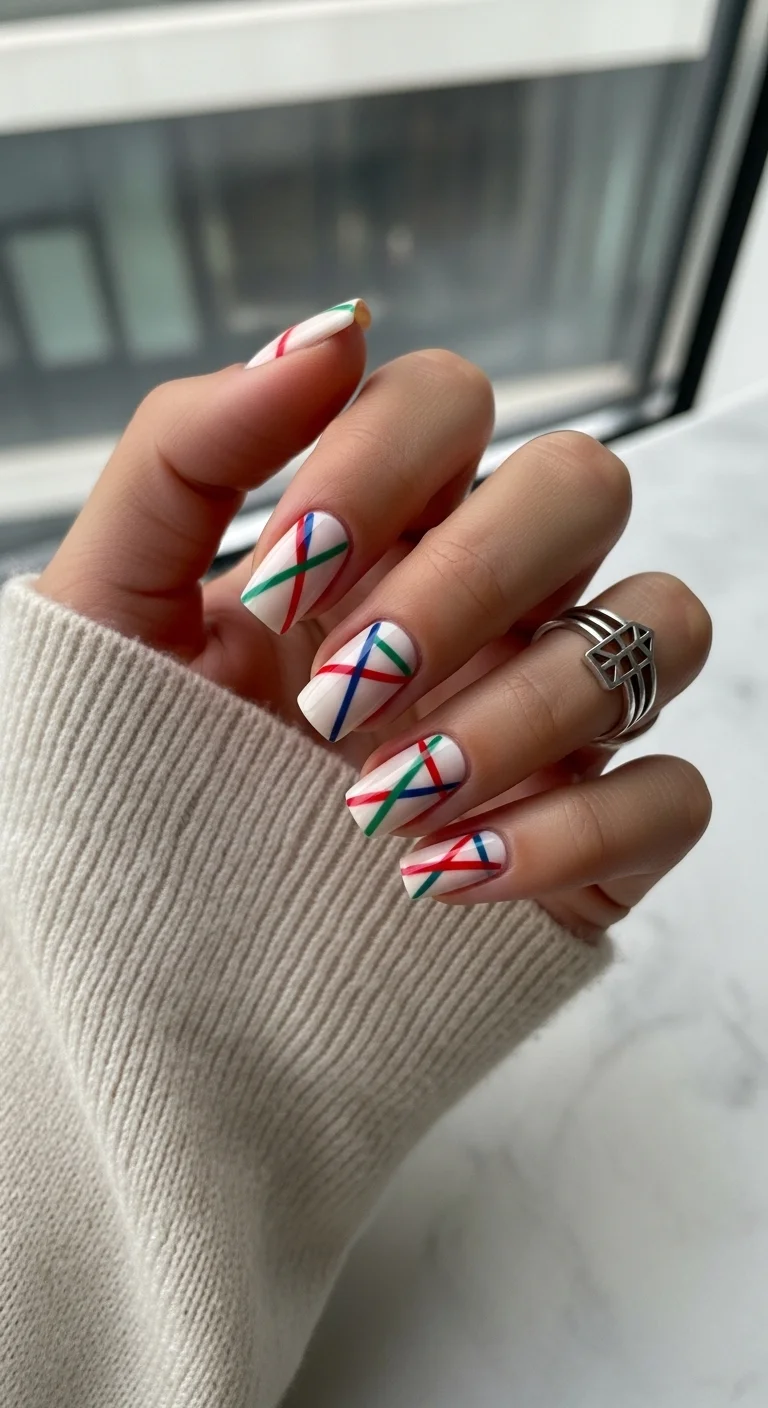
Thin primary-colored lines for an understated sporty look.
Overview:
Thin criss-crossing lines in red, blue, and green over a white base create a design that's sporty without being literal. There's no soccer ball, no flag, no field — just clean, geometric lines in primary colors that happen to reference the sport's visual language.
The simplicity is what makes this design wearable every day during the tournament. It's subtle enough for the office but thematic enough for the watch party. The thin lines keep the design delicate rather than bold.
The color choice matters. Red, blue, and green are the primary colors that appear most frequently in national flags. Using these three creates an international feel without referencing any specific country.
Design Breakdown:
Thin geometric lines on white. The primary color palette is the design reference.
Base Color: Crisp, opaque white. Two coats for full coverage.
Nail Shape: Medium almond. The curved shape softens the geometric lines.
Design Element: Thin criss-crossing lines in red, blue, and green. The lines should be delicate and evenly spaced.
Finish: High-gloss top coat to make the white look pristine and the colored lines look crisp.
Get The Look at Home:
A very fine liner brush is essential for the thin lines. Keep each line to a single stroke.
- White base: Two coats of opaque white. Let dry fully.
- Red lines: Using a thin liner brush, paint two to three thin red lines across each nail.
- Blue lines: Add thin blue lines that cross the red lines at various angles.
- Green lines: Add thin green lines that cross both the red and blue lines.
- Balance: Keep the line density roughly consistent across all nails.
- Seal: One thick coat of top coat over everything.
23.The Midnight Pitch Grid
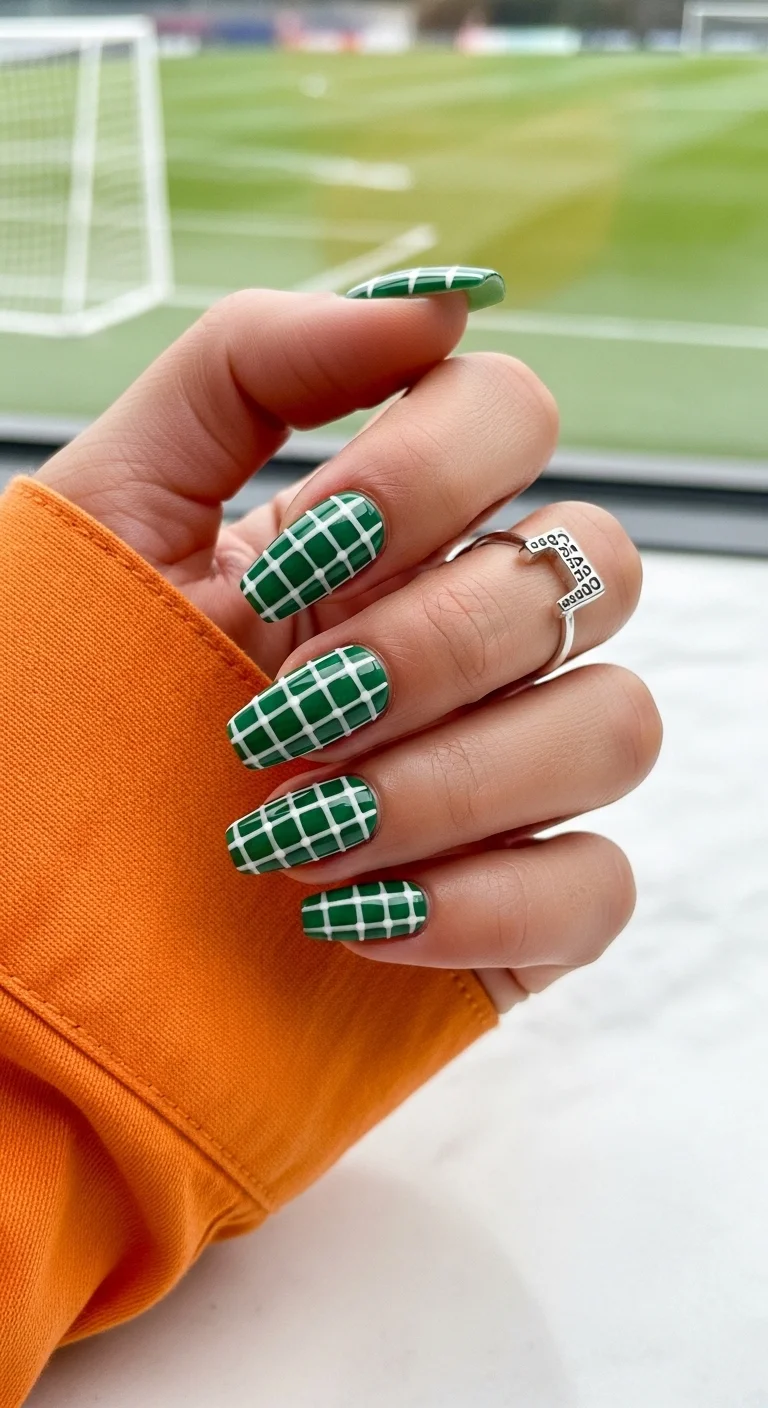
Deep green with white grid lines mimicking a soccer goal net.
Overview:
A deep green base with a white grid pattern that looks like a soccer goal net. The white lines create a regular grid over the dark green, evoking the moment before a penalty kick when you're staring at the net. It's a design that references the sport through structure rather than imagery.
The dark green is essential here. A lighter green would make the white grid look less like a net and more like a simple pattern. The depth of the green creates the illusion of looking through the net onto the pitch behind it.
The grid spacing needs to be consistent to sell the net reference. If the squares are different sizes, the pattern looks like a checkerboard rather than a net. Striping tape in both directions creates the most uniform results.
Design Breakdown:
Dark green with white grid. The goal net reference is the design.
Base Color: Deep forest or pitch green. Dark enough to provide contrast for the white grid.
Nail Shape: Medium-long coffin. The flat surface provides a clean canvas for the grid pattern.
Design Element: White grid lines forming a net pattern over the green base. The lines should be thin and evenly spaced.
Finish: High-gloss top coat to make the green look deep and the white lines look crisp.
Get The Look at Home:
Striping tape in both directions creates the most uniform grid. Budget time for the tape placement.
- Green base: Two coats of deep green. Let dry fully.
- Horizontal tape: Apply thin striping tape horizontally across each nail, spacing them evenly.
- Vertical tape: Apply thin striping tape vertically, creating a grid of squares.
- Paint the white: Swipe white polish over the entire nail, covering the tape.
- Peel while wet: Remove all tape immediately before the white sets.
- Seal: One thick coat of top coat to protect the grid.
29 Best Tropical Vacation Nails for Women in 2026 🌴
24.The Sunset Stadium Ombre
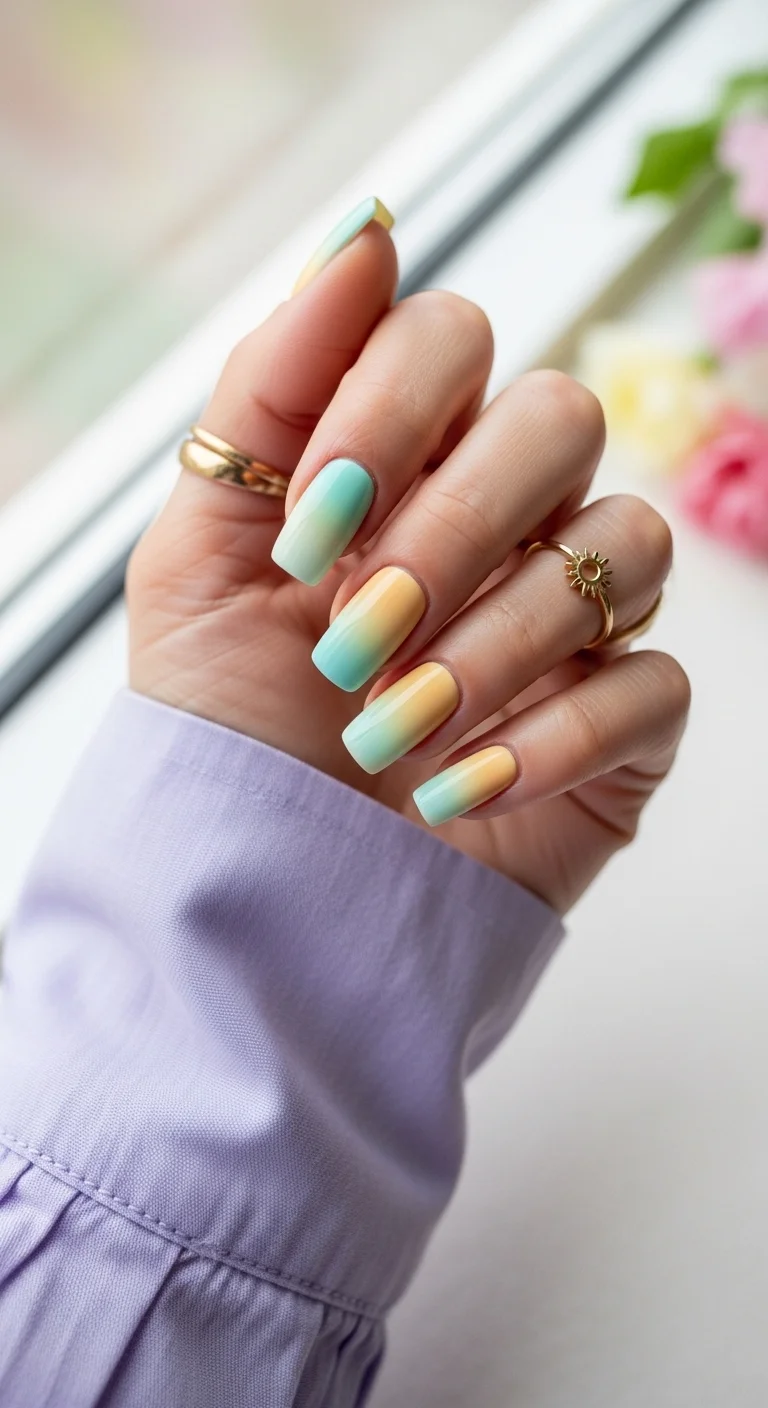
Soft mint-to-peach gradient for a dreamy stadium sunset effect.
Overview:
A smooth gradient from cool mint green at the cuticle to warm peach at the tips. The transition is seamless and dreamy, evoking the colors of a sunset over a stadium. It's the most subtle and feminine design in the collection.
The pastel tones make this design versatile for everyday wear during the tournament. It doesn't scream "soccer fan" — it whispers it through color. The green at the cuticle connects to the pitch, while the warm peach at the tips adds a sunset quality that feels celebratory.
The color transition is the technical challenge. Mint and peach are different color families, so the blend zone needs careful attention. Multiple light dabs with a sponge build a smoother transition than one heavy press.
Design Breakdown:
Pastel gradient. The color transition is the entire design.
Base Color: Cool mint green at the cuticle fading to warm peach at the tips.
Nail Shape: Medium coffin. The flat surface showcases the gradient transition.
Design Element: Sponge-applied vertical ombre using mint green and peach. The blend should be seamless.
Finish: High-gloss top coat to make the pastel colors look smooth and saturated.
Get The Look at Home:
The sponge technique builds the gradient. Multiple light passes create a smoother blend than one heavy press.
- Base coat: Apply a ridge-filling base coat. Pastel colors highlight imperfections.
- Sponge setup: Paint stripes of mint green and peach side by side on a makeup sponge. Dab on paper first.
- Dab the gradient: Press the sponge onto the nail with the mint at the cuticle and peach at the tip. Use light, repeated dabs.
- Build layers: Let each pass dry, then repeat. Three to four layers builds better opacity.
- Clean edges: Use a brush dipped in acetone to remove polish from the skin.
- Seal: Apply a thick top coat to smooth the surface and further blend the gradient.
25.The Green Pitch Frenchie
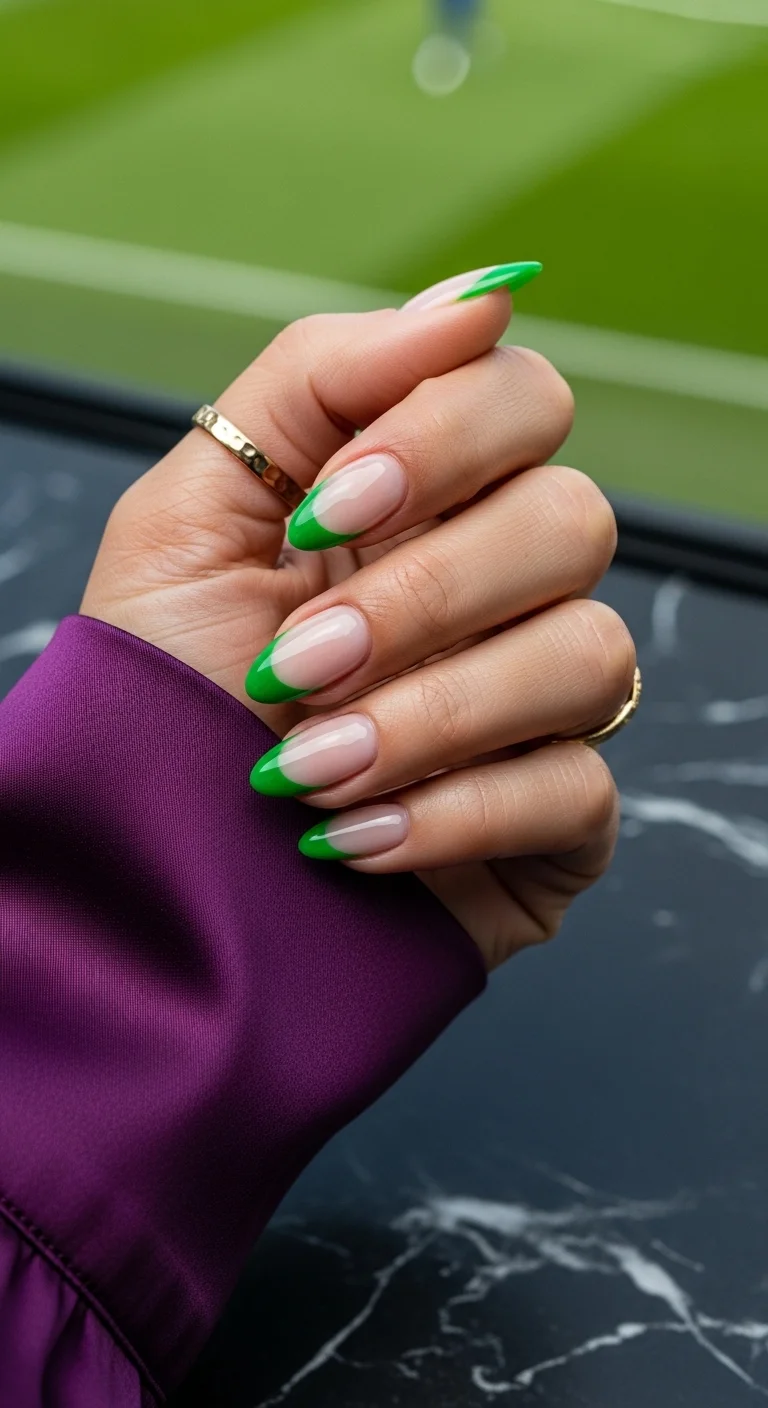
Green French tips inspired by the soccer pitch.
Overview:
A colored French tip is one of the simplest ways to reference a theme without going literal. Here, the green tips evoke the soccer pitch while keeping the overall design clean and wearable. The sheer nude base lets the green tips dominate visually.
The curved, swooping French tip style is more modern than a straight-across line. It follows the natural curve of the nail, which makes the green look intentional rather than slapped on. The almond shape is ideal for this style — the curved tip provides a natural guide for the French line.
The shade of green matters. This is a bright, grassy green — the color of a well-maintained pitch. A darker green would read more forest; a lighter green would read more mint. The bright green is the most accurate field reference.
Design Breakdown:
Green French on sheer nude. The color is the only soccer reference.
Base Color: Sheer nude or natural nail. The transparency keeps the focus on the green tips.
Nail Shape: Medium-long almond. The curved tip suits the green color.
Design Element: Bright green French tips on all nails. Clean smile lines.
Finish: High-gloss top coat to make the green look fresh and the nude look polished.
Get The Look at Home:
French guides or a steady hand are required for clean smile lines.
- Nude base: Two coats of sheer nude on all nails. Let dry fully.
- Green tips: Using a French liner brush, paint bright green tips on all nails. Two coats for opacity.
- Smile line: Use a flat brush dipped in acetone to sharpen the curve where the green meets the nude.
- Consistency: The tip thickness should be the same across all nails.
- Seal: One thick coat of top coat over all nails.
30+ Chic Pool Party Hairstyles for Summer 2026 🌊👙
26.The Fan Zone Flag Fest
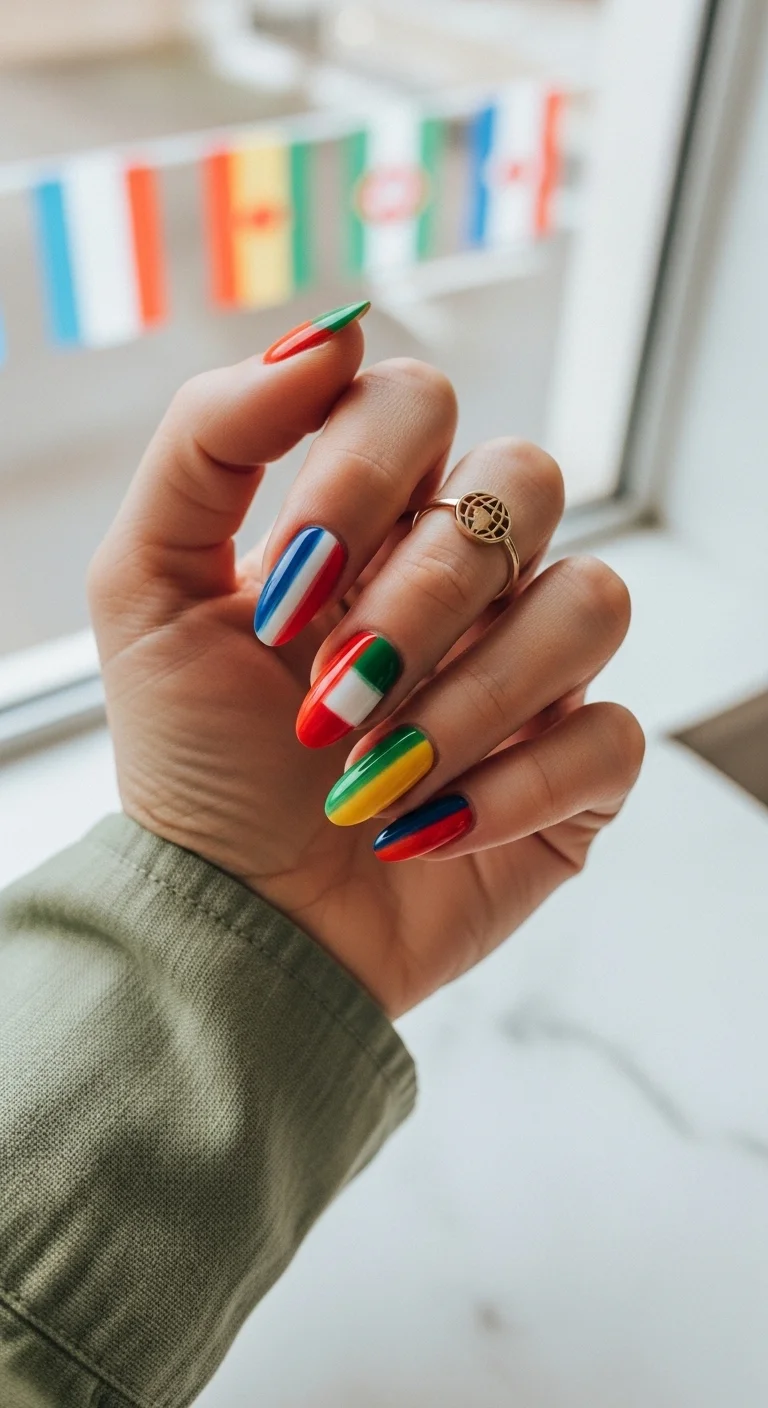
Multi-flag stripe patterns celebrating the international spirit.
Overview:
This design takes the flag concept from item 20 and simplifies it into stripe patterns. Each nail gets a different combination of colored stripes, horizontal or vertical, that reference national flags without painting them literally. It's a more abstract approach to the international theme.
The stripe format is more forgiving than painting detailed flags. Getting the proportions of a real flag correct is difficult at nail scale. Stripes in the right colors capture the reference without requiring precision.
The variety of stripe directions, horizontal on some nails, vertical on others, creates visual rhythm across the hand. Your eye moves from one pattern to the next, following the color story.
Design Breakdown:
Multi-flag stripe abstraction. The international palette is the design.
Base Color: White base on all nails. The stripes are painted on top.
Nail Shape: Medium almond. The curved shape softens the geometric stripes.
Design Element: Different national flag-inspired stripe patterns on each nail. Horizontal and vertical stripes in various color combinations.
Finish: High-gloss top coat to make the colors look saturated.
Get The Look at Home:
Plan your flag colors before you start. Each nail needs its own color palette.
- White base: Two coats of opaque white on all nails. Let dry fully.
- Stripe layout: Decide which nails get horizontal stripes and which get vertical.
- Paint stripes: Using a thin liner brush, paint two to three colored stripes on each nail. Use different flag-inspired color combinations.
- Consistency: Stripe width should be roughly the same across all nails.
- Cleanup: Use a small brush dipped in acetone to sharpen the stripe edges.
- Seal: One thick coat of top coat over everything.
27.The Tacticians Matte Green
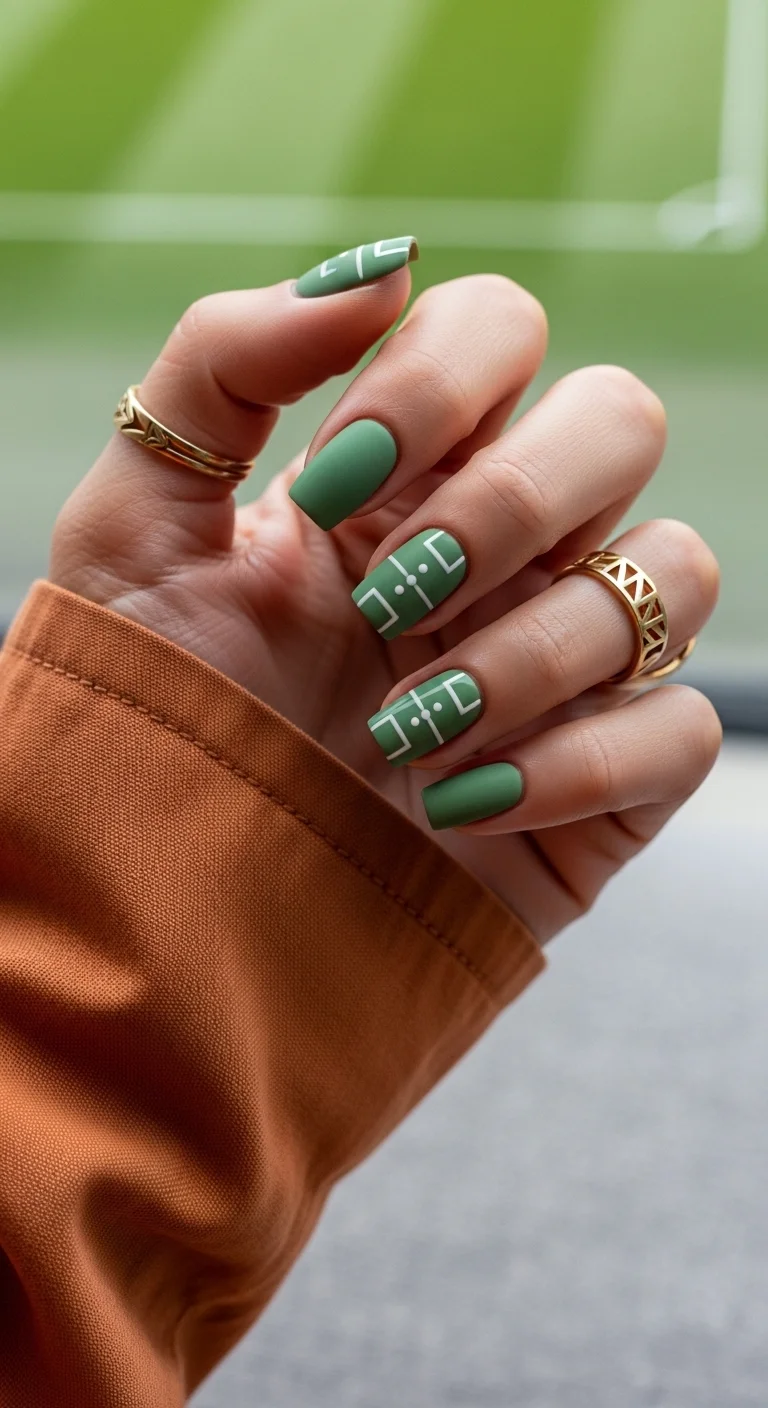
Matte olive green with soccer tactical diagram accents.
Overview:
Matte olive green with white tactical diagrams is the most conceptual design in this list. The diagrams look like soccer plays drawn on a coach's clipboard: arrows, Xs, and lines that represent player movements. It's a design for someone who loves the strategic side of the sport.
The matte finish on the green is essential. It creates a flat, clipboard-like quality that reinforces the tactical theme. A glossy finish would look more like a standard green manicure and less like a coaching tool.
The tactical diagrams are confined to two accent nails, which keeps the design from feeling busy. The solid green nails provide visual rest between the detailed accent nails.
Design Breakdown:
Matte green with tactical accent art. The coaching diagram is the design reference.
Base Color: Muted olive or sage green with a matte finish.
Nail Shape: Medium coffin. The flat surface suits the geometric diagram art.
Design Element: Solid matte green on three nails. White tactical play diagrams (arrows, Xs, lines) on two accent nails.
Finish: Matte top coat over the green base. High-gloss over the white diagram art for contrast.
Get The Look at Home:
The matte finish goes on last, after all the art is complete. It transforms the entire design.
- Green base: Two coats of olive or sage green on all nails. Let dry fully.
- Tactical art: On two accent nails, use a fine liner brush and white polish to draw arrows, Xs, and lines resembling soccer plays.
- Solid nails: Leave the remaining three nails as solid green.
- Matte seal: Apply matte top coat over all nails. The matte finish transforms the green into a clipboard-like texture.
- Re-gloss the art (optional): If you want the white diagrams to pop more, use a thin brush to add glossy top coat only over the white art.
- Cleanup: Clean the edges carefully. Matte polish against skin is more visible than glossy.
34 Cutest Butter Yellow Nail Designs for 2026 🧈
28.Solid Olive Victory
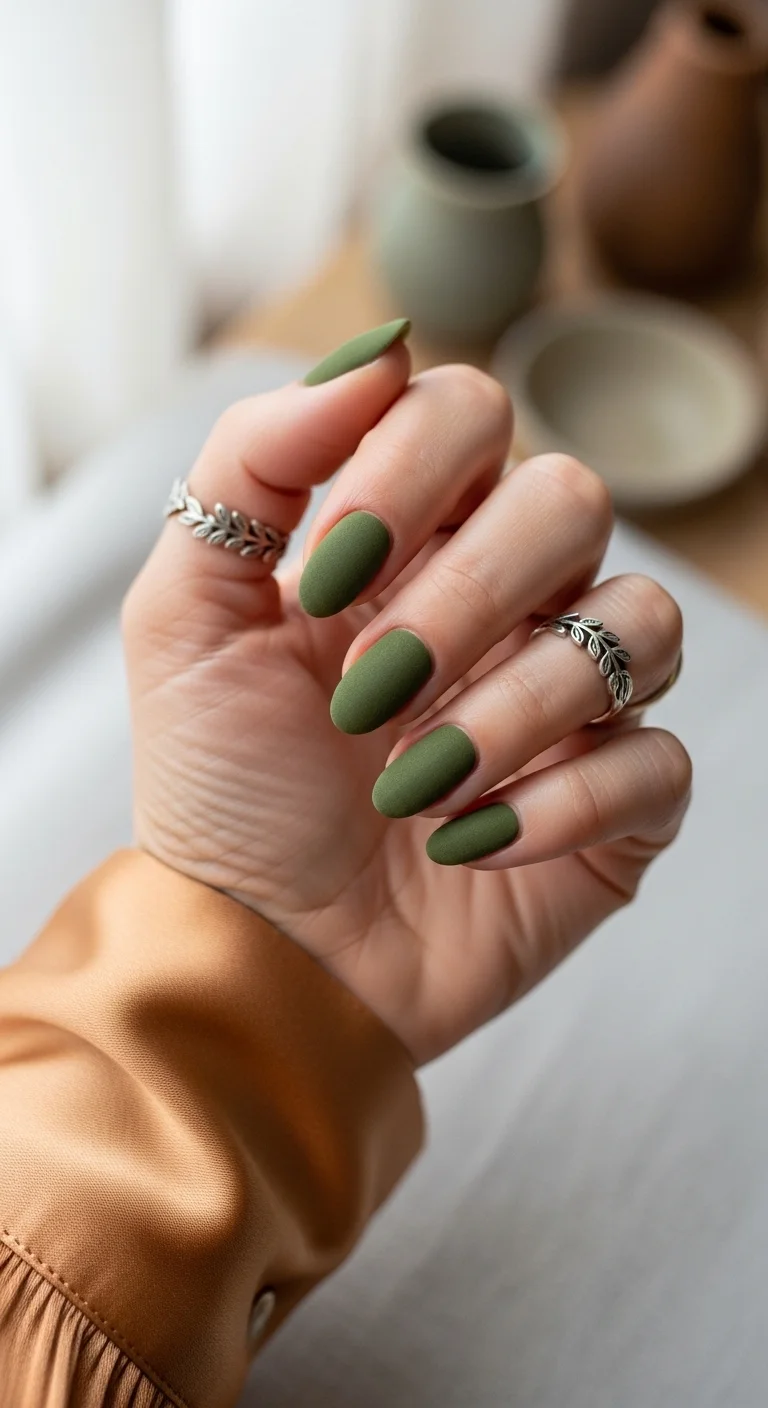
Solid matte olive green for a clean, understated look.
Overview:
Sometimes the best nail design is no design at all. A solid matte olive green hits a specific intersection of "I put thought into this" and "I didn't try too hard" that more complicated designs can't replicate. The matte finish is what makes it work — glossy olive reads as standard green polish; matte olive reads as intentional and editorial.
Olive green is a surprisingly versatile color for a soccer-themed manicure. It references the pitch without being literal. It works with virtually any outfit. And the muted, earthy quality means it doesn't clash with team colors — it complements them.
The practical advantage of a solid color: it's the fastest design on this list to execute. Two coats, matte top coat, done. Budget fifteen minutes total. The simplicity is the entire point.
Design Breakdown:
Single-color matte. The finish IS the design.
Base Color: Muted olive or army green. Not too dark, not too bright.
Nail Shape: Medium almond. The curved shape complements the earthy color.
Design Element: Solid color, zero art. The matte surface is the visual focus.
Finish: True matte top coat. Not satin, not "velvet matte" — fully flat.
Get The Look at Home:
Surface prep matters more for matte nails than any other finish. Buff every ridge.
- Buff: Smooth any ridges on the natural nail. Matte polish shows every imperfection.
- Ridge-filling base: Apply a smoothing base coat. Let it dry completely.
- Two coats: Apply the olive in two thin layers. Each should look slightly translucent on its own.
- Dry between coats: At least three minutes. Matte top coat on undried polish causes bubbling.
- Matte top coat: Apply in one confident stroke per nail. Don't go back over the same area — it creates texture differences.
- Cuticle oil: Matte finishes can make fingers look dry. Hydrate the cuticles after the top coat sets.
29.The Painterly Flag Abstract
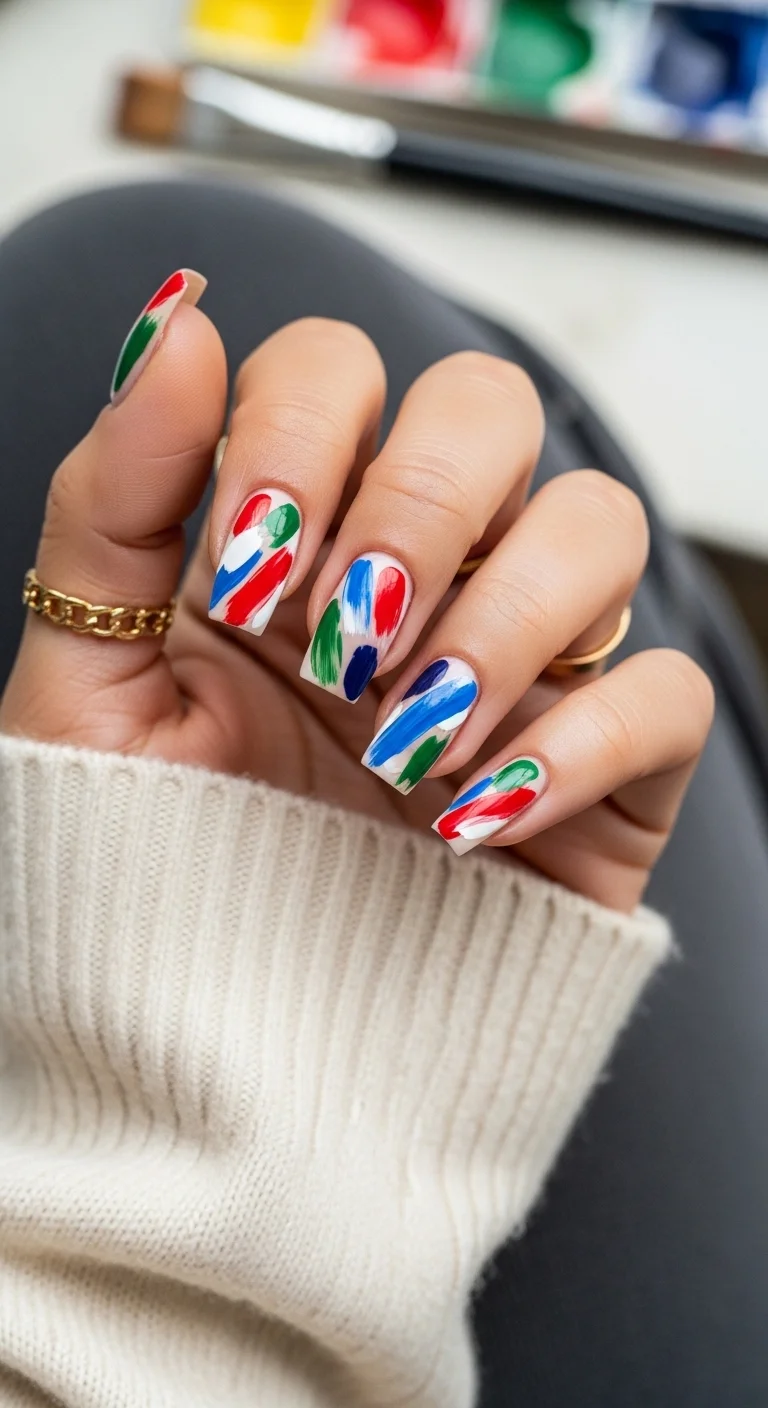
Abstract brushstroke patterns in national flag colors.
Overview:
Abstract brushstrokes in red, blue, green, and navy over a white base. The strokes look like they were made with a paintbrush loaded with color and dragged across the nail in loose, gestural movements. Each nail is a unique composition — no two look the same.
The painterly quality is what makes this design interesting. It looks like an artist's palette rather than a nail art design. The visible brushstroke texture adds a tactile quality that smooth, even coverage can't achieve.
The flag colors are abstracted into pure gesture. You won't see a specific country's flag, but the color palette — red, white, blue, green — creates an international, tournament-wide atmosphere. It's patriotic without being specific.
Design Breakdown:
Abstract painterly strokes. The brushwork quality is the design.
Base Color: White. The strokes are painted on top.
Nail Shape: Medium-long square or coffin. The flat surface provides a canvas for the brushstrokes.
Design Element: Loose, gestural brushstrokes in red, blue, green, and navy. Each nail has a unique composition.
Finish: High-gloss top coat to make the colors look vibrant and the white look crisp.
Get The Look at Home:
Work quickly and don't overthink the placement. The beauty is in the spontaneity.
- White base: Two coats of opaque white. Let dry fully.
- First color: Using a flat brush, paint loose, gestural strokes of red across each nail. Don't aim for precision.
- Second color: Add blue strokes alongside or overlapping the red. Keep the movements loose.
- Third color: Add green and navy strokes to fill the remaining white space.
- Balance: Step back and check that no single color dominates. Add more of any color that's underrepresented.
- Seal: Wait five minutes for the art to set, then apply a generous top coat.
25 Top Curly Hairstyle Trends for 2026 ➰✨
30.The Milky White Wave
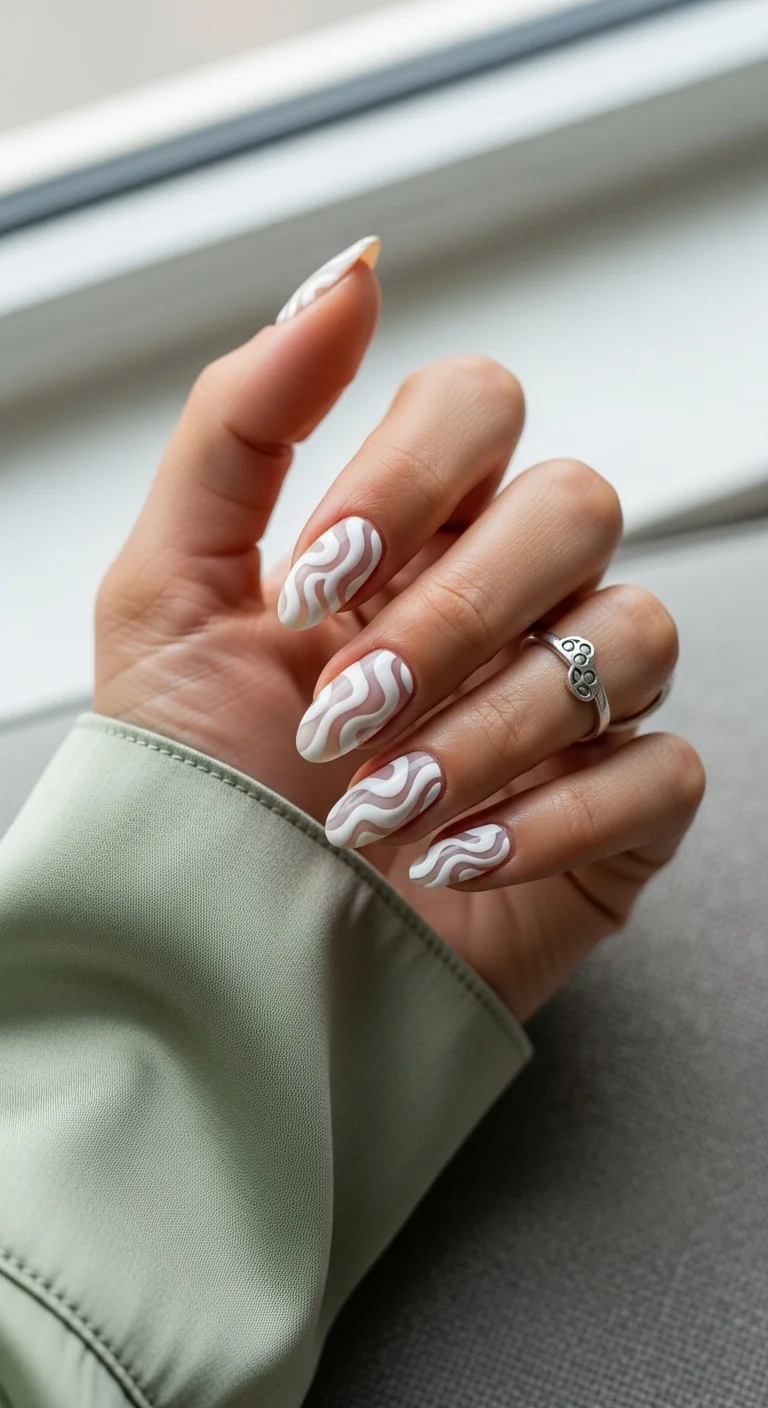
Tone-on-tone white 3D waves for a subtle, trendy look.
Overview:
White 3D swirl patterns on a milky white base. The tone-on-tone approach creates a design that's visible through texture rather than color. The raised waves catch light differently than the flat base, creating subtle dimension that's obvious in person but understated in photos.
The wave pattern could reference stadium waves, flowing scarves, or the movement of a crowd. The ambiguity is what makes the design versatile — it works as a soccer reference and as standalone nail art.
The 3D gel technique requires patience. Each wave needs to be built up in layers, and the gel needs to cure fully between layers to maintain its raised shape. Rushing the process results in waves that flatten during the final top coat.
Design Breakdown:
Tone-on-tone 3D texture. The wave pattern is the entire design.
Base Color: Milky white or sheer nude. The base should be light enough to let the 3D waves catch light.
Nail Shape: Medium-long almond. The curved surface lets the waves follow an organic path.
Design Element: White 3D raised swirl or wave patterns on every nail. Each nail has a unique wave arrangement.
Finish: High-gloss top coat over the 3D waves. The shine creates dimension through light reflection.
Get The Look at Home:
You need 3D sculpting gel or builder gel for the raised waves. Regular polish won't hold the shape.
- Base color: Two coats of milky white. Let dry fully.
- 3D gel: Using a thin liner brush, apply white 3D sculpting gel in loose, wavy patterns across each nail. Build height gradually.
- Cure each layer: Flash cure for 10 seconds between layers to maintain the raised shape.
- Vary the pattern: Each nail should have a different wave arrangement. Some waves should be thick, others thin.
- Full cure: Cure the entire hand for 60 seconds under UV or LED lamp.
- Seal: Apply top coat carefully, floating it over the waves without flattening them.
31.The Firey Fan Wave
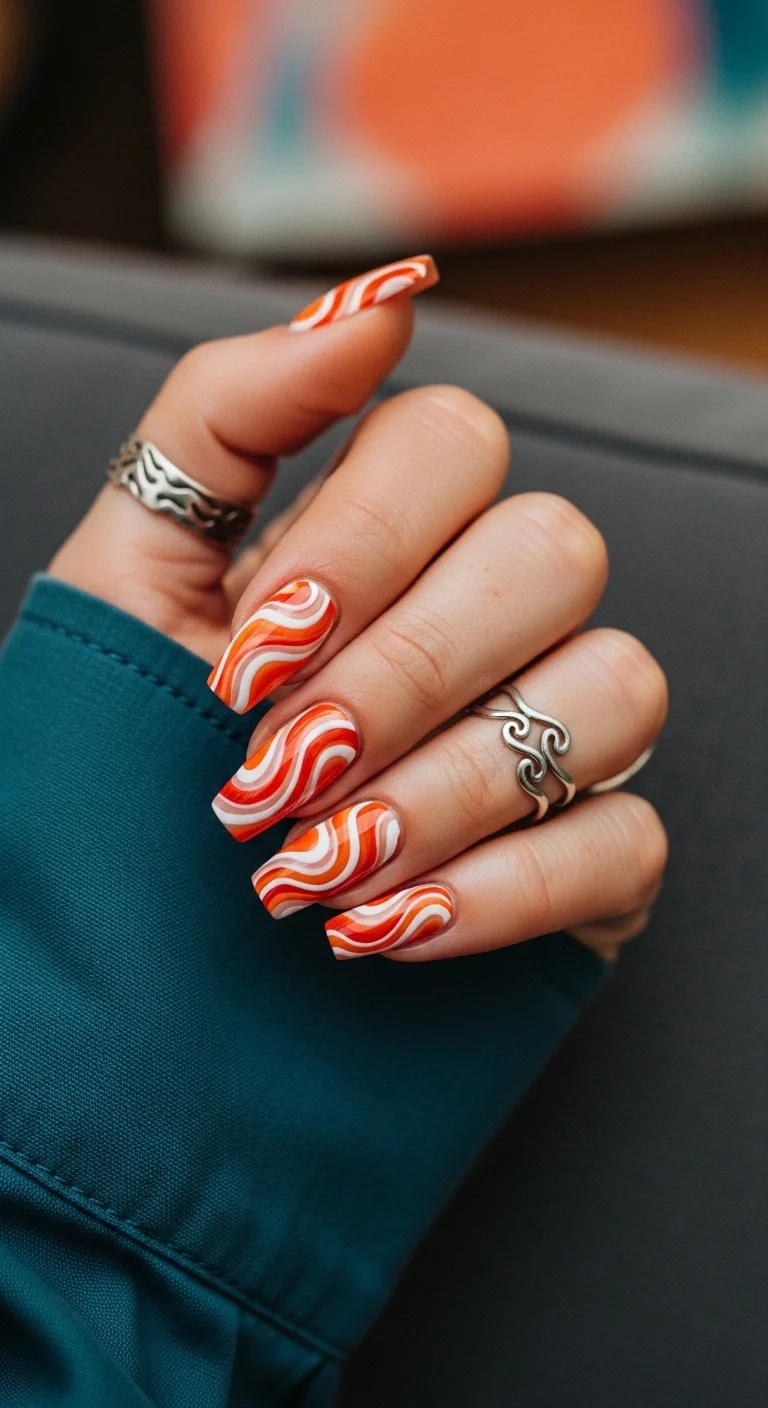
Orange and red swirl waves for an energetic, passionate look.
Overview:
Orange and red swirls on a white base create a design that looks like flames or a flag waving in the wind. The warm, energetic colors reference passion and excitement, which connects to the atmosphere of a live match.
The swirl technique creates organic, flowing shapes that look different on every nail. The inconsistency is what makes the design feel alive and dynamic. It's the opposite of a rigid, geometric pattern.
The orange-to-red palette is warm and high-energy. It reads as enthusiastic and celebratory, which is appropriate for a tournament design. The white base between the swirls provides visual breathing room.
Design Breakdown:
Warm swirl pattern. The organic movement is the design.
Base Color: White base with orange and red swirls.
Nail Shape: Medium-long coffin. The flat surface gives the swirls room to develop.
Design Element: Wavy, organic swirls in orange and red over a white base. Each nail has a different swirl pattern.
Finish: High-gloss top coat to make the warm colors look saturated.
Get The Look at Home:
Work wet-on-wet for the best swirl effect. The colors need to be dragged while still fluid.
- White base: Two coats of opaque white. Let dry fully.
- Orange swirls: Using a thin brush, paint loose, wavy orange lines across each nail.
- Red accents: While the orange is still wet, add red swirls alongside or overlapping the orange.
- Don't over-blend: Let the colors sit next to each other without fully mixing. The layering is the effect.
- Vary the pattern: Each nail should have a slightly different swirl arrangement.
- Seal: Wait five minutes, then apply a generous top coat to smooth the surface.
31 Stunning Prom Nails for Women in 2026 💃
32.The Classic Ball Print
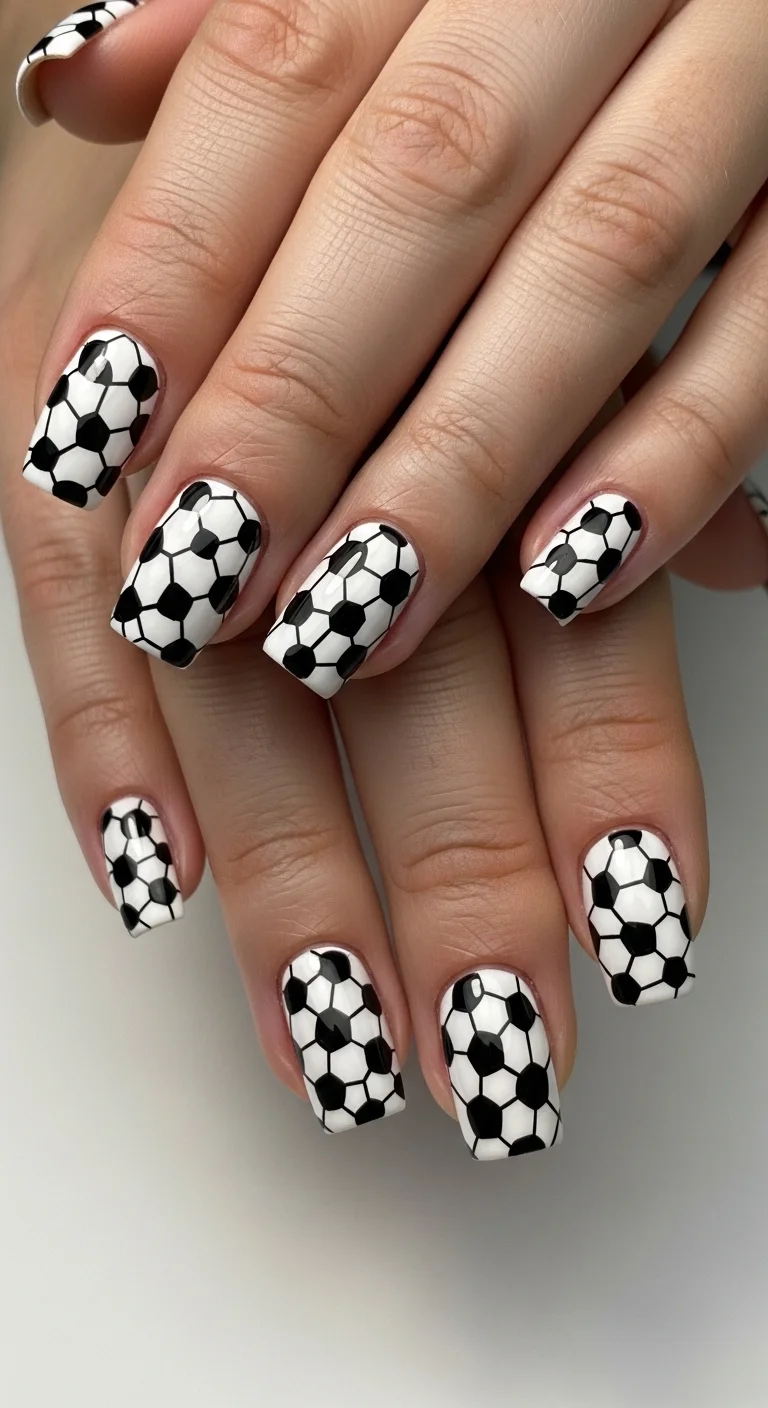
Classic black and white soccer ball pattern covering all nails.
Overview:
The most literal soccer reference possible: the entire nail is covered in the hexagonal pattern of a soccer ball. Black pentagons on a white background, repeated across every finger. There's no subtlety here. It's a full-commitment design.
The pattern works because the hexagonal grid is so universally recognized. Everyone knows what it represents. The black-and-white palette keeps the design clean and graphic despite the busy pattern.
The technical challenge is keeping the hexagons consistent in size across all nails. If the shapes vary too much, the pattern looks sloppy. Drawing the outlines first, then filling in the black shapes, creates more uniform results.
Design Breakdown:
Full-coverage soccer ball pattern. The literal reference is the design.
Base Color: Crisp, opaque white. Two coats for full coverage.
Nail Shape: Medium coffin. The flat surface provides a canvas for the hexagonal grid.
Design Element: Black hexagonal soccer ball pattern covering every nail. Black pentagons on white.
Finish: High-gloss top coat to make the black look deep and the white look crisp.
Get The Look at Home:
Draw the hexagon outlines first, then fill in the black shapes.
- White base: Two coats of opaque white. Let dry fully.
- Hexagon outlines: Using a fine liner brush and black polish, draw hexagonal outlines across each nail.
- Fill alternating shapes: Fill in every other hexagon with black polish to create the soccer ball pattern.
- Consistency: The hexagon size should be roughly the same across all nails.
- Cleanup: Use a small brush dipped in acetone to sharpen any hexagon edges.
- Seal: One thick coat of top coat over everything.
33.The Minimalist Pitch Line
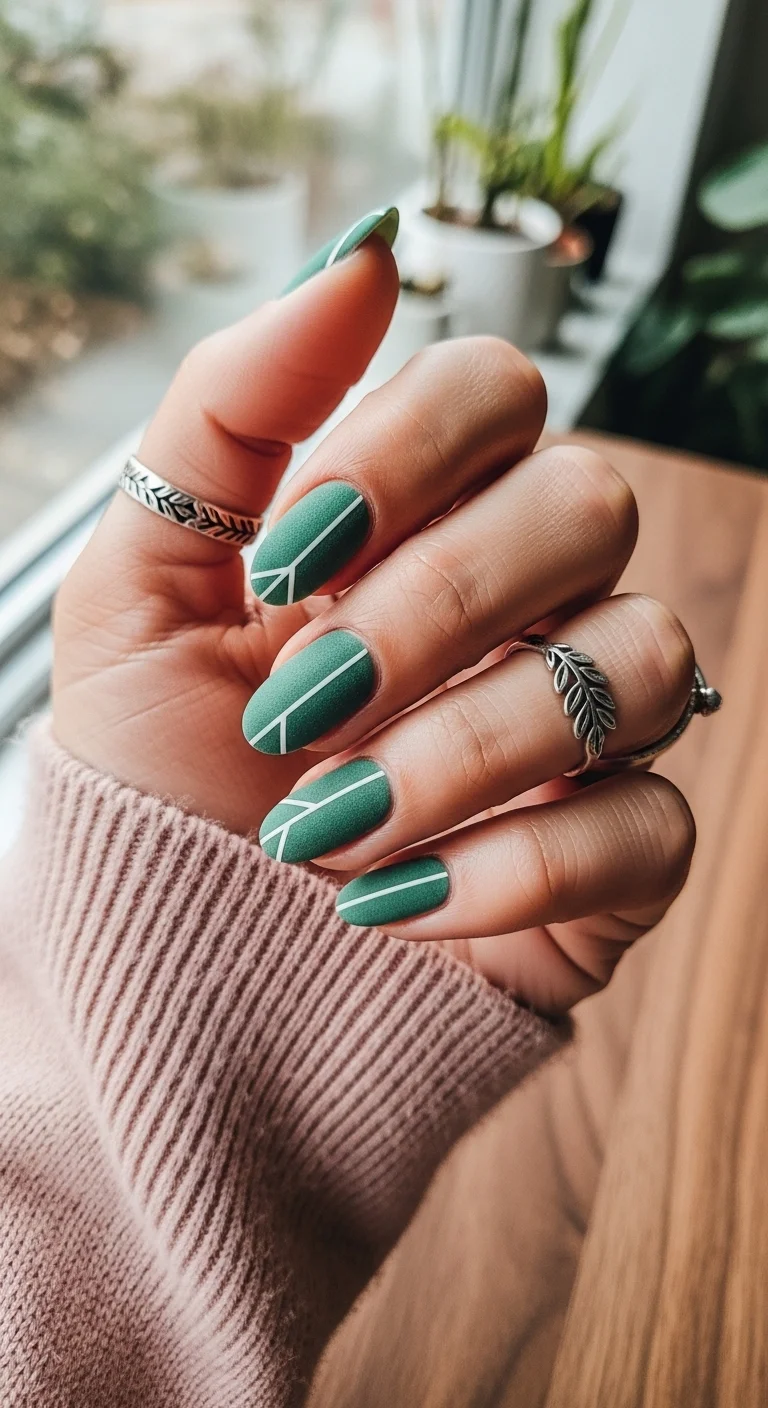
Matte green with minimal white field lines.
Overview:
This is the most restrained version of the soccer field concept. A single thin white line on a matte green base. That's it. The line references the markings on a pitch, but the minimalism keeps the design from feeling literal or costume-y.
The matte finish on the green is essential. It creates a flat, chalk-like quality that mimics the painted lines on an actual field. A glossy finish would look more like a standard green manicure.
The single-line approach works because it's enough to suggest the reference without spelling it out. It's the nail equivalent of a whisper rather than a shout.
Design Breakdown:
Matte green with a single white line. The minimalism is the design.
Base Color: Deep matte green. The flat finish is essential.
Nail Shape: Medium almond. The curved shape softens the geometric line.
Design Element: A single thin white line on each nail. Some nails have a straight vertical line; others have a chevron or angled line.
Finish: Matte top coat over the green. The white line can be glossy for subtle contrast.
Get The Look at Home:
A single confident stroke is all each nail needs. Don't go over the same line twice.
- Green base: Two coats of deep green. Let dry fully.
- White line: Using a thin liner brush and white polish, paint a single thin line on each nail. Vary the angle on different nails.
- One stroke: Keep each line to a single, confident stroke. Going over the same line creates unevenness.
- Matte seal: Apply matte top coat over all nails. The matte finish transforms the green into a chalk-like texture.
- Re-gloss the line (optional): If you want the white line to pop more, use a thin brush to add glossy top coat only over the white.
- Cleanup: Clean the edges carefully. Matte polish against skin is more visible than glossy.

30 Stunning Summer Hair Trends for 2026 ☀️🌊
34.The Blue and White Split
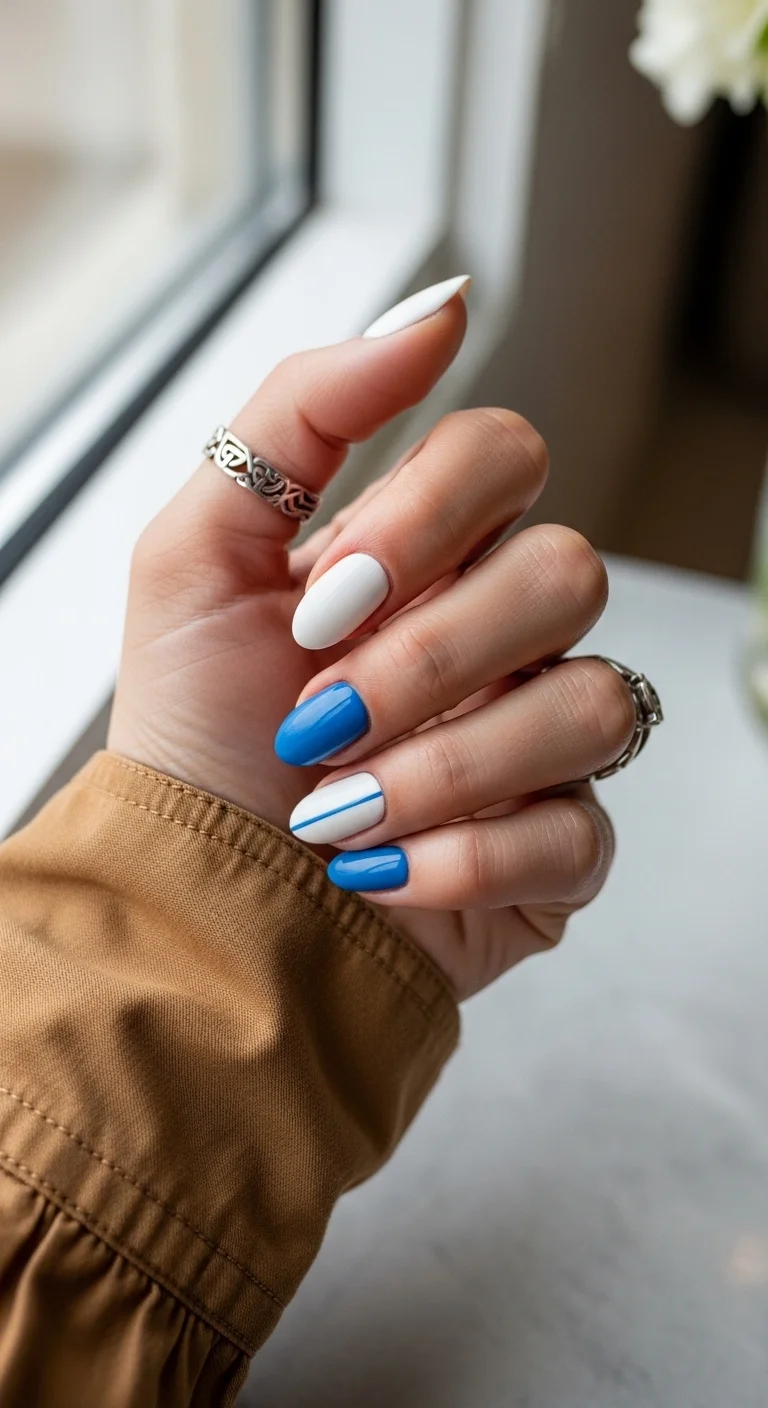
Blue and white color-blocking for a clean, patriotic look.
Overview:
Alternating solid white and royal blue nails, with one accent nail featuring a horizontal blue stripe across a white base. The design is simple, clean, and immediately evokes the flags of countries like Argentina, Greece, or Uruguay.
The stripe accent nail adds visual interest without being busy. It breaks the pattern of solid colors and creates a focal point that draws the eye. The horizontal stripe is a direct reference to flag design.
The blue-and-white palette is one of the most common in international football. It's patriotic without being specific to one country, which makes the design wearable regardless of which team you support.
Design Breakdown:
Blue and white color-blocking with one striped accent. The flag reference is abstract.
Base Color: Royal blue on some nails, white on others.
Nail Shape: Medium almond. The curved shape complements the clean color-blocking.
Design Element: Solid blue on some nails, solid white on others. One accent nail with a horizontal blue stripe across a white base.
Finish: High-gloss top coat to make both colors look saturated.
Get The Look at Home:
This is one of the fastest designs on the list. The simplicity is the entire point.
- Plan your layout: Decide which nails get blue, which get white, and which gets the stripe accent.
- Blue nails: Two coats of royal blue on the designated nails. Let dry fully.
- White nails: Two coats of opaque white on the designated nails. Let dry fully.
- Stripe accent: On one nail, paint a white base. Once dry, add a horizontal blue stripe across the center using striping tape or a steady hand.
- Cleanup: Use a small brush dipped in acetone to sharpen any edges.
- Seal: One thick coat of top coat over all nails.
35.The Sunny Frenchie Final
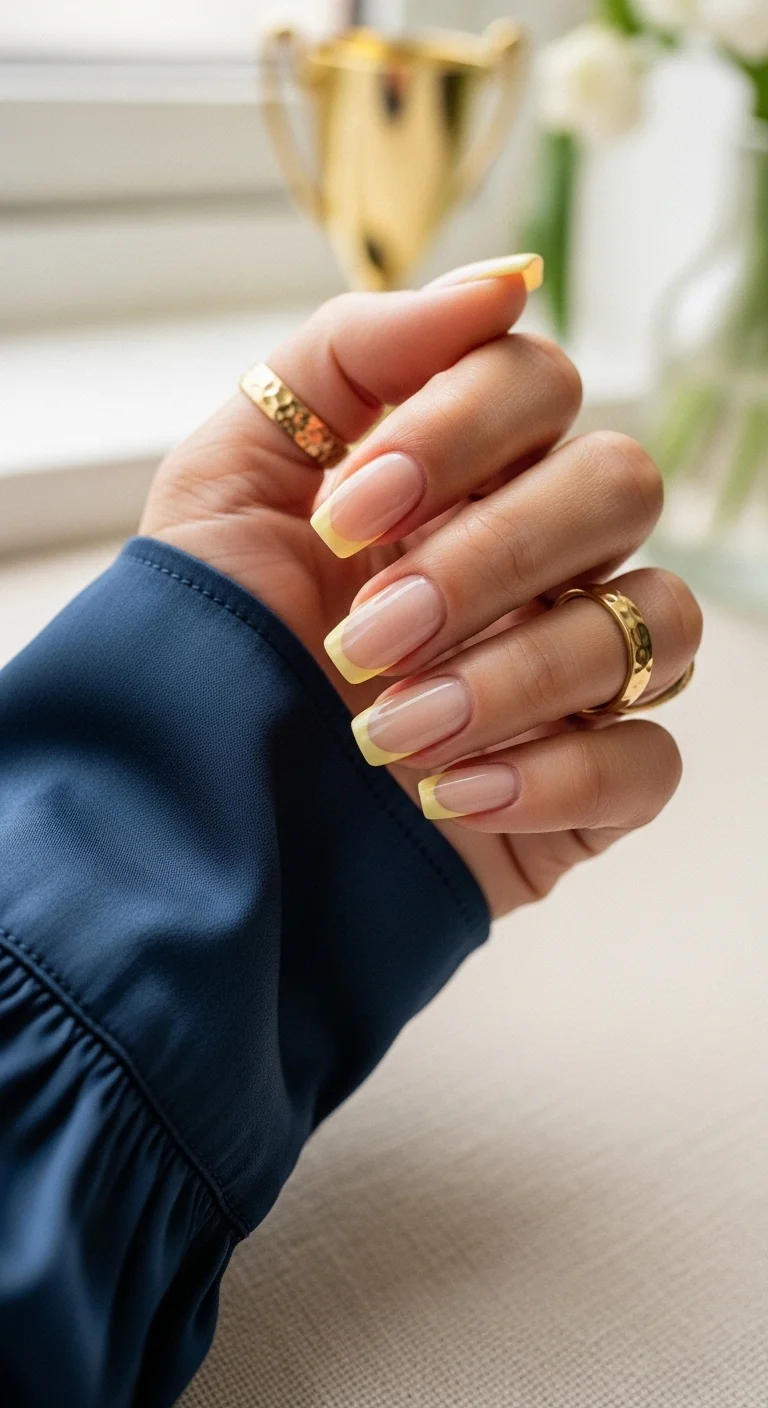
Yellow French tips for a sunny, tournament-ready look.
Overview:
A sunshine-yellow twist on the classic French manicure. The pale yellow tips are soft and buttery, giving a warm, cheerful vibe that connects to summer, sunshine, and the golden tones of victory. It's elegant and understated — perfect for someone who wants a subtle tournament reference.
The yellow is soft, not neon. It reads as warm and approachable rather than bold and demanding. On a sheer nude base, the tips look like a natural extension of the nail rather than a painted design.
Yellow polish can be streaky, especially in thin applications like French tips. Three thin coats rather than two produces better opacity. A ridge-filling base coat underneath helps create a smooth canvas for the yellow.
Design Breakdown:
Yellow French on sheer nude. The warm color is the design.
Base Color: Sheer nude or natural nail. The transparency keeps the focus on the yellow tips.
Nail Shape: Medium-long almond. The curved tip suits the warm color palette.
Design Element: Pale yellow French tips on all nails. Clean smile lines.
Finish: High-gloss top coat to make the yellow look fresh and the nude look polished.
Get The Look at Home:
Yellow French tips require patience. The color needs multiple coats for clean opacity.
- Nude base: Two coats of sheer nude on all nails. Let dry fully.
- Yellow tips: Using a French liner brush, paint pale yellow tips on all nails. Three thin coats for opacity.
- Smile line: Use a flat brush dipped in acetone to sharpen the curve where the yellow meets the nude.
- Consistency: The tip thickness should be the same across all nails.
- Seal: One thick coat of top coat over all nails.
35 Palm Tree Nail Art Ideas that are the Most Iconic Nail Art Designs 🌴✨
36.The Golden Star Goal
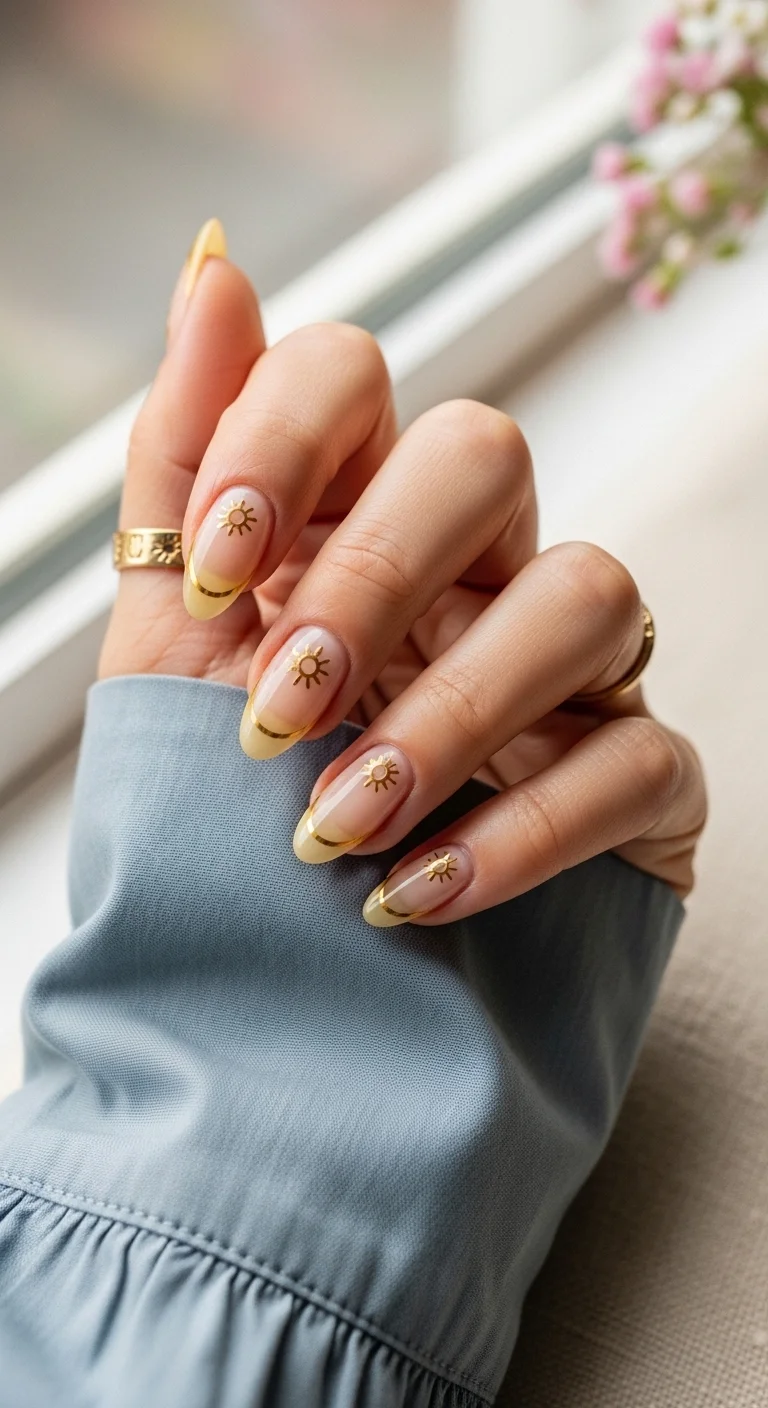
Yellow French tips with gold star accents for a championship finish.
Overview:
This design builds on the yellow French from item 35 by adding gold star or sun decals and gold line accents. The gold elements elevate the sunny French into something more celebratory and trophy-like. It's the championship version of a colored French.
The gold decals sit near the cuticle area, which creates a focal point at the base of the nail. The yellow tips draw the eye to the other end. That push-pull between the base and the tip keeps the design dynamic.
The combination of yellow and gold is warm and harmonious. Both colors share the same undertone, so they feel like they belong together despite being different materials (polish vs. metallic decal).
Design Breakdown:
Yellow French with metallic accents. The gold elements add the celebratory quality.
Base Color: Sheer nude with yellow French tips.
Nail Shape: Medium-long almond. The curved shape suits the warm color palette.
Design Element: Yellow French tips on all nails. Gold star or sun decals near the cuticle. Gold line accents along the smile line.
Finish: High-gloss top coat to seal the decals and make the yellow look saturated.
Get The Look at Home:
The French tips come first, then the gold accents. Each layer needs to dry before the next.
- Nude base: Two coats of sheer nude. Let dry fully.
- Yellow tips: Paint yellow French tips on all nails. Three thin coats for opacity.
- Gold line: Using a thin liner brush and gold metallic polish, trace a line along the smile line.
- Star decals: Using tweezers, place gold star or sun decals near the cuticle on each nail.
- Press flat: Use a silicone tool to smooth the decal edges flat against the nail.
- Seal: Two coats of top coat to encapsulate the decals and protect all the art.
Choosing a game day manicure is just as important as picking out a watch party outfit, and these designs provide all the inspiration needed. Whether the favorite team takes home the trophy or not, these manicures ensure a win for best-dressed fan!
Be sure to save the favorite designs straight to a Pinterest board or camera roll so they are ready for the next salon trip. Which country's design is the top pick for this tournament?