Nail Trends
26 Stunning Sunflower Floral Nails for Spring & Summer 2026 🌻
Is there anything that screams 'happy' more than a field of sunflowers? Honestly, these blooms are like sunshine in petal form, and wearing them on your nails is the ultimate dopamine boost for your spring and summer aesthetic! Whether you're heading to a summer music festival, a breezy garden party, or just want to feel like a walking botanical garden, sunflower nails are the absolute move for 2026. Here is a curated list of 26 stunning designs—ranging from moody matte black sets to delicate, milky-white minimalist looks. Save your favorites to show your next nail tech at the salon!
Why Your Petals Need "Dragging"
Most sunflower nail tutorials skip the most important step: the difference between a sunflower and a daisy isn't the color, it's the petal shape. Placing uniform yellow dots in a circle around a brown center produces a daisy or a marigold, not a sunflower. The sunflower's defining feature is its tapered, elongated petals with pointed tips, and a simple dotting tool can't achieve that shape on its own.
The technique that separates amateur from professional is the "drag" method. Instead of placing a dot and leaving it, you press the brush down at the base of the petal near the flower center and pull outward in a single, controlled motion. The pressure at the base creates a wider petal body, and the release at the tip creates the signature pointed end. Practicing this motion on a foil palette before committing to the nail makes a measurable difference in consistency.
After painting your first layer, rotate the brush slightly and add a second layer in a different yellow shade. This asymmetry is what makes the flower feel alive rather than printed.
In This Guide
1.Midnight Matte & Sunflower Pop
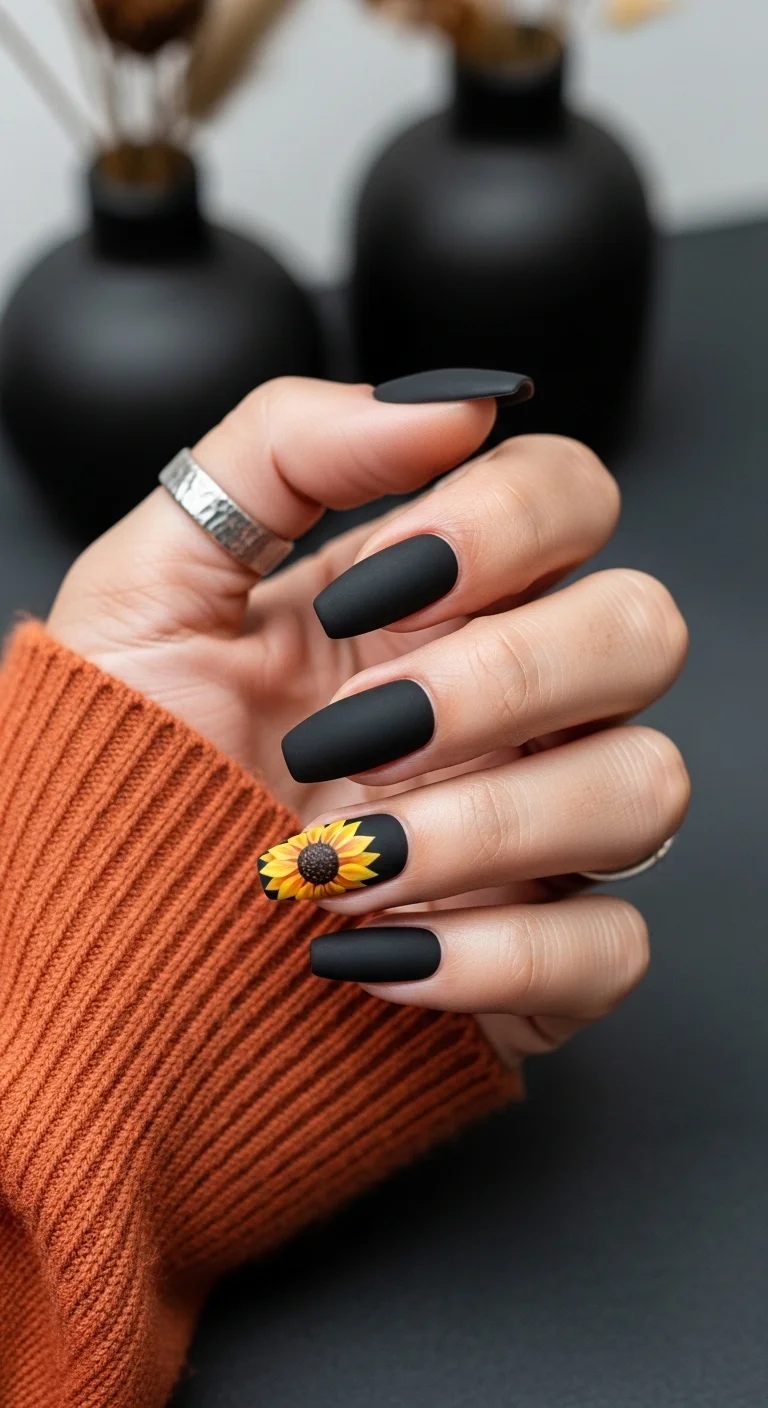
Matte black with a single sunflower accent for high contrast.
Overview:
Black nails in summer are a contrarian move, and the matte finish is what makes it work. A glossy black would look like a standard evening manicure. Matte black reads as deliberate, editorial, and slightly edgy. It's the difference between "going out nails" and "fashion nails."
The single sunflower on the ring finger is the entire focal point. The bright yellow petals against the flat black background create a contrast so sharp it almost vibrates. The flower is positioned near the cuticle rather than centered, which gives the composition a sense of upward movement, like the sunflower is growing from the base of the nail.
The practical downside of matte black: it shows every scratch and scuff. Within two to three days, the tips will start to develop a slight sheen from daily wear. A matte top coat touch-up on day three extends the life of the finish significantly.
Design Breakdown:
High-contrast design that depends entirely on the matte texture and the single accent nail.
Base Color: Opaque, deep black with a true matte finish. The matte needs to be flat, not satin, to maximize the contrast with the sunflower.
Nail Shape: Medium-long coffin. The flat tip gives the matte surface a clean, geometric edge.
Design Element: One sunflower accent on the ring finger. Yellow petals with visible orange shading at the base, dark brown textured center with black dots. Positioned near the cuticle.
Finish: Matte top coat on all nails, including over the sunflower. The matte finish unifies the set.
Get The Look at Home:
The matte finish is the most important step. Apply it over everything, including the sunflower art.
- Black base: Two coats of opaque black polish. Let each dry fully. Black shows every brush stroke, so use thin, even layers.
- Sunflower on ring finger: Using a dotting tool, place a dark brown circle near the cuticle. With a thin brush, flick yellow petals outward from the center.
- Layer the petals: Add a second layer of petals in a slightly different yellow for depth. The base of each petal should have a touch of orange.
- Center detail: Use a toothpick to add black dots to the brown center for a seeded texture.
- Matte seal: Apply matte top coat over all nails, including the sunflower. The matte finish is what makes the design cohesive.
- Cleanup: Matte black polish against skin is more visible than glossy. Clean the edges carefully with a brush and acetone.
30 Stunning Mother of the Groom Hairstyle Ideas for 2026 💍✨
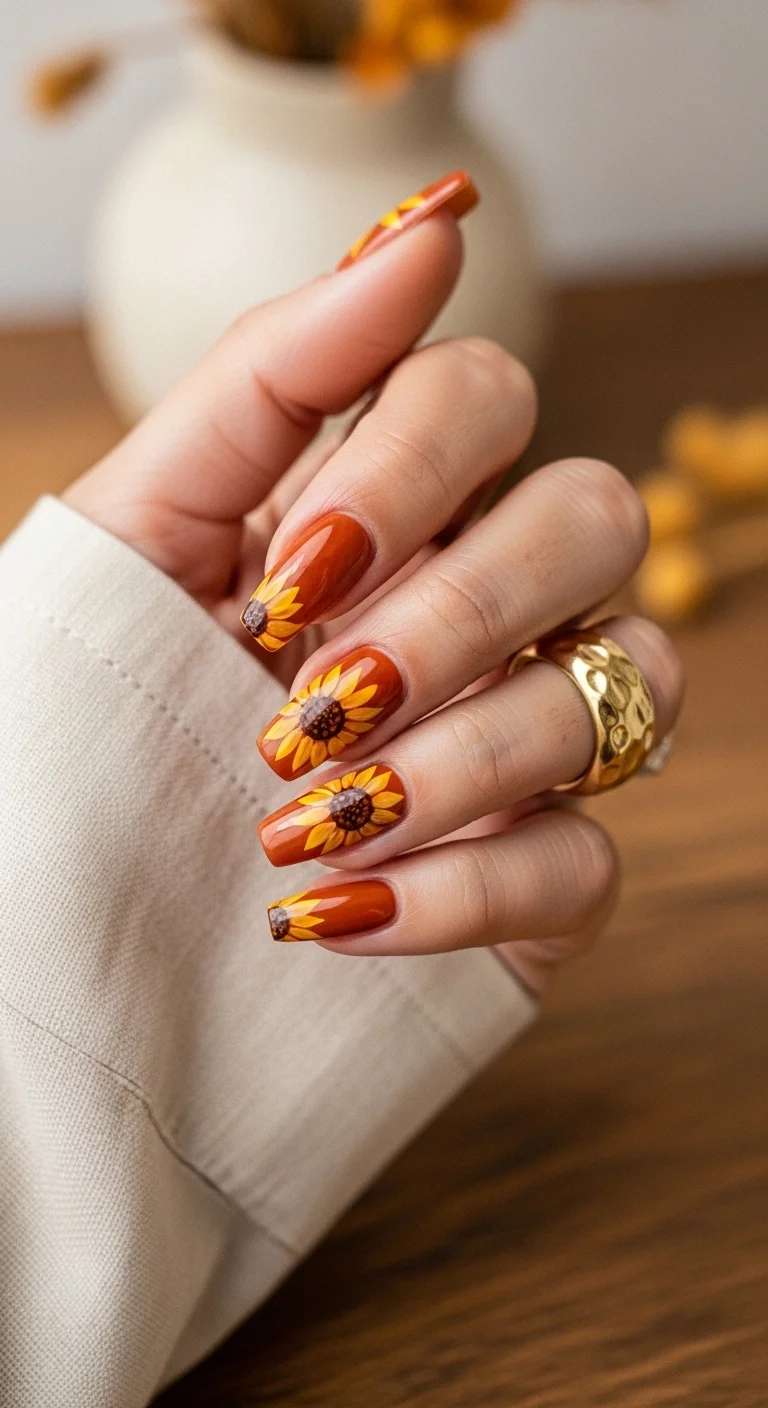
2.Toasty Terracotta Harvest
Burnt orange base with layered sunflower art across multiple nails.
Overview:
Terracotta is one of those colors that looks different under every lighting condition. In warm indoor light, it reads as a deep, brownish orange. In direct sunlight, the red undertones surface and the whole nail glows. That chameleon quality is what makes it more interesting than a standard orange or brown.
The sunflowers here work with the base color rather than against it. The petals have orange shading at their bases that blends into the terracotta, creating a gradient effect within each flower. This tonal connection makes the art feel integrated rather than pasted on top.
The challenge with terracotta formulas is streakiness. The warm pigment tends to separate in the bottle, which means uneven coverage if you don't shake it well. Three thin coats with proper dry time between each produces the best result.
Design Breakdown:
Warm-on-warm design where the base color and the art share the same tonal family.
Base Color: A rich, glossy burnt orange or terracotta. The finish should be high-shine to make the color look juicy.
Nail Shape: Medium-long almond. The curved shape complements the organic nature of the floral art.
Design Element: Hand-painted sunflowers on three to four nails. Yellow petals with orange shading at the base, dark brown textured centers. Placement varies per nail.
Finish: Ultra-glossy top coat to make the terracotta look rich and the sunflower petals look layered.
Get The Look at Home:
Paint all the sunflower centers across every nail first, then go back and add petals. This batch method is faster than finishing one nail at a time.
- Terracotta base: Two to three thin coats of burnt orange. Shake the bottle well before each coat.
- Center dots: Using a large dotting tool and chocolate brown, place one circle on each nail where you want the sunflower. Vary the position.
- First petal layer: Using a striper brush and bright yellow, flick short petal strokes outward from each brown center. Six to eight petals per flower.
- Second petal layer: Mix a drop of orange into your yellow on a foil palette. Paint shorter strokes at the base of each petal for a shadow effect.
- Center texture: Use a toothpick to add tiny dark dots within the brown centers for a seeded look.
- Seal: One thick coat of high-gloss top coat to smooth the art and saturate the colors.
3.Emerald Forest Sunflower Glow
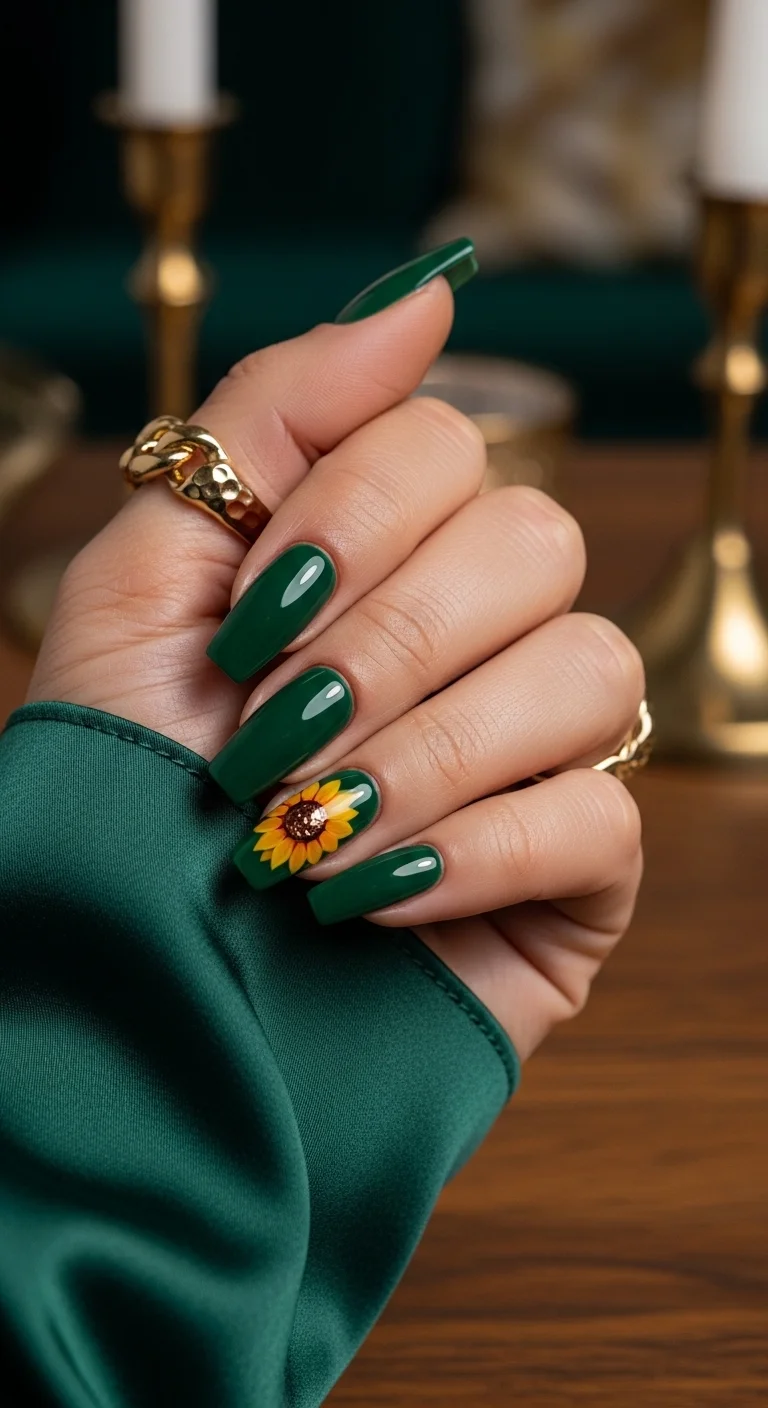
Deep emerald green with a sunflower accent featuring a glitter center.
Overview:
Dark green is a surprisingly effective backdrop for sunflower art. The cool depth of the emerald makes the warm yellow petals appear more saturated than they would on white or nude. It's the same principle as placing a warm light in a dark room: the contrast amplifies the warmth.
The glitter in the sunflower center is the subtle detail that elevates this from "green nails with a flower" to something more considered. The sparkle catches light at different angles and adds a third dimension to what would otherwise be a flat brown dot. It rewards closer inspection.
Emerald green polish is unforgiving on application. Dark greens tend to pool at the cuticle edge, creating a visible ridge where the polish is thicker. Using a cleanup brush before the polish sets prevents this, but it requires working quickly.
Design Breakdown:
Jewel-tone base with a single metallic-accented floral accent.
Base Color: Deep, opaque emerald or forest green with a high-gloss finish. The green should be cool-toned to maximize contrast with the warm yellow petals.
Nail Shape: Medium-long coffin. The flat surface frames the sunflower accent nicely.
Design Element: One sunflower on the ring finger with yellow petals and a bronze or copper glitter center. The glitter replaces the standard brown dot.
Finish: Ultra-glossy on all nails. The shine amplifies the depth of the green and the sparkle of the glitter.
Get The Look at Home:
The glitter center is the detail that makes this design. Don't substitute regular brown polish for it.
- Green base: Two coats of deep emerald. Clean the cuticle edge with a brush before each coat dries.
- Sunflower petals: On the ring finger, paint yellow petals radiating from a central point. Use a striper brush for precise, individual strokes.
- Glitter center: Instead of brown polish, use a bronze or copper glitter polish for the flower center. Apply it thick enough to create visible texture.
- Layer for depth: Add a few petals in a darker yellow or orange-yellow on top of the first layer.
- White highlights: Optional. Add tiny white dots on a few petal tips for a light-catching effect.
- Seal: Two coats of top coat. The first locks the art; the second smooths the glitter texture.

33 Trendy Polka Dot Nail Ideas for 2026 💅
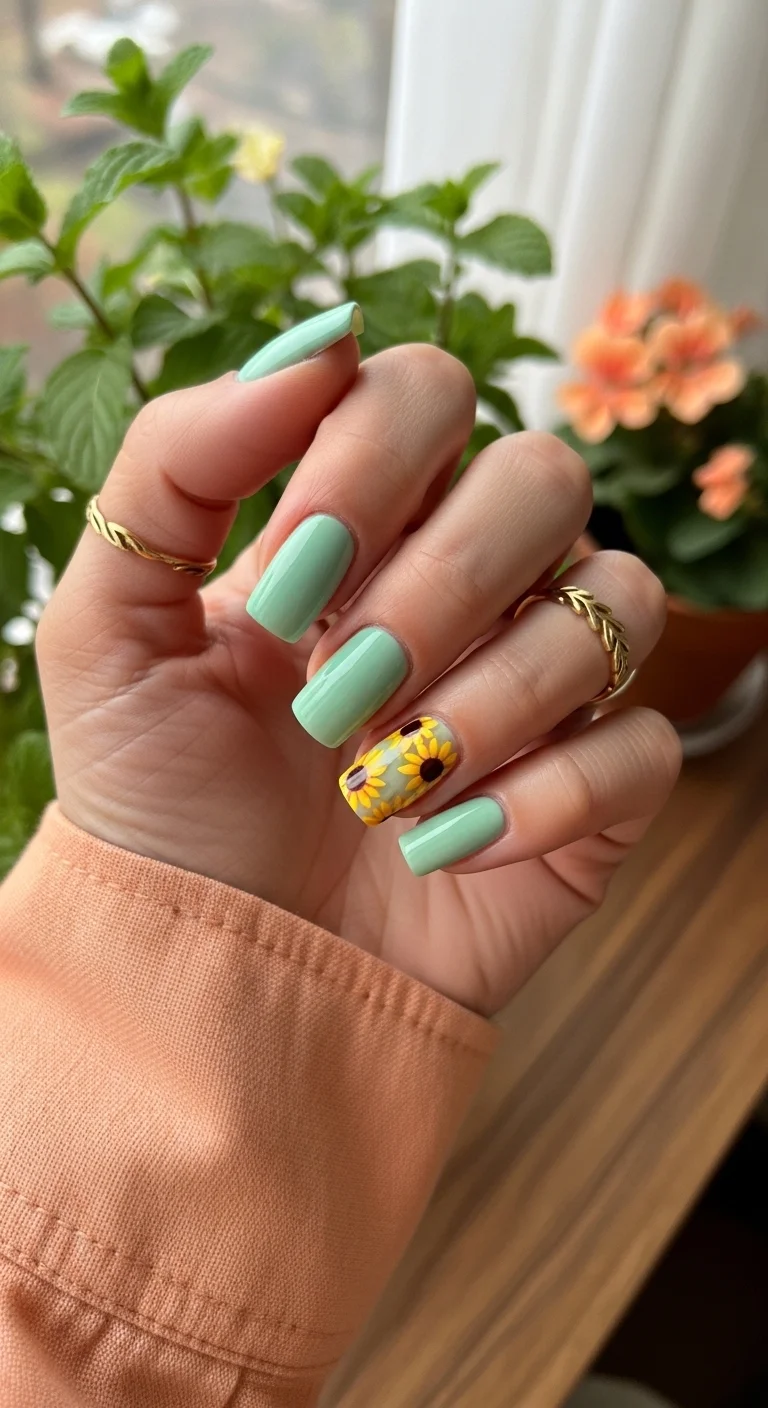
4.Minty Fresh Summer Meadows
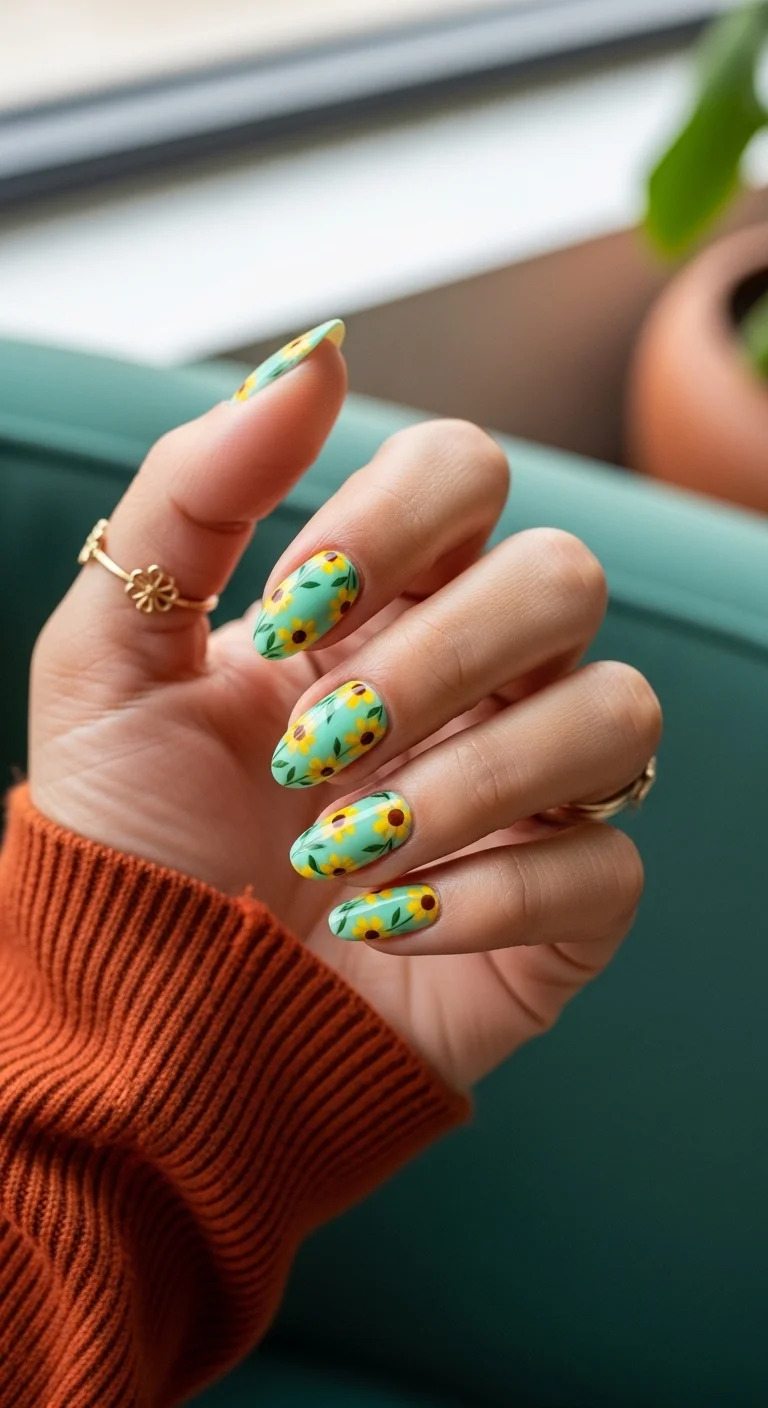
Muted mint green with scattered micro-sunflowers and greenery.
Overview:
This mint isn't the bright, almost-neon pastel that shows up in most spring nail articles. It's a muted, slightly grey-toned sage-mint that reads as more sophisticated and wearable. The desaturated quality means the tiny sunflowers on top don't compete with the base for attention.
The sunflowers are small enough to read as texture from a distance. Up close, each flower reveals individual petals, brown centers, and tiny green leaves. That dual reading is what makes the design interesting at every scale. From across a room, it looks like a patterned fabric. From six inches away, it looks like a garden.
The density of the flowers matters. Too many and the mint base disappears. Too few and the design looks sparse. The sweet spot is three to five flowers per nail with visible mint between them.
Design Breakdown:
All-over micro-floral pattern on a muted pastel base. The scale of the flowers is the design.
Base Color: A muted, slightly grey-toned mint or sage green. Not bright, not neon. The muted quality is what keeps it sophisticated.
Nail Shape: Medium almond. The curved shape complements the organic floral pattern.
Design Element: Tiny sunflowers with yellow petals, dark brown centers, and small green leaves scattered across all nails. Three to five flowers per nail.
Finish: High-gloss top coat to make the pastel base look creamy and the tiny flowers look crisp.
Get The Look at Home:
The flowers are simpler than they look because at this scale, imperfection reads as organic.
- Mint base: Two coats of muted mint green. Let dry fully.
- Brown centers: Using a small dotting tool, place tiny brown dots randomly across each nail. Three to five per nail.
- Yellow petals: Using a toothpick or the smallest dotting tool, place five tiny yellow dots around each brown center to form petals.
- Green leaves: Using a toothpick and a darker green than the base, add two small leaf strokes near some of the flowers.
- Spacing: Leave visible mint between flowers. The empty space is part of the design.
- Seal: One thick coat of top coat to protect the tiny details.
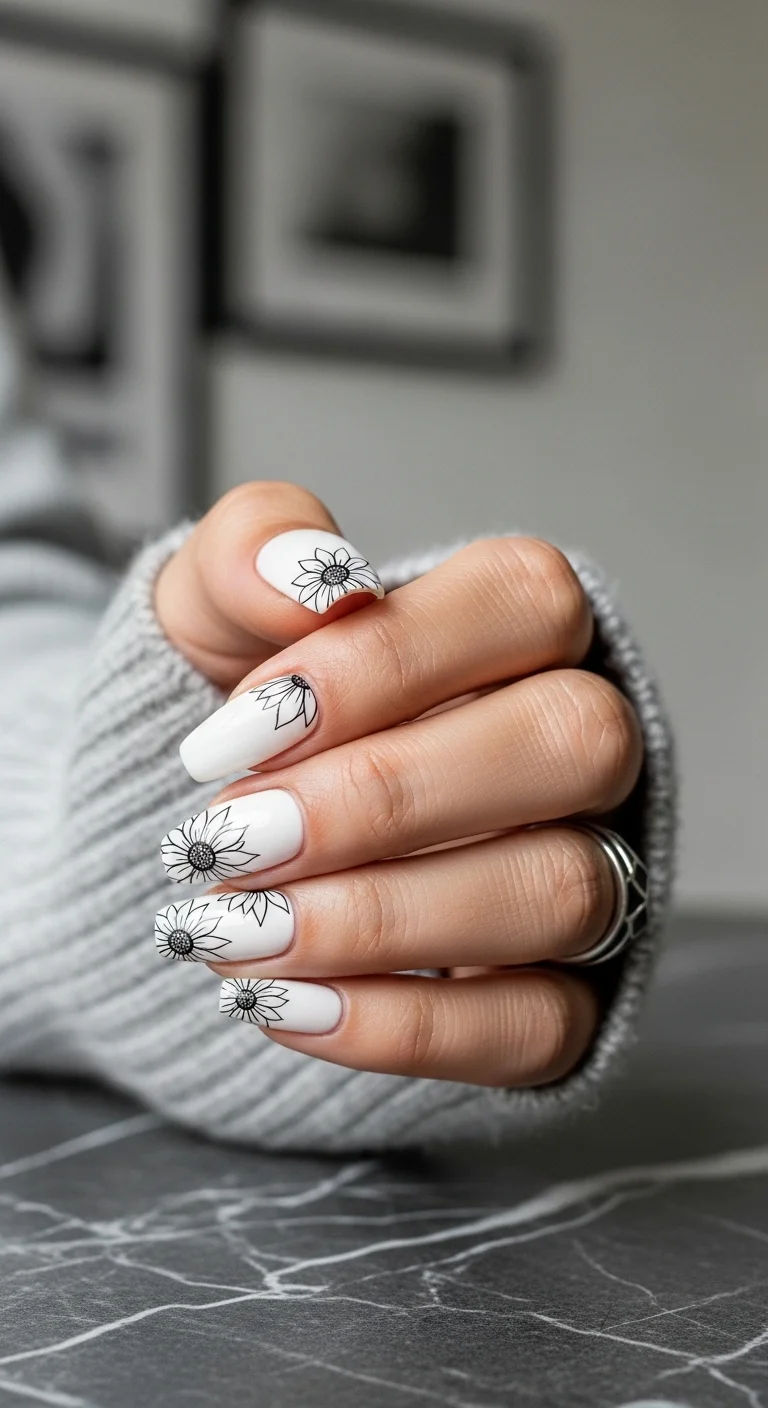
5.Minimalist Milky Sunflower
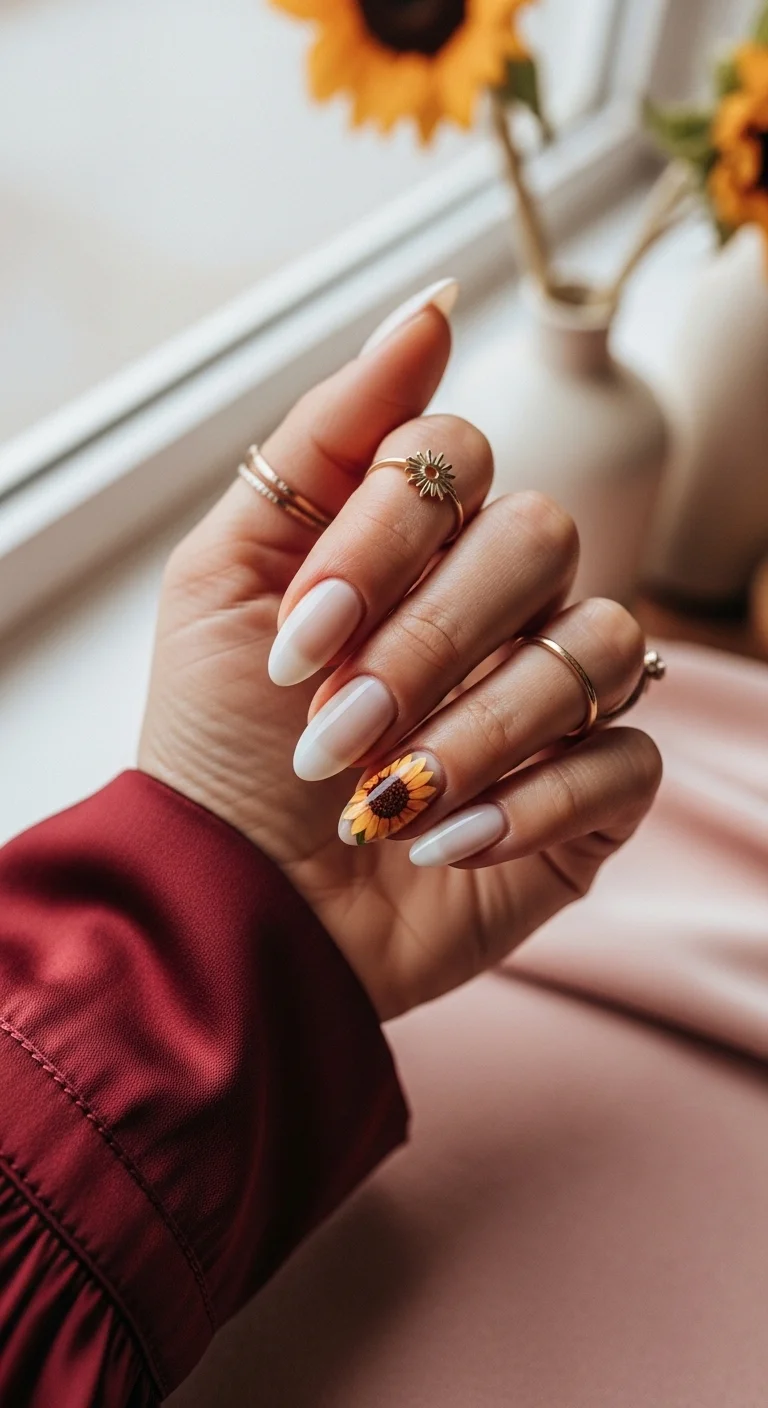
Milky white with a single realistic sunflower accent.
Overview:
The "clean girl" aesthetic has produced a specific type of nail design: minimal base, one accent, maximum restraint. This set follows that formula exactly, and the reason it works is the quality of the sunflower art. On a milky white base, a poorly painted flower would be immediately visible. The detail here, with shaded petals and a textured center, justifies the minimal surroundings.
The milky quality of the white is important. A stark, opaque white would create a hard backdrop that makes the sunflower look like a sticker. The semi-sheer, creamy white softens the transition between the bare nail and the art, which makes the flower look more like it belongs on the nail rather than being placed there.
The downside of milky white formulas: they're streaky. Achieving an even, translucent finish requires three to four very thin coats with adequate dry time between each. Thick coats create visible brush marks that the sheer formula can't hide.
Design Breakdown:
Minimal base with a single detailed accent. The quality of the art carries the entire design.
Base Color: Milky, semi-sheer white. Two to four coats depending on the formula. The finish should be translucent enough to see a hint of the natural nail.
Nail Shape: Medium-long almond. The elongated shape enhances the clean, refined aesthetic.
Design Element: One detailed sunflower on the ring finger. Layered yellow petals with orange shading, dark brown textured center, small green leaf.
Finish: High-gloss top coat to make the milky base look fresh and the sunflower look dimensional.
Get The Look at Home:
The milky base takes patience. Thin coats with dry time between each is the only way to get an even finish.
- Milky base: Apply three to four very thin coats of sheer white. Let each coat dry for at least two minutes.
- Sunflower placement: On the ring finger, use a fine brush to paint the flower. Start with the petals, not the center.
- Petal shading: Mix yellow with a tiny amount of orange on a foil palette. Apply this darker shade at the base of each petal where it meets the center.
- Center: Use a dotting tool with dark brown to create a textured circle in the middle. Add smaller black dots for a seeded effect.
- Leaf: A single small green leaf near the base of the flower adds color without clutter.
- Seal: One coat of glossy top coat over all nails.

24 Stunning Festival Hairstyle Ideas for Music Concert Nights 2026 🎶✨
6.Blue Sky & Sunny Blooms
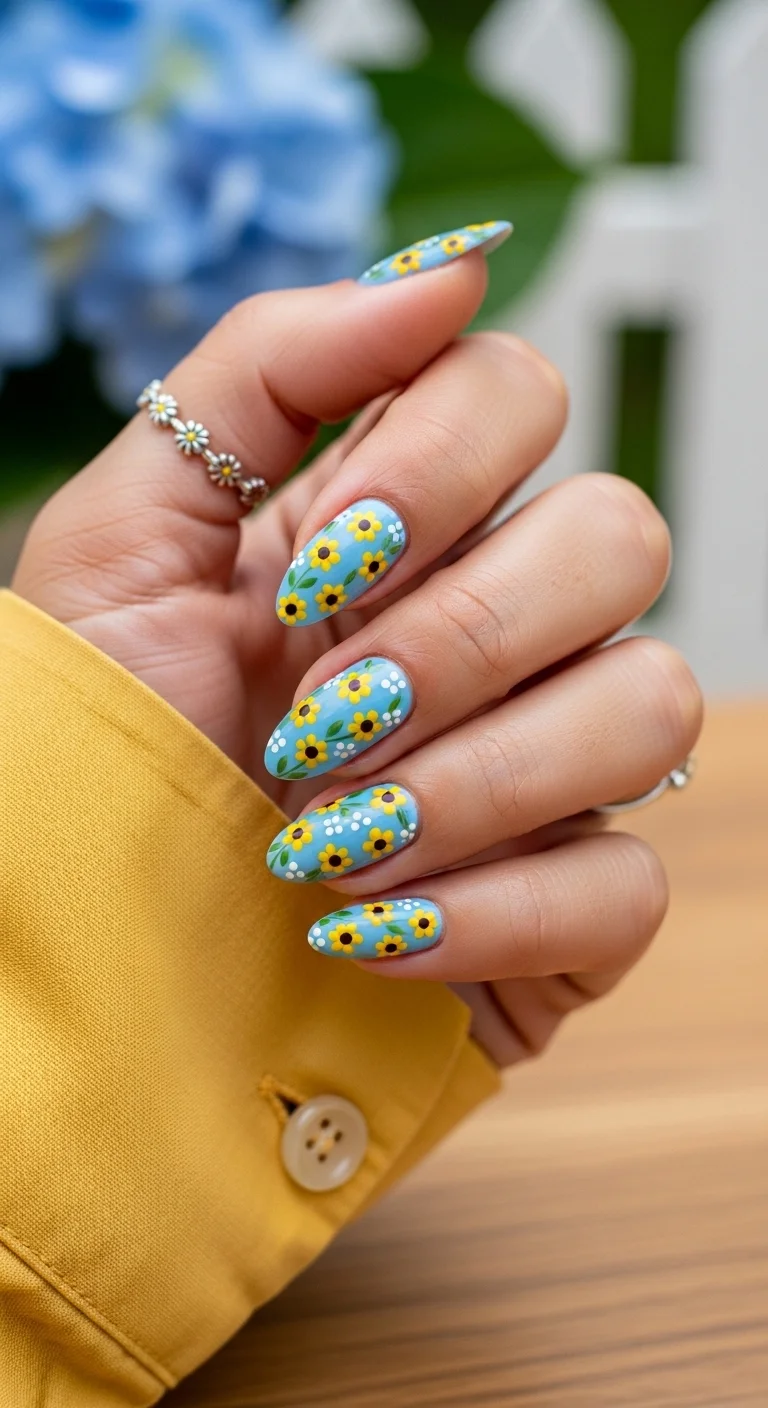
Soft sky blue covered in dense micro-sunflowers and white filler dots.
Overview:
Blue and yellow is one of those color pairings that works on a biological level. It's the sky and the sun, and the association is so deeply embedded that the combination reads as "happy" before the brain even processes the individual design elements. This set leans into that association hard.
The white dots between the sunflowers serve a practical purpose: they fill the negative space so the blue background doesn't look empty in the gaps between flowers. Without them, the design would feel sparse on nails with fewer sunflowers. With them, every nail looks complete regardless of flower density.
The blue here is soft, not electric. A brighter, more saturated blue would compete with the yellow petals for attention. The muted quality of this particular blue lets the sunflowers dominate visually while still providing enough color to read as "blue sky" rather than "grey sky."
Design Breakdown:
Dense all-over floral with white dot filler on a cool-toned base.
Base Color: Soft, opaque sky blue. Not electric, not pastel. A mid-tone cornflower that's saturated enough to hold its own against the yellow.
Nail Shape: Medium almond. A practical shape that keeps the busy pattern from overwhelming the hand.
Design Element: Dense micro-sunflowers with yellow petals and brown centers, plus small white dots scattered in the empty blue spaces.
Finish: High-gloss top coat to protect the layered art and saturate the colors.
Get The Look at Home:
Work from the background forward: base color, then flowers, then dots, then leaves.
- Blue base: Two coats of sky blue. Let dry fully. The yellow petals will smear if the blue is even slightly tacky.
- Brown centers: Place brown dots where you want each flower. Two to three per nail.
- Yellow petals: Using a toothpick or small dotting tool, place five yellow dots around each brown center.
- White filler dots: Using the smallest dotting tool, place tiny white dots in the empty blue spaces between flowers.
- Green leaves: Add one or two tiny green leaf strokes near some of the flowers for color depth.
- Seal: One thick coat of top coat to smooth the surface and lock in the details.
7.Picnic Day Gingham & Petals
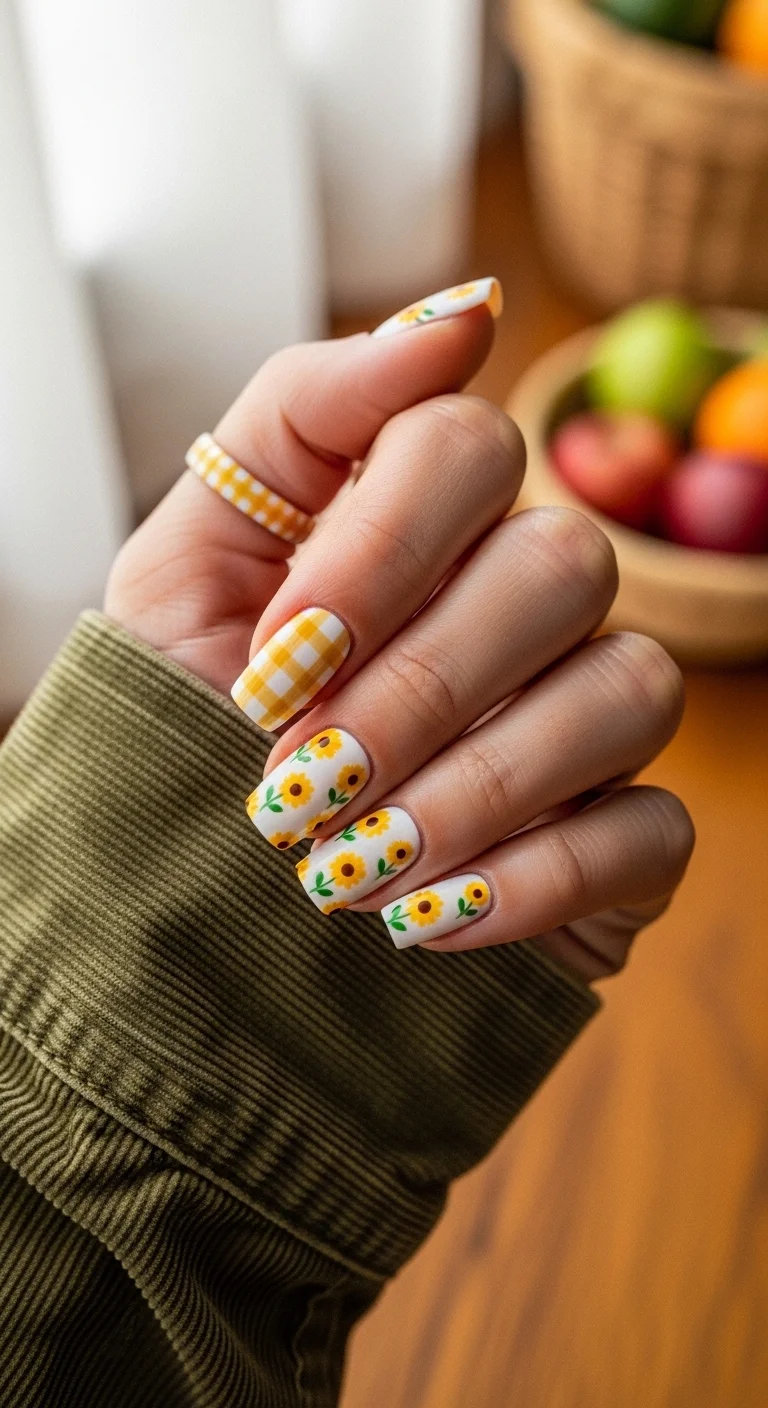
Yellow gingham alternating with white-based sunflower art.
Overview:
Mixing two patterns on one hand is a risk that usually fails because the patterns fight each other for attention. This version works because both patterns share the same color palette: yellow, white, and green. Every element on every nail uses these three colors, which creates cohesion despite the visual variety.
The gingham and the sunflowers are separated onto different nails rather than layered on the same one. Alternating keeps each pattern readable. When you stack gingham underneath a sunflower, neither element gets to shine.
The gingham pattern requires consistent line spacing to look convincing. If the horizontal and vertical lines aren't equidistant, the pattern collapses into a grid that looks like graph paper rather than fabric. Using striping tape is the realistic path to clean gingham lines.
Design Breakdown:
Two-pattern mashup unified by a consistent yellow-and-white color story.
Base Color: Opaque white on all nails, serving as the foundation for both patterns.
Nail Shape: Medium almond. The curved shape softens the geometric gingham and complements the organic flowers.
Design Element: Alternating nails between yellow gingham (thin intersecting lines on white) and small sunflowers with brown centers and green leaves on white.
Finish: High-gloss top coat to unify both patterns.
Get The Look at Home:
Do the gingham nails and the flower nails in separate rounds to keep your tools clean.
- White base: Two coats of opaque white on all nails.
- Gingham nails: On alternating nails, use a striper brush to paint thin horizontal yellow lines. Let them dry, then paint vertical lines at the same spacing.
- Flower nails: On the remaining nails, place brown dots for sunflower centers, then add yellow petals around each.
- Green details: Add small green leaves to the sunflowers and optionally to the gingham nails for color connection.
- Consistency check: Compare both hands. The gingham spacing and flower sizes should be roughly consistent.
- Seal: One thick coat of top coat over everything. Float the brush to avoid dragging the gingham lines.

27 Stunning Graduation Day Nail Ideas for 2026 🎓
8.Marble Stone & Sunflowers
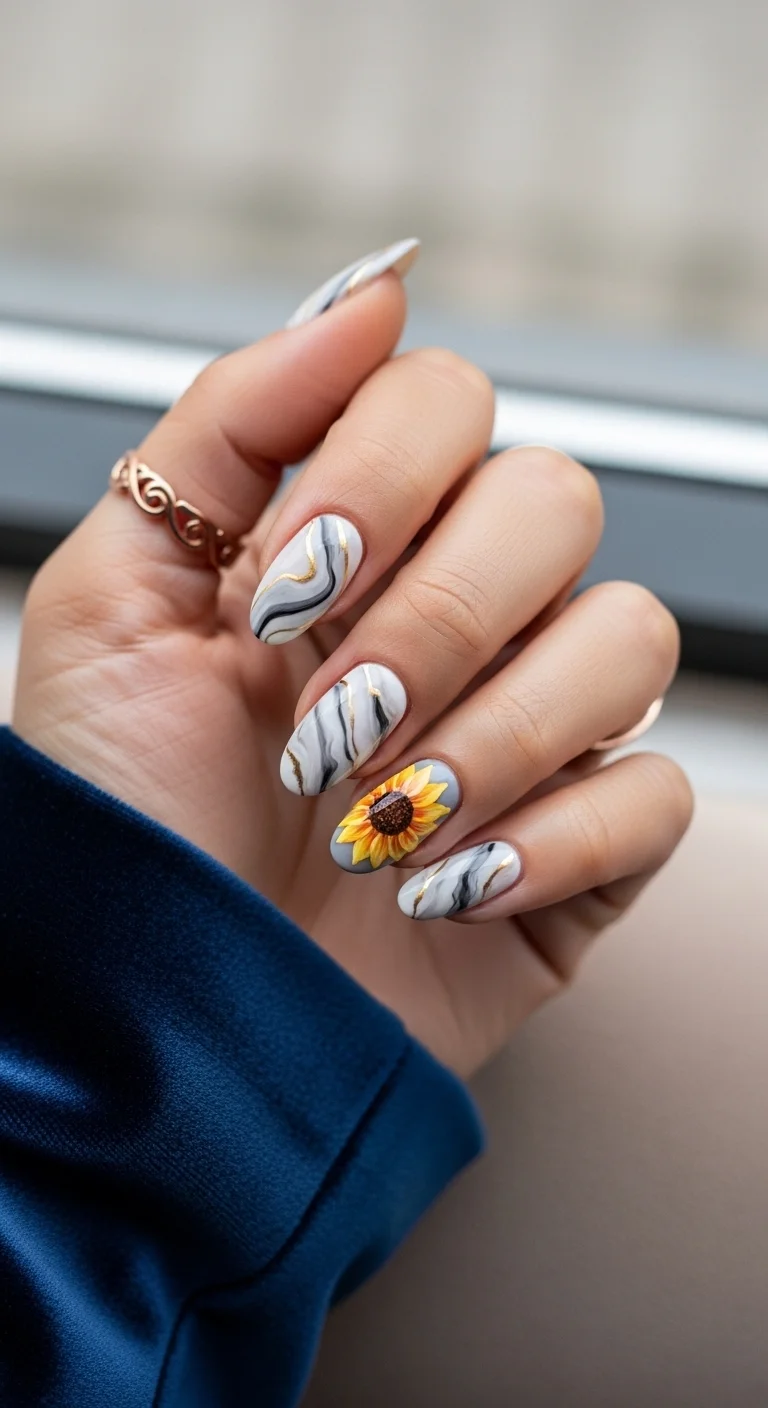
Grey and gold marble with a single sunflower accent nail.
Overview:
Marble and florals are an unusual pairing. One is geological and cold; the other is organic and warm. The tension between those two qualities is what makes this design interesting. The marble reads as sophisticated and structured. The sunflower reads as cheerful and natural. Together, they create a set that doesn't fit neatly into either category.
The gold metallic lines running through the marble are a detail that doesn't show up in every photo but is visible in person. They catch light differently than the grey veins, adding a warm accent that connects to the yellow sunflower petals. Without the gold, the marble would feel disconnected from the floral accent.
The marble technique is forgiving because every nail is supposed to look different. If you try to match the vein patterns, you'll overwork the design. Let each nail develop its own organic pattern and trust that the inconsistency is what makes it look like real stone.
Design Breakdown:
Marble nails with gold accents and a single floral accent. The gold ties the two elements together.
Base Color: White with grey and black marble veining. Gold metallic lines add warm accents to the cool-toned marble.
Nail Shape: Medium almond. The curved surface lets the marble veins follow an organic path.
Design Element: Marble pattern on four nails. One sunflower accent on the ring finger with yellow petals and a dark brown textured center.
Finish: Ultra-glossy top coat to mimic the polished surface of real marble.
Get The Look at Home:
Work the marble wet-on-wet. The veins need to blend at their edges while the polish is still fluid.
- White base: Two coats of opaque white. Let dry completely.
- Marble veins: Using a thin brush and grey polish, draw squiggly lines across the nail. Don't press hard.
- Gold accents: Using a striper brush and gold metallic polish, add thin lines that run alongside or cross the grey veins.
- Soften: Dip a clean brush in a little top coat and lightly dab at the veins to blur their edges.
- Sunflower accent: On the ring finger, paint a detailed sunflower with layered petals and a textured center.
- Seal: Wait five minutes, then apply a generous top coat to smooth the surface.
9.Olive Grove Sunflower Fields
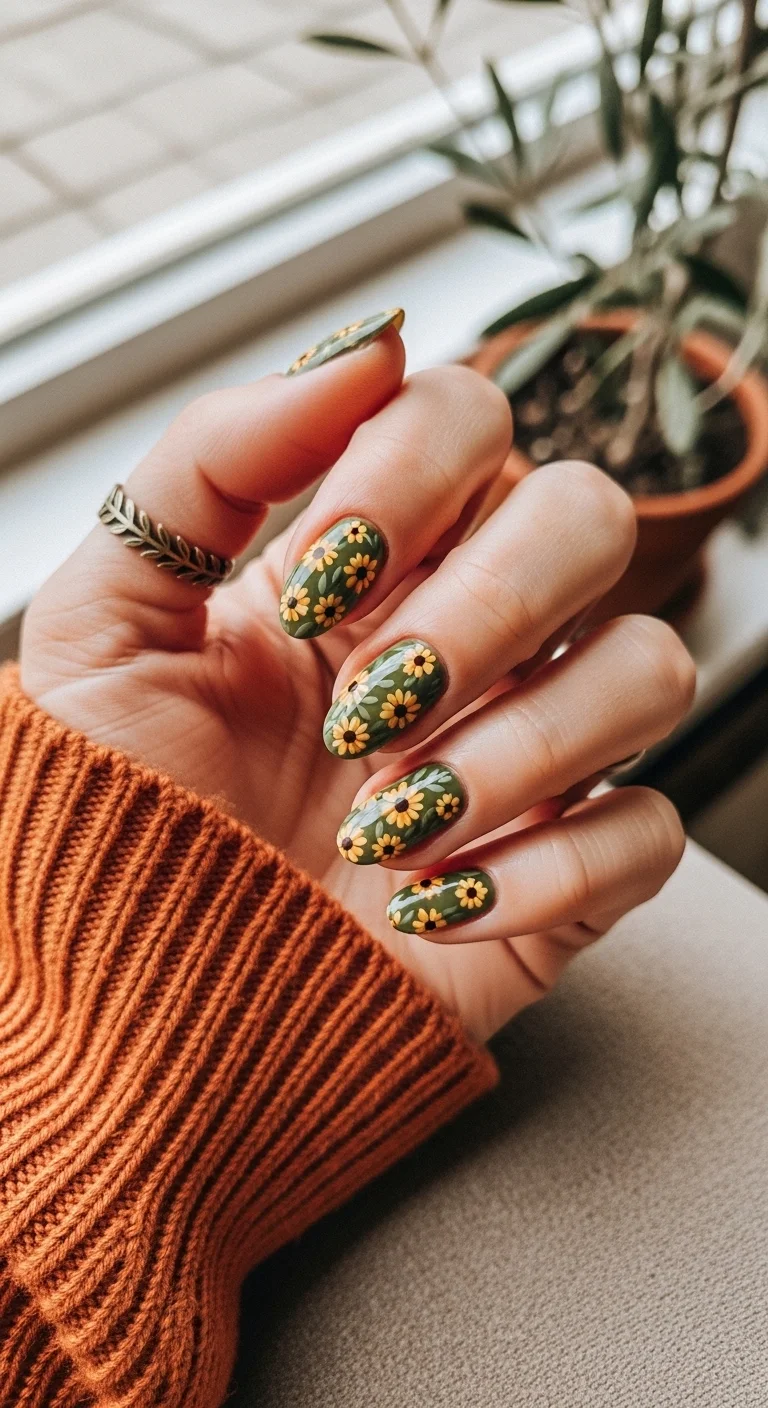
Olive green covered in dense micro-sunflowers with green leaves.
Overview:
Olive green is a neutral in the same way that camel or navy is a neutral. It goes with everything in a wardrobe without demanding attention. Adding sunflowers to an olive base transforms it from a background color into a deliberate design choice. The yellow petals pop against the muted green in a way they wouldn't against a brighter shade.
The density of the flowers is what distinguishes this from a sparse floral design. Nearly every nail is covered in small sunflowers with visible green leaves between them. The effect is closer to a textile print than individual nail art. It reads as a pattern, not a collection of flowers.
Olive greens can lean either warm or cool depending on the brand, and the direction matters for this design. A warm olive with yellow undertones makes the sunflower petals look more harmonious. A cool olive with blue undertones makes them look more contrasting. Both work, but the mood is different.
Design Breakdown:
Dense all-over floral on an earthy neutral base. The pattern density is the design.
Base Color: Muted olive green. The desaturated quality keeps the busy flower pattern from looking overwhelming.
Nail Shape: Medium almond. The organic shape matches the botanical subject matter.
Design Element: Tiny sunflowers with yellow petals and dark brown centers, plus green leaves, densely scattered across all nails.
Finish: Satin or semi-matte top coat to emphasize the earthy, botanical quality of the design.
Get The Look at Home:
Work in color layers. All browns first, then yellows, then greens. This batch method is faster than finishing one flower at a time.
- Olive base: Two coats of muted olive green. Let dry fully.
- Brown centers: Using a small dotting tool, place brown dots across all nails. Three to five per nail.
- Yellow petals: Using a toothpick, place five tiny yellow dots around each brown center.
- Green leaves: Using a slightly darker green than the base, add two small leaf strokes near some of the flowers.
- Density check: Step back and look at the overall coverage. Add more flowers if any nail looks too sparse.
- Satin seal: Apply a satin or semi-matte top coat to give it an earthy, botanical finish.
22 Best Graduation Day Hairstyles for 2026 🎓✨
10.Dainty White Sunflower Shorties
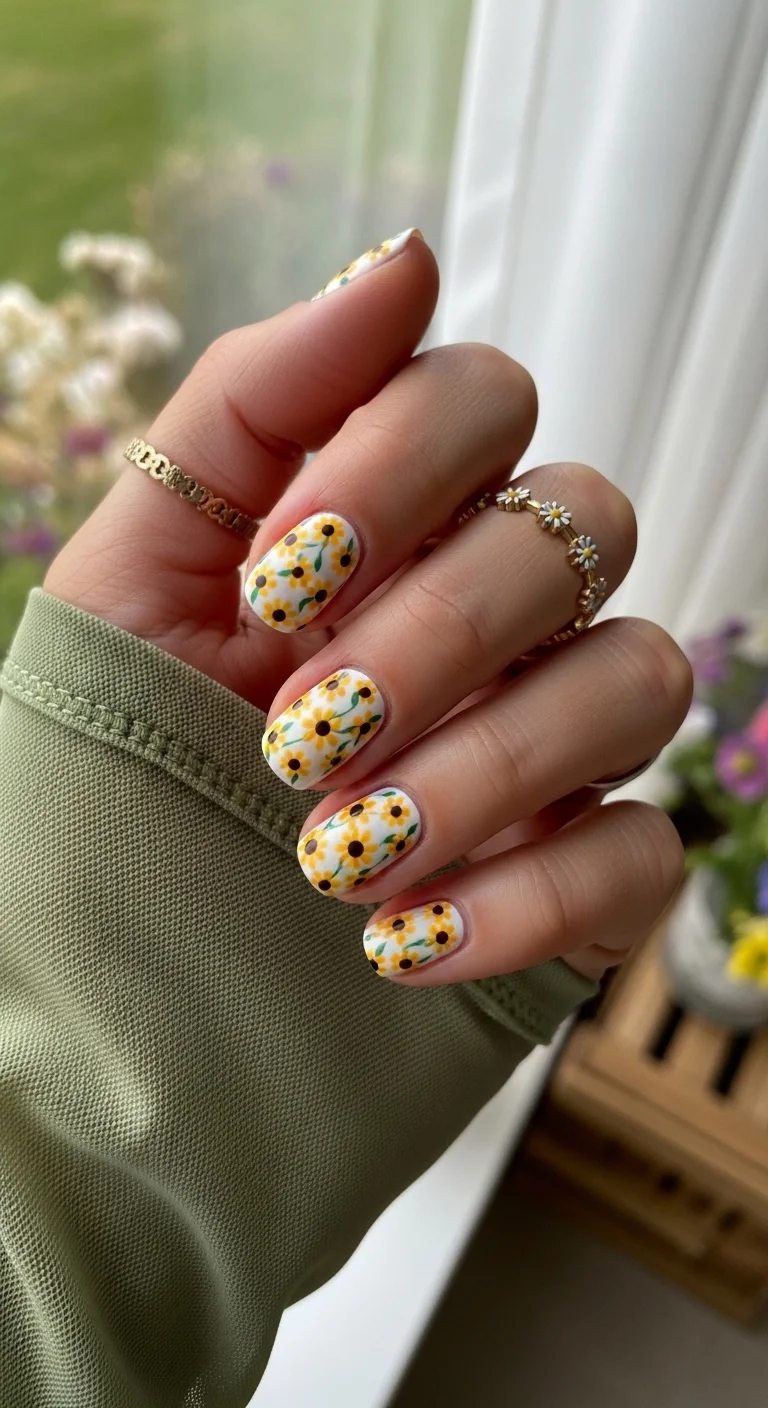
Short white nails covered in dense micro-sunflowers.
Overview:
Short nails and busy patterns are usually at odds. The limited surface area means every element has to be scaled down proportionally, which is technically difficult. This set gets around that problem by making the flowers uniformly tiny. At this scale, the individual flowers become texture rather than illustration, which is more forgiving on a small canvas.
The white base is the right choice for short nails with dense floral art. A colored base would compete with the flowers for attention on an already limited surface. White provides a clean backdrop that lets the yellow and green read clearly without visual competition.
The practical advantage of short nails for this design: there's less surface to paint, which means the project takes less time overall. The trade-off is that the tiny flowers require more precision because any inconsistency is amplified on a smaller scale.
Design Breakdown:
Dense micro-floral on a clean white base, scaled for short nails.
Base Color: Crisp, opaque white. The white needs to be fully pigmented so the tiny flowers sit cleanly on top.
Nail Shape: Short oval. The practical shape reinforces the casual, wearable quality of the design.
Design Element: Dense micro-sunflowers with yellow petals, dark brown centers, and small green leaves covering all nails.
Finish: High-gloss top coat to make the white look fresh and the tiny flowers look crisp.
Get The Look at Home:
Short nails mean less surface area, which means this project is faster than it looks.
- White base: Two coats of opaque white. Let dry fully.
- Brown centers: Using a small dotting tool, place brown dots across all nails. Three to four per nail on short nails.
- Yellow petals: Using the smallest dotting tool or a toothpick, place five yellow dots around each brown center.
- Green leaves: Add tiny green leaf strokes near some of the flowers for color depth.
- Coverage check: On short nails, the flowers should be dense enough that the white base is visible between them but doesn't dominate.
- Seal: One thick coat of top coat to protect the tiny details.
11.Lavender Fields Sunbeams
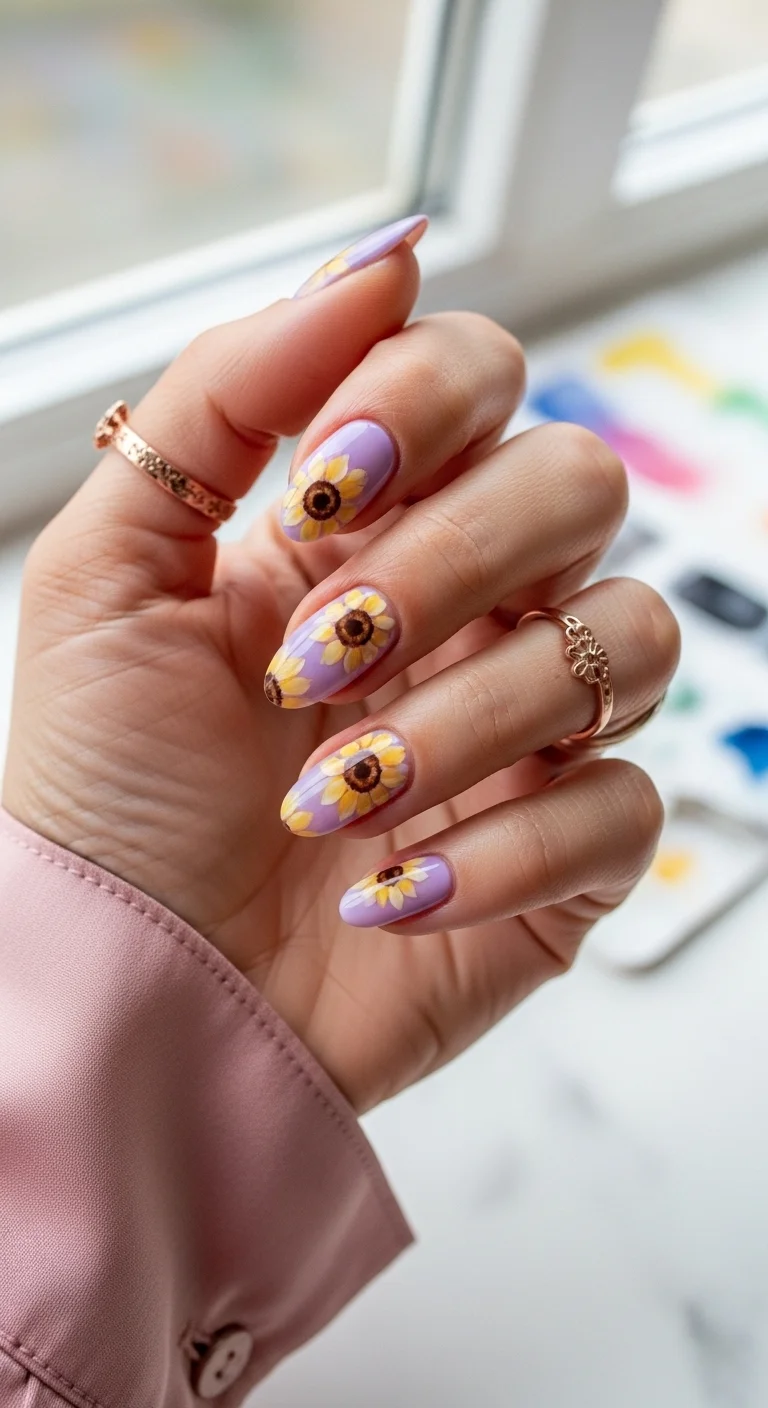
Soft lavender with hand-painted sunflowers for a cool-on-warm contrast.
Overview:
Purple and yellow sit opposite each other on the color wheel, which means this pairing creates maximum contrast without either color looking muddy. The lavender base is cool-toned enough to make the warm yellow petals appear more saturated than they would on a neutral base. The effect is vibrant without being loud.
The sunflowers here are medium-sized, not micro. Each flower takes up roughly a quarter of the nail surface, which means the petals are large enough to show individual brush strokes and color variation. That detail level is visible from arm's length, unlike the micro-sunflowers that only reveal themselves up close.
Lavender polish has a reputation for being streaky, particularly in pastel formulas. The pigment particles tend to separate, creating uneven coverage. Three thin coats with proper dry time between each is the minimum requirement for a smooth, opaque finish.
Design Breakdown:
Cool-toned base with warm floral accents. The color wheel contrast is what makes the yellow pop.
Base Color: Soft, opaque lavender. Not too bright, not too grey. A clean pastel purple that provides enough contrast for the yellow petals.
Nail Shape: Medium-long almond. The elongated shape gives the medium-sized sunflowers room to breathe.
Design Element: Medium-sized sunflowers on three to four nails. Yellow petals with visible layering, dark brown textured centers.
Finish: High-gloss top coat to make the lavender look creamy and the yellow petals look dimensional.
Get The Look at Home:
The lavender base needs three coats for full opacity. Don't rush the foundation.
- Lavender base: Three thin coats of pastel lavender. Let each dry fully before the next.
- Center dots: Using a dotting tool and dark brown, place one circle on each nail where you want the sunflower.
- First petal layer: Using a striper brush and bright yellow, flick petal strokes outward from each center. Six to eight petals per flower.
- Second petal layer: Mix a drop of orange into your yellow. Paint shorter strokes at the base of each petal for depth.
- Center texture: Use a toothpick to add tiny black dots within the brown centers for a seeded look.
- Seal: One thick coat of top coat to smooth the art and saturate the colors.

34 Stunning Summer Butterfly Nails for Women in 2026 🦋
12.Rust Orange Botanical Garden
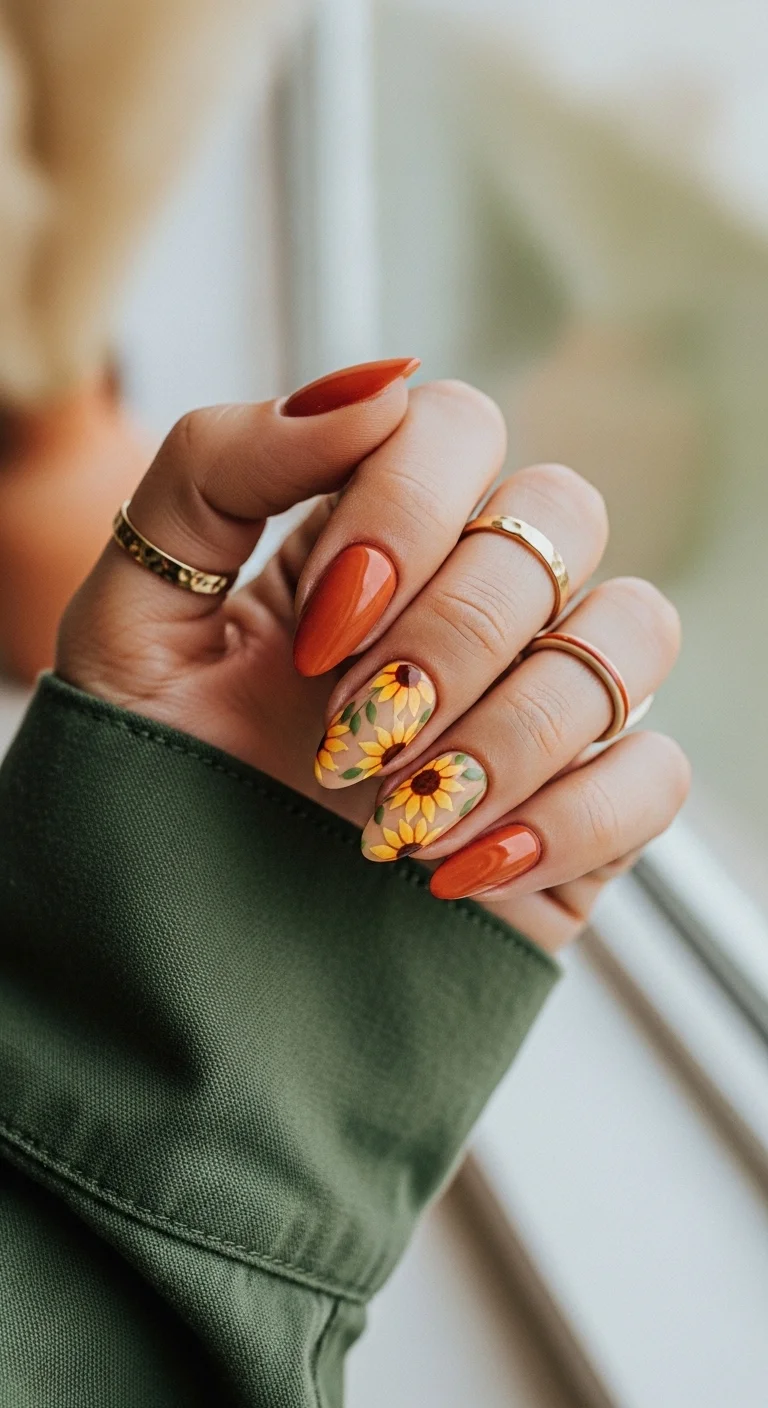
Solid rust orange alternating with sheer-based sunflower accent nails.
Overview:
This set divides the hand into two distinct zones: solid rust orange on some nails, and sheer-based sunflower art on others. The alternation creates rhythm across the hand, with the solid nails providing visual rest between the detailed floral nails. It's a more wearable approach than covering every finger in art.
The sheer base under the sunflowers is what makes the art look different from the solid nails. On the solid orange nails, the color is opaque and saturated. On the floral nails, the same orange shows through as a transparent wash behind the flowers, creating a layered, dimensional effect that opaque nails can't achieve.
The rust shade here leans toward burnt orange rather than coral or terracotta. It's warm enough to complement the yellow petals but dark enough to stand on its own as a solid color. The duality is what makes the set work as both a neutral and a statement.
Design Breakdown:
Alternating solid and art nails using the same color family at different opacities.
Base Color: Rust or burnt orange, opaque on solid nails, applied as a single sheer coat on the art nails.
Nail Shape: Medium-long almond. The warm, organic shape suits the botanical theme.
Design Element: Two to three nails with solid rust orange. Two to three nails with sheer orange base, green leaves, and hand-painted sunflowers.
Finish: High-gloss top coat to make the solid nails look juicy and the art nails look layered.
Get The Look at Home:
Decide which nails get solid color and which get art before you start painting.
- Solid nails: Two coats of opaque rust orange on your designated solid nails. Let dry fully.
- Art nails: One sheer coat of the same rust orange on the remaining nails. This creates a translucent wash.
- Green leaves: On the art nails, paint small green leaf shapes before the sunflowers. The leaves sit behind the petals.
- Sunflower centers: Place brown dots over the leaves.
- Petals: Flick yellow petal strokes outward from each center. Two to three flowers per nail.
- Seal: One thick coat of top coat to unify the solid and art nails.
13.Taupe Sunbeam Squares
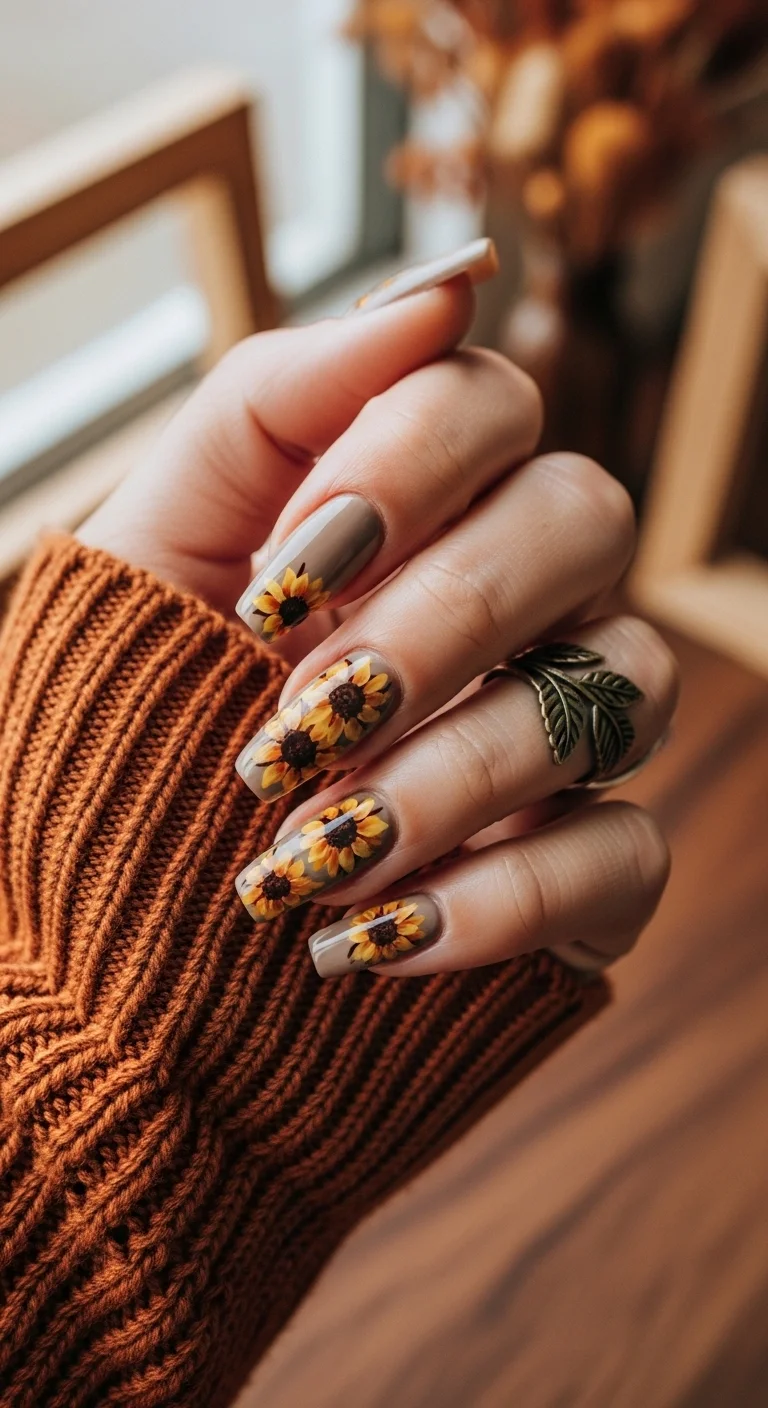
Warm taupe with layered sunflower art for an earthy, grounded look.
Overview:
Taupe is one of those colors that people either love or find boring. The boring interpretation misses the point. Taupe is a warm neutral that recedes into the background, which makes it an ideal canvas for detailed art. The sunflowers here aren't fighting the base color for attention. They're sitting on top of it, clearly visible and unobstructed.
The taupe-to-yellow contrast is lower than white-to-yellow or black-to-yellow, which gives the design a softer, more muted quality. The flowers look less like they're shouting and more like they're resting on the nail. That quieter energy is what makes this set appropriate for settings where brighter sunflower nails might feel too casual.
The coffin shape provides a flat, stable surface for the floral art. On almond nails, the same flowers would curve with the nail surface, which can distort the petal shapes. The flat coffin tip keeps the flowers geometrically consistent.
Design Breakdown:
Neutral base with floral accents. The low contrast creates a muted, sophisticated mood.
Base Color: Warm taupe or greige. A neutral that's brown enough to feel grounded but grey enough to feel modern.
Nail Shape: Medium-long coffin. The flat surface provides stable ground for the floral art.
Design Element: Sunflowers on three to four nails. Yellow petals with orange shading, dark brown textured centers, small green leaves.
Finish: High-gloss top coat to make the taupe look rich and the sunflower petals look layered.
Get The Look at Home:
The low contrast between taupe and yellow means the flowers need strong definition to read clearly.
- Taupe base: Two coats of warm taupe. Let dry fully.
- Center dots: Using a dotting tool and dark brown, place circles where you want each sunflower. Vary the position.
- Petals: Using a striper brush and bright yellow, flick petal strokes outward. The yellow needs to be fully opaque to show against the taupe.
- Orange shading: Mix a drop of orange into your yellow. Apply at the base of each petal for depth.
- Green leaves: Add small green leaf strokes near some of the flowers for color contrast.
- Seal: One thick coat of top coat to smooth the surface and protect the art.
20 Stunning Half Up Half Down Hairstyles for Prom Night 2026 💃✨
14.Minty Fresh Sunflower Accent
Bright mint green with a single sunflower accent nail.
Overview:
Mint and yellow is a color combination that shouldn't work as well as it does. Both colors are light, both are cheerful, and together they create a palette that reads as unmistakably spring-to-summer. The cool undertone of the mint keeps the warm yellow petals from looking too orange, and the yellow keeps the mint from looking too cold.
The single accent nail approach is the most wearable version of this color pairing. Four nails of solid mint provide enough color to establish the theme, while the one sunflower nail adds detail without overwhelming the set. It's the minimum effective dose of floral art.
The mint here is brighter and more saturated than the sage-mint in item 4. That brightness makes it feel more playful and casual, which is appropriate for the simpler accent-nail design. A muted mint would feel too serious for this particular layout.
Design Breakdown:
Bright solid base with a single floral accent. Simplicity is the design principle.
Base Color: Bright, opaque mint green. More saturated than a sage or pastel mint. The brightness is what keeps it playful.
Nail Shape: Medium coffin. The flat surface frames the sunflower accent cleanly.
Design Element: Solid mint on four nails. One sunflower on the ring finger with yellow petals, dark brown center, and small leaf details.
Finish: High-gloss top coat to make the mint look fresh and the sunflower look dimensional.
Get The Look at Home:
This is one of the faster designs on this list. The solid nails take minutes; the accent nail takes ten.
- Mint base: Two coats of bright mint green on all nails. Let dry fully.
- Sunflower center: On the ring finger, place a dark brown circle near the center of the nail.
- Petals: Using a striper brush and yellow, flick petal strokes outward from the center. Layer for depth.
- Leaf: Add one or two small green leaf strokes near the base of the flower.
- Center detail: Use a toothpick to add tiny black dots within the brown center.
- Seal: One thick coat of top coat over all nails.
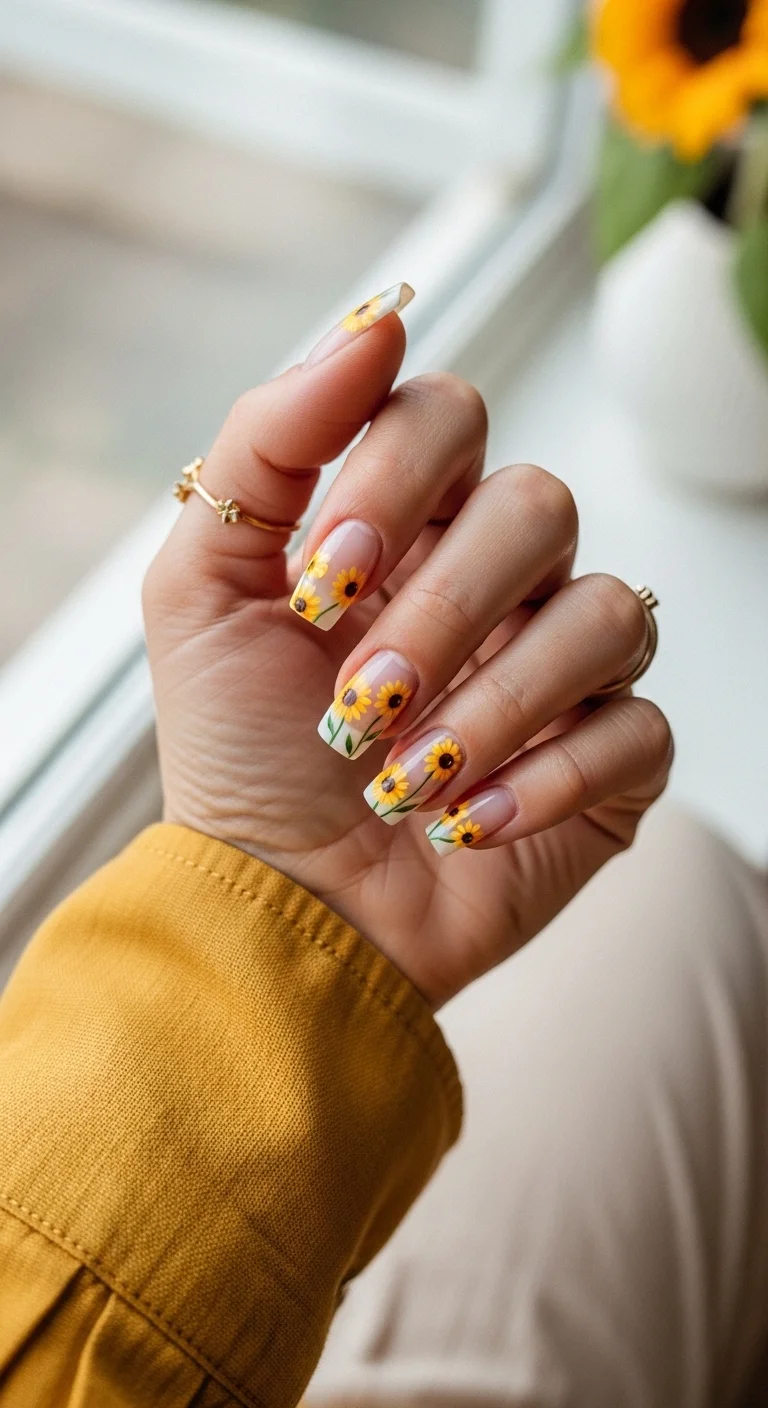
15.Crisp White Cuticle Blooms
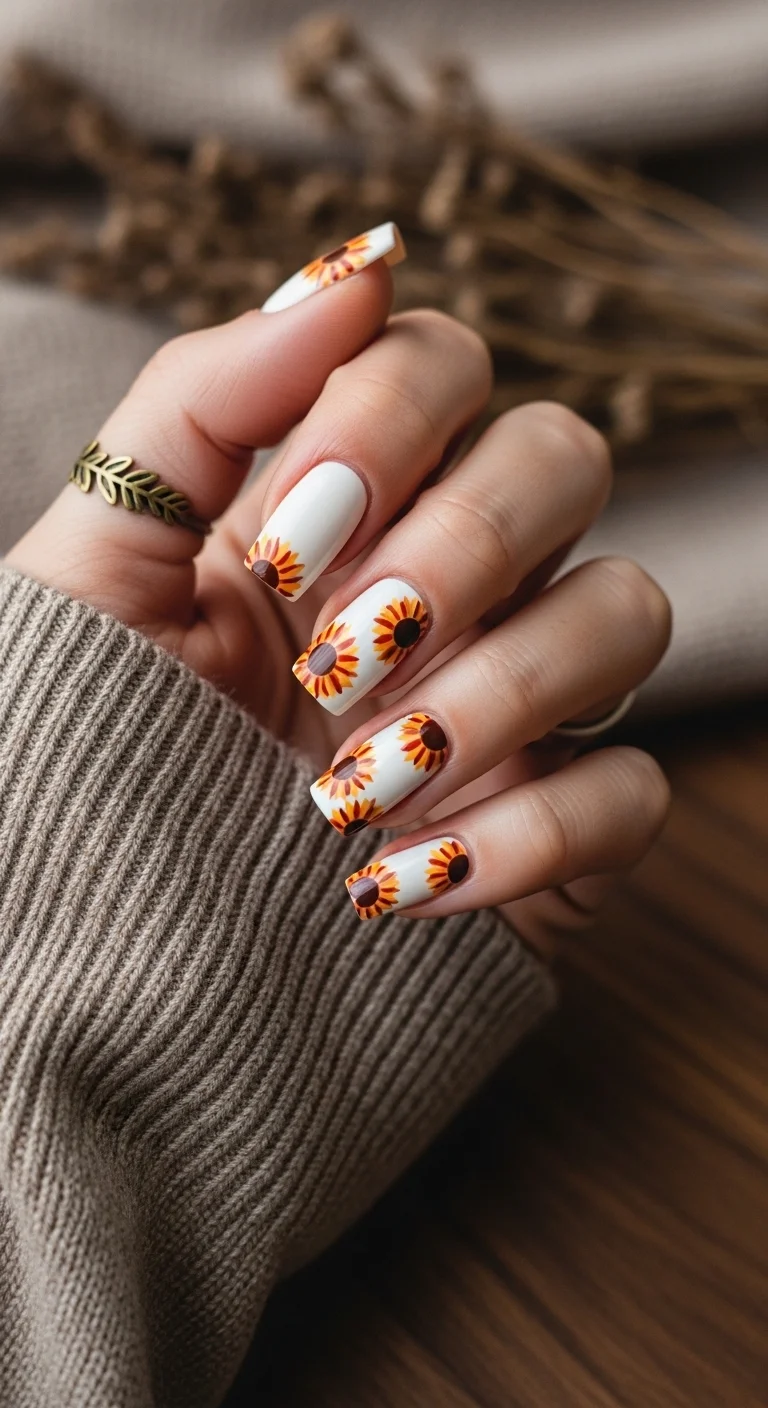
White nails with sunflowers blooming from the cuticle.
Overview:
Most sunflower nail designs center the flower in the middle of the nail. This one positions them at the cuticle, which changes the entire composition. The flowers appear to be growing upward from the base of the nail, with the white extending toward the tip. That directional quality gives the design a sense of growth and movement that centered flowers don't achieve.
The white base is essential for this placement strategy. It acts as sky or negative space above the flowers, which reinforces the "growing upward" effect. On a colored base, the flowers would sit on top of the color rather than emerging from the cuticle line.
The petals here lean more orange-yellow than pure yellow, which gives the sunflowers a warmer, more autumnal quality. This is a design that could work in late summer as easily as in June.
Design Breakdown:
Cuticle-positioned floral on a white base. The placement is the design.
Base Color: Crisp, opaque white. The white needs to be fully pigmented to provide clean negative space above the flowers.
Nail Shape: Medium-long coffin. The flat tip emphasizes the upward growth direction of the flowers.
Design Element: Sunflowers positioned at the cuticle on three to four nails. Orange-yellow petals with dark brown centers. The flowers are cropped by the cuticle line, showing only the top portion.
Finish: High-gloss top coat to make the white look crisp and the petals look warm.
Get The Look at Home:
The cuticle placement is what makes this design distinctive. Start the flowers at the base, not the center.
- White base: Two coats of opaque white. Let dry fully.
- Half-center: Using a dotting tool and dark brown, place a half-circle at the cuticle edge of each nail. This is the visible portion of the sunflower center.
- Upward petals: Using a striper brush and orange-yellow, flick petal strokes upward from the half-center. The petals should fan toward the tip.
- Second layer: Add a few petals in a brighter yellow on top for dimension.
- Spacing: Not every nail needs a flower. Two to three floral nails per hand keeps the design balanced.
- Seal: One thick coat of top coat to protect the art.
30 Trendy Summer French Tip Nail Designs for 2026 💅
16.Polka Dot Sunbeam Mix
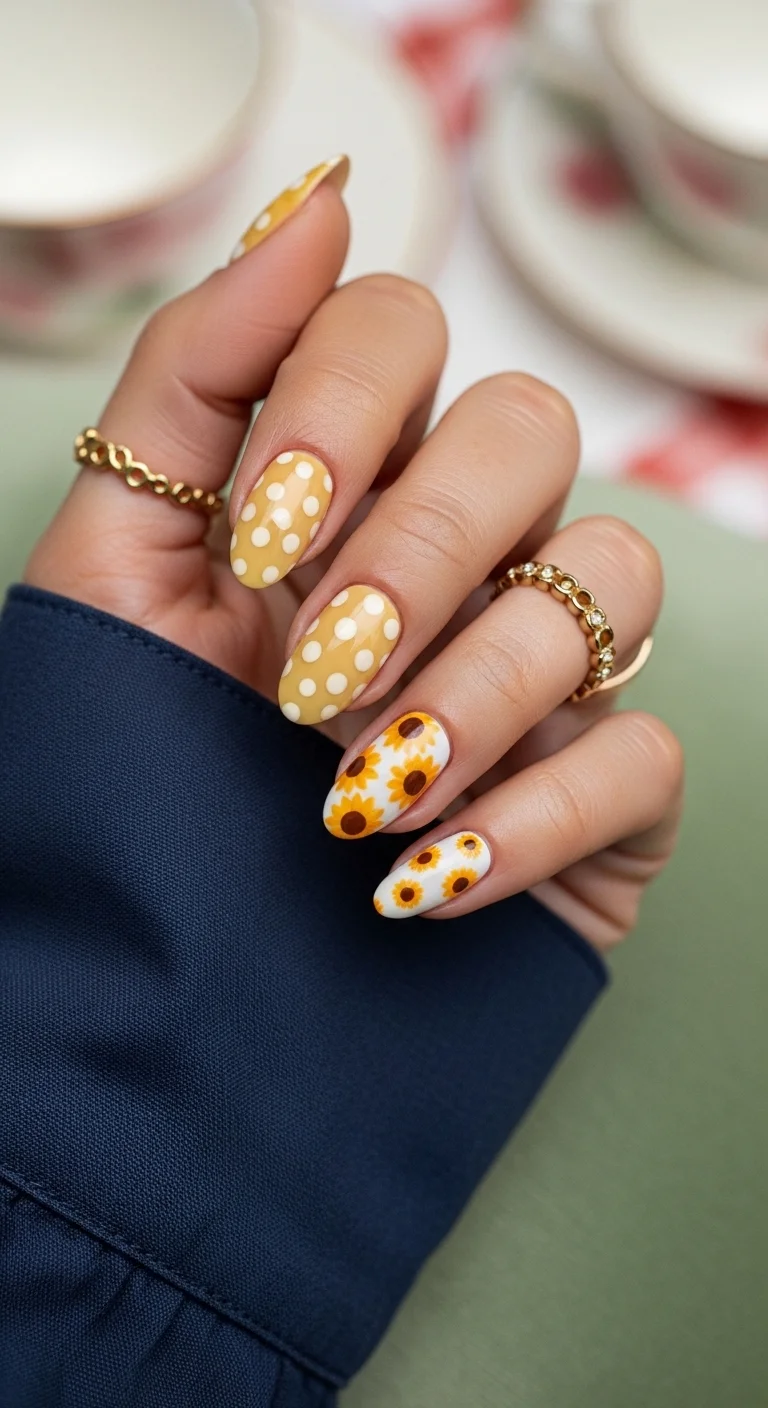
Mustard yellow polka dots alternating with white-based sunflower art.
Overview:
Polka dots and sunflowers share a visual language: both use repeating circular shapes. This set exploits that similarity by placing them side by side on different nails. The dots on the yellow nails echo the round centers of the sunflowers on the white nails, creating a visual connection between the two patterns even though they're technically different designs.
The mustard yellow is warmer and more muted than a bright lemon, which gives the polka dot nails a vintage, retro quality. The white nails with sunflowers feel cleaner and more contemporary. The contrast between vintage and modern on the same hand is what makes the set visually interesting.
The challenge is keeping both patterns proportional. The polka dots need to be roughly the same visual weight as the sunflower centers. If the dots are too large, they overpower the flowers. If they're too small, they disappear next to the detailed art.
Design Breakdown:
Two-pattern mashup connected by shared circular motifs and a yellow-and-white color story.
Base Color: Mustard yellow on the polka dot nails. White on the sunflower nails.
Nail Shape: Medium almond. The curved shape softens both the graphic dots and the organic flowers.
Design Element: Alternating nails between yellow with white polka dots and white with small sunflowers and brown centers.
Finish: High-gloss top coat to unify both patterns.
Get The Look at Home:
Do the polka dot nails and the sunflower nails in separate rounds. Keep your dotting tools organized by size.
- Yellow nails: Two coats of mustard yellow on alternating nails. Let dry fully.
- White nails: Two coats of opaque white on the remaining nails. Let dry fully.
- Polka dots: Using a medium dotting tool and white polish, place evenly spaced dots on the yellow nails.
- Sunflower centers: On the white nails, place brown dots where you want each flower.
- Sunflower petals: Using a toothpick, place five yellow dots around each brown center.
- Seal: One thick coat of top coat over everything.
17.Blue Smoke Jeweled Sunflowers
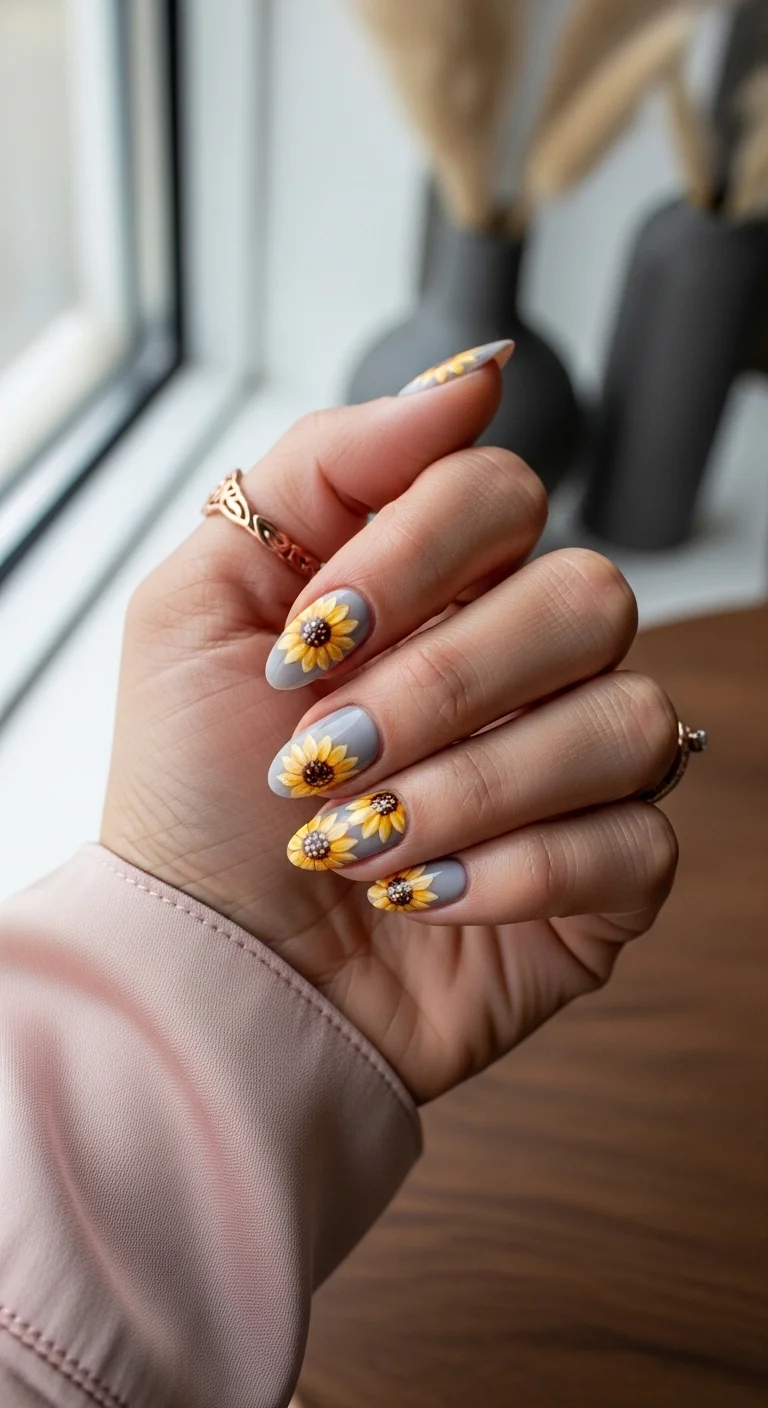
Cool grey with sunflowers featuring sparkling crystal centers.
Overview:
Sunflower nails typically use brown or black for the flower centers. Replacing those with crystal rhinestones changes the entire character of the design. The sparkle adds a third dimension that paint alone can't achieve, and it catches light in ways that shift with every hand movement. The flowers go from botanical to jewelry.
The grey base is cool-toned, which creates an unusual pairing with the warm yellow petals. Most sunflower designs use warm bases (orange, brown, green) that harmonize with the yellow. The grey creates a temperature clash that feels more modern and less expected. It's the difference between a field of sunflowers and a sunflower in a concrete vase.
The practical concern with rhinestones: they catch on everything. Hair, clothing, bag linings. Sealing the edges with a thick bead of top coat around each stone reduces snagging but doesn't eliminate it. Budget for a week of wear before something catches.
Design Breakdown:
Cool-toned base with jeweled floral accents. The rhinestones replace the traditional painted center.
Base Color: Cool-toned medium grey. Not warm grey, not blue-grey. A clean, neutral grey that lets the yellow and crystal read clearly.
Nail Shape: Medium-long almond. The curved shape suits the organic floral subject.
Design Element: Sunflowers on three to four nails with yellow petals and small crystal rhinestones in the center instead of painted brown dots.
Finish: High-gloss top coat to make the grey look sleek and the crystals sparkle.
Get The Look at Home:
The rhinestone placement is the final step. Everything else is standard sunflower technique.
- Grey base: Two coats of cool grey on all nails. Let dry fully.
- Petals: On three to four nails, paint yellow sunflower petals radiating from a center point. Use a striper brush for individual strokes.
- Rhinestone prep: Before the petal polish fully dries, apply a small bead of nail glue or thick top coat where the center should be.
- Place the crystal: Using a wax picker or tweezers, press a small crystal rhinestone into the glue. Hold for five seconds.
- Seal the edges: Using a thin brush, apply top coat around the base of each rhinestone to prevent lifting and snagging.
- Final coat: Apply top coat to all nails, being careful not to cover the top of the crystals (it dulls the sparkle).
25 Trendy Beach Day Hairstyles for Vacation 2026 ☀️🌊
18.Crystal Clear Sunbeam Extensions
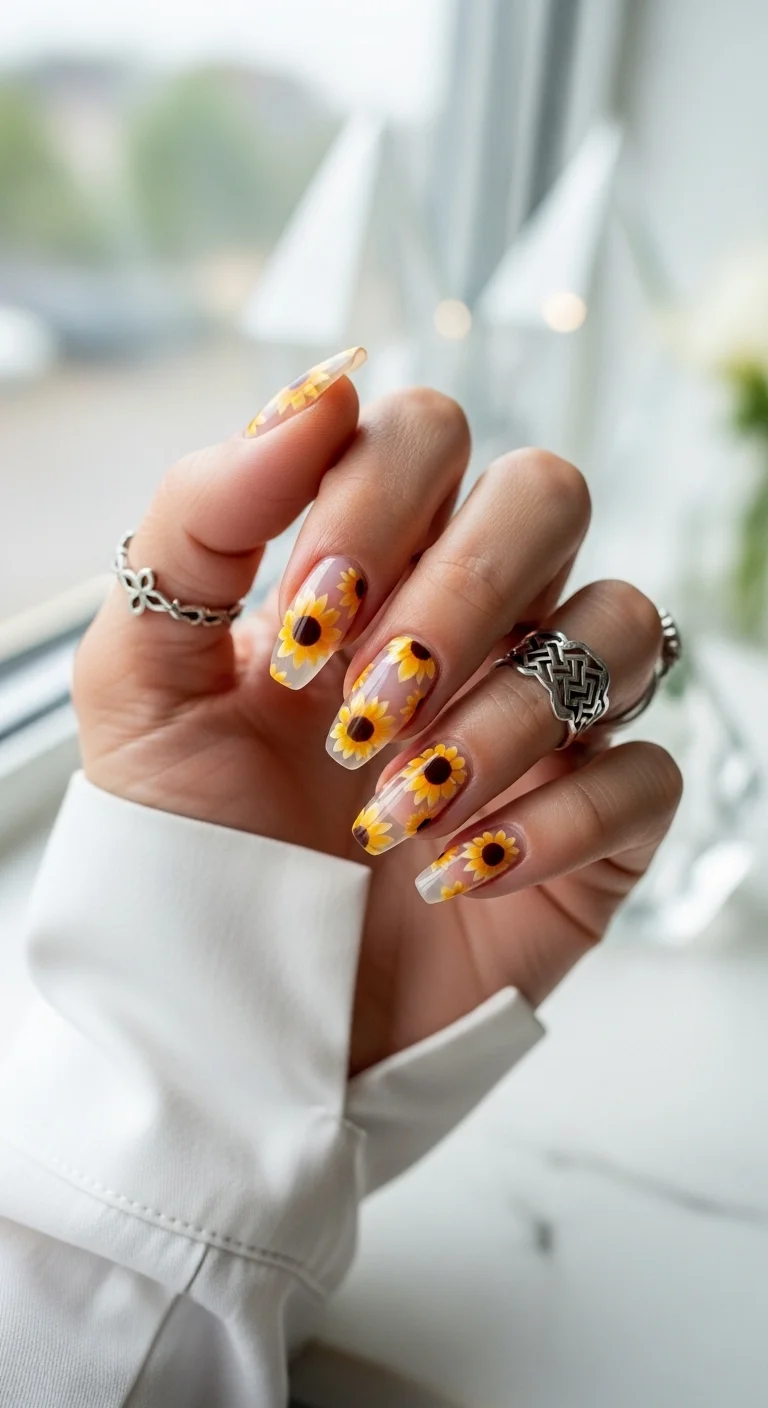
Transparent coffin nails with floating sunflower art.
Overview:
Clear nail extensions create a glass-like effect where the natural nail is visible through the extension. Painting sunflowers on this transparent canvas makes the flowers look like they're floating in mid-air rather than sitting on an opaque surface. The transparency around the flowers is what makes the design unusual.
The challenge with clear extensions is that every imperfection is visible. Bubbles in the gel, uneven thickness, cloudy spots, trapped dust particles. The extension needs to be crystal clear before any art goes on top. Any cloudiness in the base will make the flowers look murky rather than floating.
The sunflowers here are medium-sized, which is the right scale for clear nails. Too small and they'd look like stickers on glass. Too large and they'd obscure the transparency that makes the design interesting. The balance point is flowers that cover about forty percent of the nail surface.
Design Breakdown:
Transparent base with floating floral art. The clarity of the extension is the foundation.
Base Color: Clear. Crystal-clear gel extensions with no tint or opacity.
Nail Shape: Long coffin. The length maximizes the transparent surface area.
Design Element: Medium-sized sunflowers with yellow petals and dark brown centers, painted directly on the clear extension. The transparency around the flowers creates a floating effect.
Finish: High-gloss top coat to maintain the glass-like clarity of the clear base.
Get The Look at Home:
This requires gel extensions, not regular polish. Clear extensions need UV/LED curing at every step.
- Clear extensions: Apply clear gel tips or sculpt clear gel extensions. Cure fully. Make sure there are no bubbles or cloudiness.
- Smooth surface: File and buff the surface until it's perfectly smooth. Any texture will show through the art.
- Center dots: Using a dotting tool and dark brown polish or gel, place circles where you want each sunflower.
- Petals: Using a striper brush and yellow, flick petal strokes outward from each center. Keep the strokes thin so the clear base shows between petals.
- Orange shading: Add a touch of orange at the base of each petal for depth.
- Seal: Apply a clear, high-gloss top coat to maintain transparency and protect the art.
19.Fresh White Sunflower Clusters

White base covered in clustered sunflower art with visible outlines.
Overview:
White-base sunflower nails are the most common version of this design, and for good reason: the high contrast between white and yellow makes every petal visible and every center defined. There's nowhere to hide imprecision, which means the art quality carries the entire design.
The sunflowers here have visible black or dark outlines around the petals, which gives them a slightly illustrative, graphic quality rather than a photorealistic one. That outlined style is more forgiving for at-home execution because the lines define the shape even if the petal coloring is slightly uneven.
The clustering approach, where two to three flowers overlap or sit adjacent to each other on each nail, creates a denser, more textile-like pattern than a single flower per nail. The effect is closer to a sunflower-print fabric than individual botanical illustrations.
Design Breakdown:
High-contrast floral with visible outlines on a white base. The clustered layout creates density.
Base Color: Crisp, opaque white. The white needs to be fully pigmented so the yellow petals and dark outlines read clearly.
Nail Shape: Medium almond. The curved surface suits the clustered floral layout.
Design Element: Two to three sunflowers per nail, clustered together with visible dark outlines around the petals. Yellow petals, dark brown centers.
Finish: High-gloss top coat to make the white look crisp and the outlines look sharp.
Get The Look at Home:
The outlines are what give these sunflowers their graphic quality. Add them after the petals are dry.
- White base: Two coats of opaque white. Let dry fully.
- Center dots: Place brown dots where you want each flower. Two to three per nail.
- Petals: Using a toothpick or small brush, place yellow dots or short strokes around each center.
- Outlines: Using a very thin brush and black polish, outline each petal. The lines don't need to be perfectly smooth. Slightly wobbly lines add character.
- Center detail: Add black dots within the brown centers for texture.
- Seal: One thick coat of top coat to protect the outlines and smooth the surface.

27 Elegant Wedding Guest Nail Designs for Family in 2026 💍
20.Single Stem Sunny Squares

White nails with larger, detailed sunflowers and warm orange shading.
Overview:
Larger sunflowers on white are a different proposition than micro sunflowers. At this scale, every brush stroke is visible, every petal has individual character, and the color variation within each flower becomes part of the design. The orange shading at the base of the petals, the texture in the brown centers, the slight irregularity of each petal shape. All of it reads at arm's length.
The white base serves the same function here as it does in all sunflower designs: maximum contrast, minimum competition. But at this flower size, the white also acts as a frame. The flowers take up most of the nail surface, and the white peeks through between petals and around the edges. That framing effect is what makes each nail feel like a complete composition rather than a pattern tile.
The trade-off with larger flowers: consistency across all ten nails becomes harder. Two flowers per nail means twenty total, and keeping them visually balanced across both hands requires planning. Sketch your layout on paper before committing to polish.
Design Breakdown:
Larger-scale floral on white with warm shading. The individual flower quality is the design.
Base Color: Crisp, opaque white. The white frames the larger flowers and provides maximum contrast.
Nail Shape: Medium coffin. The flat surface gives the larger flowers a stable canvas.
Design Element: One to two larger sunflowers per nail. Yellow petals with visible orange shading, dark brown textured centers. The flowers take up most of the nail surface.
Finish: High-gloss top coat to make the white look crisp and the petal shading look dimensional.
Get The Look at Home:
Larger flowers need more layers for realistic shading. Budget extra time for the petal detail work.
- White base: Two coats of opaque white. Let dry fully.
- Map the flowers: Using a dotting tool and light brown, place circles where you want each sunflower center. One to two per nail.
- First petal layer: Using a striper brush and bright yellow, paint full petal shapes radiating from each center. Each petal should be a distinct, elongated oval.
- Orange shading: Mix orange into your yellow. Apply this darker shade at the base of each petal where it meets the center. Blend outward slightly.
- Center texture: Using a toothpick and dark brown, add dots and texture to the centers. A few black dots add depth.
- Seal: One thick coat of top coat to smooth the layered art and add shine.
21.Clear Glass Long Stem Blooms
Sheer nude base with sunflowers, stems, and leaves in a natural layout.
Overview:
Most sunflower nail designs focus on the flower head and ignore the stem. Including the stem and leaves changes the composition from a single focal point to a flowing, organic scene. The flowers look like they're growing across the nail rather than being stamped onto it.
The sheer nude base is important here because it lets the natural nail show through between the stems and leaves. That transparency creates depth, making the greenery look like it's sitting at different distances from the nail surface. On an opaque base, the stems and flowers would all read as being on the same plane.
The stem detail adds technical difficulty. Drawing a thin, consistent line from the flower head to the cuticle or sidewall requires a steady hand and a very fine liner brush. If freehand stems feel intimidating, consider using nail stickers or stamps for the flowers and adding the stems freehand afterward.
Design Breakdown:
Naturalistic floral with stems and leaves on a transparent base. The stems create movement across the nail.
Base Color: Sheer nude or clear. The natural nail should be visible between the stems and leaves.
Nail Shape: Medium coffin. The flat surface gives the stems room to travel from cuticle to tip.
Design Element: Sunflowers with yellow petals, dark brown centers, green stems, and small leaves. The stems connect the flowers to the cuticle area.
Finish: High-gloss top coat to make the sheer base look glass-like and the greenery look fresh.
Get The Look at Home:
Paint the stems first, then add the flower heads on top. This layering order is more natural.
- Sheer base: One to two coats of sheer nude or clear. Let dry fully.
- Stems: Using a very thin liner brush and green polish, draw thin lines from the cuticle toward the center of the nail. Vary the angles.
- Leaves: Add small leaf strokes along the stems. Use two shades of green for depth.
- Center dots: Place brown circles at the end of each stem where the flower head should be.
- Petals: Using a striper brush and yellow, flick petal strokes outward from each center.
- Seal: One thick coat of top coat to protect the stems and smooth the surface.

21 Hot Summer Buns Hairstyle Ideas for 2026 ☀️🔥
22.Ink Sketch Minimalist Sunflowers
White nails with minimalist black ink-style sunflower line drawings.
Overview:
Sunflower nail art usually means yellow petals on a colored base. This version strips the flower down to its linear structure: black outlines on white, no fill, no color. The result looks like a pen illustration lifted from a sketchbook rather than a traditional manicure.
The absence of color is the entire point. Without yellow petals to process, the eye focuses on the shape and composition of each flower. The thin black lines create a graphic quality that colored sunflowers can't achieve. It's the difference between a photograph and a line drawing of the same subject.
The technical challenge is line consistency. Every petal outline, every center detail, every stem needs to be the same thickness for the design to read as intentional. Inconsistent line weight makes the flowers look shaky rather than sketched. A very fine liner brush or a nail art pen is almost mandatory.
Design Breakdown:
Monochromatic line art on white. The design is pure linework, no color fill.
Base Color: Crisp, opaque white. The white needs to be fully pigmented so the thin black lines read clearly.
Nail Shape: Medium coffin. The flat surface provides stable ground for the detailed linework.
Design Element: Black line-drawn sunflowers, like pen sketches. Outline only, no color fill. One to two flowers per nail.
Finish: Matte or satin top coat to emphasize the sketchbook quality. High-gloss would make it look like a printed design rather than a hand-drawn one.
Get The Look at Home:
A nail art pen is more forgiving than a brush for consistent line weight.
- White base: Two coats of opaque white. Let dry fully.
- Center circles: Using a fine nail art pen or liner brush and black polish, draw small circles for the flower centers.
- Petal outlines: Draw elongated oval shapes radiating outward from each center. Keep the lines thin and consistent.
- Center details: Add tiny dots or crosshatch marks inside the center circles for texture.
- Optional stems: Add thin black lines from some flowers toward the cuticle for a more complete illustration.
- Matte seal: Apply a matte or satin top coat to preserve the sketchbook aesthetic.
23.Terrazzo Sunny Blooms
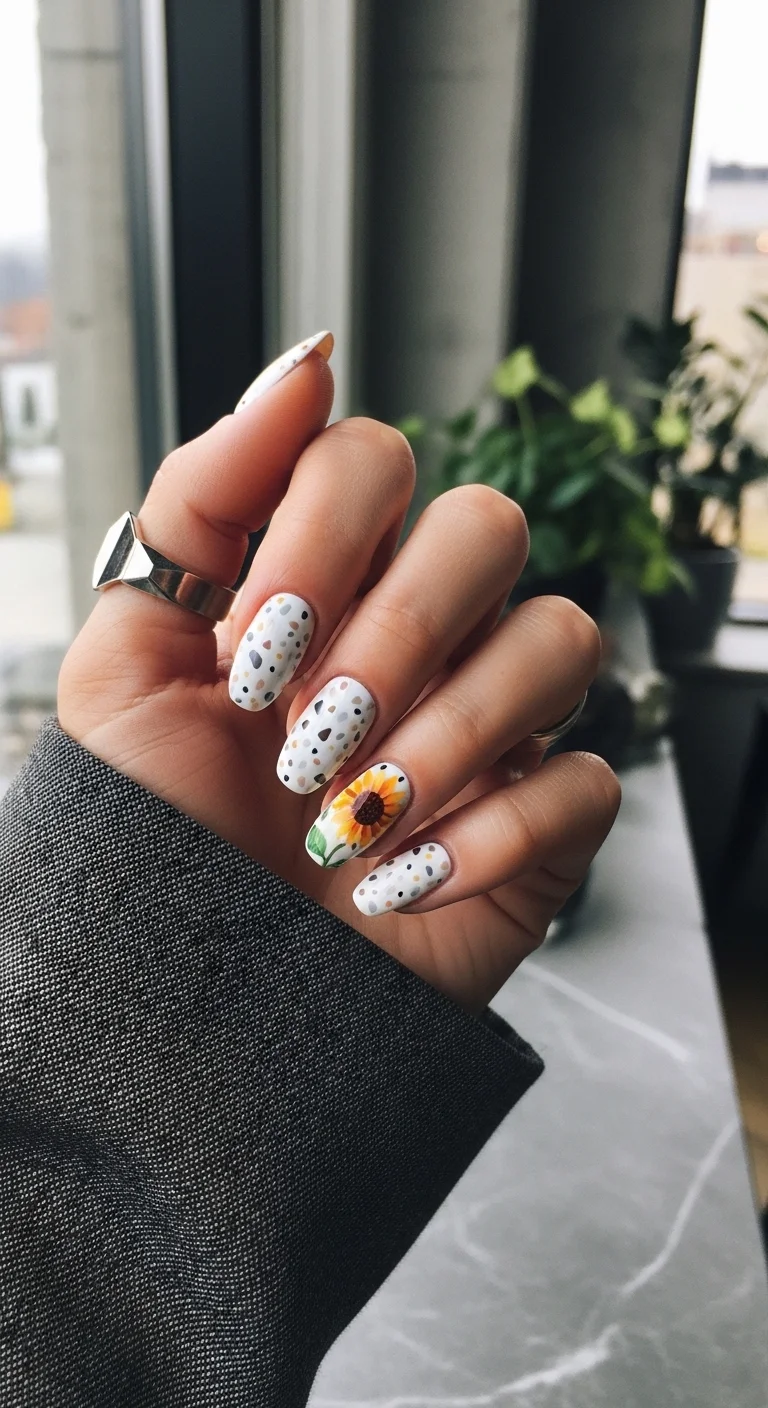
White terrazzo speckles with a single sunflower accent nail.
Overview:
Terrazzo patterns have migrated from flooring and countertops to nail art, and the translation works because the design logic is the same: small, irregular shapes scattered across a neutral background. The speckles here use muted earth tones, tans, greys, and browns that complement the sunflower without competing with it.
The sunflower accent nail is the focal point that gives the terrazzo pattern context. Without it, the speckled nails read as an abstract texture. With it, the entire set becomes a sunflower story told in two different visual languages: the literal flower and the abstract, earth-toned pattern.
The terrazzo speckles are forgiving to execute because they're supposed to be irregular. No two speckles need to be the same size, shape, or color. The randomness is the design. A toothpick or the tip of a bobby pin works as well as a proper dotting tool.
Design Breakdown:
Abstract speckled pattern with a single floral accent. The terrazzo provides texture; the sunflower provides focus.
Base Color: Crisp, opaque white on all nails. The white serves as the terrazzo "matrix" that holds the speckles.
Nail Shape: Medium almond. The curved shape softens the geometric speckles.
Design Element: Terrazzo-style speckles in tan, grey, and brown on four nails. One sunflower accent on the ring finger with yellow petals and a dark brown center.
Finish: High-gloss top coat to make the white look clean and the speckles look intentional.
Get The Look at Home:
The terrazzo speckles are the fast part. The sunflower accent takes the most time.
- White base: Two coats of opaque white on all nails. Let dry fully.
- Terrazzo speckles: Using a toothpick or bobby pin tip, dip into tan, grey, and brown polish. Press irregular dots onto the white nails. Vary the size and spacing.
- Sunflower center: On the ring finger, place a dark brown circle.
- Sunflower petals: Using a toothpick, place five yellow dots around the center. Add a second layer in a slightly different yellow for depth.
- Green leaf: Add a small green leaf near the base of the flower.
- Seal: One thick coat of top coat to smooth the surface and lock in the speckles.

34 Cutest Butter Yellow Nail Designs for 2026 🧈
24.Abstract Sunbeam Circles
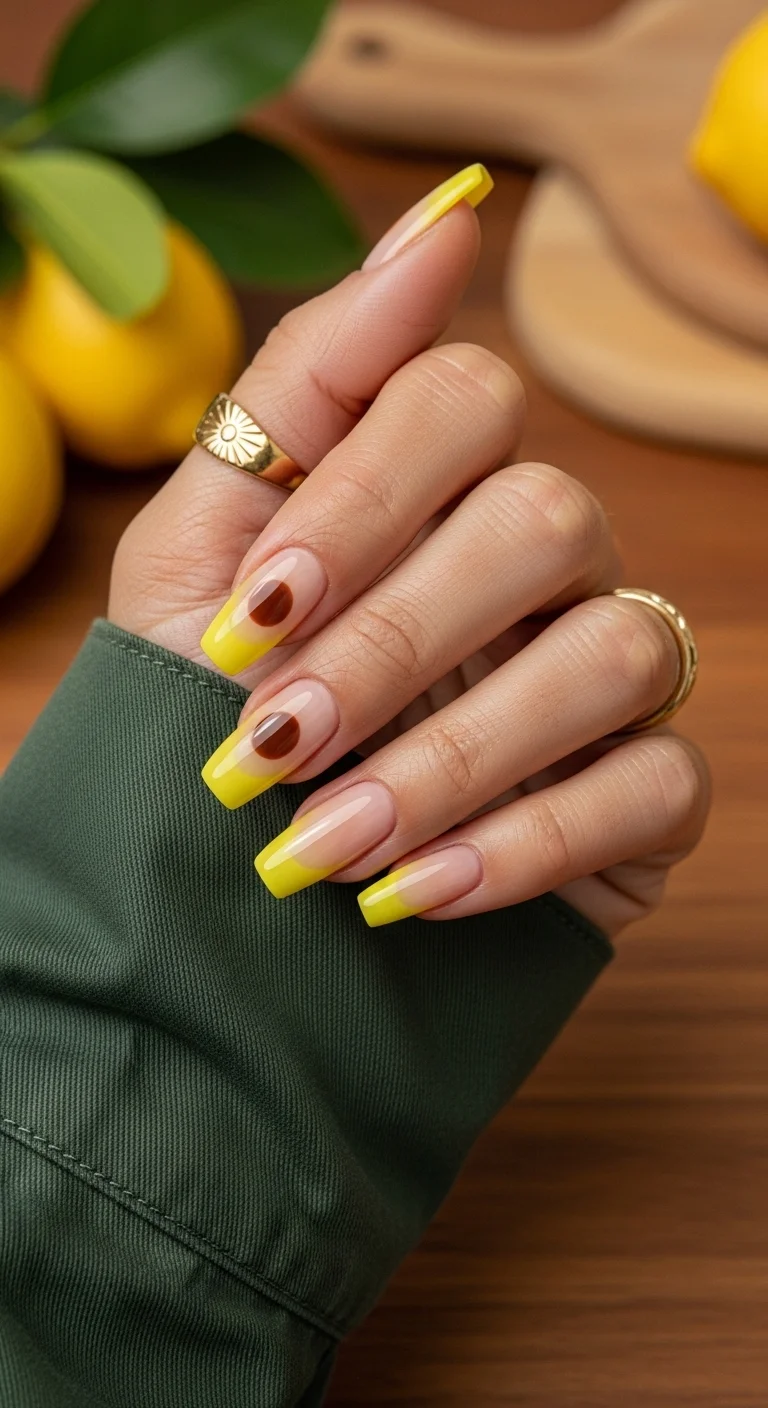
Abstract yellow and brown circles on a sheer base with French tip accents.
Overview:
This design takes the sunflower color palette and strips away the flower entirely. What remains are the essential colors, yellow, brown, orange, arranged in abstract circular shapes that evoke the idea of a sunflower without illustrating one. It's the design equivalent of hearing a song's melody without the lyrics.
The mix of techniques across nails, French tips on some, solid circles on others, creates visual variety within the same color story. No two nails look the same, but they all share the warm palette that connects them to the sunflower theme.
Abstract nail art is the most forgiving category for at-home execution. There's no reference image to match, no petal shape to replicate, no center to position correctly. You're placing circles and curves in warm tones. The only rule is that it should look intentional, which means keeping the color palette tight and the shapes deliberate.
Design Breakdown:
Abstract warm-toned circles on a sheer base. The sunflower palette is the only connection to the floral theme.
Base Color: Sheer nude or natural nail. The transparency between the abstract shapes is part of the design.
Nail Shape: Medium-long coffin. The flat surface suits the geometric circular shapes.
Design Element: Abstract circles and curves in yellow, orange, and brown. Some nails get French tips, others get solid circles. No two nails are identical.
Finish: High-gloss top coat to make the warm tones look saturated and the circles look crisp.
Get The Look at Home:
Plan your layout across all ten nails before you start. Decide which nails get which shapes.
- Sheer base: One coat of sheer nude on all nails. Let dry fully.
- Yellow French tips: On two to three nails, paint bright yellow French tips.
- Brown circles: On two to three nails, use a large dotting tool to place brown circles on the nude base.
- Orange accents: On one to two nails, place orange circles or curves. Keep the shapes deliberate, not random.
- Overlap optional: On one nail, you can overlap a smaller orange circle on a larger brown one for depth.
- Seal: One thick coat of top coat to unify the abstract shapes.
25.Retro 70s Sunflower Swirls
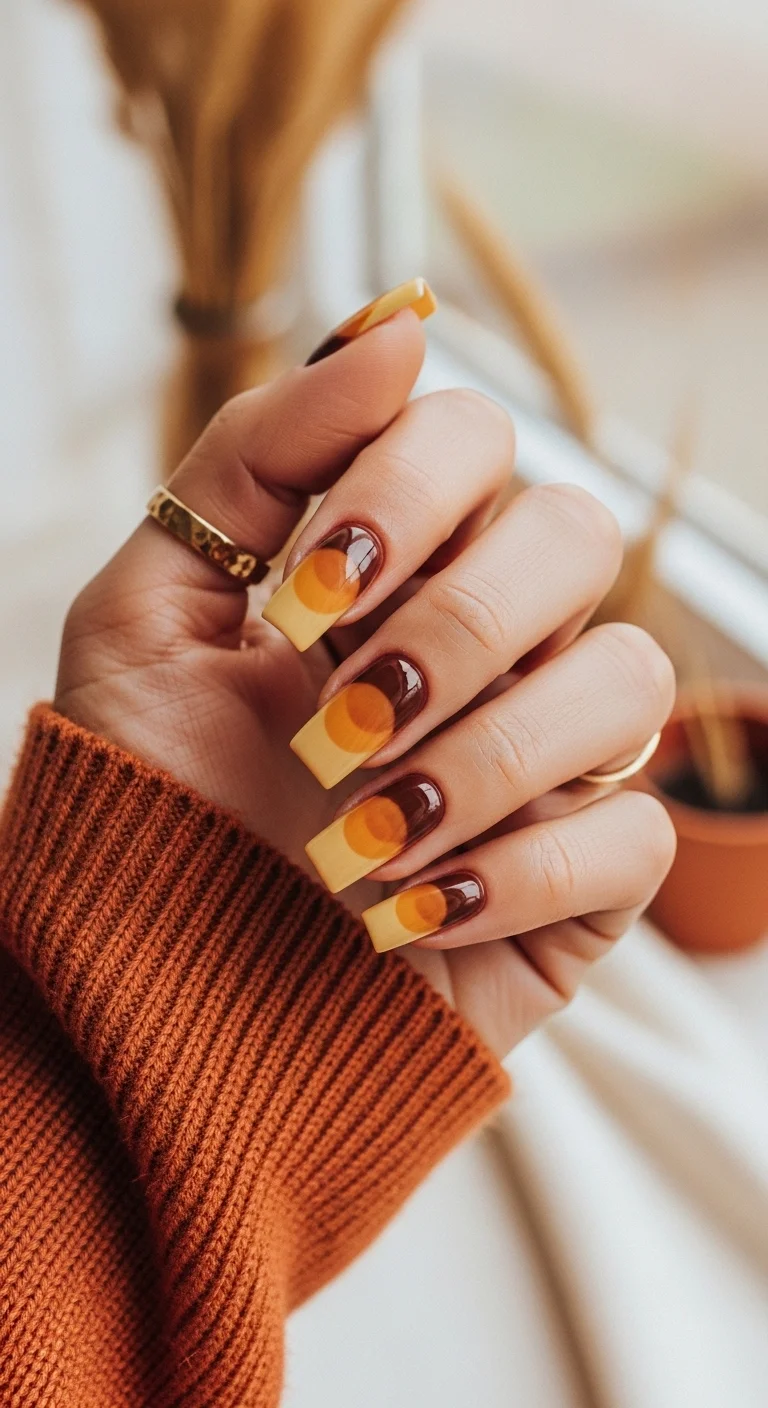
Retro 70s-inspired abstract swirls in sunflower tones.
Overview:
The 1970s color palette, harvest gold, burnt orange, chocolate brown, is so strongly associated with sunflowers that you can evoke the flower without painting one. This design does exactly that: curved, organic swirls in the three signature colors that read as "sunflower" to anyone who lived through or admires that era.
The swirl technique is the key to the retro feel. Straight lines and geometric shapes would read as modern or art deco. The soft, rounded curves of these swirls reference the organic shapes of 1970s textile and wallpaper patterns. The design feels like it belongs on a vintage scarf or a macrame wall hanging.
The challenge with multi-color swirls is keeping the colors separate at their borders. If the brown, orange, and yellow bleed into each other, the result is muddy. Each color needs to be applied and allowed to set slightly before the next one is added alongside it.
Design Breakdown:
Abstract retro swirls using the sunflower color palette. The curved shapes are the design.
Base Color: Sheer nude or natural nail. The transparency between the swirls keeps the design airy.
Nail Shape: Medium-long coffin. The flat surface provides a canvas for the curved shapes.
Design Element: Organic swirls and curved shapes in chocolate brown, burnt orange, and harvest gold/yellow. Each nail gets a different swirl pattern.
Finish: High-gloss top coat to make the retro colors look rich and saturated.
Get The Look at Home:
Work one color at a time across all nails. Don't try to finish one nail completely before moving to the next.
- Sheer base: One coat of sheer nude on all nails. Let dry fully.
- Brown swirls: Using a striper brush and chocolate brown, paint curved, organic shapes on two to three nails. Let set for two minutes.
- Orange curves: Using burnt orange, paint swirls that sit alongside or slightly overlap the brown shapes on different nails.
- Yellow accents: Using harvest gold, add swirls or filled shapes on the remaining nails.
- Color check: Step back and make sure all three colors are represented across the hand.
- Seal: One thick coat of top coat to smooth the surface and protect the art.
29 Fun FIFA World Cup Watch Party Hairstyles (2026)
26.Natural Sunbeam Almonds
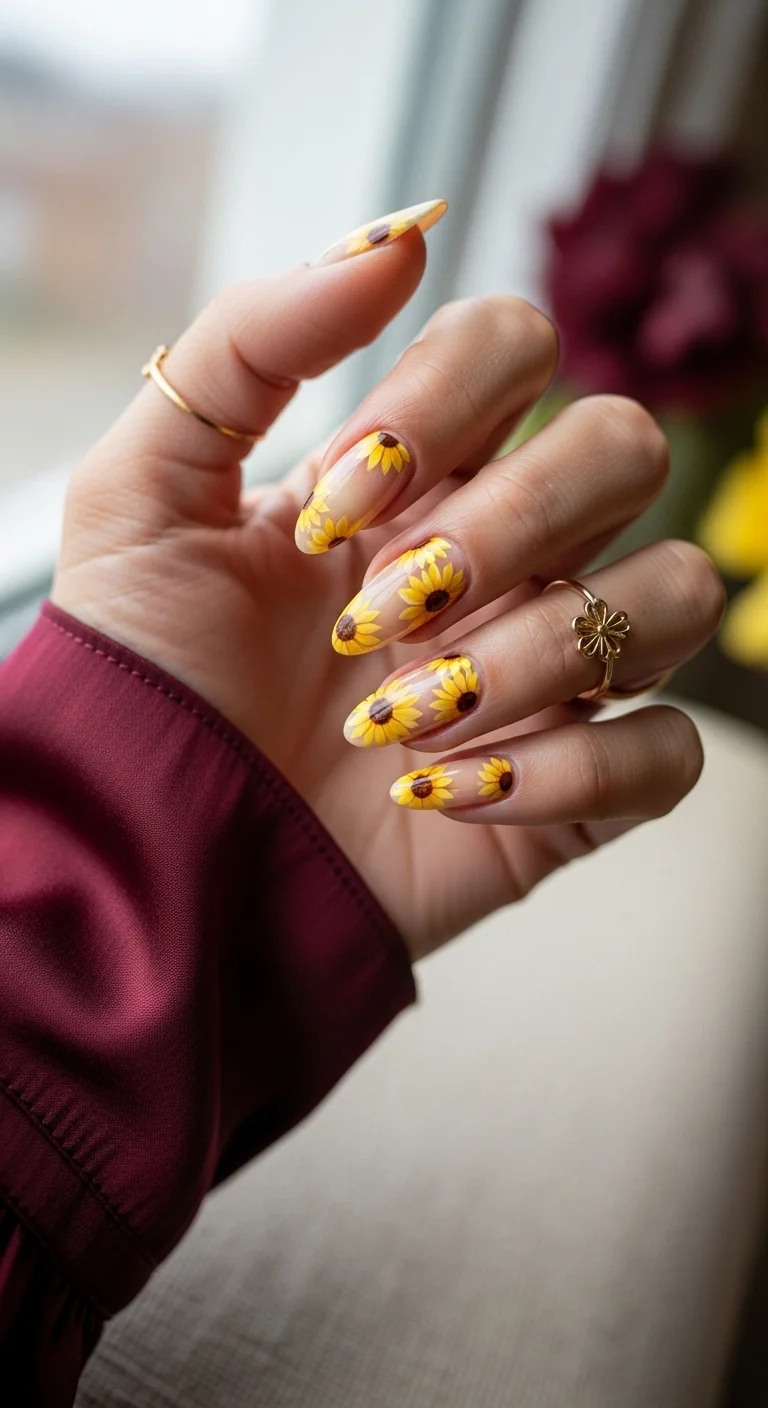
Sheer nude base with natural-looking sunflowers on every nail.
Overview:
Sheer-base sunflower nails are the most natural-looking version of this design. The transparent base lets the natural nail show through, which means the sunflowers appear to be growing from the nail itself rather than sitting on top of a colored surface. The effect is closer to pressed flowers than painted art.
The variety in flower size and placement across the nails is what makes this set feel organic. Some nails have one large sunflower, others have two smaller ones, and a few have flowers positioned at angles that suggest movement. That randomness mimics how flowers actually grow: not in uniform rows, but in scattered, unpredictable patterns.
The practical advantage of a sheer base: regrowth is nearly invisible. The natural nail showing through the base means there's no harsh line where the polish ends and new growth begins. This extends the manicure's useful life by several days compared to an opaque base.
Design Breakdown:
Naturalistic floral on a transparent base. The sheer nude makes the flowers look embedded in the nail.
Base Color: Sheer nude or clear. The natural nail should be visible between the flowers.
Nail Shape: Medium-long almond. The organic shape matches the botanical subject matter.
Design Element: Sunflowers of varying sizes scattered across all nails. Yellow petals with orange shading, dark brown textured centers. No two nails have the same layout.
Finish: High-gloss top coat to make the sheer base look glass-like and the petals look dimensional.
Get The Look at Home:
Vary the flower sizes and positions deliberately. Uniform placement makes it look stamped rather than natural.
- Sheer base: One to two coats of sheer nude. Let dry fully.
- Map the flowers: Using a dotting tool and light brown, place circles at different positions on each nail. Vary the sizes.
- Petals: Using a striper brush and bright yellow, paint petals radiating from each center. Make some petals longer than others.
- Orange shading: Mix orange into your yellow. Apply at the base of each petal for depth.
- Center texture: Use a toothpick to add dark dots within the brown centers.
- Seal: One thick coat of top coat to protect the art and add shine.
Hopefully, these sunny designs have brought plenty of joy and inspiration to your screen! Sunflowers are more than just a trend—they're a whole mood about growth, light, and staying bright. Make sure you pin your favorites to your 'Nail Inspo' boards on Pinterest so you can show your tech exactly what you're looking for.