Nail Trends
29 Bright Lemon Nail Art Designs for Summer & Spring (2026)
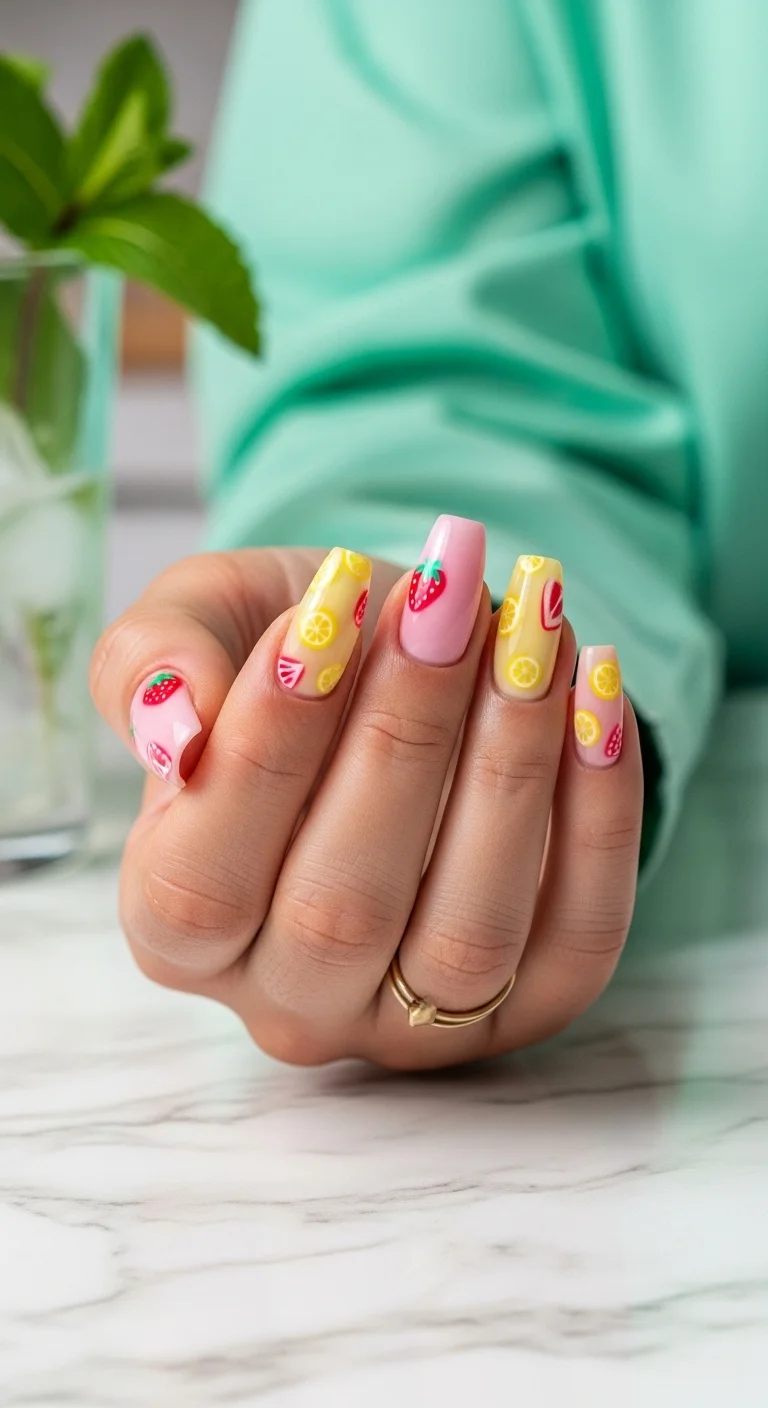
From ultra-subtle pastel yellow French tips and delicate micro-citrus decals to bold, textured 3D lemon slices that look good enough to bite, this roundup features the absolute best designs to inspire your next salon visit. Grab a glass of iced sweet tea, get comfy, and explore 29 bright lemon nail art ideas that are guaranteed to squeeze the day and make you feel like the sun-kissed queen you are!
Choosing Your Citrus Tone: Undertones & Shape Pairings
Yellow is historically considered one of the trickiest pigments to wear on the nails, as the wrong tone can make cuticles look flushed or washed out. To select the perfect lemon shade, evaluate your skin's undertone. Those with cool undertones (pink or blue veins) should opt for crisp, lemon-chiffon pastels or neon yellows with a cool white base layer. For warm undertones (golden or olive skin), deep custard yellows, banana creams, or warm mustard accents will naturally harmonize.
The nail shape you choose also determines how the art registers. A tapered medium almond or oval shape provides a gentle curve that works beautifully for organic hand-painted lemon branches and climbing vines. Conversely, structured coffin or square shapes provide an excellent geometric border for clean French tip layouts, checkerboards, or grid-patterned gingham prints.
1.Glazed Lemon Sorbet Gradient
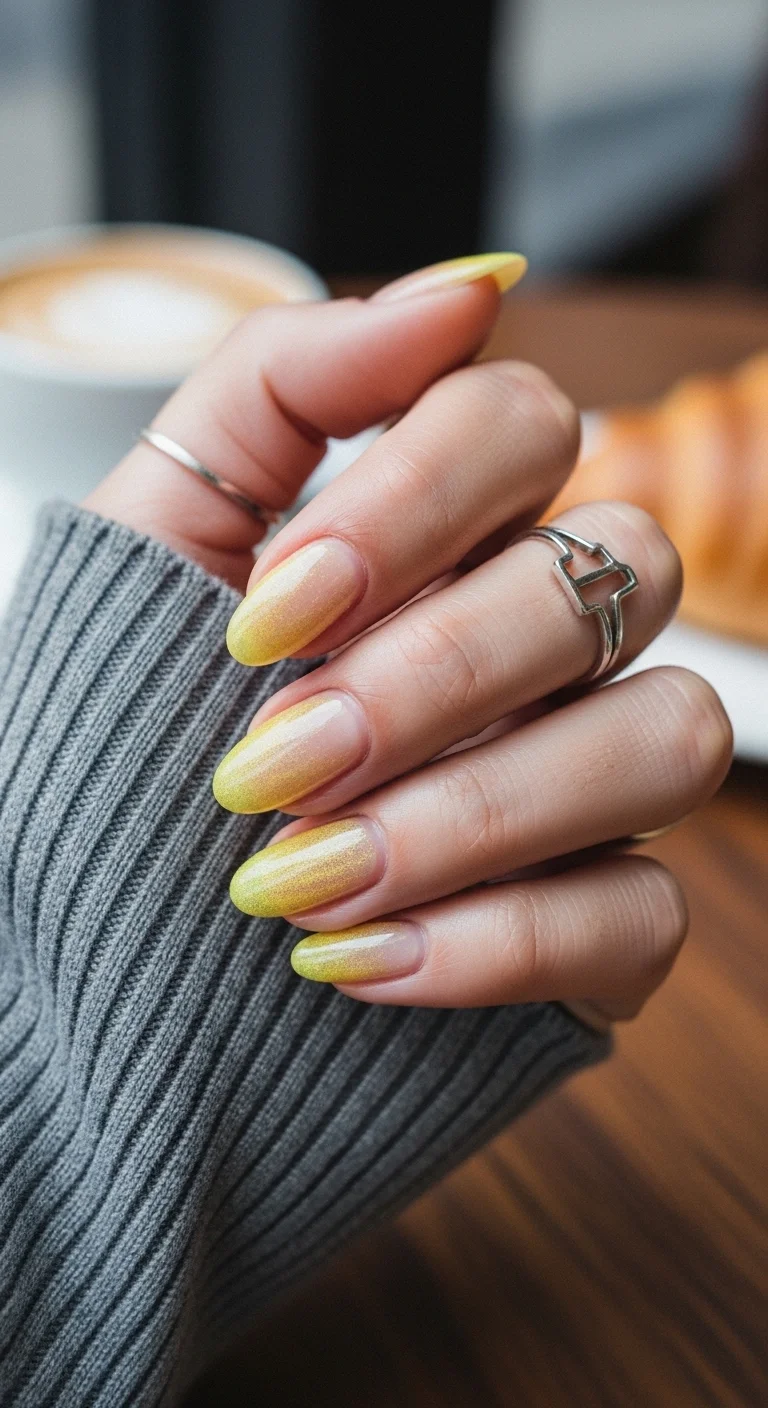
A dreamy, ethereal take on the lemon trend with a high-shine glaze.
Overview:
Gradient nails tend to fall into two camps: either the blend is seamless and the color choice is boring, or the colors are interesting but the transition looks like a kindergarten finger-painting. This design threads the needle. The lemon-to-nude fade keeps the palette tight enough that even a slightly imperfect sponge job reads as intentional.
What sells the look is the pearlescent glaze on top. Without it, this is a competent ombre. With it, the entire nail shifts color depending on the angle of your hand. Under office fluorescents it reads as a warm nude; in direct sunlight, the yellow practically glows. That dual personality makes it one of the more versatile options in the lemon nails category.
One caveat: the chrome powder step requires a no-wipe gel top coat underneath. Regular polish won't give the powder anything to adhere to, and you'll end up brushing shimmer off your nails (and onto your clothes) for the rest of the day.
Design Breakdown:
The gradient does most of the work, but the glazed finish elevates it from "nice ombre" to "salon-worthy."
Base Color: A milky, semi-sheer nude. Essie "Ballet Slippers" or OPI "Bubble Bath" are reliable choices that won't compete with the yellow.
Nail Shape: Soft almond or oval. Rounded shapes help the gradient transition look smoother because there are no hard corners to interrupt the color flow.
Design Element: Sponge-applied ombre using a buttery lemon yellow concentrated at the tips and fading toward the cuticle.
Finish: Pearl chrome powder or an iridescent topper like ILNP "Cheri." Seal with a high-gloss top coat.
Get The Look at Home:
Yellow pigments are notoriously sheer, so the sponge technique matters more here than with darker colors.
- Base prep: File into a rounded shape. Apply a ridge-filling base coat — any texture in the nail surface will show through the sheer gradient.
- Nude foundation: Two thin coats of your milky nude. Let each dry fully before the next.
- Sponge setup: Paint a stripe of yellow and a stripe of nude side by side on a dry makeup sponge. Dab the sponge on paper first to remove the initial excess.
- Build the fade: Press the sponge onto the nail with the yellow concentrated at the tip. Three to four dabs builds better opacity than one heavy press.
- Chrome application: If using chrome powder, apply a no-wipe gel top coat, cure it, then rub the powder in with a silicone applicator. Buff until the surface is mirror-smooth.
- Final seal: One coat of clear top coat over everything. Cap the free edge to prevent the chrome from flaking at the tips.
29 Fun FIFA World Cup Watch Party Hairstyles (2026)
2.Turquoise Stripe Squeeze
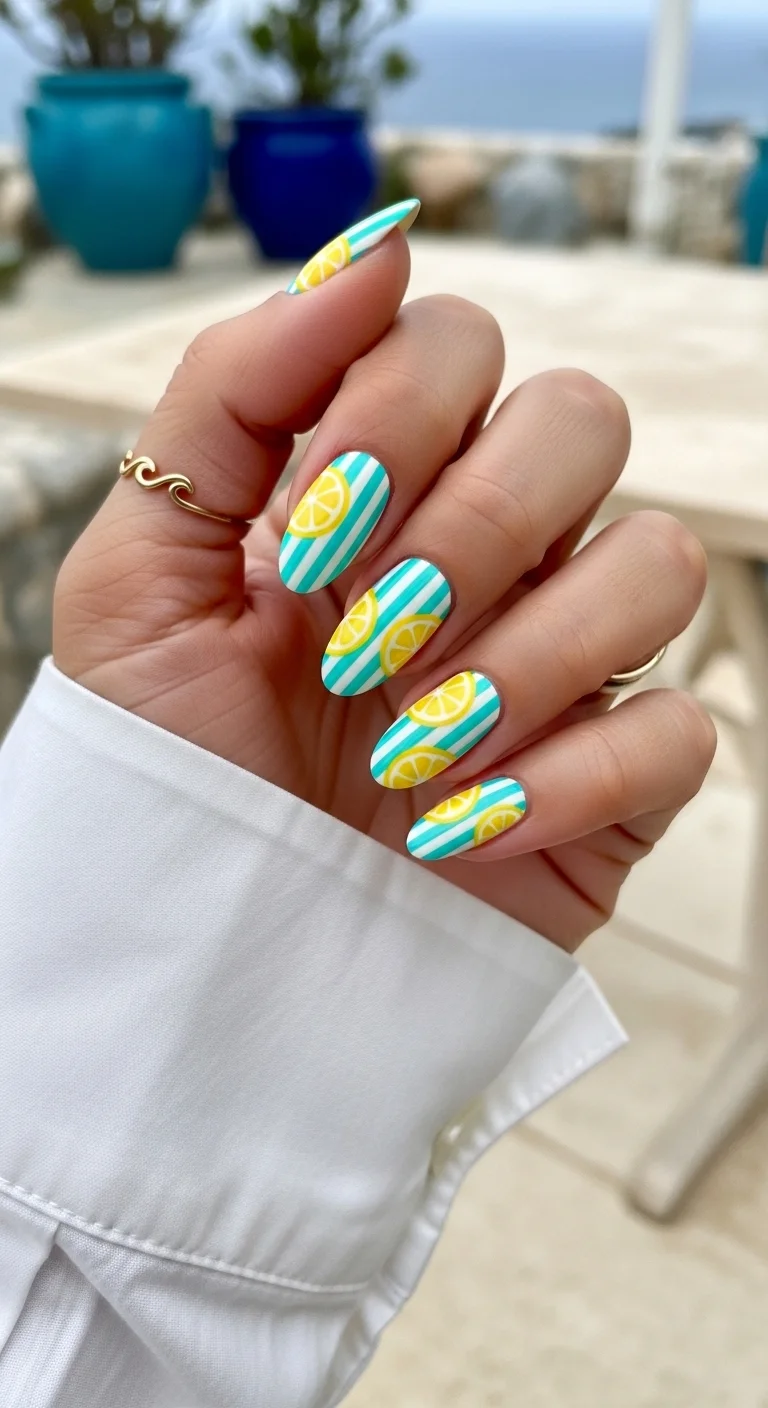
A bold, nautical-inspired citrus design perfect for the pool club.
Overview:
Diagonal stripes on nails walk a fine line between "retro beach umbrella" and "optical illusion." This teal-and-white version lands firmly on the right side of that line. The angle of the stripes creates a sense of movement that vertical lines can't replicate — each nail looks like it's leaning into the next one.
The lemon slices layered on top are the detail that elevates this from "cute stripe pattern" to a complete design. Without them, you have candy-cane nails in the wrong season. With them, you have a deliberate citrus story. The cross-section view of the lemons — showing the segments and rind — adds visual complexity that whole-lemon art wouldn't achieve.
Practical note: diagonal stripes are harder to execute than horizontal ones because the angle changes on every nail. Using striping tape is almost mandatory unless you have exceptionally steady hands. Even then, the tape gives you cleaner edges than freehand, which matters when the contrast between teal and white is this stark.
Design Breakdown:
Two competing patterns — geometric stripes and organic fruit — held together by a tight three-color palette.
Base Color: Crisp, opaque white. You need a solid foundation so the teal stripes read as sharp, deliberate lines rather than translucent streaks.
Nail Shape: Medium almond. The tapered shape gives the diagonal stripes room to travel across the nail without getting cut short.
Design Element: Diagonal teal stripes painted over white, with hand-painted lemon cross-sections placed on top of the striped pattern.
Finish: Ultra-glossy. The high shine makes the teal look saturated and the lemon segments look juicy.
Get The Look at Home:
The stripes are the hard part. The lemons are the fun part. Do the hard part first.
- White base: Two coats of opaque white. Let each dry fully. Any tackiness will cause the striping tape to pull up the base.
- Tape placement: Cut thin strips of striping tape and lay them diagonally across each nail, spacing them roughly 3mm apart. Press the edges firmly — polish bleeds under loose tape.
- Teal coat: Paint teal polish over the entire nail, covering both the tape and the exposed white. One coat is enough if the formula is pigmented.
- Peel while wet: Remove the tape immediately, before the teal polish sets. Pull at a low angle to avoid chipping the stripe edges.
- Lemon slices: Using a dotting tool and yellow polish, place half-circles and full circles on two or three nails. With a fine liner brush and white polish, draw radiating lines inside each circle to create the segment pattern.
- Seal: One thick coat of high-gloss top coat. Float the brush — dragging it across the lemon art will smear the fine white lines.
3.Royal Blue Amalfi Accents
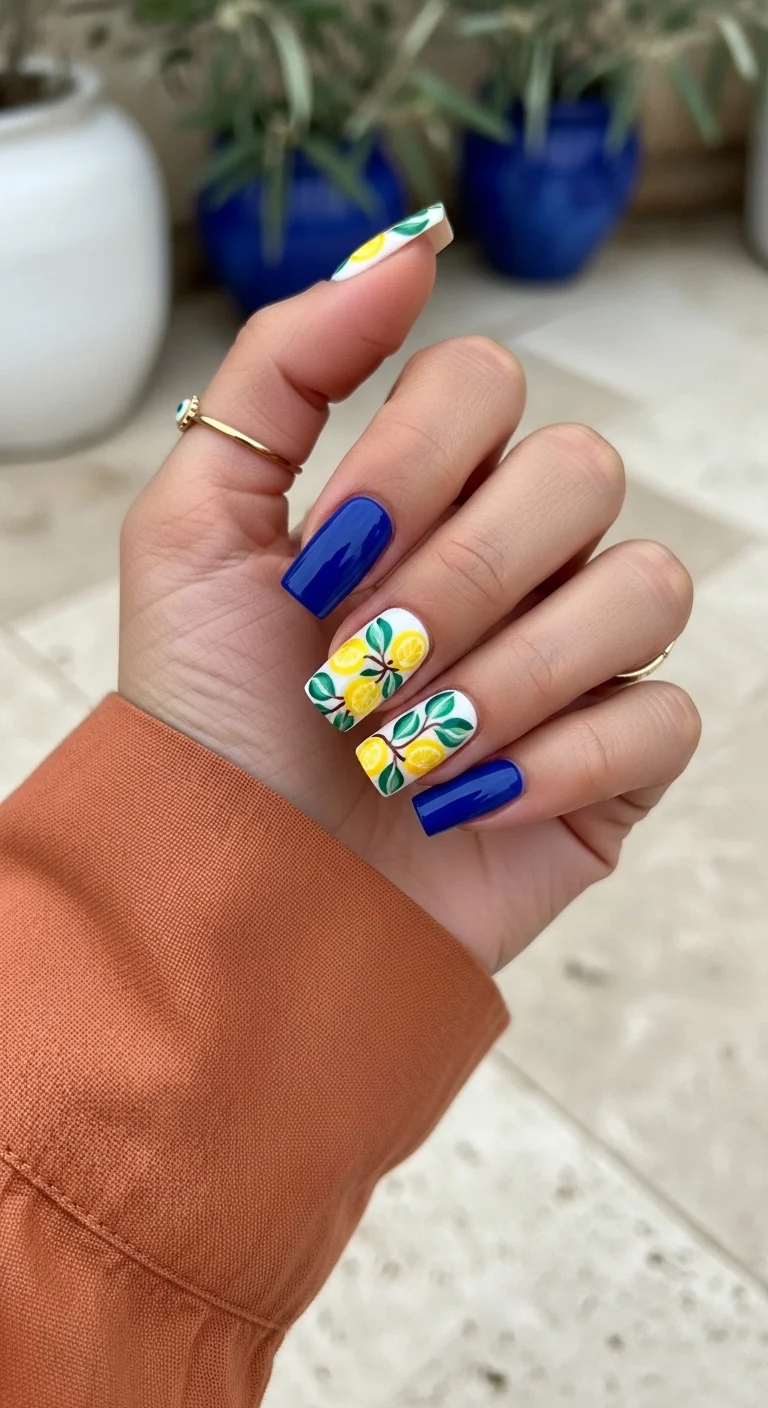
Deep Mediterranean blue meets sun-drenched lemon groves.
Overview:
Royal blue and lemon is a combination borrowed from Italian ceramics — think hand-painted tiles lining the streets of Positano. The deep, saturated blue does something interesting to the yellow: it makes the lemons look warmer and more luminous than they would on a lighter base. The contrast reads as expensive.
The accent nails do the heavy lifting here. The white background behind the lemon branches creates a clean, illustrative quality that feels more like deliberate art direction than a random pattern choice. The brown stems and multi-toned green leaves add enough detail to reward close inspection without making the design feel busy.
One thing to watch: royal blue polish is notoriously difficult to remove. It stains cuticles and lifts poorly with regular remover. Budget an extra five minutes for cleanup, and consider applying a peel-off base coat on the blue nails if you're someone who changes manicures frequently. Two coats of OPI "Russian Navy" or Essie "Butler Please" give full, streak-free coverage.
Design Breakdown:
High contrast between the dark primary blue and the bright, detailed botanical art on white.
Base Color: A deep, opaque royal blue on most nails. Solid cream white on two accent nails for the lemon illustration.
Nail Shape: Medium square with slightly softened corners. The straight edges give the design a modern, structured feel.
Design Element: Hand-painted lemon clusters with dark green leaves and brown woody stems on the white nails only.
Finish: High-gloss. The shine creates a ceramic-tile effect that complements the Mediterranean color palette.
Get The Look at Home:
The blue nails are straightforward. The accent nails require patience and a thin brush.
- Color block: Paint your thumb, index, and pinky with royal blue. Paint the middle and ring fingers white. Two coats each for full opacity.
- Lemon shapes: On the white nails, use a small brush to paint irregular yellow ovals. Vary the sizes — two or three per nail, placed at different angles.
- Stems: With a thin liner brush and brown polish, draw short connecting lines between the lemons. Let the brush wobble slightly — perfectly straight branches look artificial.
- Leaves: Using a medium green, paint small almond-shaped leaves along the stems. Add a second, darker green on a few leaves for depth.
- Dimension: A slightly darker yellow or orange dot on one side of each lemon creates a shadow that reads as roundness.
- Seal: One thick coat of top coat over everything. The blue nails benefit from the extra gloss; the art nails need it to smooth the painted texture.
36 Trendy FIFA World Cup Nail Designs (2026)
4.Blueberry Lemon Gingham Picnic
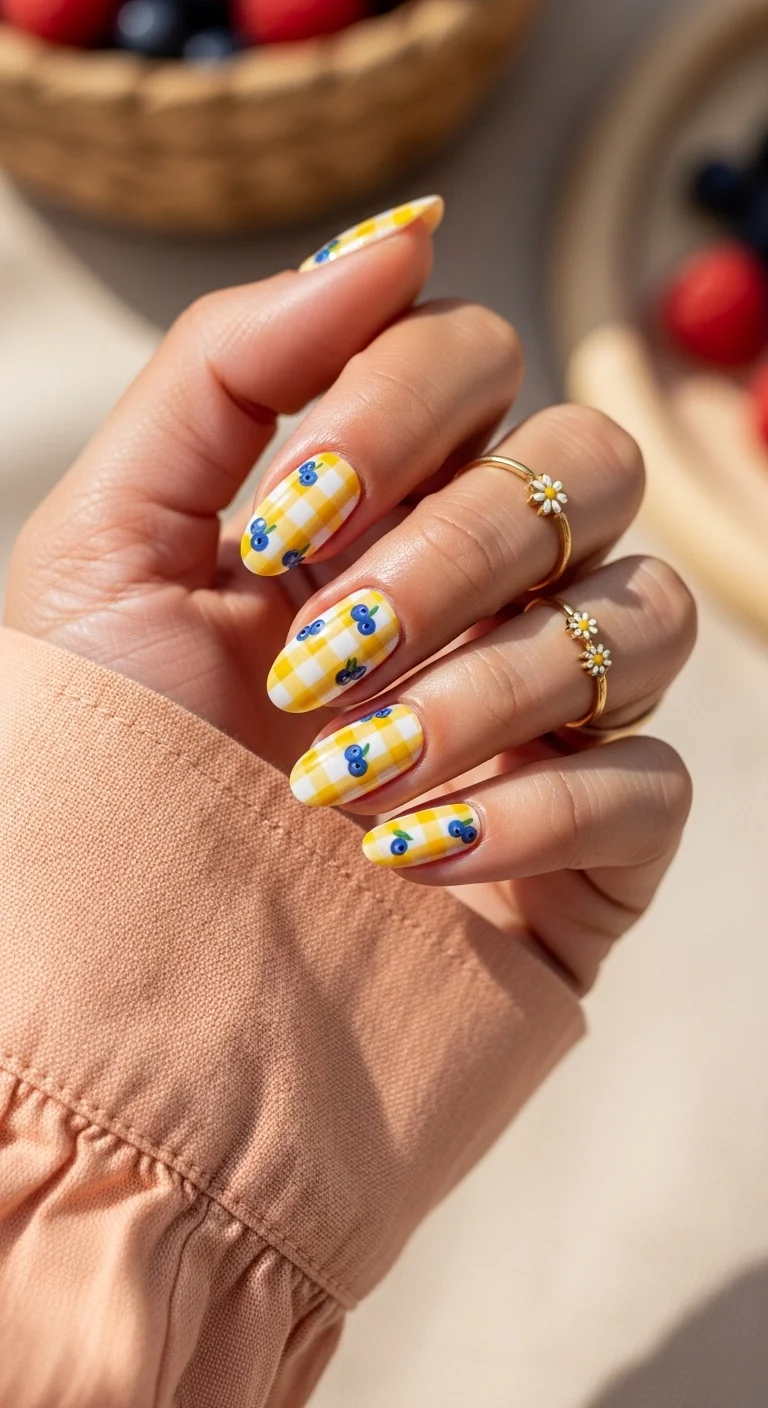
The ultimate cottagecore aesthetic for summer park days.
Overview:
Gingham nails live or die on the grid. If the lines are slightly crooked, the whole thing looks off — which is why this design works better on almond nails where the pattern only needs three or four intersections per nail instead of six.
The blueberry detail is a small addition that makes a disproportionate difference. Without it, this is a yellow gingham nail. With it, it's a complete visual story. The deep indigo of the berries creates a color temperature contrast against the warm yellow that your eye keeps returning to.
Practical note: a satin or semi-matte top coat works better here than high-gloss. Gingham is a fabric reference, and high shine undercuts the textile illusion. Essie's "Matte About You" over a glossy base creates the right sheen — not flat matte, not glass shine, but something in between that reads as woven material.
Design Breakdown:
Precision matters for the grid, but the berries should look organic and slightly imperfect.
Base Color: Bright, opaque white. Essie "Blanc" or OPI "Alpine Snow" give the clean canvas the yellow stripes need to read as intentional.
Nail Shape: Medium almond. The curved tip keeps the pattern proportional and avoids cramming too many grid lines onto a small surface.
Design Element: Yellow grid lines creating a checkered gingham pattern (where the lines cross, the doubled-up yellow creates deeper "overlap" squares), with clusters of hand-painted blueberries (navy dots with tiny green leaf accents).
Finish: Satin-gloss. Full matte makes the yellow look chalky; full gloss removes the "fabric" association.
Get The Look at Home:
The grid is the hardest part. Consider using a striper brush that holds enough polish to draw a full line without re-dipping.
- White base: Two thin coats of opaque white. Let each dry fully — any tackiness will cause the yellow striper polish to bleed.
- Horizontal lines first: Using a long striper brush and yellow polish, draw thin horizontal lines spaced roughly 2-3mm apart. Let these dry before moving on.
- Vertical lines: Draw vertical lines at the same spacing, creating a grid. Where lines cross, the doubled-up yellow creates the deeper "overlap" squares that give gingham its characteristic look.
- Berry clusters: Dip a small dotting tool in a deep navy blue. Place two or three dots close together on a few nails — not every nail needs berries.
- Leaves: With a toothpick and forest green, add a single tiny leaf stroke to each berry cluster.
- Finish: One coat of satin top coat. Avoid going back over any area twice, or you'll drag the detail work.
5.Hot Pink Lemonade Frenchie
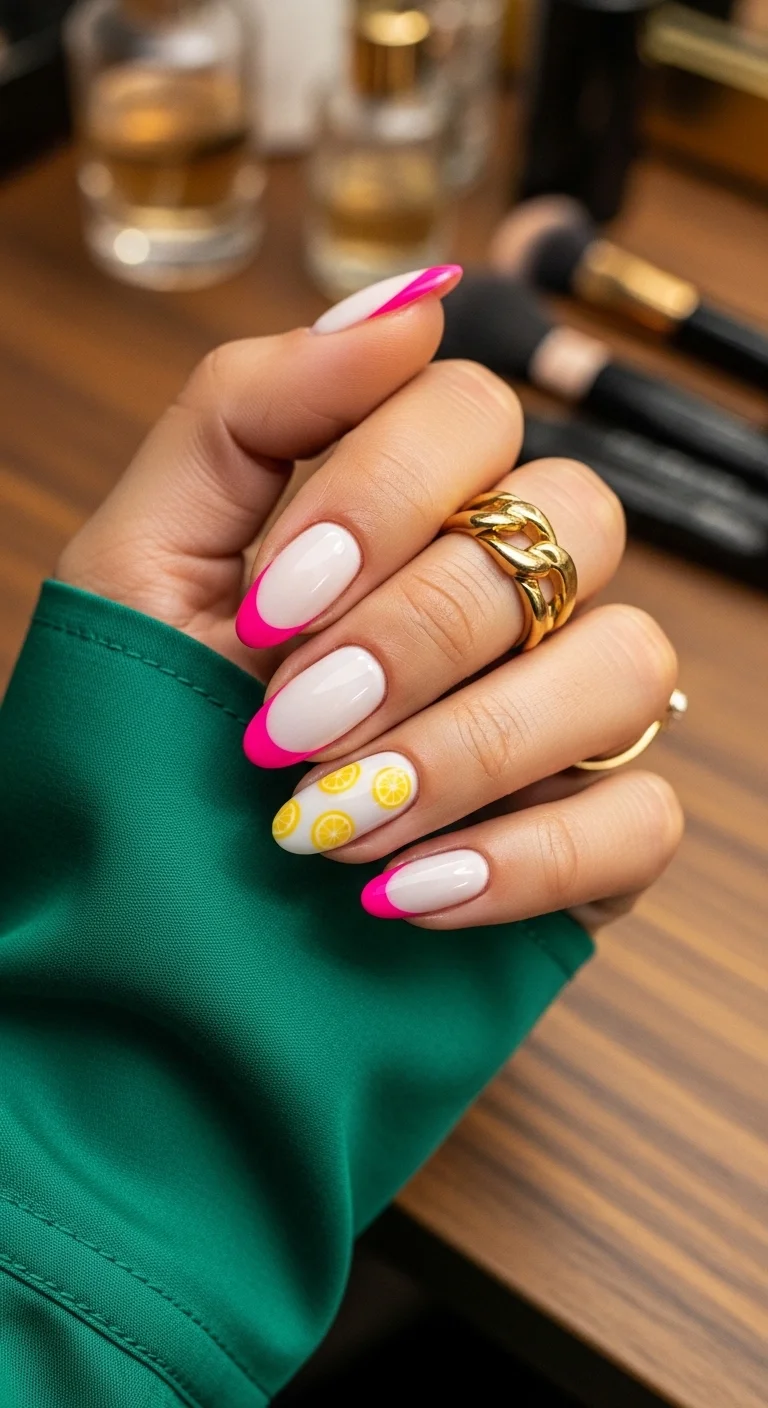
A punchy, Barbie-inspired twist on the citrus trend.
Overview:
Hot pink French tips have a visibility problem: from across a room, they just look like pink nails. Up close, the design reveals itself, which makes the lemon accent nail a smart pairing — it gives people something to notice at any distance.
The color combination pulls from complementary territory on the color wheel (pink and yellow are adjacent to red and green opposites), which is why the pairing feels energizing without clashing. Credit to whoever first figured out that "lemonade" as a color story is basically an excuse to combine two colors that shouldn't work but do.
Worth mentioning: hot pink polish formulas vary wildly. Some are chalky, some are jelly-like, some are nearly neon. For French tips, you want a formula that's opaque in one coat — going back for a second pass on a tip is where wobbly lines happen. OPI "Pink Flamenco" and Essie "Go Go" both cover well in a single layer.
Design Breakdown:
A two-part design that divides between French tips and accent art.
Base Color: Sheer milky pink for the French nails (try OPI "Put It in Neutral"); opaque white on the accent nail.
Nail Shape: Long almond. The length gives the pink tips enough surface area to register as a deliberate design choice rather than grown-out polish.
Design Element: Hot pink French tips on four nails. Hand-painted lemon slice cross-sections on the white accent nail.
Finish: Ultra-glossy. The shine makes the pink look wet and the yellow look juicy.
Get The Look at Home:
If this is your first attempt at colored French tips, practice the curve on a piece of paper first.
- Differentiate the bases: Sheer pink on index, middle, pinky, and thumb. Two coats of opaque white on the ring finger.
- The pink tips: Load a French liner brush with hot pink. Start from one sidewall, sweep to the center, then repeat from the other side to meet in the middle. This two-stroke method is more forgiving than trying to paint the entire curve in one pass.
- Lemon slices on the accent: Using a dotting tool and yellow polish, place half-circles and full circles on the white nail. Don't worry about perfection — lemons aren't perfectly round.
- Segment lines: With a very fine brush and white polish, draw radiating lines inside each yellow circle to create the pith pattern.
- Cleanup: An angled brush dipped in pure acetone is non-negotiable for crisp French lines. Run it along the smile line to sharpen the curve.
- Seal: Thick top coat. Cap the free edge on every nail.
30 Stunning Mother of the Groom Hairstyle Ideas for 2026 💍✨
6.Strawberry Lemon Swirl
A sweet and sour fruit medley that’s pure summer fun.
Overview:
Fruit nail art walks a thin line between "editorial food styling" and "children's birthday party." This design stays on the right side of that line because of the coffin shape and the alternating pastel bases. Coffin nails carry an inherent edge that counterbalances cute subject matter.
The alternating pink and yellow bases add something that full sets of one color miss: visual rhythm. Your eye moves from pink to yellow to pink across the hand, and the fruit motifs sit differently on each color background. The strawberries pop more on the yellow nails; the lemons are more visible on the pink. It's a small detail that shows the design was thought through rather than repeated on autopilot.
One thing this design demands: clean, opaque base coats. If the pink or yellow is streaky, the fruit art on top magnifies every flaw underneath. Budget three thin coats per color instead of two. The extra ten minutes saves you from starting over.
Design Breakdown:
A maximalist fruit set that stays cohesive through a limited warm palette.
Base Color: Alternating pastel bubblegum pink and soft custard yellow.
Nail Shape: Long coffin. The flat tip provides a stable canvas for the fruit illustrations and prevents them from looking cramped.
Design Element: Hand-painted strawberries (red hearts with green leaf caps and seed dots) on yellow nails; lemon cross-sections on pink nails.
Finish: High-gloss. The "candy" aesthetic needs shine to work.
Get The Look at Home:
Plan your layout before you start painting — decide which fingers get which fruit.
- Color blocking: Paint alternating nails pink and yellow. Two coats each for full opacity.
- Strawberry shapes: On the yellow nails, use a small brush to paint a red heart shape. Don't stress about symmetry — real strawberries aren't symmetric either.
- Lemon circles: On the pink nails, use a slightly darker yellow than the base to outline lemon circles, then fill them in.
- Details make or break it: Tiny white V-shaped seeds on the strawberries. White radial lines inside the lemons. Green leaf caps on the strawberries. Each of these takes 10 seconds per nail but triples the impact.
- Dry time is critical: Let the fruit art sit for at least 5 minutes before top coating. Wet detail work smears instantly under a brush.
- Top coat in one stroke: Float the top coat over the art without pressing down. A self-leveling formula like Seche Vite works well here.
7.Sage and Citrus Orchard
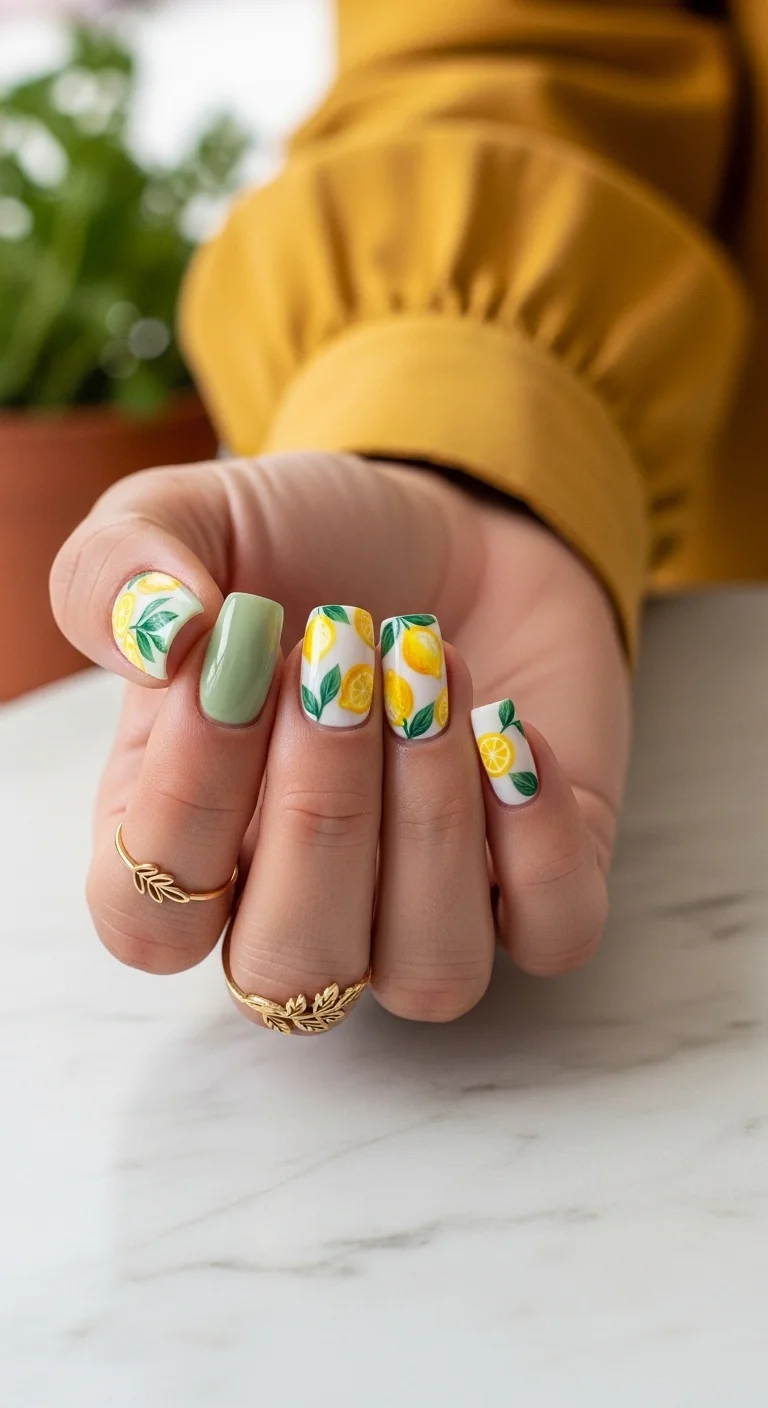
An earthy, sophisticated take on the lemon trend with muted tones.
Overview:
Most lemon nail designs pair the yellow with blue or white — safe choices that read "beach." Sage green takes the whole thing in a different direction. It reads "Italian countryside" rather than "Caribbean resort," which broadens the occasions where this design actually works. A sage-and-lemon set is as appropriate at a professional lunch as it is at a vineyard tasting.
The muted green also solves a common problem with lemon nails: the yellow can overwhelm a design when there's nothing to anchor it. Sage green has enough grey in its undertone to act as a visual anchor, letting the bright yellow accent nails feel like a pop of color rather than a shout.
Short square is the right call here. The botanical art has a rustic quality that clashes with long, glamorous nail shapes. Keeping it short reinforces the "orchard-picked" aesthetic. Zoya "Sage" or Essie "Sew Psyched" both hit the right muted tone without leaning too grey or too olive.
Design Breakdown:
A muted, earthy palette that makes the bright yellow feel more sophisticated by contrast.
Base Color: Creamy opaque sage green (try Zoya "Sage" or Essie "Sew Psyched") on most nails. Stark white on two accent nails.
Nail Shape: Short, clean square. Straight edges complement the geometric simplicity of the botanical illustrations.
Design Element: Hand-painted lemon branches on the white nails — yellow oval lemons connected by brown stems with dark and light green leaves.
Finish: High-gloss top coat. The shine creates contrast against the soft, matte-looking sage.
Get The Look at Home:
The botanical art is simpler than it looks because imperfection is part of the aesthetic.
- Sage base: Two coats on your non-accent nails. Sage greens often have a slightly chalky formula, so use thin layers and let each dry completely.
- White accent nails: Two coats of opaque white on the middle and ring fingers (or whichever layout you prefer).
- Lemon shapes: Paint small yellow ovals on the white nails. Vary their sizes — three on one nail, two on the other. Not every lemon should be the same.
- Branches: Connect the lemons with thin brown lines using a liner brush. Let the brush wobble slightly — perfectly straight branches look artificial.
- Layered leaves: Using your sage green and a darker forest green, paint small almond-shaped leaves along the branches. Alternate the two greens for depth.
- Highlight dots: A single tiny white dot on each lemon creates the illusion of light hitting the surface.
- Seal carefully: Float the top coat over the art without dragging. Botanical detail work is delicate.
27 Stunning June Nail Ideas for 2026 💅
8.Crisp White Lemon Cluster
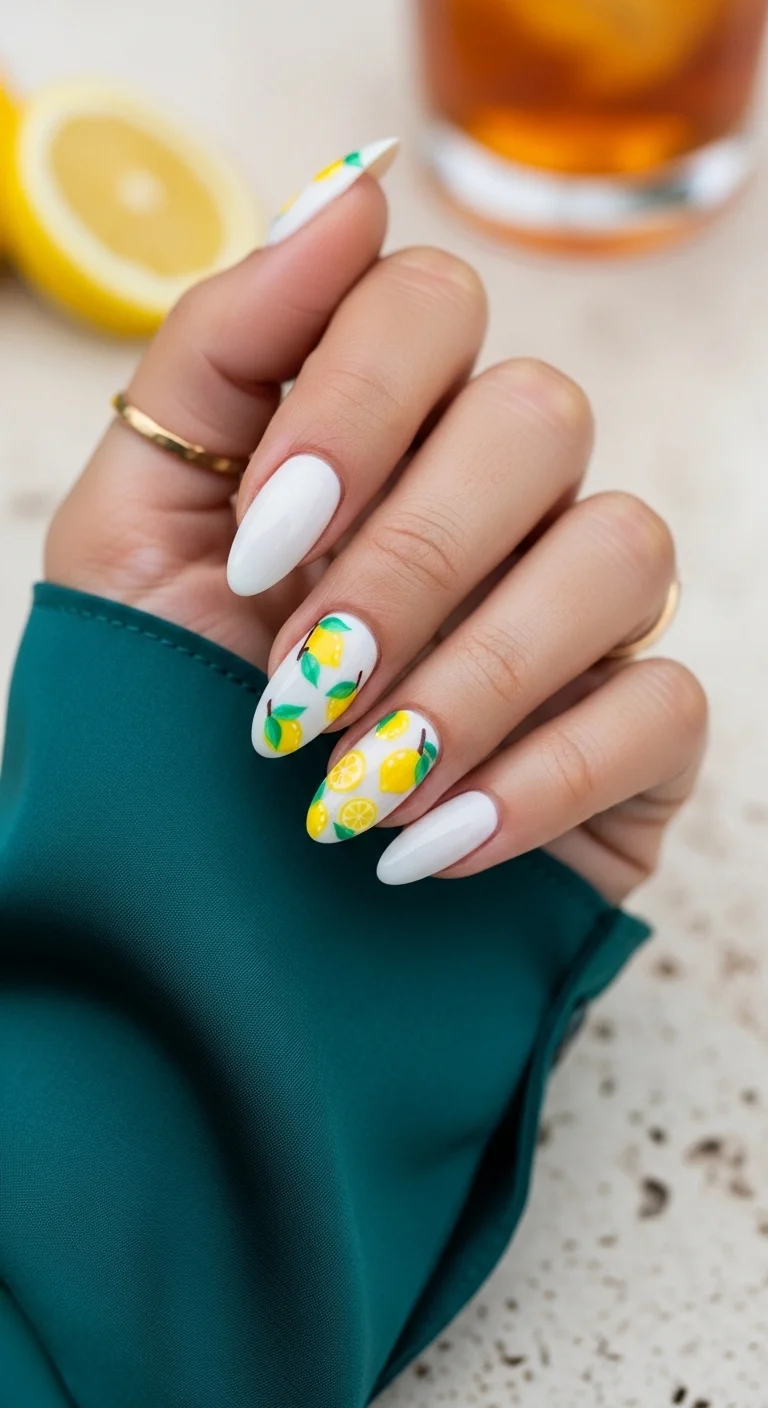
A clean and classic look that puts the focus entirely on the fruit art.
Overview:
White nails with fruit art is a combination that sounds simple but depends entirely on execution. The white base has to be completely opaque with zero streaking — any brush marks or unevenness show through like a flaw in a marble countertop. Done right, the white acts as a gallery wall that makes the yellow and green pop with almost graphic intensity.
The cluster placement on the middle two fingers (rather than every nail) is a deliberate restraint. All-over lemon prints tip into "kitchen wallpaper" territory. Concentrating the art on two nails lets the remaining white nails function as visual breathing room. The result feels curated rather than crowded.
White polish chips faster than most colors because the contrast between the white and your natural nail makes even tiny chips visible. A ridge-filling base coat (like OPI "Nail Envy") and a thick top coat extending over the free edge can add two or three extra days of wear.
Design Breakdown:
The design lives entirely in the contrast between flat white and dimensional botanical art.
Base Color: Bright, fully opaque white. Essie "Blanc" or OPI "Alpine Snow" are industry standards for streak-free coverage.
Nail Shape: Classic almond. The tapered tip adds elegance and gives the lemon clusters a natural "cascading" frame.
Design Element: Clusters of lemons and green leaves, hand-painted on the two middle nails. Remaining nails are solid white.
Finish: High-gloss top coat to make the white look like polished porcelain.
Get The Look at Home:
White polish is unforgiving. Prep the nail surface thoroughly before applying color.
- Prep: Buff out any ridges. White polish magnifies every surface imperfection, so a ridge-filling base coat is worth the extra step.
- White base: Two to three thin coats of opaque white. Let each coat dry fully — thick coats bubble and streak.
- Lemon placement: Using a medium dotting tool, place yellow blobs on the accent nails. Two or three lemons per nail, varying in size and angle.
- Leaf details: With a fine liner brush and emerald green, flick out small leaf shapes from the lemons. Alternate between a darker and lighter green for depth.
- Dimension: A tiny dot of brown at the stem end of each lemon, and a white highlight dot on the opposite side, creates the illusion of roundness.
- Top coat: Thick, self-leveling top coat to smooth the raised texture of the hand-painted art.
9.Matte Lemonade Raindrops
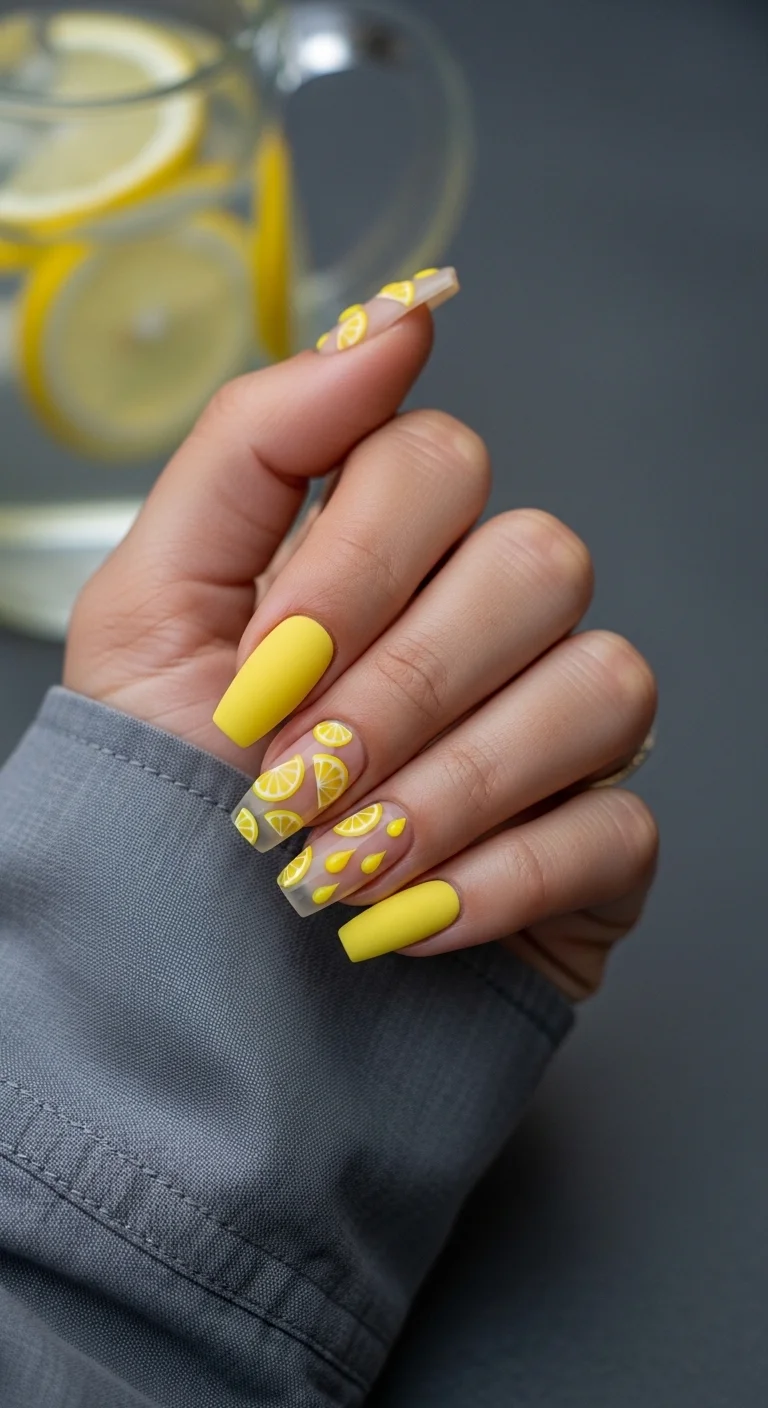
A high-fashion, textured look that mimics the feel of a cold drink.
Overview:
3D nail art is polarizing. Done well, it looks like jewelry for your hands. Done badly, it looks like something fell off your craft supplies shelf and landed on your manicure. The difference is almost entirely about placement and restraint.
This design gets it right by limiting the raised "raindrop" elements to the sheer accent nails and keeping the solid yellow nails flat and matte. The contrast between the two textures — velvety matte against glossy, dimensional drops — is what makes the design interesting. Your eye bounces between the two finishes, which keeps the set from reading as one-note.
The practical reality of 3D gel drops: they snag on hair, knitwear, and pillowcases. Sealing the edges with a thick bead of top coat around the base of each drop reduces this, but it doesn't eliminate it. Budget about a week of wear before something catches. For the matte nails, use a true matte top coat — not satin, not "velvet matte." Essie "Matte About You" or OPI "Matte Top Coat" both deliver a fully flat finish that turns the yellow from "Easter candy" into "sea glass."
Design Breakdown:
Solid pastel base with dimensional accents. Restraint is the key design principle.
Base Color: Opaque sunshine yellow on the index and pinky. Clear or very sheer nude on the middle and ring fingers.
Nail Shape: Long coffin. The flat tip and long sides provide the canvas needed for the 3D drops to read as deliberate rather than accidental.
Design Element: 3D clear "juice" drops and hand-painted lemon slices on the accent nails only.
Finish: Flat matte on the yellow nails; high-gloss 3D gel on the accent nails.
Get The Look at Home:
You'll need building gel or a thick no-wipe top coat for the 3D effect. Regular polish won't hold its shape.
- Color separation: Paint index and pinky nails solid yellow. Leave the middle and ring fingers clear or with a sheer nude base.
- Fruit art on accents: On the clear nails, paint lemon slices using yellow and white polish. Keep them small — the 3D drops need space around them.
- Matte the solids: Apply matte top coat over the yellow nails. Let it dry completely.
- Build the drops: Using a dotting tool and thick clear building gel, place individual "droplets" on the accent nails. Vary the sizes — two large, three small per nail.
- Cure immediately: If using UV gel, cure under the lamp right away so the drops don't flatten and spread.
- Placement strategy: Put drops over the lemon slices and on bare clear areas. The drops over the art create a "looking through water" effect.
24 Stunning Bridesmaid Hairstyles for Weddings 2026 💍✨
10.Vintage Lemon Grove Almonds
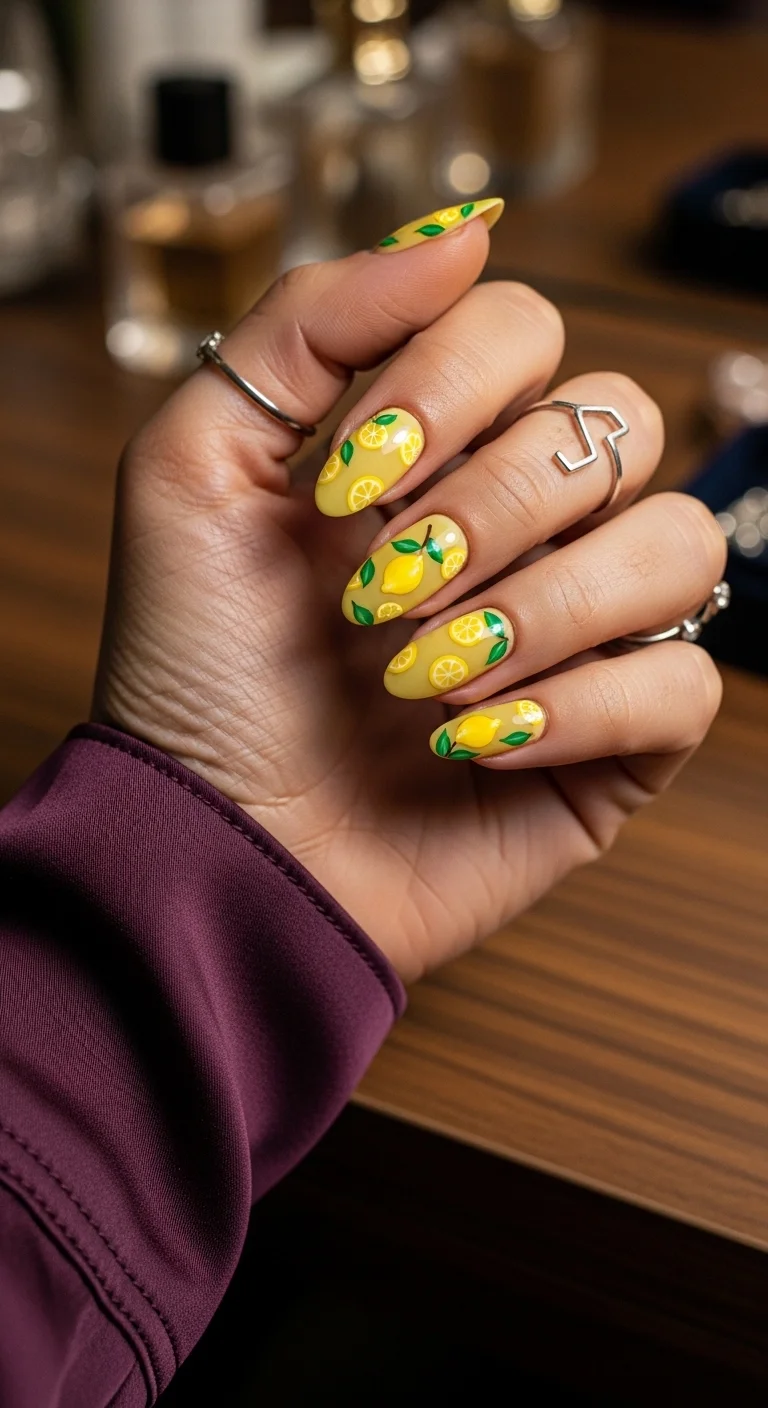
A soft and nostalgic design inspired by vintage Italian prints.
Overview:
All-over lemon prints can easily read as "tablecloth pattern" if the color range is too wide or the placement is too uniform. This design avoids that trap by keeping everything within a narrow yellow-to-green palette and varying the lemon placement on every nail. Some nails get one large lemon; others get two small ones. The inconsistency is what makes it look hand-painted rather than stamped.
The pale butter-yellow base is doing critical work here. A bright yellow would compete with the lemon art. A white would make the design feel clinical. This soft, creamy tone sits in the middle — warm enough to complement the fruit, muted enough to recede into the background.
The whole-lemon motif (with leaves, not slices) gives the design a botanical illustration quality that reads as more sophisticated than cross-section fruit art. It's the difference between a scientific drawing and a cartoon. Short to medium almond is the ideal shape — long enough to give the art room, short enough to stay practical.
Design Breakdown:
A tonal yellow palette with botanical detail. The narrow color range is what keeps it looking cohesive instead of loud.
Base Color: A soft, pastel butter-cream yellow. Something between primrose and custard — not neon, not mustard.
Nail Shape: Medium almond. The tapered shape complements the rounded form of the whole lemons.
Design Element: Whole lemons with tiny stems and leaves, repeated across all nails at varying sizes and angles.
Finish: High-gloss. The shine gives the painted lemons a "lacquered" quality that elevates the hand-painted look.
Get The Look at Home:
The repetition is meditative once you get into a rhythm. Work across all nails in stages rather than finishing one nail at a time.
- Yellow base: Two coats of your butter-cream yellow. Let each dry fully.
- Lemon shapes: Using a slightly brighter yellow than the base, paint small oval shapes on each nail. Vary the direction — some tilted left, some right, some straight.
- Leaf work: With a fine liner brush and medium green, add two small leaves to the top of each lemon. Alternate between a lighter and darker green for a natural look.
- Stem detail: A short brown line connecting the leaves to the lemon. Keep it brief — stems should be 1-2mm maximum.
- Highlight: A single white dot on the side of each lemon creates the illusion of a light source. This tiny step triples the realism.
- Top coat: One generous coat to smooth the raised texture of the painted art and unify the finish.
11.Minty Fresh Lemon Orchard
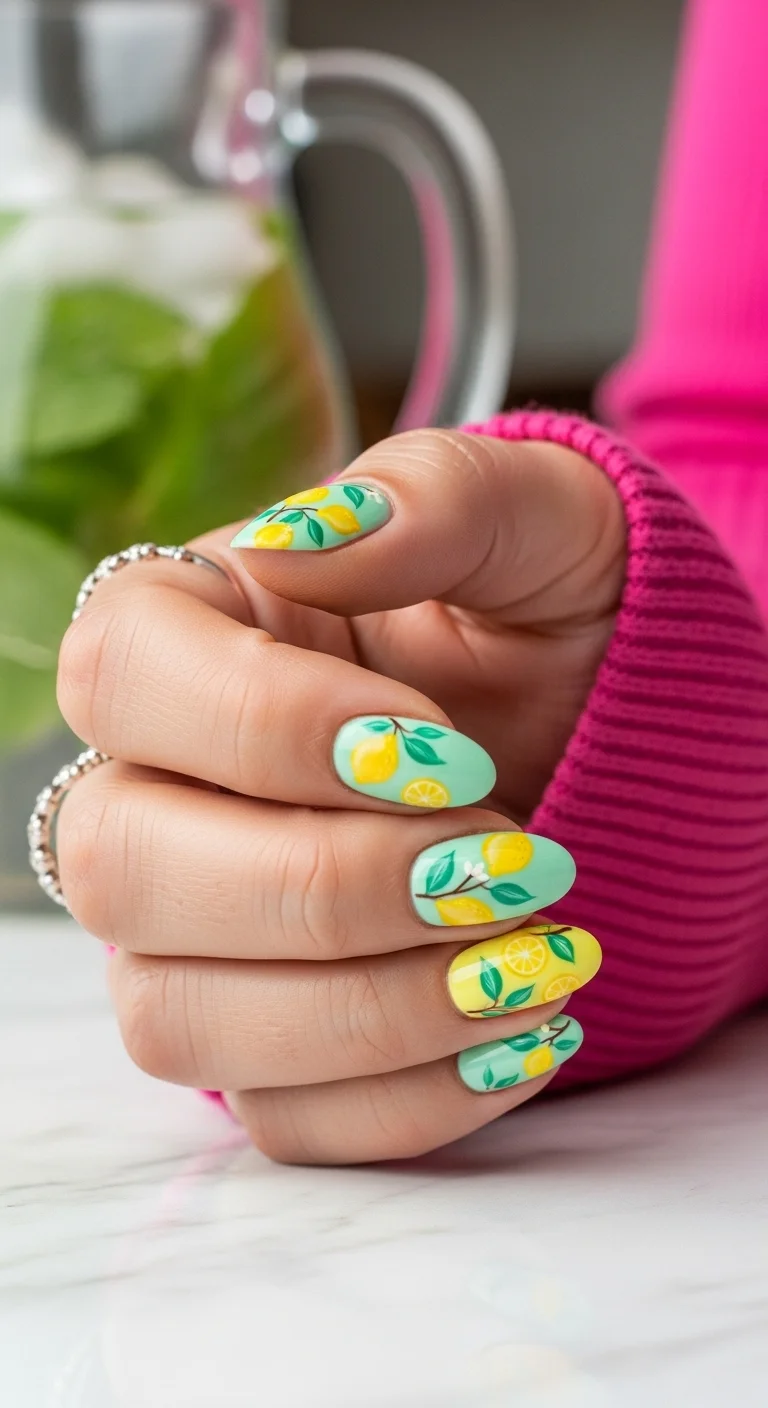
A cool and zesty color combination that feels incredibly fresh.
Overview:
Mint and lemon is a flavor combination that works in cocktails, sorbet, and — as it turns out — on nails. The cool mint base does something unexpected to the warm yellow lemons: it makes them look brighter by contrast without either color competing for attention.
The ring finger breaks the pattern with a yellow base of its own, which flips the color relationship and keeps the set from reading as one-note. That single accent nail is what separates a thoughtful design from a matchy-matchy one. The branch art with brown stems and dark green leaves adds enough botanical detail to look hand-painted rather than stamped.
Short almond is the right shape here. The rounded tips echo the organic curves of the lemons and leaves, and the shorter length keeps the botanical art from looking busy. This is a set that works as well at a baby shower as it does on a Tuesday afternoon at your desk.
Design Breakdown:
Two base colors — mint and yellow — with botanical art bridging the two palettes.
Base Color: Creamy pastel mint on most nails. Soft yellow on the ring finger accent.
Nail Shape: Short almond. The tapered tip keeps the botanical illustrations proportional.
Design Element: Hand-painted whole lemons with brown branches and dark green leaves on the mint nails; lemon slice cross-sections on the yellow accent nail.
Finish: High-gloss top coat to saturate both the mint and the yellow.
Get The Look at Home:
Work in stages across all nails rather than finishing one nail at a time — it's faster and keeps your color palette consistent.
- Mint base: Two coats on four nails. Let each coat dry fully — mint formulas tend to be slightly chalky, so thin layers prevent streaking.
- Yellow accent: Two coats of soft yellow on the ring finger.
- Lemon shapes: On the mint nails, paint two or three small yellow ovals per nail at different angles.
- Branches: Connect the lemons with thin brown lines using a liner brush. Let the lines wobble slightly — perfectly straight branches look artificial.
- Leaves: Add small almond-shaped leaves in a dark green that's several shades deeper than the mint base.
- Accent art: On the yellow ring finger, paint lemon slice cross-sections — yellow circles with white radiating lines for the segments.
- Seal: Float the top coat over the art without dragging. Botanical detail work is delicate.
30 Cute Ladybug Nail Trends That Are Taking Over (2026)
12.Neon Lime Zest
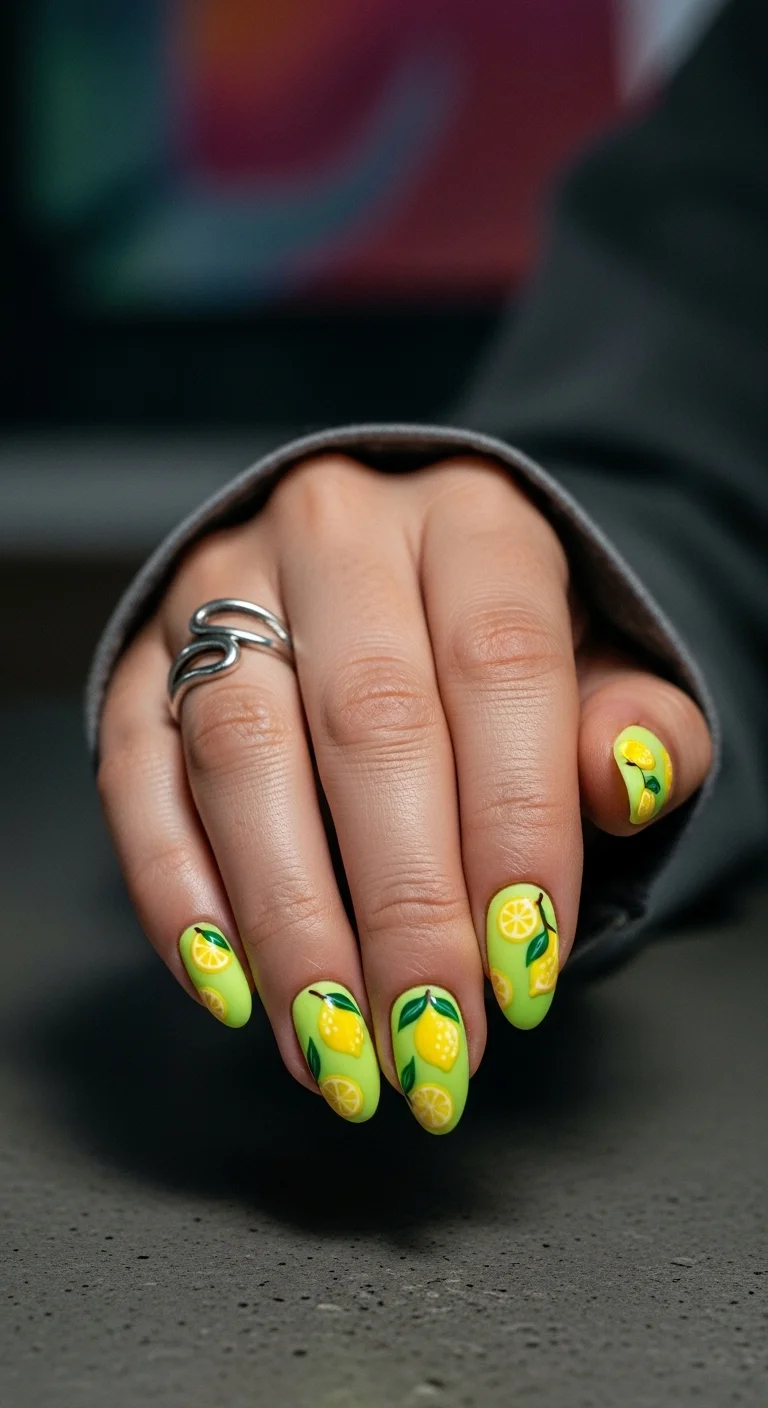
A high-octane, electric take on the citrus trend.
Overview:
Two colors that are almost the same value — neon lime and lemon yellow — sitting next to each other creates a visual vibration that's hard to ignore. That's the point. This design isn't trying to be subtle. It's aiming for the citrus equivalent of turning the volume to eleven.
What saves this from reading as costume jewelry is the variety in the fruit art. Whole lemons, slice cross-sections, tiny white blossoms, and dark green leaves give each nail something different to look at. Without that variety, you'd have the same yellow shape repeated ten times, which starts to look like wallpaper.
One practical note: neon polishes dry matte. The gloss you see in photos comes entirely from the top coat. Without it, these nails would look flat and chalky — a completely different vibe from the wet, juicy look the design is going for. A UV-resistant top coat also prevents the neon from fading in direct sunlight, which happens faster than most people expect.
Design Breakdown:
High-saturation-on-high-saturation. The lemon art differentiates itself from the lime base through shape, not color.
Base Color: Bright neon lime-yellow. Something in the neighborhood of China Glaze "Celtic Sun" or a similar electric chartreuse.
Nail Shape: Medium almond. The length gives the neon enough surface area to register as intentional.
Design Element: Hand-painted whole lemons and lemon slice cross-sections in a brighter, more saturated yellow, with dark green leaves and tiny white blossom accents.
Finish: Ultra-glossy top coat. Non-negotiable with neon formulas.
Get The Look at Home:
Neon over bare nail always looks muted. A white base coat underneath makes the difference between "bright" and "electric."
- White undercoat: One coat of opaque white. This is load-bearing for the neon's intensity.
- Neon base: Two thin coats of neon lime. The first will look streaky — that's normal for neon formulas. The second levels it out.
- Lemon shapes: Using a brighter, more saturated yellow than the base, paint whole lemons and half-circle slices across the nails. Vary the sizes.
- Leaf accents: Small dark green leaves attached to the lemons. The dark green is critical — it's the only color in the design that provides real contrast.
- Blossoms: Tiny white dots with five-petal detail on two or three nails. These break up the yellow-on-yellow density.
- Top coat: Two coats of thick, glossy top coat. The first seals the art; the second smooths the surface.
13.Sky Blue French Squeeze
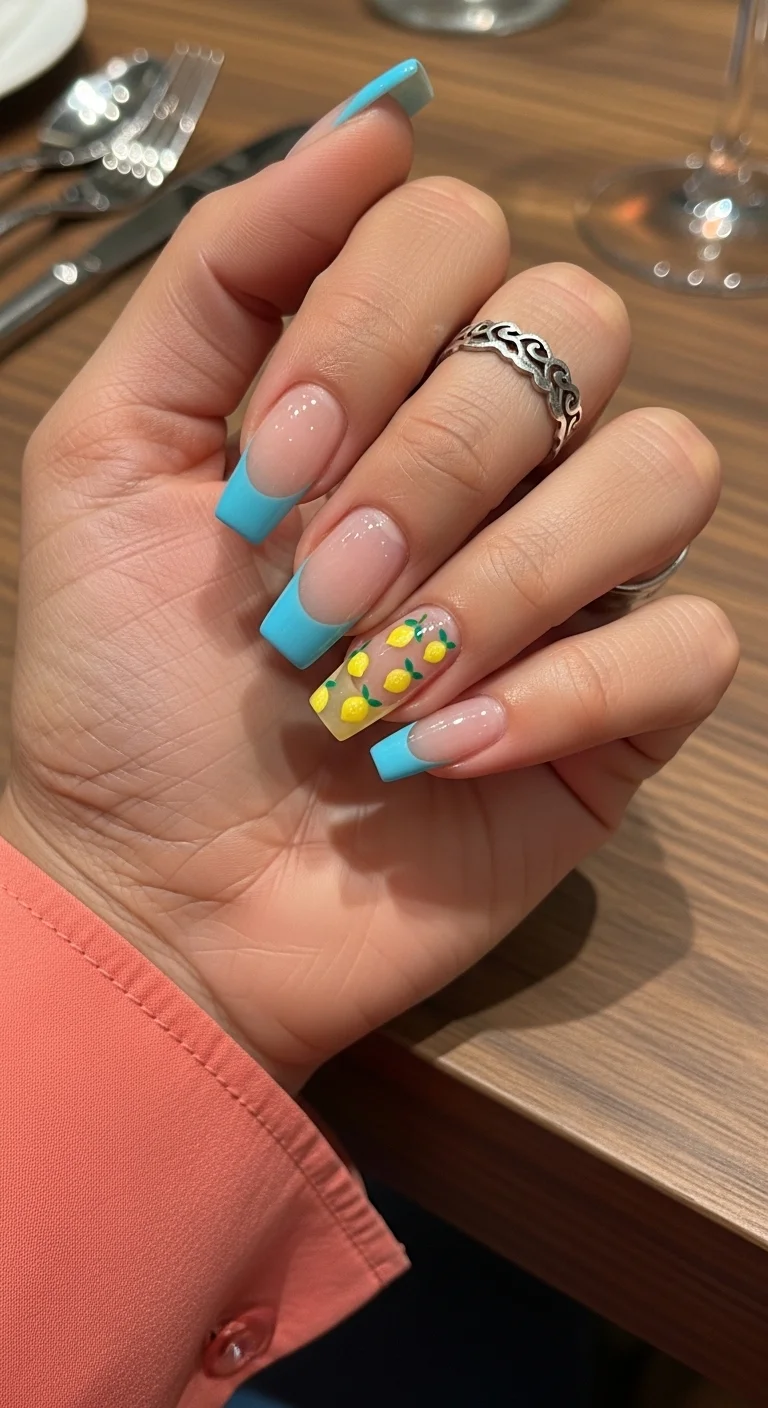
A breezy, nautical-inspired design that’s sweet and simple.
Overview:
Colored French tips are having a moment, and sky blue might be the most wearable entry point. It's less predictable than pink, less aggressive than red, and pairs naturally with the yellow of lemon art in a way that feels like the color wheel was designed for exactly this combination.
The ring finger accent — tiny scattered lemons on a sheer nude base — is what elevates this from "cute French tips" to a complete design. It's the nail people notice second, after the blue tips register, and it rewards closer inspection. The lemons are small enough that they read as texture from a distance rather than illustration.
The long square shape is essential here. The flat tip gives the French smile line a clean, geometric edge that a rounded shape would soften. If you're someone who finds classic white French tips too safe for summer, this is the direct upgrade — same technique, different color, one accent nail.
Design Breakdown:
Structure meets whimsy. The French tips provide the architecture; the lemon accent provides the personality.
Base Color: Sheer nude or milky pink for the French nails. Clear or very sheer base on the ring finger accent.
Nail Shape: Long square. The flat tip creates a sharp, modern French line.
Design Element: Sky blue French tips on four nails. Scattered tiny lemons with green leaves on the ring finger.
Finish: High-gloss. The shine makes the blue look like glazed ceramic.
Get The Look at Home:
The French tips are straightforward. The accent nail is where patience pays off.
- Sheer base: Two coats on all nails. Let dry completely.
- Blue tips: Using a French liner brush and sky blue polish, paint the smile line from sidewall to center on each nail. Two thin coats for full opacity.
- Accent lemons: On the ring finger, use your smallest dotting tool to place tiny yellow dots in a scattered pattern. Five to seven per nail.
- Mini leaves: With a toothpick and green polish, add a single tiny leaf stroke to each lemon dot.
- Cleanup: An angled brush dipped in acetone sharpens the French smile line. This step is non-negotiable for clean tips.
- Seal: Top coat over everything. Cap the free edge on every nail — French tips chip fastest at the edge.
21 Stunning Concert Hairstyles for Women 2026 🎶✨
14.Gilded Lemon Coffin
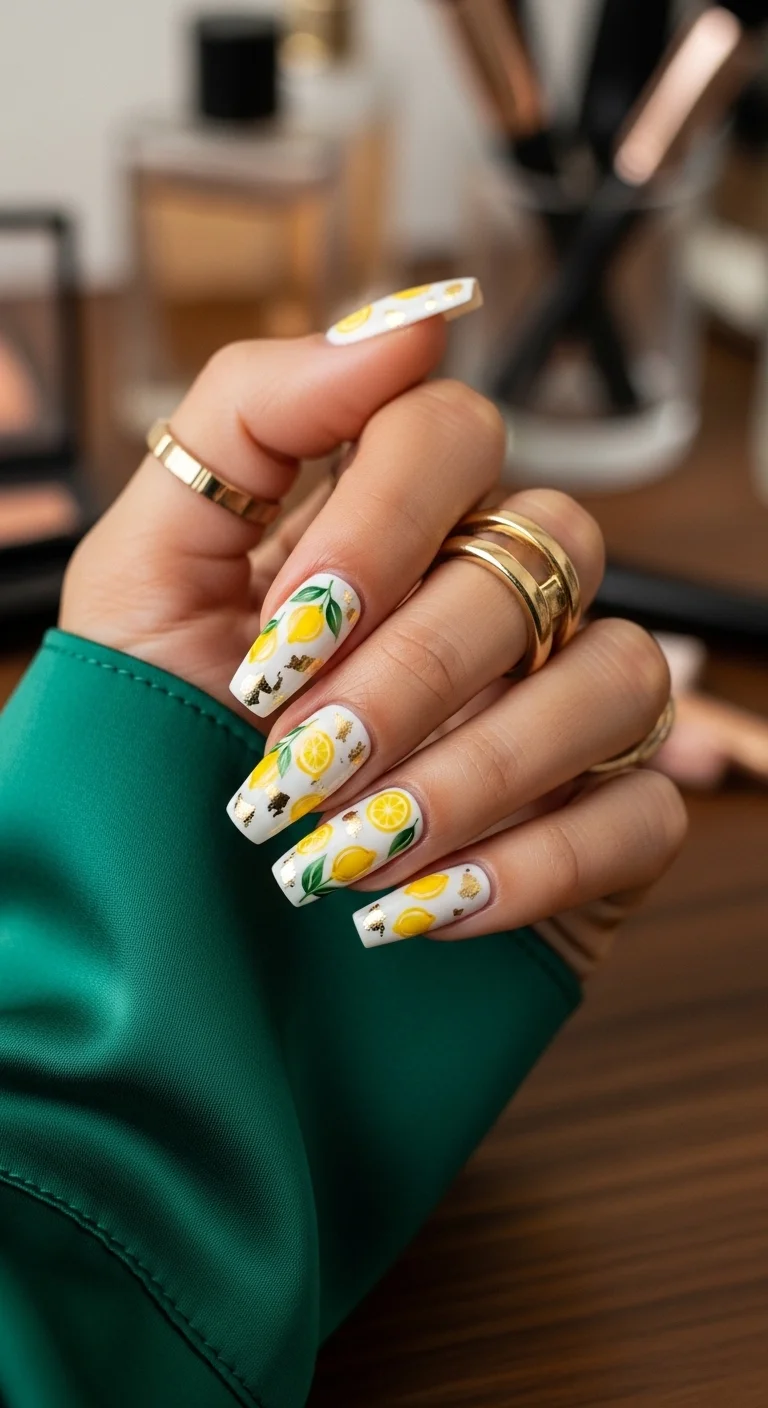
A luxurious and glam take on the citrus trend with metallic accents.
Overview:
Gold foil on nails is one of those techniques that looks expensive but is actually simpler than hand-painted art. The irregular, organic edges of real gold leaf catch light in ways that uniform glitter or metallic polish can't replicate. Each piece sits slightly differently, which means no two nails look identical — and that's the entire appeal.
The white coffin base is a deliberate choice. A nude or pastel base would compete with the gold for attention. White stays out of the way and lets the metallic flakes and the lemon art occupy the same space without fighting. The green leaves tie the botanical elements to the organic shape of the foil.
The practical challenge with gold leaf is adhesion. It needs a tacky surface to stick to, but if the polish is too wet, the foil sinks and loses its texture. The sweet spot is a base coat that's dry to the touch but not fully cured — about sixty seconds after application. Press the foil gently, then seal immediately with a thick top coat to prevent lifting.
Design Breakdown:
Botanical illustration meets metallic texture. The foil adds a third dimension that flat art alone can't achieve.
Base Color: Bright, opaque white. Essie "Blanc" or OPI "Alpine Snow" give the cleanest canvas.
Nail Shape: Long coffin. The flat surface area maximizes the space for both the lemon art and the foil flakes.
Design Element: Hand-painted whole lemons with green leaves, interspersed with randomly placed gold foil flakes.
Finish: Ultra-glossy top coat to encapsulate the foil and smooth the surface texture.
Get The Look at Home:
Work with tweezers for the foil placement. Fingers transfer oils that weaken adhesion.
- White base: Two coats of opaque white. Let dry until just slightly tacky.
- Lemon art: Paint your lemons and leaves with a fine brush. Let dry completely before adding foil — wet paint and foil don't mix.
- Foil placement: Using tweezers, press small, irregular pieces of gold leaf onto the nail around the painted art. Vary the density — more foil on some nails, less on others.
- Flatten: Press the foil flat with a dry brush or silicone tool. Jagged edges catch on things and peel off within a day.
- Seal: Two coats of thick top coat. The first coat locks the foil in place; the second creates a smooth, glassy surface over the raised texture.
15.Barbiecore Lemonade Frenchie
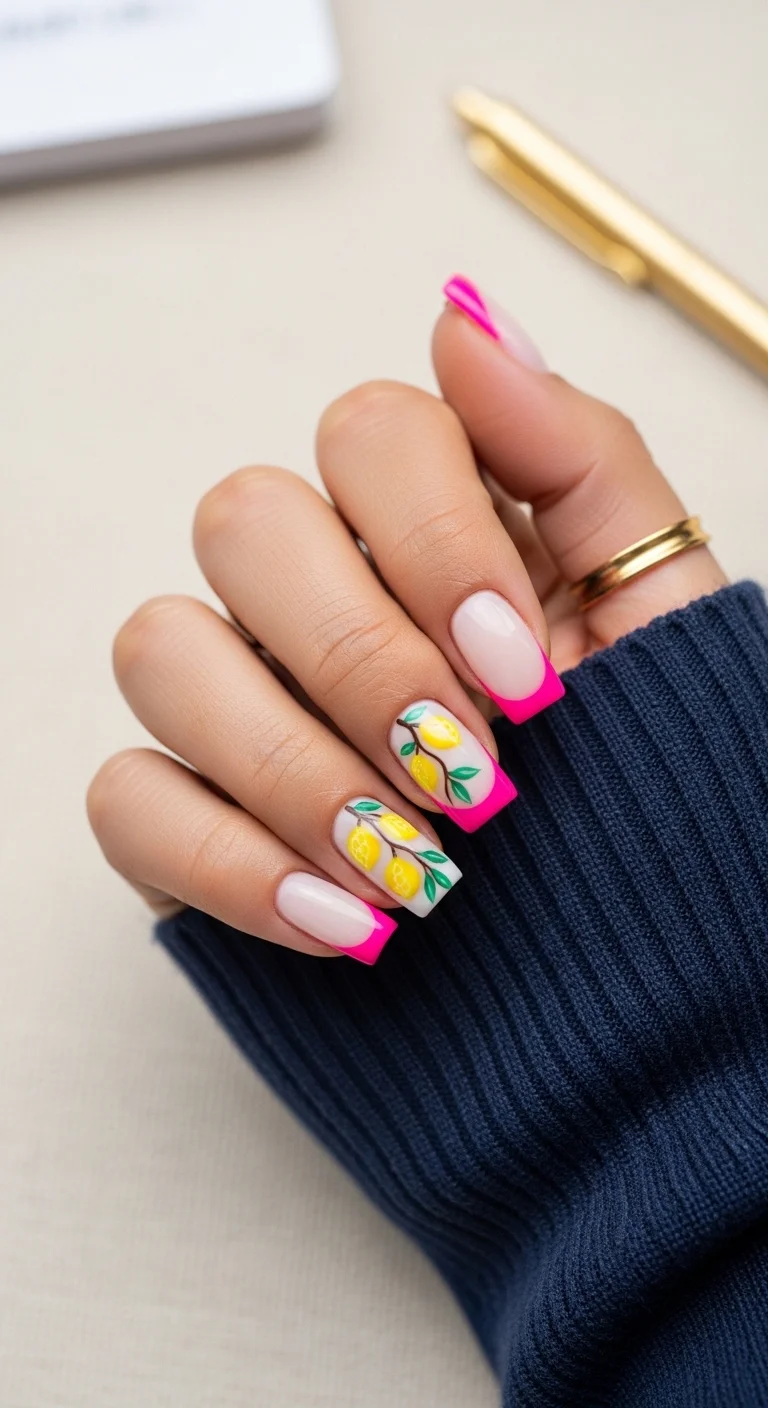
A high-contrast, playful look that combines two of summer’s biggest trends.
Overview:
Hot pink and lemon yellow shouldn't work together on paper. Pink is cool-toned, yellow is warm. But the specific shade of pink here — a saturated, almost neon fuchsia — has enough warmth in its undertone to sit next to the yellow without clashing. The result reads as energetic rather than chaotic.
The lemon branch art on the middle and ring fingers does the heavy lifting. Without it, you have colored French tips — fine, but unremarkable. With it, the design tells a story: structured French manicure meets loose botanical illustration. The milky base behind the branches keeps the art legible against the nude.
Medium square is the right shape for this. The flat tip complements the geometric precision of the French smile line, while the width gives the branch art enough room to breathe. Long stiletto would make the pink tips read as costume; short round would shrink the accent art too much.
Design Breakdown:
Structured French tips on three nails, organic branch art on two. The tension between the two styles is the design.
Base Color: Sheer milky nude for the French nails. Slightly more opaque milky white on the accent nails.
Nail Shape: Medium square. Clean edges, modern proportions.
Design Element: Hot pink French tips on thumb, index, and pinky. Hand-painted lemon branches with brown stems and green leaves on middle and ring fingers.
Finish: High-gloss top coat across all nails.
Get The Look at Home:
The French tips and the branch art use completely different techniques. Do them in separate rounds.
- Sheer base: Two coats on all nails. The accent nails can get a slightly thicker second coat for more opacity.
- Pink tips: Using a French liner brush and hot pink polish, paint the smile line. Start from one sidewall, sweep to center, repeat from the other side. Two-stroke method is more forgiving.
- Branch art: On the accent nails, draw thin brown branches with a liner brush. Add two or three yellow lemons and dark green leaves along the branches.
- Detail check: Compare the French tips across all three nails. If one is noticeably thicker than the others, fix it now — once the top coat goes on, unevenness is locked in.
- Seal: One thick coat of glossy top coat. Cap the free edge on every nail.
35 Palm Tree Nail Art Ideas that are the Most Iconic Nail Art Designs 🌴✨
16.Polka Dot Lemon Squeeze
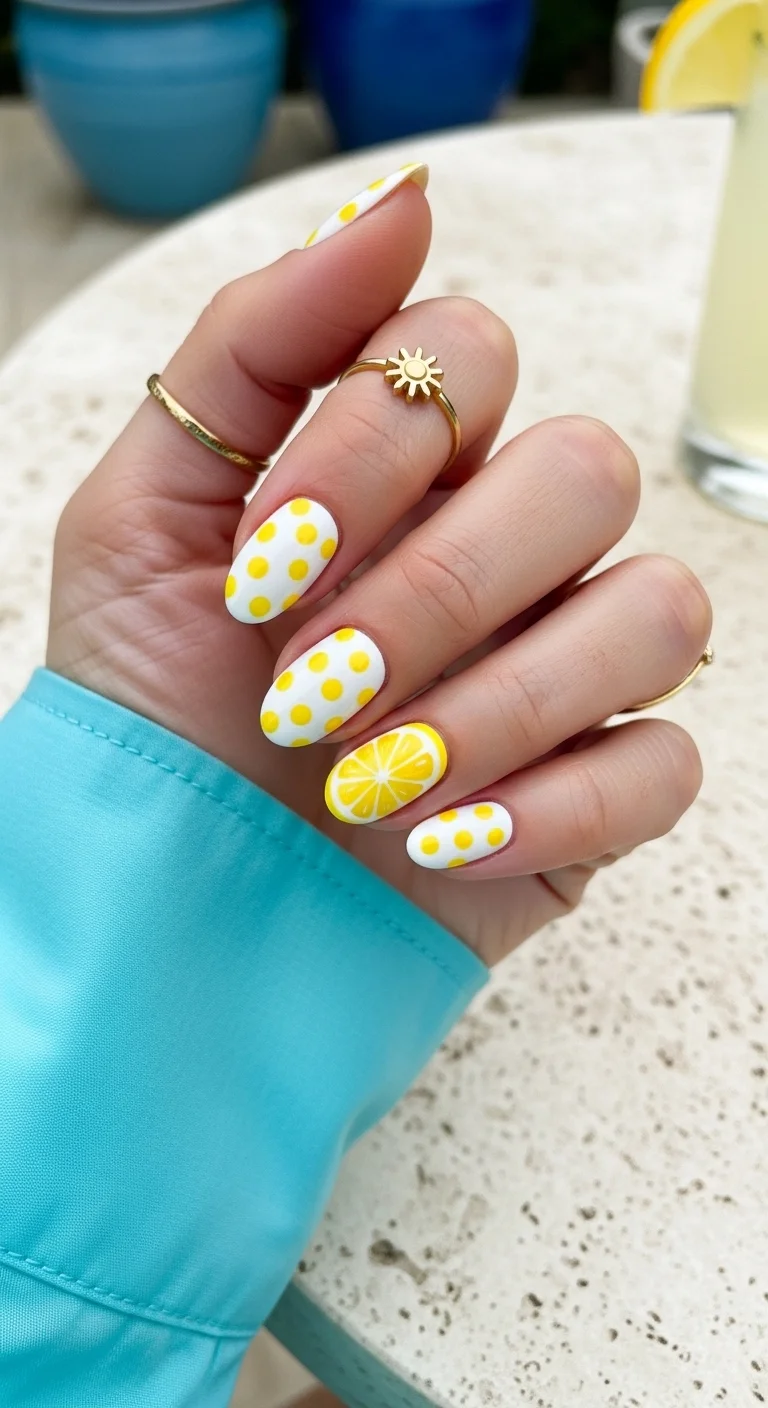
A retro-inspired, playful design that’s full of personality.
Overview:
Polka dots are one of the few nail art techniques where the execution is genuinely simple but the visual impact is high. Five dots in a circle, one dot in the center — you can paint a daisy with a bobby pin and two colors. The challenge here isn't the dots. It's the accent nail.
The ring finger lemon slice is a full-nail illustration — yellow circle, white radiating segment lines, visible rind edge. It breaks the polka dot rhythm and gives the eye something to land on. Without it, you have polka dot nails with a lemon theme. With it, you have a designed set where each nail has a distinct role.
The dot spacing matters more than people realize. Crowded dots create a busy, all-over pattern that competes with the accent nail. Widely spaced dots — five to eight per nail — feel intentional and allow the white base to function as breathing room. The white base itself needs to be streak-free. Any brush marks in the white show through between every dot.
Design Breakdown:
Simple shapes, deliberate spacing, one detailed accent.
Base Color: Bright, fully opaque white. Streaky white kills this design.
Nail Shape: Medium almond. The rounded shape complements the circular dots and the lemon slice.
Design Element: Yellow polka dots on four nails. Full-nail lemon slice cross-section on the ring finger.
Finish: High-gloss top coat.
Get The Look at Home:
The dots are the easy part. The lemon slice accent is where precision matters.
- White base: Two to three thin coats of opaque white. Let each dry fully — any tackiness drags the dotting tool.
- Dot placement: Using a medium dotting tool and yellow polish, press straight down and lift straight up. Don't twist or drag — that creates ovals, not circles. Space them roughly 3mm apart.
- Lemon slice: On the ring finger, paint a large yellow circle covering most of the nail. With a fine brush and white polish, draw radiating lines from the center to the edge for the segments.
- Rind detail: A thin white line around the edge of the yellow circle creates the pith.
- Check spacing: Hold both hands at arm's length. If any nail looks significantly more or less crowded than the others, add or remove dots before top coating.
- Seal: One coat of glossy top coat. Float the brush to avoid dragging any wet dots.
17.Zesty French Tips
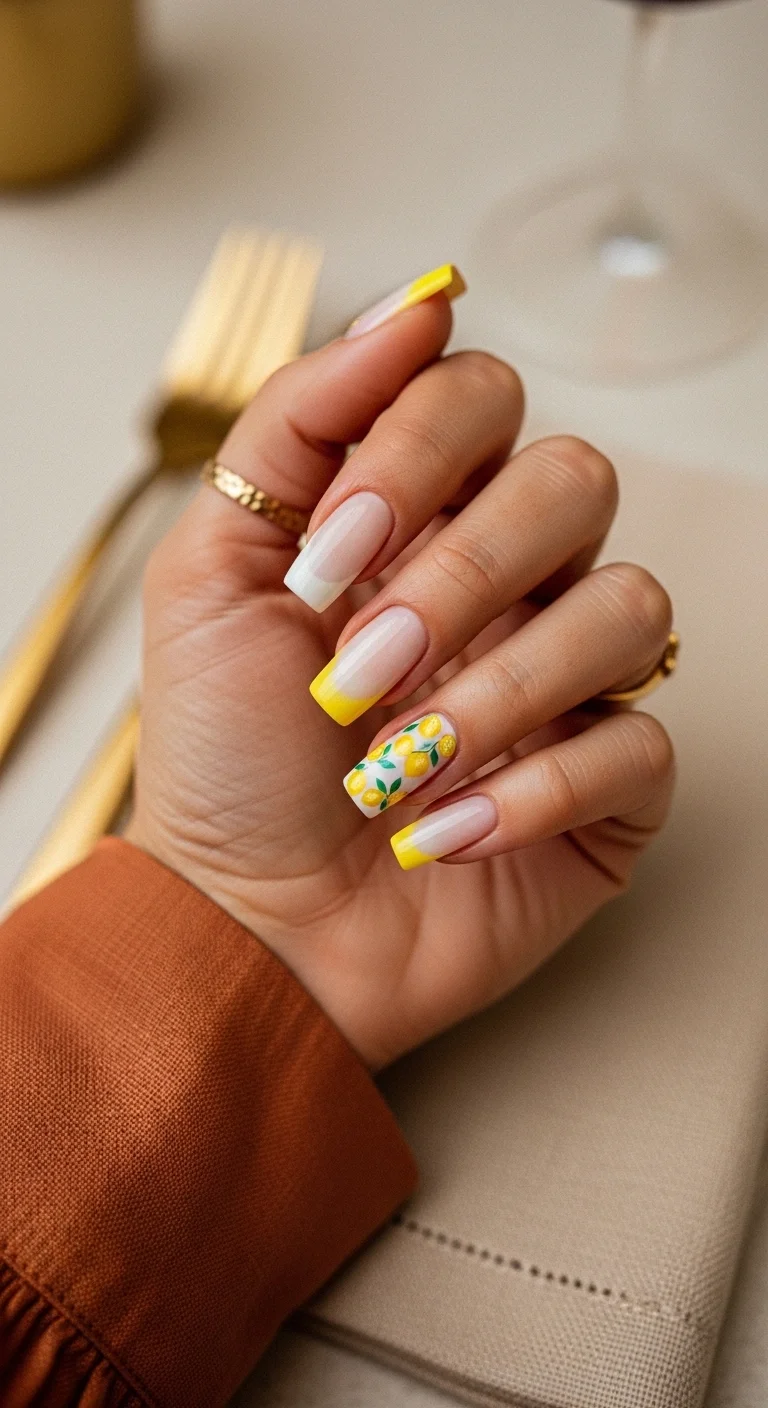
A sun-drenched version of the classic French manicure.
Overview:
A French tip doesn't have to be white. Yellow French tips on a sheer nude base are one of the simplest ways to participate in the lemon trend without committing to full-nail art. The technique is identical to a classic French — just swap the color.
What makes this set more than "yellow French tips" is the ring finger accent. The lemon branch on a milky white base adds a botanical detail that reframes the entire design as intentional rather than a quick color swap. The brown branch and green leaves introduce two colors that don't appear anywhere else in the set, which creates a subtle but effective visual anchor.
The mix of white and yellow French tips across different fingers is worth noting. The thumb and middle finger get white tips; the index, ring, and pinky get yellow. This asymmetry prevents the design from feeling too matchy and adds a layer of intentionality that a uniform set would lack.
Design Breakdown:
Two French tip colors plus one botanical accent. The asymmetry is what makes it interesting.
Base Color: Sheer milky nude for the French nails. Slightly more opaque milky white on the ring finger accent.
Nail Shape: Long square. The flat tip gives the French line a crisp, geometric edge.
Design Element: Yellow French tips on index, ring, and pinky. White French tips on thumb and middle. Lemon branch art on the ring finger over the milky base.
Finish: High-gloss top coat.
Get The Look at Home:
The two-tone French requires mapping your layout before you start painting.
- Map the colors: Decide which fingers get yellow and which get white before picking up a brush. Consistency matters more than which color goes where.
- Sheer base: Two coats on all nails. Let dry fully.
- Yellow tips: Using a French liner brush, paint the smile line on the designated nails. Two thin coats for opacity.
- White tips: Repeat on the remaining nails with white. Try to match the line thickness of the yellow tips.
- Branch accent: On the ring finger, paint a thin brown branch with two or three yellow lemons and dark green leaves.
- Cleanup: An angled brush dipped in acetone sharpens every smile line. Run it along the border between nude and color.
- Seal: Top coat over everything. Cap the free edge on every nail.
25 Stunning Summer Vacation Hairstyles for 2026 ☀️🌊
18.Floating Lemon Slices
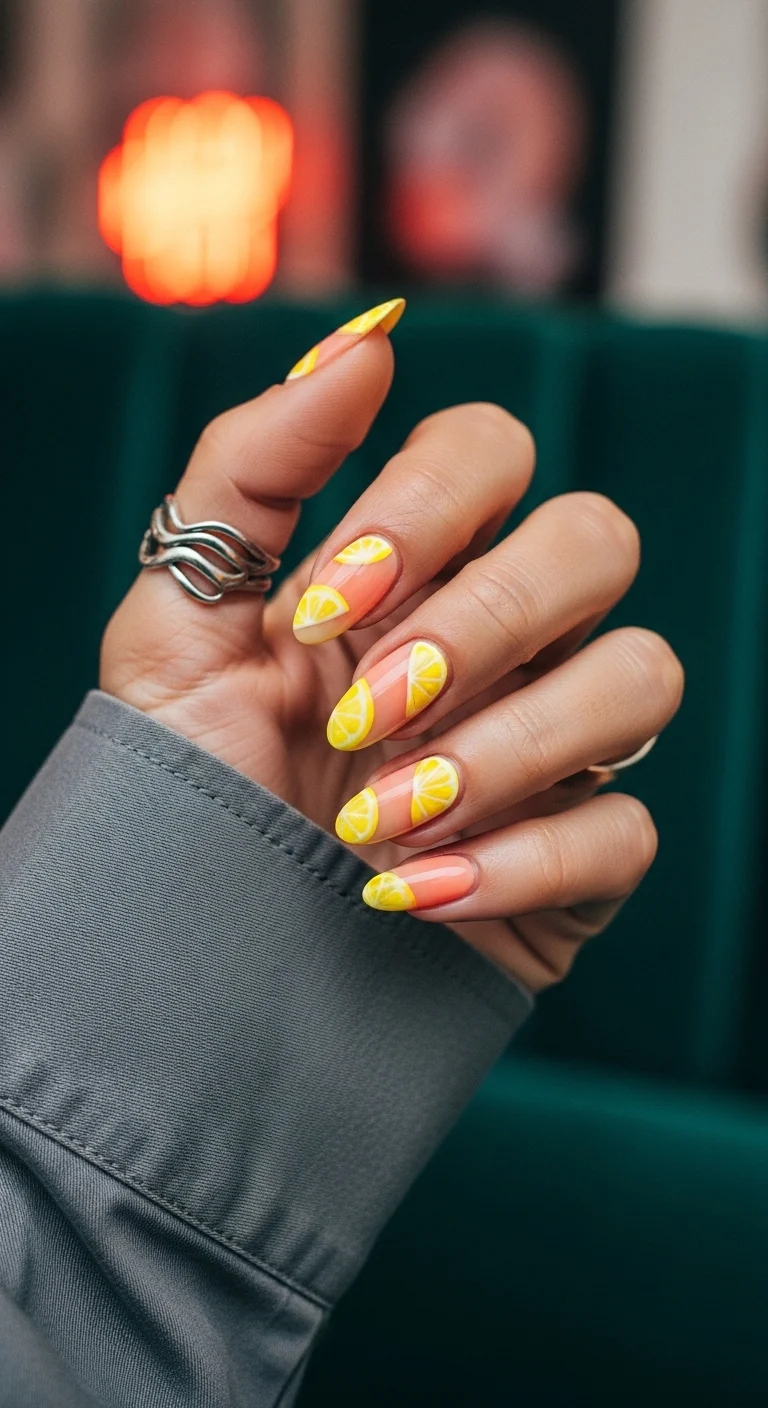
A soft, fruity-floral vibe that’s perfect for golden hour.
Overview:
Coral and lemon is a pairing that borrows from cocktail culture — think a tequila sunrise where the orange juice meets the grenadine. The gradient base does most of the atmospheric work here: warm coral at the cuticle fading into yellow at the tips creates a sunset effect that makes the lemon slices look like they're floating in golden light.
The slice placement is deliberately random. Some nails get one large cross-section, others get two smaller ones. The slices sit at different angles — some tilted, some straight, some partially cut off by the nail edge. This controlled chaos is what makes the design feel organic rather than stamped. Uniform placement would kill the "floating" illusion entirely.
The long almond shape is critical. The tapered tip extends the gradient's color range and gives the lemon slices room to sit at angles without looking cramped. On shorter nails, the slices would need to shrink, and at that size, the segment detail inside each cross-section becomes invisible.
Design Breakdown:
A gradient base with illustrative art layered on top. The two techniques serve different purposes — atmosphere and subject.
Base Color: Coral or peachy-pink at the cuticle, fading into warm yellow at the tips. The gradient is applied with a sponge.
Nail Shape: Long almond. The extended tip gives the gradient room to develop.
Design Element: Hand-painted lemon slice cross-sections placed at random angles across the nails. Yellow circles with white radiating segment lines and a thin rind edge.
Finish: High-gloss top coat to intensify the gradient colors.
Get The Look at Home:
The gradient needs to be fully dry before the lemon art goes on. Painting on a tacky surface drags the colors underneath.
- Coral base: Two coats of coral or peach on the lower two-thirds of each nail.
- Yellow tips: Paint yellow on the upper third. These can overlap slightly — the sponge blends the join.
- Blend: Use a dry makeup sponge to tap where the two colors meet until the hard line disappears. Three to four passes usually does it.
- Dry completely: Wait at least ten minutes. The sponge leaves a slightly textured surface that needs time to level out.
- Lemon slices: Using yellow polish and a fine brush, paint circles and half-circles at random angles. Vary the sizes. Inside each circle, draw white radiating lines for the segments.
- Seal: Two coats of thick top coat to smooth the gradient texture and encapsulate the art.
19.Jumbo Citrus Squeeze
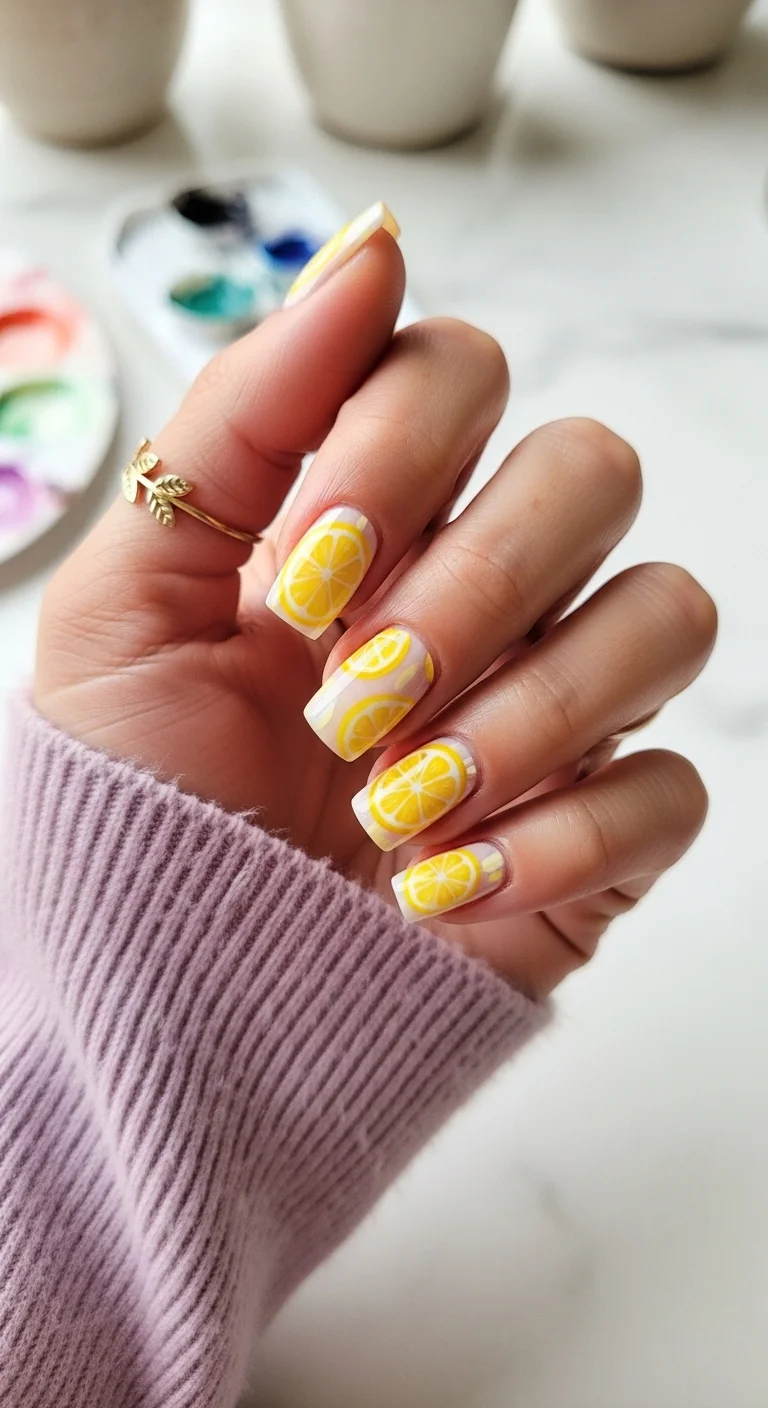
A bold and graphic take on the lemon trend with oversized art.
Overview:
Oversized lemon slices on a white base is a design that commits fully to its concept. There's no subtlety here — each slice covers seventy to eighty percent of the nail surface, and the segment detail is visible from arm's length. That scale is the entire point. It turns fruit art from a small accent into the dominant visual element.
The white base is doing more than providing contrast. It functions as the "rind" background — the visible white space between the yellow circle and the nail edge reads as pith, which makes the slices look more realistic than they would on a colored or nude base. The design essentially uses the base color as part of the illustration.
The practical challenge is keeping the circles round. Freehanding a large circle on a curved nail surface is harder than it looks. A dotting tool or a circular stencil helps. The segment lines inside need to radiate from a consistent center point — if they're off-center, the slice looks like a wheel that's been bent.
Design Breakdown:
Maximum scale, minimum color palette. The white base does double duty as both background and illustration element.
Base Color: Opaque white. The white needs to be fully coverage — any translucency makes the slices look washed out.
Nail Shape: Medium square. The flat surface gives the large circles a stable frame.
Design Element: Jumbo lemon slice cross-sections on every nail — yellow circles with white radiating segment lines and a thin yellow rind edge.
Finish: High-gloss top coat to smooth the raised texture of the layered art.
Get The Look at Home:
Large circles require a steadier hand than small dots. Consider using a circular stencil or guide.
- White base: Two to three thin coats of opaque white. Streaky white is the enemy of this design.
- Circle outline: Using a medium dotting tool or a circular stencil, outline a large yellow circle that covers most of the nail. Fill it in with yellow.
- Segment lines: With a fine brush and white polish, draw radiating lines from the center of the circle to the edge. Eight to ten lines per slice.
- Rind: A thin yellow line around the outer edge of the white circle defines the rind. This small step triples the realism.
- Check symmetry: Compare all ten nails. The circles should be roughly the same size and the segments should radiate from a consistent center.
- Top coat: Two coats to level out the texture of the layered art and create a smooth, glassy surface.
35 Cute & Trendy Short Summer Nails for 2026 ☀️
20.Nautical Lemon Stripes
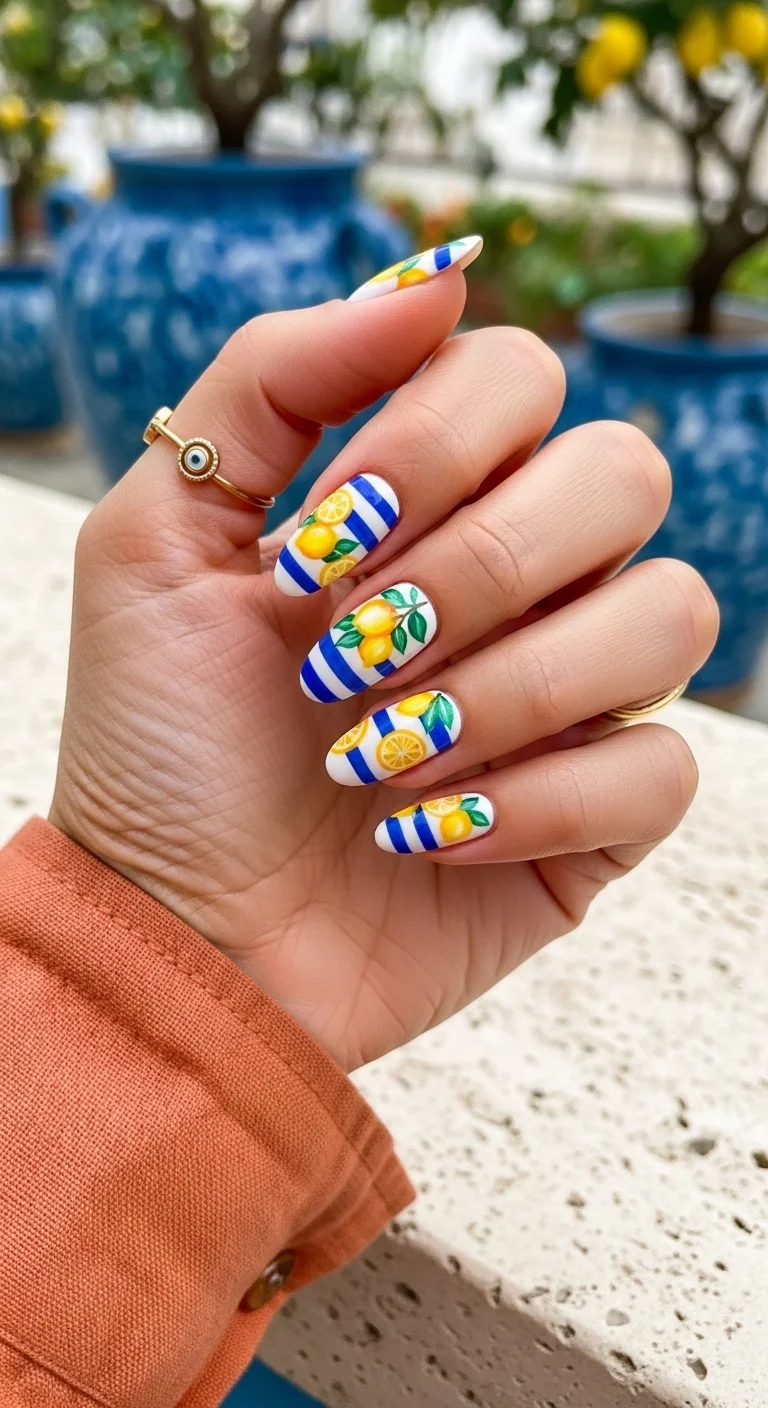
A chic and classic nautical look with a zesty citrus twist.
Overview:
Blue and white horizontal stripes are a pattern so classic it barely needs explanation — it's the visual equivalent of a Breton shirt. Adding lemons on top of the stripes creates an unexpected layer that elevates the design from "nautical reference" to something with actual personality.
The lemon art sits on top of the stripes rather than being integrated into them, which creates a collage-like quality. The fruit doesn't follow the stripe geometry — it's painted at angles, partially overlapping the blue and white lines. This deliberate disregard for the underlying pattern is what makes the design feel hand-made rather than printed.
The stripe color matters. This isn't navy — it's a brighter, more saturated cobalt that reads as Mediterranean rather than maritime. Navy against white would feel darker and more conservative. This blue has enough energy to hold its own against the bright yellow lemons without either color overpowering the other.
Design Breakdown:
Two visual layers — geometric stripes underneath, organic fruit art on top — held together by a three-color palette.
Base Color: Bright, opaque white. The white stripes need to be fully opaque so the blue doesn't bleed through.
Nail Shape: Almond. The curved shape softens the rigid geometry of the horizontal stripes.
Design Element: Bold cobalt blue horizontal stripes painted over white, with hand-painted lemons and dark green leaves placed on top of the striped pattern.
Finish: High-gloss top coat to saturate both the blue and the yellow.
Get The Look at Home:
The stripes need to be fully dry before the lemon art goes on. Painting on wet stripes creates muddy green where the yellow overlaps the blue.
- White base: Two coats of opaque white on all nails. Let dry completely.
- Stripe taping: Apply thin striping tape horizontally across each nail, spacing the lines roughly 3mm apart. Press the edges firmly — polish bleeds under loose tape.
- Blue coat: Paint cobalt blue over the entire nail, covering both the tape and the exposed white.
- Peel while wet: Remove the tape immediately, before the blue sets. Pull at a low angle to keep the stripe edges clean.
- Lemon art: Once the stripes are fully dry, paint lemons and leaves on three or four nails. The lemons should overlap the stripes at angles — don't try to align them with the geometry.
- Seal: Two coats of top coat. The first locks in the art; the second smooths the raised texture where the lemon paint sits on top of the stripes.
21.Honey Lemon Swirl

A sophisticated and earthy abstract take on the yellow trend.
Overview:
Brown and yellow together sounds like a combination that should look like a bruise. In practice, when the yellow leans buttery and the brown stays within the caramel-to-chocolate range, the result reads as warm, cohesive, and surprisingly sophisticated. The swirls look like honey stirred into espresso — organic, fluid, and impossible to replicate exactly from nail to nail.
The design alternates between solid yellow nails and nails with abstract swirls over a sheer milky base. This alternation is what keeps the set from reading as one-note. The solid yellow nails provide a resting point for the eye between the more complex swirled nails.
The wet-on-wet swirl technique is more forgiving than it looks. The key is working into a still-tacky base so the brown and caramel drag naturally into the yellow. Over-mixing is the most common mistake — three or four drags per nail, maximum. You want to see individual colors in the swirl, not a muddy blend.
Design Breakdown:
A tonal palette within the yellow-to-brown spectrum. The narrow color range is what keeps it looking polished instead of chaotic.
Base Color: Buttery honey yellow on solid nails. Sheer milky nude on swirled nails.
Nail Shape: Long almond. The extended surface area gives the swirls room to flow naturally.
Design Element: Abstract drag swirls in chocolate brown and caramel over the wet base on swirled nails. Solid yellow on alternating nails.
Finish: High-gloss top coat to smooth the surface and intensify the warm tones.
Get The Look at Home:
Pre-mix your swirl colors on foil before touching the nail. This isn't a design you build on the nail surface.
- Yellow nails: Two coats of buttery yellow on alternating nails. Let dry fully.
- Swirl base: On the remaining nails, apply one coat of sheer milky nude. Let dry.
- Wet layer: Apply a second thin coat of nude. Do NOT wait for it to dry — you're working into this wet surface.
- Drop colors: Place small dots of brown, caramel, and yellow directly onto the wet nail. Space them randomly.
- Drag, don't swirl: Use a toothpick or detailing brush to pull the dots in S-shaped curves. Three or four drags per nail, maximum. Over-mixing creates mud.
- Dry time: Wait at least ten minutes before top coating. The wet-on-wet technique needs extra time to set.
- Seal: Two coats of thick top coat to smooth the textured swirls and create a glassy surface.
28 Effortless Hot Weather Day Hairstyles for Women 2026 ☀️💇♀️
22.Tequila Sunrise Skies
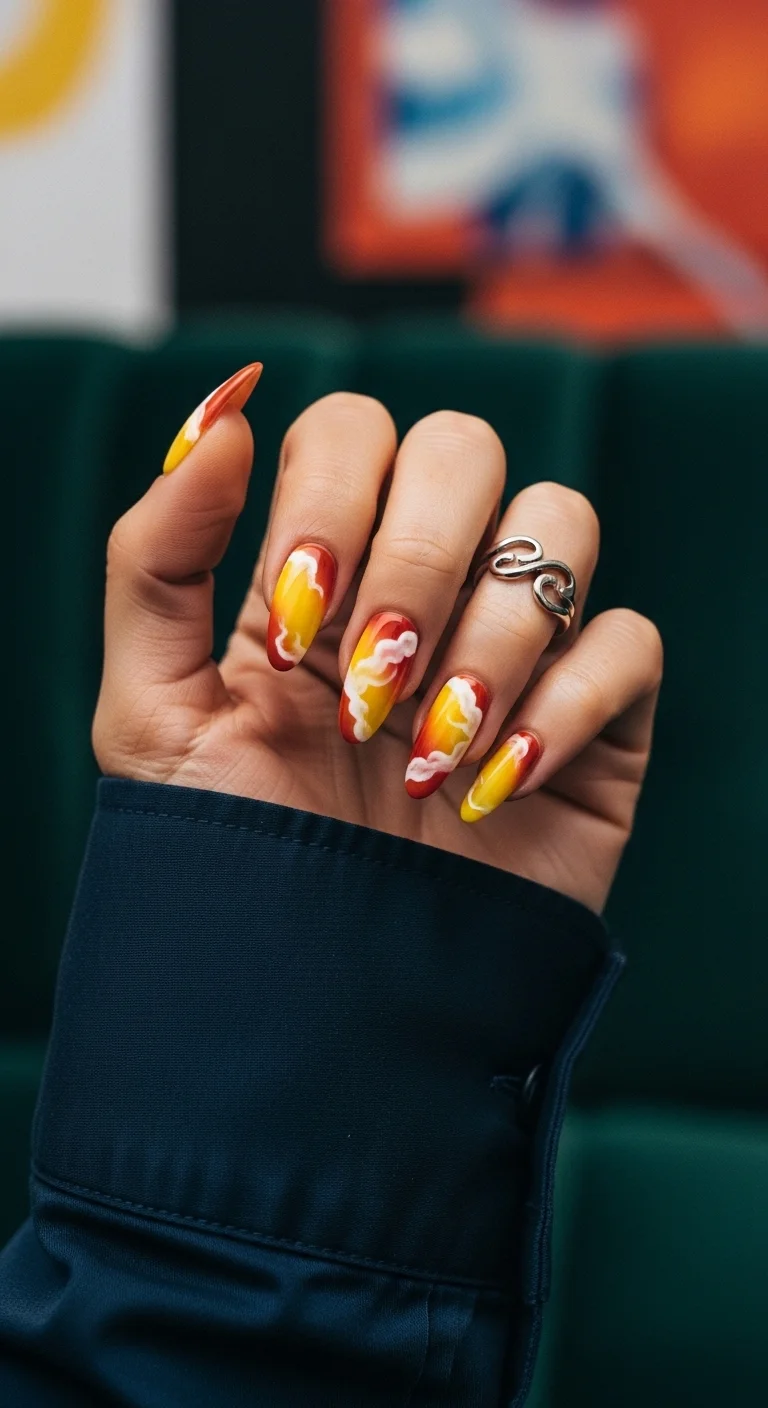
A dreamy, vacation-ready design that captures the perfect summer sunset.
Overview:
A three-color gradient that transitions from deep red at the cuticle through orange to bright yellow at the tip is one of the hardest sponge techniques to get right. The challenge isn't applying the colors — it's blending them where they meet without creating a muddy brown band between the red and the yellow. The orange has to do the mediating work, and the sponge has to hit the nail at exactly the right moisture level.
The white clouds painted on top serve two purposes. First, they break up what would otherwise be a very intense, unbroken gradient. Second, they add a layer of depth — the clouds sit visually "in front of" the sunset, which makes the gradient feel like a sky rather than a color swatch. The clouds should be placed irregularly, with different sizes on different nails. Symmetrical clouds look like stamps.
A white base coat underneath the gradient is non-negotiable. Without it, the red and orange pigments sheer out against the natural nail tone and the sunset reads as washed-out rather than vivid. Two thin coats of white, fully dried, give the sponge something opaque to work against.
Design Breakdown:
A scenic gradient with illustrative clouds layered on top. The two techniques serve different purposes — atmosphere and detail.
Base Color: White undercoat for opacity. The gradient itself uses red at the cuticle, orange in the middle, and yellow at the tips.
Nail Shape: Long almond. The extended length gives the three-color gradient room to transition smoothly.
Design Element: Sponge-applied sunset ombre with hand-painted white fluffy clouds on two or three nails.
Finish: High-gloss top coat to blend the gradient transitions and add a "sky" sheen.
Get The Look at Home:
The gradient requires patience. Each sponge layer needs to dry before the next one goes on, or the colors mix into mud.
- White base: Two thin coats of opaque white. Let dry completely.
- Sponge setup: Paint three horizontal stripes on a makeup sponge — red at the top, orange in the middle, yellow at the bottom. Dab on paper first to remove excess.
- First pass: Press the sponge onto the nail with the red aligned at the cuticle. Dab gently, three to four passes. The first layer will look sheer — that's normal.
- Build opacity: Re-apply polish to the sponge and repeat two to three more times, letting each layer dry for thirty seconds between passes.
- Cloud art: Using a small dotting tool and white polish, place irregular blobs on two or three nails. Use a clean brush to gently soften the edges while the white is still wet.
- Seal: Two coats of thick top coat to smooth the sponge texture and blend the gradient transitions.
23.Lavender Lemon Sprig
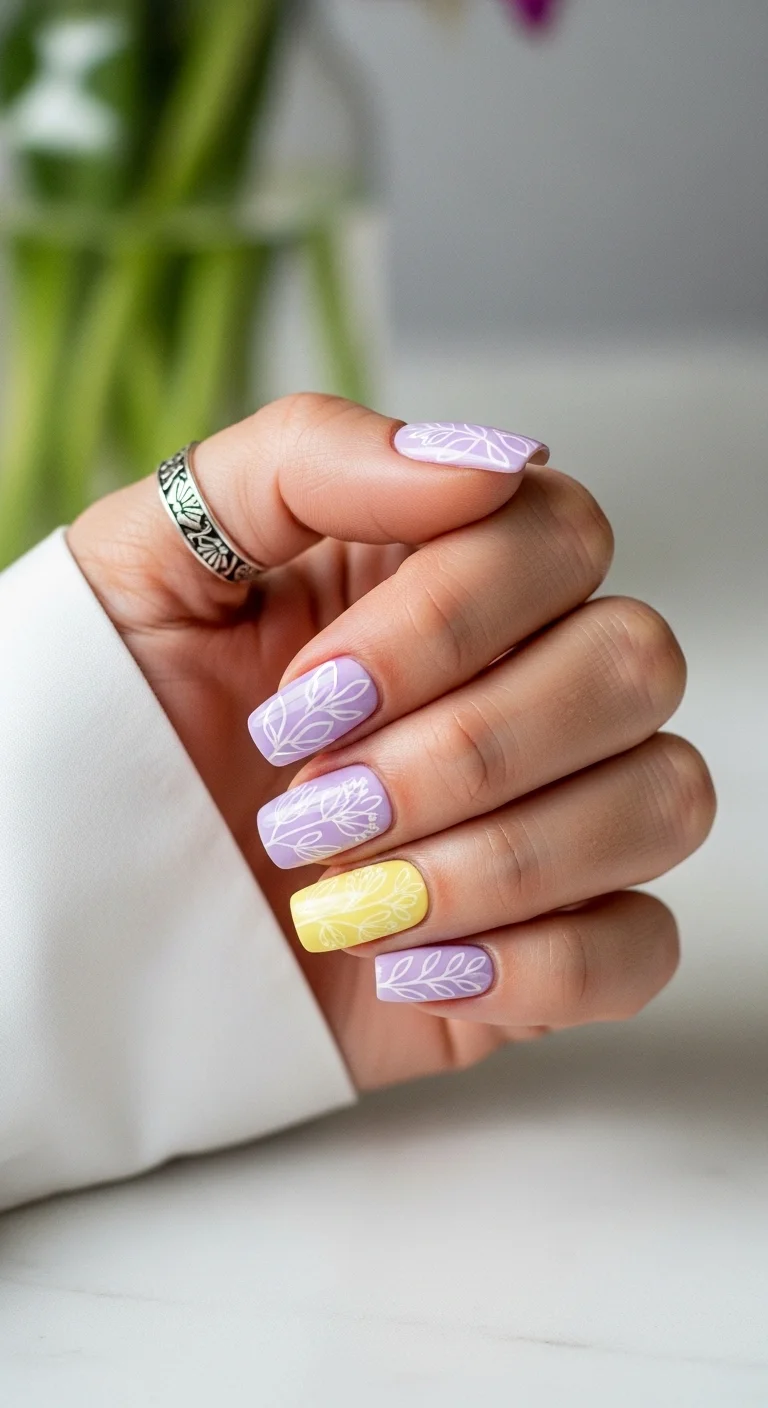
A soft and sophisticated botanical design with a unique color pairing.
Overview:
Lavender and yellow is a pairing borrowed from Provençal landscapes — the purple of lavender fields next to the yellow of sunflower borders. On nails, the two colors share a similar value (both are pastels, both roughly the same lightness), which prevents either from dominating. The result is balanced in a way that high-contrast pastel combinations rarely achieve.
The white line-art elevates this from "two pastel colors" to a deliberate design. The botanical sprigs — stems with alternating leaves — are painted in thin white lines over both the lavender and yellow bases. Because the art is the same color on both backgrounds, it creates visual continuity across the different base colors. The hand-drawn quality of the lines is part of the appeal; perfectly uniform lines would look printed.
Short square is the right call. The geometric shape contrasts with the organic leaf forms, which makes the line art look more deliberate. Long almond would soften that contrast and make the design feel more generic.
Design Breakdown:
Two pastel bases unified by consistent white line art. The simplicity of the palette is the design.
Base Color: Creamy pastel lavender on most nails. Soft lemon yellow on the ring finger accent.
Nail Shape: Short square. Clean edges complement the graphic quality of the line art.
Design Element: White line-art botanical sprigs — thin stems with alternating almond-shaped leaves — painted over both the lavender and yellow bases.
Finish: High-gloss top coat to protect the fine lines.
Get The Look at Home:
The line art requires a very fine liner brush and a steady hand. Practice the leaf shape on paper first.
- Lavender base: Two coats on most nails. Let dry fully.
- Yellow accent: Two coats of soft yellow on the ring finger.
- Central stem: Using a thin liner brush and opaque white, draw a single curved line down the center of each nail.
- Leaves: Along the stem, draw small almond-shaped leaves alternating left and right. Keep the lines thin — the delicacy is the point.
- Variation: Not every nail needs the same leaf count. Three leaves on one nail, five on another creates natural variation.
- Seal: One coat of top coat, applied carefully to avoid dragging the fine white lines.
27 Gorgeous Mint Green Nails That Are Popular Right Now (2026)
24.Amalfi Tile Art
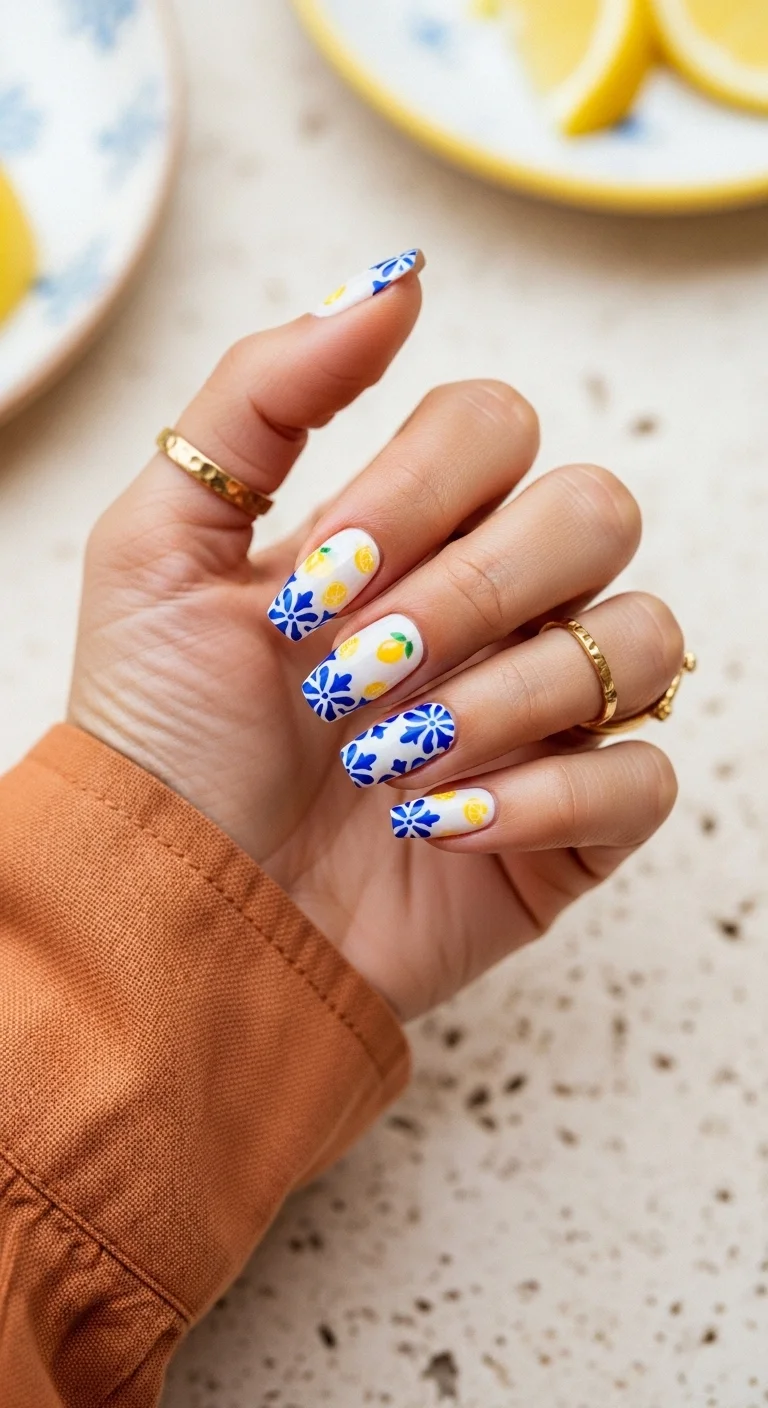
A high-fashion, intricate design inspired by Italian ceramics.
Overview:
Mediterranean ceramic tile patterns — the kind you see lining the streets of Positano or decorating the walls of Amalfi cafes — translate surprisingly well to nails. The key is keeping the scale small enough that the geometric patterns read as texture rather than chaos. On a medium almond nail, each tile motif needs to be roughly 3-4mm across to maintain that balance.
The blue-and-white tile nails and the lemon art nails alternate across the hand, which creates a visual rhythm. The tile nails are geometric and structured; the lemon nails are organic and loose. That contrast between the two styles is what makes the set interesting — neither would be as effective on its own.
The cobalt blue needs to be opaque in one coat for the tile patterns to look crisp. Thin, watery blue polish bleeds into the white base and blurs the geometric lines. If your blue formula is sheer, apply it over a dried white base rather than trying to build opacity with multiple blue coats.
Design Breakdown:
Geometric tile patterns alternating with organic fruit art. Two distinct styles held together by a three-color palette.
Base Color: Bright, opaque white on all nails.
Nail Shape: Medium almond. The curved shape softens the rigid geometry of the tile patterns.
Design Element: Cobalt blue Mediterranean tile motifs (star and flower patterns) on alternating nails. Hand-painted lemons with green leaves on the remaining nails.
Finish: High-gloss top coat to create the "glazed ceramic" effect.
Get The Look at Home:
The tile patterns are the hard part. Use reference photos of actual Mediterranean ceramics for inspiration.
- White base: Two coats on all nails. Let dry fully.
- Tile nails: Using a fine liner brush and cobalt blue, paint geometric patterns — star shapes, cross motifs, or simplified floral designs. Keep the line weight consistent.
- Lemon nails: On alternating nails, paint small yellow lemons with green leaves. The lemons can be more loosely painted than the tile work — organic shapes are part of the charm.
- Tile details: Add tiny dots or short lines inside the blue patterns to give them the density of real ceramic tile.
- Consistency check: Compare the blue line thickness across all tile nails. Inconsistent line weight makes the pattern look sloppy.
- Seal: Two coats of top coat to smooth the raised texture of the hand-painted art.
25.Minimalist Ink-Drawn Lemons
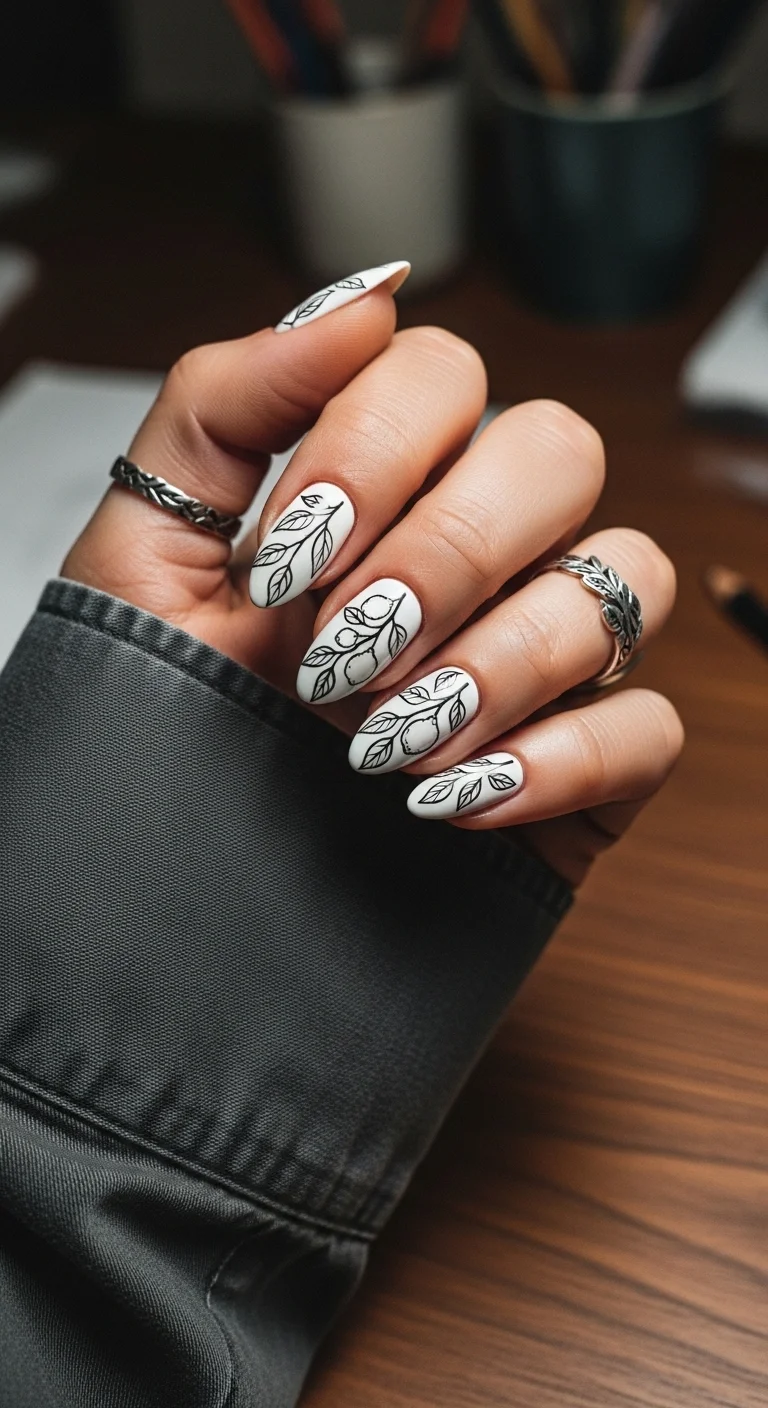
A clean, modern, and artistic take on the lemon trend.
Overview:
Black line art on a white base is one of the most difficult nail art techniques to execute well, because every shaky line, every inconsistent stroke, and every uneven thickness is visible. There's no color fill to hide behind. The design lives or dies on the quality of the linework.
What makes this design work is the variety in line weight. The outer contours of the lemons and leaves use slightly thicker lines than the interior details — the veins in the leaves, the texture dots on the fruit. This hierarchy of line thickness creates depth that a uniform line weight wouldn't achieve. It's the difference between a technical drawing and an illustration.
The matte finish is a deliberate choice. A glossy top coat would add reflections that compete with the linework. Matte keeps the focus entirely on the black-and-white contrast and reinforces the "ink on paper" aesthetic. If you prefer gloss, the design still works — but the matte version reads as more intentional.
Design Breakdown:
Monochrome illustration style. No color, no fill — just line weight and negative space.
Base Color: Bright, opaque white. The white needs to be completely smooth — any texture shows through the thin black lines.
Nail Shape: Medium almond. The tapered tip echoes the organic curves of the botanical illustration.
Design Element: Black line-art lemons, leaves, and branches. Varied line weight — thicker for outlines, thinner for interior details.
Finish: Matte top coat for the "ink on paper" effect. Glossy is also acceptable.
Get The Look at Home:
Use the thinnest liner brush you own. The lines need to be consistently thin — thick lines overpower the negative space.
- White base: Two to three thin coats of opaque white. Let dry completely — any tackiness drags the black paint.
- Outline the lemons: Using a thin liner brush and black polish, draw the outer contour of each lemon. Keep the line weight consistent.
- Add branches and leaves: Extend thin branch lines from the lemons. Add almond-shaped leaves along the branches.
- Interior details: With an even thinner brush (or the very tip of your liner), add leaf veins, small texture dots on the fruit, and stem details. These lines should be noticeably thinner than the outlines.
- Check consistency: Compare all nails. The line weight should feel consistent across the set, even though individual lines vary.
- Seal carefully: Apply matte top coat in one stroke per nail. Going back over the same area smears the black lines.

30 Stunning Summer Hair Trends for 2026 ☀️🌊
26.Lemon Drop Half-Moons
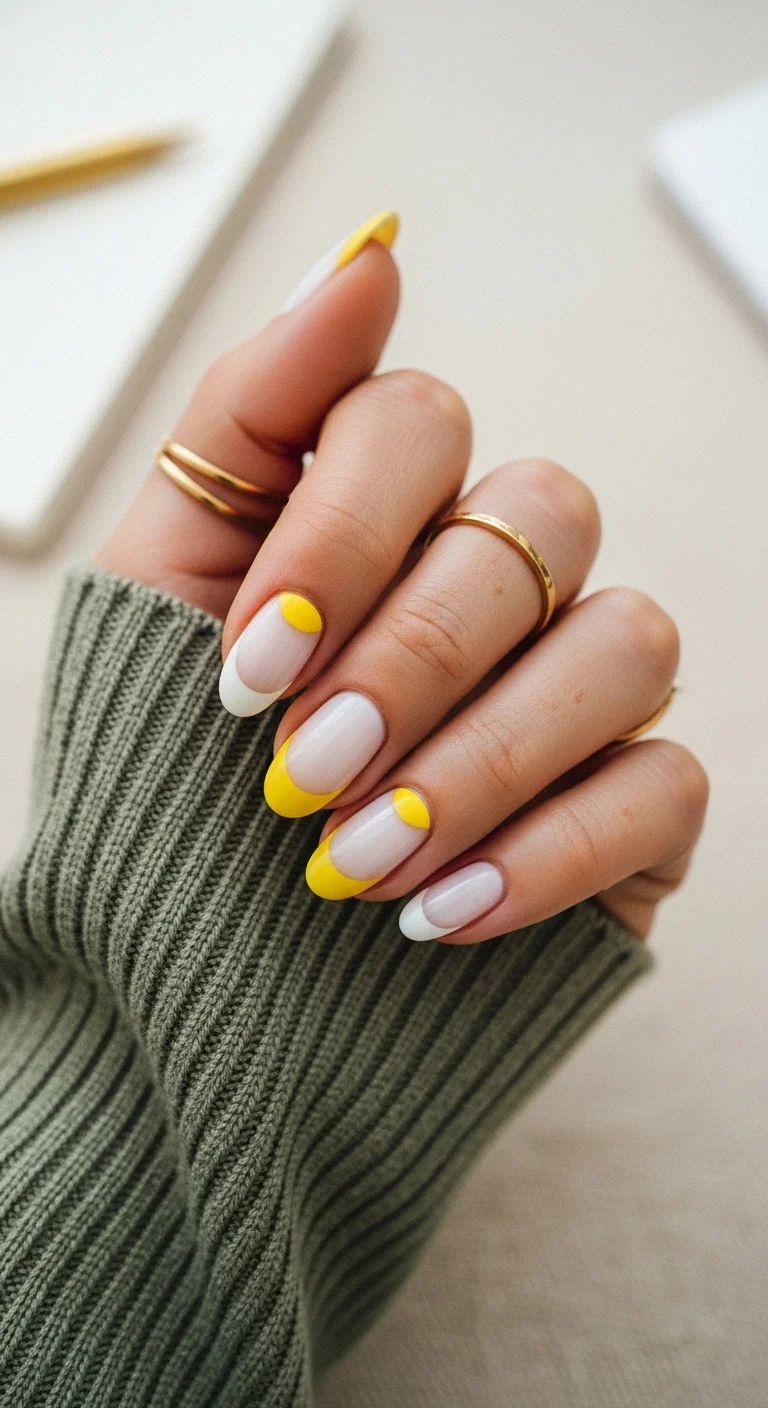
A chic and modern geometric design that’s perfect for the office.
Overview:
The half-moon manicure dates back to the 1920s, when leaving the lunula (the white crescent at the base of the nail) exposed was considered the height of elegance. Modernizing it with yellow half-moons at the cuticle and matching yellow French tips creates a geometric frame around a sheer nude center. The effect is architectural — two curves facing each other with negative space between.
The sheer base is what makes this design work on a practical level. Because the middle of the nail is close to your natural nail color, growth-out is nearly invisible for the first two weeks. The yellow at the cuticle and the tip stays crisp while the center gradually extends. It's one of the most growth-friendly designs in the lemon category.
The symmetry between the half-moon curve and the French tip curve is the design's most important detail. If one is noticeably deeper or shallower than the other, the balance breaks. An angled brush dipped in acetone can sharpen both curves after painting.
Design Breakdown:
Two mirrored curves framing negative space. Precision matters more than creativity here.
Base Color: Sheer milky nude or clear base coat. The natural nail should be visible through the center.
Nail Shape: Long almond. The tapered shape mirrors the curve of the half-moons.
Design Element: Bright yellow half-moons at the cuticle and matching yellow French tips at the free edge. The two curves face each other across a sheer nude middle.
Finish: High-gloss top coat to unify the yellow and nude sections.
Get The Look at Home:
The half-moon is harder than the French tip. Practice the curve on a piece of paper first.
- Sheer base: One thin coat of milky nude. Let dry.
- Half-moons: Using a small brush and yellow polish, paint a semi-circle at the base of each nail. Follow the natural curve of your cuticle — don't try to make it perfectly round if your cuticle line isn't.
- French tips: Paint matching yellow tips. Try to match the curve depth of the half-moons.
- Symmetry check: Compare both hands side by side. The half-moon and tip should be roughly the same thickness on corresponding nails.
- Cleanup: An angled brush dipped in acetone sharpens both curves. This step is non-negotiable on a sheer base — any mess shows.
- Seal: One coat of glossy top coat to level out the texture difference between the yellow paint and the sheer base.
27.Neon Chrome Frenchie
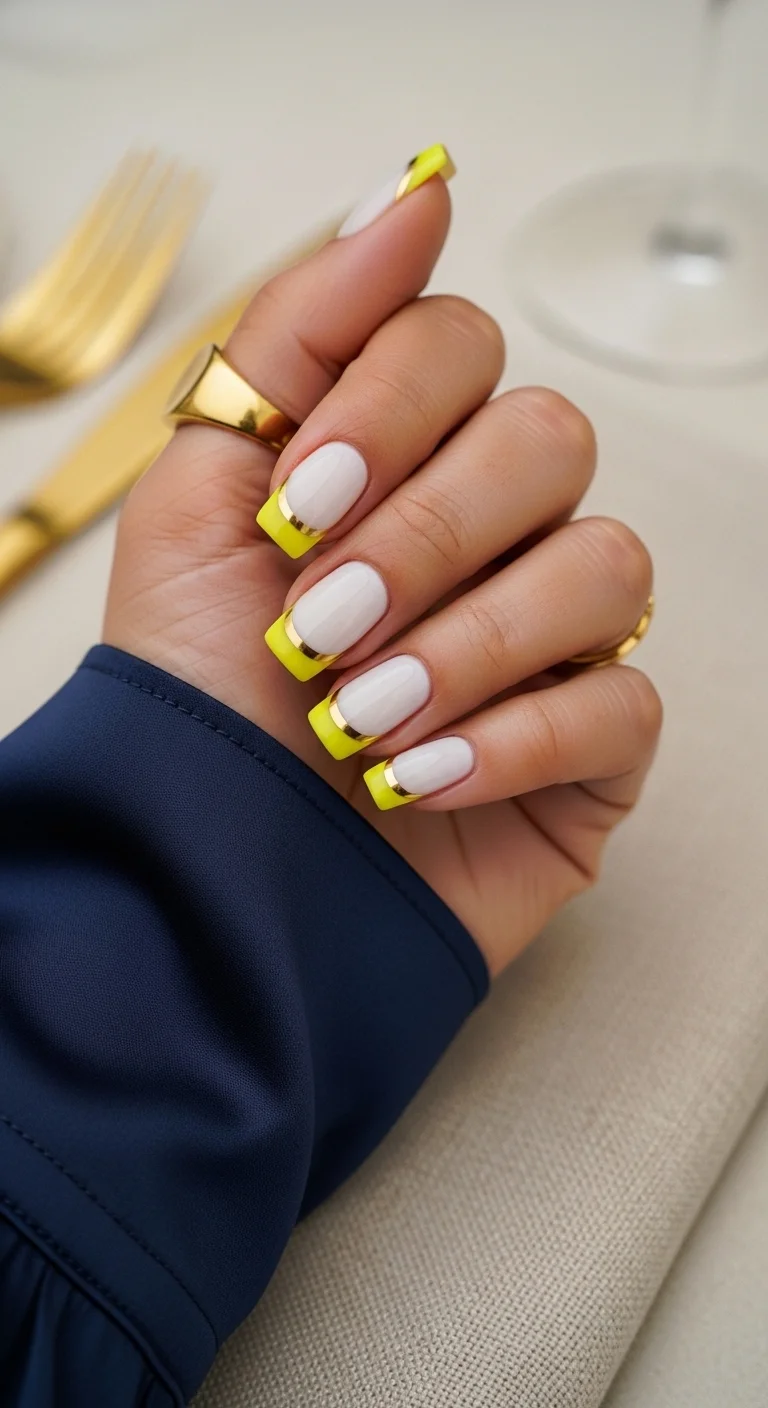
A high-fashion, edgy take on the French manicure with a metallic twist.
Overview:
A neon yellow French tip is already a step beyond the classic white. Adding a thin gold metallic line at the smile line — where the yellow tip meets the milky base — turns it from "fun color swap" into a design with a built-in luxury detail. The gold stripe is barely a millimeter wide, but it completely changes how the eye reads the transition between tip and base.
The short square shape is the right call for this design. The flat tip gives the neon French line a clean, geometric edge, and the compact surface area keeps the gold stripe from looking like an afterthought. On longer nails, the stripe would need to be proportionally wider to register, which changes the minimalism of the concept.
The practical challenge is the gold line's precision. It needs to be perfectly straight and consistent across all ten nails. A thin striping brush or metallic striping tape both work. Striping tape is more forgiving for beginners — lay it along the smile line, paint the yellow tip, peel the tape, and the gold line is already there. Freehand requires a very steady hand and a brush that holds enough metallic polish to draw a complete line without re-dipping.
Design Breakdown:
Neon color, metallic accent, neutral base. Three elements, each with a distinct role.
Base Color: Milky white or sheer nude. The neutral base makes both the neon and the gold pop.
Nail Shape: Short square. Clean edges complement the geometric precision of the design.
Design Element: Neon yellow French tips with a thin gold metallic stripe at the smile line.
Finish: High-gloss top coat to enhance both the neon vibrancy and the metallic reflectivity.
Get The Look at Home:
The gold stripe is the make-or-break detail. Take your time with this step.
- Milky base: Two coats of milky white or sheer nude. Let dry fully.
- Yellow tips: Using a French liner brush, paint neon yellow tips on all nails. Two thin coats for full opacity.
- Gold stripe: Using metallic gold striping tape or a thin brush with gold chrome polish, place a line exactly at the smile line where the yellow meets the base.
- Straighten: If using tape, press it firmly and trim the ends just inside the nail edge. If freehanding, re-dip the brush before each nail to maintain consistent gold density.
- Consistency: Compare all ten nails. The gold line should be the same width and in the same position on every nail.
- Seal: Two coats of top coat — the first locks the gold in place; the second creates a smooth surface over the raised stripe.
30 Trendy Summer French Tip Nail Designs for 2026 💅
28.Highlighter Lemon Ombre
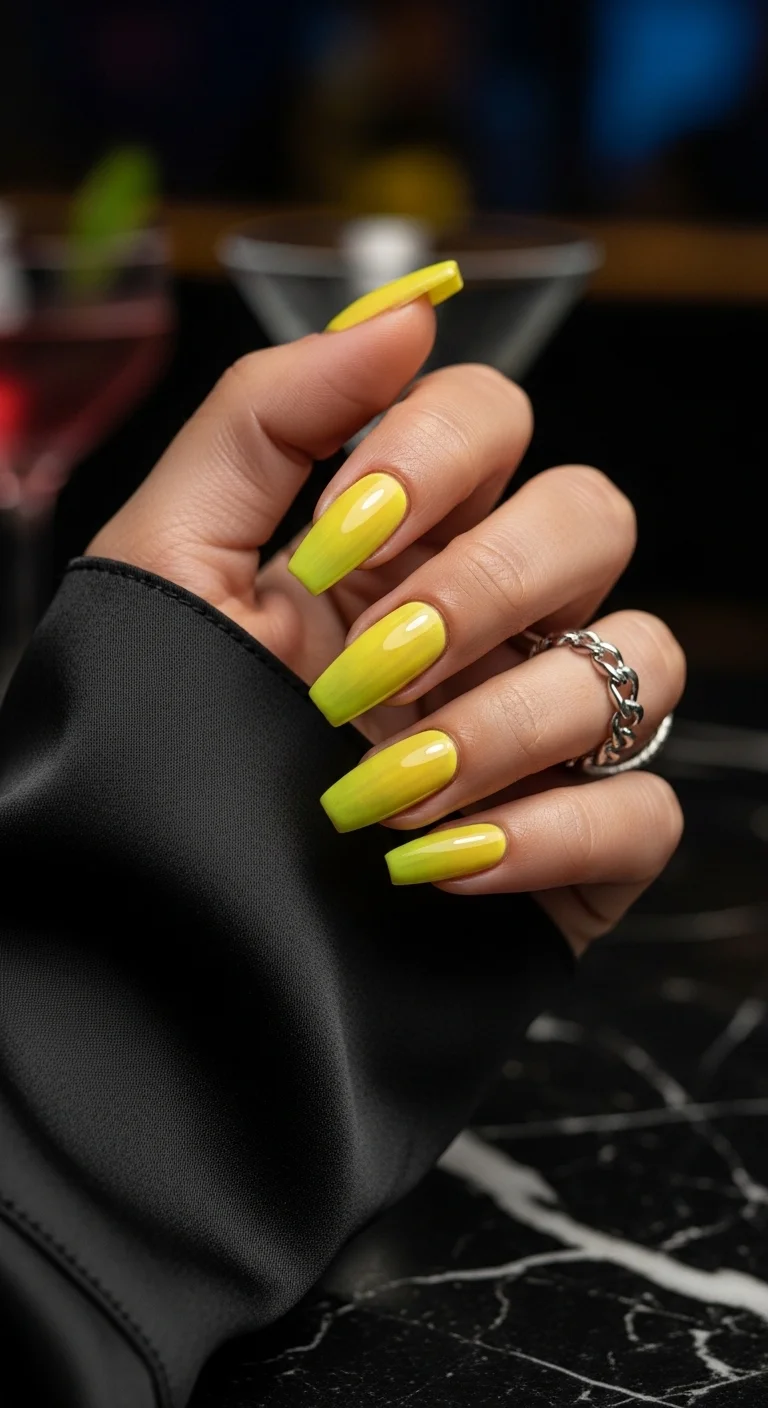
A bold and modern gradient that’s pure summer energy.
Overview:
A solid neon gradient without any art or pattern is one of the purest tests of a nail tech's sponge technique. There's nothing to hide behind — no flowers, no stripes, no accent nails. The entire design is the blend itself, and any inconsistency in the gradient is immediately visible.
The color here leans more highlighter yellow-green than pure lemon, which gives it an electric quality that pastel yellows can't match. The transition from a softer, more muted yellow at the cuticle to a fully saturated neon at the tip creates a "glowing from within" effect that's harder to achieve with a single solid color.
Neon polishes dry matte — this is a chemical property of the pigments, not a formula flaw. Without a glossy top coat, these nails would look flat and chalky. The top coat is what transforms the color from "bright" to "blinding." A UV-resistant formula also prevents the neon from fading in direct sunlight, which happens within days if the nails are unprotected.
Design Breakdown:
Single-color gradient, no art. The blend IS the design.
Base Color: Milky white or light nude at the cuticle, transitioning to neon highlighter yellow at the tips.
Nail Shape: Long coffin. The extended length gives the gradient room to develop smoothly.
Design Element: Sponge-applied ombre using neon highlighter yellow, concentrated at the tips and fading toward the cuticle.
Finish: Ultra-glossy top coat. Two coats minimum — neons absorb more top coat than standard colors.
Get The Look at Home:
Each sponge layer should be thin. Building opacity gradually produces a smoother gradient than one heavy application.
- White undercoat: One coat of opaque white. This is load-bearing for the neon's intensity.
- Milky base: Two coats of milky white or light nude. Let dry fully.
- Sponge setup: Paint a stripe of milky base and a stripe of neon yellow side by side on a makeup sponge. Dab on paper first.
- First pass: Press the sponge onto the nail with the neon concentrated at the tip. Three to four dabs. The first layer will look sheer.
- Build gradually: Re-apply polish to the sponge and repeat three to four more times, letting each layer dry for thirty seconds between passes.
- Cleanup: Neon polish stains cuticles. Use a brush dipped in acetone to clean the edges before the final coat.
- Top coat: Two thick coats of glossy top coat. The first seals the gradient; the second adds the "wet" look that neons need.
29.Daisy Lemon Field
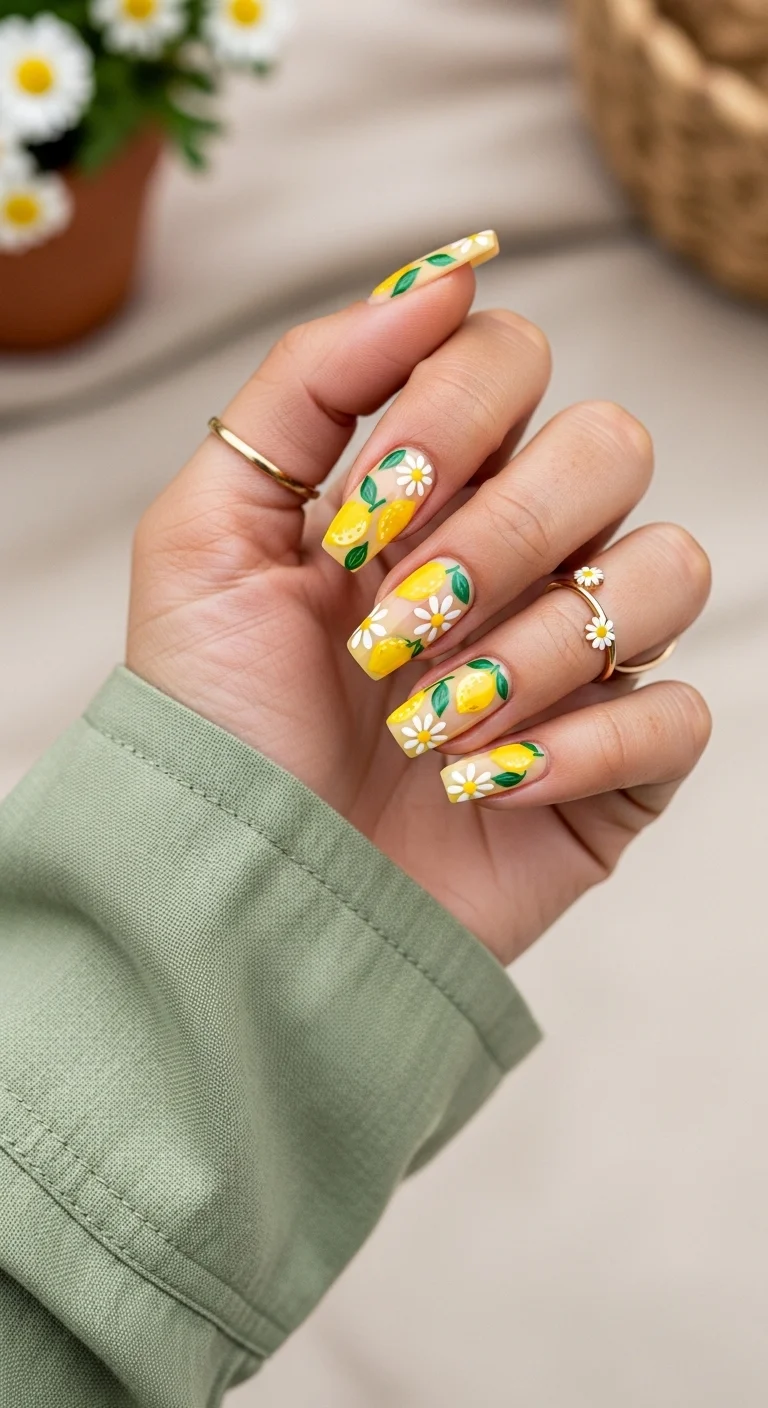
A sweet and nostalgic floral-citrus mashup that’s pure cottagecore.
Overview:
Mixing two different motifs — daisies and lemons — on the same nail is a risk that pays off when both elements share a color palette. The white petals of the daisies connect to the white pith of the lemon slices. The yellow flower centers connect to the yellow fruit. The green leaves tie everything together. No color in the design exists in isolation.
The sheer nude base does critical work here. A solid yellow base would compete with the lemons. A white base would wash out the daisy petals. The sheer nude lets both motifs sit on a neutral canvas that recedes visually, pushing the art forward. It also means growth-out is nearly invisible for the first two weeks.
The placement should feel scattered rather than grid-aligned. Some nails get more daisies, others get more lemons. The inconsistency is what makes the design look like a wildflower meadow rather than a repeating pattern. If every nail has the same number of each motif in the same positions, it reads as stamped.
Design Breakdown:
Two organic motifs sharing a three-color palette. The sheer base keeps both from competing.
Base Color: Sheer nude or clear base coat. The natural nail should be visible between the art.
Nail Shape: Long square. The flat surface provides a stable canvas for the scattered floral and fruit art.
Design Element: Hand-painted lemons with green leaves and white daisies with yellow centers, scattered across all nails at varying densities.
Finish: High-gloss top coat to smooth the raised texture of the hand-painted art.
Get The Look at Home:
Work in color layers rather than finishing one motif at a time. All yellows first, then all whites, then all greens.
- Sheer base: One or two coats of milky nude. Let dry fully.
- Yellow layer: Paint lemon shapes and daisy centers across all nails using yellow polish. Vary the placement — some nails get two lemons, others get one.
- White layer: Paint daisy petals (five dots in a circle) using white polish. Place them in the gaps between the lemons.
- Green layer: Add small leaves to the lemons and tiny stem strokes near the daisies. Use a single green for consistency.
- Dry time: Wait at least five minutes before top coating. The layered art is thick and needs time to set.
- Seal: Two coats of top coat. The first locks the art; the second smooths the surface.
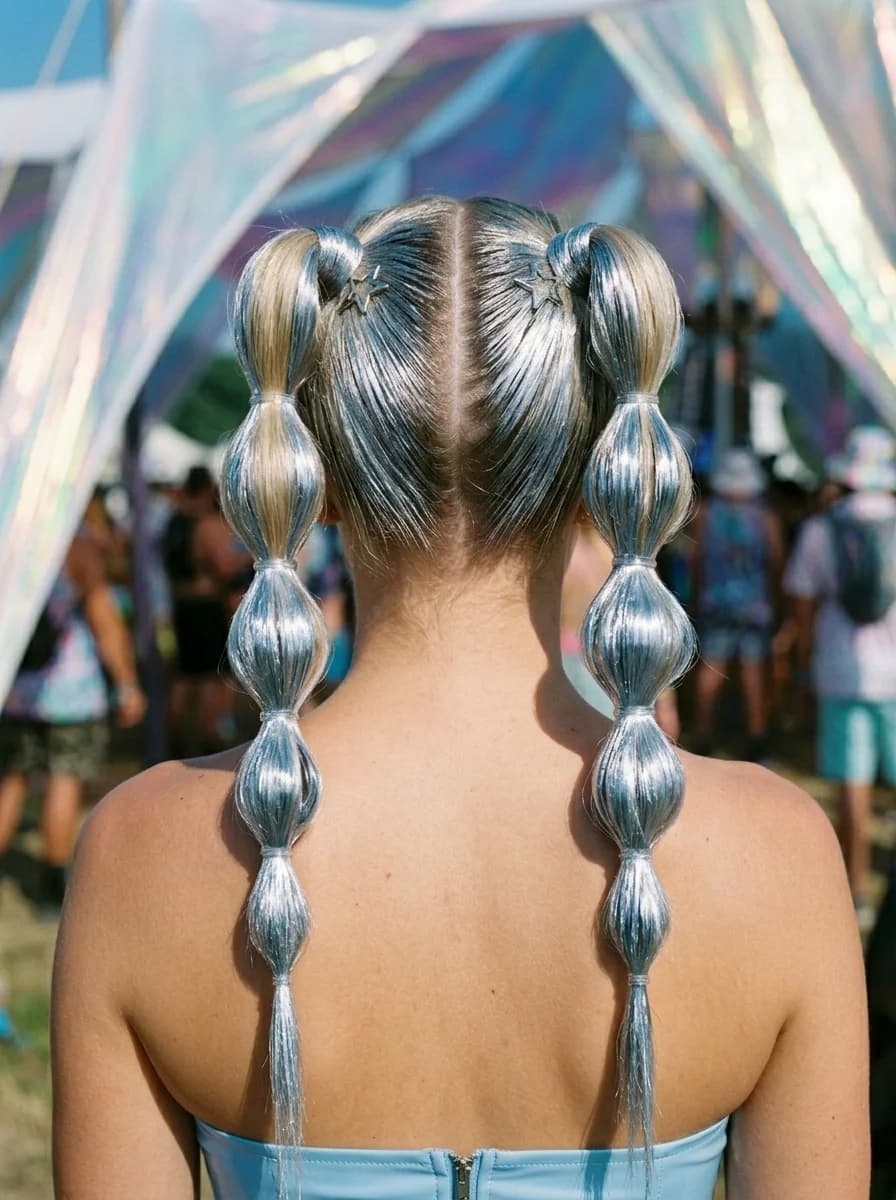
24 Stunning Festival Hairstyle Ideas for Music Concert Nights 2026 🎶✨
Scrolling through these sunny and bright designs is sure to get anyone excited to try out some citrus accents for their next manicure. Finding the perfect summer or spring set should be fun and fresh, and one of these lemon-inspired designs is going to look absolutely stunning on your hands.
Do yourself a favor and make sure to pin your absolute favorite designs straight to your Pinterest boards right now so you have them ready to show your nail tech! Doing this in advance helps prevent any panic when sitting down in the salon chair.
No matter which design is chosen, hopefully your spring and summer are filled with nothing but bright days, sweet lemonade, and gorgeous nails. Have the most amazing time showing off this zesty look! Stay gorgeous, stay sunny!